

Page 1

3-280-224-61(1)
Wireless
Audio Receiver
Operating Instructions
使用說明書
DRC-BT15N
© 2008 Sony Corporation
GB
CT
Page 2

WARNING
To reduce the risk of fire or electric
shock, do not expose this
apparatus to rain or moisture.
To reduce the risk of electrical
shock, do not open the cabinet.
Refer servicing to qualified
personnel only.
Do not install the appliance in a confined
space, such as a bookcase or built-in
cabinet.
To reduce the risk of fire, do not cover the
ventilation of the apparatus with
newspapers, tablecloths, curtains, etc.
And do not place lighted candles on the
apparatus.
To reduce the risk of fire or electric
shock, do not place objects filled with
liquids, such as vases, on the apparatus.
Connect the AC power adaptor to an
easily accessible AC outlet. Should you
notice an abnormality in the AC power
adaptor, disconnect it from the AC outlet
immediately.
Do not expose the batteries (battery pack
or batteries installed) to excessive heat
such as sunshine, fire or the like for a long
time.
Excessive sound pressure from
headphones can cause hearing loss.
The Bluetooth word mark and logos are
owned by the Bluetooth SIG, Inc. and any
use of such marks by Sony Corporation is
under license.
Other trademarks and trade names are
those of their respective owners.
MPEG Layer-3 audio coding technology
and patents licensed from Fraunhofer IIS
and Thomson.
GB
2
Page 3

Table Of Contents
What is Bluetooth wireless
technology? .................. 4
Welcome! .......................... 5
3 steps to Bluetooth function .... 6
Location and Function of
Parts ............................... 7
Charging the unit ............. 8
Pairing .............................10
What is pairing? ...................... 10
Procedures of pairing .............. 10
Wearing the unit ............. 12
Indications of Bluetooth
function ....................... 14
Listening to music ......... 15
Controlling the audio device –
AVRCP ............................... 16
Calling ............................. 17
Controlling the Bluetooth mobile
phone – HFP, HSP .............. 19
Calling while playing
back music .................. 20
Disposing of the unit ..... 21
Precautions .................... 22
Troubleshooting ............. 24
Initializing the unit ......... 26
Specifications................. 27
US
GB
3
GB
Page 4

What is Bluetooth wireless
technology?
Bluetooth™ wireless technology is
a short-range wireless technology
that enables wireless data
communication between digital
devices, such as a computer or
digital camera. Bluetooth wireless
technology operates within a range
of about 10 meters (about 30 feet).
Connecting two devices as
necessary is common, but some
devices can be connected to
multiple devices at the same time.
You do not need to use a cable for
connection, nor is it necessary for
the devices to face one another, such
is the case with infrared technology.
For example, you can use such a
device in a bag or pocket.
Bluetooth standard is an
international standard supported by
thousands of companies all over the
world, and employed by various
companies worldwide.
Communication System
and Compatible Bluetooth
Profiles of this unit
Profile is standardization of the
function for each Bluetooth device
specification. This unit supports the
following Bluetooth version and
profiles:
Communication System :
Bluetooth Specification version 2.0 +
1
EDR*
Compatible Bluetooth Profiles:
– A2DP (Advanced Audio Distribution
Profile): Transmitting or receiving
audio content of high-quality.
– AVRCP (Audio Video Remote Control
Profile): Controlling A/V equipment;
pausing, stopping, starting playback,
volume control, etc.
– HSP (Headset Profile)*
phone/Operating the phone.
– HFP (Hands-free Profile)*
the phone/Operating the phone by
hands-free.
1
Enhanced Data Rate
*
2
When you use a Bluetooth mobile
*
phone supported by both HFP (Handsfree Profile) and HSP (Headset
Profile), set to HFP.
Notes
• To be able to use the Bluetooth
function, the Bluetooth device to be
connected requires the same profile as
the unit’s.
Note also that even if the same profile
exists, devices may vary in function
depending on their specifications.
• Due to the characteristic of Bluetooth
wireless technology, the sound played
on this unit is slightly delayed from the
sound played on the Bluetooth device
during talking on the telephone or
listening to the music.
2
: Talking on the
2
: Talking on
GB
4
Page 5

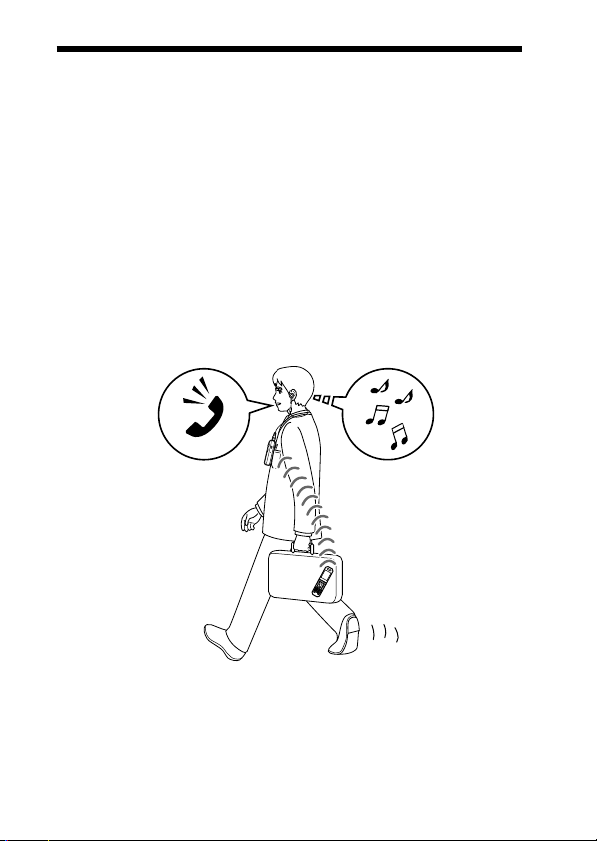
Welcome!
Thank you for purchasing this Sony Wireless Audio Receiver. This unit uses
Bluetooth wireless technology.
• Enjoy music wirelessly from Bluetooth technology-enabled music players,
or mobile phones.*
• Connect your favorite headphones via stereo mini jack (headphones are
sold separately).
• Talk hands-free with Bluetooth technology-enabled mobile phones.*
• Do basic remote control operation (play, stop, etc.) of music player
functions via Bluetooth connection.*
• Bluetooth version 2.0 + EDR (Enhanced Data Rate) for higher quality
audio with less interference and lower power consumption.
• Useful rechargeable function.
For details on Bluetooth wireless technology, see page 4.
*1The connected Bluetooth device is required to support A2DP (Advanced Audio
Distribution Profile).
2
The connected Bluetooth device is required to support HFP (Hands-free Profile) or
*
HSP (Headset Profile).
3
The connected Bluetooth device is required to support AVRCP (Audio Video Remote
*
Control Profile).
1
2
3
Listening to musicTalking on the phone
5
GB
Page 6

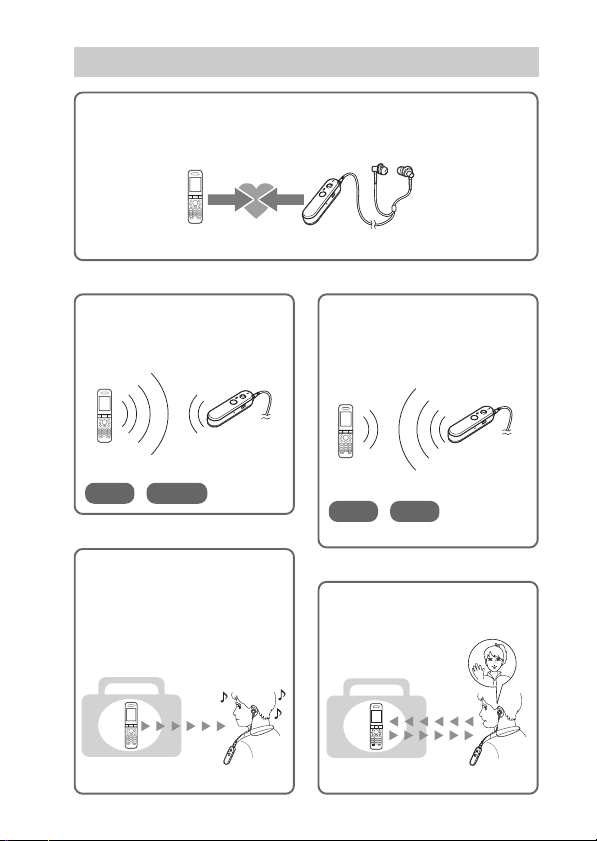
3 steps to Bluetooth function
Pairing
First, register (“pair”) a Bluetooth device (mobile phone, etc.) and this
unit with each other. Once pairing is established, there is no need for
pairing again.
Bluetooth
mobile phone,
etc.
Listening to music
V
Bluetooth connection
Operate the Bluetooth device to
make the Bluetooth connection.
Connection
A2DP
AVRCP
V
Listening to music
You can listen to music played on
the Bluetooth device.
Playback, stop, or pause is
possible from this unit.
Music
6
GB
Pairing
c Page 15
Wireless Audio
Receiver
c Page 10 - 11
Calling
V
Bluetooth connection
When the unit is turned on, the
unit starts making the Bluetooth
connection to the recognized
mobile phone automatically.
Connection
HFP HSP
c Page 17 - 18
V
Talking on the phone
You can make and receive a call
by operating this unit.
Voice
c Page 18 - 20c Page 15 - 16
Page 7

GETTING STARTED
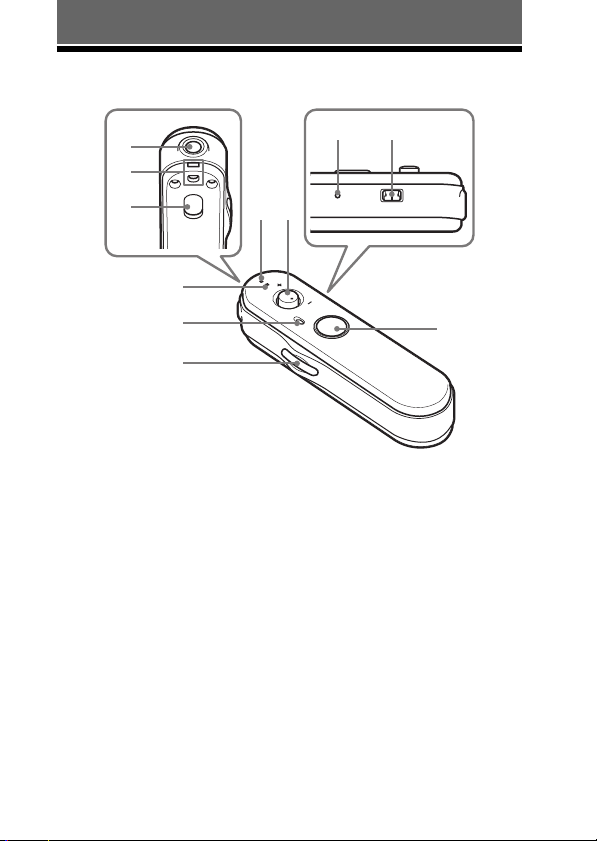
Location and Function of Parts
1
2
3
4
5
6
1 Headphones jack
2 Strap hole
3 Clip hole
4 Indicator (red)
Indicates the power status of the
unit.
5 Microphone
6 Multi function button
Controls various call functions.
7 Indicator (blue)
Indicates the communication
status of the unit.
9 q;
7
8
.
L
O
V
Nx
L
O
V
.
OWER
P
8 Jog switch
9 RESET button
0 Contact point
qa POWER button
qa
Controls various functions
when listening to music.
Adjust the volume of this unit
when talking over the
telephone.
7
GB
Page 8
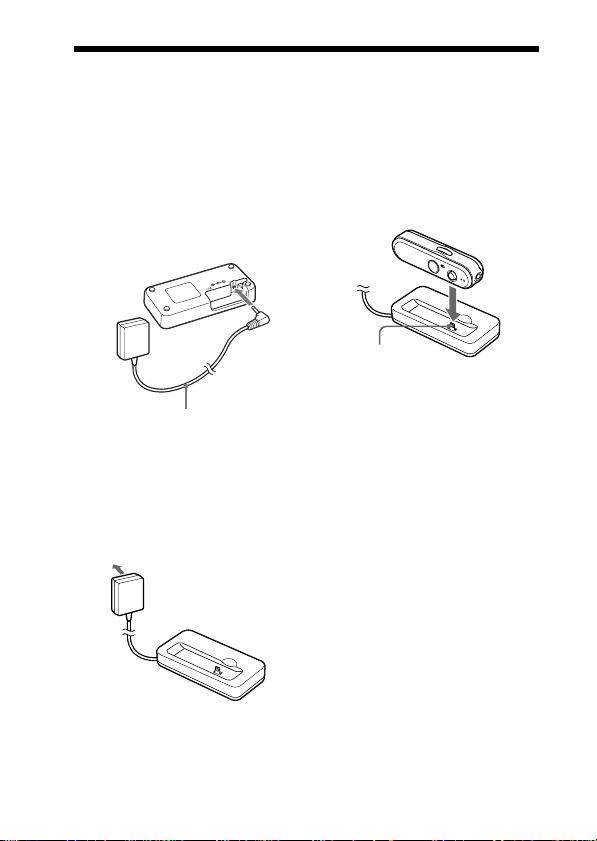
Charging the unit
The unit contains a rechargable Lithium-Ion battery, which should be
charged before using for the first time.
1 Connect the supplied
AC power adaptor with
the battery charging
stand.
Battery charging
stand (supplied)
(Rear)
D
C
I
N
3
V
3 Put the unit on the
battery charging stand.
Wireless Audio
Receiver
AC power
adaptor (supplied)
2 Connect the supplied
AC power adaptor to an
AC outlet.
To an AC outlet
Battery charging
stand (supplied)
8
GB
To DC IN
3 V jack
Contact pin
Battery charging
stand (supplied)
Rest the unit on the battery
charging stand so that the unit’s
contact point meets the contact
pin on the battery charging stand,
and make sure that the indicator
(red) lights up.
Charging is completed in about
2.5 hours* and the indicator (red)
goes off automatically.
* Time required for empty battery to
recharge.
Note
When you attach the strap to this unit,
do not let the strap get caught between
the unit and the battery charging stand.
Tips
• If the AC power adaptor is connected to
an AC outlet while the unit is turned on,
the unit will be turned off automatically.
• This unit cannot be turned on while
charging.
Page 9

Caution
If this unit detects a problem while
charging, the indicator (red) may
turn off, although charging is not
complete.
Check for the following causes:
– Ambient temperature exceeds the
range of 0 °C – 40 °C (32 °F –
104 °F).
– There is a problem with the
battery.
In this case, charge again within the
above-mentioned temperature range.
If the problem persists, consult your
nearest Sony dealer.
Notes
• If the battery is not used for a long time,
battery may be quickly depleted,
however, after a few recharges, battery
life will improve.
• If the life of the built-in rechargeable
battery drops to half the normal length,
the battery should be replaced. Consult
your nearest Sony dealer for
replacement of the rechargeable battery.
• Avoid exposure to temperature
extremes, direct sunlight, moisture,
sand, dust or mechanical shock. Never
leave in a car parked in the sun.
• Use only the supplied AC power
adaptor. Do not use any other AC
power adaptor.
Usage hours
Status
*
Approx.
usage hours
Communication
6 hours
time (including
music playback
time) (up to)
Standby time
100 hours
(up to)
* Time stated above may vary, depending
on ambient temperature or conditions of
use.
Checking the remaining
battery
When pressing the POWER button
while the unit is turned on, the
indicator (red) flashes. You can
check the remaining battery by the
number of times the indicator (red)
flashes.
Indicator (red)
3 times
2 times
1 time
Note
You cannot check the remaining battery
immediately after the unit is turned on, or
while pairing.
Status
Full
Mid
Low (needs to
charge)
When the battery is almost empty
The indicator (red) flashes slowly
automatically.
When the battery becomes empty, a
beep sounds and the unit will turn
off automatically.
9
GB
Page 10
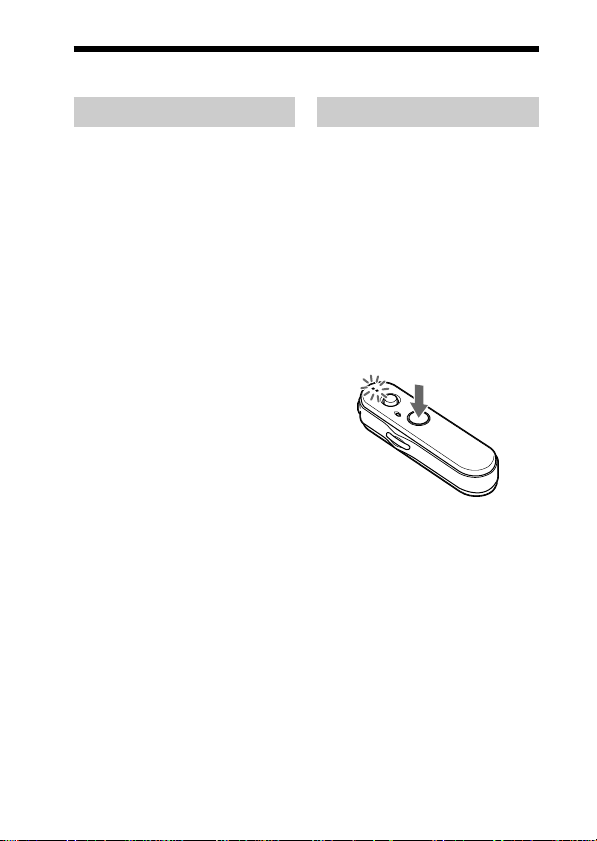
Pairing
What is pairing?
Bluetooth devices need to be
“paired” with each other
beforehand.
Once Bluetooth devices are paired,
there is no need for pairing again,
except in the following cases:
• Pairing information is deleted
after repair, etc.
• This unit is paired with 9 or more
devices.
This unit can be paired with up to
8 devices; if a new device is
paired after 8 devices have been
paired, the device whose latest
connection time is the oldest
among the 8 paired devices is
replaced by the new one.
• When recognition of the unit by
the device to be connected is
deleted.
• This unit is initialized (page 26).
All pairing information is deleted.
Procedures of pairing
1 Place the Bluetooth
device within 1 m (3 ft)
of this unit.
2 Press and hold the
POWER button for
7 seconds or more to
standby for pairing
while the unit is turned
off.
Notes
• After about 3 seconds, power is
turned on and the indicator (blue)
and indicator (red) flash together
twice. Keep the POWER button
pressed without releasing. The
indicator (blue) starts flashing.
When both indicators start flashing
together again, release the button.
This unit enters into pairing mode.
• If pairing is not established within
about 5 minutes, pairing mode will
be cancelled and this unit will turn
off. In this case, start over from
step 1.
10
GB
Page 11

3 Perform pairing
procedure on the
Bluetooth device to
detect this unit.
The list of detected devices
appears on the display of the
Bluetooth device. This unit is
displayed as “DRC-BT15.”
If “DRC-BT15” is not
displayed, repeat from step 1.
Notes
• For details, refer to the operating
instructions supplied with the
Bluetooth device.
• When pairing with a Bluetooth
device that cannot display a list of
detected devices or that has no
display, you may pair the device by
setting both this unit and the
Bluetooth device to pairing mode.
At this time, if passcode is set
besides “0000” on the Bluetooth
device, pairing cannot be done with
this unit.
4 Select “DRC-BT15” on
the display of the
Bluetooth device.
5 If Passcode* input is
required on the display
of a Bluetooth device,
input “0000.”
Pairing is complete when the
indicator (blue) flashes slowly.
The message standing for
“Pairing complete” appears on
the display of some Bluetooth
devices.
* Passcode may be called “Passkey,”
“PIN code,” “PIN number,” or
“Password.”
6 Start the Bluetooth
connection from the
Bluetooth device.
This unit memorizes the device
as the last connected device.
Some Bluetooth devices may
connect with the unit
automatically when pairing is
complete.
Tips
• To pair with other Bluetooth devices,
repeat steps 1 to 5 for each device.
• To delete all pairing information, see
“Initializing the unit” (page 26).
11
GB
Page 12
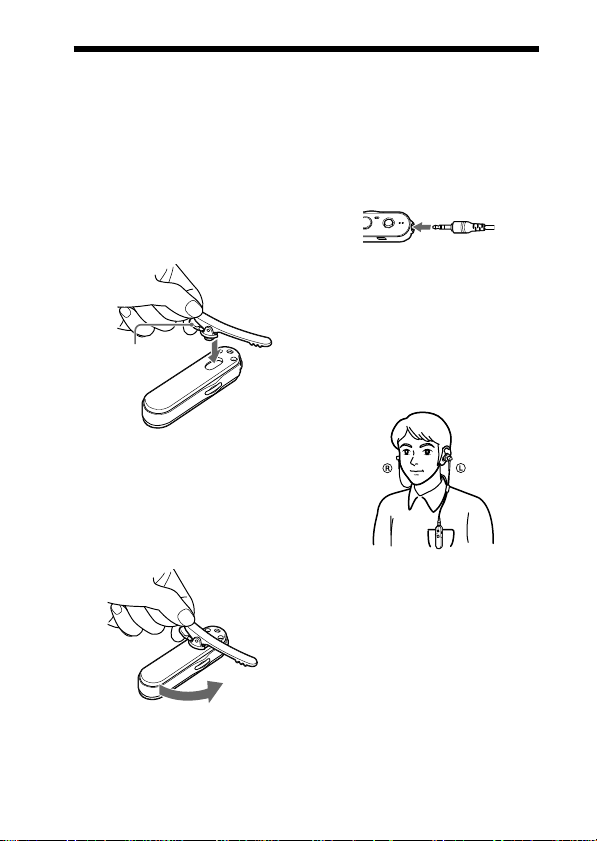
Wearing the unit
When using the clip
1 While pinching the lever
at the end of the clip
(supplied), hold the clip
across the unit as
shown, then insert the
clip into the clip hole.
Lever
2 While pinching the
lever, turn the unit
counterclockwise.
When the lever is released, the
clip is locked to prevent it from
coming off.
3 Connect the
headphones (not
supplied) to this unit.
4 Clip this unit to a
pocket, etc., of your
clothes and then wear
the headphones.
Wear the earphone marked L in
your left ear, and the one
marked R in your right ear.
12
GB
Page 13
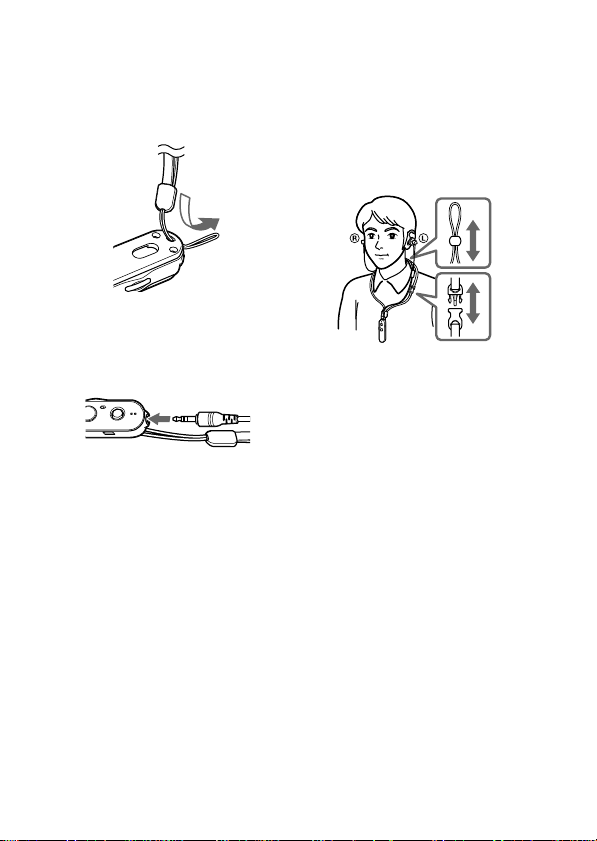
When using the strap
1 Attach the strap
(supplied) to this unit
through the strap hole.
2 Connect the
headphones (not
supplied) to the unit.
3 Place this unit around
your neck and then
wear the headphones.
Wear the earphone marked L in
your left ear, and the one
marked R in your right ear.
13
GB
Page 14
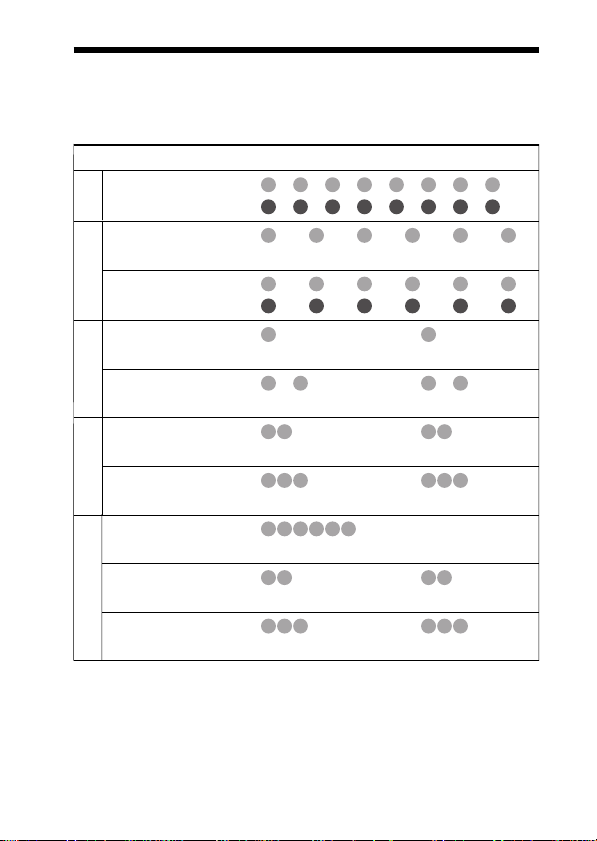
Indications of Bluetooth function
B : Indicator (blue)
R : Indicator (red)
Status Flashing patterns
Searching
Pairing
Connectable
Connecting
Connecting
HFP/HSP or A2DP
(standby for receiving audio signal)
HFP/HSP and A2DP
(standby for receiving audio signal)
Connected
Listening
Music
Listening during standby
for telephone call
Incoming call
Talking
Phone
Calling while
playing back music
– – – – – – – –
B
– – – – – – – –
R
– – – – – – – – – –
B
–
R
– – – – – – – – – –
B
– – – – – – – – – –
R
– – – – – – – – – – – – – –
B
–
R
– – – – – – – – – – – –
B
–
R
B
R
B
R
B
R
B
R
B
R
– – – – – – – – – – – –
–
– – – – – – – – – –
–
...
–
– – – – – – – – – – – –
–
– – – – – – – – – –
–
...
...
...
...
...
...
...
...
...
...
...
14
GB
Page 15

OPERATING THE UNIT
Listening to music
Jog
switch
VOL
..Nx
VOL
POWER button
Check the following before
operating the unit.
– The Bluetooth device is turned
on.
– Pairing of this unit and the
Bluetooth device is complete.
– The Bluetooth device supports the
transmitting music function
(profile: A2DP*).
1 Press and hold the
POWER button for
about 3 seconds while
the unit is turned off.
The indicator (blue) and
indicator (red) flash together
twice and the unit is turned on.
Notes
• Do not press and hold the POWER
button for more than 7 seconds,
otherwise pairing mode is entered.
• After the unit is turned on, the unit
attempts to connect to the last
connected Bluetooth device
automatically with HFP or HSP.
When not calling with this unit, do
not make the last connected
Bluetooth device ready for HFP or
HSP connection. To make or
receive a call while playing back
music, see page 20.
2 Make the Bluetooth
connection (A2DP) from
a Bluetooth device to
this unit.
Refer to the operating
instructions supplied with the
Bluetooth device on how to
operate it.
3 Start playback on the
Bluetooth device.
Tip
Bluetooth connection of A2DP
(Advanced Audio Distribution Profile)
can also be operated with the jog switch
from this unit to the Bluetooth device
except when making a call on this unit.
Notes
• When you play music by connecting the
unit to a Bluetooth device using HSP
(Headset Profile), sound quality will not
be high. For better sound, change the
Bluetooth connection to A2DP by
operating the Bluetooth device.
• If this unit is turned off while an A2DP
Bluetooth connection is established,
operate the unit again from step 1 to
make the A2DP Bluetooth connection
again.
* For detail on profiles, see page 4.
Continued
15
GB
Page 16

To adjust the volume
Push the jog switch up or down
while listening to music to adjust the
volume.
Tips
• Depending on the connected device, it
may be necessary to adjust the volume
on the connected device as well.
• Volume for calling and listening to
music can be adjusted independently.
Even if you change the volume while
calling, the volume for music playback
does not change.
To stop use
1 Terminate the Bluetooth
connection by operating
the Bluetooth device.
2 Press and hold the
POWER button for
about 3 seconds.
The indicator (blue) and
indicator (red) light up together,
and the unit turns off.
Tip
When you finish playing music, the
Bluetooth connection may terminate
automatically, depending on the
Bluetooth device.
16
GB
Controlling the audio
device – AVRCP
If the Bluetooth audio device
connected with this unit supports
AVRCP (Audio Video Remote
Control Profile), you can control by
using the unit buttons.
Refer to the operating instructions
supplied with the Bluetooth device
on how to operate it.
Note
Operation of the Bluetooth connecting
device by this unit will vary depending on
its specification.
Status: In stop or pause mode
Nx
./>
1 Starts playback*
2 Stop
3 Skip to next/previous
4 Fast-forward/Fast-rewind*
Status: In play mode
Nx
./>
5 Pause*
6 Stop
7 Skip to next/previous
8 Fast-forward/Fast-rewind*
*1You may need to press the button
*2Some
Note
You cannot adjust the volume of the
Bluetooth device by pushing the jog
switch of this unit up or down.
Short Press Long Press
1
3
Short Press Long Press
5
7
1
twice depending on the Bluetooth
device.
Bluetooth
operate.
devices may not
2
4
1
6
8
2
2
Page 17

Calling
Jog
switch
VOL
..Nx
VOL
POWER button
Multi function button
Check the following before
operating the unit.
– The Bluetooth function is active
on the mobile phone.
– Pairing of this unit and the
Bluetooth mobile phone is
complete.
1 Press and hold the
POWER button for
about 3 seconds while
the unit is turned off.
The indicator (blue) and
indicator (red) flash together
twice, the unit turns on and then
this unit tries to connect to the
last Bluetooth mobile phone that
was used.
Note
Do not press and hold the POWER
button for more than 7 seconds,
otherwise pairing mode is entered.
Tip
This unit will stop trying to connect
to the Bluetooth mobile phone after 1
minute. In such a case, press the multi
function button to try to connect
again.
When this unit does not
connect to a Bluetooth
mobile phone automatically
You can make a connection by
operating Bluetooth mobile phone
or by operating this unit to connect
the last connected Bluetooth device.
A To make a connection
by operating Bluetooth
mobile phone
1 Make the Bluetooth
connection (HFP or
HSP*) from the
Bluetooth mobile phone
to this unit.
Refer to the manual supplied
with your Bluetooth mobile
phone for operation details.
The list of recognized devices
appears on the display of the
Bluetooth mobile phone. This
unit is displayed as
“DRC-BT15.”
When you use the Bluetooth
mobile phone features both HFP
(Hands-free Profile) and HSP
(Headset Profile), set to HFP.
Note
When connecting to a Bluetooth
mobile phone which is different from
the last connected one, make the
connection following the above
procedure.
* For details on profiles, see
page 4.
Continued
17
GB
Page 18

B To make a connection
with the last connected
Bluetooth device by
operating this unit
1 Press the multi function
button.
The indicator (blue) and
indicator (red) start flashing at
the same time, and the unit
performs the connection
operation for about 5 seconds.
Note
When listening to music with this unit, a
Bluetooth connection cannot be made
with the multi function button.
To call
1 Use the buttons on your
mobile phone when
making a call.
If no dial tone is heard on this
unit, press and hold the multi
function button for about 2
seconds.
Tip
You can call in the following way,
depending on the Bluetooth mobile
phone. Refer to the manual supplied with
your mobile phone on operating details.
– When not communicating, you can call
using the voice-dial function by
pressing the multi function button.
– You can call the last dialed number by
pressing the multi function button for
about 2 seconds.
To receive a call
When an incoming call arrives, a ring
tone will be heard from the unit.
1 Press the multi function
button on the unit.
The ring tone differs in the
following ways, depending on
your mobile phone.
18
GB
– ring tone set on the unit
– ring tone set on the mobile
phone
– ring tone set on the mobile
phone only for Bluetooth
connection
Note
If you received a call by pressing the
button on the Bluetooth mobile phone,
some Bluetooth mobile phones may have
handset use priority. In this case, set to
talk with the unit by pressing and holding
the multi function button for about 2
seconds, or by operating the Bluetooth
mobile phone. For details, refer to the
manual supplied with your Bluetooth
mobile phone.
To adjust the volume
Push the jog switch up or down to
adjust the volume.
Tips
• You cannot adjust the volume when not
communicating.
• Volume for calling and listening to
music can be adjusted independently.
Even if you change the volume while
playing back the music, the volume of a
call does not change.
To terminate a call
You can end a call by pressing the
multi function button on the unit.
To stop use
1
Terminate Bluetooth
connection by the
Bluetooth mobile phone.
2
Press and hold the
POWER button for about
3 seconds to turn off the
power.
The indicator (blue) and
indicator (red) light up together,
and the unit turns off.
Page 19
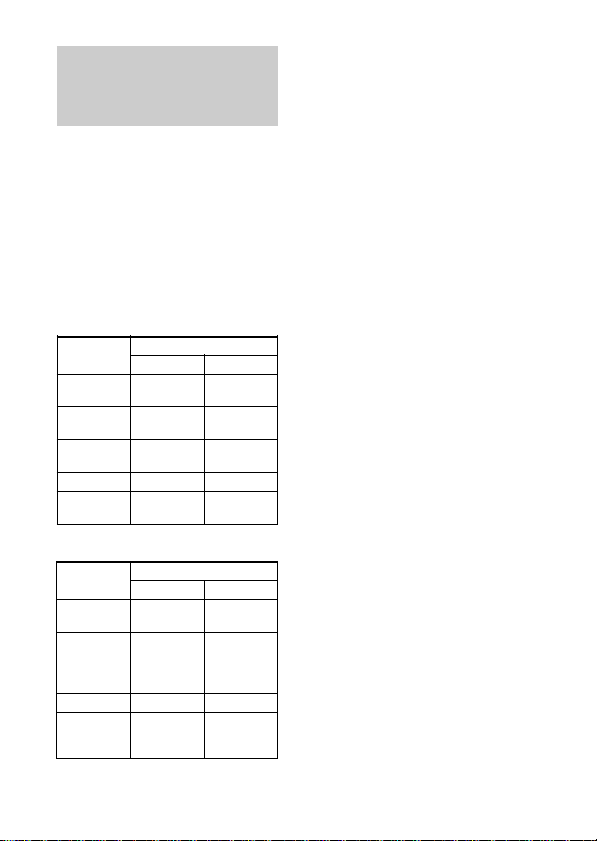
Controlling the
Bluetooth mobile
phone – HFP, HSP
The operation of the buttons on this
unit varies depending on your
mobile phone.
HFP (Hands-free Profile) or HSP
(Headset Profile) is used for
Bluetooth mobile phone. Refer to
the operating instructions supplied
with your Bluetooth mobile phone
on supported Bluetooth profiles or
how to operate.
HFP (Hands-free Profile)
Status Multi function button
Standby
Voice Dial
active
Outgoing call
Incoming call
During call
HSP (Headset Profile)
Status Multi function button
Standby
Outgoing call
Incoming call
During call
Short Press
Start Voice
1
Dial*
Cancel Voice
1
Dial*
End outgoing
call
Answer
End call
Short Press
–
End outgoing
1
call
*
Answer
End call
*
Last number
End outgoing
call or change
call device to
3
Long Press
redial
–
–
Reject
Change call
device
Long Press
1
Dial
*
headset*
–
Change call
device to
headset
*1Some functions may not be supported
depending on the Bluetooth mobile
phone. Refer to the operating
instructions supplied with your mobile
phone.
*2This may vary, depending on the
Bluetooth mobile phone.
3
Some functions may not be supported
*
when calling using the Bluetooth
mobile phone.
2
19
GB
Page 20

Calling while playing back music
The Bluetooth connection using HFP or HSP as well as A2DP is necessary
to make a call while playing back music.
For example, to make a call using a Bluetooth mobile phone while listening
to music on a Bluetooth compatible music player, this unit needs to be
connected to the mobile phone using HFP or HSP.
Make a Bluetooth connection between this unit and the
device in use following the procedures outlined below.
1 Make a Bluetooth connection between this unit and
the mobile phone in use with HFP or HSP following
the procedures outlined in “Calling” (see page 17).
2 Operate the Bluetooth device (music player or mobile
phone) used for playing the music to make a
Bluetooth connection to this unit using A2DP.
To make a call while
playing back music
1 Press the multi function
button while playing
back music (page 19), or
operate your Bluetooth
mobile phone to make a
telephone call.
If no dial tone is heard on this
unit, press and hold the multi
function button for about 2
seconds.
20
GB
To receive a call while
playing back music
When an incoming call arrives, the
music pauses and the ring tone is
heard from this unit.
1 Press the multi function
button and talk.
After finishing the call, press the
multi function button. This unit
is switched back to music
playback.
When no ring tone is heard
even if an incoming call
arrives
1 Stop music playback.
2 When ringing, press the
multi function button
and talk.
Page 21
ADDITIONAL INFORMATION
Disposing of the unit
A Lithium-lon rechargeable battery is built into this unit.
For environmental conservation, be sure to remove the built-in rechargeable
battery from the unit before disposing, and dispose of the battery
appropriately.
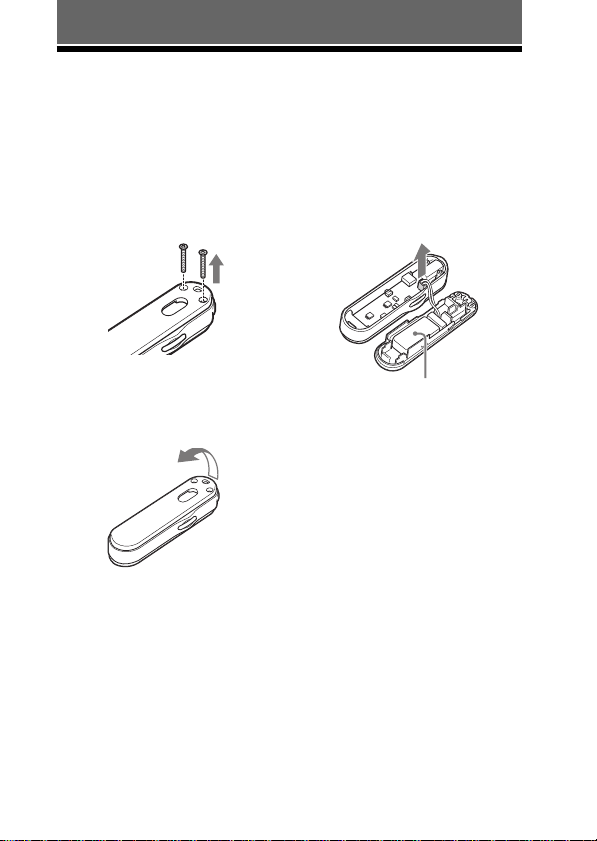
1 Remove the screws
(2 pieces) on the back
of this unit.
3 Pull out the connector.
Dispose of the rechargeable
battery without removing it from
the cover.
2 Lift the side with the
strap hole to remove
the cover.
Rechargable
battery
Note
Do not remove the rechargeable battery
from the cover, the rechargeable battery
could be destroyed.
21
GB
Page 22
Precautions
On Bluetooth communication
• Bluetooth wireless technology operates
within a range of about
10 meters (about 30 feet).
Maximum communication range may
vary depending on obstacles (human
body, metal, wall, etc.) or
electromagnetic environment.
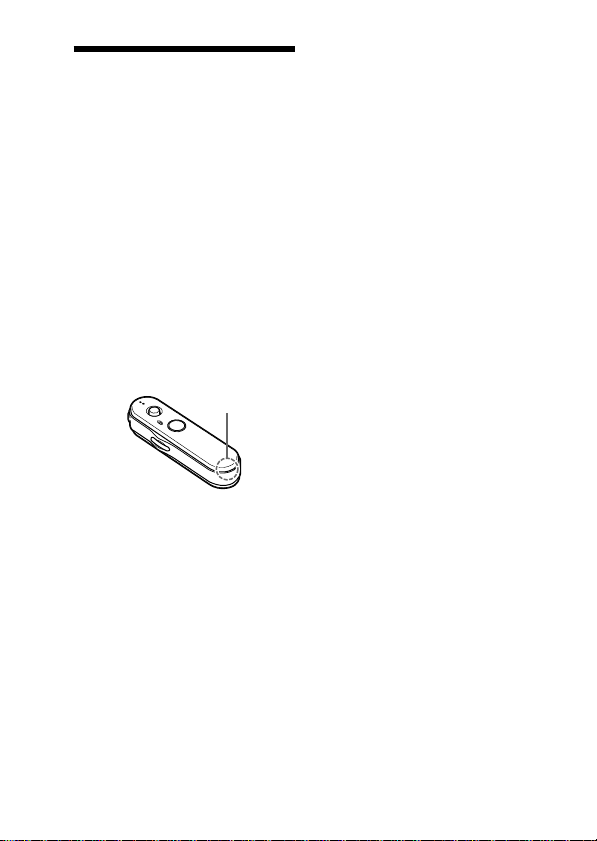
• The antenna is built into the unit as
illustrated in the dotted line. The
sensitivity of the Bluetooth
communication will improve by turning
the direction of the built-in antenna to
the connected Bluetooth device.
The communication distance shortens
when the obstacles are between the
antenna of the connected device and
this unit.
• The following conditions may affect the
sensitivity of Bluetooth communication.
– There is an obstacle such as a human
body, metal, or wall between this unit
and Bluetooth device.
–A device using 2.4 GHz frequency,
such as a wireless LAN device,
cordless telephone, or microwave
oven, is in use near this unit.
• Because Bluetooth devices and wireless
LAN (IEEE802.11b/g) use the same
frequency, microwave interference may
occur and resulting in communication
speed deterioration, noise, or invalid
connection if this unit is used near a
wireless LAN device. In such as case,
perform the following.
– Use this unit at least 10 m (about
30 ft) away from the wireless LAN
device.
22
GB
Location of
built-in antenna
– If this unit is used within 10 m (about
30 ft) of a wireless LAN device, turn
off the wireless LAN device.
– Install this unit and Bluetooth device
as near to each other as possible.
• Microwaves emitting from a Bluetooth
device may affect the operation of
electronic medical devices. Turn off
this unit and other Bluetooth devices in
the following locations, as it may cause
an accident.
– where inflammable gas is present, in
a hospital, train, airplane, or a petrol
station
– near automatic doors or a fire alarm
• This unit supports security capabilities
that comply with the Bluetooth standard
to provide a secure connection when the
Bluetooth wireless technology is used,
but security may not be enough
depending on the setting. Be careful
when communicating using Bluetooth
wireless technology.
• We do not take any responsibility for
the leakage of information during
Bluetooth communication.
• Connection with all Bluetooth devices
cannot be guaranteed.
–A device featuring Bluetooth function
is required to conform to the
Bluetooth standard specified by
Bluetooth SIG, Inc. and be
authenticated.
– Even if the connected device
conforms to the above mentioned
Bluetooth standard, some devices
may not be connected or work
correctly, depending on the features
or specifications of the device.
– While talking on the phone hands
free, noise may occur, depending on
the device or communication
environment.
• Depending on the device to be
connected, it may require some time to
start communication.
Page 23

On the supplied AC power
adaptor
• Use the AC power adaptor supplied
with this unit. Do not use any other AC
power adaptor since it may cause the
unit to malfunction.
Polarity of the plug
• If you are not going to use this unit for
a long time, unplug the AC power
adaptor from the AC outlet. To remove
the AC power adaptor from the wall
outlet, grasp the adaptor plug itself;
never pull the cord.
Others
• Do not place this unit in a place
exposed to humidity, dust, soot or
steam, subject to direct sunlight, or in a
car waiting at a traffic signal. It may
cause a malfunction.
• Do not use the strap in a place where
the strap could be snagged, such as near
a shredder or machine equipment.
• Using the Bluetooth device may not
function on mobile phones, depending
on radio wave conditions and location
where the equipment is being used.
• If you experience discomfort after using
the Bluetooth device, stop using the
Bluetooth device immediately. Should
any problem persist, consult your
nearest Sony dealer.
• Listening with this unit at high volume
may affect your hearing. For traffic
safety, do not use this unit while driving
or cycling.
• Do not put weight or pressure on this
unit as it may cause the unit to deform
during long storage.
• If you have any questions or problems
concerning this unit that are not covered
in this manual, please consult your
nearest Sony dealer.
23
GB
Page 24
Troubleshooting
If you run into any problems using this unit, use the following checklist and
read the product support information on our website.
Should any problem persist, consult your nearest Sony dealer.
Common
The unit is not turned on.
, Charge the battery of the unit.
, The unit is not turned on while
charging. Remove the unit from the
battery charging stand and then turn
on the unit.
Pairing cannot be done.
, Bring this unit and the Bluetooth
device closer together.
Cannot make the Bluetooth
connection.
, Check that this unit is turned on.
, Check that the Bluetooth connecting
device is turned on and the Bluetooth
function is on.
, Connection with the Bluetooth device
may not be memorized on this unit.
Make the Bluetooth connection from
the Bluetooth device to this unit soon
after pairing is complete.
, This unit or Bluetooth connecting
device is in sleep mode.
, The Bluetooth connection is
terminated. Make the Bluetooth
connection again (when listening to
music: see page 15, when calling: see
page 17).
Distorted sound
, Ensure that this unit is not receiving
interference from a wireless LAN,
other 2.4 GHz wireless device, or
microwave oven.
24
GB
The correspondence
distance is short. (Sound
skips.)
, If a device that generates
electromagnetic radiation, such as a
wireless LAN, other Bluetooth
device(s), or a microwave oven is
nearby, move away from such
sources.
, Point the antenna of this unit
(page 22) towards the Bluetooth
device. Make sure no obstacles
blocks the communication.
The unit does not operate
properly.
, Reset the unit. Pairing information is
not deleted by this operation.
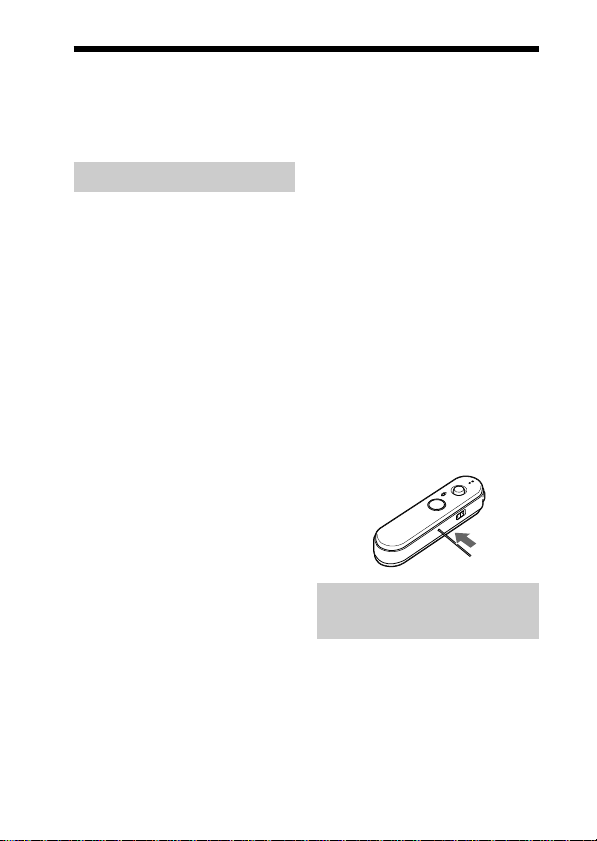
Insert a small pin, etc., into the hole,
and push until you feel a click.
When listening to
music
No sound
, Check that both this unit and the
Bluetooth device are turned on.
,
A2DP Bluetooth connection is not
made between this unit and the
Bluetooth device. Make an A2DP
Bluetooth connection (page 15).
, Check that music is being played
back by the Bluetooth device.
Page 25

, Check that the volume of the unit is
not set too low.
, Turn up the volume on the connected
device if necessary.
, Pair this unit and Bluetooth device
again (page 10).
Low sound level
, Turn up the volume of this unit.
, Turn up the volume on the connected
device if necessary.
Low sound quality
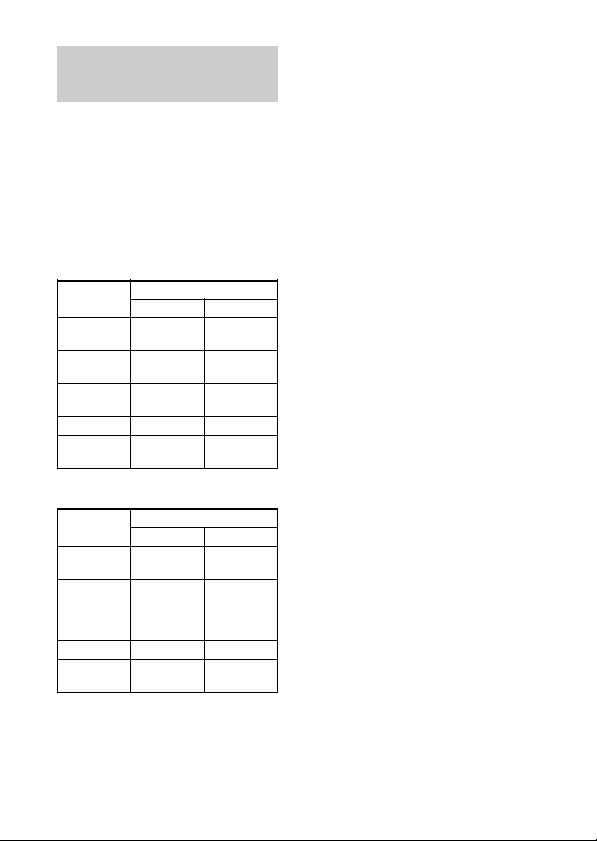
, Switch the Bluetooth connection to
A2DP (Advanced Audio Distribution
Profile) when HSP (Headset Profile)
is set.
Cannot make the Bluetooth
connection from Bluetooth
device to this unit.
, The Bluetooth device is not equipped
with SCMS-T content protection*.
With the unit turned off, press and
hold POWER and Nx for about 7
seconds to deactivate the SCMS-T
protection. The indicator (blue)
flashes once.
* The SCMS-T content protection
method is one of the methods to
protect the contents transmitted on
the Bluetooth wireless technology.
This unit can receive the contents
protected by this method. Press and
hold the POWER button and Nx
again for about 7 seconds to
reactivate the SCMS-T content
protection method on this unit. The
indicator (blue) flashes twice.
Sound skips frequently
during playback.
, Reception condition of this unit may
have become unstable due to
improper matching of the bit-rate
setting for the music transmitted from
the Bluetooth device and the
environment in which this unit is
1
used. *
Terminate A2DP Bluetooth
connection by operating the
Bluetooth device. While this unit is
turned on, press and hold Nx for
about 7 seconds to lower the setting
of receivable bit rate. *
*1Bit rate is a numerical value which
represents data transmission
volume per second. The higher the
bit rate, in general, the better
quality the sound will be. This unit
can receive high bit rate music but
sound skipping may occur
depending on the usage
environment.
2
When bit rate setting is completed,
*
the indicator (blue) flashes once.
The above operations may not
reduce the sound skip depending on
the usage environment. To reset to
the original setting, press and hold
Nx again for about 7 seconds.
The indicator (blue) flashes twice.
2
When calling
The recipient’s voice
cannot be heard.
, Check that both this unit and the
Bluetooth mobile phone are turned
on.
, Check the connection between this
unit and the Bluetooth mobile phone.
Make a Bluetooth connection (HFP
or HSP) again (page 17).
, Check that output of the Bluetooth
mobile phone is set for this unit.
, Check that the volume of the unit is
not set too low.
, Turn up the volume on the connected
Bluetooth mobile phone if necessary.
, If you are listening to music using
this unit, stop playback, press the
multi function button and talk.
Low sound from recipient
, Turn up the volume of this unit.
, Turn up the volume on the connected
Bluetooth mobile phone if necessary.
25
GB
Page 26

Initializing the
unit
You can reset this unit to its default
(such as volume setting) and delete
all pairing information.
1 If this unit is turned on,
press and hold the
POWER button for
about 3 seconds to turn
off this unit.
2 Press and hold the
POWER button and
multi function button
together for about
7 seconds.
The indicator (blue) and
indicator (red) flash together
four times, and this unit is reset
to the default setting. All pairing
information is deleted.
26
GB
Page 27

Specifications
General
Communication System
Bluetooth Specification version 2.0 +
EDR (Enhanced Data Rate)
Output
Bluetooth Specification Power Class 2
Maximum communication range
Line of sight approx. 10 m (30 ft) *
Frequency band
2.4 GHz band (2.4000 GHz – 2.4835 GHz)
Modulation method
FHSS
Compatible Bluetooth Profiles*
A2DP (Advanced Audio Distribution
Profile)
AVRCP (Audio Video Remote Control
Profile)
HSP (Headset Profile)
HFP (Hands-free Profile)
Supported Codecs
SBC
*4, MP3
Supported content protection
method
SCMS-T
Transmission range (A2DP)
20 - 20,000 Hz (Sampling frequency
44.1 kHz)
Supplied accessory
AC power adaptor (1)
Battery charging stand (1)
Holding clip (1)
Strap (1)
Operating instructions (this book) (1)
1
*
The actual range will vary depending
on factors such as obstacles between
devices, magnetic fields around a
microwave oven, static electricity,
reception sensitivity, aerial’s
performance, operating system,
software application, etc.
3
*
1
2
*2Bluetooth standard profiles indicate
the purpose of Bluetooth
communication between devices.
3
Codec: Audio signal compression and
*
conversion format
4
Subband Codec
*
Wireless Audio
Receiver
Power source
DC 3.7 V: Built-in lithium-ion
rechargeable battery
Dimension (w/h/d) (excluding
projection parts and controls)
Approx. 16.8 × 68.5 × 15.5 mm
11
(
/16 × 2 3/4 × 5/8 in.)
Mass (excluding accessories)
Approx. 15 g (0.5 oz)
Headphones output
Output jack
Stereo mini jack
Maximum output
20 mW + 20 mW (16 Ω)
Microphone
Type
Electret condenser
Direction characteristic
Omni directional
Effective frequency range
100 – 4,000 Hz
Operating temperature
0 °C to 45 °C (32 °F to 113 °F)
Design and specifications are subject to
change without notice.
27
GB
Page 28

警告事項
為減少火災或觸電的危險,請勿將本裝
置暴露在雨中或潮濕環境中。
為減少觸電的危險,請勿打開裝置外
殼。請只委託合格的人員進行維修。
請勿將本系統安放在書櫥或壁櫥等狹窄
封閉處。
為減少火災的危險,請勿讓報紙、桌
布、窗簾等覆蓋在裝置的通風口。也請
勿將點燃的蠟燭放置在本裝置上。
為減少火災或觸電的危險,請勿將花瓶
等盛滿液體的物品放置在裝置上。
將交流電源轉接器連接至方便操作的交
流電源插座。萬一您發現交流電源轉接
器出現不正常的現象,請立即將之從交
流電源插座上拔除。
請勿將電池(安裝的電池組或電池)長
時間暴露在如陽光或火源等類似過熱的
地方。
耳機聲音過大可能會造成聽力受損。
Bluetooth 字型商標和圖形商標均為
Bluetooth SIG, Inc. 所有,Sony
Corporation 對該商標的各項使用均已
經授權。
其它商標和商標名稱分屬其各自公司。
MPEG Layer-3 音頻編碼技術和專利由
Fraunhofer IIS 和 Thomson 授權。
2
CT
Page 29

目錄
什麼是 Bluetooth 無線技
術? ................. 4
歡迎使用! ............. 5
使用 Bluetooth 功能
三步驟 ................. 6
各部件位置和功能 ....... 7
為本機充電 ............. 8
配對 .................. 10
什麼是配對? ............ 10
配對步驟 ................ 10
戴上本機 .............. 12
Bluetooth 功能指示 .... 14
聆聽音樂 .............. 15
控制音訊裝置 – A VRCP
撥打電話 .............. 17
控制 Bluetooth 手機
– HFP、HSP
播放音樂時撥打電話 .... 20
廢棄本機 .............. 21
預防措施 .............. 22
疑難排除 .............. 24
初始化本機 ............ 26
規格 .................. 27
....
...........
16
19
CT
3
CT
Page 30

什麼是 Bluetooth 無線技術?
Bluetooth™ 無線技術是一種可在
電腦或數位相機等數位裝置間,
進行無線資料通訊的短距離無線
技術。Bluetooth 無線技術可在
10 m 的範圍內運作。
一般情況是兩個裝置因需要而相
互連接,但是部份裝置可以同時
連接至多個裝置。
您不需要使用電纜連接,也不需
要像紅外線技術那樣將裝置面對
面放置來進行連接。例如,您可
以將裝置放在袋子或口袋內使
用。
Bluetooth 標準為全球數千家公司
支援的國際標準,並經全球各公司
採用。
本機的通訊系統和相容的
Bluetooth 模式
模式是每種 Bluetooth 裝置規格
的功能標準化。本機可支援以下
的 Bluetooth 版本和模式:
通訊系統:
Bluetooth 規格版本 2.0 + EDR
相容的 Bluetooth 模式:
– A2DP(進階音訊發送模式):傳輸或
接收高品質的音訊內容。
– AVRCP(影音搖控模式):控制影音
裝備;暫停、停止、開始播放、音量
控制等。
– HSP(耳機模式)
作手機。
– HFP(免持聽筒模式)
聽筒用手機通話/操作手機。
1
Enhanced Data Rate
*
2
當您使用的 Bluetooth 手機同時支援
*
HFP(免持聽筒模式)和 HSP(耳
機模式)時,請設至 HFP。
註
• 為了能夠使用 Bluetooth 功能,要連
接的 Bluetooth 裝置也需要與本機相
同的模式。
請注意,即使有相同的模式,裝置也
可截依規格不同而有不同的功能。
• 由於 Bluetooth 無線技術的特性,在
電話通話或聽音樂時,本機播放的聲
音與 Bluetooth 設備上播放的聲音相
比稍有延遲。
1
*
2
*
:用手機通話/操
2
*
:利用免持
4
CT
Page 31
歡迎使用!
感謝您購買本 Sony 無線音訊接收器。本機使用 Bluetooth 無線技術。
• 透過使用 Bluetooth 技術的音樂播放器或行動電話無線欣賞音樂。*
• 透過立體聲迷你插孔連接最愛的耳機(耳機另購)。
• 使用 Bluetooth 技術的行動電話進行免持通話。*
• 透過 Bluetooth 連接對音樂播放器功能進行基本遙控操作(播放、停
止等)。*
• Bluetooth 版本 2.0 + EDR (Enhanced Data Rate),在干擾較少和功率消
耗較低的條件下得到較高的音訊品質。
3
• 實用的充電功能。
更多有關 Bluetooth 無線技術的詳細內容,請參閱第 4 頁。
2
聆聽音樂使用手機通話
1
*1
連接的 Bluetooth 裝置必須可支援 A2DP (進階音訊發送模式)。
*2
連接的 Bluetooth 裝置必須可支援 HFP (免持聽筒模式)或 HSP (耳機模式)。
*3
連接的 Bluetooth 裝置必須可支援 AVRCP (影音遙控模式)。
5
CT
Page 32
使用 Bluetooth 功能三步驟
配對
首先,讓 Bluetooth 裝置(手機等)和本機互相登記(“配對”)。
一旦建立配對後,則無須再次配對。
Bluetooth 手機
等。
聆聽音樂
V
Bluetooth 連接
操作 Bluetooth 裝置以便建立
Bluetooth 連接。
連接
A2DP
AVRCP
V
聆聽音樂
您可以聆聽在 Bluetooth 裝置上
播放的音樂。
可從本機上播放、停止或暫
停。
音樂
6
CT
配對
c 第 15 頁
無線音訊接收器
c 第 10 頁到第 11 頁
撥打電話
V
Bluetooth 連接
開啟本機時,本機會自動開始
建立與所識別的手機之間的
Bluetooth 連接。
連接
HFP HSP
c 第 17 頁到第 18 頁
V
使用手機通話
您可以操作本機來撥打和接聽
電話。
語音
c 第 18 頁到第 20 頁c 第 15 頁到第 16 頁
Page 33
開始使用
各部件位置和功能
1
2
3
4
5
6
1 耳機插孔
2 掛繩孔
3 防摩便攜孔
4 指示燈(紅色)
顯示本機的電力狀態。
5 麥克風
6 多功能按鈕
控制多種呼叫功能。
7 指示燈(藍色)
顯示本機的通訊狀態。
9 q;
7
8
.
L
O
V
Nx
L
O
V
.
OWER
P
8 控制桿
聆聽音樂時可控制多種功
能。
通話時調節本機的音量。
9 RESET 按鈕
0 電池充電座的金屬接點
qa POWER 按鈕
qa
7
CT
Page 34
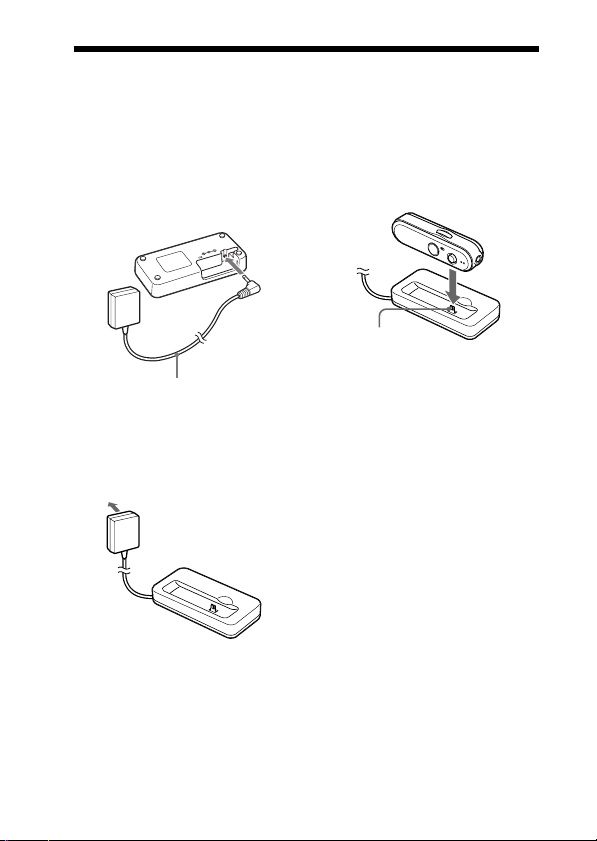
為本機充電
本機含有可充式鋰電池,第一次使用前應進行充電。
1 將隨附的交流電源轉接器
連接至電池充電座。
電池充電座
(隨附)
交流電源轉接器
(隨附)
(後視圖)
D
C
I
N
3
V
連接至 DC
IN 3 V 插孔
2 將隨附的交流電源轉接器
連接至交流電源插座。
連接至交流電源插座
電池充電座(隨附)
3 將本機放置在電池充電座
上。
無線音訊接收器
接觸針腳
將本機放置在電池充電座上,
使本機的金屬接點和電池充電
座上的接觸針腳相吻合,並請
確定指示燈(紅色)亮起。
充電完成約需 2.5 小時*,且
指示燈(紅色)會自動熄滅。
* 耗盡電力電池所需的充電時間。
註
將掛繩連接到本機時,切勿使掛繩
夾在本機和電池充電座之間。
訣竅
• 若在本機打開時將交流電源轉接器連
接至交流電源插座,則本機會自動關
閉。
• 充電時本機無法打開。
電池充電座(隨附)
8
CT
Page 35

注意事項
若本機在充電時偵測到問題,即
使充電未完成,指示燈(紅色)
仍可能熄滅。
檢查以下原因:
– 環境溫度超過 0 °C 到 40 °C 的
範圍。
– 電池有問題。
在此情況下,請在上述溫度範圍
內再次進行充電。
若問題持續,請聯絡附近的 Sony
經銷商。
註
• 若長時間未使用電池,電池可能會快
速耗盡電力,然而,只要充電數次
後,電池壽命將會慢慢恢復。
• 若內建充電電池的壽命降至正常時間
的一半,則應更換電池。請聯絡附近
的 Sony 經銷商以更換充電電池。
• 請避免讓裝置暴露在極端溫度、直射
陽光、濕氣、沙塵或持續的震動下。
切勿將裝置留置在陽光下的車內。
• 請只用隨附的交流電源轉接器。請勿
使用其他的交流電源轉接器。
使用時數
狀態
通訊時間
*
估計使用時數
6 小時
(含音樂播放
時間)
(最長可達)
待機時間
100 小時
(最長可達)
* 上述時間可能依環境溫度或使用狀態
而有所不同。
檢查剩餘電池電力
在本機開啟時按下 POWER 按
鈕,指示燈(紅色)閃爍。您可
以透過指示燈(紅色)閃爍的次
數來檢查剩餘的電池電力。
指示燈(紅色)
3 次
2 次
1 次
註
您無法在本機開啟後或是進行配對期間
馬上檢查電池的剩餘電力。
電池幾乎沒電時
指示燈(紅色)會自動緩慢閃
爍。
當電池沒電時,會發出嗶嗶聲且
本機會自動關閉。
狀態
電力已滿
電力中等
電力不足
(需充電)
9
CT
Page 36
配對
什麼是配對?
使用 Bluetooth 裝置前,必需先進
行相互配對。
除了下列情況,否則 Bluetooth 裝
置一旦配對完畢後,則無須再次
配對:
• 修復等情況後,配對資訊已被
刪除時。
• 本機與 9 個或更多裝置進行配
對。
本機可以一次與最多 8 個裝置
進行配對;若要在已經配對 8
個裝置後再配對一個新的裝
置,則 8 個裝置中有最後一次
連接時間最早的一個裝置會被
最新的設備所取代。
• 已刪除要連接裝置對本機的辨
識時。
• 本機已經初始化(第 26 頁)。
所有配對資訊已刪除。
配對步驟
1 將 Bluetooth 裝置放置在
距離本機的 1 m 內。
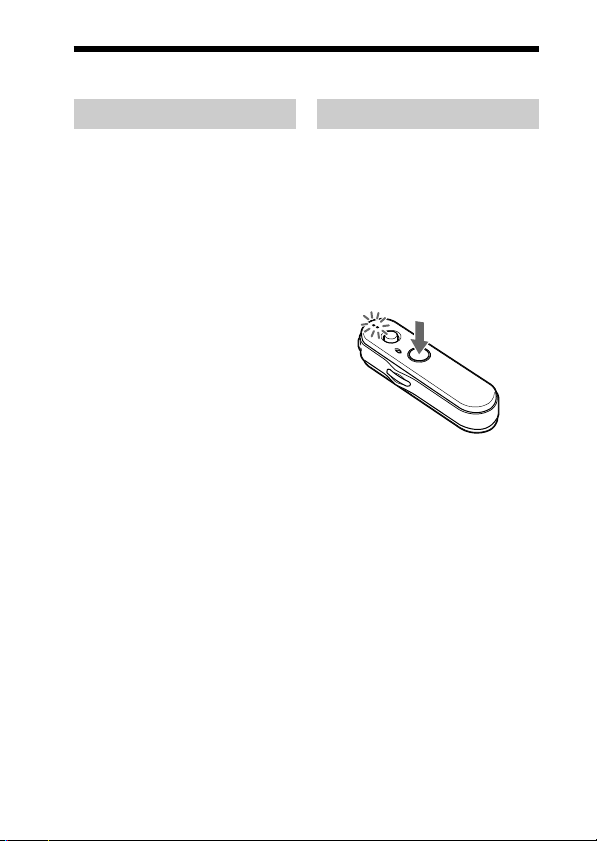
2 本機關閉時,按住
POWER 按鈕 7 秒鐘或更
久以切換至配對的待機模
式。
註
• 約 3 秒鐘後,電源開啟且指示燈
(藍色和紅色)會一起閃爍兩
次。按住 POWER 按鈕不放。指
示燈(藍色)開始閃爍。當兩個
指示燈又同時開始閃爍時,鬆開
此按鈕。
• 若未在 5 分鐘內完成配對,則會
取消配對模式,並關閉本機。在
此情況下,請從步驟 1 重新開
始。
10
CT
Page 37

3 在 Bluetooth 裝置上執行
配對步驟,以便偵測本
機。
偵測到的裝置清單會出現在
Bluetooth 裝置的螢幕上。本機
會顯示為“DRC-BT15”。
若“DRC-BT15”未出現,請
從步驟 1 重新開始。
註
• 更多詳細內容,請參閱
Bluetooth 裝置隨附的使用說明
書。
• 與無法顯示已偵測到的裝置清單
或無螢幕的 Bluetooth 裝置配對
時,您可能要將本機和
Bluetooth 裝置都設定在配對模
式後才能進行配對。 此時,如
果 Bluetooth 設備上的密碼設定
不是 “0000” ,則無法與本機配
對。
4 選擇 Bluetooth 裝置螢幕
上的“DRC-BT15”。
5 若 Bluetooth 裝置螢幕上
*
出現需要輸入密碼
入“0000”。
當指示燈(藍色)緩慢閃爍
時,則配對完成。代表“配對
完畢”的訊息會出現在部分
Bluetooth 裝置的螢幕上。
* 密碼可能會是“Passkey”、
“PIN code”、“PIN number”
或“Password”。
,請輸
6 開始從 Bluetooth 裝置上
進行 Bluetooth 連接。
本機會記憶裝置為最新的連接
裝置。配對完成時,部份
Bluetooth 裝置可能會與本機自
動連接。
訣竅
• 要與其他 Bluetooth 裝置配對,請重
複步驟 1 到 5 為每個裝置進行配
對。
• 要刪除所有配對資訊,請參閱“初始
化本機”(第 26 頁)。
11
CT
Page 38
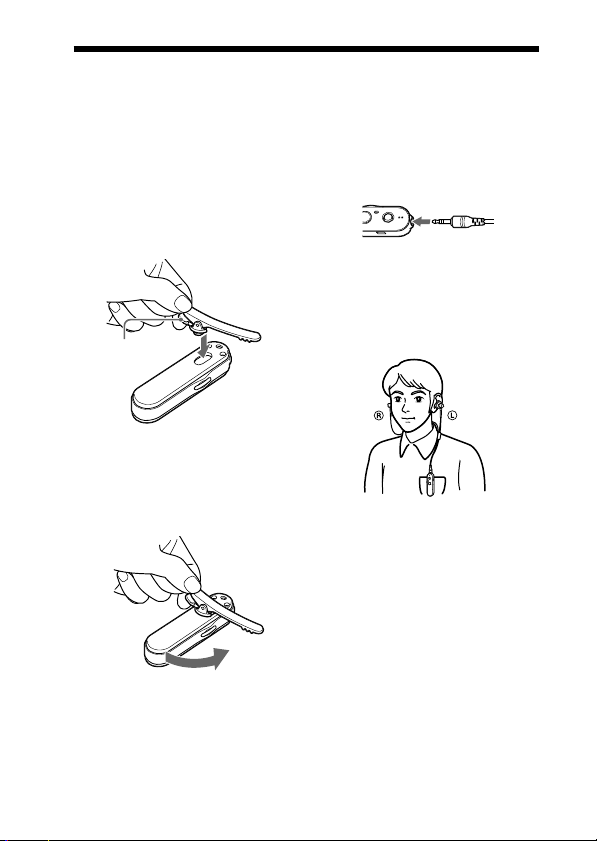
戴上本機
使用防摩便攜時
1 捏住防摩便攜(附件)頂
端的控制桿時,如圖所示
將防摩便攜穿過本機,然
後將防摩便攜插入防摩便
攜孔。
控制桿
2 捏住控制桿時,逆時針旋
轉本機。
鬆開控制桿時,防摩便攜鎖定
以防止其掉落。
3 將耳機(不附送)連接到
本機。
4 將本機夾住衣服口袋等,
然後戴上耳機。
將標有 L 的耳機戴在左耳,
將標有 R 的耳機戴在右耳。
12
CT
Page 39
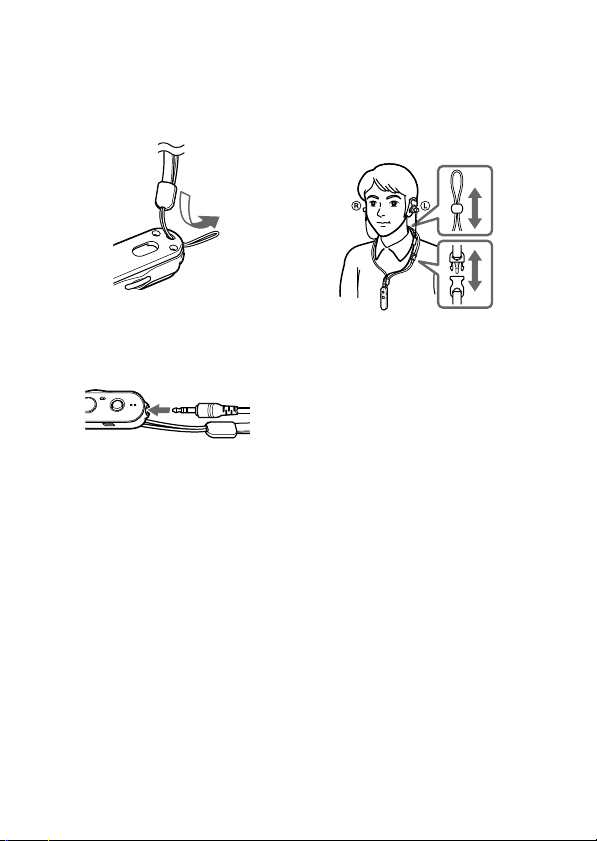
使用掛繩時
1 透過掛繩孔將掛繩(附
件)連接到本機。
2 將耳機(不附送)連接到
本機。
3 將本機繞在頸部,然後戴
上耳機。
將標有 L 的耳機戴在左耳,
將標有 R 的耳機戴在右耳。
13
CT
Page 40
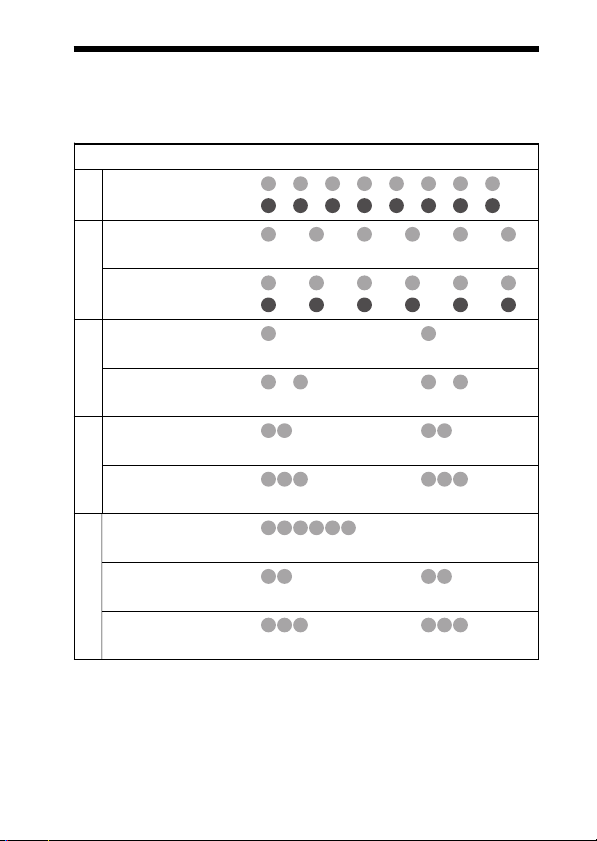
Bluetooth 功能指示
狀態 閃爍模式
搜尋中
配對
可連接
連接中
連接中
HFP/HSP 或 A2DP
(待機以便接收音訊訊號)
HFP/HSP 和 A2DP
已連接
(待機以便接收音訊訊號)
聆聽音樂
音樂
電話待機時聆聽
音樂
來電
通話
電話
播放音樂時撥打
電話
– – – – – – – –
B
– – – – – – – –
R
– – – – – – – – – –
B
–
R
– – – – – – – – – –
B
– – – – – – – – – –
R
– – – – – – – – – – – – – –
B
–
R
– – – – – – – – – – – –
B
–
R
B
–
R
B
–
R
B
–
R
B
–
R
B
–
R
B:指示燈(藍色)
R:指示燈(紅色)
– – – – – – – – – – – –
– – – – – – – – – –
...
– – – – – – – – – – – –
– – – – – – – – – –
...
...
...
...
...
...
...
...
...
...
...
14
CT
Page 41
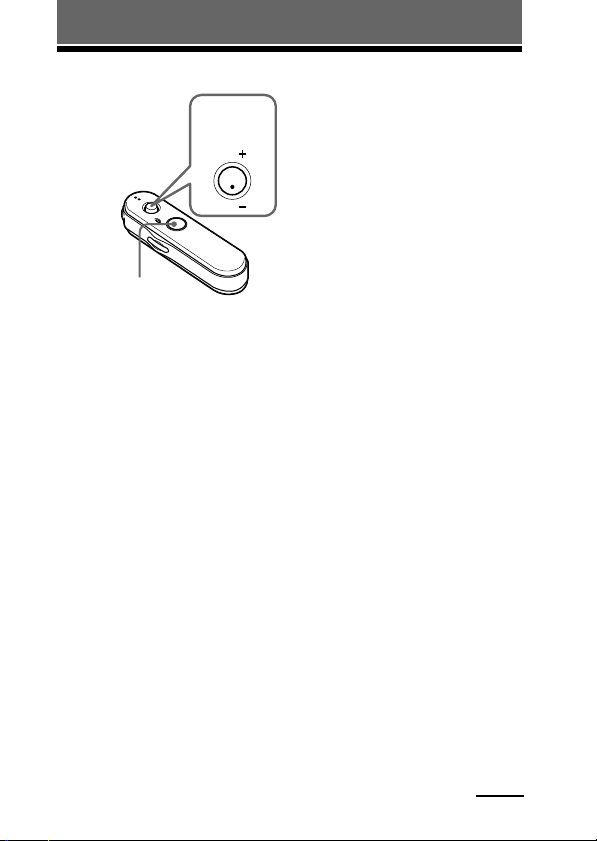
操作本機
聆聽音樂
控制桿
VOL
..Nx
VOL
POWER 按鈕
操作本機前請檢查下列項目。
– Bluetooth 裝置已開啟。
– 本機和 Bluetooth 裝置之間的配
對已完成。
– Bluetooth 裝置可支援音樂傳輸
功能(模式:A2DP*)。
1 本機關閉時,按住
POWER 按鈕約 3 秒鐘。
指示燈(藍色和紅色)會一起
閃爍兩次,並開啟本機。
註
• 請勿按住 POWER 按鈕 7 秒以
上,否則會進入配對模式。
• 開啟耳機時,耳機會用 HFP 或
HSP 自動試著連接至上次連接的
Bluetooth 裝置。當不用本機通
話時,請勿讓上次連接的
Bluetooth 裝置處於可進行 HFP
或 HSP 連接的狀態。若要在播放
音樂時撥打或接聽電話,請參閱
第 20 頁。
2 請在 Bluetooth 裝置上建
立與本機之間的
Bluetooth 連接
(A2DP)。
請參閱 Bluetooth 裝置隨附的
使用說明書中,關於如何操作
的內容。
3 在 Bluetooth 裝置上開始
播放。
訣竅
除非正在使用本機撥打電話,否則也可
用本機上的控制桿進行操作,建立到
Bluetooth 裝置的 A2DP(進階音訊發送
模式)的 Bluetooth 連接。
註
• 當您使用 HSP(耳機模式)將本機連
接到 Bluetooth 裝置播放音樂時,聲
音品質不會太好。為有更好的音質,
請在 Bluetooth 裝置上,將 Bluetooth
裝置的連接變更為 A2DP。
• 如果在建立了 A2DP Bluetooth 連接
時關閉本機,請從步驟 1 重新操作本
機以便重新建立 A2DP Bluetooth 連
接。
* 更多有關模式的詳細內容,請參閱第
4 頁。
續下頁
15
CT
Page 42
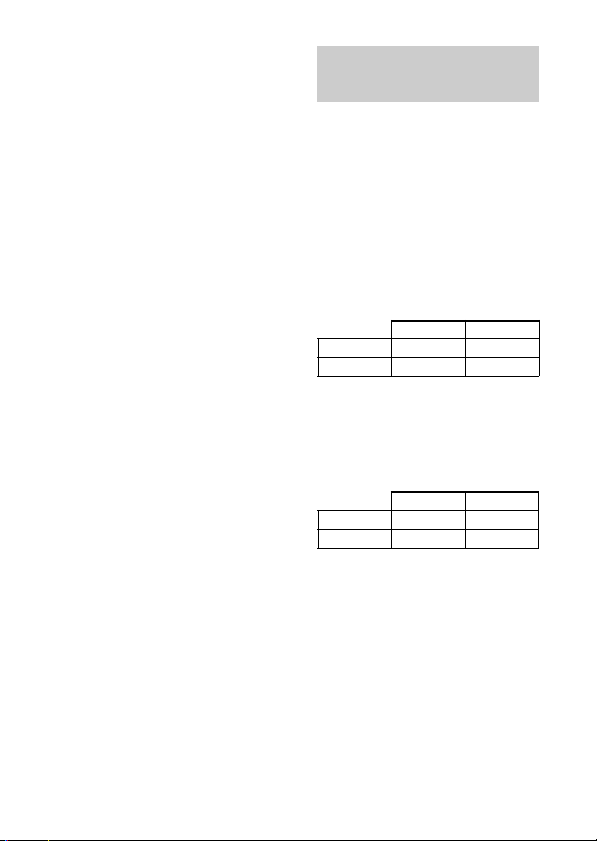
要調整音量
上下推動控制桿,在聆聽音樂時
調整音量。
訣竅
• 依連接的裝置而定,可能也有必要調
整連接裝置上的音量。
• 通話和聆聽音樂的音量可以分別調
整。即使您在通話時改變音量,音樂
播放的音量也不會改變。
要停止使用
1 在 Bluetooth 裝置上終止
Bluetooth 連接。
2 按住 POWER 按鈕約 3 秒
鐘。
指示燈(藍色和紅色)會一起
亮起,並關閉本機。
訣竅
依 Bluetooth 裝置而定,播放音樂完畢
時,Bluetooth 連接可能會自動終止。
控制音訊裝置
– AVRCP
若與本機連接的 Bluetooth 音訊裝
置支援 AVRCP(影音遙控模
式),您可以使用本機按鈕進行
控制。
請參閱 Bluetooth 裝置隨附的使用
說明書中,關於如何操作的內
容。
註
透過本機操作連接的 Bluetooth 裝置會
依規格不同而有不同的操作。
狀態:在停止或暫停模式下
*
1
*
短按 長按
1
3
1
2
*
短按 長按
5
7
2
*
2
4
6
8
Nx
.
/
>
1 開始播放
2 停止
3 跳至下一首/前一首
4 快速前轉/快速倒轉
狀態:在播放模式
Nx
.
/
>
5 暫停
6 停止
7 跳至下一首/前一首
8 快速前轉/快速倒轉
*1依 Bluetooth 裝置不同而定,您可
能需要按兩下按鈕。
2
部分 Bluetooth 裝置可能無法運
*
作。
註
您無法透過上下推動本機的控制桿來調
整 Bluetooth 裝置的音量。
16
CT
Page 43
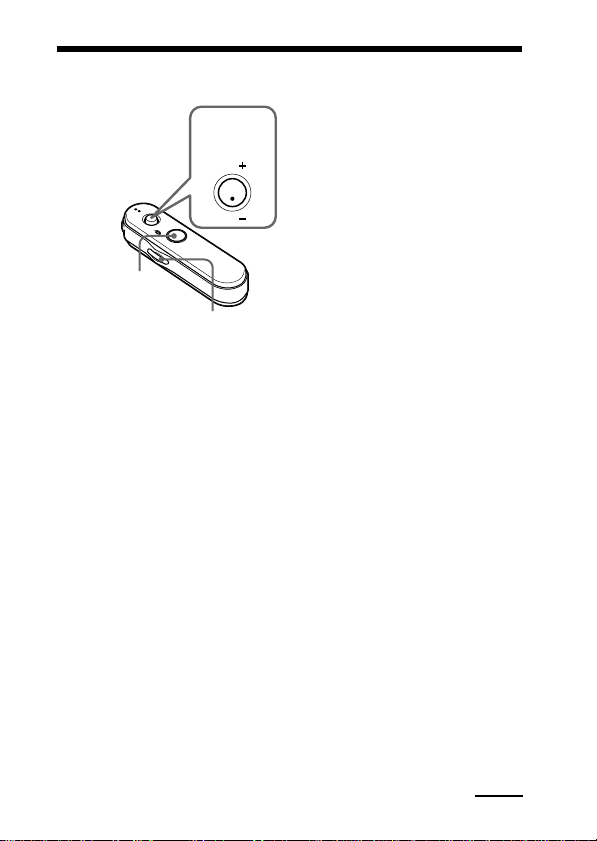
撥打電話
控制桿
VOL
..Nx
VOL
POWER 按鈕
多功能按鈕
操作本機前請檢查下列項目。
– 手機上的 Bluetooth 裝置啟動。
– 本機和 Bluetooth 手機之間的配
對已完成。
1 本機關閉時,按住
POWER 按鈕約 3 秒鐘。
指示燈(藍色和紅色)會一起
閃爍兩次,且本機開啟後會嘗
試連接至最後使用過的
Bluetooth 手機。
註
請勿按住 POWER 按鈕 7 秒以上,
否則會進入配對模式。
訣竅
1 分鐘後,本機將停止嘗試連接至
Bluetooth 手機。在此情況下,按多
功能按鈕並試著再次連接。
本機不自動連接至
Bluetooth 手機時
您可以在 Bluetooth 手機或本機
上進行操作,連接上一次連接的
Bluetooth 裝置。
A 從 Bluetooth 手機上建
立連接
1 在 Bluetooth 手機上進行
與本機之間的 Bluetooth
連接(HFP 或 HSP*)。
請參閱 Bluetooth 手機隨附的
說明書中,關於操作的詳細內
容。
辨識到的裝置清單會出現在
Bluetooth 手機的螢幕上。本機
會顯示為“DRC-BT15”。
當您使用的 Bluetooth 手機同
時具有 HFP(免持聽筒模式)
和 HSP (耳機模式)功能
時,請設至 HFP。
註
連接至與上次連接不同的
Bluetooth 手機時,請按照以上步
驟進行連接。
* 更多有關模式的詳細內容,請參
閱第 4 頁。
續下頁
17
CT
Page 44

B 經由操作本機與上次連接
的 Bluetooth 裝置建立連
接
1 按多功能按鈕。
指示燈(藍色和紅色)開始一
起閃爍,本機會執行連接約 5
秒鐘。
註
用本機聆聽音樂時,無法用多功能按鈕
建立 Bluetooth 連接。
若要撥打電話
1 請使用您手機上的按鈕來
撥打電話。
若本機上聽不見撥號音,請按
住多功能按鈕約 2 秒鐘。
訣竅
依 Bluetooth 手機不同而定,您可以用
以下方式撥打電話。請參閱您手機隨附
的說明書中,關於操作的詳細內容。
– 未在通話中時,您可以按多功能按鈕
來使用語音撥號功能。
– 您可以按住多功能按鈕約 2 秒鐘來
撥打最後一次撥出的號碼。
若要接聽來電
來電時,可從耳機上聽到鈴聲。
1 按本機上的多功能按鈕。
鈴聲會依您手機不同而變更如
下。
– 本機上設定的鈴聲
– 手機上設定的鈴聲
– 手機上專為 Bluetooth 連接設
定的鈴聲
註
若您按 Bluetooth 手機上的按鈕接聽來
電,部份 Bluetooth 手機可能優先使用
聽筒。 在此情況下,按住多功能按鈕
約 2 秒鐘或是在 Bluetooth 手機上操
作,變更設定為用本機通話。更多詳細
內容,請參閱 Bluetooth 手機隨附的說
明書。
18
CT
若要調整音量
上下推動控制桿,調整音量。
訣竅
• 未在通話中時,您無法調整音量。
• 通話和聆聽音樂的音量可以分別調
整。即使您在播放音樂時改變音量,
通話的音量也不會改變。
若要終止通話
您可以按本機上的多功能按鈕來
終止通話。
若要停止使用
1 用 Bluetooth 手機來終止
Bluetooth 連接。
2 按住 POWER 按鈕約 3 秒
鐘來關閉電源。
指示燈(藍色和紅色)會一起
亮起,並關閉本機。
Page 45
控制 Bluetooth 手機
– HFP、HSP
本機上的按鈕操作會依您手機不
同而有所不同。
HFP(免持聽筒模式)或 HSP
(耳機模式)是用在 Bluetooth 手
機上。請參閱您 Bluetooth 手機隨
附的使用說明書中,關於可支援
的 Bluetooth 模式或如何操作的內
容。
HFP(免持聽筒模式)
狀態 多功能按鈕
待機
語音撥號啟
動
撥出電話
來電
通話中
HSP(耳機模式)
狀態 多功能按鈕
待機
撥出電話
來電
通話中
短按
開始語音
撥號
取消語音
撥號
終止撥出
電話
接聽
終止通話
短按
–
終止撥出
電話
接聽
終止通話
1
*
1
*
1
*
3
*
長按
重撥最後撥
出的號碼
–
–
拒接
變更通話
裝置
長按
1
*
撥打
終止撥出
電話或變更
通話裝置為
2
*
耳機
–
變更通話
裝置為耳機
*1依 Bluetooth 手機不同而定,可能不
支援部分功能。請參閱手機隨附的
使用說明書。
2
*
依 Bluetooth 手機不同而定,可能有
所不同。
3
使用 Bluetooth 手機撥打電話時,可
*
能不支援部分功能。
19
CT
Page 46

播放音樂時撥打電話
播放音樂時,需要使用 HFP、HSP 或 A2DP 的 Bluetooth 連接才能
撥打電話。
例如,在 Bluetooth 相容的音樂播放機上聆聽音樂期間,使用 Bluetooth
手機撥打電話時,本機必須使用 HFP 或 HSP 連接至手機。
請依照以下列出的步驟,建立本機與使用中裝置間的
Bluetooth 連接。
1 請依照“撥打電話”(請參閱第 17 頁)中列出的步驟,
使用 HFP 或 HSP 建立本機與使用中的手機間的
Bluetooth 連接。
2 操作用來播放音樂之 Bluetooth 裝置(音樂播放機或手
機),以用 A2DP 建立與本機間的 Bluetooth 連接。
若要在播放音樂時撥打電話
1 播放音樂時按多功能按鈕
(第 19 頁),或是操作
Bluetooth 手機來撥打電
話。
若本機上聽不見撥號音,請按
住多功能按鈕約 2 秒鐘。
20
CT
若要在播放音樂時接聽電話
來電時音樂會暫停,並可從本機
聽見鈴聲。
1 按多功能按鈕開始通話。
結束通話後,按多功能按鈕。
本機會切換回音樂播放模式。
即使有來電仍無法聽見鈴聲
1 停止音樂播放。
2 鈴響時,按多功能按鈕開
始通話。
Page 47
額外資訊
廢棄本機
本機內建鋰離子充電電池。
為保護環境,請確定在廢棄本機前取出內建充電電池,並將電池作適
當的處理。
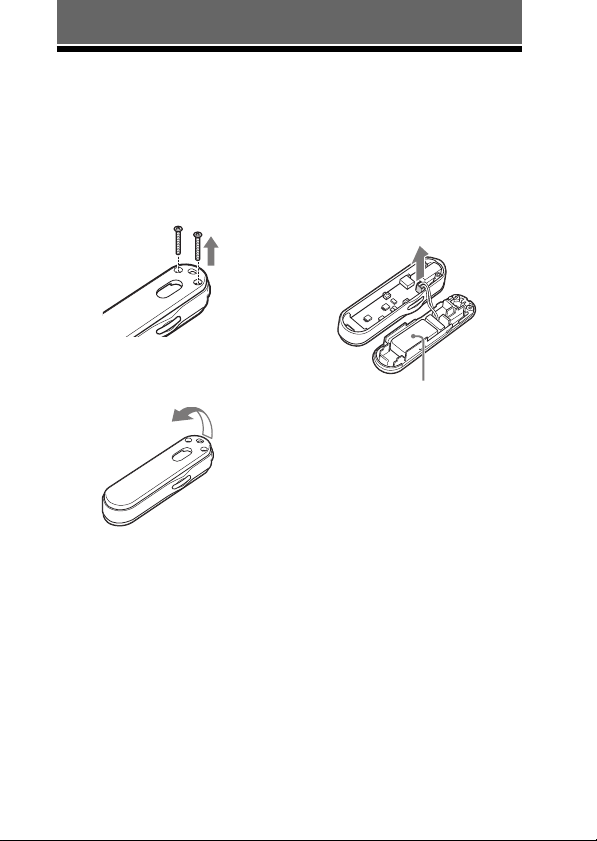
1 取下本機後面的螺絲
(2 個)。
2 抬起掛繩孔端以取出外
蓋。
3 拉出接頭。
丟棄充電電池,而不從外蓋中
取出。
充電電池
註
請勿取出外蓋裡面的充電電池,否則充
電電池可能損毀。
21
CT
Page 48
預防措施
關於 Bluetooth 通訊
• Bluetooth 無線技術可在 10 m 的範圍
內運作。
最大通訊範圍可能依障礙物(人體、
金屬、牆面等)或電磁環境不同而
定。
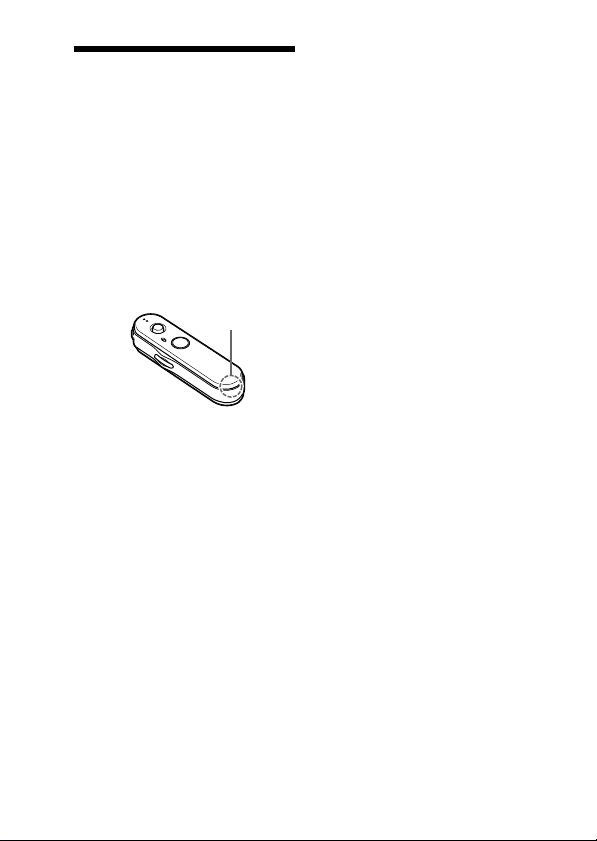
• 天線內建在裝置中,如圖中虛線所
示。將內建天線朝 Bluetooth 裝置方
向轉動可以增加 Bluetooth 通訊的敏
感度。
當相連設備的天線和本裝置之間存在
障礙物時,通信距離將縮短。
內建天線的位置
• 以下情況可能會影響 Bluetooth 通訊
的敏感度。
– 本機和 Bluetooth 裝置間有人體、
金屬或牆面等障礙物。
– 有無線區域網路裝置、無線電話或
微波爐等 2.4 GHz 頻率的裝置正在
本機附近使用。
• 因為 Bluetooth 裝置和無線區域網路
(IEEE802.11b/g)使用相同的頻
率,因此如果本機在有區域網路裝置
的附近使用,則可能會發生微波干擾
或造成通訊速度延遲、雜訊或無效連
接。在此情況下,請執行以下步驟。
– 請在距離無線區域網路裝置至少
10 m 的地方使用本機。
– 若要在距離無線區域網路裝置 10 m
內的地方使用本機,請關閉無線區
域網路裝置。
– 將本機和 Bluetooth 裝置安裝在盡
量靠近彼此的地方。
• 從 Bluetooth 裝置放射出的微波可能
會影響電子醫療裝置的操作。在以下
地點請關閉本機和其他 Bluetooth 裝
置,以免造成意外。
– 有易燃性瓦斯的地點,如醫院、火
車、飛機或加油站
– 靠近自動門或火警警鈴的地方
• 本機支援符合 Bluetooth 標準的安全
功能,以便在使用 Bluetooth 無線技
術時提供安全的連接,但依設定不同
而定,安全性可能會不足。使用
Bluetooth 無線技術進行通訊時,請
務必小心。
• 對於 Bluetooth 通訊期間的資訊外
洩,本公司不負有任何責任。
• 不保證與所有 Bluetooth 裝置均能連
接。
– 有 Bluetooth 功能的裝置必須符合
由 Bluetooth SIG, Inc. 指定的
Bluetooth 標準並取得認證。
– 即使連接的裝置符合上述的
Bluetooth 標準,依裝置功能或規格
不同而定,部分裝置仍可能無法正
確連接或運作。
– 使用手機的免持聽筒通話時,依裝
置或通訊環境不同而定,可能會產
生雜訊。
• 依要連接的裝置不同而定,可能需要
一些時間才能開始通訊。
22
CT
Page 49

關於隨附的交流電源轉接器
• 使用本機隨附的交流電源轉接器。請
勿使用任何其他的交流電源轉接器,
以免可能引起本機故障。
插頭的極性
• 若您打算長時間不使用本機,請將交
流電源轉接器從交流電源插座上拔
除。若要將交流電源轉接器從交流電
源插座上拔除,請抓住轉接器插頭本
身,切勿拉扯電線。
其它資訊
• 請勿將本機放置在暴露於濕氣、灰
塵、油煙或蒸汽,受陽光直射的地方
或等待紅綠燈的車內。這樣可能會引
起故障。
• 切勿在粉碎機或機械設備等掛繩可能
受到阻礙的地方使用掛繩。
• 依無線電波情況和裝備正在使用的地
點不同而定,Bluetooth 裝置可能無
法在手機上作用。
• 若您在使用 Bluetooth 裝置後感到不
適,請立即停止使用 Bluetooth 裝
置。萬一問題持續,請聯絡附近的
Sony 經銷商。
• 使用本機時音量很大可能會影響您的
聽力。為確保交通安全,請勿在開車
或騎腳踏車時使用本機。
• 請勿將重物放置在本機上或施加壓
力,因為長時間存放時可能會造成本
機變形。
• 若您有任何關於本機的疑問或問題未
在本說明書中涉及,請聯絡附近的
Sony 經銷商。
23
CT
Page 50
疑難排除
若您在使用本機時遇到任何問題,請使用下面的核對清單並請參閱我
們網站上的產品支援資訊。
萬一問題持續,請聯絡附近的 Sony 經銷商。
一般問題
本機未能開啟。
, 為本機的電池充電。
, 本機在充電時未能開啟。將本機從
電池充電座中取出,然後開啟本
機。
無法進行配對。
, 讓本機與 Bluetooth 裝置更靠近彼
此。
無法建立 Bluetooth 連接。
, 檢查本機是否已開啟。
, 檢查 Bluetooth 連接裝置以及
Bluetooth 功能是否均已開啟。
, 與 Bluetooth 裝置間的連接不能記
憶在本機上。配對完成後,立即在
Bluetooth 裝置上建立到本機間的
Bluetooth 連接。
, 本機或 Bluetooth 連接裝置在睡眠
模式下。
, Bluetooth 連接已終止。重新建立
Bluetooth 連接(聆聽音樂時:請參
閱第 15 頁,通話時:請參閱第 17
頁)。
聲音失真
, 請確定本機未受到無線區域網路或
微波爐等其他 2.4 GHz 的無線裝置
干擾。
24
CT
通訊距離過短。(聲音跳
過。)
, 若有產生電磁輻射的裝置如無線區
域網路、其他 Bluetooth 裝置或微
波爐等在附近,請遠離該類輻射
源。
, 請將本機天線(第 22 頁)對準
Bluetooth 裝置。請確定沒有障礙物
阻擋通訊。
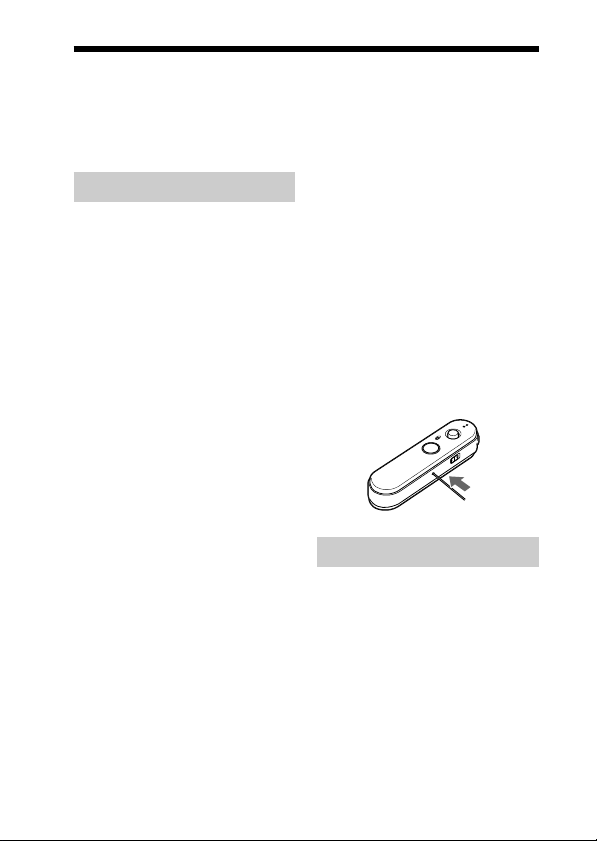
本機無法正確運作。
, 重設本機。配對資訊不會因此操作
而被刪除。
將小針等物品插入孔內,並向內推
直到有按下按鍵的感覺為止。
聆聽音樂時
無聲音
, 檢查本機和 Bluetooth 裝置是否均
已開啟。
, 本機和 Bluetooth 裝置之間未建立
A2DP Bluetooth
A2DP Bluetooth
, 檢查音樂是否正由 Bluetooth 裝置
中播放。
, 檢查本機音量是否設至太低。
, 若有必要,請調高連接裝置的音
量。
, 重新配對本機和 Bluetooth 裝置
(第 10 頁)。
連接。請建立
連接(第 15 頁)。
Page 51

低音量
, 調高本機音量。
, 若有必要,請調高連接裝置的音
量。
聲音品質不良
, Bluetooth 連接設定為 HSP (耳機
模式)時,請將 Bluetooth 連接切
換至 A2DP(進階音訊發送模
式)。
無法透過 Bluetooth 連接將
Bluetooth 裝置連接到本裝
置。
, Bluetooth 裝置不具有 SCMS-T 內
容保護功能*。當本裝置關閉時,
按住 POWER 按鈕和 Nx 約 7 秒
鐘關閉 SCMS-T 保護功能。指示燈
(藍色)閃爍一次。
* SCMS-T 內容保護法是一種對採
用 Bluetooth 無線技術傳送的內
容進行保護的方法。本裝置可以
接收用此法保護的內容。再次按
住 POWER 按鈕和 Nx 約 7 秒
鐘在本裝置上重新啟動 SCMS-T
內容保護功能。指示燈(藍色)
閃爍兩次。
播放時經常跳音。
, 本機的接收情況可能由於 Bluetooth
裝置傳送的音樂的位元率設定和本
機的使用環境不匹配而變得不穩
1
定。*
操作 Bluetooth 裝置,終止 A2DP
Bluetooth 連接。當本機開啟時,按
住 Nx 約 7 秒鐘降低可接收位元
率的設定。*
*1位元率是用來表示資料每秒傳送
量的數值。通常,位元率越高,
聲音品質越好。本機可以接收高
位元率音樂,但是可能會因為使
用環境而出現跳音。
*2當完成位元率設定時,指示燈
(藍色)閃爍一次。根據使用環
境,以上操作可能無法減少跳
音。若要重設為原始設定,再次
按住 Nx 約 7 秒鐘。指示燈
(藍色)閃爍兩次。
2
撥打電話時
聽不見接聽者的聲音。
, 檢查本機和 Bluetooth 手機是否均
已開啟。
, 檢查本機和 Bluetooth 手機間的連
接。重新建立 Bluetooth 連接
(HFP 或 HSP)(第 17 頁)。
, 檢查 Bluetooth 手機的輸出對象是
否已設定為本機。
, 檢查本機音量是否設至太低。
, 如果需要,可在所連接的 Bluetooth
手機上調高音量。
, 若您正使用本機聆聽音樂,則停止
播放,按多功能按鈕開始通話。
接聽者的音量太低
, 調高本機音量。
, 如果需要,可在所連接的 Bluetooth
手機上調高音量。
25
CT
Page 52

初始化本機
您可以重設本機至預設設定(例
如音量設定)並刪除所有的配對
資訊。
1 若本機已開啟,按住
POWER 按鈕約 3 秒鐘以
關閉本機。
2 同時按住 POWER 按鈕和
多功能按鈕約 7 秒鐘。
指示燈(藍色和紅色)會一起
閃爍四次,且本機會重設至預
設設定。所有配對資訊已刪
除。
26
CT
Page 53

規格
一般資訊
通訊系統
Bluetooth 規格版本 2.0 + EDR
(Enhanced Data Rate)
輸出
Bluetooth 規格
最大通訊範圍
直視距離約 10 m 內
頻寬
2.4 GHz
2.4835 GHz
模組方式
FHSS
相容的 Bluetooth 模式
A2DP(進階音訊發送模式)
AVRCP(影音遙控模式)
HSP(耳機模式)
HFP(免持聽筒模式)
支援的編碼器
SBC
支援的內容保護法
SCMS-T
傳輸範圍 (A2DP)
20 – 20000 Hz (採樣頻率 44.1 kHz)
隨附配件
交流電源轉接器(1)
電池充電座(1)
防摩便攜(1)
掛繩(1)
使用說明書 (本手冊)(1)
1
*
實際範圍將會依裝置間的障礙物,
微波爐周圍的磁場,靜電,接收敏
感度,天線效能,操作系統,軟體
應用程式等因素而有所不同。
2
Bluetooth 標準模式代表裝置間的
*
Bluetooth 通訊。
3
編碼器:音訊壓縮和轉換格式
*
4
次波段編碼器
*
4
*
波段(
、MP3
Power Class 2
2.4000 GHz –
)
3
*
1
*
2
*
無線音訊接收器
電源
DC 3.7 V:內建鋰電充電池
尺寸(寬/高/深)(不包含突出零部件
與控制裝置)
約 16.8 × 68.5 × 15.5 mm
質量(不包括配件)
約 15 g
耳機輸出
輸出插孔
立體聲迷你插孔
最大輸出
20 mW + 20 mW (16 Ω)
麥克風
類型
駐極體電容式
方向特性
全向
有效頻率範圍
100 – 4000 Hz
操作溫度
0 °C 至 45 °C
設計和規格若有變更,恕不另行通知。
27
CT
Page 54

Page 55

Page 56

Printed in Malaysia
(1)
 Loading...