

Page 1
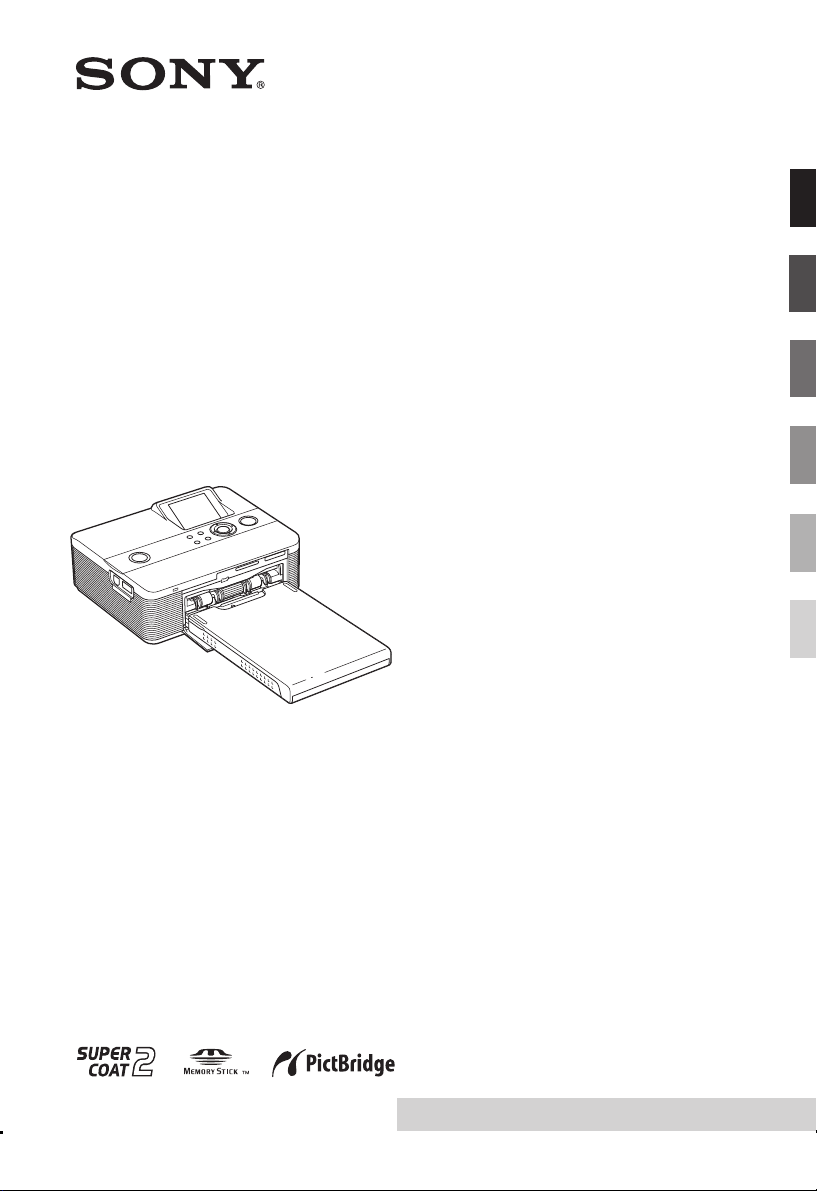
Digital Photo
3-197-729-11 (1)
Before you begin
Making various printing
Printer
DPP-FP60/FP60BT
Printing from a PictBridge
camera or external device
Printing from a PC
Troubleshooting
Additional information
Operating Instructions
Before operating this printer, please read
this manual thoroughly and retain it for
future reference.
2007 Sony Corporation
Please read the supplied "Read This First".
Page 2
WARNING
To reduce fire or shock hazard, do not
expose the unit to rain or moisture.
For the Customer in Europe
This product has been tested and found compliant
with the limits set out in the EMC Directive for
using connection cables shorter than 3 meters (9.8
feet).
Attention
The electromagnetic fields at the specific
frequencies may influence the picture of this digital
photo printer.
Notice
If static electricity or electromagnetism causes data
transfer to discontinue midway (fail), restart the
application or disconnect and connect the
communication cable (USB, etc) again.
Disposal of Old Electrical & Electronic
Equipment (Applicable in the European
Union and other European countries
with separate collection systems)
This symbol on the
product or on its
packaging indicates that
this product shall not be
treated as household
waste. Instead it shall be
handed over to the
applicable collection
point for the recycling of
electrical and
electronic equipment. By
ensuring this product is
disposed of correctly,
you will help prevent
potential negative
environment and human health, which could
otherwise be caused by inappropriate waste
handling of this product. The recycling of materials
will help to conserve natural resources. For more
detailed information about recycling of this
product, please contact your local Civic Office, your
household waste disposal service or the shop where
you purchased the product.
consequences for the
NOTICE FOR CUSTOMERS IN THE
UNITED KINGDOM
A moulded plug complying with BS 1363 is fitted to this
equipment for your safety and convenience.
Should the fuse in the plug supplied need to be replaced,
a fuse of the same rating as the supplied one and
approved by ASTA or BSI to BS 1362, (i.e.marked with
or mark) must be used.
If the plug supplied with this equipment has a detachable
fuse cover, be sure to attach the fuse cover after you
change the fuse. Never use the plug without the fuse
cover. If you should lose the fuse cover, please contact
your nearest Sony service station.
2
GB
Page 3
Duplication, edition, or printing of a CD, TV
programs, copyrighted materials such as
pictures or publications, or any other materials
except for your own recording or creation is
limited to private or domestic use only. Unless
you hold copyright or have permission of
copyright holders for the materials to be
duplicated, use of those materials beyond this
limit may infringe the provisions of the
copyright law and be subject to the copyright
holder’s claim for damages.
When using photo images with this printer, pay
special attention not to infringe the provisions of
the copyright law. Any unauthorized use or
modification of others’ portrait may also infringe
their rights.
For some demonstrations, performances, or
exhibits, photography may be forbidden.
Backup recommendations
To avoid potential risk of data loss caused by
accidental operation or malfunction of the
printer, we recommend that you save a
backup copy of your data.
Information
IN NO EVENT SHALL SELLER BE LIABLE
FOR ANY DIRECT, INCIDENTAL OR
CONSEQUENTIAL DAMAGES OF ANY
NATURE, OR LOSSES OR EXPENSES
RESULTING FROM ANY DEFECTIVE
PRODUCT OR THE USE OF ANY
PRODUCT.
Sony shall assume no responsibility for any
accidental or consequential damages or loss
of the recording contents which may be
caused by use or malfunction of the printer or
memory card.
Notes on LCD screen
•The displayed image on the screen is not
identical in picture quality and colors with the
printed image because phosphor methods or
profiles differ. Please regard the displayed
image as just a reference.
•Do not press against the LCD screen. The
screen may be discolored and that may cause a
malfunction.
•Exposing the LCD screen to direct sunlight for
long periods may cause malfunctions.
•The LCD screen is manufactured using
extremely high-precision technology so over
99.99% of the pixels are operational for effective
use. However, there may be some tiny black
points and/or bright points (white, red, blue or
green in color) that constantly appear on the
LCD screen. These points are normal in the
manufacturing process and do not affect the
printing in any way.
•Images may trail across on the LCD screen in a
cold location. This is not a malfunction.
On trademarks and copyrights
• Cyber-shot is the trademark of Sony Corporation.
•“Memory Stick“, , “Memory Stick
PRO”, , “Memory Stick
Duo”, , “Memory Stick
PRO Duo” ,
“MagicGate“, and , “Memory
Stick Micro”, “M2” are trademarks of Sony
Corporation.
• The BLUETOOTH™, trademarks are owned by
Bluetooth SIG, Inc., U.S.A. and licensed to Sony
Corporation.
•Microsoft, Windows, Windows Vista and
DirectX are either registered trademarks or
trademarks of Microsoft Corporation in the
United States and/or other countries.
•IBM and PC/AT are registered trademarks of
International Business Machines Corporation.
•Intel and Pentium are the registered trademarks
or trademarks of Intel Corporation.
•All other companies and product names
mentioned herein may be the trademarks or
registered trademarks of their respective
companies. Furthermore, “™” and “®” are
not mentioned in each case in this manual.
•The raster process of true type fonts is based on
the FreeType Team software.
•This software is based in part on the work of the
independent JPEG Group.
•Libtiff
Copyright © 1988-1997 Sam Leffler
Copyright © 1991-1997 Silicon Graphics, Inc.
Permission to use, copy, modify, distribute, and
sell this software and its documentation for any
purpose is hereby granted without fee.
• Zlib
© 1995- 2002 Jean-loup Gailly and Mark Adler
GB
3
Page 4

Notice for users
Program © 2007 Sony Corporation
Documentation ©2007 Sony Corporation
A
ll rights reserved. This manual or the software
described herein, in whole or in part, may not be
reproduced, translated or reduced to any machine
readable form without prior written approval from
Sony Corporation.
IN NO EVENT SHALL SONY CORPORATION BE
LIABLE FOR ANY INCIDENTAL,
CONSEQUENTIAL OR SPECIAL DAMAGES,
WHETHER BASED ON TORT, CONTACT, OR
OTHERWISE, ARISING OUT OF OR IN
CONNECTION WITH THIS MANUAL, THE
SOFTWARE OR OTHER INFORMATION
CONTAINED HEREIN OR THE USE THEREOF.
By breaking the seal of the envelope of the CDROM package, you accept all the terms and
conditions of this agreement. If you do not accept
these terms and conditions, please return this disk
envelope unopened, along with the rest of the
package, immediately to the dealer where you
obtained it.
Sony Corporation reserves the right to make any
modification to this manual or the information
contained herein at any time without notice.
The software described herein may also be
governed by the terms of a separate user license
agreement.
Any design data such as sample pictures provided
in this software cannot be modified or duplicated
except for the purpose of personal use. Any
unauthorized duplication of this software is
prohibited under copyright law.
Please note that unauthorized duplication or
modification of others’ portraits or copyrighted
work could infringe the rights reserved by right
holders.
You may be referred to the supplied “Read
This First” when there are detailed
explanations in the leaflet.
The DPP-FP60 and DPP-FP60BT are identical
product, except that the DPP-FP60BT is
supplied with the Sony DPPA-BT1 Bluetooth
USB adaptor.
Table of contents
Before you begin
Identifying the parts ............................... 6
LCD screen display.................................. 7
An image preview ..................................... 7
Image list .................................................. 8
Making various printing
Making easy printing (Index/DPOF/All)... 9
Editing an image .................................. 10
Displaying the Edit menu ......................... 10
Enlarging and reducing an image size ......11
Moving an image .................................... 11
Rotating an image................................... 12
Adjusting an image ................................. 12
Adding a special filter to an image .......... 13
Correcting the red-eye phenomenon ........ 13
Printing an edited image ......................... 14
Saving an edited image ........................... 14
Making a Creative Print ........................ 15
Displaying the Creative Print menu .......... 15
Making layout prints ............................... 16
Making a calendar .................................. 17
Viewing a slideshow ............................. 19
Searching for an image......................... 20
Filing images ........................................ 21
Deleting selected images ......................... 21
Formatting a “Memory Stick” .................. 22
Changing the print settings
(Print setup) .................................... 23
Changing the display and printer
preferences
(Display/Printer setup) .................... 26
4
GB
Page 5

Printing from a PictBridge
camera or external device
Printing from the PictBridge
digital camera................................. 28
Printing from a Bluetooth-compliant
device ............................................. 29
Compatible profiles for Bluetooth
communication ....................................... 29
Printing procedures ................................. 29
Printing from an external device........... 31
Printing from a PC
Installing the software.......................... 32
System requirements ............................... 32
Installing the printer driver ......................33
Installing the Picture Motion Browser ...... 35
Printing photos from the
Picture Motion Browser .................. 37
Printing from a commercially-available
application software ................................ 42
Troubleshooting
Additional information
Precautions ........................................... 63
On safety ................................................ 63
On installation ........................................ 63
On cleaning ............................................ 63
On restrictions on duplication .................. 64
On color print packs ................................ 64
About the Memory Cards ..................... 65
About the “Memory Stick” ...................... 65
About the SD card ...................................67
Specifications ....................................... 68
Printing range ......................................... 69
Glossary................................................ 70
Index .................................................... 71
If trouble occurs.................................... 43
If an error message appears ................. 58
If paper jams ........................................ 61
Cleaning the inside of the printer ......... 61
5
GB
Page 6
Before you begin
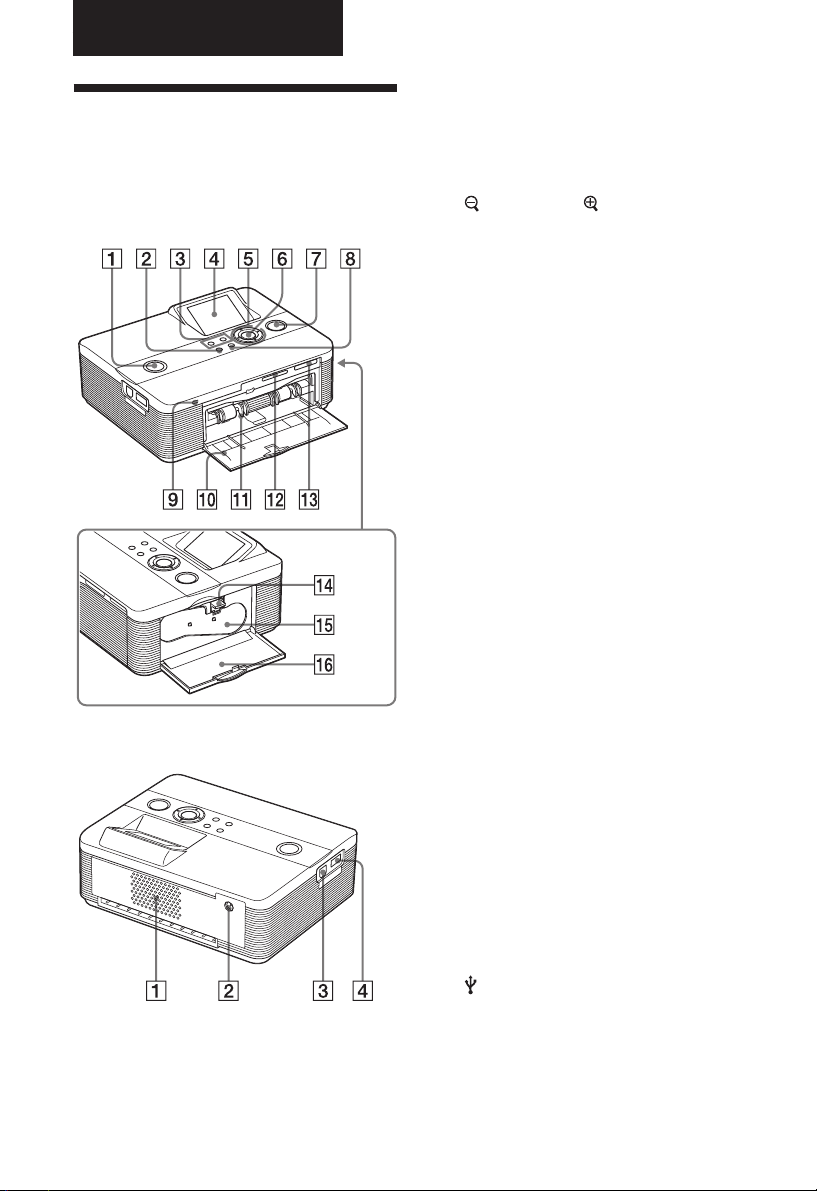
Identifying the parts
For details, see the pages indicated in the
parentheses.
Printer front panel
1 1 (on/standby) switch/indicator
(.Read This First)
2 MENU button
3
(zoom out)/ (zoom in) buttons
(page 8)
4 LCD screen
5 Direction (f/F/g/G) buttons
6 ENTER button
7 PRINT button/indicator
(.Read This First)
8 CANCEL button
9 Access indicator
(.Read This First)
0 Paper tray compartment door
(.Read This First)
qa Paper tray compartment
(.Read This First)
qs SD CARD slot (.Read This First)
(page 67)
qd MEMORY STICK PRO STD/DUO slot
(.Read This First) (page 65)
6
Printer right side panel
qf Ink ribbon eject lever
(.Read This First)
qg Ink ribbon (.Read This First)
qh Ink ribbon compartment door
(.Read This First)
Printer rear panel
1 Ventilation holes
2 DC IN 24V jack (.Read This
First)
Printer left side panel
3 USB connector (page 31)
4 PictBridge connector
(pages 28 to 31)
GB
Page 7
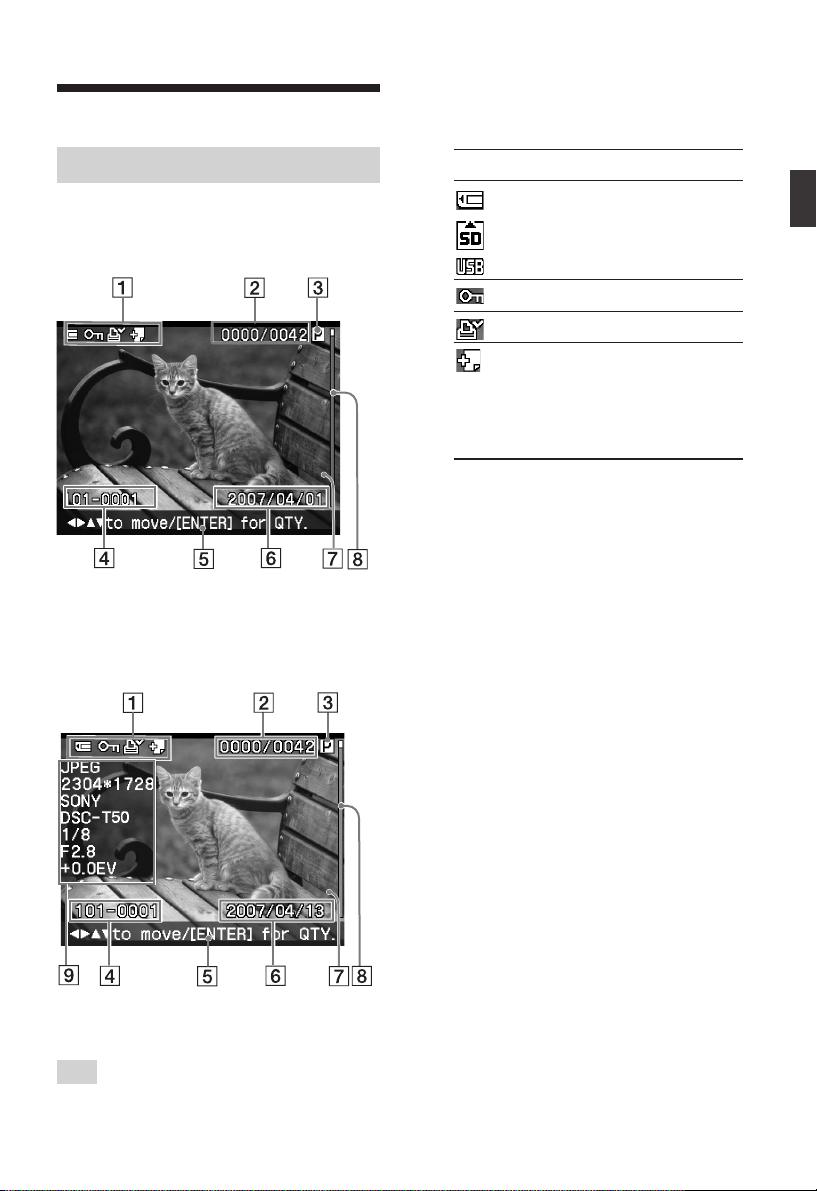
LCD screen display
An image preview
When “Image Data Display” of the
“Display/Printer setup” menu is “Off”
When “Image Data Display” of the “Display/
Printer setup” menu is “On”
Tip
To display a different image, press g/G/f/F .
1 Input/setting indications
Input indications and settings
information for an image are displayed.
Icons Meaning
“Memory Stick” or
“Memory Stick Duo” input
SD Card input
External Device input
Protect indication
DPOF preset indication
Associated file indication
(Displayed when there is
an associated file such as a
motion file or a miniature
e-mail image file.)
2 Number of the selected images/
Total number of image
3 Ink ribbon indication
(P: P size/C: Cleaning cassette)
4 Image number (folder- file
number)*
(*DCF-compatible files only. In case of
other file formats, only part of file name
will be displayed.)
5 Operation tips 6 Saved date (year/month/day) 7 Print quantity
While the image is being selected, press
ENTER to display the print quantity.
You can set the print quantity up to 20.
• To increase the print quantity one
by one, press f repeatedly.
• To reduce the print quantity one by
one, press F briefly repeatedly.
• To reset the print quantity to “0”
immediately, press F for more than
two seconds.
8 Scroll bar
Indicates the position of the image
among the total number of images.
9 Detailed Image Data Display
Before you begin
7
GB
Page 8
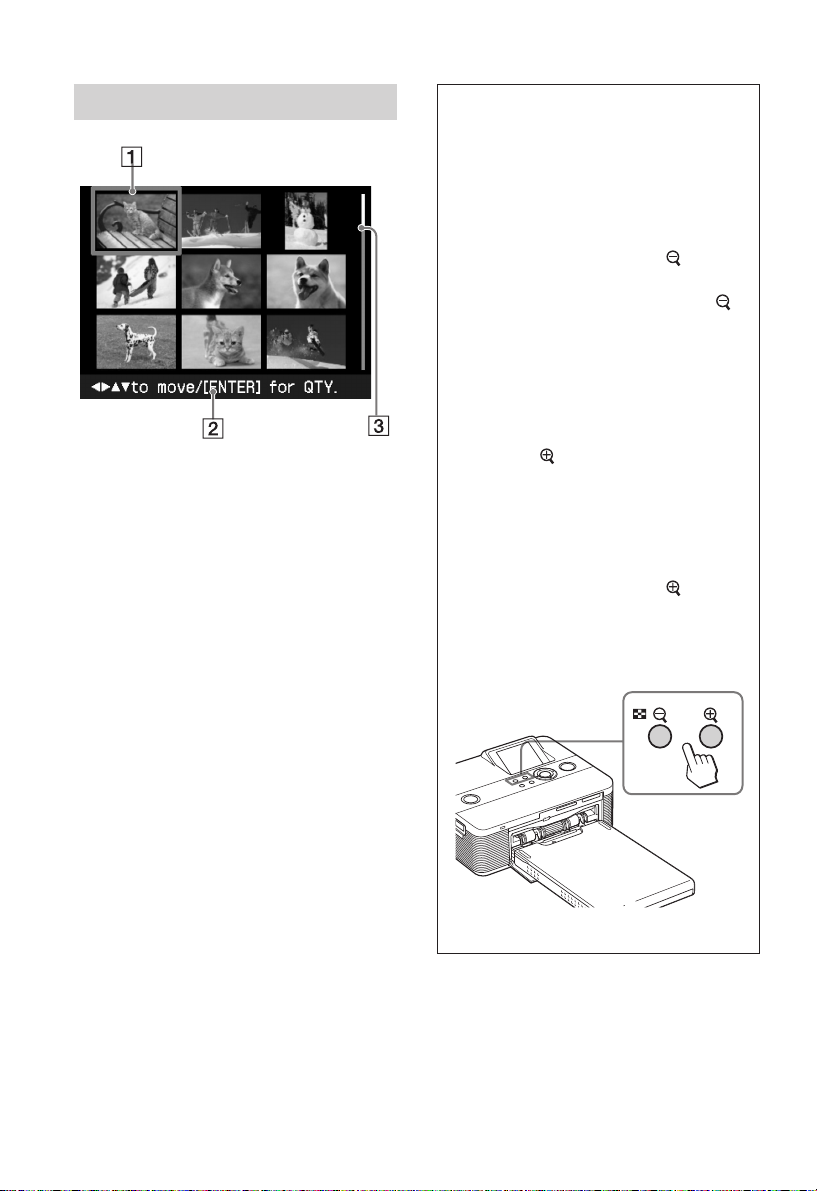
Image list
1 Cursor (orange frame)
You can move the cursor by pressing g/
G/f/F.
2 Operation tips
3 Scroll bar
Indicates the position of the image
among the total number of images.
Switching the screen display
between an image preview
and image list
You can switch an image preview and
the image list as follows:
• To display the image list
In an image preview, press
out).
When an image is enlarged, press
repeatedly. An image is reduced up
to the original scale and then the
image list is displayed.
• To display an image preview
In the image list, press g/G/f/F to
move the cursor to the desired image
and press
changes from the image list to an
image preview.
To display another image preview,
press g/G/f/F.
• To enlarge an image preview
In an image preview, press
in) repeatedly. The image is enlarged
in 5 steps up to the 5 times the
original scale: x1, x2, x3, x4, and x5
(zoom in). The display
(zoom
(zoom
8
GB
Page 9
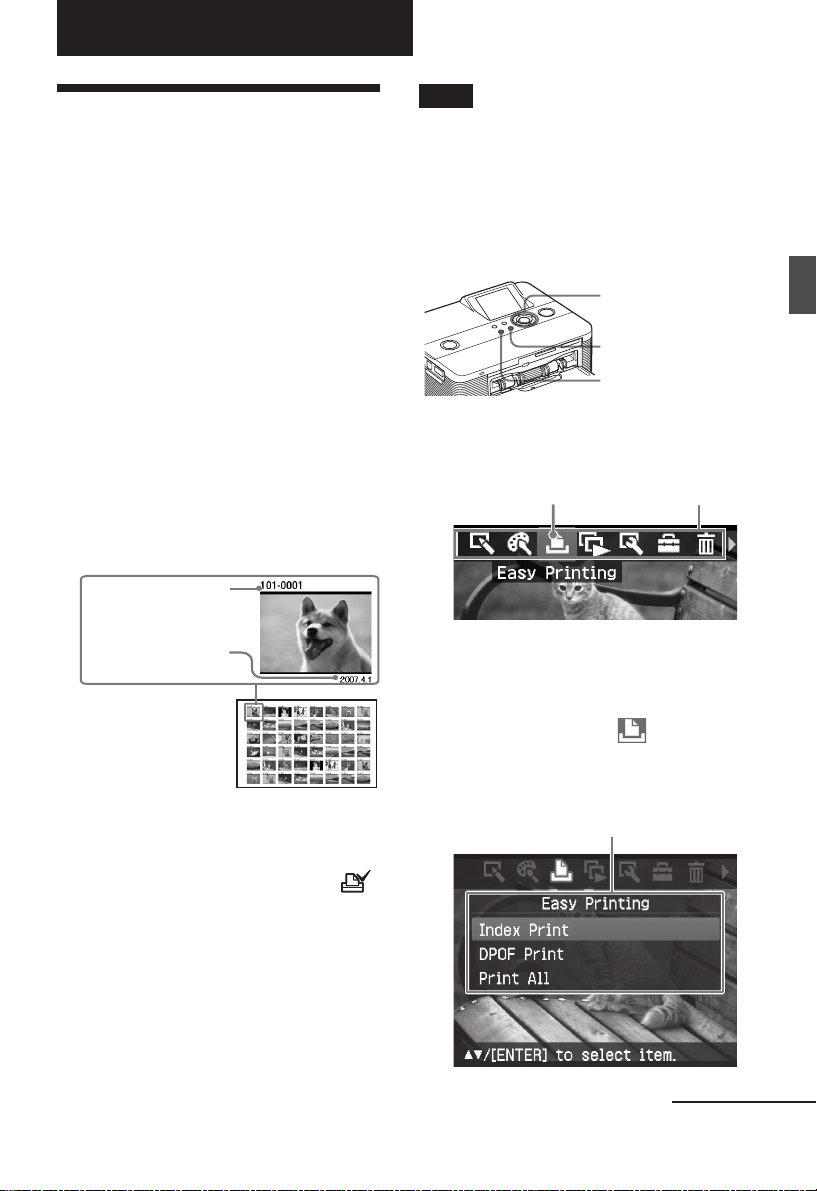
Making various printing
Making easy printing (Index/DPOF/All)
The Easy Printing menu allows you to
print multiple images stored on a memory
card or an external device at one time.
The printer provides the following three
easy printing methods:
• Index printing
You can print a list (index) of all the
images contained in a memory card or
an external device, which allows you to
check the contents of the selected media
easily.
The number of split panes on a sheet
will be calculated automatically. Images
are printed with their corresponding
image numbers (folder number-file
number).
Image numbers
Notes
• For how to preset images for printing, see the
manual of your digital camera.
• Some types of digital camera do not support
the DPOF function, or the printer may not
support some of the functions of the digital
camera.
Buttons to be used in easy printing
g/G/f/F/ENTER
CANCEL
MENU
Press MENU on the printer.
1
The menu bar is displayed.
Easy Printing icon Menu bar
Making various printing
Date (If Date Print
is on.)
• DPOF preset image printing
The images which are DPOF (Digital
Print Order Format) preset for printing
are displayed with the print mark (
in an image preveiw. You can print
those images at one time. The images
are printed with the preset number of
copies in the order they were displayed.
• All images printing
You can print all the images stored in a
memory card or an external device at
one time.
To exit the menu mode
Press MENU again. The previous
window is displayed.
Press g/G to select (Easy
2
Printing) and then press ENTER.
The Easy Printing menu is displayed.
Easy Printing menu
)
Continued
9
GB
Page 10
Press f/F to select “Index Print”,
3
“DPOF Print”, or “Print All” and
then press ENTER.
The confirmation dialog box is
displayed.
Note
If there are no DPOF preset images when
you selected “DPOF Print,” an error
message will be displayed.
Press g/G to select “Yes” to start
4
printing or “No” to cancel
printing, and then press ENTER.
When you select “Yes,” printing starts.
During printing, the PRINT indicator
flashes and the printing process is
displayed.
To stop printing
Press CANCEL. When you are
printing multiple copies, the next
printing after the one currently
printing will be canceled.
When printing is completed, the print
paper automatically emerges on the
paper tray.
Remove the print paper from the
5
paper tray.
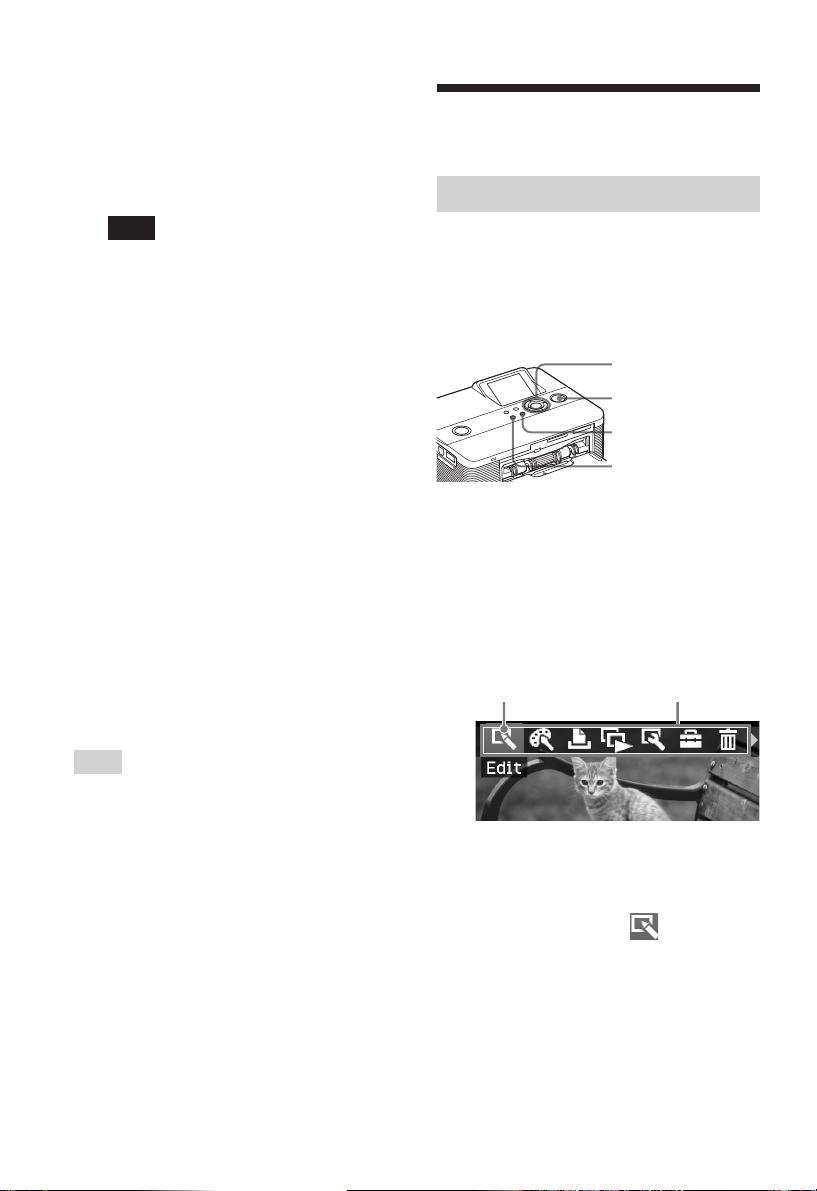
Editing an image
Displaying the Edit menu
You can display the Edit menu and edit or
add an effect to an image. You can print or
save an image being previewed.
Buttons to be used in the Edit menu
g/G/f/F/ENTER
PRINT
CANCEL
MENU
Display the image that you want
1
to edit.
Display the image in the image
preview window or move the Cursor
to the desired image in the image list.
Press MENU on the printer.
2
The menu bar is displayed.
Edit menu icon Menu bar
Tips
• Even if the remaining volume of the ink
ribbon is shorter than the print quantity, you
can proceed with printing. If the ink ribbon
runs out in the middle of printing and a
message appears, follow the displayed
instructions to replace the ink ribbon (see
“Read This First”).
• When the “Date Print” item of the Print setup
menu is set to “On”, the date the image was
shot or saved is printed (page 25).
GB
10
To exit the menu mode
Press MENU again. The previous
window is displayed.
Press g/G to select (Edit) and
3
then press ENTER.
The Edit menu is displayed.
Page 11
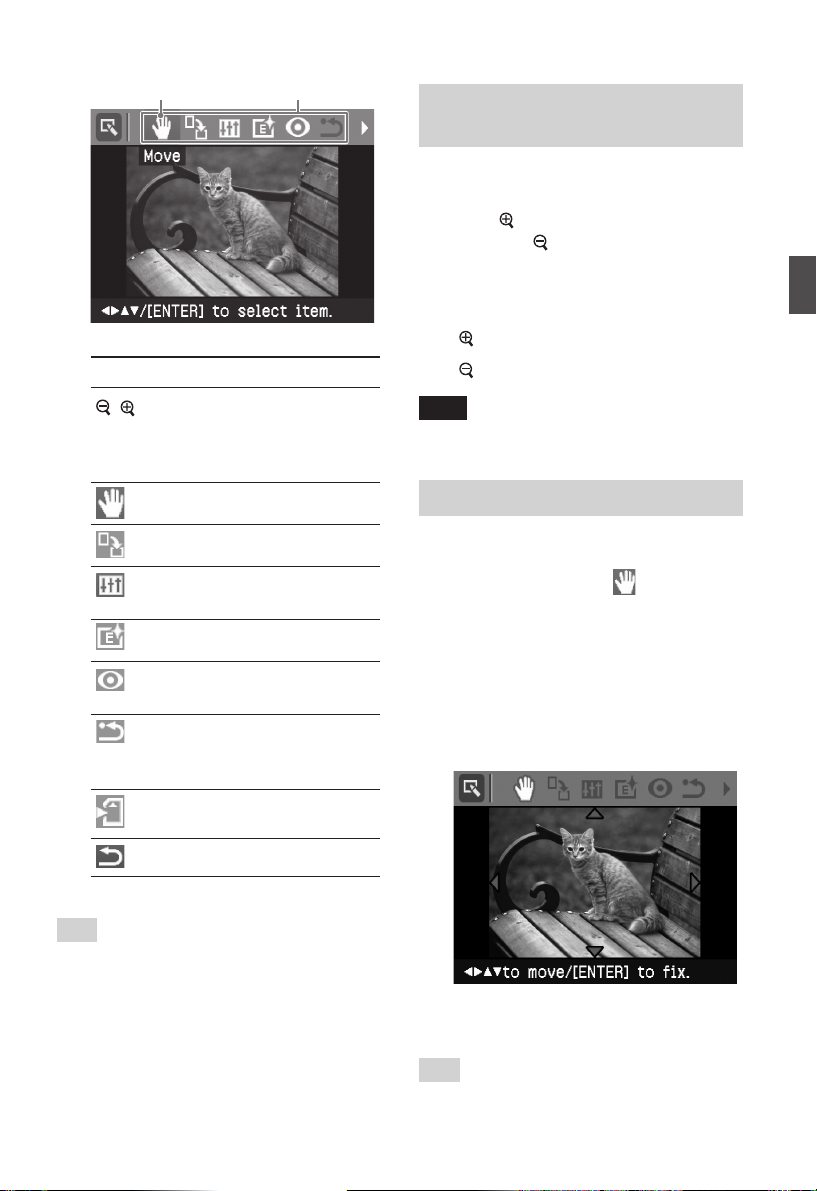
Cursor Edit menu
Items Procedures
/ Increases or reduces the
size of an image by
pressing the buttons on the
printer.
Moves an image.
Enlarging and reducing an image size
Display the Edit menu.
1
Press (zoom in) to enlarge an
2
image or
the size of it.
Each time you press the button, the
image becomes larger or smaller:
: up to 200%
: up to 60%
Note
The picture quality of an enlarged image may be
deteriorated depending on its size.
(zoom out) to reduce
Moving an image
Making various printing
Rotates an image.
Adjusts the picture quality
of an image.
Adds an filter to an image.
Corrects the red-eye
phenomenon.
Undoes the editing just
done and resets the image
to the status before editing.
Saves the edited image.
Exits the Edit menu.
Tip
You can set part of the Print setup menu items
from MENU while editing an image.
Display the Edit menu.
1
Press g/G to select (Move) and
2
then press ENTER.
The g/G/f/F appears on the right/
left/above/down the image and you
can move the image.
Move the image with g/G/f/F.
3
The image moves to the selected
direction.
Press ENTER.
4
The image is fixed to the position.
Tip
To print the image previewed, press PRINT
(page 14).
11
GB
Page 12
Rotating an image
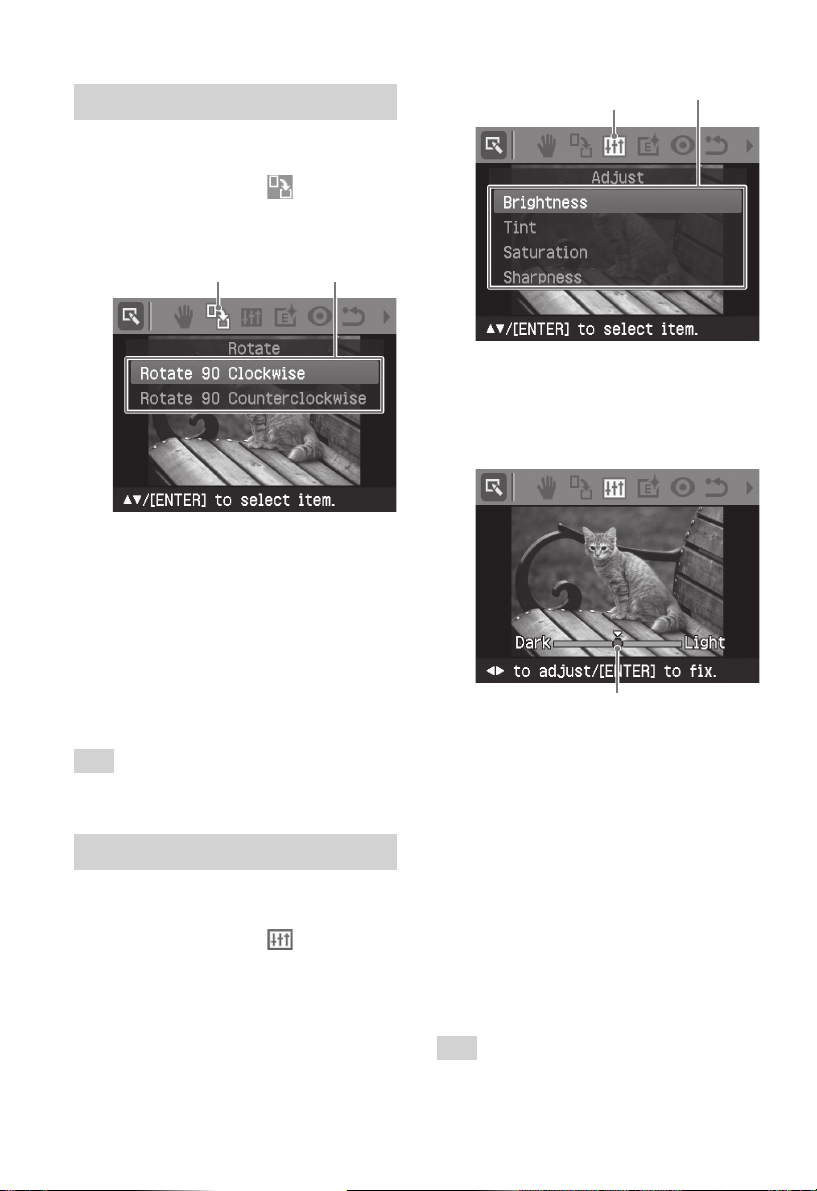
Display the Edit menu (page 11).
1
Press g/G to select (Rotate)
2
and then press ENTER.
The Rotate menu is displayed.
Rotate icon Rotate menu
Press f/F to select the direction
3
to rotate the image and then
press ENTER.
• Rotate 90° Clockwise: Each time
you press ENTER, the image rotates
90° clockwise.
• Rotate 90° Counterclockwise:
Each time you press ENTER, the
image rotates 90° counterclockwise.
Tip
To print the image previewed, press PRINT
(page 14).
Adjusting an image
Display the Edit menu (page 11).
1
Press g/G to select (Adjust)
2
and then press ENTER.
The Adjust menu is displayed.
Adjust icon Adjust menu
Press f/F to select the desired
3
adjustment tool and press ENTER.
The adjustment slider appears.
When “Brightness” is selected.
Adjustment slider
Move the slider to the desired
4
position to adjust the level.
• Brightness: Press G to brighten the
picture or g to darken it.
• Tint: Press G to make the picture
bluish or g to make it reddish.
• Saturation: Press G to deepen the
colors or g to lighten the colors.
• Sharpness: Press G to sharpen the
outlines or g to soften them.
Press ENTER.
5
The adjustment takes effect.
12
Tip
To print the image previewed, press PRINT
(page 14).
GB
Page 13
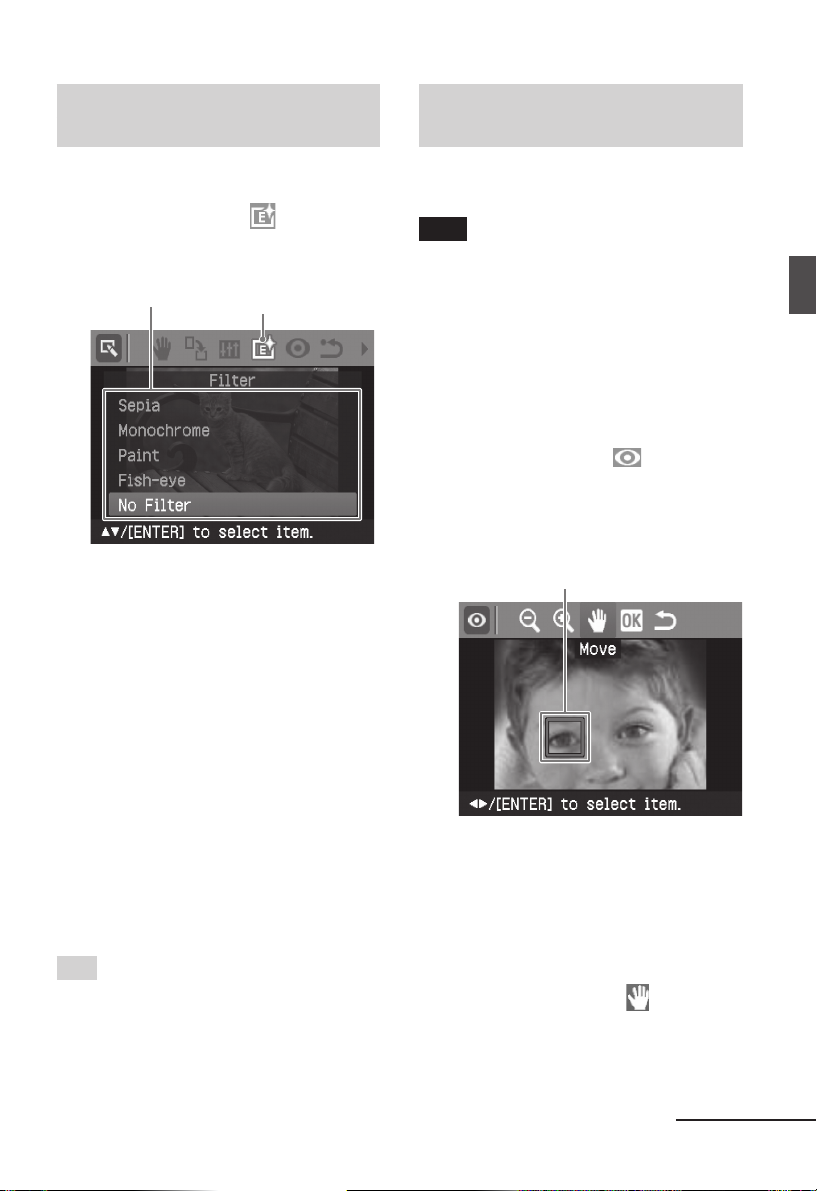
Adding a special filter to an image
Correcting the red-eye phenomenon
Display the Edit menu (page 11).
1
Press g/G to select (Filter) and
2
then press ENTER.
The Filter menu is displayed.
Filter menu Filter icon
Press f/F to select the desired
3
filter you want to add to the
image.
• Sepia: Changes the image like an
old photograph with faded colors.
• Monochrome: Changes the image
into a black and white picture.
• Paint: Makes the image look like a
painted picture.
• Fish-eye: Makes the image look like
a photo taken with a fish-eye lens.
• No Filter: No special filter on the
image (default setting).
Press ENTER.
4
The filter takes effect.
Tip
To print the image previewed, press PRINT
(page 14).
You can correct the red-eye phenomenon
of a subject shot using a flash.
Note
If you perform additional editing, such as
enlarging, reducing the image size,
rotating or moving an image, after the redeye correction adjustment, the red-eye
correction may not take effect. Perform
the red-eye correction after these editorial
operations.
Display the Edit menu (page 11).
1
Press g/G to select (Red-eye
2
correction) and then press ENTER.
The adjustment frame appears on the
image, which indicates the range for
red-eye correction adjustment.
Adjustment frame
Adjust the position and size of the
3
adjustment frame.
Make the red-eye correction
adjustment for the right and left eyes
separately.
To move the adjustment frame
1 Press g/G to select (Move) and
press ENTER.
2 Move the frame with g/G/f/F.
The frame moves in the selected
direction.
Continued
13
Making various printing
GB
Page 14
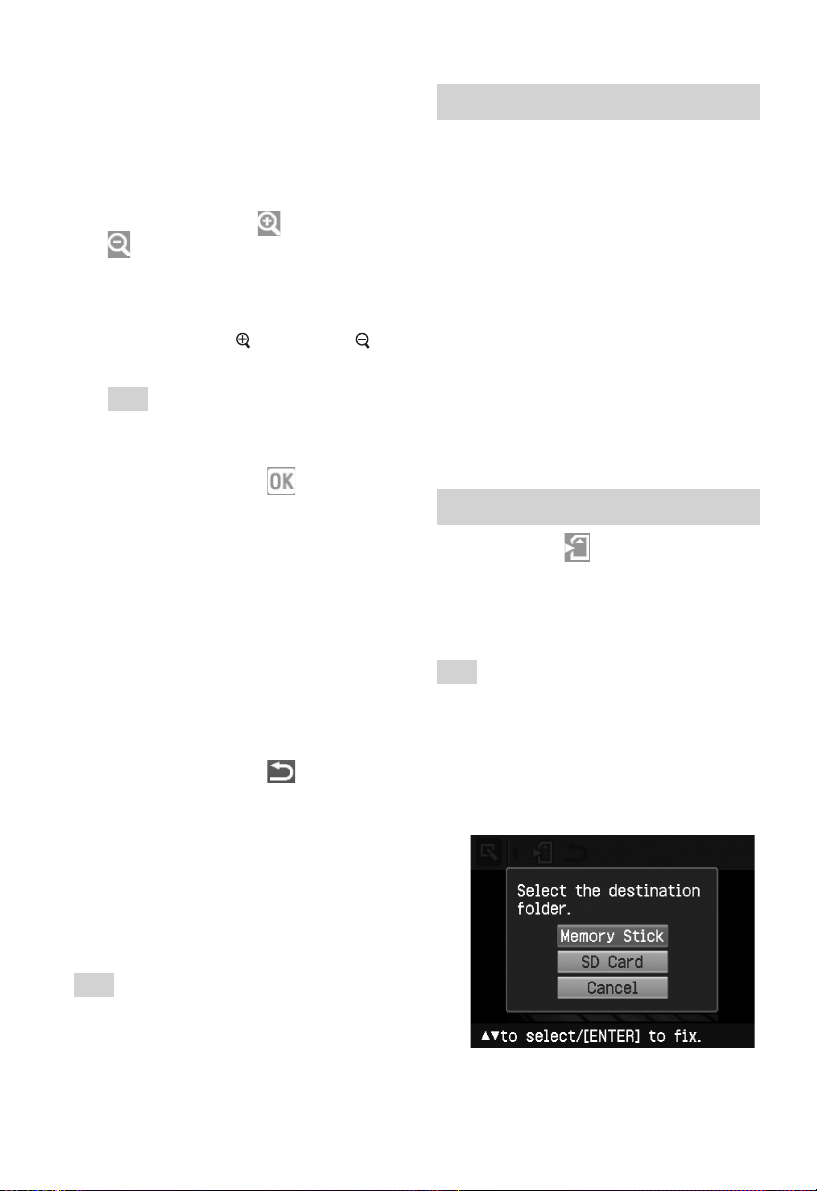
3 Press ENTER.
The frame is fixed in the current
position.
To change the size of the
adjustment frame
Press g/G to select
(Reduce) and press ENTER.
Each time you press ENTER, the
frame becomes larger or smaller.
You can also enlarge or reduce the
size by pressing
(zoom out) buttons on the printer.
Tip
Make the size of the adjustment frame two
to seven times as large as the eye size.
Press g/G to select and press
4
ENTER.
The range of red-eye correction
adjustment is enlarged.
Press ENTER.
5
The adjustment takes effect.
The Red-eye correction menu is
displayed.
To make a red-eye correction
adjustment for other eyes, repeat
steps 3 to 5.
Press g/G to select and press
6
ENTER.
The Edit menu is displayed again.
(Enlarge) or
(zoom in) or
Printing an edited image
Press PRINT.
1
The dialog box to specify the print
quantity is displayed.
Press f/F to increase or decrease
2
the print quantity.
• To increase the print quantity one
by one, press f repeatedly.
• To reduce the print quantity one by
one, press F briefly repeatedly.
• To reset the print quantity to 1,
press F for more than two seconds.
Press PRINT to start printing.
3
The image previewed is printed.
Saving an edited image
When you select (save) in the Edit or
Creative Print menu, the dialog box to
select the destination to save the image is
displayed. You can save the image under a
new image number.
Tip
The selected image will not be overwritten.
Select the destination to save an
1
image.
Press f/F to select the media
(“Memory Stick”, or “SD Card”) and
press ENTER.
To reset the adjustment
Press CANCEL in step 5 instead of
ENTER. The red-eye correction
adjustment is canceled and the window of
step 2 is displayed.
Tip
To print the image previewed, press PRINT
(page 14).
GB
14
Page 15
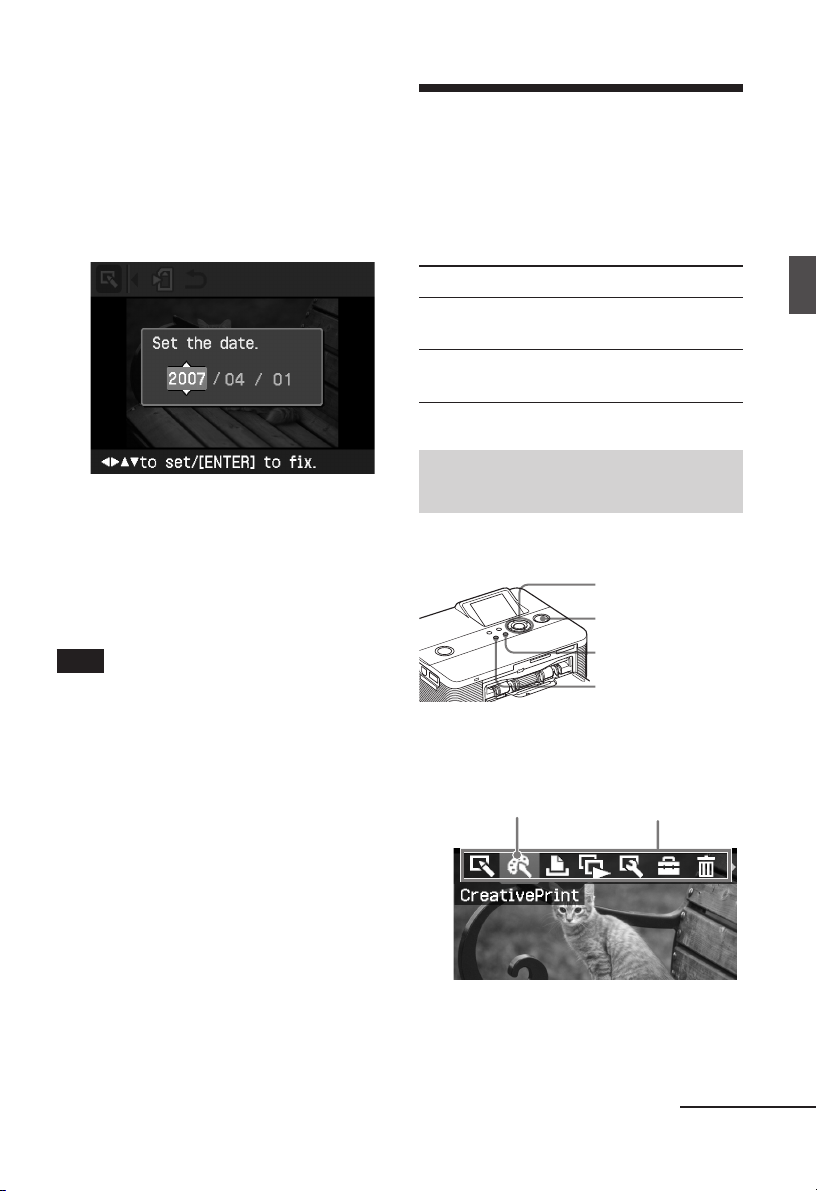
The dialog box for setting date is
displayed. You can save the date with
the image.
Set date.
2
Press f/F to select the number and
press g/G to select the day, month or
year. Then press ENTER.
Making a Creative Print
With images saved in a memory card or an
external device, you can make the
following prints:
Menu You can make...
Layout Print A print with 2/4/9/13/16
split images.
Calendar Calendars with your
favorite images.
Making various printing
The edited image by the Edit or
Creative Print menu is saved as a new
image. The dialog box to notify the
new image numbers (folder numberfile number) is displayed.
Press ENTER.
3
Note
While saving the image, do not turn off the
printer or remove a memory card from the
printer. The memory card may be damaged.
Displaying the Creative Print menu
Buttons to be used in Creative Print
g/G/f/F/ENTER
PRINT
CANCEL
MENU
Press MENU.
1
The menu bar is displayed.
Creative Print menu icon Menu bar
To exit the menu mode
Press MENU again. The previous
window is displayed.
Continued
GB
15
Page 16
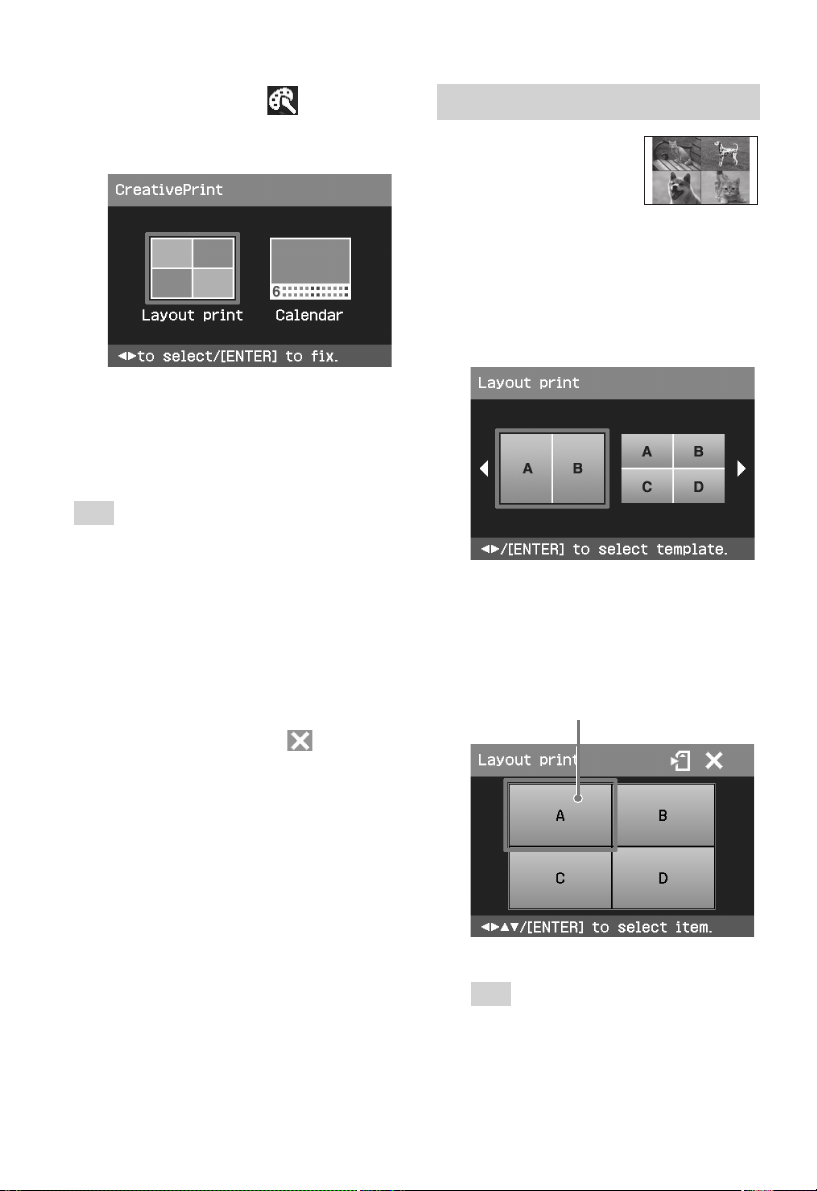
Press g/G to select (Creative
2
Print) and then press ENTER.
The Creative Print menu is displayed.
To undo the operation midway
Press CANCEL. The window of the
previous step is displayed. Depending on
the step, you cannot undo the operation.
Tip
You can press MENU while making a Creative
Print and set part of the Print setup menu items.
To exit the Creative Print menu
• Press MENU in the middle of the
operations and select “Creative Print
Complete”.
To return to the Creative Print Menu
• Display the preview image and then
press g/G/f/F to select
ENTER.
and press
Making layout prints
You can make a print
with 2-split, 4-split, 9split, 13-split, or 16split images.
Display the Creative Print menu.
1
Press g/G to select “Layout print”,
2
then press ENTER.
The layout print templates are
displayed.
Press g/G to select the desired
3
template, then press ENTER.
The preview of the selected template
is displayed.
Image area
The dialog box for saving an image may
be displayed (page 14).
GB
16
Tip
You can select and set each area in any
order.
Page 17
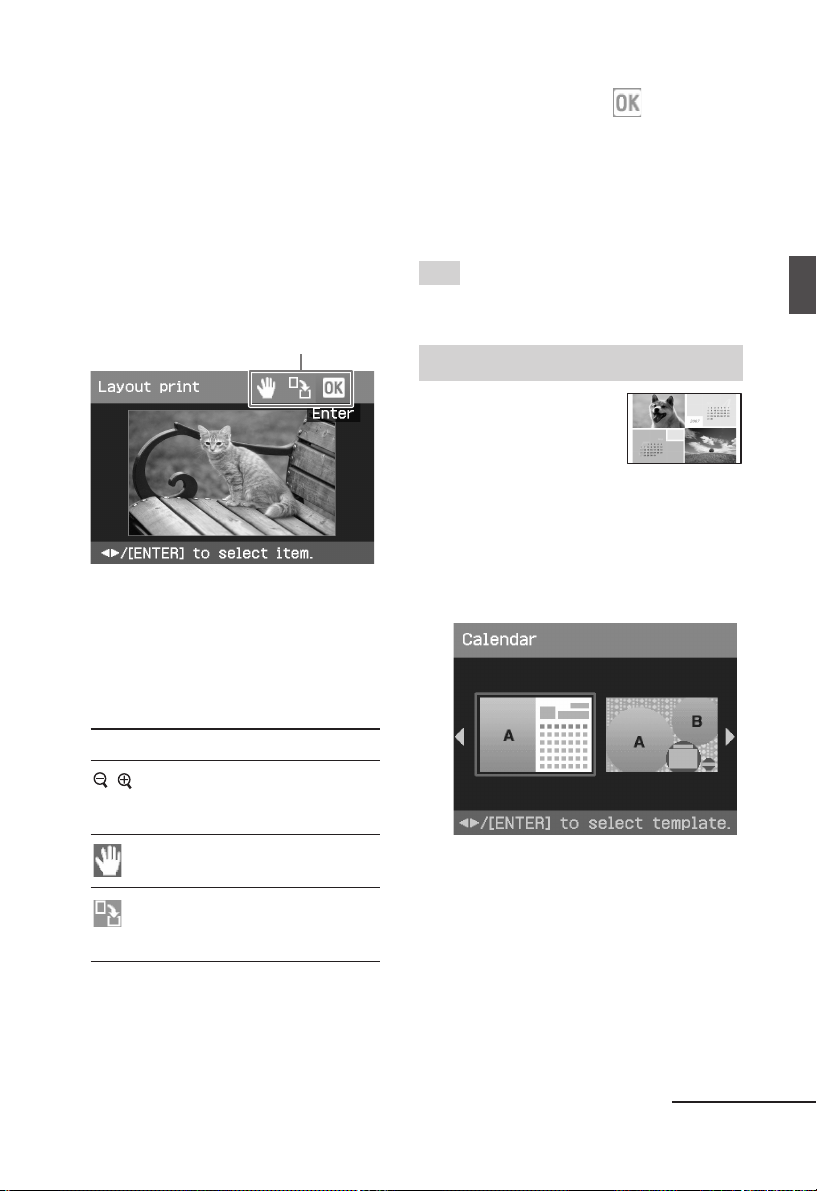
Press g/G/f/F to select the
4
desired image area and press
ENTER.
The window for selecting an image is
displayed.
Press g/G/f/F to select the
5
desired image, and then press
ENTER.
The window used for adjusting the
image position is displayed.
Adjustment tools
Adjust the size and position of the
6
selected image.
Press g/G to select the desired
adjustment item, then press ENTER.
Press g/G to select and press
7
ENTER.
The selected image is added to the
image area. When you select a
template with multiple images, repeat
the steps 4 through 7 to select an
image for each area.
Tip
To save or print the layout images previewed,
see page 14.
Making a calendar
You can make calendars
with your favorite
images.
Display the Creative Print menu
1
(page 16).
Press g/G to select “Calendar”,
2
then press ENTER.
The window used for selecting the
calendar
template,
is displayed.
Making various printing
Items Procedures
/ Increases or reduces the size of
an image by pressing the
buttons on the printer.
Move the image with g/G/
f/F, and then press ENTER.
Each time you press ENTER,
the image rotates 90°
clockwise.
Press g/G to select the desired
3
template, and then press ENTER.
The preview of the selected template
is displayed.
Continued
17
GB
Page 18
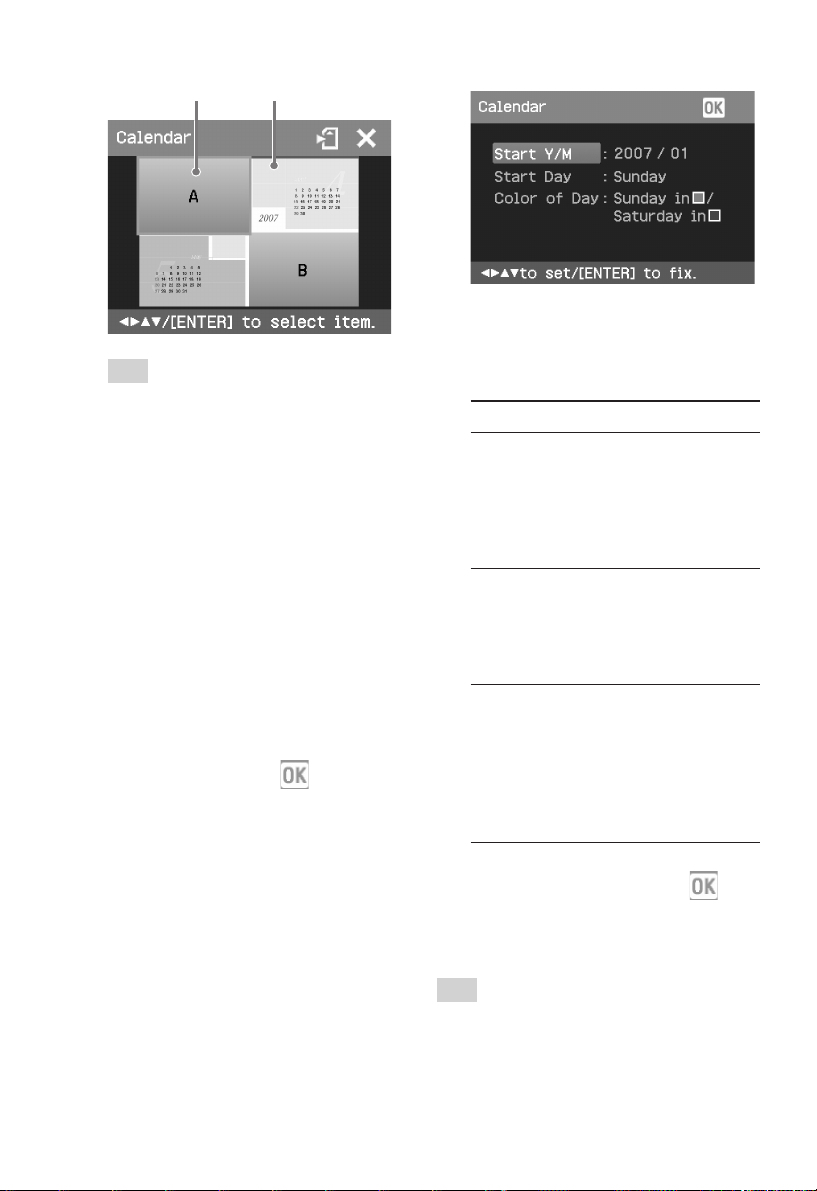
Image area Calendar area
Tip
You can select and set an image area or
calendar area in any order.
Select an image.
4
When you select a template with
multiple images, repeat the
procedures below to select an image
for each area.
1 Press g/G/f/F to select an image
area, then press ENTER.
The image list is displayed.
2 Press g/G/f/F to select the
desired image, then press ENTER.
The window used for adjusting the
image angle and position is
displayed. For information on
adjustment, see step 6 on page 17.
3 Press g/G to select
press ENTER.
The image is selected and displayed
in the relevant area.
and then
2 Press f/F to select the following
items and then press g/G to select
an option.
Item Procedures
Start Y/M
Set the first month and the year
starting the calendar. Press g/G
to select the month or year and
press f/F to set the number.
Press ENTER.
Start Day
Set the day of the week (placed
furthest left in the calendar).
Press f/F to select “Sunday” or
“Monday”. Then press ENTER.
Color of Day
Set the color of Sunday and
Saturday to be displayed in the
calendar. Press G and then f/F
to select the desired color for
Sunday and Saturday. Then press
ENTER.
Set the calendar.
5
1 Press g/G/f/F to select the
calendar area and press ENTER to
display the calendar setting
window.
GB
18
3 Press g/G/f/F to select and
then press ENTER.
The calendar is displayed in the
calendar area.
Tip
To save or print the calendar previewed, see
page 14.
Page 19
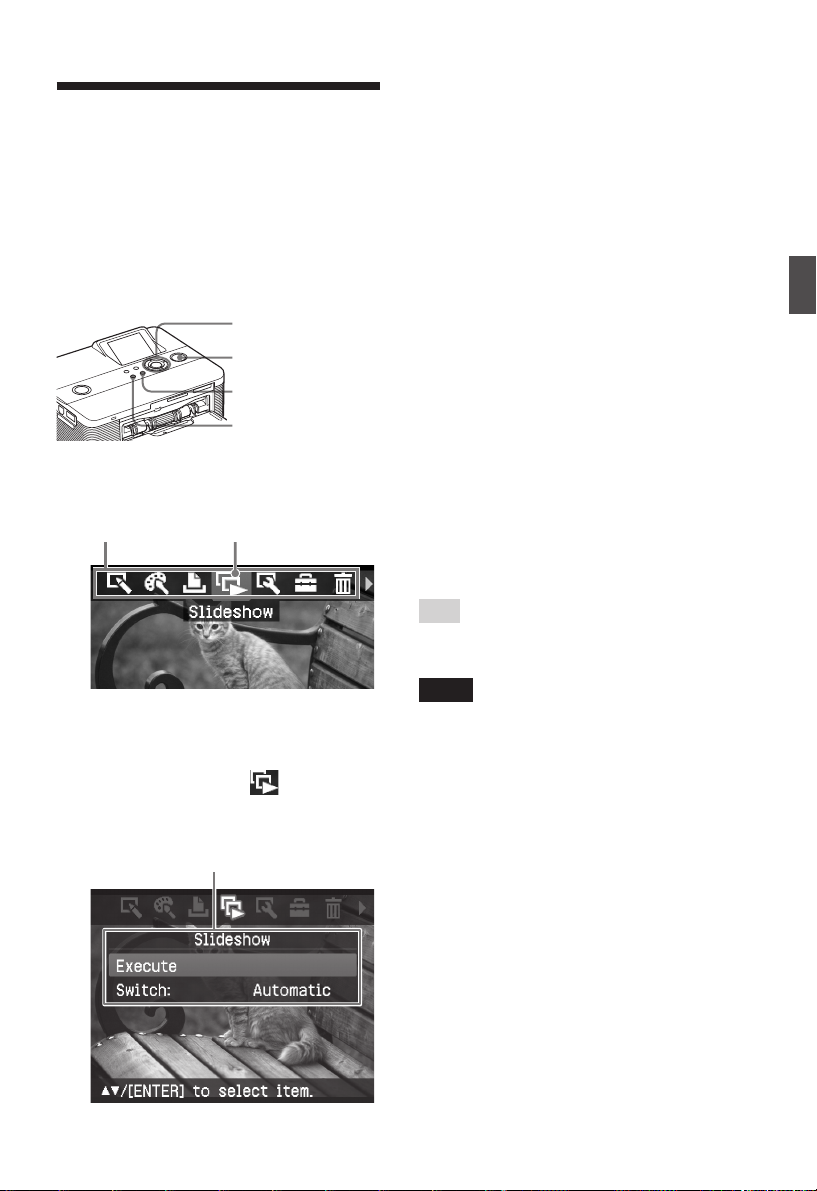
Viewing a slideshow
You can perform a slideshow of the
images saved in a memory card or an
external device. You can also manually
print an image being displayed.
Buttons to be used in this section
g/G/f/F/ENTER
PRINT
CANCEL
MENU
Press MENU.
1
The menu bar is displayed.
Menu bar Slideshow menu icon
Press f/F to select “Switch”, and
3
then press ENTER.
The window to specify the way how
images are switched is displayed.
Press f/F to select “Automatic” to
4
switch images automatically or
“Manual” to switch them
manually. Then press ENTER.
Press f/F to select “Execute”, and
5
press ENTER.
• When “Automatic” is selected: The
images in the memory card or an
external device are displayed
automatically one after another.
• When “Manual” is selected:
The image with the cursor in the
image list is displayed. To switch
images, press g/G/f/F.
To stop slideshow
Press CANCEL.
Tip
While playing the slideshow manually, you can
print a displayed image by pressing PRINT.
Making various printing
To exit the menu mode
Press MENU again. The previous
window is displayed.
Press g/G to select (Slideshow)
2
and then press ENTER.
The Slideshow menu is displayed.
Slideshow menu
Notes
• Depending on the image, it may take time to
be displayed.
• You cannot display the images that are not
displayed as thumbnails because they are
damaged or for some other reason.
19
GB
Page 20
Searching for an image
The Search menu allows you to search a
memory card or an external device for an
image by image number or date.
Note
You can search for the images saved as DCF
files only.
Buttons to be used in this section
g/G/f/F/ENTER
CANCEL
MENU
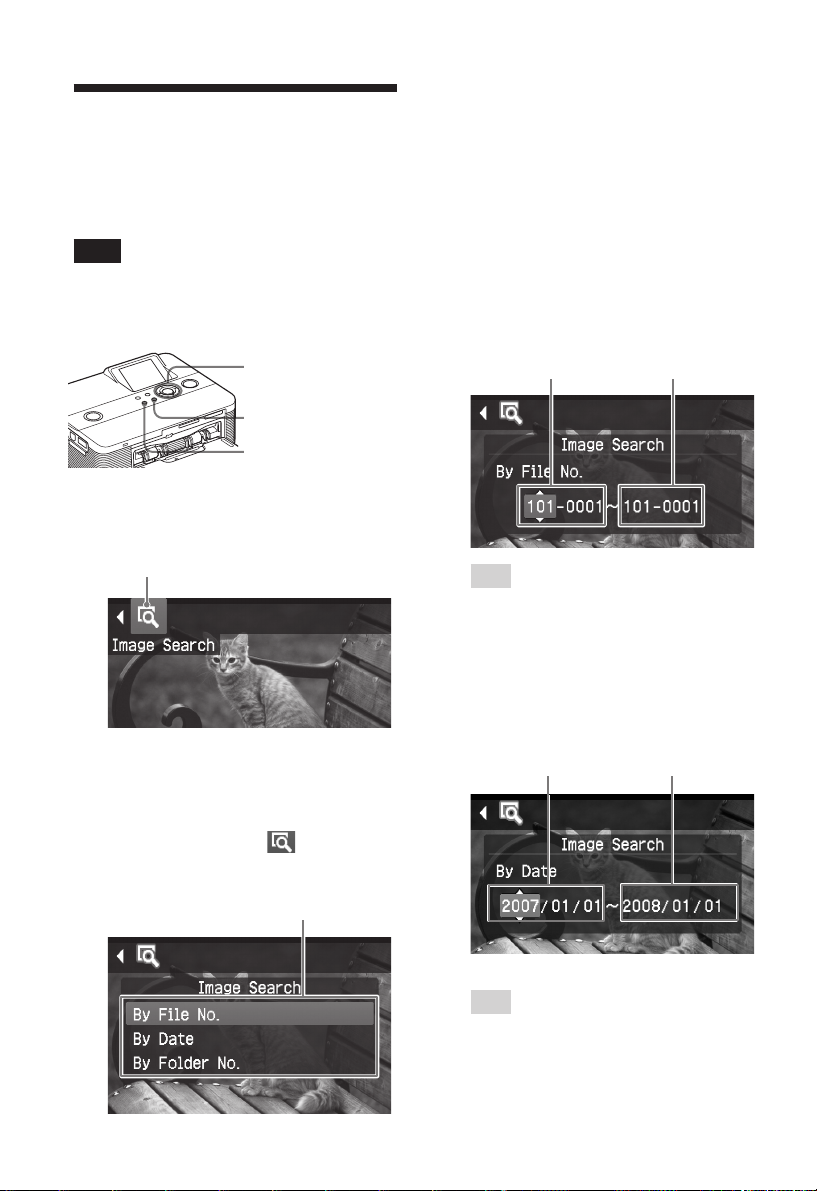
Press MENU.
1
The menu bar is displayed.
Image Search menu icon
To exit the menu mode
Press MENU again. The previous
window is displayed.
Press f/F to select the search key
3
and press ENTER.
The dialog box used for specifying
the criteria for searching is displayed.
Press g/G to select an item and
4
press f/F to specify numbers.
• When you select “By File No.”:
Specify the starting and ending
numbers of the files (folder and file
numbers) that you want to search for:
Starting image Ending image
number number
Tip
The above screen is when a Sony Cybershot digital camera is connected.
• When you select “By Date”:
Specify the starting and ending
dates of the files that you want to
search for:
Starting date Ending date
Press g/G to select (Image
2
Search) and then press ENTER.
The Image Search menu is displayed.
Image Search menu
GB
20
Tip
To search for images of a specific day,
enter the same date in both the boxes.
Page 21
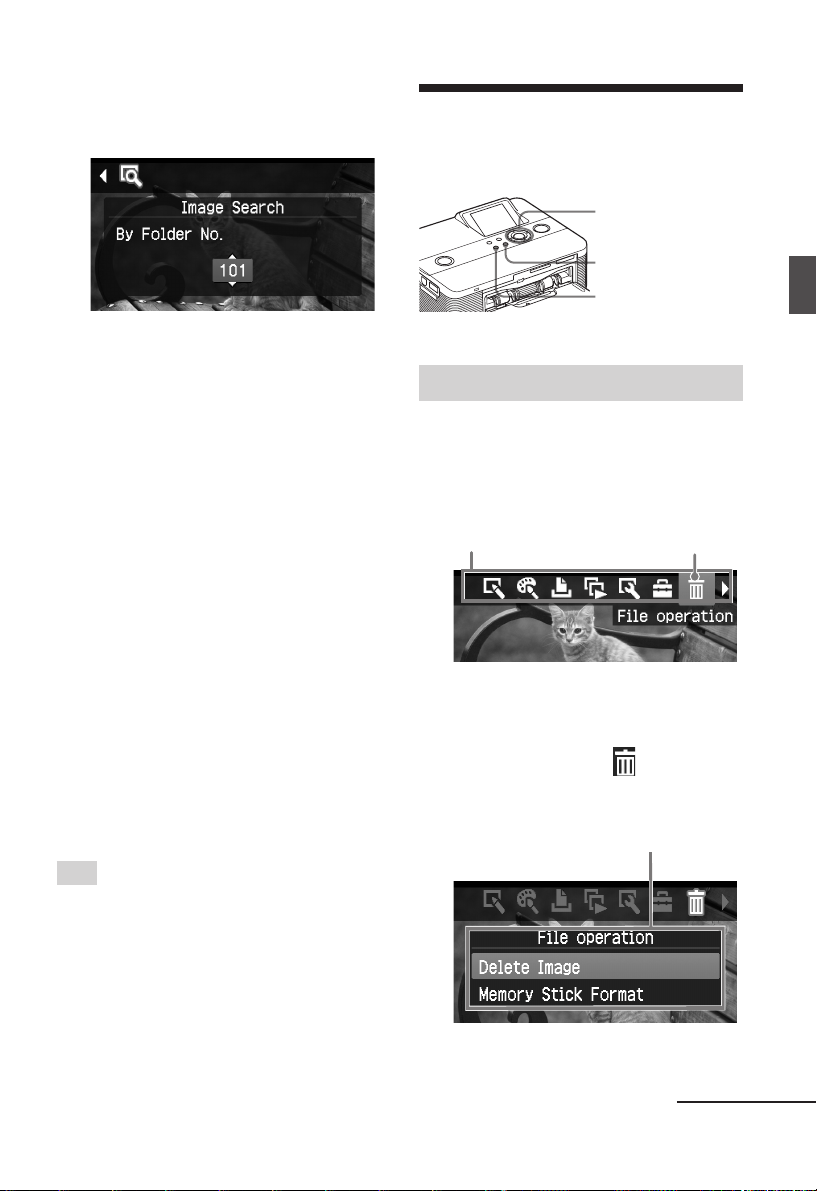
• When you select “By Folder No.”:
Specify the folder number of the
images you want to search for:
Filing images
Buttons to be used in this section
g/G/f/F/ENTER
CANCEL
Press ENTER.
5
Searching starts. When the search is
complete, the search results will be
displayed.
If no images have been found
“No images were found” will be displayed.
Press ENTER.
6
The searched image is displayed.
The searched results are displayed as
the status before you entered the
menu. When you searched from the
image list, “01” will be displayed with
the relevant images in the image list.
• If you selected “By File No.” and
“By Date”, “01” is displayed on the
images found to indicate their print
quantity. You can easily check the
images you selected on the image
list.
• If you selected “By Folder No.”, the
first or last image in the selected
folder is displayed.
Tip
To print a searched image, press g/G/f/F to
select the desired image and then press ENTER
to display it in the image preview. Press f/F to
set the print quantity and then press PRINT to
start printing.
MENU
Deleting selected images
You can select and delete images on a
memory card.
Press MENU.
1
The menu bar is displayed.
Menu bar File operation menu icon
To exit the menu mode
Press MENU again. The previous
window is displayed.
Press g/G to select (File
2
operation) and then press ENTER.
The File operation menu is displayed.
File operation menu
Making various printing
Continued
GB
21
Page 22
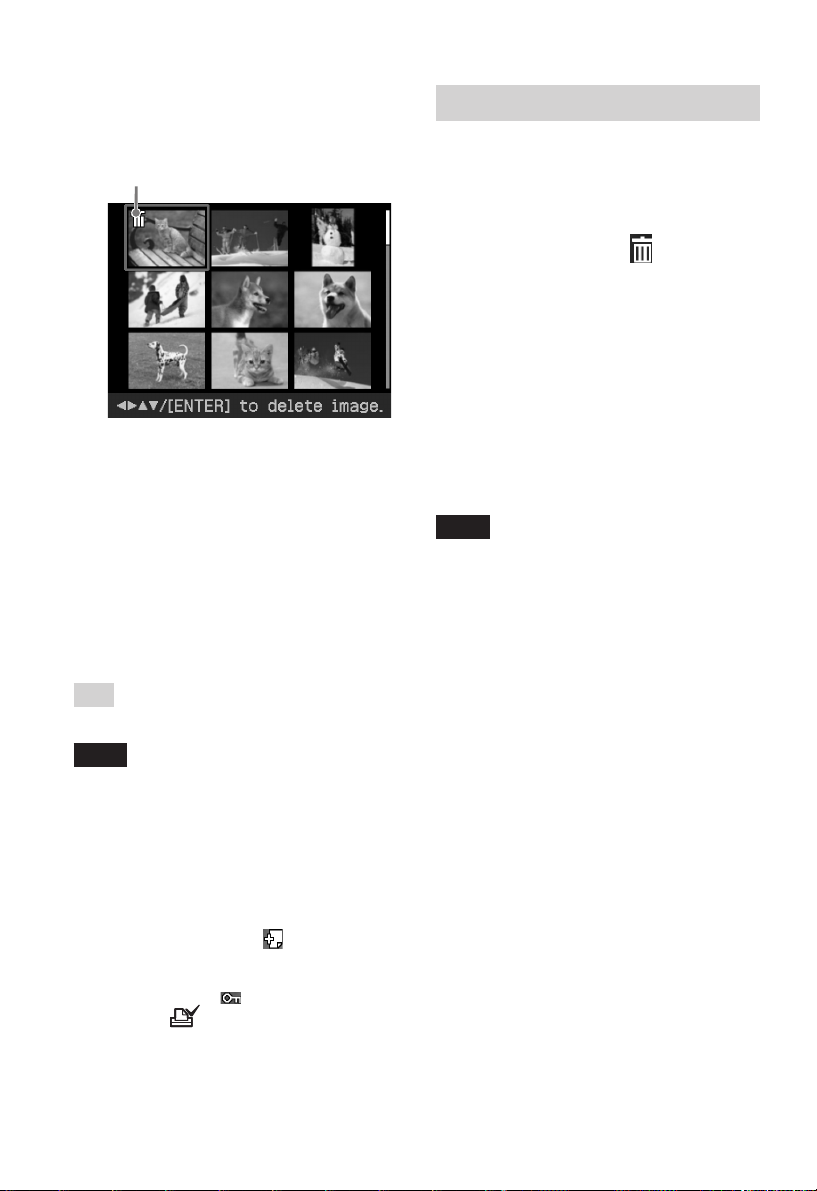
Press f/F to select “Delete
3
Image” and press ENTER.
The image list is displayed.
Trash icon
Press g/G/f/F to move the trash
4
icon to the image you want to
delete, then press ENTER.
A confirmation dialog box is
displayed.
Press g/G to select “OK” and
5
press ENTER.
The selected image is deleted. To
delete other images, repeat steps 4
through 5.
Tip
To exit the File operation menu, press CANCEL.
Formatting a “Memory Stick”
You can format a “Memory Stick”.
Press MENU.
1
The menu bar is displayed.
Press g/G to select (File
2
operation) and then press ENTER.
The File operation menu is displayed.
Press f/F to select “Memory Stick
3
Format” and press ENTER.
The confirmation dialog box is
displayed.
Press g/G to select “OK” and
4
press ENTER.
The “Memory Stick” is formatted.
Notes
• When you format a “Memory Stick”, all the
images inside are deleted.
• During formatting, do not turn off the printer
or remove the memory card. The printer or
the memory card may be damaged. Or the
image may be lost.
• You cannot format a memory card other than
the “Memory Stick” or an external device.
Notes
• During deleting, do not turn off the printer or
remove the memory card. The printer or the
memory card may be damaged. Or the data
may be lost.
• An image, once deleted, will be lost forever.
Before deleting an image, double-check that it
is the right one.
• When you delete an image with the
associated file indication ( ), the associated
motion or e-mail file will be also deleted.
• You cannot delete a protected image with the
protect indication ( ) or a DPOF preset
indication (
use your digital camera. For the details, see
the operating instruction of the digital
camera.
GB
22
) displayed. To delete them,
Page 23
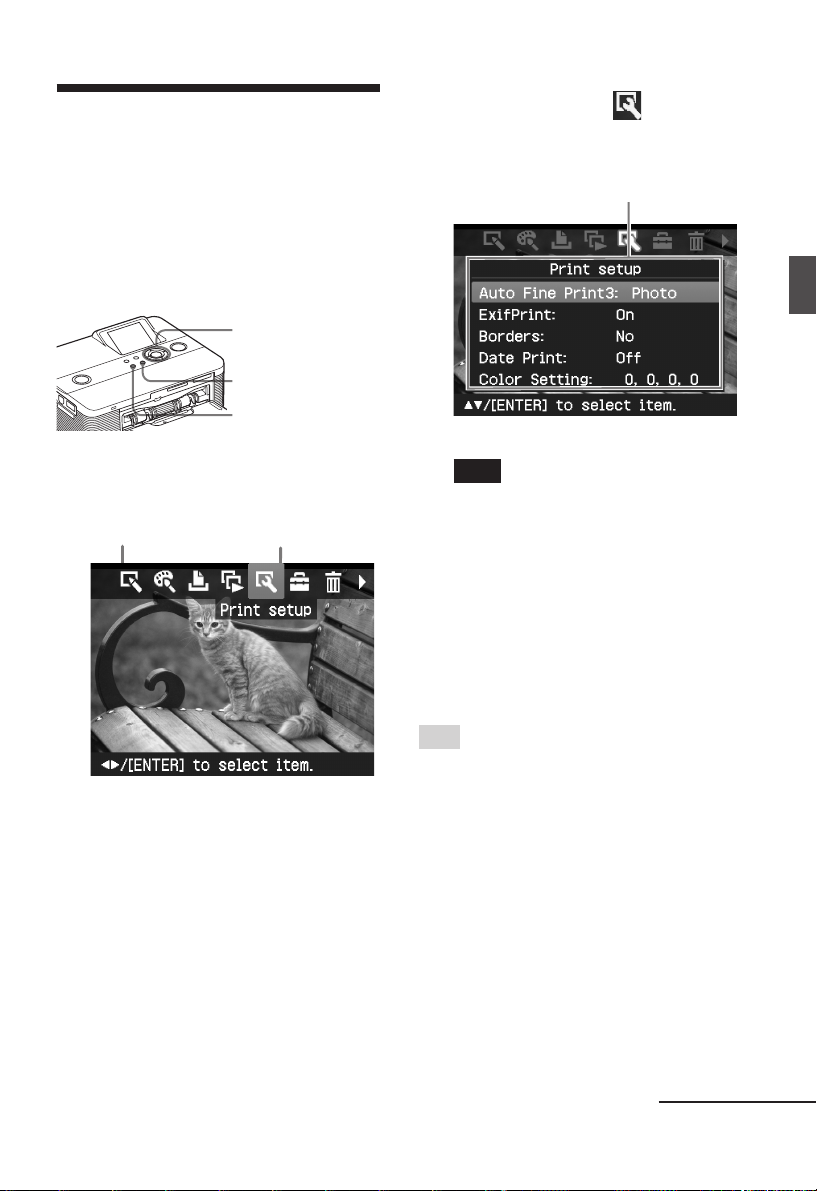
Changing the print settings (Print setup)
The Print setup menu allows you to
change various print settings listed on
pages 24 and 25.
Buttons to be used in this section
Press g/G to select (Print
2
setup) and then press ENTER.
The Print setup menu is displayed.
Print setup menu
g/G/f/F/ENTER
CANCEL
MENU
Press MENU.
1
The menu bar is displayed.
Menu bar Print setup menu icon
To exit the menu mode
Press MENU again. The previous
window is displayed.
Note
Setting items which cannot be selected and
changed are displayed in gray.
Press f/F to select the desired
3
setting item, and press ENTER.
The setting window for the selected
item is displayed (next page).
Press f/F to select the desired
4
setting and press ENTER.
The setting is fixed.
Tip
To exit the Print setup menu, press MENU.
Making various printing
Continued
23
GB
Page 24
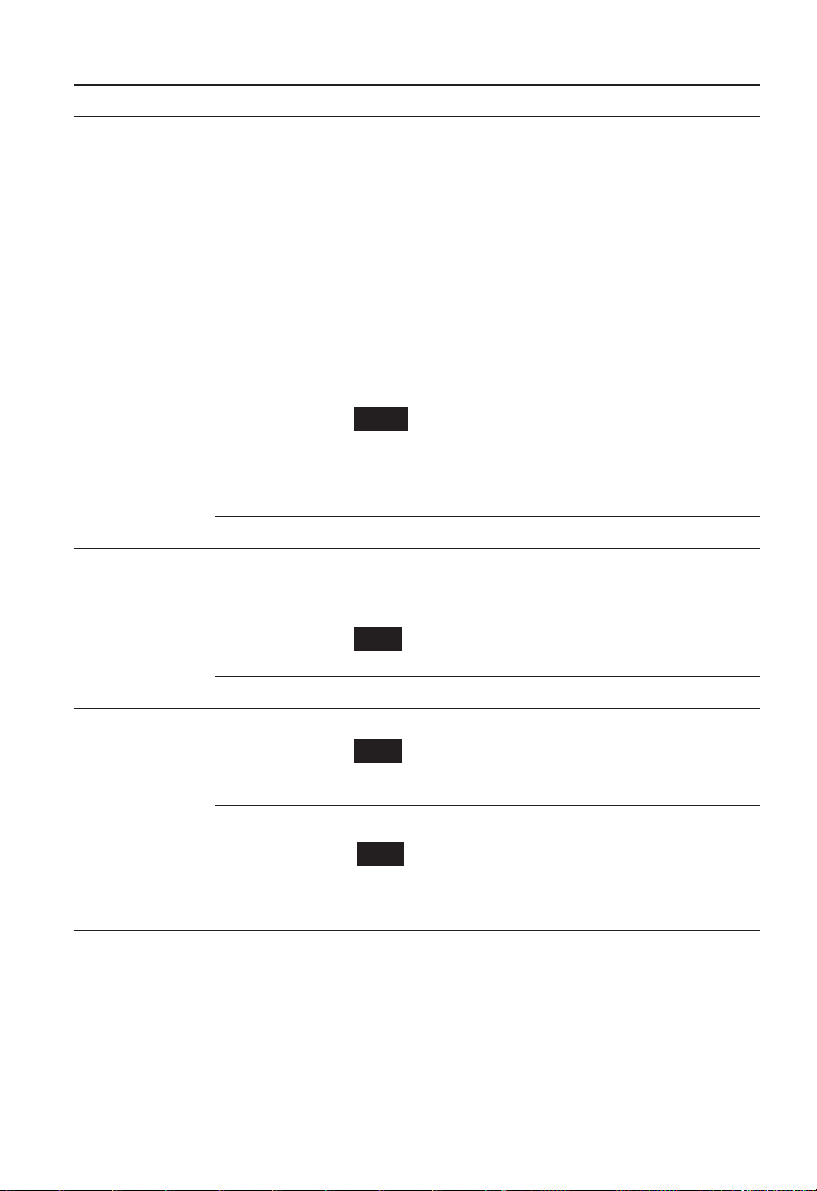
Item Settings Contents
Auto Fine Print 3
Photo*/ The function automatically corrects the picture
Vivid quality so that an image may be printed in more
vivid, clear and beautiful pictures. It is especially
effective for a darker image with low contrast. The
pictures are corrected to reproduce natural skin
colors, vivid tree leaf green, or clear sky blue.
•Photo: Adjusts an image automatically
so that the image is printed with natural and
beautiful pictures. (Recommended)
•Vivid: Adjusts an image automatically so that
the image is printed with stronger sharpness
correction and more vivid pictures than the
Photo mode.
Notes
•The image data is not corrected.
•When printing in PC mode, the Auto Fine Print 3 setting
with the printer driver has priority over the setting here.
In the PictBridge mode, this setting holds effective.
Off Prints an image without any corrections.
Exif Print On* Adjusts an image shot by an Exif Print (Exif 2.21)-
compliant digital camera to its optimum picture
quality.
Note
The image data is not corrected.
Off Prints an image without any adjustments.
Borders Yes Prints an image with borders around the image.
Note
Depending on an image, its top and bottom edges or right
and left edges may be trimmed and printed.
No* Prints an image without blank space around the image.
Note
When printing a standard 4:3 picture shot by a digital
camera, the top and bottom edges of the image are cut and
it is printed as a 3:2 picture.
*: Factory settings
24
GB
Page 25

Item Settings Contents
Date Print On Prints the date of shooting with an image when the
image is a file recorded in the DCF (Design rule for
Camera File system) format. To make a print with
the date of shooting, shoot an image in the DCF file
format.
When the image is saved with the printer, the date of
saving is printed.
Off* Prints an image without the date.
Color Setting
Adjusts the colors and sharpness of a print.
to select a color element ( “R” (red), “G“ (green), or
“B” (blue)) or “S” (Sharpness), and then press f/F to
set the level. You can set the levels for R, G, B in the
range from +4 to –4 and for S in the range from +7 to
0.
Press g/G
R: Adjusts the red and blue elements. The higher
you set the level, the more reddish the picture
becomes as if it receives red light. The lower you
set the level, the darker the picture becomes as if
light blue is added.
G:Adjusts the green and purple elements. The
higher you set the level, the more greenish the
picture becomes as if it receives green light. The
lower you set the level, the darker the picture
becomes as if red purple is added.
B: Adjusts the blue and yellow elements. The higher
you set the level, the more bluish the picture
becomes as if it receives blue light. The lower you
set the level, the darker the picture becomes as if
yellow is added.
S: The higher you set the level, the more distinct the
outlines become.
(*R: 0/G:0/B:0/S:0)
*: Factory settings
Making various printing
25
GB
Page 26
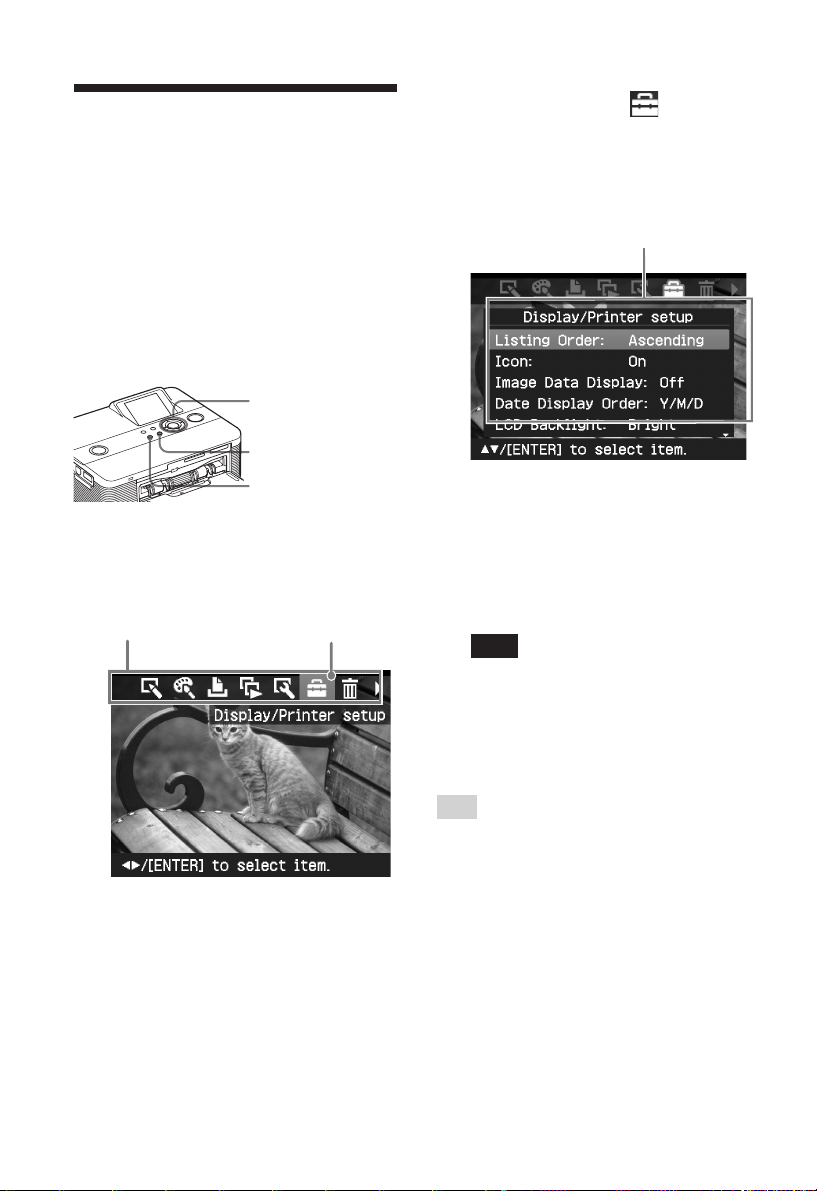
Changing the display and printer preferences (Display/ Printer setup)
The Display/Printer setup menu allows
you to change the display and printer
preferences listed on page 27.
Buttons to be used in this section
g/G/f/F/ENTER
CANCEL
MENU
Press MENU.
1
The menu bar is displayed.
Menu bar setup menu icon
Display/Printer
Press g/G to select (Display/
2
Printer setup) and then press
ENTER.
The Display/Printer setup menu is
displayed.
Display/Printer setup menu
Press f/F to select the desired
3
setting item, and press ENTER.
The setting window for the selected
item is displayed (next page).
To display the hidden setting items,
scroll the window with f/F.
Note
Setting items which cannot be selected and
changed are displayed in gray.
To exit the menu mode
Press MENU again. The previous
window is displayed.
GB
26
Press f/F to select the desired
4
setting and press ENTER.
The setting is fixed.
Tip
To exit the Display/Printer setup menu, press
MENU.
Page 27
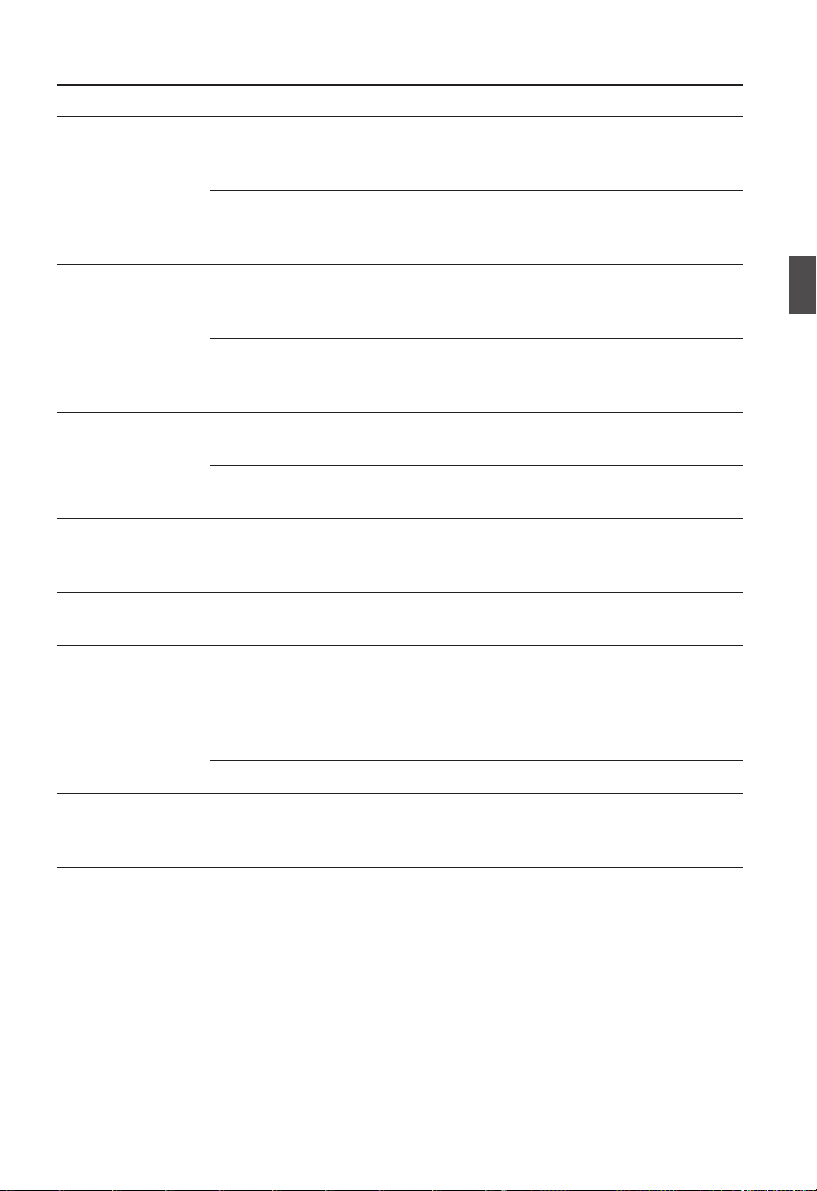
Item Settings Contents
Listing Order
Ascending* In the image list window, the images are displayed in
the order of their image numbers, starting from the
smallest number.
Descending In the image list window, the images are displayed in
the order of their image numbers, starting from the
largest number.
Icon On* In the image list window, the images without
thumbnail (miniature image used as index) data
will be displayed as an icon.
Off In the image list window, the images without
thumbnail (miniature image used as index)
data will be displayed as its original image.
Image Data Display
On In an image preview window, image information
(file type, shooting conditions, etc.) will be displayed.
Off* In an image preview window, no image information
will be displayed.
Date Display Order
Set the displayed order of the date (Year, Month, and Day) from the
following:
• Y/M/D* • M/D/Y •D/M/Y
LCD Backlight Set the brightness level of the LCD backlight from the following:
Bright*/Dark
Demonstration Mode
On* A flash file demonstration to explain the functions of
the printer starts automatically after the printer has
been left unused for about 5 seconds without any
media connected and with this option set to “On”. To
stop the demonstration, press any button.
Off No demonstration flash file will be started.
Language You can select the language of menu or messages. Depending on the
region you purchased the unit, some of the following languages will
appear: English*/French/Spanish/German/Italian/Russian
*: Factory settings
Making various printing
27
GB
Page 28
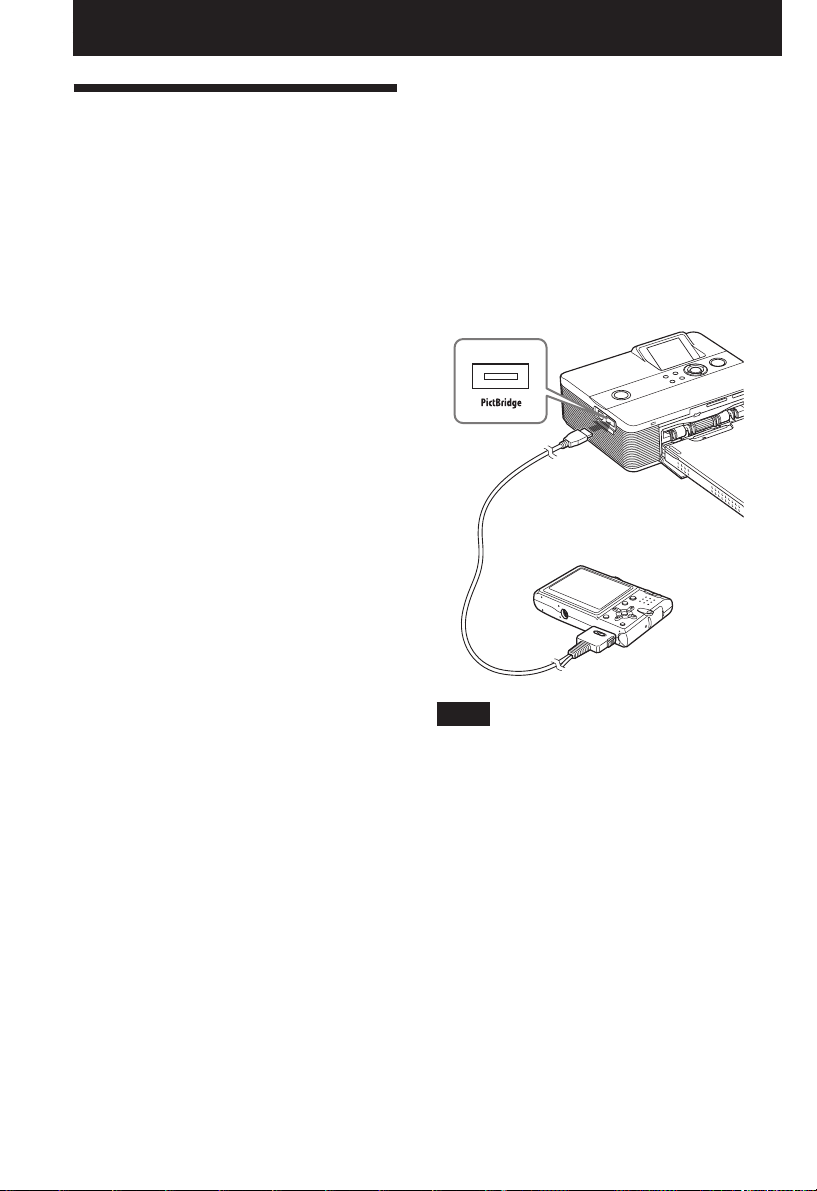
Printing from a PictBridge camera or external device
• Single-image print
Printing from the PictBridge digital camera
You can connect a PictBridge-compliant
digital camera and print an image directly
from your digital camera.
When printing from a PictBridge
connector, make sure to remove memory
card(s) from the printer in advance.
Set your digital camera ready for
1
printing with a PictBridgecompliant printer.
The settings and operations that are
necessary before connection differ
depending on the digital camera. For
details, see the operating instructions
of the digital camera you use. (In case
of Sony Cyber-shot digital camera, for
example, select “PictBridge” mode for
the “USB Connect”.)
• All images print
• Index print
• DPOF print
• Border/Borderless print
• Date print
For notes during printing, please read
“Read This First”.
To PictBridge connector
Camera or other
external device
Connect the printer to the AC
2
power source (. Read This
First).
Press 1 (on/standby) switch to
3
turn on the printer.
The 1 (on/standby) indicator of the
printer lights in yellow green.
Connect a PictBridge-compliant
4
digital camera to the PictBridge
connector of the printer.
When you connect a PictBridgecompliant digital camera to the
printer, “Connecting” is displayed on
the LCD screen of the printer.
Operate the digital camera to
5
print an image.
The printer supports the following
prints:
GB
28
To USB connector
Notes
• If you replace an ink ribbon while the printer
is connected to a PictBridge-compliant digital
camera, an image may not be printed
properly. If this occurs, disconnect and then
connect the digital camera.
• When printing from a PictBridge-compliant
digital camera, an image will be printed
according to the settings of the Print setup
menu of the printer. When you set the date
print or border/borderless options with your
digital camera, the digital camera settings will
have priority.
• For error messages displayed on your digital
camera, refer to the operating instructions of
your digital camera.
• You cannot use a USB hub or a digital camera
containing USB hub.
Page 29
Printing from a Bluetooth-compliant device
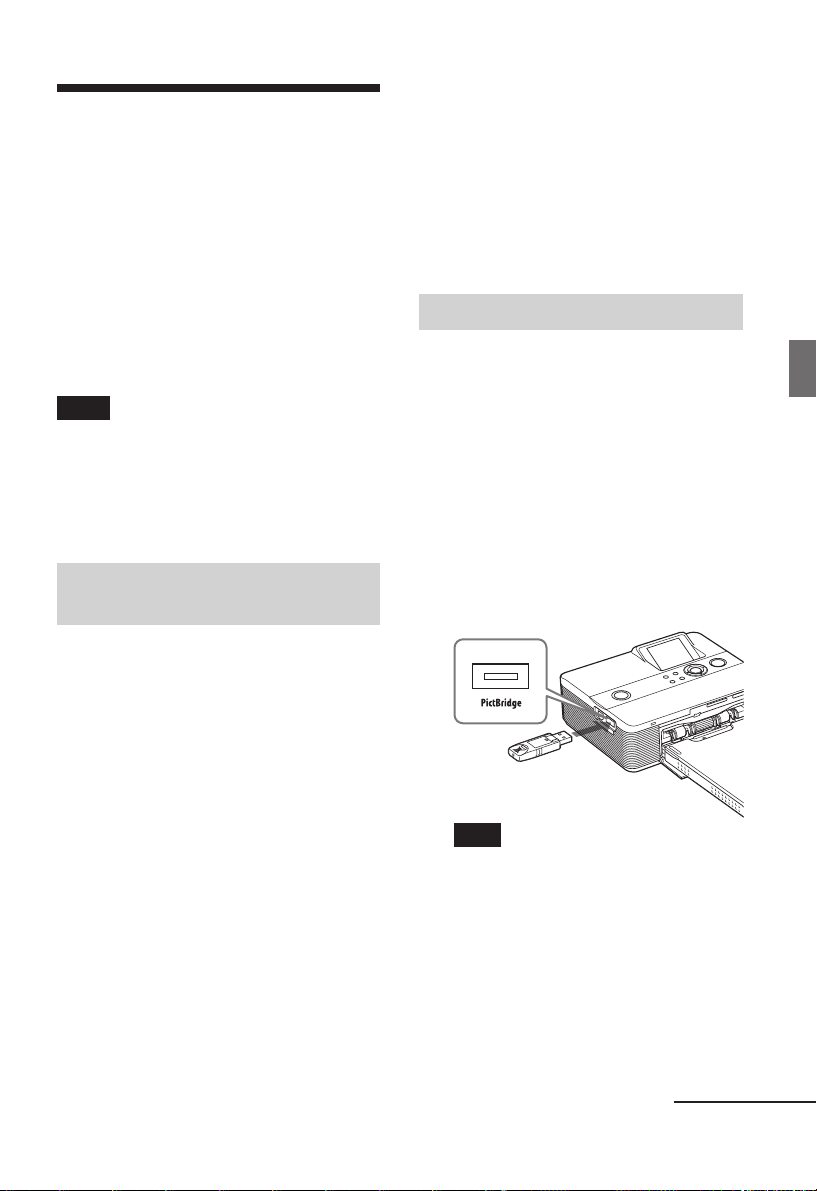
By connecting the Sony DPPA-BT1*
Bluetooth USB adaptor to your printer,
you can print an image of a Bluetoothcompliant mobile phone, digital camera,
or other device.
* DPPA-BT1 is supplied with the DPP-FP60BT
and is optional with the DPP-FP60.
Notes
• Do not use the DPPA-BT1 outsides the area
you purchased it. Depending on the areas, the
use of the adaptor may infringe the wave
regulations and may be subject to its penalty.
• In some regions, the Sony DPPA-BT1
Bluetooth USB adaptor is not sold.
Compatible profiles for Bluetooth communication
The DPPA-BT1 adaptor supports the
following profiles:
• BIP (Basic Imaging Profile)
• OPP (Object Push Profile)
For the profiles that your Bluetooth device
supports, please refer to its manual.
BMP: 1, 4, 8, 16, 24, 32 bit Windows
format
Some image file formats are not
compatible.
Maximum number of pixels to be
handled
6 400 (H) x 4 800 (V) dots (Maximum 5 MB
or less)
Printing procedures
When printing from a PictBridge
connector, make sure to remove memory
card(s) from the printer in advance.
1 Connect the printer to the AC
power source.
2 Press the 1 (on-standby) switch to
turn on the printer.
3 Insert the Bluetooth adaptor to
the PictBridge connector of your
printer.
Printing from a PictBridge camera or external device
What is “Profile”?
Standards that enable the Bluetooth
wireless communication. There are several
profiles depending on the purposes and
product profiles to be used. To make the
Bluetooth communication possible, the
devices to be communicated should
support the same profile.
Compatible image file formats to be
printed
JPEG: DCF 2.0 compatible, Exif
compatible, JFIF
formats Baseline JPEG)
TIFF: Exif 2.21 compatible
(4:4:4, 4:2:2, 4:2:0
2.21
Note
In case any device, other than the
Bluetooth adaptor, such as a memory card,
camera, PC, or other external device or a
USB cable is connected to any of the
memory card slots, the PictBridge
connector, or USB connecter of your
printer, remove it from the printer and
then connect the Bluetooth adaptor.
4 Print from the Bluetooth-
complaint mobile phone, or other
device.
Continued
29
GB
Page 30
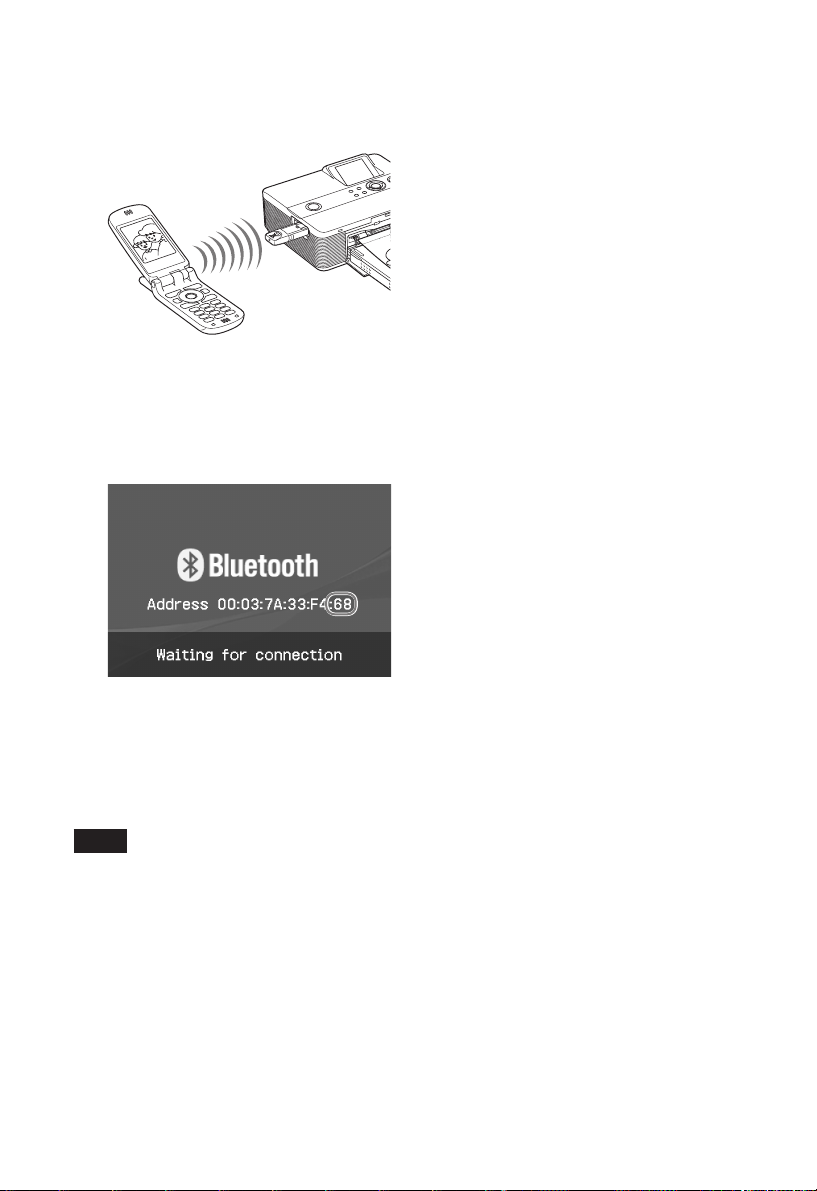
For printing procedures, refer to the
manual of the Bluetooth device you
use.
To select the printer from a Bluetoothcompliant device, select “Sony DPPFP60 ##”. (“##” stands for the two
figures from the right of the address
displayed in the LCD screen.):
• Since a Bluetooth device and a wireless LAN
(IEEE802.11b/g) device use the same frequency
ranges, wave interferences may occur when the
product is used near a device equipped with a
wireless LAN. This may cause deterioration in
the communication speed and connection
conditions. If this occurs, take the following
measures:
- Keep a distance of at the nearest 10 m from a
wireless LAN device when you connect the
product to the mobile phone.
– Turn off the wireless LAN device in case you
should use the product within 10 m from the
wireless LAN device.
• It is not guaranteed that this product works
with all devices enabled with Bluetooth
wireless technology.
• Do not use the DPPA-BT1 outsides the area you
purchased it. Depending on the areas, the use
of this product may infringe the wave
regulations and may be subject to its penalty.
• Sony cannot assume any responsibilities for any
information leakage that may be caused in
Bluetooth communications.
• Sony cannot accept responsibilities for any
failure to satisfy the protection requirements
resulting from a non-recommended
modification or use of the product.
• For customer support information, please refer
to the operating instructions of your printer.
When input of Pass code* is required
Input “0000”. You cannot change the pass
cord with the printer.
* Pass code is often referred to as “pass
key” or “PIN code”.
Notes
•
The communication distance of the product
may vary depending on the obstacles between
the product (a human body, metal object, or
wall) and mobile phone or other device.
• Sensitivity of the Bluetooth communication
may be affected in the following conditions:
- When there is an obstacle between the
product and the mobile phone or other
product such as a human body, metal object,
or a wall.
- Were a wireless LAN is established or a
microwave oven is being used near-by, or
other electromagnetic wave is emitted.
GB
30
P Cautions
• Radio waves from a Bluetooth device may
adversely affect the operations of electrical
and medical devices, and could lead to
accidents due to malfunctions. Make sure to
turn off the product and mobile phone and do
not use this product in the following places:
- Inside the medical facilities, trains,
airplanes, gas stations or other places
that may emit flammable gas.
- near automatic doors or fire alarms or
other automatically controlled devices.
• Keep this product at least 22 cm away from
cardiac pacemakers. Radio waves from this
product may adversely affect the operation of
cardiac pacemakers.
• Do not disassemble or modify this product.
Doing so could result in injury, electric shock,
or fire.
Page 31
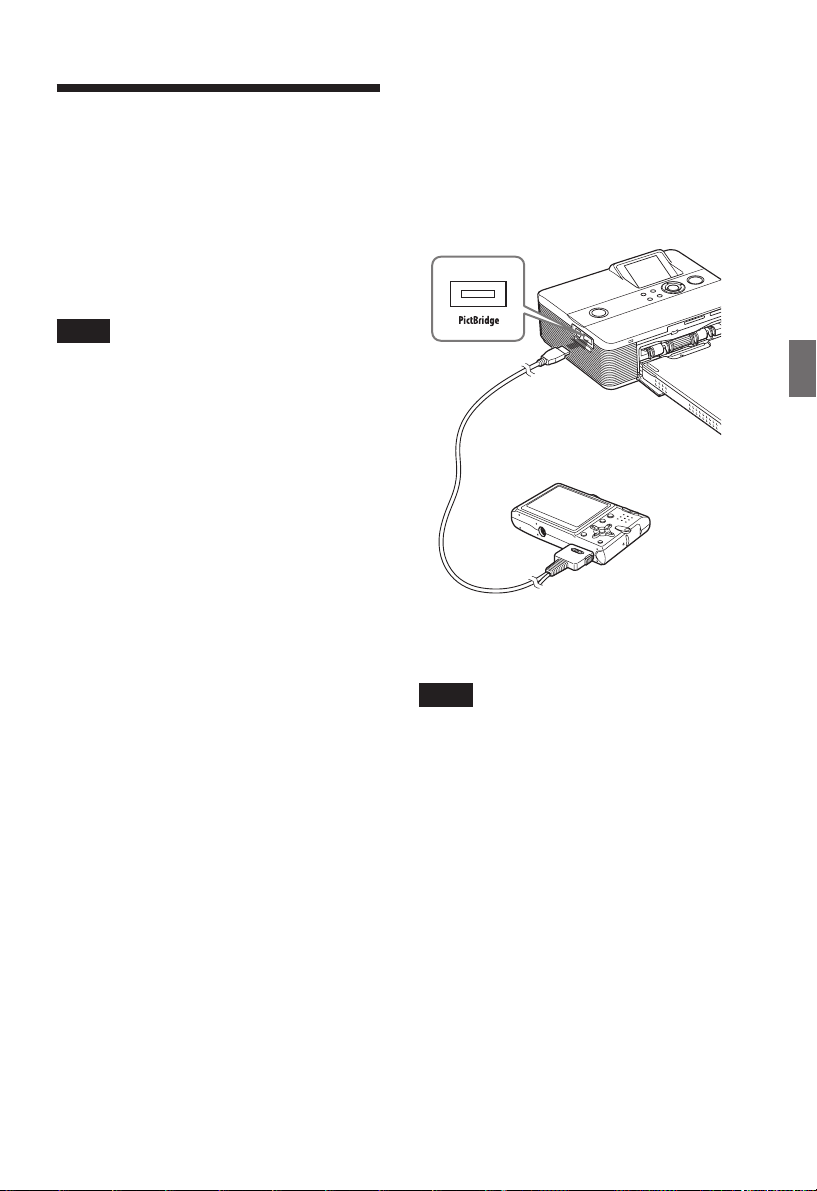
Printing from an external device
You can connect a mass-storage-complaint
digital camera, a USB memory, a photo
storage device, or other external device
and print an image directly from the
external device.
Notes
• We cannot guarantee connection with all
types of mass storage devices.
• If a memory card is inserted in the printer, the
printer cannot read the signal from an
external device connected to the PictBridge
connector of the printer. Remove the memory
card, if any.
Set your digital camera or other
1
external device ready for printing
with the Mass Storage-compliant
printer.
The settings and operations that are
necessary before connection differ
depending on the external device you
use. For details, see the operating
instructions of the external device. (In
case of Sony Cyber-shot digital
camera, for example, select “Normal”
mode or “Mass Storage” mode for the
“USB Connect”. )
Connect the printer to the AC
2
power source (. Read This
First).
Press 1 (on/standby) switch to
3
turn on the printer.
The 1 (on/standby) indicator of the
printer lights in yellow green.
Connect a camera or an external
4
device to the PictBridge connector
of the printer.
Use the USB cable supplied with the
digital camera or other external
device, if necessary.
Printing in the direct mode is
possible.
To PictBridge connector
Printing from a PictBridge camera or external device
To USB
connector
Mass-storage-compliant
USB memory, digital
camera, photo storage
device, or other external
device.
Notes
• If you use a commercially available USB
cable, please use the one shorter than 3m in
length.
• While the access indicator of the external
device is flashing, never turn off the power of
the printer or an external device nor remove
the USB cable. The data inside the external
device may be damaged. We cannot
guarantee any damages that may be caused
by data loss or damage.
• You cannot use a USB hub or a USB device
equipped with a USB hub.
• Encoded or compressed date by fingerprint
authentication or password cannot be used.
• The following Sony USB devices cannot be
used since they contain fingerprint
authentication system or a USB hub:
USM16A/S, USM32A/S, USM64A/S,
USM128A/S,USM256A/S, USM128B/BMS,
USM64C, USM128C, USM128F
31
GB
Page 32

Printing from a PC
You can print the images from a PC by
installing the supplied software on your
PC and connecting it to the printer.
This section explains how to install the
supplied software on your PC and how to
use the supplied Picture Motion Browser
software to print an image.
Please also refer to the operating
instructions supplied with your PC for
operating the PC.
Installation of the software is necessary
only when you connect the printer to your
PC for the first time.
On the supplied CD-ROM
The supplied CD-ROM contains the
following software:
• Printer driver for DPP-FP60: The
software describes the printer’s
requirements and enables printing from
the PC.
• Picture Motion Browser: Sony’s
original software application that allows
you to handle photographs and moving
images—capturing, managing,
processing, and printing.
Installing the software
System requirements
To use the supplied printer driver and
Picture Motion Browser, your PC must
meet the following system requirements:
OS: Microsoft Windows Vista (
Windows XP Professional (
Windows XP Home Edition/
Windows 2000 Professional (Service
Pack 3 or later), pre-installed
(*1 )Excluding Starter. In addition, the
Picture Motion Browser does not
support the 64-bit version.
(*2 )The 64-bit version is not supported.
(Windows 95, Windows 98 Gold
Edition, Windows 98 Second Edition,
Windows NT, Windows Millennium
Edition, other versions (ex. SP2 or
former, or Server) of Windows 2000
are not supported.)
CPU: Pentium III 500MHz or faster
(Pentium III 800MHz or faster is
recommended.)
RAM: 128 MB or more (256 MB or more is
recommended.)
Hard disk space: 200 MB or more
(Depending on the Windows version
you use, more space will be required.
To handle image data, you will need
additional hard disk space.)
Display:
Screen resolution:
800 x 600 pixels or more
Colors:
High Color (16-bit) or more
Required software: DirectX 9.0c or higher
(Required for the Picture Motion
Browser.)
*1
)/
*2
)/
32
GB
Page 33
Notes
• If a hub is used to connect the printer and
your PC, or if two or more USB devices
including other printers are connected to your
PC, a trouble may occur. If this occurs,
simplify the connections between your PC
and the printer.
• You cannot operate the printer from another
USB device being used simultaneously.
• Do not remove the USB cable from or connect
it to the printer during data communication
or printing. The printer may not work
properly.
• Do not allow the PC connected to the printer
to switch to standby mode or hibernation
mode during printing. If you do so, the
printer may not print properly.
• We cannot guarantee operations with all PCs,
even though they may meet or exceed the
system requirements.
• Picture Motion Browser supports the DirectX
technology and the DirectX installation may
be required.
DirectX is available in the CD-ROM.
• If the Picture Motion Browser is installed on a
PC on which the Cyber-shot Viewer is
already installed, the Cyber-shot Viewer will
be overwritten and replaced by the Picture
Motion Browser. The browsing folders once
registered in the Cyber-shot Viewer will be
automatically registered in the Picture Motion
Browser. When using the Picture Motion
Browser, you can view the folders easier than
you can when using the Cyber-shot Viewer,
as the registered folders are displayed by
group when viewing folders. With its
improved red-eye reduction adjustment and
newly-added tone curve adjustment, the
Picture Motion Browser also offers more
powerful editorial features. You can also use
the software to write data into an external
memory card for taking it outside.
Installing the printer driver
Follow the procedures below to install the
driver.
Notes
• Before installing the driver, do not connect
the printer to the PC .
• When using the Windows Vista/XP/2000, log
on to Windows as a “Computer
administrator” user account.
• Be sure to close all running programs before
installing the software.
• The dialog boxes in this section are those in
Windows XP, unless otherwise specified. The
installation procedures and the dialog boxes
shown differ depending on the operating
system.
1 Turn on your PC, start Windows,
and insert the supplied CD-ROM
into the CD-ROM drive of your PC.
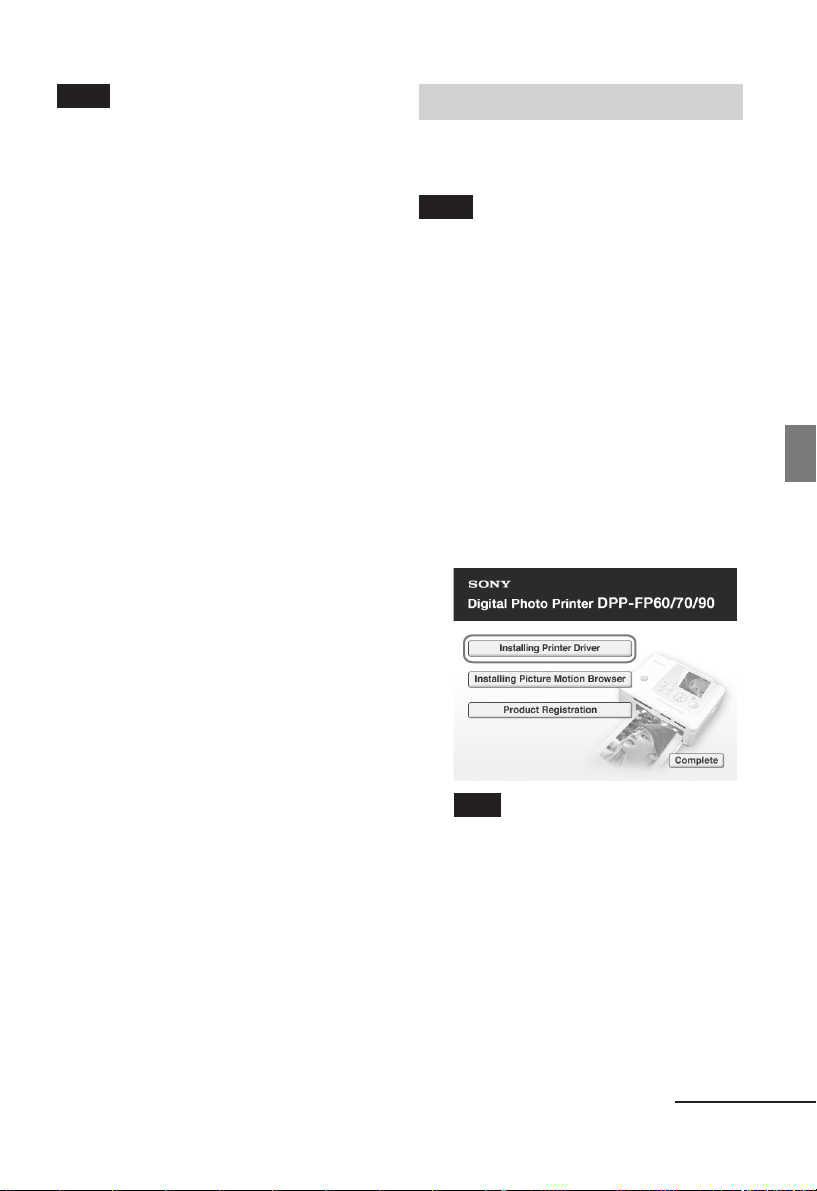
The installation window is displayed.
Note
In case the installation window is not
automatically displayed, double-click the
“Setup.exe” of the CD-ROM.
2 Click “Installing Printer Driver”.
Printing from a PC
3 Click “Next”.
The license agreement dialog box is
displayed.
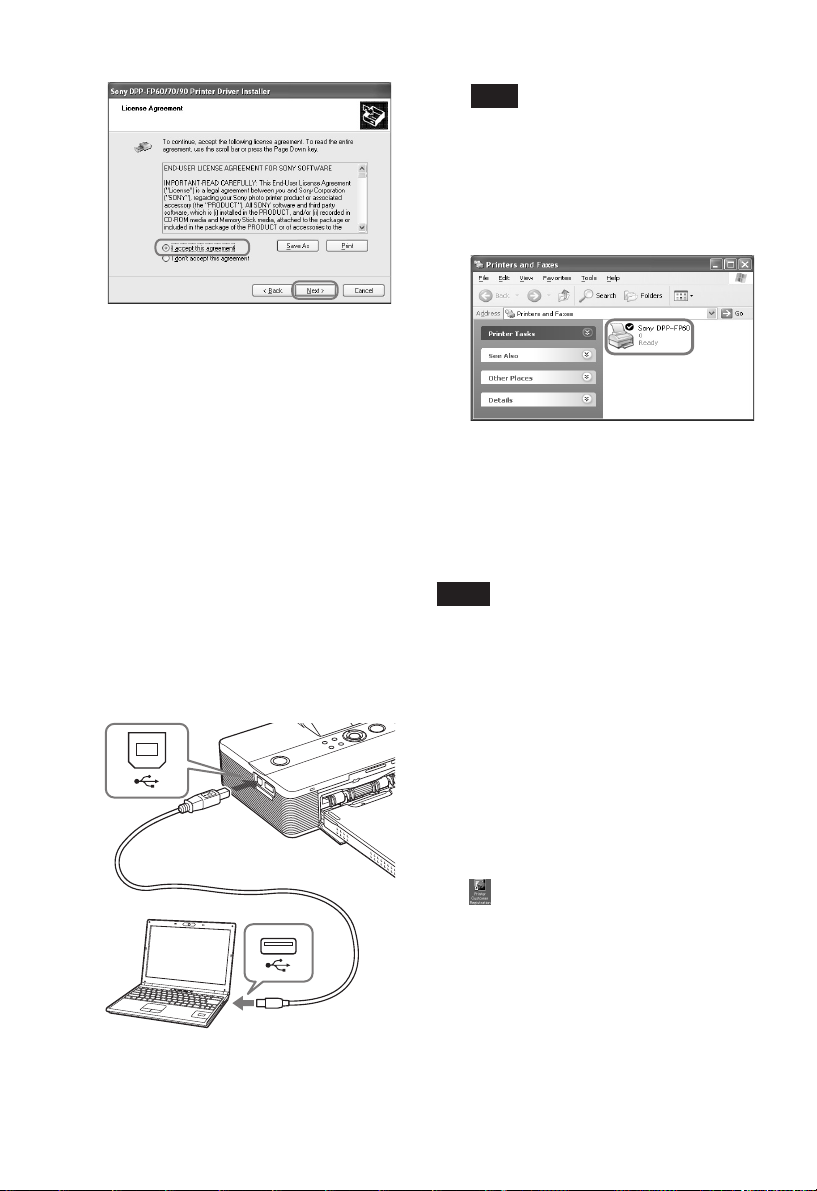
4 Read the agreement thoroughly,
and if you agree, check “I accept
this agreement” and click “Next”.
Continued
33
GB
Page 34
The setup starts.
5 When “Sony DPP-FP60/70/90
printer driver has been
successfully installed.” dialog is
displayed, click “Finish”.
Connect the printer to the AC
6
power source (. Read This
First).
Press 1 (on/standby) switch to
7
turn on the printer.
Connect the USB connectors of
8
the printer and your PC with a
USB cable (not supplied).
Printer driver installation starts
automatically.
To USB
connector
To USB
Windows PC
connector
Note
Use a B-type USB cable shorter than 3m in
length.
Wait for a while, then check to
9
see that “Sony DPP-FP60” is
added to the “Printers and
Faxes”.
10
When the installation is complete,
remove the CD-ROM from your PC
and keep it for future use.
To continue to install the Picture
Motion Browser software, follow the
procedures from step 2 on page 35.
Notes
• If the installation fails, remove the printer
from your PC, restart your PC, and then do
the installation procedures from the step 2.
• After installation, the “Sony DPP-FP60” is not
set as the default printer. Set the printer you
use for each application.
• The supplied CD-ROM will be required when
you uninstall or re-install the printer driver.
Keep it in good order for possible future use.
• Before you use the printer, read the Readme
file (the Readme folder of the CDROMcEnglish foldercReadme.txt).
When the software is installed
The
is displayed on the Windows
desktop, as well as a shortcut to the web
site for printer customer registration. If
you finish registration, you can find
support information at:
http://www.sony.net/registration/di/
34
GB
Page 35

Uninstalling the printer driver
Remove the printer driver as follows:
1 Disconnect the USB cable (not
supplied) from your printer and
the PC.
Click “Start” - “Printers and
2
Faxes”.
Select “DPP-FP60”, and click
3
“Delete” from the “File” menu.
The confirmation dialog box is
displayed.
Click “Yes”.
4
Check to see that “DPP-FP60” is
5
removed from the “Printers and
Faxes” window.
Click ”Server Properties” from the
6
“File” menu, and click “Drivers”
tab in the “Printers Server
Properties” window.
Select “Sony DPP-FP60” from the
7
list box and click “Remove”.
The confirmation dialog box is
displayed.
When using the Windows Vista,
deletion may not be possible. You can
safely leave it as it is.
Click “Yes”.
8
Click “Close” to close the “Printers
9
Server Properties” window.
10Click “Start” - “Control Panel”.
The Control Panel window is
displayed.
11Open “Add or Remove
Programs.”
12Select “Windows Driver Package –
Sony DPP-FP60/70/90” and click
“Change/Remove”.
The confirmation dialog box is
displayed.
13Click “Yes”.
Installing the Picture Motion Browser
Follow the procedures below to install the
Picture Motion Browser.
Notes
• When using the Windows Vista/XP/2000, log
on to Windows as a “Computer
administrator” user account.
• Be sure to close all running programs before
installing the software.
• The dialog boxes in this section are those in
Windows XP, unless otherwise specified. The
installation procedures and the dialog boxes
shown differ depending on the operating
system.
1 Turn on your PC, start Windows,
and insert the supplied CD-ROM
into the CD-ROM drive of your PC.
The installation window is displayed
(page 33).
2 Click “Installing Picture Motion
Browser”.
The “Choose Setup Language” dialog
box is displayed.
3 Select your language and click
“Next.”
The “Location settings” dialog box is
displayed.
4 Select the “Region” and
“Country/Area” where you use
the printer and click “Next.”
The “InstallShield Wizard” dialog box
is displayed.
Continued
35
Printing from a PC
GB
Page 36
5 Click “Next.”
The license agreement dialog box is
displayed.
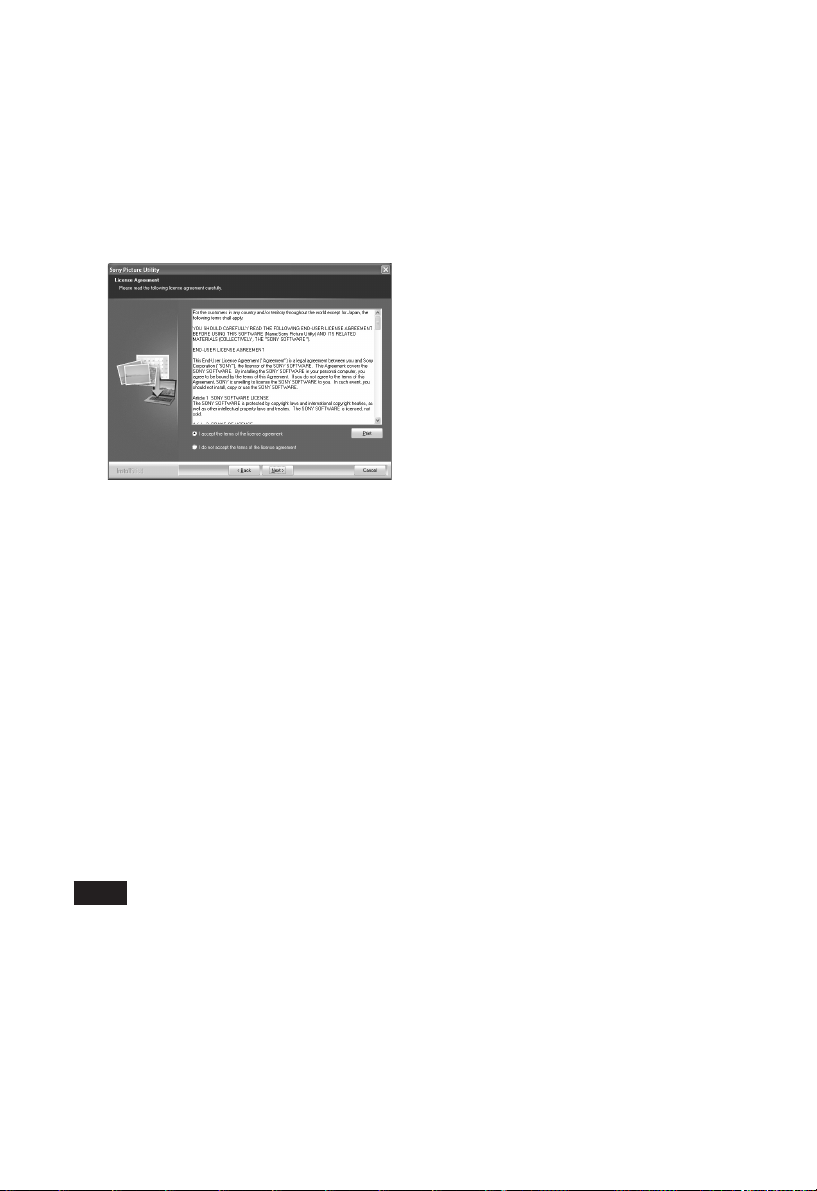
6 Read the agreement thoroughly,
and if you agree, check “I accept
the terms of the license
agreement” and click “Next”.
The dialog box used to specify the
destination location is displayed.
7 Check the destination and then
click “Next”.
The “Ready to Install the Program”
dialog box is displayed.
8 Click “Install” and follow the
instructions on the screen to
proceed with installation.
When you are prompted to restart
your PC, follow the displayed
instructions to restart it.
Uninstalling the Picture Motion
Browser
When this software is no longer needed,
remove it from your PC as follows:
1 Click “Start” - “Control Panel”.
2 Open “Add or Remove
Programs.”
3 Select “Sony Picture Utility” and
click “Change/Remove” .
The software uninstallation starts.
4 Click “Finish”.
9 When the installation is complete,
remove the CD-ROM from your PC
and keep it for future use.
Notes
• If the installation fails, perform the
installation procedures from step 2 again.
• The supplied CD-ROM will be required when
you uninstall or re-install the Picture Motion
Browser. Keep it in a safe place for possible
future use.
GB
36
Page 37
Printing photos from the Picture Motion Browser
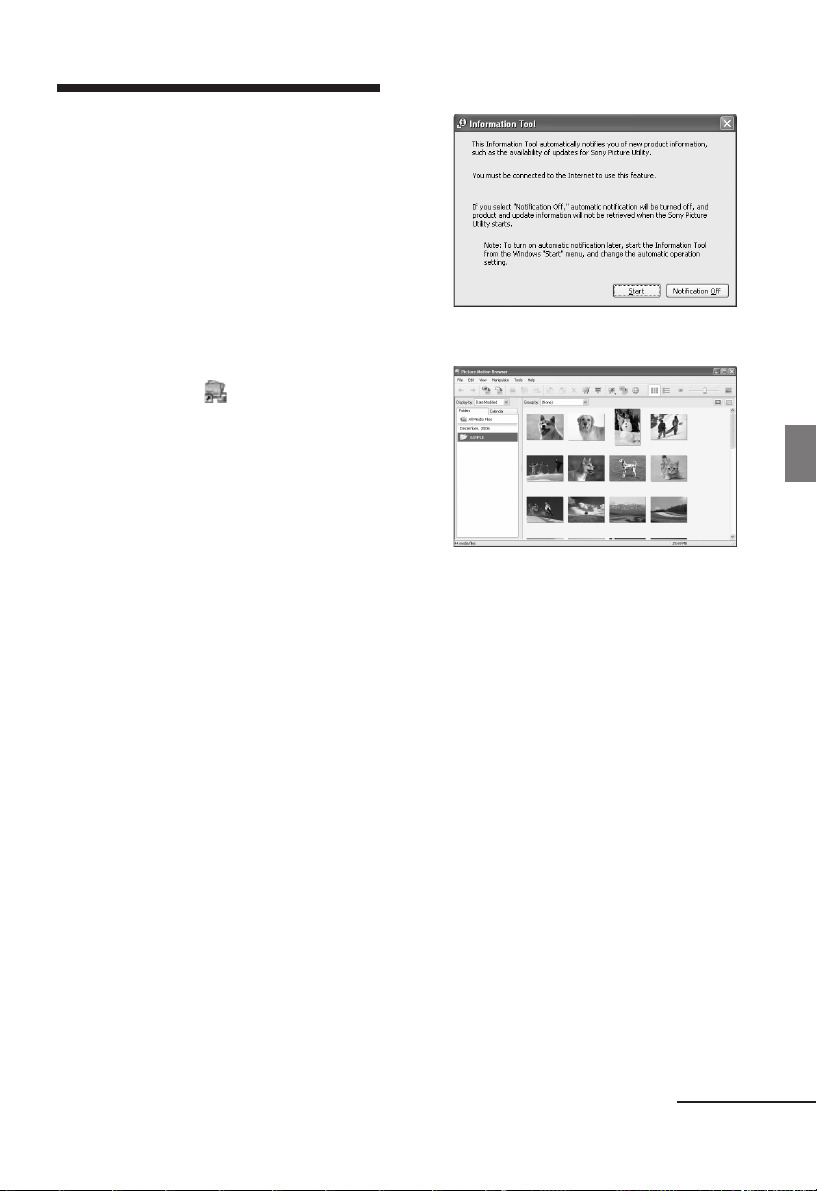
2 Click “Start”.
You can use the
print an image from your PC using P size
print paper.
Start the Picture Motion Browser
1
window using either of the
following methods:
• Double-click (Picture Motion
Browser) on the Windows desktop.
• Click “Start” - “All Programs” (or
“Programs” with Windows 2000) “Sony Picture Utility” - “Picture
Motion Browser.”
The “Information Tool” window is
displayed.
When the Picture Motion Browser is
started for the first time
The dialog box to register a viewed
folder is displayed. If images have
already been saved in the “My
Pictures” folder, click “Register
Now.”
If you have saved images in a folder
other than the “My Pictures” folder,
click “Register Later.” Refer to ”To
register a browsing folder” (page 41).
How to access the “My Pictures”
folder
• In Windows 2000:
Click “My Documents” - “My
Pictures” on the desktop.
• In Windows Vista/XP:
Click “Start” - “My Pictures” from
the taskbar.
Picture Motion Browser
to
The main window of the Picture
Motion Browser is displayed.
Printing from a PC
To switch the display of the main
window
There are 2 different versions of photo
view used in the main window as
follows:
To switch the view, click the tab
“Folders” or “Calendar.”
• “Folders” view
The images will be classified in each
registered folder and are displayed
as thumbnails.
• “Calendar” view
The images will be classified
according to the shot date and are
displayed as thumbnails on each
date of the calendar. In “Calendar”
view, you can switch the display
according to the year, month, or
hour.
In this section, “Folders” view
windows are used as examples.
Continued
GB
37
Page 38
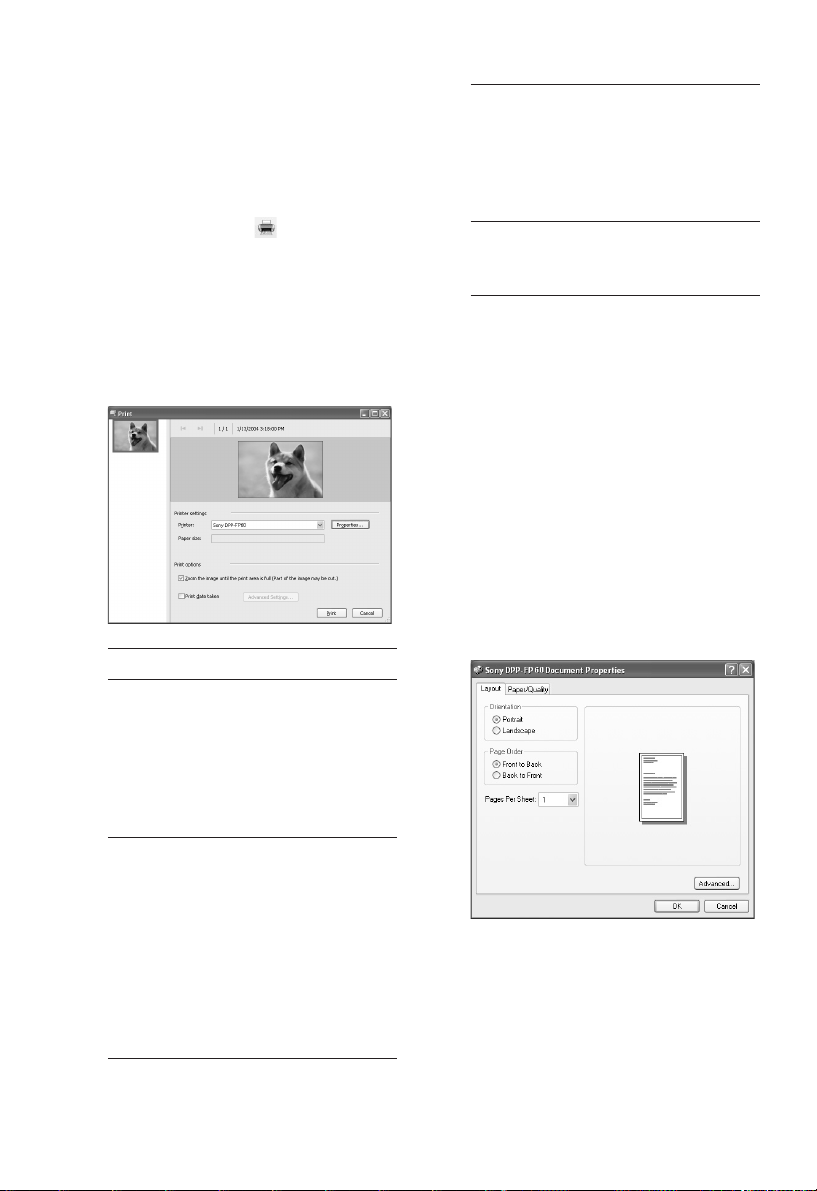
3 Click the folder containing the
photos you want to print.
As an example, the “sample” folder is
selected in the following explanation.
4 Select the photos that you want
to print and click
The Print dialog box is displayed.
(print).
5 In the “Printer” drop-down list
box, select “Sony DPP-FP60”. To
set the paper orientation or other
print options, go to step 6. To
print, skip to step 11.
Items Functions
Printer Settings
• Printer: Select the printer you
are using: “Sony DPP-FP60”
•Paper size: To change the size,
click “Properties”.
Note: In some regions, L size
print paper is not sold.
Print Options
•Zoom the image until the print
area is full: When checked, an
image will be printed over the
entire printing area of the
paper. An edge of the photo
may be cut.
When unchecked, an image
will be printed without cutting
off.
•Print date taken: When
checked, an image is printed
with the date of shooting if the
image is a file recorded in the
DCF (Design rule for Camera
File system) format.
Properties
Specifies paper size, orientation,
and other details.
6 To set the paper orientation or
other print options, click
“Properties”.
The “Properties” dialog box of the
selected printer is displayed. The
printer driver of the printer utilizes
the Universal Printer Driver, a
Microsoft common printer driver . In
the dialog boxes, there are some items
that are not used in the printer.
7 In the “Layout” tab, specify the
paper orientation or other
options.
38
GB
Page 39
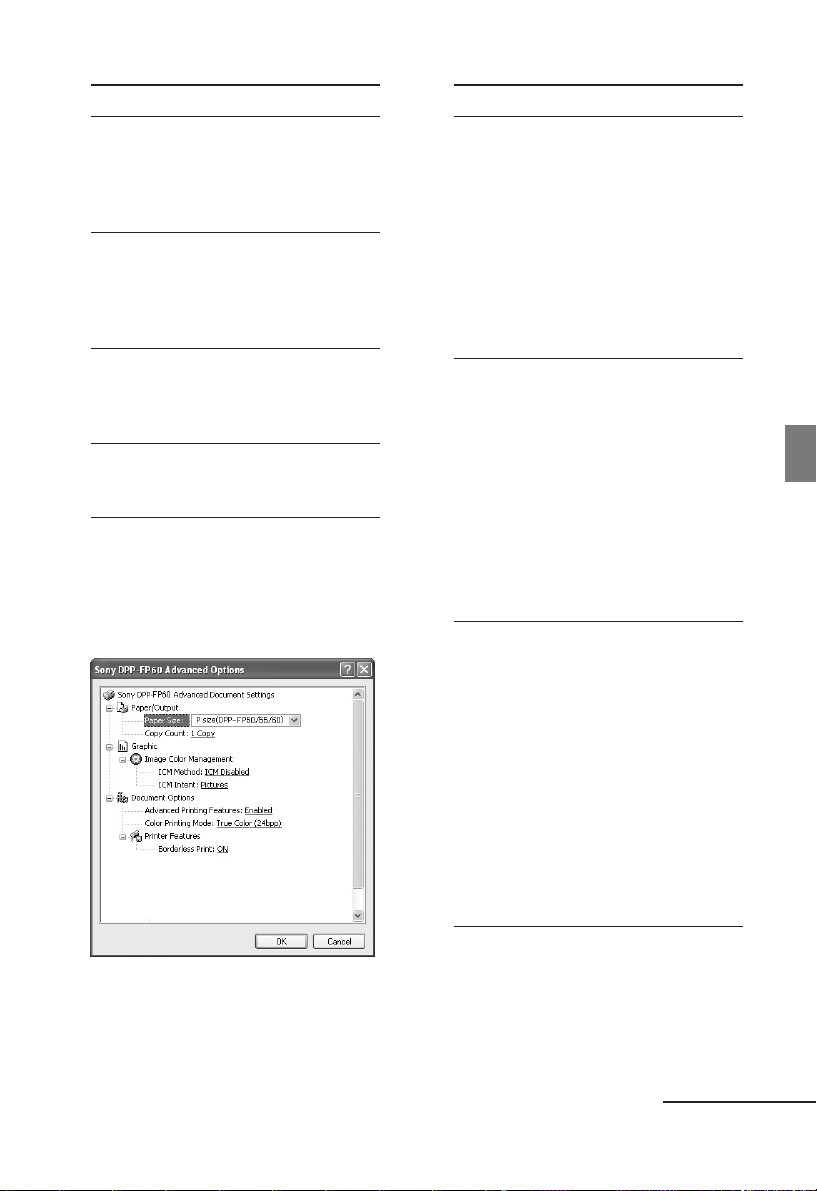
Items Functions
Orientation
Select the orientation of an
image when printed:
•Portrait
•Landscape
Page Order
Select the order of the pages
when printed:
•Front to Back
•Back to Front
Pages Per Sheet
Specify the number of copies
per sheet to be printed.
Select “1”.
Advanced
Specifies the paper size or other
options.
8 Click “Advanced”.
The “DPP-FP60 Advanced Options”
dialog box is displayed.
Items Functions
Paper/Output
•Paper Size: From the dropdown list box, select the paper
size you actually use for
printing: P size (post card
size)/L size
Note: L size print paper is
not sold in some regions.
•Copy Count: Specify the
number of copies to be
printed.
Graphic - Image Color Management
•ICM Method: The printer does
not support the ICM method
settings. Even when you select
an option other than “ICM
Disabled”, the printed results
do not reflect the setting.
Leave the option as it is.
•ICM Intent: The printer does
not support the ICM Intent
settings. Leave the option as it
is.
Document Options
•Advanced Printing Features:
Select “Enabled” to turn on
advanced printing options
such as “Page Order”. If a
compatibility problem occurs,
disable this feature.
•Color Printing Mode: To print
in colors, select “True Color
(24bpp)”. To print in
monochrome, select
“Monochrome”.
For details, see the Windows
help.
Printing from a PC
Continued
39
GB
Page 40
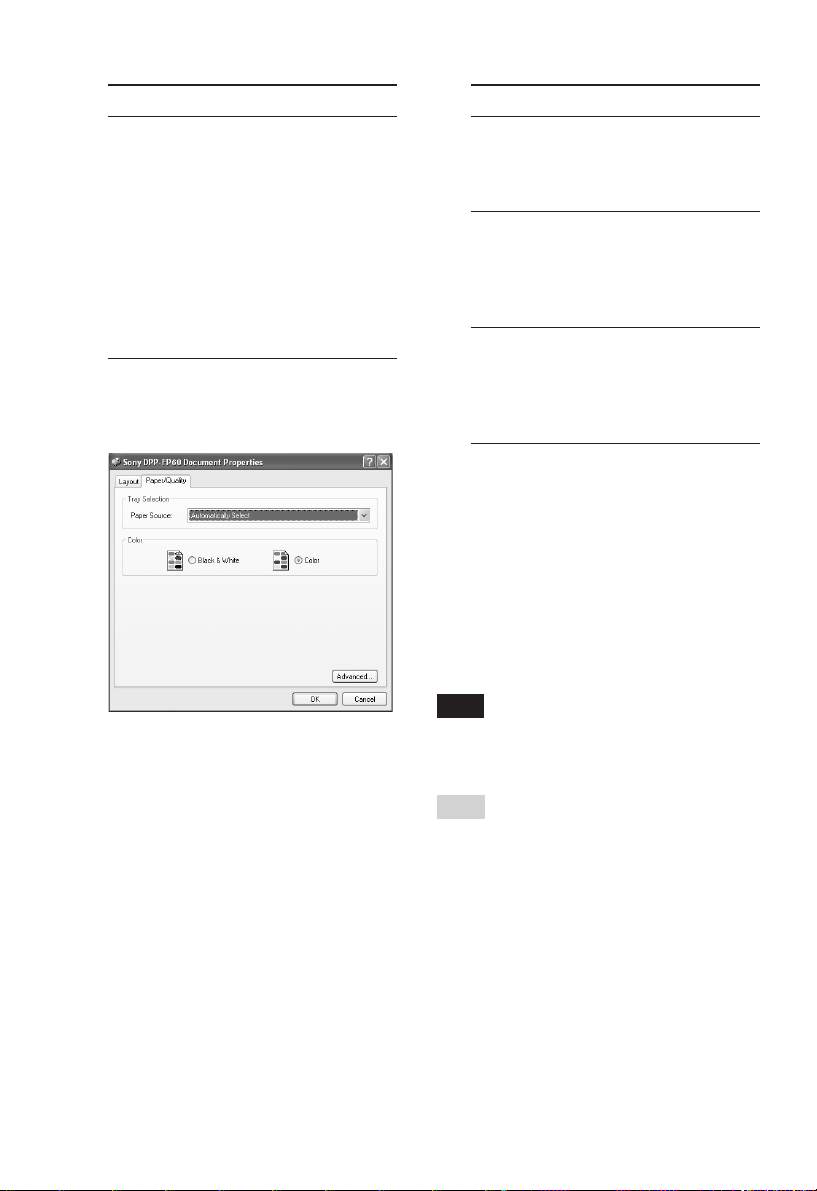
Items Functions
Printer Features
•Borderless Print: To print an
image without borders, select
“ON”. To print with borders,
select “OFF”. Depending on
the application software, an
image will be printed with
borders even if “ON” is
selected. Set an image to be
printed fully in the print
range.
9 In the “Paper/Quality” tab, specify
the color or paper source.
Items Functions
Tray Selection
From the “Paper Source” dropdown list box, elect
“Automatically Select”.
Color
To print in colors, select
“Color”. To print in
monochrome, select “Black &
White”.
Advanced
The “DPP-FP60 Advanced
Options” dialog box is
displayed. (page 39)
For details, see step 8.
10Click “OK”.
The “Print” dialog box is displayed
again.
11Click “Print”.
Printing starts. For the details of the
properties of the Picture Motion
Browser, see the Picture Motion
Browser help.
40
Note
You cannot print a motion-picture file or RAW
data files.
Tips
• To select serial still images in the image area
of the main window, click the first image in
the series and then click the last image while
pressing the Shift key.
To select multiple still images not in a
sequence, click the images individually while
pressing the Ctrl key.
• You can also print from an image preview.
GB
Page 41
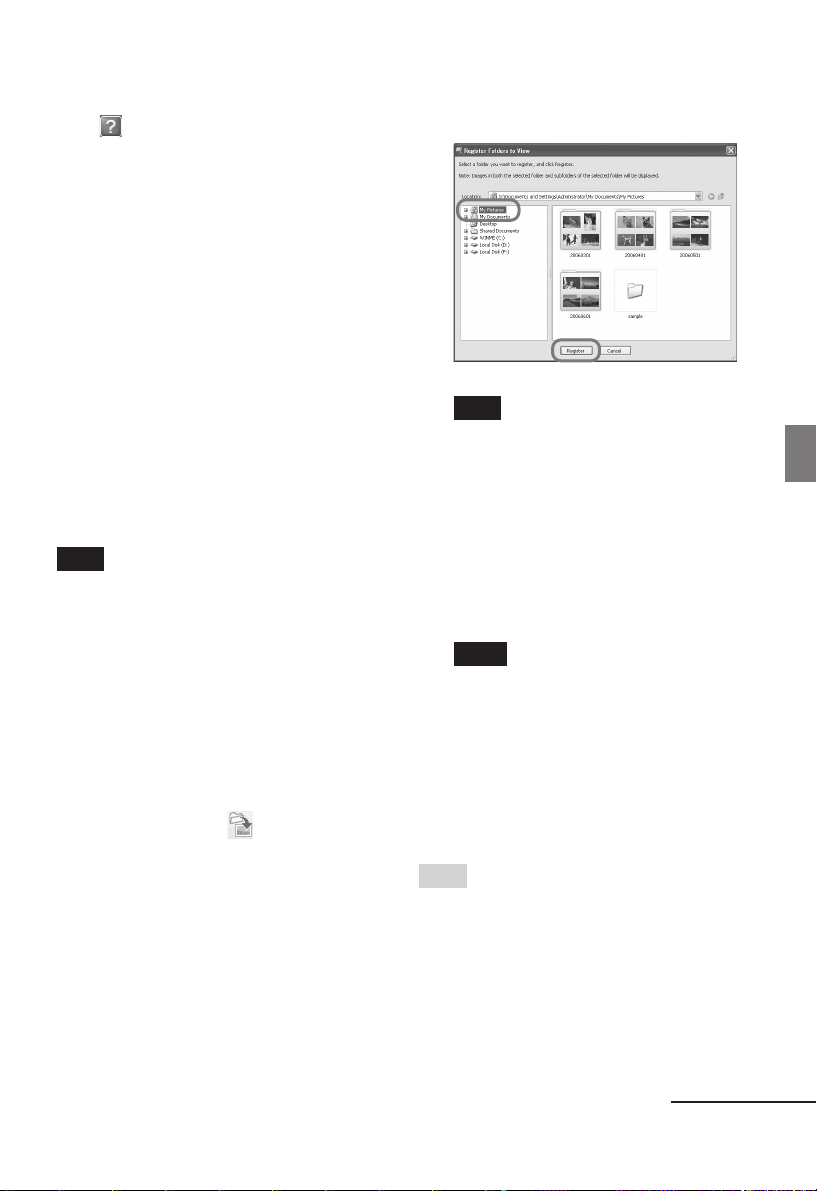
To display the Windows help
Click
box and then click the desired item on the
screen.
on the upper right on the dialog
To stop printing
1 Double-click on the printer icon
on the taskbar, and open the
“Print” dialog box.
2 Click the document name that
you want to cancel printing of
and then click “Cancel” from the
“Document” menu.
The dialog box used for confirming
the deletion is displayed.
3 Click “Yes.”
The printing job is canceled.
Note
Do not remove the job being printed. Doing so
may cause paper jam.
2 Select the folder you want to
register and then click “Register.”
Note
You cannot register the whole drive.
The confirmation dialog box for
registration is displayed.
3 Click “Yes.”
Registration of the image information
in the data base starts.
4 Click “Close.”
Printing from a PC
To register a browsing folder
The Picture Motion Browser does not
allow you to view images saved on the PC
hard disk directly. You must to register
the browsing folder as follows:
1 Click “File”-“Register Viewed
Folder,” or click
Folders to View).
The “Register Folders to View” dialog
box is displayed.
(Register
Notes
• The folder you select as the destination
of the imported images will be
registered automatically.
• You cannot cancel registration of the
folder you register here.
To change the browsing folder
Click “Tools” - “Settings” - “Viewed
folders.”
Tips
• If a sub folder is contained in the source
folder, the images in the sub folder will also
be registered.
• When the software is first started, the
message prompting you to register “My
Pictures” will be displayed.
• Depending on the number of images, it may
take some tens of minutes to register images.
Continued
41
GB
Page 42

Printing from a commerciallyavailable application software
You can use a commercially-available
application software to print an image
from the DPP-FP60. Select “DPP-FP60” as
“Printer” in the print dialog box, and
select the print paper size in the page
setup dialog box. For details in print
settings, see steps 6 and 7 on pages 38 and
39.
On “Borderless Print” setting in the
“Printer Features”
When using an application other than the
Picture Motion Browser, an image might
be printed with borders even if you select
“ON” for the “Borderless Print” in the
“Printer Features” of the “Sony DPP-FP60
Advanced Options” dialog box.
When you select the borderless print
option, the printing range information for
borderless print will be supplied to the
application. Some applications, however,
may arrange and print the image with
borders within the specified range.
If this occurs, do the following to print an
image without borders:
• When you can set print range with an
application, set an image to be printed
fully in the print range. For example,
select “Full page photo print” or a
similar option.
Orientation setting
Depending on the application software
you use, orientation may not change even
if you change portrait or landscape setting.
With border/borderless setting of the
printer driver
When the application software you use
has border/borderless setting, we suggest
you select “ON” for the “Borderless Print”
in the “Printer Features” of the “Sony
DPP-FP60 Advanced Options” dialog box
as the printer driver setting.
Print quantity setting
Depending on the application software
you use, the print quantity setting of the
application you use may have priority
over the setting specified in the printer
driver dialog box.
42
GB
Page 43
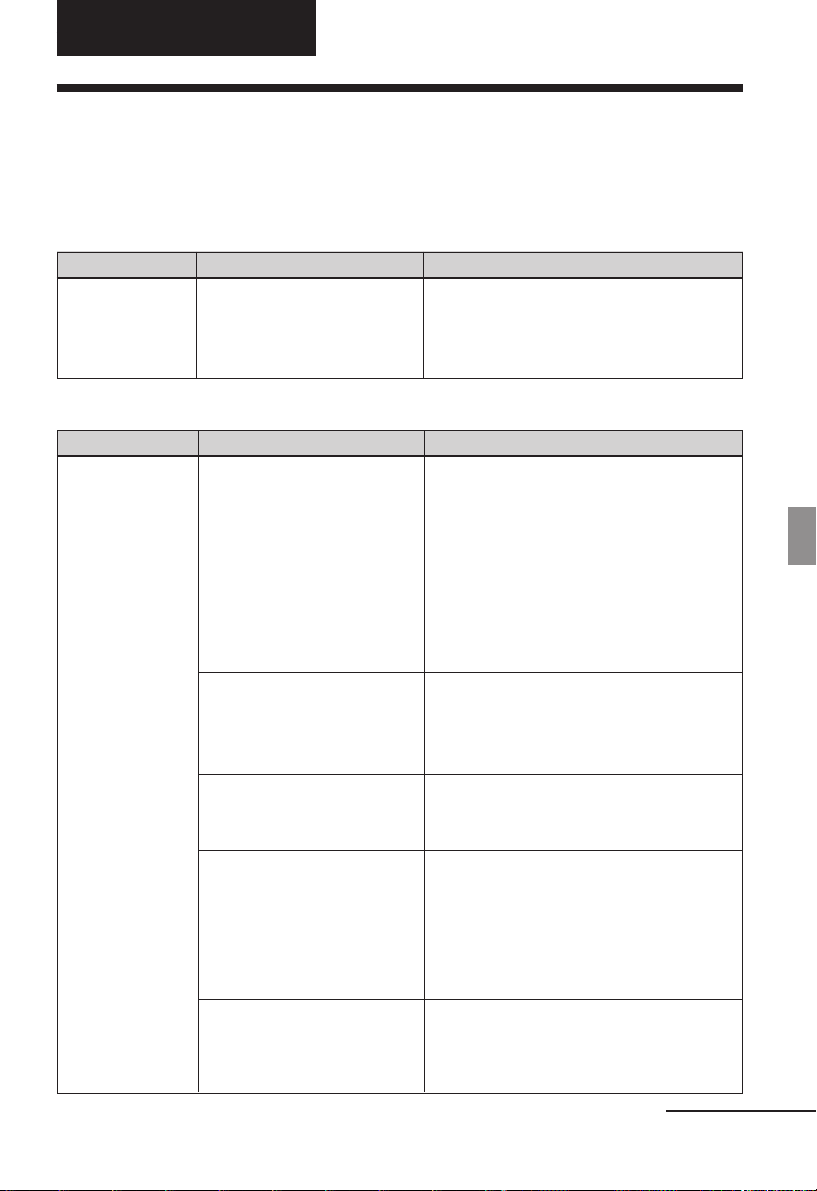
Troubleshooting
If trouble occurs
If you run into any problems using the printer, use the following guidance to solve the
problem. If the problem persists, consult your Sony dealer.
Power
Symptom
The 1 (on/
standby) switch
cannot be
turned on.
Check
• Is the AC power cord
properly connected?
Displaying images
Symptom
The LCD screen
displays no
images.
Check
• Does the LCD screen of
the printer show
“Connecting”?
• Are any error messages
displayed (cause/
remedies) on the LCD
screen?
• Is the memory card or an
external device properly
inserted?
• Does the memory card or
an external device contain
images recorded with a
digital camera or other
device?
Cause/Solutions
cConnect the AC power cord to an AC
outlet securely. (.Read This First)
Cause/Solutions
cWhen a PictBridge camera or a PC is
connected to the printer and the
printer operates on the PictBridge/
PC mode, no images will be
displayed on the window. Operate
with the PictBridge camera or PC.
To display the images of a memory
card or external device, remove the
PictBridge camera or PC.
cFollow the directions of the messages,
if any, and try to solve the problem.
(.page 58)
cInsert a memory card or an external
device properly. (.Read This First)
cInsert a memory card or an external
device that contains the recorded
images.
cCheck the file formats that can be
printed with the printer. (.page
68)
Troubleshooting
• Is the file format
compatible with the DCF?
cIf an image is not compatible with the
DCF, it may not be printed with the
printer even if it is displayed on the
PC monitor.
Continued
43
GB
Page 44
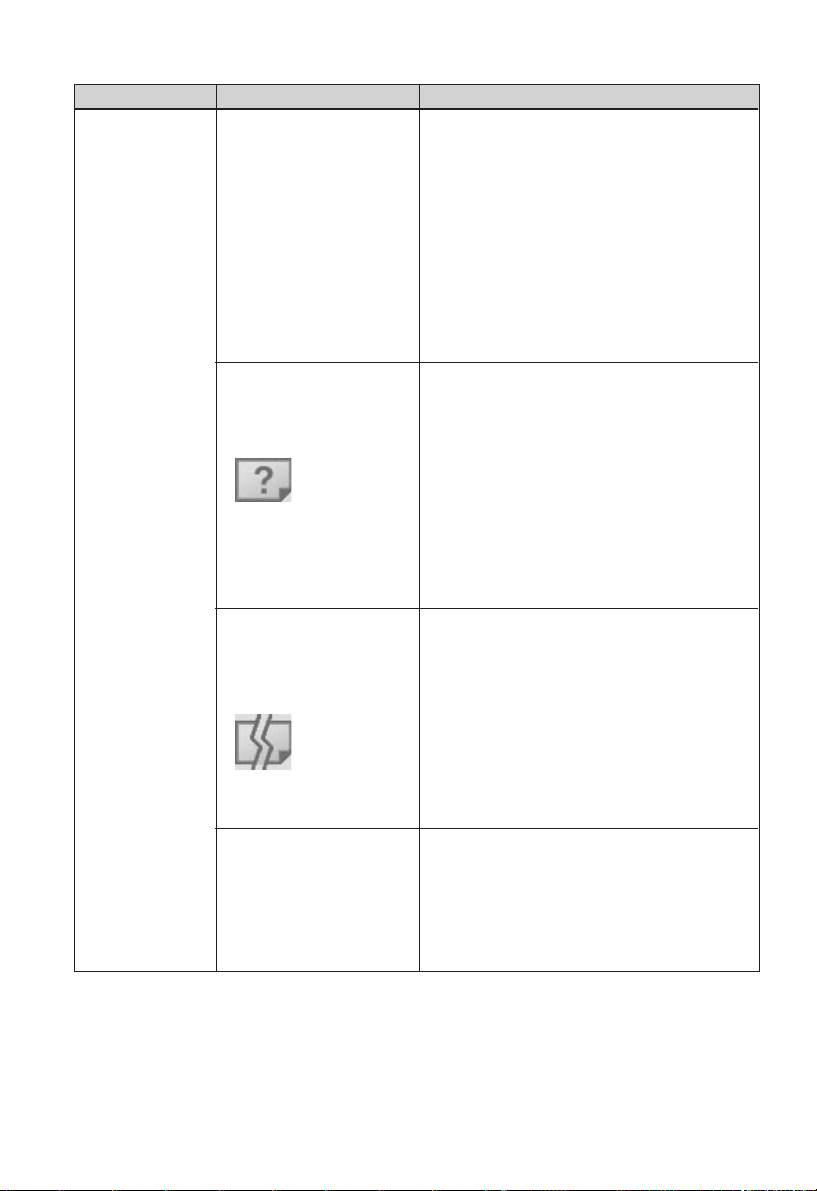
Symptom
Some images in
the image list
are not
displayed or not
printed even if
they are
displayed.
Check
• Are thumbnail images
displayed in the image
list?
Cause/Solutions
cIf the image is displayed but cannot be
printed, the file used for printing is
damaged.
cIf there are no images stored in the
memory card or an external device, the
“No image file” message appears.
cIf an image is not compatible with DCF
(Design rule for Camera File system), it
may not be printed with the printer even
if it is displayed on the PC monitor.
• Does the mark
displayed below
appear in the image
list?
• Was the image created
on your PC?
• Does the mark
displayed below
appear in the image
list?
• Are there more than
9 999 images saved in
the memory card or an
external device?
cIf the mark shown on the left is
displayed, the image may be a JPEG file
created with your computer, or the
thumbnail data is not contained.
Select the mark and press ENTER to
display its image preview. If an image is
displayed, you can print the image. If the
same mark is displayed again, the image
is of incompatible file format and you
cannot print it with the printer.
cIf the mark shown on the left is
displayed, the image is of compatible file
format but its thumbnail data or the data
itself cannot be opened.
Select the mark and press ENTER to
display its image preview. If an image is
displayed, you can print the image. If the
same mark is displayed again, you
cannot print it with the printer.
cThe printer can display, save, delete or
handle up to 9 999 image files. If there
are more than 9 999 images stored in a
memory card or an external device, use
the PC or PictBridge mode to display and
handle the remaining images.
44
GB
Page 45
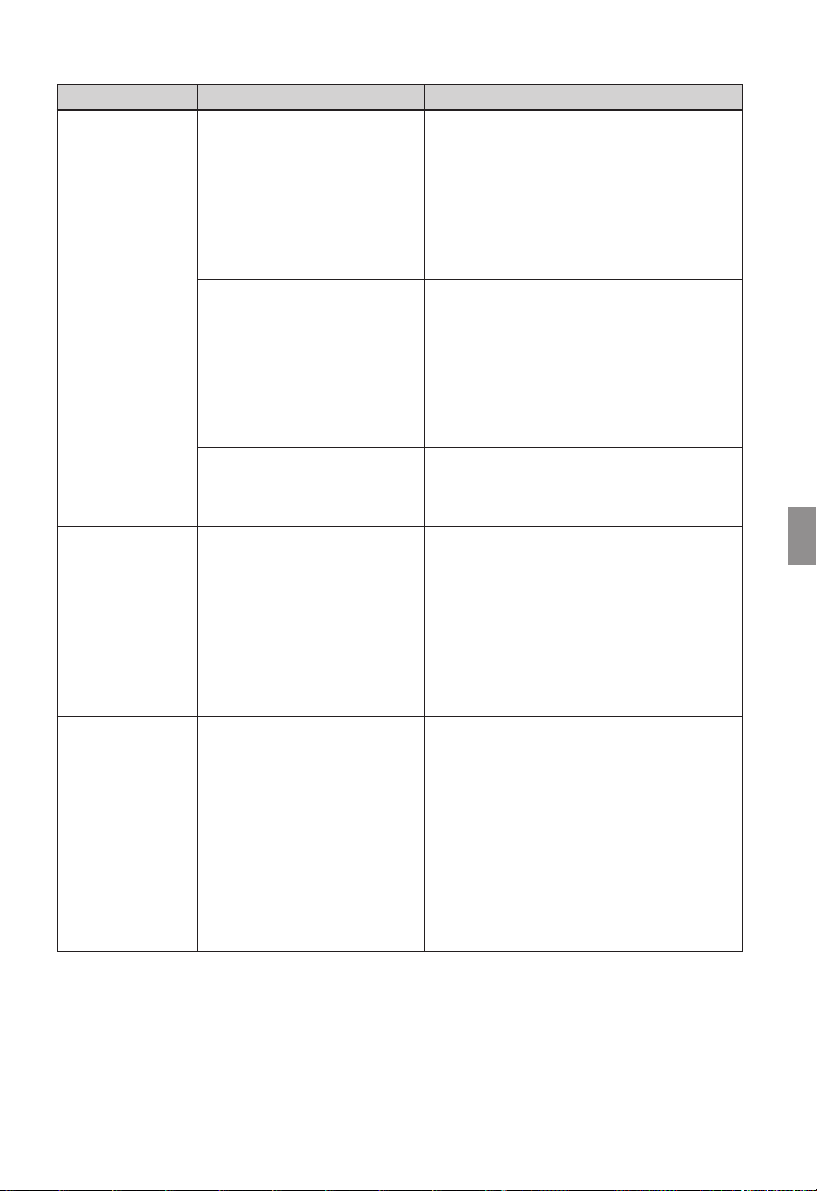
Symptom
Some images in
the image list
are not
displayed or not
printed even if
they are
displayed.
Check
• Did you name or rename
an image file with your
PC?
• Did you specify the print
quantity in the image list?
Cause/Solutions
cWhen you name or rename an image
file on your computer and its file
name includes characters other than
alphanumeric characters, the file name
may not be displayed correctly or the
image may not be displayed on the
printer (read error).
cOnce you have selected images in the
“Printing multiple images”
procedures, you cannot print an image
with which the cursor is just placed.
Press ENTER to select it and specify
the print quantity for the image.
(.Read This First)
The file name is
not displayed
correctly.
In the Edit
menu, there are
blank areas at
the top and
bottom of the
previewed
image.
• There are 8 or more
hierarchies in the memory
card or an external device.
• Did you change the file
name of the image with
your PC?
• Is the previewed image
extremely stretched
vertically or horizontally?
cThe printer cannot display the images
saved in a folder of the 8th or higher
hierarchy.
cWhen you name or rename an image
file on your computer and its file
name includes characters other than
alphanumeric characters, the file name
may not be displayed correctly . For a
file created with a PC application, the
first 8 characters of its file name will
be displayed as the file name.
cIf an image is extremely stretched
vertically or horizontally, blank areas
may appear in the Edit menu.
cThe standard aspect ratio of an image
shot with a digital camera is 3:4.
When an image is edited or printed in
the P size, it is saved as a more
horizontal print image and its top and
bottom edges will be cut and
displayed in black.
Troubleshooting
45
GB
Page 46
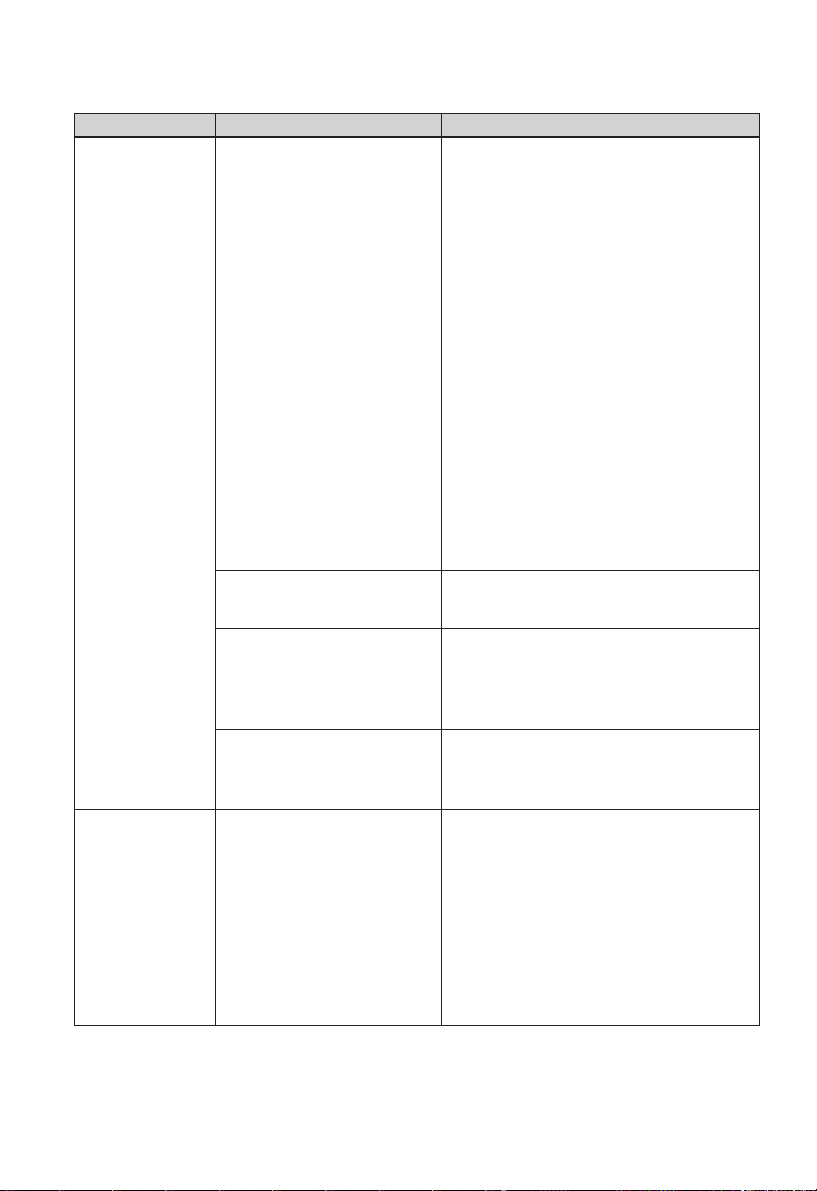
Printing
Symptom
Paper does not
feed.
Check
• Is the print paper properly
set in the paper tray?
Cause/Solutions
cIf print paper is not properly loaded,
the printer may develop trouble.
(.Read This First)
Check the following:
• Insert the correct set of print paper
and ink ribbon.
• Load the print paper in the correct
direction in the tray.
• You can insert the maximum 20
sheets of print paper into the tray. If
the sheets exceeds 20, remove the
extra sheets.
• Riffle the print paper thoroughly
and insert them into the tray.
• Do not bend or fold the print paper
before printing, which may cause
malfunction with the printer.
The print paper
emerges
partially during
printing in
process.
GB
46
• Does the ink ribbon or
print paper run out?
• Are you using print paper
that was not designed for
the printer?
• Is the print paper
jammed?
• Is it in the middle of the
printing process?
cIf an error message is displayed on the
screen, check the error message.
cUse print paper designed for the
printer. If you use incompatible print
paper, the printer may develop
trouble. (.Read This First)
cWhen the printer cannot feed the print
paper, an error message is displayed.
Check paper jam. (.page 61)
cThe print paper may emerge a few
times during printing. Do not touch
nor pull the emerged paper. Wait for
the print paper to be fully ejected after
printing ends. As the print paper
emerges from the rear a few times
during printing, make sure to spare
enough space behind the printer
during printing. (10 cm or more)
Page 47
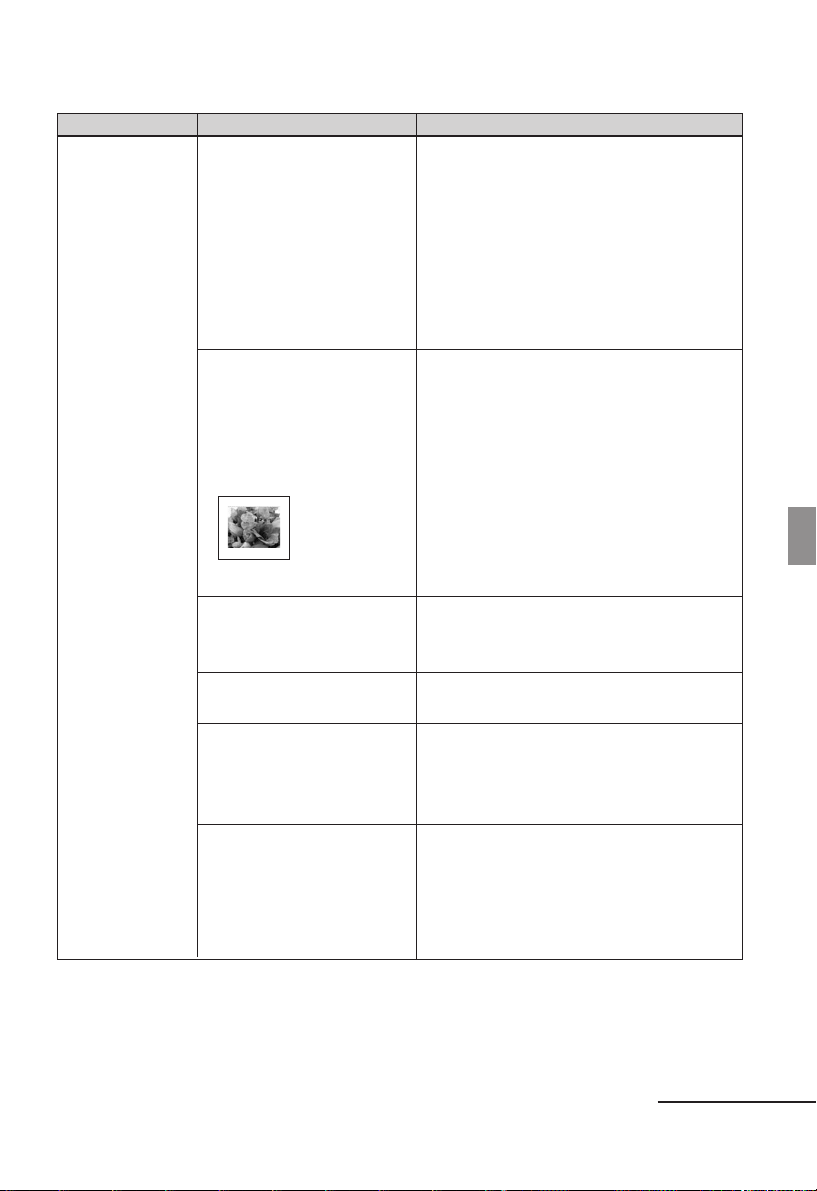
Printed results
Symptom
The printed
pictures are
inferior in
quality.
Check
• Did you print preview
image data?
• Did you print an image
whose size (width or
height) is smaller than
480 dots?
Is the image displayed as
follows?
• Did you use the Edit
menu to enlarge the
image?
Cause/Solutions
cDepending on the type of digital
camera used, preview images may be
displayed along with the primary
images in the thumbnail list. The
printed quality of the preview images
will not be as good as the primary
images. Note that if you delete the
preview images, the data for the
primary images may be damaged.
cWhen the image is displayed as shown
on the left, it is a small image. The
printing quality is rough due to this
small image size.
cChange the image size setting of the
digital camera you are using.
Troubleshooting
cAn enlarged image, depending on its
image size, will be printed with
deteriorated picture quality.
• Do you allow dust to get
on the ink ribbon?
• Did you allow dust or
finger prints to get on the
printed surface?
• Did you use used print
paper or ink ribbon?
cWipe the plastic part of the ink ribbon
and remove dust.
cDo not touch the printing surface (the
shiny-side with no imprint).
Fingerprints on the printing surface
may result in imperfect printing.
cDo not print on used print paper. Or,
do not use the used ink ribbon to print
an image. Printing an image twice on
the same paper will not make the
printed image thicker.
Continued
47
GB
Page 48
Symptom
The printed
pictures are
inferior in
quality.
Check
• Did you shoot an image in
the RAW file format?
Cause/Solutions
cWhen you shoot an image in the RAW
file format, a highly-compressed JPEG
file may be also recorded. As the
printer does not support the RAW file
format, it may use the JPEG file to
print an image. A RAW file can be
printed from a PC. For details, see the
operating instructions of the digital
camera you are using.
What is a RAW file?
A RAW file is an original image file
format to save uncompressed,
unprocessed still image data captured
from a digital camera.
For whether or not a digital camera
can capture an image in the RAW file
format, see the operating instructions
of the digital camera.
48
• Did you use an
AdobeRGB-compliant
digital camera, not
compatible with the DCF
2.0, to shoot an image in
the AdobeRGB mode?
cAn AdobeRGB image file that
supports the DCF 2.0 will undergo
color corrections, but an AdobeRGB
image file that does not support the
DCF 2.0 will be printed in vague
colors without color corrections.
What is an AdobeRGB?
An AdobeRGB is a color space that the
Adobe Systems Incorporated employs
and uses as the default setting for
image processing software including
the Adobe Photoshop. The
AdobeRGB, an optional color space
extended with the DCF 2.0,
determines the color ranges widely
used in printing industry.
For whether or not a digital camera
supports the AdobeRGB, see the
operating instructions of the digital
camera.
GB
Page 49
Symptom
The picture
quality and
colors of the
image
previewed on
the screen
differs from
those printed.
Check
Cause/Solutions
cBecause of differences in the phosphor
method or profiles of a LCD screen,
please regard the image being
displayed on the display as just a
reference. To adjust picture quality,
do either of the following:
– Menu - Print setup - Color Setting
(.page 25)
– Menu-Edit-Adjust (.page 12)
(The setting takes effect only on the
image being displayed.)
The printed
image differs
when an image
is directly
printed from the
memory card or
an external
device inserted
into the printer’s
slot and when it
is printed via a
PC.
The date cannot
be printed.
The date is
printed
unintentionally.
• Is “Date Print” set to
“On”?
• Does the image support
DCF?
• Is “Date Print” set to
“Off”?
• Was the date saved with
the image when it was
shot with the digital
camera?
cBecause of the differences in the
printer’s internal processing and PC
software processing, the printed
images will be different.
Troubleshooting
cSet “Date Print” in the Print setup
menu to “On”. (.page 25)
cThe “Date Print” function of this unit
supports an image that is compatible
with the DCF standards.
cSet “Date Print” in the Print setup
menu to “Off”. (.page 25)
cChange the camera settings.
Continued
49
GB
Page 50
Symptom
The image
cannot be
printed fully in
the print range.
Borders
remains.
Even if
“Borders” is set
to “No”, the
image is printed
with borders on
both sides.
Check
• Did you select “Yes” for
“Borders” in the Print
setup menu?
• Is the aspect ratio of the
image correct?
• Is the image edited and
saved with “Borders”“Yes” setting?
Cause/Solutions
cSet “No” by selecting Menu - Print
setup - Borders. (.page 24)
cDepending on the type of digital
camera used, the aspect ratio of the
recorded image differs, so the image
may not be printed covering the entire
printable area.
c
When you edit and save an image with
“Borders”-“Yes”setting, it is saved as a
print image including the blank areas.
Even if you print it with “Borders”“No” setting, you cannot eliminate the
borders on both sides of a print. To
print without borders, edit and save an
image with “Borders”-“No” setting.
(.page 24)
The whole area
of an image
cannot be
printed.
The image is
stretched
horizontally
when printed.
The image is
printed at an
angle.
There are white
lines or dots on
the printed
pictures.
•
Did you set
“Yes”
Borders”-
in the Print setup
menu?
• Did you rotate the image
or add other process?
• Is the paper tray inserted
properly?
cYou can print the whole area of an
image by selecting “Borders” - “No”
in the Print setup menu. (.page 24)
cDepending on the type of digital
camera used, the image may be
stretched vertically if it has been
rotated or processed using your
digital camera. This is not because of
trouble with the printer, but because
the image was rewritten with your
digital camera.
cRe-insert the paper tray firmly straight
in to the end.
cThe print head or paper path may be
soiled. Use the supplied cleaning
cartridge and sheet to clean the head
and path.
50
GB
Page 51
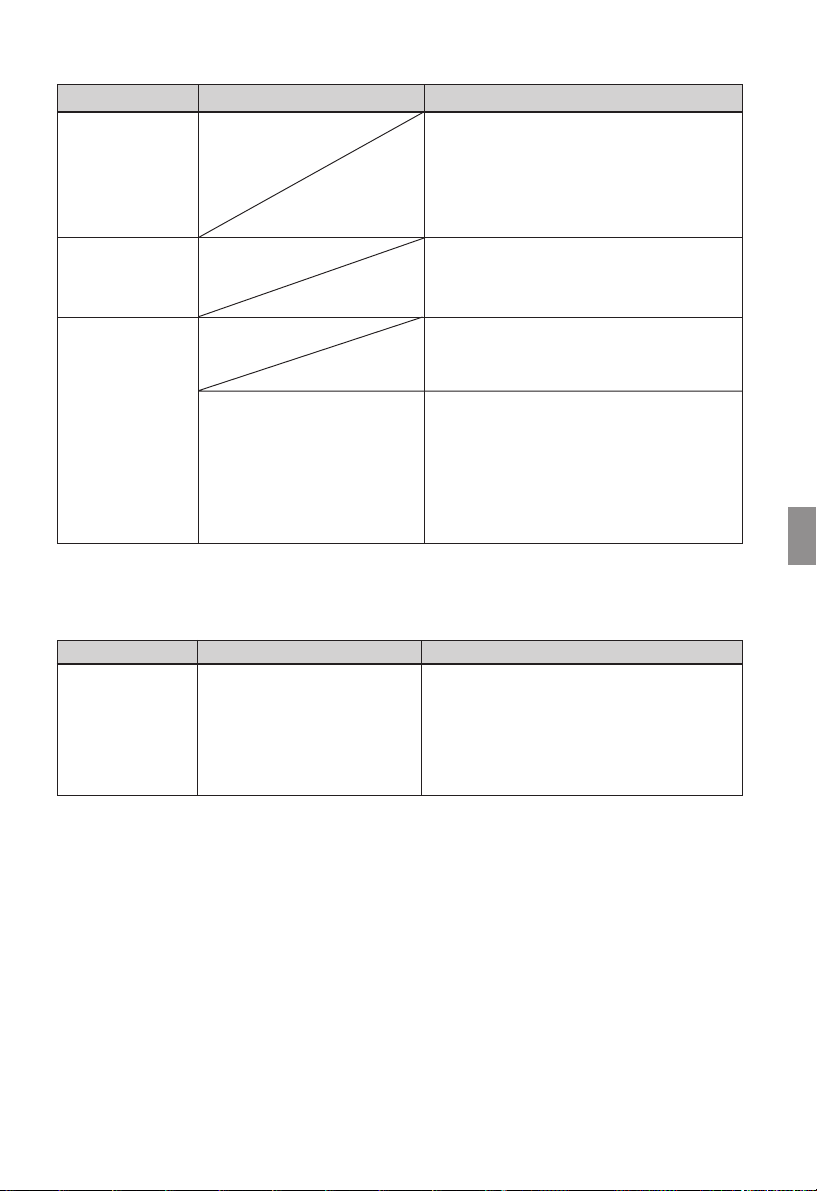
Symptom
The picture is
too bright, dark,
reddish,
yellowish, or
greenish.
Check
Cause/Solutions
cAdjust an image by selecting Menu -
Edit - Adjust. (.page 12)
The eyes of the
subject are red.
Red-eye
correction does
not take effect
with “Red-eye
correction”
menu.
Settings
Symptom
The
“Borderless” “Yes”/“No”
setting does not
take effect.
• Did you enlarge, reduce
the size of, rotate, or
move an image after the
red-eye correction?
Check
• Are you operating the
Creative Print menu?
cAdjust for the red-eye phenomenon
by selecting Menu - Edit - Red-eye
correction. (.page 13)
cSet the size of the adjustment frame to
be two to seven times as large as the
eye. (.page 13)
cRed-eye correction may not work
properly if other editorial operations
such as enlarging, reducing the size of,
rotating, or moving an image.
Perform these editorial operations first
and then perform red-eye correction.
Troubleshooting
Cause/Solutions
cIn the Creative Print menu, templates
are used and you cannot select
border/borderless prints.
51
GB
Page 52
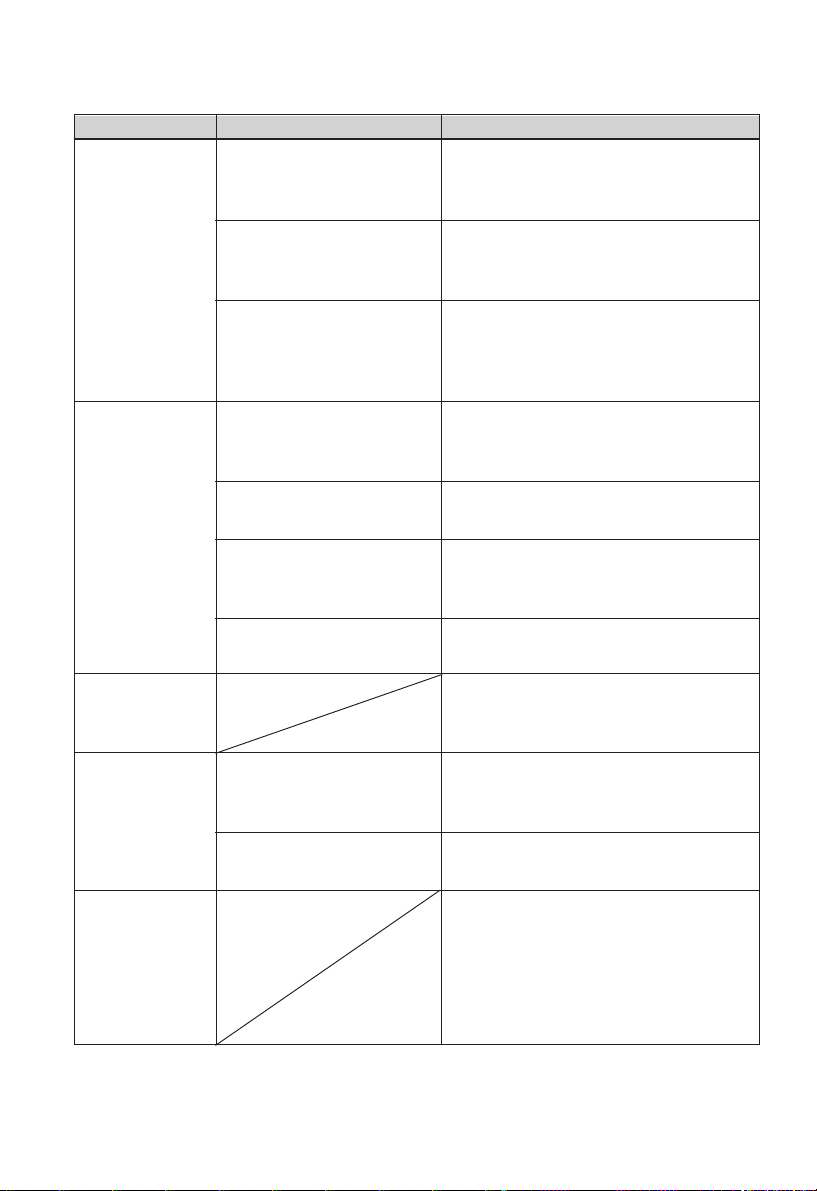
Saving or deleting an image
Symptom
You cannot save
an image.
Check
• Is the memory card or an
external device protected?
• Is the write-protect switch
of the memory card in the
LOCK position?
Cause/Solutions
cUse your digital camera or external
device to release the protection and
then try saving again.
cSlide the write-protect switch to the
write enable position. (.page 66)
You cannot
delete an image.
An image was
deleted
accidentally.
The “Memory
Stick” cannot be
formatted.
• Is the memory card full?
• Is the memory card or an
external device protected?
• Is the image DPOF-preset?
• Is the write-protect switch
of the memory card in the
LOCK position?
• Are you using a “Memory
Stick-ROM”?
• Is the write-protect switch
of the memory card is in
the LOCK position?
• Is it a “Memory StickROM”?
cDelete unnecessary images (.page
21), or replace it with a new memory
card with sufficient free memory
space. Save the image again.
cUse your digital camera or external
device to release the protection and
try printing again.
c Release the DPOF preset with your
digital camera.
cSlide the write-protect switch to the
write enable position. (.page 66)
cYou cannot delete an image from or
format a “Memory Stick-ROM”.
cYou cannot recover an image once it is
deleted.
cSlide the write-protect switch to the
write enable position. (.page 66)
cYou cannot delete an image from or
format a “Memory Stick-ROM”.
The “Memory
Stick” was
formatted
accidentally.
GB
52
cOnce the “Memory Stick” is
formatted, all the data is deleted and
cannot be recovered. To prevent
accidental format, set the write protect switch to the LOCK position.
(.page 66)
Page 53
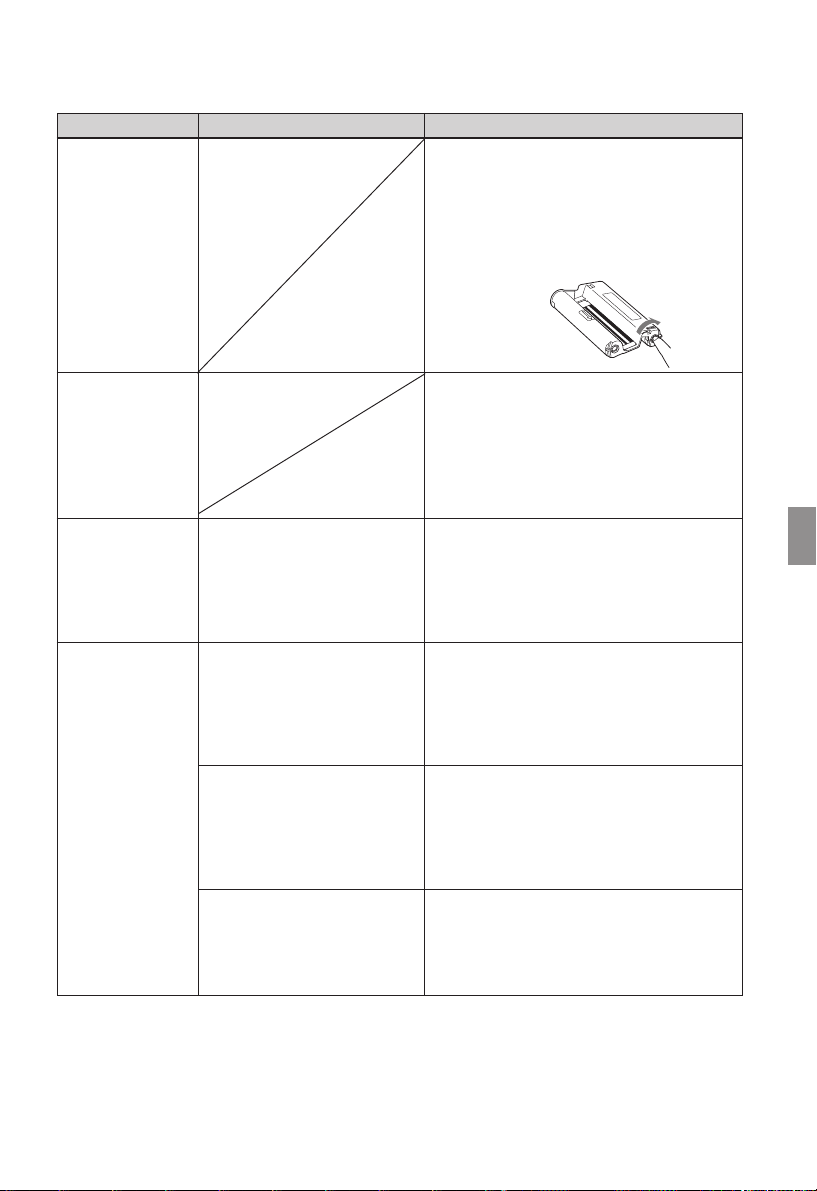
Others
Symptom
You cannot
insert the ink
ribbon
smoothly.
Check
Cause/Solutions
cIf the ink ribbon does not click into
place, remove it and then re-insert it.
Only when the ink ribbon is too slack
to be loaded, wind the ink ribbon in
the direction of the arrow to remove
the slack. (.Read This First)
The ink ribbon
cannot be
removed.
The print paper
jams.
Printing stops
midway.
• Is an error message
displayed ?
• The access indicator
flashes in orange.
• Is an error message
displayed?
• Any indicators light or
flash.
cTurn off the 1 (on/standby) switch
and then turn it on. After the motor
sound stops, try to remove the ink
ribbon. If this does not solve the
problem, contact Sony service facilities
or your Sony dealer.
cPaper is jammed. See “If paper jams”
(.page 61) and remove jammed
paper from the printer. If jammed
paper cannot be removed, contact the
Sony service facilities.
cThe data size of an image is large and
it takes longer to process it for
printing. As soon as the data
processing finishes, the printer starts
printing.
cPaper is jammed. See “If paper jams”
(.page 61) and remove jammed
paper from the printer. If jammed
paper cannot be removed, contact the
Sony service facilities.
cIf no indicator is lit, the thermal head
may be overheated. Leave the printer
until the head cools down and the
printer resumes printing.
Troubleshooting
53
GB
Page 54
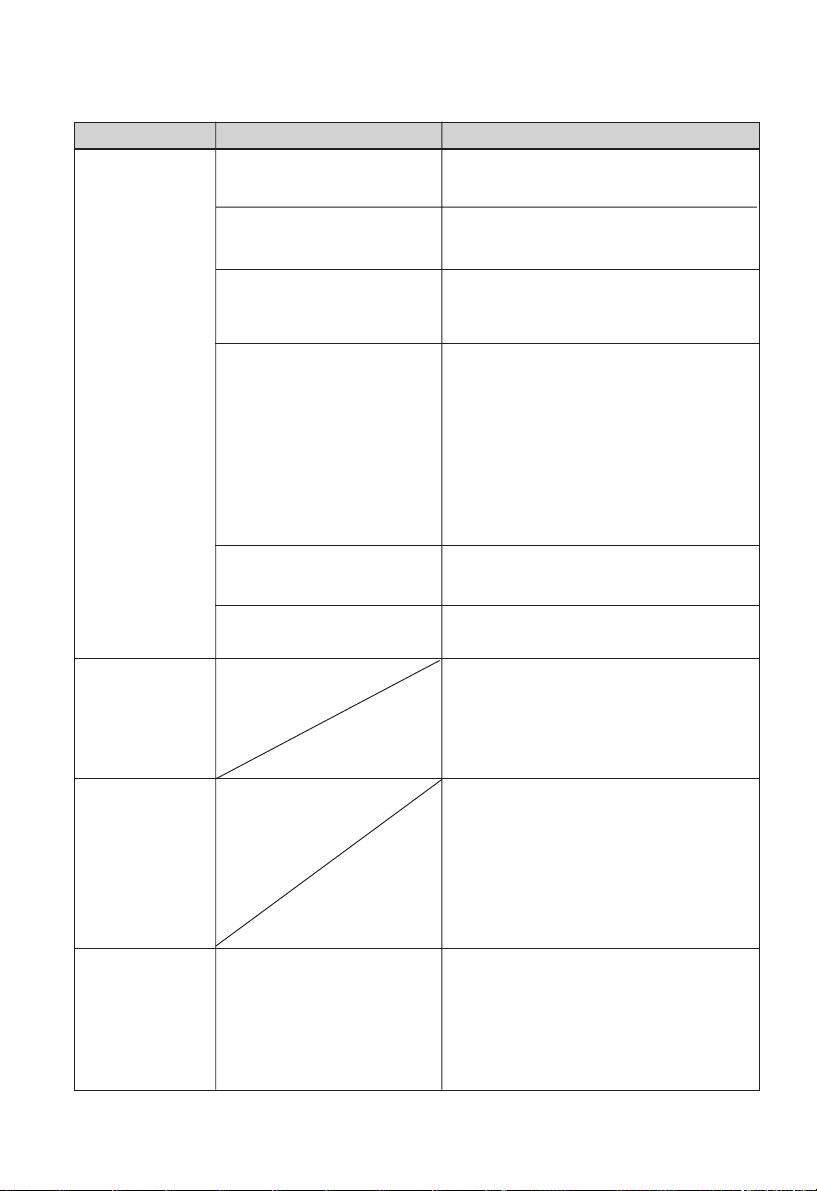
Connecting with a digital camera
Symptom
The PictBridge
mark does not
appear on the
LCD screen of
the digital
camera.
You connect and
disconnect the
USB cable, but
nothing happens.
You cannot stop
printing even if
you pressed
CANCEL.
You cannot
make Index
printing.
Check
• Is the digital camera
connected correctly?
• Is the 1 (on/standby)
switch turned on?
• Does the firmware of your
digital camera support the
printer?
• Is “Connecting”
displayed?
• Is the USB setting of your
camera in PictBridge mode?
• Is printing in process?
• Is the message “Could not
create printing data for
some images.” displayed?
Cause/Solutions
cConnect the cable correctly.
cTurn on the 1 (on/standby) switch
cSee the manual supplied with your
camera, or consult with the
manufacturer.
c
The message is not displayed while the
printer is in the Edit, Creative Print, or
other menu modes. Exit the menu and
then connect the cable again.
c
Disconnect the digital camera and the
printer and then connect them again. Or
turn off and then on the printer and the
digital camera.
c Set
the USB setting of your camera to
the PictBridge mode.
cConnect the cable again after printing
is complete.
cThe printer has developed an over-
current error. Unplug the AC power
cord of the printer, plug it in again,
and then press the 1 (on/standby)
switch to recover from the error.
cThe next print from the one currently
printed will be canceled.
c
Depending on the digital camera you
use, you cannot cancel printing from the
printer. Operate the digital camera to
stop printing. Refer to the operating
instructions of the digital camera.
cThe printer cannot print Index print of
the DPOF printing. To make Index
printing, insert the memory card
directly (.Read This First) or use a
mass storage external device
(
.
page 31).
54
GB
Page 55
Connecting with a computer
Symptom
The images of
the memory
card or an
external device
inserted in the
printer are not
displayed on the
PC.
You lost the
supplied CDROM and want
to obtain a new
one.
The printer
driver cannot be
installed.
Check
• Are you sure that you
have followed the
installation procedures
correctly?
• Is another application
program running?
• Did you specify the CDROM as the installation
CD-ROM correctly?
• Can you read the CDROM with Explorer?
Cause/Solutions
cThe printer does not provide the
function for viewing the memory card
or an external device images from the
printer.
cPlease download the printer driver
from the Customer support home
page (.page 69). Or contact your
Sony dealer.
cFollow the procedures in the
operating instructions to install the
driver (.page 33). If an error
occurs, restart your computer and do
the installation procedures again.
cExit all applications and then install
the driver again.
cDouble-click My Computer, and then
the CD-ROM icon in the open
window. Follow the procedures in the
operating instructions to install the
driver.
cThe USB driver may not be installed
properly. Follow the operating
instructions to install the USB driver
again.
cIf there is an error with the CD-ROM,
you may not be able to read it. If an
error message is displayed on your
PC, check the contents and remove the
source of the problem. Then install
the printer driver again. For details on
the error contents, see the operating
instructions of your PC.
Troubleshooting
Continued
55
GB
Page 56
Symptom
The printer
driver cannot be
installed.
Check
• Is there an anti-virus
program or other
program running on
the system?
Cause/Solutions
cIf there is an anti-virus program or other
program running on the system, exit it
and then start installing the driver.
The printer does
not respond to
the printing
order from the
PC.
An image is
printed with
borders even if I
select
“Borderls”“No”.
• Did you log onto
Windows Vista/XP/
2000 Professional using
an Administrator user
account?
• Is an error message
displayed stating that
an error was detected
in output of documents
via USB?
• Are you using an
application software
other than Picture
Motion Browser?
cTo install the driver in Windows Vista/
XP/2000 Professional, log onto Windows
using an Administrator user account.
c If there is no trouble displayed on the
Windows desktop, check the printer’s
LCD screen.
If the printer shows trouble, do the
following:
1. Turn off the 1 (on/standby) switch
then turn it on again.
2. Disconnect the power cable, wait for 5
to 10 seconds, and then connect the
cable again.
3. Restart your computer.
If these do not solve the problem, consult
with your Sony dealer or service
facilities.
c Remove the USB cable and then connect
it again.
c When using an application other than the
Picture Motion Browser, an image might
be printed with borders even if you select
borderless print.
When you can set border/borderless
with an application, set an image to be
printed fully in the print range even if it
is printed over the range.
56
GB
Page 57
Symptom
Print quantity
specified in the
“Pages Per
Sheet” in the
“Layout” tab of
the “Sony DPPFP60 Properties”
dialog box does
not match the
actual print
quantity and
printed results.
Check Cause/Solutions
cDepending on the application you use,
the print quantity setting of the
application you use may have priority
over the setting specified in the printer
driver dialog box.
Colors of the
printed image
from a PC are
different from
those printed
from a memory
card.
cSince the process in printing an image
from a memory card differs that in
printing from a PC, the colors may not
be exactly identical.
Troubleshooting
Continued
57
GB
Page 58
If an error message appears
If an error occurs, the following error messages may be displayed on the LCD screen.
Follow the solution described here to solve the problem.
Printer
Error messages
Error occurred with printer. Turn it
off and on, then retry.
Memory cards and external device
Error messages
No Memory Stick./No SD Card./
No External Device.
Meaning/Solutions
cAn error has occurred with the printer. Unplug
the AC power cord of the printer, connect it
again and then try operating again. If this occurs
again, consult with your Sony dealer or Sony
service facilities.
Meaning/Solutions
c
A memory card or an external device is not inserted
into their slot. Or the external device is not
connected. Insert the memory card or an external
device.
(.Read This First)
An incompatible Memory Stick/
SD Card/External Device is
inserted.
No image file.
No DPOF file.
Cannot delete a protected image.
You cannot delete a DPOF image.
GB
58
cA memory card or an external device that the
printer does not support is inserted. Use a
compatible memory card or device. (.pages
31, 65 to 67)
cThere are no image files in the memory card or an
external device that the printer can handle.
Connect a memory card or device that contains
images that can be displayed with the printer.
cThere are no DPOF-preset image files in the
memory card or an external device. Specify the
print (DPOF) mark with your camera.
cTo delete a protected image, cancel protection on
your camera.
cTo delete a DPOF-preset image, cancel the print
(DPOF) mark on your camera.
Page 59
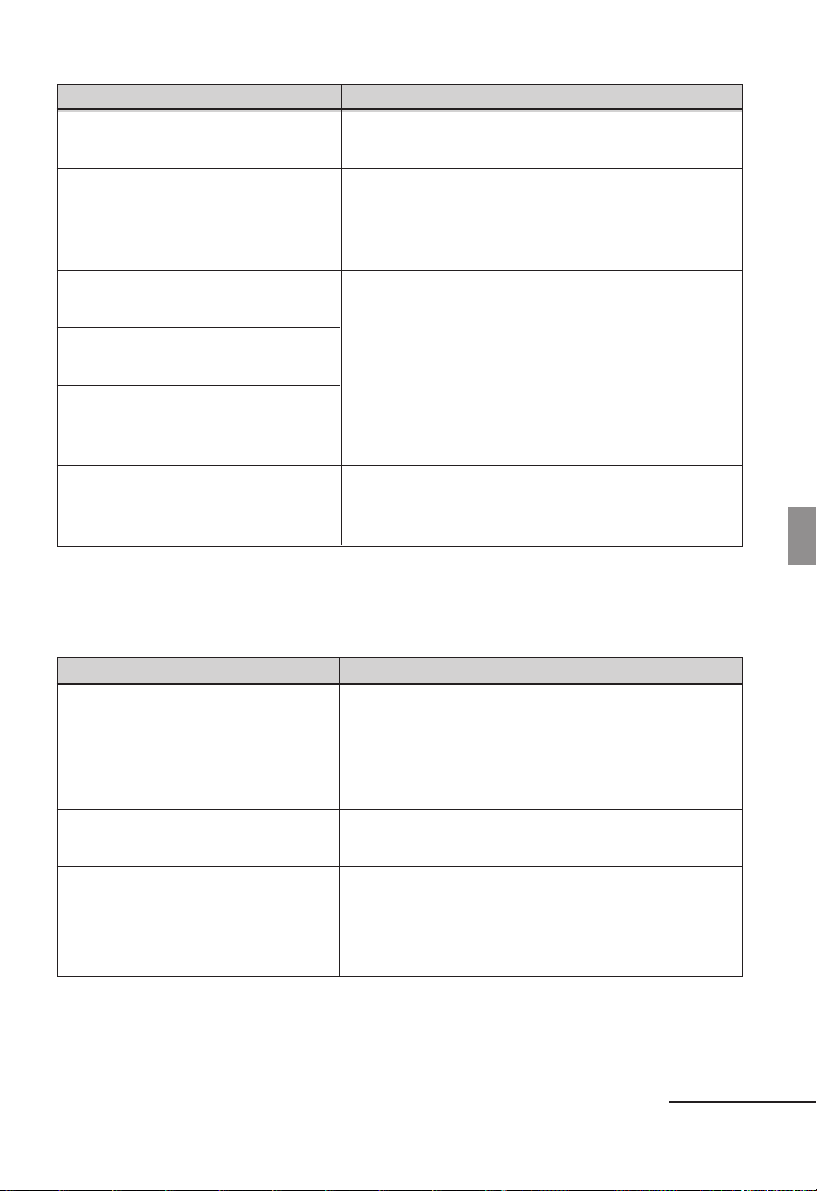
Error messages
Protected. Cancel protect then try
again.
The Memory Stick/SD Card/
External Device is full.
Meaning/Solutions
cThe “Memory Stick” is write-protected. Release
the write-protection. (.page 66)
cThere is no free memory space in the selected
memory card or external device. Delete
unnecessary images or replace with a one having
sufficient memory space.
The Memory Stick/SD Card/
External Device has trouble.
Write error in the Memory Stick/
the SD Card/the External Device.
Memory Stick Format Error
cAn error may have occurred. If these messages
appear frequently, check the memory card or an
external device status with another device.
*In case of an external device
An external device might be write-protected.
Release the write-protection setting of the device
you use. A built-in memory of a digital camera
may be write-protected.
Memory Stick is protected.
cA protected “Memory Stick” is inserted. To save
or edit the images with the printer, use the device
you are using to cancel protection.
External devices and PictBridge-compliant devices
Error messages
Incompatible USB device.
Check device’s USB setting.
Do not connect any more USB
hubs.
Write error in External Device.
Meaning/Solutions
cA USB device that the printer does not support
may be connected. Or, the USB settings of the
connected device may be incompatible. Refer to
the operating instructions of the USB device you
are using.
cConnect the device directly to the printer or use a
device that does not contain a USB hub function.
cAn external device might be write-protected.
Release the write-protection setting of the device
you use. A built-in memory of a digital camera
may be write-protected.
Troubleshooting
Continued
59
GB
Page 60
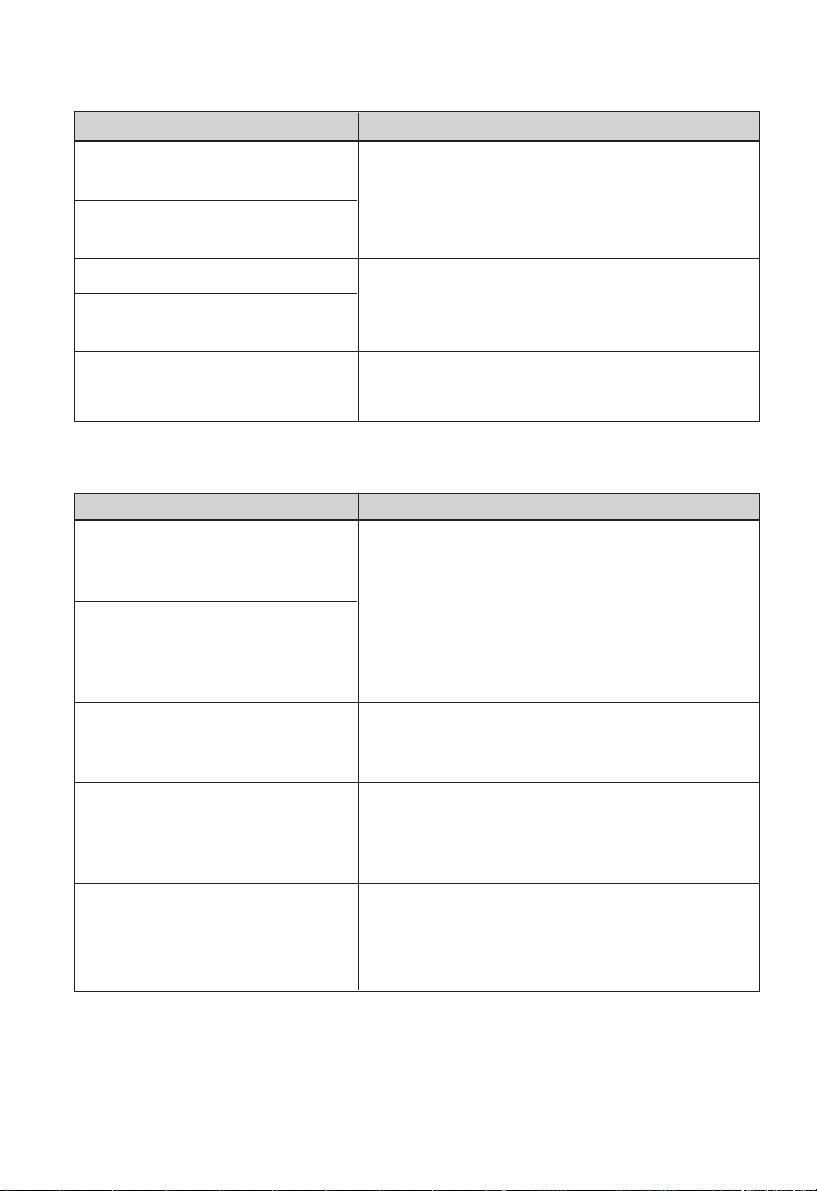
Ink ribbon
Error messages
No ink ribbon. Insert ink ribbon
and press [PRINT].
No ink ribbon. Insert P size ink
ribbon and press [PRINT].
End of ink ribbon
End of ink ribbon. Insert P size ink
ribbon and press [PRINT].
Ink ribbon type incorrect. Insert P
size ink ribbon and press [PRINT].
Print paper
Error messages
No paper tray. Insert paper tray
containing P size print paper and
press [PRINT].
No print paper. Set the print paper
for the P Size and press [PRINT].
Meaning/Solutions
cThe ink ribbon is not inserted in the printer. Set
the ink ribbon into the printer. (.Read This
First) If “cleaning cartridge” is displayed, set the
cleaning cartridge.
cReplace it with a new ink ribbon.
(.Read This First)
cSet a ink ribbon and print paper of the displayed
size. (.Read This First)
Meaning/Solutions
cThere is no print paper in the printer.
– The paper tray is not set in the printer.
– The print paper is not set in the paper tray.
– The print paper has run out.
In either case, set the print paper in the tray and
set the paper tray into the printer. (.Read
This First)
Cleaning sheet is not placed.
Set the cleaning sheet and press
[PRINT].
Wrong print paper.
Set the print paper for the P Size
and press [PRINT].
Paper jam. Remove Print Paper.
GB
60
cThere is no cleaning sheet in the paper tray.
Insert the cleaning sheet into the paper tray and
set the paper tray into the printer.
cThe print paper and ink ribbon do not match.
Check the ink ribbon size actually loaded in the
printer and set the print paper for the identical
size. (.Read This First)
cPaper jams. See “If paper jams” (.page 61)
and remove jammed paper from the printer. If
the jammed paper cannot be removed, contact
the Sony service facilities.
Page 61
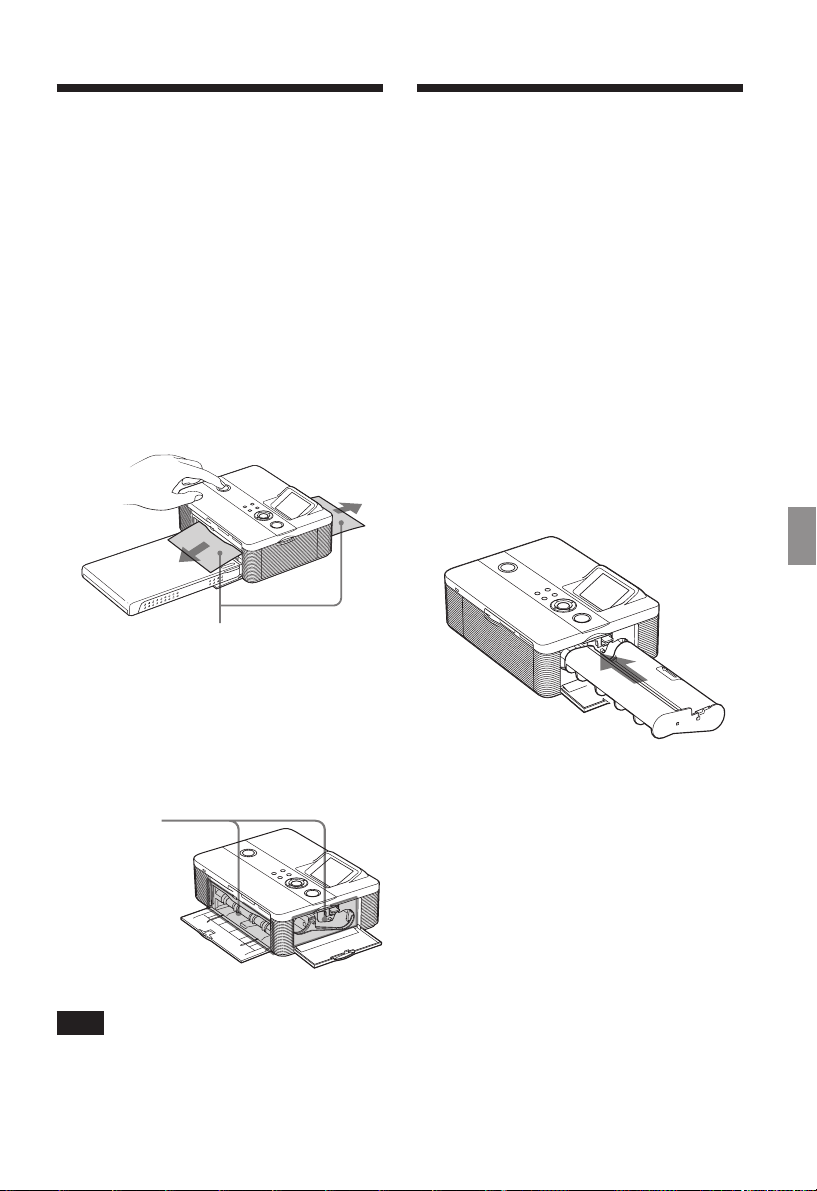
If paper jams
Cleaning the inside of
If the print paper jams, an error message is
displayed and you cannot make printing.
Please do not remove the paper tray and
ink ribbon from the printer, and remove
the jammed paper.
In case you removed the paper tray, do not
re-insert the paper tray until the jammed
paper is ejected.
1 Turn off the power of the printer
and then turn it on.
Please wait for the print paper to be
ejected automatically.
Jammed paper
2 Remove the ejected print paper
from the printer.
3 Remove the paper tray and ink
ribbon from the printer and check
to see if there is no jammed print
paper inside.
Check to see if
there is jammed
paper.
If any, remove
it.
the printer
If white lines or periodical dots are printed
on the pictures, use the cleaning cartridge
and cleaning sheet supplied to clean inside
the printer.
Before start cleaning the printer, please
remove a memory card, external device, or
USB cable from the printer.
1 Open the ink ribbon compartment
door and if there is an ink ribbon
for printing, remove it.
2 Insert the supplied cleaning
cartridge into the printer and
close the ink ribbon compartment
door.
Troubleshooting
3 Remove the paper tray from the
printer. If there is print paper in
the tray, remove it.
Note
If you cannot remove the jammed paper, contact
your Sony dealer.
61
GB
Page 62
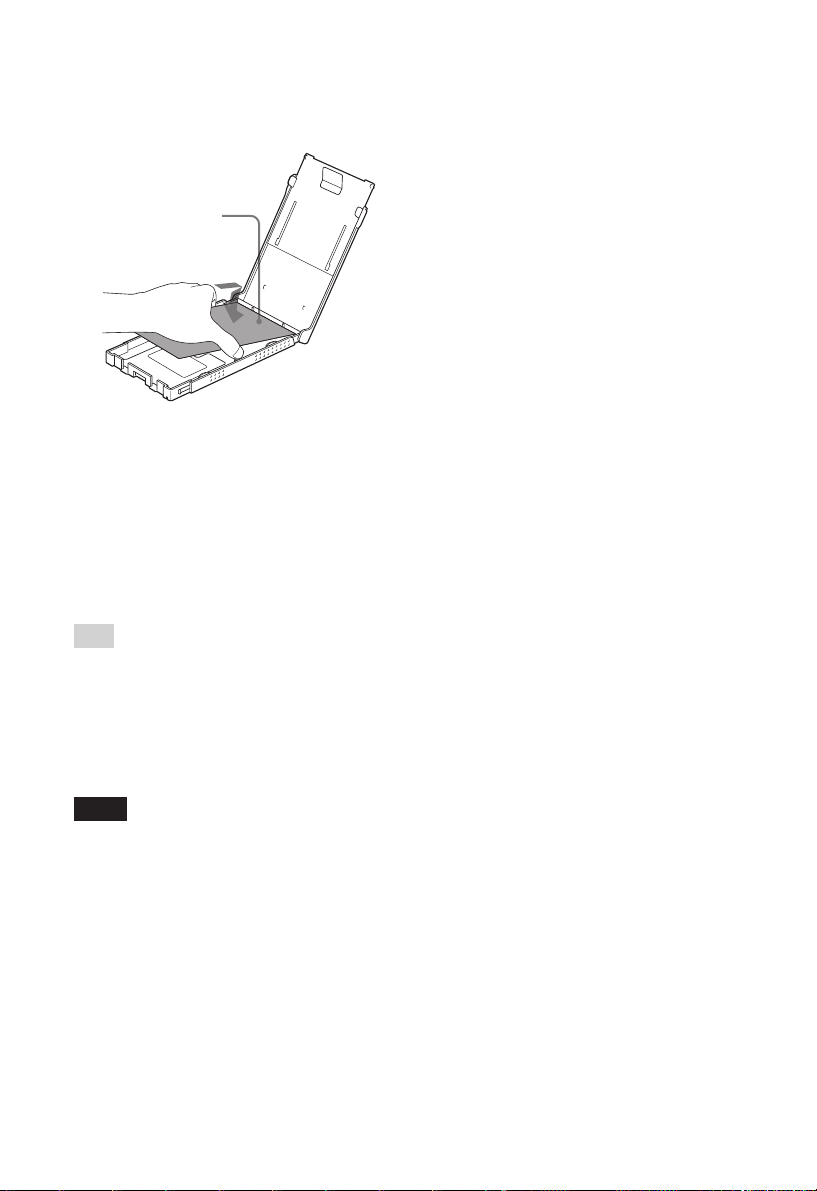
4 Place the cleaning sheet into the
paper tray with the no-imprint
side facing up.
surface without
imprints
5 Set the paper tray into the printer
and press PRINT.
The cleaning cartridge and cleaning
sheet will clean inside the printer.
After the cleaning is finished, the
cleaning sheet is automatically ejected.
6 Remove the cleaning cartridge
and sheet from the printer.
Tip
Keep the cleaning cartridge and cleaning sheet
together for future cleaning.
When cleaning ends
Set the ink ribbon and print paper into the
printer.
Notes
• Carry out cleaning when there are white lines
or dots on the print.
• When you can obtain proper printing
performances, cleaning will not improve the
printed picture quality.
• Do not place the cleaning sheet on the print
paper and carry out cleaning, which may
cause paper jam or other troubles.
• If a cleaning does not improve printed picture
quality, please carry out cleaning a couple of
times.
• You cannot clean the printer while it is
connected to a PC or a PictBridge camera.
GB
62
Page 63

Additional information
Precautions
On safety
• Be careful not to set or drop any heavy
objects on the power cord, or to damage
the power cord in any way. Never
operate this printer with a damaged
power cord.
• Should any solid object or liquid fall into
the cabinet, unplug the printer and have
it checked by qualified personnel before
operating it any further.
• Never disassemble the printer.
• To disconnect the power cord, pull it out
by the plug. Never pull the power cord
itself.
• When the printer is not going to be used
for an extended period of time,
disconnect the power cord from the wall
outlet.
• Do not handle the printer roughly.
• To reduce the risk of electrical shock,
always unplug the printer from the
electrical outlet before cleaning and
servicing the printer.
On installation
• Avoid placing the printer in a location
subject to:
– vibration
– high humidity
– excessive dust
– direct sunlight
– extremely high or low temperatures
• Do not use electrical equipment near the
printer. The printer will not work
properly in electromagnetic fields.
• Do not place heavy objects on the
printer.
• Leave enough room around the printer
so that the ventilation holes are not
blocked. Blocking these holes may cause
internal heat build-up.
On the AC adaptor
• Be sure to use the AC adaptor supplied
with the printer. Do not use other AC
adaptors, as this may cause a
malfunction.
• Do not use the supplied AC adaptor to
other devices.
• Do not use an electrical transformer
(travel converter), as this may cause
overheat or a malfunction.
• In case the cord of the AC adaptor is
damaged, never use it any longer, as this
may cause danger.
On moisture condensation
If the printer is brought directly from a
cold location to a warm location or placed
in an extremely warm or humid room,
moisture may condense inside the unit. In
such cases the printer will probably not
work properly and may even develop a
fault if you persist in using it. If moisture
condensation occurs, unplug the AC
power cord of the printer and do not use
the printer for at least one hour.
On transport
When you transport the printer, remove
the ink ribbon, paper tray, AC adaptor, the
memory card, or an external device from
the printer and put the printer and its
peripherals in the original box with the
protective packaging.
If you no longer have the original box and
packing parts, use similar packing material
so that the printer will not be damaged
while being transported.
On cleaning
Clean the cabinet, panel and controls with
a soft dry cloth, or a soft cloth lightly
moistened with a mild detergent solution.
Do not use any type of solvent, such as
alcohol or benzine, which may damage the
finish.
Continued
63
Additional information
GB
Page 64
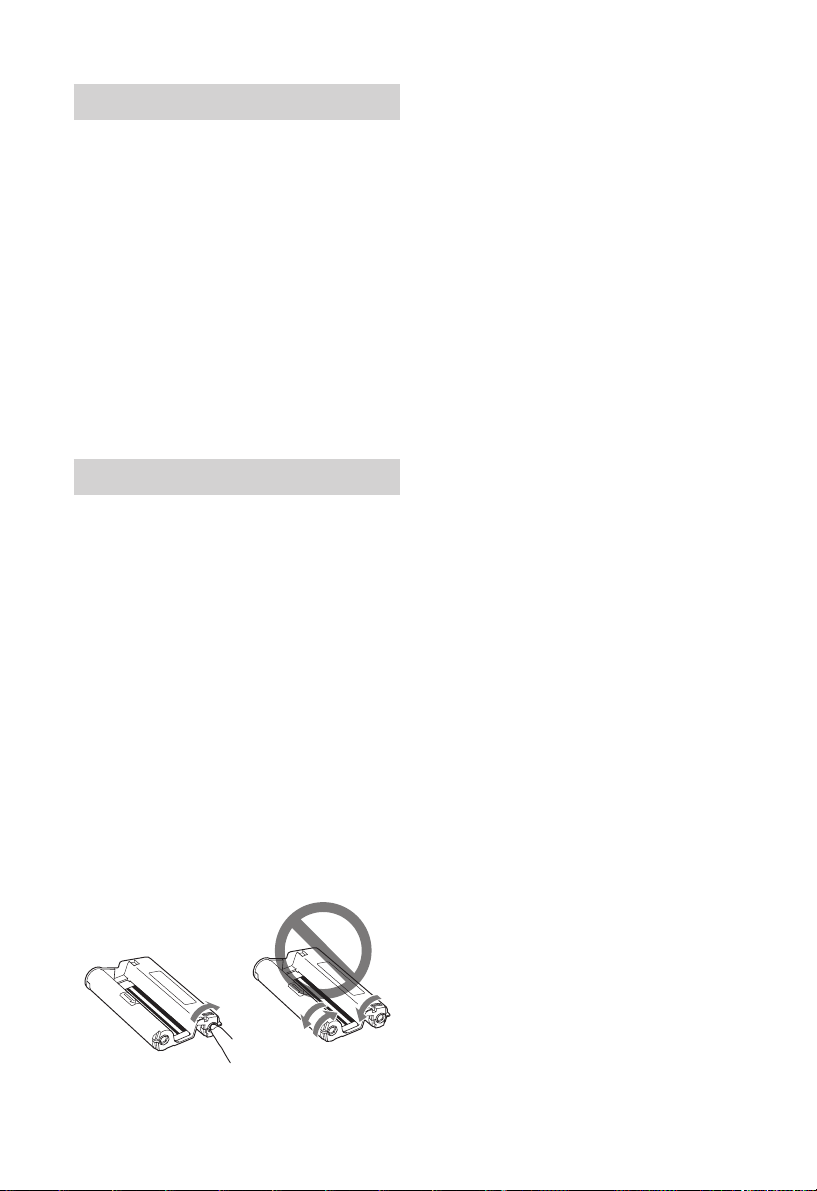
On restrictions on duplication
If duplicating documents with the printer,
pay special attention to the following:
• Duplication of banknotes, coins, or
securities is against the law.
• Duplication of blank certificates,
licenses, passports, private securities, or
unused postal stamps is also against the
law.
• TV program, films, video tapes, others’
portraits or other materials may be
copyrighted. Unauthorized video
printing of such materials may infringe
the provisions of the copyright law.
On color print packs
Notes on use
On Ink ribbon
• Do not touch the ink ribbon or place the
ink ribbon in a dusty location.
Fingerprints or dust on the ink ribbon
may result in imperfect printing.
• Do not rewind the ink ribbon and use
the rewound ink ribbon for printing.
Otherwise, proper printing result will
not be obtained, or even a malfunction
may occur.
If the ink ribbon does not click into
place, remove it and then re-insert it.
Only when the ink ribbon is too slack to
be loaded, wind the spool of the ink
ribbon in the direction of the arrow to
remove the slack.
• Never disassemble the ink ribbon.
• Do not pull out the ribbon from the ink
ribbon.
• Do not remove the ink ribbon while
printing.
On print paper
• The side without the imprinting is the
printing surface. Inferior print quality
may result if the printing surface is
contaminated with dust or fingerprints.
Be careful to avoid touching the printing
surface.
• Do not bend the paper or tear it off at the
perforations before printing.
• To avoid paper jam or malfunctions of
the printer, make sure the following
before printing:
– Do not write or type on the print
paper. Use the oil ink pen to write on
the paper after printing. You cannot
type on the print paper using an inkjet printer, etc.
– Do not attach sticker or stamps on the
print paper.
– Do not fold or bend the print paper.
– Total number of print paper does not
exceed 20 sheets.
– Do not print on the used print paper.
Printing an image twice on the same
paper will not make the printed image
thicker.
– Use the print paper for this printer
only.
– Do not use the print paper ejected
without printed.
• Do not print on used sheets of print
paper or attempt to rewind the ribbon
inside the ink ribbon. Doing so could
result in damages to the printer.
• Do not remove the paper tray while
printing.
64
GB
Page 65
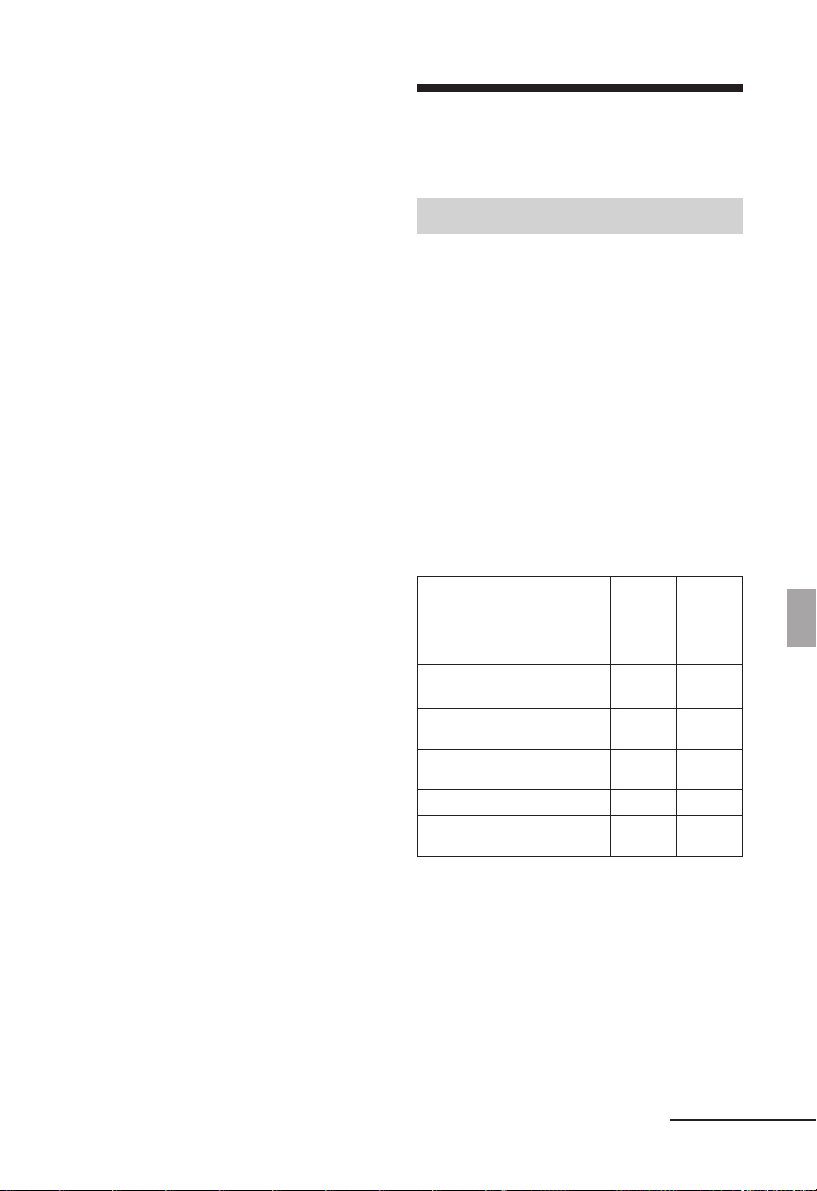
Notes on storing print packs
• When you are going to store a partiallyused pack of the ink ribbon and print
paper for an extended period of time,
store it in its original bag or in a similar
container.
• When you are going to store print paper
in the paper tray, make sure to close the
tray cover and slide cover.
• Avoid placing the ink ribbon in locations
subject to high temperature, high
humidity, excessive dust, or direct
sunlight. Please store it in a dark and
cold location and use it early. Depending
on the storage status, color elements of
the ink ribbon may deteriorate. Sony
shall assume no responsibilities for any
damage, loss or failed printed results
that may be caused by use of such ink
ribbon.
• Avoid leaving the printing surface of the
print paper in contact with a plastic
eraser or plastic desk mats that includes
vinyl chloride or plasticizer for an
extended period of time; color changes
or deterioration of the printed image
may occur.
About the Memory Cards
About the “Memory Stick”
What is “Memory Stick”?
“Memory Stick” is a compact-size IC
recording medium with a large capacity. It
has been designed not only for exchanging/
sharing digital data among “Memory Stick”
complaint products, but also for serving as
an insertable/removable external storage
medium that can save data.
Types of “Memory Stick” that
the printer can use
With the printer, you can use the following
types of “Memory Stick”
Memory Stick type
Memory Stick
(without MagicGate)
Memory Stick (with
MagicGate)
MagicGate
Memory Stick
Memory Stick PRO
Memory Stick Micro
(M2*4)
*3
:
Displaying/
Printing
*2
Deleting/Saving/Formatting
OK OK
*1
OK
OK
OK
OK
OK
*1
OK
*1
OK
*1
OK
*1
*1
*1
*1
Additional information
*1 The printer is not equipped with the
“MagicGate” technology and cannot read or
write the data subject to the “MagicGate”
copyright protection. “MagicGate” is the
general name of a copyright protection
technology developed by Sony. This
technology provides authentication and
encryption; mutual confirmation is performed
between the “Memory Stick” media and the
“MagicGate” compliant device like this unit
that the other can record and play the
Continued
65
GB
Page 66
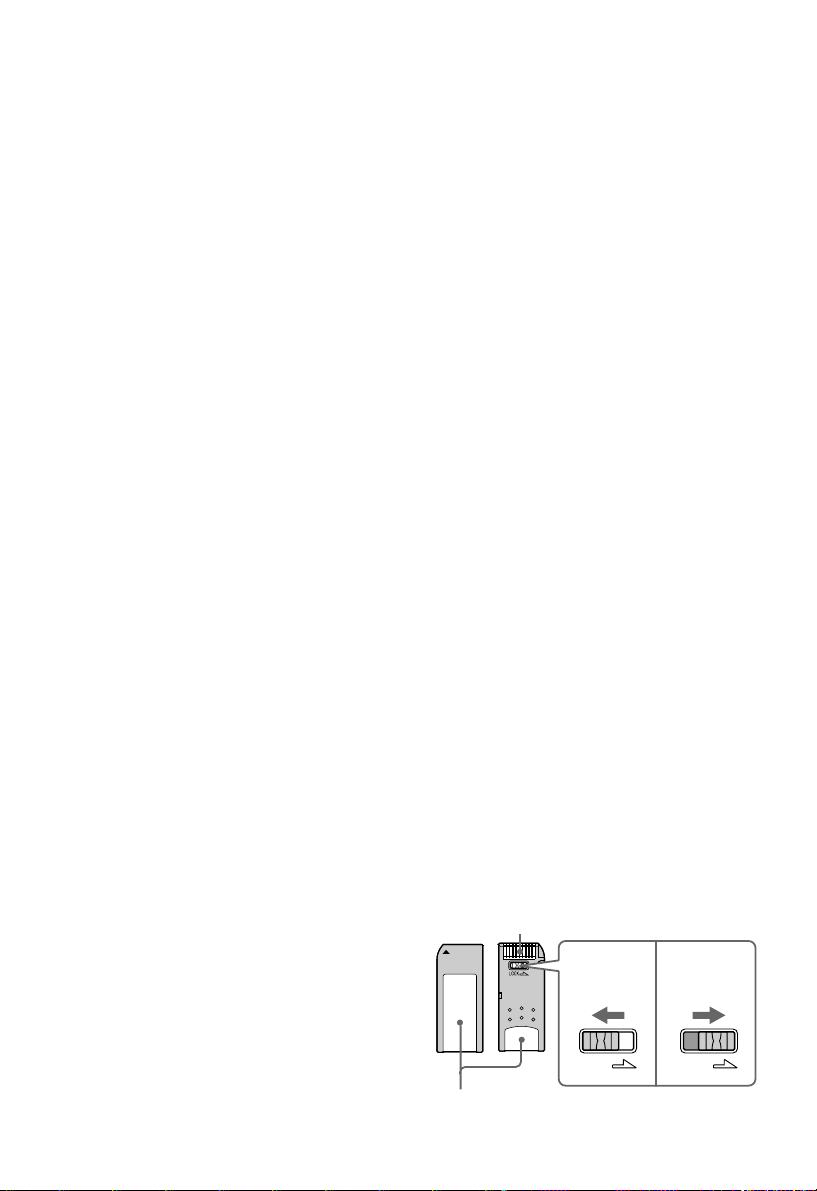
LOCK LOCK
copyrightprotected data correctly. When the
authentication is established, the data
encryption is performed. When the data is
played, the authentication is also performed.
Only when authentication is established, the
data is decrypted to the original status and
played. Copyright-protected data cannot be
played with a device other than authenticated
ones.
*2 The printer is equipped with a slot compatible
with both standard-size and Duo-size media.
Without a Memory Stick Duo adaptor, you
can use both standard-size “Memory Stick”
and compact-size “Memory Stick Duo”.
*3 The printer supports FAT32. The printer has
been demonstrated as operable with a
“Memory Stick” with a capacity of 8GB or
smaller manufactured by Sony Corporation.
However, we do not guarantee the operations
of all the “Memory Stick” media.
In addition, the printer does not support
parallel data transfer.
*4 “M2” is an abbreviation for “Memory Stick
Micro”. In this section, “M2” is used to
describe “Memory Stick Micro”.
For the latest information on available
medium or others, access the following
home page:
http://www.memorystick.com/en/
support/support.html
Select the area where you use your printer,
and then select “Digital Printer” from each
area page.
Notes on use
• For the latest information on the “Memory
Stick” that the printer supports, see the
“Memory Stick” compatibilities information
on the Sony web site.
• Do not insert multiple “Memory Stick” at the
same time, which may cause trouble with the
printer.
• When using a “Memory Stick”, make sure to
check correct insertion direction. Wrong usage
may cause trouble with the printer.
• When using the “Memory Stick Micro” with
the printer, always insert it into an M2
adaptor.
• If you insert the “Memory Stick Micro” into
the printer without an M2 adaptor, you may
be unable to remove the “Memory Stick
Micro”.
• If you insert the “Memory Stick Micro” into
an M2 adaptor, and insert the M2 adaptor into
the Memory Stick Duo adaptor, the printer
may not operate properly.
• Do not place the “Memory Stick Duo”, an
“Memory Stick Duo”-sized M2 adaptor, or M2
media within the reach of a small child to
prevent him from swallowing it by accident.
• Avoid removing the “Memory Stick” from the
printer while the printer is reading or writing
data.
• Data may be damaged in such occasions:
– “Memory Stick” is removed or the printer
is turned off during a read or write
operation.
– “Memory Stick” is used in a location
subject to static electricity or electrical
noises.
• We recommend that you save backup of the
important data.
• The data processed with the computer may
not be played with the printer.
• When you format a “Memory Stick”, use the
format function of the printer or your digital
camera. If you format a “Memory Stick” with
your computer, images may not be displayed
properly.
• When you format a “Memory Stick”, all the
data including the protected image files will
be erased. To avoid erasing important data by
accident, make sure to check the content
before formatting.
• You cannot record, edit or delete data if you
slide the write-protect switch to LOCK.
Connector
Write-protect switch
Write
enable
position
Write
protect
position
66
Place the label here.
GB
Page 67

• When you use a “Memory Stick Duo” without
the write-protect switch, be careful not to edit
or delete the data by accident.
• When you slide the write-protect switch of the
“Memory Stick Duo”, use a thin-pointed
device.
• Do not attach any other material than the
supplied label on the labeling position. When
you attach the supplied label, be sure to attach
it to the labeling position. Be careful that the
label does not stick out.
• When you write on the memo area of the
attached label, do not write forcefully.
• When you carry or store the “Memory Stick”,
put it in the case designed for the “Memory
Stick”.
• Do not touch the terminal of the “Memory
Stick” with your hand or a metal object.
• Do not strike, bend or drop the “Memory
Stick”.
• Do not disassemble or modify the “Memory
Stick”.
• Do not expose the “Memory Stick” to water.
• Do not use or store the “Memory Stick” under
the following conditions:
– Locations beyond the required operational
conditions including locations such as the
hot interior of a car parked in the sun or/
and in the summer, the outdoors exposed
to direct sunlight, or a place near a heater.
– Humid locations or locations with corrosive
substances present
About the SD card
The SD card slot of the printer allows you
to use the following:
• SD memory card
• SDHC memory card
• MMC standard memory card
We do not guarantee proper operations for
all types of SD memory cards and MMC
standard memory cards.
*1 The printer has been demonstrated as
operable with an SD card with a capacity of 2
GB or smaller.
*1*2
*3
*4
*2 When you use a miniSD card, use a miniSD
card adaptor. If you insert a miniSD card
without the adaptor into a slot of the printer,
you may not be able to remove it.
*3 The printer has been demonstrated as
operable with an SDHC card with a capacity
of 4 GB or smaller.
*4 The printer has been demonstrated as
operable with an MMC standard memory
card with a capacity of 2 GB or smaller .
Notes on use
• When using a card, make sure to check
correct insertion direction of the card and
correct insertion slot.
• You cannot read or write the data subject to
the copyright protection.
• Do not strike, drop, or bend a card.
• Do not disassemble or modify a card.
• Do not expose a card to water.
• Avoid using a card in areas subject to high
humidity, since it may be easily affected by
the humidity.
• Do not use or store a card in a location subject
to:
– extremely high temperature such as the hot
inside of a car or the outdoors exposed to a
direct sunlight, or a place near a heater.
– direct sunlight
– high humidity or corrosive substances
– static electricity or electrical noises
• When you carry or store a card, put it in the
case supplied with it.
• Do not remove a card or turn off the printer
while the printer is reading or writing data
and the access indicator is flashing.
Otherwise, data may be rendered unreadable
or erased.
Additional information
67
GB
Page 68

Specifications
x Printer
Printing method
Dye sublimation printing (Yellow/
Magenta/Cyan 3 pass)
Resolution
300 (H) x 300 (V) dpi
Image processing per dot
256 levels processing (8 bits for each
Yellow/Magenta/Cyan),
approx. 16 770 000 colors
Printing size
P (Post Card/4 x 6 inch) size:
101.6 x 152.4 mm (maximum,
borderless)
Printing time (per sheet)
Memory card
PictBridge
Via PC
Input/Output connectors
USB for PC connection USB 1.1 (Type
B)
High speed is not supported.
PictBridge connector
Slot
“Memory Stick” insertion slot
SD Card insertion slot
Compatible image file formats
JPEG: DCF 2.0 compatible, Exif
TIFF: Exif 2.21 compatible
*8
BMP
Some image file formats are not
compatible.
GB
68
*1*2*3*4
:
Approx. 64 sec.
*3*5
: Approx. 75 sec.
*6
: Approx. 61 sec.
compatible, JFIF
*7
: 1, 4, 8, 16, 24, 32 bits Windows
format
2.21
Maximum number of pixels to be
handled
6 400 (H) x 4 800 (V) dots
(Excluding Index Print and part of
Creative Print)
Maximum number of files to be handled
9 999 files for a memory card/an
external device
Ink ribbon/Print Paper
See supplied “Read This First”.
LCD screen
LCD panel:
5.0 cm (2.0 type) TFT drive
Total number of dots:
86 636 (358 x 242)
Power requirements
DC IN jack, DC 24V
Power consumption
While printing: 75 W (maximum)
On standby mode: less than 1W
Operating temperature
5 ˚C to 35 ˚C (41 ˚F to 95 ˚F)
Dimensions
Approx. 175 x 60 x 137 mm
(7
x 2 3/8 x 5 1/2 inches)
(w/h/d, excluding protruding parts)
(304 mm (12 inches) of depth when the
paper tray is installed.)
Mass
Approx. 1.0 kg (2 lb 3 oz)
(excluding the paper tray, ink ribbon,
AC power adaptor)
Supplied accessories
See supplied “Read This First”.
x AC power adaptor AC-S2425
Power requirements
AC 100V to 240 V, 50/60 Hz,
1.5A to 0.75 A
Rated output voltage
DC 24 V, 2.2 A (Peak 3.7 A, 6.5 s)
Operating temperature
5 ˚C to 35 ˚C (41 ˚F to 95 ˚F)
Page 69
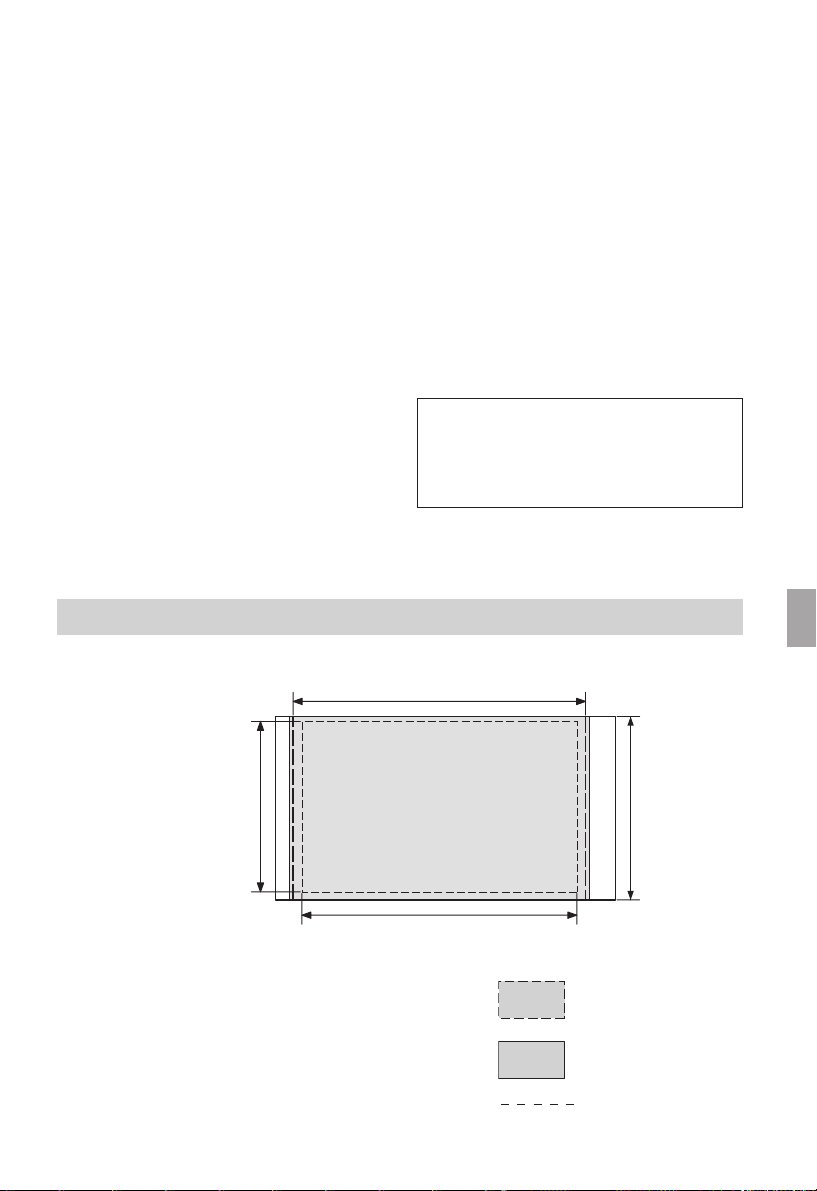
Dimensions
Approx. 60 x 30.5 x 122 mm
3
(2
/8 x 1 1/4 x 4 7/8 inches)
(w/h/d, excluding protruding parts
and cables)
Mass
Approx. 305 g (11 oz)
Design and specifications are subject to
change without notice.
* The total number of sheets of P size print paper
that the printer can print is estimated to be
approximately 2,000.
*1: Print Settings: Borderless, No time stamp,
AutoFine Print 3: ON (Photo)
*2: When printing a photo (4.22 MB file size)
taken by a Sony digital still camera
containing effective picture elements of
approximately 10,000,000 or equivalent.
*3: Print Speed: Time from when the PRINT
button is pressed to when printing is
finished. (The printing time may vary
Printing range
depending on a used equipment, a format
of an image, a used memory card, settings
of an application and operating conditions.)
*4: When printing from a “Memory Stick PRO
Duo” inserted in the printer ’s slot
*5: When printing via DSC-N2 connected by
USB cable. Time from when the “PRINT”
button on the LCD display of the camera is
pressed to when the printing is finished.
*6:
The time for data processing and
transferring is excluded.
*7: Baseline JPEG with 4:4:4, 4:2:2, or 4:2:0
format
*8: You cannot print using the Picture Motion
Browser.
Customer support home page
The latest support information is available at
the following home page address:
http://www.sony.net/
P size
95.5 mm/
3 7/8 inch
(1 128 dots)
The above illustrations are those when an
image with a 2:3 aspect ratio is printed.
The printing range differs for a border or
a borderless print.
152.4 mm/6 inch
(1 800 dots)
146.3 mm/5 7/8 inch
(1 728 dots)
101.6 mm/
4 inch
(1 200 dots)
Border print range
Borderless print
range
Perforations
69
Additional information
GB
Page 70

Glossary
DCF (Design rule for Camera File system)
This camera conforms with the DCF
(Design rule for Camera File system)
standard established by JEITA (Japan
Electronics and Information Technology
Industries Association) to maintain file
exchangeability and compatibility
between digital cameras and related
products. Complete exchangeability and
compatibility, however, are not
guaranteed.
DPOF (Digital Print Order Format)
The format used to record the
information necessary for automatically
printing images shot by a digital camera
at a printing shop or with a home-use
printer. The printer supports DPOF
printing and can automatically print the
preset number of copies of the DPOF
preset images.
Exif 2.21 (Exif Print)
Exif (Exchangeable image file format for
digital cameras) Print is a global
standard for digital photo printing. A
digital camera supporting Exif Print
stores the data relevant to the conditions
of shooting as each shot is taken. The
printer utilises the Exif Print data stored
in each image file to ensure the printed
result matches the original shot as
closely as possible
*1 When the “Auto Fine Print 3” is enabled
and an image (JPEG file) is shot by an Exif
Print (Exif 2.21)-compliant digital camera,
the image is automatically adjusted to its
optimum picture quality and printed.
*1
.
Mass Storage System
Various types devices for storing large
amounts of data, including all types of
disk drives (floppy disks, hard disks,
optical disks) or tape media. Unlike flash
memory, mass storage devices retain
data even when the PC or unit is turned
off.
“Memory Stick”/SD card
Compact, light, removable storage
media. For details see pages 65 to 67.
PictBridge
A standard specified by Camera &
Imaging Products Association that
allows you to connect PictBridgecomplaint digital camera directly to the
printer without a PC, enabling direct
printing on the spot.
Thumbnails
Miniature images for representing the
original images that are stored in the
image files taken by a digital camera.
The printer uses thumbnails in the image
list.
70
GB
Page 71

Index
A
Adjusting an image 12
All printing 9
Associated file indication
7
Auto Fine Print 3 24
B
Bluetooth device 29
Borders/Borderless
24, 40
C
Calendar 17
Changing the display 27
Cleaning 61
Color print packs
Notes on use 64
Color Setting 25
Connecting
Bluetooth device 29
Digital camera 28
PC 34
Connection
External device 31
Creative Print 15
D
Date Display Order 27
Date print 25
Deleting an image 21
Demonstration mode 27
Detailed image data
display 7
Display/Printer setup 26
DPOF 7, 9
E
Easy printing 9
Edit menu 10
Enlarging and reducing
an image size 8, 11
Error messages 58
Exif Print 24
External device 31
F
Filter 13
Fish-eye effect 13
Format 22
I
Icon 27
Image Data Display
7, 27
Image list 8
Image preview 7
Index printing 9
Ink ribbon
Notes on use 64
Input indications 7
Installing
Picture Motion
Browser 35
Printer driver 33
L
Language 27
Layout image 16
LCD backlight 27
LCD screen 7
Listing Order 27
M
Mass storage device 31
Memory Stick
Format 22
Notes on use 66
Types 65
Monochrome 13
Moving an image 11
O
On/standby indicator
28, 31, 34
On/standby switch
28, 31, 34
Orientation 39
P
Paint 13
Paper jams 61
PictBridge camera 28
PictBridge connector
28, 29, 31
Picture Motion Browser
37
Precautions 63
Preview 7
Print paper
Notes on use 64
Print quantity 7, 14
Print setup 23
Printing
Creative Print image
14
Edited image 14
From a Bluetooth
device 29
From a PC 32
From a PictBridge
camera 28
From an external
device 31
Using the Picture
Motion Browser 37
Printing range 69
Protect indication 7
R
Red-eye correction 13
Rotating an image 12
Continued
71
Additional information
GB
Page 72

S
Saving an image 14
Screen indications 7
SD Card
Notes on use 67
Types 67
Searching for an image
20
Sepia 13
Setting the print quantity
7
Slideshow 19
Special filter 13
Specifications 68
Switching the screen
display 8
System requirement 32
T
Troubleshooting 43
U
Uninstalling
Picture Motion
Browser 36
Printer driver 35
USB connector 34
W
Write-protect switch 66
Z
Zoom in 8
Zoom out 8
Printed using VOC (Volatile Organic Compound)-free vegetable oil based ink.
Sony Corporation Printed in China
 Loading...