

Page 1
3-062-474-11(1)
DirectCD
™
Software Operating Instructions
MVC-CD1000
©2000 Sony Corporation
Page 2

Notice for users
Program © Copyright 1999 Adaptec,
Inc. All rights reserved./
Documentatio n © 2000 Sony
Corporation
All rights reserve d. This manual or the
software desc ribed herein, in whole or
in part, may not be reproduced,
translated or reduced to any machine
readable form without prior written
approval from Sony Corporation.
IN NO EVENT SHALL SONY
CORPORATION BE LIABLE FOR
ANY INCIDENTAL,
CONSEQUENTIAL OR SPECIAL
DAMAGES, WHETHER BASED ON
TORT, CONTRACT, OR
OTHER WISE, ARISING OUT OF OR
IN CONNECTION WITH THIS
MANUAL, THE SOFTWARE OR
OTHER INFORMATION
CONT AINED HEREIN OR THE USE
THEREOF.
Sony Corporation reserves the right to
make any modification to this manual
or the information contained herein at
any time without notice.
Trademarks
Adaptec is a register ed trademark of
•
Adaptec, Inc.
Easy CD Creator and DirectCD are
•
trademarks of Adaptec, Inc.
Microsoft
•
trademarks of Microsoft Corporatio n,
registered in the U.S.A. and other
countries.
Macintosh and Power PC
•
trademarks of Apple Computer, Inc.
registered in the U.S.A. and other
countries.
All other prod uct names mentioned
•
herein may be the trademarks or
registered trademarks of their
respective companies. Fu rt hermore,
“™” and “®” are not m entioned in
each case in this manual.
and Windows are
are
The software described herein may
also be governed by the terms of a
separate user license agreement.
2
Page 3

Table of contents
Notice for users .................. .............2
Introduction .....................................4
Installing DirectCD .........................5
Using DirectCD ..................... ... .......8
Removing the disc ....................... ..12
Modifying data in a disc ................13
3
Page 4

Introduction
This manual describes how to install the application software, DirectCD supplied
with the MVC-C D 1000, and how to use it. If explanations des cribed in this manual
are diff eren t fr om t he P DF file in the CD-ROM, follow e x pl an ati ons d es cri bed in thi s
manual.
Note
You cannot install DirectCD into a Macintosh computer.
finalized, copy Adaptec UDF Volume Access included in the CD-ROM (SPVD-001) supplied
with the MVC-CD1000 to System folder of your personal computer and restart your personal
computer.
Once you install the USB driver into your personal computer (for details on
installation, refer to the ope rating inst ructions of the MVC-CD1 000), and connect th e
MVC-CD1000 a nd your personal comp ut er w ith the USB cable, you can do the
following operations:
You can send images shot with the MVC-CD1000 to your personal com puter and
•
play them back on yo ur personal computer. (The finalization is not r equired.)
You can write images that are captured by your personal computer onto a disc and
•
make the picture album.
You can directly re ad and write images shot w i th th e MVC-CD1000 in the CD -R/
•
CD-RW drive, without executing the finalization.
Recommended Windows environment for DirectCD
MMX Pentium 166 MHz or greater (When using DirectCD with the MVC-
•
CD1000: MMX Pentium 200 MHz or greater)
32 MB or more of RAM
•
45 MB or more of fr ee hard-disk space
•
Monitor with 80 0 × 600-resolution and 25 6-color
•
Microsoft Internet Explorer 4.01 or later
•
To read the disc that has be en
4
Page 5

Installing DirectCD
When using a CD-ROM drive
•
DirectCD is not required to only view images on the finali zed disc in a CD-ROM
drive. If you read or write images on the disc which is not finalized, you have to
connect the MVC- CD1000 to your personal com puter with the USB cable a nd
install DirectCD into your personal computer. For details on USB connection, refer
to the operating instructions of the MVC-CD1000.
When using a CD -R or CD-RW drive
•
Select one of the fol l owing way s according to the configuration of your person al
computer.
— When a writin g sof twar e ha s not been i nsta lle d int o your pers ona l comp uter, you
can install DirectCD into your personal computer.
— When DirectCD other than thi s vers ion has been installed into your personal
computer, you can install DirectCD included in the supplied CD-ROM. You
cannot use any other versions of DirectCD with the MVC- CD 1000. If you
install the supplied DirectCD, DirectCD that has been installed in your personal
computer will be upgraded to the new version.
— When a writing software other than DirectCD has been installed into your
personal comput er, uninstall the writing soft wa re from your personal computer,
then install DirectCD. If you want to use the writing software, do not install
DirectCD. You cannot use the MVC-CD1000 with Direct CD .
Note
You may not be able to use DirectCD depe nding on your CD-R drive or CD-RW drive.
5
Page 6
For Windows 98 users
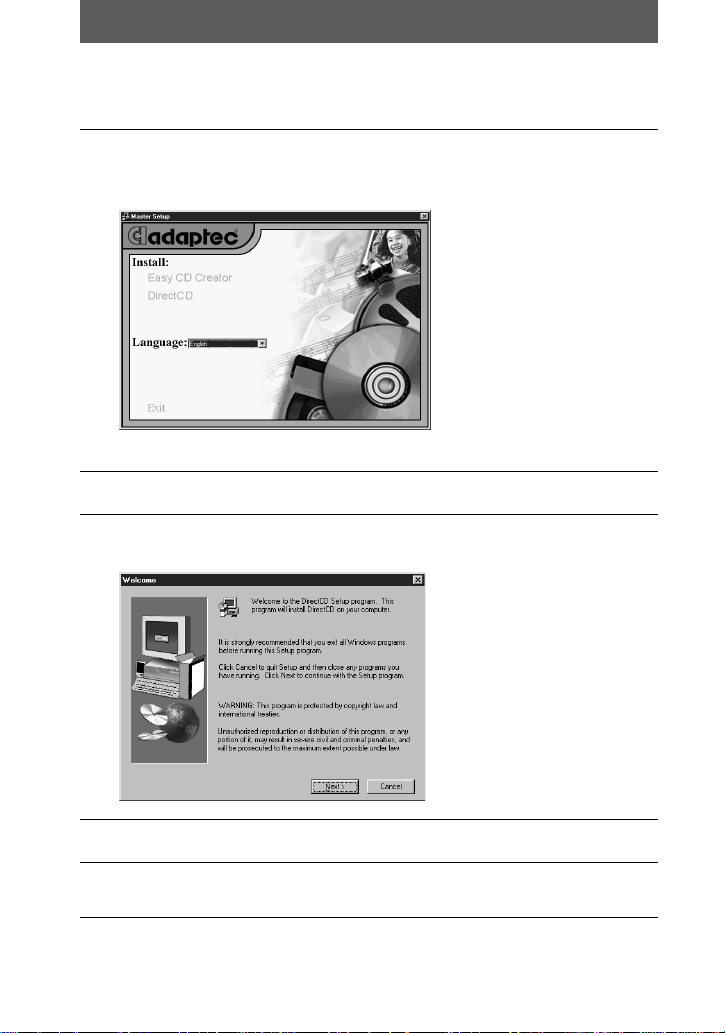
Follow these s teps b elo w t o in stall Direc tCD. English v ersi on illu st rations are u sed in
this manual.
Turn on your personal computer and insert the supplied CD-ROM
1
(SPVD-001) into the CD-ROM drive of your personal computer.
The following window appe ars on the screen.
If the window above is not displayed, start up “SETUP. EXE” in the CD-ROM.
Select the language.
2
Click [DirectCD].
3
The “Welcome” window appears on the screen.
Click [Next].
4
Read the text on the window carefully, and if you accept it, click
5
[Yes].
6
Page 7

Check the directory in which Dire ct C D will be i nst al l ed.
6
When you install DirectCD into another directory other than the default one,
click [Browse...], and select the directory.
Click [Next].
7
The setup of the program starts. When the installation is complete, the screen
returns to the wi ndow displayed in step 1.
Click [Exit].
8
The “Setup Complete” window appears on the screen.
DirectCD wi ll be a v ailab le af ter y ou res tar t your pers onal comput er. Check the option
[Yes ...,] then click [Finish].
Notes on Easy CD Creator included in the supplied CD-ROM
You cannot use Easy CD Creator with the MVC-CD1000 connected to your personal computer
•
with the USB cable.
Be sure to install Easy CD Creator of the sam e version as include d in the supplied CD-ROM,
•
with DirectCD. If one of other versions of Easy CD Crea t o r is installed, DirectC D that is
installed from the supplied CD -ROM may not functi on.
7
Page 8
Using DirectCD
You have to install the USB driver into your personal computer to connect the MVCCD1000 to your per s onal computer with the U SB cable. For details on the
installation of the USB driv er and on the directory, refe r to the o pera tin g in structions
of the MVC-CD1000.
Note
When you write new data onto the disc, before removing
the disc from the MVC-CD1000, be sure to follow the
procedure for removing the disc (page 12). If you remove
the disc or disconnect the USB cable, without following
the procedure, data on the disc may be broken.
Starting Direct CD
When you use a new disc or record a new image onto the disc that was finalized, you
have to format the disc (page 9).
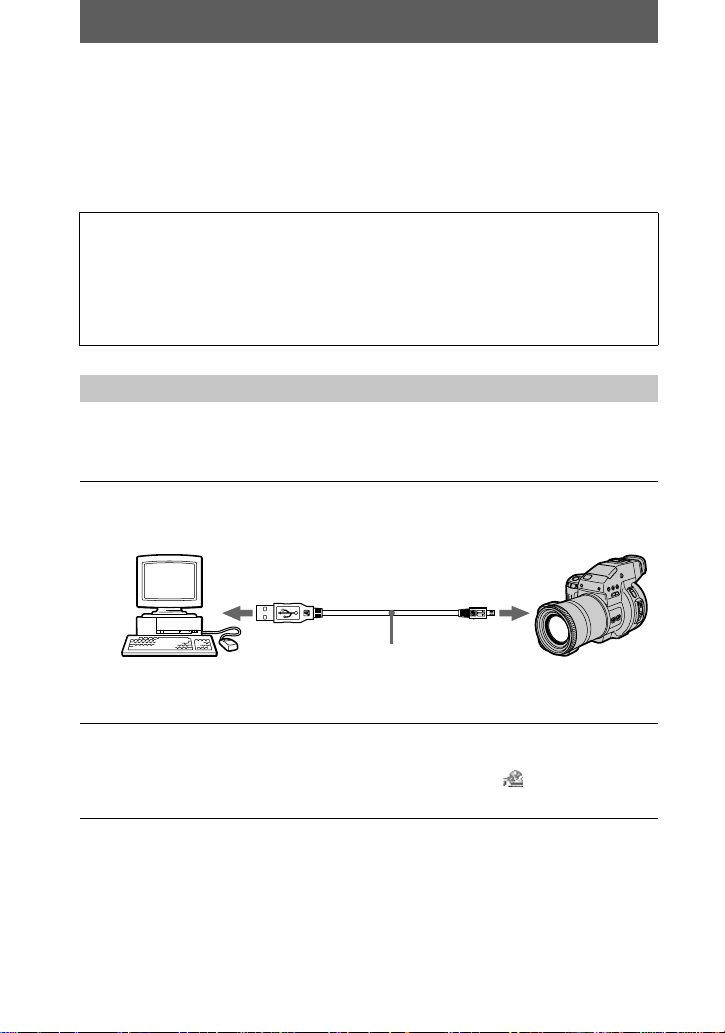
After starting up your computer, insert a disc into the MVC-
1
CD1000, and connect to your personal computer with the USB
cable.
to the USB connector
Personal computer
Turn on the MVC-CD1000 an d your personal computer.
2
“DirectCD Dis c R eady” appears on th e screen.
If this screen doe s not appear, double-click the CD icon on the Windows
taskbar, in the lower corner of yo ur screen.
to the DIGITAL I/O jack
USB cable
Push in until the
plug clicks into
place
8
Page 9
Formatt i ng a disc
You have to format (ini ti al i ze) a disc before re cording images ont o the disc.
If you format a new Sony Mavica dis c, you can store about 156 MB data on it.
Start DirectCD as described in the previous section.
1
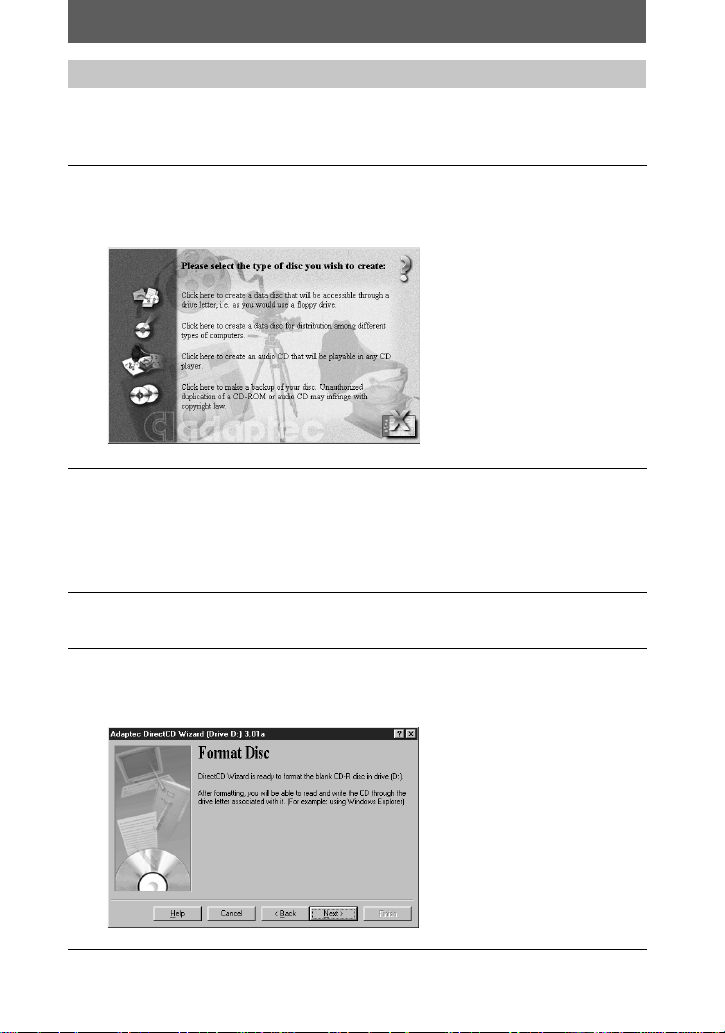
After a few seconds, a screen should appe ar asking you to “Pleas e select the
type of disc you wish to cr eate.”
Select the first option, [Click here to create a data disc that will be
2
accessible through a drive letter].
Adaptec DirectCD Wizard starts.
The
Note
Do not select the other options. If you do, you cannot use the disc with the MVC-CD1000.
Read the text in the “Welcome” window and click [Next].
3
The [Drive Information] window appears.
Read the text in the “Recorder Information” window and click
4
[Next].
The “Format Disc” window appears.
9
Page 10
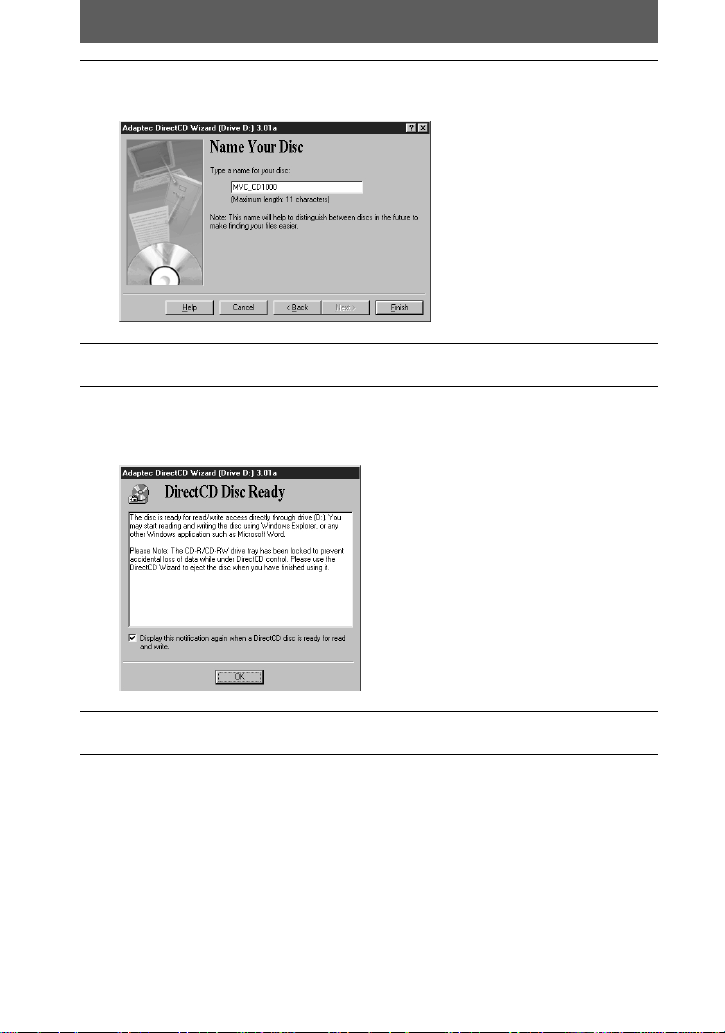
In the “Format Disc” window, click [Next] to continue.
5
The “Name Your Disc” window appears.
Type a disc name of up to 11 characters.
6
Click [Finish].
7
Disc formatting begins. The
the formatting is complete.
“DirectCD Disc R eady” window appears when
8
10
Click [OK].
Page 11

Writing data to a disc
Once your disc is formatted as a DirectCD disc, you can write data to it in several
different ways:
To shoot images using the MVC-CD10 00.
•
To drag and drop files from
•
To select [
•
drive letter o f the MVC- CD1000.
To use the [
•
To use MS - D O S command prompts f ro m a D O S w i ndow in Windows.
•
Note
If the file name format of images are not correspon d to the following format,
•
DSC0
operating instructions of the MVC- CD1000.
If the file has too large size, this file may not be able to be playe d ba ck on the MVC-CD1000.
•
Save As]
ssss
from the
Send To
] command.
.JPG, you cannot play them back on the MVC-CD1000. For details, refer to the
Windows Explorer
File
menu of a
onto the disc
Windows
drive icon.
applicati on and
select the
11
Page 12
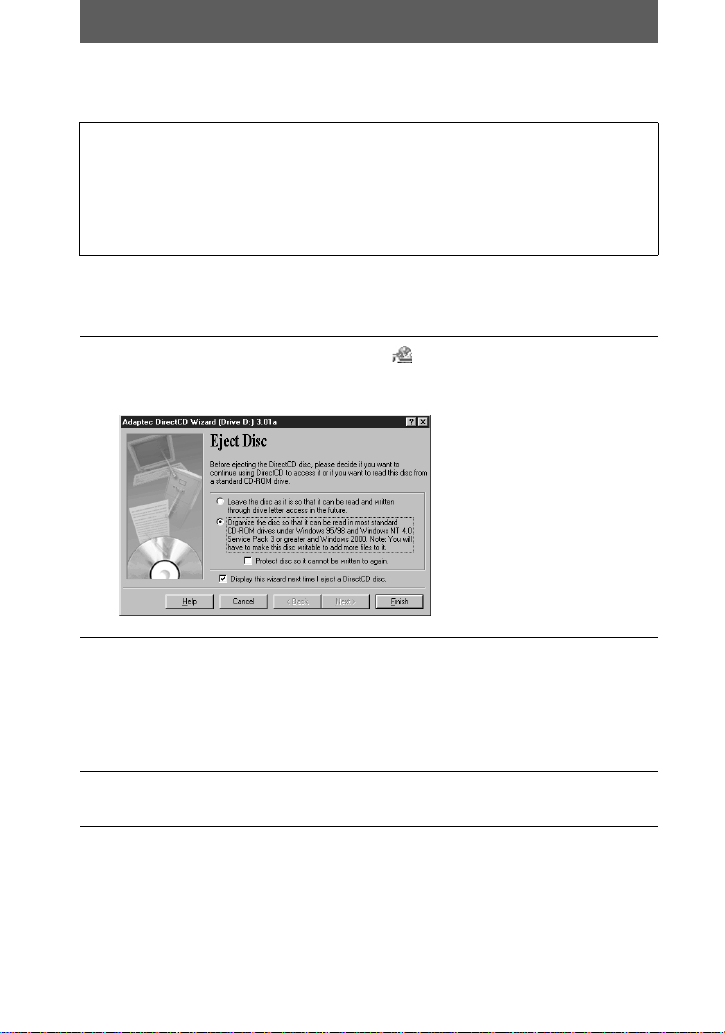
Removing the disc
Note
When you write new data onto the disc, before removing
the disc from the MVC-CD1000, be sure to follow the
procedure below. If you remove the disc or disconnect the
USB cable, without following the procedure, data on the
disc may be broken.
When you open th e file in the disc with your applic at ion software, quit it before
starting the proc edure below.
Right-click on th
1
[Eject] from the drop-down list box.
The “Eject Disc” window appears.
Check the appropriate option and click [Finish].
2
If you do not execute the finalization, click the upper option on the window.
•
If you execute the finalization to view images on a CD-ROM drive, click the
•
lower option on the window. When you will not add or m odify data on the
disc any more, also, c heck the “Protect disc so it cannot be written to agai n”
option.
Check that the ACCESS lamp is not lit, then open the disc cover
3
and remove the di sc.
e DirectCD icon on the taskbar and select
12
Page 13

Modifying data in a disc
Writing more data to a disc
After you have formatted a blank disc for DirectCD use, you can keep adding data to
the disc until it is full. To do so, follow these steps:
Insert the disc into the MVC-CD1000 and connect the MVC-CD1000
1
to your personal computer with the USB cable.
After the “DirectCD Disc Ready” window appears, click [OK], then
2
write data to the disc.
Deleting a file from a disc
If you “delete” files from a disc, the files become invisible to the file system (that is,
they cannot be seen in Windows Explorer) but the space they occupy is not av a ila b le
for other files.
Thus, “deletin g” files from a disc does not inc r ease the available free space on the
disc. To delete the contents on a disc , follow these steps:
While in Windows Explorer, select the file(s) you want to delete.
1
Select [Delete] from the File menu, or press t he Del ete key.
2
Click [Yes] to confirm that you want to delete the files from the
3
disc.
The selected files will be deleted.
Writing More Data to a finalized disc
Insert the disc that was previously finalized to read on a
1
standard
Start DirectCD.
2
Click [
3
Writable
Type the name you want to call your disc in the “
4
Disc
CD-ROM drive into the MVC-CD1000.
] on each window until you see the “
Next
”
window.
”
window, using up to 11 characters .
Make Disc
Name Your
13
Page 14

Click [Finish].
5
The “DirectCD Disc Ready” window will be displayed and writing data is
completed.
You can now copy more files to the di sc using Windows Explorer or
Windows
application.
any
14
Page 15

Page 16

Sony Corporation Printed in Japan
 Loading...