

Sony Cyber-shot DSC-RX1R User Manual

Cyber-shot User Guide
1
PrintSearch
Top page
Before Use
Shooting
Viewing
Using MENU items (Shooting)
Using MENU items (Viewing)
Changing settings
Viewing images on a TV
Using with your computer
Printing
Troubleshooting
Precautions/About this camera
Contents list
DSC-RX1/RX1R
User Guide
Use this manual if you encounter any problems, or have any questions about the camera.
Back to top
Copyright 2013 Sony Corporation
Cyber-shot User Guide
2
PrintSearch
Top page > Before Use
Before Use
Shooting
Viewing
Using MENU items (Shooting)
Using MENU items (Viewing)
Changing settings
Viewing images on a TV
Using with your computer
Printing
Troubleshooting
Precautions/About this camera
Contents list
Before Use
How to use this User Guide
How to use this User Guide
Names of parts and list of icons displayed on the screen
Names of parts
List of icons displayed on the screen
Using the strap
Using the shoulder strap
Using the control wheel
Using the control wheel
Using the In-Camera Guide
In-Camera Guide
Back to top
Copyright 2013 Sony Corporation
Cyber-shot User Guide
3
PrintSearch
Top page > Shooting
Before Use
Shooting
Viewing
Using MENU items (Shooting)
Using MENU items (Viewing)
Changing settings
Viewing images on a TV
Using with your computer
Printing
Troubleshooting
Precautions/About this camera
Contents list
Shooting
Shooting still images
Shooting still images
Zoom (Still images)
Shooting movies
Shooting movies
Zoom (Movies)
Setting REC mode
List of mode dial functions
Intelligent Auto
Superior Auto
Program Auto
Aperture Priority
Shutter Priority
Manual Exposure
1/2/3 (Calling up pre -registered settings)
Movie
Sweep Panorama
Scene Selection
Functions not available in some REC modes
Using shooting functions
Tracking focus
DISP (Display Contents)
Aperture ring
Macro switching ring
Focusing ring
Focus mode dial
Exposure compensation dial
Using the C (Custom) button
Using the AEL (AE lock) button
Using the Fn button
Using the Fn (Function) button
Functions that can be selected using the Fn button
Drive Mode
Flash Mode
ISO
Metering Mode
Autofocus Area
White Balance
DRO/Auto HDR

Creative Style
Flash Comp.
4
Smile/Face Detect.
Scene Selection
Movie
Picture Effect
Auto Port. Framing
Auto Mode
Soft Skin Effect
Quality
Aspect Ratio
Image Size
Copyright 2013 Sony Corporation
Back to top
Cyber-shot User Guide
5
PrintSearch
Top page > Viewing
Before Use
Shooting
Viewing
Using MENU items (Shooting)
Using MENU items (Viewing)
Changing settings
Viewing images on a TV
Using with your computer
Printing
Troubleshooting
Precautions/About this camera
Contents list
Viewing
Viewing still images
Viewing still images
Playback zoom
Image Index
Deleting images
Deleting images
Viewing movies
Viewing movies
Viewing panoramic images
Scrolling panoramic images for display
Back to top
Copyright 2013 Sony Corporation
Cyber-shot User Guide
6
PrintSearch
Top page > Using MENU items (Shooting)
Before Use
Shooting
Viewing
Using MENU items (Shooting)
Using MENU items (Viewing)
Changing settings
Viewing images on a TV
Using with your computer
Printing
Troubleshooting
Precautions/About this camera
Contents list
Using MENU items (Shooting)
Using MENU items (Shooting)
Using MENU items (Shooting)
Still shooting menu
Image Size
Aspect Ratio
Quality
Panorama: Size
Panorama: Direction
Clear Image Zoom
Digital Zoom
Long Exposure NR
High ISO NR
AF Illuminator
Color Space
AEL w/ shutter
Memory
Still shooting menu items not available in some REC modes
Movie shooting menu
File Format
Record Setting
SteadyShot
Auto Slow Shutter
Audio Recording
Wind Noise Reduct.
Movie shooting menu items not available in some REC modes
Custom menu
FINDER/LCD Setting
Red Eye Reduction
Grid Line
Auto Review
DISP Button(Monitor)
DISP Button(Finder)
Peaking Level
Peaking Color
MF Assist
Focus Magnif. Time
Live View Display
Func. of C Button
Func. of AEL button
Func. of Left Button

Func. of Right Button
7
Func. of Down Button
Smart Telecon./Zoom
MOVIE Button
Exp.comp.set
Bracket order
Lens Comp.: Shading
Lens Comp.: Chro. Aber.
Lens Comp.: Distortion
Face Priority Tracking
Face Registration
Custom menu items not available in some REC modes
Copyright 2013 Sony Corporation
Back to top
Cyber-shot User Guide
8
PrintSearch
Top page > Using MENU items (Viewing)
Before Use
Shooting
Viewing
Using MENU items (Shooting)
Using MENU items (Viewing)
Changing settings
Viewing images on a TV
Using with your computer
Printing
Troubleshooting
Precautions/About this camera
Contents list
Using MENU items (Viewing)
Using MENU items (Viewing)
Using MENU items (Viewing)
Playback menu
Still/Movie Select
Delete
Slide Show
Image Index
Rotate
Protect
Specify Printing
Picture Effect
Volume Settings
Playback Display
Playback menu items that cannot be set in View Mode
Back to top
Copyright 2013 Sony Corporation
Cyber-shot User Guide
9
PrintSearch
Top page > Changing settings
Before Use
Shooting
Viewing
Using MENU items (Shooting)
Using MENU items (Viewing)
Changing settings
Viewing images on a TV
Using with your computer
Printing
Troubleshooting
Precautions/About this camera
Contents list
Changing settings
Changing settings
Changing camera settings
Memory Card Tool menu
Format
File Number
Folder Name
Select REC Folder
New Folder
Recover Image DB
Display Card Space
Clock setup menu
Date/Time Setup
Area Setting
Setup menu
Menu start
Delete confirm.
Mode Dial Guide
LCD Brightness
Viewfinder Bright.
LCD Quality
Power Saving Start Time
HDMI Resolution
CTRL FOR HDMI
Upload Settings
USB Connection
USB LUN Setting
USB Power Supply
PAL/NTSC Selector (only for 1080 50i-compatible models)
Audio signals
Version
Language
Demo Mode
Initialize
Back to top
Copyright 2013 Sony Corporation
Cyber-shot User Guide
10
PrintSearch
Top page > Viewing images on a TV
Before Use
Shooting
Viewing
Using MENU items (Shooting)
Using MENU items (Viewing)
Changing settings
Viewing images on a TV
Using with your computer
Printing
Troubleshooting
Precautions/About this camera
Contents list
Viewing images on a TV
Viewing an image on a High Definition (HD) TV
Viewing an image on an HD TV using the HDMI Cable (sold separately)
Viewing an image on a “BRAVIA” Sync-compatible TV
Viewing an image on a “BRAVIA” Sync- compatible TV
Back to top
Copyright 2013 Sony Corporation
Cyber-shot User Guide
11
PrintSearch
Top page > Using with your computer
Before Use
Shooting
Viewing
Using MENU items (Shooting)
Using MENU items (Viewing)
Changing settings
Viewing images on a TV
Using with your computer
Printing
Troubleshooting
Precautions/About this camera
Contents list
Using with your computer
Recommended computer environment
Recommended computer environment
Using the software
“PlayMemories Home” (Windows)
Installing “PlayMemories Home” (Windows)
Software for Mac
“Image Data Converter”
Installing “Image Data Converter”
Importing images to a computer
Connecting the camera to the computer
Importing images to a computer
To disconnect your camera from the computer
Creating a disc of movies
Selecting a method for creating a disc of movies
Copying high-definition image quality (HD) movies on to DVD discs (AVCHD discs)
Creating standard definition image quality (STD) DVD discs
Creating Blu -ray discs
Copyright 2013 Sony Corporation
Back to top
Cyber-shot User Guide
12
PrintSearch
Top page > Printing
Before Use
Shooting
Viewing
Using MENU items (Shooting)
Using MENU items (Viewing)
Changing settings
Viewing images on a TV
Using with your computer
Printing
Troubleshooting
Precautions/About this camera
Contents list
Printing
Printing still images
Printing still images
Back to top
Copyright 2013 Sony Corporation

Cyber-shot User Guide
13
PrintSearch
Top page > Troubleshooting
Before Use
Shooting
Viewing
Using MENU items (Shooting)
Using MENU items (Viewing)
Changing settings
Viewing images on a TV
Using with your computer
Printing
Troubleshooting
Precautions/About this camera
Contents list
Troubleshooting
If you have problems
If you have problems
Troubleshooting
Battery pack and power
Shooting still images/movies
Viewing images
Computers
Memory card
Printing
Others
Warning indicators and messages
Self- diagnosis display
Messages
Situations this camera has difficulty handling
Situations this camera has difficulty handling
Back to top
Copyright 2013 Sony Corporation
Cyber-shot User Guide
14
PrintSearch
Top page > Precautions/About this camera
Before Use
Shooting
Viewing
Using MENU items (Shooting)
Using MENU items (Viewing)
Changing settings
Viewing images on a TV
Using with your computer
Printing
Troubleshooting
Precautions/About this camera
Contents list
Precautions/About this camera
Precautions
Precautions
On the internal rechargeable backup battery
Battery pack
Charging the battery pack
Memory card
On cleaning
On cleaning
Number of still images and recordable time of movies
Number of still images
Recordable time of movies
Using the camera abroad
Using the camera abroad
On TV color systems
About this camera
Carl Zeiss lens
AVCHD format
License
Trademarks
Trademarks
Copyright 2013 Sony Corporation
Back to top
Cyber-shot User Guide
15
PrintSearch
Top page > Contents list
Before Use
Shooting
Viewing
Using MENU items (Shooting)
Using MENU items (Viewing)
Changing settings
Viewing images on a TV
Using with your computer
Printing
Troubleshooting
Precautions/About this camera
Contents list
Contents list
Before Use
How to use this User Guide
How to use this User Guide
Names of parts and list of icons displayed on the screen
Names of parts
List of icons displayed on the screen
Using the strap
Using the shoulder strap
Using the control wheel
Using the control wheel
Using the In-Camera Guide
In-Camera Guide
Back to top
Shooting
Shooting still images
Shooting still images
Zoom (Still images)
Shooting movies
Shooting movies
Zoom (Movies)
Setting REC mode
List of mode dial functions
Intelligent Auto
Superior Auto
Program Auto
Aperture Priority
Shutter Priority
Manual Exposure
1/2/3 (Calling up pre -registered settings)
Movie
Sweep Panorama
Scene Selection
Functions not available in some REC modes
Using shooting functions
Tracking focus
DISP (Display Contents)

Aperture ring
Macro switching ring
16
Focusing ring
Focus mode dial
Exposure compensation dial
Using the C (Custom) button
Using the AEL (AE lock) button
Using the Fn button
Using the Fn (Function) button
Functions that can be selected using the Fn button
Drive Mode
Flash Mode
ISO
Metering Mode
Autofocus Area
White Balance
DRO/Auto HDR
Creative Style
Flash Comp.
Smile/Face Detect.
Scene Selection
Movie
Picture Effect
Auto Port. Framing
Auto Mode
Soft Skin Effect
Quality
Aspect Ratio
Image Size
Viewing
Viewing still images
Viewing still images
Playback zoom
Image Index
Deleting images
Deleting images
Viewing movies
Viewing movies
Viewing panoramic images
Scrolling panoramic images for display
Using MENU items (Shooting)
Using MENU items (Shooting)
Back to top
Back to top

Using MENU items (Shooting)
Still shooting menu
17
Image Size
Aspect Ratio
Quality
Panorama: Size
Panorama: Direction
Clear Image Zoom
Digital Zoom
Long Exposure NR
High ISO NR
AF Illuminator
Color Space
AEL w/ shutter
Memory
Still shooting menu items not available in some REC modes
Movie shooting menu
File Format
Record Setting
SteadyShot
Auto Slow Shutter
Audio Recording
Wind Noise Reduct.
Movie shooting menu items not available in some REC modes
Custom menu
FINDER/LCD Setting
Red Eye Reduction
Grid Line
Auto Review
DISP Button(Monitor)
DISP Button(Finder)
Peaking Level
Peaking Color
MF Assist
Focus Magnif. Time
Live View Display
Func. of C Button
Func. of AEL button
Func. of Left Button
Func. of Right Button
Func. of Down Button
Smart Telecon./Zoom
MOVIE Button
Exp.comp.set
Bracket order
Lens Comp.: Shading
Lens Comp.: Chro. Aber.
Lens Comp.: Distortion

Face Priority Tracking
Face Registration
18
Custom menu items not available in some REC modes
Using MENU items (Viewing)
Using MENU items (Viewing)
Using MENU items (Viewing)
Playback menu
Still/Movie Select
Delete
Slide Show
Image Index
Rotate
Protect
Specify Printing
Picture Effect
Volume Settings
Playback Display
Playback menu items that cannot be set in View Mode
Back to top
Changing settings
Changing settings
Changing camera settings
Memory Card Tool menu
Format
File Number
Folder Name
Select REC Folder
New Folder
Recover Image DB
Display Card Space
Clock setup menu
Date/Time Setup
Area Setting
Setup menu
Menu start
Delete confirm.
Mode Dial Guide
LCD Brightness
Viewfinder Bright.
LCD Quality
Power Saving Start Time
HDMI Resolution
CTRL FOR HDMI
Back to top

Upload Settings
USB Connection
19
USB LUN Setting
USB Power Supply
PAL/NTSC Selector (only for 1080 50i-compatible models)
Audio signals
Version
Language
Demo Mode
Initialize
Viewing images on a TV
Viewing an image on a High Definition (HD) TV
Viewing an image on an HD TV using the HDMI Cable (sold separately)
Viewing an image on a “BRAVIA” Sync-compatible TV
Viewing an image on a “BRAVIA” Sync- compatible TV
Using with your computer
Back to top
Back to top
Recommended computer environment
Recommended computer environment
Using the software
“PlayMemories Home” (Windows)
Installing “PlayMemories Home” (Windows)
Software for Mac
“Image Data Converter”
Installing “Image Data Converter”
Importing images to a computer
Connecting the camera to the computer
Importing images to a computer
To disconnect your camera from the computer
Creating a disc of movies
Selecting a method for creating a disc of movies
Copying high-definition image quality (HD) movies on to DVD discs (AVCHD discs)
Creating standard definition image quality (STD) DVD discs
Creating Blu -ray discs
Back to top
Printing
Printing still images
Troubleshooting
Printing still images
Back to top

If you have problems
If you have problems
20
Troubleshooting
Battery pack and power
Shooting still images/movies
Viewing images
Computers
Memory card
Printing
Others
Warning indicators and messages
Self- diagnosis display
Messages
Situations this camera has difficulty handling
Situations this camera has difficulty handling
Precautions/About this camera
Precautions
Precautions
On the internal rechargeable backup battery
Battery pack
Charging the battery pack
Memory card
Back to top
On cleaning
On cleaning
Number of still images and recordable time of movies
Number of still images
Recordable time of movies
Using the camera abroad
Using the camera abroad
On TV color systems
About this camera
Carl Zeiss lens
AVCHD format
License
Trademarks
Trademarks
Copyright 2013 Sony Corporation
Back to top
Cyber-shot User Guide
21
Before Use
PrintSearch
Top page > Before Use > How to use this User Guide > How to use this User Guide
Shooting
Viewing
Using MENU items (Shooting)
Using MENU items (Viewing)
Changing settings
Viewing images on a TV
Using with your computer
Printing
Troubleshooting
Precautions/About this camera
Contents list
How to use this User Guide
Selecting a topic to display
Searching a topic by keyword
Returning to a previous page
Printing out a page
Marks and notations used in this User Guide
This User Guide explains how to use each function of the camera, how to change settings, and how to
troubleshoot a problem.
The images used as examples in this User Guide are reproduced images, and are not actual images
shot using this camera.
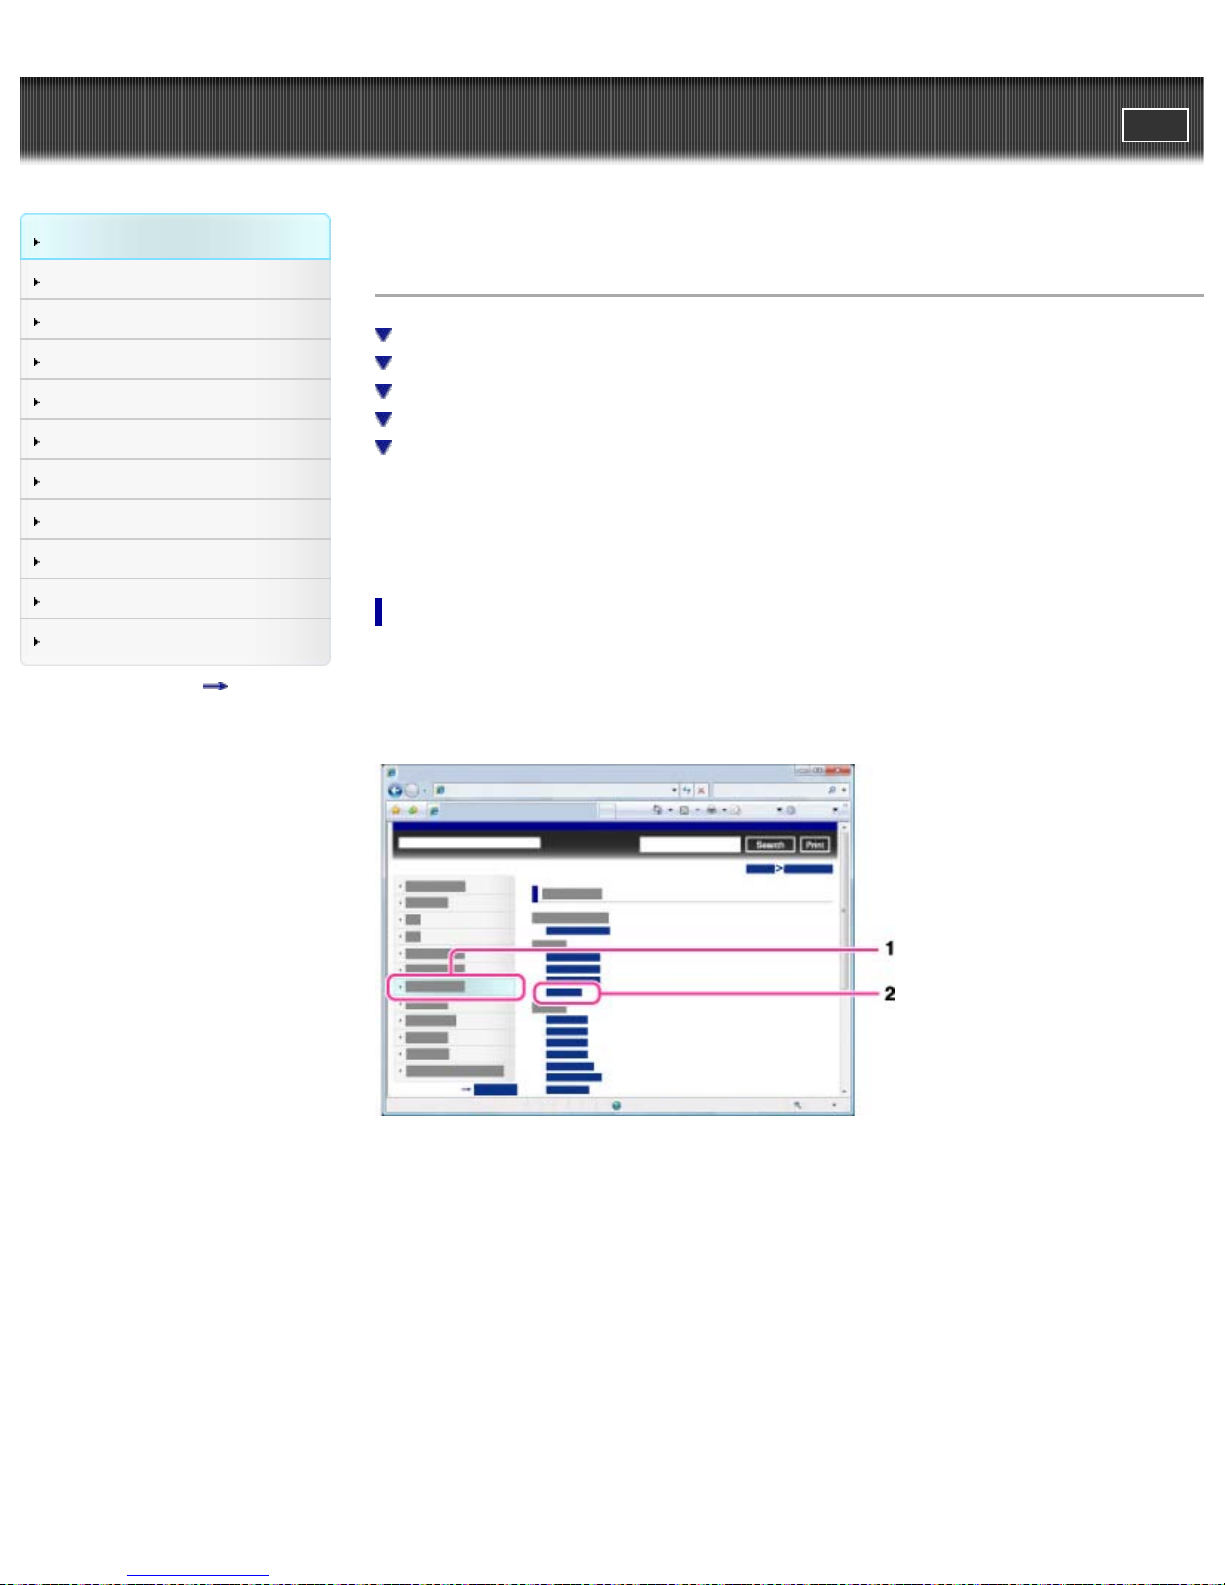
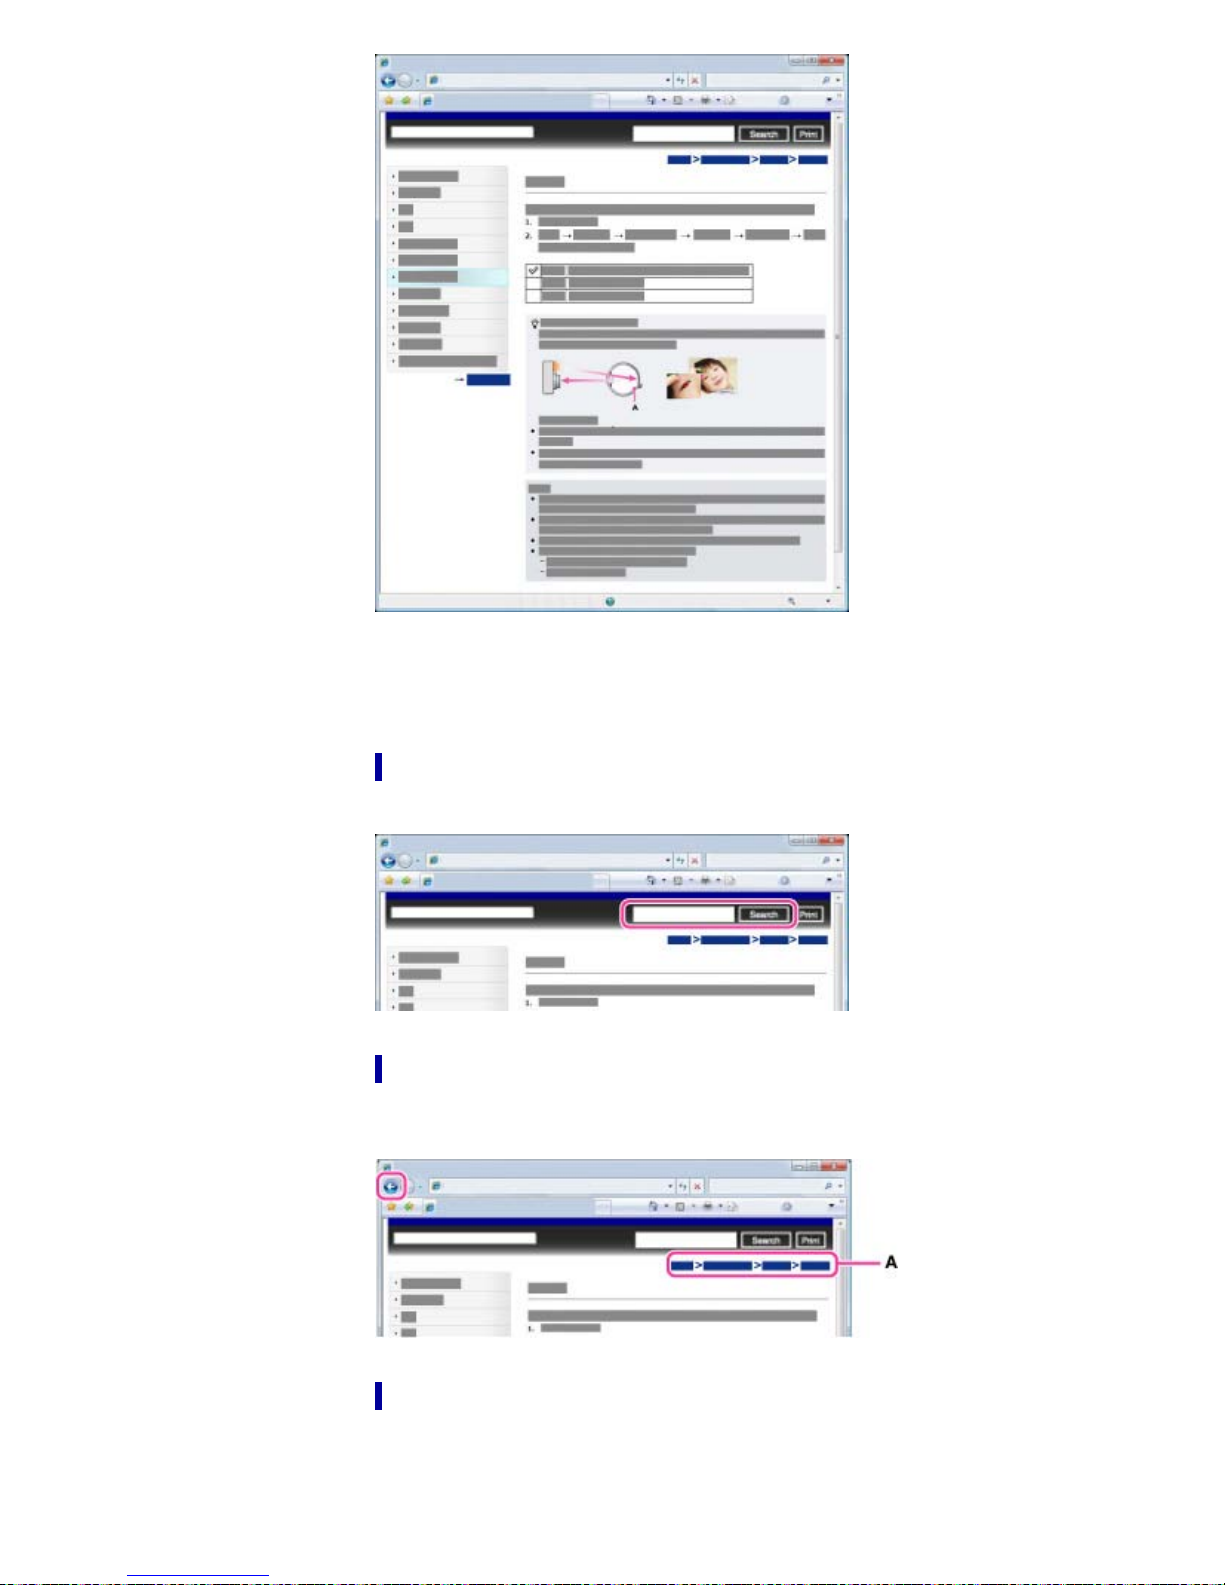
Selecting a topic to display
The following illustrations take Internet Explorer 7 as an example.
1. Click a title in the side bar on the left of the browser window.
The title’s topic list appears in the right pane.
2. Click a topic title in the list.
Descriptions appear in the right pane.
Changing the font size
22
Change the font size by changing the setting of your web browser. For how to change the font size
setting, refer to the Help of your web browser.
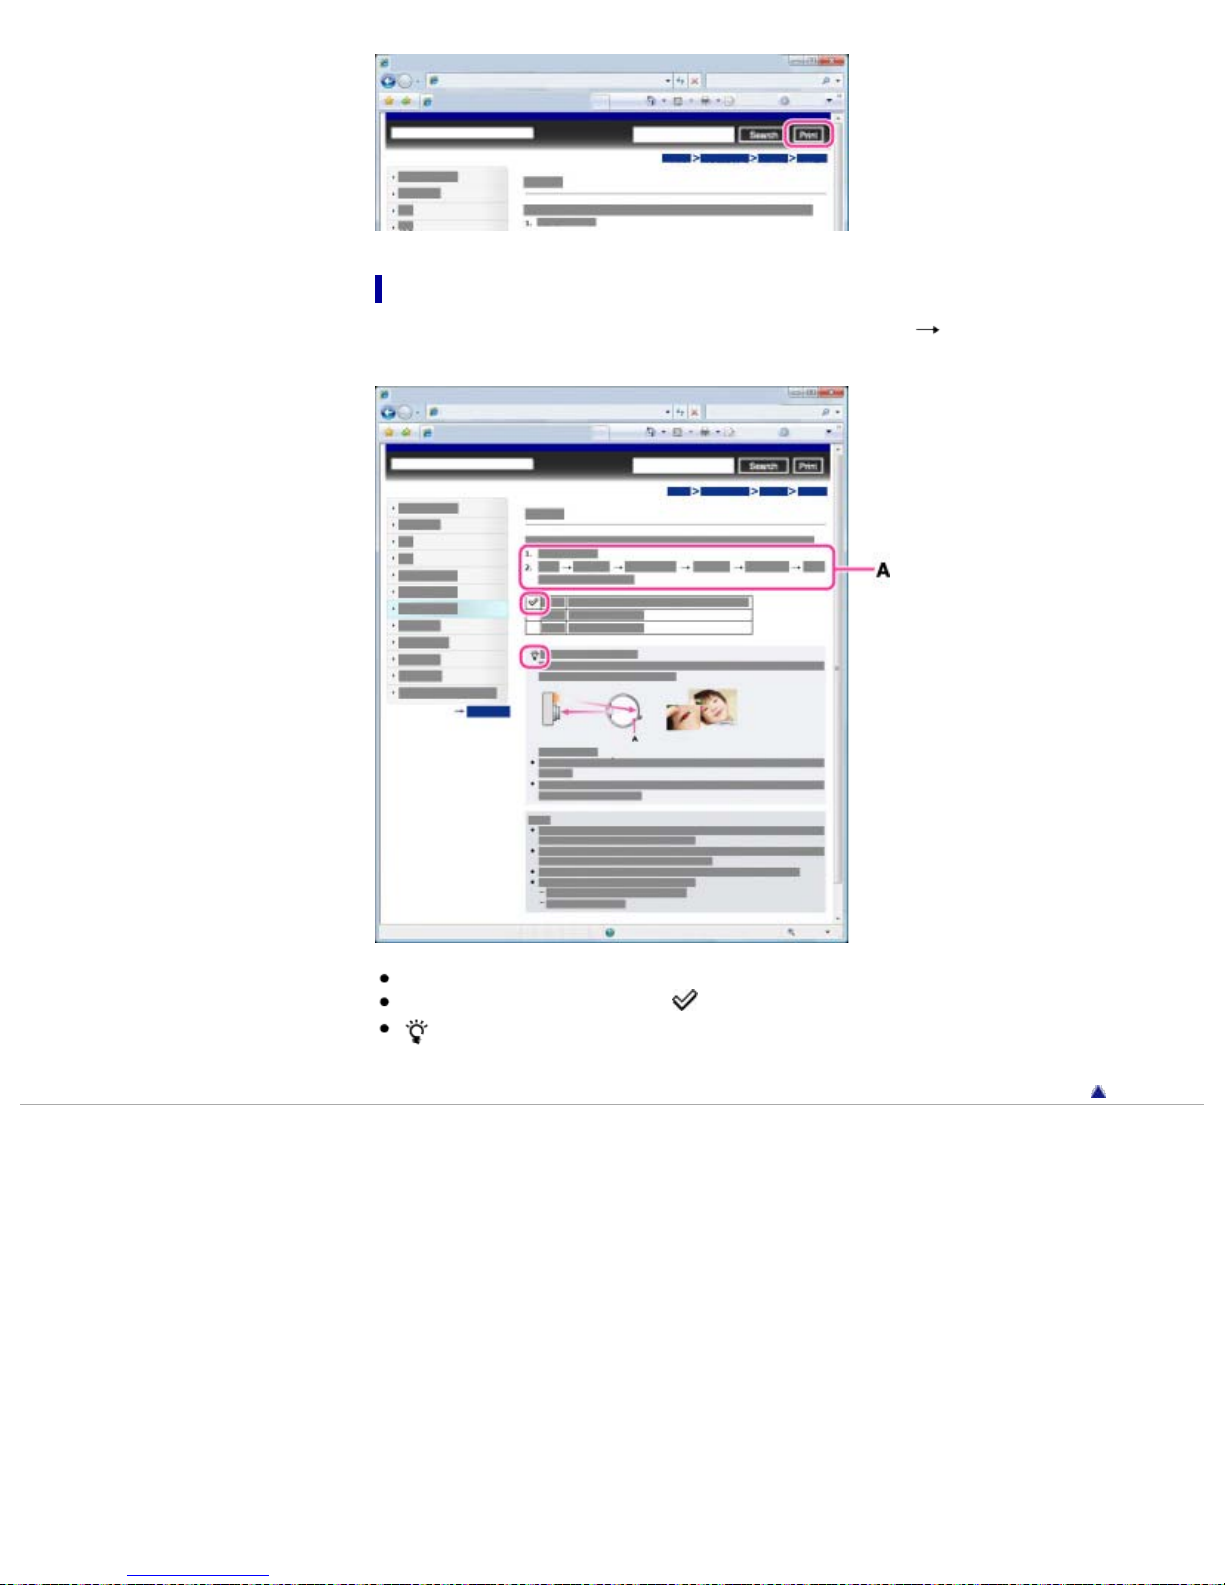
Searching a topic by keyword
Enter the keyword in the search window, then click the [Search] button.
Returning to a previous page
Use the browser’s back button to return to a previously viewed page, or use the breadcrumb trail
navigation (A) to display the desired page.
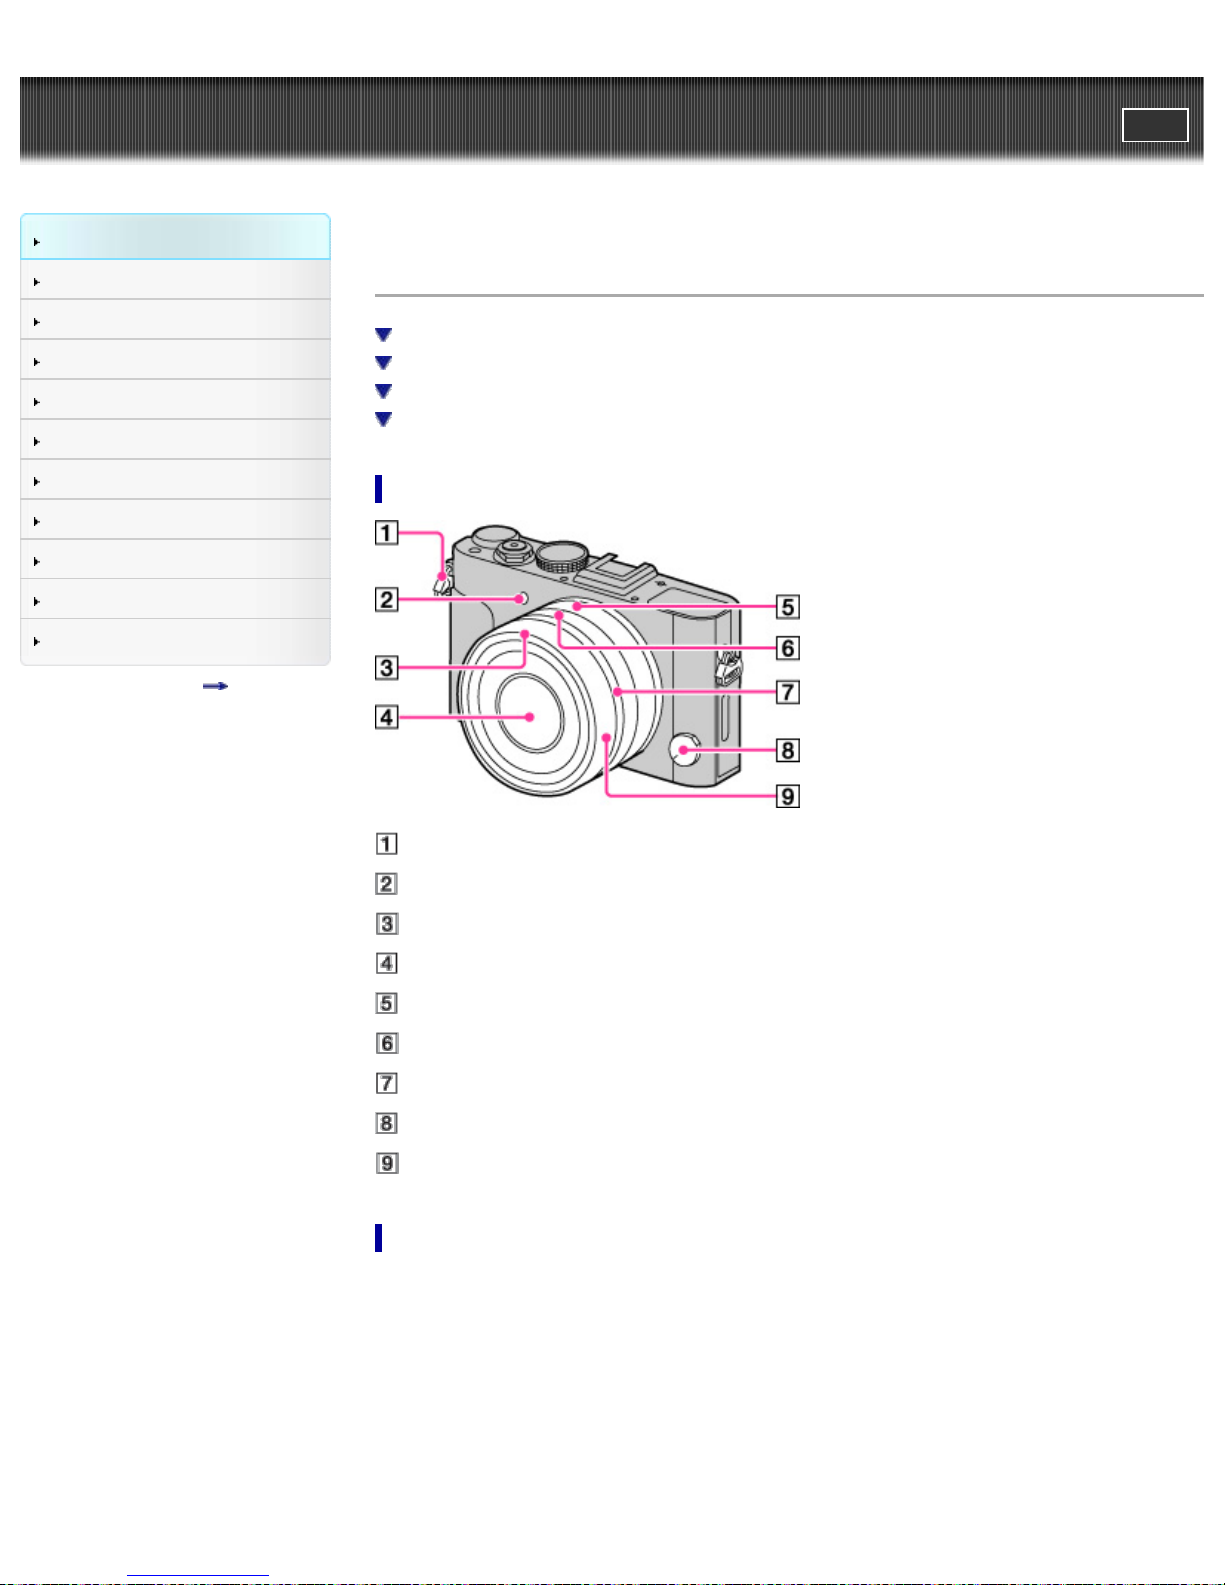
Printing out a page
Click the [Print] button to print out the page you are viewing.
Marks and notations used in this User Guide
23
In this User Guide, the sequence of operations is shown by arrows ( ) (A).
Operate the camera in the order indicated.
Icons in the operating procedure sentences appear when the camera is in its default settings.
The default setting is indicated by
.
indicates information that is useful to know.
Back to top
Copyright 2013 Sony Corporation
Cyber-shot User Guide
24
Before Use
PrintSearch
Top page > Before Use > Names of parts and list of icons displayed on the screen > Names of parts
Shooting
Viewing
Using MENU items (Shooting)
Using MENU items (Viewing)
Changing settings
Viewing images on a TV
Using with your computer
Printing
Troubleshooting
Precautions/About this camera
Contents list
Names of parts
Front side
Rear side/Sides
Top side
Bottom
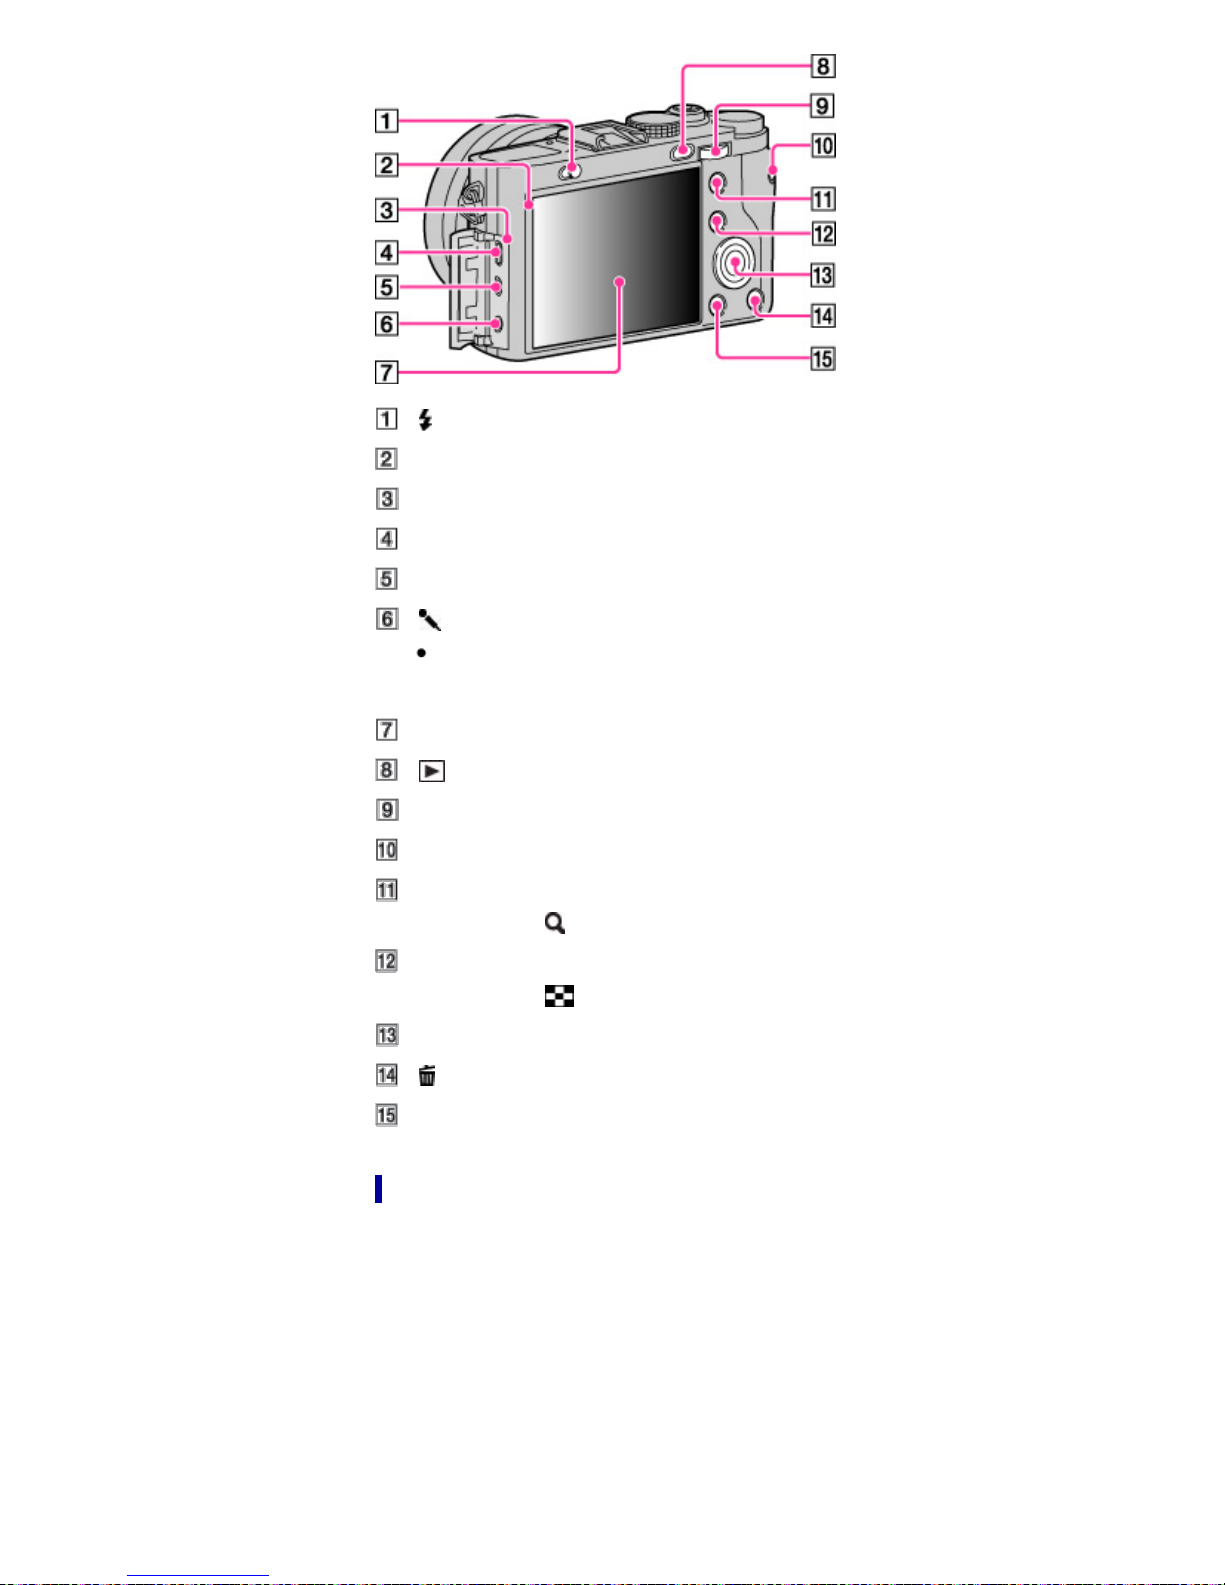
Front side
Hooks for shoulder strap
AF illuminator/Self-timer lamp
Lens hood index
Lens
Aperture ring
Aperture index/Macro switching index
Macro switching ring
Focus mode dial
Focusing ring
Rear side/Sides
(Flash pop-up) switch
25
Light sensor
Charge lamp
Micro USB connector
HDMI micro jack
(Microphone) jack
When an external microphone is connected, the camera switches from the internal microphone
to the external microphone. If the external microphone is a plug-in-power type, the power of the
microphone is supplied by the camera.
LCD screen
(Playback) button
Control dial
MOVIE (Movie) button
For shooting: AEL (AE lock) button
For viewing:
(Enlarge) button
For shooting: Fn (Function) button
For viewing:
(Image index) button
Top side
Control wheel
(Delete) button
MENU button
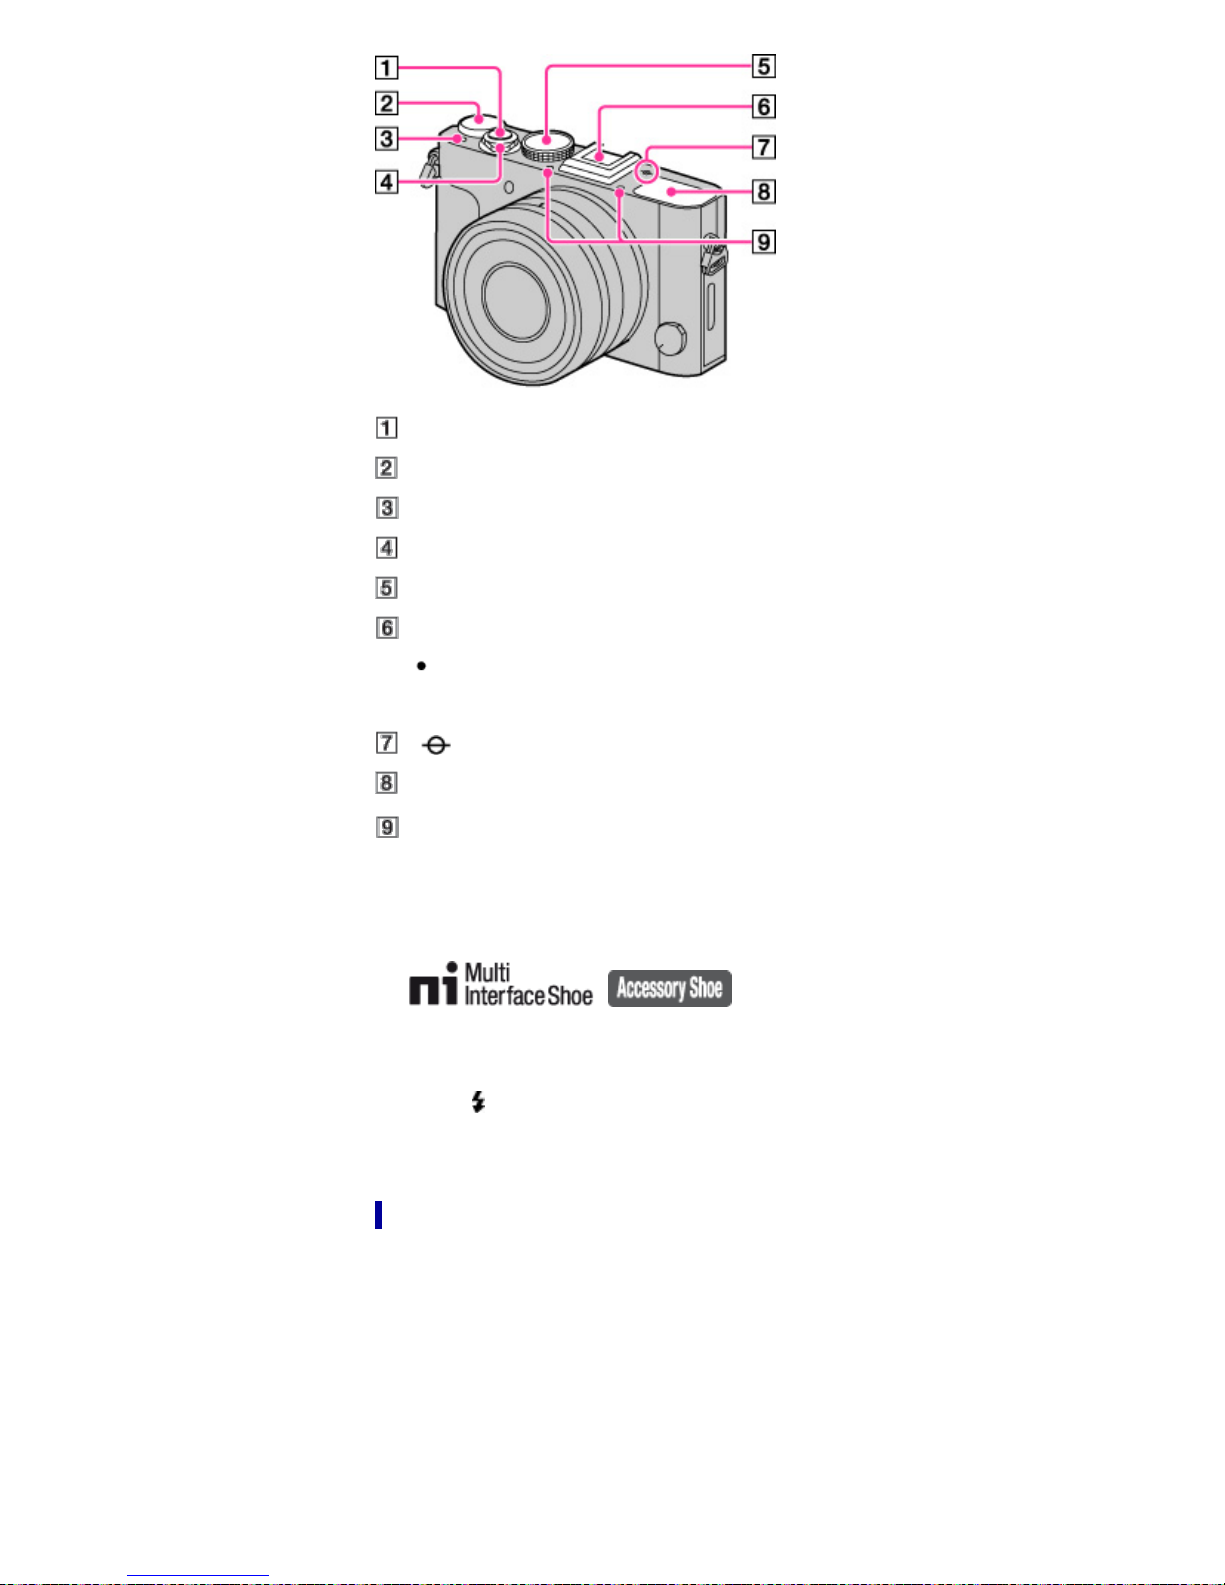
Shutter button
26
Exposure compensation dial
C (Custom) button
Power switch
Mode dial
Multi interface shoe*
1
Some of the accessories may not be inserted fully and protrude backward from the multi
interface shoe. However, if the accessory reaches the front end of the shoe, the connection is
completed.
Image sensor position mark
Flash*
Microphone*
*1 For details on compatible accessories for the multi interface shoe, visit the Sony web site, or consult your
Sony dealer or local authorized Sony service facility. You can also use accessories that are compatible with
the accessory shoe. Operations with other manufacturers’ accessories are not guaranteed.
2
3
The camera functions for viewfinder are available only when using the FDA-EV1MK viewfinder accessory (sold
separately).
2
*
To raise the flash, first check that you are not blocking the flash with your fingers or other objects, and then
slide the
Take care not to pinch your finger when closing the flash.
3
*
Do not cover this part while recording movies. Doing so may cause noise or lower the volume.
(flash pop-up) switch. When you are not using the flash, push it back into place with a finger.
Bottom
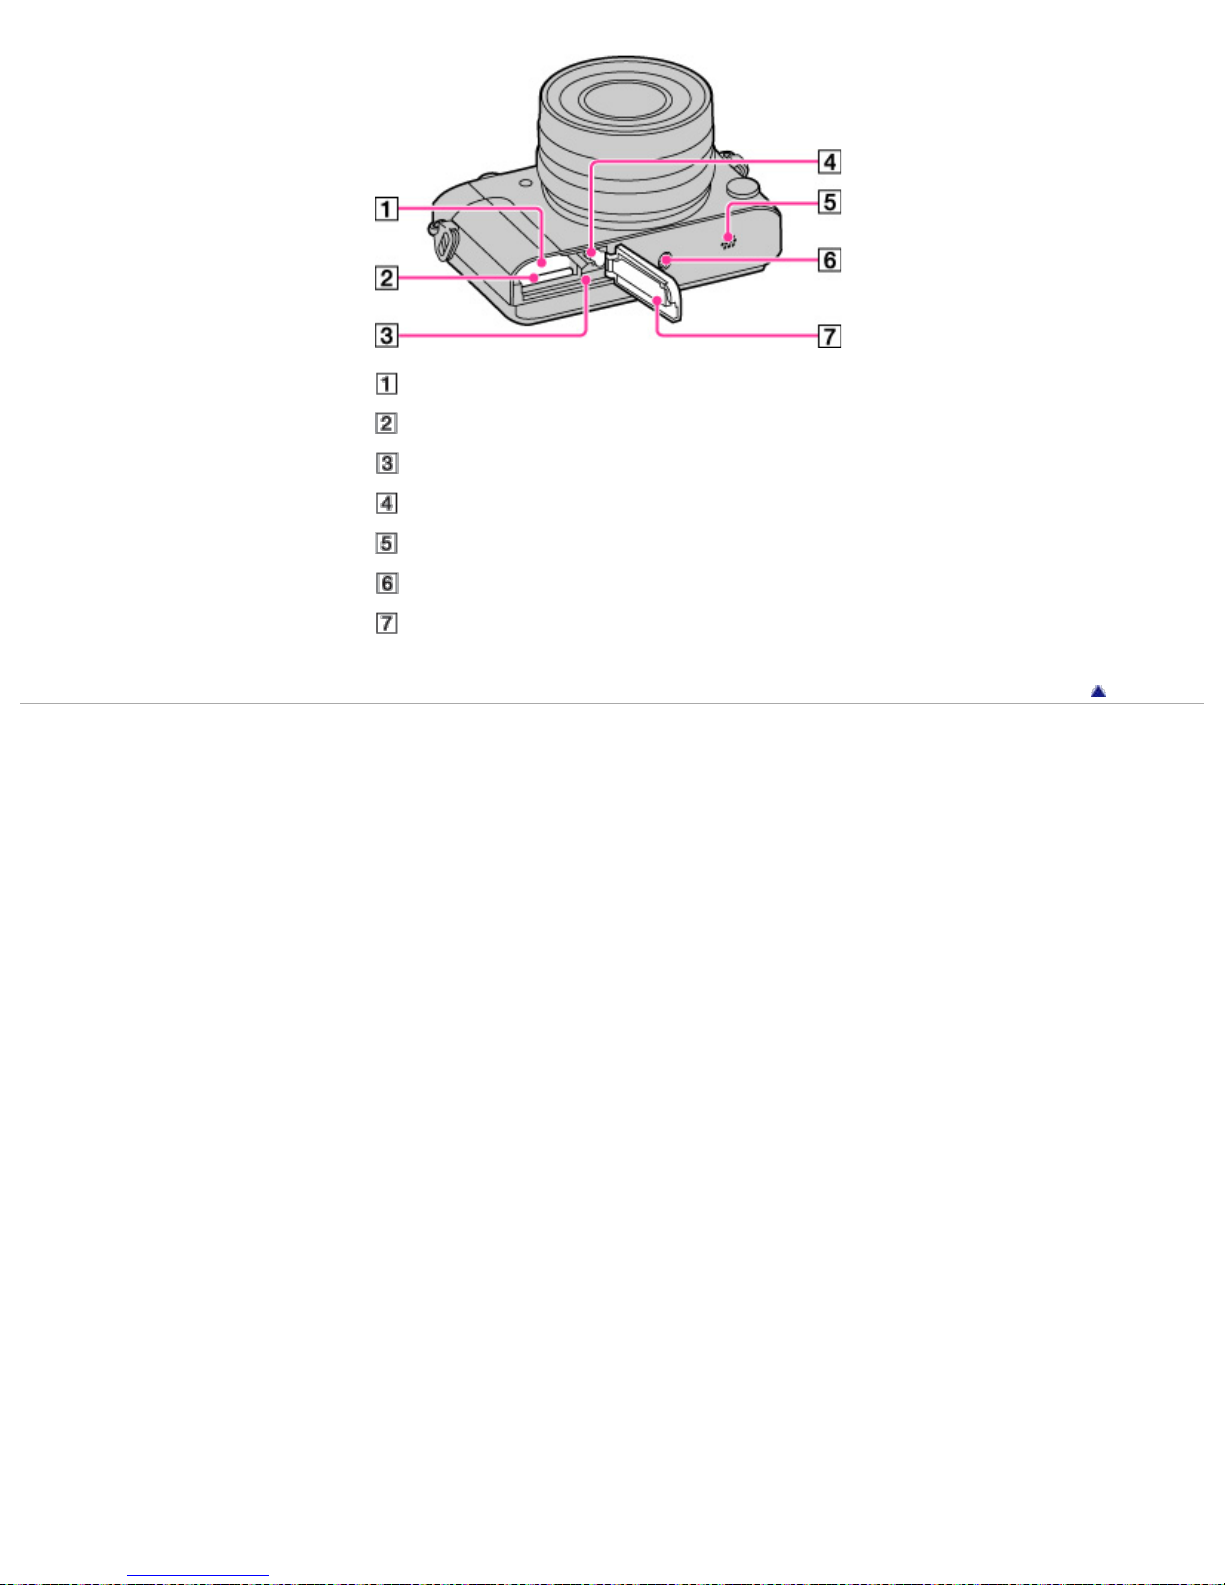
Battery insertion slot
27
Memory card slot
Access lamp
Lock lever
Speaker
Tripod socket hole
Battery/Memory card cover
Copyright 2013 Sony Corporation
Back to top
Cyber-shot User Guide
28
Before Use
PrintSearch
Top page > Before Use > Names of parts and list of icons displayed on the screen > List of icons
displayed on the screen
Shooting
Viewing
Using MENU items (Shooting)
Using MENU items (Viewing)
Changing settings
Viewing images on a TV
Using with your computer
Printing
Troubleshooting
Precautions/About this camera
Contents list
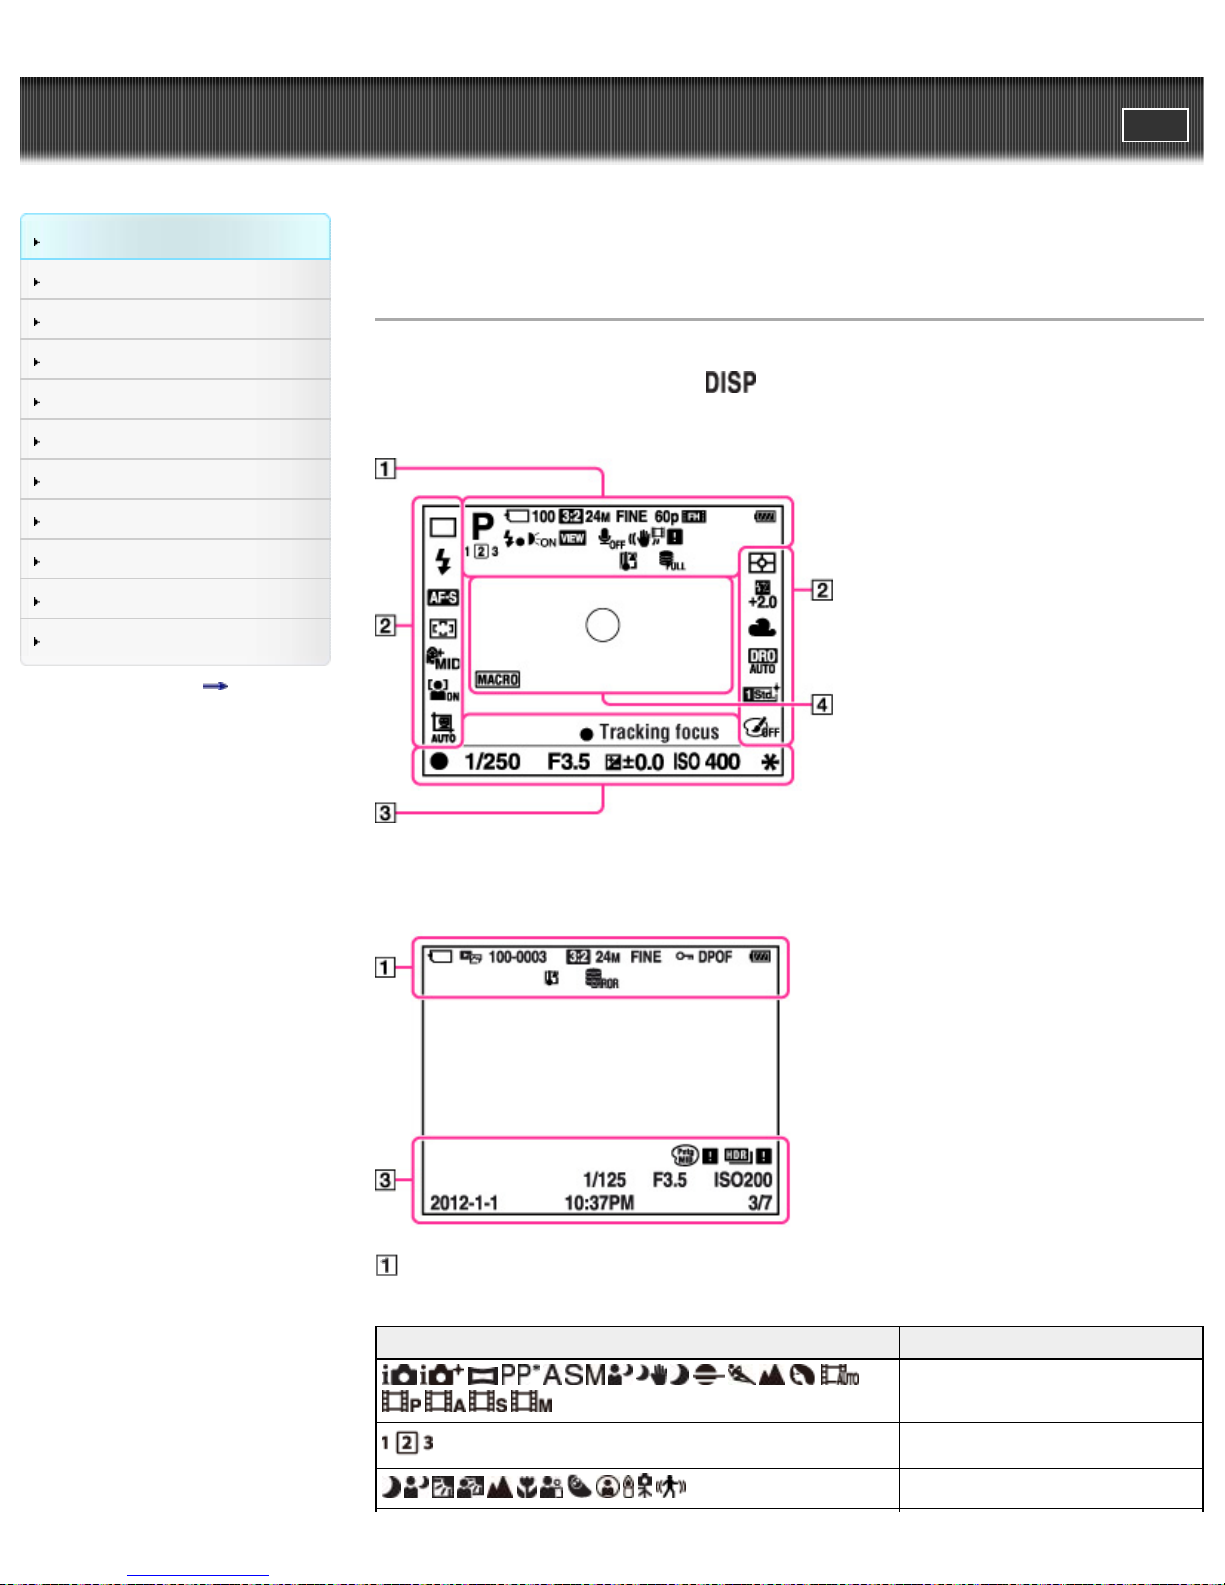
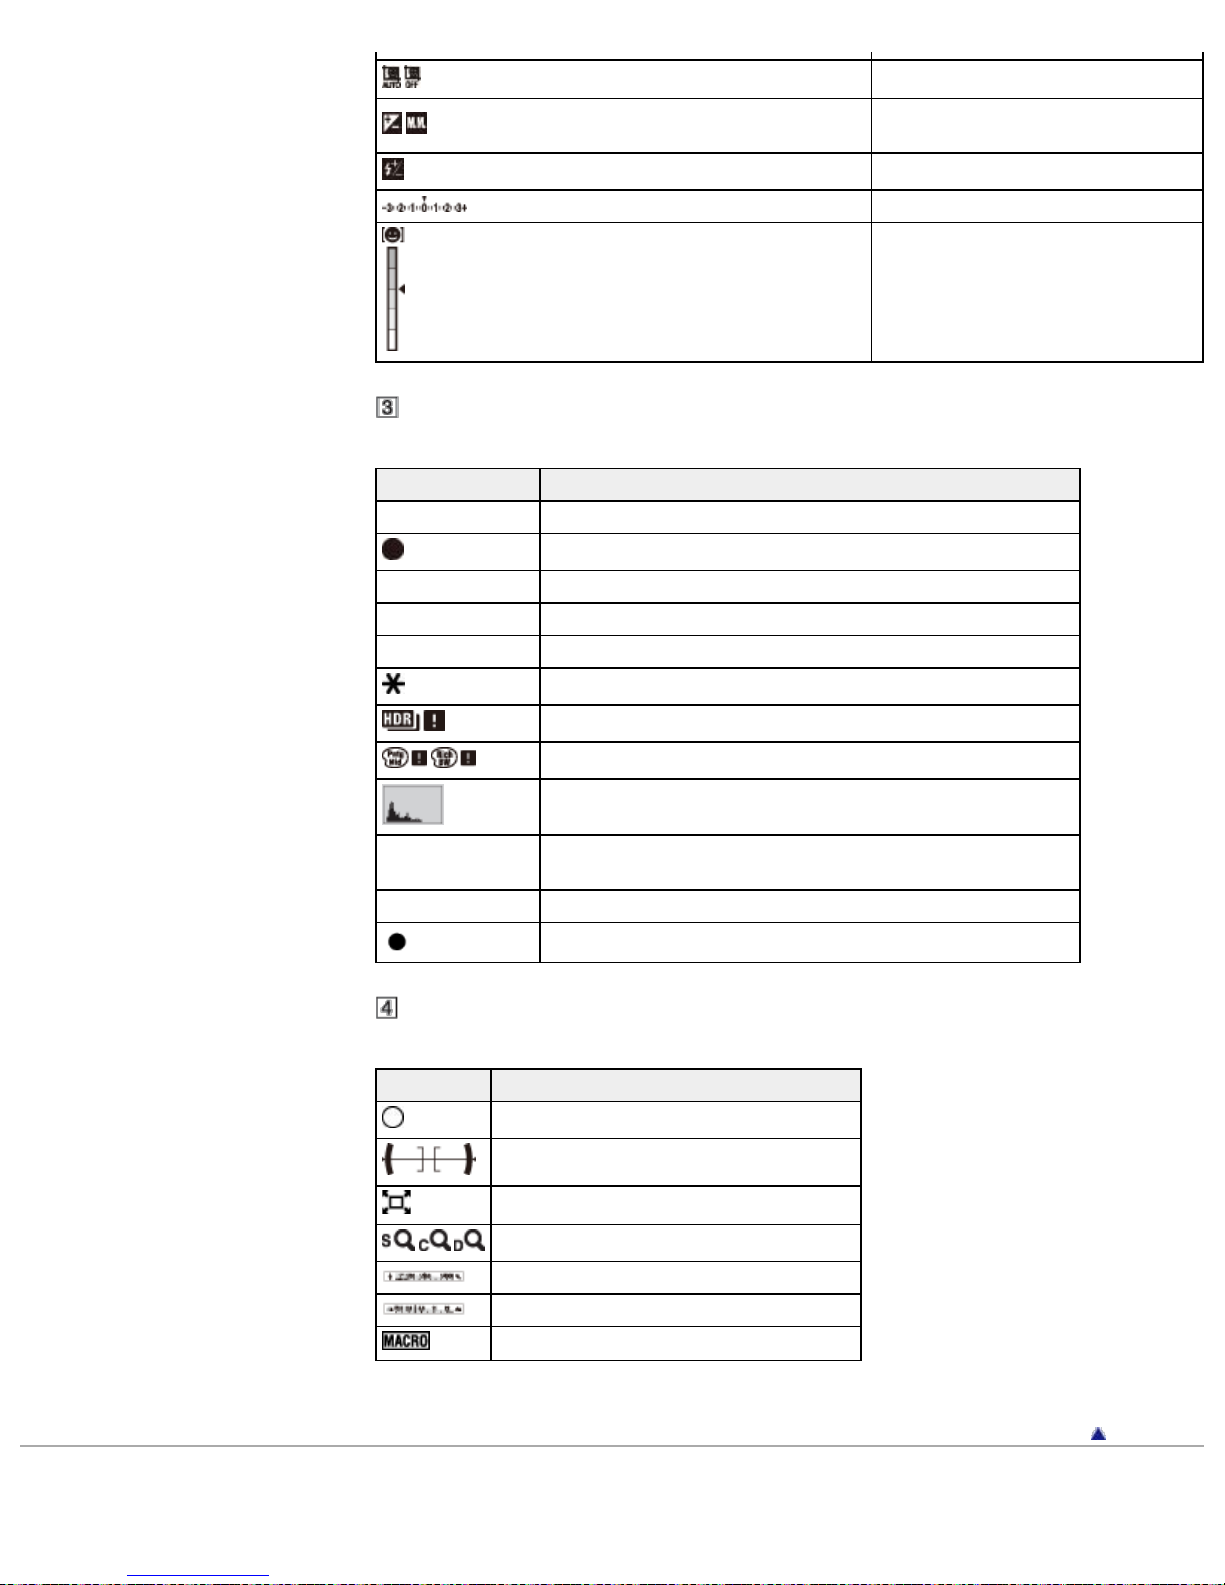
List of icons displayed on the screen
Icons are displayed on the screen to indicate camera status.
You can change the screen display using
For LCD screen mode*
* Viewfinder mode is available and is suitable for shooting with an external viewfinder (sold separately).
on the control wheel.
For playback (Basic information display)
Display Indication
Shooting mode
Register number
Scene Recognition icon
Overlay icon
29
AF Illuminator
Memory card/Upload
100 Number of recordable images
24M/10M/4.6M/20M/8.7M/3.9M
Aspect ratio of still images
Image size of still images
Image quality of still images
Frame rate of movies
Recording mode of movies
Battery charge remaining
Flash charge in progress
Setting Effect OFF
Does not record sound during movie
recording
Wind Noise Reduction
SteadyShot/SteadyShot warning
Overheating warning
Database file full/Database file error
View Mode
100-0003 Folder-file number
Protect
Print order (DPOF)
Low battery warning
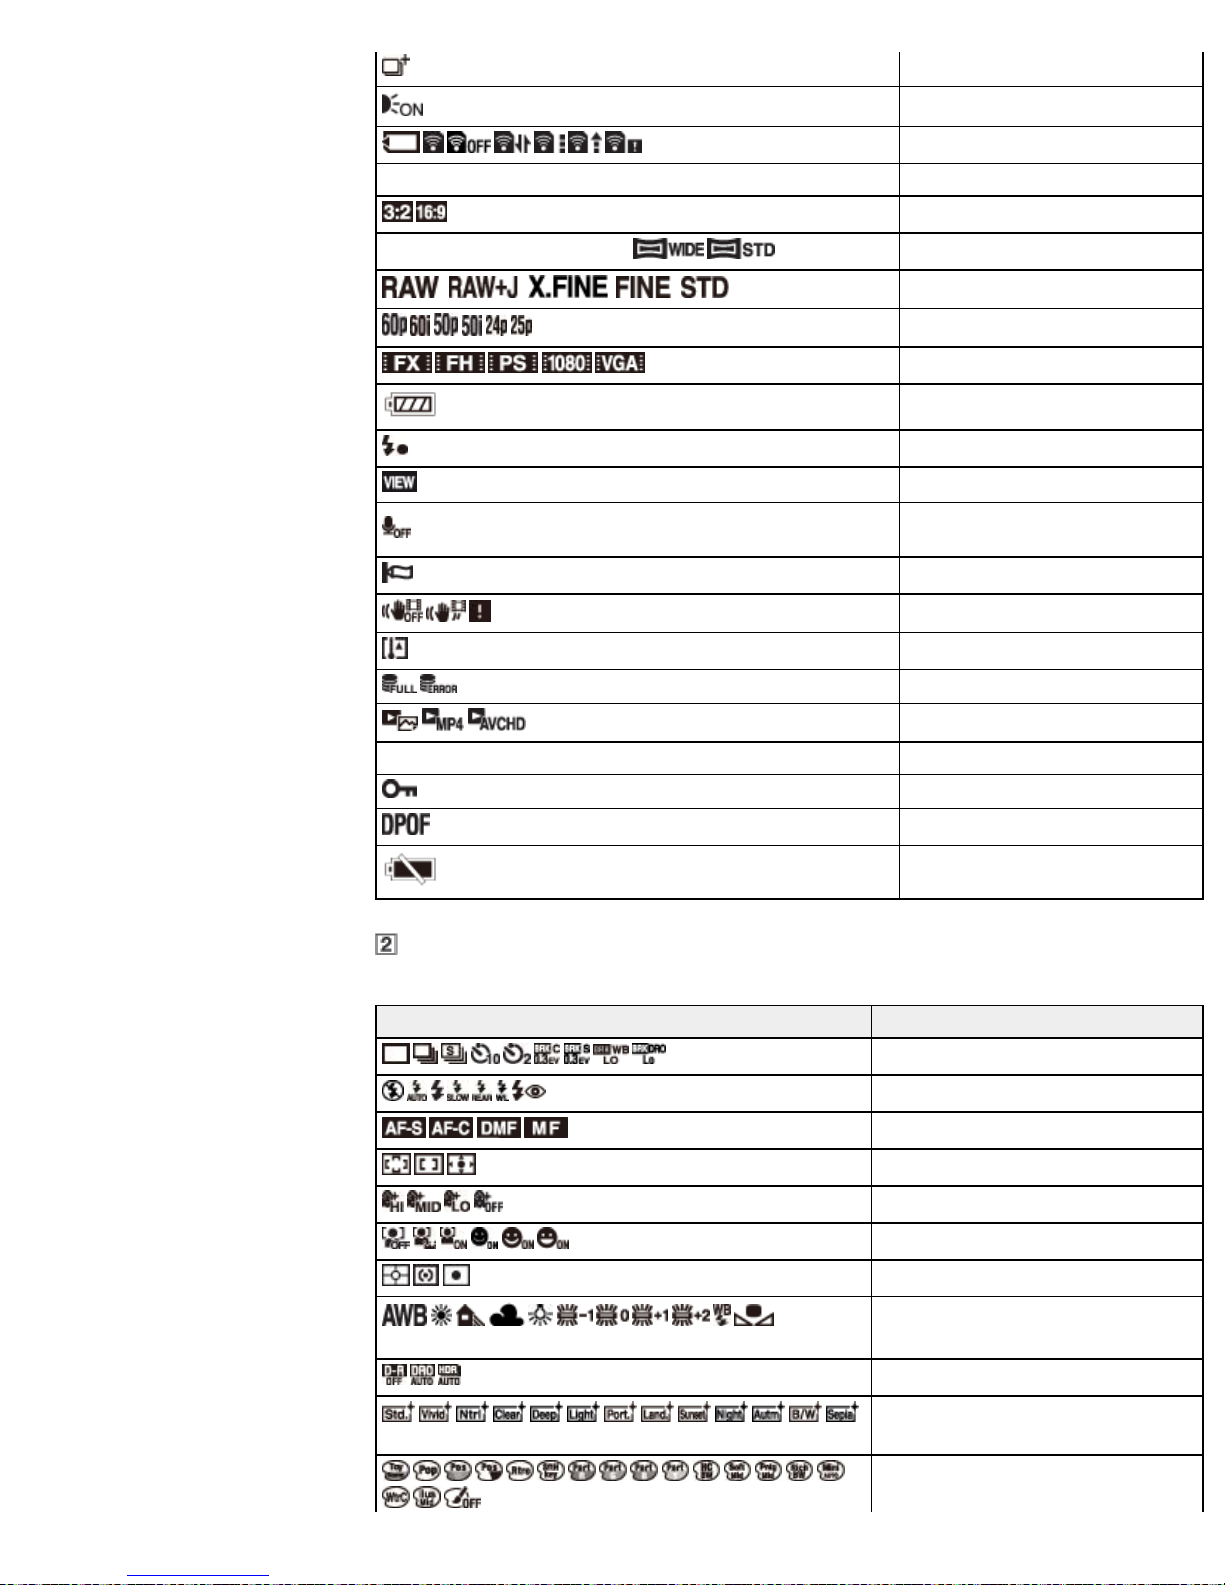
Display Indication
7500K A5
G5
Drive Mode
Flash Mode/Red Eye Reduction
Focus Mode
Autofocus Area
Soft Skin Effect
Face detection/Smile Shutter
Metering Mode
White Balance
DRO/Auto HDR
+3 +3 +3
Creative Style/Contrast, Saturation,
Sharpness
Picture Effect
30
Display Indication
REC 0:12 Recording time of the movie (m:s)
Focus status
1/250 Shutter speed
F3.5 Aperture value
ISO400 ISO number
Auto Port. Framing
Exposure compensation/Metered
manual
Flash compensation
EV scale (for viewfinder mode only)
Smile Detection Sensitivity indicator
AE lock
Auto HDR image error
Picture Effect error
Histogram
2012-1-1
10:37 AM
Recorded date/time of the playback image
3/7 Image number/Number of images recorded in selected View Mode
Tracking focus Tracking focus guide
Display Indication
Spot metering circle
Level
Smart teleconverter
Smart Zoom/Clear Image Zoom/Digital Zoom
Shutter speed indicator
Aperture indicator
Macro mode
Back to top
Copyright 2013 Sony Corporation
 Loading...