

SONY CYBER-SHOT DSC-P73 User Manual
2-189-207-11(1)
_
_
_
_
_
_
_
_
_
_
_
_
_
_
Getting started_______________________
Shooting still images_________________
Digital Still Camera
Operating Instructions
Before operating the uni t, ple ase read this manual thoroughly, and
retain it for future reference.
Owner’s Record
The model and serial numbers are located on the bottom. Record the
serial number in the space provided below. Refer to thes e numbers
whenever you call upon your Sony dealer regarding this product.
Model No. DSC-P73/P93A
Serial No.
DSC-P73/P93A
© 2004 Sony Corporation
Viewing still images__________________
Deleting still images _________________
Before advanced oper at ions ____________
Advanced still image shooting __________
Advanced still image viewing ___________
Still image editing _____________________
Still image printing ____________________
(PictBridge printer)
Enjoying movies ______________________
Enjoying images on you r co m put er______
Troubleshooting ______________________
Additional information__________________
Index _____________________________
WARNING
To prevent fire or shock hazard, do
not expose the unit to rain or
moisture.
For the Customers in the U.S.A.
This symbol is intended to
alert the user to the presence
of uninsulated “dangerous
voltage” withi n the p r o duct’s
enclosure that may be of
sufficient magnitude to
constitute a risk of electric
shock to persons.
This symbol is intended to
alert the user to the presence
of important operating and
maintenance (servicing)
instructions in the literature
accompanying the appliance.
If you have any questions about this product,
you may call:
Sony Customer Information Services Center
1-800-222-SONY (7669)
The number below is for the FCC related
matters only.
Regulatory Information
Declaration of Conformity
Trade Name: SONY
Model No.: DSC-P93A
Responsible Party:Sony Electronics Inc.
Address: 16450 W. Bernardo Dr,
San Diego, CA 92127
U.S.A.
Telephone No.: 858-942-2230
This device complies with Part 15 of the
FCC Rules. Operation is subject to the
following two conditions: (1) This device
may not cause harmful interfe rence, a nd (2)
this device mus t acce pt an y in t erference
received, including interference that may
cause undesired operation.
Declaration of Conformity
Trade Name: SONY
Model No.: DSC-P73
Responsible Party:Sony Electro n ics In c.
Address: 16450 W. Bernardo Dr,
San Diego, CA 92127
U.S.A.
Telephone No.: 858-942-2230
This device complies with Part 15 of the
FCC Rules. Operation is subject to the
following two conditions: (1) This device
may not cause harmful interference, an d (2)
this device must acc ep t any interference
received, including interference that may
cause undesired operatio n.
CAUTION
You are cautioned that any changes or
modifications not expressly approved in this
manual could void you r au thority to operate
this equipment.
2

Note:
This equipment has been tested and found to
comply with the limits for a Class B digital
device, pursuant to Part 15 of the FCC Rules.
These limits a re designed to provide
reasonable protection against ha r mful
interference in a residential installation. This
equipment generates, use s, and can radiate
radio frequency energy and, if not installed
and used in accordance with the instructions,
may cause harmful interference to radio
communications. However, there is no
guarantee that interference will not occur in a
particular installation. If this equipment does
cause harmful interference to radio or
television reception, which can be determined
by turning the equipment off and on, the user
is encouraged to try to co rrect t he int erferen ce
by one or more of the following measures:
—Reorient or relocate the receiving antenna.
—Increase the separation between the
equipment and receiver.
—Connect the equipment into an outlet on a
circuit different fro m that to which the
receiver is connected.
—Consult the dealer or an experien ced
radio/TV technician for help.
The supplied interface cable m u st be use d
with the equipment in order to comply with
the limits for a digital device purs ua nt to
Subpart B of Part 15 of FC C Rules.
For the Customers i n the U .S.A.
and Canada
RECYCLING NICKEL METAL
HYDRIDE BATTERIES
Nickel Metal Hydride batt e ri es
are recyclable.
You can help preserve our
environment by returning your
used rechargeable batteries to
the collection and recycling location nearest
you.
For more information regarding recycling of
rechargeable batteries, call toll free
1-800-822-8837, or
visit http://www.rbrc.org/
Caution: Do not handle damaged or leaking
Nickel Metal Hydride batt e ri es .
Notice for the customers in the
United Kingdom
A moulded plug complying with BS 1363 is
fitted to th is equipment for you r s afety and
convenience.
Should the fuse in the plug supplied need to be
replaced, a fuse of the same rating as the
supplied one and approved by ASTA or BSI to
BS 1362, (i.e., marked with or mark)
must be used.
If the plug supplied with this equipm e nt ha s a
detachable fuse cover, be sure to attach the
fuse cover after you change the fuse. Never
use the plug without the fuse cover. If you
should lose the fuse cover, please contact your
nearest Sony service station.
For the Customers in Europe
This product has been tested and found
compliant with the limits sets out in the EMC
Directive for using connection cables shorte r
than 3 meters (9.8 feet).
Attention
The electromagnetic fields at the specific
frequencies may influence the picture and
sound of this digital camera .
Notice
If static electricity or electromagnetism causes
data transfer to discontinue midway (fail),
restart the application or disc onnect and
connect the USB cable again.
Certain countries or regions may regulate
disposal of the battery used to power this
product. Please consult with your loca l
authority.
3

“Memory Stick”
Read this first
N50
For the Customers in the U.S.A.
and Canada
THIS CLASS B DIGITAL DEVICE
COMPLIES WITH PART 15 OF THE FCC
RULES AND THE CANADIAN ICES-003
OPERATION IS SUBJECT TO THE
FOLLOWING TWO CONDITIONS:
(1) THIS DEVICE MAY NOT CAUSE
HARMFUL INTERFERENCE, AND (2)
THIS DEVICE MUST ACCEPT ANY
INTERFERENCE RECEIVED,
INCLUDING INTERFERENCE THA T MAY
CAUSE UNDESIRED OPERATION.
4
Trial recording
Before you record one-time events, you may
want to make a tr ial recording to make sure
that the camera is working correc tl y.
No compensation for contents of the
recording
Contents of the recording cannot be
compensated for if recording or playback is
not possible due to a malfunctio n of you r
camera or recording medium, etc.
Back up recommendation
To av oid the potential risk of data loss, always
copy (back up) data to a disk.
Notes on image data compatibility
• This camera conforms with the D e sign rule
for Camera File system universal standard
established by the JEITA (Japan Electronics
and Information T echnology Industries
Association).
• Playback of images recorded with your
camera on other equi p m ent and playback of
images recorded or edited with othe r
equipment on your camera are not
guaranteed.
Precaution on copyright
Television progra ms, films, video tape s, and
other materials may be copyrighted.
Unauthorized record ing of such ma teria ls may
be contrary to the provision of the copyright
laws.
Do not shake or strike the camera
In addition to malfunc tions and inability to
record images, this may render the “Memory
Stick” unusable or image data brea kdown,
damage or loss may occur.
LCD screen, LCD finder (only models
with an LCD finder) and lens
• The LCD screen and the LCD f ind er are
manufactured using extremely highprecision technology so over 99.99% of the
pixels are operational for effective use.
However, there may be some tiny black
points and/or bright points ( white, red, blue
or green in color) that constantly ap pe ar on
the LCD screen and the LCD finder. These
points are normal in the manufacturing
process and do not affect the recording in
any way.
• Be careful when pla cin g the camera near a
window or outdoors. Exposing the LCD
screen, the finder or the lens to direct
sunlight for long periods may c au se
malfunctions.
• Do not press the LCD screen hard ly. The
screen may be uneven and that may cause a
malfunction.
• Images may be trailed on the LCD screen in
a cold location. Th is is not a malfunction.
Remove dirt from the surface of the
flash
If the dirt changes color or sticks to the
surface of the flash du e to the heat of the fla sh,
sufficient light may not be emitted.

The power zoom lens
This camera is equipped with power zoom
lens. Be careful not to bump the lens, and be
careful not to apply force to it.
Do not get the camera wet
When taking pictures outdoors in the rain or
under similar conditions, be careful not to get
the camera wet. If water gets insid e of the
camera, it may cause the camera to
malfunction, sometimes beyond repair. If
moisture condensation oc curs, see page 118
and follow the instructions on how to remove
it before using the camera.
Do not expose the camera to sand or
dust
Using the camera in sandy or dusty loca tions
may cause a malfunction.
Do not aim the camera at the sun or
other bright light
This may cause irrecoverable damage to your
eyes or the malfunction of your camera .
Note on locations where you can
use the camera
Do not use the camera near a location that
generates strong radio waves or emits
radiation. The camera may not be able to
record or play back properly.
The pictures used in this manual
The photographs used as examples of pictures
in this manual are reproduced images , and are
not actual images shot using this camera.
Trademarks
• is a trademark of Sony
Corporation.
• “Memory Stick,” , “Memory Stick
PRO,” , “Memory Stick
Duo,” , “Memory Stick
PRO Duo,” ,
“MagicGate,” are
trademarks of Sony Corporation.
• Picture Package is a trademark of Sony
Corporation.
• Microsoft, Windows, Windows Media, and
DirectX are either registered trademarks or
trademarks of Microsoft Cor por a tion in the
United States and/or other countries.
• Macintosh, Mac OS, QuickTime, iMac,
iBook, PowerBook, Power Mac and eMac
are trademarks or registered trademarks of
Apple Computer, Inc.
• Macromed ia and Flash are trademarks or
registered tradem arks of Macromedi a, Inc. in
the United States and/or other count ri es .
• Intel, MMX, and Pentium are tra d e ma rks or
registered trade marks of Intel Corporation.
• In addition, system and product names used
in this manual are, in gene ra l, tr ademarks or
registered trademarks of their respectiv e
developers or manufacturers. However , the
™
or ® marks are not u sed in all ca se s in th is
manual.
5

Table of contents
Read this first............................................4
Identifying the parts..................................8
Mode dial............................... .............10
Getting started
Preparing batteries.................................. 11
Charging the batteries.............................11
Inserting the batteries..............................13
Using the AC Adaptor............................16
Using your camera abroad......................17
Turning your camera on/off.................. ..17
How to use the control button.................18
Setting the date and time.........................18
Shooting still images
Inserting and removing a “Memory Stick”
........................................................21
Setting the still image size......................22
Image size and quality ............................23
Basic still image shooting
– Using auto mode..........................25
Checking the last image shot
– Quick Review................. .............27
Using the zoom feature.......................27
Shooting close-ups – Macro...............29
Using the self-timer............................30
Selecting a flash mode........................31
Shooting images with the finder.........33
Inserting the date and time on a still
image..............................................34
Shooting according to scene conditions
........................................................ 35
Viewing still images
Viewing images on the LCD screen of your
camera............................................ 38
Viewing images on a TV screen.............40
Deleting still images
Deleting images........................... ........... 42
Formatting a “Memory Stick”................44
Before advanced operations
How to setup and operat e your camera
........................................................ 46
Changing menu settings..................... 46
Changing item s in the SET UP scre en
........................................................ 47
Deciding the still image quality.............. 47
Creating or selecting a folder................. 48
Creating a new folder.........................48
Selecting the recording folder............ 48
Advanced still image
shooting
Choosing an auto focus method..............49
Choosing a focus range finder frame
– AF range finder............................49
Choosing a focus operation
– AF Mode......................................50
Setting the distance to the subject
– Focus preset .................................51
Shooting with manual shutter speed and
aperture settings
– Manual Exposure.........................52
Adjusting the exposure
– EV adjustment.............................55
Displaying a histogram.......................56
Selecting the metering mode...................57
Adjusting color tones – White Ba lance... 58
Adjusting the flash level – Flash Level... 59
Shooting images in succession................60
Shooting in Multi Burst mode
– Multi Burst...................................61
Shooting with special effects
– Picture Effect...............................62
Advanced still image viewing
Selecting the folder and playing back
images – Folder .... ..........................63
6

Enlarging a portion of a still image
– Playback zoom.............................64
Playing back successive images
– Slide show....................................65
Rotating still images – Rotate.................66
Playing back images shot in Multi Burst
mode ...............................................66
Playing back continuously..................67
Playing back frame by frame..............67
Still image editing
Protecting images – Protect.....................68
Changing image size – Resize.................69
Choosing im ages to print
– Print (DPOF) mark......................70
Still image printing
(PictBridge printer)
Connecting to a P ictBridge compliant
printer..............................................72
Printing images........................................73
Printing index-images.............................75
Enjoying movies
Shooting movies......................................79
Viewing movies on the LCD screen .......80
Deleting movies .................... ................. .81
Cutting movies........................................82
Enjoying images on your
computer
Copying images to your computer
– For Windows users......................84
Installing the USB driver....................85
Connecting the camera to your computer
........................................................86
Copying images..................................87
Viewing the images on yo ur computer
........................................................89
Image file storage destinations and file
names..............................................90
Viewing an image previously copied to a
computer.........................................92
Installing “Picture Package”...............92
Copying images using “Picture Package”
........................................................94
Using “Picture Package”....................95
Copying images to your computer
– For Macintosh users....................96
Using “ImageMixer VCD2”............... 97
Troubleshooting
Troubleshooting......................................99
Warnings and messages........................108
Self-diagnosis display – If a code star ting
with an alphabet lette r appears..... 110
Additional information
The number of images that can be saved/
shooting time.................................111
Menu items............................................112
SET UP items..................................... ...1 1 6
Precautions............................................118
The “Memory Stick”..................... ........119
The nickel-metal hydride batteries........120
The battery charger........................ ........121
Specifications........................................121
The LCD screen ......................... ...........124
Index
Index......................................................128
7
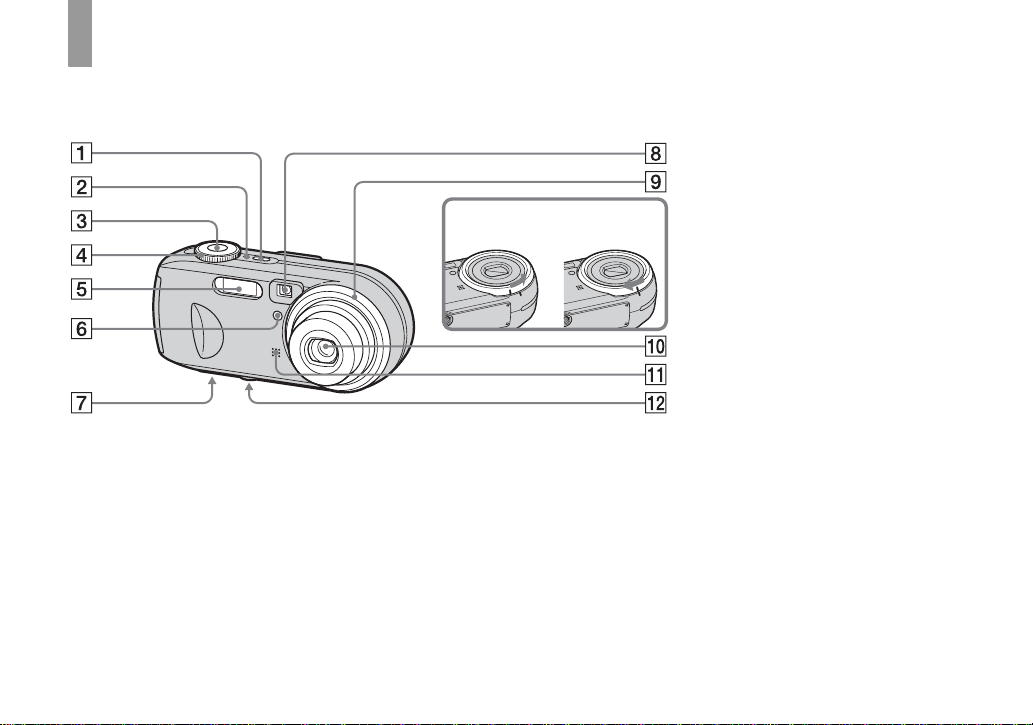
Identifying th e parts
See the pages in parentheses for details of
operation.
A POWER button (17)
B POWER lamp (17)
C Shutter button (25)
D Mode dial (10)
E F l ash (3 1)
F Self-timer lamp (30)/
AF illumina tor (32, 116)
G Speaker (bottom surface)
H Finder window
I Lens ring
J Lens
K M icrophone
8
Removing
Attaching
L Tripod receptacle (bottom
surface)
• The lens ring is removable so that you can
attach an adaptor ring (not supplied).
• Use a tripod with a screw length of less than
7
5.5 mm (
/32 inch). You will be unable to firmly
secure the camera to tripods having longer
screws, and may damage the camera.
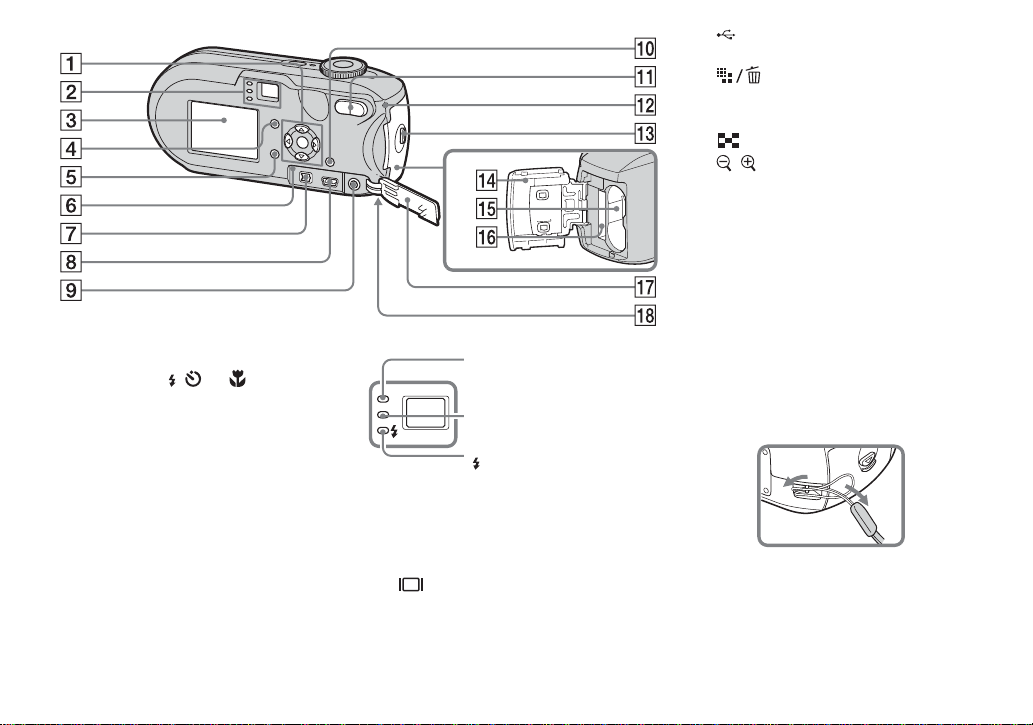
A Control button
Menu on: v/V/b/B/z (18)
Menu off: //7/ (3 1/30/27/
29)
Mode dial “M”: Shutter speed/
aperture value (52)
B Finder (33)
Self-timer/recording
lamp (red) (30/26)
AE/AF lock lamp
(green) (26)
(Flash charge) lamp
(orange) (31)
C L CD screen
For details on the items on the LCD screen,
see pages 124 to 127.
D (LCD status/LCD on/off)
button (33)
E MENU button (46, 112)
F RESET button (99)
G DC IN jack (16)
(USB) jack (86)
H
I A/V OUT (MONO) jack (40)
J (Image Size/Delete)
button (22, 42)
K Zoom (W/T) buttons (27)/
(Index) button (39)/
/ (Playback zoom) buttons
(64)
L Access lamp (21)
M OPEN button (13)
N Bat tery/ “M emo ry St ick” cover
(13)
O Bat tery i nsertion slot (13)
P “Memory Stick” insertion slot
(21)
Q Jack cover (16)
R Hook for wrist strap (bottom
surface)
Attachin g th e wrist strap .
9
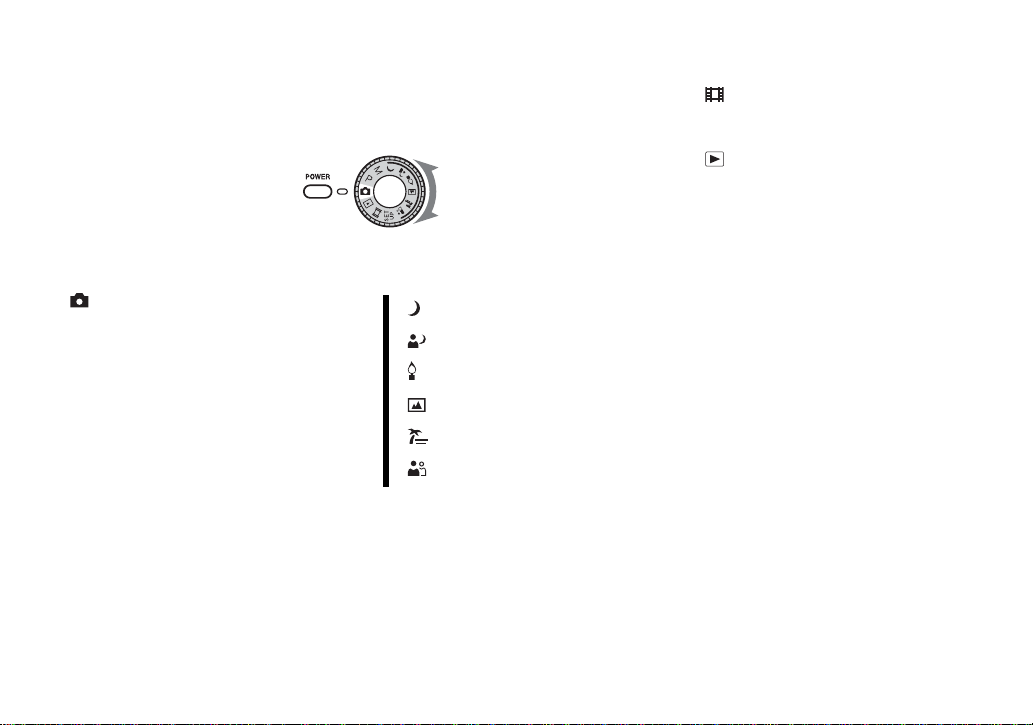
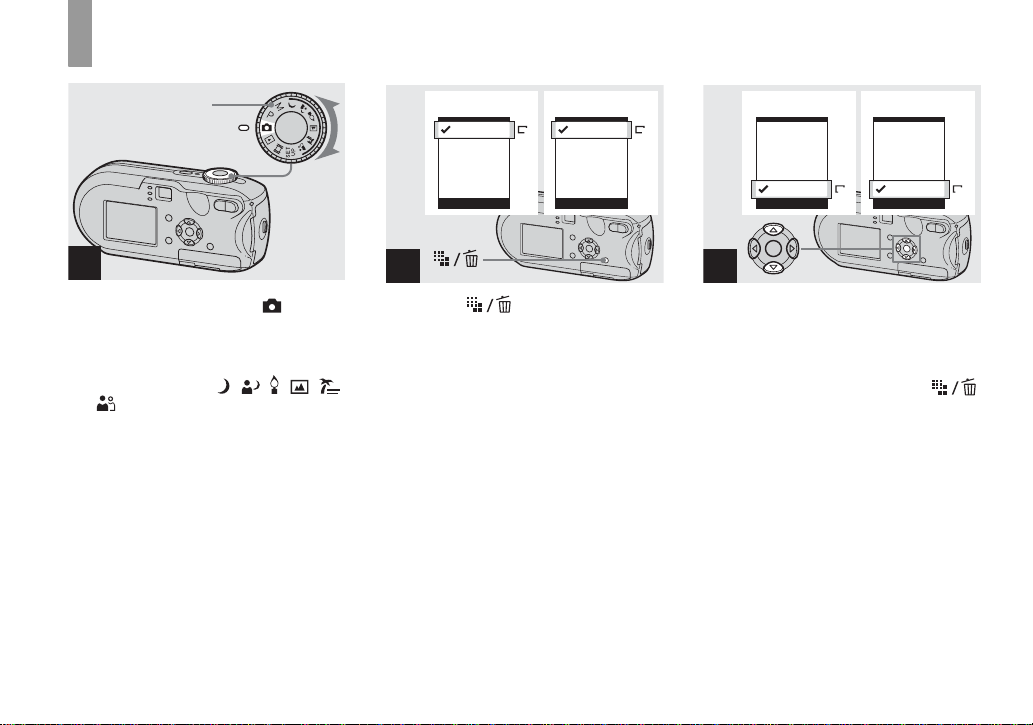
Mode dial
Before using your camera , set th e mark on
the mode dial to the POWER butt on si de.
(Auto adjustment mode)
The focus, exposure and white balance are
automatically adjusted to allow easy
shooting. The image quality is set to [ F in e]
(page 47).
P (Program auto shooting)
Shooting ad justment is automatically
carried out just as in the auto adjustment
mode. However, you ca n intentionally
adjust the focus, etc. In addition, you can set
the desired functions using the menu (pages
46 and 112).
M (Manual exposure shooting)
You can manually adjust the shutter speed
and the aperture value (page 52). In
addition, you can set the desire d shoot in g
functions using menus (pages 46 and 112).
10
(Movie shooting)
You can shoot movies (page 79).
(Playback/Editing)
You can play back or edit still images or
movies (pages 38 and 68).
(Twilight)
(Twilight portrait)
(Candle)
(Landscape)
(Beach)
(Soft snap)
You can easily shoot an effe c ti ve photo
based on the scene conditions in the scene
(page 35). In addition, you can set the
desired shooting functions using menus
(pages 46 and 114).
SET UP (Set up)
You can change t he s ettings of the cam era
(pages 47 and 116).
Preparing batt eries
Getti
d
Use the following batteries in this camera.
Acceptable batteries
HR 15/51:HR6 (size AA) Nickel-Metal
Hydride batteries (2)
– NH-AA-DA (2) (supplied)
– NH-AA-2DA twin-pack, etc. (not
supplied)
R6 (size AA) alkaline batteries (2)
Batteries that cannot be used
Manganese batteries
Lithium batteri es
Ni-cad batteries
If you use the batteries described above, we
cannot guarantee full performance of the
camera by property of the batteries, such as
brownout of the batteries.
Notes on alkaline batteries
• Alkaline batteries have a shorter life compared
to the supplied Nickel-Metal Hydride batteries.
The power may shut off even if the battery
remaining indicator shows sufficient battery life
remaining.
• There is a big difference in the performance of
batteries of different types and of batteries
made by different manufacturers. This is
especially true in low temperatures, where
some batteries are noticeably weaker.
You may not be able to shoot in temperatures
below 5°C (41°F).
• Do not mix new and old batteries.
• The battery remaining indicator does not
display the correct information.
• There is a big difference between available
shooting time and available playback time. Due
to the characteristics of alkaline batteries, the
camera may shut off with the lens portion
extended if you change the position of the mode
dial. In this case, replace the batteries with new
ones or fully charged Nickel-Metal Hydride
batteries.
It is recommend that you use the supplied
Nickel-Metal Hydride batteries.
ng starte
Charging the batteries
Getting started
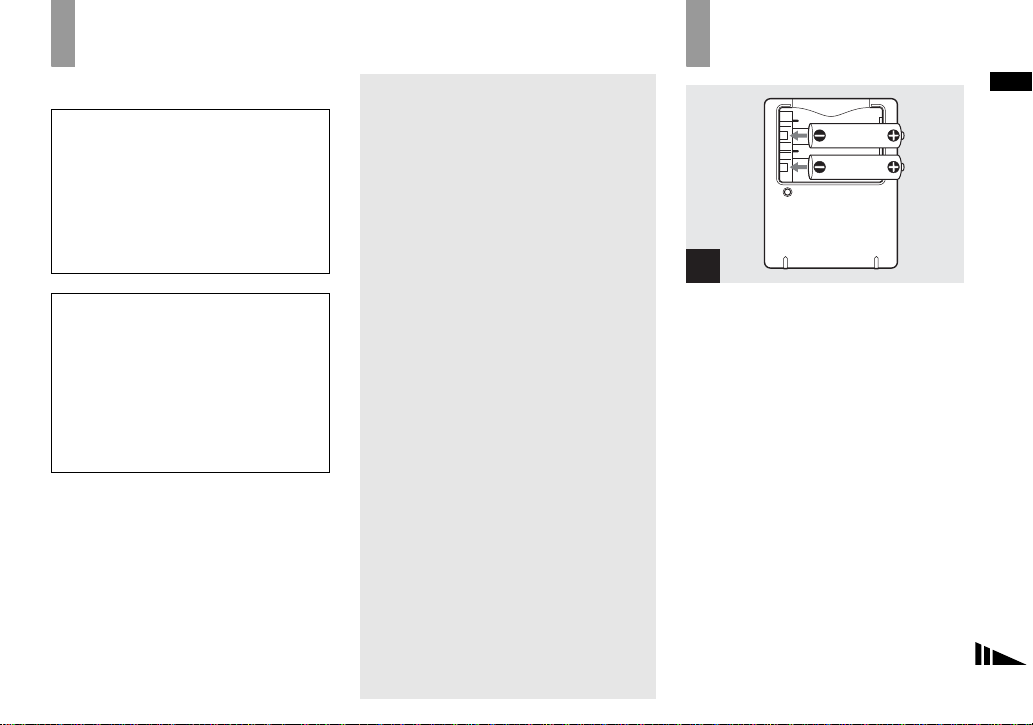
1
, Insert Nickel-Metal Hydride
batteries into the batte ry
charger (supplied) with the
correct po larity +/–.
• You cannot charge alkaline batteries
using the battery charger.
• Be sure to charge the Nickel-Metal
Hydride batteries supplied with your
camera before using them.
• Connect the battery charger to an easily
accessible wall outlet (wall socket) close by.
• Even if the CHARGE lamp is not lit, the set is
not disconnected from the AC power source
(mains) as long as it is connected to the wall
outlet (wall socket). If some trouble occur s
while using the battery charger, immediately
shut off the power by disconnecting the plug
from the wall outlet (wall socket).
11
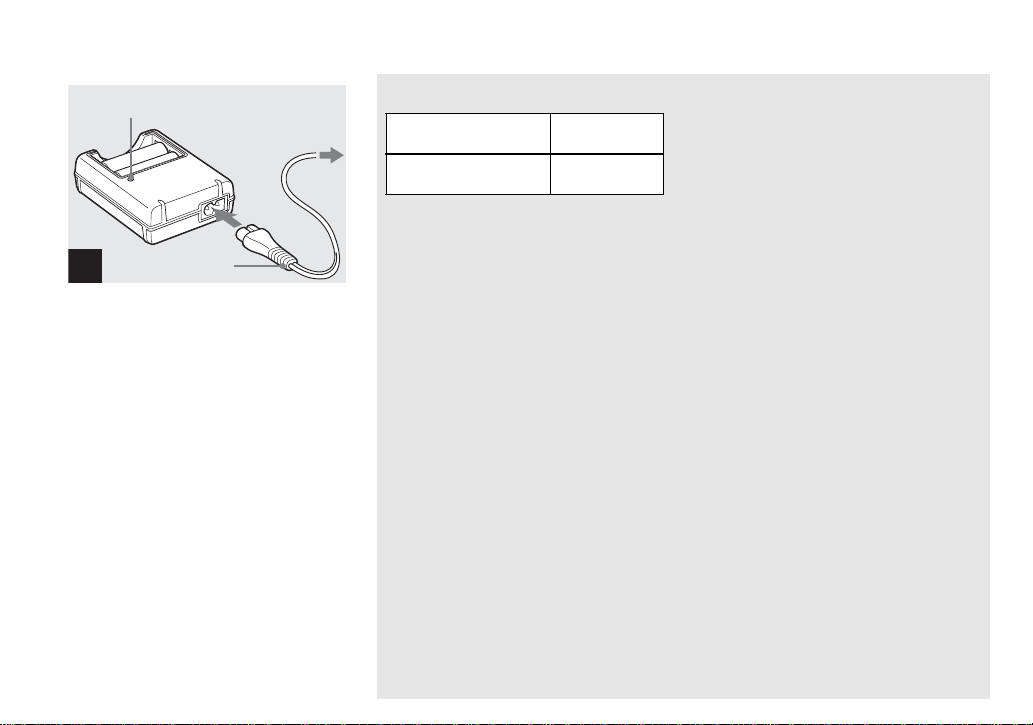
CHARGE lamp
to a wall outlet
(wall socket)
Power cord
(Mains lead)
2
, Connect the battery charger to
a wall outlet (wall socket) using
the power cord (mains lead).
Charging starts, and the CH A RGE lamp
lights. When the CHARGE lamp goes out,
charging is finished.
For details on the battery charger, see page
121.
To remove the batteries
Press the - end of the battery down in order
to raise the + end, then remove the battery.
• When charging is finished, disconnect the
power cord (mains lead) from the wall outlet
(wall socket), and remove the Nickel-Metal
Hydride batteries from the battery charger.
12
Charging time
Nickel-Metal Hydride
battery
NH-AA-DA × 2
(supplied)
This represents the time required to charge fully
depleted Nickel-Metal Hydride batteries using
the supplied battery charger in an environment
where the ambient temperature is 25°C (77°F).
• Charging is complete in approximately six
hours. The CHARGE lamp may remain lit
longer than six hours, but this is not a
malfunction.
• If you use the battery charger supplied with the
STAMINA “Quick charge” kit (not supplied),
the batteries will charge faster .
Charging time
When charging two Nickel-Metal Hydride
batteries: Approximately 2 hours 30 minutes
When charging four Nickel-Metal Hydride
batteries: Approximately 5 hours
Charging time
Approx. 6 hours
Notes on the Nickel-Metal
Hydride batteries
• At the time of purchase, or when the
Nickel-Metal Hydride batteries have not
been used for a long time, they may not
be fully charged. This is typical of this
type of battery, and is not a malfunction.
If this happens, repeatedly using up the
battery fully, and then recharging it,
should correct the problem.
• If the poles of the Nickel-Metal Hydride
batteries are dirty, the batteries may not be
charged properly. Occasionally clean the poles
of the batteries and the terminals of the charger
by wiping them with a dry cloth.
• When transporting the Nickel-Metal Hydride
batteries, be sure to use the battery case
(supplied). If the +/- metal termi nal s are
shorted, there is a possibility of danger from
excessive heat or fire.
• Even when Nickel-Metal Hydride batteries are
not being used they lose their charge naturally
over time. It is recommended that you recharge
the batteries just before using them.
• If you recharge Nickel-Metal Hydride batteries
before fully using up the existing charge, the
so-called memory effect* can occur, and the
low battery warning will be triggered sooner
than expected. Charging the battery after fully
depleting the existing charge should correct the
problem.
* The “memory effect” – the situation in which a
battery temporarily accepts a less than full
charge.

Inserting the batteries
• To use up the batteries completely, put the
camera in the slide show mode (page 65) and
leave it that way until the batteries are used up.
• Do not peel off the external seals or damage the
batteries. Never use batteries from which the
seals have been partially or completely
removed, or batteries that have been split in any
way. These may cause leakage, explosion, or
heat-up of the battery, and personal scald or
injury may be caused. These may cause a
malfunction of the battery charger.
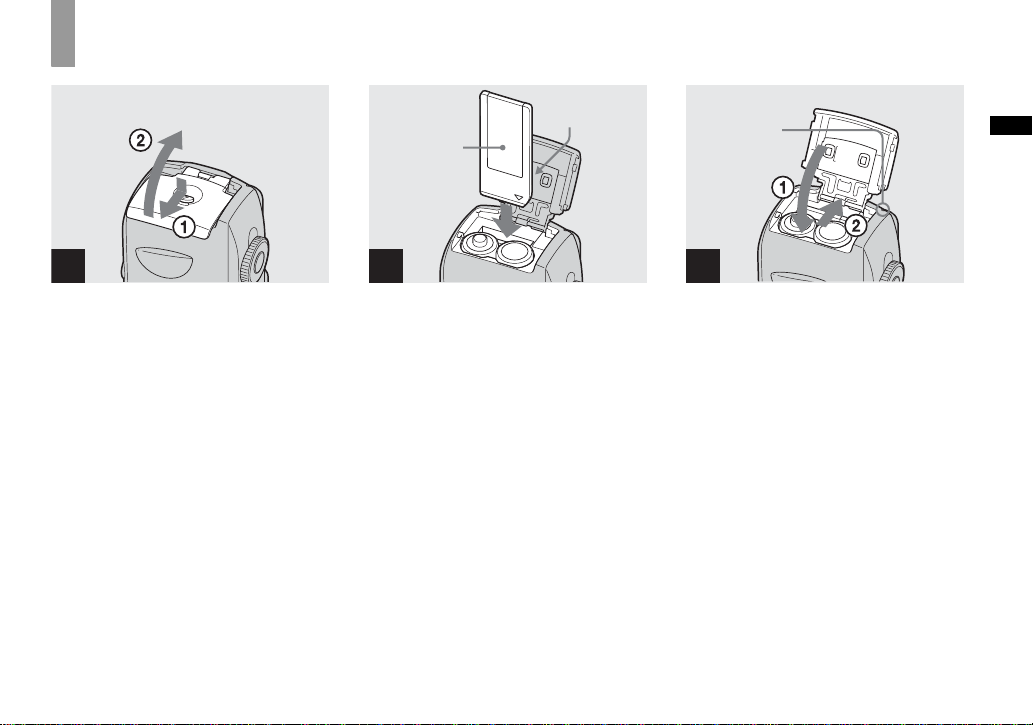
1
, Open the battery/“M emory
Stick” cover.
Turn up the battery/“Memory Stick” cover,
and slide the cover in the dir ection of the
arrow.
Getting started
2
, Insert the batteries.
Match the +/- poles of the b atte rie s to th e +/
- marks inside the battery case.
• Occasionally clean the poles of the batteries
and the terminals of the battery/“Memory
Stick” cover by wiping them with a dry cloth. If
the poles of the batteries or the terminals
become covered with a film of dirt or oil from
the skin, the operating time of the camera can
be greatly reduced.
13

3
, Close the battery/“Memory
Stick” cover.
Close the battery/“Memory Stick” cover
while holding the batteries in. The cover is
closed when it cl icks.
To remove the batteries
Turn up the battery/“Memory Stick” cover,
open the battery/“Memory Stick” cover,
then remove the batteries.
• Make sure you do not drop the batteries when
opening or closing the battery/“Memory Stick”
cover.
Battery remaining indicator
(When using the Nickel-Metal
Hydride batteries)
As the battery po wer decrease s with use, the
battery remaining indicator displ ay s the
amount of power remaini ng using the
following symbols.
Battery
remaining
indicator
Battery remaining
guidelines
(A full charge is 10 0%)
Sufficient power remaining
Battery half full
Battery low, recording/
playback will stop soon.
Change the batteries for fully
charged ones, or charge these
batteries. (The warning
indicator flashes.)
• If the LCD screen is off, press to turn it
on.
• Based on the conditions under which the
camera is being used and the state of the
charge, or on the environment, this inf o rmatio n
may not be correctly indicated.
• When using alkaline batteries, the correct
battery remaining time is not indicated. There is
a big difference in the performance of batteries
of different types and of batteries made by
different manufacturers, the power may shut off
even if the battery remaining indicator shows
sufficient battery life remaining. In this case,
replace the batteries with new ones or fully
charged Nickel-Metal Hydride batteries.
• When the AC Adaptor (not supplied) is being
used, the remaining battery information is not
displayed.
14
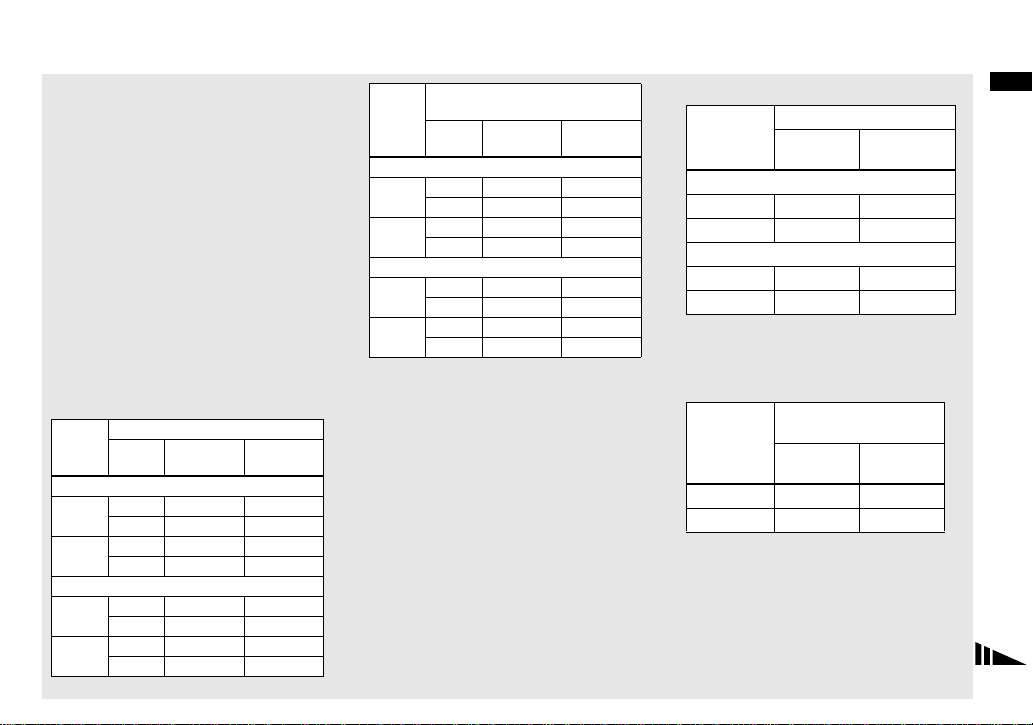
Number of images and battery
life that can be recorded/
viewed
The tables show the approximate number of
images and the battery life that can be recorded/
viewed when you shoot images in normal mode
with fully charged batteries at a temperature of
25°C (77°F). The numbers of images that can be
recorded or viewed take into account changing
the supplied “Memory Stick” as necessary . Note
that the actual numbers may be less than
indicated depending on the conditions of use.
• The battery capacity decreases little by little as
you use it more and more, and as time passes
(page 120).
Shooting s till images
Under the average conditions
NH-AA-DA (2) (supplied)
Image
LCD
screen
No. of
images
size
DSC-P93A
5M
VGA
(E-Mail)
On
Off
On
Off
Approx. 410 Approx. 205
Approx. 740 Approx. 370
Approx. 410 Approx. 205
Approx. 740 Approx. 370
DSC-P73
4M
VGA
(E-Mail)
On
Off
On
Off
Approx. 420 Approx. 210
Approx. 760 Approx. 380
Approx. 420 Approx. 210
Approx. 760 Approx. 380
1)
Battery
life (min.)
R6 (Size AA) alkaline battery
(2) (not supplied)
Image
LCD
size
screen
No. of
images
Battery
life (min .)
DSC-P93A
5M
VGA
(E-Mail)
On
Off
On
Off
Approx. 80 Approx. 40
Approx. 180 Approx. 90
Approx. 80 Approx. 40
Approx. 180 Approx. 90
DSC-P73
On
4M
Off
On
VGA
(E-Mail)
Off
When using Sony alkaline batteries
1)
Shooting in the following situations:
– The image quality is set to [Fine]
– [AF Mode] is set to [Single]
– Shooting one time every 30 seconds
– The zoom is switched alternately between the
W and T ends
– The flash strobes once every two times
– The power turns on and off once every ten
times
The measurement method is based on CIPA
standard. (CIPA: Camera & Imaging Pro d ucts
Association)
Approx. 110 Approx. 55
Approx. 240 Appr ox. 120
Approx. 110 Approx. 55
Approx. 240 Appr ox. 120
Viewing still images
2)
NH-AA-DA (2) (supplied)
Image size
No. of
images
Battery life
(min.)
DSC-P93A
5M
VGA (E-Mail)
Approx. 9200
Approx. 9200
Approx. 460
Approx. 460
DSC-P73
4M
VGA (E-Mail)
2)
Viewing single images in order at about three
second intervals
Shooting movies
Approx. 9800
Approx. 9800
3)
Approx. 490
Approx. 490
NH-AA-DA (2)
(supplied)
LCD
screen On
LCD
screen Off
DSC-P93A Approx. 210 Approx. 270
DSC-P73 Approx. 210 Approx. 270
3)
Shooting continuously at [160] image size
Getting started
15

Using the AC Adaptor
• The number of images and the battery life that
can be recorded/viewed are decreased under the
following conditions:
– The surrounding temperature is low
– The flash is used
– The camera has been turned on and off many
times
– The zoom is used frequently
– [LCD Backlight] is set to [Bright] in the SET
UP settings
– [AF Mode] is set to [Monitor]
– The battery power is low.
AC Adaptor (not
supplied)
DC plug
Jack cover
1
, Open the jack cove r, th en
connect the AC-LS5 AC
Adaptor (not supplied) to the
DC IN jack of the camera .
Connect the plug with the v mark facing
up.
• Be sure to use the AC-LS5 AC Ad aptor.
Other AC adaptors cannot be used with
this camera.
• Connect the AC Adaptor to an easily accessible
wall outlet (wall socket) close by. If some
trouble occurs while using the adaptor,
immediately shut off the power by
disconnecting the plug from the wall outlet
(wall socket).
2 To a wall outlet
(wall socket)
1
Power cord
(mains lead)
2
, Connect the power cord (mains
lead) to the AC Adaptor and to
a wall outlet (wall socket).
• When you have finished using the AC Adaptor,
disconnect it from the DC IN jack of the
camera and the wall outlet (wall socket).
• The set is not disconnected from the AC power
source (mains) as long as it is connected to the
wall outlet (wall socket), even if the unit itself
has been turned off.
16
Using your camera abroad
Power sources
You can use your camera in any country or
region with the battery charger (supplied) or
the AC-LS5 AC Adaptor (not supplied)
within 100 V to 240 V AC, 50/60 Hz. Use a
commercially available AC plug adaptor
[a], if necessary, depending on the design of
the wall outlet (wall socket ) [b].
BC-CS2A/CS2B
• Do not use an electrical transformer (travel
converter), as this may cause a malfunction.
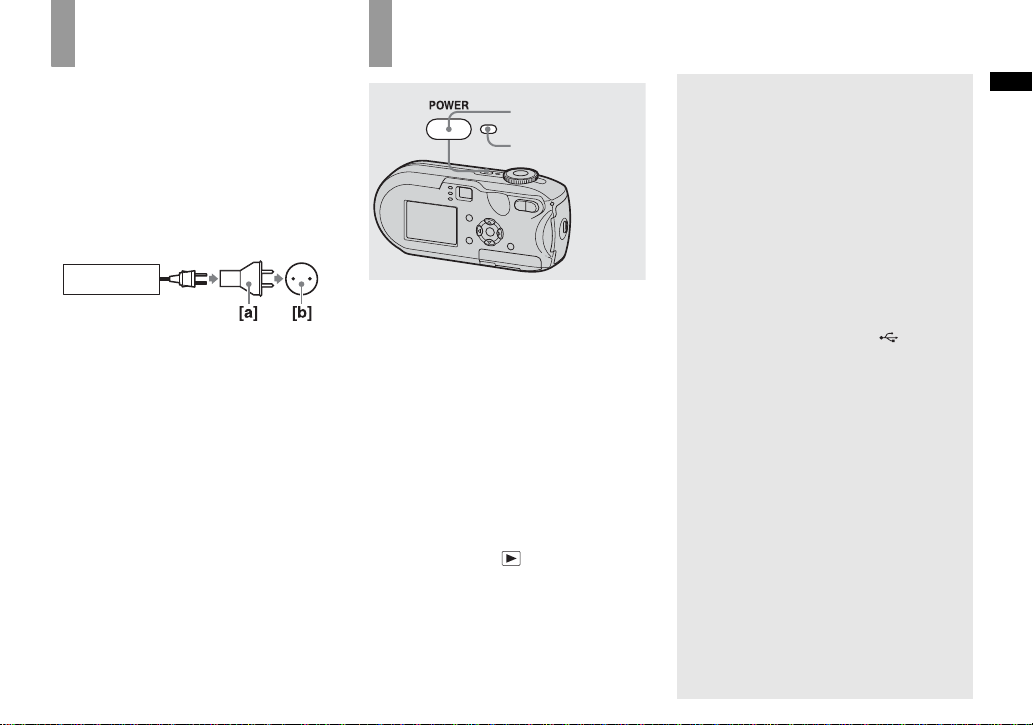
Turning your camera on/off
POWER
POWER lamp
, Press POWER to turn on the
power.
The POWER lamp lights in green and the
power is on. When you turn on t he camera
for the first time, the Clock Set screen
appears (page18).
To turn off the power
Press POWER again, the POWER lamp
goes out, and the cam era turns off.
• When you turn the power on with the mode dial
not set to SET UP or , the lens begins to
move. Please be careful not to touch the lens.
• Do not leave the camera with the lens
portion pulled out by removing the
batteries or AC Adaptor (not supplied),
etc., for a long time. This may cause a
malfunction.
The Auto Power Off function
If no tasks are performed for about three
minutes when shootin g, view ing images, or
setting up the camera while using the
batteries, power is automatically shut off to
preserve battery power.
However, in the following circum stances,
even if the batteries are being used to power
the camera, the Auto Power Off function
will not work.
• Movies are being played back
• A slide show is being shown
• A cable is connected to the (USB)
jack or the A/V OUT (MONO) jack
Getting started
17
How to use the control button
Setting the date and time
Camera
AF Mode:
Single
Digital Zoom:
Smart
Date/Time:
Off
Red Eye Reduction
:
Off
Auto
AF Illuminator:
Auto Review: Off
SELECT
Setup 2
File Number:
USB Connect:
OK
Video Out:
Cancel
Clock Set:
To change the current settings of the
camera, bring up the menu or the SET UP
screen (pages 46, 47), an d use t he cont rol
button to make the ch anges.
When setting up the menu, press v/V/b/B
to select the item or the setting and make the
setting.
When setting up the SET UP, press v/V/b/
B to select the item or the setting and press
z to make the setting.
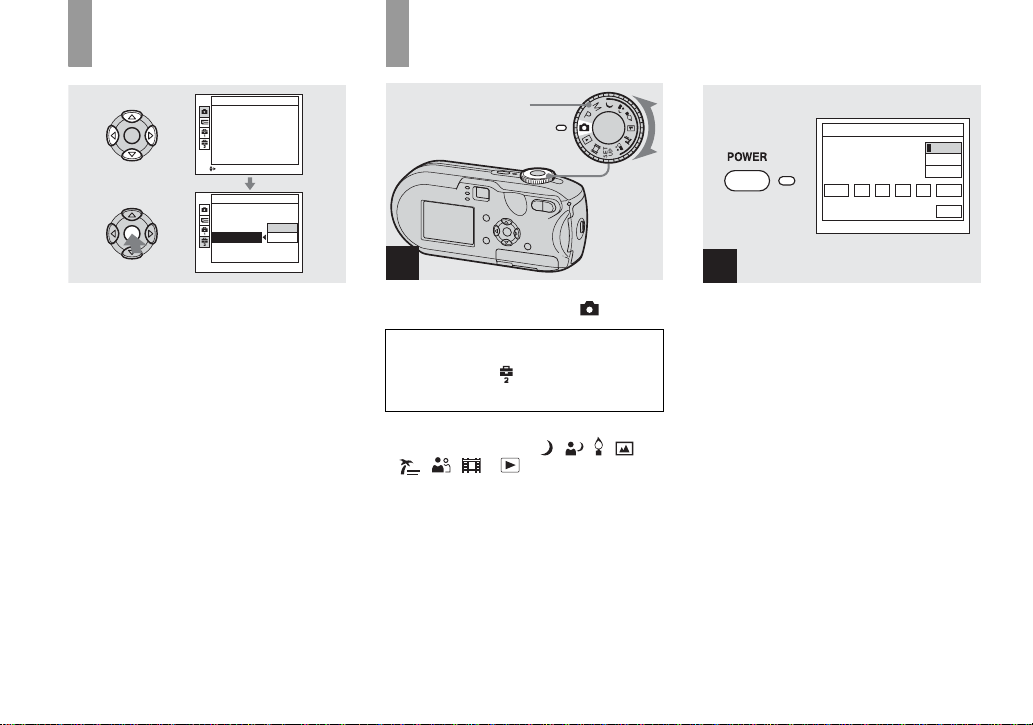
Mode dial
1
, Set the mode dial to .
• To set the time and the date again, set
the mode dial to SET UP, select
[Clock Set] in (Setup 2) (pages 47,
117), then proceed from Step 3.
• Y ou can carry out this operation even when the
mode dial is set to P
,
, M, , , , ,
, or .
Clock Set
2004 11//
12 :
Y/M/D
M/D/Y
D/M/Y
00
OK
AM
Cancel
2
, Press POWER to turn on the
power.
The POWER lamp lights in green and the
Clock Set screen appears on the LCD
screen.
18
Clock Set
2004 11// 00
12 :
AM
Y/M/D
M/D/Y
D/M/Y
OK
Cancel
Clock Set
2004 11// 00
12 :
AM
Y/M/D
M/D/Y
D/M/Y
OK
Cancel
Clock Set
2005 11// 00
10 :
AM
Y/M/D
M/D/Y
D/M/Y
OK
Cancel
Getting started
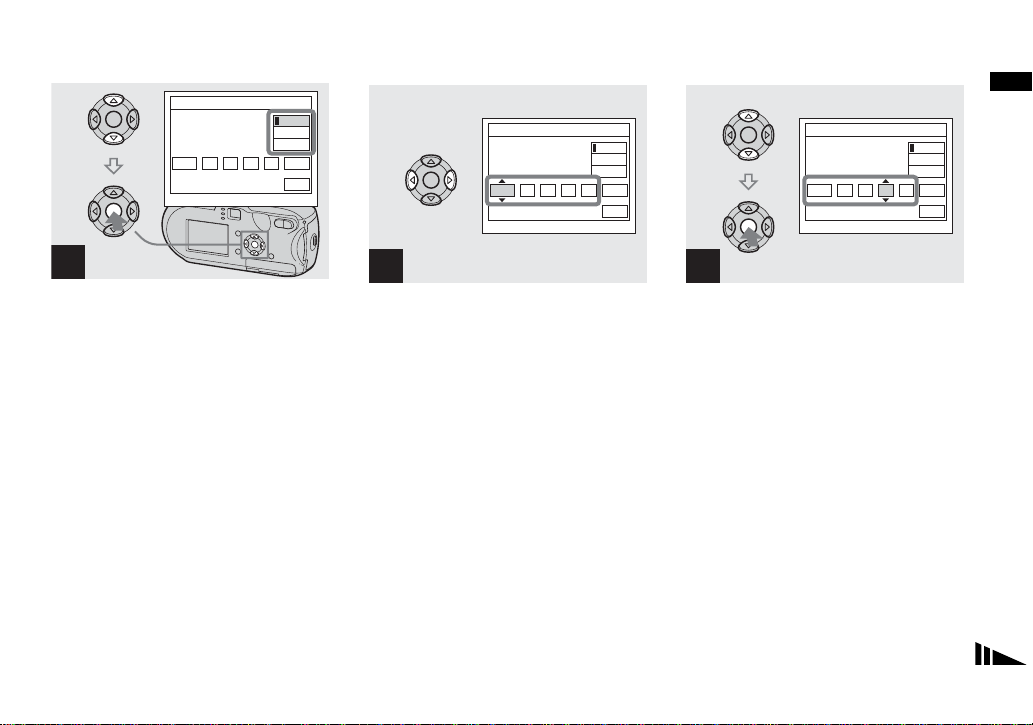
3
, Select the desired date format
with v/V on the control button,
then press z.
You can select from [Y/M/D] (year/month/
day), [M/D/Y], and [D/M/Y].
• If the rechargeable button battery, which
provides the power for saving the time data, is
ever fully discharged (page 119), the Clock Set
screen will appear again. When this happens,
reset the date and time by starting from Step 3
above.
4
, Select the year, m ont h, day,
hour, or minute item you want
to set with b/B on the control
button.
v is shown above and V is shown below the
selected it em.
5
, Set the desired numerical
value with v/V on the control
button, then press z.
After setting the current nume rical value,
set the next item. Repeat Steps 4 and 5
until all of the items have been set.
• If you select [D/M/Y] in Step 3, set the time
on a 24-hour cycle.
• 12:00 AM stands for midnight and 12:00 PM
stands for noon.
19

Clock Set
2005 11// 30
6
, Select [OK] with B on the
control button, then press z.
The date and time are set and the clock w ill
start to kee p ti me.
• To cancel the setting process, select [Cancel],
then press z.
20
10 :
AM
Y/M/D
M/D/Y
D/M/Y
OK
Cancel
Inserting and removing a “Memory Stick”
Shooti
till i
s
ng s
mage
1 2
, Open the battery/“Memory
Stick” cover.
Turn up the battery/“Memory Stick” cover,
and slide the cover in the directio n of the
arrow.
• Be careful not to drop the batteries when
opening or closing the battery/“Memory Stick”
cover.
• For details on “Memory Stick,” see page 119.
Terminal side
Label side
, Insert the “Memory Stick.”
Insert the “Mem ory Stick” all the way in
until it clicks as shown in the illustration.
• Whenever you insert a “Memory Stick,” push it
as far as it can go. If you do not insert it
correctly, a proper recording or playback may
not be carried out.
Access lamp
3
, Close the battery/“Memory
Stick” cover.
To remove the “Memory Stick”
Open the battery/“Memory Stick” cover,
then push the “Memory Stick” to pop it out.
• Whenever the access lamp is lit, the
camera is recording or reading out an
image. Never open the battery/“Memory
Stick” cover or turn off the power at this
time. The data may be corrupted.
Shooting still imag e s
21
Setting the still image size
Mode dial
1
, Set the mode dial to and
turn on the power.
• Y ou can carry out this operation even when the
mode dial is set to P, M, , , , ,
or .
DSC-P93A DSC-P73
5M
3:2
3M
1M
(
E-Mail
VGA
Image Size
5M
4M
3:2
3M
)
1M
VGA
Image Size
(
E-Mail
4M
)
2
, Press (Image Size).
The Image Size setup item appears.
• For more information about the image size, see
page 23.
DSC-P93A DSC-P73
5M
3:2
3M
1M
)
VGA(E-Mail
Image Size
VGA
4M
3:2
3M
1M
)
VGA(E-Mail
Image Size
VGA
3
, Select the desired image size
with v/V on the control button.
The image size is set.
After the setting is completed, press
(Image Size). The Image Size setup item
disappears from the LCD screen.
• This setting is maintained even when the power
is turned off.
22
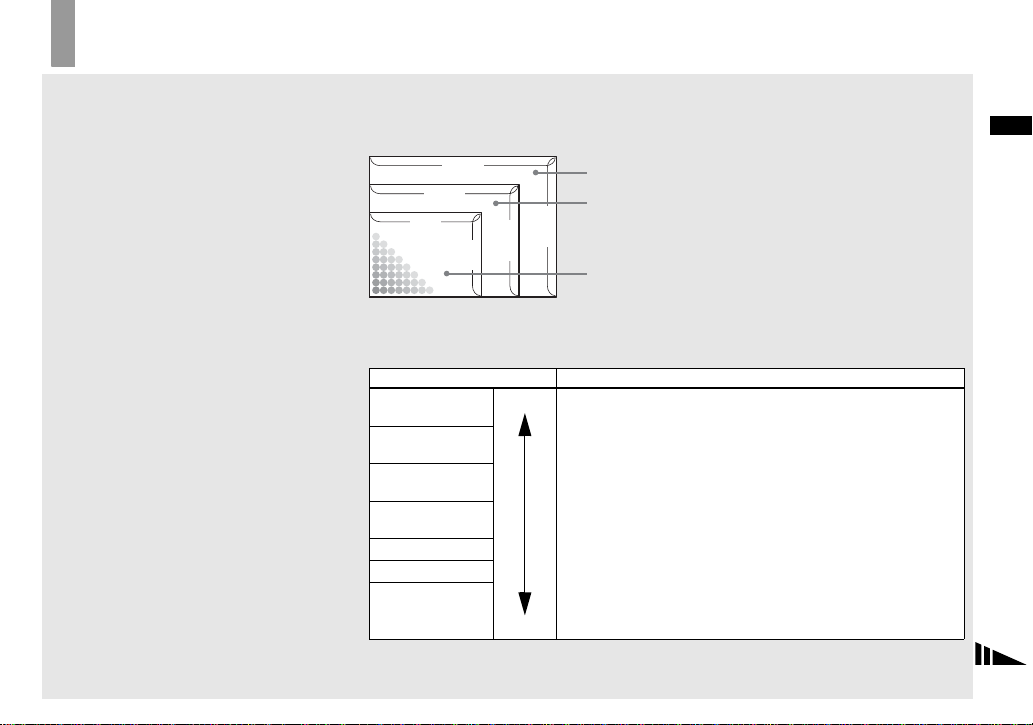
Image size and quality
You can choose image si ze (number of
pixels) and im age quality (compressio n
ratio) based on the kind of images you want
to shoot. The image size is s h own by the
number of pixels (dots) (ho riz ont al ×
vertical) , wh ich compose an image. For
example, a 5M (2592×1944) siz e im ag e
indicates that there are 2592 pixels
horizontally 1944 vertically. The larger the
number of pixels, the larger th e image size.
You can select an image quality level from
Fine (high quality) or Standard.
Each has a different compressio n rat io .
When you select Fine and ma ke t he image
size larger, you get better quality. However,
the amount of data needed to preserve your
image is larger and the nu mber of images
recordable in the “ Memo ry St ick” is fe wer.
Choose an image size and qu al it y le ve l
appropriate to the kind of images you want
to shoot by checking the table below.
1)
The default setting is [5M] (DSC-P93A) or
[4M] (DSC-P73). This size can give the highest
image quality using each camera.
2)
This option records images in a horizontal to
vertical proportion of 3:2 to match the size of
the print paper used.
Short description of the image size
The following illustration shows a brief image using the maximum image size and the
minimum one.
[a]:Display size: 5M
Image size: 5M
[a]
2592 pixels × 1944 pixels = 5038848 pixels
[b]
[b]:Display size: 4M
Image size: 4M
2304 pixels × 1728 pixels = 3981312 pixels
[c]:Display size: VGA (E-Mail)
Image si ze: VGA
[c]
640 pixels × 480 pixels = 307200 pixels
640
2592
2304
480
1728
1944
Examples based on the image size and image quality
Image size Examples
5M 1) (2592×1944)
(DSC-P93A)
3:2 2) (2592×1728)
(DSC-P93A)
4M 1) (2304×1728)
(DSC-P73)
3:2 2) (2304×1536)
(DSC-P73)
3M (2048×1536)
1M (1280×960)
VGA (E-Mail)
(640×480)
Larger
Smaller
• For printing A4 size or fine A5 size images.
• For printing A4 size or fine A5 size images.
• For printing postcard size images.
• For shooting a lot of images, attaching images to e-mail, or
posting images to your home page.
Shooting still imag e s
23
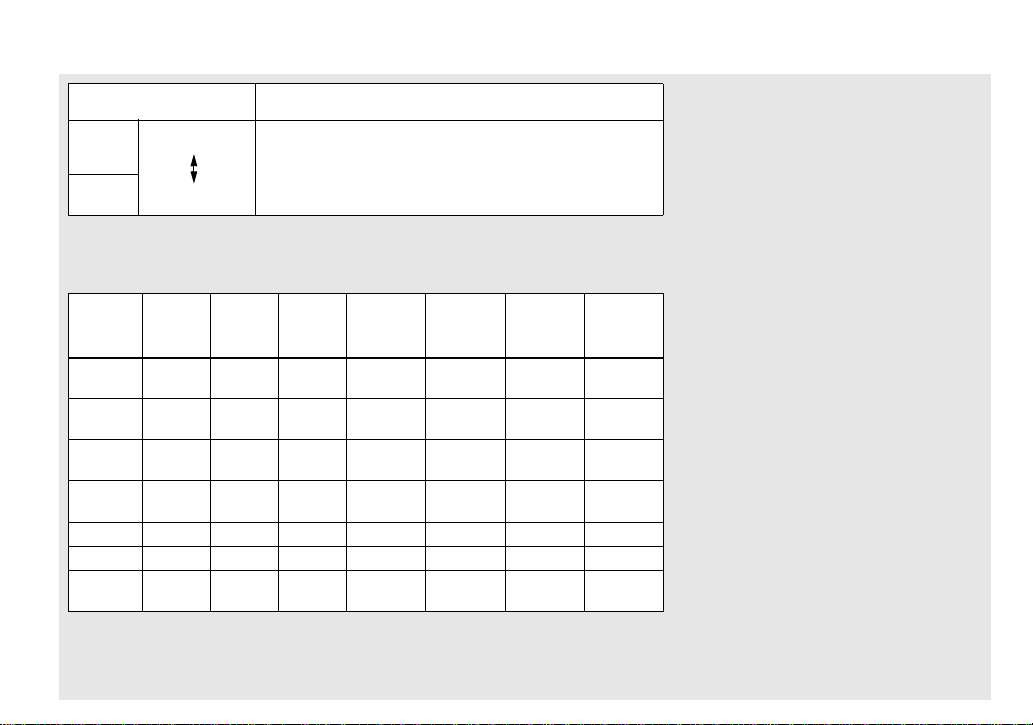
Image quality
Examples
(Compression ratio)
Fine
Standard
Low compression
(looks better)
High compression
(normal)
• To shoot or print with better quality.
• To shoot more images.
The number of images that can be saved in a “Memory Stick”
The number of i mages that ca n be saved in Fine (Standard)4) mode are shown below. (Units:
number of image s )
Capacity
Image
16MB 32MB 64MB 128MB MSX-256 MSX-512 MSX-1G
size
5M (DSCP93A)
3:2 (DSCP93A)
4M (DSCP73)
3:2 (DSCP73)
6 (11) 12 (23) 25 (48) 51 (96) 92 (174) 1 88 (3 54) 384 (723)
6 (11) 12 (23) 25 (48) 51 (96) 92 (174) 1 88 (3 54) 384 (723)
8 (14) 16 (30) 32 (60) 65 (121) 119 (216) 242 (440) 494 (898)
8 (14) 16 (30) 32 (60) 65 (121) 119 (216) 242 (440) 494 (898)
3M 10 (18) 20 (37) 41 (74) 82 (149) 148 (264) 302 (537) 617 (1097)
1M 24 (46) 50 (93) 101 (187) 202 (376) 357 (649) 726 (1320) 1482 (2694)
VGA (E-
Mail)
3)
When [Mode] (RE C M o de) is set to [Normal]
For the number of images that can be saved in other modes, see page 111.
4)
For more information about the image quality (compre s sion ratio) s et up, see page 47.
97 (243) 196 (491) 394 (985) 790 (1975) 1428 (3571) 2904 (7261)
24
3)
5928
(14821)
• When the images recorded using other Sony
devices are played back, the image size
indication may be different from the actual
image size.
• When the images are viewed on the LCD
screen of the camera, they all look the same
size.
• Number of shooting images can differ from
these values according to shooting conditions.
• When the remaining number of images
recordable is more than 9999, “>9999” is
indicated.
• Y ou can resize the images later (Resize
function, see page 69).
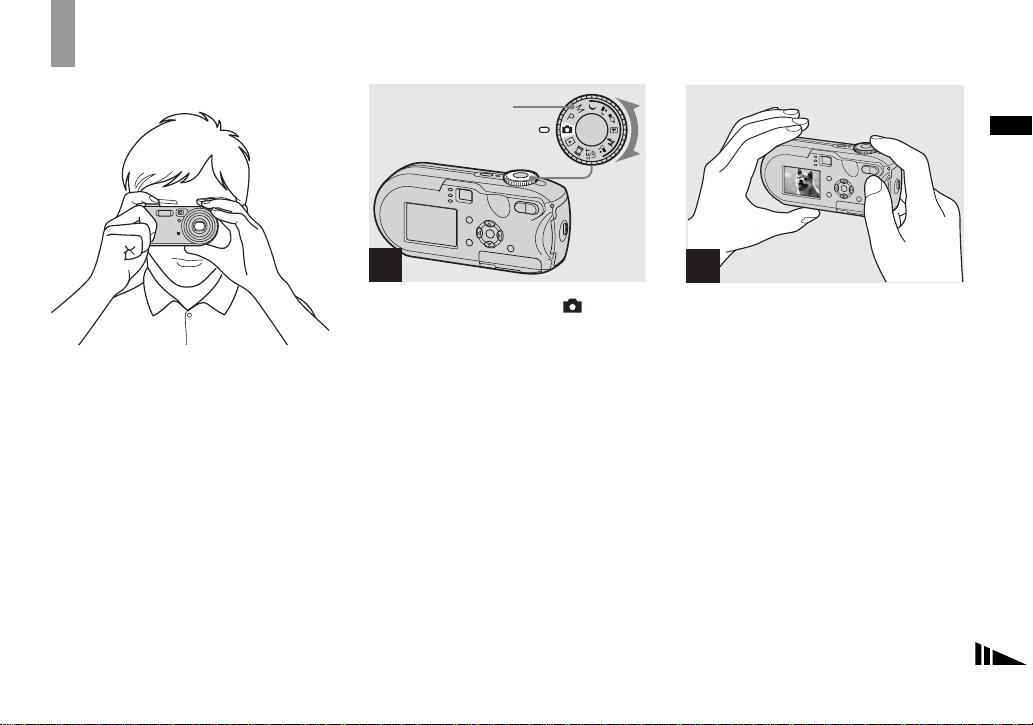
Basic still image shooting – Using auto mode
Holding the camera correctly
When shooting pictures with the cam era, be
careful so that your fingers do not block the
lens portion, finder window, flash emitter,
or AF illuminator (pages 8, 9).
Mode dial
1
, Set the mode dial to , and
turn on the camera.
• The lens cover opens when the power is turned
on.
• Do not touch the lens portion while it is
operating, such as when you press POWER to
turn on the power or when the zoom function is
working (page 27).
• Y ou can create a new folder in the “Memory
Stick” and select the folder for storing images
(page 48).
2
, Hold the camera steadily with
both hands and position a
subject in the center of the
focus frame.
• The minimum focal distance to a subject is as
follows:
DSC-P93A: Approx 50 cm (19
60 cm (23
DSC-P73: Approx 50 cm (19
To shoot subjects at distances closer than this,
use the macro mode (page 29).
• The frame indicated on the LCD screen shows
the focus adjustment range. (AF range finder,
see page 49.)
5
/8 inches) (T).
3
/4 inches) (W)/
3
/4 inches)
Shooting still imag e s
25
101
FINE
VGA
98
SAF
3
F2.0250
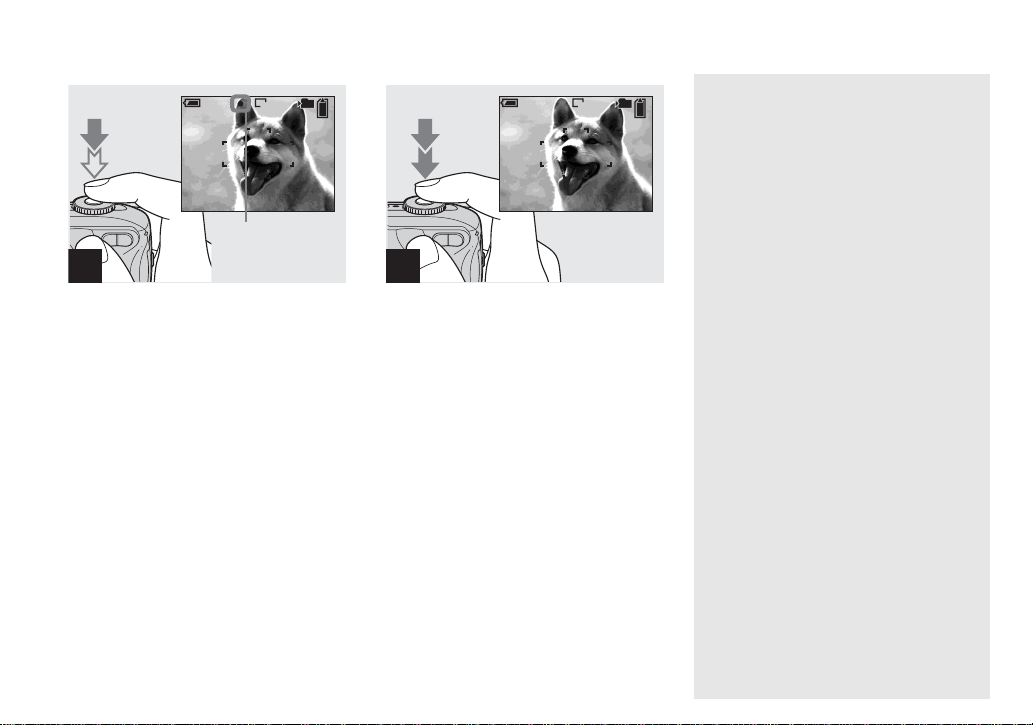
AE/AF lock indicator
Flashes in green t
Remains on
, Press and hold the shutter
button hal fway down.
When the focus is achieved, the camera
beeps. When the AE/AF lock indicator
stops flashing and remains on, the camera is
ready for shooting. (The LC D scre en may
be frozen for a split second depending on
the subject.)
• If you release your finger from the shutter
button, shooting will be canceled.
• When the camera does not beep, the AF
adjustment is not complete. You can continue to
shoot, but the focus is not set properly.
101
VGA
97
SAF
4
, Press the shutter button full y
down.
The shutter clicks, the shooting is
completed, and the still image is saved in
the “Memory Stick.” When the recording
lamp (page 9) goes out, you ca n shoot the
next image.
• When you are shooting with the batteries, if no
tasks are performed for a while with the camera
turned on, power is automatically shut off to
preserve battery power (page 17).
About Auto Focus
When you try to sho ot a subj ect t hat is hard
to focus on, the AE/AF lock indicator will
change to flashing slowly and the AE lock
beep does not sound.
The Auto Focus functi on may be di fficul t to
use with in the following subjects. In such
cases, release the shutter butto n, then tr y to
recompose the shot and focus agai n.
• The subject is distant from the camera
and dark
• The contra st betwe en the subject and its
background is poor
• The subject is seen through glass, such as
a window
• A fast-moving subject
• The subject has a reflection, such as that
from a mirror, or there is a luminous body
and a lustrous subject
• A flashing subject
• A back li t subj e ct .
There are two Auto Focus func tions: “AF
range finder frame” which sets the focus
position according to the subject position
and size, and “AF mode” which set s when
the camera starts and stops focusing on .
See page 49 for details.
26
Checking the last image
shot – Quick Review
Using the zoom feature
VGA
8/8
Review
RETURN
101
10:30
2005 1 1101-0008
PM
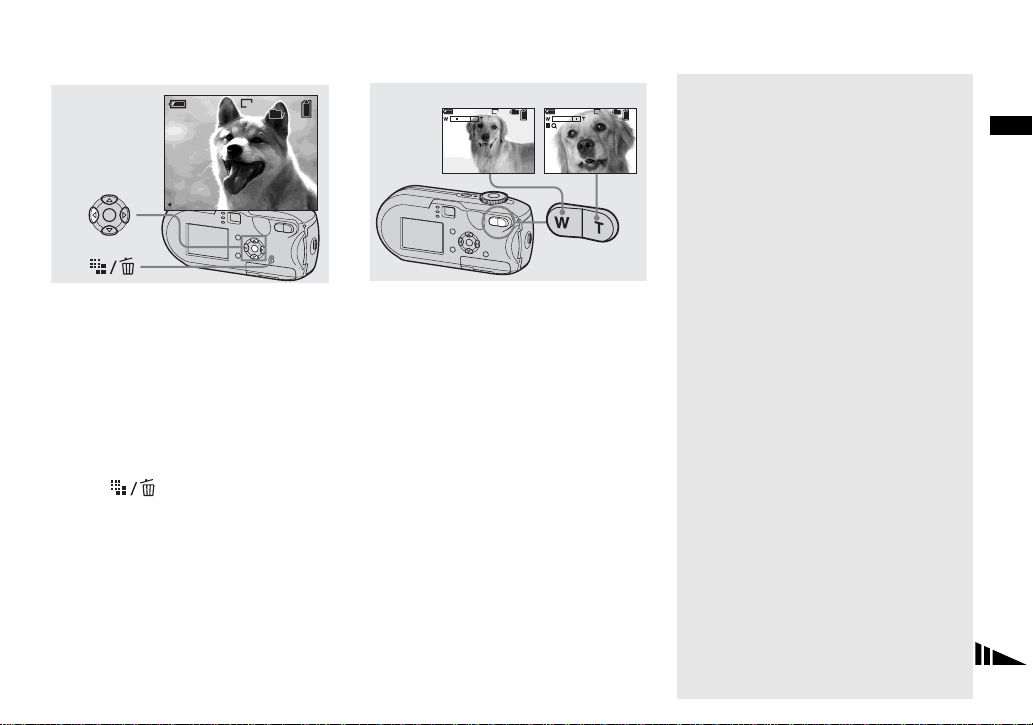
, Press b (7) on the control
button.
To return to shooting mode, press the
shutter button lightly or press b (7) on the
control button agai n.
To delete the image displayed on the
LCD screen
1 Press (Delete).
2 Select [Delete] with v on the control
button, then press z.
The image is d eleted.
• The image may appear rough right after
playback starts due to the image processing.
W (wide-angle)
x1.1 x5.0S
T (telephoto)
101
VGA VGA
98
101
98
, Press the zoom buttons to
choose the desired zoom
position , and shoot yo ur
image.
The minimum focal distance to the
subject
DSC-P93A: Approx 50cm (19
(W)/60 cm (23
5
/8 inches) (T) from the lens
surface
DSC-P73: Approx 50 cm (19
3
/4 inches)
3
/4 inches)
(W/T) from the lens surface
• The lens moves when the zoom feature is being
used. Be very careful not to touch the lens.
• You cannot change the zoom scaling while
shooting movies (page 79).
Zoom
Your camera is equi pped with zoom
functions that enlarge the image using
optical zoom and two typ es of di gital
processing. Digital zoom can be selected
from smart zoom or precision digital zoom.
When digital zoom is set, the zoom method
switches from optical z oom to dig ital zo om
when the zoom sca le exceeds 3×.
To use only the optical zoo m, set [Digital
Zoom] to [Off] in the SET UP settings
(page 116). In this case, th e digital zoom
area does not appear in the zoom scale
display bar on the LCD screen, and the
maximum zoom is 3×.
The enlargement method and the zoom
scale differ according to the image size and
the zoom type, so select the zoom to match
the shooting purpose.
When you press the zoom button, the zoom
scaling indicator appears on the LCD screen
as follows.
Shooting still imag e s
27
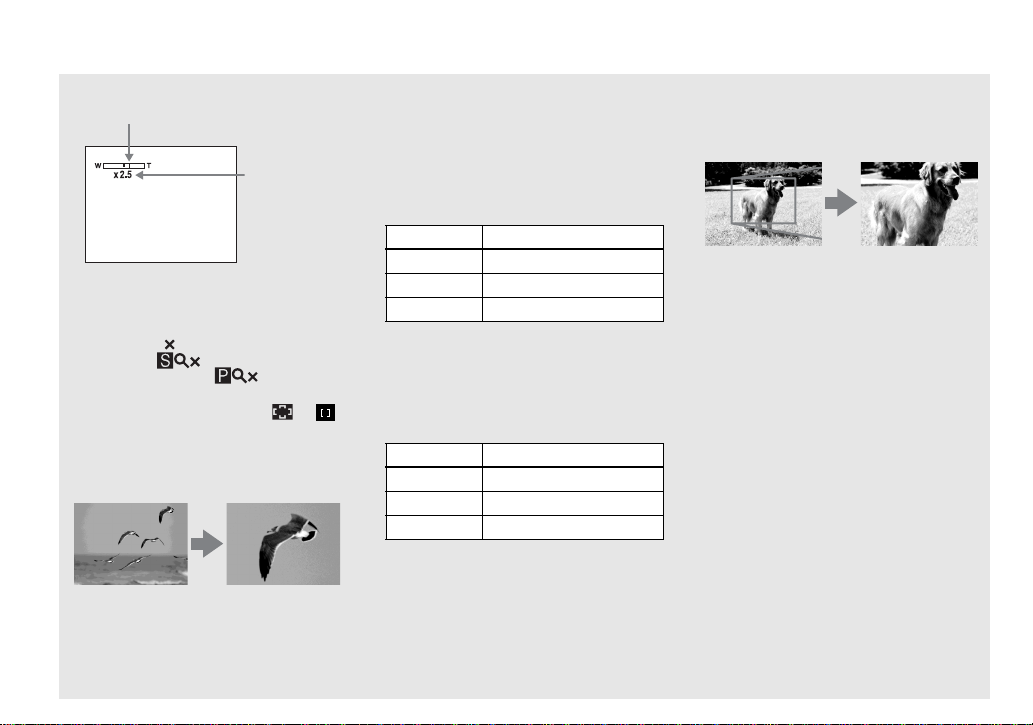
The W side of this line is optical zoom
area, and the T side is digital zoom area
Zoom
scaling
indicator
• The zoom scaling indicator differs according to
the zoom type.
Optical zoom:
Smart zoom:
Precision digital zoom:
• The AF range finder frame does not appear
when using the digital zoom. The or
indicator flashes, and AF operates with priority
on subjects located near the center.
Smart zoom
Optical zoom
The image is enlarged with almost no
distortion. This lets you use smart zoom
with the same feeling as optical zoom. To
Smart zoom
28
set smart zoom, set [Digital Zoom] to
[Smart] in the SET UP settings (page 116).
The default setting is smart zoom.
The maximum zoom scal e de pe nds on the
selected image size as follows.
DSC-P93A
Image size Maximum zoom scale
3M 3.8×
1M 6.1×
VGA (E-Mail) 12×
Smart zoom cannot be used when
the image size is set to [5M] or [3:2].
The default setting of the image size
is [5M].
DSC-P73
Image size Maximum zoom scale
3M 3.4×
1M 5.4×
VGA (E-Mail) 10×
Smart zoom cannot be used when
the image size is set to [4M] or [3:2].
The default setting of the image size
is [4M].
• When using the smart zoom, the image on the
LCD screen may look rough. However, this has
no effect on the recorded image.
• You cannot use the smart zoom in the Multi
Burst mode.
Precision digital zoom
Optical zoom
All image sizes are enlarged up to a
maximum 6×. This functi on cuts out and
enlarges a certain portion of the image, so
the image quality deteriorates. To set
precision digital zoom, set [Digital Zoom]
to [Precisio n] in the SET UP s ettings
(page 116).
Precision digital
zoom
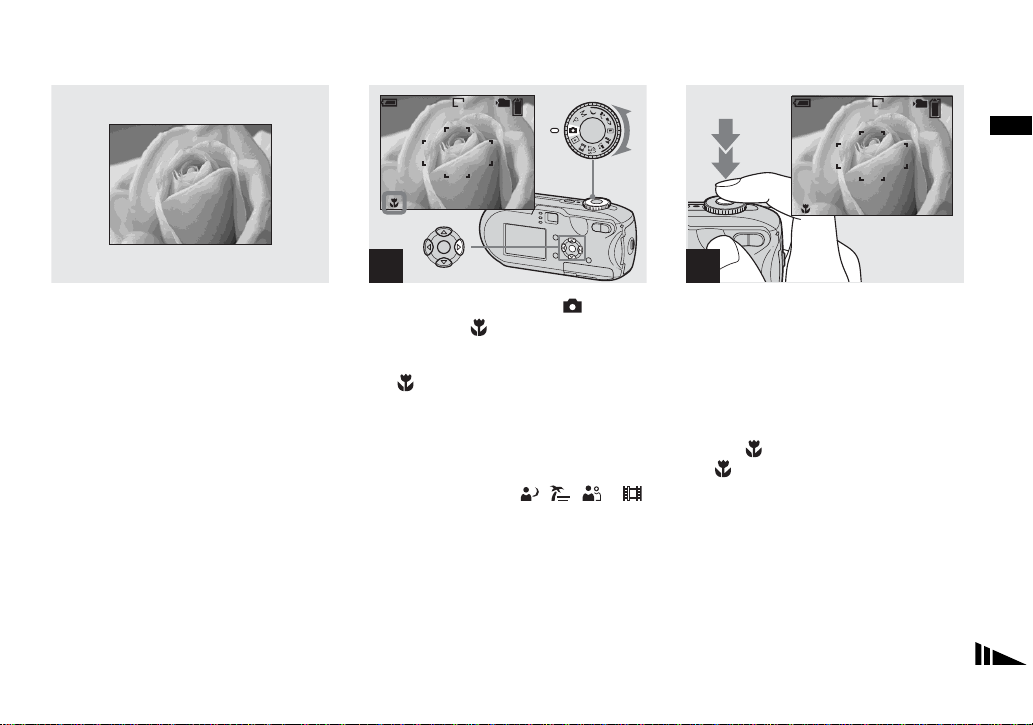
Shooting close-ups – Macro
For close-ups of subjects like flowe rs or
insects, shoot using the macro feature. You
can shoot subjects approaching up to 10 cm
(4 inches) when the zoom is set to its Wend. However, the av ailable focus distance
depends on the zoom position. We
recommend that you set the zoom to its Wend during shooting.
When the zoom is set all the way to
the W side:
Approx. 10 cm (4 inches) from the end of
the lens
When the zoom is set all the way to
the T side:
DSC-P93A: Approx. 60 cm (23
5
/8inches)
from the end of the lens
DSC-P73: Approx. 50 cm (19
3
/4inches)
from the end of the lens
101
VGA
98
SAF
1
, Set the mode dial to , and
press B ( ) on the con trol
button.
The (macro) indicat or a ppears on the
LCD screen.
• If the menu is currently displayed, press MENU
first to make the menu disappear.
• You can carry out this operation even when the
mode dial is set to P, M, , , or .
101
VGA
97
SAF
2
, Center the subject in the frame.
Press and hold the shutter
button halfway down to focus
on, then press the shut ter
button fully down.
To return to normal shooting
Press B ( ) on the control button again.
The indicator disappears from the LCD
screen.
Shooting still imag e s
29
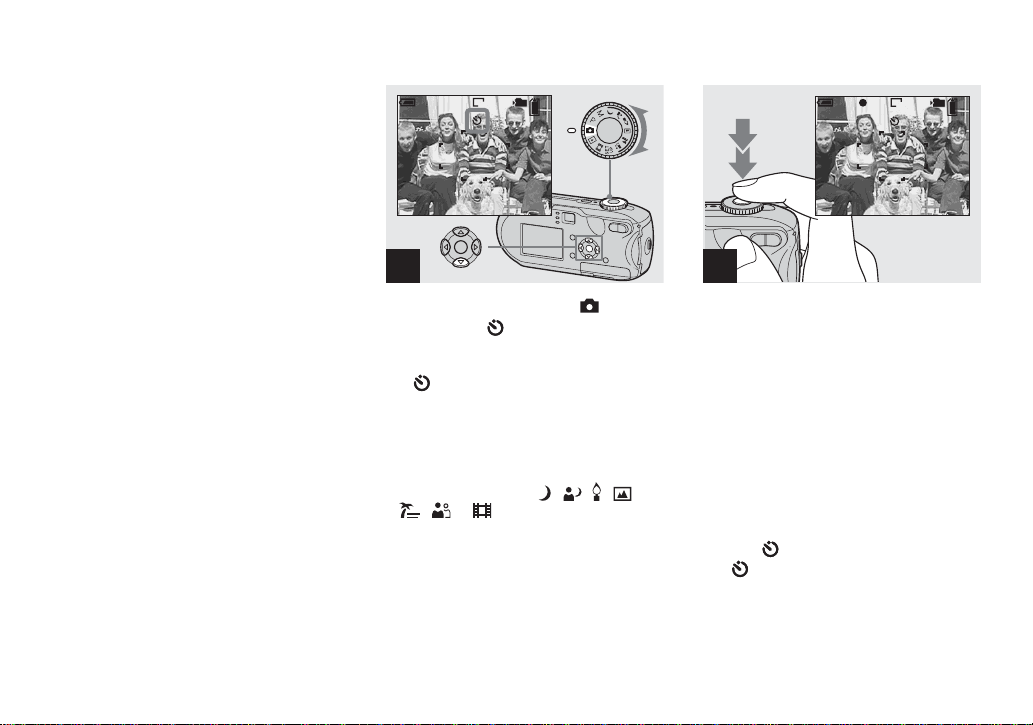
Using the self-timer
• When shooting in macro mode, use the LCD
screen. If you use the finder, the limits of what
you see and what you actually shoot may be
different. This is due to the parallax effect.
• When shooting in macro mode, the focus range
is very narrow and you may not be able to focus
on the whole of the subject.
• When shooting in macro mode, the focus
adjustment becomes slower to accurately focus
on a close subject.
30
101
VGA
98
SAF
1
, Set the mode dial to , and
press V ( ) on the control
button.
The (self-ti mer) i ndicat or ap pears on th e
LCD screen.
• If the menu is currently displayed, press MENU
first to make the menu disappear.
• Y ou can carry out this operation even when the
mode dial is set to P, M, , , , ,
, or .
101
FINE
VGA
98
F2.0
250
SAF
2
, Center the s ubject in the f rame.
Press and hold the shutter
button halfway down to focus
on, then press the shutter
button fully down.
The self-timer lamp (page 8) will flash, and
you will hear a beeping sound. The image
will be shot after approximately 10 seconds.
To cancel the self-timer during the
operation
Press V ( ) on the control button a gain.
The indicator disappears from the LCD
screen.
• If you stand in front of the camera and press the
shutter button, the focus and the exposure may
not be correctly set.
 Loading...