

Sony Cyber-Shot DSC-HX400, Cyber-Shot DSC-HX400V Instruction Manual
S 02'_]'"_'_ 4-_3o-69o-21(1)
Oioita,St,,OameraJ,r,stroctior,Manoa, GBi!iii_iiiiiiO!i
:I_"r_....... '_q "Hel l) Guide" is an on-line manual. Relier Io it for in-depth
_2N_ _ instructions on the many functions of the camera.
....... _';E2_ (!) Access the Sony support page.
http://www, sony.netlSonylnl'o/Sul)port/
@ Select your country or region.
@ Search l'or the model name of your camera within the
support page.
• Check the model name on the bottom of your camera.
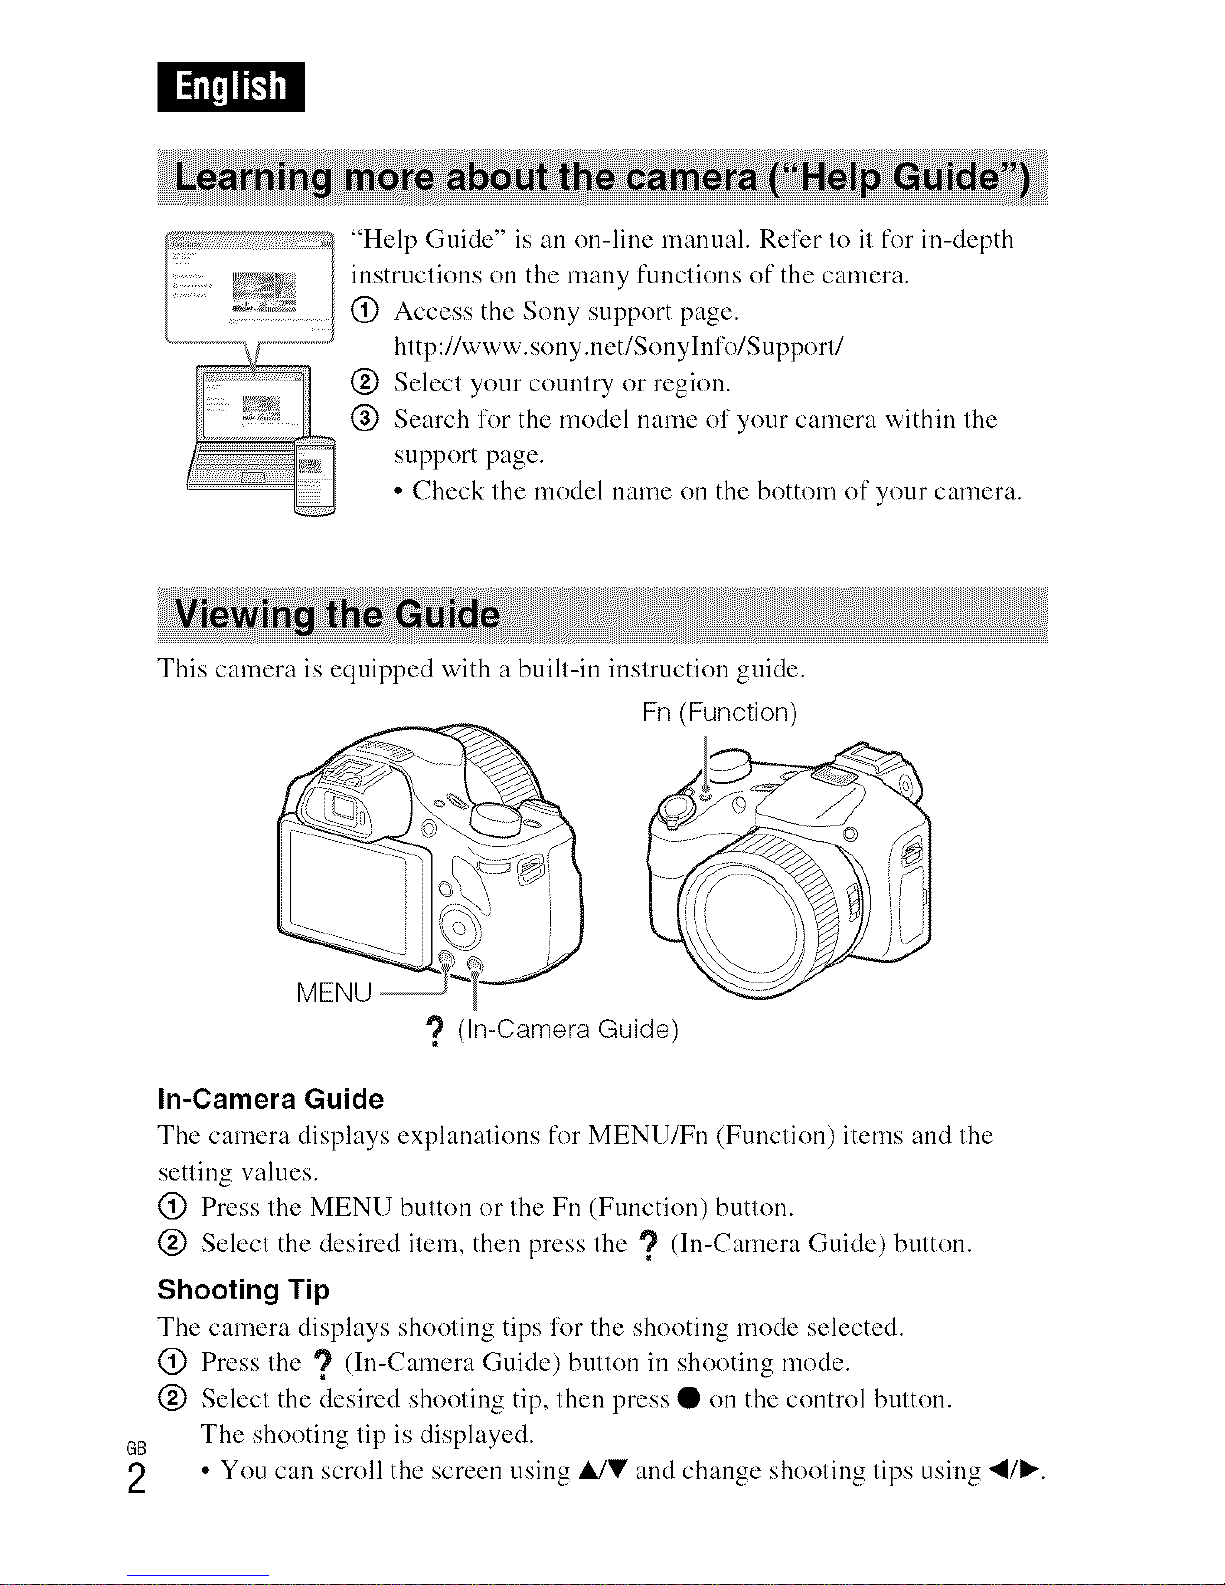
This camera is equipped with a built-in instruction guide.
Fn (Function)
? (In-Camera Guide)
In-Camera Guide
The camera displays explanations for MENU/Fn (Function) items and the
setting values.
(!) Press the MENU button or the Fn (Function) button.
@ Select the desired item, then press the ? (In-Camera Guide) button.
Shooting Tip
The camera displays shooting tips for the shooting mode selected.
(!) Press the ? (In-Cmnera Guide) button in shooting mode.
@ Select the desired shooting tip, then press • on the control button.
G8 The shooting tip is displayed.
2 • You can scroll the screen using i/V and change shooting tips using "_/1_.
Owner's Record
The model and serial numbers arc located on the bottom. Record the serial number in the
space provided below. Refer to these numbers whenever you call your Sony dealer
regarding this product.
Model No. DS(-HX400/DSC-HX4OOV
Serial No.
Model No. A(7-UB IOC/AC-UB I 0D
Serial No.
GBi!!!!!!i!!!!!!
To reduce fire or shock hazard, do not expose the unit to rain or
moisture.
IMPORTANTSAFETYINSTRUCTIONS
-SAVE THESEINSTRUCTIONS
DANGER
TOREDUCETHERISKOFFIREORELECTRIC
SHOCK,CAREFULLYFOLLOWTHESE
INSTRUCTIONS
If the shape of thu plug does not fit the power outk't, use an attachment phlg adaptor of thu
proper configuration 17_rthe power outlet.
Battery pack
If"thu baltery pack is mishandlud. Ihu batlery pack can bursl, cause a fire or evun chemical
bulns. Obserx e the following cautions.
• Do not disassemble.
• Do not crush and do not expose the battery pack to any shock or force such as
hammering, dropping or stepping on it.
• Do not short circuit and do not allow metal o{_iects to come into contact with the battery
terminals.
• Do not expose to high temperatul-<, above 60(7 (I 4OF) such as in direct sunlight or in a
car parked in the sun.
• Do not incinerate or dispose of in fire.
• Do not handle damaged or leaking lithium ion batteries.
GB
3

• Be sure to charge the battery pack using a genuine Sony battery charger or a device that
can charge the battery pack.
• Keep the battery pack out of the roach of small childr_.n.
• Keep the battery pack dry.
• Replace only with the same or equivalent type recommended by Sony.
• Dispose of used battery packs promptly as described in the instructions.
AC Adaptor
Use tile nearby wall outlet (wall socket) when using the AU Adaptor. Disconnect thu A(
Adaptor from the wall outlet (wall socket) immediately if any malfunction occurs while
using the apparatus.
RECYCLING LITHIUM-ION BATTERIES
Lithium-Ion batturies are recyclable.
You can help preserve our environment by returning your used
rechargeable batteries to the collection and recycling location nearest
you.
For more infommtion regarding recycling of rechargeable batteries.
call toll free
1-800_822-8837. or visit http://www.call2recycle.org/
Caution: Do not handle damaged or leaking Lithiumqon batteries.
Battery pack
This device complies with Part 15 of thu F(-'(-' Rules. Operation is sub.ject to the following
two conditions:
(1) This device may not cause harmful interference, and (2) this device must accept any
interf<.mnce received, inchlding interference that may cause undesired operation.
(7AN I(7ES-3 B/NMB-3 B
This equipment complies with F((/IU radiation exposur<, limits set forth for an
uncontrolled environment and meets the F((7 radio lYequency (RF) Exposure Guidelines
in Supplement C to OET65 and RSS- 102 of the IC radio frequency (RF) Exposur<. rules.
This equipment has very low levels of RF energy that are deemed to comply without
testing of specific absorption ratio (SAR).
GB
4
If you have any questions about this product, you may call:
Sony (ustomer Information Center
1-81)0-222-SONY (7669)
The number below is for tile FCC related matters only.
Regulatory Information
Declaration of Conformity
Trade Nume: SONY
Model No.: DS(-HX400V
Responsible Party: Sony Electronics Inc.
Address: 16530 Via Esprillo.
San Diego. (A 92127 U.S.A.
Telephone No.: 858-942-2230
This device complies with Patti 5 of the F(C Rules. Operation is sut_iect to tile
following two conditions: (1) This device may not cause harmful interference, and (2)
this device must accept any interference received, including interference that may cause
undesired operation.
This equipment must not be co-located or operated in conjunction with any other antenna
or transmitter.
CAUTION
You arc cautioned thut any chungcs or modifications not expressly approved in this munuul
could void your authority to operate this equipment.
Note:
This equipment has bccn tested and fo/ind to comply with tilt' limits for a Class B digitul
device, pursuant to Part 15 of tile PCC Rules.
These limits are designed to provide reasonable protection against harmful interference in
a residential installation. This equipment generates, uses. and can radiate radio frequency
energy and. if not installed and used in accoMance with the instructions, may cause
harmful interference to radio communications. However. them is no guarantee that
interference will not occur in a particular installation. If this equipment does cause harmful
interl\.rence to radio or television reception, which can be determined by turning the
equipment off and on. the user is encouraged to try to correct the interference by one or
more of the following measures:
Reorient or relocate tile receiving antenna.
Increase the separation between tile equipment and receiver.
Connect the equipment into an outlet on a circuit different from that to which tile
receiver is connected.
Consult the dealer or an experienced radio/TV technician lk_r help.
GBiliii iiiiiiili
Tile supplied inlel-face cable must be used widl tile equipment ill order to comply with the GB
limits for a digital dexice pursuant tO Subpart B of Parl 15 of PCC Rules. 5
ThisdevicecomplieswithIndustryCanadalicence-exemptRSSstandard(s).
Operationissu[_jecttothefollowingtwoconditions:(1)thisdevicemaynotcause
interference,and(2)thisdevicemustacceptanyinterference,includinginterferencethat
maycauseundesiredoperationofthedevice.
Notice for the customers in the countries applying EU Directives
Manufacturer: Sony Corporation. 1-7-1 Konun Minato-ku Tokyo, 108-0075 Jupan
For EU product compliance: Sony Deutschland GmbH. Hedelfinger Strasse 61. 70327
Stuttgart, Germany
Hereby, Sony Corporation. declares that this equipment is in compliance with the essential
requirements and other relevant provisions of Directive 1999/5/EC. For details, please
access the following URL:
http://www.compliance.sony.de/
Notice
If static electricity or ulectl-omagnctism causes duta transl\.r to discontinue midway (fail),
restart the application or disconnect and connect the communication cable (USB. etc.)
again.
This product has been tested and l\mnd compliant with the limits set out in the EM(
regulation for using connection cables shorter than 3 meters (9.8 feet).
The electromagnetic fields at the specific frequencies may infhlence the picture and sound
of this unit.
GB
6
Disposal of waste batteries and electrical and electronic
equipment (applicable in the European Union and other
European countries with separate collection systems)
This symhol on the product, the balt_.,ry Ol-on the packaging indicates that
tile product and tile battery shall 11ol be treated as household wasle. On
certain batteries this sylnbol might be used in combination with a
chemical symboh The chemical symbols for mercury (Hg) or lead (Pb) are
added if the battery contains more than ().()005c/_ mercury or 0.004c/_ lead.
By, ensuring these lwoducts and batteries are disposed of correctly, you
will hdp prevent potentially n_,gativ ......... q .......... fortl ........ 'i........... landl .......... health GB
which could otherwise be caused by inappropriate waste handling. The recycling of the
materials will help to conserve natural resources.
In case of products that for saf<,ty, performance or data integrity masons require a
permanent connection with an incorporated battery, this battery should be replaced by
qualified service staff only. To ensure that the battery and the electrical and electronic
equipment will be treated properly, hand over these products at end-of-life to the
applicable collection point lk)r the recycling of electrical and elecmmic equipment. For all
other batteries, please view the section on how to remove the battery from the product
sal\,ly. Hand the battery over to the applicable collection point for the recycling of waste
batteries. For more detailed inRwmation about recycling of this product or battery, please
contact your local (ivic Office, your household waste disposal service or the shop where
you purchased the product or battery.
Complies with 1
IDA Standards
DB00353
The number in parentheses indicates the number of pieces.
• Camera (1)
Rechargeable Battery Pack NP-BXI (1)
Micro USB Cable (1)
AC Adaptor AC-I JB 10C/I JB 10D (1)
Power Cord (mains lead) (not supplied in the USA and Canada) (1)
Shoulder Strap (1)
Lens Cap (1)
Shoe Cap (1) (Attached on the camera)
Instruction Manual (this manual) (1)
Wi-Fi Connection/One-touch (NFC) Guide (1)
This guide explains the functions that require a Wi-Fi connection.
GB
7
GB
8
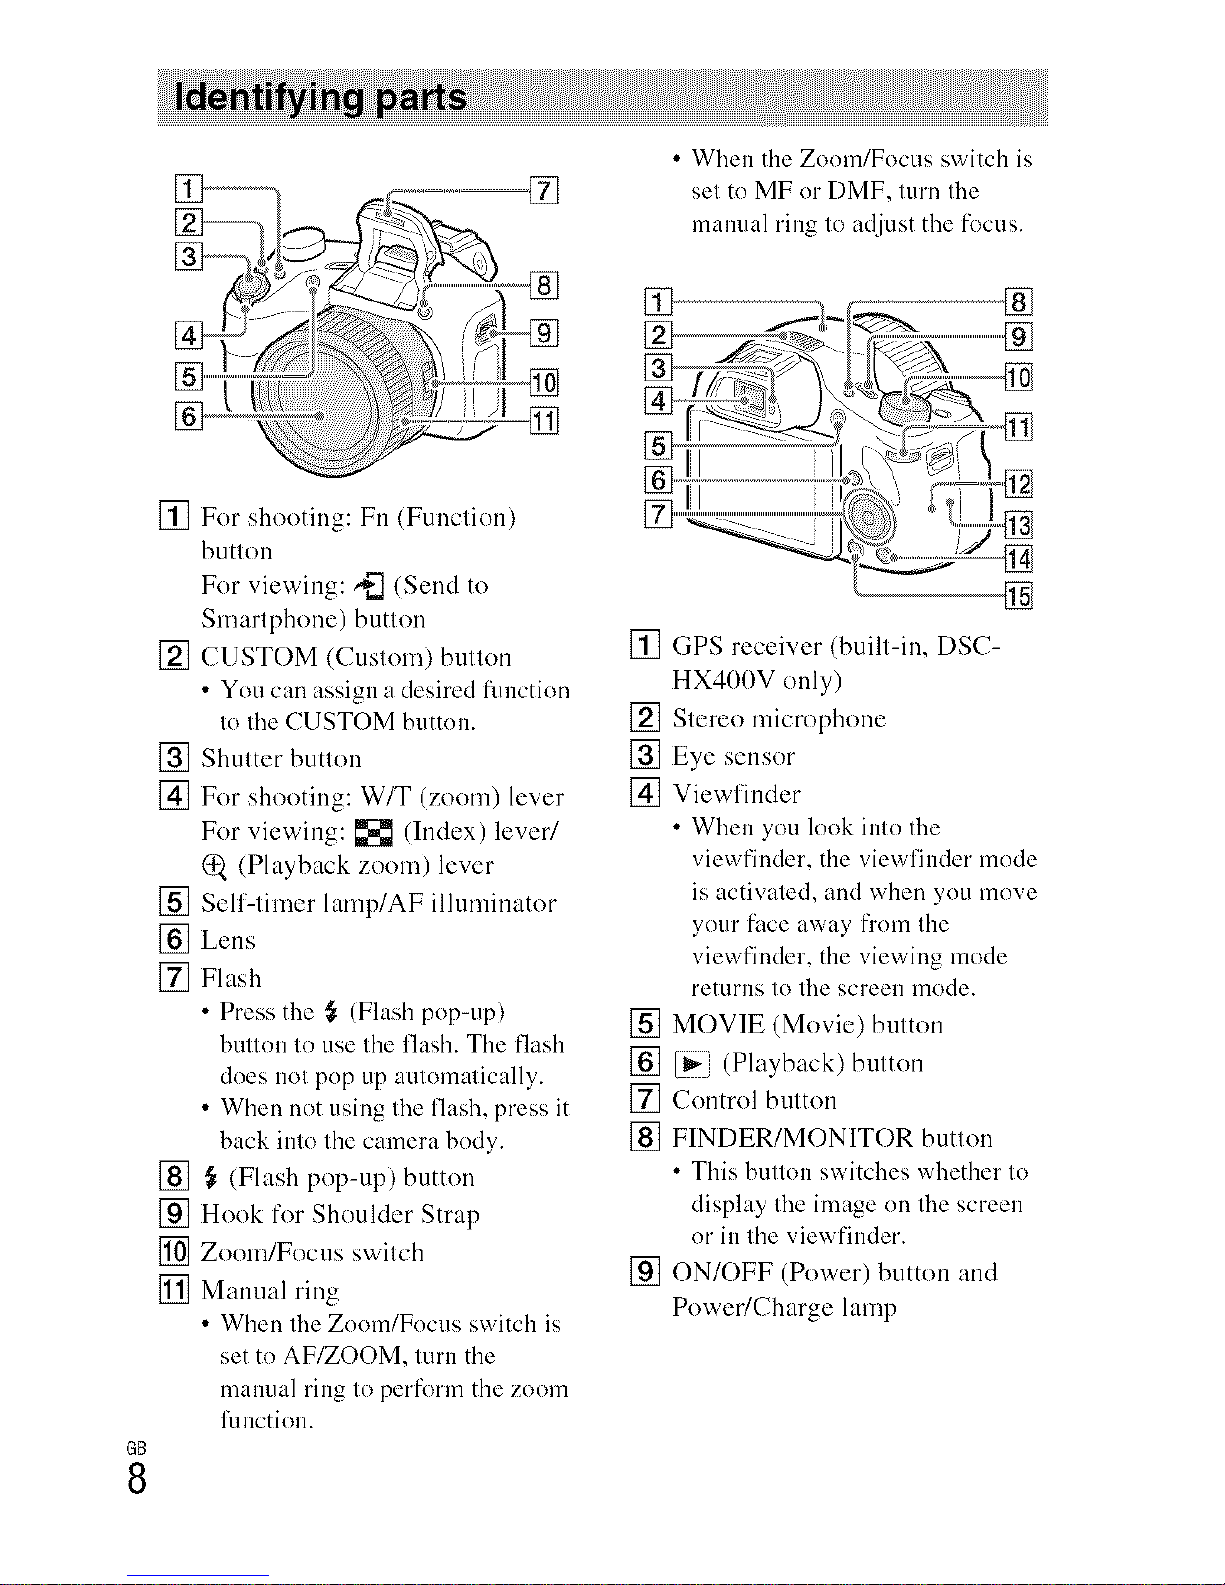
[] For shooting: Fn (Function)
button
For viewing: ,*-_(Send to
Smartphone) button
[] CUSTOM (Custom) button []
• You can assign a desired flmction
to tile CUSTOM button. []
[] Shutter button []
[] For shooting: W/T (zoom) lever []
For viewing: [] (Index) leveff
(Playback zoom) lever
[] Self-timer lamp/AF illuminator
[] Lens
[] Flash
• Press the _ (Flash pop-up) []
btHlOll IO use Ihe flash. The flash
does 11olpop up aulomalically. []
• When not using tile flash, press it []
back into the camera body. []
[] } (Flash pop-up) button
[] Hook for Shoulder Strap
[] Zoom/Focus switch
[] Manual ring []
• When tile Zoom/Focus switch is
set to AF/ZOOM, turn the
manual ring to perform the zoom
Rmction.
• When the Zoom/Focus switch is
sel to MF or DMF, lurn tile
mamlal ring lo adjust the t_>cus.
¢--.
GPS receiver (built-in, DSC-
HX400V only)
Stereo microphone
Eye sensor
Viewfiuder
• When you look into tile
viewfinder the viewfinder mode
is activated, and when you move
your face away from the
viewfinder, the viewing mode
returns to tile screen mode.
MOVIE (Movie) button
[_i (Playback) button
Control button
FINDER/MONITOR button
• This button switches whether to
display tile image on tile screen
or in the viewfinder.
ON/OFF (Power) button and
PoweffCharge lamp
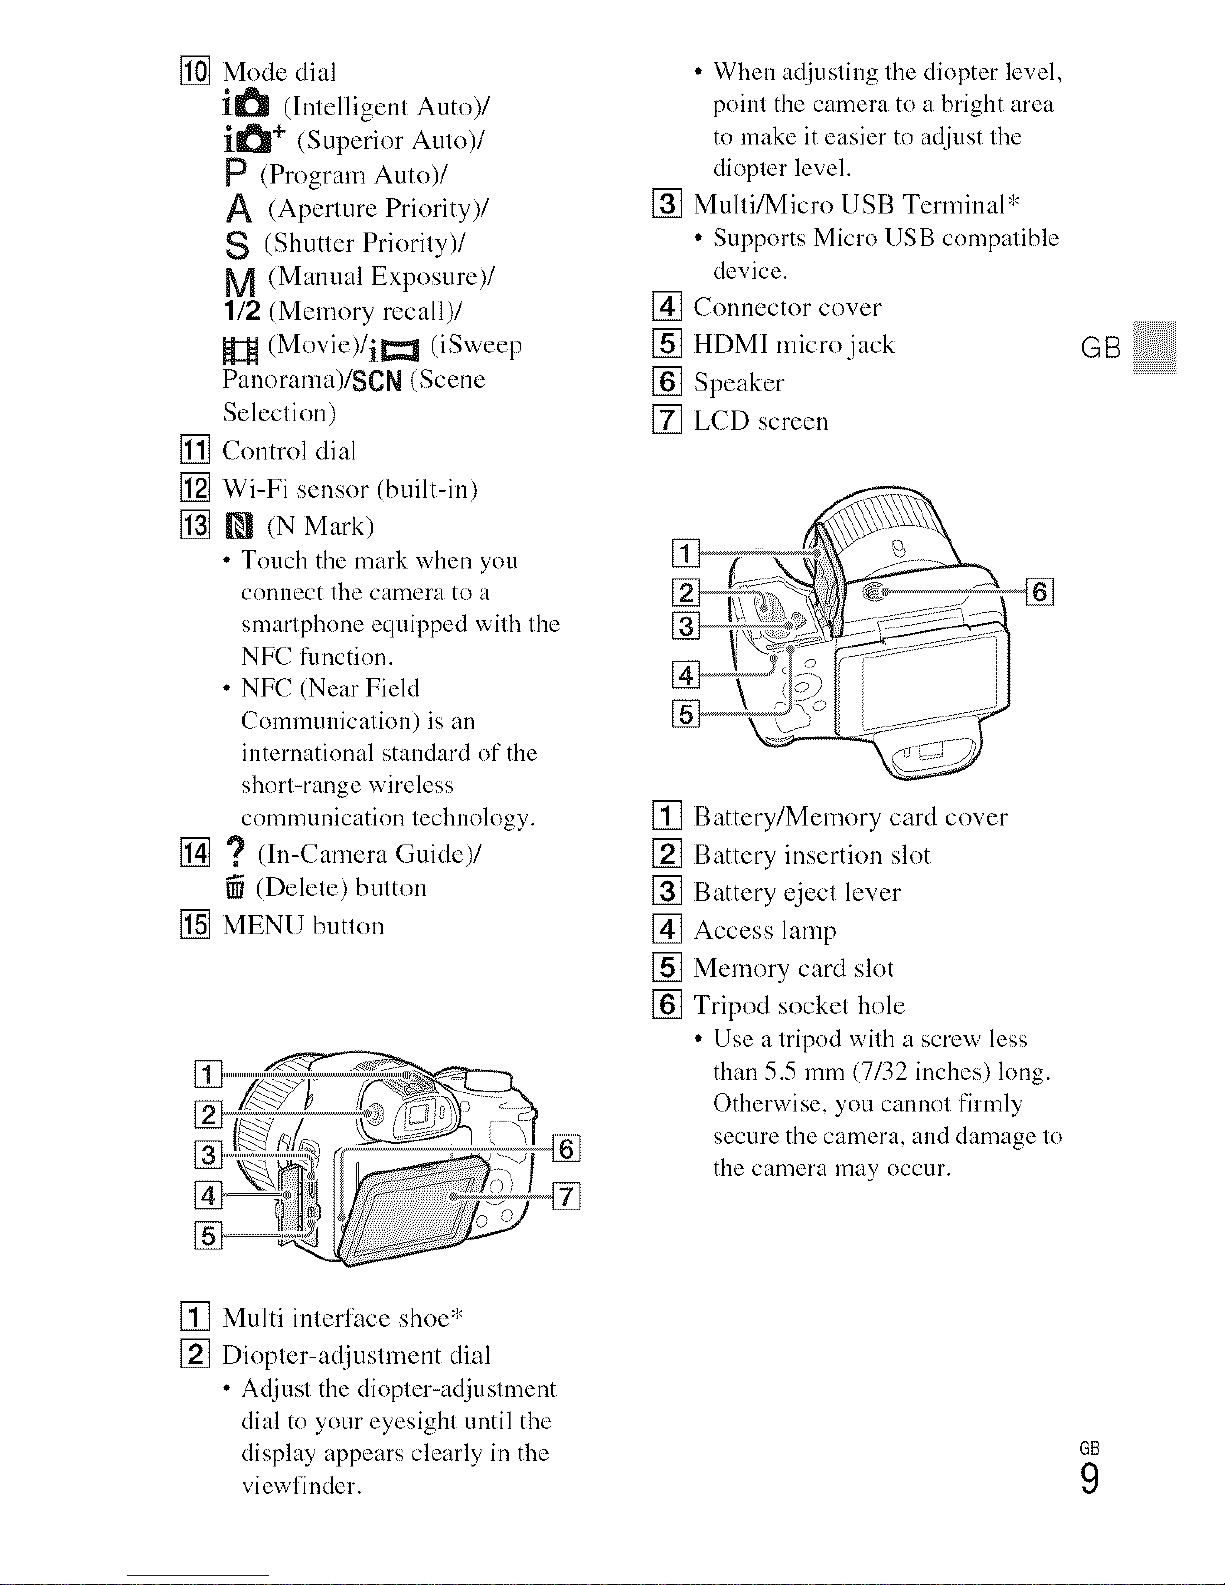
[] Modedial
i_ (IntelligemAura)/
i_ +(SuperiorAuto)/
P(ProgramAuto)/
A (AperturePriority)/
S(ShutterPriority)/
M(ManualExposure)/
1/2(Memoryrecall)/
H (M°vie)/i_(iSweep
Panormna)/SCN(Scene
Selection)
[] Controldial
[] Wi-Fisensor(built-in)
[] _ (NMark)
•Tnuchtilemarkwhenyou
cnnnecttilecameratoa
smartphnneequippedwithtile
NFCfunctinn.
•NFC(NearField
Commtmication)isan
internatinnalstandardoftile
short-rangewireless
communicationtechnology.
[] ? (In-CameraGuide)/
(Delete)button
[] MENUbutton
•Whenadjustingtilediopterlevel,
pointtilecameratoabrightarea
tomakeiteasiertoadjustthe
diopterlevel.
[] Multi/MicroUSBTerminal*
•SupportsMicroUSBcnmpatible
device.
[_Connectorcover
[] HDMImicrojack
[] Speaker
[] LCDscreen
[] Battery/Memorycardcover
[] Batteryinsertionslot
[] Batteryejectlever
[] Accesslamp
[] Memorycardslot
[] Tripodsockethole
•Useatripodwithascrewless
than5.5mm(7/32inches)long.
Otherwise,youcannotfirmly
secnretilecamera,anddamageto
tilecameramayoccur.
GBi!!!!!!i!!!!!!
[] Multi interface shoe*
[] Diopter-adjusmlent dial
• Adjust tile diopter-adjustment
dial to your eyesight until the
display appears clearly in the
view finder.
GB
9
':' For details on compatible accessories
li)r the multi interl_lce shoe and the
Multi/Micro USB Terminal, visit the
Sony web site, or consult your Sony
dealer or local authorized Sony
service facility. You can also use
accessories that are compatible with
the accessory shoe. Operations with
other manufacturers' accessories are
not guaranteed.
_la Multi
| InterfaceShoe
GB
10

Battery eject lever
GBi!!!!_!!7!!!!!!
1Open the cover.
2Insert the battery pack.
• While pressing the battery qject lever, insert the baltcry pack as
illustrated. Make sure thai the battery ejecl lever locks after insertion.
• Closing the cever with the battery inserted incorrectly may damage the
cal]nera.
GB
11
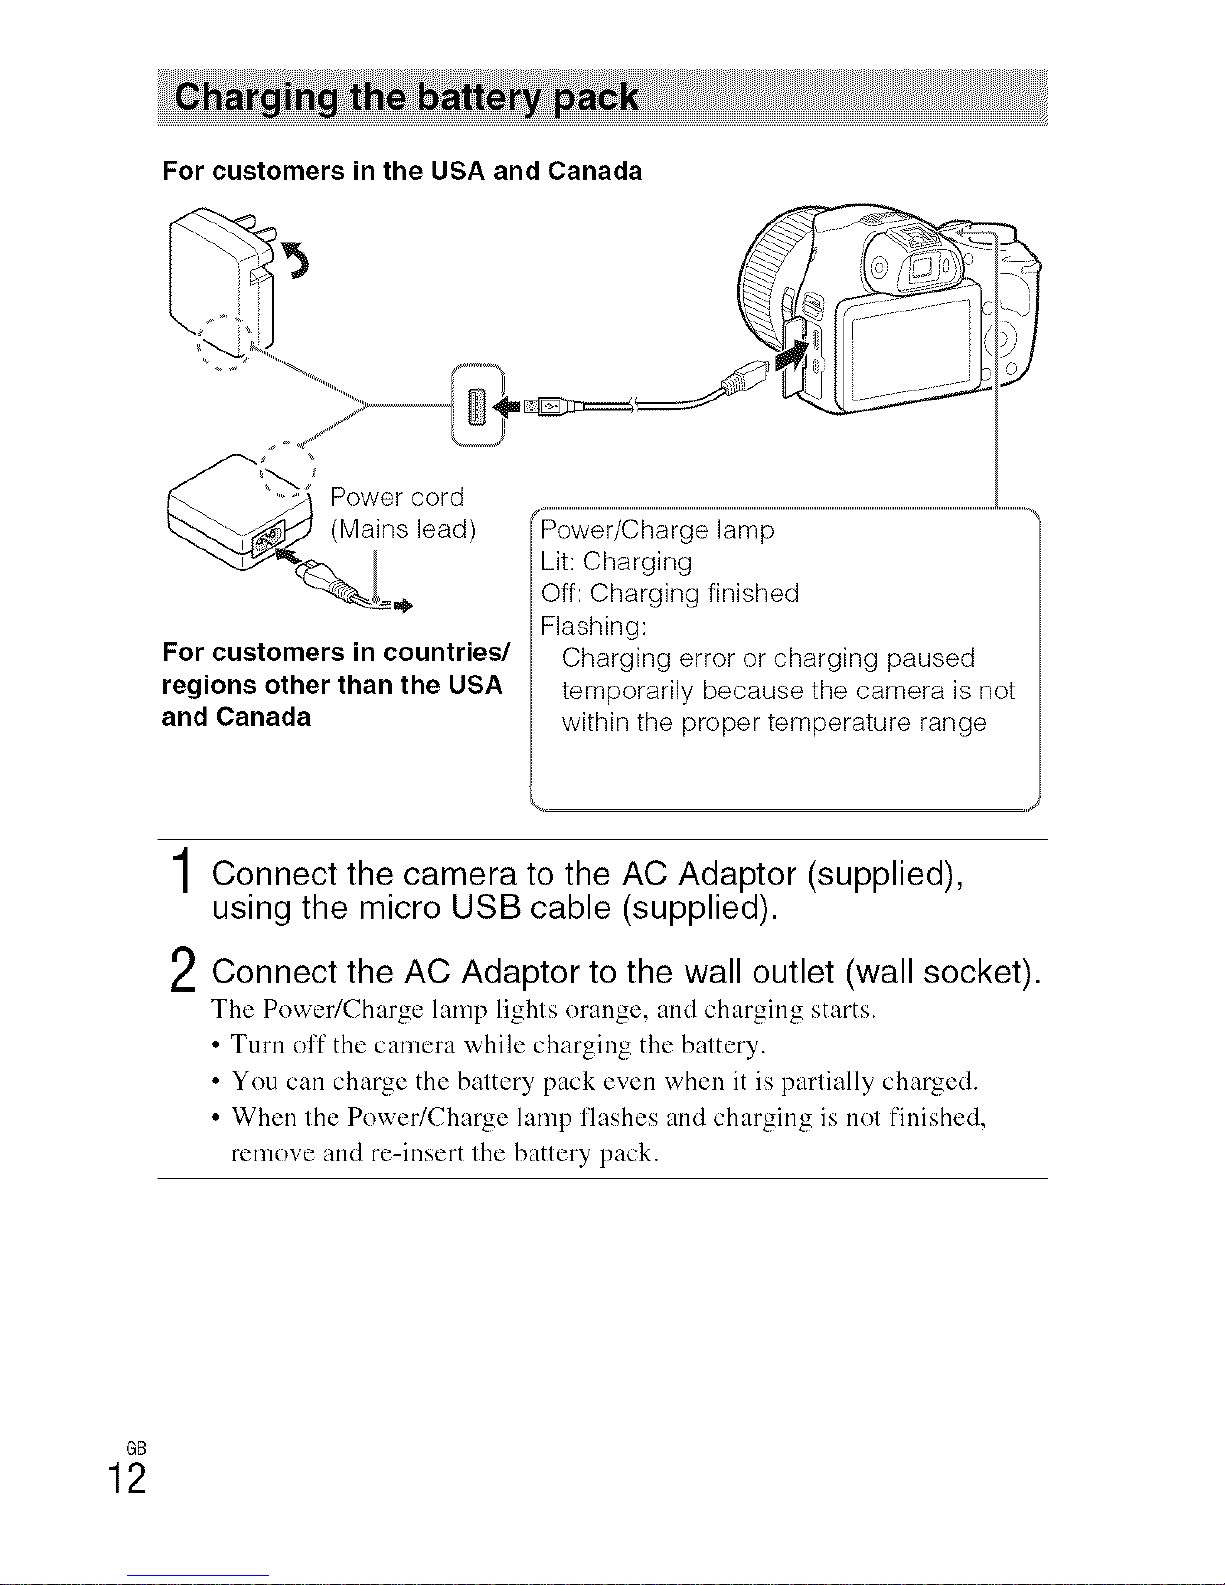
For customers in the USA and Canada
'5
Power cord
(Mains lead)
For customers in countries/
regions other than the USA
and Canada
lamp
Lit: Charging
Off: Charging finished
Flashing:
Charging error or charging paused
temporarily because the camera is not
within the proper temperature range
1Connect the camera to the AC Adaptor (supplied),
using the micro USB cable (supplied).
2Connect the AC Adaptor to the wall outlet (wall socket).
The Power/Charge lamp lights orange, and charging starts.
• Turn oft" the camera while charging the battery.
• You can charge the battery pack even when it is partially charged.
• When the Power/Charge lamp flashes and charging is not finished,
remove and re-insert the battery pack.
GB
12
• lfthe Power/Charge lamp oi1 the camera flashes when tile AC Adaptor is
cnnnected to the wall outlet (wall socket), this indicates that charging is
temporarily stopped because the temperature is nutside the recommended range.
When the temperature gets back within the appropriate range, tile charging
resumes. We recommend charging tile battery pack in an ambient temperature of
between 10°C to 30°C (50°F to 86°F).
• Tile battery pack may nol be el [eclivelycharged i[ the terminal sect i....... lille
battery is dirty. In this case, wipe an',/dust nil lightly using a snft cloth or a cnllnn GB
swab to clean tile terminal section of the battery.
• Connect the AC Adaptor (supplied) to the nearest wall outlet (wall socket). If
malfunctions occur while using the AC Adaptor, disconnect the plug from the wall
nutlet (wall socket) immediately to disconnect from tile pnwer source.
• When charging is finished, disconnect the AC Adaptor from the wall outlet (wall
shekel).
• Be sure to use only genuine Sony brand battery packs, micrn USB cable (supplied)
and AC Adaptor (supplied).
Charging time (Full charge)
The ch:_rging time is approximatuly 230 minutes using thu AC Adaptor
(supplied).
• The above charging lime applies when charging a fi.llly depleted battery pack at a
temperature nl 25°C (77°F). Charging may take longer depending on conditions or"
use and circnmslances.
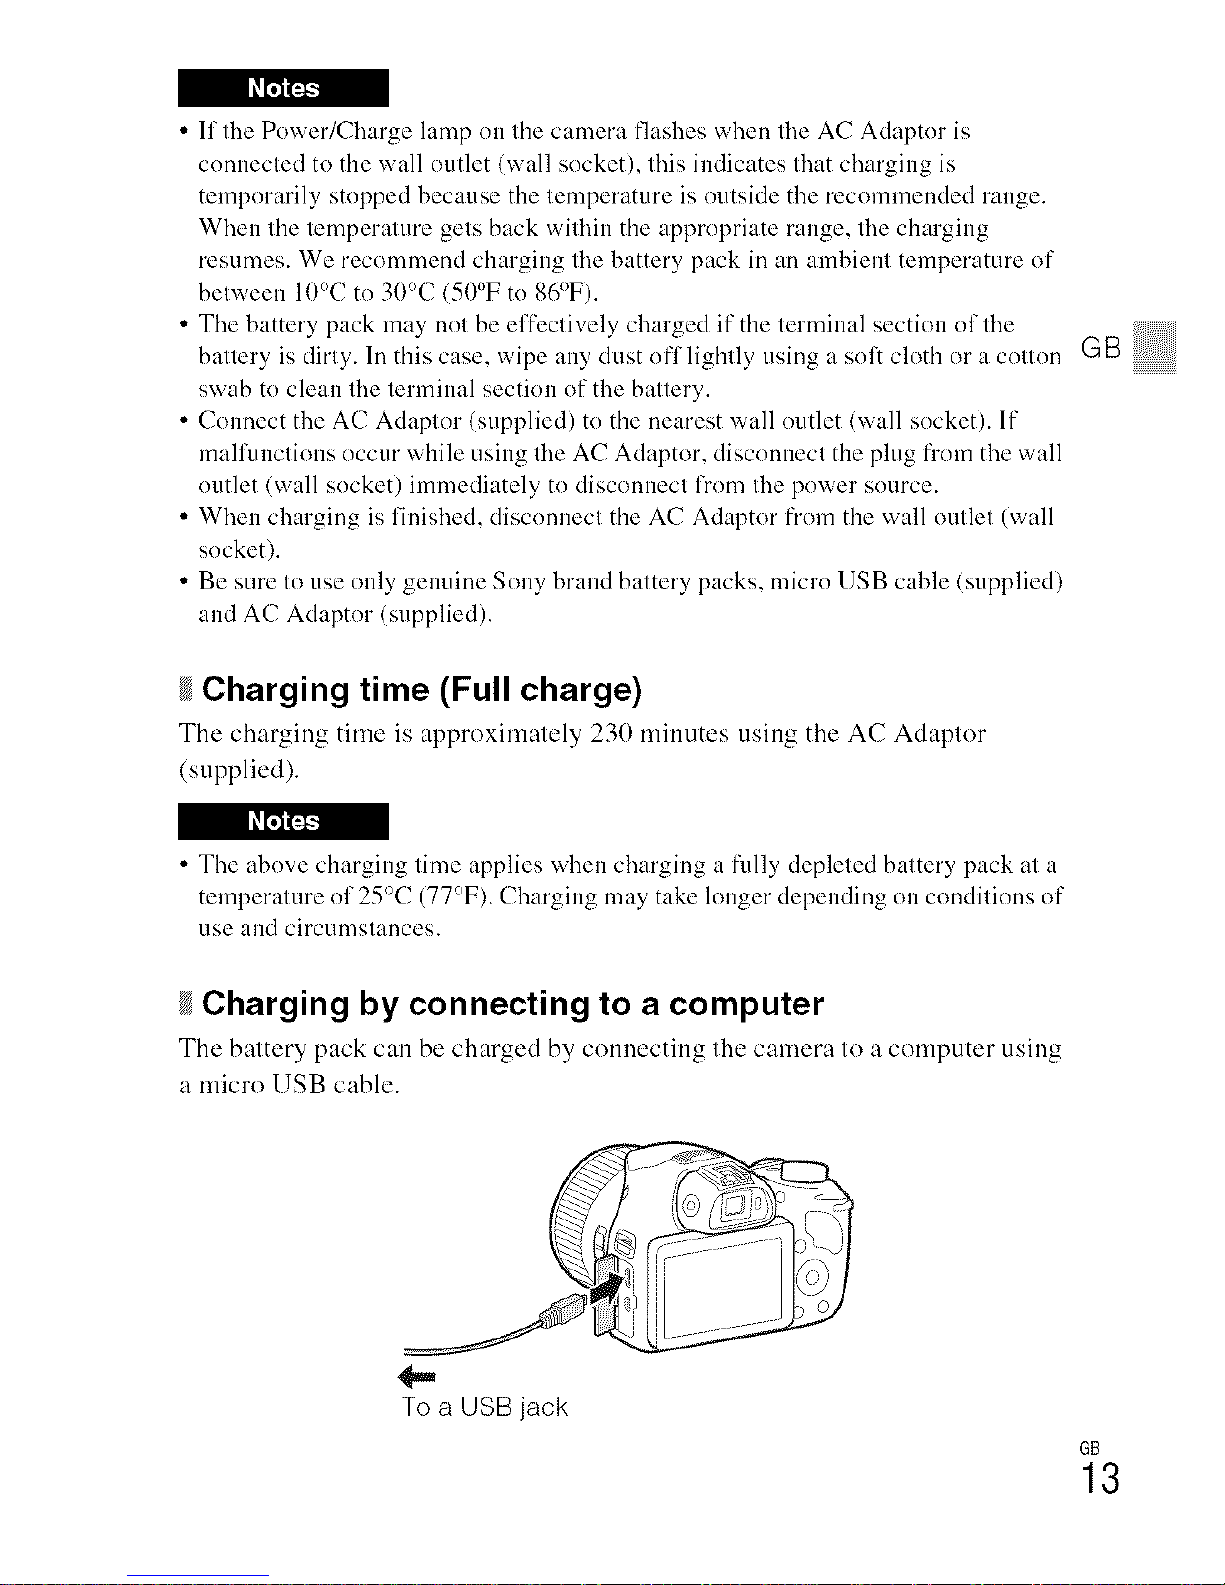
Charging by connecting to a computer
The battery pack can be charged by connecting thu camera to a computer using
a micro USB cable.
To a USB jack
GB
13

• If you connect the camera to a computer when power is turned on, the battery
is not charged but the camera will be powered by the computer, which allows
you to import images to a computer without worrying about the battery
running out.
• Note the following points when charging via a computer:
If the camera is connected to a laptop computer that is not connected to a power
som'ce, the laptop battery level decreases. Do not charge lot an extended period
of time.
Do not turn on/off or restart the computer, or wake the computer to resume from
sleep mode when a USB connection has been established between the computer
and the camera. That may cause the camera to malfunction. Before turning on/
off, or restarting the computer or waking the computer from sleep mode,
disconnect the camera and the computer.
No guarantees are made IT)rcharging clsing a custom=built computer or a
modified computer.
Battery life and number of images that can be
recorded and played back
Shooting (still Screen Approx. 150 min. Approx. 300 images
images) Viewfinder Approx. 191) min. Approx. 381)images
Typical movie Screen Approx. 50 min.
shooting Viewfinder Approx. 55 min.
Continuous Screen Approx. 85 min.
movie shooting Viewfinder Approx. 95 min.
Viewing (still images) Approx. 250 min. Approx. 5000 images
• The above number of images applies when the battery pack is fl/lly charged. The
number of images may decrease depending on the conditions of else.
• The nmnber of images that can be recorded is for shooting under the following
conditions:
Using a Sony Memory Stick PRO [)uo _x_(Mark2) media (sold separately).
-The battery pack is clsed at an ambient temperature of 25°C (77°F).
[GPS On/Off] is set to [Off] (DSC-HX400V only)
[Display Quality] is set to [Standard]
GB
14

• The number fk_r "Shooting (still images)" is based on the C1PA standard, and is for
shooting under the following conditions:
(CIPA: Camera &lmaging Products Association)
DISP is set to [Display All lnfo.].
Shooting once every 30 seconds.
The zoom is switched alternately between the W and T ends.
-The flash is used once every two times.
The power is turned on and off once every ten times.
• The number of minutes for movie shooting is based on the C1PA standard, and is
for shooting under the following conditions:
J_it Record Settiug]: 60i 17M(FH)/50i 17M(FH).
Typical movie shooting: Battery lillz based on repeatedly starting/stopping
shooting, zooming, turning on/off, etc.
Continuous movie shooting: Battery life based on non-stop shooting until the
limit (29 minutes) has been reached, and then continued by pressing the MOVIE
button again. Other functions, such as zooming, are not operated.
Supplying power
You can use the AC Adaptor AC-UDI(I (sold separately) or AC-UDI 1 (sold
separately) for shooting and playback to supply power when shooting or
playing back images.
• If you shoot or play back images when the camera is connected to the
supplied AC Adaptor, power will not be supplied through the AC Adaptor.
GBi!!!!!!i!!!!!!
GB
15
! ! _i_ I!!!!_!!
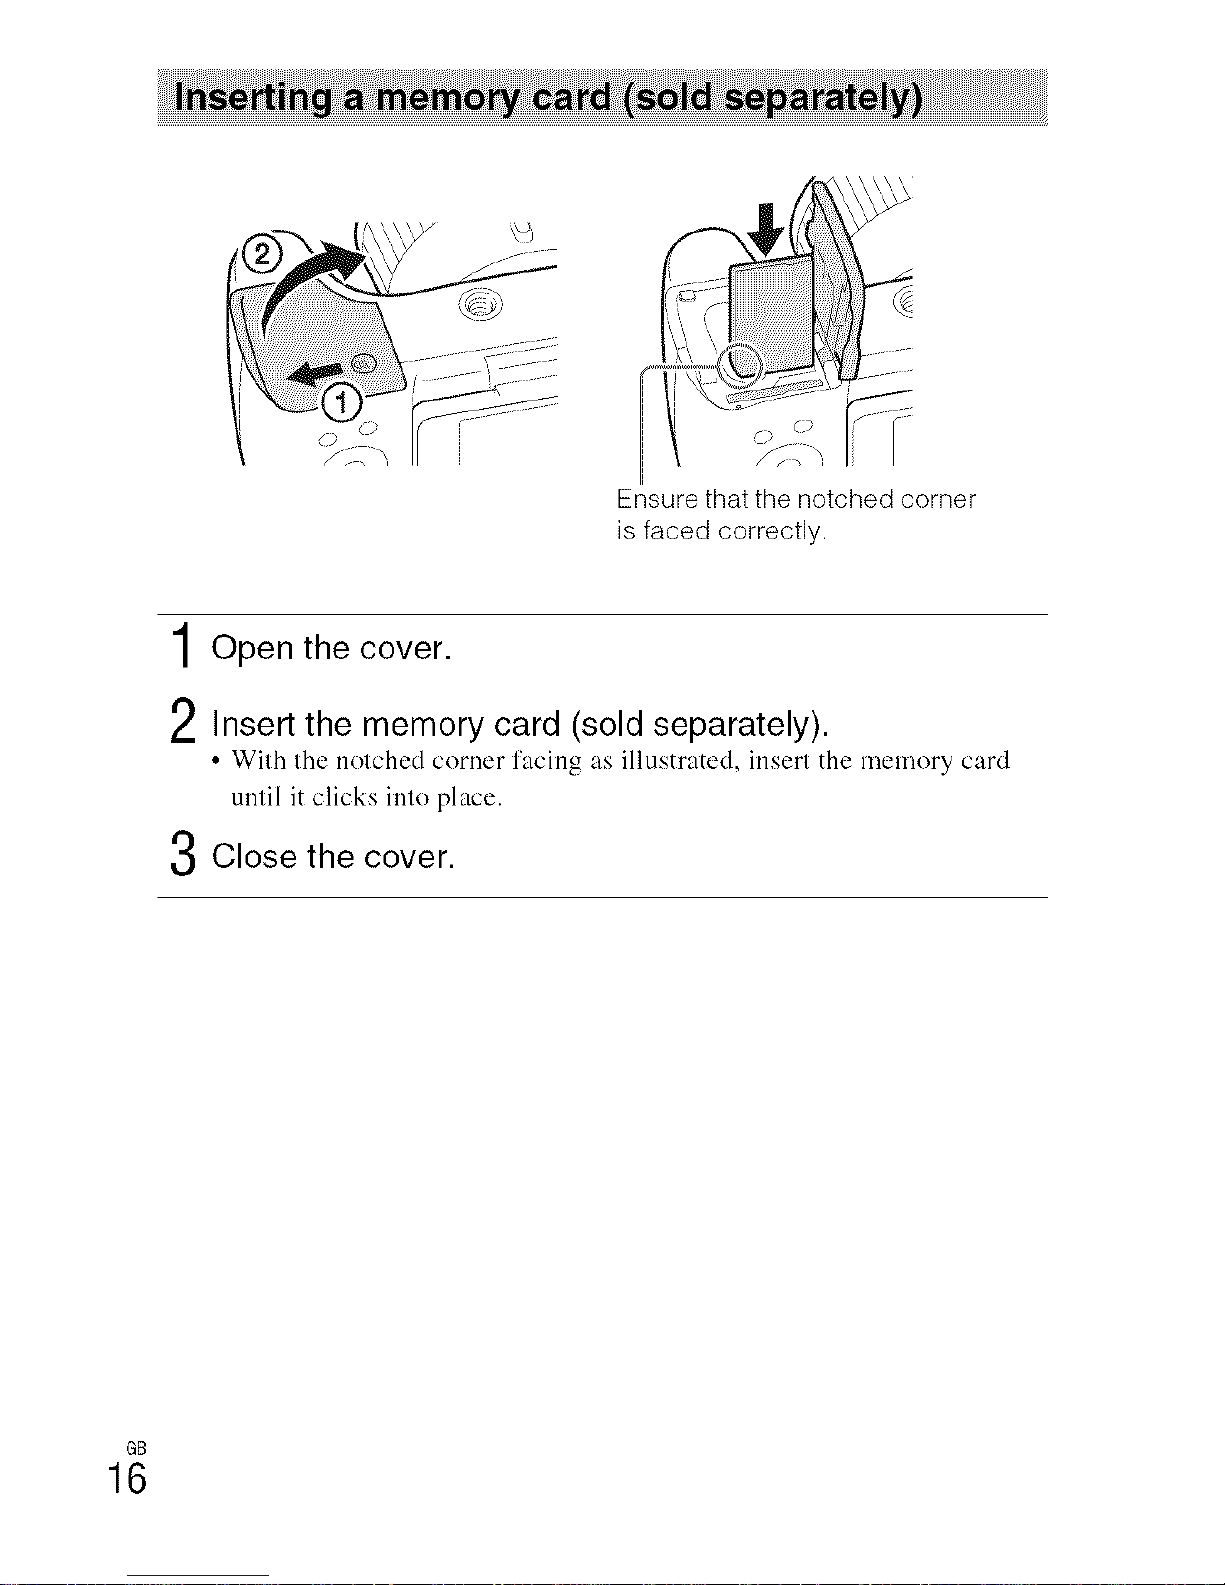
Ensure that the notched corner
is faced correctly.
1Open the cover.
2Insert the memory card (sold separately).
• Wilh Ihe nolched corner l'acing as illustrated, insert the memory card
until it clicks inlo place.
3Close the cover.
GB
16
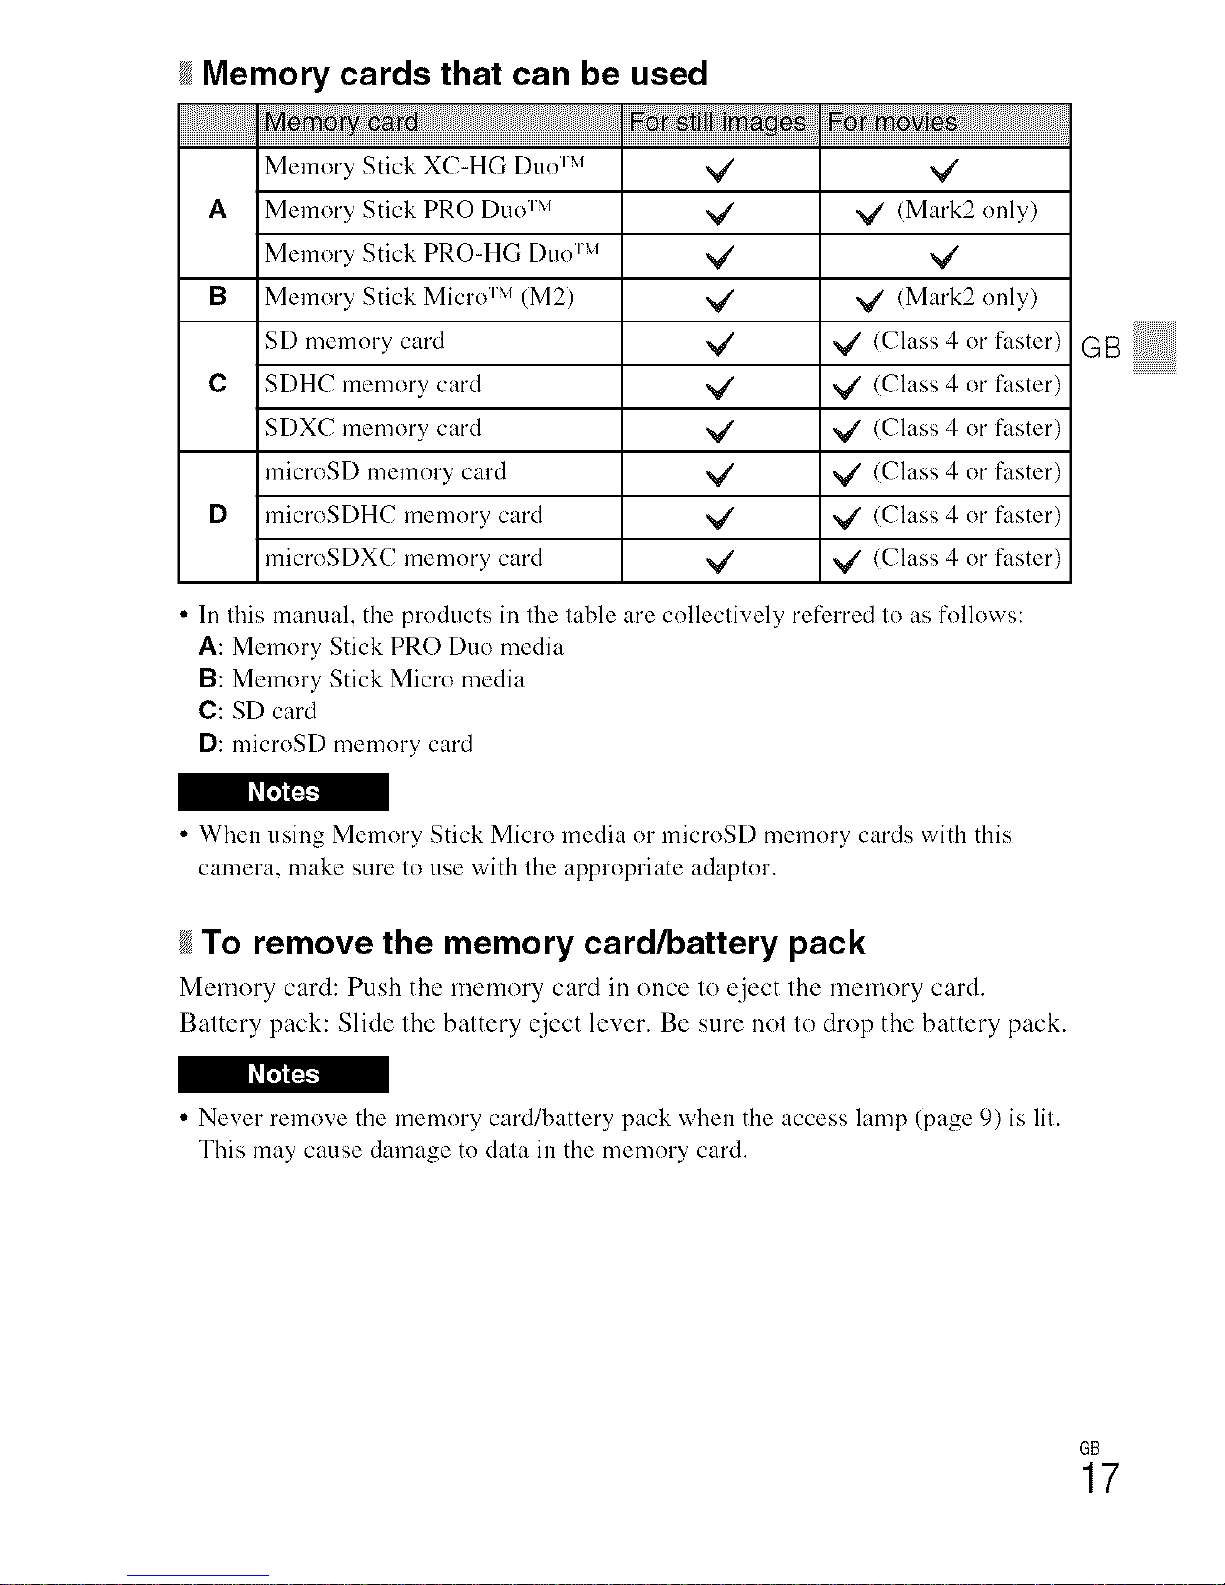
#Memory cards that can be used
_ _/card'_ ,_SNt[mages
Memory Stick XC-HG [)uo _'' V' _/
A Memory Stick PRO [)uo r'' x/ V' <Mark2 only)
Memory Stick PRO-HG [)uo _'' V' _/'
B Memory Stick Micro r'' (M2) V' _/ <Mark2 only)
SD memory card V' _/' (Class 4 or faster)
C SDHC memory card _/ V' (Class 4 or faster)
SDXC memory card _/ _ (Class 4 or faster)
microSD memory card V' V' (Class 4 or faster)
D microSDHC memory card V' ,_ {Class 4 or faster)
microSDXC memory card _/ _ (Class 4 or faster)
• In this manual, the products in the table are collectively refim'ed to as follows:
A: Memory Stick PRO Duo media
B: Memory Stick Micro media
C: SD card
D: microSD memory card
• When using Memory Stick Micro media or microSD memory cards with this
camera, make sure to use with the appropriate adaptor.
gTo remove the memory card/battery pack
Memory card: Push the memory card in once to eject the memory card.
Battery pack: Slide the battery eject lever. Be sure not to drop the battery pack.
• Never remove the memory card/battery pack vvrl]enthe access lamp (page 9) is lit.
This may cause damage to data ill the memory card.
GBiliii iiiiiiili
GB
17
2
3
4
5
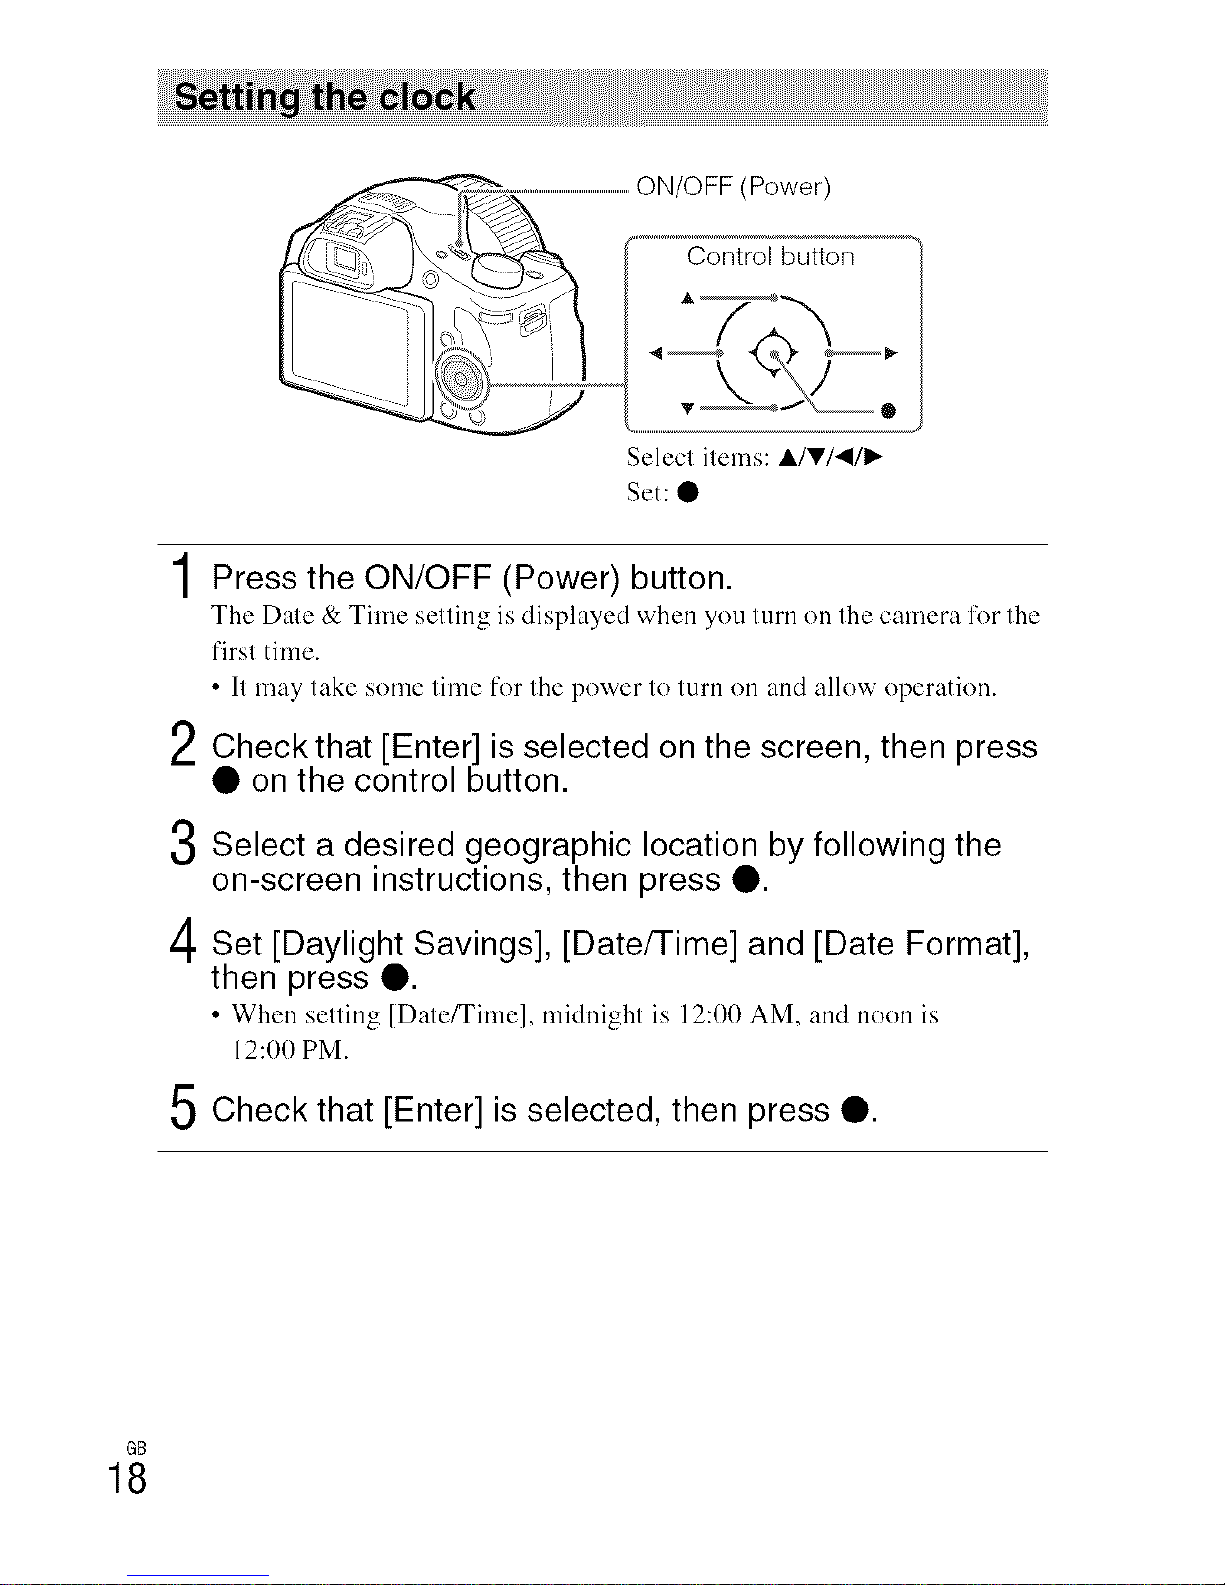
Selecl items: AlVl4!I_
Set: •
Press the ON/OFF (Power) button.
The Dale & Time selling is displayed when you turn on the camera lk)r the
t'irsl time.
• It may take some time ['or the power to turn on and allow operation.
Checkthat [Enter] is selected on the screen, then press
• on the control button.
Select a desired geographic location by following the
on-screen instructions, then press •.
Set [Daylight Savings], [Date/Time] and [Date Format],
then press •.
• When sulling [Date/Time], mMnight is 12:00 AM, and noon is
12:00 PM.
Check that [Enter] is selected, then press •.
GB
18
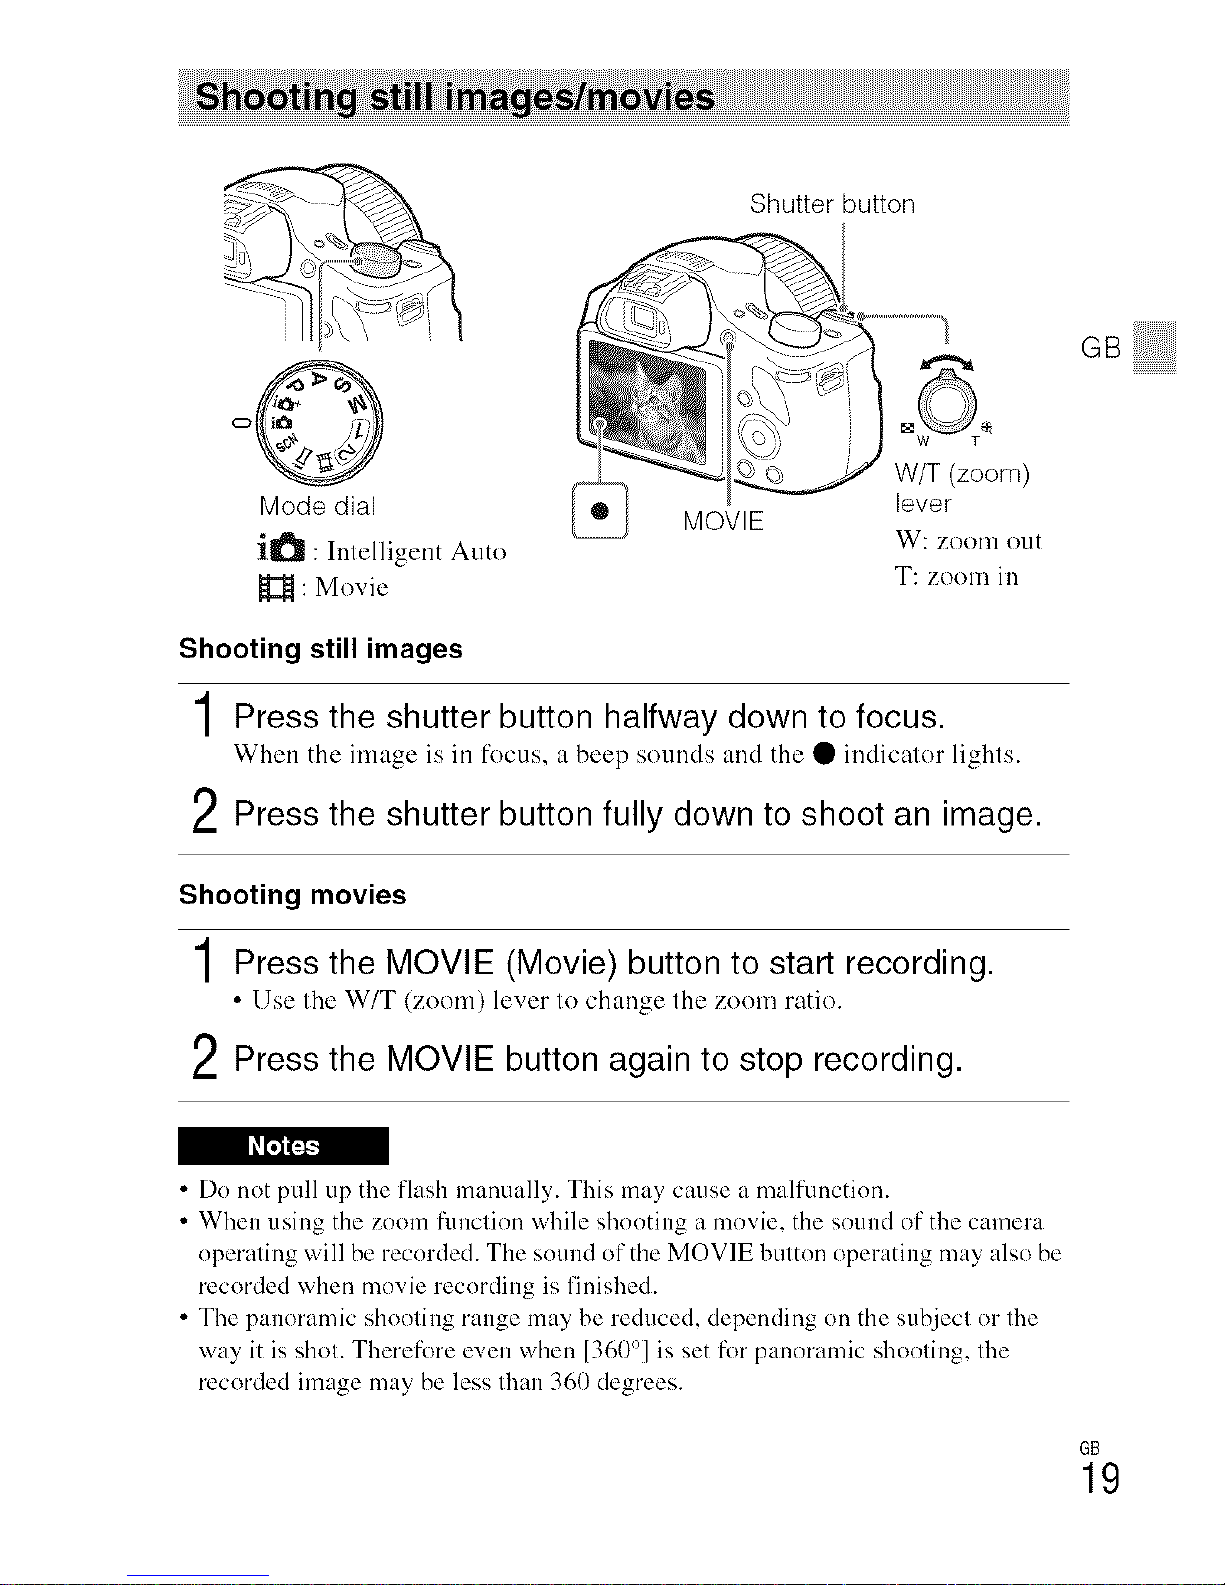
Shutter button
o©
Mode dial
i_ : Intelligent Auto
: Movie
MOVIE
W/T (zoom)
lever
W: zoom o1.1[
T: zoom in
Shooting still images
1Press the shutter button halfway down to focus.
When the image is in locus, a beep sounds and the • indicator lights.
2 Press the shutter button fully down to shoot an image.
Shooting movies
1Press the MOVIE (Movie) button to start recording.
• Use tile W/T (zoom) luver to change thu zoom ratio.
2Press the MOVIE button again to stop recording.
GB
• Do not pull up the flash manually. This may cause a malflmction.
• When using the zoom flmction while shooting a movie, the sound of the camera
operating will be recorded. The sound of the MOVIE button operating may also be
recorded when movie recording is finished.
• The panoramic shooting range may be reduced, depending on the subject or tile
way it is shot. There[k>re even when [360°] is set for panoramic shooting, tile
recorded image may be less than 360 degrees.
6B
19
• For the continuous shooting time of a movie recording, relier to "Number of still
images and recordable time of movies" (page 29). When movie recording is
finished, you can restart recording by pressing the MOVIE button again.
Recording may stop to protect the camera depending on the ambient temperature.
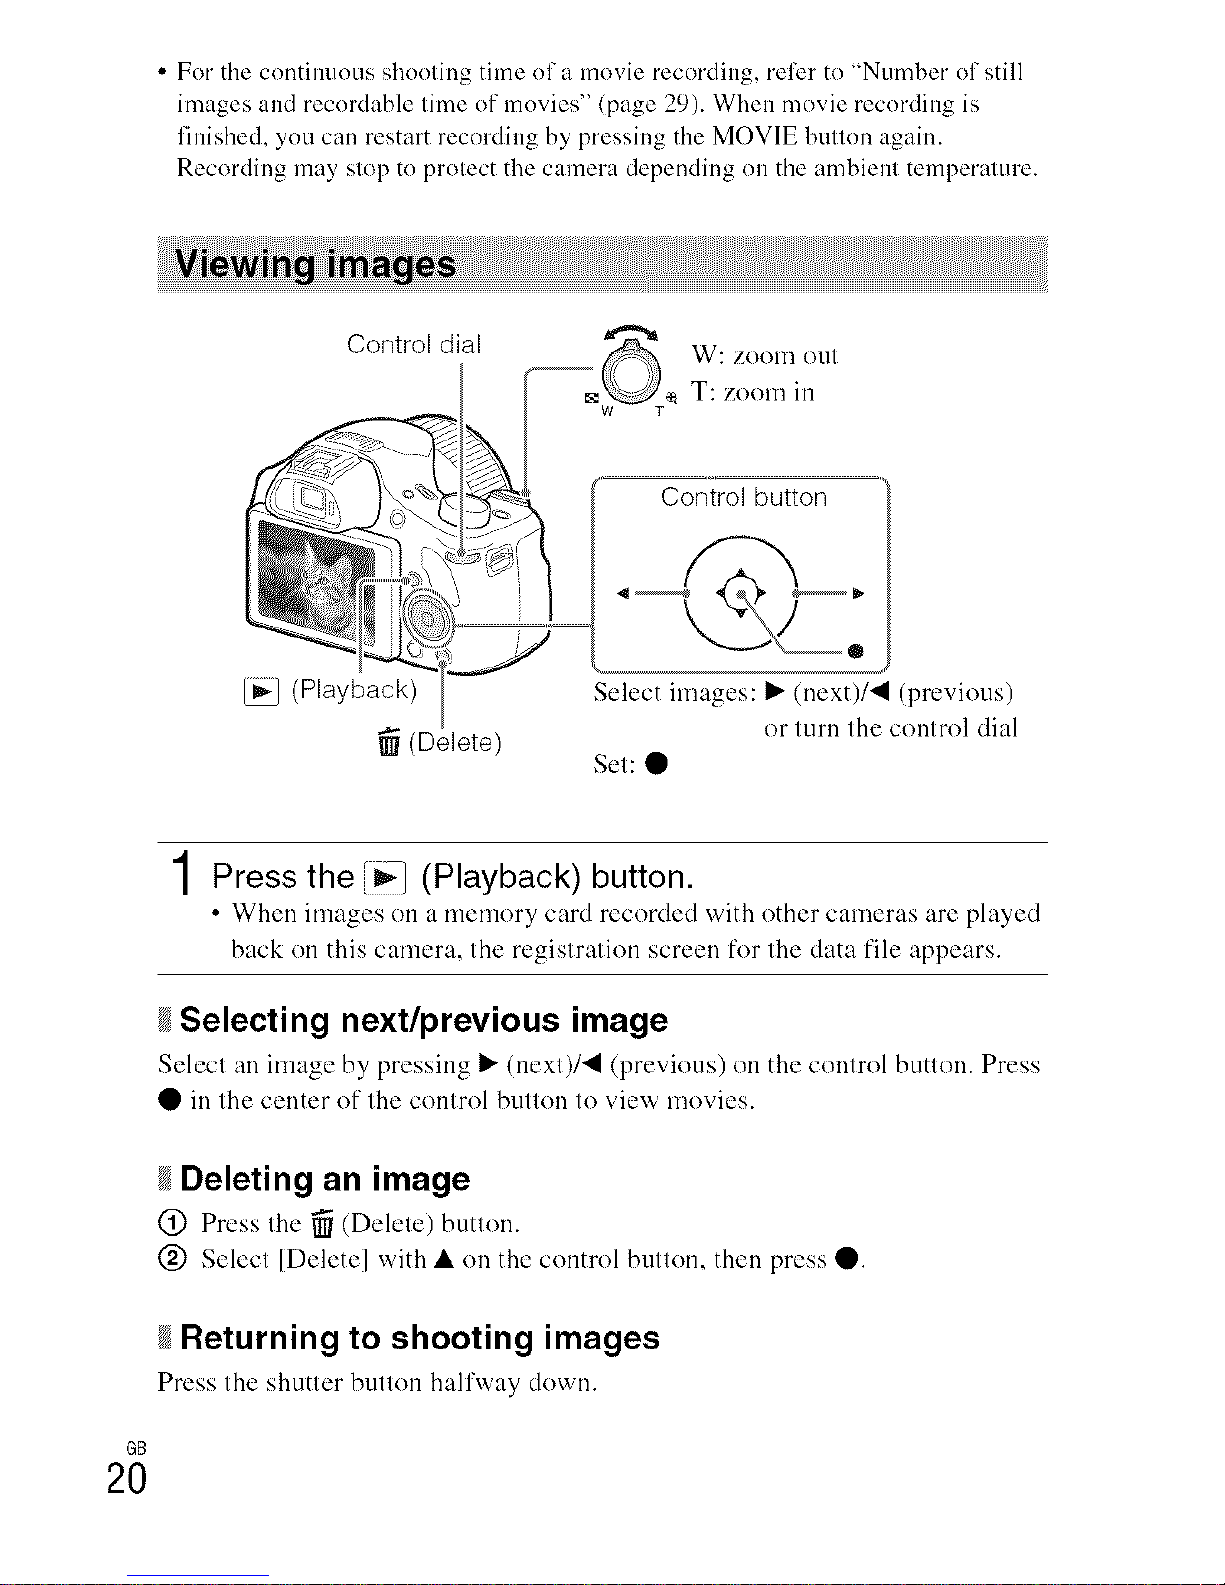
Control dial
W: ZOOIll OU1
T: zoom in
Control button
(Playback) Select images: I_ (next)/_l (previous)
(Delete) or turn the control dial
Set: •
1Press the [i_] (Playback) button.
• When images on a memory card recorded with other cameras are played
back on this camera, the registration screen for the data file appears.
Selecting next/previous image
Selecl an image by pressing I_ (next)/_l (previous) on the control button. Press
• in the center of the control button to view movies.
Deleting an image
@ Press Ihe _ (Delele) butlon.
@ Select [Delete] with • on the control button, then press •.
Returning to shooting images
Press the shutter button hail'way down.
GB
2O

Fn (Function)
Control dial
MENU
Control button
G=!!iiili
/ Control button
DISP (Display Contents): Allows you to change the screen display.
b_)/_ (Drive Mode): Allows you to switch between shooting methods, such
as single shooting, continuous shooting or bracket shooting.
[] (Exposure Comp.): Allows you to compensate the exposure and brightness
for the entire image.
_1_ + (Photo Creativity): Allows you to operate the camera intuitively and
shoot creative images easily.
(Flash Mode): Allows you to select a flash mode for still images.
• (Lock-on AF): The camera tracks the subject and adjusts focus
automatically even when the subject is moving.
/ Fn (Function) button
Allows you to register 12 functions and recall those functions when shooting.
(_) Press the Fn (Function) button.
@ Select the desired function by pressing A/V'/_I/I_ on the control button.
@ Select the setting value by turning the control dial.
/ Control dial
You can instmltly change the appropriate setting for each shooting mode just
by turning the control dial.
GB
21
GB
22
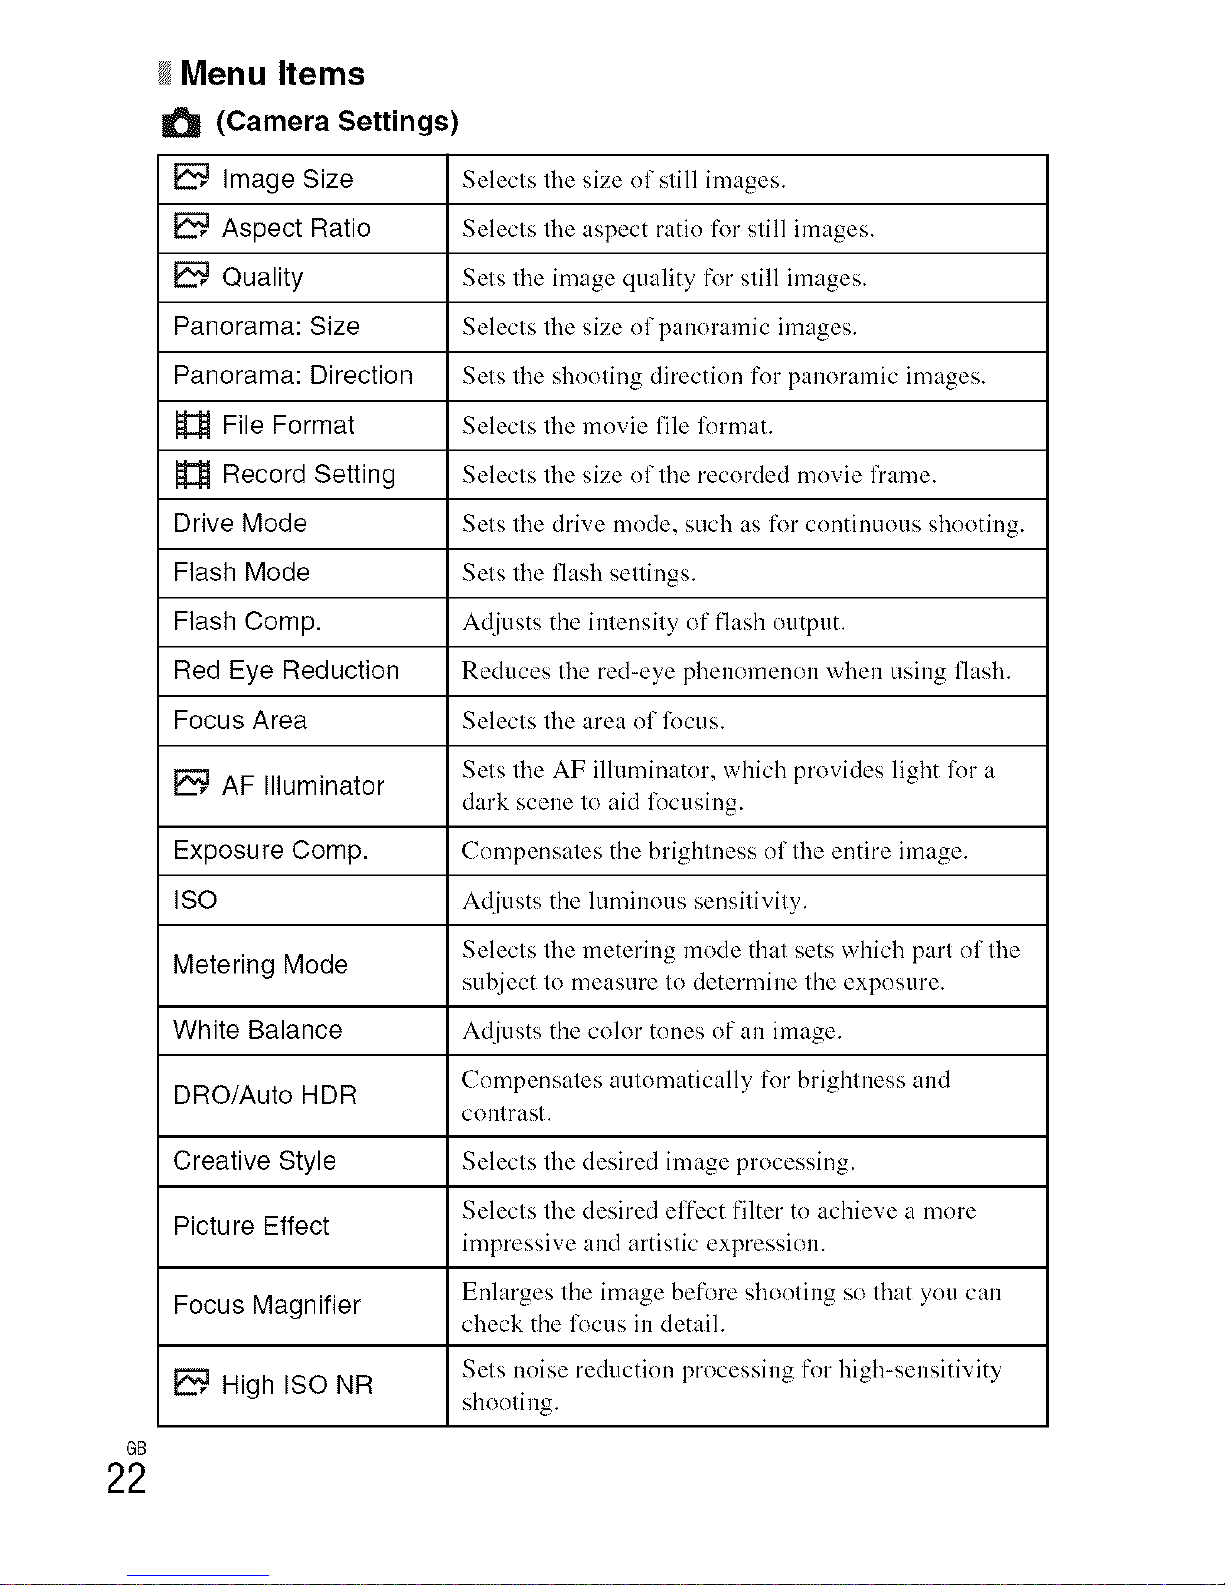
gMenu Items
(Camera Settings)
Image Size Selects the size of still images.
Aspect Ratio Selects tire aspect ratio R_I"still images.
Quality Sets tire image quality for still images.
Panorama: Size Selects tire size of panoramic images.
Panorama: Direction Sets tire shooting direction for panoramic images.
H File Format Selects tire mnvie file lirrmat.
Record Setting Selects tire size of tire recorded movie frame.
Drive Mode Sets tire drive mode, such as for continuous shooting.
Flash Mode Sets tire flash settings.
Flash Comp. Adjusts the intensity of flash nl/tpl/t.
Red Eye Reduction Reduces tire red-eye phenomenon when using flash.
Focus Area Selects tire area of lircus.
AF Illuminator Sets tire AF illuminator, which provides light lor a
dark scene to aid locusing.
Exposure Comp. Compensates the brightness of the entire image.
ISO Adjusts the luminous sensitivity.
Metering Mode Selects tire metering mode that sets which part of tire
subject to measure to determine the exposure.
White Balance Adjusts the coM" tnnes of all image.
DRO/Auto HDR Compensates automatically for brightness and
COlltrast.
Creative Style Selects tire desired image processing.
Selects tire desired effect filter tn achieve a mnre
Picture Effect
impressive and artistic expression.
Enlarges the image bet_tre shooting so that you calf
Focus Magnifier check the focus ill detail.
_, High ISO NR Sets noise reduction processing flrr high-sensitivity
shooting.
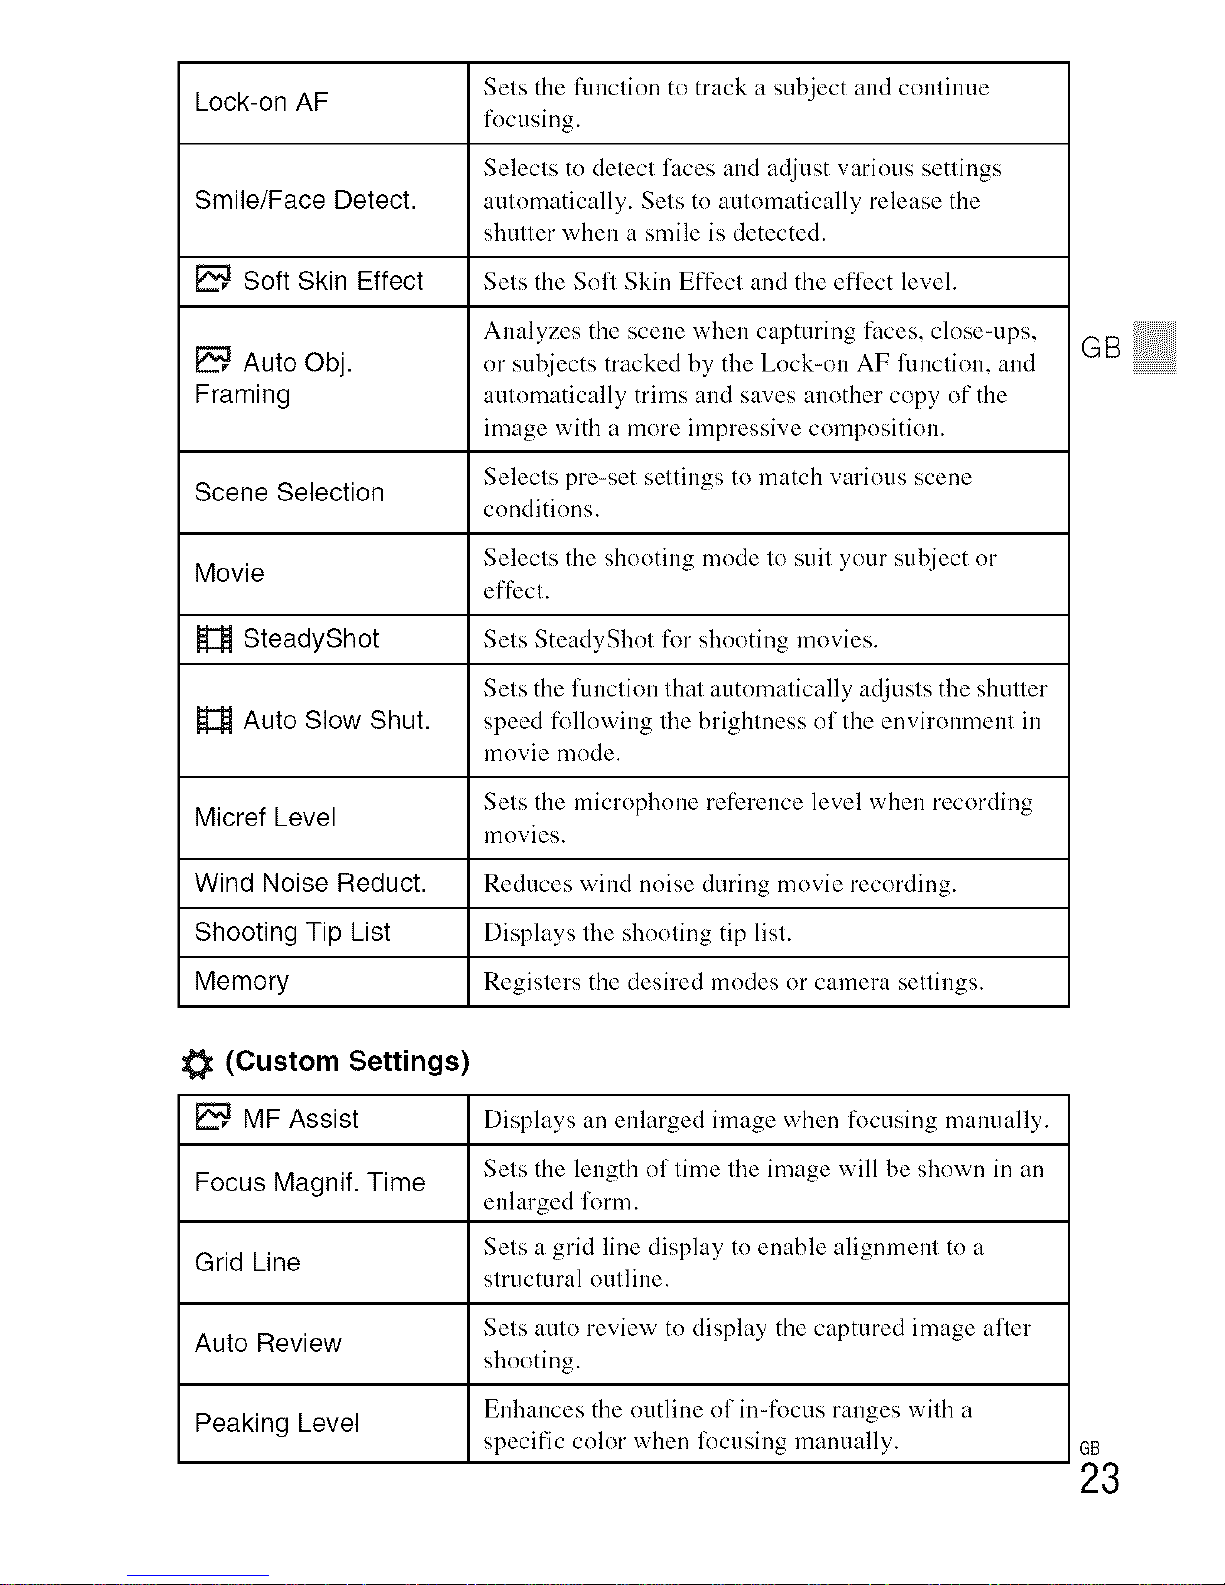
Lock-on AF Sets the ftmctinn to track a subject and continue
fl)cusing.
Selects to detect faces andadjust various settings
Smile/Face Detect. automatically. Setstn autnmatically release the
shutter when a smile is detected.
Soft Skin Effect Sets the Sofl Skin Effect and the et'li_ct level.
Analyzes the scene when capturing faces, close-ups,
Auto Obj. or subjects tracked by the Lnck-on AF lhnction, and
Framing automatically trims and sa,_es another copy of the
image with a more impressive composition.
Scene Selection Selects pre-set settings to match various scene
conditions.
Movie Selects the shooting mnde tn suit your subject or
effect.
SteadyShot Sets SteadyShot for shooting movies.
Sets the function that automatically adjusts the shutter
Auto Slow Shut. speed tk>llnwing the brightness of the envirnmnent in
movie mode.
Micref Level Sets the microphone reference level when recording
mnvies.
Wind Noise Reduct. Reduces wind nnise during mnvie recording.
Shooting Tip List Displays the shooting tip list.
Memory Registers the desired modes nr camera settings.
(Custom Settings)
_, MF Assist Displays an enlarged image when f,,>cusing manually.
Focus Magnif. Time Sets the length of time the image will be shown in an
enlarged form.
Grid Line Sets a grid line display tn enable alignment tn a
strucmral outline.
Auto Review Sets auto review tn display the captured image afler
shooting.
Peaking Level Enhances the outline of in-focus ranges with a
specific color when locusing manually.
GBiliii iiiiiiili
33

Peaking Color ,gels lhe color used t_tr lhe peaking lunclion.
Sels lhe guide displayed when exposure settings are
Exposure Set. Guide changed in the shooling screen.
Sels whelher to use 1he Clear 1mage Zoom and Digi(al
Zoom Setting Zoom Wl-lellzooming.
FINDER/MONITOR Sels 1hemethod t_>rswitching between file viewfinder
and screen.
_, Write Date Sels whether lo record a shooling dale on the still
image.
Function Menu Set. Customizes the lunclions displayed when Ihe Fn
(Funclion) button is pressed.
Custom Key Settings Assignsa desired hmction to the button.
MOVIE Button Sels whether lo always aclivate lhe MOVIE button.
(Wireless)
Send to Smartphone Transfers images lo display on a smartphone.
Backs up images by' lransferring lhem to acompuler
Send to Computer connected to a nelwork.
View on TV You can view images on a nelwork-enabled TV.
Assigns an application lo One-louch (NFC). You can
One-touch(NFC) call up lhe application when shooting by*touching an
NFC-enabled smarlphone to lhe camera.
You can sel lhis device not Io perlorm wireless
Airplane Mode communicalions and GPS funclions.
WPS Push You can regisler the access point to lhe camera easily
by pushing lhe WPS bullon.
Access Point Set. You can regisler your access poim manually.
Edit Device Name You can change the device name under Wi-Fi Direct,
elc.
Disp MAC Address Displays the MAC address el lhe camera.
SSID/PW Reset Resets the SS1D and password lor the smarlphone
COllneclioll.
Reset Network Set. Resets all network setlings.
 Loading...