

Sony CXNA92, CXNA330, CXNA332 Operating Manual
NSX-330
NSX=332
NSX=A92
COMPACT DISC STEREO SYSTEM
SISTEMA ESTEREOFONICO DE DISCO
COMPACTO
COMPACT DISC STEREO CASSEITE RECEIVER
RADIOCASSEITE ESTEREO CON DISCO COMPACTO
CX-N330 LH,HE,U,C,E,K
CX-N332 U
CX-A92 HE
SPEAKERSYSTEM
SISTEMADEALTAVOCES
SX=N330
SX-N332
SX-A92
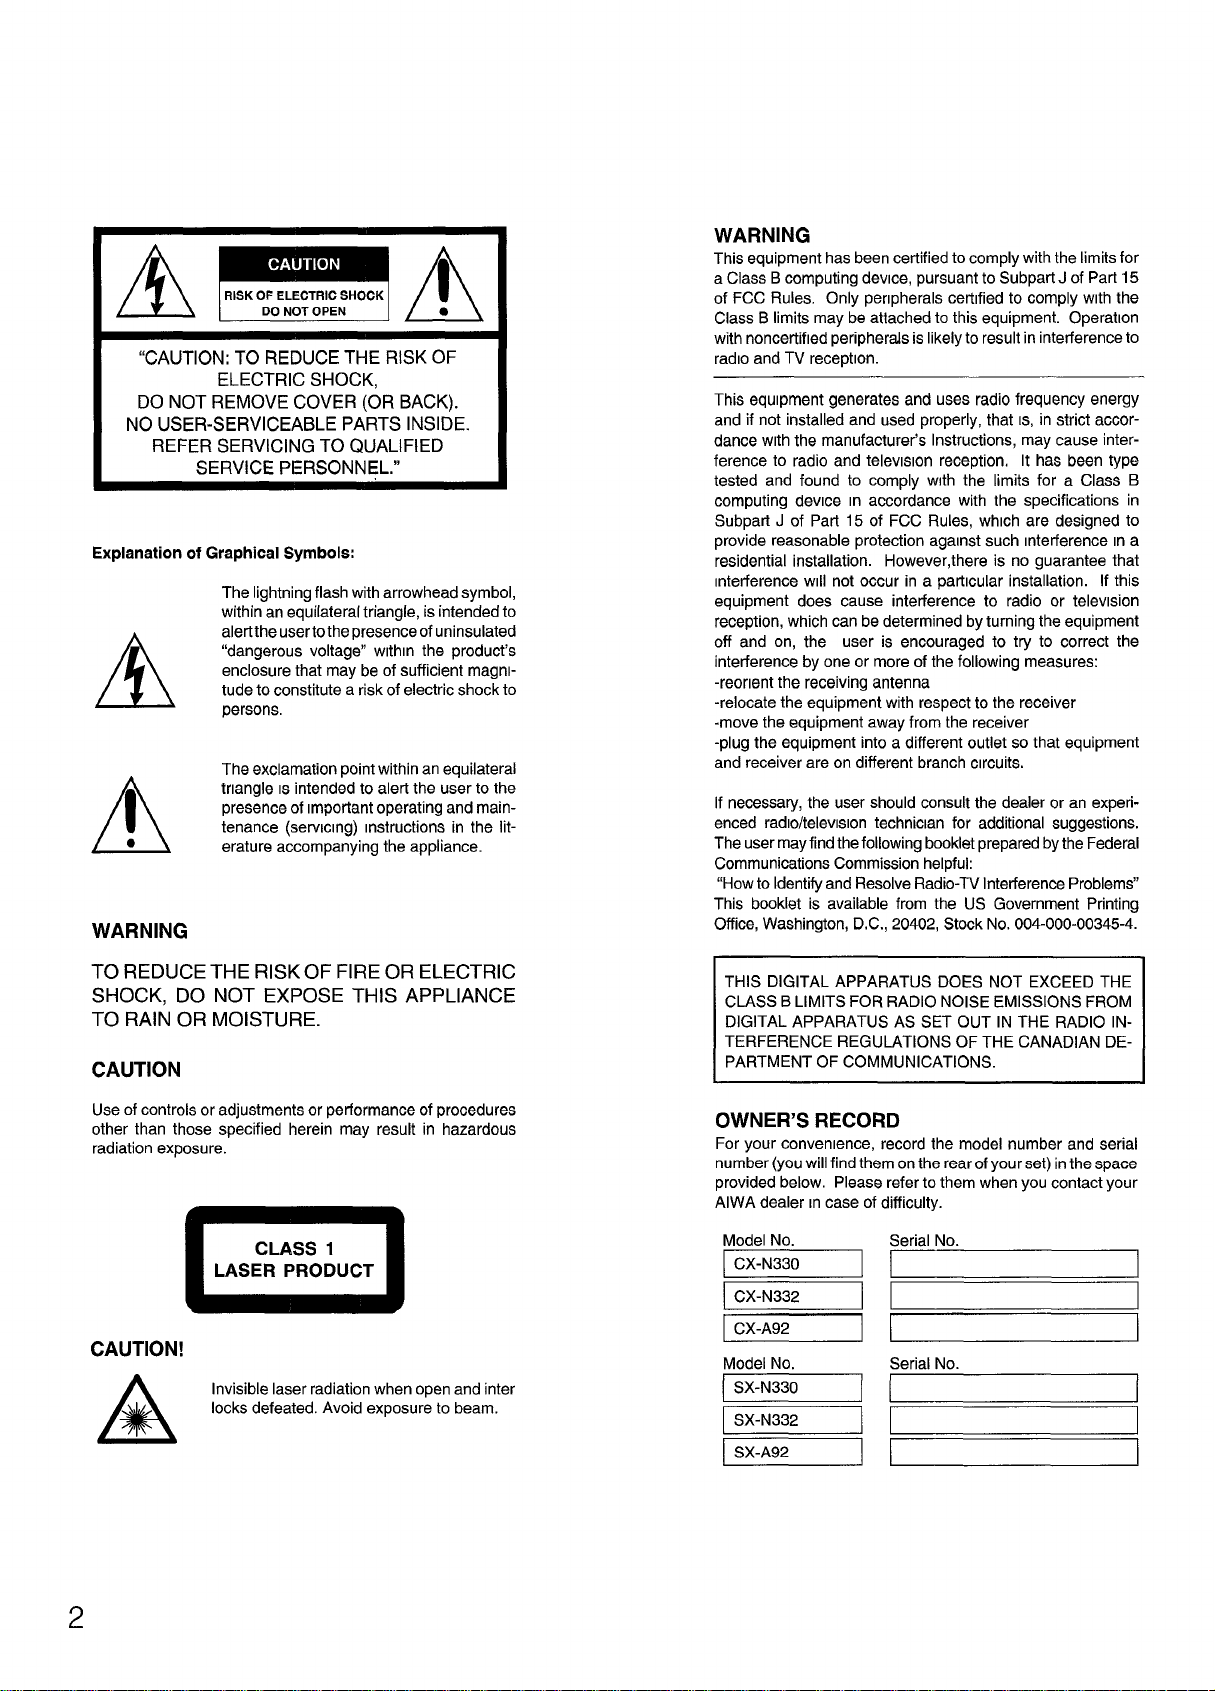
“CAUTION: TO REDUCE THE RISK OF
ELECTRIC SHOCK,
DO NOT REMOVE COVER (OR BACK).
NO USER-SERVICEABLE PARTS INSIDE.
REFER SERVICING TO QUALIFIED
SERVICE PERSONNEL.”
Explanation of Graphical Symbols:
The lightning flash with arrowhead symbol,
within an equilateral triangle, is intended to
alert the user tothe presence of uninsulated
“dangerous voltage” wlthm the product’s
enclosure that may be of sufficient magni-
A
●
A
tude to constitute a risk of electric shock to
persons.
The exclamation point within an equilateral
triangle ISintended to alert the user to the
presence of Important operating and maintenance (serwcmg) Instructions in the literature accompanying the appliance.
WARNING
This equipment has been certified to comply with the limits for
a Class B computing device, pursuant to Subparl J of Part 15
of FCC Rules. Only peripherals cerbfied to comply with the
Class B limits maybe attached to this equipment. Operation
with noncertified peripherals is likely to result in interference to
radio and TV reception.
This equipment generates and uses radio frequency energy
and if not installed and used properly, that Is, in strict accordance with the manufacturer’s Instructions, may cause interference to radio and televwon reception. It has been type
tested and found to comply with the limits for a Class B
computing device m accordance with the specifications in
Subpart J of Part 15 of FCC Rules, which are designed to
provide reasonable protection against such mteflerence m a
residential installation. However, there is no guarantee that
interference WIII not occur in a parhcular installation. If this
equipment does cause interference to radio or telewsion
reception, which can be determined by turning the equipment
off and on, the user is encouraged to try to correct the
interference by one or more of the following measures:
-reorient the receiving antenna
-relocate the equipment with respect to the receiver
-move the equipment away from the receiver
-plug the equipment into a different outlet so that equipment
and receiver are on different branch circuits.
If necessary, the user should consult the dealer or an experienced radio/televmon technician for additional suggestions.
The user may find the following booklet prepared by the Federal
Communications Commission helpful:
‘[How to Identify and Resolve Radio-TV Interference Problems”
This booklet is available from the US Government Printing
Office, Washington, D.C., 20402, Stock No. 004-000-00345-4.
TO REDUCE THE RISK OF FIRE OR ELECTRIC
SHOCK, DO NOT EXPOSE THIS APPLIANCE
TO RAIN OR MOISTURE.
CAUTION
Use of controls or adjustments or performance of procedures
other than those specified herein may result in hazardous
radiation exposure.
Ezl
CAUTION!
Invisible laser radiation when open and inter
locks defeated. Avoid exposure to beam.
A
THIS DIGITAL APPARATUS DOES NOT EXCEED THE
CLASS B LIMITS FOR RADIO NOISE EMISSIONS FROM
DIGITAL APPARATUS AS SET OUT IN THE RADIO iNTERFERENCE REGULATIONS OF THE CANADIAN DE-
L
OWNER’S RECORD
For your convenience, record the model number and serial
number (you willfind them on the rear of your set) inthe space
provided below. Please refer to them when you contact your
AIWA dealer m case of difficulty.
Model No.
CX-N330
~
I CX-A92
Model No.
~ SX-N330
SX-N332
SX-A92
Serial No.
I I
Serial No.
I I
I
2

FEATURES .............................................4
PRECAUTIONS .......................................
CONNECTIONS ......................................6
CLOCK SETTING .............1................... 12
SOUND ADJUSTMENT
........................14
cARAcTERisTlcAs ............”..................4
PRECAUCIONES ....................................
5
coNExloNEs .........................................6
PUESTA EN HORA DEL RELOJ ..........12
AJUSTE DEL SONIDO ......................... 14
5
LISTENING TO A COMPACT DISC ......16
PROGRAMMED PLAY .......................... 19
RANDOM PLAY .................................... 20
REPEAT PLAY ......................................20
PLAYING BACK A TAPE .....................21
CONTINUOUS PLAY FROM DECK TO
DECK .....................................................24
TUNING INTO A STATION
MANUALLY .......................................
PRESETTING STATIONS .....................26
TUNING INTO A PRESET STATION ...27
RECORDING .........................................28
TAPE DUBBING ....................................32
RECORDING FROM COMPACT
"...................."..........................34
DISCS
EDITING COMPACT DISCS .................36
Auto-edit recording ..........................36
Programmed-edit recording ............38
TIMER SETTING
SLEEP TIMER SETTING ......................44
LISTENING TO OTHER SOURCES ......45
MICROPHONE MIXING
MAINTENANCE ....................................48
SPECIFICATIONS .................................49
TROUBLESHOOTING GUIDE ..............50
IDENTIFICATION OF PARTS ...............55
...................................
........................46
25
?
40
ESCUCHA DE DISCOS COMPACTOS 16
REPRODUCTION PROGRAMADA ......19
REPRODUCTION ALEATORIA ............2O
REPRODUCTION REPETIDA ..............20
REPRODUCTION DE CINTAS .............21
REPRODUCTION CONTINUA
DE DECK A DECK
SINTONiA MANUAL DE
EMISORAS .......................m................25
MEMORIZATION DE EMISORAS ........26
SINTONiA DE EMISORAS
MEMORIZADAS ................................27
GRABACION .........................................28
DUPLICATION DE CINTAS ..................32
GRABACION DE DISCOS
COMPACTOS
EDICION DE DISCOS COMPACTOS ...36
Grabacion con edition
automatic ....................................36
Grabacion con edition
programada
PROGRAMACION DEL
TEMPORIZADOR ..............................40
PROGRAMACION DEL
CRONODESCONECTADOR .............44
ESCUCHA DE OTRAS FUENTES ........45
MEZCLA CON MICROFONO ................46
............................24
....................................34
.................................. 38
The illustrations in this manual show the HE
L
MANTENIMIENTO .................................48
ESPECIFICACIONES
GUiA PARA LA SOLUCION DE
PROBLEMAS
IDENTIFICATION DE PARTES ............55
Las ilustraciones de este manual corresponded
al modelo HE.
.................,,.,,,,,,,, 51
....................................52
*WE9fJbbfiHRHEi#320
1
3

BBE system
Sistema BBE
BBE is a technology developed for professional
studio and live use. It gives astonishing definition
and clarity to music reproduction. It makes highfrequency sound especially clear and brings out
the special character of vocals’ and solo instruments,
AIWA is the world’s first manufacturer to employ
the BBE sound in consumer audio equipment.
CD edit functions
Two different CD edit functions are available, and
you can easily make original tapes according to
your preference.
Other features
Amplifier section
● T-BASS for realistic reproduction at IOW sound
levels.
● The desired tone quality can be selected from
among three different preset tones.
Tuner section
e Synthesizer tuner.
● Internal daily eventksleep timer.
Cassette deck section
. High speed tape duplication.
CD player section
c Repeated playback of tracks.
● Playback of tracks in random order.
BBE es una tecnolog~a desarrollada para
emplearse en estudios profesionales y en directo.
BBE ofrece una definition y una claridad
asombrosas a la reproduction musical. BBE hate
especialmente claro el sonido de alta frecuencia y
enfatiza el caracter especial de Ias votes y Ios
instruments solistas.
AIWAesel primerfabricante del mundoen emplear
el sonido de BBE en un equipo de audio para el
consumidor.
Funciones de edicibn de discos compactos
Existen cuatro funciones de edition de discos
compactos para mayor comodidad de duplication
que Iepermitiran crearfacilmente cintas originales
a su gusto.
Otras
Seccion del amplificador
● T-BASS para ofrecer una reproduction realista
a bajos niveles de sonido
● La calidad de tono puede seleccionarse de
entre Ios tres diferentes tonos memorizados.
Secci6n del sintonizador
● Sintonizador sintetizador
● Temporizador interno para programa diario/ y
cronodesconectador
Seccion del
c Duplication
velocidad
deck de casetes
de discos compactos a gran
%w%$wwr-
● zEa#lwJTlki%o
● #E%RmwkMl Elo
Seccion del reproductor de discos compactos
● Reproduction repetida de canciones
● Reproduction de canciones en orden aleatorio
4
Follow the advice below for safe and correct operation.
Para obtener una operation segura y apropiada,
siga Ios consejos ofrecidos a continuation.
On ACvoltage (LH, HE, U, C models)
Before use, check that the rated voltage of your
system matches your local voltage.
17%!Z%tiEl :%%!%AC”
NSX-A92 HE
NSX-330 U, C
selectable, 50/60 Hz
120/220-240 V AC
NSX-332 U selectable, 50/60 Hz
To adjust the operating voltage
The system shc,uld have been set for use on your
local voltage. If not, change the AC VOLTAGE
selector on the rear panel with a screwdriver or
similar object.
On
placement
● Do not use the system in places which are
extremely hot, cold, dusty or humid.
● Place the system on a flat, even surface.
● Be careful nottoobstructthe ventilation holes on
the rear panel, as increased internal temperature may affect the electric parts. In particular,
do not place the system in an airtight rack.
On
safety
.
When connecting and disconnecting the AC
cord, grip the plug and not the cord itself. Pulling
the cord may damage it and thus be hazardous.
.
When you are not going to use the system for a
long period of time, disconnect the AC cord. If
the cord is plugged in, a small amount of current
keeps on flowing to the system even if the power
switch is not ON.
.
If the AC cord is broken or damaged, or if the
wires are exposed, contact your dealer or an
AIWA setvice station and have it replaced or
repaired immediately.
On
condensation
When the room is heated, you sometimes see
water drops on your windows; this is called condensation.
This can occur inside the CD player unit when:
. it is moved from a cold spot to a warm spot.
. it is used in a room where the heating system
has just been turned on.
● it is used in a place with a lot of moisture.
● it is used where it has direct contact with cool air,
such as near an air-conditioner.
When it has condensation inside, the unit may not
function normally. Let it stand for 1 to 2 hours
before turning the power on; or, gradually heat the
room and dry the unit before use.
Should any trouble occur, disconnect the AC cord
and refer servicing to qualified personnel only.
For customers purchasing the U or C
mod-
els
When using the unit in the AC 220–240V position, be sure to attach a suitable adaptor plug to
the plug end of the AC cord.
Adaptor plugs may be obtained at nominal cost
from an authorized AIWA dealer.
Tension de CA (modelos
LH, HE, U, C)
Antes de emplear el sistema, compruebe si su
tension nominal coincide con lade la red local.
‘“1
NSX-A92 HE seleccionable, 50/60 Hz
NSX-330 U, C
NSX-332 U
Para ajustar la tension de alimentacion
El sistema ha sido ajustado para emplearse con la
tensi6n de la red local. Si la tensi6n de la red local
is diferente, cambie el selector AC VOLTAGE del
panel posterior del receptor estereo con un
destornillador u otro objeto puntiagudo.
Ubicacion
●
No emplee et sistema en Iugares
extremadamente calidos, fries, polvorientos, ni
h(rmedos.
✎
Coloque el sistema sobre una superficie
nivelada.
✎
Tenga cuidado de no obstruir Ios orificios de
venfilacion del panel posterior del receptor
estereo, ya que el aumento de la temperature
interna podria afectar Ios components
electr6nicos. En particular, nocoloque el sistema
en un armario cerrado.
Secfuridad
.
~ara conectar y desconectar el cable de CA,
sujeteel enchufe, noel propio cable. si tirase del
cable podrfadafiarlo, Ioque resultariapeligroso.
●
Cuando no vava a emriear el sistema durante
mucho tiem~o, de~conecte el cable de
alimentacion. Cuando el cable de alimentacion
este conectado, circulara una pequenacantidad
de corriente incluso aunque el interruptor de
alimentacion no este en ON.
.
Si el cable de alimentaci6n se rompe o daiia, o
si Ios hilos estan al descubierto, pongase
inmediatamente en contacto con un centro de
reparaciones AIWA para que se 10 reparen o
cambien.
Condensation
Al calentar una sala, a veces pueden verse gotas
de agua en Ias ventanas; esto se denomina
condensaci6n.
Este fenomeno puede ocurrir en el interior del
reproductor de discos compactos cuando:
● se traslade de un Iugar frio a otro calido.
● se emplee en una sala en la que se acabe de
poner en funcionamiento el sistema de
calefaccidm.
● se emplee en un Iugar con mucha humedad.
● se emplee en un Iugar directamente en contacto
con aire frio, como cerca de un acondicionador
de aire.
Cuando se haya producido condensation en el
interior, es posible que el sistema no funcione
normalmente. Dejelo 1a2 horas antes de conectar
la alimentacion, o caliente gradualmente la sala y
el sistema antes de emplear este.
Si se produce algun problems, desconecte el
cable de alirnentacion de CA ysolicitar Ios.servicios
de personal cualificado solamente.
120/220-240 V CA
seleccionable, 50/60 Hz
NSX-330LH ,HE, 120/220/240V ?’liti~
NSX-A92HE
NSX-330U,C
NSX-332U
%J=fj&J50/60Hz
120/220-240V ~1%.%
fi%~ 50/60Hz
Para Ios clientas que hayan adquirido Ios
modelos U o C
Antes de emplear ei sistema en la position AC
220-240V, cerciorese de colocar en el cable de
alimentacion el adaptador de enchufe adecuado.
Los adaptadores de enchufe podran obtenerse
al costo nominal del proveedorAIWA autorizado.
5

Speaker (left)
Altavoz (izquierdo)
$%%%$ (E)
To an AC outlet
+ ~)
A un tomacorriente de CA
%Af?%&3ZjfisNRj?H?!Zo
Tips on connection
● Be sure to connect correctly, according to the
figure.
● Turn on the power after verifying that the con-
nection is correct.
Notes on speaker connections
● Use speakers with an impedance of 6 ohms. ●
●
This speaker system is magnetically shielded.
However, if the speaker should affect the color .
on the TV screen, turn off the TV, and turn it on
again 15-30 minutes later. If the TV screen still
has poor color, place the speaker system away
from the
● Do not leave magnets or objects generating
TV.
magnetism near the speaker system.
Consejos sobre Ias conexiones
● Cerciorese de realizar Ias conexiones como se
muestra en la ilustracion.
● Conecte la alimentacion despues de haber
verificadoque Iasconexionessean correctas.
Notas sobre la conexion de Ios altavoces
Emplee altavoces con una impedancia de 6
ohmios.
Este sistemade altavoces esta magneticamente
apantallado. Sin embargo, si Ios altavoces
afectan el color o de la pantalla del televisor,
desconecte la alimentacion de este y vuelva a
conectarla despues de 15 a 30 minutes. Si el
colorde Iapantallasigue siendo de malacalidad,
aleje el sistema de altavoces del televisor.
.
No deje imanes ni objetos que generen
magnetism cerca del sistema de altavoces.
6
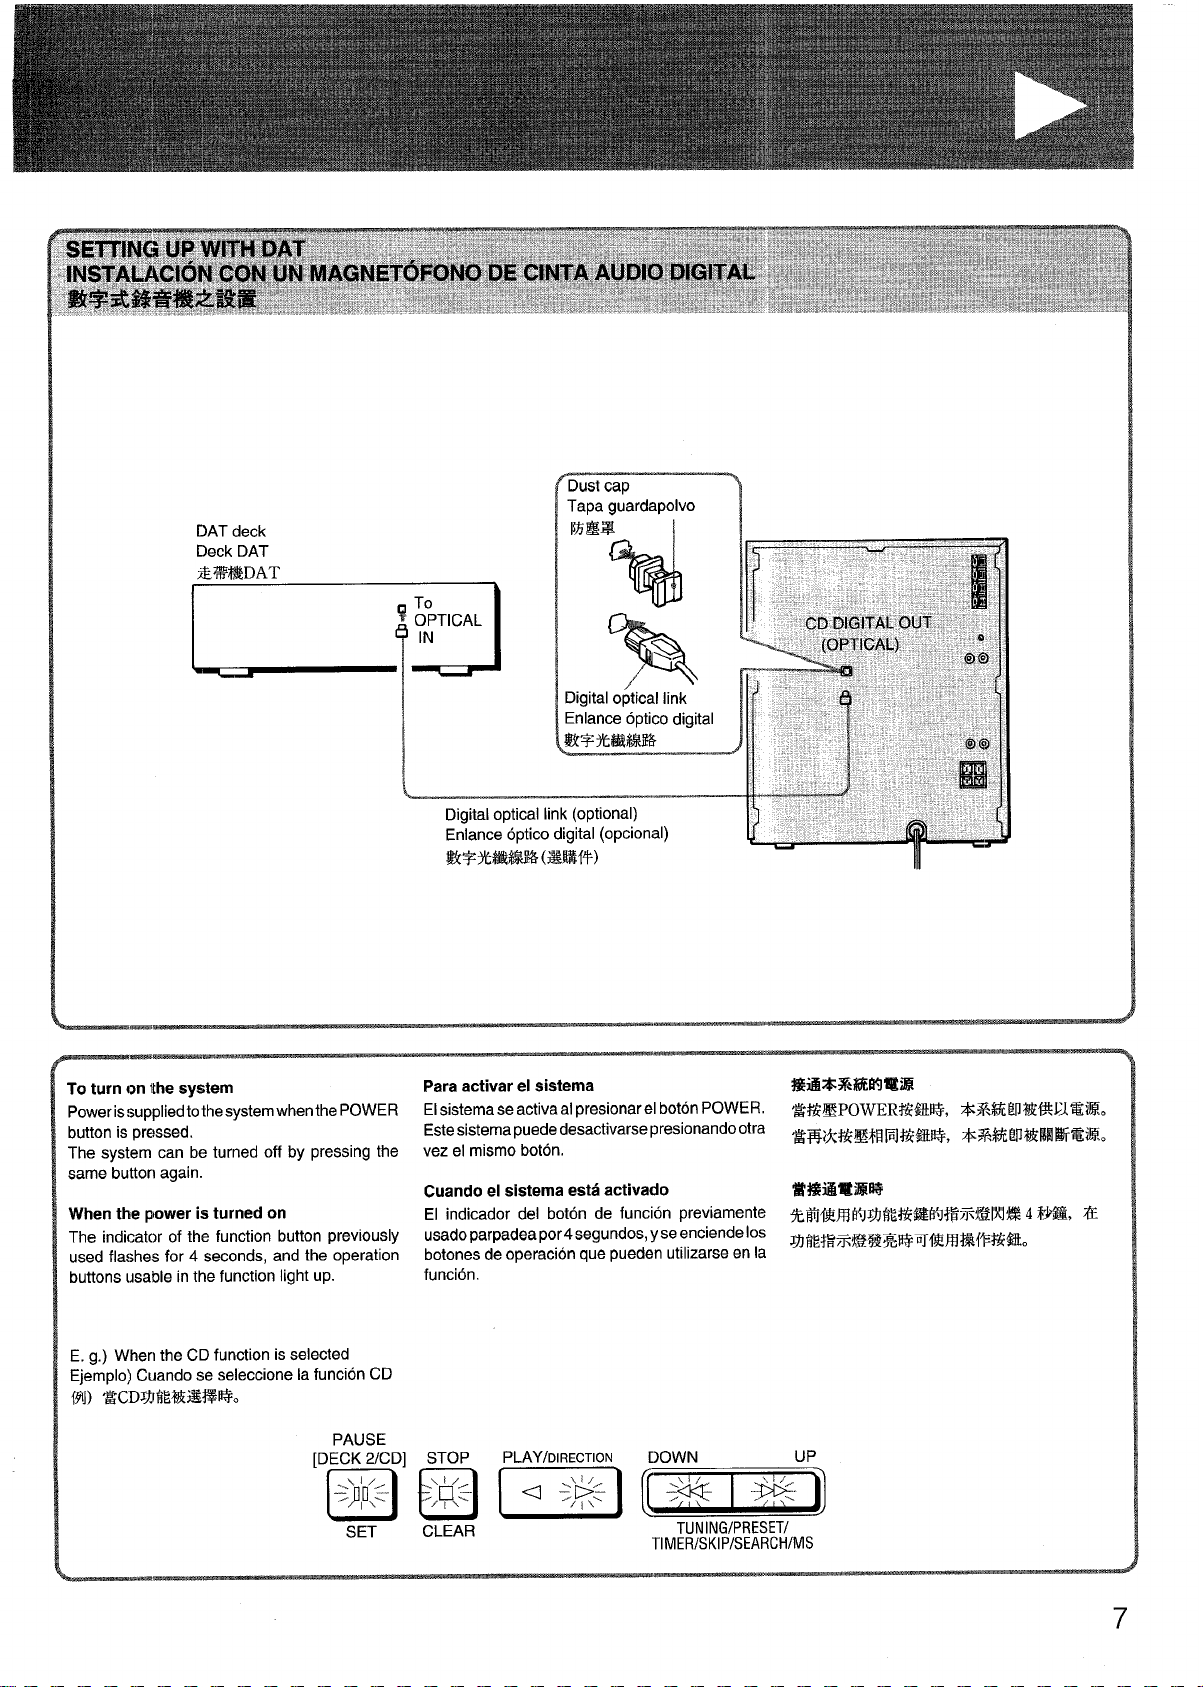
Dust cap
Tapa guardapolvo
r
1
To turn on the system
Power isw.rppliedtothe system when the POWER
button is pressed.
The system can be turned off by pressing the
same button again.
When the power is turned on
The indicator of the function button previously
used flashes for 4 seconds, and the operation
buttons usable in the function light up.
E. g.) When the CD function is selected
Ejemplo) Cuando se seleccione la funcion CD
m)
PAUSE
‘DE??ii%
SET
Para activar el sistema
El sistema se activa al presionarel boton POWER.
Este sistema puede desactivarse presionando otra
vez el mismo boton.
Cuando el sistema esta activado
El indicador del boton de funcion previamente ~fi&~h+JagE#&!M$J+&KEfi?@J??l 4 M%& 7$
usado parpadea por4 segundos, y se enciende Ios
botones de operation que pueden utilizarse en la
tunclon.
PLAY/DIRECTION
C2El
CLEAR
DOWN
[fij
TUNING/PRESET/
TIMER/SKIP/SEARCH/MS
%ti*Yi%K.li9ai63
%MEPOWEWMWF, *3MMJ7fltW%%Mo
#w{A*@*EIFl*&t&$, *%%iWk?%tlMaiKo
‘H%%Ml@Be
gfi~;s$!gg%wwl%m~il+%lto
7

Connect the red plug to the R jack, and the
white plug to the L jack.
Conecte la clavija roja a la toma R, y la clavija
blanca a la toma L.
WJ.&iiZ4%XRk27LF3, MD&% Ei%iAU%7LFTo
II
n
II
LD player, VCR for playback, DAT deck, etc.
Rer)roductor de discos laser, videoarabadora
para reproduction, deck DAT, etc. -
LDIE#& RWM$$M%M, DATRA!S%.
\
I
mm I
I
I
u.
Pin-cord (optional)
Cordon con clavija (optional)
To connect an analog record player Para conectar un tocadiscos analogo
Connect a player with an equalizer amplifier to Conecte un tocadiscos con un amplificador
VIDEO/AUX jacks.
the
ecualizador a Ias tomas VIDEO/AUX.
J
EMHYM$$e+sf
~$fii%7fim*%Pg$*%%RvIDE0/
.4UXR?LM%
8

Surround speaker (right)
Altavoz periferico (derecho)
m%%%?%%(%)
Setup example
Ejemplo de instalacion
!%E51F0
Rear
Trasera
7*H*R
Surround speaker: AIWA SX-R1 00, SX-R1 50, SX-R200, etc. (optional)
Altavoz periferico : AIWA SX-RI 00, SX-RI 50, SX-R200, etc. (optional)
~%%%% :
AIWA SX-R1OO, SX-R150, SX-R200~(illflsf$)
Surround speaker (left)
Altavoz periferico (izquierdo)
HLW&%%%(%)
Notes Notas
.
The surrcund effect will not work with monaural c
sources.
.
Connect only surround speakers to the SURROUND SPEAKERS jacks.
●
Use surrcwnd speakers with an impedance of 16
ohms.
✎
Be sure i.o connect surround speakers to both
right and left jacks.
El efecto de sonido perimetrico no trabajara con
fuentes monoaurales.
●
A Ias tomas SURROUND SPEAKERS conecte
solamente altavoces oerimetricos.
●
Emplee altavoces perimetricos con una ● #VHN3ti%%16 Q hbl!!%%%=%$o
impedancia de 16 ohmios.
●
Cerciorese de conectar altavoces perimetricos
a ambas tomas, izquierda y derecha.
w
● &lBi4WWF%%E%E&B%o o
● ~$4W&%4Efi~xJ%ESURR0UND
SPEAKERS%3LI.
● LE%+E72, ZiWR!%?L%I!&%@Yo
9
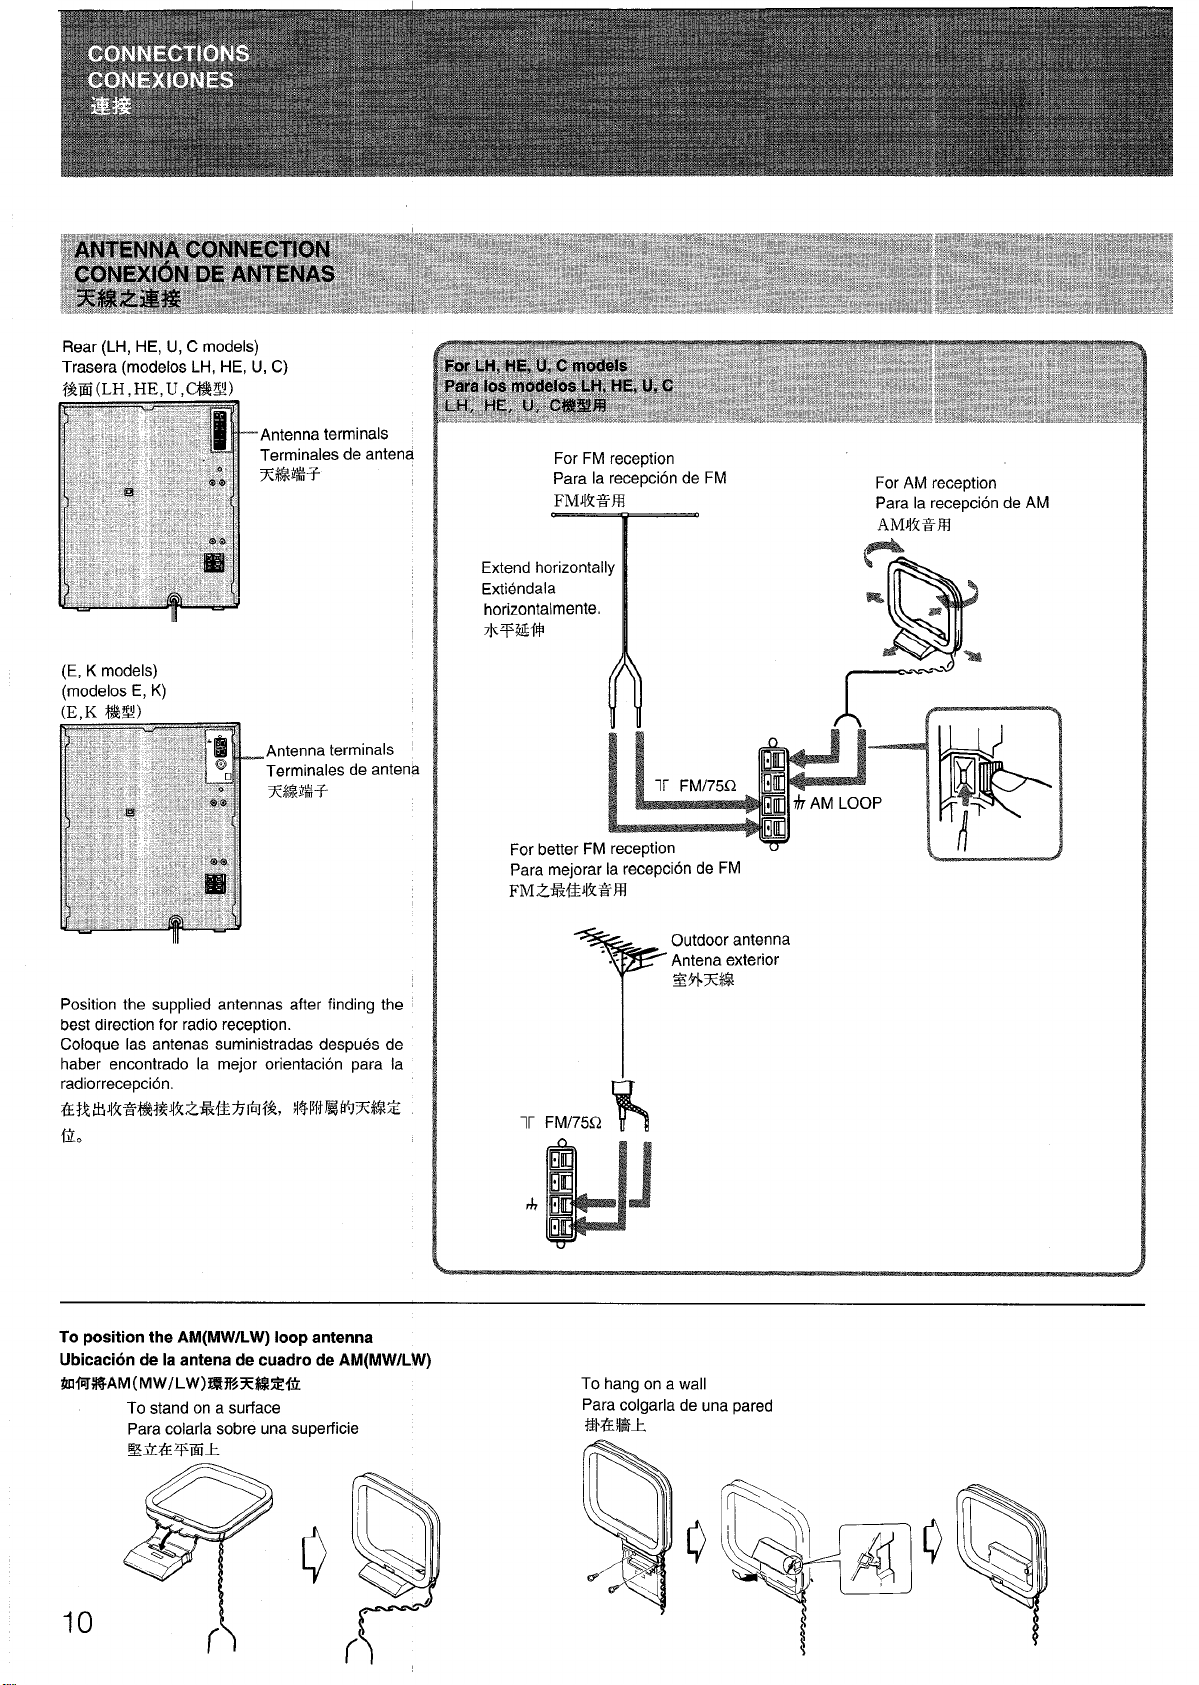
Rear (LH, HE, U, C models)
Trasera (modelos LH, HE, U, C)
f%Eii(LH. HE. U.(%4&)
‘Antenna terminals
Terminals de antena
(E, K models)
(modelos E, K)
(E.K $%&!)
For FM recetXion
Para la recepcion de FM
FMkk;
.
Extend horizontal
Extiendala
hOriZOntalmente.
7kW&f$
For better FM re
Para meiorar la
FM2+?&JIk%M
For AM reception
Para la recepcion de AM
AMJIR%?EI
u I
Position the supplied antennas after finding the
best direction for radio reception.
Coloque Ias antenas suministradas despues de
haber encontrado la mejor orientation para la
radiorrecepcion.
E+21!H4k2%%J%4k2R&% fif*, l$FitE$YJx*z
ii.
To position the AM(MW/LW) loop antenna
Ubicacion de la antena de cuadro de AM(MW/LbV)
WIGt$AM(MW/LW)ERf%33RZHti
To stand on a surface
Para colarla sobre una superficie
EEMEq%il
T
lr FM175Q
J1
To hang on a wall
Para colgarla de una pared
.-.
R
HElfAJl
Outdoor antenna
Antena exterior
S**%
J
10
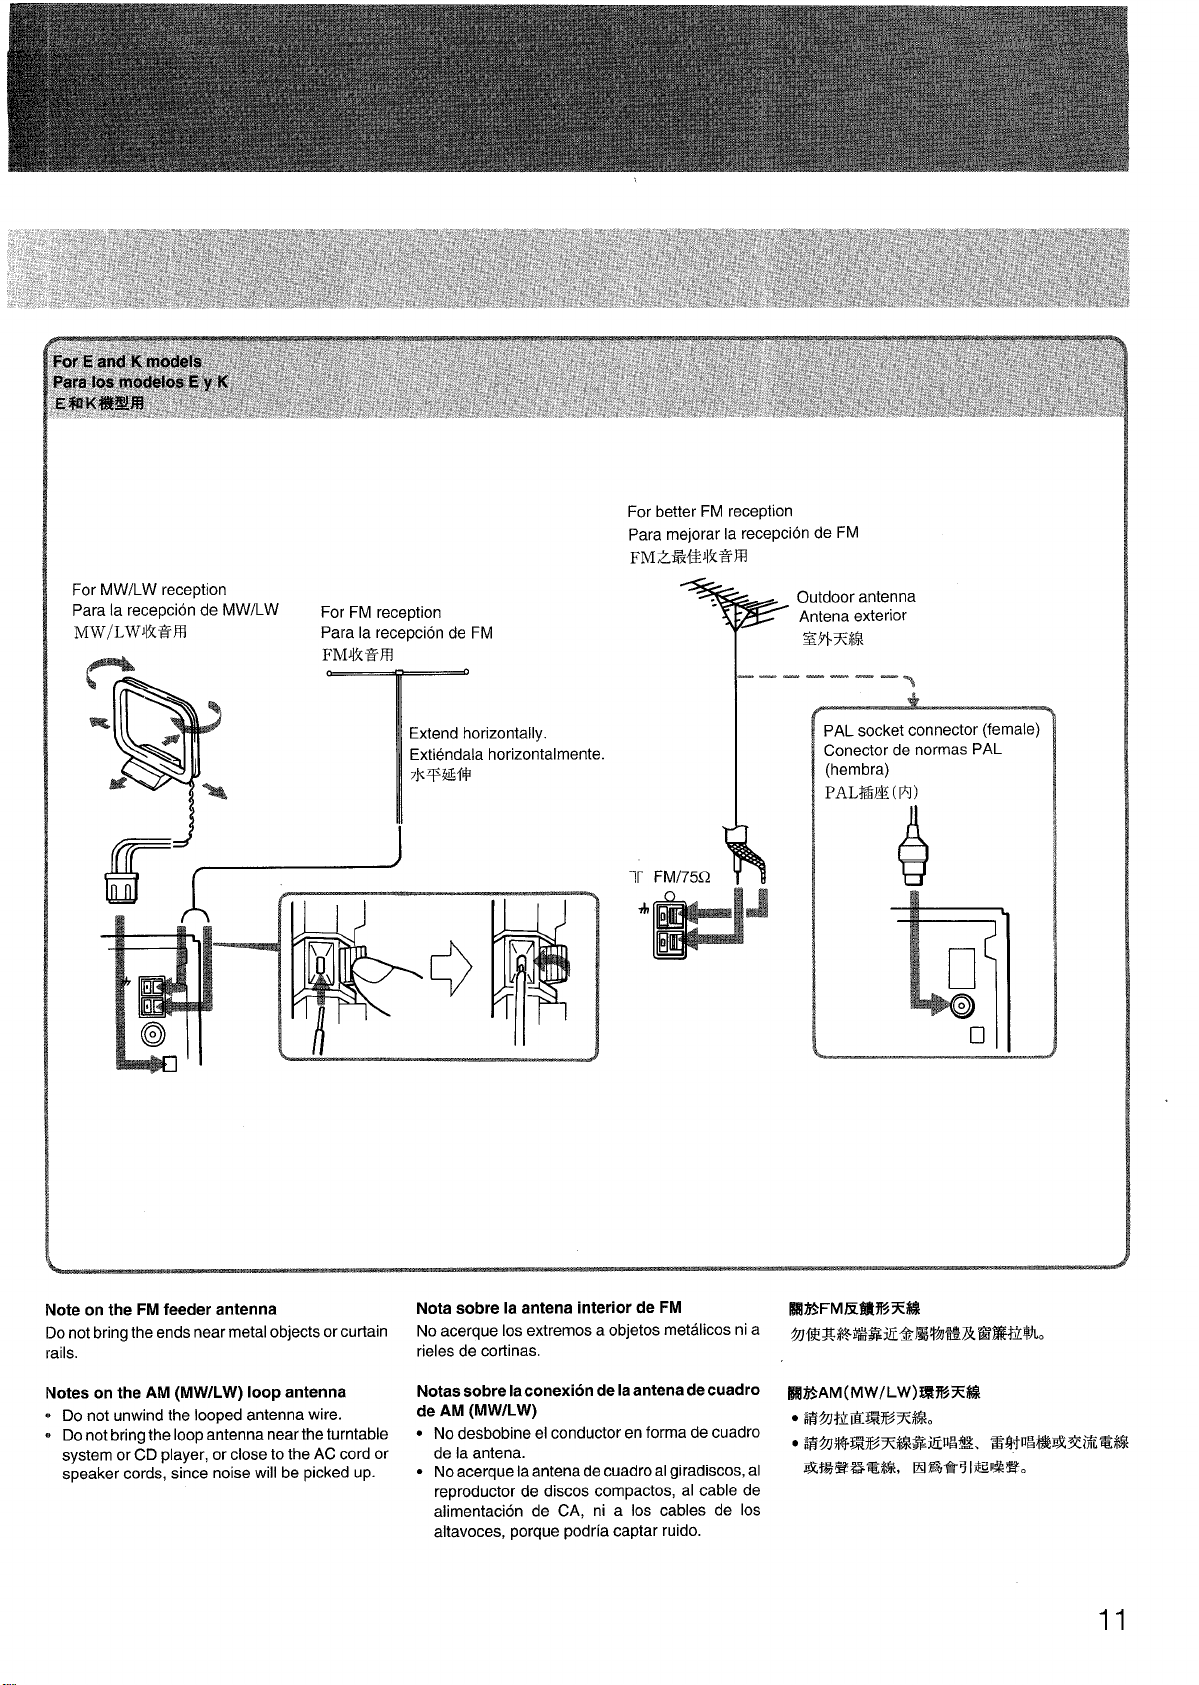
For MWILW reception
Para la recepcion de MW/LW
MW/LWJIfC%M
For FM reception
Para la recepcion de FM
FMJIk&?Rl
o
(
0
Extend horizontally.
Extiendala horizontalmente,
For better FM reception
Para mejorar la recepcion de FM
FM Z5%&]k%R
:
-.
-Y
Outdoor antenna
Antena exterior
a=
-—-— ———
~$’b%J%%
PAL socket connector (female)
Conector de normas PAL
(hembra)
PAL%13Z(EI)
T
1-
3
+
*
Note on the FM feeder antenna
IDonot bring the ends near metal objects or curtain
rails.
lNotes on the AM (MW/LW) IOODantenna
u Do not unwind the looped antenna wire.
I} Do not bring the loop antenna near the turntable
system or CD player, or close to the AC cord or
sDeaker cords. since noise will be picked up.
. .
lr FM/75Q
h
Nota sobre la antena interior de FM
No acerque Ios extremes a objetos metalicos ni a
rieles de cortinas.
Notas sobre Iaconexion de la antena de cuadro
de AM (MW/LW)
● No desbobine el conductor en forma de cuadro
de la antena.
● No acerque la antena de cuadro al giradiscos, al
reproductor de discos compactos, al cable de
alimentacion de CA, ni a Ios cables de Ios
altavoces, porque podria captar ruido.
b
b
J
I%R%FMIWl!lWX$%
~&~*il#&gfi*~$jJ*R&f g#@jl.o
M155AM(MW/LW)HWKX%4
● i#~*i@y~tix*o
● ;~@j$~fjx.$$&$@g&\ agfDg&E2fi/TL%j$$
EW%E4%%%$R!
❑F@-5 Ifip%wo
11
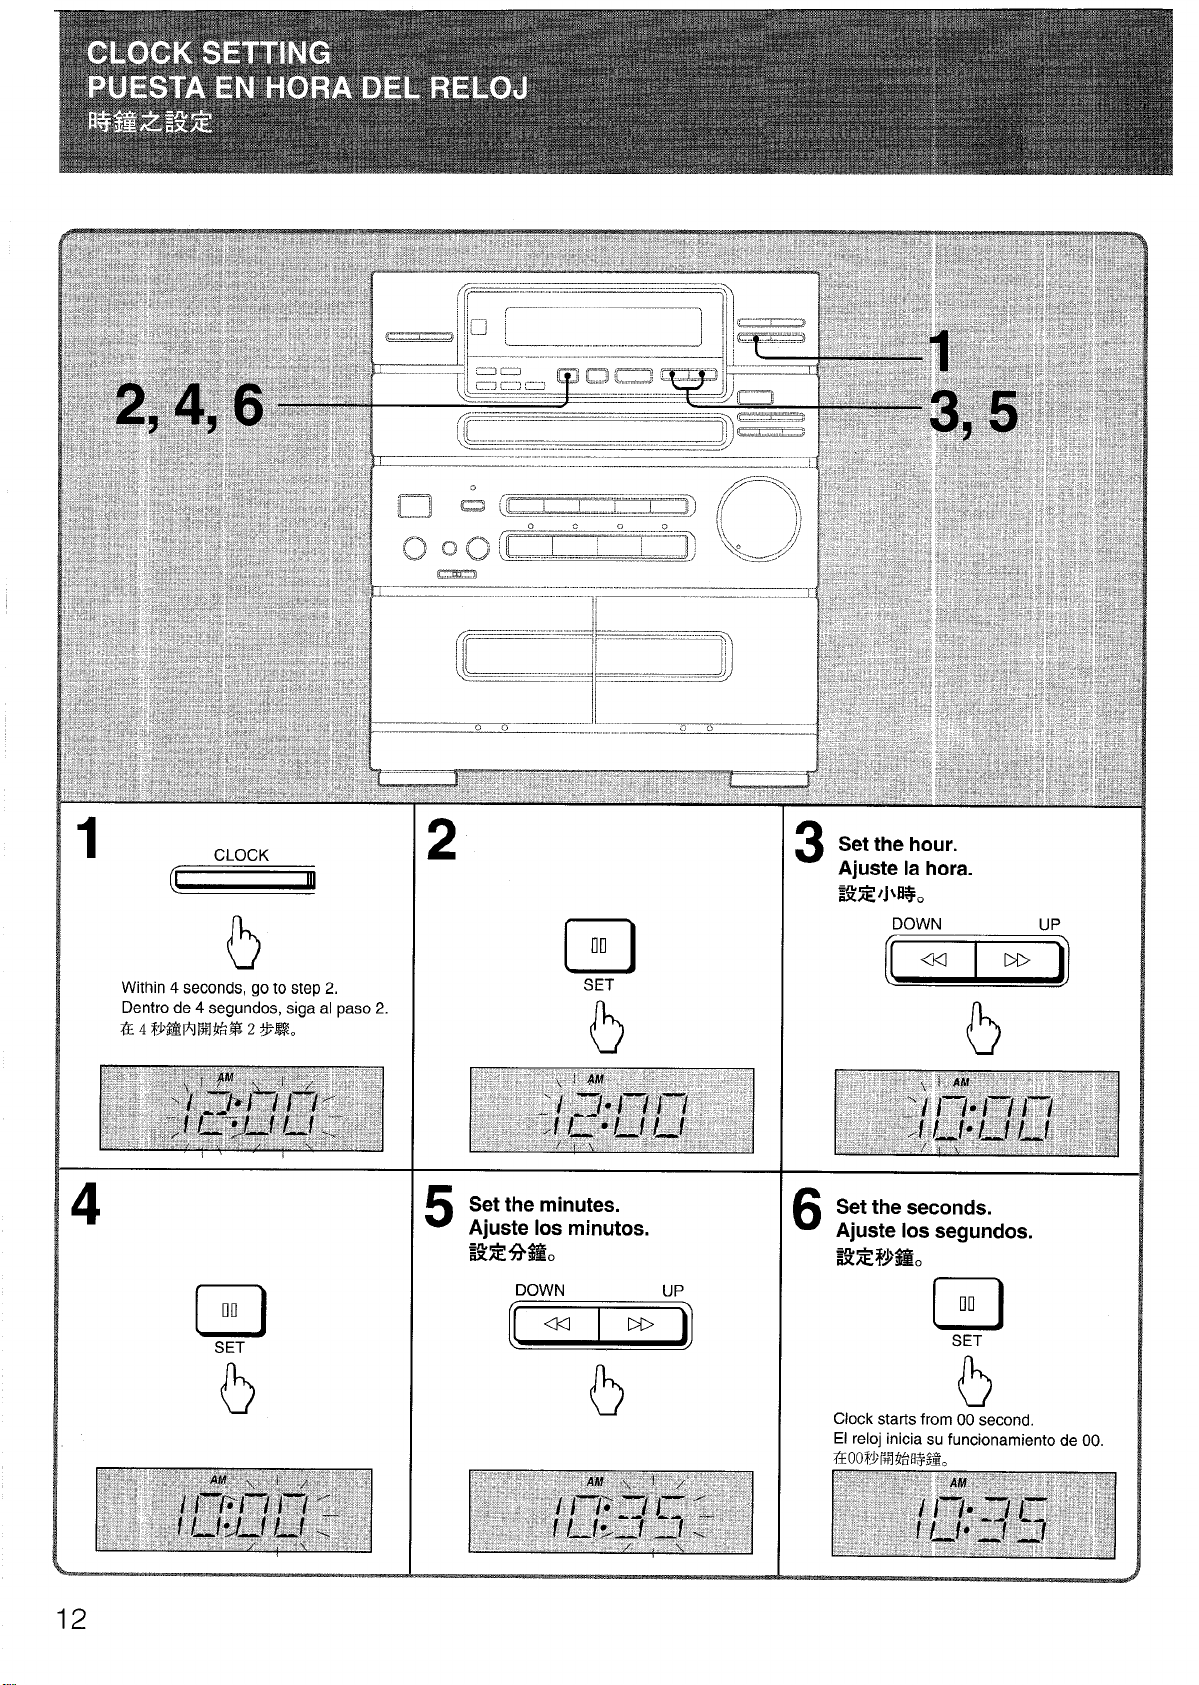
1
CLOCK
~
b
Within 4 seconds, go to step 2.
Dentro de 4 segundos, siga al paso 2.
7=4 W$l!lmw%% 2 %%%.
2
Set the hour.
3
Ajuste la hors.
12
Do
o
SET
b
Set the minutes.
5
Ajuste Ios minutes.
Set the seconds.
6
Ajuste Ios segundos.
Ww!$%
Do
u
SET
Clock starts from 00 second
El reloj inicia su funcionamiento de 00.
EOOWR7%%13%=.
b
To set the time exactly
Press the SET button in step 6 to starl the clock at
the desired point, as indicated by another clock or
time signal from an external time source.
To display the clock while the power is on
Press the CLOCK button. The clock is displayed
for 4 seconds.
During recording or dubbing, the clock is not displayed even if the button is pressed.
To switch the time display
The time display is factory-set to the 12-hour stan-
dard. When switching to the 24-hour standard,
press the POWER button while pressing the CLOCK
button. Repeat the same procedure to restore the
12-hour standard.
In case of power failure
● for less than about 24 hours, the clock stops
during the failure.
Only the current time setting is needed.
● for more! than about 24 hours, setting of the
current time, station presetting and timer setting
are neecled.
Note
● The current time cannot be set with the remote
control.
● While setting the current time, the on-timer is not
activated when the specified time is displayed.
Para ajustar exactamente la hors
Presione el boton SET en el paso 6 para poner en
funcionamiento el reloj en el punto deseado,
indicado por otro reloj o la sefial horaria de de una
fuente externa.
Para visualizer el reloj cuando el sistema esta
activado
Presione el boton CLOCK. El reloj se visualiza
por 4 segundos.
Durante la grabacion o duplication, el reloj no
se visualizara aunque se presione el boton.
Para cambiar la visualization de la hors
La visualization de la hors ha sido ajustada en la
fabrica al sistema de 12 horas. Para cambiarla al
sistema de 24 horas, presione el bot6n POWER
manteninedo pulsado el boton CLOCK. Paravolver
al sistema de 12 horas, repita el mismo
procedimiento.
En caso de Corte del suministro electrico
.
si el torte ha durado menos de unas 24 horas,
el reloj se habra parado.
Solamente necesitara poner en hors el reloj.
.
si el torte ha durado mas de unas 24 horas,
necesitara poner en hors el reloj, memorizar Ias
emisoras, y programar el temporizador.
Nota
. La hors no puede ajustarse con elcontrol remoto.
● Durante la puesta en hors, el temporizador no
se activara cuando se visualice la hors
especificada.
● mH2%lEEwm%
Wfw?lo
13
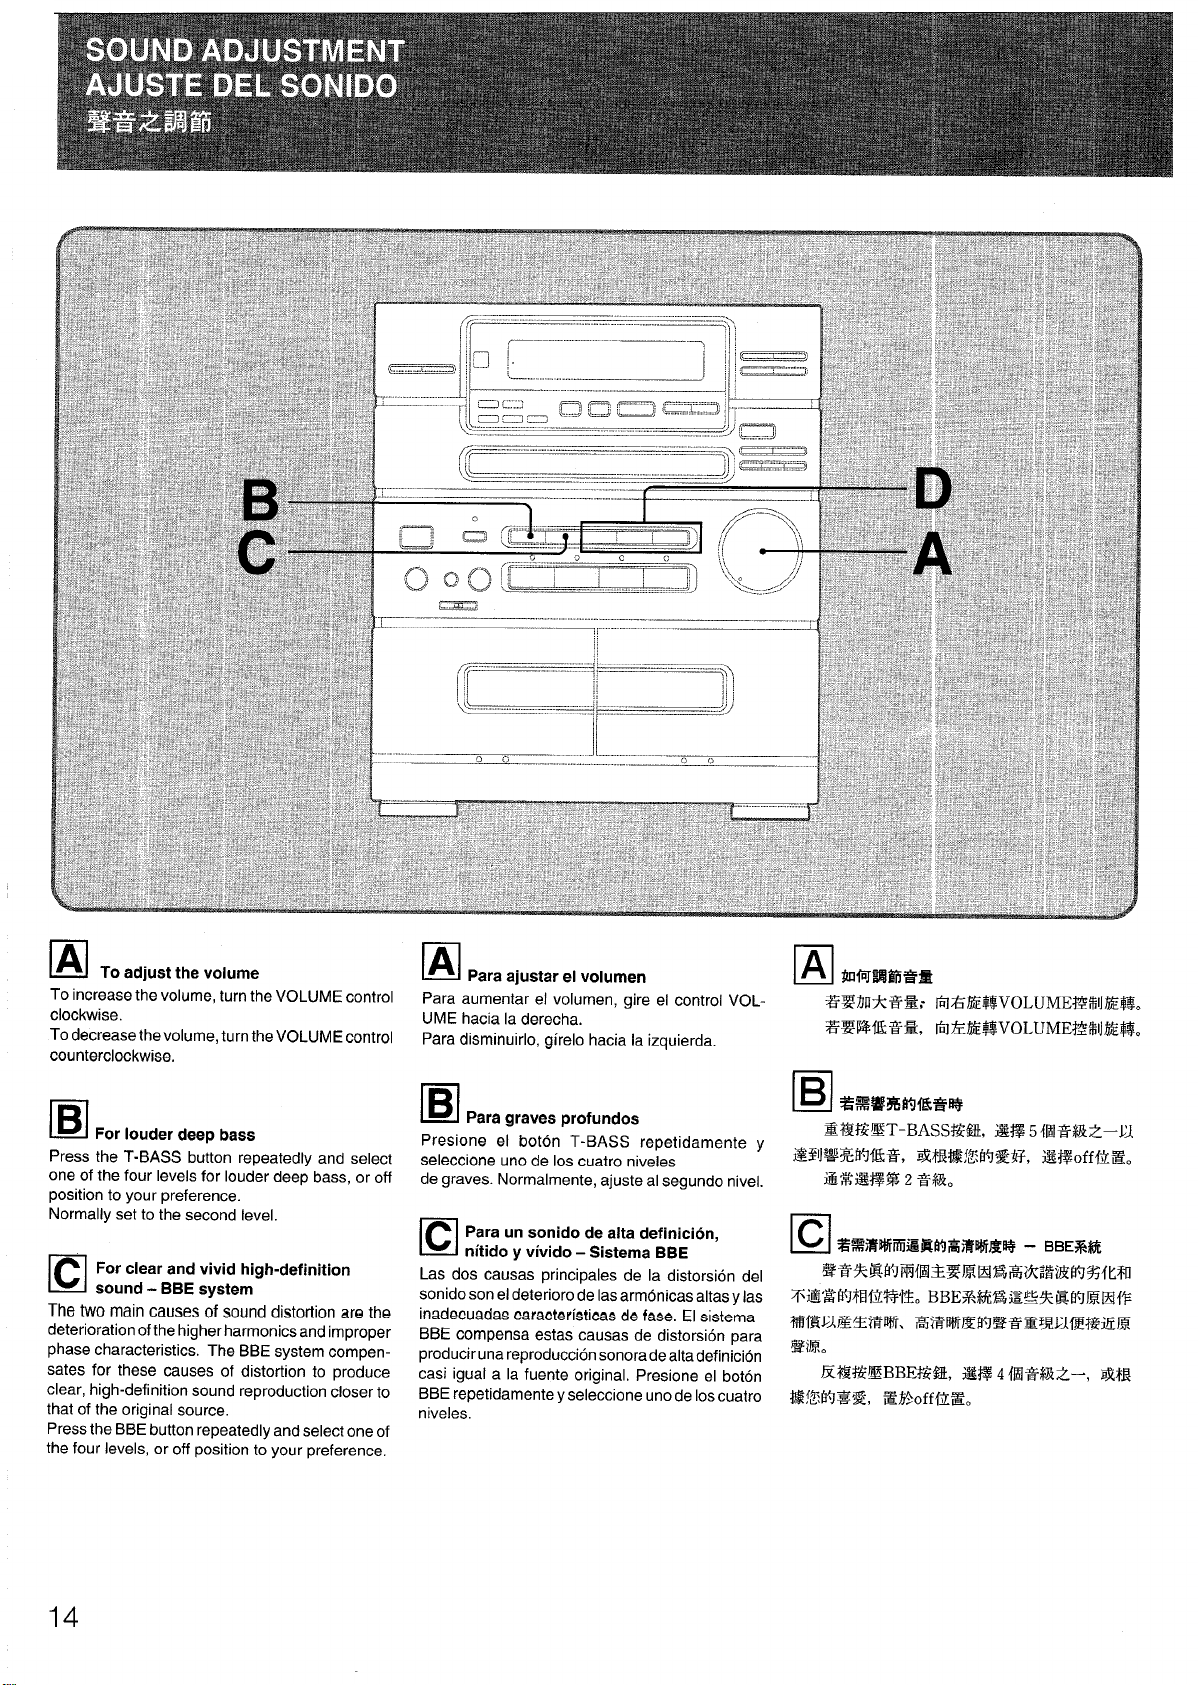
To adjust the volume
•1
TO kICE!aS!S the volume, turn the VOLUME control
clockwise.
To decrease the volume, turn the VOLUME control
counterclockwise.
❑
For louder deep bass
Press the T-BASS button repeatedly and select
one of the four levels for louder deep bass, or off
position to your preference.
Normally set to the second level.
For clear and vivid high-definition
❑
sound - BBE system
The two main causes of sound distortion are the
deterioration of the higher harmonics and improper
phase characteristics, The BBE system compensates for these causes of distortion to produce
clear, high-definition sound reproduction closer to
that of the original source,
Press the BBE button repeatedly and select one of
the four levels, or off position to your preference.
la
Para ajustar el volumen
Para aumentar et volumen, gire et control VOLUME hacia la derecha.
Para disminuirlo, girelo hacia la izquierda.
El
Para graves profundos
Presione et boton T-BASS repetidamente y
seleccione uno de Ios cuatro niveles
de graves. Normalmente, ajuste al segundo nivel.
Para un sonido de alta defmlclon,
El
nitido y vivido - Sistema BBE
Las dos causas principals de la distortion del
sonido son el deterioro de Iasarmonicas altas y Ias
inadecuada~ caracterfsticas de fase. El sistema
BBE compensa estas causas de distortion para
produciruna reproduction sonorade altadefinicion
casi igual a la fuente original, Presione el boton EZL’Z$W52BBEW3, %% 4@F%WZ-, ELE3
BBE repetidamente y seleccione uno de Ios cuatro
niveles.
. . . .
a31wwtiJ*s3
El
%?%fiufiM&-
~3W%f&tSF&,FiffdE$@/OLUME&%IJj&$$.
I%i%wimfi%?m%
❑
FZE%EEET-BASSW& %% 5 f!tl?$WZ-LJ
FMFWHFJffk%, RtF&$&&J~fi,
i&%ifg&g3 2 ~+~o
%%%~~&&W6%fkhf&@ - BBE%%t
❑
&%* Eb5tifD*%EmRR7A;MEPg% fLm
ZGf&%FJtH4~&l$o
mfsW&E’R4rlF7\ 73’Rii?IEErqaaEfglblmwmR
*&}J+o
E%MYJSX,
Eif7i)jEK$VOLUMEJ4%IJ~$$.
~~offj~~o
BBE%fjM?&E!!X%@YJRE{j=
EmoffilEo
14
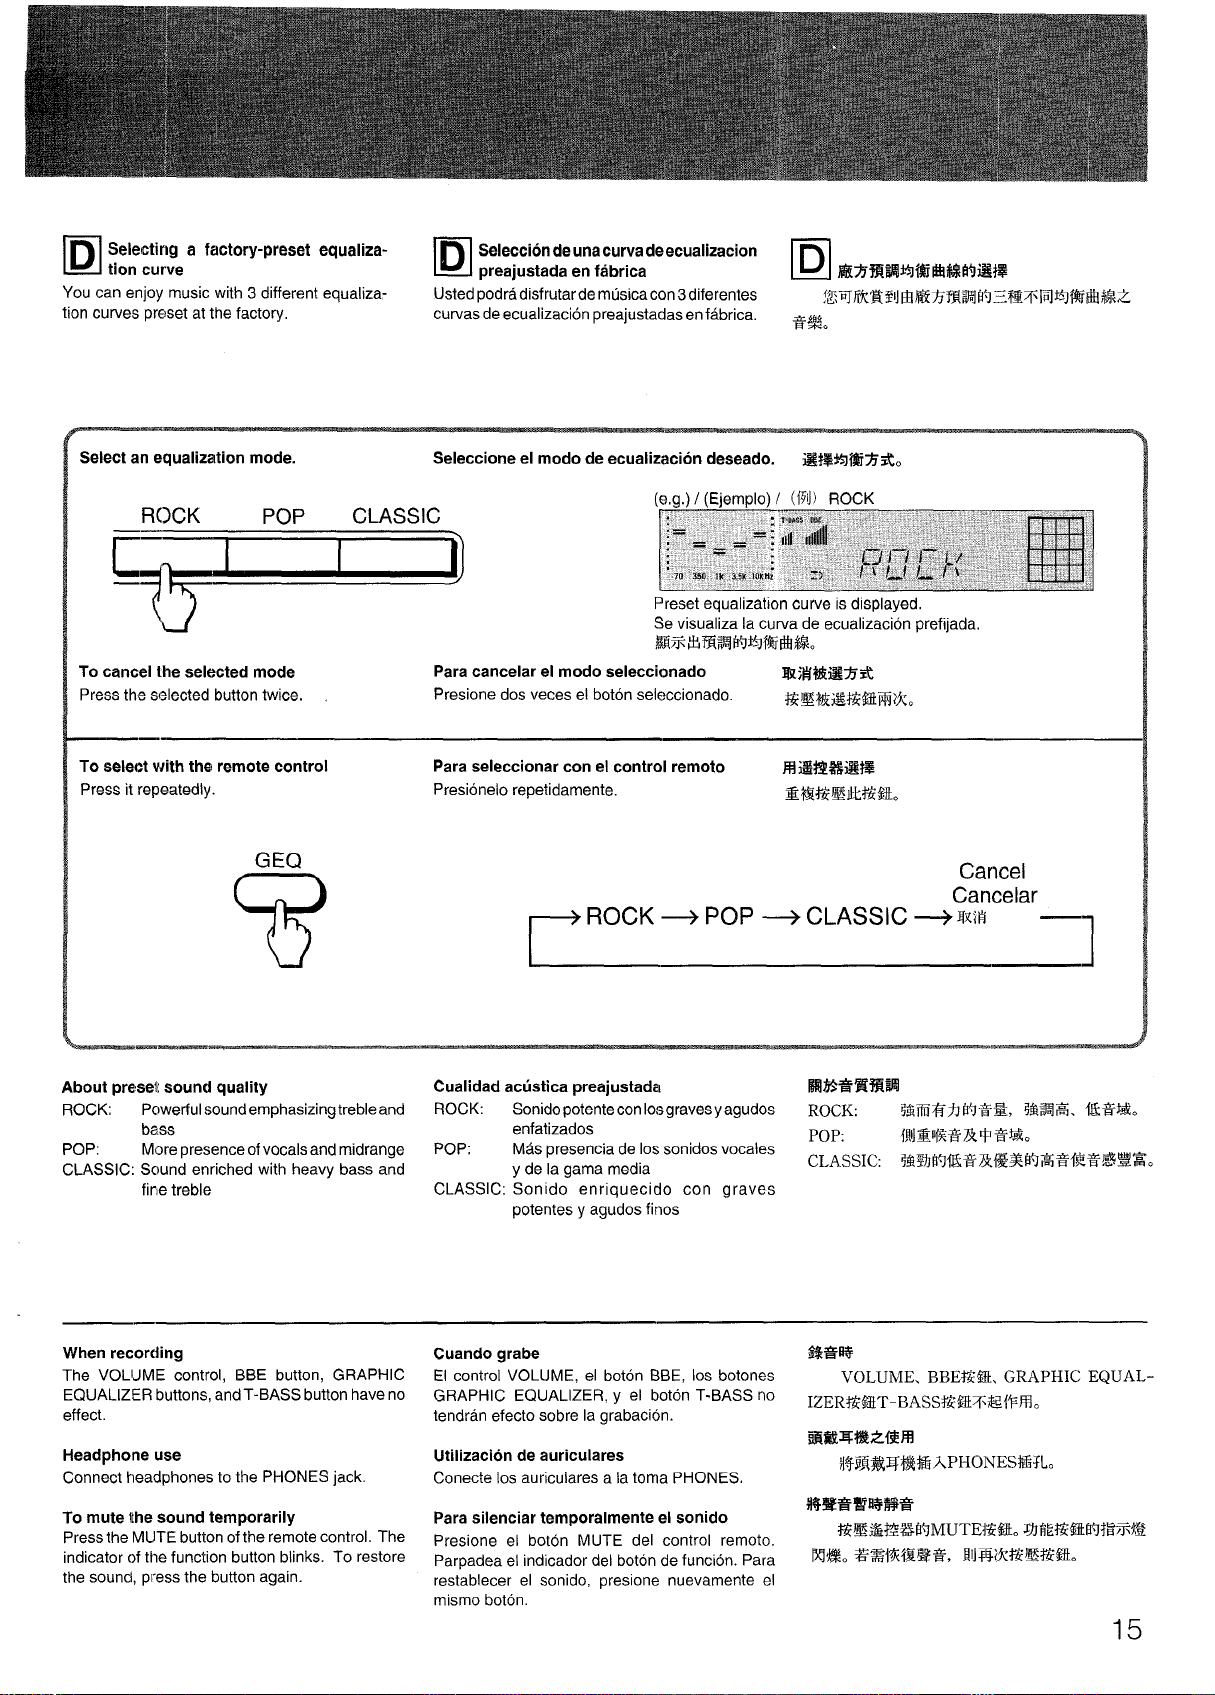
Selecting a factory-preset equaliza-
r+p”’+c’’ss’c+%’r-l
❑
tion curve
You can enjoy music with 3 different equalization curves preset at the factory,
Select an equalization mode. Seleccione el modo de ecualizacion deseado.
ROCK
‘F ~’: 4 : - ‘
To cancel the selected mode Para cancelar el modo seleccionado
Press the selected button twice.
—.
To select with the remote control
Press it repeatedly.
POP
CLASSIC
Selecciondeuna curvadeecualizacion
preajustada en fabrica
•I
Usted podradisfrutarde musicacon 3diferentes
curvas de ecualizacion preajustadas en fabrica.
(Ejemplo) / ({JO) ROCK
(e.g.)/
Preset equalization curve is displayed,
Se visualiza la curva de ecualizacion prefijada,
R%Xti?%ltifrt%f%i%%i.
Presione dos veces el boton seleccionado.
Para seleccionar con el control remoto
Presionelo repetidamente.
*%mw*it5w#$@E4%
❑
?KmRH211mmz7R=wbq:3 M7Hfq%wti%z
@#.
iWW$JBlf%o
~: ~,1,,;lII:: ,.:,.’..”: ;,:::; ’:;:;;;:;;~;,;::”;
“ ““:iq’f=’l%lf””t: : :;
y:h ~, f,”f ,:pt,;:’ :: ‘:.
m~lWf@%*
%EZlK+Wz$il%2Ao
mi+l+m%+iRt2
ZE?EWEWLE2H0
~ _ _ + ~:
““‘ -{ ‘“ :
~,’ -
-
*
,:
GEQ
7!?
—-—
About preset sound quality
ROCK: Powerful sound emphasizing treble and
POP:
CLASSIC: Sound enriched with heavy bass and
When recording
The VOLIJME control, BBE button, GRAPHIC El control VOLUME, el boton BBE, Ios botones
EQUALIZER buttons, and T-BASS button have no
effect. tendran efecto sobre la grabacion.
Headphone use Utilization de auriculares
Connect headphones to the PHONES jack. Conecte Ios auriculares a la toma PHONES.
To mute the sound temporarily
Press the MUTE button of the remote control. The
indicator of the function button blinks. To restore
the sound, press the button again.
bass
More presence of vocals and midrange
fine treble
Cualidad acustica preajustada
ROCK: Sonido potente con Iosgraves y agudos
enfatizados
POP: Mas presencia de Ios sonidos vocales
y de la gama media
CLASSIC: Sonido enriquecido con graves
potentes y agudos fines
Cuando grabe $$79%
GRAPHIC EQUALIZER, y el boton T-BASS no
Para silenciar temporalmente el sonido
Presione el boton MUTE del control remoto.
Parpadea el indicador del boton de funcion. Para
restablecer el sonido, presione nuevamente e!
mismo boton.
.——
M%*5Q7’R%
ROCK
POP:
CLASSIC
IZER&&kT-BASS#&Ti& {’F%.
?3@!t=%%.Z@M
RBR@3%klEiAPH01fES%TLo
%%??3BR%5$?3
&EH@&JMLJTEHL !71WWH+JWR!
N’%%.%%%’IXE%?3, RIFWH2!%W41L
$~~%jJ bb”~=, ;!$~~. &&&
VOLUME. BBEWQt. GRAPHIC EQUAL-
15
m--
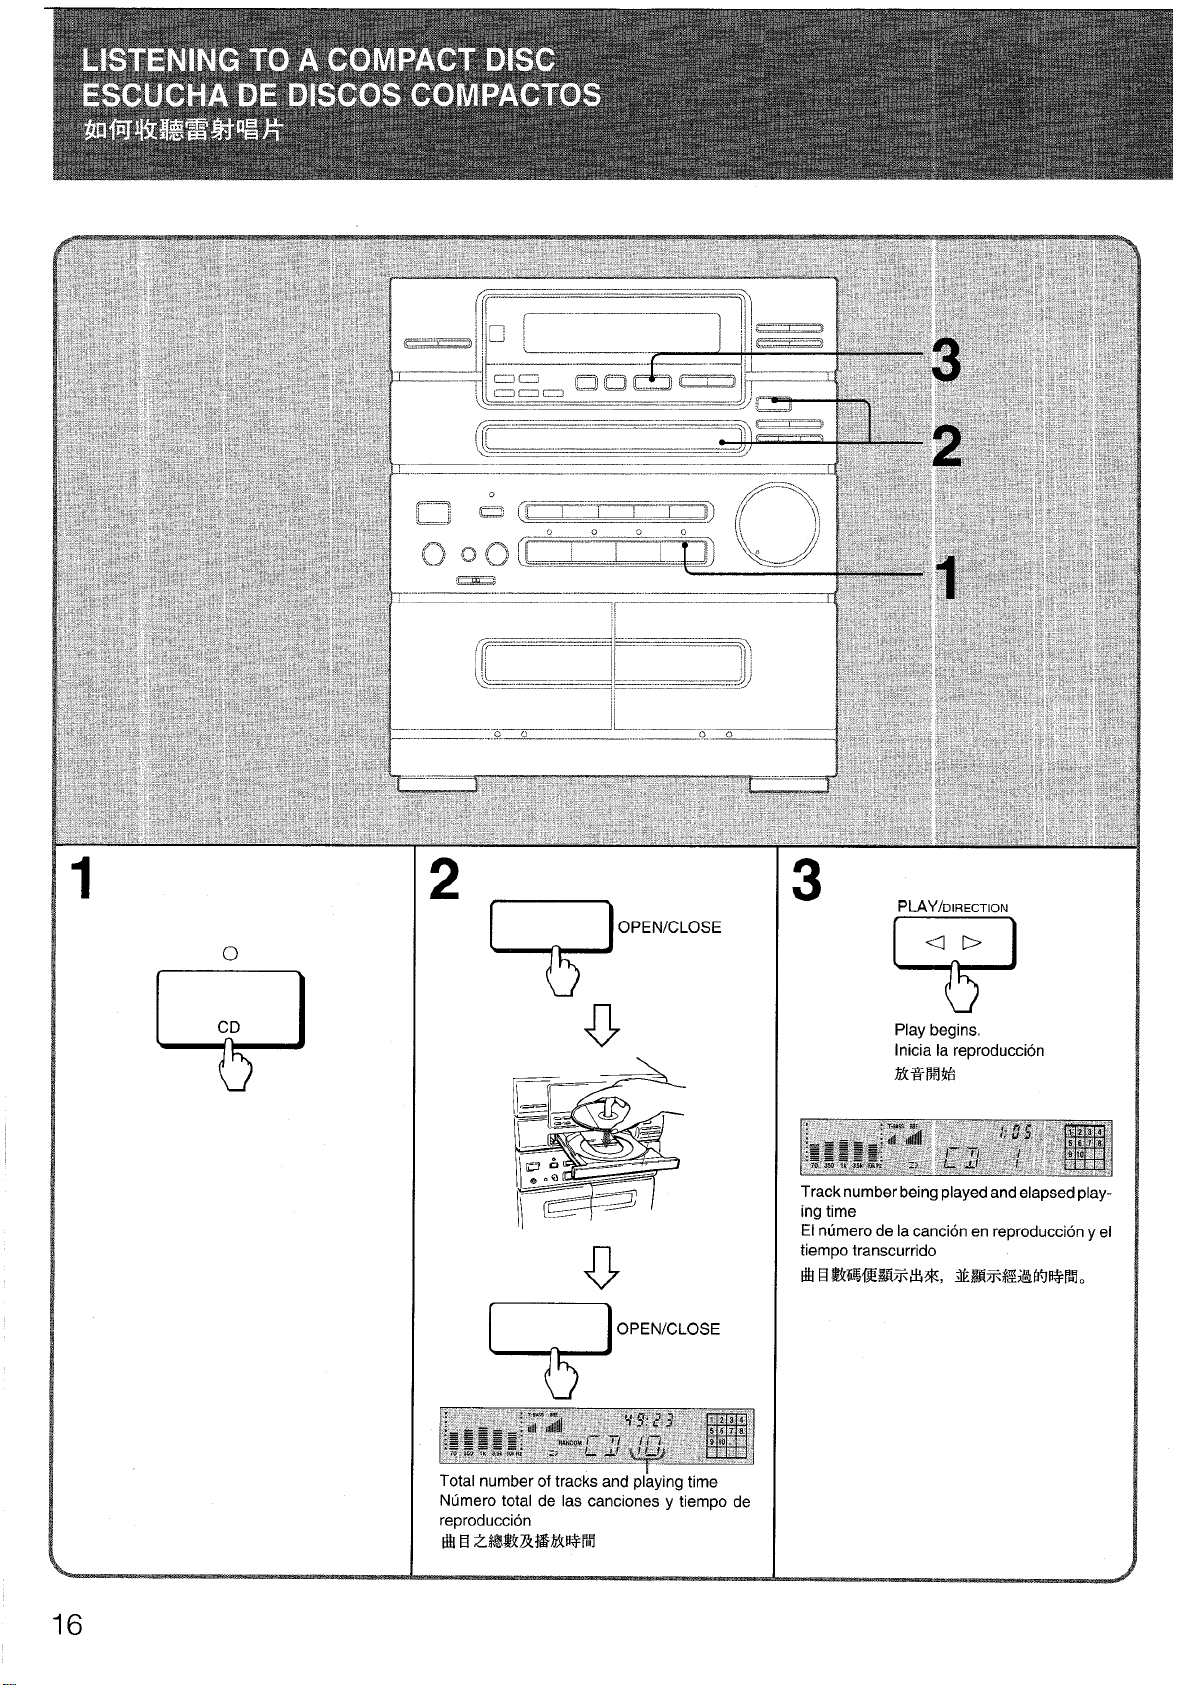
3
PLAY/DIRECTION
Qb
(?
9
Play begins.
Inicia la reproduction
EM=Fl?&
Track number being played and elapsed playing time
El numero de la cancion en reproduction y el
tiempo transcurrido
w El%kE%mw%w%, *R7RW’%HKJRM.
wOpEN’cLOsE
t?
Total number of tracks and pl~ying time
.umero total de Ias canciones y tiempo de
reproduction
Eilf B 2M%WW%EORWS
16
To stop play
Press the M
To pause
Press the Iil button.
To resume play, press the II button again.
To play an 8cm CD
Load a disc onto the inner circle of the tray.
Note on the display window
If the disc includes more than 17 tracks, the track
numbers after 17 are not displayed.
To check the remaining time
Press the DISPLAY button during playback, The
amount of time remaining until all tracks finish
playing is disp;ayed.
To resume the play time display, press the DIS-
PLAY button again.
If a dirty disc is used
The disc may not play normally. (It may stop, the
search for a track may take longer, etc.)
Inthis case, press the
and take out the disc. Then wipe it with a cleaning
cloth.
A disc with a major flaw will not play normally either.
Notes
● Do not place more than one compact disc on the
disc tray at “the same time.
c If, during CD play, the video image of a nearby
television is distorted, or if static is heard from a
nearby radio, please move this unit further away
from the affected television or radio.
button.
❑ STOP button to stop play,
Para cesar la reproduction
Presione el boton
Para realizar una pausa
Presione el bot6n Il.
Para reanudar la reproduction, vuelva a presionar
el boton.
Pars reproducer un disco compacto de 8 cm
Coloquelo en el circulo interior de la bandeja.
Nota aobre la ventanilla visualizadora
Si ei disco contiene mas de 17 canciones, no se
visualizaran 10sntimeros posteriors a 17.
■,
Para comprobar el tiempo restsnte
Presione el boton DISPLAY durante la
reproduction. Se visualizara el tiempo de
reproducci6n restante hasta el final del disco.
Para reanudar la visualization del tiempo de
reproduction, vuelva a presionar el boton DISPLAY.
En caso de un disco sucio
Ut7disco sucio puede que no se reproduzca
normalmente. (Puede detenerse la reproduction,
demerara mucho para buscar una cancion, etc.)
En este case, interrumpa la reproduction
presionando el boton de parada ~ STOP, saque
el disco y l~mpielo con el pailo de Iimpieza. El disco
con una rayadura grande puede tambien
reproducirse anormalmente.
mismo.
Si, durante la reproduction de un disco
compacto, Ias imageries de untelevisorcercano
sufren distortion, o si se oyen estaticos en una
radio cercana, aleje el eistemadel televisor del
aparato de radio efectado.
?5m%!=wi
mm 9 E&It.
%EwF&KWAz.
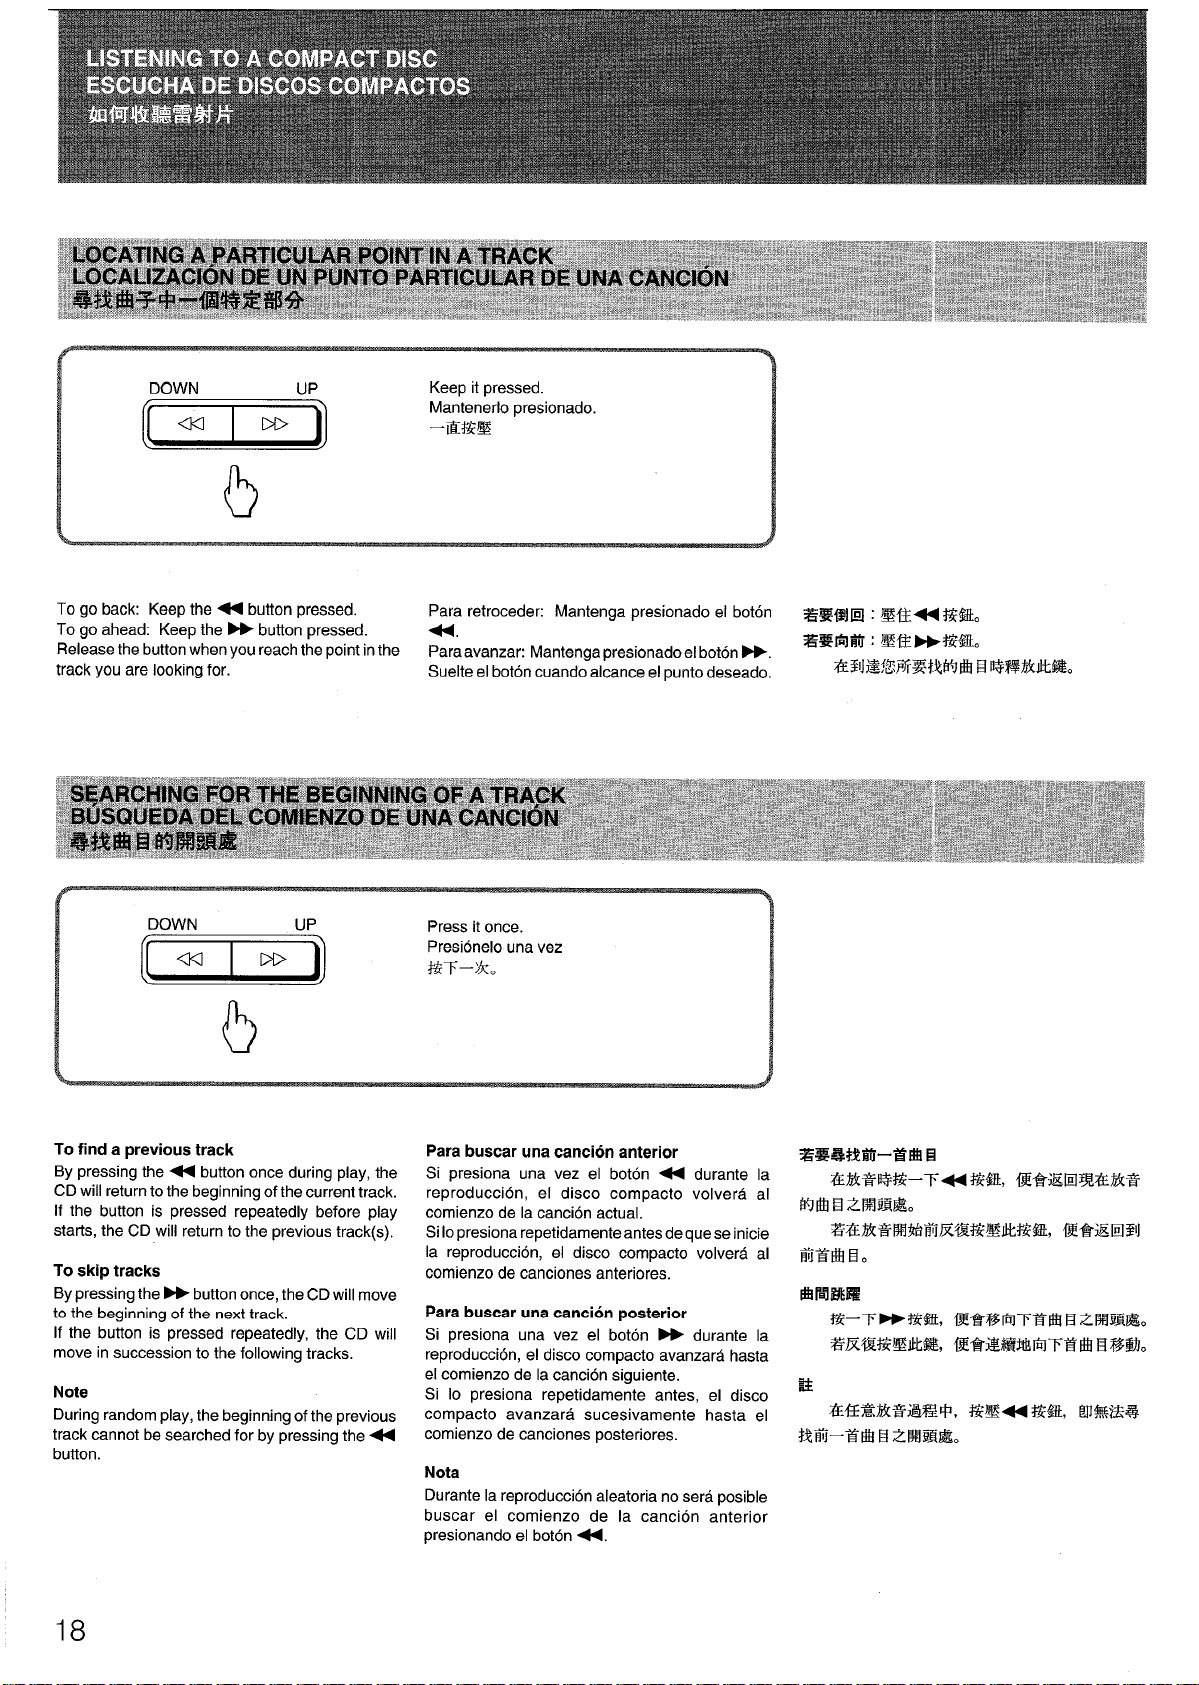
DOWN
[*]
Keep it pressed.
Mantenerlo presionado.
–EE52
b
Togo back: Keep the + button pressed.
Togo ahead: Keep the - button pressed.
Release the button when you reach the point in the
track you are looking for.
DOWN
[*]
b
To find a previous track
By pressing the 4 button once during play, the
CD will return tothe beginning ofthe current track.
If the button is pressed repeatedly before play
starts, the CD will return to the previous track(s).
To skip tracks
By pressing the* button once, the CD will move
to the beginning of the next track.
If
the button is pressed repeatedly, the CD will
move in succession to the following tracks.
Note
During random play, the beginning of the previous
track cannot be searched for by pressing the+
button.
Para retroceder: Mantenga presionado et bot6n
+,
Para avanzat Mantenga presionado el boton B.
Suelte el boton cuando alcance el punto deseado.
Press it once.
Presionelo una vez
+3T-YK0
Para buscar una cancion anterior
presiona una vez el bot6n < durante la
Si
reproduction, el disco compacto volvera al
comienzo de la cancion actual.
Si 10presiona repetidamenteantes de que se inicie
la reproduction, el disco compacto volvera al
comienzo de canciones anteriores.
Para buacar una canci6n posterior
Si
presiona una vez el boton ~ durante la
reproduction, el disco compacto avanzara hasta
el comienzo de la cancion siguiente.
Si 10 presiona repetidamente antes, el disco
compacto avanzara sucesivamente hasta el
comienzo de canciones posteriors.
Nota
Durante la reoroduccion aleatoria no sera ~osible
buscar el comienzo de
presionando el boton +.
la cancion a’nterior
%%W21E31: EXR+ w%.
ZSl=lf% : k%f%w+M&
&31JE?fiFfix&i%Jw B %fWatl#&
18
 Loading...