

Page 1
For assistance and information
call toll free I-800-BUY-AIWA
(United States and Puerto Rico)
88-NF8-903-01
971120AMI-M-9
mm
DIGITAL AIJDIO
Page 2

“CAUTION:TO REDUCE THE RISK OF
ELECTRIC SHOCK,
DO NOT REMOVE COVER (OR BACK).
NO USER-SERVICEABLE PARTS INSIDE
REFER SERVICING TO QUALIFIED
SERVICE PERSONNEL.”
Read the Operating Instructions carefully and completely before
operating the unit. Be sure to keep the Operating Instructions
for future reference. All warnings and cautions in the Operating
Instructions and on the unit should be strictly followed, as well
as the safety suggestions below.
Installation
Water and moisture — Do not use this unit near water, such
1
as near a bathtub, washbowl, swimming pool, or the like.
Heat — Do not use this unit near sources of heat, including
2
heating vents, stoves, or other appliances that generate heat.
It also should not be placed in temperatures less than 5°C
(41 “F) or greater than 35°C (95°F).
Mounting surface — Place the unit on a flat, even surface.
3
Ventilation — The unit should be situated with adequate
4
space around it so that proper heat ventilation is assured.
Allow 10 cm (4 in.) clearance from the rear and the top of the
unit, and 5 cm (2 in.) from each side.
- Do not place the unit on a bed, rug, or similar surface that
may block the ventilation openings.
- Do not install the unit in a bookcase, cabinet, or airtight rack
where ventilation may be impeded.
Objects and liquid entry — Take care that objects or liquids
5
do not get inside the unit through the ventilation openings.
Carts and stands — When placed
6
or mounted on a stand or cart, the
unit should be moved with care.
Quick stops, excessive force, and
uneven surfaces may cause the
unit or cart to overturn or fall.
Condensation — Moisture may form on the CD pickup lens
7
when;
- The unit is moved from a cold spot to a warm spot
- The heating system has just been turned on
- The unit is used in a very humid room
- The unit is cooled by an air conditioner
When this unit has condensation inside, it may not function
normally. Should this occur, leave the unit for a few hours,
then try to operate again.
Wall or ceiling mounting —The unit should not be mounted
8
on a wall or ceiling, unless specified in the Operating
Instructions.
@!!!I!
&&*
Owner’s record
For your convenience, record the model number and serial
number (you will find them on the rear of your set) in the space
provided below. Please refer to them when you contact your Aiwa
dealer in case of difficulty.
Model No. Serial No. (Lot No.)
CX-NA303
SX-NA302
SX-R275 (NSX-A304 only)
1 ENGLISH
Electric Power
Power sources — Connect this unit only to power sources
1
specified in the Operating Instructions, and as marked on the
unit.
2 Polarization — As a safety feature, some units are equipped
with polarized AC power plugs which can only be inserted
one way into a power outlet. If it is difficult or impossible to
insert the AC power plug into an outlet, turn the plug over and
try again. If it still does not easily insert into the outlet, please
call a qualified service technician to service or replace the
outlet. To avoid defeating the safety feature of the polarized
plug, do not force it into a power outlet.
3 AC
power cord
When disconnecting the AC power cord, pull it out by the
-
AC power plug. Do not pull the cord itself.
- Never handle the AC power plug with wet hands, as this
could result in fire or shock.
- Power cords should be firmly secured to avoid being severely
bent, pinched, or walked upon. Pay particular attention to
the cord from the unit to the power outlet.
- Avoid overloading AC power plugs and extension cords
beyond their capacity, as this could result in fire or shock.
Page 3
4
Extension cord
a polarized AC power plug with an extension cord, receptacle,
or other outlet unless the polarized plug can be completely
inserted to prevent exposure of the blades of the plug.
When not in use — Unplug the AC power cord from the power
5
outlet if the unit will not be used for several months or more.
When the cord is plugged in, a small amount of current
continues to flow to the unit, even when the power is turned
off.
—
To help prevent electric shock, do not use
Outdoor Antenna
Power lines — When connecting an outdoor antenna, make
1
sure it is located away from power lines.
2
Outdoor antenna grounding — Be sure the antenna system
is properly grounded to provide protection against unexpected
voltage surges or static electricity build-up. Article 810 of the
National Electrical Code, ANS1/NFPA 70, provides information
on proper grounding of the mast, supporting structure, and
the lead-in wire to the antenna discharge unit, as well as the
size of the grounding unit, connection to grounding terminals,
and requirements for grounding terminals themselves.
Antenna Ground!ng According to the National Electrical Code
~ ANTENNA LEAD IN WIRE
PRECAUTIONS ...................................................................l
PREPARATIONS
CONNECTIONS ................................................................. 3
REMOTE CONTROL ...........................................................5
BEFORE OPERATION ........................................................5
SOUND
AUDIO ADJUSTMENTS .................................................... 6
GRAPHIC EQUALIZER .......................................................6
RADIO RECEPTION
MANUAL TUNING ................................................................7
PRESETTING STATIONS ....................................................7
TAPE PLAYBACK
BASIC OPERATIONS ....................................................... 8
CD PLAYING
BASIC OPERATIONS ........................................................ 9
PROGRAMMED PLAY ..................................................... 10
ANTENNA DISCHARGE UNIT
(NEC SECTION 810-20)
I
-i
NEC-NATIONAL ELECTRICAL CODE
ELECTRIC I /11
ELECTRODE SYSTEM
(NEC ART 250 PART H)
Maintenance
Clean the unit only as recommended in the Operating
Instructions.
Damaae Recwirinct Service
Have the units serviced by a qualified service technician if:
- The AC power cord or plug has been damaged
- Foreign objects or liquid have gotten inside the unit
- The unit has been exposed to rain or water
- The unit does not seem to operate normally
- The unit exhibits a marked change in performance
- The unit has been dropped, or the cabinet has been damaged
DO NOT ATTEMPT TO SERVICE THE UNIT YOURSELF.
RECORDING
BASIC RECORDING ...m.................................................... 11
DUBBING A TAPE MANUALLY ....................................... 12
DUBBING THE WHOLE TAPE ......................................... 12
Al EDIT RECORDING ...................................................... 13
PROGRAMMED EDIT RECORDING ............................... 14
CLOCK AND TIMER
SETTING THE CLOCK .........................................i........... 15
SETTING THE SLEEP TIMER ......................................... 15
SETTING THE TIMER ...................................................... 16
OTHER CONNECTIONS
CONNECTING OPTIONAL EQUIPMENT ...................... 17
LISTENING TO EXTERNAL SOURCES ......................... 17
GENERAL
CARE AND MAINTENANCE
TROUBLESHOOTING GUIDE ........................................ 18
SPECIFICATIONS ........................................................... 191
PARTS INDEX
...................................................
.......................................... 18
Back cover
❑
ENGLISH 2
Page 4

Check your system and accessories
INSX-A3041
Before connecting the AC cord
The rated voltage of your unit shown on the rear panel is
120 V AC. Check that the rated voltage matches your local
voltage.
IMPORTANT
Connect the speakers, antennas, and all optional equipment first.
Then connect the AC cord in the end.
7 Connect the right and left speakers to the main
unit.
Connect the right speaker cord to SPEAKERS R terminals,
and left to SPEAKERS L terminals.
CX-NA303 Compact disc stereo cassette reciever
SX-NA302 Front speakers
* SX-R275 Surround speakers (For NSX-A304 only)
Remote control
m
Operating Instructions, etc
* Optional SX-R275 Surround speakers are available with theNSX-A304.
Righ
1
AM antenna
FM antenna
The speaker cord with the white stripe should be connected
to ~ terminal and the black cord to ~ terminal.
2 Connect the surround speakers to the main unit,
(only for NSX-A304)
There are no differences between the surround speakers.
Connect each surround speaker cord to SURROUND
SPEAKERS R or L terminal.
I
m
3 ENGLISH
@k
Surround ;peaker cord
I--’--J
/-
AC cord
2
➤4
Page 5
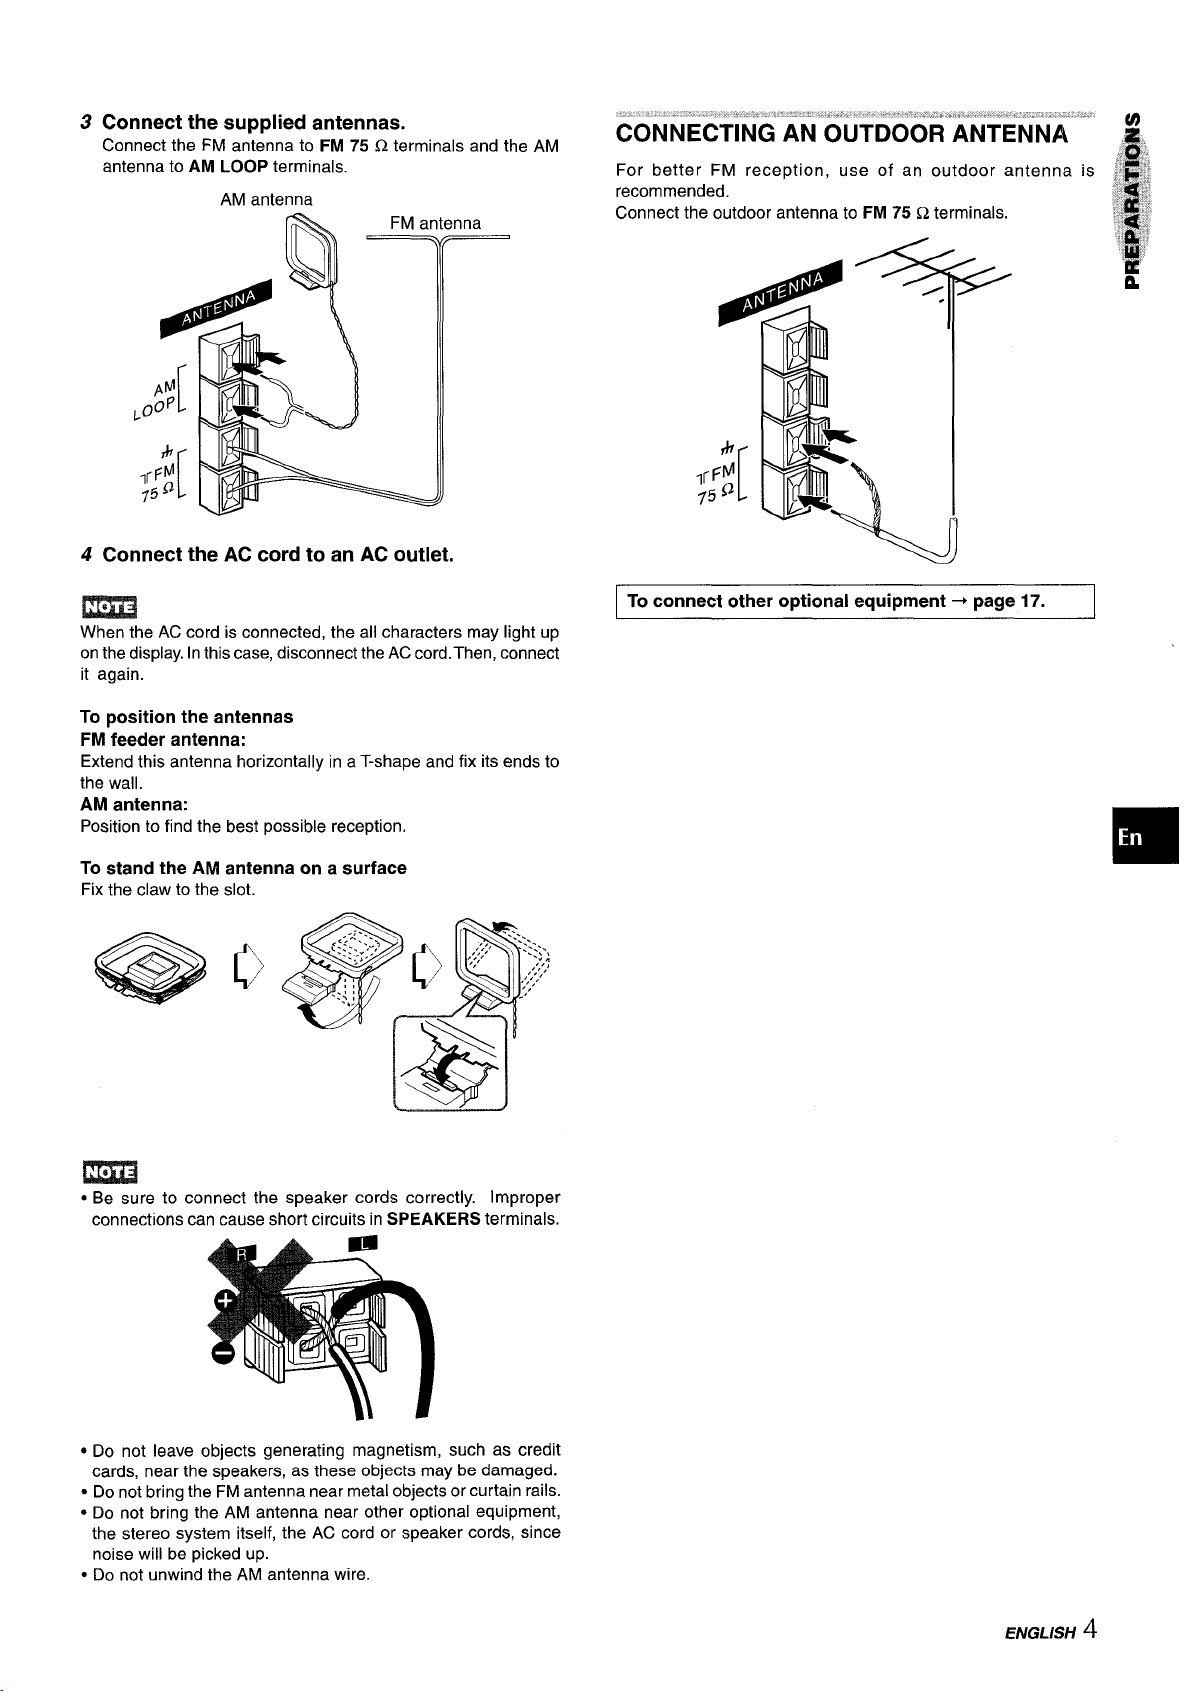
3
Connect the supplied antennas.
Connect the FM antenna to FM 75 Q terminals and the
antenna to
4
Connect the AC cord to an AC outlet.
When the AC cord is connected, the all characters may light up
on the display. In this case, disconnect the AC cord. Then, connect
it again.
AM LOOP terminals.
AM antenna
AM
CONNECTING AN OUTDOOR ANTENNA
For better FM reception, use of an outdoor antenna
recommended.
Connect the outdoor antenna to
To connect other optional equipment+ page 17.
FM 75 Q terminals.
To position the antennas
FM feeder antenna:
Extend this antenna horizontally in a T-shape and fix its ends to
the wall.
antenna:
AM
Position to find the best possible reception.
To stand the AM antenna on a surface
Fix the claw to the slot.
,.,
~.
~:::...:,
..+ ,,.-,,
... >,
% ::
,2< ~
@Q
.,.
\
%
:-4!$7.
.,;:’
‘ .’....\
,;,,
:: .
.. .
-,:,;
,,,’,,,,,
j,
m
● Be sure to connect the speaker cords correctly. Improper
connections can cause short circuits in SPEAKERS terminals.
● Do not leave objects generating magnetism, such as credit
cards, near the speakers, as these objects may be damaged.
● Do not bring the FM antenna near metal objects or curtain rails.
● Do not bring the AM antenna near other optional equipment,
the stereo system itself, the AC cord or speaker cords, since
noise will be picked up.
● Do not unwind the AM antenna wire.
ENGLISH ‘!
Page 6
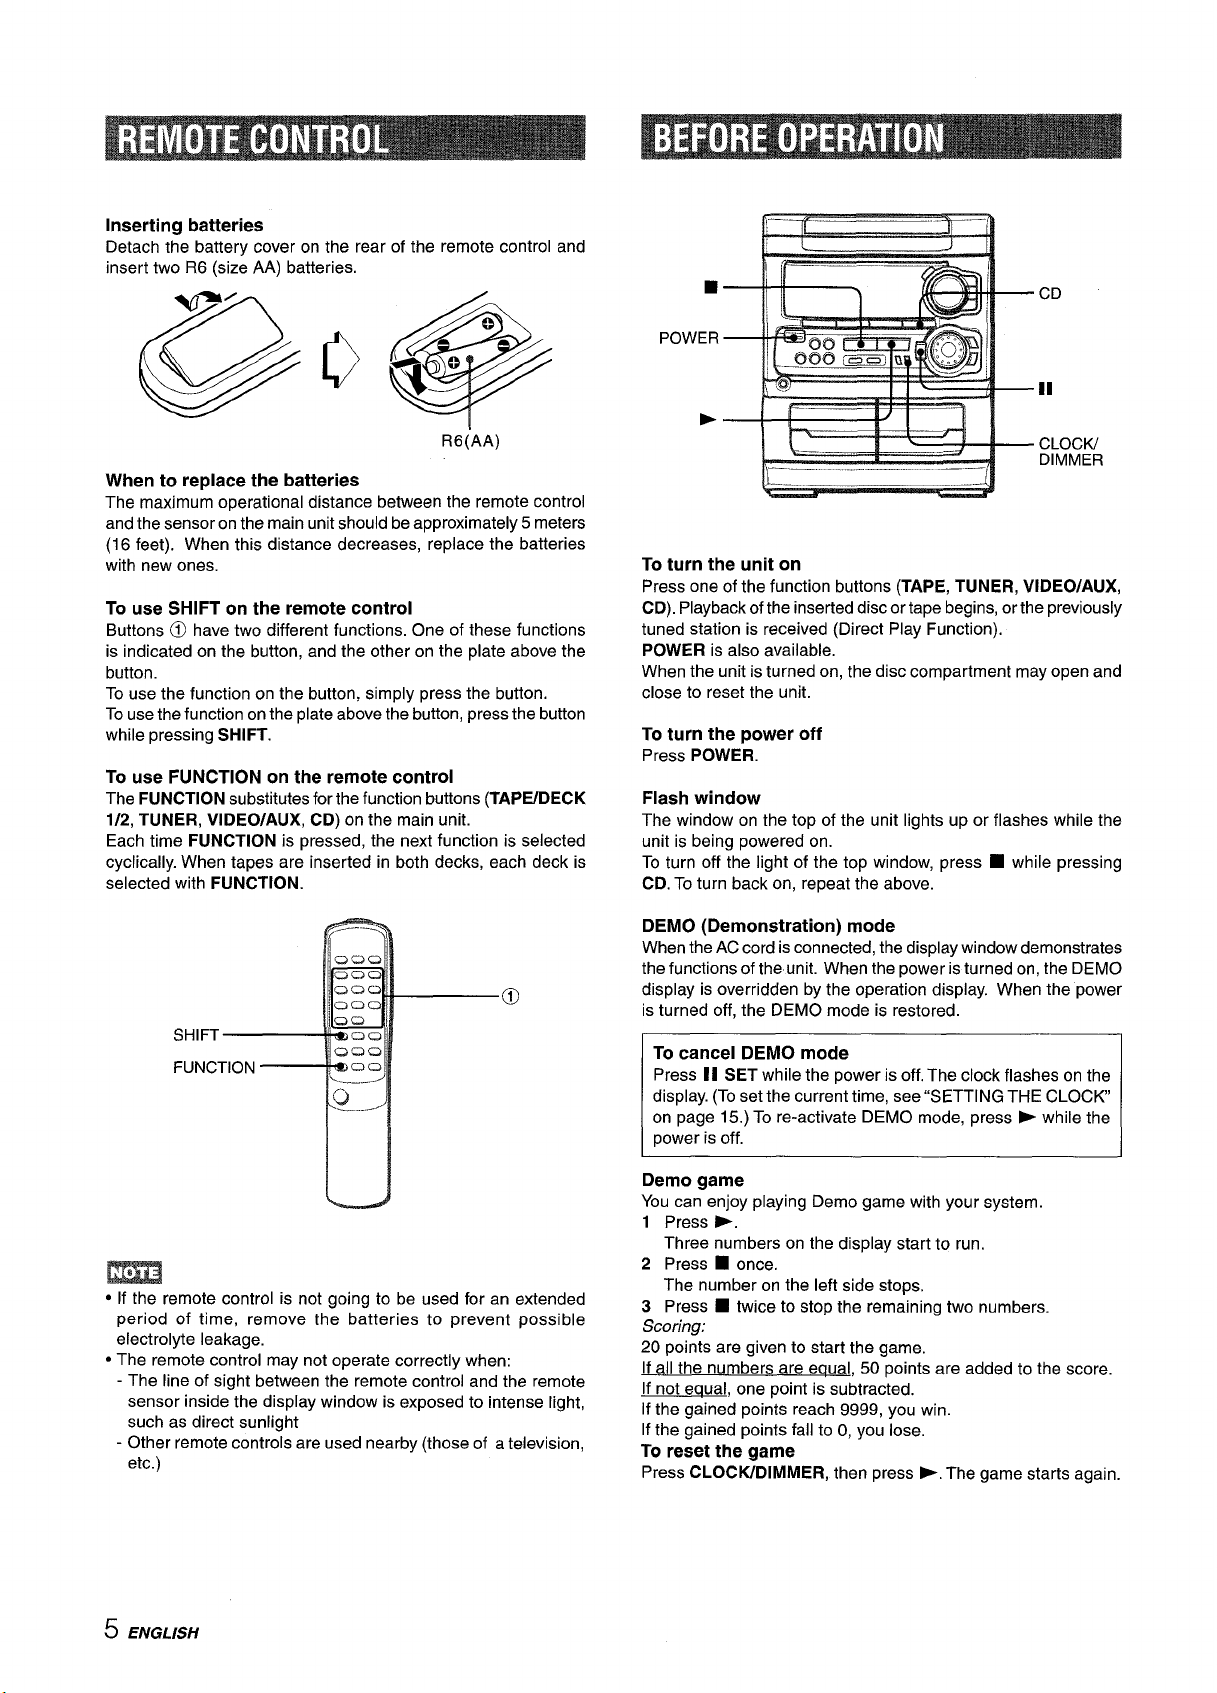
Inserting batteries
Detach the battery cover on the rear of the remote control and
insert two R6 (size AA) batteries.
@~e
POWER
,—
~“-
■
—.
CD
In
..
R6(AA)
When to replace the batteries
The maximum operational distance between the remote control
and the sensor on the main unit should be approximately 5 meters
(16 feet). When this distance decreases, replace the batteries
with new ones.
To use SHIFT on the remote control
Buttons @ have two different functions. One of these functions
is indicated on the button, and the other on the plate above the
button.
To use the function on the button, simply press the button.
To use the function on the plate above the button, press the button
while pressing
To use FUNCTION on the remote control
The FUNCTION substitutes for the function buttons (TAPIYDECK
1/2, TUNER, VIDEO/AUX, CD) on the main unit.
Each time FUNCTION is pressed, the next function is selected
cyclically. When tapes are inserted in both decks, each deck is
selected with
SHIFT.
FUNCTION.
~
h
!:–— ---
To turn the unit on
Press one of the function buttons (TAPE, TUNER, VIDEO/AUX,
CD). Playback of the inserted disc or tape begins, or the previously
tuned station is received (Direct Play Function).
pOWER is also available.
When the unit is turned on, the disc compartment may open and
close to reset the unit.
To turn the power off
Press POWER.
Flash window
The window on the top of the unit lights up or flashes while the
unit is being powered on.
To turn off the light of the top window, press W while pressing
CD. To turn back on, repeat the above.
DEMO (Demonstration) mode
When the AC cord is connected, the display window demonstrates
the functions of the unit. When the power is turned on, the DEMO
display is overridden by the operation display. When the power
is turned off, the DEMO mode is restored;
-—
-/
CLOCIU
DIMMER
● If the remote control is not going to be used for an extended
period of time, remove the batteries to prevent possible
electrolyte leakage.
● The remote control may not operate correctly when:
- The line of sight between the remote control and the remote
sensor inside the display window is exposed to intense light,
such as direct sunlight
- Other remote controls are used nearby (those of a television,
etc.)
5 ENGLISH
To cancel DEMO mode
Press II SET while the power is off. The clock flashes on the
display. (To set the current time, see “SETTING THE CLOCK
on page 15.) To re-activate DEMO mode, press ~ while the
power is off.
Demo game
You can enjoy playing Demo game with your system.
1 Press >.
Three numbers on the display start to run.
2 Press
3 Press
Scoring:
20 points are given to start the game.
If all the numbers are equal, 50 points are added to the score.
If not eaual, one point is subtracted.
If the gained points reach 9999, you win.
If the gained points fall to O, you lose.
To reset the game
Press CLOCW-DIMMER, then press >. The game starts again.
■ once.
The number on the left side stops.
■ twice to stop the remaining two numbers.
Page 7

T-BASS
l-r
\
—.r. —
I
B
SHIFT
T-BASS
VOLUME
Turn VOLUME on the main unit, or press VOLUME on the
remote control.
The volume level is displayed as a number from O to MAX (31).
The volume level is automatically set to 16 when the power is
turned off with the volume level set to 17 or more.
Au
This unit provides the following three different equalization curves.
ROCK: Powerful sound emphasizing treble and bass
POP: More presence in the vocals and midrange
CLASSIC: Enriched sound with heavy bass and fine treble.
Press one of GRAPHIC EQUALIZER.
The selected equalization mode is displayed.
The T-BASS system enhances the realism of low-frequency
sound.
Press T-BASS.
Each time it is pressed, the level changes. Select one of the
three levels, or the off position to suit your preference.
select with the remote control
To
press T-BASS while pressing SHIFT.
m
Low frequency sound may be distorted when the T-BASS system
is used for a disc or tape in which low frequency sound is originally
emphasized. In this case, cancel the T-BASS system.
To dim the illumination of the display
Press CLOCK/DIMMER twice so that “DIMMER” is displayed,
1
then press II SET within 4 seconds.
Press ++ or - repeatedly to select the dimmer mode as
2
follows.
DIMMER 1 — DIMMER 2— DIM-OFF
Press II SET within 4 seconds.
3
DIMMER 1: The illumination of the display is dimmer than
usual, and the spectrum analyzer lights off.
DIMMER 2: The illumination of the display is dimmer than
DIMMER 1, and the illumination on the buttons light off.
DIM-OFF: The normal display is resumed.
(cancel)
cancel the selected mode
To
Press the selected button again. “GEQ OFF is displayed.
To select with the remote control
Press GEQ repeatedly while pressing SHIFT. The GEQ mode is
displayed cyclically as follows.
ROCK— POP — CLASSIC— GEQ OFF –
r
(cancel)
7
Using the headphones
Connect headphones to the PHONES jack with a standard stereo
plug (06.3 mm,
No sound is output from the speakers while the headphones are
plugged in.
‘/4 inch).
Sound adjustment during recording
The output volume and tone of the speakers or headphones may
be freely varied without affecting the recording.
ENGLISH
16
Page 8
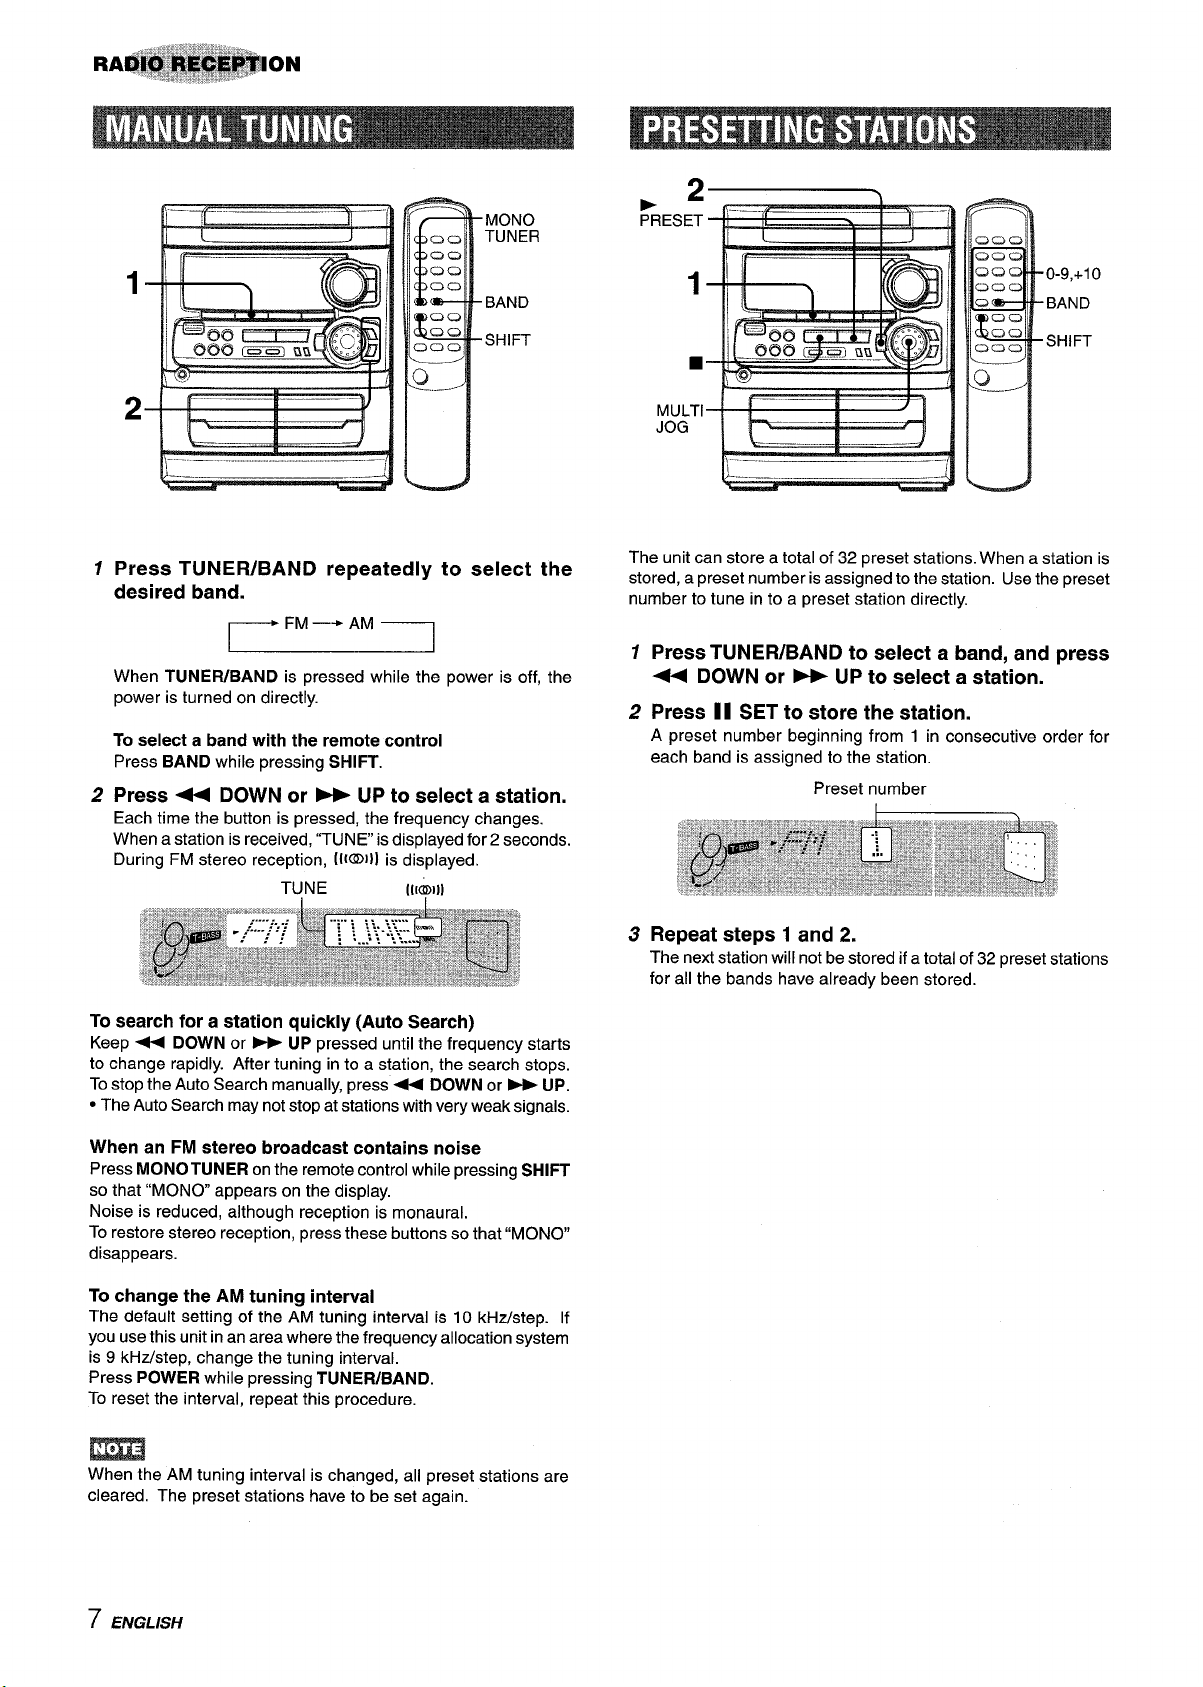
MONO
TUNER
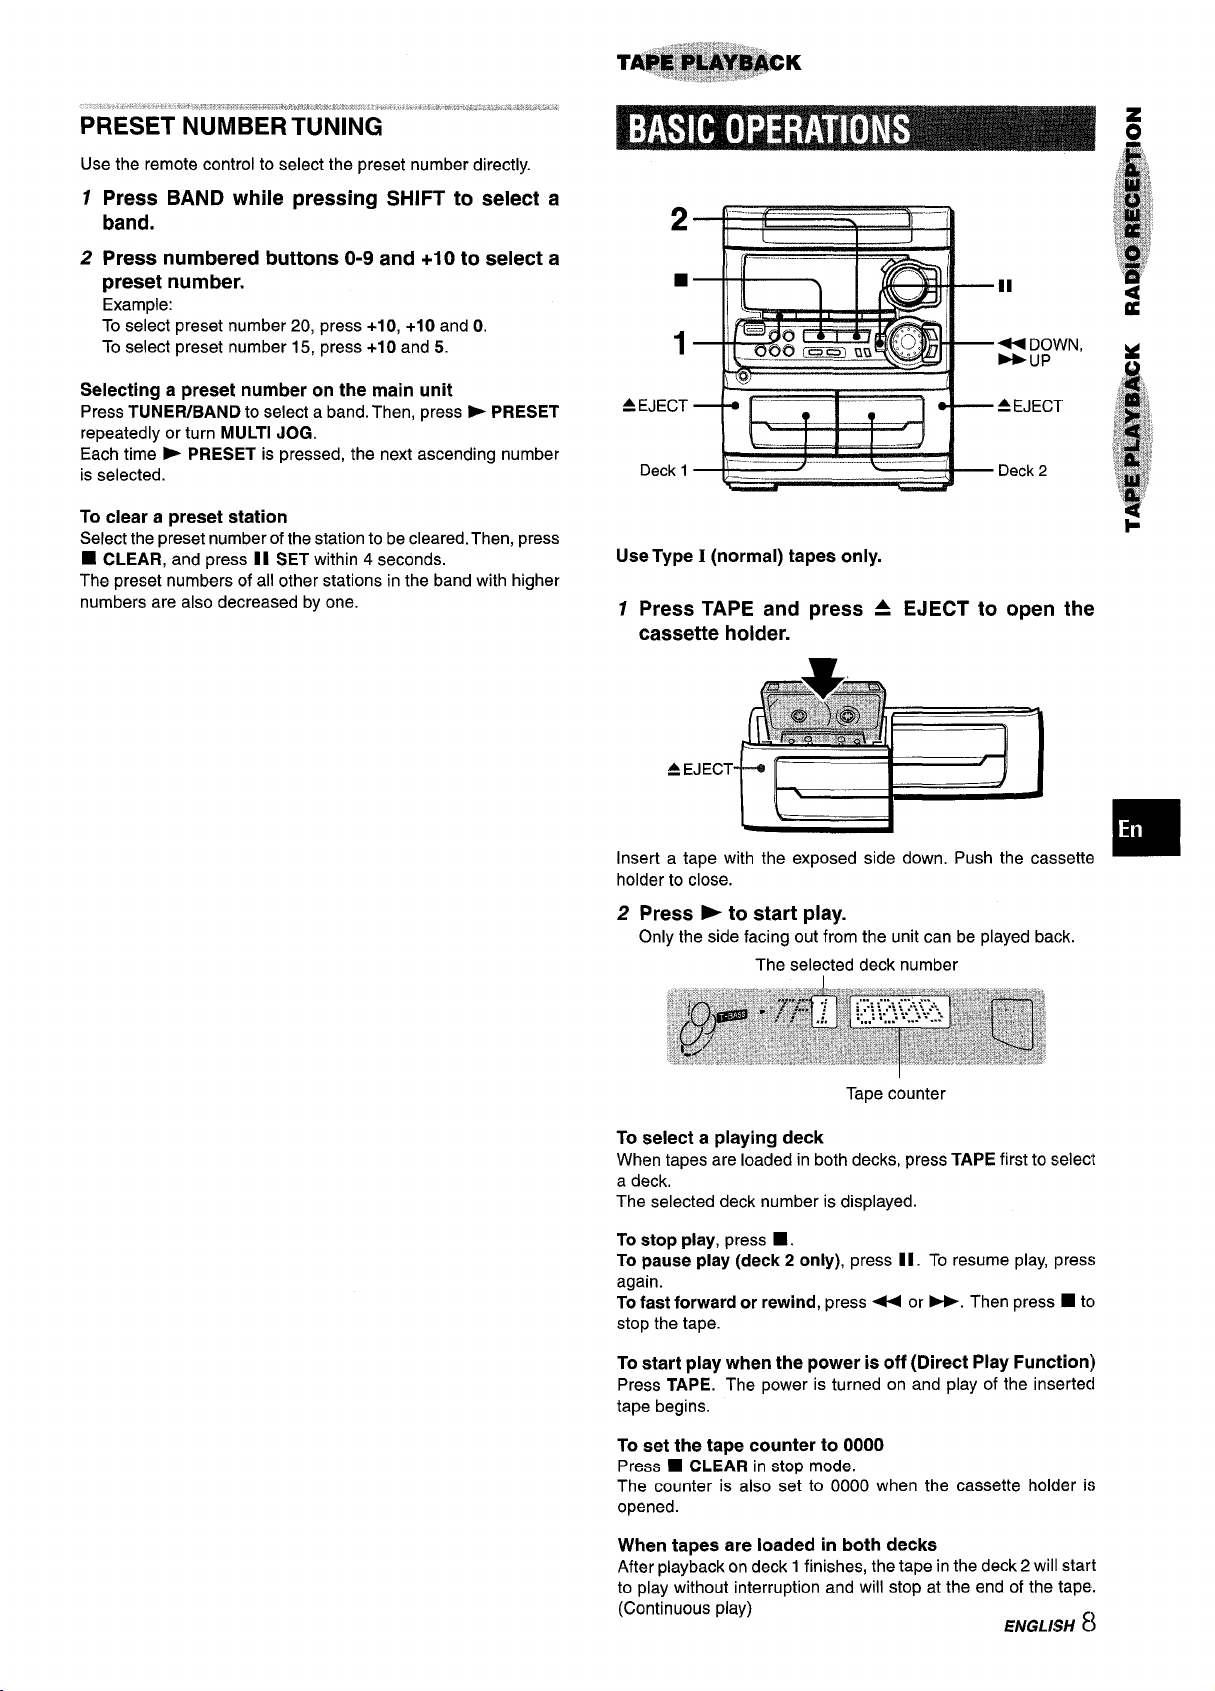
.2
PRESET
1
h
2 f-%—-
‘–—
BAND
SHIFT
—
\---–...... . ----
—
1
Press TUNER/BAND repeatedly to select the
desired band.
When TUNER/BAND is pressed while the power is off, the
power is turned on directly.
To select a band with the remote control
Press BAND while pressing SHIFT.
Press + DOWN or W UP to select a station.
2
Each time the button is pressed, the frequency changes.
When a station is received, “TUNE is displayed for 2 seconds.
During FM stereo reception, IIKD}] is displayed.
TUNE
[[[?1))
1
0-9,+10
BAND
SHIFT
■
MULTI
JOG
The unit can store a total of 32 preset stations. When a station is
stored, a preset number is assigned to the station. Use the preset
number to tune in to a preset station directly.
1
Press TUNER/BAND to select a band, and press
+ DOWN or > UP to select a station.
2
Press 11 SET to store the station.
A preset number beginning from 1 in consecutive order for
each band is assigned to the station.
Preset number
To search for a station quickly (Auto Search)
Keep - DOWN or - UP pressed until the frequency starts
to change rapidly. After tuning in to a station, the search stops.
To stop the Auto Search manually, press+ DOWN or > UP.
● The Auto Search may not stop at stations with very weak signals.
When an FM stereo broadcast contains noise
Press MONO TUNER on the remote control while pressing SHIFT
that “MONO appears on the display.
so
Noise is reduced, although reception is monaural.
To restore stereo reception, press these buttons so that “MONO
disappears.
To change
The default setting of the AM tuning interval is 10 kHz/step. If
you use this unit in an area where the frequency allocation system
is 9 kHz/step, change the tuning interval.
Press
To reset the interval, repeat this procedure.
the AM tuning interval
POWER while pressing TUNER/BAND.
m
When the AM tuning interval is changed, all preset stations are
cleared. The preset stations have to be set again.
Repeat steps 1 and 2.
3
The next station will not be stored if a total of 32 preset stations
for all the bands have already been stored.
7 ENGLISH
Page 9
“ \ ,, # .-. p:.....,, .;, 4., =..,.,,! .
PRESET”’N’UM’BE’RTUNiNG” “
Use the remote control to select the preset number directly.
12Press BAND while pressing SHIFT to select a
band.
Press numbered buttons O-9 and +1O to select a
preset number.
Example:
To select preset number 20, press +10, +10 and O.
To select preset number 15, press +10 and 5.
Selecting a preset number on the main unit
TUNEFUBAND to select a band. Then, press > PRESET
Press
repeatedly or turn MULTI JOG.
Each time
is selected.
➤ PRESET is pressed, the next ascending number
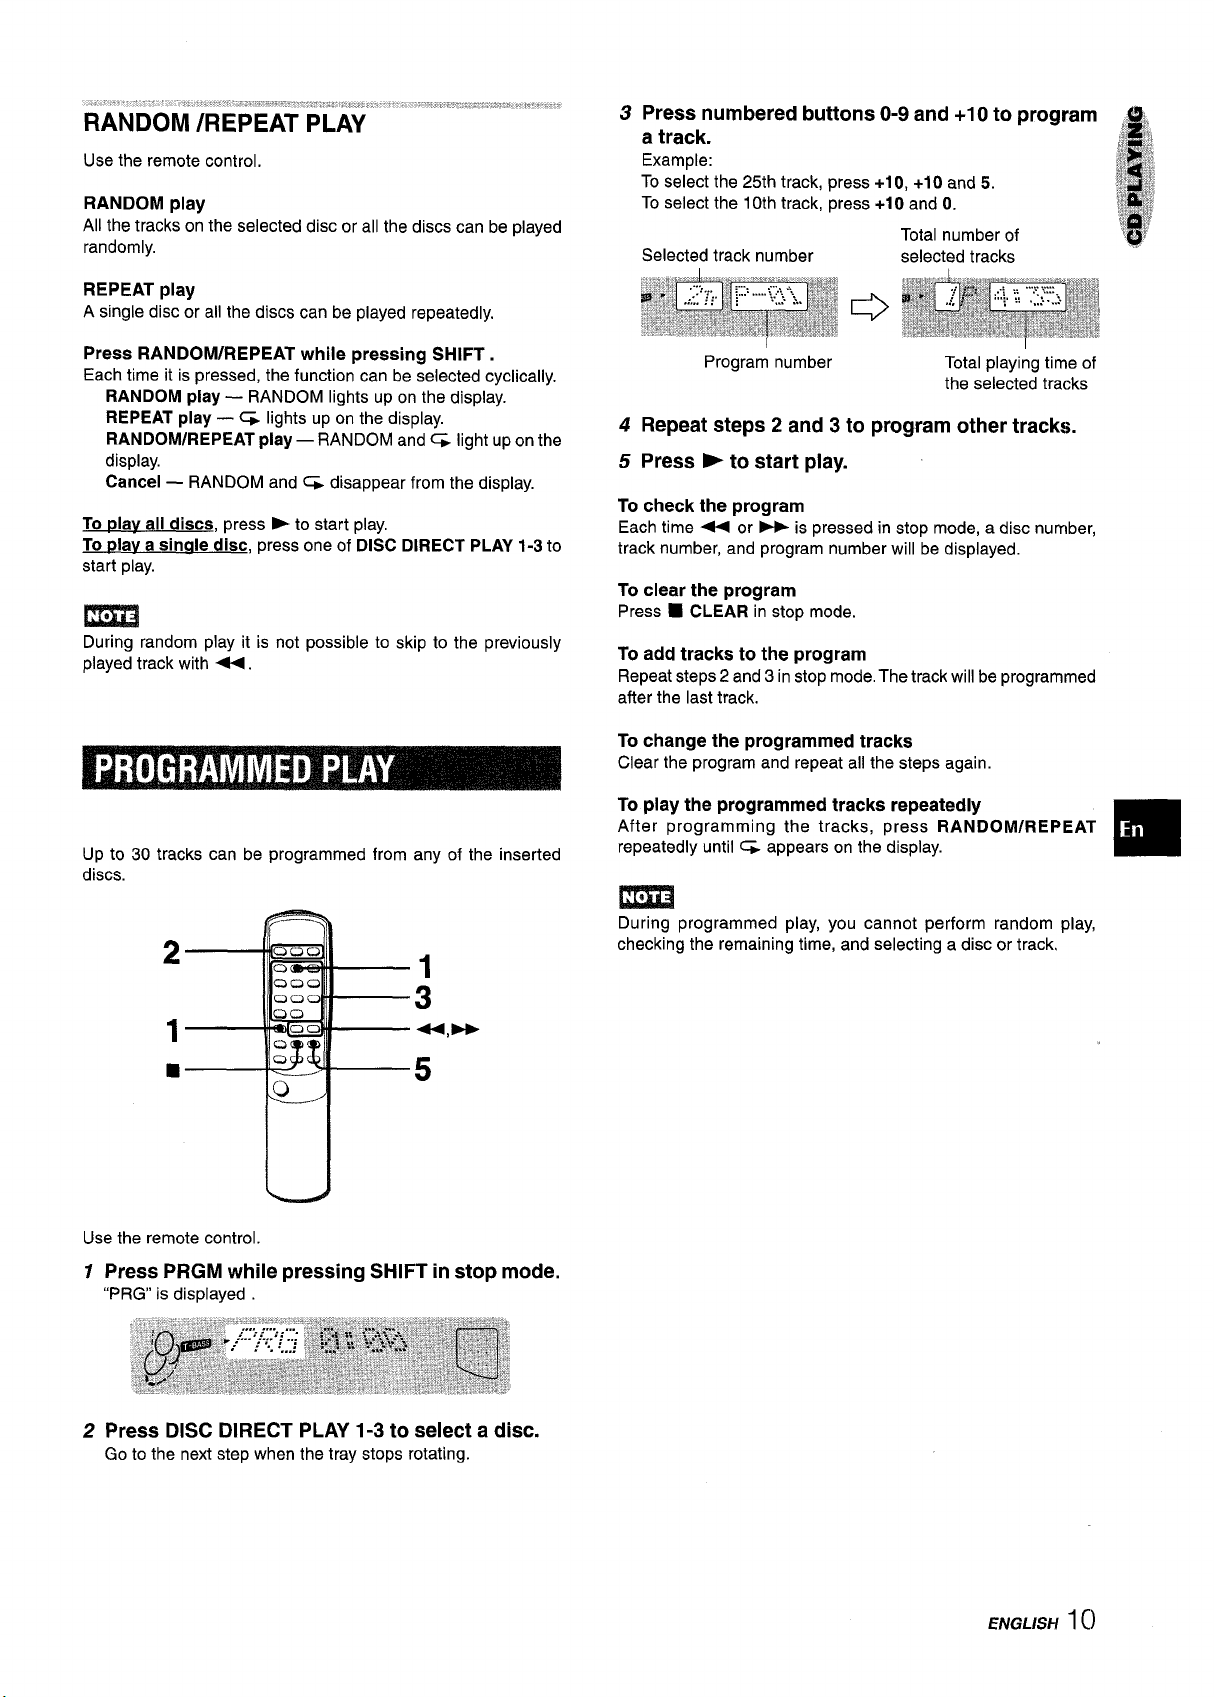
EJECT
=
Deck 1
2
1
N
DOWN,
UP
To clear a preset station
Select the preset number of the station to be cleared. Then, press
■ CLEAR, and press 11 SET within 4 seconds.
The preset numbers of all other stations in the band with higher
numbers are also decreased by one.
Use Type I (normal) tapes only.
1 Press TAPE and
press A
EJECT to open the
cassette holder.
Insert a tape with the exposed side down. Push the cassette
holder to close.
Press > to start play.
2
Only the side facing out from the unit can be played back.
The selected deck number
:
Tape counter
To select a playing deck
When tapes are loaded in both decks, press TAPE first to selecl
a deck.
The selected deck number is displayed.
To
stop play, press ■ .
To pause play (deck 2 only), press 1I. To resume play, press
again.
To fast forward or rewind, press 44 or>. Then press ■ tc)
stop the tape.
To start play when the power is off (Direct Play Function)
Press TAPE. The power is turned on and play of the inserteci
tape begins.
To set the tape counter to 0000
Press 9 CLEAR in stop mode.
The counter is also set to 0000 when the cassette holder is
opened.
When tapes are loaded in both decks
After playback on deck 1 finishes, the tape in the deck 2 will start
to play without interruption and will stop at the end of the tape.
(Continuous play)
ENGLISH 8
Page 10

To
dav one disc only press DISC DIRECT PLAY 1-3.
The selected disc is played once.
Press CD, then press A OPEN/CLOSE to open the
disc compartment. Load disc(s) with the label side
up.
To play one or two discs, place the discs on tray 1 and 2.
To tdav three discs, press DISC CHANGE to rotate the trays
after placing two discs. Place the third disc on tray 3.
Close the disc compartment by pressing A OPEN/CLOSE.
Tray 1
I
To stop play, press 1.
To pause play, press 11. To resume play, press again.
To sesrch for a particular point during playback, keep +
or > pressed and release it at the desired point.
skip to the beginning of a track during playback, press
To
4 or * repeatedly or turn MULTI JOG.
To remove discs, press 4 OPEN/CLOSE.
To start play when the power is off (Direct Play Function)
Press CD. The power is turned on and play of the loaded disc(s)
begins.
When A OPEN/CLOSE is pressed, the power is also turned on
and the disc compartment is opened.
To check the remaining time
During play, press EDiT/CHECK on the remote control while
pressing SHIFT. The amount of time remaining until all tracks
finish playing is displayed. To restore the playing time display,
repeat the above.
Selecting a track with the remote control
Press DISC DIRECT PLAY 1-3 to select a disc.
1
2 Press numbered buttons O-9 and +1 O to select a track.
Example:
To select the 25th track, press +10, +10 and 5.
To select the 10th track, press +1 O and 0.
The selected track starts to play and continues to the end of
that disc.
Replacing discs during play
While one disc is playing, the other discs can be replaced without
interrupting play.
1 Press DISC CHANGE.
Remove the discs and replace with other discs.
2
3 Press A OPEN/CLOSE to close the disc compartment.
DISC CHANGE~
Tray number of the
disc to be played Total playing time
Total number of tracks
Load discs.
To plav all discs in the disc com~artment, press -.
Play begins with the disc on tray 1.
Number of track being played
Elapsed playing time
● When loading an 8-cm (3-inch) disc, put it onto the inner circle
of the tray.
● Do not place more than one compact disc on one disc tray.
● Do not tilt the unit with discs loaded. Doing so may cause
malfunctions.
9 ENGLISH
Page 11
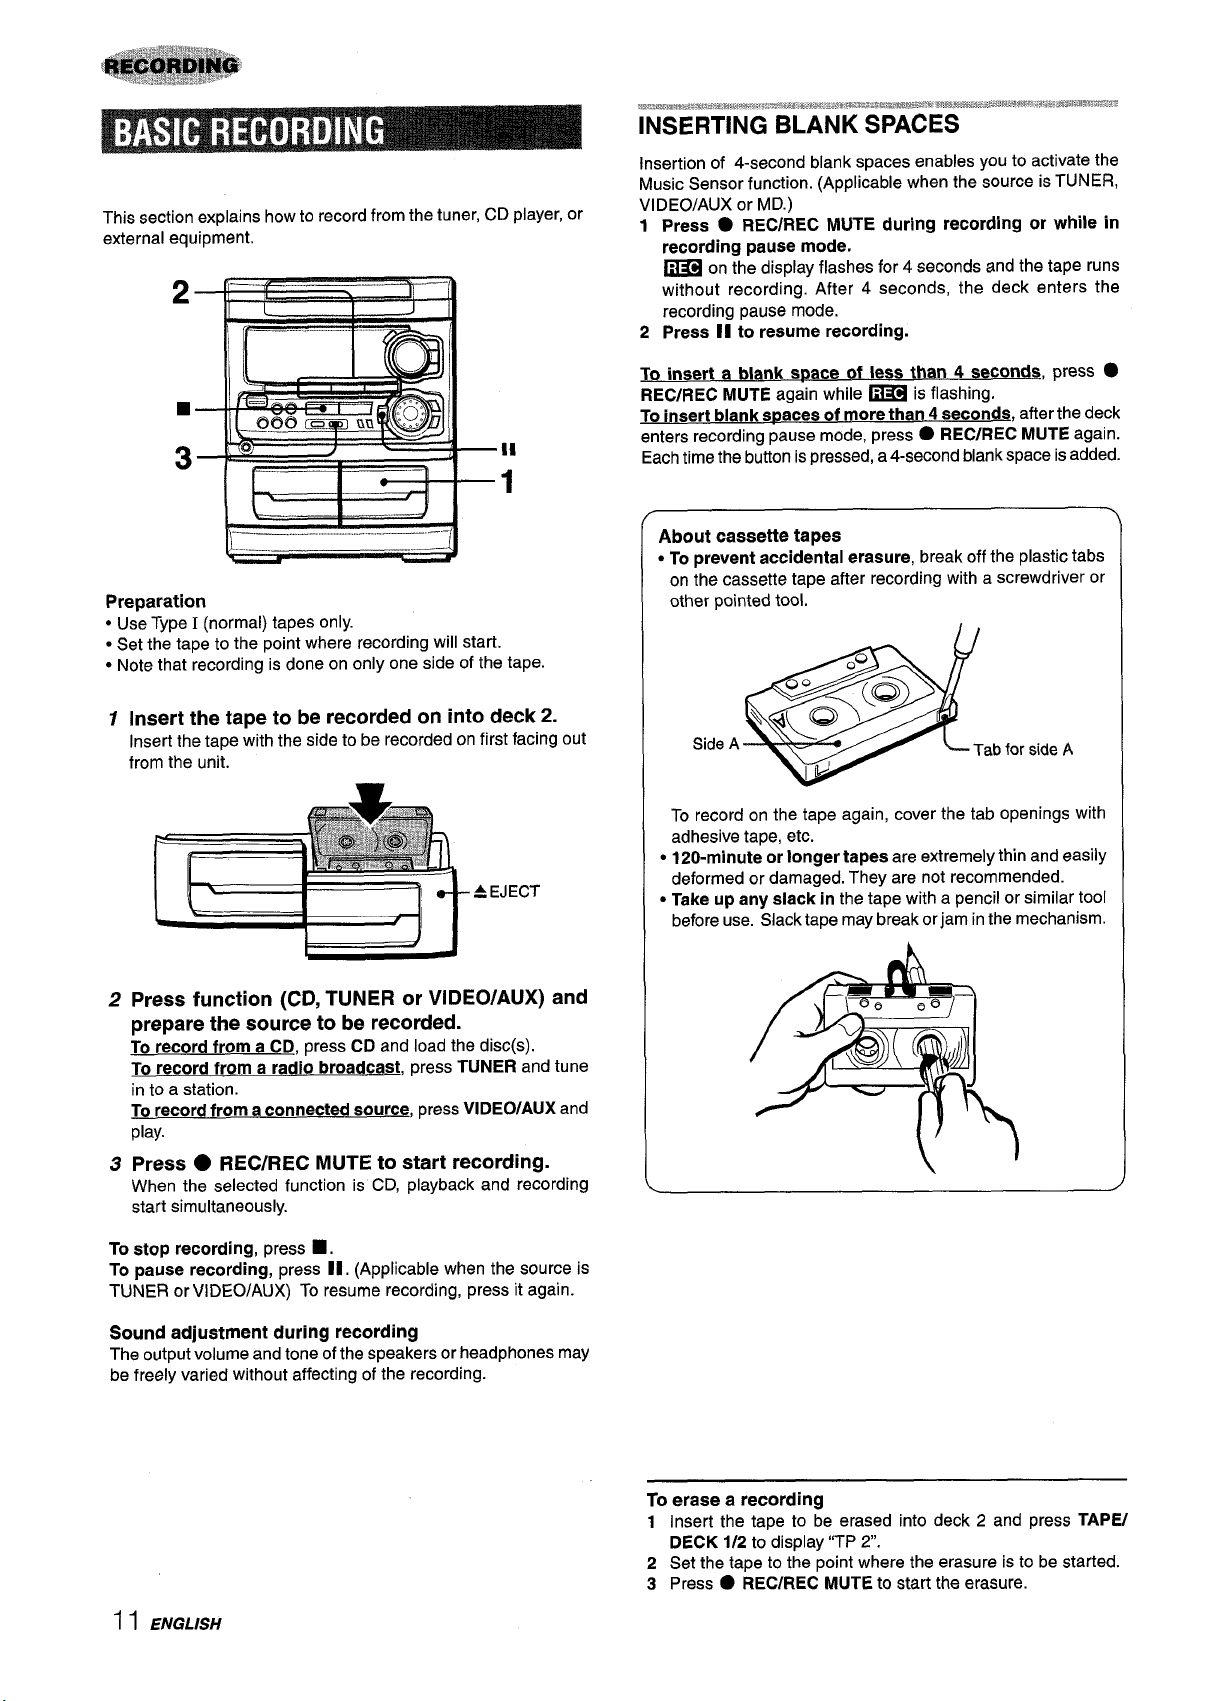
Use the remote control.
RANDOM play
All the tracks on the selected disc or all the discs can be played
randomly.
REPEAT play
A single disc or all the discs can be played repeatedly,
3 Press numbered buttons O-9 and +10 to program ,,, ,
a track.
Example:
To select the 25th track, press +10, +10 and 5.
To select the 10th track, press +1 O and O.
Total number of
Selected track number
selected tracks
,& ,!,
,1t ‘Lb
“,>
R’,?/,,m
#
?$,%‘~~~
..,2
,.,1
~,:,4$
1
!,.!
~,,;;
.’$$
Press RANDOM/REPEAT while pressing SHIFT.
Each time it is pressed, the function can be selected cyclically.
RANDOM play —
REPEAT play — ~ lights up on the display.
RANDOM/REPEAT
display.
Cancel —
To
~lav all discs, press - to start play.
To Dlay a sinale disc, press one of DISC DIRECT PLAY 1-3 to
start play.
RANDOM and G disappear from the display.
RANDOM lights up on the display.
play — RANDOM and% light up on the
m
During random play it is not possible to skip to the previously
played track with <.
Up to 30 tracks can be programmed from any of the inserted
discs.
Program number
Total playing time of
the selected tracks
4 Repeat steps 2 and 3 to program other tracks.
5 Press -to start play.
To check the program
Each time - or - is pressed in stop mode, a disc number,
track number, and program number will be displayed.
To
clear the program
Press ■ CLEAR in stop mode.
To add tracks to the program
Repeat steps 2 and 3 in stop mode. The track will be programmed
after the last track.
To change the programmed tracks
Clear the program and repeat all the steps again.
To play the programmed tracks repeatedly
After programming the tracks, press RANDOM/REPEAT
repeatedly until % appears on the display.
m
During programmed play, you cannot perform random play,
checking the remaining time, and selecting a disc or track,
❑
u
Use the remote control.
1 Press PRGM while pressing SHIFT in stop mode.
“PRG” is displayed
2 Press DISC DIRECT PLAY 1-3 to select a disc.
Go to the next step when the tray stops rotating.
ENGLISH 1()
Page 12
This section explains how to record from the tuner, CD player, or
external equipment.
2
t+
,.
~*.;a.,mm,d*mx,r*cm%@’*w XF%.=kee.,, *W. .
*m,,=a,$ ~~ax=.~~ *g,*>q,$~~r4.J,* wLw$,,”%, .,*,W $3$%W%W-W$
INSERTING BLANK SPACES
Insertion of 4-second blank spaces enables you to activate the
Music Sensor function. (Applicable when the source is TUNER,
VIDEO/AUX or MD.)
1 Press ● REC/REC MUTE during recording or while in
recording pause mode.
on the display flashes for 4 seconds and the tape runs
~
without recording. After 4 seconds, the deck enters the
recording pause mode.
2
Press II to reeume recording.
-—,_,,,,,,,,.
Preparation
Use Type I (normal) tapes only.
“
● Set the tape to the point where recording will start.
● Note that recording is done on only one side of the tape.
1
Insert the tape to be recorded on into deck 2.
Insert the tape with the side to be recorded on first facing out
from the unit.
A EJECT
1
I
J
To insert a blank space of less than 4 seconds,
press ●
REC/REC MUTE again while ~ is flashing.
To insert blank
enters recording pause mode, press
Each time the button is pressed, a 4-second blank space is added.
spacee of more than 4 seconds, after the deck
● REC/REC MUTE again.
About cassette tapes
● To prevent accidental erasure, break off the plastic tabs
on the cassette tape after recording with a screwdriver or
other pointed tool.
Side A
To record on the tape again, cover the tab openings with
adhesive tape, etc.
● 120-minute or longer tapes are extremely thin and easily
deformed or damaged. They are not recommended.
● Take up any slack in the tape with a pencil or similar tool
before use. Slack tape may break or jam in the mechanism.
>
2
Press function (CD, TUNER or VIDEO/AUX) and
prepare the source to be recorded.
To record from a CD, press CD and load the disc(s).
To record from a radio broadcast, press TUNER and tune
in to a station.
To record from
play.
Press ● REC/REC MUTE to start recording.
3
When the selected function is CD, playback and re=ording
start simultaneously.
To stop recording, press
To
psuse recording, press II. (Applicable when the source is
TUNER or VIDEO/AUX) To resume recording, press it again.
Sound adjustment during recording
The output volume and tone of the speakers or headphones may
be freely varied without affecting of the recording.
a connected source, press VIDEO/AUX and
■ .
To erase a recording
Insert the tape to be erased into deck 2 and press TAPE/
1
DECK 1/2
2 Set the tape to the point where the erasure is to be started.
3 Press
to display “TP 2.
● REC/REC MUTE to start the erasure.
I I ENGLISH
Page 13
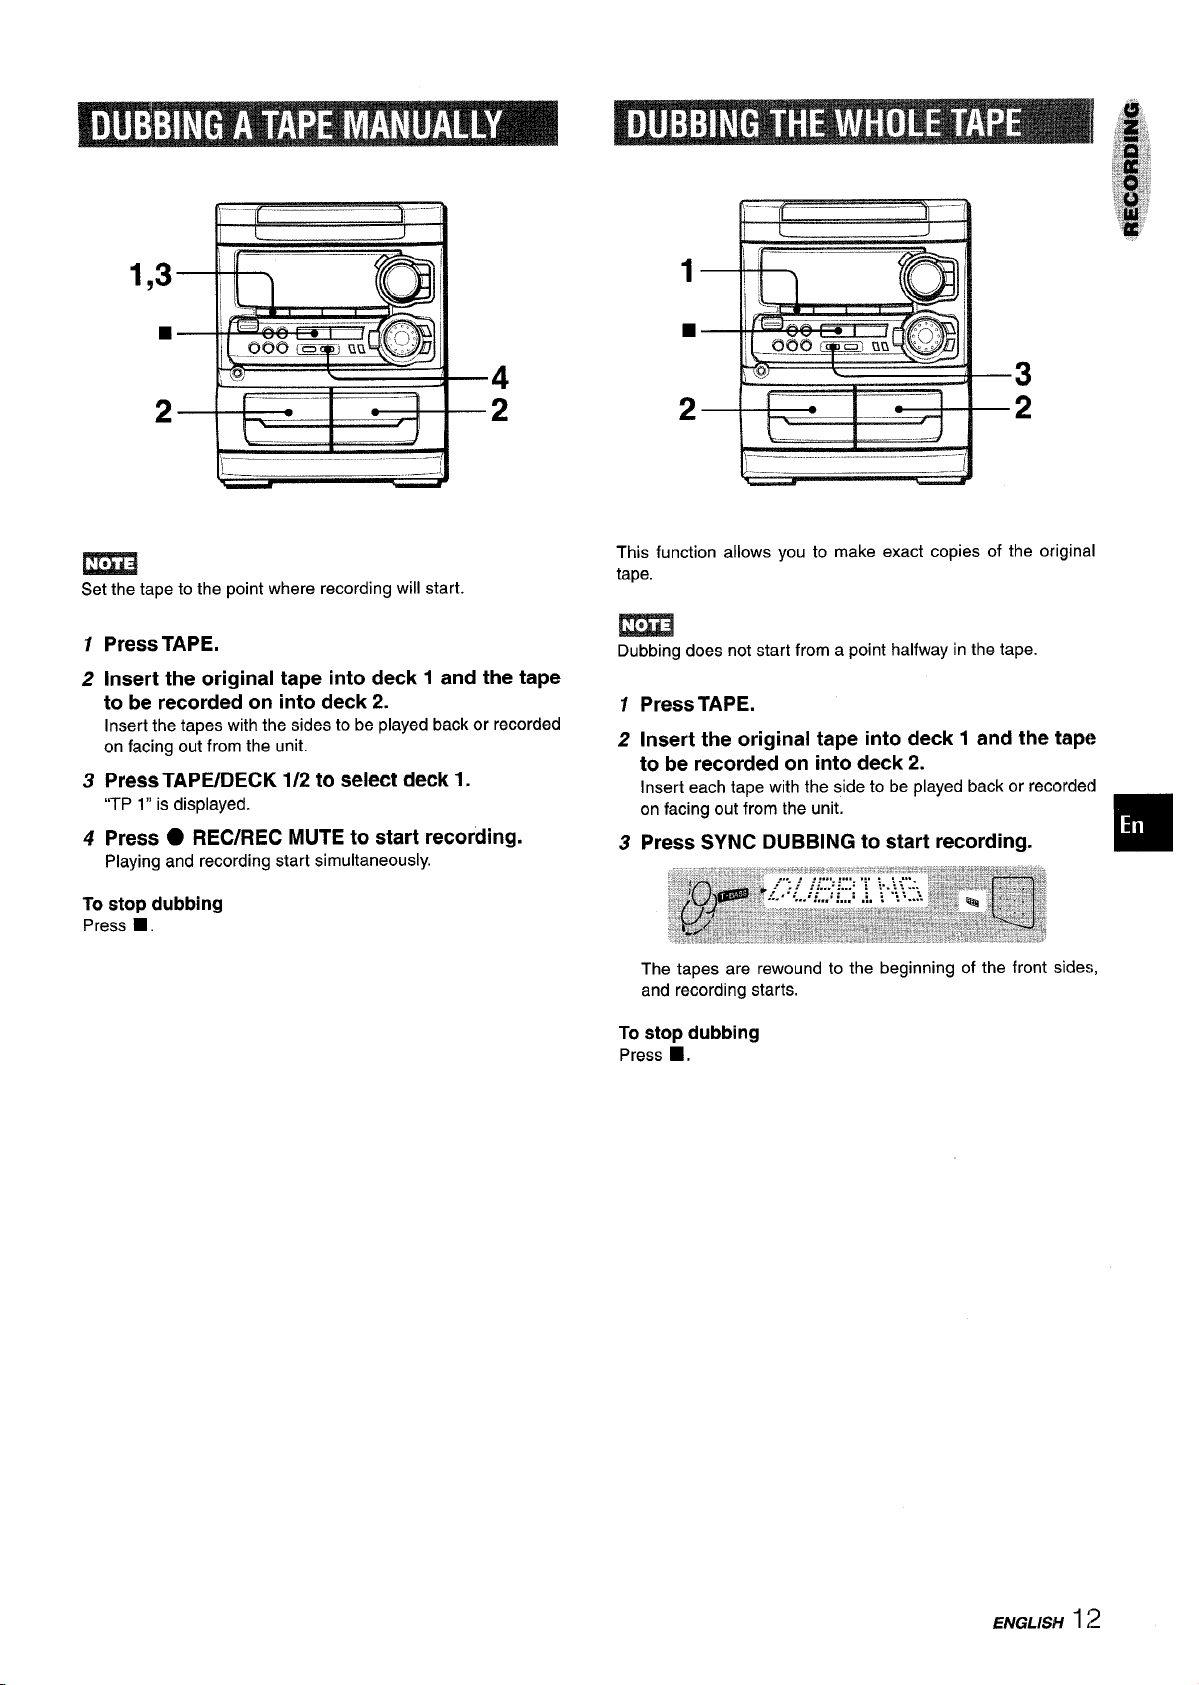
1,3
■
2
m
Set the tape to the point where recording will start.
1
Press TAPE.
2
Insert the original tape into deck 1 and the tape
to be recorded on into deck 2.
Insert the tapes with the sides to be played back or recorded
on facing out from the unit.
TAPE/DECK 1/2 to select deck 1.
Press
3
“TP 1” is displayed.
Press . REC/REC MUTE to start recording.
4
Playing and recording start simultaneously.
To stop dubbing
Press 9.
This function allows you to make exact copies of the original
tape.
m
Dubbing does not start from a point halfway in the tape.
1 Press TAPE.
2 Insert the original tape into deck 1 and the tap(?
to be recorded on into deck 2.
Insert each tape with the side to be played back or recorded
on facing out from the unit.
3 Press SYNC DUBBING to start recording.
The tapes are rewound to the beginning of the front sides,
and recording starts.
To stop dubbing
Press ■,
ENGLISH
1:2
Page 14
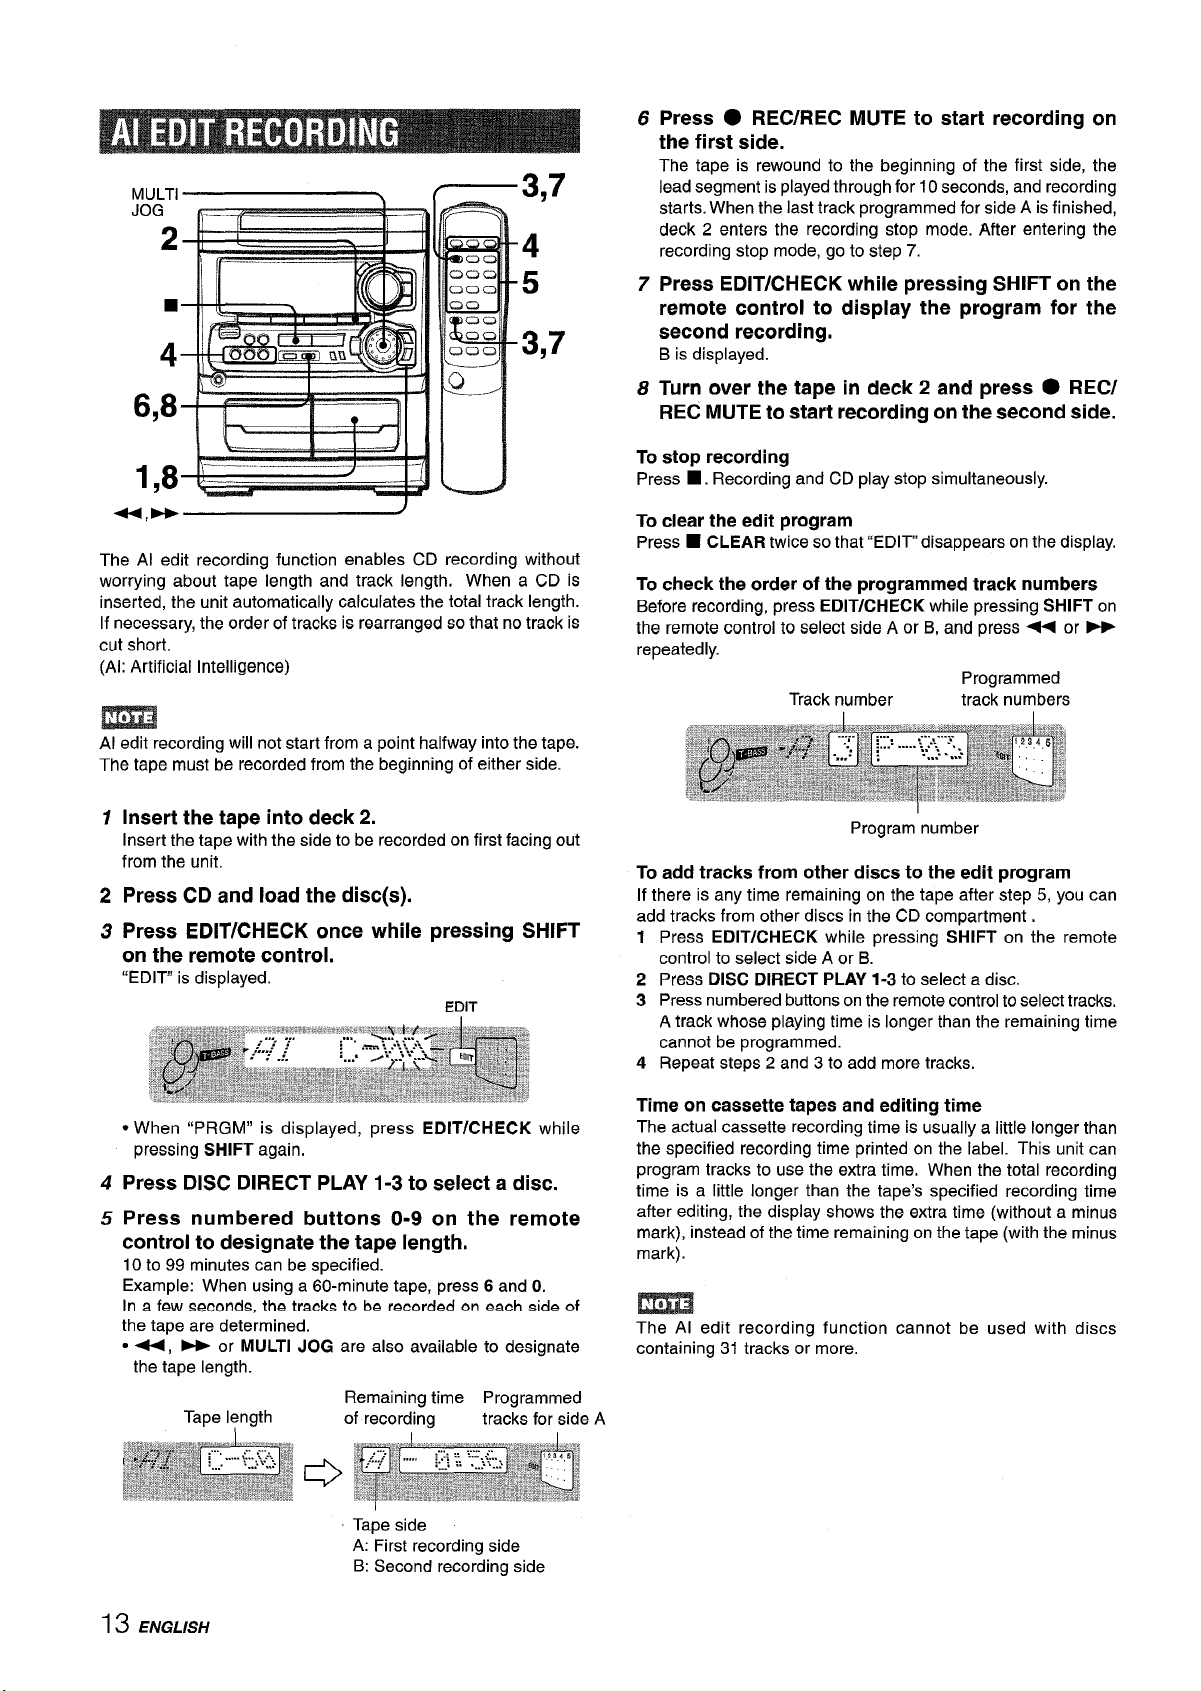
f—3q7
MULTI
JOG .–. ._
~ ~-+ ~lf%==% -
n
\
—.
4
5
3,7
,
6,8-I!+==--- . “II1 r=---’l
.
I h
The Al edit recording function enables CD recording without
worrying about tape length and track length, When a CD is
inserted, the unit automatically calculates the total track length.
If necessary, the order of tracks is rearranged so that no track is
cut short.
(Al: Artificial Intelligence)
v
I
I
I
‘Ml I
m
Al edit recording will not start from a point halfway into the tape.
The tape must be recorded from the beginning of either side.
6
Press
● REC/REC MUTE to start recording on
the first side.
The tape is rewound to the beginning of the first side, the
lead segment is played through for 10 seconds, and recording
starts. When the last track programmed for side A is finished,
deck 2 enters the recording stop mode. After entering the
recording stop mode, go to step 7.
Press EDIT/CHECK while pressing SHIFT on the
7
remote control to display the program for the
second recording.
B is displayed.
Turn over the tape
8
REC MUTE to start recording on the second side.
To stop recording
Press ■. Recording and CD play stop simultaneously.
To clear the edit program
Press ■ CLEAR twice so that “EDIT” disappears on the display.
To check the order of the programmed track numbers
Before recording, press EDIT/CHECK while pressing SHIFT on
the remote control to select side A or B, and
repeatedly.
in deck 2 and press ● REC/
press + or E
Programmed
Track number
track numbers
Insert the tape into deck 2.
1
Insert the tape with the side to be recorded on first facing out
from the unit.
Press
2
Press EDIT/CHECK once while pressing SHIFT
3
CD and load the disc(s).
on the remote control.
‘[EDIT” is displayed.
● When “PRGM” is displayed, press EDIT/CHECK
pressing SHIFT again,
Press DISC DIRECT PLAY 1-3 to select a disc,
4
Press numbered buttons O-9 on the remote
5
control to designate the tape length,
10 to 99 minutes can be specified.
Example: When using a 60-minute tape, press 6 and O.
In a few
the tape are determined.
● 44, - or MULTI JOG are also available to designate
seconde, the tracks to be recorded cm each side of
the tape length.
Remaining time Programmed
Tape length
of recording
tracks for side A
while
Program number
To add tracks from other discs to the edit program
If there is any time remaining on the tape after step 5, you can
add tracks from other discs in the CD compartment,
1 Press
2 Press DISC DIRECT PLAY 1-3 to select a disc.
3 Press numbered buttons on the remote control to select tracks.
4 Repeat steps 2 and 3 to add more tracks.
Time on cassette tapes and editing time
The actual cassette recording time is usually a little longer than
the specified recording time printed on the label. This unit can
program tracks to use the extra time, When the total recording
time is a little longer than the tape’s specified recording time
after editing, the display shows the extra time (without a minus
mark), instead of the time remaining on the tape (with the minus
mark).
The Al edit recording function cannot be used with discs
containing 31 tracks or more.
EDIT/CHECK while pressing SHIFT on the remote
control to select side A or B.
A track whose playing time is longer than the remaining time
cannot be programmed.
13 ENGLISH
Tape side
A: First recording side
B: Second recording side
Page 15
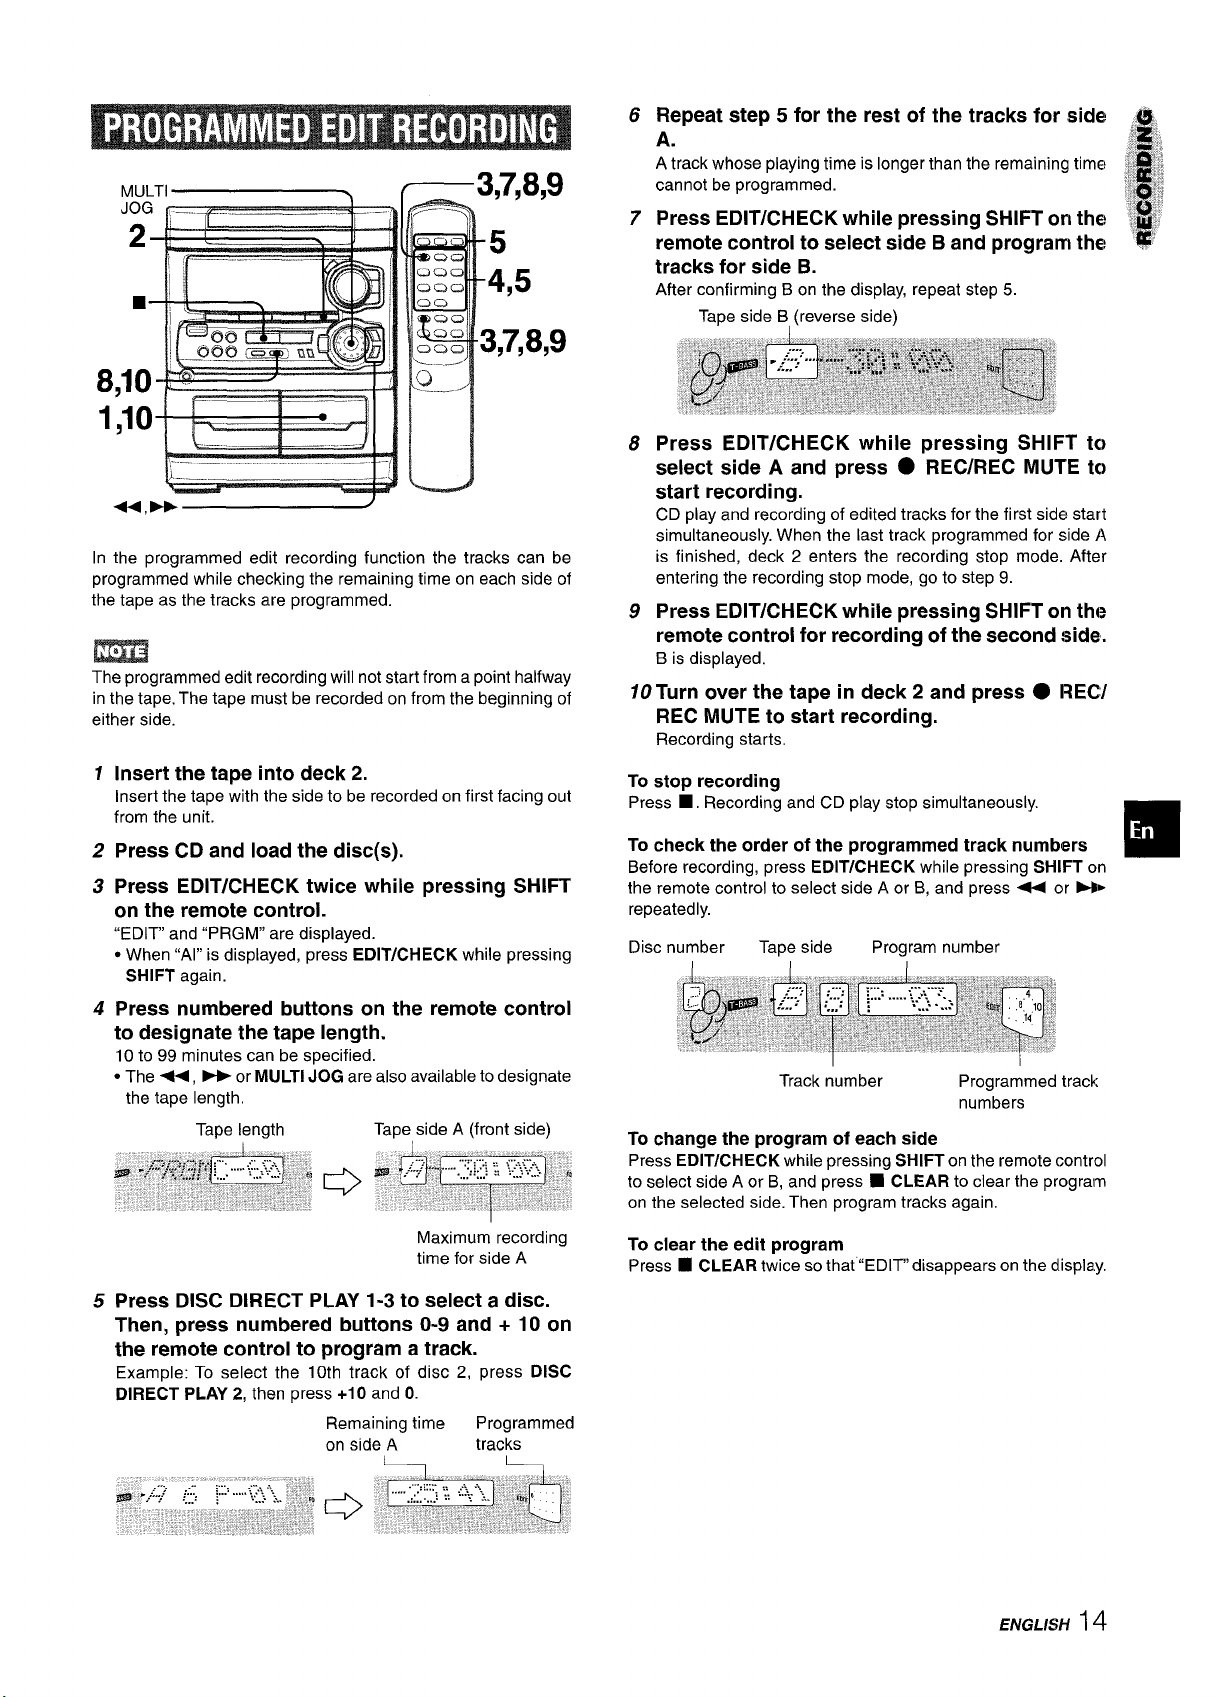
Repeat step 5 for the rest of the tracks for side! ~
6
A.
A track whose playing time is longer than the remaining time ~~; ~
cannot be programmed.
Press EDIT/CHECK while pressing SHIFT on the! ,#
7
remote control to select side B and program the
tracks for side B.
After confirming B on the display, repeat step 5.
Tape side B, (reverse side)
,3 ~
ill
,~::miij
,>,,:
~,. ,
., ‘:;/
8
::S”:
In the programmed edit recording function the tracks can be
programmed while checking the remaining time on each side of
the tape as the tracks are programmed.
m
The programmed edit recording will not start from a point halfway
in the tape. The tape must be recorded on from the beginning of
either side.
1
Insert the tape into deck 2.
Insert the tape with the side to be recorded on first facing out
from the unit.
Press CD and
2
Press EDIT/CHECK twice while pressing SHIFT
3
load the disc(s).
on the remote control.
“EDIT” and “PRGM” are displayed.
c When “Al” is displayed, press
SHIFT again.
4
Press numbered buttons on the remote control
EDIT/CHECK while pressing
to designate the tape length.
10 to 99 minutes can be specified.
● The -, > or MULTI JOG are also available to designate
the tape length.
Tape length
Tape side A (front side)
Press EDIT/CHECK while pressing SHIFT
8
select side A and press
● REC/REC MUTE
start recording.
CD play and recording of edited tracks for the first side start
simultaneously. When the last track programmed for side A
is finished, deck 2 enters the recording stop mode. After
entering the recording stop mode, go to step 9.
Press EDIT/CHECK while pressing SHIFT on tht?
9
remote control for recording of the second side.
B is displayed.
10 Turn over the tape in deck 2 and press ● REC/
REC MUTE to start recording.
Recording starts.
To stop recording
Press ■, Recording and CD play stop simultaneously.
check the order of the programmed track numbers
To
Before recording, press EDIT/CHECK while pressing SHIFT on
the remote control to select side A or B, and press - or N>
repeatedly.
Disc number
To change the program of each side
Press EDIT/CHECK while pressing SHIFT on the remote control
to select side A or B, and press 9 CLEAR to clear the program
on the selected side. Then program tracks again.
Tape side Program number
Track number
Programmed track
numbers
to
to
❑
Maximum recording
time for side A
Press DISC DIRECT PLAY 1-3 to select a disc.
5
Then, press numbered buttons O-9 and + 10 on
the remote control to program a track.
Example: To select the 10th track of disc 2, press DISC
DIRECT PLAY 2,
then press +10 and O.
Remaining time
on side A
Programmed
tracks
L
To clear the edit program
Press ■ CLEAR twice so that “EDIT” disappears on the dlispla.y.
ENGLISH14
Page 16

i--r
9
11
1
II
1
1,2,3
2
2,3
rP--A-a 1
1
Press CLOCK, then press II
seconds.
When using the remote control
Press CLOCK while pressing SHIFT, then press II SET !Mt!lin
4 seconds.
2
Press + DOWN or > UP to designate the
hour, then press II SET.
The hour stops flashing and the minute starts flashing.
Press - DOWN or - UP to designate the
3
minute, then press II SET.
The minute stops flashing on the display and the clock starts
from 00 seconds.
To display the current time
Press CLOCK. The time is displayed for 4 seconds.
However, the time cannot be displayed during recording.
To switch to the 24-hour standard
Press the CLOCK and then press
Repeat the same procedure to restore the 12-hour standard.
If the clock display flashes
This is caused by a power interruption. The current time needs
to be reset.
If power is interrupted for more than approximately 24 hours,
all settings stored in memory after purchase need to be reset.
■ within 4 seconds.
1
SET within 4
u,
The unit can be turned off automatically at a specified time.
Use the remote control.
Press SLEEP while pressing SHIFT.
1
2
Within 4 seconds, press < or W to specify
the time until the power is turned off.
Each time the button is pressed, the time changes between 5
and 240 minutes in 5-minute steps.
Specified time
I
To check the time remaining until the power is turned off
Press SLEEP once while pressing SHIFT. The remaining time
is displayed for 4 seconds.
To cancel the sleep timer
Press SLEEP twice while pressing SHIFT so that “SLEEP OFF”
appears on the display.
* MULTI JOG is also available instead of U and W.
MULTI JOG is also available instead of U and W.
15 ENGLISH
Page 17

4
Select the duration for the timer-activated periold
with 4 DOWN or - UP, then press [I set. ~
f
3
6
P
1 “[-----i‘
?
\-——..
The unit can be turned on at a specified time every day with the
built-in timer.
Preparation
Make sure the clock is set correctly.
Use the
1
remote control.
Press TIMER to display 0, then press II SET
within 6 seconds.
O
is displayed and the hour flashes.
1 I
.——-
2,4
A
—1,2,3,4
9
1
The duration for the timer-activated period can beset between
5 and 240 minutes in 5-minute steps.
Prepare the source.
5
To listen to a CD, load the disc to be played first on tray 1.
listen to a tarJe, insert the tape into deck 1 or 2.
To
To
listen to the radio, tune in to a station.
Press POWER to turn the unit off after adjusting
6
the volume and tone.
remains on the display after the power is turned off (timer
O
standby mode).
When the timer-on time is reached, the unit turns on and
begins play with the selected source.
The volume level is automatically set to 16 when the power is
turned off with the volume level set to 17 or more,
To check the specified time and source
Press TIMER. The timer-on time, the selected source name and
the duration for the timer-activated period are displayed for 4
seconds.
To cancel timer standby mode temporarily
Press TIMER re~eatedlv until ~ disaDDears on the dlSDlaV.
To restore the timer standby mode, press TIMER once’ortwice
to display 0.
.g-
G
❑
m
If you press II SET after 6 seconds, another operation may
start.
Designate the hour of the timer-on time by
2
pressing <
SET.
Repeat to designate the minute of the timer-on
time.
After you designate the timer-on time, one of the source names
flashes on the display.
Press FUNCTION to select a source, then press
3
II SET.
● If TUNER is pressed, the band cannot be selected in this
step.
DOWN or > UP, then press II
Using the unit while the timer is set
You can use the unit normally after setting the timer.
Before turning off the power, carry out step 5 to prepare the
source, and adjust the volume and tone.
● Timer playback and timer recording will not begin unless thle
power is turned off.
● Connected equipment cannot be turned on and off by the built-
in timer of this unit. Use an external timer.
* MULTI JOG is also available instead of 4 and >.
Timer recording is applicable for TUNER and VIDEO/AUX (wi’!h
an external timer) sources only.
Press TIMER repeatedly until @ flashes on the display, them
press II SET within 6 seconds.
“SETTING THE TIMER” from step 2 and insert the tape to be
recorded on into deck 2 after step 5.
Carry out the steps of
ENGLISH16
Page 18

CD DIGITAL OUT
(OPTICAL)
vIDEO/AUX
SURROUND
SPEAKERS
1
POWER
Refer to the operating instructions of the connected equipment
for details.
● The connecting cords are not supplied. Obtain the necessary
connecting cords.
● Consult your local Aiwa dealer for optional equipment.
?$,:--.:,’! ,= 2. s , . . . . . . ., .,., - .-:*N :=: : -m- 7.%..-,:;:$.-’- .:-.,: -.. . .-.:’..2.:.=$ ‘~’.-:=~fl= .J”=*-=.’”’
.-....=..,------
VIDEO/AUX JACKS
This unit can input analog sound signals through these jacks.
Use a cable with RCA phono plugs to connect audio equipment
(turntables, LD players, MD players, VCRs, TV, etc.).
Connect the red plug to the VIDEO/AUX R jack, and the white
plug to the
VIDEO/AUX L jack.
When connecting a turntable
Use an Aiwa turntable equipped with a built-in equalizer amplifier.
.T”zis:.u *X:.- “ ‘,.; S.? .*.:*,%4 .-.- ..-:- : .,_.L-., . y,yJ- & :;!
CD DIGITAL OUT (OPTICAL) JACK
This unit can output CD digital sound signals through this jack.
Use an optical cable to connect digital audio equipment (DAT
deck, MD recorder, etc.).
Remove the dust cap @ from the
jack. Then, connect an optical cable plug to the CD DIGITAL
OUT (OPTICAL) jack.
CD DIGITAL OUT (OPTICAL)
To play equipment connected to the VIDEO/AUX jacks proceed
as follows.
Press VIDEO/AUX.
1
“VIDEO” or “AUX appears on the display.
Play the connected equipment.
2
To change a source name in the display
When VIDEO/AUX is pressed, “VIDEO or “AUX is displayed
initially. It can be changed to “VIDEO, “AUX or “TV.
With the power on, press POWER while pressing VIDEO/AUX.
Repeat the procedure to select one of the names.
When the CD DIGITAL OUT (OPTICAL) jack is not being
used
Attach the
SUppllMt O’USt cap.
17 ENGLISH
Page 19

Occasional care and maintenance of the unit and the software
are needed to optimize the performance of your unit.
If the unit fails to perform as described
Instructions, check the following guide.
in these Operating
To clean the cabinet
Use a soft and dry cloth.
If the surfaces are extremely dirty, use a soft cloth lightly
moistened with mild detergent solution. Do not use strong
solvents, such as alcohol, benzine or thinner as these could
damage the finish of the unit,
To clean the heads and tape paths
After every 10 hours of use, clean the heads and tape paths with
a head cleaning cassette or cotton swab moistened with cleaning
fluid or denatured alcohol. (These cleaning kits are commercially
available.)
When cleaning with a cotton swab, wipe the recording/playback
head (deck 2 only), erasure head (deck 2 only), capstans, and
pinchrollers.
/ i
\
After cleaning the heads and tape paths with
I
a liquid head
cleaning cassette or a moistened swab, wait until the cleaned
parts are completely dry before inserting the tapes,
To demagnetize the heads
The heads may become magnetized after long-term use. This
may narrow the output range of recorded tapes and increase
noise. After 20 to 30 hours use, demagnetize the heads with
any commercially available demagnetizer.
Care of discs
● When a disc becomes dirty, wipe the disc from the center out
with a cleaning cloth.
GENERAL
There is no sound.
● Is the AC cord connected properly?
● Is there a bad connection? (+ page 3)
● There may be a short circuit in the speaker terminals.
+ Disconnect the AC cord, then correct the speaker
connections.
● Was an incorrect function button pressed?
Sound is emitted from one speaker only.
● Is the other speaker disconnected?
An erroneous display or a malfunction occurs.
Reset the unit as stated below.
+
TUNER SECTION
There is constant, wave-like static.
● Is the antenna connected properly? (+ page 4)
● Is the signal weak?
+ Connect an outdoor antenna.
The reception contains noise interferences or the sound
is distorted.
● Isthe system picking up external noise or multipath distortion?
+ Change the orientation of the antenna.
+ Move the unit away from other electrical appliances.
CASSETTE DECK SECTION
The tape does not run.
Is deck 2 in pause mode? (+ page 8)
c
The sound is off-balance or not adequately high.
● Is the playback head dirty? (~ page 18)
Recording is not possible.
● Is the erasure prevention tab on the tape broken off? (+ page
8)
● Is the recording head dirty? (+ page 18)
Erasure is not possible.
● Is the erasure head dirty? (-+ page 18)
● Is a metal tape being used?
High frequency sound is not emitted.
● Is the recording/playback head dirty? (+ page 18)
CD PLAYER SECTION
The CD player does not play.
● Is the disc correctly placed? (+ page 9)
● Is the disc dirty? (+ page 18)
● Is the lens affected by condensation?
+ Wait approximately one hour and try again.
o
● After playing a disc, store the disc in its case. Do not leave the
disc in places that are hot or humid.
Care of tapes
● Store tapes in their cases after use.
● Do not leave tapes near magnets, motors, television sets, or
any source of magnetism. This will downgrade the sound quality
and cause noise.
● Do not expose tapes to direct sunlight, or leave them in a car
parked in direct sunlight.
—.
To reset
If an unusual condition occurs in the display window or the
cassette decks, reset the unit as follows.
1 Press POWER to turn off the power.
2 Press
If the power cannot be turned off in step 1 because of a
malfunction, reset by disconnecting the AC cord, and connect it
again. Then carry out step 2.
POWER to turn the power back on while pressing IM
CLEAR. Everything stored in memory after purchase is
canceled.
ENGLISH
18
Page 20

Main unit CX-NA303
FM tuner section
Tuning range
Usable sensivity
(IHF)
Antenna terminals
AM tuner section
Tuning range
Usable sensitivity
Antenna
Amplifier section
Power output
Total harmonic distortion
Inputs
outputs
Cassette deck section
Track format
Frequency response
Recording system
Heads
Compact disc player section
Laser
D-A
converter
Signal-to-noise ratio
Harmonic distortion
Wow and flutter
87.5 MHz to 108 MHz
13.2 dBf
75 ohms (unbalanced)
530 kHz to 1710 kHz (1OkHz step)
531 kHz to 1602 kHz (9 kHz step)
350 @//m
Loop antenna
30 W+30W(50Hz–20 kHz, THD
less than 1
0.17. (15 W, 1 kHz, 6 ohms, DIN
AUDIO)
VIDEO/AUX: 500 mV
SPEAKERS: accept speakers of 6
ohms or more
SURROUND SPEAKERS:
accept speakers of 8 ohms to 16
ohms
PHONES (stereo jack): accepts
headphones of 32 ohms or more
4 tracks, 2 channels stereo
50 Hz – 10000
AC bias
Deck 1:Playback head x 1
Deck 2: Recording/playback head
Semiconductorlaser(1= 780
1 bit dual
85
0.057.
Unmeasurable
‘7., 6 ohms)
tiz
x 1, erase head x 1
nm)
dB (1 kHz, O dB)
(1 kHz, O dB)
SDeaker svstem SX-NA302
Cabinet type
Speakers
Impedance
Output sound pressure level
Dimensions (W x H x D)
Weight
Specifications and external appearance are subject to change without
notice.
2 way, bass reflex (magnetic
shielded type)
Woofer:
120 mm (4
Tweeter:
10
6 ohms
87 dBIWlm
235 x 324x 250 mm
(9
3/8x 1P 7/8X 9 7/8 h.)
3.2 kg (7 Ibs 11 OZ.)
3/4 in.) cone type
(13/32 h.) mm Cf3LN?7iC typf3
COPYRIGHT
Please check the laws on copyright relating to recordings from
discs, radioor externaltape
is being used.
for the country in which the machine
NOTE
This equipment has been tested and found to comply with the
limits for a Class B digital device, pursuant to Part 15 of the FCC
Rules. These limits are designed to provide reasonable protection
against harmful interference in a residential installation.
This equipment generates, uses, and can radiate radio frequency
energy and, if not installed and used in accordance with the
instructions, may cause harmful interference to radio
communications. However, there is no guarantee that
interference will not occur in a particular installation. If this
equipment does cause harmful interference to radio or television
reception, which can be determined by turning the equipment
off and on, the user is encouraged to try to correct the interference
by one or more of the following measures:
- Reorient or relocate the receiving antenna.
- Increase the separation between the equipment and receiver.
- Connect the equipment into an outlet on circuit different from
that to which the receiver is connected.
- Consult the dealer or an experienced radio/TV technician
for help.
General
Power requirements
Power consumption
Dimensions of main unit
(W XHXD)
Weight of main unit
I 9 ENGLISH
120 V AC, 60
85 W
260 x 330x 346 mm
(10’/4 x 13x 135/8 in.)
5.7 kg (12 Ibs 9
I-Iz
OZ.)
CAUTION
Modifications or adjustments to this product, which are not
expressly approved by the manufacturer, may void the user’s
right or authority to operate this product.
Page 21

Page 22

L!L!l
I
“CAUTION:TO REDUCE THE RISK OF
DO NOT REMOVE COVER (OR BACK).
NO USER-SERVICEABLE PARTS INSIDE.
REFER SERVICING TO QUALIFIED
DO NOT OPEN
ELECTRIC SHOCK,
SERVICE PERSONNEL.”
1
/!LLJ
Lea cuidadosa y completamente el manual de instrucciones
antes de utilizar la unidad, Asegtirese de guardar el manual de
instrucciones para utilizario como referencia en ei future. Todas
Ias advertencias y precauciones del manual de instrucciones y
de la unidad deberan cumplirse estrictamente, as( como tambien
Ias sugerencias de seguridad mencionadas mas abajo.
Instalacion
Agua y humedad — No utilice esta unidad cerca del agua
1
como, por ejemplo, cerca de una bahera, una palangana, una
piscina o algo similar.
2
Calor — No utilice esta unidad cerca de fuentes de calor,
incluyendo salidas de aire caliente, estufas u otros aparatos
que generen calor.
No debera colocarse tampoco en Iugares donde la
temperature sea inferior a 5°C o superior a 35”C.
3
Superficie de montaje — Ponga la unidad sobre una
superficie plana y nivelada.
Ventilaci6n — La unidad debera situarse donde tenga
4
suficiente espacio Iibre a su alrededor, para que laventilaci6n
apropiada quede asegurada. Deje un espacio Iibre de 10 cm
por la parte posterior y superior de la unidad, y 5 cm por cada
Iado.
- No ponga la unidad sobre una cama, una alfombra o
superficies similares que podr[an tapar Ias aberturas de
ventilation.
- No instale la unidad en una Iibreria, mueble o estanter[a
cerrada hermeticamente donde la ventilaci6n no sea
adecuada.
Entrada de objetos y Iiquidos — Tenga cuidado de que
5
objetos y I[quidos no entren en la unidad por Ias aberturas de
ventilation.
Carros de mano y soportes — Cuando
6
ponga o monte la unidad en un soporte o
carro de mane, esta debera moverse con
mucho cuidado.
Las paradas repentinas, lafuerza excesiva
y Ias superficies irregulars pueden hater
que la unidad o el carro de rnano se de vuelta o se caiga.
7
Condensscion — En la Iente del fonocaptor del reproductor
de discos compactos tal vez se forme condensation cuando:
- La unidad se pase de un Iugar frio a uno caliente.
- El sistema de calefaccion se acabe de encender.
- La unidad se utilice en una habitation muy humeda.
- La unidad se enfrie mediante un acondicionador de sire.
Esta unidad tal vez funcione mal cuando tenga condensaci6n
en su interior. Eneste case, deje en reposo la unidad durante
unas pocas horas y repita de nuevo la operation.
8
Montaie en pared o techo — La unidad no se debera montar
en un; pared ni en el techo, a menos que se especifique 10
contrario en el manual de instrucciones.
@!!O
●
AL
Anotacion del propietario
Para su conveniencia, anote el ntimero de modelo y el ntimero
de serie (Ios encontrara en el panel trasero de su aparato) en el
espacio suministrado mas abajo. Mencionelos cuando se ponga
en contacto con su concesionario Aiwa en caso de tener
dificultades.
/ N.” de modelo I N.” de serie (N.” de Iote) I
I CX-NA303
I SX-NA302
SX-R275
(NSX-A304 solamente)
ESPANOL
1
I
I
I
I
Enerafa electrica
Fuentes de alimentacion — Conecte solamente esta unidad
1
a Ias fuentes de alimentacion especificadas en el manual de
instrucciones, y como esta marcado en la unidad.
2
Polarization — Como caracterktica de seguridad, algunas
unidades estan equipadas con clavijas de alimentacion de
CA polarizadas, Ias cuales solo se pueden insertar de una
forma en Ias tomas de corriente. Si results dificil o imposible
insertar la clavija de alimentacion de CA en una toma de
corriente, de vuelta a la clavija e intentelo de nuevo. Si sigue
sin poder insertar facilmente la clavija en latoma de corriente,
Ilame a un electricista cualificado para que modifique o
reemplace la toma de corriente. Para evitar anular la
caracteristica de seguridad de la clavija polarizada, no la
inserte a la fuerza en una toma de corriente.
Page 23

3
Cable de alimentacion de CA
- Cuando desconecte el cable de alimentacion de CA, sujete
la clavija de alimentacion de CA y tire de ells. No tire del
propio cable.
- Nunca maneje la clavija de alimentacion de CA con Ias
manes mojadas porque podria producirse un incendio o una
sacudida electrica.
- Los cables de alimentacion deberan colocarse de forma que
no scan doblados excesivamente, pellizcados o pisados.
Tenga mucho cuidado con el cable que va de la unidad a la
toma de corriente.
- Evite sobrecargar Ias tomas de CA y Ioscables de extensi6n
mas alla de su capacidad porque esto podrfa causar un
incendio o una sacudida electrica.
4
Cable de extension — Para evitar sacudidas electrical, no
utilice laclavija de alimentacion de CA polarizada con un cable
de extension, ni tampoco en un receptaculo u otra toma de
corriente a menos que la clavija polarizada pueda insertarse
completamente evitando que sus patinas queden expuestas.
Periodos de no utilization — Desenchufe el cable de
5
alimentacion de CA de la toma de corriente si la unidad nova
a ser utilizada durante varies meses o mas. Cuando el cable
de alimentacion este conectado, por la unidad continuara
circulando una pequetia cantidad de corriente, aunque la
alimentacion este desconectada.
Antena exterior
1 Lfneas de alta tension — Cuando conecte una antena
exterior, asegurese de colocarla Iejos de Ias Ifneas de alta
tension.
2 Conexion a tierra de la antena exterior — Asegtirese de
que el sistema de la antena este conectado correctamente a
tierra para proporcionar asi una protection contra el exceso
inesperado de tension o contra la acumulacion de electricidad
estatica. El articuio 810 del Codigo Electrico National, ANS1/
NFPA70, proporciona information acerca de lapuesta a tierra
apropiada del mastil de la antena, la estructura de apoyo y el
cable de bajada a la unidad de descarga de la antena, as[
como tambien del tamafio de la unidad de puesta a tierra, la
conexion de Ios terminals de puesta a tierra y Ios requisites
para conectar a tierra Ios mismos terminals.
Puestaatierrade la antenaseg(mel CodigoElectricoNational
PRECAUCIONES ................................................................l
PREPARATIVES
CONEXIONES ..m . . . . . . . . . . . . . . . . . . . . . . . . . . . . . . . . . . . . . . . . . . . . . . . . . . . . . . . . . . . . . . . . . 3
CONTROL REMOTO ............................................................5
ANTES DE LA OPERACION ........................................s......5
SONIDO
AJUSTES DE AUDIO ........................................................ 61
ECUALIZADOR GRAFICO ................................................ 6
RECEPCION DE LA RADIO
SINTONIZACION MANUAL ............................................... i’
PREAJUSTE DE EMISORAS ............................................ i’
REPRODUCTION DE CINTAS
OPERACIONES BASICAS ............................................... 8
REPRODUCTION DE DISCOS COMPACTOS
OPERAClONES BASICAS ................................................ 9
REPRODUCTION PROGRAMADA ................................. 10
GRABACION
GRABACION BASICA .....................................................
COPIADO MANUAL DE UNA CINTA
COPIADO DETODA LA CINTA ....................................... 12
GRABACION CON EDICION Al .................................... 13
GRABACION CON EDICION PROGRAMADA ...............14
.............................. ;:2
RELOJ Y TEMPORIZADOR
PUESTA EN HORA DEL RELOJ ................................... 1!5
AJUSTE DEL TEMPORIZADOR PARA DORMER............ 1!5
AJUSTE DEL TEMPORIZADOR .....................................
❑
lIB
CABLE DE BAJADA
~ DE LA ANTENA
R
CONDUCTORES DE
PUESTA A TIERRA
(NEC, SECCION 8?0-21)
ABRAZADERAS DE
NEC (CODIGO ELECTRICO NACIONAL)
Mantenimiento
Limpie la unidad solo como se recomienda en el manual de
instrucciones.
Daiios que necesitan ser reparados
Haga que un tecnico en reparaciones cualificado Ie repare Ias
unidades si:
- El cable de alimentacion de CA o su clavija esta estropeado.
- Objetos extrahos o Iiquidos han entrado en la unidad.
- La unidad ha estado expuesta a la Iluvia o al agua.
- La unidad no parece funcionar normalmente.
- La unidad muestra un cambio considerable en sus prestaciones.
- La unidad se ha caido o la caja se ha estropeado.
NO TRATE DE REPARAR LA UNIDAD USTED MISMO.
~ SISTEMA DE ELECTRODO DE
PUESTA A TIERRA
PUESTA A TIERRA DEL SERVICIO
ELECTRICD (NEC, ARTICULO 250, PARTE H)
OTRAS CONEXIONES
CONEXION DE UN EQUIPO OPCIONAL ....................... 1’7
ESCUCHA DE FUENTES DE SONIDO EXTERNAS ......1’7
GENERALIDADES
CUIDADOSY MANTENIMIENTO .................................... 18
GUIA PARA LA SOLUCION DE PROBLEMAS ..............18
ESPECIFICACIONES ....................................................... 19
INDICE DE LAS PARTES .....................
Cubierta trasefa
ESPAiiOL
.
2
Page 24

Compruebe su sistema y Ios accesorios
CX-NA303 Sintonizador, amplificador, piatina de casete y
reproductor de discos compactos esttfweo
SX-NA302 Altavoces delanteros
* SX-R275 Altavoces de sonido ambiental (para el NSX-A304
solamente)
Control remoto
Antena de AM
Antena de FM
Antes de conectar el cable de alimentacion de CA
La tensi6n nominal de su unidad, mostrada en el panel trasero,
es de 120 V CA. Asegurese de que la tension nominal coincida
con la tension empleada en su Iocalidad.
IMPORTANTE
Conecte primero Ios altavoces, Ias antenas y todos Ios demas
equipos opcionales. Finalmente conecte ei cable de alimentacion
de CA.
Conecte Ios altavoces derecho e izquierdo a la
1
unidad principal.
Cortecte el cable del altavoz derecho a Ios terminals
SPEAKERS R, y el cable del altavoz izquierdo aIos terminals
SPEAKERS L,
El cable de altavoz con la franja blanca debera conectarse al
terminal 0, y el cable negro al terminal O.
2
Conecte Ios altavoces de sonido ambiental a la
unidad principal. (Solo para el NSX-A304)
Conecte cada cable de altavoz de sonido ambiental al terminal
SURROUND SPEAKERS R
O L.
Manual de instrucciones. etc.
* Con el NSX-A304 se encuentran disponibles alta votes de sonido
ambiental SX-R275 opcionales.
1
,—
Altavoz derecho
=-----_~
~=1
2
Altavoz Izquierdo
1
L-J
w
%
:
7
I
.
ambiental
~ ESPANOL
Cable de CA
➤4
Cable de altavoz de sonido ambiental
J
Page 25

3
Conecte Ias antenas suministradasi
Conecte la antena de FMa Iosterminates FM 75 Q, y la antena
de AM a Ios terminates AM LOOP.
Antena de AM
Antena de FM
pfl
@’
[
Para obtener la mejor recepcion de FM se recomienda I.Itilizar
una antena exterior.
Conecte la antena exterior a Ios terminals FM 75 Q.
*C I IIEWL
Conecte el cable de alimentacion de CA a una
4
T
toma de CA.
m
Cuando se conecte el cable de alimentacion de CA puede que
todos Ios caracteres se enciendan en el visualizador. En este
case, desconecte el cable de alimentacion de CA y Iuego vuelva
a conectarlo.
Para posicionar Ias antenas
Antena de FM:
Extienda horizontalmente esta antena formando una T y fije sus
extremes en la pared.
Antena de AM:
Pongala para obtener la mejor recepcion posible.
Para poner la antena de AM en position vertical sobre
una eupetiicie
Fije el gancho en la ranura.
Para conectar otro equipo optional -+ pagina 17.
J
“,J
‘%
J
m
● Aseaurese de conectar correctamente Ios cables de
altavoces, Las conexiones mal hechas podrian causar
cortocircuitos en Ios terminals SPEAKERS.
● No deje objetos que generen magnetism, tales como tarjetas
de credito, cerca de Ios altavoces porque podrian estropearse.
● No ponga la antena de FM cerca de objetos metalicos o rieles
de cortinas.
● No ponga la antena de AM cerca de otros equipos opcionales,
el propio sistema estereo, el cable de alimentacion de CA o Ios
cables de Ios altavoces, porque se captaran ruidos.
● No desbobine el cable de la antena de AM.
10s
ESPAfiOL
4
Page 26

Insertion de Ias pilas
Quite la tapa de Ias pilas, ubicada en la parte trasera del control
remoto, e inserte dos pilas R6 (tamafio AA).
—-
T
J
■
I 7
I
CD
II
R6(AA)
Cuando reemplazar Ias pilas
La distancia maxima de operation entre el control remoto y el
sensor de sefiales de la unidad principal debera ser de 5 metros
aproximadamente. Cuando disminuya esta distancia, reemplace
Ias pilas por otras nuevas.
Para utilizar SHIFT del control remoto
Los botones 0 tienen dos funciones diferentes. Una de estas
funciones se indica en el boton, y la otra en la placa situada
encima del bot6n.
Para utilizar la funcion del boton, pulse simplemente el boton.
Para utilizar la funcic5n de la placa situada encima del bot6n,
pulse el boton mientras pulsa SHIFT.
Para utilizar FUNCTION del control remoto
FUNCTION sustituye a Ios botones de funcion (TAPE/DECK 1/
2,TUNER, VIDEO/AUX y CD) de la unidad principal.
Cada vez que se pulse FUNCTION, la siguiente funcidn se
seleccionara ciclicamente. Cuando haya cintas insertadas en
ambas platinas, cada platina se seleccionara con FUNCTION.
CLOCIV
DIMMER
Para encender la unidad
Pulse uno de Ios botones de funcion (TAPE, TUNER, VIDEO/
AUX, CD). La reproduction de la cinta o del disco insertado
empezara o se recibira la emisora previamente sintonizada
(funcion de reproduction directs).
Tambi6n podra utilizarse POWER.
Cuando se encienda la unidad, el compartimiento de Ios discos
tal vez se abra y se cierre para reponer la unidad.
Para desconectar la alimentacion
Pulse POWER.
Ventanilla parpadeante
La ventanilla de la parte superior de la unidad se encendera o
parpadeara mientras la alimentacion este conectada.
Para apagar la Iuz de la ventanilla superior, pulse ■ mientras
pulsa CD. Para volver a encenderla, repita el procedimiento
seguido para apagarla.
Modo de demostraci6n
Cuando se conecte el cable de alimentaci6n de CA, el
visualizador mostrara Ias funciones de la unidad, Cuando se
conecte la alimentacion, la visualiza”cion DEMO sera anulada
~or la visualization de oueracion. Cuando se desconecte la
alimentaci6n, el modo DEMO se repondr~.
(DEMO)
c)
u
m
● Si el control remoto nova a ser utilizado durante mucho tiempo,
quite Ias pilas para evitar Ias posibles fugas de electr61ito.
● El control remoto quiza no funcione correctamente cuando:
- La Iinea de vision entre el control remoto y el sensor de
seriales del interior del visualizador este expuesta a una Iuz
intensa como, por ejemplo, la Iuz del sol.
- Otros controles remotos (Ios de un televisor, etc.) esten siendo
utilizados cerca de esta unidad.
5 ESPAfiOL
Para cancelar el modo DEMO
Pulse II SET estando desconectada la alimentacion. El reloj
parpadeara en el visualizador. (Para poner la hors actual,
consulte “PUESTA EN HORA DEL RELOJ” en la pagina 15.
Para volver a activar el modo DEMO, pulse > estando
desconectada la alimentacion.
Jueao de demostracion
Uste~ podra disfrutar del juego de demostracion con su sistema.
1 Pulse ➤ .
En el visualizador empiezan a moverse tres numeros.
2 Pulse ma vez ■ .
El ntimero del Iado izquierdo se para.
3 Pulse dos veces ■ para detener Ios dos ntimeros restantes.
Puntuacion
Al empezar el juego dispondra de 20 puntos.
Si todos Ios ntimeros son iauales se ariadiran 50 puntos a la
puntuacion.
Si no son iauales se Ie restara un punto.
Si Ios puntos Ilegan a 9999, usted gana.
Si Ios puntos Ilegan a O, usted pierde.
Para reiniciar el juego
Pulse CLOCWDIMMER y Iuego pulse >. El juego empezara
de nuevo,
Page 27

T-BASS
!
SHIFT
GEQ
VO1
.UME
T-BASS
VOLUME
—
[
\,,-_—
Gire VOLUME de la unidad principal o pulseVOLUME del
control remoto.
El nivel de sonido se visualiza mediante un numero del Oal 31
(MAX).
El nivel de sonido se ajusta automaticamente a 16 cuando se
desconecta la alimentacion estando el nivel ajustado en 170
mas.
El sistema T-BASS realza e! realismo del sonido de baja
frecuencia.
Pulse T-BASS.
Cada vez que 10pulse, el nivel cambiara. Seleccione uno de Ios
tres niveles o la position de apagado, 10que usted prefiera.
( 1
—
8
/
SHIFT
PHONES
Esta unidad ofrece Ias tres curvas de ecualizacion diferentes
siguientes:
ROCK: Sonido potente que realza Ios agudos y Ios graves.
POP: Mas presencia en Ias votes y en la gama de registro rnedio.
CLASSIC: Sonido enriquecido con graves profundos y agudcxs
fines.
Pulse un GRAPHIC EQUALIZER.
El modo de ecualizacion seleccionado se visualizara.
Para cancelar el modo seleccionado
Pulse de nuevoel boton seleccionado. Se visualizara “GE(2 OFF”.
Para seleccionar con el control remoto
Pulse repetidamente GEQ mientras pulsa SHIFT. El modo GEQ
se visualizara c(clicamente de la forma siguiente.
ROCK— POP— CLASSIC- GEQ OFF -
r
(cancelacion)
1
Para seleccionar con el control remoto
Pulse T-BASS mientras pulsa SHIFT.
El sonido de baja frecuencia tal vez se distorsione cuando se
utilice el sistema T-BASS con un disco o una cinta cuyo sonido
de baja frecuencia haya sido realzado originalmente. En este
case, cancele el sistema T-BASS.
Para reducir la intensidad de iluminacion del visualizador
1
Pulse dos veces CLOCWDIMMER para que se visualice
“DIMMER, y Iuego pulse II SET antes de que pasen 4
segundos.
Pulse repetidamente + o _ para seleccionar el modo
2
de intensidad de ikrminacion de la forma siguiente.
DIMMER 1 —DIMMER 2— DIM-OFF
Pulse II SET antes de que pasen
3
DIMMER 1: La intensidad de iluminacion del visualizador es
inferior a la normal, y el analizador de espectro se apaga.
DIMMER 2: La intensidad de iluminacion del visualizador es
inferior a la de DIMMER 1, y la iluminacion de Ios botones se
apaga.
DIM-OFF: La visualization normal se reanuda.
(Cancelacion)
4 segundos,
——
Utilization de auriculares
Conecte auriculares con clavija estereo estandar (6,3 mm @la
la toma PHONES.
Mientras Ios auriculares esten conectados no saldra sonido de
Ios altavoces.
Ajuste del sonido durante la grabacion
El volumen de salida y el tono de Ios altavoces o de Ios
auriculares podra cambiarse Iibremente sin afectar en absoluto
a la grabacion.
ESPAfiOL 6
Page 28

MONO
TUNER
.2
PRESET
1
..
.—— .
2
1
Pulse repetidamente TUNER/BAND para
seleccionar la banda deseada.
Cuando se pulse TUNEIWBAND mientras la alimentacion este
desconectada, la alimentacion se conectara directamente.
Para seieccionar una banda con ei control remoto
Pulse BAND mientras pulsa SHIFT.
Pulse + DOWN 0> UP para seleccionar una
2
emisora.
Cada vez que pulse el boton, la frecuencia cambiara.
Cuando se reciba una emisora, “TUNE se visualizara durante
2 segundos.
Durante la recepcion estereo por FM se visualizara ([lo])).
P
\
—
!
l.—.—. .—.—-
I
I
FM- AM
8
I
-4
BAND
SHIFT
1
■
MULTI
JOG
Esta unidad puede almacenar un total de 32 emisoras. Cuando
almacene una emisora, a esa emisora se Ieasignara un numero
de preajuste. Utilice el numero de preajuste para sintonizar
directamente una emisora preajustada.
7 PulseTUNER/BAND para seleccionar una banda,
y pulse + DOWN o FF UP para seleccionar
una emisora.
2 Pulse II SET para almacenar la emisora.
A Ias emisoras de cada banda se Ies asigna un numero de
preajuste en orden consecutive empezando por el 1.
—.
———. .. . . .—..—-
—— ——
LLQ--LJL-J
—
Numero de preajuste
0-9,+10
BAND
SHIFT
Para buscar rapidamente una emisora (btisqueda
automatic)
Mantenga pulsado - DOWN o *UP hasta que la frecuencia
empiece a cambiar rapidamente. Despues de sintonizar una
emisora, la btisqueda parara.
Para detener manualmente la bk.queda automatic, pulse +
O M UP.
DOWN
● La bdsqueda automatic quiz4 no pare en emisoras cuyas
sehales scan muy debiles.
Cuando una radiodifusion estereo por FM tenga ruido
Pulse MONO TUNER del control remoto mientras pulsa SHIFT
para que “MONO aparezca en el visualizador.
El ruido se reducira, pero la recepcion sera mono.
Para reponer la recepci6n estereo, pulse estos botones para
que aparezca “MONO.
Para cambiar el intervalo de sintonizacion de AM
El ajuste por omision del intervalo de sintonizacion de AM es de
10 kHz/paso. Si utiliza esta unidad en una zona donde el sistema
de asignacion de frecuencias sea de 9 kHz/paso, cambie el
intervalo de sintonizacion.
Pulse POWER mientras pulsa TUNEIWBAND.
Para reponer el intervalo, repita este procedimiento.
m
Cuando se cambie el intervalo de sintonizacion de AM, todas
Ias emisoras preajustadas se borraran. Las emisoras
preajustadas tendran que ajustarse de nuevo.
3 Repita Ios pasos 1 y 2.
La siguiente emisora no se almacenara si ya se ha
aimacenado un total de 32 emisoras de preajuste de todas
Ias bandas.
7 ESPAliOL
Page 29

SINTONIZACION MEDIANTE NUMERO DE
PREAJUSTE
Utilice elcontrol remoto para seleccionar directamente el numero
de preajuste.
12Pulse BAND mientras pulsa SHIFT para
seleccionar una banda,
Pulse Ios botones numerados O-9 y +1O para
seleccionar un numero de preajuste.
Ejemplo:
Para seleccionar el numero de preajuste 20, pulse +1O,+1O
o.
y
Para seleccionar el numero de preajuste 15, pulse +10 y 5.
A EJECT
I
1
A EJECT
Seleccif5n de un numero de preajuste en la unidad
principal
Pulse TUNER/BAND para seleccionar una banda. Luego, pulse
repetidamente > PRESET o gire MULTI JOG,
Cada vez que pulse > PRESET se seleccionara el siguiente
numero mas alto,
Para borrar una emisora preajustada
Seleccione el n(tmero de preajuste de la emisora que vaya a
borrar. Luego, pulse ■ CLEAR, y pulse II SET antes de que
pasen 4 segundos.
Los numeros de preajuste superiors de todas Ias demas
emisoras de la banda disminuiran tambien en uno.
Platina 1
Utilice solamente cintas tipo I (normales)
1
PulseTAPE y A EJECT para abrir el portacasete,
Pulse ➤ para iniciar la reproduction.
2
Solo la cara que queda hacia afuera de la unidad puede ser
reproducida,
Nhmero de la
platina seleccionada
I
Platina
2
Contador de cinta
Para seleccionar una platina de reproduction
Cuando haya cintas introducidas en ambas platinas, pulse
primero TAPE para seleccionar una platina.
El numero de la platina seleccionada se visualizara.
Para detener la reproduction, pulse
Para hater una pausa en la reproduction (platina 2
solamente), pulse II. Para reanudar la reproduction, pulselo
otra vez.
Para avanzar rapidamente o rebobinar, pulse 4+ o -.
Luego pulse 1 para detener la cinta.
Para iniciar la reproduction cuando la alimentacitin est~
desconectada (funcion de reproduction directs)
Pulse TAPE. La alimentacion se conectara y la reproduction de
la cinta insertada empezara.
Para poner el contador de cinta a 0000
■ CLEAR en el modo de parada.
Pulse
El Gontador tambi6n se pone a 0000 cuando se abre ei
portacasete.
Cuando haya cintas introducidas en ambas piatinas
Despues de terminar la reproduction en la platina 1, la cinta de
la platina 2 empezara a reproducirse sin interruption y se pararii
al final de la cinta. (Reproduction continua)
■ .
ESPANOL t3
Page 30
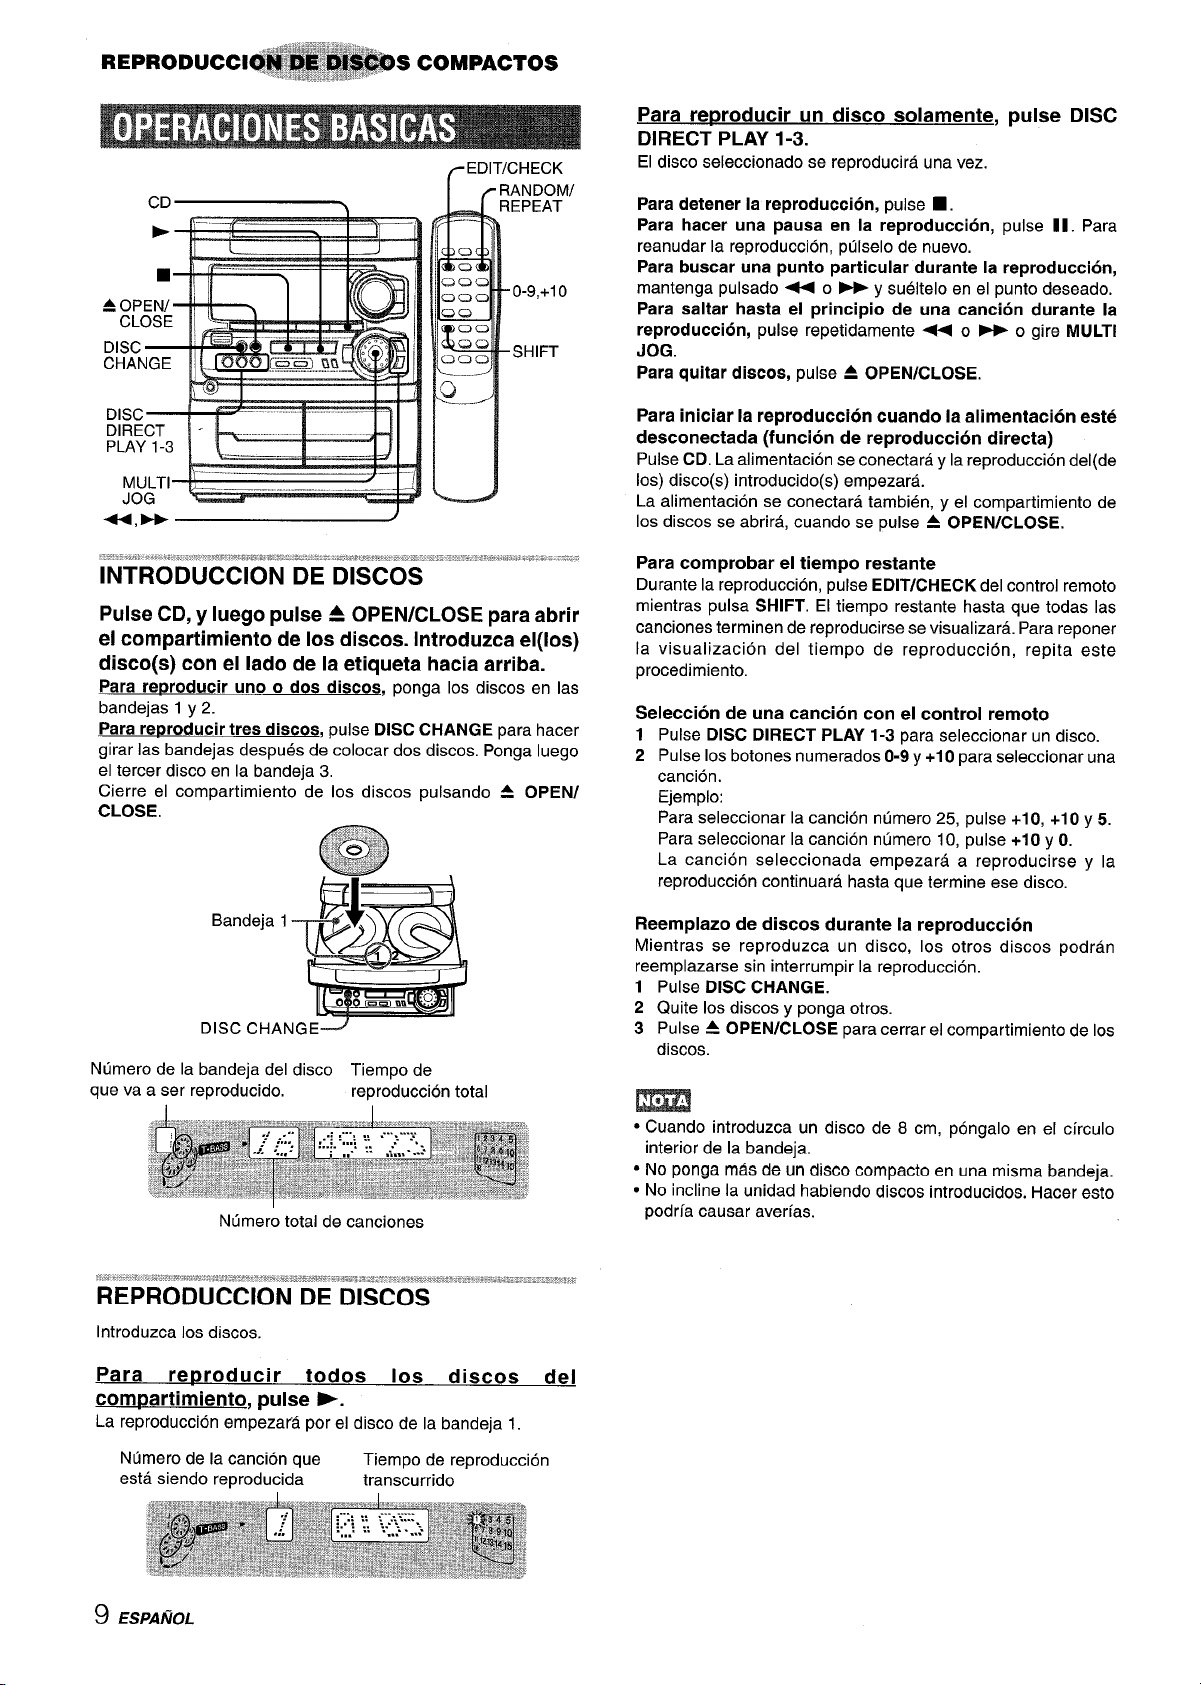
Para retxoducir un disco solamente,
DIRECT PLAY 1-3.
El disco seleccionado se reproduciri5. una vez.
pulse DISC
- CLOSE
Pulse CD, y Iuego pulse A OPEN/CLOSE para abrir
el compartimiento de Ios discos. Introduzca el(los)
disco(s) con el Iado de la etiqueta hacia arriba.
Para rerxoducir uno o dos discos, ponga Ios discos en Ias
bandejas 1 y 2.
Para rerxoducir tres discos, pulse DISC CHANGE para hater
girar Ias bandejas despues de colocar dos discos. Ponga Iuego
el tercer disco en la bandeja 3,
Cierre el compartimiento de Ios discos pulsando A OPEN/
CLOSE.
Para detener la reproduction, pulse
Para hater una pausa en la reproduccirh, pulse Il. Para
reanudar la reproduction, pulselo de nuevo.
Para buscar una punto particular durante la reproduction,
mantenga pulsado - 0 * y sueltelo en el punto deseado.
Para saltar hasta el principio de una canci6n durante la
reproduction, pulse repetidamente ~ o >0 gire MULTI
JOG.
Para quitar discos, pulse A OPEN/CLOSE.
Para iniciar la reproduction cuando la alimentacion este
desconectada (funcion de reproduction directs)
Pulse CD. La alimentacion se conectara y la reproduction del(de
IOS) disco(s) introducido(s) empezara.
La alimentacion se conectara tambien, y el compartimiento de
Ios discos se abrira, cuando se pulse = OPEN/CLOSE.
Para comprobar el tiempo restante
Durante la reproduction, pulse EDIT/CHECK del control remoto
mientras pulsa SHIFT. El tiempo restante hasta que todas Ias
canciones terminen de reproducirse se visualizara. Para reponer
la visuaiizacion del tiempo de reproduction, repita este
procedimiento.
Seleccion de una cancion con el control remoto
1 Pulse DISC DIRECT PLAY 1-3 para seleccionar un disco.
2 Pulse Ios botones numerados O-9y +1Opara seleccionar una
cancion.
Ejemplo:
Para seleccionar la cancion ntimero 25, pulse +10, +10 y 5.
Para seleccionar la cancion numero 10, pulse +10 y O.
La cancion seleccionada empezara a reproducirse y la
reproduction continuara hasta que termine ese disco.
■ .
Bandeja
DISC CHANGEJ
Numero de la bandeja del disco Tiempo de
que va a ser reproducido.
1
reproduction total
Ntimero total de canciones
REPRODUCTION DE DISCOS
Introduzca Ios discos.
Para reproducer todos Ios discos del
compartimiento, pulse >.
La reproduction empezara por el disco de la bandeja 1.
Ntimero de la cancion que
esta siendo reproducida
Tiempo de reproduction
transcurrido
Reemplazo de discos durante la reproduction
Mientras se reproduzca un disco,
reemplazarse sin interrumpir la reproduction.
1 Pulse DISC CHANGE.
2 Quite Ios discos y ponga otros.
3 Pulse 4 OPEN/CLOSE para cerrar el compartimiento de Ios
discos.
IOS otros discos podran
m
● Cuando introduzca un disco de 8 cm, pongalo en el circulo
interior de la bandeja.
“ NOponga mas de un disco compacto en una misma bandeja.
● No incline la unidad habiendo discos introducidos. Hater esto
podria causar averias.
9 ESPAfiOL,
Page 31

.,
REPRODUCTION ALEATORIA/FiEPETICION
DE REPRODUCTION
2
Pulse DISC DIRECT PLAY 1-3 para seleccionar
un disco.
Vaya al paso siguiente cuando la bandeja deje de girar.
Utilice el control remoto.
Reproduction aleatoria
Todas Ias canciones del disco seleccionado o de todos Ios discos
podran reproducirse aleatoriamente.
Repetition de reproduction
Un solo disco o todos ellos podran reproducirse repetidamente.
Pulse RANDOM/REPEAT mientras pulsa SHIFT.
Cada vez que 10pulse, la funcion podra ser seleccionada
ciclicamente.
Reproduction aleatoria —
visualizador.
Repetition de reproduction — CL se enciende en el
visualizador.
Reproduction aleatoria/repetition de reproduction —
RANDOM y C& se encienden en el visualizador.
Cancelacion — RANDOM y % desaparecen del visualizador.
Para rerxoducir todos Ios discos pulse P para iniciar la
reproduction.
Para reproducer un solo disco pulse DISC DIRECT PLAY 1-3
para iniciar la reproduction.
RANDOM se enciende en el
m
Durante la reproduction aleatoria no sera posible saltar a la
cancion previamente reproducida con -.
3
Pulse Ios botones numerados O-9 y +10
para
programar una cancion.
Ejemplo:
Para seleccionar la cancion ntimero 25, pulse +1O, +1Oy 5.
Para seleccionar la cancion ntimero 10, pulse +10 y O.
Nhmero de la cancion
seleccionada
Numero de programa
4
Repita Ios pasos 2 y 3 para programar otras
canciones.
Pulse - para iniciar la reproduction.
5
Para comprobar el programa
Cada vez que se pulse + 0- en el modo de parada se
visualizara un numero de disco, un numero de cancion y un
numero de programa.
Para borrar el programa
■ CLEAR en el modo de parada.
Pulse
Para aiiadir canciones al programa
Repita Ios pasos 2 y 3 en el modo de parada. La cancion se
programara despues de la tiltima cancion programada.
Ntimero total de
canciones seleccionadias
Tiempo de reproduction
total de Ias canciones
seleccionadas
Se podra programar un maximo de 30 canciones de cualquiera
de Ios discos introducidos.
,*
Utilice el control remoto.
7 Pulse PRGM mientras pulsa
SHIFT estando en el
modo de parada.
“PRG” se visualiza.
Para cambiar Ias canciones programadas
Borre el programa y repita todos Ios pasos de programacion.
Para reproducer repetidamente Ias canciones programadas
Despues de programar Ias canciones, pulse repetidamente
RANDOM/REPEAT hasta que C& aparezca en el visualizacfor.
m
Durante la reproduction programada, usted no podra realizar la
reproduction aleatoria, comprobar el tiempo restante ni
seleccionar un disco o cancion.
ESPAiiOL 10
Page 32

Esta seccion explica como grabar del sintonizador, del
reproductor de discos compactos o de equipos exteriors.
2
Preparation
● Utilice solamente cintas tipo I (normales)
● Bobine la cinta hasta el punto donde vaya a empezar la
grabacion.
● Tenga en cuenta que la grabacion solo se reaiiza en una cara
de la cinta.
INSERCION DE ESPACIOS SIN GRABAR
La insertion de espacios sin grabar de 4 segundos permite la
activation de la funcion del sensor musical. (Puede aplicarse
cuando la fuente de sonido sea TUNER, VI DEO/AUX o MD.)
1 Pulse
2 Pulse II para reanudar la grabacion.
Para insertar un es~acio sin arabar de menos de 4seaundos,
pulse de nuevo
m.
Para insertar esDacios sin arabar de mas de 4 seaundos,
despues de que la platina entre en el modo de pausa de
grabacion, pulse de nuevo
pulse el boton se arladira un espacio sin grabar de 4 segundos.
Acerca de Ias cintas de casete
● Para evitar el borrado accidental, romps con un
● REC/REC MUTE durante la grabacion o en el
modo de pausa de grabacion.
~ parpadeara en el visualizador durante 4 segundos y la
cinta avanzara sin grabarse. Despues de 4 segundos, la
platina entrara en el modo de pausa de grabacion.
● REC/REC MUTE mientras este parpadeando
● REC/REC MUTE. Cada vez que
destornillador u otra herramienta puntiaguda Ias Ienguetas
de plastico del casete despues de grabar.
Inserte la cinta que vaya a grabar en la platina 2.
1
Inserte la cinta con la cara que vaya a grabar en primer Iugar
hacia afuera de la unidad.
2
Pulse uno de Ios botones de funcion (CD, TUNER
o VI DEO/AUX) y prepare la fuente de sonido de la
que vaya a grabar.
Para arabar de un disco compacto, pulse CD e introduzca
el(los) disco(s).
Para arabar una radiodifusion, pulse TUNER y sintonice la
emisora.
Para arabar de una fuente de sonido conectada, pulse
VIDEO/AUX y active la reproduction.
Pulse ● REC/REC MUTE para iniciar la
3
grabacion.
Cuando la funcion seleccionada sea CD, la reproduction y la
grabacion empezaran simultaneamente.
Cara A
para la cara A
Para volver a grabar en una cinta, tape Ias aberturas con
cinta adhesiva, etc.
● Las cintas de 120 minutes o mas son extremadamente
finas y se deforman o estropean facilmente. No son
recomendadas.
● Tense la cinta con un Iapicero o herramienta similar antes
de utilizarla. La cinta floja podra romperse o atascarse en
el mecanismo.
Para detener la grabacith, pulse 1.
Para hater una pausa en la grabacion, pulse 11. (Puede
aplicarse cuando la fuente de sonido seaTUNER o VIDEO/AUX.)
Para reanudar la grabacion, ptilselo de nuevo.
Ajuste del sonido durante la grabacion
El volumen de salida y el tono de Ios altavoces o de Ios
auricuiares podr~ cambiarse Iibremente sin afectar en absoluto
a la grabacion.
1 I ESPAfiOL
Para borrar una grabacion
1 Inserte la cinta que vaya a borrar en la platina 2 y pulse TAPE/
DECK 1/2 para visualizer “TP 2“.
2 Ponga la cinta en el punto donde vaya a empezar a borrar.
3 Pulse
● REC/REC MUTE para iniciar el borrado.
Page 33

1,3
■
I---r-
-q
—.
—4
2
k-— ---+--
)_
Ponga la cinta en el punto donde vaya a empezar la grabacion.
Pulse TAPE.
1
Inserte la cinta original en la platina 1 y la cinta
2
que vaya a grabar en la platina 2.
Inserte Ias cintas con Ias caras que vaya a reproducer o grabar
hacia afuera de la unidad.
PulseTAPE/DECK 1/2
3
1.
visualiza “TP 1”.
Se
4
Pulse ● REC/REC MUTE para iniciar la
grabacion.
La reproduction y lagrabacion empezaran simultaneamente.
Para detener el copiado
❑ .
Pulse
para seleccionar la platina
—2
Y
—3
—2
Esta funci6n Ie permitira hater copias exactas de la cinta original.
La copia no empieza desde un punto ubicado en medio de la
cinta.
Pulse TAPE.
1
2 Inserte la cinta original en la platina 1 y la cinta
que vaya a grabar en la platina 2.
Inserte cada cinta con la cara que vaya a ser reproducida o
grabada hacia afuera de la unidad.
3 Pulse SYNC DUBBING para iniciar la grabacion.
Las cintas se rebobinaran hasta el principio de Ias caras
delanteras y empezara la grabaci6n.
Para detener el copiado
Pulse 9.
ESPANOL ‘12
Page 34

MULTI
JOG
4
2
Pulse. REC/REC MUTE para iniciar la grabacion
6
de la primers cara.
La cinta se rebobinara hasta el principio de la primers cara,
f—3,7
>
4
5
■
3,7
el segmento gu(a avanzara durante 10 segundos y la
grabaci6n empezara. Cuando termine de grabarse la tiltima
cancion programada para la cara A, la platina 2 se pondra en
el modo de parada de grabacion. Despues de entrar en el
modo de parada de grabacion, vaya al paso 7.
7
Pulse EDIT/CHECK mientras pulsa SHIFT del
control remoto para visualizer el programa para
la segunda grabacion.
Se visualiza B.
6,8
1,8
La funcion de grabacion con edition Al permite grabar discos
compactos sin preocuparse de la duration de la cinta y de Ias
canciones, Cuando se inserte un disco compacto, la unidad
calculara automaticamente la duration total de Ias canciones.
En caso de ser necesario, el orden de Ias canciones se cambiara
para que ninguna cancion quede cortada.
(Al: Inteligencia Artificial)
m
La grabacion con edition Al no empezara desde un punto que
se encuentre en medio de la cinta, La cinta debera grabarse
desde el principio de cada cara.
Inserte la cinta en la platina 2.
1
Inserte la cinta con la cara que vaya a grabar en primer Iugar
hacia afuera de la unidad,
2
Pulse CD e introduzca el(los) disco(s).
Pulse una vez EDIT/CHECK mientras pulsa SHIFT
3
del control remoto.
“EDIT se visualizar~.
. Cuando se visualice “PRGM”, pulse EDIT/CHECK mientras
pulsa de nuevo SHIFT.
Pulse DISC DIRECT PLAY 1-3 para seleccionar
4
un disco.
Pulse Ios botones numerados O-9 del control
5
remoto para designar la duration de la cinta.
Se puede especificar una duration de 10 a 99 minutes.
Ejemplo: Cuando utilice una cinta de 60 minutes, pulse 6 y O.
En unos pocos segundos, Ias canciones que vayan a ser
grabadas en cada cara de la cinta seran determinadas.
● 44, ~ o MULTI JOG tambien se pueden utilizar para
desionar la duration de la cinta.
Tiempo de
grabacion restante para la cara A.
Canciones
programadas
De la vuelta a la cinta de la platina 2 y
8
pulse ●
REC/REC MUTE para iniciar la grabacion de la
segunda cara.
Para detener la grabacion
■ . La grabacirfm y la reproduction del disco compacto
Pulse
pararan simultaneamente.
Para borrar el programa de edition
■ CLEAR dos veces para que “EDIT desaparezca del
Pulse
visualizador.
Para comprobar el orden de Ios ntimeros de Ias canciones
programadas
Antes de grabar, pulse EDIT/CHECK mientras pulsa SHIFT del
control remoto para seleccionar la cara A o la B, y pulse
repetidamente < 0 -.
Numeros de Ias
Numero de canci6n
Para arladir canciones de otros discos a un programa de
edition
Si queda tiempo en la cinta despues del paso 5, usted podra
ahadir canciones de otros discos que se encuentren en el
compartimiento de Ios discos compactos,
1 Pulse EDIT/CHECK mientras pulsa SHIFT del control remoto
para seleccionar la cara A o la B.
2 Pulse DISC DIRECT PLAY 1-3 para seleccionar un disco.
3 Pulse Ios botones numerados del control remoto para
seleccionar canciones.
Una canci6n CUYOtiempo de reproduction sea superior al
tiempo restante no podra ser programada.
4 Repita Ios pasos 2 y 3 para ariadir mas canciones.
Tiempo de [as cintas de casete y tiempo de edition
El tiempo real de grabacion de Ios casetes es por 10general un
poco mas Iargo que el tiempo de grabacion especificado en sus
etiquetas. Esta unidad puede programar canciones para utilizar
ese tiempo extra. Cuando el tiempo total de grabacion sea un
poco mas Iargo que el tiempo de grabacion especificado en el
casete, despues de la edition, el visualizador mostrara et tiempo
extra (sin un signo menos) en Iugar del tiempo restante de la
cinta (con el signo menos).
I
Ntimero del programa
canciones programadas
13 ESPANOL
m
La funcion de grabacion con edition Al nose podra utilizar con
discos que tengan 31 canciones o mas.
Cara de la cinta
A: Primers cara de grabacion
B: Segunda cara de grabacion
Page 35

MULTI
JOG r,. — ~_.
8,10
1,10
Repita el paso 5 para el resto de Ias canciones
6
para la cara A.
Una cancion cuyo tiempo de reproduction sea superior al
3,7,8,9
—1 – -/2 -
I
I
r
1!
r
.....
,9
tiempo restante no podra ser programada.
Pulse EDIT/CHECK mientras pulsa SHIFT clel
7
control remoto para seleccionar la cara B y
programe Ias canciones para la cara B.
Despues de confirmar que B aparezca en el visualizaclor,
repita el paso 5.
Cara B de la cinta (cara trasera)
11
En la funcion de grabacion con edition programada, Ias
canciones pueden programarse mientras se comprueba el tiempo
restante de cada cara de la cinta segtin se programan Ias
canciones.
m
La grabacion con edition programada no empezara desde un
punto ubicado en medio de la cinta. La cinta debera grabarse
desde el principio de una de Ias caras.
Inserte la cinta en la platina 2.
1
Inserte la cinta con la cara que vaya a grabar en primer Iugar
hacia afuera de la unidad.
Pulse CD e introduzca el(los) disco(s).
2
Puke dos veces EDIT/CHECK mientras pulsa
3
SHIFT del control remoto.
“EDIT y “PRGM” se visualizaran.
● Cuando se visualice “Al”, pulse EDIT/CHECK mientras pulsa
de nuevo SHIFT.
Pulse Ios botones numerados del control remoto
4
para designar la duration de la cinta.
puede especificar una duration de 10 a 99 minutes.
Se
● 44, ~ o MULTI JOG tambien se encuentran disponibles
para designar la duration de la cinta.
Pulse EDIT/CHECK mientras pulsa SHIFT palra
8
seleccionar la cara A y pulse
para iniciar la grabacion.
La reproduction del disco compacto y la grabacion de Ias
canciones editadas para la primers cara empiezan
simultaneamente. Cuando termine de grabarse la ultima
cancion programada para lacara A, la platina 2 entrara en el
modo de parada de grabacion. Despues de entrar en el modo
de parada de grabacion, vaya al paso 9.
Pulse EDIT/CHECK mientras twlsa SHIFT del
9
control remoto para grabar la segunda cara.
visualiza B.
Se
10 De la vuelta a la cinta de la platina 2 y pulse ●
REC/REC MUTE para iniciar la grabacion.
Empieza la grabacion.
Para detener la qrabacion
■ . La grab;cion y la reproduction del disco compacto
Pulse
pararan simultaneamente.
Para comprobar el orden de Ios numeros de Ia.ecanciones
programadas
Antes de grabar, pulse EDIT/CHECK mientras pulsa SHIFT del
control remoto para seleccionar la cara A o la B, y pulse
repetidamente 4 0-.
Numero
de disco la cinta
Cara de
● REC/REC MUTE
Numero de programa
❑
Cara A de la cinta
Duration de la cinta (cara delantera)
Tiempo de grabacion
maximo para la cara A
Pulse DISC DIRECT PLAY 1-3 para seleccionar
5
un disco.
Luego, pulse Ios botones numerados O-9 y +10
del control remoto para programar una cancion.
Ejemplo: Para seleccionar la cancion numero 10 del disco 2,
pulse DISC DIRECT PLAY 2, y Iuego pulse +10 y O.
Tiempo restante Canciones
de la cara A
programadas
Numero de cancion Ntimeros de
programadas
Para cambiar el programa de cada cara
Pulse EDIT/CHECK mientras pulsa SHIFT del control rermoto
para seleccionar la cara A o B, y pulse
programa de la cara seleccionada. Luego vuelva a prograimar
canciones.
Para borrar el programa de edition
■ CLEAR dos veces para que “EDIT” desaparezca del
Pulse
visual izador.
■ CLEAR para borrar el
cancioines
ESPAiiOL 14
Page 36

RELOJ?@#;_ADOR
-.=.!%..)”,,
Ii
I
1,2,3
2,3
1
44, W
II
1
2
1
f
t-”-
4---------
w
Pulse CLOCK y Iuego pulse II SET antes de aue
1
pasen 4 seaundos.
Cuando se utilice el control remoto
Pulse CLOCK mientras pulsa SHIFT, y Iuego pulse II SET
antes de que pasen 4 seaundos.
Pulse - DOWN o ~ UP para designar la hors,
2
y Iuego pulse II SET.
La hors deja de parpadear y empieza a parpadear el minute.
Pulse + DOWN o W UP para designar el
3
minute, y Iuego pulse 11 SET.
El minuto deja de parpadear en el visualizador y el reloj
empieza desde 00 segundos.
Para visualizer la hors actual
Pulse CLOCK. La hors se visualizara durante 4 segundos.
Sin embargo, la hors no se podra visualizer durante la grabacion.
Para cambiar al modo de 24 horas
Pulse CLOCK y Iuego pulse
Repita el mismo procedimiento para reponer el modo de 12
horas.
Si parpadea la visuaiizacion del reloj
Esto se debera a un interruption en el suministro de
alimentacion. La hors tendra que ponerse de nuevo.
Si la alimentacion se interrumpe durante mas de 24 horas
aproximadamente, todos Ios ajustes almacenados en la
memoria despues de adquirir la unidad tendran que ajustarse
otra vez.
■ antes de que pasen 4segundos.
La unidad se podra apagar automaticamente despues de
transcurrido un tiempo especificado.
Utilice el control remoto.
12Pulse SLEEP mientras pulsa SHIFT.
Antes de aue pasen 4 seaundos, pulse <0 ~
para especificar el tiempo tras el cual se
desconectara la alimentacion.
Cada vez que pulse el boton, el tiempo cambiara entre 5 y
240 minutes en pasos de 5 minutes.
Tiempo especificado
Para comprobar el tiempo restante hasta que se
desconecte la alimentacion
Pulse una vez SLEEP mientras pulsa SHIFT. El tiempo restante
se visualizara durante 4 segundos.
Para cancelar el temporizador para dormir
Pulse dos veces SLEEP mientras pulsa SHIFT para que
desaparezca “SLEEP OFF del visualizador.
Tambien se puede utilizar MULTI JOG en Iugar de U y W.
*
Tambien se puede ufilizar MULTI JOG en Iugar de U y ~,
“
15 ESPAiiiOL
Page 37

2,4
) ..
1
f-”-
\
——..__...——
r
La unidad podra encenderse a la hors especificada todos Ios
alias gracias al temporizador incorporado.
Preparation
Asegurese de que la hors del reloj sea corrects.
Utilice et control remoto.
1
Pulse TIMER para visualizer 0, y Iuego pulse II
SET antes de aue pasen 6 seaundos.
visualizara y la hors parpadeara.
O se
I
I
[
❑
■
Y
6
——
I
1,2,3,4
La duration del periodo de reproduction activado por
temporizador podra ajustarse entre 5 y 240 minutes en pasos
de 5 minutes.
Prepare la fuente de sonido.
5
Para escuchar un disco compacto, introduzca el disco que
vaya a reproducer en primer Iugar en la bandeja 1.
Para escuchar una cinta, introduzca la cinta en la piatina 1
0 en la 2.
Para escuchar la radio, sintonice una emisora.
Pulse POWER para apagar la unidad despues [~e
6
haber ajustado el volumen y el tono.
permanecera en el visualizador despues de que se
O
desconecte laalimentacion (modo deespera deltemporizadclr).
Cuando Ilegue la hors de encendido del temporizador,
unidad se encendera y la reproduction empezara con
fuente de sonido seleccionada.
Elvolumen del sonido se ajusta automaticamente a 16cuando
se desconecta la alimentacion estando el nivel ajustado en
170 mas,
Para comprobar la hors y la fuente de sonido
especificadas
Pulse TIMER. La hors de encendido del temporizador, el nombre
de lafuente seleccionada y la duration del periodo de activaci6n
por temporizador se visualizaran durante 4 segundos.
la
la
m
Si pulsa II SET despues de 6segundos tal vez empiece otra
operation.
Designe la hors de encendido del temporizador
2
pulsando + DOWN 0- UP, y Iuego pulse II
SET. Repita e! mismo procedimiento para
designar el minuto de encendido
temporizador.
Despues de designar la hors de encendido del temporizador,
uno de Ios nombres de Ias fuentes de sonido parpadeara en
el visualizador.
Pulse FUNCTION para seleccionar una fuente, y
3
Iuego pulse II SET.
Si se pulsa TUNER, la banda no se podra seleccionar en
c
este paso.
4
Seleccione la duration del periodo de
reproduction activado por temporizador con DOWN 0- UP. Luego, pulse 11 SET.
del
Para cancelar temporalmente el modo de espera clel
temporizador
Pulse repetidamente TIMER hasta que @ desaparezca del
visualizador.
Para reponer el modo de espera del temporizador, pulse una o
dos veces TIMER para visualizer ~.
Utilization de la unidad mientras este ajustado el
temporizador
Podra utilizar normalmente la unidad despues de ajustar et
temporizador.
Antes de desconectar la alimentacion, siga el paso 5 para
preparar la fuente de sonido y ajuste el volumen y el tono.
m
● La reproduction y lagrabacion con temporizador no empezaran
si no se desconecta la alimentacion.
● El equipo conectado no se podra encender ni apagar con el
temporizador incorporado de esta unidad. Utilice en este ca.so
un temporizador externo.
* Tambien se puede utilizar MULTI JOG en Iugar de U y PD.
La grabaci6n contemporizador solo podra utilizarse con Iasfuentes
de sonido TUNER y VIDEO/AUX (con un temporizador externcl).
Pulse repetidamente TIMER hasta que 0 parpadee en el
visualizador, y Iuego pulse II SET antes de aue paser~
seaundos.
TEMPORIZADOR, a partirdel paso 2, e inserte la cinta que vaya
a grabar en la platina 2 despues de efectuar el paso 5.
Ejecute Ios pasos de AJUSTE DEL
H
ESPAifOL ‘16
Page 38

CD DIGITAL OUT
T ‘OpT’cAL)
E
!2
~
F
4
Consulte el manual de instrucciones del equipo conectado para
tener mas detalles.
● Los cables de conexion no han sido suministrados. Obtenga
Ios cables de conexi6n necesarios.
● Consulte con su concesionario AIWA en cuanto al equipo
optional.
Esta unidad puede introducer sehales de sonido analogico a
traves de estas tomas.
Utilice un cable con clavijas fono RCA para conectar equipos de
audio (giradiscos, reproductores de discos laser, reproductores
de minidiscos, videos, televisors, etc.).
Conecte la clavija roja a la toma VIDEO/AUX R y la blanca a la
toma VIDEO/AUX L.
g
E
I
1
mm—
‘ I
m —ISURROUND
m
VIDEO/AUX
SPEAKERS
1
POWER
●
—.
,.—
Para hater la reproduction en el equipo conectado a Ias tomas
VIDEO/AUX, siga el procedimiento siguiente:
1 Pulse VIDEO/AUX.
“VIDEO o “AUX aparece en el visualizador,
2 Haga la reproduction en el equipo conectado.
Para cambiar el nombre de una fuente de sonido en ei
visualizador
Cuando se pulse VIDEO/AUX, “VIDEO o “AUX se visualizara
inicialmente. Esto podra ser cambiado por
Cuando la alimentacion este conectada, pulse POWER mientras
pulsa VIDEO/AUX.
Repita el procedimiento para seleccionar uno de Ios nombres.
I
I
t
),
——,.
“VIDEO, “AUX o “TV.
Cuando conecte un giradiscos
Utilice un giradiscos Aiwa con amplificador ecualizador
incorporado.
Esta unidad puede dar salida a seiiales de sonido digital de
discos compactos a traves de esta toma. Utilice un cable 6ptico
para conectar el equipo de audio digital (platina de cinta
audiodigital, grabadora de minidiscos, etc.).
Quite la tapa contra el polvo @ de la toma CD DIGITAL OUT
(OPTICAL). Luego, conecte la clavija del cable optico a la toma
CD DIGITAL OUT (OPTICAL).
Cuando no se utilice la toma CD DIGITAL OUT (OPTICAL)
Ponga la tapa contra el polvo.
Conecte Ios altavoces de sonido ambiental opcionales con
impedancia de 8 a 16 ohmios a estas tomas.
17 ESPAhiOL
Page 39

El mantenimiento y el cuidado ocasional de la unidad y del
software resultan necesarios para optimizar Ias prestaciones de
su unidad.
Para Iimpiar la caja
Utilice un parlo blando y seco.
Si Ias superficies estan muy sucias, utilice un pafio suave
humedecido un poco en una solution de detergente suave. No
utilice disolventes fuertes tales como alcohol, bencina o diluyente
porque estos podrfan estropear el acabado de la unidad.
Para Iimpiar Ias cabezas y Ios puntos por donde pasa la
cinta
Despues de cada 10 horas defuncionamiento, Iimpie Iascabezas
y Ios puntos por donde pasa la cinta con un casete de Iimpieza
de cabezas o un palillo con algodon humedecido con Ifquido de
Iimpieza o alcohol desnaturalizado. (Estos juegos de Iimpieza
pueden adquirirse en Ios comercios del ramo.)
Cuando Iimpie con un palillo con algodon, Iimpie la cabeza de
grabacion/reproduction (platina 2 solamente), la cabeza de
borrado (platina 2 solamente), Ios cabrestantes y Ios rodillos de
presion.
Cabeza de Cabeza de Palillo con
borrado grabacionl algodon
reproduction , Cabrestante
,,,
,1’!
$,.
~
Si la unidad no funciona como se describe en este manual de $ ‘~
instrucciones, compruebe la guia siguiente:
GENERALIDADES
No hay sonido.
● LEst~ bien conectado el cable de alirnentaci~n de CA?
● LHay alguna conexion mai hecha? (~ pagina 3)
● Puede haber uncortocircuito en Iosterminals de Ios altavoces.
I
~:;#j#
‘;$’
a
1-
o
+ Desconecte el cable de alimentacion de CA y corrija Ias
conexiones de Ios altavoces.
● LSe ha pulsado un boton de funcion equivocado?
Solo sale sonido de un altavoz.
. ~Est~ el otro altavoz desconectado?
,E
.. ,,,
1$’,..
a
::@;
Se produce una visualization erronea o un mal :,:~!,
funcionamiento.
+ Vuelva a ajustar la unidad como se indica mas abajo.
SECCION DEL SINTONIZADOR
Hay un ruido de estatica constante en forma de onda,,
● LEsta conectada correctamente la antena? (+ pagina 4)
● LES debil la serial?
;“@~
$}
UI
o
+ Conecte una antena exterior.
La recepcion tiene interferencias o el sonido esta
distorsionado.
● LCapta el sistema ruidos externos o distortion de multiples
trayectorias?
+ Cambie la orientation de la antena.
+ Separe la unidad de otros aparatos electricos.
“;
::”,
d,
},
Rodillo de presion
Des~ues de Iimuiar Ias cabezas
v Ios rwntos ~or donde oasa la
cinta con un casete de Iimpieza rie cabezas que emplee”l~quido
o un palillo con algodon humedecido en Ifquido de Iimpieza,
espere hasta que Ias partes Iimpiadas esten completamente
secas antes de introducer Ias cintas.
Para desmagnetizar Ias cabezas
Las cabezas se magnetizan despues de utilizarlas durante
mucho tiempo. Esto puede reducir la gama de salida de Ias
cintas grabadas y aumentar el ruido. Despues de 20 a30 horas
de utilization, desmagnetice Ias cabezas con un
desmagnetizador de venta en el comercio del ramo.
Cuidado de Ios discos
● Cuando un disco este sucio, Iimpielo pasando un paiio de
Iimpieza desde el centro hacia afuera.
● Despues de reproducer un disco, guardelo en su caja. No deje
Ios discos en lugares calientes o htimedos.
Cuidados de Ias cintas
● Guarde Ias cintas en sus cajas despues de utilizarlas.
. No deje Ias cintas cerca de imanes, motores, televisors o
cualquier otra fuente de magnetism. Esto reducira la calidad
del sonido y causara ruidos.
● No exponga cintas a la Iuz directs del sol, ni Ias deje en el
interior de un automovil estacionado bajo la Iuz directs del sol.
SECCION DE LA PLATINA
La cinta no se mueve.
● LEsta la platina 2 en el modo de pausa? (+ pagina 8)
El sonido esta desequilibrado o no alcanza la altulra
suficiente.
. ~Esta sucia la cabeza de reproduction? (+ pagina 18)
No es posible grabar.
● LEsta rota laIengtieta de prevention contra borrado? (+ paglna
8)
● ~Esta sucia la cabeza de grabacion? (+ pagina 18)
No es posible borrar la grabacion.
. LEsta sucia la cabeza de borrado? (+ pagina 18)
● ~Esta utilizando una cinta de metal?
No se emite sonido de alta frecuencia.
● ~Estd sucia la cabeza de grabacion/reproduction? (+ p59ina
18)
SECCION DEL REPRODUCTOR DE DISCOS COMPACTOS
El reproductor de discos compactos no puede reproducer.
● LEsta bien puesto el disco? (+ pagina 9)
. LEsta sucio el disco? (+ pagina 18)
● LAfecta la condensaci~n a la Iente?
+ Espere una hors aproximadamente y pruebe otra vez.
—
Para reajustar la unidad
Si se produce alguna condicion extrafia en el visualizador o en
Ias platinas, reajuste la unidad de la forma siguiente:
1 Pulse POWER para desconectar la alimentacion.
2 Pulse POWER para conectar la alimentacion mientras pulsa
■ CLEAR. Todo 10que haya sido almacenado en la memcwia
despues de haber adquirido la unidad se borrara.
Si no puede desconectarse la alimentaci6n en et paso 1 debido
a algtin mal funcionamiento, reajuste la unidad desconectando
el cable de alimentacion de CA y conectandolo de nuevo. Luego
ejecute el paso 2.
ESPANOL ‘18
Page 40

Unidad principal CX-NA303
Seccion del sintonizador de FM
Gama de sintonizacion 87,5
Sensibilidad util
(IHF) 13,2 dBf
MHz a 108 MHz
Terminals de antena 75 ohmios (desequilibrada)
Seccion del sintonizador de AM
Gama de aintonizacion
Senaibilidad util
Antena
530
kHz a 1710kHz (pasos de 10
kHz)
531 kHz a 1602 kHz (pasos de 9
kHz)
350 pV/m
Antena de cuadro
Sistema de altavoces SX-NA302
Tfpo de caja
Altavoces
Impedancia
Nivel de presion acustica
de salida
Dimensioned
(An x Al x Prof)
Peso
Las especificaciones y el aspecto exterior estan sujetos a cambios
sin previo aviso.
2 vias, reflejo de graves (tipo de
blindaje antimagnetic)
Altavoz para graves:
Tipo conico de 120 mm
Altavoz para agudos:
Tipo ceramico de 10 mm
6 ohmios
87 dWWlm
235 x 324x 250 mm
3,2 kg
Seccion del amplificador
Potencia de salida
Distortion armonica total
Entradas
Salidas
Seccion de la platina
Formato ds pistas
Reapuesta de frecuencia
Sistema de grabacion
Cabezas
Seccion del reproductor de
Laser
Convertidor D-A
Relation serial a ruido
Dfstorsion armonica
Fluctuation y tremolo
30 W + 30 W (50
con no mas del 10/. de distorsi6n
armonica total, 8 ohmios)
0,1% (15 W, 1 kHz, 6 ohmios, DIN
AUDIO)
VIDEO/AUX: 500 mV
SPEAKERS: Acepta altavoces de
6 ohmios o mas
SURROUND SPEAKERS:
Acepta altavoces de 8 ohmios a
16 ohmios
PHONES (toma estereo): Acepta
auriculares de 32 ohmios o mas
4 pistas, 2 canales estereo
50 Hz-1 0000
Polarization de CA
Platina 1:1 cabeza de
reproduccitm
Platina 2:1 cabeza de
grabaci6n/reproducci6n,
1 cabeza de borrado
Iiz -20 kHz,
tfz
discos compactos
Laser de semiconductor
(k= 780 nm)
1 bit doble
85 dB (1 kHz, O dB)
0,05% (1 kHz, O dB)
No se puede medir
DERECHOS DE AUTOR
SirVase comprobar Ias Ieyes de derechos de autor relacionadas
con la grabacion de discos, de la radio o de cintas del pa(s en el
que se utilice el aparato.
Generalidades
Alimentacion
Consumo
Dimensioned de la unidad
principal (An x Al x Prof)
Peso de la unidad principal
19 ESPAfiOL
120 V CA, 60
85 W
260 x 330x 346 mm
5,7 kg
HZ
Page 41

Page 42

Lire Ie mode d’emploi attentivement et completement avant
d’utiliser I’appareil. Garder Ie mode d’emploi pour toute reference
future. Tous Ies avertissements et toutes Ies precautions donnes
clans Ie mode d’emploi et sur I’appareil doivent ~tre suivis a la
Iettre, aussi bien que Ies suggestions de securite suivantes.
Installation
Eau et humidite — Ne pas utiliser cet appareil pres d’eau,
1
comme pres d’une baignoire, d’une cuvette, d’une piscine ou
autre.
Chaleur — Ne pas utiliser cet appareil pres de sources de
2
chaleur, comme sorties de chauffage, po~les ou autres
appareils qui degagent de la chaleur.
Lappareil ne doit pas &re soumis a des temperatures
inferieures a 5°C ou superieures a 35”C.
Surface d’utilisation — Poser I’appareil sur une surface plate
3
et Iisse.
Ventilation — Lappareil doit &re positionne avec un espace
4
suffisant autour afin d’assurer une dissipation ad6quate de la
chaleur. Laisser un espace de 10 cm derriere et dessus
I’appareil, et un espace de 5 cm de chaque cde.
- Ne pas mettre I’appareil sur un lit, un tapis ou sur une surface
similaire qui pourrait obstruer Ies orifices de ventilation.
- Ne pas mettre I’appareil clans une bibliotheque, un coffret
ou un meuble completement ferme ou I’aeration serait
insuffisante.
Entree d’objets et de Iiquide — Faire attention a ce que
5
aucun corps etranger ou Iiquide ne penetre clans I’appareil
pas Ies orifices de ventilation.
Chariot et support — Si I’appareil
6
est pose ou monte sur un support
ou un chariot, deplacer ce dernier
avec precaution.
Les arr6ts brusques, une force
excessive et Ies surfaces inegales
peuvent provoquer Ie renversement
ou Ie chute de I’appareil et du chariot.
7
Condensation — De la condensation peut se former sur la
Ientille du capteur du Iecteur de disques compacts quand:
- I’appareil est deplace d’un endroit froid a un endroit chaud.
- Ie chauffage vient juste d’etre mis en marche.
- I’appareil est utilise clans une piece tres humide.
- I’appareil est refroidi par un climatiseur.
S’il y a de la condensation a I’interieur de cet appareil, il risque
de ne pas fonctionner correctement. Le cas echeant, Iaisser
I’appareil pendant quelques heures, puis essayer de nouveau
de I’utiliser.
Fixation a un mur ou un plafond — L’appareil ne doit ~as
8
&re fixe a un mur ou un plafond, a moins que ce ne soit specifie
clans Ie mode d’emploi.
3
m
AA*
Releve du proprietaire
Pour plus de commodite, rioter Ie numero de modele et Ie numero
de serie (ces numeros se trouvent au dos de I’appareil) clans Ies
cases ci-dessous. Priere de mentioner ces numeros quand on
contacte un distributeur Aiwa en cas de difficult.
N“ de modele N“ de serie (NO de lot)
CX-NA303
SX-NA302
SX-R275
(NSX-A304 seulement)
1 F/?AiV&A/S
Enerctie electricrue
12Alimentatiena +Iec?triquee — BranGher Get appareil
uniquement aux alimentations electriques specifiers clans Ie
mode d’empioi, et comme indique sur I’appareil.
Polarisation — Comme mesure de securite, certains
appareils sent munis de fiches polarisees d’alimentation
secteur qui ne peuvent etre introduites que clans un sens clans
une prise de courant. S’il est difficile ou impossible d’inserer
la fiche d’alimentation secteur clans une
fiche et essayer de nouveau. Si I’on ne peut toujours pas
inserer la fiche clans la prise, s’adresser a un electrician
qualifie pour faire reparer ou changer la prise. Afin de ne pas
annuler la securite de la fiche polarisee, ne pas inserer cette
fiche en force clans une prise.
prise, retourner la
Page 43

Cordon d’alimentation secteur
3
- Pour debrancher Ie cordon d’alimentation secteur, Ie tirer
par sa fiche. Ne pas tirer sur Ie cordon proprement alit.
- Ne jamais tenir la fiche d’alimentation secteur avec Ies mains
mouillees, cela pourrait se traduire par un court-circuit ou
un choc electrique.
- Les cordons d’alimentation doivent &re installes de maniere
a ne pas &re plies, pinces ou pietines. Faire particulierement
attention au cordon allant de I’appareil a la prise de courant.
- Eviter de surcharge Ies prises d’alimentation et Ies rallonges
au-dela de Ieur capacite, cela pourrait se traduire par un
court-circuit ou un choc electrique.
Rallonge — Afin d’eviter tout choc electrique, ne pas utiliser
4
une fiche polarisee d’alimentation secteur avec une rallonge
ou une prise si cette fiche ne peut pas 6tre inseree
completement de maniere que ses lames ne soient pas
exposees.
Periodes de non-utilisation — Debrancher Ie cordon
5
d’alimentation secteur de la prise de courant si I’appareil ne
doit pas 6tre utilise pendant plusieurs mois ou plus. Quand Ie
cordon est branche, un courant de faible intensite continue
de circuler clans I’appareil meme si I’alimentation est toupee.
Antenne exterieure
12Lignes d’amenee de courant — Quand on branche une
antenne exterieure, s’assurer qu’elle est situee a I’ecart de
toute Iigne d’amenee de courant.
Mise de I’antenne exterieure a la terre — Afin d’assurer
une protection contre toute impulsion de tension et contre
toute accumulation d’electricity statique, s’assurer que
I’antenne est correctement mise a la terre. IJarticle 810 du
code national d’electricity (NEC), ANSVNFPA 70, fournit des
information au sujet de la mise a la terre du mat, de la
structure de support et du conducteur arrivant a I’unite de
decharge d’antenne et au sujet des dimensions des
conducteurs de mise a la terre, de la connexion aux electrodes
demise ala terre et des exigences concernant ces electrodes.
Mke i laterred’une antenne selon [e code national d’electricity (NEC)
~ rlL DE DESCENTE O,&NTENNE
- UNITE DE DECHARGE
DANTENNE
(NEC SECTION 810-20)
PRECAUTIONS ...................................................................1
PREPARATIONS
CONNEXIONS ................i................................................... 3
TELECOMMANDE ............................................................. 5
AVANT L’UTILISATION .......................................................5
SON
REGLAGES AUDIO .............................................................6
EGALISEUR GRAPHK2UE ................................................ 6
RECEPTION RADIO
ACCORD MANUEL
MEMORISATION DE STATIONS ....................................... 7
LECTURE DE CASSETTES
OPERATIONS DE BASE ................................................... 8
LECTURE DE DISQUES COMPACTS
OPERATIONS DE BASE ................................................... 9
LECTURE PROGRAMMED ............................................. 10
ENREGISTREMENT
ENREGISTREMENT DE BASE ....................................... “l1
DUPLICATION MANUELLE D’UNE CASSETTE .............
DUPLICATION DE LA TOTALITE D’UNE CASSETTE ... “12
ENREGISTREMENT AVEC MONTAGE ET CALCUL
DU TEMPS ........................................................................ ’13
ENREGISTREMENT AVEC MONTAGE
PROGRAMME .................................................................. ’14
HORLOGE ET MINUTERIE
REGLAGE DE L’HORLOGE ............................................ 15
REGLAGE DE LA MINUTERIE D’ARRET ...................... ‘t5
REGLAGE DE LA MINUTERIE
AUTRES CONNEXIONS
CONNEXION D’UN APPAREIL OPTIONNEL ................. ’17
ECOUTE DE SOURCES EXTERNES ............................. 17
GENERALITIES
............................................................
....................................... 16
7
“12
I
-EZE?
NEC: CODE NATIONAL O’ELECTRICITY
Entretien
Nettoyer I’appareil uniquement comme recommande clans Ie
mode d’emploi.
Dommaae necessitant une reparation
S’adresser a un technician qualifie pour faire reparer I’appareil
si:
- Le cordon ou la fiche d’alimentation secteur de I’appareil est
endommagb
-
Tout corps etranger ou Iiquide est entre clans I’appareil
- L’appareil a ete expose a la pluie ou a de I’eau
- Lappareil ne semble pas fonctionner normalement
- Lappareil presente un changement notable de performances
- Lappareil a subi un choc, ou son coffret a ete endommage
N’ESSAYEZ PAS DE REPARER LAPPAREIL VOUS-MEME.
LA LIGNE !YAMENEE DE COURANT
(NEC ARTICLE 250 PARTIE H)
SOINS ET ENTRETIEN ....................................................
EN CAS DE PROBLEME ..........................m.....................m18
SPECIFICATIONS ............................................................ 19
NOMENCLATURE ................................ Cowerture A dos
FRAIVf2Al$
18
2
Page 44

Contr61er la chaine et Ies accessoires.
CX-NA303 Radio magnetocassette Iecteur de disques compacts
stereo
SX-NA302 Enceintes avant
* SX-R275 Enceintes surround (Pour NSX-A304 seulement)
Telecommande
m
Antenne AM Antenne FM
Avant de brancher Ie cordon secteur
La tension nominale d’alimentation secteur de I’appareil, indiquee
au dos de ce dernier, est de 120V. S’assurer que cette tension
nominale correspond a celle du secteur local.
IMPORTANT
Commencer par brancher Ies enceintes, Ies antennes et tout
appareil optionnel. Brancher Ie cordon secteur en dernier.
7 Connecter Ies enceintes droite et gauche a
I’appareil principal.
Connecter Ie cordon de I’enceinte droite aux bornes
SPEAKERS R et celui de I’enceinte gauche aux bornes
SPEAKERS L.
Le cordon d’enceinte raye de blanc doit @tre connecte a la
borne 0 et Ie cordon noir a la borne O.
2 Connecter Ies enceintes surround a I’appareil
principal. (Pour NSX-A304 seulement)
II n’y a pas de difference entre Ies enceintes surround.
Connecter Ie cordon de chaque enceinte surround a la borne
SURROUND SPEAKERS R
OU L.
Mode d’emploi, etc
* Les enceintes surround SX-R275 optionnelles sent fournies avec la
chafne NSX-A304.
Encemte drone
1
~+ n
L
3.
Antenne AM 11(
Antenne FM
bi---
I
I
2
3 FRAN~AIS
/= +4
Cordon secteur
Cordon d’enceinte surround
Page 45

Connecter Ies antennes fournies.
3
Connecter I’antenne FM aux bornes FM 75 Q et I’antenne
AM aux bornes AM LOOP.
ne AM
L
4 Brancher Ie cordon secteur a une prise de
courant.
CONNEXION D’UNE ANTENNE EXTERIEURE
Pour obtenir une meilleure reception FM, il est recommande
d’utiliser une antenne exterieure.
Connecter I’antenne exterieure aux bornes FM 75 Q.
mm
Quand on branche Ie cordon secteur, tous Ies caracteres peuvent
s’allumer sur I’affichage. Le cas echeant, debrancher Ie cordon
secteur. Ensuite, Ie rebrancher.
Pour positioner Ies antennes
Antenne FM interieure:
Deployer cette antenne horizontalement selon la forme d’un T et
fixer ses extremities a un mur.
Antenne
Orienter cette antenne de maniere a obtenir la meilleure reception
possible.
Pour
Fixer la griffe clans la rainure.
● Faire attention a connecter Ies cordons d’enceinte correctement.
Des connexions incorrectes peuvent provoquer des courtscircuits clans Ies bornes SPEAKERS.
AM:
poser I’antenne AM sur une surface
] Pour connecter
un appareil optionnel + page 17. I
● Ne pas Iaisser d’objets produisant un champ magnetique, tels
que des cartes de credit, pres des enceintes, ils pourraient
&re endommages.
● Ne pas mettre I’antenne FM pres d’objets metalliques ou de
tringles a rideaux.
● Ne pas mettre I’antenne AM pres d’un appareil optionnel, de la
chakre stereo proprement dite, du cordon secteur ou des
cordons d’enceinte; elle pourrait capter des parasites.
● Ne pas derouler Ie fil de I’antenne AM.
FRAN~AIS
4
Page 46

Mise en place des piles
Enlever Ie couvercle des piles du dos de la telecommande et
mettre deux piles R6 (taille AA) en place.
R6(AA)
Quand remplacer Ies piles
La distance maximale de fonctionnement de la telecommande
entre cette derniere et Ie capteur situe sur I’appareil principal
doit 6tre d’environ cinq metres. Lorsque cette distance diminue,
remplacer Ies piles par des neuves.
Utilisation de SHIFT de la telecommande
Les touches @) possedent deux fonctions differences. Une de
ces fonctions est indiquee sur la touche, et I’autre sur la plaque
se trouvant au-dessus de la touche.
Pour utiliser la fonction indiquee sur la touche, il suffit d’appuyer
sur cette derniere.
Pour utiliser la fonction indiquee sur la plaque se trouvant audessus de la touche, appuyer sur cette derniere tout en appuyant
sur SHIFT.
II
■
POWER
b
Pour mettre I’appareil sous tension
Appuyer sur une des touches de fonction (TAPE, TUNER, VIDEO/
AUX, CD). La lecture du disque ou de la cassette en place
commence, ou la station ecoutee en dernier est regue (fonction
de lecture directe).
On peut aussi appuyer sur POWER.
Quand I’appareil est mis sous tension, Ie compartment a disques
peut s’ouvrir et se fermer pour reinitialisation de I’appareil.
Pour couper I’alimentation
Appuyer sur POWER.
CD
II
CLOCKI
DIMMER
Utilisation de FUNCTION de la telecommande
FUNCTION remplace Ies touches de fonction (TAPE/DECK 1/2,
TUNER, VIDEO/AUX et CD) de I’appareil principal.
A chaque pression sur FUNCTION, la fonction suivante est
selectionnee de maniere cyclique. Quand il a une cassette clans
chacune des deux platines, chaque platine est selectionnee avec
FUNCTION.
~
● Si la telecommande ne doit pas ~tre utilisee pendant Iongtemps,
enlever Ies piles pour eviter tout risque de fuite d’electrolyte.
● La telecommande risque de ne pas fonctionner correctement
quand:
- I’espace entre la telecommande et Ie capteur situe sur la
fen~tre d’affichage est expose a une Iumiere intense, comme
Ie soleil.
- d’autres telecommandes (televiseur, etc.) sent utilisees a
proximite.
Fen6tre ciignotante
La fen&re situee au sommet de I’appareil s’allume ou clignote
quand I’appareil est mis sous tension.
Pour eteindre I’eclairage de la fen&re superieure, appuyer sur
■ tout en appuyant sur CD. Pour rallumer I’eclairage, repeter
cette operation.
Mode DEMO (Demonstration)
Quand on branche Ie cordon secteur, la fen6tre d’affichage
montre Ies fonctions de I’appareil. Lors de la mise sous tension,
I’affichage de demonstration est remplace par I’affichage
d’operation. Quand I’alimentation est toupee, Ie mode DEMO
est”retabli.
Pour annuler Ie mode DEMO
!Jalimentation etant toupee, appuyer sur 11 SET. 12horloge
clignote sur I’affichage. (Pour regler I’heure courante, voir la
partie “REGLAGE DE LHORLOGE, page 15.) Pour retablir
Ie mode DEMO, appuyer sur - tandis que I’alimentation est
toupee.
Jeu de demonstration
La chakte est munie d’un jeu de demonstration.
1 Appuyer sur >.
Trois chiffres se mettent a defiler sur I’affichage.
2 Appuyer une fois sur
Le chiffre de gauche s’arr&e.
3 Appuyer deux~ois sur
Marque des points:
On dispose de 20 points au demarrage du jeu.
Si Ies trois chiffres sent eaaux, 50 points sent ajoutes au score.
Si Ies chiffres ne sent ~as eaaux, un point est soustrait.
Si Ie total des points atteint 9999, on a gagne.
Si Ie total des points tombe a O, on a perdu.
Pour annuler la partie
Appuyer sur CLOCWDIMMER, puis appuyer sur E. Le jeu
redemarre.
■ .
■ pour arr??ter Ies deux chiffres restants.
5 FRAN~AIS
Page 47

—
-t
I
SHIFT
GEQ
VOLUME
T-BASS
VOLUME
VOLUME
Tourner VOLUME de I’appareil principal, ou appuyer sur
VOLUME de la telecommande
Le niveau du volume est affiche sous la forme d’un nombre de O
a MAX (31). Quand on coupe I’alimentation alors que Ie niveau
du volume est regle a 17 ou plus, ce niveau est automatiquement
regle a 16.
Le systeme T-BASS ameliore Ie realisme du son aux basses
frequencies,
Appuyer sur T-BASS.
A chaque pression sur cette touche, Ie niveau change.
Selectionner un des trois niveaux ou la position de repos, comme
on prefere.
SHIFl-
PHONES
Cet appareil possede Ies trois courbes d’egalisation differences
suivantes.
ROCK: Son puissant accentuant Ies aigus et Ies graves
POP: Presence accrue des parties vocales et de la gamrne
moyenne
CLASSIC: Son enrichi par des graves puissants et des aigus
fins
Appuyer sur une des touches GRAPHIC EQUALIZER.
Le mode d’egalisation selectionne est affiche.
Pour annuler Ie mode selectionne
Appuyer de nouveau sur la touche selectionnee. “GEQ OFF est
affiche.
Pour selectionner avec la telecommande
Appuyer sur T-BASS tout en appuyant sur SHIFT.
~
Le son aux basses frequencies risque d’etre deforme quand Ie
systeme T-BASS est utilise pour un disque ou une cassette dent
Ie son aux basses frequencies est accentue d’origine. Dans ce
cas, annuler Ie systeme T-BASS.
Pour assombrir I’eclairaae de I’afficha!ae
1
Appuyer deux fois sur ~LOCK/DIMME-R de maniere que
“DIMMER soit affiche puis appuyer sur II SET clans Ies
quatre secondes.
Appuyer sur + ou ~ a plusieurs reprises pour
2
selectionner Ie mode de Iuminosite comme suit.
DIMMER
3
Armuver sur II SET clans Ies quatre secondes.
DIMMER 1: Peclairage de I’affichage est plus sombre que
d’habitude et I’analyseur de spectre s’eteint.
DIMMER 2: Leclairage de I’affichage est plus sombre que clans
Ie mode DIMMER I et I’eclairage des touches s’eteint.
DIM-OFF: Laffichage normal est retabli.
1 —DIMMER 2— DIM-OFF
(Annulation)
Pour selectionner avec la telecommande
Appuyer sur GEQ a plusieurs reprises tout en appuyant sur
SHIFT. Le mode d’egalisation graphique est affiche de mani?!re
cyclique comme suit.
ROCK— POP — CLASSIC— GEQ OFF
(annulation)
1
Utilisation d’un casque
Brancher un casque muni d’une fiche stereo standard (6,3 mm
a) a la prise PHONES.
Aucun son ne sort par Ies enceintes quand un casque est
branche.
Reglage du son pendant I’enregistrement
On peut faire varier Iibrement Ie volume de sortie et la tonalite
des enceintes ou du casque saris affecter I’enregistrement.
FRAN~AIS
6
Page 48

MONO
TUNER
BAND
0-9,+10
BAND
SHIFT
2
,-
——
f
\-–.
1
J-?
.—.
/
1
u
1
Appuyer sur TUNER/BAND a plusieurs reprises
pour selectionner la gamme souhaitee.
Quand on appuie sur TUNEFUBAND alors que I’alimentation
est toupee, I’appareil est mis sous tension directement.
Pour selectionner une gamme avec la telecommande
Appuyer sur BAND tout en appuyant sur SHIFT.
Appuyer sur + DOWN ou M UP pour
2
selectionner une station.
A chaque pression sur la touche, la frequence change.
Quand une station est regue, “TUNE est affiche pendant deux
second es.
Pendant la reception FM stereo, (iI@Il) est affiche.
FM— AM
SHIFT
MULTI
JOG
Lappareil peut memoriser un total de 32 stations. Quand une
station est memorisee, un numero de prereglage Iui est affecte.
Pour accorder I’appareil directement sur une station memorisee,
utiliser Ie numero de prereglage correspondent.
1
Appuyer surTUNER/BAND pour selectionner une
gamme, puis appuyer sur ++
pour selectionner une station.
2
Appuyer sur II SET pour memoriser la station.
Un numero de prereglage est affecte a une station a partir de
1 clans I’ordre consecutif pour chaque gamme.
Numero de prereglage
I
DOWN ou - UP
Pour rechercher une station rapidement (Recherche
automatique)
Tenir 44 DOWN ou ~ UP enfoncee jusqu’a ce que la
frequence commence a changer rapidement. Apres I’accord sur
une station, la recherche s’arr6te.
Pour arr6ter la recherche automatique manuellement, appuyer
sur + DOWN ou w UP.
● La recherche automatique risque de ne pas s’arr~ter sur Ies
stations presentant des signaux tres faibles.
Quand une emission FM stereo presente des parasites
Appuyer sur MONO TUNER tout en appuyant sur SHIFT de la
telecommande de maniere que “MONO” apparaisse sur
I’affichage.
Les parasites sent reduits, mais la reception est monophonique.
Pour retablir la reception stereophonique, appuyer sur Ies touches
pour faire disparaitre “MONO.
Pour changer I’intervalle d’accord AM
Le reglage par defaut de I’intervalle d’accord AM est de 10 kHz/
pas. Si on utilise cet appareil clans un endroit ou Ie systeme
deallocation de frequencies est de 9 kHz/pas, changer I’intervalle
d’accord.
Appuyer sur POWER tout en appuyant sur TUNER/BAND.
Pour retablir I’intervalle initial, proceder de la m6me maniere.
Repeter Ies etapes 1 et 2.
3
La station suivante ne sera pas memorisee si un total de 32
stations ont ete memorisees pour toutes Ies gammes.
~
Apres Ie changement de I’intervalle d’accord AM, toutes Ies
stations memorisees sent effacees. II faut memoriser de nouveau
ces stations.
7 FRAN~AIS
Page 49

ACCORD SUR UNE STATION MEMORISEE
Utiliser la telecommande pour selectionner Ie numero de
prereglage directement.
1
Appuyer sur BAND tout en appuyant sur SHIFT
pour selectionner une gamme.
2 A l’aide des touches numeriques O-9 et +10,
selectionner un numero de prereglage.
Exemple:
Pour selectionner Ie numero de prereglage 20, appuyer sur
+10, +10 et O.
Pour selectionner Ie numero de prereglage 15, appuyer sur
+10 et 5.
Selection d’un numero de prereglage
principal
Appuyer sur TUNER/BAND pour selectionner une gamme.
Ensuite, appuyer sur - PRESET a plusieurs reprises ou tourner
MULTI JOG.
A chaque pression sur - PRESET, Ie numero de prereglage
suivant Ie plus proche est selectionne.
Suppression d’une station memorisee
Selectionner Ie numero de prereglage de la station a supprimer.
Ensuite, appuyer sur
Ies quatre secondes.
Les numeros de prereglage suivants de toutes Ies autres stations
de la gamme sent aussi diminues d’une unite.
■ CLEAR puis appuyer sur II SET clans
sur I’appareil
II
- DOWN ,
-UP
= EJECT _
+
&JEcT
Platine 2
Utiliser seulement des cassettes de type I (normales).
7 Appuyer sur TAPE puis appuyer sur A EJECT
pour ouvrir Ie porte-cassette.
‘EJEcT-t-~
Inserer une cassette avec Ie cde expose du ruban magnetique
en has. Pousser Ie porte-cassette pour Ie fermer.
2 Appuyer sur ~ pour demarrer la lecture.
Seule la face orientee vers I’exterieur de I’appareil peut i51re
Iue.
Numero de la platine selectionnee
Compteur
Pour selectionner une platine de lecture
Quand il y une cassette clans chacune des deux platines, appuyer
d’abord sur TAPE pour selectionner une platine.
Le numero de la platine selectionnee est affiche.
Pour arr6ter la lecture, appuyer sur
Pour mettre la lecture en pause (platine 2 seulement), appuyer
sur II. Pour reprendre la lecture, appuyer de nouveau sur cette
touche.
Pour obtenir une avarice rapide ou un rebobinage, appuyer
sur 44 ou -. Ensuite, appuyer sur
defilement.
■ .
■ pour arr~ter Ie
Pour demarrer la lecture quand I’alimentation est coupbe
(fonction de lecture directe)
Appuyer sur TAPE. Lappareil est mis sous tension et la lecture
de la cassette en place commence.
Pour mettre Ie compteur a 0000
Appuyer sur ■ CLEAR clans [e mode arr&.
Le compteur est aussi mis a 0000 quand Ie porte-cassette est
ouvert.
Quand il y a une cassette clans chacune des deux platines
Une fois que la lecture sur la platine 1 est terminee, la lecture de
la cassette de la platine 2 demarre saris interruption et se poursuit
jusqu’a la fin de la face avant de cette cassette. (Lecture continue)
FRAN~AIS
8
Page 50

LECTURE
~EDIT/CHECK
ANDOMI
EPEAT
0-9,+10
SHIFT
Appuyer sur CD, puis appuyer sur A OPENICLOSE
pour ouvrir Ie compartment a disques. Mettre Ie(s)
disque(s) en place avec I’etiquette en haut.
Pour Iire un ou deux disaues, mettre Ies disques sur Ies
plateaux 1 et 2.
Pour Iire trois disaues, appuyer sur DISC CHANGE pour faire
tourner Ies plateaux apres avoir mis deux disques en place. Mettre
en place Ie troisieme disque sur Ie plateau 3.
Fermer Ie compartment a disques en appuyant sur 4 OPEN/
Pour Iire un disaue seulement,
appuyer sur une des
touches DISC DIRECT PLAY 1-3.
Le disque selectionne est Iu une fois.
Pour arreter la lecture, appuyer sur 9.
Pour mettre la lecture en pause, appuyer sur 1I. Pour reprendre
la lecture, appuyer de nouveau sur cette touche.
Pour rechercher un point particulier pendant la lecture, tenir
+ ou > enfoncee jusqu’a ce que Ie point souhaite soit atteint.
Pour passer au debut d’une plage pendant la lecture, appuyer
sur + ou E a plusieurs reprises ou tourner
Pour enlever des disques,
Pour demarrer la lecture quand I’alimentation est toupee
(fonction de lecture directe)
Appuyer sur CD. Lappareil est mis sous tension et la lecture du
(ales) disque(s) en place demarre.
Quand on appuie sur 4
sous tension et Ie compartment a disques est ouvert.
appuyer sur 4 OPEN/CLOSE.
OPEN/CLOSE, I’appareil est aussi mis
MULTI JOG.
Pour verifier Ie temps restant
Pendant la lecture, appuyer sur EDIT/CHECK de la
telecommande tout en appuyant sur SHIFT. Le temps restant
jusqu’a ce que toutes Ies plages soient Iues est affiche. Pour
retablir I’affichage du temps de lecture, repeter cette operation.
Selection d’une plage avec la telecommande
1
Appuyer sur une des touches DISC DIRECT PLAY 1-3 pour
selectionner un disque.
2
A I’aide des touches numeriques O-9 et +10, selectionner une
plage.
Exemple:
Pour selectionner la vingt-cinquieme plage, appuyer sur +10,
+10 et 5.
Pour selectionner la dixieme plage, appuyer sur +1 O et O.
La lecture demarre a la plage selectionnee et continue jusqu’a
la fin du disque.
DISC CHANGEJ
Numero de plateau du
disque a Iire Temps de lecture total
Nombre total de plages
Mettre des disques en place.
Pour Iire tous Ies disaues situes clans Ie com~artiment,
appuyer sur F.
La lecture commence par Ie disque du plateau 1.
Numero de la plage en
tours de lecture
Temps de lecture ecoule
Changement de disques pendant la lecture
Pendant qu’un disque est en lecture, on peut remplacer Ies autres
disques saris interrompre la lecture.
1 Appuyer sur DISC CHANGE.
2 Enlever Ies disques et mettre d’autres disques en place.
3 Appuyer sur 4 OPEN/CLOSE pour fermer Ie compartment
a disques.
● Pour mettre un disque de 8 cm en place, Ie poser clans Ie
renfoncement circulaire du plateau.
● Ne pas mettre plus d’un disque compact sur un plateau.
c Ne pas incliner I’appareil avec des disques en place. Ceia
pourrait provoquer des pannes.
9 FRAN~AIS
Page 51

Utiliser la telecommande.
Lecture aleatoire
Toutes Ies plages du disque selectionne ou tous Ies disques
peuvent ~tre Iues clans un ordre aleatoire.
Lecture repetee
Un seul disque ou tous Ies disques peuvent &re Ius a plusieurs
reprises.
A I’aide des touches numeriques O-9 et +10,
3
programmer une plage.
Exemple:
Pour selectionner la vingt-cinquieme plage, appuyer sur +10,
+10 et 5.
Pour selectionner la dixieme plage, appuyer sur +10 et O
Numero de la plage
selectionnee
Nombre total de
plages selectionnees
Appuyer sur RANDOM/REPEAT tout en appuyant sur
SHIFT.
A chaque pression sur ces touches, la fonction est selectionnee
de maniere cyclique.
Lecture aleatoire — RANDOM s’allume sur I’affichage.
Lecture repetee — % s’allume sur I’affichage.
Lecture aleatoire/repetee — RANDOM et ~ s’allument sur
I’affichage.
Annulation — RANDOM et ~ disparaissent de I’affichage.
Pour Iire tous Ies disaues, appuyer sur > pour demarrer la
lecture.
Pour Iire un seul disaue, appuyer sur une des touches DISC
DIRECT PLAY 1-3 pour demarrer la lecture.
~
Pendant la lecture aleatoire, ii est impossible de sautera la
precedemment Iue avec U.
On peut programmer un maximum
Iequel des disques en place.
-
de 30 plages de n’importe
plage
2
Numero de programme
Temps de lecture total des
plages seiectionnees
4 Repeter Ies etapes 2 et 3 pour programmer ~
d’autres plages.
5 Appuyer sur - pour demarrer la lecture.
Pour contrt51er Ie programme
A chaque pression sur < ou M en mode arr~t, un num6ro
de disque, un numero de plage et un numero de programrne
sent affiches.
Pour effacer Ie programme
Appuyer sur ■ CLEAR clans Ie mode arr6t.
Pour ajouter des plages au programme
Repeter Ies etapes 2 et 3 clans Ie mode arrd.
programmed a la suite de la derniere plage.
Pour changer les plages programmers
Effacer Ie programme puis repeter toutes Ies etapes.
Iire Ies plages programmers a plusieurs reprisee
Pour
Apres la programmation des plages, appuyer sur RANDOM/
REPEAT a
I’affichage.
~
Pendant la lecture programmed, la lecture aleatoire, Ie contrhle
du temps restant et la selection d’un disque ou d’une plage sent
impossible.
plusieurs reprises jusqu’a ce que ~ apparaisse sur
La plage sera
w
d
1
■
Utiliser la telecommande.
7 Appuyer sur
PRGM tout en appuyant sur SHIFT
clans Ie mode arr~t.
“PRG” est affiche.
2 Appuyer sur une des touches DISC DIRECT PLAY
1-3 pour selectionner un disque.
Passer a I’etape suivante quand Ie plateau arrete de tourner.
5
FRAN@/S
IIO
Page 52

Cette partie explique comment enregistrer a partir du tuner, du
Iecteur de disques compacts ou d’un appareil externe.
h
\,–——.. -- -- ---–——-
I ——
S@b.mz=’-? Wwx.ar.z” ,.,,$., -m ,.,,.,ra.f..rla ..-. . ‘,. .
‘-- ‘-- .-.”- ~‘- - ~.- - ‘--’-=.--.,* ‘Wb.’..--,.wa., 8 +wsjmenmsm%:!mr.r=rfl skr.:es.m~.sm
INSERTION D’ESPACES BLANCS
I_’insertion d’espaces blancs de quatre secondes permet
I’utilisation de la fonction senseur de musique. (Applicable quand
la source est TUNER, VI DEO/AUX ou MD.)
1 Appuyer sur
ou pendant Ie mode pause d’enregistrement.
~ clignote sur I’affichage pendant quatre secondes et Ie
ruban magnetique defile saris enregistrement. Au bout de
quatre secondes, la platine passe au mode pause
d’enregistrement.
2
Appuyer sur II pour reprendre I’enregistrement.
Pour inserer un espace blanc de moins de auatre secondes,
appuyer de nouveau sur
clignote.
Pour inserer des es~aces blancs de DIUS de auatre secondes,
appuyer de nouveau sur
platine passe au mode pause d’enregistrement. A chaque
pression sur cette touche, un espace blanc de quatre secondes
est ajoute.
● REC/REC MUTE pendant I’enregistrement
● REC/REC MUTE tandis que ~
● REC/REC MUTE une fois que la
Preparation
● Utiliser seulement des cassettes de type I (normales).
● Bobiner la cassette jusqu’a I’endroit ou on veut demarrer
I’enregistrement.
● Remarquer que I’enregistrement n’est fait que sur une face de
la cassette.
Inserer la cassette a enregistrer clans la platine
1
2.
Inserer la cassette avec la face a enregistrer en premier
orientee vers I’exterieur de I’appareil.
A EJECT
LQ=I=71--
Appuyer sur une des touches de fonction (CD,
2
TUNER ou VIDEO/AUX) et preparer la source a
partir de Iaquelle on veut enregistrer.
Pour enreaistrer a ~artir d’un disque compact, appuyer
sur CD et mettre Ie(s) disque(s) en place.
Pour enreaistrer une emission de radio, appuyer sur
TUNER et accorder sur une station.
Pour enreaistrer a Partir d’une source connectee, appuyer
sur VIDEO/AUX et mettre la source en lecture.
Au sujet des cassettes
● Pour eviter un effacement accidental, utiliser un
tournevis ou tout autre objet effile pour casser Ies ergots
en plastique de la cassette apres I’enregistrement.
Face A
Pour enregistrer de nouveau sur une cassette, recouvrir
Ies cavites des ergots avec du ruban adhesif ou autre.
● Le ruban magnetique des cassettes de 120 minutes
ou plus est extr@mement fin et se deforme et
s’endommage facilement. Ces cassettes ne sent pas
recommandees.
● Tendre Ie ruban magnetique avec un crayon ou un objet
similaire avant d’utiliser une cassette. Un ruban magnetique
detendu peut se rompre ou s’emm~ler clans Ie mecanisme.
Appuyer sur ● RECIREC MUTE pour demarrer
3
I’enregistrement.
Wand la fonction selectionnee est CD, la lecture et
I’enregistrement demarrent simuitanement.
Pour arr~ter I’enregistrement, appuyer sur
Pour mettre I’enregistrement en pause, appuyer sur 11.
(Applicable quand la source est TUNER ou VIDEO/AUX.) Pour
reprendre I’enregistrement, appuyer de nouveau sur cette touche.
Reglage du son pendant I’enregistrement
On peut faire varier Iibrement Ie volume de sortie et la tonalite
des enceintes ou du casque saris affecter I’enregistrement.
■ .
Pour effacer un enregistrement
Inserer la cassette a effacer clans la platine 2 et appuyer sur
1
TAPIYDECK 1/2 pour afficher “TP 2.
Bobiner la cassette jusqu’a I’endroit ou on veut dgmarrer
2
I’effacement.
Appuyer sur
3
● REC/REC MUTE pour demarrer I’effacement.
Page 53

1,3
■
2
—
II T
L
\._—–.
..’
●
—.—.—-
i’T-
{
II
—i
u
1
2
—
T -)
2
I
1
..—.—-
.-
IIT
‘,*
~,-——...
~
Bobiner la cassette jusqu’a I’endroit ou on veut demarrer
I’enregistrement.
1
Appuyer surTAPE.
2
Inserer la cassette originale clans la platine 1 et
la cassette a enregistrer clans la platine 2.
Inserer chaque cassette avec la face a Iire ou a enregistrer
orientee vers I’exterieur de l’appareil.
Appuyer sur TAPE/DECK
3
la platine 1.
“TP 1” est affiche.
Appuyer sur
4
l’enregistrement.
La lecture et I’enregistrement demarrent simultanement.
Pour arr&er la duplication
Appuyer sur ■ .
● REC/REC MUTE pour demarrer
1/2 pour selectionner
Cette fonction permet de faire des copies exactes de la cassette
originale.
~
La duplication ne demarre pas a un point situe au milieu d’une
face.
1
Appuyer sur TAPE.
2
Inserer la cassette originale clans la platine 1 et
la cassette a enregistrer clans la platine 2.
Inserer chaque cassette avec la face a Iire ou a enregisttwr
orientee vers I’exterieur de I’appareil.
Appuyer
3
l’enregistrement.
avant, puis I’enregistrement demarre.
Pour arr&er la duplication
Appuyer sur
sur SYNC DUBBING pour demarrer
■ .
FRAN~AE
12
Page 54

MULTI x
JOG
2
■
4
6,8
(-3,7
.-
4
5
3,7
---
6
Appuyer sur
● REC/REC MUTE pour demarrer
i’enregistrement sur la premiere face,
La cassette est rebobinee jusqu’au debut de la premiere face,
I’amorce est Iue pendant dix secondes, puis I’enregistrement
demarre. Une fois que I’enregistrement de la derniere plage
programmed pour la face A est termine, la platine 2 se met
en mode arr6t d’enregistrement. Passer alors & I’etape 7.
Appuyer sur EDIT/CHECK tout en appuyant sur
7
SHIFT de la telecommande pour afficher Ie
programme du deuxieme enregistrement.
B est affiche.
Retourner la cassette de la platine 2 puis appuyer
8
● REC/REC MUTE pour demarrer
sur
I’enregistrement sur la deuxieme face.
U
La fonction enregistrement avec montage et calcul du temps
permet d’enregistrer a partir de disques compacts saris se
preoccuper de la duree de la cassette et des durees des plages.
Quand on met un disque compact en place, I’appareil calcule
automatiquement la duree totale des plages. Si necessaire,
I’ordre des plages est change de maniere qu’aucune plage ne
soit tronquee.
(Al: Intelligence Artificielle)
Lenregistrement avec montage et calcul du temps ne demarrera
pas a un point situe au milieu d’une face. La cassette doit tXre
enregistree a partir du debut d’une de ses faces.
Inserer la cassette clans la platine 2.
7
Inserer la cassette avec la face a enregistrer en premier
orientee vers I’exterieur de I’appareil.
Appuyer sur CD et mettre Ie(s) disque(s) en place.
2
3 Appuyer une fois sur EDIT/CHECK tout en
appuyant sur SHIFT de la telecommande.
● Si “PRGM” est affiche, appuyer de nouveau sur EDIT/
CHECK tout en appuyant sur SHIFT.
4 Appt.wer
1:3-pour selectionner un disque.
5
A I’aide des touches numeriques O-9 de la
telecommande, specifier la duree de la cassette.
On peut sp~cifier une dur6e de 10 A 99 minutes.
Exemple: Quand on utilise une cassette de 60 minutes,
appuyer sur 6 et O.
En quelques secondes, Ies plages a enregistrer sur chaque
face de la cassette sent determiners.
● On peut aussi utiliser -, * ou MULTI JOG pour specifier
la duree de la cassette.
Duree de la cassette
sur une des touches DISC DIRECT PLAY
Plages
Temps restant
d’enregistrement pour la face A
Programmers
Pour arri+ter I’enregistrement
Appuyer sur ■ . Uenregistrement de la cassette et la lecture du
disque compact s’arr/?tent simultanement.
Pour effacer Ie programme du montage
Appuyer deux fois sur ■ CLEAR de maniere que “EDIT”
disparaisse de I’affichage.
Pour contr~ler I’ordre des numeroe des plages
programm6es
Avant I’enregistrement, appuyer sur EDIT/CHECK tout en
appuyant sur
face A ou B, puis appuyer sur + ou * a plusieurs reprises.
Pour ajouter des plages d’autres disques au programme
du montage
S’il reste du temps sur la cassette apres l’&ape 5, on peut ajouter
des rXaaes des autres disaues situes clans Ie comDartiment,
1
App~yer sur EDIT/CHECK tout en appuyant SU; SHIFT de la
telecommande pour selectionner la face A ou B,
2
Appuyer sur une des touches DISC DIRECT PLAY 1.3 pour
selectionner un disque.
3
Selectionner Ies plages a I’aide des touches numeriques de
la telecommande.
Une plage dent la duree de lecture est superieure au temps
restant ne peut pas etre programmed.
Pour ajouter d’autres plages, r6p&er Ies &apes 2 et 3.
4
Duree des cassettes et temps
La duree d’une cassette est generalement superieure a celle
indiquee sur I’etiquette. Cet appareil peut programmer des plages
pour utiliser Ie temps en exces. Quand la duree totale
d’enregistrement est Iegerement superieure a la duree specifiee
pour la cassette apres Ie montage, I’affichage indique Ie temps
en exces (saris signe moins) au lieu du temps restant (avec Ie
signe moins).
~
La fonction enregistrement avec montage et calcul du temps ne
peut pas ~tre utilisee avec Ies disques contenant 31 plages ou
plus.
SHIFT de la telecommande pour selectionner la
Numeros des plages
Numero de plage
Numero de programme
programmers
du montage
13 F/?AN~A/S
Face de la cassette
A: Face du premier enregistrement
B: Face du deuxieme enregistrement
Page 55

... -.
I
,
8,10-!+$
1,10 ~x-
t-
La fonction enregistrement avec montage programme permet
de programmer Ies plages tout en contr61ant Ie temps restant
sur chaque face de la cassette au fur et a mesure de la
programmation.
~
Lenregistrement avec montage programme ne demarrera pas a
un point situe au milieu d’une face. La cassette doit ~tre
enregistree a partir du debut d’une de ses faces.
/
I
1
......
—
●
8
—
6 Repeter I’etape 5 pour Ie reste des plages de la ~
face A.
Une plage dent la duree de lecture est superieure au temps ~ ~
restant ne peut pas &re programmed.
Appuyer sur EDIT/CHECK tout en appuyarnt sur $ -:$
7
*?’
:J,p ,,,,
!:; ‘“;
SHIFT de la telecommande pour selectionner la @;!
face B, puis programmer Ies plages
face.
Apres s’&re assure que B est affiche, repeter I’etape .5.
Face B de la cassette (face arriere)
pour Cette . ~-
8 Appuyer sur EDIT/CHECK tout en appuyant sur
SHIFT pour selectionner la face A, puis appuyer
● REC/REC MUTE pour demarrwr
sur
I’enregistrement.
La lectu~e de disque compact et I’enregistrement des plages
montees pour la la premiere face demarrent simultanement.
Une fois que la derniere plage programmed pour la face A est
terminee, la platine 2 se met en mode arr6t d’enregistrement.
Passer alors a I’etape 9.
9 Appuyer sur EDIT/CHECK tout en appuyartt sur
SHIFT de la telecommande pour l’enregistrement
de la deuxieme face
B est affiche.
z
Ilk
~;:.1
24
!
%
z
w
1
Inserer la cassette clans la platine 2.
Inserer la cassette avec la face a enregistrer en premier
orientee vers I’exterieur de I’appareil.
Appuyer sur CD et mettre Ie(s) disque(s) en place.
2
Appuyer deux fois sur EDIT/CHECK tout en
3
appuyant sur SHIFT de la telecommande.
“EDIT” et “PRGM” sent affiches.
● Si “Al” est affiche, appuyer de nouveau sur EDIT/CHECK
tout en appuyant sur SHIFT.
A I’aide des touches numeriques O-9 de la
4
telecommande, specifier la duree de la cassette.
On peut specifier une duree de 10 a 99 minutes.
● On peut aussi utiliser-, - ou MULTI JOG pour specifier
la duree de la cassette.
Duree de la cassette
Appuyer sur une des touches DISC DIRECT PLAY
5
Face A de la cassette
(face avant)
Duree maximale
d’enregistrement de la face A
1-3 pour selectionner un disque.
Ensuite, programmer une plage a l’aide des
touches numeriques O-9 et +10 de la
telecommande.
Exemple: pour selectionner la dixieme plage du disque 2,
appuyer sur DISC DIRECT PLAY 2, puis appuyer sur +10 et
10 Retourner la cassette de la platine 2 puis appuyer
● REC/REC MUTE pour demarrer
sur
l’enregistrement.
Uenregistrement demarre.
Pour arr~ter I’enregistrement
Appuyer sur
disque compact s’arr~tent simultanement.
Pour contr61er I’ordre des numeros des plage!s
programmers
Avant I’enregistrement, appuyer sur EDIT/CHECK tout en
appuyant sur SHIFT de la telecommande pour selectionner la
face A ou B, puis appuyer sur 4 ou - a plusieurs reprises.
Numero de
disque
Pour changer Ie programme de chaque face
Appuyer sur EDIT/CHECK tout en appuyant sur SHIFT de la
telecommande pour selectionner la face A ou B, puis appuyer
sur
■ CLEAR pour effacer Ie programme de la face selectionnee.
Ensuite, reprogrammer des plages.
Pour effacer Ie programme du montage
Appuyer deux fois sur ■ CLEAR de maniere que “EDIT”
disparaisse de I’affichage.
■ . Lenregistrement de la cassette et la lecture du
Face de la
cassette
Numero de plage
Numero de
programme
Numeros des plages
programmers
❑
FRAN~A/S
14
Page 56

TERIE
II
■
1,2,3
1
2
2,3
u- --
\ /
—.—
Appuyer sur CLOCK puis appuyer sur II
1
1
!
-w
—1
clans Ies auatre secondes.
Quand on utilise la telecommande
Appuyer sur CLOCK tout en appuyant sur SHIFT,
appuyer sur II SET clans Ies auatre secondes.
Appuyer sur + DOWN ou - UP pour specifier
2
Ies heures, puis appuyer sur II SET pour Ies
regler.
Les heures arr6tent de clignoter et Ies minutes se mettent a
clignoter.
Appuyer sur + DOWN ou -
3
Iei- m-inutes, puis appuyer
UP pour specifier
sur II ‘SET p-our Ies
regler.
Les minutes arri%ent de clignoter
demarre a 00 seconde.
sur I’affichage et I’horloge
SET
puis
“’”B
La minuterie d’arrix permet de mettre I’appareil hors tension
automatiquement au bout d’un temps specifie.
Utiliser la telecommande.
1
Appuyer sur SLEEP tout en appuyant sur SHIFT.
2 Dans Ies auatre secondes, appuyer sur 44 ou
- pour specifier Ie temps jusqu’a la mise hors
tension.
A chaque pression sur la touche, Ie temps change entre 5 et
240 minutes par pas de 5 minutes.
Temps specifie
Pour afficher I’heure courante
Appuyer sur CLOCK. Lheure est
secondes.
Toutefois, I’heure ne peut pas
I’enregistrement.
Pour passer au format de 24 heures
Appuyer sur CLOCK puis appuyer sur ■ clans Ies quatre
secondes.
Pour revenir au format de 12 heures, proceder de la m6me
maniere
Si I’affichage de I’horloge clignote
Ceci est dti a une interruption d’alimentation. Ilheure courante
doit &re reglee de nouveau.
Si I’alimentation est interrompue pendant
heures, tous Ies reglages memorises apres I’achat doivent
6tre faits de nouveau.
On peut utiliser MULTI JOG a la place de U et -.
affichee pendant quatre
6tre affichee pendant
plus cf’environ 24
15 FRAIV~AIS
Pour contrder Ie temps restant jusqu’a la mise hors
tension
Appuyer une fois sur SLEEP tout en appuyant sur SHIFT. Le
temps restant est affiche pendant quatre secondes.
Pour annuler la minuterie d’arr~t
Appuyer deux fois sur SLEEP tout en appuyant sur SHIFT de
maniere que “SLEEP OFF apparaisse sur I’affichage.
*On peut utiliser MULTI JOG a la place de U et W.
Page 57

2,4
I I
1
f 8 J-V-
-8
—
1
\_________________.__./
Avec la minuterie integree, I’appareil peut i%re mis sous tension
chaque jour a I’heure specifiee.
Preparation
S’assurer que I’horloge est reglee correctement.
Utiliser la telecommande.
1
Appuyer sur TIMER pour afficher 0, puis appuyer
sur 1I
@
~
S1 on n’appule pas sur [I SET clans Ies six secondes, une
autre operation peut demarrer.
2
Specifier Ies heures en appuyant
ou - UP, puis appuyer sur II SET pour Ies
regler.
Proceder de la m6me maniere pour specifier et
regler Ies minutes.
Une fois que I’heure est specifiee, un des noms de source
clignote sur I’affichage.
Appuyer sur FUNCTION pour selectionner une
3
source puis appuyer sur II SET.
+
Appuyer sur < DOWN ou * UP pour
4
selectionner la duree de la mise sous tension par
la minuterie. Ensuite, appuyer sur 1I
SET clans Ies six secondes.
est affiche et Ies heures clignotent.
Si on appuie sur TUNER, la gamme ne peut pas etre
selectionnee a cette etape.
f
1+
1
sur < DOWN
1,2,3,4
SET.
La duree de la mise sous tension par la minuterie peut ~tre
reglee entre 5 et 240 minutes par pas de 5 minutes.
Preparer la source.
5
Pour ecouter un disaue com~act, mettre Ie disque a Iire en “:’~
premier en place clans Ie plateau 1.
Pour ecouter une cassette, la mettre en place clans la platins #
1 Ou 2.
Pour ecouter la radio, I’accorder sur une station.
6
Apres avoir regle Ie volume et la tonalite, appuyer
sur POWER pour mettre I’appareil hors tension.
reste sur I’affichage une fois que I’alimentation est coupes
@
(mode attente de minuterie).
Quand I’heure de la mise sous tension par la minuterie est
atteinte, I’appareil est mis sous tension et la lecture commence
sur la source selectionnee.
Quand on coupe I’alimentation alors que Ie niveau du volume
est regle a 17 ou plus, ce niveau est automatiquement reglb
a16.
Pour contrder I’heure et la source specifiers
Appuyer sur TIMER. Lheure de la mise sous tension par la
minuterie, Ie nom de la source selectionnee et la duree de la
mise sous tension par la minuterie sent affiches pendant quatre
second es.
Pour annuler provisoirement Ie mode attente de minuteriie
Appuyer sur TIMER a plusieurs reprises jusqu’a ce que @
disparaisse de I’affichage.
Pour retablir Ie mode attente de minuterie, appuyer une ou deux
fois sur TIMER pour afficher ~.
Utilisation de I’appareil une fois que la minuterie eet
reglee
On peut utiliser I’appareil normalement apres avoir regle la
minuterie.
Avant de couper I’alimentation, repeter I’etape 5 pour pr~parc!r
la source, et regler Ie volume et la tonalite.
~
● La lecture et I’enregistrement commandes par la minuterie ne
se feront pas si I’appareil n’est pas mis hors tension.
● Ilappareil connecte ne peut pas &re mis sous et hors tension
par la minuterie integree de I’appareil principal. Utiliser une
minuterie externe.
* On peut utiliser MULTI JOG a /a p/ace de + et*.
.... . ..,,, --,., ..-.?.,”’... ....”.,,,,
.,“,.,,.,. ---
-.-:~....-! ,’.;’”‘:~’..... :!N-”
ENREGISTREMENT COMMANDE PAR LA
MINUTERIE
L’enregistrement commande par la minuterie est applicable
uniquement aux sources TUNER et VI DEO/AUX (avec une
minuterie externe).
Appuyer sur TIMER a plusieurs reprises jusqu’a ce que d]
clignote sur I’afficnage, puis appuyer Sur 11 SET
six secondes. Effectuer Ies etapes de la partie “REGLAGE DIE
LA MI NUTERIE” a partir de I’etape 2 et, apres I’etape 5, inserx!r
la cassette a enregistrer clans la platine 2.
aanS leS
;$g
jll!%:
‘y;
8
t
z
❑
Page 58

CD DIGITAL OUT
v ‘OpT1cAL)
F ]
Pour plus de details, se reporter au mode d’emploi de I’appareil
connecte.
● Les cordons de raccordement ne sent pas fournis. Se procurer
Ies cordons necessaires.
● Pour Ies appareils option nels disponibles, consulter Ie
distributeur Aiwa local.
Cet appareil peut recevoir des signaux sonores analogiques par
ces prises.
Utiliser un cable a fiches phono RCA pour connecter un appareil
audio (tourne-disque, Iecteur de disque laser, Iecteur de
minidisque, magnetoscope, televiseur, etc.).
Connecter la fiche rouge a la prise VIDEO/AUX R et la fiche
blanche a la prise VIDEO/AUX L.
Q
D
!
I
= —
m —ISURROUND
m
VIDEO/AUX
I
SPEAKERS
1
.
[’.
-—___
Pour utiliser I’appareil connecte aux prises VIDEO/AUX, procedet
de la maniere suivante.
1
Appuyer sur VIDEO/AUX.
“VIDEO ou “AUX apparalt sur I’affichage.
Mettre I’appareil connecte en lecture.
2
Pour changer Ie nom de source sur I’affichage
Quand on appuie sur VI DEO/AUX, “VIDEO ou “AUX” est affich~
initialement. On peut remplacer ce nom par “VIDEO, “AUX ou
“TV”.
Lappareil etant sous tension, appuyer sur POWER tout en
appuyant sur VIDEO/AUX.
Rep6ter cette procedure pour selectionner un des noms.
1
$
.-. ._ —-
Pour connecter un tourne-disque
Utiliser un tourne-disque Aiwa muni d’un amplificateur a egaliseur
integre.
PRISE CD DIGITAL OUT (OPTICAL)
Cet appareil peut sortir Ies signaux sonores numeriques de
disque compact par cette prise. Utiliser un ctible optique pour
connecter un appareil audio numerique (platine DAT, enregistreur
de minidisque, etc.).
Eniever Ie capuchon antipoussi&e @ de la prise CD
OUT (OPTICAL). Ensuite, connecter la fiche d’un cable optique
a cette prise.
Quand la prise CD DIGITAL OUT (OPTICAL) n’est pas
utilisee
Mettre en place Ie capuchon antipoussiere fourni.
DIGITAL
Connecter des enceintes surround optionnelles d’une impedance
de 8 ohms a 16 ohms a ces prises.
17 FRAN~AIS
Page 59

Un entretien et des soins reguliers de I’appareil et des disques
et cassettes sent necessaires pour assurer un fonctionnement
optimal.
Nettoyage du coffret
Utiliser un chiffon doux et sec.
Si I’appareil eSt extr~mement sale, utilser un chiffon doux
Iegerement imbibe d’une solution detergence deuce. Afin de ne
pas alterer Ie fini de I’appareil, ne pas utiliser de solvants forts,
tels que de I’alcool, de la benzine ou du diluant.
Nettoyage des ti$tes et des chemins de bande
Toutes Ies dix heures d’utilisation, nettoyer Ies tetes et Ies
chemins de bande avec une cassette de nettoyage ou un cotontige imbibe d’un Iiquide de nettoyage ou d’alcool denature. (Des
kits de nettoyage sent disponibles clans Ie commerce.)
Lors du nettoyage avec un coton-tige, essuyer la t6te
d’enregistrement/de lecture (platine 2 seulement), la t&e
d’effacement (platine 2 seulement), Ies cabestans et Ies galets
presseurs.
Si I’appareil ne fonctionne pas comme decrit clans ce mode
d’emploi, contr61er Ie guide suivant.
GENERALITIES
II n’y a pas de son.
● Le cordon secteur est-il branche correctement?
● N’y a-t-ii pas une mauvaise connexion? (+ page 3)
● II y a peut-~tre un court-circuit clans Ies bornes d’enceinte.
+ Debrancher Ie cordon secteur puis corriger Ies connexions
d’enceinte.
● Une touche de fonction incorrect n’est-elle pas en service?
Le son ne sort que par une enceinte.
● Lautre enceinte n’est-elle pas deconnectee?
Un affichage ou un fonctionnement errone se produit.
Reinitialiser I’appareil comme indique ci-dessous.
+
PARTIE TUNER
II y a des charges statiques constants en forme d’onde.
. Lantenne est-elle raccordee correctement? (+ page 4)
. Le signal n’est-il pas faible?
+ Connecter une antenne exterieure.
La reception presente des parasites ou Ie son presente
de la distortion.
● Le systeme ne capte-t-il pas des bruits exterieurs ou des ondes
reflechies?
+ Changer I’orientation de I’antenne.
-+ Eloigner I’appareil d’autres appareils electriques.
I
Galet presseur
I
Apres Ie nettoyage des t&es et des chemins de bande avec une
cassette de nettoyage a Iiquide ou avec un coton-tige imbibe,
attendre que Ies parties nettoyees soient completement seches
avant de mettre des cassettes en place.
Pour demagnetiser Ies tiXes
A la Iongue, Ies t~tes peuvent devenir magnetisees. Ceci peut
restreindre la plage de sortie des cassettes enregistrees et
augmenter Ie bruit. A I’aide d’un dispositif de demagnetisation
disponible clans Ie commerce, demagnetiser Ies ti$tes toutes Ies
20 a 30 heures d’utilisation.
Soin des disques
● Si un discme est sale, I’essuyer du centre vers I’exterieur avec
● Apres la lecture d’un disque, Ie ranger clans son etui. Ne pas
Iaisser Ie disque clans un endroit chaud ou humide.
Soin des cassettes
● Apres I’utilisation, ranger Ies cassettes clans Ieurs bo;tes.
● Ne pas Iaisser Ies cassettes pres d’un aimant, d’un moteur
electrique, d’un televiseur ou de toute autre source de champ
magnetique. Cela diminuerait la qualite sonore et provoquerait
du souffle,
● Ne pas exposer Ies cassettes au soleil ni Ies Iaisser clans un
vehicule gare au soleil.
PARTIE MAGNETOCASSETTE
La bande ne defile pas.
● La platine 2 n’est-elle pas en mode pause? (+ page 8)
Le son est desequilibre ou trop faible.
● La t6te de lecture n’est-elle pas sale? (+ page 18)
L’enregistrement est impossible.
● Un ergot de securite de la cassette n’est-il pas absent?
(+ page 8)
● La t6te d’enregistrement n’est-elle pas sale? (+ page 18)
L’effacement est impossible.
La t&e d’effacement n’est-elle pas sale? (+ page 18)
c
● Une cassette au metal n’est-elle pas utilisee?
n’y a pas de sons aigus.
II
● La t~te d’enregistremenffde lecture n’est-elle pas sale?
(+ page 18)
PARTIE LECTEUR
DE DISQUES COMPACTS
La lecture ne fonctionne pas.
Le disque est-il correctement mis en place? (+ page 9)
*
● Le disque n’est-il pas sale? (+ page 18)
● N’y a-t-ii pas de la condensation sur la Ientille?
+ Attendre environ une heure puis essayer de nouveau
——
Pour reinitialiser
Si une anomalie apparatt sur la fen~tre d’affichage ou clans Ie
magnetocassette, reinitialiser I’appareil de la maniere suivante.
1 Appuyer sur POWER pour couper I’alimentation.
2 Appuyer sur POWER tout en appuyant sur
remettre I’appareil sous tension. Toutes Ies donnees
memorisees apres I’achat sent effacees.
Si a I’etape 1 I’alimentation ne peut pas ~tre toupee du fait d’une
anomalie, reinitialiser en debranchant Ie cordon secteur puis Ie
rebrancher. Ensuite, effectuer I’etape 2.
■ CLEAR pour
FRANf2A\S
18
Page 60

Appareil principal CX-NA303
Partie tuner FM
Plage d’accord
Sensibility utile
Bornes d’antenne
(IHF)
Partie tuner AM
Plage d’accord
Sensibility utile
Antenne
Partie amplificateur
Puissance de sortie
Distortion harmonique totale
Entrees
Sorties
87,5 MHz a 108 MHz
13,2 dBf
75 ohms (asymetrique)
530 kHz a 1710 kHz (par pas de
10 kHz)
531 kHz a 1602 kHz (par pas de 9
kHz)
350 pV/m
Antenne cadre
30 W +30 W (de 50 Hz a 20 kHz,
DHT inferieure a 1%, 6 ohms)
0,1% (15 W, 1 kHz, 6 ohms, AUDIO
DIN)
VIDEO/AUX: 500 mV
SPEAKERS: acceptent des
enceintes de 6 ohms ou plus
SURROUND SPEAKERS:
acceptent des enceintes de 8
ohms A 16 ohms
PHONES (prise stereo): accepte
un casque de 32 ohms ou plus
Enceintes acoustiques SX-NA302
Type de caisson
Haut-parleurs
Impedance
Niveau de pression acoustique
de sortie
Dimensions
(Lx H x P) 235 x 324x 250 mm
Poids
Les specifications et I’aspect exterieur peuvent &re modifies saris
preavis.
voies, bass-reflex (Type a
2
blindage antimagnetique)
Haut-parleur de grave:
cdne de 120 mm
Haut-parleur d’aigu:
ceramique 10 mm
6
ohms
87 dBAfV/m
3,2
kg
DROITS D’AUTEUR
Priere de verifier Ies Iois sur la propriete artistique relatives a
I’enregistrement de disques, de la radio ou de cassettes clans Ie
pays d’utilisation de I’appareil.
Partie magnetocassette
Format de piste
Reponse en frequence
Systeme d’enregistrement
T6tes
4 pistes, 2 canaux stereo
50
Hz – 10000 Hz
Polarisation CA
1 t&e de lecture (platine 1)
1 t~te d’enregistrementide iecture,
1 ti%e d’effacement (platine 2)
Partie Iecteur de disques compacts
Laser
Convertisseur N/A 1 bit, double
Rapport signal/bruit 85 dB (1 kHz, O dB)
Distortion harmonique
Pleurage et acintillement En deqa du seuil mesurable
Laser a semi-conducteurs
(k= 780 nm)
0,05% (1 kHz, O dB)
Generalities
Alimentation electrique
Consummation electrique
Dimensions de I’appareil
principal (Lx H x P)
Poids de I’appareil principal 5,7 kg
Secteur 120 V, 60 Hz
85 W
260 x 330x 346 mm
19 FRAN~AIS
Page 61

Page 62

Page 63

Page 64

o
Q
Q
Q
o
Name/Nombre/Nom
TAPE DECK1/2
@
TUNER/BAND ...............................................
VIDEO/AUX ................................................... 17
CD ................................................................. 9
0 POWER .........................................................
0 DISC CHANGE
=OpEN/cLOsE
DISC DIRECT PLAY1-3 ................................ 9,10,13,14
@ PHONES ....................................................... 6
~ VOLUME ....................................................... 6
T.BASS .......................................................... 6
GRAPHIC EQUALIZER
(ROCK, POP, CLASSIC) ................................ 6
............................................. 8,12
.............................................
...........................................
Page/Pagina/Page
7
5
9
9
(3
e
c)
Name/Nombre/Nom
@ DISC DIRECT PLAY1-3 ............................... 9,10,13,14
@ 0-9,+10
l/EDIT/CHECK
2/PRGM ........................................................ 10
3/RANDoM/REPEAT ................................... 10
4/GEQ .......................................................... 6
6n.BASS ...................................................... 6
7/TIMER
8/sLEEP ....................................................... 15
9/cLocK ...................................................... 15
O/MONO~UNER .......................................... 7
+10/BAND .................................................... 7
@SHIFT ............................................................ 5
@ FUNCTION
......................................................... 8,9,10,13,14
............................................ 9,13,14
. . . . . . . . . . . . . . . . . . . . . . . . . . . . . . . . . . . . . . . . . . . . . . . . . . . . . . .
...................................................
Page/Pagina/Page
16
5
■CLEAR ......................................................
0
.PRESET .................................................... 8-10
MULTI JOG ................................................... 8,9,13,14
llSET ............................................................ 7,8,9,15,16
M/+ UP .................................................. 7-10,13-16
-/-DOWN ............................................ 7-10,13-16
~ TIMER ........................................................... 16
CLOCWDIMMER
~ SYNC DUBBING .......................................... 12
●REc/REC MUTE
..........................................
.......................................
8-15
15
11,13,14
c~// k)// free l-800-BUY-A/WA (United States and Puerto Rico)
Printed in Malaysia
@ POWER
@ ml-UP ................................................. 7-10,13-16
M/-DOWN ........................................... 7-10,13-16
llSET ........................................................... 7,8,9,15,16
........................................................
5
■CLEAR ..................................................... 8-15
-PRESET
VOLUME(A,V) ...................................... 6
................................................... 8-10
AIWA CO.,LTD.
 Loading...