

Page 1
"Handycam" User Guide
1
PrintSearch
Top page
Operation Search
Before use
Getting started
Recording
Playback
Saving images with an external
device
Customizing your camcorder
Troubleshooting
Maintenance and precautions
Contents list
HDR-CX190/CX200/CX210/PJ200
User Guide
Use this manual if you encounter any problems, or have any questions about the camcorder.
Back to top
Copyright 2012 Sony Corporation
Page 2
"Handycam" User Guide
2
PrintSearch
Top page > Operation Search
Operation Search
Before use
Getting started
Recording
Playback
Saving images with an external
device
Customizing your camcorder
Troubleshooting
Maintenance and precautions
Contents list
Operation Search
Operation Search
Search by operation
Back to top
Copyright 2012 Sony Corporation
Page 3
"Handycam" User Guide
3
PrintSearch
Top page > Before use
Operation Search
Before use
Getting started
Recording
Playback
Saving images with an external
device
Customizing your camcorder
Troubleshooting
Maintenance and precautions
Contents list
Before use
How to use this User Guide
How to use this User Guide
Models and illustrations used in this User Guide
Parts and controls/Screen indicators
Parts and controls
Screen indicators
Operating your camcorder
Selecting items on the LCD screen
Back to top
Copyright 2012 Sony Corporation
Page 4
"Handycam" User Guide
4
PrintSearch
Top page > Getting started
Operation Search
Before use
Getting started
Recording
Playback
Saving images with an external
device
Customizing your camcorder
Troubleshooting
Maintenance and precautions
Contents list
Getting started
Checking the supplied items
Supplied items
Charging the battery pack
Charging the battery using the AC Adaptor
Charging the battery using your computer
Charging the battery abroad
Turning the power on, and setting the date and time
Turning the power on, and setting the date and time
Preparing the recording media
Selecting a recording medium (HDR-CX210)
Inserting a memory card
Back to top
Copyright 2012 Sony Corporation
Page 5
"Handycam" User Guide
5
PrintSearch
Top page > Recording
Operation Search
Before use
Getting started
Recording
Playback
Saving images with an external
device
Customizing your camcorder
Troubleshooting
Maintenance and precautions
Contents list
Recording
Recording
Recording movies
Shooting photos
Useful functions for recording images
Zooming
Intelligent Auto
Recording the selected subject clearly (Face Priority) (HDR-CX200/CX210/PJ200)
Back to top
Copyright 2012 Sony Corporation
Page 6
"Handycam" User Guide
6
PrintSearch
Top page > Playback
Operation Search
Before use
Getting started
Recording
Playback
Saving images with an external
device
Customizing your camcorder
Troubleshooting
Maintenance and precautions
Contents list
Playback
Playback
Playing movies and photos from the Event View screen
Operating buttons while playing
Dividing a movie
Capturing a photo from a movie
Highlight Playback
Enjoying a digest of your movies (Highlight Playback)
Saving Highlight Playback in high definition image quality (HD) (Scenario Save)
Converting Highlight Playback scenes or Highlight Scenarios to standard definition image
quality (STD) (Highlight Movie)
Using the built-in projector
Using the built-in projector (HDR-PJ200)
Playing images on a TV
Connecting the camcorder to a high definition TV
Connecting the camcorder to a non-high-definition TV
Connecting the camcorder to a TV via a VCR
Using “BRAVIA” Sync
Copyright 2012 Sony Corporation
Back to top
Page 7
"Handycam" User Guide
7
PrintSearch
Top page > Saving images with an external device
Operation Search
Before use
Getting started
Recording
Playback
Saving images with an external device
Customizing your camcorder
Troubleshooting
Maintenance and precautions
Contents list
Saving images with an external device
Using the “PlayMemories Home” software
Starting the “PlayMemories Home” software
Selecting a method for saving images
Disc creation guide
Types of media devices on which the images can be saved
The devices on which the created disc can be played back
Saving images on an external media device
Saving images on an external media device easily
Saving the desired images in the camcorder to the external media device
Playing back images in the external media device on the camcorder
Devices that cannot be used as an external media device
Creating a disc with the DVD writer, DVDirect Express
Creating a disc with DVDirect Express
Performing [DISC BURN OPTION]
Playing back a disc on the DVDirect Express
Creating a disc with a DVD writer other than DVDirect Express
Creating a high definition image quality (HD) disc with a DVD writer
Creating a disc with a recorder
Creating a standard definition image quality (STD) disc with a recorder, etc.
Copyright 2012 Sony Corporation
Back to top
Page 8
"Handycam" User Guide
8
PrintSearch
Top page > Customizing your camcorder
Operation Search
Before use
Getting started
Recording
Playback
Saving images with an external
device
Customizing your camcorder
Troubleshooting
Maintenance and precautions
Contents list
Customizing your camcorder
Using menu items
Setting up menu items
Shooting Mode
Movie
Photo
Camera/Mic
White Balance
Spot Meter/Fcs (Spot meter/focus) (HDR-CX200/CX210/PJ200)
Spot Meter (Flexible spot meter) (HDR-CX200/CX210/PJ200)
Spot Focus (HDR-CX200/CX210/PJ200)
Exposure
Focus
Low Lux
Scene Selection
Fader
Self-Timer
Tele Macro
SteadyShot (movie)
Digital Zoom
Auto Back Light
Face Detection
Smile Shutter
Smile Sensitivity
Blt-in Zoom Mic
Wind Noise Reduct.
Micref Level (Microphone reference level)
My Button
Guide Frame
Display Setting
Image Quality/Size
REC Mode
HD/STD Setting
Wide Mode
x.v.Color
Image Size
Playback Function
Event View
Highlight Movie
Scenario
Page 9

Edit/Copy
Delete
9
Protect
Copy (HDR-CX210)
Direct Copy
Setup
Media Select (HDR-CX210)
Media Info
Format
Repair Img. DB F.
File Number
Data Code
Volume
Download Music
Empty Music
TV Type
HDMI Resolution
CTRL FOR HDMI (Control for HDMI)
USB Connect
USB Connect Setting
USB LUN Setting
Disc Burn
Beep
LCD Brightness
Language Setting
Calibration (HDR-CX200/CX210/PJ200)
Battery Info
Eco Mode
Demo Mode
Date & Time Setting
Area Setting
Back to top
Copyright 2012 Sony Corporation
Page 10
"Handycam" User Guide
10
PrintSearch
Top page > Troubleshooting
Operation Search
Before use
Getting started
Recording
Playback
Saving images with an external
device
Customizing your camcorder
Troubleshooting
Maintenance and precautions
Contents list
Troubleshooting
If you have problems
If you have problems
Troubleshooting
Overall operations
Batteries/power sources
LCD screen
Memory card
Recording
Playback
Playing back images stored on memory card on other devices
Editing movies/photos on your camcorder
Playback on the TV
Copying/Connecting to other devices
Connecting to a computer
Self-diagnosis display/Warning indicators
Self-diagnosis display
Warning Indicators
Copyright 2012 Sony Corporation
Back to top
Page 11
"Handycam" User Guide
11
PrintSearch
Top page > Maintenance and precautions
Operation Search
Before use
Getting started
Recording
Playback
Saving images with an external
device
Customizing your camcorder
Troubleshooting
Maintenance and precautions
Contents list
Maintenance and precautions
Maintenance and precautions
About the AVCHD format
About the memory card
About the “InfoLITHIUM” battery pack
About x.v.Color
About the AC Adaptor
About handling of your camcorder
On use and care
On moisture condensation
On adjustment of the touch panel (HDR-CX200/CX210/PJ200)
On charging the pre-installed rechargeable battery
Notes on disposal/transfer of the camcorder
Recording time of movies/number of recordable photos
Charging time
Expected time of recording and playback with each battery pack
Expected recording time of movies
Using your camcorder abroad
Using your camcorder abroad
On trademarks
On trademarks
Copyright 2012 Sony Corporation
Back to top
Page 12

"Handycam" User Guide
12
PrintSearch
Top page > Contents list
Operation Search
Before use
Getting started
Recording
Playback
Saving images with an external
device
Customizing your camcorder
Troubleshooting
Maintenance and precautions
Contents list
Contents list
Operation Search
Operation Search
Search by operation
Back to top
Before use
How to use this User Guide
How to use this User Guide
Models and illustrations used in this User Guide
Parts and controls/Screen indicators
Parts and controls
Screen indicators
Operating your camcorder
Selecting items on the LCD screen
Back to top
Getting started
Checking the supplied items
Supplied items
Charging the battery pack
Charging the battery using the AC Adaptor
Charging the battery using your computer
Charging the battery abroad
Turning the power on, and setting the date and time
Turning the power on, and setting the date and time
Preparing the recording media
Selecting a recording medium (HDR-CX210)
Inserting a memory card
Recording
Recording
Recording movies
Shooting photos
Back to top
Useful functions for recording images
Zooming
Page 13

Intelligent Auto
Recording the selected subject clearly (Face Priority) (HDR-CX200/CX210/PJ200)
13
Playback
Playback
Playing movies and photos from the Event View screen
Operating buttons while playing
Dividing a movie
Capturing a photo from a movie
Highlight Playback
Enjoying a digest of your movies (Highlight Playback)
Saving Highlight Playback in high definition image quality (HD) (Scenario Save)
Converting Highlight Playback scenes or Highlight Scenarios to standard definition image
quality (STD) (Highlight Movie)
Using the built-in projector
Using the built-in projector (HDR-PJ200)
Playing images on a TV
Connecting the camcorder to a high definition TV
Connecting the camcorder to a non-high-definition TV
Connecting the camcorder to a TV via a VCR
Using “BRAVIA” Sync
Back to top
Saving images with an external device
Using the “PlayMemories Home” software
Starting the “PlayMemories Home” software
Selecting a method for saving images
Disc creation guide
Types of media devices on which the images can be saved
The devices on which the created disc can be played back
Saving images on an external media device
Saving images on an external media device easily
Saving the desired images in the camcorder to the external media device
Playing back images in the external media device on the camcorder
Devices that cannot be used as an external media device
Creating a disc with the DVD writer, DVDirect Express
Creating a disc with DVDirect Express
Performing [DISC BURN OPTION]
Playing back a disc on the DVDirect Express
Back to top
Creating a disc with a DVD writer other than DVDirect Express
Creating a high definition image quality (HD) disc with a DVD writer
Creating a disc with a recorder
Creating a standard definition image quality (STD) disc with a recorder, etc.
Back to top
Page 14

Customizing your camcorder
14
Using menu items
Setting up menu items
Shooting Mode
Movie
Photo
Camera/Mic
White Balance
Spot Meter/Fcs (Spot meter/focus) (HDR-CX200/CX210/PJ200)
Spot Meter (Flexible spot meter) (HDR-CX200/CX210/PJ200)
Spot Focus (HDR-CX200/CX210/PJ200)
Exposure
Focus
Low Lux
Scene Selection
Fader
Self-Timer
Tele Macro
SteadyShot (movie)
Digital Zoom
Auto Back Light
Face Detection
Smile Shutter
Smile Sensitivity
Blt-in Zoom Mic
Wind Noise Reduct.
Micref Level (Microphone reference level)
My Button
Guide Frame
Display Setting
Image Quality/Size
REC Mode
HD/STD Setting
Wide Mode
x.v.Color
Image Size
Playback Function
Event View
Highlight Movie
Scenario
Edit/Copy
Delete
Protect
Copy (HDR-CX210)
Direct Copy
Setup
Page 15

Media Select (HDR-CX210)
Media Info
15
Format
Repair Img. DB F.
File Number
Data Code
Volume
Download Music
Empty Music
TV Type
HDMI Resolution
CTRL FOR HDMI (Control for HDMI)
USB Connect
USB Connect Setting
USB LUN Setting
Disc Burn
Beep
LCD Brightness
Language Setting
Calibration (HDR-CX200/CX210/PJ200)
Battery Info
Eco Mode
Demo Mode
Date & Time Setting
Area Setting
Troubleshooting
If you have problems
If you have problems
Troubleshooting
Overall operations
Batteries/power sources
LCD screen
Memory card
Recording
Playback
Playing back images stored on memory card on other devices
Editing movies/photos on your camcorder
Playback on the TV
Copying/Connecting to other devices
Connecting to a computer
Self-diagnosis display/Warning indicators
Self-diagnosis display
Warning Indicators
Back to top
Back to top
Page 16

Maintenance and precautions
Maintenance and precautions
16
About the AVCHD format
About the memory card
About the “InfoLITHIUM” battery pack
About x.v.Color
About the AC Adaptor
About handling of your camcorder
On use and care
On moisture condensation
On adjustment of the touch panel (HDR-CX200/CX210/PJ200)
On charging the pre-installed rechargeable battery
Notes on disposal/transfer of the camcorder
Recording time of movies/number of recordable photos
Charging time
Expected time of recording and playback with each battery pack
Expected recording time of movies
Using your camcorder abroad
Using your camcorder abroad
On trademarks
On trademarks
Copyright 2012 Sony Corporation
Back to top
Page 17
"Handycam" User Guide
17
Operation Search
PrintSearch
Top page > Operation Search > Operation Search > Search by operation
Before use
Getting started
Recording
Playback
Saving images with an external
device
Customizing your camcorder
Troubleshooting
Maintenance and precautions
Contents list
Search by operation
Setting the date and time
Date & Time Setting
Area Setting
Checking the name of parts and controls
Parts and controls
Identifying part names
Parts and controls
Displaying the data code
Data Code
Selecting the suitable setting automatically for the recording situation
Intelligent Auto
Recording people clearly
Face Detection
Recording the selected subject clearly (Face Priority) (HDR-CX200/CX210/PJ200)
Smile Shutter
Scene Selection (Portrait)
Scene Selection (Spotlight)
Recording images with the selected image quality
REC Mode
HD/STD Setting
Wide Mode
Image Size
Recording images without blurring
SteadyShot (movie)
Adjusting the focus
Spot Focus (HDR-CX200/CX210/PJ200)
Tracking focus: Recording the selected subject clearly (Face Priority) (HDR-CX200/CX210/PJ200)
Focus
Recording movies in a dim place
Low Lux
Scene Selection (Night Scene)
Recording sound clearly
Wind Noise Reduct.
Blt-in Zoom Mic
Micref Level (Microphone reference level)
Capturing photos during movie recording
Recording high quality photos during movie recording (Dual capture): Recording movies
Smile Shutter
Page 18

Recording sunset or fireworks beautifully
Scene Selection (Fireworks)
18
Scene Selection (Sunrise&Sunset)
Selecting a recording medium
Media Select (HDR-CX210)
Saving battery power
Eco Mode
Playing movies and photos from an event
Event View
Enjoying a digest of your movies
Enjoying a digest of your movies (Highlight Playback)
Using the built-in projector
Using the built-in projector (HDR-PJ200)
Playing images on a TV
Connecting the camcorder to a high definition TV
Connecting the camcorder to a non-high-definition TV
Editing movies and photos
Capturing a photo from a movie
Dividing a movie
Delete
Saving images with an external device
Saving images on an external media device easily
Creating a disc
Creating a disc with DVDirect Express
Creating a high definition image quality (HD) disc with a DVD writer
Creating a standard definition image quality (STD) disc with a recorder, etc.
Copyright 2012 Sony Corporation
Back to top
Page 19
"Handycam" User Guide
19
Operation Search
PrintSearch
Top page > Before use > How to use this User Guide > How to use this User Guide
Before use
Getting started
Recording
Playback
Saving images with an external
device
Customizing your camcorder
Troubleshooting
Maintenance and precautions
Contents list
How to use this User Guide
Selecting a topic to display
Searching a topic by keyword
Returning to a previous page
Printing out a page
Marks and notations used in this User Guide
This User Guide explains how to use each function of the camcorder, how to change settings, and how
to troubleshoot a problem.
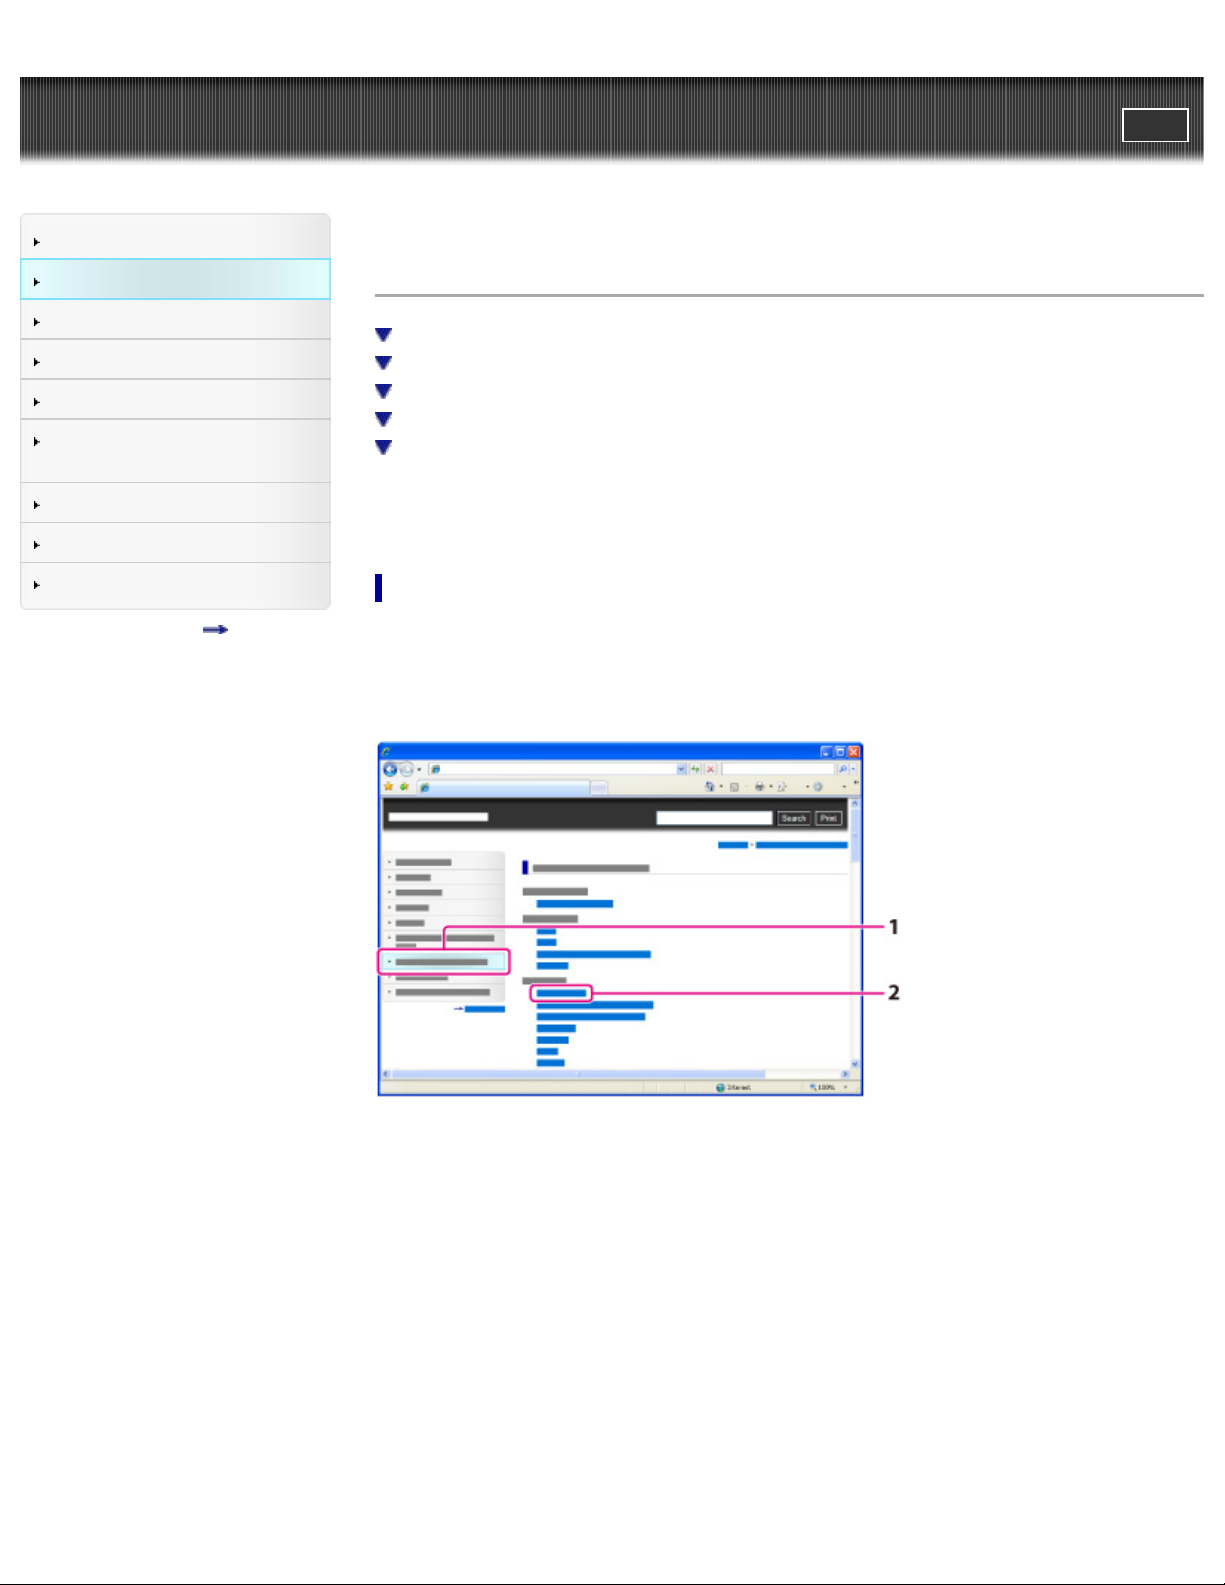
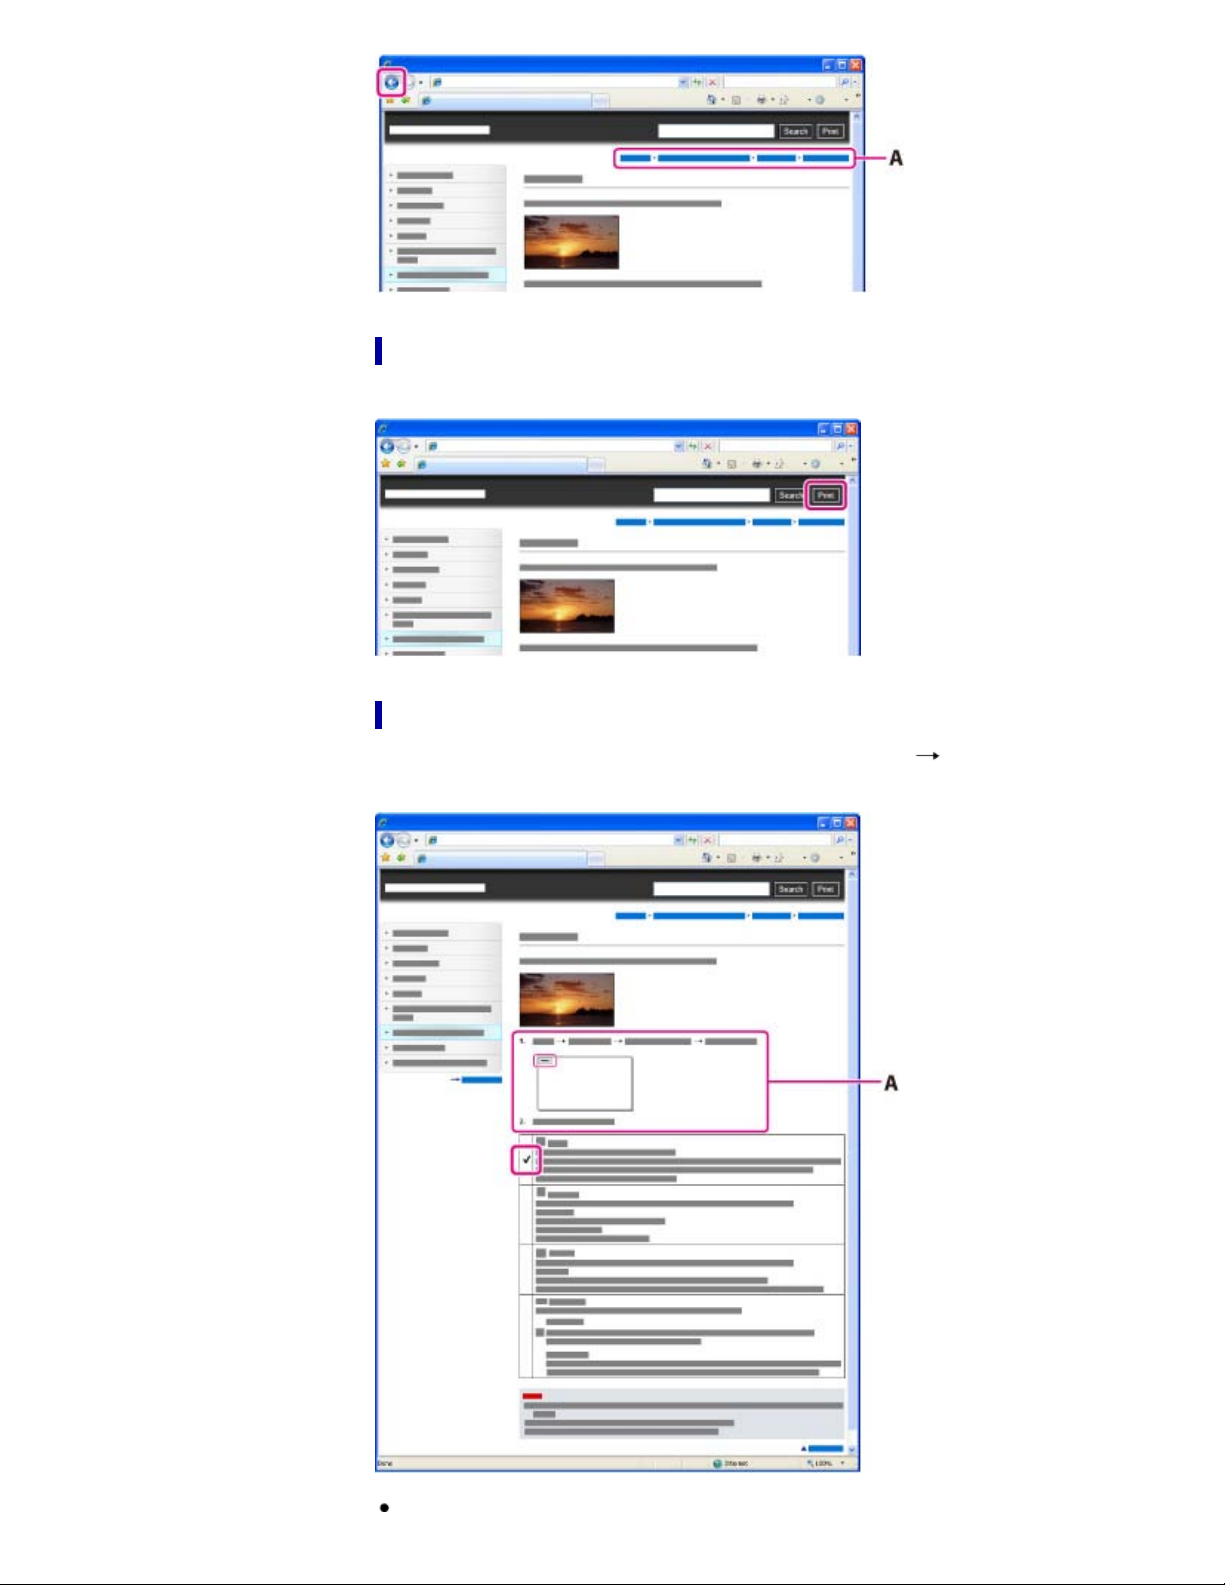
Selecting a topic to display
The following illustrations take Internet Explorer 7 as an example.
1. Click a title in the side bar on the left of the browser window.
A list of topic titles appears in the right pane.
2. Click a topic title in the list.
Descriptions appear in the right pane.
Page 20

Changing the font size
20
Change the font size by changing the setting of your web browser. For how to change the font size
setting, refer to the Help of your web browser.
Searching a topic by keyword
Enter the keyword in the search window, then click the [Search] button.
Returning to a previous page
Use the back button of your web browser or the breadcrumb trail navigation (A) to return to a page you
previously viewed.
Page 21
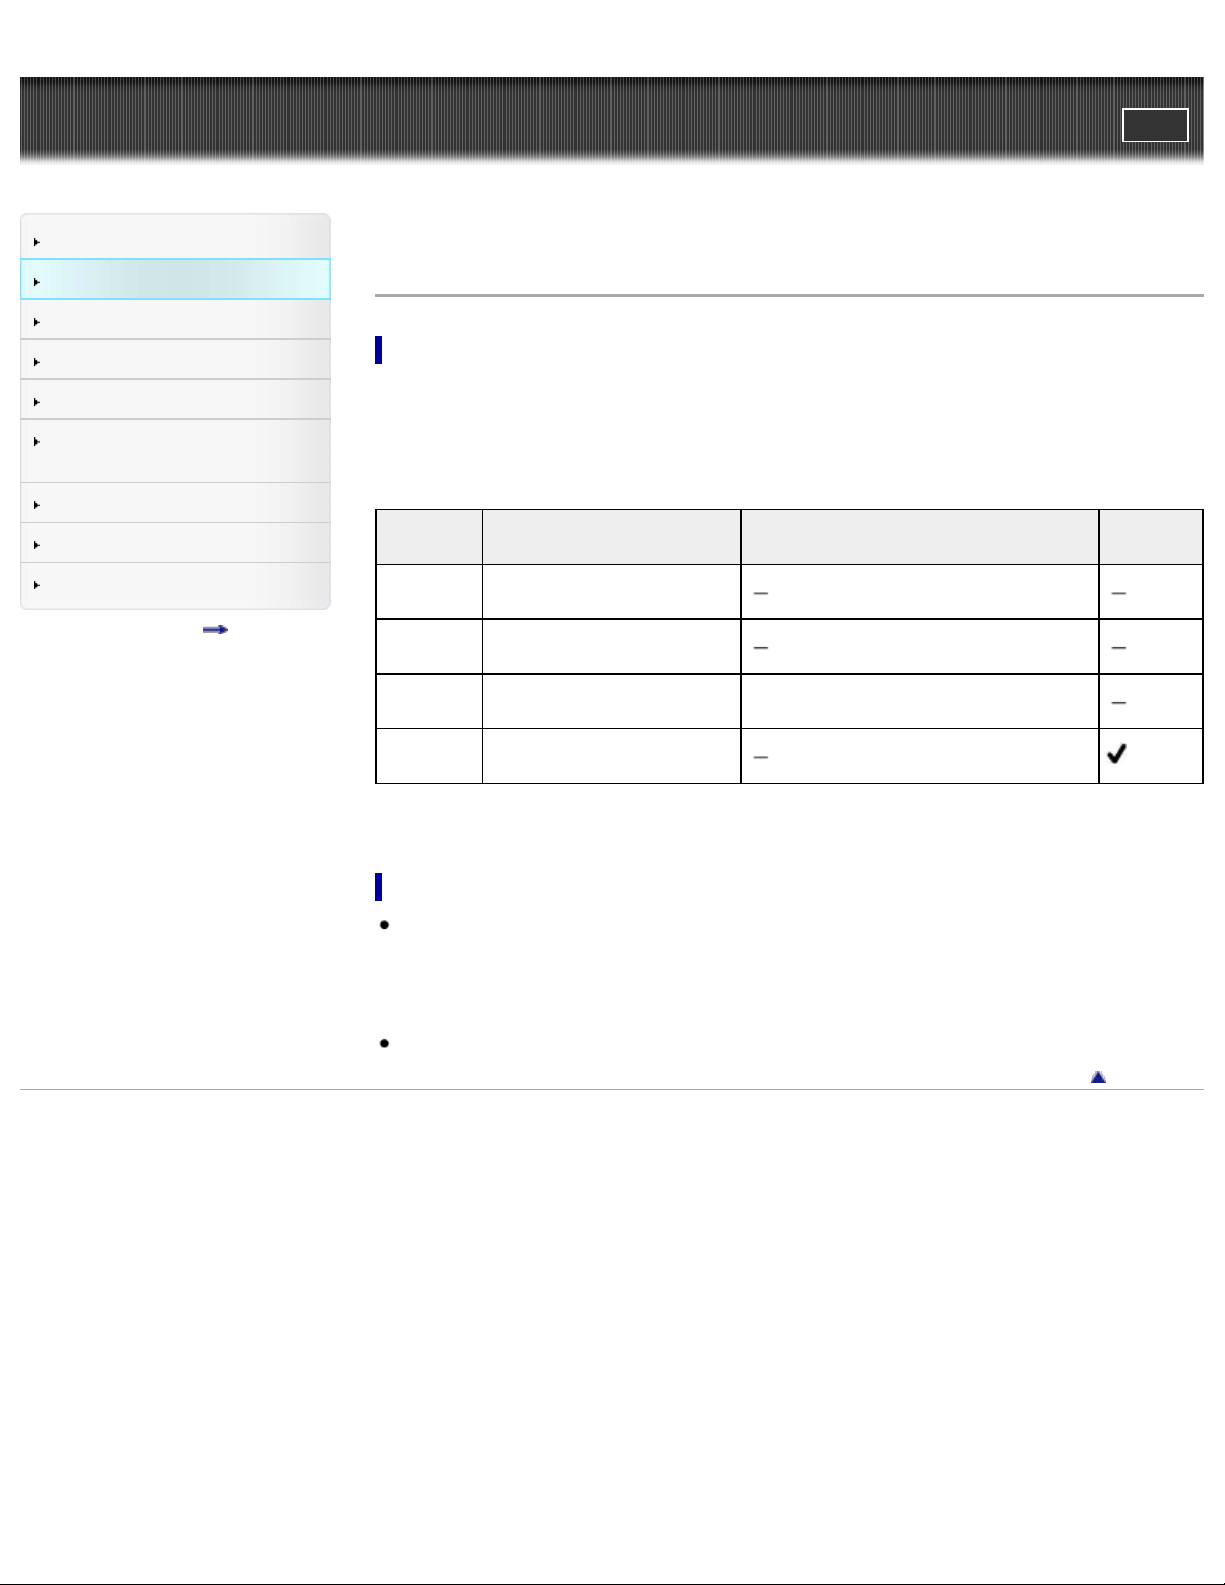
Printing out a page
21
Click the [Print] button to print out a page you are viewing.
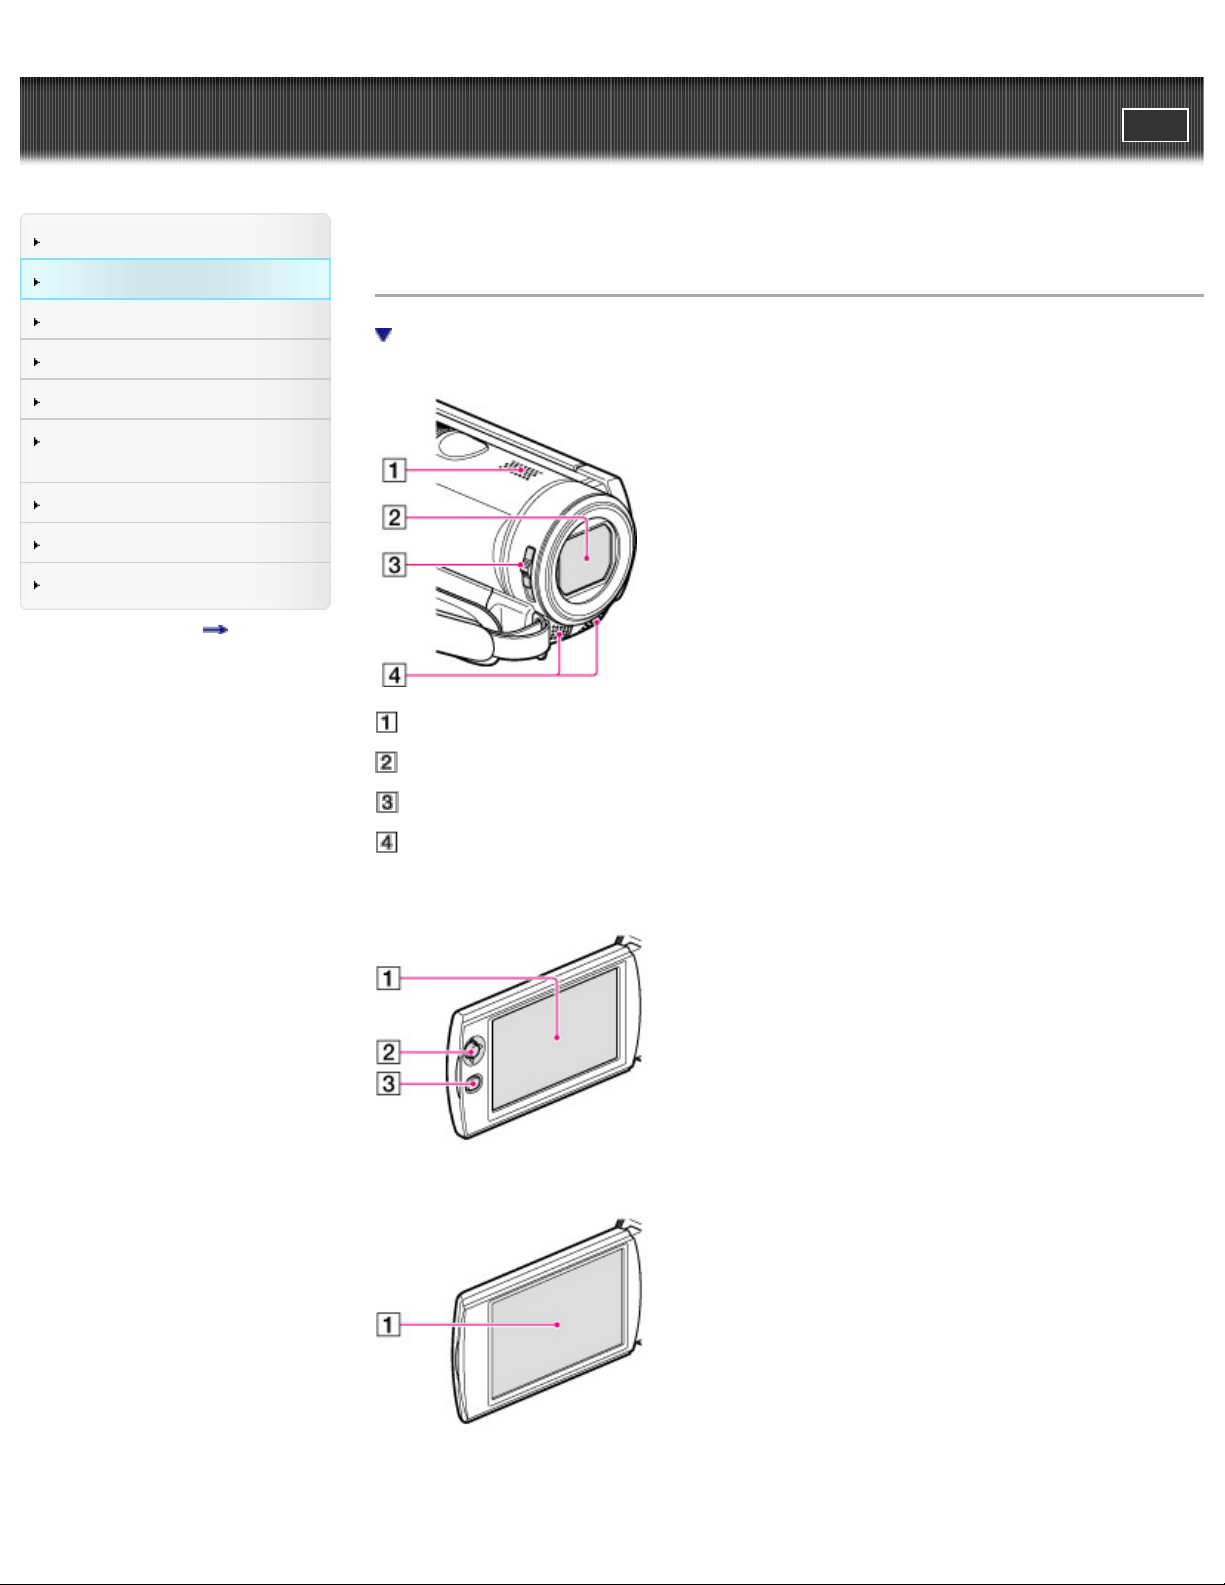
Marks and notations used in this User Guide
In this User Guide, the sequence of operations is shown by arrows ( ) (A).
Operate the camcorder in the order indicated.
Page 22

Icons in the operating procedure sentences appear when the camcorder is in its default settings.
22
The default setting is indicated by
.
Back to top
Copyright 2012 Sony Corporation
Page 23
"Handycam" User Guide
23
Operation Search
PrintSearch
Top page > Before use > How to use this User Guide > Models and illustrations used in this User Guide
Before use
Getting started
Recording
Playback
Saving images with an external
device
Customizing your camcorder
Troubleshooting
Maintenance and precautions
Contents list
Models and illustrations used in this User Guide
Models described in this User Guide
Models described in this User Guide are as follows.
HDR-CX190/CX200/CX210/PJ200
Difference of each model are as follows.
Capacity of internal recording
media
8 GB
HDRCX190
HDRCX200
HDRCX210
HDRPJ200
Recording media
Memory card only
Memory card only
Internal memory + memory
card
Memory card only
Projector
Illustrations and on- screen displays used in this User Guide
The example images used in this User Guide for illustration purposes are captured using a digital still
camera, and therefore may appear different from images and screen indicators that actually appear
on your camcorder.
And, the illustrations of your camcorder and its screen indication are exaggerated or simplified for
understandability.
Illustrations used in this manual are based on HDR-CX210 unless otherwise specified.
Back to top
Copyright 2012 Sony Corporation
Page 24
"Handycam" User Guide
24
Operation Search
PrintSearch
Top page > Before use > Parts and controls/Screen indicators > Parts and controls
Before use
Getting started
Recording
Playback
Saving images with an external
device
Customizing your camcorder
Troubleshooting
Maintenance and precautions
Contents list
Parts and controls
To fasten the grip belt
Speaker
Lens (Carl Zeiss lens)
LENS COVER switch
Built-in microphone
HDR-CX190
HDR-CX200/CX210
HDR-PJ200
Page 25
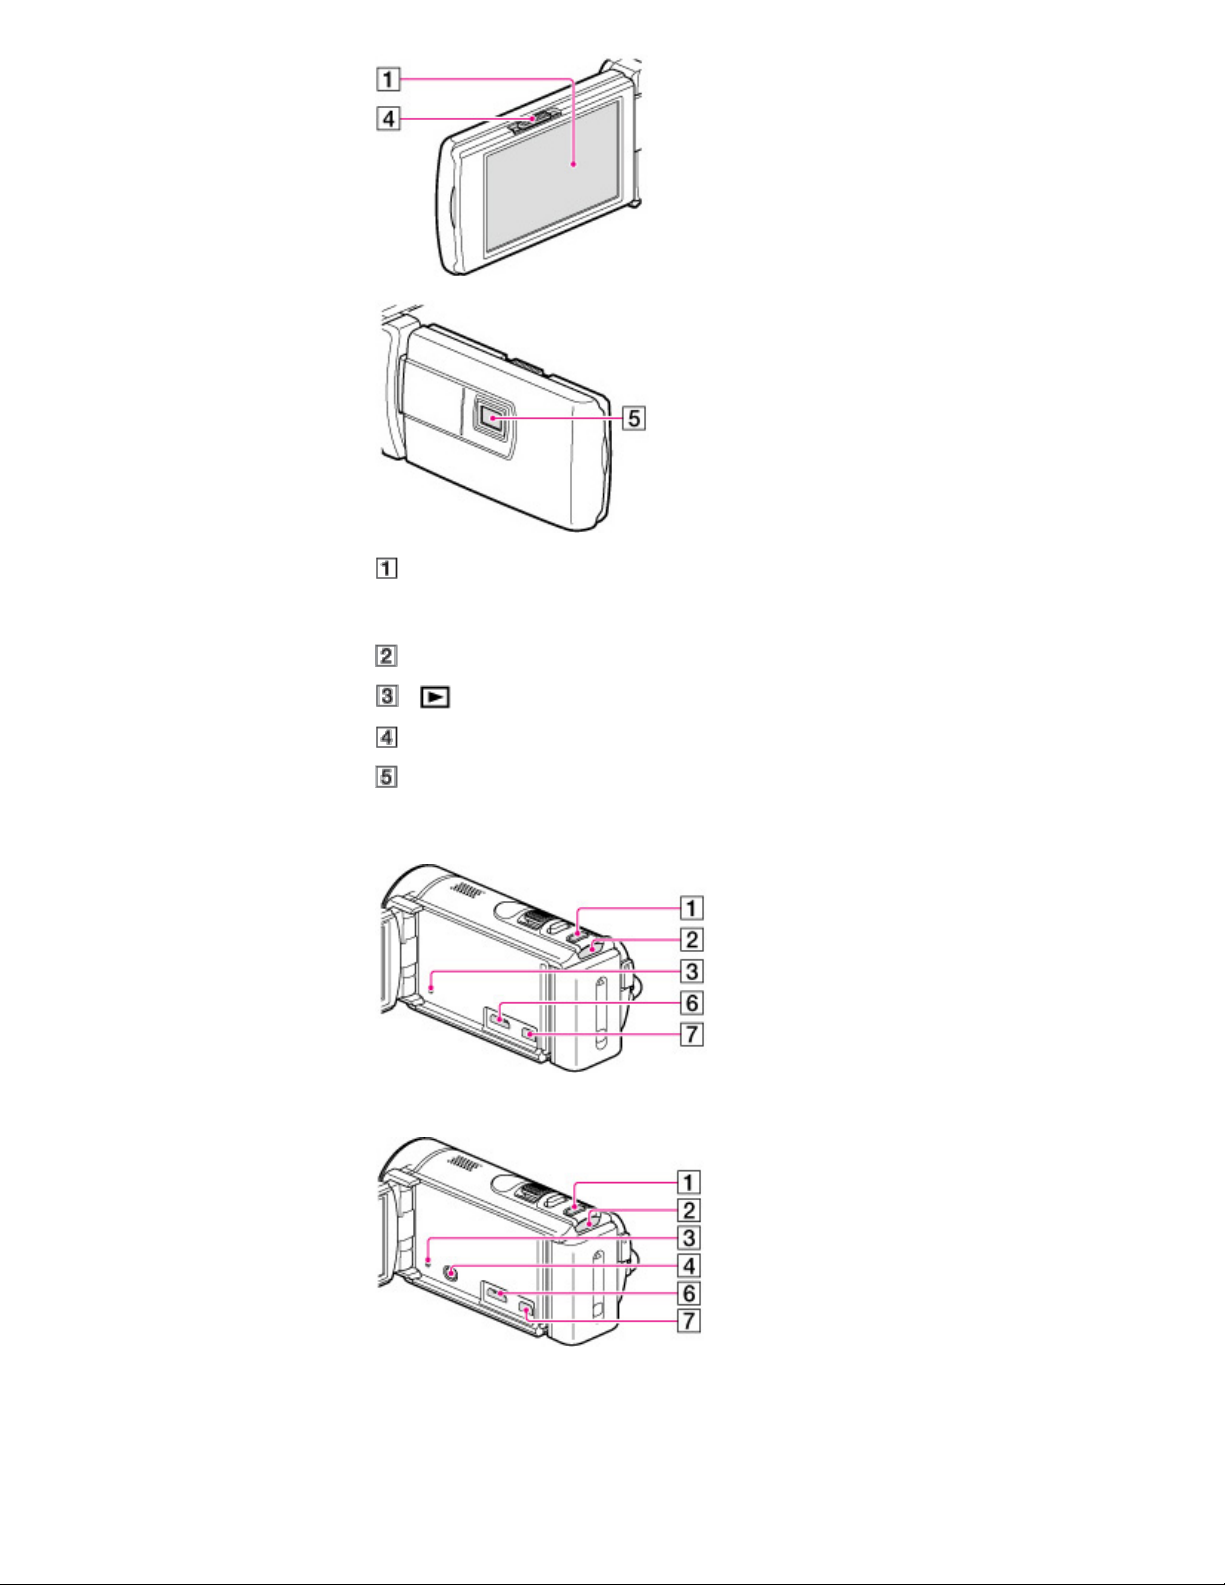
LCD screen/Touch panel (HDR-CX200/CX210/PJ200)
25
If you rotate the LCD panel 180 degrees, you can close the LCD panel with the LCD screen facing
out. This is convenient during playback operations.
Multi selector (HDR-CX190)
(View Images) button (HDR-CX190)
PROJECTOR FOCUS lever (HDR-PJ200)
Projector lens (HDR-PJ200)
HDR-CX190
HDR-CX200/CX210
HDR-PJ200
Page 26
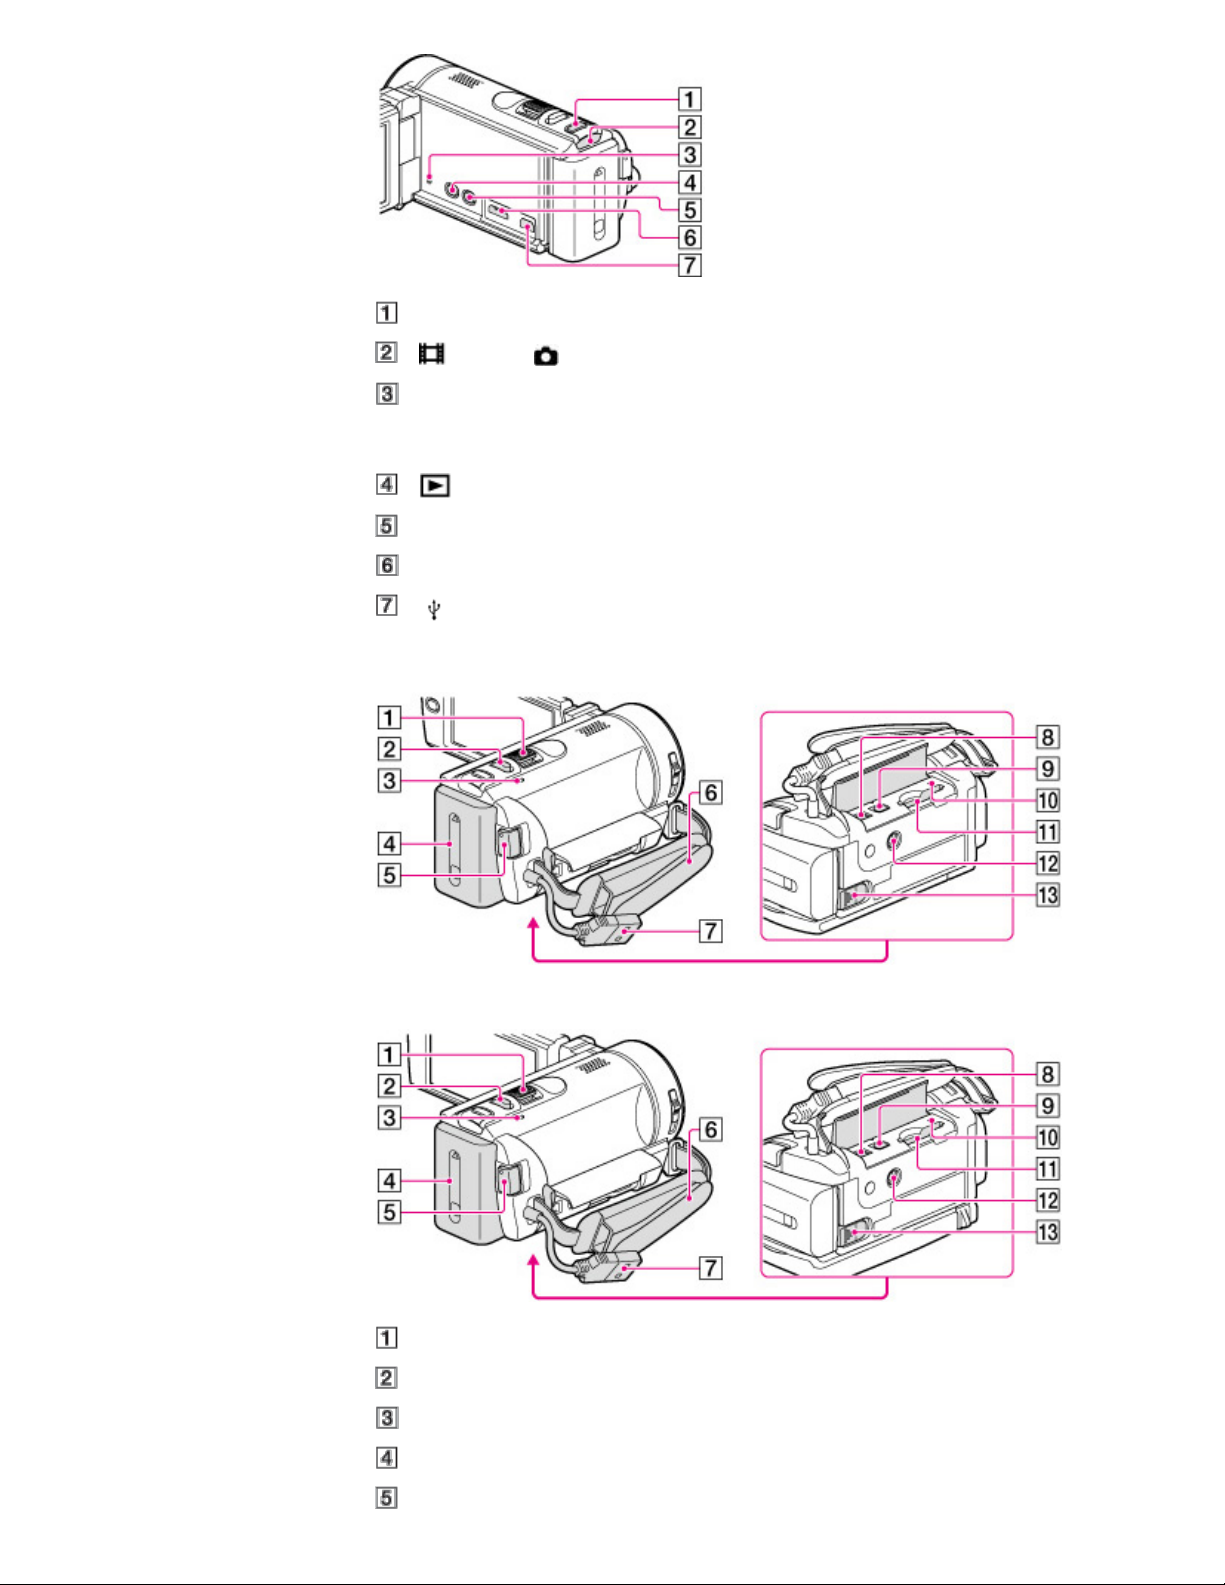
MODE button
26
(Movie)/ (Photo) lamp
RESET button
Press RESET using a pointed object.
Press RESET to initialize all the settings including the clock setting.
(View Images) button (HDR-CX200/CX210/PJ200)
PROJECTOR button (HDR-PJ200)
HDMI OUT jack
(USB) jack
HDR-CX190
HDR-CX200/CX210/PJ200
Power zoom lever
PHOTO button
CHG (charge) lamp
Battery pack
Page 27
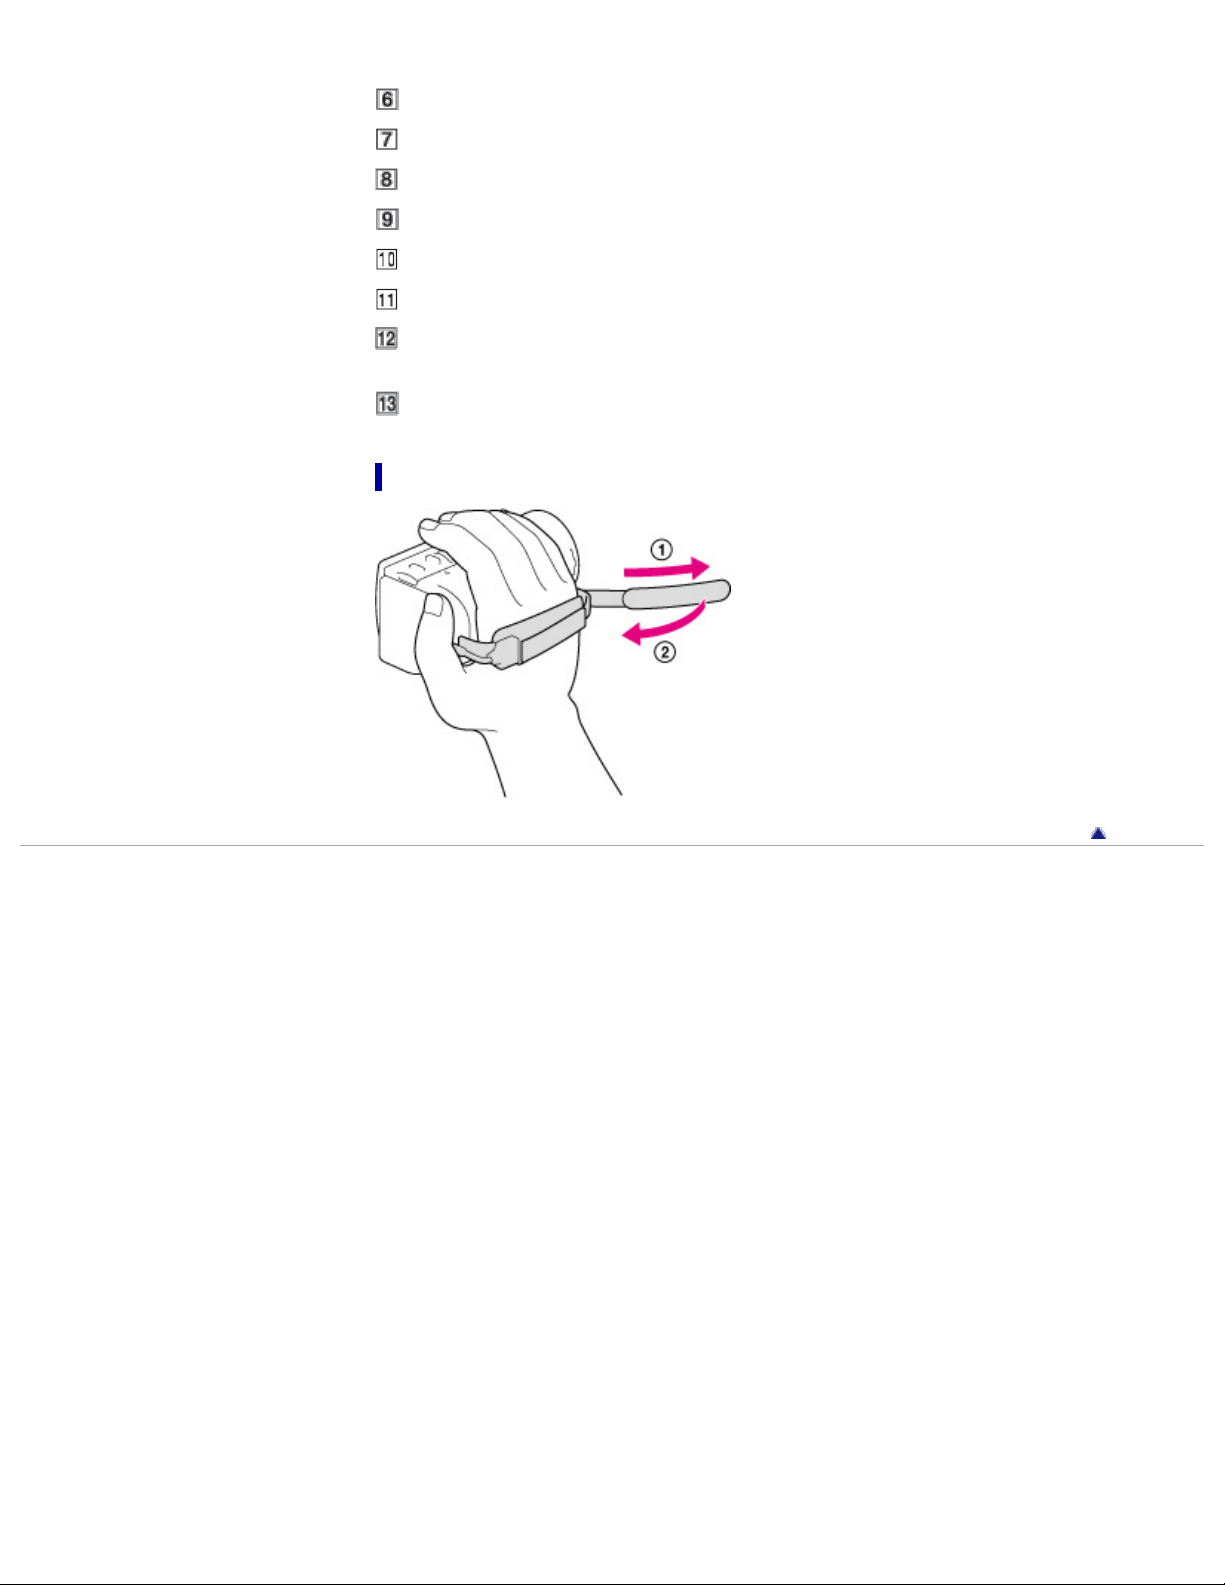
START/STOP button
Grip belt
27
Built-in USB Cable
DC IN jack
A/V Remote Connector
Memory card access lamp
Memory card slot
Tripod receptacle
Attach a tripod (sold separately: the length of the screw must be less than 5.5 mm (7/32 in.))
BATT (battery) release lever
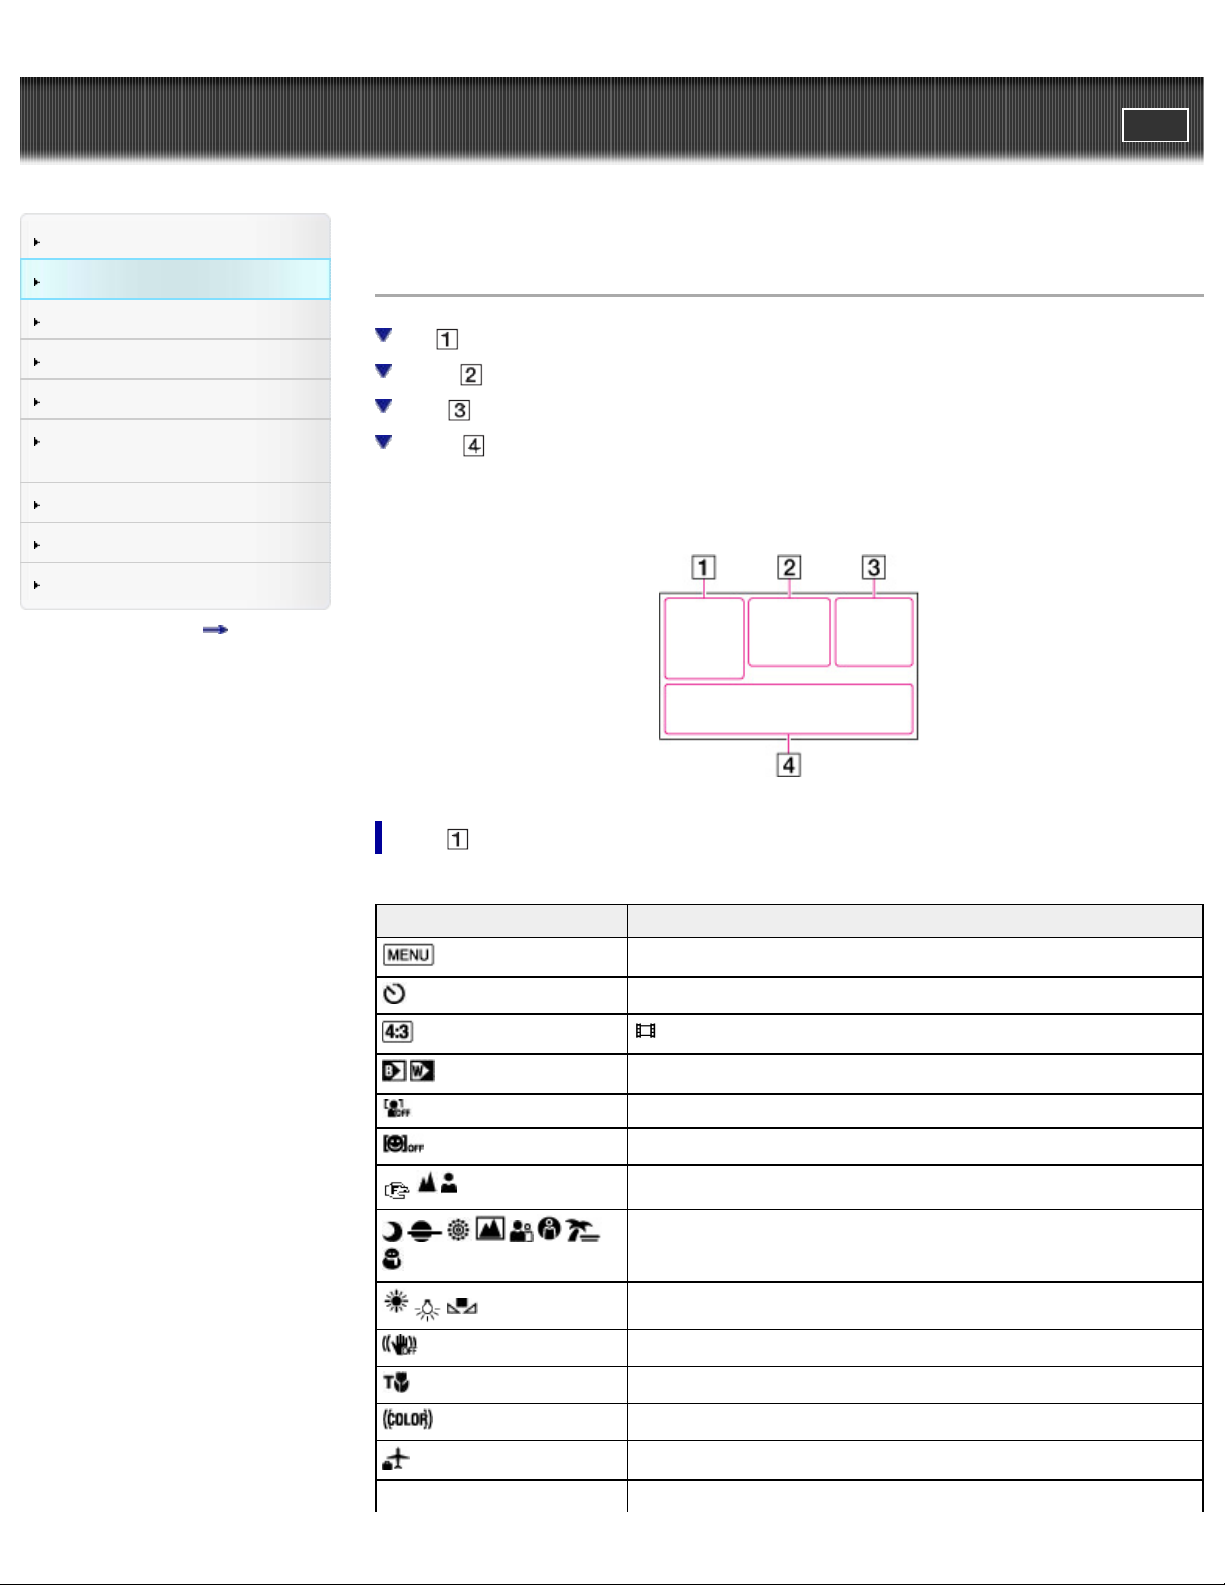
To fasten the grip belt
Copyright 2012 Sony Corporation
Back to top
Page 28
"Handycam" User Guide
28
Operation Search
PrintSearch
Top page > Before use > Parts and controls/Screen indicators > Screen indicators
Before use
Getting started
Recording
Playback
Saving images with an external
device
Customizing your camcorder
Troubleshooting
Maintenance and precautions
Contents list
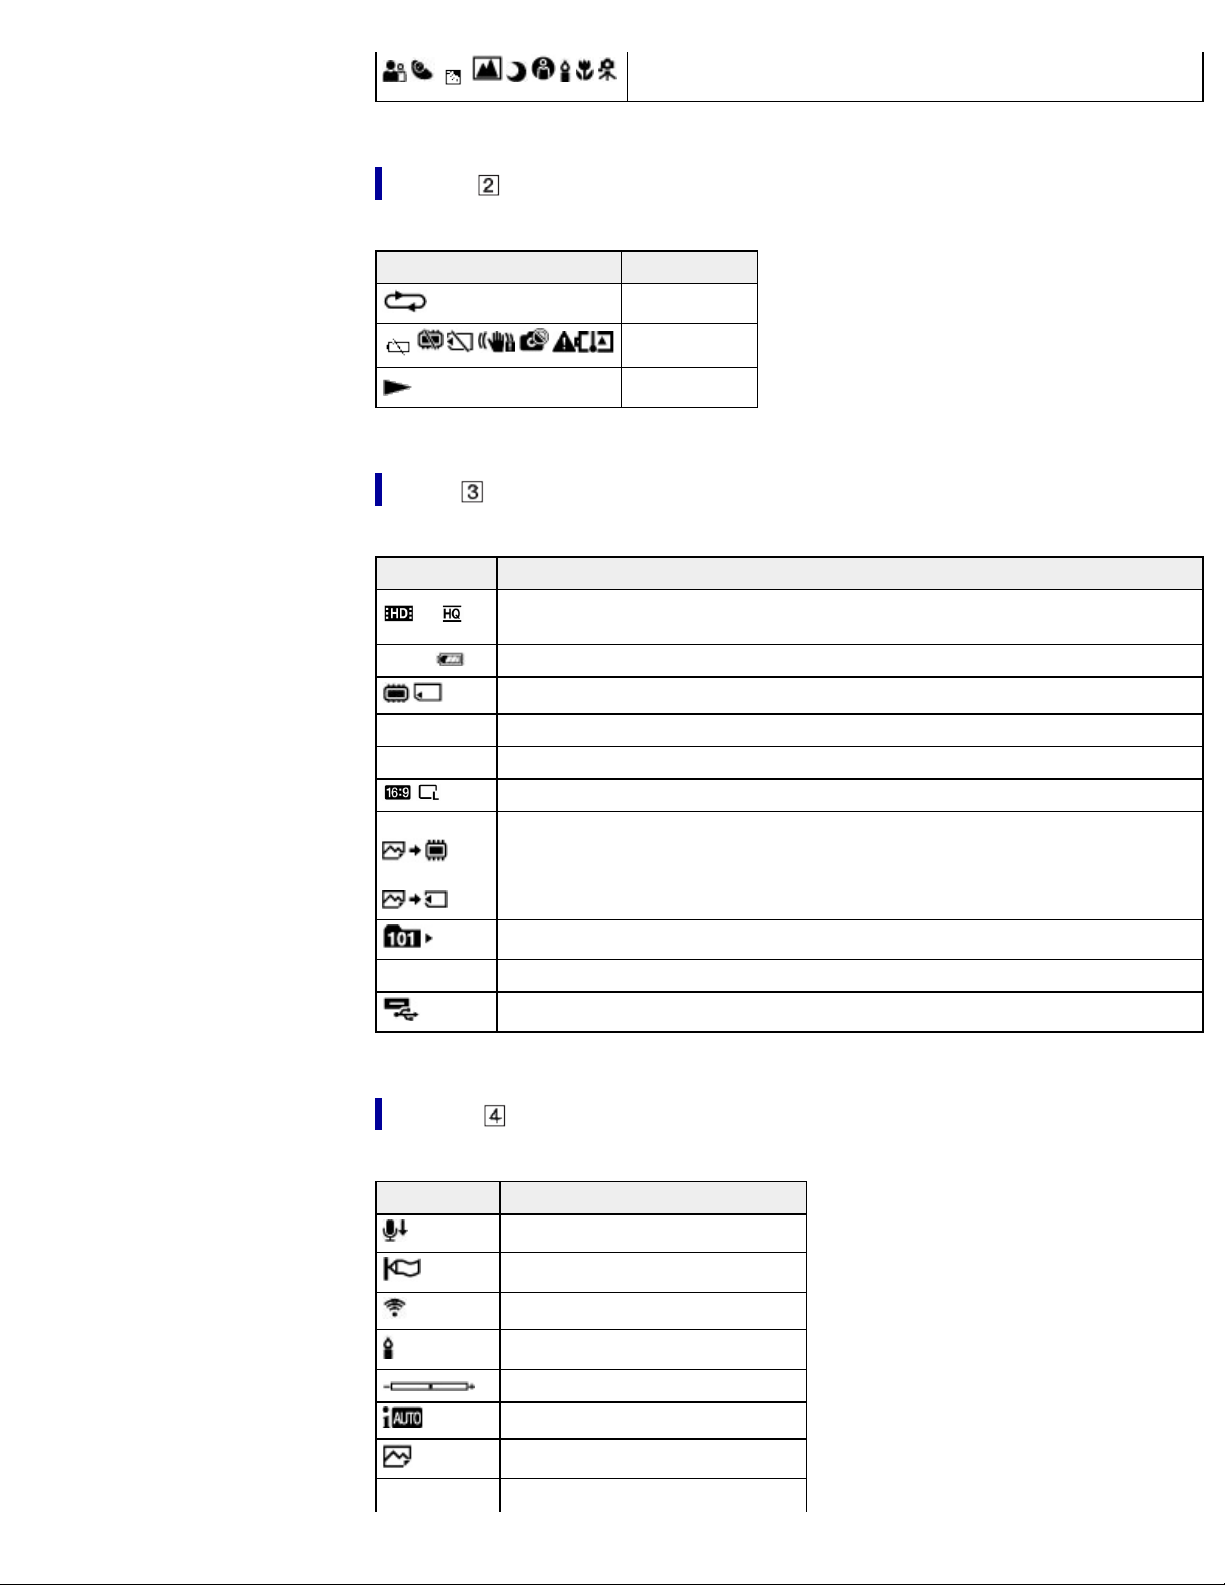
Screen indicators
Left
Center
Right
Bottom
The following indicators appear when you change the settings.
Check also for the indicators that appear during recording or playing.
Left
Indicator Meaning
MENU button
Self-timer recording
Wide Mode
Fader
[Face Detection] set to [Off]
[Smile Shutter] set to [Off]
Manual focus
Scene Selection
White Balance
SteadyShot off
Tele Macro
x.v.Color
Destination
Intelligent Auto (face detection/scene detection/camera-shake
Page 29
29
detection)
Center
Indicator Meaning
Slideshow Set
Warning
Playback mode
Right
Indicator Meaning
60i
60min
0:00:00 Counter (hour:minute:second)
00min Estimated recording remaining time
5.3M Photo size
9999
9999
Recording image quality (HD/STD), frame rate (60i) and recording mode
(FX/FH/HQ/LP)
Remaining battery
Recording/playback/editing media
Approximate number of recordable photos and photo size
Playback folder
100/112 Current playing movie or photo/Number of total recorded movies or photos
Connection to the external media device
Bottom
Indicator Meaning
Micref Level low
Wind Noise Reduct.
Blt-in Zoom Mic
Low Lux
Spot Meter/Fcs/Spot Meter/Exposure
Intelligent Auto
101-0005
Data file name
Protected image
Page 30

Indicators and their positions are approximate and may differ from what you actually see.
30
Some indicators may not appear, depending on your camcorder model.
Copyright 2012 Sony Corporation
Back to top
Page 31
"Handycam" User Guide
31
Operation Search
PrintSearch
Top page > Before use > Operating your camcorder > Selecting items on the LCD screen
Before use
Getting started
Recording
Playback
Saving images with an external
device
Customizing your camcorder
Troubleshooting
Maintenance and precautions
Contents list
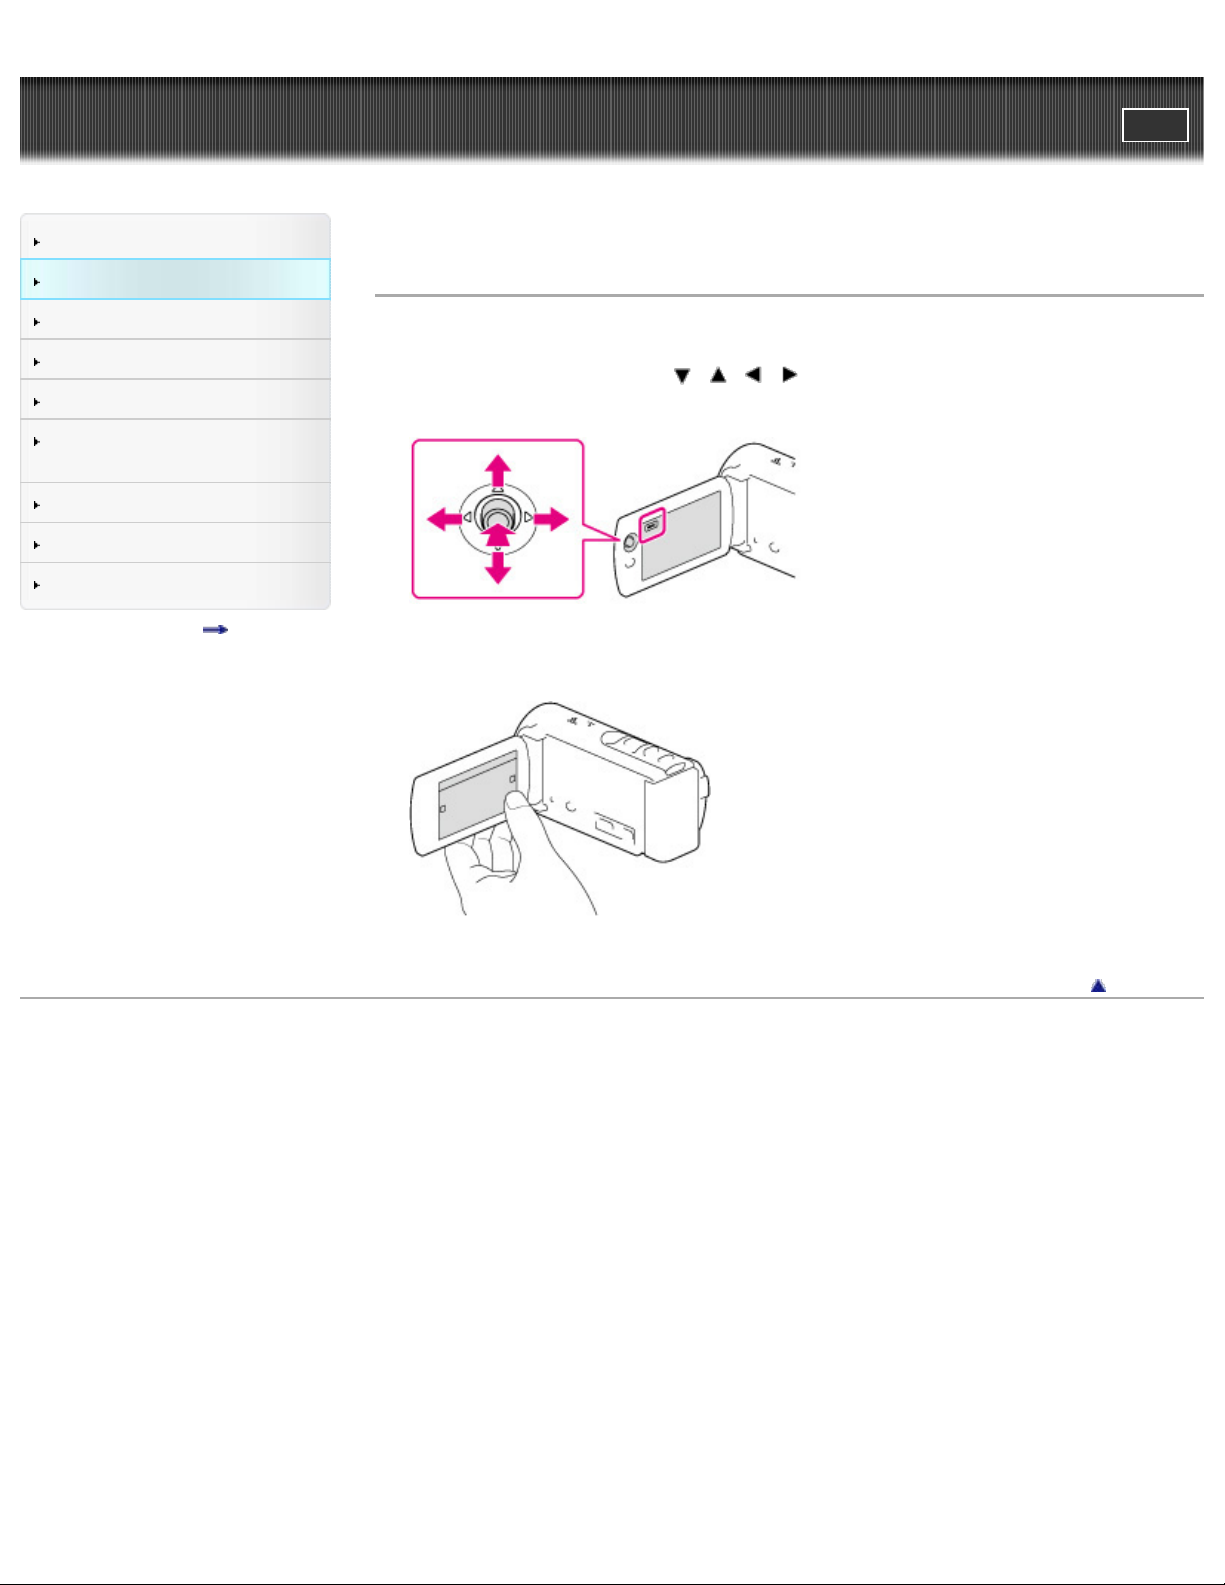
Selecting items on the LCD screen
HDR-CX190
1. Move the multi-selector towards / / / to select the desired item.
2. Press the center of the multi-selector to complete the selection.
HDR-CX200/CX210/PJ200
1. Touch the desired part of the LCD screen.
Copyright 2012 Sony Corporation
Back to top
Page 32

"Handycam" User Guide
32
Operation Search
PrintSearch
Top page > Getting started > Checking the supplied items > Supplied items
Before use
Getting started
Recording
Playback
Saving images with an external
device
Customizing your camcorder
Troubleshooting
Maintenance and precautions
Contents list
Supplied items
The numbers in ( ) are the supplied quantity.
Camcorder (1)
AC Adaptor (1)
Power cord (mains lead) (1)
HDMI cable (1) (only for HDR-CX200/CX210/PJ200)
A/V connecting cable (1)
USB connection support cable (1)
The USB connection support cable is designed for use with this camcorder only. Use this cable when
the Built-in USB Cable of the camcorder is too short for connection.
Rechargeable battery pack NP-FV30 (1)
“Operating Guide” (1)
Notes
The “PlayMemories Home” (Lite Version) software and “PlayMemories Home” Help Guide are preinstalled in this camcorder.
Back to top
Copyright 2012 Sony Corporation
Page 33

"Handycam" User Guide
33
Operation Search
PrintSearch
Top page > Getting started > Charging the battery pack > Charging the battery using the AC Adaptor
Before use
Getting started
Recording
Playback
Saving images with an external
device
Customizing your camcorder
Troubleshooting
Maintenance and precautions
Contents list
Charging the battery using the AC Adaptor
Charging time
To remove the battery pack
To use a wall outlet (wall socket) as a power source
Notes on the battery pack
Notes on the AC Adaptor
1. Close the LCD screen and attach the battery pack (
).
2. Connect the AC Adaptor ( ) and the power cord (mains lead) ( ) to your camcorder and the
wall outlet (wall socket) (
A: Align the mark on the DC plug ( ) with that of DC IN jack ( ).
The CHG (charge) lamp (
The CHG (charge) lamp turns off when the battery pack is fully charged. Disconnect the AC
Adaptor from the DC IN jack of your camcorder.
Notes
You cannot attach any “InfoLITHIUM” battery pack other than the V series to your camcorder.
).
) turns on.
Page 34

Charging time
34
Approximate time (min.) required when you fully charge a fully discharged battery pack.
Battery pack AC Adaptor
NP-FV30 (supplied) 115
NP-FV50 155
NP-FV70 195
NP-FV100 390
The charging times shown in the table above are measured when charging the camcorder at a
temperature of 25 °C (77 °F). It is recommended that you charge the battery in a temperature range
of 10 °C to 30 °C (50 °F to 86 °F).
To remove the battery pack
Close the LCD screen. Slide the BATT (battery) release lever ( ) and remove the battery pack ( ).
To use a wall outlet (wall socket) as a power source
Make the same connections as those for charging the battery pack.
Even if the battery pack is attached, the battery pack is not discharged.
Notes on the battery pack
When you remove the battery pack or disconnect the AC Adaptor, turn the camcorder off and make
sure that the
The CHG (charge) lamp flashes during charging under the following conditions.
The battery pack is not attached correctly.
The battery pack is damaged.
The temperature of the battery pack is low.
Remove the battery pack from your camcorder and put it in a warm place.
The temperature of the battery pack is high.
Remove the battery pack from your camcorder and put it in a cool place.
In the default setting, the power turns off automatically if you leave your camcorder without any
operation for about 2 minutes, to save battery power ([Eco Mode]).
(Movie)/ (Photo) lamps, the access lamp are turned off.
Notes on the AC Adaptor
Use the nearby wall outlet (wall socket) when using the AC Adaptor. Disconnect the AC Adaptor from
the wall outlet (wall socket) immediately if any malfunction occurs while using your camcorder.
Do not use the AC Adaptor placed in a narrow space, such as between a wall and furniture.
Do not short-circuit the DC plug of the AC Adaptor or battery terminal with any metallic objects. This
may cause a malfunction
Disconnect the AC Adaptor from the camcorder, holding both the camcorder and the DC plug.
Related topics
Expected time of recording and playback with each battery pack
Page 35

Remaining battery indicator: Screen indicators
Using your camcorder abroad
35
[Eco Mode]
Copyright 2012 Sony Corporation
Back to top
Page 36

"Handycam" User Guide
36
Operation Search
PrintSearch
Top page > Getting started > Charging the battery pack > Charging the battery using your computer
Before use
Getting started
Recording
Playback
Saving images with an external
device
Customizing your camcorder
Troubleshooting
Maintenance and precautions
Contents list
Charging the battery using your computer
To charge the battery from a wall outlet (wall socket) using the Built-in USB Cable
Charging time
To remove the battery pack
1. Turn off your camcorder and connect the camcorder to a running computer using the Built-in USB
Cable (
).
: To the wall outlet (wall socket)
The CHG (charge) lamp turns on.
The CHG (charge) lamp turns off when the battery pack is fully charged. Disconnect Built-in USB
Cable from your computer.
To charge the battery from a wall outlet (wall socket) using the Builtin USB Cable
You can charge the battery by connecting the Built-in USB Cable to a wall outlet (wall socket) using an
AC-UD10 USB charger/AC Adaptor (sold separately). You cannot use a Sony CP-AH2R, CP-AL, or ACUP100 portable power supply device (sold separately) to charge the camcorder.
Charging time
Approximate time (min.) required when you fully charge a fully discharged battery pack.
Battery pack Built-in USB Cable*
NP-FV30 (supplied) 150
NP-FV50 280
NP-FV70 545
NP-FV100 1,000
The charging times shown in the table above are measured when charging the camcorder at a
temperature of 25 °C (77 °F). It is recommended that you charge the battery in a temperature range
of 10 °C to 30 °C (50 °F to 86 °F).
* The charging times are measured without using the USB Connection support cable.
Page 37

To remove the battery pack
Close the LCD screen. Slide the BATT (battery) release lever ( ) and remove the battery pack ( ).
37
Related topics
Charging the battery using the AC Adaptor
Back to top
Copyright 2012 Sony Corporation
Page 38

"Handycam" User Guide
38
Operation Search
PrintSearch
Top page > Getting started > Charging the battery pack > Charging the battery abroad
Before use
Getting started
Recording
Playback
Saving images with an external
device
Customizing your camcorder
Troubleshooting
Maintenance and precautions
Contents list
Charging the battery abroad
You can charge the battery pack in any countries/regions using the AC Adaptor supplied with your
camcorder within the AC 100 V – 240 V, 50 Hz/60 Hz range.
Notes
Do not use an electronic voltage transformer.
Related topics
Charging the battery using the AC Adaptor
Back to top
Copyright 2012 Sony Corporation
Page 39

"Handycam" User Guide
39
Operation Search
PrintSearch
Top page > Getting started > Turning the power on, and setting the date and time > Turning the power
on, and setting the date and time
Before use
Getting started
Recording
Playback
Saving images with an external
device
Customizing your camcorder
Troubleshooting
Maintenance and precautions
Contents list
Turning the power on, and setting the date and time
To change the language setting
To turn off the power
To adjust the angle of the LCD screen
1. Open the LCD screen of your camcorder to turn the power on.
2. Select the desired language, then select [Next].
Touch the button on the LCD screen.
For HDR-CX190, select the button using the multi-selector.
3. Select the desired geographical area with
4. Set [Daylight Savings] or [Summer Time], select the date format and the date and time.
If you set [Daylight Savings] or [Summer Time] to [On], the clock advances 1 hour.
When you select the date and time, select one of the items and adjust the value with
When you select
A: HDR-CX200/CX210/PJ200
B: HDR-CX190
, the date and time setting operation is complete.
/ , then select [Next].
/ .
Page 40

To change the language setting
You can change the on-screen displays to show messages in a specified language.
40
Select
[Setup] [ General Settings] [Language Setting] a desired language.
To turn off the power
Close the LCD screen.
To adjust the angle of the LCD screen
First open the LCD panel 90 degrees to the camcorder ( ), and then adjust the angle ( ).
Notes
The recording date, time and condition are recorded automatically on the recording media. They
are not displayed during recording. However, you can check them as [Data Code] during playback.
To display them, select
[Date/Time].
[Setup] [ Playback Settings] [Data Code]
Related topics
To set the date and time again: [Date & Time Setting]
To calibrate the touch panel: [Calibration (HDR-CX200/CX210/PJ200)]
Copyright 2012 Sony Corporation
Back to top
Page 41

"Handycam" User Guide
41
Operation Search
PrintSearch
Top page > Getting started > Preparing the recording media > Selecting a recording medium (HDR-
CX210)
Before use
Getting started
Recording
Playback
Saving images with an external
device
Customizing your camcorder
Troubleshooting
Maintenance and precautions
Contents list
Selecting a recording medium (HDR-CX210)
The recording media that can be used are displayed on the screen of your camcorder as following icons.
Default recording medium Alternative recording medium
Internal memory Memory card
You can select a recording medium from the menu.
1. Select
Notes
You cannot select a different recording medium for movies and for photos.
[Setup] [ Media Settings] [Media Select] the desired medium.
Related topics
Screen indicators during recording
Expected recording time of movies
Copyright 2012 Sony Corporation
Back to top
Page 42

"Handycam" User Guide
42
Operation Search
PrintSearch
Top page > Getting started > Preparing the recording media > Inserting a memory card
Before use
Getting started
Recording
Playback
Saving images with an external
device
Customizing your camcorder
Troubleshooting
Maintenance and precautions
Contents list
Inserting a memory card
Types of memory card you can use with your camcorder
To eject the memory card
1. Open the cover, and insert the memory card until it clicks.
The [Preparing image database file. Please wait.] screen appears if you insert a new memory
card. Wait until the screen disappears.
A: Insert the card with the notched edge in the direction as illustrated
B: Access lamp
Types of memory card you can use with your camcorder
SD
Speed
Class
“Memory Stick PRO Duo”
media (Mark2)
“Memory Stick PRO-HG
Duo” media
SD memory card
SDHC memory card
SDXC memory card
Operation with all memory cards is not assured.
Notes
A MultiMediaCard cannot be used with this camcorder.
Movies recorded on SDXC memory cards cannot be imported to or played back on computers or
AV devices not supporting the exFAT* file system by connecting the camcorder to these devices
with the USB cable. Confirm in advance that the connecting equipment is supporting the exFAT
system. If you connect an equipment not supporting the exFAT system and the format screen
appears, do not perform the format. All the data recorded will be lost.
— 32 GB
Class 4 or
faster
Capacity
(operation
verified)
64 GB SD card
Described in
this manual
“Memory Stick PRO
Duo” media
Page 43

* The exFAT is a file system that is used for SDXC memory cards.
43
To eject the memory card
Open the cover and lightly push the memory card in once.
Notes
To ensure stable operation of the memory card, it is recommended to format the memory card with
your camcorder before the first use. Formatting the memory card will erase all the data stored on it
and the data will be irrecoverable. Save your important data on your PC, etc.
If [Failed to create a new Image Database File. It may be possible that there is not enough free
space.] is displayed, format the memory card.
Confirm the direction of the memory card. If you forcibly insert the memory card in the wrong
direction, the memory card, memory card slot, or image data may be damaged.
When inserting or ejecting the memory card, be careful so that the memory card does not pop out
and drop.
Copyright 2012 Sony Corporation
Back to top
Page 44

"Handycam" User Guide
44
Operation Search
PrintSearch
Top page > Recording > Recording > Recording movies
Before use
Getting started
Recording
Playback
Saving images with an external
device
Customizing your camcorder
Troubleshooting
Maintenance and precautions
Contents list
Recording movies
To display items on the LCD screen
Screen indicators during recording
To record in mirror mode
In the default setting, movies and photos are recorded on the following media. Movies are recorded with
high definition image quality (HD).
HDR-CX190/CX200/PJ200: Memory card
HDR-CX210: Internal recording media
1. Open the lens cover.
2. Open the LCD screen and press MODE to turn on the (Movie) lamp.
3. Press START/STOP to start recording.
To stop recording, press START/STOP again.
You can record photos during movie recording by pressing PHOTO (Dual Capture).
To display items on the LCD screen
Items on the LCD screen disappear if you do not operate the camcorder for a few seconds after you turn
Page 45

the camcorder on or switch between the movie recording and photo shooting modes. To display the
45
items again, do as follows.
HDR-CX190: Move the multi-selector.
HDR-CX200/CX210/PJ200: Touch anywhere except the buttons on the LCD screen.
Screen indicators during recording
Described here are icons for both movie recording and photo recording modes.
Zoom button (W: Wide/T: Telephoto), START/STOP button (in movie recording
mode), PHOTO button (in photo recording mode)*
MENU button
1
Status detected by Intelligent Auto
Recording status ([STBY]/[REC])
AE/AF (automatic exposure/automatic focus) lock
Tracking focus*
1
Zoom, Remaining battery
Counter (hour: minute: second), Capturing a photo, Recording/playback/editing
media*
Tracking focus cancel button*
2
1
Intelligent Auto button
Approximate number of recordable photos, Aspect ratio (16:9 or 4:3), and photo
size (L/S)
Estimated recording remaining time, Recording image quality (HD/STD), and
recording mode (FX/FH/HQ/LP)
View Images button
My Button (you can assign your favorite functions to icons displayed in this
area)
*1 HDR-CX200/CX210/PJ200
2
*
HDR-CX210
To record in mirror mode
Page 46

1. Open the LCD panel 90 degrees to the camcorder ( ), then rotate it 180 degrees to the lens side
46
).
(
A mirror-image of the subject appears on the LCD screen, but the image will be normal when
recorded.
Notes
If you close the LCD screen while recording movies, the camcorder stops recording.
The maximum continuous recordable time of movies is about 13 hours.
When a movie file exceeds 2 GB, the next movie file is created automatically.
The following states will be indicated if data is still being written onto the recording media after
recording has finished. During this time, do not apply shock or vibration to the camcorder, or
remove the battery or AC Adaptor.
Access lamp is lit or flashing
The media icon in the upper right of the LCD screen is flashing
The LCD screen of your camcorder can display recording images across the entire screen (full pixel
display). However, this may cause slight trimming of the top, bottom, right, and left edges of images
when played back on a TV which is not compatible with full pixel display. It is recommended you
record images with [Guide Frame] set to [On] and using the outer frame of [Guide Frame] as a
guide.
Related topics
Expected recording time of movies
[Media Select (HDR-CX210)]
To display items on the LCD screen all the time: [Display Setting]
To change the image size: [Image Size]
Recordable time, remaining capacity: [Media Info]
Zooming
Copyright 2012 Sony Corporation
Back to top
Page 47

"Handycam" User Guide
47
Operation Search
PrintSearch
Top page > Recording > Recording > Shooting photos
Before use
Getting started
Recording
Playback
Saving images with an external
device
Customizing your camcorder
Troubleshooting
Maintenance and precautions
Contents list
Shooting photos
In the default setting, movies and photos are recorded on the following media. Movies are recorded with
high definition image quality (HD).
HDR-CX190/CX200/PJ200: Memory card
HDR-CX210: Internal recording media
1. Open the LCD screen and press MODE to turn on the
2. Press PHOTO lightly to adjust the focus, then press it fully.
(Photo) lamp.
When the focus is adjusted properly, AE/AF lock indicator appears on the LCD screen.
Related topics
Screen indicators during recording
Zooming
Copyright 2012 Sony Corporation
Back to top
Page 48
"Handycam" User Guide
48
Operation Search
PrintSearch
Top page > Recording > Useful functions for recording images > Zooming
Before use
Getting started
Recording
Playback
Saving images with an external
device
Customizing your camcorder
Troubleshooting
Maintenance and precautions
Contents list
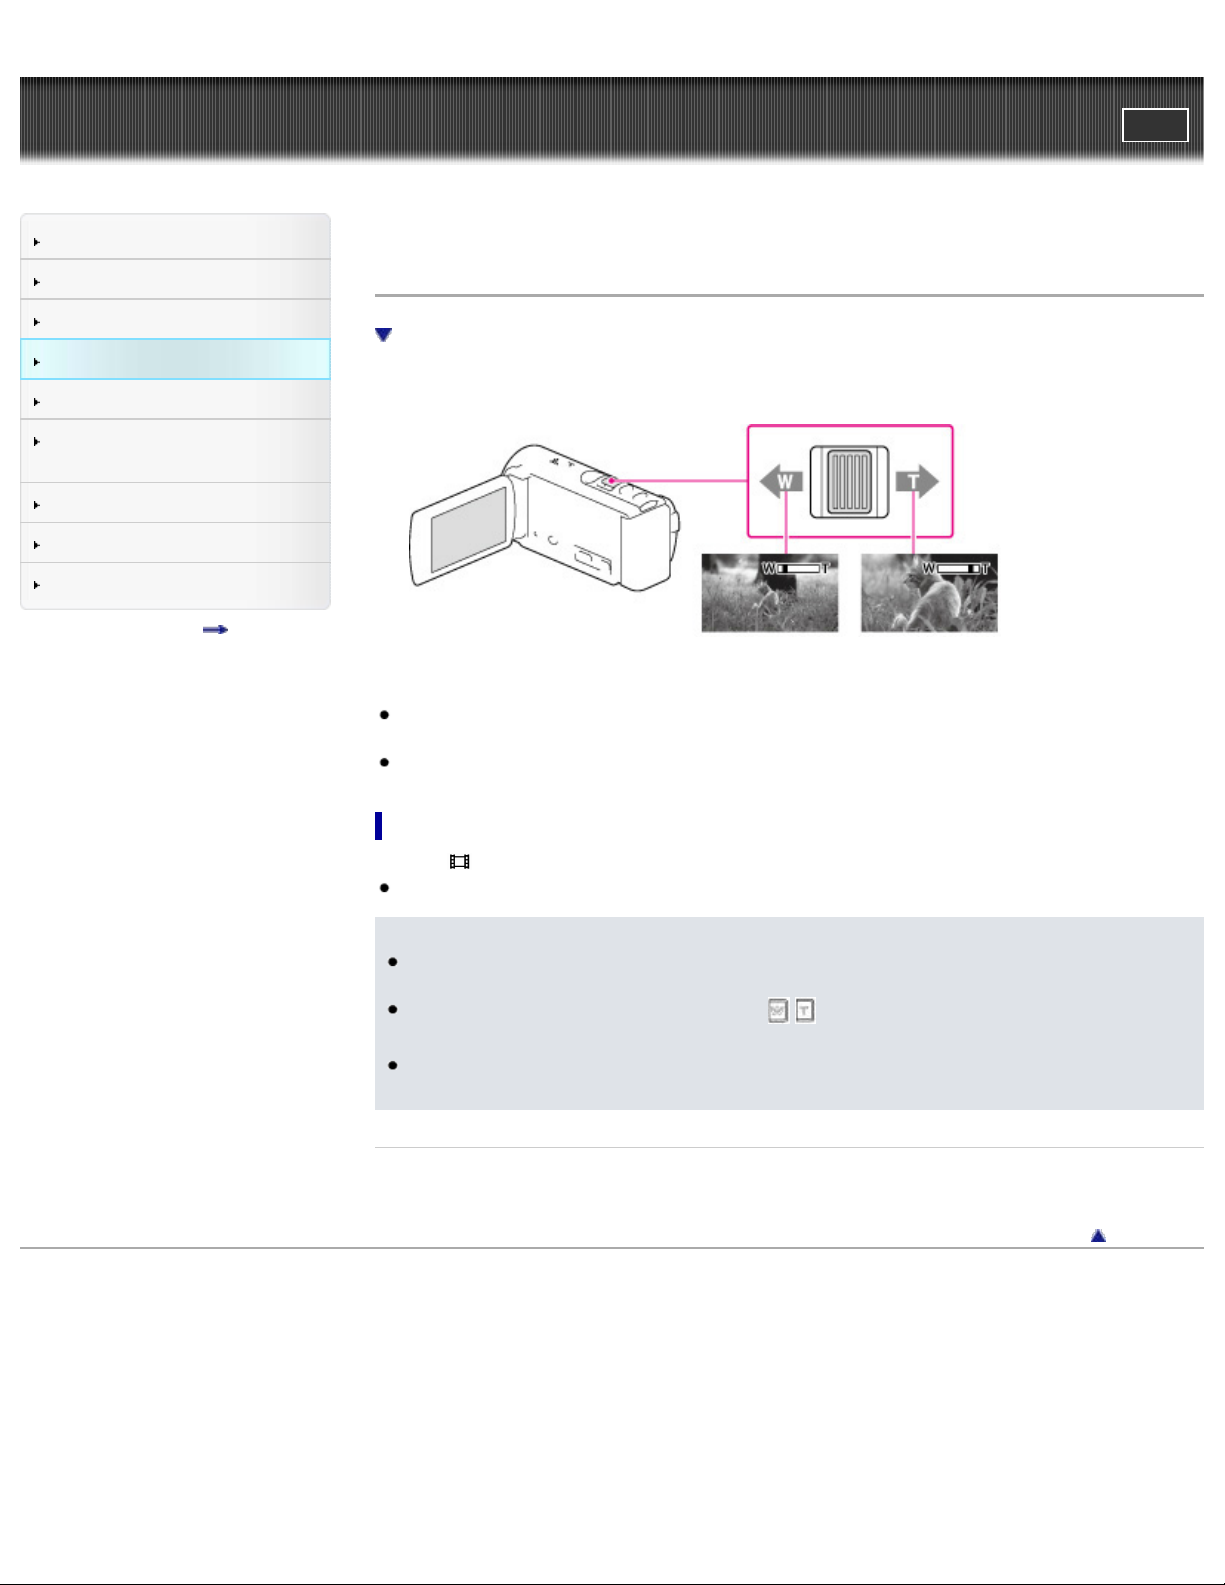
Zooming
To magnify images further (Extended Zoom)
1. Move the power zoom lever to magnify or reduce the size of the image.
W: Wider range of view (Wide angle)
T: Close view (Telephoto)
You can magnify images using optical zooming up to 25 times the original size with the default
setting.
Move the power zoom lever slightly for a slower zoom. Move it further for a faster zoom.
To magnify images further (Extended Zoom)
1. Set [ SteadyShot] to [Standard] or [Off].
You can magnify images up to 30 times the original size by extending the wide angle.
Notes
Be sure to keep your finger on the power zoom lever. If you move your finger off the power zoom
lever, the operation sound of the power zoom lever may also be recorded.
You cannot change the zoom speed with the
CX200/CX210/PJ200).
The minimum possible distance between camcorder and subject while maintaining sharp focus is
about 1 cm (about 13/32 in.) for wide angle and about 80 cm (about 31 1/2 in.) for telephoto.
Related topics
Further zooming: [Digital Zoom]
Copyright 2012 Sony Corporation
/ button on the LCD screen (HDR-
Back to top
Page 49

"Handycam" User Guide
49
Operation Search
PrintSearch
Top page > Recording > Useful functions for recording images > Intelligent Auto
Before use
Getting started
Recording
Playback
Saving images with an external
device
Customizing your camcorder
Troubleshooting
Maintenance and precautions
Contents list
Intelligent Auto
Your camcorder records movies after selecting the most suitable setting for the subjects or the situation
automatically. ([On] is the default setting.) When the camcorder detects a subject, the icons that
correspond to the detected conditions are displayed.
1. Select
Face detection:
The camcorder detects faces, and adjusts the focus, color and exposure.
(Portrait), (Baby)
Scene detection:
The camcorder selects the most effective setting automatically, depending on the scene.
(Backlight), (Landscape), (Night Scene), (Spotlight), (Low light), (Macro)
Camera-shake detection:
The camcorder detects whether camera-shake occurs or not, and makes the optimum compensation.
(Tripod)
[On] at the right bottom of the recording screen of movies or photos.
To cancel the Intelligent Auto function, select
[Off].
To record images brighter than that of when using the Intelligent Auto
function
Select [Camera/Mic] [ Manual Settings] [Low Lux].
Notes
The camcorder may not detect the expected scene or subject, depending on the recording
conditions.
Back to top
Copyright 2012 Sony Corporation
Page 50

"Handycam" User Guide
50
Operation Search
PrintSearch
Top page > Recording > Useful functions for recording images > Recording the selected subject clearly
(Face Priority) (HDR-CX200/CX210/PJ200)
Before use
Getting started
Recording
Playback
Saving images with an external
device
Customizing your camcorder
Troubleshooting
Maintenance and precautions
Contents list
Recording the selected subject clearly (Face Priority) (HDRCX200/CX210/PJ200)
To record subjects other than people (Tracking focus)
Your camcorder can track a face you select and adjust the focus, exposure, and skin tone of the face
automatically.
1. Touch one of the faces targeted.
A: The double-lined frame is displayed.
B: You can release the selection.
Notes
The subject you touched may not be detected, depending on the surrounding brightness or hairstyle
of the subject.
Make sure to set the [Face Detection] setting to other than [Off] ([Auto] is the default setting).
To record subjects other than people (Tracking focus)
Touch the subject you want to record.
Your camcorder adjusts the focus automatically.
Copyright 2012 Sony Corporation
Back to top
Page 51

"Handycam" User Guide
Screen display on the Event View screen
51
Operation Search
PrintSearch
Top page > Playback > Playback > Playing movies and photos from the Event View screen
Before use
Getting started
Recording
Playback
Saving images with an external
device
Customizing your camcorder
Troubleshooting
Maintenance and precautions
Contents list
Playing movies and photos from the Event View screen
Screen display on the Event View screen
You can search for recorded images by date and time of recording (Event view).
1. Open the LCD screen and press the
HDR-CX200/CX210/PJ200
HDR-CX190
button on the camcorder to enter the playback mode.
You can enter the playback mode by selecting on the LCD screen. [Details]
2. Select
3. Select the image.
/ to move the desired event to the center ( ) and then select it ( ).
The camcorder displays recorded images as an event automatically, based on the date and
time.
The camcorder plays from the selected image to the last image in the event.
Page 52

: To the MENU screen
52
: Event name
: To the previous event
: Change to the movie/photo recording mode
: To play back short movies
: Remaining battery
: Events
: To the next event
: Time-line bar
: Change Event Scale button
: Event title
: To go back to the Event View screen
: Previous/next
: Change to the movie/photo recording mode
: Last played image
: Recorded time/number of photos
: Switch image type button
: Movie
: Photo
Reduced-size images which enable you to view many images at the same time on an index screen
are called “thumbnails.”
Notes
To prevent your image data from being lost, save all your recorded images on external media
periodically.
In the default setting, a protected demonstration movie is pre-recorded. (HDR-CX210)
Back to top
Copyright 2012 Sony Corporation
Page 53

"Handycam" User Guide
53
Operation Search
PrintSearch
Top page > Playback > Playback > Operating buttons while playing
Before use
Getting started
Recording
Playback
Saving images with an external
device
Customizing your camcorder
Troubleshooting
Maintenance and precautions
Contents list
Operating buttons while playing
While playing a movie
While viewing photos
To play back images with other devices
Items on the LCD screen disappear if you do not operate the camcorder for a few seconds. To display
the items again, do as follows.
HDR-CX190: Move the multi-selector.
HDR-CX200/CX210/PJ200: Touch the LCD screen.
While playing a movie
: Volume
: Delete
: Context
: To stop
: Previous
: To fast-reverse
: Next
: To fast-forward
: To pause/play
While viewing photos
Operating buttons while viewing photos will be changed depends on the setting of Switch Image Type
Button.
(Movie/photo) (default setting)
Page 54

: Delete
54
: Previous
: Next
: To play/pause movies and photos in the order recorded
(photo)
: Delete
: Context
: Previous
: Next
: To start/stop slide show
As you repeat selecting
about 10 times about 30 times about 60 times.
Select
To repeat Slideshow, select
/ during pause to play movies slowly.
/ during playback, movies are played as fast as about 5 times
[Slideshow Set].
To play back images with other devices
You may not be able to play back normally images recorded on your camcorder with other devices.
Also, you may not be able to play back images recorded on other devices with your camcorder.
Standard definition image quality (STD) movies recorded on SD memory cards cannot be played on
AV equipment of other manufacturers.
Back to top
Copyright 2012 Sony Corporation
Page 55

"Handycam" User Guide
55
Operation Search
PrintSearch
Top page > Playback > Playback > Dividing a movie
Before use
Getting started
Recording
Playback
Saving images with an external
device
Customizing your camcorder
Troubleshooting
Maintenance and precautions
Contents list
Dividing a movie
1. Select [Divide] on the movie playback screen.
2. Select the point where you want to divide the movie into scenes using / , and then select
.
A: Returns to the beginning of the selected movie
B: Adjusts the dividing point with more precision
Notes
A slight difference may occur from the point where you select and the actual dividing point, as your
camcorder selects the dividing point based on about half-second increments.
Some basic editing operations can be done on the camcorder. If you want to do advanced editing
operations, use the built-in “PlayMemories Home” software.
Do not remove the battery pack or the AC Adaptor from your camcorder while dividing the images. It
may damage the recording media.
Do not eject the memory card while dividing images from the memory card.
If you divide movies that are included in saved scenarios, the scenarios will also be deleted.
Related topics
[Delete]
Back to top
Copyright 2012 Sony Corporation
Page 56

"Handycam" User Guide
56
Operation Search
PrintSearch
Top page > Playback > Playback > Capturing a photo from a movie
Before use
Getting started
Recording
Playback
Saving images with an external
device
Customizing your camcorder
Troubleshooting
Maintenance and precautions
Contents list
Capturing a photo from a movie
On recording date and time of captured photos
1. Select
2. Select the point where you want to capture a photo using / , and then select .
[Photo Capture] that appears on the playback screen of a movie.
A: Returns to the beginning of the selected movie
B: Adjusts the capturing point with more precision
If the movie was recorded with one of the following image quality levels, the image size will be set
as shown below.
High definition image quality (HD): 2.1 M (16:9)
Wide aspect ratio (16:9) with standard definition image quality (STD): 0.2 M (16:9)
4:3 aspect ratio with standard definition image quality (STD): 0.3 M (4:3)
On recording date and time of captured photos
The recording date and time of captured photos is the same as the recording date and time of the
movies.
If the movie you are capturing from has no data code, the recording date and time of the photo will
be the date and time you captured from the movie.
Back to top
Copyright 2012 Sony Corporation
Page 57

"Handycam" User Guide
57
Operation Search
PrintSearch
Top page > Playback > Highlight Playback > Enjoying a digest of your movies (Highlight Playback)
Before use
Getting started
Recording
Playback
Saving images with an external
device
Customizing your camcorder
Troubleshooting
Maintenance and precautions
Contents list
Enjoying a digest of your movies (Highlight Playback)
To change the settings for Highlight Playback
You can enjoy a digest of high definition image quality (HD) movies and photos, similar to a short movie.
1. Press
2. Display the desired event at the center of the Event View, and select [
(View Images).
Highlight].
A: Volume adjustment
B: Context
C: To stop
D: Previous
E: To pause
F: Next
3. Select the desired operation when the highlight playback finishes.
A: The camcorder plays the Highlight Playback scenes again.
B: You can save the Highlight Playback scenes in standard definition image quality (STD) and share
it (upload it to the web, etc.).
C: You can change the settings for Highlight Playback.
To change the settings for Highlight Playback
You can change the Highlight Playback settings by selecting [Highlight Setting] on the screen after
Highlight Playback has finished.
You can also change the setting by selecting
highlight scenes.
[Highlight Setting] while the camcorder is playing
Page 58

[Playback Range]: You can set the playback range (starting and ending date) of the Highlight
58
Playback.
[Theme]: You can select a theme for Highlight Playback.
[Music]: You can select music.
[Audio mix]: The original sound is played back with the music.
[Length]: You can set the length of the Highlight Playback segment.
[Highlight Point]: You can set the points in a movie or photo that will be used in a Highlight Playback.
Play the desired movie, and select
. Or play the desired photo and select .
appears on the movie or photo that is used in a Highlight Playback.
To erase the points, select
[Clear All Points].
Notes
Highlight Playback scenes will change each time you select a Highlight Playback.
The [Playback Range] setting is cleared when the Highlight Playback stops.
After the music file is transferred to the camcorder, if you cannot play the music, the music file may
be damaged. Delete the music file by selecting
[Setup] [ Playback Settings]
[Empty Music], then transfer the music file again. You can restore the music data recorded on your
camcorder at the default using “Music Transfer.” For operating instructions, see “Music Transfer”
help.
When you connect the camcorder to an external device, such as a TV, and watch Highlight
Playback, these images do not appear on the LCD screen of the camcorder.
Back to top
Copyright 2012 Sony Corporation
Page 59

"Handycam" User Guide
59
Operation Search
PrintSearch
Top page > Playback > Highlight Playback > Saving Highlight Playback in high definition image quality
(HD) (Scenario Save)
Before use
Getting started
Recording
Playback
Saving images with an external
device
Customizing your camcorder
Troubleshooting
Maintenance and precautions
Contents list
Saving Highlight Playback in high definition image quality (HD) (
Scenario Save)
To play back a saved scenario
You can save your favorite Highlight Playback as a “Scenario” with high definition image quality (HD). Up
to 8 scenarios can be saved and these scenarios can be played on the camcorder only.
1. Select [Replay] on the screen after a Highlight Playback has finished.
2. When the Highlight Playback starts again, select
To play back a saved scenario
1. Select [Playback Function] [ Scenario], select the desired scenario, and then
select
.
[ Scenario Save].
To erase a saved scenario, select [Erase]/[Erase All] while playing the scenario.
Notes
When you connect the camcorder to an external device, such as a TV, and watch Highlight
Scenario, these images do not appear on the LCD screen of the camcorder.
Back to top
Copyright 2012 Sony Corporation
Page 60

"Handycam" User Guide
60
Operation Search
PrintSearch
Top page > Playback > Highlight Playback > Converting Highlight Playback scenes or Highlight
Scenarios to standard definition image quality (STD) (Highlight Movie)
Before use
Getting started
Recording
Playback
Saving images with an external
device
Customizing your camcorder
Troubleshooting
Maintenance and precautions
Contents list
Converting Highlight Playback scenes or Highlight Scenarios to
standard definition image quality (STD) (Highlight Movie)
To play back a Highlight Movie
You can convert the data format of Highlight Playback or Highlight Scenarios to standard definition
image quality (STD) and save them as a “Highlight Movie.” Highlight movies can be used to create DVDs
or be uploaded to the Web.
1. Select [Save and Share] on the screen after Highlight Playback or Highlight Scenario playback has
finished.
2. Select the desired operation when the item has been saved.
A: Selecting [Share] allows you to upload the Highlight movie to the Web using the built-in
“PlayMemories Home” software, or create DVDs using the “DVDirect Express” DVD writer.
[Details][Details]
B: Your camcorder plays the Highlight Movie saved.
To play back a Highlight Movie
1. Select [Playback Function] [Highlight Movie] and select the desired Highlight Movie.
To erase Highlight Movie, select
Copyright 2012 Sony Corporation
while the Highlight Movie is playing.
Back to top
Page 61

"Handycam" User Guide
61
Operation Search
PrintSearch
Top page > Playback > Using the built-in projector > Using the built-in projector (HDR-PJ200)
Before use
Getting started
Recording
Playback
Saving images with an external
device
Customizing your camcorder
Troubleshooting
Maintenance and precautions
Contents list
Using the built-in projector (HDR-PJ200)
You can use a flat surface such as a wall as a screen to view recorded images using the built-in
projector.
The LCD screen turns off while an image is being projected. Use the power zoom lever/PHOTO button
to operate the camcorder.
1. Face the projector lens towards a surface, such as a wall, and then press PROJECTOR.
2. When the operating guide screen appears, select [Project].
This screen appears the first time you use the built-in projector.
3. Adjust the focus of the projected image using the focus lever.
A: PROJECTOR FOCUS lever
The projected image is larger when the distance between your camcorder and the reflecting
surface increase.
It is recommended that you place the camcorder further than 0.5 m (1.6 feet) away (approximate
distance) from the surface that the images are to be projected onto.
4. Move the power zoom lever to select the image you want to play, then press PHOTO to begin
playback.
Page 62

A: Power zoom lever
62
B: PHOTO button
Use the power zoom lever to move the selection frame that appears on the LCD screen and
press the PHOTO button to start playing the framed item.
For details on playback, see the playback section. [Details]
To turn off the projector, press PROJECTOR.
Notes
Be careful of the following operations or situations while using the projector.
Make sure not to project images towards the eyes.
Make sure not to touch the projector lens.
The LCD screen and the projector lens become hot while in use.
Using the projector shortens battery life.
The following operations are unavailable while you are using the projector.
Output of Highlight Playback to a device such as a TV
Operation of the camcorder with the LCD screen closed
Several other functions
Copyright 2012 Sony Corporation
Back to top
Page 63

"Handycam" User Guide
63
Operation Search
PrintSearch
Top page > Playback > Playing images on a TV > Connecting the camcorder to a high definition TV
Before use
Getting started
Recording
Playback
Saving images with an external
device
Customizing your camcorder
Troubleshooting
Maintenance and precautions
Contents list
Connecting the camcorder to a high definition TV
On an HDMI cable
When movies are recorded with high definition image quality (HD), they are played back in high
definition image quality (HD) on a high definition TV. Use the HDMI cable to connect the camcorder to a
TV which has an HDMI input jack.
If the TV does not have an HDMI input jack, use the A/V connecting cable. [Details]
: Supplied with HDR-CX200/CX210/PJ200
1. Switch the input on the TV to the connected jack.
2. Connect the HDMI cable (
jack (
) on the TV.
) to the HDMI OUT jack ( ) on the camcorder and to the HDMI IN
3. Play a movie or a photo on the camcorder.
On an HDMI cable
Use an HDMI cable with the HDMI logo.
Use an HDMI mini connector on one end (for the camcorder), and a plug suitable for connecting your
TV on the other end.
Copyright-protected images are not output from the HDMI OUT jack of your camcorder.
Some TVs may not function correctly (e.g., no sound or image) with this connection.
Do not connect the camcorder HDMI OUT jack to an external device HDMI OUT jack, as malfunction
may result.
HDMI (High Definition Multimedia Interface) is an interface to send both video/audio signals. The
HDMI OUT jack outputs high quality images and digital audio.
Notes
Refer to the instruction manuals of the TV as well.
Use the supplied AC Adaptor as the power source. [Details]
When movies are recorded with standard image quality (STD), they are played back in standard
definition image quality (STD) even on a high definition TV.
If you connect your camcorder to the TV using more than one type of cable to output images, HDMI
output takes priority.
The camcorder does not support the S-Video output.
Back to top
Copyright 2012 Sony Corporation
Page 64

"Handycam" User Guide
64
Operation Search
PrintSearch
Top page > Playback > Playing images on a TV > Connecting the camcorder to a non-high-definition TV
Before use
Getting started
Recording
Playback
Saving images with an external
device
Customizing your camcorder
Troubleshooting
Maintenance and precautions
Contents list
Connecting the camcorder to a non-high-definition TV
To set the aspect ratio according to the connected TV (16:9/4:3)
When your TV is monaural (When your TV has only one audio input jack)
When movies are recorded with high definition image quality (HD), they are played back in standard
definition image quality (STD) on a non-high-definition TV. When movies are recorded with standard
image quality (STD), they are played back in standard definition image quality (STD).
1. Switch the input on the TV to the connected jack.
2. Connect the A/V connecting cable (
camcorder and to the AUDIO and VIDEO input jacks (
; supplied) to the A/V Remote Connector ( ) on the
) on the TV.
3. Play a movie or a photo on the camcorder.
To set the aspect ratio according to the connected TV (16:9/4:3)
Set [TV Type] to [16:9] or [4:3] according to your TV.
When your TV is monaural (When your TV has only one audio input
jack)
Connect the yellow plug of the A/V connecting cable to the video input jack and connect the white (left
channel) or red (right channel) plug to the audio input jack of your TV or VCR.
Notes
Refer to the instruction manuals of the TV as well.
Use the supplied AC Adaptor as the power source. [Details]
When you play back standard definition image quality (STD) movies on a 4:3 TV that is not
compatible with the 16:9 signal, set [
If you connect your camcorder to the TV using more than one type of cable to output images, HDMI
input takes priority on the TV.
The camcorder does not support the S-Video output.
Related topics
[TV Type]
[Wide Mode]
Wide Mode] to [4:3] to record movies with 4:3 aspect ratio.
Page 65

Copyright 2012 Sony Corporation
65
Back to top
Page 66

"Handycam" User Guide
66
Operation Search
PrintSearch
Top page > Playback > Playing images on a TV > Connecting the camcorder to a TV via a VCR
Before use
Getting started
Recording
Playback
Saving images with an external
device
Customizing your camcorder
Troubleshooting
Maintenance and precautions
Contents list
Connecting the camcorder to a TV via a VCR
Connect your camcorder to the LINE IN input on the VCR using the A/V connecting cable. Set the input
selector on the VCR to LINE (VIDEO 1, VIDEO 2, etc.).
Back to top
Copyright 2012 Sony Corporation
Page 67

"Handycam" User Guide
67
Operation Search
PrintSearch
Top page > Playback > Playing images on a TV > Using “BRAVIA” Sync
Before use
Getting started
Recording
Playback
Saving images with an external
device
Customizing your camcorder
Troubleshooting
Maintenance and precautions
Contents list
Using “BRAVIA” Sync
You can operate your camcorder with the remote commander of your TV by connecting your camcorder
to a “BRAVIA” Sync compatible TV launched in 2008 or later with the HDMI cable.
You can operate the menu of your camcorder by pressing the SYNC MENU button of the remote
commander of your TV. You can display the camcorder screens such as Event View, play selected
movies or display selected photos by pressing up/down/left/right/enter buttons of the remote commander
of your TV.
Notes
Set [CTRL FOR HDMI] to [On].
Also set your TV accordingly. Refer to the instruction manual of the TV for details.
The operation of “BRAVIA” Sync differs according to each model of BRAVIA. Refer to the
instruction manual of your TV for details.
If you turn off the TV, your camcorder is turned off simultaneously.
Back to top
Copyright 2012 Sony Corporation
Page 68

"Handycam" User Guide
68
Operation Search
PrintSearch
Top page > Saving images with an external device > Using the “PlayMemories Home”
software > Starting the “PlayMemories Home” software
Before use
Getting started
Recording
Playback
Saving images with an external
device
Customizing your camcorder
Troubleshooting
Maintenance and precautions
Contents list
Starting the “PlayMemories Home” software
1. Double-click the “PlayMemories Home” icon on the computer screen.
The “PlayMemories Home” software starts up.
2. Double-click the ““PlayMemories Home” Help Guide” short-cut icon on the computer screen to see
how to use “PlayMemories Home.”
If the icon is not displayed on the computer screen, click [Start] [All Programs]
[PlayMemories Home] the desired item.
Back to top
Copyright 2012 Sony Corporation
Page 69

"Handycam" User Guide
69
Operation Search
PrintSearch
Top page > Saving images with an external device > Selecting a method for saving images > Disc
creation guide
Before use
Getting started
Recording
Playback
Saving images with an external
device
Customizing your camcorder
Troubleshooting
Maintenance and precautions
Contents list
Disc creation guide
Movies that are recorded with standard definition image quality (STD)
You can save high definition image quality (HD) movies using an external device. Select the method to
be used according to the device.
External devices Connecting cable
Built-in USB cable of the
DVDirect Express
DVDirect Express DVD writer
Saving images on a DVD disc with high definition image quality (HD).
[Details]
Built-in USB Cable
DVD writer other than DVDirect Express
Saving images on a DVD disc with high definition image quality (HD) or
with standard definition image quality (STD). [Details]
A/V connecting cable
Hard disk recorder, etc.
Saving images on a DVD disc with standard definition image quality
(STD). [Details]
External media device
Saving images on an external media device with high definition image
quality (HD). [Details]
(supplied)
USB Adapter cable VMCUAM1 (sold separately)
Movies that are recorded with standard definition image quality (STD)
Use the A/V connecting cable to connect the camcorder to an external device in which images are
saved.
Notes
Page 70

Delete the demonstration movie when copying or creating discs. If it is not deleted, the camcorder
70
may not operate correctly. However, you cannot recover the demonstration movie once you delete it
(HDR-CX210).
There may be some types of discs or media devices on which movies cannot be saved, depending
on the [
Mode] set to [Highest Quality
REC Mode] setting selected when you record the movie. Movies recorded with [ REC
] can be saved on external media devices.
Related topics
Dubbing on a computer: Starting the “PlayMemories Home” software
Back to top
Copyright 2012 Sony Corporation
Page 71

"Handycam" User Guide
71
Operation Search
PrintSearch
Top page > Saving images with an external device > Selecting a method for saving images > Types of
media devices on which the images can be saved
Before use
Getting started
Recording
Playback
Saving images with an external
device
Customizing your camcorder
Troubleshooting
Maintenance and precautions
Contents list
Types of media devices on which the images can be saved
Types of media that images can be saved on will depend on the recording mode selected.
Recording mode
Types of media
FX FH/HQ/LP
Internal recording media on this camcorder*
Memory card inserted in this camcorder
External media (USB storage devices)
Blu-ray discs
AVCHD recording discs
* HDR-CX210
Back to top
Copyright 2012 Sony Corporation
Page 72

"Handycam" User Guide
72
Operation Search
PrintSearch
Top page > Saving images with an external device > Selecting a method for saving images > The
devices on which the created disc can be played back
Before use
Getting started
Recording
Playback
Saving images with an external
device
Customizing your camcorder
Troubleshooting
Maintenance and precautions
Contents list
The devices on which the created disc can be played back
DVD disc with high definition image quality (HD)
AVCHD format playback devices, such as a Sony Blu-ray disc player or a PlayStation®3
DVD disc with standard definition image quality (STD)
Ordinary DVD playback devices, such as a DVD player
Notes
The AVCHD recording disc can be played back only on AVCHD format compatible devices.
Discs with high definition image quality (HD) images recorded should not be used in DVD
players/recorders. Because DVD players/recorders are not compatible with the AVCHD format,
DVD players/recorders may fail to eject the disc.
Always maintain your PlayStation®3 to use the latest version of the PlayStation®3system software.
The PlayStation®3 may not be available in some countries/regions.
Back to top
Copyright 2012 Sony Corporation
Page 73

"Handycam" User Guide
73
Operation Search
PrintSearch
Top page > Saving images with an external device > Saving images on an external media
device > Saving images on an external media device easily
Before use
Getting started
Recording
Playback
Saving images with an external
device
Customizing your camcorder
Troubleshooting
Maintenance and precautions
Contents list
Saving images on an external media device easily
To delete images in the external media device
You can save movies and photos on an external media device (USB storage devices), such as an
external hard disk drive. The following functions will be available after you have saved your images on
an external media device.
You can connect your camcorder and the external media device, and then play back images stored
on the external media device.
You can connect your computer and the external media device and import images to your computer
using the built-in “PlayMemories Home” software.
Notes
For this operation, you need the USB Adaptor Cable VMC-UAM1 (sold separately).
Connect the AC Adaptor and the power cord (mains lead) to the DC IN jack of your camcorder and
the wall outlet (wall socket).
Refer to the instruction manual supplied with the external media device.
1. Connect your camcorder and the external media device using the USB Adaptor Cable (sold
separately).
A: USB Adaptor Cable VMC-UAM1 (sold separately)
Make sure not to disconnect the USB cable while [Preparing image database file. Please wait.] is
displayed on the LCD screen.
If [Repair Img. DB F.] is displayed on the camcorder screen, select
2. Select [Copy.] on the camcorder screen.
HDR-CX190/CX200/PJ200
Movies and photos that are stored in the memory card (inserted in the camcorder), and that have
not yet been saved on to external media device can be saved on the connected media device at this
time.
HDR-CX210
Movies and photos that are stored on one of the camcorder’s recording media selected in [Media
Select], and that have not yet been saved on external media device can be saved on the connected
media device at this time.
.
Page 74

This operation is available only when there are newly recorded images in your camcorder.
74
To disconnect the external media device, select
standby mode (either Event View or Event Index is displayed).
while the camcorder is in the playback
To delete images in the external media device
1. Select [Play without copying.] in step 2 above.
2. Select
screen to delete images.
Notes
You may not be able to use external media devices with a code function.
The FAT file system is available for your camcorder. If the storage medium of the external device
was formatted for the NTFS file system, etc., format the external media device using the camcorder
before use. The format screen appears when an external media device is connected to your
camcorder. Make sure that important data has not previously been saved on the external media
device before you format it using the camcorder.
Operation is not assured with every device satisfying requirements for operating.
For details on available external media devices, go to the Sony support website in your
country/region.
The number of scenes you can save on the external media device are as follows. However, even if
the external media device has free space, you cannot save scenes exceeding the following number.
High definition image quality (HD) movies: Max. 3,999
Standard definition image quality (STD) movies: Max. 9,999
Photos: Max. 40,000
If your camcorder does not recognize the external media device, try the following operations.
Reconnect the USB Adaptor Cable to your camcorder.
If the external media device has the AC power cord (mains lead), connect it to the wall outlet (wall
socket).
The number of scenes may be smaller depending on the type of images recorded.
You cannot copy images from an external media device to the internal recording medium on the
camcorder.
[Edit/Copy] [Delete], and then follow the instructions that appear on the LCD
Copyright 2012 Sony Corporation
Back to top
Page 75

"Handycam" User Guide
75
Operation Search
PrintSearch
Top page > Saving images with an external device > Saving images on an external media
device > Saving the desired images in the camcorder to the external media device
Before use
Getting started
Recording
Playback
Saving images with an external
device
Customizing your camcorder
Troubleshooting
Maintenance and precautions
Contents list
Saving the desired images in the camcorder to the external media
device
You can save desired images in the camcorder to the external media device.
Notes
For this operation, you need the USB Adaptor Cable VMC-UAM1 (sold separately).
Connect the AC Adaptor and the power cord (mains lead) to the DC IN jack of your camcorder and
the wall outlet (wall socket).
Refer to the instruction manual supplied with the external media device.
1. Connect your camcorder and the external media device using the USB Adaptor Cable (sold
separately).
A: USB Adaptor Cable VMC-UAM1 (sold separately)
Make sure not to disconnect the USB cable while [Preparing image database file. Please wait.] is
displayed on the LCD screen.
If [Repair Img. DB F.] is displayed on the camcorder screen, select
2. Select [Play without copying.].
.
3. Select
screen to save images.
If you want to copy images that have not yet been copied, select
[Direct Copy] while your camcorder is connected to the external media device.
[Edit/Copy] [Copy], and then follow the instructions that appear on the LCD
Copyright 2012 Sony Corporation
[Edit/Copy]
Back to top
Page 76

"Handycam" User Guide
76
Operation Search
PrintSearch
Top page > Saving images with an external device > Saving images on an external media
device > Playing back images in the external media device on the camcorder
Before use
Getting started
Recording
Playback
Saving images with an external
device
Customizing your camcorder
Troubleshooting
Maintenance and precautions
Contents list
Playing back images in the external media device on the
camcorder
To play back high definition image quality (HD) movies on your computer
Notes
For this operation, you need the USB Adaptor Cable VMC-UAM1 (sold separately).
Connect the AC Adaptor and the power cord (mains lead) to the DC IN jack of your camcorder and
the wall outlet (wall socket).
Refer to the instruction manual supplied with the external media device.
1. Connect your camcorder and the external media device using the USB Adaptor Cable (sold
separately).
A: USB Adaptor Cable VMC-UAM1 (sold separately)
2. Select [Play without copying.] and select the image you want to view.
You can also view images on a TV connected to your camcorder.
When an external media device is connected,
will appear on the Event View screen.
To play back high definition image quality (HD) movies on your
computer
On the “PlayMemories Home” software, select the drive that represents the external media device
connected, and then play movies.
Back to top
Copyright 2012 Sony Corporation
Page 77

"Handycam" User Guide
77
Operation Search
PrintSearch
Top page > Saving images with an external device > Saving images on an external media
device > Devices that cannot be used as an external media device
Before use
Getting started
Recording
Playback
Saving images with an external
device
Customizing your camcorder
Troubleshooting
Maintenance and precautions
Contents list
Devices that cannot be used as an external media device
You cannot use the following devices as an external media device.
media devices with a capacity exceeding 2 TB
ordinary disc drive such as CD or DVD drive
media devices connected via a USB hub
media devices with built-in USB hub
card reader
Back to top
Copyright 2012 Sony Corporation
Page 78

"Handycam" User Guide
78
Operation Search
PrintSearch
Top page > Saving images with an external device > Creating a disc with the DVD writer, DVDirect
Express > Creating a disc with DVDirect Express
Before use
Getting started
Recording
Playback
Saving images with an external
device
Customizing your camcorder
Troubleshooting
Maintenance and precautions
Contents list
Creating a disc with DVDirect Express
Connect your camcorder and the “DVDirect Express” DVD writer (sold separately) using the USB cable
supplied with the DVDirect Express.
Notes
Connect your camcorder to the wall outlet (wall socket) using the supplied AC Adaptor for this
operation.
Refer to the instruction manual supplied with the device connected.
Sony DVD writer may not be available in some countries/regions.
1. Connect the DVDirect Express to the
DVDirect Express.
2. Insert an unused disc into the DVDirect Express, and close the disc tray.
(USB) jack of your camcorder with the USB cable of the
3. Press
Movies that have not yet been saved on any disc can be saved on the disc at this time.
Notes
High definition (HD) and standard definition (STD) image quality movies will be saved on individual
discs.
If the total memory size of movies to be burnt by the DISC BURN operation exceeds that of the
disc, disc creation stops when the limit is reached. The last movie on the disc may be cut off.
Do not do any of the following when creating a disc.
Turn off the camcorder
Disconnect the USB cable or the AC Adaptor
Subject the camcorder or the DVDirect Express to mechanical shock or vibration
Eject the memory card from the camcorder
Disc creation time to copy movies to the limit of the disc is about 20 to 60 minutes. It may take
more time depending on the recording mode or the number of scenes.
(DISC BURN) on the DVDirect Express.
After the operation is completed, select
Copyright 2012 Sony Corporation
.
Back to top
Page 79

"Handycam" User Guide
79
Operation Search
PrintSearch
Top page > Saving images with an external device > Creating a disc with the DVD writer, DVDirect
Express > Performing [DISC BURN OPTION]
Before use
Getting started
Recording
Playback
Saving images with an external
device
Customizing your camcorder
Troubleshooting
Maintenance and precautions
Contents list
Performing [DISC BURN OPTION]
You can create a standard definition image quality (STD) disc using the DVDirect Express (sold
separately).
1. Connect the DVDirect Express to the
DVDirect Express.
2. Insert an unused disc into the DVDirect Express, and close the disc tray.
3. Select [DISC BURN OPTION].
4. Select the recording media containing the movie(s) you want to save (HDR-CX210)
5. Select the image quality of the disc you will create.
6. Add check marks
to the images you want to copy, and then select .
(USB) jack of your camcorder with the USB cable of the
A: Remaining disc capacity
After the operation is completed, select
Copyright 2012 Sony Corporation
.
Back to top
Page 80

"Handycam" User Guide
80
Operation Search
PrintSearch
Top page > Saving images with an external device > Creating a disc with the DVD writer, DVDirect
Express > Playing back a disc on the DVDirect Express
Before use
Getting started
Recording
Playback
Saving images with an external
device
Customizing your camcorder
Troubleshooting
Maintenance and precautions
Contents list
Playing back a disc on the DVDirect Express
You can watch movies or photos stored on a disc in the DVDirect Express (sold separately) with the TV.
1. When you play back movies on the TV screen, connect the DVDirect Express to the
of your camcorder, and connect your camcorder to the TV.
2. Insert a created disc into the DVDirect Express.
3. Press the play button on the DVDirect Express.
After the operation is completed, select
Copyright 2012 Sony Corporation
.
(USB) jack
Back to top
Page 81

"Handycam" User Guide
81
Operation Search
PrintSearch
Top page > Saving images with an external device > Creating a disc with a DVD writer other than
DVDirect Express > Creating a high definition image quality (HD) disc with a DVD writer
Before use
Getting started
Recording
Playback
Saving images with an external
device
Customizing your camcorder
Troubleshooting
Maintenance and precautions
Contents list
Creating a high definition image quality (HD) disc with a DVD
writer
Use the Built-in USB Cable to connect your camcorder to a Sony DVD writer other than DVDirect
Express (sold separately), etc., which is compatible with high definition image quality (HD) movies.
1. Connect a DVD writer to your camcorder with the Built-in USB Cable.
2. Select [USB Connect] on the camcorder screen.
If the [USB Select] screen does not appear, select
Connect].
3. Record movies on the connected device.
After the operation is completed, select
[Setup] [ Connection] [USB
.
Notes
Always maintain the firmware of the Sony DVDirect (DVD Writer) to its latest version. For details,
see the following website.
http://sony.storagesupport.com/
Copyright 2012 Sony Corporation
Back to top
Page 82

"Handycam" User Guide
82
Operation Search
PrintSearch
Top page > Saving images with an external device > Creating a disc with a recorder > Creating a
standard definition image quality (STD) disc with a recorder, etc.
Before use
Getting started
Recording
Playback
Saving images with an external
device
Customizing your camcorder
Troubleshooting
Maintenance and precautions
Contents list
Creating a standard definition image quality (STD) disc with a
recorder, etc.
Connect your camcorder to a disc recorder, a Sony DVD writer, etc., other than DVDirect Express, with
the A/V connecting cable. You can copy images played back on your camcorder on a disc or video
cassette.
1. Insert the recording medium in the recording device (a disc recorder, etc.).
If your recording device has an input selector, set it to the input mode.
2. Connect your camcorder to the recording device with the A/V connecting cable.
A: A/V Remote Connector
B: A/V connecting cable
: Signal flow
Connect your camcorder to the input jacks of the recording device.
3. Start playback on your camcorder, and record it on the recording device.
4. When dubbing is finished, stop the recording device, and then your camcorder.
Notes
You cannot copy images to recorders connected with an HDMI cable.
Since copying is performed via analog data transfer, the image quality may deteriorate.
High definition image quality (HD) movies will be copied with standard definition image quality
(STD).
When you connect a monaural device, connect the yellow plug of the A/V connecting cable to the
video input jack, and the white (left channel) or the red (right channel) plug to the audio input jack
on the device.
Related topics
Copying date and time information: [Data Code]
Using 4:3 screen size display device: [TV Type]
Back to top
Copyright 2012 Sony Corporation
Page 83

"Handycam" User Guide
LCD screen displays the list of menus in the sub-category selected.
83
Operation Search
PrintSearch
Top page > Customizing your camcorder > Using menu items > Setting up menu items
Before use
Getting started
Recording
Playback
Saving images with an external
device
Customizing your camcorder
Troubleshooting
Maintenance and precautions
Contents list
Setting up menu items
To find a menu item quickly
When you cannot select a menu item
The camcorder has various menu items under each of 6 menu categories.
Shooting Mode (Items for selecting a shooting mode)
Camera/Mic (Items for customized shooting)
Image Quality/Size (Items for setting up image quality or size)
Playback Function (Items for playback)
Edit/Copy (Items for editing images such as copy or protect)
Setup (Other setup items)
1. Select
2. Select a category.
.
3. Select your desired menu item.
Notes
Select
to finish setting the menu or to return to the previous screen.
To find a menu item quickly
The [Camera/Mic] and [Setup] menus have sub-categories. Select the sub-category icon so that the
Page 84

A: Sub-category icons
84
When you cannot select a menu item
Grayed out menu items or settings are not available.
Your camcorder displays the reason why you cannot select the menu item or the instruction of under
which condition you can set the menu item.
Back to top
Copyright 2012 Sony Corporation
Page 85

"Handycam" User Guide
85
Operation Search
PrintSearch
Top page > Customizing your camcorder > Shooting Mode > Movie
Before use
Getting started
Recording
Playback
Saving images with an external
device
Customizing your camcorder
Troubleshooting
Maintenance and precautions
Contents list
Movie
You can select the movie recording mode.
1.
[Shooting Mode] [Movie].
Copyright 2012 Sony Corporation
Back to top
Page 86

"Handycam" User Guide
86
Operation Search
PrintSearch
Top page > Customizing your camcorder > Shooting Mode > Photo
Before use
Getting started
Recording
Playback
Saving images with an external
device
Customizing your camcorder
Troubleshooting
Maintenance and precautions
Contents list
Photo
You can select the photo shooting mode.
1.
[Shooting Mode] [Photo].
Copyright 2012 Sony Corporation
Back to top
Page 87

"Handycam" User Guide
Notes
87
Operation Search
PrintSearch
Top page > Customizing your camcorder > Camera/Mic > White Balance
Before use
Getting started
Recording
Playback
Saving images with an external
device
Customizing your camcorder
Troubleshooting
Maintenance and precautions
Contents list
White Balance
You can adjust the color balance to the recording environment.
1. [Camera/Mic] [ Manual Settings] [White Balance].
2. Select the desired setting.
(Auto)
The white balance is adjusted automatically.
If you have changed the battery pack while [Auto] was selected, or taken your camcorder outdoors
after inside use (or vice versa), aim your camcorder at a nearby white object for about 10 seconds
for better color balance adjustment.
(Outdoor)
The white balance is appropriately adjusted for the following recording conditions:
Outdoors
Night views, neon signs and fireworks
Sunrise or sunset
Under daylight fluorescent lamps
(Indoor)
The white balance is appropriately adjusted for the following recording conditions:
Indoors
At party scenes or studios where the lighting conditions change quickly
Under video lamps in a studio, or under sodium lamps or incandescent-like color lamps
(One Push)
The white balance will be adjusted according to the ambient light.
Select [
Keep framing white object such as a piece of paper, to fill the screen under the same lightning
conditions as you will shoot the subject.
Select [
If the lighting conditions changed by bringing your camcorder outdoors from inside the house,
or vice versa, you need to redo the [One Push] procedure to readjust the white balance.
].
].
Page 88

Set [White Balance] to [Auto] or adjust the color in [One Push] under white or cool white fluorescent
88
lamps.
While you are recording a movie,
(One Push) cannot be set.
If you set [White Balance], [Scene Selection] is set to [Auto].
Back to top
Copyright 2012 Sony Corporation
Page 89

"Handycam" User Guide
89
Operation Search
PrintSearch
Top page > Customizing your camcorder > Camera/Mic > Spot Meter/Fcs (Spot meter/focus) (HDR-
CX200/CX210/PJ200)
Before use
Getting started
Recording
Playback
Saving images with an external
device
Customizing your camcorder
Troubleshooting
Maintenance and precautions
Contents list
Spot Meter/Fcs (Spot meter/focus) (HDR-CX200/CX210/PJ200)
Brightness and focus can be adjusted for the selected subject automatically.
1.
2. Touch the subject of which you want to adjust the brightness and focus.
Notes
[Camera/Mic] [ Manual Settings] [Spot Meter/Fcs].
To adjust the brightness and focus automatically, touch [Auto].
[Exposure] and [Focus] are automatically set to [Manual].
Copyright 2012 Sony Corporation
Back to top
Page 90

"Handycam" User Guide
90
Operation Search
PrintSearch
Top page > Customizing your camcorder > Camera/Mic > Spot Meter (Flexible spot meter) (HDR-
CX200/CX210/PJ200)
Before use
Getting started
Recording
Playback
Saving images with an external
device
Customizing your camcorder
Troubleshooting
Maintenance and precautions
Contents list
Spot Meter (Flexible spot meter) (HDR-CX200/CX210/PJ200)
Exposure can be adjusted and set for the selected subject automatically. This function is useful when
there is strong contrast between the subject and the background, such as subjects in the spotlight on
stage.
1.
2. Touch the subject of which you want to adjust the exposure.
[Camera/Mic] [ Manual Settings] [Spot Meter].
To return the setting to automatic exposure, touch [Auto].
Notes
[Exposure] is automatically set to [Manual].
Copyright 2012 Sony Corporation
Back to top
Page 91

"Handycam" User Guide
91
Operation Search
PrintSearch
Top page > Customizing your camcorder > Camera/Mic > Spot Focus (HDR-CX200/CX210/PJ200)
Before use
Getting started
Recording
Playback
Saving images with an external
device
Customizing your camcorder
Troubleshooting
Maintenance and precautions
Contents list
Spot Focus (HDR-CX200/CX210/PJ200)
Focus can be adjusted automatically for the subject selected.
1.
2. Touch the subject of which you want to adjust the focus.
Notes
[Camera/Mic] [ Manual Settings] [Spot Focus].
To adjust the focus automatically, touch [Auto].
[Focus] is automatically set to [Manual].
Copyright 2012 Sony Corporation
Back to top
Page 92

"Handycam" User Guide
92
Operation Search
PrintSearch
Top page > Customizing your camcorder > Camera/Mic > Exposure
Before use
Getting started
Recording
Playback
Saving images with an external
device
Customizing your camcorder
Troubleshooting
Maintenance and precautions
Contents list
Exposure
You can fix the brightness of a picture manually. Adjust the brightness when the subject is too bright or
too dark.
1.
2. Select the desired item.
[Camera/Mic] [ Manual Settings] [Exposure].
Auto
The exposure is adjusted automatically.
Manual
Select
or the light is dim.
if the subject is white or the backlight is bright, or select if the subject is black
Back to top
Copyright 2012 Sony Corporation
Page 93

"Handycam" User Guide
93
Operation Search
PrintSearch
Top page > Customizing your camcorder > Camera/Mic > Focus
Before use
Getting started
Recording
Playback
Saving images with an external
device
Customizing your camcorder
Troubleshooting
Maintenance and precautions
Contents list
Focus
To adjust the focus
On focal distance information
You can adjust the focus manually. You can select this function also when you want to focus on a
certain subject intentionally.
1.
2. Select the desired item.
[Camera/Mic] [ Manual Settings] [Focus].
Auto
The focus is adjusted automatically.
Manual
Adjust the focus using
appears when the focus cannot be adjusted any closer, and appears when the focus cannot
be adjusted farther away.
(nearby subject) or (distant subject).
To adjust the focus
It is easier to focus on the subject by moving the power zoom lever towards T (telephoto) to adjust the
focus, then towards W (wide angle) to adjust the zoom for recording. When you want to record a subject
at close range, move the power zoom lever to W (wide angle), then adjust the focus.
On focal distance information
Your camcorder displays the focal distance information for a few seconds when the focus mode is
switched from automatic to manual or when you set the focus manually. You can use this information as
a guide when the subject is dark and focus adjustment is difficult.
Notes
When you set [Focus] to [Manual],
The minimum possible distance between camcorder and subject while maintaining sharp focus is
appears.
Page 94

about 1 cm (about 13/32 in.) for wide angle and about 80 cm (about 31 1/2 in.) for telephoto.
94
Back to top
Copyright 2012 Sony Corporation
Page 95

"Handycam" User Guide
95
Operation Search
PrintSearch
Top page > Customizing your camcorder > Camera/Mic > Low Lux
Before use
Getting started
Recording
Playback
Saving images with an external
device
Customizing your camcorder
Troubleshooting
Maintenance and precautions
Contents list
Low Lux
You can record bright color images, even in dim light.
1.
2. Select the desired item.
[Camera/Mic] [ Manual Settings] [Low Lux].
Off
The Low Lux function is not used.
)
On (
The Low Lux function is used.
Copyright 2012 Sony Corporation
Back to top
Page 96

"Handycam" User Guide
96
Operation Search
PrintSearch
Top page > Customizing your camcorder > Camera/Mic > Scene Selection
Before use
Getting started
Recording
Playback
Saving images with an external
device
Customizing your camcorder
Troubleshooting
Maintenance and precautions
Contents list
Scene Selection
You can record images effectively in various situations.
1.
2. Select the desired item.
[Camera/Mic] [ Camera Settings] [Scene Selection].
(Auto)
Adjusts image quality automatically.
(Night Scene)*
1
Maintains the darkening atmosphere of the distant surroundings in
night scenes.
(Sunrise&Sunset)*
1
Reproduces the atmosphere of scenes such as sunsets or sunrises.
(Fireworks)*
1
Takes spectacular shots of fireworks.
(Landscape)*
1
Shoots distant subjects clearly. This setting also prevents your
camcorder from focusing on glass or metal mesh in windows
between the camcorder and the subject.
(Portrait)
Brings out the subject such as people or flowers while creating a soft
Page 97

background.
97
(Spotlight)*
2
Prevents people’s faces from appearing excessively white when
subjects are lit by strong light.
(Beach)*
2
Takes the vivid blue of the ocean or a lake.
(Snow)*
2
Takes bright pictures of a white landscape.
*1 Adjusted to focus on subjects farther away only.
2
*
Adjusted not to focus on subjects a short distance away.
Copyright 2012 Sony Corporation
Back to top
Page 98

"Handycam" User Guide
98
Operation Search
PrintSearch
Top page > Customizing your camcorder > Camera/Mic > Fader
Before use
Getting started
Recording
Playback
Saving images with an external
device
Customizing your camcorder
Troubleshooting
Maintenance and precautions
Contents list
Fader
You can record a transition with the following effects adding to the interval between scenes.
Select the desired effect in [STBY] (to fading in) or [REC] (to fading out) mode.
1.
2. Select the desired item.
[Camera/Mic] [ Camera Settings] [ Fader].
Off
Does not use an effect.
White Fader (
Fades in/out with the white effect.
Out
In
)
Black Fader ( )
Fades in/out with the black effect.
Out
Notes
When you press START/STOP, the setting is cleared.
In
Copyright 2012 Sony Corporation
Back to top
Page 99

"Handycam" User Guide
99
Operation Search
PrintSearch
Top page > Customizing your camcorder > Camera/Mic > Self-Timer
Before use
Getting started
Recording
Playback
Saving images with an external
device
Customizing your camcorder
Troubleshooting
Maintenance and precautions
Contents list
Self-Timer
Press PHOTO to start the count down. A photo is recorded after about 10 seconds.
1.
2. Select the desired item.
[Camera/Mic] [ Camera Settings] [ Self-Timer].
Off
Cancels the self-timer.
On (
Starts the self-timer recording. To cancel the recording, select [Reset].
)
Copyright 2012 Sony Corporation
Back to top
Page 100

"Handycam" User Guide
100
Operation Search
PrintSearch
Top page > Customizing your camcorder > Camera/Mic > Tele Macro
Before use
Getting started
Recording
Playback
Saving images with an external
device
Customizing your camcorder
Troubleshooting
Maintenance and precautions
Contents list
Tele Macro
You can blur out backgrounds and the subject stands out clearer. This is useful to shoot small subjects,
such as flowers or insects.
1.
2. Select the desired item.
[Camera/Mic] [ Camera Settings] [Tele Macro].
Off
Cancels Tele Macro. (Tele Macro is also canceled when you move the zoom lever to the W side.)
On (
The zoom moves to the top of the T (telephoto) side automatically and allows recording subjects
at close range down to about 39 cm (15 3/8 in.).
)
Notes
When recording a distant subject, focusing may be difficult and can take some time.
Adjust the focus manually when it is hard to focus automatically.
Related topics
Zooming
Focus
Back to top
Copyright 2012 Sony Corporation
 Loading...