

Page 1
4-420-759-11(1)
SLT-A57
Interchangeable Lens
Digital Camera
Instruction Manual
A-mount
Preparing the camera
Shooting and viewing
images
Shooting images to suit
your subject
Using the shooting
functions
Using the playback
functions
Functions list
Viewing images on a
computer
Others
Index
Page 2

2
Owner’s Record
The model and serial numbers are located
on the bottom.
Record the serial number in the space
provided below.
Refer to these numbers whenever you call
upon your Sony dealer regarding this
product.
Model No. SLT-A57
Serial No. __________________________
To reduce fire or shock hazard, do
not expose the unit to rain or
moisture.
IMPORTANT SAFETY
INSTRUCTIONS
SAVE THESE
INSTRUCTIONS.
DANGER - TO
REDUCE THE RISK
OF FIRE OR
ELECTRIC SHOCK,
CAREFULLY
FOLLOW THESE
INSTRUCTIONS.
If the shape of the plug does not fit the
power outlet, use an attachment plug
adaptor of the proper configuration for the
power outlet.
Battery pack
If the battery pack is mishandled, the
battery pack can burst, cause a fire or even
chemical burns. Observe the following
cautions.
• Do not disassemble.
• Do not crush and do not expose the
battery pack to any shock or force such as
hammering, dropping or stepping on it.
• Do not short circuit and do not allow
metal objects to come into contact with
the battery terminals.
• Do not expose to high temperature above
60°C (140°F) such as in direct sunlight or
in a car parked in the sun.
• Do not incinerate or dispose of in fire.
• Do not handle damaged or leaking
lithium ion batteries.
• Be sure to charge the battery pack using a
genuine Sony battery charger or a device
that can charge the battery pack.
WARNING
Caution
Page 3

3
• Keep the battery pack out of the reach of
small children.
• Keep the battery pack dry.
• Replace only with the same or equivalent
type recommended by Sony.
• Dispose of used battery packs promptly
as described in the instructions.
Battery charger
Even if the CHARGE lamp is not lit, the
battery charger is not disconnected from the
AC power source (mains) as long as it is
connected to the wall outlet (wall socket).
If some trouble occurs while using the
battery charger, immediately shut off the
power by disconnecting the plug from the
wall outlet (wall socket).
The power cord (mains lead), if supplied, is
designed specifically for use with this
camera only, and should not be used with
other electrical equipment.
RECYCLING LITHIUM-ION
BATTERIES
Lithium-Ion batteries are
recyclable.
You can help preserve
our environment by
returning your used
rechargeable batteries to
the collection and
recycling location nearest you.
For more information regarding recycling
of rechargeable batteries, call toll free
1-800-822-8837, or visit http://
www.rbrc.org/
Caution: Do not handle damaged or
leaking Lithium-Ion batteries.
Battery Pack and lens
This device complies with Part 15 of the
FCC Rules, Operation is subject to the
following two conditions:
(1) This device may not cause harmful
interference, and (2) this device must
accept any interference received, including
interference that may cause undesired
operation.
This Class B digital apparatus complies
with Canadian ICES-003.
UL is an internationally recognized safety
organization.
The UL Mark on the product means it has
been UL Listed.
If you have any questions about this
product, you may call:
Sony Customer Information Center
1-800-222-SONY (7669)
The number below is for the FCC related
matters only.
Regulatory Information
CAUTION
You are cautioned that any changes or
modifications not expressly approved in
this manual could void your authority to
operate this equipment.
For Customers in the U.S.A.
and Canada
For Customers in the U.S.A.
Declaration of Conformity
Trade Name: SONY
Model No.: SLT-A57
Responsible Party: Sony Electronics
Inc.
Address:16530 Via Esprillo,
San Diego, CA 92127 U.S.A.
Telephone No.: 858-942-2230
This device complies with Part 15 of the
FCC Rules. Operation is subject to the
following two conditions: (1) This
device may not cause harmful
interference, and (2) this device must
accept any interference received,
including interference that may cause
undesired operation.
Page 4

4
Note:
This equipment has been tested and found
to comply with the limits for a Class B
digital device, pursuant to Part 15 of the
FCC Rules.
These limits are designed to provide
reasonable protection against harmful
interference in a residential installation.
This equipment generates, uses, and can
radiate radio frequency energy and, if not
installed and used in accordance with the
instructions, may cause harmful
interference to radio communications.
However, there is no guarantee that
interference will not occur in a particular
installation. If this equipment does cause
harmful interference to radio or television
reception, which can be determined by
turning the equipment off and on, the user
is encouraged to try to correct the
interference by one or more of the
following measures:
– Reorient or relocate the receiving
antenna.
– Increase the separation between the
equipment and receiver.
– Connect the equipment into an outlet
on a circuit different from that to which
the receiver is connected.
– Consult the dealer or an experienced
radio/TV technician for help.
The supplied interface cable must be used
with the equipment in order to comply with
the limits for a digital device pursuant to
Subpart B of Part 15 of FCC Rules.
Notice for the customers in the
countries applying EU Directives
The manufacturer of this product is Sony
Corporation, 1-7-1 Konan Minato-ku
Tokyo, 108-0075 Japan. The Authorized
Representative for EMC and product safety
is Sony Deutschland GmbH, Hedelfinger
Strasse 61, 70327 Stuttgart, Germany. For
any service or guarantee matters please
refer to the addresses given in separate
service or guarantee documents.
This product has been tested and found
compliant with the limits set out in the
EMC Directive for using connection cables
shorter than 3 meters (9.8 feet).
Attention
The electromagnetic fields at the specific
frequencies may influence the picture and
sound of this unit.
Notice
If static electricity or electromagnetism
causes data transfer to discontinue midway
(fail), restart the application or disconnect
and connect the communication cable
(USB, etc.) again.
For Customers in Europe
Page 5
5
Disposal of Old Electrical &
Electronic Equipment (Applicable in
the European Union and other
European countries with separate
collection systems)
This symbol on the product or on its
packaging indicates that this product shall
not be treated as household waste. Instead it
shall be handed over to the applicable
collection point for the recycling of
electrical and electronic equipment. By
ensuring this product is disposed of
correctly, you will help prevent potential
negative consequences for the environment
and human health, which could otherwise
be caused by inappropriate waste handling
of this product. The recycling of materials
will help to conserve natural resources. For
more detailed information about recycling
of this product, please contact your local
Civic Office, your household waste
disposal service or the shop where you
purchased the product.
Disposal of waste batteries
(applicable in the European Union
and other European countries with
separate collection systems)
This symbol on the battery or on the
packaging indicates that the battery
provided with this product shall not be
treated as household waste.
On certain batteries this symbol might be
used in combination with a chemical
symbol. The chemical symbols for mercury
(Hg) or lead (Pb) are added if the battery
contains more than 0.0005% mercury or
0.004% lead.
By ensuring these batteries are disposed of
correctly, you will help prevent potentially
negative consequences for the environment
and human health which could otherwise be
caused by inappropriate waste handling of
the battery. The recycling of the materials
will help to conserve natural resources.
In case of products that for safety,
performance or data integrity reasons
require a permanent connection with an
incorporated battery, this battery should be
replaced by qualified service staff only.
To ensure that the battery will be treated
properly, hand over the product at end-oflife to the applicable collection point for the
recycling of electrical and electronic
equipment.
For all other batteries, please view the
section on how to remove the battery from
the product safely. Hand the battery over to
the applicable collection point for the
recycling of waste batteries.
For more detailed information about
recycling of this product or battery, please
contact your local Civic Office, your
household waste disposal service or the
shop where you purchased the product.
Page 6

6
A moulded plug complying with BS 1363
is fitted to this equipment for your safety
and convenience.
Should the fuse in the plug supplied need to
be replaced, a fuse of the same rating as the
supplied one and approved by ASTA or
BSI to BS 1362, (i.e., marked with an or
mark) must be used.
If the plug supplied with this equipment has
a detachable fuse cover, be sure to attach
the fuse cover after you change the fuse.
Never use the plug without the fuse cover.
If you should lose the fuse cover, please
contact your nearest Sony service station.
Notice for customers in the
United Kingdom
Page 7
7
Table of Contents
Notes on using your camera .............................................. 9
Preparing the camera
Checking the supplied items ............................................ 11
Identifying parts .............................................................. 12
Charging the battery pack ................................................ 18
Inserting the battery pack/memory card (sold separately)
..................................................................................... 20
Attaching a lens ............................................................... 23
Turning the camera on and setting the clock ................... 26
Before shooting ............................................................... 28
Adjusting the viewfinder to the visual acuity (diopter
adjustment)......................................................... 28
Holding the camera properly ...................................... 28
Shooting and viewing images
Shooting still images ....................................................... 30
Recording movies ............................................................ 32
Playing back images ........................................................ 33
Deleting images (Delete) ................................................. 34
Shooting images to suit your subject
Adjusting the angle of the LCD screen ........................... 35
Shooting with the various shooting modes ...................... 36
Superior Auto .................................................. 37
Scene Selection .................................................. 38
Sweep Panorama/ 3D Sweep Panorama ....... 39
Continuous Advance Priority AE Mode ............ 40
Using the shooting functions
Using the flash ................................................................. 41
Adjusting the brightness of the image ............................. 43
Selecting the drive mode .................................... 45
Switching the recording information display (DISP) ...... 46
Setting image size ............................................................ 47
Image Size .................................................................. 47
Panorama: Size ........................................................... 47
Page 8

8
Using the playback functions
Enlarging images ............................................................. 49
Switching to the display of the image list ....................... 50
Viewing images on a TV screen ...................................... 51
Functions list
Functions that can be operated with the buttons/switch
..................................................................................... 52
Selecting a function with the Fn (Function) button ......... 53
Functions that can be selected with the Fn (Function) button
..................................................................................... 54
The functions selected with the MENU button ............... 56
Using the guide function of the camera ........................... 63
In-Camera Guide ........................................................ 63
Shooting Tip ............................................................... 63
Viewing images on a computer
Using with your computer ............................................... 65
Using the software ........................................................... 67
Selecting the method for creating a disc of movies ......... 70
Others
List of icons on the screen ............................................... 73
Functions available for each shooting mode ................... 76
Flash modes available ...................................................... 77
Learning more about the camera (α Handbook) .............. 78
Checking the number of recordable images/recording time
..................................................................................... 79
Specifications .................................................................. 83
Index ................................................................................92
Page 9

9
Notes on using your camera
Shooting procedure
• This camera has 2 modes for monitoring
subjects: the LCD screen mode using the
LCD screen, and the viewfinder mode
using the viewfinder.
• The recorded image may be different
from the image you monitored before
recording.
Notes on the functions available with
the camera
• To check whether it is a 1080 60icompatible device or 1080 50icompatible device, check for the
following marks on the bottom of the
camera.
1080 60i-compatible device:60i
1080 50i-compatible device:50i
• This camera is compatible with 1080 60p
or 50p-format movies. Unlike standard
recording modes up to now, which record
in an interlacing method, this camera
records using a progressive method. This
increases the resolution, and provides a
smoother, more realistic image.
• You may feel uncomfortable symptoms
such as eyestrain, nausea, or a tired
feeling while watching 3D-images
recorded with the camera on 3Dcompatible monitors. When you watch
3D-images, we recommend that you take
a break at regular time intervals. Since
the need for or frequency of break times
varies among individuals, please set your
own standards. If you feel sick, stop
watching 3D-images, and consult a
doctor as needed. Also, refer to the
operating instructions of the connected
device or the software used with the
camera. A child’s vision is always
vulnerable (especially for children under
6 years of age). Before allowing them to
watch 3D-images, please consult with an
expert, such as a pediatric or ophthalmic
doctor. Be sure to make sure your
children follow the precautions above.
No compensation for contents of the
recording
The contents of the recording cannot be
compensated for if recording or playback is
not possible due to a malfunction of your
camera or a memory card, etc.
Back up recommendation
To avoid the potential risk of data loss,
always copy (back up) data to other
medium.
Notes on the LCD screen, electronic
viewfinder, lens, and image sensor
• The LCD screen and electronic
viewfinder are manufactured using
extremely high-precision technology so
over 99.99% of the pixels are operational
for effective use. However, there may be
some tiny black points and/or bright
points (white, red, blue or green in color)
that constantly appear on the LCD screen
and electronic viewfinder. These points
are normal in the manufacturing process
and do not affect the images in any way.
• Do not hold the camera by taking hold of
the LCD screen.
• Do not expose the camera to sunlight or
shoot sunward for a long time. The
internal mechanism may be damaged. If
sunlight is focused on a nearby object, it
may cause a fire.
• There is a magnet on the back and around
the rotating shaft of the hinge part of the
LCD screen. Do not bring anything that
is easily affected by a magnet, such as
floppy disk, credit cards near the LCD
screen.
• Images may trail across on the screen in a
cold location. This is not a malfunction.
When turning on the camera in a cold
location, the screen may become
temporarily dark. When the camera
warms up, the screen will function
normally.
Notes on long-time recording
• When you continue to shoot for a long
time, the temperature of the camera rises.
Page 10
10
Notes on using your camera
If the temperature reaches above a certain
level, the mark is indicated on the
screen and the camera is turned off
automatically. If the power is turned off,
leave the camera for 10 minutes or longer
to allow the temperature inside the
camera to decrease to a safe level.
• Under high ambient temperatures, the
temperature of the camera rises quickly.
• When the temperature of the camera
rises, the image quality may deteriorate.
It is recommended that you wait until the
temperature of the camera drops before
continuing to shoot.
• The surface of the camera may get warm.
This is not a malfunction.
Notes on importing AVCHD movies to
a computer
When importing AVCHD movies to a
computer, for Windows computers, use the
“PlayMemories Home” software on the
CD-ROM (supplied).
Notes when playing movies on other
devices
• This camera uses MPEG-4 AVC/H.264
High Profile for AVCHD format
recording. Movies recorded in AVCHD
format with this camera cannot be played
with the following devices.
– Other devices compatible with
AVCHD format that does not support
High Profile
– Devices incompatible with the
AVCHD format
This camera also uses MPEG-4 AVC/
H.264 Main Profile for MP4 format
recording. For this reason, movies
recorded in MP4 format with this camera
cannot be played on devices other than
those that support MPEG-4 AVC/H.264.
• Discs recorded with HD image quality
(high definition) can be played back only
on AVCHD format-compatible devices.
DVD-based players or recorders cannot
play back HD image quality discs, as
they are incompatible with the AVCHD
format. Also, DVD-based players or
recorders may fail to eject HD image
quality discs.
• 1080 60p/50p movies can be played back
on compatible devices only.
Warning on copyright
Television programs, films, videotapes, and
other materials may be copyrighted.
Unauthorized recording of such materials
may be contrary to the provisions of the
copyright laws.
The pictures used in this manual
The photographs used as examples of
pictures in this manual are reproduced
images, and are not actual images shot
using this camera.
On the data specifications described
in this manual
The data on performance and specifications
is defined under the following conditions,
except as described in this manual: at an
ordinary ambient temperature of 25ºC
(77°F), and using a battery pack that is
charged for about 1 hour after the
CHARGE lamp goes out.
Model name
This manual covers several models
supplied with different lenses.
The model name varies depending on the
supplied lens. The available model varies
depending on the countries/regions.
Model name Lens
SLT-A57 –
SLT-A57K DT18-55mm
SLT-A57Y DT18-55mm and
DT55-200mm
Page 11
11
Preparing the camera
Preparing the camera
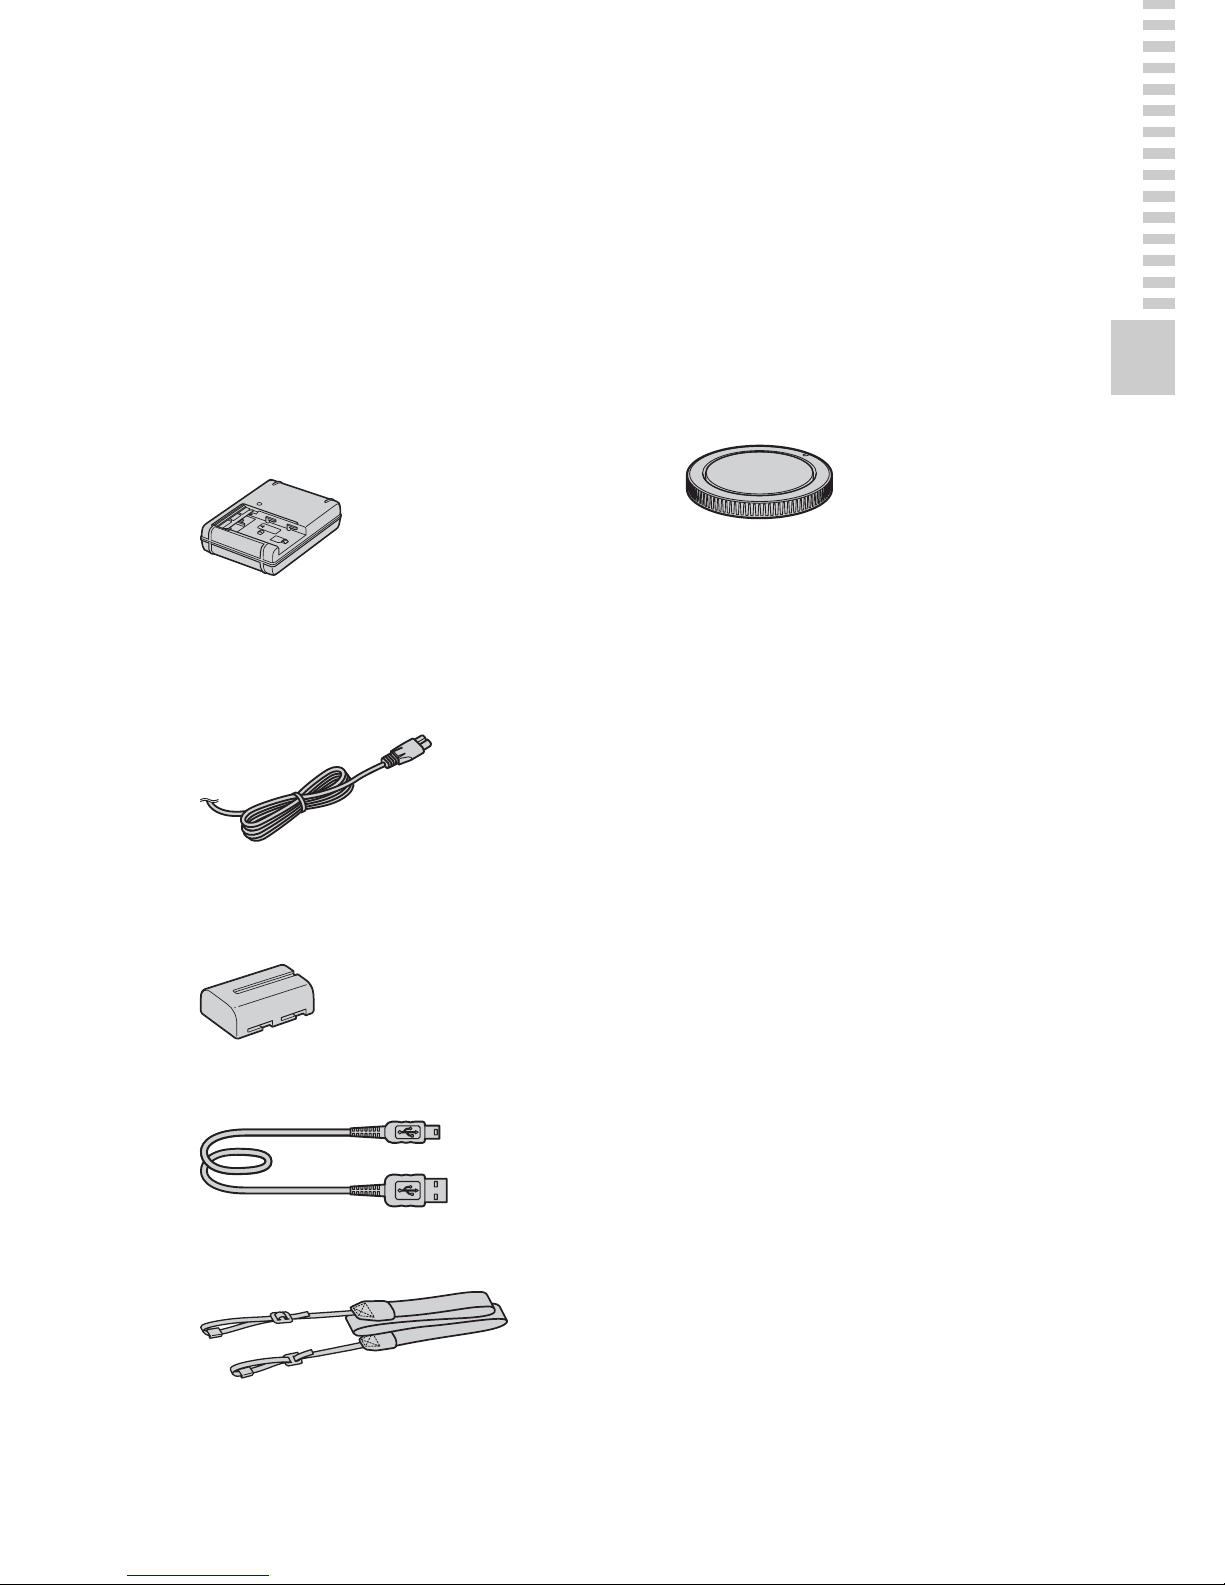
Checking the supplied items
First check the model name of your camera (page 10). The accessories
supplied differ depending on the model.
The number in parentheses indicates the number of pieces.
Common accessories
• Camera (1)
• BC-VM10A Battery charger (1)
• Power cord (mains lead) (1) (not
supplied in the U.S.A. and
Canada)
• Rechargeable battery pack NPFM500H (1)
• USB cable (1)
• Shoulder strap (1)
• Body cap (1) (Attached on the
camera)
• Eyecup (1) (Attached on the
camera)
•CD-ROM (1)
– Application Software for α
camera
– α Handbook
• Instruction Manual (1) (This
manual)
SLT-A57K
• DT18-55mm zoom lens (1)/Front
lens cap (1)/Packaging lid (1)
SLT-A57Y
• DT18-55mm zoom lens (1)/Front
lens cap (1)/Packaging lid (1)
• DT55-200mm zoom lens (1)/
Front lens cap (1)/Rear lens cap
(1)/Lens hood (1)
Page 12
12
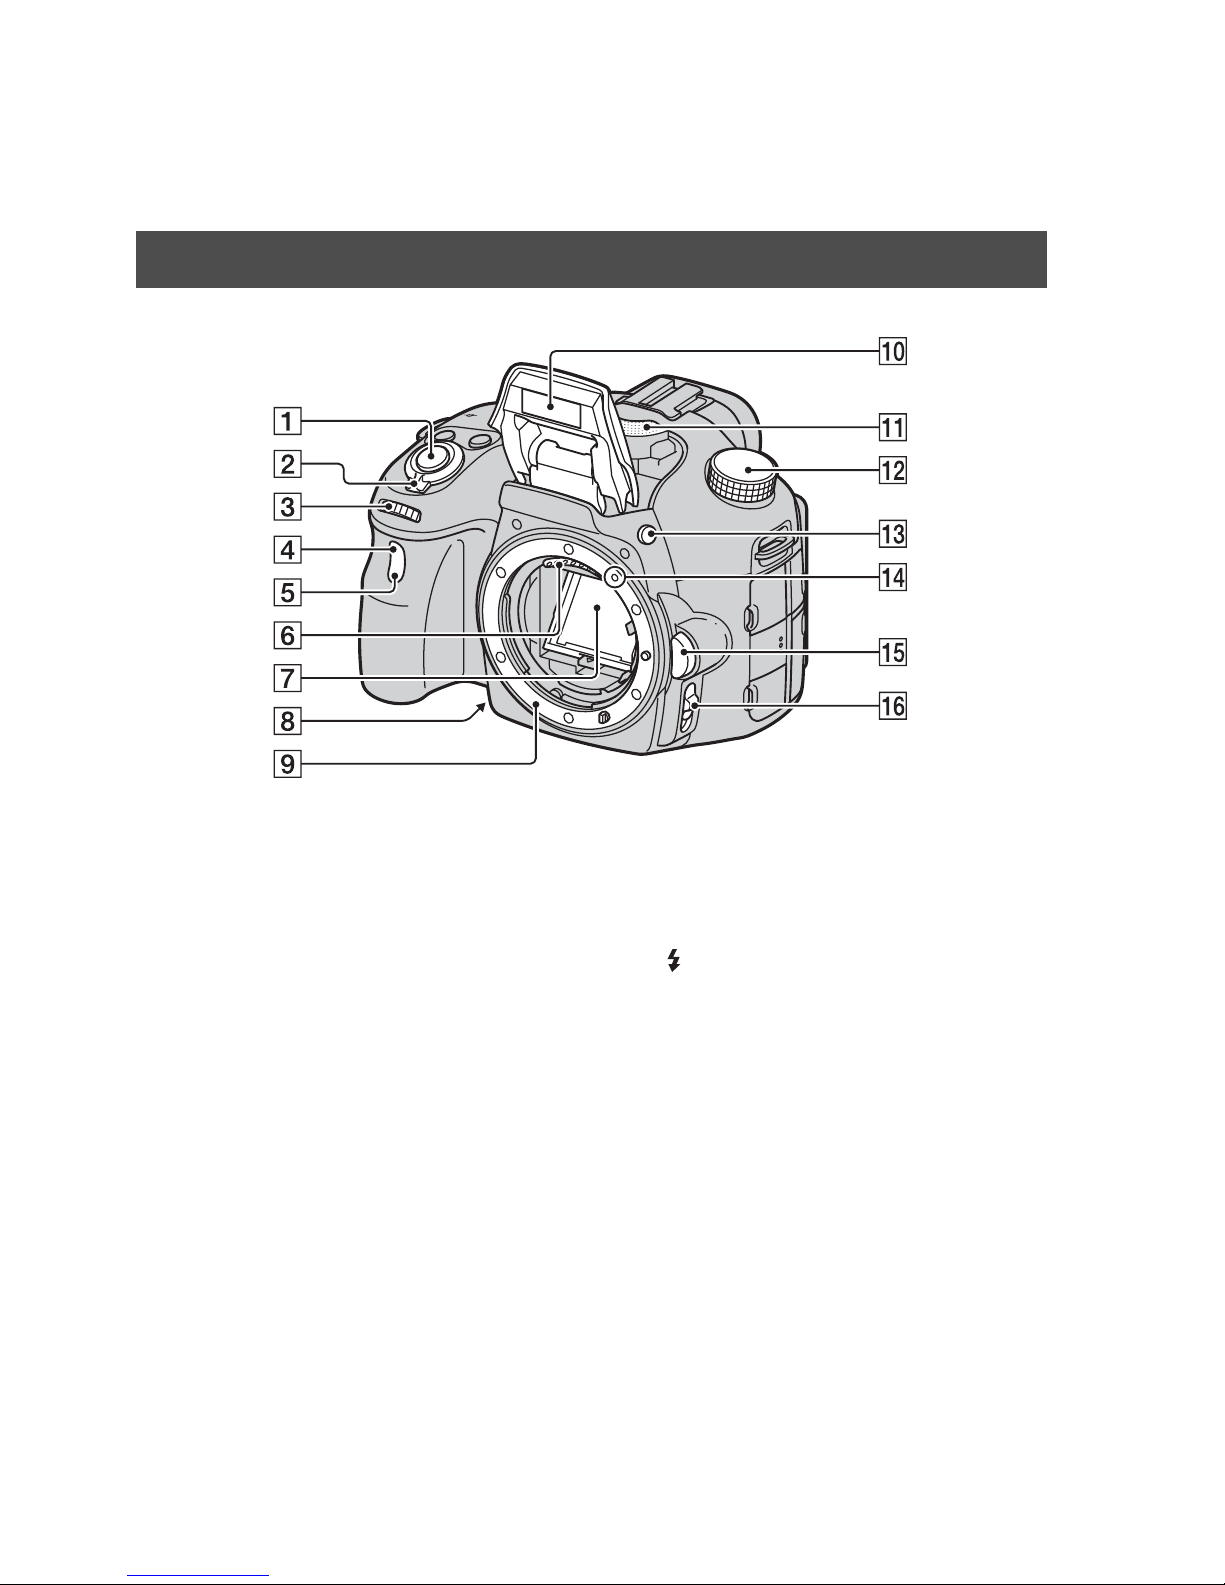
Identifying parts
See the pages in parentheses for details of operation.
A Shutter button (30)
B Power switch (26)
C Control dial
D Remote sensor (45)
E Self-timer lamp (45)
F Lens contacts*
G Mirror*
H Preview button (52)/Focus
Magnifier button (52)
I Mount
J Built-in flash* (41)
K Microphone**
L Mode dial (36)
M (Flash pop-up) button (41,
52)
N Mounting index (23)
O Lens release button (24)
P Focus mode switch (52)
* Do not directly touch these
parts.
** Do not cover this part
during movie recording.
Doing so may cause noise
or lower the volume.
Front side
Page 13
13
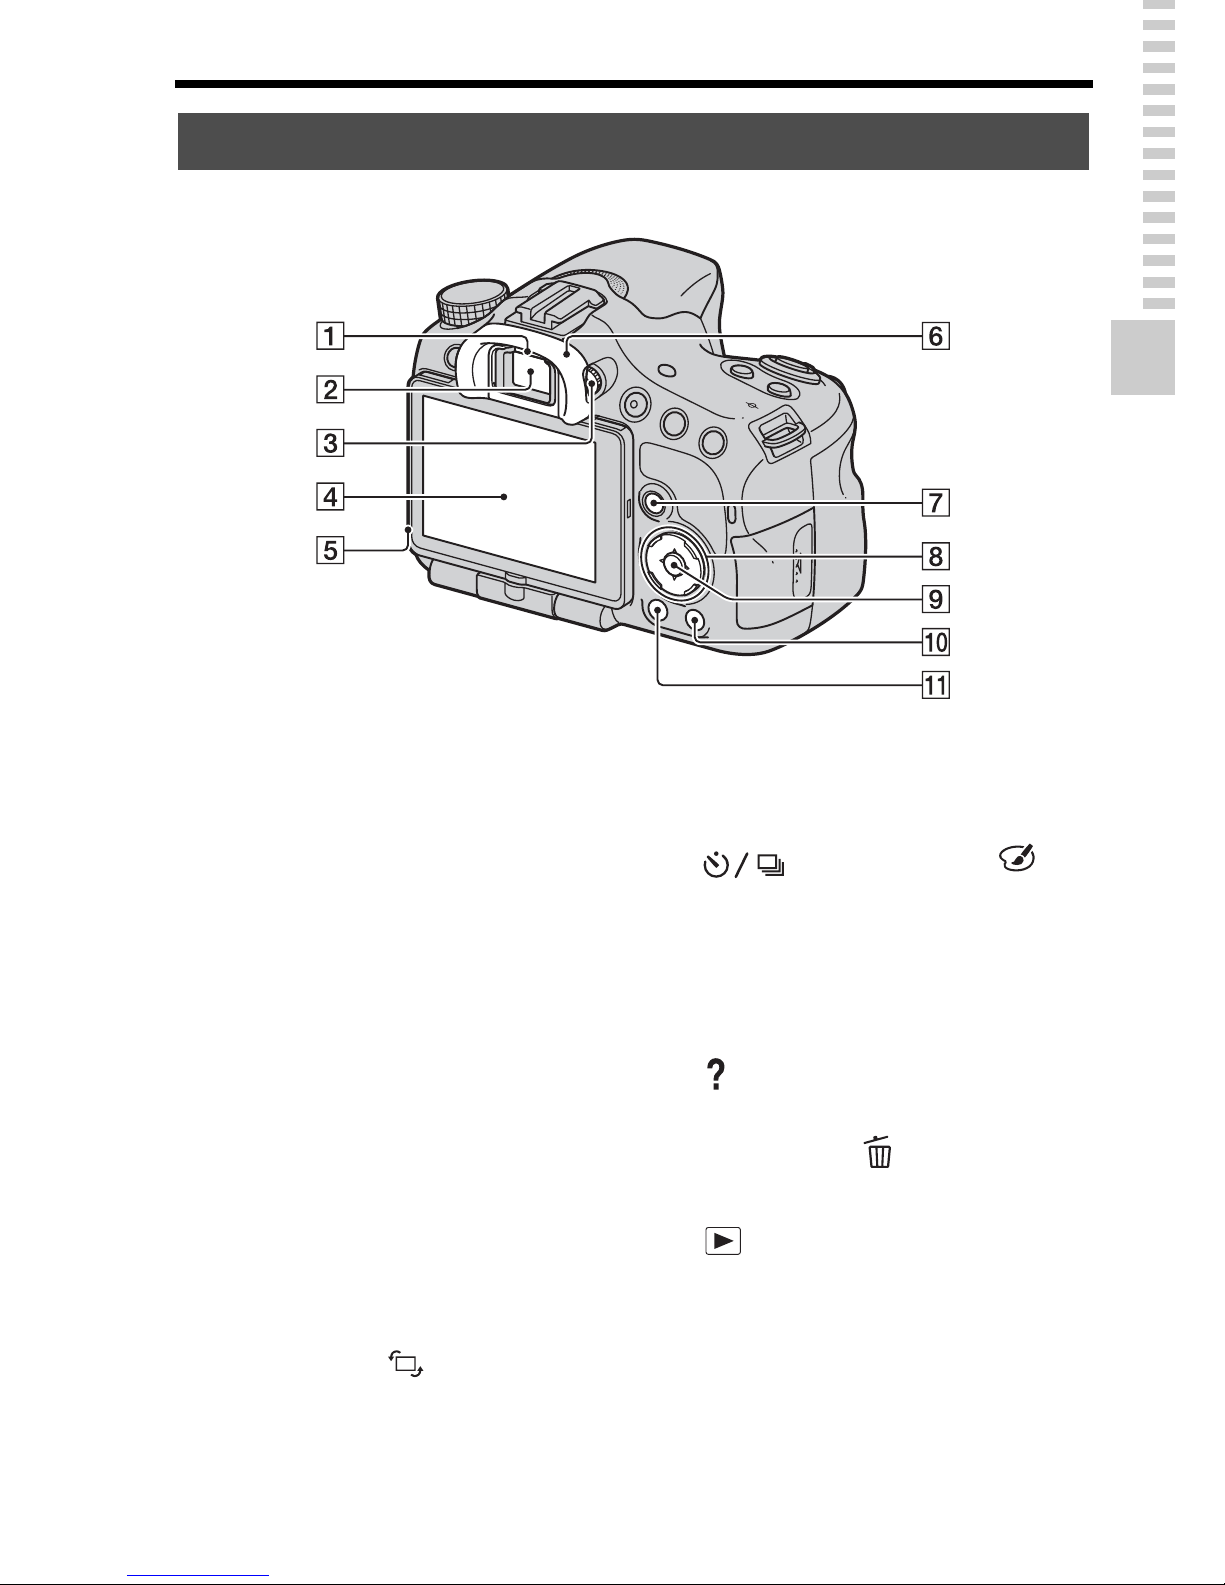
Identifying parts
Preparing the camera
A Eyepiece sensors
B Viewfinder*
• When you look into the
viewfinder, the viewfinder
mode is activated, and when
you take your face away from
the viewfinder, the screen mode
returns to the LCD screen
mode.
C Diopter-adjustment dial (28)
D LCD screen (73)
E Light sensor
F Eyecup
G For shooting: Fn (Function)
button (53, 54)
For viewing: (Image
rotation) button (52)
H Control button
v/V/b/B/DISP (Display) (46)/
WB (White balance) (52)/
(Drive) (45, 52)/
(Picture Effect) (52)
I Control button (Enter)/AF
button/Object Tracking button
(54)
J (In-Camera Guide) button
(63)
For viewing: (Delete) button
(34)
K (Playback) button (33)
* Do not directly touch this
part.
Rear side
Page 14
14
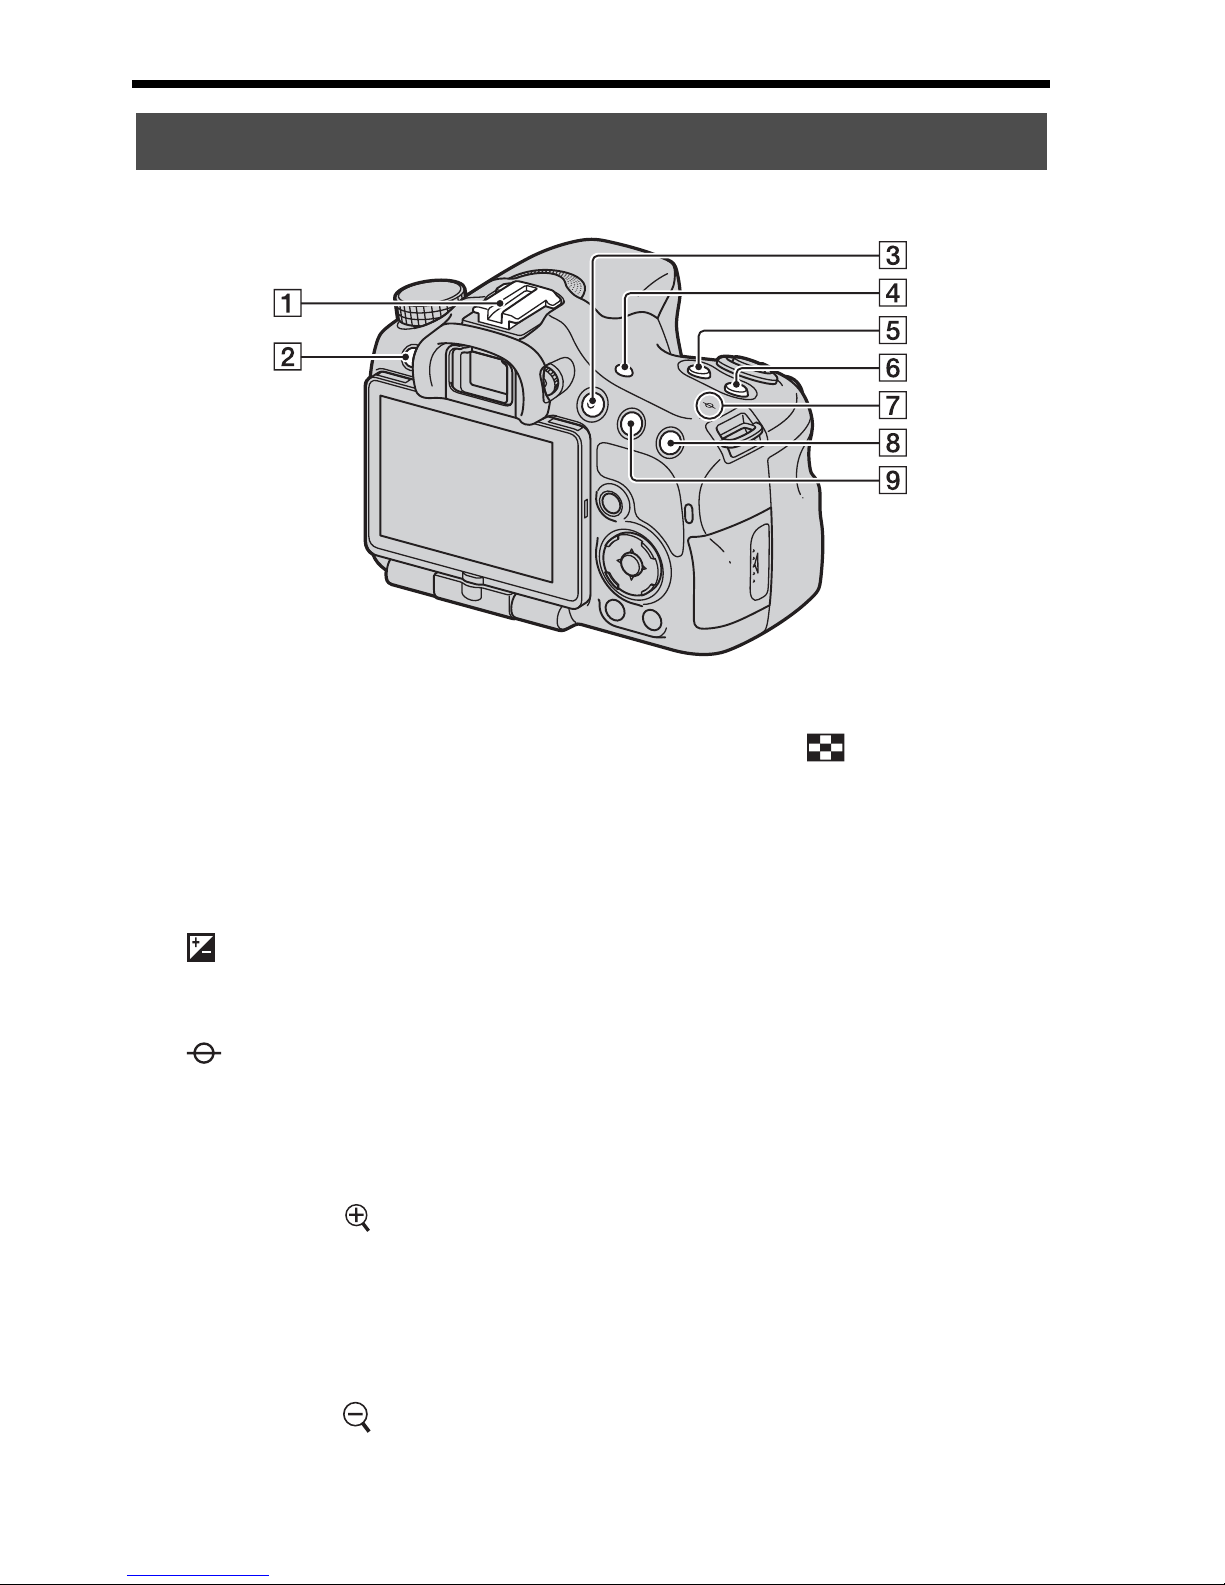
Identifying parts
A Auto-lock Accessory shoe
B MENU button (56)
C MOVIE button (32, 52)
D FINDER/LCD button (52)
E (Exposure) button (43)
F ISO button (52, 59)
G Image sensor position
mark
H For shooting: ZOOM button
(52)
For viewing: (Zoom in)
button (52)
I For shooting: AEL (AE lock)
button (52, 59)/AV (Aperture
value) button (52)
For viewing: (Zoom out)
button (49)/ (Image index)
button (50)
Top side
Page 15
15
Identifying parts
Preparing the camera
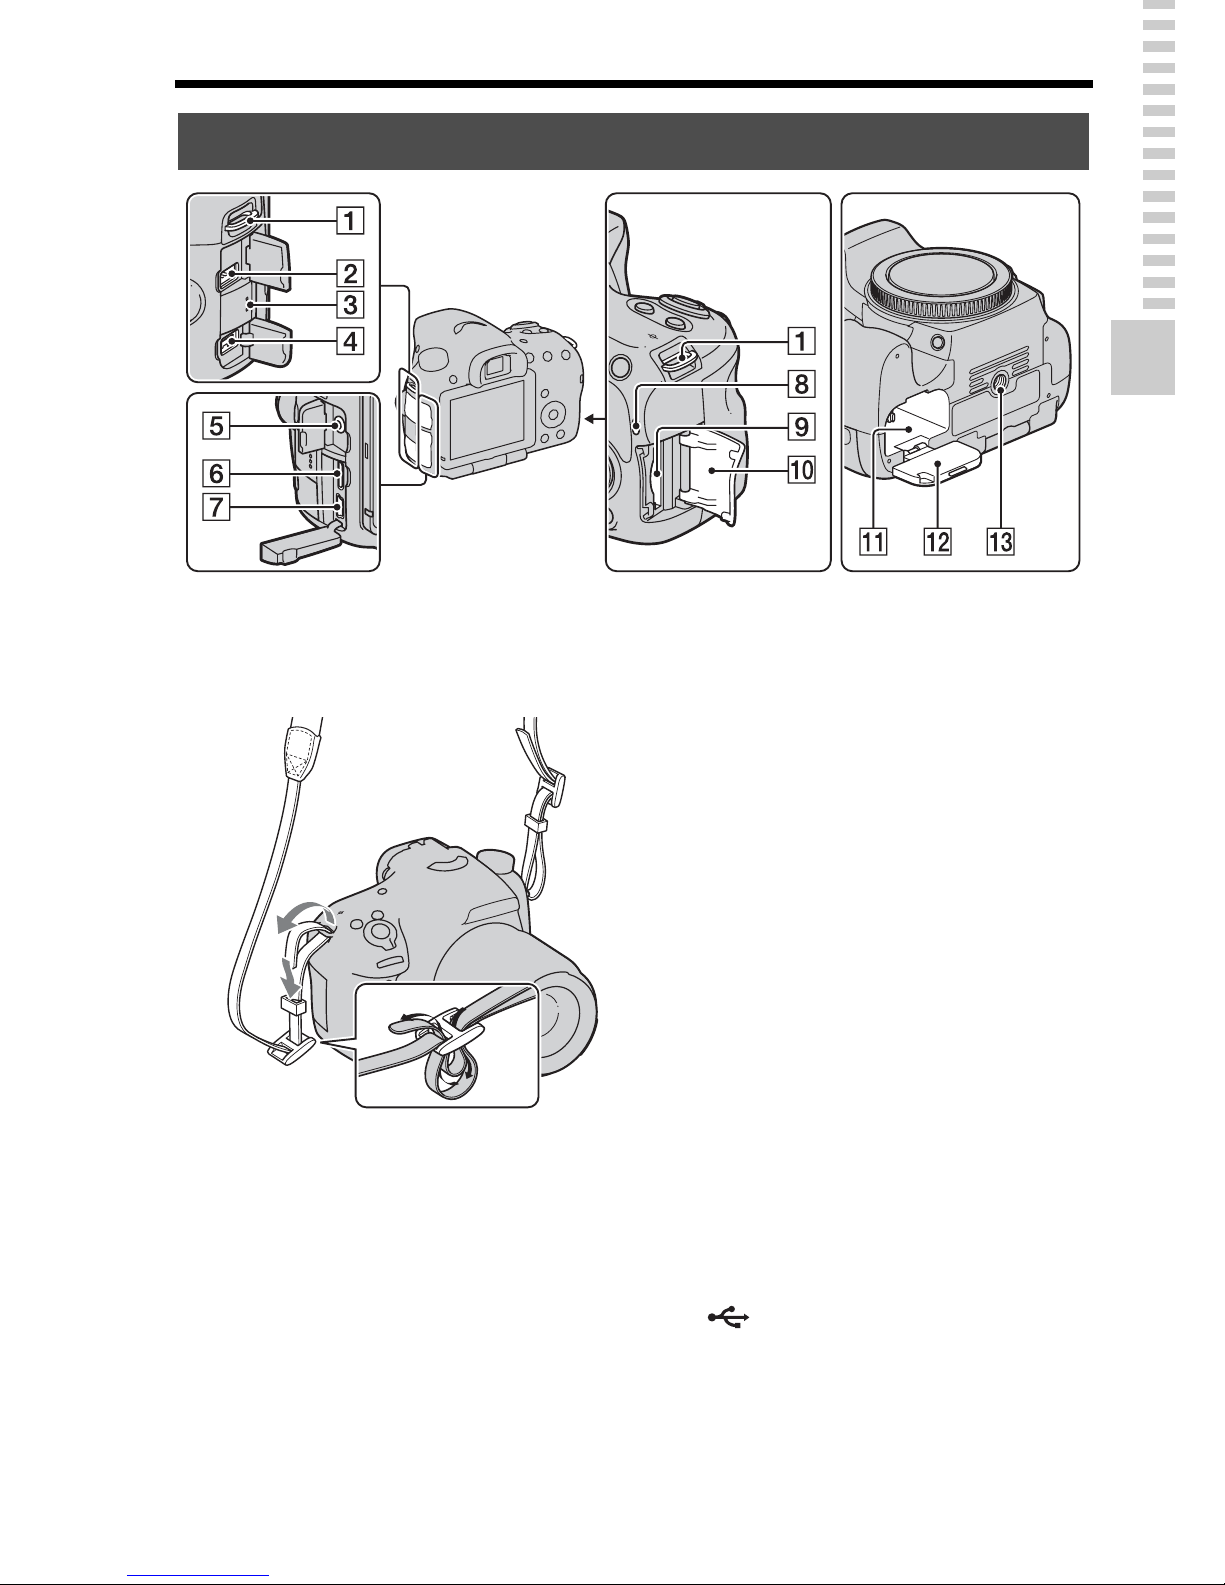
A Hooks for shoulder strap
• Attach both ends of the strap
onto the camera.
B REMOTE terminal
• When connecting the RML1AM Remote Commander
(sold separately) to the camera,
insert the plug of the Remote
Commander into the REMOTE
terminal, aligning the guide of
the plug with the guide of the
REMOTE terminal. Make sure
that the cord of the Remote
Commander faces forward.
C Speaker
D DC IN terminal
• When connecting the ACPW10AM AC Adaptor (sold
separately) to the camera, turn
the camera off, then plug the
connector of the AC Adaptor to
the DC IN terminal on the
camera.
E Microphone jack
• When an external microphone
is connected, the internal
microphone is turned off
automatically. When the
external microphone is a plugin-power type, the power of the
microphone is supplied by the
camera.
F HDMI mini terminal (51)
G (USB) terminal
H Access lamp (21)
I Memory card insertion slot (20)
J Memory card cover (20)
Sides/Bottom
Page 16

16
Identifying parts
K Battery insertion slot (20)
L Battery cover (20)
M Tripod receptacle
• Use a tripod with a screw length
of less than 5.5 mm (7/32 inch).
You will be unable to firmly
secure the camera to tripods
with a screw length of 5.5 mm
(7/32 inch) or longer, and
attempting to do so may
damage the camera.
Page 17
17
Identifying parts
Preparing the camera
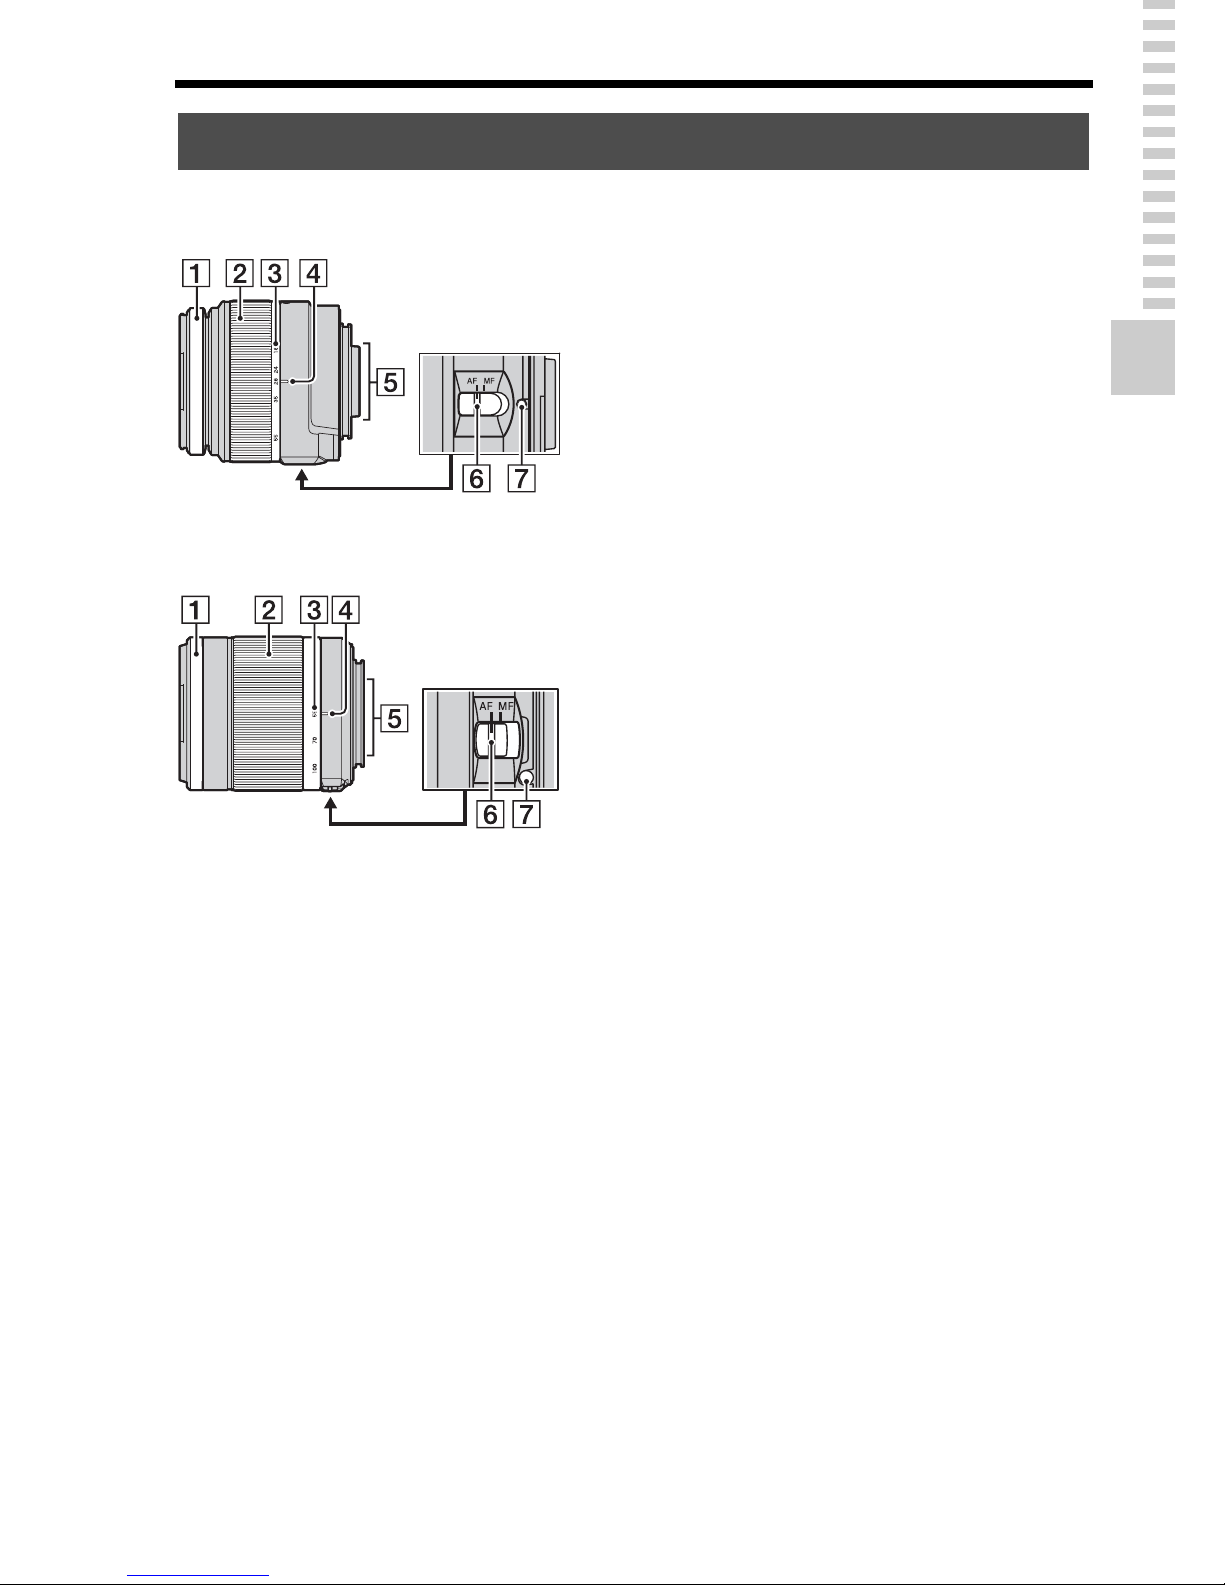
DT 18-55mm F3.5-5.6 SAM
(Supplied with the SLT-A57K/A57Y)
DT 55-200mm F4-5.6 SAM
(Supplied with the SLT-A57Y)
A
Focusing ring
B Zoom ring
C Focal-length scale
D Focal-length index
E Lens contacts
F Focusing mode switch
G Mounting index
• The DT 18-55mm F3.5-5.6
SAM/DT 55-200mm F4-5.6
SAM are designed for Sony Amount cameras (models equipped
with an APS-C sized image
sensor). You cannot use these
lenses on 35mm-format cameras.
• For the lenses other than DT 1855mm F3.5-5.6 SAM/DT 55200mm F4-5.6 SAM, refer to the
operating instructions supplied
with the lens.
Lens
Page 18
18
Charging the battery pack
When using the camera for the first time, be sure to charge the NPFM500H “InfoLITHIUM” battery pack (supplied).
The “InfoLITHIUM” battery pack can be charged even when it has not
been fully depleted.
It can also be used when it has not been fully charged.
The battery pack is discharged little by little, even when you do not use it.
To avoid missing an opportunity to shoot, check the remaining battery level
before you shoot. If the battery level is low, charge it again.
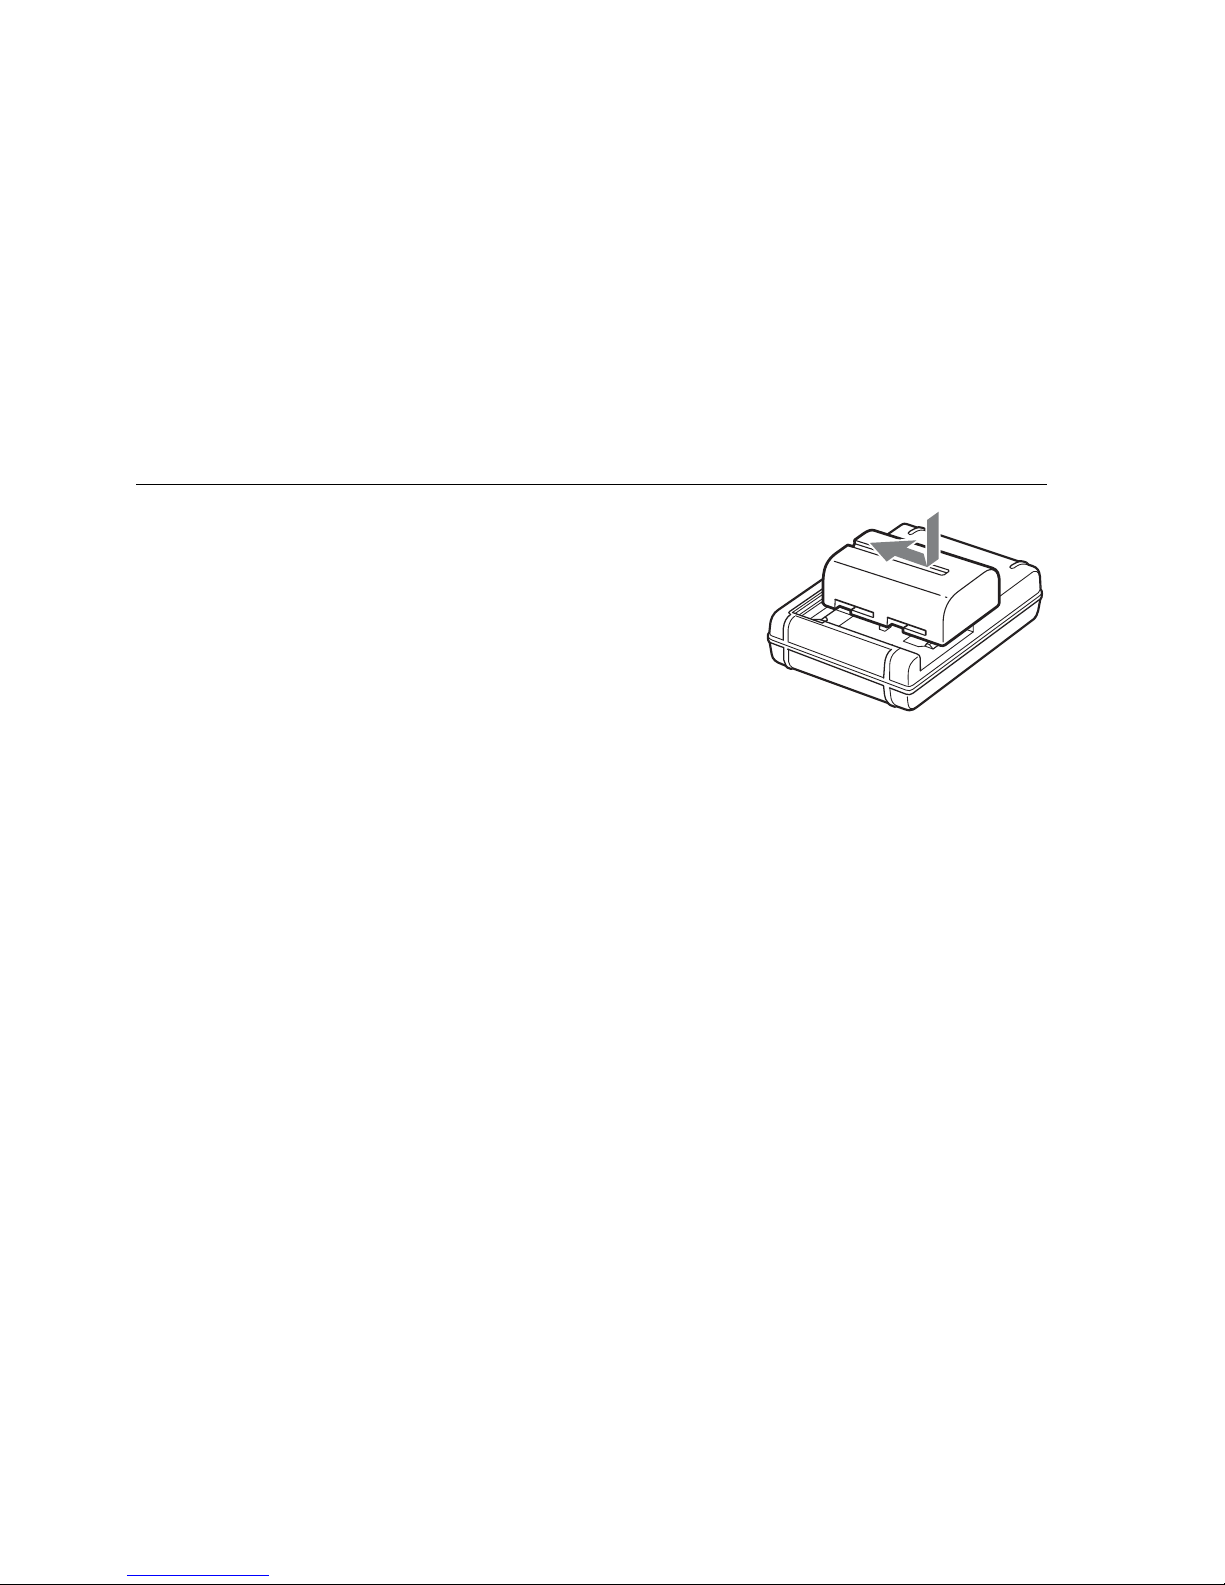
1
Insert the battery pack onto
the battery charger.
Push the battery pack until it clicks.
Page 19
19
Charging the battery pack
Preparing the camera
Notes
• The charging time differs depending on the remaining capacity of the battery pack or
charging conditions.
• We recommend charging the battery pack in an ambient temperature of between
10°C to 30°C (50°F to 86°F). You may not be able to efficiently charge the battery
pack outside of this temperature range.
• Connect the battery charger to the nearest wall outlet (wall socket).
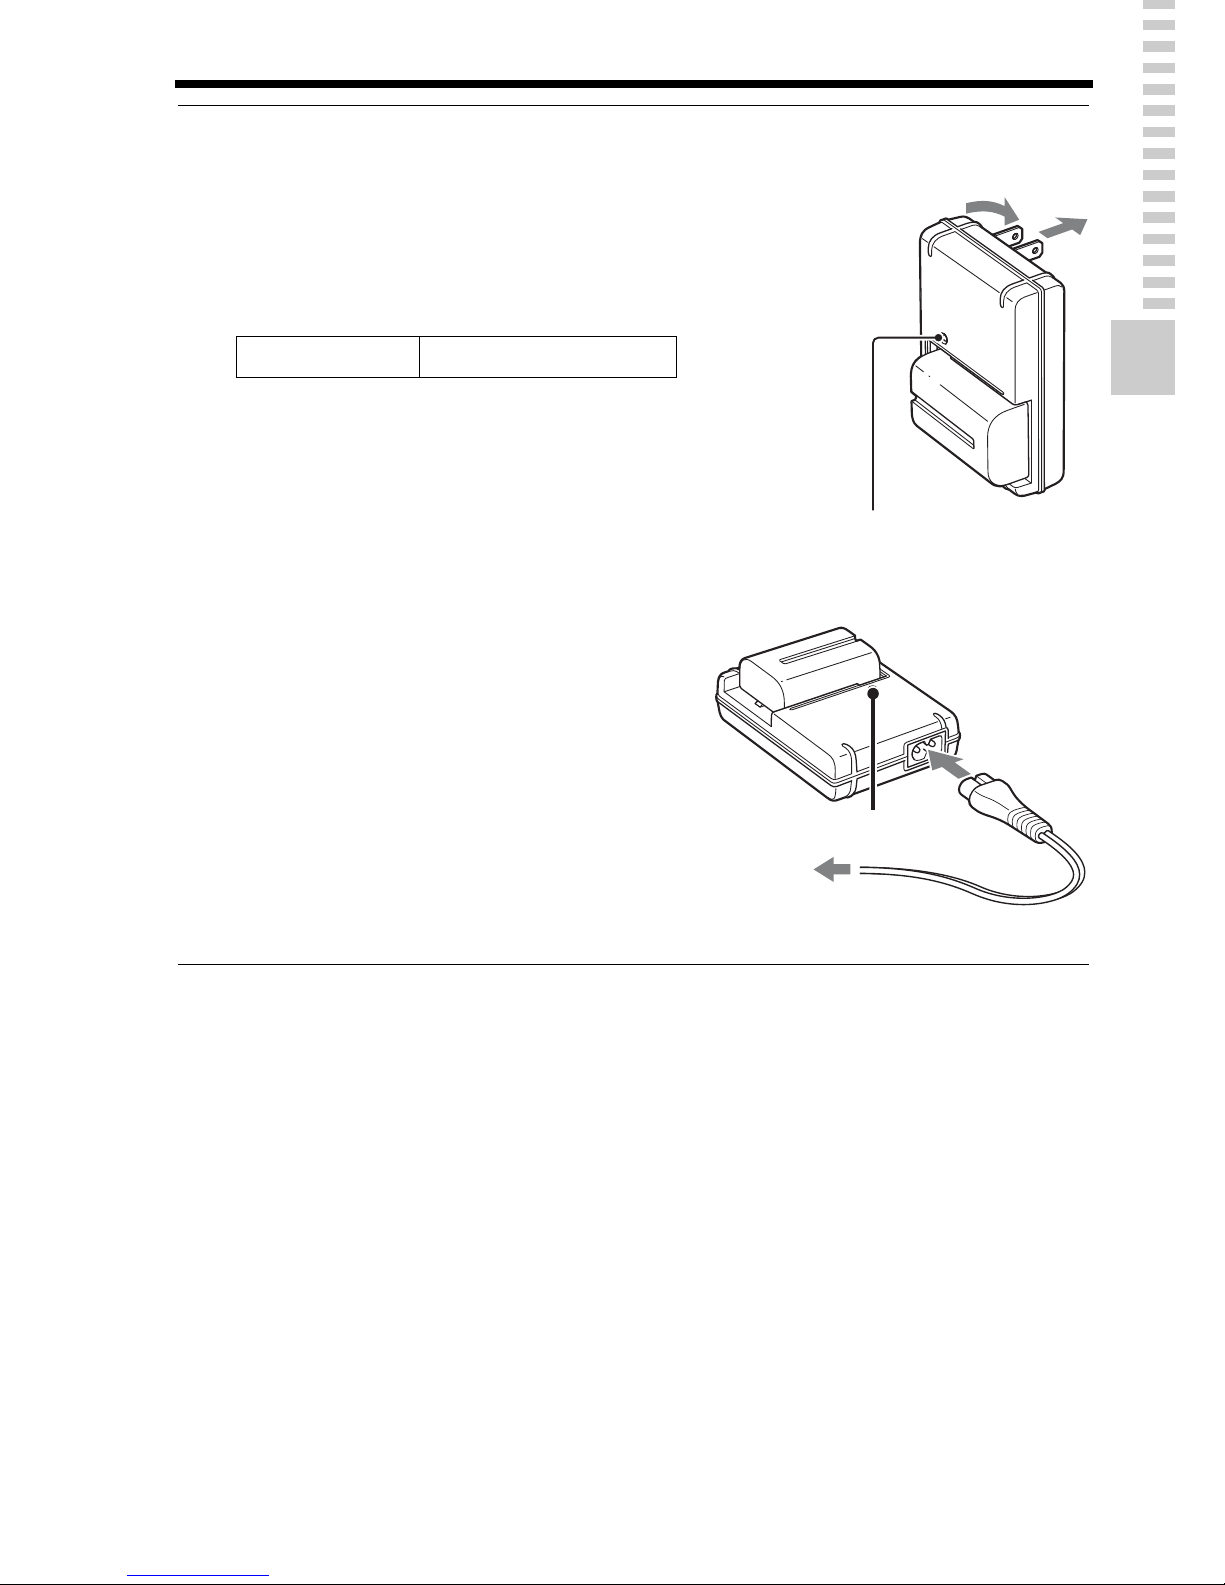
2
Connect the battery charger
to the wall outlet (wall
socket).
Light on: Charging
Light off: Charge completed
• When charging a fully depleted
battery pack at a temperature of 25°C
(77°F).
• The CHARGE lamp turns off when
charging is completed.
For the U.S.A and Canada
CHARGE lamp
For countries/regions other than the
U.S.A. and Canada
Charging time About 175 minutes
Plug
To a wall outlet
(wall socket)
CHARGE lamp
Page 20
20
Inserting the battery pack/memory
card (sold separately)
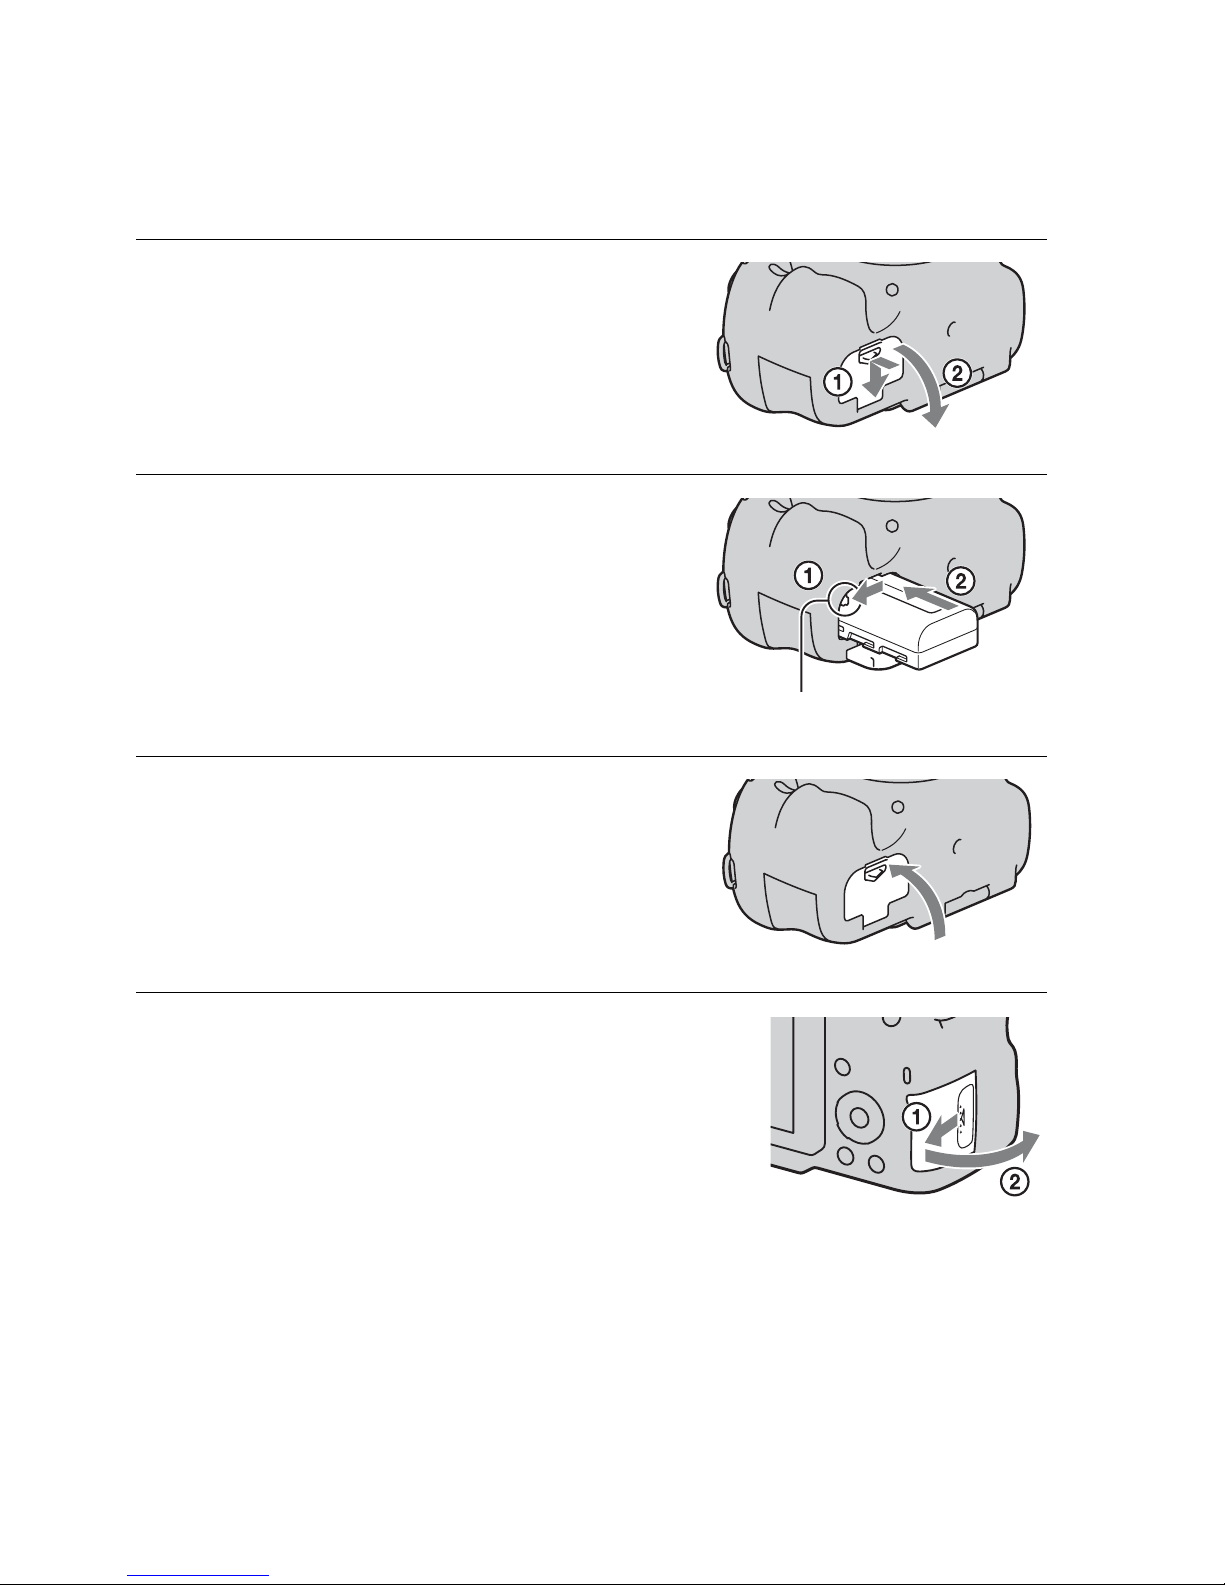
1
While sliding the battery
cover open lever, open the
cover.
2
Firmly insert the battery pack
all the way while pressing
the lock lever with the tip of
the battery.
Lock lever
3
Close the cover.
4
While sliding the memory
card cover, open the cover.
Page 21
21
Inserting the battery pack/memory card (sold separately)
Preparing the camera
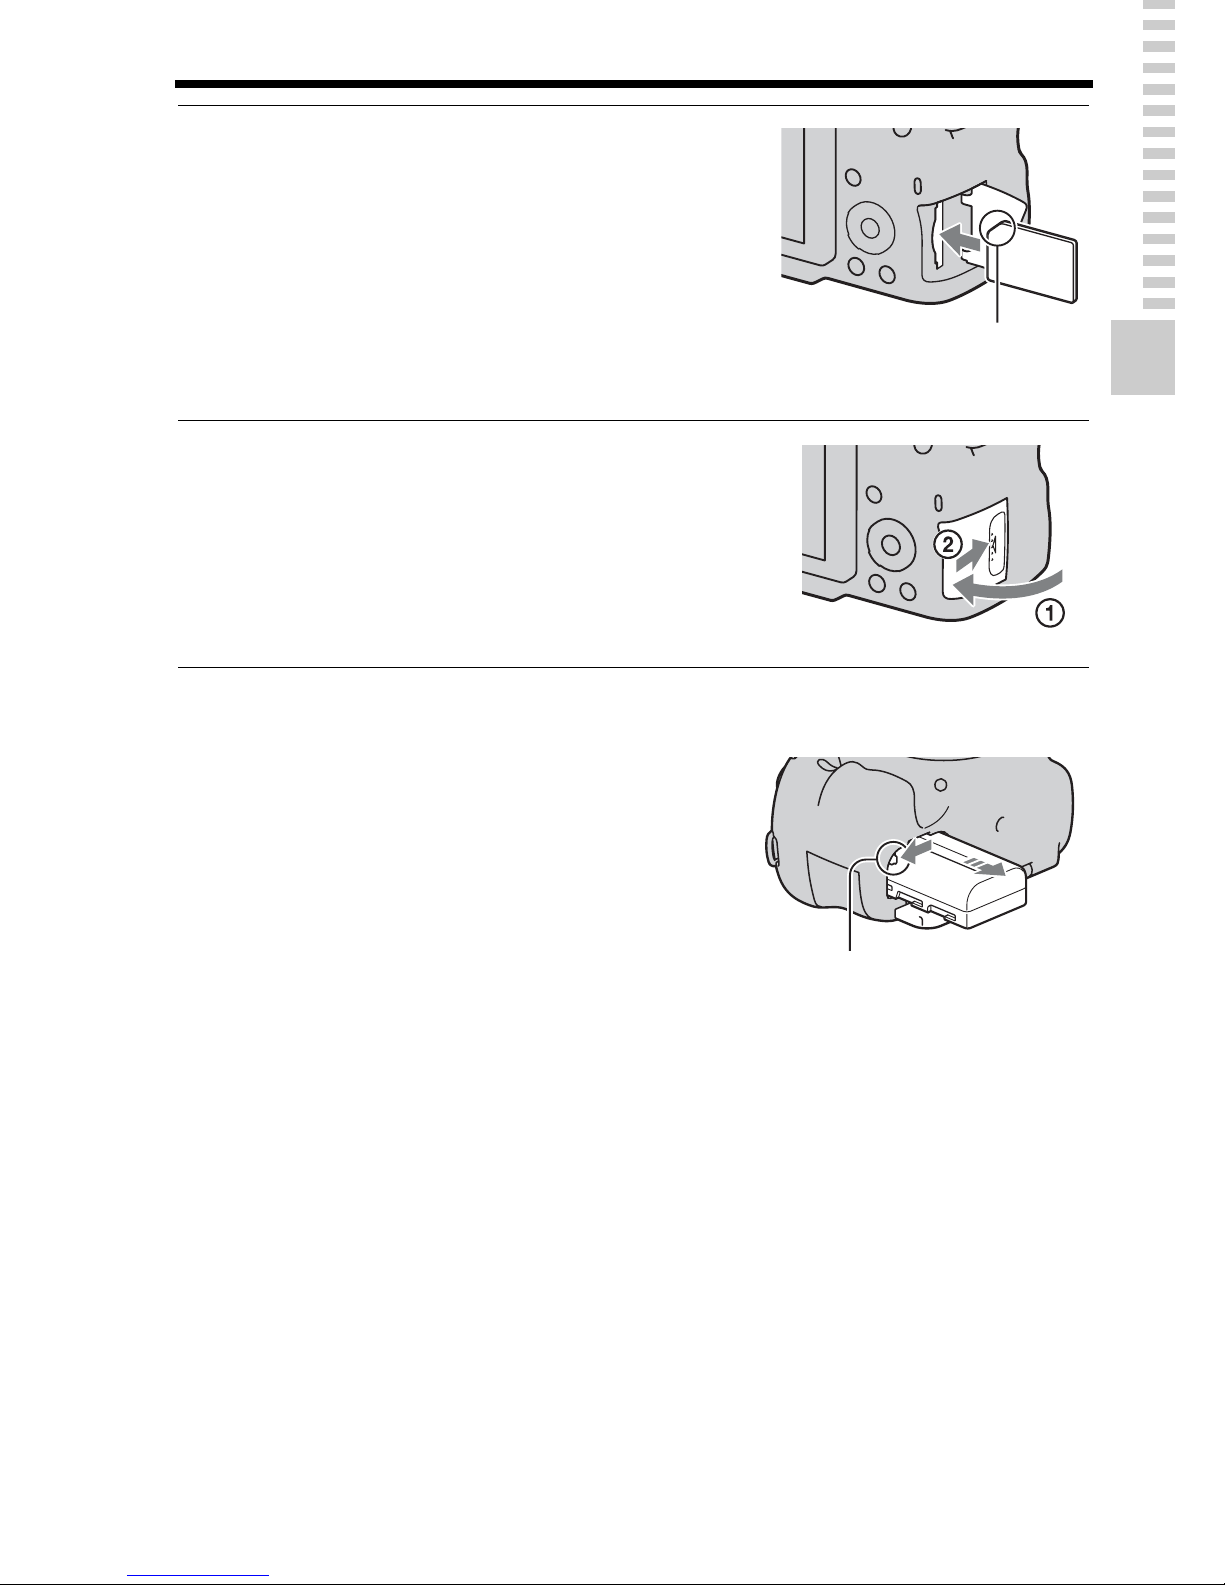
To remove the battery pack
To remove the memory card
Check that the access lamp is not lit, then open the cover, and push the
memory card once.
To check the remaining battery level
The supplied battery pack is a lithium-ion battery pack that has functions
for exchanging information related to operating conditions with your
camera. The remaining battery time in percent figures is displayed
according to the operating conditions of your camera.
5
Insert a memory card.
• With the notched corner facing as
illustrated, insert the memory card
until it clicks into place.
Ensure the notched corner faces
correctly.
6
Close the cover.
Turn off the camera. Slide the lock lever
in the direction of the arrow 10 seconds
after turning off the camera, then remove
the battery pack. Be careful not to drop
the battery pack.
Lock lever
Page 22
22
Inserting the battery pack/memory card (sold separately)
The following memory cards are compatible with this camera. However, all
memory cards are not guaranteed to work with this camera.
• MultiMediaCard cannot be used.
Note
• Images recorded on an SDXC memory card cannot be imported to or played on
computers or AV devices that are not compatible with exFAT. Make sure that the
device is compatible with exFAT before connecting it to the camera. If you connect
your camera to an incompatible device, you may be prompted to format the card.
Never format the card in response to this prompt, as doing so will erase all data on
the card. (exFAT is the file system used on SDXC memory cards.)
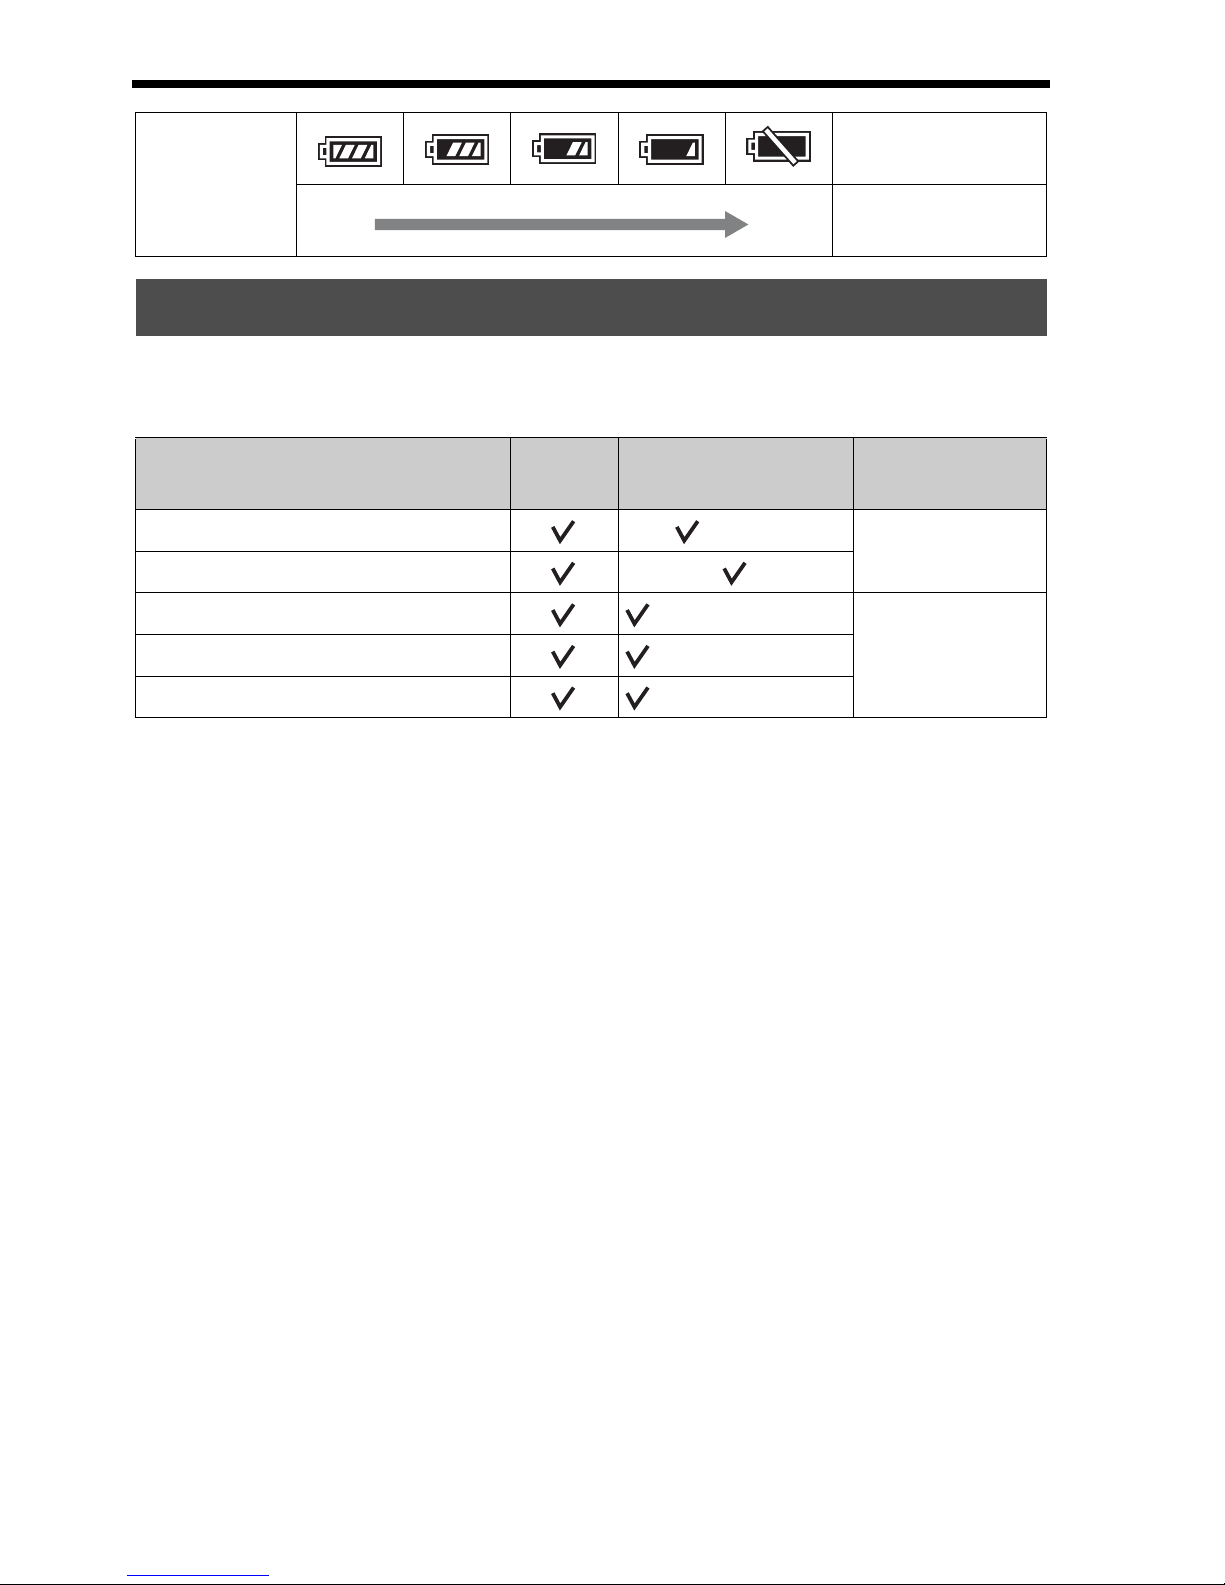
Battery level
“Battery
exhausted.”
High Low
You cannot shoot
any more pictures.
Available memory cards
Types of memory card
Still
images
Movies In this manual
Memory Stick PRO Duo (Mark2)
Memory Stick
PRO Duo
Memory Stick PRO-HG Duo
SD memory card
(Class 4 or faster)
SD card
SDHC memory card (Class 4 or faster)
SDXC memory card (Class 4 or faster)
Page 23
23
Preparing the camera
Attaching a lens
Notes
• When attaching a lens, do not press the lens release button.
• Do not use force when attaching a lens.
• E-mount lenses are not compatible with this camera.
• When you use a lens for which a tripod socket is provided, attach the lens onto the
tripod using the tripod socket provided to help balance the weight of the lens.
• When carrying the camera with a lens attached, hold both the camera and the lens
firmly.
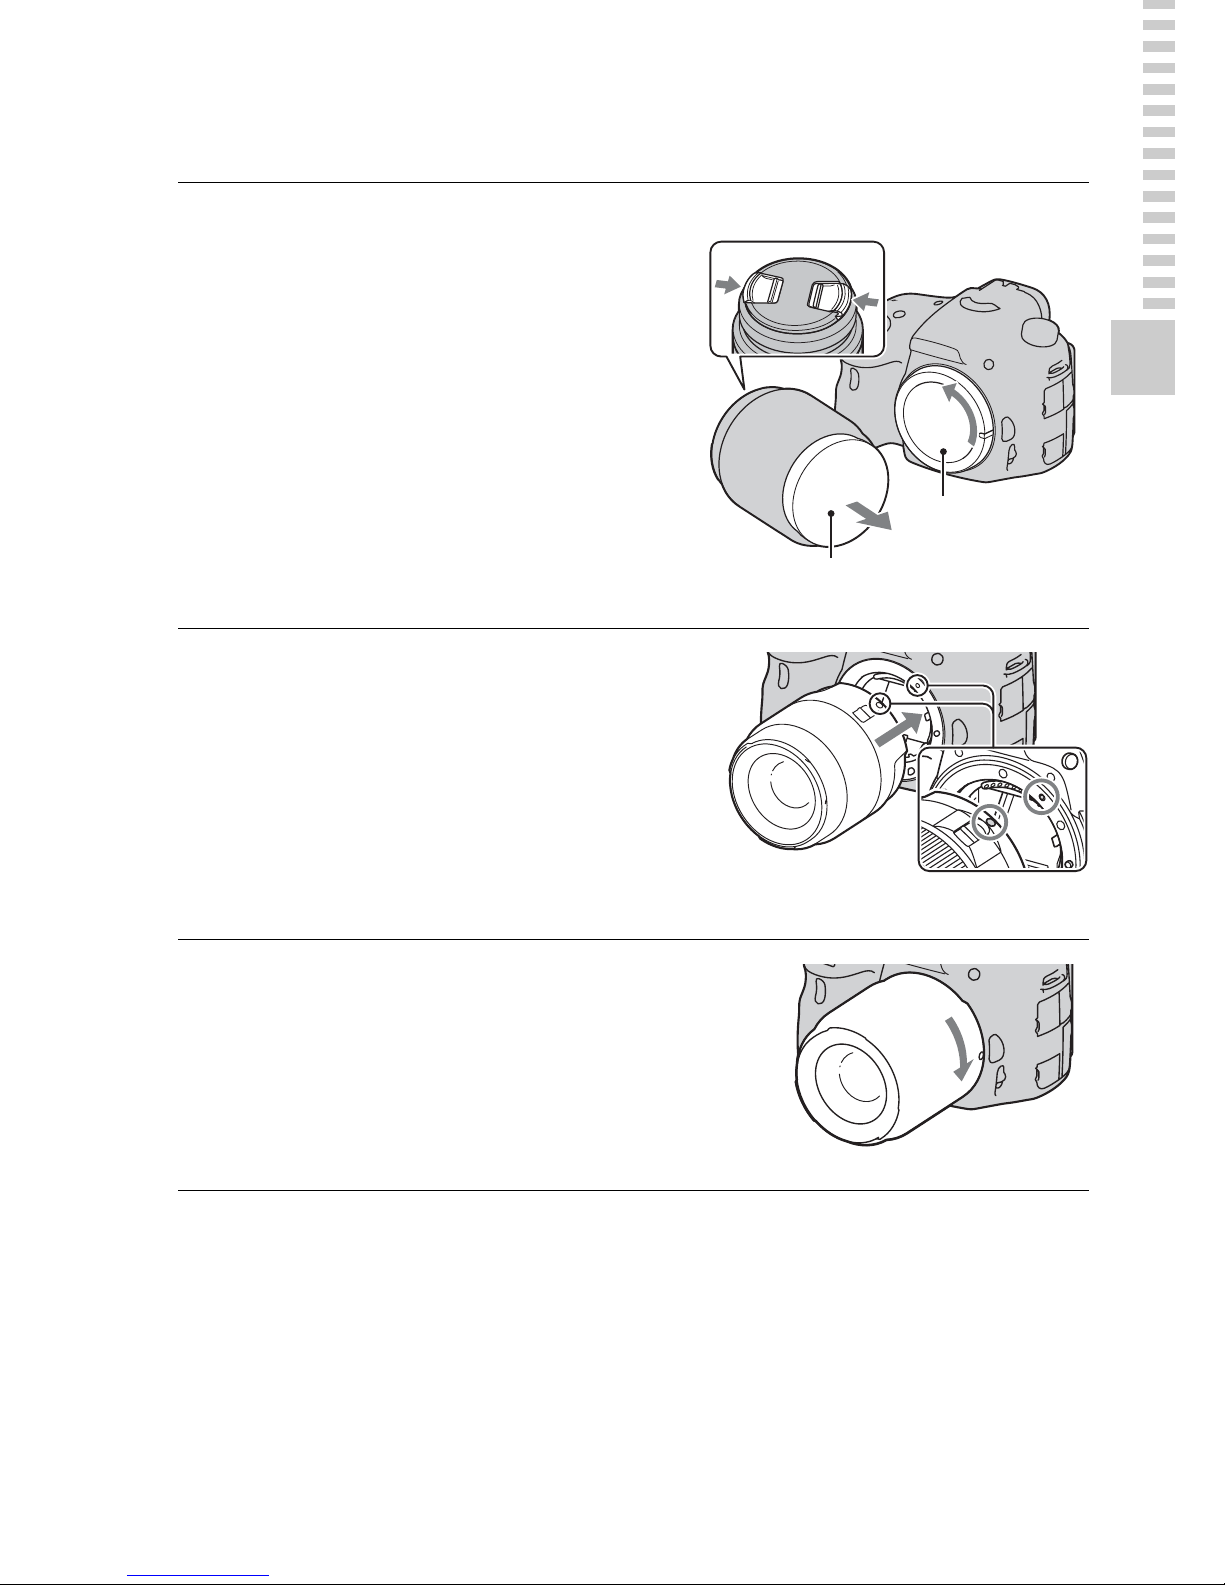
1
Remove the body cap from
the camera and the
packaging lid from the rear
of the lens.
• When changing the lens, quickly
change the lens away from dusty
locations so as to keep dust or debris
from getting inside the camera.
• When shooting, remove the front lens
cap from the front of the lens.
Front lens cap
Packaging lid
2
Mount the lens by aligning
the orange index marks
(mounting indexes) on the
lens and camera.
Orange index marks
3
Turn the lens clockwise until
it clicks into the locked
position.
• Be sure to put the lens on straight.
Body cap
Page 24
24
Attaching a lens
• Do not hold the part of the lens that is extended for the zoom or focus adjustment.
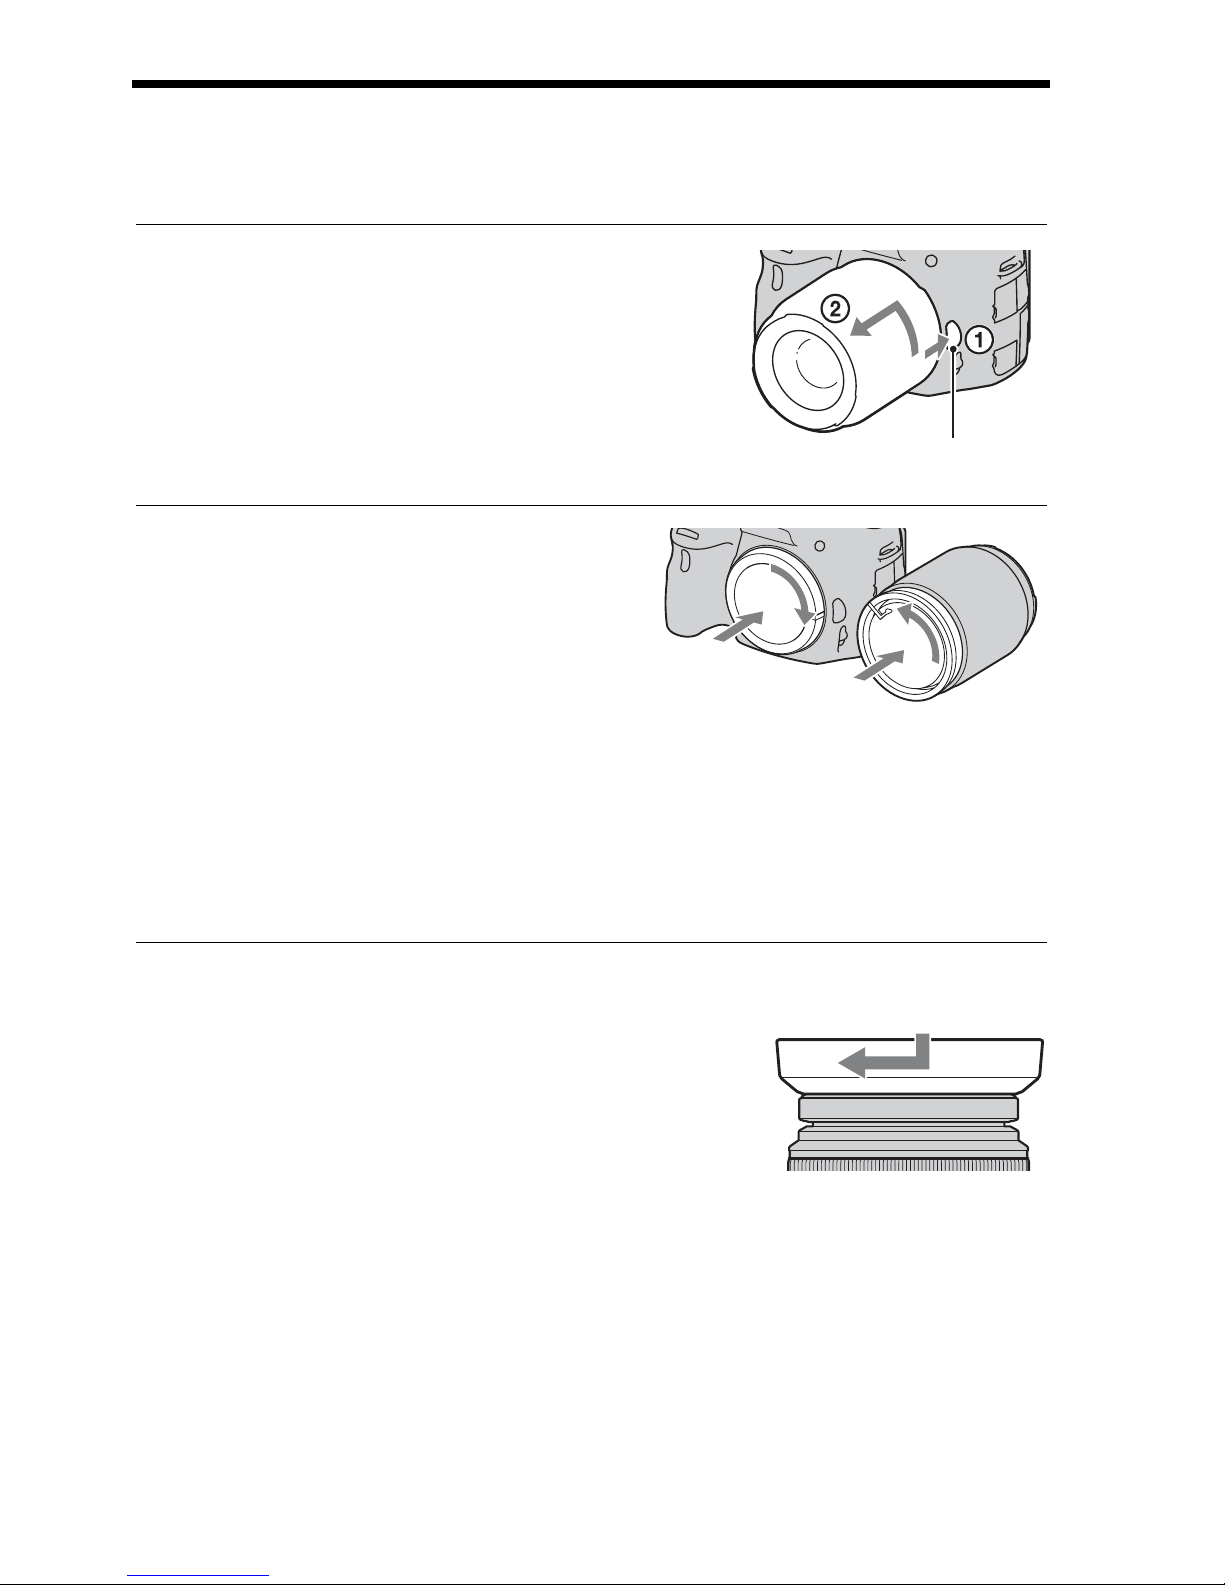
To remove the lens
To attach a lens hood
Notes
• A lens hood is not included with the DT 18-55mm F3.5-5.6 SAM. You can use the
ALC-SH108 (sold separately).
• The lens hood may block the light of the flash. Remove the lens hood when using the
flash.
1
Press the lens release button
all the way in and turn the
lens counterclockwise until it
stops.
Lens release button
2
Attach the caps to the front
and rear of the lens and the
body cap to the camera.
• Before you attach them, remove dust
from them.
• A rear lens cap is not supplied with
the DT 18-55mm F3.5-5.6 SAM Lens
Kit. When you store the lens without
attaching it to the camera, purchase
the Rear Lens Cap ALC-R55.
It is recommended that you use a lens
hood to reduce flare and ensure
maximum image quality.
Fit the hood into the mount on the end of
the lens barrel and rotate the hood
clockwise until it clicks.
Page 25

25
Attaching a lens
Preparing the camera
• When storing, turn over the lens hood and place it onto the lens backwards.
Note on changing the lens
When changing the lens, if dust or debris gets inside the camera and
adheres to the surface of the image sensor (the part that acts as the film), it
may appear as dark spots on the image, depending on the shooting
environment.
The camera is equipped with an anti-dust function to prevent dust from
landing on the image sensor. However, quickly change the lens away from
dusty locations when attaching/removing a lens.
Page 26
26
Turning the camera on and setting the
clock
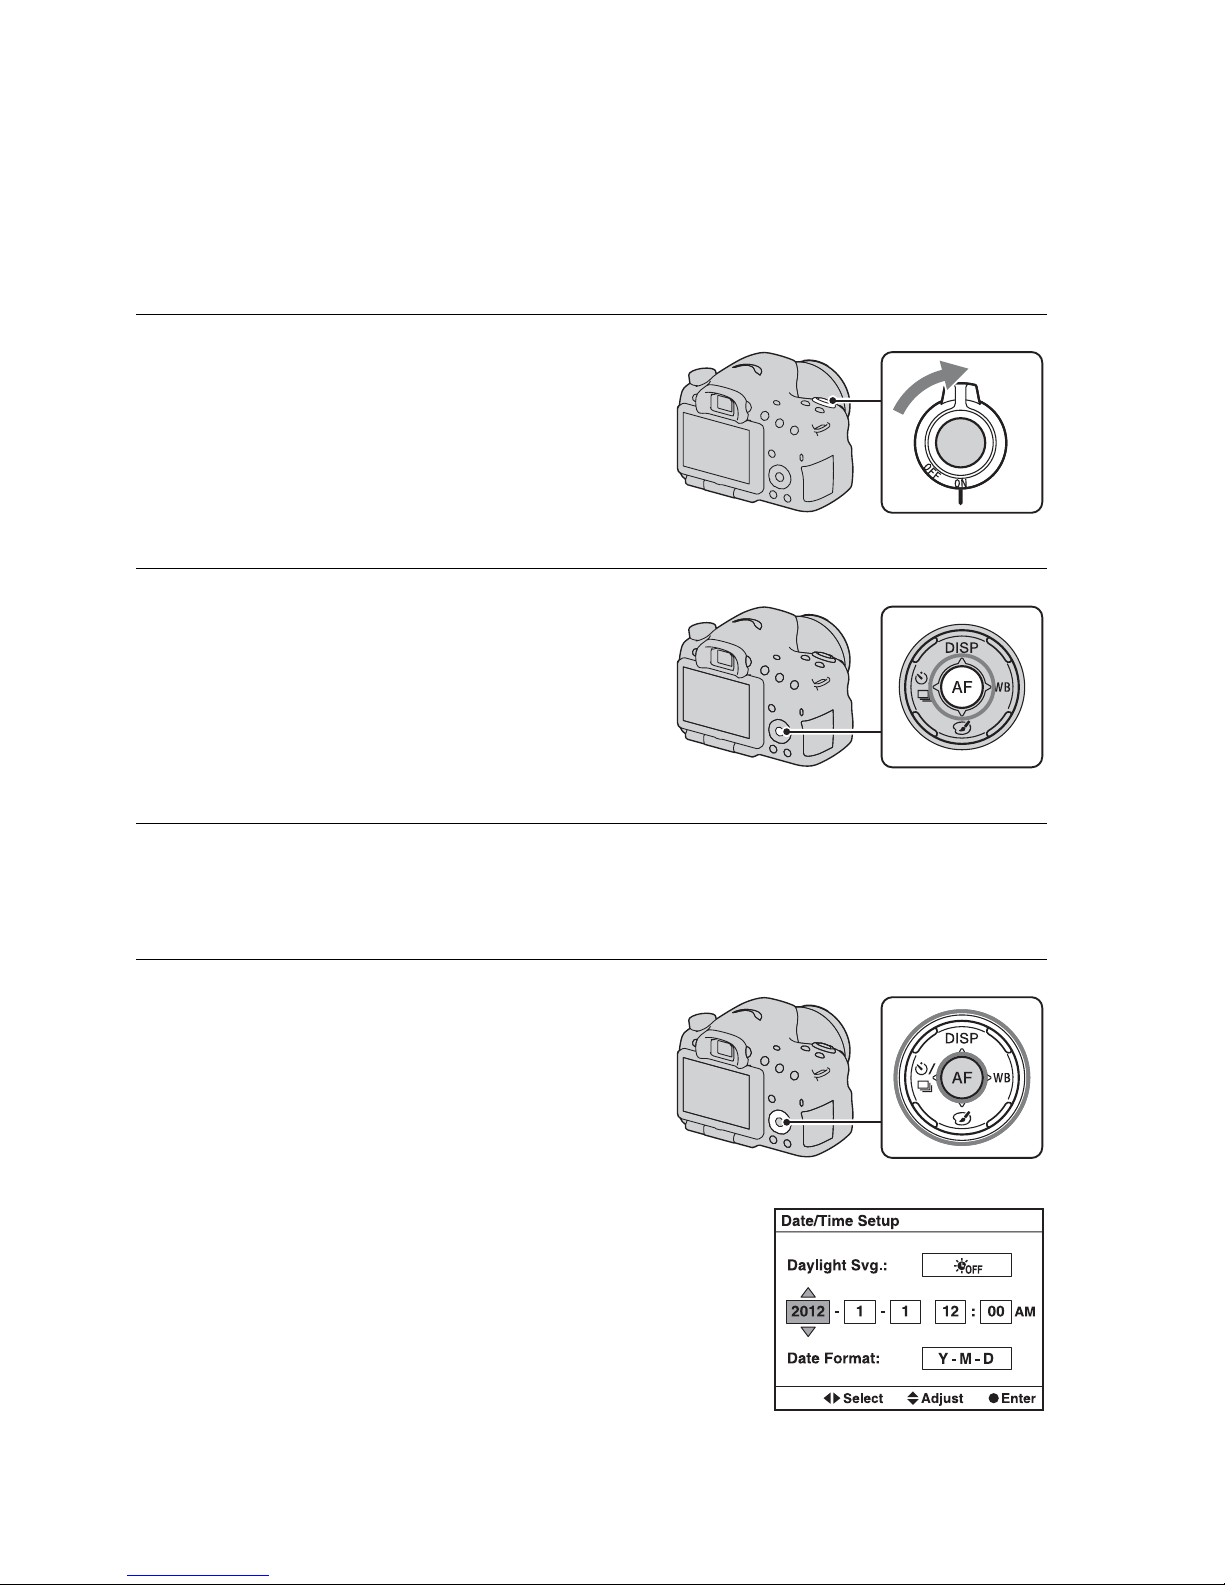
When you turn the camera on for the first time, the date/time setup screen
appears.
1
Set the power switch to ON to
turn the camera on.
The screen used for setting date and
time appears.
• To turn the camera off, set it to OFF.
2
Verify that [Enter] is selected
on the LCD screen, then
press the center of the
control button.
3
Select your area with b/B on the control button, then
press the center of the control button.
4
Select each item with b/B
and set the numeric value
with v/V.
[Daylight Svg.:]: Turns on or off the
daylight saving time setting.
[Date Format:]: Selects the format to
display date.
• Midnight is indicated as 12:00 AM,
and noon as 12:00 PM.
Page 27

27
Turning the camera on and setting the clock
Preparing the camera
To cancel the date/time setting operation
Press the MENU button.
To set up the date/time again
When you turn the camera on for the first time, the date/time setup screen
appears automatically. The next time, set up the date and time from the
menu.
MENU button t 1 t [Date/Time Setup]
To set up the area again
You can set the area where you are using the camera. This allows you to set
the local area when you use the camera abroad.
MENU button t 1 t [Area Setting]
Maintaining the date and time setting
This camera has an internal rechargeable battery for maintaining the date
and time and other settings regardless of whether the power is on or off, or
the battery is installed or not.
5
Repeat step 4 to set other items, then press the center
of the control button.
6
Verify that [Enter] is selected, then press the center of
the control button.
Page 28
28
Before shooting
Note
• The dioptic adjustment attachment (sold separately) cannot be used with this camera.
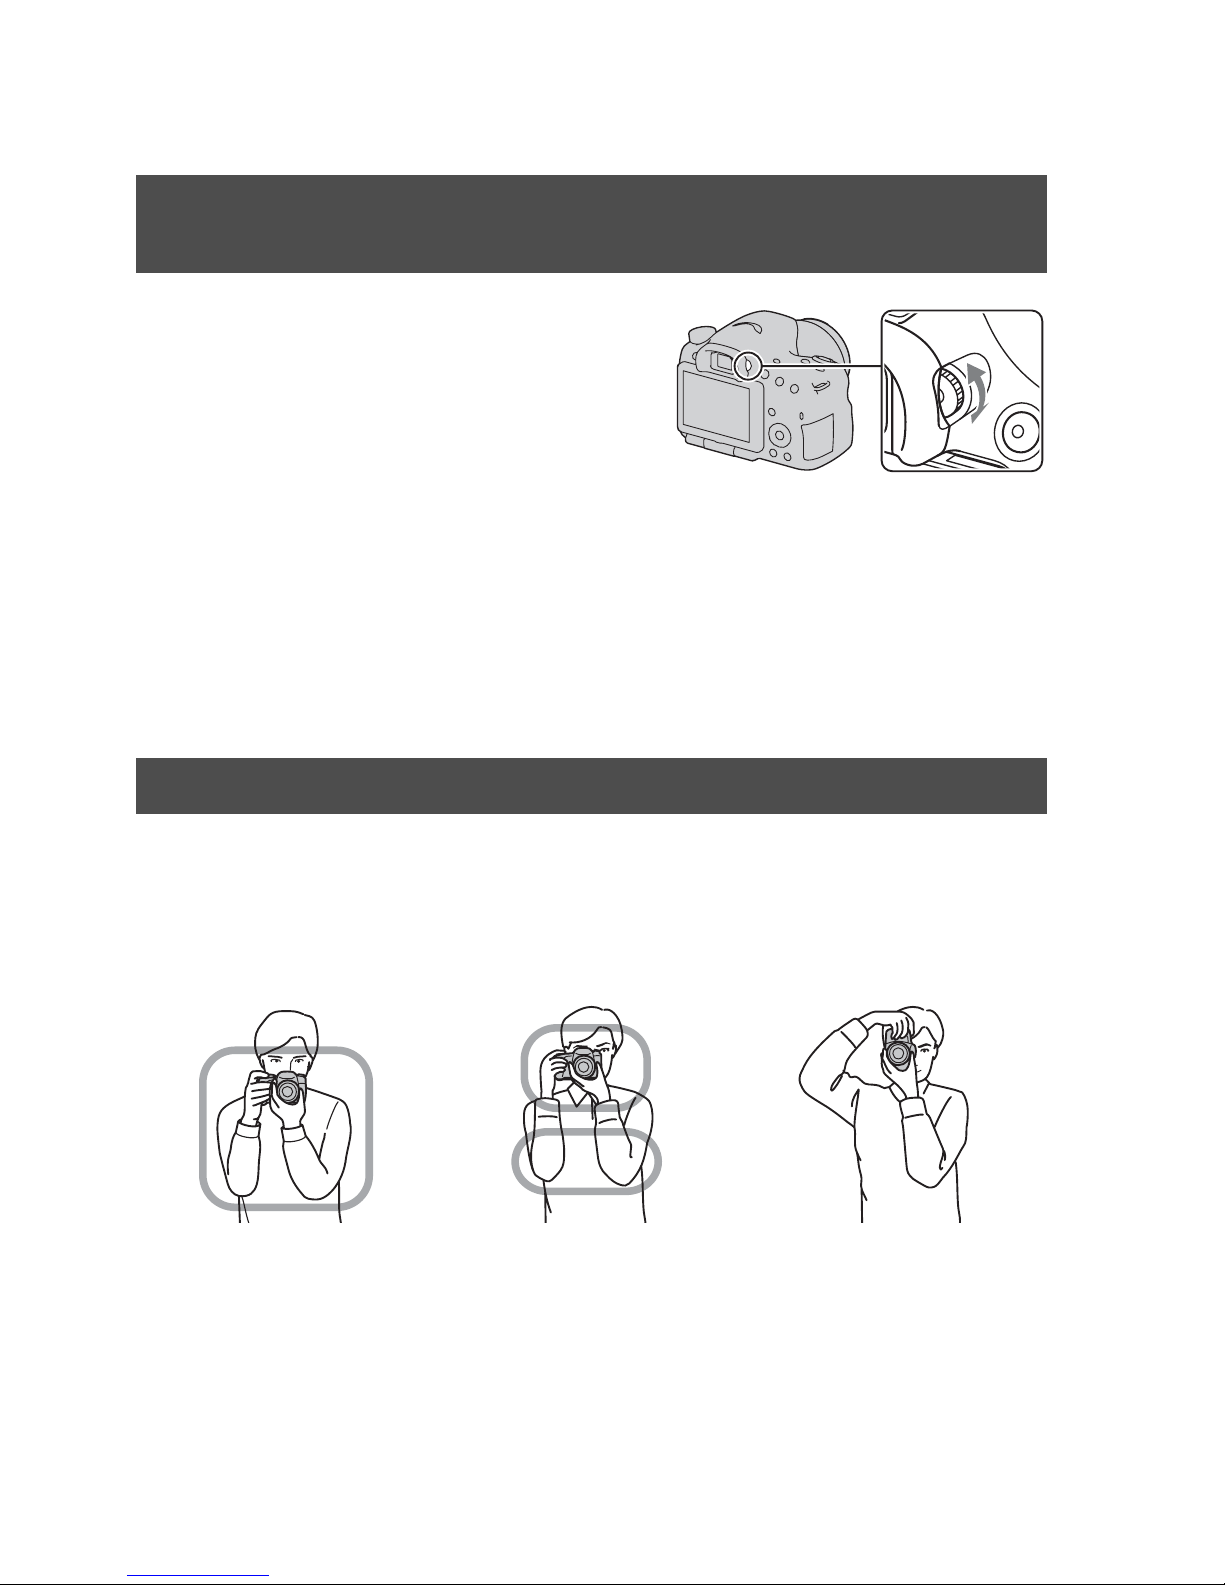
Stabilize your upper body and take a position that keeps the
camera from moving.
Point 1
One hand holds the grip of the camera, and the other hand supports the lens.
Point
2
Take a secure stance with your feet shoulder-width apart.
Adjusting the viewfinder to the visual acuity (diopter
adjustment)
Adjust the diopter-adjustment
dial to your eyesight until the
display appears clearly in the
viewfinder.
• If you cannot see the entire screen in
the viewfinder, you can change the
scale of the viewfinder screen
(page 58).
Holding the camera properly
In LCD screen mode In viewfinder mode In viewfinder mode
(vertical position)
Page 29

29
Before shooting
Preparing the camera
Point 3
Lightly tuck your elbows against your body.
When shooting in a kneeling position, steady your upper body by placing
your elbow on your knee.
Page 30
30
Shooting and viewing images
Shooting still images
The “Intelligent Auto” mode allows you to easily shoot any subject under
any conditions because the camera makes appropriate judgments on the
situation to adjust the settings.
Select when shooting in a location where the use of a flash is restricted.
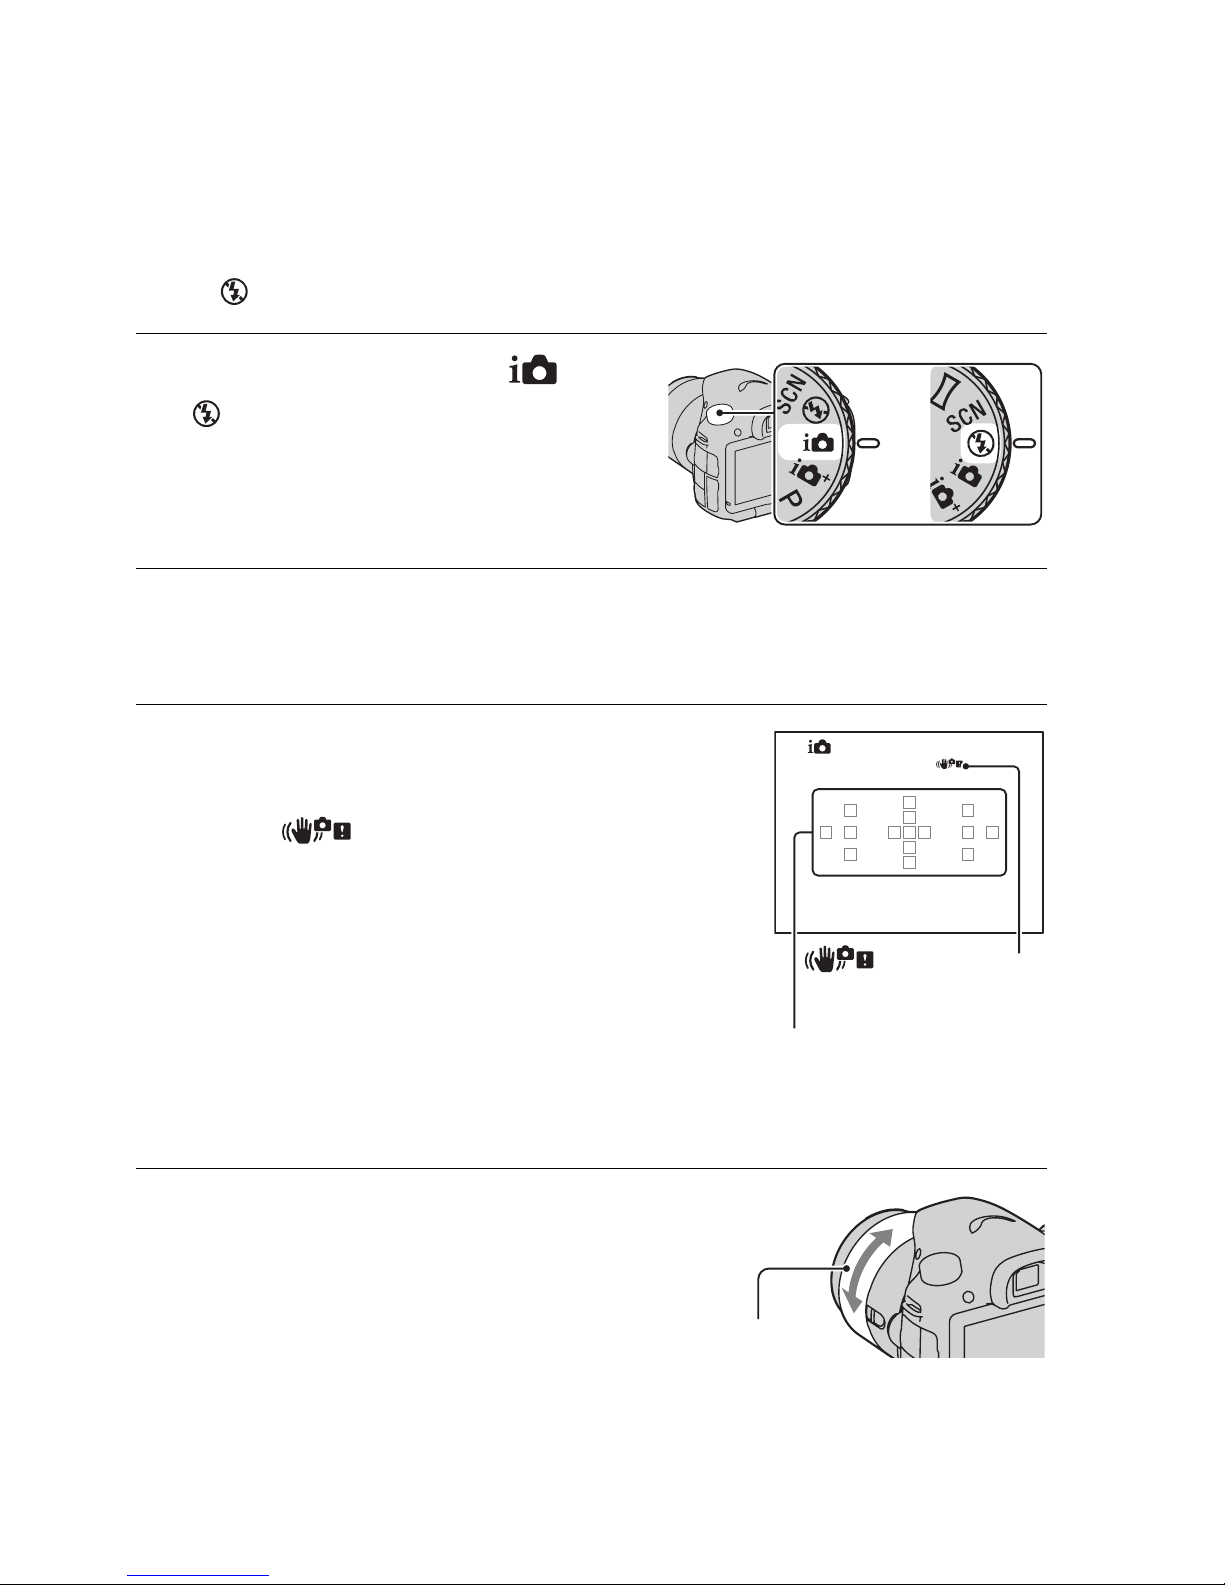
1
Set the mode dial to or
(Flash Off).
2
Hold the camera, monitoring your shot with the LCD
screen or viewfinder.
3
Overlay the AF area on the
desired subject.
• If the (Camera shake
warning) indicator flashes, carefully
shoot the subject, holding the camera
steady, or by using a tripod.
• When the camera recognizes the
scene, the Scene Recognition icon
appears on the screen and suitable
settings for that scene will be put into
effect.
AF area
4
When using a zoom lens,
turn the zoom ring, then
decide on your shot.
or
(Camera shake
warning) indicator
Zoom ring
Page 31
31
Shooting still images
Shooting and viewing images
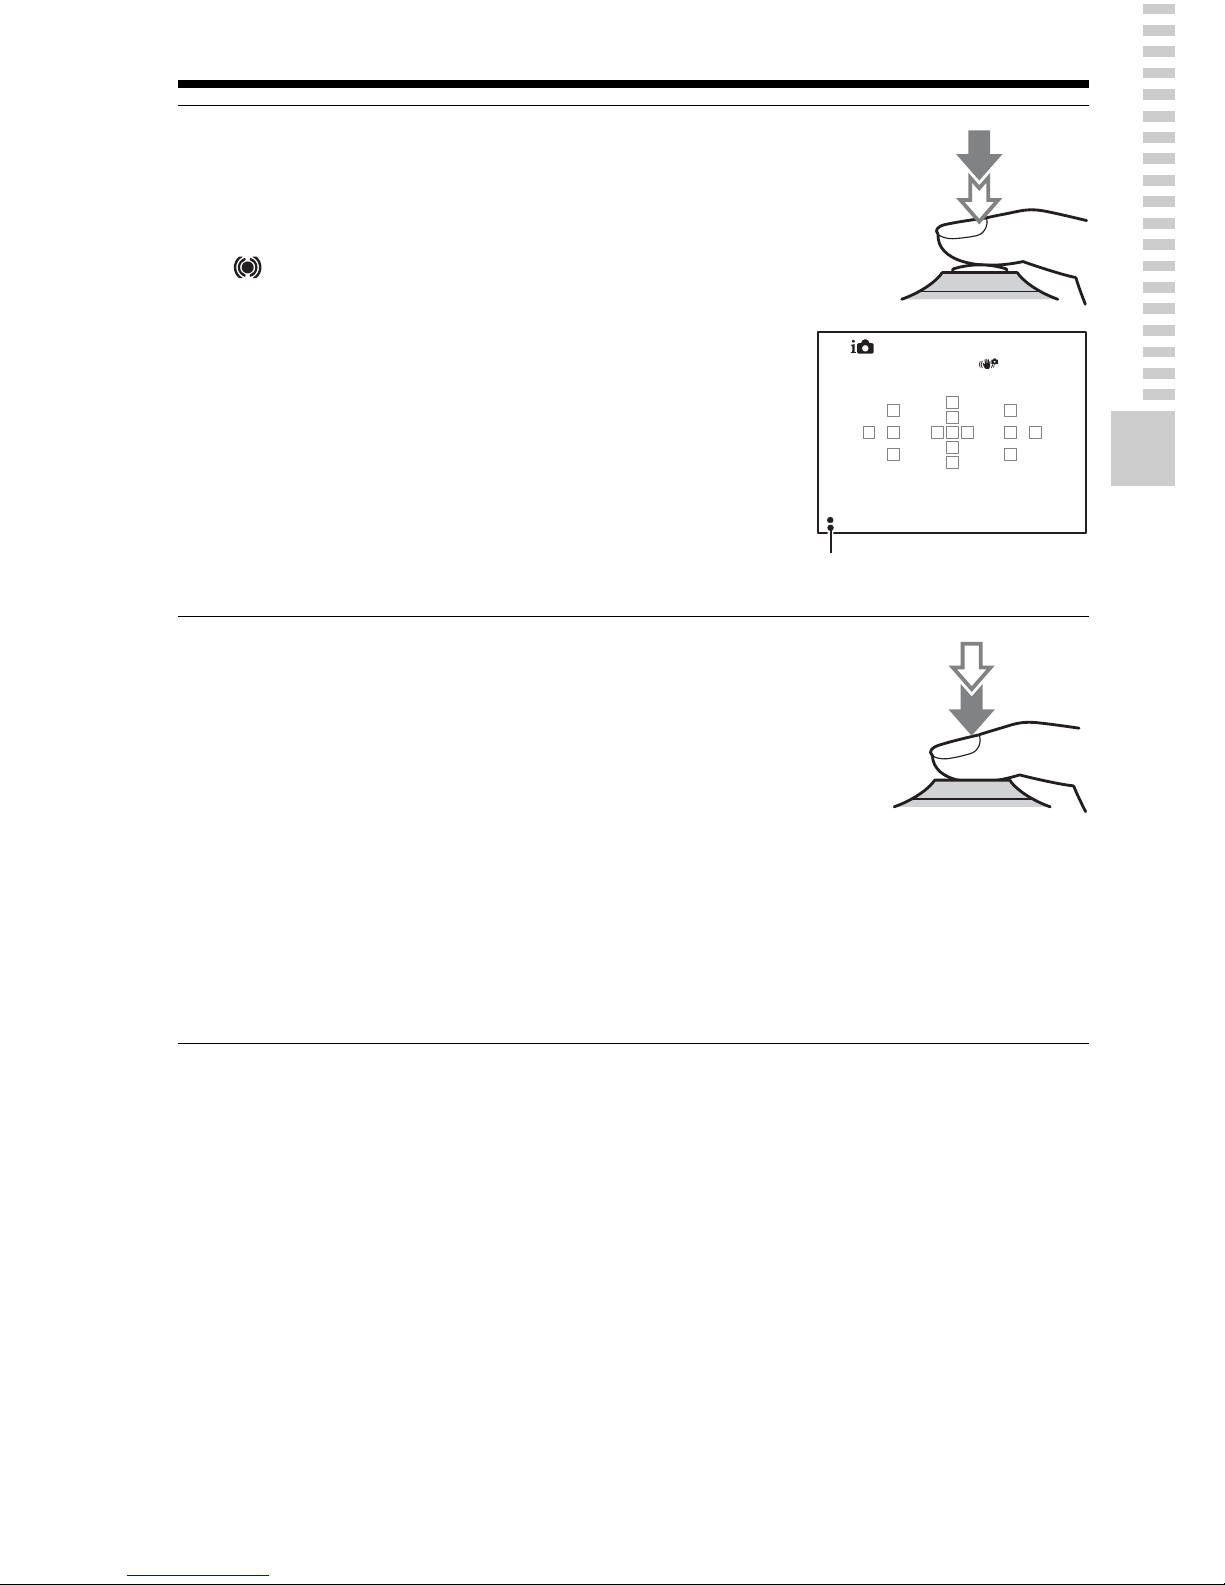
5
Press the shutter button
halfway down to focus.
When the focus is confirmed, z or
(Focus indicator) lights up.
Focus indicator
6
Press the shutter button fully
down to shoot.
• When the camera detects and
shoots a face with [Auto Port.
Framing] set to [Auto], the
captured image is automatically
trimmed into a suitable
composition. Both the original and
the trimmed images are saved
(page 54).
Page 32
32
Recording movies
Notes
• The sound of the camera and the lens in operation may be recorded while recording a
movie. You can disable sound recording by setting [Audio Recording] to [Off]
(page 57).
• The continuous recording time of a movie may be shorter, depending on the ambient
temperature or the status of the camera. See “Notes on continuous movie recording.”
• When the mark is indicated, the temperature of the camera is too high. Turn the
camera off and wait until the temperature of the camera drops.
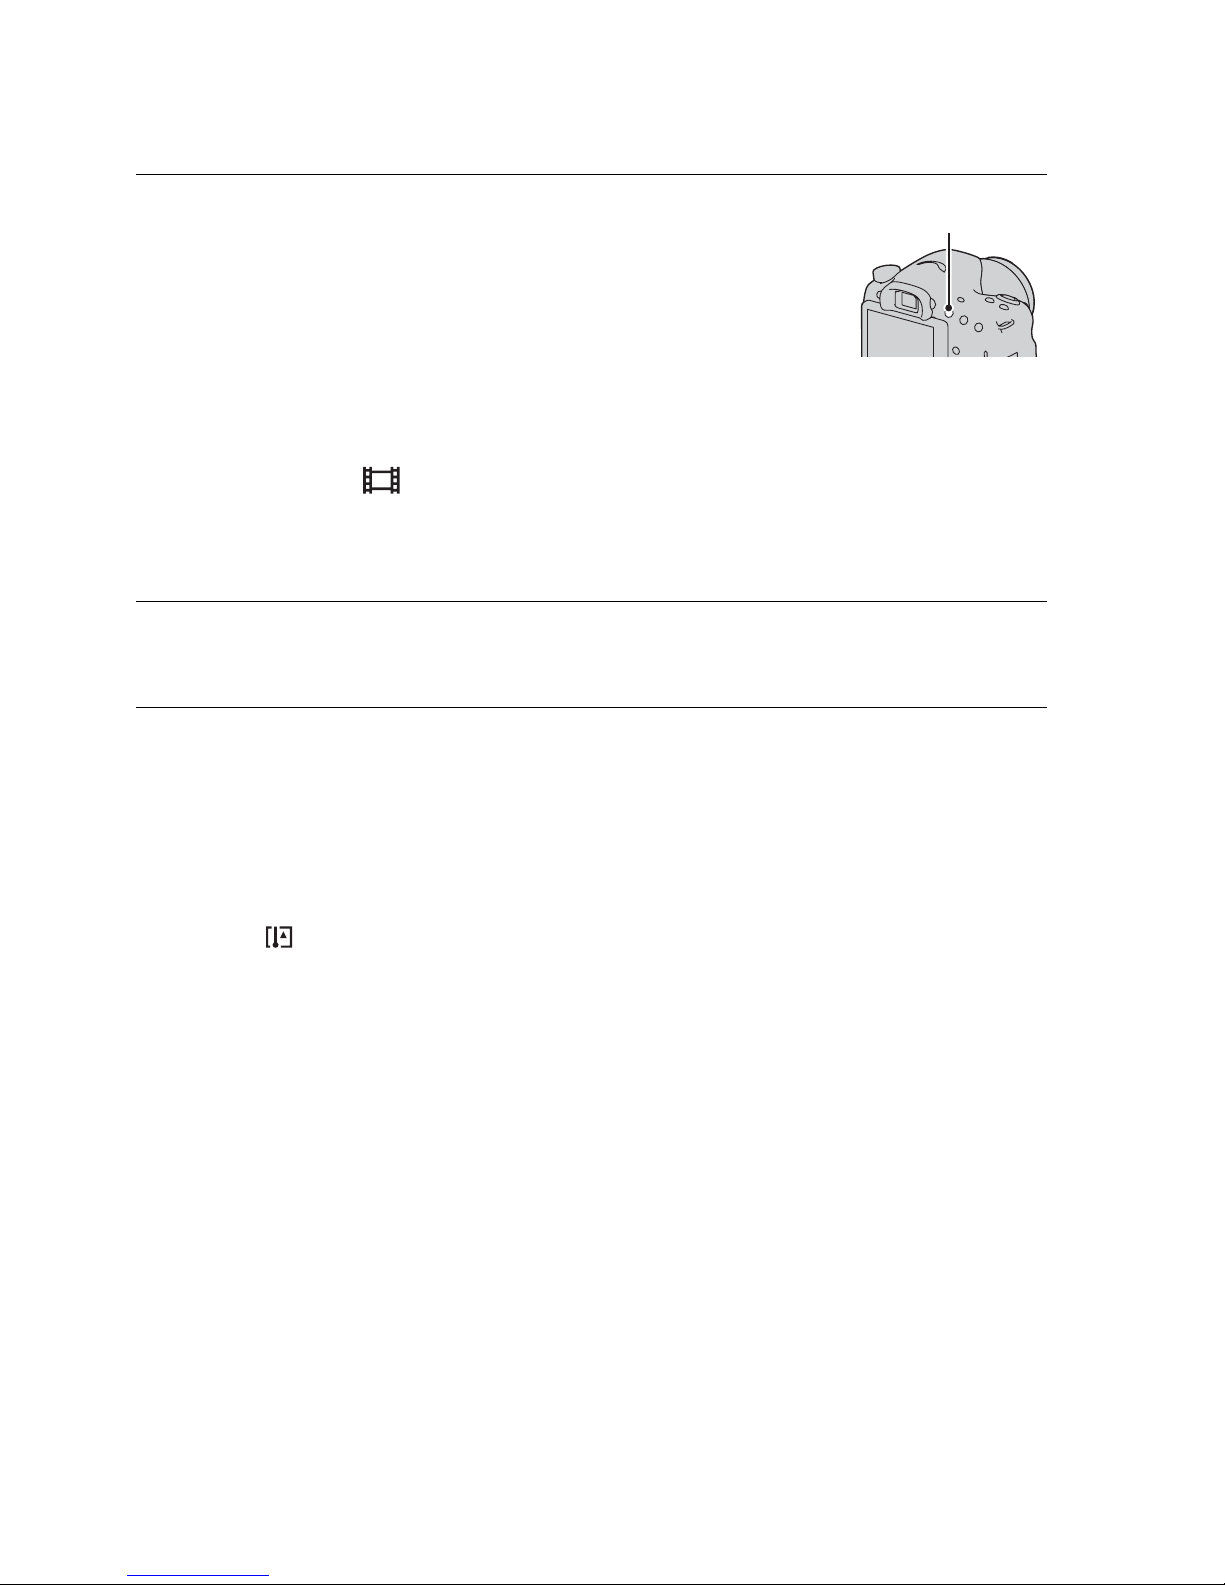
1
Press the MOVIE button to
start recording.
• Movie recording can be started from
any exposure mode.
• The shutter speed and aperture are
adjusted automatically. If you want to
set them to particular values, set the
mode dial to (Movie) (page 36).
• The camera continues to adjust the
focus when it is in autofocus mode.
MOVIE button
2
Press the MOVIE button again to stop recording.
Page 33
33
Shooting and viewing images
Playing back images
Note
• Movies recorded with other devices may not be played back on this camera.
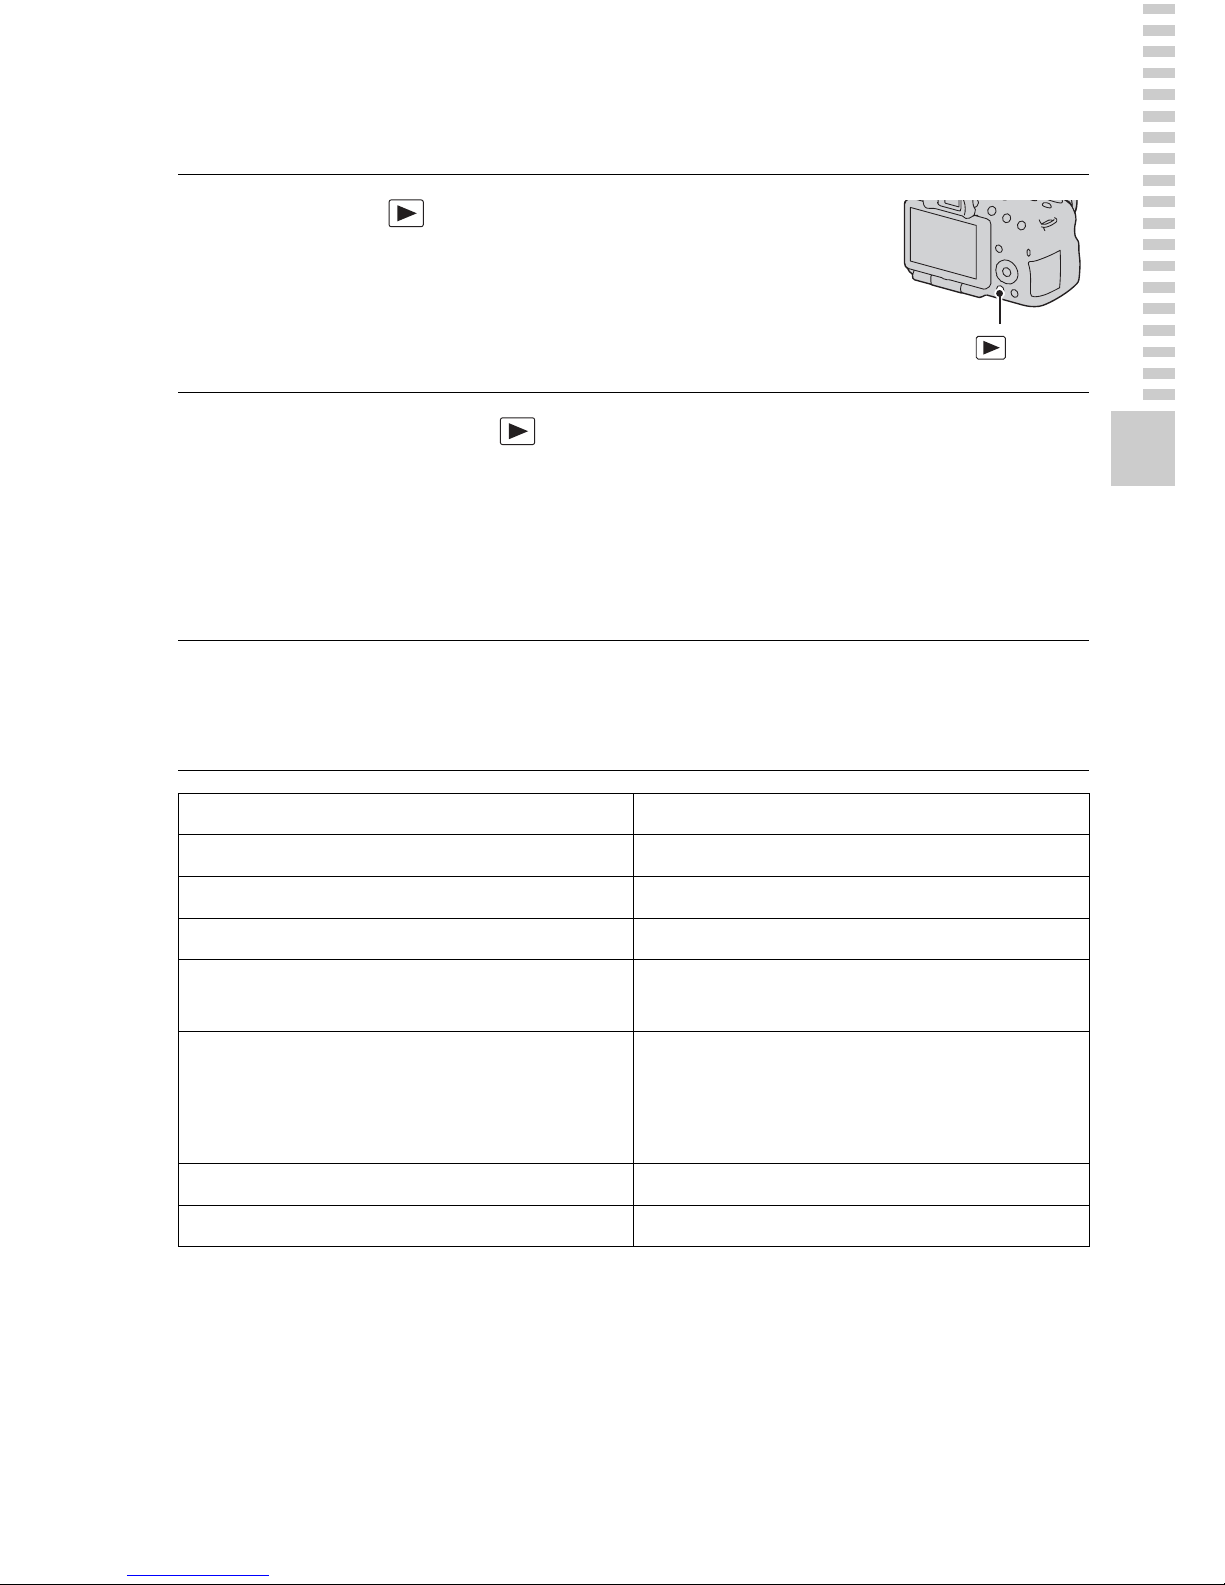
1
Press the button.
button
2
MENU button t 1 t [View Mode] t Select the
desired mode
• To play back still images, select [Folder View(Still)], and to play back
movies, select [Folder View(MP4)] or [AVCHD View] according to the
file format.
3
Select an image with b/B on the control button.
• To play back movies, press the center of the control button.
During movie playback Control button/control dial operation
To pause/resume z
To fast-forward B
To fast-rewind b
To slow-forward Rotate the control dial to the right during
pause
To slow-reverse Rotate the control dial to the left during
pause
• The movie is played back frame-byframe.
To adjust sound volume V t v/V
To display the information v
Page 34
34
Deleting images (Delete)
Once you have deleted an image, you cannot restore it. Check whether to
delete the image or not beforehand.
Note
• Protected images cannot be deleted.
Deleting the image that is currently displayed
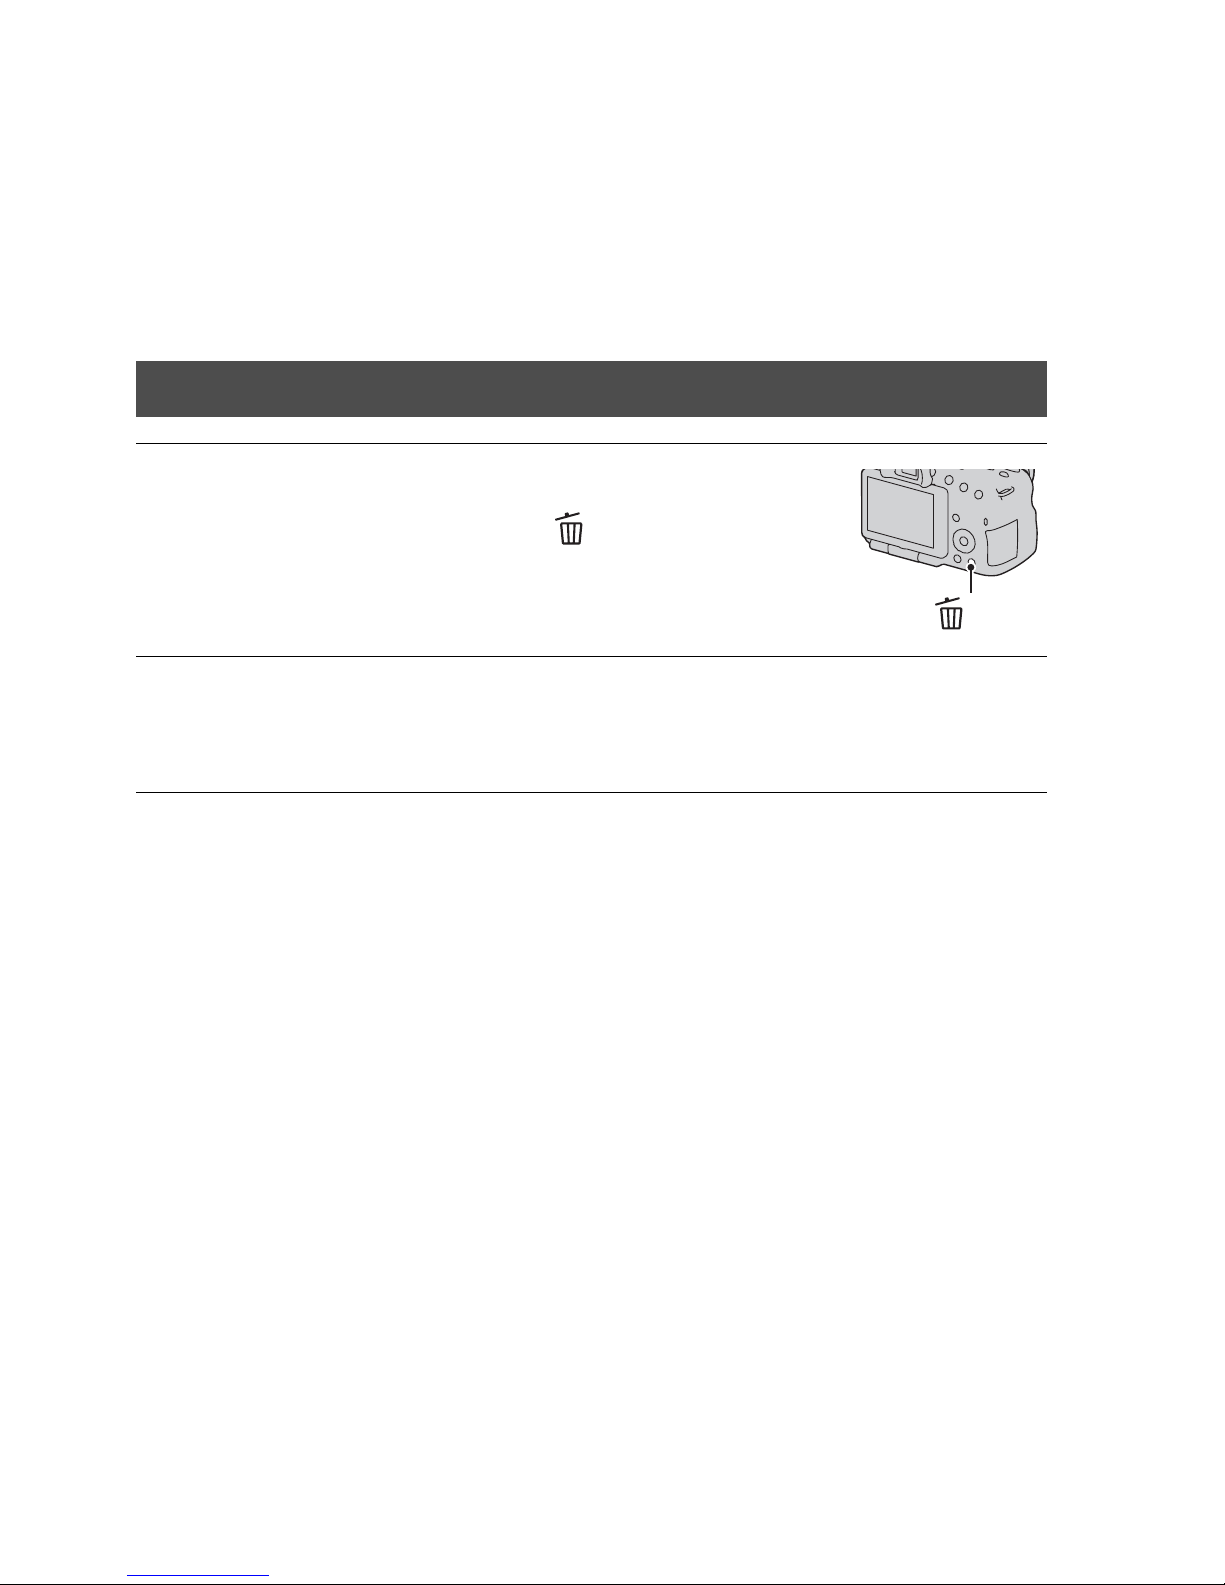
1
Display the image you want
to delete and press the
button.
button
2
Select [Delete] with v on the control button, then press
the center of the control button.
Page 35
35
Shooting images to suit your subject
Shooting images to suit your subject
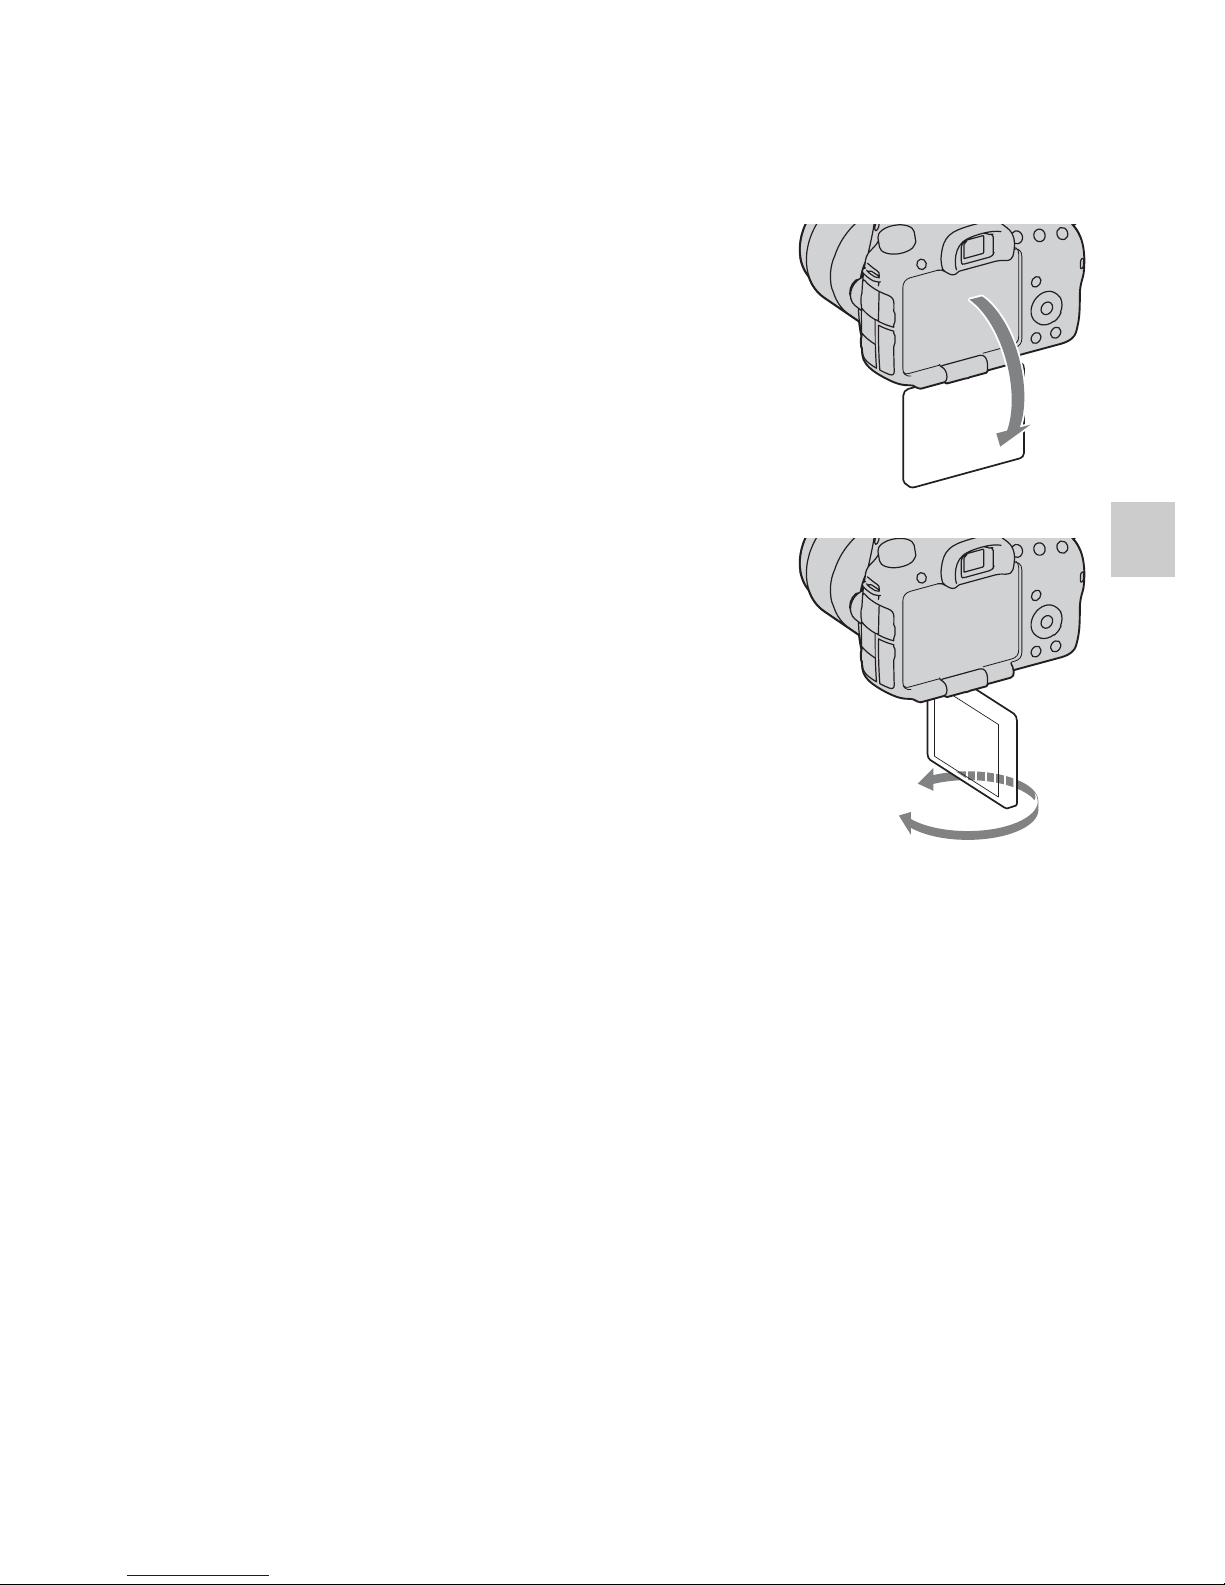
Adjusting the angle of the LCD screen
Adjust the LCD screen to an easily
viewable angle.
• The LCD screen tilts 180 degrees.
• The LCD screen can be rotated leftward
270 degrees from the position in which
the LCD screen is facing forward.
• When the LCD screen is not used, it is
recommended that you close it with the
screen side facing to the camera.
Note
• When the LCD screen is open, the eye sensor
may not be able to function in situations
involving low-position shooting. If you look
into the viewfinder and the monitor is not
switched automatically, press the FINDER/
LCD button.
Page 36
36
Shooting with the various shooting
modes
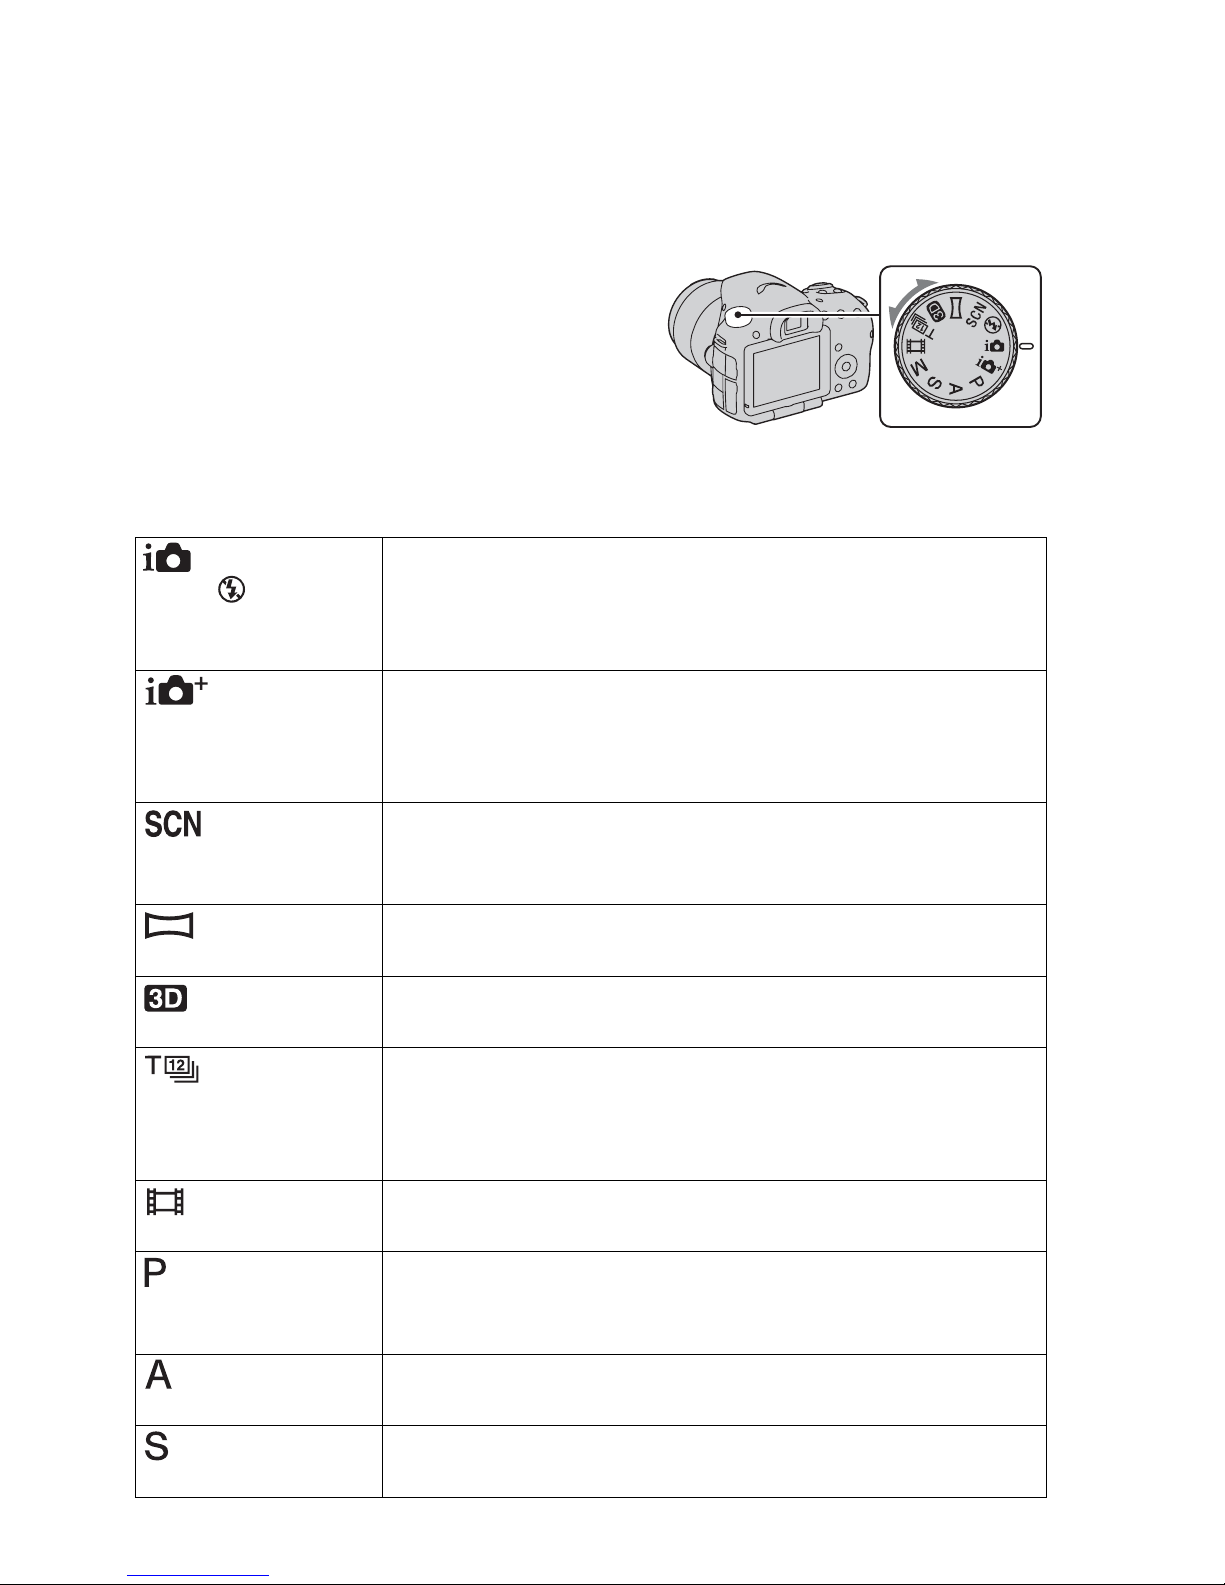
The following shooting modes are provided with the camera:
Set the mode dial to the desired
mode.
(Intelligent
Auto)/ (Flash Off)
The “Intelligent Auto” mode allows you to easily shoot any
subject under any conditions because the camera makes
appropriate judgments on the situation to adjust the settings.
Select “Flash Off” when you want to shoot without the flash.
(Superior
Auto)
The camera recognizes and evaluates the shooting condition,
and appropriate settings are set automatically. The camera
saves 1 appropriate image by combining or separating
images, as necessary.
(Scene
Selection)
Selecting an appropriate mode for the subject or the shooting
conditions allows you to shoot the image with a suitable
setting for the subject.
(Sweep
Panorama)
Allows you to shoot panoramic images.
(3D Sweep
Panorama)
Allows you to shoot 3D panoramic images for playback on a
3D compatible TV.
(Cont. Priority
AE Mode)
The camera continues to shoot while the shutter button is
pressed fully down. The camera records the images
continuously at a maximum of about 12 or 10 images per
second.
(Movie) Allows you to shoot movies with the exposure adjusted
manually (both the shutter speed and the aperture value).
(Program Auto) Allows you to shoot with the exposure adjusted automatically
(both the shutter speed and the aperture value). The other
settings can be adjusted manually.
(Aperture
Priority)
Allows you to shoot after adjusting the aperture value
manually using the control dial.
(Shutter Priority) Allows you to shoot after adjusting the shutter speed
manually using the control dial.
Page 37

37
Shooting with the various shooting modes
Shooting images to suit your subject
Scene recognized by the camera
Shooting function
(Manual
Exposure)
Allows you to shoot after adjusting the exposure manually
(both the shutter speed and the aperture value) using the
control dial.
Superior Auto
1 Set the mode dial to (Superior Auto).
2 Point the camera towards the
subject.
When the camera recognizes and adjusts
for shooting conditions, the following
information is indicated: recognized
scene mode mark, appropriate shooting
function, the number of images to be
shot.
Recognized scene mode mark
Number of images to be shot
3 Adjust the focus and shoot the subject.
(Night Scene) (Hand-held Twilight) (Landscape)
(Backlight Portrait) (Portrait) (Tripod Night Scene)
(Backlight) (Macro) (Night Portrait)
(Spotlight) (Low Brightness) (Baby)
Cont. Shooting (45) Slow Sync. (41) Auto HDR (54)
Daylight Sync. Slow Shutter Hand-held Twilight (38)
Shooting function
Page 38
38
Shooting with the various shooting modes
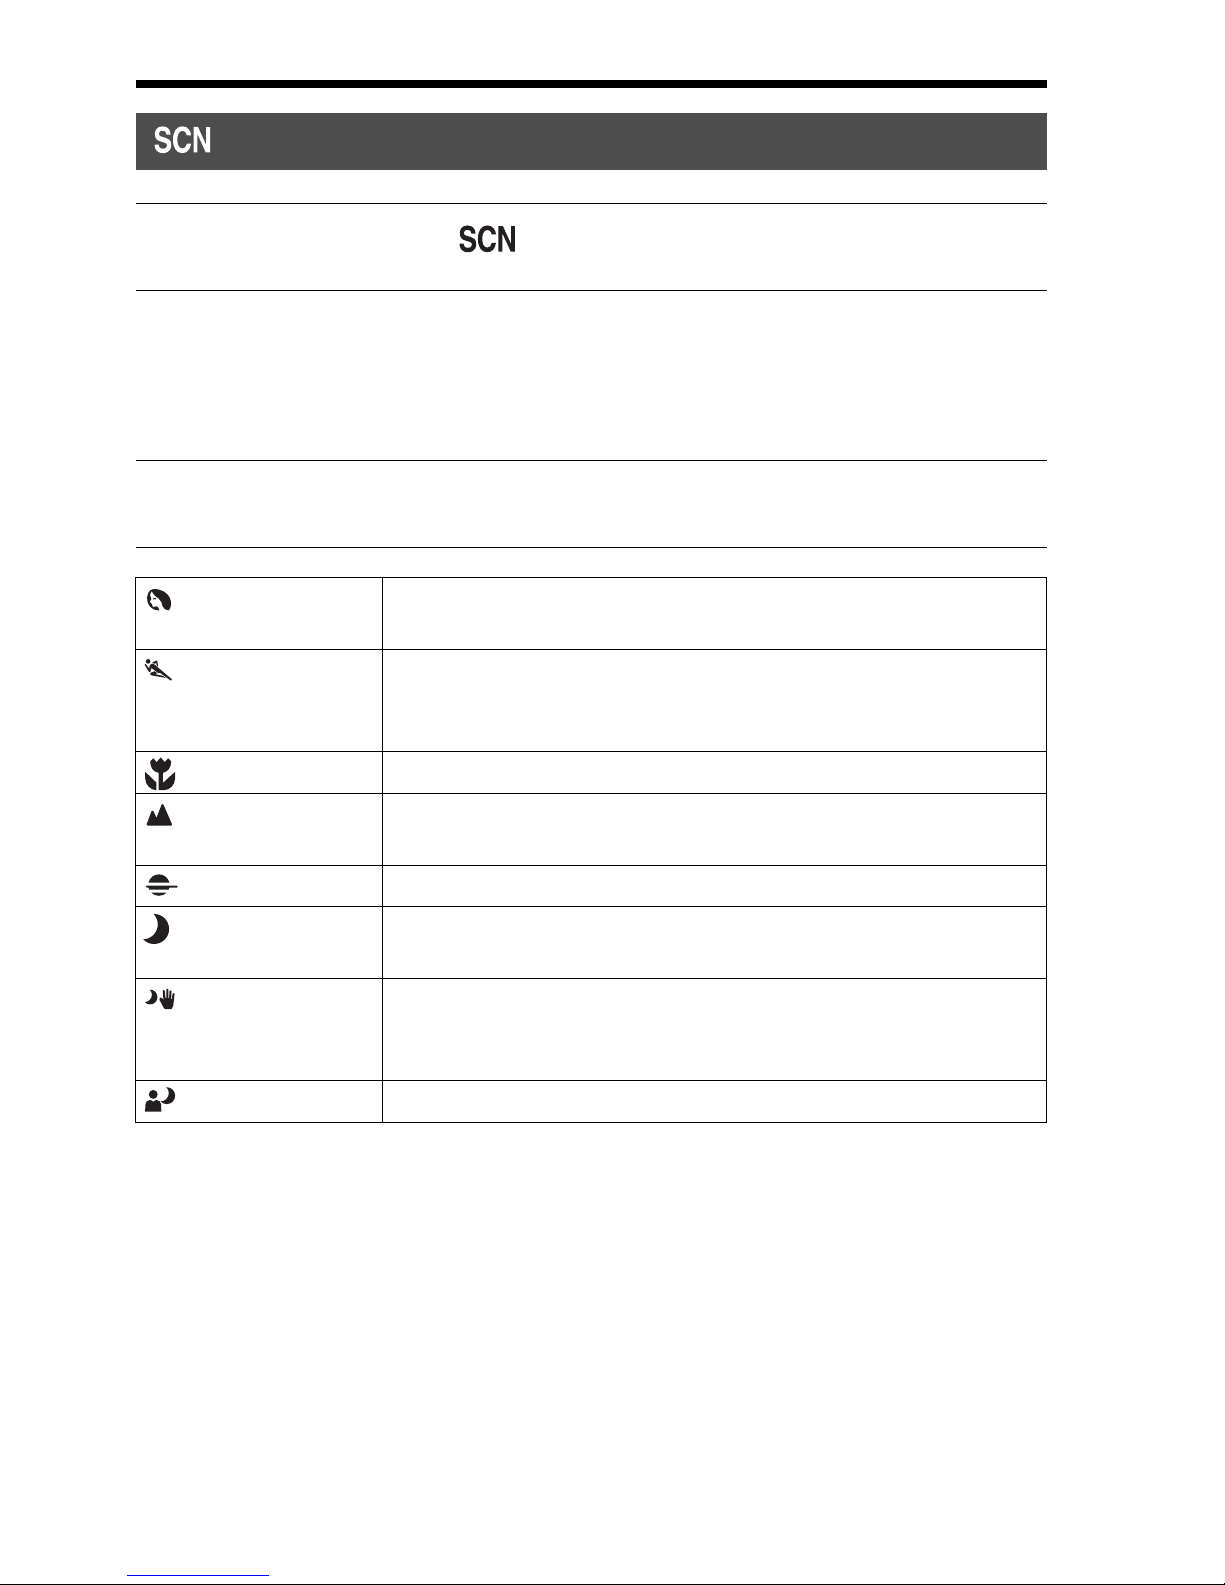
Scene Selection
1 Set the mode dial to (Scene Selection).
2 Select the desired mode with v/V, then press the center of the
control button.
• To change the scene, press the Fn button, then select another scene.
3 Adjust the focus and shoot the subject.
(Portrait) Blurs away backgrounds and sharpens the subject. Expresses
skin tones softly.
(Sports Action) Shoots a moving subject at a fast shutter speed so that the
subject looks as if it is standing still. The camera shoots
images continuously while the shutter button is pressed.
(Macro) Shoots close subjects such as flowers, foods.
(Landscape) Shoots the entire range of scenery in sharp focus with vivid
colors.
(Sunset) Shoots the red of the sunrise or sunset beautifully.
(Night Scene) Shoots night scenes at a distance without losing the dark
atmosphere of the surroundings.
(Hand-held
Twilight)
Shoots night scenes with less noise and blur without using a
tripod. A burst of shots are taken, and image processing is
applied to reduce subject blur, camera shake, and noise.
(Night Portrait) Shoots portraits in night scenes.
Page 39
39
Shooting with the various shooting modes
Shooting images to suit your subject
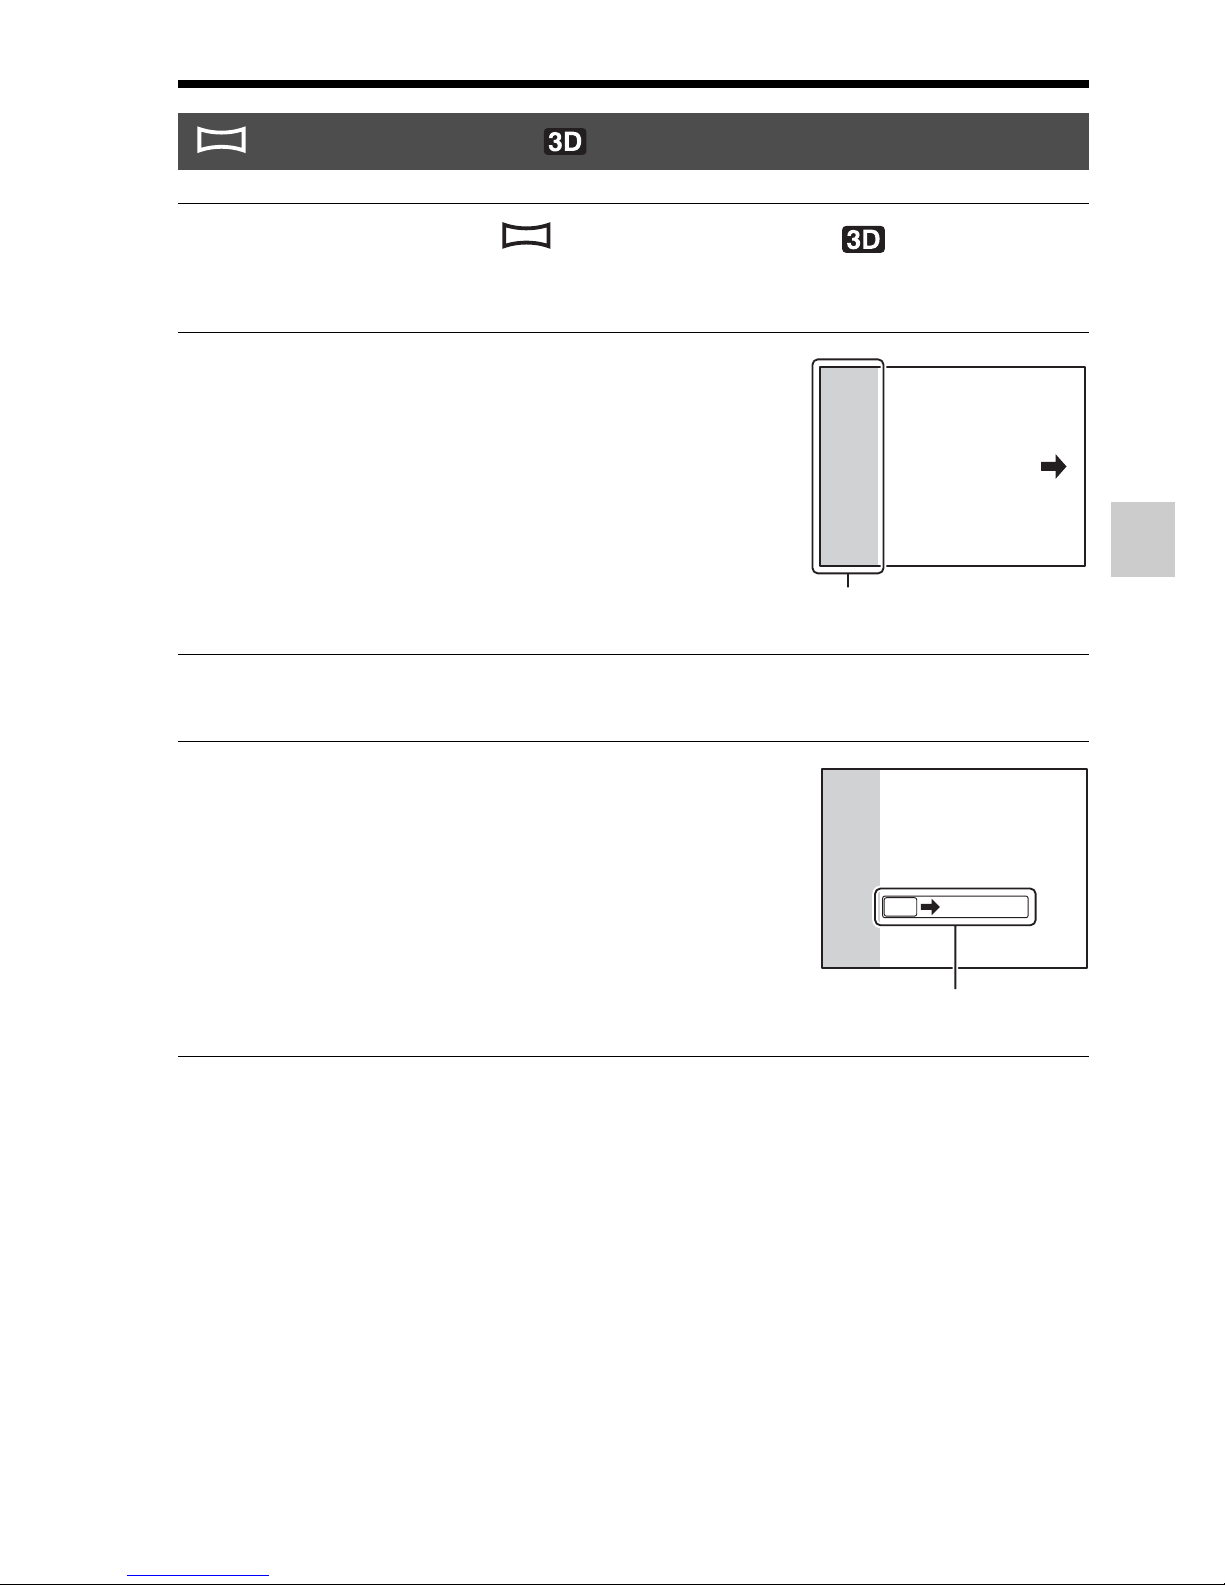
Sweep Panorama/ 3D Sweep Panorama
1 Set the mode dial to (Sweep Panorama)/ (3D Sweep
Panorama).
2 Point the camera at the edge of
the subject, then press the shutter
button halfway down to adjust the
focus.
This part will not be taken
3 Press the shutter button fully down.
4 Pan or tilt the camera to the end,
following the guidance on the
screen.
Guidance bar
Page 40
40
Shooting with the various shooting modes
Continuous Advance Priority AE Mode
1 Set the mode dial to (Cont. Priority AE Mode).
2 Select the desired mode with v/V on the control button, then
press the center z on the control button.
• To change the mode, press the Fn button, then select another mode.
3 Adjust the focus and shoot the subjects.
• The camera continues to shoot while the shutter button is pressed fully
down.
(Tele-zoom
Cont. Priority AE)
The camera records the images continuously at a maximum
of about 12 images per second.
• The minimum zoom scale of the camera is set to 1.4 times
and the image size can be set to M or S.
(Cont. Priority
AE)
The camera records the images continuously at a maximum
of about 10 images per second. The image size can be set to
L.
Page 41
41
Using the shooting functions
Using the shooting functions
Using the flash
In a dark location, using the flash allows you to shoot the subject brightly,
and it also helps to prevent camera shake. When shooting into the sun, you
can use the flash to shoot a bright image of the backlit subject.
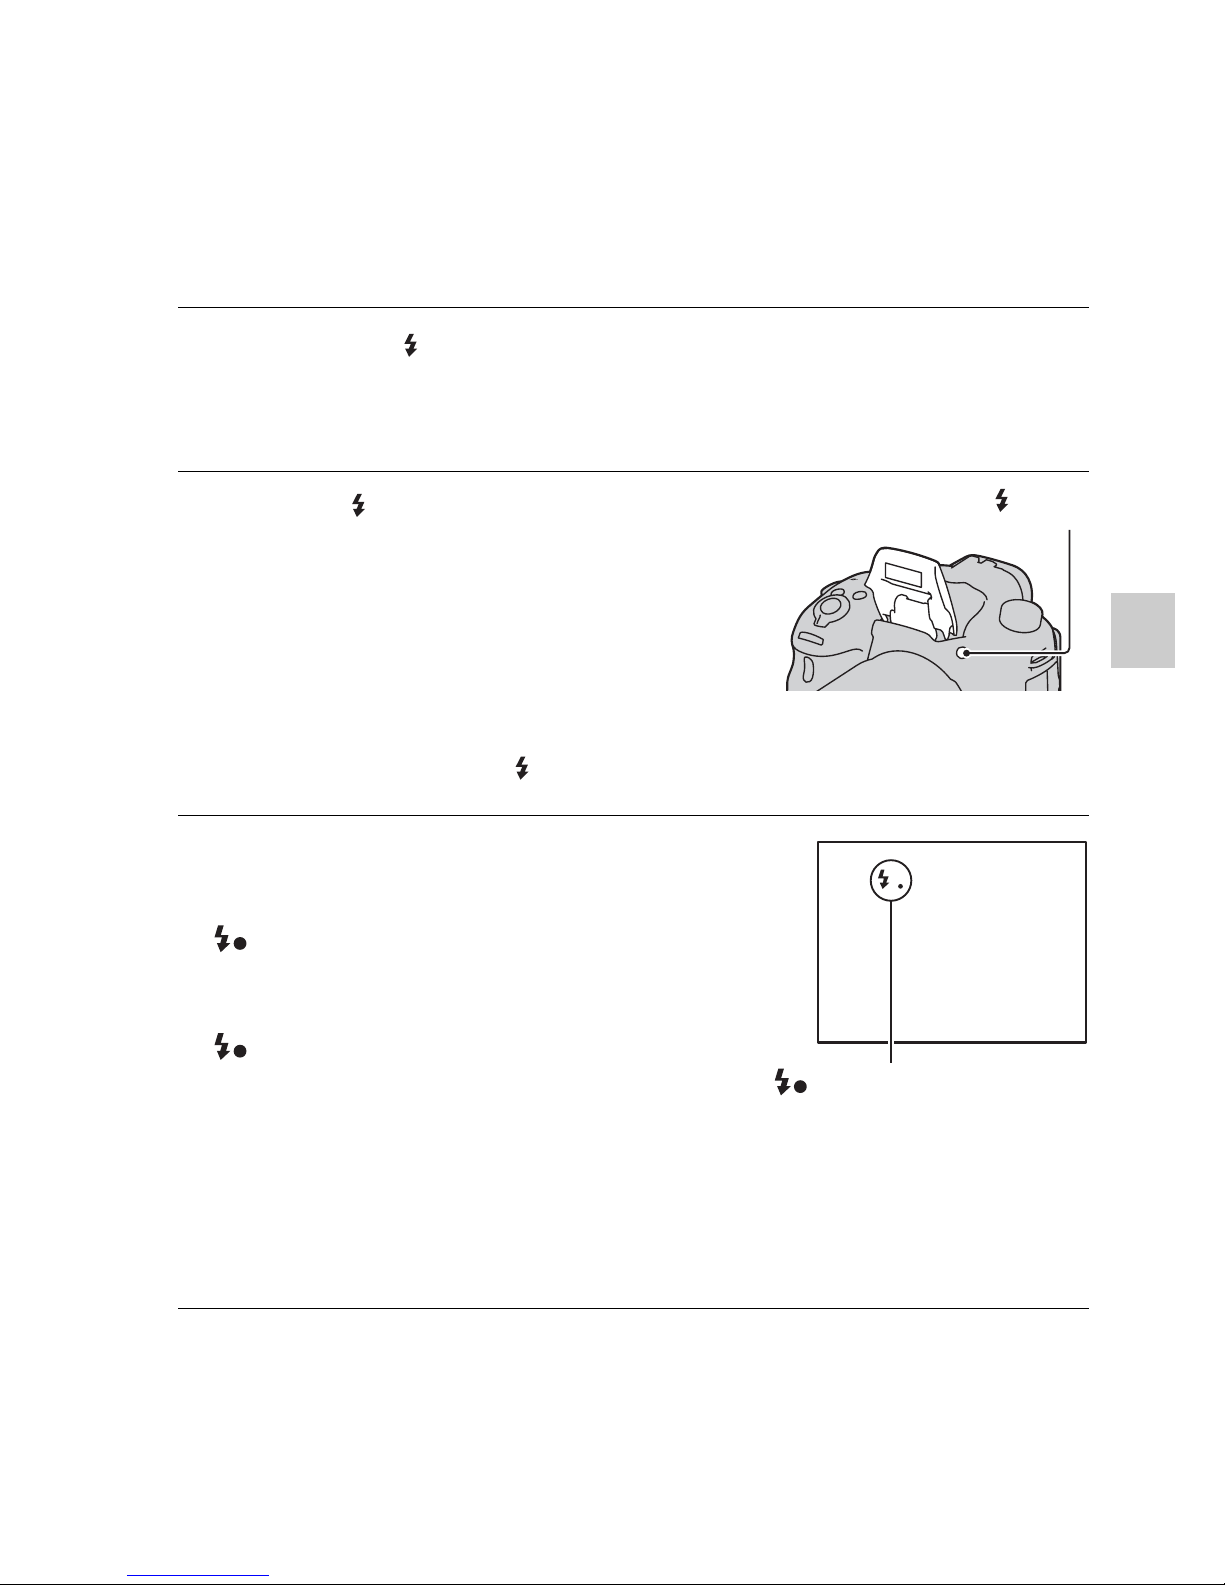
1 Fn button t (Flash Mode) t Select the desired setting
• For further information on the flash modes available for each shooting
mode, see page 77.
2 Press the button.
The flash pops up.
• In Intelligent Auto, Superior Auto or
Scene Selection mode, the flash
automatically pops up if the amount of
light is insufficient or the subject is
backlit. The built-in flash does not pop
up even if you press the button.
button
3 After the flash has finished
charging, shoot the subject.
Flashing: The flash is being charged.
When the indicator flashes, you cannot
release the shutter.
Lit: The flash has been charged and
is ready to fire.
• When you press the shutter button
halfway down under dark lighting in
autofocus mode, the flash may be fired
to help focus on a subject (AF
Illuminator).
(Flash charging) indicator
Page 42
42
Using the flash
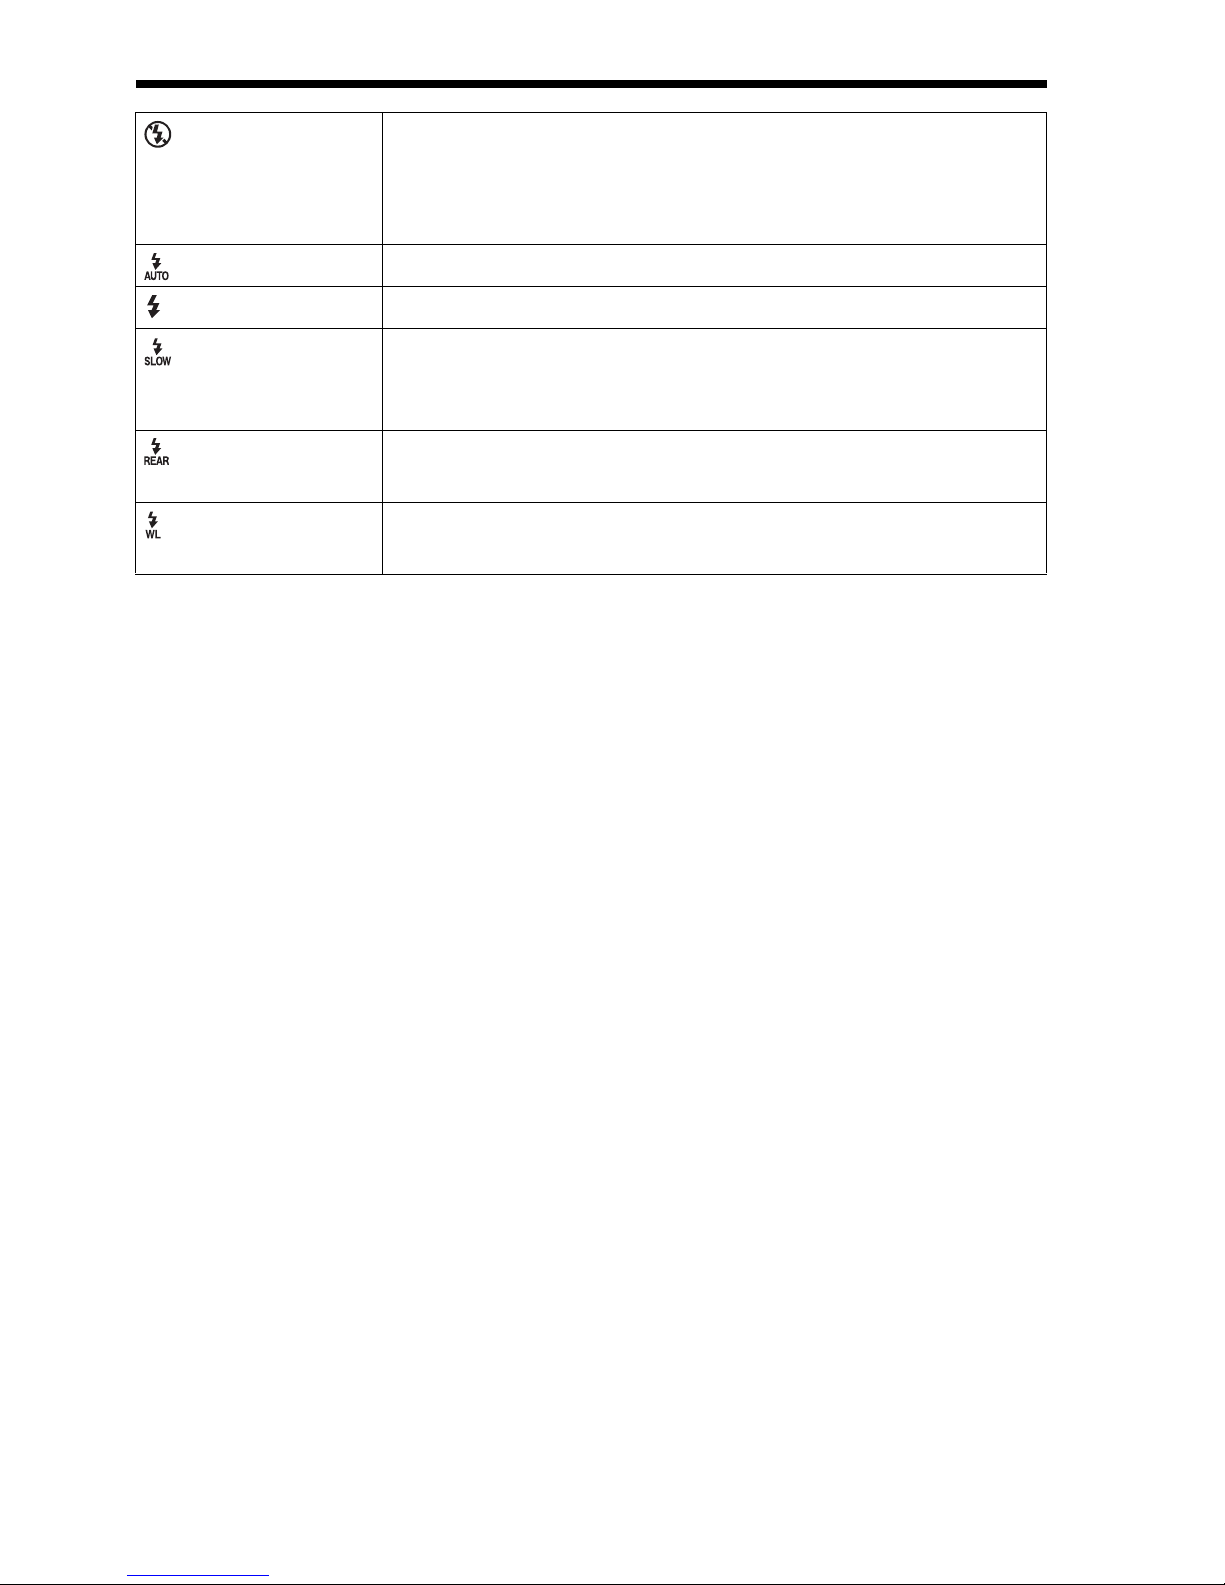
(Flash Off) Does not fire even the built-in flash pops up.
• You cannot select this item when the mode dial is set to P,
A, S, or M. However, the flash will not be fired if it is not
pulled up.
(Autoflash) Fires if it is dark or against light.
(Fill-flash) Fires every time you trigger the shutter.
(Slow Sync.) Fires every time you trigger the shutter. Slow sync shooting
allows you to shoot a clear image of both the subject and the
background by slowing the shutter speed.
(Rear Sync.) Fires right before the exposure is completed every time you
trigger the shutter.
(Wireless) Fires an external flash (sold separately) that is off the camera
and away from it (Wireless flash shooting).
Page 43
43
Using the shooting functions
Adjusting the brightness of the image
Except for exposure mode M, the exposure is automatically selected
(Automatic exposure).
Based on the exposure acquired by the automatic exposure, you can
perform exposure compensation. You can make the entire image brighter
by shifting to the + side. The entire image becomes darker when you shift it
to the – side (Exposure compensation).
• Adjust the compensation level by checking the recorded image.
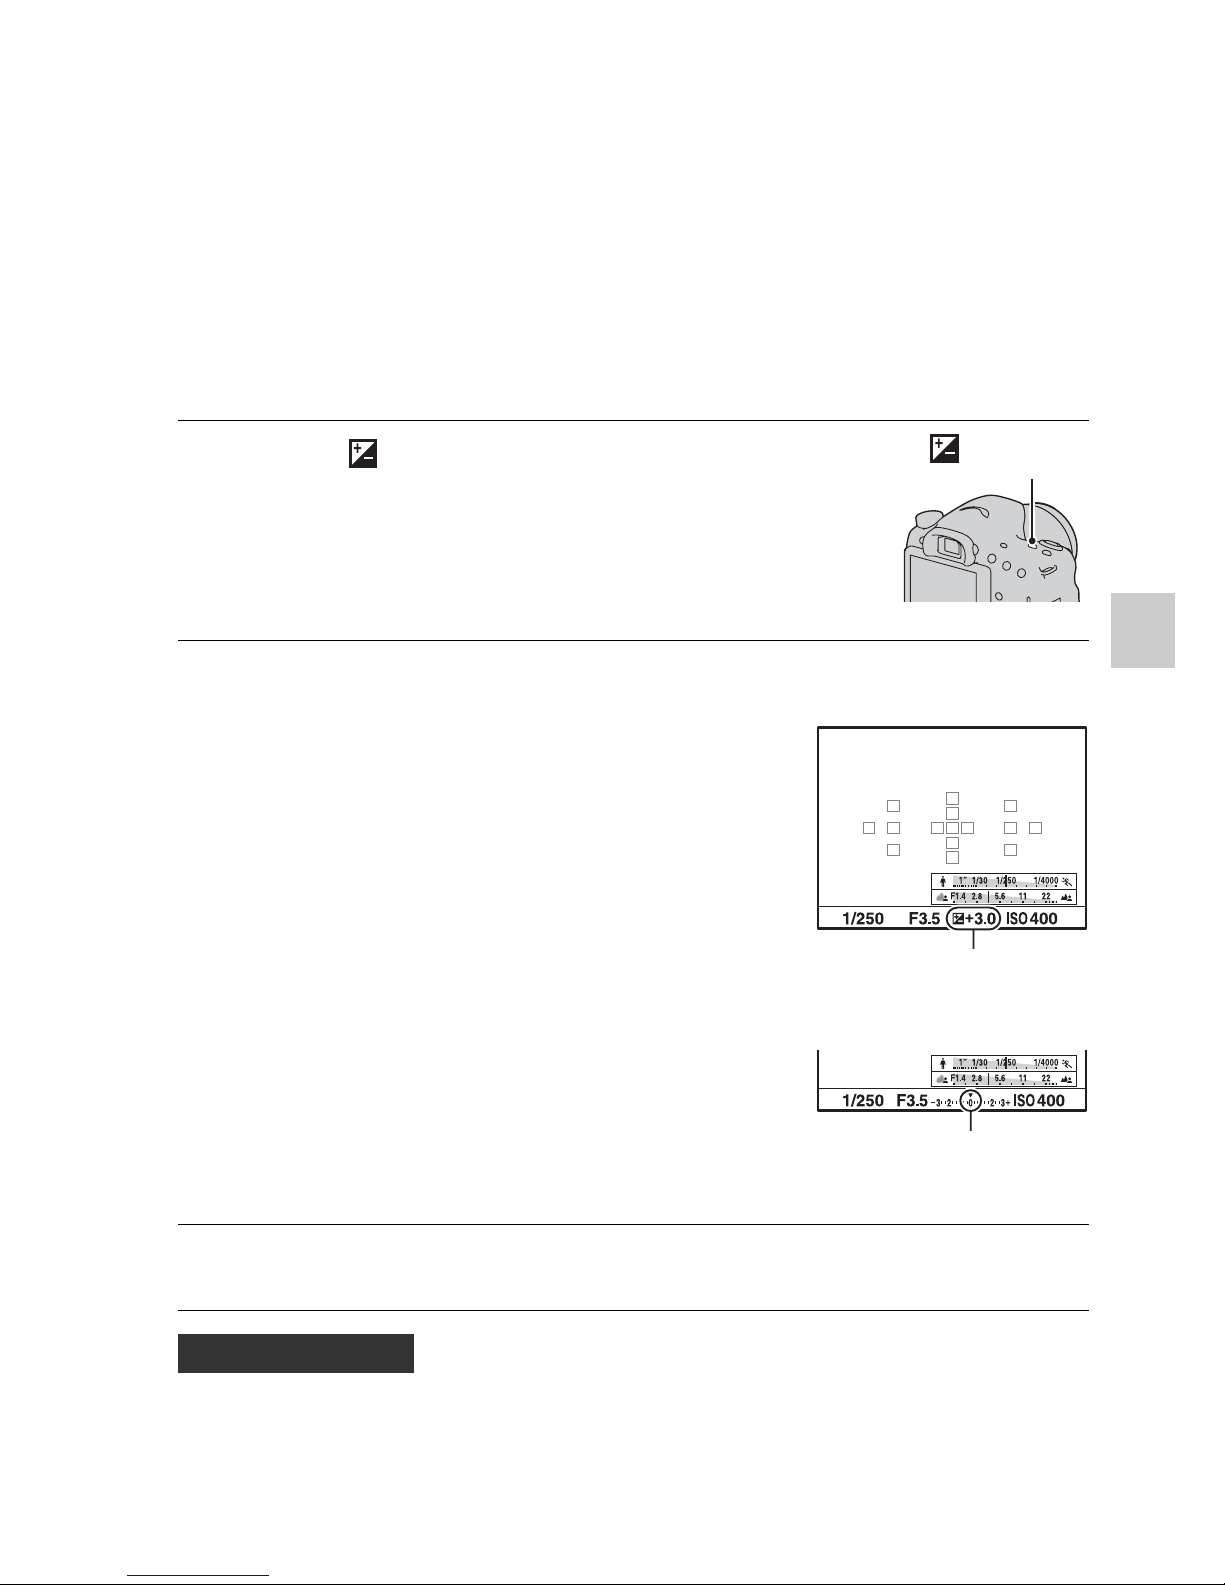
1 Press the button.
button
2 Adjust the exposure with the
control dial.
Toward + (over): Brightens an image.
Toward – (under): Darkens an image.
• In viewfinder mode, confirm the
exposure using the EV scale.
The LCD screen after the
exposure is adjusted.
Compensated exposure
The screen in the viewfinder
Standard exposure
3 Adjust the focus and shoot the subject.
Shooting techniques
Page 44

44
Adjusting the brightness of the image
• Using bracket shooting, you can shoot multiple images with the exposure
shifted to the plus or minus sides (page 45).
Note
• This item cannot be set when the exposure mode is set to Intelligent Auto, Superior
Auto, or Scene Selection.
Page 45
45
Using the shooting functions
Selecting the drive mode
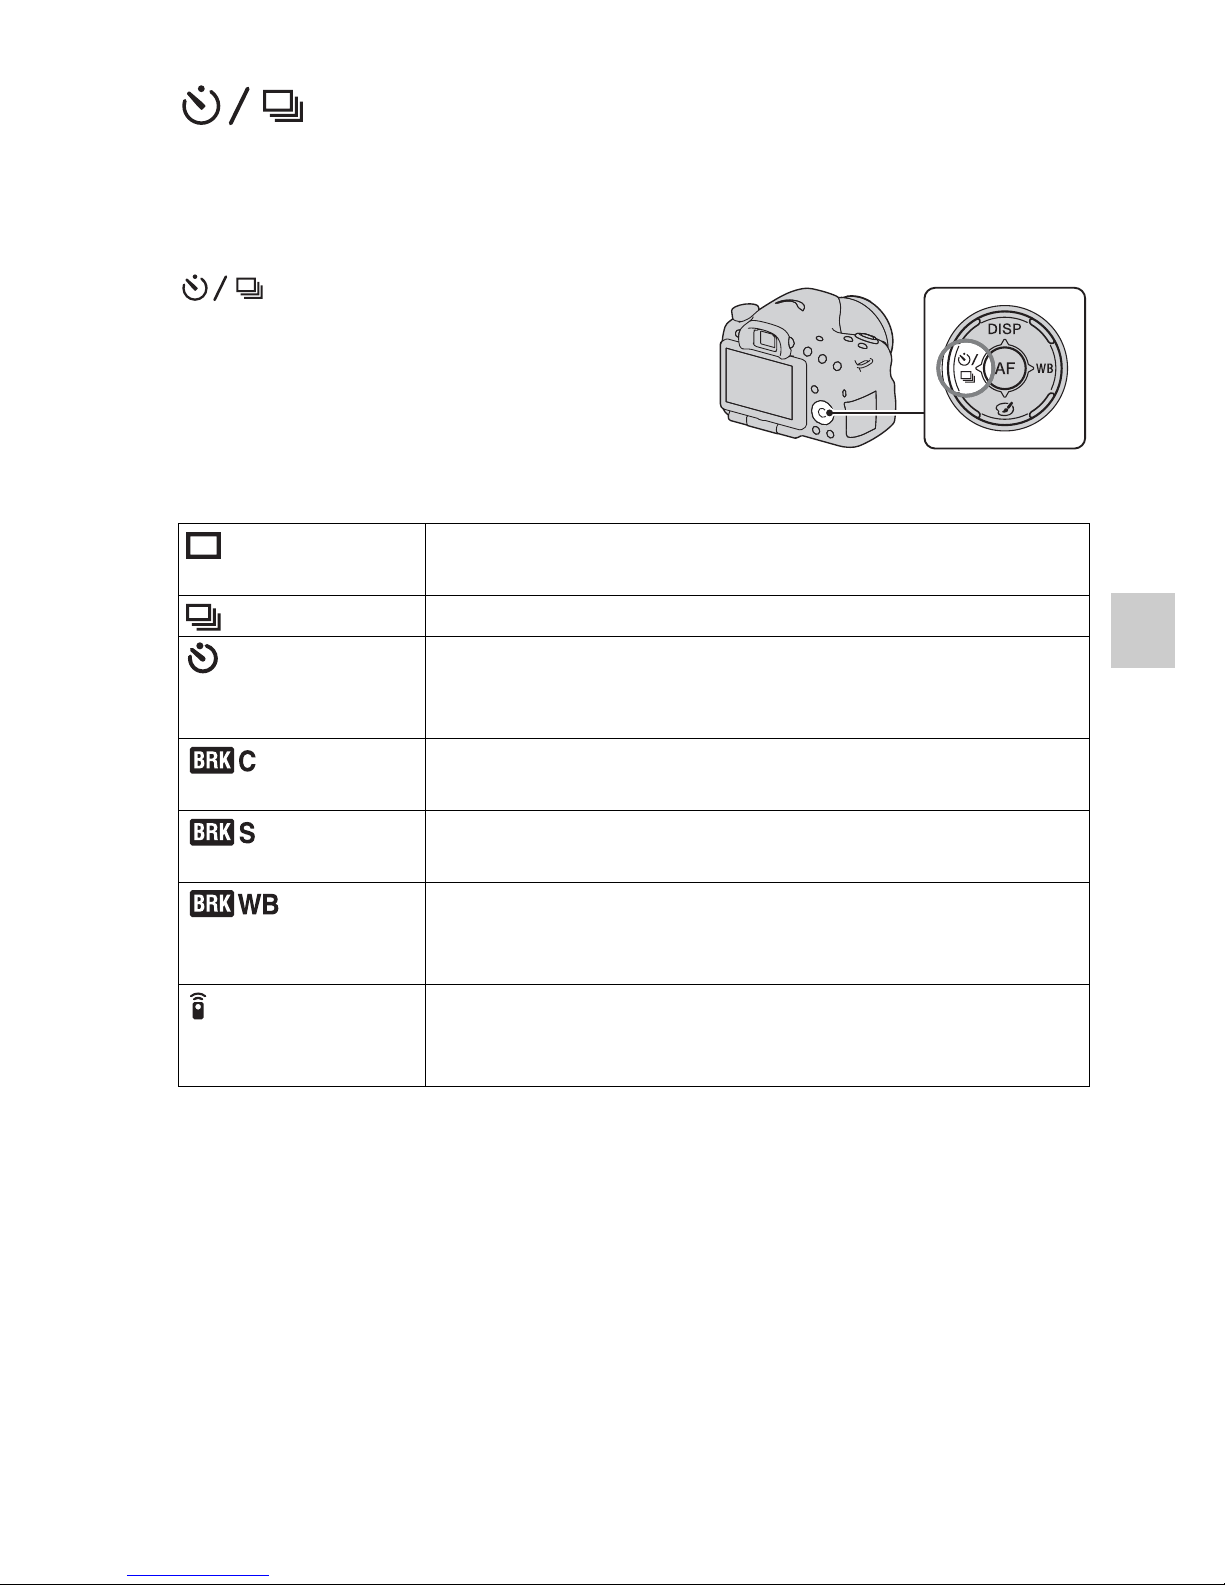
You can use an appropriate drive mode to suit your purposes, such as
single-shot advanced, continuous advanced, or bracket.
on the control button t
Select the desired mode
(Single
Shooting)
This mode is for normal shooting.
(Cont. Shooting) The camera records the images continuously.
(Self-timer) The 10-second self-timer is convenient when the
photographer appears in a photo and the 2-second self-timer
is convenient to reduce the camera shake.
(Bracket:
Cont.)
You can shoot 3 images, each with different degrees of
exposure.
(Single
Bracket)
You can shoot 3 images, shot by shot, each with different
degrees of exposure.
(WB
bracket)
Based on the selected white balance, and the color
temperature/color filter, 3 images are recorded with the white
balance shifted.
(Remote Cdr.) You can shoot using the SHUTTER and 2SEC (the shutter is
released after 2 seconds) buttons on the RMT-DSLR1
Wireless Remote Commander (sold separately).
Page 46

46
Switching the recording information
display (DISP)
Graphic Display
Each time you press DISP on the control
button, the recording information display
changes as follows.
You can select the available displays in
the viewfinder or on the LCD screen
separately.
The Graphic Display shows the shutter
speed and aperture value as graphs, and
clearly illustrates how the exposure
works. The pointers on the shutter speed
indicator and aperture indicator indicate
the current value.
Shutter speed
No Disp. Info. LevelDisplay All Info.
Digital level gauge
Graphic Display
Aperture value
Page 47
47
Using the shooting functions
Setting image size
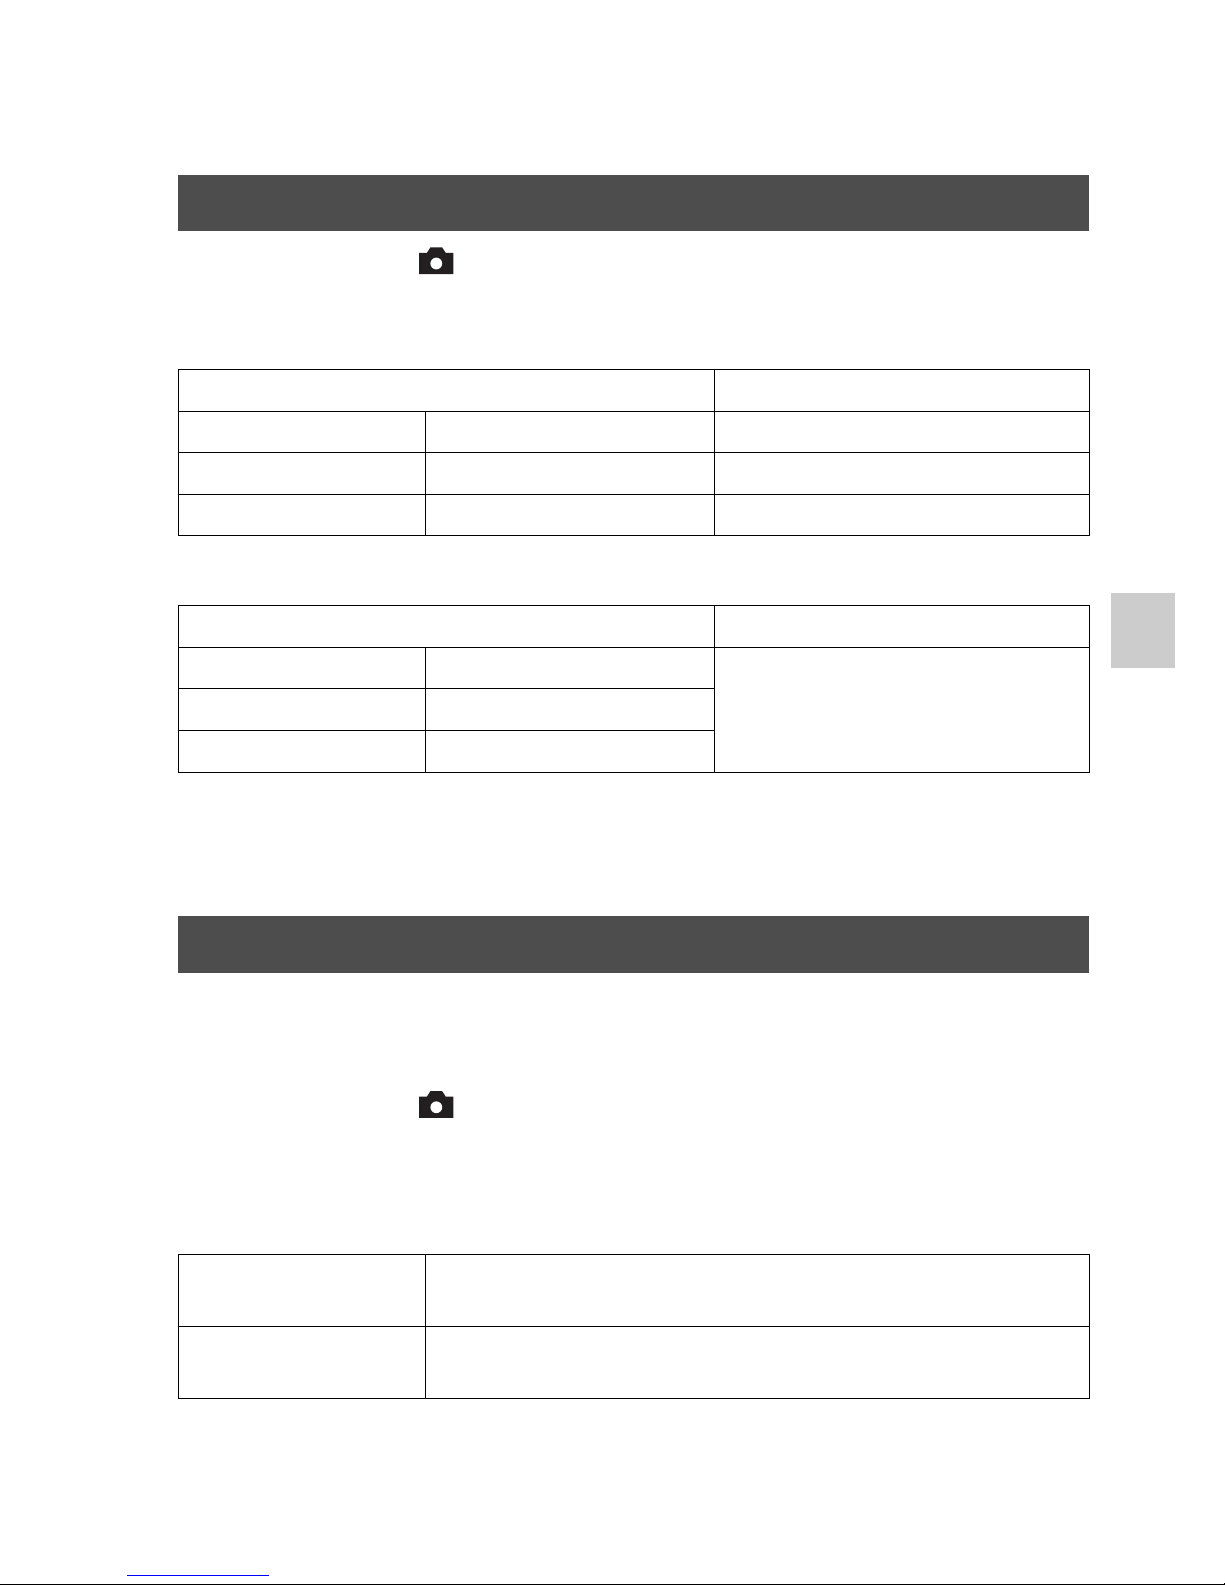
MENU button t 1 t [Image Size] t Select the desired size
[Aspect Ratio]: [3:2]
[Aspect Ratio]: [16:9]
Note
• When you select a RAW image with [Quality], the image size of the RAW image
corresponds to L. This size is not displayed on the screen.
You can set the image size of panoramic images. The image size varies
depending on the setting of the shooting direction (page 56).
MENU button t 1 t [Panorama: Size] or [3D Pan.: Image
Size] t Select the desired size
[Panorama: Size]
Image Size
Image size Usage guidelines
L:16M 4912 × 3264 pixels For prints up to A3+ size
M:8.4M 3568 × 2368 pixels For prints up to A4 size
S:4.0M 2448 × 1624 pixels For prints up to L/2L size
Image size Usage guidelines
L:14M 4912 × 2760 pixels For viewing on a high-definition
TV
M:7.1M 3568 × 2000 pixels
S:3.4M 2448 × 1376 pixels
Panorama: Size
Standard [Panorama: Direction] is set to [Up] [Down]: 3872 × 2160
[Panorama: Direction] is set to [Right] [Left]: 8192 × 1856
Wide [Panorama: Direction] is set to [Up] [Down]: 5536 × 2160
[Panorama: Direction] is set to [Right] [Left]: 12416 × 1856
Page 48

48
Setting image size
[3D Pan.: Image Size]
16:9 1920 × 1080
Standard 4912 × 1080
Wide 7152 × 1080
Page 49
49
Using the playback functions
Using the playback functions
Enlarging images
A still image can be enlarged for closer examination. This is convenient to
check the focus condition of a recorded image.
To cancel the enlarged playback
Press the center of the control button so that the image returns to the normal
size.
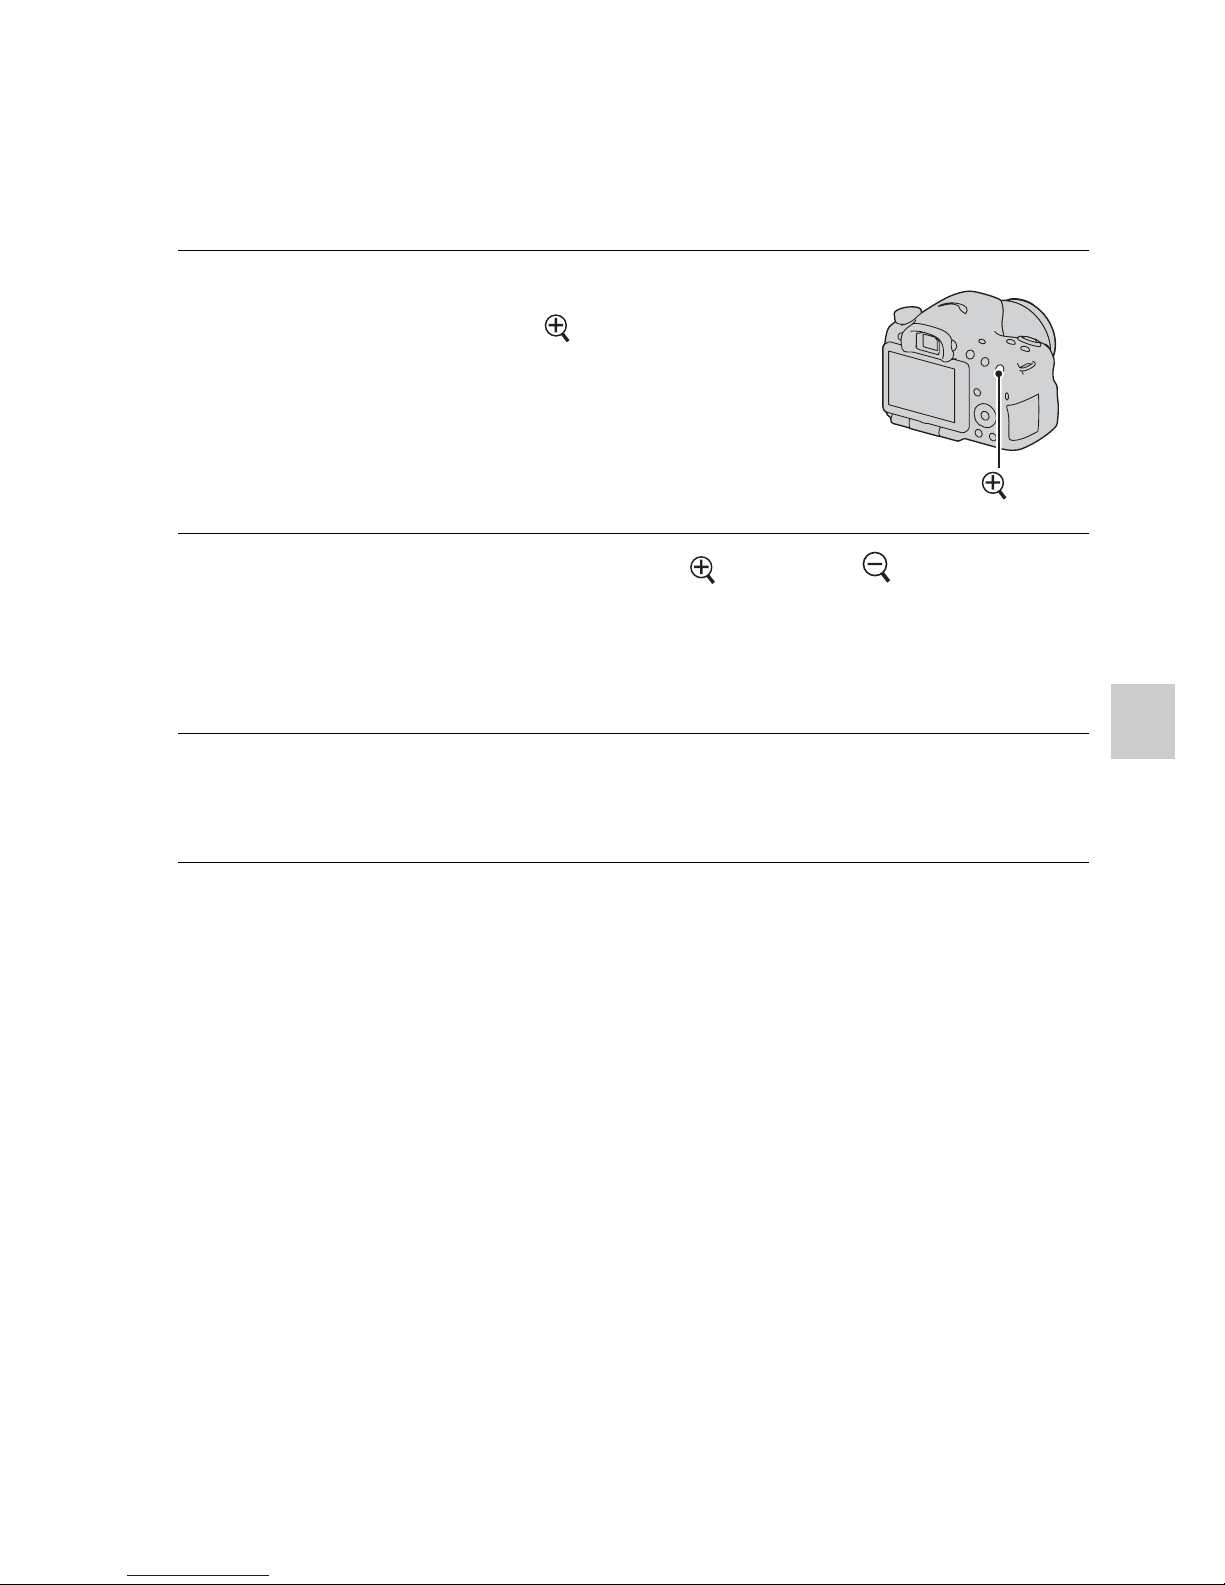
1 Display the image you want to
enlarge, then press the button.
button
2 Zoom the image in or out with the button or button.
• Rotating the control dial switches the image at the same display
magnification. When you shoot multiple images with the same
composition, you can compare their focus conditions.
3 Select the portion you want to enlarge with v/V/b/B on the
control button.
Page 50

50
Switching to the display of the image
list
You can display multiple images on the screen simultaneously.
To return to the single-image screen
Press the center of the control button when you select the desired image.
To display the desired folder
Press the button.
The image index screen is displayed.
• You can select the number of images
displayed on one page of the image
index screen using [Image Index] in the
Playback menu.
button
Select the left bar on the image index
screen with the control button, then select
the desired folder with v/V. Pressing the
center of the control button when the left
bar is selected switches the view mode.
Page 51
51
Using the playback functions
Viewing images on a TV screen
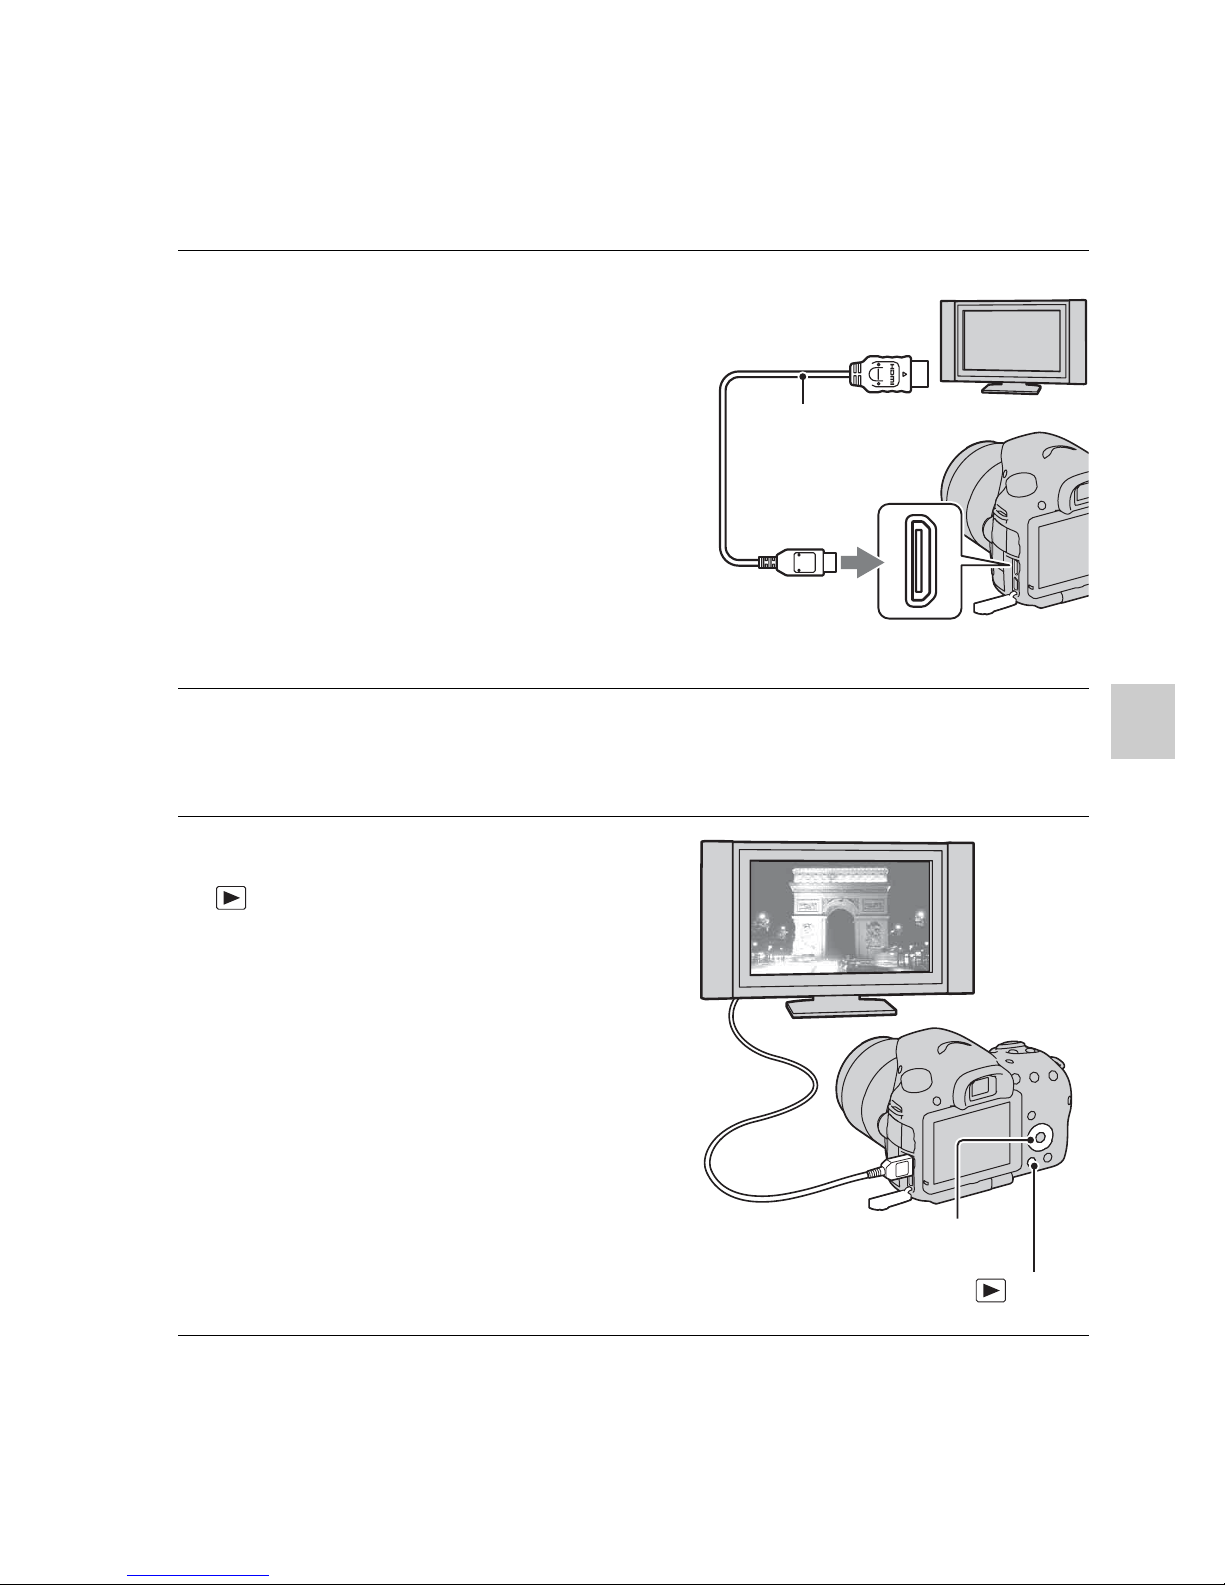
To view images recorded on the camera on a TV set, an HDMI cable (sold
separately) and an HD TV equipped with an HDMI connector are required.
1 Turn off both your camera and the
TV, and connect the camera to the
TV.
2 Turn on the TV and switch the input.
• See also the operating instructions supplied with the TV.
3 Turn on the camera, and press the
button.
Images shot with the camera appear on
the TV screen.
Select the desired image with b/B on the
control button.
• The LCD screen on the camera does
not turned on.
button
1 To the HDMI
connector
HDMI cable
(sold separately)
2 To the
HDMI mini terminal
Control button
Page 52
52
Functions list
Functions that can be operated with
the buttons/switch
You can set up or operate various functions with these buttons/switch.
For the location of the buttons/switch, see “Identifying parts” (page 12).
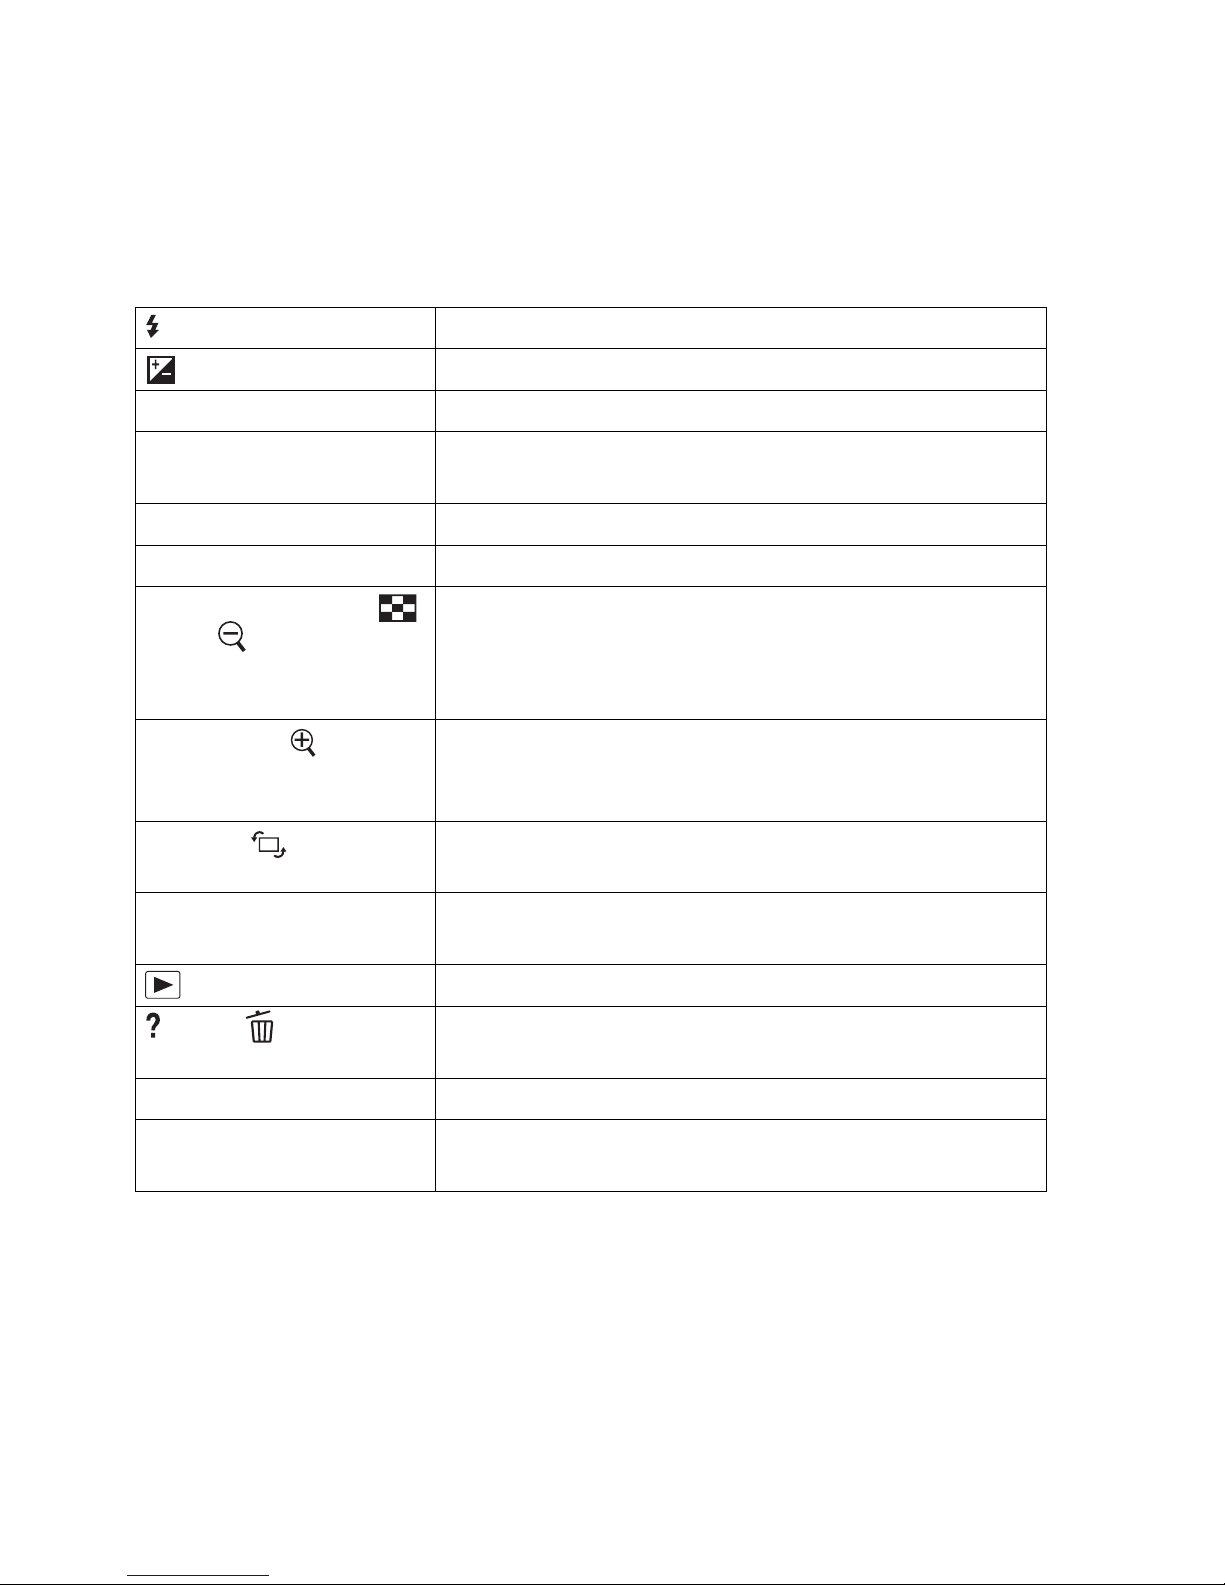
button Pops the flash up.
button Compensates the exposure.
ISO button Adjusts the ISO sensitivity.
FINDER/LCD button Switches the display between the LCD screen and the
viewfinder.
MENU button Displays the menu screen for setting up the menu item.
MOVIE button Records movies.
AEL button/AV button/
button/ button
Fixes the exposure of the entire screen./Sets up the
aperture value./Displays multiple images on the screen
simultaneously./Scales down an image that has been
scaled up when viewing images.
ZOOM button/ button Magnifies and shoots the subject using the zoom feature
of the camera (ZOOM)./Scales an image up when
viewing images.
Fn button/ button Displays the setup screen of the function that is set using
the Fn button./Rotates images.
Control button Sets up the following functions: Display, White
Balance, Drive mode, Picture Effect, and Autofocus.
button Plays back images.
button/ button Displays a shooting tip or In-Camera Guide./Deletes
images.
Focus mode switch Switches the autofocus and manual focus.
Preview button/Focus
Magnifier button
Checks blurring of the background./Allows you to check
the focus by enlarging the image before shooting.
Page 53
53
Functions list
Selecting a function with the Fn
(Function) button
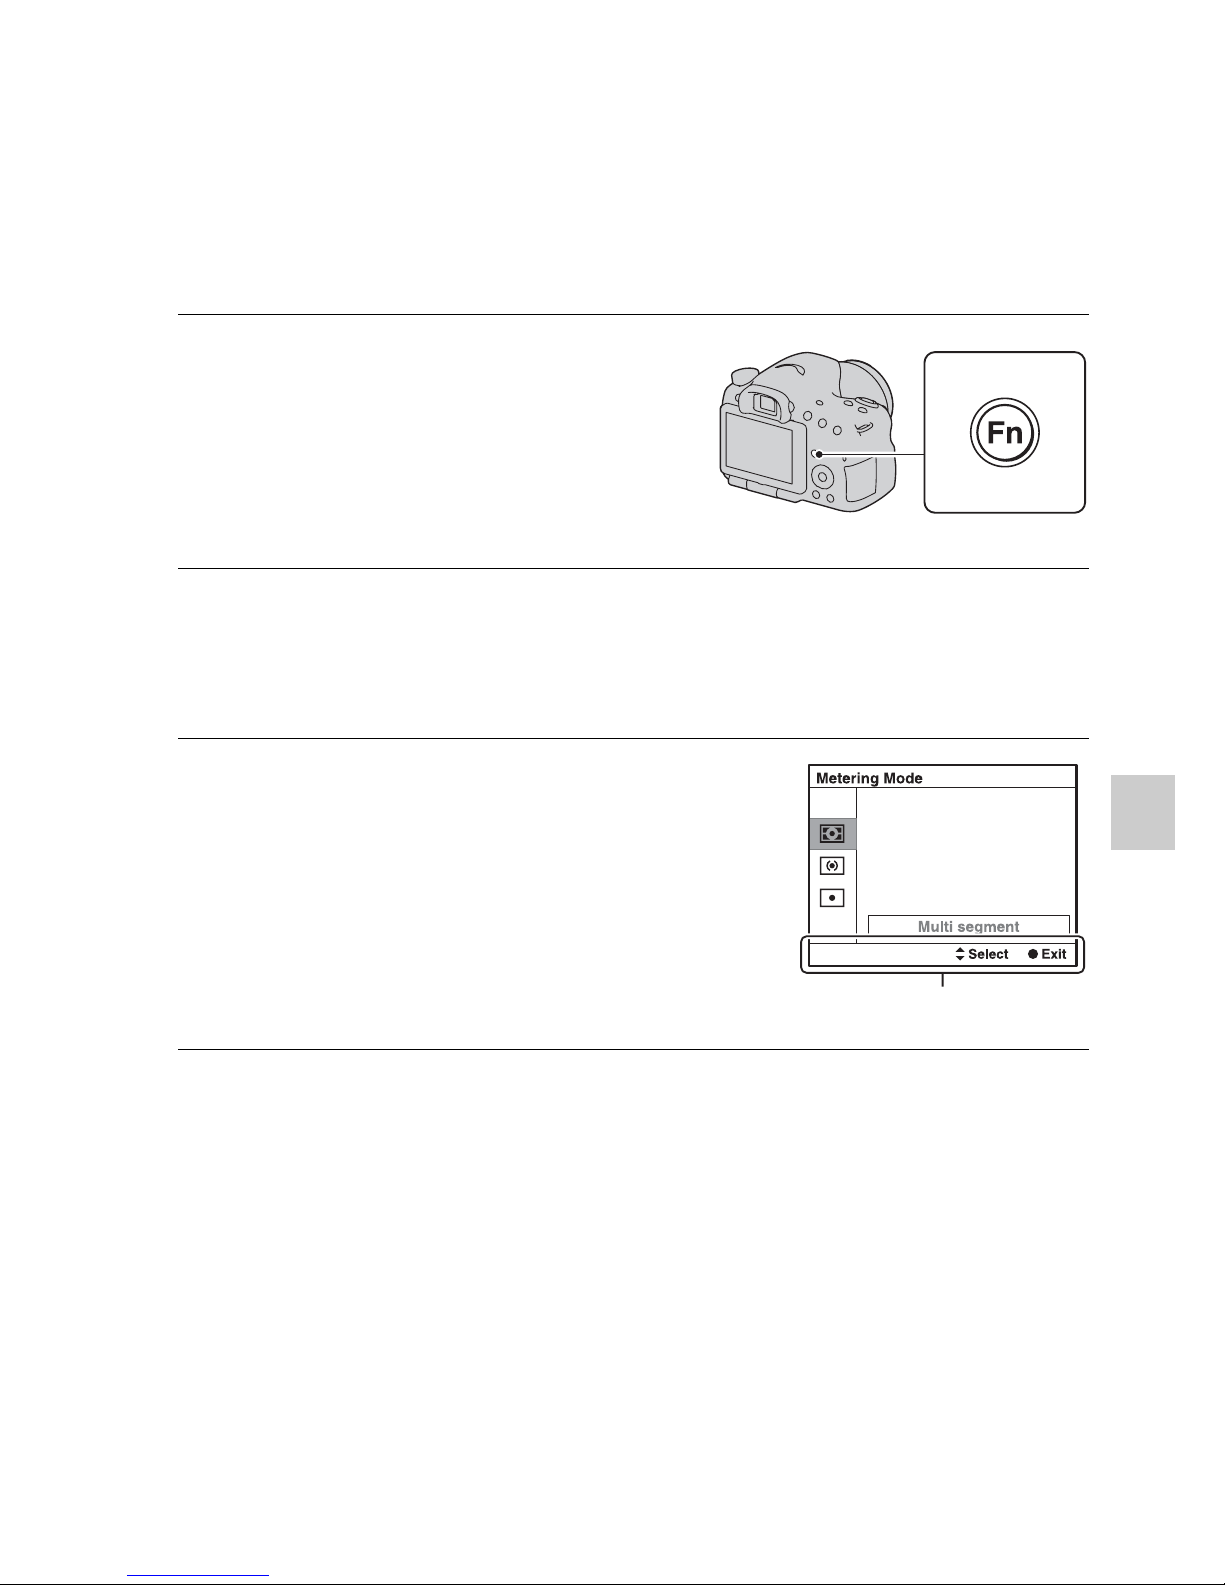
This button is used for setting up or executing functions used frequently in
shooting.
To set up the camera directly from the recording information screen
Turn the control dial without pressing the center z in step 2. You can set
up the camera directly from the recording information screen.
1 Press the Fn button.
2 Select the desired item with v/V/b/B on the control button,
then press the center z to execute.
The setup screen appears.
3 Following the operation guide,
select and execute the desired
function.
Operation guide
Page 54
54
Functions that can be selected with
the Fn (Function) button
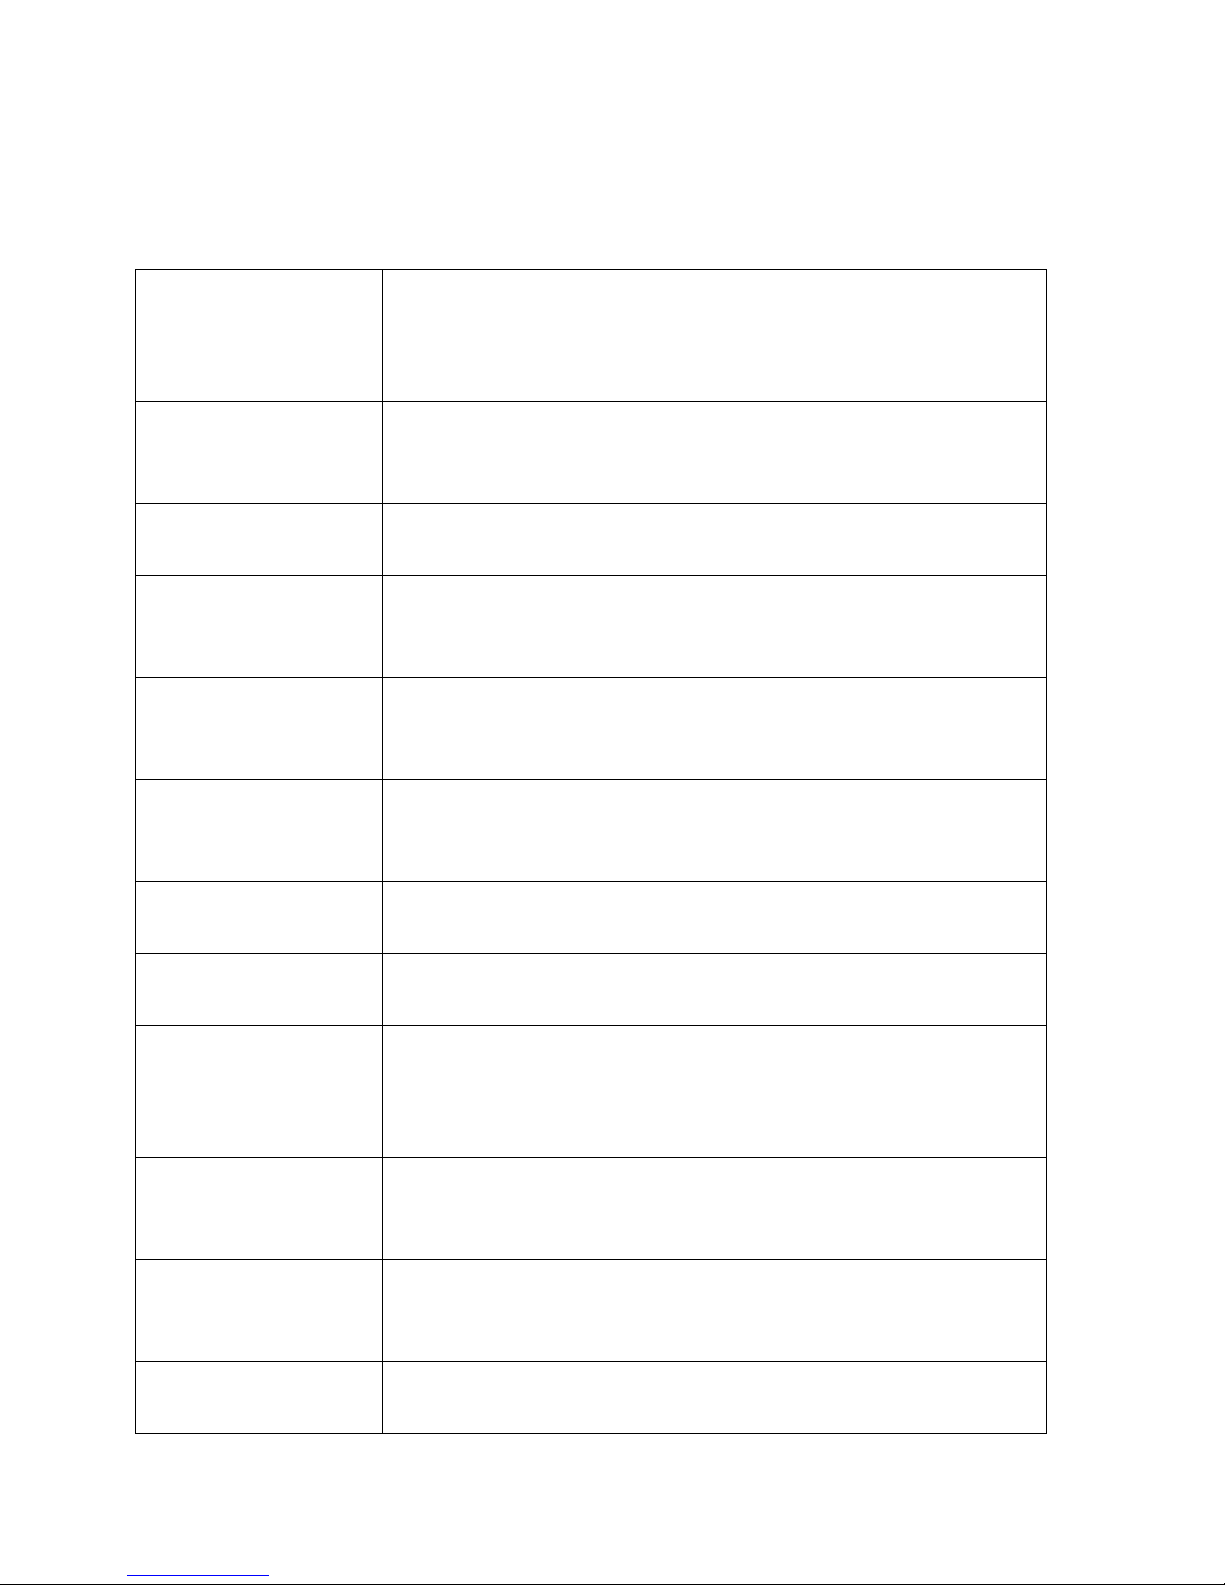
The functions that can be selected with the Fn button are as follows:
Scene Selection Selects an appropriate mode from among the Scene Selection
preset settings to suit shooting conditions.
(Portrait/Sports Action/Macro/Landscape/Sunset/Night
Scene/Hand-held Twilight/Night Portrait)
Movie Selects the exposure mode to suit your subject or your effect
and records movies.
(P/A/S/M)
Cont. Priority AE
Mode
Sets the speed for continuous shooting.
(Tele-zoom Cont. Priority AE/Cont. Priority AE)
Drive Mode Sets the drive mode such as continuous shooting.
(Single Shooting/Cont. Shooting/Self-timer/Bracket: Cont./
Single Bracket/WB bracket/Remote Cdr.)
Flash Mode Sets the flash mode.
(Flash Off/Autoflash/Fill-flash/Slow Sync./Rear Sync./
Wireless)
Autofocus Mode Selects the method for focusing according to movement of
the subject.
(Single-shot AF/Automatic AF/Continuous AF)
AF area Selects the area of focus.
(Wide/Zone/Spot/Local)
Object Tracking Keeps the focus on a subject while tracking it.
(On/Off)
Smile/Face Detect. Automatically captures people’s face(s) with the optimal
focus and exposure./Shoots when a smile is detected.
(Face Detection Off/Face Detection On (Regist. Faces)/Face
Detection On/Smile Shutter)
Auto Port. Framing Analyzes the scene when capturing face and automatically
saves another image with well-balanced composition.
(Auto/Off)
ISO Sets the sensitivity to light. The larger the number, the faster
the shutter speed.
(Multi Frame Noise Reduct./ISO AUTO to 16000)
Metering Mode Selects the method for measuring brightness.
(Multi segment/Center weighted/Spot)
Page 55
55
Functions that can be selected with the Fn (Function) button
Functions list
Flash Comp. Adjusts the intensity of flash output.
(+2.0EV to –2.0EV)
White Balance Adjusts the color tone of images.
(Auto WB/Daylight/Shade/Cloudy/Incandescent/Fluor.:
Warm White/Fluor.: Cool White/Fluor.: Day White/Fluor.:
Daylight/Flash/C.Temp./Filter/Custom)
DRO/Auto HDR Compensates for the brightness and contrast automatically.
(Off/D-RangeOptimizer/Auto HDR)
Creative Style Selects your desired image processing.
(Standard/Vivid/Portrait/Landscape/Sunset/Black & White)
Picture Effect Shoots with the desired effect filter to achieve more
impressive expression.
(Off/Toy Camera/Pop Color/Posterization/Retro Photo/Soft
High-key/Partial Color/High Contrast Mono./Soft Focus/
HDR Painting/Rich-tone Mono./Miniature)
Page 56
56
The functions selected with the MENU
button
You can set up the basic settings for the camera as a whole or execute
functions such as shooting, playback, or other operations.
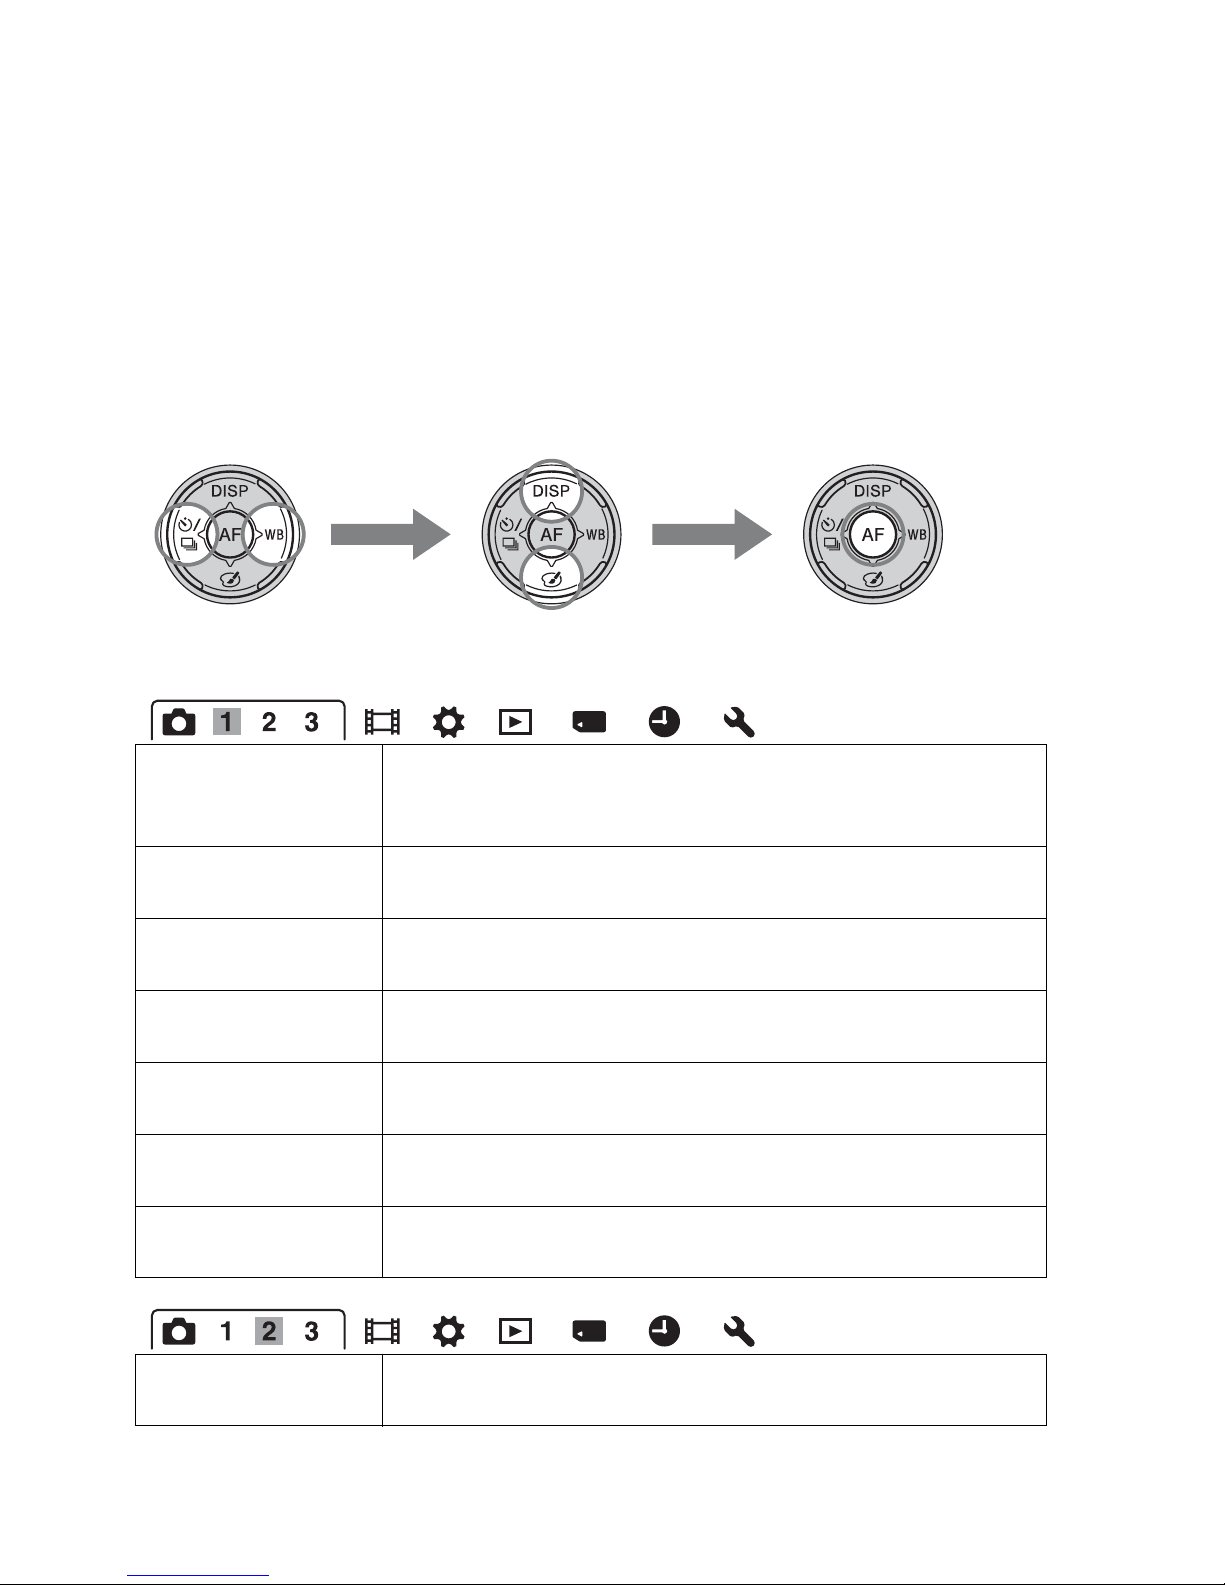
Press the MENU button, then set up the desired item with v/V/b/B on the
control button, then press the center of the control button.
Still shooting menu
Select a page of the menu Select an item on the menu
Image Size Selects the size of still images.
(L:16M/M:8.4M/S:4.0M (When [Aspect Ratio] is set to 3:2)
L:14M/M:7.1M/S:3.4M (When [Aspect Ratio] is set to 16:9))
Aspect Ratio Selects the aspect ratio for still images.
(3:2/16:9)
Quality Sets the image quality for still images.
(RAW/RAW & JPEG/Fine/Standard)
Panorama: Size Selects the size of panoramic images.
(Standard/Wide)
Panorama: Direction Sets the shooting direction for panoramic images.
(Right/Left/Up/Down)
3D Pan.: Image Size Selects the size of 3D-images.
(16:9/Standard/Wide)
3D Pan.: Direction Sets the shooting direction for 3D-images.
(Right/Left)
Clear Image Zoom Zooms an image with higher quality than Digital Zoom.
(On/Off)
Page 57
57
The functions selected with the MENU button
Functions list
Movie shooting menu
Digital Zoom Zooms an image with higher magnification than Clear Image
Zoom. This feature can be also available in movie recording.
(On/Off)
Long Exposure NR Sets noise reduction processing for shots in which shutter
speed will be 1 second or longer.
(On/Off)
High ISO NR Sets noise reduction processing for high-sensitivity shooting.
(High/Normal/Low)
Flash control Sets the method for determining the intensity of flash output.
(ADI flash/Pre-flash TTL)
AF Illuminator Sets the AF illuminator, which sheds light on a dark scene to
aid focusing.
(Auto/Off)
Color Space Changes the range of reproducible colors.
(sRGB/AdobeRGB)
SteadyShot Sets SteadyShot.
(On/Off)
Shooting Tip List Allows you to access all shooting tips.
File Format Selects the movie file format.
(AVCHD/MP4)
Record Setting Selects the size of the recorded movie frame.
(60i 24M(FX)/50i 24M(FX)/60i 17M(FH)/50i 17M(FH)/60p
28M(PS)/50p 28M(PS)/24p 24M(FX)/25p 24M(FX)/24p
17M(FH)/25p 17M(FH)/1440×1080 12M/VGA 3M)
Audio Recording Sets whether or not to record audio when shooting a movie.
(On/Off)
Wind Noise Reduct. Reduces wind noise during movie recording.
(On/Off)
SteadyShot Sets SteadyShot.
(On/Off)
Page 58
58
The functions selected with the MENU button
Custom menu
Eye-Start AF Sets whether or not to use auto focus when you look through
the viewfinder.
(On/Off)
FINDER/LCD Setting Sets the method for switching between the viewfinder and
LCD screen.
(Auto/Manual)
Viewfinder Magnifi. Changes the screen size in the viewfinder. If you cannot see
the entire screen in the viewfinder, set it to [Standard].
(Maximum/Standard)
Red Eye Reduction Reduces the red-eye phenomenon during flash use.
(On/Off)
Release w/o Lens Sets whether shutter can open when lens is not attached.
(Enable/Disable)
S. Auto Cont.
Shooting
Sets whether or not to shoot continuously in Superior Auto
mode.
(Auto/Off)
S. Auto Image
Extract.
Sets whether or not to save all the images that were shot
continuously in Superior Auto mode.
(Auto/Off)
Grid Line Sets a grid line display to enable alignment to a structural
outline.
(Rule of 3rds Grid/Square Grid/Diag. + Square Grid/Off)
Auto Review Displays the captured image after shooting. Sets auto review.
(10 Sec/5 Sec/2 Sec/Off)
DISP Button(Monitor) Allows you to select the available screen display modes of
the LCD screen that can be selected by pressing DISP on the
control button.
(Graphic Display/Display All Info./No Disp. Info./Level/
Histogram/For viewfinder)
DISP Button(Finder) Allows you to select the available screen display modes of
the viewfinder that can be selected by pressing DISP on the
control button.
(Graphic Display/Display All Info./No Disp. Info./Level/
Histogram)
Page 59
59
The functions selected with the MENU button
Functions list
Peaking Level Enhances the outline of in-focus ranges with a specific color
in manual focus mode.
(High/Mid/Low/Off)
Peaking Color Sets the color used for the peaking function.
(Red/Yellow/White)
Live View Display Sets whether or not to display the effect of a function on the
screen, such as the effect of the exposure compensation
value.
(Setting Effect ON/Setting Effect OFF)
Func. of AEL button Assigns the desired function to the AEL button.
(Exposure Comp./Drive Mode/Flash Mode/Autofocus Mode/
AF area/Face Detection/Smile Shutter/Auto Port. Framing/
ISO/Metering Mode/Flash Comp./White Balance/DRO/Auto
HDR/Creative Style/Picture Effect/Image Size/Quality/AEL
hold/AEL toggle/ AEL hold/ AEL toggle/Object
Tracking/AF lock/Aperture Preview/Shot. Result Preview/
Zoom/Focus Magnifier)
ISO Button Assigns the desired function to the ISO button.
(Exposure Comp./Drive Mode/Flash Mode/Autofocus Mode/
AF area/Face Detection/Smile Shutter/Auto Port. Framing/
ISO/Metering Mode/Flash Comp./White Balance/DRO/Auto
HDR/Creative Style/Picture Effect/Image Size/Quality/AEL
hold/AEL toggle/ AEL hold/ AEL toggle/Object
Tracking/AF lock/Aperture Preview/Shot. Result Preview/
Zoom/Focus Magnifier)
Preview Button Selects the method to be used for the operating preview
button.
(Shot. Result Preview/Aperture Preview/Focus Magnifier)
Focus Hold Button Sets the function of the focus hold button of the lens.
(Focus Hold/D.O.F.Preview)
MOVIE Button Selects the appropriate mode for the MOVIE button.
(Always/Movie Mode Only)
Lens Comp.: Shading Compensates for the shaded corners of the screen caused by
the lens attached.
(Auto/Off)
Page 60
60
The functions selected with the MENU button
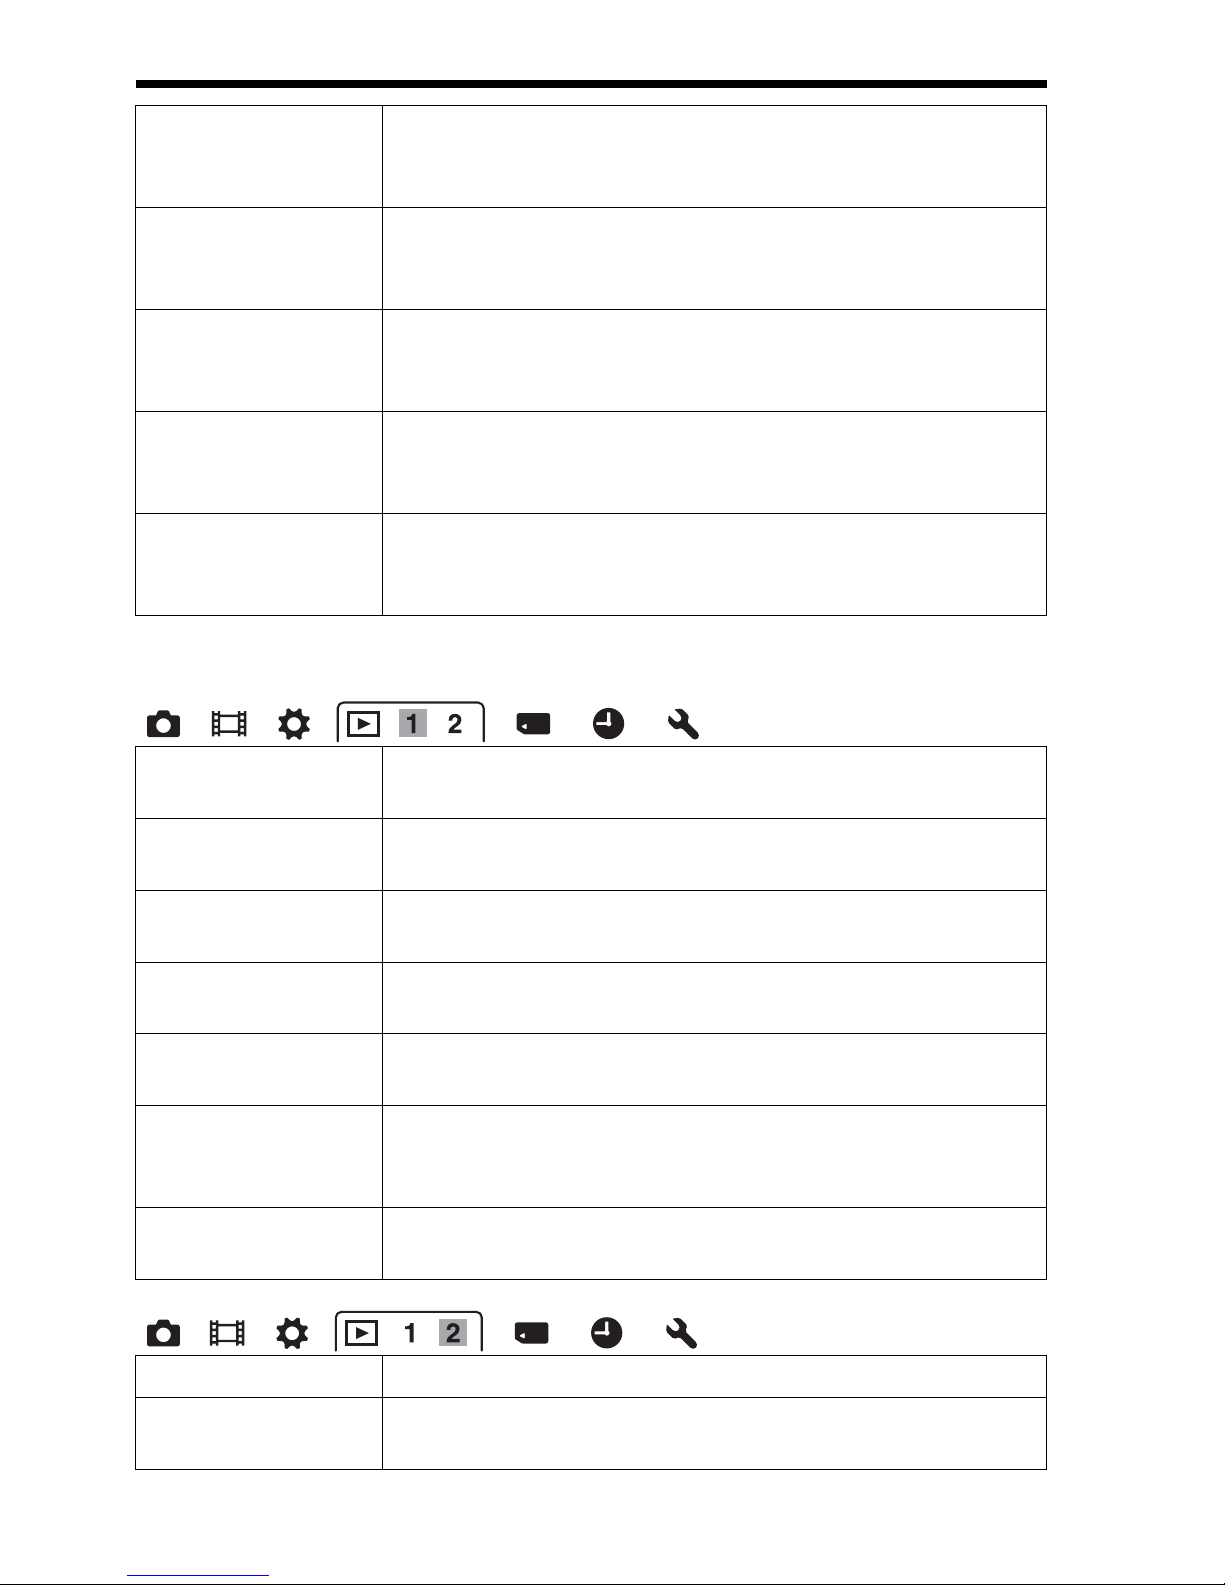
Playback menu
Lens Comp.: Chro.
Aber.
Reduces the color deviation at the corners of the screen
caused by the lens attached.
(Auto/Off)
Lens Comp.:
Distortion
Compensates for distortion on the screen caused by the lens
attached.
(Auto/Off)
Front Curtain Shutter Sets whether or not to use the electronic front curtain shutter
function.
(On/Off)
Face Registration Registers or changes the person to be given priority in the
focus.
(New Registration/Order Exchanging/Delete/Delete All)
Face Priority
Tracking
Sets whether to preferentially-track a certain face or not when
the camera detects that face during object tracking.
(On/Off)
Delete Deletes images.
(Multiple Img./All in Folder/All AVCHD view files)
View Mode Allows you to determine how to group the playback images.
(Folder View(Still)/Folder View(MP4)/AVCHD View)
Slide Show Shows a slide show.
(Repeat/Interval/Image Type)
Image Index Displays the image list.
(4 Images/9 Images)
3D Viewing Plays back 3D-images using a 3D-compatible TV connected
to the camera.
Protect Protects or cancels protection for an image.
(Multiple Img./Cancel All Images/Cancel All Movies(MP4)/
Cancel All AVCHD view files)
Specify Printing Specifies or unspecifies the images for DPOF.
(DPOF Setup/Date Imprint)
Volume Settings Sets the volume for movie playback.
Playback Display Sets how to play back an image recorded in portrait.
(Auto Rotate/Manual Rotate)
Page 61
61
The functions selected with the MENU button
Functions list
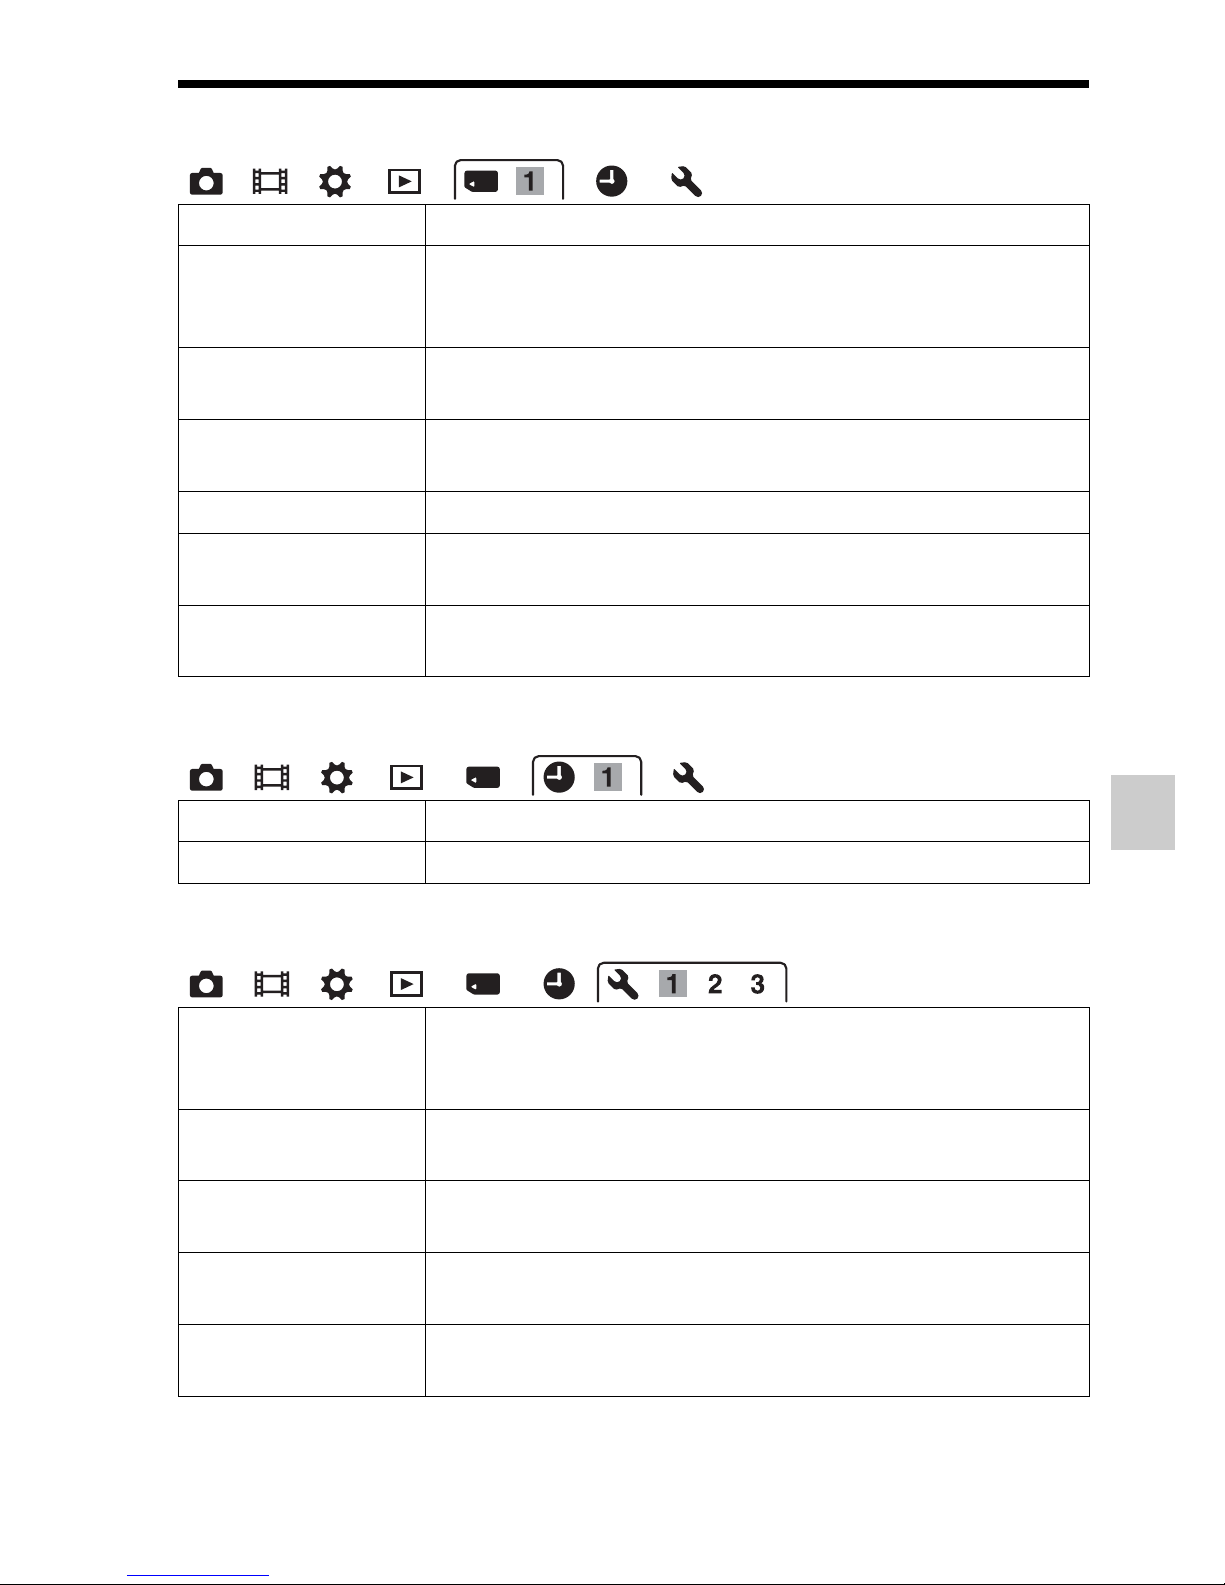
Memory Card Tool menu
Clock setup menu
Setup menu
Format Formats the memory card.
File Number Sets the method used to assign file numbers to still images
and MP4 movies.
(Series/Reset)
Folder Name Sets the folder format for still images.
(Standard Form/Date Form)
Select REC Folder Changes the selected folder for storing still images and MP4
movies.
New Folder Creates a new folder for storing still images and MP4 movies.
Recover Image DB Recovers the image database file and enables recording and
playback.
Display Card Space Displays the remaining recording time of movies and the
recordable number of still images on the memory card.
Date/Time Setup Sets date and time, and daylight savings.
Area Setting Sets the location of use.
Menu start Sets the default position of the cursor on the menu to the top
item or the last-selected item.
(Top/Previous)
LCD Brightness Sets the brightness of the LCD screen.
(Auto/Manual)
Viewfinder Bright. Sets the brightness of the viewfinder.
(Auto/Manual)
Eco Mode Sets the level of the power saving feature.
(Standard/Max)
Power Save Sets the interval after which power save mode engages.
(30 Min/5 Min/1 Min/20 Sec/10 Sec)
Page 62
62
The functions selected with the MENU button
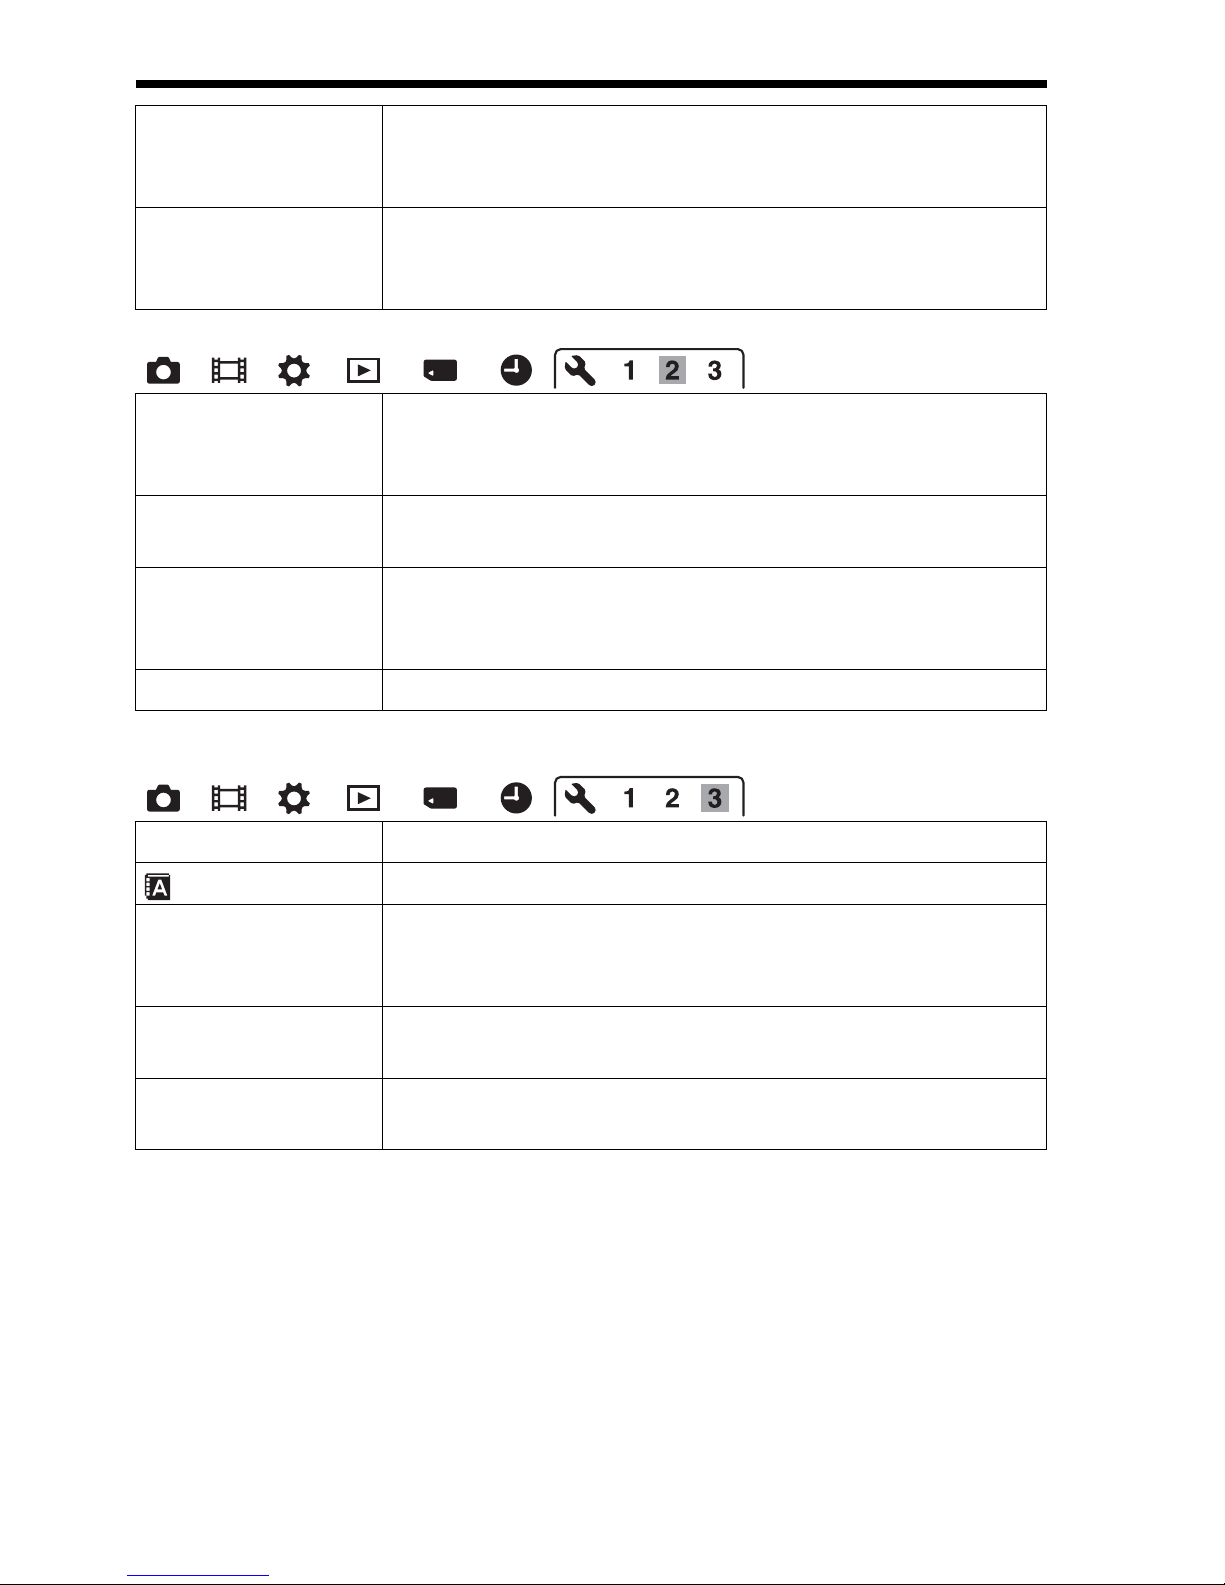
* Appears when an Eye-Fi card (sold separately) is inserted in the camera.
HDMI Resolution Sets the resolution when the camera is connected to an HDMI
TV.
(Auto/1080p/1080i)
CTRL FOR HDMI Operates the camera from a TV that support “BRAVIA”
Sync.
(On/Off)
Upload Settings* Sets the upload function of the camera when using an Eye-Fi
card.
(On/Off)
USB Connection Sets the USB connection method.
(Auto/Mass Storage/MTP)
Audio signals Sets whether or not to use the beep sound when the focus is
achieved or the self-timer is working.
(On/Off)
Cleaning Mode Starts the cleaning mode to clean the image sensor.
Version Displays the camera software version.
Language Selects the language.
Mode Dial Guide Turns on or off the mode dial guide (the explanation of each
shooting mode).
(On/Off)
Demo Mode Sets the demonstration playback of a movie to on or off.
(On/Off)
Initialize Restores the settings to their defaults.
(Reset Default/Rec mode reset/Custom reset)
Page 63
63
Functions list
Using the guide function of the camera
The camera displays the shooting tips in accordance with the shooting
mode selected.
To access all shooting tips
You can search through all the shooting tips from the menu.
Use this item when you want to read shooting tips you have seen before.
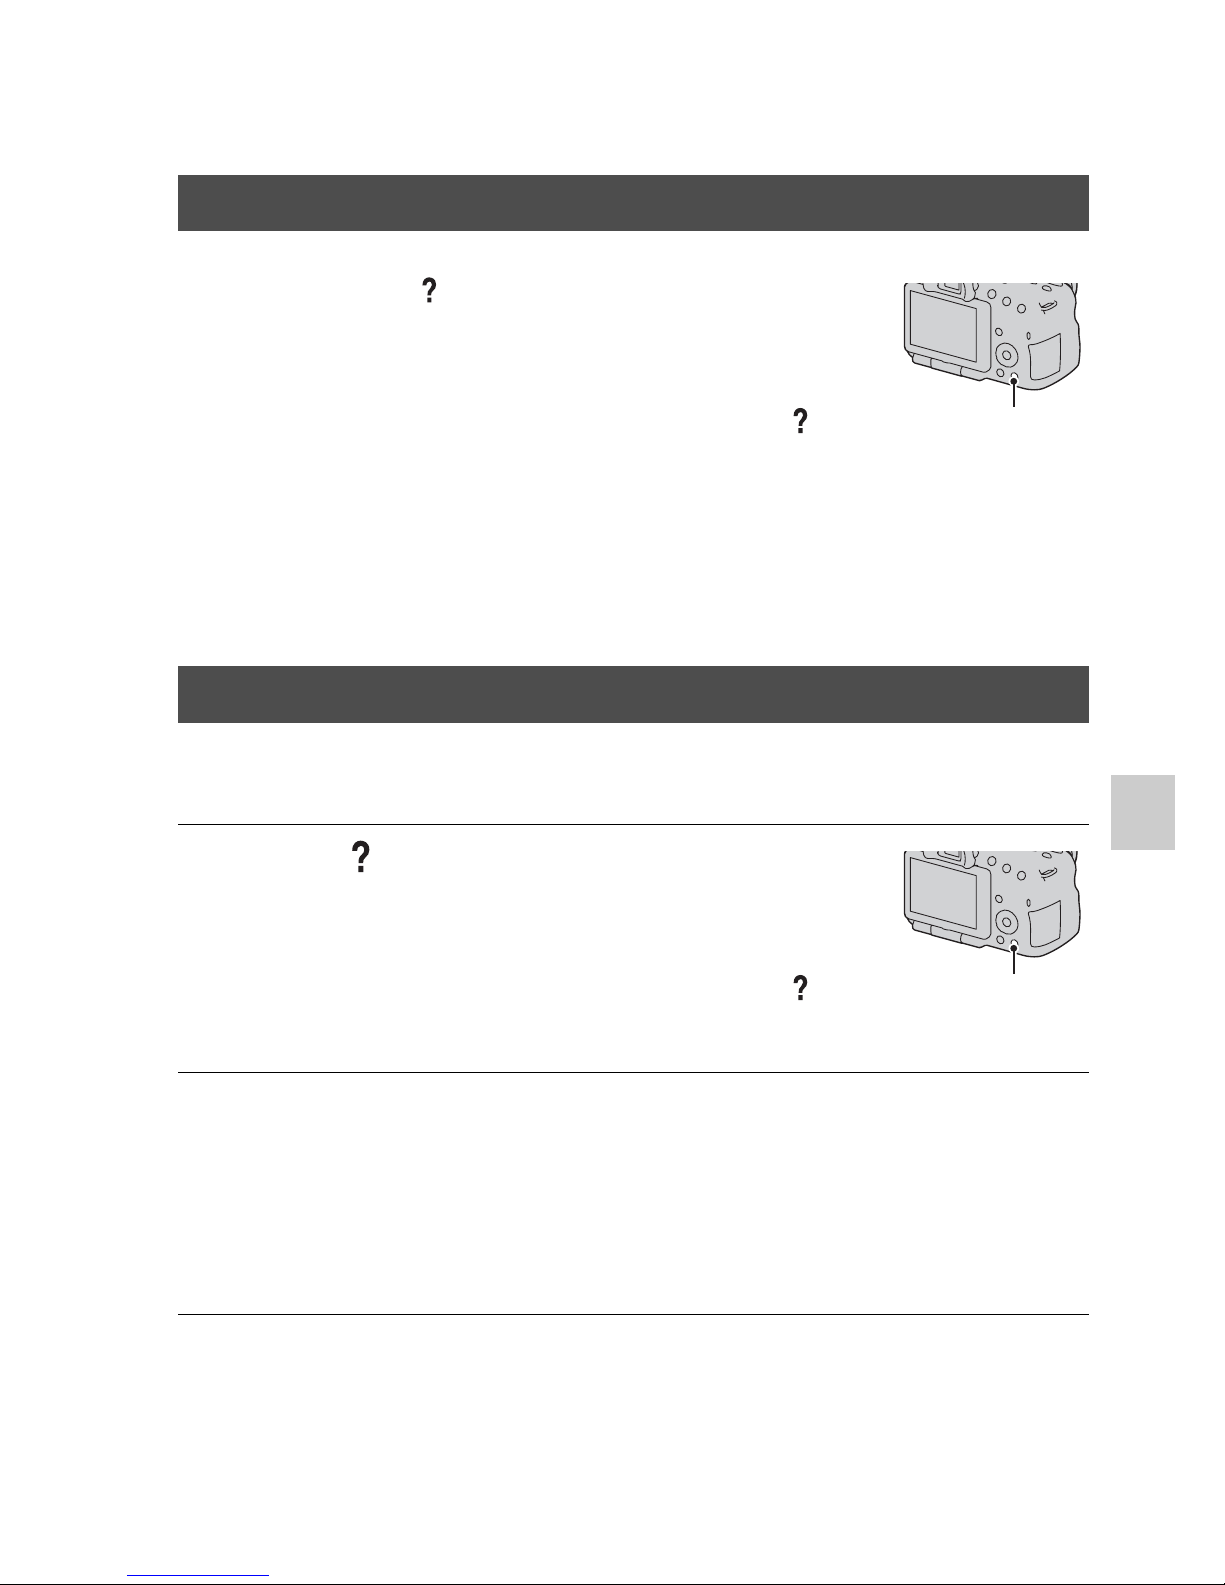
In-Camera Guide
When you press the (In-Camera Guide)
button on the Fn screen or menu screen, a
guide in accordance with the currently
selected function or setting appears
automatically.
Select unavailable functions or settings
on the Fn screen, then press the center of
the control button, the appropriate setup
is indicated in order to enable them.
(In-Camera Guide) button
Shooting Tip
1 Press the (In-Camera Guide)
button when the recording
information display is displayed.
A shooting tip list in accordance with the
current subject appears automatically.
(In-Camera Guide) button
2 Select the desired shooting tip with v/V on the control button,
then press the center of the control button.
The shooting tip is displayed.
• You can scroll the screen with v/V.
• You can select the item with b/B.
Page 64

64
Using the guide function of the camera
MENU button t 3 t [Shooting Tip List]t Select the desired
shooting tip
Page 65
65
Viewing images on a computer
Viewing images on a computer
Using with your computer
Following applications are contained on the CD-ROM (supplied) to allow
more versatile use of images shot with your camera.
• “Image Data Converter”
You can open RAW format image files.
• “PlayMemories Home”
You can import still images or movies recorded with the camera to your
computer so that you can view them, and use various convenient features
to enhance the images you have shot.
For detailed notes on installation, also see page 67.
Notes
• Use “Image Data Converter” to play back RAW images.
• “PlayMemories Home” is not compatible with Mac computers. When you play back
images on Mac computers, use the appropriate application software supplied with
the Mac computer.
The following computer environment is recommended when using the
supplied software and importing images via a USB connection.
* 64-bit editions and Starter (Edition) are not supported. Windows Image
Mastering API (IMAPI) Ver.2.0 or later is required to use the function
for creating discs.
Recommended computer environment (Windows)
OS (pre-installed) Microsoft Windows XP* SP3/Windows Vista** SP2/
Windows 7 SP1
“PlayMemories
Home”
CPU: Intel Pentium III 800 MHz or faster
(For playing/editing the High Definition movies: Intel Core
Duo 1.66 GHz or faster/Intel Core 2 Duo 1.66 GHz or faster,
Intel Core 2 Duo 2.26 GHz or faster (AVC HD (FX/FH)),
Intel Core 2 Duo 2.40 GHz or faster (AVC HD (PS)))
Memory: Windows XP 512MB or more (1 GB or more is
recommended), Windows Vista/Windows 7 1 GB or more
Hard Disk: Disk space required for installationapproximately 500 MB
Display: Screen resolution-1024 × 768 dots or more
“Image Data
Converter Ver.4”
CPU/Memory: Pentium 4 or faster/1 GB or more
Display: 1024 × 768 dots or more
Page 66
66
Using with your computer
** Starter (Edition) is not supported.
The following computer environment is recommended when using the
supplied software and importing images via a USB connection.
Notes
• Operation is not assured in an environment based on an upgrade of the operating
systems described above or in a multi-boot environment.
• If you connect 2 or more USB devices to a single computer at the same time, some
devices, including the camera, may not operate, depending on the types of USB
devices you are using.
• Connecting the camera using a USB interface that is compatible with Hi-Speed USB
(USB 2.0 compliant) allows advanced transfer (high speed transfer), as the camera is
compatible with Hi-Speed USB (USB 2.0 compliant).
• When your computer resumes activity from suspend or sleep mode, communication
between the camera and your computer may not recover at the same time.
Recommended computer environment (Mac)
OS (pre-installed) USB Connection: Mac OS X v10.3 – 10.7
“Image Data Converter Ver.4”: Mac OS X v10.5, 10.6
(Snow Leopard), 10.7 (Lion)
“Image Data
Converter Ver.4”
CPU: Intel Core Solo/Core Duo/Core 2 Duo or faster
Memory: 1 GB or more is recommended.
Display: 1024 × 768 dots or more
Page 67
67
Viewing images on a computer
Using the software
Log on as Administrator.
Note
• If “PMB” (Picture Motion Browser) supplied with a camera that was purchased
before 2011 has already been installed on the computer, “PMB” is overwritten by
“PlayMemories Home,” and you may be unable to use some functions of “PMB.”
Installing the software (Windows)
1 Turn on your computer, and insert the CD-ROM (supplied) into
the CD-ROM drive.
The installation menu screen appears.
• If it does not appear, double-click [Computer] (For Windows XP: [My
Computer]) t (PMHOME) t [Install.exe].
• If the AutoPlay screen appears, select “Run Install.exe” and follow the
instructions that appear on the screen to proceed with the installation.
2 Click [Install].
Make sure that both “Image Data Converter” and “PlayMemories Home” are
checked and follow the instructions on the screen.
• Connect the camera to the computer during the procedure following the
instructions on the screen.
• When the restarting confirmation message appears, restart the computer
following the instructions on the screen.
• DirectX may be installed depending on the system environment of your
computer.
3 Remove the CD-ROM after the installation is complete.
The following software is installed and shortcut icons appear on the desktop.
“Image Data Converter”
“PlayMemories Home”
“PlayMemories Home Help Guide”
Page 68

68
Using the software
Log on as Administrator.
With “Image Data Converter” you can do the following, etc.:
• To edit images recorded in RAW format with various corrections, such as
tone curve, and sharpness.
• To adjust images with white balance, exposure, and creative style, etc.
• To save the images displayed and edited on a computer.
You can either save the image as RAW format or save it in the general
file format.
• To display and compare RAW/JPEG images recorded with this camera.
• To rate the images on a scale of five.
• To set color labels.
To use “Image Data Converter,” refer to Help.
Click [Start] t [All Programs] t [Image Data Converter] t [Help] t
[Image Data Converter Ver.4].
With “PlayMemories Home” you can do the following, etc.:
• To set images shot with the camera and display them on the computer.
Installing the software (Mac)
1 Turn on your Mac computer, and insert the CD-ROM (supplied)
into the CD-ROM drive.
2 Double-click the CD-ROM icon.
3 Copy the [IDC_INST.pkg] file in the [MAC] folder to the hard
disk icon.
4 Double-click the [IDC_INST.pkg] file in the copy-to folder.
Follow the instructions on the screen to complete the installation.
Using “Image Data Converter”
Using “PlayMemories Home”
Page 69

69
Using the software
Viewing images on a computer
• To organize images on the computer on a calendar by shooting date to
view them.
• To retouch (red-eye reduction, etc.), print, send still images as e-mail
attachments, and change the shooting date.
• To print or save still images with the date.
• To create Blu-ray discs or DVD discs from AVCHD movies imported to
a computer. (An Internet connection environment is required when a Bluray disc/DVD disc is created for the first time.)
Notes
• “PlayMemories Home” is not compatible with Mac computers. When you play back
images on Mac computers, use the appropriate application software supplied with
the Mac computer.
• Movies recorded with the [60p 28M(PS)]/[50p 28M(PS)], [60i 24M(FX)]/[50i
24M(FX)] or [24p 24M(FX)]/[25p 24M(FX)] setting in [Record Setting] are
converted by “PlayMemories Home” in order to create an AVCHD recording disc.
This conversion can take a long time. Also, you cannot create a disc with the original
image quality. If you want to keep the original image quality, you must store your
movies on a Blu-ray disc.
To use “PlayMemories Home,” refer to “PlayMemories Home Help
Guide.”
Double-click the shortcut of (PlayMemories Home Help Guide) on the
desktop. Or, click [Start] t [All Programs] t [PlayMemories Home] t
[PlayMemories Home Help Guide].
“PlayMemories Home” support page (English only)
http://www.sony.co.jp/pmh-se/
Page 70
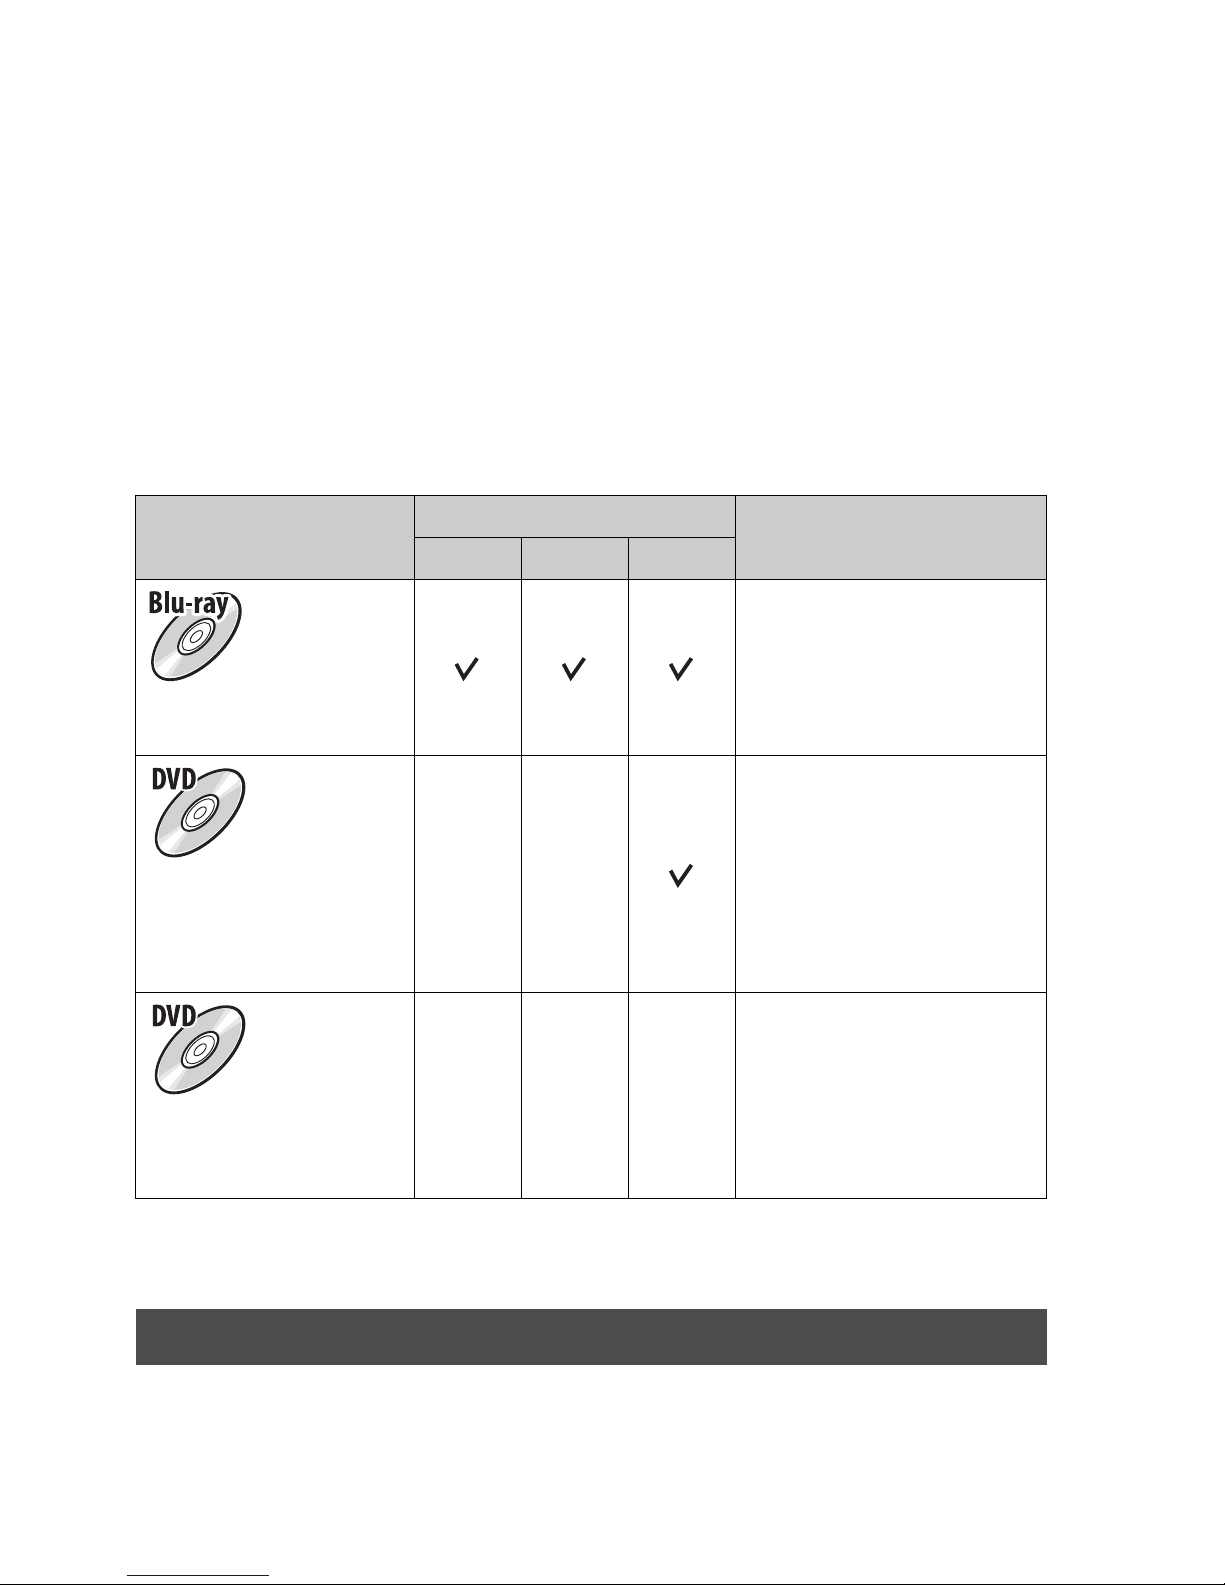
70
Selecting the method for creating a
disc of movies
You can create a disc from AVCHD movies that have been recorded with
this camera.
Depending on the disc type, playable devices may vary. Select the method
that suits your disc player.
Here, 2 ways of creating a disc of movies are described; creating a disc with
a computer using “PlayMemories Home” or creating a disc with devices
other than a computer such as a DVD writer.
* When creating a disc using “PlayMemories Home,” changing the image quality to a
lower setting allows you to create a disc.
You can import AVCHD movies to a computer using “PlayMemories
Home” and create an AVCHD recording disc or a standard definition image
quality (STD) disc.
Disc type/usage
Record setting available
Player
PS FX FH
To keep high-definition
image quality (HD)
Blu-ray disc playback
devices
(Sony Blu-ray disc player,
PlayStation®3, etc.)
To keep high-definition
image quality (HD)
(AVCHD recording
disc)
–* –*
AVCHD format playback
devices
(Sony Blu-ray disc player,
PlayStation®3, etc.)
To keep standard
definition image quality
(STD)
–* –* –*
Ordinary DVD playback
devices
(DVD player, computer
that can play DVDs, etc.)
Creating a disc using a computer
Page 71
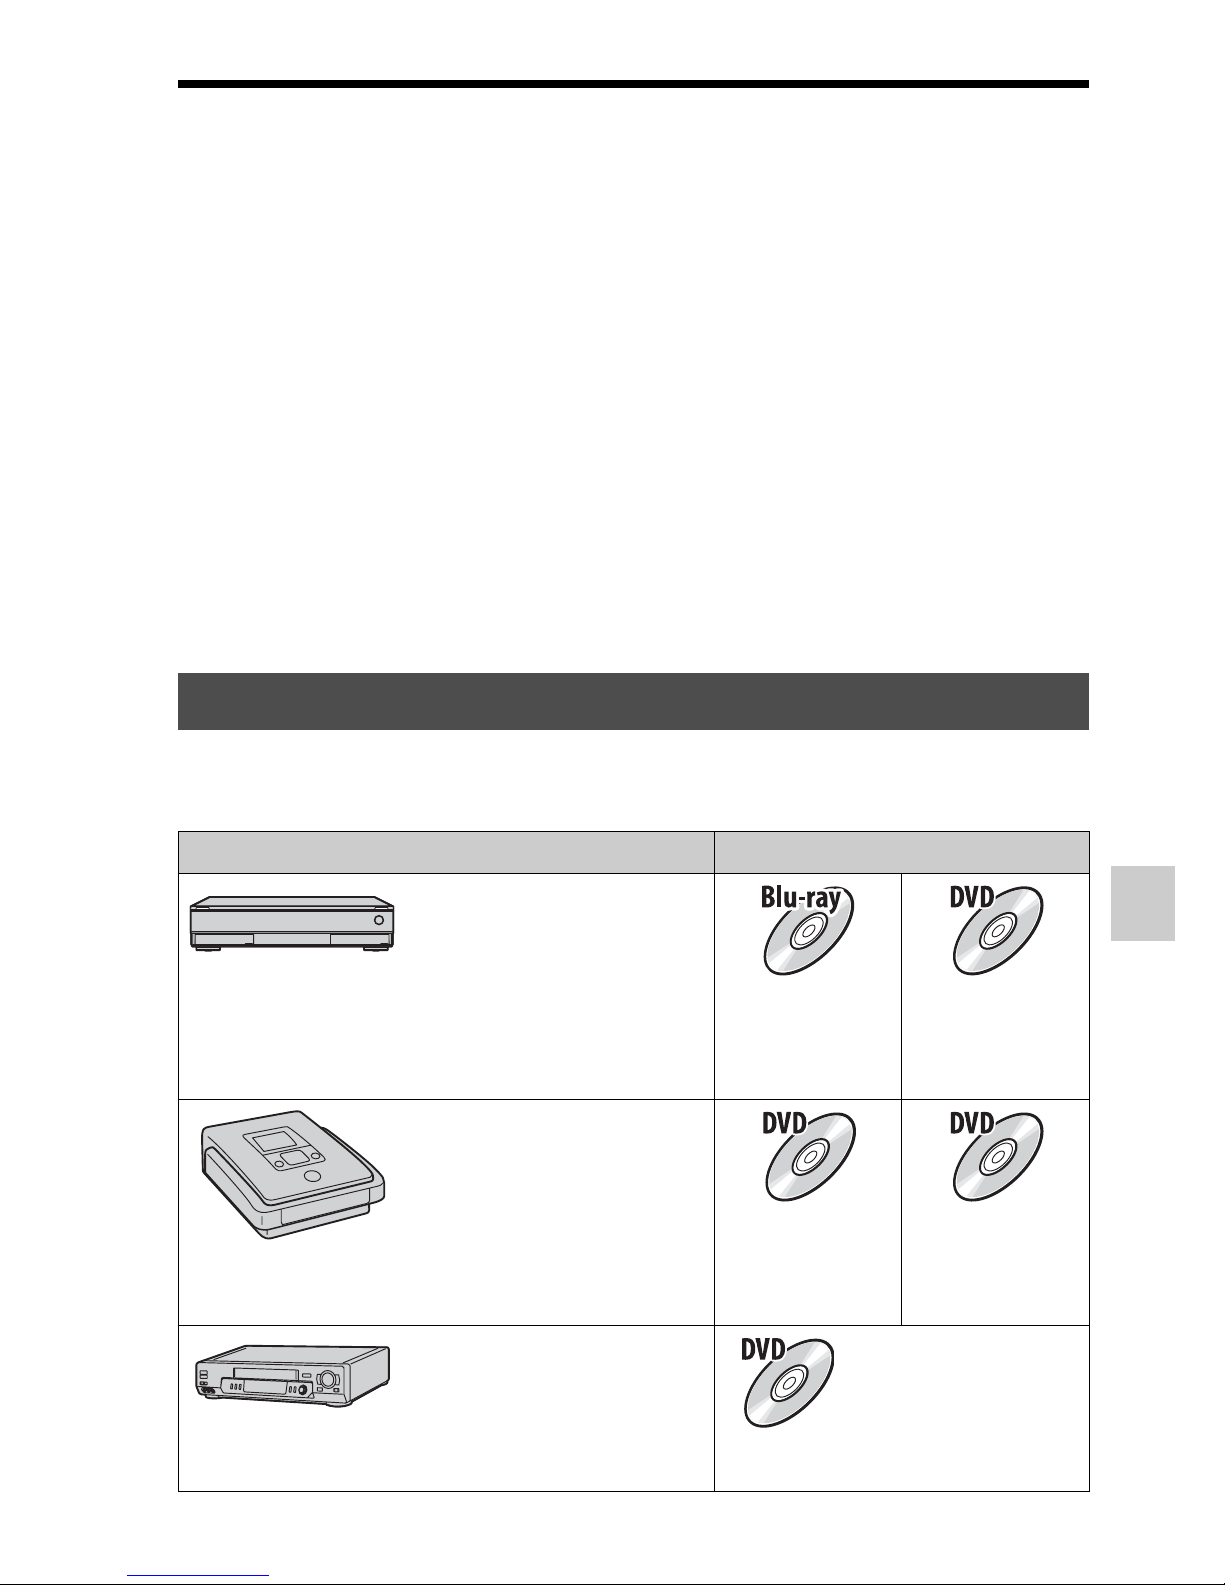
71
Selecting the method for creating a disc of movies
Viewing images on a computer
For details on the method for creating a disc using “PlayMemories Home,”
see “PlayMemories Home Help Guide.”
Notes
• To create Blu-ray discs with “PlayMemories Home,” you have to install proprietary
add-on software. For details, access following URL:
http://support.d-imaging.sony.co.jp/BDUW/
• The PlayStation®3 may not be available in some countries/regions.
• Movies recorded with the [60p 28M(PS)]/[50p 28M(PS)], [60i 24M(FX)]/[50i
24M(FX)] or [24p 24M(FX)]/[25p 24M(FX)] setting in [Record Setting] are
converted by “PlayMemories Home” in order to create an AVCHD recording disc.
This conversion can take a long time. Also, you cannot create a disc with the original
image quality. If you want to keep the original image quality, you must store your
movies on a Blu-ray disc.
• To play back movies recorded with the [60p 28M(PS)]/[50p 28M(PS)] setting on a
Blu-ray disc, a device compatible with the AVCHD Ver 2.0 format is required.
You can create a disc with a Blu-ray disc recorder and DVD writer.
The disc type you can create depends on the device used.
Creating a disc with a device other than a computer
Device Disc type
Blu-ray disc recorder: To
create a Blu-ray disc or
DVD with standard image
quality (STD)
High-definition
image quality
(HD)
Standard
definition
image quality
(STD)
DVD writer other than
DVDirect Express: To
create an AVCHD
recording disc or DVD
with standard image
quality (STD)
High-definition
image quality
(HD) (AVCHD
recording disc)
Standard
definition
image quality
(STD)
HDD recorder, etc.: To
create a DVD with
standard image quality
(STD)
Standard definition image quality
(STD)
Page 72

72
Selecting the method for creating a disc of movies
Notes
• For details on how to create a disc, refer to the operating instructions of the device
you use.
• If you create a disc using Sony DVDirect (DVD Writer), use the memory card slot of
the DVD Writer or connect the DVD Writer via USB connection to transfer the data.
• If you use Sony DVDirect (DVD Writer), check that the firmware is updated to the
newest version.
For details, see the following URL:
http://sony.storagesupport.com/
• To copy movies recorded with the [60p 28M(PS)]/[50p 28M(PS)] setting to a Bluray disc, a device compatible with the AVCHD Ver 2.0 format is required. To play
back the created Blu-ray disc, a device compatible with the AVCHD Ver 2.0 format
is required.
Page 73
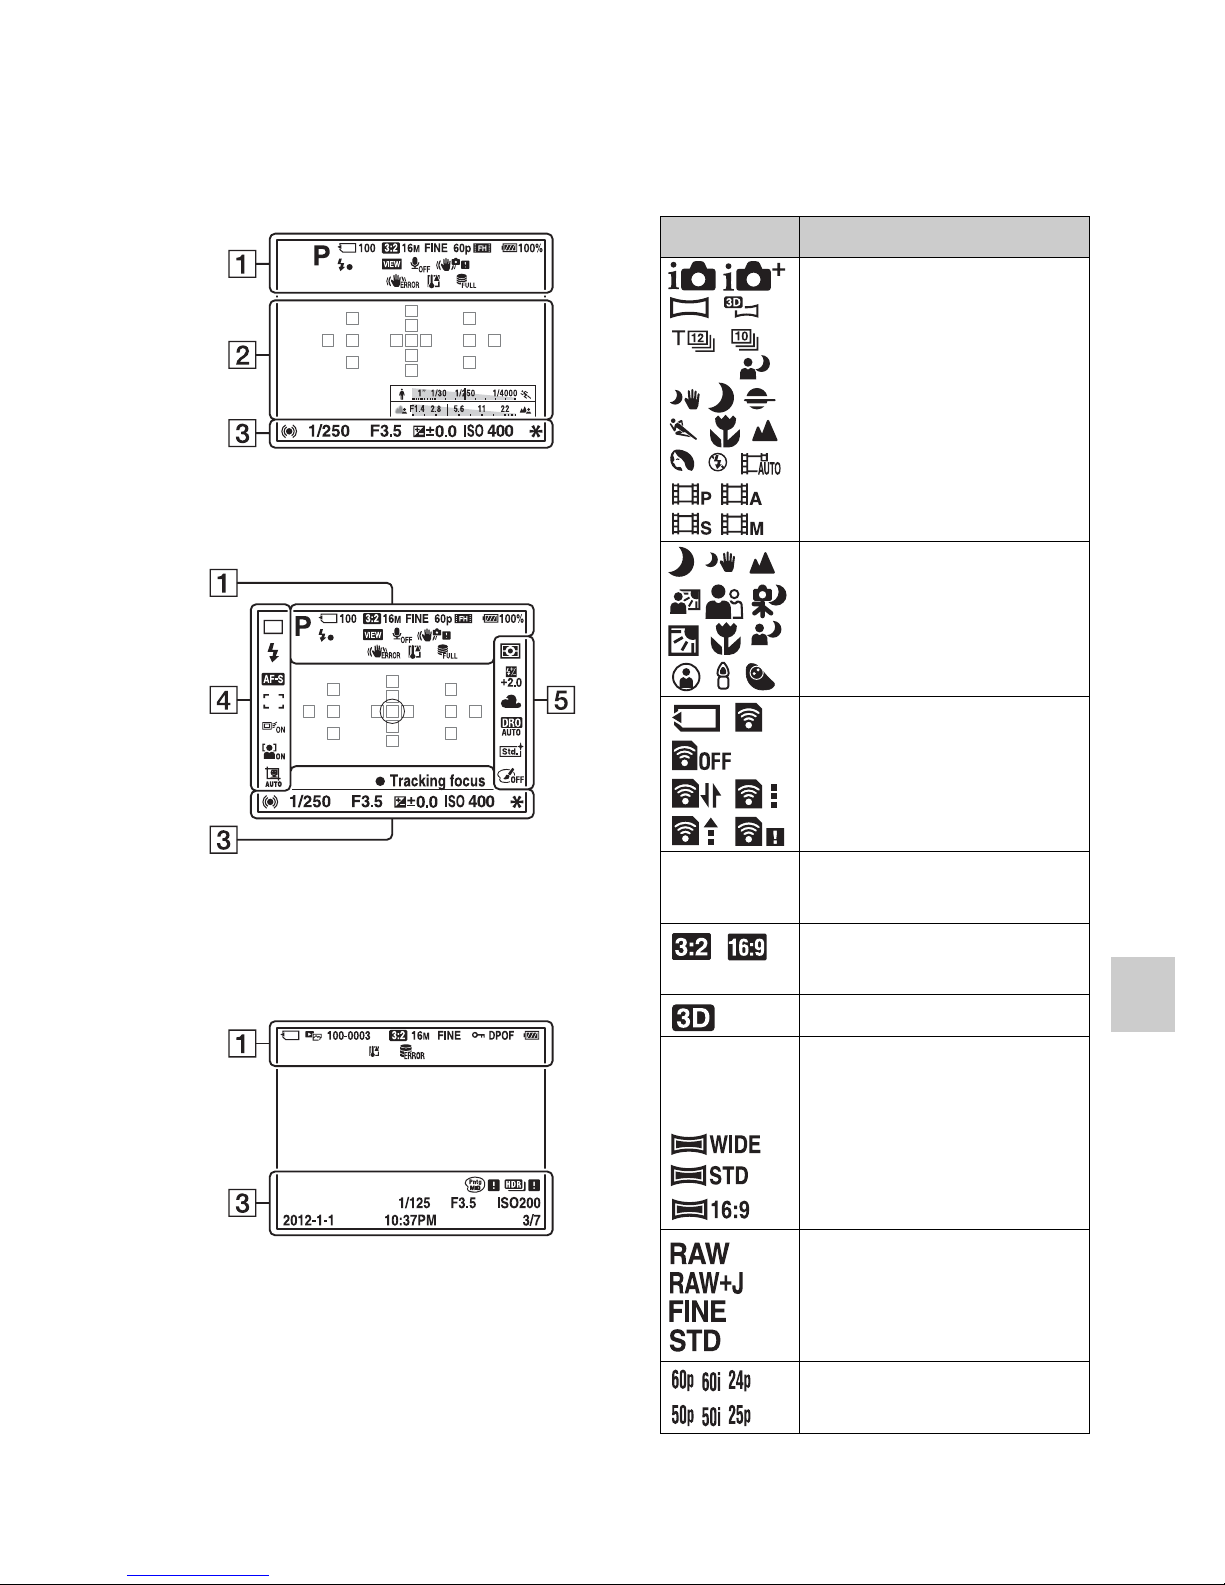
73
Others
Others
List of icons on the screen
Graphic Display (LCD screen)
Display All Info. (LCD screen)
For playback (Basic information
display)
A
Display Indication
P
A S M
Exposure mode (36)
Scene Recognition icons
(30, 37)
Memory card (20)/
Upload (61)
100 Remaining number of
recordable images
Aspect ratio of still
images (56)
3D Sweep Panorama (39)
16M 8.4M
4.0M 14M
7.1M 3.4M
Image size of still images
(47)
Image quality of still
images (56)
Frame rate of movies (57)
Page 74
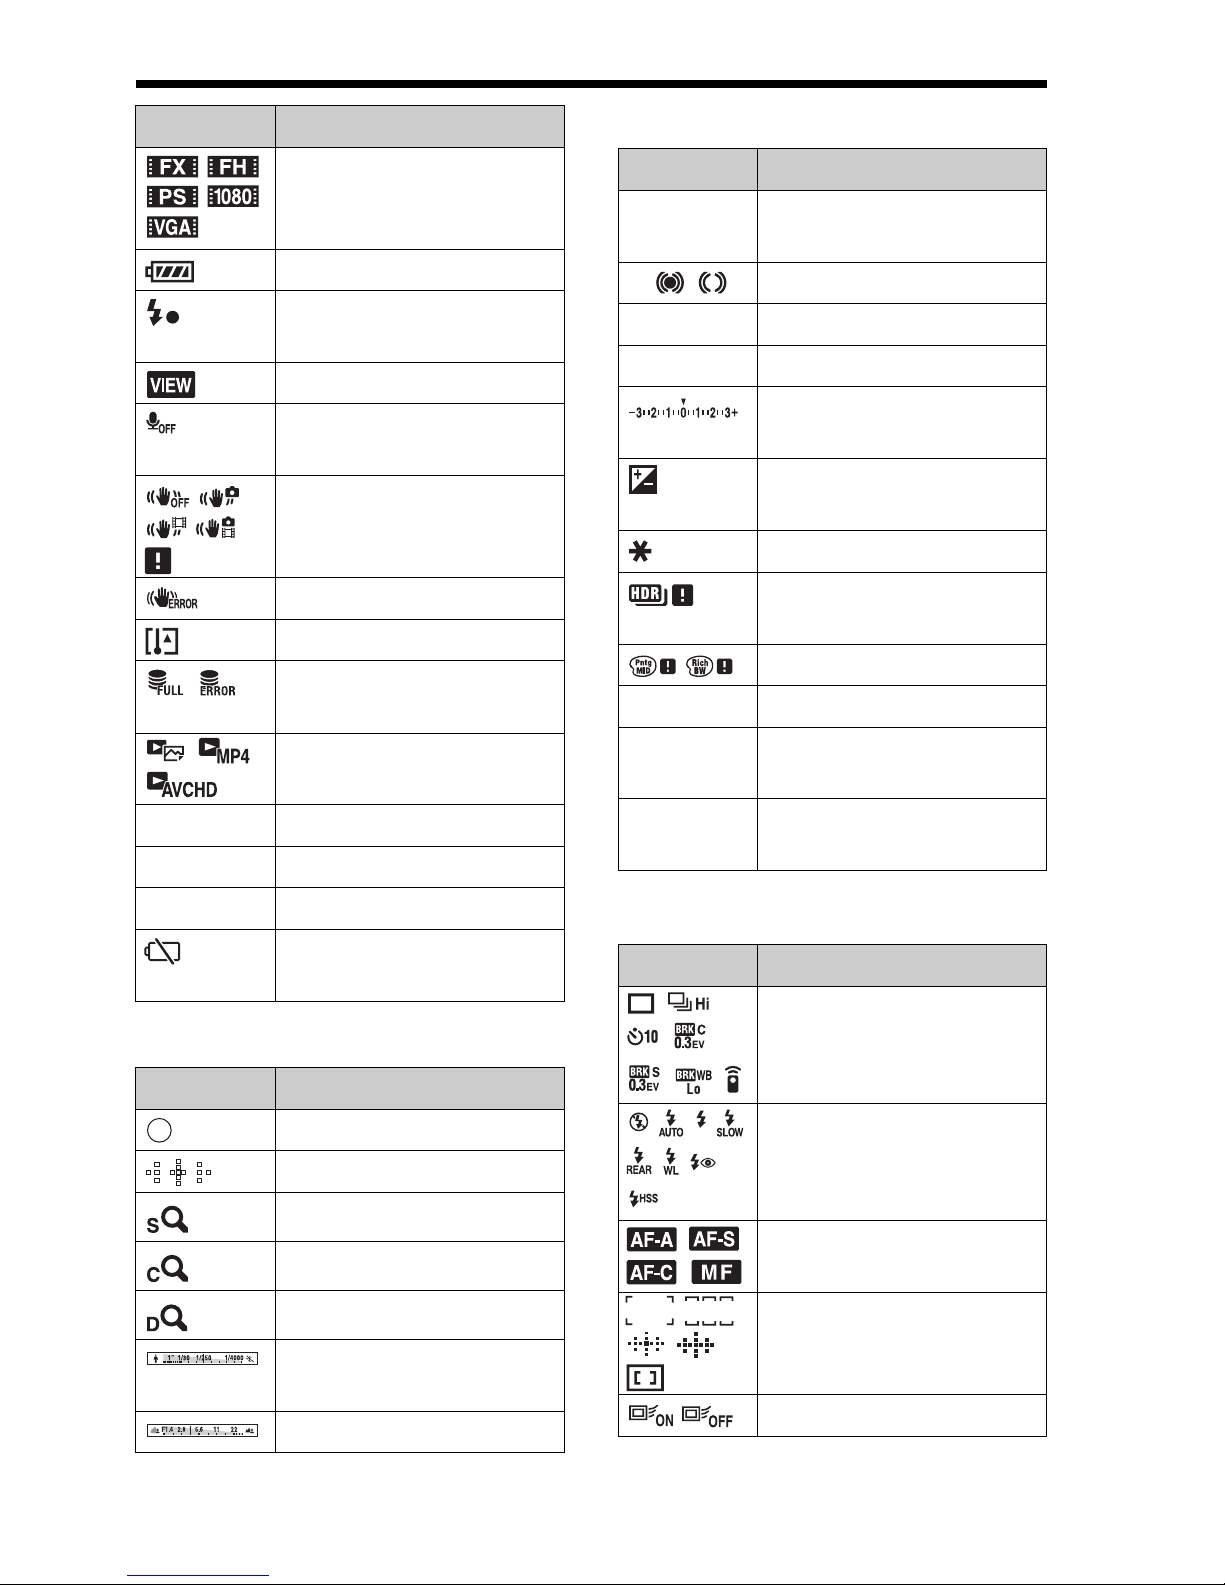
List of icons on the screen
74
B
C
D
Image size of movies (57)
100% Remaining battery (21)
Flash charge in progress
(41)
Setting Effect OFF (58)
No audio recording of
movies (57)
SteadyShot/Camera
shake warning (56, 57)
SteadyShot error
Overheating warning (9)
Database file full/
Database file error
View Mode (60)
100-0003 Folder - file number
- Protect (60)
DPOF DPOF set (60)
Remaining battery
warning (21)
Display Indication
Spot metering area (54)
AF area (54)
Smart Zoom (52)
Clear Image Zoom (52)
Digital Zoom (52)
Shutter speed indicator
(46)
Aperture indicator (46)
Display Indication
Display Indication
REC 0:12 Recording time of the
movie (m:s)
z Focus (31)
1/250 Shutter speed (36)
F3.5 Aperture (36)
EV scale (43) (Only for
viewfinder)
+3.0 Exposure compensation
(43)
AE lock (52)
Auto HDR image
warning
Picture Effect error
ISO400 ISO sensitivity (52)
3/7 File number/Number of
images in the view mode
2012-1-1
10:37AM
Date of recording
Display Indication
Drive mode (45)
Flash mode (41)/Red-eye
reduction (58)
Focus mode (54)
AF area (54)
Object tracking (54)
Page 75
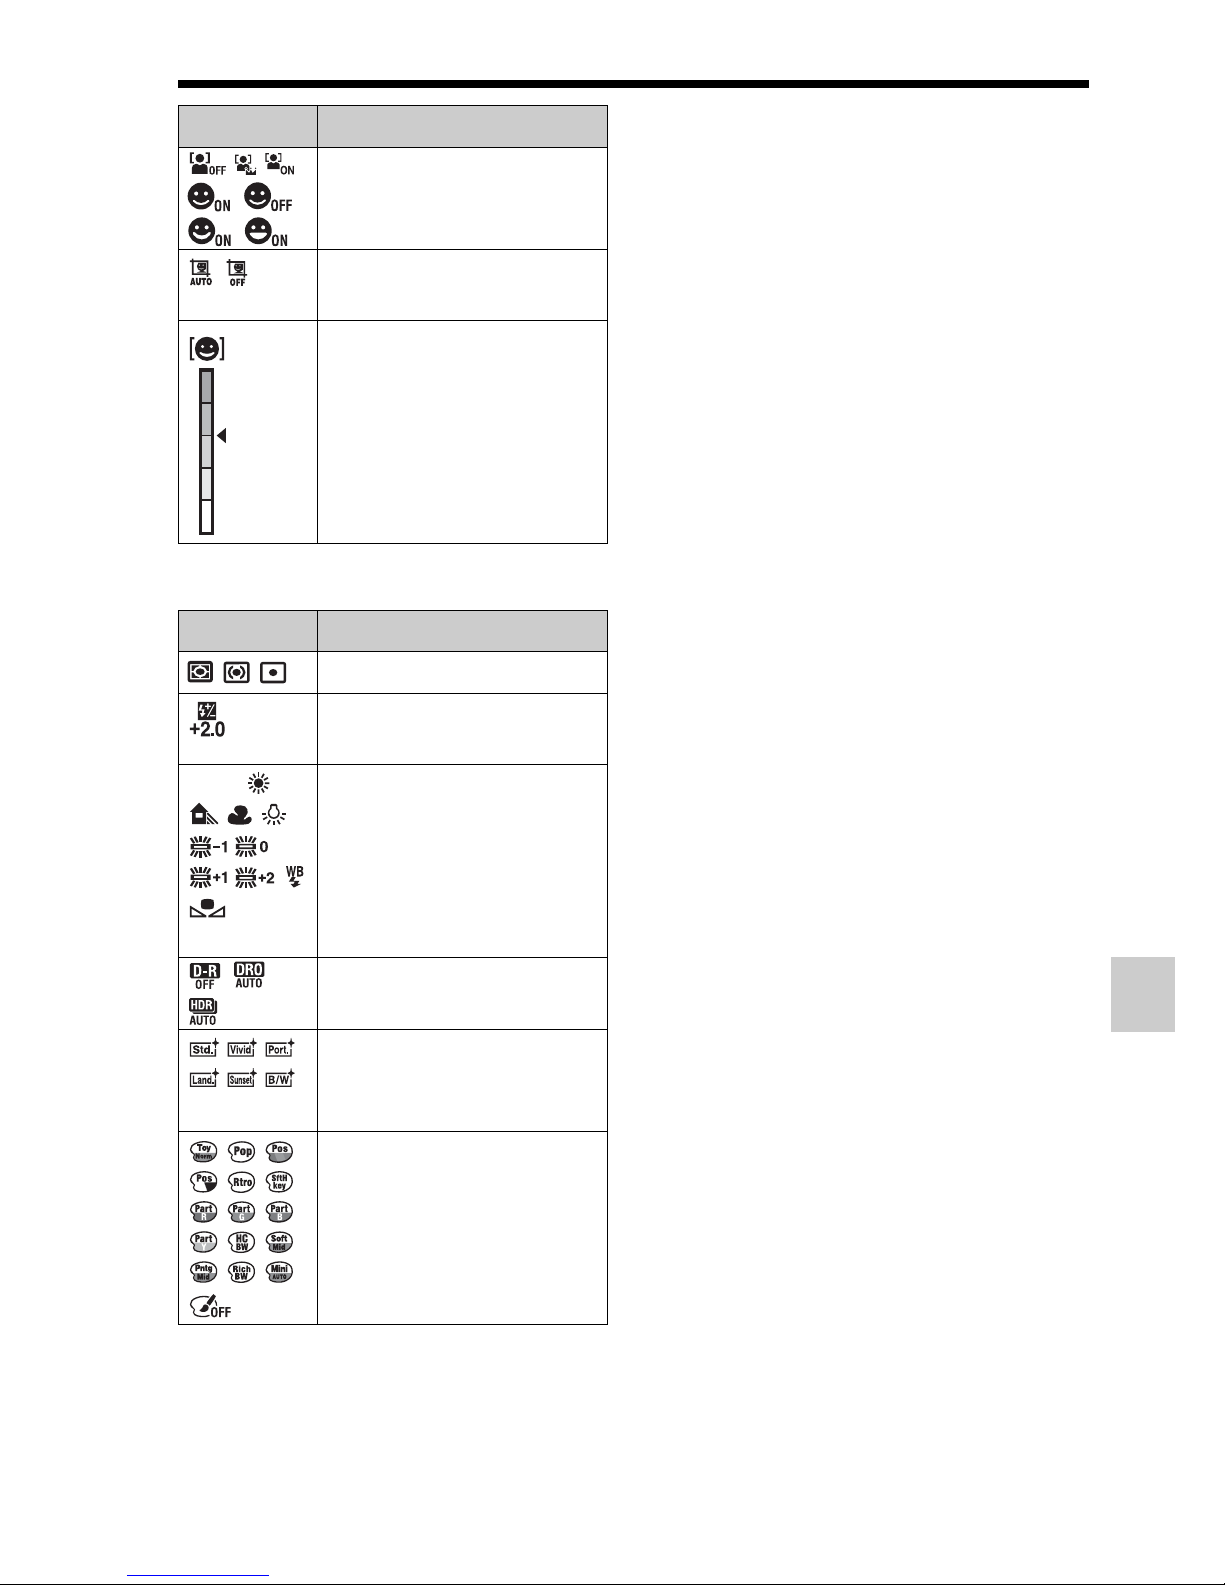
75
List of icons on the screen
Others
E
Face Detection (54)/
Smile Shutter (54)
Auto Portrait Framing
(54)
Smile Detection
Sensitivity indicator (54)
Display Indication
Metering mode (54)
Flash compensation (54)
AWB
7500K
A5 G5
White balance (Auto,
Preset, Custom, Color
temperature, Color filter)
(52)
D-Range Optimizer (54)/
Auto HDR (54)
+3 +3 +3
Creative Style (54)/
Contrast, Saturation,
Sharpness
Picture Effect (54)
Display Indication
Page 76
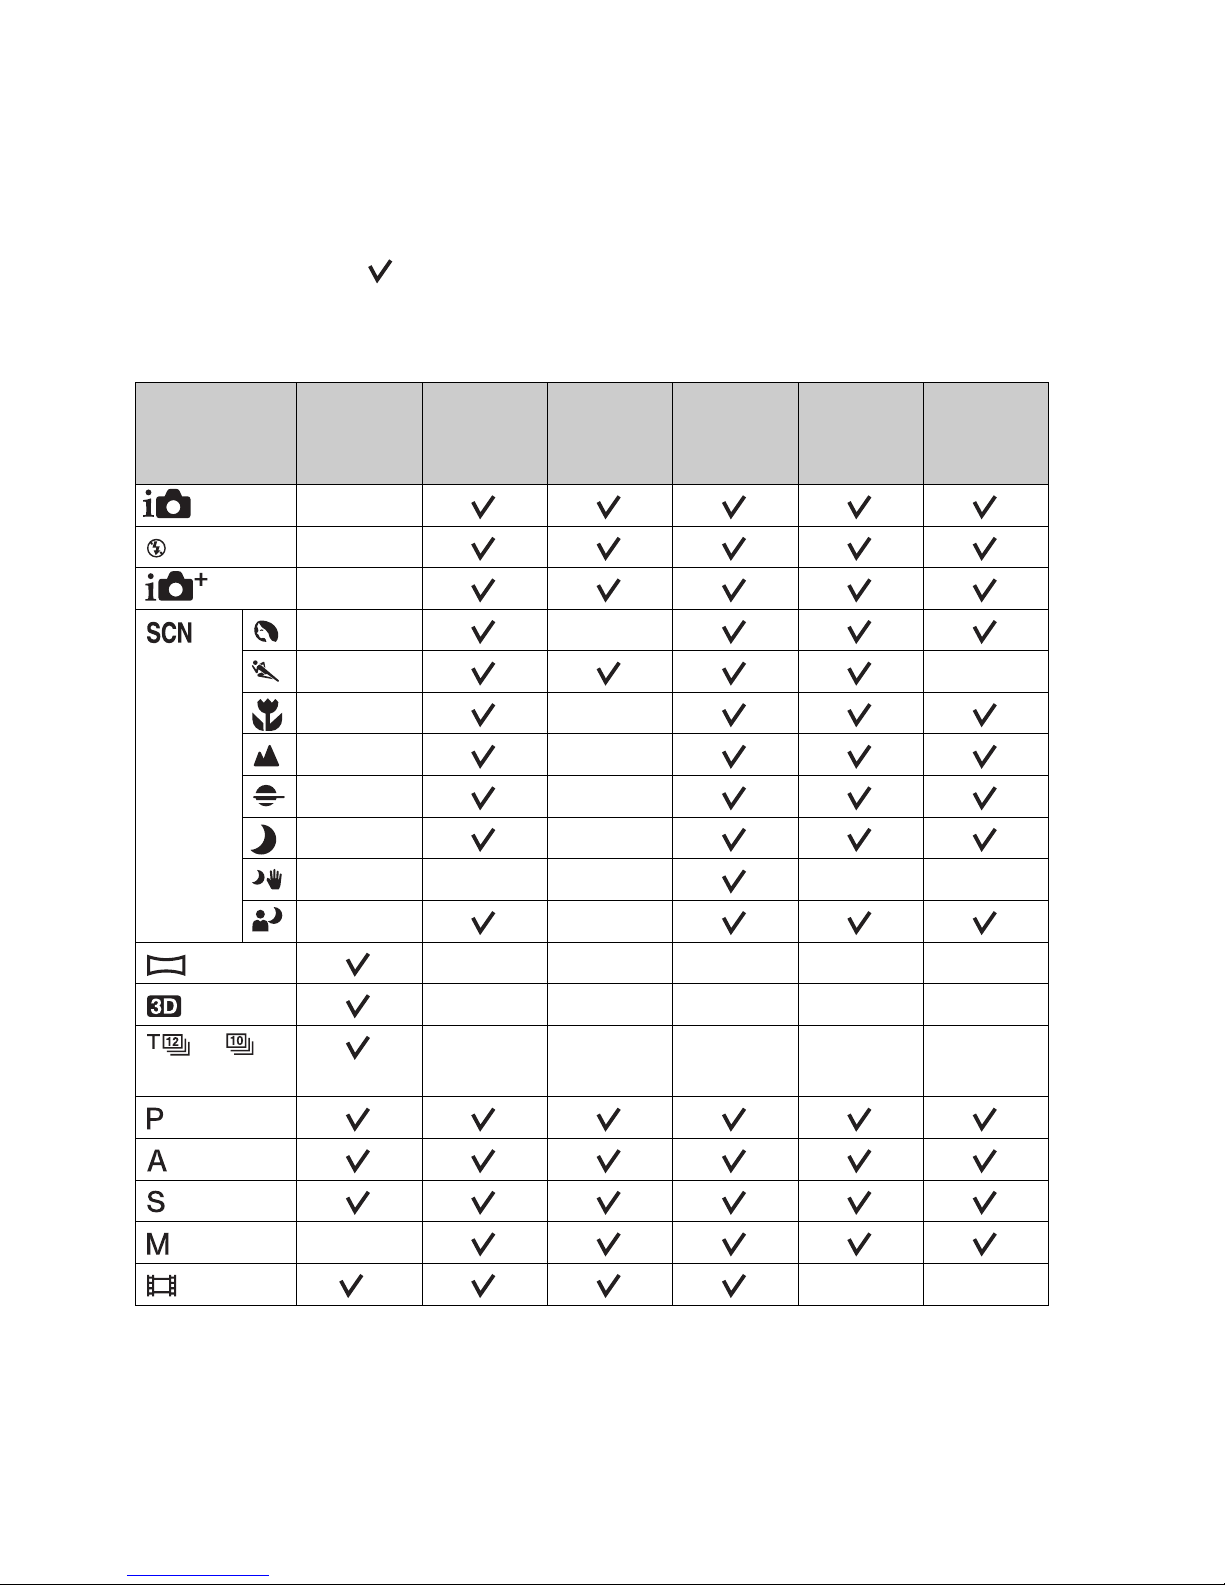
76
Functions available for each shooting
mode
The functions you can use depend on the selected shooting mode.
In the table below, indicates the function available. – indicates the
function not available.
The functions you cannot use are displayed in gray on the screen.
* When [Manual Exposure] is selected, this function is not available.
Shoot Mode
Exposure
Comp.
(43)
Self-timer
(45)
Cont.
Shooting
(45)
Face
Detection
(54)
Smile
Shutter
(54)
Auto Port.
Framing
(54)
(30) –
(30) –
(37) –
(38)
––
––
––
––
––
––
––– ––
––
(39) –––––
(39) –––––
/
(40)
–––––
(36)
(36)
(36)
(36) –
(32) *––
Page 77
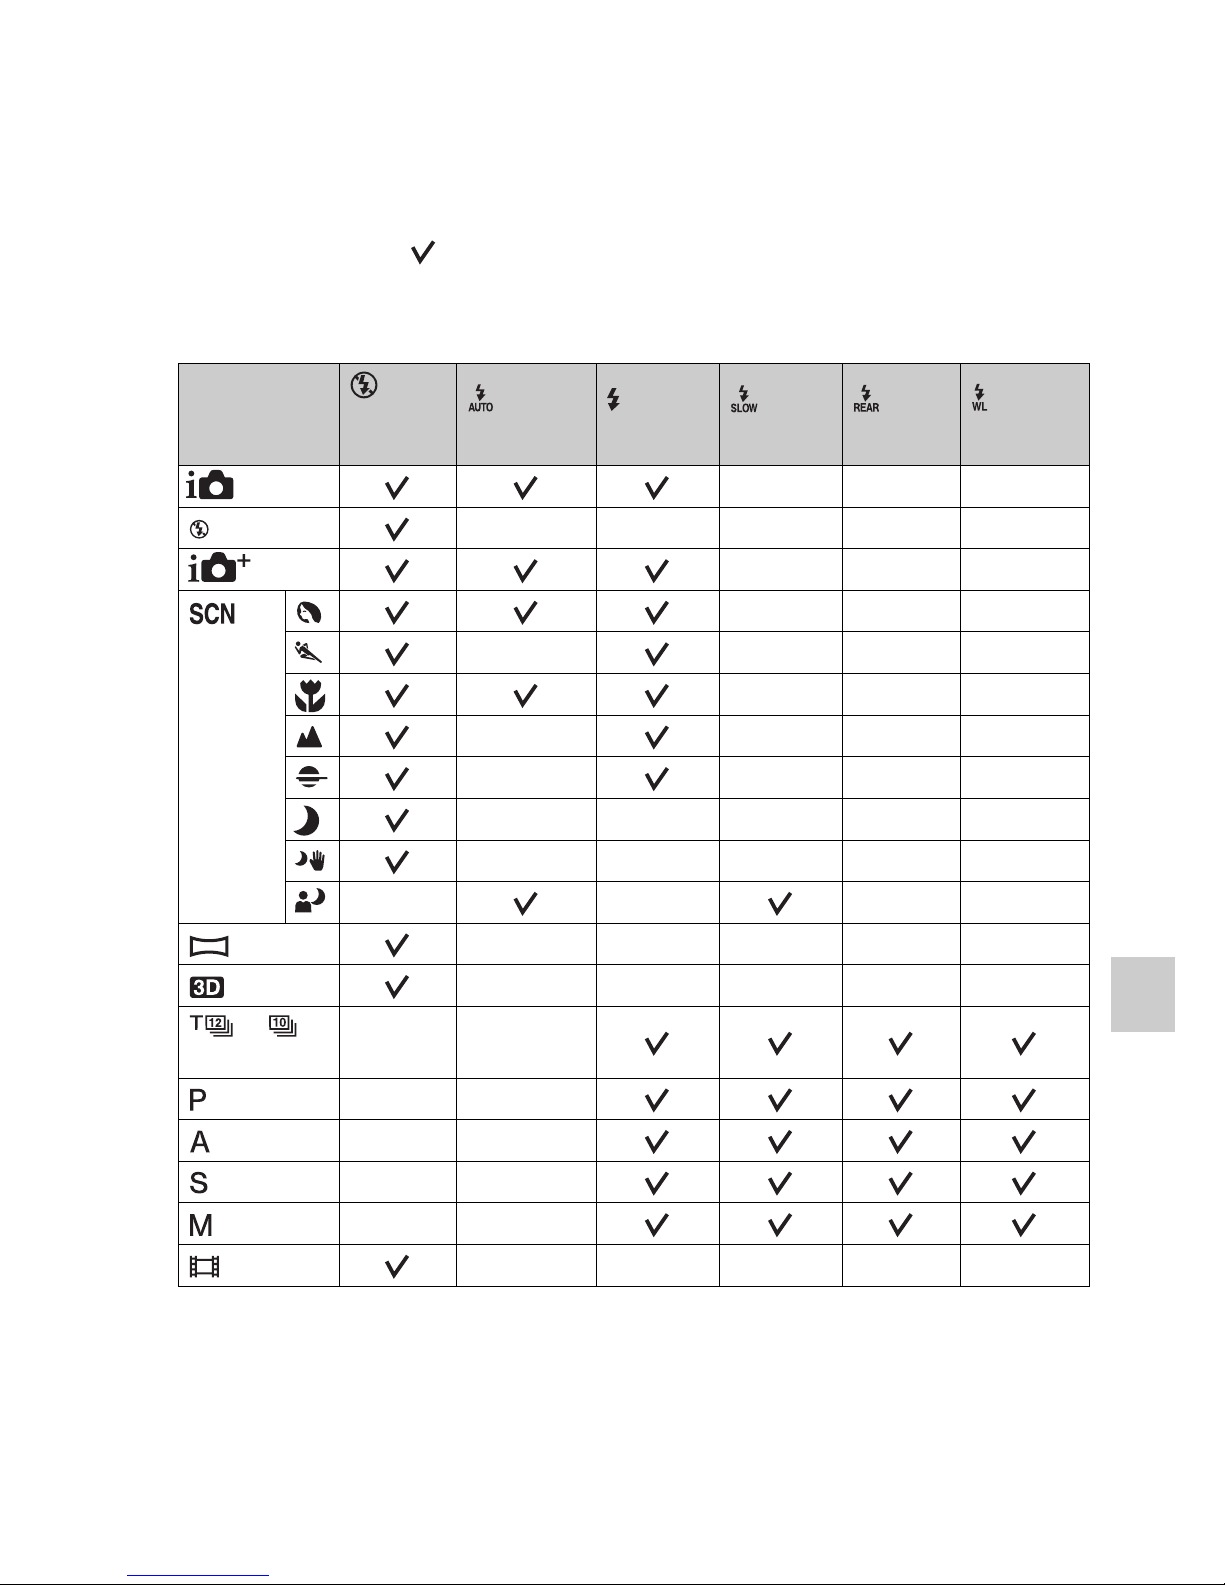
77
Others
Flash modes available
The flash modes you can select depend on the shooting mode and functions
selected.
In the table below, indicates the function selectable. – indicates the
function not selectable.
The flash modes you cannot select are displayed in gray on the screen.
Shoot Mode
(Flash
Off)
(Autoflash)
(Fill-
flash)
(Slow
Sync.)
(Rear
Sync.)
(Wireless)
(30) –– –
(30) –––––
(37) –– –
(38)
–– –
––––
–– –
––––
––––
–––––
–––––
––––
(39) –––––
(39) –––––
/
(40)
––
(36) ––
(36) ––
(36) ––
(36) ––
(32) –––––
Page 78
78
Learning more about the camera
(α Handbook)
“α Handbook,” which explains how to use the camera in detail, is included
on the CD-ROM (supplied). Refer to it for in-depth instructions on the
many functions of the camera.
For Windows users
1 Turn on your computer, and insert the CD-ROM (supplied) into
the CD-ROM drive.
2 Click [Handbook].
3 Click [Install].
4 Start “α Handbook” from the shortcut on the desktop.
For Mac users
1 Turn on your computer, and insert the CD-ROM (supplied) into
the CD-ROM drive.
2 Select the [Handbook] folder and copy “Handbook.pdf” stored
in the [GB] folder to your computer.
3 After copying is complete, double-click “Handbook.pdf.”
Page 79
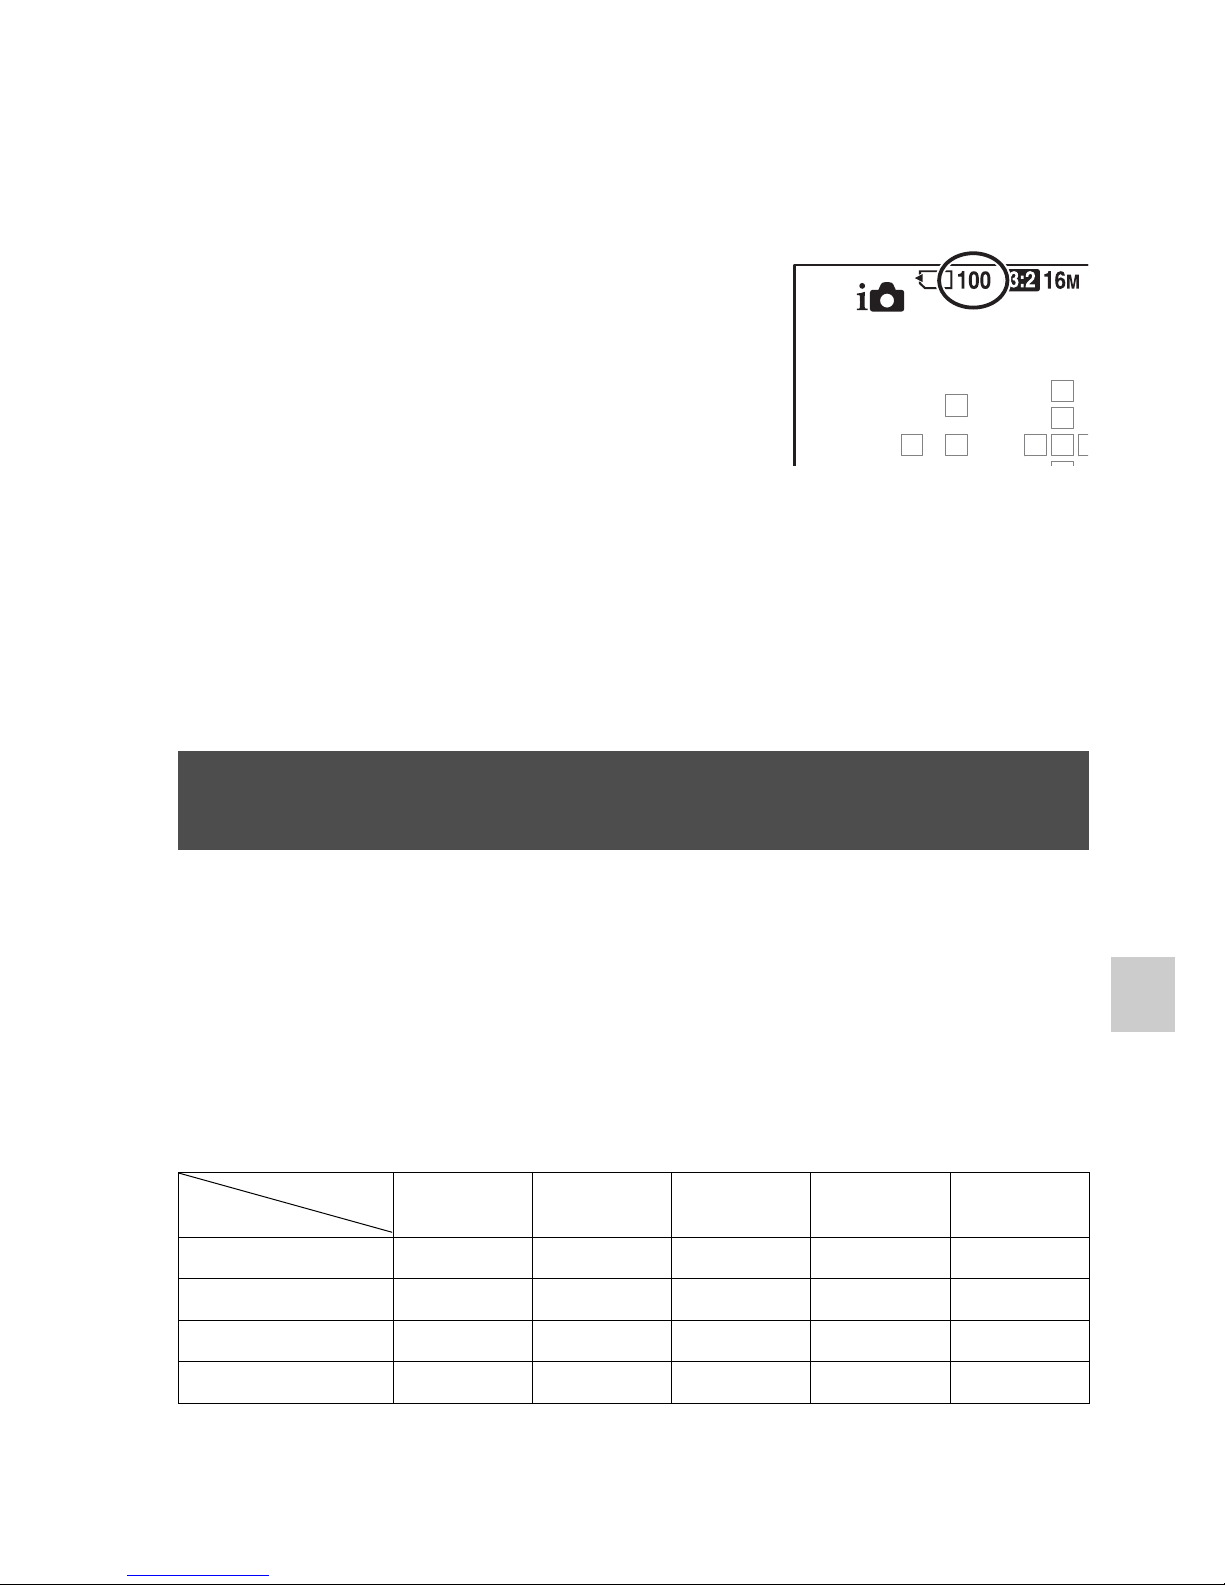
79
Others
Checking the number of recordable
images/recording time
Notes
• When “0” (the number of recordable images) flashes in yellow, the memory card is
full. Replace the memory card with another one, or delete images in the current
memory card (pages 34, 60).
• When “NO CARD” (the number of recordable images) flashes in yellow, it means
no memory card has been inserted. Insert a memory card.
The table shows the approximate number of images that can be recorded on
a memory card formatted with this camera. The values are defined using
Sony standard memory cards for testing. The values may vary depending
on the shooting conditions and the type of memory card used.
Image Size: L 16M
Aspect Ratio: 3:2*
“Memory Stick PRO Duo” (Units: Images)
* When [Aspect Ratio] is set to [16:9], you can record more images than the numbers
shown in the table above (except when [RAW] is selected).
Once you insert a memory card into the
camera and set the power switch to ON,
the number of images that can be
recorded (should you continue to shoot
using the current settings) is displayed on
the screen.
The number of images that can be recorded on a memory
card
Capacity
Size
2GB 4GB 8GB 16GB 32GB
Standard 410 820 1650 3350 6700
Fine 295 590 1150 2400 4800
RAW & JPEG 80 160 325 650 1300
RAW 110 220 445 890 1750
Page 80
Checking the number of recordable images/recording time
80
The approximate number of images that can be recorded is as follows when
you use the camera with the battery pack (supplied) at full capacity.
Note that the actual numbers may be less than those indicated depending on
the conditions of use.
• The number is calculated with a battery pack at full capacity and in the
following situation:
– At an ambient temperature of 25°C (77°F).
– Using the battery pack that is charged for an hour after the CHARGE
lamp goes out.
– Using Sony “Memory Stick PRO Duo” media (sold separately).
– [Quality] is set to [Fine].
– [Autofocus Mode] is set to [Automatic AF].
– Shooting once every 30 seconds.
– The flash strobes once every 2 times.
– The power turns on and off once every 10 times.
• The measurement method is based on the CIPA standard.
(CIPA: Camera & Imaging Products Association)
The table below shows the approximate total recording times using a
memory card formatted with this camera.
The number of images that can be recorded using a
battery pack
LCD screen mode Approx. 590 images
Viewfinder mode Approx. 550 images
Available recording time for a movie
Page 81
81
Checking the number of recordable images/recording time
Others
“Memory Stick PRO Duo” (h (hour), m (minute))
Notes
• The recordable time of movies varies for the reason that the camera equipped with
VBR (Variable Bit Rate) which automatically adjusts image quality depending on
shooting scene. When you record fast-moving subject, the image is clearer but the
recordable time is shorter because it spends much memory to record. The recordable
time also vary depending on the shooting condition or subject or setting of image
quality/size.
• The values shown are not the continuous recording time.
• Recording time may depend on shooting conditions and the memory card used.
• When is indicated, stop recording the movie. The temperature inside the camera
has increased to an unacceptable level.
• For details on movie playback, see page 33.
• It requires a lot of power to perform high quality movie recording or continuous
shooting using the APS-C size image sensor. Therefore, if you continue to shoot, the
temperature inside the camera will rise, especially that of the image sensor. In such
cases, the camera is turned off automatically since higher temperatures affect the
quality of the images or burden the internal mechanism of the camera.
• The duration of time available for movie recording is as follows when the camera
starts recording after the power of the camera has been turned off for a while. (The
Capacity
Record
Setting
2GB 4GB 8GB 16GB 32GB
60i 24M(FX)/50i
24M(FX)
10 m 20 m 40 m 1 h 30 m 3 h
60i 17M(FH)/50i
17M(FH)
10 m 30 m 1 h 2 h 4 h 5 m
60p 28M(PS)/50p
28M(PS)
9 m 15 m 35 m 1 h 15 m 2 h 30 m
24p 24M(FX)/25p
24M(FX)
10 m 20 m 40 m 1 h 30 m 3 h
24p 17M(FH)/25p
17M(FH)
10 m 30 m 1 h 2 h 4 h 5 m
1440×1080 12M 20 m 40 m 1 h 20 m 2 h 45 m 5 h 30 m
VGA 3M 1 h 10 m 2 h 25 m 4 h 55 m 10 h 20 h 5 m
Notes on continuous movie recording
Page 82
Checking the number of recordable images/recording time
82
following values indicate the continuous time from when the camera starts recording
until the camera stops recording.)
• The duration of time available for movie recording varies with the temperature or
condition of the camera before you start recording. If you frequently recompose or
shoot images after the power is turned on, the temperature inside the camera rises
and the recording time available is shorter than the values indicated in the table
above.
• If the camera stops recording due to the temperature, leave it for several minutes
with the power turned off. Start recording after the temperature inside the camera
drops fully.
• If you observe the following points, the recording time is longer.
– Keep the camera out of direct sunlight.
– Turn the camera off when it is not being used.
– If possible, use a tripod and disable the SteadyShot function.
• The maximum size of a movie file is about 2 GB. When the file size is about 2 GB,
the recording stops automatically when [File Format] is set to [MP4], and a new
movie file is created automatically when [File Format] is set to [AVCHD].
• The maximum continuous recording time is 29 minutes.
Ambient temperature
Continuous recording time
for movies
20°C (68°F) About 29 minutes
30°C (86°F) About 29 minutes
40°C (104°F) About 13 minutes
Page 83

83
Others
Specifications
[System]
Camera Type Interchangeable Lens Digital Camera
Lens A-mount lens
[Image sensor]
Image format 23.5 mm×15.6 mm (APS-C format) CMOS image
sensor
Total pixel number of image sensor
Approx. 16 700 000 pixels
Effective pixel number of camera
Approx. 16 100 000 pixels
[SteadyShot]
For still images System: Image sensor-shift mechanism
Effect: Approx. 2.5 EV to 4.5 EV in shutter speed
(depending on shooting conditions and the attached
lens)
For movies System: Electronic
[Anti-Dust]
System Charge protection coating on Low-Pass Filter and
image sensor-shift mechanism
[Auto focus system]
System TTL phase-detection system, 15 points (3 points cross
type)
Sensitivity Range –1 EV to 18 EV (at ISO 100 equivalent)
AF illuminator Approx. 1 m to 5 m (3.3 feet to 16.4 feet)
[Electronic viewfinder]
Type Electronic viewfinder (color)
Screen size 1.2 cm (0.46 type)
Total number of dots 1 440 000 dots equivalent
Effective number of dots When [Viewfinder Magnifi.] is set to [Maximum]:
1 440 000 dots equivalent
When [Viewfinder Magnifi.] is set to [Standard]:
1 253 280 dots equivalent
Camera
Page 84

Specifications
84
Frame coverage 100%
Magnification When [Viewfinder Magnifi.] is set to [Maximum]:
1.04× with 50 mm lens at infinity, –1 m
–1
(diopter)
When [Viewfinder Magnifi.] is set to [Standard]:
0.97× with 50 mm lens at infinity, –1 m
–1
(diopter)
Eye Point When [Viewfinder Magnifi.] is set to [Maximum]:
Approximately 23.1 mm from the eyepiece, 18 mm
from the eyepiece frame (at –1 m
–1
)
When [Viewfinder Magnifi.] is set to [Standard]:
Approximately 25.2 mm from the eyepiece, 20.1 mm
from the eyepiece frame (at –1 m
–1
)
Diopter Adjustment –4.0 m
–1
to +3.0 m–1 (diopter)
[LCD screen]
LCD panel 7.5 cm (3.0 type) TFT drive
Total number of dots 921 600 (640 × 3 (RGB) × 480) dots
[Exposure control]
Metering Cell “Exmor” CMOS sensor
Metering method 1 200-zone evaluative metering
Metering Range –2 EV to +17 EV on Multi segment, Center weighted,
Spot modes (at ISO 100 equivalent with F1.4 lens)
ISO sensitivity (Recommended exposure index)
Still images: AUTO (ISO 100 – 3 200), ISO 100 to
16 000 (1 EV step)
Movies: AUTO (ISO 100 – 3 200 equivalent), ISO 100
to 3 200 equivalent (1 EV step)
Exposure compensation ±3.0 EV (1/3 EV step)
[Shutter]
Type Electronically-controlled, vertical-traverse, focal-plane
type
Speed range Still images: 1/4 000 second to 30 seconds, bulb
Movies: 1/4 000 second to 1/4 second (1/3 step), up to
1/60 in AUTO mode
Flash sync speed 1/160 second
[Built-In-Flash]
Flash G.No. GN 10 (in meters at ISO 100)
Recycling time Approx. 3 seconds
Page 85

85
Specifications
Others
Flash coverage Covering 18 mm lens (focal length that the lens
indicates)
Flash compensation ±2.0 EV (1/3 EV step)
Flash range
[Continuous shooting]
Continuous shooting speed Tele-zoom cont. priority AE: Maximum 12 images per
second/Cont. Priority AE: Maximum 10 images per
second/ : Maximum 8 images per second/ :
Maximum 3 images per second
• Our measurement conditions. The speed of
continuous shooting may be slower, depending on
shooting conditions (Image size, ISO setting, High
ISO NR, or the setting of [Lens Comp.: Distortion]).
The maximum number of continuous shots
In Tele-zoom cont. priority AE mode
Fine: 23 images/Standard: 25 images
In Cont. Priority AE mode
Fine: 23 images/Standard: 27 images/RAW & JPEG:
18 images/RAW: 21 images
In Continuous shooting
Fine: 25 images/Standard: 29 images/RAW & JPEG:
19 images/RAW: 21 images
[Image zooming playback]
Scaling range Image size: L: Approx. ×1.0 – ×15.4/M: Approx. ×1.0 –
×11.2/S: Approx. ×1.0 – ×7.7
Aperture F2.8 F4.0 F5.6
100 1 m – 3.6 m
(3.3 feet –
11.8 feet)
1 m – 2.5 m
(3.3 feet –
8.2 feet)
1 m – 1.8 m
(3.3 feet –
5.9 feet)
200 1 m – 5 m
(3.3 feet –
16.4 feet)
1 m – 3.6 m
(3.3 feet –
11.8 feet)
1 m – 2.5 m
(3.3 feet –
8.2 feet)
400 1.4 m – 7.1
m (4.6 feet –
23.3 feet)
1 m – 5 m
(3.3 feet –
16.4 feet)
1 m – 3.6 m
(3.3 feet –
11.8 feet)
800 2 m – 10 m
(6.6 feet –
32.8 feet)
1.4 m – 7.1
m (4.6 feet –
23.3 feet)
1 m – 5 m
(3.3 feet –
16.4 feet)
ISO setting
Page 86

Specifications
86
[Recording format]
File format JPEG (DCF Ver. 2.0, Exif Ver. 2.3, MPF Baseline)
compliant, RAW (Sony’s exclusive ARW2.3 format)
3D still images MPO (MPF Extended (Disparity Image)) compliant
Movie (AVCHD format) AVCHD format Ver. 2.0 compatible
Video: MPEG-4 AVC/H.264
Audio: Dolby Digital 2ch, equipped with Dolby Digital
Stereo Creator
• Manufactured under license from Dolby
Laboratories.
Movie (MP4 format) Video: MPEG-4 AVC/H.264
Audio: MPEG-4 AAC-LC 2ch
[Recording media]
“Memory Stick PRO Duo” media, SD card
[Input/output terminals]
USB miniB, Hi-Speed USB (USB 2.0)
HDMI HDMI minijack
Mic Terminal 3.5 mm Stereo minijack
REMOTE Terminal
[Power, general]
Used battery pack Rechargeable battery pack NP-FM500H
[Others]
Microphone Stereo
Speaker Monaural
Print features Exif Print compatible, PRINT Image Matching III
compatible, DPOF compatible
Dimensions Approx. 132.1 mm × 97.5 mm × 80.7 mm
(5 1/4 inches × 3 7/8 inches × 3 1/4 inches) (W/H/D,
excluding protrusions)
Mass Approx. 618 g (1 lb 5.7 oz) (with battery and “Memory
Stick PRO Duo” media)
Approx. 539 g (1 lb 2.9 oz) (body only)
Operating temperature 0°C to 40°C (32°F to 104°F)
Page 87

87
Specifications
Others
On image data compatibility
• This camera conforms with DCF (Design rule for Camera File system)
universal standard established by JEITA (Japan Electronics and Information
Technology Industries Association).
• Playback of images recorded with your camera on other equipment and
playback of images recorded or edited with other equipment on your camera
are not guaranteed.
Design and specifications are subject to change without notice.
BC-VM10A Battery charger
Input rating 100 V - 240 V AC, 50/60 Hz, 9 W
Output rating 8.4 V DC, 0.75 A
Operating temperature range 0°C to 40°C (32°F to 104°F)
Storage temperature range –20°C to +60°C (–4°F to +140°F)
Maximum dimensions Approx. 70 mm × 25 mm × 95 mm (2 7/8 inches ×
1 inch × 3 3/4 inches) (W/H/D)
Mass Approx. 90 g (3.2 oz)
Rechargeable battery pack NP-FM500H
Used battery Lithium-ion battery
Maximum voltage DC 8.4 V
Nominal voltage DC 7.2 V
Maximum charge voltage DC 8.4 V
Maximum charge current 2.0 A
Capacity Typical 11.8 Wh (1 650 mAh)
Minimum 11.5 Wh (1 600 mAh)
Maximum dimensions Approx. 38.2 mm × 20.5 mm × 55.6 mm (1 9/16 inches
× 13/16 inches × 2 1/4 inches) (W/H/D)
Mass Approx. 78 g (2.8 oz)
Battery charger/Battery
Page 88
Specifications
88
* The values for equivalent 35mm-format focal length and angle of view are based
on Interchangeable Lens Digital Camera equipped with an APS-C sized image
sensor.
** Minimum focus is the shortest distance from the image sensor to the subject.
• This lens is equipped with a distance encoder. The distance encoder allows more
accurate measurement (ADI) by using a flash for ADI.
• Depending on the lens mechanism, the focal length may change with any change of
the shooting distance. The focal length assumes the lens is focused at infinity.
• The infinity position provides for some adjustment to compensate for focus shift
caused by change in temperature. To shoot a subject at infinite distance in MF mode,
use the viewfinder and set focus.
On focal length
The picture angle of this camera is narrower than that of a 35 mm-format
camera. You can find the approximate equivalent of the focal length of a 35 mmformat camera, and shoot with the same picture angle, by increasing the focal
length of your lens by half.
Lens
Name (Model name)
DT 18-55mm F3.5-5.6 SAM
(SAL1855)
DT 55-200mm F4-5.6 SAM
(SAL55200-2)
Equivalent 35mmformat focal length*
(mm)
27–82.5 82.5–300
Lens groups-elements 7–8 9–13
Angle of view* 76°-29° 29°-8°
Minimum focus** (m
(feet))
0.25 (0.82) 0.95 (3.2)
Maximum
magnification (X)
0.34 0.29
Minimum f-stop f/22-36 f/32-45
Filter diameter (mm) 55 55
Dimensions (maximum
diameter × height)
(approx., mm (in.))
69.5×69
(2 3/4 × 2 3/4)
71.5×85
(2 7/8 × 3 3/8)
Mass (approx., g (oz.)) 210 (7 4/8) 305 (10 3/4)
Page 89

89
Specifications
Others
For example, by using a 50 mm lens, you can get the approximate equivalent of
a 75 mm lens of a 35 mm-format camera.
Page 90
Specifications
90
Trademarks
• is a trademark of Sony
Corporation.
• “Memory Stick,” , “Memory
Stick PRO,” ,
“Memory Stick Duo,”
, “Memory Stick
PRO Duo,” ,
“Memory Stick PRO-HG Duo,”
, “Memory
Stick Micro,” “MagicGate,” and
are trademarks of
Sony Corporation.
• “InfoLITHIUM” is a trademark of
Sony Corporation.
• “PhotoTV HD” is a trademark of
Sony Corporation.
• “AVCHD Progressive” and
“AVCHD Progressive” logotype
are trademarks of Panasonic
Corporation and Sony Corporation.
• Blu-ray Disc ™ and Blu-ray ™ are
trademarks of the Blu-ray Disc
Association.
• Dolby and the double-D symbol are
trademarks of Dolby Laboratories.
• Microsoft, Windows, DirectX, and
Windows Vista are either registered
trademarks or trademarks of
Microsoft Corporation in the
United States and/or other
countries.
• HDMI, the HDMI logo and HighDefinition Multimedia Interface are
trademarks or registered trademarks
of HDMI Licensing LLC.
• Mac and Mac OS are trademarks or
registered trademarks of Apple Inc.
• PowerPC is a registered trademark
of IBM Corporation in the United
States.
• Intel, Intel Core, MMX, and
Pentium are trademarks or
registered trademarks of Intel
Corporation.
• SDXC Logo is a trademark of SD3C, LLC.
• Eye-Fi is a trademark of Eye-Fi Inc.
• MultiMediaCard is a trademark of
MultiMediaCard Association.
• “ ” and “PlayStation” are
registered trademarks of Sony
Computer Entertainment Inc.
• Adobe is a registered trademark or
a trademark of Adobe Systems
Incorporated in the United States
and/or other countries.
• In addition, system and product
names used in this manual are, in
general, trademarks or registered
trademarks of their respective
developers or manufacturers.
However, the ™ or ® marks are not
used in all cases in this manual.
• Add further enjoyment with your
PlayStation 3 by downloading the
application for PlayStation 3 from
PlayStation Store (where available.)
• The application for PlayStation 3
requires PlayStation Network
account and application download.
Page 91

91
Specifications
Others
Accessible in areas where the
PlayStation Store is available.
l\VCHD
Progressive
•
Page 92

92
Index
Index
Numerics
3D....................................................... 39
A
AE Lock ............................................. 52
AEL button......................................... 52
AF area............................................... 54
AF illuminator.................................... 57
Aperture Priority................................ 36
Area Setting ....................................... 27
Aspect ratio ........................................ 56
Audio signals ..................................... 62
Auto HDR.......................................... 55
Auto Port. Framing ............................ 54
Auto review........................................ 58
Autofocus mode................................. 54
AVCHD .......................................57
, 70
B
Battery pack .................................18, 20
Bracket............................................... 45
C
Cleaning mode ................................... 62
Clear Image Zoom ............................. 56
Continuous Advance Priority AE ...... 40
Continuous shooting .......................... 45
Creative Style..................................... 55
D
Date imprint ....................................... 60
Date/Time setup................................. 26
DC IN terminal .................................. 15
Delete........................................... 34
, 60
Digital Zoom...................................... 57
Diopter-adjustment ............................ 28
Disc creation ...................................... 70
DISP................................................... 46
DPOF Setup ....................................... 60
D-Range Optimizer ............................ 55
Drive mode......................................... 45
E
Electronic Front Curtain Shutter ........ 60
Enlarged image .................................. 49
EV scale ............................................. 43
Exposure compensation ..................... 43
Eye-Fi................................................. 62
Eye-Start AF ...................................... 58
F
Face Detection ................................... 54
Face Priority Tracking ....................... 60
FINDER/LCD Setting........................ 58
Flash compensation............................ 55
Flash mode ................................... 41
, 77
Flash Off ...................................... 30
, 41
Fn button ...................................... 52
, 54
Focal length........................................ 88
Focus Hold Button ............................. 59
Focus Magnifier................................. 52
Folder Name....................................... 61
Format................................................ 61
Func. of AEL button .......................... 59
H
Hand-held Twilight............................ 38
Histogram........................................... 58
I
Image Data Converter........................ 68
Image Index ....................................... 50
Image quality ..................................... 56
Image size .......................................... 47
In-Camera Guide................................ 63
Initialize ............................................. 62
Intelligent Auto.................................. 30
ISO Button ......................................... 59
ISO sensitivity.................................... 54
J
JPEG .................................................. 56
L
Landscape .......................................... 38
Page 93

93
Index
Index
Language ............................................ 62
LCD brightness...................................61
LCD screen...................................35
, 73
Lens ..............................................17
, 23
Lens Compensation ............................59
M
Macro..................................................38
Manual Exposure................................37
Manual focus ......................................52
Memory card ......................................20
Menu...................................................56
Metering mode ...................................54
Movie Audio Recording.....................57
MOVIE Button ...................................59
Movie File Format..............................57
Multi frame noise reduction ...............54
N
Night Portrait......................................38
Night Scene ........................................38
Noise reduction.............................54
, 57
Number of recordable images ......79
, 80
O
Object Tracking..................................54
P
Peaking ...............................................59
Picture Effect......................................52
Playback Display................................60
PlayMemories Home....................67
, 68
Portrait................................................38
Power Save .........................................61
Preview Button...................................59
Program Auto .....................................36
Protect.................................................60
Q
Quality................................................56
R
RAW...................................................56
Record Setting ....................................57
Recording information display...........46
Recording movies...............................32
Recover Image DB .............................61
Red Eye Reduction.............................58
Remote Commander...........................15
Reset ...................................................62
Rotate..................................................52
S
Scene Selection...................................38
Select REC Folder ..............................61
Self-timer............................................45
Set the clock .......................................26
Shooting..............................................30
Shooting Tip .......................................63
Shutter Priority ...................................36
Slide show ..........................................60
Slow Sync...........................................41
Smile Shutter ......................................54
Software..............................................67
Specifications .....................................83
Sports Action......................................38
SteadyShot function ...........................57
Sunset .................................................38
Superior Auto .....................................37
Superior Auto Cont. Shooting ............58
Superior Auto Image Extract..............58
Sweep Panorama ................................39
T
Tele-zoom Continuous Priority AE.... 40
U
USB connection..................................62
V
Version ...............................................62
View Mode.........................................33
Viewfinder..........................................58
Viewing image ...................................33
Viewing images on a TV screen.........51
Volume Settings ................................. 60
W
White balance.....................................55
Z
Zoom ............................................30, 52
Page 94
© 2012 Sony Corporation Printed in Thailand
Printed using VOC (Volatile Organic
Compound)-free vegetable oil based ink.
Additional information on this product and
answers to frequently asked questions can be
found at our Customer Support Website.
Page 95

4-420-756-11(1)
SLT-A57
©2012 Sony Corporation
Interchangeable Lens
Digital Camera
α Handbook
A-mount
Preparing the camera
Shooting and viewing
images
Shooting images to suit
your subject
Using the shooting
functions
Using the playback
functions
Functions list
Viewing images on a
computer
Others
Advanced operations
Index
Page 96
2
Table of Contents
Basic
operations ................................................................. 9
This section provides basic information on operating the camera.
The contents of the “Basic operations” section are the same as those in the
Instruction Manual supplied.
Notes on using your camera ............................................ 10
Preparing the camera
Checking the supplied items ............................................ 12
Identifying parts ............................................................... 13
Charging the battery pack ................................................ 19
Inserting the battery pack/memory card (sold separately)
..................................................................................... 21
Attaching a lens ............................................................... 24
Turning the camera on and setting the clock ................... 27
Before shooting ............................................................... 29
Adjusting the viewfinder to the visual acuity (diopter
adjustment)......................................................... 29
Holding the camera properly ...................................... 29
Shooting and viewing images
Shooting still images ....................................................... 31
Recording movies ............................................................ 33
Playing back images ........................................................ 34
Deleting images (Delete) ................................................. 35
Shooting images to suit your subject
Adjusting the angle of the LCD screen ........................... 36
Shooting with the various shooting modes ...................... 37
Superior Auto .................................................. 38
Scene Selection .................................................. 39
Sweep Panorama/ 3D Sweep Panorama ....... 40
Continuous Advance Priority AE Mode ............ 41
Using the shooting functions
Using the flash ................................................................. 42
Adjusting the brightness of the image ............................. 44
Page 97
3
Selecting the drive mode .................................... 46
Switching the recording information display (DISP) ...... 47
Setting image size ............................................................ 48
Image Size .................................................................. 48
Panorama: Size ........................................................... 48
Using the playback functions
Enlarging images ............................................................. 50
Switching to the display of the image list ....................... 51
Viewing images on a TV screen ...................................... 52
Functions list
Functions that can be operated with the buttons/switch
..................................................................................... 53
Selecting a function with the Fn (Function) button ......... 54
Functions that can be selected with the Fn (Function) button
..................................................................................... 55
The functions selected with the MENU button ............... 57
Using the guide function of the camera ........................... 64
In-Camera Guide ........................................................ 64
Shooting Tip ............................................................... 64
Viewing images on a computer
Using with your computer ............................................... 66
Using the software ........................................................... 68
Selecting the method for creating a disc of movies ......... 71
Others
List of icons on the screen ............................................... 74
Functions available for each shooting mode ................... 77
Flash modes available ..................................................... 78
Advanced
operations ...............................................................79
This section provides further information on the camera.
Preparation
Setting up the camera ...................................................... 80
Removing the eyecup ................................................. 80
The screen displayed for shooting mode ......................... 81
Selecting the screen mode .......................................... 81
Page 98
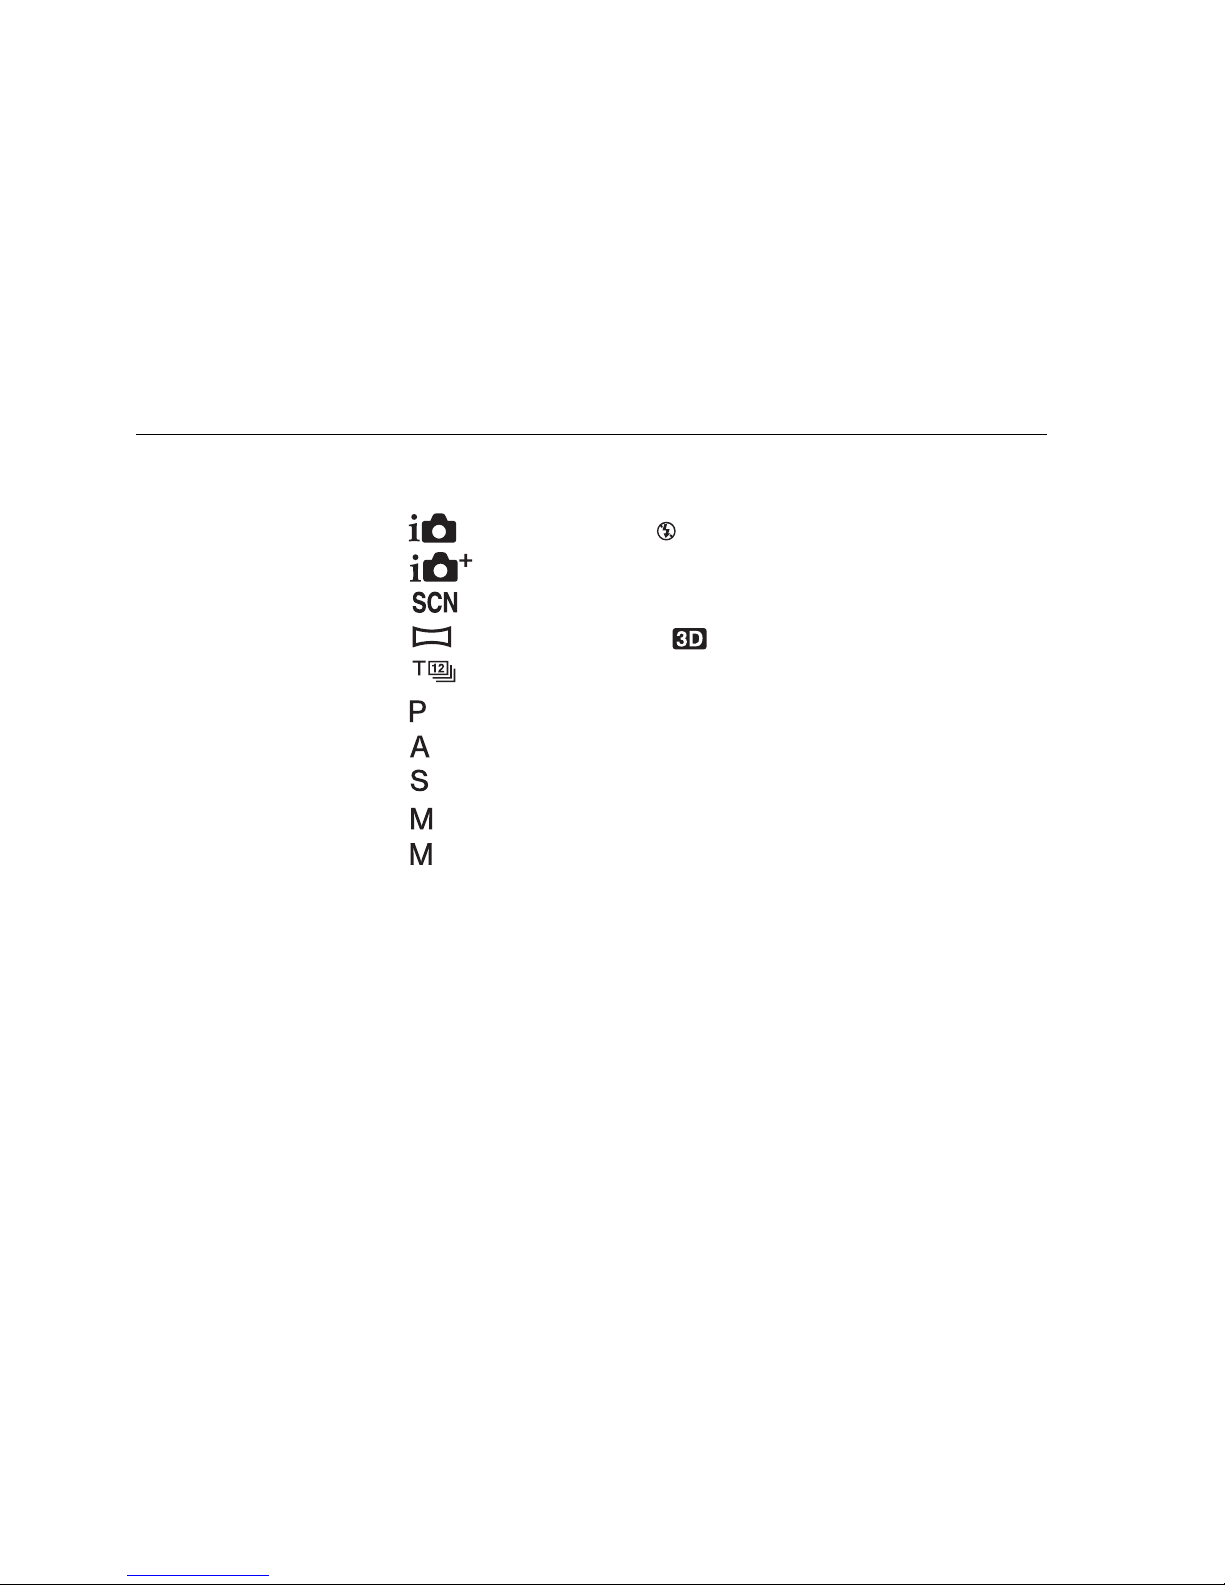
4
Histogram ................................................................... 82
The digital level gauge ............................................... 83
Monitoring the subject through the lens without effects
displayed ........................................................... 83
List of icons for viewfinder mode .............................. 84
Shooting a clear image without camera shake ................ 86
Camera shake warning indicator ................................ 86
Using the SteadyShot function ................................... 86
Using a tripod ............................................................. 87
Shooting
Selecting the shooting mode ............................................ 88
Intelligent Auto/ Flash Off .............................. 88
Superior Auto .................................................... 88
Scene Selection .................................................. 89
Sweep Panorama/ 3D Sweep Panorama ....... 91
Cont. Priority AE Mode ..................................... 93
Program Auto ......................................................... 94
Aperture Priority ................................................... 95
Shutter Priority ....................................................... 97
Manual Exposure ................................................... 99
BULB ................................................................... 100
Movie recording setup ................................................... 103
Recording movies easily .......................................... 103
Digital Zoom ............................................................ 104
Recording movies with the shutter speed and aperture
adjusted ........................................................... 105
File Format ............................................................... 105
Record Setting .......................................................... 106
Audio Recording ...................................................... 107
Adjusting the focus ........................................................ 109
Autofocus ................................................................. 109
Focus-lock ................................................................ 111
Autofocus Mode ....................................................... 112
AF area ..................................................................... 113
The AF illuminator ................................................... 113
Object Tracking ........................................................ 114
Manual focus ............................................................ 116
Peaking ..................................................................... 117
Page 99

5
Focus Magnifier ....................................................... 117
Detecting faces .............................................................. 119
Face Detection .......................................................... 119
Face Registration ...................................................... 120
Auto Port. Framing ................................................... 121
Smile Shutter ............................................................ 122
Adjusting the brightness of the image ........................... 124
AE Lock ................................................................... 124
Metering Mode ......................................................... 125
Flash Comp. ............................................................. 125
Flash control ............................................................. 126
The flash ........................................................................ 128
Wireless flash ........................................................... 128
Setting ISO .................................................................... 130
Multi frame noise reduction ..................................... 130
Compensating for the brightness and contrast automatically
(D-Range) ................................................................. 131
D-RangeOptimizer ................................................... 131
Auto HDR ................................................................ 132
Setting the image processing ......................................... 134
Picture Effect ............................................................ 134
Creative Style ........................................................... 135
Adjusting the color tones (White balance) .................... 137
The fine adjustment screen for color ........................ 138
Color Temp./Color Filter ......................................... 139
Custom white balance .............................................. 139
Magnifies images with higher scale than the optical zoom
(ZOOM) ................................................................... 141
Selecting the drive mode .................................. 144
Shooting single shot ................................................. 144
Cont. Shooting .......................................................... 144
Self-timer .................................................................. 145
Bracket: Cont./Single Bracket .................................. 145
WB bracket ............................................................... 147
Remote Cdr. ............................................................. 148
Page 100

6
Playback
The screen displayed for playback mode ...................... 149
Switching the screen during playback ...................... 149
List of icons on the histogram display ..................... 149
Using the playback functions ........................................ 151
Rotating an image .................................................... 151
View Mode ............................................................... 151
Slide Show ............................................................... 152
Playback Display ...................................................... 152
Scrolling panoramic images ..................................... 153
Protecting images (Protect) ........................................... 154
Deleting images (Delete) ............................................... 155
Delete (Multiple Img.) ............................................. 155
Deleting all the images or movies in the same view mode
.......................................................................... 156
About playback on TV .................................................. 157
3D Viewing .............................................................. 157
Using “BRAVIA” Sync ........................................... 157
Setup of the camera
Setting the aspect ratio and image quality ..................... 159
Aspect Ratio ............................................................. 159
Quality ...................................................................... 159
Setting the other functions of the camera ...................... 161
Long Exposure NR ................................................... 161
High ISO NR ............................................................ 161
Color Space .............................................................. 162
Release w/o Lens ...................................................... 162
Grid Line .................................................................. 163
Auto Review ............................................................. 163
Func. of AEL button ................................................ 163
ISO Button ............................................................... 164
Preview Button ......................................................... 164
Electronic Front Curtain Shutter .............................. 165
LCD Brightness ........................................................ 165
Viewfinder Bright. ................................................... 166
Eco Mode ................................................................. 166
Power Save ............................................................... 166
 Loading...