

Sony CS User Manual

User Guide
Personal Computer
VGC-LS1 Series
N

Contents
Before Use .........................................................................................................................................................................5
Documentation .............................................................................................................................................................5
Ergonomic Considerations...........................................................................................................................................7
Getting Started ...................................................................................................................................................................9
Locating Controls and Ports.......................................................................................................................................10
About the Indicator Lights ..........................................................................................................................................15
Connecting a Power Source ......................................................................................................................................16
Shutting Down Your Computer Safely .......................................................................................................................19
Using Your VAIO Computer.............................................................................................................................................20
Using the Keyboard ...................................................................................................................................................21
Using the Mouse ........................................................................................................................................................28
Using the Built-in MOTION EYE Camera...................................................................................................................33
Using the Optical Disc Drive ......................................................................................................................................35
Using the TV Function ...............................................................................................................................................46
Using PC Cards .........................................................................................................................................................62
Using the ExpressCard Module .................................................................................................................................65
Using the Memory Stick Media ..................................................................................................................................69
Using Other Memory Cards .......................................................................................................................................74
Using the Internet.......................................................................................................................................................77
Using Wireless LAN (WLAN) .....................................................................................................................................78
2
nN

3
nN
Using Peripheral Devices .................................................................................................................................................87
Connecting a Universal Serial Bus (USB) Device......................................................................................................88
Connecting a Printer ..................................................................................................................................................90
Connecting an i.LINK Device .....................................................................................................................................91
Connecting to a Network (LAN) .................................................................................................................................93
Customizing Your VAIO Computer ..................................................................................................................................94
Setting the Password .................................................................................................................................................95
Setting Up Your Computer with VAIO Central ...........................................................................................................98
Using the Power Saving Modes.................................................................................................................................99
Upgrading Your VAIO Computer....................................................................................................................................104
Adding and Removing Memory................................................................................................................................105
Precautions ....................................................................................................................................................................111
On Handling the LCD Screen ..................................................................................................................................112
On Using the Power Source ....................................................................................................................................113
On Handling Your Computer....................................................................................................................................114
On Using the Built-in MOTION EYE Camera...........................................................................................................116
On Handling Floppy Disks .......................................................................................................................................116
On Handling Discs ...................................................................................................................................................117
On Using Headphones.............................................................................................................................................118
On Handling Memory Stick Media............................................................................................................................119
On Handling the Hard Disk ......................................................................................................................................120

4
nN
Troubleshooting .............................................................................................................................................................121
Computer .................................................................................................................................................................122
System Security .......................................................................................................................................................129
Built-in MOTION EYE Camera.................................................................................................................................131
Internet.....................................................................................................................................................................134
Networking ...............................................................................................................................................................136
CDs and DVDs.........................................................................................................................................................139
Display .....................................................................................................................................................................143
Printing.....................................................................................................................................................................144
Microphone ..............................................................................................................................................................145
Mouse ......................................................................................................................................................................146
Speakers..................................................................................................................................................................147
Keyboard..................................................................................................................................................................148
Floppy Disks ............................................................................................................................................................149
PC Cards .................................................................................................................................................................150
Audio/Video..............................................................................................................................................................151
Memory Stick Media ................................................................................................................................................152
Peripherals ...............................................................................................................................................................153
Support Options .............................................................................................................................................................154
Sony Support Information ........................................................................................................................................154
Program Support Information...................................................................................................................................155

nN
Before Use
Before Use
Congratulations on your purchase of this Sony VAIO® computer, and welcome to the on-screen User Guide. Sony has
combined leading-edge technology in audio, video, computing, and communications to provide state-of-the-art personal
computing.
Documentation
Your documentation includes printed information and user guides to read on your VAIO computer.
Printed Documentation
❑ Welcome mat — Contains an overview of connections, setting up information, etc.
❑ Safety Information — Contains safety guidelines and owner information.
5

6
nN
Before Use
Non-printed Documentation
❑ User Guide (this manual) — Contains features of your computer. It also includes information about the software programs
included with your computer, as well as information on solving common problems.
❑ Specifications — The online Specifications describe the hardware and software configuration of your VAIO computer.
To view the online Specifications:
1 Connect to the Internet.
2 Go to the Sony online support Web site at http://esupport.sony.com/EN/VAIO/
at http://www.sony.ca/support
for customers in Canada, or at http://esupport.sony.com/ES/VAIO/ for customers in
Latin American countries or areas.
❑ VAIO Recovery Guide — Provides information about restoring individual software programs, software drivers, and drive
partition(s) or your entire hard disk drive to the original factory installed settings.
To access this on-screen guide:
1 Click Start, point to All Programs, and click VAIO Support Central.
2 Click VAIO Documentation.
3 Click VAI O Recovery Guide.
❑ MCE Guide — Provides information about using the Windows XP Media Center Edition operating system.
To access this on-screen guide:
1 Click Start, point to All Programs, and click VAIO Support Central.
2 Click VAI O Documentation.
3 Click MCE Guide.
for customers in USA,

Ergonomic Considerations
Whenever possible, you should attempt to take account of the following ergonomic considerations:
7
nN
Before Use
❑ Stable work surface — Use a stable work surface large enough to support the computer and other peripheral equipment.
❑ Position of your computer – Place the display directly in front of you (1). Keep your forearms horizontal (2), with your
wrists in a neutral, comfortable position (3) while using the keyboard, pointing device, or external mouse. Let your upper
arms hang naturally at your sides. Have breaks during sessions with your computer. Excessive use of the computer may
strain muscles or tendons.
8
nN
Before Use
❑ Furniture and posture – Sit in a chair with good back support. Adjust the level of the chair so your feet are flat on the
floor. A footrest may make you more comfortable. Sit in a relaxed, upright posture and avoid slouching forward or leaning
far backwards.
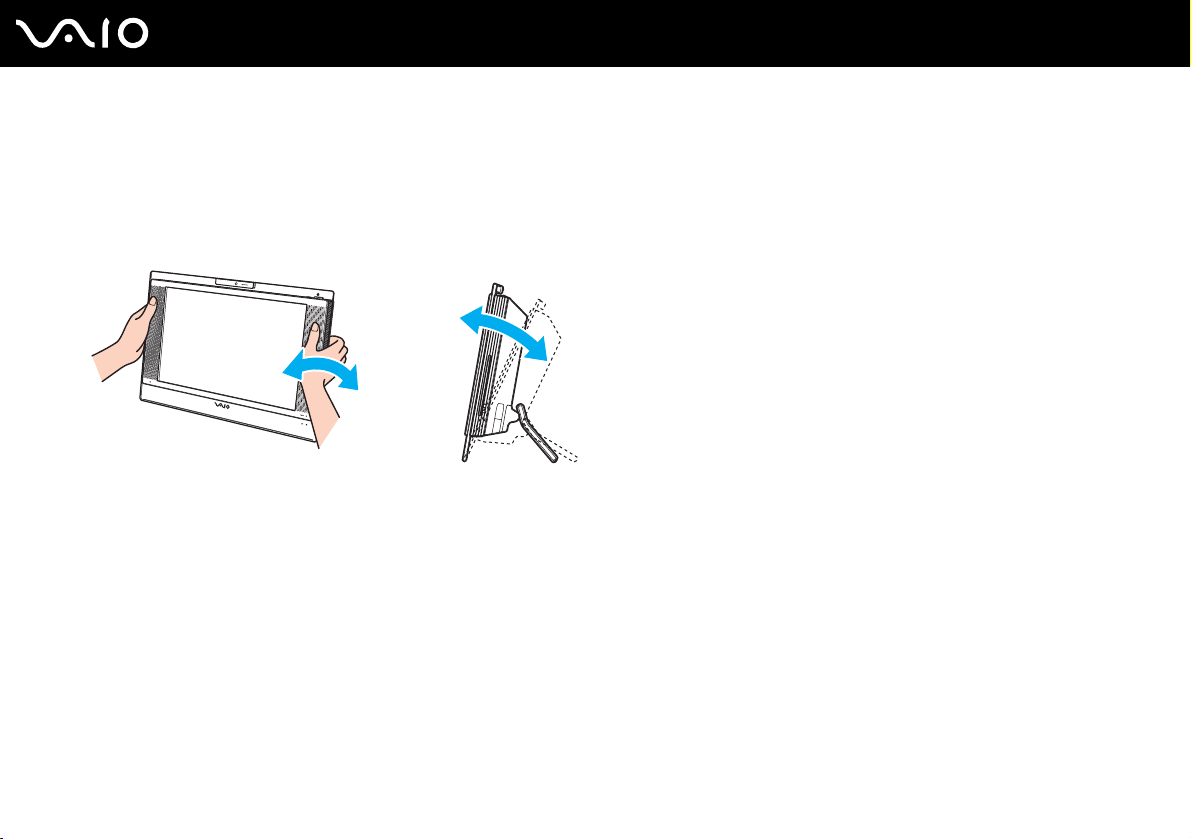
❑ Viewing angle of the display – Use the display's tilting feature to find the best position. You can reduce eye strain and
muscle fatigue by adjusting the tilt of the display to the proper position. Adjust the brightness setting of the display as well.
!
While adjusting the viewing angle, do not exert excessive pressure on your computer, especially on the center of the speaker grill, to eliminate a risk of
mechanical damage.
❑ Lighting – Choose a location where windows and lights do not create glare and reflection on the display. Use indirect
lighting to avoid bright spots on the display. You can also purchase accessories for your display that help reduce glare.
Proper lighting adds to your comfort and work effectiveness.
❑ Ventilation – Make sure you leave at least 4 inches (10 cm) of space behind and at least 8 inches (20 cm) of space on
each side of the main unit.

Getting Started
Getting Started
This section describes how to get started with using your VAIO computer.
!
Before starting your computer for the first time, do not connect any new hardware that did not originally come with your computer. Make sure to start
up your computer with only the supplied accessories connected and set up your system. Upon completion, connect one device (for example, a printer,
an external hard disk drive, a scanner, and so on) at a time, following the manufacturer's instructions.
❑ Locating Controls and Ports (page 10)
❑ About the Indicator Lights (page 15)
❑ Connecting a Power Source (page 16)
❑ Shutting Down Your Computer Safely (page 19)
9
nN
Locating Controls and Ports
Take a moment to identify the controls and ports shown on the following pages.
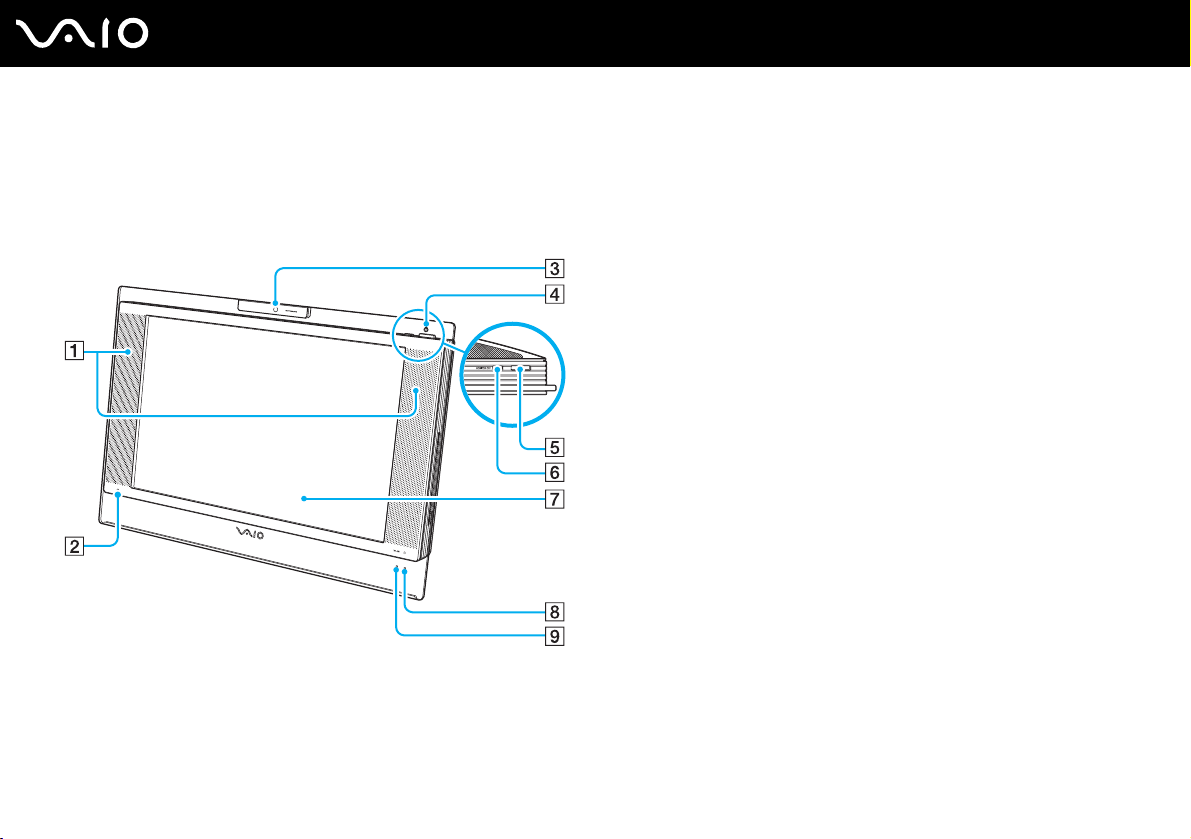
Front
A Built-in speakers
B Built-in microphone (monaural)
C Built-in MOTION EYE camera (page 33)
D Power indicator (page 15)
E Power button
F MONITOR OFF button / MONITOR OFF indicator (page 15)
Press this button to turn off the LCD backlight and the speaker
volum
e.
✍
You can change the MONITOR OFF button setting to keep the speaker volume
on. See Setting Up Your Computer with VAIO Central (page 98) and find out
more in its help file.
G LCD screen (page 112)
H Hard disk drive indicator (page 15)
I WLAN (Wireless LAN) indicator (page 15)
10
nN
Getting Started
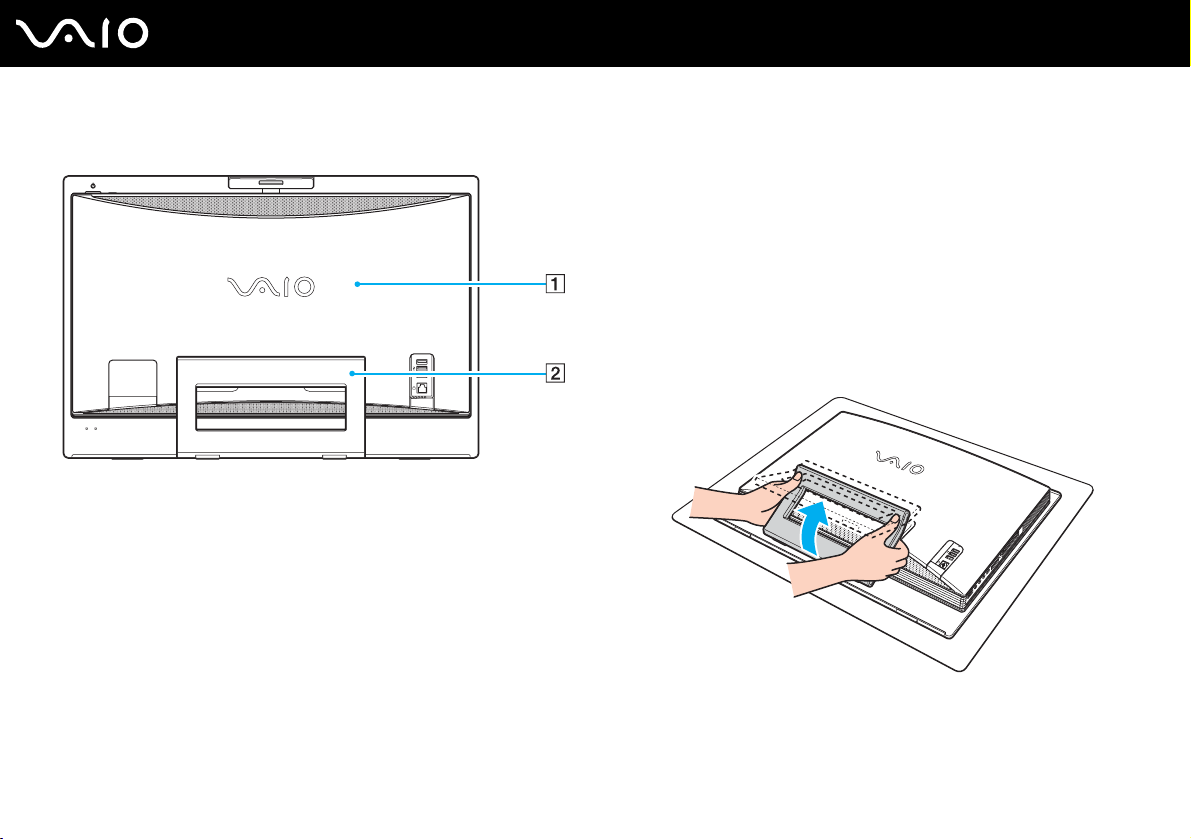
Back
Getting Started
A Back panel cover
Remove the back panel cover to access the ports and jacks
behind it (page 16).
!
Before removing the cover, be sure to shut down your computer.
B Prop-up stand
Grasp the side ends with both hands and raise the bottom end,
as shown below, to place your computer upright. When moving
or storing the computer, you can simply push it back in for easy
handling.
11
nN
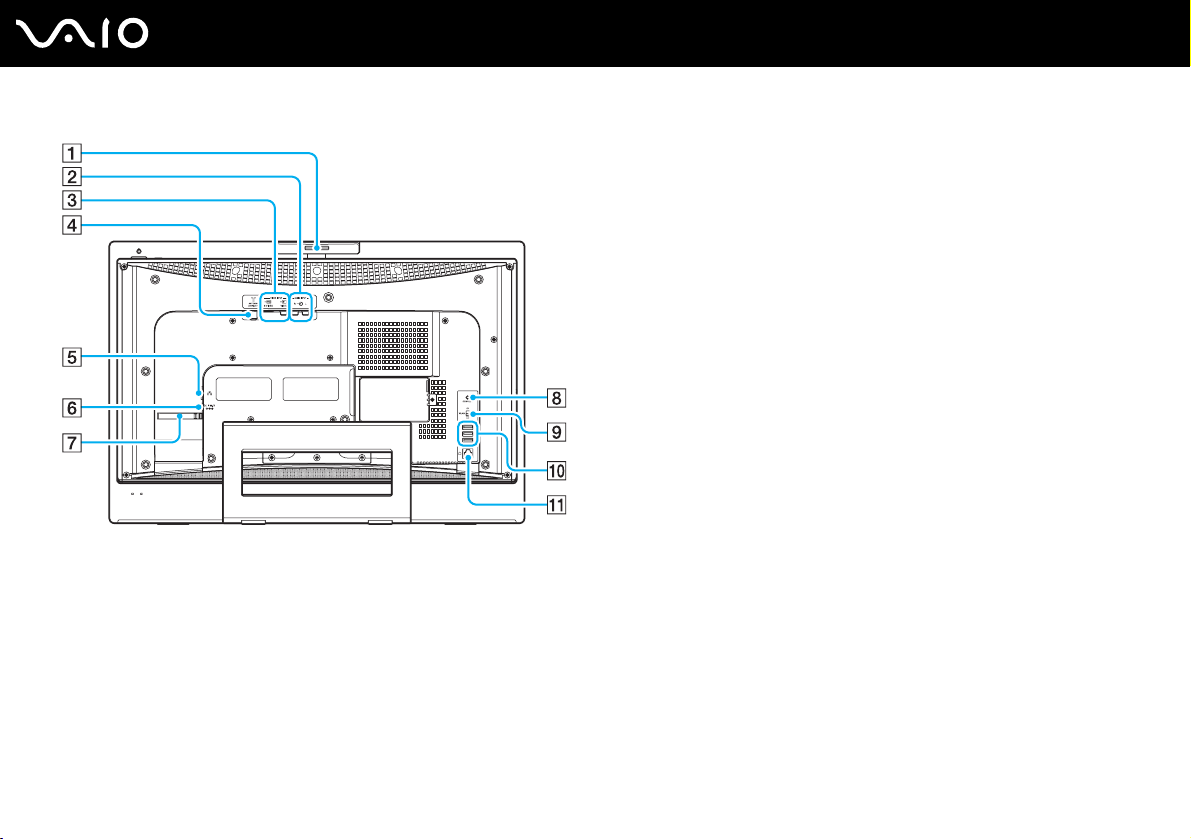
Capture angle adjuster (page 34)
A
B AUDIO INPUT (L/R) jacks (page 55)
C VIDEO INPUT (S VIDEO/VIDEO) port (page 55)
D VHF/UHF port (page 46)
E Network (Ethernet) port (page 93)
F DC IN port (page 16)
G Cable bundler (page 18)
H CONNECT button (page 21), (page 28)
I WLAN (Wireless LAN) switch (page 78)
J Hi-Speed USB (USB 2.0) ports
*
(page 88)
K Modem port (page 77)
* Supports high-/full-/low- speeds.
12
nN
Getting Started
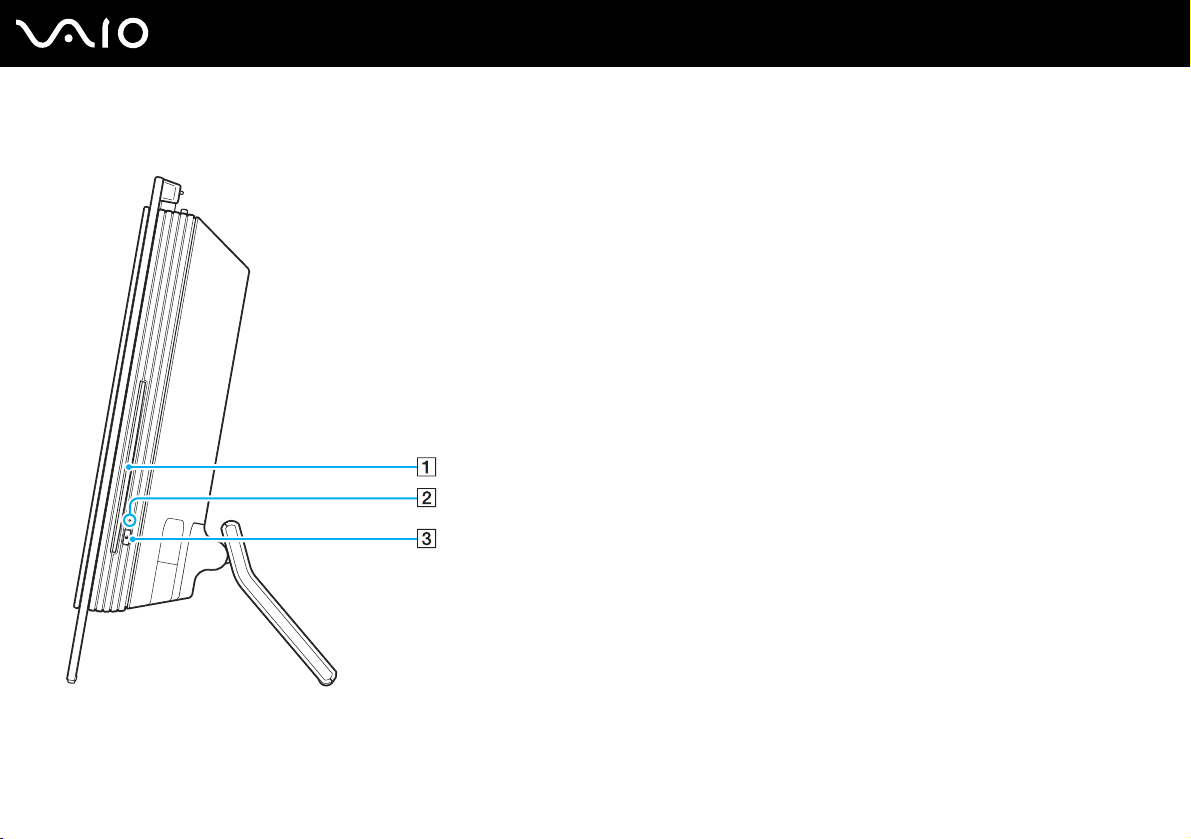
Right
A Optical disc drive (page 35)
B Optical disc drive indicator (page 15)
C Drive eject button (page 37)
13
nN
Getting Started
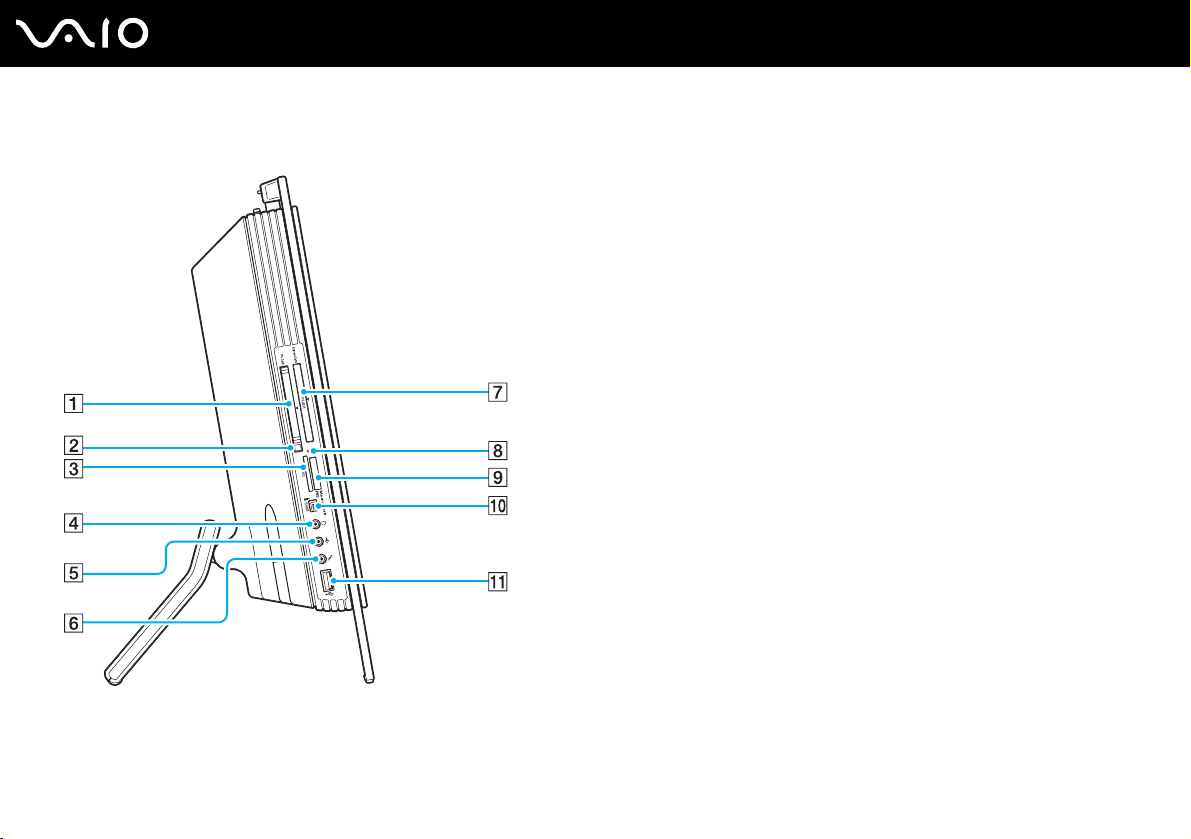
Left
Getting Started
A PC Card slot (page 62)
B PC Card release button (page 64)
C SD memory card slot (page 75)
D Headphones jack
Connect external headphones or speakers.
E Line In jack
Connect an external audio device for audio input.
F Microphone jack
Connect an external microphone.
G Universal ExpressCard
slot*1 (page 66)
H Media Access indicator (page 15)
I Memory Stick PRO/Duo media slot
*2
(page 71)
J i.LINK (IEEE 1394) S400 port (page 91)
K Hi-Speed USB (USB 2.0) port
*1
Referred to as the ExpressCard slot hereinafter.
*2
Your computer supports Memory Stick PRO media and Memory Stick Duo
media with high speed and high capacity capabilities.
*3
Supports high-/full-/low- speeds.
*3
(page 88)
14
nN
Getting Started
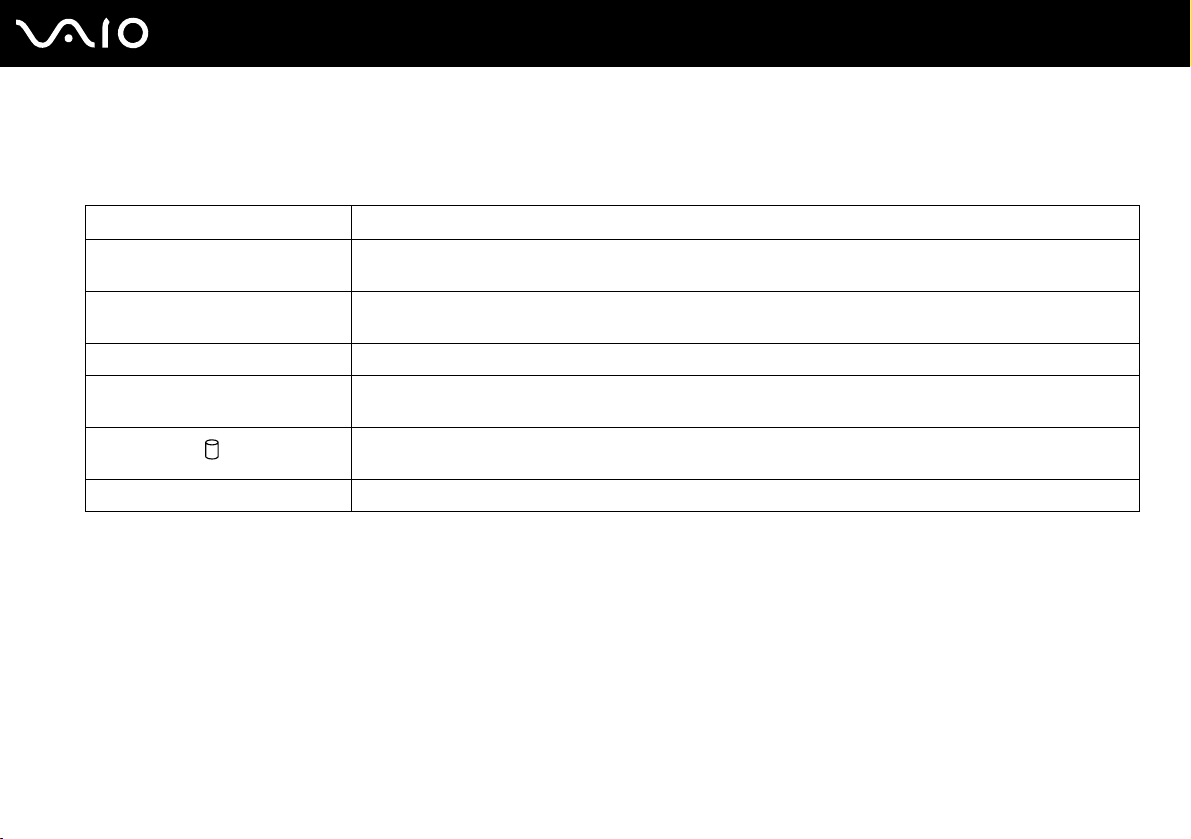
About the Indicator Lights
Your computer is equipped with the following indicator lights.
Indicator Functions
Power 1 Illuminates in green when the power of the computer is on, illuminates in orange when the computer is in
Standby mode, and turns off when the computer is in Hibernate mode or off.
Media Access Illuminates when data is read from or written to a memory card. (Do not enter Standby mode or turn
MONITOR OFF Illuminates in orange when the LCD backlight and the speaker volume are turned off.
Optical disc drive Illuminates when data is read from or written to the optical disc. When the indicator is off, the optical disc is not
Hard disk drive
WIRELESS LAN Illuminates when the wireless LAN function is running.
✍
You can change the brightness of the indicator lights. See Setting Up Your Computer with VAIO Central (page 98) and find out more in its help file.
off the computer when this indicator is on.) When the indicator is off, the memory card is not being used.
being used.
Illuminates when data is read from or written to the hard disk drive. Do not enter Standby mode or turn off the
computer when this indicator is on.
15
nN

Connecting a Power Source
You need an AC adapter as a power source for your computer.
Before accessing the DC IN port
You need to remove the back panel cover (1). Simply pull the cover off your computer.
!
Be sure to put the cover back on the computer when you are done.
16
nN
Getting Started
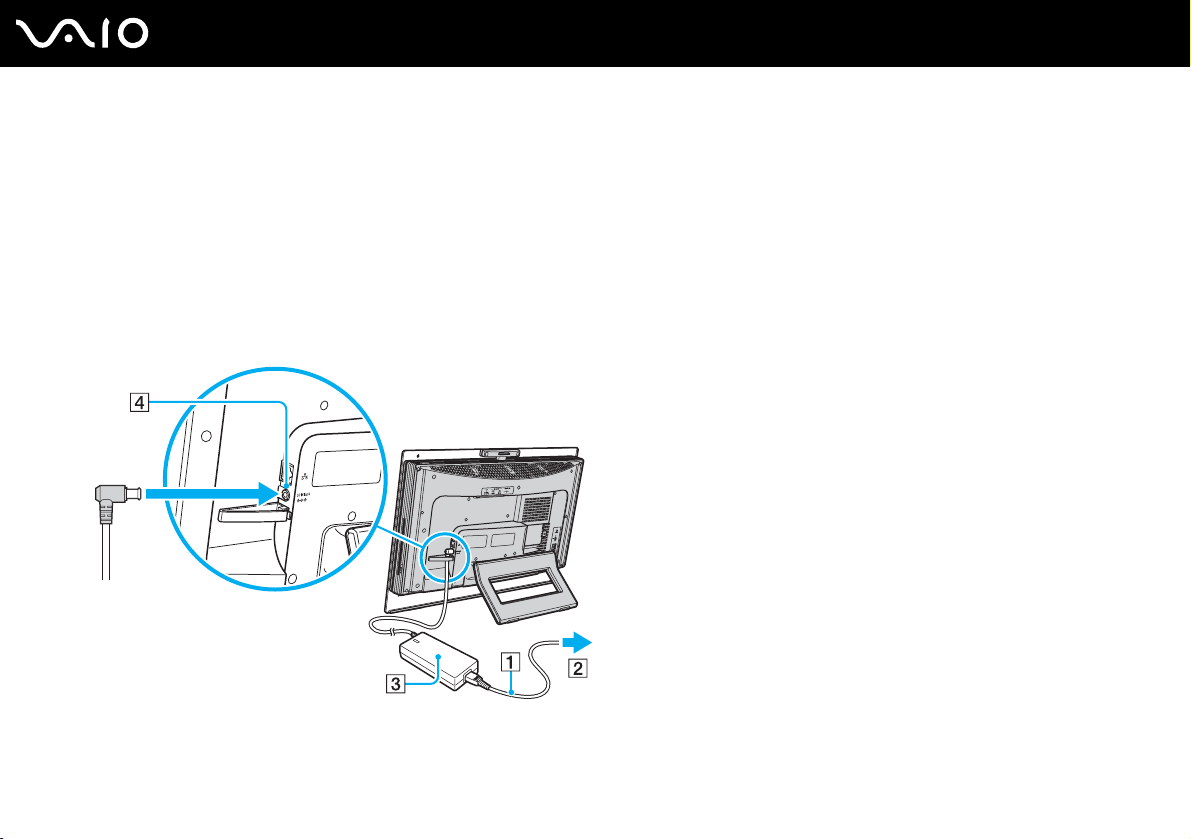
Using the AC Adapter
✍
Use your computer only with the supplied AC adapter.
To use the AC adapter
1 Plug one end of the power cord (1) into the AC adapter (3).
2 Plug the other end of the power cord into an AC outlet (2).
3 Plug the cable attached to the AC adapter (3) into the DC IN port (4) on the computer.
17
nN
Getting Started

Getting Started
✍
You can bundle the AC adapter cable along with other cables to keep them tidy. Snap open the cable bundler, route the cables through it, and then snap
the cable bundler back shut as shown below:
To disconnect your computer completely from AC power, unplug the AC adapter.
Make sure that the AC outlet is easily accessible.
If you do not use your computer for a long period of time, place the computer into Hibernate mode. See Using Hibernate Mode (page 102). This power
saving mode saves the time of shutting down or resuming.
18
nN

19
nN
Getting Started
Shutting Down Your Computer Safely
To avoid losing unsaved data, be sure to shut down your computer properly, as described below.
To shut down your computer
1 Turn off any peripherals connected to the computer.
2 Click Start and then Turn Off Computer.
The Turn off computer window appears.
3 Click Turn O ff.
4 Respond to any prompts warning you to save documents or to consider other users and wait for the computer to turn off
automatically.
The power indicator light turns off.

Using Your VAIO Computer
This section describes how to get the most out of using your computer.
❑ Using the Keyboard (page 21)
❑ Using the Mouse (page 28)
❑ Using the Built-in MOTION EYE Camera (page 33)
❑ Using the Optical Disc Drive (page 35)
❑ Using the TV Function (page 46)
❑ Using PC Cards (page 62)
❑ Using the ExpressCard Module (page 65)
❑ Using the Memory Stick Media (page 69)
❑ Using Other Memory Cards (page 74)
❑ Using the Internet (page 77)
❑ Using Wireless LAN (WLAN) (page 78)
20
nN
Using Your VAIO Computer

Using Your VAIO Computer
Using the Keyboard
A wireless keyboard is supplied with your computer.
The wireless keyboard uses a standard key arrangement with additional keys that perform specific functions.
21
nN
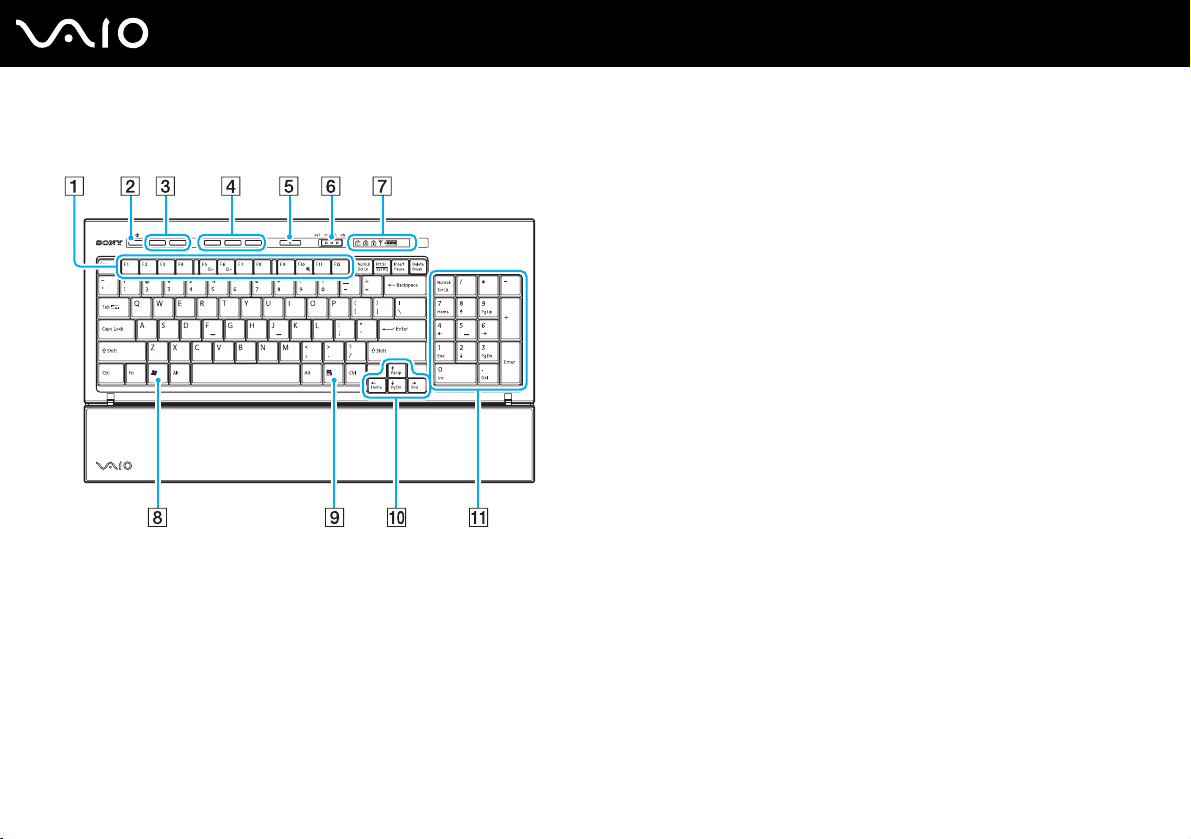
Using the Wireless Keyboard
Using Your VAIO Computer
A Function keys
Perform certain tasks. The task associated with each function
key varies among software applications except the following
combinations with the Fn key.
Fn + F5: Decreases lightness intensity of the LCD screen.
Fn + F6: Increases lightness intensity of the LCD screen.
Fn + F10: Changes the screen resolution.
B Muting button
Turns the volume on and off.
C Volume control buttons
Increase (+) or decrease (-) the volume.
D Shortcut buttons
Perform the pre-assigned tasks. The default tasks are as
follows:
S1: Launches or exits LifeFlow.
S2: Launches Internet Explorer. When Internet Explorer is up
and running, press this button to magnify the contents in the
foreground Internet Explorer window. One press magnifies the
contents by 25%. When magnification reaches 200%, it goes
back to 100%. If the Internet Explorer window is minimized or
hidden behind another window, pressing this button will bring
the window into the foreground.
S3: Opens the Media Center Start menu.
22
nN
✍
You can change these button assignments with VAIO Central. See Setting Up
Your Computer with VAIO Central (page 98) and find out more in its help file.
23
nN
Using Your VAIO Computer
Standby button
E
Provides for the lower level of power consumption.
For details on power management, see Using the Power Saving
Modes (page 99).
F POWER switch
Slide the POWER switch to turn on and off the wireless keyboard.
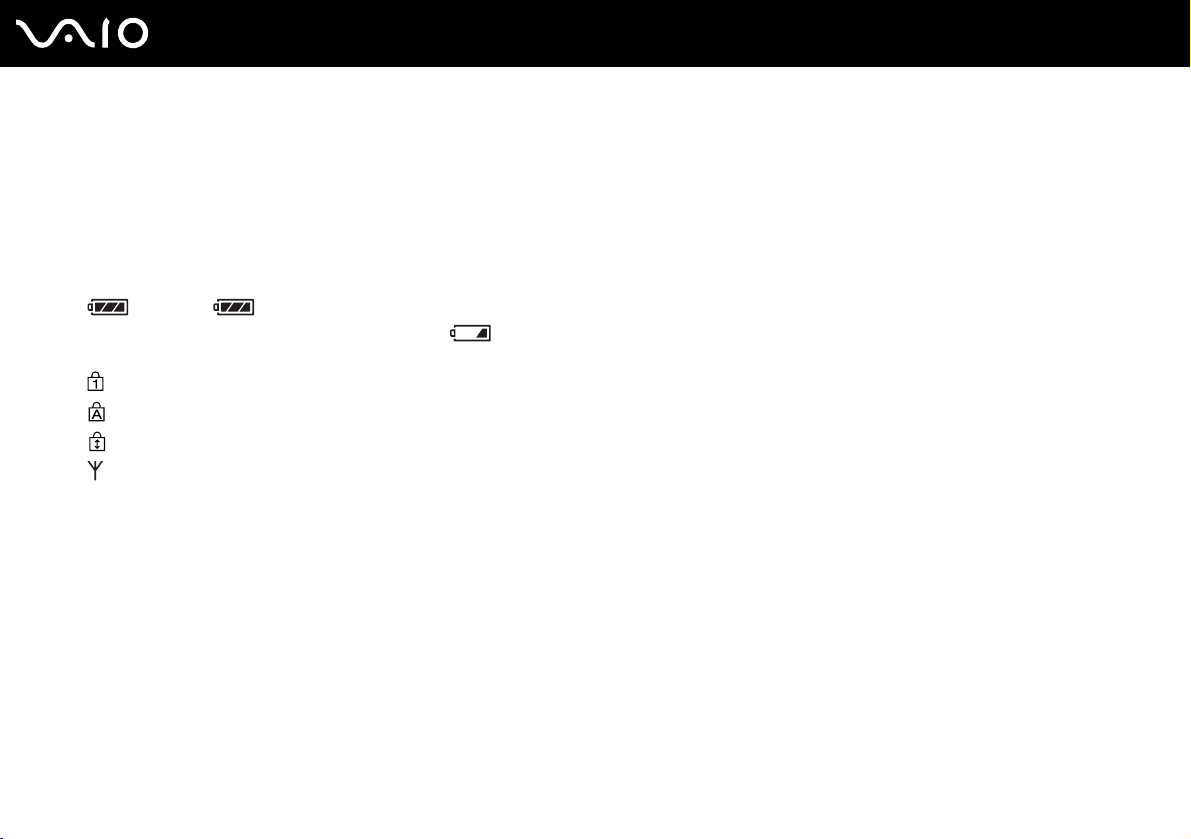
G Indicators
(Battery): turns on while the AA batteries for the
wireless keyboard are sufficient and switches to when the
batteries wear out.
(Num lock): Turns on while in the Num Lock state.
(Caps lock): Turns on while in the Caps Lock state.
(Scroll lock): Turns on while in the Scroll Lock state.
(Connect): Turns on while connection between the computer and
the wireless keyboard is in place to indicate that the keyboard is
ready for use (page 26).
H Windows key
Displays the Start menu.
I Applications key
Displays a shortcut menu in certain software applications.
J Directional arrow keys
Move the pointer on the computer screen.
K Numeric keypad
Use the numeric keypad to type numbers or to perform basic
math calculations.
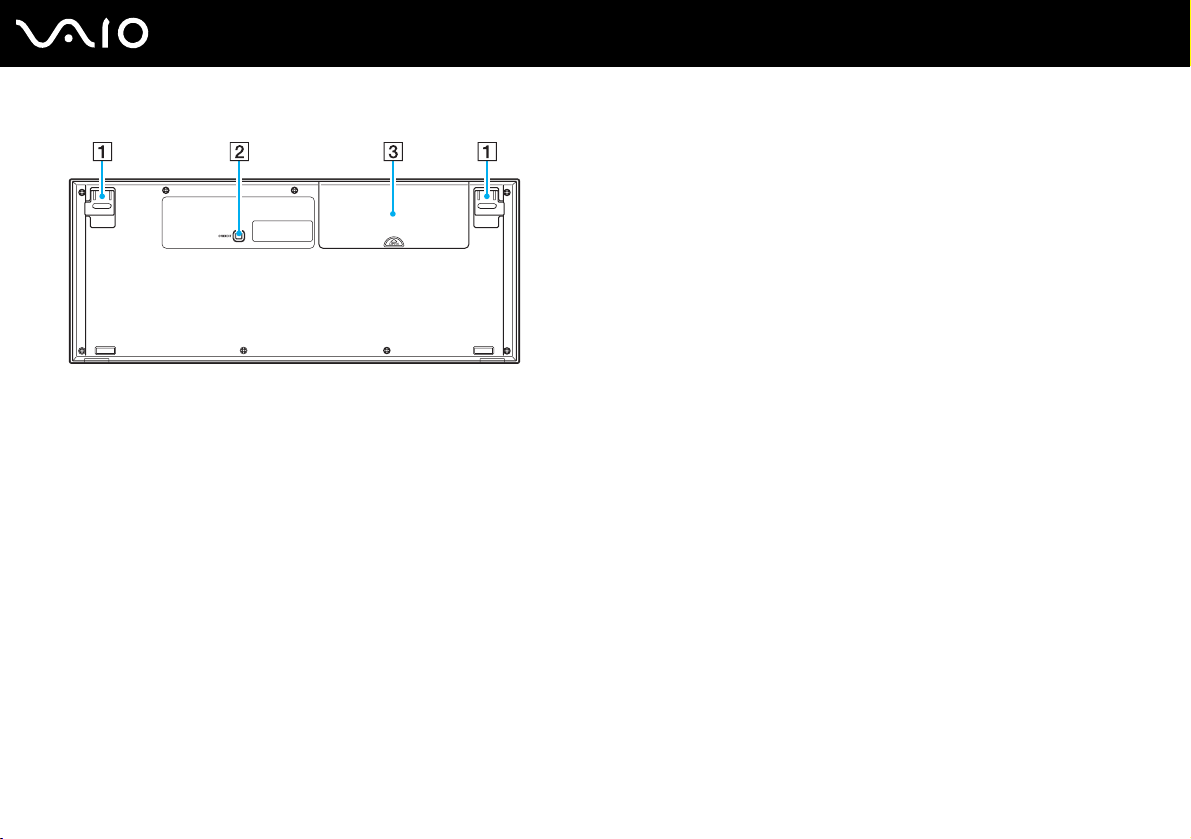
Using Your VAIO Computer
A Keyboard feet
Flip open to adjust the keyboard angle.
B CONNECT button
Press to enable the wireless keyboard to communicate with the
main unit.
C Battery compartment
Storage compartment for the AA batteries.
24
nN

25
nN
Using Your VAIO Computer
Before You Use the Keyboard
Four AA alkaline batteries are supplied with your computer for use in the wireless keyboard. Before attempting to use the
wireless keyboard, you must install the batteries and establish communication between the computer and the keyboard. To
connect your wireless keyboard, it must be located within a range of approximately 11.8 inches (30 cm) to approximately 39.4
inches (1 m) from the computer.
!
To maintain good communication, operate the wireless keyboard within the distance limitations of keyboard: approximately 32.8 feet (10 m) from your
computer.
Confirm that the supplied AA batteries are properly installed.
Press the CONNECT button located on the back of your computer first, and then press the CONNECT button on the bottom of the wireless keyboard.
Avoid using any wireless devices that exchange radio signals on the 2.4 GHz frequency band near the wireless keyboard. These devices may cause
interference, causing the keyboard to stop working properly.
Do not place metal furniture near your computer or wireless keyboard, as this may create interference, causing the keyboard to stop working properly.
Do not mix old (used) and new batteries when replacing batteries in the wireless keyboard. Always use the same type and manufacture of battery.
Do not mix alkaline with manganese batteries. Using incompatible batteries or mixing used, new or different types of batteries can damage the wireless
keyboard.

Using Your VAIO Computer
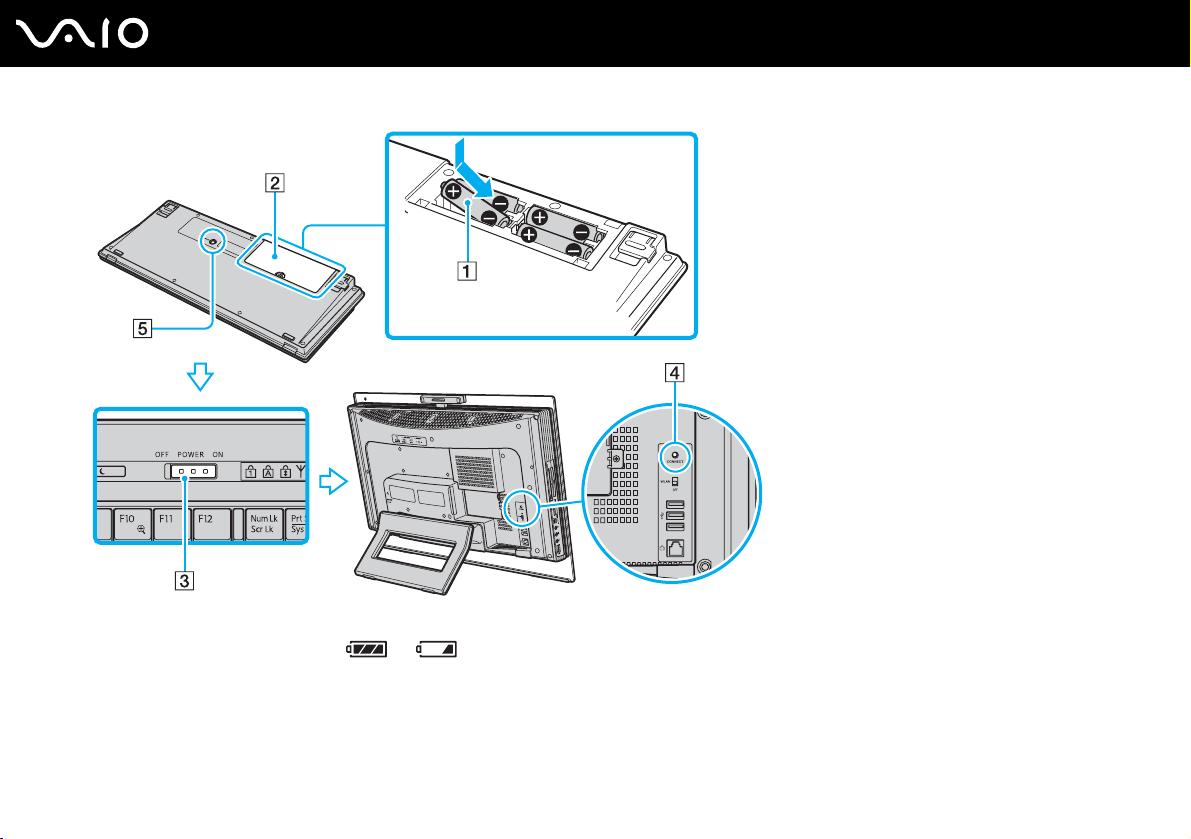
To connect the wireless keyboard
1 Insert the supplied four AA batteries (1) into the battery compartment (2) on the bottom of the wireless keyboard.
2 Turn on the computer.
3 Slide the POWER switch (3) at the top of the keyboard to the ON position.
4 Press the CONNECT button (4) on the back of the computer.
5 Press the CONNECT button (5) on the bottom of the keyboard.
The connect indicator turns on in the indicator window on the keyboard when connection is established between the
computer and the keyboard. If not, repeat the procedure.
!
Steps 4 and 5 must be completed within 10 seconds of each other.
If the wireless keyboard is left unused for 20 minutes or longer, the connect indicator will turn off. This could indicate that the connection between
your computer and the keyboard is lost. Press the Fn key to check that the connect indicator turns on before using the keyboard.
26
nN
27
nN
Using Your VAIO Computer
✍
You can check the battery indicator ( or ) in the indicator window on the wireless keyboard for its battery power level.
If the wireless keyboard does not operate properly, the batteries may need to be replaced. If the wireless keyboard is not being used for an extended
period of time, remove the batteries to avoid possible damage from battery leakage.
If you want to put the wireless keyboard in a more 'ergonomic' position, flip open the keyboard feet.
Using Your VAIO Computer
Using the Mouse
A wireless mouse is supplied with your computer.
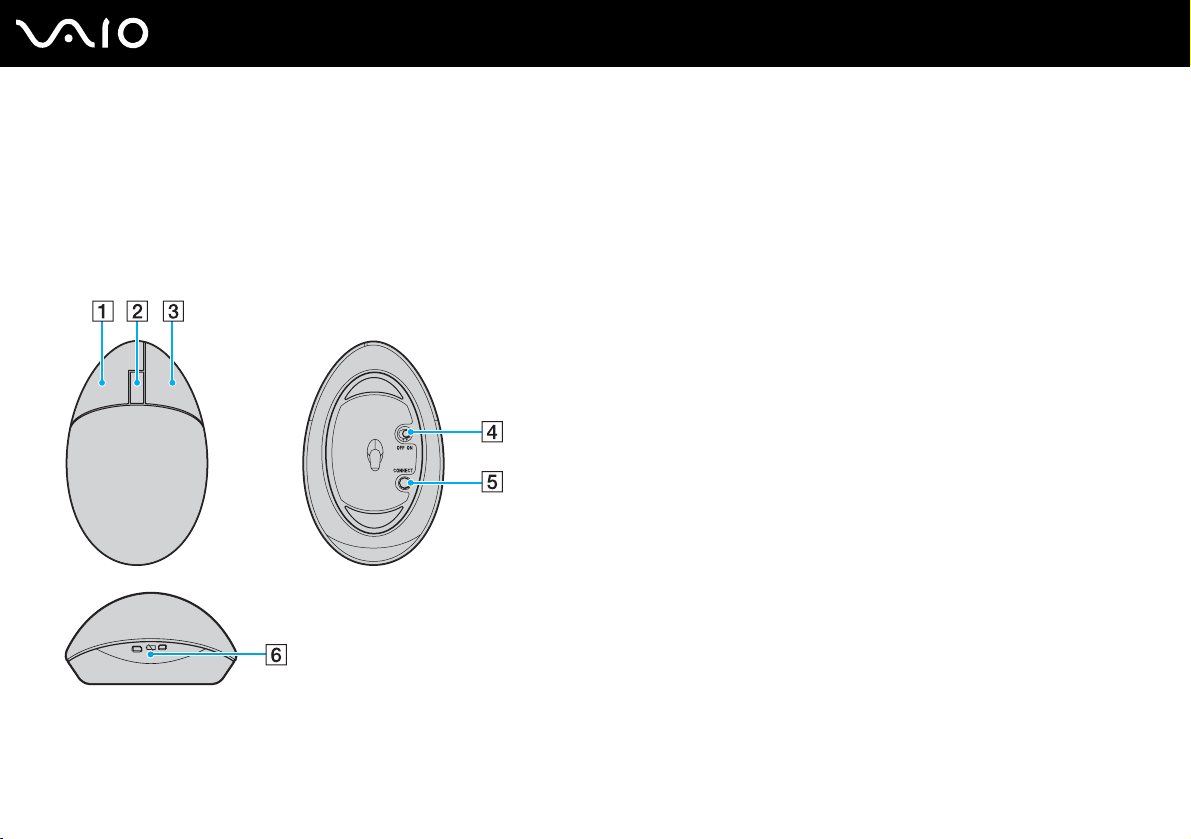
Using the Wireless Mouse
The wireless optical mouse has no cables to plug in and uses a light-emitting diode (LED) instead of a ball.
A Left button
Click or double-click the left button to select items. To drag and
drop items, hold the left button down while sliding the mouse,
then release the button to drop the item.
B Central wheel
Rotate the central wheel to scroll up or down a page. Press the
wheel once to lock the scroll action and control the movement
by moving the entire mouse (the scroll function is available only
with applications that support it).
C Right button
Press the right button once to display a context-sensitive
shortcut menu (not always an active function).
D Power switch
Slide the switch to turn the mouse on and off. This will help you
save battery power.
E CONNECT button
Press to enable communication between the computer and the
wireless mouse.
F Battery indicator
Blinks when the mouse batteries are running out of power.
28
nN

29
nN
Using Your VAIO Computer
Before You Use the Mouse
Two AA alkaline batteries are supplied with your computer for use in the wireless mouse. Before attempting to use the
wireless mouse, you must install the batteries and establish communication between your computer and the mouse. To
connect the wireless mouse, it must be located within a range of approximately 11.8 inches (30 cm) to approximately 39.4
inches (1 m) from the computer.
!
To maintain good communication, operate the wireless mouse within the distance limitations of mouse: approximately 32.8 feet (10 m) from your
computer.
Confirm that the supplied AA batteries are properly installed.
Press the CONNECT button located on the back of your computer first, and then press the CONNECT button on the bottom of the wireless mouse.
Avoid using any wireless devices that exchange radio signals on the 2.4 GHz frequency band near the wireless mouse. These devices may cause
interference, causing the mouse to stop working properly.
Use surfaces such as plain paper, card stock, or fabric that have minimal repetitive patterns.
Avoid surfaces such as mirrors, smooth glass, or magazines that have half- tone printing.
Do not place metal furniture near your computer or wireless mouse, as this may create interference, causing the mouse to stop working properly.
Do not mix old (used) and new batteries when replacing batteries in the wireless mouse. Always use the same type and manufacture of battery.
Do not mix alkaline with manganese batteries. Using incompatible batteries or mixing used, new or different types of batteries can damage the wireless
mouse.
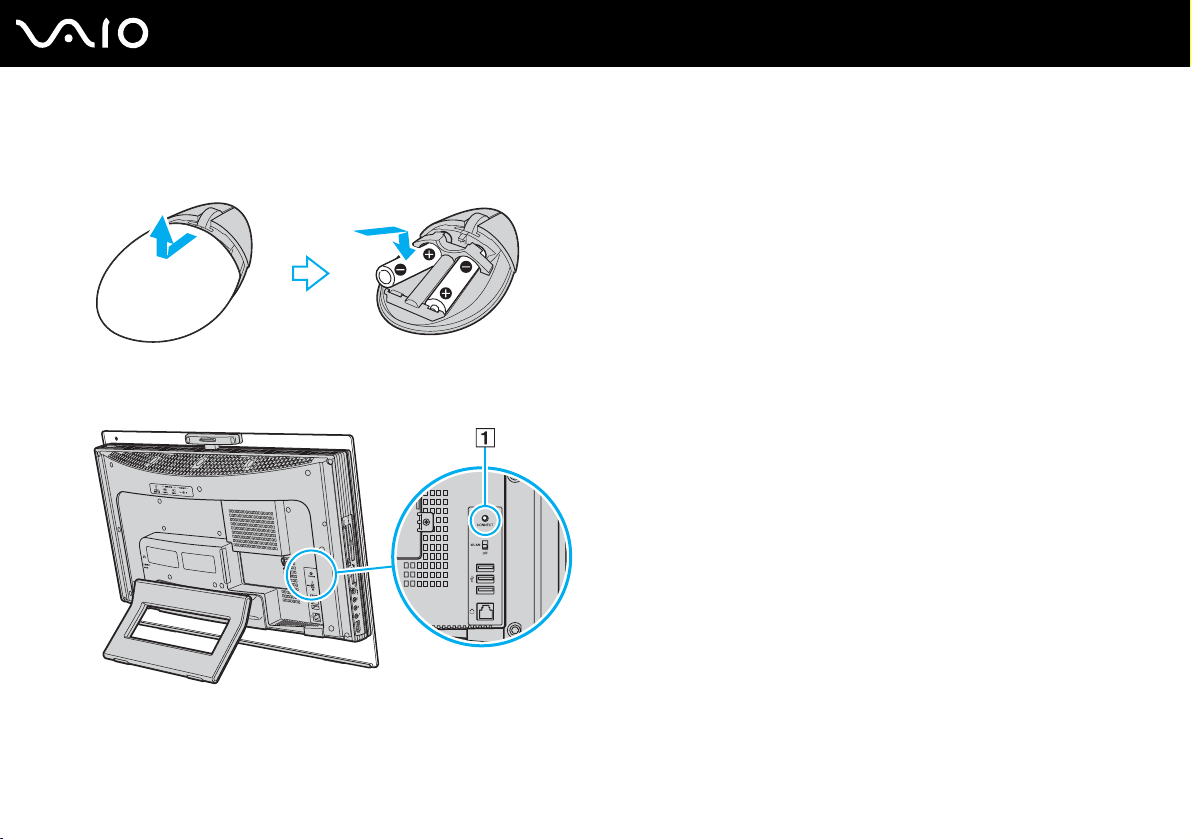
To connect the wireless mouse
1 Insert the supplied two AA batteries into the wireless mouse as shown below.
2 Turn on the computer.
3 Press the CONNECT button (1) on the back of the computer.
30
nN
Using Your VAIO Computer
 Loading...