

Page 1

CD-R/RW Drive
User’s Guide
4-650-837-11(1)
CRX10U
2001 Sony Corporation
Page 2
Safety Regulations
WARNING - For the customers in U.S.A.:
You are cautioned that any changes or modifications not expressly approved in this
manual could void your authority to operate this equipment.
WARNING:
To prevent fire or shock hazard, do not expose the unit to rain or moisture.
To avoid electrical shock, do not open the cabinet. Refer servicing to qualified
personnel only.
CAUTION:
As the laser beam in this CRX10U is harmful to the eyes, do not attempt to
disassemble the cabinet. Refer servicing to qualified personnel only.
The use of optical instruments with this product will increase eye hazard.
The use of controls or adjustments or performance of procedures other than those
specified herein may result in hazardous radiation exposure.
This label is located on the inside surface of top cover.
Dieses Etikett befindet sich auf der Innenseite der oberen Abdeckung.
DANGER
INVISIBLE LASER RADIATION WHEN OPEN.
AVIOD DIRECT EXPOSIRE TO BEAM
VORSICHT
UNSICHTBARE LASERSTRAHLUNG. WENN ABDECKUNG
GEOFFNET
NICHT DEMSTRAHL AUSSETZEN.
This label is located on the surface of inner bottom shield plate.
DANGER
DANGER
VORSICHT
ADVARSEL
ADVARSEL
VARNING
VAROI
INVISIBLE LASER RADIATION WHEN OPEN.
AVOID DIRECT EXPOSURE TO BEAM.
RADIATIONS INVISIBLES DU LASER EN CAS D'OUVERTURE.
EVITER TOUTE EXPOSITION DIRECTE AU FAISCEAU.
UNSICHTBARE LASERSTRAHLUNG, WENN ABDECKUNG GEÖFFNET.
NICHT DEM STRAHL AUSSET ZEN.
USYNLIG LASERSTRÅLING VED ÅBNING.
UNDGÅ UDS/ETTELSE FOR STRÅLING.
USYNLIG LASERSTRÅLING NÅR DEKSEL ÅPNES.
UNNGÅ EKSPONERING FOR STRÅLEN.
OSYNLIG LASERSTRÅLING NÅR DENNA DEL AR ÖPPNAD.
STRÅLEN ÄR FARLIG.
NÄKYMÄTÖN AVATTAESSA OLET ALTTINA LASERSÄTEILYLLE.
ÄLÄ KATSO SÄTEESEN.
2
Page 3

This CD-R/RW drive unit is classified as a CLASS 1 LASER PRODUCT.
The CLASS 1 LASER PRODUCT label is located on the bottom cover.
Bei diesem CD-R/RW-Laufwerk handelt es sich um ein Laser-Produkt der Klasse 1.
Das Etikett mit der Aufschrift LASER KLASSE 1 PRODUKT befindet sich auf der
Oberseite des Gehäses.
CLASS 1
LASER PRODUCT
LASER KLASSE 1
PRODUKT
LOUKAN 1 LASERLAITE
KLASS 1 LASER APPARAT
FCC Compliance:
This equipment has been tested and found to comply with the limits for a Class B
digital device, pursuant to Part 15 of the FCC Rules. These limits are designed to
provide reasonable protection against harmful interference in a residential
installation. This equipment generates, uses, and can radiate radio frequency energy
and, if not installed and used in accordance with the instructions, may cause harmful
interference to radio communications. However, there is no guarantee that
interference will not occur in a particular installation. If this equipment does cause
harmful interference to radio or television reception, which can be determined by
turning the equipment off and on, the user is encouraged to try to correct the
interference by one or more of the following measures:
• Reorient or relocate the receiving antenna.
• Increase the separation between the equipment and receiver.
• Connect the equipment into an outlet on a circuit different from that to which
the receiver is connected.
• Consult the dealer or an experienced radio/TV technician for help.
If you have any questions about this product, you may call the Sony Customer
Information Service Center at (800) 588- 3847 or visit the Sony web site
http://www.sony.com/storagesupport.
Declaration of Conformity
Trade Name: SONY
Model No.: CRX10U
Responsible Party: Sony Electronics Inc.
Address: 1 Sony Drive, Park Ridge, NJ. 07656 USA
Telephone No.: 201-930-6972
This device complies with Part 15 of the FCC Rules. Operation is subject to the
following two conditions:
(1) This device may not cause harmful interference, and
(2) This device must accept any interference received, including interference that
may cause undesired operation.
3
Page 4

The shielded interface cable recommended in this manual must be used with this
equipment in order to comply with the limits for a digital device pursuant to Subpart
B of Part 15 of FCC Rules.
CE Sicherheitsbestimmungen
Diese Ausrüstung erfüllt die Europäischen EMC-Bestimmungen für die Verwendung
in folgender / folgenden Umgebung(en):
• Wohngegenden
• Gewerbegebiete
• Leichtindustriegebiete
(Diese Ausführung erfüllt die Bestimmungen der Norm EN55022, Klasse B.)
CAUTION:
Danger of explosion if battery is incorrectly replaced.
Replace only with the specified battery pack below.
• Rechargeable Battery Pack : NP-F550
Disposal of Lithium Ion Battery:
You can return your unwanted lithium ion batteries to your nearest Sony Service
Center.
For the Sony Service Center nearest you call
1-800-222-SONY (United States only)
Note: In some areas the disposal of lithium ion batteries in household or business
trash may prohibited.
4
Page 5

English
Table of Contents
Safety Regulations .......................................................... 2
Introduction...................................................................... 7
System Configuration Requirements ............................ 7
Compatible Discs ............................................................ 9
About CD-R and CD-RW Discs...................................10
Names and Functions of Parts ..................................... 12
Connecting the Drive to a Computer ........................... 14
Using the Battery Pack ................................................. 15
Installing the Battery Pack............................................15
Charging .......................................................................16
Loading and Ejecting Discs.......................................... 19
Loading a Disc..............................................................19
Ejecting a Disc..............................................................20
Listening to Music CDs................................................. 21
Playing CDs .................................................................. 21
Search & Fast Forward .................................................23
Continuous Play (Repeat) ............................................. 24
Displaying Song Title and Remaining Time ................ 24
Playing Discs with MP3 Files ......................................26
Troubleshooting ............................................................ 30
Operating Precautions .................................................. 34
Special Precautions.......................................................34
Operating and Storage Environments...........................34
Transporting the Drive..................................................34
Condensation ................................................................34
Lens Considerations......................................................34
When using the CRX10U abroad ................................. 34
Handling Discs .............................................................35
Battery Pack Considerations.........................................35
Warranty Card & After Sales Service........................... 36
Warranty Card ..............................................................36
After Sales Service .......................................................36
Major Specifications...................................................... 37
English
5
Page 6

• Microsoft, MS, MS-DOS and Windows are registered trademarks of Microsoft
Corporation
• Macintosh and MacOS are trademarks of Apple Computer Corporation
• Other system and product names used herein are registered trademarks or
trademarks of their respective manufacturers, although the™ and ®marks are not
used in the text.
Before using this device, be sure to read the end users license agreements for the
software provided with your computer.
❑ Our product guarantee is valid only when the supplied accessories
(including software) are used in the specified or recommended system
environment, in accordance with this Users Guide, and applies only to this
CD-R/RW drive. Our customer service and user support apply only under
these product guarantee conditions.
❑ Please note that we cannot accept responsibility for failure of the computer
or other devices, incompatibility with special hardware, operating
problems caused by improper installation of software, loss of data, discs or
other accidental or incidental damage that might occur when using this
product.
❑ The guarantee and user support for this product are valid only within the
countries or sales regions specified on the warranty card.
❑ Copyright laws prohibit the copying of all or part of the supplied software
and Users Guide, or loaning the software, without obtaining permission of
the copyright holder.
❑ We cannot accept responsibility for any direct or indirect financial damage
or loss of profit that might occur when using the supplied software.
❑ Specifications of the supplied software may be changed without notice in
the interest in product improvement.
6
Page 7

Introduction
The CRX10U has the following features:
❑ Writes CD-R discs at up to 4× speed.
❑ Writes CD-RW discs at up to 4× speed.
❑ Reads CD-ROM discs at up to 6× speed.
❑ Has a compact, lightweight design for portability.
❑ Includes an AC adapter compatible with power supply voltages
from 100 to 240 V.
❑ Includes a USB interface for easy connection and removal from the
computer.
❑ Includes a rechargeable battery pack for convenient use in places
without electric power.
❑ Plays music CDs and MP3 files as a stand-alone player, using the
supplied remote-controlled headphones.
System Configuration Requirements
The CRX10U can be used with a computer with the following
specifications:
For Windows
❑ CPU: At least 200-MHz Pentium® (233 MHz or faster
recommended)
❑ RAM: At least 32 MB
❑ Hard disk space: At least 100 MB (1 GB or more recommended)
❑ An available USB connector on the computer
❑ 3.5" floppy disk drive (used for setup)
❑ OS: Microsoft Windows 981), Windows 2000 Professional or
Windows Me
1) Either Windows 98 with Service Pack 1 installed, or Windows
Second Edition
®
Continued
7
Page 8

For Macintosh
®
❑ Models: iMac, iBook, PowerBook G3, PowerMacintosh G3/G4/G4
Cube
❑ An available USB connector on the computer
❑ CD-ROM or DVD drive (used for setup)
❑ OS: Mac OS® 8.6 to 9.0.4 (9.0.4 recommended)
Note
If using MacOS 9, 9.0.2 or 9.0.3, we recommend upgrading to MacOS 9.0.4, which
includes USB connection software enhancements to improve stability.
The MacOS 9.0.4 upgrade is available from the following Apple website:
http://asu.info.apple.com/
CAUTION
The System Configuration Requirements listed above are estimates based on the
requirements for writing to CD-R and CD-RW discs. When using the CRX10U, In
addition to these requirements, those specified by the particular writing software must
also be satisfied (and those requirements may be greater than the requirements listed
here).
8
Page 9
Compatible Discs
The following chart lists the types of discs that can be used with the
CRX10U.
Disc Type Symbol
CD-R
CD-RW
CD-ROM
Music CD
CD Extra
Video CD
CD TEXT
CD Graphics
Photo CD
CD-I
Electronic Book
CAUTION
Use only round discs in the CRX10U. Using discs of other shapes (stars, hearts, etc.)
could damage the drive.
Continued
9
Page 10

About CD-R and CD-RW Discs
The CRX10U can write CD-R discs and CD-RW discs when used with
appropriate disc writing software. To play or read a disc written using
the CRX10U on another CD-ROM drive, certain settings must be made
in the writer software.
What is a CD-R Disc?
CD-R (CD-Recordable) discs can be written only once, and cannot be
erased. Music CDs created using CD-R discs can be played on
common CD players.
What is a CD-RW Disc?
CD-RW (CD-ReWritable) discs can be written and erased repeatedly.
A typical CD-RW disc can be rewritten about a thousand times.
Disc Compatibility
Data stored on CD-R and CD-RW discs using the CRX10U can be
retrieved by many CD-ROM drives. However, some older models
designed specifically for CD-ROM discs cannot read CD-RW discs.
Also, music CD-R discs written with the CRX10U can be played on
most CD players, although some models (particularly automobile CD
players) are not guaranteed to be capable of playing CD-R discs.
Please also note that differences in quality and performance
characteristics among different manufacturers of CD-ROM drives, CDR and CD-RW discs may result in some drives being unable to play
certain types of discs.
10
Applications for CD-R and CD-RW Discs
The applications for which CD-R and CD-RW discs are best suited are
generally as follows. These should be considered as general guidelines.
CD-R CD-RW
Creating Music CDs a
Data Distribution a
Backup a
Data Storage a
Creating Originals (Mastering) aa
Temporary File Storage a
Page 11

Writing Speeds
The writing speed for a CD-R or CD-RW disc should be set so that it
does not exceed the speed specified for the particular disc media. You
can set the writing speed in the writer software.
Recommended Discs
We recommend using Sony discs with the CRX10U.
CD-R: Sony 650 MB and 700 MB CD Recordable discs
CD-RW: Sony 650 MB CD ReWritable discs
For trouble-free 4× CD-RW recording, make sure the CD-RW media
supports 4× or faster recording speed.
CAUTION
• The CRX10U is not capable of writing high-speed CD-RW discs. However, high-speed
CD-RW discs that have been properly written using a high-speed CD-RW drive can be
read by the CRX10U.
• The CRX10U cannot be used to write 99 minute discs or 8 cm CD-R discs.
Recording Methods
The CRX10U is capable of writing CD-R/CD-RW discs using several
different formats. The writing format is determined by the writer
software according to the type or application of the disc being created.
Data can usually be written to CD-R and CD-RW discs using the
standard settings of the writer software, with no need for concern about
the writing format. The writing methods supported by the CRX10U are
briefly described here. Refer to the manual for the writer software you
are using for more details.
• Disc at Once: this recording method writes the entire disc in a single
operation. Data cannot be added later.
• Session at Once: a complete session is written in a single operation
(one at a time). Data can be added in later sessions.
• Track at Once: tracks are written to the disc incrementally (one at a
time). Data can be added in later tracks.
• Packet Writing: data is written in file and folder units, instead of track
or session units. This allows writing as simply as drag-and-drop
copying of files or folders.
11
Page 12
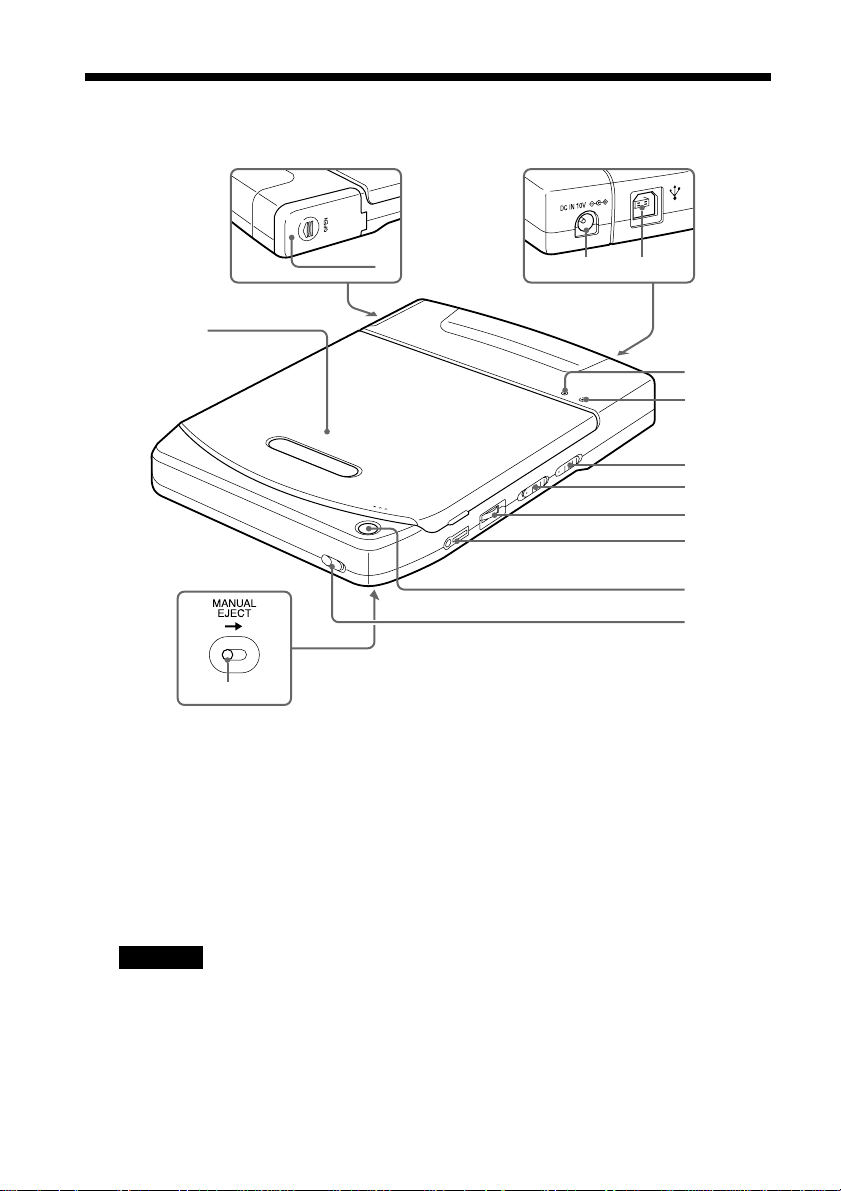
Names and Functions of Parts
2
1
3
4
5
6
7
8
9
0
qa
qs
qd
1 Top Cover
2 Battery Compartment (on rear)
3 Power Jack (on rear)
Connect the supplied ACCRX10U AC adapter here.
CAUTION
Never connect any AC adapter or power
cord other than those provided.
4 USB Connector (on rear)
Connect the supplied USB cable
here.
12
5 Power Indicator
When power is on, the power status
is indicated as follows.
If connected to AC power
• The indicator lights green.
If operating from the battery
• The indicator usually lights green.
• When the remaining battery
capacity falls below 25%, the
indicator lights red.
• When the remaining battery
capacity falls below 5%, the
indicator flashes red.
Page 13

6 BUSY Indicator
This indicator lights orange while
the drive is operating.
7 AVLS (Auto Volume Limiter
System) Switch
When listening to music CDs, this
switch can be set to the LIMIT
position to protect against excessive
volume levels and suppress sound
leakage, pressure on the eardrums
and other hazards to hearing.
8 POWER Switch
This switch turns the drive on and
off, and turns battery charging
(CHG) on.
9 Volume Control
This control adjusts the volume at
the headphone jack.
q; i /REMOTE Jack
The RM-CRX10 headphone remote
control connects here.
qs HOLD (inhibit inadvertent
operation) switch
Slide this switch in the direction of
the arrow to enable the Hold state,
which prevents the top cover from
opening when the eject button is
pressed.
qd Manual Eject Lever (bottom of
drive)
While the drive is off, push this
lever in the direction of the arrow
to open the top cover.
qz Eject Button
Press this button to open the top
cover.
Important
The CRX10U has an electronic eject
mechanism to prevent the top cover from
being opened accidentally while the drive is
operating, so the eject button cannot open the
top cover when the drive is turned off.
Furthermore, even when the power is on,
depending on the status of the currently
running application, the top cover might not
open for a few seconds after the eject button
is pressed.
If pressing the eject button does not open the
top cover (when not writing a disc), press the
manual eject lever (on the bottom of the
drive) in the direction indicated by the arrow
to open the top cover.
13
Page 14

Connecting the Drive to a Computer
Connect the drive to a computer as shown below.
CAUTION
• Be sure to read the Quick Start Guide before connecting the CRX10U to the computer
the first time.
• Use only the supplied AC adapter, power cord, and USB cable for connections.
To USB port on the
computer
To power outlet
14
Precautions for USB Connections
• Connect the CRX10U directly to a USB port on the computer.
Operation through a hub (including keyboard hubs) cannot be
guaranteed.
• With Windows Me and Windows 2000, we recommend clicking
on the task bar and allowing the CRX10U to stop before removing
the USB cable. Otherwise, a warning message will be displayed when
the USB cable is removed.
Page 15

Using the Battery Pack
The supplied battery pack can be used to operate the CRX10U without
connecting AC power, for convenient portable music CD listening.
Important
We recommend operating the drive from AC using the AC adapter when writing CD-R/
RW discs. If the battery was to be discharged while writing data, the write operation
would fail and the disc would probably be unusable.
Note
When operating the CRX10U from the battery, the drive will turn itself off automatically
if no key is pressed on the remote control for one hour (unless playing a music CD). Use
the POWER switch to turn the CRX10U off and back on.
Installing the Battery Pack
Install the supplied battery pack in the CRX10U. The battery pack is
charged when it is installed.
1 Open the battery compartment cover.
Slide the cover in the direction indicated by the c mark.
Continued
15
Page 16

2 Insert the battery pack.
Insert the battery pack in the direction indicated by the B arrow on
the pack. The battery pack will stick out slightly from the drive.
CAUTION
Use only the supplied NP-F550 Battery Pack.
3 Close the battery compartment cover.
Place the cover over the opening, and slide it until it clicks.
Charging
16
Charge the battery pack before using it the first time, and whenever it
becomes discharged.
Note
• When the remote control is connected to the CRX10U, the battery’s discharge status
can be displayed as follows:
uytre
(Full Charge) (Discharged)
• The power indicator also indicates the battery’s discharge status. When less than 25%
charge remains, the indicator lights red, and when less than 5% remains, the indicator
flashes red. (Use the discharge status display as a guide to remaining battery charge.)
Page 17

1 Install the supplied battery pack in the CRX10U.
See “Installing the Battery Pack” on page 15 for details.
2 Connect the power cord to the AC adapter and to a power outlet.
To power outlet
CAUTION
Use only the supplied AC-CRX10U AC adapter and power cord.
3 Connect the remote control.
Continued
17
Page 18

4 Set the POWER switch to CHG.
The display window of the remote control and the indicators
display as follows while charging:
Remote Control Display POWER Indicator
Charging CHARGE1)/e Flashes orange/green
rr
CHARGE1)/r Flashes orange/green
rr
CHARGE1)/t Flashes orange/green
rr
CHARGE1)/y Flashes orange/green
Fully charged for use FULL/u Flashes or off
1) “CHARGE” and the approximate remaining charge time appear alternately. The
remaining charge time is displayed with a minus sign.
Example: -0:46 indicates the battery will be fully charged in about 46 minutes.
2) The POWER indicator turns off about one hour after u appears on the remote
controller display. When the POWER indicator turns off, the battery is fully
charged.
2)
18
Display
CAUTION
The battery does not charge when the POWER switch is on: it must be set to CHG.
Note
A fully discharged battery pack requires four to five hours to completely recharge.
5 When charging is finished, turn the POWER switch off and
disconnect the AC adapter.
Page 19

Loading and Ejecting Discs
Loading a Disc
1 Press the eject button to open the top cover.
The top cover opens slightly by itself. Lift it all of the way open
manually.
Eject button
CAUTION
The top cover does not open if the HOLD switch is in the HOLD position.
2 Load a disc.
Push the center of the disc until it clicks into place. Do not press
too hard, and be careful not to touch the lens in the drive.
Label facing up
Press here
Disc
Continued
19
Page 20

3 Close the top cover.
You can now access the data on the disc.
Press here firmly to close.
Ejecting a Disc
1 Press the eject button to open the top cover.
The top cover opens slightly by itself. Lift it all of the way open
manually.
2 Remove the disc.
Hold one finger against the edge of the disc from the side of the
CRX10U, and press another finger against the protrusion in the
center of the drive to remove the disc.
20
CAUTION
• Make sure the disc has stopped spinning before removing it. This is especially
important with 8-cm discs, since they do not stop spinning immediately when the
top cover is opened.
• Do not open the top cover while the BUSY indicator is orange. Doing so may
cause the computer to freeze up.
• The top cover does not open if the HOLD switch is in the HOLD position.
Page 21

Listening to Music CDs
To listen to a music CD with the CRX10U, connect the headphone
with remote control, and operate from the remote control. With the
supplied battery pack, you can listen to music CDs without connecting
the CRX10U to the AC adapter or a computer, for convenient outdoor
listening.
CAUTION
• The CRX10U is not equipped with buffer memory storage or similar shock protection
for playing back music CDs. Therefore, you may experience breaks in sound if you use
the CRX10U to play music while subjecting it to strong vibration, such as while
walking or riding on a moving vehicle.
• When connected to some Macintosh models, music CDs may not play well in the
CRX10U. Also, the music cannot be played on the Macintosh speakers. Please use the
headphone jack on the CRX10U. (We recommend using the CD-ROM or DVD drive
on the Macintosh for playing music CDs).
Playing CDs
1 Install a charged battery pack, connect the remote control and
headphones, and turn on the POWER switch.
The headphones plug into the remote controller.
Continued
21
Page 22

Note
• See “Using the Battery Pack” on page 15 for details about installing and charging the
battery pack.
• To operate from AC power, connect the CRX10U to the AC adapter, and the adapter to
an outlet.
CAUTION
• Use only the supplied AC-CRX10U AC adapter and power cord.
• Use only the supplied NP-F550 battery pack.
2 Load a disc (music CD).
See “Loading a Disc” on page 19 for details.
3 Move the remote control knob to the N • > side.
Playing starts with a confirming beep in the headphones.
Volume control
HOLD
(inhibit inadvertent operation) switch
22
Display
VOL +/–
To adjust the volume:
Press VOL +/–. The volume level appears on the remote control
display during adjustment.
Note
• Headphone volume can also be adjusted by the volume control on the drive, so
you can adjust volume using both the VOL +/– control on the remote control and
the control on the drive.
• Sliding the HOLD switch on the remote control in the direction of the arrow
disables the other controls, to prevent accidental operation.
Page 23

4 Press x to stop playing.
Play stops after a confirming beep in the headphones.
5 Eject the disc when desired.
See “Ejecting a Disc” on page 20 for details. If you are not going
to use the CRX10U for a long time, disconnect the cables.
Search & Fast Forward
While playing a music CD, you can pause, search, fast forward and
rewind as follows.
X
Search forward for next song.
Rewind to previous song.
While playing... Operation Confirming Sound
Pause Press X Slow repeating beeps
Resume Press X One beep
Rewind to start of song Press the knob Three quick beeps
Fast forward to next song Press the knob Two quick beeps
Rewind while playing
Fast forward while playing1)Hold the knob toward No sound
1) Pausing and then holding the knob toward the . or N • > side rewinds or fast
forwards, respectively, at high speed without playing any sound.
to the . side
to the N • > side
1)
Hold the knob No sound
toward the . side
the N • > side
Continued
23
Page 24

Continuous Play (Repeat)
Three types of continuous play are available: replay the whole disc,
repeat one song, or shuffle.
1 Press the PLAYMODE button on the remote control while playing
or stopped, to display the play mode.
PLAYMODE button
Each time you press PLAYMODE, the display changes as follows.
Display Play Mode
None Normal play
Repeat all songs on the disc (repeat playing all songs)
1 Repeat one song (repeat the song now playing)
SHUF Shuffle Repeat (repeat playing all songs randomly)
Displaying Song Title and Remaining Time
24
When CD TEXT is played, the song title and disc name can be
displayed while playing.
When a standard music CD is played, the remaining or elapsed play
time can be displayed.
Note
• CD TEXT consists of text information such as song titles and disc names written on a
music CD along with the music.
• Refer to “Playing Discs with MP3 Files” on page 26 for a description of the
information displayed while playing MP3 discs.
Page 25

1 Press the DISPLAY button on the remote control while playing.
DISPLAY button
Each time you press the button, the display changes as follows.
• For CD TEXT discs
Left Side Right Side
Song No. Elapsed play time for song
Song No. Song title and artist name
Songs Remaining Album title and artist name
• For standard music CDs
Left Side Right Side
Song No. Elapsed play time for song
Song No. Remaining play time for song
Songs Remaining Remaining play time for disc
Note
• Text that is too long to fit on the display is scrolled.
• Letters, numbers and symbols can be displayed. Double-byte characters cannot be
displayed.
• Unsupported text information may not display correctly.
Continued
25
Page 26

Playing Discs with MP3 Files
Discs consisting of MP3 files (or MP3 discs) can be played by the
CRX10U in the same way as standard music CDs.
MP3 Files
MP3 is a compression standard used by computers to handle music
data. Music compressed with the MP3 format is stored in MP3 files.
One major advantage of MP3 is its high rate of compression. Files in
MP3 format are about one tenth of the size of the equivalent WAV
format sound files commonly used with Windows. For example, the
650 MB content of a standard music CD compresses to about 65 MB
as an MP3 file, while maintaining sound quality equivalent to the
music CD, allowing great savings of disc space.
Playing MP3 Discs
Operations for playing MP3 discs on the CRX10U are the same as for
standard music CDs. See pages 21 to 25 for details as needed.
However, the items displayed on the remote control are different from
those displayed with standard music CDs. When playing MP3 discs,
the remote control display changes as follows each time you press the
DISPLAY button.
• When MP3 files being played include ID3 tags (title, artist name, and
album title information)
Left Side Right Side
Song No. Song play progress time
Song No. Song title and artist name
Songs Remaining Album title and artist name
1) The song title is displayed immediately after the song starts playing.
1)
26
• When MP3 files being played do not include ID3 tags (title, artist
name, and album title information)
Left Side Right Side
Song No. Song play progress time
Song No. File name (excluding .MP3 extension)
/ No artist name
Songs Remaining No album name / No artist name
2) The file name (excluding .MP3 extension) is displayed immediately after the song
starts playing.
2)
Page 27

Note
• Text that is too long to fit on the display is scrolled.
• Letters, numbers and symbols can be displayed.
• Unsupported text information may not display correctly.
Limitations when Playing MP3 Discs
Limitations with playing MP3 discs on the CRX10U alone are as
follows (for details about MP3 and related terminology, refer to the
Internet or computer-related books).
• Only MP3 discs created in ISO9660 Level 1, Level 2 and Joliet
formats are playable. MP3 discs created in CD-UDF format using the
Packet Write mode are not playable.
• Discs written by Adaptec DirectCDTM cannot be played, even if the
ISO9660 format option is selected.
• Multi-session discs created with up to 45 sessions can be played.
• Up to 32,767 files (songs) can be recognized.
• Forward/rewind to the start of songs can be done with up to 32,767
songs. Shuffle play supports up to 2,048 songs.
• The file extension of MP3 files may be either “.MP3” or “.mp3”.
MP3 files with other extensions are not playable. Of course,
regardless of file extension, a file is not playable if the contents are
not in MP3 format.
• Discs with many folder directories or files may have some delay
before starting to play, so we recommend limiting the number of
recorded files to no more than one or two hundred songs.
• The standard compression bit rate of MP3 files is 128 Kbps. MP3
files with other compression bit rates may have sound drop out or
may have their play times displayed incorrectly.
• The remote control display can show only the lowest three digits of
the track number (song number). For example, 1000 appears as “000”
and 1001 appears as “001.”
• The remote control can display the same characters as for standard
music CDs: letters, numbers and symbols (up to 64 characters).
• ID3 tag (character data describing the MP3 content) support complies
with ID3 versions 1.0 and 1.1.
Continued
27
Page 28

Play Order of MP3 Files
The order in which MP3 files are played from an MP3 disc depends on
the number of folder levels on the disc and the names of the MP3 files.
The priority of folders and file depends on the characters used in their
names, with symbols having the highest priority, followed by numerals
(0-9) and letters (A-Z). For example, with the MP3 disc hierarchy
shown in the figure below, MP3 files are played in the sequence
indicated by the numbers 1 to 9.
ARTIST
1 10u.mp3
album001
album
002
album003
4 RAIN.MP3
best001
SELECT
7 RED.MP3
6 green.mp3
xyz
Folder
MP3 file
3 WIND.MP3
best002
2 snow.mp3
5 BLUE.MP3
8 700e.mp3
SUB
9 yellow.mp3
28
Note
One way to determine the order in which files at the same folder level are played is to
add numerals to the beginning of the file names.
Example: 01xxx.MP3, 02xxx.MP3
Page 29

Creating MP3 Files
MP3 files are created using special ripping and encoding programs (not
supplied). When creating an MP3 disc with MP3 files, use ISO9660
Level 1, Level 2 or Joliet format.
MP3 Files and Copyrights
Please be careful to respect copyrights when making and using MP3
files. Violating copyrights can result in penalties including
compensation for damages. If you are unsure of your responsibilities
regarding copyrights, please contact a legal professional.
29
Page 30

Troubleshooting
If you are experiencing a problem with the drive, check the following
items before contacting us for assistance. If you cannot resolve the
problem after checking these items, contact your dealer or our
customer service department.
You can also find the latest user support information for the CRX10U
on web site. Refer to “Quick Start Guide” for details.
Problem
The drive is not recognized
by the computer, or it
behaves incorrectly or
intermittently.
After loading a disc, the
audio skips or data cannot
be read.
Cause/Solution
t The driver may not be properly installed. Try uninstalling
and then reinstalling the driver using the procedure in the
Quick Start Guide.
t The power connector or interface cable may not be properly
connected. Verify that the connectors are firmly mated at
the drive and the computer ends. Also refer to the Quick
Start Guide to confirm that the connections are correct.
t If using Windows 98 (except Second Edition or later), verify
that Service Pack 1 is installed, and if it is not, install it. Visit
the Microsoft web site to obtain the update.
t The disc may not be inserted with the label side facing up.
Discs must be loaded label-side up.
t The disc may be incompatible with this drive. Refer to
“Compatible Discs” on page 9.
t The disc or the drive lens on the drive may be dirty. If the
lens is dirty, contact your place of purchase or your nearest
repair service provider.
t The disc may be scratched. Try a different disc to determine
whether the drive is operating normally.
t There may be debris on the drive turntable. If so, wipe it
clean.
t Condensation may have formed in the drive or on the disc.
If the disc surface or the drive lens appears to be fogged,
remove the disc and wait approximately one hour for the
condensation to evaporate.
30
Page 31

Problem
Cannot remove the disc.
Writing fails when writing to
CD-R/RW.
Cause/Solution
t When the drive is off, pressing the Eject button does not
open the top cover. Turn the drive on, or use the manual
eject lever. Refer to “Names and Functions of Parts” on
page 12.
t If the HOLD (inhibit inadvertent operation) switch on the
side of the drive is in the HOLD position, move it to the
other position.
t While writing is in progress, you cannot remove the disc by
pressing the Eject button. Remove the disc by following the
instructions for the writer software you are using. Refer to
the manual provided with the writer software.
t The computer may have hung for some reason. Turn the
drive off and back on, and then restart the computer.
t If the CRX10U is connected to a USB hub (including
keyboard hubs), reconnect the drive directly to a USB port
on the computer.
t Set the write speed setting to 4× if it is not already (the
recommended write speed for this drive is 4× for CD-RW
and CD-R discs). The write speed setting can be changed
through the writer software.
t Disable any screen saver that may be running on the
computer.
t Shut down any software that may be running, other than the
writer software. Other software running while writing data
can cause the data transfer rate to drop considerably, which
can cause the writing process to fail (buffer underrun).
t Shut down any resident disc utilities or other utilities that are
supposed to speed up disc access.
t If “on-the-fly” writing (copying data disc to disc from a CD-
ROM drive to the CRX10U) is enabled, disable it. Instead,
copy the data to the hard disk first, and then write from the
hard disk. On-the-fly writing is affected by many factors,
such as CPU speed, memory capacity and transfer speed
of the reading drive, so write errors are highly systemdependent.
Continued
31
Page 32

Problem
Created music CDs are
noisy (noise is mixed into
the played sound).
A failure occurs when the
computer boots up, or the
writer software does not
operate properly.
Writer software other than
the supplied program has
been installed, but does not
work.
Although the drive worked
normally in the past,
operation became unstable
at some point.
Cause/Solution
t Refer to the FAQ or troubleshooting sections of the writer
software manual to change the writer software settings.
t Some computers generate more noise than others, so using
a different computer may allow creating noise-free music
CDs.
t If the writer software provided with the CRX10U is installed
on a computer with packet writing-based writer software
(such as CDRFS) already been installed, the writer software
may not operate correctly. The other packet writing software
should be uninstalled beforehand. Note that packet writing
software comes pre-installed on some computers, so check
your system to see if it is present.
t Some writer software may be incompatible with the
CRX10U. For details, contact the manufacturer or seller of
the writer software.
t Some versions of writer software may be incompatible with
the CRX10U. For details, contact the manufacturer or seller
of the writer software. In some cases, the writer software
can be upgraded to be compatible with the CRX10U.
t If operation became unstable after a particular application
was installed, uninstall that application. If this resolves the
problem, refrain from using or installing that application.
32
Page 33

Problem
No sound can be heard in
the headphones or
computer speakers when
playing a music CD.
The battery pack does not
charge, or the battery can
only be used for a short
period of time.
Cause/Solution
t The sound output destination is determined by Windows
settings.
• If using Windows Me or Windows 2000, click the Start
button - Settings - Control Panel - System, and select the
Device Manager tab. (If using Windows 2000, click the
Hardware tab and then the Device Manager button to
display the Device Manager window.) To enable CD
audio from the computer speakers, click CD-ROM,
double click CRX10U, click the Properties tab, and check
the “Enable digital CD audio for this CD-ROM device”
checkbox. When this box is not checked, the music can
be heard in the headphones.
• If using Windows 98, click the Start button - Settings Control Panel - Multimedia, and select the CD Music tab.
To enable CD audio from the computer speakers, check
the “Enable digital CD audio for this CD-ROM device”
checkbox. When this box is not checked, the music can
be heard in the headphones.
• If using a Macintosh, music CDs cannot be played
through the computer speakers, although you can listen
with headphones connected to the CRX10U. We
recommend using the CD-ROM or DVD-ROM drive in the
Macintosh to play music CDs.
• Some computers cannot play music from an external
drive through their speakers, in which case you can still
listen with the headphones.
t The battery does not charge when the POWER switch is
on. Be sure to set the switch to CHG.
t Battery operation time is shorter at temperatures below
10°C. Use the drive at room temperature (10 to 30°C). Also,
charge the battery pack at room temperature.
t If battery operation time is severely reduced, the battery
pack has probably reached the end of its working life.
Please buy a new battery pack.
33
Page 34

Operating Precautions
Special Precautions
• Never use any AC adapter other
than the one provided. Using a
different adapter could damage the
drive.
• Never subject the drive to any
vibration or physical shock while a
write operation is in progress.
Errors may occur while writing,
rendering the CD-R/RW disc
unusable.
• Avoid bending the interface cable
sharply, especially near the
connectors. Doing so can damage the
cable or cause poor contact.
• The CRX10U is not equipped with
buffer memory storage or similar
shock protection for playing back
music CDs. Therefore, you may
experience breaks in sound if you use
the CRX10U to play music while
subjecting it to strong vibration, such
as while walking or riding on a
moving vehicle.
Condensation
Avoid subjecting the drive to rapid
temperature changes. Do not use the
drive immediately after moving it from
a cold location to a warm location, or
after a sudden increase in room
temperature. Such circumstances can
cause condensation to form inside the
drive.
If the temperature changes suddenly
while using the drive, stop using it but
leave the power on for at least one
hour. After waiting at least one hour,
turn the drive off.
Lens Considerations
• Do not touch or look directly into the
lens inside the top cover. To prevent
dust from accumulating on the lens,
always keep the top cover closed
except when inserting and removing
discs.
• If the lens has gotten dirty and the
drive no longer operates properly,
please contact your place of purchase
or your nearest repair service
provider.
Operating and Storage Environments
Do not use or store the drive in a hot or
humid location, or where it could be
subject to strong vibrations or direct
sunlight.
Transporting the Drive
• Save the packing materials for future
use. They will be needed if you ever
have to ship the drive in the future.
• Before shipping the drive, make sure
there is no disc in it.
34
When using the CRX10U abroad
Damage will result if you connect the
CRX10U and its AC adapter (the ACCRX10U) to an electronic transformer
such as those sold for international
travelers. Do not use such devices.
The supplied AC adapter can be used
with 50/60 Hz AC voltages ranging
from 100 to 240V, allowing it to be
used with power outlets used in most
hotels and households around the
world.
Page 35

Handling Discs
• Handle discs only by the edges. Do
not touch the recording surface of the
disc.
• Never wipe a CD-R or CD-RW disc
with a cleaning solution before
recording data on the disc. Use a
blower to blow any dust off of the
surface of the disc.
• Scratches or dust on the unrecorded
portion of a CD-R or CD-RW disc
may prevent proper data recording.
Handle discs carefully.
• Except where specified by the disc
manufacturer or warranty, do not
write on or attach labels to discs.
• Do not store discs in a dusty or dirty
location, in direct sunlight, near a
heater or in a humid location.
• Do not spill liquids on a disc.
• To protect valuable data, always store
discs in their cases.
• Gently wipe discs with a soft cloth,
from the center straight towards the
outer edge.
If a disc is very dirty, wet the cloth
with water, wring it out thoroughly,
wipe the disc with the damp cloth and
then use a dry cloth to wipe any
moisture off of the disc.
Do not use benzene, record cleaner,
anti-static solutions or other liquids,
as they can damage the disc.
Battery Pack Considerations
• The correct battery pack for the
CRX10U is the Sony NP-F550. One
pack is supplied with the drive, but
additional packs can be purchased
separately.
• The CRX10U does not support the
power management feature of the NPF550 InfoLithium battery pack.
• Charge the battery pack using the
CRX10U with the provided AC
adapter (AC-CRX10U).
• The battery pack is partially charged
before shipping, but you should
charge it completely before use.
• The battery pack gradually discharges
itself when not being used, so even
after it has been fully charged, we
recommend recharging before use (if
more than a day or two has passed).
• Charge the battery pack where the
surrounding temperature is in the
range from 10 to 30°C. This will
provide longer battery operation.
• If the battery is not used for a long
time, it should be charged and then
discharged completely before storage,
and once each year to maintain its
usability.
35
Page 36

Warranty Card & After Sales Service
Warranty Card
• The warranty card should be provided
with this product at the time of
purchase.
• Please read the terms on the card, fill
in any required items and keep it in a
safe place.
• The warranty period is one year from
the date of purchase.
After Sales Service
If a problem arises,
First check the “Troubleshooting”
chapter in this manual.
If the problem persists,
Contact customer service.
See the “Product Support Information”
listed in the separate “Quick Start
Guide” or the Warranty card.
Replacement Parts Availability
We retain CD-R/RW drive repair parts
(those that may be required to maintain
product functionality) for at least six
years after model production is
discontinued. We consider this parts
retention period to be the period during
which the drive is repairable. However,
depending on the nature of damage,
repair may be possible even after this
period, so please contact your place of
purchase or repair service provider.
Repair Requirements
If the drive needs repair, return it
together with all supplied accessories
(cables and AC adapter) to your place
of purchase or Sony Customer Support
Center.
• If you return the drive to your place of
purchase or repair service provider
because of damage resulting from
misuse or other causes, you will be
responsible for all repair-related
expenses, including shipping and
handling and product adjustments.
• The product warranty and user
support service are valid only in the
countries or sales regions specified on
the warranty card.
Repairs Within the Warranty
Period
We provide repairs according to the
terms stated on the warranty card.
Please refer to the card for details.
Repairs Outside of the
Warranty Period
If functionality can be restored by
repair, we will do so for a charge, as
you direct.
36
Page 37

Major Specifications
Speed
Write speed (CD-R)
2×, 4×
Write speed (CD-RW)
2×, 4×
Read speed
6× maximum
Discs
Compatible disc types
CD-R
CD-RW
CD-ROM
CD-ROM XA
CD-DA
CD Extra (CD+)
Video CD
CD TEXT
Photo CD
(Multisession compatible)
CD-I
CD Bridge
Audio combined CD-ROM
Disc diameter: 12 cm
8 cm (read only)
Writing Methods
Track at once
Disc at once
Session at once
Packet writing
Drive
Data transfer rate
Maximum: 900 KB/s (6×1))
Access time
Average (random stroke): 160 ms
1) The maximum data transfer rate depends on
computer capabilities.
MP3 play format support
MPEG1 Audio Player Level 3
(128 Kbps recommended bit rate)
ID3 Tag Versions 1.0 and 1.1
Operating and Storage
Environments
Operating temperature
5 to 35 °C
Operating humidity
20 to 80% RH (non-condensating)
Storage environment
–20 to 50 °C at 20 to 90% RH (noncondensating)
Power Supply, Miscellaneous
Power supply
External power jack: 10 V
Can operate from 100 to 240 VAC
using the supplied AC-CRX10U AC
adapter.
Power consumption
Approximately 6 W
Size
Approximately 132 × 25 × 189.5 mm
(W × H × D)
Weight
Approximately 340 g (drive only)
Continued
37
Page 38

Interface
Drive interface
USB 1.1 compliant
Buffer capacity
8 MB
Battery
Battery Pack Model NP-F550
Charging time2)Approx. 5 hours
Operating time
3)
Playing music Approx. 2.5 hours
Writing Approx. 2 hours
2) This is a general indication of the amount of
time required to fully charge the battery from
the completely discharged condition.
3) Actual charging time and operating time
depend on the surrounding temperature and
conditions of use.
Main Specifications (NP-F550)
Battery type
Lithium ion storage battery
Maximum voltage : 8.4 VDC
Nominal voltage : 7.2 VDC
Usage temperature : 0 to 40°C
Size : 38.4 × 20.6 × 70.8 mm
Weight : Approximately 95 g
Product specifications and appearance
are subject to change without notice.
38
Page 39

Page 40

Printed in Malaysia
 Loading...