

Page 1
3-867-100-11
CDMA PCS
Telephone
Operating Instructions
©1999 Sony Electronics Inc.
SB200 01-03 toc 4/9/99, 2:21 PM1
CM-SB200
Page 2
Before operating your portable dual band telephone, please read this
manual thoroughly and retain it for future reference.
If your usage includes in-vehicle operation, refer to the Installation/
Connections/Operation manual for the optional accessory kits.
DISPOSAL OF LITHIUM ION BATTERY
LITHIUM ION BATTERY.
DISPOSE OF PROPERLY.
You can return your unwanted lithium ion batteries to your nearest
Sony Service Center or Factory Service Center.
Note: In some areas the disposal of lithium ion batteries in
household or business trash may be prohibited.
For the Sony Service Center nearest you call 1-800-222-SONY
(United States only).
For the Sony Factory Service Center nearest you call 416-499-SONY
(Canada only).
WARNING
To prevent fire or shock hazard, do not expose the unit to rain or moisture.
FCC CAUTION STATEMENT
You are cautioned that any changes or modifications not expressly approved
in this manual could void your authority to operate this equipment.
Owner’s record
The model number, regulatory number, and serial number are located on a
nameplate inside the battery compartment. Record the serial number in the
space provided below. Refer to these numbers whenever you call your
dealer regarding this product.
Model No.: ____________________ Serial No.: ___________________
©1999 Sony Electronics Inc. All rights reserved. Reproduction without written consent
expressly prohibited. Sony, Jog Dial, D-WAVE logo and D-WAVE Astra are trademarks of Sony.
Third party trademarks are the property of their respective holders. Design and specifications
are subject to change without notice. Talk and standby times are subject to change.
®
2
SB200 01-03 toc 4/9/99, 2:21 PM2
Page 3
Table of Contents
Getting Started
Unpacking your phone ................. 4
Looking at your phone ................. 5
Charging the battery ..................... 6
Turning the phone on.................... 9
Activating your phone ................ 11
Navigating
Navigating .................................... 12
Jog Dial™ navigator ............... 12
Navigating keys ...................... 12
Menu map ................................ 13
List of menu items ....................... 14
Quick tips and features ............... 16
First things first ............................ 18
Selecting a language ............... 18
Getting your phone number.. 18
Alphanumeric table ................ 19
Making & Receiving Calls
Calling fundamentals.................. 20
Basic calling..............................20
Related calling functions ........ 20
Limiting outbound calls ............. 21
Calling from the Phone Book ..... 22
Manually .................................. 22
Speed dialing ........................... 22
Touch dialing ........................... 22
Fast 4 dialing ............................ 23
Call prefixing ........................... 23
Calling from the Calls List.......... 24
Additional Calls List info....... 24
Saving to your Phone Book ... 24
Incoming calls .............................. 25
Basic call answering ................ 25
Related answering functions . 25
Setting all keys to answer ...... 25
Setting automatic answer....... 26
Caller ID ................................... 26
Missed Calls ............................. 26
Using the scratch pad.................. 26
Phone Book Functions
Storing information ..................... 27
Basic storage............................. 27
If the Phone Book is full ......... 27
Special storage functions........ 28
Searching your Phone Book ....... 30
Alphabetically.......................... 30
By memory location ................ 31
For a phone number ............... 31
Editing Phone Book entries ........32
Erasing Phone Book entries ....... 33
Restricting Phone Book entries .. 34
Menu Settings
Sounds menu................................ 35
Display menu ............................... 38
Security menu ..............................40
Network menu ............................. 42
Extras menu.................................. 45
Timers menu................................. 46
Carrier provided features
and services
Short Messaging Service ............. 48
Receiving messages ................ 48
Message capacity..................... 49
Message format .......................50
Accessing messages ................ 50
Text messages .......................... 51
Voice mail ................................. 52
Sending and receiving data........ 53
Additional information
Troubleshooting ........................... 55
Specifications................................ 56
Optional accessories .................... 57
Rules and regulations ................. 58
Safety precautions .......................59
Glossary ........................................ 62
Index .............................................. 64
Warranty Card..............................69
Quick Reference Card ................. 71
Navigating Getting StartedMaking &
Receiving Calls
Phone BookMenu SettingsCarrier FeaturesAdditional Info
3
SB200 01-03 toc 4/9/99, 2:21 PM3
Page 4
Unpacking Your Phone
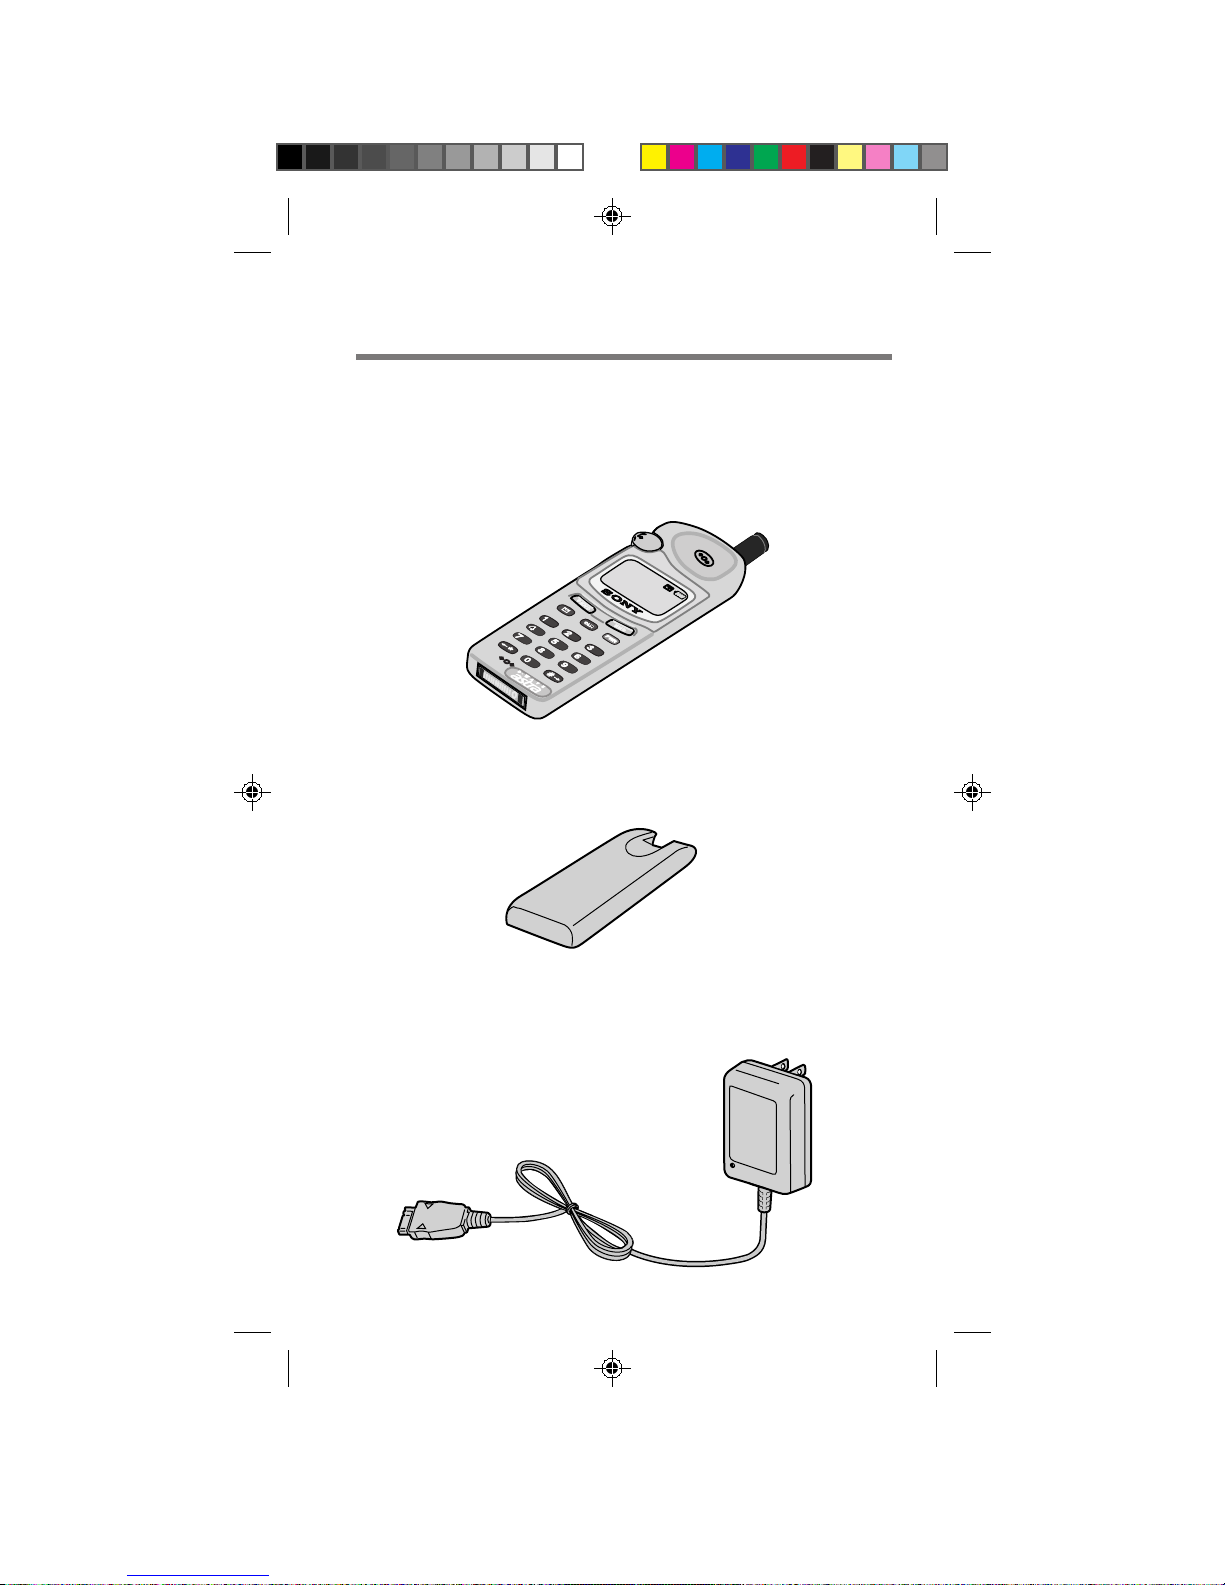
Carefully unpack your phone and check the contents using this list. If
something is missing, please contact your nearest Sony dealer.
Portable Cellular/PCS Telephone (1)
QN-400BPL2 Extended Life Lithium-Ion Battery (1)
QN-301TA Travel Adapter (1)
4
SB200 04-11 prep 4/9/99, 2:21 PM4
Page 5

Looking at Your Phone
For more information, refer to the page numbers in parentheses ( ).
1 Antenna (18)
2 Red/Green LED (XX)
Alerts for incoming calls/messages
and identifies charging status.
3 Earpiece
4 Jog Dial™ navigator (14)
Turn (scroll) and press (select) to
access menus and settings.
5 Display (14)
6 Ringer speaker
SEND
7
key (21 to 23)
Press to make or receive calls.
8
key (78)
Press to access messages.
CLR
9
key (19, 21, 40)
Press to clear characters on the display
or exit the current operation.
!º Number and / keys
(21, 25, 49)
Use the keypad to enter numbers
and letters. Use
move the cursor.
and to
!¡ Microphone
PWR
!™
key (18)
Press to turn the phone on or off.
END
!£
key (19, 21, 23)
Press to end calls or cancel
operations and return to standby
mode.
!¢
Battery release tab (15)
Slide up to remove the battery.
!∞ Battery (15)
!§ Connector (16)
Connects the phone to the travel
adapter or other accessory.
1
2
3
4
5
6
7
8
9
!º
!¡
!¢
!∞
!§
SEND
4
7
*
END
CLR PWR
21
3
5
6
89
0#
Getting Started
!£
!™
5
SB200 04-11 prep 4/9/99, 2:21 PM5
Page 6
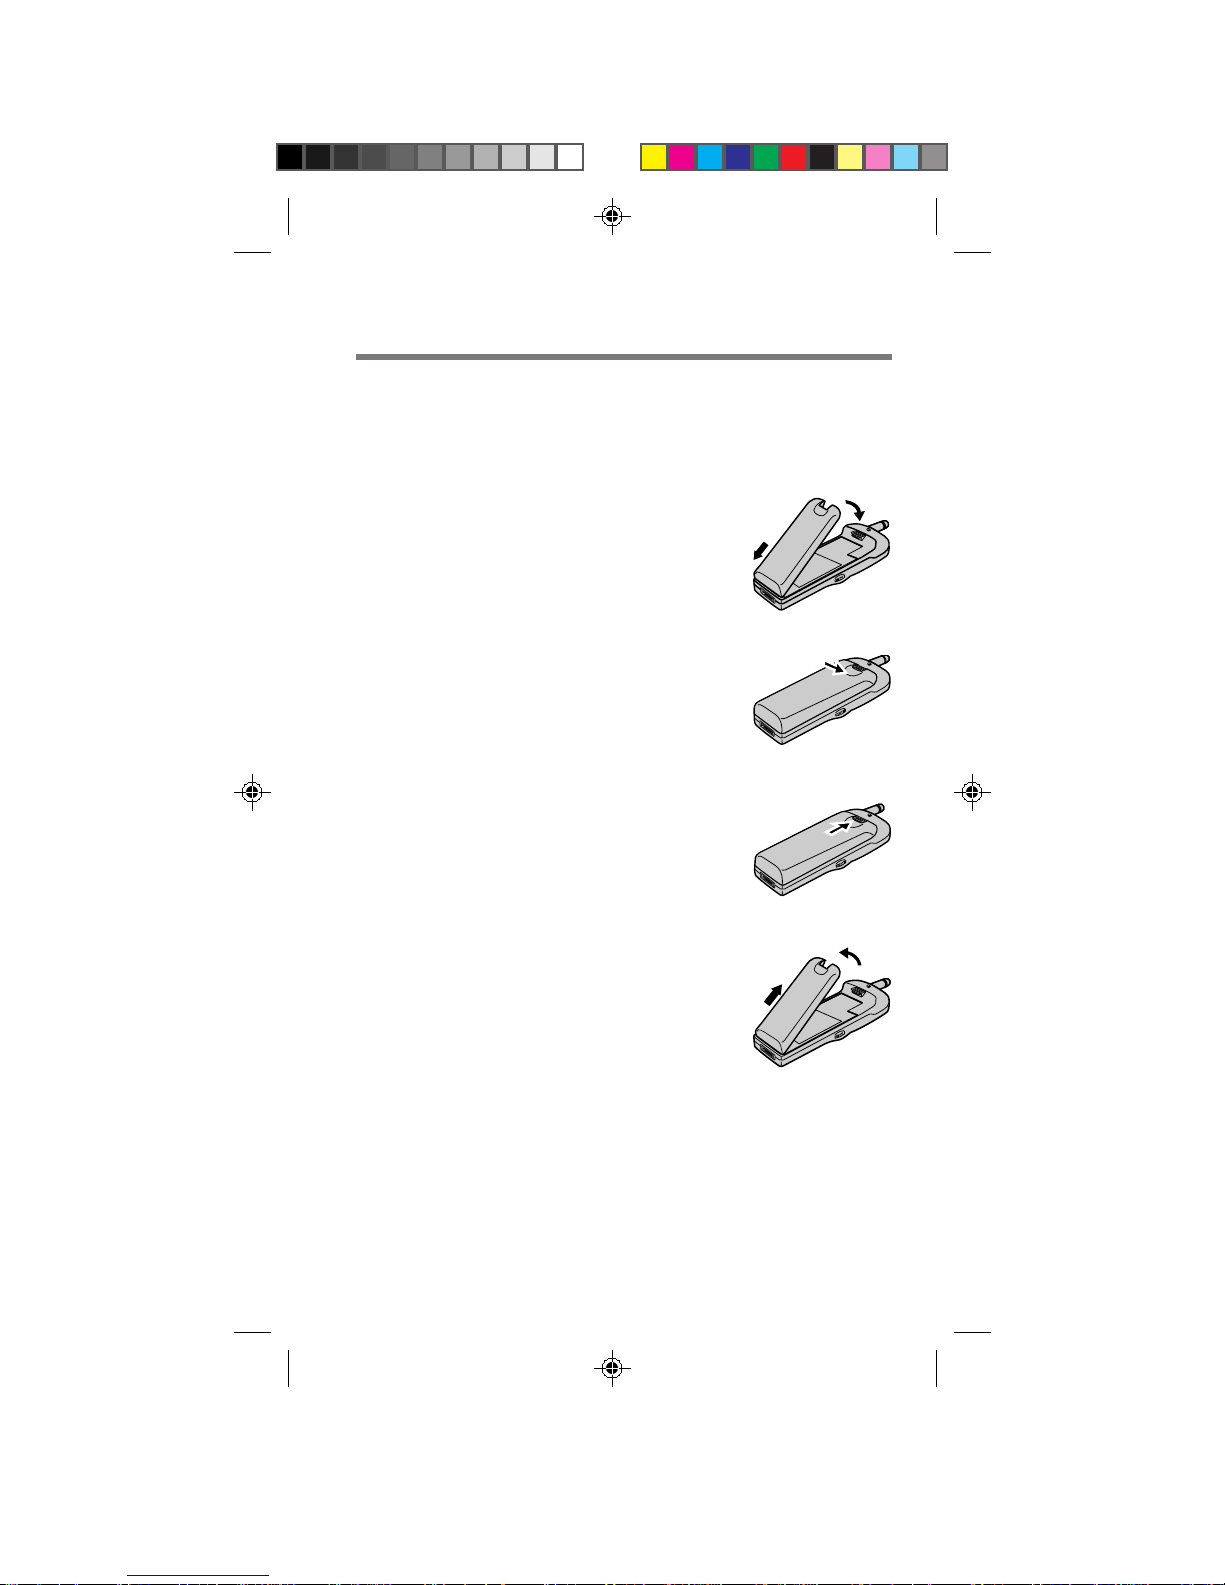
Charging the Battery
A new battery is not fully charged so it’s best to charge the battery
before using the phone. The following instructions show you how to
attach/detach the battery and connect the supplied travel adapter.
To attach the battery
1 Hook the battery onto the
bottom of the phone 1, then
lower the top down 2.
2 Press down firmly on the thumb
indent to secure the battery in
place.
To remove the battery
1 Place your thumb on the battery
release tab and press upward.
2 Lift the top of the battery 1, then
remove it from the back of the
phone 2.
2
1
1
2
6
SB200 04-11 prep 4/9/99, 2:21 PM6
Page 7
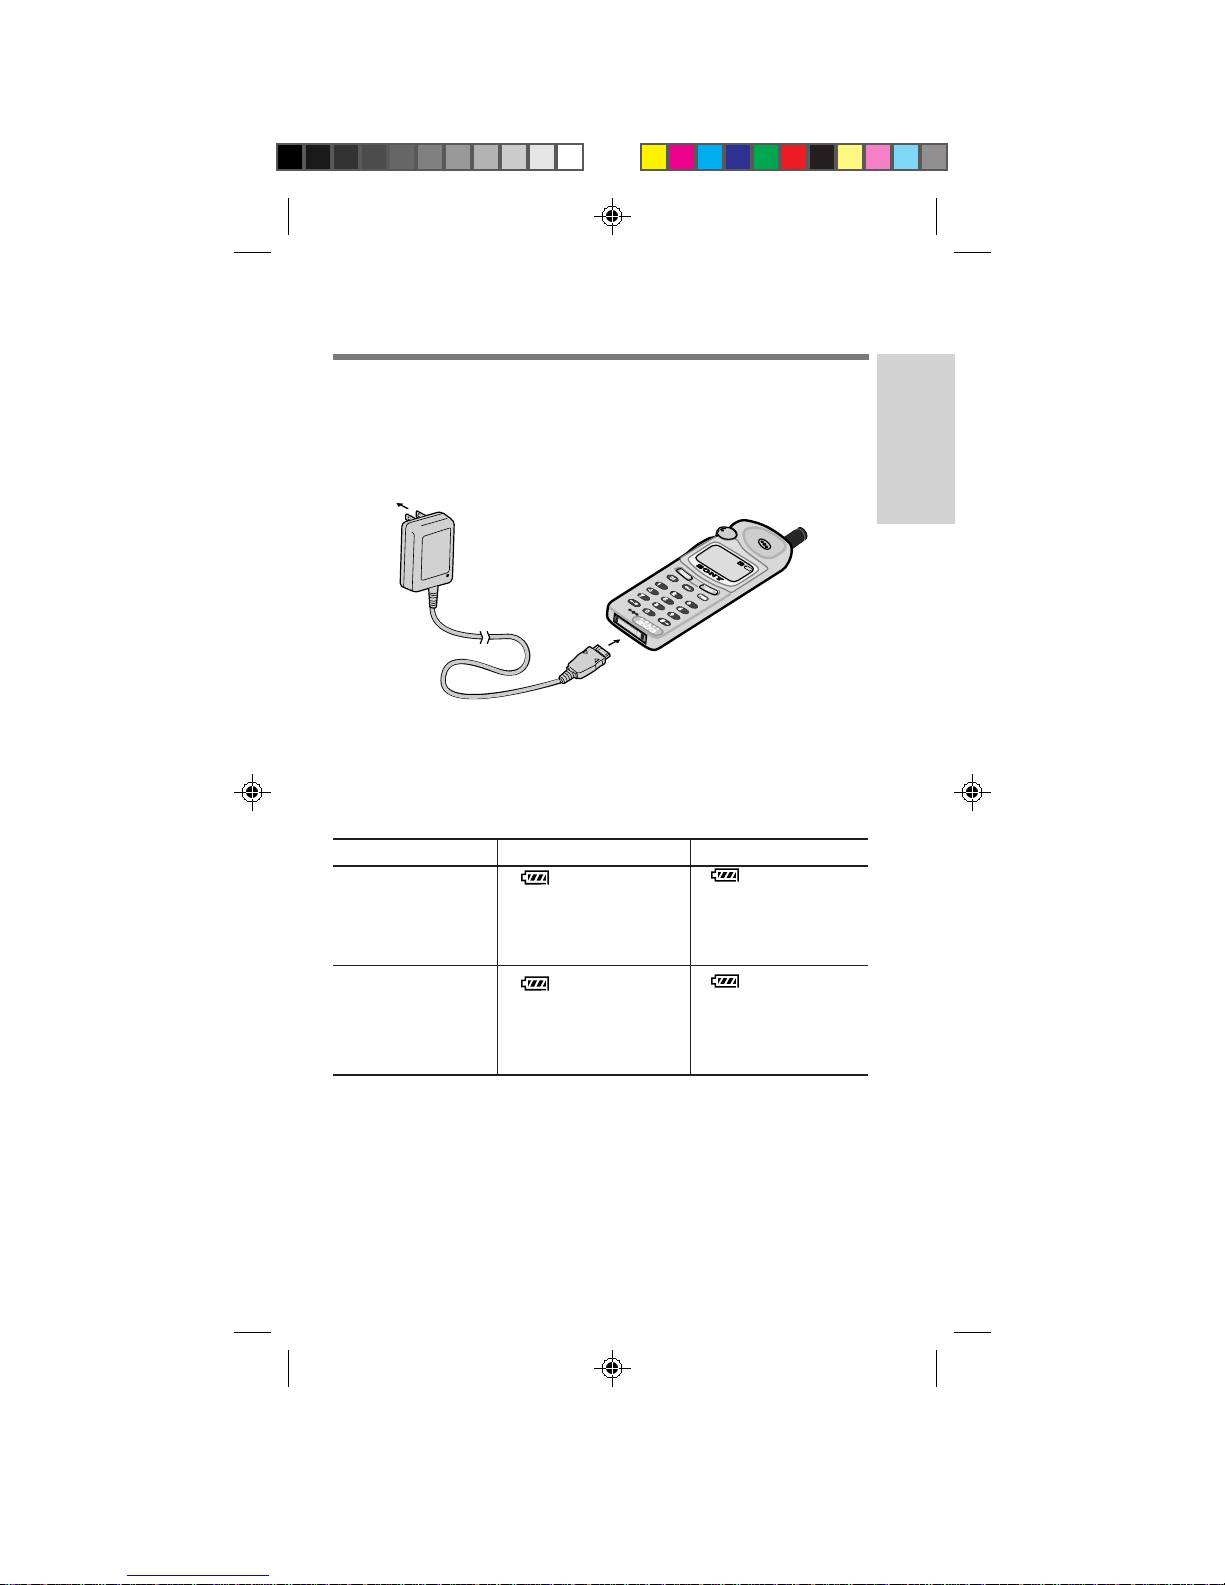
Charging the battery
Connect the travel adapter to the phone connector 1, then plug it into a
standard 120V AC outlet 2. Charging time is about 5 hours. Charging
will take longer if the phone is turned on.
plug
2
into
an AC
outlet
1
attach to the phone connector
(thumb indent faces up)
What you’ll see when the battery is being charged
When phone is OFF
• flashes
Battery is Charging
•
displayed on the
display screen
• LED flashes red
stops flashing
•
Charging is Complete
•
displayed on the
display screen
•LED turns green
During charging
Battery
fully charged
When phone is ON
• flashes
• CH is displayed in the
upper left corner of the
standby display
• LED is not lit
stops flashing
•
• FCH is displayed in the
upper left corner of the
standby display
• LED is not lit
Getting Started
is
is
Cautions
• Use only Sony-approved batteries and use only as intended. Don’t try to
disassemble or dispose of them in a fire (possible personal injury).
• Avoid charging for long periods of time, in places with high humidity, direct
sunlight or extreme temperatures (below 32°F /0°C or over 104°F /40°C).
• The battery may become warm during charging or after use.
• Replace the supplied AC adapter if necessary. It is not intended to be serviced.
• The AC Adapter allows you to turn on your phone without a battery attached.
But without a battery attached, you won’t be able to make or receive calls.
SB200 04-11 prep 4/9/99, 2:21 PM7
7
Page 8
Battery life
Standard battery
CDMA mode Analog mode
Standby mode 72.0 hours 14.0 hours
Talk time 3.0 hours 1.5 hours
Extended battery
CDMA mode Analog mode
Standby mode 144.0 hours 28.0 hours
Talk time 6.0 hours 3.0 hours
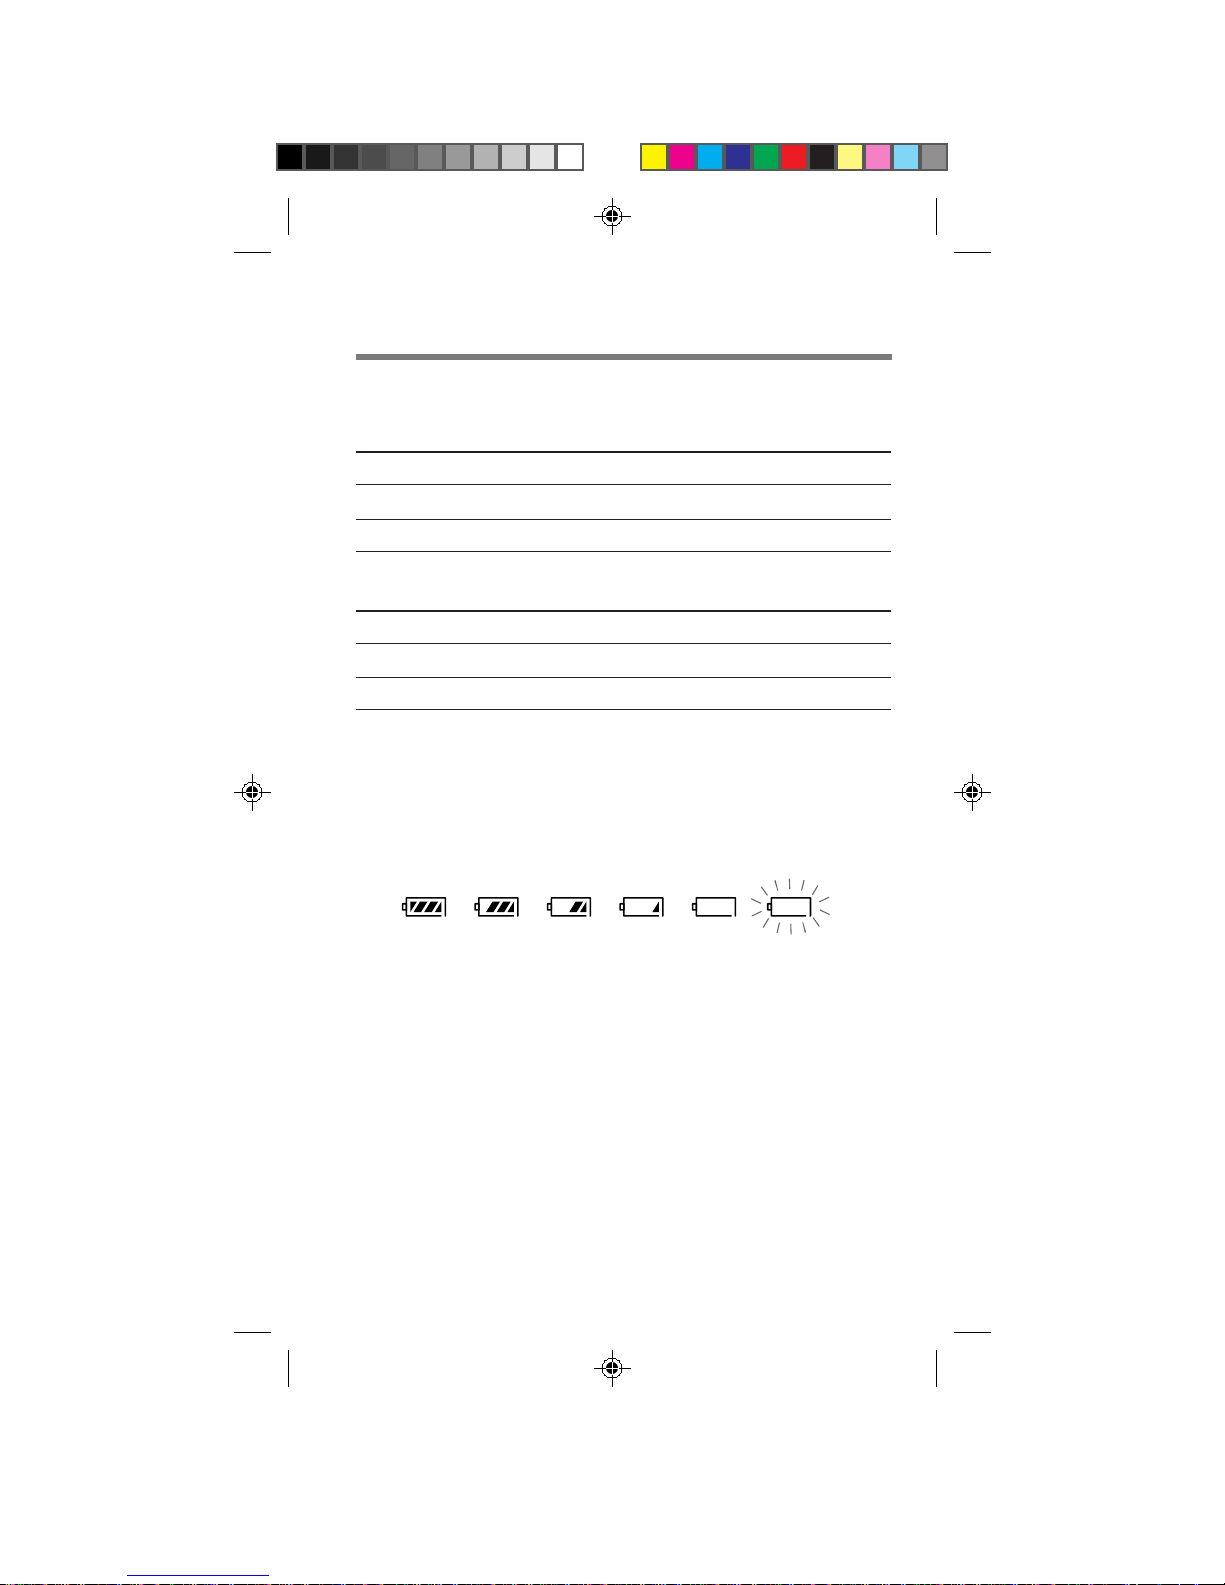
Battery condition
The battery icon indicates the approximate charge level remaining in the
battery.
Energy consumption varies depending on conditions of use
(including ambient temperature, network coverage and usage patterns).
The fewer lines you see inside the battery icon body, the less charge it has.
Full
n n n
When the battery is empty
When your battery charge is very low, the icon flashes and a warning
message is displayed to remind you. The phone automatically turns off when
the battery runs out of energy. If this happens during a call, you will hear a
beep and the call will be cut off. Recharge the battery as soon as possible.
8
SB200 04-11 prep 4/9/99, 2:21 PM8
n n
Empty
Page 9
Sony
555-1212
:Options
Turning the Phone On
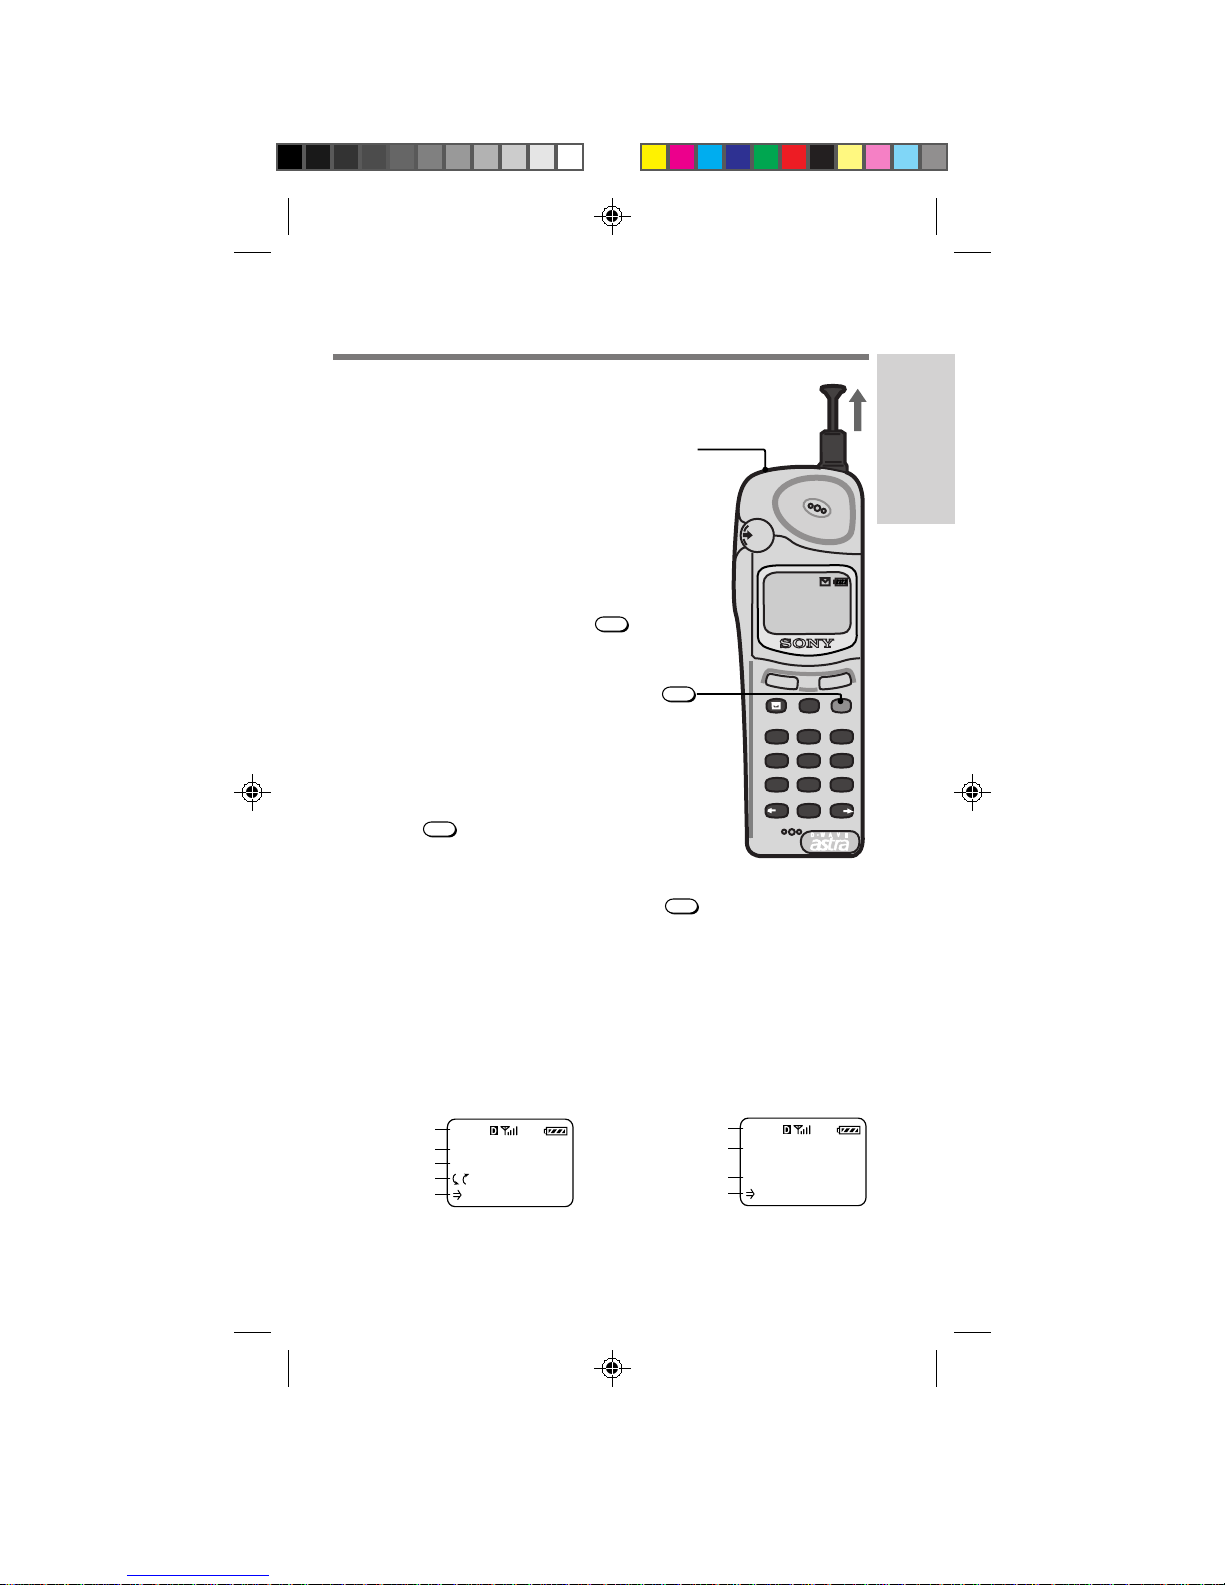
Extending and retracting
the antenna
Extend the antenna to maximize signal
strength and minimize interference. When
you make or receive a call, hold the end of
the antenna and pull up until fully
extended. When you are not in a call, push
the antenna down until fully retracted.
Powering on
To turn your phone on, hold down
for about two seconds. Powering On
appears on the screen, the LED flashes
green, the phone beeps and searches for a
signal. When a service signal is found, the
standby display appears. Your phone is
ready to use.
PWR
Powering off
Hold down
The phone beeps and displays the message
To turn off: Hold down the POWER
key. You hear a second beep, then Powering
off appears on the screen. When you release
PWR
for about two seconds.
LED
PWR
PWR
, the phone turns off.
1
4
Getting Started
SEND
END
PWRCLR
2
3
5 6
8
7
9
0
#
*
Display screen
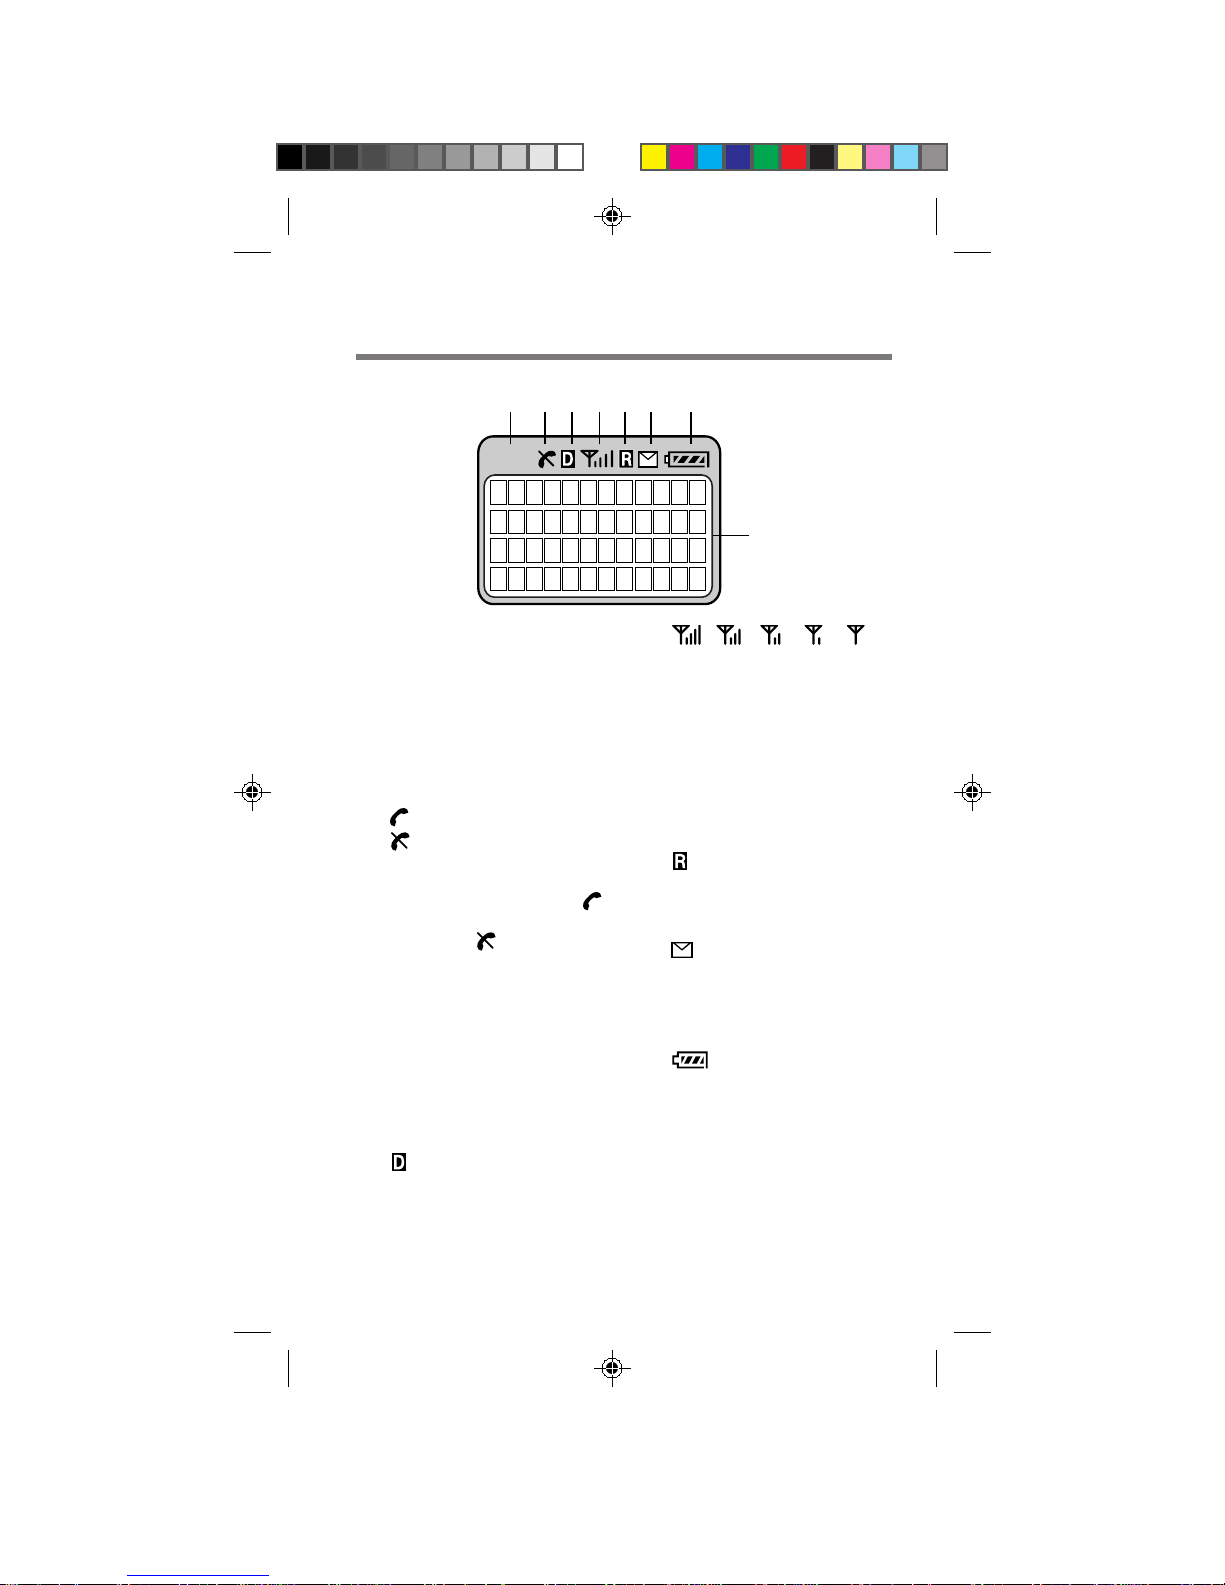
Your phone’s display screen has five information lines. Each line can
display up to 12 characters. The top line displays icons which tell you
the status of your phone. Lines two through five change depending on
the current operation. The bottom line is usually a prompt for an
operation. See the following basic examples:
phone status phone status
“banner” name
time and date
menu prompt phone #
menu prompt menu prompt
The next page provides detailed information regarding your phone’s display.
SB200 04-11 prep 4/9/99, 2:21 PM9
Standby mode Phone Book
My Phone
12:34P 12/25
:Saved #s
:Features
9
Page 10
1 2 3 4 5 6 7
888
8
1 Short character display
Identifies the display based
on the current operation.
• Features menus/submenus
begin with “F”.
• Calls List memory locations
begin with “C”.
• Phone Book memory
locations are all digits.
2 (in-use) /
(out-of-service) icon
(18, 21, 23, 71)
Indicates within or outside a
service area. A phone icon
appears during a call. A slash
through it (
no signal is received, which
means you cannot make or
receive calls. The phone will
search for a service signal. If
it can’t find one, it enters
power save mode and
“wakes up” automatically (at
intervals based on carrier
network settings) to search
for a service signal.
) appears when
( )
3 (digital) icon
Appears when your phone is
operating in digital (CDMA)
mode.
4
(signal strength) icon (18)
Shows the approximate
strength of the signal being
received. The more lines
displayed, the stronger the
signal. The icon changes if
the signal strength fluxuates.
It’s best when the signal is
strong, but calls can be made
when it’s weak.
5 (roam) icon (71)
Appears when you are
roaming outside your home
service area.
6 (message) icon (77)
Appears when you have new
text or voice mail messages.
The icon flashes if the new
message is urgent.
7
(battery) icon (16, 17)
Shows the approximate amount
of energy remaining in the
battery. Recharge the battery
before it is fully discharged.
8 Character display
Displays phone numbers and
names, prompts various
actions and displays results.
10
SB200 04-11 prep 4/9/99, 2:21 PM10
Page 11

Activating Your Phone
First time activation
In order to make and receive calls, you need to establish telephone
service from a service provider. Many companies provide service.
Choose a service provider that will meet your calling needs.
Self-activating your phone
Some service providers have a service feature called OTASP (Over-TheAir Service Provisioning) which allows you to self-activate your phone
with a new service. Your phone supports this service feature. Contact
your service provider to see if this service is available in your area.
1 From the Network menu, scroll and select Activation.
2 Scroll and select which system block to activate the
service on.
A display appears prompting you for confirmation. To go back one
step, press
display, press
CLR
. To cancel activation and return to the standby
END
.
Getting Started
3 Press
1
to confirm.
The phone calls up a service provider. When a service provider is
contacted, a message appears and you are connected to an
operator. When activation is complete, a confirmation message
appears followed by the standby display.
If activation fails
A message appears advising you that activation failed. Push Jog Dial to
retry or press
END
to return to the standby display.
11
SB200 04-11 prep 4/9/99, 2:21 PM11
Page 12

Navigating
IT'S A SONY!
12:34P 12/25
:Saved #s
:Features
Standby display
OPTIONS
Send
Duration
Time/Date
View Number
Number Tone
Save
Saved #s display
SAVED #S
:Calls List
:Phone Book
:Find Name
+
CALL TO
Office
555-1212
:Options
C01
Calls List
Home
555-1234
:Options
001
Phone Book
SEARCH FOR
(Enter Name)
:Find
Sony
555-4321
:Options
005
CALLING....
Office
555-1212
C01
OPTIONS
Send
Edit
Restriction
View Number
Number Tone
Erase
Phone Book
–
–
+
or
SEND
Features menu
FEATURES
Sounds
Timers
Directory
Extras
Security
Display
Network
SOUNDS
Ringer Vol
Mute/Unmute
Keybeep Vol
EarpieceVol
Ringer Type
Key Sound
Beep Length
Message Ring
DIRECTORY
My Number
Save
Erase
Edit
Find Name
Phone Book
Calls List
TIMERS
All Calls
RecentCalls
Roam Calls
MinuteAlert
Auto-Off
EXTRAS
Key Guard
Touch Dial
Auto-Retry
Auto-Answer
AnyKey Answ
Recv. Data
Fast 4 Dial
Scratch Pad
SECURITY
Lock Phone
New Code
Restrict #
RestrictAll
MasterReset
Erase Book
Erase Calls
Emergency #
Limit Calls
NETWORK
Set Analog
Roam Alert
Drop Alert
Priv. Alert
Auto-N.A.M.
Set N.A.M.
Set System
Force Call
DISPLAY
Banner
Backlight
Auto-Hyphen
Sort Book
Language
Menu Length
Msg Format
Call any number that's displayed
Jog Dial navigator: scroll and select
Your Sony portable phone is easy to use thanks to the
The instructions in this manual will tell you to “scroll and select”. To
scroll, turn Jog Dial up or down. When the flashing arrow points to the
item you want to select, push Jog Dial in toward the phone.
Navigating keys
Key Action Destination
CLR
CLR
END
Note
The phone automatically
returns to standby after 30
seconds of inactivity (e.g., you
haven’t scrolled, selected or
pressed any key).
12
SB200 12-21 navigate 4/9/99, 2:21 PM12
Press previous menu
Hold down standby display
Press standby display
1
Jog Dial navigator
.
Page 13

SAVED #S
-
+
:Calls List
:Phone Book
:Find Name
SEARCH FOR
(Enter Name)
:Find
ist
005
Sony
555-4321
1212
:Options
s
e
ber
one
+
or
–
Phone Book
OPTIONS
Send
Edit
Restriction
View Number
Number Tone
Erase
Saved #s display
–
Phone Book
001
Home
555-1234
:Options
Menu Map: How do I get there?
There are three navigation routes from the standby display:
2
in either direction to access numbers saved in memory.
Enter digits
Features menu
SECURITY
Lock Phone
New Code
Restrict #
RestrictAll
MasterReset
Erase Book
Erase Calls
Emergency #
Limit Calls
DISPLAY
Banner
Backlight
Auto-Hyphen
Sort Book
Language
Menu Length
Msg Format
NETWORK
Set Analog
Roam Alert
Drop Alert
Priv. Alert
Auto-N.A.M.
Set N.A.M.
Set System
Force Call
Dials the number
Calling...
555-1212
3
SEND
555-1212
:Options
OPTIONS
Send
Save
Enter Pause
Enter Link
EnterHyphen
Find Number
Options menu
13
1 Turn Jog Dial
2 Press Jog Dial to access the Features menu.
3 Enter a digits.
To see the complete list of menus, submenus and corresponding settings,
see the “Menu list” on pages 12 and 13.
Standby display
IT'S A SONY!
12:34P 12/25
:Saved #s
:Features
FEATURES
Sounds
Timers
Directory
Extras
Security
Display
Network
SOUNDS
Ringer Vol
Mute/Unmute
Keybeep Vol
EarpieceVol
Ringer Type
Key Sound
Beep Length
Message Ring
TIMERS
All Calls
RecentCalls
Roam Calls
MinuteAlert
Auto-Off
DIRECTORY
My Number
Save
Erase
Edit
Find Name
Phone Book
Calls List
EXTRAS
Key Guard
Touch Dial
Auto-Retry
Auto-Answer
AnyKey Answ
Recv. Data
Fast 4 Dial
Scratch Pad
Navigating
SB200 12-21 navigate 4/9/99, 2:21 PM13
Page 14
List of Menu Items
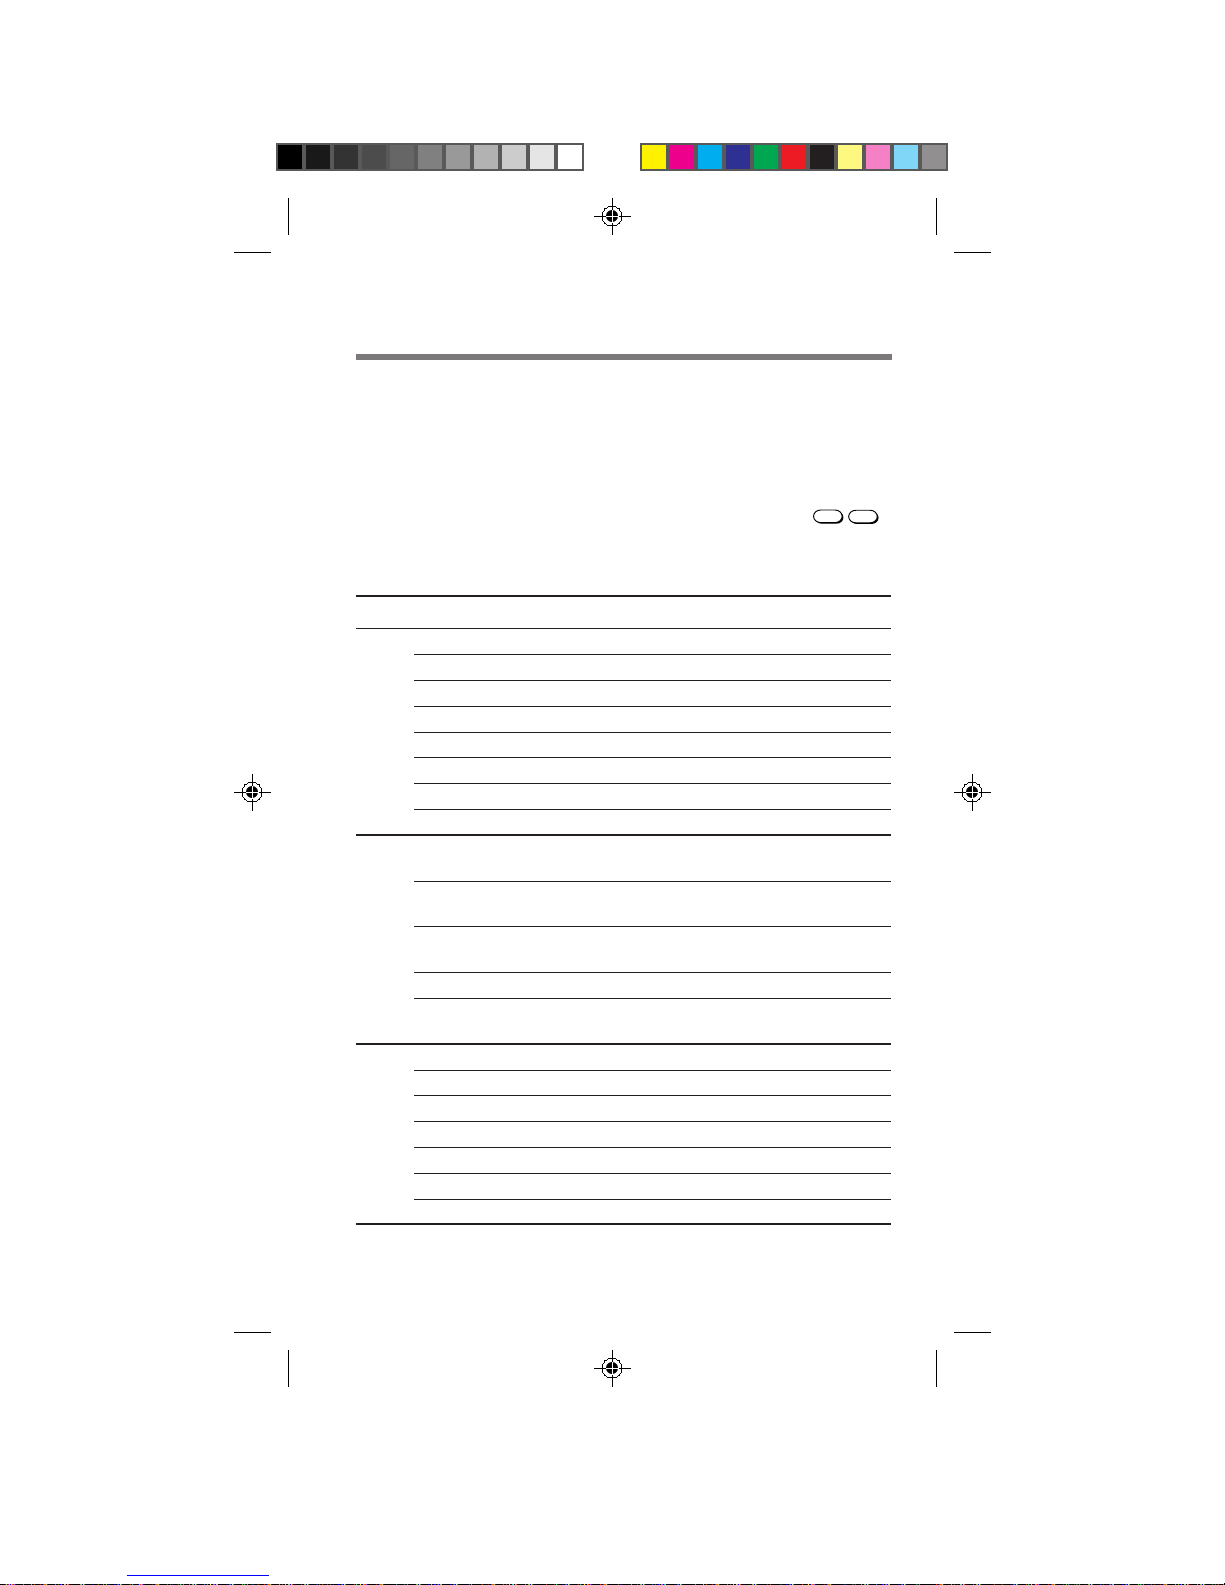
The Features menu allows you to personalize the way your phone
functions. This menu list shows the entire Features menu (a.k.a. long
menu). The Features menu includes seven categories of menus. Within
each of these menus are submenus identified by a “menu item number”
(they begin with the letter “F” (Features) followed by two digits). Menu
item numbers allow you to quickly access any menu from the Features
menu (for example, to access the earpiece volume menu press
Current submenu settings are indicated by a check mark (✓) and
displayed in capital letters.
Submenu Settings Page
F11 Ringer Vol. off/low/med./high/escalate/vibrate 41
F12 Mute/UnMute mutes or unmutes the microphone 42
F13 Keybeep Vol off / low / med. / high 42
F14 Earpiece Vol 1 / 2 / 3 / 4 / 5 / 6 / 7 43
F15 Ringer Type option 1 to 5 / melody 1 to 5 43
F-1 Sounds
F16 Key Sound tones / clicks 44
Features menu 1
F17 Beep Length standard / long 44
F17 Msg Ringer on / off / +reminder 44
F21 All Calls total call time,
number of calls 45
F22 Recent Calls total call time,
number of calls 45
F23 Roam Calls total call time,
F-2 Timers
F24 Minute Alert before min/each min/every 5 min/off44
Features menu 2
F25 Auto-Off in 3 hrs / in 2 hrs / in 1 hr /
F31 My Number — 48
F32 Save — 48
F33 Erase — 50
F34 Edit — 51
F35 Find Name — 52
F36 Phone Book No default entries 54
F-3 Directory
Features menu 3
F37 Calls List No default entries 55
number of calls 46
in 30 mins / never 47
GHI
1
4
).
14
SB200 12-21 navigate 4/9/99, 2:21 PM14
Page 15

Sub Menu Settings Page
F41 Keyguard — 56
F42 Touch Dial on / off 57
F43 Auto-Retry off / on 10 sec / on 30 sec / on 60 sec 57
F44 Auto-Answer on / off 58
F45 AnyKey Answ on / off 58
F45 Recv. Data off / fax / modem / PC Control 58
F-4 Extras
F46 Fast 4 Dial on / off 58
F47 Scratch Pad — 59
Features menu 4
F51 Lock Phone never / on power-up / right now 60
F52 New Code 0000 61
F53 Restrict # No default on restricted numbers 62
F54 Restrict All on / off 63
F55 Master Reset — 64
F56 Erase Book — 64
F57 Erase Calls — 65
F-5 Security
F58 Emergency # No default emergency numbers 65
Features menu 5
F59 Limit Calls Off/ incoming/ to loc 1-9/ to loc 1-99 65
F61 Banner No default banner 66
F62 Backlight always off / for 7 secs / for 15 secs /
F63 Auto-hyphen on / off 68
F64 Sort Book by loc. # / alphabetic 68
F65 Language English/ French/ Spanish/ Port 20, 69
F-6 Display
F66 Menu Length long / short 69
Features menu 6
F67 Msg. Format none/ partial/ full 77
F71 Set Analog disabled / until off / automatic 70
F72 Roam Alert on / off 71
F73 Drop Alert on / off 72
F74 Priv. Alert on / off 73
F75 Auto-N.A.M. on / off 74
F76 Set-N.A.M. N.A.M. 1 / N.A.M. 2 74
F-7 Network
F77 Activation on Blocks A thru F 75
Features menu 7
F78 System Pref. standard / home only 76
for 30 sec / always on 67
Navigating
SB200 12-21 navigate 4/9/99, 2:21 PM15
15
Page 16

Quick Tips and Features
Here is a list of your phone’s features which simplify your calling experience.
MAKING CALLS
Calling displayed phone
numbers
Speed dialing
Touch dialing
Automatic redial
Searching for a phone
number to call
Muting the microphone
Call prefixing
SEND
• Push
it’s displayed on the screen.
• Your phone is able to speed dial phone
numbers stored in your Phone Book:
Enter the memory location number and
press [send].
• Your phone is able to dial at the touch of
the memory location number:
Enter the memory location number, but
keep pressure on the last digit until
connecting appears on the display.
• Need to get through to a difficult number?
Set your phone to automatically redial until
successful!
• There are several ways to search for a
phone number:
- Scroll through your entire Phone Book or
- Quick alphabetic search
- Alphabetic search
- Number search
• Push and hold Jog Dial to quickly mute and
unmute the microphone during a call.
• Quickly add a prefix to local numbers
stored in your Phone Book. This is helpful
when you’re traveling outside your area
code.
to call a phone number anytime
Calls List
Viewing long phone
numbers
Emergency numbers
16
SB200 12-21 navigate 4/9/99, 2:21 PM16
• If a number is too long to fit on the screen,
view the overflow digits by selecting View
Number on the Options menu.
• You can call 911 and your three stored
emergency numbers even if your phone is
locked or calls are limited.
Page 17

RECEIVING CALLS
AnyKey Answer
•
You can set your phone to answer
incoming calls with any key except
PWR
.
Navigating
Setting your phone to
answer calls
automatically
Muting the ringer
• A Hands-Free Car Kit ia a handy
accessories that allows you to set your
phone to answer calls automatically on
the second ring.
• Quickly mute the ringer by turning Jog
Dial down or pressing the [end] key.
SB200 12-21 navigate 4/9/99, 2:21 PM17
17
Page 18

PHONE FEATURES and FUNCTIONS
Navigating
• Quick menu access
Each menu item can be accessed quickly
from the standby display by pushing Jog
Dial, entering the menu item number, then
pressing Jog Dial again.
• Previous menu
Press [clr] to quickly go back to the
previous menu.
• Return to standby
Press [end] or hold down [clr] to quickly
return to standby.
The display automatically returns to
standby after 30 seconds of inactivity.
Stored information
Backlight
18
• Phone Book (permanent storage of
information)
Your phone can store up to 199 entries.
You can make calls from your Phone Book.
You can view your Phone Book from the
standby display or the Directory menu.
• Calls List (temporary information)
Your phone stores a list of your 10 most
recent calls.
You can make calls from your Calls List.
You can save information from your Calls
List to your Phone Book.
You can view the Calls List from the
standby display or from the Directory menu.
• DTMF signals
You can store DTMF signals in your Phone
Book and send them automatically.
• Your phone has two backlight settings: one
in charging mode and one in battery mode.
For faster charging while in charging mode,
you may want to change the setting from
always on (which is set at the factory).
• You can activate the backlight while
KeyGuard is on:
Push and hold Jog Dial.
SB200 12-21 navigate 4/9/99, 2:21 PM18
Page 19

Volume
• Turn Jog Dial up or down to quickly adjust
the earpiece volume during a call.
• Turn Jog Dial up or down to quickly adjust
the ringer volume while the phone is
ringing.
• Turn Jog Dial down or press [end] when the
phone is ringing to mute the ringer.
• Press and hold Jog Dial to mute the
microphone during a call.
Navigating
Locking the keypad
Keyguard vs lock phone
vs limit calls
• Push and hold Jog Dial to quickly lock the
keypad.
• You can lock the keypad even when the
phone itself is locked.
• The keypad unlocks when you answer a
call then relocks when the call is finished.
• Keyguard prevents the keys from
accidentally being pushed. This is
particularly helpful when you transport
your phone.
• Lock phone prevents anyone from using
your phone unless a security code is
entered. This is important not only to
ensure phone calls are made with your
permission, but also to ensure the privacy
of information contained in your phone’s
memory.
• Limit calls doesn’t lock the keys or the
phone, but allows you to limit the calls that
can be made from your phone.
SB200 12-21 navigate 4/9/99, 2:21 PM19
19
Page 20

First Things First
Selecting a language
When you receive your phone, the menus are displayed in English, but
you can change the menu language. To change the menu language,
follow the instructions below.
1 From the Features menu, scroll and select Display.
2 Scroll and select Language.
3 Scroll and select English, French, Spanish or Portuguese.
Getting your phone number
Your phone number has its own submenu; just in case you forget it.
1 From the Directory menu, scroll and select My Number.
2 Push Jog Dial to exit.
Entering information
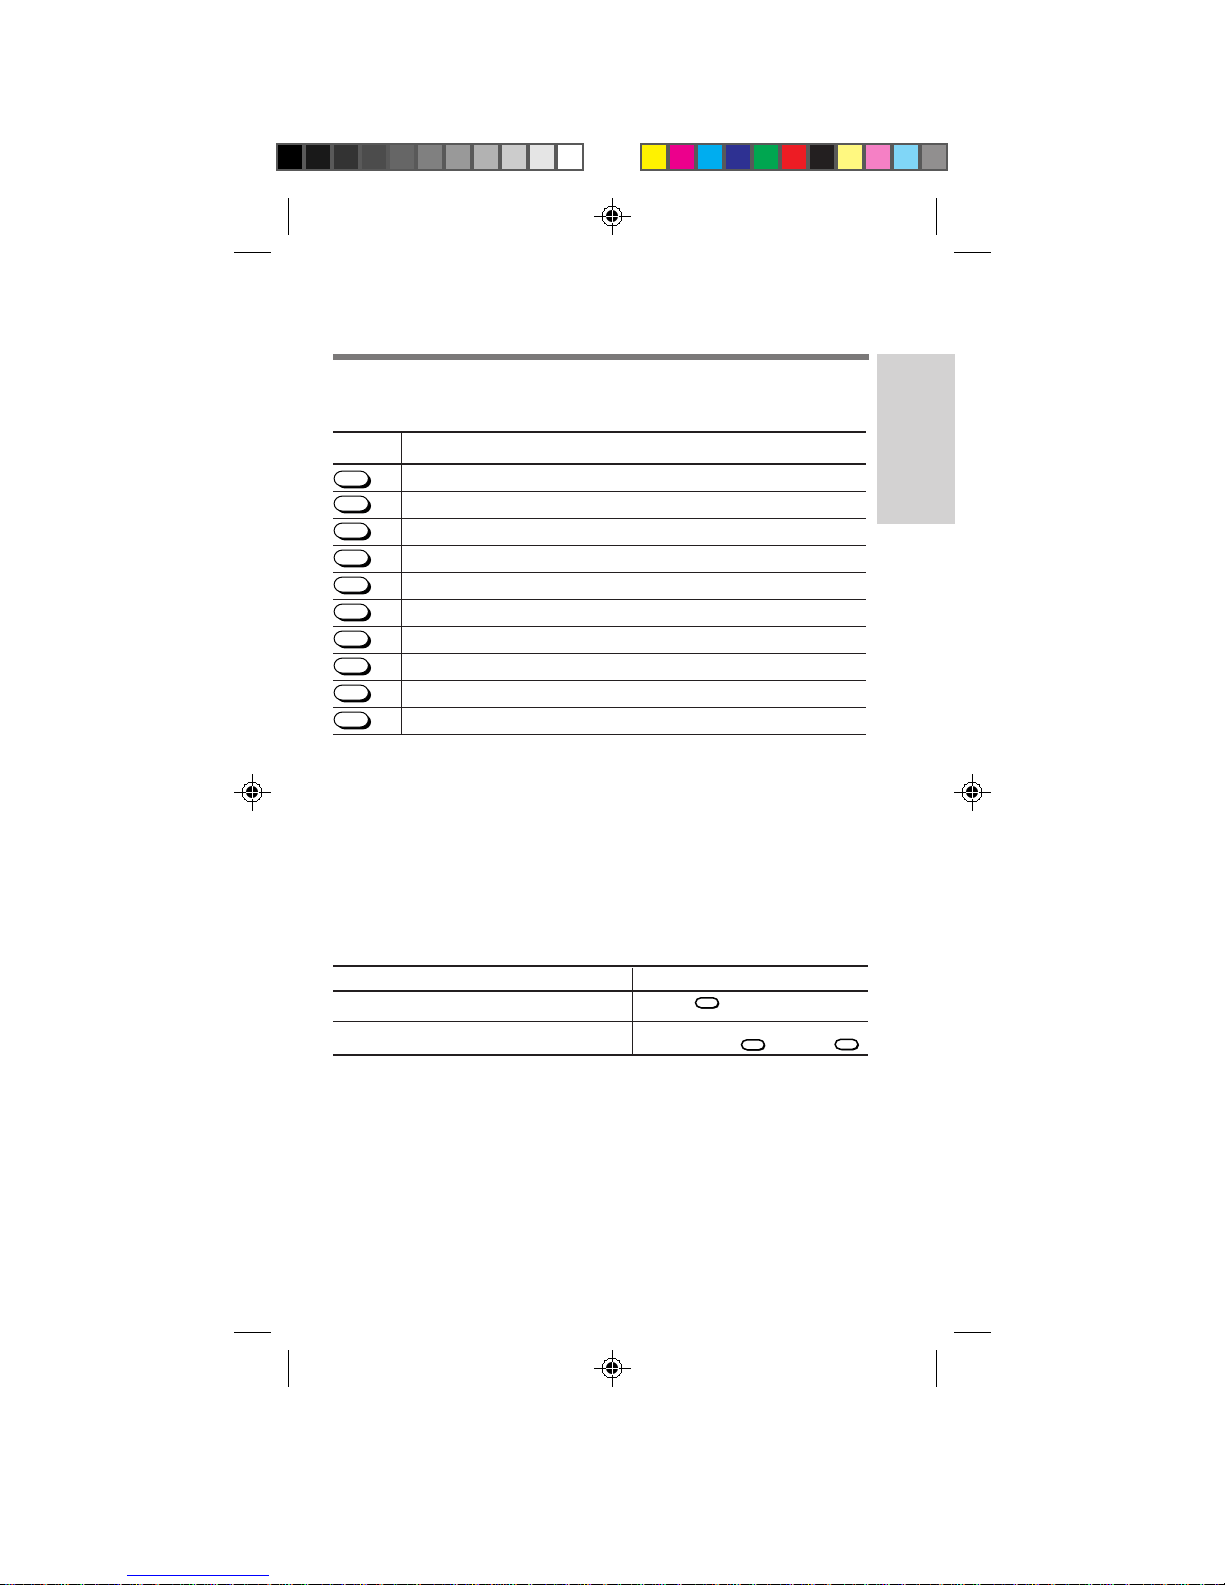
Entering numbers: To enter numbers, just press the numbers on the
keypad.
Entering characters: You can enter characters as well as numbers using
the keypad. When prompted to enter characters, press the key that has
the character you want to enter printed on it. Continue pressing it until
the character is displayed (lower case letters follow capitals). Refer to the
alphanumeric table on the next page to see a complete list of numeric
keys and corresponding characters. Each menu language has its own
alphanumeric table. Once entered, special language characters (e.g.,
letters with accents) display regardless of the current menu language!
Moving the cursor: To enter the next character, press the corresponding
key. If it’s the same as the last, wait three seconds and the cursor will
move automatically. Or, manually move the cursor to the next space with
Jog Dial or arrow keys (
/ ).
For example, to enter “SONY”:
Press
Press
Press
Press
20
SB200 12-21 navigate 4/9/99, 2:21 PM20
PQ
7
RS
four times to enter an “S”.
MNO
6
three times to enter an “O”.
MNO
6
twice to enter an “N”.
WX
three times to enter a “Y”.
9
YZ
Page 21
Alphanumeric table
Key English Sequence
1
2
ABC
DEF
3
GHI
4
JKL
5
MNO
6
PQ
7
RS
TUV
8
WX
9
YZ
OPER
0
-“ . ‘ , & ( ) :1
AB Ca b c 2
DE Fd ef3
GH Ig hi4
JK L j k l 5
MN Om n o 6
PQ RS pq r s7
TU Vt uv8
WX Y Z w x y z9
0
Alphanumeric tables for other languages
To view another language table, refer to the respective phone operating
instructions. Not all areas distribute the phone operating instructions in
all languages. To obtain operating instructions in another language,
contact Sony Customer Service.
Correcting and exiting
When you want to: Do this:
Change a character entered Press
CLR
to correct mistakes.
Navigating
Cancel operation and return to standby Hold down
SB200 12-21 navigate 4/9/99, 2:21 PM21
CLR
or press
END
21
.
Page 22
Calling Fundamentals
You can call any number up to 32 digits when you are within a service
area. If you are outside a service area,
There are several ways to make calls, including dialing manually,
speed dialing, touch dialing or recalling a stored number.
Basic calling
The most basic way to call any phone number is to dial it manually.
1
Enter a phone number on the standby display and press
The phone dials the number and the icon appears. When the
call is connected, the call timer appears.
To correct mistakes Press
appears on the display.
CLR
.
SEND
.
To return to standby Hold down
2 Press
END
to disconnect the call.
The icon disappears and the final elapsed call time flashes.
CLR
or press
END
.
Related calling functions
Volume adjustments during a call
Earpiece: Adjust the earpiece volume during a call by simply turning
Jog Dial up to increase and down to decrease.
Speaker: To quickly mute the microphone during a call, push and
hold Jog Dial. Push and hold again to unmute.
Redialing
Last number called
From standby, press
Automatic redial of unsuccessful call attempts
If a phone call doesn’t go through (e.g., busy or no answer), you can
set your phone to redial automatically up to five times.
1 From the Extras menu, scroll and select Auto-Retry.
2 Scroll and select
SEND
to automatically redial the last number dialed.
off, on 60 secs, on 30 secs or on 10 secs.
22
SB200 22-28 calls 4/9/99, 2:21 PM22
Page 23

Limiting outbound calls (limit calls)
Limit calls is a function that allows you to control calls that can be
made from your phone. You can limit outgoing calls to specific
segments of your Phone Book, while leaving incoming calls unaffected.
Both limit calls and lock phone allow you to call 911 and your three
stored emergency numbers. This function simply limits your outgoing
calls whereas, locking your phone restricts your entire phone.
Setting Limitation
Off No limitation; calls can be made to any number.
To incoming Only calls to 911 and stored emergency numbers can
be made.
to loc 1-9 You can only call Phone Book entries 1-9, 911 and
stored emergency numbers.
to loc 1-99 You can only call Phone Book entries 1-99, 911 and
stored emergency numbers.
1 From the Security menu, scroll and select Limit Calls.
Scroll and select off, to loc 1-9, to loc 1-99 or to incoming.
2
Making calls when outgoing calls are limited
If you’ve chosen to limit outgoing calls, it doesn’t matter how you
attempt the call (e.g., dialing manually, from the Phone Book or Calls
List) the phone number is checked against the Phone Book (pauses and
links are ignored). If the number is not in the Phone Book or in a
limited location, an error message is displayed. The phone number is
still displayed when the standby display reappears, so you can edit it.
Making and Receiving Calls
Changing the Phone Book when outgoing calls are limited
If you’ve chosen to limit outgoing calls, you cannot change your Phone
Book (including saving, editing or restricting).
Restricted Phone Book entries
You will still be prompted to enter the lock code for restricted Phone
Book entries whether or not your outgoing calls are limited.
SB200 22-28 calls 4/9/99, 2:21 PM23
23
Page 24

Calling From the Phone Book
Your phone has an internal Phone Book. Once you create entries in your
Phone Book (see the Phone Book section), dial stored numbers quickly
by selecting an entry, speed dialing, touch dialing or fast 4 dialing.
Note
If the Phone Book entry includes a pause or link, push Jog Dial to release
the remaining numbers.
Selecting a Phone Book entry manually
1 From standby, scroll and
select Saved #s.
2
Scroll and select Phone Book.
3
Scroll to select the Phone Book entry you want to call.
4 Push Jog Dial twice to automatically dial.
1
From the Features menu,
scroll and select Directory.
2
Scroll and select Phone Book.
Speed dialing
There’s no need to program speed dial numbers. You just have to know the
memory location number. You can speed dial memory locations 01 to 99.
1 From standby, enter the memory location number, then
SEND
press
The Phone Book entry in that memory location appears and the
phone dials the stored number.
.
Touch dialing
1 From the Extras menu, scroll and select Touch Dial.
2 Scroll and select on or off.
Once Touch Dial is on, dial using just the memory location number.
1 From standby, enter the memory location number and hold
down the last digit for about two seconds.
The Phone Book entry in that memory location appears and the
phone dials the stored number.
24
SB200 22-28 calls 4/9/99, 2:21 PM24
Page 25

Fast four-digit dialing (fast 4 dial)
Fast 4 dial allows you to dial just the last four digits of a phone
number stored in your Phone Book. The last four digits of the number
you want to dial must be unique (e.g., only one phone number in your
Phone Book has those last four digits).
1 From the Extras menu, scroll and select Fast 4 Dial.
2 Scroll and select on or off.
Once you’ve turned fast 4 dial on, you can dial using this feature:
1 From standby, enter the last four digits of the phone
number you want to call, then press
The phone searches your entire Phone Book for those exact digits.
SEND
.
Automatic dial
If only one Phone Book entry matches, the phone automatically
dials it for you.
Error message
An error message is displayed if more than one Phone Book entry
has those four digits or no Phone Book entries match the digits.
Pauses and links
For entries with pauses or links, the four digits preceding the first
pause or link in the entry are used to match the entered digits.
Call prefixing
It’s not unusual to leave out the area code when you store “local”
numbers in your Phone Book. However, this may pose a problem
when you travel. When you’re outside your normal area code and you
want to call one of these local numbers, temporarily add the area code
(prefix) and dial it like this:
1 Scroll and select the Phone Book entry you want to call, then
push Jog Dial to display the Options menu.
2 Scroll and select Prefix.
When prompted, enter the prefix (area code).
3 Push Jog Dial to automatically dial the number.
Making and Receiving Calls
SB200 22-28 calls 4/9/99, 2:21 PM25
25
Page 26

Calling From the Calls List
The Calls List is a chronological history the phone keeps of your ten
most recent calls (outgoing, incoming, missed, fax calls or data calls)
and scratch pad entries. If you call the same number twice in a row,
only the most recent call is stored. Each Calls List entry includes:
• The type of entry (Call To, Call From, Missed and Added)
• Corresponding name (if the digits match a Phone Book entry)
• Digits (phone number or Scratch pad entry)
From standby mode
1
Turn Jog Dial once to
access the Saved #s menu.
2 Turn Jog Dial up to select
Calls List.
3 Use Jog Dial to scroll
through your Calls List.
When the entry you want to
call is displayed, press
push Jog Dial twice to call it.
SEND
From the Directory
1 Scroll and select Calls
List.
2 Use Jog Dial to scroll
through your Calls List.
When the entry you want to call
is displayed, press
or
Jog Dial twice to call it.
SEND
or push
Additional Calls List information
Your phone stores additional information that isn’t displayed on the
Calls List screen, including:
• Time and date of the entry
• Duration of the entry.
• Digits that don’t fit on one display line (only the last 12 digits
appear on the Calls List display).
To view additional information
1 Scroll to view a Calls List entry, then push Jog Dial to
display the Options menu.
2 Scroll and select View Number, Duration, or Time/Date.
Saving a Calls List entry to your Phone Book
Your Calls List is only temporary storage for your ten most recent call
items. When a new item is added, the oldest item is deleted. If you
want to keep a Calls List entry, save it to your Phone Book.
1 Scroll to view a Calls List entry, then push Jog Dial to
display the Options menu.
2 Scroll and select Save then follow the screen prompts.
26
SB200 22-28 calls 4/9/99, 2:21 PM26
Page 27

Incoming Calls
You can receive calls as long as the icon is not displayed. When
you receive a call, the ringer sounds and the LED flashes green with
each ring. Incoming Call flashes on your phone’s display.
Basic call answering
1 Press
2 Press
SEND
to answer the call.
When the call is connected, the call timer appears.
END
to disconnect the call.
The icon disappears and the final elapsed call time flashes for 10
seconds.
Related answering functions
Adjusting volume
The Sounds menu allows you set the various volume settings. To change
the volume of the ringer, earpiece and microphone for individual calls:
Ringer Increase volume Turn Jog Dial up.
while it’s Decrease volume Turn
ringing Mute the ringer Turn Jog Dial down or
Earpiece Increase volume Turn Jog Dial up.
during a call Decrease volume Turn Jog Dial down.
Microphone Toggle between Push and hold Jog Dial
during a call mute and unmute
Setting all keys to answer
As an added convenience, you can set your phone to answer incoming
calls with any key (except
1 From the Extras menu, scroll and select AnyKey Answ.
PWR
).
Press
Jog Dial
END
.
up then down.
Making and Receiving Calls
2 Scroll and select on or off.
Note: If AnyKey Answ is on, pressing
will not answer the call.
SB200 22-28 calls 4/9/99, 2:21 PM27
END
, will mute the ringer, but
27
Page 28

Setting the phone to answer automatically
When the phone is used with a Sony Hands-Free Car Kit, it can
automatically answer calls on the second ring.
1 From the Extras menu, scroll and select Auto-Answer.
2 Scroll and select on or off.
If you select on and the phone is in the hands-free car kit, the
message –AutoAnswer– is displayed on the standby display.
Caller ID
Incoming calls
If caller ID is supported, the caller’s phone number appears on the
display when you receive an incoming call or call waiting alert. If the
Caller ID number matches a Phone Book entry, the corresponding
name is also displayed.
Missed calls
If you miss an incoming call, you will hear an alert (beep) and a
CLR
message appears on the display. To return to standby, press
or Jog Dial. The caller’s number will be stored in your Calls List if
Caller ID is supported.
END
,
Using the scratch pad
Your phone has a scratch pad feature which is useful for temporarily
holding information such as a phone number. It’s easy to find at the
bottom of the Extras menu. The phone doesn’t send DTMF tones from
the scratch pad, but you will hear tones when you enter digits if your
keybeeps aren’t turned off.
1 Scroll and select Scratch Pad.
2 Use the keypad to enter the digits, then push Jog Dial.
The Options menu appears. You can also enter hyphens, pauses
and links (see page 27).
3 Scroll and select Store&Exit.
The information is stored as a scratch pad entry in the Calls List.
28
SB200 22-28 calls 4/9/99, 2:21 PM28
Page 29

Storing Information
Your phone has an internal Phone Book for up to 199 entries (each with its
own memory location number). Phone Book entries can be numbers up to
32 digits (phone, credit card, medical record, etc.) and corresponding
names up to 12 characters. Things to keep in mind when creating your
Phone Book:
• It’s a good idea to use the first nine memory locations for numbers you
call most often.
• Consider whether you want to use last names first since it will affect
searching your Phone Book.
Basic storage
Entries can be stored in your Phone Book from Standby mode or the
Directory menu.
From standby mode
Enter the number you
1
want to save, then
push Jog Dial.
2 Scroll and select
Save.
3 Enter a name to identify the number you entered, then
push Jog Dial to save.
For information on entering characters, see the “Alphanumeric
table” on page 20.
4 Push Jog Dial again to store it in the first available memory
location.
To store it in another memory location, scroll to that memory
location or use the keypad to enter the memory location number,
then push Jog Dial. A confirmation message appears followed by
the status of the Phone Book.
From the Directory menu
1 Scroll and select Save.
2 Enter the phone number
you want to save, then push
Jog Dial.
Phone Book Functions
If the Phone Book is full
A message appears when you try to save if no more memory locations
are available. You can cancel or overwrite another memory location.
• To cancel, hold down
• To overwrite an existing memory location, enter it using the keypad or
scroll through your Phone Book to display it, then press Jog Dial. A
confirmation message appears. Press Jog Dial again to confirm.
SB200 29-36 phonebook 4/9/99, 2:21 PM29
CLR
.
29
Page 30

Special storage functions
Hyphens, pauses and links are special functions that can be stored in
your Phone Book entries.
Hyphens in Phone Book entries
Your phone has a default setting of autohyphenation ON. When you
enter digits, the phone assumes you are entering a standard U.S. phone
number (such as 800-555-1234). Every fourth and eight character is a
hyphen. To enter hyphens manually (to store a foreign phone number or
other type of number), turn autohyphenation OFF (see page 68).
Using pauses and links to Send DTMF signals
Dual Tone Multiple Frequency (DTMF) is also known as “touch-tone”.
Each key on your phone’s keypad generates a distinct tone (number
tone). You use DTMF signals when you call electronic services such as
answering machines, pagers, telephone banking services, etc. (e.g., a
number that asks if you are calling from a touch-tone phone then
prompts you to enter information using the keypad). DTMF signals can
be used to route the call or identify the person calling. Instead of
sending the number tones manually one-by-one using the keypad, you
can store them in your Phone Book and send them at the touch of a key.
Notes
• You can send DTMF signals only during a call.
• To change the length of the DTMF transmission, see “Setting the
keybeep length” on page 44.
When you dial a Phone Book entry that has a hard pause or link in it, the
phone displays and dials only the numbers up to the hard pause or link.
When prompted, press Jog Dial to release the hard pause or link and
transmit the next set of digits. A time pause waits for a specified period
of time before sending the second string automatically.
Pauses in Phone Book entries
The pause function allows you to save a phone number and
corresponding DTMF signals together in the same Phone Book entry.
• 555-1212H123 is an example of calling 555-1212, then extension 123
using a hard pause.
• 555-1212T123 is an example of calling 555-1212, then extension 123
using a time pause.
30
SB200 29-36 phonebook 4/9/99, 2:21 PM30
Page 31
Linking Phone Book entries
Use the link function if the combined phone number and corresponding
DTMF signals exceed 32 digits. 555-1234L50 is an example of calling
555-1234, then linking the number in memory location 50 (i.e., your
medical record number).
Adding hyphens, pauses or links in a Phone Book entry
1 Enter all digits to be dialed prior to the hyphen, pause or
link, then push Jog Dial.
2 Scroll and select enter hyphen, hard pause, time pause or
enter link.
A special character is displayed (“-”, “H” , T or “L”) then the
phone is ready to accept additional digits.
3 Enter the next set of digits, then push Jog Dial.
• If you chose enter hyphen continue entering digits as needed.
• If you chose time pause or hard pause, enter the digits
(number tones) to be released.
• If you chose enter link, enter the memory location you used
to store the digits (number tones).
4 When the entry is complete, scroll and select Save and
follow the remaining save prompts.
Sending DTMF signals manually from the Phone Book
You don’t have to include the DTMF signal(s) with the phone number
(pause or link function). You can store the DTMF signals in a Phone
Book memory location (as in the link function), then when needed, send
the number tones manually from your Phone Book as follows:
1 Dial the phone number.
Phone Book Functions
2
Use the Directory menu to locate the Phone Book entry that
contains the numbers you want to send, then push Jog Dial.
3 Scroll and select Number Tone.
A DTMF signal containing the entered digits is sent in a burst.
SB200 29-36 phonebook 4/9/99, 2:21 PM31
31
Page 32

Searching the Phone Book
Information stored in your Phone Book is sorted either alphabetically (the
first character of the memory location) or numerically by memory location
number. So, one way to search your Phone Book is to simply scroll using
the Jog Dial. No matter how your Phone Book is sorted, you can find
information quickly by searching alphabetically, by memory location or
phone number. Once a Phone Book entry is displayed, you can call it by
pressing
Searching your Phone Book alphabetically
Quick alphabetic Phone Book recall
If your Phone Book is sorted alphabetically, you can search using the
phone’s keypad. For example, when viewing your Phone Book, press [2]
and entries that begin with “A” are displayed. Press [7] four times to
display entries that begin with “S”. If no entries that begin with that
letter, it looks for the next letter on the key. If there aren’t any entries for
any of the letters on the key, it searches for the first letter of the next key.
Once the phone displays an entry, you can use Jog Dial to scroll up or
down from there.
Alphabetic search
You can search alphabetically using as little as 1 character or as many as
12 characters. Search from standby mode or from the Directory menu.
From standby mode
1 Turn Jog Dial once to
2 Push Jog Dial to select
SEND
or Jog Dial twice.
select Saved #s.
Find Name.
A message prompts you for a
search string.
From the Directory menu
1 Scroll and select Directory
from the Features menu.
2 Scroll and select Find
Name.
A message prompts you for a
search string.
3 Enter the first character of the name you want to find (two
or more consecutive characters is best), then push Jog Dial.
• If you entered only one character, all Phone Book entries that
begin with that character are displayed alphabetically.
• If you entered two or more characters, all Phone Book entries
that contain those consecutive characters are displayed starting
from the lowest memory location number.
4 Scroll to view the list of matched character(s).
32
SB200 29-36 phonebook 4/9/99, 2:21 PM32
Page 33
Searching by memory location number
You can search for a memory location number in your Phone Book from
standby mode or the Directory menu.
From standby mode
1 Enter a memory location,
then push Jog Dial.
2 Scroll and select Recall
Loc#.
A message appears if the
memory location is empty.
From the Directory menu
1 Scroll and select Phone
Book.
A message prompts you for a
memory location.
2 Enter a memory location,
then push Jog Dial.
A message appears if the
memory location is empty.
Searching for a phone number
You can only search for a phone number from standby mode.
1 Enter at least the first three digits of the phone number
you want to find, then push Jog Dial.
2 Scroll and select Find Number.
All entries matching the entered digits are displayed. The list is
displayed either alphabetically or by memory location depending
on the Sort Book setting. A message is displayed if a matching
Phone Book entry is not found.
3 Scroll to view the next entry that contains the search
string.
Phone Book Functions
SB200 29-36 phonebook 4/9/99, 2:21 PM33
33
Page 34

Editing Phone Book Entries
You can edit the name, phone number and memory location of entries
stored in your Phone Book. If the selected Phone Book entry is restricted,
you must enter a four-digit lock code to edit it. You can edit Phone Book
entries from standby mode or the Directory menu.
From standby mode
1 Scroll down twice to
access your Phone
Book.
2 Scroll to the Phone
Book entry you want
to edit, then push Jog
Dial.
3 Scroll and select Edit.
A message prompts you to
confirm that you want to
edit the selected Phone
Book entry.
4
Scroll and select name, phone # or location #.
From the Directory menu
1 Scroll and select Edit.
A message prompts you for
the Phone Book entry to edit.
2 Choose the Phone Book
entry to edit by:
• Entering the memory
location number, or
• Scrolling to the
location.
3 Push Jog Dial.
A message prompts you to
confirm that you want to edit
the selected Phone Book entry.
5 Make the change, then push Jog Dial.
Enter new information the same way you store information. If you
want to cancel, press
CLR
.
6 Scroll and select Save.
A message confirms that your changes have been saved.
34
SB200 29-36 phonebook 4/9/99, 2:21 PM34
Page 35
Erasing Phone Book Entries
If the selected Phone Book entry is restricted, you must enter a four-digit
lock code before you can erase it. You can erase Phone Book entries from
the standby display or from the Directory menu. You can erase them one
at a time, or erase your entire Phone Book.
From standby mode
1 Scroll down twice to access
your Phone Book.
2 Scroll to the Phone Book
entry you want to erase,
then push Jog Dial.
3 Scroll and select Erase.
A message prompts you to
confirm.
4 Push Jog Dial again to
confirm.
From the Directory menu
1 Scroll and select Erase.
A message prompts you for the
Phone Book entry to erase.
2 Choose the Phone Book
entry to erase by:
• Entering the memory
location number, or
• Scrolling to the
location.
A message prompts you to
confirm.
3 Push Jog Dial again to
confirm.
Erasing all Phone Book entries
1 From the Security menu, scroll and select Erase Book.
1
2 Press
to quit without erasing.
If you erase all entries, a confirmation display appears. Be careful,
there is no way to “undo” this function.
to erase all Phone Book entries or push Jog Dial
Phone Book Functions
SB200 29-36 phonebook 4/9/99, 2:21 PM35
35
Page 36

Restricting Phone Book Entries
You can restrict access to individual Phone Book entries or your entire
Phone Book. Restricted entries display the message Phone Book entry
restricted in place of the phone number. A lock code is required to view
restricted numbers. If a restricted Phone Book entry is added to your
Calls List, it’s also restricted in your Calls List.
To restrict Phone Book entries
From the Phone Book
1
Scroll to the Phone Book
entry you want to restrict,
then push Jog Dial.
2 Scroll and select
Restriction. Push Jog Dial
to restrict the entry.
From the Security menu
1 Scroll and select Restrict #.
You are prompted for the
Phone Book entry to restrict.
2
Scroll to the Phone Book
entry that you want to
restrict, then push Jog Dial.
To unrestrict Phone Book entries
1 Scroll to the Phone Book entry you want to unrestrict, then
push Jog Dial.
2 Scroll and select Restriction.
3 Enter the lock code to unrestrict the Phone Book entry.
To restrict all Phone Book entries
Turning off Restrict All will not unrestrict a Phone Book entry
restricted individually.
1 From the Security menu, scroll and select Restrict All.
2 Scroll and select on or off.
36
SB200 29-36 phonebook 4/9/99, 2:21 PM36
Page 37

Sounds Menu Settings
The Sounds menu allows you to adjust the volume of the ringer, keybeep
and earpiece. You can also select the type of sounds heard when the
phone rings and when you press keys.
Accessing the Sounds menu
My Phone
12:34P 12/25
:Saved #s
:Features
From standby,
press Jog Dial
to access the
Features menu.
F-1
FEATURES
Sounds
Timers
Directory
From Features,
press Jog Dial
to access the
Sounds menu.
F11
SOUNDS
Ringer Vol
Mute/Unmute
Keybeep Vol
Sounds menu
Ringer
Ringer volume
This menu sets the ringer volume for all incoming calls. Manually adjust
the ringer volume of individual incoming calls by turning Jog Dial.
1 Scroll and select Ringer Vol..
2 Scroll and select off, low, med., high , escalate or vibrate.
Note: You cannot set the ringer volume to escalate if your ringer type is
a melody.
Ringer Off
If you select off, –Ringer Off– is displayed on the standby display and
turning Jog Dial while the phone is ringing will not affect the ringer.
Menu Settings
Ringer mute
You can quickly mute the ringer when you receive a call, but cannot take
the call (e.g., during a meeting). While the phone is ringing, turn Jog
Dial down or press
stored in the Calls List. Only the current call is muted; turn Jog Dial
down or press
SB200 37-49 settings 4/9/99, 2:21 PM37
END
to mute the ringer. The unanswered call will be
END
down to mute each additional call.
37
Page 38

Ringer type
1 Scroll and select Ringer Type.
2 Scroll and select the ringer type.
You can select from ten different ringer settings. You can choose
from five types of rings and five melodies. The ringer sounds every
time you turn Jog Dial.
Message ringer
You can choose to be alerted when you receive new messages. See the
section regarding carrier provided features.
Earpiece and microphone speakers
Earpiece volume
This menu sets the earpiece volume. You can easily adjust the earpiece
volume during a call by turning Jog Dial.
1 Scroll and select Earpiece Vol.
2 Scroll and select the earpiece volume 1
Muting/unmuting the microphone
Quickly mute/unmute the microphone during a call directly by pushing
and holding Jog Dial. You can also use the Sounds menu.
1 During a call, push Jog Dial to access the Features menu.
Scroll and select Sounds. Scroll and select Mute/UnMute.
2 To unmute, push and hold Jog Dial for one second.
38
SB200 37-49 settings 4/9/99, 2:21 PM38
(lowest) to
7
(highest)
.
Page 39

Keybeeps
Keybeeps are the sounds made by your phone’s keys.
Keybeep type
This menu sets the sound to a click or tone (similar to DTMF tones). This
setting does not affect DTMF tones sent to the other party.
1 Scroll and select Key Sound.
Scroll and select tones or clicks.
2
Keybeep volume
1 Scroll and select Keybeep Vol.
2 Scroll and select off, low, med. or high.
Keybeep length
This sets the length of the sound; what you hear and what the phone
sends out (DTMF signals). The standard keybeep length is short, no
matter how long you hold down the key. Long will send the tone as
long as the key is held down.
1 Scroll and select Beep Length.
2 Scroll and select standard or long.
SB200 37-49 settings 4/9/99, 2:21 PM39
Menu Settings
39
Page 40

Display Menu Settings
You can use the features on the Display menu to change the appearance
of the on-screen display. See page 20 for information regarding the
Language selection menu.
Accessing the Display menu
My Phone
12:34P 12/25
:Saved #s
:Features
From standby,
press Jog Dial
to access the
Features menu.
F-6
FEATURES
Security
Display
Network
From Features,
scroll and select
Display.
F61
DISPLAY
Banner
Backlight
Auto-Hyphen
Display menu
Setting the banner
Your phone’s display has one line (up to 12 characters) for you to
personalize your standby display. This is called your banner.
1 Scroll and select Banner.
The current banner text is displayed.
2 Push Jog Dial to change your banner.
A message prompts you to enter a new banner.
3 Use the keypad and Jog Dial to enter the new banner text.
For details on character entry, see the “Alphanumeric table”.
4 Push Jog Dial to save the new banner.
Setting the backlight
When you use the Jog Dial the backlight comes on automatically, but
this menu sets how long your phone’s backlight remains illuminated.
1 Scroll and select Backlight.
2 Scroll and select
An additional setting, always on, is available if you’re using your
phone with a hands-free car kit, a cigarette lighter adapter or a
single- or dual-slot battery charger.
40
SB200 37-49 settings 4/9/99, 2:21 PM40
7 secs, for 15 secs , 30 secs or always off.
Page 41

Setting autohyphenation
If autohyphenation is on, the phone assumes you’re entering a U.S.
phone number and enters a hyphen in the fourth and eighth spaces (e.g.,
North American Numbering Plan: eleven digits including a long
distance identifier, three-digit area code, three-digit community code
and four-digit location code, e.g., 999-999-9999).
1 Scroll and select Auto-Hyphen.
2 Scroll and select on or off.
Sorting the Phone Book
This menu determines how your Phone Book displays its entries and
also how it sorts the entries (alphabetically or by memory location).
1 Scroll and select Sort Book.
2 Scroll and select by loc. # or alphabetic.
Message Format
You can choose how text messages appear on your display. See the
section regarding carrier provided features.
Setting the menu length
This changes the menu from long to short. The long menu contains all of
your phone’s menus. However, once you’ve set your phone up, you may
want to have access to just the few key menus included on the short menu.
• Ringer Vol.
• My Number
• Saved #s
• Lock Phone
• Long Menu
(submenus include: Find Name, Phone Book and Calls List.)
Menu Settings
1 Scroll and select Menu Length.
2 Scroll and select short or long.
To return to the long menu
1 From standby, press Jog Dial to access the Feature menu.
2 Scroll and select Long Menu.
SB200 37-49 settings 4/9/99, 2:21 PM41
41
Page 42

Security Menu Settings
You can restrict access to your phone, reset to the default menu settings
and store emergency numbers. You must enter a four-digit lock code to
access the Security menu. A typical default lock code is either the last
four digits of your phone number or 0000.
Access to the Security menu
F-5
My Phone
12:34P 12/25
:Saved #s
:Features
From standby,
press Jog Dial
to access the
Features menu.
FEATURES
Security
Display
Network
From Features,
scroll and select
Security, then
enter the lock code.
Locking your phone
This menu locks your phone for low-level security. When locked, you
can still answer incoming calls and dial 911 or other stored emergency
numbers, but most operations require the lock code to be entered first.
1 Scroll and select Lock Phone.
2 Scroll and select never, on power-up or right now.
If you select on power-up, the phone is locked every time you turn it on.
To unlock the phone
The message “ :Unlock” indicates that the phone is locked.
1 On the standby display, press Jog Dial.
2 Enter the lock code.
F51
SECURITY
Lock Phone
New Code
Restrict #
Security menu
Setting a new lock code
The lock code must be exactly four digits long.
1 Scroll and select New Code.
2 Use the keypad to enter a lock code.
3 Push Jog Dial to store the new lock code.
A confirmation message appears.
IMPORTANT
If you forget your lock code, contact your service provider.
42
SB200 37-49 settings 4/9/99, 2:21 PM42
Page 43

Reverting to default settings
Reverting to the default settings does not affect Phone Book or Calls List
entries.
1 Scroll and select Master Reset.
1
2 Press
to revert to the factory defaults or push Jog Dial
to keep the current settings.
Storing emergency numbers
You can store up to three emergency numbers other than 911 (which
you cannot erase).
1 Scroll and select Emergency #.
The first Emergency # display appears.
2
Scroll and select Emergency #1, Emergency #2 or Emergency #3.
The phone prompts you to enter the emergency phone number.
3 Use the keypad to enter the number, then push Jog Dial to
store it.
To go back to the standby display, hold down
CLR
.
SB200 37-49 settings 4/9/99, 2:21 PM43
Menu Settings
43
Page 44
Network Menu Settings
You can set the phone to alert you when something happens to your
network (roaming status change, call is dropped, enhanced voice
privacy is lost). You can also activate/switch NAMs.
Accessing the Network menu
F-7
My Phone
12:34P 12/25
:Saved #s
:Features
From standby,
press Jog Dial
to access the
Features menu.
FEATURES
Security
Display
Network
From Features, scroll
and select Network.
Setting the phone’s mode
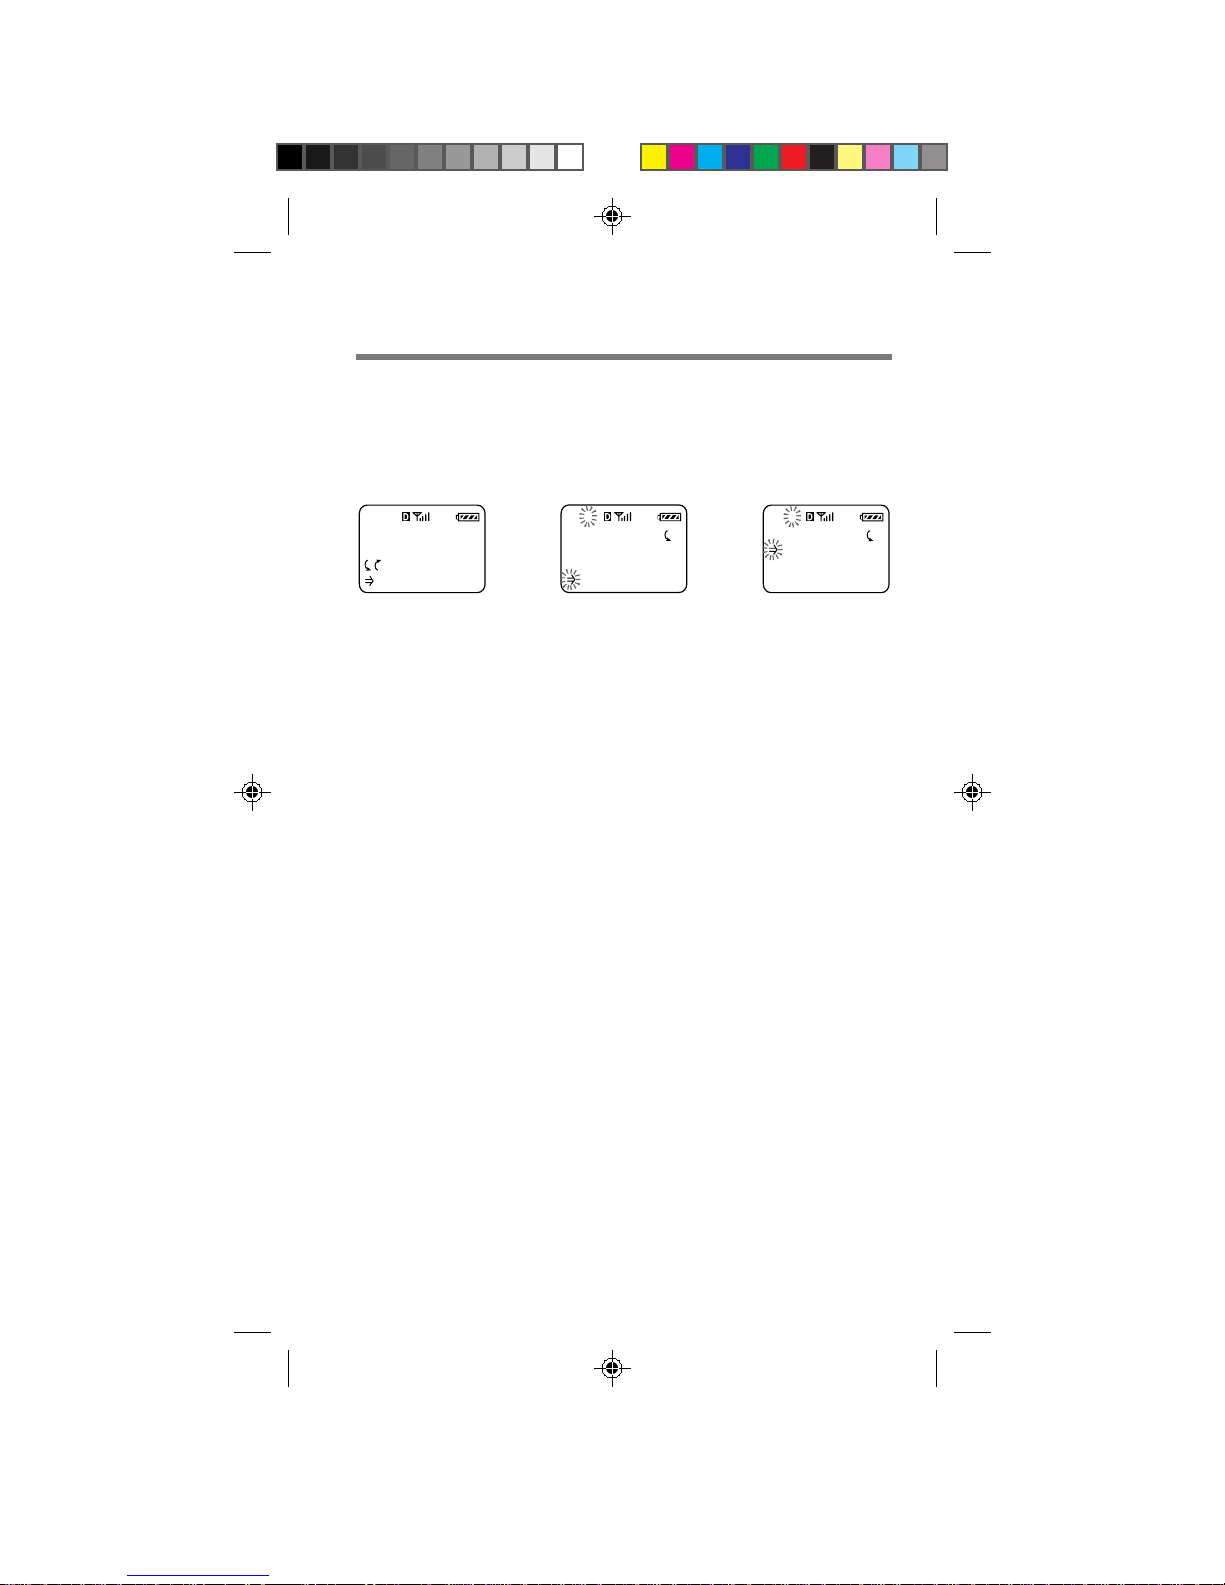
You can determine whether your dual-band phone switches to analog
mode when you roam off the Network. You have three options:
• Automatic (digital or analog) searches for digital service first, then
analog service if digital could not be found.
• Disabled (digital only).
• Until OFF (analog only until phone is turned off).
F71
NETWORK
Roam Alert
Drop Alert
Priv. Alert
Network menu
1 Scroll and select Set Analog.
2 Scroll and select disabled, until OFF or automatic.
A message appears corresponding to the mode selected. Looking
for Service is displayed. When established, a service area message
is displayed followed by the standby screen.
System Preference
Activate the “Home Only” option to ensure that while you are in your
home system area, your phone will bypass any other system’s signal
that may be stronger than your home system’s signal. This option will
help you to avoid higher costs or other calling problems.
1 Scroll and select System Pref.
2 Scroll and select standard or home only.
44
SB200 37-49 settings 4/9/99, 2:21 PM44
Page 45
Setting the roaming alert
“Roaming” is when you use your phone outside of the home service
area or other valid service areas. Roaming access to a different carrier
and the types of calls you can make varies with the agreement between
your “home” carrier and the current serving carrier. Check with your
service provider for details.
1 Scroll and select Roam Alert.
2 Scroll and select on or off.
Your phone alerts you when you enter or leave valid service areas.
Enter roaming icon (R) You’ll hear a beep
On the display If Roam Alert is on
Leave Message You’ll hear a beep
Out-of-service icon ( )
If you are in an analog roaming area
The message Analog Roam is displayed on the standby display when
you’re outside your home area and in an analog service area.
Setting the drop alert
If the signal fades, your phone may drop the ongoing call. If a call is
dropped, you will see a message. If you turn Drop Alert on, you will
also hear an audible alarm.
1 Scroll and select Drop Alert.
2 Scroll and select on or off.
Setting the voice privacy alert
The network automatically turns on enhanced voice privacy if it is
available. You do not have to change your phone settings. For details,
contact your service provider.
1 Scroll and select Priv. Alert.
2 Scroll and select on or off.
Enhanced voice privacy alerts
Your phone alerts you with display messages if enhanced voice privacy is
lost or regained. In addition to the message, a beep sounds if you set the
voice privacy alert on.
45
Menu Settings
SB200 37-49 settings 4/9/99, 2:21 PM45
Page 46

NAMS
NAMs are phone identifier numbers associated specifically with your
phone. For example, your phone may have both a business phone
number and also a personal phone number. You can store up to two
NAM’s (Number Assignment Modules) on your phone. To add or
remove NAMs, contact your service provider who will change the
NAMs for you.
Switching NAM’s automatically
You can set your phone to switch between NAMs automatically when it
enters a service provider’s coverage area that matches one of your NAM
settings.
1 Scroll and select Auto-N.A.M..
2 Scroll and select on or off.
Switching NAM’s manually
You can set your phone for manual switching between two NAMs. You
must switch from one NAM to the other if the phone enters a service
provider’s coverage area that matches the other NAM setting. AutoN.A.M. must be OFF to switch between NAMs manually.
1 Scroll and select Set-N.A.M..
2
Scroll and select NAM1 or NAM2.
46
SB200 37-49 settings 4/9/99, 2:21 PM46
Page 47

Extras Menu Settings
On the Extras menu, you can set the phone to enable touch dialing, redial
automatically and answer incoming calls automatically or at the press of
any key. You can also use this menu to lock the keypad and to jot down
phone numbers.
Accessing the Extras menu
F-4
My Phone
12:34P 12/25
:Saved #s
:Features
From standby,
press Jog Dial
to access the
Features menu.
FEATURES
Directory
Extras
Security
From Features,
scroll and select
Extras.
Preventing accidental operation
You can lock the keypad from the standby display or using the phone’s
menus. Locking the keypad offers low-level security. For example, it
disables accidental dialing when you keep the phone in your pocket.
Keyguard will remain active until the keypad is manually unlocked.
F41
EXTRAS
Key Guard
Touch Dial
Auto-Retry
Extras menu
1 From standby mode
push and hold Jog Dial.
1 From the Extras menu,
scroll and select Keyguard.
To unlock the keypad
The keypad lock icon ( ) and the text Keyguard On indicates that the
keypad is locked. To turn the Keyguard off, press
in quick succession.
1
To answer an incoming call when the keypad is locked
Just press
ended, the phone automatically reverts to Keyguard On.
SB200 37-49 settings 4/9/99, 2:21 PM47
SEND
. You do not need to unlock the keypad. When the call is
ABC
2
,
and
DEF
3
Menu Settings
47
Page 48

Checking and Setting the Timers
You can check call durations on the Timers menu. You can also set the
phone to alert you every minute of a call and make the phone turn itself
off automatically.
Accessing the Timers menu
My Phone
12:34P 12/25
:Saved #s
:Features
From standby,
press Jog Dial
to access the
Features menu.
F-2
FEATURES
Sounds
Timers
Directory
From Features,
scroll and select
Timers.
F21
TIMERS
All Calls
RecentCalls
MinuteAlert
Timers menu
Checking the duration of all calls
You can view the total duration of all calls. This information cannot be reset.
1 Scroll and select All Calls.
2 Push Jog Dial to go back to the standby display.
Checking and resetting the duration of recent calls
You can view the total duration of your most recent calls.
1 Scroll and select Recent Calls.
2 Press
1
to reset, or hold down
CLR
to go back to the
standby display.
If you choose to reset, the counter of recent calls and the
corresponding durations are reset.
Checking and resetting the duration of roaming calls
You can view the total duration of your recent roaming calls.
1 Scroll and select Roam Calls.
1
2 Press
to reset, or hold down
standby display.
If you choose to reset, the counter for roaming calls and the
corresponding durations are reset.
CLR
to go back to the
48
SB200 37-49 settings 4/9/99, 2:21 PM48
Page 49

Setting the minute alert
You can set the phone to sound an alert to help you monitor the length
of your calls.
1 Scroll and select Minute Alert.
2 Scroll and select
before min., each min., every 5 min. or off.
Setting the phone to turn off automatically
You can set the phone to automatically turn itself off. But, it will not turn
itself off during a call. Once the phone turns off, the setting reverts to
never.
The countdown timer
The countdown to auto-off appears on your standby display as
Off:HH:MM:SS (hours: minutes: seconds) based on the setting selected.
The timer counts down as long as the phone is idle. If you press any key
or operate Jog Dial, the timer is reset and the countdown starts over.
1 Scroll and select Auto-Off.
2 Scroll and select never, in 3 hours, in 2 hours, in 1 hour or
in 30 mins.
If you don’t want the phone to turn off automatically, select never.
Menu Settings
SB200 37-49 settings 4/9/99, 2:21 PM49
49
Page 50
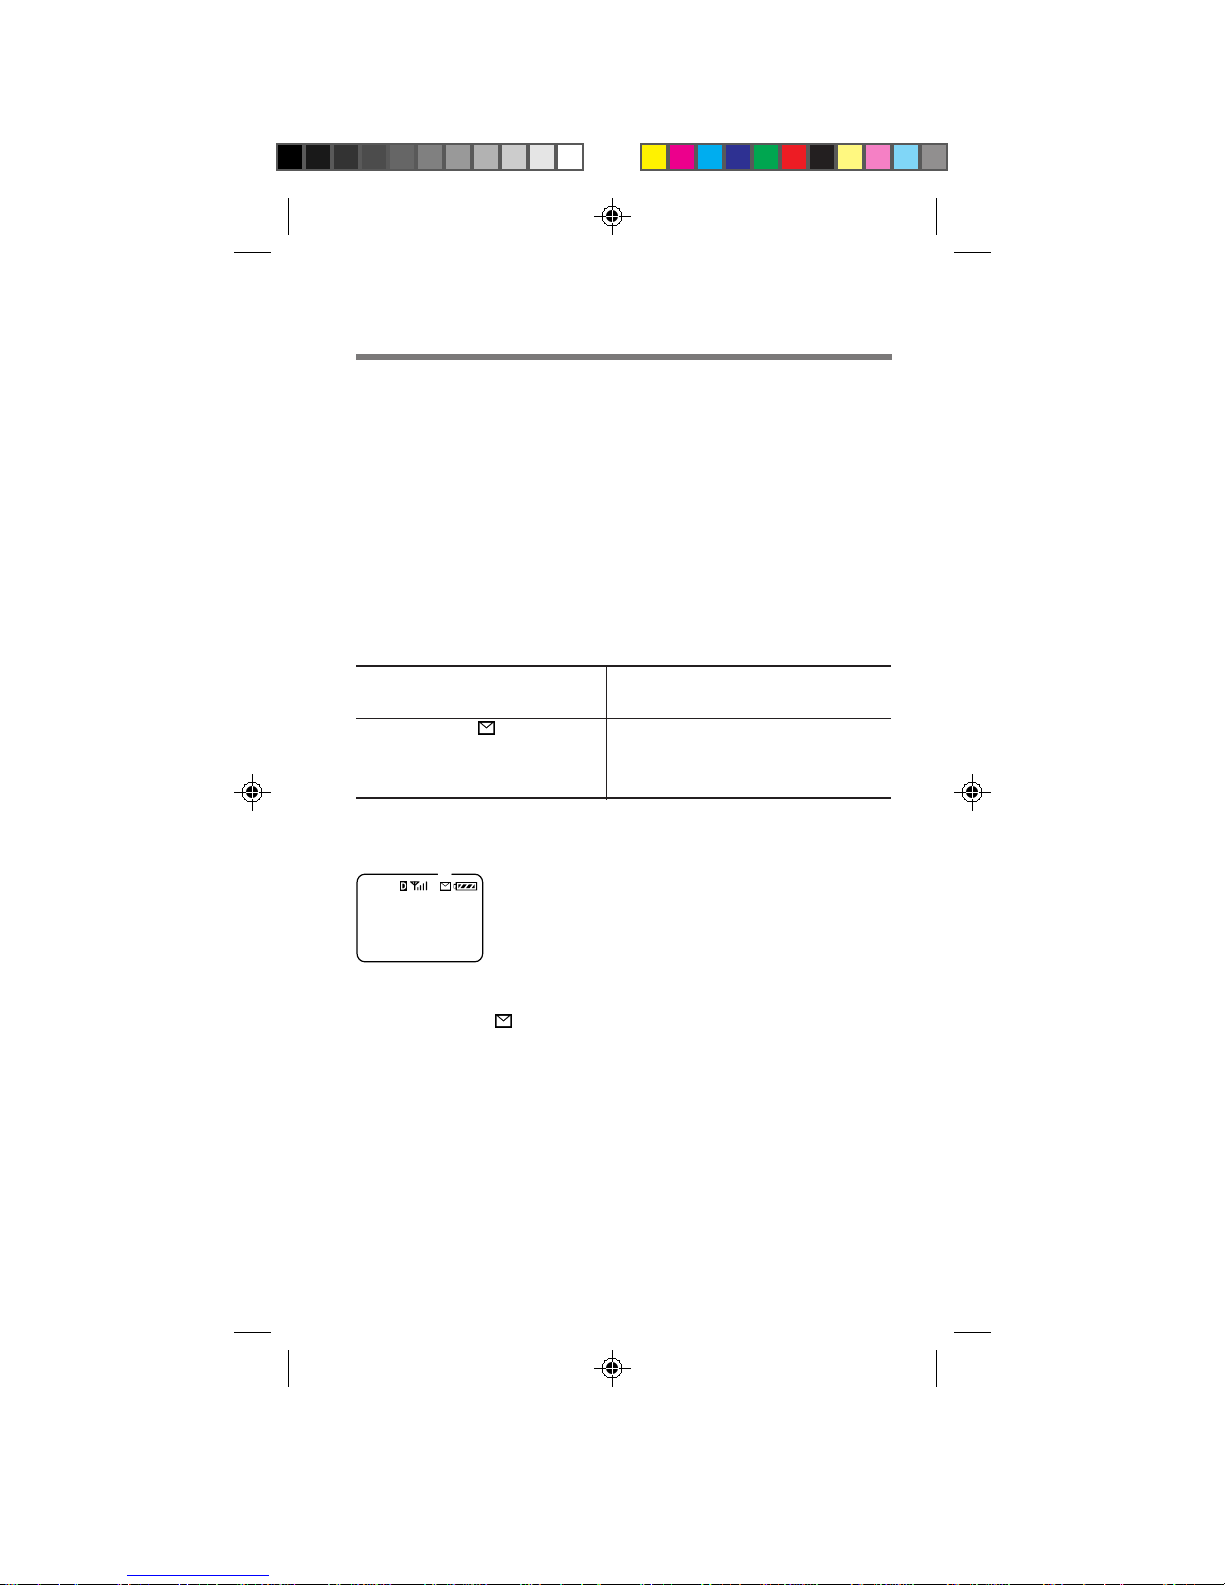
Short Messaging Service
Your phone is capable of many functions. However, some of these
functions are dependent upon your service provider being able to
support them. Check with your service provider to see which functions
are supported in your area. One function, Short Messaging Service
(SMS), allows you receive messages and store them in your phone’s
memory.
Receiving messages
Your phone is able to receive three different types of messages
and pages.
your phone can only alert you when it’s on and within a service area.
New messages are received whether your phone is on or off, but
When your phone is ON When your phone is OFF
and within a service area or outside a service area
•Message icon ( ) appears New message(s) are stored but the
•A beep sounds display does not alert you. Alerts
•LED flashes (green or red) appear when you turn the phone
on within a service area.
The notification display
** PAGE! **
at 11:15AM
12/25 from
123-456-7...
2
1
1
Envelope icon indicates you have unread messages
2 Text indicates the type of message
3
3 Asterisks and exclamation mark indicate urgency
4 Dots indicate the number is too long to fit on
4
one line
text, voicemail
The message icon
The message icon ( ) will remain on the display as long as you have
unread messages.
Message beep
You can choose to have an audible sound to accompany the notification
display when you receive a new message.
1 From the Sounds menu, scroll and select MessageBeep.
2 Scroll and select on, off or +reminder.
50
SB200 50-56 sms 4/9/99, 2:21 PM50
Page 51

The LED
The LED alerts you that new messages have been received:
When the message is LED
Non-urgent Flashes green (quickly)
Urgent Blinks red
Unread Remains lit (green or red) until the
message is read or for 15 minutes.
Clearing the message notification
To clear the notification, press Jog Dial or any key (except
PWR
).
Message storage capacity
Text messages and pages
A text message can be between 1 and 200 characters long. You can store
approximately 7 large messages or 22 small messages.
Voice mail messages
Unlike text messages, voice mail messages are stored remotely by your
service provider. Check with your service provider to find out the
maximum number and length of voice mail messages you can store.
If memory becomes full
When the phone issues a warning that message memory is almost full, it’s
time to erase unnecessary messages (including locked messages). If your
phone doesn’t have enough memory to receive new messages, it attempts
to free up memory by automatically erasing old unlocked messages. If it’s
unable to free up enough memory, new messages are rejected.
Features
Carrier Provided
SB200 50-56 sms 4/9/99, 2:21 PM51
51
Page 52

Message format
Text messages received by your phone are just strings of characters. To
make message reading easier, you can set your phone to format the text
using one of the following settings:
Setting How message is displayed How text is affected
none Exactly as received Twelve consecutive characters
partial Long lines of text are If a word doesn’t fit on the
wrapped without current line, the entire word is
improper word breaks moved to the next line.
full Long lines of text are Text is read easily because it’s
wrapped. Extra spaces wrapped, but it also keeps the
and lines are removed. text as compact as possible.
are displayed on each line with
every thirteenth character
displayed on the next line
regardless of word breaks.
1 From the Display menu, scroll and select Msg. Format.
2 Scroll and select none, partial or full.
Accessing messages
1 Press from the standby display.
The Messages display appears indicating the number of messages
found in each of the following mailboxes:
• Voice mail messages.
• Unread text messages and pagings.
• Old text messages and pagings stored in memory.
Duplicate messages
If you receive the same message more than once, only the most recent
duplicate message is stored and Duplicate is displayed next to it.
To erase a message
1 After reading a text message or listening to a voice mail
message, push Jog Dial.
2 Scroll and select Erase Msg.
To go back to the Messages display without erasing the message,
press
52
SB200 50-56 sms 4/9/99, 2:21 PM52
CLR
.
Page 53

Text messages
A hollow box ( ) indicates the end of the message. If you do not scroll,
the display automatically scrolls down for you. After reading your text
messages, protect or erase them.
To read new text messages
1 Scroll and select New Text.
The first message is displayed. If there are no new messages, a
display appears. Push Jog Dial to return to the Messages display.
2 Scroll through the message. To view the next message,
push Jog Dial when you reach the end of the message.
To return to the standby display, press
3 Scroll and select Next Msg.
The next message is displayed. If there are no more messages, the
Messages display reappears.
To read old messages
1 Scroll and select Old Text.
2 Scroll through the list. When the message you want is
displayed, push Jog Dial to read it.
3 Scroll through the message. After reading the message,
CLR
press
To return to the Messages display, press . To read the next
message, push Jog Dial, then select Next Msg.
to return to the list of old messages.
To respond to a text message
1 After reading a text message, push Jog Dial.
2 Scroll and select Send.
The phone dials the callback phone number attached to the
message. If there is no callback number attached, a message is
displayed.
END
.
Features
Carrier Provided
To protect a text message
1 After reading a message, push Jog Dial.
2 Scroll and select Lock Msg.
The message is now locked and protected from being erased.
SB200 50-56 sms 4/9/99, 2:21 PM53
53
Page 54

To save the callback number
1 After reading a message, push Jog Dial.
2 Scroll and select Save Number.
The phone prompts you for a name to accompany the number.
3 Use the keypad to enter the name, then push Jog Dial to
store the phone number and name.
The phone prompts you to confirm the save.
4 Push Jog Dial to store the new number in the first available
memory location.
If you want to store it in another location, scroll to the desired
location, then push Jog Dial. A confirmation message appears,
followed by the status of the Phone Book.
To erase all old text messages
1 Scroll and select Erase Old.
1
2 Press
To go back to the Messages display without erasing the messages,
push Jog Dial.
to erase all old messages.
Voice mail messages
1 Scroll and select Voice.
A message appears indicating the number of messages stored in
your voice mailbox. Press
2 Scroll through the message.
A hollow box ( ) indicates the end of the message. After reading
your messages, protect or erase them.
CLR
to go back to the Messages display.
To dial a callback number
1 After reading a voice mail message, push Jog Dial.
2 Scroll and select Send.
The phone dials the callback number attached to the message.
54
SB200 50-56 sms 4/9/99, 2:21 PM54
Page 55

Sending and Receiving Data
You are able to use your phone to send and receive electronic data (such
as e-mail, faxes and WWW). Your phone can be set to convert digital
signals (which are used by computers) to analog signals (which are used
in telephone communication). This function enables your phone to act as
a modem allowing it to send and receive computer communications.
However, this capability is dependent upon your service provider being
able to support it. Check with your service provider to see which of the
following electronic data functions are supported in your area.
Electronic data using your phone and a computer
To send and receive electronic data, just connect your phone to a
computer using the Sony Interface Cable (QN-012DAS) or Desktop
Charger Speakerphone (QN-023DCS). These accessories include a “Data
Communication Guide” which provides detailed information regarding
sending and receiving data. You can also download the guide from the
Sony Wireless website at www.sony.com/wireless.
Sending data
As long as your phone is connected to a computer, sending data or fax
calls from your phone doesn’t require any special settings.
Receiving data
When your phone is connected to a computer and an incoming call is
received, the Recv. Data setting tells your phone how to handle the
transmission. It’s best to turn this function off unless you are expecting
to receive data or fax calls. If you choose fax, data/modem or PC control,
your computer routes the data accordingly and normal voice calls aren’t
received. All settings except PC Control reset to off when you turn your
phone off.
Features
Carrier Provided
1 From the Extras menu, scroll and select Recv. Data.
2 Scroll and select off, fax, data/modem or PC Control.
SB200 50-56 sms 4/9/99, 2:21 PM55
55
Page 56

Unwired planet
As discussed on the previous page, your phone can be set to act as a
modem for your computer allowing it to send and receive electronic
data. However, with unwired planet, your phone can actually bypass
the computer component as well! Just think, send and receive computer
communications such as e-mail, fax and WWW using just your phone!
Unwired planet relies on satellite signals to send and receive electronic
data directly to your phone’s display. However, unwired planet is
dependent upon your service provider supporting this capability.
Check with your provider to see if this service is available in your area.
Access to unwired planet
1 From standby, select Features.
2 Scroll and select browser.
What you’ll see
Navigating and selecting
You’ll still use Jog Dial to scroll through lists of items. However to
navigate and select data, you’ll see two choices on the bottom of the
screen. The choice in the lower lefthand corner is always OK which
selects the item indicated by the flashing arrow (=>). The second choice
in the lower righthand corner is dependent on the current operation. To
select the item indicated by the flashing arrow (=>), push and release Jog
Dial when the word OK is surrounded by brackets. To select the other
choice, hold down Jog Dial until the brackets surround the other choice.
56
SB200 50-56 sms 4/9/99, 2:21 PM56
Page 57

Troubleshooting
Problem Possible solutions Page
Nothing appears • The phone is off. Turn the phone on. 18
on the display. • Battery is fully discharged. Recharge the battery. 16
Out-of Service • The phone is outside the service area or the 18
icon (
) appears. signal is too weak. Extend the antenna fully.
Nothing happens • The keys may be locked. 56
when you press • The phone may be locked. 60
the keys. Enter the lock code to unlock the phone.
The call does not • Check the signal strength. 18
go through. • If the out-of-service icon (
You hear the caller,
but the caller Unmute the microphone.
cannot hear you.
You hear the caller • Adjust the earpiece volume. If possible, 22, 43
only faintly. also reduce the noise around you.
The call is cut off • You are possibly out of the coverage area. 18
(“dropped”). Redial the number. If the problem continues,
You hear an • You are attempting to use the phone in an 18
alternate area without service.
high/low tone. • Extend the antenna fully. 18
You forgot the • Try 0000, 1234 (commonly used as defaults) 60
lock code. or the last four digits of your own number.
You hear a fast • The fast busy tone can result from any one
busy tone. of the following problems:
You cannot place • Make sure that the phone is turned on and 18
or receive calls. that out-of-service icon (
• Battery may not be completely attached. 15
Securely attach the battery.
• Check NAM settings on the Network menu. 74
If you set “Auto-NAM” to “off” and you are
using two NAM’s, the phone may be ignoring
an available service.
there is no service. See above.
• Check the number. 21
SEND
• Press
• Listen for a busy signal. —
• The microphone may be muted. 22, 42
contact your carrier. Also see “Out-of-service
icon ( ) appears” above.
• Wait for the out-of-service icon (
disappear, then try to dial.
•
See your authorized dealer or service provider.
– The phone is improperly programmed. —
– The phone is out of range. 18
– All channels are busy. —
– The antenna is broken or damaged. 18
• Check system settings. If you are roaming, 71
consult your service provider concerning
roaming agreements.
. 21
) is displayed, 18
) to 18
—
) is not displayed.
Additional
Information
SB200 57-76 index 4/9/99, 2:22 PM57
57
Page 58

Specifications
Frequency range Transmit (MHz) Receive (MHz)
CDMA 1851.25 to 1908.75 1931.25 to 1988.75
FM 824.04 to848.97 869.04 to 893.97
Dimensions 5.4 x 1.6 x 1.0 inches (146 x 50 x 37 mm)
(h/w/d) (not including antenna)
Mass (weight) Approx. 5 oz (218 g)
(including battery)
RF power CDMA 0.01 µW to 550 mW
output
Operational –22°F to +140°F (–30°C to +60°C)
temperature (excluding battery)
FM 6 mW to 600 mW
Supplied
accessories QN-301TA Travel Adapter (1)
Design and specifications are subject to change without notice.
Enhanced Variable Rate Codec available.
QN-400BPL2 Extended Life Lithium-Ion Battery (1)
58
SB200 57-76 index 4/9/99, 2:22 PM58
Page 59
Optional Accessories
Call 1-800-447-8030 or visit our website to order additional accessories
(USA only).
QN-400BPL
Standard Li-Ion Battery
QN-400BPL2
Extended Li-Ion Battery
QN-402BCD
Dual Slot Battery Charger
QN-403LC
Leather Case
QN-301TA
Travel Adapter
QN-301CLA
Rapid Charging
Cigarette Lighter Adapter
FPO
QN-307DA
Interface Cable
Additional
Information
Install Hands-Free Car Kit
SB200 57-76 index 4/9/99, 2:22 PM59
QN-404HFK
59
Page 60

Rules and Regulations
The U.S. Federal Communications
Commission and the Industry
Canada regulate cellular/PCS
telephone service in their respective
countries. It is important for you,
the cellular/PCS telephone user, to
observe the applicable regulations
when operating your cellular/PCS
telephone in either country. In
addition to these U.S. and Canadian
federal regulations, you may be
bound also by certain state,
provincial, territorial, and local
rules and regulations, as well as by
your cellular/PCS carrier’s tariff
(the rates, terms, and conditions of
its service). If you wish to use your
cellular/PCS telephone in both the
U.S. and Canada, please consult
with your System Operator.
Furthermore, you should remember
that your cellular/PCS telephone is
a radiotelephone, — i.e., it combines
both wireline technology, as used in
your home or office telephone
system, and radio technology — and
that the scope of regulations and
precautions is therefore broader
than the scope of regulations and
precautions relating to wirelineonly telephone usage.
Some of the major points of
consideration are set out below.
Please note, however, that these
“Rules and Regulations” and
“Safety Precautions” sections do
not constitute legal advice, and are
intended merely for general
information purposes. If you have
specific questions, please contact
your cellular/PCS carrier (System
Operator).
License —
in the U.S., you do not require a
separate license to operate your
cellular/PCS telephone; obtaining a
cellular/PCS telephone access
number is sufficient to register you
as a user. If your home system is in
If your home system is
60
Canada, a separate license is
required; your carrier will assist you
in the licensing process. If you wish
to use your cellular/PCS telephone
on both sides of the border, please
contact your cellular/PCS carrier
(System Operator).
Equipment modifications — The U.S.
Federal Communications Commission
has type-approved the model of
cellular/PCS telephone which you have
purchased, and has allocated a specific
frequency range for cellular/PCS
service. No changes or adjustments are
to be made to your cellular/PCS
telephone.
The radio equipment shall be made
available for inspection upon
request by representatives of the
FCC or licensees.
Denial of service — A cellular/
PCS carrier may deny service
temporarily or terminate service for
violation of any government
regulations or violation of its tariff.
Privacy —
have come to assume a certain
standard of privacy when you place
or receive a telephone call via the
traditional wireline systems.
However, because cellular/PCS
telephones utilize radio
transmissions to effect calls, the
same standard cannot always be
assured. While it is unlawful for any
unauthorized person to divulge or
use any information obtained from
intercepting or “listening in on”
conversations intended for others,
you should not assume that your
conversation is completely secure.
Commercially available scanning
equipment can permit a third party
to monitor the radio channels used
for cellular/PCS telephone calls.
Interference —
interfere with, or cause interference to,
any radio communication or signal.
As a telephone user, you
No person shall
SB200 57-76 index 4/9/99, 2:22 PM60
Page 61

Safety Precautions
scientific evidence that adverse
IMPORTANT
For safe and efficient
operation of your phone,
observe these guidelines.
Your dual band (analog/digital
CDMA) hand-held portable cellular/
PCS telephone uses both analog
frequency modulation (FM)
technology and digital Code Division
Multiple Access (CDMA) technology.
CDMA is a newer radio frequency
(RF) technology than the FM
technology that has been used for
radio communications for decades.
Your dual band portable cellular/
PCS telephone is a radio
transmitter and receiver. When the
phone is ON, it receives and sends
out radio frequency (RF) energy.
The phone operates in the
frequency range of 800 MHz in
analog mode and 1.9 GHz in digital
CDMA mode. When you use your
phone, the cellular/PCS system
handling your call controls the
mode of operation (analog or
digital CDMA) and the power level
at which your phone transmits. In
the analog mode, the power is
continuously transmitted at a level
that can range from about 6 mW to
about 600 mW. In the digital
CDMA mode, the power is
transmitted as a digitally coded
waveform at a rate varying from
100 Hz to 800 Hz. The average
power can range from about 0.01
µW to about 300 mW.
Exposure to radio
frequency energy
Research on health effects from RF
energy has focused for many years
on FM radio technology. That
research and studies regarding
newer radio technologies, such as
CDMA, have found no credible
health effects result from the use of
cellular/PCS telephones.
The Institute of Electrical and
Electronics Engineers (IEEE) in
1991, and The American National
Standards Institute (ANSI) in 1992,
updated the 1982 ANSI Standard
for safety levels with respect to
human exposure to RF energy.
Over 120 scientists, engineers, and
physicians from universities,
government health agencies, and
industry, reviewed the available
research and developed this
updated Standard. In March 1993,
the U.S. Federal Communications
Commission (FCC) proposed the
adoption of this updated Standard.
The design of your phone complies
with this updated Standard. Of
course, if you want to limit RF
exposure even further than the
updated ANSI Standard, you may
choose to control the duration of
your calls and operate your phone
in the most power efficient manner.
Efficient phone operation
For your phone to operate at the
lowest power level consistent with
satisfactory call quality, please
observe the following guidelines:
Your phone has an extendable
antenna; extend it fully whenever
possible for maximum efficiency.
Hold the phone as you would any
other telephone. While speaking
directly into the mouthpiece,
position the antenna up and over
your shoulder.
Do not hold the antenna when the
phone is in use. Holding the
antenna affects call quality and
may cause the phone to operate at
a higher power level than needed.
Additional
Information
SB200 57-76 index 4/9/99, 2:22 PM61
61
Page 62

Heat and sunlight exposure
Avoid leaving your cellular/PCS
phone exposed to direct sunlight or
extreme heat. Extended exposure
to heat and sunlight may damage
the components of your cellular/
PCS phone.
Antenna care and
replacement
Do not use the phone with a
damaged antenna. If a damaged
antenna comes into contact with the
skin, a minor burn may result.
Replace a damaged antenna
immediately. Take your phone to an
authorized service center for repair.
Use only the supplied or approved
antenna. Unauthorized antennas,
modifications, or attachments
could impair call quality, damage
the phone, and violate FCC
regulations.
Driving
Check the laws and regulations on
the use of cellular/PCS telephones
in the areas where you drive.
Always obey them. Also, when
using your phone while driving,
please:
• pay full attention to driving;
• use hands-free operation, if
available;
• pull off the road and park
before making or answering a
call, if driving conditions so
require.
Electronic devices
Most modern electronic equipment
is shielded from RF energy.
However, RF energy from cellular/
PCS telephones may affect some
electronic equipment.
RF energy may affect improperly
installed or inadequately shielded
electronic operating and
entertainment systems in motor
vehicles. Check with the
manufacturer or its representative
to determine if these systems are
adequately shielded from external
RF energy. You should also check
with the manufacturer of any
equipment that has been added to
your vehicle.
Medical devices
Consult the manufacturer of any
personal medical devices (such as
pacemakers, hearing aids, etc.) to
determine if they are adequately
shielded from external RF energy.
Your physician may be able to
assist you in obtaining this
information.
Turn your phone OFF in health
care facilities when regulations
posted in the areas instruct you to
do so. Hospitals or health care
facilities may be using equipment
that could be sensitive to external
RF energy.
Aircraft
Turn your phone OFF before
boarding any aircraft.
• Use it on the ground only with
crew permission.
• Do not use in the air.
To prevent possible interference
with aircraft systems, U.S. Federal
Aviation Administration (FAA)
regulations require you to have
permission from a crew member to
use your phone while the plane is
on the ground. To prevent
interference with aircraft
communication systems, FCC
regulations prohibit using your
phone while the plane is in the air.
62
SB200 57-76 index 4/9/99, 2:22 PM62
Page 63

Children
Do not allow children to play with
your phone. It is not a toy.
Children could hurt themselves or
others (by poking themselves or
others in the eye with the antenna,
for example). Children also could
damage the phone or make calls
that increase your telephone bill.
Blasting areas
To avoid interfering with blasting
operations, turn your unit OFF
when in a “blasting area” or in
areas posted: “Turn off two-way
radio.” Construction crews often
use remote control RF devices to
set off explosives.
Potentially explosive
atmospheres
Turn your phone OFF when in any
area with a potentially explosive
atmosphere. It is rare, but your
phone or its accessories could
generate sparks. Sparks in such
areas could cause an explosion or
fire resulting in bodily injury or
even death.
Areas with a potentially explosive
atmosphere are often, but not
always, clearly marked. They
include fueling areas such as gas
stations; below deck on boats; fuel
or chemical transfer or storage
facilities; areas where the air
contains chemicals or particles,
such as grain, dust or metal
powders; and any other area where
you would normally be advised to
turn off your vehicle’s engine.
Do not transport or store
flammable gas, liquid or explosives
in the compartment of your vehicle
which contains your phone or
accessories.
In the United States, vehicles using
liquefied petroleum gas (such as
propane or butane) must comply
with the National Fire Protection
Standard (NFPA-58). For a copy of
this standard, contact the National
Fire Protection Association, One
Batterymarch Park, Quincy, MA
02269, Attn: Publication Sales
Division.
In Canada, vehicles using liquefied
petroleum gas (such as propane or
butane) must comply with the
Canadian Gas Association (CAN/
CGS-B149.2). For a copy of this
standard, contact the Canadian
Standards Association, 178 Rexdale
Blvd., Etobicoke, ON M9W 1R3,
Attn.: Standard Sales Department.
Additional
Information
SB200 57-76 index 4/9/99, 2:22 PM63
63
Page 64

Glossary
Alphanumeric table
Allows you to enter characters on
your phone’s display.
AnyKey Answer
Allows you to answer your
incoming calls with any key except
power.
Autohyphenation
Automatically hyphens the phone
number as you enter the digits.
Backlight
The light that illuminates the
display on your phone.
Banner
Message at the top of the standby
display.
Calls List
A list of your 10 most recent calls.
Carrier
A company that provides cellular
and PCS telephone service.
CDMA
Code Division Multiple Access. A
spread-spectrum approach to
digital transmission. With CDMA,
each conversation is digitized and
then tagged with a code. The
mobile phone receives only the
signal with the appropriate code.
Coverage area
The geographic area covered by one
carrier. If you travel outside a carrier’s
area, you cannot receive service from
that carrier. Also see “Roam”.
Dropped call
A call terminated because of a
deep, long fade or because the user
left the coverage area.
DTMF
Dual Tone Multiple Frequency,
also known as “touch-tone”. Tone
generated when you press a
telephone key (number, * or #).
Can be used to access answering
machines, pagers, telephone
banking services, data services and
other electronic services.
ESN
Electronic Serial Number. The
unique identification number of
your telephone. The telephone
transmits this number to the base
station every time a call is placed.
Home area
The area of the home system to
which you subscribe.
Keyguard
A feature that allows you to lock
the phone’s keypad for low level
security.
Lock Phone
Protects your phone from
accidental key presses or
unauthorized access to your phone.
Minute Alert
A feature that helps you keep track
of the time you spend on the
phone, by beeping every 10
seconds before the minute.
NAM
Number Assignment Module.
Portion of your telephone’s memory
programmed to contain information
about your subscription to the
carrier. Your telephone can have up
to two NAM’s.
64
SB200 57-76 index 4/9/99, 2:22 PM64
Page 65

NAM, automatic
Feature that automatically selects
an available NAM that matches the
current serving system (carrier).
NAM, multiple registration
Registering your phone in more
than one carrier. A cheaper
alternative to roaming. If you travel
frequently to a specific area,
registering the local carrier in your
phone’s NAM’s may be an
economical alternative to roaming
and long distance charges.
Roam
Your phone is roaming when you
use it outside of the home area.
Availability of roaming access to a
different carrier and types of calls
you can make varies with the
agreement between your home
carrier and serving carrier. Check
with your carrier for details about
roaming in a specific area.
Scratch pad
Allows you to enter a number and
store it in the Calls List.
OTASP
Allows you to self-activate with
new service. Check with your
service provider for details.
Pause
You can insert a Time Pause or
Hard Pause in the phone number
memory data. A pause causes the
phone to wait (either for a specified
time or until manually released)
before sending a second string of
digits, ensuring your counterpart
(e.g., answering machine, voice mail
system, electronic banking system,
etc.) is ready to accept the string.
Pauses and links
Phone Book
You can store up to 99 numbers in
Phone Book memory, location
number 01 to number 99.
Prefixing
To add an area code to an existing
number in the Phone Book.
Redial
Set your phone to automatically
redial when the first attempt
doesn’t go through (e.g., no answer
or busy signal).
Service area
Region covered by a cellular/PCS
service. Also see “Coverage area”.
SMS
Short Messaging Service. An
extended service offered by carriers
that allows you to receive text
messages on your phone. Check
with your carrier for details.
Speed dialing
Making a call using Phone Book
memory locations.
Touch dialing
A quick way of making a call using
a number stored in a Phone Book
memory location.
Voice mail
An extended service, offered by
carriers, that allows you to retrieve
voice mail messages stored in your
voice mailbox. Check with your
carrier for details.
65
Additional
Information
SB200 57-76 index 4/9/99, 2:22 PM65
Page 66

Index
A
AC adapter 10, 16
Accessories, optional 54
Adjusting volume
Earpiece 18
Ringer 21
Alerts
Analog roam 41
Drop 42
Minute 47
Privacy 42
Alphanumeric table 16
Antenna 7, 10
Any Key Answer.see Functions
Automatic
Answer 58
Hyphenation 68
Power off 47
Redial 57
Retry 57
B
Backlight 67
Banner 66
Battery
Attaching/removing 8
Charge contacts 16
Charging 8
Checking 9
Duration 9
Icon 16, 17
Release tab 7
C
Caller ID 23
Calls, duration 46
Calls, making
Basic 18
From your Calls List 36, 55
From your Phone Book 19
Limiting
Prefixing 22
Recent number 36
Redialing 22, 57
Restricting 30, 62, 63
Roaming 71
Speed dialing 32
Touch dialing 32, 57
Calls, in progress
Dropped call 72
Ending calls 21, 23
Calls, missed 24
Calls, receiving 21
Carrier 71
CDMA (Code Division
Multiple Access) 5
Character display 11
Clearing. See Deleting
Connector 7
Coverage area 71
Cursor 25, 49
66
SB200 57-76 index 4/9/99, 2:22 PM66
Page 67
D
Dialing. See Calls
Default settings, reverting 39
Deleting
Calls List entries 65
Characters 29, 50
Message 83
Phone Book entries 29, 50
Phone Book, entire 31
Text messages 23
Voice mail 84
Digital icon 14
Display 11
Display settings
Accessing 39
Autohyphenation 68
Backlight 67
Banner 66
Time 45
Displaying overflow digits 23
Displays
Calling 21
Features menu 39
Hyphens/pauses/links 27
Menu setting 69
Security 60
Standby 18
Dropped call 41
DTMF (Dual Tone Multiple
Frequency)
Attached to pauses and
links 27
Sending manually 27
E
Earpiece 22, 43
Editing
Emergency numbers 65
Phone Book entries 28, 51
Emergency numbers 39
Enabling
Lock 56
Touch dialing 57
Ending a call 21, 23
Entering
Digits and letters 23
Hyphens 27
Links 27
Pauses 27
Erasing. See Deleting
ESN (Electronic Serial
Number) 90
F
Finding. See Searching
Functions
Any Key Answer 23
Autohyphenation 23
Auto Redial 23
Limit calls 23
Prefixing 23
Touch dial 23
SB200 57-76 index 4/9/99, 2:22 PM67
H
Home Only 76
Hyphens
Autohyphenation 68
Entering manually 27
67
Additional
Information
Page 68
I
Incoming call 23
Icon
Battery 11
Digital 11
In-use 10, 11, 21, 23
Message 11
Roam 11
Out-of service 10, 11
Signal strength 10, 11
J
Jog Dial 19
K
Key, arrow/* 7
Key, arrow/# 7
Key, clear 7
Key, end 7
Key, message 7
Key, number 7
Key, power 7
Key, send 7
Keybeep
Length 35
Type 35
Volume 22
Keyguard 56
Keypad lock icon 56
L
Language selection 20
Laws
Rules and regulations 3
Limit calls 20
Link 27
List of menu items 15
Lock code 39
Locking the keypad 44
Locking your phone 38
68
M
Making calls 21
answer manually 23
call 21
Hyphenation 27
Redial 22
Memory
Deleting 29, 50
Editing 28, 51
Number searching 33, 52, 53
Storing 25, 48
Menu
Display 36
Extras xx
Network 40
Security xx
Timers 46
Volume xx
Menu items 15
Menu language 20
Menu Map 14
Menus access 39
Message key 78
Message icon 77
Messages
Access 49
Format 49
Full memory 48
Message list 79
Receiving 48
Storage capacity 48
Messages, text
Displaying new 50
Displaying old 50
Erasing 51
Locking 51
Responding 50
Saving the callback 51
Messages, voice mail
Dialing callback 49
Displaying 48
Erasing 49
Locking 80
Receiving 48
Microphone 7, 22, 42
Minute alert 46
Multiple city registration 91
Muting the microphone 22, 42
Muting the ringer 23, 41
SB200 57-76 index 4/9/99, 2:22 PM68
Page 69
N
NAM (Number Assignment
Module), switching
Automatically 70, 74
Manually 42
Number keys 21, 25
O
Out-of-service icon 18, 21, 23, 71
Over-the-Air Service
Provisioning (OTASP) 7
Overflow digits 37
P
Pause 27
Phone Book 25, 31, 33, 48
Calling 21
Deleting 29
Limiting calls 22
Restricting/unrestricting 32
Phone number, yours 17
Power
Turning off 10, 18, 47
Turning on 10, 18
Prefixing 22
Privacy alert 42
R
Receiving
Calls 23
text messages 77
Voice mail 83
Recent number memory
Calling recent numbers 36
Clearing call memory 64
Redialing
Auto-retry 57
Last dialed number 18
Restriction 30, 62, 63
Reverting to default settings 11
Ringer
Speaker 7, 12, 13
Type 35
Volume 41
Roam
Alert 41
Analog 41
Roam icon 71
Roaming agreement 71
Rules and regulations 55
Q
Quitting. See Power
SB200 57-76 index 4/9/99, 2:22 PM69
69
Additional
Information
Page 70
S
Safety precautions 55
Saving
Emergency numbers 39
To the Phone Book 25
Scratch pad 59
Scrolling
Menus 19
Message 79, 80
Message list 80
Searching
Alphabetically 28
By memory location 29
For a message 80
For a name 52
For a phone number 33-35
Security code. See Security
functions
Security functions
Accessing 60
Clearing call memory 64
Emergency numbers 65
Lock phone 60
New lock code 61
Restriction 62, 63
Sending. See Calling
Service area 71
Settings
Display xx
Extras 44
Menu length 37
Network 40
Phone’s mode 40
Timers 47
Security 38
Volume 38
Signal strength icon 18
SMS (Short Messaging
Service) 48
Message format 77
Sorting the Phone Book 37
Special characters 20
70
Special features
Accessing 56
Changing DTMF
transmission 44
Enabling touch dialing 57
Muting the microphone 42, 22
Muting the ringer 23, 41
Setting auto-answer 58
Setting auto-retry 58
Using the scratch pad 59
Specifications 53
Standby display 18
Storing. see Saving.
System preference 76
System settings
Accessing 70
Analog 70
Over-the-Air Service
Provisioning
(OTASP) 75
Selecting NAM’s
Auto-NAM 74
Manual NAM 74
T
Text Message. See Messages
Touch dialing
Enabling 57
Troubleshooting 52
Turning phone on 18
U
Unlocking your phone 38
V
Viewing additional info 24
Voice mail notification
Accessing 84
Receiving 84
Voice Privacy 73
Volume, setting and adjusting
Earpiece 41
Keybeep 34
Ringer 71
SB200 57-76 index 4/9/99, 2:22 PM70
Page 71

S
CELLULAR/PCS TELEPHONE
CELLULAR/PCS TELEPHONE ACCESSORIES
LIMITED WARRANTY
SONY ELECTRONICS INC. (“SONY”) warrants this Product and its accessories against defects in
material or workmanship as follows:
1. PRODUCTS: For a period of one (1) year from the date of purchase, SONY will, at its
option, either pay the parts and labor charges to any SONY authorized Cellular/PCS telephone
service facility to repair or replace the defective Product (with new or rebuilt replacements).
After this one (1) year period, you must pay all parts, shipping, and labor charges.
2. ACCESSORIES: For a period of one (1) year from the date of purchase, SONY will, at its
option, either pay the parts and labor charges to any SONY authorized Cellular/PCS telephone
service facility to repair or replace defective accessories (i.e.; cables, casings, straps, batteries,
etc.) with new or rebuilt replacements. After this one (1) year period, you must pay all parts,
shipping, and labor charges. This warranty is not valid for any battery if (i) it has been charged
by other than a SONY approved battery charger specified for the charging of the battery, (ii) any
of the seals on the battery are broken or show evidence of tampering, or (iii) the battery has
been used in equipment other than the Cellular/PCS telephone product for which it is specified.
3. REPAIRS:
original Product or accessory, or for 90 days after the date of repair/replacement, whichever is longer,
SONY will repair or replace (with new or rebuilt replacements) defective parts, accessories and/or
Products used in the repair or replacement of Products or accessories under this Limited Warranty.
To obtain warranty service, contact SONY WIRELESS HOTLINE or your local service provider.
This warranty does not cover customer education, instruction, installation, set up adjustments,
or signal reception problems.
This warranty does not cover cost of removal or reinstallation, cosmetic damage or damage due
to acts of God, accident, misuse, abuse, negligence, or modification of, or to any part of the
Product, including the antenna. This warranty does not cover lost profits, lost sales, loss of use
of the Product, or other consequential loss (e.g., airtime charges during the malfunction of the
Product or accessory), damage due to improper operation or maintenance, installation, connection
to improper voltage supply or attempted repair of the Product or accessories by anyone other
than a facility authorized by SONY. This warranty does not cover Products sold AS IS or WITH
ALL FAULTS, or consumables (such as fuses). This warranty does not apply when the malfunction
results from use of the Product in conjunction with accessories, products or ancillary or peripheral
equipment not manufactured by SONY, and where it is determined by SONY that there is no
fault with the Product itself.
This warranty is valid only in the United States.
Proof of purchase in the form of a bill of sale or receipted invoice, which is evidence that the unit
is within the warranty period must be presented to obtain warranty service.
This warranty is invalid if the factory-applied serial number has been altered or removed from
the Product or accessory.
REPAIR OR REPLACEMENT AS PROVIDED UNDER THIS WARRANTY IS THE EXCLUSIVE REMEDY
OF THE CONSUMER. SONY SHALL NOT BE LIABLE FOR ANY INCIDENTAL OR CONSEQUENTIAL
DAMAGES FOR BREACH OF ANY EXPRESS OR IMPLIED WARRANTY ON THIS PRODUCT OR
ACCESSORY. EXCEPT TO THE EXTENT PROHIBITED BY APPLICABLE LAW, ANY IMPLIED
WARRANTY OF MERCHANTABILITY OR FITNESS FOR A PARTICULAR PURPOSE ON THIS PRODUCT
OR ACCSSSORY IS LIMITED IN DURATION TO THE DURATION OF THIS WARRANTY.
Some states do not allow the exclusion or limitation of incidental or consequential damages, or
allow limitations on how long an implied warranty lasts, so the above limitations or exclusions
may not apply to you. This warranty gives you specific legal rights, and you may have other
rights which vary from state to state.
FOR FREQUENTLY CALLED TELEPHONE NUMBERS, PLEASE SEE REVERSE SIDE.
For a period equal to the remainder of the original limited warranty period on the
71
Additional
Information
SB200 57-76 index 4/9/99, 2:22 PM71
Page 72

For your convenience, SONY ELECTRONICS INC. has established
telephone numbers for product information regarding
CELLULAR/PCS telephones.
Please call:
SONY WIRELESS HOTLINE
1-800-578-SONY (7669)
SONY Customer Information Center
Park Ridge, New Jersey 07656-8003
For an accessory or part not available from your authorized dealer,
or write to:
One Sony Drive
call:
1-800-488-SONY (7669)
or
1-816-891-2553
72
SB200 57-76 index 4/9/99, 2:22 PM72
FOR WARRANTY INFORMATION ON YOUR PURCHASE,
PLEASE SEE REVERSE SIDE.
Page 73

3-xxx-xxx-xx
SEND
END
SEND
80-xxxxx-x
Quick
Reference
Card
CM-SB200
Sony Electronics Inc. 1999 Printed in USA
The Basics
ON/OFF Hold down
Call Enter a phone number then press
Answer Press
Disconnect Press
Redial Press
Volume Adjustments
Ringer While it’s ringing, turn Jog Dial
Earpiece During a call, turn Jog Dial
Mute/Unmute
Security
Keypad Lock Hold down Jog Dial
Keypad Unlock Press
During a call, press and hold Jog Dial
PWR
for one second
2
1
(from standby mode)
DEF
3
ABC
SEND
SB200 57-76 index 4/9/99, 2:22 PM73
Locking the phone
From Long Features menu
1 Scroll / select Security
2 Enter lock code
3 Select Lock Phone
4 Scroll / select setting
Setting a New Lock Code (from Long Features menu)
1 Scroll / select Security; enter current lock code
2 Scroll / select New Code
3 Enter new lock code; push Jog Dial
(settings: never, right now or on power up)
From Short Features menu
1
Scroll / select
2 Enter lock code
3 Scroll / select setting
Lock Phone
73
Additional
Information
Page 74

Memory
Phone Book
Storing 1 Enter a phone number, then push
2 Scroll & select Save
3 Enter a name, then push
twice
Calling
Touch Dial Enter the memory location # and
hold down the last digit
Speed Dial
Fast 4 Dial
Manually
Enter the memory location #, press
Enter the last 4 digits of an entry, press
Scroll/select an entry, then push twice
SEND
SEND
Searching
Quick Press the key that corresponds with the
Alphabetic first letter of the name you want to find
Find Name 1
Turn – down to access the phone book
2 Push to select Find Name
3 Enter a name, then push
Calls List
Calling 1
Saving 1
Miscellaneous
Outbound call restriction
What’s my phone number?
Long Menu
1 Select Features
2 Scroll & select Directory
3 Scroll & select My Number.
Push Jog Dial in Turn Jog Dial down – Turn Jog Dial up
Turn + up twice to access the Calls List
2
Scroll/select an entry, then push twice
Scroll & select an entry, then push
2 Scroll & select Save
3 Enter a name, then push twice
(settings: off, to loc 99, to loc 199)
1 Push to access the Features menu
2
Scroll & select Security; enter lock code
3 Scroll & select Limit Calls
4 Scroll & select setting
Short Menu
1 Select Features
Scroll & select
2
My Number
+
74
SB200 57-76 index 4/9/99, 2:22 PM74
Page 75

SB200 57-76 index 4/9/99, 2:22 PM75
75
Additional
Information
Page 76
SONY Wireless Hotline Number (USA only)
If you have any questions or comments, please call:
Visit our website at www.sony.com/wireless
find out about additional Sony technology
SONY WIRELESS HOTLINE
1-800-578-SONY (7669)
to register your product online and
76
SB200 57-76 index 4/9/99, 2:22 PM76
Printed in USA
 Loading...