Page 1

Revised July 17, 2007
After Cinescore® software is installed and you start it for the first time, the registration wizard appears. This
wizard offers easy steps that allow you to register the software online with Sony Creative Software Inc.
Alternatively, you may register online at
Registering your product will provide you with access to a variety of technical support options, notification
of product updates, and special promotions exclusive to registered Cinescore users.
http://www.sonycreativesoftware.com/ at any time.
Registration assistance
If you do not have access to the Internet, registration assistance is available during normal weekday
business hours. Please contact our Customer Service department by dialing one of the following numbers
Telephone/Fax Country
1-800-577-6642 (toll-free) US, Canada, and Virgin Islands
+608-204-7703 for all other countries
1-608-250-1745 (Fax) All countries
Customer service/sales
For a detailed list of customer service options, we encourage you to visit
http://www.sonycreativesoftware.com/support/custserv.asp. Use the following numbers for telephone
support during normal weekday business hours:
Telephone/Fax Country
1-800-577-6642 (toll-free) US, Canada, and Virgin Islands
+608-204-7703 for all other countries
1-608-250-1745 (Fax) All countries
:
Technical support
For a detailed list of technical support options, we encourage you to visit
http://www.sonycreativesoftware.com/support/default.asp. To listen to your support options by
telephone, please call 608-256-5555.
Page 2

About your rights in Cinescore software
Cinescore software is licensed to you under the terms of the End User License Agreement. The End User
License Agreement is first presented to you when you install the software. Please review the End User
License Agreement carefully as its terms affect your rights with respect to the software. For your reference,
a copy of the End User License Agreement for Cinescore software is located at
http://www.sonycreativesoftware.com/.
About your privacy
Sony Creative Software Inc. respects your privacy and is committed to protecting personal information.
Your use of the software is governed by the Software Privacy Policy. A copy of this policy is incorporated
into the registration process and you are asked to agree to its terms prior to accepting the terms of the End
User License Agreement. Please review its contents carefully as its terms and conditions affect your rights
with respect to the information that is collected by the software. For your reference, a copy of the Software
Privacy Policy is located at
http://www.sonycreativesoftware.com/corporate/privacy.asp.
Proper use of software
Cinescore software is not intended and should not be used for illegal or infringing purposes, such as the
illegal copying or sharing of copyrighted materials. Using Cinescore software for such purposes is, among
other things, against United States and international copyright laws and contrary to the terms and
conditions of the End User License Agreement. Such activity may be punishable by law and may also
subject you to the breach remedies set forth in the End User License Agreement.
Legal notices
Vegas, Vegas+DVD, DVD Architect, Vegas Movie Studio, Vegas Movie Studio+DVD, DVD Architect Studio, ACID, Music
Studio, ACIDized, Super Duper Music Looper, Jam Trax, Sony Sound Series, Chopper, Groove Mapping, Groove Cloning,
Media Manager, CD Architect, Sound Forge, Audio Studio, Cinescore, Acoustic Mirror, Noise Reduction, Wave 64, Wave
Hammer, and XFX are trademarks or registered trademarks of Sony Creative Software Inc. or its affiliates in the United
States and other countries.
Thomson Fraunhofer MP3
MPEG Layer-3 audio coding technology licensed from Fraunhofer IIS and Thomson.
Supply of this product does not convey a license nor imply any right to distribute content created with this product in
revenue generating broadcast systems (terrestrial, satellite, cable and/or other distribution channels), streaming
applications (via internet, intranets and/or other networks), other content distribution systems (pay-audio or audio on
demand applications and the like) or on physical media (compact discs, digital versatile discs, semiconductor chips, hard
drives, memory cards and the like).
An independent license for such use is required. For details, please visit: http://mp3licensing.com.
Page 3

Microsoft DirectX programming interface
Portions utilize Microsoft® DirectX® technologies. Copyright © 1999 – 2007 Microsoft Corporation. All rights reserved.
Microsoft Windows Media 9
Portions utilize Microsoft Windows Media® technologies. Copyright © 1999 – 2007 Microsoft Corporation. All rights
reserved.
Real, RealMedia, RealAudio, and RealVideo applications
2007 RealNetworks, Inc. Patents Pending. All rights reserved. Real®, Real Media®, RealAudio®, RealVideo®, and the Real
logo are trademarks or registered trademarks of RealNetworks, Inc. in the United States and other countries.
MPEGLA and MPEG 2
USE OF THIS PRODUCT IN ANY MANNER THAT COMPLIES WITH THE MPEG-2 STANDARD IS EXPRESSLY PROHIBITED
WITHOUT A LICENSE UNDER APPLICABLE PATENTS IN THE MPEG-2 PATENT PORTFOLIO, WHICH LICENSE IS AVAILABLE
FROM MPEG-LA, LLC, 250 STEELE STREET, SUITE 300, DENVER, COLORADO 80206.
Manufactured under license from MPEG-LA.
Dolby, Dolby Digital AC-3, and AAC encoding
This product contains one or more programs protected under international and U.S. copyright laws as unpublished
works. They are confidential and proprietary to Dolby Laboratories. Their reproduction or disclosure, in whole or in part,
or the production of derivative works therefrom without the express permission of Dolby Laboratories is prohibited.
Copyright 1992 – 2007 Dolby Laboratories. All rights reserved.
Dolby®, the double-D symbol, AC-3®, and Dolby Digital® are registered trademarks of Dolby Laboratories. AAC™ is a
trademark of Dolby Laboratories.
PNG file format
Copyright © 2007. World Wide Web Consortium (Massachusetts Institute of Technology, European Research Consortium
for Informatics and Mathematics, Keio University). All rights reserved. This work is distributed under the W3C Software
License in the hope that it will be useful, but WITHOUT ANY WARRANTY; without even the implied warranty of
MERCHANTIBILITY or FITNESS FOR A PARTICULAR PURPOSE. http://www.w3.org/Consortium/Legal/2002/copyright-
software-20021231.
Apple QuickTime
Apple® QuickTime® application is a trademark of Apple, Inc. in the United States and other countries.
Apple Macintosh Audio Interchange File Format (AIFF) file format.
Apple® Macintosh® Audio Interchange™ File Format (AIFF) is a trademark of Apple, Inc. in the United States and other
countries.
Targa file format
The Targa™ file format is a trademark of Pinnacle Systems, Inc.
Tagged Image File Format ( TIFF)
Adobe Tagged Image™ File Format is a registered trademark of Adobe Systems Incorporated in the United States and
other countries. All rights reserved.
Main Concept encoder
Main Concept® plug-in is a trademark of registered trademark of Main Concept, Inc. in the United States or other
countries. All rights reserved.
Macromedia Flash
Macromedia and Flash are trademarks or registered trademarks of Macromedia, Inc. in the United States and/or other
countries.
Page 4

Gracenote
CD and music-related data from Gracenote, Inc., copyright © 2000-2007 Gracenote. Gracenote CDDB® Client Software,
copyright 2000-2007 Gracenote. This product and service may practice one or more of the following U.S. Patents:
#5,987,525; #6,061,680; #6,154,773, #6,161,132, #6,230,192, #6,230,207, #6,240,459, #6,330,593, and other patents issued
or pending. Services supplied and/or device manufactured under license for following Open Globe, Inc. United States
Patent 6,304,523.
Gracenote and CDDB are registered trademarks of Gracenote. The Gracenote logo and logotype, MusicID, and the
"Powered by Gracenote" logo are trademarks of Gracenote.
SmartSound
Portions of this product practice the following SmartSound® patents: #5,693,902 and #5,877,445.
Sony Creative Software Inc.
1617 Sherman Avenue
Madison, WI 53704
USA
The information contained in this manual is subject to change without notice and does not represent a
guarantee or commitment on behalf of Sony Creative Software Inc. in any way. All updates or additional
information relating to the contents of this manual will be posted on the Sony Creative Software Inc. Web
site, located at
http://www.sonycreativesoftware.com. The software is provided to you under the terms of
the End User License Agreement and Software Privacy Policy, and must be used and/or copied in
accordance therewith. Copying or distributing the software except as expressly described in the End User
License Agreement is strictly prohibited. No part of this manual may be reproduced or transmitted in any
form or for any purpose without the express written consent of Sony Creative Software Inc.
Copyright 2007. Sony Creative Software Inc.
Program Copyright 2007. Sony Creative Software Inc. All rights reserved.
Page 5

Table of
Contents
Introduction . . . . . . . . . . . . . . . . . . . . . . . . . . . . . . . . . . . . . . . . . . . . . . . . . . . . 5
Welcome . . . . . . . . . . . . . . . . . . . . . . . . . . . . . . . . . . . . . . . . . . . . . . . . . . . . . . . . .5
System requirements . . . . . . . . . . . . . . . . . . . . . . . . . . . . . . . . . . . . . . . . . . . . .5
Technical support. . . . . . . . . . . . . . . . . . . . . . . . . . . . . . . . . . . . . . . . . . . . . . . . .5
Installing Cinescore software . . . . . . . . . . . . . . . . . . . . . . . . . . . . . . . . . . . . . .5
Installing Adobe Reader . . . . . . . . . . . . . . . . . . . . . . . . . . . . . . . . . . . . . . . . . . . . . .6
Using online help . . . . . . . . . . . . . . . . . . . . . . . . . . . . . . . . . . . . . . . . . . . . . . . . .6
Show Me How tutorials . . . . . . . . . . . . . . . . . . . . . . . . . . . . . . . . . . . . . . . . . . . . . . .8
Overview . . . . . . . . . . . . . . . . . . . . . . . . . . . . . . . . . . . . . . . . . . . . . . . . . . . . . . . . .8
Main window . . . . . . . . . . . . . . . . . . . . . . . . . . . . . . . . . . . . . . . . . . . . . . . . . . . . . . . .8
Toolbar . . . . . . . . . . . . . . . . . . . . . . . . . . . . . . . . . . . . . . . . . . . . . . . . . . . . . . . . . . . . . .9
Time display . . . . . . . . . . . . . . . . . . . . . . . . . . . . . . . . . . . . . . . . . . . . . . . . . . . . . . . . .9
Ruler . . . . . . . . . . . . . . . . . . . . . . . . . . . . . . . . . . . . . . . . . . . . . . . . . . . . . . . . . . . . . . . . .9
Marker bar . . . . . . . . . . . . . . . . . . . . . . . . . . . . . . . . . . . . . . . . . . . . . . . . . . . . . . . . . . .9
Track list . . . . . . . . . . . . . . . . . . . . . . . . . . . . . . . . . . . . . . . . . . . . . . . . . . . . . . . . . . . 10
Timeline . . . . . . . . . . . . . . . . . . . . . . . . . . . . . . . . . . . . . . . . . . . . . . . . . . . . . . . . . . . 10
Transport bar controls . . . . . . . . . . . . . . . . . . . . . . . . . . . . . . . . . . . . . . . . . . . . . . 10
Window docking area and floating window docks . . . . . . . . . . . . . . . . . . . 11
Getting Started. . . . . . . . . . . . . . . . . . . . . . . . . . . . . . . . . . . . . . . . . . . . . . . . . 15
Creating projects . . . . . . . . . . . . . . . . . . . . . . . . . . . . . . . . . . . . . . . . . . . . . . . 15
Saving a project . . . . . . . . . . . . . . . . . . . . . . . . . . . . . . . . . . . . . . . . . . . . . . . . . . . . 16
Renaming a project (using Save As) . . . . . . . . . . . . . . . . . . . . . . . . . . . . . . . . . 16
Getting media files. . . . . . . . . . . . . . . . . . . . . . . . . . . . . . . . . . . . . . . . . . . . . . 16
Selecting media . . . . . . . . . . . . . . . . . . . . . . . . . . . . . . . . . . . . . . . . . . . . . . . . . . . . 17
Previewing a media file . . . . . . . . . . . . . . . . . . . . . . . . . . . . . . . . . . . . . . . . . . . . . 17
Using the Project Media window . . . . . . . . . . . . . . . . . . . . . . . . . . . . . . . . . . . . 18
Obtaining or editing CD information using Gracenote . . . . . . . . . . . . . . . 21
Adding media to the timeline . . . . . . . . . . . . . . . . . . . . . . . . . . . . . . . . . . . . . . . 23
Working with events . . . . . . . . . . . . . . . . . . . . . . . . . . . . . . . . . . . . . . . . . . . . 25
Understanding files and events . . . . . . . . . . . . . . . . . . . . . . . . . . . . . . . . . . . . . 25
Moving events along the timeline . . . . . . . . . . . . . . . . . . . . . . . . . . . . . . . . . . 26
Working with tracks. . . . . . . . . . . . . . . . . . . . . . . . . . . . . . . . . . . . . . . . . . . . . 27
TABLE OF CONTENTS | 1
Page 6

Using the track view . . . . . . . . . . . . . . . . . . . . . . . . . . . . . . . . . . . . . . . . . . . . . . . . 27
Audio track header . . . . . . . . . . . . . . . . . . . . . . . . . . . . . . . . . . . . . . . . . . . . . . . . . 28
Volume or pan envelopes . . . . . . . . . . . . . . . . . . . . . . . . . . . . . . . . . . . . . . . . . . 28
Playing back and previewing . . . . . . . . . . . . . . . . . . . . . . . . . . . . . . . . . . . . 30
Playing your project . . . . . . . . . . . . . . . . . . . . . . . . . . . . . . . . . . . . . . . . . . . . . . . . 30
Scrubbing . . . . . . . . . . . . . . . . . . . . . . . . . . . . . . . . . . . . . . . . . . . . . . . . . . . . . . . . . . 31
Rendering a project . . . . . . . . . . . . . . . . . . . . . . . . . . . . . . . . . . . . . . . . . . . . . 32
Creating a movie . . . . . . . . . . . . . . . . . . . . . . . . . . . . . . . . . . . . . . . . . . . . . . . . . . . 32
Basic Editing Techniques. . . . . . . . . . . . . . . . . . . . . . . . . . . . . . . . . . . . . . . .35
Getting around . . . . . . . . . . . . . . . . . . . . . . . . . . . . . . . . . . . . . . . . . . . . . . . . . 35
Moving the cursor . . . . . . . . . . . . . . . . . . . . . . . . . . . . . . . . . . . . . . . . . . . . . . . . . . 35
Changing focus . . . . . . . . . . . . . . . . . . . . . . . . . . . . . . . . . . . . . . . . . . . . . . . . . . . . 35
Making selections. . . . . . . . . . . . . . . . . . . . . . . . . . . . . . . . . . . . . . . . . . . . . . . 36
Selecting multiple events . . . . . . . . . . . . . . . . . . . . . . . . . . . . . . . . . . . . . . . . . . . 36
Selecting a time range . . . . . . . . . . . . . . . . . . . . . . . . . . . . . . . . . . . . . . . . . . . . . . 37
Looping playback . . . . . . . . . . . . . . . . . . . . . . . . . . . . . . . . . . . . . . . . . . . . . . . . . . 38
Selecting events and a time range . . . . . . . . . . . . . . . . . . . . . . . . . . . . . . . . . . 39
Selecting tracks . . . . . . . . . . . . . . . . . . . . . . . . . . . . . . . . . . . . . . . . . . . . . . . . . . . . 39
Editing events . . . . . . . . . . . . . . . . . . . . . . . . . . . . . . . . . . . . . . . . . . . . . . . . . . 39
Copying events . . . . . . . . . . . . . . . . . . . . . . . . . . . . . . . . . . . . . . . . . . . . . . . . . . . . 39
Cutting events . . . . . . . . . . . . . . . . . . . . . . . . . . . . . . . . . . . . . . . . . . . . . . . . . . . . . 41
Pasting events . . . . . . . . . . . . . . . . . . . . . . . . . . . . . . . . . . . . . . . . . . . . . . . . . . . . . 42
Duplicating events . . . . . . . . . . . . . . . . . . . . . . . . . . . . . . . . . . . . . . . . . . . . . . . . . 44
Trimming events . . . . . . . . . . . . . . . . . . . . . . . . . . . . . . . . . . . . . . . . . . . . . . . . . . . 44
Splitting events . . . . . . . . . . . . . . . . . . . . . . . . . . . . . . . . . . . . . . . . . . . . . . . . . . . . 47
Slipping and sliding events . . . . . . . . . . . . . . . . . . . . . . . . . . . . . . . . . . . . . . . . . 49
Deleting events . . . . . . . . . . . . . . . . . . . . . . . . . . . . . . . . . . . . . . . . . . . . . . . . . . . . 51
Applying post-edit ripples. . . . . . . . . . . . . . . . . . . . . . . . . . . . . . . . . . . . . . . 51
Applying a post-edit ripple manually . . . . . . . . . . . . . . . . . . . . . . . . . . . . . . . . 52
Shuffling events . . . . . . . . . . . . . . . . . . . . . . . . . . . . . . . . . . . . . . . . . . . . . . . . . . . . 53
Crossfading events. . . . . . . . . . . . . . . . . . . . . . . . . . . . . . . . . . . . . . . . . . . . . . 53
Using automatic crossfades . . . . . . . . . . . . . . . . . . . . . . . . . . . . . . . . . . . . . . . . . 53
2 | TABLE OF CONTENTS
Page 7

Manually setting a crossfade . . . . . . . . . . . . . . . . . . . . . . . . . . . . . . . . . . . . . . . . 54
Changing crossfade curves . . . . . . . . . . . . . . . . . . . . . . . . . . . . . . . . . . . . . . . . . 54
Sliding a crossfade . . . . . . . . . . . . . . . . . . . . . . . . . . . . . . . . . . . . . . . . . . . . . . . . . 54
Using undo and redo . . . . . . . . . . . . . . . . . . . . . . . . . . . . . . . . . . . . . . . . . . . 55
Using undo . . . . . . . . . . . . . . . . . . . . . . . . . . . . . . . . . . . . . . . . . . . . . . . . . . . . . . . . 55
Using redo . . . . . . . . . . . . . . . . . . . . . . . . . . . . . . . . . . . . . . . . . . . . . . . . . . . . . . . . . 56
Clearing the edit history . . . . . . . . . . . . . . . . . . . . . . . . . . . . . . . . . . . . . . . . . . . . 56
Adding project markers and regions. . . . . . . . . . . . . . . . . . . . . . . . . . . . . 56
Working with markers . . . . . . . . . . . . . . . . . . . . . . . . . . . . . . . . . . . . . . . . . . . . . . 57
Working with regions . . . . . . . . . . . . . . . . . . . . . . . . . . . . . . . . . . . . . . . . . . . . . . . 58
Using an external audio editing program . . . . . . . . . . . . . . . . . . . . . . . . 60
Setting up an audio editing program . . . . . . . . . . . . . . . . . . . . . . . . . . . . . . . . 61
Opening an audio editor from Cinescore software . . . . . . . . . . . . . . . . . . . 61
Working with Generated Music . . . . . . . . . . . . . . . . . . . . . . . . . . . . . . . . . 63
Creating generated music. . . . . . . . . . . . . . . . . . . . . . . . . . . . . . . . . . . . . . . 63
Setting the composition start time and length . . . . . . . . . . . . . . . . . . . . . . 63
Generating music . . . . . . . . . . . . . . . . . . . . . . . . . . . . . . . . . . . . . . . . . . . . . . . . . . 63
Editing generated music . . . . . . . . . . . . . . . . . . . . . . . . . . . . . . . . . . . . . . . . 66
Using themes . . . . . . . . . . . . . . . . . . . . . . . . . . . . . . . . . . . . . . . . . . . . . . . . . . . . . . 69
Using hints . . . . . . . . . . . . . . . . . . . . . . . . . . . . . . . . . . . . . . . . . . . . . . . . . . . . . . . . . 71
Index . . . . . . . . . . . . . . . . . . . . . . . . . . . . . . . . . . . . . . . . . . . . . . . . . . . . . . . . . . . . i
TABLE OF CONTENTS | 3
Page 8

4 | TABLE OF CONTENTS
Page 9

Chapter 1
Introduction
Welcome
Cinescore® software is a breakthrough in professional soundtrack creation, automatically
generating fully composed, multigenre, production music perfect for movies, slideshows,
commercials, and radio productions.
Using Cinescore software, you can arrange audio and video on the timeline, and then you
can let Cinescore work its magic to create a soundtrack that you can tailor to fit your exact
needs.
System requirements
In order to use Cinescore software, your computer must satisfy the following minimum
specifications:
• Microsoft® Windows® XP or Windows Vista™
• 1.5 GHz processor
• 512 MB RAM, 1 GB recommended
• 200 MB hard-disk space for program installation
• 1.7 GB hard-disk space for optional installation of themes and audio transitions
• Windows-compatible sound card
• DVD-ROM drive (for installation of themes and audio transitions)
• Microsoft DirectX® 9.0c or later (included on application disc)
• Internet connection (for Gracenote® MusicID™)
Technical support
The Web site at http://www.sonycreativesoftware.com/support/default.asp has technical
support, reference information, program updates, tips and tricks, user forums, and a
knowledge base.
Installing Cinescore software
1.
Insert the application disc. The setup screen appears (if AutoPlay is enabled for your
DVD-ROM drive).
If DVD-ROM AutoPlay is not enabled, click the Start button and choose Run. In the Run
dialog that appears, type the DVD-ROM drive’s letter and add :\setup.exe. Click OK to
start the installation.
INTRODUCTION | 5
Page 10

2.
Click Install Cinescore Software, and then follow the on-screen prompts to install the appropriate
version of Cinescore for your computer.
Note:
Windows Installer is used for all versions of Windows. Windows Installer is installed and then
you are asked to restart your system.
Installing Adobe Reader
In order to view the Quick Start Manual, you will need to install the Adobe Reader software. It has been
included on the application disc in the Extras\Adobe Reader 6.0\English folder for your convenience.
1.
Place the Cinescore application disc in the drive. AutoPlay launches the Setup menu.
Note:
If AutoPlay is not enabled, click the Start button and choose Run. Type D:\Extras\Adobe
Reader 6.0\English\ adberdr60_enu_full.exe, where D is the drive letter of your CD-ROM or DVD-
ROM drive. Follow the instructions in the dialogs to complete the installation.
2.
Choose Browse, and then browse to the \Extras\Adobe Reader 6.0\English\ folder on the application
disc.
3.
Double-click the adberdr60_enu_full.exe icon, and follow the instructions in the dialogs to complete
the installation.
Using online help
You can access three varieties of help:
•Online help
• Show Me How tutorials
• Help on the Web
Online help
To access online help, choose Contents and Index from the Help menu or press F1.
Note:
To view online help, Internet Explorer 4.0 or later must be installed on your system. Internet Explorer
is included on the Cinescore CD-ROM for your convenience.
6 | INTRODUCTION
Page 11
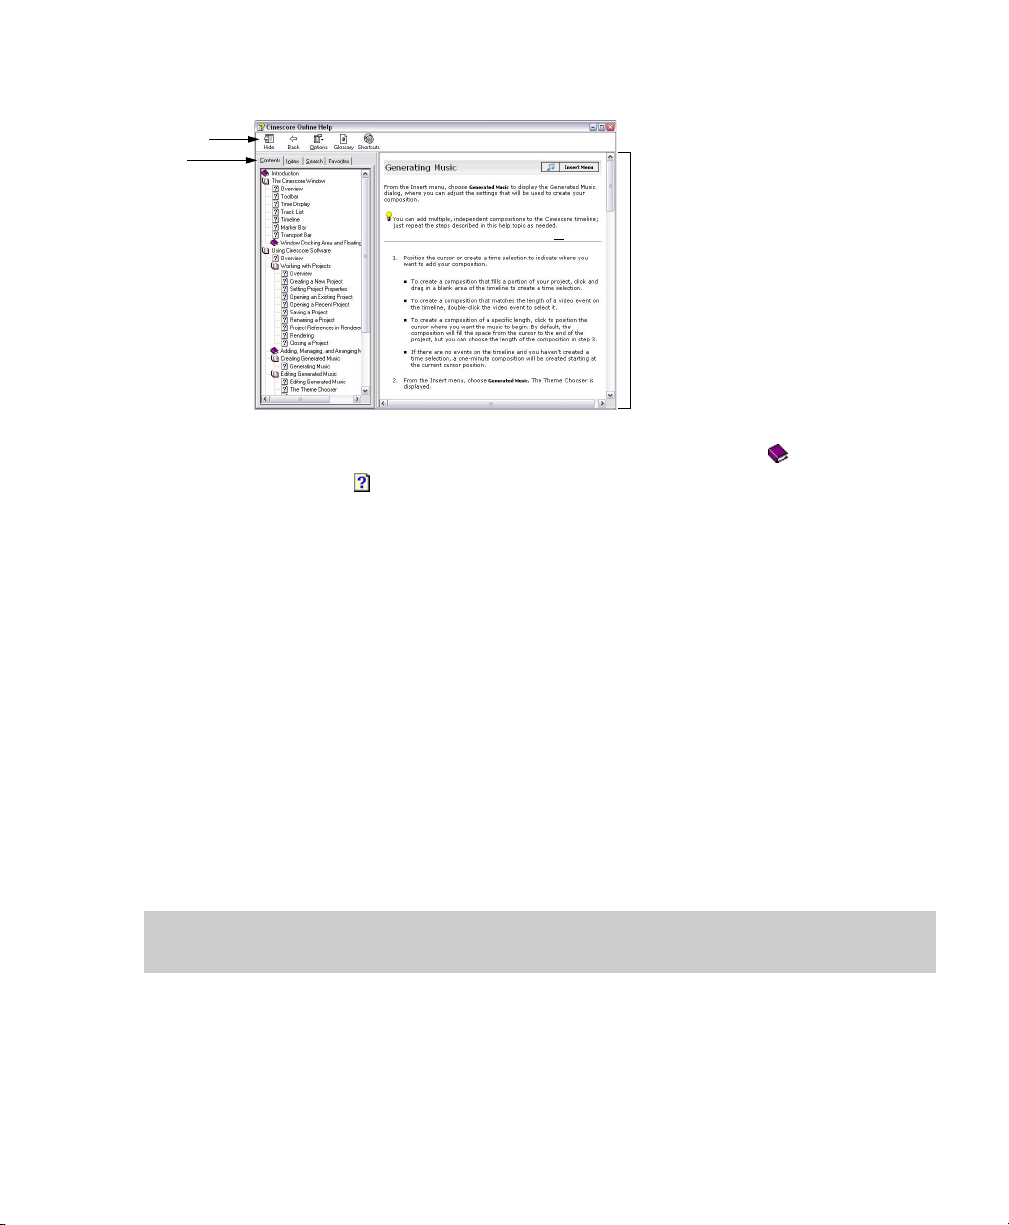
The online help window has four tabs that you can use to find the information that you need.
Toolbar
Tabs
Information
pane
The Contents tab provides a list of available help topics. Double-click a closed book ( ) to open the pages
and then click a topic page ( ).
The Index tab provides a complete listing of the help topics available. Scroll through the list of available
topics or type a word in the Type in the keyword to find box to quickly locate topics related to that word.
Select the topic and click Display.
The Search tab allows you to enter a keyword and display all of the topics in the online help that contain
the keyword you have entered. Type a keyword in the Type in the word(s) to search for box and click List
To pi cs . Select the topic from the list and click Display.
The Favo rite s tab allows you to keep topics that you revisit often in a separate folder. To add a topic to your
favorites, click Add on the Favorites tab.
Show Me How tutorials
You can learn more about many of the features in Cinescore by using the interactive Show Me How
tutorials installed with the software.
By default, Show Me How tutorials display upon startup of the application. However, you can access them
at any time from the Help menu by choosing Show Me How.
Tip:
To disable automatic display of the Show Me How tutorials, clear the Show at Startup check box at
the bottom of the tutorial window.
INTRODUCTION | 7
Page 12
Help on the Web
Additional help and information is available on the Sony Creative Software Inc. Web site. From the Help
menu, choose Sony on the Web to view a listing of Web pages pertaining to Cinescore software and Sony
Creative Software Inc..
Overview
Cinescore software is designed to be an easy-to-use program. Many operations, menu items, and shortcut
keys are consistent with other popular Microsoft Windows software applications.
The following sections provide a graphical tour of the Cinescore workspace.
Main window
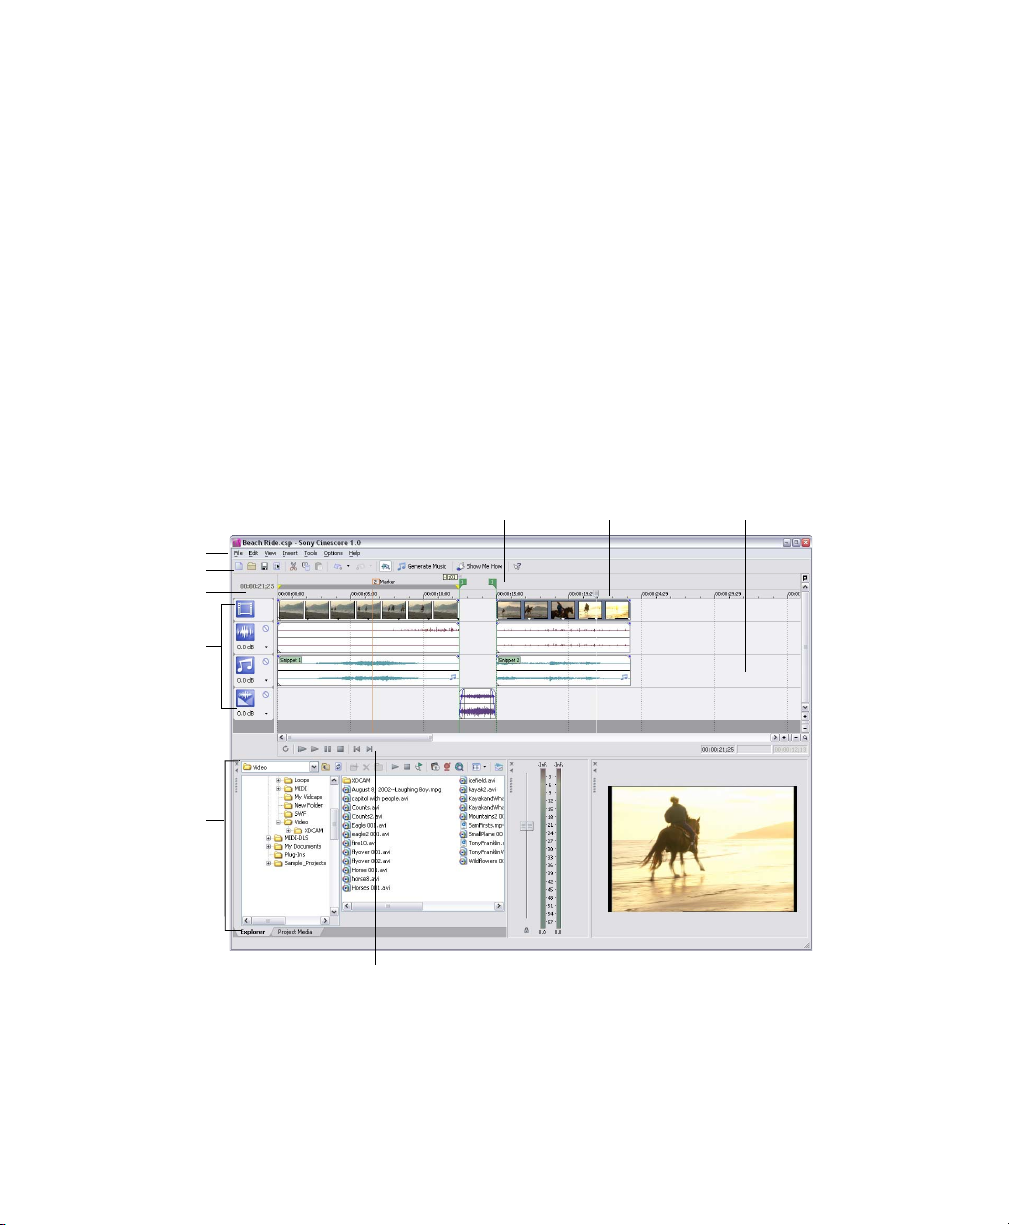
This is the window that appears when the software is opened. The work area is subdivided into three
primary areas: the track list, the track view (or timeline), and the window docking area.You can resize the
track list, track view, and window docking area by dragging the dividers between them
Marker bar Ruler Timeline
Menu bar
Toolbar
Time display
Track
list
.
Window
docking
area
8 | INTRODUCTION
Transport bar
Page 13
Toolbar
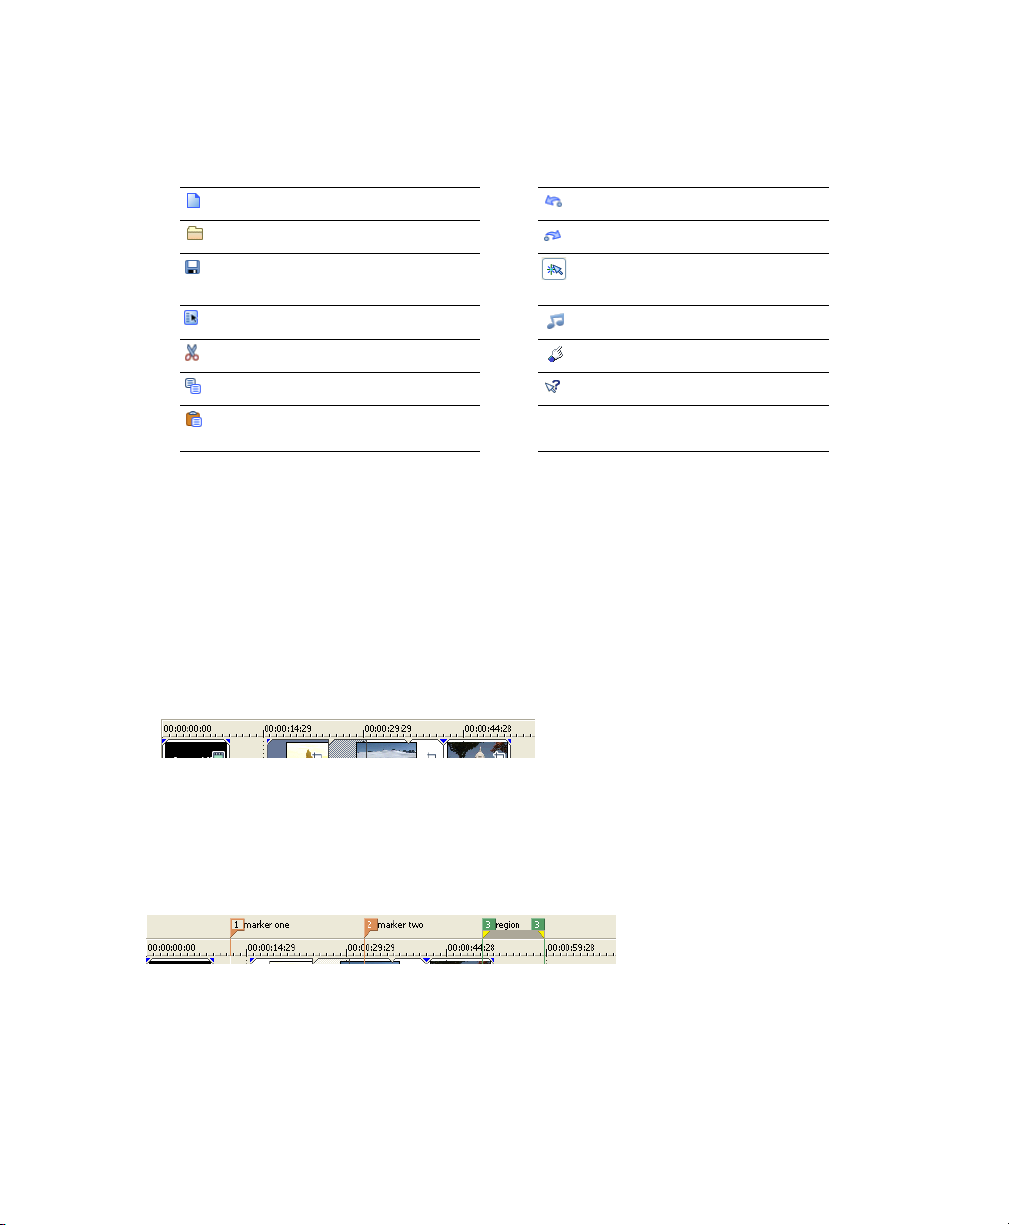
The toolbar allows you to quickly access the most commonly used functions and features. From the
Options menu, choose Customize Toolbar to specify which buttons are displayed.
Create new project Undo
Open existing project Redo
Save project Enable snapping to grid lines
Open project properties Generate Music
Cut selected events or time range Display Show Me How Tutorials
Copy selected events or time range What’s This? help
Paste items from clipboard into
project
Time display
The Time Display window reflects the cursor’s position on the timeline and the end point of a time
selection.
Ruler
The ruler is the timeline for your project. You may specify how the ruler measures time: seconds, measures
and beats, frames, etc.
Marker bar
The marker bar is the area where you can place markers and regions along the project’s timeline. These
informational tags can serve as cues or reminders highlighting important events in your project.
INTRODUCTION | 9
Page 14
Track list
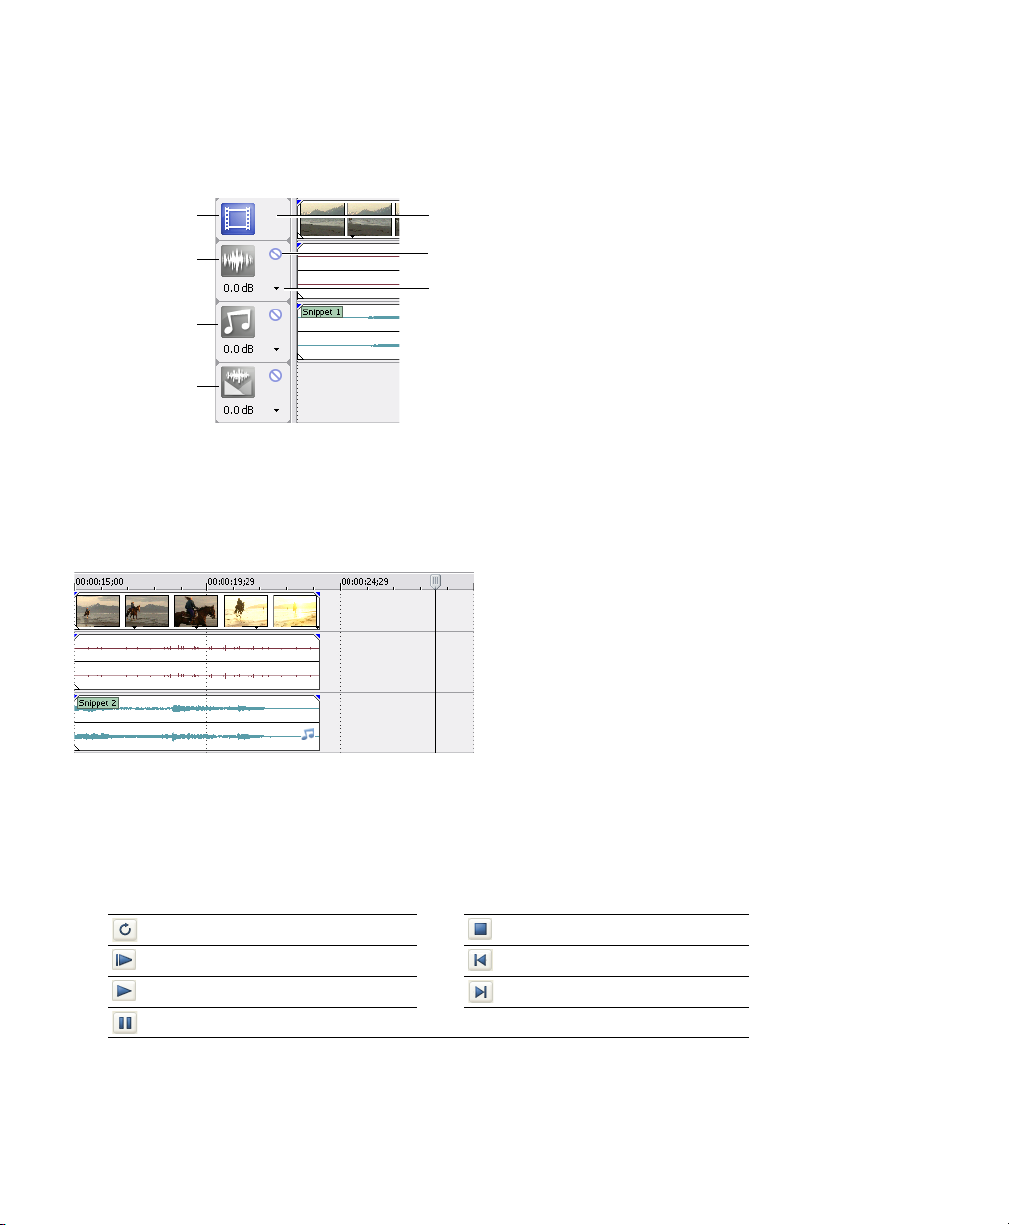
This displays the tracks in your project and contains controls used to determine track mixing.For more
information, see Audio track header on page 28.
Video Track
Audio Track
Generated
Music Track
Audio Transitions
Track
Selected track
Mute track
Track volume
Timeline
All arranging and editing is done in the timeline or track view. This area contains all of a project’s events.
For more information, see Using the track view on page 27.
Transport bar controls
The transport bar contains the playback and cursor positioning buttons frequently used while working on
and previewing your project.
Loop playback Stop playback
Play from beginning of project Move cursor to start of project
Play project from cursor position Move cursor to end of project
Pause project playback
10 | INTRODUCTION
Page 15
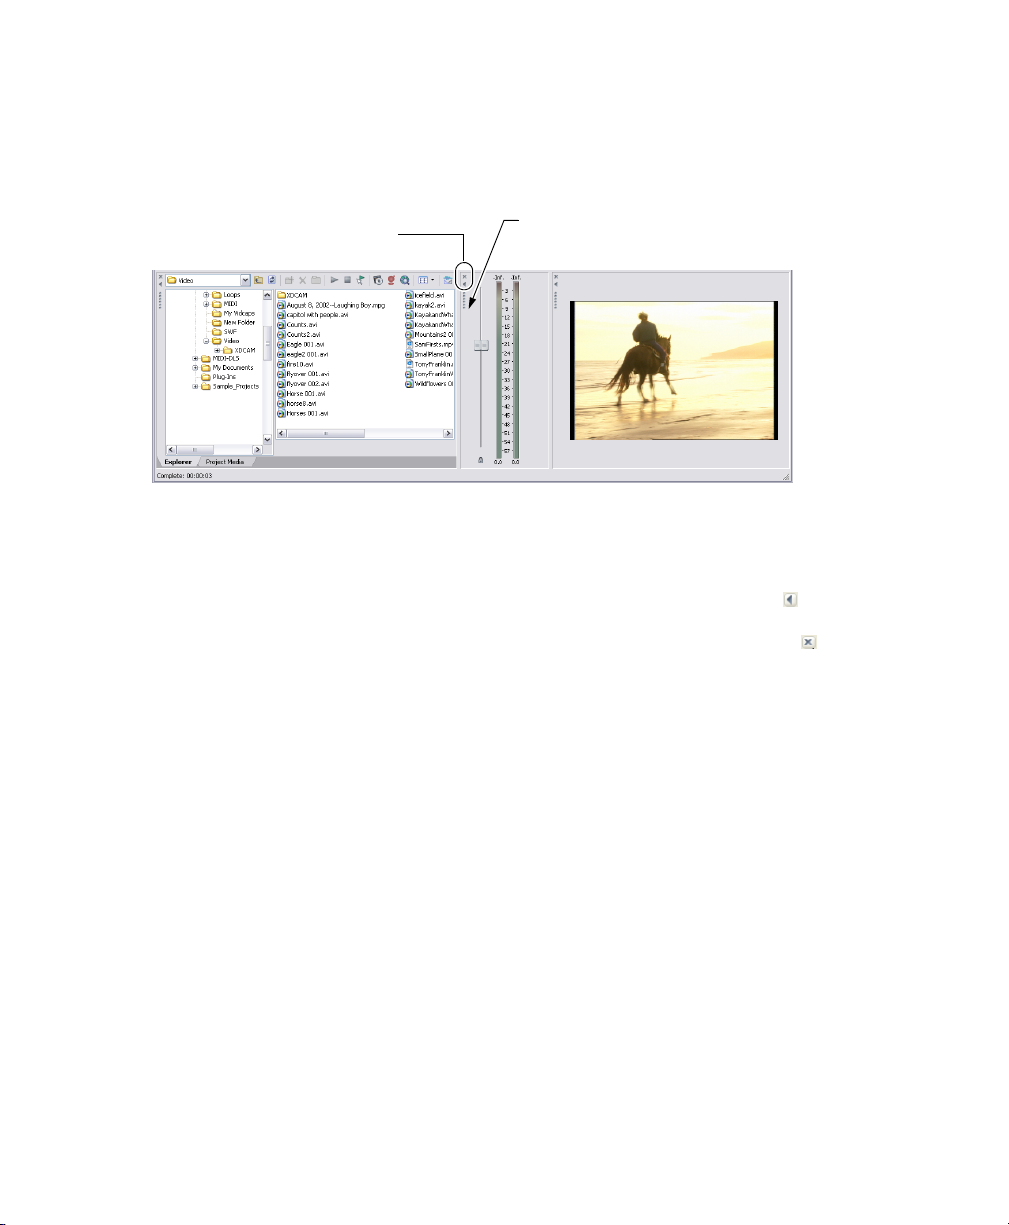
Window docking area and floating window docks
This area allows you to keep frequently used windows available but out of the way while you are working
with a project. Windows can be docked next to each other, subdividing the docking area, or they can be
docked in a stack in the window docking area or in a separate floating docking window. When stacked,
each window has a tab at the bottom with its name on it. Click the window’s tab to bring it to the top.
Close window
Expand window
• To dock a window, drag it to the docking area.
• Drag the handle on the left side of a docked window to remove a window from the docking area and
float it.
• To prevent a window from docking when you drag it, hold the Ctrl key.
• To expand a docked window so it fills the docking area, click the Maximize button ( ). Click again to
restore the window to its previous size.
• To remove a window from the docking area or a floating dock, click the Close button ( ).
Drag the handle away from the
docking area to float the window.
INTRODUCTION | 11
Page 16
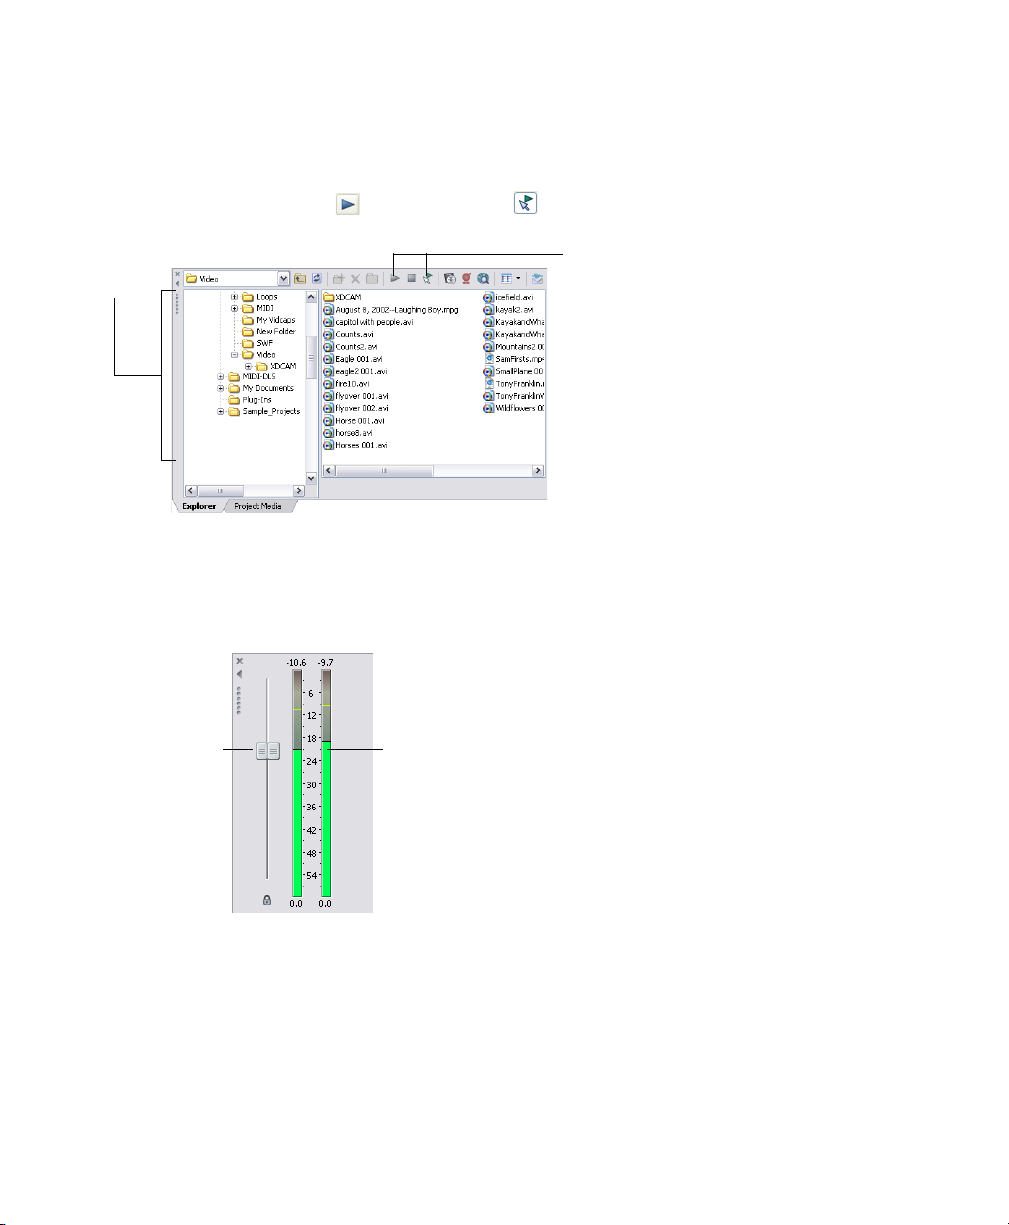
Explorer window - Alt+1
The Explorer window is similar to the Microsoft Windows Explorer. Use the Explorer window to select
media files to drag to the project timeline or add to the Project Media list. You can also use the Explorer to
perform common file management tasks such as creating folders, renaming files and folders, deleting files
and folders. Use the Start Preview (
) and Auto Preview ( ) buttons to preview files before adding
them to the project.
Select drive
or folder
Preview selected
media files before
placing them
in the project.
Select media to place
in the project by dragging
and dropping or
double-clicking.
Add media to the Project Media
window by right-clicking a file
and choosing Add to Project
Media list from the shortcut
menu.
Mixer window - Alt+2
The Mixer window allows you to adjust the volume of your project.
Drag the fader to adjust
the project volume.
12 | INTRODUCTION
The meters display
the current level.
Page 17
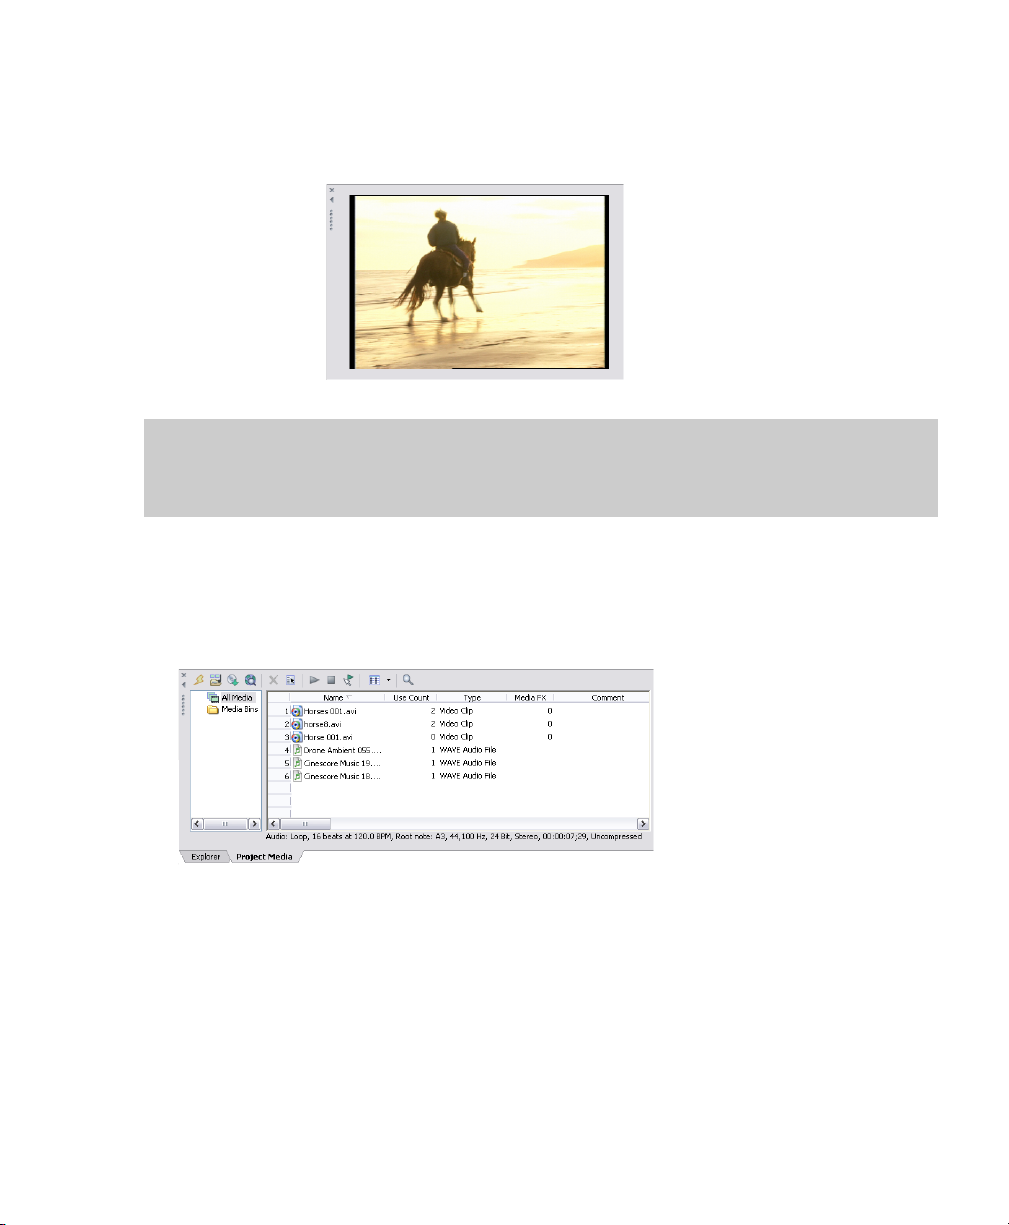
Video Preview window - Alt+3
This window displays a project’s video during project editing and playback. For more information, see
Playing your project on page 30.
Video appears during
project playback or as
the cursor is moved
during editing.
Tip:
To change the video preview quality, choose Preview Quality from the View menu, and then
choose a setting from the submenu. This setting is used for previewing only and has no effect on the
final rendered video. Decreasing the preview resolution can allow the Video Preview window to display
a higher frame rate if your computer is unable to display full-frame-rate video.
Project Media window - Alt +4
The Project Media window helps you organize the media files you’re using in a project. The information
about these files is displayed in a highly flexible database that can be instantly sorted.
For more information,
see Using the Project Media window on page 18.
INTRODUCTION | 13
Page 18

14 | INTRODUCTION
Page 19
Chapter 2
Getting Started
Cinescore® software is a new way of creating video scores. Whether you are an experienced
musician author or an inspired novice, Cinescore will help you add a musical score to a video
in four simple steps:
1.
Create a Cinescore project.
2.
Add a video to the timeline. For more information, see Adding media to the timeline on
page 23.
3.
Generate music, and then fine-tune the composition to suit your taste. For more
information, see Creating generated music on page 63.
4.
Render your video. For more information, see Creating a movie on page 32.
Creating projects
The process of creating a multimedia production can be a complicated undertaking,
involving hundreds of shots, voiceovers, and music beds. Organization is a critical issue in
this process. In the software, organization is handled by a Cinescore project file (.csp) that
saves information about source file locations, edits, cuts, and insertion points. This project
file is not a multimedia file, but is instead used to create (render) the final file when editing is
finished.
Because Cinescore software edits a project file and not the original source files, you can edit
without worrying about corrupting your source files. This not only gives you a strong sense
of security, but it also gives you the freedom to experiment.
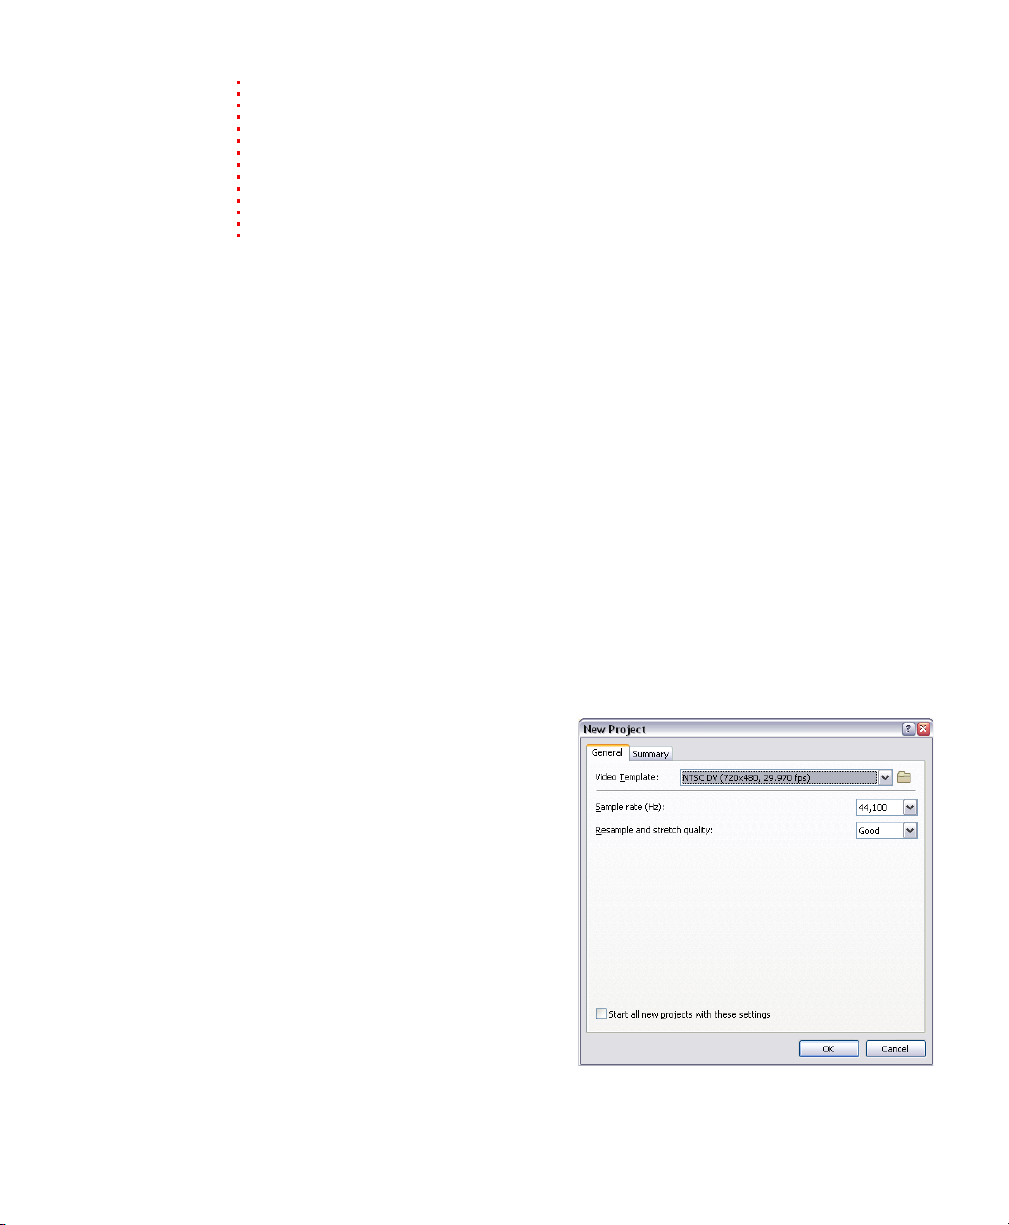
1.
From the File menu, choose New.
The New Project dialog appears.
2.
Enter your project settings on the
various tabs.
•The General tab allows you to
select the video and audio
settings for your project.
•The Summary tab allows you to
enter any relevant information
and reminders about your
project.
3.
Click OK.
4.
From the File menu, choose Save.
and choose where you want to save
your project (.csp file).
GETTING STARTED | 15
Page 20
You can change project settings at any time while working on a project. From the File menu, choose
Properties to change any of these settings.
Saving a project
When you save your work, it is saved in a project file. Project files are not rendered media files.
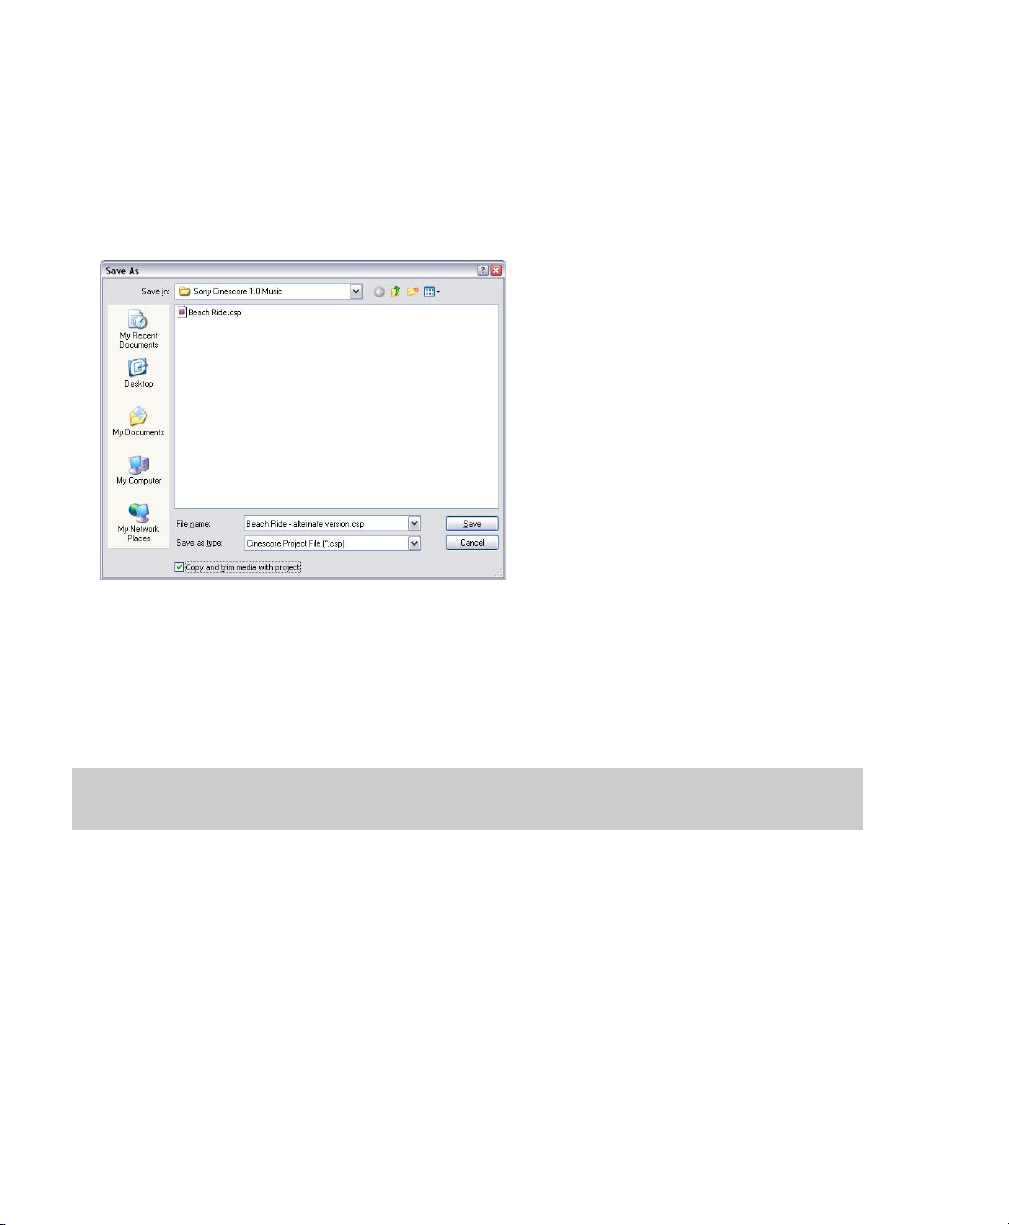
1.
From the File menu, choose Save.
The first time you save a project, the Save As dialog appears. In subsequent saves, the dialog is
bypassed, your existing file name is retained, and your project is updated to include any implemented
changes.
2.
Select the drive and folder where you want to store the project.
3.
Type the project name in the File name box.
4.
Click Save.
Tip:
Select the Copy and trim media with project check box to save the project file and copies of the
media files to a common location.
Renaming a project (using Save As)
After you have been working with your project, you can use the Save As command in the File menu to save
a copy of a project with a new name. This is useful for backing up different versions of a project.
Getting media files
You can add media from a variety of sources to your project.
16 | GETTING STARTED
Page 21
Selecting media
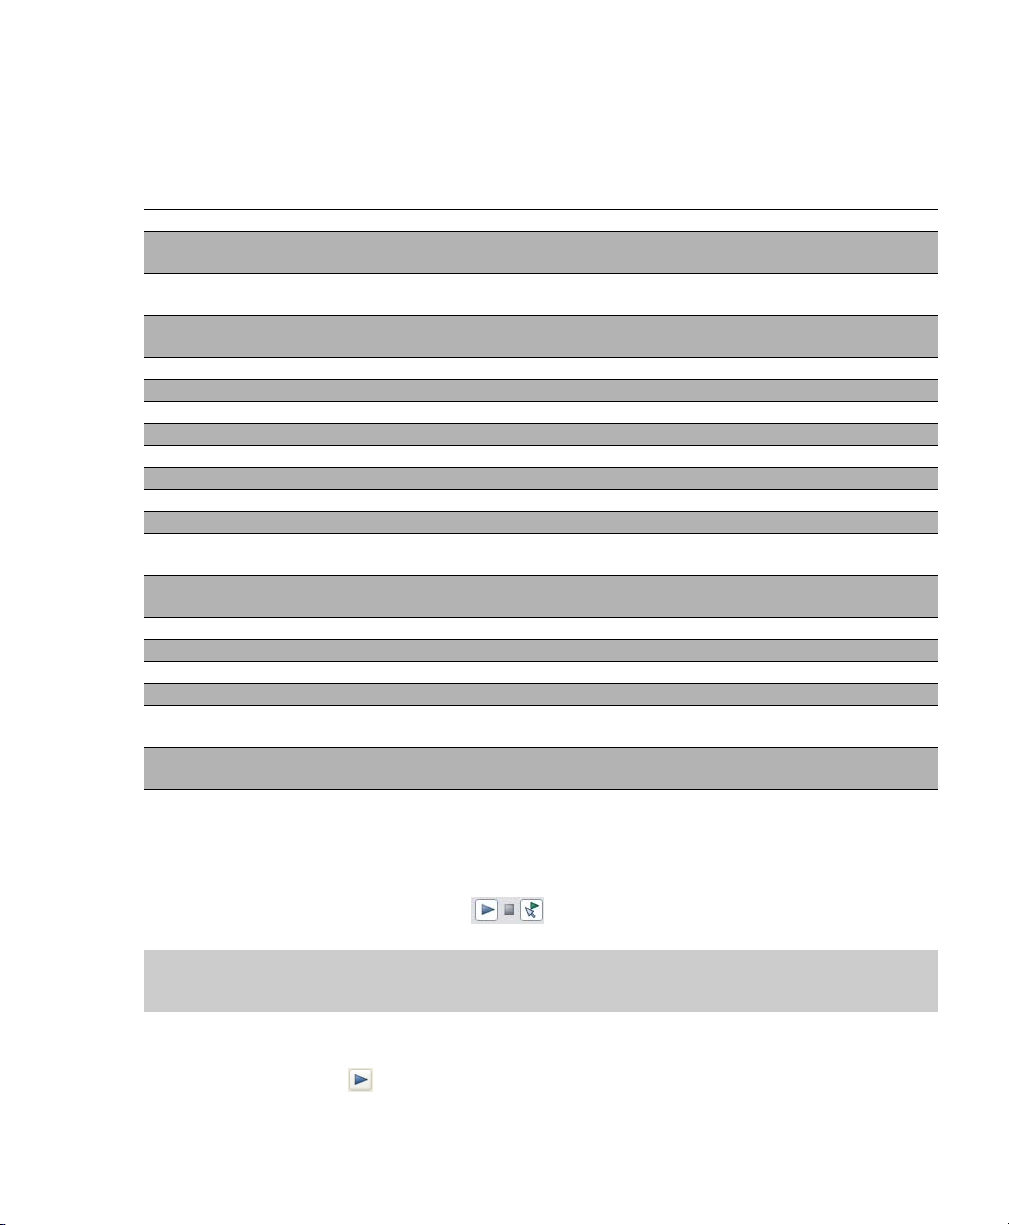
Cinescore software supports a wide range of media file types. You may select any of the media file types
listed below to add to your project.
Form at Extension Definition
CD Audio .cda Audio format used on compact discs.
ATRA C Au dio .aa3, .oma Audio format developed by Sony, including ATRAC3™, ATRAC3plus™, and
ATRAC Advanced Lossless™ formats.
Audio Interchange File
Format
GIF .gif 256 index color, lossless image and animation format widely used on the
JPEG .jpg True color, lossy Internet image format.
MPEG-1 and MPEG-2 .mpg Video files encoded using a lossy audio/video compression.
MP3 Audio .mp3 Highly compressed audio file.
OggVorbis .ogg A patent-free audio encoding and streaming technology.
Photoshop .psd Adobe® Photoshop® proprietary image format (flattened).
Portable Network Graphic .png True color or indexed color, lossy or lossless Internet image format.
QuickTime™ .mov, .qt QuickTime standard audio/video format.
Shockwave Flash .swf Multimedia file format developed by Macromedia.
Sony Perfect Clarity
Audio®
Sony Wave64 .w64 Sony Creative Software Inc. proprietary Wave64™ audio file that does not have
TAR G A .tga True color, lossless image format that supports alpha channel transparency.
Video for Windows® .avi Standard audio/video format used on Microsoft® Windows®-based computers.
Wave (Microsoft®) .wav Standard audio format used on Microsoft Windows-based computers.
Windows Bitmap .bmp Standard graphic format used on Microsoft Windows-based computers.
Windows Media® Audio .wma The Microsoft audio-only format used to create files for streaming or
Windows Media Video .wmv The Microsoft standard used for streaming audio and video media via the
.aif Standard audio format developed by Apple® and used on Macintosh®
computers.
Internet.
.pca A proprietary lossless audio compression format from Sony Creative Software
Inc..
a limited file size (unlike Windows WAV files that are limited to ~2GB).
downloading via the Web.
Web.
Previewing a media file
You may preview files before placing them in your project. The Explorer window has a mini-transport bar
with Play, Stop, and Auto Preview buttons ( ).
Tip:
You can use the same mini-transport bar buttons in the Project Media window to preview files in
the Project Media list.
1.
Select a file in the Explorer window.
2.
Click the Play button ( ) to listen to the file.
GETTING STARTED | 17
Page 22
3.
Click the Stop button ( ) or select a different file to stop previewing the file.
Tip:
To automatically preview selected files, click the Auto Preview button ( ) on the Explorer
window’s transport bar.
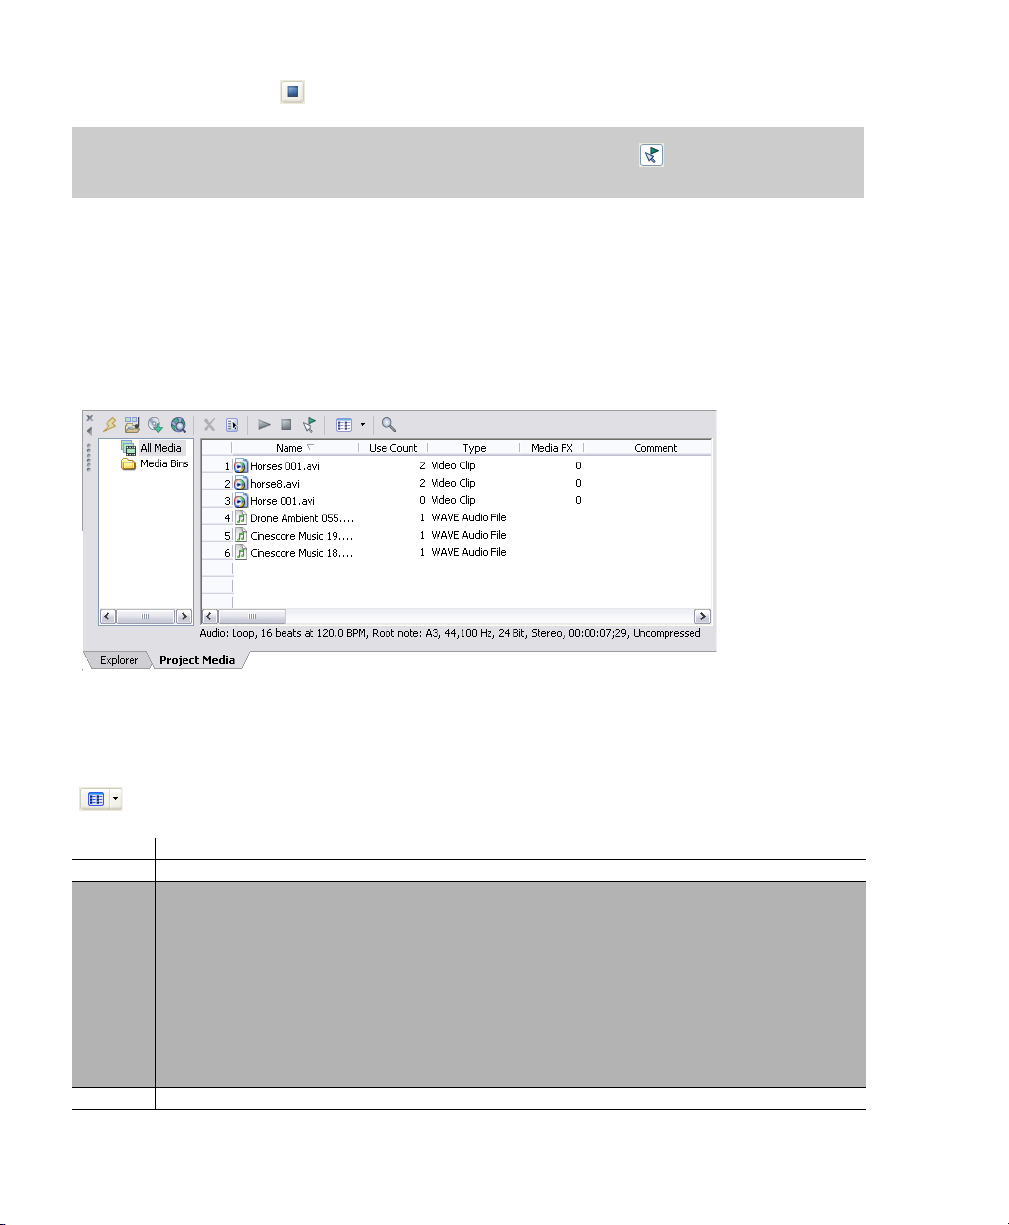
Using the Project Media window
Media files, both video and audio, tend to be the largest files on your hard drive. It is therefore not always
easy to move them around and impractical to store multiple copies of these files. You can add media files
to the Project Media list to organize them before any editing begins. Once you begin working on a project,
all files you add to the timeline are automatically included in the Project Media list. From the View menu,
choose Project Media to open this window if it is not already visible.
Using Project Media views
You can control the information that is displayed in the Project Media window by clicking the Views button
(
) and selecting a view. The purpose of each view is explained below.
View Description
List Displays a simple listing of the file name of each file in the Project Media window.
Detailed Displays all the properties for each file. The information is presented in a table format. You can customize
Thumbnail Displays the first frame of a video file.
the information displayed:
Reorder columns (fields) by dragging the column label to a new position.
Hide a column by dragging the column label off of the Project Media window. To display a hidden column,
right-click the Project Media window, choose View from the shortcut menu, and choose the column name
from the submenu.
Sort the files in the Project Media list according to a category by clicking the column label for that category.
Use the Comments field to add your own annotations to a file’s entry in the Project Media list. Double-click
the field to enter text. This information is saved with the project and is not saved with the media file itself.
18 | GETTING STARTED
Page 23

Adding media to the Project Media list
You can add media to the Project Media list without adding it to the timeline by importing the file.
Adding media to the Project Media list from the Explorer window
1.
Navigate to and select a file to add to the Project Media list. You can use Ctrl or Shift to select multiple
media files.
2.
Right-click the file and choose Add to Project Media list from the shortcut menu. The selected file is
added to the Project Media list.
Replacing media in the Project Media list
You may replace a file in the Project Media list with a different file. When changing the media file that an
event contains, every occurrence of the event on the timeline is updated with the new media file contents.
1.
Right-click a file in the Project Media window.
2.
Choose Replace from the shortcut menu.
3.
In the Replace Media File dialog, browse for and select the file that you want to replace the current file.
4.
Click Open. The selected file replaces the old file in the Project Media list, and any events in the
timeline containing the old file are updated to contain the new media file.
Extracting audio from a CD
You can extract tracks from a CD and add them to the Project Media window as .wav files.
Important:
purposes, such as the illegal copying or sharing of copyrighted materials. Using Cinescore software for such
purposes is, among other things, against United States and international copyright laws and contrary to
the terms and conditions of the End User License Agreement. Such activity may be punishable by law and
may also subject you to the breach remedies set forth in the End User License Agreement.
1.
Insert the audio CD.
Cinescore software is not intended for, and should not be used for, illegal or infringing
GETTING STARTED | 19
Page 24
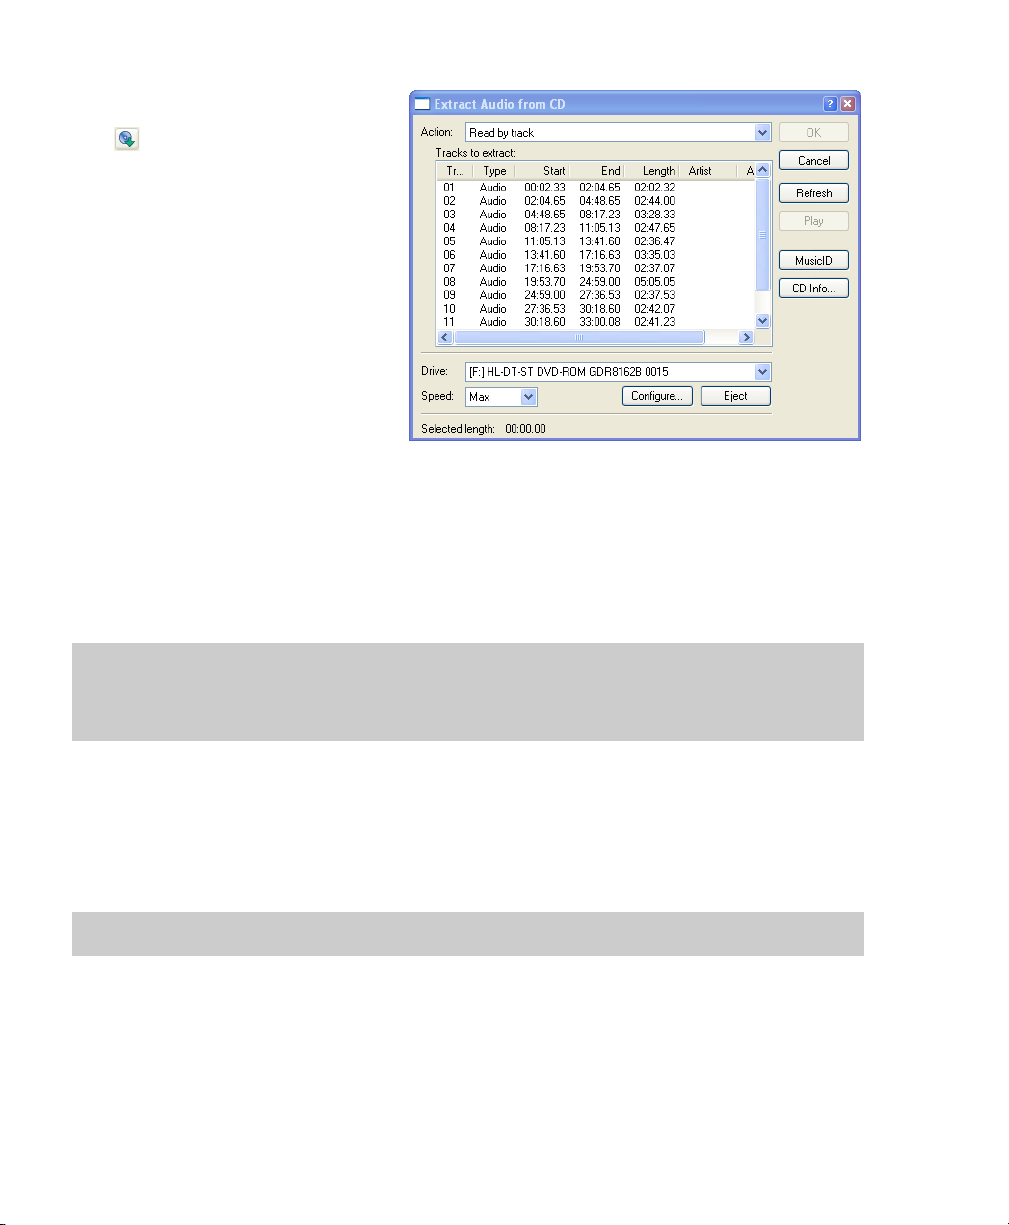
2.
In the Project Media window, click
the Extract Audio from CD button
(
). The Extract Audio from CD
dialog appears.
3.
From the Action drop-down list,
choose the method you want to use
for extracting the CD audio:
• Read by track - Use this option to
choose the tracks you want to
extract from the CD.
• Read entire disc - Use this option
to automatically extract all tracks
on the disc. The entire CD is
extracted into one new file in the
Project Media list.
• Read by range - Use this option
to extract audio from a specified
range of time.
4.
If you chose either the Read by track or Read by range option, specify the track(s) or range to extract:
•For Read by track, click the track(s) you want to extract in the Tracks to read list. Use the Ctrl or
Shift keys to select more than one track. Each track is extracted into a separate file in the Project
Media list.
•For Read by range, enter a time in the Range start field and either the Range end or Range
length fields. The range of audio is extracted into one new file in the Project Media list.
Note:
If you want to extract multiple tracks to a single file, choose Read by track from the Action
drop-down list to select your tracks, and then choose Read by range from the Action drop-down list.
The appropriate time range for the tracks you selected will automatically be inserted and the time
range will be extracted to a single file.
5.
From the Drive drop-down list, choose the drive containing the audio CD from which you want to
extract.
6.
From the Speed drop-down list, choose the speed at which you want to extract the audio. If you
experience any problems extracting audio, you can try decreasing the selected speed, or you can click
Configure to adjust the Audio extract optimization setting.
Note:
To eject the CD at any time prior to beginning the extraction process, click the Eject button.
7.
Click OK. The Save As dialog appears.
8.
Select a name and location for the new WAV file.
9.
Click Save to begin extracting the audio.
20 | GETTING STARTED
Page 25

The track is extracted and a progress meter is displayed to indicate the percent complete. Once extraction
is complete, the new WAV file appears in the Project Media window.
The option of automatically naming extracted tracks is provided for you. To enable this option, choose
Preferences from the Options menu, and on the CD Settings tab, select the Autoname extracted tracks
check box.
Obtaining or editing CD information using Gracenote
If Cinescore can access information about a track or CD (either from the file or CD itself, or from a local
cache), it automatically reads and displays this information when you insert a CD or browse your computer.
However, if this information is not available, the software can retrieve information over the Internet from
Gracenote® MusicID™.
Once Cinescore obtains information from Gracenote MusicID, it is saved to a local cache so the information
displays more quickly the next time the tracks are displayed.
If the software cannot connect to Gracenote and the appropriate CD information is not available on your
computer, the tracks are simply listed numerically. In this case, you can edit CD information and submit it to
the Gracenote Media Database.
Note:
Using Gracenote requires an active Internet connection. For more information on using Gracenote ,
refer to www.gracenote.com/.
Obtaining CD information
1.
Insert a CD in your drive.
2.
Click the MusicID button in the in the Extract Audio from CD dialog, or browse to the CD and click the
button in the Explorer window. For more information, see Extracting audio from a CD on page 19.
Gracenote MusicID attempts to obtain matching CD information and displays artist, album, and track
data:
• If the service locates an exact match, this information is automatically displayed. No additional
action is necessary.
• If the service locates multiple possible matches, the Match dialog is displayed. Proceed to step 2.
3.
Choose a method for completing the CD information:
• If none of the possible matches is appropriate, click the Submit New button. The Gracenote CDDB
Disc Information dialog is displayed, allowing you to complete information for the CD and submit
it for inclusion in the Gracenote Media Database. For help on submitting CD information, click the
Help/Guidelines button in this dialog.
When you are finished typing information, click the OK button to submit your data.
• Select the appropriate match from the list and click the Accept Match button. The artist, album,
and track information is displayed based on your selection in the right side of the PC pane.
4.
You're now ready to extract tracks.
GETTING STARTED | 21
Page 26
Editing and submitting CD information
1.
Insert a CD in your drive.
2.
Select a track and click the CD Info button in the Extract Audio from CD dialog, or browse to the CD
and click the
displayed. For more information, see Extracting audio from a CD on page 19.
3.
Use the Gracenote CDDB Disc Information dialog to edit information about the CD. For help on
submitting CD information, click the Help/Guidelines button in this dialog.
4.
When you are finished entering the information, click the OK button to submit it for inclusion in the
Gracenote database.
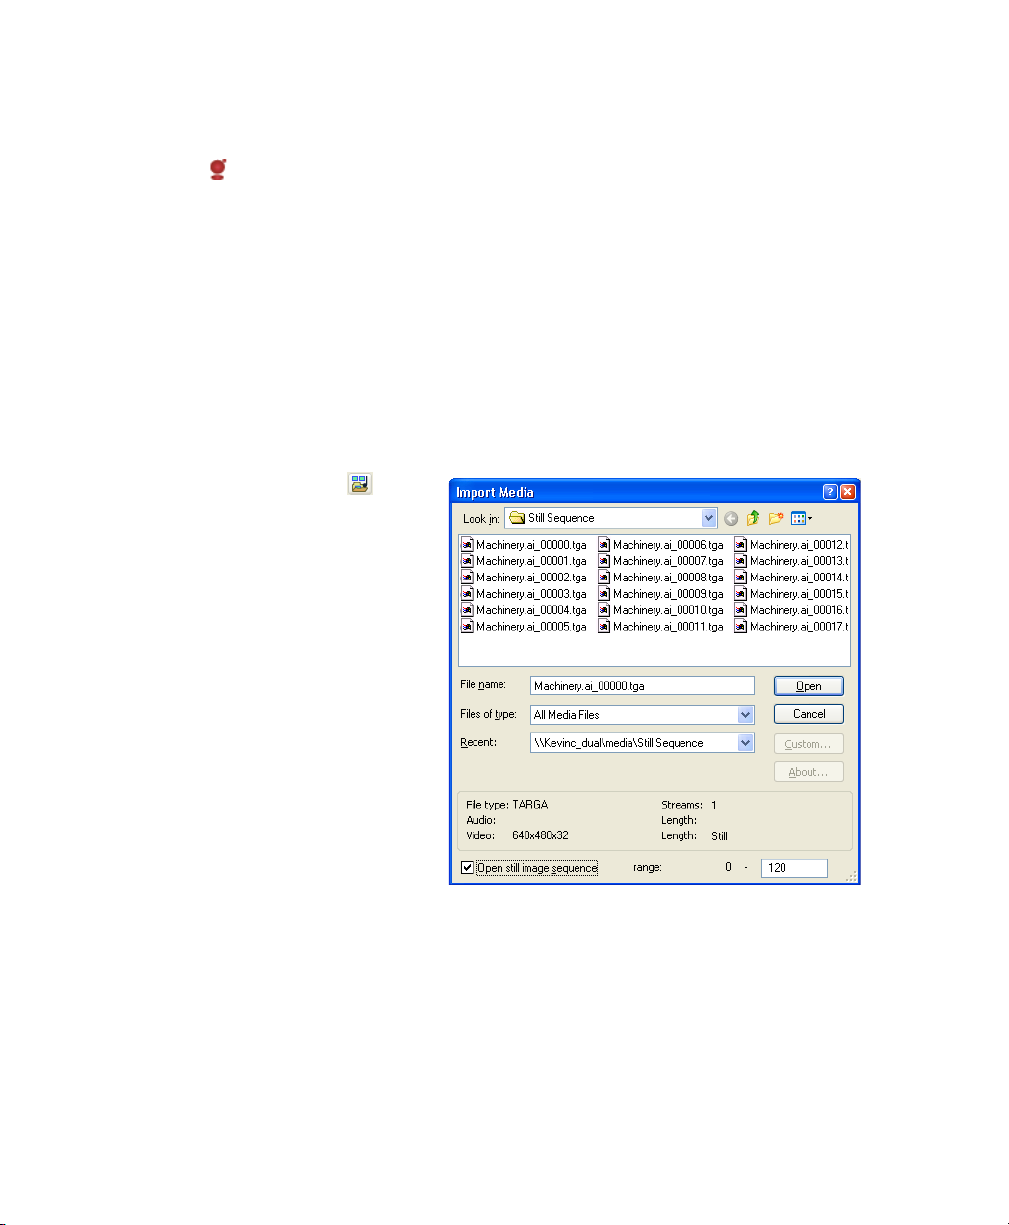
Adding a still-image sequence
If you’ve exported a video clip as a still-image sequence using another application (a 3D-rendering
application, for example), the sequence can be added to the Project Media list and treated as a single
media file. Each image in the sequence will be displayed for one frame in the event.
1.
Click the Import Media button ( ) in the
Project Media window. The Import Media
dialog appears.
2.
Choose the folder where the sequence you
want to open is stored.
3.
Select the first image in the sequence (or
the image you want to start the event).
4.
Select the Open still-image sequence
check box.
5.
In the Range field, enter the number of the
last image you want to open. For example, if
you'd selected AnimationOne_00001.tga in
step 3, you could enter 120 in this box to
create a new image sequence using
AnimationOne_00001.tga to
AnimationOne_00120.tga.
6.
Click Open. The still-image sequence is
added to the Project Media list.
button in the Explorer window. The Gracenote CDDB Disc Information dialog is
Sorting media with bins
The detailed view of the Project Media window helps you sort your media files using their attributes, but
for more control, you can create bins. Bins are folders within projects that you can use to organize your
media files.
22 | GETTING STARTED
Page 27

Media bins are virtual folders that are saved with your project. They do not affect the way media is saved on
your computer.
Creating bins
Right-click the parent bin where you want to create a new bin and choose Create New Bin from the
shortcut menu.
Adding media to a bin
1.
Browse your existing bins to find the media file you want to move. The All Media Folder contains all
media files in your project.
2.
Drag a file from the right-hand pane to a bin.
Searching media bins
1.
Right-click in the Project Media window and choose Search Media Bins from the shortcut menu. The
Search Media Bins dialog is displayed.
2.
Use the drop-down lists in the Search Media Bins dialog to set your search conditions and click the
Search button. The selected bin and all sub-bins will be searched.
3.
Click the Search Results icon to view the matching files.
Hint:
Right-click the Search Results icon and choose Save as Bin from the shortcut menu to save the
results of your search as a new media bin.
Adding media to the timeline
Media files may be added to your project from the Explorer or Project Media windows by double-clicking
them or by dragging them. Either method places the media file in an event in its entirety in the timeline.
Dragging a media file to the timeline
You can create a new event by dragging a media file to a blank area on the timeline. Tracks can contain
multiple events, so you can place different events next to each other on a track.
Note:
Video is always added to the video track, and you can add audio to the Audio, Generated Music, or
Audio Transitions track.
1.
Locate a media file in the Explorer or Project Media windows.
2.
Drag the media file to the timeline.
GETTING STARTED | 23
Page 28

An event for the media file appears where you released the mouse.
Video will be added to the Video track wherever you drop it. If the video contains
an audio stream, the audio will be added to the Audio track automatically.
You can drag audio files to the Audio track, the Generated Music track , or the
Audio Transitions track .
Double-clicking a media file
This method places the event at the cursor’s position in the selected track (for audio only; video is always
added to the Video track).
Once an event is placed, you can move it from one track to another or change its position on the timeline.
Inserting audio transitions
From the Insert menu, choose Audio Transition to add an audio transition or sound effect at the cursor
position on the Audio Transitions track
Tip:
You can also right-click the timeline and choose Insert Audio Transition from the shortcut menu.
1.
Click to position the cursor where you want to add the audio transition.
2.
From the Insert menu, choose Audio Transition. The Insert Audio Transition dialog is displayed.
3.
The default Audio Transitions folder (specified on the Audio tab of the Preferences dialog) is
displayed.
4.
Navigate to the folder that contains the file you want to use:
5.
Choose a drive and folder from the Look in drop-down list.
6.
Select a file in the browse window or type a name in the File name box. Detailed information about
the selected file appears at the bottom of the dialog box.
7.
Click Open.
An event representing the selected file is added to the timeline at the cursor position, and the file is
added to the Project Media window.
.
24 | GETTING STARTED
Page 29
Inserting generated music
From the Insert menu, choose Generated Music to add a generated composition at the cursor position on
the Generated Music track
Tip:
You can also right-click the timeline and choose Insert Generated Music from the shortcut menu.
.
For more information, see Generating music on page 63.
Working with events
Events are the most basic objects in a project. An event is something that happens in time, has a specific
duration, and can be video or audio.
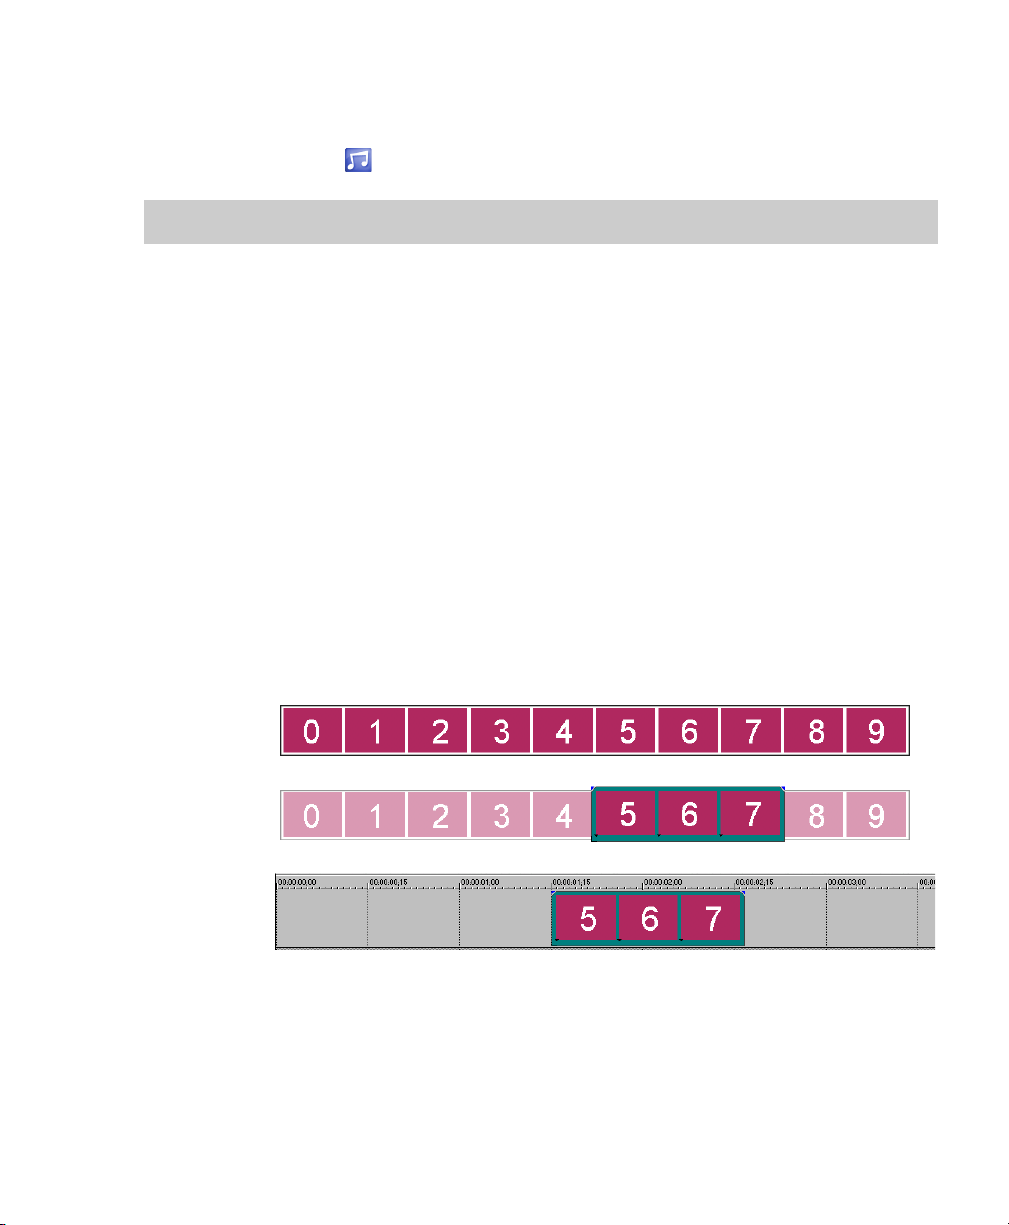
Understanding files and events
The objects you work with are referred to as media files and events.
• Files are objects that are stored on your hard disk. In Cinescore software, you will work with media files,
such as music and video files. These files are neither operated on nor changed. You can access files from
the Cinescore Explorer window.
• Events are periods of time on the timeline that act as windows into media files, either whole or in part.
When you drag a media file onto the timeline, you automatically create an event that contains that file’s
contents. An event can contain video, audio, still images, or generated media. The event window may
contain only a small portion of a much larger media file. A single media file can be used repeatedly to
create any number of different events, since each event can be trimmed independently.
The original media file.
An event trimmed from the original media file.
The event as it appears in Cinescore software.
Audio events are created from audio files on your computer (e.g., WAV, MP3) or can be a part of a
video file (e.g., AVI). You can change many characteristics of an audio event, such as speed, volume,
and equalization. Audio events can be mixed with other audio events.
Video events are created from video files captured to your computer (typically AVI, MOV, QT) or
GETTING STARTED | 25
Page 30
images (BMP, JPEG, PNG, or TGA).
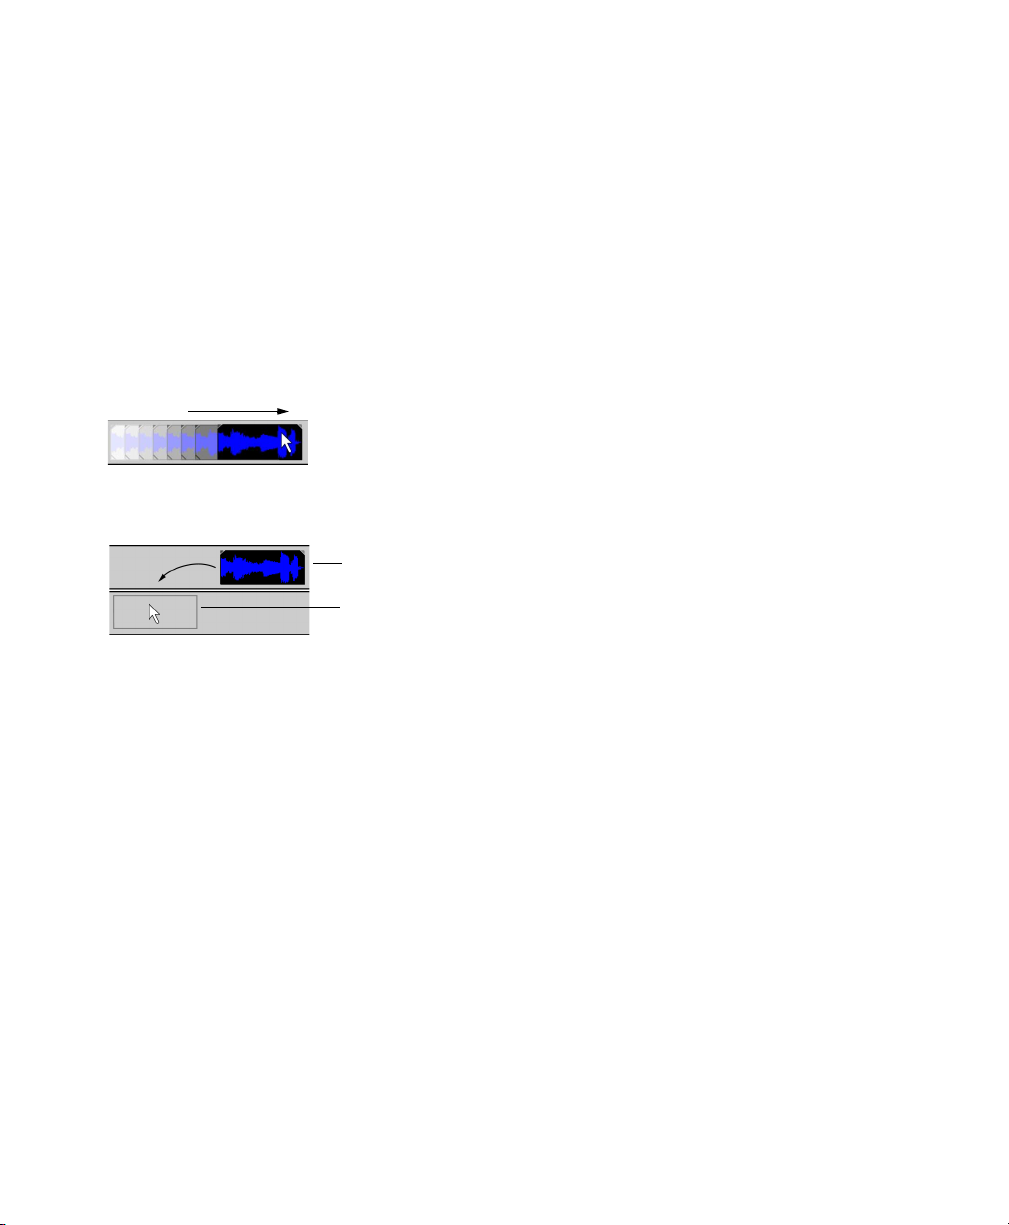
Moving events along the timeline
You can move events along the timeline individually or as a group. Events may overlap each other or be
placed on top of each other. You can crossfade overlapping events automatically or with envelopes.
Moving an event
You can move an event along the timeline within a track or move it to a different track.
1.
Drag the event along the timeline.
If you move the event along the original track’s timeline, the event’s appearance (color) remains the
same.
However, you may move an audio event to a different track. When you do, the event appears as a
simple outline and you will see its original track and position on the timeline. Once you release the
mouse, the event assumes the new timeline position and track color.
Original track position
New track and position
2.
Release the mouse to place the event.
Moving multiple events
You can move multiple events along the timeline within a track or move them to a different track. Selected
events do not need to be within the same track. Hold the Ctrl key or the Shift key while clicking events to
select them. To select all events on the track after a given event, right-click the event and choose Select
Events to End.
For more information, see Selecting multiple events on page 36.
Moving events by small increments
To move an event more precisely, click the event and press 4 or 6 on the numeric keypad to nudge it by
small increments. The amount of movement caused by each nudge is determined by how far the timeline
is zoomed in or out. You can also click the event and press 1 or 3 on the numeric keypad to nudge the
event by frames.
26 | GETTING STARTED
Page 31
Moving grouped events
Groups allow you to move multiple events within their tracks as a single unit. While you can create your
own groups as needed, groups are automatically created for you when video files with associated audio
(e.g., AVI) are added to a project. When you add these video files, the audio portion of the video file is
inserted into the timeline as a separate audio event. The video and audio events are grouped and can be
moved as a single unit within their respective tracks.
To move grouped events, drag any event in the group to a new position.
Working with tracks
A project consists of a video track and multiple audio tracks. The track view is the timeline in which all
events appear. The track list provides information about the track and contains controls that affect all
events in the track.
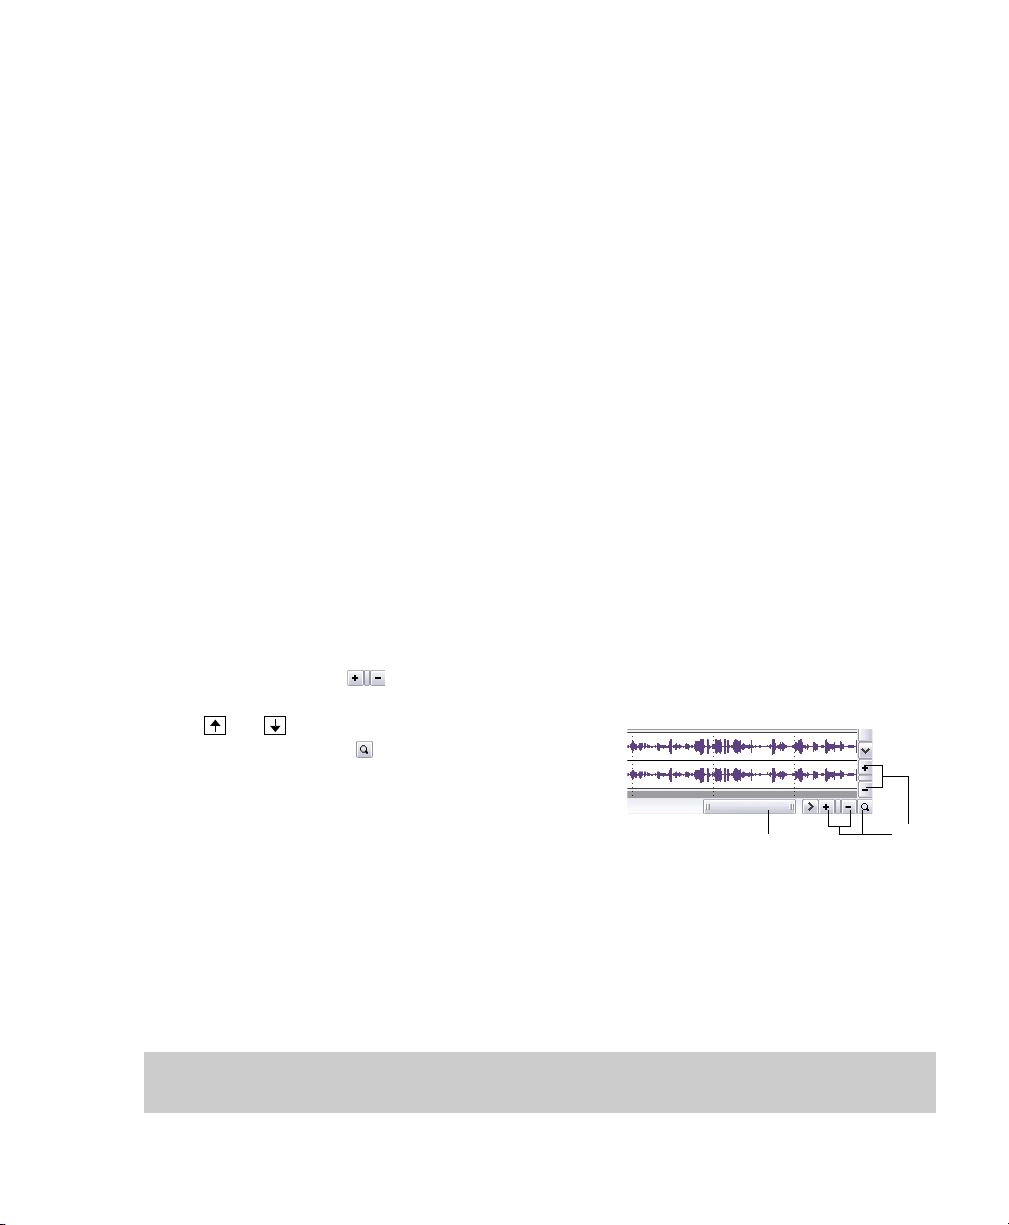
Using the track view
Numerous options are provided for viewing and navigating in track view.
Scrolling and zooming
There are several ways to scroll and zoom in the track view.
• Click the scroll bar arrows or drag the scroll bars to move up and down the tracks or to move forward and
back along the timeline.
•Click the Zoom buttons ( ) to reveal more or less of the timeline.
• Drag the edge of the scroll box, found on the scroll bar, to zoom.
• Press and to zoom in and out along the timeline.
•Click the Zoom Edit Tool ( ) button in the bottom-right
corner of the timeline. In this mode, drag on the timeline to
draw a rectangle that defines the zoom region.
Mouse wheel control is also supported. The default behavior of
the wheel is to zoom horizontally.
Scroll box
• Shift+wheel scrolls horizontally (through time).
• Ctrl+wheel scrolls vertically.
• Ctrl+Shift+wheel moves the cursor in small increments.
• Ctrl+Shift+Alt+wheel moves the cursor in one-frame increments.
Zooming directly controls the accuracy of your editing. Each video event has thumbnail representations of
the frames within the event. Depending on how far you have zoomed in on a video event, a thumbnail can
represent the entire event or a single frame in the event.
Zoom
tools
Tip:
You can choose to display frame numbers, time, or timecode on video event thumbnails on the Video
tab of the Preferences dialog.
GETTING STARTED | 27
Page 32

Changing track height
You can change the height of individual tracks by dragging their
borders in the track list. In the example below, the video track is
fairly large to show the details of the scene while the audio tracks
below are displayed at their default size
Press ~ to restore all tracks to their default height.
Audio track header
Button or Control Name Description
Track i con Track icons identify the Audio track, Generated Music track, and Audio
Transitions track.
Mute
Volume fader
Temporarily mutes playback of the track so that you can focus on other tracks.
Controls the audio track volume relative to the other tracks.
Click the down arrow next to the track's volume display to display the Volume
fader, and then drag the fader to adjust the volume.
If the track has a volume envelope, the track volume is added to a track's
volume envelope so the envelope is preserved, but with a boost or cut applied.
For example, setting the track volume to -3 dB has the same effect as
decreasing every envelope point by 3 dB.
When adjusting the mix of your tracks, remember to look at the meters on the
Mixer. Because you are adding the volumes of all of the tracks together, it is
easy to clip the audio output. Make sure that the meters never display the red
Clip indication during playback.
Drag the divider
to resize a track
Volume or pan envelopes
You can change an audio track’s volume or position in the stereo field throughout a project using
envelopes.
Adding or removing volume or pan envelopes
1.
Select an audio track.
28 | GETTING STARTED
Page 33

2.
From the Insert menu, choose Audio Envelopes, or right-click in the timeline and choose Insert/
Remove Envelope from the shortcut menu.
3.
From the submenu, choose Volume or Pan. A check mark is displayed for the envelopes types that are
used on the selected track.
If you want to change the track’s volume or pan setting throughout the track, edit the envelope in the
timeline.
Adding envelope points
Once you add an envelope to a track, you
may add points to it. These points are used
to edit the envelope line in order to
automate the control.
1.
Place the mouse pointer on the
envelope’s line. The pointer changes
to a hand icon (
2.
Right-click and choose Add Point
from the shortcut menu or doubleclick to add an envelope point. A
square point appears on the
envelope line.
Deleting envelope points
You can delete a point by right-clicking it and choosing Delete from the shortcut menu. If you want to
delete all envelope points, right-click a point and choose Reset All from the shortcut menu.
).
Moving envelope points
Once you have added envelope points, you can raise and lower them to different levels along the timeline,
or you can adjust the envelope’s location along the timeline by dragging it right or left. You can move one
point at a time, even during playback and check the results in real time. If snapping is enabled, the
envelope point snaps to time divisions as you drag. Hold Shift while dragging to override snapping.
1.
Place the mouse pointer on an envelope point. The pointer changes to a hand icon ( ).
2.
Drag the point to the desired position. As you move an envelope point, a ToolTip displays both the
point’s location on the timeline and its decibel level/percent pan.
GETTING STARTED | 29
Page 34

3.
Click the Play ( ) or Play From Start ( ) button to play the project and check the timing of the
envelope.
Changing envelope fade curves
You can set the type of fade curve used after each envelope point: linear, fast, slow, smooth, sharp, or hold.
You can select either a point or a portion of the envelope to set the fade curve. If you select a portion of the
envelope, the fade curve is applied to that envelope segment. If you select a point, the fade curve is
applied to the segment of the envelope after the selected point.
1.
Right-click a point or a portion of the envelope to display a shortcut menu.
2.
From the shortcut menu, choose the curve type.
Playing back and previewing
Playing your project
The transport bar allows you to play back your entire project or
portions of your project based on a time selection or the current
Loop Play from
playback
cursor position
Stop
Cursor
to end
cursor position.
If your project includes video, make sure the Video Preview
window is displayed for playback: from the View menu, choose
Video Preview or press Alt+3.
Play from
start to start
Pause
Cursor
Playing an entire project
1.
Click the Play From Start button ( ) to begin playback at the beginning of the project.
2.
Click the Stop button ( ) to stop playback.
Most of the time, you will only want to preview a small portion of the project to perfect a section. You can
do this by creating a time selection.
30 | GETTING STARTED
Page 35

Playing a time selection
1.
Place the mouse pointer above the ruler on the marker bar. The mouse
pointer changes to include a left/right arrow cursor (
2.
Drag to select the time region. To increase or decrease the time selection,
).
Loop bar
drag its start and end points. The time selection is highlighted and the loop
bar appears above the ruler on the timeline.
3.
Click the Play button ( ) to begin playback. Only the non-muted tracks and
events within the time selection play back.
4.
Click the Loop Playback button ( ) to continually play back the events
within the time selection. Click the button again to toggle this feature off.
5.
Click the Stop button ( ) to stop playback.
By looping the playback, you can repeatedly watch the same section of the project over and over as you
make changes to filters and effects in real time. You can define selection areas automatically, depending on
what you would like to preview. For more information, see
Selecting a time range on page 37.
Playback reference
The following table describes all the transport bar buttons and their keyboard equivalents. You may use
these playback functions at any time while working in your project.
Note:
The use of many multimedia keyboards is also supported for controlling playback.
.
Button Keyboard Func tion
Q Turn on/off loop playback during time selection playback
Shift+Space Begin playback from the start of the project
Space Begin playback from cursor position
Enter Pause playback, cursor stops and holds at pause position
Space or Esc Stop playback, cursor stops and returns to prior cursor position
Ctrl+Home Place cursor at the beginning of project
Ctrl+End Place cursor at the end of the project
Scrubbing
Scrubbing is a type of timeline playback that gives you precise control over the speed and direction of
playback. Both linear and logarithmic scale scrubbing are allowed.
GETTING STARTED | 31
Page 36

Scrubbing with the playhead
The playhead ( ) above the timeline can be dragged back and forth to shuttle
forward or backward from the cursor position to locate an edit point.
Tip:
Set in and out points while dragging the playhead by pressing the I and O keys.
Scrubbing on the timeline
The second way that a project can be scrubbed is by
positioning the mouse pointer over the timeline cursor at
a location that is not over any events and pressing Ctrl. The
cursor changes to a speaker icon. Now, when you left-click,
the cursor icon changes again to a pan/scrub icon. Drag
Press Ctrl over
timeline cursor
the mouse left or right to scrub the timeline.
Scrubbing with the keyboard
Drag playhead to scrub
Left-click and
drag to scrub
Three letters (JKL) are used as a keyboard scrub control.
Press J for reverse and L for forward playback. Press K to pause
Keyboard scrub letters
playback.
There are several ways to adjust playback speed:
• Adjust the JKL / shuttle speed selection on the Editing tab of
JKL
Reverse
Pause
Forward
the Preferences dialog.
• Hold K while pressing J or L to emulate a shuttle knob mode.
Press K+J to turn the knob to the left or K+L to turn the knob to
the left. Press K again or Space to return to normal mode.
Rendering a project
Rendering refers to the process of creating a new media file from a Cinescore project. The project file is not
affected (overwritten, deleted, or altered) during the rendering process. You may return to the original
project to make edits or adjustments and render it again.
Creating a movie
To create a movie, you render the project into an appropriate media file output. The final output format
depends on the destination of the new media file. Some examples are AVI, MOV, and WMV.
1.
From the File menu, choose Render As.
2.
In the Render As dialog box, choose the appropriate option from the Save as type drop-down list.
32 | GETTING STARTED
Page 37

3.
Choose a setting from the Te mp l at e drop-down list or click Custom to select custom compression
settings.
4.
Enter a name and browse for a destination for your file.
5.
Click OK.
GETTING STARTED | 33
Page 38

34 | GETTING STARTED
Page 39

Chapter 3
Basic Editing Techniques
Cinescore® projects are multitrack compilations of events that occur over time. The events in
your project are references (pointers) to source media files. Cinescore software is a
nondestructive editor, so editing events in your project does not alter the source media files
in any way.
Getting around
When editing and playing back the project, the cursor identifies where you are along the
project’s timeline.
Moving the cursor
Use the following keyboard commands to move the cursor in the timeline.
Description Keys Description Keys
Go to beginning of project Ctrl+Home or WMove left/right to marker(s) Ctrl+Left/Right
Go to end of project Ctrl+End or E Move to marker # 0-9 keys (not
Go to beginning of selection
or view (if no selection)
Go to end of selection or view (if no
selection)
Move right by grid marks Page Down
Move left by grid marks Page Up Move left/right one frame Ctrl+Alt+Shift+M
Go to Ctrl+G
Home Move left/right to event edit points
End Nudge cursor on timeline Left or Right Arrow
including fade edges (see figure
below)
Move left/right one frame Alt+Left/Right
Center in view \
Arrow
numeric keypad)
Ctrl+Alt+Left/Right
Arrow
Arrow
ouse wheel
Event edit point cursor jumps
Changing focus
Focus is used to describe which objects have the attention of a program. For example, when
you click a file in the Project Media list, the Project Media window has focus. To instantly
switch the program’s focus to the track view (timeline), press Alt+0 or, from the View menu,
choose Focus to Track View.
BASIC EDITING TECHNIQUES | 35
Page 40

In Cinescore software, it matters which track has focus when you perform a task. For example, when you
double-click a media file in the Explorer, it is inserted into the track that has focus. You can click a track on
its track number to make it the focus track. A blinking white line under the track number and shading in
the track list indicates a track has focus.
Making selections
You have the flexibility to select one or more events, a time range, or events and a time range. All selection
options can apply to a single track or to multiple tracks.
To select an event, click it.
Selecting multiple events
You can select multiple events in your project using several methods.
Tip:
Once you have selected multiple events, you can group them together.
Note:
You can select multiple video events, multiple audio events, or a combination of both video and
audio events. However, you can only use commands and operations that apply to both types of events for
selections composed of both audio and video events.
Selecting nonadjacent events
1.
Hold the Ctrl key.
2.
Select the events by clicking them.
To deselect an event, simply click it again to toggle the
event selection on or off.
Selecting a range of events
1.
Hold the Shift key.
2.
Click the first event that you want to select.
3.
Click the last event that you want to select.
All events between the first and last selected events
are highlighted and selected.
Tip:
You may include or exclude events from a selection area by pressing Ctrl and clicking an event. To
deselect all events, click anywhere in the workspace outside of the selected events.
36 | BASIC EDITING TECHNIQUES
Selected events
Selected events
Page 41
Selecting all events to the end of the track
1.
Right-click an event. A shortcut menu appears.
2.
From the shortcut menu, choose Select Events to End. All events on the track after the selected event
are selected.
Tip:
To move large blocks of events, you can use Select Events to End with events selected on
different tracks. Press Ctrl and click to select events on different tracks, and then right-click to access the
shortcut menu.
Selecting all events that refer to a specific media file
Right-click a file in the Project Media list and choose Select Timeline Events from the shortcut menu. All
events that use the selected media file in the active take are selected.
Hold Ctrl or Shift while choosing Select Timeline Events from the shortcut menu to add the events to the
current selection.
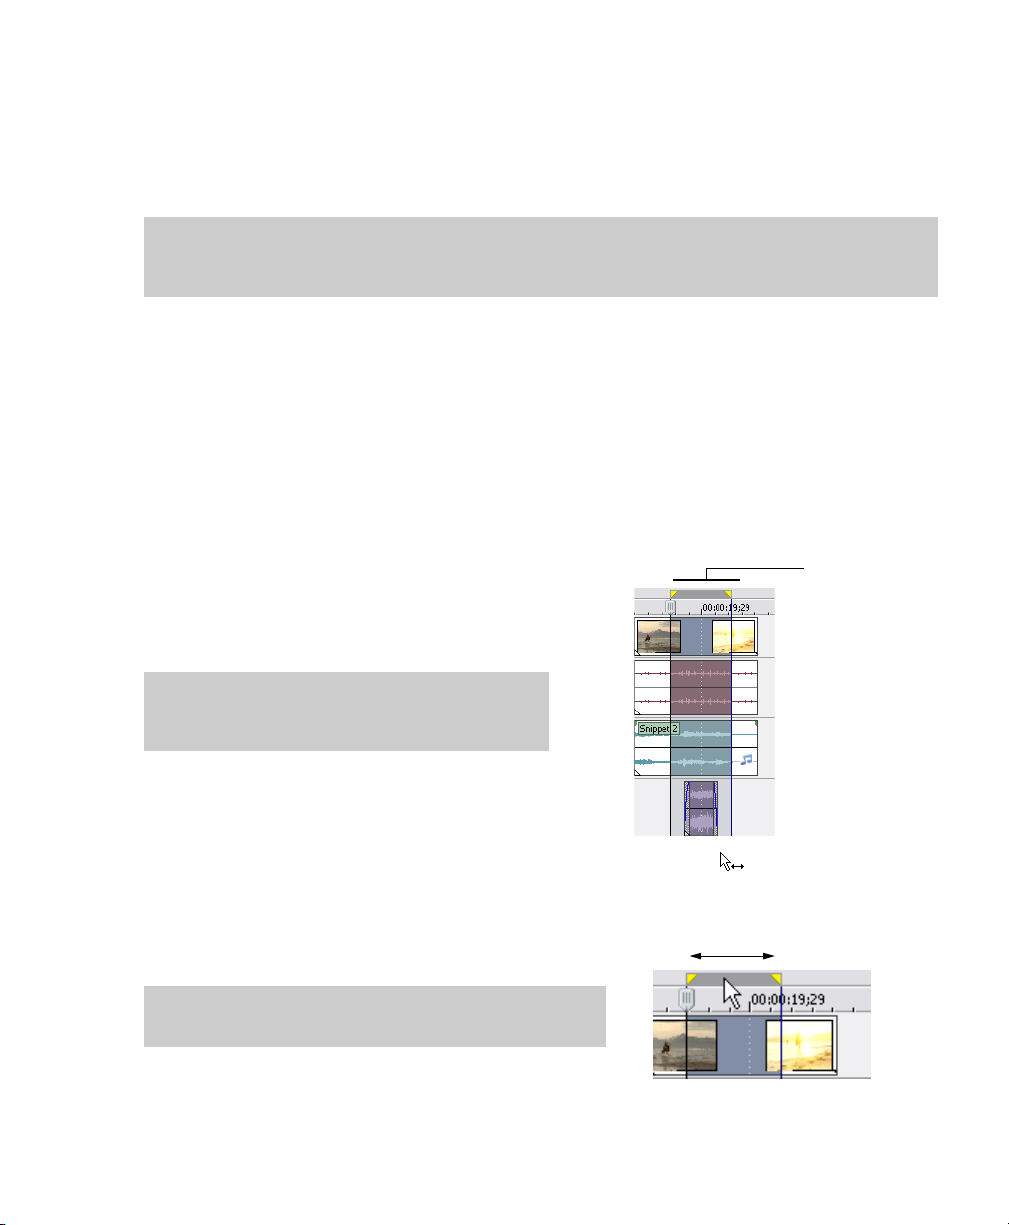
Selecting a time range
Time selections are indicated by a shaded box and a
Time selection
bar that appears on the top of the timeline. You can
use the time selection bar for playing back a smaller
portion of your project or to apply cross-track edits.
Note:
Unless an event is locked, a selected time
range affects all events, or portions of events, that
Only the events
within the time
selection are
affected by edits
or played back.
occur within the range.
Dragging to select a time range
1.
Position the mouse pointer above the ruler (on
the marker bar). The mouse pointer changes to a left/right arrow cursor (
2.
Drag to select a region. All events, or portions of events within the region are highlighted.
3.
Drag the yellow handles on either end of the time selection to increase or decrease your time range
).
selection.
Tip:
You can move the entire selection range by dragging
the time selection bar.
BASIC EDITING TECHNIQUES | 37
Page 42

Selecting a time range during playback
1.
Click the Play ( ) or the Play From Start ( ) button to begin playback.
2.
Press I where you want the time selection to begin.
3.
Press O here you want the time selection to end.
4.
Click the Stop button ( ) to stop playback.
Using shortcuts for time selections
These shortcuts can speed up the process of making precise time selections.
Description Shortcut
Set time selection duration equal to an event’s duration Double-click the event
Extend selection to the end of the currently selected event edge Ctrl+Shift+Alt+Right Arrow
Extend selection to the beginning of the currently selected
event edge
Drag a time selection on an event without selecting/
deselecting the event
Tip:
Press Backspace to recall the last five time selection areas.
Ctrl+Shift+Alt+Left Arrow
Ctrl+Shift+drag on the event
Looping playback
If you want to play back the time range, click Play ( ) to play only the events within the time range. Click
the Loop Playback button ( ) or press Q to toggle loop playback on and off. Cinescore software
continually plays back the portion of the timeline within the time selection when loop playback is toggled
on.
38 | BASIC EDITING TECHNIQUES
Page 43

Selecting events and a time range
Selecting a time range does not
Time selection
automatically select events.
Excluding locked events, all items
within the time range play back and
are affected by Edit menu
commands. However, you may select
specific events to edit, and then
select a time range.
1.
Select the events you wish to
edit.
For more information, see
Selected
event
Unselected
event
Selected
event
Selecting multiple events on page
36.
2.
Place the mouse pointer above
the ruler (on the marker bar). The mouse pointer changes to a left/right arrow cursor (
3.
Drag to select the region. Notice that events that were not initially selected in step 1 remain
unselected (not highlighted).
Selecting tracks
Click a track header to select it. Hold Ctrl or Shift to select multiple tracks.
Editing events
Unselected
event
Selected
event
Unselected
event
).
Copying events
You can copy events, or portions of events, to the clipboard and paste them into your project. You may
copy a single event or multiple events. Copying preserves the original event information, edits, and other
modifications.
1.
Select the events to be copied. For more information, see Selecting multiple events on page 36.
2.
Select a time range, if applicable.
3.
Click the Copy button ( ).
BASIC EDITING TECHNIQUES | 39
Page 44

Copying selected events
When copied, selected events are reproduced and placed on the clipboard. Time information is also placed
on the clipboard.
Events before copy Clipboard contents Events after copy
The original events are not
affected and do not change.
Copying a time selection
Events within the time selection and across all tracks are reproduced and placed on the clipboard. Time
information is also placed on the clipboard.
Events before copy Clipboard contents Events after copy
The original events are not
affected and do not change.
Copying a time selection and events
Events and portions of selected events within the time selection are reproduced and placed on the
clipboard. Time information is also placed on the clipboard.
Events before copy Clipboard contents Events after copy
The original events are not
affected and do not change.
40 | BASIC EDITING TECHNIQUES
Page 45

Cutting events
Cutting events removes them from their respective tracks, but places the cut information (events and time)
on the clipboard. Once on the clipboard, you may paste the information into your project.
Tip:
You can apply a ripple edit after cutting. For more information, see Applying post-edit ripples on page
51.
1.
Select events or a time range. For more information, see Making selections on page 36.
2.
Click the Cut button ( ).
Cutting selected events
When cut, selected events are removed from the timeline and placed on the clipboard. Time information is
also placed on the clipboard.
Events before cut Clipboard contents Events after cut Events after cut in
post-edit ripple
mode
BASIC EDITING TECHNIQUES | 41
Page 46
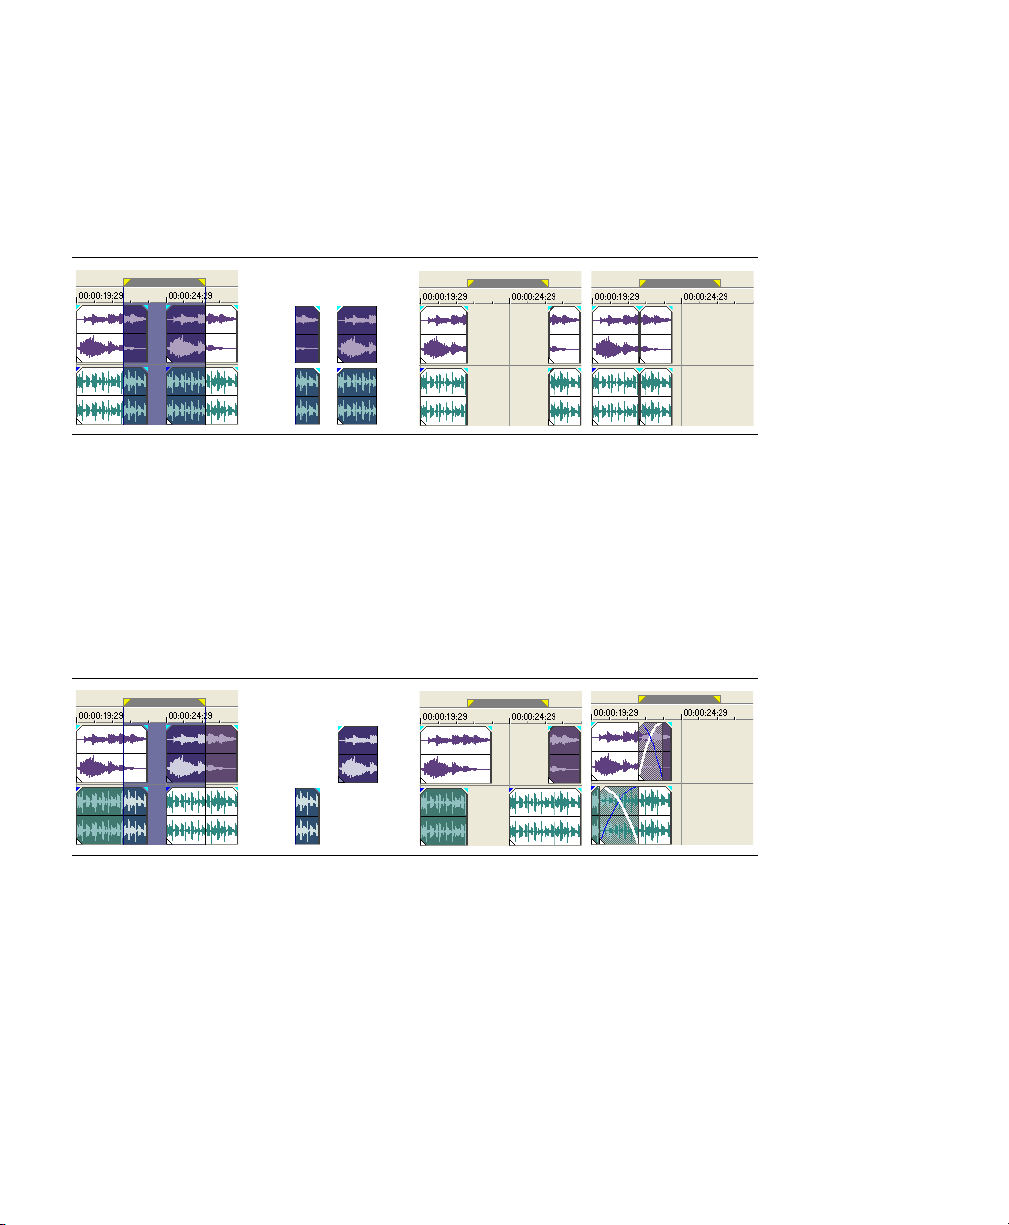
Cutting a time selection
Events within the time selection are reproduced and placed on the clipboard. Time information is also
placed on the clipboard. When cutting a time selection, ripple edit mode affects the position of material on
all tracks or affected tracks after the cut.
Events before cut Clipboard contents Events after cut Events after cut in
post-edit ripple mode
Cutting a time selection and events
Events and portions of selected events within the time selection are reproduced and placed on the
clipboard. Time information is also placed on the clipboard. When cutting a combination of time selection
and event selection, post-edit ripple mode affects the position of material on all tracks or the tracks of
selected events after the cut.
Events before cut Clipboard contents Events after cut Events after cut in
post-edit ripple mode
Pasting events
Once information is copied to the clipboard, you may choose a variety of ways to paste the clipboard
items. Items are always pasted from the cursor’s position along the timeline.
42 | BASIC EDITING TECHNIQUES
Page 47

When post-edit ripple mode is enabled, material is pushed down the track to make room for pasted
material. The exact behavior of the ripple depends on what is being pasted, and the type of ripple edit you
chose to perform. If one or more events are pasted, only those tracks where pasted material appears are
ripple edited.
Tip:
You can apply a ripple edit after pasting. For more information, see Applying post-edit ripples on page
51.
1.
Move the cursor to the desired location on the timeline.
2.
Click either the track number or within the track where you want to paste the event. This track is the
focus track; there can be only one focus track at a time.
Note:
If you are pasting multiple events from different tracks, new tracks are automatically created as
needed.
3.
Click the Paste button ( ).
Clipboard events are pasted at the cursor position on the track. Existing track events can be
overlapped with newly pasted information.
Punching-in and crossfading events
You can insert events into the middle of (on top of) existing events without altering the timing of the
project. When the inserted event ends, the original event continues playing as if it had never stopped.
You can choose the duration of crossfades for punched-in audio events.
1.
From the Options menu, choose Preferences. The Preferences dialog appears.
2.
Click the Editing tab.
3.
Select Quick fade length of audio events. Specify a duration for each transition.
BASIC EDITING TECHNIQUES | 43
Page 48

Events that have previously been inserted or punched-in are not affected by this change. The concept of
punching in and out only applies when you are inserting an event that is shorter than the event that it is
being inserted into. In the following illustration, every frame is numbered so that you can see how the
original event continues after the inserted event ends, as if it continued to play underneath the original.
Punched-in event
Duplicating events
Duplicating is a combination of copying and pasting in one action. The process is like moving the event to
a new position while leaving a copy behind.
1.
Press Ctrl.
2.
Drag the event you want to duplicate to the place where you want the new event to be positioned.
Trimming events
This section describes simple ways to trim events.
Tip:
You can apply a ripple edit after trimming an event. For more information, see Applying post-edit
ripples on page 51.
Trimming an event
During the trimming process for a video event, both the last
thumbnail image on the event and the Video Preview
window show the last frame in the event, allowing you to edit
events very accurately.
1.
Move the cursor over the edge of the event. The cursor
changes when properly positioned (
2.
Drag the edge of the event to trim it.
).
Since a multimedia file often has both a video and an audio
component, both events are trimmed (or extended) as a group unless you ungroup them.
44 | BASIC EDITING TECHNIQUES
Trimming
grouped events
at the same time
Page 49

Trimming an event beyond its end
You can trim an event beyond its end, extending it as a result. Once extended, the event loops as a default.
A notch indicates where the looped event repeats.
Alternately, you can turn looping off and make the last frame of an event’s media repeat for the duration of
the event (a freeze frame). A notch appears at the point in the event where the video ends and the freeze
frame begins.
Trimming adjacent events
You can trim adjacent events simultaneously. Press Ctrl+Alt while dragging the common edge between
two adjacent events. The trim adjacent cursor appears (
Press Ctrl+Alt over the
boundary between two events...
...and drag left... ...or right to trim both events at once.
).
Trimming a time selection
Trimming events removes all media outside the time selection. The removed information is not placed on
the clipboard. Trimming is different from cutting in that the events within the time selection are preserved.
1.
Select a time range. For more information, see Selecting a time range on page 37.
2.
Press Ctrl+T or, from the Edit menu, choose Tri m.
The material outside the time selection (across all tracks) is removed from the project. However, the time
information (space) between events is not removed.
Events before trim Clipboard contents Events after trim
Trimmed information is not
placed on the Clipboard.
Trimming a time and event selection
1.
Select the events to be trimmed.
BASIC EDITING TECHNIQUES | 45
Page 50

2.
Select a time range. For more information, see Selecting events and a time range on page 39.
3.
Press Ctrl+T or, from the Edit menu, choose Tri m.
Only the portion of selected events outside the time selection is trimmed. Unselected events remain. The
time information (space) between events is not removed.
Events before trim Clipboard contents Events after trim
Trimmed information is not
placed on the Clipboard.
Edge trimming events using the keyboard
With this method, you can quickly jump through your project and adjust cuts until they're perfectly
synchronized. If you have an external multimedia controller, it's even easier.
1.
If you want downstream events to ripple as you trim, click the Auto Ripple button ( ) to turn on
Auto Ripple mode.
2.
Select the event you want to trim.
3.
Press 7 or 9 on the numeric keypad to move the cursor to the event edge you want to trim. 7 selects
the beginning of an event or moves to the previous event edge. 9 selects the end of the event or
moves to the next event edge. A red bracket is displayed to indicate which event edge will be
trimmed.
Note:
You can also perform this step using the [ or ] keys.
4.
Use the 1, 3 and 4, 6 keys on the numeric keypad to trim the current event edge:
• Press 1 to trim one video frame left, or press 3 to trim one video frame right (or hold Ctrl+Shift+Alt
while rolling the mouse wheel).
• Press 4 to trim one pixel left, or press 6 to trim one pixel right (or hold Ctrl+Shift while rolling the
mouse wheel). Depending on the current zoom level, the trim duration will vary.
Note:
Pressing 5 on the numeric keypad exits edge-trimming mode. If you are not in edge-trimming
mode, 1, 3, 4, and 6 on the numeric keypad to nudge events on the timeline by frame (1 and 3) or by
pixel (4 and 6).
5.
Repeat steps 3 and 4 as necessary.
46 | BASIC EDITING TECHNIQUES
Page 51

Splitting events
You are allowed to create multiple, independently functioning events from a single event by splitting it.
Splitting creates a new ending point for the original event and creates a starting point for the newly
created event.
Splitting an event does not alter the original media.
The original media file’s information is there, but is
omitted for playback based on where the event’s
starting or ending point occurs on the timeline.
When split, the two new events are flush against one
another. The two events can be moved
independently.
One event
Split position
Two events after split
Splitting an event
1.
Select the event(s) to be split. For more
The two new events
can be moved
independently.
information, see Making selections on page 36.
2.
Place the cursor at the timeline position where the split will occur.
3.
From the Edit menu, choose Split, or press S.
Splitting all events at the cursor
All events are split at the cursor’s position (unless an event is locked). The split occurs across all tracks (if no
events are selected).
Events before splitting Events after splitting
BASIC EDITING TECHNIQUES | 47
Page 52

Splitting selected events
Only the selected events are split at the cursor’s position.
Events before splitting Events after splitting
Splitting a time selection
Unless locked, all events within the time selection are split at the starting and ending points of the time
range, meaning that two splits are made. The split occurs across all tracks.
Events before splitting Events after splitting
48 | BASIC EDITING TECHNIQUES
Page 53
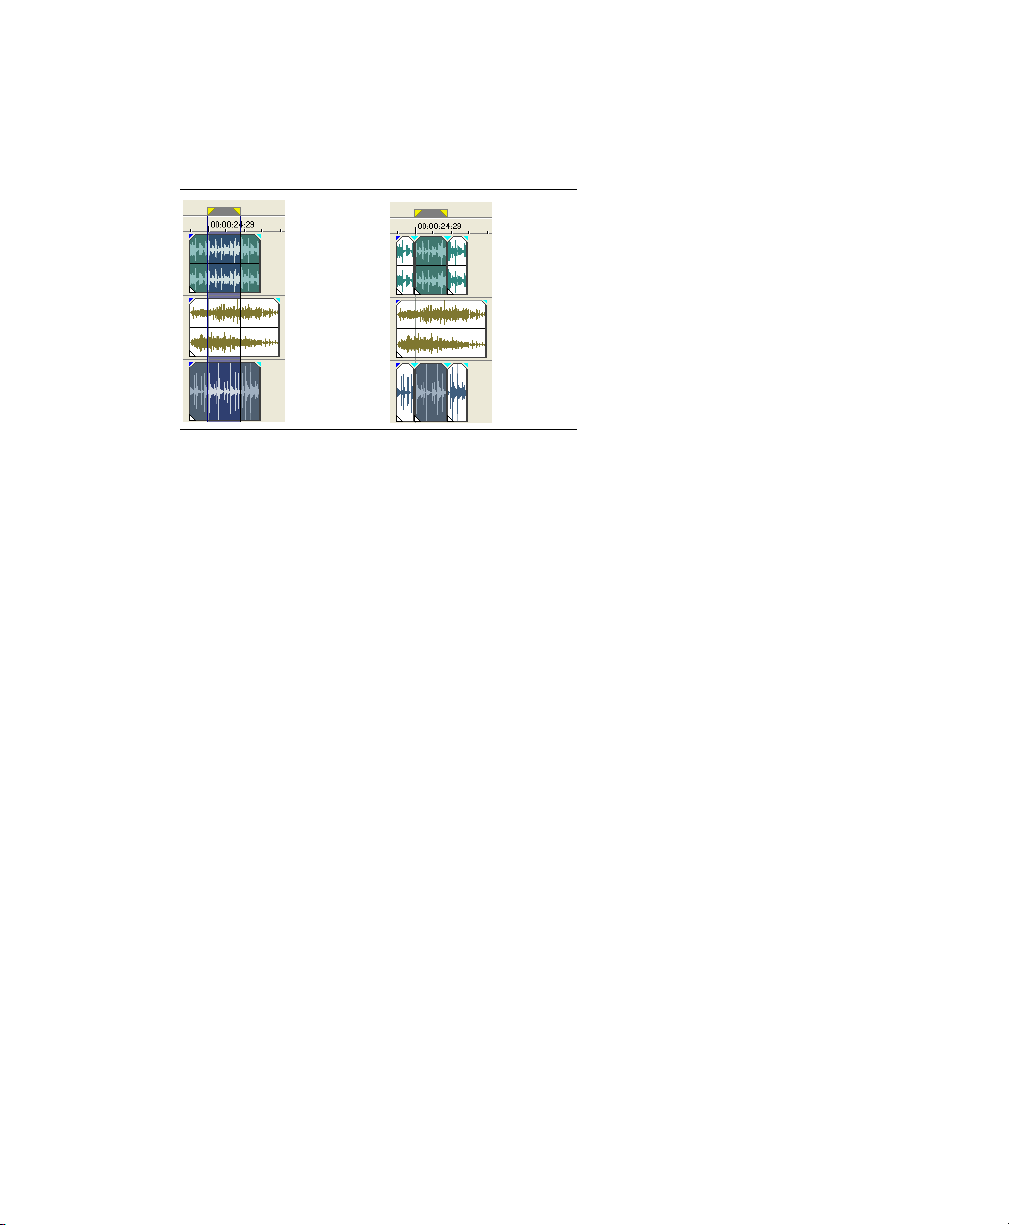
Splitting a time selection across selected events
Only selected events within the time selection are split at the starting and ending points of the time range.
Events before splitting Events after splitting
Slipping and sliding events
To help you picture what happens when you slip and slide events, think of an event as a window to a media
file. The window can display the entire media file or a small section. When the window displays only a
portion of the media file, you can move either the window or the underlying media to adjust the media
that is played by an event:
• When you slip an event, your event maintains its place on the timeline, but the media file moves in the
direction you drag.
BASIC EDITING TECHNIQUES | 49
Page 54

• When you slide an event, the media file maintains its place on the timeline, but the event moves in the
direction you drag.
The original
media file.
The event on the timeline
with original frames.
Slipping the event two
frames to the right.
Slip-trimming the event
two frames to the right.
Sliding the event two
frames to the right.
Tip:
You can also slip or slide grouped events (at the same time) or slide a crossfade between two
events.
Shifting the contents of (slipping) an event
Press Alt while dragging an event. The slip cursor appears ( ).
As you drag the event, the contents of the event shift, but the event does not move. You can use this
technique when you want to maintain an event’s length and position, but have the event play a different
section of the source media file.
Slip-trimming an event
Press Alt while dragging the right or left edge of an event. The slip-trim cursor appears ( ).
As you drag the event edge, the media moves with the event edge.
50 | BASIC EDITING TECHNIQUES
Page 55

Sliding an event
Press Ctrl+Alt while dragging an event. The slide cursor appears ( ).
As you drag, the relative position of the media remains fixed on the track, and the event position changes.
You can use this technique when you want to maintain an event’s length, but have the event play a
different section of the source media file at a different point in your project.
Tip:
You can apply a ripple edit after slip-trimming or sliding an event. For more information, see Applying
post-edit ripples on page 51.
Deleting events
Deleting an event removes it from its track. Multiple events can be deleted and time selections can be used
to modify the process. Ripple editing also applies to delete actions. Deleting operates exactly like a cutting
operation, but the removed information is not placed on the clipboard.
events on page 41.
1.
Select the events to be deleted.
2.
Press Delete.
For more information, see Cutting
Applying post-edit ripples
You can apply a post-edit ripple that affects either the edited track(s), the track(s) and certain project
elements, or everything in the timeline. The power lies in the fact that you can apply this post-edit ripple to
a wide variety of editing tasks, such as trimming, crossfading, cutting, pasting, and deleting events. You can
also choose to apply your ripple edits manually or automatically.
You can ripple the contents of the timeline following an edit after performing these tasks:
• trimming (pg. 44), slip-trimming (pg. 50), and sliding (pg. 51) events
• time compressing/stretching events
• cutting events (pg. 41)
• pasting events (pg. 42)
• deleting events (pg. 51)
Ripple editing also affects how material is added from the Trimmer window.
BASIC EDITING TECHNIQUES | 51
Page 56

The original four events
Trimming the second event
After applying a post-edit ripple, the third and fourth events close the gap
A quick and easy method is also provided for shuffling a sequence of events on a track. Decide that the
third event in a series should really be the second instead? You can drag the event to a new position and
instruct the software to shuffle the events into their new order.
Applying a post-edit ripple manually
1.
Perform one of edits discussed above. Above the timeline, an arrow
indicates where the post-edit ripple will occur and the direction the
affected events will move.
2.
From the Edit menu, choose Post-Edit Ripple, and choose a
command from the submenu:
• Affected Tracks ripples only the track(s) where you performed the edit.
• Affected Tracks, Bus Tracks, Markers, and Regions ripples the track(s) where you performed the
edit and ripples any envelopes on those tracks. This command also ripples any markers or regions
in the project.
• All Tracks, Markers, and Regions ripples all tracks and all envelopes on those tracks. This
command also ripples any markers or regions in the project.
The timeline is rippled after the edit according to the option you choose.
Tip:
You can press F after an edit to ripple the affected tracks, or you can press Ctrl+F to ripple markers
and envelopes too. To ripple everything after an edit, press Ctrl+Shift+F.
52 | BASIC EDITING TECHNIQUES
Page 57

Shuffling events
T
T
A quick way to change the order of a sequence of events in a track is provided. Right-click and drag an
event to a new location in the track and choose Shuffle Events from the shortcut menu that appears. The
events are shuffled into the new order.
he original four events
Right-click and drag event three between events one and two
he four events after the shuffle
Crossfading events
You are allowed to crossfade between two events on
the same track. For audio events, crossfading fades
out one audio event’s volume while another event’s
volume fades in. For video events, crossfading
creates a transition between two events, one fading
out while the other fades in. Lines appear indicating
how and when the event’s volume or transparency is
being affected.
Using automatic crossfades
The automatic crossfade feature turns the overlapping portions of two events into a smooth crossfade. This
feature is turned on as a default.
BASIC EDITING TECHNIQUES | 53
Fade in
volume line
Fade out
volume line
Page 58
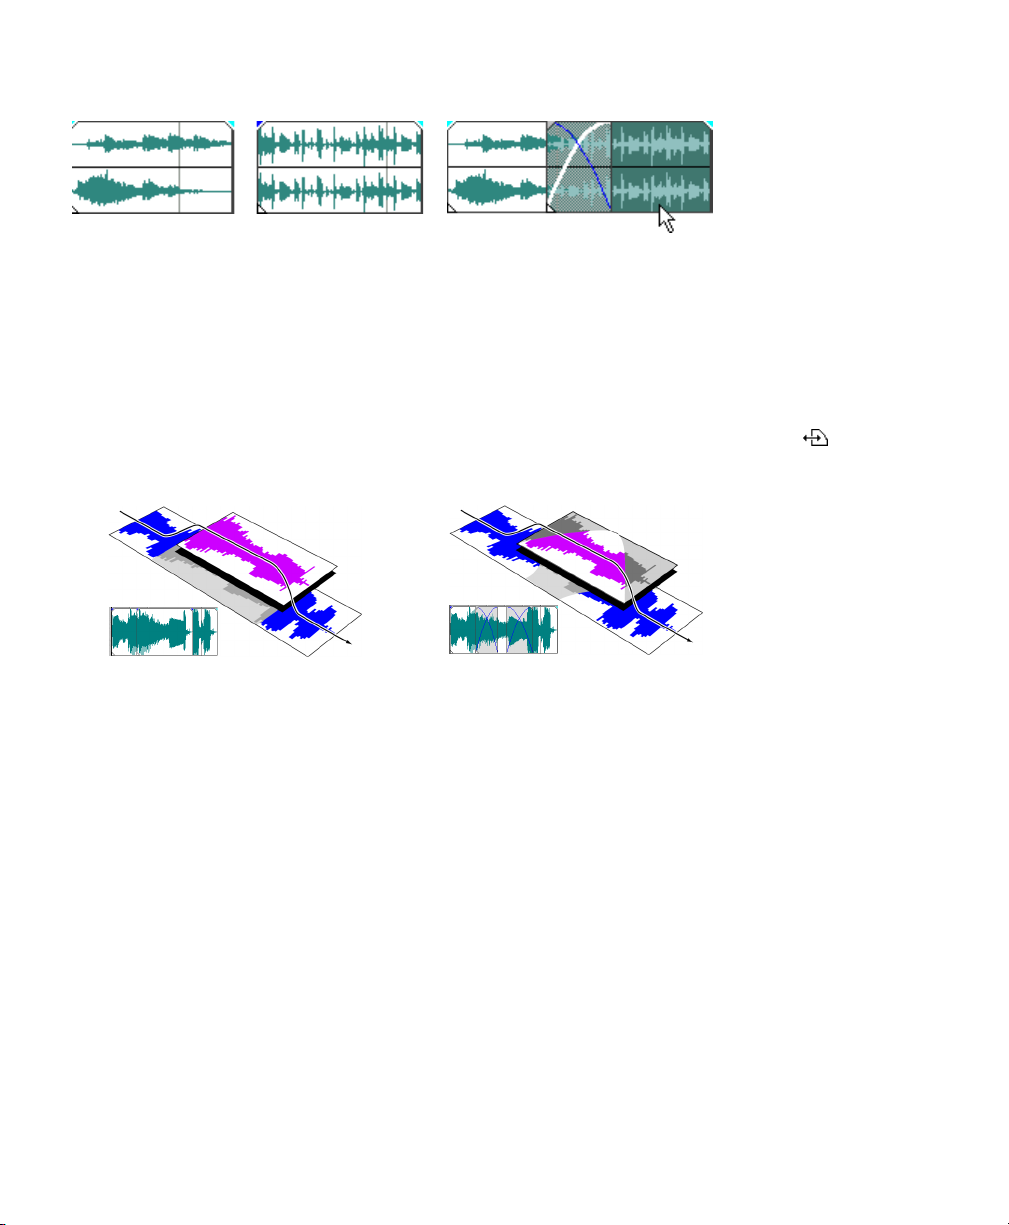
Events before crossfade Events after crossfade
p
Drag one event to
the other
overla
Manually setting a crossfade
An automatic crossfade is not inserted if a shorter event is placed on top of and within the same time frame
of a longer event. In this case, the longer event begins playing, then the shorter event plays, and then the
longer event resumes playing at the timeline position. You can manually create a crossfade to fade in and
out of the shorter event.
1.
Place the mouse pointer on one of the shorter event’s handles. The envelope cursor appears ( ).
2.
Drag the handle to the desired position.
Events without crossfade
Events with manual crossfade
This is a fast and effective method of inserting a voiceover on top of a background music track (although
the music fades out completely) or to replace a bad section of audio.
For more information, see Punching-in
and crossfading events on page 43.
Changing crossfade curves
You can change the crossfade curves that are used to fade in and out between two events.
1.
Right-click anywhere in the crossfade region to display a shortcut menu.
2.
From the shortcut menu, choose Fade Type, and choose the desired fade type from the submenu.
Sliding a crossfade
You can slide a crossfade between two events without affecting the total length of the two overlapping
events. This process is similar to sliding and slipping events.
events on page 49.
54 | BASIC EDITING TECHNIQUES
For more information, see Slipping and sliding
Page 59
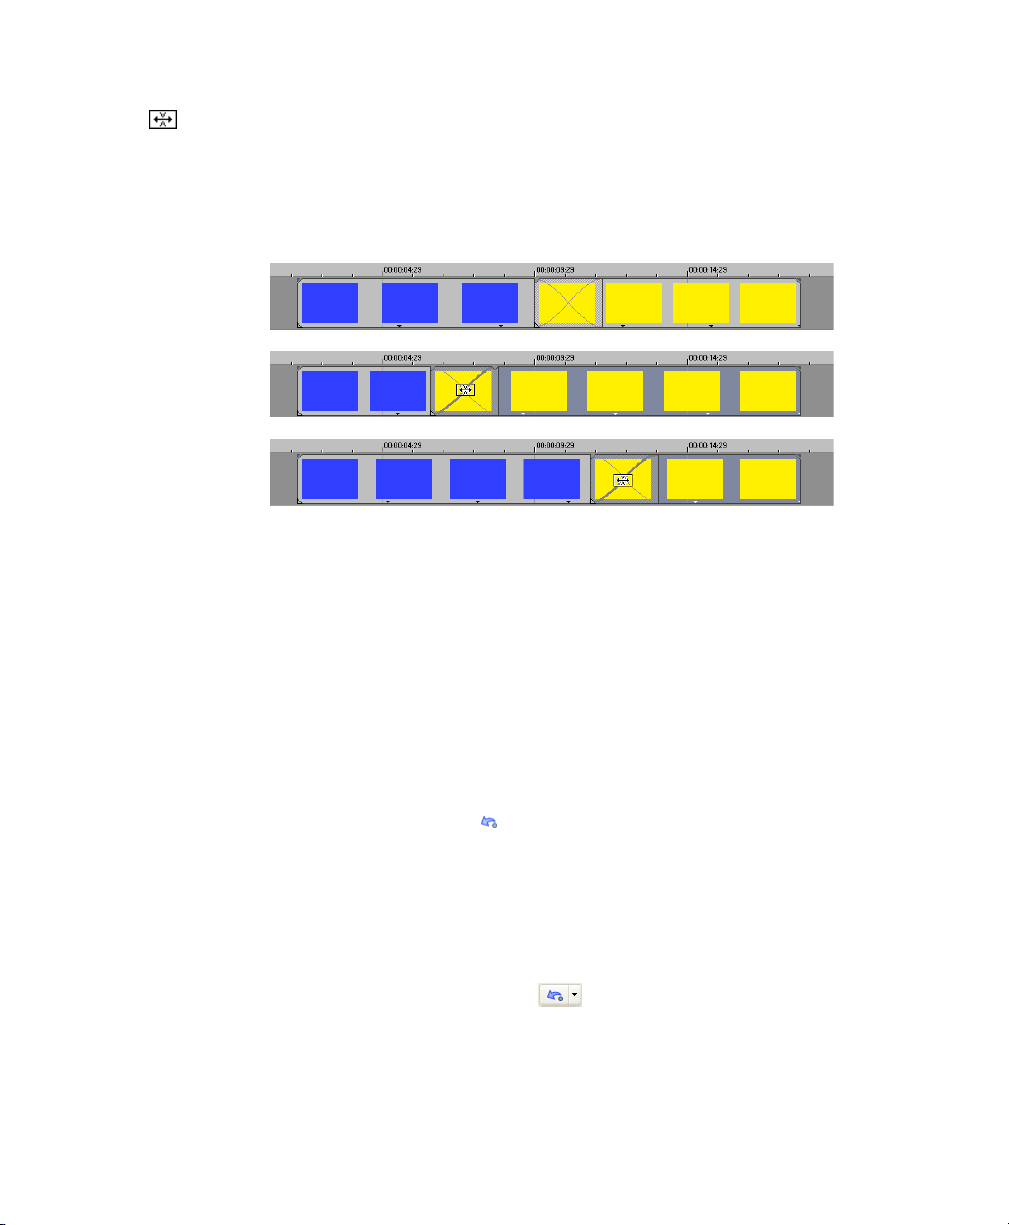
Press Ctrl+Alt while dragging the overlapping area between two events. The slide crossfade cursor appears
( ).
As you drag, the relative position of the media remains fixed on the track, and the crossfade position
changes, effectively trimming the edge of the event in the direction you drag. You can use this technique
when you want to maintain the length of two combined events but want the transition to occur earlier or
later.
Two events with a
crossfade.
Sliding the crossfade
to the left...
...and to the right.
Using undo and redo
You are given unlimited undo and redo functionality while working on your project, even to the extent of
being able to undo changes made before the last time a project was saved (but not closed). While you are
working with a project, an undo history of the changes that you have performed is created. Each time you
undo something, that change is placed in the redo history.
When you close the project or exit the software, both the undo and redo histories are cleared.
Using undo
Pressing Ctrl+Z or clicking the Undo button ( ) reverses the last edit performed. Repeatedly using the
keyboard command or toolbar button continues undoing edits in reverse order, from most recent to
oldest. In addition, you may undo the last edit by choosing it from the Edit menu.
Undoing a series of edits
You can undo a series of edits by using the drop-down list on the Undo button.
1.
Click the arrow to the right of the Undo button ( ).
2.
From the drop-down list, choose the edit that you want to undo. Items above it (subsequent edits) are
selected automatically. Your project is restored to the state prior to those edits.
BASIC EDITING TECHNIQUES | 55
Page 60

Use the mouse
to select
a series of edits.
When you undo an edit or a series of edits, they are added to the redo history. This feature allows you to
restore your project to a previous state.
Tip:
From the Edit menu, choose Undo All to undo all edits in the history. All edits are undone and
added to the redo history.
Using redo
Pressing Ctrl+Shift+Z or clicking the Redo button ( ) redoes the last undo performed. Repeatedly using
the keyboard command or toolbar button continues redoing undos in reverse order, from most recent to
oldest. In addition, you may redo the last edit by choosing it from the Edit menu.
Redoing a series of edits
You can view the redo history by clicking the arrow on the right side of the Redo button ( ). The top
item in the list that appears is the most recent undo edit. If you redo a specific edit that appears farther
down the list, all subsequent edits above it are redone as well.
When you redo an edit or a series of edits, they are added to the undo history again. The redo history is
cleared when a new edit is performed.
Clearing the edit history
You can clear both undo and redo histories without closing your project or exiting the software. Once the
histories have been cleared, a new edit history is created as you continue working on the project. While
clearing the edit history is not usually necessary, it can free up disk space. To clear the edit history, choose
Clear Edit History from the Edit menu.
Adding project markers and regions
Several types of project markers are provided that identify parts of your project, serve as cues, and provide
additional functionality:
• Markers are points that you mark along the project’s timeline. They are typically used to mark locations
in the project for later reference or to mark timing cues.
56 | BASIC EDITING TECHNIQUES
Page 61

• Regions are ranges of time that you mark along the timeline. Regions identify ranges of time for your
reference and can function as permanent time selections.
Tip:
You can use ripple editing to automatically move markers and regions as you edit in the timeline.
For more information, see Applying post-edit ripples on page 51.
Working with markers
Markers are useful for identifying and navigating to specific locations in longer projects. As you place
markers in your project, they are automatically numbered (up to 99) in the order that they are placed.
Markers appear as orange tags above the ruler. You may name them and reposition them along the
project’s timeline.
Markers
Marker
bar
Right-click the marker bar
Inserting a marker at the cursor
1.
Position the cursor where you want to place the marker.
2.
From the Insert menu, choose Marker, or press M.
3.
Type a name for the marker and press Enter. If you do not want to name the marker, simply press Enter.
Inserting a marker during playback
During playback, press M. The marker appears on the marker bar. You may name the marker after it has
been set.
Naming (or renaming) a marker
1.
Place the mouse pointer on the marker you want to name or rename. The pointer changes to a hand
icon (
2.
Right-click to display a shortcut menu.
).
BASIC EDITING TECHNIQUES | 57
Page 62
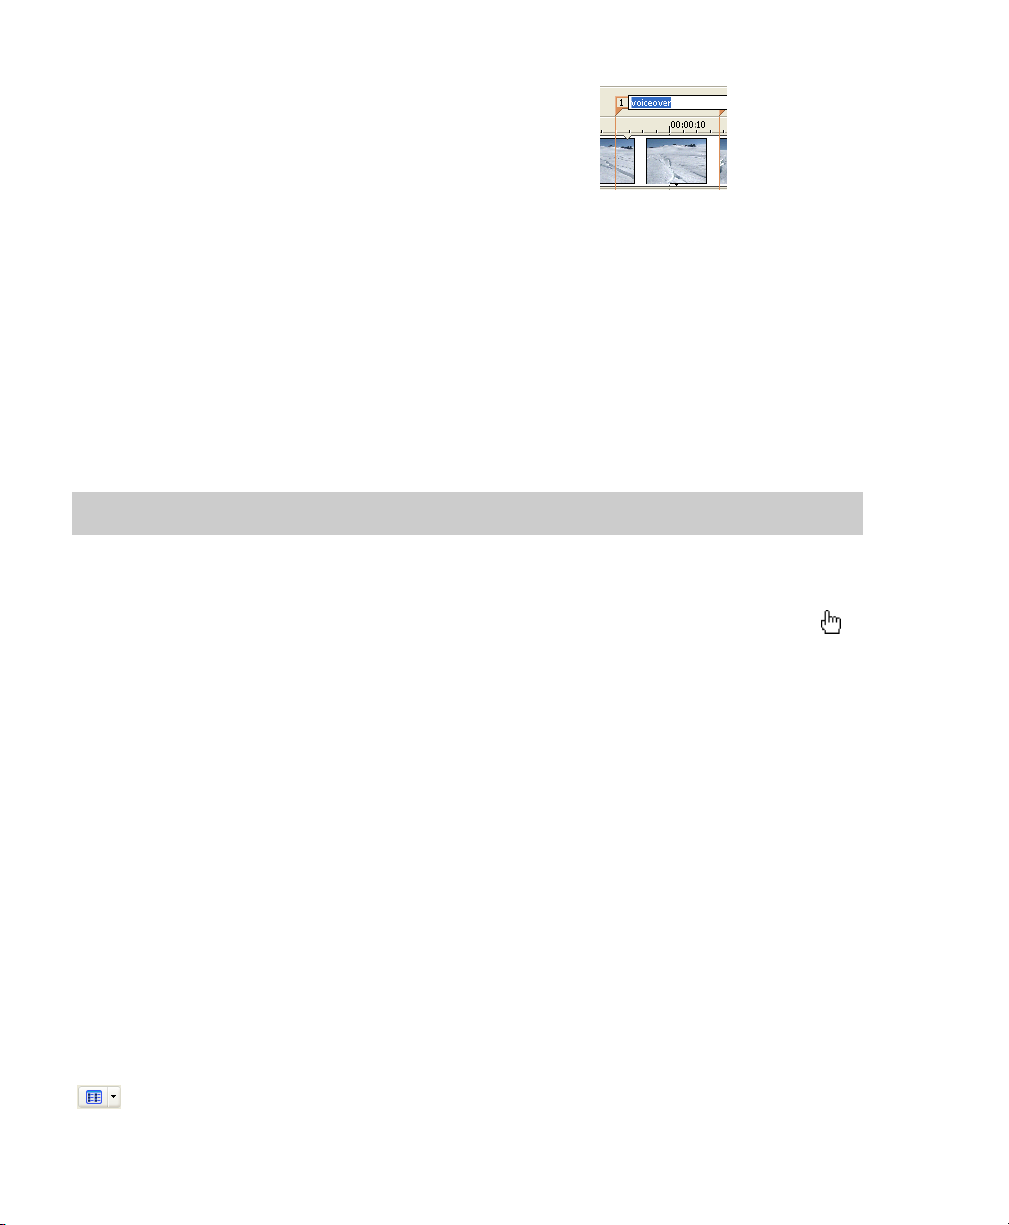
3.
From the shortcut menu, choose Rename. A text box opens
next to the marker.
4.
Type the marker name.
5.
Press Enter to set the marker’s name.
You can also double-click an existing name or double-click the
space just to the right of a marker to rename it.
Moving markers
You can reposition a marker by dragging it on the marker bar.
Navigating to markers
You can jump the cursor to any marker on the timeline by clicking the marker. You can also jump to a
marker by pressing the number keys along the top of the keyboard (not the numeric keypad).
Tip:
Jump the cursor to the next or previous marker by pressing Ctrl+Right Arrow or Ctrl+Left Arrow.
Deleting markers
1.
Place the mouse pointer on the marker that you want to delete. The pointer changes to a hand ( ).
2.
Right-click to display a shortcut menu.
3.
From the shortcut menu, choose Delete. The marker is removed from your project.
The tags are not renumbered as you remove them. For example, if you have five markers in your project
and delete markers 3 and 4, the remaining markers will be listed as 1, 2 and 5. However, as you add markers
again, Cinescore software begins numbering the missing sequence first, in this case 3 and 4, then 6, 7, 8,
etc.
Deleting all markers and regions
1.
Right-click the marker bar.
2.
From the shortcut menu, choose Markers/Regions, and choose Delete All from the submenu.
Working with regions
Regions identify ranges of time and provide a way to subdivide your project. A region is defined as the area
between two region markers that share the same number. Regions can function as semi-permanent time
selections. You can view region information in the Explorer by clicking the arrow next to the View button
(
) and selecting Region View.
58 | BASIC EDITING TECHNIQUES
Page 63
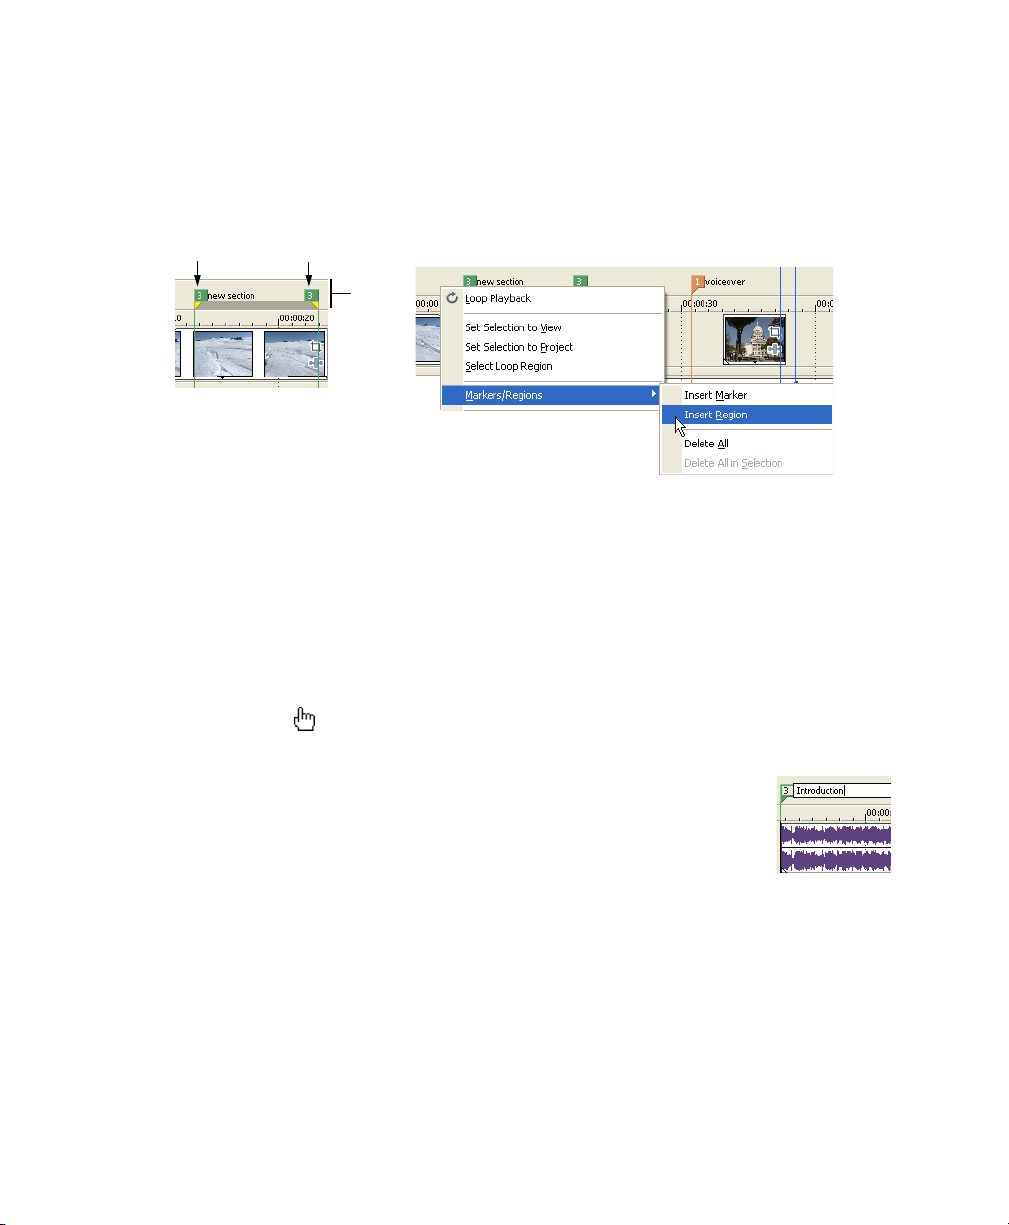
Inserting regions
1.
Make a time selection. For more information, see Selecting a time range on page 37.
2.
From the Insert menu, choose Region, or press R.
3.
Type a name for the region and press Enter. If you do not want to name the region, simply press Enter.
Region markers display at the beginning and end points of a time selection.
Region start
Region end Right-click the marker bar
Marker
bar
Moving regions
Drag a region marker to reposition it. To move both region markers (start and end markers) at once, hold
Alt while dragging a region marker.
Naming regions
1.
Place the mouse pointer on the left region marker you want to name or rename. The pointer changes
to a hand icon (
2.
Right-click to display a shortcut menu.
3.
From the shortcut menu, choose Rename. A text box appears next to the
).
region marker.
4.
Type the region’s name.
5.
Press Enter or click anywhere in the track view to set the name.
Selecting regions
You may select the events, across all tracks, within the region for editing or playing back.
1.
Right-click one of the region markers to display a shortcut menu.
BASIC EDITING TECHNIQUES | 59
Page 64

Selected region
2.
From the shortcut menu, choose Select Region.
Tip:
You can also select a region by pressing a number on your keyboard (not the numeric keypad) or
by double-clicking a region marker.
Navigating to regions
You can move the cursor to the start or end of a region by clicking either region marker. You may press
Ctrl+Right Arrow or Ctrl+Left Arrow to move the cursor to the next or previous region markers.
Right-click a region marker to display a shortcut menu that allows you to navigate to the beginning (Go to
Start) or the end (Go to End) of a region.
Deleting regions
1.
Place the mouse pointer on the region marker’s starting or ending point. The pointer changes to a
hand icon (
2.
Right-click to display a shortcut menu.
3.
From the shortcut menu, choose Delete. The region is removed from your project.
The tags are not renumbered as you remove them. For example, if you have five regions in your project and
delete region 3 and 4, the remaining regions are listed at 1, 2 and 5. However, as you add regions again,
Cinescore software begins numbering the missing sequence first, in this case 3 and 4, and then 6, 7, 8, etc.
).
Deleting all regions and markers
1.
Right-click the marker bar.
2.
From the shortcut menu, choose Markers/Regions, and choose Delete All from the submenu.
Using an external audio editing program
Cinescore software is a nondestructive editing environment, which means that the original source files
remain unchanged by any editing done in the software. Destructive (constructive) edits that modify the
actual source media file may be done in a separate application such as Sound Forge® software from Sony
Creative Software Inc.. By setting up a separate audio editor, you can quickly access the program from
Cinescore software via the Too l s menu or by pressing Ctrl+E.
60 | BASIC EDITING TECHNIQUES
Page 65

Setting up an audio editing program
If you already have Sound Forge software loaded on your computer when you installed Cinescore software,
the installation should have detected it and made it your default audio editing program. However, if you do
not have Sound Forge software or want to specify a different audio editor, you may do so in the Preferences
dialog.
1.
From the Options menu, choose Preferences. The Preferences dialog appears.
2.
In the Preferences dialog, click the Audio tab.
3.
Click the Browse button to the right of the Preferred audio editor box. The Preferred Audio Editor
dialog appears.
4.
From this dialog, navigate to the application to use for editing audio files.
5.
Select the application’s executable icon (.exe) and click Open to set the application as your default
audio editor.
The application’s path displays in the Preferred audio editor box.
Opening an audio editor from Cinescore software
All events in your project are references to media files on a storage device. When you edit an audio event in
an audio editor, you can choose to open the original media file or a copy of the file.
Opening a file in an audio editor
You can directly edit the media file to which an audio event is referenced. Any changes you make and save
in the audio editor are permanent and are reflected in the event in your project.
1.
Select the event to be edited.
2.
From the To o ls menu, choose Audio, and choose Open in Audio Editor from the submenu. Your
selected audio editing application opens the event’s referenced media file.
3.
Make the necessary changes and save the file in the audio editor. If you keep the media file’s name and
location the same, its event is updated immediately in your project. However, if you change the media
file’s name or location (by using Save As), you must import the edited (new) file into Cinescore
software.
Opening a copy of a file in an audio editor
You can also create a copy of an audio file and open it in an audio editor. Opening a copy of a file has the
advantage of preserving the original file unchanged.
1.
Select the event to be edited.
2.
From the To o ls menu, choose Audio, and choose Open Copy in Audio Editor from the submenu.
3.
Make the necessary changes and save the file in the audio editor.
BASIC EDITING TECHNIQUES | 61
Page 66

After editing the sound file and saving, the new file replaces the original contents of the event and is added
to the Project Media window (“Take X” is added to the end of the filename to distinguish it from the original
file). If you want to return to the original event, you can drag it from the Project Media window to the
timeline.
62 | BASIC EDITING TECHNIQUES
Page 67

Chapter 4
Working with Generated Music
The previous chapters showed you how to create a project, add media to the Cinescore®
timeline, and edit events on the timeline. At this point, your movie is looking — and
sounding — good; now you just need to create a score.
Creating generated music
Setting the composition start time and length
Position the cursor or create a time selection to indicate where you want to add your
composition.
• To create a composition that fills a portion of your project, click and drag in a blank area of
the timeline to create a time selection.
• To create a composition that matches the length of a video event on the timeline, doubleclick the video event to select it.
• To create a composition of a specific length, click to position the cursor where you want
the music to begin. By default, the composition will fill the space from the cursor to the
end of the project, but you can choose the length of the composition later.
• If there are no events on the timeline and you haven't created a time selection, a oneminute composition will be created starting at the current cursor position.
Generating music
1.
From the Insert menu, choose Generated Music. The Theme Chooser is displayed.
2.
Use the Theme Chooser to select the media and musical variations you want to use to
generate music:
a.
The Themes pane displays the available themes on your computer. Click the name
of the theme you want to use.
WORKING WITH GENERATED MUSIC | 63
Page 68

A theme is a group of related musical ideas that can be combined to create a composition.
Tip:
You can use the top portion of the Theme Chooser dialog to filter the list of displayed themes or
install/uninstall/download themes.
b.
The Variations pane displays the available versions of the selected theme. Click the name of the
variation you want to use.
A variation is a preset combination of the starting section, mood, arrangement, tempo, and
intensity.
You can preview the selected theme/variation combination by clicking the Preview button .
Tip:
If you want to create your own variations, click the Advanced button to display the
Variation Settings pane. For more information, see Creating or editing variations on page 70.
c.
Click OK. The Insert Generated Music dialog is displayed, and the selected theme is loaded.
3.
The Project pane of the Insert Generated Music dialog shows the basic settings that will be used to
generate music.
a.
The Theme field displays the selected theme that will be used to generate your music along with
its genre and tempo.
You can click the name of the theme to display the Theme Chooser, where you can choose a new
style or a variation on the current theme. For more information, see Creating or editing variations on
page 70.
b.
The Length box displays the length of the current timeline selection.
If you want to change the length of the composition, you can edit the contents of this box. The
composition will be added at the beginning of the timeline selection (or at the cursor position if
no selection exists).
64 | WORKING WITH GENERATED MUSIC
Page 69

c.
Choose a setting from the Ending Type drop-down list to indicate how the composition should
end:
Setting Description
Normal The composition will match the Length setting as closely as possible while providing a musical ending.
Fade Out The composition will match the Length setting as closely as possible with a gradual fade to silence.
This setting will produce the best results when you want to match the Length setting.
Loop The composition will match the Length setting as closely as possible while allowing the end of the
composition to loop smoothly into its beginning.
This setting is useful if you're scoring a video that plays and repeats indefinitely, such as an information
kiosk or a DVD menu.
Abrupt The composition will match the Length setting as closely as possible, ending on the next beat. Note that
the end of the composition may not correspond with the end of a musical measure.
Notes:
• Not all ending types are available at all times. Depending on the current theme, starting section, or
composition length, some settings may not be available.
• If you're generating music to match a small selection, use the Fade Out or Abrupt setting to create the best
possible match between the composition and the selection.
4.
The Generated Music pane allows you to fine-tune sound and tempo of your music.
a.
When you generate music, multiple versions of the composition are created. Choose a setting
from the Composition drop-down to select the version you want to use.
When you choose a new composition, you'll notice that the song in the Timeline pane changes.
Click the Play from Start or Play button to audition the current composition.
b.
Use the Time stretch controls to make fine adjustments to the composition length.
Select the Scale by radio button and drag the slider to make the composition longer or shorter. As
you adjust the length, the composition's tempo changes.
Note:
The available range of tempo adjustment depends on the selected theme.
Select the Fit to length radio button if you want to adjust the tempo automatically to match the
value in the Length box.
The Timeline pane at the bottom of the Generated Music dialog displays the sections that were used
to create the composition, and the intensity curve represents the density of the music, defined in
terms of the number of instruments or sounds included, how loud these are in the mix, and the
WORKING WITH GENERATED MUSIC | 65
Page 70

musical complexity of each instrument's performance:
5.
Click OK to create your composition and add it to the Generated Music track in the main timeline.
If you want to change the file name and folder where the composition is created, click the Output tab
in the Project pane and set new values in the Output name and Output folder boxes.
Tip:
For even more control over your composition, you can use hints to change the sections,
mood, tempo, or intensity.
For more information, see Using hints on page 71.
Editing generated music
After you’ve added generated music to your project, you have two options if you want to edit the
composition.
• If you want to recreate an existing composition, choose Generated Music from the Edit menu, and then
choose Recreate from the submenu.
The music is regenerated, and the event in the timeline is updated to match the new composition
length.
• If you want to edit an existing composition, choose Generated Music from the Edit menu, and then
choose Edit from the submenu. The music is regenerated, and the event in the timeline is updated to
match the new composition length.
Recreating or editing a composition doesn't overwrite the original composition. A new media file is added
to the Project Media window, and the event in the timeline is updated to use the new media file. If you
want to return to the original composition, you can drag it from the Project Media window to the timeline.
Recreating generated music
1.
Select an event on the timeline
2.
From the Edit menu, choose Generated Music, and then choose Recreate from the submenu (or click
the Recreate Generated Music button on an event).
The Generated Music dialog is displayed, and the Timeline pane displays the updated composition.
3.
Use the Generated Music dialog to change the settings that will be used to generate music. For more
information, see Editing generated music on page 67.
66 | WORKING WITH GENERATED MUSIC
Recreate generated music
Page 71

4.
Click OK to recreate your composition and update the event in the timeline.
The updated event will match the Adjusted length setting: the beginning of the event remains fixed,
but the end of the event will move to accommodate the new event length.
Editing generated music
1.
Select an event on the timeline.
2.
From the Edit menu, choose Generated Music, and then choose Edit from the submenu. The
Generated Music dialog is displayed
3.
The Project pane of the Generated Music dialog shows the basic settings that will be used to generate
music.
a.
The Theme field displays the selected theme that will be used to generate your music along with
its genre and tempo.
You can click the name of the theme to display the Theme Chooser, where you can choose a new
style or a variation on the current theme. For more information, see Creating or editing variations on
page 70.
b.
The Length box displays the length of the current timeline selection.
If you want to change the length of the composition, you can edit the contents of this box. The
composition will be added at the beginning of the timeline selection (or at the cursor position if
no selection exists).
c.
Choose a setting from the Ending Type drop-down list to indicate how the composition should
end:
Setting Description
Normal The composition will match the Length setting as closely as possible while providing a musical ending.
WORKING WITH GENERATED MUSIC | 67
Page 72

Fade Out The composition will match the Length setting as closely as possible with a gradual fade to silence.
This setting will produce the best results when you want to match the Length setting.
Loop The composition will match the Length setting as closely as possible while allowing the end of the
composition to loop smoothly into its beginning.
This setting is useful if you're scoring a video that plays and repeats indefinitely, such as an information
kiosk or a DVD menu.
Abrupt The composition will match the Length setting as closely as possible, ending on the next beat. Note that
the end of the composition may not correspond with the end of a musical measure.
Notes:
• Not all ending types are available at all times. Depending on the current theme, starting section, or
composition length, some settings may not be available.
• If you're generating music to match a small selection, use the Fade Out or Abrupt setting to create the best
possible match between the composition and the selection.
4.
The Generated Music pane allows you to fine-tune sound and tempo of your music.
a.
When you generate music, multiple versions of the composition are created. Choose a setting
from the Composition drop-down to select the version you want to use.
When you choose a new composition, you'll notice that the song in the Timeline pane changes.
Click the Play from Start or Play button to audition the current composition.
b.
Use the Time stretch controls to adjust the length of the composition.
Select the Scale by radio button and drag the slider tto make the composition longer or shorter.
As you adjust the length, the composition's tempo changes.
Note:
The available range of tempo adjustment depends on the selected theme.
Select the Fit to length radio button if you want to adjust the tempo automatically to match the
value in the Length box.
The Timeline pane at the bottom of the Generated Music dialog displays the sections that were used
to create the composition, and the intensity curve represents the density of the music, defined in
terms of the number of instruments or sounds included, how loud these are in the mix, and the
musical complexity of each instrument's performance:
5.
Click OK to generate a new composition.
The event in the timeline is updated to play the new composition, but the event length is unaffected.
68 | WORKING WITH GENERATED MUSIC
Page 73

If you want to change the file name and folder where the composition is created, click the Output tab
in the Project pane and set new values in the Output name and Output folder boxes.
Tip:
For even more control over your composition, you can use hints to change the sections,
mood, tempo, or intensity.
For more information, see Using hints on page 71.
Using themes
When you generate music with Cinescore, you work with themes and variations.
A theme is a group of related musical ideas that can be combined to create a composition. Each theme can
contain multiple variations.
A variation is a is a preset combination of the starting section, mood, arrangement, tempo, and intensity.
Installing themes
When you obtain new themes, you need to install them before you can use them to create music.
If you purchase a theme disc, the disc includes an installer you can use to install its themes. Perform the
following procedure to install downloaded themes.
1.
Open the Theme Chooser:
• If you're creating a new composition, the Theme Chooser is displayed when you click the
Generate Music button on the toolbar.
• If you're editing an existing composition, right-click an event on the timeline and choose
Regenerate Music from the shortcut menu. Then, in the Project pane of the Generated Music
dialog, click the name of the theme to display the Theme Chooser.
2.
Click the Options button at the top of the Theme Chooser, and then choose Install Themes from the
menu.
3.
Click the Browse button at the top of the Install Themes dialog and browse to the folder that contains
the themes you want to install.
4.
Select the themes you want to install, and then click the OK button.
WORKING WITH GENERATED MUSIC | 69
Page 74
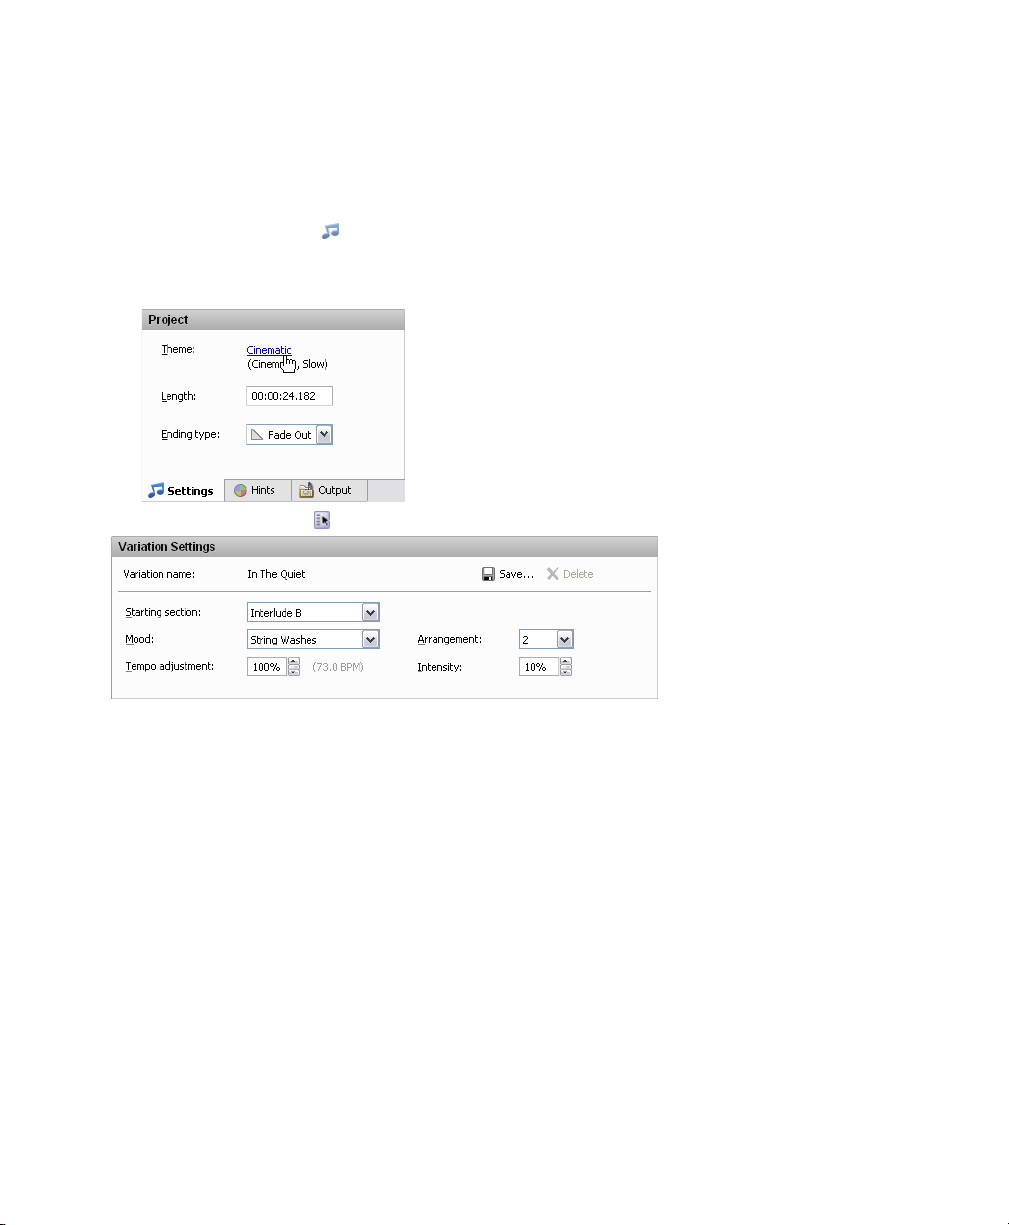
Creating or editing variations
By using variations, you can customize how the generated music will sound at the beginning of the
composition and create presets that you can use in other Cinescore projects.
1.
Open the Theme Chooser:
• If you're creating a new composition, the Theme Chooser is displayed when you click the
Generate Music button on the toolbar.
• If you're editing an existing composition, right-click an event on the timeline and choose
Regenerate Music from the shortcut menu. Then, in the Project pane of the Generated Music
dialog, click the name of the theme to display the Theme Chooser.
2.
Click the Advanced button at the top of the Theme Chooser to display the Variation Settings pane.
70 | WORKING WITH GENERATED MUSIC
Page 75
3.
The Variation Settings pane displays the settings for the selected variation. Adjust the settings as
needed:
Item Description
Starting section Each theme contains multiple musical sections. A section is a defined element of a
Mood Each theme can contain multiple moods. Each mood can change the instrumentation, sound,
Arrangement Each mood can contain multiple arrangements. Each arrangement specifies how the
Tempo adjustment Type a value in the box or use the spin control to speed up or slow down the tempo of your
Intensity Intensity refers to the density of the music defined in terms of the number of instruments or
composition, such as a verse, chorus, or bridge.
Choose a setting from the drop-down list to specify the section that will be used to start your
composition.
feel, or phrasing of the theme. Depending on the selected theme, a mood could contain
different melodies, rhythms, instruments, and so on.
Choose a setting from the drop-down list to specify which mood you want to use.
instruments in the mood are combined as the intensity changes.
Choose a setting from the drop-down list to specify which arrangement you want to use.
composition. A setting of 100% represents the original tempo of the theme.
The available range of tempo adjustment depends on the selected theme.
sounds included, how loud these are in the mix, and the musical complexity of each
instrument's performance.
Type a value in the box or use the spin control to adjust the amount of instrumentation in the
composition.
A setting of 100% uses all instruments in the theme; decreasing the setting reduces the
number of instruments.
You can preview the selected style/variation combination by clicking the Preview button .
4.
Click the Save button to save your changes as a new variation. You'll be prompted to type a name
for the variation.
5.
Click the Delete button to delete the selected variation. Only user-created variations can be
deleted. User-created variations are displayed with a gray icon in the Variations pane.
Using hints
Hints give you additional control over the composition.Do you want to change the music to fit a scene
partway through your source video? By adding hints, you can customize the section, mood, tempo, or
intensity of a composition throughout its length.
All compositions contain at least one hint at the beginning of the timeline in the Generated Music dialog:
this hint contains information about the settings you chose when you generated your composition.
WORKING WITH GENERATED MUSIC | 71
Page 76

Hints are suggestions that Cinescore uses to modify the choices it makes when generating music. When
you add a hint, the composition does not change exactly at the hint's position on the timeline; rather,
Cinescore will try to make the change at the next musical opportunity. In the following image, notice how
each change occurs at the nearest section change.
When you view the generated music on the Cinescore timeline or in an audio editor, you'll notice that hint
markers are added at the location where you placed a hint on the timeline to request a change. Cue
markers are added at the location where a hint is applied in the composition:
Editing the first hint
The hint at the left edge of the timeline contains information about the settings you chose when
generating your music. Editing these controls has the same effect as editing the settings in the Variation
Settings pane in the Theme Chooser.
1.
Select an event on the timeline.
2.
From the Edit menu, choose Generated Music, and then choose Edit from the submenu. The
Generated Music dialog is displayed.
3.
Click the first hint in the timeline to select it. The Hints tab is displayed in the Project pane. Adjust the
settings as needed.
For more information, see Creating or editing variations on page 70.
72 | WORKING WITH GENERATED MUSIC
Page 77
You can preview the selected settings by clicking the Play from Start or Play button below the
timeline.
Item Description
Starting section Each theme contains multiple musical sections. A section is a defined element of a composition,
Randomness This setting determines how randomly Cinescore arranges the sections in your composition.
Vari ance This setting determines how much adjacent sections vary from each other and how often
Mood Each theme can contain multiple moods. Each mood can change the instrumentation, sound,
such as a verse, chorus, or bridge.
Choose a setting from the drop-down list to specify the section that will be used to start your
composition.
The composition's sections are displayed in the Sections track in the Timeline pane:
Click the button to expand the controls if you want to modify how Cinescore chooses and
arranges sections.
With a low setting, the sequence of sections will be more predictable (1-1-2-1-1-2-1-1-2. . . for
example); as you increase the setting, the sequence will be more random (1-2-2-1-1-1-2-1-2. . . for
example). The theme composer determines how the Randomness control affects section order
for each theme.
Select the value and click the button to display a slider that you can use to adjust the value.
When you set Randomness to 100%, the Varia nce setting has no effect.
sections in the composition repeat. With a low setting, adjacent sections will sound similar and
are more likely to be repeated; as you increase the setting, adjacent sections will sound different
and are less likely to be repeated.
The following example demonstrates how sections are arranged with increasing Variance
settings. These images are provided for illustration only; the theme composer determines how
the Variance control affects section order for each theme:
0%
3%
9%
18%
36%
72%
Select the value and click the button to display a slider that you can use to adjust the value.
feel, or phrasing of the theme. Depending on the selected theme, a mood could contain
different melodies, rhythms, instruments, and so on.
Choose a setting from the drop-down list to specify which mood you want to use.
Mood changes are displayed on the Mood track in the Timeline pane:
The first mood, Light - pensive (1) means that the selected mood is Light - pensive, and
arrangement 1 is selected.
WORKING WITH GENERATED MUSIC | 73
Page 78
Item Description
Arrangement Each mood can contain multiple arrangements. Each arrangement specifies how the
Tem po
adjustment
Intensity Type a value in the box or use the spin control to adjust the amount of instrumentation in the
Mode Determines how Cinescore varies intensity over time.
Vari ance When you choose Generate from the Mode drop-down list, the Vari ance setting determines
instruments in the mood are combined as the intensity changes.
Choose a setting from the drop-down list to specify which arrangement you want to use.
Type a value in the box or use the spin control to speed up or slow down the tempo of your
composition. A setting of 100% represents the original tempo of the theme.
The available range of tempo adjustment depends on the selected theme.
Tempo changes are displayed on the Tempo track in the Timeline pane:
composition.
Intensity refers to the density of the music defined in terms of the number of instruments or
sounds included, how loud these are in the mix, and the musical complexity of each instrument's
performance.
The intensity curve is displayed in the Intensity track in the Timeline pane:
Click the button to expand the controls if you want to modify how Cinescore varies intensity
over time.
Click the current setting and click the button to choose a new setting.
• Generate: Generates an intensity curve that varies over time.
• Hold: Maintains the current hint's intensity level until the next hint.
• Linear: Intensity changes gradually from the current hint's intensity to the next hint's setting.
how frequently the intensity changes. With a low setting, intensity changes are slow and less
frequent; as you increase the setting, intensity changes are faster and more frequent.
The following example demonstrates how intensity changes with increasing Varia nce settings.
These images are provided for illustration only; the theme composer determines how the
Variance control affects intensity changes for each theme:
0%
10%
20%
40%
80%
Select the value and click the button to display a slider that you can use to adjust the value.
74 | WORKING WITH GENERATED MUSIC
Page 79

Item Description
Range When you choose Generate from the Mode drop-down list, the Range setting determines how
much the intensity changes.
With a low setting, changes in the intensity curve are subtle.
As you increase the setting, intensity changes are more dramatic (note that the basic curve is
similar to the previous example, but the amount of change is greater).
Select the value and click the button to display a slider that you can use to adjust the value.
Adding hints
To add a hint, click in the Timeline pane to position the cursor, and then click the Insert Hint button . A
new, blank hint is added, and you can edit the hint to adjust its settings.
Tip:
You can also double-click in the Hints bar to insert a new hint.
Deleting hints
To delete a hint, select it in the Timeline pane, and then click the Delete Selected Hints button . You can
hold Ctrl or Shift to select multiple hints.
Click the Delete All Hints button to remove all hints from the timeline.
Note:
The first hint is required to create a composition and cannot be deleted.
Editing hints on the timeline
Hints that follow the first hint allow you to suggest changes in the composition.
Click a hint in the timeline to select it. The Hints tab is displayed in the Project pane, and you can adjust the
settings.
WORKING WITH GENERATED MUSIC | 75
Page 80

You can preview the selected settings by clicking the Play from Start or Play button below the
timeline.
Item Description
Section Change Each theme contains multiple musical sections. A section is a defined element of a composition, such
as a verse, chorus, or bridge.
Choose Ye s if you want the hint to suggest a section change, and then use the Deviation,
Randomness, and Vari ance controls to modify how Cinescore chooses and arranges sections.
Choose No if you do not want the hint to suggest a section change.
The composition's sections are displayed in the Sections track in the Timeline pane:
Using section-change hints, you can modify how frequently sections are changed throughout the
composition. In the following example, the first portion of the composition has a low Var ianc e setting,
so a single section repeats. In the second portion of the composition, the section-change hint has a
high Vari ance setting, so the section changes frequently:
Deviation This setting determines how much the first section after the hint can deviate stylistically from the
Randomness This setting determines how randomly Cinescore arranges the sections in your composition. With a
preceding section. With a low setting, section changes will be subtle; as you increase the setting,
section changes will be more dramatic.
The theme contains information about similarities between sections, and Cinescore uses this
information to determine which sections it will use.
Select the value and click the button to display a slider that you can use to adjust the value.
low setting, the sequence of sections will be more predictable (1-1-2-1-1-2-1-1-2. . . for example); as
you increase the setting, the sequence will be more random (1-2-2-1-1-1-2-1-2. . . for example). The
theme composer determines how the Randomness control affects section order for each theme.
Select the value and click the button to display a slider that you can use to adjust the value.
When you set Randomness to 100%, the Varian ce setting has no effect.
76 | WORKING WITH GENERATED MUSIC
Page 81

Item Description
Vari ance This setting determines how much adjacent sections vary from each other and how often sections in
Mood Change Each theme can contain multiple moods. Each mood can change the instrumentation, sound, feel, or
Arrangement Each mood can contain multiple arrangements. Each arrangement specifies how the instruments in
Tem po C han ge Choose Yes if you want to use the hint to suggest a tempo change, and then use the Amount control
the composition repeat. With a low setting, adjacent sections will sound similar and are more likely to
be repeated; as you increase the setting, adjacent sections will sound different and are less likely to be
repeated.
The following example demonstrates how sections are arranged with increasing Variance settings.
These images are provided for illustration only; the theme composer determines how the Variance
control affects section order for each theme:
0%
3%
9%
18%
36%
72%
Select the value and click the button to display a slider that you can use to adjust the value.
phrasing of the theme. Depending on the selected theme, a mood could contain different melodies,
rhythms, instruments, and so on.
Choose a mood from the drop-down list if you want to use the hint to suggest a mood change.
Mood changes are displayed on the Mood track in the Timeline pane:
The first mood, Light - pensive (1) means that the selected mood is Light - pensive, and arrangement
1 is selected.
the mood are combined as the intensity changes.
Choose a setting from the drop-down list to specify which arrangement you want to use.
to indicate the desired tempo change.
Choose No if you do not want the hint to change tempo.
Tempo changes are displayed on the Tempo track in the Timeline pane:
Amount Type a value in the box or use the spin control to speed up or slow down the tempo of your
composition. A setting of 100% represents the original tempo of the theme.
The available range of tempo adjustment depends on the selected theme.
WORKING WITH GENERATED MUSIC | 77
Page 82

Item Description
Intensity
Change
Amount Type a value in the box or use the spin control to adjust the amount of instrumentation in the
Mode Determines how Cinescore varies intensity over time.
Vari ance When you choose Generate from the Mode drop-down list, the Var ianc e setting determines how
Choose Ye s if you want to use the hint to suggest an intensity change in your composition, and then
use the Amount, Mode, Varia nce, and Range controls to indicate how you want to change intensity.
Choose No if you do not want the hint to change intensity.
The intensity curve is displayed in the Intensity track in the Timeline pane:
Using intensity-change hints, you can modify how frequently intensity is changed throughout the
composition. In the following example, we used four hints to adjust the intensity curve:
• The first hint is set to Hold with an Amount setting of 50%.
• The second hint is set to Generate with an Amount setting of 100%, a Va rianc e setting of 50%, and
a Range setting of 100%.
• The third hint is set to Linear, with an Amount of 65%.
• The last hint is set to Linear with an Amount setting of 0% to set the final intensity.
composition.
Intensity refers to the density of the music defined in terms of the number of instruments or sounds
included, how loud these are in the mix, and the musical complexity of each instrument's
performance.
Click the current setting and click the button to choose a new setting.
• Generate: Generates an intensity curve that varies over time.
• Hold: Maintains the current hint's intensity level until the next hint.
• Linear: Intensity changes gradually from the current hint's intensity to the next hint's setting.
frequently the intensity changes. With a low setting, intensity changes are slow and less frequent; as
you increase the setting, intensity changes are faster and more frequent.
The following example demonstrates how intensity changes with increasing Varia nce settings. These
images are provided for illustration only; the theme composer determines how the Variance control
affects intensity changes for each theme:
0%
10%
20%
40%
80%
Select the value and click the button to display a slider that you can use to adjust the value.
78 | WORKING WITH GENERATED MUSIC
Page 83

Item Description
Range When you choose Generate from the Mode drop-down list, the Range setting determines how much
the intensity changes.
With a low setting, changes in the intensity curve are subtle.
As you increase the setting, intensity changes are more dramatic (note that the basic curve is similar to
the previous example, but the amount of change is greater).
Select the value and click the button to display a slider that you can use to adjust the value.
WORKING WITH GENERATED MUSIC | 79
Page 84

80 | WORKING WITH GENERATED MUSIC
Page 85

Index
A
Adding audio transitions, 24
Adding generated music, 25
Adding hints, 75
Adding media to a bin, 23
Adding media to the timeline, 23
Audio editor program, 60–62
Opening from Cinescore, 61
Setting up, 61
Audio transitions, 24
Automation
Volume and panning automation, 28
B
Bins, media, 22
Adding media, 23
creating, 23
searching, 23
C
Cinescore
Installing, 5
Overview, 8
Clearing the edit history, 56
Compositions, creating, 63
Converting format, See Rendering
Copying events, 39
Time and events, 40
Time selections, 40
Creating a movie, 32
Creating bins, 23
Creating generated music, 63
Creating variations, 70
Crossfades, 53–55
Automatic, 53
Curve types, 54
Manually setting, 54
Sliding, 54
Customizing Cinescore
Toolbar, 9
Cutting events, 41–42
Ripple mode, 41
Time and events, 42
Time selections, 42
D
Deleting
Envelope points, 29
Events, 51
Markers, 58
Regions, 60
Deleting hints, 75
Docking Cinescore windows, 11
Duplicating events, 44
E
Edge trimming, 44
Edit history, clearing, 56
Editing audio in external editor, 61
Editing events, 39
Editing generated music, 66, 67
Editing hints on the timeline, 75
Editing the first hint, 72
Editing tools
Zoom, 27
Editing variations, 70
Envelopes
Adding points, 29
Changing fade curves, 30
Deleting points, 29
Moving points, 29
Ripple editing, 52
Event editing, 39
Events, 25
Copying, 39
Crossfading, 53–55
Cutting, 41
Defined, 16
Deleting, 51
Duplicating, 44
Edge trimming with keyboard, 46
Editing, 39
INDEX | i
Page 86

Moving by small increments, 26
Moving in time, 26
Moving multiple, 26
Moving single, 26
Pasting, 42
Placing, 23, 24
Selecting multiple, 36
Selecting with time, 39
Shifting the contents of, 50
Shuffling, 53
Sliding, 51
Slipping, 50
Slip-trimming, 50
Splitting, 47–49
Trimming, 44
Explorer window, 12
Transport bar, 17
F
Fit to length, 65
Focus, 35
Frame-by-frame cursor movement, 35
Freeze frame, 45
G
General editing, 35–62
Event vs. file, 25
Generated music, 25
Generated music, editing, 66
Generating music, 63
Gracenote
Obtaining or editing CD information, 21
Grouping events
Moving grouped events, 27
H
Hints, 71
Adding, 75
Deleting, 75
Editing the first hint, 72
Editing user hints, 75
I
Importing
Audio CD tracks, 19
Media, 19
Still image sequences, 22
Inserting
Audio transitions, 24
Generated music, 25
Markers, 57
Media, 23
Regions, 59
Sound effects, 24
Installation, 5
System requirements, 5
Installing themes, 69
K
Keyboard commands
Cursor placement, 35, 38
L
Loop playback, 38
M
Main window, 8
Marker bar, 9
Markers
Deleting, 58
Hints, 71
Inserting, 57
Moving, 58
Navigating, 58
Renaming, 57
Ripple editing, 52
Markers and regions, 56
Media bins, 22
Adding media, 23
creating, 23
searching, 23
Media files
Auto preview setting, 18
Inserting, 23
Previewing, 17
Media Pool
Adding still image sequences, 22
Mixer, 12
Mouse scroll-wheel shortcuts, 27, 35
Muting tracks, 28
ii | INDEX
Page 87

N
Naming
Markers, 57
Regions, 59
O
Online help
Via the Web, 7
What’sThis? help, 7
P
Panning automation, 28
Pasting events, 42
Placing media
Dragging/dropping, 23
Playback
Scrubbing, 31
Transport bar controls, 10
Post-edit rippling, 52
Preview Quality, 13
Previews, 30
Project Media window
Adding media, 19
Extracting CD audio, 19
Replacing media in events, 19
Using, 18
Project playback
Entire, 30
Time selection, 31
Projects
Creating, 15
Renaming, 16
Saving, 16
Punch-in, 43
R
Recreating generated music, 66
Redo/Undo commands, 55–56
Clearing history, 56
Multiple, 56
Region, 58
Regions
Deleting, 60
Inserting, 59
Moving, 59
Naming, 59
Navigating to, 60
Ripple editing, 52
Selecting, 59
Renaming
Markers, 57
Projects, 16
Rendering, 32
Ripple editing, 43
Cutting, 41
Deleting, 51
Manually, 52
Pasting, 42
Post-edit rippling, 52
Shuffling events, 53
Ruler, 9
S
Saving a project, 16
Using Save As, 16
Scale by, 65
Scrolling, 27
Scrubbing, 31–32
Keyboard, 32
Playhead, 32
Timeline, 32
Searching media bins, 23
Selecting
Events and a time range, 39
Events to the end of the track, 37
Media files, 17
Multiple events, 36
Range of events, 36
Regions, 59
time range, 37
Show Me How, 8
Shuffling events, 53
Sliding
Crossfades, 54
Events, 51
Slipping events, 50
Slip-trimming events, 50
Sorting media with bins, 22
Sound effects, 24
INDEX | iii
Page 88

Splitting, 47–49
All events at cursor, 47
Selected events, 48
Time selection, 48
System requirements, 5
T
Technical support, 5
Themes, 69
Choosing, 64
Installing, 69
Variations, 70
Time Display window, 9
Time selection, 37
Copying, 40
Cutting, 42
With events, 39
Time stretch, 65
Timeline
Adding media to, 23
Moving events along, 26
moving events along, 26
Toolbar, 9
Track envelopes
Adding points, 29
Changing fade curves, 30
Deleting points, 29
Moving points, 29
Track header, 10
audio, 28
Track list, 10
Track view, 10
Tra cks , 27
muting, 28
volume fader, 28
Transport bar, 10, 30, 31
Trimming, 44–46
Adjacent events, 45
Beyond event edges, 45
events with keyboard, 46
selected events, 44
Time selection, 45
Tut ori als, 8
U
Undo/Redo commands, 55–56
Clearing history, 56
Using themes, 69
V
Video Preview Quality, 13
Video Preview window, 13
Video previews
Window, 13
Volume
track fader, 28
Volume automation, 28
W
Web site
Accessing help, 7
Technical support, 5
What’sThis? help, using, 7
Window docking area, 11
Z
Zoom Edit Tool, 27
Zooming, 27
iv | INDEX
 Loading...