

Page 1
SE-1
RM-ED007
SERVICE MANUAL
MODEL
KDL-26U2000
KDL-32U2000
KDL-40U2000
COMMANDER DEST
RM-ED007 AEP
RM-ED007 AEP
RM-ED007 AEP
SE-1
MODEL
KDL-26U2000
KDL-32U2000
KDL-40U2000
COMMANDER DEST
CHASSIS
RM-ED007 UK
RM-ED007 UK
RM-ED007 UK
KDL-26U2000 / KDL-32U2000 / KDL-40U2000
FLAT PANEL COLOR TV
- 1 -
RM-ED007
Page 2

SE-1
RM-ED007
TABLE OF CONTENTS
Section Title Pag e Section Title Pa ge
Caution ................................................................ 3
Specifications ...................................................... 4
Connectors .......................................................... 6
Self Diagnosis ..................................................... 7
1. GENERAL ................................................................... 8
2. DISASSEMBLY
2-1. Stand Removal .................................................... 17
2-2. Rear Cover Removal ........................................... 17
2-3. Speaker Removal ................................................ 18
2-4. A1/A1P Board Removal ..................................... 18
2-5. BDT Board Removal .......................................... 19
2-6. G1/G2 Board Removal ....................................... 19
2-7. H1/H1P Board Removal ..................................... 20
2-8. H2/H2P Board Removal ..................................... 20
2-9. H3/H3P Board Removal ..................................... 21
2-10. Bracket Removal ................................................. 21
2-11. LCD Panel Removal ........................................... 22
3. CIRCUIT ADJUSTMENTS
3-1. Electrical Adjustments ....................................... 23
3-2. Test Mode 2 ....................................................... 25
3-3. TT OSD Labels .................................................. 26
4. DIAGRAMS
4-1. Block Diagrams(1) ............................................. 27
Block Diagrams(2) ............................................. 28
Block Diagrams(3) ............................................. 29
Block Diagrams(4) ............................................. 30
Block Diagrams(5) ............................................. 31
4-2. Circuit Board Location ........................................ 31
4-3. Schematic Diagrams and Printed Wiring
Boards ................................................................. 31
A1/A1P Board Schematic Diagram .................... 32
A1/A1P Printed Wiring Board ......................... 35
BDT Board Schematic Diagram ......................... 36
BDT Printed Wiring Board ................................ 47
G1 Board Schematic Diagram
(KDL-26U2000, KDL-32U2000) ..... 49
G1 Printed Wiring Board
(KDL-26U2000, KDL-32U2000) .... 51
G2 Board Schematic Diagram (KDL-40U2000) 53
G2 Printed Wiring Board (KDL-40U2000) ..... 55
H1/H1P Board Schematic Diagram .................... 57
H1/H1P Printed Wiring Board ......................... 58
H2/H2P Board Schematic Diagram .................... 57
H2/H2P Printed Wiring Board ......................... 58
H3/H3P Board Schematic Diagram .................... 57
H3/H3P Printed Wiring Board ......................... 58
4-4. Semiconductors .................................................. 59
WARNING !!
AN ISOLATION TRANSFORMER SHOULD BE USED DURING
ANY SERVICE WORK TO AVOID POSSIBLE SHOCK HAZARD
DUE TO LIVE CHASSIS, THE CHASSIS OF THIS RECEIVER IS
DIRECTLY CONNECTED TO THE POWER LINE.
5. EXPLODED VIEWS
5-1. Chassis................................................................ 61
5-2. Stand, Rear Cover, Power Leads........................ 62
6. ELECTRICAL PARTS LIST .................................. 63
SAFETY-RELATED COMPONENT WARNING !!
COMPONENTS IDENTIFIED BY SHADING AND MARKED
THE SCHEMATIC DIAGRAMS, EXPLODED VIEWS AND IN THE
PARTS LIST ARE CRITICAL FOR SAFE OPERATION. REPLACE
THESE COMPONENTS WITH SONY PARTS WHOSE PART
NUMBERS APPEAR AS SHOWN IN THIS MANUAL OR IN
SUPPLEMENTS PUBLISHED BY SONY.
ON
- 2 -
Page 3
CAUTION
Lead Free Soldered Boards
The circuit boards used in these models have been processed using
Lead Free Solder. The boards are identified by the LF logo located
close to the board designation e.g. F1, H1 etc [ see examples ]. The
servicing of these boards requires special precautions to be taken as
outlined below.
SE-1
RM-ED007
example 1
example 2
It is strongly recommended to use Lead Free Solder material in order to guarantee optimal quality of new solder joints. Lead Free Solder is
available under the following part numbers :
rebmuntraP retemaiD skrameR
91-500-046-7mm3.0gK52.0
02-500-046-7mm4.0gK05.0
12-500-046-7mm5.0gK05.0
22-500-046-7mm6.0gK52.0
32-500-046-7mm8.0gK00.1
42-500-046-7mm0.1gK00.1
52-500-046-7mm2.1gK00.1
62-500-046-7mm6.1gK00.1
Due to the higher melting point of Lead Free Solder the soldering iron tip temperature needs to be set to 370 degrees centigrade. This requires
soldering equipment capable of accurate temperature control coupled with a good heat recovery characteristics.
For more information on the use of Lead Free Solder, please refer to http://www.sony-training.com
- 3 -
Page 4
LEDOMMETI metsySnoisiveleT metsySoeretS egarevoClennahC metsySroloC
21E-20E:FHV
96E-12E:FHU
ET-BVD,L,I,K/D,H/G/B
MACIN/NAMREG
oeretS
02S-10S:VTAC
14S-12S:REPYH
R,21R-1R:K/D
96R-12
96F-12F,Q-B,01F-2F:L
96B-12BFHU:I
UT-BVD,IoeretSM
ACIN96B-12B:FHU
SE-1
RM-ED007
MACES,LAP
34.4/85.3CSTN
)YLNOOEDIV(
LM@PM2-GEPM
MACES,LAP
34.4/85.3CSTN
)YLNOOEDIV(
LM@PM2-GEPM
Sound Output
Right and Left speaker
Sub-woofer
Projected Picture Size
LCD (Liquid Crystal Display) Panel
KDL-26U2000 (26inches)
KDL-32U2000 (32inches)
KDL-40U2000 (40inches).
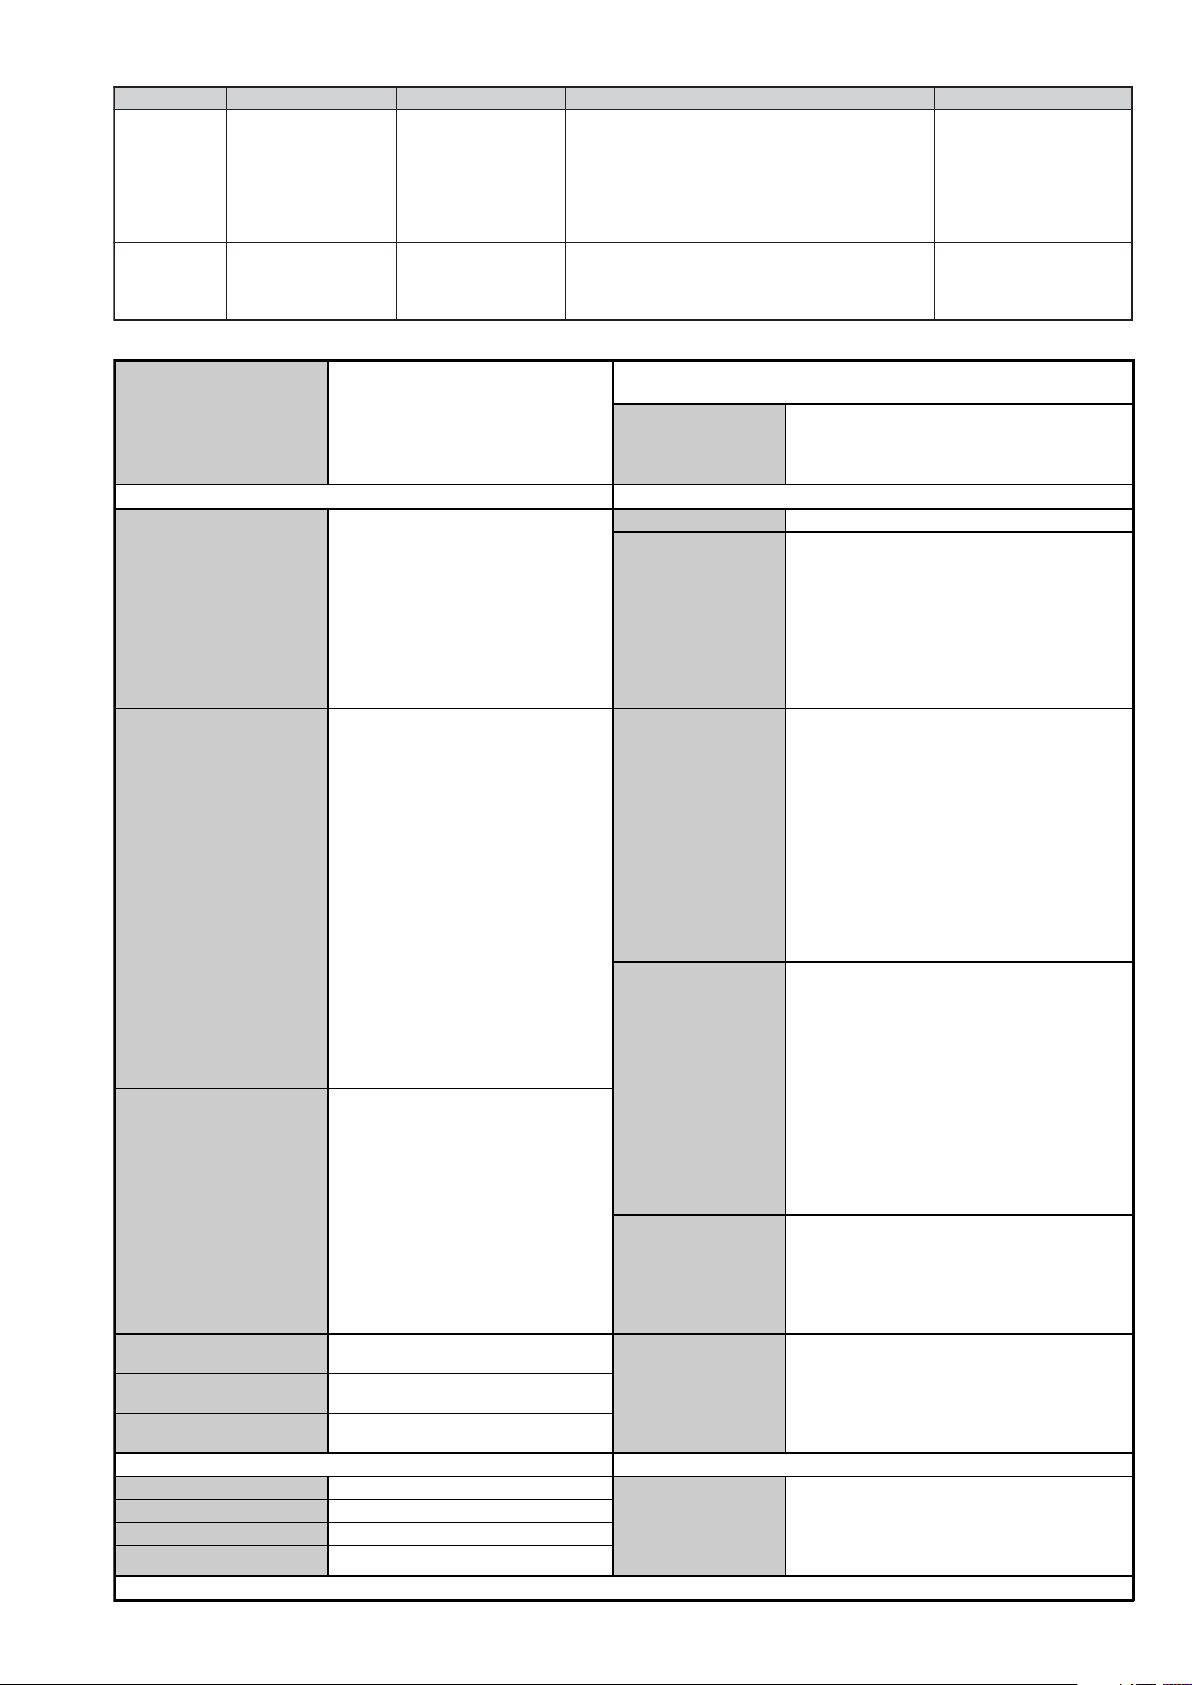
Input/Output Terminals [REAR] General Specifications
Power Requirements 220 - 240V
AV1: 21-pin Euro connector
(CENELEC standard)
Inputs for Audio and Video signals.
Inputs for RGB.
Outputs of TV Video and Audio signals.
Power Consumption/
Standby
Dimensions
Inputs for Audio and Video signals.
AV2: 21-pin Euro connector
(CENELEC standard)
Inputs for RGB.
Outputs of Video and Audio signals
(Selectable). SmartLink interface.
2 x 10W (RMS)
KDL-26U2000:
Approx. 105W or less/1W or less
KDL-32U2000:
Approx. 160W or less/1W or less
KDL-40U2000:
Approx. 180W or less/1W or less
KDL-26U2000:
Approx. 663x503x220mm (With stand)
Approx. 663x472x128mm (Without stand)
KDL-32U2000:
Approx. 797x580x220mm (With stand)
Approx. 797x548x125mm (Without stand)
KDL-40U2000:
Approx. 988x687x270mm (With stand)
Approx. 988x653x128mm (Without stand)
KDL-26U2000:
Approx. 12kg (With stand)
Approx. 10kg (Without stand)
KDL-32U2000:
Weight
Approx. 16kg (With stand)
Approx. 14kg (Without stand)
KDL-40U2000:
Approx. 24kg (With stand)
Approx. 21kg (Without stand)
RM-ED007 Remote Commander (1)
IEC designated R06 battery (2)
Cable Holder (1) (KDL-40U2000 only)
AV3: Phono Jacks
Y:1 Vp-p, 75 ohms, 0.3V negative sync
P
B/CB
:0.7 Vp-p,75 ohms
P
R/CR
:0.7 Vp-p,75 ohms
Audio Input Jacks: 500mV rms,
47Kohms
Supplied Accessories
Support Belt (1) and Screws (2)
HDMI Input HDMI Connector.
PC Input 15 Pin D-Sub Connector.
CAM Conditional Access Module
Other Features
IDTV, High Picture Quality WXGA, 3D Comb
Filter, BBE Digital, Virtual Dolby Surround, HDMI
Input, PC Input (HD15), Video Label, Channel
Return, Sleep Timer, Fanless Design.
Input/Output Terminals [SIDE] Remote control system : Infrared control
Headphone jack Stereo mini jack
Audio input Phono jacks
Video input Phono jack
S Video input 4 pin mini DIN
Power requirements
3V dc
2 batteries IEC designation
R06 (size AA)
Design and specifications are subject to change without notice.
- 4 -
Page 5
SE-1
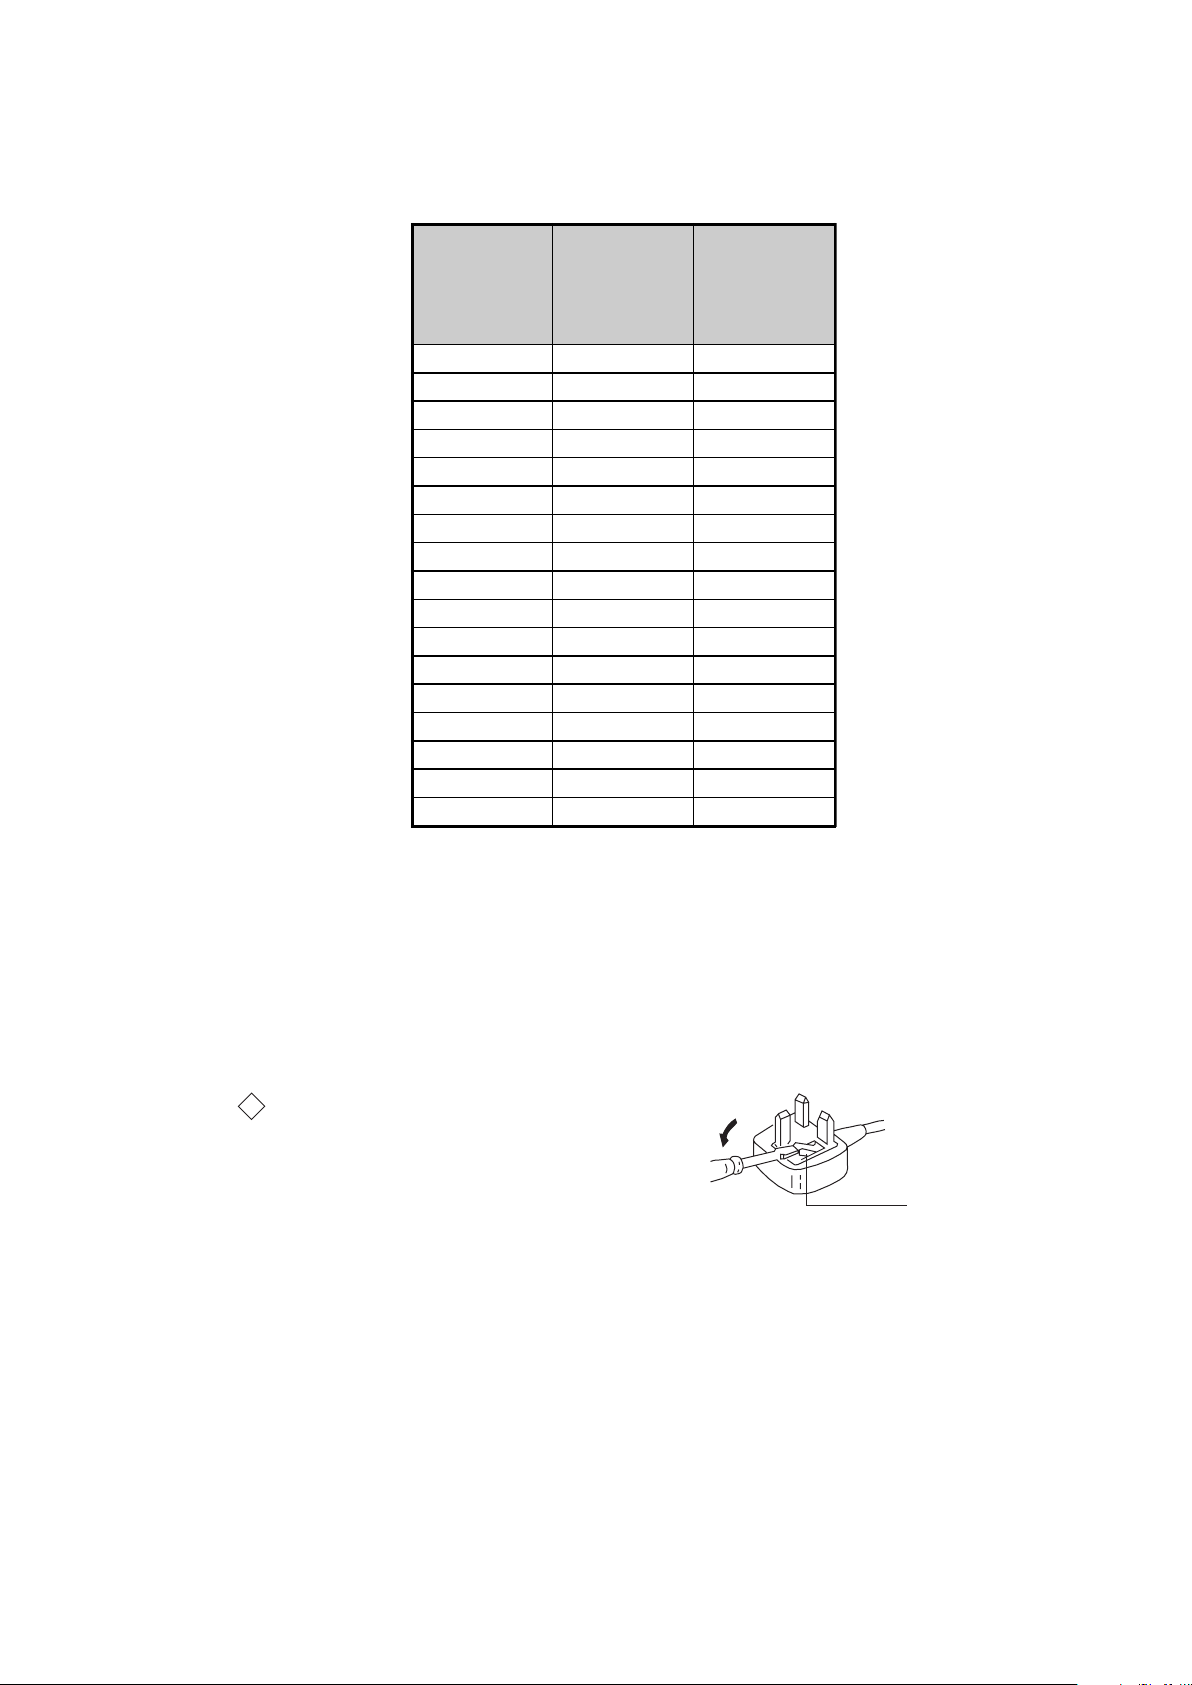
How to replace the fuse.
Open the fuse compartment with
a screwdriver blade and replace
the fuse.
FUSE
RM-ED007
KDL-26U2000
Model Name
Item
PA P O F F O F F
PAT O F F O F F
RGB Priority ON ON
Sub Woofer OFF OFF
Scart 1 ON ON
Scart 2 ON ON
Front in (4) ON ON
Projector OFF OFF
Norm B/G ON OFF
Norm I ON ON
Norm D/K ON OFF
Norm AUS OFF OFF
Norm L ON OFF
Norm SAT OFF OFF
Norm M OFF OFF
Teletext ON ON
Nicam Stereo ON ON
KDL-32U2000
KDL-40U2000
(AEP)
KDL-26U2000
KDL-32U2000
KDL-40U2000
(UK)
WARNING (UK Models only)
The flexible mains lead is supplied connected to a B.S. 1363 fused
plug having a fuse of 10 AMP rating. Should the fuse need to be
replaced, use a 10AMP FUSE approved by ASTA to BS 1362, ie one
that carries the
IF THE PLUG SUPPLIED WITH THIS APPLIANCE IS NOT SUITABLE FOR THE OUTLET SOCKETS IN YOUR HOME, IT SHOULD
BE CUT OFF AND AN APPROPRIATE PLUG FITTED. THE PLUG
SEVERED FROM THE MAINS LEAD MUST BE DESTROYED AS A
PLUG WITH BARED WIRES IS DANGEROUS IF ENGAGED IN A
LIVE SOCKET.
When an alternative type of plug is used, it should be fitted with a
10 AMP FUSE, otherwise the circuit should be protected by a
10AMP FUSE at the distribution board.
ASA
T
mark.
- 5 -
Page 6
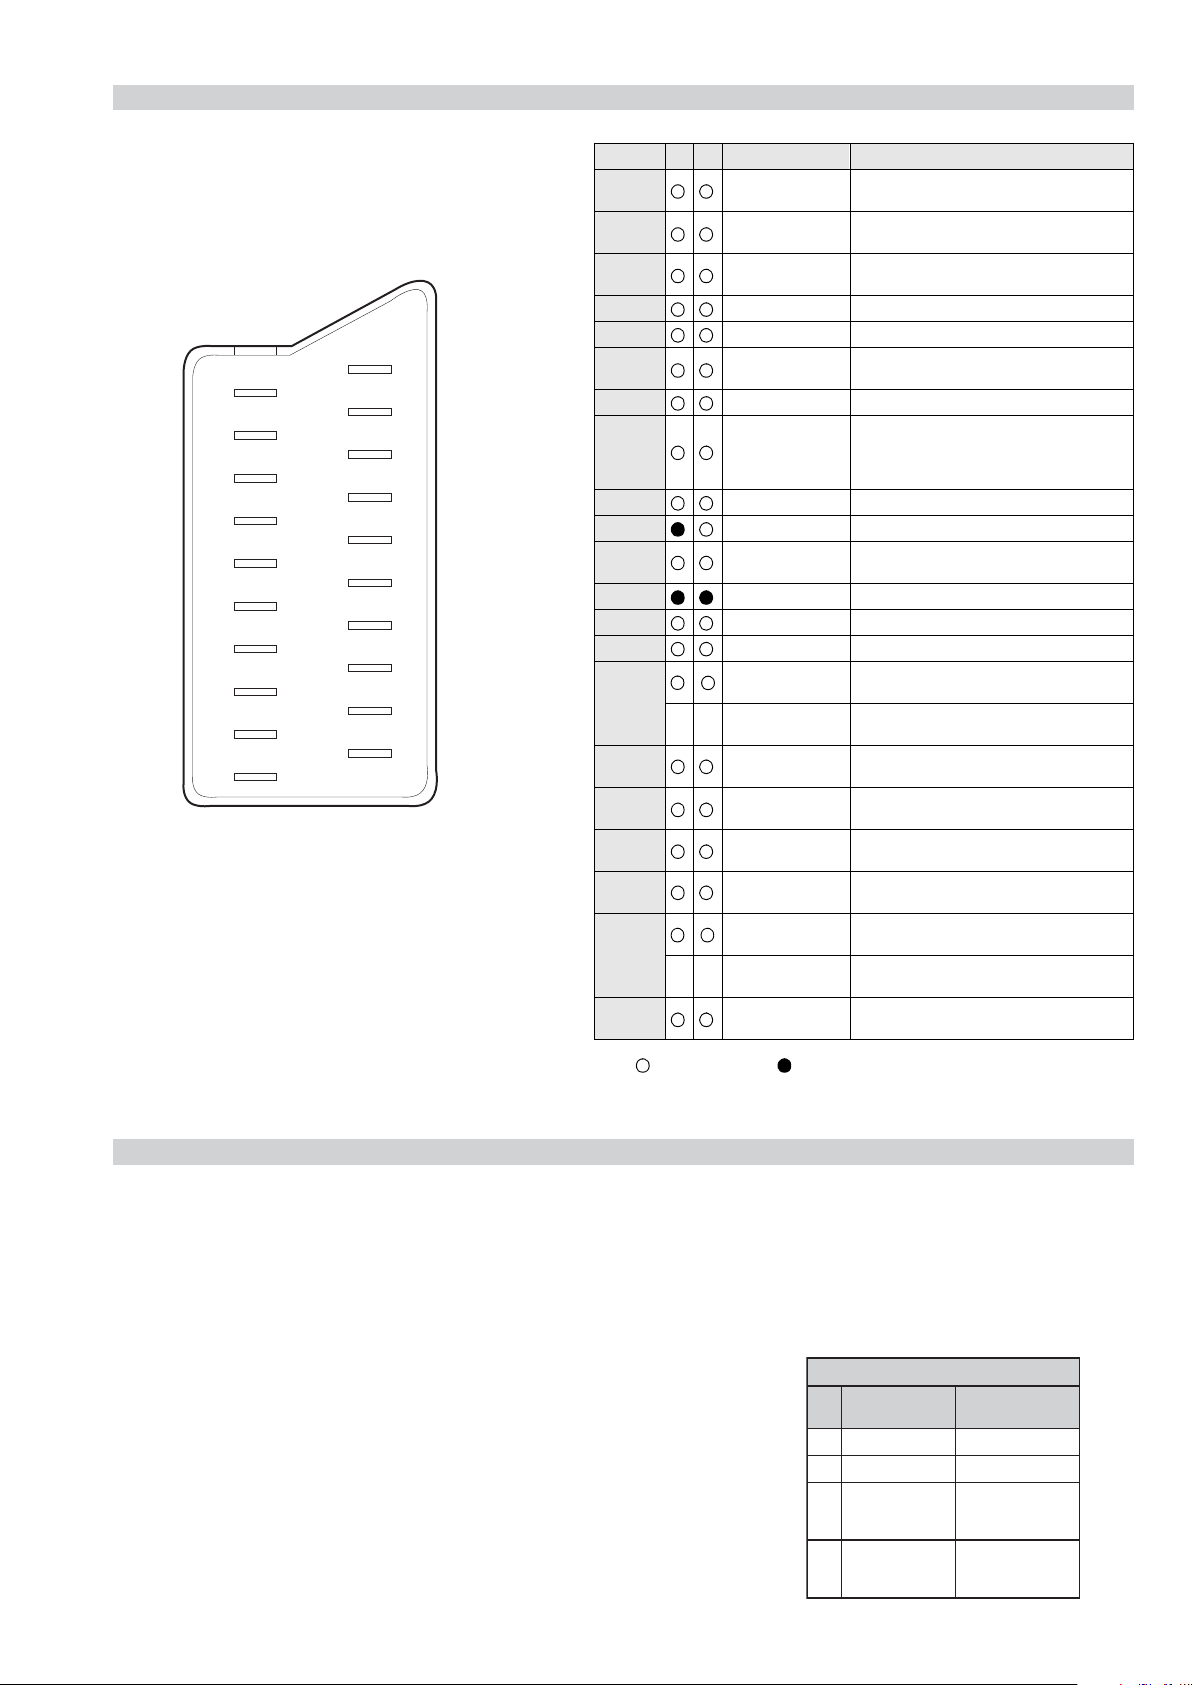
21 pin connector
21
19
17
15
13
11
9
7
5
3
1
20
18
16
14
12
10
8
6
4
2
Pin No 1 2 Signal Signal level
1 Audio output B
2
3
4 Ground (audio)
5 Ground (blue)
6 Audio input A
7 Blue input 0.7 +/- 3dB, 75 ohms positive
8 Function select
9 Ground (green)
10 AVlink
11 Green Green signal : 0.7 +/- 3dB, 75 ohms,
12 Open
13 Ground (red)
14 Ground (blanking)
15
_ (S signal Chroma
16 Blanking input
17 Ground (video
18 Ground (video
19 Video output 1V +/- 3dB, 75ohms, positive sync 0.3V
20
21 Common ground
(right)
Audio input B
(right)
Audio output A
(left)
(left)
(AV control)
_ _ Red input 0.7 +/- 3dB, 75 ohms, positive
-
-
input)
(Ys signal)
output)
input)
Video input 1V +/- 3dB, 75ohms, positive sync 0.3V
Video input
--
Y (S signal)
(plug, shield)
Standard level : 0.5V rms
Output impedence : Less than 1kohm*
Standard level : 0.5V rms
Output impedence : More than 10kohm*
Standard level : 0.5V rms
Output impedence : Less than 1kohm*
Standard level : 0.5V rms
Output impedence : More than 10kohm*
High state (9.5-12V) : Part mode
Low state (0-2V) : TV mode
Input impedence : More than 10K ohms
Input capacitance : Less than 2nF
positive
0.3 +/- 3dB, 75 ohms, positive
High state (1-3V) Low state (0-0.4V)
Input impedence : 75 ohms
(-3+10dB)
(-3+10dB)
1V +/- 3dB, 75ohms, positive sync 0.3V
(-3+10dB)
SE-1
RM-ED007
Connected Not Connected (open) * at 20Hz - 20kHz
Rear Connection Panel Side Connection Panel
S-Video
socket
niP
oN
1dnuorG-
2dnuorG-
3tupni)langisS(Y,mho57Bd3-/+V1
4tupni)langisS(CBd3-/+V3.0
langiS leveLlangiS
noitarugifnocniptekcosoediVS
V3.0.cnySevitisop
Bd01+3-
itisop,mho57
ev
.cnyS
- 6 -
Page 7
SE-1
RM-ED007
SE-1 SELF DIAGNOSTIC SOFTWARE
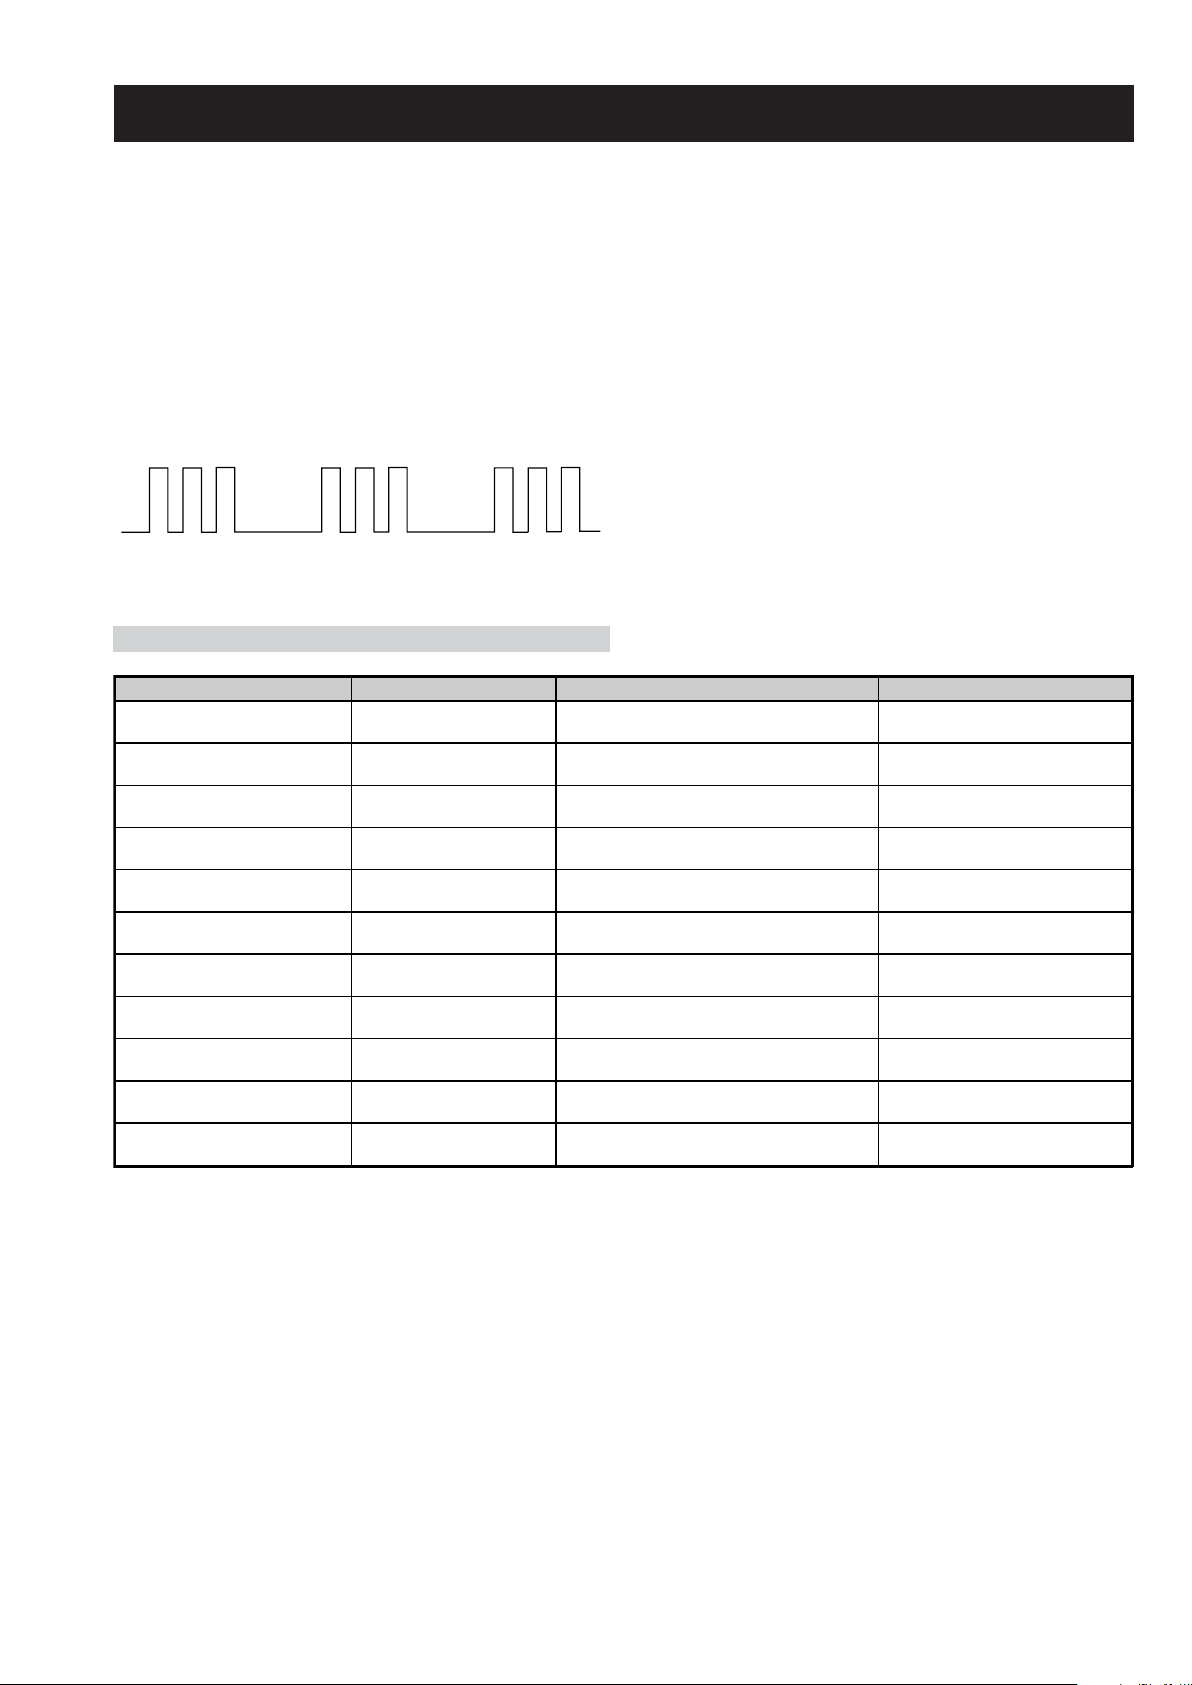
The identification of errors within the SE-1 chassis is triggered in one of two ways :- 1: Busy or 2: Device failure to respond to IIC. In the event
of one of these situations arising the software will first try to release the bus if busy (Failure to do so will report with a continuous flashing
LED) and then communicate with each device in turn to establish if a device is faulty. If a device is found to be faulty the relevant device number
will be displayed through the LED (Series of flashes which must be counted).
Flash Timing Example : e.g. error number 3
StBy LED
ON ON
OFF
OFF
LED Error Code
Error Message LED Code Checked Action
Power Supply Protection Error 03 In Normal mode.
Panel Error 04 In Normal mode.
NVM Error 05 In Initialisation state.
IIC Error 06 In Initialisation state.
HDMI Error 07 In Initialisation state.
Digital Error 08 In Initialisation state.
Tuner Error 09 In Initialisation state.
Sound Processor Error 10 In Initialisation state.
Video Processor (VCTP) Error 11 In Initialisation state.
Port Expander Error 12 In Initialisation state.
RTC IC Error 14 In Initialisation state.
Goes into standby. LED flashes 3
times.
Goes into standby. LED flashes 4
times.
Adds error to Error Menu. LED
flashes 5 times in factory mode.
Adds error to Error Menu. LED
flashes 6 times in factory mode.
Adds error to Error Menu. LED
flashes 7 times in factory mode.
Adds error to Error Menu. LED
flashes 8 times in factory mode.
Adds error to Error Menu. LED
flashes 9 times in factory mode.
Adds error to Error Menu. LED
flashes 10 times in factory mode.
Adds error to Error Menu. LED
flashes 11 times in factory mode.
Adds error to Error Menu. LED
flashes 12 times in factory mode.
Adds error to Error Menu. LED
flashes 14 times in factory mode.
- 7 -
Page 8
The operating instructions mentioned here are partial abstracts
C
from the Operating Instruction Manual. The page numbers of
the Operating Instruction Manual remain as in the manual.
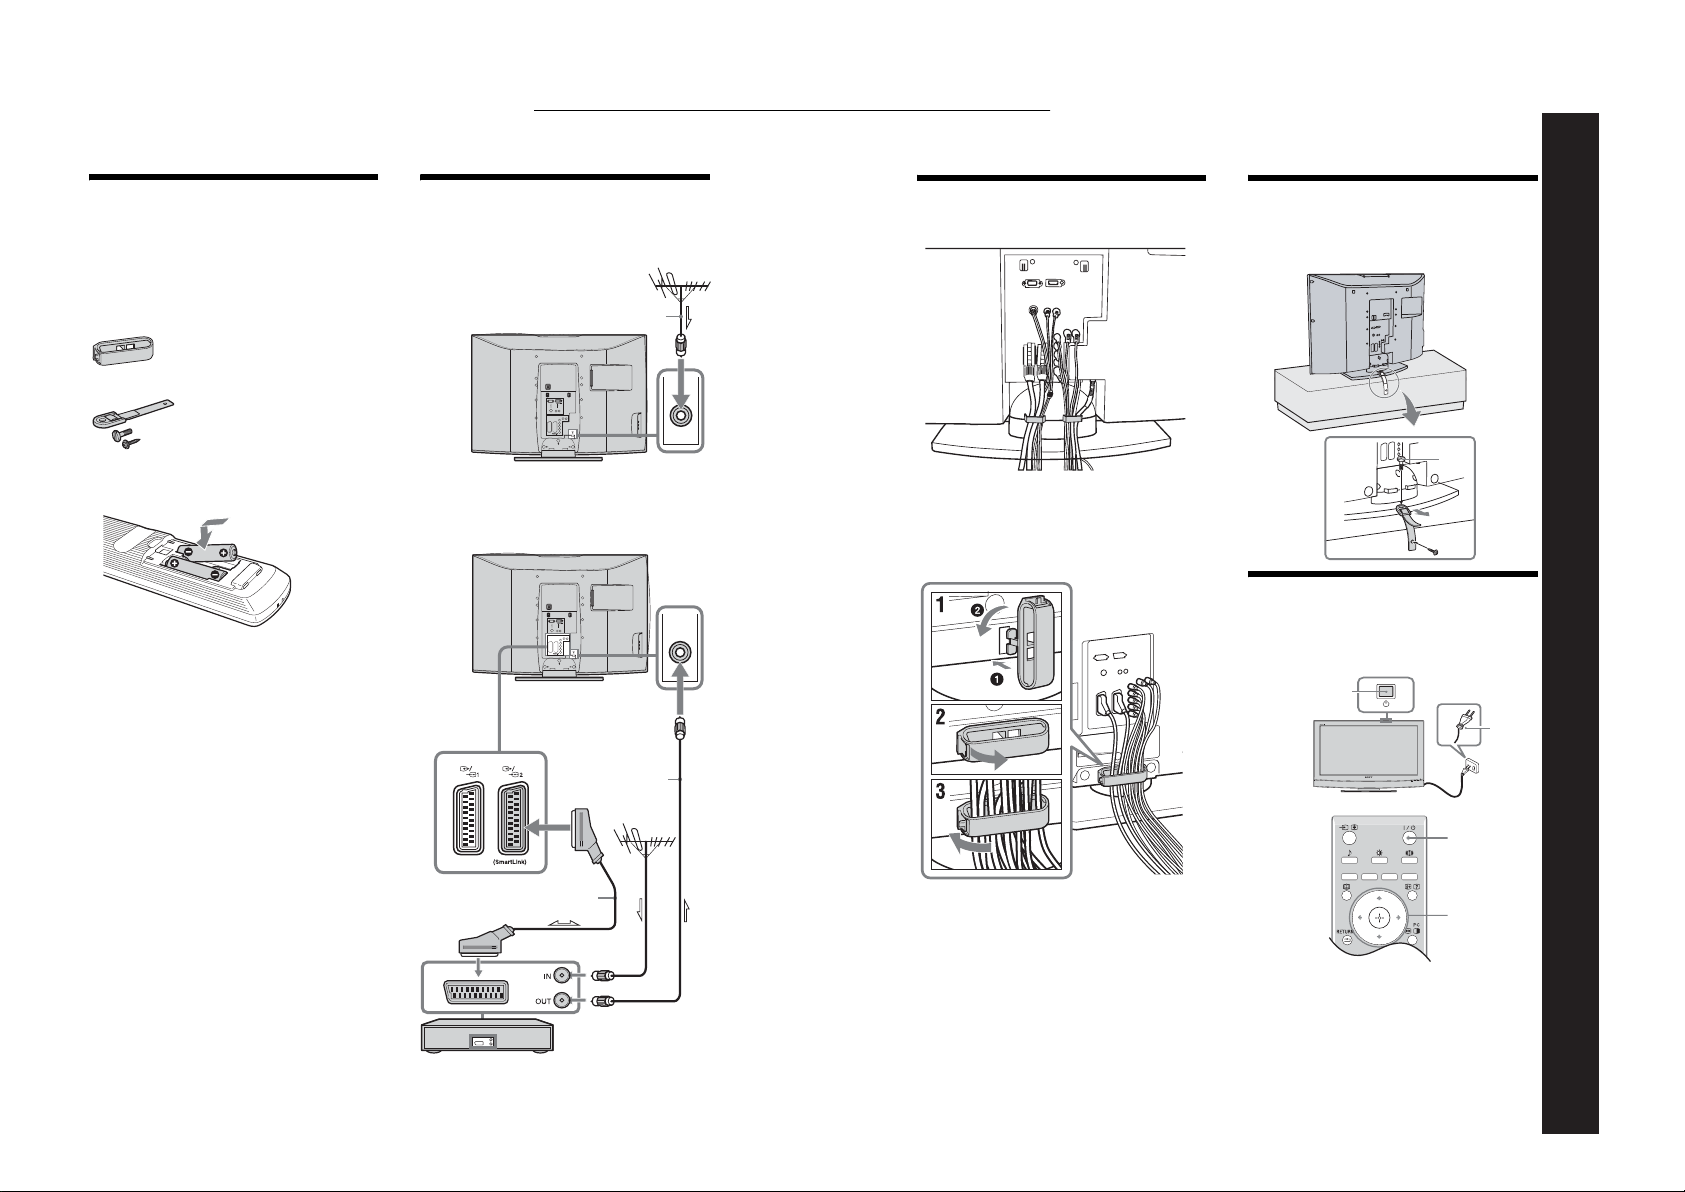
1: Checking the
accessories
Remote RM-ED007 (1)
Size AA batteries (R6 type) (2)
Cable holder (1) (only for KDL-40U2000)
Support belt (1) and screws (2)
2: Connecting an aerial/
VCR
onnecting an aerial only
Coaxial cable
(not supplied)
3: Bundling the cables 4: Preventing the TV
from toppling over
2
To insert batteries into the remote
SECTION 1 GENERAL
– 8 –
Notes
• Observe the correct polarity when inserting batteries.
• Dispose of batteries in an environmentally friendly way.
Certain regions may regulate disposal of the battery.
Please consult your local authority.
• Do not use different types of batteries together or mix old
and new batteries.
• Handle the remote with care. Do not drop or step on it, or
spill liquid of any kind onto it.
• Do not place the remote in a location near a heat source, or
in a place subject to direct sunlight, or in a damp room.
Connecting an aerial and VCR
RF lead
(not supplied)
(only for KDL-40U2000)
3
1
5:
Selecting the language
and country/region
2
1
Scart lead (not supplied)
VCR
2
3,4
1
Connect the TV to your mains socket
(220-240V AC, 50Hz).
2
Press 1 on the TV (top side).
When you switch on the TV for the first time, the
Language menu appears on the screen.
When the TV is in standby mode (the
indicator on the TV (front) is red), press "/1 on
the remote to switch on the TV.
1
Continued
(standby)
RM-ED007
SE-1
Page 9
– 9 –
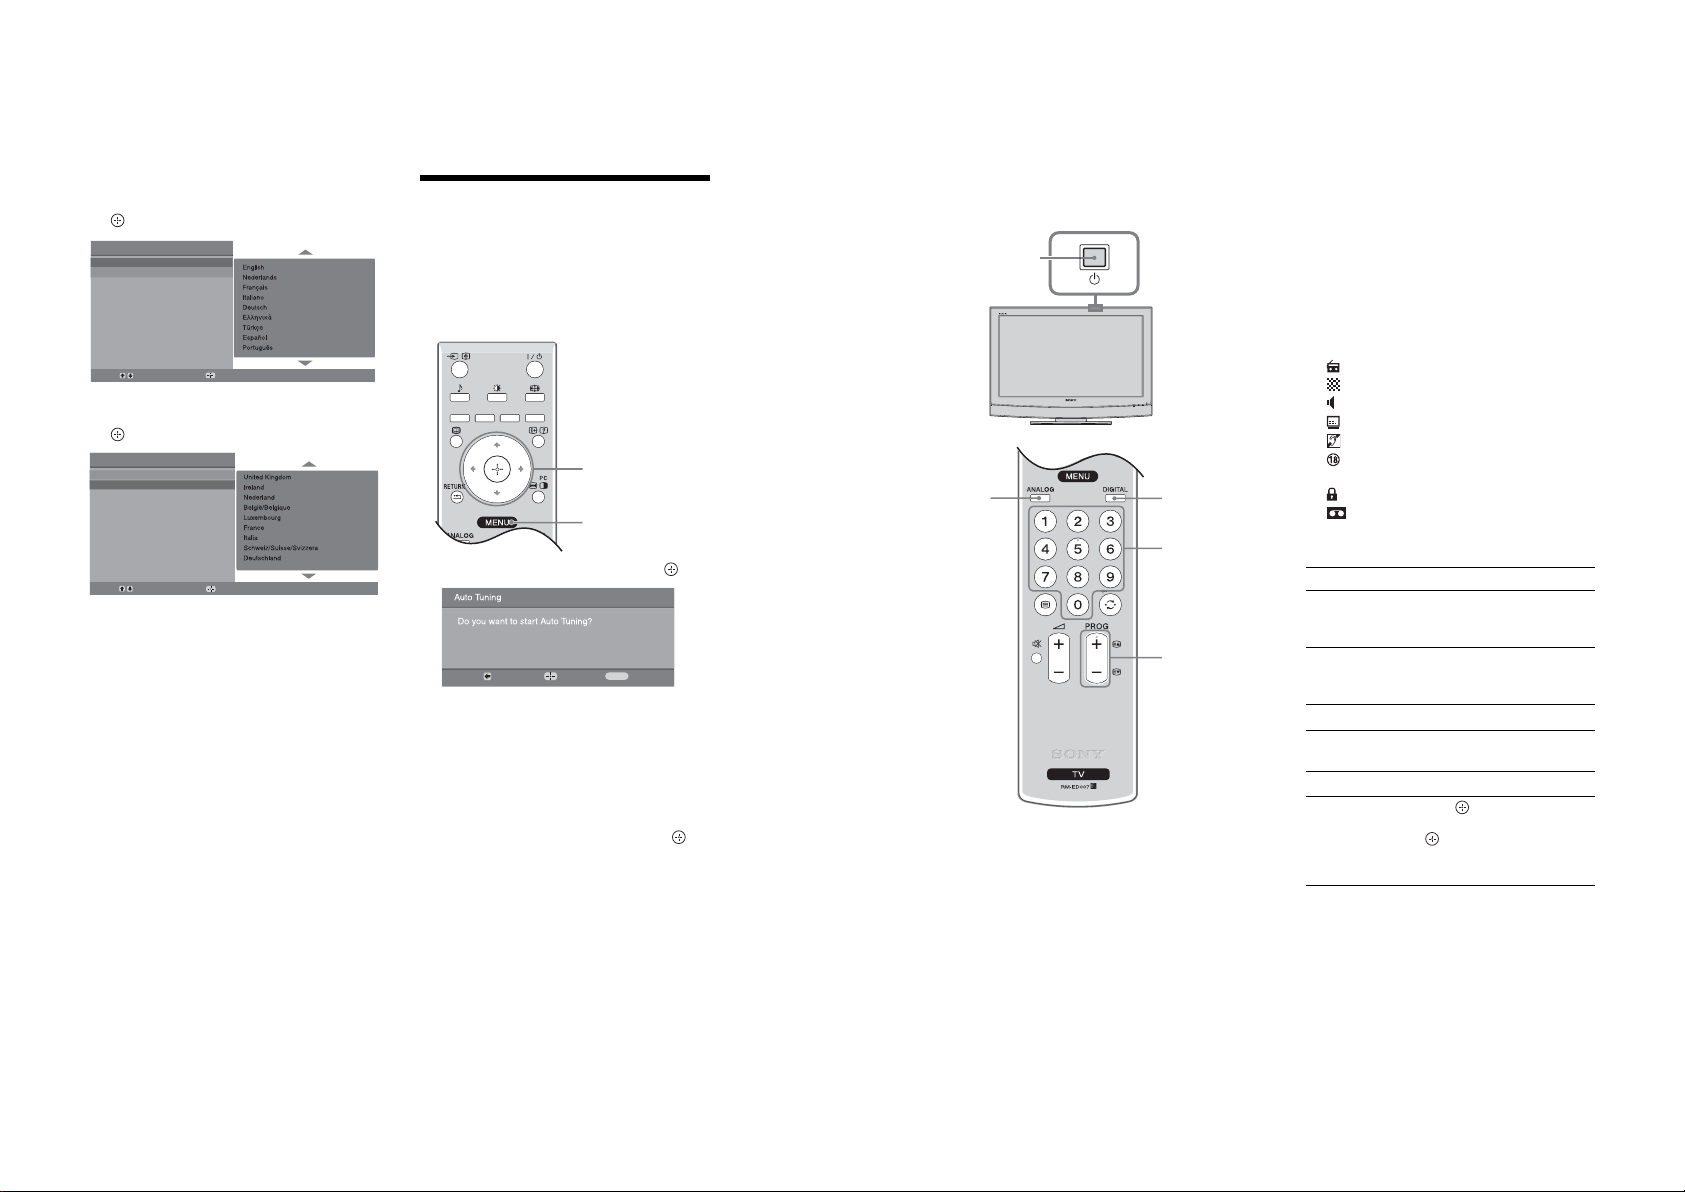
3
Press F/f to select the language
displayed on the menu screens, then press
.
Auto Start Up
Language
Country
Select:
4
Press F/f to select the country/region in
Confirm:
which you will operate the TV, then press
.
Auto Start Up
Language
Country
Select:
If the country/region in which you want to use the
TV does not appear in the list, select “-” instead of
a country/region.
The message confirming the TV start auto-tuning
appears on the screen, then go to “6: Auto-tuning
the TV”.
Confirm:
6: Auto-tuning the TV
After selecting the language and country/region, a
message confirming the TV start auto-tuning appears
on the screen.
The TV will now search for and store all available TV
channels.
1
3
1
Press G to select “OK”, then press .
Back:
The TV starts searching for all available digital
channels, followed by all available analogue
channels. This may take some time, please be
patient and do not press any buttons on the TV or
remote.
If a message appears for you to confirm the aerial
connections
No digital or analogue channels were found.
Check all the aerial connections and press to
start auto-tuning again.
2
When the Programme Sorting menu
Start:
appears on the screen, follow the steps of
“Programme Sorting” (page 25).
If you do not wish to change the order in which the
analogue channels are stored on the TV, go to step
3.
3
Press MENU to exit.
The TV has now tuned in all the available
channels.
Cancel:
MENU
Watching TV
1
1
2
1
Press 1 on the TV (top side) to switch on
the TV.
When the TV is in standby mode (the 1 (standby)
indicator on the TV (front) is red), press "/1 on
the remote to switch on the TV.
2
Press DIGITAL to switch to digital mode or
ANALOG to switch to analogue mode.
The channels available vary depending on the
mode.
2
3
3
3
Press the number buttons or PROG +/- to
select a TV channel.
To select channel numbers 10 and above using the
number buttons, enter the second and third digits
within two seconds.
To select a digital channel using the Digital
Electronic Programme Guide (EPG), see page 15.
In digital mode
An information banner appears briefly. The
following icons may be indicated on the banner.
:Radio service
: Scrambled/Subscription service
: Multiple audio languages available
: Subtitles available
: Subtitles available for the hearing impaired
: Recommended minimum age for current
programme (from 4 to 18 years)
: Parental Lock
: Current programme is being recorded
Additional operations
To Do this
Turn off the TV
temporarily
(Standby mode)
Turn on the TV
from Standby mode
without sound
Turn off the TV Press 1 on the TV (top side).
Adjust the volume Press 2 + (increase)/
Mute the sound Press %. Press again to restore.
Access the
Programme index
table (in analogue
mode only)
Press "/1.
Press %. Press 2 +/- to set the
volume level.
- (decrease).
Press . To select an analogue
channel, press
To access the Input signal index
table, see page 18.
.
F/f, then press
RM-ED007
SE-1
Page 10
– 10 –
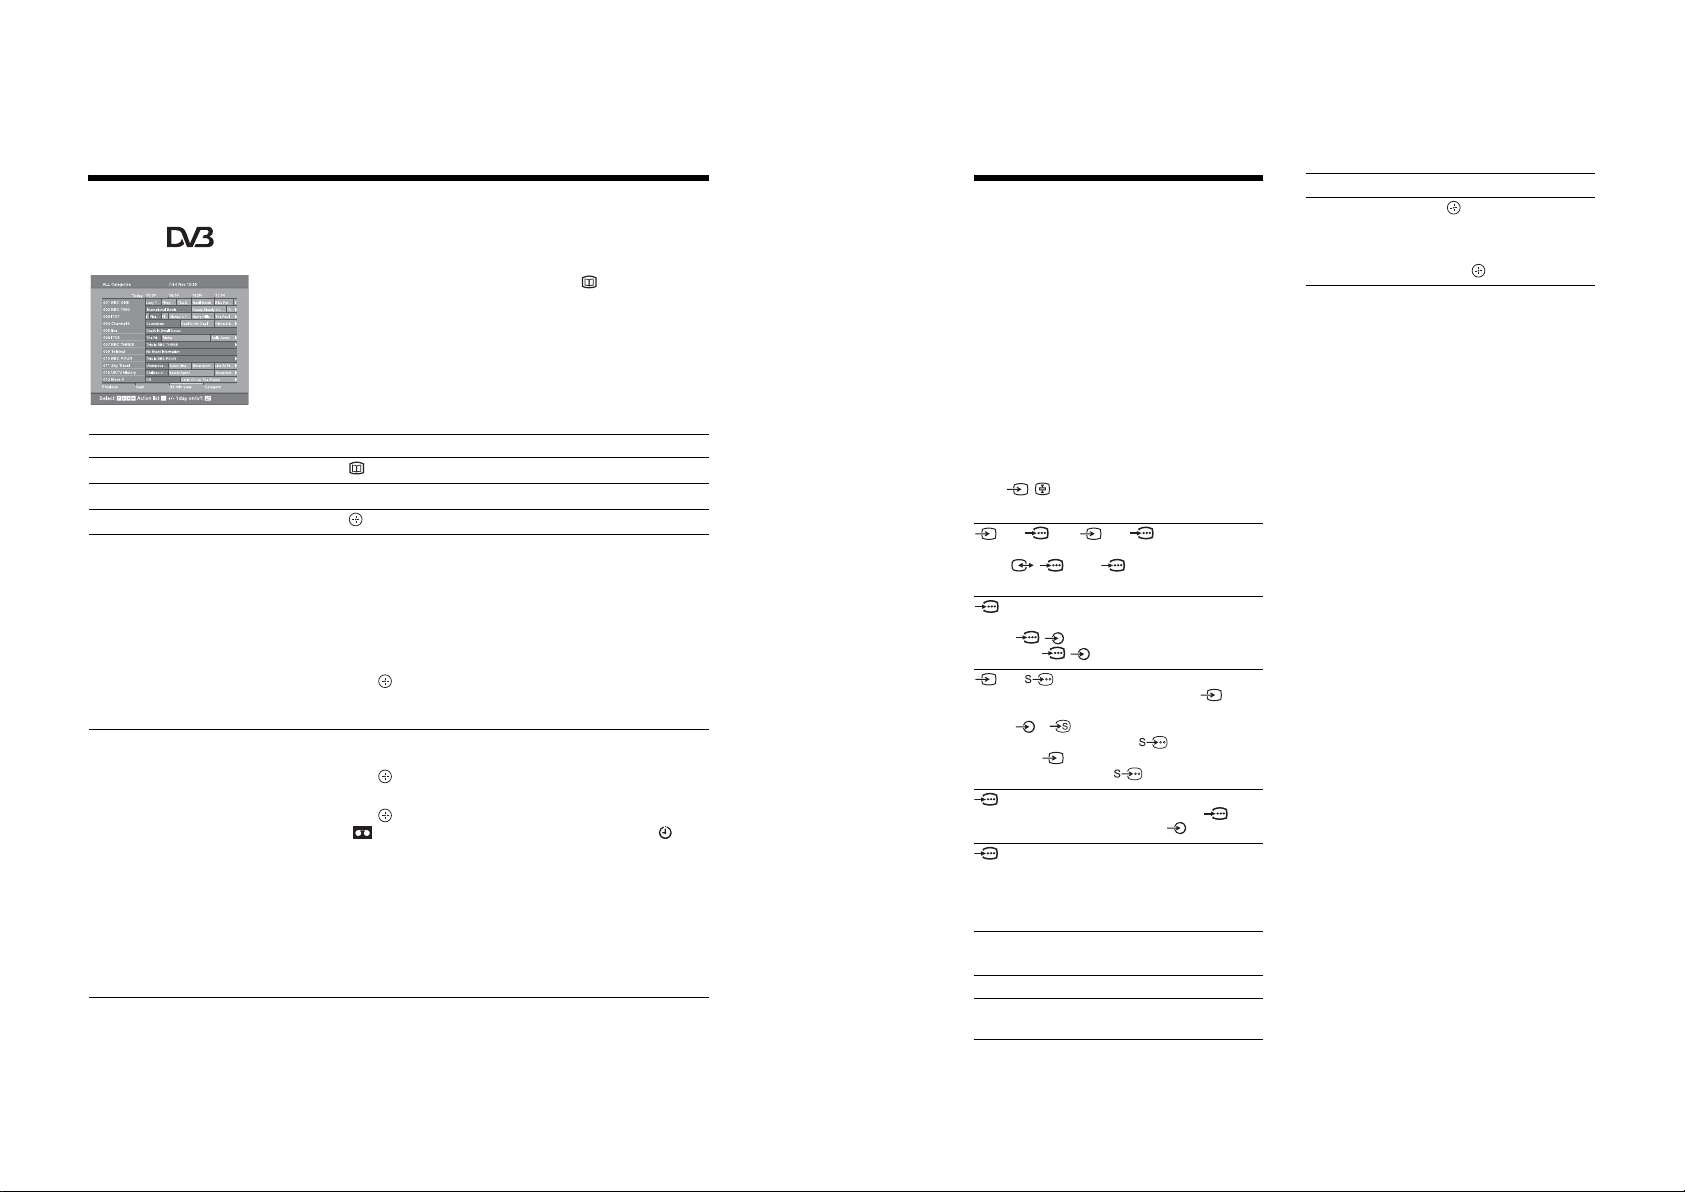
Checking the Digital Electronic Programme Guide
(EPG)
1
In digital mode, press to display the
Digital Electronic Programme Guide
(EPG).
2
Perform the desired operation, as shown in
the following table.
Note
Programme information will only be displayed if the TV
Digital Electronic Programme Guide (EPG)
To Do this
Turn off the EPG Press .
Move through the EPG Press
Watch a current programme Press while the current programme is selected.
Sort the programme information by
category – Category list
Set a programme to be recorded – Timer
REC
F/f/G/g
1 Press the blue button.
2 Press
displayed on the side.
The categories available include:
“Favourite”: Contains all the channels that have been stored in the
Favourite list (page 17).
“All Categories”: Contains all available channels.
“News”: Contains all news channels.
3 Press .
The Digital Electronic Programme Guide (EPG) now only displays the
current programmes from the category selected.
1 Press F/f/G/g to select the future programme you want to
record.
2 Press .
3 Press
4 Press to set the TV and your VCR timers.
A symbol appears by that programme’s information. The
indicator on the TV (front) lights up.
Notes
• You can set VCR timer recording on the TV only for Smartlink compatible
VCRs. If your VCR is not Smartlink compatible, a message will be displayed to
remind you to set your VCR timer.
• Once a recording has begun, you can switch the TV to standby mode, but do not
switch off the TV completely or the recording may be cancelled.
• If an age restriction for programmes has been selected, a message asking for pin
code will appear on the screen. For more details refer to “Parental Lock” on
page 29.
station is transmitting it.
.
F/f/G/g
to select a category. The category name is
F/f
to select “Timer REC”.
Viewing pictures from connected equipment
Switch on the connected equipment, then
perform one of the following operation.
For equipment connected to the scart sockets using a
fully-wired 21-pin scart lead
Start playback on the connected equipment.
The picture from the connected equipment appears on
the screen.
For an auto-tuned VCR (page 4)
In analogue mode, press PROG +/-, or the number
buttons, to select the video channel.
For other connected equipment
Press / repeatedly until the correct input
symbol (see below) appears on the screen.
AV1/ AV1, AV2/ AV2:
Audio/video or RGB input signal through the scart
socket / 1 or 2. appears only if an RGB
source has been connected.
AV 3 :
Component input signal through the Y, P
sockets / 3, and audio input signal through the
L, R sockets / 3.
AV 4 / AV 4 :
Video input signal through the video socket 4, and
audio input signal through the L (MONO), R audio
sockets 4. appears only if the equipment is
connected to the S video socket 4 instead of the
video socket 4, and S video input signal is input
through the S video socket 4.
5:
RGB input signal through the PC connectors 5, and
audio input signal through the socket .
AV 6 :
Digital audio/video signal is input through the HDMI IN
6 socket. Audio input signal is analogue only if the
equipment has been connected using the DVI and audio
out socket.
Additional operations
To Do this
Return to the normal
TV operation
Press DIGITAL or ANALOG.
B/CB
, PR/CR
To Do this
Access the Input
signal index table
Press to access the Input signal
index table. (Then, only in
analogue mode, press
select an input source, press
then press .
g.) To
F/f,
RM-ED007
SE-1
Page 11
– 11 –
Navigating through menus
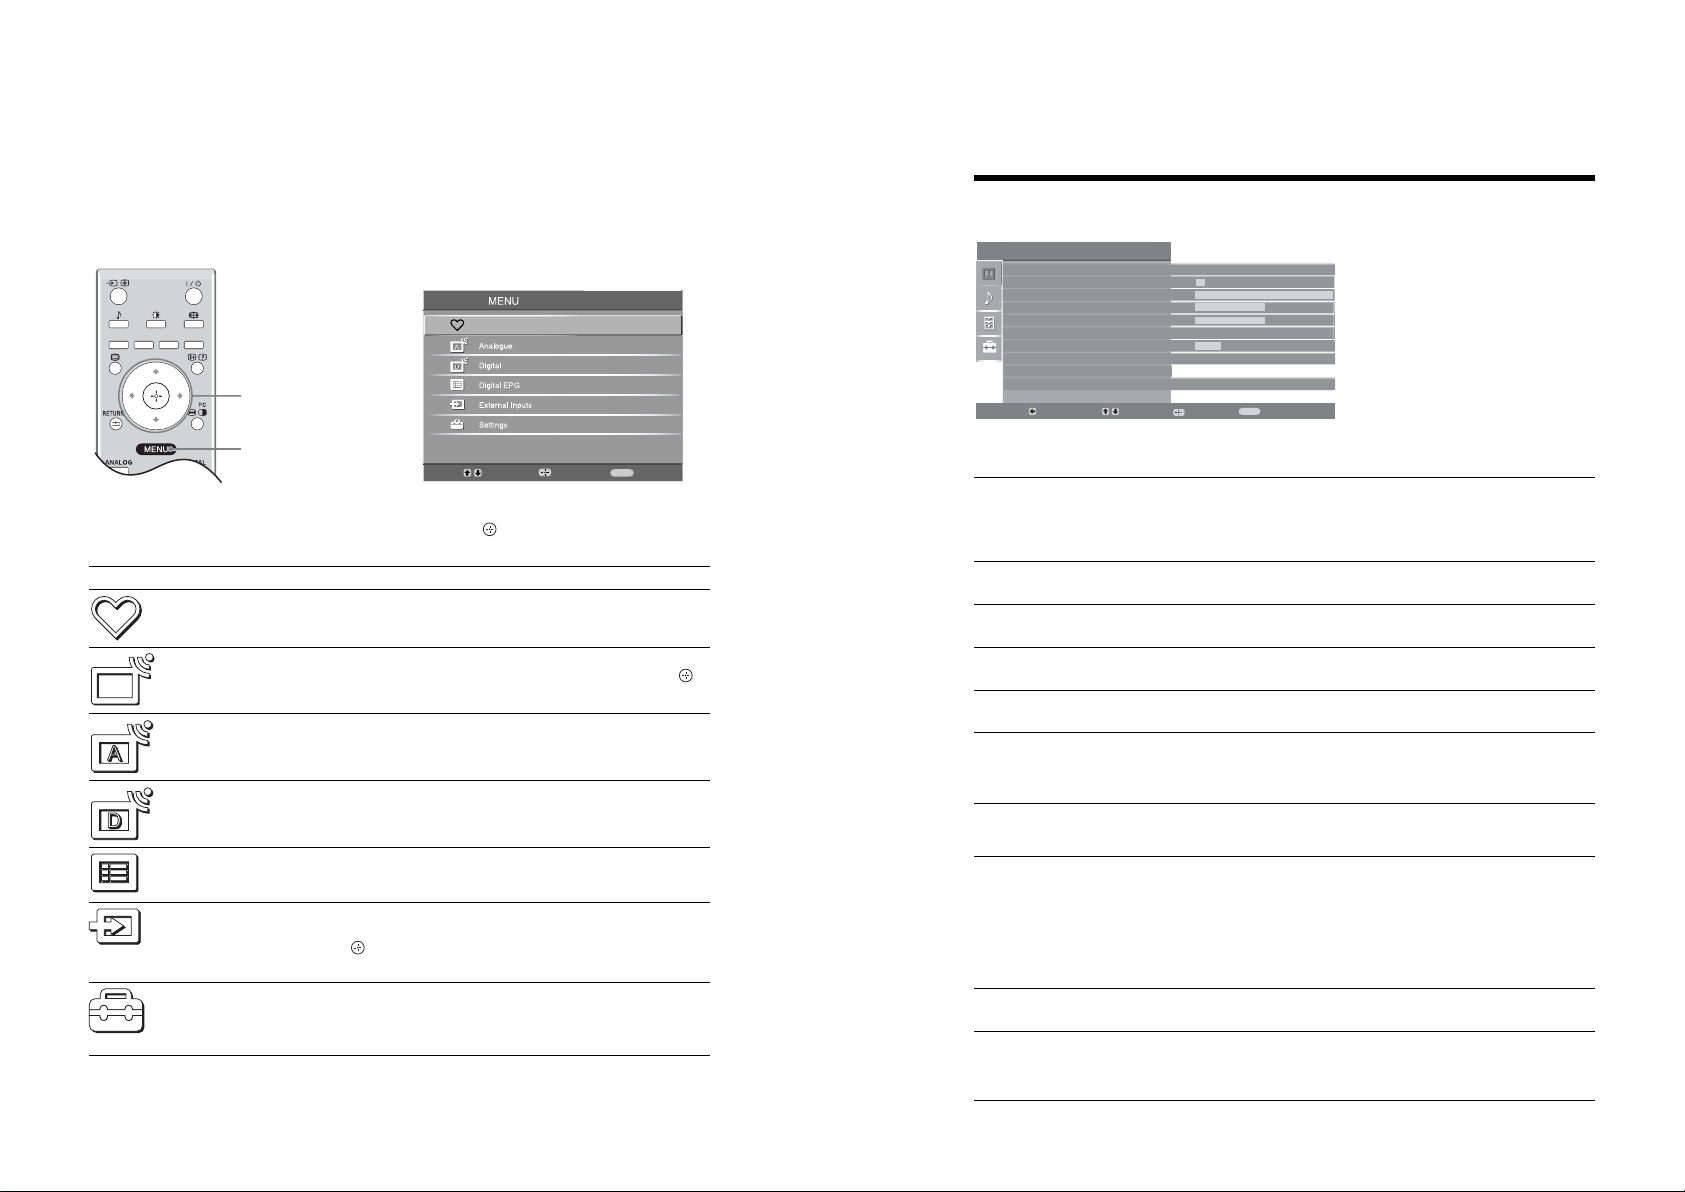
“MENU” allows you to enjoy various convenient features of this TV. You can easily select channels or external
inputs with the remote. Also, settings for your TV can be changed easily using “MENU”.
1
Press MENU to display the menu.
Digital Favourites
2,3
1
MENU
Exit:
Menu Description
Digital Favourites
Launches the Favourite list. For details about settings, see page 17.
(in digital mode only)
Select:
2
Press F/f to select an option.
3
Press to confirm a selected option.
Enter:
To exit the menu, press MENU.
Picture Adjustment menu
Picture Adjustment
Picture Mode
Backlight
Contrast
Brightness
Colour
Hue
Sharpness
Colour Tone
Reset
Noise Reduction
Back:
Picture Mode
Backlight
Contrast
Select:
Custom
5
Max
50
50
0
15
Warm
Auto
MENU
Enter:
Selects the picture mode.
• “Vivid”: For enhanced picture contrast and sharpness.
• “Standard”: For standard picture. Recommended for home entertainment.
• “Custom”: Allows you to store your preferred settings.
Exit:
Adjusts the brightness of the backlight.
Increases or decreases picture contrast.
You can select the options listed below on the
Picture menu. To select options in “Settings”,
see “Navigating through menus” (page 19).
TV List
(in analogue mode
only)
Analogue
(in digital mode only)
Digital
(in digital mode only)
Digital EPG
(in digital mode only)
External Inputs
Settings
Allows you to select TV programs from a list of channel labels.
• To watch the desired channel, select the channel, then press .
• To assign a label to a program, see page 26.
Returns to the last viewed analogue channel.
Returns to the last viewed digital channel.
Launches the Digital Electronic Programme Guide (EPG).
For details about settings, see page 15.
Selects equipment connected to your TV.
• To watch the desired external input, select the input source, then
press .
• To assign a label to an external input, see page 25.
Opens the Settings menu screen where most of advanced settings and
adjustments are performed. Select a menu icon, select an option and make the
desired change or adjustment using
For details about settings, see page 20 to 29.
F/f/G/g
.
Brightness
Colour
Hue
Sharpness
Colour Tone
Reset
Noise Reduction
Brightens or darkens the picture.
Increases or decreases colour intensity.
Increases or decreases the green tones.
Tip
“Hue” can only be adjusted for an NTSC colour signal (e.g., U.S.A. video tapes).
Sharpens or softens the picture.
Adjusts the whiteness of the picture.
• “Cool”: Gives the white colours a blue tint.
• “Neutral”: Gives the white colours a neutral tint.
• “Warm”: Gives the white colours a red tint.
Tip
“Warm” can only be selected when you set “Picture Mode” to “Custom”.
Resets all picture settings except “Picture Mode” to the factory settings.
Reduces the picture noise (snowy picture) in a weak broadcast signal.
• “Auto”: Automatically reduces the picture noise.
• “High/Mid/Low”: Modifies the effect of the noise reduction.
RM-ED007
SE-1
Page 12
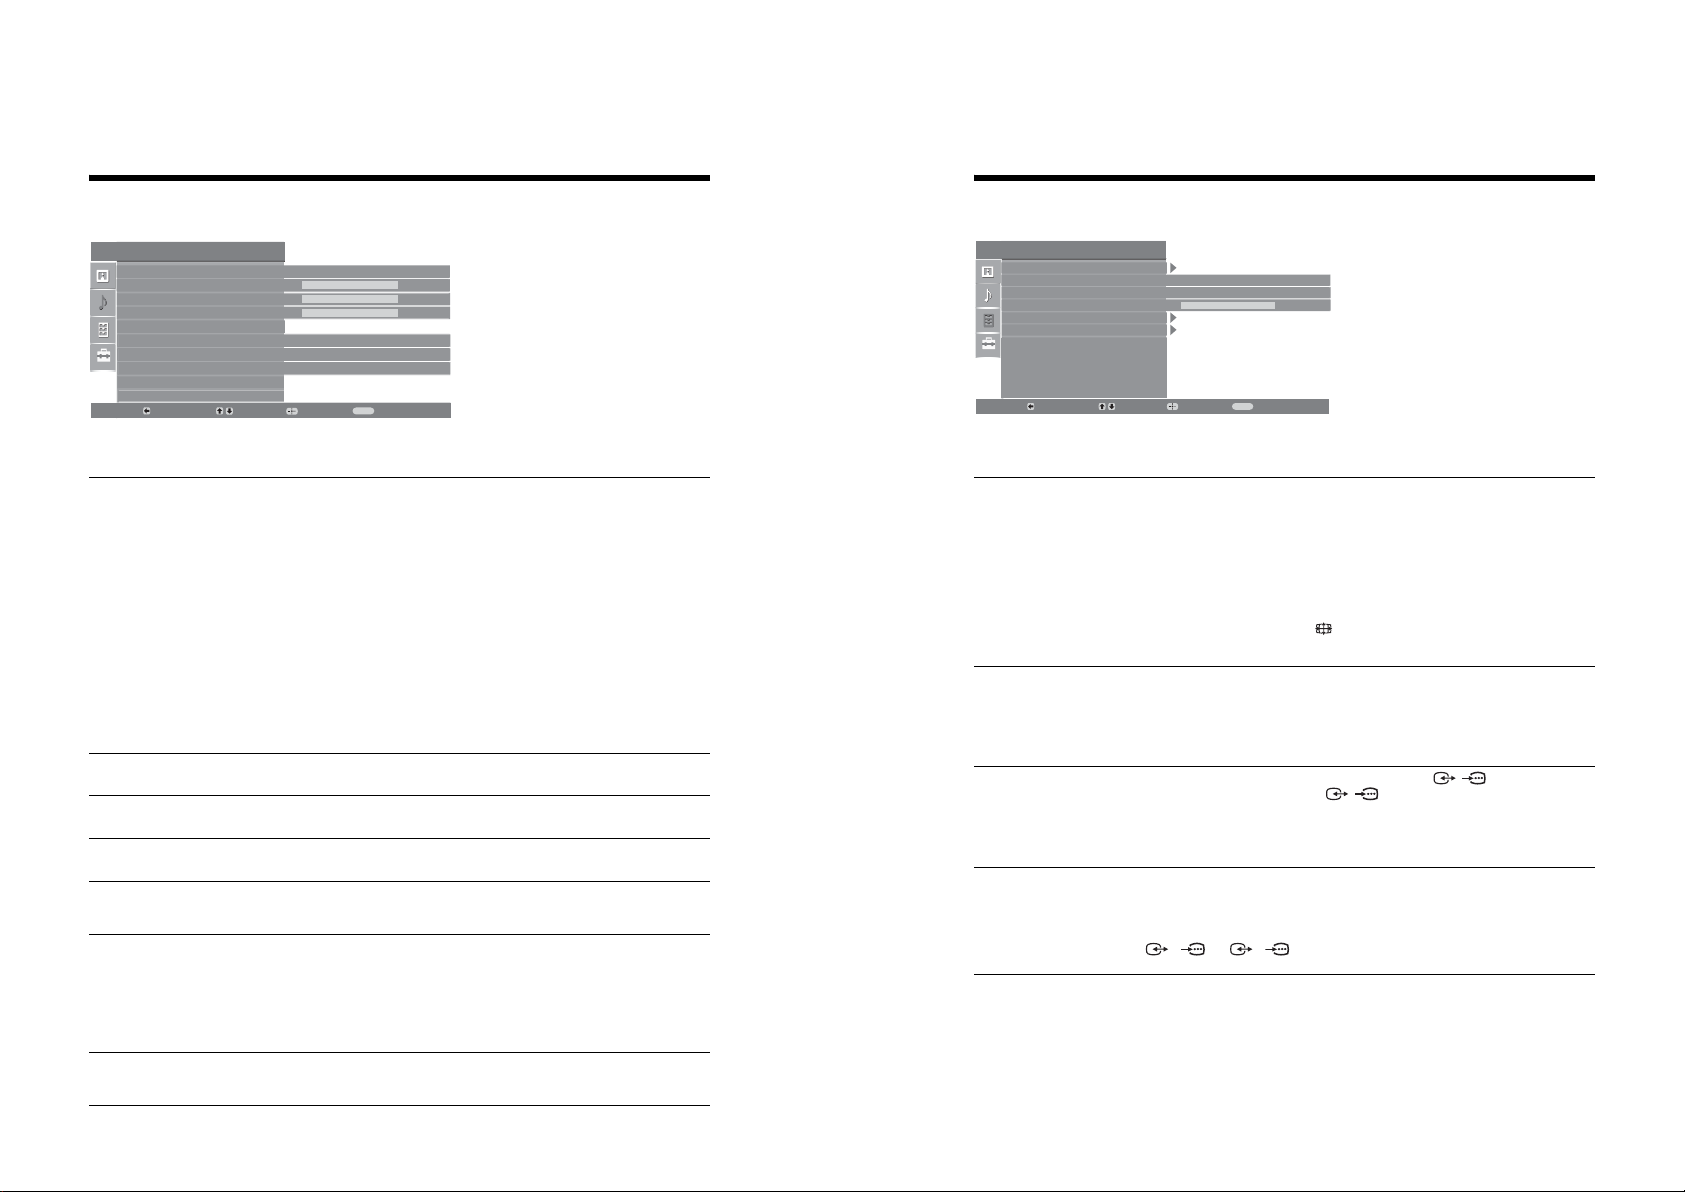
Sound Adjustment menu
Features menu
– 12 –
Sound Adjustment
Sound Effect
Tre ble
Bass
Balance
Reset
Dual Sound
Auto Volume
TV Speakers
Back:
Sound Effect
Treble
Bass
Balance
Reset
Dual Sound
Select:
You can select the options listed below on the
Standard
50
50
0
Mono
On
On
MENU
Enter:
Selects the sound mode.
•“Standard”: Enhances clarity, detail, and sound presence by using “BBE High definition
Sound System.”
• “Dynamic”: Intensifies clarity and sound presence for better intelligibility and musical
realism by using the “BBE High definition Sound System.”
• “BBE ViVA”: BBE ViVA Sound provides musically accurate natural 3D image with Hi-Fi
sound. The clarity of the sound is improved by BBE while the width depth and height of
sound image are expanded by BBE’s proprietary 3D sound process. BBE ViVA Sound is
compatible with all TV programs including news, music, dramas, movies, sports and
electronic games.
• “Dolby Virtual
channel system.
• “Off”: Flat response.
Exit:
”
: Uses the TV speakers to simulate the surround effect produced by a multi
Sound menu. To select options in “Settings”,
see “Navigating through menus” (page 19).
Tips
• You can change sound effect by pressing 9 repeatedly.
• If you set “Auto Volume” to “On”, “Dolby Virtual” changes to “Standard”.
Adjusts higher-pitched sounds.
Adjusts lower-pitched sounds.
Emphasizes left or right speaker balance.
Resets all the sound settings to the factory settings.
Selects the sound from the speaker for a stereo or bilingual broadcast.
• “Stereo”, “Mono”: For a stereo broadcast.
• “A”/“B”/“Mono”: For a bilingual broadcast, select “A” for sound channel 1, “B”
for sound channel 2, or “Mono” for a mono channel, if available.
Tip
If you select other equipment connected to the TV, set “Dual Sound” to “Stereo”, “A” or “B”.
Features
Screen
Power Saving
AV2 Output
RGB Center
PC Adjustment
Timer
Back:
Screen
Power Saving
AV2 Output
RGB Center
Select:
You can select the options listed below on the
Features menu. To select options in “Settings”,
Standard
TV
0
MENU
Enter:
Changes the screen format.
• “Auto Format”: Automatically changes the screen format according to the
• “Screen Format”: For details about the screen format, see page 14
• “Vertical Size”: Adjusts the vertical size of the picture when the screen format is
Exit:
broadcast signal.
set to Smart.
see “Navigating through menus” (page 19).
Tips
• Even if you have selected “On” or “Off” in “Auto Format”, you can always modify the
format of the screen by pressing repeatedly.
• “Auto Format” is available for PAL and SECAM signals only.
Selects the power saving mode to reduce the power consumption of the TV.
• “Standard”: Default settings.
• “Reduce”: Reduces the power consumption of the TV.
• “Picture Off”: Switches off the picture. You can listen to the sound with the picture
off.
Sets a signal to be output through the socket labelled / 2 on the rear of the
TV. If you connect a VCR to the / 2 socket, you can then record from the
equipment connected to other sockets of the TV.
• “TV”: Outputs a broadcast.
• “Auto”: Outputs whatever is being viewed on the screen.
Adjusts the horizontal picture position so that the picture is in the middle of the
screen.
Tip
This option is only available if an RGB source has been connected to the Scarts connectors
1/ 1
or
2/ 2
on the rear of the TV.
Auto Volume
Keeps a constant volume level even when volume level gaps occur (e.g., adverts tend
to be louder than programmes).
RM-ED007
SE-1
Page 13
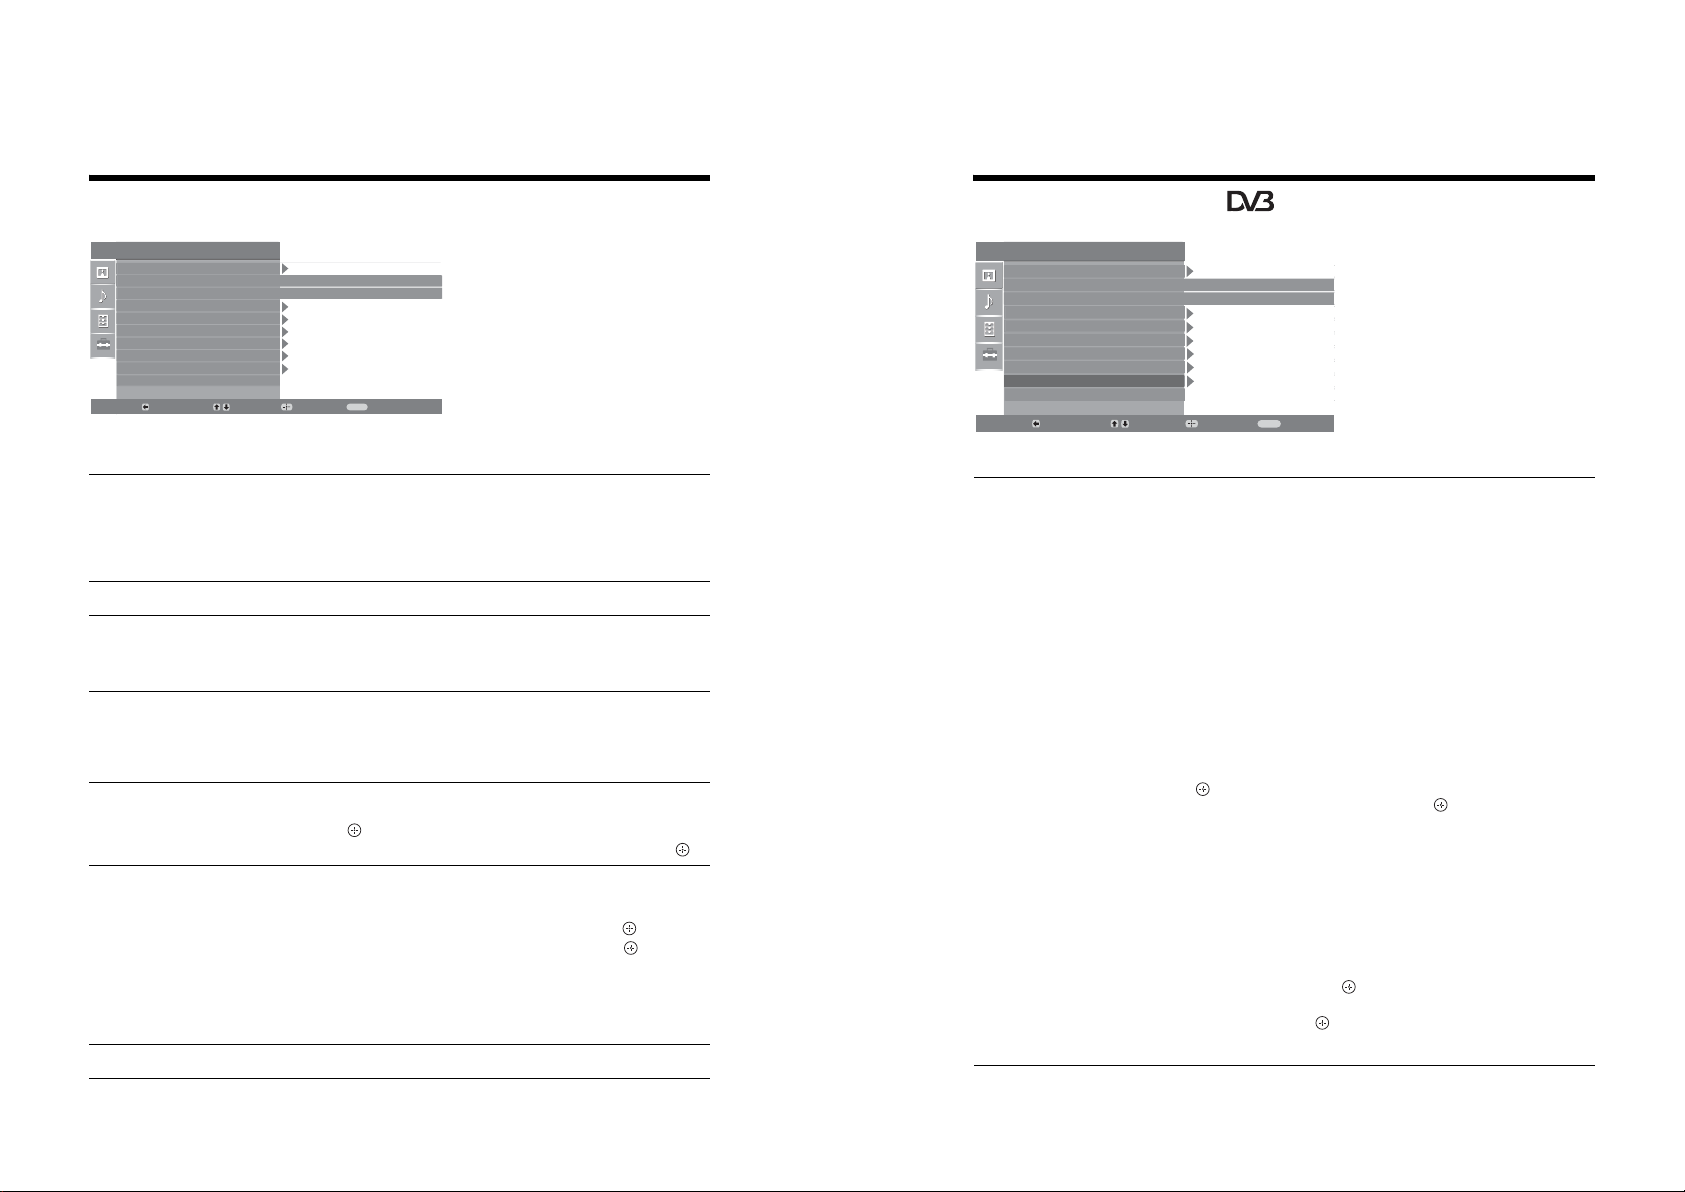
Set-up menu
Digital Set-up menu
– 13 –
Set Up
Auto Start Up
Language
Country
Auto Tuning
Programme Sorting
AV Preset
Sound Offset
Manual Programme Preset
Digital Set Up
Back:
Select:
Auto Start-up
Language
Country
Auto Tuning
Programme Sorting
AV Preset
Sound Offset
You can select the options listed below on the
Set-up menu. To select options in “Settings”, see
English
Off
MENU
Enter:
Starts the “first time operation menu” to select the language and country/region, and
tune in all available digital and analogue channels. Usually, you do not need to do
this operation because the language and country/region will have been selected and
channels already tuned when the TV was first installed (page 5, 6). However, this
option allows you to repeat the process (e.g., to retune the TV after moving house,
or to search for new channels that have been launched by broadcasters).
Exit:
“Navigating through menus” (page 19).
Selects the language in which the menus are displayed.
Selects the country/region where you operate the TV.
Tip
The country/region in which you want to use the TV does not appear in the list, select
“Off” instead of a country/region.
Tunes in all the available analogue channels.
Usually you do not need to do this operation because the channels are already tuned
when the TV was first installed (page 5, 6). However, this option allows you to
repeat the process (e.g., to retune the TV after moving house, or to search for new
channels that have been launched by broadcasters).
Changes the order in which the analogue channels are stored on the TV.
F/f
1 Press
to select the channel you want to move to a new position,
then press .
F/f
2 Press
Assigns a name to any equipment connected to the side and rear sockets. The name
will be displayed briefly on the screen when the equipment is selected. You can skip
an input source that is not connected to any equipment.
1 Press
2 Press
• “Equipment labels”: Uses one of the preset labels to assign a name to connected
• “Edit”: Creates your own label.
• “Skip”: Skips an input source that is not connected to any equipment when you
to select the new position for your channel, then press .
F/f
to select the desired input source, then press .
F/f
to select the desired option below, then press .
equipment.
press F/f to select the input source.
Sets an independent volume level to each equipment connected to the TV.
Set Up
Auto Start Up
Language
Country
Auto Tuning
Programme Sorting
AV Preset
Sound Offset
Manual Programme Preset
Digital Set Up
Back:
Digital Tuning
Select:
You can change/set the digital settings using the
Digital Set-up menu. To select options in
“Settings”, see “Navigating through menus”
(page 19).
Enter:
English
Off
Exit:
MENU
Displays the “Digital Tuning” menu.
Digital Auto Tuning
Tunes in all the available digital channels.
Usually you do not need to do this operation because the channels are already tuned
when the TV was first installed (page 5). However, this option allows you to repeat
the process (e.g., to retune the TV after moving house, or to search for new channels
that have been launched by broadcasters).
Programme List Edit
Removes any unwanted digital channels stored on the TV, and changes the order of
the digital channels stored on the TV.
F/f
1 Press
to select the channel you want to remove or move to a new
position.
If you know the programme number (frequency)
Press the number buttons to enter the three-digit programme number of the broadcast
you want.
2 Remove or change the order of the digital channels as follows:
To remove the digital channel
Press . A message that confirms whether the selected digital channel is to be
deleted appears. Press
G
to select “Yes”, then press .
To change the order of the digital channels
Press g, then press F/f to select the new position for the channel and press G.
Repeat the procedure in steps 1 and 2 to move other channels if required.
3 Press RETURN.
Digital Manual Tuning
Tunes the digital channels manually.
1 Press the number button to select the channel number you want to
F/f
manually tune, then press
2 When the available channels are found, press
to tune the channel.
F/f
to select the channel
you want to store, then press .
F/f
3 Press
to select the programme number where you want to store the
new channel, then press .
Repeat the procedure above to tune other channels manually.
RM-ED007
SE-1
Page 14
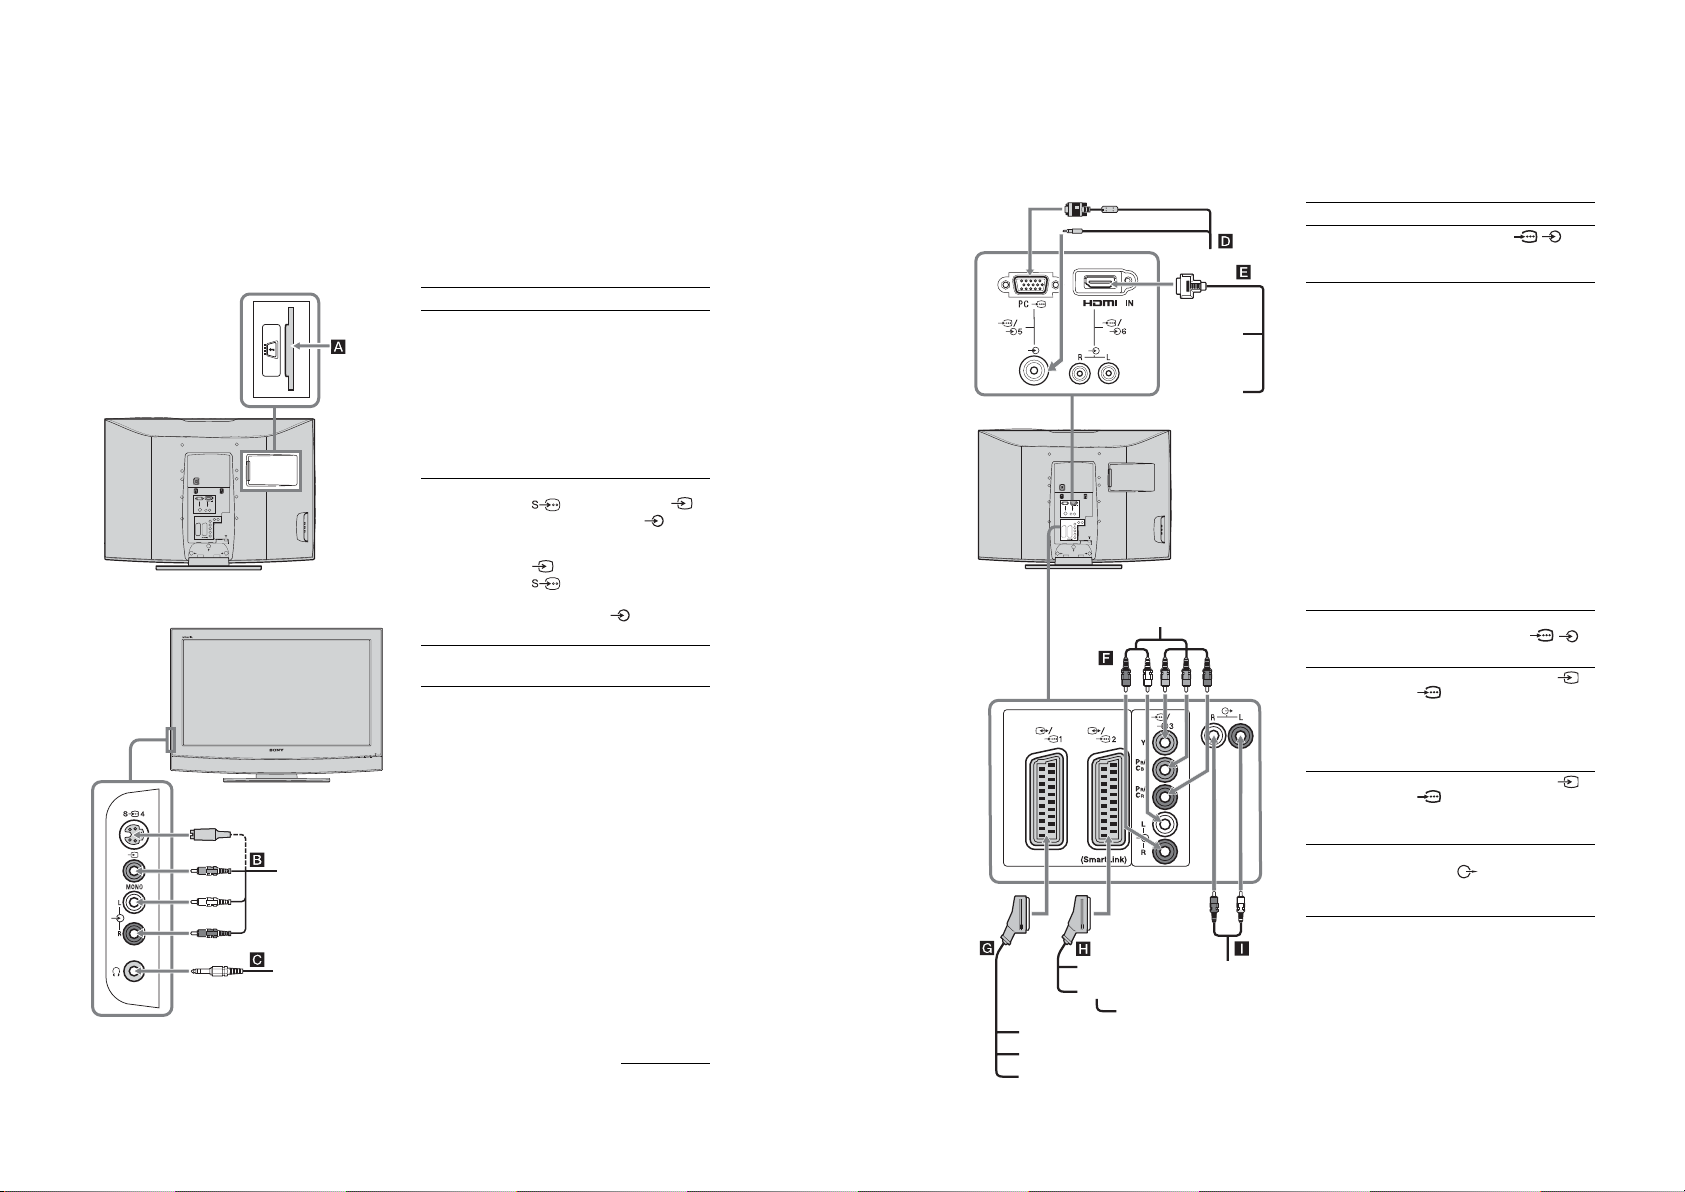
Connecting optional equipment
Connecting to the TV (rear)
DVD player
with component output
DVD player
Decoder
DVD recorder
VCR
Hi-Fi
Video game equipment
DVD player
Digital
satellite
receiver
PC
Decoder
To connect Do this
PC D Connect to the PC /
sockets. It is recommended to use
a PC cable with ferrites.
Digital satellite
receiver or DVD
player E
Connect to the HDMI IN 6 socket
if the equipment has a HDMI
socket. The digital video and audio
signals are input from the
equipment. If the equipment has a
DVI socket, connect the DVI
socket to the HDMI IN 6 socket
through a DVI - HDMI adaptor
interface (not supplied), and
connect the equipment’s audio out
sockets to the audio in HDMI IN 6
sockets.
Notes
• The HDMI sockets only support
the following Video inputs: 480i,
480p, 576i, 576p, 720p and
1080i. To connect a PC, please
use the PC input socket.
• Use HDMI certified cable with
HDMI logo.
DVD player with
component output
F
Connect to the component sockets
and the audio sockets / 3.
Video game
equipment, DVD
player or decoder
G
Connect to the scart socket /
1. When you connect the
decoder, the scrambled signal from
the TV tuner is output to the
decoder, then the unscrambled
signal is output from the decoder.
DVD recorder or
VCR that supports
SmartLink H
Connect to the scart socket /
2. SmartLink is a direct link
between the TV and a VCR/DVD
recorder.
Hi-Fi audio
equipment I
Connect to the audio output
sockets to listen to the sound
from the TV on Hi-Fi audio
equipment.
You can connect a wide range of optional equipment to your TV. Connecting cables are not supplied.
Connecting to the TV (side)
– 14 –
S VHS/Hi8/DVC
camcorder
Headphones
To connect Do this
Conditional Access
Module (CAM) A
S VHS/Hi8/DVC
camcorder B
Headphones C Connect to the i socket to listen to
To use Pay Per View services.
For details, refer to the instruction
manual supplied with your CAM.
To use the CAM, remove the
rubber cover from the CAM slot.
Switch off the TV when inserting
your CAM into the CAM slot.
When you do not use the CAM, we
recommend that you replace the
cover on the CAM slot.
Connect to the S video socket
4 or the video socket 4,
and the audio sockets 4. To
avoid picture noise, do not connect
the camcorder to the video socket
4 and the S video socket
4 at the same time. If you
connect mono equipment, connect
to the L socket 4, and set
“Dual Sound” to “A” (page 21).
sound from the TV on headphones.
Continued
RM-ED007
SE-1
Page 15
Specifications
Sound Output
KDL-40U2000: 10 W + 10 W (RMS)
KDL-32U2000: 10 W + 10 W (RMS)
KDL-26U2000: 10 W + 10 W (RMS)
Supplied Accessories
Refer to “1: Checking the accessories” on page 4.
Optional Accessories
• Wall-Mount Bracket
SU-WL51 (for KDL-40U2000)
SU-WL31 (for KDL-32U2000 / KDL-26U2000)
Design and specifications are subject to change
without notice.
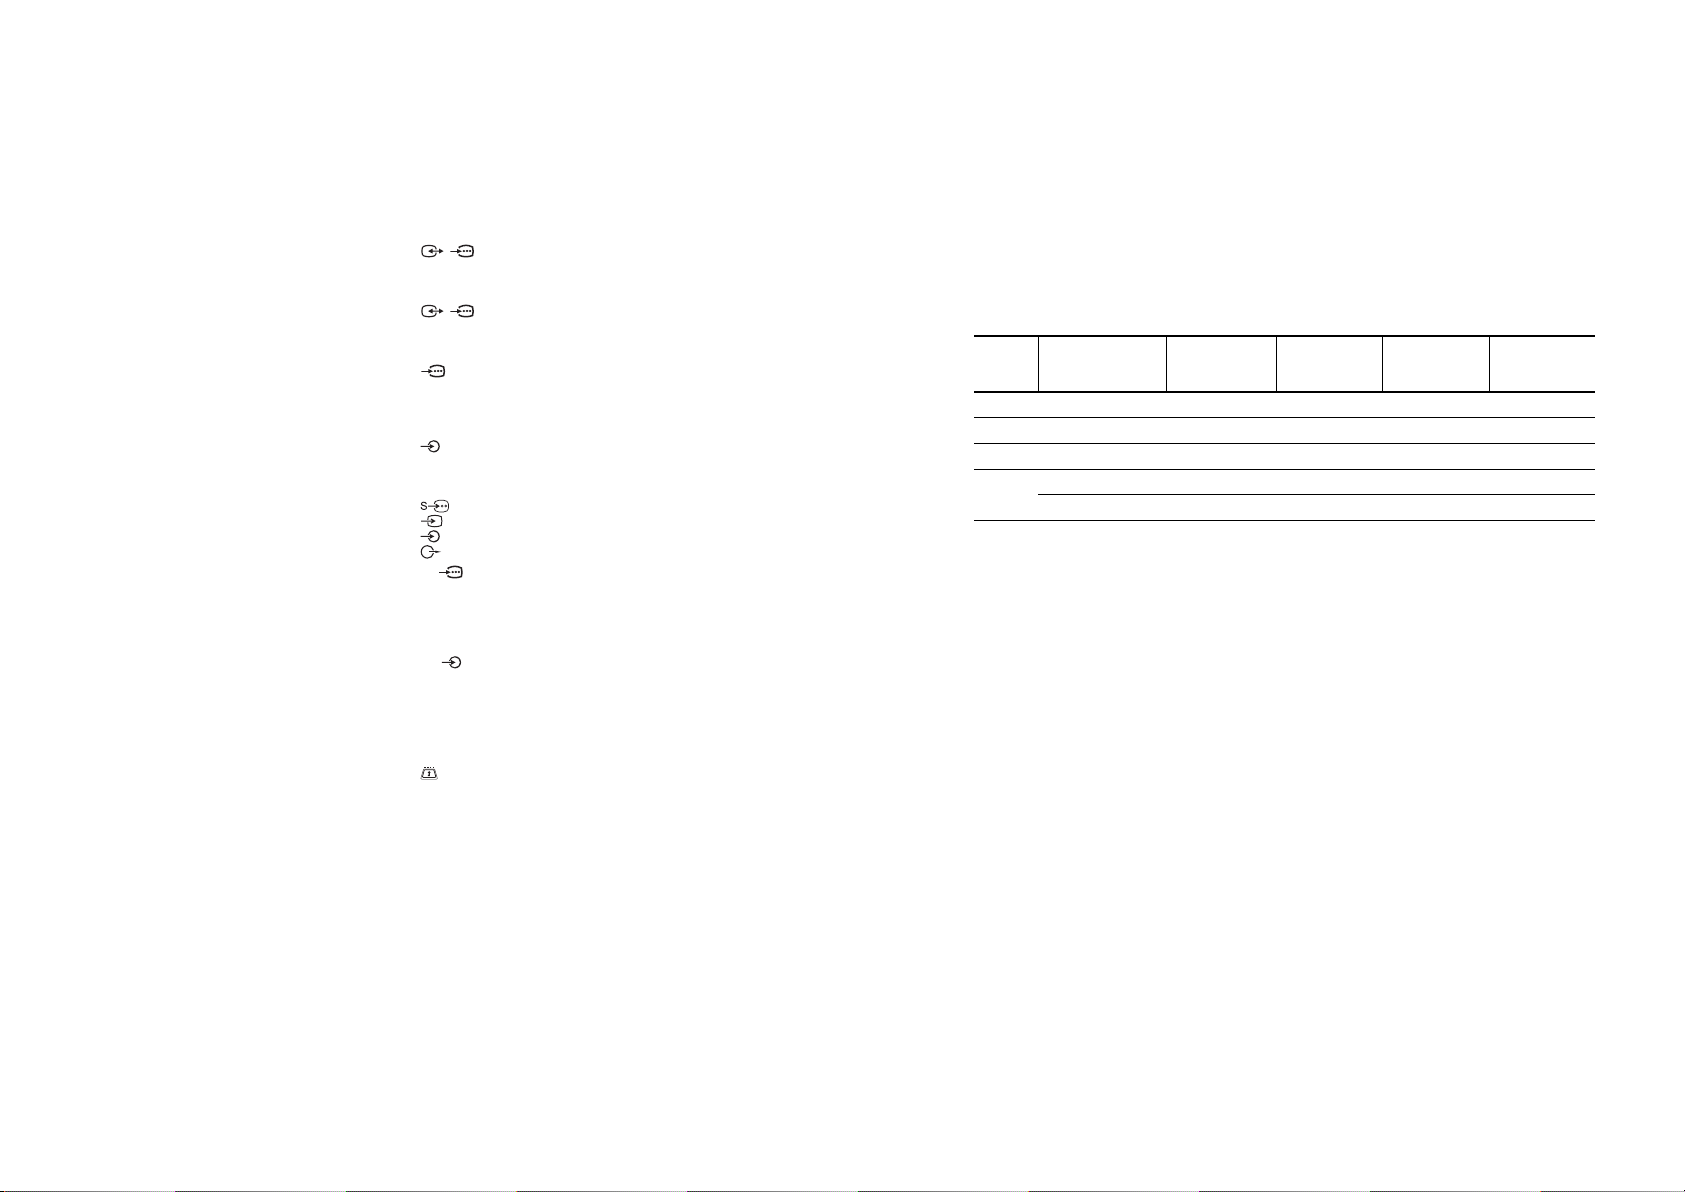
PC Input Signal Reference Chart
• This TV’s PC input does not support Sync on Green or Composite Sync.
• This TV’s PC input does not support interlaced signals.
• This TV’s PC input supports signals in the above chart with a 60 Hz vertical frequency. For other signals, you will see the
message “NO SYNC”.
Signals Horizontal (Pixel) Vertical (Line)
Horizontal
frequency
(kHz)
Vertical
frequency (Hz)
Standard
VGA 640 480 31.5 60 VGA
SVGA 800 600 37.9 60 VESA Guidelines
XGA 1024 768 48.4 60 VESA Guidelines
WXGA 1280 768 47.4 60 VESA
1280 768 47.8 60 VESA
Display Unit
– 15 –
Power Requirements:
220–240 V AC, 50 Hz
Screen Size:
KDL-40U2000: 40 inches
KDL-32U2000: 32 inches
KDL-26U2000: 26 inches
Display Resolution:
1,366 dots (horizontal) × 768 lines (vertical)
Power Consumption:
KDL-40U2000: 180 W or less
KDL-32U2000: 160 W or less
KDL-26U2000: 105 W or less
Standby Power Consumption:
1 W or less
Dimensions (w × h × d):
KDL-40U2000:
Approx. 988 × 687 × 270 mm (with stand)
Approx. 988 × 653 × 128 mm (without stand)
KDL-32U2000:
Approx. 797 × 580 × 220 mm (with stand)
Approx. 797 × 548 × 125 mm (without stand)
KDL-26U2000:
Approx. 663 × 503 × 220 mm (with stand)
Approx. 663 × 472 × 128 mm (without stand)
Mass:
KDL-40U2000:
Approx. 24 kg (with stand)
Approx. 21 kg (without stand)
KDL-32U2000:
Approx. 16 kg (with stand)
Approx. 14 kg (without stand)
KDL-26U2000:
Approx. 12 kg (with stand)
Approx. 10 kg (without stand)
Panel System
LCD (Liquid Crystal Display) Panel
Digital: VHF/UHF
Terminals
PC PC Input (15 Dsub) (see page 31)
HDMI IN 6
i Headphones jack
L: F2–F10, B–Q, F21–F69
I: UHF B21–B69
/1
21-pin Scart connector (CENELEC standard) including
audio/video input, RGB input, and TV audio/video
output.
/ 2 (SmartLink)
21-pin Scart connector (CENELEC standard) including
audio/video input, RGB input, selectable audio/video
output, and SmartLink interface.
3
Supported formats: 1080i, 720p, 576p, 576i, 480p, 480i
Y: 1 Vp-p, 75 ohms, 0.3V negative sync
P
B/CB
: 0.7 Vp-p, 75 ohms
P
R/CR
3
Audio input (phono jacks)
500 mVrms
Impedance: 47 kilo ohms
4 S video input (4-pin mini DIN)
4 Video input (phono jack)
4 Audio input (phono jacks)
G: 0.7 Vp-p, 75 ohms, non Sync on Green
B: 0.7 Vp-p, 75 ohms, non Sync on Green
R: 0.7 Vp-p, 75 ohms, non Sync on Green
HD: 1-5 Vp-p
VD: 1-5 Vp-p
Video: 1080i, 720p, 576p, 576i, 480p, 480i
Audio: Two channel linear PCM
CAM (Conditional Access Module) slot
: 0.7 Vp-p, 75 ohms
Audio output (Left/Right) (phono jacks)
PC audio input (minijack)
32, 44.1 and 48 kHz, 16, 20 and 24 bits,
or analogue audio input (phono jacks)
TV System
Analogue: Depending on your country/region selection:
Digital: DVB-T
B/G/H, D/K, L, I
Colour/Video System
Analogue: PAL, SECAM
Digital: MPEG-2 MP@ML
NTSC 3.58, 4.43 (only Video In)
Aerial
75 ohm external terminal for VHF/UHF
Channel Coverage
Analogue: VHF: E2–E12
UHF: E21–E69
CATV: S1–S20
HYPER: S21–S41
D/K: R1–R12, R21–R69
RM-ED007
SE-1
Page 16
– 16 –
Troubleshooting
Check whether the 1 (standby) indicator is flashing in red.
When it is flashing
The self-diagnosis function is activated.
1 Measure how long the 1 (standby) indicator flashes and stops flashing.
For example, the indicator flashes for two seconds, stops flashing for one second, and flashes for two seconds.
2 Press 1 on the TV (top side) to switch it off, disconnect the mains lead, and inform your dealer or
Sony service centre of how the indicator flashes (duration and inter val).
When it is not flashing
1 Check the items in the tables below.
2 If the problem still persists, have your TV serviced by qualified service personnel.
Picture
Problem Cause/Remedy
No picture (screen is dark) and
no sound
No picture or no menu
information from equipment
connected to the scarts or
HDMI IN socket
Double images or ghosting
Only snow and noise appear
on the screen
Distorted picture (dotted lines
or stripes)
Picture noise when viewing a
TV channel
Some tiny black points and/or
bright points on the screen
No colour on programmes
No colour or irregular colour
when viewing a signal from the
Y, P
B/CB
, PR/CR jacks of 3
• Check the aerial connection.
• Connect the TV to the mains, and press 1 on the TV (top side).
• If the 1 (standby) indicator lights up in red, press "/1.
• Check that the optional equipment is on and press / repeatedly until
the correct input symbol is displayed on the screen.
• Check the connection between the optional equipment and the TV.
• When connecting any equipment to the HDMI IN 6 socket or when
changing the resolution, some dots can appear blinking on the screen for a
few seconds. HDMI signal decoding is in progress and it does not indicate a
malfunction.
• Check aerial/cable connections.
• Check the aerial location and direction.
• Check if the aerial is broken or bent.
• Check if the aerial has reached the end of its serviceable life (three to five
years in normal use, one to two years at the seaside).
• Keep the TV away from electrical noise sources such as cars, motorcycles,
hair-dryers or optical equipment.
• When installing optional equipment, leave some space between the optional
equipment and the TV.
• Make sure that the aerial is connected using the supplied coaxial cable.
• Keep the aerial cable away from other connecting cables.
• Select “Manual Programme Preset” in the “Set-Up” menu and adjust “AFT”
(Automatic Fine Tuning) to obtain better picture reception (page 26).
• The picture of a display unit is composed of pixels. Tiny black points and/or
bright points (pixels) on the screen do not indicate a malfunction.
• Select “Reset” in the “Picture Adjustment” menu to return to the factory
settings (page 20).
• Check the connection of the Y, PB/CB, PR/CR jacks of 3.
• Make sure that the Y, P
respective sockets.
B/CB
, PR/CR jacks of 3 are firmly seated in their
Sound
Problem Cause/Remedy
No sound, but good picture
Noisy sound
• Press 2 +/– or % (Mute).
• Check that “TV Speakers” is set to “On” in the “Sound Adjustment” menu
(page 22).
• See the “Picture noise” causes/remedies on page 34.
Channels
Problem Cause/Remedy
The desired channel cannot be
selected
Some channels are blank
Digital channel is not displayed
• Switch between digital and analogue mode and select the desired digital/
analogue channel.
• Scrambled/Subscription only channel. Subscribe to the Pay Per View
service.
• Channel is used only for data (no picture or sound).
• Contact the broadcaster for transmission details.
• Check that the aerial is plugged directly into the TV (not through other
equipment).
• Contact a local installer to find out if digital transmissions are provided in
your area.
• Upgrade to a higher gain aerial.
General
Problem Cause/Remedy
The TV turns off automatically
(the TV enters standby mode)
The TV turns on automatically
Some input sources cannot be
selected
The remote does not function
• Check if the “Sleep Timer” is activated, or confirm the setting of “Off Time”
(page 24).
• If no signal is received and no operation is performed in the TV mode for
10 minutes, the TV automatically switches to standby mode.
• Check if the “On Time” is activated (page 24).
• Select “AV Preset” in the “Set-up” menu and cancel “Skip” of the input
source (page 25).
• Replace the batteries.
RM-ED007
SE-1
Page 17
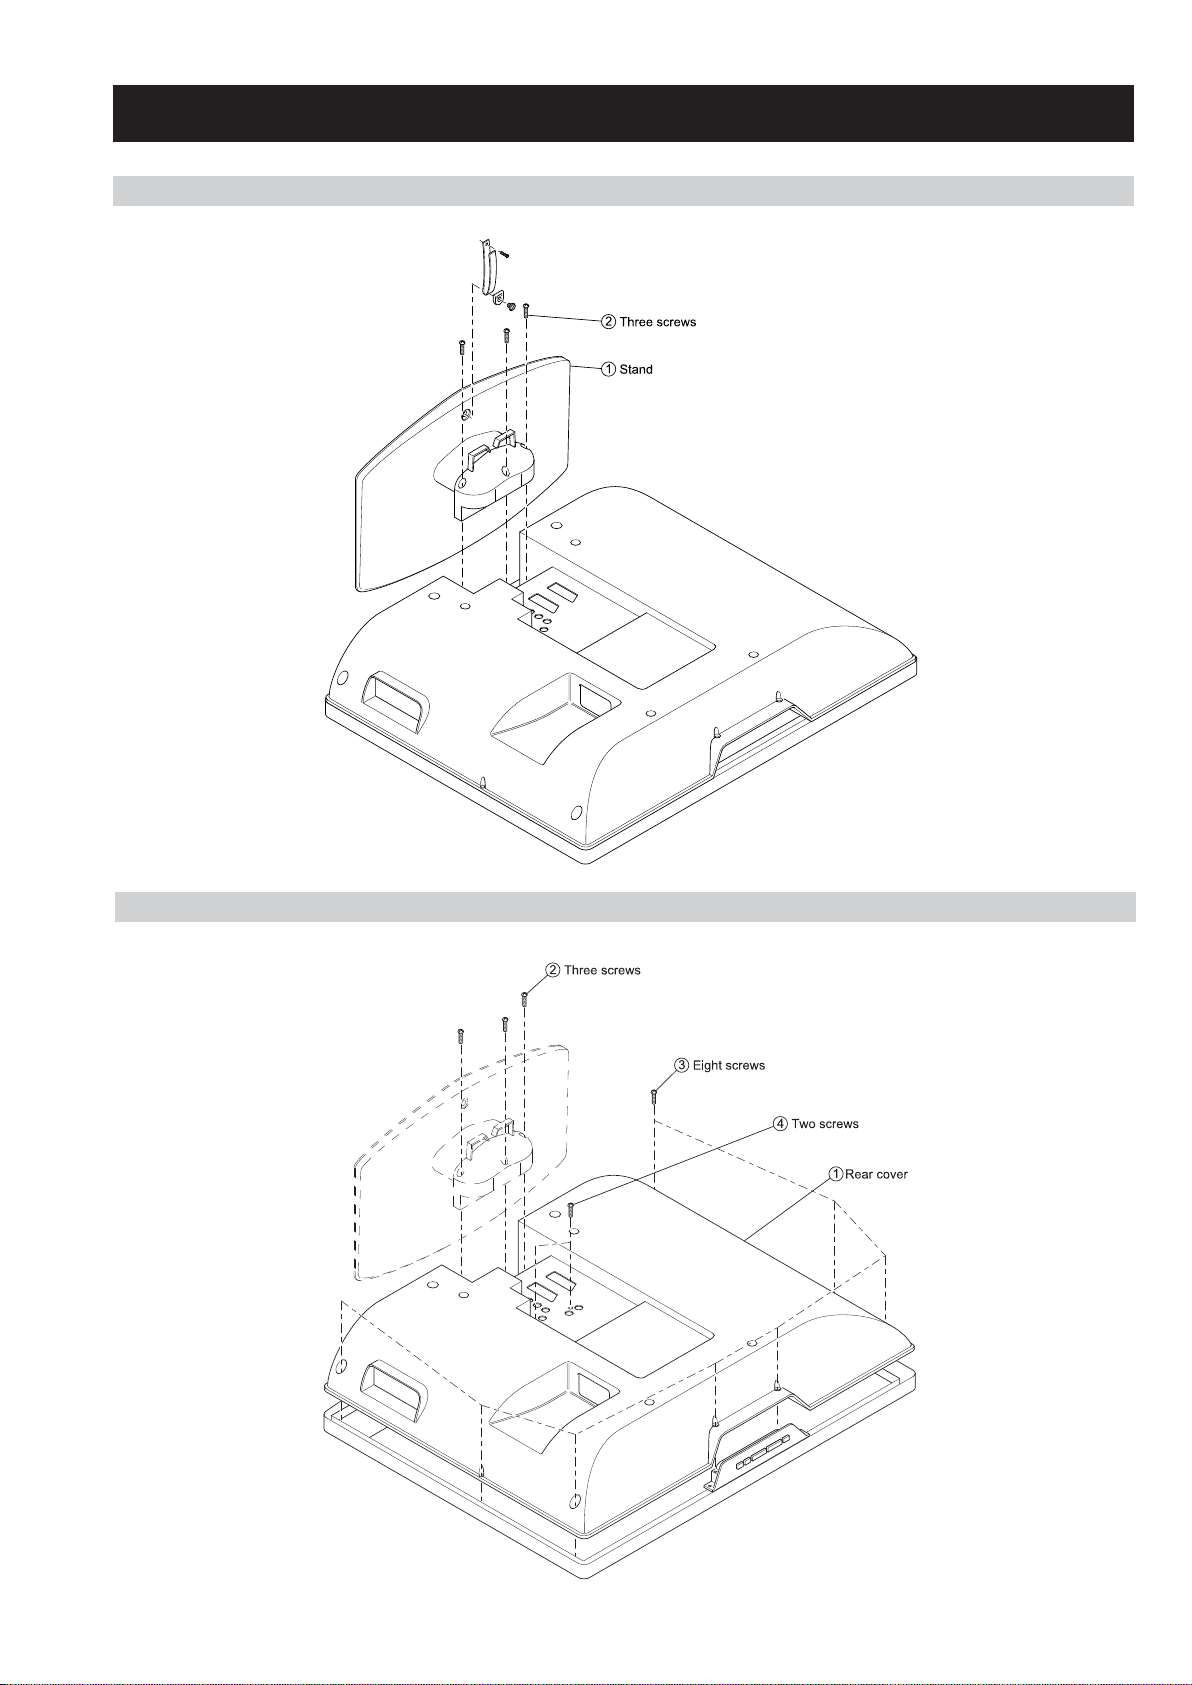
2-1. STAND REMOVAL
SE-1
RM-ED007
SECTION 2 DISASSEMBLY
2-2. REAR COVER REMOVAL
– 17 –
Page 18
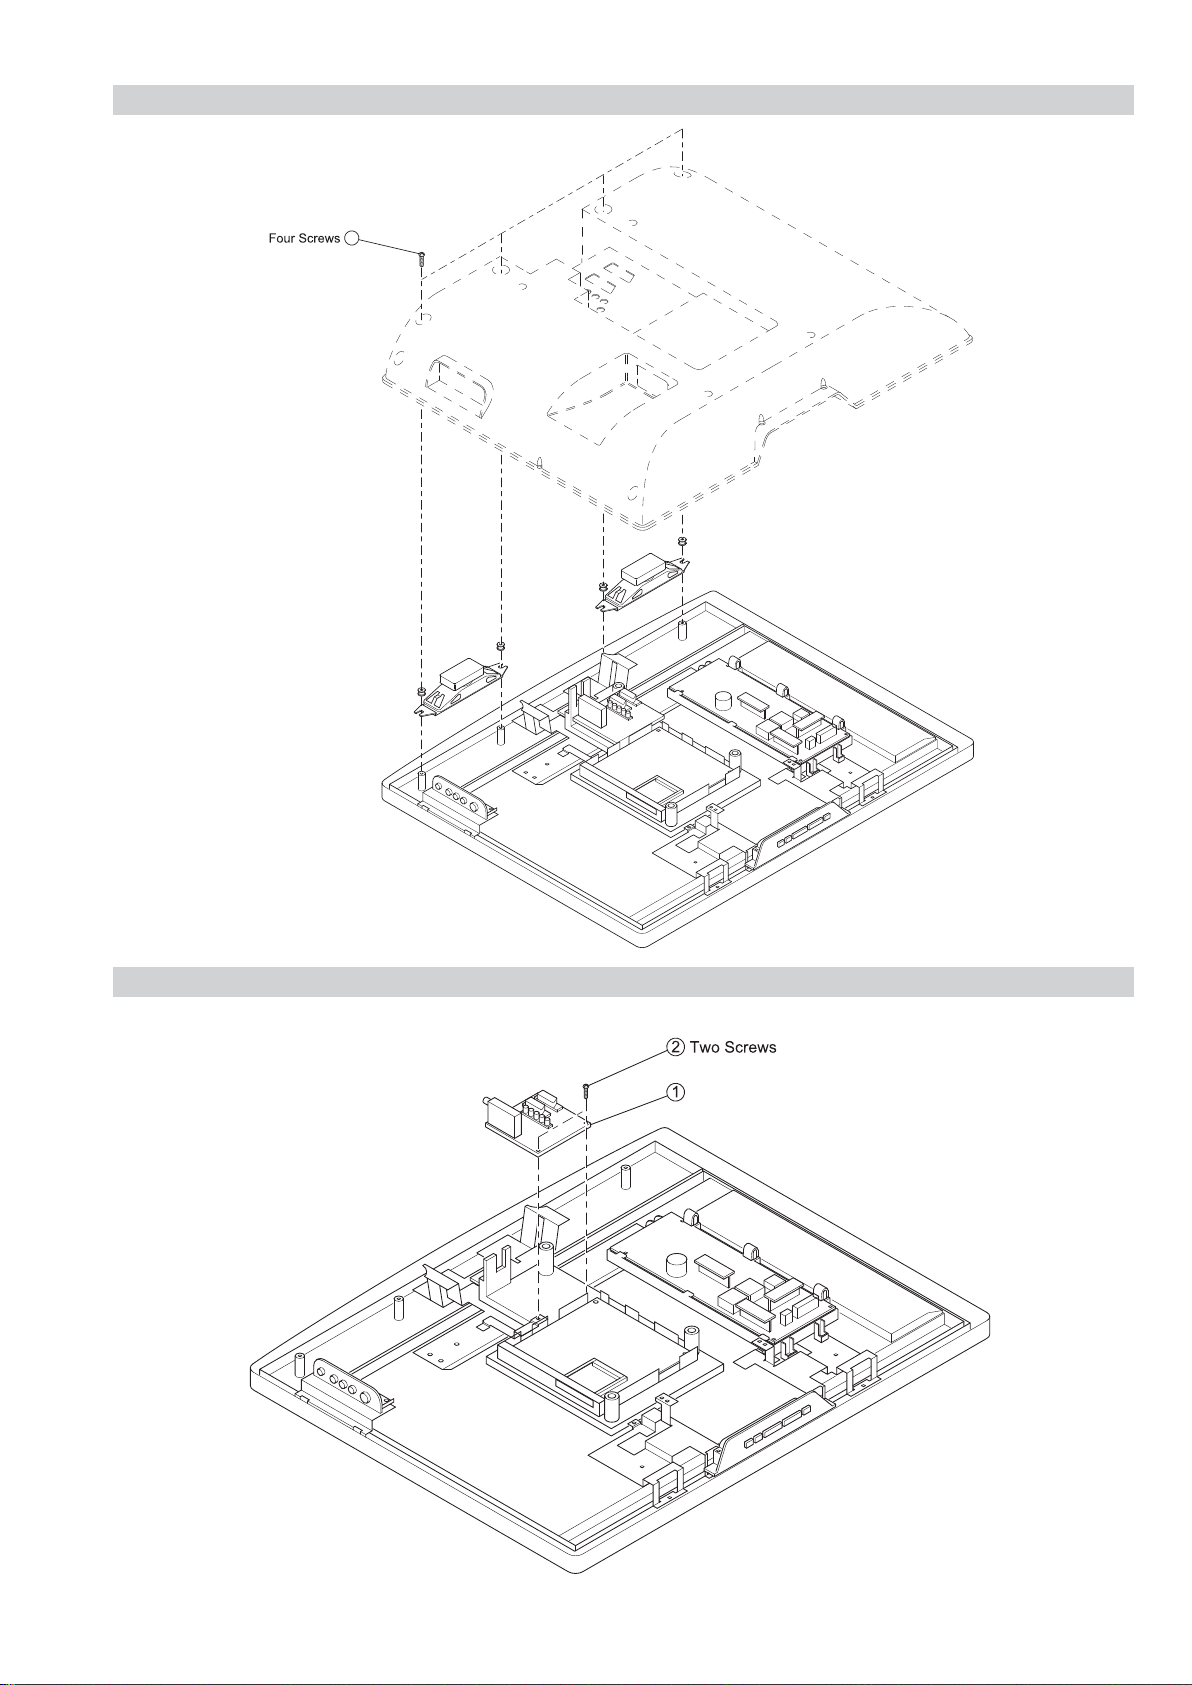
2-3. SPEAKER REMOVAL
1
SE-1
RM-ED007
2-4. A1/A1P BOARD REMOVAL
A1/A1P Board
– 18 –
Page 19
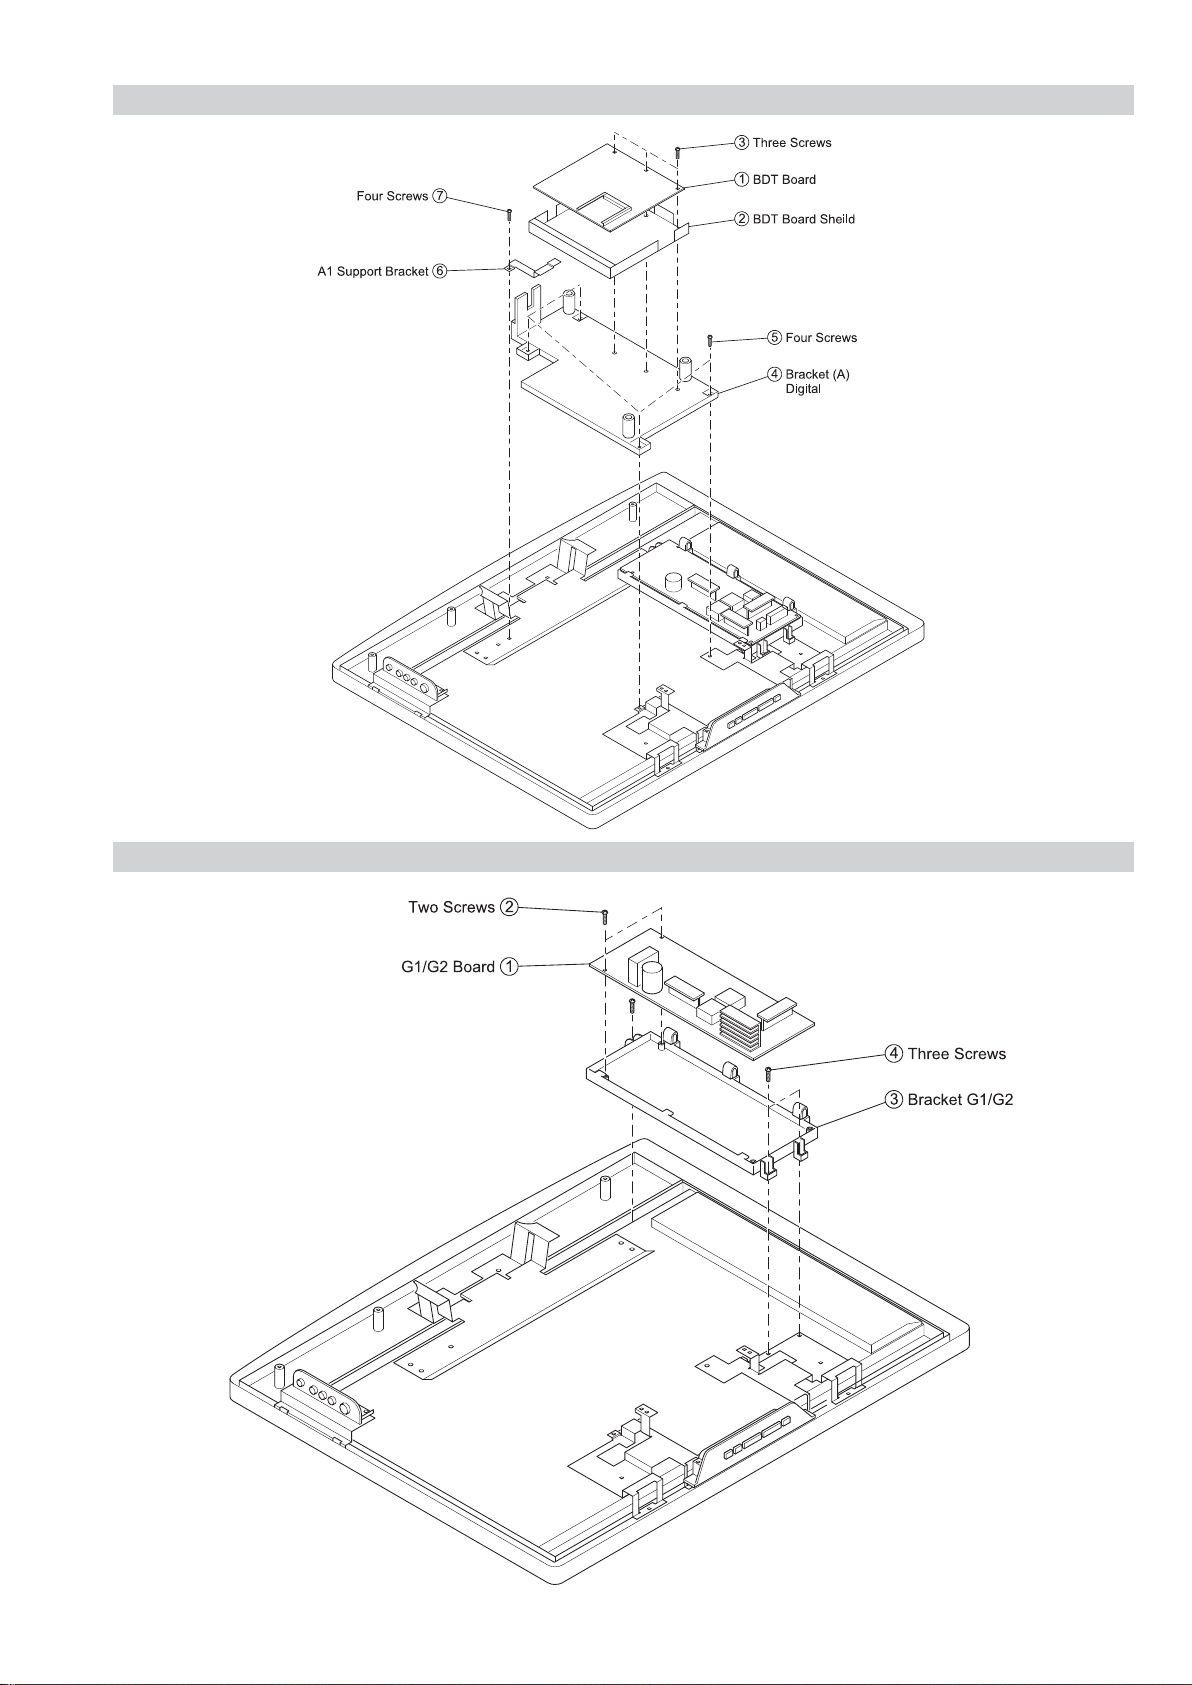
2-5. BDT BOARD REMOVAL
SE-1
RM-ED007
2-6. G1/G2 BOARD REMOVAL
– 19 –
Page 20
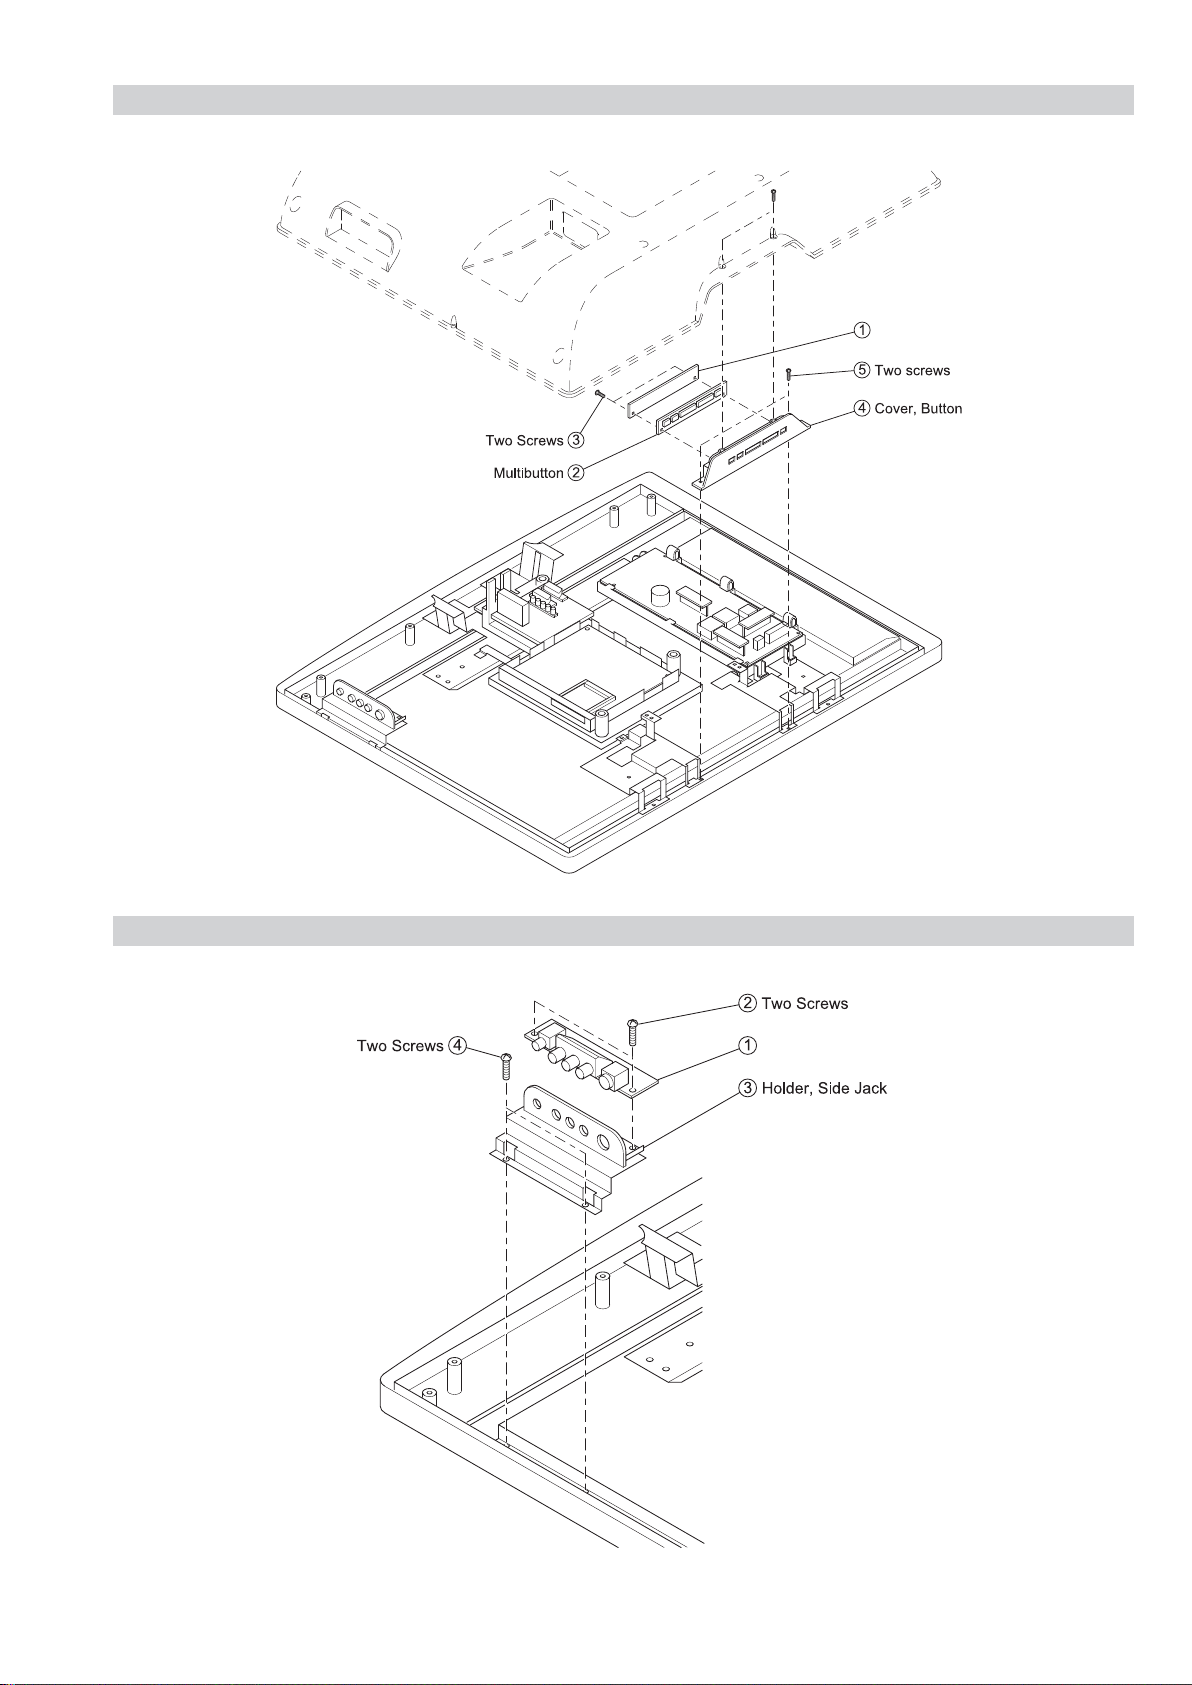
2-7. H1/H1P BOARD REMOVAL
SE-1
RM-ED007
H1/H1P Board
2-8. H2/H2P BOARD REMOVAL
H2/H2P Board
– 20 –
Page 21
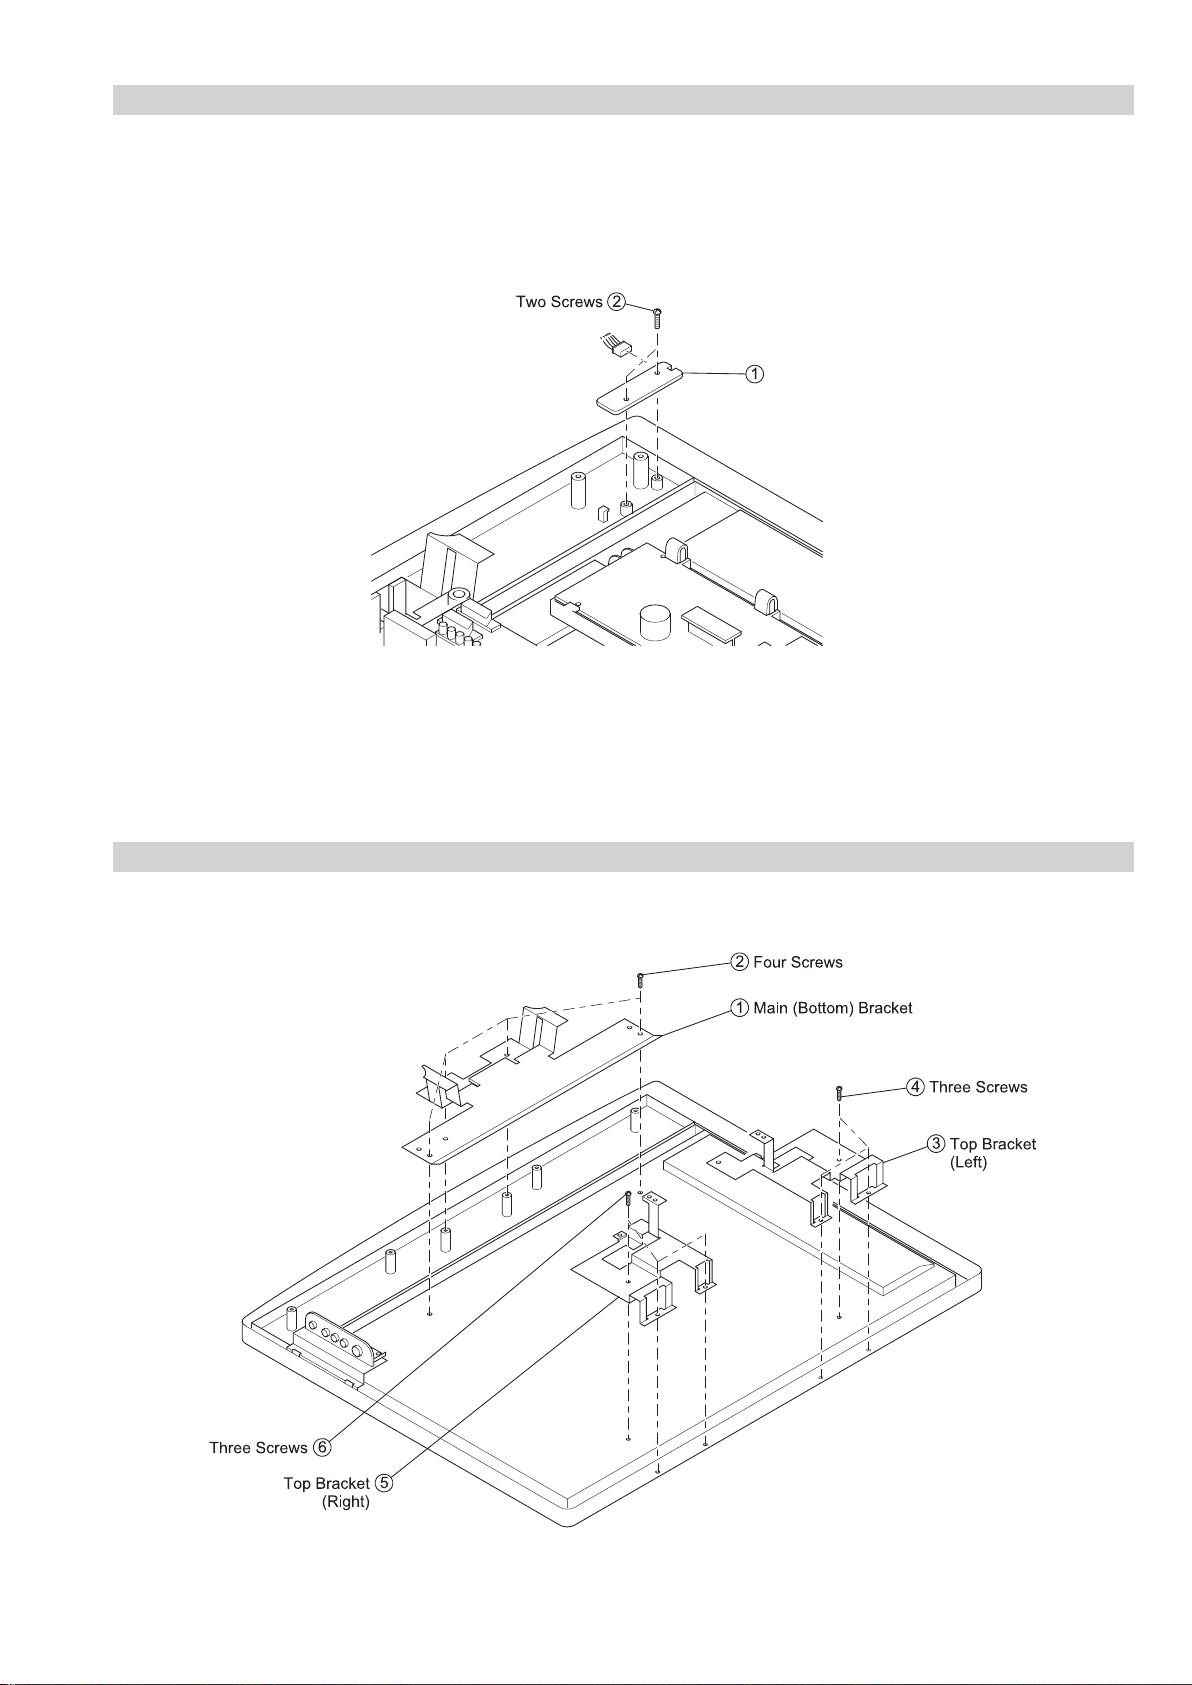
2-9. H3/H3P BOARD REMOVAL
SE-1
RM-ED007
H3/H3P Board
2-10. BRACKET REMOVAL
– 21 –
Page 22
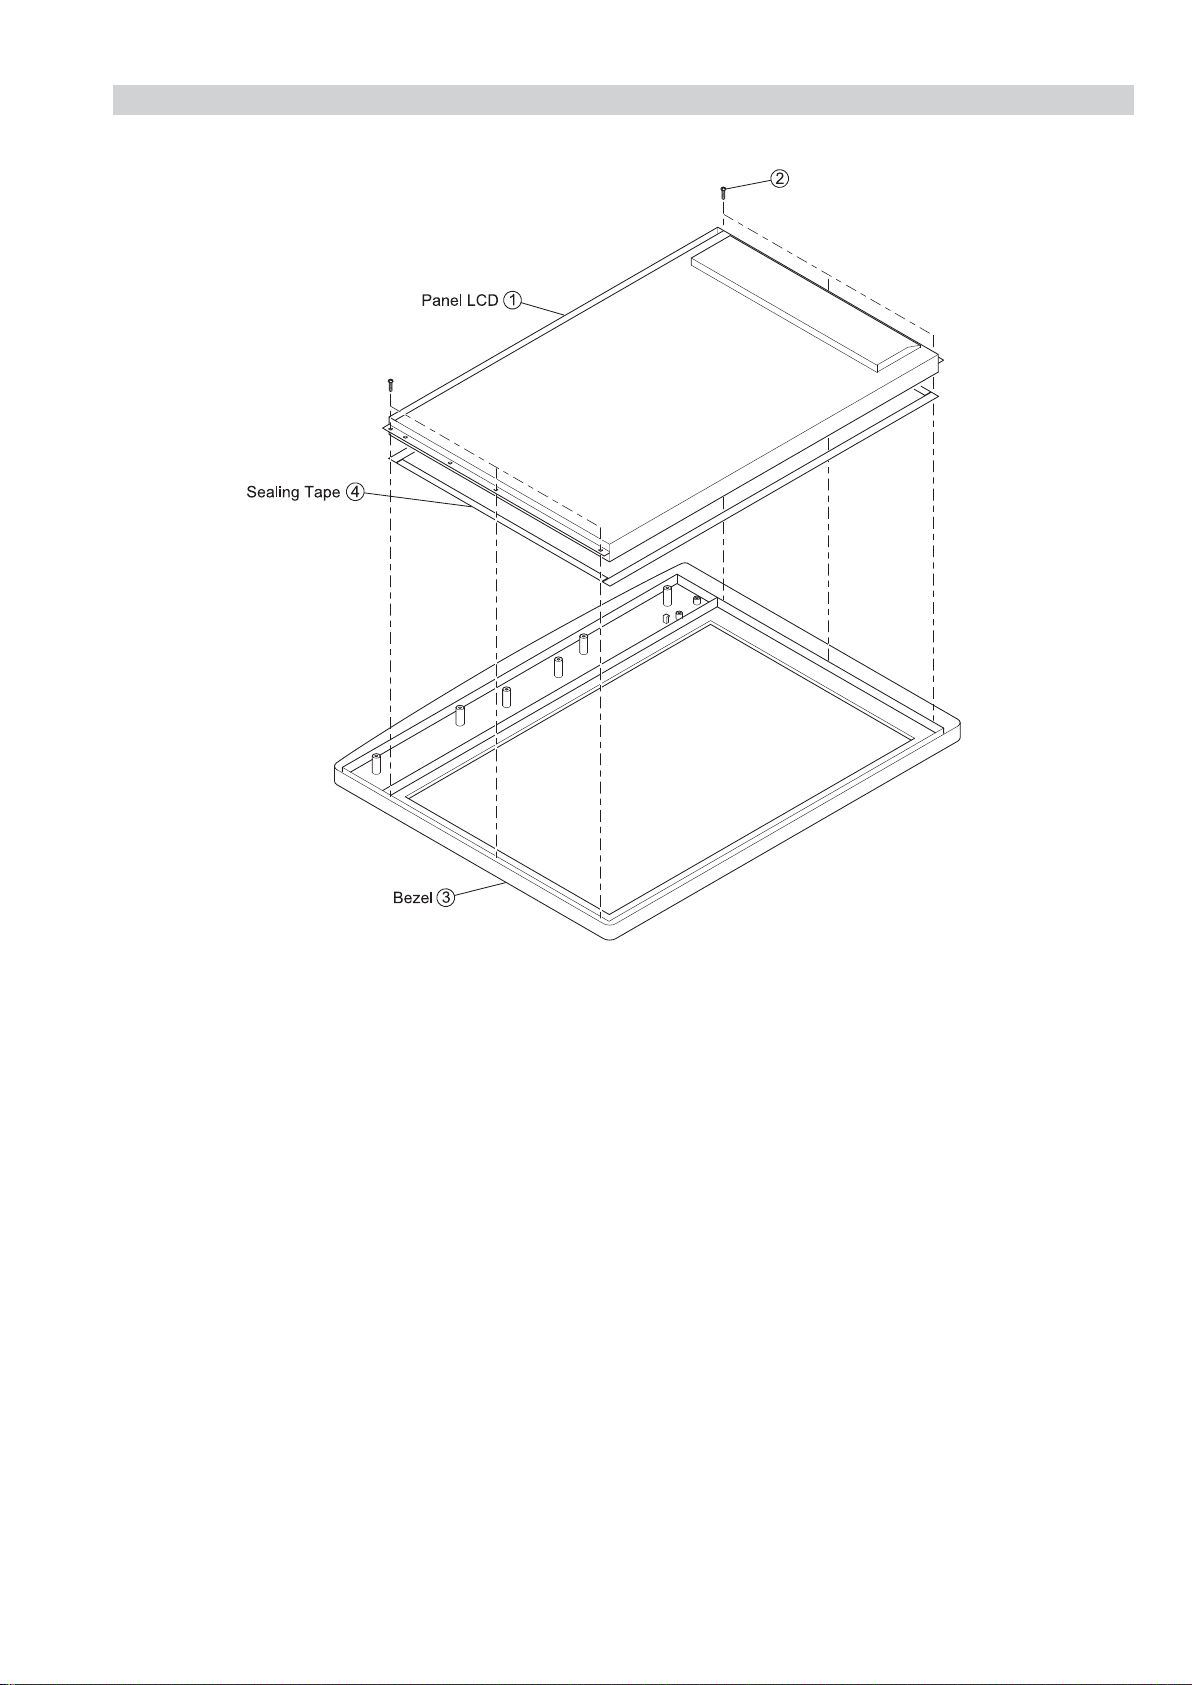
2-11. LCD PANEL REMOVAL
SE-1
RM-ED007
Six screws
– 22 –
Page 23
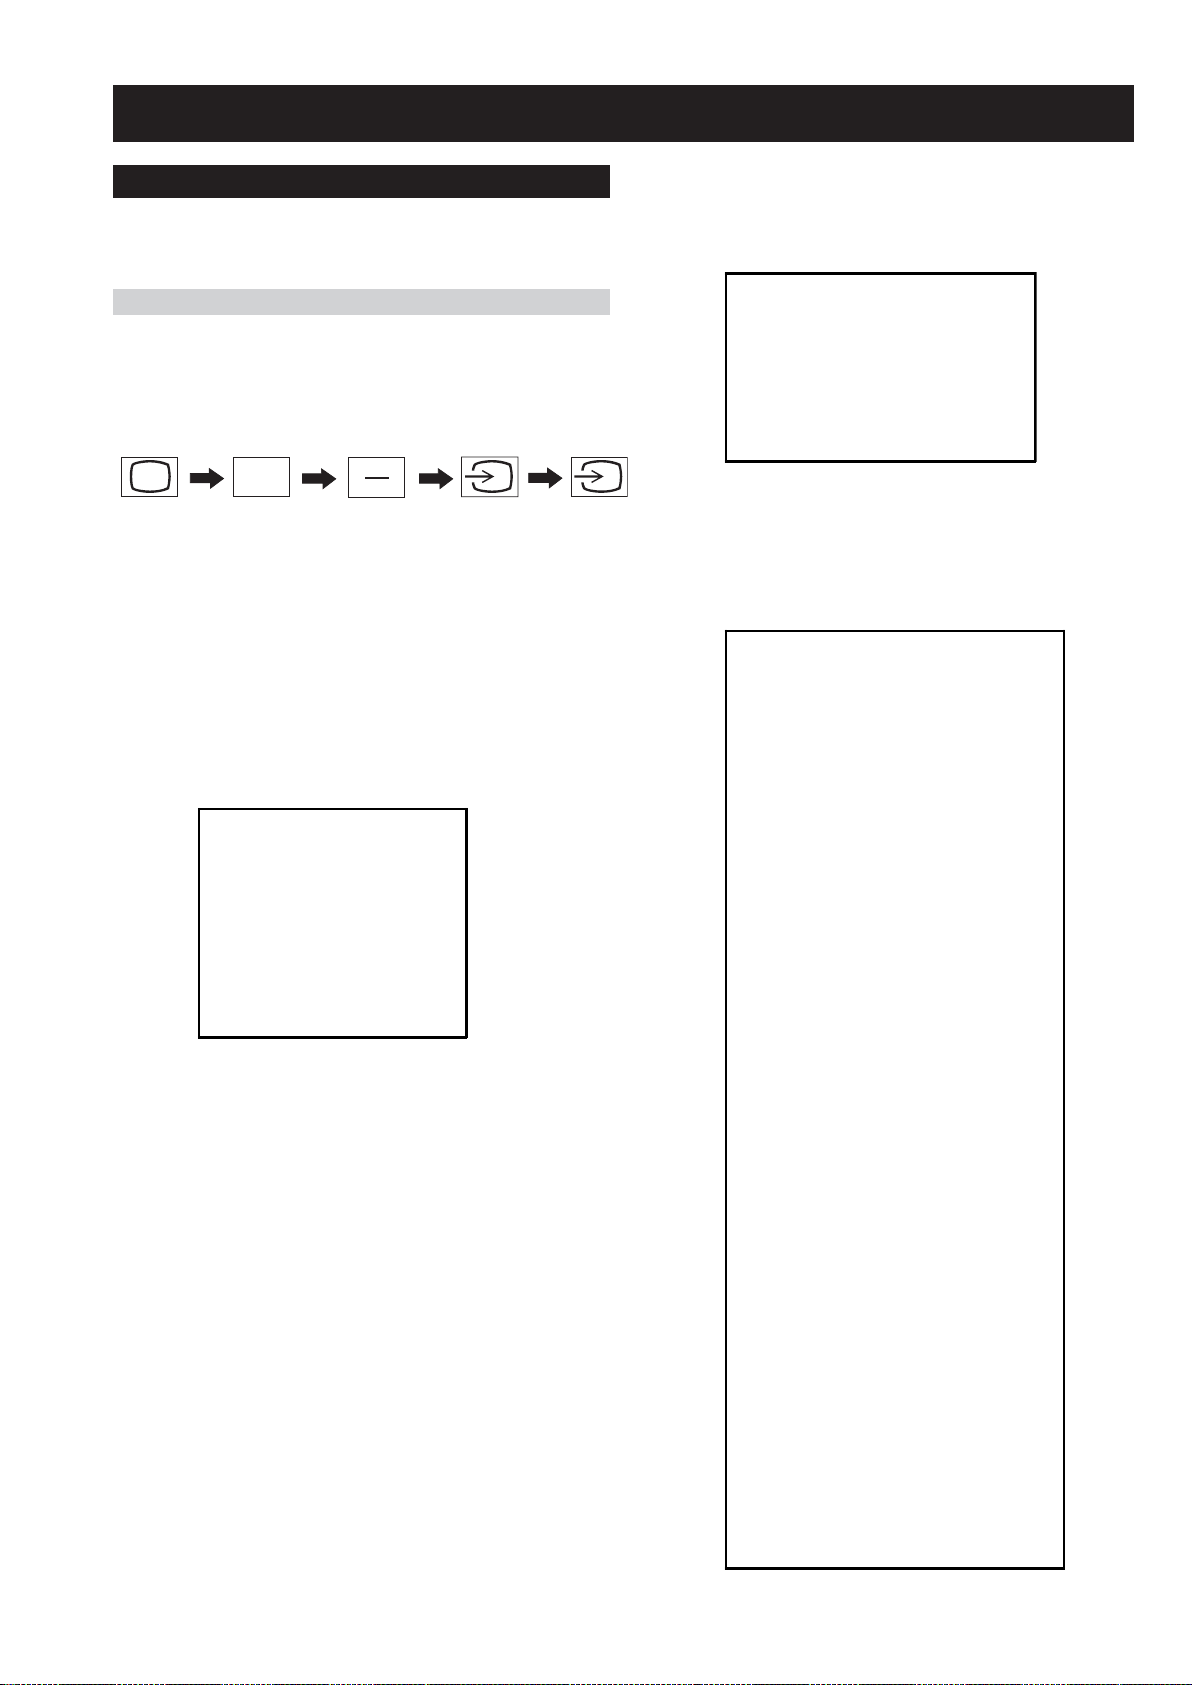
SECTION 3 CIRCUIT ADJUSTMENTS
3-1. Electrical Adjustments
Service adjustments to this model can be performed using the
supplied remote Commander RM-ED007.
SE-1
RM-ED007
How to enter into the Service Mode
1. Turn on the main power switch.
2. Press the following sequence of buttons on the Remote
Commander.
i
+
(ON SCREEN
DISPLAY)
These 3 buttons must be pressed together
for approximately three seconds.
5
(DIGIT 5)
(PROG -)
{
‘TT—’ will appear in the upper right corner of the screen.
Other status information will also be displayed (See 3-3 Page
26).
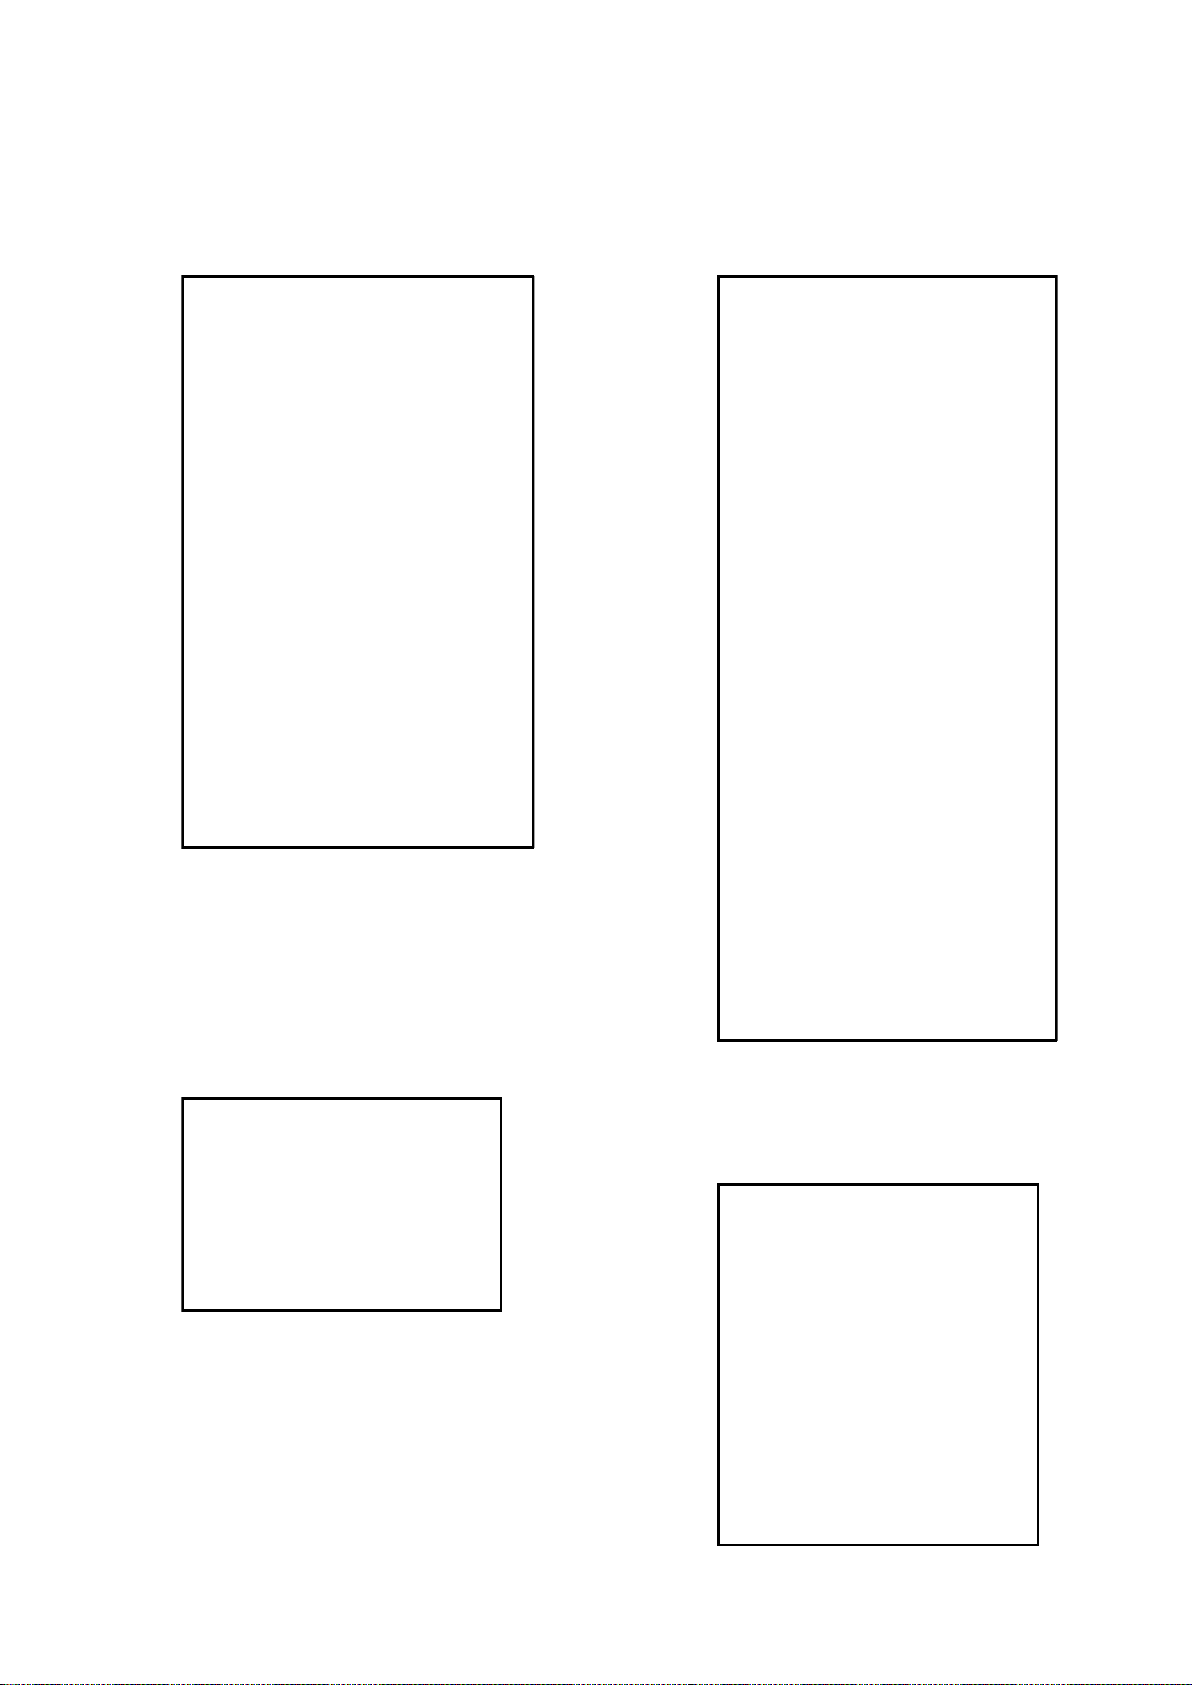
3. Press ‘MENU’ on the remote commander to obtain the
following menu on the screen.
BACKLIGHT
HDMI
SOUND
IF ADJUST
SERVICE MENU
ERROR MENU
SE1 v0.18 Mar06
FACTORY DATA: 11111111
SERIAL NUMBER: 4294967295a
WORKING TIME: 3:50
4. Move to the corresponding adjustment item using the
up or down arrow buttons on the Remote Commander.
5. Press the right arrow button to enter into the required menu
item.
6. Press the ‘Menu’ button on the Remote Commander to quit
the Service Mode when all adjustments have been completed.
Note :
• After carrying out the service adjustments, to prevent the
customer accessing the ‘Service Menu’ switch the TV set
OFF and then ON.
BACKLIGHT
BACKLIGHT
U BACKLIGHT
BL SETUDEN
BL BOTTOM
ECO MODE
DIMMER
HDMI
Ver si on
Video Mode
VAI2
VAI3
TRA_CAL
Vper MSB
Vper ISB
Hper MSB
HS Width MSB
STM LSB
Ri (MSB)
Ri (LSB)
Aksv_0
Aksv_1
Aksv_2
Aksv_3
Aksv_4
An_0
An_1
An_2
An_3
An_4
An_5
An_6
An_7
Pj
Ainfo
Flags
AVI Typ e
AVI Vers i on
AVI Length
AVI Checksum
AVI Byte1
AVI Byte2
AVI Byte3
AVI Byte4
AVI Byte5
AVI Byte6
AVI Byte7
AVI Byte8
AVI Byte9
AVI Byte10
AVI Byte11
AVI Byte12
AVI Byte13
(0, 255)
(0, 10)
(0, 255)
(0, 255)
(0, 1)
(0, 255)
(0, 255)
(0, 255)
(0, 255)
(0, 255)
(0, 255)
(0, 255)
(0, 255)
(0, 255)
(0, 255)
(0, 255)
(0, 255)
(0, 255)
(0, 255)
(0, 255)
(0, 255)
(0, 255)
(0, 255)
(0, 255)
(0, 255)
(0, 255)
(0, 255)
(0, 255)
(0, 255)
(0, 255)
(0, 255)
(0, 255)
(0, 255)
(0, 255)
(0, 255)
(0, 255)
(0, 255)
(0, 255)
(0, 255)
(0, 255)
(0, 255)
(0, 255)
(0, 255)
(0, 255)
(0, 255)
(0, 255)
(0, 255)
(0, 255)
(0, 255)
(0, 255)
(0, 255)
160
10
28
28
1
160
36
10
0
0
24
0
0
0
0
48
205
69
0
0
0
0
0
0
0
0
0
0
0
0
0
220
0
20
0
0
0
0
0
0
0
0
0
0
0
0
0
0
0
0
0
- 23 -
Page 24
SE-1
RM-ED007
SOUND
M-N
M-D
M-S
S-M
D-M
N-M
Effect Mode
BBE Mode
BBE Vol main
BBE Vol res
B1
B2
B3
B4
B5
Loudness
MB_STR
MB_LIM
MB_HMC
MB_LP
MB_HP
SUBW_FREQ
NICAM C AD
NICAM Error
Stereo
Status 0000000110
(0, 511)
(-128, -1)
(+0, +127)
(+0, +127)
(-128, -1)
(0, 1023)
(+0, +2)
(-0, +127)
(+0, +255)
(+0, +7)
(-96, +96)
(-96, +96)
(-96, +96)
(-96, +96)
(-96, +96)
(+0, +68)
(+0, -127)
(-32, +0)
(+0, +127)
(+5, +30)
(+3, +30)
(+5, +40)
00000
(0, 2047)
(-128, +127)
192
-20
+20
+10
-10
496
+2
+0
+6
+3
+0
+8
+7
+8
-28
-11
+0
+0
-15
-24
-20
+30
2047
+0
SERVICE MENU
NORM_PAL_RD_H
NORM_PAL_RD_L
NORM_PAL_GD_H
NORM_PAL_GD_L
NORM_PAL_BD_H
NORM_PAL_BD_L
NORM_PAL_RC_H
NORM_PAL_RC_L
NORM_PAL_GC_H
NORM_PAL_GC_L
NORM_PAL_BC_H
NORM_PAL_BC_L
SECAM_OFF_RD
SECAM_OFF_GD
SECAM_OFF_BD
SECAM_OFF_RC
SECAM_OFF_GC
SECAM_OFF_BC
WARM_OFF_RD
WARM_OFF_GD
WARM_OFF_BD
WARM_OFF_RC
WARM_OFF_GC
WARM_OFF_BC
COOL_OFF_RD
COOL_OFF_GD
COOL_OFF_BD
COOL_OFF_RC
COOL_OFF_GC
COOL_OFF_BC
NTSC_OFF_RD
NTSC_OFF_GD
NTSC_OFF_BD
NTSC_OFF_RC
NTSC_OFF_GC
NTSC_OFF_BC
(+0, +1)
(+0, +255)
(+0, +1)
(+0, +255)
(+0, +1)
(+0, +255)
(+0, +3)
(+0, +255)
(+0, +3)
(+0, +255)
(+0, +3)
(+0, +255)
(-128, +128)
(-128, +128)
(-128, +128)
(-128, +128)
(-128, +128)
(-128, +128)
(-128, +128)
(-128, +128)
(-128, +128)
(-128, +128)
(-128, +128)
(-128, +128)
(-128, +128)
(-128, +128)
(-128, +128)
(-128, +128)
(-128, +128)
(-128, +128)
(-128, +128)
(-128, +128)
(-128, +128)
(-128, +128)
(-128, +128)
(-128, +128)
+3
+0
+3
+0
+3
+0
+0
+0
+0
+0
+0
+0
+0
+0
+0
+0
+0
+0
+50
+0
-50
+0
+0
+0
-50
+0
+50
+0
+0
+0
-1
+0
+0
+0
+0
+0
IF ADJUST
Automute
Audio Gain
L Gating
Coincidence
AFT window
AFT Status
AGC TOP (-16, +15)
0111
0
0
0
0
1
-5
ERROR MENU
E02: Reserved
E03: DC Fail
E04: PANEL DET
E05: NVM
E06: IIC
E07: HDMI
E08: DIGITAL
E09: TUNER
E10: SP
E11: VCTP
E12: PEXP
E13: RTC
WORKING TIME
HOURS
MINUTES
(0, 255)
(0, 255)
(0, 255)
(0, 255)
(0, 255)
(0, 255)
(0, 255)
(0, 255)
(0, 255)
(0, 255)
(0, 255)
(0, 255)
(0, 65535)
(0, 59)
0
0
2
0
0
2
0
0
0
0
47
0
4
38
- 24 -
Page 25
SE-1
RM-ED007
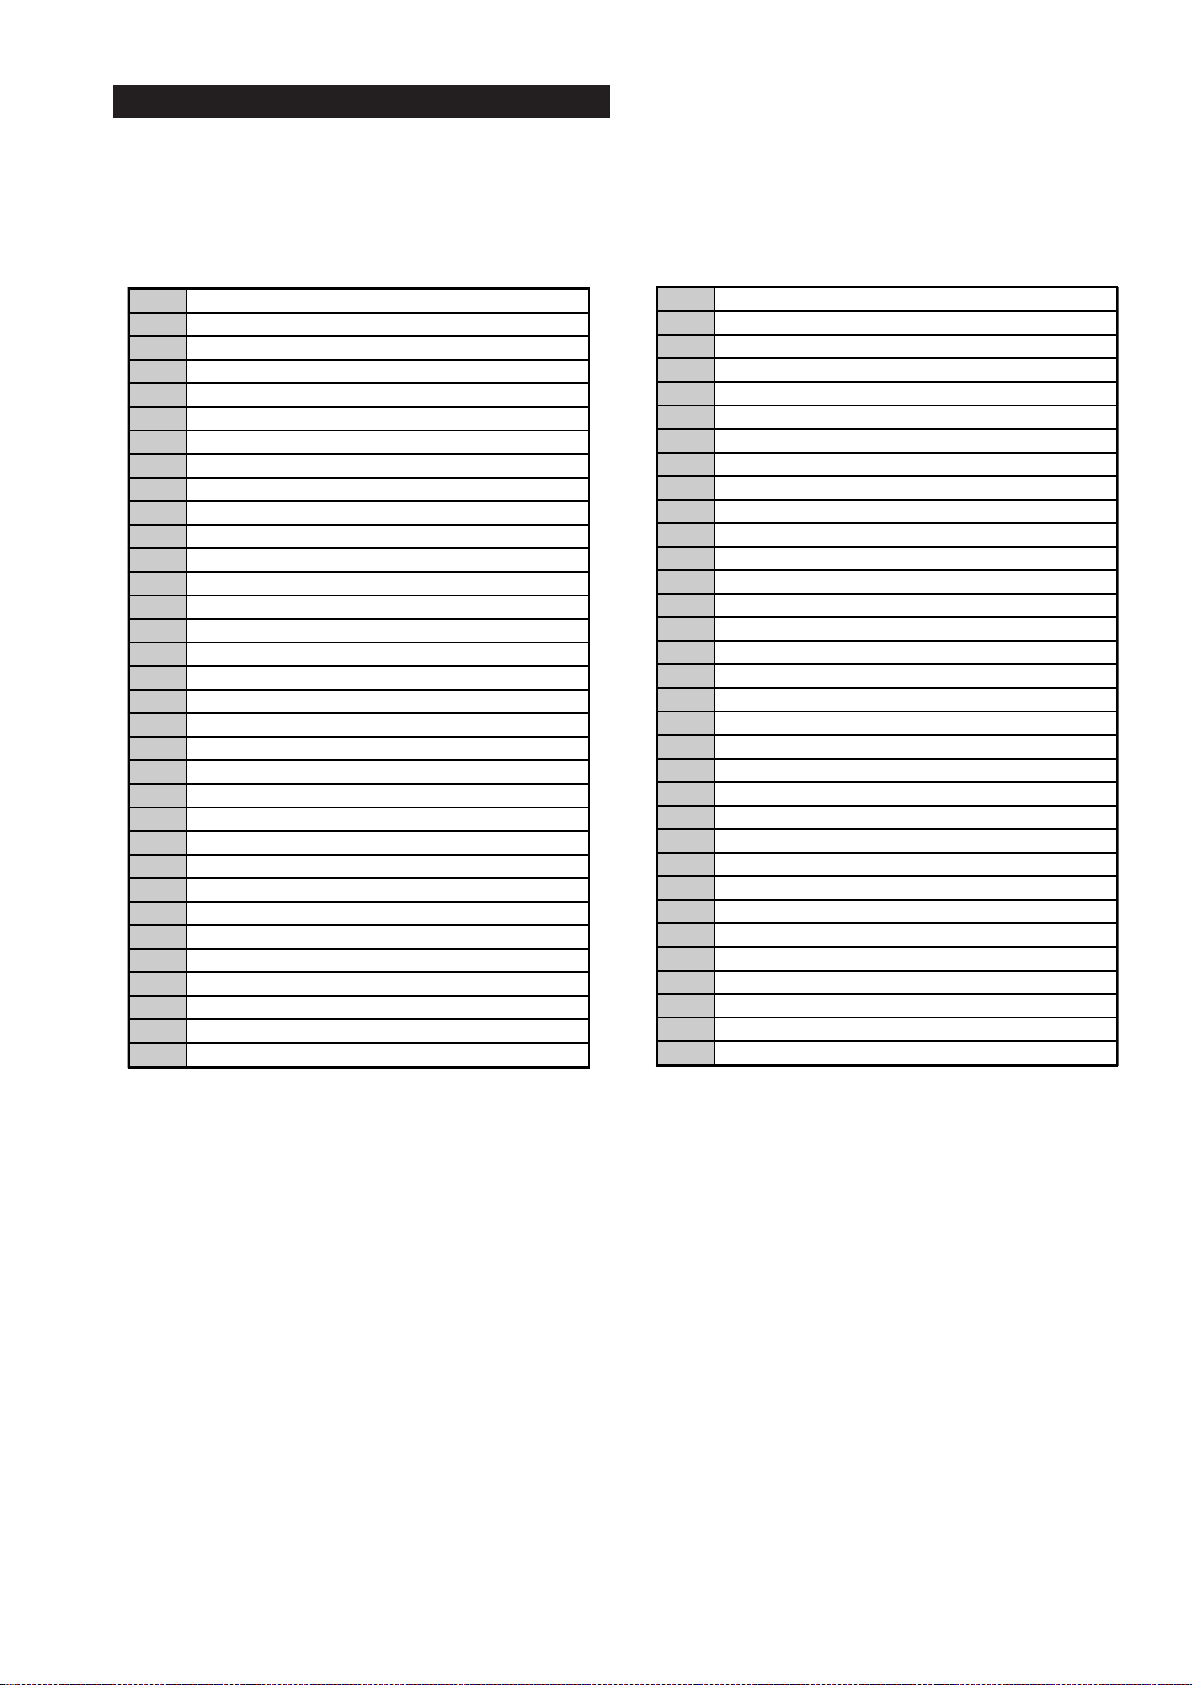
3-2. TEST MODE 2
Test Mode 2 is available by setting the TV for operation in Service Mode [ As shown on Page 23 ] , OSD ‘TT’ appears. The functions described below are available by selecting the two numbers. To release the ‘Test mode 2’, press 00, 10, 20 ... twice or switch the TV set into
Stand-by mode. In ‘TT Menu’ mode, it is possible to remove the Menu from the screen by pressing the Speaker Off button once. Pressing the
Speaker OFF button a second time will cause the Menu to reappear. The function is kept even when the menu is not displayed on screen !!.
'TT' mode off
00
Set picture level to maximum
01
Set picture level to minimum
02
Set volume to 35%
03
Set volume to 50%
04
Set volume to 65%
05
06 Set volume to 80%
Ageing mode on
07
Shipping Condition
08
Picture level 50%
16
Factory mode enable/disable
19
U Destination
24
25 AEP Destination
CBA mode toggle (ON/OFF)
27
ECS mode toggle (ON/OFF)
31
Set BCN channels preset
32
FILMODE toggle (ON/OFF)
33
Set INY channels preset
34
INSERT or SWAP sorting
35
Hotel mode
37
OTRUM mode
38
39 Enable Digital Test
Re-initialise NVM
41
Select Dual Sound A
43
Select Dual Sound B
44
Select Dual Sound Mono
45
Select Dual Sound Stereo
46
Set NVM as non-virgin
48
Set NVM as virgin
49
PAL autoadjustment
51
RGB autoadjustment
52
SECAM autoadjustment
53
Watchdog toggle
54
55 Toggle tuner selection
Reset all channel attenuations
56
Chip select toggle
58
Visual I2C toggle
59
Auto AGC
61
Toggle digital mode flag
62
AM from baseband or from RF
63
Set 40" settings
64
MSP Auto Carrier Mute function enable/disable
67
Set 19" settings (Not Applicable)
71
72 Set 23" settings (Not Applicable)
Set 26" settings
73
Set 32" settings
74
Set centred balance
75
Set volume to max
76
Set volume to min
77
Set balance full left
78
Set balance full right
79
81 Digital BER display
Digital Service menu
82
83 Digital colour bar output from DENC
TS CI path through
84
Digital tuner power down
85
Switch between two digital SW banks
86
Local keys test
87
Digital shipping conditions
88
LED test
89
PC Monitor mode
92
93 I2S / Analogue audio used for Digital sound
Digital debug output: enable/disable
96
Digital 656 output: enable/disable
97
Digital Auto Reset function: enable/disable
98
Display Error and Working Time menu
99
- 25 -
Page 26
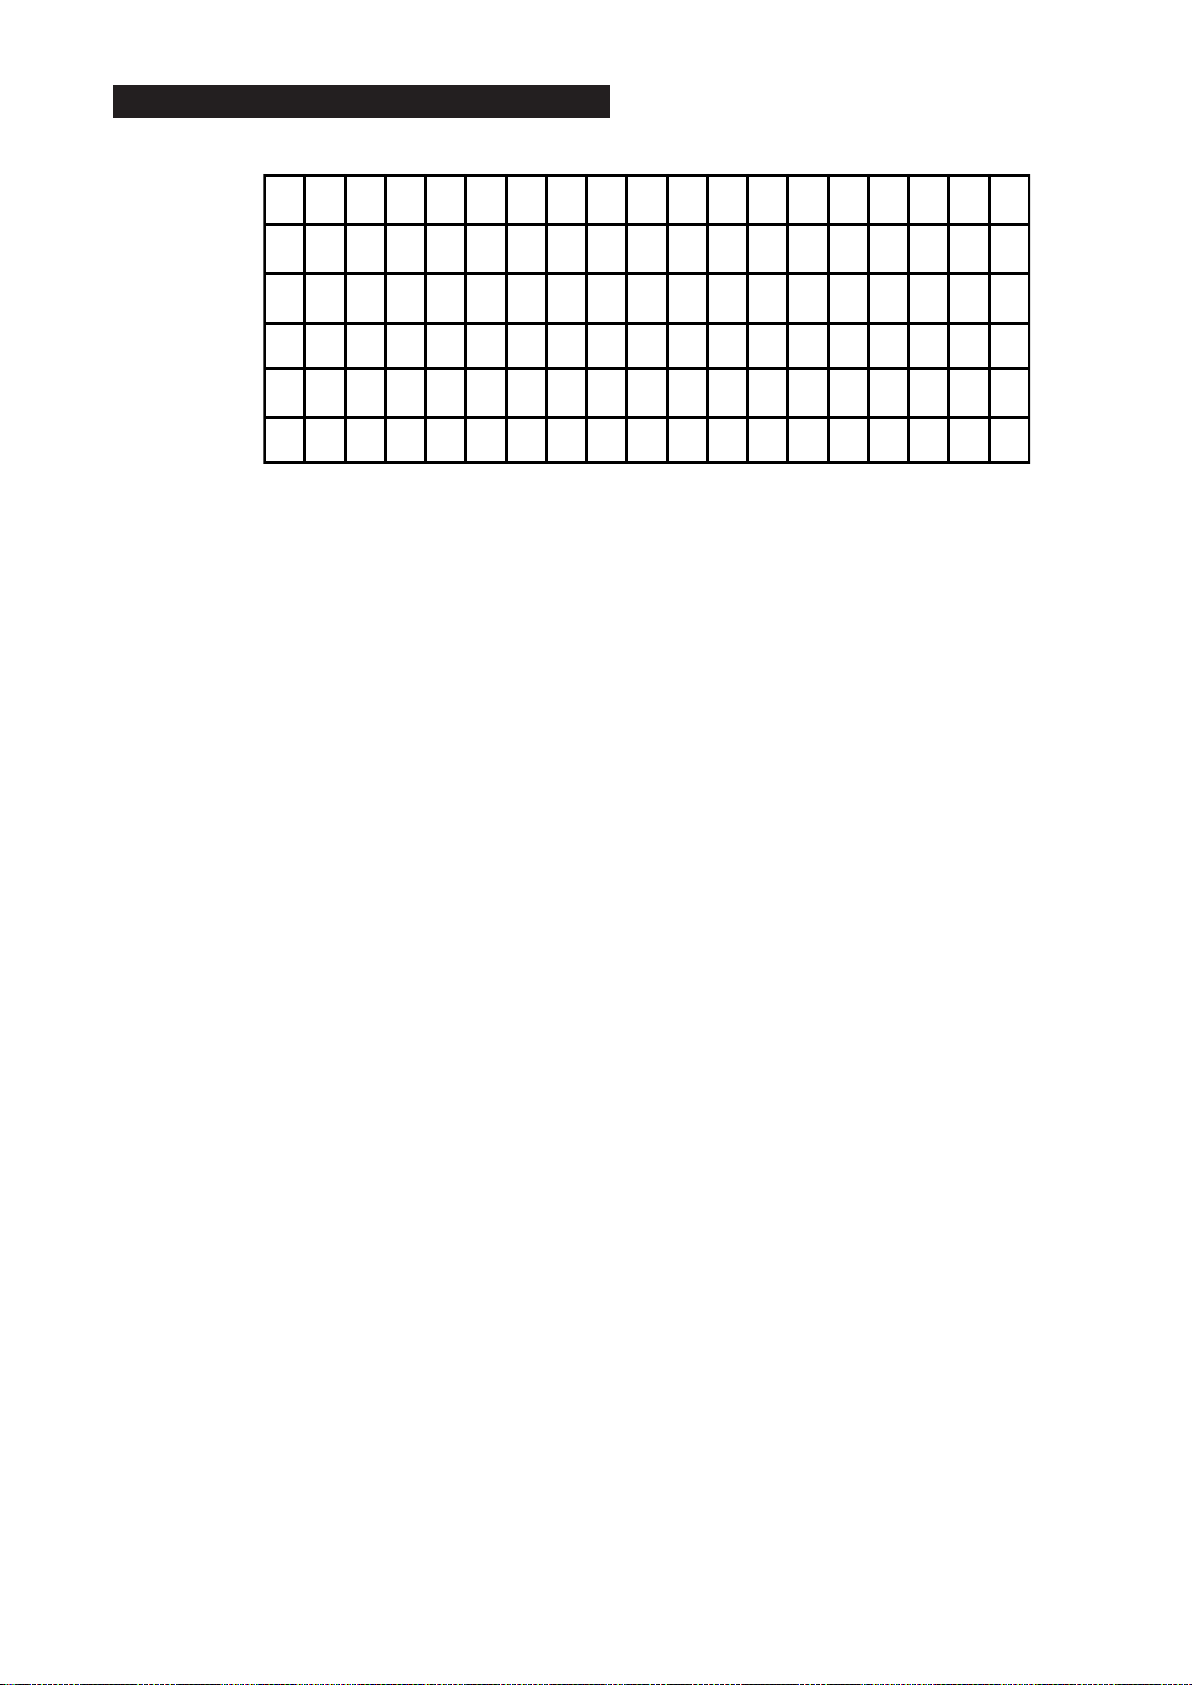
3-3. TT OSD Labels
SE-1
RM-ED007
(4)
ECS
(7)
DDC
(1)
32 AEP
(5)
CBA
(8)
E OHDCMS
(2) (3)
(9) (10) (11) (12) (13) (14)
TT - -
(6)
No r m
CLK -W CV
(15) (16) (17) (18)
1. Model configuration.
2. Model destination.
3. Command prompt.
4. ECS enabled/disabled (TT31).
5. CBA is shown when the TV set is in CBA mode (This mode is available from Factory mode).
6. Normal or Factory mode (TT19).
7. DDC enabled/disabled (TT65).
8. E is shown when EDID WP is enabled; - is shown otherwise (TT66).
9. O is shown when OTRUM is enabled; - is shown otherwise (TT38).
10. H is shown when Hotel mode is enabled; - is shown otherwise (TT37).
11. D is shown when Digital mode is enabled; A is shown when Analogue mode is enabled (TT62).
12. C (Default value) is shown when MSP Auto Carrier Mute function is enabled; - is shown otherwise.
13. M (Default value) is shown when AM sound is demodulated in MSP; A is shown when AFRIC demodulator is used.
14. S is shown when a SONY tuner is selected; P is shown when a PHILIPS tuner is selected (TT55).
15. V is shown when Visual I2C is enabled; - is shown otherwise (TT55).
16. W is shown when Watchdog is enabled; - is shown otherwise (TT55).
17. C is shown when Chip Select is enabled; - is shown otherwise (TT55).
18. V is shown when Visual I2C is enabled; - is shown otherwise (TT55).
- 26 -
Page 27
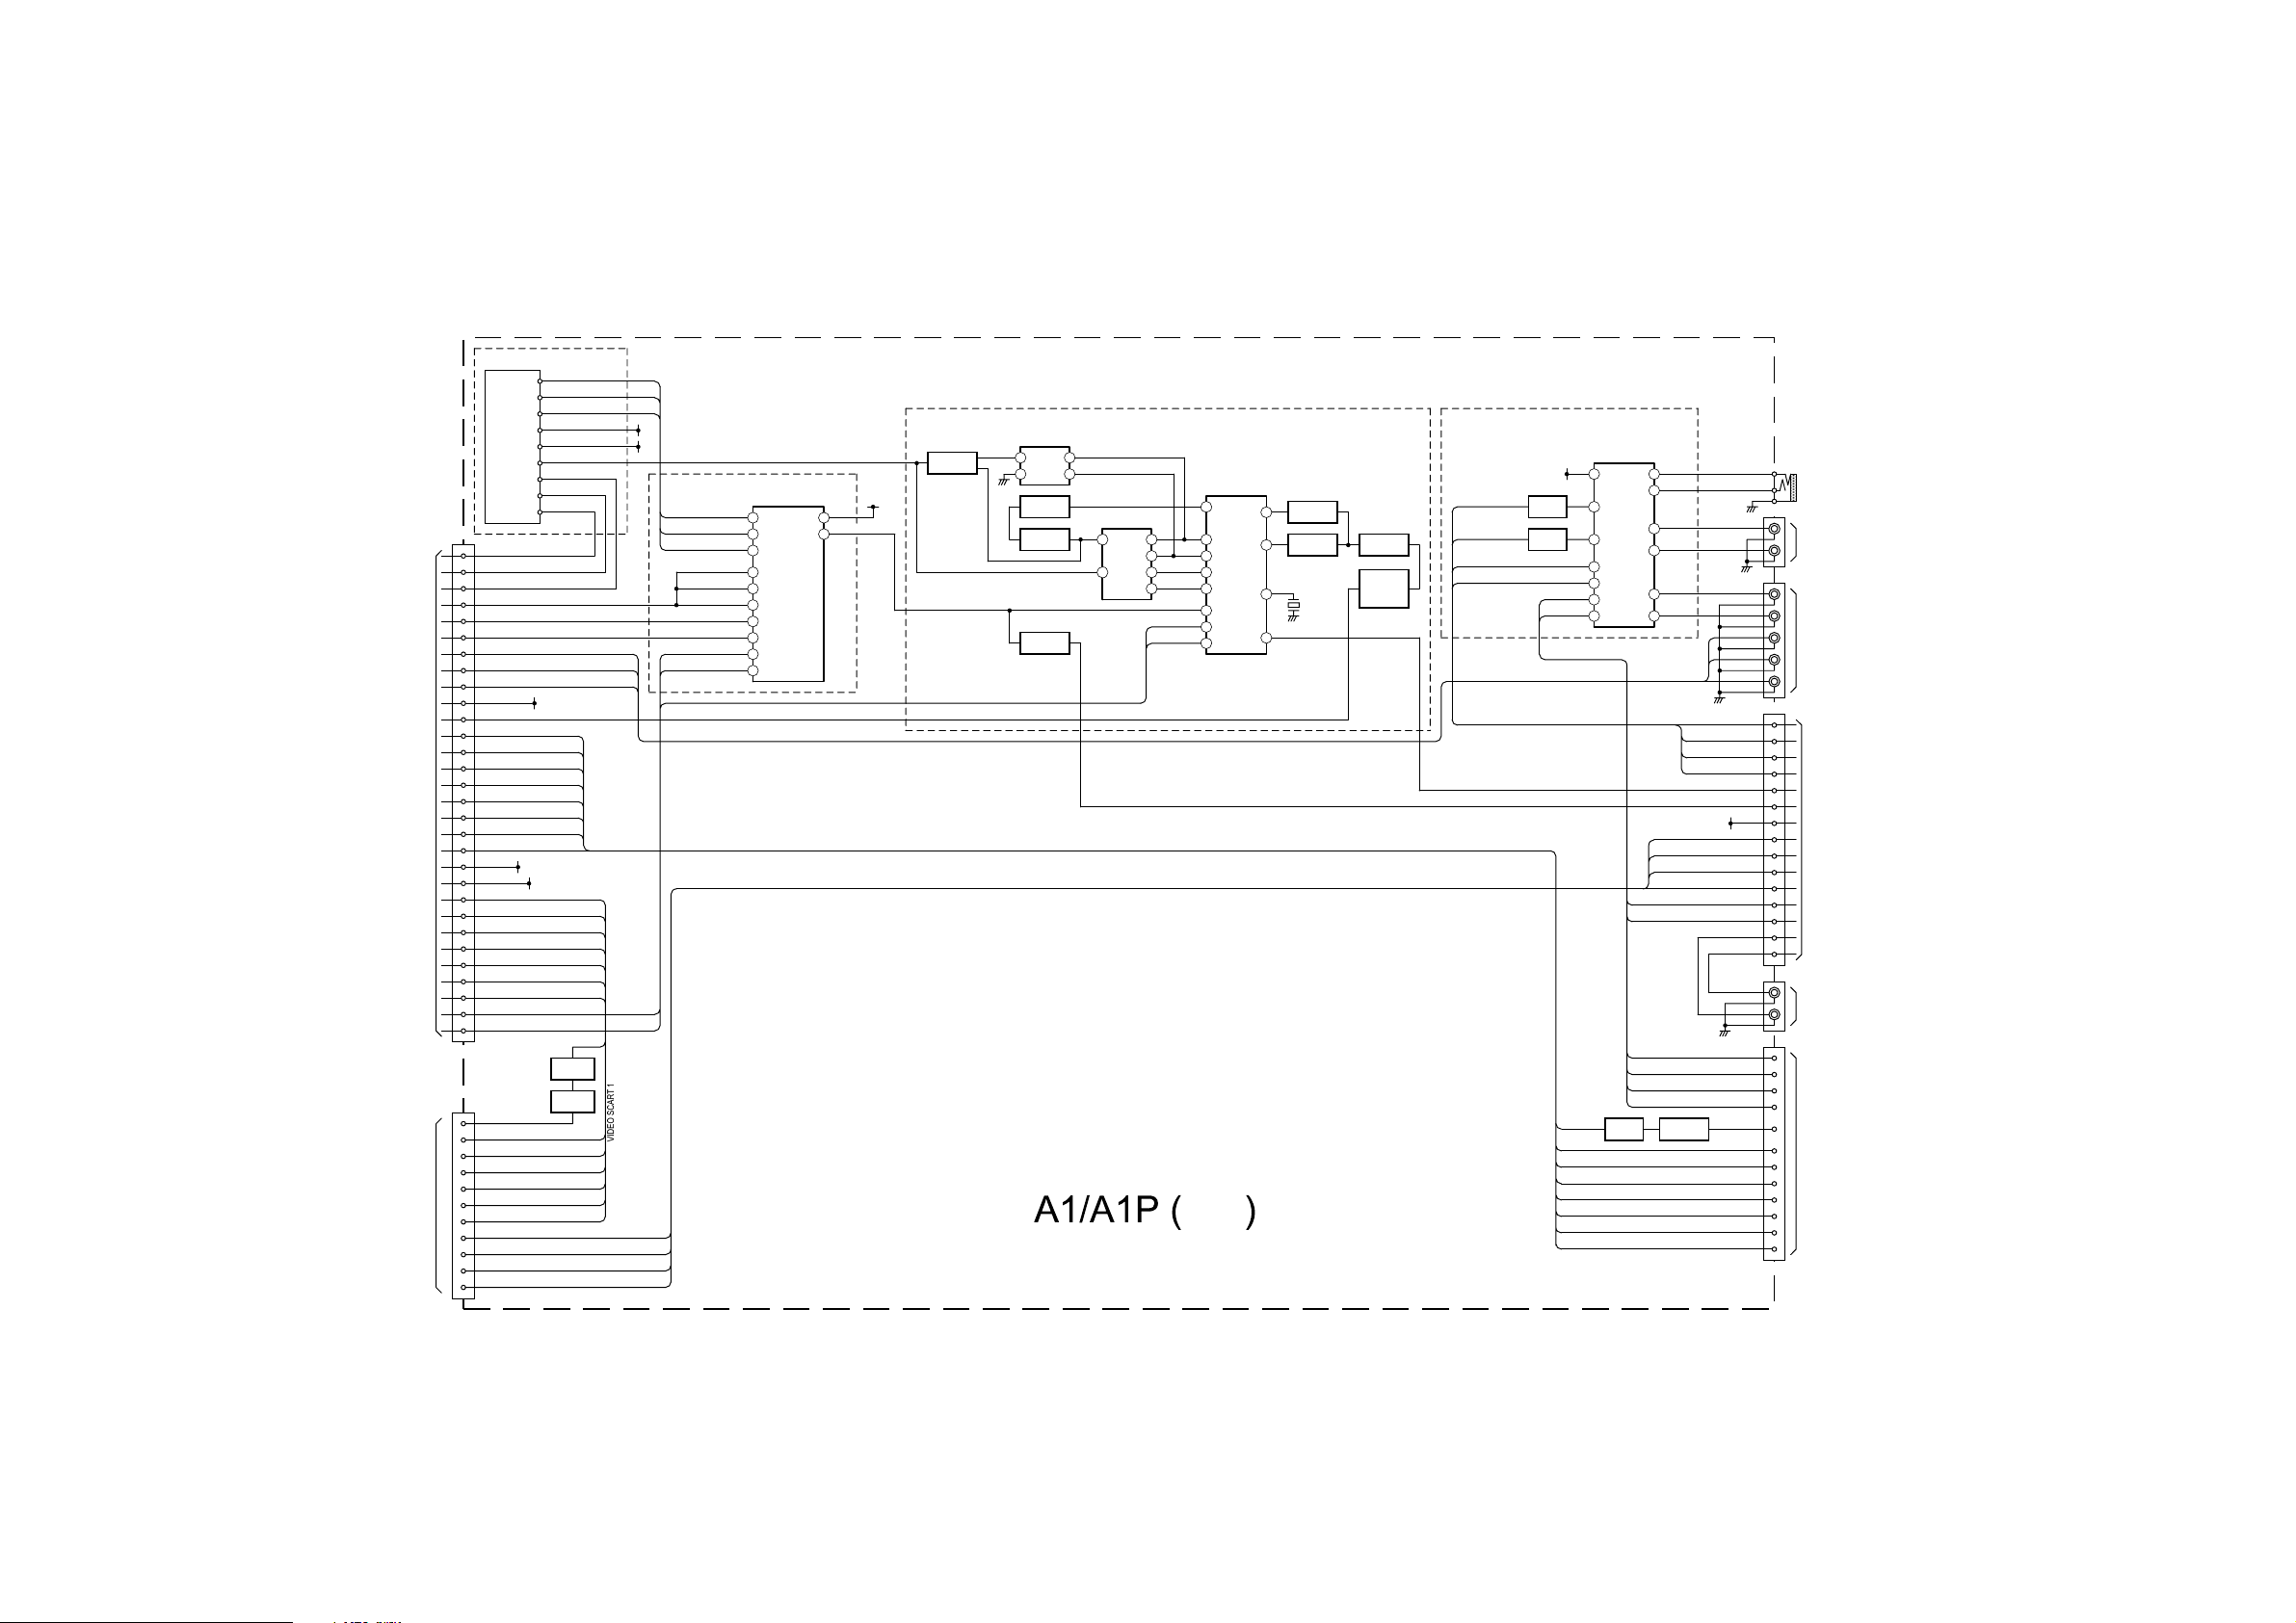
4-1. BLOCK DIAGRAMS (1)
TO BDT BOARD
CN3005
SCART 1
AV 1
CN2022
CN2021
DIGITAL IF 2
DIGITAL IF 1
17
IF DIGITAL -
18
IF DIGITAL +
12
AGC DIGITAL
7
TUNER 12C SW
10
12C SDA OFDM
9
12C SCL OFDM
V-YUV
22
U-YUV
24
Y-YUV
26
5V
2
CVBS TUNER
20
CVBS2 OUT
28
CVBS2 IN
30
MODE 2
31
AV LINK
32
FBLK 2
33
B2
34
G2
36
R2
38
8.5V
1
33V
4
CVBS1 OUT
40
CVBS1 IN
42
MODE 1
43
44 FBLK 1
45 B1
47 G1
49
R1
14
12C SCL
15
12C SDA
VIDEO OUT
19
BLUE IN
7
MODE 1
8
GREEN IN
11
RED IN
15
BLANKING
16
VIDEO IN
20
LEFT IN
6
RIGHT IN
2
LEFT OUT
3
RIGHT OUT
1
TU1300
TUNER
TU AGC
ANALOG IF
IF AGC
SCL
SDA
33V
5V
+5VA
V OUT 2 B
8.5V
33V
TUNER BLOCK
ANALOG AGC SW
12C SCL SW
12C SDA SW
33V
+5VA
IF ANALOG
IF AGC DIGITAL
IF DIGITAL +
IF DIGITAL -
V IN 2
MODE 2
AV LINK
BLK 2
BLUE 2
GREEN 2
RED 2
V OUT 1 B
V IN 1
MODE 1
BLK 1
BLUE 1
GREEN 1
RED 1
V OUT 1 B
Q2005
BUFFER
Q2004
AMP
BLUE 1
MODE 1
GREEN 1
RED 1
BLK 1
V IN 1
33V
5V
SC1 IN L
SC1 IN R
SC1 OUT L
SC1 OUT R
ANALOG AGC SW
12C SCL SW
12C SDA SW
TUNER 12C SW
TUNER 12C SW
TUNER 12C SW
12C SDA OFDM
12C SCL OFDM
SDA 5V
SCL 5V
TUNER SWITCH
IC1000
ANALOG MULTIPLEXER/
DEMULTIPLEXER
4
Z
VCC
15
Y
Z1
14
X
9
C
10
B
11
A
12
X0
2
Y0
13
X1
1
Y1
5V
16
ANALOG AGC
3
STBY
Q1203
Q1204
X1200
ANALOG IF BLOCK
Q1205
AMPLIFIER
C1226
L1201
TUNED
CIRCUIT
SW1201
FILTER
SURFACE WAVE
L1
D1200
RECTIFIER
5V
L2
Q1201
SWITCH
Q1202
SWITCH
Q1200
SWITCH
01
02
SW1200
SAW FILTER
1 4
10
IC1200
IF-PLL
DEMODULATOR
22
OP/2
17
VIDEO
24
SDA 5V
SCL 5V
23
1
2
14
10
11
S1 F
S1 F
V1 F
V1 F
TU AGC
SDA
SCL
5
6
7
OP/1
QSS
VCD
AMPLIFIER
3
BUFFER
15
12
AUDIO SWITCH
AUX-MUX-CTRL-B
AUX-MUX-CTRL-A
8.5V
Q2000
SWITCH
Q2001
SWITCH
AUX-MUX-OUT-R
AUX-MUX-OUT-L
SC2-IN-L
SC2-IN-R
AV SCART 2
IC2000
4 CHANNEL
ANALOG
MULTIPLEXER/
DEMULTIPLEXER
16
VDD
9
B
10
A
13
X
3
Y
1
Y0
12
X0
J2023
L-YUV
R-YUV
U-YUV
V-YUV
PC-R
PC-L
J2022
L
R
J2024
PC
CONNECTION
DV1
CONNECTOR
EXTERNAL
CONNECTOR
11
X3
4
Y3
DV1 L
2
Y2
DV1 R
15
X2
L-YUV
5
Y1
R-YUV
14
X1
Y-YUV
QSS
L1 IN
R1 IN
L1 OUT
R1 OUT
L2 OUT
R2 OUT
OUT L
OUT R
RIGHT IN
LEFT IN
AV LINK
BLUE 2
MODE 2
GREEN 2
RED 2
BLK 2
V IN 2
CN2024
4
5
6
7
8
1
2
16
17
19
20
13
14
10
11
J2021
L
R
CN2023
1
2
3
6
19
10
7
8
11
15
16
20
TO BDT BOARD
CN3006
AUDIO OUT
SCART 2
AV 2
TUNER, I/O
CONNECTIONS &
A/V SWITCHING
CVBS ANALOG RF
VIDEO SCART 2
AV SCART 1
V OUT 2 B
Q2003
BUFFER
SC2 OUT L
SC2 OUT R
SC2 OUT R
SC2 IN R
SC2 OUT L
SC2 IN L
SC1 IN L
SC1 IN R
SC1 OUT L
SC1 OUT R
Q2002
AMPLIFIER
AUX-MUX-OUT-R
AUX-MUX-OUT-L
AUX-MUX-CTRL-B
AUX-MUX-CTRL-A
AGC DEFEAT
5V STBY
LINEOUT R
LINEOUT L
RIGHT OUT
LEFT OUT
VIDEO OUT
- 27 -
Page 28
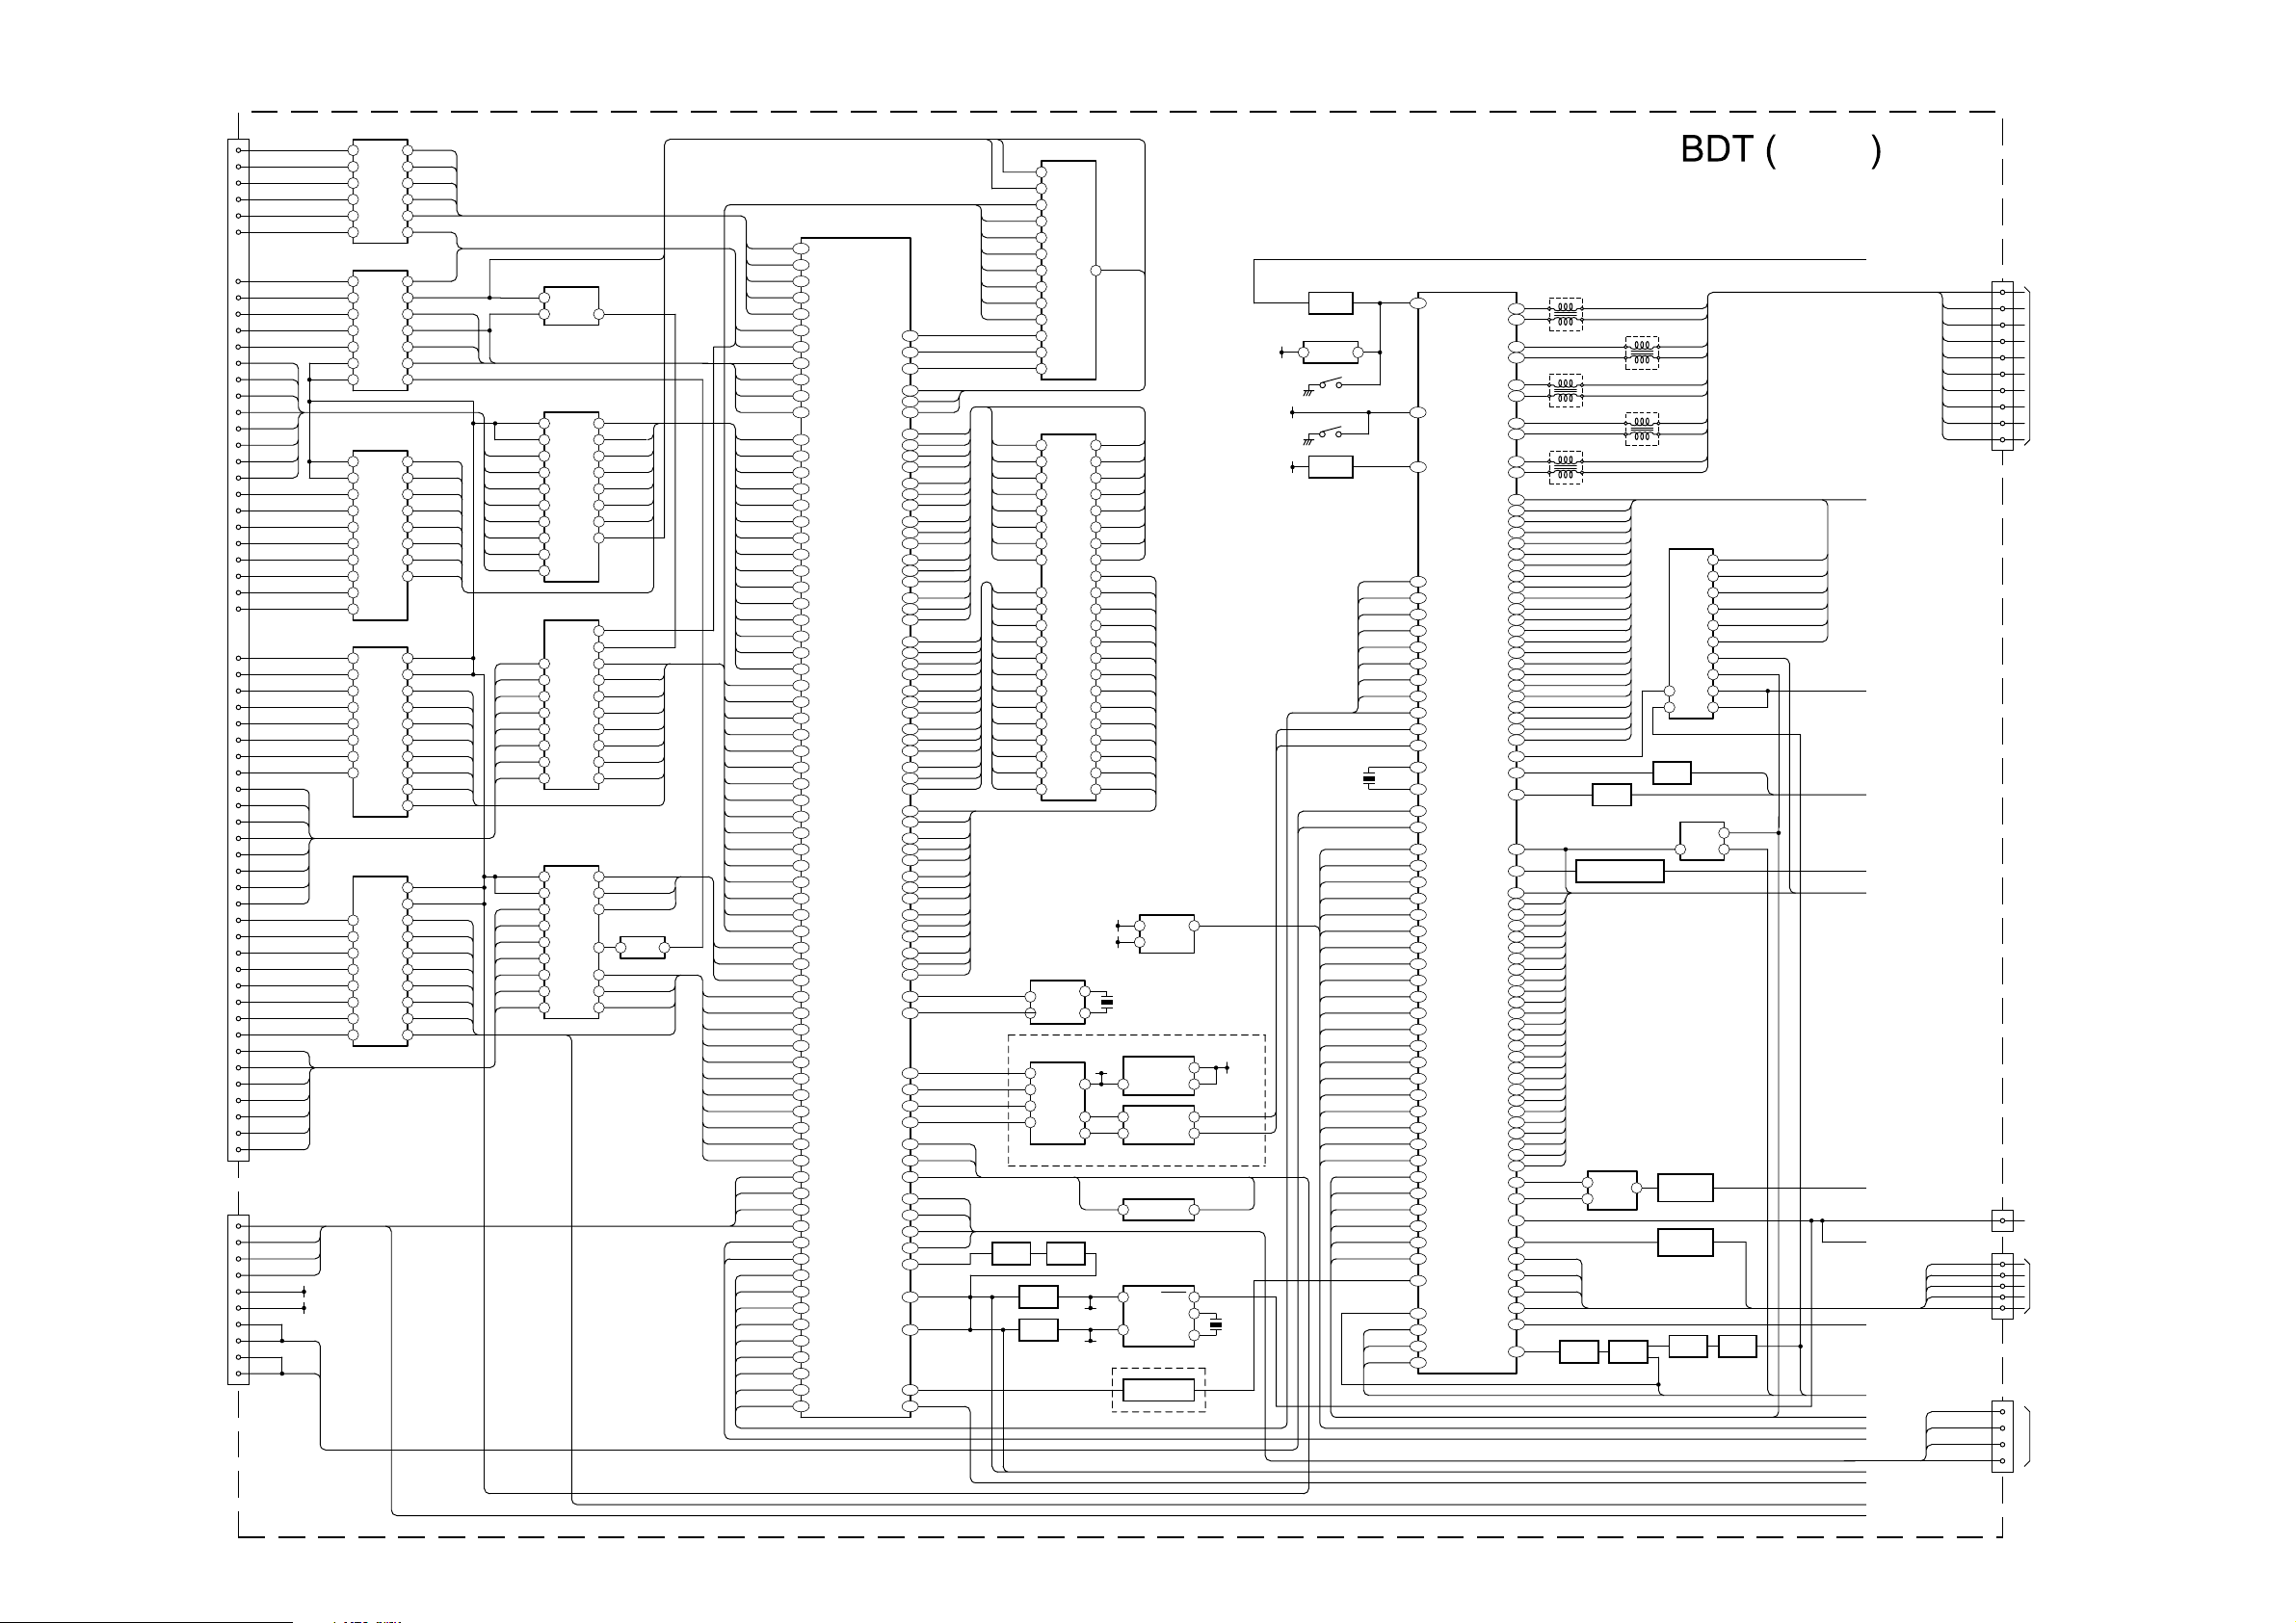
4-1. BLOCK DIAGRAMS (2)
CN5750
B26
INPACK
A16
IREQ
B2
CD1
B33
CD2
B9
VS1
B25
WAIT
A7
CE1
PCMCIA
CARD
CN3008
A15
B10
B24
B27
A12
A11
A8
A10
A21
A13
A14
A9
A29
A28
A27
A26
A25
A24
A23
A22
B7
B6
B5
B4
B3
B32
B31
B30
A30
A31
A32
A2
A3
A4
A5
A6
B22
B21
B20
B19
B16
B15
B14
B13
B29
B28
B23
A20
A19
B12
B11
12
7
8
10
6
15
3
16
2
17
WE
IORD
RESET
REG
CA(8)
CA(9)
CA(10)
CA(11)
CA(12)
CA(13)
CA(14)
CARD OEB
CA(0)
CA(1)
CA(2)
CA(3)
CA(4)
CA(5)
CA(6)
CA(7)
MODE (7)
MODE (6)
MODE (5)
MODE (4)
MODE (3)
MODE (2)
MODE (1)
D0
CD(0)
D1
CD(1)
D2
CD(2)
D3
CD(3)
D4
CD(4)
D5
CD(5)
D6
CD(6)
D7
CD(7)
MD1 7/A25
MD1 6/A24
MD1 5/A23
MD1 4/A22
MD1 3/A21
MD1 2/A20
MD1 1/A19
MD1 0/A18
MOSTRT
MOVAL
MOCLK
MICLK
MIVAL
MISTRT
IOWR
RXD1B
TXD1B
JTAG RESET
JIG MODE
SDA 5V
SCL 5V
RXD
RXD
TXD
TXD
nCARD-WE
PCCARD-RST
IC5751
OCTAL BUFFER/LINE DRIVER
INPACK
4
A2
nIREQ
5
A3
nCD1
6
A4
nCD2
7
A5
VS1
8
A6
nWAIT
9
A7
IC5750
OCTAL BUFFER/LINE DRIVER
nCE1
18
Y0
17
Y1
nIORD
15
Y3
13
Y5
nREG
12
Y6
nCL-EN
IOE1
nCL-EN
19 14
IOE2 Y4
IC5753
OCTAL BUFFER/LINE DRIVER
1
IOE1
nCL-EN
19
IOE2
CA(0)
18
Y0
CA(1)
17
Y1
CA(2)
16
Y2
CA(3)
Y3
CA(4)
14 8
Y4 A6
CA(5)
13
Y5
CA(6)
12
Y6
CA(7)
11
Y7
IC5756
OCTAL BUFFER/LINE DRIVER
2
MODE (6)
MODE (5)
MODE (4)
MODE (3)
MODE (2)
MODE (1)
MODE (0)MODE (0)
IOE1A0
3
A1
IOE2
4
A2
5
A3
6
A4
7 15
A5
A6
9
A7
IC5757
OCTAL BUFFER/LINE DRIVER
IOE2
MD1(7)
MD1(6)
MD1(5)
MD1(4)
MD1(3)
MD1(2)
MD1(1)
MD1(0)
IOE1
18
Y0
17
Y1
16
Y2
15
Y3
14
Y4
13
Y5
12
Y6
11
Y7
SDA
SCL
Y2
Y3
Y4
Y5
Y6
Y7
A0
A1
A3
A4
A5
A6
A0
A1
A2
A3
A4
A5
A7
Y0
Y1
Y2
Y3
Y4
Y5
Y6
Y7
A0
A1
A2
A3
A4
A5
A6
A7
INPACKB
16
IREQB
15
CD1B
14
CD2B
13
VS1B
12
nCL-WAIT
11
CE1B
2
FWEB
3
IORDB
5
IOWRB
6
CARD RESET
7
REGB
81
nIOWR
RADD(0)nCL-EN
2
RADD(1)
3
RADD(2)
4
RADD(3)
5
RADD(4)
6
RADD(5)
715
RADD(6)
RADD(7)
9
nCL-ENMODE (7)
1
nCL-EN
19
RDATA(15)
18
RDATA(14)
17
RDATA(13)
16
RDATA(12)
RDATA(11)
148
RDATA(10)
13
RDATA(9)
12
RDATA(8)
11
nCL-EN
19
nCL-EN
1
IN-TSD(7)
2
IN-TSD(6)
3
IN-TSD(5)
4
IN-TSD(4)
5
IN-TSD(3)
6
IN-TSD(2)
7
IN-TSD(1)
8
IN-TSD(0)
9
JTAG RESET
IC5752
2 I/P NAND
FWEB
1
B
A
IC5755
IC5759
IOE1
B0 A0
B1
B2
B3
B4
B5
B6
B7
IC5758
A2
A3
A4
Y0
Y5
Y6
Y7
DIR
4
Y
RADD(8)
2
A0
RADD(9)
3
A1
RADD(10)
4
A2
RADD(11)
5
A3
RADD(12)
6
A4
RADD(13)
715
A5
RADD(14)
A6
FOEB
9
A7
CEIB
19
DIR
1
DIR
RDATA(0)
2
RDATA(1)
3
A1
RDATA(2)
4
A2
RDATA(3)
5
A3
RDATA(4)
6
A4
RDATA(5)
7
A5
RDATA(6)
8
A6
RDATA(7)
9
A7
16
15
BUF-MDO-EN
14
Y4
INVERTING BUFFER
2
A0
IN-TSBCLK
7
A5
IN-TSBSYNC
8
A6
IN-TSPVAL
9
A7
IC5754
5Y 6A
IOWRB
2
OCTAL BUFFER/LINE DRIVER
nCL-EN
1
IOE1
nCL-EN
19
IOE2
CA(8)
18
Y0
CA(9)
17
Y1
CA(10)
16
Y2
CA(11)
Y3
CA(12)
14 8
Y4
CA(13)
13
Y5
CA(14)
12
Y6
CAD OEB
11
Y7
OCTAL TRANSCEIVER
CD(0)
18
CD(1)
17
CD(2)
16
CD(3)
15
CD(4)
14
CD(5)
13
CD(6)
12
CD(7)
11
OCTAL BUS BUFFER
nCL-EN BUF-MDO-CLK
19
IOE2
nCL-EN BUF-MDO-STRT
1
IOE1Y2Y3
MOCLK
4
MOSTRT
5
MOVAL
6
IOWR
18
MICLK
13
MISTRT
12
MIVAL
11
IC5680
NAND FLASH MEMORY
FWEB
18
FOEB
8
RDATA(0)
29
RDATA(1)
IC5630
IREQB
CD1B
CD2B
VS1B
CEIB
IORDB
REG B
TXDIB
RXDIB
G2
K3
V1
C1
P2
F3
P4
P2
G1
F4
N4
D3
E1
E3
F1
H2
J2
G4
H4
L3
M3
T2
N3
K1
N1
M1
E2
D4
C2
V4
W2
V2
R4
U4
C3
D2
D1
U1
T3
T1
R3
R1
H1
E4
F2
A4
B4
C4
A3
B2
A2
B2
A1
D5
B5
A5
AA5
AA6
AA10
AA16
Y7
AA7
AA20
AA21
Y20
Y21
W20
W21
V20
V21
V19
MPEG DECODER
W1
U3
U4
K2
L1
P1
C16
D16
C15
D15
C14
D14
C13
D13
B13
A13
B14
A14
B15
A15
B16
A16
C7
D7
C6
D6
B6
A6
B7
A7
B8
A8
D8
B9
A9
C8
D9
A11
A12
C12
C9
D10
C10
D11
B10
A10
B11
B12
C11
V7
M21
W6
Y5
AA4
W5
C21
A20
B20
W3
Y3
AA2
V16
V9
Y8
AA8
Y12
AA15
NAND RBB
NAND CLE
NAND ALE
FCSBO
FWEB
FOEB
DQ(0)
DQ(1)
DQ(2)
DQ(3)
DQ(4)
DQ(5)
DQ(6)
DQ(7)
DQ(8)
DQ(9)
DQ(10)
DQ(11)
DQ(12)
DQ(13)
DQ(14)
DQ(15)
DADD(0)
DADD(1)
DADD(2)
DADD(3)
DADD(4)
DADD(5)
DADD(6)
DADD(7)
DADD(8)
DADD(9)
DADD(10)
DADD(11)
DADD(12)
DBA1
DBA0
DQM1
DQS1
DQS0
DCSB
DRASB
DCASB
DWEB
DCKE
DCLK DDR
DCLK B
DV REF
DQM0
PWM OUT
CLK 27M
ADO
ALRCK
ABCK
AMCK
nSMC INT
CI PWR EN
nCI EN
PMSDIO
PMSBS
PMSSCLK
PMSINS
RESET N
SDA EMMA
SCL EMMA
CVBS
nFE-RESET
INPACKB
nCI-WAIT
CARD RESET
IOWRB
RADD(0)
RADD(1)
RADD(2)
RADD(3)
RADD(4)
RADD(5)
RADD(6)
RADD(7)
RADD(8)
RADD(9)
RADD(10)
RADD(11)
RADD(12)
RADD(13)
RADD(14)
RDATA(0)
RDATA(1)
RDATA(2)
RDATA(3)
RDATA(4)
RDATA(5)
RDATA(6)
RDATA(7)
RDATA(8)
RDATA(9)
RDATA(10)
RDATA(11)
RDATA(12)
RDATA(13)
RDATA(14)
RDATA(15)
nIOWR
1310
BUF-MDO-CLK
BUF-MDO-STRT
BUF-MDO-EN
IN TSD(0)
IN TSD(1)
IN TSD(2)
IN TSD(3)
IN TSD(4)
IN TSD(5)
IN TSD(6)
IN TSD(7)
IN-TSBCLK
IN-TSBSYNC
IN-TSPVAL
JTAG RESET
JIG MODE
SDA COFDM
SCL COFDM
VDO(0)
VDO(1)
VDO(2)
VDO(3)
VDO(4)
VDO(5)
VDO(6)
VDO(7)
VDO CLK
RDATA(2)
RDATA(3)
RDATA(4)
RDATA(5)
RDATA(6)
RDATA(7)
DQ(0)
DQ(1)
DQ(2)
DQ(3)
DQ(4)
DQ(5)
DQ(6)
DQ(7)
DADD(0)
DADD(1)
DADD(2)
DADD(3)
DADD(4)
DADD(5)
DADD(6)
DADD(7)
DADD(8)
DADD(9)
DADD(10)
DADD(11)
DADD(12)
AUDIO DAC & AMP
Q5923
SWITCH
Q5920
BUFFER
Q5921
BUFFER
30
31
32
41 9
42
43
44
7
16
17
IC5681
DDR SDRAM
2
4
5
7
8
10
11
13
29
30
31
32
35
36
37
38
39
40
28
41
42
IC5682
27 MHZ CLOCK
X1
3
VIN
5
CLK
X2
IC5782
STEREO DAC
1
DATA
VDD
3
2
RO
4
LO
Q5922
BUFFER
SDA
SCL
FCSBO
DQ(8)
54
DQ(9)
56
DQ(10)
57
DQ(11)
59
DQ(12)
60
DQ(13)
62
DQ(14)
63
DQ(15)
65
DCLK DDR
45
DCLK B
46
DV REF
49
DBA1
27
DBA0
26
DQM1
47
DQM0
20
DQS1
51
DQS0
16
DCSB
24
DRASB
23
DCASB
22
DWEB
21
DCKE
44
SCL
SDA
1
8
5V
AUDIO
7 4
5
8
nC1 EN
SDA
SCL
IC3004
SERIAL EEPROM
6
5
X5680
IC5781
DROPOUT REGULATOR
CONTROL
NOISE
OUT
2
A-IN
A-OUT
6
B-IN
B-OUT
IC5783 OP AMP
IC5786
USB POWER SWITCH
2 1
IC5780
REAL TIME CLOCK
3
SDA
INTRC
OSC IN
SCL
2
OSC OUT
VIDEO AMP BUFFER
Q5780
BUFFER AMP
NVM-WP
7
1
5
DIGITAL RF R
1
DIGITAL RF L
7
CI PWR EN
KEY
4
9
8
X5780
8.5V
3.3V
SCL
SDA
Q3001
RESET
IC3005
SYSTEM RESET
2 4
SW3001
SW3000
Q3017
X3000
HOT PLUG DET 1
AUX-MUX OUT R
AUX-MUX OUT L
PDHDMI/MAIN ON
TUNER 12C SWITCH
AUDIODATA-HDMI
AUDIOCLK-HDMI
RESETDB RESET
VDO(0)
VDO(1)
VDO(2)
VDO(3)
VDO(4)
VDO(5)
VDO(6)
VDO(7)
VDO(CLK)
DIGITAL RF R
DIGITAL RF L
OUT
RXD
TXD
NVM WP
MODE 1
MODE 2
LINE R
LINE L
MONITOR R
MONITOR L
SELECT OUT R
SELECT OUT L
TCK
TDO
TMS
POWER LCD
POWER DET
EDID WP
AUDIOWS-HDMI
PC-HDMI
INT-HDMI
RF-DIGITAL
POWER ON/
POWER ON LED
PC BLUE
PC GREEN
PC RED
IC3006
VIDEO CONTROLLER/TELETEXT
83
83
83
198
199
200
201
202
203
204
205
206
11
12
79
IN
78
106
105
119
116
87
88
27
28
25
26
21
22
15
16
208
1
4
5
TDI
6
7
166
167
110
40
38
39
161
160
190
2
172
173
174
L3000 FILTER
141
140
41
138
137
L3002 FILTER
135
134
41
132
131
L3004 FILTER
129
128
41
FB-SCART 1
175
BLUE SCART 1/Y FRONT
176
GREEN SCART 1/C FRONT
177
RED SCART 1
178
PB-HD
179
Y-HD
180
PR-HD
181
BLUE SCART 2
182
FB-SCART 2
183
GREEN SCART 2
184
RED 2/C-DIG
187
CVBS 2/Y-DIG
188
CVBS SCART 1
189
RF ANALOGUE
191
CVBS SELECT
194
CVBS-LAST-RF
195
SCART 1-L
10
SCART 1-R
9
FRONT-L
14
FRONT-R
13
ANALOG RF R
23
ANALOG RF L
24
HP DET
109
DVS
47
102
101
HDMI-H
171
31
DB0
73
DB1
72
DB2
71
DB3
70
DB4
69
DB5
68
DB6
67
DB7
66
DG0
65
DG1
64
DG2
63
DG3
62
DG4
61
DG5
60
DG6
59
DG7
58
DR0
57
DR1
56
DR2
55
DR3
54
DR4
53
DR5
52
DR6
51
DR7
50
DCLK
49
DE
48
AV LINK 1
92
AV LINK 2
91
KEY
162
SIRCS
3
GREEN LED
165
REC LED
168
STBY LED
90
TIMER LED
89
AC ON/OFF
159
PC-DET
Q3121
118
SWITCH
23
TATA+
L3001 FILTER
41
23
TCTC+
L3003 FILTER
41
23
TDTD+
Q3003
SWITCH
Q3350, Q3351
BUFFER & AMPLIFIER
IC3001
COMPARATOR
5
3
1
Q3123
BUFFER
23
TBTB+
23
TCLKTCLK+
IC3002
ANALOG
MULTIPLEXER/
DEMULTIPLEXER
13
PC-V
LOUDSPEAKER
Q3002
SWITCH
LINE OUT MUTE
IC3000
BILATERAL SWITCH
1 2
Q3000
HIGH SPEED
SWITCH
Q3004
HIGH SPEED
SWITCH
Q3122
BUFFER
BLUE SCART
5
GREEN SCART 1/C FRONT
4
GREEN SCART1
3
Y FRONT
2
C FRONT
1
BLUE SCART 1/Y FRONT
15
HDMI-V
12
PC/HDMI
11
SCI/FRONT
1014
9
MUTE
PC/HDMI
4
PCH
AV LINK
SIRCS
Q3120
SWITCH
MAIN MICRO
CONTROLLER, PANEL
DRIVING, AUDIO & VIDEO
PROCESSOR
QSS
KEY
PORT CS
PC-V
(Sht 1 of 2)
SHEET 2 A
SHEET 2 B
SHEET 2 C
SHEET 2 D
SHEET 2 E
SHEET 2 F
SHEET 2 G
SHEET 2 H
SHEET 2 J
SHEET 2 K
SHEET 2 L
SHEET 2 M
SHEET 2 N
SHEET 2 P
SHEET 2 R
SHEET 2 S
SHEET 2 T
TCLKTCLK+
STBY LED
ON-TIMER
GREEN LED
REC LED
SIRCS
PMSBS
PMSDIO
PMSINS
PMSSCLK
CN3001
1
TA-
3
TA+
5
TB-
7
TB+
19
9
TC-
TC+
TD-
TD+
KEY
11
19
13
15
17
19
CN3002
1
CN3003
4
5
6
7
10
CN5883
2
4
6
8
TO LCD
PANEL
TO H1 BOARD
CN9000
TO H3 BOARD
CN9300
SERVICE
(MEMORY STICK)
CONNECTOR
- 28 -
Page 29
4-1. BLOCK DIAGRAMS (3)
SHEET 1 F
SHEET 1 L
SHEET 1 P
SHEET 1 H
SHEET 1 B
SHEET 1 S
SHEET 1 R
SHEET 1 N
SHEET 1 M
SHEET 1 D
SHEET 1 C
SHEET 1 J
SHEET 1 T
SHEET 1 A
SHEET 1 K
EDIT WP
PORT CS
PD-HDMI-
AC ON/OFF
MAIN MICRO
CONTROLLER, PANEL
DRIVING, AUDIO & VIDEO
PROCESSOR
Q4204
BUFFER
RF ANALOG
MAIN-ON
Q6555
INVERTER
7
Q3300
BUFFER
Q3301
AMP
IC4200
EEPROM
DB(0)
DB(1)
DB(2)
DB(3)
DB(4)
DB(5)
DB(6)
DB(7)
DG(0)
DG(1)
DG(2)
DG(3)
(Sht 2 of 2)
DG(4)
DG(5)
DG(6)
DG(7)
DR(0)
DR(1)
DR(2)
DR(3)
DR(4)
DR(5)
DR(6)
DR(7)
DCLK
SDA
6
SCL
5
SDA
HDML-H
HDML-V
SCL
HOT PLUG-DETI
Q4211
SWITCH
IN-TSD(7)
IN-TSD(6)
IN-TSD(5)
IN-TSD(4)
IN-TSD(3)
IN-TSD(2)
IN-TSD(1)
IN-TSD(0)
IN-TSD CLK
IN-TSD VAL
IN-TSD SYNC
IC3008
HPD1
SC1/FRONT
D/A CONVERTER
9
7
6
COINCIDENCE AUDIO SW 1
SIGNAL VCC
IC6502
3.15A
REGULATOR
45
IC6503
DC/DC CONVERTER
21
PS6501
POWER LCD
IC6500
DC/DC CONVERTER
PS6502
3.15A
PS6500
3.15A
21
IC6501
DC/DC CONVERTER
21
IC4202
HDMI RECEIVER
43
44
47
48
49
50
51
52
27
26
31
32
33
34
35
36
9
10
15
16
17
18
19
20
2
DE
199
200
201
Q4200
SWITCH
IC5040
DVB-S FRONT END IC
22
TSDATA 7
21
TSDATA 6
20
TSDATA 5
19
TSDATA 4
18
TSDATA 3
17
TSDATA 2
TUNER DAT
14
TSDATA 1
TUNER CLK
13
TSDATA 0
10
TS CLK
9
TS VALID
RESET N
8
TS SYNC
2
AUDIO SW 2
3
AGC DEFEAT
10
PANEL DET
1
BACKLIGHT
4
DIMMER
5
8.5V
5V MAIN
Q6511
INVERTER
3.3V STBY
Q6510
INVERTER
1.8V STBY
161
162
167
168
173
174
179
180
146
145
135
182
183
187
115
206
142
143
IF AGC
SDA
SCL
RXAC1RXAC1+
RXA0RXA0+
RXA1RXA1+
RXA2RXA2+
HSCLA
HSDAA
MCLK
X3001
AUDIOWS-HDMI
AUDIODATA-HDMI
AUDIOCLK-HDMI
PC-HDMI
INT-HDMI
SDA-EMMA
SCL-EMMA
AGC DIGITAL
2
IF DIGITAL+
58
IF DIGITAL-
57
SDA-OFDM-TUNER
63
SCL-OFDM-TUNER
64
SDA-COFDM
26
SCL-COFDM
25
nFE RESET
6
AMP MUTE
LOUDSPEAKER
HARDWARE MUTE
Q3009
SWITCH
Q3010
SWITCH
Q6513
MOSFET
SWITCH
Q6512
MOSFET
SWITCH
Q6509
MOSFET
SWITCH
MUTE
D6520
SWITCH
5V LCD
3.3V
D6518
SWITCH
1.8V
HDMI HOST INTERFACE PROTECTION
HDMI-CLK-
HDMI-CLK+
HDMI-D0HDMI-D0+
HDMI-D1HDMI-D1+
HDMI-D2HDMI-D2+
HSCLA
HSDAA
SDA
SCL
LINE OUT
D3004
MUTE
DUAL-
SWITCHING
DIODE
AC ON/OFF
Q3016
SWITCH
Q3012
LINE OUT R
Q3015
SWITCHES
Q3013
LINE OUT L
Q3014
SWITCHES
POWER DET
Q6514
BUFFER
IC4201
24
26
27
29
30
32
33
35
21
22
CLKCLK+
D0D0+
D1D1+
D2D2+
DDC DAT
DDC CLK
15
13
12
10
9
7
6
4
17
18
CVBS1 OUTCVBS LAST RF
CVBS2 OUTCVBS SELECT
CVBS TUNERRF ANALOG
SDA
SHEET 1 G
QSS
SHEET 1 E
MONITOR LMONITOR R
PANEL DET
Q3007
Q6515
SWITCH
AMP
Q3006
SWITCH
IC3003 OP AMP
DIMMER
1
7 2
SCL
AUX MUX OUT L
AUX MUX OUT R
Q3020
BUFFER
AGC DIGITAL
IF DIGITAL+
IF DIGITALSDA OFDM TUNER
SCL OFDM TUNER
TUNER 12C SWITCH
SCART1-LSCART 1-L
SCART 1-RSCART 1-R
AUDIO SW1
AUDIO SW2
AGC DEFEAT
LINE OUT L
LINE OUT R
AMP-MUTE
SIGNAL VCC
SIGNAL VCC
SIGNAL VCC
PANEL DET (40)
PANEL DET (26/32)
BACKLIGHT
PC GREEN
IC4000
EEPROM
SDA
6
SCL
5
+5V
F4000
0.5A
DB RESET
AC OFF DETAC ON/OFF
POWER ONPOWER ON/POWER ON LED
5V STBY
CLK-
CLK+
DDC DAT
DDC CLK
C FRONT
Y FRONT
L FRONT
R FRONT
HP-DET
FBLK1FB SCART 1
CVBS INCVBS SCART 1
FBLK2FB SCART 2
CVBS2 INCVBS SCART 2
Y-YUVY-HD
U-YUVPB-HD
V-YUVPR-HD
SDA-5V
SCL-5V
AV LINK
PORT CS
MODE 1
MODE 2
R1 OUTANALOG RF R
L1 OUTANALOG RF L
R2 OUTSELECT OUT R
L2 OUTSELECT OUT L
LINE L
LINE R
DIMMER
PC RED
PC BLUE
PC-H
PC-V
RESETJTAG RESET
HPD
QSS
SDA
TMS
SCL
+5V
TD0
TD1
TCK
CN4200
12
10
9
D0-
7
D0+
6
D1-
4
3
1
16
15
19
CN3000
2
4
6
8
9
CN3005
1
3
5
6
8
10
12
14
16
17
20
22
24
26
28
30
35
36
44
18
38
32
33
40
41
43
7
19
CN3006
1
2
4
5
7
8
16
17
13
14
15
20
10
11
CN6500
7
9
13
1
2
3
CN3004
1
2
3
4
CN4000
1
2
3
13
14
12
15
9
CN3007
1
3
19
7
9
19
5
8
CN6501
5
19
6
1
2
19
HDMI
CONNECTOR
TO H2 BOARD
CN9855
TO A1 BOARD
CN2022
TO A1 BOARD
CN2024
TO G1 BOARD
CN6003
OR
TO G2 BOARD
CN6005
LCD PANEL
TO G1 BOARD
CN6200
OR
G2 BOARD
CN6003
D1+
D2D2+
R1RED SCART 1
G1GREEN SCART 1
B1BLUE SCART 1
R2RED SCART 2
G2GREEN SCART 2
B2BLUE SCART 2
- 29 -
Page 30

4-1. BLOCK DIAGRAMS (4)
MAINS
INPUT
AC IN (L)
(KDL-26/32U2000 ONLY)
CN6000
1AC IN (N)
3
F6000
FUSE
4A
123
234
1
L6001
INDUCTOR
12
9
4
L6000
LINE FILTER
L6006
LINE FILTER
POWER
SUPPLY
1
3
4
5
6
D6000
BRIDGE
RECTIFIER
IC6001
SHUNT
REGULATOR
1 3
+
_
PHOTOCOUPLER
1
2
SWITCHING CONTROL
V SENSE
1
C1
3
RT
4
TIMER
6
SS
7
VC1
8
OCP
9
Q6001
BUFFER
IC6200
STANDBY SWITCHING
REGULATOR
5
UP
2
VCC
7
D
8 4
FB
D
PH6001
4
3
Q6000
AMP
Q6002
AMP
IC6000
AC OFF DET
FB
2
VG(H)
16
VG(L)
12
PH6000
PHOTOCOUPLER
T6200
1
2
49
68
PH6200
PHOTOCOUPLER
Q6003
Q6004
POWER
SWITCHING
(MOS FETS)
41
32
14
23
3 2
5V
Q6005
SWITCH
STBY
5V
IC6201
SHUNT
REGULATOR
PH6002
PHOTOCOUPLER
4
3
IC6002
SHUNT REGULATOR
2 3
Q6006
Q6007
SWITCHES
Q6300
Q6301
SWITCHES
T6000
1
2
5
7
T6001
714
5
18V/24V
STEREO POWER AMPLIFIER
SVR
AUDIO VCC
13
12
D6011
DIODE
11
10
9
D6018
DIODE
8
13
D6012
DIODE
12
PS6000
11
4A
10
PS6001
9
4A
D6014
DIODE
+18V/24V
PS6002
3.15A
SIGNAL VCC
SIGNAL VCC
SIGNAL VCC
IC6300
L IN
1
R IN
5
MUTE
10
7
13
L OUT
14
R OUT
12
STBY
Q6302
9
Q6303
STBY
CIRCUIT
AC OFF DET
POWER ON
MUTE
+18V/24V
+18V/24V
+18V/24V
+18V/24V
STBY 5V
STBY 5V
L-HP
R IN
CN6003
1
2
3
TO BDT BOARD
6
L IN
CN6500
8
13
CN6002
1
2
TO INVERTER
3
BOARD
4
CN6200
1
2
TO BDT BOARD
5
CN6501
6
CN6300
4
TO H2 BOARD
1R-HP
CN9856
MAINS
INPUT
A.C. IN (L)
CN6001
1A.C. IN (N)
3
(KDL-40U2000 ONLY)
213
134
2
2
F6000
FUSE
6.3A
18V/24V
4
L6000
LINE FILTER
L6001
LINE FILTER
POWER SUPPLY
RY6000R6017
PH6000
PHOTOCOUPLER
2
1
D6003
BRIDGE
RECTIFIER
IC6003
IC6000
ACTIVE PFC
CONTROL
SHUNT RECTIFIER
1 3
3 4
IC6002
SHUNT RECTIFIER
1 3
2
Q6007
BUFFER
AMP
D6000
D6001
D6002
DIODES
STBY
5V
4
Q6005
3
Q6006
SWITCHES
7
51
PH6002
PHOTOCOUPLER
2 4
1
Q6003
Q6004
SWITCHES
Q6010
SWITCH
Q6009
BUFFER
Q6008
BUFFER
Q6011
BUFFER
3
Q6001
Q6002
SWITCHES
PH6001
PHOTOCOUPLER
4
3
Q6012
SWITCH
POWER ON
L6003
INDUCTOR
8
2
105
RESISTOR
CHAIN
1
2
IC6001
SWITCHING CONTROL
15
1
3
4
6
7
9
IC6200
STANDBY
SWITCHING
REGULATOR
25
UPDVCC
7
8 4
D
FB
11
PHOTOCOUPLER
2
1
2
4
3
811
PH6003
4
3
IC6004
SHUNT
RECTIFIER
2 3
T6200
1
2
610
PH6200
PHOTOCOUPLER
14
23
AC OFF DET
T6002
5
7
T6003
715
5
STBY
IC6201
SHUNT
REGULATOR
3 2
15
14
D6035
DIODE
13
12
11
D6037
DIODE
10
D6038
DIODE
14
D6039
DIODE
13
D6036
DIODE
+18V/24V
+33V
SIGNAL VCC
SIGNAL VCC
SIGNAL VCC
12
11
D6040
DIODE
10
PS6301
4A
5V
Q6300
Q6301
SWITCHES
AUDIO VCC
STEREO POWER
SVR
7
13
IC6300
AMPLIFIER
L IN
1
R IN
5
MUTE
10
L OUT
14
R OUT
12
STBY
Q6302
9
Q6303
STBY
CIRCUIT
AC OFF DET
POWER ON
R IN
+33V
MUTE
+18V/24V
+18V/24V
+18V/24V
+18V/24V
STBY 5V
STBY 5V
L-HP
CN6005
1
2
3
L IN
7
TO BDT BOARD
CN6500
9
11
13
CN6004
7
8
TO INVERTER
9
BOARD
10
CN6003
1
2
TO BDT BOARD
5
CN6501
6
CN6300
4
TO H2 BOARD
1R-HP
CN9856
- 30 -
Page 31
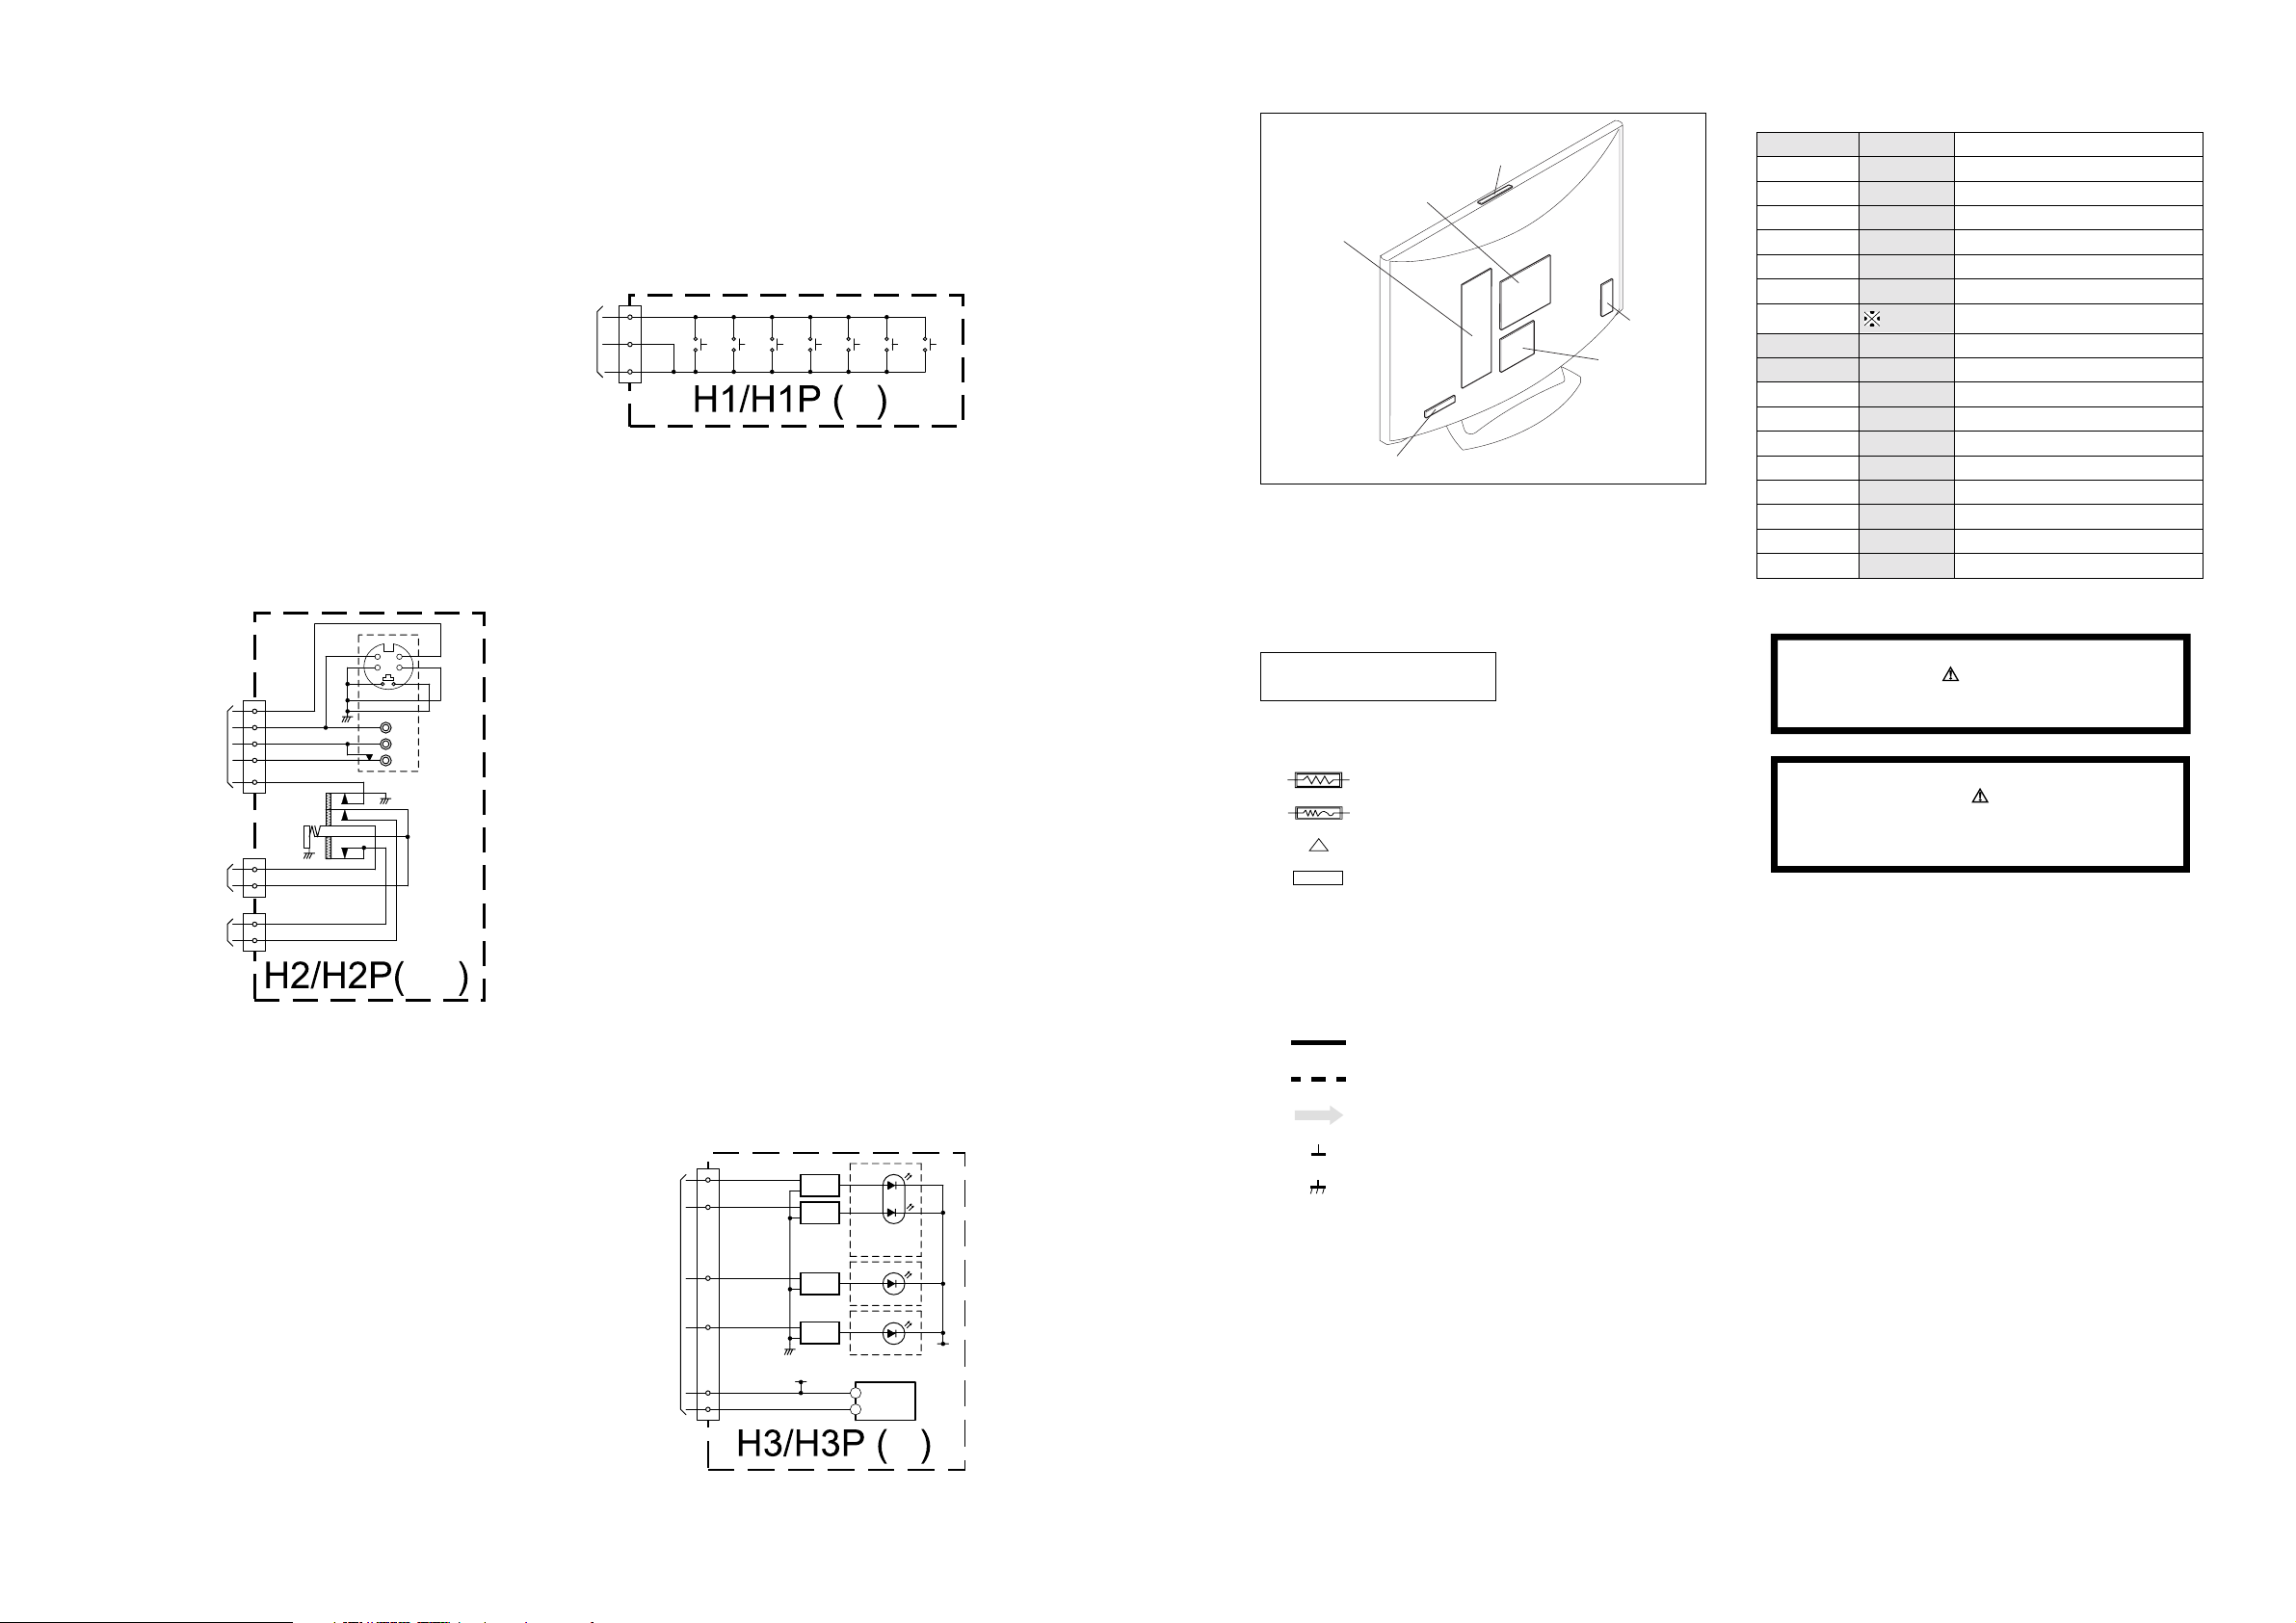
4-1. BLOCK DIAGRAMS (5)
5-2. CIRCUIT BOARD LOCATION
5-3. SCHEMATIC DIAGRAMS AND
PRINTED WIRING BOARDS
Note :
• All capacitors are in µF unless otherwise noted.
• pF : µµF 50WV or less are not indicated except for
electrolytic types.
• Indication of resistance, which does not have one for
rating electrical power, is as follows.
Pitch : 5mm
Electrical power rating : 1/4W
• Chip resistors are 1/10W
• All resistors are in ohms.
k = 1000 ohms, M = 1000,000 ohms
• : nonflammable resistor.
• : fusible resistor.
• : internal component.
• : panel designation or adjustment for repair.
• All variable and adjustable resistors have
characteristic curve B, unless otherwise noted.
• All voltages are in Volts.
• Readings are taken with a 10Mohm digital mutimeter.
• Readings are taken with a color bar input signal.
• Voltage variations may be noted due to normal production
tolerences.
•: B + bus.
• : B - bus.
• : RF signal path.
• : earth - ground.
• : earth - chassis.
Reference Information
RESISTOR RN
: METAL FILM
RC
: SOLID
FPRD
: NON FLAMMABLE CARBON
FUSE
: NON FLAMMABLE FUSIBLE
RS
: NON FLAMMABLE METAL OXIDE
RB
: NON FLAMMABLE CEMENT
RW
: NON FLAMMABLE WIREWOUND
: ADJUSTMENT RESISTOR
COIL LF-8L
: MICRO INDUCTOR
CAPACITOR TA
: TANTALUM
PS
: STYROL
PP
: POLYPROPYLENE
PT
: MYLAR
MPS
: METALIZED POLYESTER
MPP
: METALIZED POLYPROPYLENE
ALB
: BIPOLAR
ALT
: HIGH TEMPERATURE
ALR
: HIGH RIPPLE
Les composants identifiés par une trame et
par une marque sont d'une importance
critique pour la sécurité. Ne les remplacer
que par des pièces de numéro spécifié.
specified.
Note :
The components identified by shading
and marked are critical for safety.
Replace only with the part numbers
specified in the parts list.
Note :
CVM Board
A Board
S1 Board
VM
C
H
D1
A
J
A2
N
D
A1
D2
C
A
TO BDT BOARD
CN3000
TO G1/G2 BOARD
CN6300
SPEAKERS
CN9855
CN9856
CN9857
2
C FRONT
Y FRONT
4
L FRONT
6
R FRONT
8
9 HP DET
HEAD
PHONES
1
R-HP
5
L-HP
3
SPK-R
1
SPK-L
J2901
J9006
43
21
V
L
R
HEADPHONES
YC, AV,
CN9000
1
KEY 1
TO BDT BOARD
CN3002
2GND
GND
4
TO BDT BOARD
CN3003
CN9300
MENU
S9000
6
4
5
7
9
1
CH+
CH-
POWER
S9002
S9004
S9006
VOL-
S9001
SWITCH
PANEL
VCC
OUT
D9302
AMBER
RED
REC/RESERVE
AND ON-TIMER
INDICATOR
D9313
GRN
GREEN LED
D9312
RED
STBY LED
IC9300
IR RECEIVER
ON_TIMER
REC/RESERVE
GREEN LED
STBY LED
STBY 5V
SIRCS
STBY 5V
SWITCH
Q9300
SWITCH
Q9301
SWITCH
Q9303
SWITCH
Q9302
INPUT
S9003
VOL+
S9005
STBY 5V
4-2. CIRCUIT BOARD LOCATION
H1/H1P
BDT
G1 (KDL-26/32U2000)
G2 (KDL-40U2000)
H3/H3P
4-3. SCHEMATIC DIAGRAMS AND
PRINTED WIRING BOARDS
H2/H2P
A1/A1P
Note :
• CVBS and RGB waveforms are measured using a PAL colour bar
input to Scart1. Y, U, V waveforms are measured using a PAL colour
bar input to component sockets (Y, Pb/Cb, Pr/Cr).
LED,
SIRCS
- 31 -
Page 32
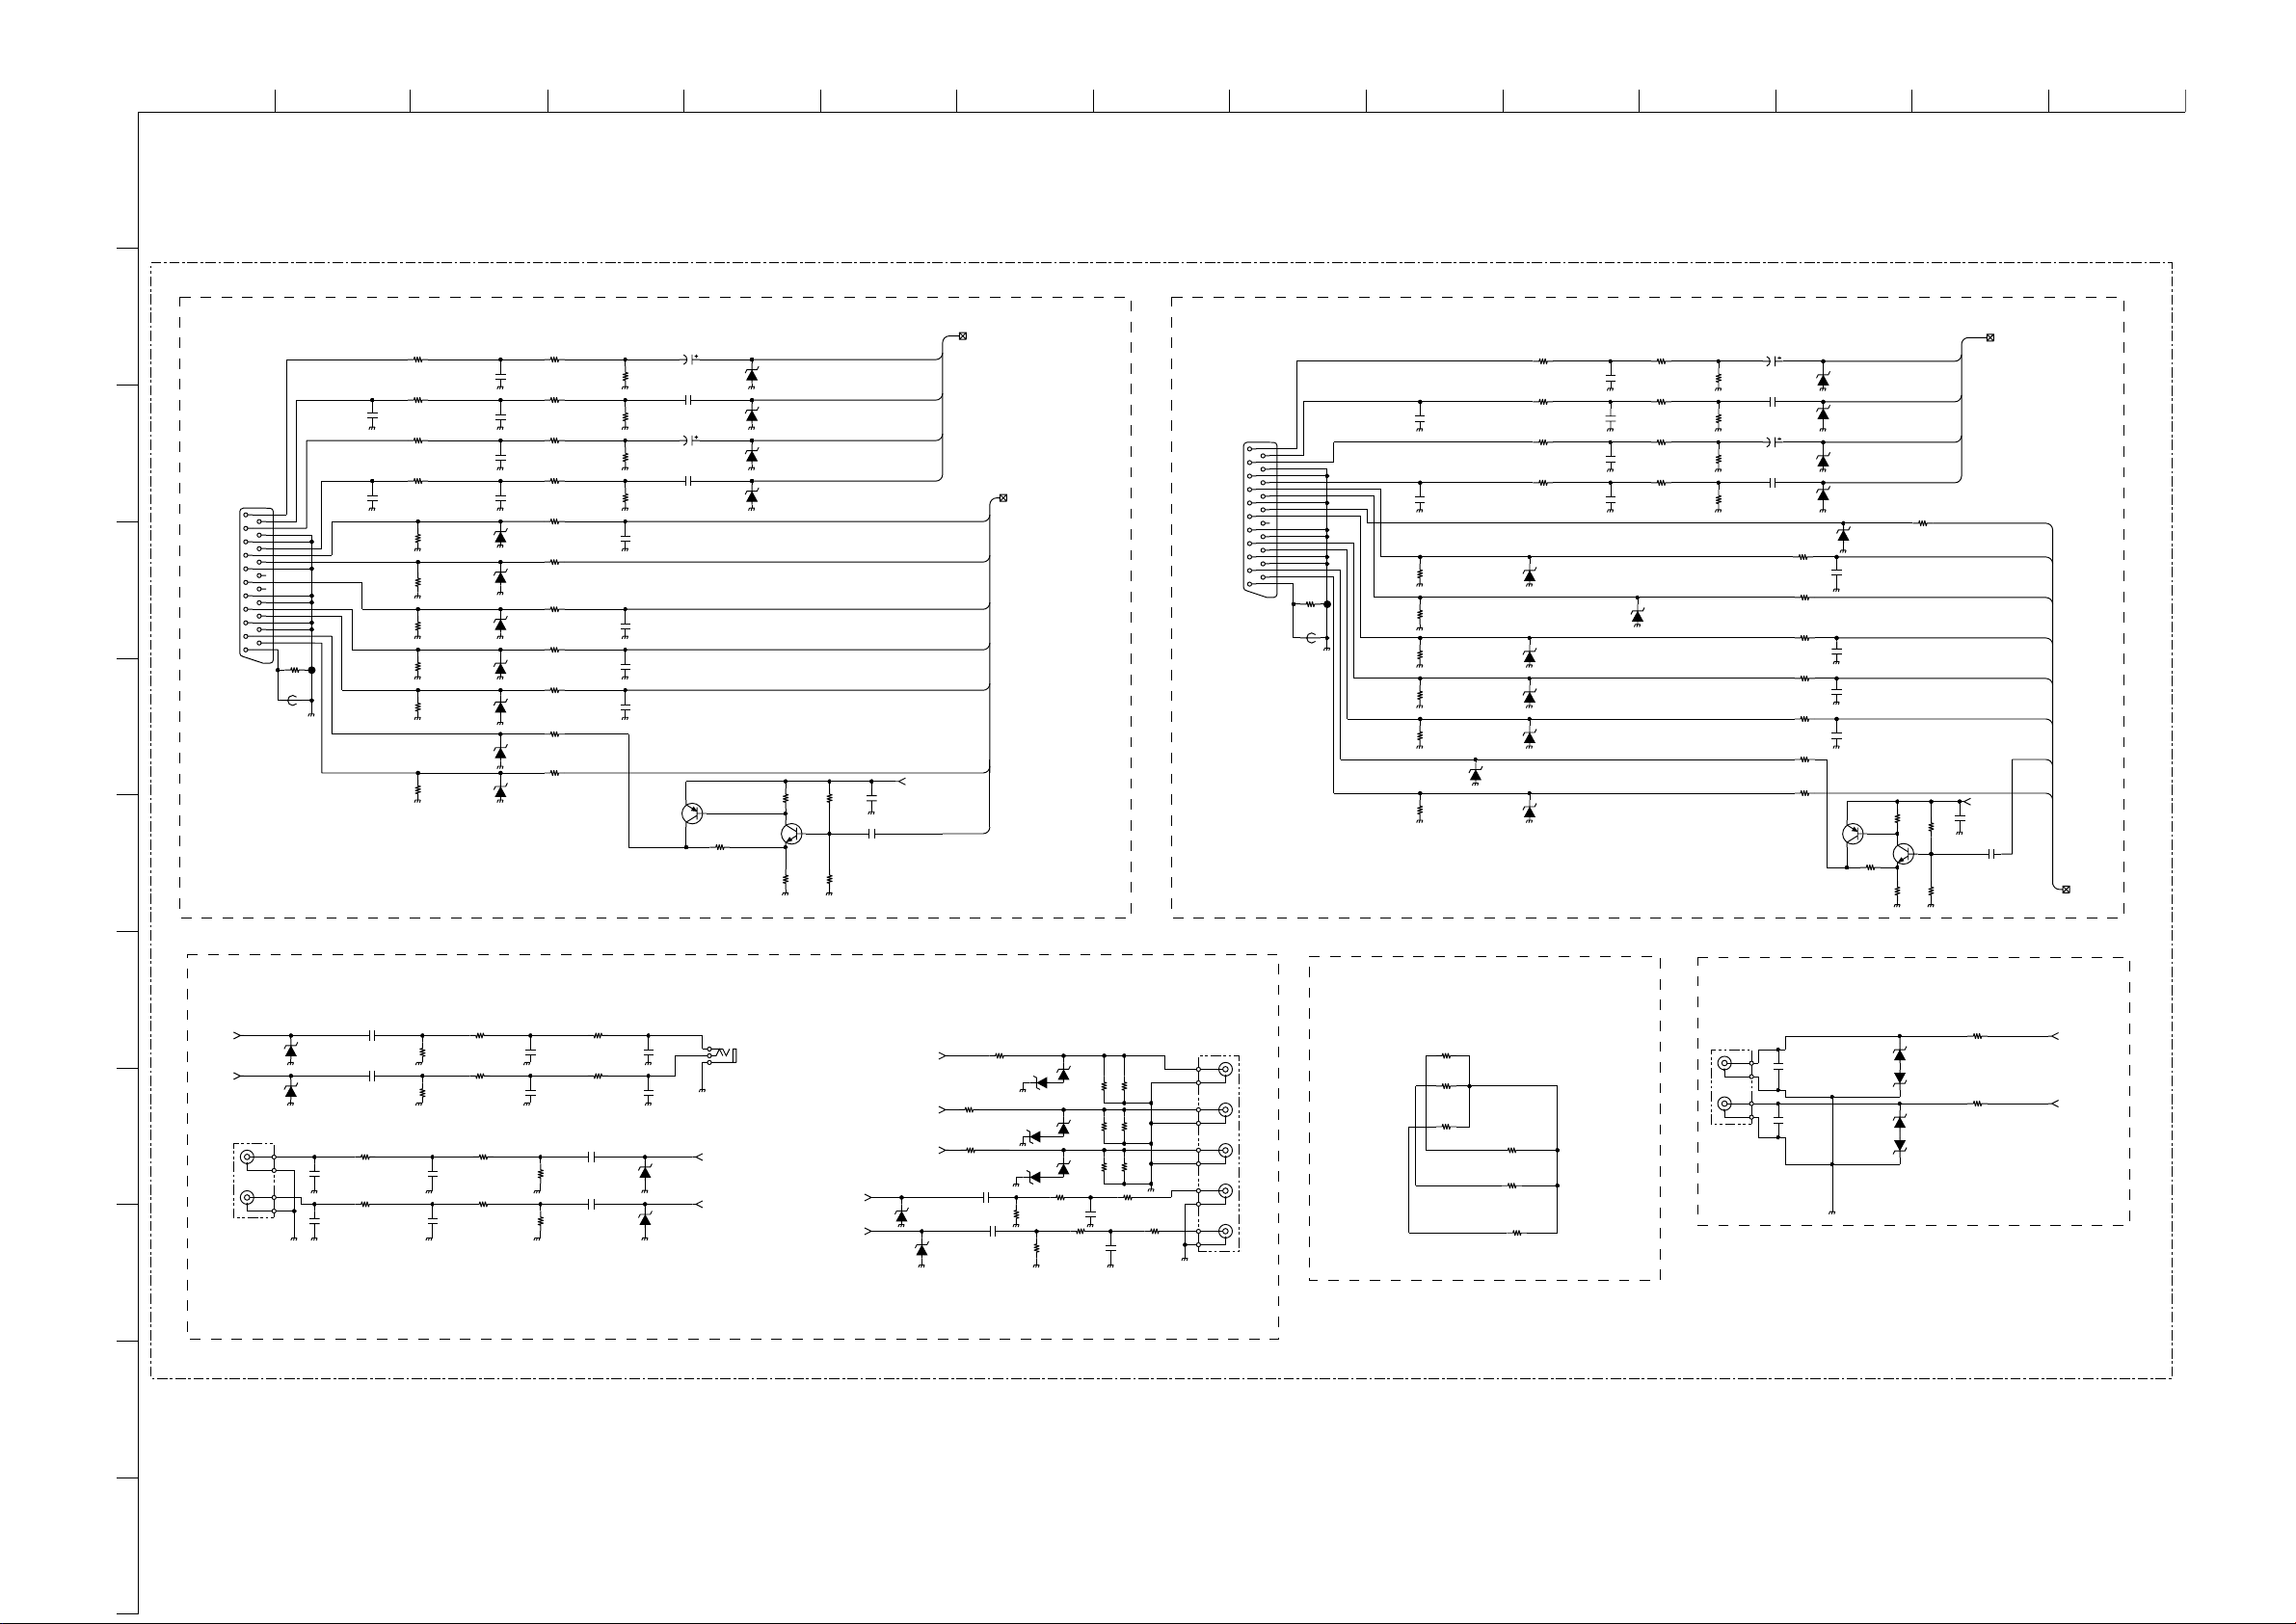
ABCDE F
1
A1.-SE-1(KDL-26/32U2000) / A1P.-SE-1(KDL-40U2000)
G
HI JKLMN
O
2
AUDIO SCART1
BLUE-1
MODE1
GREEN-1
RED-1
BLK1
V-IN-1
V-OUT-1B
VIDEO SCART1
SCART 2
CN2023
21P
RIGHT OUT
RIGHT IN
LEFT OUT
GND
GND
LEFT IN
BLUE IN
MODE
GND
AV LINK
GREEN IN
NC
GND
GND
RED IN
BLANKING
GND
GND
VIDEO OUT
VIDEO IN
GND
AV2
SCART2
R2082
0
FB2022
XX
C2063
XX
C2064
XX
R2087
75
1/10W
R2096
XX
R2088
75
1/10W
R2089
75
1/10W
R2090
75
1/10W
D2045
UDZSTE-1713B
R2091
75
1/10W
R2092
330
1/10W
R2093
1k
1/10W
R2094
330
1/10W
R2095
1k
1/10W
D2046
UDZSTE-179.1B
D2047
UDZSTE-179.1B
D2048
UDZSTE-179.1B
D2049
UDZSTE-175.6B
D2050
UDZSTE-179.1B
C2065
0.022
25V
C2066
1000p
50V
C2067
0.022
25V
C2068
1000p
50V
R2097
0
R2098
0
R2099
0
R2100
0
D2052
UDZSTE-1713B
R2101
470k
1/10W
R2102
470k
1/10W
R2103
4
1/10W
R2104
470k
1/10W
70k
C2071
47
16V
C2069
1
10V
C2072
47
16V
C2070
1
10V
D2068
UDZSTE-179.1B
Q2002
MSB709-RT1
R2105
100
1/10W
R2106
220
1/10W
R2107
100
1/10W
R2108
100
1/10W
R2109
100
1/10W
R2110
75
1/10W
R2111
100
1/10W
D2061
UDZSTE-179.1B
D2062
UDZSTE-179.1B
D2063
UDZSTE-179.1B
D2064
UDZSTE-179.1B
C2075
XX
C2076
XX
C2077
XX
C2078
XX
R2140
47
1/10W
R2139
150
1/10W
SC2-OUT-
SC2-IN-R
SC2-OUT-L
SC2-IN-L
R2122
100
1/10W
R2142
C2086
0
18k
0.1
1/10
16V
W
Q2003
2SC1623-L5L6
R2143
R2141
150
1/10W
1/10W
C2084
0.1
16V
C2085
10
10V
SC1-OUT-R
SC1-IN-R
SC1-OUT-L
SC1-IN-L
BUFFER_V
R2022
330
1/10W
C2023
3
R2021
0
XX
C2024
SCART 2
CN2021
21P
RIGHT OUT
RIGHT IN
LEFT OUT
GND
GND
LEFT IN
BLUE IN
MODE
GND
NC
GREEN IN
4
NC
GND
GND
RED IN
BLANKING
GND
GND
VIDEO OUT
VIDEO IN
GND
1
AV
FB2021
5
R2023
XX
1/10W
R2024
330
1/10W
R2025
XX
1/10W
R2026
75
1/10W
R2027
XX
R2028
75
1/10W
R2029
75
1/10W
R2030
75
1/10W
R2031
75
1/10W
1k
1k
UDZSTE-179.1B
UDZSTE-179.1B
UDZSTE-179.1B
UDZSTE-179.1B
UDZSTE-175.6B
UDZSTE-179.1B
C2025
0.022
25V
C2026
1000p
50V
C2027
0.022
25V
C2028
1000p
50V
D2031
D2025
UDZSTE-1713B
D2026
D2027
D2028
D2029
D2030
6
SCART1
R2034
220
1/10W
R2035
R2036
220
1/10W
R2037
R2067
100
1/10W
R2068
220
1/10W
R2069
100
1/10W
R2070
100
1/10W
R2071
100
1/10W
R2072
75
1/10W
R2073
100
1/10W
R2063
470k
1/10W
R2064
0
470k
1/10W
R2065
470k
1/10W
R2066
0
470k
1/10W
C2050
XX
C2047
XX
C2045
XX
C2046
XX
Q2004
MSB709-RT1
C2048
47
16V
C2043
10V
C2049
47
16V
C2044
10V
1
1
2SC1623-L5L6
R2138
150
1/10W
Q2005
R2137
1/10W
D2037
UDZSTE-179.1B
D2038
UDZSTE-179.1B
D2039
UDZSTE-179.1B
D2040
UDZSTE-179.1B
R2134
470
1/10W
R2136
R2135
150
1/10W
1/10W
18k
10k
R
10k
GREEN-2
BUFFER_V
C2087
10
10V
AUDIO SCART2
AV_LINK
BLUE-2
MODE2
GREEN-2
RED-
BLK2
V-OUT-2B
V-IN-2
2
VIDEO SCART2
10
11
7
PC_
R
PC_ L
8
J2022
DV1 Connection
9
DVI/PC AUDIO INPUT
R2076
C2055
1000p
50V
C2056
1000p
50V
470k
1/10W
R2077
470k
1/10W
1
1
UDZSTE-179.1B
L
R
D2041
UDZSTE-179.1B
D2042
C2051
XX
C2052
XX
R2074
1/10W
R2075
1k
1/10W
C2053
10V
C2054
10V
1k
R2080
R2081
R2078
R2079
R2085
C2057
1k
0
0
1000p
1/10W
50V
C2058
R2086
1000p
1k
50V
1/10W
R2083
470k
0
1/10W
R2084
0
470k
1/10W
C2059
10V
C2060
10V
1
1
C2061
XX
C2062
XX
D2043
UDZSTE-179.1B
D2044
UDZSTE-179.1B
PC Connection
DVI_L
DVI_R
J2023
L_YUV
R_YUV
UDZSTE-179.1B
D205
COMPONENT INPUT
Y_YUV
U_YUV
V_YUV
UDZSTE-179.1B
9
D2058
R2113
100
1/10W
R2114
100
1/10W
R2112
100
1/10W
UDZSTE-175.6B
UDZSTE-175.6B
C2073
10V
C2074
1
10V
UDZSTE-175.6B
D2065
D2066
R2115
470
1
1/10W
D2069
UDZSTE-175.6B
D2067
UDZSTE-175.6B
D2071
UDZSTE-175.6B
R2117
k
0
R2116
470k
1/10W
R2119
1/10W
R2120
150
D207
R2121
1/10W
R2118
150
0
150
C2079
1
0
000p
50
V
C2080
1000p
50V
R2124
150
1/10W
R2125
150
R2126
150
1/10W
R2123
1k
1/10W
R2127
1k
1/10W
J2024
External Connection
BOARD DESCRIPTION
ANALOG
DIGITAL
XXX
R2128
R2129
R2130
XX
XX
0
R2131
XX
R2132
0
R2133
XX
LINE OUT
AUDIO OUT
L
R
J2021
External Audio
Connection
A1/A1P
R2033
330
1/10
D2021
D2023
UDZS-TE17-12B
UDZS-TE17-12B
UDZS-TE17-12B
D2024
D2022
R2032
330
1/10W
C2021
XX
C2022
XX
UDZS-TE17-12B
1/3 TUNER, I/O CONNECTORS & A/V SWITCHING
W
OUT_L
OUT_R
COMPONENTS MARKED AS XX ARE NOT FITTED ON THIS MODEL
~ A1/A1P Board Schematic Diagram [ Tuner, I/O Connectors & A/V Switching ] Page 1/3 ~
- 32 -
Page 33
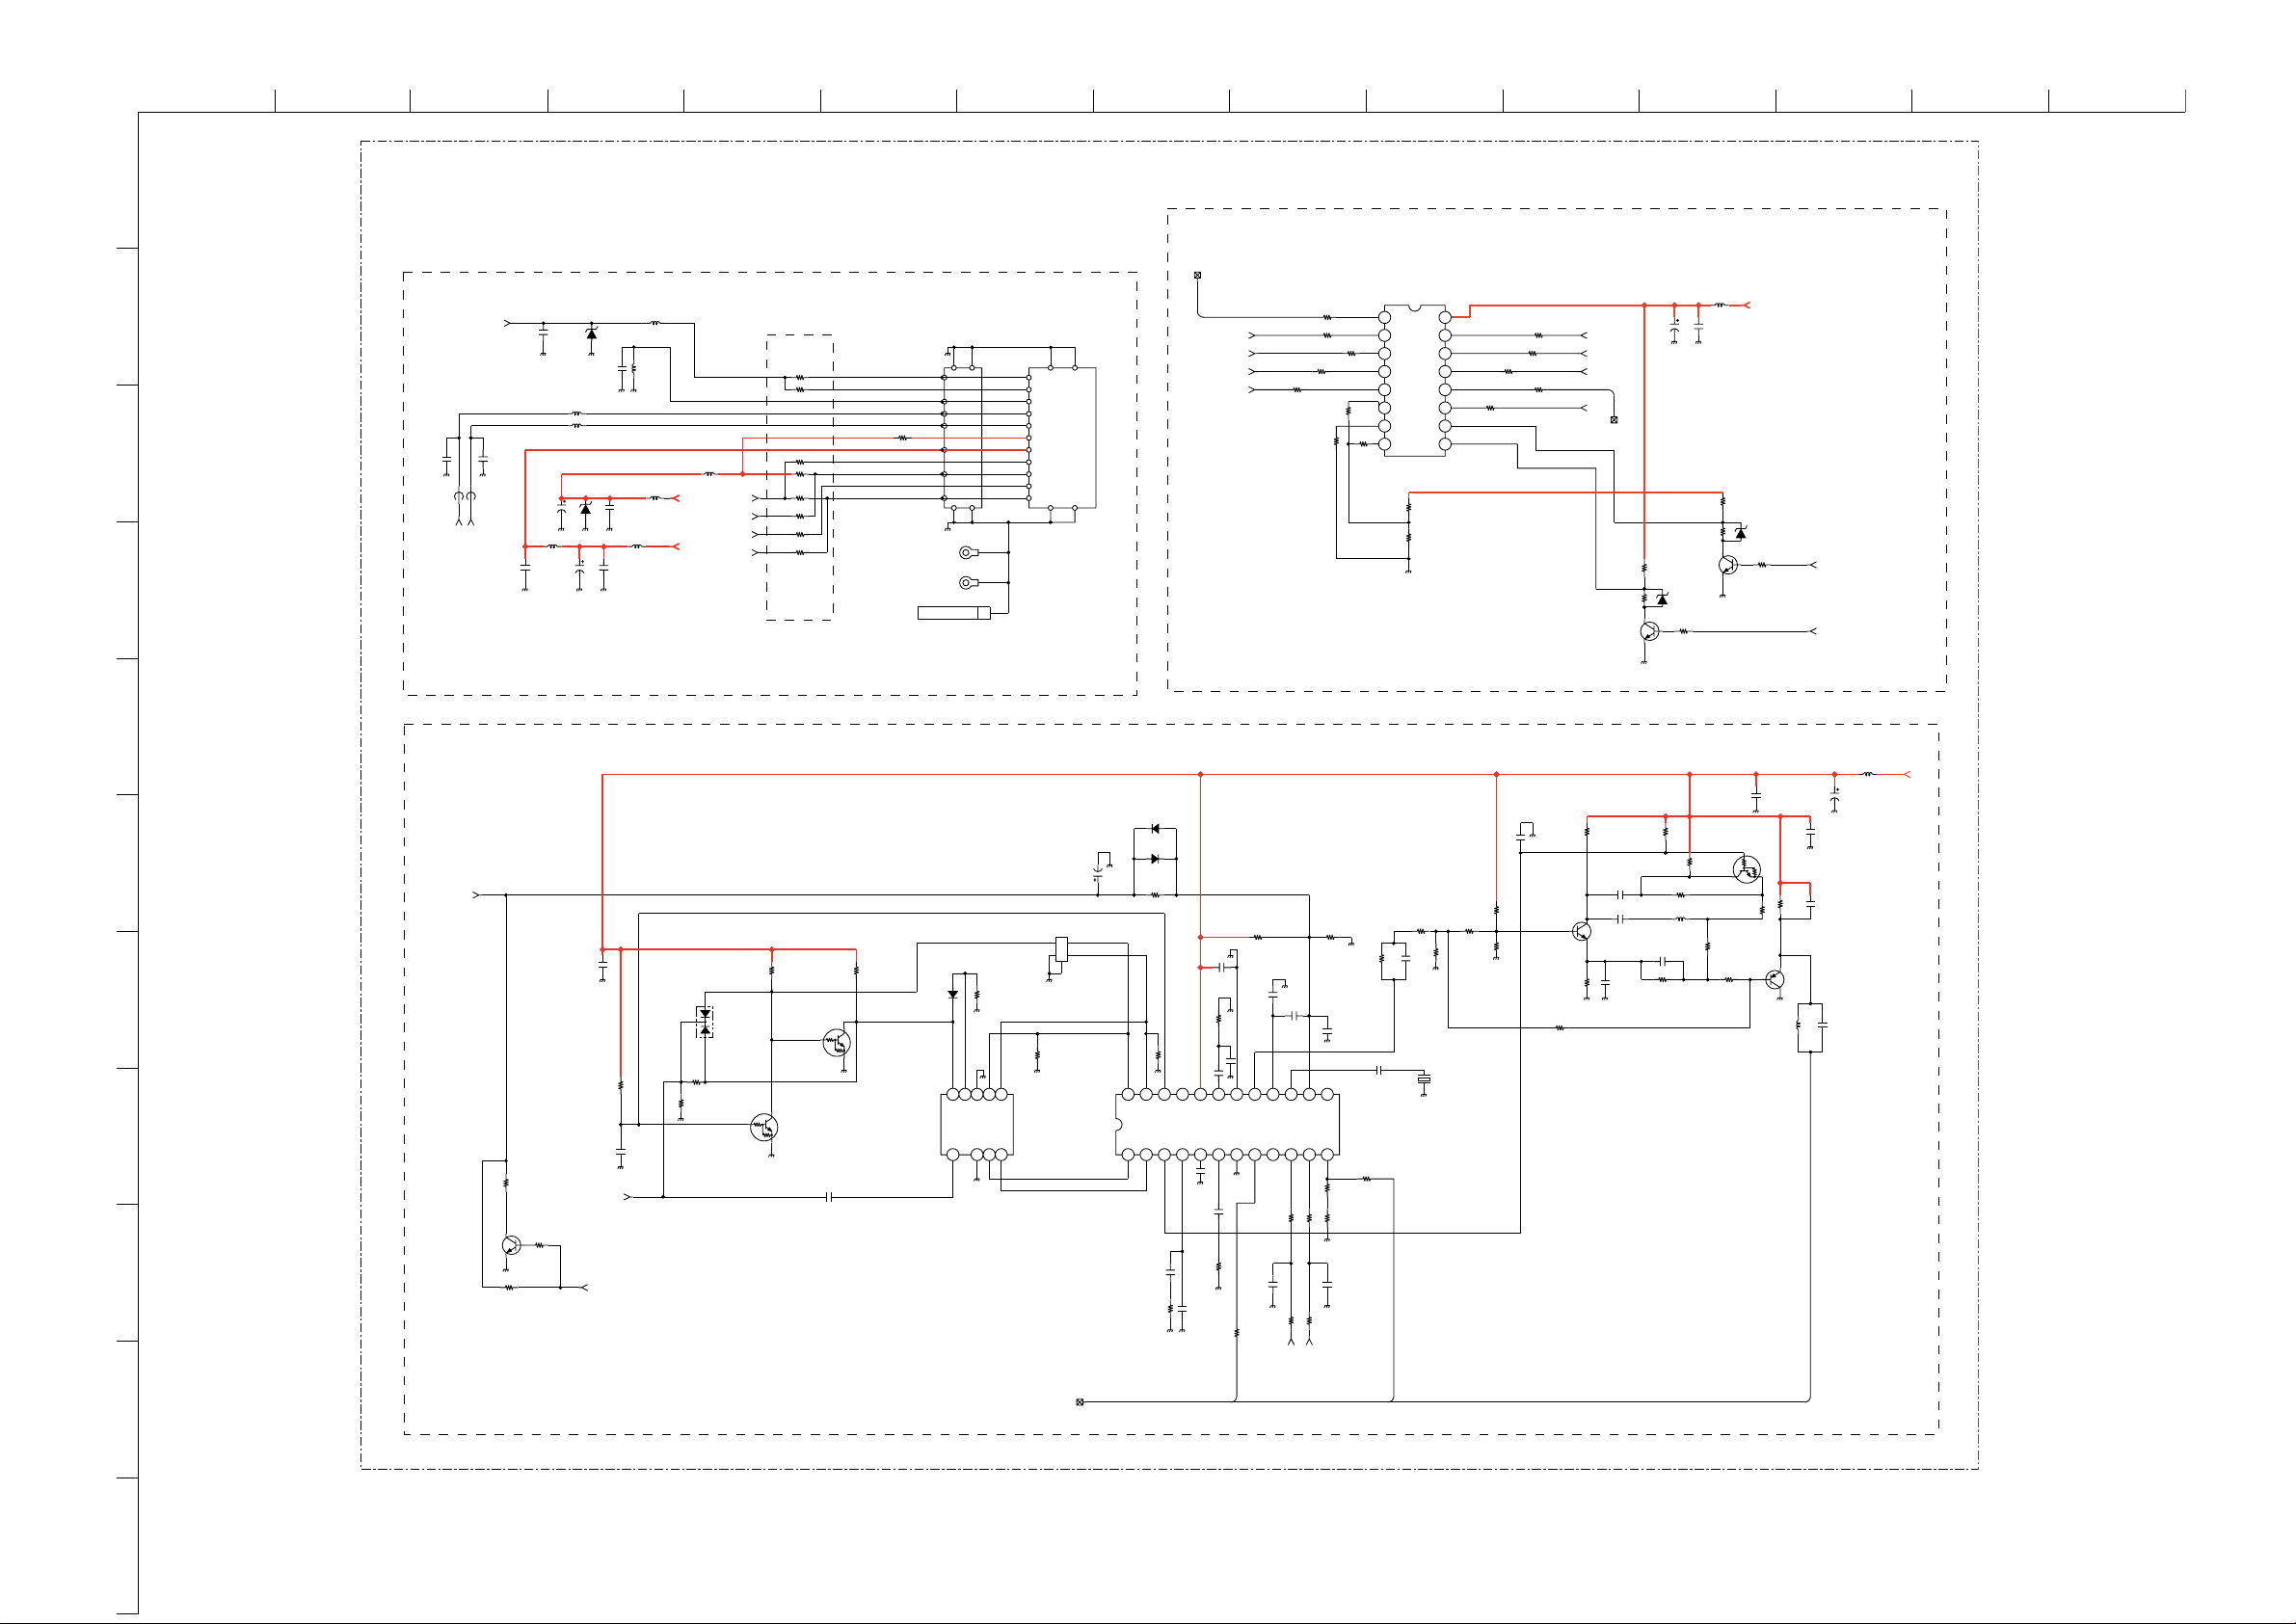
ABCDE F
G
HI JKLMN
O
A1.-SE-1(KDL-26/32U2000) / A1P.-SE-1(KDL-40U2000)
1
10
A1/A1P
D1100
2
3
C1102
68p
50V
FB1100
0uH
ANALOG_AGC_SW
FB1101
0uH
2C_SDA_SW
I
I2C_SCL_SW
C1103
68p
50V
4
C1100
C1104
UDZSTE-175.6B
XX
L1102
100nH
L1103
100nH
UDZS-TE17-33B
C1105
100
50V
L1104
10uH
C1106
1000
0.1
25V
6.3V
C1101
XX
D1101
C1108
0.1
25V
C1107
0.1
25V
L1107
10uH
L1101
4.7uH
L1100
4.7uH
L1106
L1105
100nH
IF_ANALOG
33V
XX
IF_AGC_DIGITAL
IF_DIGITAL_+
+5VA
IF_DIGITAL_-
2/3
R1300
XX
R1301
R1302
R1303
R1304
XX
0
R1305
0
R1306
R1307
0
TUNER DPL
AUDIO SWITCH (PC,Component,Scart2,DVI)
AUDIO SCART2
2
R200
R2000
100
R2003
R2001
R2004
CHIP
100
0
R2005
CHIP
100
R2006
100
0
SC2-IN-L
DVI_L
AU_MUX_OUT_L
AGC
0
0
XX
R1308
0
TU1100
XX
XXXX
CN6500
XX
AS
SCL
SD
MB
TU2
IF OUT
A
ET6501
ET6502
GND
NC
TU AGC
AS
SCL
SDA
30V
5V
ANALOG IF
IF AGC
DIGITAL IF2
DIGITAL IF1
TU1300
1
PC_L
L_YUV
IC2000
MC14052 BDR2
4 CHANNEL ANALOG
MULTIPLEXER/DEMULTIPLEXER
100
87654321
R2007
0
CHIP
16 15 14 13 12 11 10 9
VDD
Y0
X2
Y2
X1
Y
X
Y3
X0
Y1
X3
INH
A
VEE
B
VSS
R2008
4.7k
1/10W
R2009
4.7k
1/10W
R2010
R201
L2000
10uH
R2018
10k
1/10W
10k
1/10W
8.5V
D2001
XX
R2020
10k
1/10W
AU_MUX_CTRL_
AU_MUX_CTRL_B
A
R2014
100
DVI_R
R2013
100
1
100
R2012
100
R_YUV
AU_MUX_OUT_R
SC2-IN-R
100
PC_R
AUDIO SCART
MSD601-RST1
Q2000
R2015
1/10W
R2016
10k
1/10W
C2000
C2081
100
0.1
16V
25V
2
R2019
10k
Q2001
MSD601-RST1
D2000
XX
R201
7
10k
1/10W
TUNER BLOCK
5
L1200
10uH
C1223
0.01
R1238
0
MUN2213T1
R1240
MSB709-RT1
R1239
180
1/10W
1/10W
Q1204
22
Q1205
25V
L1201
1uH
R1241
1/10W
D1203
XX
D1202
6
ANALOG_AGC
C1200
0.1
25V
7
R1203
22k
1/10W
8
R1201
22k
1/10W
Q1200
MSD601-RST1
R1202
1k
9
R1200
XX
1/10W
C1201
XX
F_ANALOG
I
AGC_DEFEAT
R1205
XX
R1204
2.2k
1/10W
R1206
2.2k
1/10W
D1200
M1MA152WK-T1
Q120
MUN2213T1
Q120
MUN2213T1
R1207
2.2k
1/10W
2
1
C1202
0.01
25V
D1201
XX
12
SW1200
SAW FILTER
10
R1208
0
CHIP
345
678
I1
SWF
I2O1O2
G2
FILTER SURFACE
R1209
XX
IC1200
TDA9886TS/V4,118
IF-PLL DEMODULATOR
ANALOG_TUNER
C1203
22
25V
SW1201
WAVE
XX
R1210
470
1/10W
C1207
0.01
25V
R1213
150
1/10W
R1211
XX
C1208
0.22
16V
24 23 22 21 20 19 18
SIF
SIF
VIFVIFOP1
C1204
0.01
25V
R1212
1/10W
5.6k
+5V
AFT
OP2
PLL FL
FM PLL
DE_EM
C AF
C1206
0.01
25V
C1209
0.47
10V
R1214
3.3k
1/10W
C1205
390p
50V
R1215
470
1/10W
R1216
12k
1/10W
C1211
0.15
10V
C1210
470p
50V
17 16 15 14 13
AGC
A GND
VIDEO
D GND
FM AF
TOP
7654321
8 9 10 11 12
R1217
0
C1212
XX
R1218
100
1/10W
AM
C1213
0.047
16V
VCD
SDA
R1219
SDA_5V
R1226
0
68
1/10W
R1221
100k
1/10W
C1214
XX
TU AGC
SNC
SCL
OS
R1222
220
1/10W
0
R1223
1.8k
1/10W
C1215
XX
R1220
100
1/10W
SCL_5V
R1225
R1224
100
1/10W
0
C1216
22p
50V
R1227
XX
C1217
XX
X1200
4MHz
QSS
C1218
0.01
25V
R1232
68
1/10W
R1229
6.8k
R1228
CHIP
1/10W
0
R1230
1.2k
1/10W
Q1203
2SD601A-Q-TX
R1233
1/10W
R1231
XX
68
ANALOG IF BLOCK
C1220
120p
C1221
2
50V
C1219
R1235
4.7k
1/10W
R1237
10k
C1222
10p
50V
R1234
270
1/10
R1236
W
L1223
10uH
1/10W
XX
50V
70p
p
82
50V
1k
CVBS_ANALOG_RF
C1224
XX
C1225
XX
C1226
330p
50V
C1227
100
16V
+5VA
11
COMPONENTS MARKED AS XX ARE NOT FITTED ON THIS MODEL
~ A1/A1P Board Schematic Diagram [ Tuner, I/O Connectors & A/V Switching ] Page 2/3 ~
- 33 -
Page 34
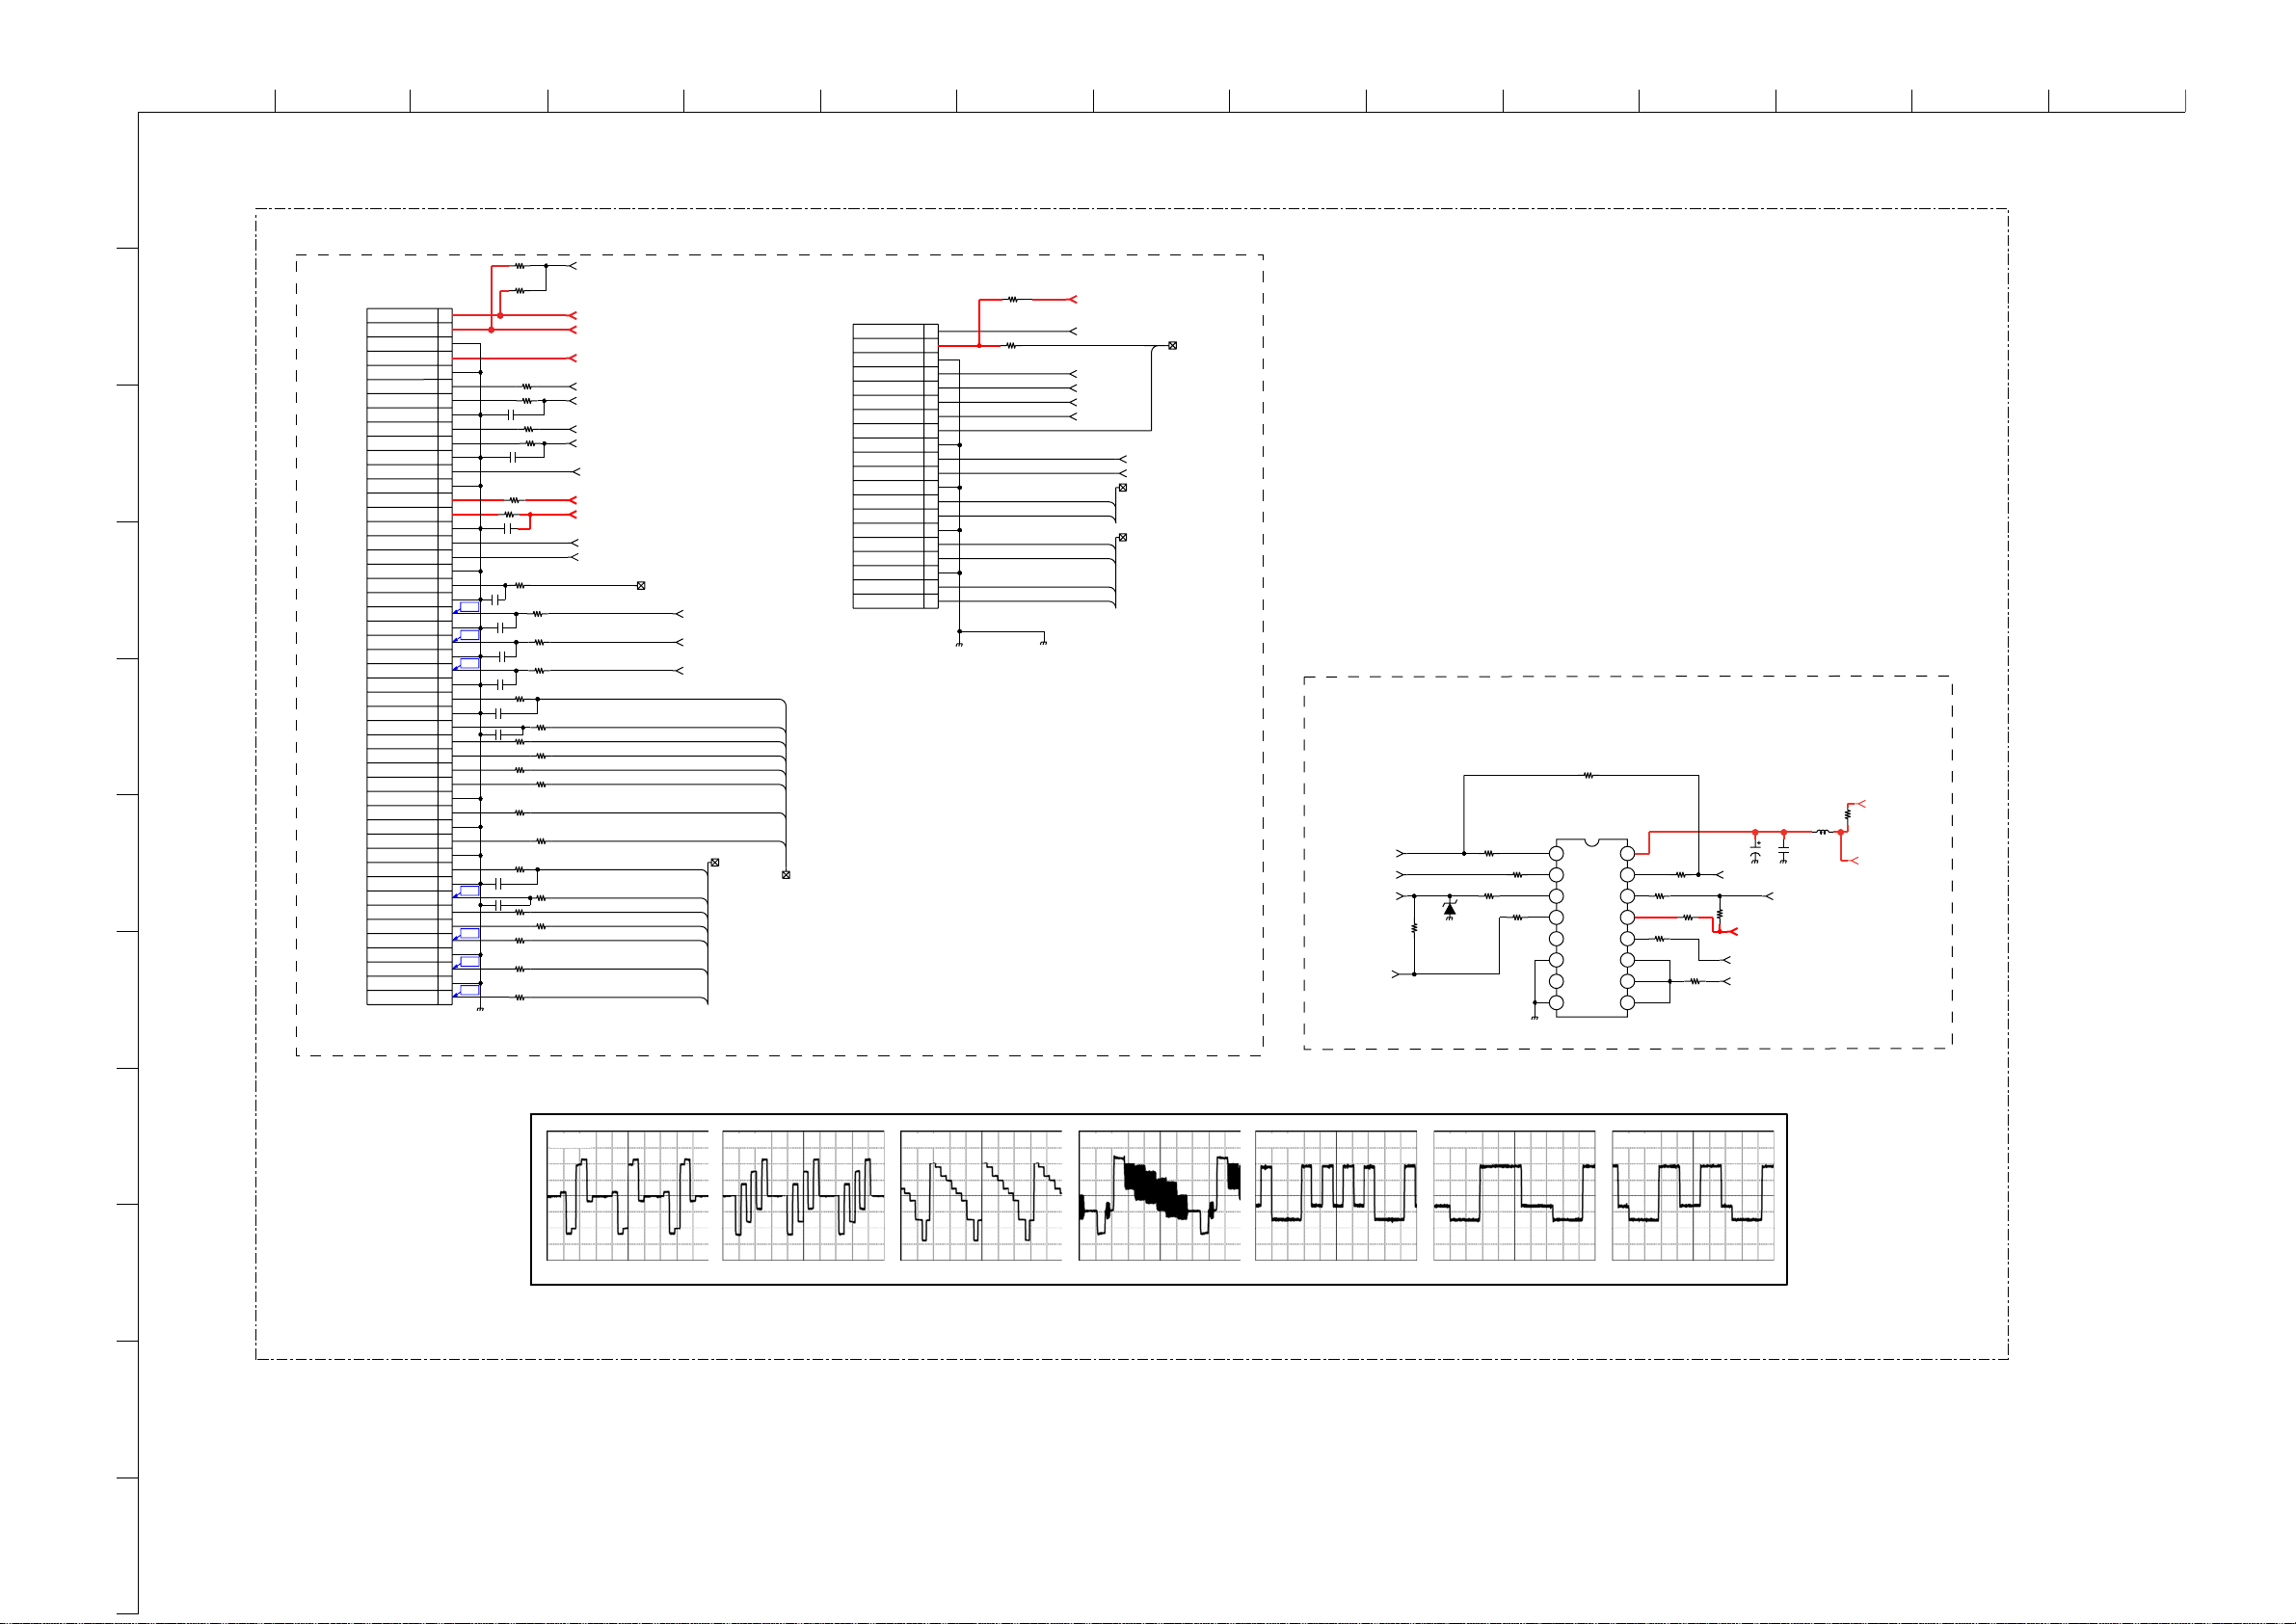
ABCDE F
G
HI JKLMN
O
1
A1.-SE-1(KDL-26/32U2000) / A1P.-SE-1(KDL-40U2000)
R2041
0
R2042
0
0
R2057
R2045
R2058
R2059
0
R2060
0
R2062
0
0
R2043
0
R2061
0
BUFFER_V
8.5V
+5VA
+33V
PORT_CS
TUNER_I2C_SWITCH
I2C_SCL_OFDM
I2C_SDA_OFDM
IF_AGC_DIGITAL
SCL_5V
SDA_5V
IF_DIGITAL_-
IF_DIGITAL_+
CVBS_ANALOG_RF
0
0
0
0
0
0
ANALOG_TUNER
V_YUV
U_YUV
Y_YUV
V-OUT-1B
V-IN-1
MODE1
BLK1
BLUE-1
GREEN-1
RED-1
V-OUT-2B
-IN-2
MODE2
AV_LINK
BLUE-
GREEN-2
RED-2
VIDEO SCART1
TO BDT BOARD
V
BLK2
2
VIDEO SCART2
R2145
CN3006
AGC_DEFEAT
SV_STBY/AUDIO MONO
GND
AU_MUX_OUT_R
AU_MUX_OUT_L
AU_MUX_CTRL_B
AU_MUX_CTRL_A
QSS
GND
LINEOUT_R
LINEOUT_L
GND
L2 OUT
R2 OUT
GND
L1 IN
R1 IN
GND
L1 OUT
R1 OUT
CN2024
20P
WHT
0
1
2
3
4
5
6
7
8
9
10
11
12
13
14
15
16
17
18
19
20
R2144
XX
5V_STBY
AGC_DEFEAT
AU_MUX_OUT_R
AU_MUX_OUT_L
AU_MUX_CTRL_B
AU_MUX_CTRL_A
SC2-OUT-L
SC2-OUT-R
SC1-IN-L
SC1-IN-R
SC1-OUT-L
SC1-OUT-
R
AM
QSS
OUT_R
OUT_L
AUDIO SCART2
AUDIO SCART1
A / B BOARD CONNECTORS
ANALOG_TUNER
A1/A1P
I2C TUNER SWITCH
ANALOG MULTIPLEXER/
R1003
0
4
R100
0
CHIP
87654321
SCL_5V
I
2C_SCL_OFDM
ANALOG_AGC
ANALOG_AGC_SW
R1000
XX
D1102
UDZSTE-175.6B
R1001
1/10W
R1002
100
1/10W
100
R1005
XX
IC1000
MC74LVX8053DTR2
DEMULTIPLEXER
VCC
Y1
Y
Y0
Z1
X
Z
X1
X0
Z0
A
ENABLE
NC
B
GND C
3/3
+5VA
L1000
R2146
10uH
XX
5V_STB
Y
SDA_5V
C1001
0.1
25V
I
2C_SDA_SW
R1008
0
CHIP
R1009
0
R1010
0
C1000
47
35V
I2C_SCL_SW
R1011
1k
1/10W
I2C_SDA_OFDM
TUNER_I2C_SWITCH
16 15 14 13 12 11 10 9
R1006
0
R1007
0
R2148
XX
R2147
1
2
3
4
TO BDT BOARD
CN3005
5
6
7
+8.5V
PORT_CS
TUNER_I2C_SW
I2C_SCL_OFDM
I2C_SDA_OFDM
AGC_DIGITAL
I2C_SCL
I2C_SDA
IF_DIGITAL_-
IF_DIGITAL_+
CVBS_TUNER
V_YUV
U_YUV
Y_YUV
CVBS2_OUT
CVBS2_IN
MODE2
AV_LINK
FBLK2
CVBS1_OUT
CVBS1_IN
MODE1
FBLK1
CN2022
49P
WHT
GND
+33V
GND
GND
GND
GND
GND
GND
GND
GND
GND
GND
GND
GND
GND
GND
GND
GND
GND
2
+5V
3
4
5
6
7
8
9
10
11
12
13
14
15
16
17
18
19
20
21
22
23
24
25
26
27
28
29
30
31
32
33
34
B2
35
36
G2
37
38
R2
39
40
41
42
C2083
43
44
45
B1
46
47
G1
48
49
R1
XX
R2053
R2054
0
C2041
XX
R2055
R2056
0
C2042
XX
R2039
0
R2038
0
C2040
XX
R2040
0
C2037
XX
TP1
TP2
XX
C2038
TP3
XX
C2039
C2036
XX
R2044
C2030
XX
C2082
XX
0
R2046
R2047
0
R2048
C2034
XX
TP4
XX
R2049
TP5
R2050
0
TP6
R2051
0
TP7
CHIP
R2052
0
CHIP
10
11
A1/A1P (3/3) Board Waveforms
8
9
TP1
500mVp-p (H) 500mVp-p (H)
(20us/div) (20us/div) (20us/div) (10us/div) (10us/div) (10us/div)
TP2 TP3
980mVp-p (H)
TP4 TP5 TP6
1Vp-p (H) 650mVp-p (H) 650mVp-p (H)
TP7
650mVp-p (H)
COMPONENTS MARKED AS XX ARE NOT FITTED ON THIS MODEL
(10us/div)
~ A1/A1P Board Schematic Diagram [ Tuner, I/O Connectors & A/V Switching ] Page 3/3 ~
- 34 -
Page 35

ABCDE F
Ref No Pin No Vo l t s ( V ) Ref No Pin No Vol t s ( V) Ref No Pin No Vo l t s ( V )
IC1000
13.7
IC1000
13-15 3.6
IC2000
84.2
2 3.2 16 5.0 9 8.5
3-4 2.3
IC2000
1-5 0 10 4.3
5-8 0 6 4.2 11-15 0
9-12 3.2 7 0 16 8.5
G
HI JKLMN
O
1
2
~ A1/A1P Printed Wiring Board Conductor Side A ~
~ A1/A1P Printed Wiring Board Conductor Side B ~
3
4
5
6
7
8
9
10
11
~ A1/A1P Board Semiconductor Voltage Table ~
Ref (e)(s) (b)(g) (c)(d)
Q2000 0 0.4 8.4
Q2001 0 0.7 0
~ A1/A1P Board IC Voltage Table ~
- 35 -
Page 36
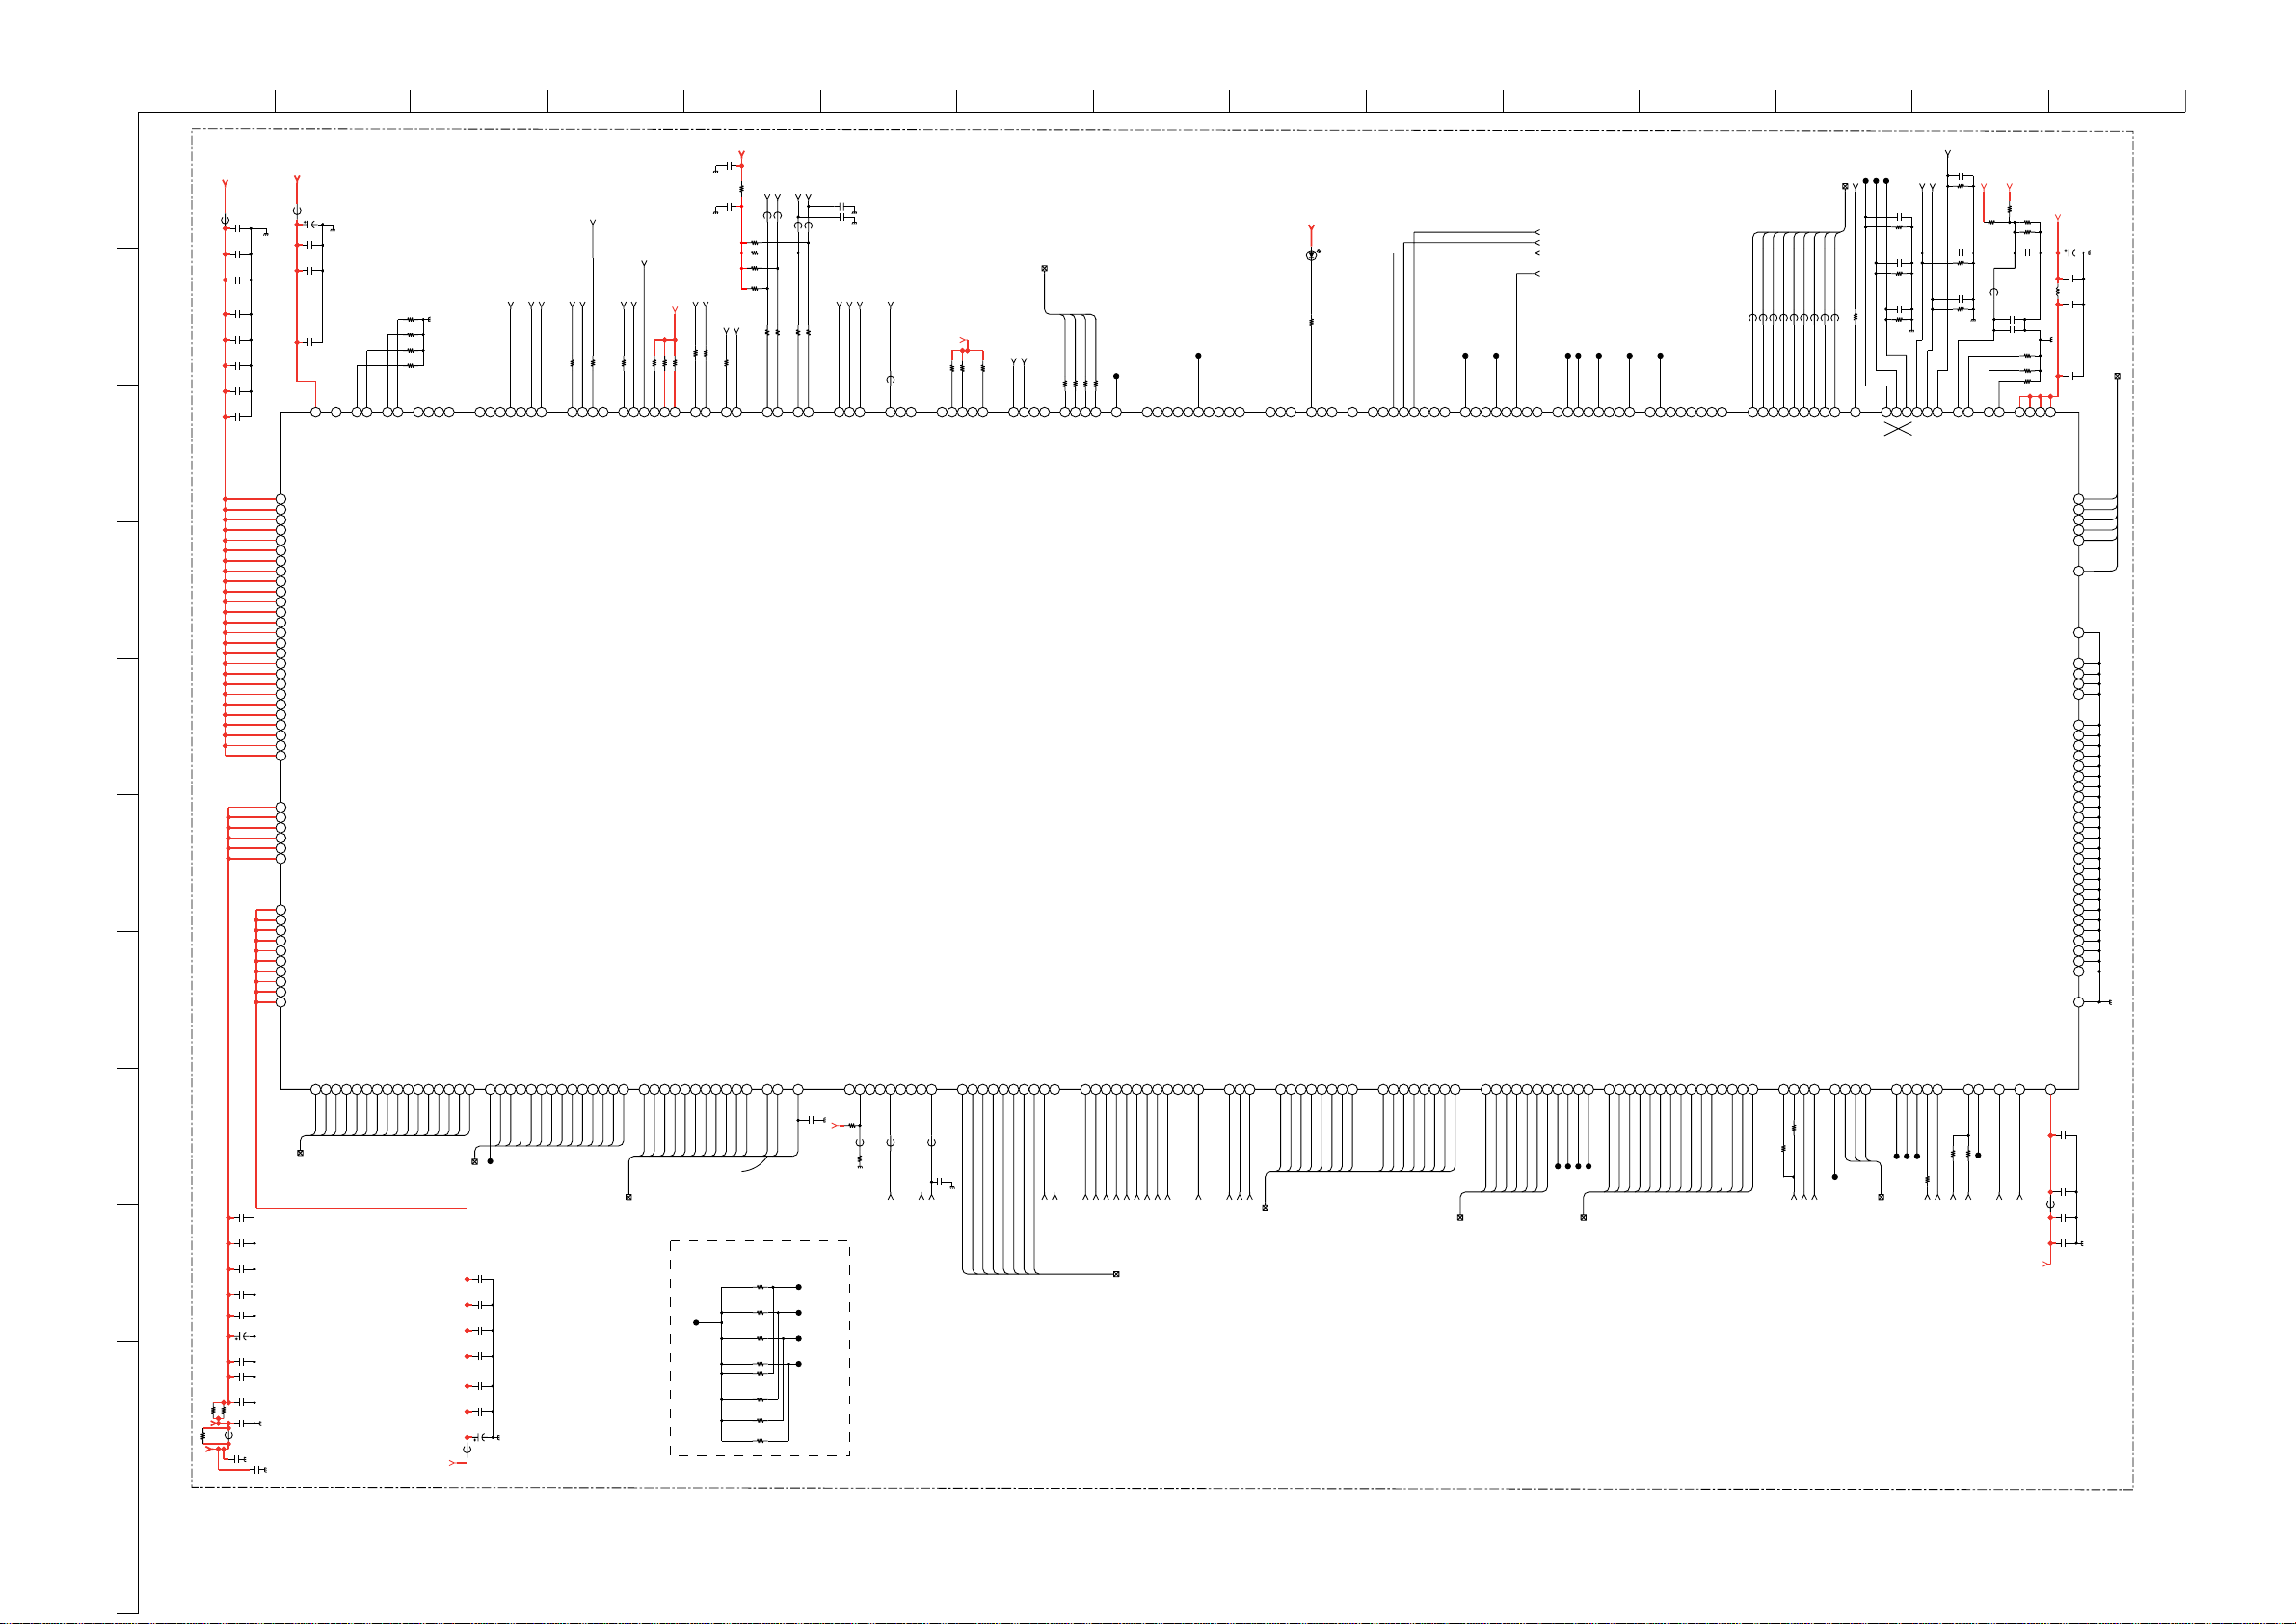
ABCDE F
G
HI JKLMN
O
BDT.-SE-1(KDL-26/32/40U2000)
3.3V_MAIN
3.3V_MAIN
FB5630
0uH
+1V5D
0
C563
4.7
6.3V
THESE CAPACITORS TO BE PLACED UNDERNEATH BGA
C5632
C5633
C5634
C5635
C5636
C5637
C5638
0.1
C5645
FB5637
XX
0uH
C5647
0.1
0.1
0.1
0.1
0.1
0.1
XX
C5648
XX
PMSDIO
R5630
10k
R5631
T20
USB_DP0
T21
USB_DN0
10k
R5632
10k
R5633
10k
0
U18U19
U21
U2
USB_OCI1 / PPORT108
USB_OCI0 / PPORT106
USB_PPON0 / PPORT107
USB_PPON1 / PPORT109
C5649
XX
THIS CAPACITOR TO BE
PLACED UNDERNEATH BGA
R21
R20
R17
P21
5
USB_DN1
USB_DP1
VDD3_USB
USBCLKI / PPORT10
VDD1
U16
VDD1
U15
VDD1
U14
0
VDD1
U1
VDD1
U9
VDD1
VDD1
U7 U8
VDD1
T5
VDD1
R5
VDD1
P17
VDD1
P5
VDD1
N5
VDD1
M5
VDD1
L17
VDD1
L5
VDD1
K17
VDD1
K5
7
VDD1
J1
VDD1
J5
VDD1
H17
VDD1
H5
VDD1
E16
VDD1
E15
VDD1
E14
VDD1
E7
VDD1
E6
VDD2
E13
VDD2
E12
VDD2
E11
VDD2
E10
VDD2
E9
VDD2
E8
VDD3
U17
U6
VDD3
U5
VDD3
VDD3
T17
VDD3
G17
VDD3
G5
VDD3
F17
F5
VDD3
VDD3
E17
VDD3
E5
PMSBS
Y4
V5
Y3
W4
W3
AA3
8
MSBS / PPORT130
MSDIR / PPORT12
MSDATA3 / PPORT127
MSDATA2 / PPORT126
MSDATA1 / PPORT132
MSDIO/DATA0 / PPORT131
PMSSCLK
AA2
MSCLK / PPORT129
100
R5634
5
V1
TXD0B / CAP/COMP0 / PPORT110
TXD0B
AA1
RXD0B
RXD0B / CAP/COMP3 / PPORT137
CTS0B
IN_TSPSYNC
RXD1B
TXD1B
3.3V_MAIN
CTS0B
100R5636
100
R5635
W15
CTS0B / CAP/COMP1 / PPORT111
10k
R5676
5
B5
C5
AA5
AA6
Y1
TXD1B
RXD1B
RTS0B / CAP/COMP2 / PPORT112
CTS1B_B / STP0_ERRB / PPORT11
RTS1B_B / STP0_STRT / PPORT10
1
2
3
4
5
6
7
C5674
C5675
VDO_VVSB
VDO_VHSB
XX
XX
7
10k
10k
R591
R5918
R5638
R5637
9
9
M1
L20
W1
AA19
4
RI1B / PPORT54
TXD2B / PPORT1
RXD2B / PPORT13
DCD1B / PPORT55
VDO_VHSB /
VDO_VVSB /
A
0.1
10V
R5629
SCL_EMM
SCL_COFDM
SDA_COFDM
SDA_EMMA
0
H
0u
0.1
FB5916
10V
R5640
4.7k
R5641
4.7k
R5642
XX
R5643
XX
RXD3B
TXD3B
100
100
R5644
R5639
8
Y8
L21
N1
SDA1
TXD3B / PPORT53
RXD3B / PPORT52
0uH
FB5917
0uH
FB5634
SIGN12844
100
100
R5645
R5646
AA8Y7AA7
SCL1
SIGN12843
100
R5647
SDA0
SCL0
0uH
FB5635
C5677
XX
C5678
XX
FTV_CONFIG2
9
P1
FTV_CONFIG0
R18
4
SDIN / PPORT4
SCKINOUT / PPORT46
FTV_CONFIG1
FB5621
N20V1
SDOUT / PPORT45
FTV_CONFIG3
0uH
8
IR_IN_1 / PPORT47
3.3V_MAIN
ABCK,ADO,ALRCK,AMCK
ADO
ABCK
AMCK
3.3V_MAIN
RESET_N
R5653
10k
R5652
1/16W
8
P18
W1
8
R_OUT / PPORT4
I
IR_IN_0 / PPORT51
R5654
10k
10k
1/16W
1
T19
T18
SMRST0 / PPORT39
CMDVCC0 / RI0B / PPORT40
V9W7Y6
N2
R19
P20
1
AO1_DAT / PPORT125
FF0 / DCD0B / PPORT4
O
SMCLK0 / DTR0B / PPORT42
SMDAT0 / DSR0B / PPORT43
/ CTS1B
/ RTS1B
NAND_WPB
AO1_BCK / PPORT124
AO1_LRCK / PPORT123
ALRCK
47
47
47
47
JL5638
R5655
R5656
R5658
R5657
V8
V6
Y5
W6
W5
AA4
ATX
AO0_DAT
AO0_BCK
AO0_MCK
AO0_LRCK
AO1_MCK / PPORT122
0
F18
E21
D2
F19
PAR / PPORT56
TRDYB / PPORT59
IRDYB / PPORT58
FRAMEB / PPORT57
UPD61123F1-100-KA3-A
E19
STOPB / PPORT60
JL5639
IC5630
1
9
8
8
H2
E1
N1
M1
E20
IDSEL / PPORT61
PERRB / PPORT65
GNTB0 / PPORT64
REQB0 / PPORT63
DEVSELB / PPORT62
D5630
XX
R5659
XX
JL5640
1
7
C17
B17
D1
VDOE_VCK_IN / AD1 / PPORT70
VDOE_VVSB_IN / AD2 / PPORT71
VDOE_VHSB_IN / AD3 / PPORT72
7
D2
K21A1
M20
VDOE_VCK / SERRB / PPORT66
VDOE_VVSB_OUT / INTAB / PPORT67
VDOE_VHSB_OUT / PCICLK / PPORT68
A21
B21
C18
B20
VDOE_A4 / AD8 / PPORT77
VDOE_A5 / AD9 / PPORT78
VDOE_A7 / AD11 / PPORT80
VDOE_A6 / AD10 / PPORT79
VDOE_FLD / AD0 / PPORT69
0G19G18
8
A19
A1
B18
G2
A20
VDOE_A2 / AD6 / PPORT75
VDOE_A1 / AD5 / PPORT74
VDOE_A0 / AD4 / PPORT73
VDOE_A3 / AD7 / PPORT76
VDOE_R7 / AD19 / PPORT88
VDOE_R6 / AD18 / PPORT87
VDOE_R5 / AD17 / PPORT86
JL5641
F21
VDOE_R4 / AD16 / PPORT85
CI_PWR_EN
nCI_EN
nCI_OVR
nSMC_INT
L5645
L5643
JL5648
J
J
8
8
K1
C20
D1
C21
C19
J21
J19
J20
VDOE_R3 / AD15 / PPORT84
VDOE_R2 / AD14 / PPORT83
VDOE_G5 / AD25 / PPORT94
VDOE_R1 / AD13 / PPORT82
VDOE_G6 / AD26 / PPORT95
VDOE_R0 / AD12 / PPORT81
VDOE_G7 / AD27 / PPORT96
VDOE_G4 / AD24 / PPORT93
JL5650
JL5649
1
9
0
9
H18
G2
J18
H2
H1
F20
DOE_G0 / AD20 / PPORT89
VDOE_G2 / AD22 / PPORT91
VDOE_G3 / AD23 / PPORT92
VDOE_G1 / AD21 / PPORT90
V
VDOE_B7 / CBE3 / PPORT104
VDOE_B6 / CBE2 / PPORT103
9
B19
L19
L18
D1
K20K1
DOE_B3 / AD31 / PPORT100
VDOE_B0 / AD28 / PPORT97
VDOE_B2 / AD30 / PPORT99
VDOE_B1 / AD29 / PPORT98
V
VDOE_B4 / CBE0 / PPORT101
VDOE_B5 / CBE1 / PPORT102
E
VDO[7]
0uH
FB5907
V21
VDO0_D7 / PPORT23
VDO[6]
0uH
FB5908
V20
VDO0_D6 / PPORT22
VDO[5]
0uH
FB5909
W21W2
VDO0_D5 / PPORT21
0uH
FB5910
VDCLK,VDO[0-7]
VDO[4]
VDO[3]
0uH
FB5911
0
1
Y2
VDO0_D4 / PPORT20
VDO0_D3 / PPORT19
VDO[2]
0uH
FB5912
0
Y2
VDO0_D2 / PPORT18
VDO[1]
H
0u
FB5913
AA2
VDO0_D1 / PPORT17
VDO[0]
0uH
FB5914
AA2
VDO0_D0 / PPORT16
VDCLK
0uH
FB5915
9
V1
5
VDO0_VCK / PPORT1
VDO_FLD
VDO_FLD
Y19
VDO0_FLD / PPORT12
XX
R5916
JL5652
JL5653
R5663
C5658
R5664
C5659
R5665
1
V1
VAR
YUV
JL5654
C5657
200
XX
200
XX
200
V12
CVBS
C5660
p
10
D
+5V_AUDIO_DAC
+1V5
YC_C
YC_Y
R5666
200
R5670
R5671
XX
3.3V_MAIN
1Y13
Y1
VREF0
R5669
330
1/16W
0uH
FB5646
C5663
4.7
6.3V
RSET1
C5664
C5665
0.1
1
W1
0.1
R5674
RSET0
R5672
R5675
680
1/16W
THESE CAPACITORS
R5673
XX
V14
AVDDV
XX
TO BE PLACED
0
470
UNDERNEATH BGA
4
W1
Y14
AVDDV
NMI/EDINT
TEST / GND
AVDDV
L5630
4
AA1
JTRST
AGNDV
AGNDV
AGNDV
AGNDV
AGNDP
10uH
AVDDV
C5670
10
16V
C5671
0.1
C5672
0.1
C5673
0.1
JTCK
JTDI
JTDO
JTMS
GND
GND
GND
GND
GND
GND
GND
GND
GND
GND
GND
GND
GND
GND
GND
GND
GND
GND
GND
GND
GND
GND
GND
GND
GND
THIS CAPACITOR TO BE
PLACED UNDERNEATH BGA
JTCK
AA9
JTDI
8
JTD O
9W
JTMS
9W
0Y
JTRST
AA1
NMI_EDINT
V10
10
V13W
U13
U12
U11
N13
N12
N11
N10
N9
M13
M12
M11
M10
M9
L13
L12
L11
L10
L9
K13
K12
K11
K10
K9
J13
J12
J11
J10
J9
M17
JTCK,JTDI,JTDO,JTMS,JTRST,NMI_EDINT
XX
C5661
10p
R5667
200
C5662
10p
R5668
200
3
2
2
Y1
W1
W1
AA12AA13
VAY
VAC
VAB
VAG
VREF1
VACVBS
10
11
B
STP1_STRT / PPORT38
STP1_EN / PPORT37
VDI_D7 / PPORT121
VDI_D6 / PPORT120
VDI_D5 / PPORT119
VDI_D4 / PPORT118
VDI_D3 / PPORT117
VDI_D2 / PPORT116
VDI_D1 / PPORT115
VDI_D0 / PPORT114
DADD13
DADD12
DADD11
DADD10
DADD9
DADD8
DADD7
DADD6
DADD5
DADD4
DADD3
DADD2
DADD1
DADD0
DBA1
DBA0
UDQM
UDQS
LDQM
LDQS
DQ15
DQ14
DQ13
DQ12
DQ11
DQ10
DQ9
DQ8
DQ7
DQ6
DQ5
DQ4
DQ3
DQ2
DQ1
4
A16
A1
D13
B14
B13
A13
A15
B15
B16
DQ[12]
DQ[13]
DQ[14]
8
DQ[15]
DQ[11]
DQ[10]
DQ[9]
DQ[8]
DQ[7]
C13
DQ[6]
DQ[0-15]
C5639
XX
C5640
XX
C5641
0
JR5601
+2V5D_DDR
THESE CAPACITORS TO BE PLACED UNDERNEATH BGA
0
JR5602
C5602
FB5631
XX
XX
C5845
XX
C5642
C5702
C5703
C5697
C5643
C5644
XX
XX
4.7
10V
100
16V
0.1
XX
XX
C5631
4.7
6.3V
9
0
JR5600
+2V5D
4
D1
DQ[4]
DQ[5]
3.3V_MAIN
DQ0
5
DQ[3]
2
D1
D1
D16
C16
C15
DQ[0]
DQ[1]
DQ[2]
DADD[13]
C14
A9
DADD[12]
B9
DADD[11]
D8
DADD[10]
DADD[9]
A7
B7
A8
B8
DADD[8]
DADD[7]
DADD[6]
DADD[5]
C6D7C7
B6
A6
D6
C8
DADD[0]
DADD[1]
DADD[2]
DADD[3]
DADD[4]
DBA1
JL5630
DADD[0-12]
C5650
0.1
C5651
0.1
C5652
0.1
C5653
0.1
THESE CAPACITORS TO BE PLACED UNDERNEATH BGA
C5654
0.1
C5655
FB5636
0uH
C5646
0.1
10
16V
DBA0,DBA1,DCASB,DCKE,DCLKB,DCLK_DDR,DCSB,DQM0,DQM1,DQS0,DQS1,DRASB,DVREF,DWEB
DCSB
2
C9
D9
A11
A1
C11
C12
DQM0
DQS1
DQS0
DQM1
DBA0
DCSB
DRASB
BOARD VERSION RESISTORS - MOUNT ON
SIDE-A WITH JL’S ON SIDE-B
JL5633
DRASB
D10
DCASB
DCASB
C10
DWEB
DCKE
B10
D11
DCKE
DWEB
DIFFERENTIAL PAIR
OF CLOCK SIGNALS
R5648
R5649
R5650
R5651
R5677
R5678
R5679
R5662
0
XX
XX
XX
0
XX
XX
XX
DCLK
0
A1
DCLKB
DCLK_DDR
DCLKB
B11
JL5634
JL5635
JL5636
JL5637
DVREF
B12
C5656
DVREF
7
7
V17
Y1
W1
3.3V_MAI
N
R9034
10k
0.1
1/16W
FB5618
0uH
R9033
XX
THIS CAPACITOR TO BE
PLACED UNDERNEATH BGA
7
AA1
6
Y16
AA1
FB5619
0uH
JIG_MODE
VDI_VCK / PPORT113
STP0_DAT7 / PPORT8
STP0_DAT6 / PPORT7
STP0_DAT5 / PPORT6
STP0_DAT4 / PPORT5
STP0_DAT3 / PPORT4
STP0_DAT2 / PPORT3
IN_TSD[6]
IN_TSD[5]
IN_TSD[4]
IN_TSD[3]
STP0_DAT1 / PPORT2
C4
B4
IN_TSD[2]
IN_TSD[1]
6
A1B2A2B3A3
V16
W1
AA15
FB5620
0uH
C5676
XX
PMSINS
nFE_RESET
IN_TSD[7]
STP0_DAT0 / PPORT1
STP0_EN / PPORT9
A4A5D5
IN_TSPVAL
IN_TSD[0]
STP0_CLK / PPORT0
N_TSBCLK
I
REGB / PPORT34
IOWRB / PPORT31
F4N4P2
REGB
IOWRB
IORDB / PPORT30
IORDB
INPACKB / PPORT33
GPIO_VS1B / PPORT28
R2
G2
VS1B
INPACKB
IN_TSD[0-7
GPIO_RESET / PPORT32
GPIO_IREQB / PPORT24
K3
G1
REQB
I
CARD_RESET
]
GPIO_CD1B / PPORT26
V1C1Y1
CD1B
GPIO_CD2B / PPORT35
CD2B
PCE1B(CE2B_2) / PPORT36PCE0B(CE2B_1) / PPORT27IOSI16B / PPORT25
P3
B1
IOIS16B
E4
BUF_MDO_STRT
STP1_CLK / PPORT29
H1
F2
BUF_MDO_EN
BUF_MDO_CLK
RDATA[15]
RDATA[0-15]
RDATA15 / STP1_DAT7 / BOOT_NAND_SEL1
RDATA14 / STP1_DAT6 / BOOT_NAND_SEL0
RDATA13 / STP1_DAT5 / BOOTSEL1
T1
R1
R3
RDATA[14]
RDATA[13]
BDT
RDATA7 / MCLKSEL1
RDATA6 / MCLKSEL0
RDATA5 / VRCLKSEL1
RDATA4 / VRCLKSEL0
RDATA 3
RDATA2 / MRGMODE1
RDATA1 / MRGMODE0
RDATA12 / STP1_DAT4 / BOOTSEL0
RDATA11 / STP1_DAT3 / MINIBOOT
RDATA10 / STP1_DAT2 / BWSEL
RDATA9 / STP1_DAT1 / ROMBEND
RDATA8 / STP1_DAT0 / MCLKSEL2
U1
D1
T3
C3U2R4
D2
RDATA[12]
RDATA[11]
RDATA[10]
RDATA [ 6 ]
RDATA [ 8 ]
RDATA [ 9 ]
RDATA [ 7 ]
RDATA0 / ENDIAN
RADD25 / HSD7 / EJTAG_MODE
RADD24 / HSD6 / DINT_EN
RADD23 / HSD5 / DSYSELB
RADD22 / HSD4 / PCI_MOD
RADD21 / HSD3 / PCI_SIZE1
RADD20 / HSD2 / PCI_SIZE0
V2
V4
W2
RDATA [ 5 ]
RDATA [ 4 ]
RDATA [ 3 ]
J1
D4
E2
C2
RDATA [ 2 ]
RDATA [ 1 ]
RDATA [ 0 ]
RADD[25]
G3
RADD[23]
RADD[24]
J4
K4
RADD[22]
RADD[21]
L2
RADD19 / HSD1 / NAND_CS
N2
M2
RADD[20]
RADD[19]
RADD[19-25]
RADD18 / HSD0
RADD17 / PKTSTRT
L4
M4
JL5642
JL5646
JL5644
RADD14
RADD16 / HSDE
RADD15 / HSDCLK
H3
J3
JL5647
RADD[14]
RADD[0-14]
M1
1/11 MAIN MICROCONTROLLER, PANEL DRIVING, AUDIO & VIDEO PROCESSOR
RADD13
N1
RADD[12]
RADD[13]
RADD12
K1
RADD11
N3
RADD[10]
RADD[11]
RADD10
RADD9
T2M3L3
RADD[9]
RADD8
RADD[8]
RADD7
H4
RADD[7]
RADD6
G4
RADD[6]
RADD5
J2
RADD[5]
RADD4
H2
RADD[4]
RADD3
F1
RADD[3]
RADD2
E3
RADD[2]
RADD1
E1
RADD[1]
RADD0
D3
RADD[0]
NRBB
NCLE
U3
W1
NAND_CLE
NAND_RBB
NALE
U4
NAND_ALE
AA18
JL5655
GCSB3 / PPORT50
GCSB2 / PPORT49
GCSB0
GCSB1
8
P4
F3
Y2
Y1
JL5657
JL5656
XX
R5626
R5624
0
CHIP
CE1B
RESET_N
nCI_WAIT
XX
R5660
V3
FCSB1
47
R5661
FCSB0
K2
FCSB0
FWEB
FOEB
L1P1T4
FOEB
FWEB
NSEB
NAND_SEB
JL5651
GRDYB
NAND_ALE,NAND_CLE,NAND_RBB
COMPONENTS MARKED AS XX ARE NOT FITTED ON THIS MODEL
RSTOUT
RSTSW
0
Y1
AA11
L5662
J
0
R5625
nMASTER_RESET
PWMOUT
V7
PWMOUT
N
CLK27I
1
M2
CLK27M
+1V5D
FB5647
0uH
AVDDP
7
N1
C5667
0.1
THIS CAPACITOR TO BE
PLACED UNDERNEATH BGA
C5668
0.1
C5669
0.1
C5666
4.7
6.3V
~ BDT Board Schematic Diagram [ Main Microcontroller, Panel Driving, Audio & Video Processor ] Page 1/11 ~
- 36 -
Page 37
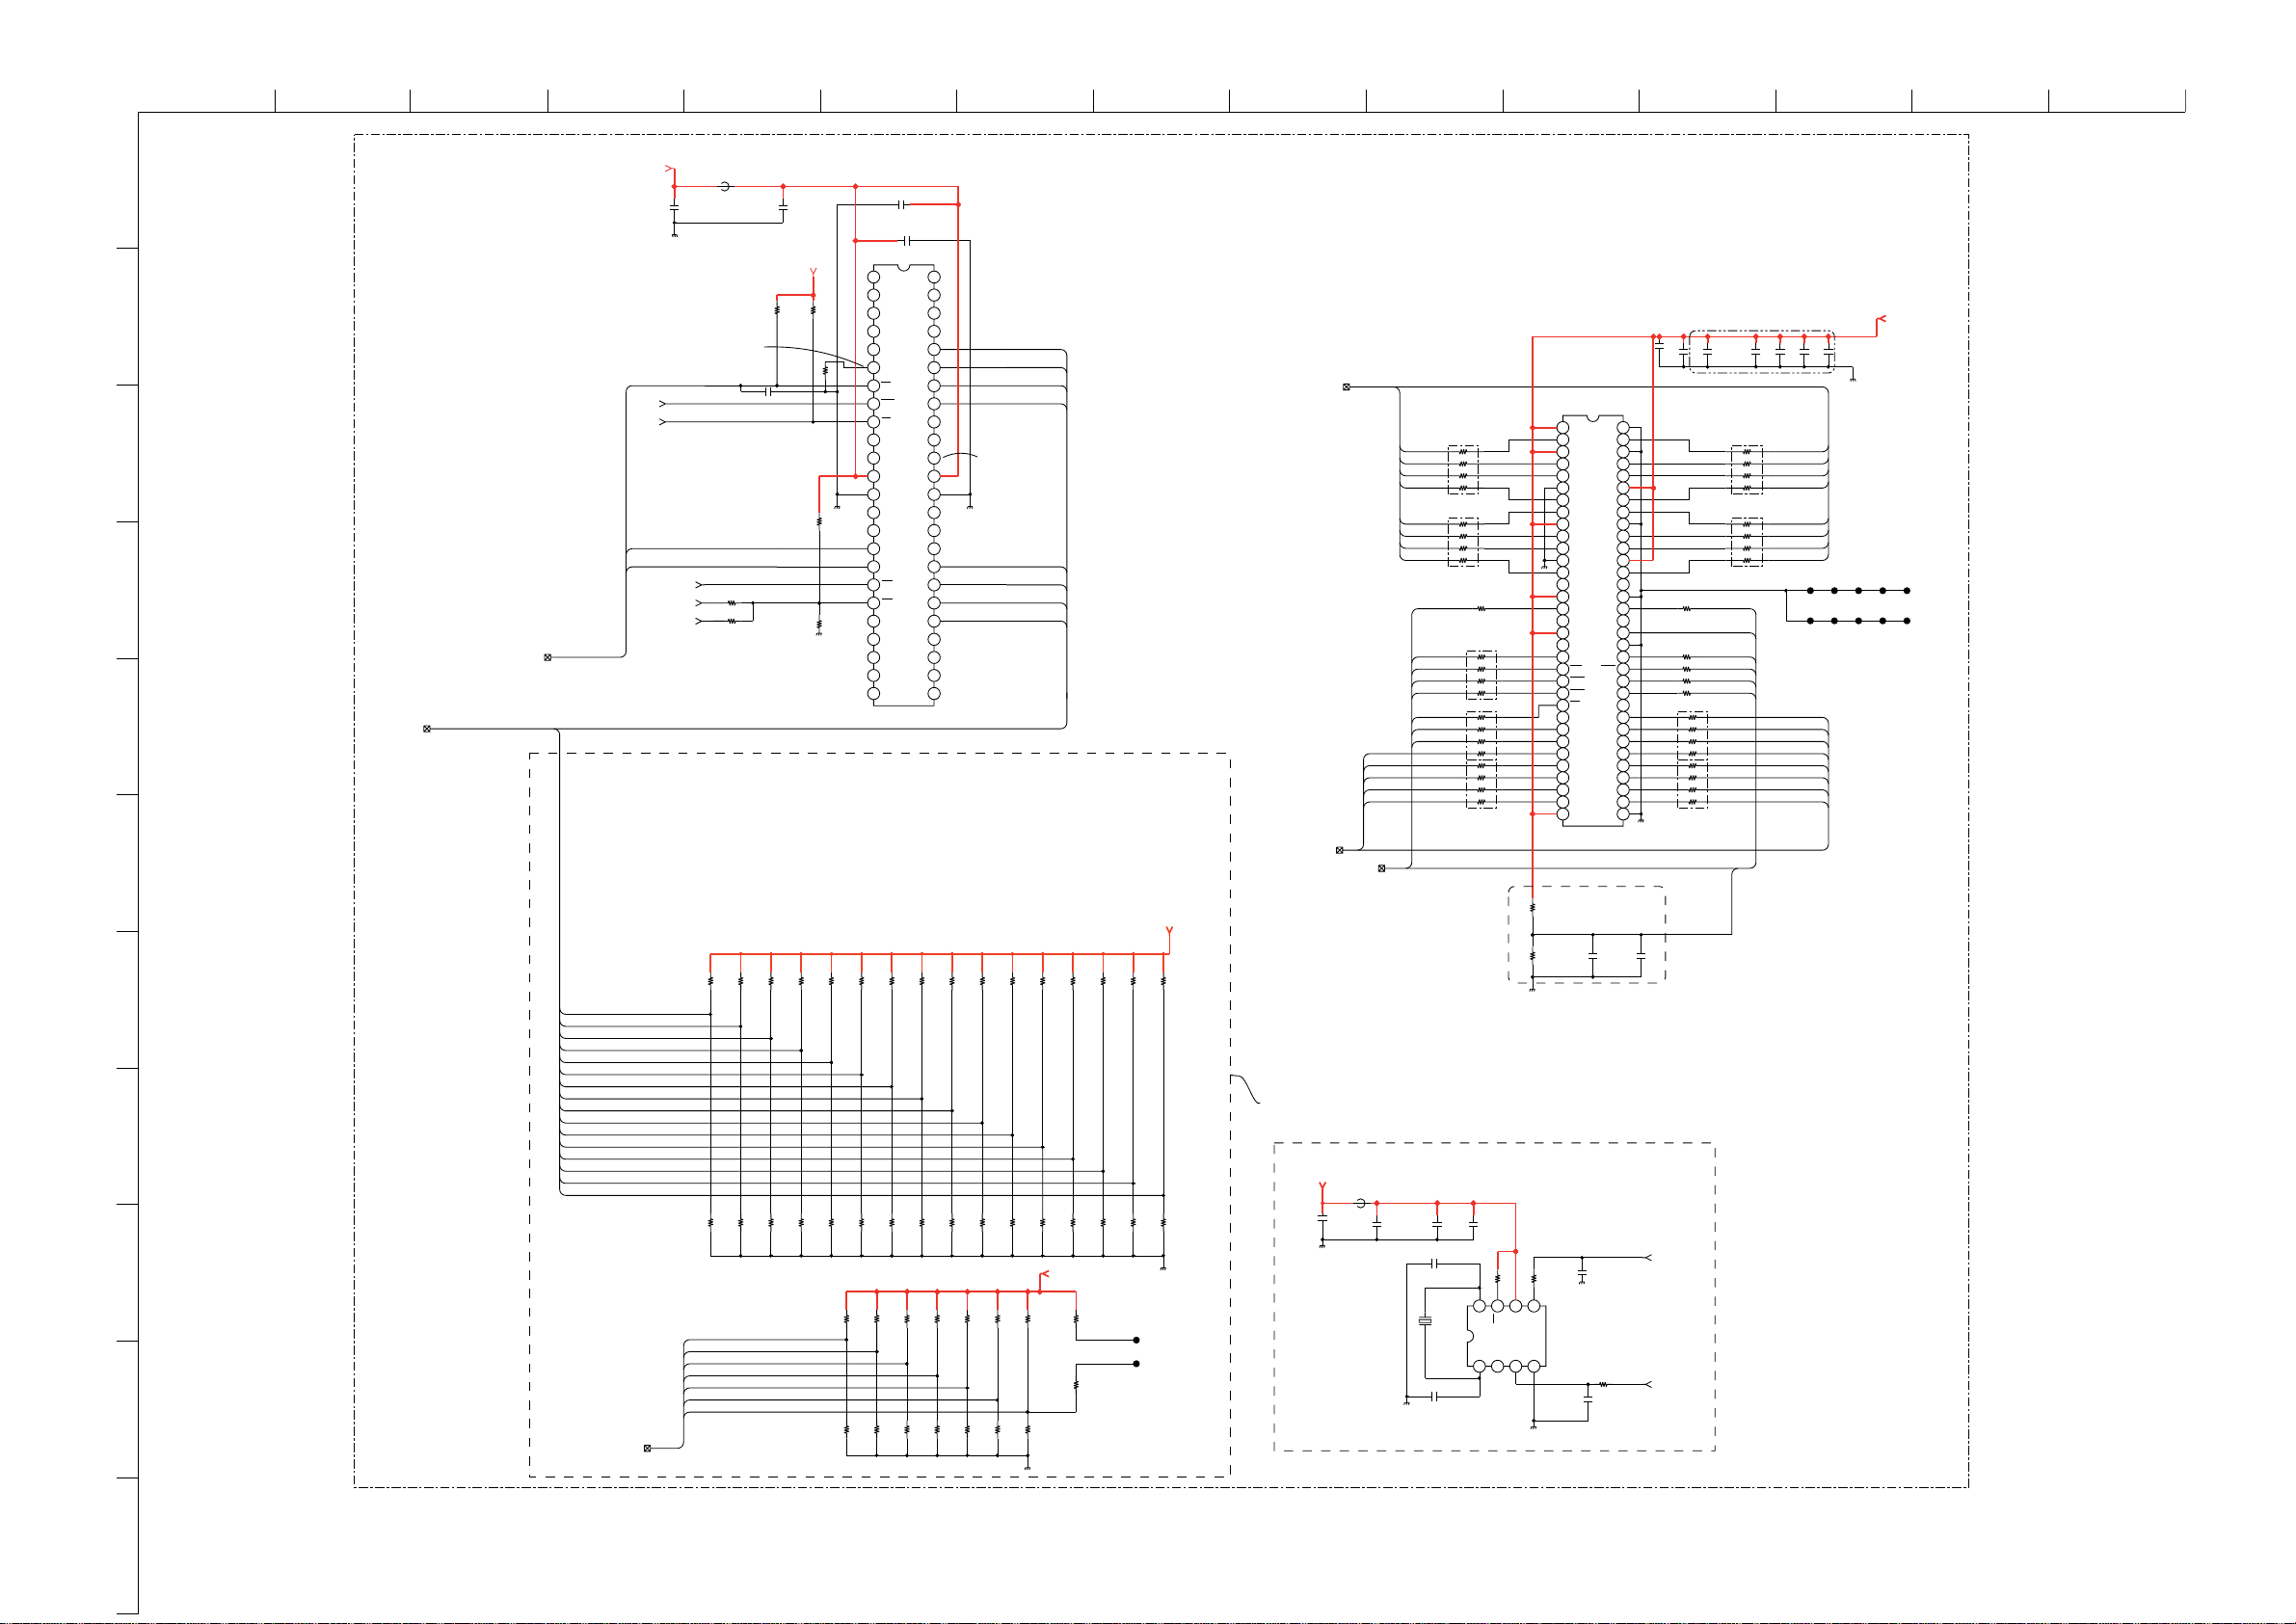
ABCDE F
BDT.-SE-1(KDL-26/32/40U2000)
G
HI JKLMN
O
10
1
BDT
2/11
2
3
4
NAND_ALE,NAND_CLE,NAND_RBB
5
RDATA[0-15]
6
7
8
RDATA[15]
RDATA[14]
RDATA[13]
RDATA[12]
RDATA[11]
RDATA[10]
RDATA[9]
RDATA[8]
RDATA[7]
RDATA[6]
RDATA[5]
RDATA[4]
RDATA[3]
RDATA[2]
RDATA[1]
RDATA[0]
9
3.3V_MAIN
C5680
FB5680
0.1
0uH
10V
NOTE PIN 6 IS NOT GND ON SAMSUNG
NAND FLASH, ONLY TOSHIBA
NAND_RBB
FOEB
FCSB0
NAND_CLE
NAND_ALE
FWEB
nMASTER_RESET
NAND_WPB
R5742
R5743
STRAP PINS
XX
1k
RADD[25]
RADD[24]
RADD[23]
RADD[22]
RADD[21]
RADD[20]
RADD[19]
R5680
R5681
BOOT_NAND_SEL_1
BOOT_NAND_SEL_0
BOOTSEL1
BOOTSEL0
MINIBOOT
BWSEL
ROMBEND
MCLKSEL2
MCLKSEL1
MCLKSEL0
VRCLKSEL1
VRCLKSEL0
RESERVED
MRGMODE1
MRGMODE0
ENDIAN
RADD[19-25]
10V
C5683
1k
R5699
0.1
0.1
C5684
NC
NC
321
NC
4
NC
NC
IO/8
65
NC
IO/7
IO/6
RB
FOE
IO/5
CE
NC
NC
LOCKPRE
1210 11987
VCC
VCC
13
VSS
VSS
14
NC
15
NC
16
CLE
17
ALE
IO/4
18
WE
IO/3
19
WP
I/O2
20
I/O1
NC
NC
NC
232221
NC
24
NC
1k
R5703
NAND FLASH
10V
48
NC
47 45 44
NC
46
NC
NC
43
42 41
NC
NC
383940
LEAVE N.C. SO NOT USED
37
36
35
NC
34
IC5680
NC
K9F2808U0C-PCB0T
16 BIT NAND
33
NC
FLASH/MEMORY
3132
30 29 28
NC
27 26 25
NC
NC
NC
t
XX
R5707
R5711
1k
R5715
1k
1k
R5717
RDATA[7]
RDATA[6]
RDATA[5]
RDATA[4]
RDATA[3]
RDATA[2]
RDATA[1]
RDATA[0]
XX
R5719
XX
R5721
1k
R5723
XX
R5725
1k
R5727
C5701
0.1
JL5702 JL5704
3
JL570
+2V5D_DDR
JL5706
JL5707
JL5705
PLACE THESE CAPACITORS CLOSE TO IC PINS.
C5601
XX
C5693
C5692
4.7
10V
0.1
616263646566
60
59
5758
56
55
54 52
53
5051
49
48
47
R5737
100
100
R5735
46 45 44
100
R5736
100
R5738
43 42
41
40
39 38 37 36 35
34
DDR SDRAM
R5734
1
3
5
7
1
3
5
7
DQ[0-15]
RB5680
68
DQ[0]
1
3
5
7
1
3
5
7
RB5681
68
1
3
5
7
1
3
5
7
1
3
5
7
R5729
68
RB5684
100
2
4
6
8
2
4
6
8
RB5682
100
2
4
6
8
RB5683
100
2
4
6
8
2
4
6
8
R5730
R5731
DQ[1]
DQ[2]
DQ[3]
DQ[4]
DQ[5]
DQ[6]
DQ[7] DQ[8]
DQS0
DQM0
DWEB
DCASB
DRASB
DCSB
DBA0
DBA1
DADD[10]
DADD[0]
DADD[1]
DADD[2]
DADD[3]
DADD[0-12]
3.3V_MAIN
DBA0, DBA1, DCASB, DCKE, DCLKB, DCLK_DDR, DCSB, DQM0, DQM1, DQS0, DQS1, DRASB, DVREF, DWEB
IC5681
EDD1216AATA-6B-E
ELPIDA MEMORY
1
VDD
2
DQ0
345678
VDDQ
DQ1
DQ2
VSSQ
DQ3
DQ4
9
VDDQ
10
DQ5
11 12
DQ6
VSSQ
13 14 15
DQ7
NC
VDDQ
16 17 18 19 20
LDQS
NC
VDD
NC
LDM
21 22
WE
CAS
23
RAS
24
CS
NC
26
BS0
27 28
BS1
A10
A0
A1
313029
A2
3225
A3
33
VDD
PLACE THESE CLOSE TO PIN 49 OF IC
100
C5690
0.1
100
10V
DQ15
VSSQ
DQ14
DQ13
VDDQ
DQ12
VSSQ
DQ1
VDDQ
VSSQ
UDQS
VREF
DQ11
UDM
VSS
0
DQ9
DQ8
NC
NC
VSS
CLK
CLK
CKE
NC
A12
A11
A9
A8
A7
A6
A5
A4
VSS
68
RB5686
100
C5695
0.1
DCLKB
DCLK_DDR
RB5685
100
2
4
6
8
2
4
6
8
1
3
5
7
1
3
5
7
DQS1
DVREF
DQM1
DCKE
DVREF
C5698
0.1
RB5687
68
RB5688
68
C5699
0.1
2
4
6
8
2
4
6
8
C5700
0.1
DQ[15]
DQ[14]
DQ[13]
DQ[12]
DQ[11]
DQ[10]
DQ[9]
JL5698
JL5699
DADD[12]
DADD[11]
DADD[9]
DADD[8]
DADD[7]
DADD[6]
DADD[5]
DADD[4]
JL5700
JL5701
C5682
1
10V
3.3V_MAIN
R5691
R5686
1k
470
XX
R5694
C5681
XX
R5740
10k
1/16W
XX
R5741
XX
XX
1k
R5684
R5682
XX
RDATA[0] = 1 = ENDIAN = Big Endian
RDATA[2:1] = 10 = MRGMODE1-0 = Full merge & All bytes
RDATA[3] = -- = RESERVED
RDATA[5:4] = 11 = VRCLKSEL1-0 = 201MHz
RDATA[8:6] = 101 = MCLKSEL2-0 = 187MHz
RDATA[9] = 1 = ROMBEND = Big Endian
RDATA[10] = 1 = BWSEL = 8bi
RDATA[11] = 1 = MINIBOOT = use miniboot
RDATA[13:12] = 11 = BOOTSEL1-0 = Nand, then Memory Stick
RDATA[15:14] = 00 = BOOT_NAND_SEL1-0 = <256mbit
RADD[25] = 1 = EJTAG_MODE = EJTAG
RADD[24] = 0 = DINT_EN = disable
RADD[23] = 1 = DSYSELB = main only
RADD[22] = 1 = PCIMODE = host
RADD[21:20] = 00 = PCI_SIZE1-0 = 32Mbyte
RADD[19] = 0 = NANDCS = CS0
1k
1k
R5695
R5689
PLEASE PLACE COMPONENTS IN
THIS BOX IN SAME AREA ON PWB
LAYOUT NOTE:
REMOVE GND PLANE AROUND IC3201 AND X3200
AND ALSO FROM UNDERNEATH X3200 AND IC3201
INCLUDING TRACKS FROM XTAL TO IC.
C5691
C5689
0.1
4.7
10V
10V
2
X5680
7MHz
1k
R5732
8765
X2
PD
VDD
X1NCVIN
4321
C5687
C5688
XX
XX
R5733
47
IC5682
CLK
ICS7150MLFT
27MHZ OSCILLATOR
GND
C5694
XX
R5739
C5696
CLK27M
10k
PWMOUT
0.1
10V
1k
R5683
XX
R5685
EJTAG_MODE
DINT_EN
DSYSELB
PCIMODE
PCI_SIZE1
PCI_SIZE0
NANDCS
XX
R5690
XX
R5696
XX
R5688
XX
R5700
1k
R5687
1k
R5693
XX
R5704
XX
R5692
XX
R5698
XX
R5708
1k
R5697
XX
R5702
1k
R5712
1k
R5701
1k
R5706
XX
R5716
XX
R5705
1k
R5710
XX
R5718
XX
R5709
4.7k
R5714
1k
R5720
R5713
3.3V_MAIN
XX
1k
R5722
R5744
470
R5745
470
1/16W
XX
R5724
1k
R5726
TP5700
TP5701
XX
R5728
27MHZ CLOCK
3.3V_MAIN
FB5681
0uH
C5685
0.1
10V
C5686
1000p
50V
COMPONENTS MARKED AS XX ARE NOT FITTED ON THIS MODEL
11
~ BDT Board Schematic Diagram [ Main Microcontroller, Panel Driving, Audio & Video Processor ] Page 2/11 ~
- 37 -
Page 38
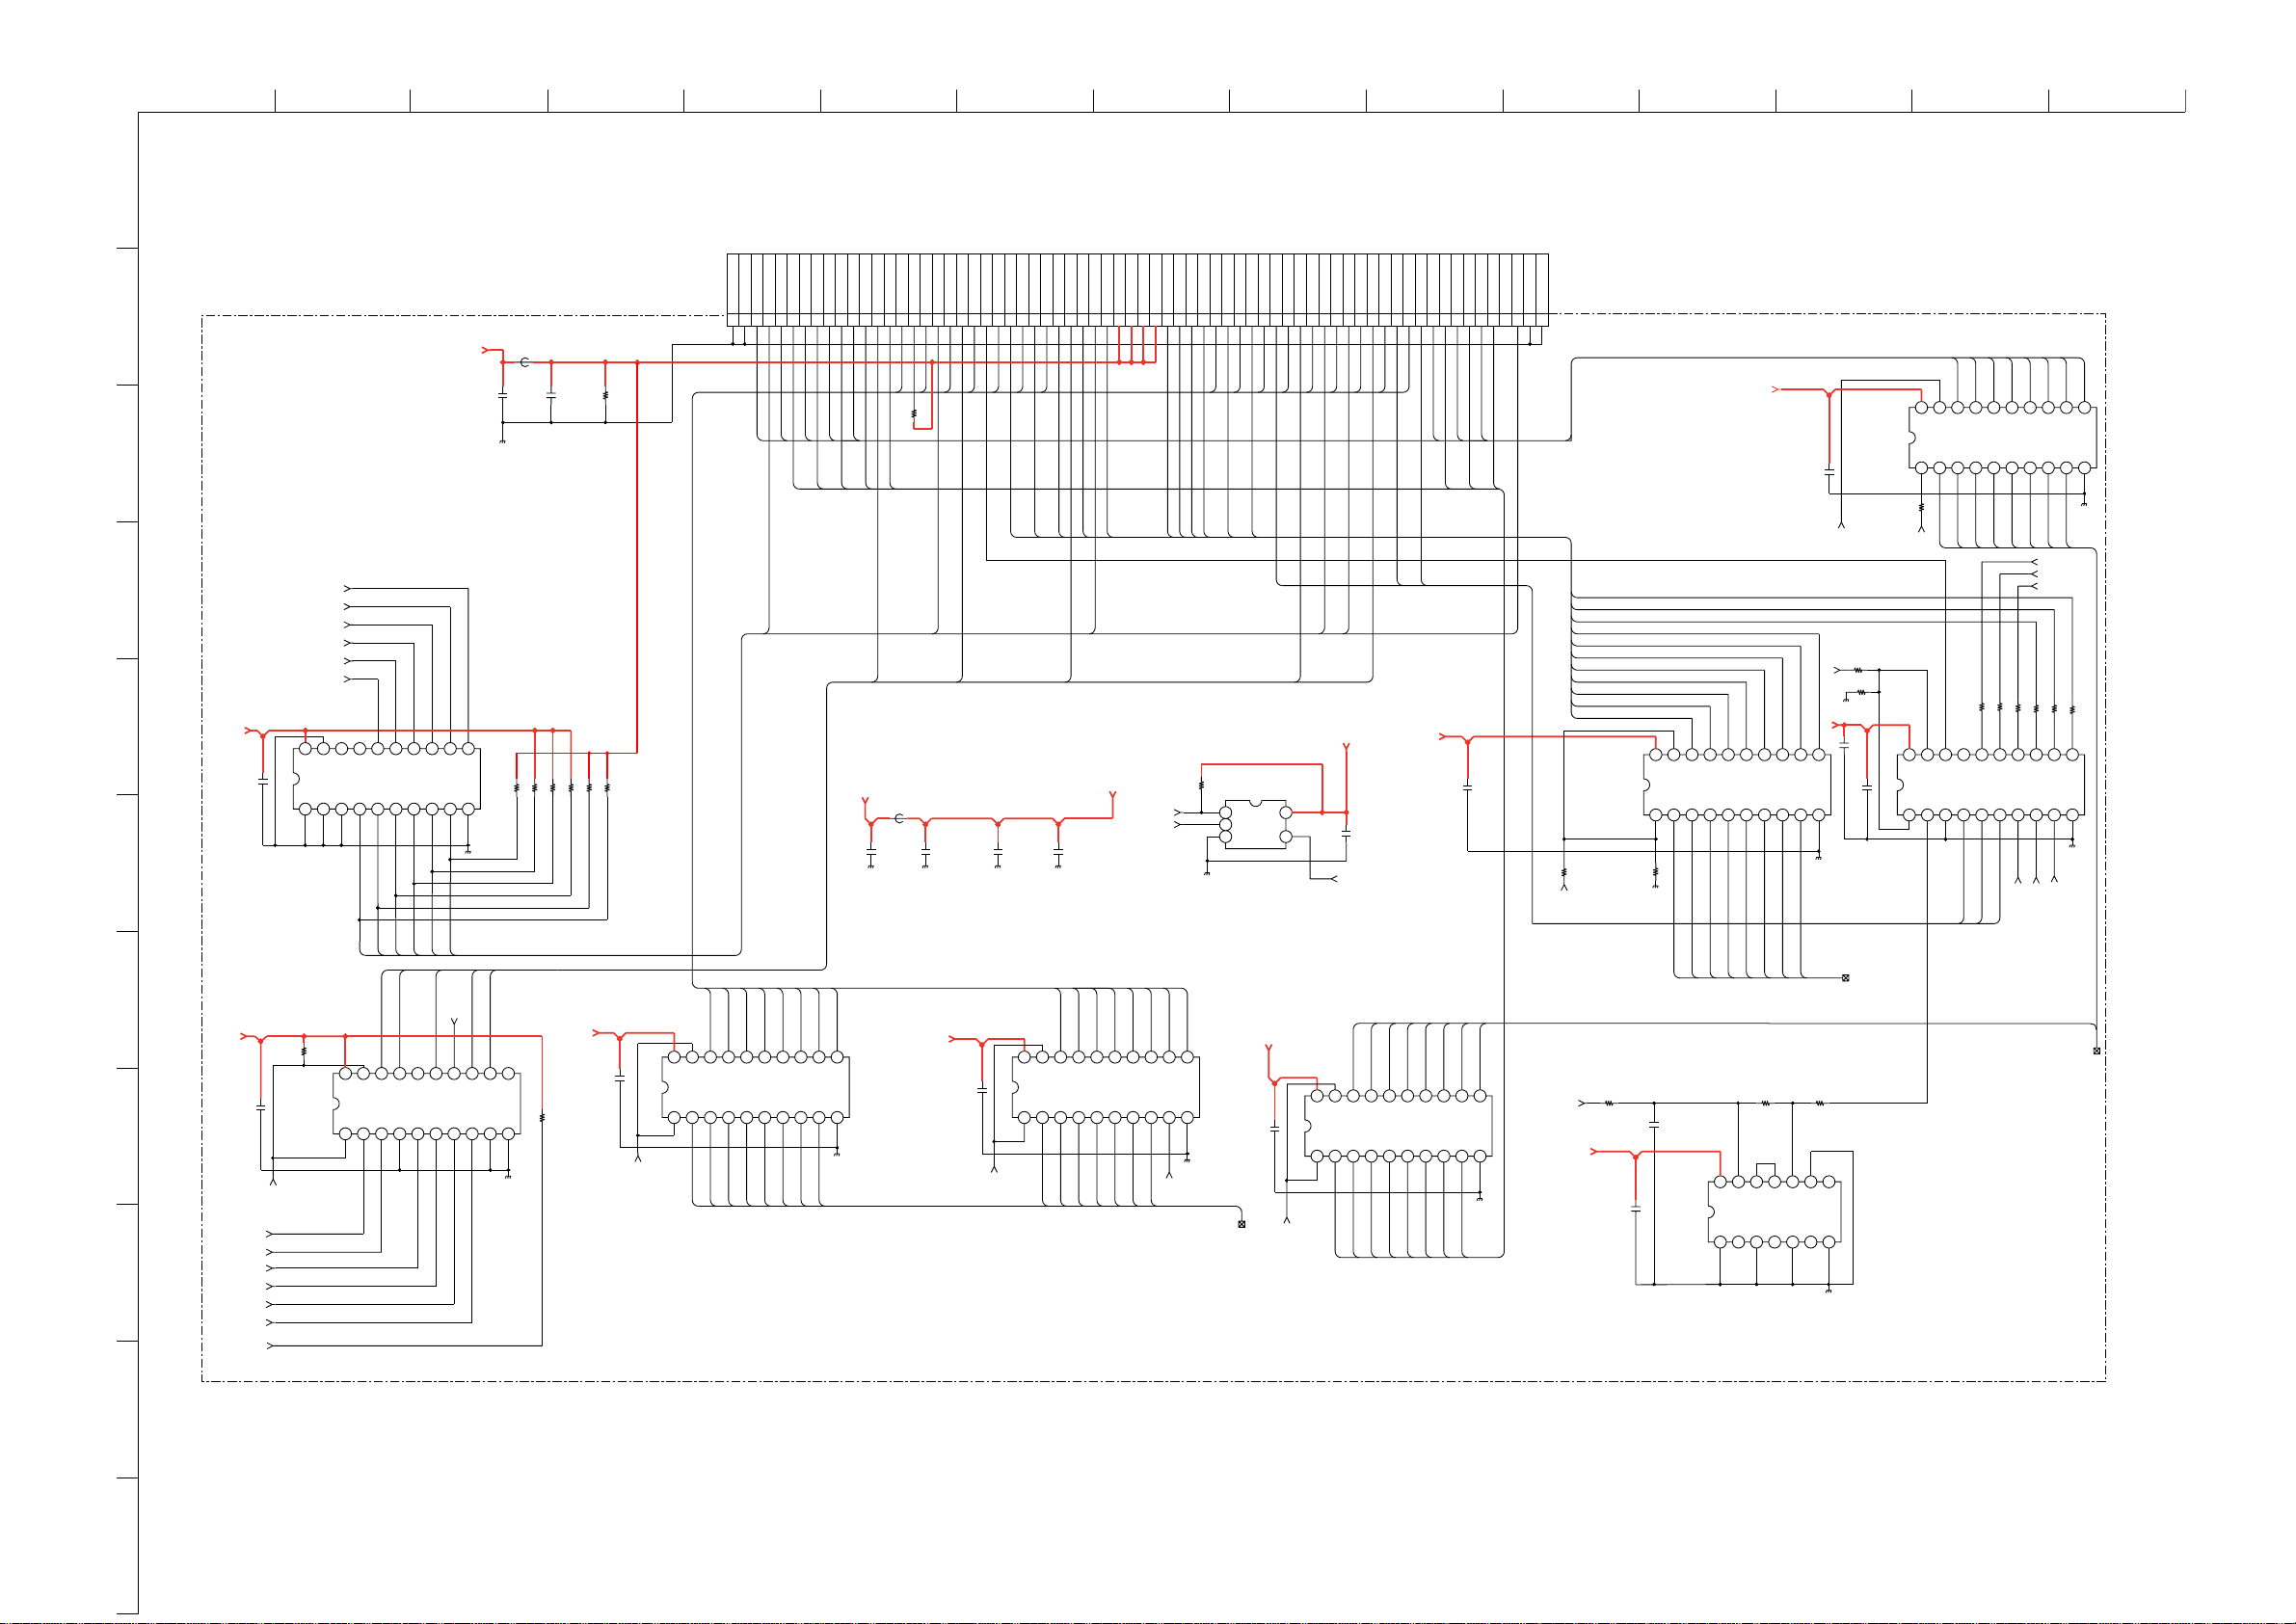
ABCDE F
G
HI JKLMN
O
1
PCMCIA CARD
CN5750
68P
CARD_OEB
A11A9A8
CE2#
VS1#
10kR5761
B9
CARD_OEB
0
A1
CA[11]
IORD#
B10
D3
GND
D4D5D6
GND
CD1#
2
BDT.-SE-1(KDL-26/32/40U2000)
BDT
3/11
+5VD_CI
FB5751
C5756
4.7
10
A1
H
0u
C5758
R5759
0.1
1k
10
V
V
MDO3/D11
B1
B2A3B3
A2
]
CD[3
CD[4]
A4
MDO4/D12
B4
CD[5]
A5
MDO5/D13
B5
CD[6]
D7
A6
CD[7]
CE1#
MDO6/D14
MDO7/D15
A7B7A8B8A9
B6
A10
CA[10]
1
A1
CA[9]
A13
A14
WE#
IREQ#
VCC
VPP1
MIVAL/A16
MCLKI/A15
IOWR#
MISTRT/A17
MDI0/A18
MDI1/A19
MDI2/A20
MDI3/A21
VCC
2
B1
A12
A13
B11
B1 3
CA[13]
CA[8]
4
A1
CA[14]
6
5
B15
A1
B14
A1
VPP2
A17
B18
B17
A18
B16
A12A7A6
MDI4/A22
MDI5/A23
MDI6/A24
1
9
A2
B20
A1
B19
A20
B21
CA[12]
2
A2
CA[7]
MDI7/A25
A2
B22
CA[6]
A5
A4
A3
A2
A1
A0
D0
MCLK0/VS2#
RESET
WAIT#
INPACK#
REG#
3
5
A2
B23
CA[5]
A26
B24
B25
A24
CA[3]
CA[4]
MOVAL/SPKR#
B26
B28
A27
A28
B27
CA[1]
CA[2]
9
A2
CA[0]
MOSTRT/STSCHG#
0
B29
A3
CD[0]
D1D2IOIS16#
MDO0
MDO1
1
B31
B30
A3
A32A3
CD[2]
CD[1]
2
B3
MDO2
3
MDO[0]
MDO[2]
3V3D_31
MDO[1]
MOSTRT
C5764
1
0.
10V
MDO[5]
C5750
0.1
10V
3.3V_MAIN
MDO[6]
nCE1
FB5750
0uH
MDO[7]
C575
4.
10V
MISTRT
MDI[0]
MDI[1]
MDI[2]
MDI[3]
VS1
nIORD
1
7
C5753
4.7
10V
C5755
nIREQ
nCARD_WE
+3V3D_31
0.1
10V
IOWRB
FWEB
MIVAL
MDI[4]
R5751
10k
MICLK
MDI[6]
MDI[5]
IC5752
TC7SH00FU(T5RSOYJF)
2 INPUT NAND GATE
A
B
321
GND
MDI[7]
VCC
Y
MOCLK
PCCARD_RST
54
nWAIT
C5757
0.1
10
MOVAL
INPACK
nREG
+
+3V3D_31
V
DIR
MDO[3]
MDO[4]
n
4
5
+3V3D_31
C5754
10V
0.
1
CI_WAIT
VS1B
CD2B
CD1B
IREQB
INPACKB
IC5751
74LVC541APW
OCTAL
BUFFER/LINE
DRIVER
20 19 1817161514 13 12 11
Vcc
!OE1!
1
INPACKB
Y2
Y1
Y0
!OE2!
1
A0A1A2A3A4A5A6A7GND
2
543
I
REQB
Y3
CD1B
VS1B
CD2B
Y6
Y5
Y4
nCD1
nCI_WAIT
Y7
10k
10k
10k
10k
10k
109876
R5753
R5754
R5755
R5756
R5757
4.7k
R5758
6
BLK
GND
CD2#
GND
3
3
4
B34
B3
A3
CD[0]
CD[1]
CD[2]
CD[3]
CD[4]
CD[5]
CD[6]
B5
B4
876
RD ATA [ 5 ]
RDATA[6]
BUF_MDO_CLK
BUF_MDO_STRT
BUF_MDO_EN
68
68
R5957
R5958
MICLK
MISTRT
13 12
Y5
Y6
A6
A7
876
12
9
B6
68
R5959
MIVAL
11
109
CD[7]
11
B7
10
RDATA[7]
Y7
GND
nCD2
R5951
+3V3D_31
74LVT245PW-T
TRANSCEIVER
C5766
0.1
10V
CE1B
nCI_EN
R5950
0
R5953
XX
+3V3D_31
MDI[4]
MDI[5]
MDI[3]
MDI[1]
MDI[6]
MDI[7]
20 19 18 17 16
IC5757
74LVC541APW
OCTAL
BUFFER/LINE
DRIVER
0
R5952
XX
Y1
Y0
Vcc
!OE2!
11
!OE1!A0A1A2A3A4A5A6A7
MDI[2]
15 14 13 12 11
Y3
Y4
Y2
MDI[0]
C5767
4.7
10
V
Y6
Y5
C5765
0.1
GND Y7
10V
10987654321
TC74LCX541FT(EKJ)
OCTAL BUS BUFFER
20 19 18
Vcc
IC5759
OCTAL
IC5758
!OE!
DIRA0A1A2A3A4A5A6A7GND
R5764
100
DIR
RD ATA [ 0 ]
20 19 18 17 16
Y0
Vcc
!OE2!
!OE1!A0A1
21
15 14 13
17
16
B3
B2
B1
B0
5
321
4
5
RDATA[2]
RDATA[3]
RDATA[4]
RDATA[1]
68
68
68
R5954
R5955
R5956
15 14
Y1
Y4
Y2
Y3
6
A2
A3A4A5
43
5
10
nCI_EN
nWAIT
VS1
nCD2
nCD1
INPACK
nIREQ
IN_TSD[0]
IN_TSD[1]
IN_TSD[2]
IN_TSD[3]
IN_TSD[4]
IN_TSD[5]
IN_TSD[6]
IN_TSD[7]
7
+3V3D_31
C575
0.1
8
10V
9
CARD_RESET
IOIS16B
CE1B
FWEB
IORDB
IOWRB
REGB
0
R575
10k
IC5750
74LVC541APW
2
OCTAL
BUFFER/LINE
DRIVER
nCI_EN
nCE1
nCARD_WE
20
19 18 17
Vcc
!OE2!
!OE1!A0A1A2A3A4A5A6A7
CE1B
Y0
FWEB
16
Y2
Y1
4
4321
5
IORDB
15 14 13 12 11
Y3
IOWRB
nIORD
nIOWR
Y4
76
CARD_RESET
PCCARD_RST
Y5
REGB
nREG
+
3V3D_31
C5759
R5752
10k
0.1
10V
Y7
Y6
GND
1098
C5753
I
74LVC541APW
BUFFER/LINE
DRIVER
nCI_EN
CA[0]
OCTAL
CA[1]
20 19 18 17
Y1
Y0
Vcc
!OE2!
!OE1!A0A1A2A3A4A5A6A7
RADD[0]
RADD[1]
RADD[2]
ADD[0:7]
CA[3]
CA[2]
CA[4]
15 14 13 12 11
16
Y4
Y3
Y2
3
76
54321
RADD[3]
RADD[4]
RADD[5]
CA[5]
Y5
RADD[6]
CA[6]
Y6
RADD[7]
CA[7]
1098
IC5755
74LVC541APW
C5762
0.1
10V
BUFFER/LINE
nCI_EN
+3V3D_31
Y7
GND
CA[8]
OCTAL
DRIVER
20
19 18 17 16
Y0
Vcc
!OE2!
A0A1A2A3A4A5A6
!OE1!
RADD[8]
RADD[9]
ADD[8:14]
CA[9]
4321
Y1
RADD[10]
CA[10]
Y2
2
5
CA[11]
CA[12]
CA[13]
15 14 13 12 11
Y5
Y4
Y3
876
RADD[13]
RADD[12]
RADD[14]
RADD[11]
CA[14]
Y6
A7
FOEB
CARD_OEB
GND Y7
109
+3V3D_31
C5763
0.1
10
V
RADD[0-14]
TS[7:0] TO DMX
IC5756
74LVC541APW
OCTAL
BUFFER/LINE
DRIVER
20 19 18 17 16 15 14 13 12 11
Vcc
!OE2!
!OE1!
A0
nCI_EN
MDO[7]
RDATA[14]
RDATA[15]
Y1
Y0
A2
A1
MDO[6]
RDATA[12]
RDATA[13]
Y2
7
A3A4A5A6A7
54321
MDO[4]
MDO[5]
RD ATA [ 8 ]
RD ATA [ 9 ]
RDATA[10]
RDATA[11]
Y7
Y6
Y5
Y4
Y3
GND
876
109
MDO[0]
MDO[1]
MDO[2]
MDO[3]
nIOWR
+3V3D_31
R5760
100
C5760
0.1
TS_IN[7:0] FROM COFDM
14 13 12
6A
Vcc
1A
1Y
R5762
XX
11 10 9 8
6Y
5A
2A
2Y
C5761
1000p
50V
IC5754
74LVC14APW
OCTAL
BUFFER/LINE
DRIVER
IN_TSD[0-7]
R5763
100
4Y
5Y
4A
3Y
GND
3A
654321
7
MOCLK
N_TSBCLK
IN_TSPVAL
I
MOVAL
MOSTRT
N_TSPSYNC
I
RDATA[0-15]
COMPONENTS MARKED AS XX ARE NOT FITTED ON THIS MODEL
11
~ BDT Board Schematic Diagram [ Main Microcontroller, Panel Driving, Audio & Video Processor ] Page 3/11 ~
- 38 -
Page 39
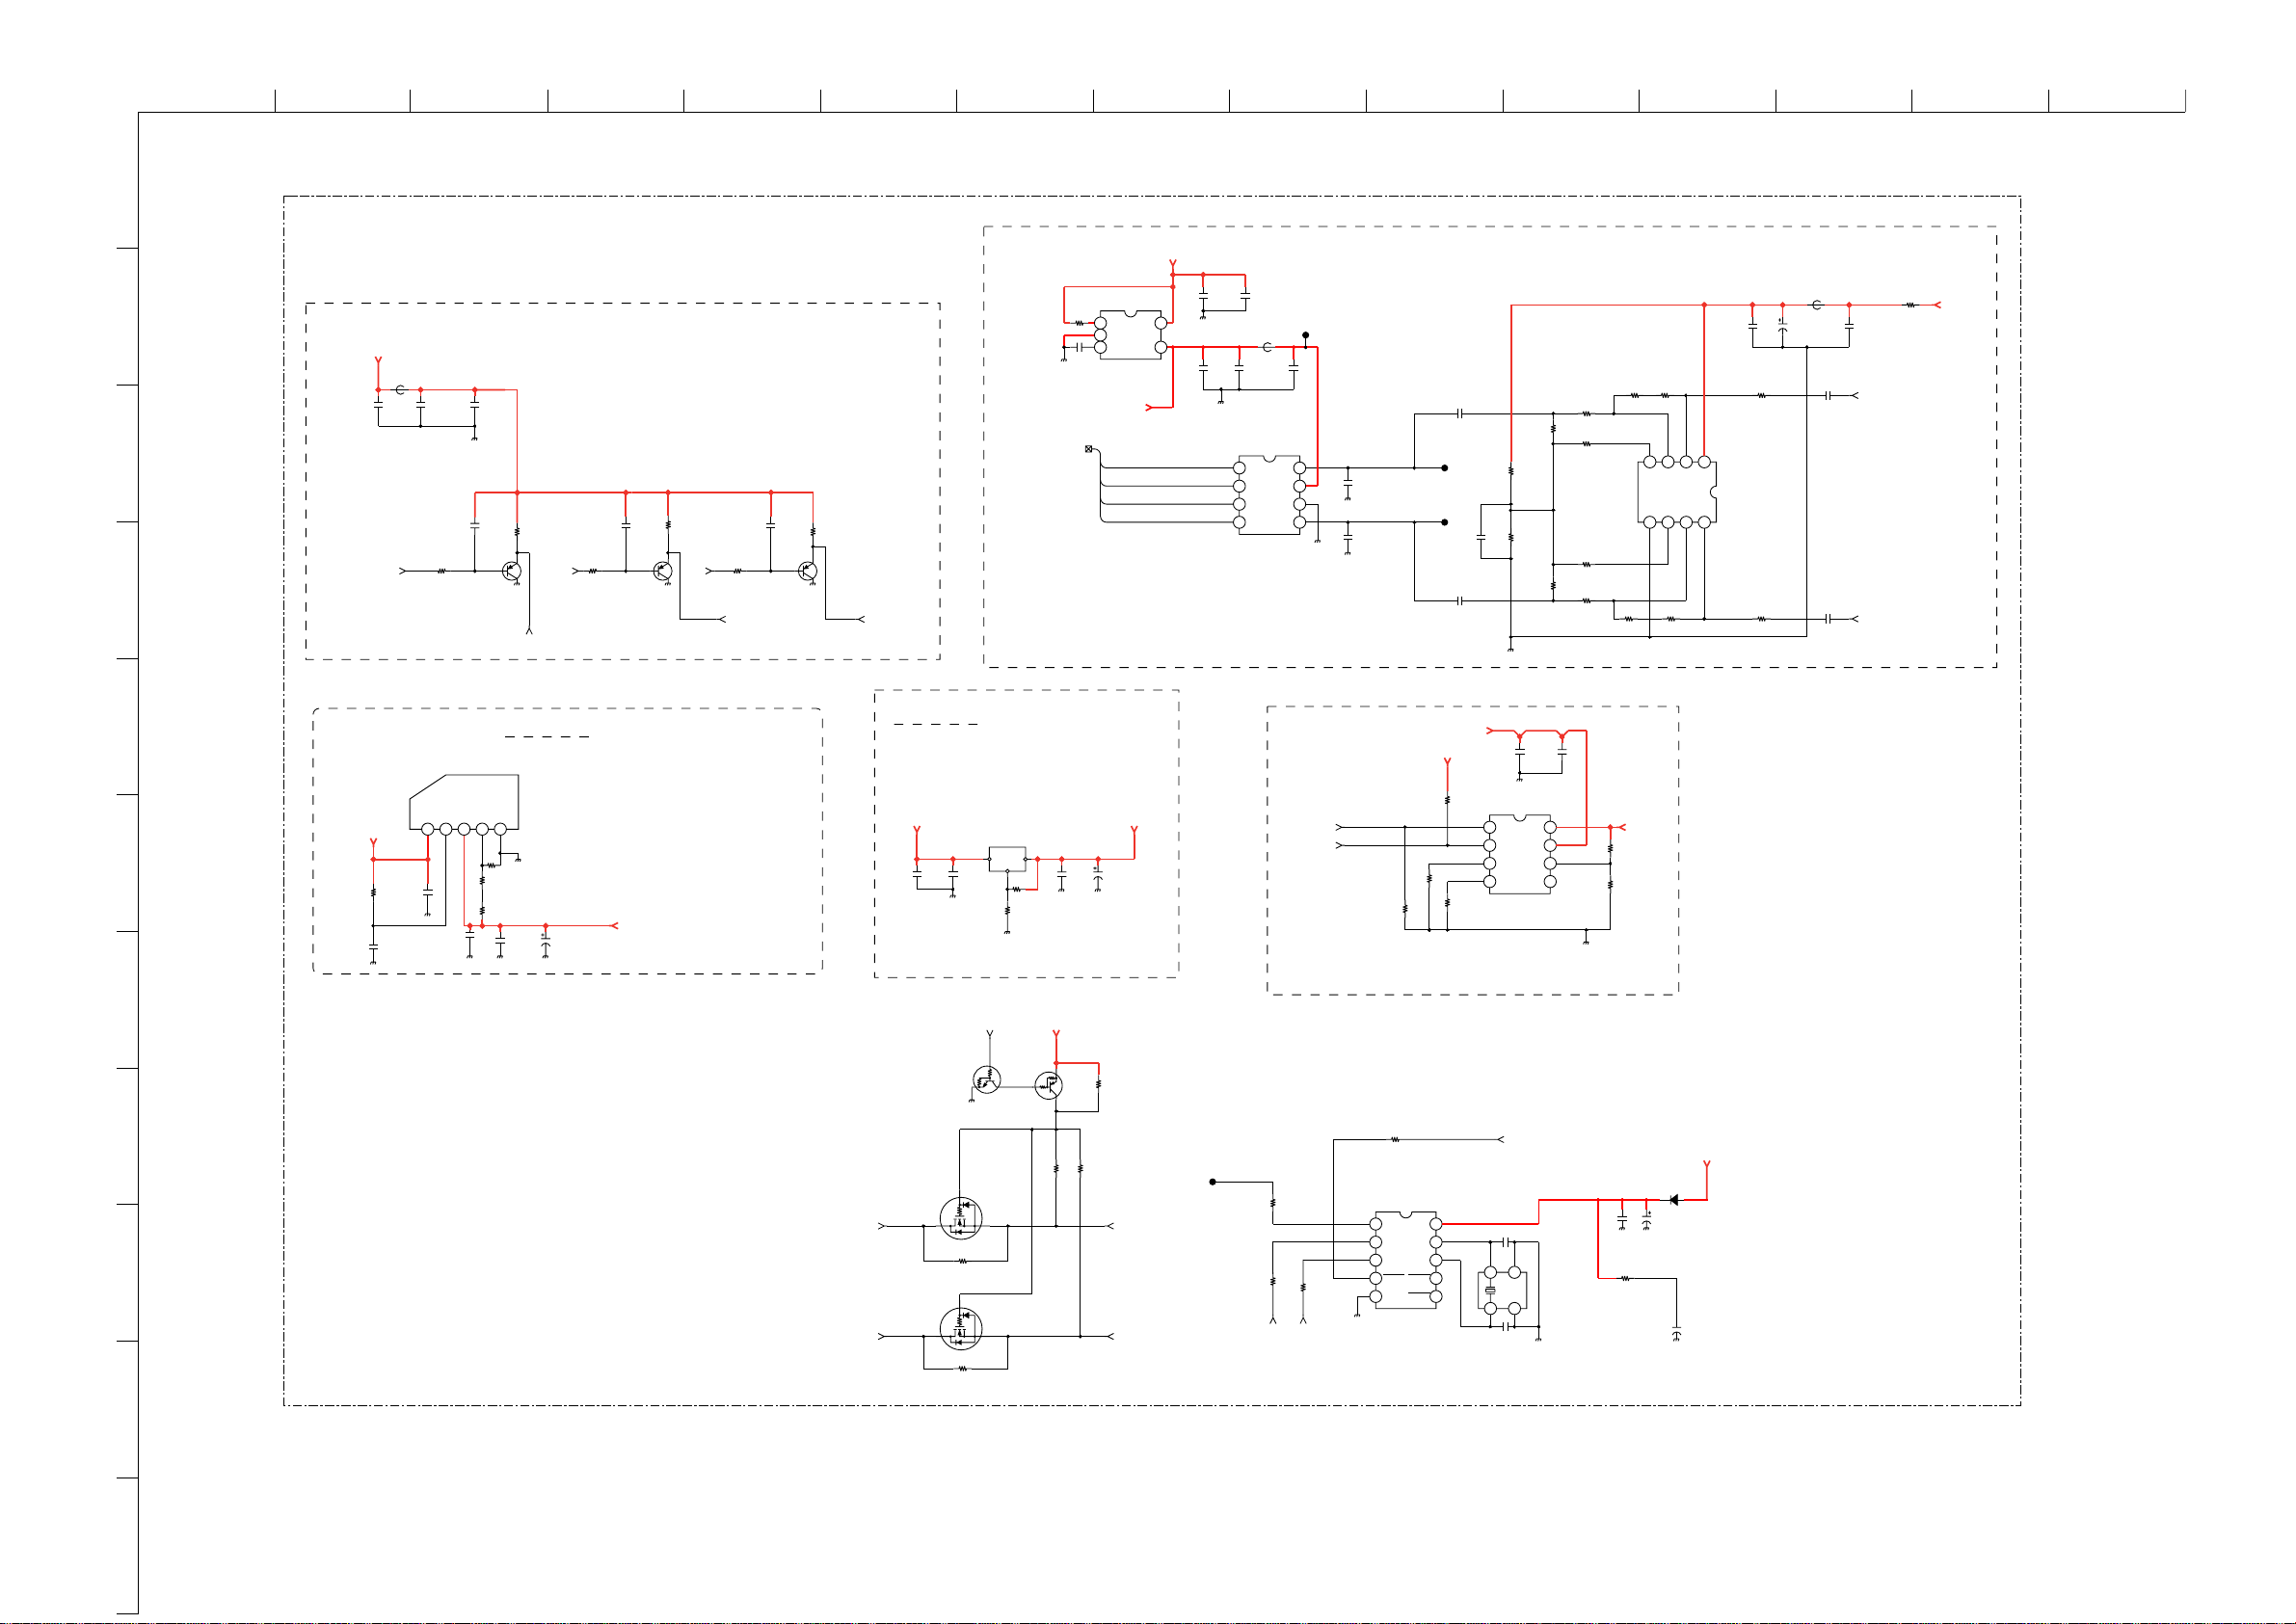
ABCDE F
G
HI JKLMN
O
1
2
3
4
5
6
BDT.-SE-1(KDL-26/32/40U2000)
5V_MAIN
FB5780
0uH
C5780
0.1
10V
CVBS
IC5785
PQ070XNA1ZPH
REGULATOR
3.3V_MAIN
C5805
R5803
0.47
1k
16V
C5803
0.1
10V
C5783
C5781
0.01
0.1
16V
C5782
10p
R5782
220
1/16W
Q5780
MSB709-RT1
VINEN
VOUT
C5817
VREF
R5810
1k
R5811
33
1/16W
XX
12345
VIDEO AMPS/BUFFERS
R5787
R5784
1k
YC_Y
RF_DIGITAL
GND
NOTE R3401, R3406, R3407
ARE 0.5% TOLERANCE.
1k
R5812
C5810
C5809
0.1
10V
100
6.3V
C5784
XX
XX
R5785
XX
Q5781
XX
YC_C
Cu Heatsink
----------Add 20mmx20mm area
Connect to TAB of
Regulator
+2V5
D
EMMA 2V5 REG
R5788
XX
Y_DI
8.5V_MAI
N
C5795
C5792
1
0.1
I
C5781
R5791
TAR5S50
0
CHIP
1
2
3
C5791
0.01
16V
+5V_AUDIO_DAC
ABCK,ADO,ALRCK,AMCK
C5788
R5790
XX
XX
2
Q578
XX
G
C_DIG
CONTROL
GND
NOISE
ADO
ABCK
ALRCK
AMCK
VIN
VOUT
54
25V
C5793
4.7
10V
C5794
0.1
10V
25V
21
43
FB5781
0uH
IC5782
WM8727GED/RV
DATA
VDD
BCKI
LRCK
MCK
JL5784
C5796
0.1
10V
8765
LO
VSS
RO
C5797
100p
C5798
100p
50V
50V
AUDIO DAC & AMP
DAC_L
DAC_R
JL5787
JL5788
C5799
4.7
10V
C5800
4.7
10V
C5801
0.1
10V
R5792
1/16W
R5793
1k
1/16W
1k
R5794
CHIP
R5795
39k
CHI
39k
AMPLIFIER GAIN = 2.0
R5796
18k
1/16W
R5797
10k
CHIP
R5798
10k
CHIP
R5799
18k
P
1/16W
R5800
15k
R5801
15k
CHIP
B+IN
V-
R5802
18k
1/16W
87
65
V+
B_OUT
B-IN
IC5783
NJM3404AM-TE1
A_OUT
A+IN
-IN
A
4321
R5804
18k
C5806
R5807
100
1/16W
R580
100
C5814
0.1
25V
DIGITAL_RF_L
DIGITAL_RF_R
R5814
CHIP
0
8.5V_MAI
N
FB5782
0u
H
0.1
25V
C5807
10
16V
C5811
1
10V
8
C5812
P
1
10V
Cu Heatsink
----------Add 20mmx20mm area
Connect to TAB of
Regulator
3.3V_MAI
C5802
N
XX
C5804
4.7
10V
IC5784
NCP1117STAT3
REGULATOR
VIN VOUT
GND/ADJ
R5805
1k
R5806
200
EMMA 1V5 REG
C5813
C5808
0.1
100
10V
16V
NOTE R3415, R3425, R3426
ARE 0.5% TOLERANCE.
+1V5D
C
I_PWR_EN
nCI_OVR
R5809
10k
CI POWER SWITCH
R5925
0
R5813
10k
3.3V_MAI
5V_MAIN
N
LM3525MX-H/J5000395
USB POWER SWITCH
R5926
XX
C5815
1
10V
IC5786
SINGLE PORT
EN
21
FLAG
3
GND
4
NC
C5816
0.1
10V
8765
OUT
IN
OUT
NC
R5927
R5928
+5VD_CI
0
XX
7
N
Q5922
DTA143EUA-T106
3.3V_MAI
R5924
XX
Q5923
DTC114EUA-T106
RESET_N
10
11
8
R5922
R5923
10k
10k
1/10W
Q5920
2SK2036(TE85L)
SDA
9
BDT
4/11
2SK2036(TE85L)
SCL
Q5921
R5920
R5921
S
XX
S
XX
1/10W
SDA_EMMA
SCL_EMMA
JL5780
R5780
1/10W
R5781
100
1/10W
SCL
100
R5783
100
1/10W
SDA
R5786
3.3k
1/10W
IC5780
RV5C387A-E2
REAL TIME CLOCK
32KOUT
VDD
SCL
OSCIN
SDA
OSCOUT
INTRC
NTRB
I
54321
VSS
NTRA
I
10
9876
C5785
50V
1
234
C5786
KEY
C5787
0.1
1p
X5780
32.768kH
1p
50V
10V
R5789
220
z
1/10W
C5789
47
6.3V
MA113-(TX)
C5790
0.22F
5.5V
+3.3IO
D5780
COMPONENTS MARKED AS XX ARE NOT FITTED ON THIS MODEL
~ BDT Board Schematic Diagram [ Main Microcontroller, Panel Driving, Audio & Video Processor ] Page 4/11 ~
- 39 -
Page 40

ABCDE F
G
HI JKLMN
O
1
2
BDT.-SE-1(KDL-26/32/40U2000)
3
3.3V_MAIN
3.3V_MAI
N
R5840
10k
R5841
XX
1/16W
4
FTV_CONFIG3
FTV_CONFIG0
FTV_CONFIG1
5
FTV_CONFIG2
R5842
XX
R5843
10k
R5844
XX
R5845
10k
R5846
XX
R5847
10k
R5851
XX
C5841
XX
RESET SIGNAL GENERATION
R5854
D5840
I
12
GND
Vcc
XX
C5840
XX
OUT
CD
XX
C5842
XX
43
C5843
XX
R5857
XX
S/W OPTION SELECT R’s
nMASTER_RESET
C5844
6
3.3V_MAIN
R5852
R5861
10k
7
BDT
5/11
R5862
10k
nSMC_INT
CTS0B
RESET_N
R5850
XX
C5840
XX
3.3V_MAIN
R5853
XX
XX
Q5840
XX
R5930
100
1/16W
Q5842
XX
100p
50V
RESET
10
11
8
9
~ BDT Board Schematic Diagram [ Main Microcontroller, Panel Driving, Audio & Video Processor ] Page 5/11 ~
COMPONENTS MARKED AS XX ARE NOT FITTED ON THIS MODEL
- 40 -
Page 41
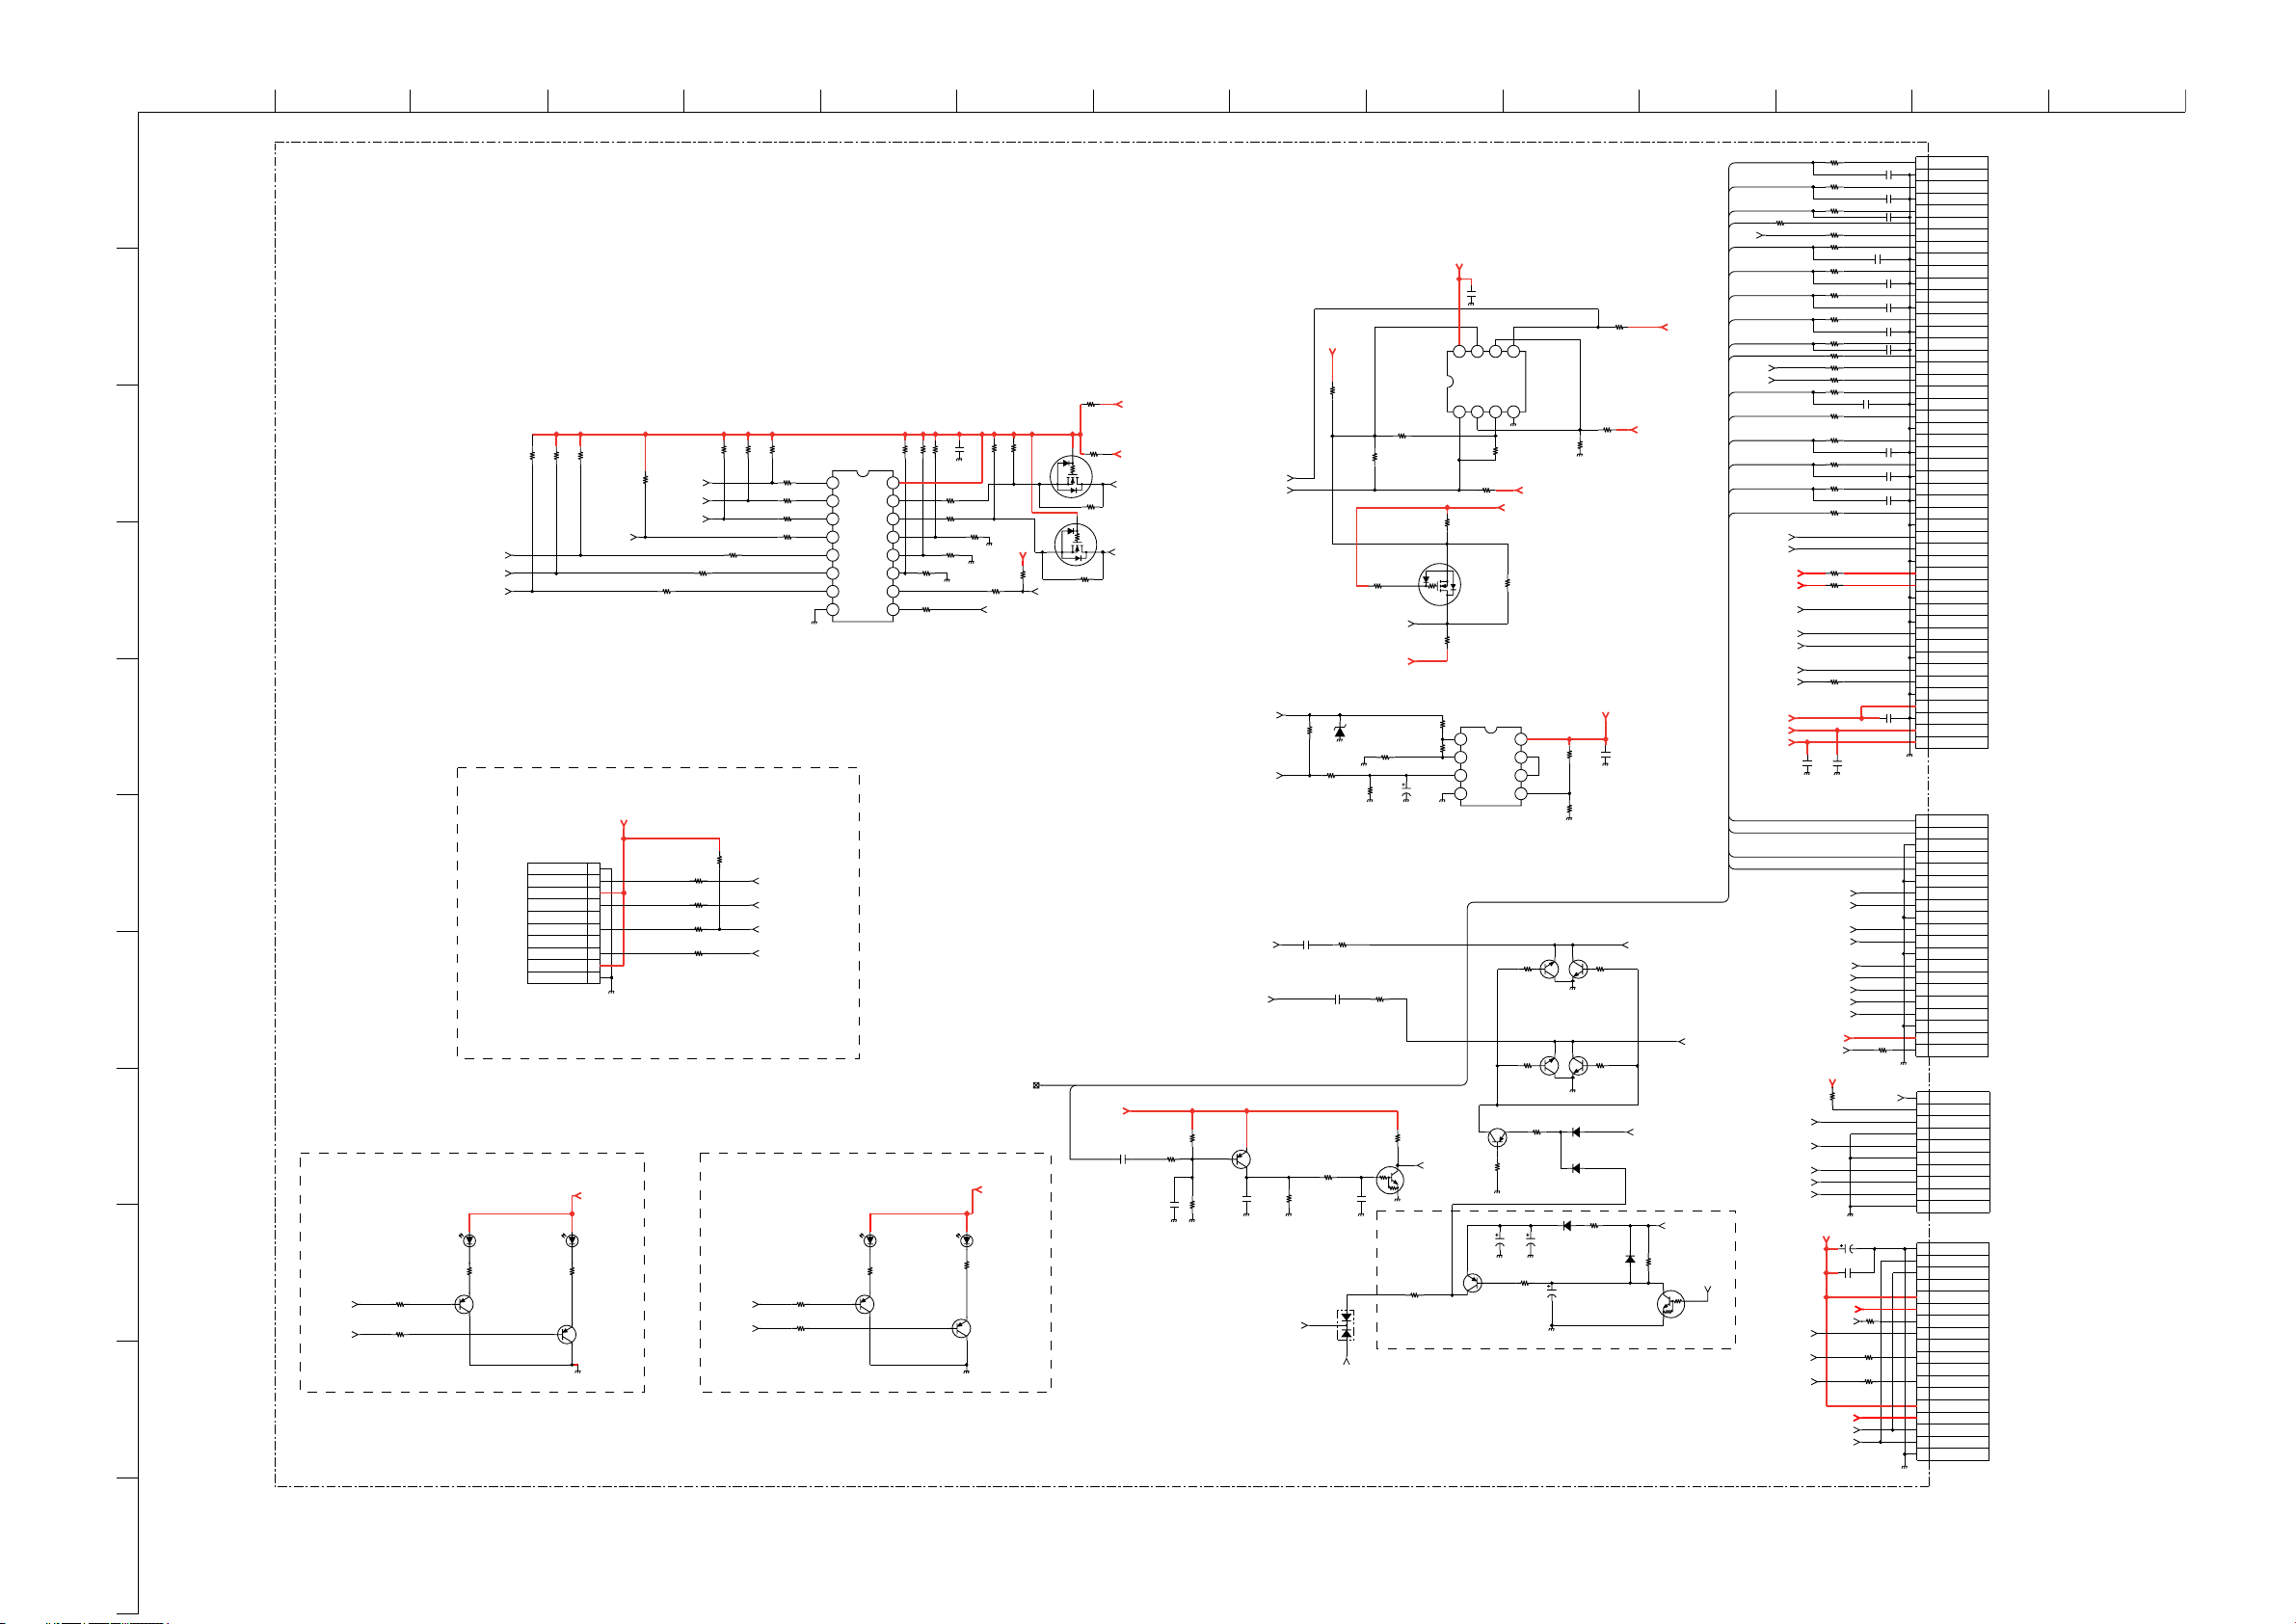
10
ABCDE F
G
HI JKLMN
O
BDT.-SE-1(KDL-26/32/40U2000)
RED_SCART1
LINE_OUT_R
AC_ON/OFF
GREEN_SCART1
BLUE_SCART1
FB_SCART1
R3270
MODE1
CVBS_SCART1CVBS_SCART1
CVBS_LAST_RFCVBS_LAST_RF
RED_SCART2
GREEN_SCART2
BLUE_SCART2
FB_SCART2
AV_LINK
MODE2
CVBS_SCART2
CVBS_SCART2
CVBS_SELEC
Y_HDY_HD
PB_HDPB_HD
PR_HDPR_HD
RF_ANALOG
IF_DIGITAL_+
IF_DIGITAL_ -
AGC_DIGITAL
SDA_OFDM_TUNER
SCL_OFDM_TUNER
UNER_I2C_SWITCH
PORT_CS
UNREG_33V
5V_MAIN
8.5V_MAIN
J
TAG_RESET
JTAG_RESET
P
SDA_5V
SCL_5V
C8925
XX
DBRESET
JIG_MODE
RXD1B_ECS
1
IC3001
C3006
10k
1k
1/10W
R3044
470
1/10W
R3045
0
XX
COINCIDENCE
6
+3.3IO
C3004
0.1
25V
8765
VCC
-IN2
OUT2
OUT1
-IN1
+IN1
R3029
1/10W
R3030
10k
1/10
W
R3019
10k
1/10W
S
R3020
10k
1/10W
IC3003
NJM2904M(TE2)
OPERATIONAL
AMPLIFIER
VCC
OUT1
OUT2
-IN1
-IN2
+IN1
4321
VSS
+IN2
Q3012
2SD601A-R-TX
2SD601A-R-TX
2SA1576A-T106-QR
R3259
1/10
C3072
C309
100
16V
Q3009
2SA1576A-T106-Q
VSS +IN2
4321
47k
+3.3IO
+3.3IO
R3033
XX
8765
R3263
2.2k
1/10W
Q3013
R3264
2.2k
1/10W
Q3010
R3015
2.2k
1/10W
1k
W
4
D3011
100
MMDL914T1
16
V
R3260
22
k
R
R3057
1/10W
R3058
1/10W
2
D3010
MMDL914T1
C3095
10
16V
R3046
10k
1/10W
R3042
10k
1/10W
10k
10k
Q3014
2SD601A-R-TX
R3267
2.2k
1/10W
R3268
2.2k
Q3015
SD601A-R-TX
D3009
MMDL914T1
R3266
470
1/10W
D3012
MMDL914T1
R3043
10k
1/10W
5V_MAIN
C3009
0.1
25V
MUN2213T1
+3.3IO
LINE_OUT_L
LINE_OUT_MUTE
Q3016
+3.3IO
SIGNAL_VCC_P
R3269
47k
1/10W
BDT
6/11
2
+3.3IO
5V_MAIN
Q3388
XX
S
Q3389
XX
S
AGC_DEF
R3386
R3388
R338
XX
R338
0
5V_STBY
7
0
SCL_5V
AV_LINK1
AV_LINK2
0
SDA_5V
9
2
R3191
R3194
XX
1
0
R3195
0
R3198
1k
1/10W
R3200
XX
R3201
IC3008
CXA1875AM-T4
D/A CONVERTER
0
R3203
R3202
R3204
1
SW
VCC
0
SW
0
DAC4
0
DAC3
0
DAC2
DAC1
DAC0
87654321
GND
R3152
XX
3
R3148
XX
R3157
XX
R3179
XX
PANEL_DET
AUDIO_SW
AUDIO_SW
BACKLIGHT
DIMMER
SC1/FRONT
4
HPD1
R3188
0
C3082
0.1
R3384
R3385
16V
XX
XX
XX
XX
XX
16 15 14 13 12 11 10 9
R3223
R3218
R3228
R3229
0
R3230
0
R3233
5V_MAIN
0
0
R325
R3220
R3222
100
1/10W
R3231
0
1k
0
1/10W
R3221
0
COINCIDENCE
1/10W
R3005
XX
Q3000
2SK2036(TE85L)
R3002
2.2k
1/10W
AV_LINK
R3006
10k
1/10W
LM393DT (A)
R3001
DUAL VOLTAGE
10k
COMPARATOR
5V_STBY
5
DIMMER2
DIMMER
R3025
R3034
22k
1/10W
D3000
R3040
68k
1/10
XX
R3041
XX
W
XX
3.3V_MAIN
CN5883
10P
6
External
Connector
7
BLK
GND
1
PMSBS
2
+3V3D
3
PMSDIO
4
5
PMSINS
6
7
PMSSCLK
8
+3V3D
9
GND
10
R5902
R5903
100
R5904
100
R5905
R5906
4.7k
100
PMSBS
PMSDIO
100
PMSSCLK
PMSINS
MONITOR_L
MONITOR_R
C3083
10V
R3240
470
1
1/10W
R3249
C3085
470
1
1/10W
10V
SERVICE (MEMORY STICK) CONNECTOR
RF_ANALOG
to sht 7/11
8
SCL_COFDM
SDA_COFDM
I2C_COFDM
R5898
XX
R5899
XX
D5882
R5900
XX
Q5882
3.3V_MAIN
D5883
R5901
XX
XX
XX
XX
Q5883
XX
I2C_TV
D5880
9
SCL_EMMA
SDA_EMMA
R5880
R5881
XX
XX
R5882
Q5880
XX
XX
R5883
XX
3.3V_MAIN
D5881
XXXX
Q5881
XX
5V_MAIN
RF_ANALOG
C3300
0.1
25V
C3301
270p
50V
R3300
470
1/10W
R3301
22k
1/10W
R3302
220k
1/10W
Q3300
MSB709-RT1
C3302
100p
50V
AMP_MUTE
R3303
33k
1/10W
D3004
M1MA152WK-T1
R3304
33k
1/10W
C3303
0.22
25V
LOUDSP_MUTE
R3305
1/10W
Q3301
MUN2213T1
R301
HARDWARE MUTE CIRCUIT
R3274
0
R3275
R3276
R3277
R3278
0
R328
R3286
SELECT_OUT_R
SELECT_OUT_L
LINE_OUT_L
LINE_OUT_R
AUDIO_SW1
UDIO_SW
A
AU_MUX_OUT_L
AU_MUX_OUT_R
5V_STBY
AGC_DEF
R3293
100
1/10
TDO
TDI
TCK
R3271
R3272
0
R3283
R3284
R3285
R3287
R3288
R3289
R3290
R3291
+3.3IO
W
5V_STBY
SDA_5V
SCL_5V
0
0
0
0
0
0
C3096
TXD1B
0
0
R3273
0
0
0
0
R3279
R3282
0
0
0
C8924
QSS
2
10
16V
C3097
100p
50V
RXD
TXD
0
C3101
C310
C3103
C3105
XX
ANALOG_RF_
ANALOG_RF_
R5863
R5864
R5865
COMPONENTS MARKED AS XX ARE NOT FITTED ON THIS MODEL
C3098
C309
0
C3100
2
XX
XX
C3104
0
C8921
0R3281
0
C3106
C3107
C310
C3109
SCART1_R
SCART1_L
R3292
0
0
0
1
R1
XX
2
GND
3
G1
XX
9
4
GND
5
B1
6
FBLK1
XX
7
MODE1
8
CVBS1_IN
XX
9
GND
10
CVBS1_OUT
11
GND
12
R2
13
GND
14
G2
XX
15
GND
16
B2
17
FBLK2
XX
18
AV_LINK
19
MODE2
20
CVBS2_IN
XX
21
GND
22
CVBS2_OUT
23
GND
24
Y_YUV
XX
25
GND
26
U_YUV
XX
27
GND
28
V_YUV
8
XX
29
GND
30
CVBS_TUNER
31
GND
32
IF_DIGITAL_+
33
IF_DIGITAL_-
34
GND
35
I2C_SDA
36
I2C_SCL
37
GND
38
AGC_DIGITAL
39
GND
40
I2C_SDA_OFDM
41
I2C_SCL_OFDM
42
GND
43
TUNERI2C_SWITCH
44
PORT_CS
45
GND
46
+33V
XX
47
GND
48
+5V
49
+8.5V
R
1
R1 OUT
L
2
L1 OUT
3
GND
4
R1 IN
5
L1 IN
6
GND
7
R2 OUT
8
L2 OUT
9
GND
10
LINEOUT_L
11
LINEOUT_R
12
GND
13
QSS
14
AU_MUX_CTRL_A
15
AU_MUX_CTRL_B
16
AU_MUX_OUT_
17
AU_MUX_OUT_ R
18
AUDIO MONO/5V_STBY
19
AGC_DEFEAT
20
1
TMS
TMS
2
VCC
3
TDO
4
GND
5
RESET
6
GND
7
TDI
8
DBRESET
9
TCK
10
GND
1
GND
2
TXD
3
RXD
4
RES
5
VIN
6
MD0
7
MD1
0
8
MD2
9
NC
10
NC
11
FEW
12
NC
13
DTTLOG
14
VIN
15
B INT
16
RXD
17
TXD
18
GND
CN3005
49P
WHT
CN3006
20
WH
CN3007
10P
CN3008
18P
GND
P
T
TO A1/A1P BOARD
CN2022
TO A1/A1P BOARD
CN2024
L
11
~ BDT Board Schematic Diagram [ Main Microcontroller, Panel Driving, Audio & Video Processor ] Page 6/11 ~
- 41 -
Page 42
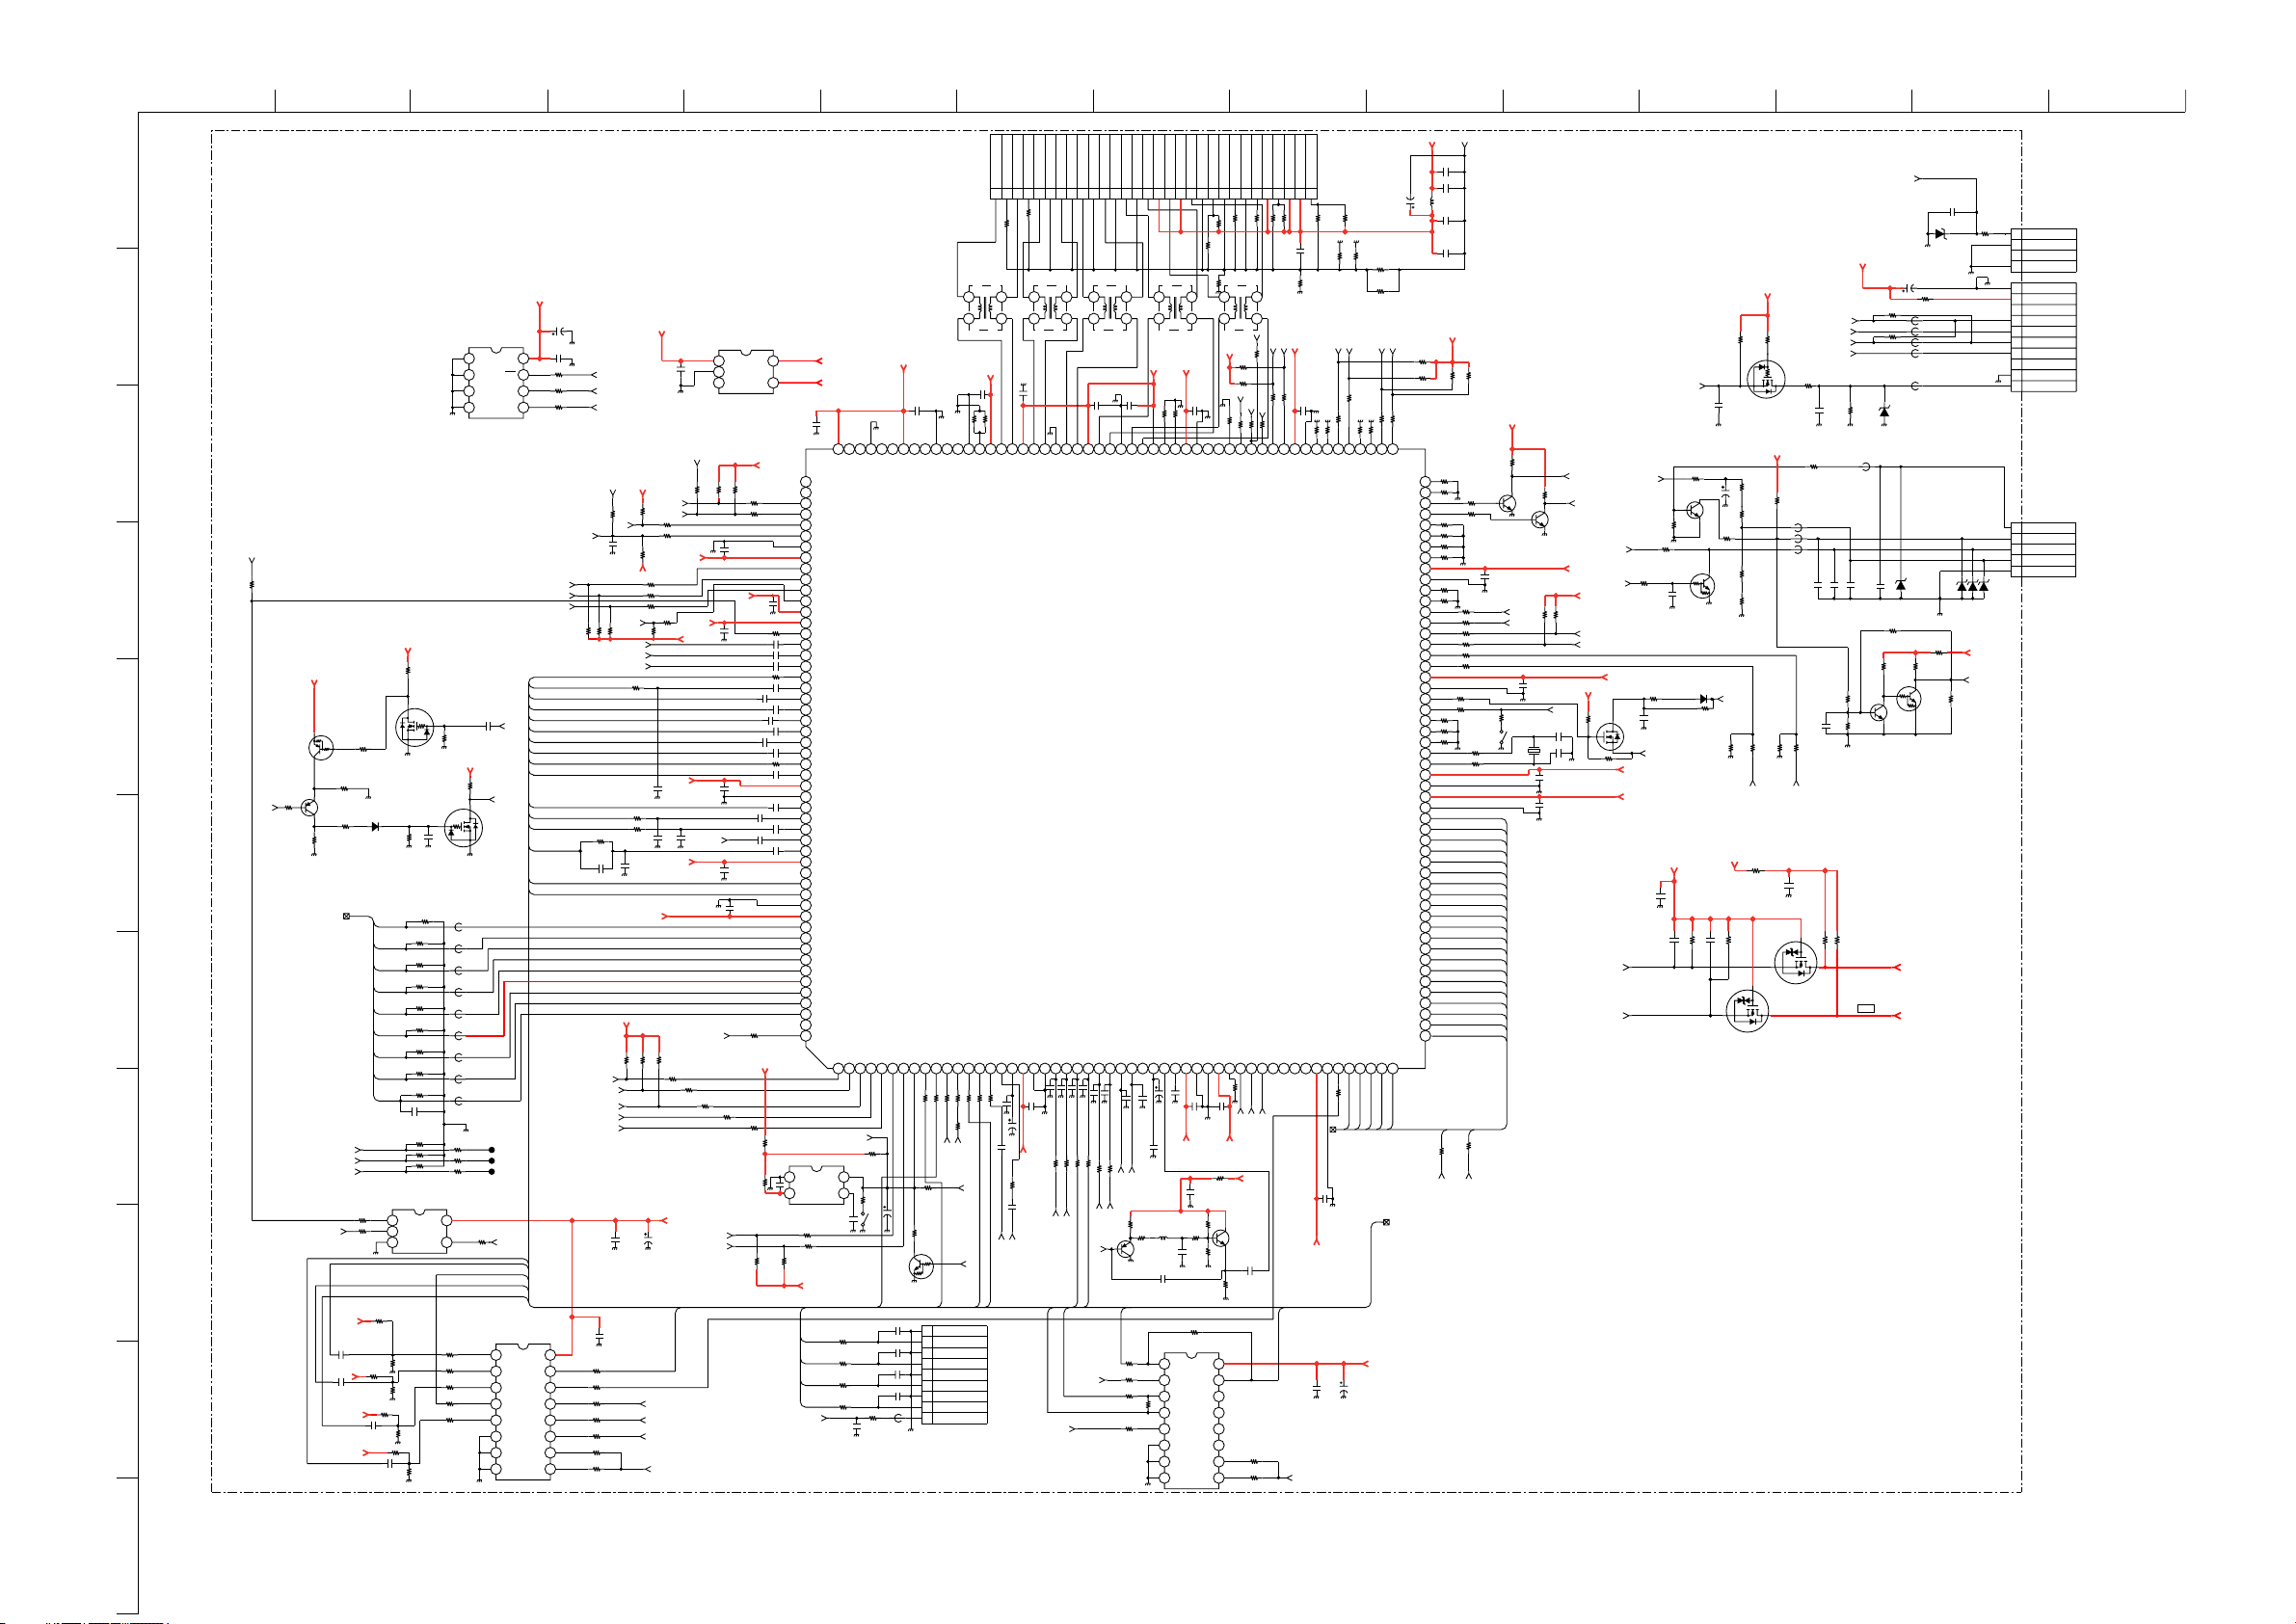
ABCDE F
BDT.-SE-1(KDL-26/32/40U2000)
G
HI JKLMN
PANEL5V_GND
5V_LCD
O
10
CN3001
TA -
GND
TA+
DCC
TB-
GND
TB+
GND
TC-
GND
TC+
GND
TCLK-
GND
TCLK+
VCC
TD-
VCC
TD+
GND
DCC
1
R3378
10k
1/10W
Q3123
MSB709-RT1
R3381
100
1/10
VDO_VVSB
VDO_VHSB
VDO_FLD
PC_H
5V_MAIN
C3001
0.47
10V
5V_MAIN
C3002
0.47
10V
5V_MAIN
5V_MAIN
W
C3003
R3003
R3004
0.47
10V
R3375
100
1/10W
D3014
MMDL914T1
0
0
R3022
1/10W
R3021
220k
7/11
VDO[0]
VDO[1]
VDO[2]
VDO[3]
VDO[4]
VDO[5]
VDO[6]
VDO[7]
VDCLK
R5608
R5609
R5610
TC7S66FU(TE85R)
321
220k
R3023
R3024
C3005
0.47
10V
+3.3IO
R3382
47k
1/10W
XX
XX
XX
R3026
220k
R3027
220k
220k
220k
R3028
S
R5602
R5604
R5605
R5606
R5607
C5600
220k
R5600
R5601
R5603
XX
I
R3374
1/10W
R5611
C3000
R3032
1/10W
47k
Q3120
2SK2036(TE85L)
C3355
1
16V
Q3121
2SK2036(TE85L)
XX
FB5612
XX
FB5613
XX
FB5614
XX
FB5615
XX
FB5616
XX
FB5617
XX
FB5622
XX
FB5623
XX
54
R3035
R3036
R3037
R3038
R3039
220k
IC3004
M24C32-WMN6T(B)
SERIAL EEPROM
E0
VCC
E1
WC
E2
SCL
4321
NSS SDA
PC_V
C3354
R3376
0.022
4.7M
50V
1/10W
+3.3IO
R3377
10k
1/10W
PC_DET
S
0uH
0uH
0uH
0uH
0uH
0uH
0uH
0uH
FB5624
0uH
R5621
XX
JL5609
XX
R5622
JL5610
JL5611
R5623
XX
R3031
0
PC/HDMI
GREEN_SCART1/C_FRONT
Y_FRONT
GREEN_SCART1
MC74LVXT4053DTR2
ANALOG MULTIPLEXER/
DEMULTIPLEXER
0
0
0
0
0
87654321
+3.3IO
C3017
47
6.3V
8765
R3079
0
R3080
0
R3081
0
GREEN_LED
POWER_LCD
POWER_DET
FB_SCART1
BLUE_SCART1/Y_FRONT
GREEN_SCART1/C_FRONT
RED_SCART1
PB_HD
Y_HD
PR_HD
BLUE_SCART2
FB_SCART2
GREEN_SCART2
RED2/C_DIG
CVBS2/Y_DIG
CVBS_SCART1
RF_ANALOG
CVBS_SELEC
CVBS_LAST_RF
TUNER_I2C_SWITCH
POWER_ON/POWER_ON_LED
BLUE_SCART1
C_FRONT
IC3002
16 15 14 13 12 11 10 9
R3047
XX
C3018
0.1
25V
KEY
R3370
R3048
R3049
R3050
R3051
R3052
R9032
C3120
R3055
C3123
R3053
R3054
0
XX
XX
XX
SIRCS
0
0
NVM_WP
SCL
SDA
PORT_CS
0
R3059
10k
1/10W
TCK
TDO
C8922
0
0
0
0
0
R3060
XX
PC/HDMI
R3061
1k
1/10W
REC_LED
R3056
XX
PC_BLUE
PC_GREEN
PC_RED
R3373
R3372
+3.3IO
C3007
0.1
25V
0.1
25V
+3.3IO
R3371
+3.3IO
R3066
XX
C3112
0
C3130
XX
+3.3IO
XX
R3065
AC_ON/OFF
R3068
R3064
100
0
XX
0
PC_V
HDMI_V
PC/HDMI
I NT_HDMI
1/10W
5V_STBY
C3079
XX
R3383
R3067
100
+3.3DAC
R3062
R3063
100
R3069
100
+1.8FE
C3110
+3.3VO
PD_HDMI/MAIN_ON
R3070
XX
R3071
100
5V_MAIN
C3008
47
6.3V
SC1/FRONT
XX
100
R3072
PC_DET
+3.3FE
+3.3IO
XX
100
R3073
BLUE_SCART1/Y_FRONT
C3111
XX
R8980
XX
100
C3012
0.1
16V
RF_DIGITAL
100
C3026
C3015
R3074
C3010
C3011
C3019
C3021
C3027
C3020
C3028
TDI
TMS
1
2
3
0.1
16V
C3025
Vcc
GND
+1.8FE
C3022
C3023
C3024
0.1
C3016
C3032
100
IC3009
R6568
0.1
0.1
0.1
0.1
0.1
0.1
C3031
C3013
0.1
16V
C3014
R3082
XX
4.7k
R3084
R3085
16V
0.1
16V
R3078
R3088
XX
16V
C3033
0.1
16V
16V
16V
R3077
100
1/10W
100
SM2
0.1
16V
0.1
0.1
16V
16V0.1
16V
C3029
C3030
0.1
0.1
+3.3IO
0
SM1
16V0.1
54
+3.3IO
R3075
R3076
R3083
16V
16V
16V
0
0
0.1
16V
16V
R3087
C3114
0.1
25V
R3086
XX
0.1
0.1
100
100
0
0
3.3LVDS
VS14
P4_5
DBO9
P4_4
GND3.3LVDS
P4_3
DBO7
P4_2
DBO6
P4_1
+
VSUP3.3LVDS
P4_0
R3097
C3035
0.1
16V
100
DBO4
RESET Q
DBO3
AIN1R
GND3.3LVDS
AIN1L
SCL_5V
SDA_5V
C8923
0.1
16V
157
ADHD
158
RCON
VSUP3.3LVDS
159
P1_7
160
P1_6
161
P1_5
162
P1_4
163
GND3.3DAC
164
VSUP3.3DAC
165
P1_3
166
P1_2
167
P1_1
168
P1_0
169
VSUP1.8FE
170
VSUP3.3FE
171
V IN 22
172
V IN 21(CVBS)
173
V IN 20(Y)
174
V IN 19
175
V IN 18 H SYNC/FB
176
V IN 17 B IN
177
V IN 16 G IN
178
V IN 15 R IN/C
179
V IN 13 B IN
180
V IN 12 G IN
181
V IN 11 R IN
182
V IN 9
183
V IN 8
184
V IN 7
185
VSUP1.8FE
16V
186
GNDA
16V
187
V IN 6
188
V IN 5
189
V IN 3
190
V IN 2
191
V IN 1
192
VSUP3.3VO
193
VOUT3
194
VOUT2
195
VOUT1
196
GND3.3IO3
197
VSUP3.3IO3
198
656I0
199
656I1
200
656I2
201
656I3
202
656I4
203
656I5
204
656I6
205
656I7
206
656CLKI
207
AVD6
208
P4_7
P4_6
12345678910111213141516171819202122232425262728293031323334353637383940414243444546474849505152
100
SCART1_L
C3036
C3037
C3038
C3039
FB3099
0uH
MUN2211T1
R3098
0
R3096
10k
1/10W
Q3001
XX
1
2
XX
3
4
XX
5
6
XX
7
8
9
TO H2/H2P BOARD
R3100
SCART1_R
GND
C_FRONT
GND
Y_FRONT
GND
L_FRONT
GND
R_FRONT
HP_DET
CN9855
12
PST3629UL
R3089
100
1/10W
R3090
100
1/10W
C_FRONT
Y_FRONT
FRONT_L
FRONT_R
HP_DET
IC3005
+3.3IO
C3078
0.1
25V
R3092
R3093
R3094
R3095
C3131
0.1
25V
RESET
43
S3001
0
0
0
0
0
R6552
R3091
1/10W
C3034
R3299
1/10W
10k
XX
220
BDT
2
3
HDMI_H
R3000
4
5
6
7
8
9
0
Q3122
DTA114EUA-T106
R3379
10k
1/10W
R3380
1/10W
POWER_ON/POWER_ON_LED
VDCLK,VDO[0-7]
+3.3IO
10k
R3106
68k
1/10W
DBO0
DBO1
AIN2R
AIN2L
100
R3103
DIGITAL_RF_L
DIGITAL_RF_R
JTAG_RESET
DBRESET
C3040
0.1
16V
R3108
100
R3101
R3104
2
3
GND1.8LVDS
AIN3R
0
L3000
R3105
FRONT_L
0uH
REXT
AIN3L
100
100
R3107
FRONT_R
CN3000
+1.8LVDS
6.8k
VSUP1.8LVDS
AIN4R
0.22
WHT
1
100
R3109
C3041
9P
2
3
4
0
0
R3112
R3110
1
4
C3115
0.1
16V
LVDSA_0P
LVDSA_ON
VSUP3.3LVDS
AIN4L
VREFAU
VSUP8.0AUGNDA
C3042
0.1
C3045
0.1
16V
16V
C3043
10
+8.0AU
R3111
100
C3044
0.22
16V
AU_MUX_OUT_L
AU_MUX_OUT_R
56789
L3001
0uH
2
3
LVDSA_1P
LVDSA_1N
SGND
XX
C3046
R3113
100
C_DIG
G
RED2/C_DI
10
121314
11
15
16
L3002
L3003
0uH
1
3
4
C3050
0.1
16V
0uH
2
12
4
3
3.3LVDS
+
C3051
0.1
16V
XX
R3122
LVDS-2N
LVDSA_2P
GND3.3LVDS
VIDEO CONTROLLER/TELETEXT IC
OUT2R
OUT2L
AOUT1R
XX
0.1
0.1
C3047
C3048
C3049
100
100
100
R3115
R3116
R3114
SELECT_OUT_L
SELECT_OUT_R
ANALOG_RF_L
ANALOG_RF_R
RED_SCART2
Y_DIG
VSUP3.3LVDS
AOUT1L
2200p
100
R3310
QSS
LVDSA_CLKN
IC3006
VCT6973G
HEADPHR
2200p
C3201
C3200
100
R3311
MONITOR_L
MONITOR_R
R3118
R3119
GND3.3LVDS
LVDSA_CLKP
HEAPPHL
SPEAKERR
2200p
C3052
LINE_R
Q3350
MSB709-RT1
R3117
CVBS_SCART2
0
R3121
0
R3120
XX
LVDSA_3P
LVDSA_3N
SPEAKERL
SUBWOOFER
C3053
2200p
50V
C3054
0.1
25V
LINE_L
R3350
1k
R3351
47
0
XX
VSUP3.3LVDS
VREFSIF
16V
10
L3350
8.2uH
C3350
120p
C3351
XX
C3055
R3123
XX
LVDSA_4N
SIFIN+
C3056
0.1
25V
87654321
17
18
+1.8DIG
C3057
LVDSA_4P
VSUP1.8DIG
SIFIN-
VSUP5.0SIF
C3058
16V
+5.0SIF
R3353
R3352
R3354
R3124
IC3007
XX
19
1
4
0.1
16V
0.1
XX
XX
0
GND1.8DIG
GNDA
C3352
0
R3355
20
21
XX
R3126
R3125
0
R3127
HOT_PLUG_DET1
DYO2
GND3.3DIG
C3059
0.1
16V
XX
1k
GNDNCGNDNCVCC
22
23
0
R3129
XX
L3004
0uH
2
3
R3390
XX
+3.3IO
R3130
XX
R3131
XX
XX
100
R3128
R3133
P4_2
P4_3
DYO1
VSUP3.3DIG
SPDIF OUT
I2S DA_IN
AUDIODATA_HDMI
+3.3MSP
+8.0AU
R3356
0
Q3351
MSD601-RST1
C3353
4700p
50V
16 15 14 13 12 11 10 9
R3134
R3135
24
25
0
R3137
1
4
SC2/DIG
PC_DET
PD_HDMI
100
R3136
P4_0
P4_1
I2S_CL
I2S_WS
XX
R3132
AUDIOWS_HDMI
AUDIOCLK_HDMI
XX
XX
DCC LUT
272829
26
XX
C3061
470p
50V
R3139
P
NVM_W
RESET_N
100
R3138
P2_6
P2_7
I2S_DEL_OUT
I2S_DEL_IN
CVBS2/Y_DIG
VCC
VCC
XX
R3141
R3143
+3.3IO
100
C3060
R3140
0.1
16V
100
R3144
R3142
VSUP3.3IO1
I2S_DEL_CL
C3063
0.1
16V
C3062
XX
SC2/DIG
30P
DCC MODE
WHT
30
R3149
R3153
0
0
R3146
R3145
XX
OSDR0
GND3.3IO1
I2S_DEL_WS
VSUP3.3RAM
+3.3RAM
XX
P
EDID_W
0
R3151
XX
OSDR2
OSDR1
GND3.3RAM
DVS
0
R3147
HDMI_VIDEO
R3155
DE
XX
HP_DET
R3150
100
XX
OSDR3
DEN
DCLK
C3064
XX
R3158
R3156
OSDG0
DCLK
0
R3160
0
R3161
0
0
R3154
XX
OSDG1
VSUP3.3IO1
GND3.3IO1
VSUP3.3FL
VSUP3.3COM
GND3.3COM
VSUP3.3DRI
GND3.3DRI
DRI7
DR7
DR6
5V_MAIN
C3065
47
16V
TXD
RXD
R3159
105106107108109110111112113114115116117118119120121122123124125126127128129130131132133134135136137138139140141142143144145146147148149150151152153154155156
OSDG3
OSDG2
OSDB0
OSDB1
OSDB2
OSDB3
OSDHCS0
OSDHCS1
OSDFSW
OSDCLK
FFSW
GND3.3FL
AVD3
XTALOUT
XTALI N
DRI6
DRI5
DR5
RF_ANALOG
To sht 6/11
R3163
VD6
P2_5
P2_4
P2_3
P2-2
P2_1
P2_0
SDA
SCL
DBI0
DBI1
DBI2
DBI3
DBI4
DBI5
DBI6
DBI7
DGI0
DGI1
DGI2
DGI3
DGI4
DGI5
DGI6
DGI7
DRI0
DRI1
DRI2
DRI3
DRI4
0
S1
S0
R3162
XX
10k
R3175
C3066
XX
C3067
XX
L3005
0uH
C3068
1000p
50V
C3069
0.01
25V
3.3V_STBY
STBY_LED
+3.3IO
XX
XX
R3189
R3176
SIRCS
5V_STBY
R3193
10k
1/10W
R3164
XX
Q3002
104
2SC4617TL-QR
103
R3186
XX
R3165
10k
102
10k
R3187
101
100
R3166
XX
XX
R3167
99
98
97
96
95
94
93
92
91
90
89
88
87
86
85
84
83
82
81
80
79
78
77
76
75
74
73
72
71
70
69
68
67
66
65
64
63
62
61
60
59
58
57
56
55
54
53
0
R3170
R3171
R3177
R3178
R3174
XX
XX
HS
HDMI_H
XX
10
100
R3172
R3173
R3321
0
R3168
R3169
XX
XX
R3180
R3181
R3182
R3183
R3184
R3185
R3190
HDMI_V
100
VS
R3192
R3320
0
0
XX
XX
C3070
0.1
16V
AV_LINK1
100
AV_LINK2
100
100
100
100
S3000
0
0
DB0
DB1
DB2
DB3
DB4
DB5
DB6
DB7
DG0
DG1
DG2
DG3
DG4
DG5
DG6
DG7
DR0
DR1
DR2
DR3
DR4
C3071
X3000
20.25MHz
0.1
16V
LOUDSP_MUTE
R3196
10k
1/10W
Q3003
2SC4617TL-QR
+3.3IO
XX
R3199
XX
R3197
SCL
C3075
15p
50V
C3076
15p
C3073
0.1
16
V
C3074
0.1
16V
LINE_OUT_MUTE
BACKLIGHT
AC_ON/OFF
+3.3IO
STBY_LED
TIMER_LED
+3.3IO
R3393
10k
1/10W
R3391
SCL
SDA
+3.3FL
S
XX
PMBF170-215
DIMMER2
R6582
Q3017
+3.3COM
+3.3DRI
C3318
0
R3392
1/10W
XX
R3298
330k
1/10W
R3225
2.2k
1/10W
C6579
1
10V
100
C3116
0.22
16V
SDA
3.3V_STBY
C3088
XX
R3232
R3251
4.7k
1/10W
0
C3084
XX
Q6515
MUN2211T1
D3015
MMDL914T1
R3394
47k
1/10W
0
R3297
100
1/10W
Q302
2SC4081T106R
R3213
2.2k
1/10W
5V_STBY
C3091
XX
C3077
RESET
XX
R3215
6.8k
1/10W
R3255
4.7k
1/10W
R3209
1/16W
S
R3236
R3237
R3238
R3239
R3257
CHIP
10k
0
0
XX
XX
MODE1
0
R3212
10k
1/16W
3.3V_MAIN
R3296
100k
1/10W
FB3013
R3219
2.2k
1/10W
2SK2158-T2B
LEVEL SHIFT
Q3008
2SK2158-T2B
TIMER_LED
GREEN_LED
REC_LED
Q3004
2SK2036(TE85L)
R3216
0
C3081
R3295
0
FB3012
0uH
FB3014
0uH
C309
0
0.01
C3092
25V
4.7
6.3V
R3247
1/10W
C3087
XX
R3224
6.8k
1/10W
MODE2
C3319
XX
R3262
2.2k
1/16W
Q3011
220
50V
0uH
C3093
68k
R3265
2.2k
1/16W
5V_STBY
R3235
R3099
XX
FB3046
0u
C3080
0.01
25V
0.01
25V
R3248
330k
1/10W
2SC4081T106R
KEY
R3234
H
Q3006
XX
R3254
XX
R3252
1/10W
KEY
D3005
RD5.6SB-T1
C3086
22
6.3V
XX
D3003
XX
D3013
10k
DTC114EUAFT106
SCL_5V
SDA_5V
XX
FB3241
FB3242
FB3243
FB3244
FB3245
R3256
10k
1/10W
Q3007
0uH
0uH
0uH
R3261
R3258
R3246
XX
C3089
100p
50V
0
0uH
0uH
D3006
D300
XX
0
R3253
XX
5V_MAIN
7
D3008
0
XX
TO H1/H1P BOARD
CN9000
1
KEY
2
GND
3
NC
4
GND
1
GND
2
STBY+5V
3
NC
4
STBY_LED
5
ON_TIMER
6
GREEN_LED
7
REC/RESERVE
8
NC
9
GND
10
SIRCS
TO H3/H3P BOARD
CN9300
CN3004
5P
WH
T
1
PANEL DET 20/40
PANEL DET 26/32
2
3
BACKLIGHT
4
DIMMER
5
GND
TO LCD PANEL
CN3002
CN3003
10P
4P
PANEL_DET
COMPONENTS MARKED AS XX ARE NOT FITTED ON THIS MODEL
11
~ BDT Board Schematic Diagram [ Main Microcontroller, Panel Driving, Audio & Video Processor ] Page 7/11 ~
- 42 -
Page 43
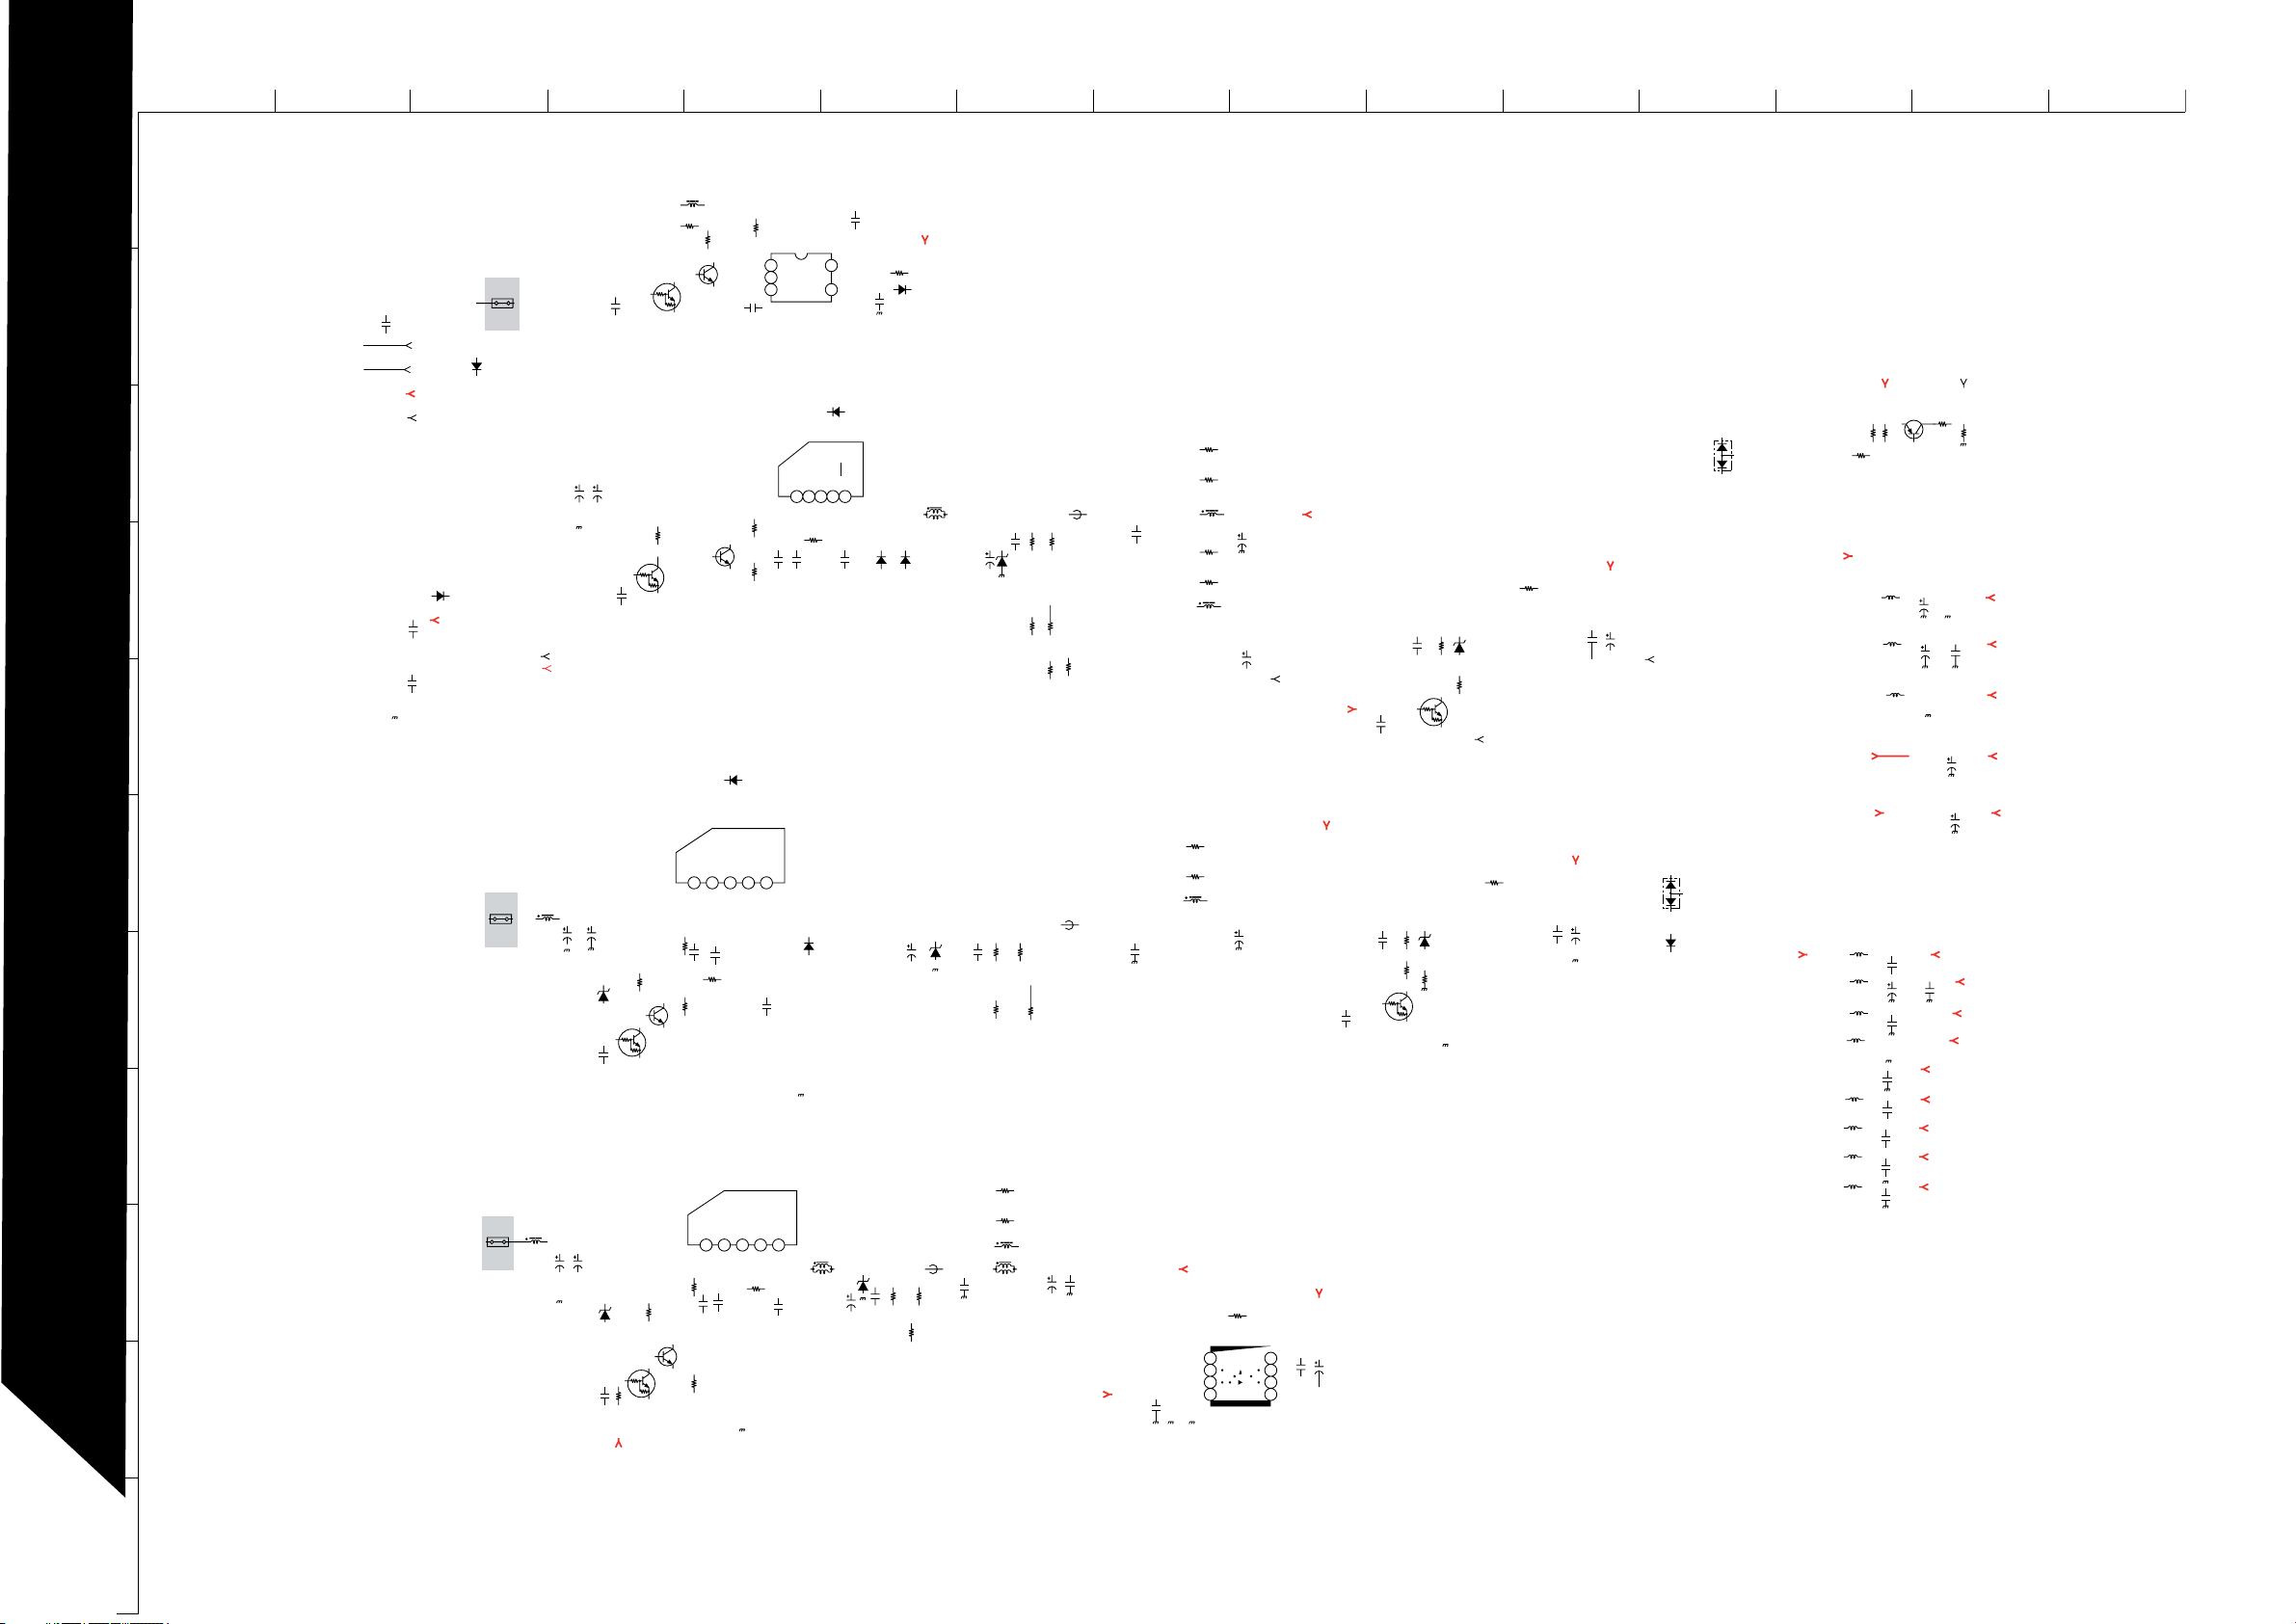
ABCDE F
G
HI JKLMN
O
10
1
2
C6500
0.01
25V
LINE_L
LINE_R
UNREG_33V
AMP_MUTE
PS6501
3.15A
D6501
M1FM3
C6512
0.01
50V
MUN2211T1
3
C6509
C6507
470
470
25V
25V
D6500
C6503
0.01
25V
C6502
0.01
25V
M1FM3
5V_STBY
C6513
0.01
25V
AC_ON/OFF
POWER_ON/POWER_ON_LED
4
5
6
L6501
47uH
PS6502
3.15A
C6508
C6505
470
470
25V
25V
R6500
10k
1/10W
7
D6502
UDZSTE-173.0B
C6510
0.01
25V
MSD601-RT1
Q6500
MUN2211T1
8
L6500
PS6500
47uH
3.15A
C6504
9
C6506
470
470
25V
25V
R6501
D6503
XX
1/10W
Q6505
MSD601-RT1
Q6501
MUN2211T1
C6511
0.01
R6570
25V
1/10W
Q6504
10k
1k
R6502
10k
1/10W
Q6503
MUN2211T1
R6503
XX
L6503
10uH
R6507
R6508
XX
10k
1/10W
Q6506
MSD601-RT1
Q6507
MSD601-RT1
Q6502
V IN
V OUT
12345
C6514
XX
R6572
R6504
10k
XX
1/10W
V IN
12345
R6505
XX
C6515
0.1
25V
C6517
4.7
25V
R6506
XX
C6519
R6510
XX
D6504
MMDL914T1
IC6500
PQ1CY1032ZP
COM
C6516
4.7
25V
PQ1CY1032ZP
V OUT
R6511
10k
1/10W
21
3
0.01
50V
IC6503
PQ1CY1032ZP
R6509
XX
C6521
XX
OAOJ
ON/OFF
IC6501
COM
DAOJ
R6573
10k
IC6502
TK11185CSCL-G
VIN
12345
R6569
10k
1/10W
C6523
4.7
25V
C6520
0.1
25V
ON/OFF
C6522
0.1
25V
54
C6528
D6508
MMDL914T1
VOUT
COM
0ADJ
ON/OFF
C6524
0.1
25V
RB053L-30TE25
D6507
RB063L-30TE25
L6504
47uH
PTZ-TE25-3.9B
C6525
470
C6527
6.3V
0.22
16V
D6510
D6509
XX
C6526
0.22
16V
C6529
470
6.3V
R6512
0
D6511
XX
RB053L-30TE25
PTZ-TE25-3.9B
R6513
1.8k
1/10W
R6515
1/10W
8.5V_MAIN
L6506
47uH
D6512
D6513
FB6500
R6516
1/10W
12k
C6562
47
16V
C6563
16V
47
R6550
0
CHIP
C6565
+3.3MSP
C6570
+3.3IO
+3.3LVDS
+3.3DAC
+3.3FE
+3.3VO
C6571
47
16V
C6566
XX
POWER_DET
R6551
10k
1/10W
+1.8DIG
+1.8FE
XX
+1.8LVDS
+8.0AU
+5.0SIF
47
16V
+3.3RAM
+3.3COM
+3.3FL
3.3V_STBY
Q6514
MSB709-RT1
R6548
1.8V_STBY
10k
1/10W
R6547
10k
1/10W
8.5V_MAIN
5V_MAIN
L6520
1uH
L6521
1uH
L6522
1uH
L6519
1uH
L6518
1uH
L6514
1uH
L6515
1uH
L6516
1u
H
R6549
10k
1/10W
L6523
1u
L6524
1uH
L6525
1uH
H
C6553
C6554
C6555
C6559
C6560
16V
C6561
10V
C6556
10
10V
C6557
10
10V
10
10V
10
10V
10
10V
10
10V
47
10
D6520
R6534
XX
R6535
L6512
47uH
R6536
R6537
L6511
10uH
R6532
XX
R6533
XX
L6509
10uH
1.8V_STBY
XX
5V_MAIN
C6541
XX
XX
XX
C6548
C6542
XX
PANEL5V_GND
R6538
C6540
XX
POWER_LCD
3.3V_STBY
XX
1.8V_MAIN
C6544
C6543
1
16V
C6546
R6539
150k
1/10W
C6547
0.001
50V
R6540
33k
1/10W
C6545
0.1
16V
XX
16V
0.1
16V
1
R6542
150k
D6516
MM3Z13VT1
R6541
Q6510
MUN2211T1
D6517
MM3Z13VT1
MUN2211T1
XX
Q6511
R6544
XX
PANEL5V_GND
R6545
XX
R6546
XX
C6549
16V
5V_LCD
C6551
1
16V
C6552
XX
PANEL5V_GND
3.3V_MAIN
D6518
C6550
XX
1PS181-115
D6519
MMDL914T1
1
FB6502
R6526
CHIP
C6534
XX
R6523
3.9k
0
XX
R6521
3.6k
1/10W
R6522
2.2k
1/10W
R6527
XX
R6525
XX
FB6501
0uH
R6528
CHIP
0uH
C6535
3.3V_MAIN
C6539
0.1
25V
0
C6538
0.1
25V
0.1
25V
C6536
0.1
16V
C6533
C6532
D6514
1000
6.3V
PTZ-TE25-5.6B
R6524
1.3k
1/10W
R6517
C6531
XX
XX
R6518
XX
R6519
XX
R6520
XX
L6508
C6530
0.1
25V
10uH
L6507
XX
0uH
18k
1PS181-115
3.3V_STBY
11
3.3V_STBY
~ BDT Board Schematic Diagram [ Main Microcontroller, Panel Driving, Audio & Video Processor ] Page 8/11 ~
- 43 -
Page 44
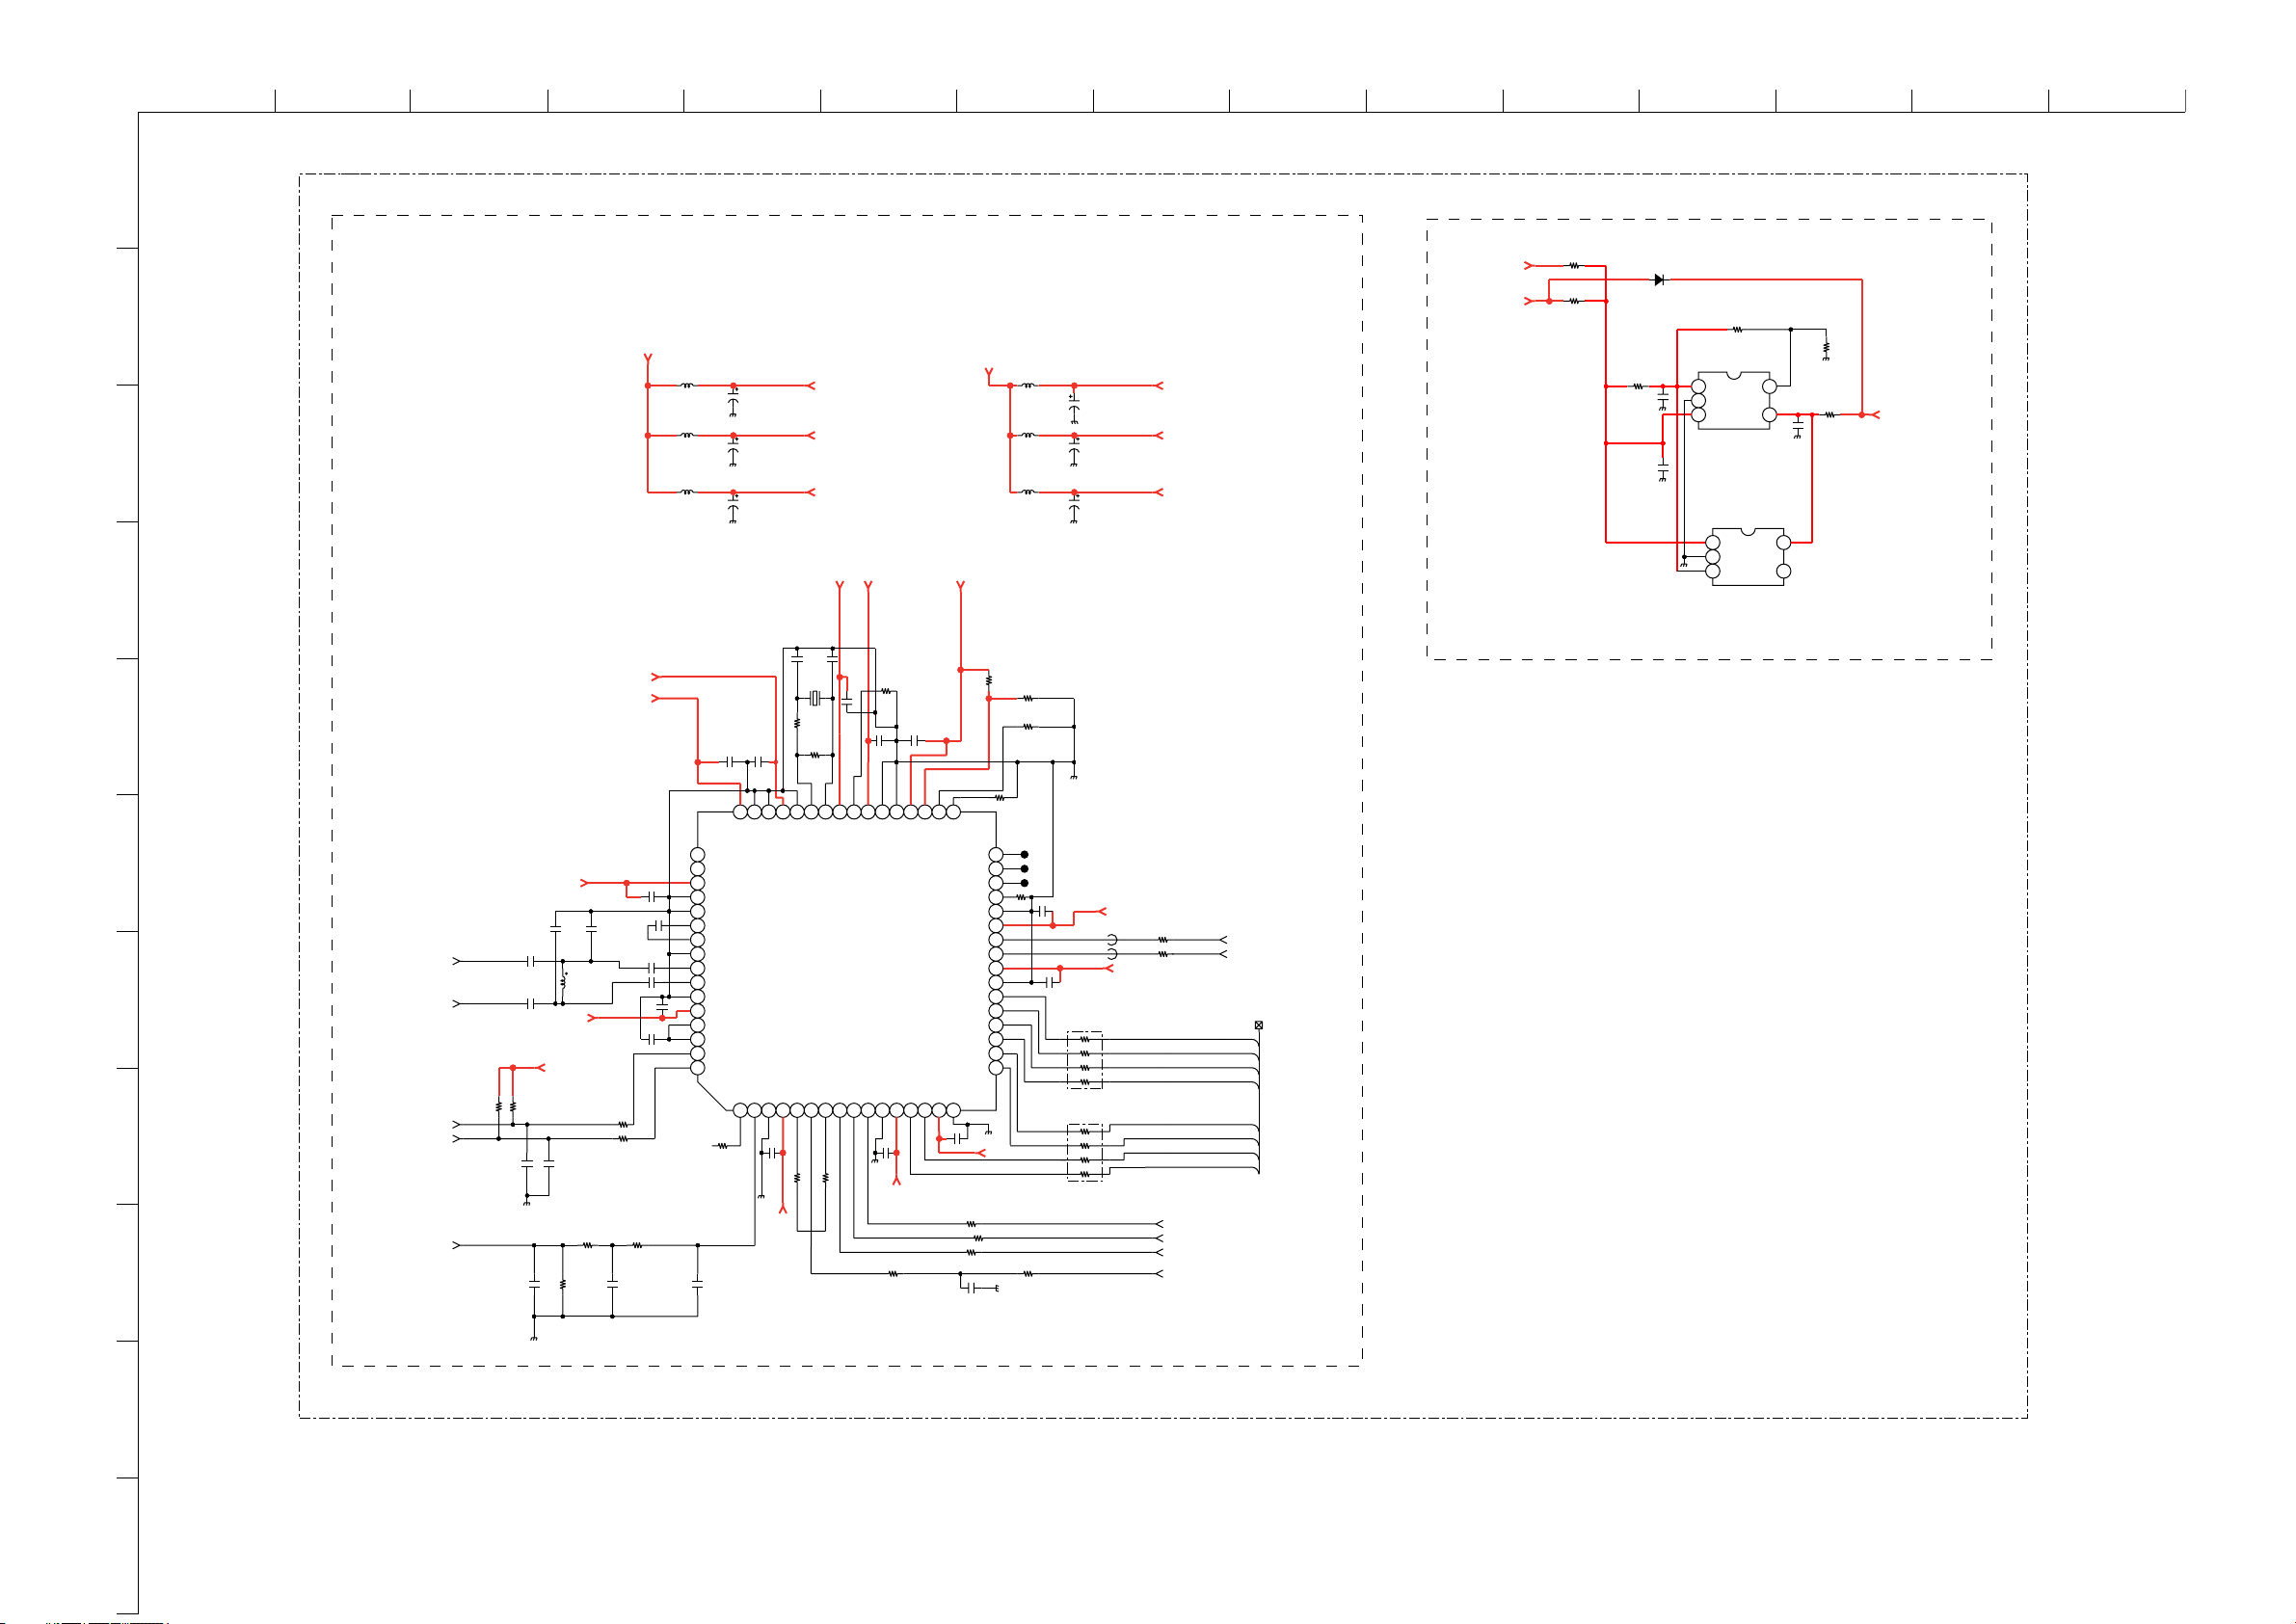
ABCDE F
G
HI JKLMN
O
1
BDT.-SE-1(KDL-26/32/40U2000)
R6576
CXD1968R (COFDM DEMODULATOR BLOCK)
3.3V_MAIN
1.8V_MAIN
2
3.3V_MAIN
L5041
10uH
L5042
3
10uH
L5043
10uH
C5055
10
16V
C5056
10
16V
C5057
10
16V
3V3D_XTAL_CO
3V3D_CO
3V3A_CO
3V3D_XTAL_CO
1V2D_C_CO
1.2V_MAIN
3V3D_CO
L5046
10uH
L5044
10uH
L5045
10uH
C5071
10
16V
C5072
10
16V
C5073
10
16V
1V2D_PAD_CO
1V2D_DIV_CO
1V2D_C_CO
XX
R6577
CHIP
D6522
R6578
C6580
C6581
XX
0
XX
1
10V
0
R6579
XX
IC6504
BH12PB1WHFV-TR
AUTO POWER-SAVE
REGULATOR
321
IC6505
MM3141CNRE
321
R6580
XX
54
C6582
0.47
16V
54
R6581
0
CHIP
1.2V_MAIN
4
C5061
C5062
22p
22p
50V
50V
C5063
1V2D_DIV_CO
1V2D_PAD_CO
5
6
3V3A_CO
0.1
L5040
0.47uH
R5043
10k
C5046
82p
50V
C5048
1000p
R5044
100
R5045
100
C5050
C5053
C5049
1000p
50V
50V
R5046
1/16W
C5047
10V
XX
C5052
1k
0.1
C5045
82p
50V
IF_DIGITAL_-
7
8
IF_DIGITAL_+
SDA_OFDM_TUNER
SCL_OFDM_TUNER
AGC_DIGITAL
R5040
10k
1/16W
C5042
22p
50V
C5040
1000p
50V
C5041
1000p
50V
R5041
10k
1/16W
3V3A_CO
3V3D_CO
C5044
22p
50V
9
R5042
C5043
0.1
XX
10V
C5051
0.1
0.1
C5058
0.1
49
AINP_Q
50
AINM_Q
51
AVDD_Q/3.3V alog
52
AVSS_Q/0V alog
53
GUARD_Q
54
DAREFP
55
DAREFM
56
GUARD_I
57
AINM_I
58
AINP_I
59
AVSS_I/0V alog
60
AVDD_I/3.3V alog
61
REFI
62
REFOUT
63
TUNERDAT
64
TUNERCLK
R5047
XX
C5054
100p
50V
20.480MHz
C5059
0.1
DIVSS/0V alog
PADVSS/0V alog
DIVDD/1.2V alog
PADVDD/1.2V alog
N
VDD/1.2V dig
CVSS/0V dig
C
RF_IFAGC_QIFAGC_I
123456789
C5060
0.1
1V2D_C_CO
X5040
R5051
100
1/16W
R5049
1M
1/16W
XTALI
XTALO
XVSS/0V xtal
IC5040
CXD1968R-T6
INTRPTN
RESETN
TSERR
100R5050
XX
R5048
0.1
R5052
C5064
0.1
OSCEN
CVSS/0V dig
DVSS/0V dig
VDD/1.2V dig
C
XVDD/3.3V xtal
TSSYNC
TSVALIDTSCLK
DVSS/0V dig
DVDD/3.3V dig
10 11 12 13 14 15 16
C5065
0.1
3V3D_CO
R5053
47
XX
C5066
0.1
DVDD/3.3V dig
TSDATA0
AO
CVSS/1.2V di g
DVDD3.3V dig
TSDATA1
33343536373839404142434445464748
TRSTN
TMS
TESTMODE
TDO
TCLK
CVSS/0V dig
SDA
DVSS/0V dig
TSDATA7
TSDATA6
TSDATA5
TSDATA4
TSDATA3
TSDATA2
VDD/1.2V dig
C
CVSS/0V dig
C5068
0.1
R5055
C5067
0.01
16V
TD
I
SCL
1V2D_C_CO
R5054
R5057
100
R5056
CHIP
R5064
1/16W
32
31
30
29
28
27
26
25
24
23
22
21
20
19
18
17
0
10k
JL5058
JL5059
JL5060
R5058
10k
1/16W
100
100
R5059
XX
R5060
10k
1/16W
R5061
100
1/16W
C5069
0.1
FB5041
C5070
0.1
RB5041
RB5040
O
1V2D_C_C
R5062
FB5040
0uH
47
47
0uH
3V3D_CO
100
1/16W
R5063
100
1/16W
IN_TSBCLK
IN_TSPVAL
IN_TSPSYNC
nFE_RESET
SDA_COFDM
SCL_COFDM
IN_TSD[0-7
IN_TSD[7]
IN_TSD[6]
IN_TSD[5]
IN_TSD[4]
IN_TSD[3]
IN_TSD[2]
IN_TSD[1]
IN_TSD[0]
]
BDT
9
/11
10
11
COMPONENTS MARKED AS XX ARE NOT FITTED ON THIS MODEL
~ BDT Board Schematic Diagram [ Main Microcontroller, Panel Driving, Audio & Video Processor ] Page 9/11 ~
- 44 -
Page 45
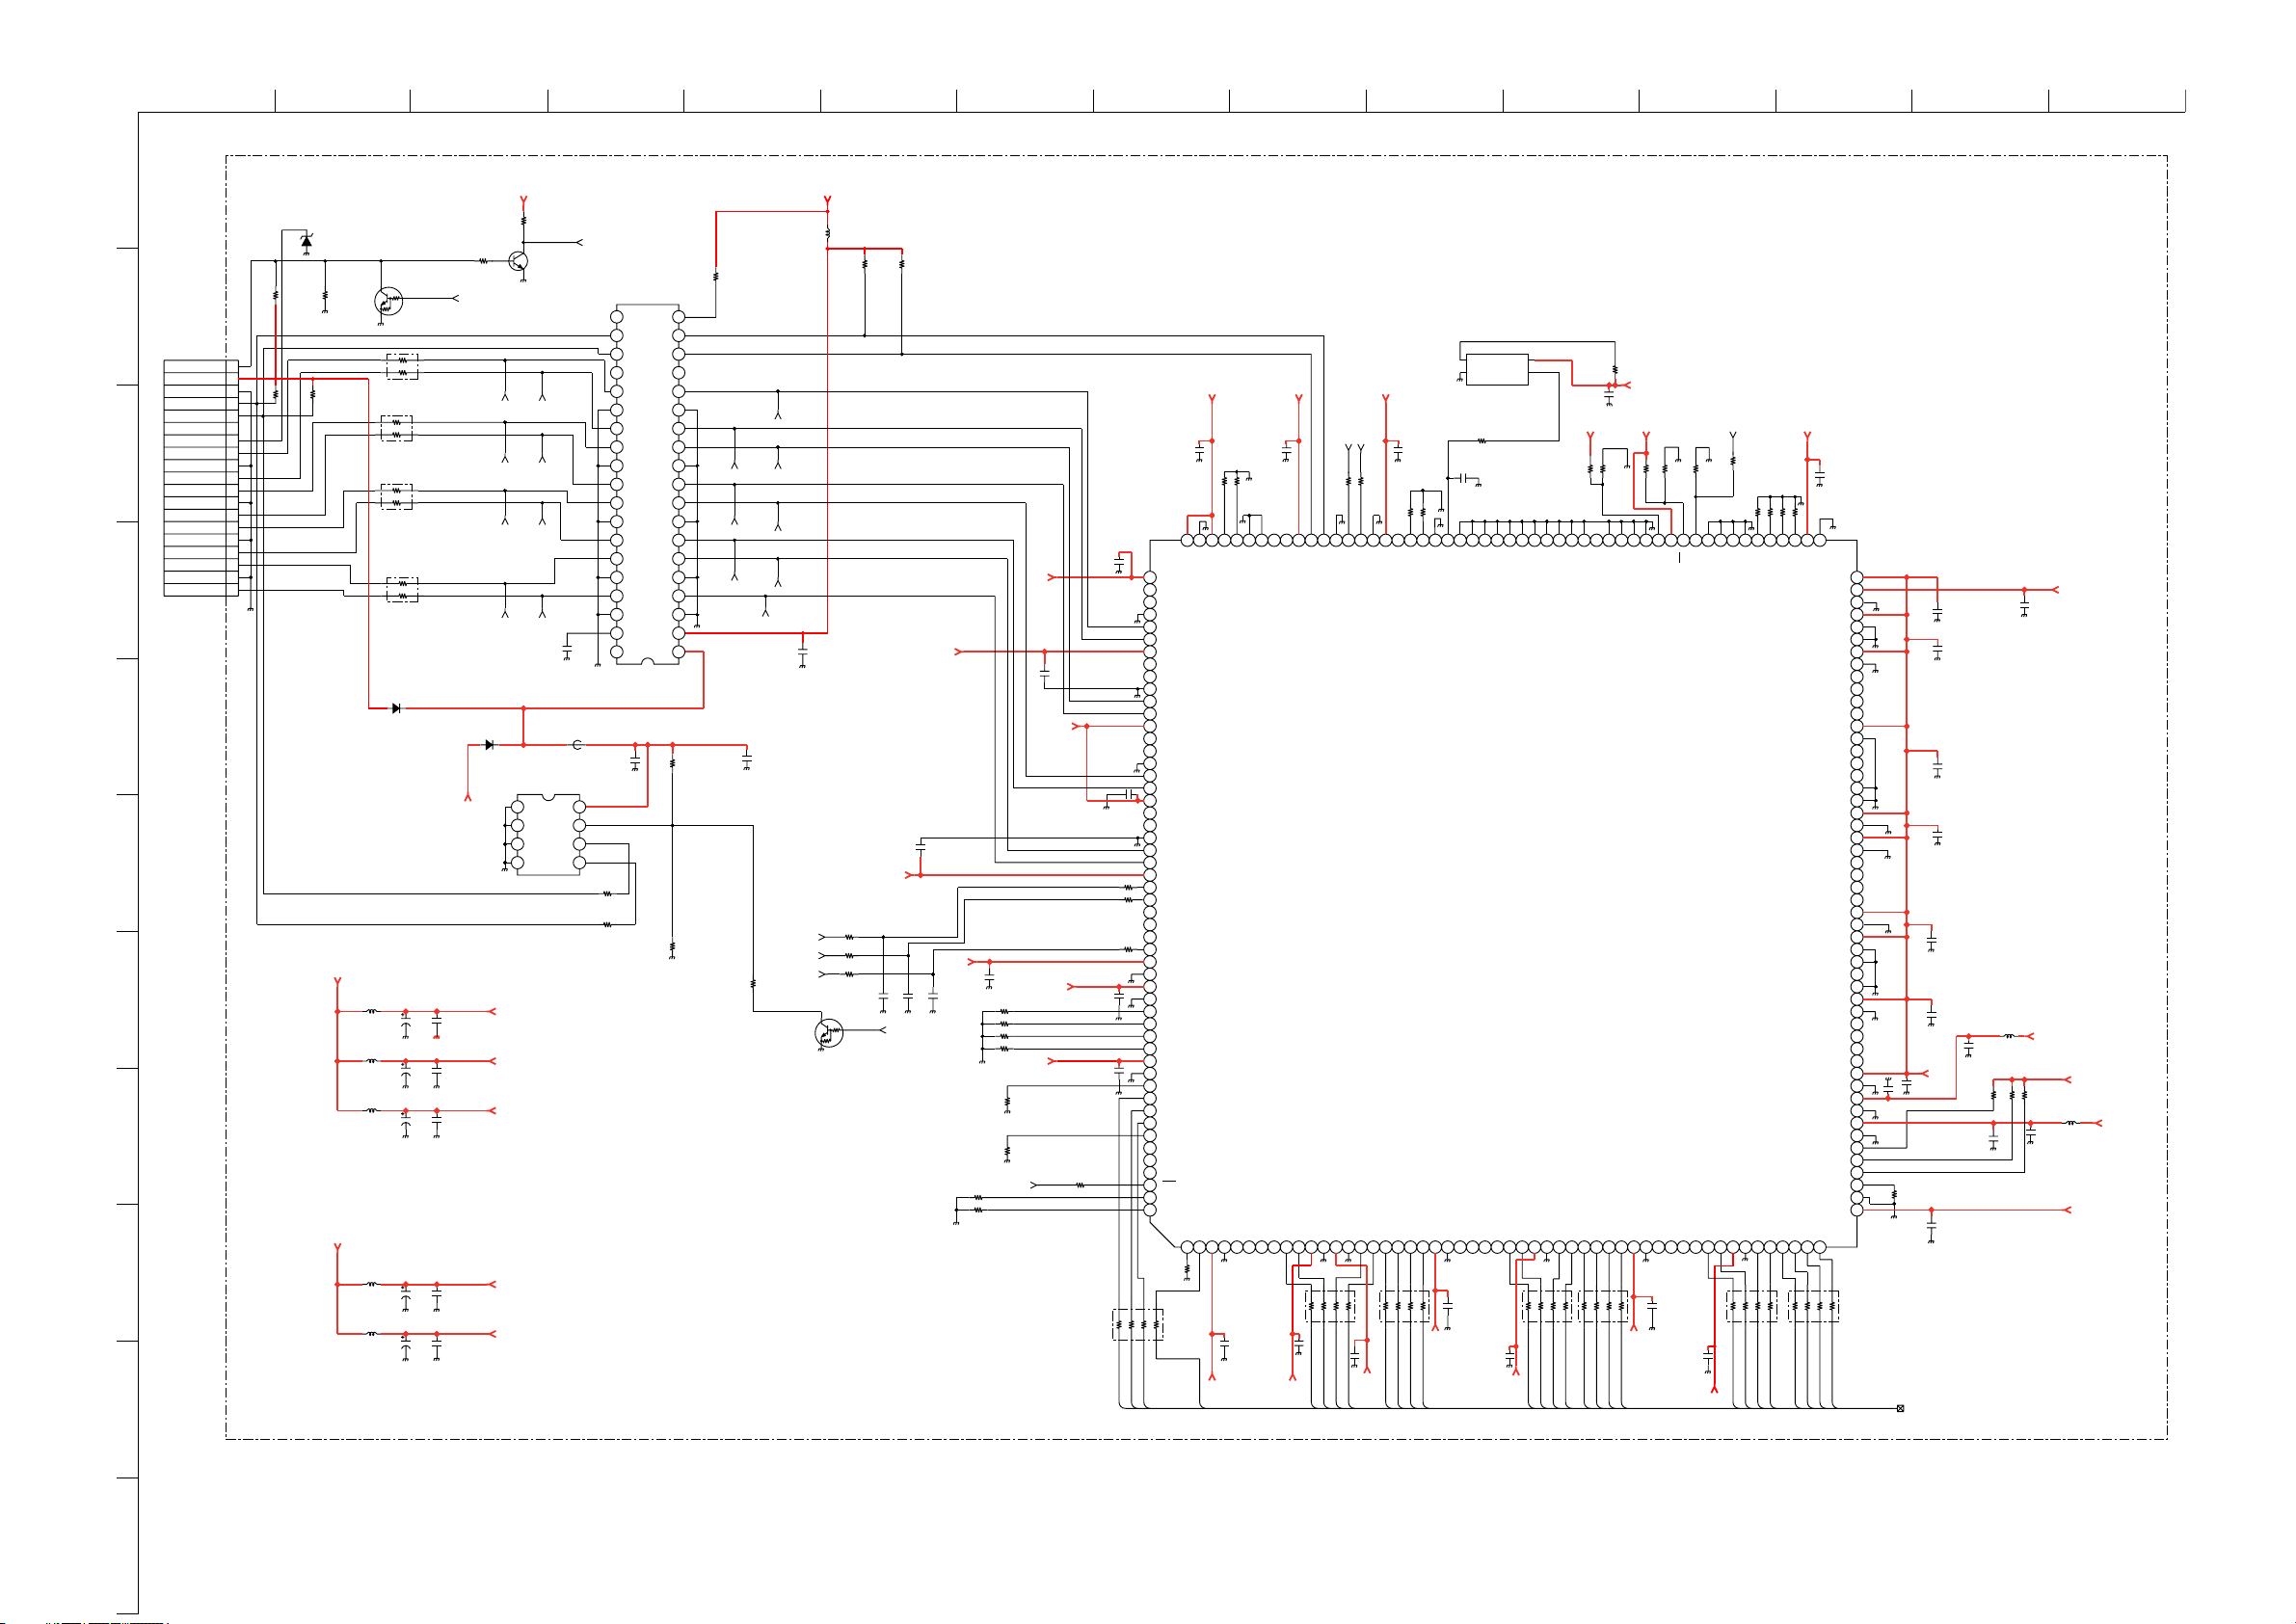
ABCDE F
BDT.-SE-1(KDL-26/32/40U2000)
G
HI JKLMN
O
10
1
D4200
XX
Q4200
RB4215
0
RB4216
0
RB4217
D4204
MA111-TX
MUN2211T1
0
RB4214
HPD1
0
R4204
R4202
10k
1k
1/10W
2
CN4200
19P
HPD
DDC +5V
E
DDC DAT
DDC CLK
NC
CEC
HDMI
CONNECTOR
CLK+
CLK-
D0
D1+
D2
D2+
E
-
E
D0+
D1-
E
-
E
3
4
1/10W
19
18
17
16
15
14
13
12
11
10
9
8
7
6
5
4
3
2
1
R4205
10k
R4206
10k
1/10W
5
6
3.3V_MAIN
C4222
C4228
10
7
L4212
2.2uH
L4213
2.2uH
L4214
8
2.2uH
16V
C4224
10
16V
C4223
10
16V
0.1
25V
C4230
0.1
25V
C4229
0.1
25V
R4271
10k
1/10W
HDMI_CLK-
HDMI_D0-
HDMI_D1-
D4203
MA111-TX
5V_MAIN
HDMI_D1+
HDMI_D2-
BR24L02F-WE2
BUS EEPROM
1
2
3
4
VH_DDH_3.3
VH_DDO
VH_DDI
+3.3IO
R4272
10k
1/10W
Q4211
MSD601-RST1
HDMI_CLK+
HDMI_D0+
HDMI_D2+
IC4200
A1
A0
A2
E
HOT_PLUG_DET1
C4201
0.1
16V
FB4200
0uH
8765
VCC
WP
SCL
SDA
25 24 23 22 21 20
262728293031
38 37 36 35 34 33 32
IC4201
IP4776CZ38
HDMI HOST INTERFACE
PROTECTION
C4200
0.1
16V
R4208
100
1/10W
R4209
100
1/10W
191817161514
8 9 10 11 12 13
7654321
R4212
10k
1/10W
R4213
XX
R4207
XX
HDMI_D0+
HDMI_D1+
C4259
1000p
50V
R4220
100
1/10W
1.8V_MAIN
C4232
C4226
0.1
9
L4216
2.2uH
L4217
2.2uH
10
16V
C4227
16V
25V
VH_DDC
VH_DDH_1.8
C4233
0.1
10
25V
HDMI_CLK-
HDMI_D0-HDMI_CLK+
HDMI_D1-
HDMI_D2-
HDMI_D2+
AUDIOWS_HDMI
AUDIODATA_HDMI
AUDIOCLK_HDMI
MUN2211T1
Q4204
VH_DDH_3.3
C4202
0.1
16V
L4208
2.2uH
R4210
4.7k
1/10W
VH_DDH_3.3
R6554
0
R6555
0
R6556
0
C4264
XX
C4261
XX
EDID_WP
R4211
4.7k
1/10W
VH_DDH_3.3
C4260
1000p
50V
VH_DDO
C4262
XX
R4224
XX
R4225
BDT
CONT VDD
X3001
13.5MHz
R4246
0
XX
TEST11
TEST12
H/CSYNC2
H/CSYNC3
IC4202
TDA9974AHS/8/C112
HDMI RECEIVER
VPB[0]
VPN[1]
VPB[2]
VPB[3]
50V
C4214
1000p
50V
VH_DDO
OUT
VSYNC3
H/CSYNC1
VPB[4]
VPB[5]
47
RB4208
DG0
VSYNC1
VSYNC2
VDDO(33)
VSSO
DG1
DG2
R4247
CLAMP
VPB[6]
DG3
RRXA
VXXO
R4240
1k
RRXB
VPA[0]
VSSH
VPA[1]
C4210
1000p
50V
VSSI
VPA[2]
HSCLB
VPA[3]
VH_DDI
HSDAB
VPA[4]
HSCLA
VDDI(33)
VPA[5]
VDDC(18)
VH_DDH_1.8
R4239
1k
C4208
1000p
50V
C4204
1000p
50V
157
VH_DDH_3.3
C4258
1000p
50V
VH_DDH_3.3
100
R4235
R4236
100
R4237
C4263
1000p
50V
VH_DDC
C4206
R4228
R4229
R4230
R4231
R4233
R4234
INT_HDMI
VH_DDO
XX
XX
1000p
XX
XX
XX
XX
C4207
1000p
R4232
XX
158
159
160
161
162
163
164
165
166
167
168
169
170
171
172
173
174
175
C4205
176
1000p
50V
177
178
179
180
181
1/10W
182
1/10W
183
184
185
186
100
1/10W
187
188
189
190
191
50V
192
193
194
195
196
197
50V
198
199
200
201
202
203
204
205
100
206
207
208
VSSH
VDDH(18)
VDDH(33)
VDDH(18)
RXBC+
RXBC-
VSSH
RXAC1-
RXAC1+
VDDH(33)
RXBO+
RXBO-
VSSH
RXAO-
RXAO+
VDDH(33)
RXB1+
RXB1-
VSSH
RXA1-
RXA1+
VDDH(33)
RXB2+
RXB2-
VSSH
RXA2-
RXA2+
VDDH(33)
WS
AP0
AP1
AP2
AP3
ACLK
VDDO(33)
VSSO
VDDC(18)
VSSC
CTL0
CTL1
CTL2
CTL3
VDDO(33)
VSSO
PL
DE
HS
VS
CS
OR_R/CR
OR_B/CB
OR_G/Y
VAI
FREF
VREF
HREF
VCLK
VDDO(33)
12345678910111213141516171819202122232425262728293031323334353637383940414243444546474849505152
R4238
XX
47
47
RB5689
C4209
1000p
50V
VSHSDE
VH_DDO
DCLK
C4211
1000p
50V
VH_DDC
RB4205
DR0
R4241
1/10W
DR1
100
HSDAA
VSSC
VSSI
VDDO(33)
DR2
SCL_EMMA
SCL
VSSO
1000p
C4257
DR3
SDA_EMMA
R4242
100
1/10W
SDA
VPA[6]
VH_DDC
VSSC
VPA[7]
47
RB4206
DR4
VH_DDO
R4243
0
VDDC(18)
VPA[8]
DR5
C4212
1000p
n.c.
VPA[9]
50V
DR6
R4244
DIS
VPA[10]
0
C8926
VPP
MCLK
TEST13
VPA[11]
VDD0(33)
VSSC
C4256
1000p
VH_DDO
DR7
XX
GAIN
VPB[7]
C4213
1000p
50V
VH_DDI
47
RB4209
DG4
COAST
VPB[8]
DG5
R4248
TEST10
VPB[9]
DG6
R4245
1/10W
0
TEST9
VPV[10]
DG7
33k
VH_DDI
VH_DDI
TEST7
TEST8
VPB[11]
VDD0(33)
VH_DDO
XX
R4249
TEST6
VSS0
A0
VPC[0]
C4255
1000p
50V
R4250
0
HE
VPC[1]
C4215
1000p
OE
VPC[2]
50V
R4251
XX
PD
VPC[3]
VH_DDO
TEST5
VPC[4]
R4253
TEST4
VPC[5]
47
RB4211
DB0
PD_HDMI
R4252
100
10k
TEST2
TEST3
VDD0(33)
VSSO
DB1
R4254
1/10W
DB2
10k
TDI
VPC[6]
DB3
TCK
VPC[7]
R4255
10k
TMS
TRST
VSSA(SOG/Y)
VPC[8]
VPC[9]
47
RB4212
DB4
VH_DDI
C4216
1000p
10k
R4256
105106107108109110111112113114115116117118119120121122123124125126127128129130131132133134135136137138139140141142143144145146147148149150151152153154155156
TEST0
TEST1
VDDA(33)
VDDA(18)
VSSA(PLL)
VDDA(33)
VSSA
VSSA(R/PR)
VDDA(33)
VSSA
R/PR1
R/PR2
R/PR3
REF_R/PR
VDDA(33)
VSSA
SOG/Y1
SOG/Y2
SOG/Y3
VSSA
VDDA(33)
VSSA(G/Y)
VDDA(33)
VSSA
G/Y1
G/Y2
G/Y3
REF_G/Y
VDDA(33)
VSSA
VDDA(33)
VSSA
VSSA(BIAS)
BIAS
VSSA(B/PB)
VDDA(33)
VSSA
B/PB1
B/PB2
B/PB3
REF_B/PB
VDDA(33)
VSSA
VDDH(33)
VSSH
VDDH(18)
VSSH
VSSO
VDD0(33)
VPC[10]
VPC[11]
DB5
DB6
50V
X2
X1
X0
TDO
DB7
10/11
104
103
102
101
100
99
98
97
96
95
94
93
92
91
90
89
88
87
86
85
84
83
82
81
80
79
78
77
76
75
74
73
72
71
70
69
68
67
66
C8907
65
1000p
VH_DDH_3.3
50V
64
63
62
61
60
59
58
57
56
55
54
53
R4257
XX
C4254
1000p
C4250
C4251
1000p
C4218
1000p
C4252
1000p
C4219
1000p
50V
C4253
1000p
50V
C4220
1000p
50V
1000p
50V
50V
50V
50V
R4259
C4221
1000p
XX
C4270
0.1
25V
C4217
1000p
50V
R4260
L4262
2.2uH
XX
HDMI_VIDEO
VH_DDH_3.3
R4261
XX
C4271
0.1
VH_DDC
L4263
2.2uH
VH_DDO
VH_DDH_1.8
VH_DDO
COMPONENTS MARKED AS XX ARE NOT FITTED ON THIS MODEL
11
~ BDT Board Schematic Diagram [ Main Microcontroller, Panel Driving, Audio & Video Processor ] Page 10/11 ~
- 45 -
Page 46
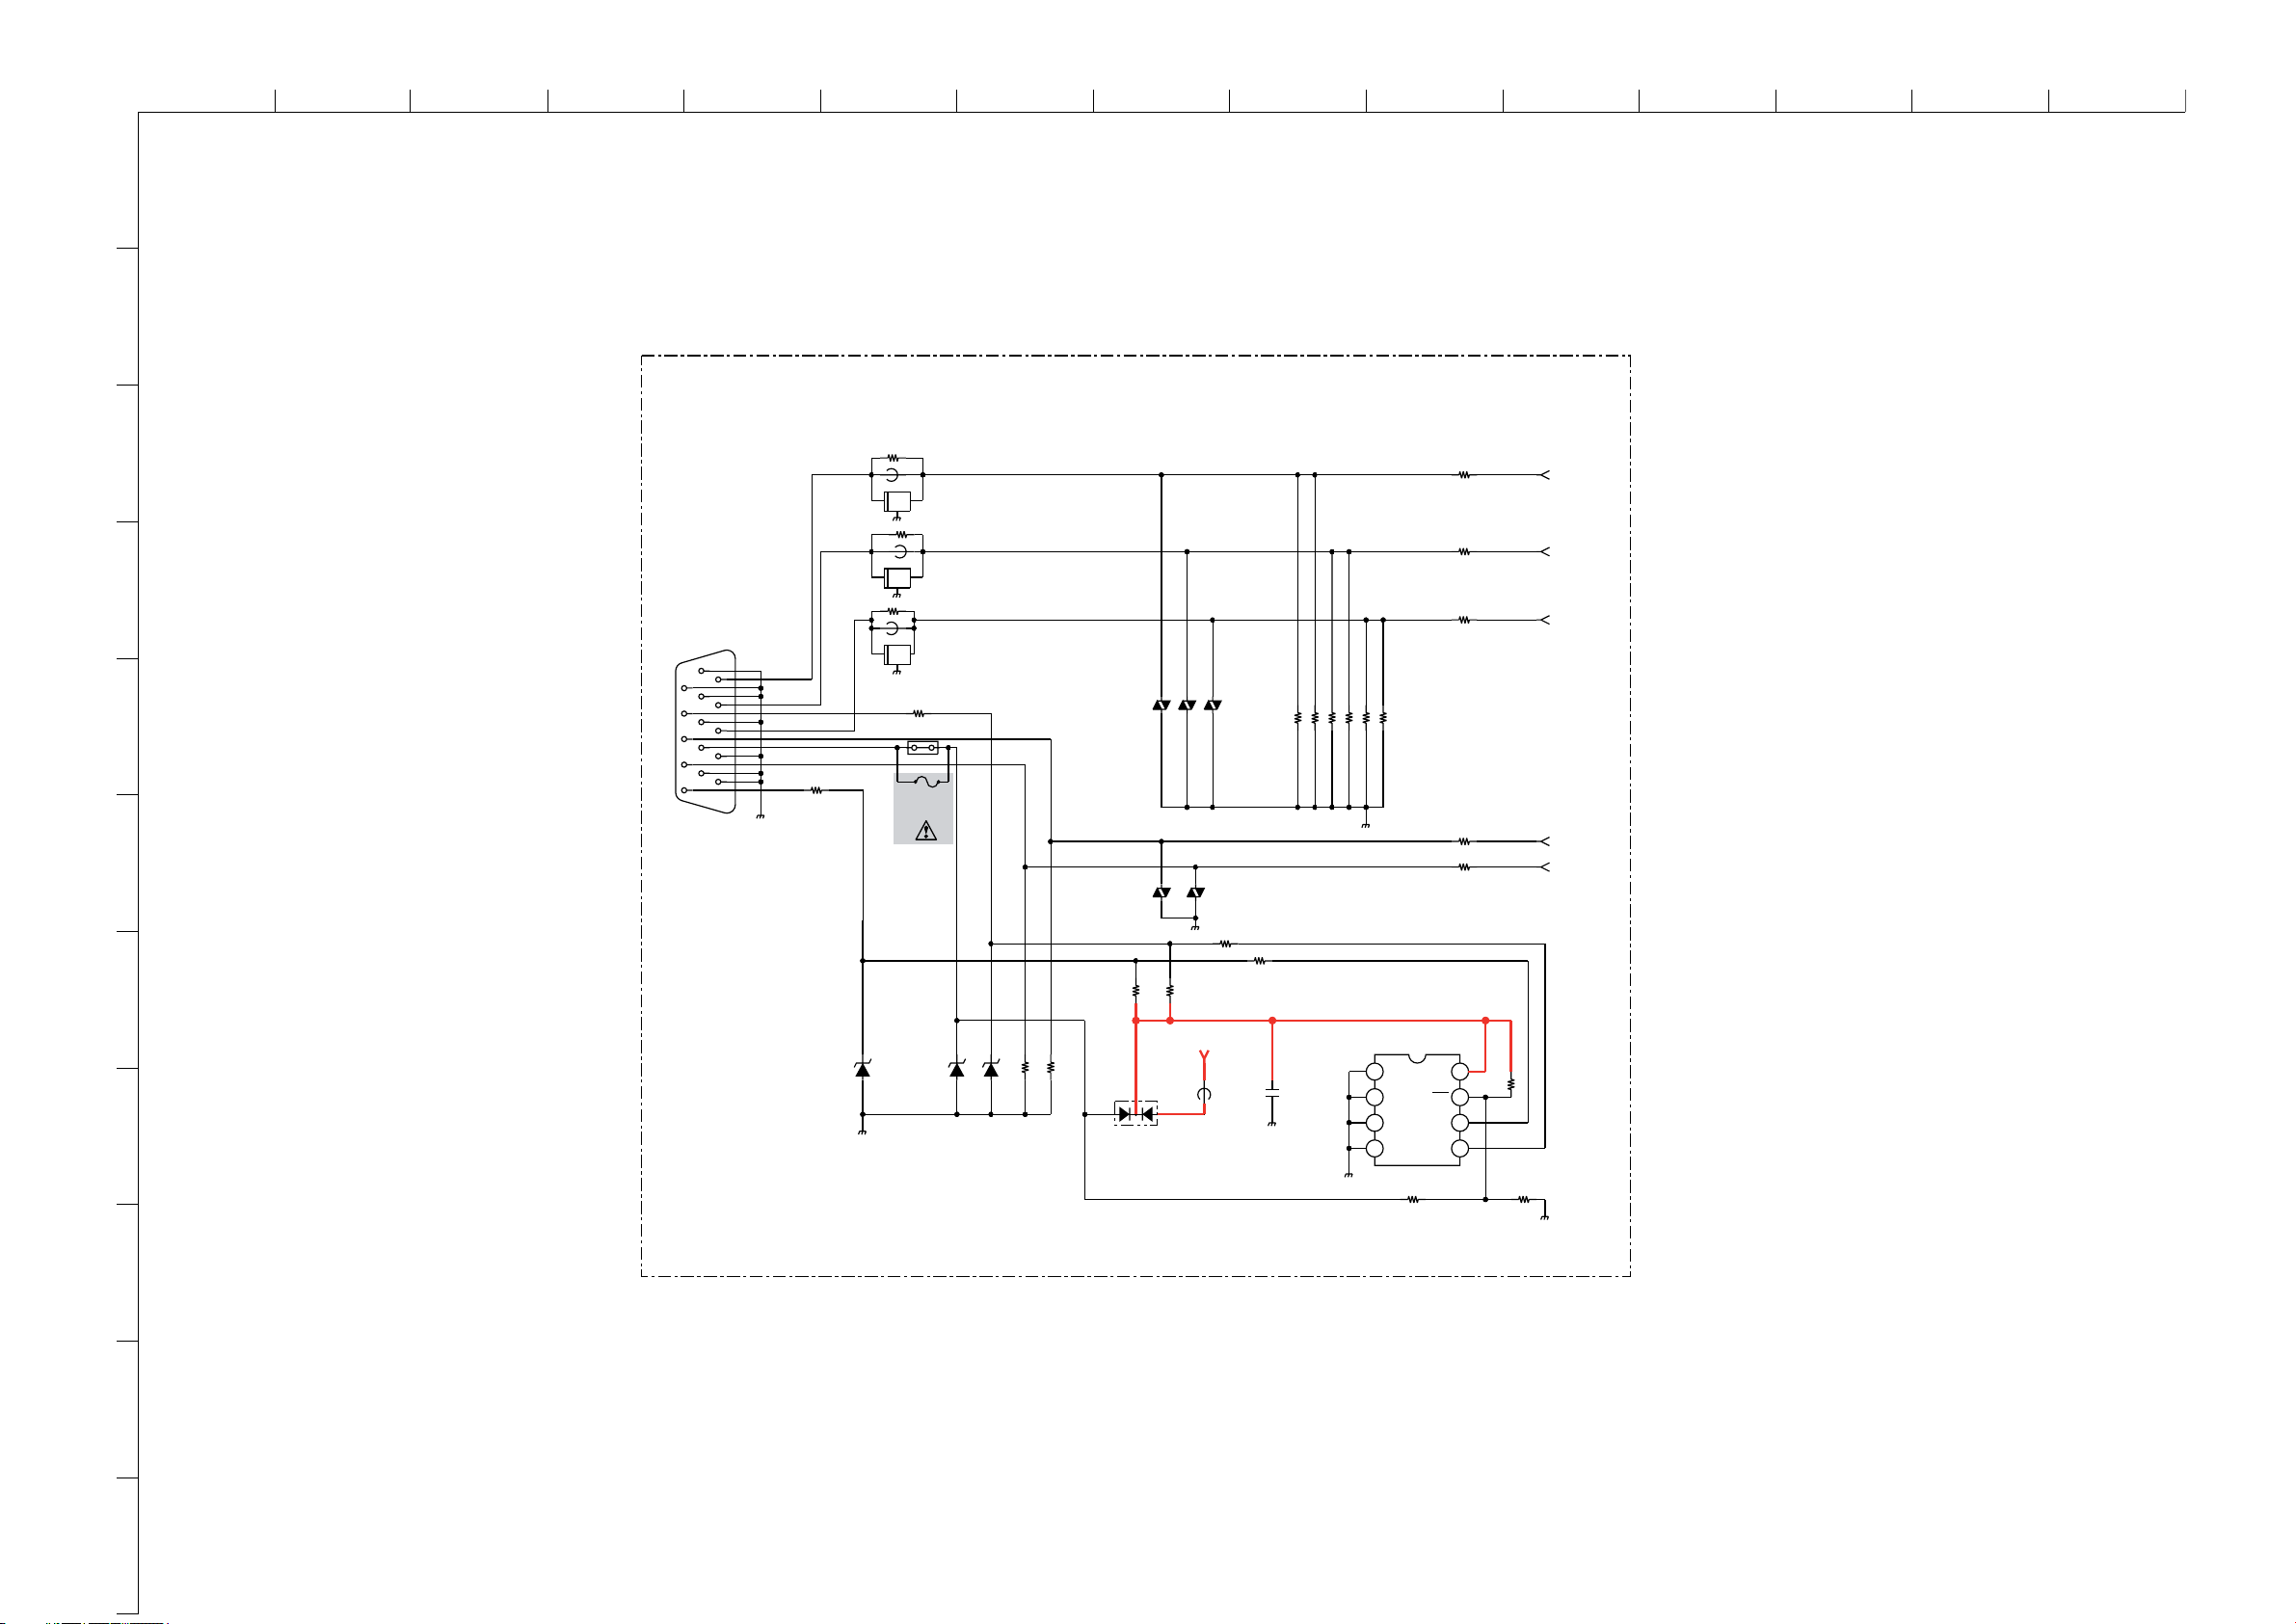
ABCDE F
G
HI JKLMN
O
1
2
BDT.-SE-1(KDL-26/32/40U2000)
R6558
0
3
FB6503
4
CN4000
15P
BLK
678910
12345
1112131415
5
R4000
47
External
Connector
1/10W
XX
R6560
0
CHIP
EMI
EMI
EMI
R4001
47
1/10W
PS4000
R6559
FL002
XX
FB6505
FL003
F4000
0.5A
50V
FL001
XX
FB6504
XX
XX
0
XX
XX
BDT
VD4000
VD4002
VD4004
6
R4005
10k
1/10W
5V_MAIN
VD4003
R4006
47
FB4003
0uH
VD4001
R4004
R4003
XX
10k
1/10W
D4003
1SS184
7
D4000
HZU5.6GTRF
8
D4001
HZU5.6GTRF
R4002
XX
D4002
HZU5.6GTRF
R4007
47
1/10W
11/11
1/10W
150
R4008
C4000
0.1
16V
1/10W
150
R4009
1/10W
150
R4010
1/10W
150
R4011
1/10W
1/10W
150
150
R4012
R4013
IC4000
M24C02-WMN6T(B)
EEPROM
E0
E1
E2
4321
VSS SDA
R4015
0
CHIP
R4016
0
CHIP
R4017
0
CHIP
R4018
0
CHIP
R4019
0
CHIP
8765
VCC
WC
SCL
R4020
100
PC_RED
PC_GREEN
PC_BLUE
PC_H
PC_V
10
11
R4014
1k
1/10W
9
COMPONENTS MARKED AS XX ARE NOT FITTED ON THIS MODEL
R4021
XX
~ BDT Board Schematic Diagram [ Main Microcontroller, Panel Driving, Audio & Video Processor ] Page 11/11 ~
- 46 -
Page 47
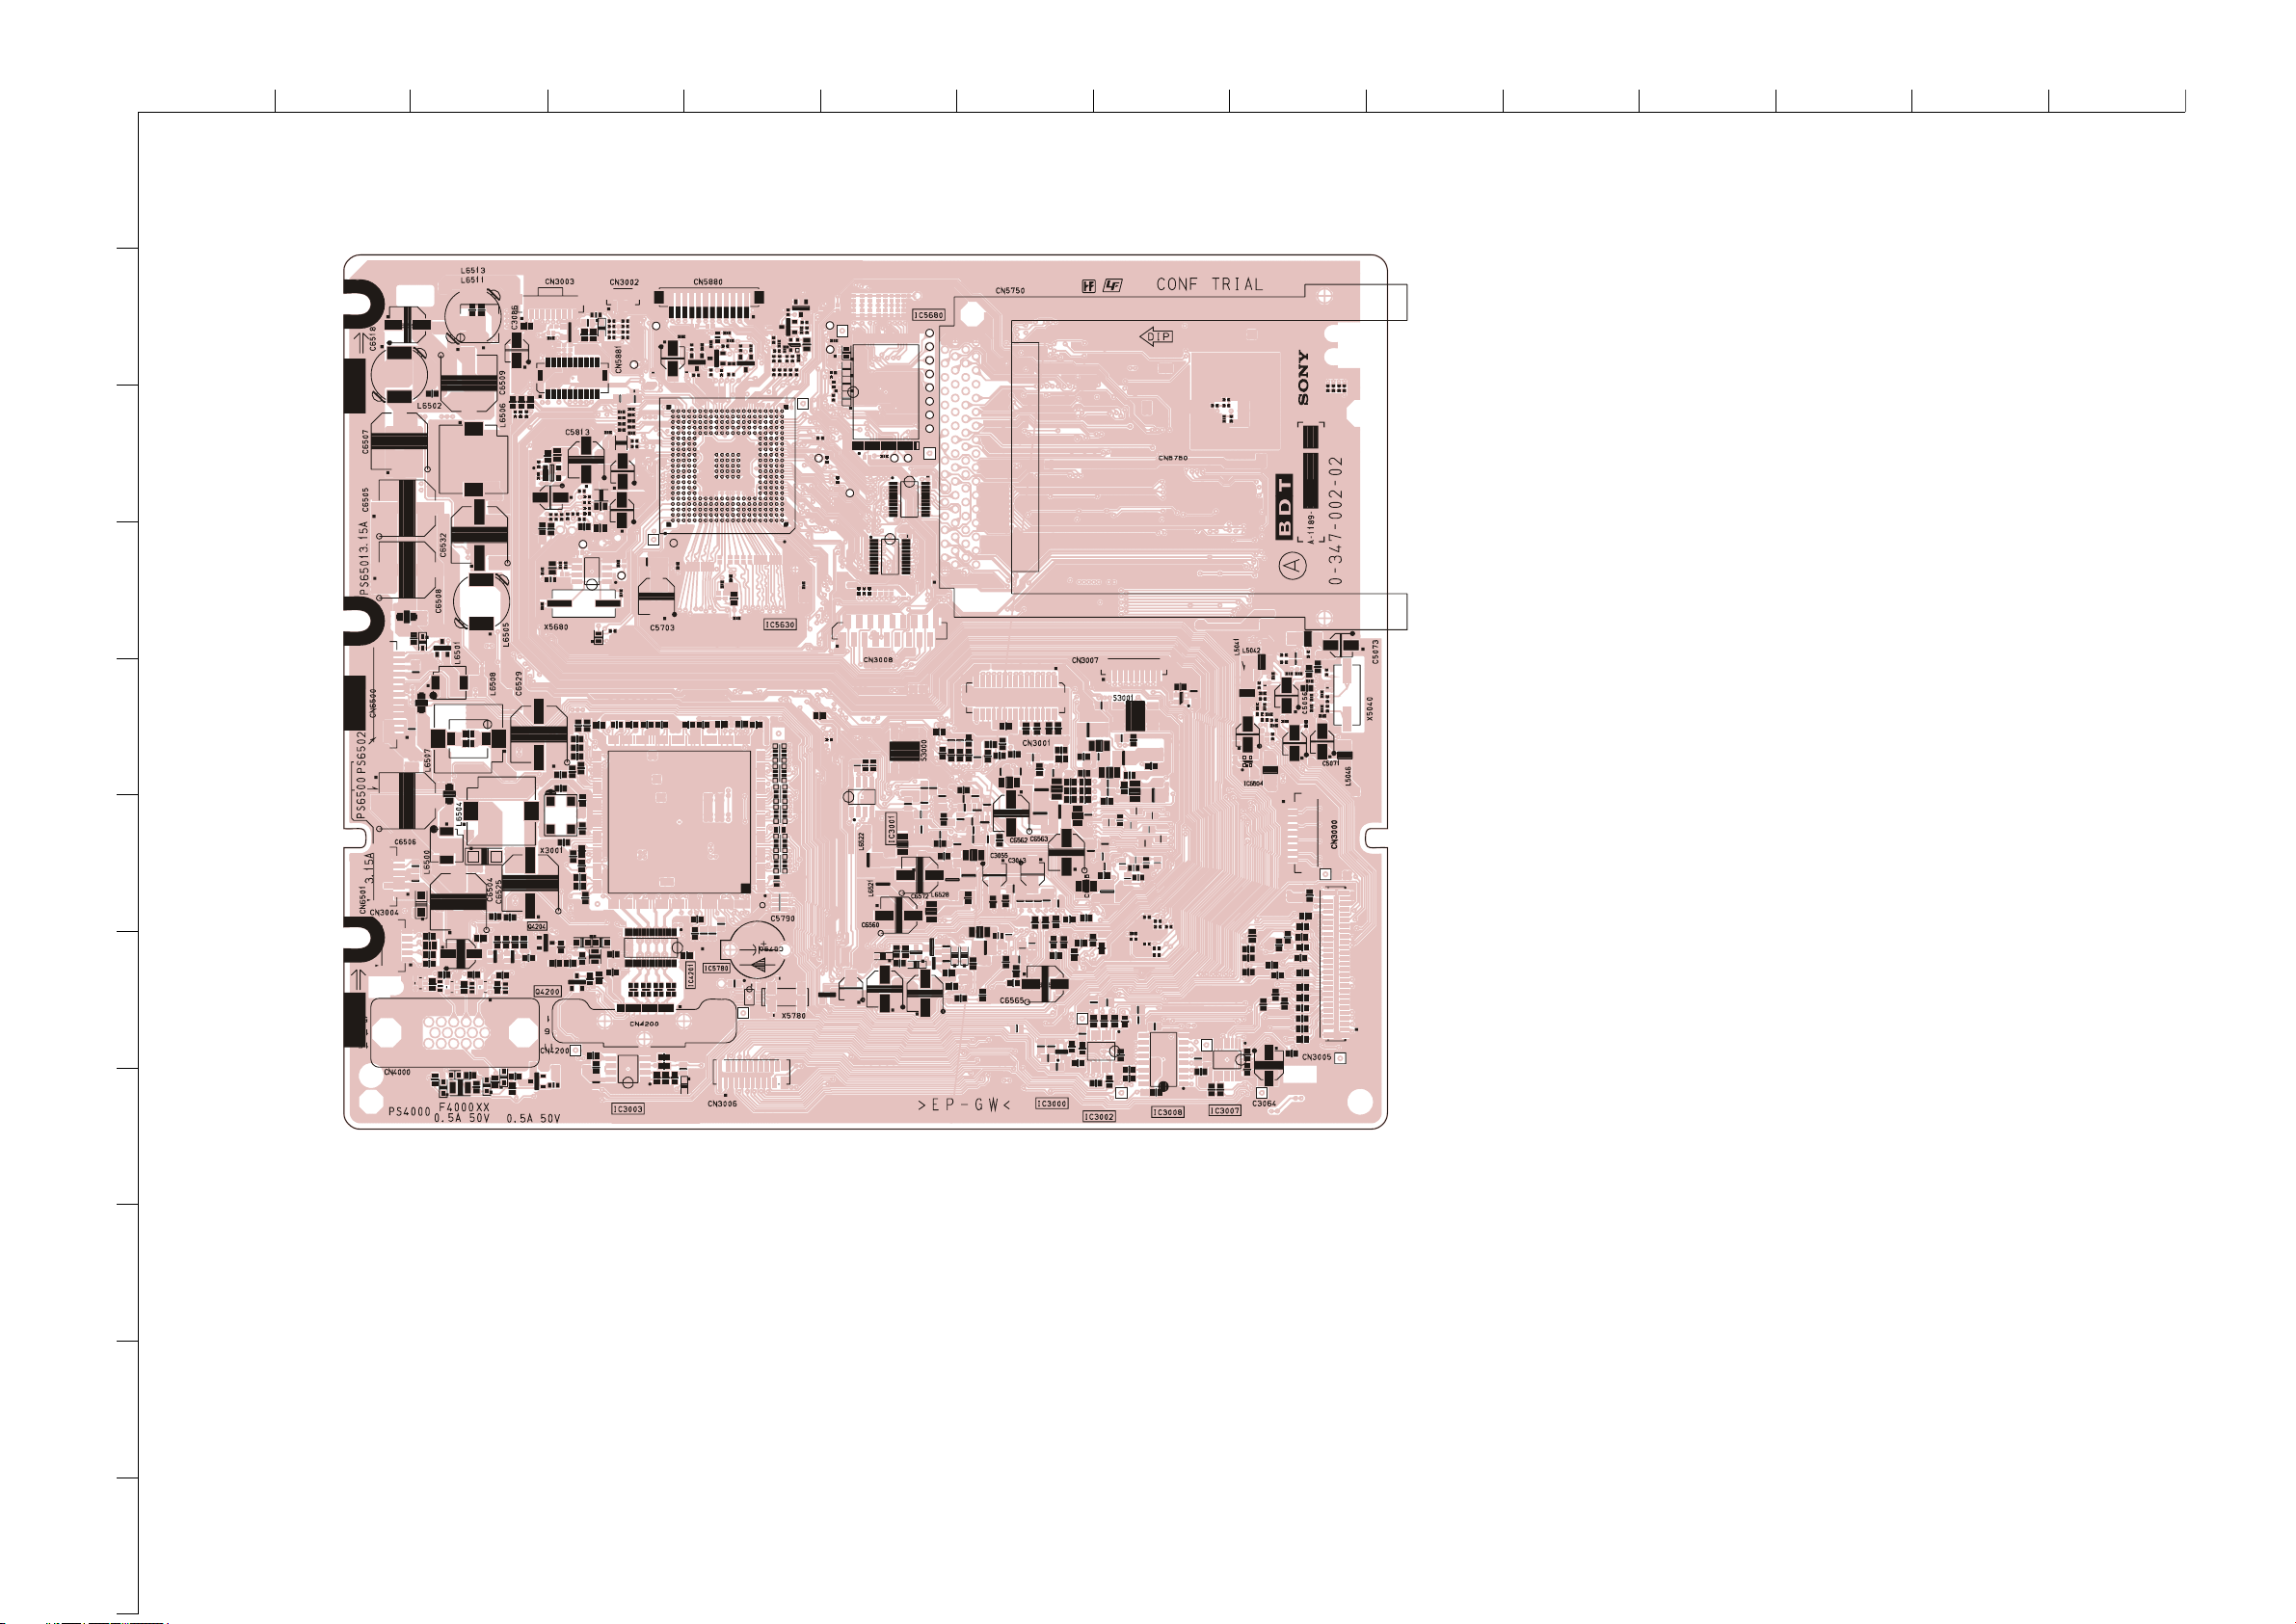
ABCDE F
1
G
HI JKLMN
O
~ BDT Printed Wiring Board Conductor Side A ~
2
3
4
5
~ BDT Board Semiconductor Voltage Table ~
6
7
8
9
~ BDT Board IC Voltage Table ~
10
11
- 47 -
Page 48
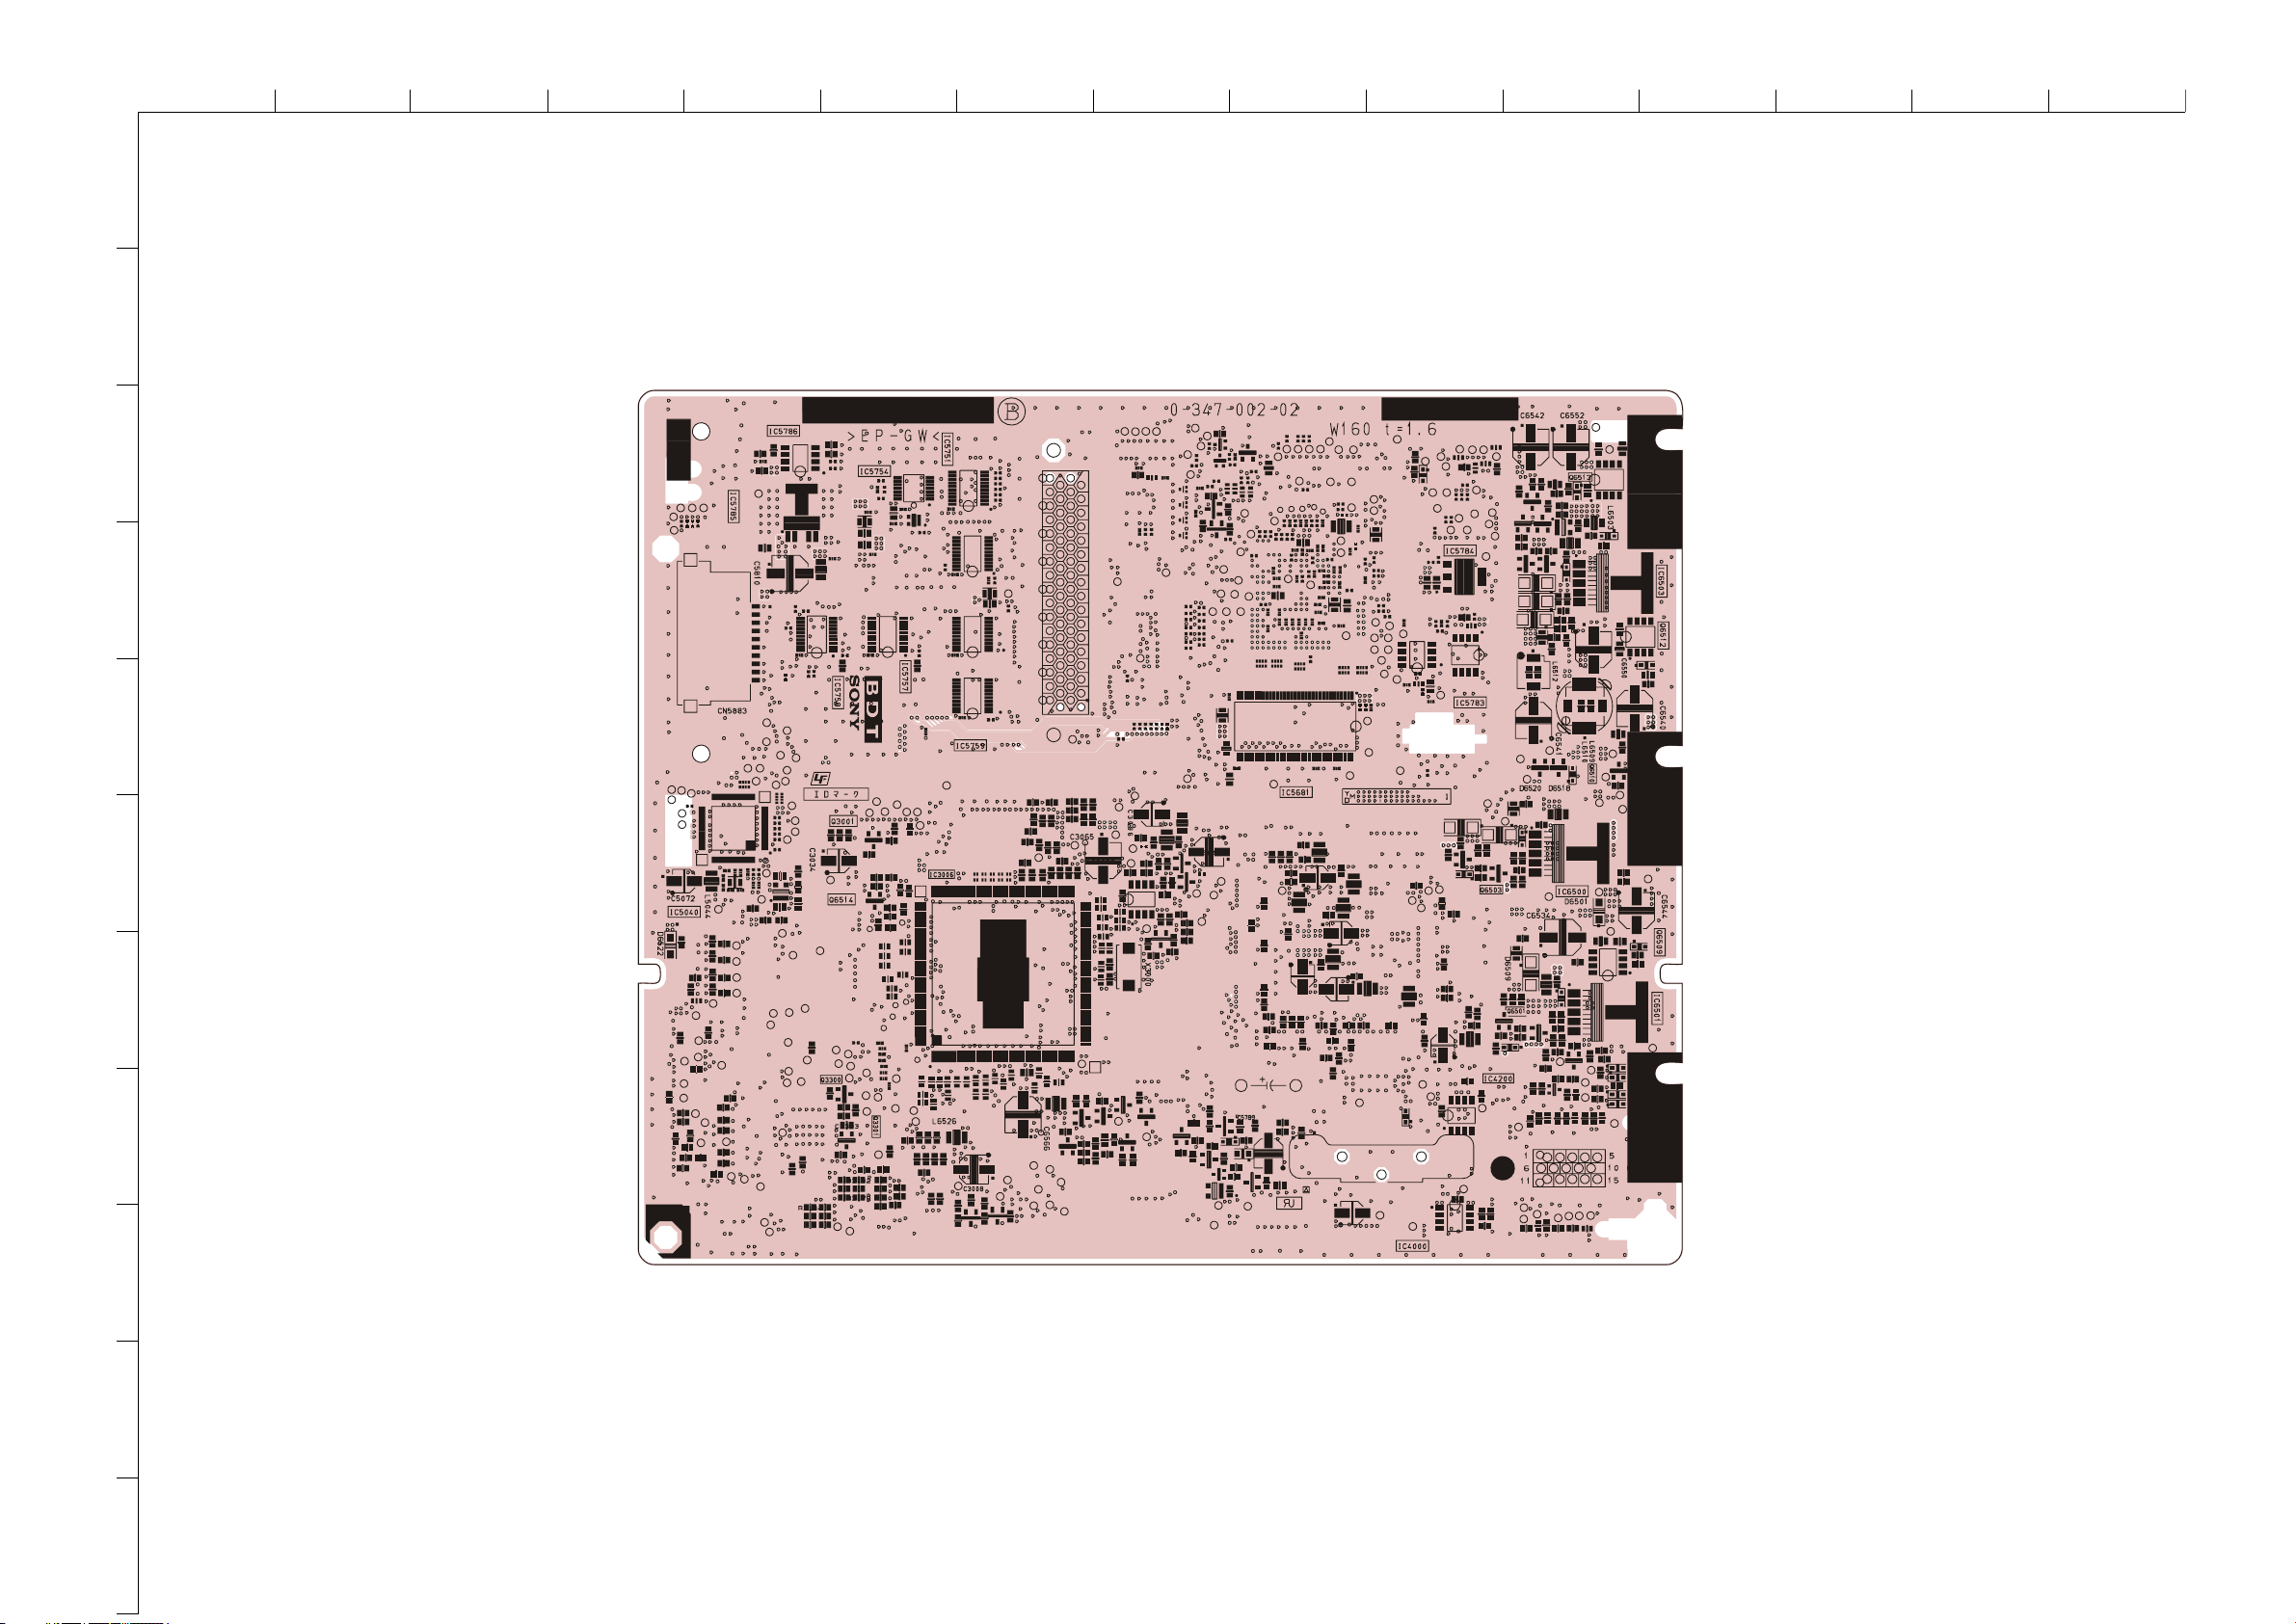
ABCDE F
1
2
G
HI JKLMN
O
~ BDT Printed Wiring Board Conductor Side B ~
3
4
5
6
7
8
9
10
11
- 48 -
Page 49
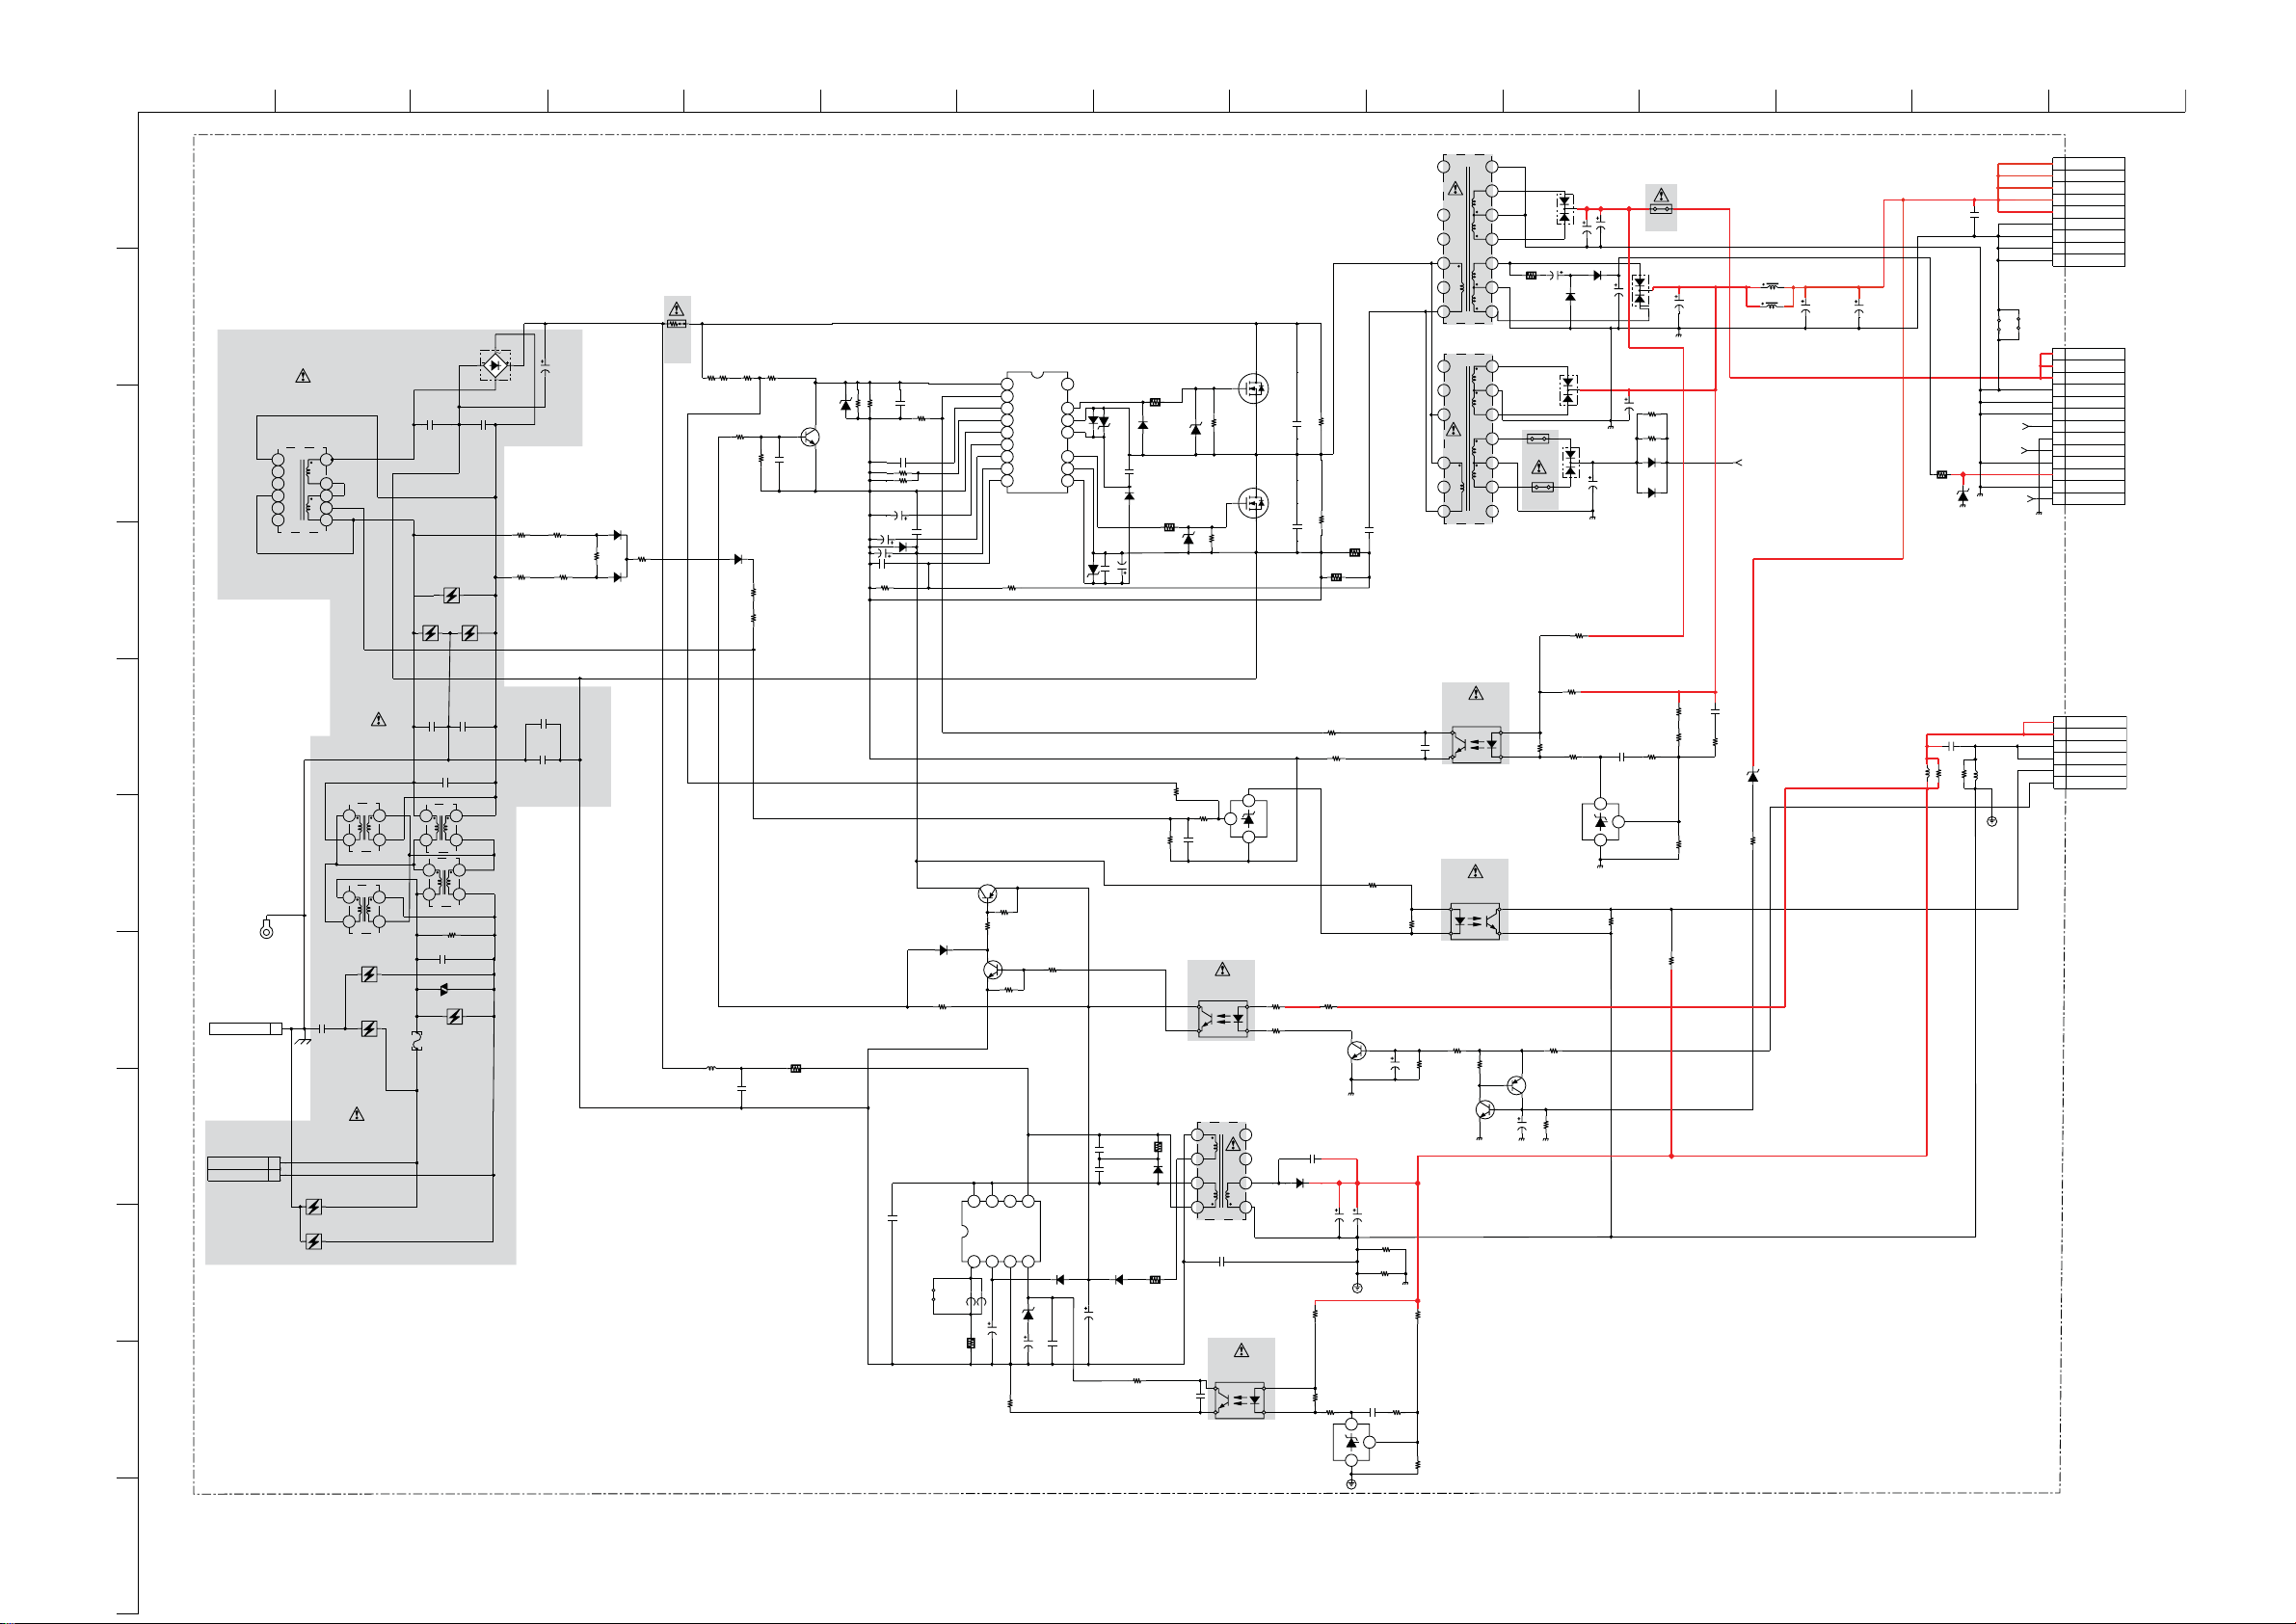
ABCDE F
G
HI JKLMN
O
G1.-SE1(KDL-26/32U2000)
JW6001
5
AUD_GND
CN6002
1
18V/24V
2
18V/24V
3
18V/24V
4
18V/24V
18V/24V
5
6
GND
7
GND
8
GND
9
GND
CN6003
1
SIGNALVCC
2
SIGNALVCC
3
SIGNALVCC
GND
4
GND
5
GND
6
L
7
GND
8
R
9
GND
10
+33V
11
GND
12
AMP_MUTE
13
TO BDT BOARD
P
9
13P
CN6500
T6000
1
14
D6011
1
G1
1/2 POWER SUPPLY
2
D6000
D4SB60L-F
C6008
330
450V
L6001
3
37mH
1
12
11
3
10
4
9
5
8
6
7
4
C6001
4700p
250V
CM6005
F
CM6006
CM6007
C6006
4700p
250V
F
XX
R6006
D6001
R6007
XX
D6002
XX
XX
R6003
R6004
R6005
XX
XX
R6009
0.1
1/2W
RF
R6010
820k
1/10W
XX
R6008
XX
R6011
820k
1/10W
1/10W
RN-CP
D600
R6012
22k
RN-CP
XX
R6013
820k
1/10W
R6016
10k
1/10W
3
R6017
7.5k
1/10W
Q6000
MSD601-RST
R6014
XX
R6015
XX
C6009
0.01
R6018
R6019
27k
XX
1/10W
C6015
0.01
R6023
25V
D6004
1
MM3Z15VT1
25V
C6014
4.7
50V
C6011
47
25V
C6010
1000p
50V
R6020
100
1/10W
C6013
1000p
C6016
XX
R6021
50V
XX
R6022
15k
50V10
C6017
XX
D6020 XX
1
32
87654
9
R6028
1/10W
RN-CP
100
C6000
I
MCZ3001DB
SWITCHING
CONTROL
Vsense
F/B
V
Ct
RT
GND
TIMER
SS
VC1
P-GND
OCP
MM3Z15VT1
V
G(H)
G(L)
VC2
D6006
Q6003
D6010
D6009
R6035
10k
1/10W
RN-CP
R6036
10k
1/10W
RN-CP
2SK3469
Q6004
2SK3469
S
S
C6022
220p
1kV
SL
C6023
220p
R6040
2.2M
1/4
W
R6041
2.2M
1/4W
RN
R6045
C6024
0.1
R6043
0.1
2W
RS
0.033
2W
800V
RS
PP
1kV
SL
D6007
MM3Z15VT1
C6018
0.01
25V
R6030
10
1/4W
FPRD
XX
D6022
MM3Z15VT1
C6020
0.1
50V
D6008
UF4005PKG23
R6031
0
1
1/4
W
C6019
47
25V
MM3Z15VT1
18
VD
16 15
VS
14
VB
D6021
12
XX
11
10
3
4
5
6
7
1
2
3
5
6
7
T6001
FCH08U10
C603
10ERB20-TB3
C6028
22
100V
D6013
10ERB20-TB3
R6057
1.2k
1/10W
RN-CP
1000
16V
D6015
C6032
100V
D6014
FCH08U10
AV_GND
9
22
GND_INV
C6029
1500
35V
C6030
2200
16V
C6033
1200
35V
R6059
D6016
XX
D6017
PS6002
3.15A
D6018
FMB-29L
XX
XX
GND_INV
C6034
1200
35V
R6060
AUDIO_VCC
C6038
XX
L6005
10uH
C6036
C6037
XX
L6004
10uH
XX
AUDIO_VCC
XX
JW6002
5
TO A BOARD
SIGNAL_VCC
L_I
N
R_IN
R6068
2.2k
1/2
W
AMP_MUTE
FPRD
D6023
UDZS-TE17-33B
13
12
11
10
R6051
9
0.47
1/4W
FPRD
8
14
D6012
FMB-29L
13
12
11
PS6000
4A
10
9
PS6001
4A
8
10
R6056
R6052
1k
1/10W
RN-CP
IC6002
TL1431CZ-AP
R6053
1k
1/10W
RN-CP
Q6007
MSB709-RT1
R6054
10k
1/10W
RN-CP
XX
R6055
CHIP
CN6200
6P
1
STBY+5V
2
STBY+5V
3
GND
4
GND
5
AC_OFF_DET
6
POWER_ON
TO BDT BOARD
CN6501
R6063
7.5k
1/10W
UDZSTE-1727B
R6064
1k
1/10W
RN-CP
R6061
22k
1/10W
D6019
C6035
R6065
R6066
1/10W
RN-CP
XX
XX
4.7k
L6201
XX
R6212
0
C6213
XX
R6213
L6202
XX
0
R6062
1.2k
1/10W
R6058
C6031
0
0.01
10k
1/10W
25V
3
1
2
R6067
XX
C6002
C6005
470p
470p
250V
250V
B
5
CONNECTEDTO SECONDARY BY METAL SUPPORT
B
275VPT0.22C6003
123
4
C6000
4700p
250V
E
4
L6000
L6006
CM6002
CM6003
123
F6000
4A
250V
6
E
ET6000
7
8
CN6001
XX
CN6000
3P
WHT
AC IN
AC IN
1
GND
FH6000
VD6000
CM6004
1234
1234
R6002
1M
L6002
XX
L6003
1/2W
XX
275V0.47C6004
CM6000
CM6001
9
COMPONENTS MARKED AS XX ARE NOT FITTED ON THIS MODEL
C6012
470p
250V
C6007
470p
250V
1k
PHOTOCOUPLER
PHOTOCOUPLER
R6049
1/10W
RN-CP
R6048
22k
1/10W
RN-CP
Q6006
MSD601-RT1
R6210
10k
1/10W
R6211
10k
1/10W
PH6002
PC123Y22JOOF
PH6001
PC123Y22JOOF
22k
R6050
10k
1/10W
RN-CP
SHUNT REGULATOR
C6027
1
50V
R6042
470
1/10W
RN-CP
R6044
MSD601-RST1
C6210
1000p
630V
D6204
C6314
R6207
1k
1/10W
IC6201
TL1431CZ-AP
R6039
Q6005
XX
R6206
1/10W
CHIP
0
CHIP
470
R6208
CHIP
0
0
IC6001
B
Q6001
MSB710-RT1
R6025
R6026
10k
1/10W
RN-CP
Q6002
8765
STR-A6169
SWITCHING
REGULATOR
XX
R6201
2.2
1W
RS
C6202
4.7
50V
10k
1/10W
RN-CP
IC6200
STANDBY
FB6201
XX
R6027
22k
1/10W
RN-CP
4321
D6200
UDZSTE-174.7B
C6203
10
50V
R6202
0
CHIP
R6029
22k
1/10W
RN-CP
D6201
MMDL914T1
C6204
1000p
50V
C6206
2200pF
C620
1kV
L6200
100uH
C6200
0.22
400V
R6200
D6005
MMDL914T1
MSD601-RST1
R6024
100k
1/10W
RN-CP
XX
C6201
22p
2kV
SL
FB6200
JW6200
5
1kV
R
D6203
ERA22-06AVRBT
7
330p
D6202
10ERB20-TB3
C6205
47
50V
R6203
CHIP
R6033
1k
1/10W
R6032
XX
R6205
100k
1W
RS
R6204
10
1/4W
FPRD
C6208
0
0.1
16V
TL1431CZ-AP
R6034
XX
1
C6021
0.01
25V
PH6000
PC123Y22JOOF
PHOTOCOUPLER
T6200
1
2
4
6
C6209
470p
250V
B
PH6200
PC123Y22JOOF
PHOTOCOUPLER
3
2
11
10
9
8
R6037
1k
1/10W
RN-CP
R6038
0
CHIP
M1FL20U-4063
SHUNT REGULATOR
C6026
XX
R6046
4.7k
1/10W
RN-CP
R6047
1/10W
RN-CP
C6025
1
50V
C6211
1000
10V
R6218
XX
R6219
XX
C6212
R6209
0.1
33k
16V
1/10W
3
1
2
11
~ G1 Board Schematic Diagram [ Power Supply ] Page 1/2 ~
- 49 -
Page 50
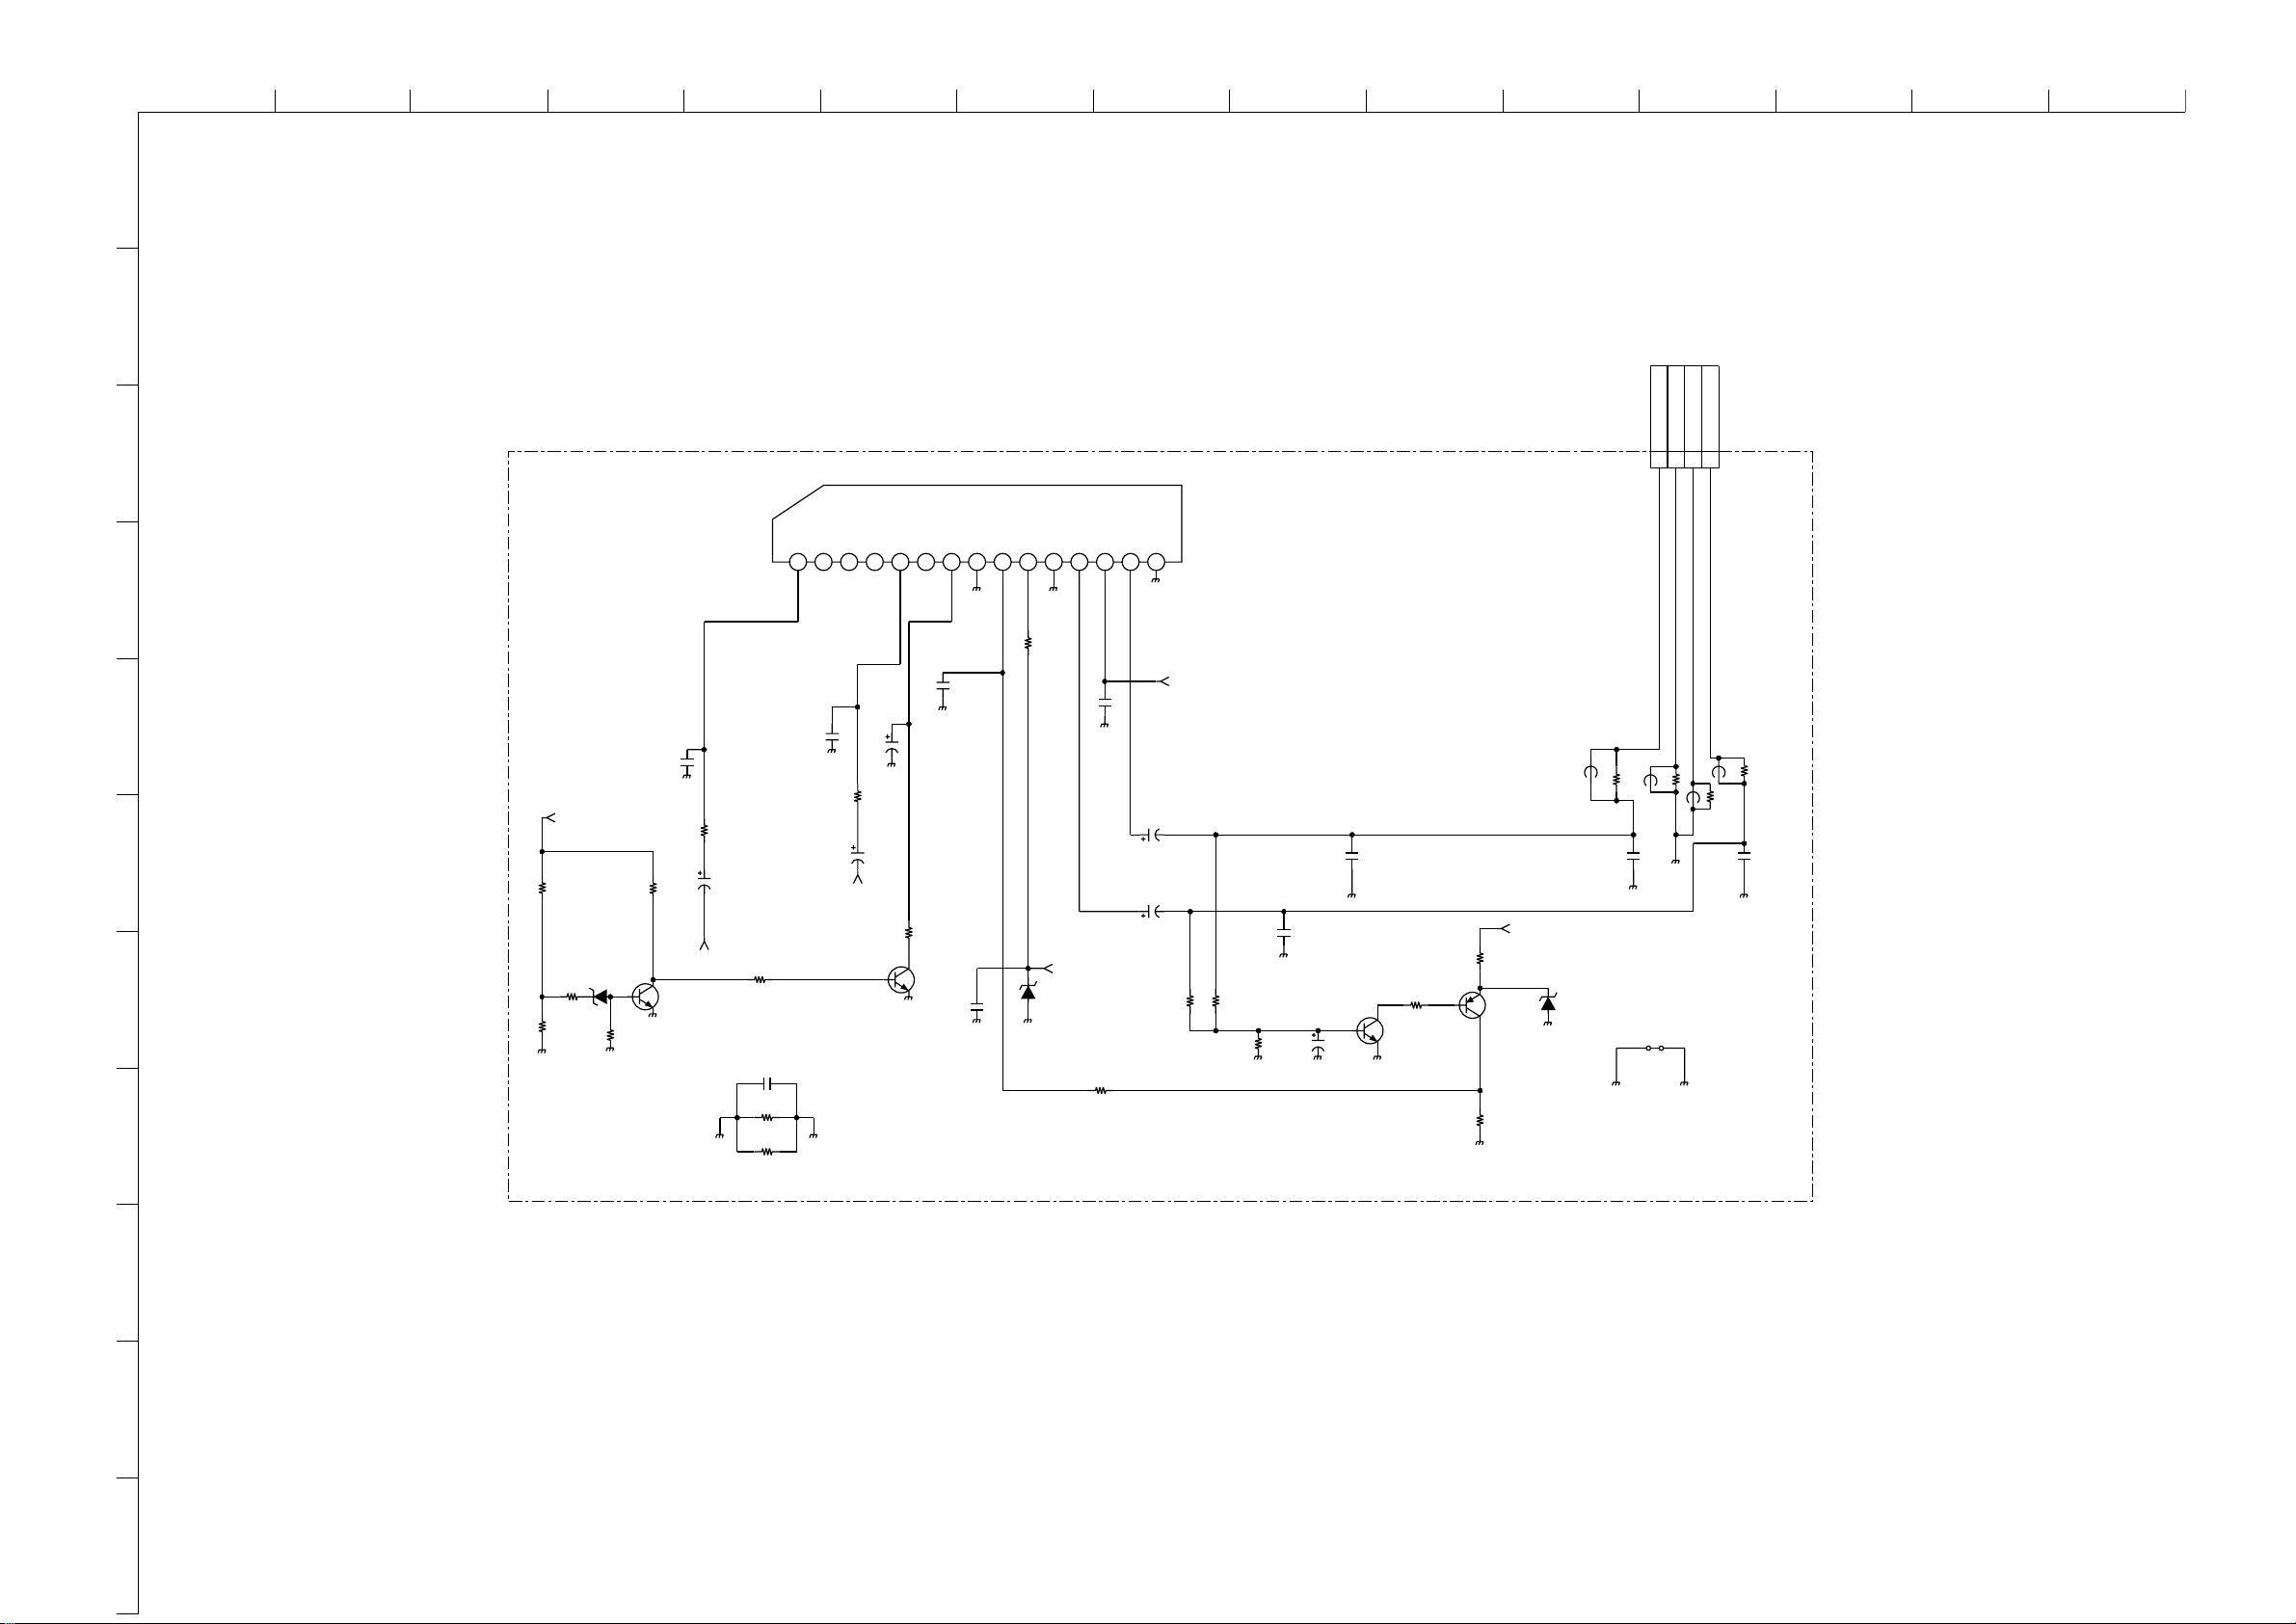
ABCDE F
G
HI JKLMN
O
1
2
TO H2/H2P BOARD
CN9856
D
CN6300
4P
3
4
G1.-SE1(KDL-26/32U2000)
G1
2/2
L INNCNCNCR INNCSVR
1
C6305
XX
S_GND
8765432
AUD_GND
IC6300
TDA7495S
STBY
MUTE
PW_GND
R OUT
VCCL OUT
14
10
11
R6309
1k
1/10W
12
13
9
PW_GND
15
AUDIO_VCC
STEREO POWER
AMPLIFIER
L_HP
4
AV-GND
3
AV_GN
2
R_HP
1
C6304
220
25V
R6307
XX
AUD_GND
C6306
0.22
16V
AUD_GND
C6307
AMP_MUTE
D6300
UDZSTE-175.6B
R6313
CHIP
0
0.1
50V
C6309
1000
35V
C6308
1000
35V
R6314
100k
1/10W
R6315
100k
1/10W
RN-CP
R6316
22k
1/10W
C6310
0.022
25V
Q6302
MSD601-RST1
C6316
22
50V
JR6313
0
FB6302
C6311
0.022
25V
MSB709-RT1
R6317
10k
1/10W
RN-CP
Q6303
R6318
1/10W
R6308
1/10W
RN-CP
AUD_GND
10k
2.2k
FB6301
AUDIO_VCC
XX
UDZSTE-175.6B
C6312
0.01
D6302
AUD_GND
50V
XX
JW6300
15
COMPONENTS MARKED AS XX ARE NOT FITTED ON THIS MODEL
JR6314
0
AV_GND
FB6304
JR6315
FB6303
XX
XX
0
JR6316
0
C6313
0.01
50V
R6305
XX
C6315
0.022
R6311
R6310
25V
XX
XX
C6302
220p
50V
R6306
120k
1/10W
C6303
1
50V
R_IN
Q6301
XX
5
C6300
220p
50V
AUDIO_VCC
R6304
120k
1/10W
6
Q6300
XX
C6301
_IN
L
50V
1
R6301
7
R6312
XX
XX
R6300
XX
D6301
XX
R6302
R6303
XX
XX
8
~ G1 Board Schematic Diagram [ Power Supply ] Page 2/2 ~
9
10
11
- 50 -
Page 51

ABCDE F
G
HI JKLMN
O
1
2
~ G1 Printed Wiring Board Conductor Side A ~
3
4
5
6
7
8
~ G1 Board Semiconductor Location Table Side A ~
DIODE
9
D6000 K - 6 D6015 D - 7 IC6000 I - 3 IC6300 C - 4
D6008 I - 4 D6018 C - 7 IC6001 G - 3
D6011 E - 6 D6202 I - 7 IC6002 F - 3 Q6003 I - 5
D6013 D - 7 D6203 H - 6 IC6200 I - 6 Q6004 H - 5
D6014 D - 5
IC
IC6201 F - 7
TRANSISTOR
10
11
- 51 -
Page 52
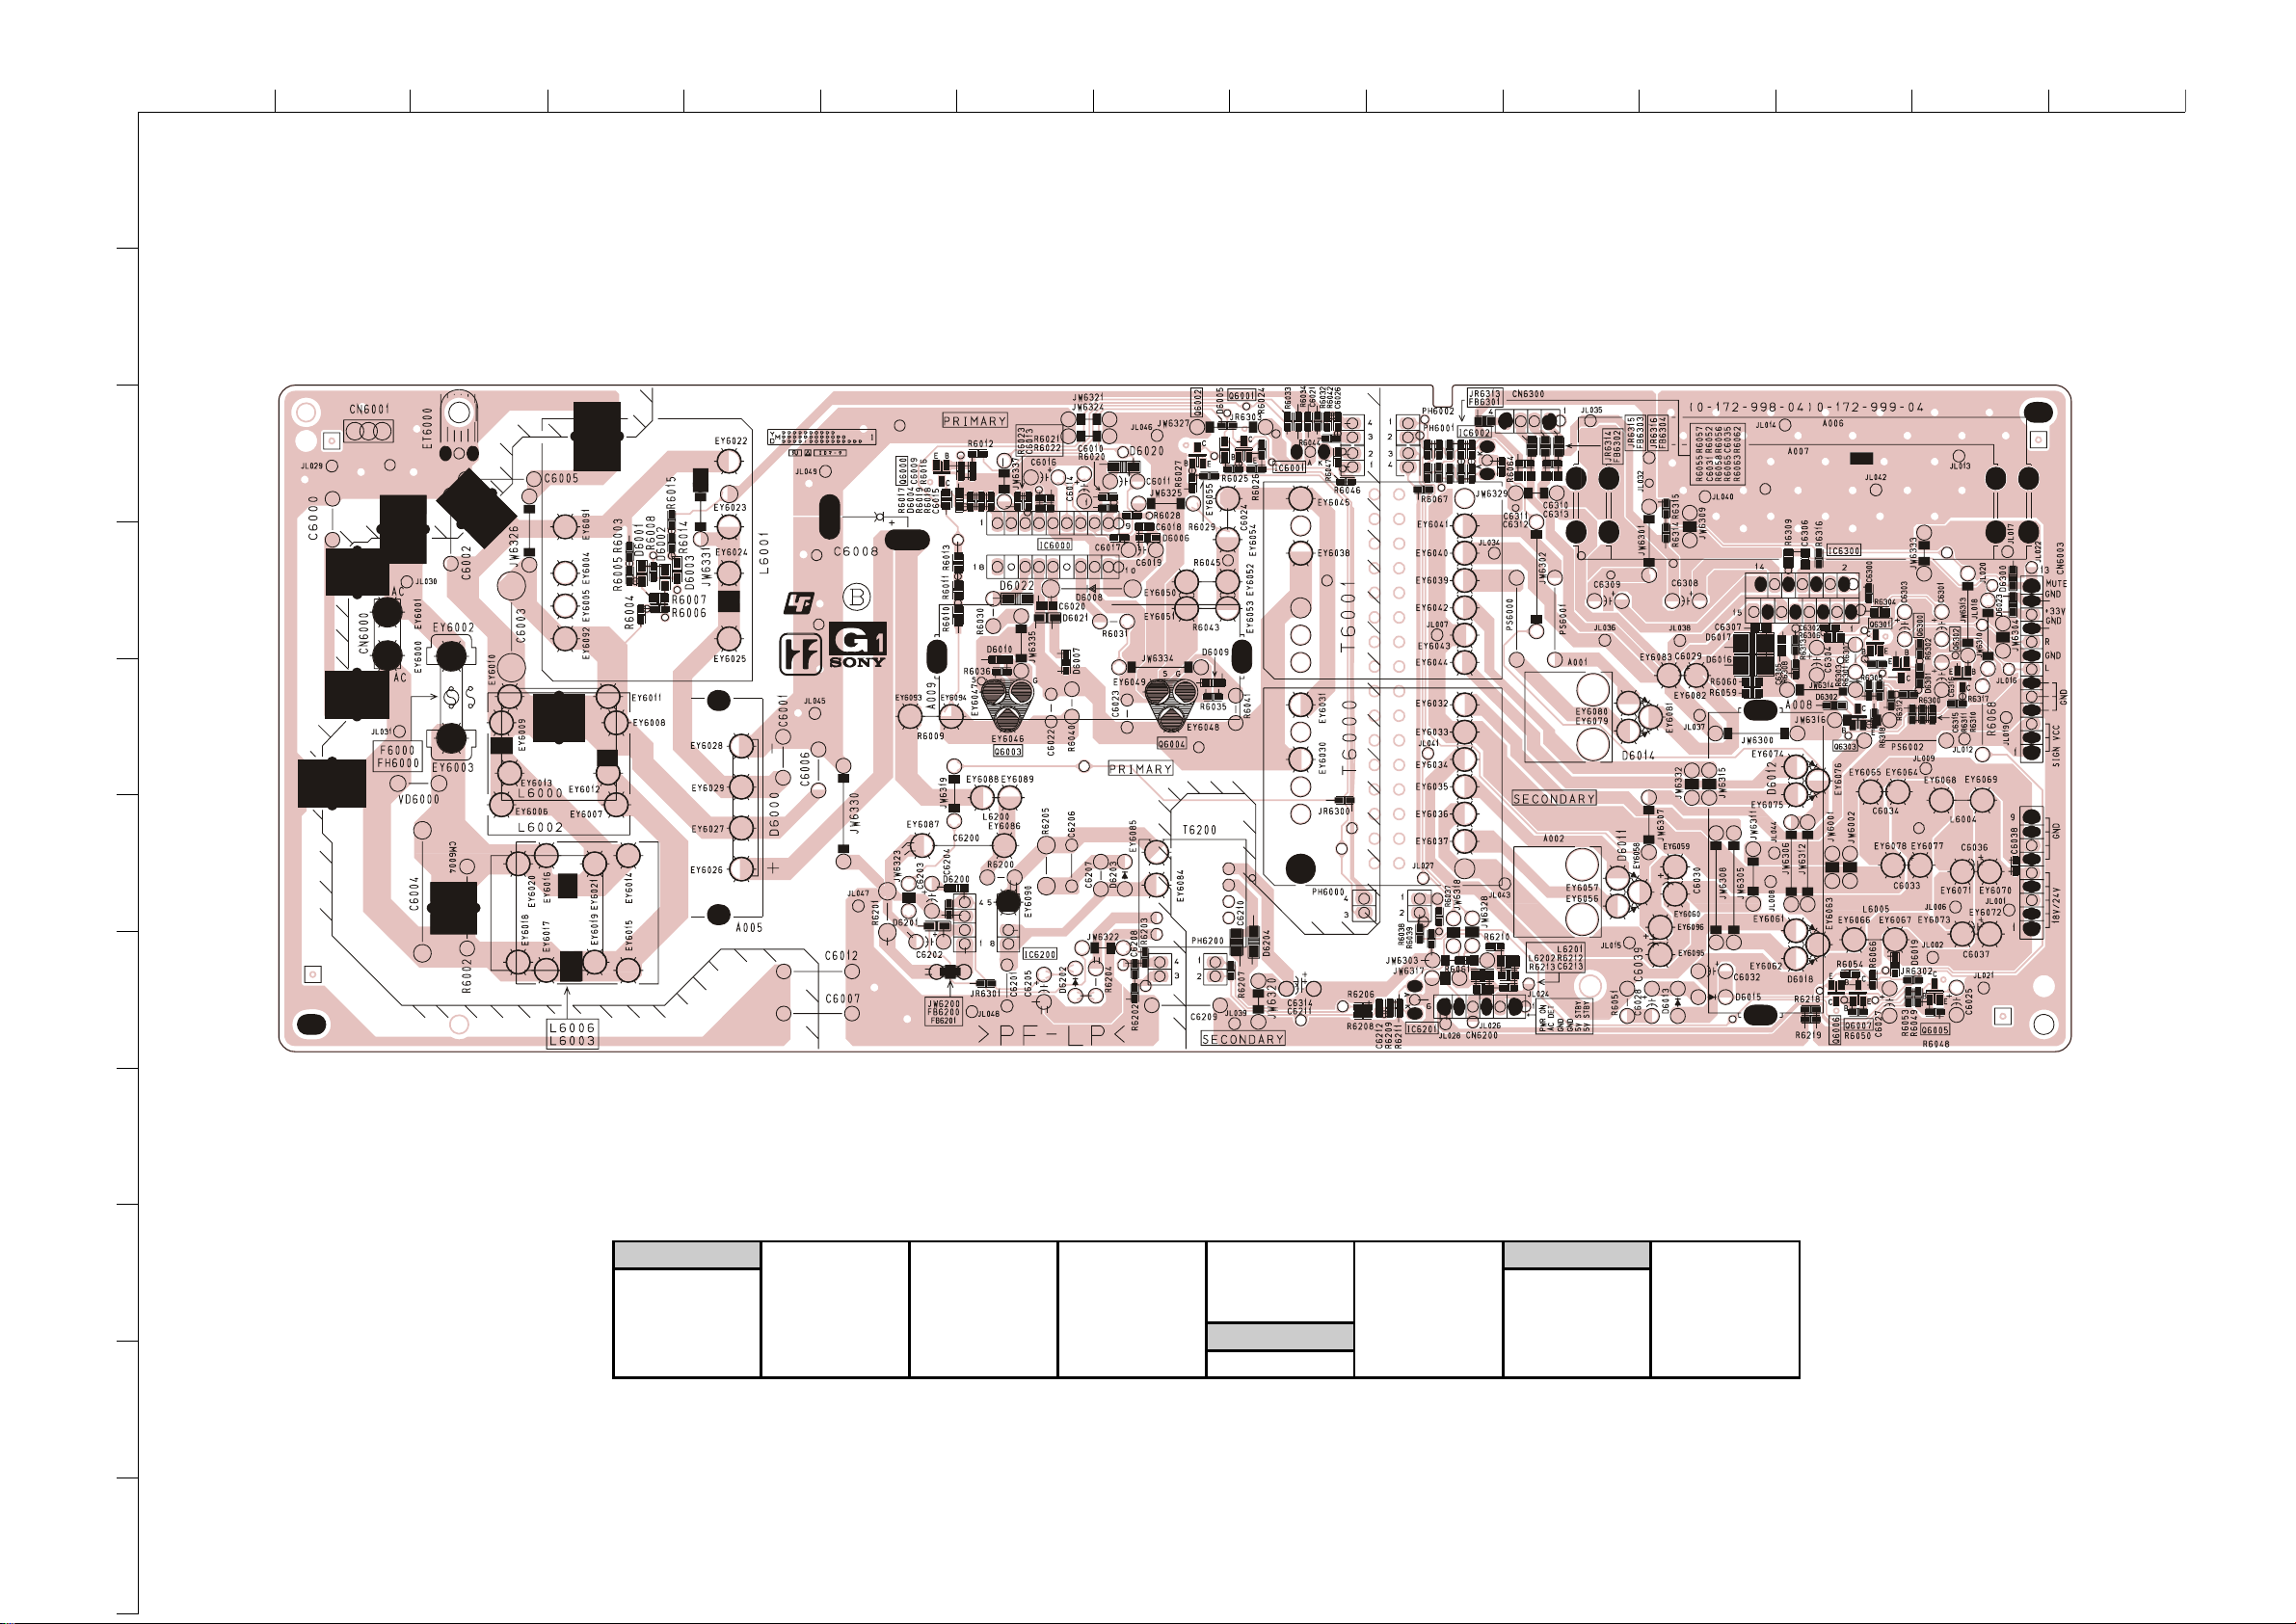
ABCDE F
G
HI JKLMN
O
1
2
~ G1 Printed Wiring Board Conductor Side B ~
3
4
5
6
7
8
~ G1 Board Semiconductor Location Table Side B ~
DIODE
9
D6000 E - 6 D6008 G - 4 D6013 L - 7 D6019 M - 6 D6300 N - 4 IC6002 J - 3 Q6000 F - 3 Q6006 M - 7
D6004 F - 3 D6009 H - 5 D6014 K - 5 D6200 F - 6 D6302 M - 5 IC6200 G - 7 Q6001 I - 3 Q6007 M - 7
D6005 H - 3 D6010 G - 4 D6015 L - 7 D6201 F - 6
D6006 H - 4 D6011 K - 6 D6016 L - 4 D6202 G - 7 IC6000 G - 4 IC6300 M - 4 Q6004 H - 5 Q6303 M - 5
D6007 G - 4 D6012 L - 5 D6018 M - 7 D6203 H - 6 IC6001 I - 3
IC
IC6201 J - 7 Q6002 H - 3 Q6302 N - 4
TRANSISTOR
Q6005 N - 7
10
11
- 52 -
Page 53

PC123Y22JOOF
PH6200
50V
4.7
C6044
CM6000
3.2mm
D6029
XX
Q6009
10ERB20-TB
D6043
1/4W
FPRD
0.47
R6126
MMDL914T1
D6042
CM6003
3.2mm
CM6001
6.2mm
PC123Y22JOOF
PH6003
1
23
4
MA113-(TX)
D6023
D6045
XX
1
CN6000
50V
22
C6073
100V
4.7
C606
8
MM3Z22VT1
D604
1
Mount Mecha
404240802
A6003
D6022
XX
1/4W
FPRD
100
R6046
50V10
C6049
D6044
10ERB20-TB3
GND_1
450V
180
C6039
8765
4
32
1
FA5501AN-D1-TE1
IC6000
FB
COMP
MUL
IS
ZCD
GND
OUT
VCC
C6031
16V
100
PC123Y22JOOF
PH6000
1
2
3
4
1/2W
RF
0.1
R6069
25V
47
C6055
FH6000
XX
MMDL914T1
D6020
EP05FA20
D6017
1/4W
FPRD
4.7
R6042
D6034
XX
50V
100
C6045
PC123Y22JOOF
PH6001
1
23
4
R6065
10
1/4W
FPRD
MMDL914T1
D6005
1/4W
FPRD
4.7
R6127
FH6001
XX
2SC1623-L5L6
Q6006
MMDL914T1
D6015
2SA1037AK-T146-QR
Q6005
PC123Y22JOOF
PH6002
14
Q6003
MMDL914T1
D6019
CM6002
6.2mm
XX
C6034
XX
C6057
2SC1623-L5L6
Q6007
MMDL914T1
D6021
10uH
L6200
R6081
2.2
1/4W
FPRD
25
V
1500
C6069
25
V
1500
C6067
D6004
XX
5W
RB
0.33
R6035
C6070
16V
1
500
R6028
1/2W
1k
Mount Mecha
214976661
A6008
D6036,D6037
D6036(1),D6037(1)
Mount Mecha
407727701
A6006
D6040
D6040(1)
Mount Mecha
263406601
A600
1
D6003
D6003(1)
BAT54HT1
D6013
50V
10
C6038
D6026
XX
250V
6.3A
F6000
0.45uH
FB6001
0.45uH
FB6002
UF4005PKG2
3
D6028
1/10W
560k
R6058
25V
6800p
C6016
1/10W
4.7k
R6084
1/10W
RN-CP
1k
R6098
XX
R6014
1/10W
330
R6031
1/10W
100k
R6066
1/10W
4.7k
R6091
25V
0.01
C6027
1/10W
3.3k
R6093
1/10W
RN-CP
100k
R6055
275V
1
C6009
1/10W
RN-CP
1k
R6115
1/10W
4.7k
R6041
XX
C6063
680
R6121
1/10W
1/10W
470k
R6061
1/10W
10k
R6038
1/10
W
39k
R6094
1/10W
1M
R6088
1/10W
220k
R6092
1/10W
1M
R6072
50V
1000p
C6053
1kV
470p
C6059
1/10W
1M
R6073
C6076
XX
25V
0.01
C6041
1/10
W
5.6k
R6122
C6030
XX
12k
R6078
47k
R6071
1/10W
47
R6090
XX
R6020
1/10W
10k
R6082
1kV
C6020
470p
SL
XX
R6040
50V
0.01
C6052
10V
0.47
C6061
1/10W
22k
R6023
XX
R6013
250V
C6005
470p
1/10W
1k
R6096
1/10W
RN-CP
22k
R6103
1/10W
100
R6037
XX
C6065
250V
4700p
C6003
F
1/10
W
RN-CP
1k
R6124
250V
4700p
C6010
F
1/10W
RN-CP
22k
R6054
1/10W
RN-CP
330k
R6053
XX
R6018
XX
C6001
C6079
XX
XX
C6050
XX
R6012
1/10W
22k
R6044
XX
R6015
XX
R600
0
1000p
C6047
1/10W
RN-CP
1k
R6109
1/10W
1k
R6113
1/10W
390k
R6062
250V
4700p
C6004
1/10W
10k
R6056
XX
R6049
16V
0.47
C6024
1/10W
100
R6070
CHIP
0
R6030
C6032
16V
1
XX
R6010
XX
C6000
25V
0.01
C6046
1/10W
10k
R6083
25V
0.01
C6043
1/10W
1M
R6075
25V
0.22
C6054
1/10
W
4.7k
R6105
1kV
C6021
470p
SL
XX
R6011
1/10W
RN-CP
1k
R6114
1/10W
4.7k
R6118
1/10W
10k
R6052
25V
0.02
2
C606
4
47k
R6085
1/10W
1/10W
10k
R6125
XX
R6004
1/10W
RN-CP
22k
R6067
1/10W
1.5k
R6064
1/10W
15k
R6063
50V
1000p
C6026
50V
0.1
C6036
1/10W
R6110
4.7k
1/10W
240k
R6076
XX
C6058
XX
R6080
250V
470p
C6011
1/10W
560k
R6059
1/10W
560k
R6060
1/10W
1k
R6104
XX
R6123
50V
0.1
C6042
1/10W
RN-CP
100
R6057
R6101
1/10W
10k
XX
R6019
R6102
1/10W
10k
1/10W
22
R6095
1/10W
27k
R6077
1/10W
10k
R6068
XX
R6089
XX
R6079
1/10W
22
R6099
C6007
275V
PT
0.22
16V
0.1
C6035
1/10W
1M
R6074
FSF05A60
D6012
450V
1
C6017
450V
1
C6018
C6028
XX
C6029
XX
XX
C6019
1/10W
R6027
100
XX
C6023
1
CN6002
Mount Mecha
214976661
A6009
D6038,D6039
D6038(1),D6039(1)
GND_1
C6002
470p
470p
C6013
C6008
XX
C6006
XX
C6012
XX
1
R6016
XX
D15XB60
D6003
450V
180
C6040
1
2
5
6
12
10
8
7
175uH
L6003
C6033
XX
XX
C6037
1/10W
10k
R6043
EP05FA20
D6018
1/4W
FPRD
4.7
R6047
Mount Mecha
403694821
A6007
D6035
D6035(1)
D10SC6M-4012
D6039
D603
6
D10SC6M-4012
D10SC6M-4012
D6037
D10SC6M-4012
D6038
D10SC6M-4012
D6035
1uH
L600
5
LHL08
1uH
L6004
LHL08
25V
1500
C6071
XX
L6006
D6010
XX
XX
C6072
1/10W
R6002
220k
1/10W
R6001
220k
1/10W
R6007
220k
1/10W
R6006
220k
MMDL914T1
D6000
MMDL914T1
D6002
1/10W
R6005
470k
1/10W
R6008
470k
MMDL914T1
D600
1
C6048
XX
16V
C6051
0.1
2SC1623-L5L6
Q6010
1/10W
R6087
10k
R6086
10k
2SC2412K-T-146-QR
Q6011
1/10W
R6108
220k
XX
R6112
MMDL914T1
D6008
5
J
W6000
R6009
47k
1/10W
CHIP
0
R6022
10k
R6097
1/10W
D6025
XX
D6030
XX
MMDL914T1
D6027
250V
C6014
4700p
1/10W
R6100
10k
MMDL914T1
D6033
XX
FB6000
XX
C6022
XX
R6111
XX
R6025
10V
0.47
C6056
S
Q6012
2SK2158-T2B
1
23
4
L6000
1
23
4
L6001
1
23
4
T6000
XX
1
23
4
T6001
XX
FH6002
R6003
100k
1/10
W
560k
R6021
1/10W
R6036
33
XX
R6039
XX
C6074
1/2W
RF
10
R6200
E
ET6002
E
ET6003
E
ET6000
100uH
L6002
50V
1000p
C6062
50V
100
C6206
1/10W
10k
R6210
1/10W
1.5k
R6207
50V
4.7
C6205
1/4W
2.2
R6205
FPRD
1
2
3
4
1/10W
10k
R6211
220
R6204
1/10W
C6204
XX
1/10W
470
R6206
16V
0.1
C6210
D1NS6-TR
D6207
XX
C6207
8765
4321
STR-A6169
IC6200
OCP
VCC
GND
FB/OLP
S.UP
NC
D
D
16V
470
C6209
D1NL40-TR2
D6206
1/10
W
100
R6208
1/4W
2.2
R6203
FPRD
D6202
XX
D1NL40-TR2
D6204
50V
1000p
C6202
XX
R6209
ERA22-08KFLB
D6203
3
1
2
MM1431ATT
IC6201
50V
2.2
C6201
500V
470
p
C6203
10ERB20-TB3
D6200
2kV
47p
SL
C6200
1W
RS
2.2
R6201
XX
C6208
1
3
CN6001
3P
WHT
AC IN<N>
AC IN<L>
C6075
XX
XX
C6077
C6078
XX
L_I
N
R_I
N
AMP_MUTE
35V
1000
C6066
0.018
C6060
R6017
10W
RB
6.8
10
JW6001
RD5.65B-T1
D6201
1/10W
R6116
22k
XX
C6212
XX
L6201
2W
RS
0.22
R6107
2W
RS
0.22
R6106
R6045
XX
XX
R6026
2W
RS
R6029
22
UMZ16NT106
D6014
UMZ16NT106
D6031
UMZ16NT106
D603
2
UMZ16NT106
D6011
JW6201
XX
L6202
CHI
P
0
R6218
XX
L620
3
CHIP
0
R621
7
1/4W
R6128
2.2M
1/4W
R6129
2.2M
10
9
3
2
11
1
4
6
8
12
15
16
T6200
FCH08U10
D6040
5W
RB
0.33
R6032
VD6000
VD6001
3
1
2
MM1431ATT(CN)
I
C600
2
3
1
2
MM1431ATT(CN
)
IC6003
3
1
2
MM1431ATT(CN)
IC6004
XX
R6117
CHI
P
R6131
0
CHIP
R6130
0
D6046
XX
D6047
XX
AUDIO_VCC
2
6
16
14
11
9
12
15
10
13
3
7
8
5
T600
2
L6007
4.7uH
L600
8
4.7uH
Q600
4
1/10W
22k
R6051
1/10W
22k
R6024
1/10W
220
R6048
1/10W
220
R6033
220
R6050
1/10W
220
R6034
RY6000
7.5
J
W6082
Mount Mecha
234990031
A6005
Q6014,Q6013
Q6014(1),Q6013(1)
R6202
1/2W
330k
2
6
16
14
11
9
12
15
10
134
7
8
5
T6003
1
/4W
FPRD
82
0
R6132
UDZS-TE17-33B
D6048
4A
PS6301
S
2SK3797(LBS1SONY,Q)
Q6001
S
2SK3797(LBS1SONY,Q)
Q6002
DTZ5.1B
D6006
MMDL914T1
D6007
CHIP
0
R6133
10V
2.2
C6080
C6015
XX
JR6009
XX
JR6008
18
16 15 14 12 11
10
9
8
765
4321
MCZ3001DB
IC6001
VSENSE
F/B
CT
RT
GND
TIMER
SS
VC1
OCP
VC2
P-GND
VG(L)
VB
VS
VG(H)
VD
1
2
3
4
5
6
7
8
9
10
11
12
13
13P
CN600
5
SIGNAL_VCC
SIGNAL_VCC
SIGNAL_VCC
GND
GND
GND
L
GND
R
GND
+33V
GND
1
2
3
4
5
6
7
8
9
10
10P
CN6004
18V/24
V
18V/24
V
18V/24
V
18V/24V
18V/24V
GND
GND
GND
GND
1
2
3
4
5
6
6P
CN6003
STBY5V
STBY5V
GND
GND
AC_OFF_DET
POWER_ON
5
J
W6045
5
JW6046
Mount Mecha
214976661
A6012
Q6001,Q6002,D6012
Q6001(1),Q6002(2),D6012(1)
S
2SK3469
Q6013
S
Q601
4
2SB1122-S
Q6008
PROTECT
POWER ON
OVP
AC OFF DET
MAIN FB
PROTECT
MM1431ATT(NEW)
MM1431ATT(NEW)
MM1431ATT(NEW)
FA5501AN
OH8
SBC8
G2
1/2 POWER SUPPLY
G2.-SE-1(KDL-40U2000)
ACTIVE PFC CONTROL
PHOTOCOUPLED
250V
250V
STANDBY
SWITCHING
REGULATOR
PHOTOCOUPLER
SHUNT REGULATOR
COMPONENTS MARKED AS XX ARE NOT FITTED ON THIS MODEL
7.5MM
SHUNT
REGULATOR
2SC1623-L5L6
PHOTOCOUPLER
SHUNT
REGULATOR
PHOTOCOCOUPLER
SHUNT
REGULATOR
PHOTOCOCOUPLER
800V
TO BDT BOARD
CN6501
TO BDT BOARD
CN6500
SWITCHING
CONTROL
AMP_MUTE
GND
XX
XX
2SK3469
XX
XX
XX
10
11
1
2
3
4
5
6
7
8
9
ABCDE F
G
HI JKLMN
- 53 -
~ G2 Board Schematic Diagram [ Power Supply ] Page 1/2 ~
O
Page 54
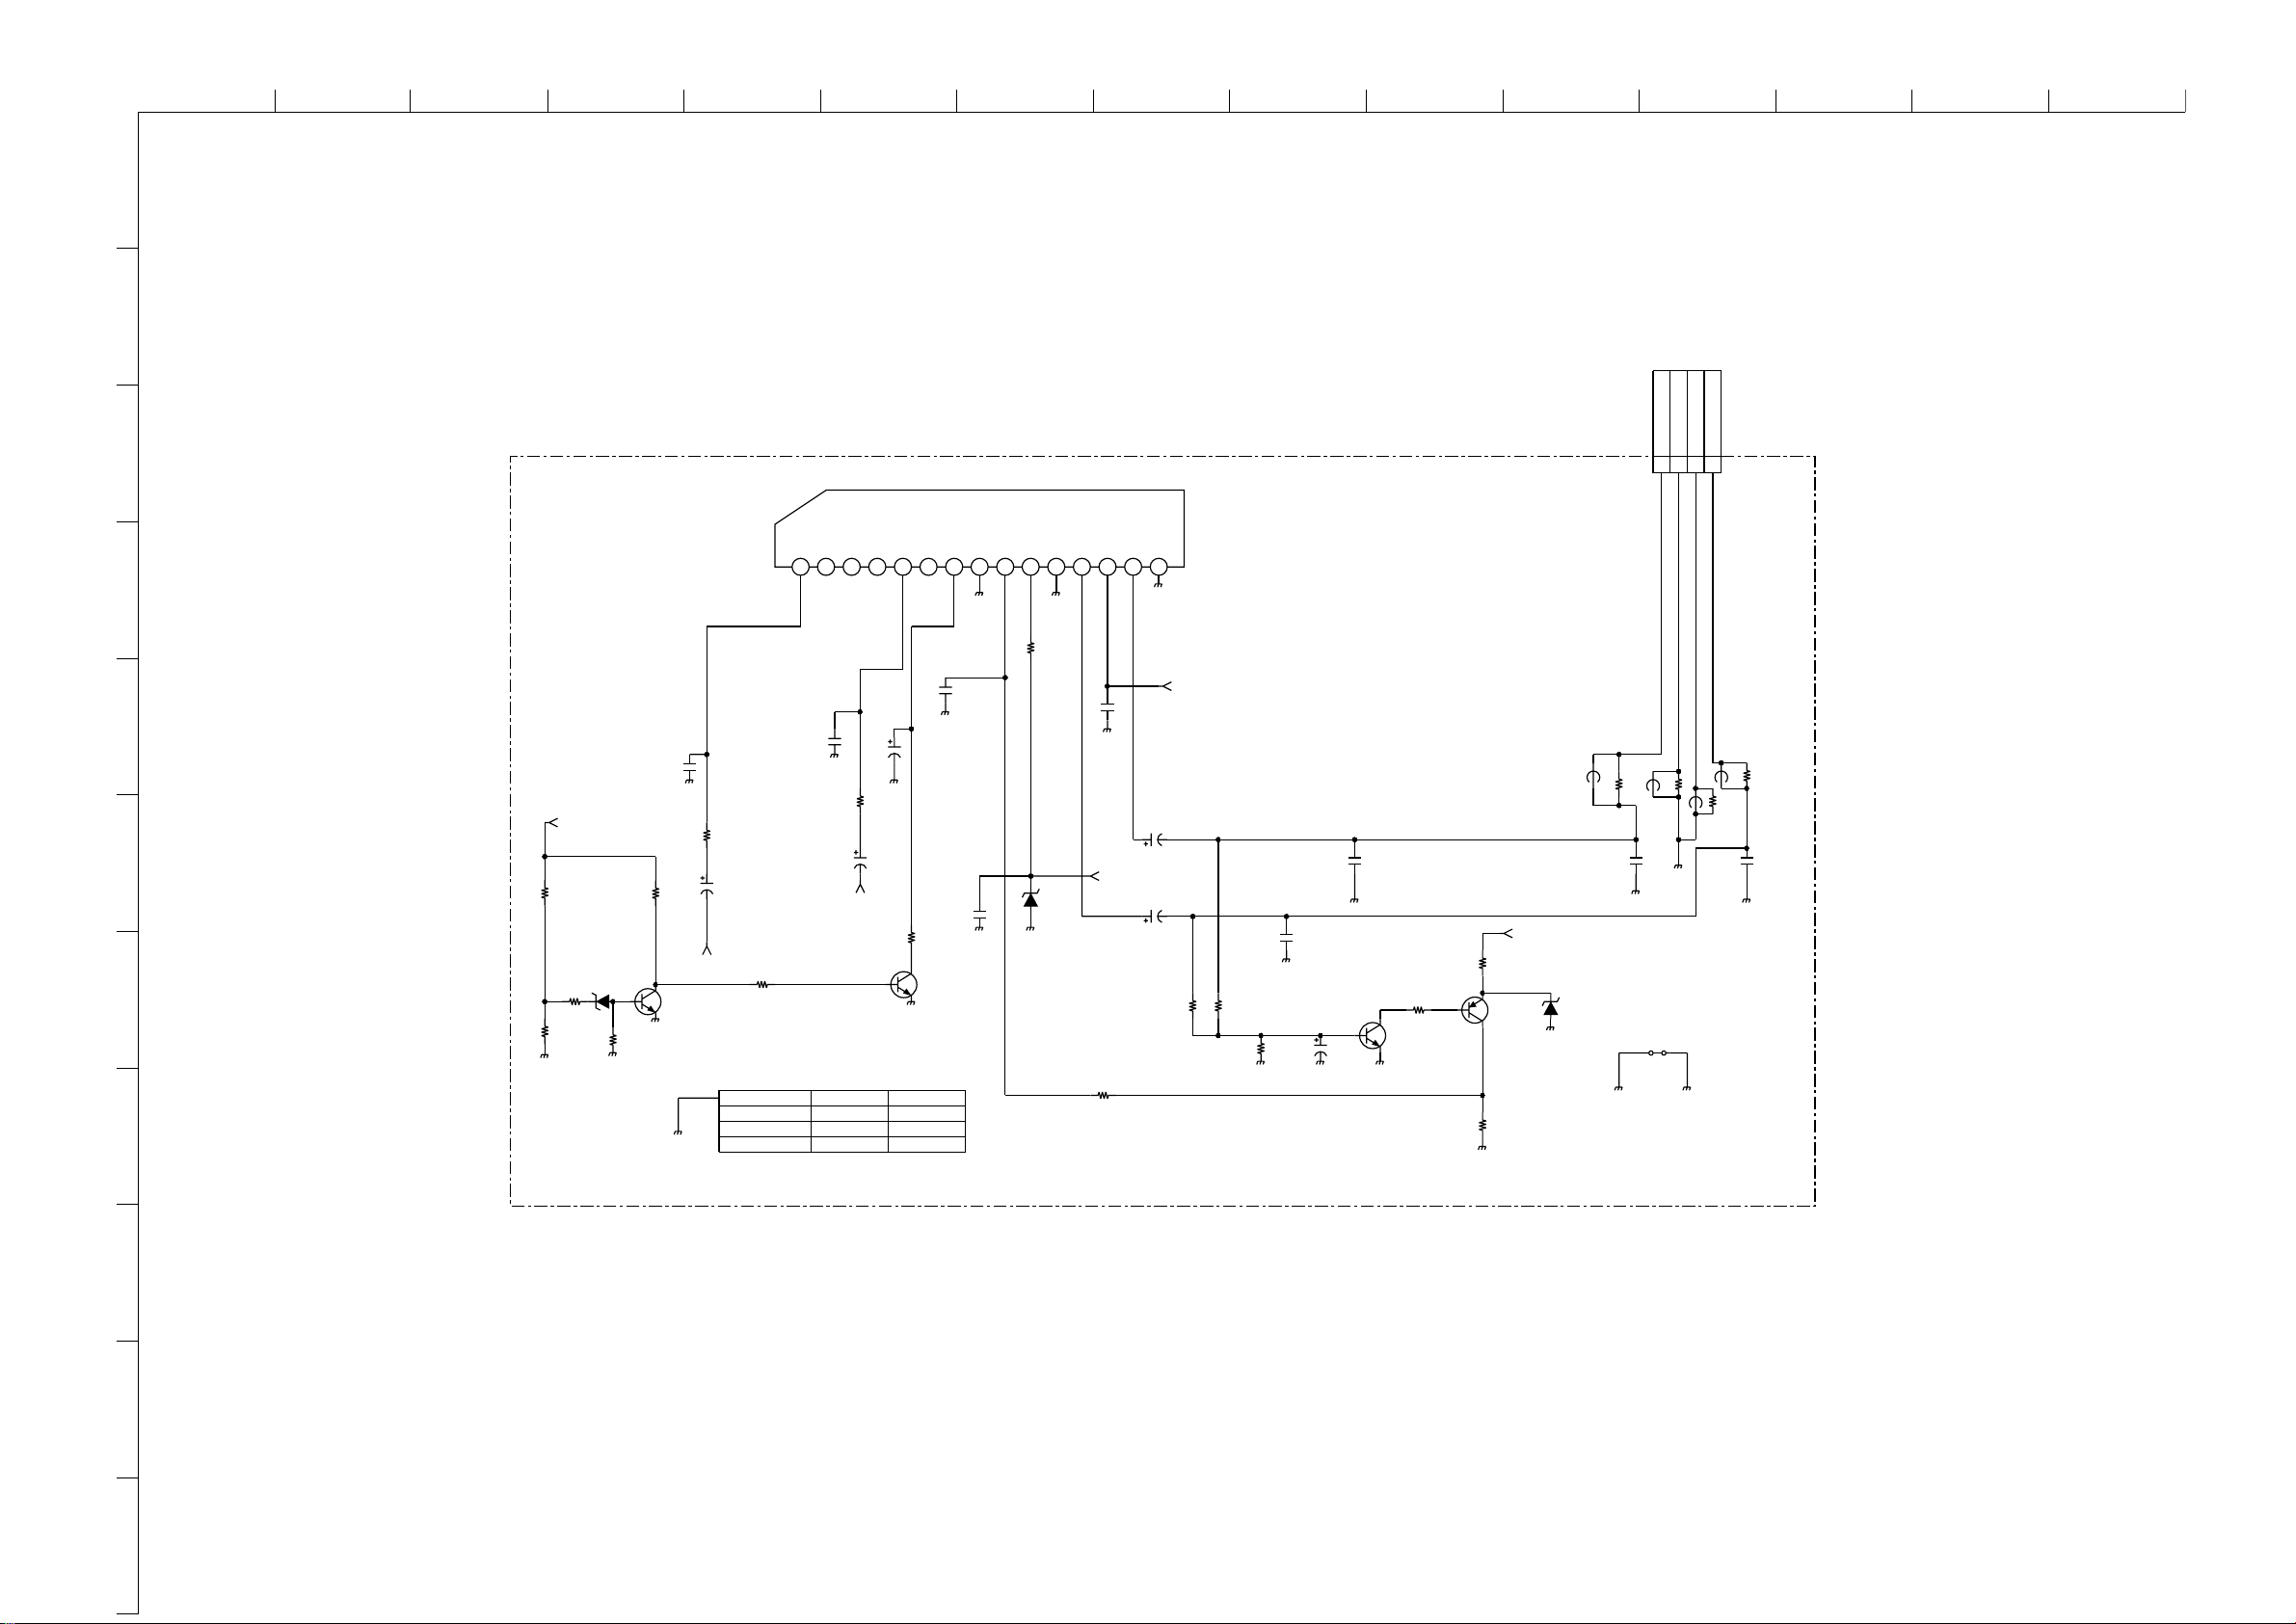
ABCDE F
G
HI JKLMN
O
1
2
TO H2/H2P BOARD
CN9856
D
CN6300
4P
3
4
G2.-SE1(KDL-40U2000)
G2
2/2
L INNCNCNCR INNCSVR
1
C6305
XX
S_GND
8765432
AUD_GND
IC6300
TDA7495S
STBY
MUTE
PW_GND
R OUT
VCCL OUT
14
10
11
R6309
1k
1/10W
12
13
9
PW_GND
15
AUDIO_VCC
STEREO POWER
AMPLIFIER
L_HP
4
AV-GND
3
AV_GN
2
R_HP
1
C6304
220
25V
R6307
XX
IC6003
AUD_GND
C6306
0.22
16V
AUD_GND
D6300
UDZSTE-175.6B
C6307
0.1
50V
AMP_MUTE
R6313
0
CHIP
C6309
1000
35V
C6308
1000
35V
R6314
1/10W
100k
R6315
100k
1/10W
RN-CP
R6316
22k
1/10W
C6310
0.022
25V
Q6302
MSD601-RST1
C6316
50V
JR6313
0
FB6301
XX
C6311
0.022
25V
AUDIO_VCC
R6318
10k
Q6303
MSB709-RT1
R6317
10k
1/10W
22
RN-CP
1/10W
R6308
1/10W
RN-CP
AUD_GND
2.2k
FB6302
C6312
0.01
50V
D6302
UDZSTE-175.6B
AUD_GND
XX
JW6300
5
COMPONENTS MARKED AS XX ARE NOT FITTED ON THIS MODEL
JR6314
0
FB6304
JR6315
FB6303
XX
XX
0
JR6316
0
C6313
0.01
50V
5
C6300
220p
50V
AUDIO_VCC
R6304
120k
1/10W
6
Q6300
XX
IC6003(1)
C6301
1
50V
_IN
L
Mount Mech a
R6301
R6300
7
R6312
XX
8
R6303
XX
XX
D6301
XX
R6302
XX
XX
AUD_GND
R6305
A6010
C6302
220p
50V
R6306
120k
1/10W
C6303
1
50V
267419001
R_IN
Q6301
XXXX
~ G2 Board Schematic Diagram [ Power Supply ] Page 2/2 ~
9
10
11
- 54 -
Page 55
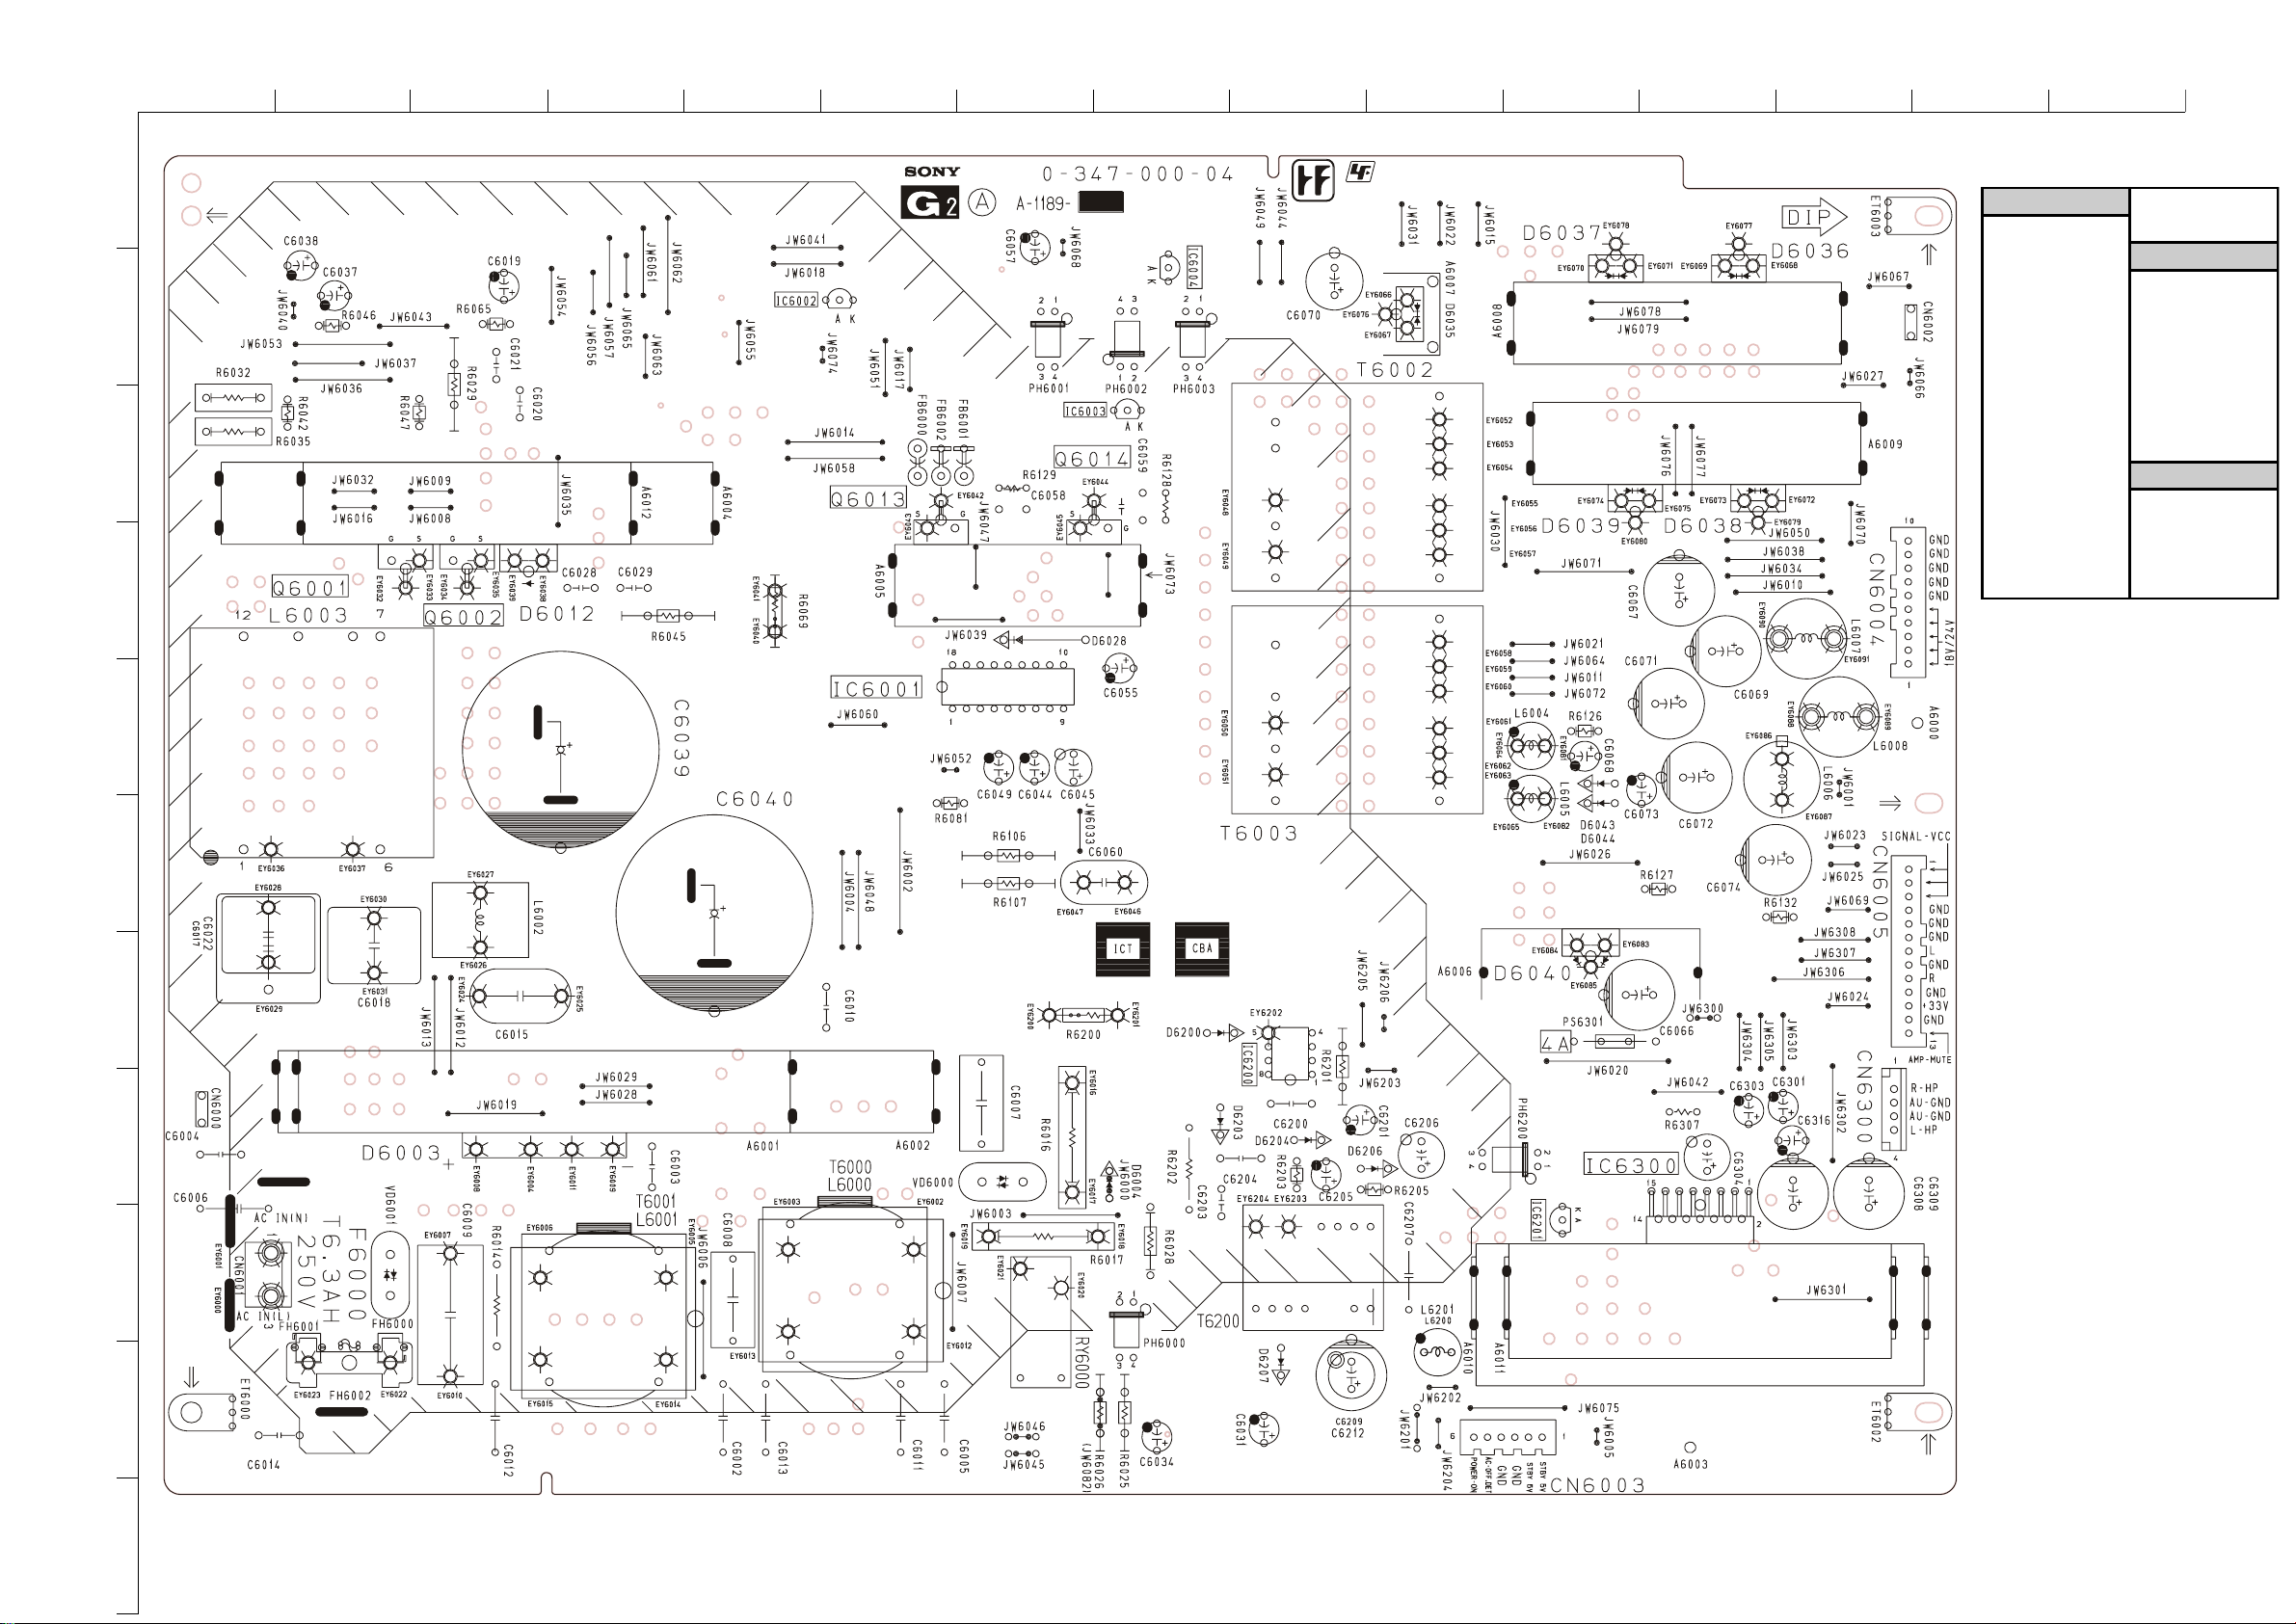
ABCDE F
DIODE
D6206 I - 8
D6003 B - 8 D6207 I - 9
D6004 H - 8
IC
D6012 D - 4 IC6001 F - 5
D6028 H - 4 IC6002 E - 2
D6036 M - 2 IC6003 G - 3
D6037 K - 2 IC6004 H - 2
D6038 L - 3 IC6200 I - 7
D6039 K - 3 IC6201 K - 8
D6040 K - 7 IC6300 K - 8
D6043 K - 6
TRANSISTOR
D6044 K - 6 Q6001 B - 4
D6200 H - 7 Q6002 C - 4
D6203 H - 8 Q6013 F - 3
D6204 I - 8 Q6014 G - 3
G
HI JKLMN
O
~ G2 Printed Wiring Board Conductor Side A ~ ~ G2 Board Semiconductor
Location Table Side A ~
1
2
3
4
5
6
7
8
9
10
11
- 55 -
Page 56
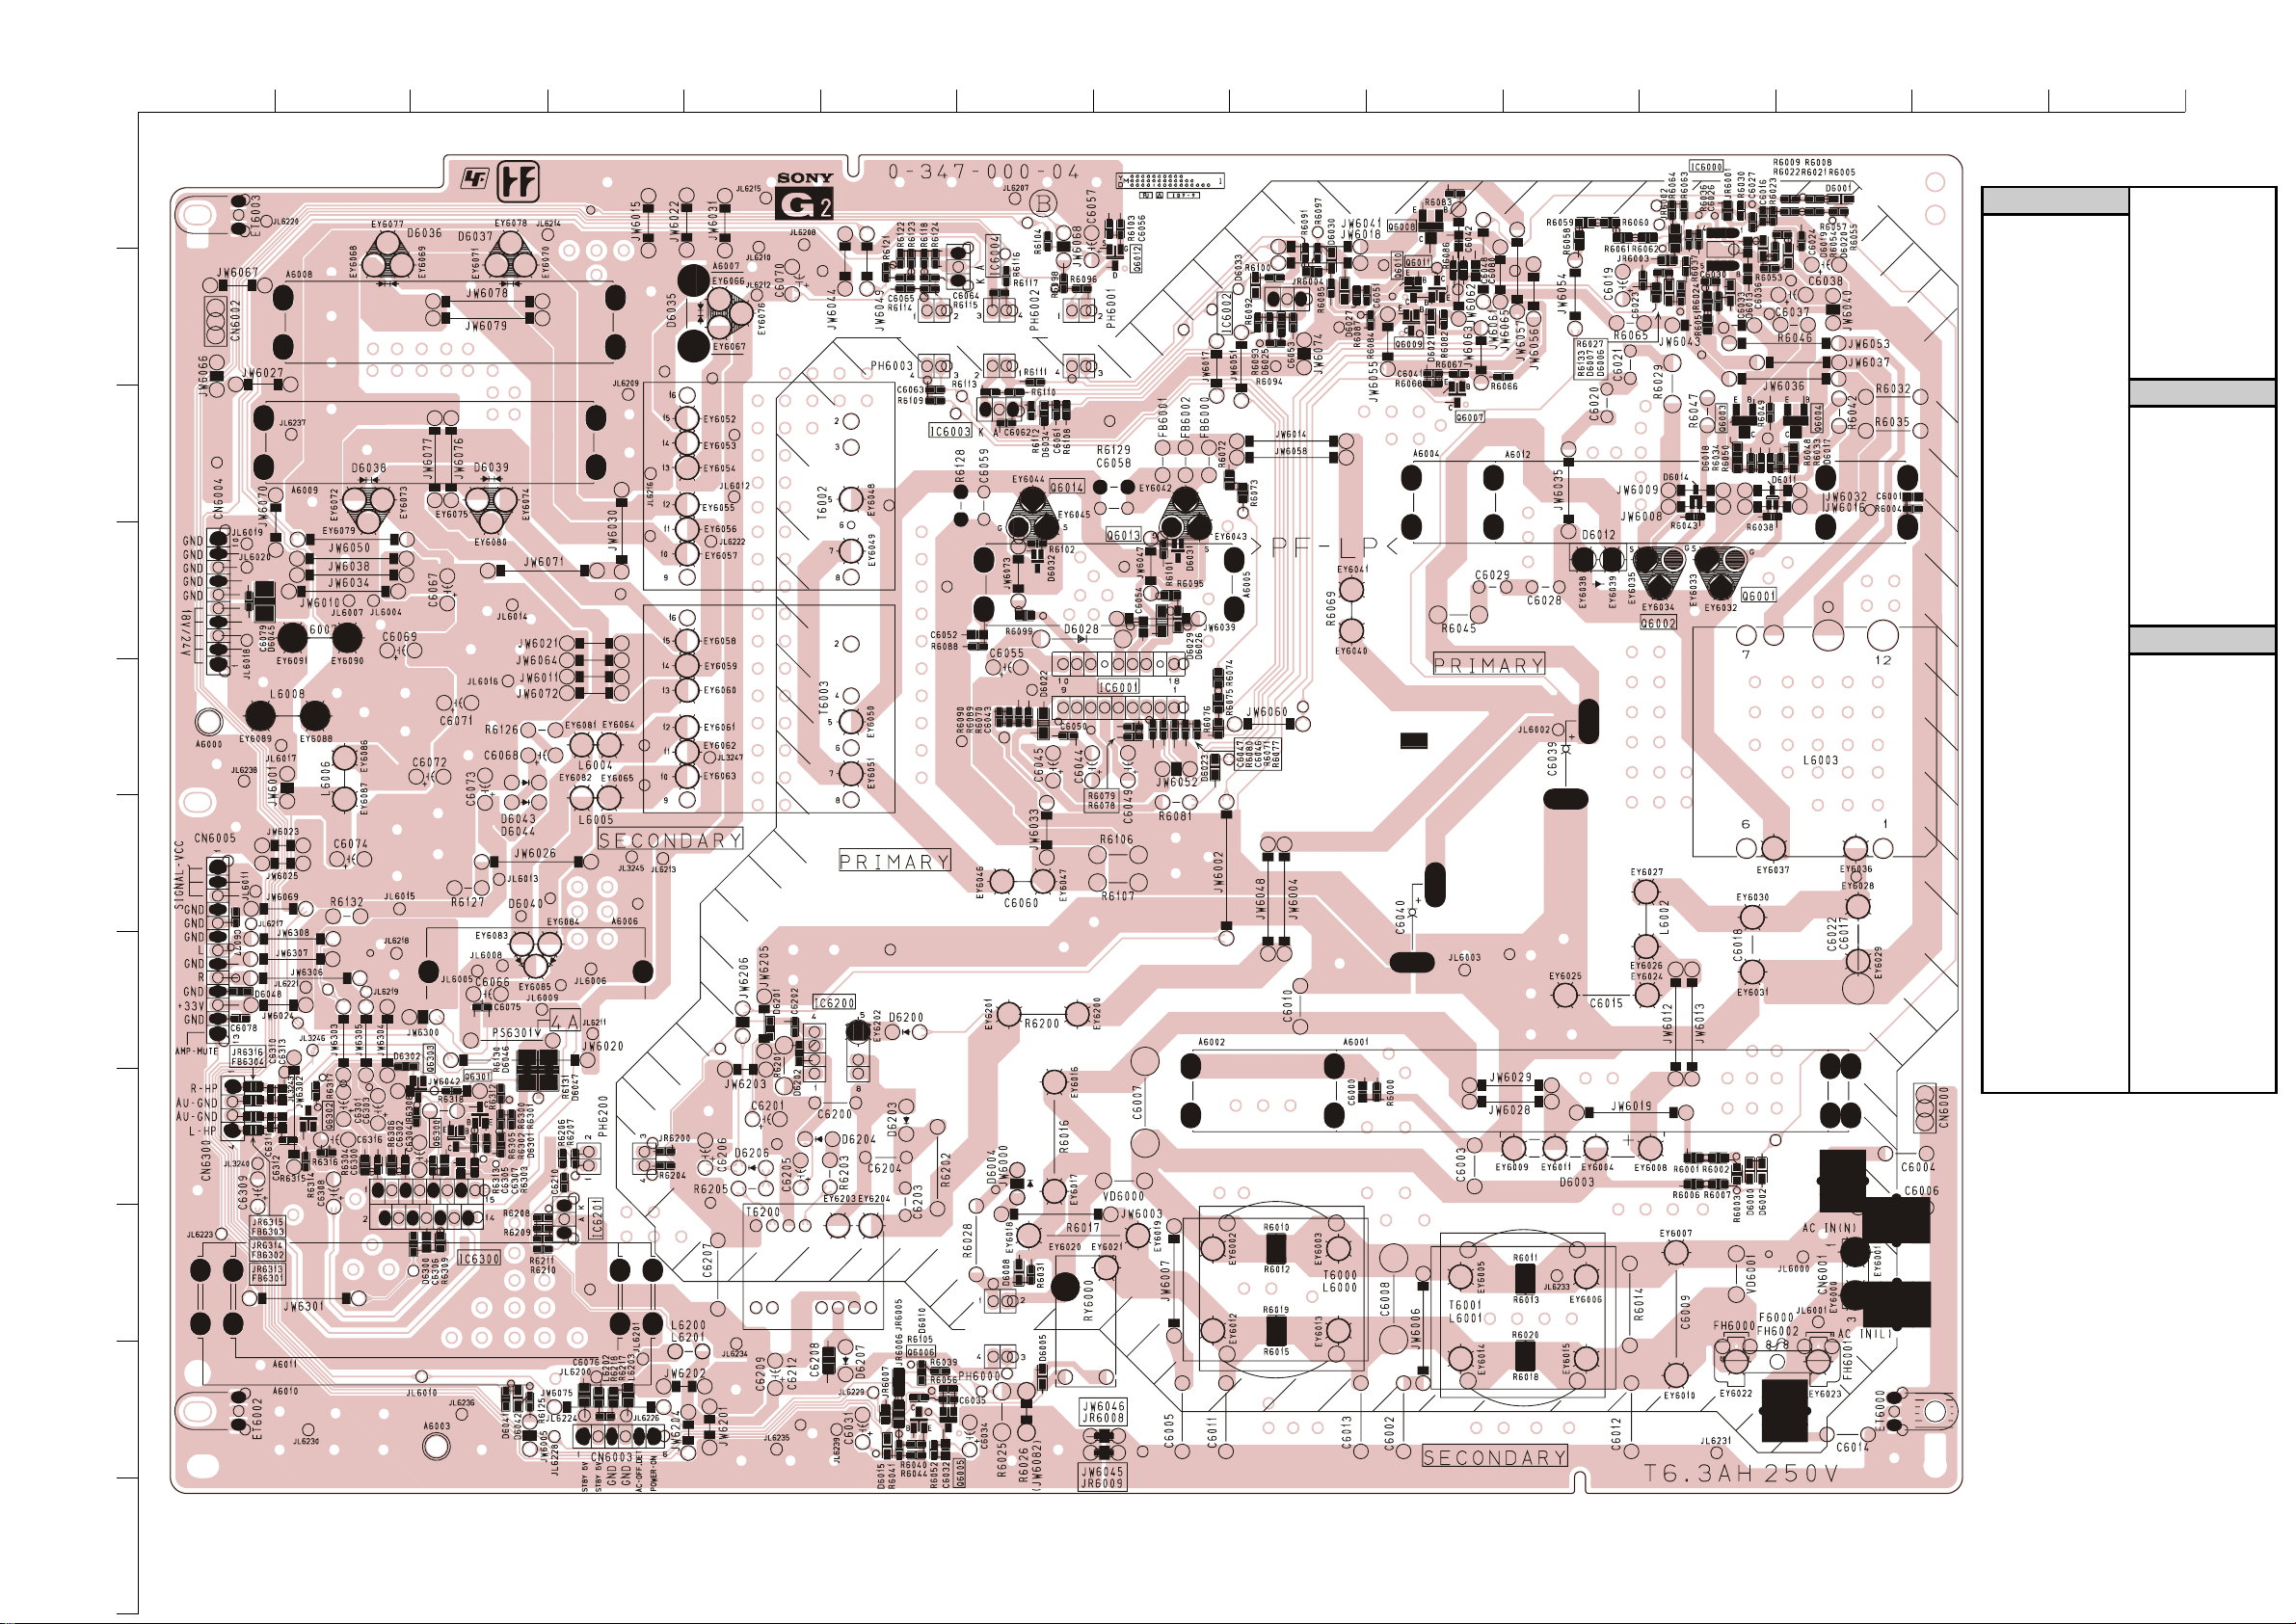
ABCDE F
DIODE
D6200 F - 7
D6000 L - 8 D6203 F - 8
D6001 M - 1 D6204 F - 8
D6002 L - 8 D6206 E - 8
D6005 G - 9 D6207 F - 10
D6006 K - 2 D6300 B - 9
D6007 K - 2 D6302 B - 7
D6008 G - 9
IC
D6011 M - 3 IC6000 L - 1
D6013 L - 2 IC6001 H - 5
D6014 L - 3 IC6002 H - 2
D6015 F - 10 IC6003 F - 3
D6017 M - 3 IC6004 G - 2
D6018 L - 3 IC6200 E - 7
D6019 M - 1 IC6201 D - 9
D6020 M - 1 IC6300 C - 9
D6021 J - 2
TRANSISTOR
D6023 H - 5 Q6001 L - 4
D6027 I - 2 Q6002 L - 4
D6028 G - 4 Q6003 L - 3
D6031 H - 4 Q6004 M - 3
D6032 G - 4 Q6005 F - 10
D6033 I - 2 Q6006 F - 10
D6035 D - 2 Q6007 J - 3
D6036 B - 2 Q6008 J - 2
D6037 C - 2 Q6009 J - 2
D6038 B - 3 Q6010 J - 2
D6039 C - 3 Q6011 J - 2
D6040 C - 6 Q6012 H - 2
D6041 C - 10 Q6013 H - 4
D6042 C - 10 Q6014 G - 3
D6043 C - 6 Q6302 B - 8
D6044 C - 6 Q6303 C - 7
G
HI JKLMN
O
~ G2 Printed WiringBoard Conductor Side B ~ ~ G2 Board Semiconductor
Location Table Side B ~
1
2
3
4
5
6
7
8
9
10
11
- 56 -
Page 57
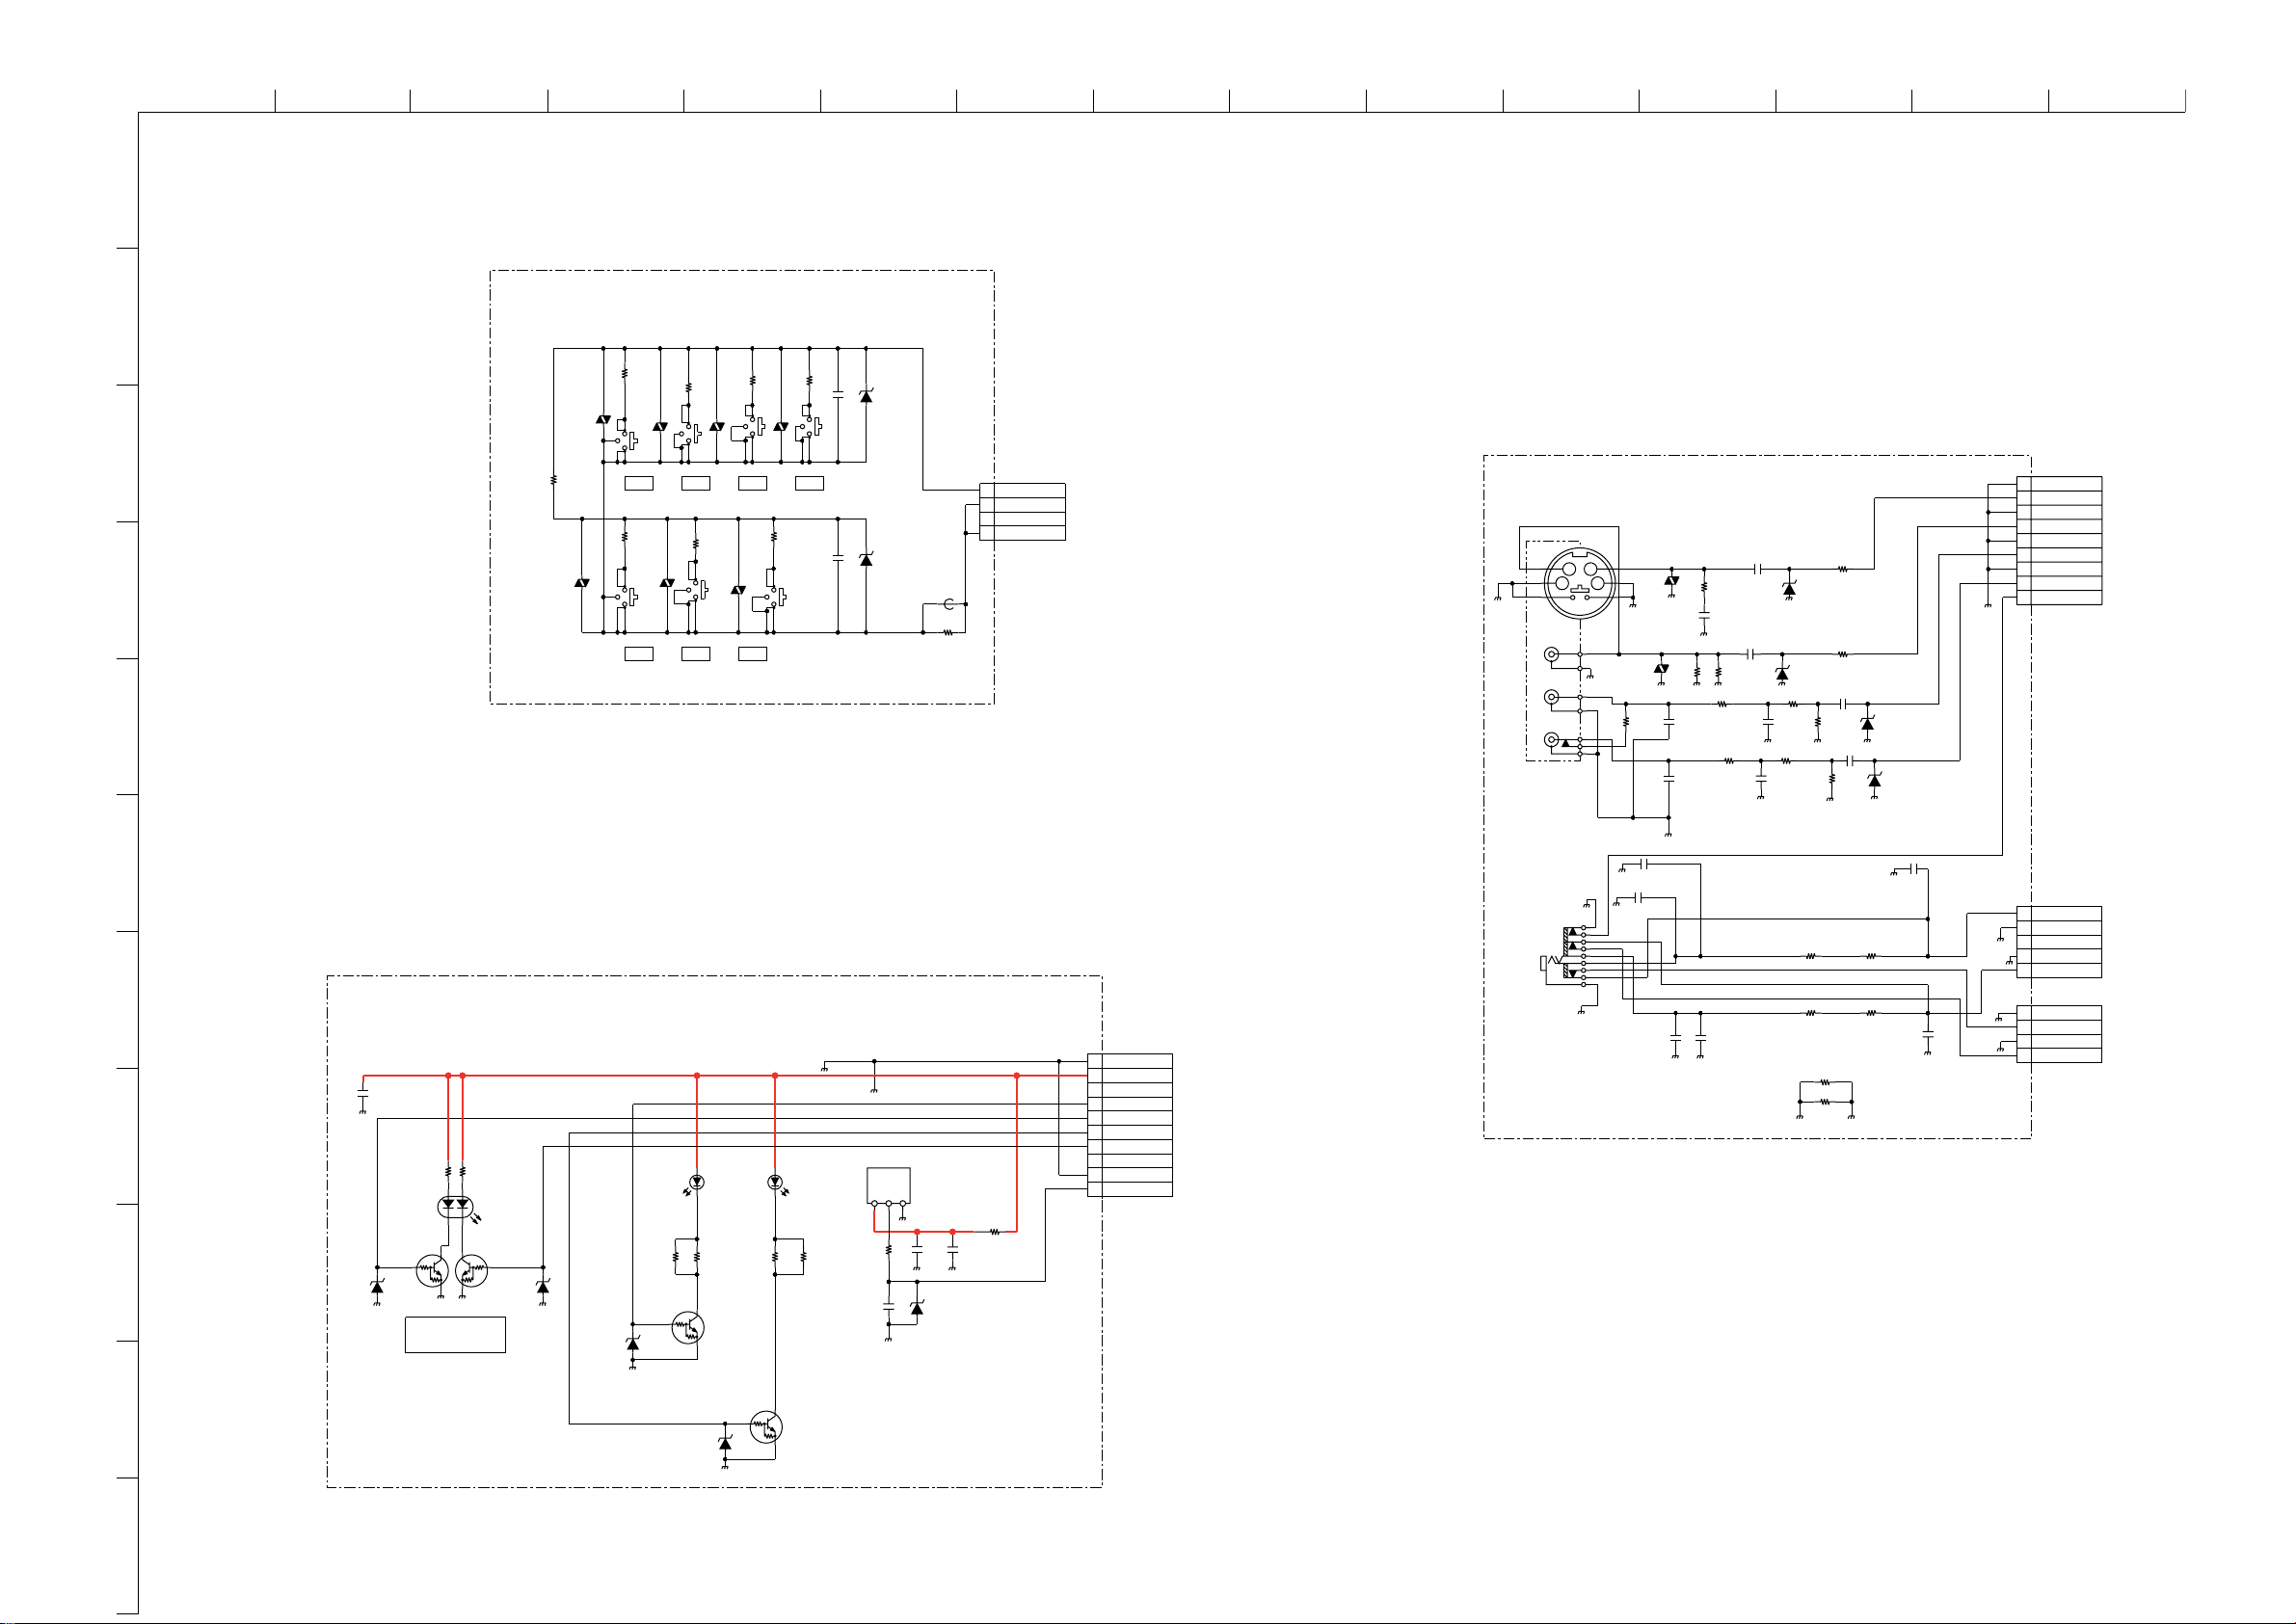
ABCDE F
50V
C9082
100p
50V
1000p
C9079
DTZ10B
D9038
16V
2.2
C9049
CHIP
0
R9116
10V
C9041
0.47
1/10W
100
R9113
VD9024
50V
C9081
100p
1/10W
R9104
75
VD9023
CHIP
R9142
0
50V
1000p
C9077
10V
1
C9080
470k
R9136
DTZ10B
D9036
150
R9105
16V
2.2
C9050
150
R9109
10V
1
C9078
1/10W
1k
R9139
1/10W
470k
R9138
1/10W
1k
R9137
0
R9853
CHIP
0
R9854
J2901
1
2
3
4
5
5P
CN9856
R_HP
AV_GND_R
NC
AV_GND_L
L-HP
1
2
3
4
4P
CN9857
SPK_L
GND_L
SPK_R
GND
1000p
C2902
50V
1000p
C2905
50V
1000p
C2930
50V
50V
1000p
C2931
50V
1000p
C2904
50V
1000p
C2903
UDZSTE-179.1B
D9059
UDZSTE-179.1B
D9058
1/4W
150
R2903
R2901
150
1/4W
150
R2904
1/4W
150
R2902
34
12
L
R
V
J9006
XX
JR2900
XX
JR2901
1
2
3
4
5
6
7
8
9
CN9855
9P
WHT
GND
C_FRONT
GND
Y_FRONT
GND
L_FRONT
GND
R_FRONT
HP_DET
H2/H2P
H2.-SE-1(KDL-26/32U2000) / H2P.-SE-1(KDL-40U2000)
YC , AV, HEADPHONES
TO BDT BOARD
CN3000
TO G1 BOARD
CN6300
SPEAKERS
HEADPHONES
COMPONENTS MARKED AS XX ARE NOT FITTED ON THIS MODEL
(KDL-26/30U2000)
(KDL-40U2000)
TO G2 BOARD
CN6300
G
HI JKLMN
O
1
~ H1/H1P Board Schematic Diagram [ Switch Panel ] ~
H1.-SE-1(KDL-26/32U2000) / H1P.-SE-1(KDL-40U2000)
R9001
1k
1/10W
VD9002
S9000
MENU
R9002
680
1/10W
VD9003
S9001
VOL-
SWITCH PANEL
R9003
1.5k
1/10W
VD9004
S9002
CH+
R9004
470
1/10W
VD9005
S9003
INPUT
R9005
2.2k
1/10W
VOL+
CH-
VD9006
S9004
R9007
CHI
R9006
300
1/10W
S9005
C9000
0
0.1
P
16V
POWER
S9006
C9001
XX
D9000
RD5.6SB-T1
D9001
XX
FB9000
XX
R9008
CHI
CN9000
4P
BRN
1
KEY
2
GND
3
NC
4
GND
0
P
TO BDT BOARD
CN3002
~ H2/H2P Board Schematic Diagram [ YC, AV, Headphones ] ~
2
H1/H1P
VD9001
3
R9000
0
CHIP
4
VD9000
COMPONENTS MARKED AS XX ARE NOT FITTED ON THIS MODEL
5
6
7
8
9
10
11
~ H3/H3P Board Schematic Diagram [ Led, Sircs ] ~
D9302
Q9301
LED, SIRCS
D9303
XX
D9308
XX
D9312
SML-512UWT86
RED
R9312
XX
D9305
H3.-SE-1(KDL-26/32U2000) / H3P.-SE-1(KDL-40U2000)
D9300
XX
C9300
XX
DTC114EUA-T106
H3/H3P
R9301
R9300
1/10W
Q9300
REC/RESERVE-->RED
ON_TIMER-->AMBER
820
680
1/10W
123
4
CL-165HR/SYG-D-T
DTC114EUA-T106
COMPONENTS MARKED AS XX ARE NOT FITTED ON THIS MODEL
R9309
R9310
2.2k
1/10W
1/10W
Q9302
DTC114EUA-T106
XX
560
D9313
SML-310PTT86
GREEN
R9311
560
1/10W
Q9303
DTC114EUA-T106
R9306
470
1/10W
C9301
1000p
50V
VCC
OUT
IC9300
RPM7140-H8
SIRCS RECEIVER
GND
C9302
22
10V
D9309
RD5.6SB-T1
C9303
XX
R9307
47
1/10W
CN9300
10
9
8
7
STBY_LED
6
ON_TIMER
5
GREEN_LED
4
REC/RESERVE
3
2
1
10P
GND
STBY+5V
NC
NC
GND
SIRCS
TO BDT BOARD
CN3003
- 57 -
Page 58
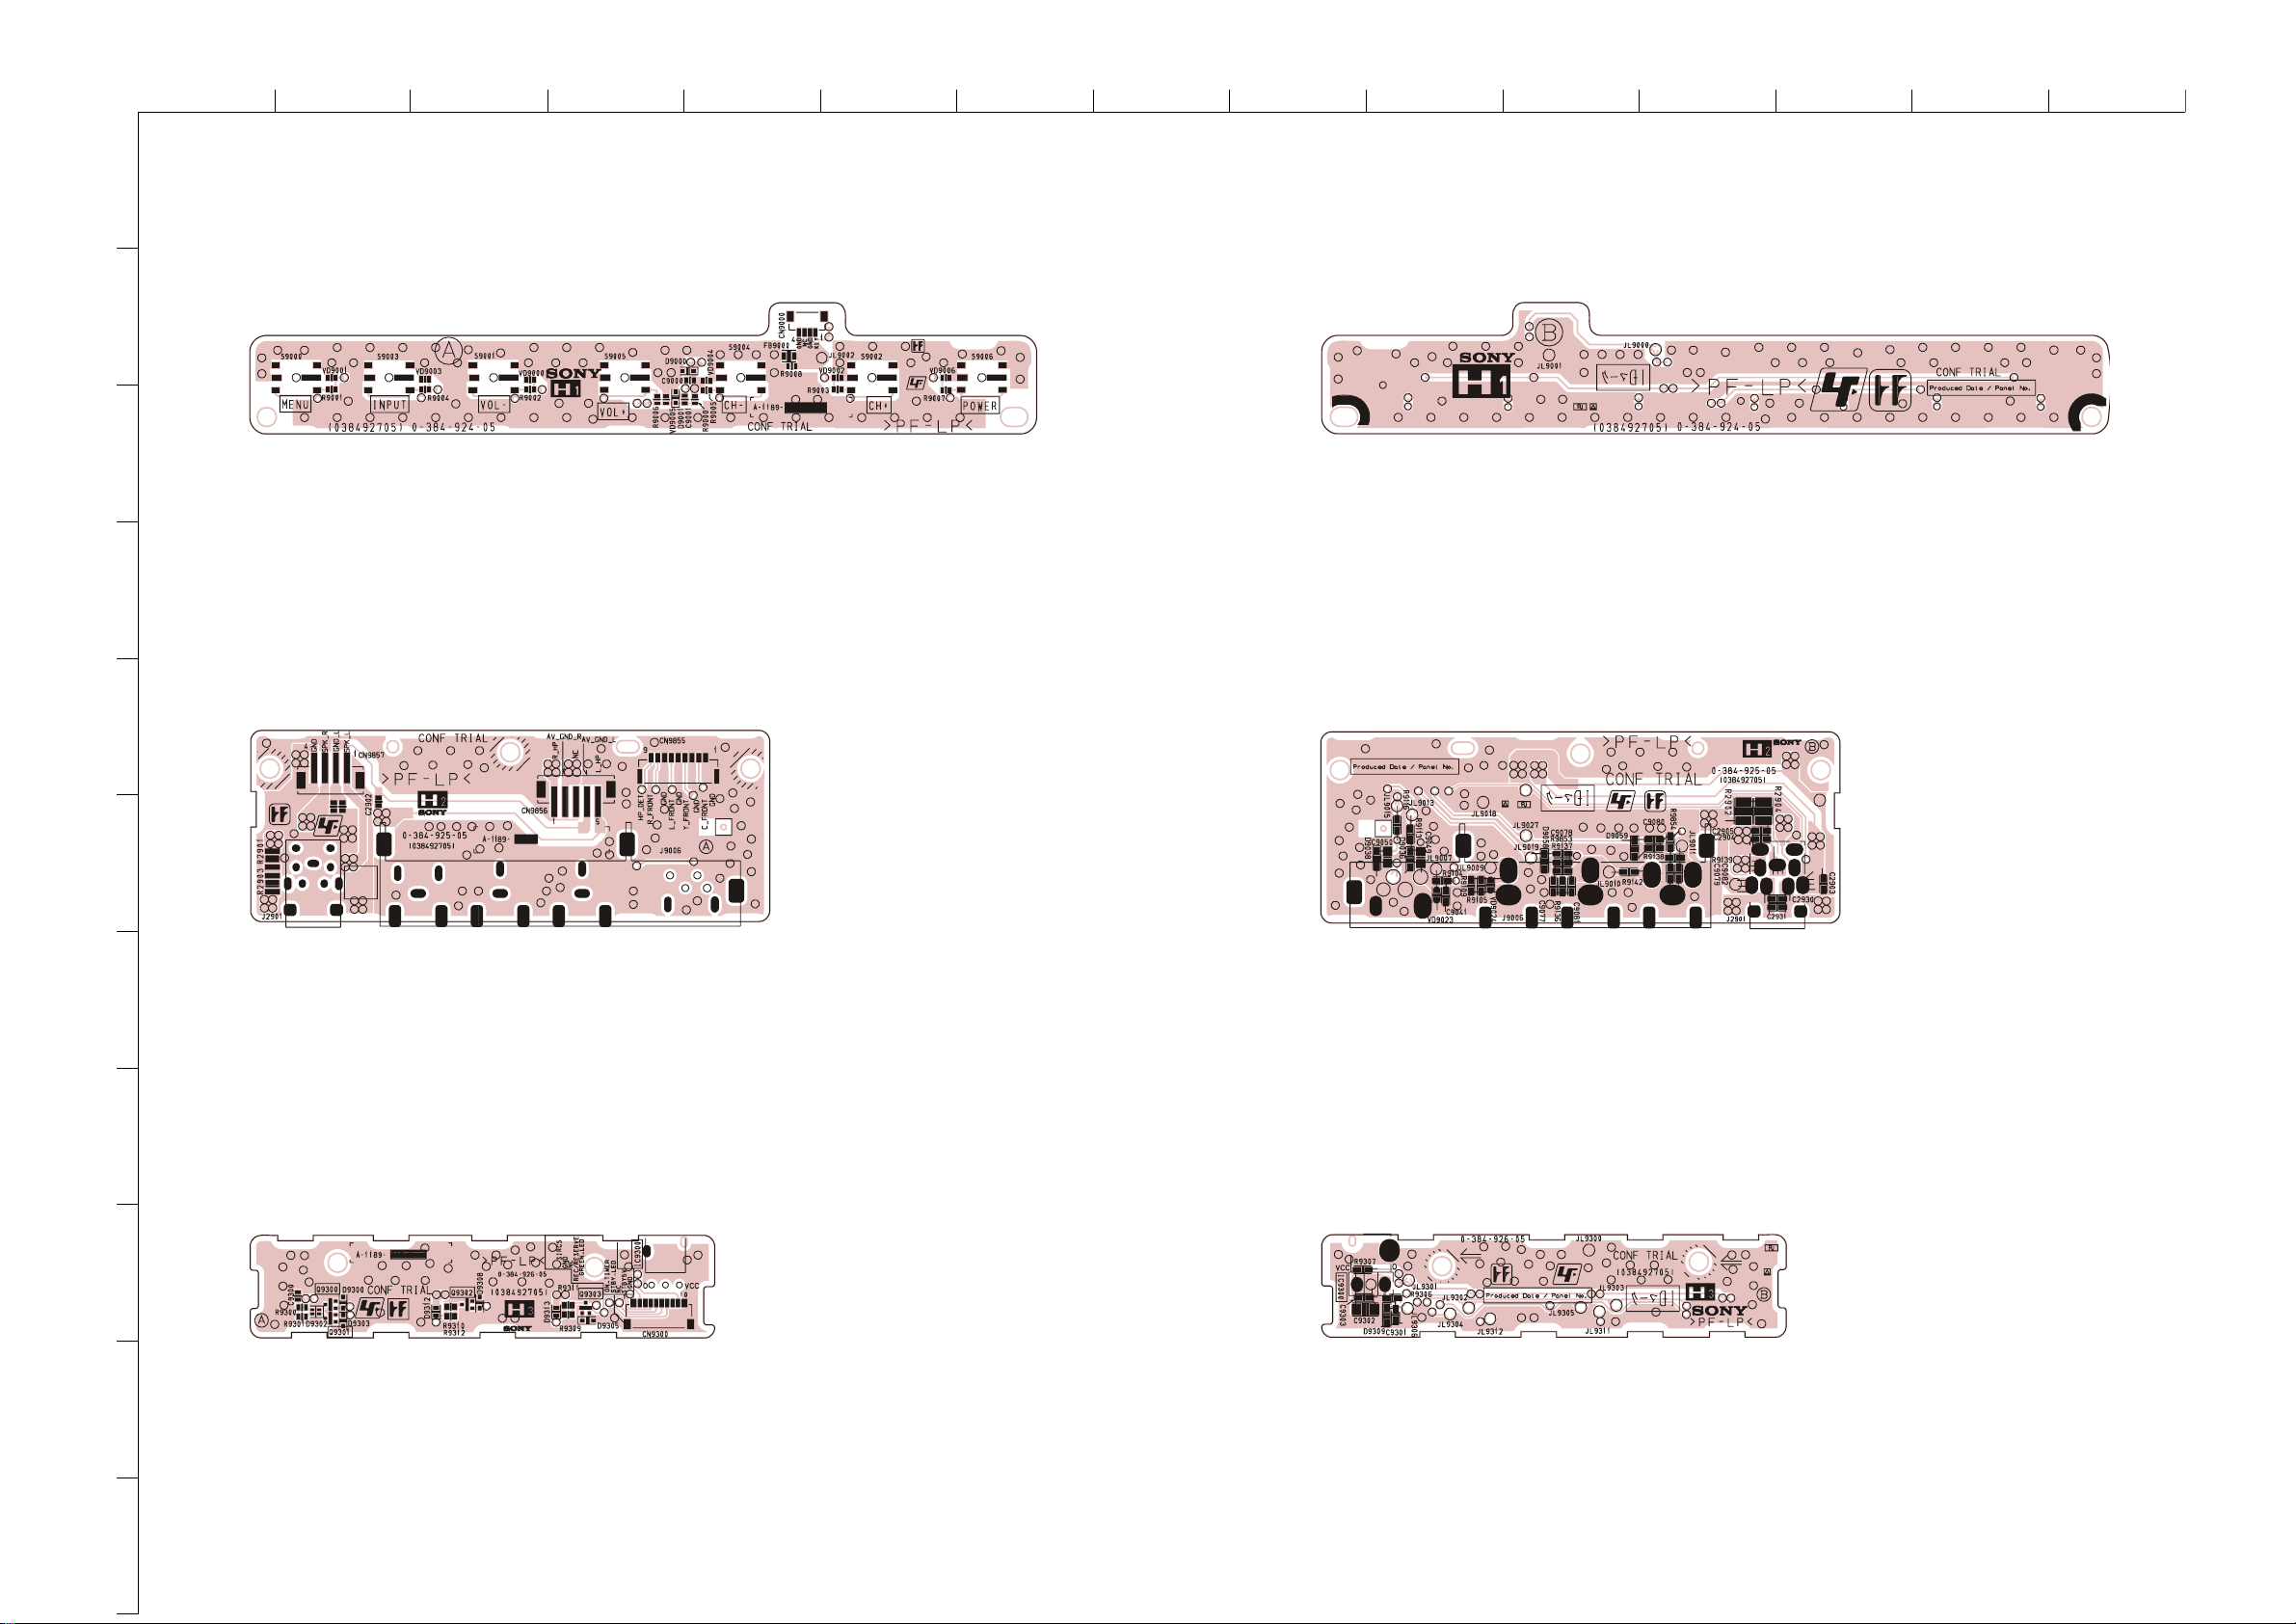
ABCDE F
1
G
HI JKLMN
O
~ H1/H1P Printed Wiring Board Conductor Side A ~ ~ H1/H1P Printed Wiring Board Conductor Side B ~
2
3
4
~ H2/H2P Printed Wiring Board Conductor Side A ~ ~ H2/H2P Printed Wiring Board Conductor Side B ~
5
6
7
8
~ H3/H3P Printed Wiring Board Conductor Side A ~ ~ H3/H3P Printed Wiring Board Conductor Side B ~
10
11
9
- 58 -
Page 59

4-4. SEMICONDUCTORS
74LVC14APW
74LVC541APW
74LVT245PW-T
BR24L02F-WE2
CXA1875AM-T4
K9F2808U0C-PCB0T
LM3525MX-H/J5000395
LM393DT (A)
MCZ3001DB
MM1431ATT
MM1431ATT(CN)
NCP1117STAT3
FA5501AN-D1-TE1
ICS7150MLFT
IP4776CZ38
M24C02-WMN6T(B)
M24C32-WMN6T(B)
MC14052 BDR2
MC74LVX8053DTR2
MC74LVXT4053DTR2
NJM2904M
NJM3404AM-T1
PQ070XNA1ZPH
PQ1CY1032ZP
- 59 -
Page 60
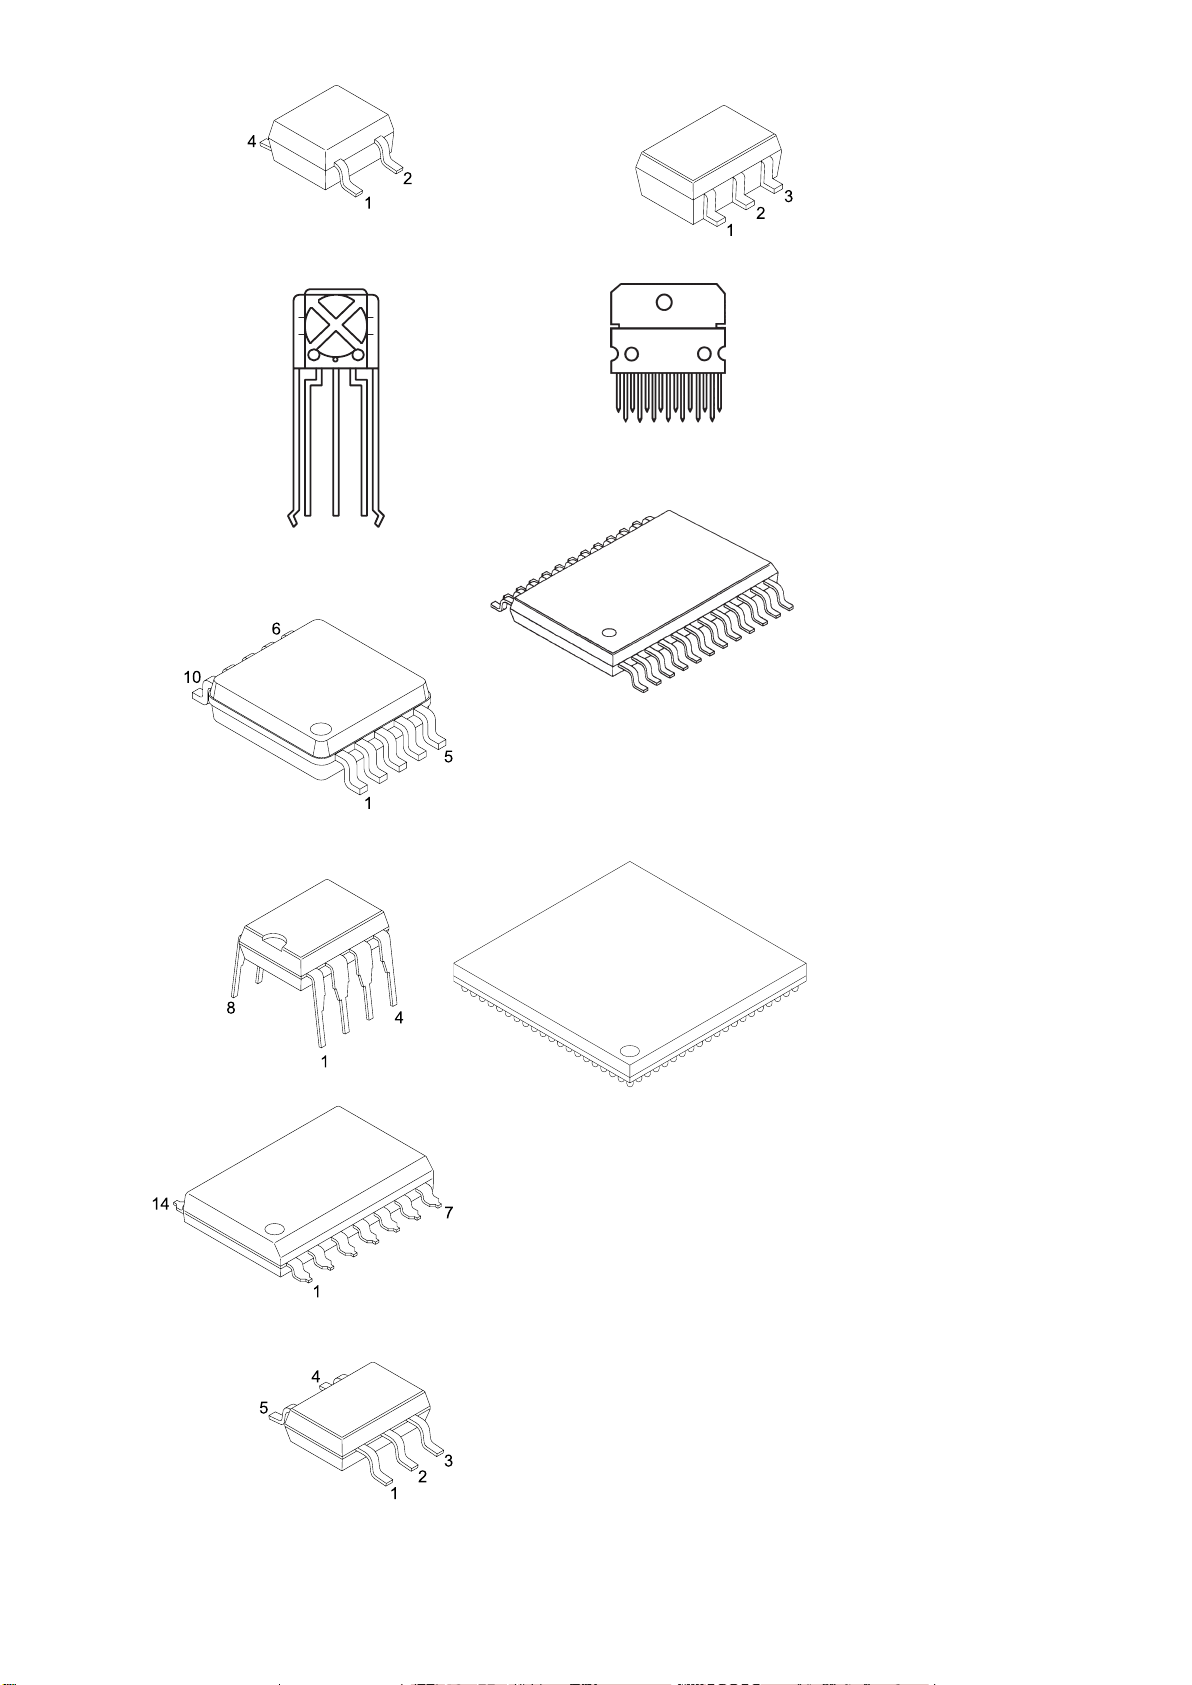
PST3629UL TC7SH00FU (T5RSOYJF)
RPM7140-H8
RV5C387A-E2-FB
TDA7495S
TDA9886TS/V4,118
TDA9974AHS/8/C112
UPD61123F1-100-KA3-A
VCT6973G
STR-A6169
TL1431CZ-AP
TC74LCX541FT(EKJ)
TAR5S50(TE85R)
TC7S66FU
TK11185CSCL-G
- 60 -
Page 61
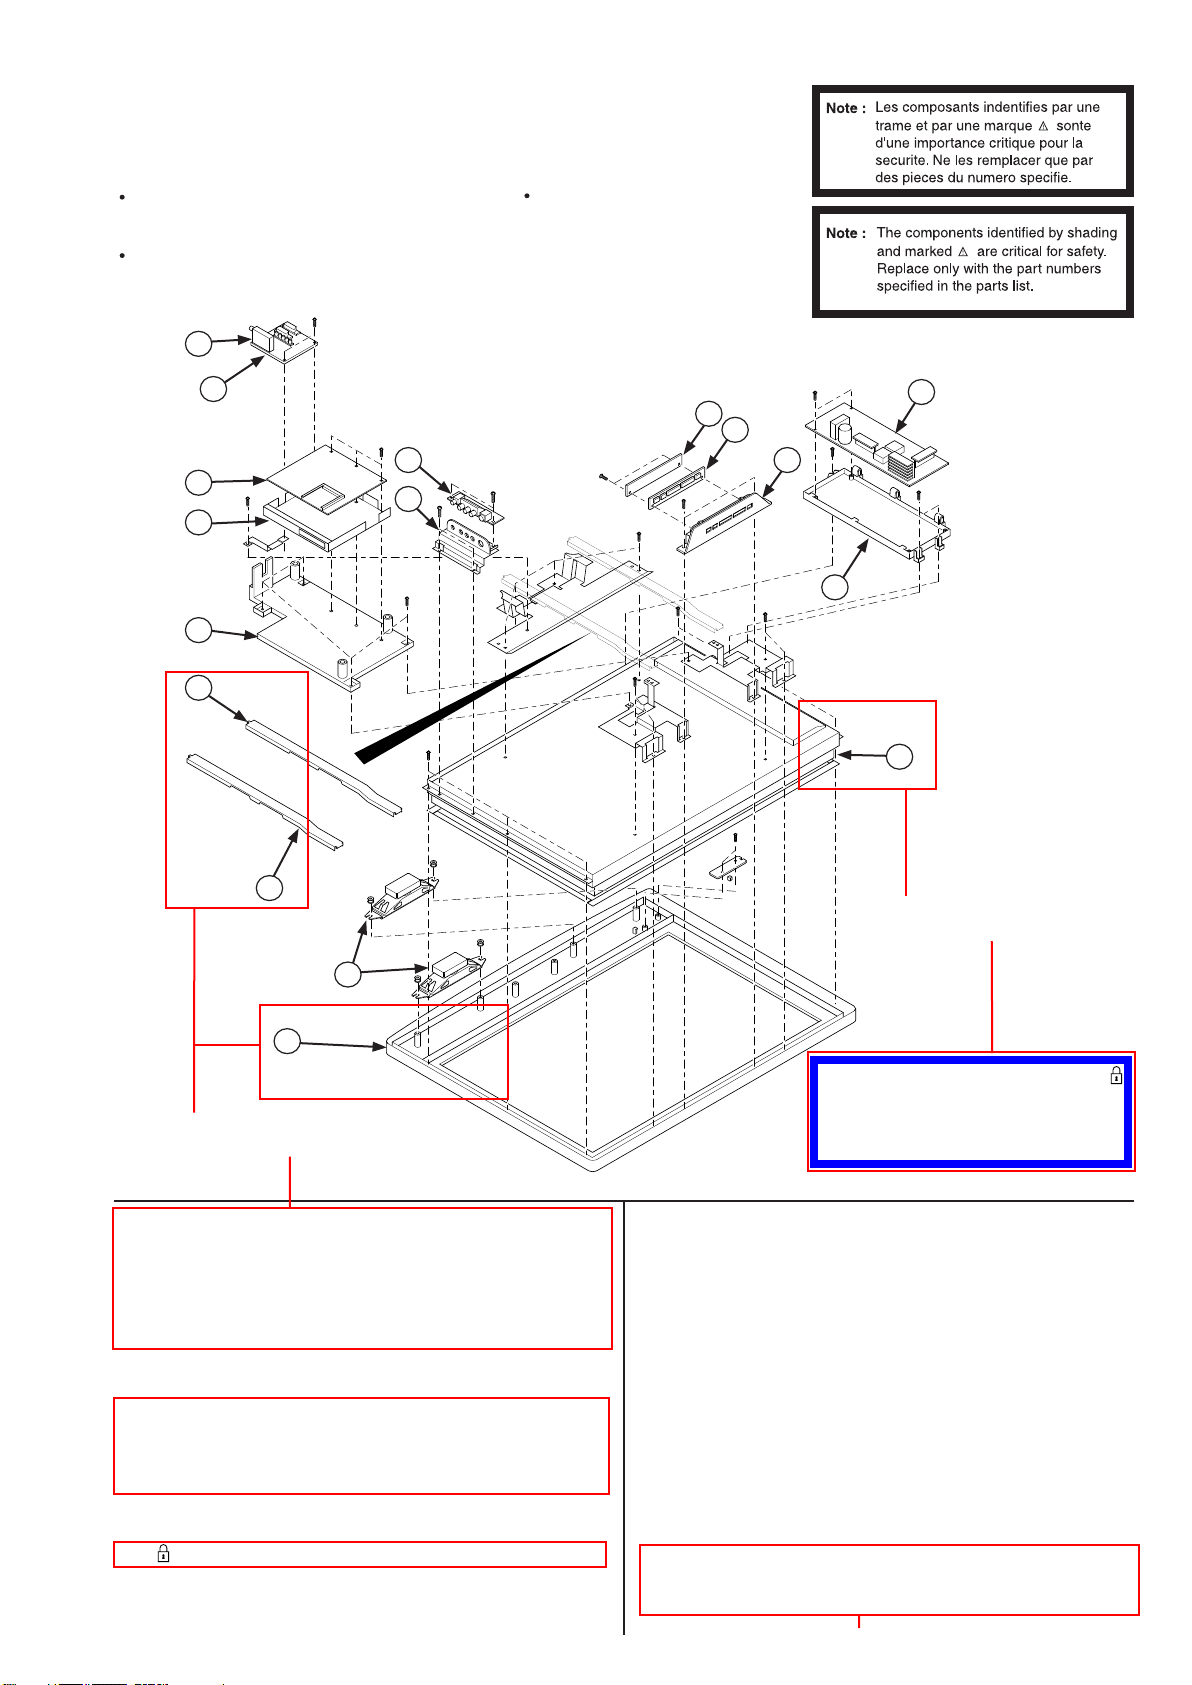
NOTE :
SECTION 5
EXPLODED VIEWS
Items with no part number and no description are not
stocked because they are seldom required for routine
service.
The construction parts of an assembled part are indicated
with a collation number in the remarks column.
5-1. CHASSIS
9
8
10
7
11
6
5
4
Items marked “*” are not stocked
since they are seldom required for
routine service. Some delay should
be anticipated when ordering these
items.
15
12
13
14
16
17
3
Revision 3.0
(Click inside red box to see related change)
2
1
Note : The components identified by mark
contain confidential information.
Revision 3.0
(Click inside red box to see related change)
Strictly follow the instructions when
ever the components are repaired
and/or replaced.
REF.NO. PART.NO DESCRIPTION REMARK REF.NO. PART.NO DESCRIPTION REMARK
1 X-2109-945-1 BEZEL ASSY (26) SILVER (26U2000UK/AEP)
X-2177-005-1 BEZEL ASSY (26) GREY (26U2000UK/AEP)
X-2109-674-1 BEZEL ASSY (32) SILVER (32U2000UK/AEP)
X-2176-987-1 BEZEL ASSY (32) GREY (32U2000UK/AEP)
X-2109-938-1 BEZEL ASSY (40) SILVER (40U2000UK/AEP)
X-2177-008-1 BEZEL ASSY (40) GREY (40U2000UK/AEP)
2 1-826-479-11 LOUDSPEAKER (4.2X15CM) (26/32U2000UK/AEP)
1-826-478-11 LOUDSPEAKER (4.2X24CM) (40U2000UK/AEP)
3 *2-674-183-01 VESA BRACKET (26/32U2000UK/AEP)
*X-2109-059-3 VESA BRACKET (40) R ASSY (40U2000UK/AEP)
4 *2-674-183-01 VESA BRACKET (26/32U2000UK/AEP)
*X-2109-058-3 VESA BRACKET (40) L ASSY (40U2000UK/AEP)
5 *2-679-993-01 BRACKET (A) DIG
6 *2-674-192-01 BRACKET, TERMINAL SIDE
7 *A-1198-236-A BDT BOARD, COMPLETE (40U2000UK/AEP)
8 *A-1189-407-A A1 BOARD, COMPLETE (26/32U2000UK/AEP)
*A-1202-962-A A1P BOARD, COMPLETE (40U2000UK/AEP)
9 8-597-585-00 TUNER, FSS BTP-HC401
10 *A-1189-409-A H2 BOARD, COMPLETE (26/32U2000UK/AEP)
*A-1202-964-A H2P BOARD, COMPLETE (40U2000UK/AEP)
11 *2-679-988-01 HOLDER, SIDE JACK (26) (26U2000UK/AEP)
*2-674-302-01 HOLDER, SIDE JACK (32) (32U2000UK/AEP)
*2-679-989-01 HOLDER, SIDE JACK (40) (40U2000UK/AEP)
12 *A-1189-408-A H1 BOARD, COMPLETE (26/32U2000UK/AEP)
*A-1202-963-A H1P BOARD, COMPLETE (40U2000UK/AEP)
13 2-674-197-01 BUTTON, MULTI
14 2-674-196-01 COVER, BUTTON
15 *A-1189-415-A G1 BOARD, COMPLETE (26/32U2000UK/AEP)
*A-1189-416-A G2 BOARD, COMPLETE (40U2000UK/AEP)
16 *2-674-181-11 BRACKET G1 (26U2000UK/AEP)
*2-674-181-01 BRACKET G1 (32U2000UK/AEP)
*2-674-180-01 BRACKET G2 (40U2000UK/AEP)
17 1-802-187-11 LCD PANEL (26 WXGA TFT) (26U2000UK/AEP)
1-802-188-11 LCD PANEL (32 WXGA TFT) (32U2000UK/AEP)
1-802-386-21 LCD PANEL (40 WXGA TFT) (40U2000UK/AEP)
- 61 -
Revision 3.0
(Click inside red box to see related change)
Page 62
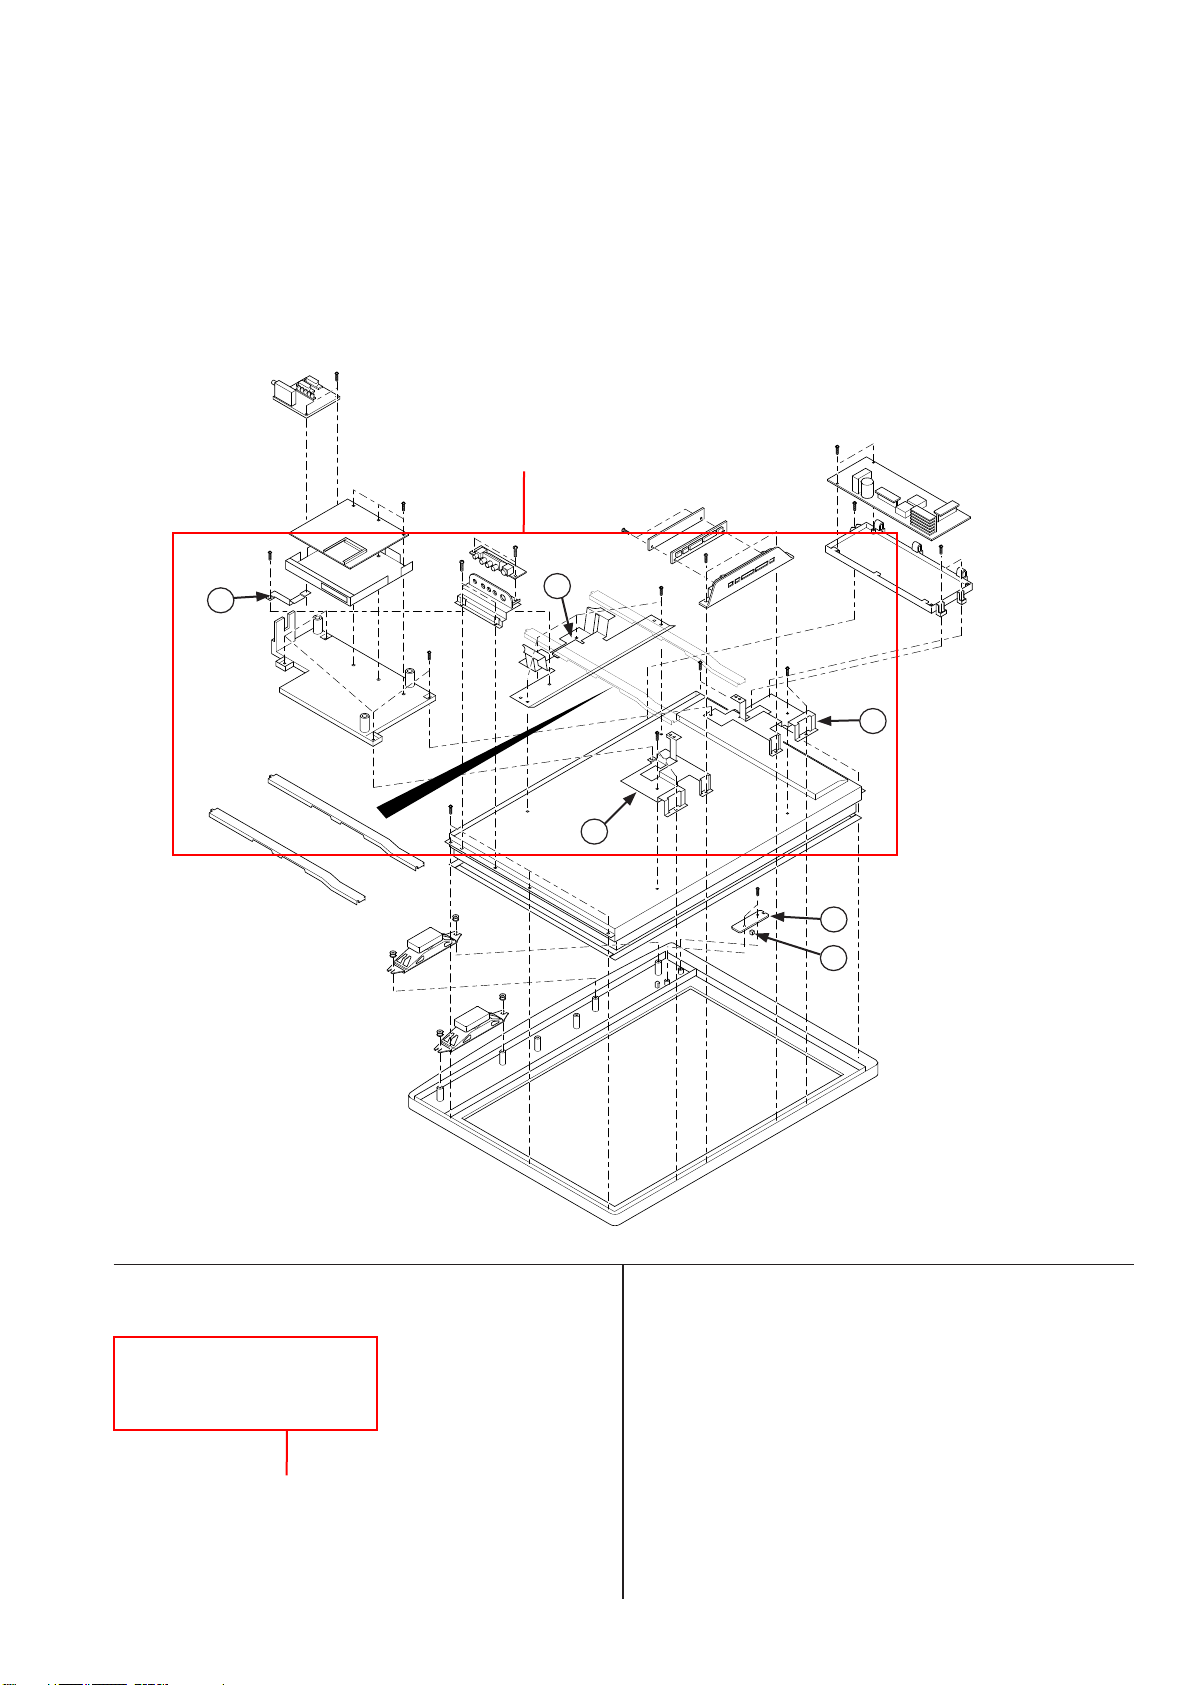
5-2. STAND, REAR COVER, POWER LEADS
5-1. CHASSIS Cont.
Revision 3.0
(Click inside red box to see related change)
21
20
23
22
18
19
REF.NO. PART.NO DESCRIPTION REMARK REF.NO. PART.NO DESCRIPTION REMARK
18 *A-1189-410-A H3 BOARD, COMPLETE (26/32U2000UK/AEP)
*A-1202-965-A H3P BOARD, COMPLETE (40U2000UK/AEP)
19 2-674-189-01 GUIDE, LIGHT
20 NOT SERVICEABLE PART
21 NOT SERVICEABLE PART
22 NOT SERVICEABLE PART
23 NOT SERVICEABLE PART
Revision 3.0
(Click inside red box to see related change)
- 62 -
Page 63
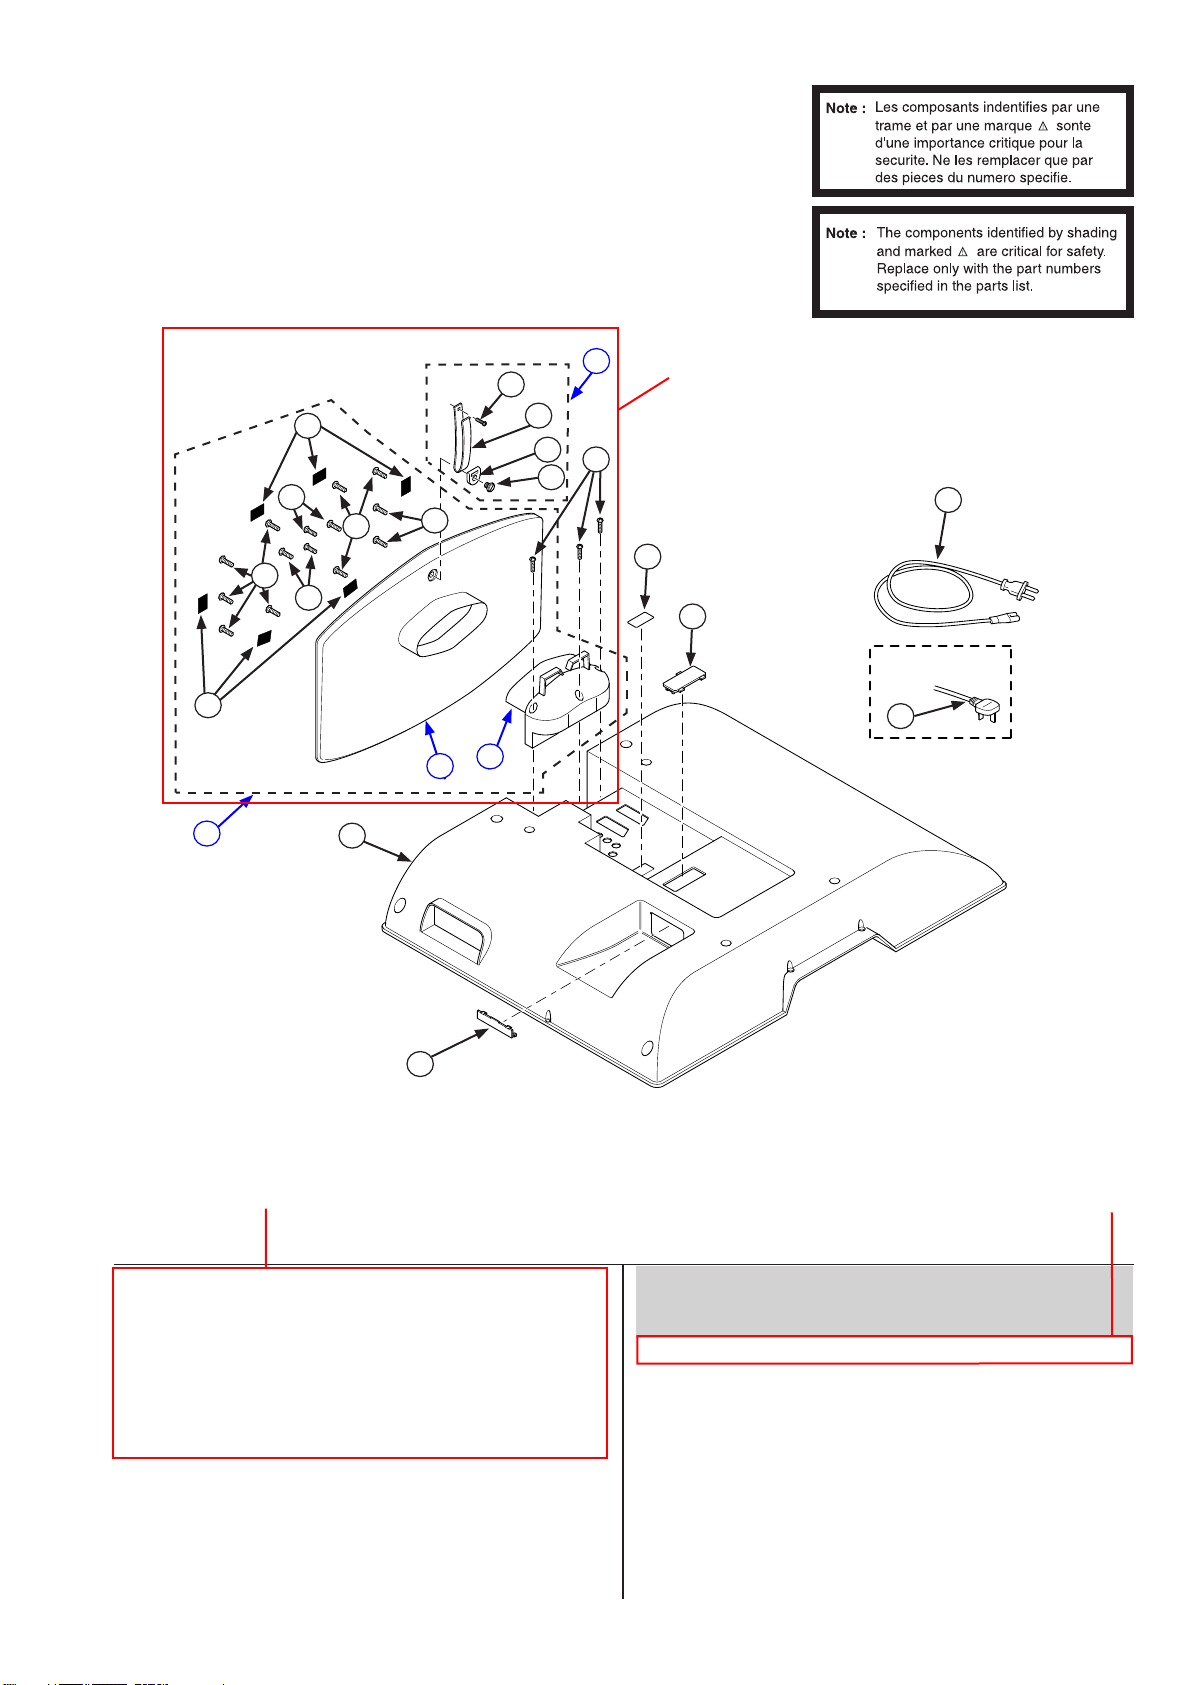
5-2. STAND, REAR COVER, POWER LEADS
54
51
55
56
54
56
67
55
55
53
52
62
63
64
65
61
68
Revision 3.0
(Click inside red box to see related change)
59
57
58
UK models only
60
66
Revision 3.0
(Click inside red box to see related change)
Revision 3.0
(Click inside red box to see related change)
REF.NO. PART.NO DESCRIPTION REMARK REF.NO. PART.NO DESCRIPTION REMARK
51 *X-2177-004-1 STAND(M)ASSY 26 (26U2000UK/AEP) 52-56
*X-2176-991-1 STAND(M)ASSY 32 (32U2000UK/AEP) 52-56
*X-2177-007-1 STAND(L)ASSY 40 (40U2000UK/AEP) 52-56
52 *2-674-301-11 NECK, STAND (26U2000UK/AEP)
*2-674-301-01 NECK, STAND (32U2000UK/AEP)
*2-674-301-22 NECK, STAND (40U2000UK/AEP)
53 2-674-194-21 COVER, STAND (M) (26/32U2000UK/AEP)
2-674-314-01 COVER, STAND (L) (40U2000UK/AEP)
54 4-100-951-02 FOOT, STAND
55 2-580-644-01 SCREW, KTP2 3X8 (26/32U2000UK/AEP)
2-580-647-01 SCREW, KTP2 4X12 (40U2000UK/AEP)
56 2-580-640-01 SCREW, +BVTP2 4X16
57 2-021-173-12 COVER, ECS (20)
58 2-667-973-02 COVER, SERVICE C
59 £ 1-832-132-11 POWER SUPPLY CORD (26/32/40U2000AEP)
60 £ 1-832-170-11 POWER SUPPLY CORD (UK PLUG)
(26/32/40U2000UK)
61 *X-2102-511-2 BAG ASSY, RUDDER LOCK (62-65)
62 *2-580-663-01 SCREW, WOOD 3.8X20
63 *2-591-689-01 BELT
64 *2-591-688-02 RUDDER LOCK
65 *2-593-320-02 SCREW, COIN (M6X18)
66 2-667-975-01 COVER, PCMCIA
67 2-674-304-03 COVER, REAR (26) (26U2000UK/AEP)
2-674-191-03 COVER, REAR (32) (32U2000UK/AEP)
2-674-312-01 COVER, REAR (40) (40U2000UK/AEP)
68 2-580-608-01 SCREW, +PSW M5X16 (26/32U2000UK/AEP)
2-580-609-01 SCREW, +PSW M5X25 (40U2000UK/AEP)
- 63 -
Page 64

SECTION 6
ELECTRICAL PARTS LIST
PARTS LISTING TABLE OF CONTENTS
Page
A1/A1P BOARD COMPLETE Parts List : .................................................................................................... 65
H2/H2P BOARD COMPLETE Parts List : .................................................................................................... 68
H3/H3P BOARD COMPLETE Parts List : .................................................................................................... 69
G2 BOARD COMPLETE Parts List : KDL-40U2000 only..................................................................... 69
H1/H1P BOARD COMPLETE Parts List : .................................................................................................... 73
BDT BOARD COMPLETE Parts List : .................................................................................................... 73
G1 BOARD COMPLETE Parts List : KDL-26U2000 & KDL-32U2000 only......................................... 85
MISCELLANEOUS : .................................................................................................... 88
ACCESSORIES AND CONNECTORS : .................................................................................................... 88
REMOTE COMMANDER : ................................................................................................... 88
Note: The BDT Board is regarded as a non service item for exchange only if there is a fault with either
IC3006 or IC5630.
Note : Items marked “*” are not stocked since they are seldom required for routine service.
Some delay should be anticipated when ordering these items.
Parts indicated (XX) on the Schematic Diagram are not used in this model and
therefore do not appear in the Parts List.
- 64 -
Page 65

A1/A1P
REF.NO. PART.NO DESCRIPTION REMARK REF.NO. PART.NO DESCRIPTION REMARK
*A-1189-407-A A1 Board Complete (KDL-26/32U2000)
*A-1202-962-A A1P Board Complete (KDL-40U2000)
*2-586-040-02 SHIELD CASE, IFOB (MAIN)
*2-586-041-01 SHIELD CASE, IFOB (TOP)
*2-586-042-02 SHIELD CASE, IFOB (BOTTOM)
< CAPACITOR >
C1000 1-126-947-11 ELECT 47UF 20.00% 35V
C1001 1-164-156-11 CERAMIC CHIP 0.1UF 25V
C1102 1-162-925-11 CERAMIC CHIP 68PF 5.00% 50V
C1103 1-162-925-11 CERAMIC CHIP 68PF 5.00% 50V
C1104 1-164-156-11 CERAMIC CHIP 0.1UF 25V
C1105 1-126-968-11 ELECT 100UF 20.00% 50V
C1106 1-126-916-11 ELECT 1000UF 20.00% 6.3V
C1107 1-164-156-11 CERAMIC CHIP 0.1UF 25V
C1108 1-164-156-11 CERAMIC CHIP 0.1UF 25V
C1200 1-164-156-11 CERAMIC CHIP 0.1UF 25V
C1202 1-162-970-11 CERAMIC CHIP 0.01UF 10.00% 25V
C1203 1-104-662-91 ELECT 22UF 20.00% 25V
C1204 1-162-970-11 CERAMIC CHIP 0.01UF 10.00% 25V
C1205 1-164-392-11 CERAMIC CHIP 390PF 5.00% 50V
C1206 1-162-970-11 CERAMIC CHIP 0.01UF 10.00% 25V
C2056 1-162-964-11 CERAMIC CHIP 0.001UF 10.00% 50V
C2057 1-162-964-11 CERAMIC CHIP 0.001UF 10.00% 50V
C2058 1-162-964-11 CERAMIC CHIP 0.001UF 10.00% 50V
C2059 1-165-908-11 CERAMIC CHIP 1UF 10% 10V
C2060 1-165-908-11 CERAMIC CHIP 1UF 10% 10V
C2065 1-164-227-11 CERAMIC CHIP 0.022UF 10.00% 25V
C2066 1-162-964-11 CERAMIC CHIP 0.001UF 10.00% 50V
C2067 1-164-227-11 CERAMIC CHIP 0.022UF 10.00% 25V
C2068 1-162-964-11 CERAMIC CHIP 0.001UF 10.00% 50V
C2069 1-165-908-11 CERAMIC CHIP 1UF 10% 10V
C2070 1-165-908-11 CERAMIC CHIP 1UF 10% 10V
C2071 1-126-396-11 ELECT CHIP 47UF 20.00% 16V
C2072 1-126-396-11 ELECT CHIP 47UF 20.00% 16V
C2073 1-165-908-11 CERAMIC CHIP 1UF 10% 10V
C2074 1-165-908-11 CERAMIC CHIP 1UF 10% 10V
C2079 1-162-964-11 CERAMIC CHIP 0.001UF 10.00% 50V
C2080 1-162-964-11 CERAMIC CHIP 0.001UF 10.00% 50V
C2081 1-164-156-11 CERAMIC CHIP 0.1UF 25V
C2084 1-107-826-11 CERAMIC CHIP 0.1UF 10.00% 16V
C2085 1-117-370-11 CERAMIC CHIP 10UF 10V
C2086 1-107-826-11 CERAMIC CHIP 0.1UF 10.00% 16V
C2087 1-117-370-11 CERAMIC CHIP 10UF 10V
C1207 1-162-970-11 CERAMIC CHIP 0.01UF 10.00% 25V
C1208 1-127-715-91 CERAMIC CHIP 0.22UF 10% 16V
C1209 1-125-891-11 CERAMIC CHIP 0.47UF 10.00% 10V
C1210 1-164-315-11 CERAMIC CHIP 470PF 5.00% 50V
C1211 1-131-664-91 CERAMIC CHIP 0.15UF 10% 10V
C1213 1-165-176-11 CERAMIC CHIP 0.047UF 10.00% 16V
C1216 1-162-919-11 CERAMIC CHIP 22PF 5.00% 50V
C1218 1-162-970-11 CERAMIC CHIP 0.01UF 10.00% 25V
C1219 1-162-926-11 CERAMIC CHIP 82PF 5.00% 50V
C1220 1-162-928-11 CERAMIC CHIP 120PF 5.00% 50V
C1221 1-164-388-91 CERAMIC CHIP 270PF 5.00% 50V
C1222 1-162-915-11 CERAMIC CHIP 10PF 0.50PF 50V
C1223 1-162-970-11 CERAMIC CHIP 0.01UF 10.00% 25V
C1226 1-162-961-11 CERAMIC CHIP 330PF 10.00% 50V
C1227 1-126-933-11 ELECT 100UF 20.00% 16V
C2000 1-126-933-11 ELECT 100UF 20.00% 16V
C2025 1-164-227-11 CERAMIC CHIP 0.022UF 10.00% 25V
C2026 1-162-964-11 CERAMIC CHIP 0.001UF 10.00% 50V
C2027 1-164-227-11 CERAMIC CHIP 0.022UF 10.00% 25V
C2028 1-162-964-11 CERAMIC CHIP 0.001UF 10.00% 50V
C2043 1-165-908-11 CERAMIC CHIP 1UF 10% 10V
C2044 1-165-908-11 CERAMIC CHIP 1UF 10% 10V
C2048 1-126-396-11 ELECT CHIP 47UF 20.00% 16V
C2049 1-126-396-11 ELECT CHIP 47UF 20.00% 16V
C2053 1-165-908-11 CERAMIC CHIP 1UF 10% 10V
C2054 1-165-908-11 CERAMIC CHIP 1UF 10% 10V
C2055 1-162-964-11 CERAMIC CHIP 0.001UF 10.00% 50V
< CONNECTOR >
CN2021 *1-417-602-11 SOCKET 21PIN
CN2022 1-819-390-51 FFC/FPC CONNECTOR (ZIF) 49P
CN2023 *1-417-602-11 SOCKET 21PIN
CN2024 1-820-255-51 FFC/FPC CONNECTOR (ZIF) 20P
< DIODE >
D1100 8-719-069-55 DIODE UDZSTE-175.6B
D1101 8-719-083-87 DIODE UDZS-TE17-33B
D1102 8-719-069-55 DIODE UDZSTE-175.6B
D1200 8-719-050-38 DIODE M1MA152WK-T1
D2021 8-719-083-82 DIODE UDZS-TE17-12B
D2022 8-719-083-82 DIODE UDZS-TE17-12B
D2023 8-719-083-82 DIODE UDZS-TE17-12B
D2024 8-719-083-82 DIODE UDZS-TE17-12B
D2025 8-719-083-63 DIODE UDZSTE-1713B
D2026 8-719-069-60 DIODE UDZSTE-179.1B
D2027 8-719-069-60 DIODE UDZSTE-179.1B
D2028 8-719-069-60 DIODE UDZSTE-179.1B
D2029 8-719-069-55 DIODE UDZSTE-175.6B
D2030 8-719-069-60 DIODE UDZSTE-179.1B
D2031 8-719-069-60 DIODE UDZSTE-179.1B
D2037 8-719-069-60 DIODE UDZSTE-179.1B
D2038 8-719-069-60 DIODE UDZSTE-179.1B
D2039 8-719-069-60 DIODE UDZSTE-179.1B
D2040 8-719-069-60 DIODE UDZSTE-179.1B
D2041 8-719-069-60 DIODE UDZSTE-179.1B
- 65 -
Page 66
A1/A1P
REF.NO. PART.NO DESCRIPTION REMARK REF.NO. PART.NO DESCRIPTION REMARK
D2042 8-719-069-60 DIODE UDZSTE-179.1B
D2043 8-719-069-60 DIODE UDZSTE-179.1B
D2044 8-719-069-60 DIODE UDZSTE-179.1B
D2045 8-719-083-63 DIODE UDZSTE-1713B
D2046 8-719-069-60 DIODE UDZSTE-179.1B
L1104 1-414-934-21 INDUCTOR 10UH
L1105 1-414-580-21 INDUCTOR 100NH
L1107 1-414-934-21 INDUCTOR 10UH
L1200 1-414-934-21 INDUCTOR 10UH
L1201 1-410-993-42 INDUCTOR 1UH
D2047 8-719-069-60 DIODE UDZSTE-179.1B
D2048 8-719-069-60 DIODE UDZSTE-179.1B
D2049 8-719-069-55 DIODE UDZSTE-175.6B
D2050 8-719-069-60 DIODE UDZSTE-179.1B
D2052 8-719-083-63 DIODE UDZSTE-1713B
D2058 8-719-069-60 DIODE UDZSTE-179.1B
D2059 8-719-069-60 DIODE UDZSTE-179.1B
D2061 8-719-069-60 DIODE UDZSTE-179.1B
D2062 8-719-069-60 DIODE UDZSTE-179.1B
D2063 8-719-069-60 DIODE UDZSTE-179.1B
D2064 8-719-069-60 DIODE UDZSTE-179.1B
D2065 8-719-069-55 DIODE UDZSTE-175.6B
D2066 8-719-069-55 DIODE UDZSTE-175.6B
D2067 8-719-069-55 DIODE UDZSTE-175.6B
D2068 8-719-069-60 DIODE UDZSTE-179.1B
D2069 8-719-069-55 DIODE UDZSTE-175.6B
D2070 8-719-069-55 DIODE UDZSTE-175.6B
D2071 8-719-069-55 DIODE UDZSTE-175.6B
< EARTH TERMINAL >
ET6501 1-780-336-11 EARTH TERMINAL
ET6502 1-780-336-11 EARTH TERMINAL
< FERRITE BEAD >
FB1100 1-469-185-11 FERRITE 0UH
FB1101 1-469-185-11 FERRITE 0UH
< IC >
L1223 1-410-509-11 INDUCTOR 10UH
L2000 1-414-934-21 INDUCTOR 10UH
< TRANSISTOR >
Q1200 8-729-010-29 TRANSISTOR MSD601-RST1
Q1201 8-729-421-19 TRANSISTOR UN2213
Q1202 8-729-421-19 TRANSISTOR UN2213
Q1203 8-729-422-33 TRANSISTOR 2SD601A-Q-TX
Q1204 8-729-421-19 TRANSISTOR UN2213
Q1205 8-729-010-05 TRANSISTOR MSB709-RT1
Q2000 8-729-010-29 TRANSISTOR MSD601-RST1
Q2001 8-729-010-29 TRANSISTOR MSD601-RST1
Q2002 8-729-010-05 TRANSISTOR MSB709-RT1
Q2003 8-729-120-28 TRANSISTOR 2SC1623-L5L6
Q2004 8-729-010-05 TRANSISTOR MSB709-RT1
Q2005 8-729-120-28 TRANSISTOR 2SC1623-L5L6
< RESISTOR >
R1001 1-216-809-11 METAL CHIP 100 5% 1/10W
R1002 1-216-809-11 METAL CHIP 100 5% 1/10W
R1003 1-216-864-11 SHORT CHIP 0
R1004 1-216-864-11 SHORT CHIP 0
R1006 1-216-864-11 SHORT CHIP 0
R1007 1-216-864-11 SHORT CHIP 0
R1008 1-216-864-11 SHORT CHIP 0
R1009 1-216-864-11 SHORT CHIP 0
R1010 1-216-864-11 SHORT CHIP 0
R1101 1-216-049-11 RES-CHIP 1K 5% 1/10W
IC1000 6-704-465-01 IC MC74LVX8053DTR2
IC1200 6-704-747-01 IC TDA9886TS/V4,118
IC2000 8-759-385-76 IC MC14052 BDR2
< SOCKET >
J2021 1-819-327-11 PHONO JACK 2P
J2022 1-819-327-11 PHONO JACK 2P
J2023 1-820-021-11 JACK
J2024 1-819-354-11 PHONO JACK 5P
< COIL >
L1000 1-414-934-21 INDUCTOR 10UH
L1100 1-412-987-31 INDUCTOR 4.7UH
L1101 1-412-987-31 INDUCTOR 4.7UH
L1102 1-414-580-21 INDUCTOR 100NH
L1103 1-414-580-21 INDUCTOR 100NH
R1201 1-216-837-11 METAL CHIP 22K 5% 1/10W
R1202 1-216-821-11 METAL CHIP 1K 5% 1/10W
R1203 1-216-837-11 METAL CHIP 22K 5% 1/10W
R1204 1-216-825-11 METAL CHIP 2.2K 5% 1/10W
R1206 1-216-825-11 METAL CHIP 2.2K 5% 1/10W
R1207 1-216-825-11 METAL CHIP 2.2K 5% 1/10W
R1208 1-216-864-11 SHORT CHIP 0
R1210 1-216-817-11 METAL CHIP 470 5% 1/10W
R1212 1-216-830-11 METAL CHIP 5.6K 5% 1/10W
R1213 1-216-811-11 METAL CHIP 150 5% 1/10W
R1214 1-216-827-11 METAL CHIP 3.3K 5% 1/10W
R1215 1-216-817-11 METAL CHIP 470 5% 1/10W
R1216 1-216-834-11 METAL CHIP 12K 5% 1/10W
R1217 1-216-864-11 SHORT CHIP 0
R1218 1-216-809-11 METAL CHIP 100 5% 1/10W
R1219 1-216-864-11 SHORT CHIP 0
- 66 -
Page 67
A1/A1P
REF.NO. PART.NO DESCRIPTION REMARK REF.NO. PART.NO DESCRIPTION REMARK
R1220 1-216-809-11 METAL CHIP 100 5% 1/10W
R1221 1-216-845-11 METAL CHIP 100K 5% 1/10W
R1222 1-216-813-11 METAL CHIP 220 5% 1/10W
R1223 1-216-824-11 METAL CHIP 1.8K 5% 1/10W
R1224 1-216-809-11 METAL CHIP 100 5% 1/10W
R2025 1-216-049-11 RES-CHIP 1K 5% 1/10W
R2026 1-216-022-00 RES-CHIP 75 5% 1/10W
R2028 1-216-022-00 RES-CHIP 75 5% 1/10W
R2029 1-216-022-00 RES-CHIP 75 5% 1/10W
R2030 1-216-022-00 RES-CHIP 75 5% 1/10W
R1225 1-216-864-11 SHORT CHIP 0
R1226 1-216-819-11 METAL CHIP 680 5% 1/10W
R1228 1-216-864-11 SHORT CHIP 0
R1229 1-218-867-11 METAL CHIP 6.8K 0.5% 1/10W
R1230 1-216-822-11 METAL CHIP 1.2K 5% 1/10W
R1232 1-216-807-11 METAL CHIP 68 5% 1/10W
R1233 1-216-807-11 METAL CHIP 68 5% 1/10W
R1234 1-216-814-11 METAL CHIP 270 5% 1/10W
R1235 1-216-829-11 METAL CHIP 4.7K 5% 1/10W
R1237 1-216-833-11 METAL CHIP 10K 5% 1/10W
R1238 1-216-864-11 SHORT CHIP 0
R1239 1-216-812-11 METAL CHIP 180 5% 1/10W
R1240 1-216-801-11 METAL CHIP 22 5% 1/10W
R1241 1-216-821-11 METAL CHIP 1K 5% 1/10W
R1301 1-216-864-11 SHORT CHIP 0
R1302 1-216-864-11 SHORT CHIP 0
R1305 1-216-864-11 SHORT CHIP 0
R1306 1-216-864-11 SHORT CHIP 0
R1307 1-216-864-11 SHORT CHIP 0
R1308 1-216-864-11 SHORT CHIP 0
R2000 1-216-809-11 METAL CHIP 100 5% 1/10W
R2001 1-216-809-11 METAL CHIP 100 5% 1/10W
R2002 1-216-809-11 METAL CHIP 100 5% 1/10W
R2003 1-216-809-11 METAL CHIP 100 5% 1/10W
R2004 1-216-864-11 SHORT CHIP 0
R2031 1-216-022-00 RES-CHIP 75 5% 1/10W
R2032 1-216-815-11 METAL CHIP 330 5% 1/10W
R2033 1-216-815-11 METAL CHIP 330 5% 1/10W
R2034 1-216-813-11 METAL CHIP 220 5% 1/10W
R2035 1-216-864-11 SHORT CHIP 0
R2036 1-216-813-11 METAL CHIP 220 5% 1/10W
R2037 1-216-864-11 SHORT CHIP 0
R2038 1-216-864-11 SHORT CHIP 0
R2039 1-216-864-11 SHORT CHIP 0
R2040 1-216-864-11 SHORT CHIP 0
R2041 1-216-864-11 SHORT CHIP 0
R2042 1-216-864-11 SHORT CHIP 0
R2043 1-216-864-11 SHORT CHIP 0
R2044 1-216-864-11 SHORT CHIP 0
R2045 1-216-864-11 SHORT CHIP 0
R2046 1-216-864-11 SHORT CHIP 0
R2047 1-216-864-11 SHORT CHIP 0
R2048 1-216-864-11 SHORT CHIP 0
R2049 1-216-864-11 SHORT CHIP 0
R2050 1-216-864-11 SHORT CHIP 0
R2051 1-216-864-11 SHORT CHIP 0
R2052 1-216-864-11 SHORT CHIP 0
R2053 1-216-864-11 SHORT CHIP 0
R2054 1-216-864-11 SHORT CHIP 0
R2055 1-216-864-11 SHORT CHIP 0
R2005 1-216-864-11 SHORT CHIP 0
R2006 1-216-809-11 METAL CHIP 100 5% 1/10W
R2007 1-216-864-11 SHORT CHIP 0
R2008 1-216-829-11 METAL CHIP 4.7K 5% 1/10W
R2009 1-216-829-11 METAL CHIP 4.7K 5% 1/10W
R2010 1-216-809-11 METAL CHIP 100 5% 1/10W
R2011 1-216-809-11 METAL CHIP 100 5% 1/10W
R2012 1-216-809-11 METAL CHIP 100 5% 1/10W
R2013 1-216-809-11 METAL CHIP 100 5% 1/10W
R2014 1-216-809-11 METAL CHIP 100 5% 1/10W
R2015 1-216-833-11 METAL CHIP 10K 5% 1/10W
R2016 1-216-833-11 METAL CHIP 10K 5% 1/10W
R2017 1-216-833-11 METAL CHIP 10K 5% 1/10W
R2018 1-216-833-11 METAL CHIP 10K 5% 1/10W
R2019 1-216-833-11 METAL CHIP 10K 5% 1/10W
R2020 1-216-833-11 METAL CHIP 10K 5% 1/10W
R2021 1-216-295-91 SHORT CHIP 0
R2022 1-216-815-11 METAL CHIP 330 5% 1/10W
R2023 1-216-049-11 RES-CHIP 1K 5% 1/10W
R2024 1-216-815-11 METAL CHIP 330 5% 1/10W
R2056 1-216-864-11 SHORT CHIP 0
R2057 1-216-864-11 SHORT CHIP 0
R2058 1-216-864-11 SHORT CHIP 0
R2059 1-216-864-11 SHORT CHIP 0
R2060 1-216-864-11 SHORT CHIP 0
R2061 1-216-864-11 SHORT CHIP 0
R2062 1-216-864-11 SHORT CHIP 0
R2063 1-216-853-11 METAL CHIP 470K 5% 1/10W
R2064 1-216-853-11 METAL CHIP 470K 5% 1/10W
R2065 1-216-853-11 METAL CHIP 470K 5% 1/10W
R2066 1-216-853-11 METAL CHIP 470K 5% 1/10W
R2067 1-216-025-11 RES-CHIP 100 5% 1/10W
R2068 1-216-033-00 RES-CHIP 220 5% 1/10W
R2069 1-216-025-11 RES-CHIP 100 5% 1/10W
R2070 1-216-025-11 RES-CHIP 100 5% 1/10W
R2071 1-216-025-11 RES-CHIP 100 5% 1/10W
R2072 1-216-022-00 RES-CHIP 75 5% 1/10W
R2073 1-216-025-11 RES-CHIP 100 5% 1/10W
R2074 1-216-049-11 RES-CHIP 1K 5% 1/10W
R2075 1-216-049-11 RES-CHIP 1K 5% 1/10W
- 67 -
Page 68
A1/A1P H2/H2P
REF.NO. PART.NO DESCRIPTION REMARK REF.NO. PART.NO DESCRIPTION REMARK
R2076 1-216-853-11 METAL CHIP 470K 5% 1/10W
R2077 1-216-853-11 METAL CHIP 470K 5% 1/10W
R2078 1-216-864-11 SHORT CHIP 0
R2079 1-216-864-11 SHORT CHIP 0
R2080 1-216-864-11 SHORT CHIP 0
R2127 1-216-049-11 RES-CHIP 1K 5% 1/10W
R2129 1-216-864-11 SHORT CHIP 0
R2132 1-216-864-11 SHORT CHIP 0
R2134 1-216-836-11 METAL CHIP 18K 5% 1/10W
R2135 1-216-833-11 METAL CHIP 10K 5% 1/10W
R2081 1-216-864-11 SHORT CHIP 0
R2082 1-216-295-91 SHORT CHIP 0
R2083 1-216-853-11 METAL CHIP 470K 5% 1/10W
R2084 1-216-853-11 METAL CHIP 470K 5% 1/10W
R2085 1-216-049-11 RES-CHIP 1K 5% 1/10W
R2086 1-216-049-11 RES-CHIP 1K 5% 1/10W
R2087 1-216-022-00 RES-CHIP 75 5% 1/10W
R2088 1-216-022-00 RES-CHIP 75 5% 1/10W
R2089 1-216-022-00 RES-CHIP 75 5% 1/10W
R2090 1-216-022-00 RES-CHIP 75 5% 1/10W
R2091 1-216-022-00 RES-CHIP 75 5% 1/10W
R2092 1-216-815-11 METAL CHIP 330 5% 1/10W
R2093 1-216-049-11 RES-CHIP 1K 5% 1/10W
R2094 1-216-815-11 METAL CHIP 330 5% 1/10W
R2095 1-216-049-11 RES-CHIP 1K 5% 1/10W
R2097 1-216-864-11 SHORT CHIP 0
R2098 1-216-864-11 SHORT CHIP 0
R2099 1-216-864-11 SHORT CHIP 0
R2100 1-216-864-11 SHORT CHIP 0
R2101 1-216-853-11 METAL CHIP 470K 5% 1/10W
R2102 1-216-853-11 METAL CHIP 470K 5% 1/10W
R2103 1-216-853-11 METAL CHIP 470K 5% 1/10W
R2104 1-216-853-11 METAL CHIP 470K 5% 1/10W
R2105 1-216-025-11 RES-CHIP 100 5% 1/10W
R2106 1-216-033-00 RES-CHIP 220 5% 1/10W
R2107 1-216-025-11 RES-CHIP 100 5% 1/10W
R2108 1-216-025-11 RES-CHIP 100 5% 1/10W
R2109 1-216-025-11 RES-CHIP 100 5% 1/10W
R2110 1-216-022-00 RES-CHIP 75 5% 1/10W
R2111 1-216-025-11 RES-CHIP 100 5% 1/10W
R2112 1-216-809-11 METAL CHIP 100 5% 1/10W
R2113 1-216-809-11 METAL CHIP 100 5% 1/10W
R2114 1-216-809-11 METAL CHIP 100 5% 1/10W
R2115 1-216-853-11 METAL CHIP 470K 5% 1/10W
R2116 1-216-853-11 METAL CHIP 470K 5% 1/10W
R2117 1-216-864-11 SHORT CHIP 0
R2118 1-216-864-11 SHORT CHIP 0
R2119 1-216-029-00 RES-CHIP 150 5% 1/10W
R2120 1-216-029-00 RES-CHIP 150 5% 1/10W
R2121 1-216-029-00 RES-CHIP 150 5% 1/10W
R2122 1-216-025-11 RES-CHIP 100 5% 1/10W
R2123 1-216-049-11 RES-CHIP 1K 5% 1/10W
R2124 1-216-029-00 RES-CHIP 150 5% 1/10W
R2125 1-216-029-00 RES-CHIP 150 5% 1/10W
R2126 1-216-029-00 RES-CHIP 150 5% 1/10W
R2136 1-216-811-11 METAL CHIP 150 5% 1/10W
R2137 1-216-817-11 METAL CHIP 470 5% 1/10W
R2138 1-216-811-11 METAL CHIP 150 5% 1/10W
R2139 1-216-811-11 METAL CHIP 150 5% 1/10W
R2140 1-216-817-11 METAL CHIP 470 5% 1/10W
R2141 1-216-811-11 METAL CHIP 150 5% 1/10W
R2142 1-216-836-11 METAL CHIP 18K 5% 1/10W
R2143 1-216-833-11 METAL CHIP 10K 5% 1/10W
R2145 1-216-864-11 SHORT CHIP 0
< FILTER >
SW1200 1-795-617-11 SAW FILTER
SW1201 1-767-083-11 FILTER, SURFACE WAVE
< TUNER >
TU1300 8-597-585-00 TUNER, FSS BTP-HC401
< CRYSTAL >
X1200 1-767-704-11 VIBRATOR, CRYSTAL
*A-1189-409-A H2 Board, Complete (KDL-26/32U2000)
*A-1202-964-A H2P Board, Complete (KDL-40U2000)
< CAPACITOR >
C2902 1-162-964-11 CERAMIC CHIP 0.001UF 10.00% 50V
C2903 1-162-964-11 CERAMIC CHIP 0.001UF 10.00% 50V
C2904 1-162-964-11 CERAMIC CHIP 0.001UF 10.00% 50V
C2905 1-162-964-11 CERAMIC CHIP 0.001UF 10.00% 50V
C2930 1-162-964-11 CERAMIC CHIP 0.001UF 10.00% 50V
C2931 1-162-964-11 CERAMIC CHIP 0.001UF 10.00% 50V
C9041 1-125-891-11 CERAMIC CHIP 0.47UF 10.00% 10V
C9049 1-164-505-11 CERAMIC CHIP 2.2UF 16V
C9050 1-164-505-11 CERAMIC CHIP 2.2UF 16V
C9077 1-162-964-11 CERAMIC CHIP 0.001UF 10.00% 50V
C9078 1-165-908-11 CERAMIC CHIP 1UF 10% 10V
C9079 1-162-964-11 CERAMIC CHIP 0.001UF 10.00% 50V
C9080 1-165-908-11 CERAMIC CHIP 1UF 10% 10V
C9081 1-162-927-11 CERAMIC CHIP 100PF 5.00% 50V
C9082 1-162-927-11 CERAMIC CHIP 100PF 5.00% 50V
< CONNECTOR >
CN9855 *1-819-335-11 HEADER ASSEMBLY FOR PWB, 9P
CN9856 1-779-993-11 PIN, CONNECTOR (PWB) 5P
CN9857 *1-764-250-11 PIN, CONNECTOR (PC BOARD) 4P
- 68 -
Page 69
H2/H2P H3/H3P
REF.NO. PART.NO DESCRIPTION REMARK REF.NO. PART.NO DESCRIPTION REMARK
< DIODE >
< TRANSISTOR >
G2
D9036 8-719-977-28 DIODE DTZ10B
D9038 8-719-977-28 DIODE DTZ10B
D9058 8-719-069-60 DIODE UDZSTE-179.1B
D9059 8-719-069-60 DIODE UDZSTE-179.1B
< SOCKET >
J2901 1-750-264-31 JACK
J9006 1-794-442-21 TERMINAL BLOCK (LIGHT ANGLE),S
< RESISTOR >
R2901 1-220-259-11 METAL CHIP 150 5% 1/4W
R2902 1-220-259-11 METAL CHIP 150 5% 1/4W
R2903 1-220-259-11 METAL CHIP 150 5% 1/4W
R2904 1-220-259-11 METAL CHIP 150 5% 1/4W
R9104 1-218-285-11 METAL CHIP 75 5% 1/10W
R9105 1-216-811-11 METAL CHIP 150 5% 1/10W
R9109 1-216-811-11 METAL CHIP 150 5% 1/10W
R9113 1-216-809-11 METAL CHIP 100 5% 1/10W
R9116 1-216-864-11 SHORT CHIP 0
R9136 1-216-853-11 METAL CHIP 470K 5% 1/10W
R9137 1-216-821-11 METAL CHIP 1K 5% 1/10W
R9138 1-216-853-11 METAL CHIP 470K 5% 1/10W
R9139 1-216-821-11 METAL CHIP 1K 5% 1/10W
R9142 1-216-864-11 SHORT CHIP 0
R9853 1-216-864-11 SHORT CHIP 0
R9854 1-216-864-11 SHORT CHIP 0
< VARISTOR >
VD9023 1-803-974-21 VARISTOR, CHIP (1608)
VD9024 1-803-974-21 VARISTOR, CHIP (1608)
*A-1189-410-A H3 Board Complete (KDL-26/32U2000)
*A-1202-965-A H3P Board Complete (KDL-40U2000)
< CAPACITOR >
Q9300 8-729-907-00 TRANSISTOR DTC114EU
Q9301 8-729-907-00 TRANSISTOR DTC114EU
Q9302 8-729-907-00 TRANSISTOR DTC114EU
Q9303 8-729-907-00 TRANSISTOR DTC114EU
< RESISTOR >
R9300 1-216-820-11 METAL CHIP 820 5% 1/10W
R9301 1-216-819-11 METAL CHIP 680 5% 1/10W
R9306 1-216-817-11 METAL CHIP 470 5% 1/10W
R9307 1-216-805-11 METAL CHIP 47 5% 1/10W
R9309 1-216-818-11 METAL CHIP 560 5% 1/10W
R9310 1-216-825-11 METAL CHIP 2.2K 5% 1/10W
R9311 1-216-818-11 METAL CHIP 560 5% 1/10W
*A-1189-416-A G2 Board Complete (KDL-40U2000 only)
4-382-854-11 SCREW (M3X10), P, SW (+)
< CAPACITOR >
C6002 £ 1-119-892-51 CERAMIC 470PF 10.00% 250V
C6003 £ 1-161-964-91 CERAMIC 0.0047UF 250V
C6004 £ 1-113-924-11 CERAMIC 0.0047UF 20.00% 250V
C6005 £ 1-119-892-51 CERAMIC 470PF 10.00% 250V
C6007 £ 1-165-529-11 MYLAR 0.22UF 10 275V
C6009 £ 1-165-531-11 MYLAR 1UF 10 275V
C6010 £ 1-161-964-91 CERAMIC 0.0047UF 250V
C6011 £ 1-119-892-51 CERAMIC 470PF 10.00% 250V
C6013 £ 1-119-892-51 CERAMIC 470PF 10.00% 250V
C6014 £ 1-113-924-11 CERAMIC 0.0047UF 20.00% 250V
C6016 1-162-969-11 CERAMIC CHIP 0.0068UF 10.00% 25V
C6017 1-117-227-11 MYLAR 1UF 10.00% 450V
C6018 1-117-227-11 MYLAR 1UF 10.00% 450V
C6020 1-100-613-81 CERAMIC 470PF 5% 1KV
C6021 1-100-613-81 CERAMIC 470PF 5% 1KV
C9301 1-162-964-11 CERAMIC CHIP 0.001UF 10.00% 50V
C9302 1-119-667-11 CERAMIC CHIP 22UF 10V
< CONNECTOR >
CN9300 1-770-627-21 PIN, CONNECTOR 10P
< DIODE >
D9302 8-719-085-26 DIODE CL-165HR/SYG-D-T
D9309 8-719-036-94 DIODE RD5.6SB-T1
D9312 6-500-817-01 DIODE (LED) SML-512UWT86
D9313 8-719-078-21 DIODE SML-310PTT86
< IC >
IC9300 6-600-271-01 IC RPM7140-H8
C6024 1-107-823-11 CERAMIC CHIP 0.47UF 10.00% 16V
C6026 1-162-964-11 CERAMIC CHIP 0.001UF 10.00% 50V
C6027 1-162-970-11 CERAMIC CHIP 0.01UF 10.00% 25V
C6031 1-107-882-91 ELECT 100UF 20% 16V
C6032 1-127-573-11 CERAMIC CHIP 1UF 10% 16V
C6035 1-107-826-11 CERAMIC CHIP 0.1UF 10.00% 16V
C6036 1-115-339-11 CERAMIC CHIP 0.1UF 10.00% 50V
C6038 1-107-906-11 ELECT 10UF 20% 50V
C6039 1-135-361-11 ELECT(BLOCK) 180UF 20% 450V
C6040 1-135-361-11 ELECT(BLOCK) 180UF 20% 450V
C6041 1-162-970-11 CERAMIC CHIP 0.01UF 10.00% 25V
C6042 1-115-339-11 CERAMIC CHIP 0.1UF 10.00% 50V
C6043 1-162-970-11 CERAMIC CHIP 0.01UF 10.00% 25V
C6044 1-107-905-11 ELECT 4.7UF 20% 50V
C6045 1-107-910-11 ELECT 100UF 20% 50V
- 69 -
Page 70
REF.NO. PART.NO DESCRIPTION REMARK REF.NO. PART.NO DESCRIPTION REMARK
C6046 1-162-970-11 CERAMIC CHIP 0.01UF 10.00% 25V
C6047 1-100-831-91 CERAMIC CHIP 0.001UF 2% 50V
C6049 1-107-906-11 ELECT 10UF 20% 50V
C6051 1-107-826-11 CERAMIC CHIP 0.1UF 10.00% 16V
C6052 1-163-021-91 CERAMIC CHIP 0.01UF 10.00% 50V
C6053 1-162-964-11 CERAMIC CHIP 0.001UF 10.00% 50V
C6054 1-115-340-11 CERAMIC CHIP 0.22UF 10.00% 25V
C6055 1-107-888-11 ELECT 47UF 20% 25V
C6056 1-125-891-11 CERAMIC CHIP 0.47UF 10.00% 10V
C6059 1-100-613-81 CERAMIC 470PF 5% 1KV
C6060 1-100-310-11 FILM 18000PF 3% 800V
C6061 1-125-891-11 CERAMIC CHIP 0.47UF 10.00% 10V
C6062 1-162-964-11 CERAMIC CHIP 0.001UF 10.00% 50V
C6064 1-164-227-11 CERAMIC CHIP 0.022UF 10.00% 25V
C6066 1-128-959-31 ELECT 1000UF 20% 35V
C6067 1-112-242-21 ELECT 1500UF 20% 25V
C6068 1-107-928-11 ELECT 4.7UF 20% 100V
C6069 1-112-242-21 ELECT 1500UF 20% 25V
C6070 1-112-229-21 ELECT 1500UF 20% 16V
C6071 1-112-242-21 ELECT 1500UF 20% 25V
C6073 1-107-907-11 ELECT 22UF 20% 50V
C6080 1-125-889-91 CERAMIC CHIP 2.2UF 10% 10V
C6200 1-107-974-11 CERAMIC 47PF 5.00% 2KV
C6201 1-107-903-11 ELECT 2.2UF 20% 50V
C6202 1-162-964-11 CERAMIC CHIP 0.001UF 10.00% 50V
C6203 1-165-127-11 CERAMIC 470PF 10.00% 500V
C6205 1-107-905-11 ELECT 4.7UF 20% 50V
C6206 1-107-910-11 ELECT 100UF 20% 50V
C6209 1-165-729-31 ELECT 470UF 20% 16V
C6210 1-107-826-11 CERAMIC CHIP 0.1UF 10.00% 16V
C6300 1-164-230-11 CERAMIC CHIP 220PF 5.00% 50V
C6301 1-126-960-11 ELECT 1UF 20.00% 50V
C6302 1-164-230-11 CERAMIC CHIP 220PF 5.00% 50V
C6303 1-126-960-11 ELECT 1UF 20.00% 50V
C6304 1-104-666-11 ELECT 220UF 20.00% 25V
C6306 1-164-489-11 CERAMIC CHIP 0.22UF 10.00% 16V
C6307 1-115-339-11 CERAMIC CHIP 0.1UF 10.00% 50V
C6308 1-126-952-11 ELECT 1000UF 20.00% 35V
C6309 1-126-952-11 ELECT 1000UF 20.00% 35V
C6310 1-164-227-11 CERAMIC CHIP 0.022UF 10.00% 25V
C6311 1-164-227-11 CERAMIC CHIP 0.022UF 10.00% 25V
C6312 1-163-021-91 CERAMIC CHIP 0.01UF 10.00% 50V
C6313 1-163-021-91 CERAMIC CHIP 0.01UF 10.00% 50V
C6316 1-107-907-11 ELECT 22UF 20% 50V
< CONNECTOR >
< DIODE >
D6000 8-719-081-97 DIODE MMDL914T1
D6001 8-719-081-97 DIODE MMDL914T1
D6002 8-719-081-97 DIODE MMDL914T1
D6003 8-719-054-89 DIODE D15XB60
D6005 8-719-081-97 DIODE MMDL914T1
D6006 8-719-976-99 DIODE DTZ5.1B
D6007 8-719-081-97 DIODE MMDL914T1
D6008 8-719-081-97 DIODE MMDL914T1
D6011 6-501-043-01 DIODE UMZ16NT106
D6012 8-719-054-59 DIODE FSF05A60
D6013 6-500-137-01 DIODE BAT54HT1
D6014 6-501-043-01 DIODE UMZ16NT106
D6015 8-719-081-97 DIODE MMDL914T1
D6017 6-500-108-01 DIODE EP05FA20
D6018 6-500-108-01 DIODE EP05FA20
D6019 8-719-081-97 DIODE MMDL914T1
D6020 8-719-081-97 DIODE MMDL914T1
D6021 8-719-081-97 DIODE MMDL914T1
D6023 8-719-041-97 DIODE MA113-(TX)
D6027 8-719-081-97 DIODE MMDL914T1
D6028 8-719-979-64 DIODE UF4005/23
D6031 6-501-043-01 DIODE UMZ16NT106
D6032 6-501-043-01 DIODE UMZ16NT106
D6033 8-719-081-97 DIODE MMDL914T1
D6035 8-719-057-96 DIODE D10SC6M-4012
D6036 8-719-057-96 DIODE D10SC6M-4012
D6037 8-719-057-96 DIODE D10SC6M-4012
D6038 8-719-057-96 DIODE D10SC6M-4012
D6039 8-719-057-96 DIODE D10SC6M-4012
D6040 6-501-505-01 DIODE FCH08U10
D6041 8-719-082-04 DIODE MM3Z22VT1
D6042 8-719-081-97 DIODE MMDL914T1
D6043 6-500-567-31 DIODE 10ERB20-TB3
D6044 6-500-567-31 DIODE 10ERB20-TB3
D6048 8-719-083-87 DIODE UDZS-TE17-33B
D6200 6-500-567-31 DIODE 10ERB20-TB3
D6201 8-719-036-94 DIODE RD5.6SB-T1
D6203 6-500-849-01 DIODE ERA22-08KFLB
D6204 8-719-052-90 DIODE D1NL40-TA2
D6206 8-719-052-90 DIODE D1NL40-TA2
D6207 8-719-032-12 DIODE D1NS6
D6300 8-719-069-55 DIODE UDZSTE-175.6B
D6302 8-719-069-55 DIODE UDZSTE-175.6B
G2
CN6001 £ *1-691-960-11 PIN, CONNECTOR (PC BOARD) 3P
CN6003 *1-785-703-21 PIN, CONNECTOR (PC BOARD) 6P
CN6004 *1-785-706-11 PIN, CONNECTOR (PC BOARD) 10P
CN6005 *1-793-235-11 PIN, CONNECTOR (PC BOARD) 13P
CN6300 *1-564-507-11 PLUG, CONNECTOR 4P
< TERMINAL BOARD >
ET6000 1-537-770-21 TERMINAL BOARD, GROUND
ET6002 1-537-770-21 TERMINAL BOARD, GROUND
ET6003 1-537-770-21 TERMINAL BOARD, GROUND
- 70 -
Page 71
REF.NO. PART.NO DESCRIPTION REMARK REF.NO. PART.NO DESCRIPTION REMARK
< FUSE >
F6000 £ 1-576-233-51 FUSE 6.3A 250V
FH6002 £ 1-533-725-11 FUSE HOLDER
< FERRITE BEAD >
FB6001 1-410-396-41 FERRITE 0.45UH
FB6002 1-410-396-41 FERRITE 0.45UH
< IC >
IC6000 6-709-192-01 IC FA5501AN-D1-TE1
IC6001 6-705-810-01 IC MCZ3001DB
IC6002 6-709-368-01 IC MM1431ATT (CN)
IC6003 6-709-368-01 IC MM1431ATT (CN)
IC6004 6-709-368-01 IC MM1431ATT (CN)
IC6200 6-600-279-01 IC STR-A6169
IC6201 8-759-682-42 IC MM1431ATT
IC6300 8-759-831-57 IC TDA7495S
Q6010 8-729-026-49 TRANSISTOR 2SA1037AK-T146-R
Q6011 8-729-120-28 TRANSISTOR 2SC1623-L5L6
Q6012 8-729-045-62 TRANSISTOR 2SK2158-T2B
Q6013 6-551-545-01 TRANSISTOR 2SK3469-01MR-F111
Q6014 6-551-545-01 TRANSISTOR 2SK3469-01MR-F111
Q6302 8-729-010-29 TRANSISTOR MSD601-RST1
Q6303 8-729-010-05 TRANSISTOR MSB709-RT1
< RESISTOR >
JR6313 1-216-295-91 SHORT CHIP 0
JR6314 1-216-295-91 SHORT CHIP 0
JR6315 1-216-295-91 SHORT CHIP 0
JR6316 1-216-295-91 SHORT CHIP 0
R6001 £ 1-218-760-11 METAL CHIP 220K 0.5% 1/10W
R6002 £ 1-218-760-11 METAL CHIP 220K 0.5% 1/10W
R6003 £ 1-208-830-11 METAL CHIP 100K 0.5% 1/10W
R6005 1-218-911-11 METAL CHIP 470K 0.5% 1/10W
R6006 £ 1-218-760-11 METAL CHIP 220K 0.5% 1/10W
G2
< COIL >
L6000 £ 1-456-856-21 LINE FILTER COIL
L6001 £ 1-456-856-21 LINE FILTER COIL
L6002 1-457-218-11 INDUCTOR 100UH
L6003 1-457-141-11 INDUCTOR 175UH
L6004 1-414-487-41 INDUCTOR 1UH
L6005 1-414-487-41 INDUCTOR 1UH
L6007 1-457-239-11 INDUCTOR 4.7UH
L6008 1-457-239-11 INDUCTOR 4.7UH
L6200 1-414-934-21 INDUCTOR 10UH
< PHOTOCOUPLER >
PH6000 £ 6-600-187-01 PHOTO COUPLER PC123Y22JOOF
PH6001 £ 6-600-187-01 PHOTO COUPLER PC123Y22JOOF
PH6002 £ 6-600-187-01 PHOTO COUPLER PC123Y22JOOF
PH6003 £ 6-600-187-01 PHOTO COUPLER PC123Y22JOOF
PH6200 £ 6-600-187-01 PHOTO COUPLER PC123Y22JOOF
< PROTECTOR MODULE >
PS6301 £ 1-533-596-21 IC LINK 4A 90V
< TRANSISTOR >
Q6001 6-551-403-01 TRANSISTOR 2SK3797(LBS1SONY.
Q6002 6-551-403-01 TRANSISTOR 2SK3797(LBS1SONY.
Q6003 8-729-807-17 TRANSISTOR 2SD1621-S
Q6004 8-729-804-41 TRANSISTOR 2SB1122-S
Q6005 8-729-026-49 TRANSISTOR 2SA1037AK-T146-R
Q6006 8-729-120-28 TRANSISTOR 2SC1623-L5L6
Q6007 8-729-120-28 TRANSISTOR 2SC1623-L5L6
Q6008 8-729-804-41 TRANSISTOR 2SB1122-S
Q6009 8-729-120-28 TRANSISTOR 2SC1623-L5L6
R6007 £ 1-218-760-11 METAL CHIP 220K 0.5% 1/10W
R6008 1-218-911-11 METAL CHIP 470K 0.5% 1/10W
R6009 1-218-887-11 METAL CHIP 47K 0.5% 1/10W
R6017 £ 1-240-251-11 METAL 6.8 5% 10W
R6021 1-218-913-91 METAL CHIP 560K 0.5% 1/10W
R6022 1-216-864-11 SHORT CHIP 0
R6023 1-218-879-11 METAL CHIP 22K 0.5% 1/10W
R6024 1-208-814-91 METAL CHIP 22K 0.5% 1/10W
R6027 1-218-823-11 METAL CHIP 100 0.5% 1/10W
R6028 1-247-752-11 CARBON 1K 5% 1/2W
R6029 1-215-882-21 METAL OXIDE 22 5% 2W
R6030 1-216-864-11 SHORT CHIP 0
R6031 1-218-835-11 METAL CHIP 330 0.5% 1/10W
R6032 1-217-157-00 METAL 0.33 10% 5W
R6033 1-216-813-11 METAL CHIP 220 5% 1/10W
R6034 1-216-813-11 METAL CHIP 220 5% 1/10W
R6035 1-217-157-00 METAL 0.33 10% 5W
R6036 1-211-981-11 METAL CHIP 33 0.5% 1/10W
R6037 1-218-823-11 METAL CHIP 100 0.5% 1/10W
R6038 1-216-833-11 METAL CHIP 10K 5% 1/10W
R6041 1-216-829-11 METAL CHIP 4.7K 5% 1/10W
R6042 1-249-389-11 CARBON 4.7 5% 1/4W
R6043 1-216-833-11 METAL CHIP 10K 5% 1/10W
R6044 1-216-837-11 METAL CHIP 22K 5% 1/10W
R6046 1-249-405-11 CARBON 100 5% 1/4W
R6047 1-249-389-11 CARBON 4.7 5% 1/4W
R6048 1-216-813-11 METAL CHIP 220 5% 1/10W
R6050 1-216-813-11 METAL CHIP 220 5% 1/10W
R6051 1-208-814-91 METAL CHIP 22K 0.5% 1/10W
R6052 1-216-833-11 METAL CHIP 10K 5% 1/10W
R6053 1-218-907-11 METAL CHIP 330K 0.5% 1/10W
- 71 -
Page 72
REF.NO. PART.NO DESCRIPTION REMARK REF.NO. PART.NO DESCRIPTION REMARK
R6054 1-218-879-11 METAL CHIP 22K 0.5% 1/10W
R6055 1-218-895-11 METAL CHIP 100K 0.5% 1/10W
R6056 1-216-833-11 METAL CHIP 10K 5% 1/10W
R6057 1-216-809-11 METAL CHIP 100 5% 1/10W
R6058 1-208-848-11 METAL CHIP 560K 0.5% 1/10W
R6107 1-216-361-00 METAL OXIDE 0.22 5% 2W
R6108 1-218-903-11 METAL CHIP 220K 0.5% 1/10W
R6109 1-218-847-11 METAL CHIP 1K 0.5% 1/10W
R6110 1-216-829-11 METAL CHIP 4.7K 5% 1/10W
R6113 1-216-821-11 METAL CHIP 1K 5% 1/10W
G2
R6059 1-208-848-11 METAL CHIP 560K 0.5% 1/10W
R6060 1-208-848-11 METAL CHIP 560K 0.5% 1/10W
R6061 1-208-846-11 METAL CHIP 470K 0.5% 1/10W
R6062 1-208-844-11 METAL CHIP 390K 0.5% 1/10W
R6063 1-218-875-11 METAL CHIP 15K 0.5% 1/10W
R6064 1-218-851-11 METAL CHIP 1.5K 0.5% 1/10W
R6065 1-249-393-11 CARBON 10 5% 1/4W
R6066 1-216-845-11 METAL CHIP 100K 5% 1/10W
R6067 1-216-837-11 METAL CHIP 22K 5% 1/10W
R6068 1-216-833-11 METAL CHIP 10K 5% 1/10W
R6069 £ 1-202-933-61 FUSIBLE 0.1 10% 1/2W
R6070 1-218-823-11 METAL CHIP 100 0.5% 1/10W
R6071 1-218-887-11 METAL CHIP 47K 0.5% 1/10W
R6072 1-208-854-11 METAL CHIP 1M 0.5% 1/10W
R6073 1-208-854-11 METAL CHIP 1M 0.5% 1/10W
R6074 1-208-854-11 METAL CHIP 1M 0.5% 1/10W
R6075 1-208-854-11 METAL CHIP 1M 0.5% 1/10W
R6076 1-218-761-11 METAL CHIP 240K 0.5% 1/10W
R6077 1-218-881-11 METAL CHIP 27K 0.5% 1/10W
R6078 1-218-873-11 METAL CHIP 12K 0.5% 1/10W
R6081 1-249-385-11 CARBON 2.2 5% 1/4W
R6082 1-216-833-11 METAL CHIP 10K 5% 1/10W
R6083 1-216-833-11 METAL CHIP 10K 5% 1/10W
R6084 1-218-863-11 METAL CHIP 4.7K 0.5% 1/10W
R6085 1-218-887-11 METAL CHIP 47K 0.5% 1/10W
R6114 1-216-821-11 METAL CHIP 1K 5% 1/10W
R6115 1-216-821-11 METAL CHIP 1K 5% 1/10W
R6116 1-216-837-11 METAL CHIP 22K 5% 1/10W
R6118 1-216-829-11 METAL CHIP 4.7K 5% 1/10W
R6121 1-218-843-11 METAL CHIP 680 0.5% 1/10W
R6122 1-218-865-11 METAL CHIP 5.6K 0.5% 1/10W
R6124 1-218-847-11 METAL CHIP 1K 0.5% 1/10W
R6125 1-216-833-11 METAL CHIP 10K 5% 1/10W
R6126 1-249-377-11 CARBON 0.47 5% 1/4W
R6127 1-249-389-11 CARBON 4.7 5% 1/4W
R6128 1-245-494-21 METAL 2.2M 2% 1/4W
R6129 1-245-494-21 METAL 2.2M 2% 1/4W
R6130 1-216-864-11 SHORT CHIP 0
R6131 1-216-864-11 SHORT CHIP 0
R6132 1-249-416-11 CARBON 820 5% 1/4W
R6133 1-216-295-91 SHORT CHIP 0
R6200 £ 1-212-958-00 FUSIBLE 10 5% 1/2W
R6201 1-216-353-00 METAL OXIDE 2.2 5% 1W
R6202 1-260-129-11 CARBON 330K 5% 1/2W
R6203 1-249-385-11 CARBON 2.2 5% 1/4W
R6204 1-216-813-11 METAL CHIP 220 5% 1/10W
R6205 1-249-385-11 CARBON 2.2 5% 1/4W
R6206 1-216-817-11 METAL CHIP 470 5% 1/10W
R6207 1-216-823-11 METAL CHIP 1.5K 5% 1/10W
R6208 1-216-809-11 METAL CHIP 100 5% 1/10W
R6086 1-216-833-11 METAL CHIP 10K 5% 1/10W
R6087 1-216-833-11 METAL CHIP 10K 5% 1/10W
R6088 1-216-857-11 METAL CHIP 1M 5% 1/10W
R6090 1-211-985-11 METAL CHIP 47 0.5% 1/10W
R6091 1-216-829-11 METAL CHIP 4.7K 5% 1/10W
R6092 1-218-903-11 METAL CHIP 220K 0.5% 1/10W
R6093 1-218-859-11 METAL CHIP 3.3K 0.5% 1/10W
R6094 1-218-885-11 METAL CHIP 39K 0.5% 1/10W
R6095 1-216-009-91 RES-CHIP 22 5% 1/10W
R6096 1-216-821-11 METAL CHIP 1K 5% 1/10W
R6097 1-216-833-11 METAL CHIP 10K 5% 1/10W
R6098 1-216-821-11 METAL CHIP 1K 5% 1/10W
R6099 1-216-009-91 RES-CHIP 22 5% 1/10W
R6100 1-216-833-11 METAL CHIP 10K 5% 1/10W
R6101 1-216-833-11 METAL CHIP 10K 5% 1/10W
R6102 1-216-833-11 METAL CHIP 10K 5% 1/10W
R6103 1-218-879-11 METAL CHIP 22K 0.5% 1/10W
R6104 1-218-847-11 METAL CHIP 1K 0.5% 1/10W
R6105 1-218-863-11 METAL CHIP 4.7K 0.5% 1/10W
R6106 1-216-361-00 METAL OXIDE 0.22 5% 2W
R6210 1-218-871-11 METAL CHIP 10K 0.5% 1/10W
R6211 1-218-871-11 METAL CHIP 10K 0.5% 1/10W
R6217 1-216-295-91 SHORT CHIP 0
R6218 1-216-295-91 SHORT CHIP 0
R6304 1-216-864-11 METAL CHIP 120K 5% 1/10W
R6306 1-216-864-11 METAL CHIP 120K 5% 1/10W
R6308 1-216-825-11 METAL CHIP 2.2K 5% 1/4W
R6309 1-216-049-11 RES-CHIP 1K 5% 1/10W
R6313 1-216-864-11 SHORT CHIP 0
R6314 1-216-845-11 METAL CHIP 100K 5% 1/10W
R6315 1-216-845-11 METAL CHIP 100K 5% 1/10W
R6316 1-216-837-11 METAL CHIP 22K 5% 1/10W
R6317 1-216-833-11 METAL CHIP 10K 5% 1/10W
R6318 1-216-833-11 METAL CHIP 10K 5% 1/10W
< RELAY >
RY6000 £ 1-755-579-11 RELAY, POWER
- 72 -
Page 73
G2
REF.NO. PART.NO DESCRIPTION REMARK REF.NO. PART.NO DESCRIPTION REMARK
< TRANSFORMER >
VD9006 1-803-974-21 VARISTOR, CHIP (1608)
H1/H1P
BDT
T6002 £ 1-443-983-11 CONVERTER TRANSFORMER (PIT)
T6003 £ 1-443-986-11 CONVERTER TRANSFORMER (PIT)
T6200 £ 1-443-313-21 TRANSFORMER, CONVERTER (SBT)
< VARISTOR >
VD6000 £ 1-804-995-11 VARISTOR
VD6001 £ 1-804-995-11 VARISTOR
*A-1189-408-A H1 Board Complete (KDL-26/32U2000)
*A-1202-963-A H1P Board Complete (KDL-40U2000)
< CAPACITOR >
C9000 1-107-826-11 CERAMIC CHIP 0.1UF 10.00% 16V
< CONNECTOR >
CN9000 1-778-507-21 PIN, CONNECTOR (PC BOARD) 4P
< DIODE >
D9000 8-719-036-94 DIODE RD5.6SB-T1
< RESISTOR >
R9000 1-216-864-11 SHORT CHIP 0
R9001 1-218-847-11 METAL CHIP 1K 0.5% 1/10W
R9002 1-218-843-11 METAL CHIP 680 0.5% 1/10W
R9003 1-218-851-11 METAL CHIP 1.5K 0.5% 1/10W
R9004 1-218-839-11 METAL CHIP 470 0.5% 1/10W
R9005 1-218-855-11 METAL CHIP 2.2K 0.5% 1/10W
R9006 1-218-834-11 METAL CHIP 300 0.5% 1/10W
R9007 1-216-864-11 SHORT CHIP 0
R9008 1-216-864-11 SHORT CHIP 0
< SWITCH >
S9000 1-572-595-11 SWITCH, TACTIL (REFLOW TYPE)
S9001 1-572-595-11 SWITCH, TACTIL (REFLOW TYPE)
S9002 1-572-595-11 SWITCH, TACTIL (REFLOW TYPE)
S9003 1-572-595-11 SWITCH, TACTIL (REFLOW TYPE)
S9004 1-572-595-11 SWITCH, TACTIL (REFLOW TYPE)
S9005 1-572-595-11 SWITCH, TACTIL (REFLOW TYPE)
S9006 1-572-595-11 SWITCH, TACTIL (REFLOW TYPE)
< VARISTOR >
VD9000 1-803-974-21 VARISTOR, CHIP (1608)
VD9001 1-803-974-21 VARISTOR, CHIP (1608)
VD9002 1-803-974-21 VARISTOR, CHIP (1608)
VD9003 1-803-974-21 VARISTOR, CHIP (1608)
VD9004 1-803-974-21 VARISTOR, CHIP (1608)
VD9005 1-803-974-21 VARISTOR, CHIP (1608)
*A-1198-236-A BDT Board Complete
< CAPACITOR >
C3001 1-125-891-11 CERAMIC CHIP 0.47UF 10.00% 10V
C3002 1-125-891-11 CERAMIC CHIP 0.47UF 10.00% 10V
C3003 1-125-891-11 CERAMIC CHIP 0.47UF 10.00% 10V
C3004 1-164-156-11 CERAMIC CHIP 0.1UF 25V
C3005 1-125-891-11 CERAMIC CHIP 0.47UF 10.00% 10V
C3007 1-164-156-11 CERAMIC CHIP 0.1UF 25V
C3008 1-126-205-11 ELECT CHIP 47UF 20.00% 6.3V
C3009 1-164-156-11 CERAMIC CHIP 0.1UF 25V
C3010 1-107-826-11 CERAMIC CHIP 0.1UF 10.00% 16V
C3011 1-107-826-11 CERAMIC CHIP 0.1UF 10.00% 16V
C3012 1-107-826-11 CERAMIC CHIP 0.1UF 10.00% 16V
C3013 1-107-826-11 CERAMIC CHIP 0.1UF 10.00% 16V
C3014 1-107-826-11 CERAMIC CHIP 0.1UF 10.00% 16V
C3015 1-107-826-11 CERAMIC CHIP 0.1UF 10.00% 16V
C3016 1-107-826-11 CERAMIC CHIP 0.1UF 10.00% 16V
C3017 1-126-205-11 ELECT CHIP 47UF 20.00% 6.3V
C3018 1-164-156-11 CERAMIC CHIP 0.1UF 25V
C3019 1-107-826-11 CERAMIC CHIP 0.1UF 10.00% 16V
C3020 1-107-826-11 CERAMIC CHIP 0.1UF 10.00% 16V
C3021 1-107-826-11 CERAMIC CHIP 0.1UF 10.00% 16V
C3022 1-107-826-11 CERAMIC CHIP 0.1UF 10.00% 16V
C3023 1-107-826-11 CERAMIC CHIP 0.1UF 10.00% 16V
C3024 1-107-826-11 CERAMIC CHIP 0.1UF 10.00% 16V
C3025 1-107-826-11 CERAMIC CHIP 0.1UF 10.00% 16V
C3026 1-107-826-11 CERAMIC CHIP 0.1UF 10.00% 16V
C3027 1-107-826-11 CERAMIC CHIP 0.1UF 10.00% 16V
C3028 1-107-826-11 CERAMIC CHIP 0.1UF 10.00% 16V
C3029 1-107-826-11 CERAMIC CHIP 0.1UF 10.00% 16V
C3030 1-107-826-11 CERAMIC CHIP 0.1UF 10.00% 16V
C3031 1-107-826-11 CERAMIC CHIP 0.1UF 10.00% 16V
C3032 1-107-826-11 CERAMIC CHIP 0.1UF 10.00% 16V
C3033 1-107-826-11 CERAMIC CHIP 0.1UF 10.00% 16V
C3035 1-107-826-11 CERAMIC CHIP 0.1UF 10.00% 16V
C3040 1-107-826-11 CERAMIC CHIP 0.1UF 10.00% 16V
C3041 1-127-715-91 CERAMIC CHIP 0.22UF 10% 16V
C3042 1-107-826-11 CERAMIC CHIP 0.1UF 10.00% 16V
C3043 1-126-394-11 ELECT CHIP 10UF 20.00% 16V
C3044 1-127-715-91 CERAMIC CHIP 0.22UF 10% 16V
C3045 1-107-826-11 CERAMIC CHIP 0.1UF 10.00% 16V
C3048 1-107-826-11 CERAMIC CHIP 0.1UF 10.00% 16V
C3049 1-107-826-11 CERAMIC CHIP 0.1UF 10.00% 16V
C3050 1-107-826-11 CERAMIC CHIP 0.1UF 10.00% 16V
C3051 1-107-826-11 CERAMIC CHIP 0.1UF 10.00% 16V
C3052 1-162-966-11 CERAMIC CHIP 0.0022UF 10.00% 50V
C3053 1-162-966-11 CERAMIC CHIP 0.0022UF 10.00% 50V
- 73 -
Page 74

BDT
REF.NO. PART.NO DESCRIPTION REMARK REF.NO. PART.NO DESCRIPTION REMARK
C3054 1-164-004-11 CERAMIC CHIP 0.1UF 10.00% 25V
C3055 1-124-779-00 ELECT CHIP 10UF 20.00% 16V
C3056 1-164-004-11 CERAMIC CHIP 0.1UF 10.00% 25V
C3057 1-107-826-11 CERAMIC CHIP 0.1UF 10.00% 16V
C3058 1-107-826-11 CERAMIC CHIP 0.1UF 10.00% 16V
C4201 1-107-826-11 CERAMIC CHIP 0.1UF 10.00% 16V
C4202 1-107-826-11 CERAMIC CHIP 0.1UF 10.00% 16V
C4204 1-162-964-11 CERAMIC CHIP 0.001UF 10.00% 50V
C4205 1-162-964-11 CERAMIC CHIP 0.001UF 10.00% 50V
C4206 1-162-964-11 CERAMIC CHIP 0.001UF 10.00% 50V
C3059 1-107-826-11 CERAMIC CHIP 0.1UF 10.00% 16V
C3060 1-107-826-11 CERAMIC CHIP 0.1UF 10.00% 16V
C3061 1-162-962-11 CERAMIC CHIP 470PF 10.00% 50V
C3063 1-107-826-11 CERAMIC CHIP 0.1UF 10.00% 16V
C3065 1-126-396-11 ELECT CHIP 47UF 20.00% 16V
C3068 1-162-964-11 CERAMIC CHIP 0.001UF 10.00% 50V
C3069 1-162-970-11 CERAMIC CHIP 0.01UF 10.00% 25V
C3070 1-107-826-11 CERAMIC CHIP 0.1UF 10.00% 16V
C3071 1-107-826-11 CERAMIC CHIP 0.1UF 10.00% 16V
C3072 1-117-681-11 ELECT CHIP 100UF 20.00% 16V
C3073 1-107-826-11 CERAMIC CHIP 0.1UF 10.00% 16V
C3074 1-107-826-11 CERAMIC CHIP 0.1UF 10.00% 16V
C3075 1-162-917-11 CERAMIC CHIP 15PF 5.00% 50V
C3076 1-162-917-11 CERAMIC CHIP 15PF 5.00% 50V
C3078 1-100-566-91 CERAMIC CHIP 0.1UF 10.00% 25V
C3080 1-162-970-11 CERAMIC CHIP 0.01UF 10.00% 25V
C3081 1-164-230-11 CERAMIC CHIP 220PF 5.00% 50V
C3082 1-107-826-11 CERAMIC CHIP 0.1UF 10.00% 16V
C3083 1-165-908-11 CERAMIC CHIP 1UF 10% 10V
C3085 1-165-908-11 CERAMIC CHIP 1UF 10% 10V
C3086 1-126-390-11 ELECT CHIP 22UF 20.00% 6.3V
C3089 1-162-927-11 CERAMIC CHIP 100PF 5.00% 50V
C3090 1-162-970-11 CERAMIC CHIP 0.01UF 10.00% 25V
C3092 1-127-760-11 CERAMIC CHIP 4.7UF 10% 6.3V
C3093 1-162-970-11 CERAMIC CHIP 0.01UF 10.00% 25V
C4207 1-162-964-11 CERAMIC CHIP 0.001UF 10.00% 50V
C4208 1-162-964-11 CERAMIC CHIP 0.001UF 10.00% 50V
C4209 1-162-964-11 CERAMIC CHIP 0.001UF 10.00% 50V
C4210 1-162-964-11 CERAMIC CHIP 0.001UF 10.00% 50V
C4211 1-162-964-11 CERAMIC CHIP 0.001UF 10.00% 50V
C4212 1-162-964-11 CERAMIC CHIP 0.001UF 10.00% 50V
C4213 1-162-964-11 CERAMIC CHIP 0.001UF 10.00% 50V
C4214 1-162-964-11 CERAMIC CHIP 0.001UF 10.00% 50V
C4215 1-162-964-11 CERAMIC CHIP 0.001UF 10.00% 50V
C4216 1-162-964-11 CERAMIC CHIP 0.001UF 10.00% 50V
C4217 1-162-964-11 CERAMIC CHIP 0.001UF 10.00% 50V
C4218 1-162-964-11 CERAMIC CHIP 0.001UF 10.00% 50V
C4219 1-162-964-11 CERAMIC CHIP 0.001UF 10.00% 50V
C4220 1-162-964-11 CERAMIC CHIP 0.001UF 10.00% 50V
C4221 1-162-964-11 CERAMIC CHIP 0.001UF 10.00% 50V
C4222 1-124-779-00 ELECT CHIP 10UF 20.00% 16V
C4223 1-124-779-00 ELECT CHIP 10UF 20.00% 16V
C4224 1-124-779-00 ELECT CHIP 10UF 20.00% 16V
C4226 1-124-779-00 ELECT CHIP 10UF 20.00% 16V
C4227 1-124-779-00 ELECT CHIP 10UF 20.00% 16V
C4228 1-100-566-91 CERAMIC CHIP 0.1UF 10.00% 25V
C4229 1-100-566-91 CERAMIC CHIP 0.1UF 10.00% 25V
C4230 1-100-566-91 CERAMIC CHIP 0.1UF 10.00% 25V
C4232 1-100-566-91 CERAMIC CHIP 0.1UF 10.00% 25V
C4233 1-100-566-91 CERAMIC CHIP 0.1UF 10.00% 25V
C3094 1-117-681-11 ELECT CHIP 100UF 20.00% 16V
C3095 1-124-779-00 ELECT CHIP 10UF 20.00% 16V
C3096 1-124-779-00 ELECT CHIP 10UF 20.00% 16V
C3097 1-162-927-11 CERAMIC CHIP 100PF 5.00% 50V
C3114 1-100-566-91 CERAMIC CHIP 0.1UF 10.00% 25V
C3115 1-107-826-11 CERAMIC CHIP 0.1UF 10.00% 16V
C3116 1-127-715-91 CERAMIC CHIP 0.22UF 10% 16V
C3131 1-100-566-91 CERAMIC CHIP 0.1UF 10.00% 25V
C3200 1-162-966-11 CERAMIC CHIP 0.0022UF 10.00% 50V
C3201 1-162-966-11 CERAMIC CHIP 0.0022UF 10.00% 50V
C3300 1-164-004-11 CERAMIC CHIP 0.1UF 10.00% 25V
C3301 1-164-388-91 CERAMIC CHIP 270PF 5.00% 50V
C3302 1-162-927-11 CERAMIC CHIP 100PF 5.00% 50V
C3303 1-115-340-11 CERAMIC CHIP 0.22UF 10.00% 25V
C3350 1-162-928-11 CERAMIC CHIP 120PF 5.00% 50V
C3353 1-162-968-11 CERAMIC CHIP 0.0047UF 10.00% 50V
C3354 1-163-037-11 CERAMIC CHIP 0.022UF 10.00% 50V
C3355 1-127-573-11 CERAMIC CHIP 1UF 10% 16V
C4000 1-107-826-11 CERAMIC CHIP 0.1UF 10.00% 16V
C4200 1-107-826-11 CERAMIC CHIP 0.1UF 10.00% 16V
C4250 1-162-964-11 CERAMIC CHIP 0.001UF 10.00% 50V
C4251 1-162-964-11 CERAMIC CHIP 0.001UF 10.00% 50V
C4252 1-162-964-11 CERAMIC CHIP 0.001UF 10.00% 50V
C4253 1-162-964-11 CERAMIC CHIP 0.001UF 10.00% 50V
C4254 1-162-964-11 CERAMIC CHIP 0.001UF 10.00% 50V
C4255 1-162-964-11 CERAMIC CHIP 0.001UF 10.00% 50V
C4256 1-162-964-11 CERAMIC CHIP 0.001UF 10.00% 50V
C4257 1-162-964-11 CERAMIC CHIP 0.001UF 10.00% 50V
C4258 1-162-964-11 CERAMIC CHIP 0.001UF 10.00% 50V
C4259 1-162-964-11 CERAMIC CHIP 0.001UF 10.00% 50V
C4260 1-162-964-11 CERAMIC CHIP 0.001UF 10.00% 50V
C4263 1-162-964-11 CERAMIC CHIP 0.001UF 10.00% 50V
C4270 1-100-566-91 CERAMIC CHIP 0.1UF 10.00% 25V
C4271 1-100-566-91 CERAMIC CHIP 0.1UF 10.00% 25V
C5040 1-164-937-11 CERAMIC CHIP 0.001UF 10.00% 50V
C5041 1-164-937-11 CERAMIC CHIP 0.001UF 10.00% 50V
C5042 1-164-858-11 CERAMIC CHIP 22PF 5.00% 50V
C5043 1-125-777-11 CERAMIC CHIP 0.1UF 10.00% 10V
C5044 1-164-858-11 CERAMIC CHIP 22PF 5.00% 50V
C5045 1-164-872-11 CERAMIC CHIP 82PF 5.00% 50V
- 74 -
Page 75

BDT
REF.NO. PART.NO DESCRIPTION REMARK REF.NO. PART.NO DESCRIPTION REMARK
C5046 1-164-872-11 CERAMIC CHIP 82PF 5.00% 50V
C5047 1-125-777-11 CERAMIC CHIP 0.1UF 10.00% 10V
C5048 1-164-937-11 CERAMIC CHIP 0.001UF 10.00% 50V
C5049 1-164-937-11 CERAMIC CHIP 0.001UF 10.00% 50V
C5050 1-125-777-11 CERAMIC CHIP 0.1UF 10.00% 10V
C5666 1-127-760-11 CERAMIC CHIP 4.7UF 10% 6.3V
C5667 1-125-777-11 CERAMIC CHIP 0.1UF 10.00% 10V
C5668 1-125-777-11 CERAMIC CHIP 0.1UF 10.00% 10V
C5669 1-125-777-11 CERAMIC CHIP 0.1UF 10.00% 10V
C5670 1-126-394-00 ELECT CHIP 10UF 20.00% 16V
C5051 1-125-777-11 CERAMIC CHIP 0.1UF 10.00% 10V
C5052 1-125-777-11 CERAMIC CHIP 0.1UF 10.00% 10V
C5054 1-164-874-11 CERAMIC CHIP 100PF 5.00% 50V
C5055 1-124-779-00 ELECT CHIP 10UF 20.00% 16V
C5056 1-124-779-00 ELECT CHIP 10UF 20.00% 16V
C5057 1-124-779-00 ELECT CHIP 10UF 20.00% 16V
C5058 1-125-777-11 CERAMIC CHIP 0.1UF 10.00% 10V
C5059 1-125-777-11 CERAMIC CHIP 0.1UF 10.00% 10V
C5060 1-125-777-11 CERAMIC CHIP 0.1UF 10.00% 10V
C5061 1-164-858-11 CERAMIC CHIP 22PF 5.00% 50V
C5062 1-164-858-11 CERAMIC CHIP 22PF 5.00% 50V
C5063 1-125-777-11 CERAMIC CHIP 0.1UF 10.00% 10V
C5064 1-125-777-11 CERAMIC CHIP 0.1UF 10.00% 10V
C5065 1-125-777-11 CERAMIC CHIP 0.1UF 10.00% 10V
C5066 1-125-777-11 CERAMIC CHIP 0.1UF 10.00% 10V
C5067 1-164-943-81 CERAMIC CHIP 0.01UF 10.00% 16V
C5068 1-125-777-11 CERAMIC CHIP 0.1UF 10.00% 10V
C5069 1-125-777-11 CERAMIC CHIP 0.1UF 10.00% 10V
C5070 1-125-777-11 CERAMIC CHIP 0.1UF 10.00% 10V
C5071 1-124-779-00 ELECT CHIP 10UF 20.00% 16V
C5072 1-124-779-00 ELECT CHIP 10UF 20.00% 16V
C5073 1-124-779-00 ELECT CHIP 10UF 20.00% 16V
C5630 1-127-760-11 CERAMIC CHIP 4.7UF 10% 6.3V
C5631 1-127-760-11 CERAMIC CHIP 4.7UF 10% 6.3V
C5632 1-125-777-11 CERAMIC CHIP 0.1UF 10.00% 10V
C5671 1-125-777-11 CERAMIC CHIP 0.1UF 10.00% 10V
C5672 1-125-777-11 CERAMIC CHIP 0.1UF 10.00% 10V
C5673 1-125-777-11 CERAMIC CHIP 0.1UF 10.00% 10V
C5674 1-100-907-11 CERAMIC CHIP 0.1UF 10% 10V
C5675 1-100-907-11 CERAMIC CHIP 0.1UF 10% 10V
C5680 1-125-777-11 CERAMIC CHIP 0.1UF 10.00% 10V
C5682 1-165-908-11 CERAMIC CHIP 1UF 10% 10V
C5683 1-125-777-11 CERAMIC CHIP 0.1UF 10.00% 10V
C5684 1-125-777-11 CERAMIC CHIP 0.1UF 10.00% 10V
C5685 1-125-777-11 CERAMIC CHIP 0.1UF 10.00% 10V
C5686 1-164-937-11 CERAMIC CHIP 0.001UF 10.00% 50V
C5689 1-117-720-11 CERAMIC CHIP 4.7UF 10V
C5690 1-125-777-11 CERAMIC CHIP 0.1UF 10.00% 10V
C5691 1-125-777-11 CERAMIC CHIP 0.1UF 10.00% 10V
C5692 1-117-720-11 CERAMIC CHIP 4.7UF 10V
C5693 1-125-777-11 CERAMIC CHIP 0.1UF 10.00% 10V
C5695 1-125-777-11 CERAMIC CHIP 0.1UF 10.00% 10V
C5696 1-125-777-11 CERAMIC CHIP 0.1UF 10.00% 10V
C5697 1-125-777-11 CERAMIC CHIP 0.1UF 10.00% 10V
C5698 1-125-777-11 CERAMIC CHIP 0.1UF 10.00% 10V
C5699 1-125-777-11 CERAMIC CHIP 0.1UF 10.00% 10V
C5700 1-125-777-11 CERAMIC CHIP 0.1UF 10.00% 10V
C5701 1-125-777-11 CERAMIC CHIP 0.1UF 10.00% 10V
C5702 1-117-720-11 CERAMIC CHIP 4.7UF 10V
C5703 1-117-681-11 ELECT CHIP 100UF 20.00% 16V
C5633 1-125-777-11 CERAMIC CHIP 0.1UF 10.00% 10V
C5634 1-125-777-11 CERAMIC CHIP 0.1UF 10.00% 10V
C5635 1-125-777-11 CERAMIC CHIP 0.1UF 10.00% 10V
C5636 1-125-777-11 CERAMIC CHIP 0.1UF 10.00% 10V
C5637 1-125-777-11 CERAMIC CHIP 0.1UF 10.00% 10V
C5638 1-125-777-11 CERAMIC CHIP 0.1UF 10.00% 10V
C5646 1-126-394-11 ELECT CHIP 10UF 20.00% 16V
C5650 1-125-777-11 CERAMIC CHIP 0.1UF 10.00% 10V
C5651 1-125-777-11 CERAMIC CHIP 0.1UF 10.00% 10V
C5652 1-125-777-11 CERAMIC CHIP 0.1UF 10.00% 10V
C5653 1-125-777-11 CERAMIC CHIP 0.1UF 10.00% 10V
C5654 1-125-777-11 CERAMIC CHIP 0.1UF 10.00% 10V
C5655 1-125-777-11 CERAMIC CHIP 0.1UF 10.00% 10V
C5656 1-125-777-11 CERAMIC CHIP 0.1UF 10.00% 10V
C5660 1-164-850-11 CERAMIC CHIP 10PF 0.50PF 50V
C5661 1-164-850-11 CERAMIC CHIP 10PF 0.50PF 50V
C5662 1-164-850-11 CERAMIC CHIP 10PF 0.50PF 50V
C5663 1-127-760-11 CERAMIC CHIP 4.7UF 10% 6.3V
C5664 1-125-777-11 CERAMIC CHIP 0.1UF 10.00% 10V
C5665 1-125-777-11 CERAMIC CHIP 0.1UF 10.00% 10V
C5750 1-125-777-11 CERAMIC CHIP 0.1UF 10.00% 10V
C5751 1-117-720-11 CERAMIC CHIP 4.7UF 10V
C5752 1-125-777-11 CERAMIC CHIP 0.1UF 10.00% 10V
C5753 1-117-720-11 CERAMIC CHIP 4.7UF 10V
C5754 1-125-777-11 CERAMIC CHIP 0.1UF 10.00% 10V
C5755 1-125-777-11 CERAMIC CHIP 0.1UF 10.00% 10V
C5756 1-117-720-11 CERAMIC CHIP 4.7UF 10V
C5757 1-125-777-11 CERAMIC CHIP 0.1UF 10.00% 10V
C5758 1-125-777-11 CERAMIC CHIP 0.1UF 10.00% 10V
C5759 1-125-777-11 CERAMIC CHIP 0.1UF 10.00% 10V
C5760 1-125-777-11 CERAMIC CHIP 0.1UF 10.00% 10V
C5761 1-164-937-11 CERAMIC CHIP 0.001UF 10.00% 50V
C5762 1-125-777-11 CERAMIC CHIP 0.1UF 10.00% 10V
C5763 1-125-777-11 CERAMIC CHIP 0.1UF 10.00% 10V
C5764 1-125-777-11 CERAMIC CHIP 0.1UF 10.00% 10V
C5765 1-125-777-11 CERAMIC CHIP 0.1UF 10.00% 10V
C5766 1-125-777-11 CERAMIC CHIP 0.1UF 10.00% 10V
C5767 1-117-720-11 CERAMIC CHIP 4.7UF 10V
C5780 1-125-777-11 CERAMIC CHIP 0.1UF 10.00% 10V
C5781 1-125-777-11 CERAMIC CHIP 0.1UF 10.00% 10V
- 75 -
Page 76

BDT
REF.NO. PART.NO DESCRIPTION REMARK REF.NO. PART.NO DESCRIPTION REMARK
C5782 1-164-850-11 CERAMIC CHIP 10PF 0.50PF 50V
C5783 1-164-943-81 CERAMIC CHIP 0.01UF 10.00% 16V
C5785 1-164-840-11 CERAMIC CHIP 1PF 0.25PF 50V
C5786 1-164-840-11 CERAMIC CHIP 1PF 0.25PF 50V
C5787 1-125-777-11 CERAMIC CHIP 0.1UF 10.00% 10V
C6518 1-126-396-11 ELECT CHIP 47UF 20.00% 16V
C6519 1-162-974-11 CERAMIC CHIP 0.01UF 50V
C6520 1-100-566-91 CERAMIC CHIP 0.1UF 10.00% 25V
C6522 1-100-566-91 CERAMIC CHIP 0.1UF 10.00% 25V
C6523 1-100-911-11 CERAMIC CHIP 4.7UF 10% 25V
C5789 1-126-205-11 ELECT CHIP 47UF 20.00% 6.3V
C5790 1-104-905-11 DOUBLE LAYER 0.22F 5.5V
C5791 1-164-943-81 CERAMIC CHIP 0.01UF 10.00% 16V
C5792 1-100-566-91 CERAMIC CHIP 0.1UF 10.00% 25V
C5793 1-117-720-11 CERAMIC CHIP 4.7UF 10V
C5794 1-125-777-11 CERAMIC CHIP 0.1UF 10.00% 10V
C5795 1-165-822-91 CERAMIC CHIP 1UF 25V
C5796 1-125-777-11 CERAMIC CHIP 0.1UF 10.00% 10V
C5797 1-164-874-11 CERAMIC CHIP 100PF 5.00% 50V
C5798 1-164-874-11 CERAMIC CHIP 100PF 5.00% 50V
C5799 1-117-720-11 CERAMIC CHIP 4.7UF 10V
C5800 1-117-720-11 CERAMIC CHIP 4.7UF 10V
C5801 1-125-777-11 CERAMIC CHIP 0.1UF 10.00% 10V
C5803 1-125-777-11 CERAMIC CHIP 0.1UF 10.00% 10V
C5804 1-117-720-11 CERAMIC CHIP 4.7UF 10V
C5805 1-107-823-11 CERAMIC CHIP 0.47UF 10.00% 16V
C5806 1-100-597-91 CERAMIC CHIP 0.1UF 10% 25V
C5807 1-126-394-11 ELECT CHIP 10UF 20.00% 16V
C5808 1-125-777-11 CERAMIC CHIP 0.1UF 10.00% 10V
C5809 1-125-777-11 CERAMIC CHIP 0.1UF 10.00% 10V
C5810 1-126-206-11 ELECT CHIP 100UF 20.00% 6.3V
C5811 1-165-908-11 CERAMIC CHIP 1UF 10% 10V
C5812 1-165-908-11 CERAMIC CHIP 1UF 10% 10V
C5813 1-135-366-11 ELECT CHIP 100UF 20% 16V
C5814 1-100-597-91 CERAMIC CHIP 0.1UF 10% 25V
C6524 1-100-566-91 CERAMIC CHIP 0.1UF 10.00% 25V
C6525 1-165-671-21 ELECT CHIP 470UF 20% 6.3V
C6526 1-127-715-91 CERAMIC CHIP 0.22UF 10% 16V
C6528 1-127-715-91 CERAMIC CHIP 0.22UF 10% 16V
C6529 1-165-671-21 ELECT CHIP 470UF 20% 6.3V
C6530 1-100-566-91 CERAMIC CHIP 0.1UF 10.00% 25V
C6532 1-110-530-11 ELECT CHIP 1000UF 20% 6.3V
C6535 1-100-566-91 CERAMIC CHIP 0.1UF 10.00% 25V
C6536 1-107-826-11 CERAMIC CHIP 0.1UF 10.00% 16V
C6538 1-100-566-91 CERAMIC CHIP 0.1UF 10.00% 25V
C6539 1-100-566-91 CERAMIC CHIP 0.1UF 10.00% 25V
C6543 1-127-573-11 CERAMIC CHIP 1UF 10% 16V
C6545 1-107-826-11 CERAMIC CHIP 0.1UF 10.00% 16V
C6546 1-107-826-11 CERAMIC CHIP 0.1UF 10.00% 16V
C6547 1-162-964-11 CERAMIC CHIP 0.001UF 10% 50V
C6548 1-127-573-11 CERAMIC CHIP 1UF 10% 16V
C6549 1-127-573-11 CERAMIC CHIP 1UF 10% 16V
C6551 1-127-573-11 CERAMIC CHIP 1UF 10% 16V
C6553 1-117-370-11 CERAMIC CHIP 10UF 10V
C6554 1-117-370-11 CERAMIC CHIP 10UF 10V
C6555 1-117-370-11 CERAMIC CHIP 10UF 10V
C6556 1-117-370-11 CERAMIC CHIP 10UF 10V
C6557 1-117-370-11 CERAMIC CHIP 10UF 10V
C6558 1-100-911-11 CERAMIC CHIP 4.7UF 10.00% 25V
C6559 1-117-370-11 CERAMIC CHIP 10UF 10V
C5815 1-165-908-11 CERAMIC CHIP 1UF 10% 10V
C5816 1-125-777-11 CERAMIC CHIP 0.1UF 10.00% 10V
C5844 1-164-874-11 CERAMIC CHIP 100PF 5.00% 50V
C6500 1-162-970-11 CERAMIC CHIP 0.01UF 10.00% 25V
C6501 1-162-974-11 CERAMIC CHIP 0.01UF 50V
C6502 1-162-970-11 CERAMIC CHIP 0.01UF 10.00% 25V
C6503 1-162-970-11 CERAMIC CHIP 0.01UF 10.00% 25V
C6504 1-137-894-21 ELECT CHIP 470UF 20% 25V
C6505 1-137-894-21 ELECT CHIP 470UF 20% 25V
C6506 1-137-894-21 ELECT CHIP 470UF 20% 25V
C6507 1-137-894-21 ELECT CHIP 470UF 20% 25V
C6508 1-137-894-21 ELECT CHIP 470UF 20% 25V
C6509 1-137-894-21 ELECT CHIP 470UF 20% 25V
C6510 1-162-970-11 CERAMIC CHIP 0.01UF 10.00% 25V
C6511 1-162-970-11 CERAMIC CHIP 0.01UF 10.00% 25V
C6512 1-162-974-11 CERAMIC CHIP 0.01UF 50V
C6513 1-162-970-11 CERAMIC CHIP 0.01UF 10.00% 25V
C6515 1-100-566-91 CERAMIC CHIP 0.1UF 10.00% 25V
C6516 1-100-911-11 CERAMIC CHIP 4.7UF 10% 25V
C6517 1-100-911-11 CERAMIC CHIP 4.7UF 10% 25V
C6560 1-126-396-11 ELECT CHIP 47UF 20.00% 16V
C6561 1-117-370-11 CERAMIC CHIP 10UF 10V
C6562 1-126-396-11 ELECT CHIP 47UF 20.00% 16V
C6563 1-126-396-11 ELECT CHIP 47UF 20.00% 16V
C6564 1-100-911-11 CERAMIC CHIP 4.7UF 10.00% 25V
C6565 1-126-396-11 ELECT CHIP 47UF 20.00% 16V
C6566 1-126-396-11 ELECT CHIP 47UF 20.00% 16V
C6567 1-100-911-11 CERAMIC CHIP 4.7UF 10% 25V
C6572 1-126-396-11 ELECT CHIP 47UF 20.00% 16V
C6579 1-165-908-11 CERAMIC CHIP 1UF 10% 10V
C6581 1-109-982-11 CERAMIC CHIP 1UF 10.00% 10V
C6582 1-107-823-11 CERAMIC CHIP 0.47UF 10.00% 16V
C8907 1-162-964-11 CERAMIC CHIP 0.001UF 10.00% 50V
C8922 1-164-156-11 CERAMIC CHIP 0.1UF 25V
C8923 1-107-826-11 CERAMIC CHIP 0.1UF 10.00% 16V
< CONNECTOR >
CN3000 *1-819-335-11 HEADER ASSEMBLY FOR PWB, 9P
CN3001 *1-818-656-21 HEADER ASSEMBLY 30P
CN3002 1-779-884-11 CONNECTOR 4P
- 76 -
Page 77
BDT
REF.NO. PART.NO DESCRIPTION REMARK REF.NO. PART.NO DESCRIPTION REMARK
CN3003 1-820-187-11 HEADER ASSEMBLY (PRINT PWB)10P
CN3004 *1-819-333-11 HEADER ASSEMBLY FOR PWB 5P
CN3005 1-819-390-51 FFC/FPC CONNECTOR (ZIF) 49P
CN3006 1-820-255-51 FFC/FPC CONNECTOR (ZIF) 20P
CN3007 1-784-254-11 CONNECTOR 10P
< FUSE >
F4000 £ 1-576-646-11 FUSE 0.5A 50V
< FERRITE BEAD >
CN3008 1-779-936-51 CONNECTOR, FFC/FPC 18P
CN4000 *1-817-804-11 CONNECTOR, D SUB 15P
CN4200 *1-820-208-11 HDMI CONNECTOR
CN5750 *1-793-769-21 CONNECTOR, CARD (PCMCIA CARD)
CN5883 1-820-209-11 MEMORY STICK CONNECTOR
CN6500 *1-819-441-11 PWB HEADER, 13P
CN6501 *1-819-474-11 HEADER ASSEMBLY FOR PWB 6P
< DIODE >
D3004 8-719-050-38 DIODE M1MA152WK-T1
D3005 8-719-036-94 DIODE RD5.6SB-T1
D3009 8-719-081-97 DIODE MMDL914T1
D3010 8-719-081-97 DIODE MMDL914T1
D3011 8-719-081-97 DIODE MMDL914T1
D3012 8-719-081-97 DIODE MMDL914T1
D3014 8-719-081-97 DIODE MMDL914T1
D3015 8-719-081-97 DIODE MMDL914T1
D4000 8-719-073-39 DIODE HZU5.6GTRF
D4001 8-719-073-39 DIODE HZU5.6GTRF
D4002 8-719-073-39 DIODE HZU5.6GTRF
D4003 8-719-801-78 DIODE 1SS184
D4203 8-719-404-50 DIODE MA111-TX
D4204 8-719-404-50 DIODE MA111-TX
D5780 8-719-041-97 DIODE MA113-(TX)
D6500 8-719-081-67 DIODE M1FM3
D6501 8-719-081-67 DIODE M1FM3
D6502 6-500-696-01 DIODE UDZSTE-173.0B
D6504 8-719-081-97 DIODE MMDL914T1
D6505 8-719-081-97 DIODE MMDL914T1
D6506 6-501-336-01 DIODE RSX201L-30TE25
D6507 8-719-080-41 DIODE RB063L-30TE25
D6508 8-719-081-97 DIODE MMDL914T1
D6509 6-500-294-01 DIODE PTZ-TE25-3.9B
D6510 6-500-253-01 DIODE RB053L-30TE25
D6512 6-500-253-01 DIODE RB053L-30TE25
D6513 6-500-294-01 DIODE PTZ-TE25-3.9B
D6514 6-500-295-01 DIODE PTZ-TE25-5.6B
D6515 8-719-083-63 DIODE UDZSTE-1713B
D6516 8-719-081-99 DIODE MM3Z13VT1
D6517 8-719-081-99 DIODE MM3Z13VT1
D6518 8-719-066-10 DIODE 1PS181-115
D6519 8-719-081-97 DIODE MMDL914T1
D6520 8-719-066-10 DIODE 1PS181-115
FB3012 1-414-445-11 FERRITE 0UH
FB3013 1-414-445-11 FERRITE 0UH
FB3014 1-414-445-11 FERRITE 0UH
FB3046 1-414-445-11 FERRITE 0UH
FB3099 1-414-760-21 FERRITE 0UH
FB3241 1-414-760-21 FERRITE 0UH
FB3242 1-414-760-21 FERRITE 0UH
FB3243 1-414-760-21 FERRITE 0UH
FB3244 1-414-760-21 FERRITE 0UH
FB3245 1-414-760-21 FERRITE 0UH
FB4003 1-400-141-22 FERRITE 0UH
FB4200 1-414-234-22 FERRITE 0UH
FB5040 1-400-244-11 FERRITE 0UH
FB5041 1-400-244-11 FERRITE 0UH
FB5612 1-400-833-21 FERRITE 0UH
FB5613 1-400-833-21 FERRITE 0UH
FB5614 1-400-833-21 FERRITE 0UH
FB5615 1-400-833-21 FERRITE 0UH
FB5616 1-400-833-21 FERRITE 0UH
FB5617 1-400-833-21 FERRITE 0UH
FB5618 1-400-807-21 FERRITE 0UH
FB5619 1-400-807-21 FERRITE 0UH
FB5620 1-400-807-21 FERRITE 0UH
FB5621 1-400-807-21 FERRITE 0UH
FB5622 1-400-833-21 FERRITE 0UH
FB5623 1-400-833-21 FERRITE 0UH
FB5624 1-400-833-21 FERRITE 0UH
FB5630 1-469-869-21 FERRITE 0UH
FB5634 1-400-244-11 FERRITE 0UH
FB5635 1-400-244-11 FERRITE 0UH
FB5636 1-469-869-21 FERRITE 0UH
FB5637 1-469-869-21 FERRITE 0UH
FB5646 1-400-834-11 FERRITE 0UH
FB5647 1-469-869-21 FERRITE 0UH
FB5680 1-400-244-11 FERRITE 0UH
FB5681 1-400-244-11 FERRITE 0UH
FB5750 1-469-869-21 FERRITE 0UH
FB5751 1-469-869-21 FERRITE 0UH
FB5780 1-400-244-11 FERRITE 0UH
FB5781 1-400-244-11 FERRITE 0UH
FB5782 1-400-244-11 FERRITE 0UH
FB5907 1-400-834-11 FERRITE 0UH
FB5908 1-400-834-11 FERRITE 0UH
FB5909 1-400-834-11 FERRITE 0UH
FB5910 1-400-834-11 FERRITE 0UH
- 77 -
Page 78

BDT
REF.NO. PART.NO DESCRIPTION REMARK REF.NO. PART.NO DESCRIPTION REMARK
FB5911 1-400-834-11 FERRITE 0UH
FB5912 1-400-834-11 FERRITE 0UH
FB5913 1-400-834-11 FERRITE 0UH
FB5914 1-400-834-11 FERRITE 0UH
FB5915 1-400-834-11 FERRITE 0UH
FB5916 1-400-244-11 FERRITE 0UH
FB5917 1-400-244-11 FERRITE 0UH
FB6500 1-469-324-21 FERRITE 0UH
FB6501 1-469-324-21 FERRITE 0UH
FB6502 1-469-775-21 FERRITE 0UH
< IC >
IC3000 8-759-082-60 IC TC7S66FU
IC3001 6-706-419-01 IC LM393DT (A)
IC3002 6-701-173-01 IC MC74LVXT4053DTR2
IC3003 8-759-701-01 IC NJM2904M
IC3004 6-704-573-01 IC M24C32-WMN6T(B)
IC3005 6-703-175-01 IC PST3629UL
IC3006 6-806-613-01 IC VCT6973G
IC3008 8-752-072-94 IC CXA1875AM-T4
IC4000 6-704-600-01 IC M24C02-WMN6T(B)
IC4200 6-704-001-01 IC BR24L02F-WE2
IC4201 6-709-806-01 IC IP4776CZ38
IC4202 6-709-602-01 IC TDA9974AHS/8/C112
IC5040 8-753-264-52 IC CXD1968R-T6
IC5630 6-709-214-01 IC UPD61123F1-100-KA3-A
IC5680 6-705-336-01 IC K9F2808U0C-PCB0T
IC5681 6-707-809-01 IC EDD1216AATA-6B-E
IC5682 6-708-916-01 IC ICS7150MLFT
IC5750 8-759-644-48 IC 74LVC541APW
IC5751 8-759-644-48 IC 74LVC541APW
IC5752 6-706-482-01 IC TC7SH00FU(T5RSOYJF)
IC5753 8-759-644-48 IC 74LVC541APW
IC5754 6-708-132-01 IC 74LVC14APW
IC5755 8-759-644-48 IC 74LVC541APW
IC5756 8-759-644-48 IC 74LVC541APW
IC5757 8-759-644-48 IC 74LVC541APW
IC5758 6-707-853-01 IC TC74LCX541FT(EKJ)
IC5759 8-759-298-91 IC 74LVT245PW-T
IC5780 6-700-108-01 IC RV5C387A-E2-FB
IC5781 6-703-271-01 IC TAR5S50(TE85R)
IC5782 6-707-808-01 IC WM8727GED/RV
IC5783 8-759-701-40 IC NJM3404AM-T1
IC5784 6-706-106-01 IC NCP1117STAT3
IC5785 6-708-603-01 IC PQ070XNA1ZPH
IC5786 6-705-790-01 IC LM3525MX-H/J5000395
IC6500 6-702-142-01 IC PQ1CY1032ZP
IC6501 6-702-142-01 IC PQ1CY1032ZP
IC6502 6-706-046-01 IC TK11185CSCL-G
IC6503 6-702-142-01 IC PQ1CY1032ZP
IC6504 6-709-240-01 IC BH12PB1WHFV-TR
IC6505 6-709-932-01 IC MM3141CNRE
< COIL >
L3000 1-456-984-11 INDUCTOR 0UH
L3001 1-456-984-11 INDUCTOR 0UH
L3002 1-456-984-11 INDUCTOR 0UH
L3003 1-456-984-11 INDUCTOR 0UH
L3004 1-456-984-11 INDUCTOR 0UH
L3005 1-400-180-21 FERRITE 0UH
L3350 1-412-990-41 INDUCTOR 8.2UH
L4208 1-414-394-11 INDUCTOR 2.2UH
L4212 1-414-394-11 INDUCTOR 2.2UH
L4213 1-414-394-11 INDUCTOR 2.2UH
L4214 1-414-394-11 INDUCTOR 2.2UH
L4216 1-414-394-11 INDUCTOR 2.2UH
L4217 1-414-394-11 INDUCTOR 2.2UH
L4262 1-414-394-11 INDUCTOR 2.2UH
L4263 1-414-394-11 INDUCTOR 2.2UH
L5040 1-469-842-21 INDUCTOR 0.47UH
L5041 1-412-058-11 INDUCTOR 10UH
L5042 1-412-058-11 INDUCTOR 10UH
L5043 1-412-058-11 INDUCTOR 10UH
L5044 1-412-058-11 INDUCTOR 10UH
L5045 1-412-058-11 INDUCTOR 10UH
L5046 1-412-058-11 INDUCTOR 10UH
L5630 1-414-398-11 INDUCTOR 10UH
L6500 1-416-511-11 INDUCTOR 47UH
L6501 1-416-511-11 INDUCTOR 47UH
L6502 1-457-242-11 INDUCTOR 0UH
L6503 1-414-398-11 INDUCTOR 10UH
L6504 1-424-976-21 INDUCTOR 47UH
L6505 1-457-242-11 INDUCTOR 0UH
L6506 1-424-976-21 INDUCTOR 47UH
L6508 1-424-922-21 INDUCTOR 10UH
L6509 1-424-922-21 INDUCTOR 10UH
L6511 1-424-922-21 INDUCTOR 10UH
L6512 1-416-511-11 INDUCTOR 47UH
L6514 1-412-026-11 INDUCTOR 1UH
L6515 1-412-026-11 INDUCTOR 1UH
L6516 1-412-026-11 INDUCTOR 1UH
L6517 1-414-394-11 INDUCTOR 2.2UH
L6518 1-412-026-11 INDUCTOR 1UH
L6519 1-412-026-11 INDUCTOR 1UH
L6520 1-412-026-11 INDUCTOR 1UH
L6521 1-412-026-11 INDUCTOR 1UH
L6522 1-412-026-11 INDUCTOR 1UH
L6523 1-412-026-11 INDUCTOR 1UH
L6524 1-412-026-11 INDUCTOR 1UH
L6525 1-412-026-11 INDUCTOR 1UH
- 78 -
Page 79
BDT
REF.NO. PART.NO DESCRIPTION REMARK REF.NO. PART.NO DESCRIPTION REMARK
L6526 1-414-394-11 INDUCTOR 2.2UH
L6527 1-414-394-11 INDUCTOR 2.2UH
L6528 1-412-026-11 INDUCTOR 1UH
< PROTECTOR MODULE >
Q6506 8-729-010-25 TRANSISTOR MSD601-RT1
Q6507 8-729-010-25 TRANSISTOR MSD601-RT1
Q6509 8-729-046-04 TRANSISTOR FDS6690A
Q6510 8-729-421-22 TRANSISTOR UN2211
Q6511 8-729-421-22 TRANSISTOR UN2211
PS6500 £ 1-576-736-41 IC LINK 3.15A 24V
PS6501 £ 1-576-736-41 IC LINK 3.15A 24V
PS6502 £ 1-576-736-41 IC LINK 3.15A 24V
< TRANSISTOR >
Q3000 8-729-028-28 TRANSISTOR 2SK2036(TE85L)
Q3001 8-729-421-22 TRANSISTOR UN2211
Q3002 8-729-927-99 TRANSISTOR 2SC4617R
Q3003 8-729-927-99 TRANSISTOR 2SC4617R
Q3004 8-729-028-28 TRANSISTOR 2SK2036(TE85L)
Q3006 8-729-905-35 TRANSISTOR 2SC4081-R
Q3007 6-550-549-01 TRANSISTOR DTC114EUAFT106
Q3008 8-729-045-62 TRANSISTOR 2SK2158-T2B
Q3009 8-729-026-53 TRANSISTOR 2SA1576A-T106-QR
Q3010 8-729-026-53 TRANSISTOR 2SA1576A-T106-QR
Q3011 8-729-045-62 TRANSISTOR 2SK2158-T2B
Q3012 8-729-422-29 TRANSISTOR 2SD601A-S
Q3013 8-729-422-29 TRANSISTOR 2SD601A-S
Q3014 8-729-422-29 TRANSISTOR 2SD601A-S
Q3015 8-729-422-29 TRANSISTOR 2SD601A-S
Q3016 8-729-421-19 TRANSISTOR UN2213
Q3017 8-729-050-10 TRANSISTOR PMBF170-215
Q3020 8-729-905-35 TRANSISTOR 2SC4081-R
Q3120 8-729-028-28 TRANSISTOR 2SK2036(TE85L)
Q3121 8-729-028-28 TRANSISTOR 2SK2036(TE85L)
Q6512 6-550-369-01 TRANSISTOR TPC8109(TE12L)
Q6513 6-550-369-01 TRANSISTOR TPC8109(TE12L)
Q6514 8-729-010-05 TRANSISTOR MSB709-RT1
Q6515 8-729-421-22 TRANSISTOR UN2211
Q6555 8-729-421-22 TRANSISTOR UN2211
< RESISTOR >
JR5600 1-216-295-91 SHORT CHIP 0
JR5601 1-218-990-81 SHORT CHIP 0
JR5602 1-218-990-81 SHORT CHIP 0
R3000 1-216-864-11 SHORT CHIP 0
R3001 1-216-833-11 METAL CHIP 10K 5% 1/10W
R3002 1-216-825-11 METAL CHIP 2.2K 5% 1/10W
R3003 1-216-864-11 SHORT CHIP 0
R3004 1-216-864-11 SHORT CHIP 0
R3006 1-216-833-11 METAL CHIP 10K 5% 1/10W
R3015 1-216-825-11 METAL CHIP 2.2K 5% 1/10W
R3016 1-216-821-11 METAL CHIP 1K 5% 1/10W
R3019 1-216-833-11 METAL CHIP 10K 5% 1/10W
R3020 1-216-833-11 METAL CHIP 10K 5% 1/10W
R3021 1-216-849-11 METAL CHIP 220K 5% 1/10W
R3022 1-216-849-11 METAL CHIP 220K 5% 1/10W
R3023 1-216-849-11 METAL CHIP 220K 5% 1/10W
R3024 1-216-849-11 METAL CHIP 220K 5% 1/10W
R3026 1-216-849-11 METAL CHIP 220K 5% 1/10W
Q3122 8-729-028-73 TRANSISTOR DTA114EUA-T106
Q3123 8-729-010-05 TRANSISTOR MSB709-RT1
Q3300 8-729-010-05 TRANSISTOR MSB709-RT1
Q3301 8-729-421-19 TRANSISTOR UN2213
Q3350 8-729-010-05 TRANSISTOR MSB709-RT1
Q3351 8-729-010-29 TRANSISTOR MSD601-RST1
Q4200 8-729-421-22 TRANSISTOR UN2211
Q4204 8-729-421-22 TRANSISTOR UN2211
Q4211 8-729-010-29 TRANSISTOR MSD601-RST1
Q5780 8-729-010-05 TRANSISTOR MSB709-RT1
Q5920 8-729-028-28 TRANSISTOR 2SK2036(TE85L)
Q5921 8-729-028-28 TRANSISTOR 2SK2036(TE85L)
Q5922 8-729-028-86 TRANSISTOR DTA143EUA-T106
Q5923 8-729-907-00 TRANSISTOR DTC114EU
Q6500 8-729-421-22 TRANSISTOR UN2211
Q6501 8-729-421-22 TRANSISTOR UN2211
Q6502 8-729-421-22 TRANSISTOR UN2211
Q6503 8-729-010-25 TRANSISTOR MSD601-RT1
Q6504 8-729-421-22 TRANSISTOR UN2211
Q6505 8-729-010-25 TRANSISTOR MSD601-RT1
R3027 1-216-849-11 METAL CHIP 220K 5% 1/10W
R3028 1-216-849-11 METAL CHIP 220K 5% 1/10W
R3029 1-216-841-11 METAL CHIP 47K 5% 1/10W
R3030 1-216-833-11 METAL CHIP 10K 5% 1/10W
R3031 1-216-864-11 SHORT CHIP 0
R3032 1-216-849-11 METAL CHIP 220K 5% 1/10W
R3034 1-218-879-11 METAL CHIP 22K 0.5% 1/10W
R3035 1-216-864-11 SHORT CHIP 0
R3036 1-216-864-11 SHORT CHIP 0
R3037 1-216-864-11 SHORT CHIP 0
R3038 1-216-864-11 SHORT CHIP 0
R3039 1-216-864-11 SHORT CHIP 0
R3040 1-218-891-11 METAL CHIP 68K 0.5% 1/10W
R3042 1-216-833-11 METAL CHIP 10K 5% 1/10W
R3043 1-216-833-11 METAL CHIP 10K 5% 1/10W
R3044 1-216-817-11 METAL CHIP 470 5% 1/10W
R3045 1-216-864-11 SHORT CHIP 0
R3046 1-216-833-11 METAL CHIP 10K 5% 1/10W
R3048 1-216-864-11 SHORT CHIP 0
R3049 1-216-864-11 SHORT CHIP 0
- 79 -
Page 80

BDT
REF.NO. PART.NO DESCRIPTION REMARK REF.NO. PART.NO DESCRIPTION REMARK
R3050 1-216-864-11 SHORT CHIP 0
R3051 1-216-864-11 SHORT CHIP 0
R3052 1-216-864-11 SHORT CHIP 0
R3053 1-216-864-11 SHORT CHIP 0
R3054 1-216-864-11 SHORT CHIP 0
R3110 1-216-864-11 SHORT CHIP 0
R3111 1-218-823-11 METAL CHIP 100 0.5% 1/10W
R3112 1-216-864-11 SHORT CHIP 0
R3113 1-218-823-11 METAL CHIP 100 0.5% 1/10W
R3114 1-218-823-11 METAL CHIP 100 0.5% 1/10W
R3057 1-216-833-11 METAL CHIP 10K 5% 1/10W
R3058 1-216-833-11 METAL CHIP 10K 5% 1/10W
R3059 1-216-833-11 METAL CHIP 10K 5% 1/10W
R3061 1-218-847-11 METAL CHIP 1K 0.5% 1/10W
R3062 1-216-809-11 METAL CHIP 100 5% 1/10W
R3063 1-216-809-11 METAL CHIP 100 5% 1/10W
R3064 1-216-809-11 METAL CHIP 100 5% 1/10W
R3067 1-216-809-11 METAL CHIP 100 5% 1/10W
R3068 1-216-809-11 METAL CHIP 100 5% 1/10W
R3069 1-216-809-11 METAL CHIP 100 5% 1/10W
R3071 1-216-809-11 METAL CHIP 100 5% 1/10W
R3072 1-216-809-11 METAL CHIP 100 5% 1/10W
R3073 1-216-809-11 METAL CHIP 100 5% 1/10W
R3074 1-216-809-11 METAL CHIP 100 5% 1/10W
R3075 1-216-809-11 METAL CHIP 100 5% 1/10W
R3076 1-216-809-11 METAL CHIP 100 5% 1/10W
R3077 1-216-809-11 METAL CHIP 100 5% 1/10W
R3078 1-216-809-11 METAL CHIP 100 5% 1/10W
R3079 1-216-864-11 SHORT CHIP 0
R3080 1-216-864-11 SHORT CHIP 0
R3081 1-216-864-11 SHORT CHIP 0
R3083 1-216-864-11 SHORT CHIP 0
R3084 1-216-864-11 SHORT CHIP 0
R3085 1-216-864-11 SHORT CHIP 0
R3087 1-216-864-11 SHORT CHIP 0
R3115 1-218-823-11 METAL CHIP 100 0.5% 1/10W
R3116 1-218-823-11 METAL CHIP 100 0.5% 1/10W
R3117 1-216-864-11 SHORT CHIP 0
R3119 1-216-864-11 SHORT CHIP 0
R3121 1-216-864-11 SHORT CHIP 0
R3124 1-216-864-11 SHORT CHIP 0
R3127 1-216-864-11 SHORT CHIP 0
R3129 1-216-864-11 SHORT CHIP 0
R3133 1-216-809-11 METAL CHIP 100 5% 1/10W
R3136 1-216-809-11 METAL CHIP 100 5% 1/10W
R3137 1-216-864-11 SHORT CHIP 0
R3138 1-216-809-11 METAL CHIP 100 5% 1/10W
R3140 1-216-809-11 METAL CHIP 100 5% 1/10W
R3142 1-216-809-11 METAL CHIP 100 5% 1/10W
R3143 1-216-864-11 SHORT CHIP 0
R3146 1-216-864-11 SHORT CHIP 0
R3147 1-216-864-11 SHORT CHIP 0
R3150 1-216-809-11 METAL CHIP 100 5% 1/10W
R3153 1-216-864-11 SHORT CHIP 0
R3156 1-216-864-11 SHORT CHIP 0
R3158 1-216-864-11 SHORT CHIP 0
R3159 1-216-864-11 SHORT CHIP 0
R3160 1-216-864-11 SHORT CHIP 0
R3161 1-216-864-11 SHORT CHIP 0
R3163 1-216-833-11 METAL CHIP 10K 5% 1/10W
R3088 1-216-864-11 SHORT CHIP 0
R3089 1-216-809-11 METAL CHIP 100 5% 1/10W
R3090 1-216-809-11 METAL CHIP 100 5% 1/10W
R3091 1-216-833-11 METAL CHIP 10K 5% 1/10W
R3092 1-216-864-11 SHORT CHIP 0
R3093 1-216-864-11 SHORT CHIP 0
R3094 1-216-864-11 SHORT CHIP 0
R3095 1-216-864-11 SHORT CHIP 0
R3096 1-216-833-11 METAL CHIP 10K 5% 1/10W
R3097 1-218-823-11 METAL CHIP 100 0.5% 1/10W
R3098 1-216-864-11 SHORT CHIP 0
R3100 1-218-823-11 METAL CHIP 100 0.5% 1/10W
R3101 1-218-823-11 METAL CHIP 100 0.5% 1/10W
R3103 1-218-823-11 METAL CHIP 100 0.5% 1/10W
R3104 1-216-864-11 SHORT CHIP 0
R3105 1-218-823-11 METAL CHIP 100 0.5% 1/10W
R3106 1-218-891-11 METAL CHIP 68K 0.5% 1/10W
R3107 1-218-823-11 METAL CHIP 100 0.5% 1/10W
R3108 1-218-867-11 METAL CHIP 6.8K 0.5% 1/10W
R3109 1-218-823-11 METAL CHIP 100 0.5% 1/10W
R3175 1-216-864-11 SHORT CHIP 0
R3177 1-216-809-11 METAL CHIP 100 5% 1/10W
R3178 1-216-809-11 METAL CHIP 100 5% 1/10W
R3180 1-216-809-11 METAL CHIP 100 5% 1/10W
R3181 1-216-809-11 METAL CHIP 100 5% 1/10W
R3182 1-216-809-11 METAL CHIP 100 5% 1/10W
R3183 1-216-809-11 METAL CHIP 100 5% 1/10W
R3184 1-216-809-11 METAL CHIP 100 5% 1/10W
R3185 1-216-809-11 METAL CHIP 100 5% 1/10W
R3186 1-216-833-11 METAL CHIP 10K 5% 1/10W
R3187 1-216-833-11 METAL CHIP 10K 5% 1/10W
R3188 1-216-864-11 SHORT CHIP 0
R3190 1-216-864-11 SHORT CHIP 0
R3191 1-216-864-11 SHORT CHIP 0
R3192 1-216-864-11 SHORT CHIP 0
R3193 1-216-833-11 METAL CHIP 10K 5% 1/10W
R3195 1-216-864-11 SHORT CHIP 0
R3196 1-216-833-11 METAL CHIP 10K 5% 1/10W
R3198 1-218-847-11 METAL CHIP 1K 0.5% 1/10W
R3201 1-216-864-11 SHORT CHIP 0
- 80 -
Page 81

BDT
REF.NO. PART.NO DESCRIPTION REMARK REF.NO. PART.NO DESCRIPTION REMARK
R3202 1-216-864-11 SHORT CHIP 0
R3203 1-216-864-11 SHORT CHIP 0
R3204 1-216-864-11 SHORT CHIP 0
R3209 1-218-965-11 RES-CHIP 10K 5% 1/16W
R3212 1-218-965-11 RES-CHIP 10K 5% 1/16W
R3276 1-216-864-11 SHORT CHIP 0
R3277 1-216-864-11 SHORT CHIP 0
R3278 1-216-864-11 SHORT CHIP 0
R3279 1-216-864-11 SHORT CHIP 0
R3280 1-216-864-11 SHORT CHIP 0
R3213 1-216-825-11 METAL CHIP 2.2K 5% 1/10W
R3215 1-218-867-11 METAL CHIP 6.8K 0.5% 1/10W
R3216 1-216-864-11 SHORT CHIP 0
R3219 1-216-825-11 METAL CHIP 2.2K 5% 1/10W
R3220 1-216-864-11 SHORT CHIP 0
R3221 1-216-864-11 SHORT CHIP 0
R3222 1-216-809-11 METAL CHIP 100 5% 1/10W
R3224 1-218-867-11 METAL CHIP 6.8K 0.5% 1/10W
R3225 1-216-825-11 METAL CHIP 2.2K 5% 1/10W
R3229 1-216-864-11 SHORT CHIP 0
R3230 1-216-864-11 SHORT CHIP 0
R3231 1-216-864-11 SHORT CHIP 0
R3232 1-216-864-11 SHORT CHIP 0
R3233 1-216-864-11 SHORT CHIP 0
R3236 1-216-864-11 SHORT CHIP 0
R3237 1-216-864-11 SHORT CHIP 0
R3240 1-216-817-11 METAL CHIP 470 5% 1/10W
R3246 1-216-864-11 SHORT CHIP 0
R3247 1-216-843-11 METAL CHIP 68K 5% 1/10W
R3248 1-216-851-11 METAL CHIP 330K 5% 1/10W
R3249 1-216-817-11 METAL CHIP 470 5% 1/10W
R3250 1-216-821-11 METAL CHIP 1K 5% 1/10W
R3251 1-216-829-11 METAL CHIP 4.7K 5% 1/10W
R3252 1-216-833-11 METAL CHIP 10K 5% 1/10W
R3253 1-216-864-11 SHORT CHIP 0
R3281 1-216-864-11 SHORT CHIP 0
R3282 1-216-864-11 SHORT CHIP 0
R3283 1-216-864-11 SHORT CHIP 0
R3284 1-216-864-11 SHORT CHIP 0
R3285 1-216-864-11 SHORT CHIP 0
R3286 1-216-864-11 SHORT CHIP 0
R3287 1-216-864-11 SHORT CHIP 0
R3288 1-216-864-11 SHORT CHIP 0
R3289 1-216-864-11 SHORT CHIP 0
R3290 1-216-864-11 SHORT CHIP 0
R3291 1-216-864-11 SHORT CHIP 0
R3292 1-216-864-11 SHORT CHIP 0
R3293 1-216-809-11 METAL CHIP 100 5% 1/10W
R3295 1-216-864-11 SHORT CHIP 0
R3296 1-216-845-11 METAL CHIP 100K 5% 1/10W
R3297 1-216-809-11 METAL CHIP 100 5% 1/10W
R3298 1-216-851-11 METAL CHIP 330K 5% 1/10W
R3299 1-216-813-11 METAL CHIP 220 5% 1/10W
R3300 1-216-817-11 METAL CHIP 470 5% 1/10W
R3301 1-216-837-11 METAL CHIP 22K 5% 1/10W
R3302 1-216-849-11 METAL CHIP 220K 5% 1/10W
R3303 1-216-839-11 METAL CHIP 33K 5% 1/10W
R3304 1-216-839-11 METAL CHIP 33K 5% 1/10W
R3305 1-216-833-11 METAL CHIP 10K 5% 1/10W
R3310 1-216-809-11 METAL CHIP 100 5% 1/10W
R3255 1-216-829-11 METAL CHIP 4.7K 5% 1/10W
R3256 1-216-833-11 METAL CHIP 10K 5% 1/10W
R3257 1-218-990-81 SHORT CHIP 0
R3259 1-216-821-11 METAL CHIP 1K 5% 1/10W
R3260 1-216-837-11 METAL CHIP 22K 5% 1/10W
R3261 1-216-864-11 SHORT CHIP 0
R3262 1-218-957-11 RES-CHIP 2.2K 5% 1/16W
R3263 1-216-825-11 METAL CHIP 2.2K 5% 1/10W
R3264 1-216-825-11 METAL CHIP 2.2K 5% 1/10W
R3265 1-218-957-11 RES-CHIP 2.2K 5% 1/16W
R3266 1-216-817-11 METAL CHIP 470 5% 1/10W
R3267 1-216-825-11 METAL CHIP 2.2K 5% 1/10W
R3268 1-216-825-11 METAL CHIP 2.2K 5% 1/10W
R3269 1-216-841-11 METAL CHIP 47K 5% 1/10W
R3270 1-216-864-11 SHORT CHIP 0
R3271 1-216-864-11 SHORT CHIP 0
R3272 1-216-864-11 SHORT CHIP 0
R3273 1-216-864-11 SHORT CHIP 0
R3274 1-216-864-11 SHORT CHIP 0
R3275 1-216-864-11 SHORT CHIP 0
R3311 1-216-809-11 METAL CHIP 100 5% 1/10W
R3320 1-216-864-11 SHORT CHIP 0
R3321 1-216-864-11 SHORT CHIP 0
R3350 1-216-821-11 METAL CHIP 1K 5% 1/10W
R3351 1-216-805-11 METAL CHIP 47 5% 1/10W
R3352 1-216-864-11 SHORT CHIP 0
R3355 1-216-821-11 METAL CHIP 1K 5% 1/10W
R3356 1-216-864-11 SHORT CHIP 0
R3370 1-216-864-11 SHORT CHIP 0
R3371 1-216-864-11 SHORT CHIP 0
R3372 1-216-864-11 SHORT CHIP 0
R3373 1-216-864-11 SHORT CHIP 0
R3374 1-216-841-11 METAL CHIP 47K 5% 1/10W
R3375 1-216-809-11 METAL CHIP 100 5% 1/10W
R3376 1-220-397-11 METAL CHIP 4.7M 5% 1/10W
R3377 1-216-833-11 METAL CHIP 10K 5% 1/10W
R3378 1-216-833-11 METAL CHIP 10K 5% 1/10W
R3379 1-216-833-11 METAL CHIP 10K 5% 1/10W
R3380 1-216-833-11 METAL CHIP 10K 5% 1/10W
R3381 1-216-809-11 METAL CHIP 100 5% 1/10W
- 81 -
Page 82

BDT
REF.NO. PART.NO DESCRIPTION REMARK REF.NO. PART.NO DESCRIPTION REMARK
R3382 1-216-841-11 METAL CHIP 47K 5% 1/10W
R3387 1-216-864-11 SHORT CHIP 0
R3388 1-216-864-11 SHORT CHIP 0
R3389 1-216-864-11 SHORT CHIP 0
R3392 1-216-809-11 METAL CHIP 100 5% 1/10W
R4252 1-216-809-11 METAL CHIP 100 5% 1/10W
R4253 1-216-833-11 METAL CHIP 10K 5% 1/10W
R4254 1-216-833-11 METAL CHIP 10K 5% 1/10W
R4255 1-216-833-11 METAL CHIP 10K 5% 1/10W
R4256 1-216-833-11 METAL CHIP 10K 5% 1/10W
R3393 1-216-833-11 METAL CHIP 10K 5% 1/10W
R3394 1-216-841-11 METAL CHIP 47K 5% 1/10W
R4000 1-216-805-11 METAL CHIP 47 5% 1/10W
R4001 1-216-805-11 METAL CHIP 47 5% 1/10W
R4004 1-216-833-11 METAL CHIP 10K 5% 1/10W
R4005 1-216-833-11 METAL CHIP 10K 5% 1/10W
R4006 1-216-805-11 METAL CHIP 47 5% 1/10W
R4007 1-216-805-11 METAL CHIP 47 5% 1/10W
R4008 1-218-827-11 METAL CHIP 150 0.5% 1/10W
R4009 1-218-827-11 METAL CHIP 150 0.5% 1/10W
R4010 1-218-827-11 METAL CHIP 150 0.5% 1/10W
R4011 1-218-827-11 METAL CHIP 150 0.5% 1/10W
R4012 1-218-827-11 METAL CHIP 150 0.5% 1/10W
R4013 1-218-827-11 METAL CHIP 150 0.5% 1/10W
R4014 1-216-821-11 METAL CHIP 1K 5% 1/10W
R4015 1-216-864-11 SHORT CHIP 0
R4016 1-216-864-11 SHORT CHIP 0
R4017 1-216-864-11 SHORT CHIP 0
R4018 1-216-864-11 SHORT CHIP 0
R4019 1-216-864-11 SHORT CHIP 0
R4020 1-216-845-11 METAL CHIP 100K 5% 1/10W
R4202 1-216-821-11 METAL CHIP 1K 5% 1/10W
R4204 1-216-833-11 METAL CHIP 10K 5% 1/10W
R4205 1-218-871-11 METAL CHIP 10K 0.5% 1/10W
R4206 1-218-871-11 METAL CHIP 10K 0.5% 1/10W
R4271 1-216-833-11 METAL CHIP 10K 5% 1/10W
R4272 1-216-833-11 METAL CHIP 10K 5% 1/10W
R5040 1-218-965-11 RES-CHIP 10K 5% 1/16W
R5041 1-218-965-11 RES-CHIP 10K 5% 1/16W
R5043 1-218-965-11 RES-CHIP 10K 5% 1/16W
R5044 1-218-941-81 RES-CHIP 100 5% 1/16W
R5045 1-218-941-81 RES-CHIP 100 5% 1/16W
R5046 1-218-953-11 RES-CHIP 1K 5% 1/16W
R5049 1-218-989-11 RES-CHIP 1M 5% 1/16W
R5050 1-218-941-81 RES-CHIP 100 5% 1/16W
R5051 1-218-941-81 RES-CHIP 100 5% 1/16W
R5053 1-218-937-11 RES-CHIP 47 5% 1/16W
R5054 1-218-941-81 RES-CHIP 100 5% 1/16W
R5055 1-218-941-81 RES-CHIP 100 5% 1/16W
R5056 1-216-864-11 SHORT CHIP 0
R5057 1-218-941-81 RES-CHIP 100 5% 1/16W
R5058 1-218-965-11 RES-CHIP 10K 5% 1/16W
R5060 1-218-965-11 RES-CHIP 10K 5% 1/16W
R5061 1-218-941-81 RES-CHIP 100 5% 1/16W
R5062 1-218-941-81 RES-CHIP 100 5% 1/16W
R5063 1-218-941-81 RES-CHIP 100 5% 1/16W
R5064 1-218-965-11 RES-CHIP 10K 5% 1/16W
R5625 1-218-990-81 SHORT CHIP 0
R5626 1-218-990-81 SHORT CHIP 0
R5629 1-218-990-81 SHORT CHIP 0
R4208 1-216-809-11 METAL CHIP 100 5% 1/10W
R4209 1-216-809-11 METAL CHIP 100 5% 1/10W
R4210 1-216-829-11 METAL CHIP 4.7K 5% 1/10W
R4211 1-216-829-11 METAL CHIP 4.7K 5% 1/10W
R4212 1-216-833-11 METAL CHIP 10K 5% 1/10W
R4220 1-216-809-11 METAL CHIP 100 5% 1/10W
R4232 1-216-809-11 METAL CHIP 100 5% 1/10W
R4235 1-216-809-11 METAL CHIP 100 5% 1/10W
R4236 1-216-809-11 METAL CHIP 100 5% 1/10W
R4237 1-216-809-11 METAL CHIP 100 5% 1/10W
R4239 1-218-847-11 METAL CHIP 1K 0.5% 1/10W
R4240 1-218-847-11 METAL CHIP 1K 0.5% 1/10W
R4241 1-216-809-11 METAL CHIP 100 5% 1/10W
R4242 1-216-809-11 METAL CHIP 100 5% 1/10W
R4243 1-216-864-11 SHORT CHIP 0
R4244 1-216-864-11 SHORT CHIP 0
R4245 1-216-839-11 METAL CHIP 33K 5% 1/10W
R4246 1-216-864-11 SHORT CHIP 0
R4248 1-216-864-11 SHORT CHIP 0
R4250 1-216-864-11 SHORT CHIP 0
R5630 1-218-965-11 RES-CHIP 10K 5% 1/16W
R5631 1-218-965-11 RES-CHIP 10K 5% 1/16W
R5632 1-218-965-11 RES-CHIP 10K 5% 1/16W
R5633 1-218-965-11 RES-CHIP 10K 5% 1/16W
R5634 1-218-941-81 RES-CHIP 100 5% 1/16W
R5635 1-218-941-81 RES-CHIP 100 5% 1/16W
R5636 1-218-941-81 RES-CHIP 100 5% 1/16W
R5637 1-218-965-11 RES-CHIP 10K 5% 1/16W
R5638 1-218-965-11 RES-CHIP 10K 5% 1/16W
R5639 1-218-941-81 RES-CHIP 100 5% 1/16W
R5640 1-218-961-11 RES-CHIP 4.7K 5% 1/16W
R5641 1-218-961-11 RES-CHIP 4.7K 5% 1/16W
R5644 1-218-941-81 RES-CHIP 100 5% 1/16W
R5645 1-218-941-81 RES-CHIP 100 5% 1/16W
R5646 1-218-941-81 RES-CHIP 100 5% 1/16W
R5647 1-218-941-81 RES-CHIP 100 5% 1/16W
R5648 1-216-864-11 SHORT CHIP 0
R5652 1-218-965-11 RES-CHIP 10K 5% 1/16W
R5653 1-218-965-11 RES-CHIP 10K 5% 1/16W
R5654 1-218-965-11 RES-CHIP 10K 5% 1/16W
- 82 -
Page 83

BDT
REF.NO. PART.NO DESCRIPTION REMARK REF.NO. PART.NO DESCRIPTION REMARK
R5655 1-218-937-11 RES-CHIP 47 5% 1/16W
R5656 1-218-937-11 RES-CHIP 47 5% 1/16W
R5657 1-218-937-11 RES-CHIP 47 5% 1/16W
R5658 1-218-937-11 RES-CHIP 47 5% 1/16W
R5661 1-218-937-11 RES-CHIP 47 5% 1/16W
R5737 1-218-941-81 RES-CHIP 100 5% 1/16W
R5738 1-218-941-81 RES-CHIP 100 5% 1/16W
R5739 1-218-965-11 RES-CHIP 10K 5% 1/16W
R5740 1-218-965-11 RES-CHIP 10K 5% 1/16W
R5744 1-218-949-11 RES-CHIP 470 5% 1/16W
R5663 1-220-174-11 RES-CHIP 200 5% 1/16W
R5664 1-220-174-11 RES-CHIP 200 5% 1/16W
R5665 1-220-174-11 RES-CHIP 200 5% 1/16W
R5666 1-220-174-11 RES-CHIP 200 5% 1/16W
R5667 1-220-174-11 RES-CHIP 200 5% 1/16W
R5668 1-220-174-11 RES-CHIP 200 5% 1/16W
R5669 1-208-671-11 METAL CHIP 330 0.5% 1/16W
R5671 1-208-679-11 METAL CHIP 680 0.5% 1/16W
R5673 1-218-990-81 SHORT CHIP 0
R5674 1-208-675-11 METAL CHIP 470 0.5% 1/16W
R5676 1-218-965-11 RES-CHIP 10K 5% 1/16W
R5677 1-216-864-11 SHORT CHIP 0
R5681 1-218-953-11 RES-CHIP 1K 5% 1/16W
R5683 1-218-953-11 RES-CHIP 1K 5% 1/16W
R5684 1-218-953-11 RES-CHIP 1K 5% 1/16W
R5686 1-218-949-11 RES-CHIP 470 5% 1/16W
R5687 1-218-953-11 RES-CHIP 1K 5% 1/16W
R5689 1-218-953-11 RES-CHIP 1K 5% 1/16W
R5691 1-218-953-11 RES-CHIP 1K 5% 1/16W
R5693 1-218-953-11 RES-CHIP 1K 5% 1/16W
R5695 1-218-953-11 RES-CHIP 1K 5% 1/16W
R5697 1-218-953-11 RES-CHIP 1K 5% 1/16W
R5699 1-218-953-11 RES-CHIP 1K 5% 1/16W
R5701 1-218-953-11 RES-CHIP 1K 5% 1/16W
R5703 1-218-953-11 RES-CHIP 1K 5% 1/16W
R5745 1-218-949-11 RES-CHIP 470 5% 1/16W
R5750 1-218-965-11 RES-CHIP 10K 5% 1/16W
R5751 1-218-965-11 RES-CHIP 10K 5% 1/16W
R5752 1-218-965-11 RES-CHIP 10K 5% 1/16W
R5753 1-218-965-11 RES-CHIP 10K 5% 1/16W
R5754 1-218-965-11 RES-CHIP 10K 5% 1/16W
R5755 1-218-965-11 RES-CHIP 10K 5% 1/16W
R5756 1-218-965-11 RES-CHIP 10K 5% 1/16W
R5757 1-218-965-11 RES-CHIP 10K 5% 1/16W
R5758 1-218-961-11 RES-CHIP 4.7K 5% 1/16W
R5759 1-218-953-11 RES-CHIP 1K 5% 1/16W
R5760 1-218-941-81 RES-CHIP 100 5% 1/16W
R5761 1-218-965-11 RES-CHIP 10K 5% 1/16W
R5763 1-218-941-81 RES-CHIP 100 5% 1/16W
R5764 1-218-941-81 RES-CHIP 100 5% 1/16W
R5780 1-216-809-11 METAL CHIP 100 5% 1/10W
R5781 1-216-809-11 METAL CHIP 100 5% 1/10W
R5782 1-218-945-11 RES-CHIP 220 5% 1/16W
R5783 1-216-809-11 METAL CHIP 100 5% 1/10W
R5784 1-218-953-11 RES-CHIP 1K 5% 1/16W
R5786 1-218-859-11 METAL CHIP 3.3K 0.5% 1/10W
R5789 1-216-813-11 METAL CHIP 220 5% 1/10W
R5791 1-218-990-81 SHORT CHIP 0
R5792 1-208-683-11 METAL CHIP 1K 0.5% 1/16W
R5793 1-208-683-11 METAL CHIP 1K 0.5% 1/16W
R5706 1-218-953-11 RES-CHIP 1K 5% 1/16W
R5707 1-218-953-11 RES-CHIP 1K 5% 1/16W
R5710 1-218-953-11 RES-CHIP 1K 5% 1/16W
R5712 1-218-953-11 RES-CHIP 1K 5% 1/16W
R5714 1-218-961-11 RES-CHIP 4.7K 5% 1/16W
R5715 1-218-953-11 RES-CHIP 1K 5% 1/16W
R5717 1-218-953-11 RES-CHIP 1K 5% 1/16W
R5720 1-218-953-11 RES-CHIP 1K 5% 1/16W
R5722 1-218-953-11 RES-CHIP 1K 5% 1/16W
R5723 1-218-953-11 RES-CHIP 1K 5% 1/16W
R5726 1-218-953-11 RES-CHIP 1K 5% 1/16W
R5727 1-218-953-11 RES-CHIP 1K 5% 1/16W
R5729 1-218-939-11 RES-CHIP 68 5% 1/16W
R5730 1-218-941-11 RES-CHIP 100 5% 1/16W
R5731 1-218-941-11 RES-CHIP 100 5% 1/16W
R5732 1-218-953-11 RES-CHIP 1K 5% 1/16W
R5733 1-218-937-11 RES-CHIP 47 5% 1/16W
R5734 1-218-939-11 RES-CHIP 68 5% 1/16W
R5735 1-218-941-81 RES-CHIP 100 5% 1/16W
R5736 1-218-941-81 RES-CHIP 100 5% 1/16W
R5794 1-218-972-11 RES-CHIP 39K 5% 1/16W
R5795 1-218-972-11 RES-CHIP 39K 5% 1/16W
R5796 1-218-968-11 RES-CHIP 18K 5% 1/16W
R5797 1-218-965-11 RES-CHIP 10K 5% 1/16W
R5798 1-218-965-11 RES-CHIP 10K 5% 1/16W
R5799 1-218-968-11 RES-CHIP 18K 5% 1/16W
R5800 1-218-967-11 RES-CHIP 15K 5% 1/16W
R5801 1-218-967-11 RES-CHIP 15K 5% 1/16W
R5802 1-218-968-11 RES-CHIP 18K 5% 1/16W
R5803 1-218-953-11 RES-CHIP 1K 5% 1/16W
R5804 1-218-968-11 RES-CHIP 18K 5% 1/16W
R5805 1-208-683-11 METAL CHIP 1K 0.5% 1/16W
R5806 1-220-174-11 RES-CHIP 200 5% 1/16W
R5807 1-218-941-81 RES-CHIP 100 5% 1/16W
R5808 1-218-941-81 RES-CHIP 100 5% 1/16W
R5809 1-218-965-11 RES-CHIP 10K 5% 1/16W
R5810 1-208-683-11 METAL CHIP 1K 0.5% 1/16W
R5811 1-218-935-11 RES-CHIP 33 5% 1/16W
R5812 1-208-683-11 METAL CHIP 1K 0.5% 1/16W
R5813 1-218-965-11 RES-CHIP 10K 5% 1/16W
- 83 -
Page 84

BDT
REF.NO. PART.NO DESCRIPTION REMARK REF.NO. PART.NO DESCRIPTION REMARK
R5814 1-218-990-81 SHORT CHIP 0
R5840 1-218-965-11 RES-CHIP 10K 5% 1/16W
R5843 1-218-965-11 RES-CHIP 10K 5% 1/16W
R5845 1-218-965-11 RES-CHIP 10K 5% 1/16W
R5847 1-218-965-11 RES-CHIP 10K 5% 1/16W
R6547 1-216-833-11 METAL CHIP 10K 5% 1/10W
R6548 1-216-833-11 METAL CHIP 10K 5% 1/10W
R6549 1-216-833-11 METAL CHIP 10K 5% 1/10W
R6550 1-216-864-11 SHORT CHIP 0
R6551 1-216-833-11 METAL CHIP 10K 5% 1/10W
R5861 1-218-965-11 RES-CHIP 10K 5% 1/16W
R5862 1-218-965-11 RES-CHIP 10K 5% 1/16W
R5863 1-218-990-81 SHORT CHIP 0
R5864 1-218-990-81 SHORT CHIP 0
R5865 1-218-990-81 SHORT CHIP 0
R5884 1-218-953-11 RES-CHIP 1K 5% 1/16W
R5890 1-218-965-11 RES-CHIP 10K 5% 1/16W
R5902 1-218-941-81 RES-CHIP 100 5% 1/16W
R5903 1-218-941-81 RES-CHIP 100 5% 1/16W
R5904 1-218-941-81 RES-CHIP 100 5% 1/16W
R5905 1-218-941-81 RES-CHIP 100 5% 1/16W
R5906 1-218-961-11 RES-CHIP 4.7K 5% 1/16W
R5922 1-216-833-11 METAL CHIP 10K 5% 1/10W
R5923 1-216-833-11 METAL CHIP 10K 5% 1/10W
R5925 1-216-864-11 SHORT CHIP 0
R5927 1-216-864-11 SHORT CHIP 0
R5930 1-218-941-81 RES-CHIP 100 5% 1/16W
R5950 1-218-990-81 SHORT CHIP 0
R5951 1-218-990-81 SHORT CHIP 0
R5954 1-218-939-11 RES-CHIP 68 5”% 1/16W
R5955 1-218-939-11 RES-CHIP 68 5”% 1/16W
R5956 1-218-939-11 RES-CHIP 68 5”% 1/16W
R5957 1-218-939-11 RES-CHIP 68 5”% 1/16W
R5958 1-218-939-11 RES-CHIP 68 5”% 1/16W
R5959 1-218-939-11 RES-CHIP 68 5”% 1/16W
R6500 1-216-833-11 METAL CHIP 10K 5% 1/10W
R6501 1-216-833-11 METAL CHIP 10K 5% 1/10W
R6502 1-216-833-11 METAL CHIP 10K 5% 1/10W
R6508 1-216-833-11 METAL CHIP 10K 5% 1/10W
R6511 1-216-833-11 METAL CHIP 10K 5% 1/10W
R6512 1-216-864-11 SHORT CHIP 0
R6513 1-218-853-11 METAL CHIP 1.8K 0.5% 1/10W
R6514 1-218-861-11 METAL CHIP 3.9K 0.5% 1/10W
R6515 1-218-873-11 METAL CHIP 12K 0.5% 1/10W
R6516 1-218-877-11 METAL CHIP 18K 0.5% 1/10W
R6521 1-218-860-11 METAL CHIP 3.6K 0.5% 1/10W
R6522 1-218-855-11 METAL CHIP 2.2K 0.5% 1/10W
R6523 1-218-861-11 METAL CHIP 3.9K 0.5% 1/10W
R6524 1-218-850-11 METAL CHIP 1.3K 0.5% 1/10W
R6526 1-216-864-11 SHORT CHIP 0
R6528 1-216-864-11 SHORT CHIP 0
R6539 1-216-847-11 METAL CHIP 150K 5% 1/10W
R6540 1-216-839-11 METAL CHIP 33K 5% 1/10W
R6542 1-216-847-11 METAL CHIP 150K 5% 1/10W
R6543 1-216-837-11 METAL CHIP 22K 5% 1/10W
R6552 1-216-864-11 SHORT CHIP 0
R6554 1-216-864-11 SHORT CHIP 0
R6555 1-216-864-11 SHORT CHIP 0
R6556 1-216-864-11 SHORT CHIP 0
R6558 1-216-864-11 SHORT CHIP 0
R6559 1-216-864-11 SHORT CHIP 0
R6560 1-216-864-11 SHORT CHIP 0
R6568 1-216-829-11 METAL CHIP 4.7K 5% 1/10W
R6569 1-216-833-11 METAL CHIP 10K 5% 1/10W
R6570 1-216-821-11 METAL CHIP 1K 5% 1/10W
R6572 1-216-833-11 METAL CHIP 10K 5% 1/10W
R6573 1-216-833-11 METAL CHIP 10K 5% 1/10W
R6574 1-216-797-11 METAL CHIP 10 5% 1/10W
R6575 1-216-827-11 METAL CHIP 3.3K 5% 1/10W
R6577 1-216-864-11 SHORT CHIP 0
R6578 1-216-864-11 SHORT CHIP 0
R6581 1-216-864-11 SHORT CHIP 0
R6582 1-216-864-11 SHORT CHIP 0
R6596 1-216-837-11 METAL CHIP 22K 5% 1/10W
R9032 1-216-864-11 SHORT CHIP 0
R9034 1-218-965-11 RES-CHIP 10K 5% 1/16W
< RESISTOR CHIP >
RB4205 1-239-409-11 NETWORK RESISTOR (CHIP) 47
RB4206 1-239-409-11 NETWORK RESISTOR (CHIP) 47
RB4208 1-239-409-11 NETWORK RESISTOR (CHIP) 47
RB4209 1-239-409-11 NETWORK RESISTOR (CHIP) 47
RB4211 1-239-409-11 NETWORK RESISTOR (CHIP) 47
RB4212 1-239-409-11 NETWORK RESISTOR (CHIP) 47
RB4214 1-233-796-11 RES, NETWORK (1608)
RB4215 1-233-796-11 RES, NETWORK (1608)
RB4216 1-233-796-11 RES, NETWORK (1608)
RB4217 1-233-796-11 RES, NETWORK (1608)
RB5040 1-234-371-21 RES, NETWORK 47 (1005X4)
RB5041 1-234-371-21 RES, NETWORK 47 (1005X4)
RB5680 1-234-702-11 RES, NETWORK 68 (1005X4)
RB5681 1-234-702-11 RES, NETWORK 68 (1005X4)
RB5682 1-234-372-11 RES, NETWORK 100 (1005X4)
RB5683 1-234-372-11 RES, NETWORK 100 (1005X4)
RB5684 1-234-372-11 RES, NETWORK 100 (1005X4)
RB5685 1-234-372-11 RES, NETWORK 100 (1005X4)
RB5686 1-234-372-11 RES, NETWORK 100 (1005X4)
RB5687 1-234-702-11 RES, NETWORK 68 (1005X4)
RB5688 1-234-702-11 RES, NETWORK 68 (1005X4)
- 84 -
Page 85

BDT
REF.NO. PART.NO DESCRIPTION REMARK REF.NO. PART.NO DESCRIPTION REMARK
RB5689 1-239-409-11 NETWORK RESISTOR (CHIP) 47
< SWITCH >
S3000 1-572-921-11 SWITCH, KEY BOARD
S3001 1-572-921-11 SWITCH, KEY BOARD
< VARISTOR >
VD4000 1-803-974-21 VARISTOR, CHIP (1608)
VD4001 1-803-974-21 VARISTOR, CHIP (1608)
VD4002 1-803-974-21 VARISTOR, CHIP (1608)
VD4003 1-803-974-21 VARISTOR, CHIP (1608)
VD4004 1-803-974-21 VARISTOR, CHIP (1608)
< CRYSTAL >
X3000 1-813-531-11 OSCILLATOR, CRYSTAL UNIT
X3001 1-813-806-21 OSCILLATOR, CRYSTAL
X5040 1-813-547-11 QUARTZ CRYSTAL UNIT
X5680 1-813-055-11 QUARTZ CRYSTAL UNIT
X5780 1-781-696-31 VIBRATOR, CRYSTAL
*A-1189-415-A G1 Board Complete
(KDL-26U2000 & KDL-32U2000 only)
2-409-877-21 WASHER (3X10), RS TITE SPRING
< CAPACITOR >
C6027 1-107-902-11 ELECT 1UF 20% 50V
C6028 1-107-930-11 ELECT 22UF 20% 100V
C6029 1-128-960-31 ELECT 1500UF 20% 35V
C6030 1-128-951-21 ELECT 2200UF 20% 16V
C6031 1-162-970-11 CERAMIC CHIP 0.01UF 10.00% 25V
C6032 1-107-930-11 ELECT 22UF 20% 100V
C6033 1-165-744-11 ELECT 1200UF 20% 35V
C6034 1-165-744-11 ELECT 1200UF 20% 35V
C6039 1-128-950-21 ELECT 1000UF 20% 16V
C6200 1-136-201-61 MYLAR 0.22UF 10.00% 400V
C6201 1-109-879-11 CERAMIC 22PF 5.00% 2KV
C6202 1-107-905-11 ELECT 4.7UF 20% 50V
C6203 1-107-906-11 ELECT 10UF 20% 50V
C6204 1-162-964-11 CERAMIC CHIP 0.001UF 10.00% 50V
C6205 1-107-909-11 ELECT 47UF 20% 50V
C6206 1-104-331-11 CERAMIC 0.0022UF 10.00% 1KV
C6207 1-162-115-00 CERAMIC 330PF 10.00% 1KV
C6208 1-107-826-11 CERAMIC CHIP 0.1UF 10.00% 16V
C6209 1-119-892-51 CERAMIC 470PF 10.00% 250V
C6210 1-131-872-91 CERAMIC CHIP 1000PF 10% 630V
C6211 1-128-945-31 ELECT 1000UF 20% 10V
C6212 1-107-826-11 CERAMIC CHIP 0.1UF 10.00% 16V
C6300 1-164-230-11 CERAMIC CHIP 220PF 5.00% 50V
C6301 1-126-960-11 ELECT 1UF 20.00% 50V
C6302 1-164-230-11 CERAMIC CHIP 220PF 5.00% 50V
G1
C6000 £ 1-113-924-11 CERAMIC 0.0047UF 20.00% 250V
C6001 £ 1-161-964-91 CERAMIC 0.0047UF 250V
C6002 £ 1-119-892-51 CERAMIC 470PF 10.00% 250V
C6003 £ 1-165-529-11 MYLAR 0.22UF 10 275V
C6004 £ 1-165-530-11 MYLAR 0.47UF 10 275V
C6005 £ 1-119-892-51 CERAMIC 470PF 10.00% 250V
C6006 £ 1-161-964-91 CERAMIC 0.0047UF 250V
C6007 £ 1-119-892-51 CERAMIC 470PF 10.00% 250V
C6008 £ 1-117-752-11 ELECT(BLOCK) 330UF 20% 450V
C6009 1-162-970-11 CERAMIC CHIP 0.01UF 10.00% 25V
C6010 1-162-964-11 CERAMIC CHIP 0.001UF 10.00% 50V
C6011 1-107-888-11 ELECT 47UF 20% 25V
C6012 £ 1-119-892-51 CERAMIC 470PF 10.00% 250V
C6013 1-100-831-91 CERAMIC CHIP 0.001UF 2% 50V
C6014 1-107-905-11 ELECT 4.7UF 20% 50V
C6015 1-162-970-11 CERAMIC CHIP 0.01UF 10.00% 25V
C6016 1-107-906-11 ELECT 10UF 20% 50V
C6018 1-162-970-11 CERAMIC CHIP 0.01UF 10.00% 25V
C6019 1-107-888-11 ELECT 47UF 20% 25V
C6020 1-115-339-11 CERAMIC CHIP 0.1UF 10.00% 50V
C6021 1-162-970-11 CERAMIC CHIP 0.01UF 10.00% 25V
C6022 1-107-824-11 CERAMIC 220PF 5.00% 1KV
C6023 1-107-824-11 CERAMIC 220PF 5.00% 1KV
C6024 1-165-610-11 FILM 33000PF 3% 800V
C6025 1-107-902-11 ELECT 1UF 20% 50V
C6303 1-126-960-11 ELECT 1UF 20.00% 50V
C6304 1-128-952-31 ELECT 220UF 20.00% 25V
C6306 1-164-489-11 CERAMIC CHIP 0.22UF 10.00% 16V
C6307 1-115-339-11 CERAMIC CHIP 0.1UF 10.00% 50V
C6308 1-128-959-31 ELECT 1000UF 20.00% 35V
C6309 1-128-959-31 ELECT 1000UF 20.00% 35V
C6310 1-164-227-11 CERAMIC CHIP 0.022UF 10.00% 25V
C6311 1-164-227-11 CERAMIC CHIP 0.022UF 10.00% 25V
C6312 1-163-021-91 CERAMIC CHIP 0.01UF 10.00% 50V
C6313 1-163-021-91 CERAMIC CHIP 0.01UF 10.00% 50V
C6315 1-164-227-11 CERAMIC CHIP 0.022UF 10.00% 25V
C6316 1-107-907-11 ELECT 22UF 20% 50V
< CONNECTOR >
CN6000 £ *1-691-960-11 PIN, CONNECTOR (PC BOARD) 3P
CN6002 *1-785-705-11 PIN, CONNECTOR (PC BOARD) 9P
CN6003 *1-793-235-11 PIN, CONNECTOR (PC BOARD) 13P
CN6200 *1-785-703-21 PIN, CONNECTOR (PC BOARD) 6P
CN6300 *1-564-507-11 PLUG, CONNECTOR 4P
< DIODE >
D6000 8-719-510-53 DIODE D4SB60L
D6004 8-719-082-03 DIODE MM3Z15VT1
D6005 8-719-081-97 DIODE MMDL914T1
D6006 8-719-082-03 DIODE MM3Z15VT1
- 85 -
Page 86
REF.NO. PART.NO DESCRIPTION REMARK REF.NO. PART.NO DESCRIPTION REMARK
D6007 8-719-082-03 DIODE MM3Z15VT1
D6008 8-719-979-64 DIODE UF4005/23
D6009 8-719-082-03 DIODE MM3Z15VT1
D6010 8-719-082-03 DIODE MM3Z15VT1
D6011 6-501-505-01 DIODE FCH08U10
< PROTECTOR MODULE >
PS6000 £ 1-533-596-21 IC LINK 4A 90V
PS6001 £ 1-533-596-21 IC LINK 4A 90V
PS6002 £ 1-533-595-31 IC LINK 3.15A 90V
G1
D6012 8-719-310-56 DIODE FMB-29L
D6013 6-500-567-31 DIODE 10ERB20-TB3
D6014 6-501-505-01 DIODE FCH08U10
D6015 6-500-567-31 DIODE 10ERB20-TB3
D6018 8-719-310-56 DIODE FMB-29L
D6019 8-719-083-70 DIODE UDZSTE-1727B
D6023 8-719-083-87 DIODE UDZS-TE17-33B
D6200 8-719-083-60 DIODE UDZSTE-174.7B
D6201 8-719-081-97 DIODE MMDL914T1
D6202 6-500-567-31 DIODE 10ERB20-TB3
D6203 8-719-948-45 DIODE ERA22-08
D6204 8-719-080-75 DIODE M1FL20U-4063
D6300 8-719-069-55 DIODE UDZSTE-175.6B
D6302 8-719-069-55 DIODE UDZSTE-175.6B
< TERMINAL BOARD >
ET6000 1-537-770-21 TERMINAL BOARD, GROUND
< FUSE >
F6000 £ 1-576-231-51 FUSE 4A 250V
FH6000 £ 1-533-725-11 FUSE HOLDER
< IC >
IC6000 6-705-810-01 IC MCZ3001DB
IC6001 8-759-586-17 IC TL1431CZ-AP
IC6002 8-759-586-17 IC TL1431CZ-AP
IC6200 6-600-279-01 IC STR-A6169
IC6201 8-759-586-17 IC TL1431CZ-AP
IC6300 8-759-831-57 IC TDA7495S
< COIL >
L6000 £ 1-456-507-12 LINE FILTER COIL
L6001 £ 1-457-243-11 INDUCTOR 37MH
L6004 1-406-971-11 INDUCTOR 10UH
L6005 1-406-971-11 INDUCTOR 10UH
L6006 £ 1-456-507-12 LINE FILTER COIL
L6200 1-412-537-31 INDUCTOR 100UH
< PHOTOCOUPLER >
PH6000 £ 6-600-187-01 PHOTO COUPLER PC123Y22JOOF
PH6001 £ 6-600-187-01 PHOTO COUPLER PC123Y22JOOF
PH6002 £ 6-600-187-01 PHOTO COUPLER PC123Y22JOOF
PH6200 £ 6-600-187-01 PHOTO COUPLER PC123Y22JOOF
< TRANSISTOR >
Q6000 8-729-010-29 TRANSISTOR MSD601-RST1
Q6001 8-729-010-08 TRANSISTOR MSB710-R
Q6002 8-729-010-29 TRANSISTOR MSD601-RST1
Q6003 6-551-545-01 TRANSISTOR 2SK3469-01MR-F111
Q6004 6-551-545-01 TRANSISTOR 2SK3469-01MR-F111
Q6005 8-729-010-29 TRANSISTOR MSD601-RST1
Q6006 8-729-010-25 TRANSISTOR MSD601-RT1
Q6007 8-729-010-05 TRANSISTOR MSB709-RT1
Q6302 8-729-010-29 TRANSISTOR MSD601-RST1
Q6303 8-729-010-05 TRANSISTOR MSB709-RT1
< RESISTOR >
JR6313 1-216-295-91 SHORT CHIP 0
JR6314 1-216-295-91 SHORT CHIP 0
JR6315 1-216-295-91 SHORT CHIP 0
JR6316 1-216-295-91 SHORT CHIP 0
R6002 £ 1-219-759-11 METAL 1M 5% 1/2W
R6009 £ 1-202-933-61 FUSIBLE 0.1 10% 1/2W
R6010 1-208-852-11 METAL CHIP 820K 0.5% 1/10W
R6011 1-208-852-11 METAL CHIP 820K 0.5% 1/10W
R6012 1-216-837-11 METAL CHIP 22K 5% 1/10W
R6013 1-208-852-11 METAL CHIP 820K 0.5% 1/10W
R6016 1-216-833-11 METAL CHIP 10K 5% 1/10W
R6017 1-208-803-11 METAL CHIP 7.5K 0.5% 1/10W
R6018 1-218-881-11 METAL CHIP 27K 0.5% 1/10W
R6020 1-218-823-11 METAL CHIP 100 0.5% 1/10W
R6022 1-218-875-11 METAL CHIP 15K 0.5% 1/10W
R6024 1-216-845-11 METAL CHIP 100K 5% 1/10W
R6025 1-216-833-11 METAL CHIP 10K 5% 1/10W
R6026 1-216-833-11 METAL CHIP 10K 5% 1/10W
R6027 1-216-837-11 METAL CHIP 22K 5% 1/10W
R6028 1-218-823-11 METAL CHIP 100 0.5% 1/10W
R6029 1-216-837-11 METAL CHIP 22K 5% 1/10W
R6030 1-249-393-11 CARBON 10 5% 1/4W
R6031 1-249-393-11 CARBON 10 5% 1/4W
R6033 1-216-821-11 METAL CHIP 1K 5% 1/10W
R6035 1-216-833-11 METAL CHIP 10K 5% 1/10W
R6036 1-216-833-11 METAL CHIP 10K 5% 1/10W
R6037 1-216-821-11 METAL CHIP 1K 5% 1/10W
R6038 1-216-864-11 SHORT CHIP 0
R6039 1-216-864-11 SHORT CHIP 0
R6040 1-245-494-21 METAL 2.2M 2% 1/4W
R6041 1-245-494-21 METAL 2.2M 2% 1/4W
- 86 -
Page 87

J3 G1
REF.NO. PART.NO DESCRIPTION REMARK REF.NO. PART.NO DESCRIPTION REMARK
R6042 1-216-817-11 METAL CHIP 470 5% 1/10W
R6043 1-245-315-71 METAL OXIDE 0.1 5% 2W
R6044 1-216-864-11 SHORT CHIP 0
R6045 1-245-315-71 METAL OXIDE 0.1 5% 2W
R6046 1-216-829-11 METAL CHIP 4.7K 5% 1/10W
R6047 1-216-821-11 METAL CHIP 1K 5% 1/10W
R6048 1-216-837-11 METAL CHIP 22K 5% 1/10W
R6049 1-216-837-11 METAL CHIP 22K 5% 1/10W
R6050 1-216-833-11 METAL CHIP 10K 5% 1/10W
R6051 1-249-377-11 CARBON 0.47 5% 1/4W
R6052 1-216-821-11 METAL CHIP 1K 5% 1/10W
R6053 1-216-821-11 METAL CHIP 1K 5% 1/10W
R6054 1-216-833-11 METAL CHIP 10K 5% 1/10W
R6055 1-216-864-11 SHORT CHIP 0
R6057 1-216-822-11 METAL CHIP 1.2K 5% 1/10W
R6058 1-216-833-11 METAL CHIP 10K 5% 1/10W
R6061 1-216-837-11 METAL CHIP 22K 5% 1/10W
R6062 1-218-849-11 METAL CHIP 1.2K 0.5% 1/10W
R6063 1-218-868-11 METAL CHIP 7.5K 0.5% 1/10W
R6064 1-218-847-11 METAL CHIP 1K 0.5% 1/10W
< VARISTOR >
VD6000 £ 1-804-995-11 VARISTOR
R6066 1-216-829-11 METAL CHIP 4.7K 5% 1/10W
R6068 1-260-332-51 CARBON 2.2K 5% 1/2W
R6201 1-216-353-00 METAL OXIDE 2.2 5% 1W
R6202 1-216-864-11 SHORT CHIP 0
R6203 1-216-864-11 SHORT CHIP 0
R6204 1-249-393-11 CARBON 10 5% 1/4W
R6205 1-243-725-21 METAL OXIDE 100K 5% 1W
R6206 1-216-817-11 METAL CHIP 470 5% 1/10W
R6207 1-216-821-11 METAL CHIP 1K 5% 1/10W
R6208 1-216-864-11 SHORT CHIP 0
R6209 1-216-839-11 METAL CHIP 33K 5% 1/10W
R6210 1-218-871-11 METAL CHIP 10K 0.5% 1/10W
R6211 1-218-871-11 METAL CHIP 10K 0.5% 1/10W
R6212 1-216-295-91 SHORT CHIP 0
R6213 1-216-295-91 SHORT CHIP 0
R6304 1-216-864-11 METAL CHIP 120K 5% 1/10W
R6306 1-216-864-11 METAL CHIP 120K 5% 1/10W
R6308 1-216-825-11 METAL CHIP 2.2K 5% 1/10W
R6309 1-216-049-11 RES-CHIP 1K 5% 1/10W
R6313 1-216-864-11 SHORT CHIP 0
R6314 1-216-845-11 METAL CHIP 100K 5% 1/10W
R6315 1-216-845-11 METAL CHIP 100K 5% 1/10W
R6316 1-216-837-11 METAL CHIP 22K 5% 1/10W
R6317 1-216-833-11 METAL CHIP 10K 5% 1/10W
R6318 1-216-833-11 METAL CHIP 10K 5% 1/10W
< TRANSFORMER >
T6000 £ 1-445-026-11 CONVERTER TRANSFORMER (PIT)
T6001 £ 1-445-027-11 CONVERTER TRANSFORMER (PIT)
T6200 £ 1-443-312-11 TRANSFORMER, CONVERTER (SBT)
- 87 -
Page 88
REF.NO. PART.NO DESCRIPTION REMARK REF.NO. PART.NO DESCRIPTION REMARK
MISCELLANEOUS
1-826-479-11 LOUDSPEAKER (4.2X15CM) (26/32U2000UK/AEP)
1-826-478-11 LOUDSPEAKER (4.2X24CM) (40U2000UK/AEP)
8-597-585-00 TUNER, FSS BTP-HC401
1-802-187-11 LCD PANEL (26 WXGA TFT) (26U2000UK/AEP)
1-802-188-11 LCD PANEL (32 WXGA TFT) (32U2000UK/AEP)
Revision
3.0
1-802-386-21 LCD PANEL (40 WXGA TFT) (40U2000UK/AEP)
£ 1-832-132-11 POWER SUPPLY CORD (26/32/40U2000AEP)
£ 1-832-170-11 POWER SUPPLY CORD (UK PLUG) (26/32/40U2000UK)
ACCESSORIES AND CONNECTORS
*2-682-331-13 INSTRUCTION MANUAL (ENGLISH)
(26/32/40U2000UK)
*2-682-331-23 INSTRUCTION MANUAL (GERMAN/FRENCH/ITALIAN/
DUTCH) (26/32/40U2000AEP)
*2-682-331-33 INSTRUCTION MANUAL (SPANISH/PORTUGUESE/
GREEK) (26/32/40U2000AEP)
Revision
3.0
*2-682-331-43 INSTRUCTION MANUAL (ENGLISH/RUSSIAN/POLISH)
(26/32/40U2000AEP)
*2-682-331-53 INSTRUCTION MANUAL (SWEDISH/DANISH/FINNISH/
NORWEGIAN) (26/32/40U2000AEP)
*2-682-331-62 INSTRUCTION MANUAL (ENGLISH/RUSSIAN)
(32U2000AEP)
G1
*1-910-026-42 CONNECTOR ASSY 4P (26/32U2000UK/AEP)
*1-910-026-43 CONNECTOR ASSY 4P (40U2000UK/AEP)
*1-910-026-45 CONNECTOR ASSY 13P (26/32U2000UK/AEP)
*1-910-026-46 CONNECTOR ASSY 14P (40U2000UK/AEP)
*1-910-026-48 CONNECTOR ASSY 14P (26U2000UK/AEP)
*1-910-026-49 CONNECTOR ASSY 14P (32U2000UK/AEP)
*1-910-026-50 CONNECTOR ASSY 14P (40U2000/AEP/UK)
*1-910-026-52 CONNECTOR ASSY 6P (40U2000/AEP/UK)
*1-910-026-53 CONNECTOR ASSY 6P (26/32U2000UK/AEP)
*1-910-026-54 FFC 20P
*1-910-026-57 CONNECTOR ASSY 9P
*1-910-026-59 SPEAKER HARNESS 26 (32U2000UK)
*1-910-026-60 SPEAKER HARNESS 32 (32U2000UK/AEP)
*1-910-026-61 SPEAKER HARNESS 40 (40U2000UK/AEP)
*1-910-026-62 CONNECTOR ASSY 4P (32U2000UK/AEP)
*1-910-026-63 CONNECTOR ASSY 4P (26U2000UK/AEP)
*1-910-026-65 CONNECTOR ASSY 10P (26U2000UK/AEP)
*1-910-026-66 CONNECTOR ASSY 10P (32U2000UK/AEP)
*1-910-026-67 FFC 49P FOLDER (26/32U2000UK/AEP)
*1-910-026-68 LVDS FIE-SHLDP 30P (26/32U2000UK/AEP)
*1-910-026-69 LVDS FIR-SHLDP 30P (40U2000UK/AEP)
*1-910-026-71 CONNECTOR ASSY 4P (40U2000UK/AEP)
*1-910-026-72 CONNECTOR ASSY 10P (40U2000UK/AEP)
*1-910-033-22 CONNECTOR ASSY 4P (32U2000UK/AEP)
1-830-570-41 CABLE, ANTENNA(WITH FILTER) (26U2000AEP)
*2-693-044-11 INSTRUCTION MANUAL (ENGLISH)
(26/32U2000UK)
*2-693-044-21 INSTRUCTION MANUAL (GERMAN/FRENCH/ITALIAN/
DUTCH) (32U2000AEP)
*2-693-044-31 INSTRUCTION MANUAL (SPANISH/PORTUGUESE/
GREEK) (32U2000AEP)
*2-693-044-41 INSTRUCTION MANUAL (ENGLISH/RUSSIAN/POLISH)
(26U2000AEP)
*2-693-044-51 INSTRUCTION MANUAL (SWEDISH/DANISH/FINNISH/
NORWEGIAN) (26U2000AEP)
REMOTE COMMANDER
1-479-847-11 REMOTE COMMANDER (RM-ED007)
Revision
1-469-778-11 CLAMP, FERRITE (26/32U2000UK/AEP)
3.0
1-469-778-21 CLAMP, FERRITE (40U2000UK/AEP)
1-469-089-11 FILTER, CLAMP (FERRITE CORE)
(26/32U2000UK/AEP)
2-595-155-01 CLAMP (40U2000UK/AEP)
X-2102-511-2 BAG ASSY, RUDDER LOCK
2-591-688-02 LOCK, RUDDER
2-591-689-01 BELT
2-580-663-01 SCREW, WOOD 3.8X20
2-593-320-02 SCREW, COIN (M6X18)
*4-101-087-02 BAG. PROTECTION CROSS (26U2000UK/AEP)
- 88 -
Page 89

9-927-534-02
Sony Corporation
Sony UK
Service Promotions Dept.
English
07AP7100-1
Printed in U.K.
© 2007.01
Page 90
HISTORY
Model Name :
SERVICE MANUAL
Click on Page Number to display detail of changes.
Date Part Number Description of Revisions
Original Manual
2006.09
2007.01 9-927-534-02 Additional colour choice for Bezel assy , revisedexploded 3.0
9-927-534-81
Supplement 1 - Alternative panel, BDTR board replaces
BDT board for KDL-26/32U2000.
views, miscellaneous, accessories and connectors. P61-63, P88
KDL-26/32/40U2000
Version
1.09-927-534-01 2006.06
2.0
 Loading...