

Page 1

4-233-429-12(1)
Compact Hi-Fi
Component
System
Operating Instructions
CHC-CL5MD
© 2001 Sony Corporation
Page 2
Warning
To prevent fire or shock hazard, do not
expose the unit to rain or moisture.
To avoid electrical shock, do not open the cabinet.
Refer servicing to qualified personnel only.
To prevent fire, do not Cover the ventilation of the
apparatus with news papers, table-cloths, curtains,
etc. And don’t place lighted candles on the apparatus.
To prevent fire or shock hazard, do not place vases on
the apparatus.
Do not install the appliance in a confined space,
such as a bookcase or built-in cabinet.
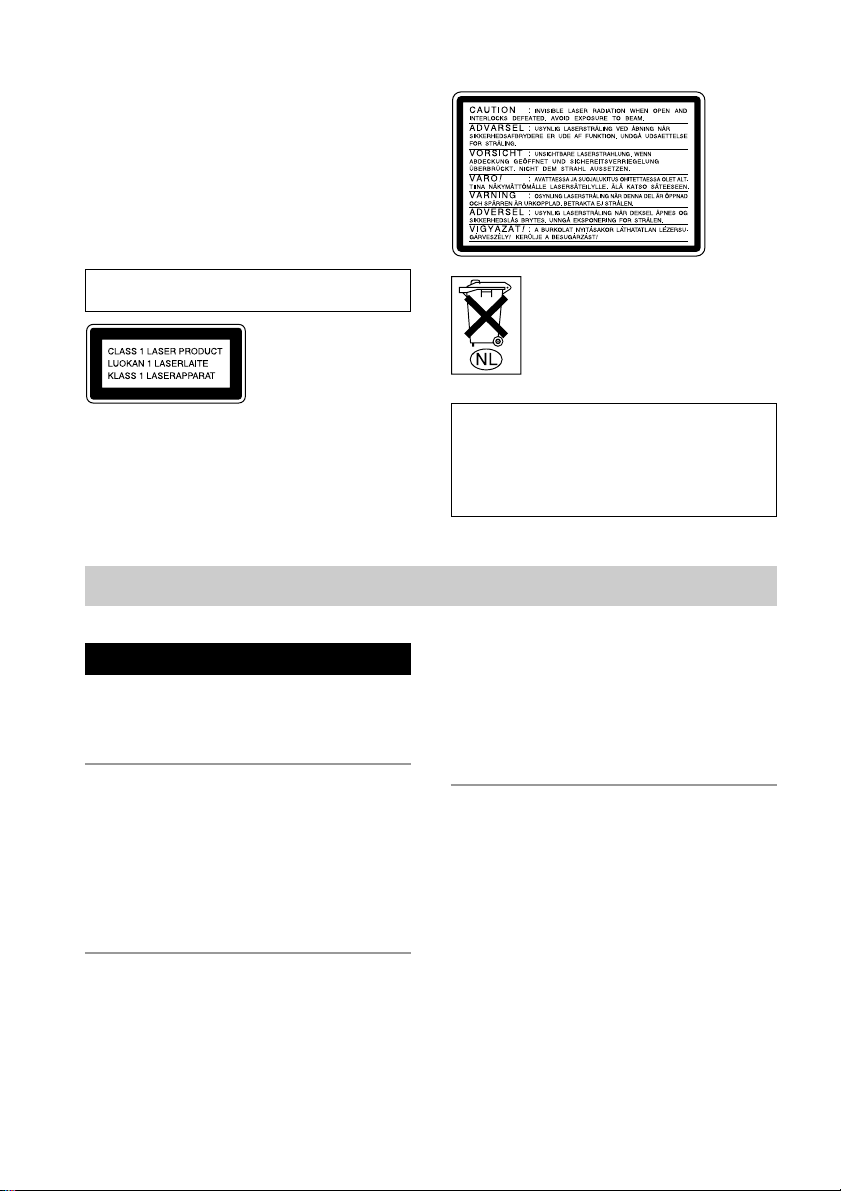
This appliance is
classified as a CLASS
1 LASER product.
The CLASS 1 LASER
PRODUCT
MARKING is located
on the rear exterior.
Table of Contents
The following caution label is located inside the unit.
Don’t throw a battery, dispose it as the
injurious wastes.
IN NO EVENT SHALL SELLER BE LIABLE
FOR ANY DIRECT, INCIDENTAL OR
CONSEQUENTIAL DAMAGES OF ANY
NATURE, OR LOSSES OR EXPENSES
RESULTING FROM ANY DEFECTIVE
PRODUCT OR THE USE OF ANY PRODUCT.
Parts Identification
Main unit ................................................... 4
Remote Control ......................................... 5
Getting Started
Hooking up the system..............................6
Inserting two R6 (size AA) batteries
into the remote .................................... 7
Setting the time ......................................... 8
Saving the power in standby mode ........... 8
CD
Loading a CD ............................................ 9
Playing a CD
— Normal Play/Shuffle Play/Repeat
Play ..................................................... 9
2
Programming CD tracks
— Programme Play .......................... 11
Using the CD display .............................. 12
Labelling a CD
— Disc Memo .................................. 12
MD – Play
Loading an MD ....................................... 14
Playing an MD
— Normal Play/Shuffle Play/
Repeat Play ....................................... 14
Programming MD tracks
— Programme Play .......................... 15
Using the MD display ............................. 16
Page 3

MD – Recording
Tape – Play
Before you start recording....................... 16
Recording a CD on an MD
— CD-MD Normal-Speed Synchro
Recording/CD-MD High-Speed
Synchro Recording ........................... 17
Recording a tape on an MD
— TAPE-MD Synchro Recording ... 18
Recording on an MD manually
— Manual Recording ....................... 19
Starting recording with 6 seconds of
prestored audio data
— Time Machine Recording ............ 19
Recording tips ......................................... 20
— Recording for long times/
Marking track numbers/Smart Space/
Adjusting the recording level
MD – Editing
Before you start editing ........................... 24
Labelling an MD
— Name Function ............................ 25
Erasing recordings................................... 27
— Erase Function/Track Erase
Function/All Erase Function/
A-B Erase Function
Moving recorded tracks
— Move Function ............................ 29
Dividing recorded tracks
— Divide Function ........................... 29
Combining recorded tracks
— Combine Function ....................... 30
Undoing the last edit
— Undo Function ............................. 31
Changing the recorded level after recording
— S.F Edit Function......................... 32
Tuner
Presetting radio stations .......................... 34
Listening to the radio
— Preset Tuning............................... 35
Labelling the preset stations
— Station Name ............................... 36
Using the Radio Data System (RDS)* .... 36
Loading a tape ......................................... 37
Playing a tape .......................................... 37
Tape – Recording
Recording a CD on a tape
— CD-TAPE Synchro Recording .... 38
Recording an MD on a tape
— MD-TAPE Synchro Recording ... 39
Recording on a tape manually
— Manual Recording ....................... 39
Sound Adjustment
Adjusting the sound
— GROOVE/DBFB ......................... 40
Selecting the preset music menu ............. 41
Timer
Falling asleep to music
— Sleep Timer ................................. 41
Waking up to music
— Daily Timer ................................. 42
Timer recording radio programmes ........ 43
Optional Components
Hooking up the optional components ..... 44
Additional Information
Precautions .............................................. 45
System limitations of MDs ..................... 47
Troubleshooting ...................................... 48
Self-diagnosis display ............................. 52
Specifications .......................................... 54
* European model only
3
Page 4
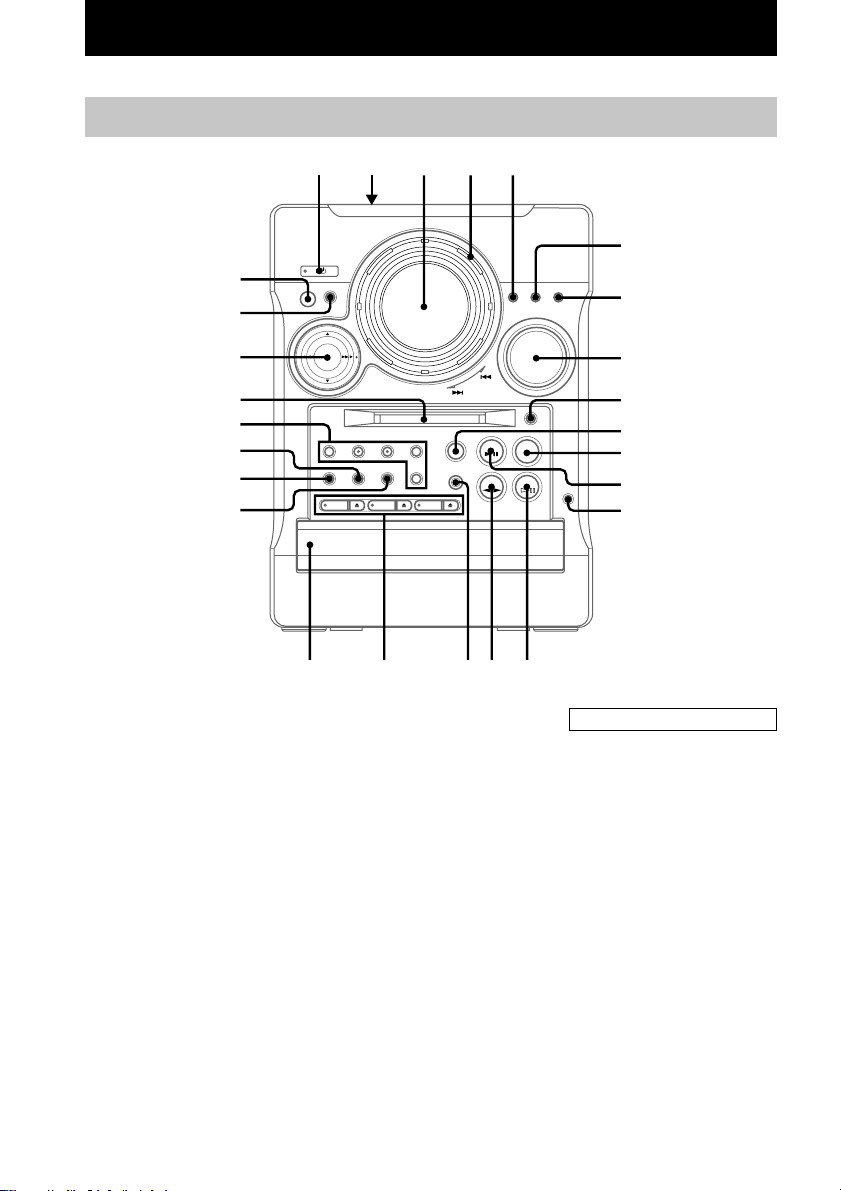
Parts Identification
The items are arranged in alphabetical order. Refer to the pages indicated in parentheses for details.
Main unit
12345
6
wh
wg
7
wf
wd
ws
wa
w;
ql
BASS/TREBLE wf (40)
CD 1 – 3 qj (11)
CD 1 – 3 Z qj (9)
CD disc tray qk (9)
CD NX qs (9)
DIMMER 5 (7)
DISPLAY wg (8, 12, 16)
Display window 3
ENTER/START ws (17, 38)
ENTER/YES 7 (8, 11, 15, 20,
25, 34, 42)
FUNCTION qh (9, 14, 17, 25, 37)
GROOVE w; (40)
MD insertion slot wd (14)
MD REC ws (19)
MD NX qf (14)
MENU/NO 6 (24)
MUSIC MENU wf (41)
qj
PHONES jack qd
PLAY MODE/DIRECTION wa
(9, 14, 17, 37)
REC MODE ws (20)
Remote sensor wh
REPEAT ql (10, 14)
STEREO/MONO ql (35)
SYNCHRO MODE ws (17)
Tape deck lid 2 ( 37)
TAPE REC PAUSE/START ws
(39)
TAPE nN qg (37)
TUNER/BAND qa (34)
VOLUME 8
qgqhqk
8
9
0
qa
qs
qd
qf
BUTTON DESCRIPTIONS
?/1 1
./> 4
Z 9
x 0
m/M wf
+/– wf
4
Page 5
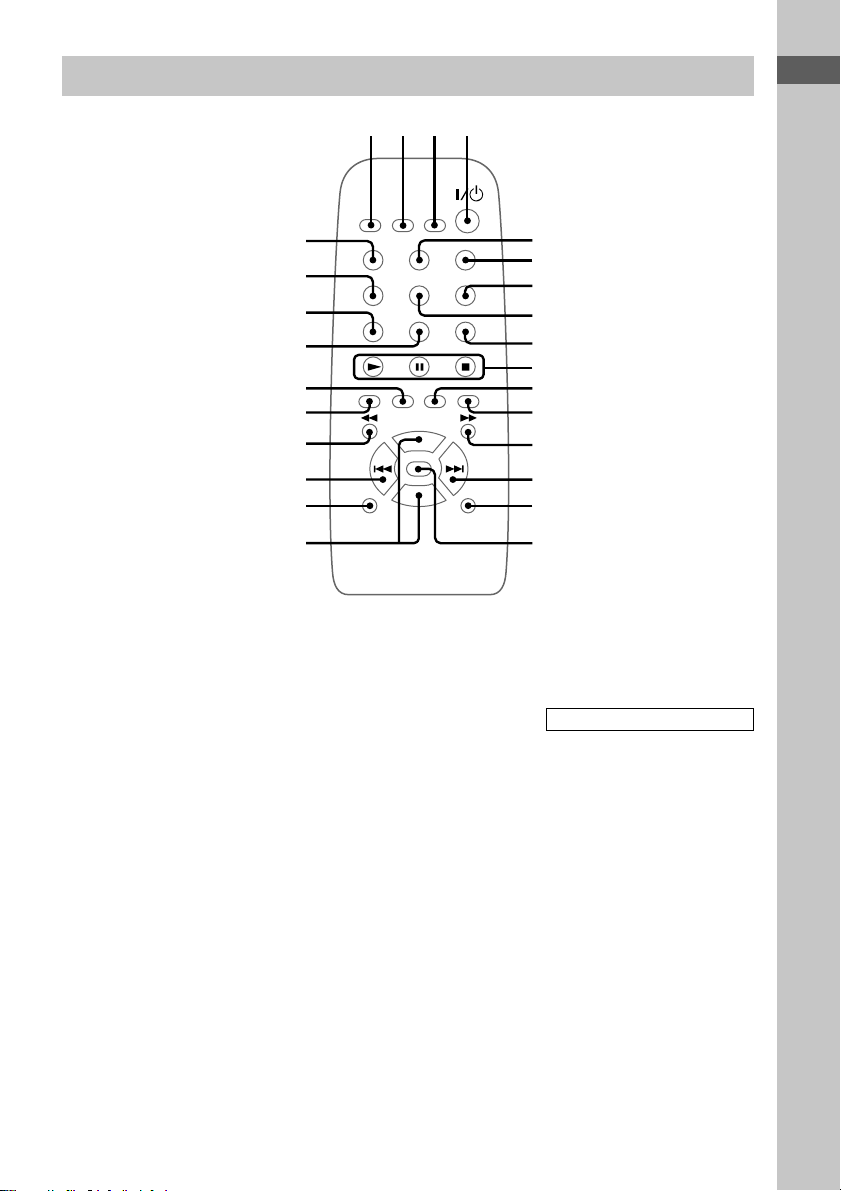
Remote Control
Parts Identification
1234
CHECK 8 (11, 15)
CLEAR qs (11, 15)
CLOCK/TIMER SELECT 2
(42)
CLOCK/TIMER SET 3
(8, 42)
DBFB wh (40)
DIMMER wd (7)
DISC SKIP 9 (10)
DISPLAY qk (8, 12, 16)
ENTER/YES qa (8, 11, 15, 20,
25, 34, 42)
FUNCTION qg (9, 14, 17, 25, 37)
GROOVE qh (40)
MENU/NO wa (24)
MUSIC MENU 6 (41)
wh
wg
wf
wd
ws
wa
w;
ql
qk
qj
NAME EDIT/CHARACTER ws
(12, 25, 36)
REPEAT 7 (10, 14)
SCROLL wg (13, 26)
SLEEP 1 (41)
SURROUND 5 (40)
TUNER/BAND wf (34)
VOL +/– qj
5
6
7
8
9
0
qa
qs
qd
qf
qg
qh
BUTTON DESCRIPTIONS
@/1 4
N q;
x q;
X q;
M qd
> qf
. ql
m w;
5
Page 6
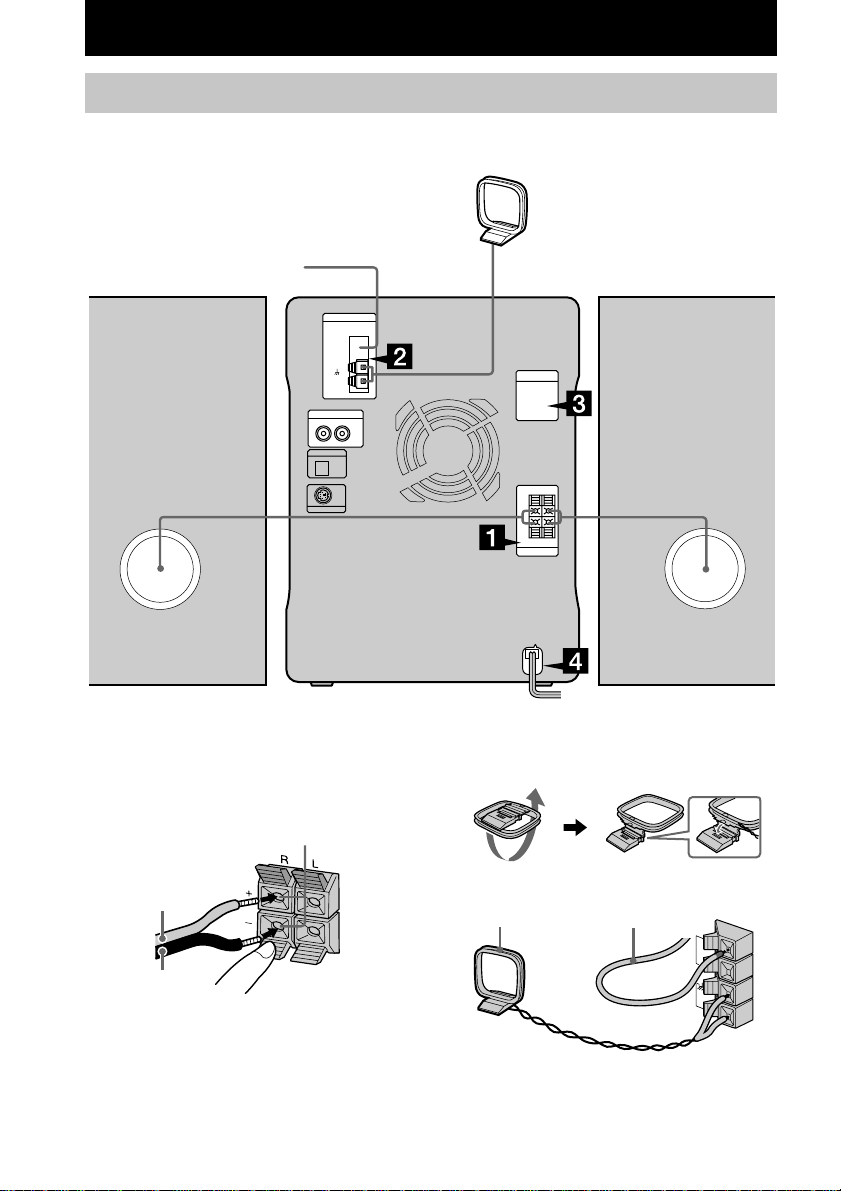
Getting Started
Hooking up the system
Perform the following procedure 1 to 4 to hook up your system using the supplied cords and
accessories.
AM loop aerial
FM aerial
Right speaker
Left speaker
1 Connect the speakers.
Connect the speaker cords to the SPEAKER
terminals on the unit and to the terminals on
the speakers as the following.
Insert this portion
Red/Solid (3)
Black/Stripe (#)
6
2 Connect the FM/AM aerials.
Set up the AM loop aerial, then connect it.
Jack type A
AM loop aerial
Extend the FM lead aerial
horizontally
FM75
AM
Page 7

Jack type B
VOLTAGE SELECTOR
230-
240V
220V
120V
AM loop aerial
Extend the FM lead aerial
horizontally
FM75
COAXIAL
AM
When carrying this system
Perform the following procedure to protect the
CD mechanism.
1 Make sure that all discs are removed from
the system.
2 Press FUNCTION while holding down CD 1
and then press ?/1 until “LOCK” appears.
3 Disconnect the mains lead.
Getting Started
3 For models with a voltage selector, set
VOLTAGE SELECTOR to the local
mains voltage.
4 Connect the mains lead to the mains.
The demonstration appears in the display.
If the plug of the mains lead does not fit
your mains, attach the supplied adaptor on
to the plug (for models with a plug adaptor).
To turn on the system, press ?/1.
The demonstration mode
The demonstration mode appears in the display
when you connect the mains lead to the mains.
When you press ?/1, the system turns on and
the demonstration automatically ends. The
demonstration is deactivated when you set the
time.
To activate/deactivate the demonstration again,
press DISPLAY while the system is off.
To adjust the brightness of the
display back light
1 Press DIMMER while the system is on.
2 Turn ./> (or press . or > on
the remote) to adjust the back light
brightness.
You can adjust the back light brightness in
11 steps from –5 to +5.
Inserting two R6 (size AA)
batteries into the remote
e
E
E
e
Tip
When the remote no longer operates the system,
replace both batteries with new ones.
Note
If you do not use the remote for a long period of time,
remove the batteries to avoid possible damage from
battery leakage.
7
Page 8

Setting the time
Saving the power in
1 Turn on the system.
2 Press CLOCK/TIMER SET on the
remote.
Proceed to step 5 when you set the clock for
the first time.
3 Turn ./> (or press . or > on
the remote) to select “CLOCK SET?”.
4 Press ENTER/YES.
5 Turn ./> (or press . or > on
the remote) to set the hour.
6 Press ENTER/YES or M.
The minute indication flashes.
7 Turn ./> (or press . or > on
the remote) to set the minute.
8 Press ENTER/YES.
The clock starts working.
If you made a mistake
Press m or M repeatedly until the incorrect
item flashes, then set it again.
To change the preset time
Start over from step 1.
standby mode
Press DISPLAY repeatedly when the
system is off. Each time you press the
button, the system switches cyclically as
follows:
Demonstration t Clock display t Power
Saving Mode
To cancel the Power Saving Mode
Press DISPLAY once to show the
demonstration, twice to show the clock display.
Tip
?/1 indicator lights up even in the Power Saving
Mode.
8
Page 9
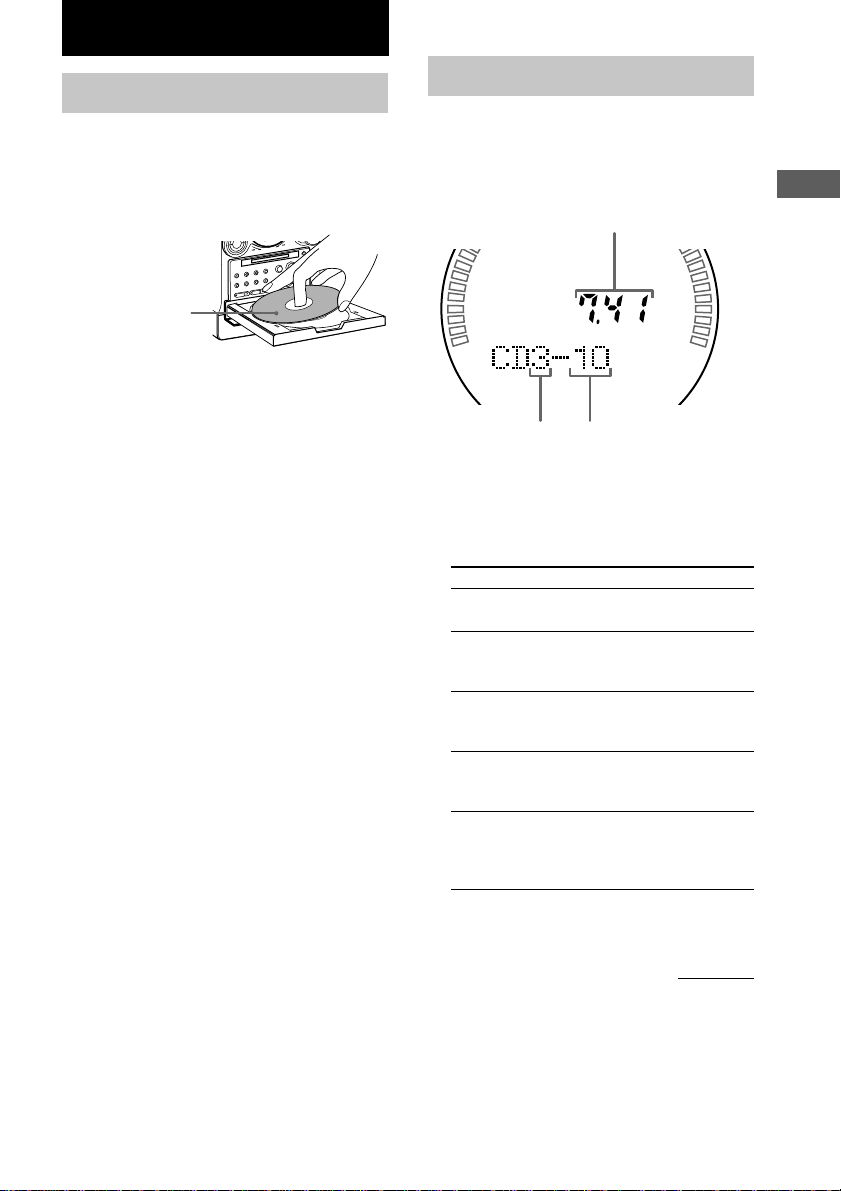
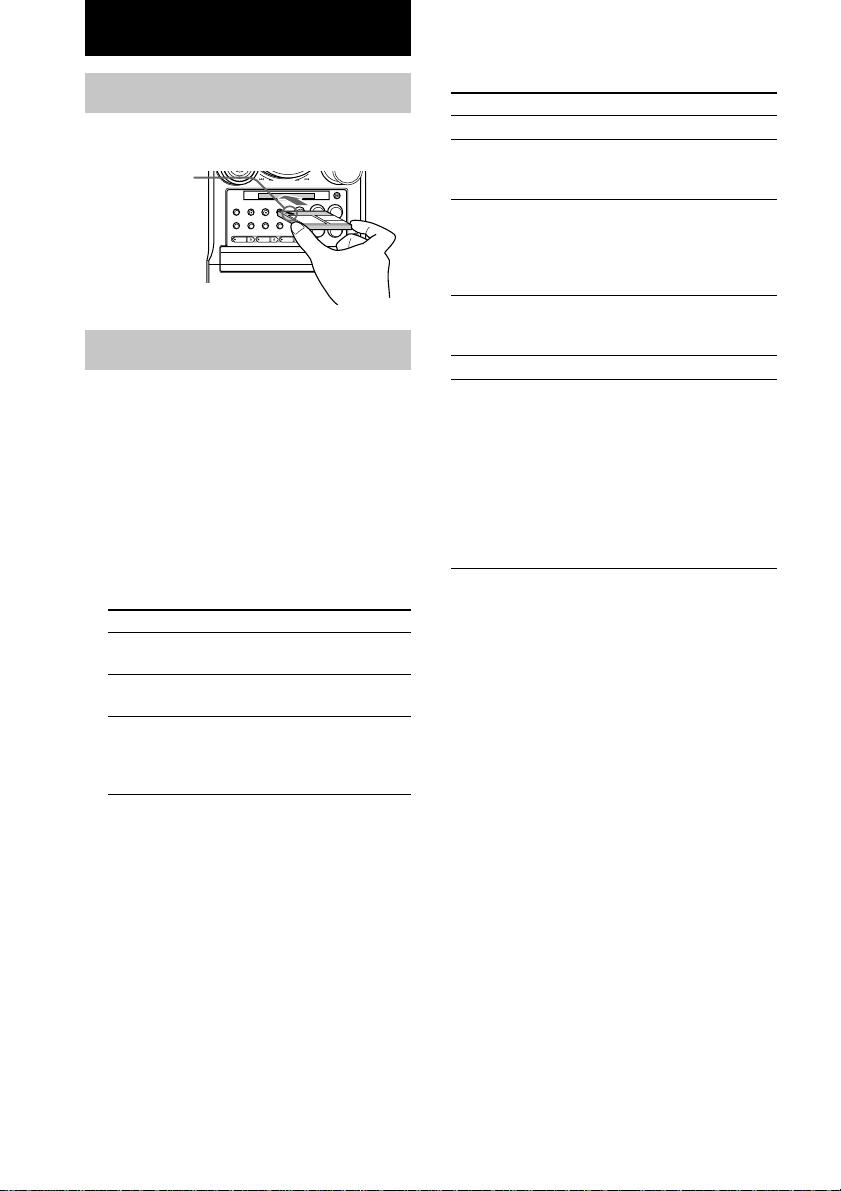
CD
Loading a CD
1 Press CD 1 – 3 Z.
The disc tray opens.
2 Place a CD with the label side up on the
disc tray.
When you play a CD
single (8 cm CD),
place it on the inner
circle of the tray.
To load other CDs, press a different Z and
place the CD in the disc tray.
3 Press the same Z again to close the
disc tray.
Playing a CD
— Normal Play/Shuffle Play/Repeat
Play
This system lets you play the CD in different
play modes.
Disc tray number Track number
1 Press FUNCTION repeatedly to switch
the function to CD.
2 Press PLAY MODE/DIRECTION
repeatedly until the mode you want
appears in the display.
Select To play
ALL DISCS
(Normal Play)
1 DISC
(Normal Play)
ALL DISCS
SHUFFLE
(Shuffle Play)
1 DISC SHUFFLE
(Shuffle Play)
PGM (Programme
Play)
Playing time
All CDs in the disc tray
continuously.
The tracks on the CD you
have selected in original
order.
The tracks on all CDs in
random order.
The tracks on the CD you
have selected in random
order.
The tracks on all CDs in the
order you want them to be
played (see “Programming
CD tracks” on page 11).
Getting Started/CD
3 Press CD NX (or N on the remote).
continued
9
Page 10

Playing a CD (continued)
Other Operations
To Do this
Stop play
Pause
Select a track Turn ./> clockwise (to go
Find a point in
a track
Select a CD • Press CD 1 – 3. Play starts when
Remove a CD
Play repeatedly
(Repeat Play)
Press x.
Press CD NX (or X on the
remote). Press again to resume
play.
forward) or counterclockwise (to
go back) and release it when you
locate the desired track (or press
. or > on the remote).
Keep pressing m or M during
play and release it at the desired
point.
the button is pressed.
• Press DISC SKIP on the remote
repeatedly so that CD 1 – 3
appears. Press CD NX (or N
on the remote) to play the
selected CD.
If you press CD 1 – 3 during play,
the selected CD changes and the
new CD starts playing.
Press one of CD 1 – 3 Z to open
the tray that contains the CD you
want to remove.
Press REPEAT during play until
“REPEAT” or “REPEAT 1”
appears.
REPEAT*: For all the tracks on
the CD up to five times.
REPEAT 1: For a single track
only.
To cancel playing repeatedly, press
REPEAT until “REPEAT” or
“REPEAT 1” disappears.
Tips
• You can start playing from the desired track in
Normal Play or Programme Play. Turn ./>
(or press . or > on the remote) until the
desired track number appears after step 1.
• The CD 1 – 3 button lights orange when a CD is
loaded on the tray.
All of the CD 1 – 3 button indicators light orange at
first, and then turn on/off if the system determines
that a CD is not loaded after the CD tray is opened
and closed, etc.
Note
The play mode cannot be changed while playing a
disc.
* You cannot select “REPEAT” and “ALL DISCS
SHUFFLE” at the same time.
10
Page 11
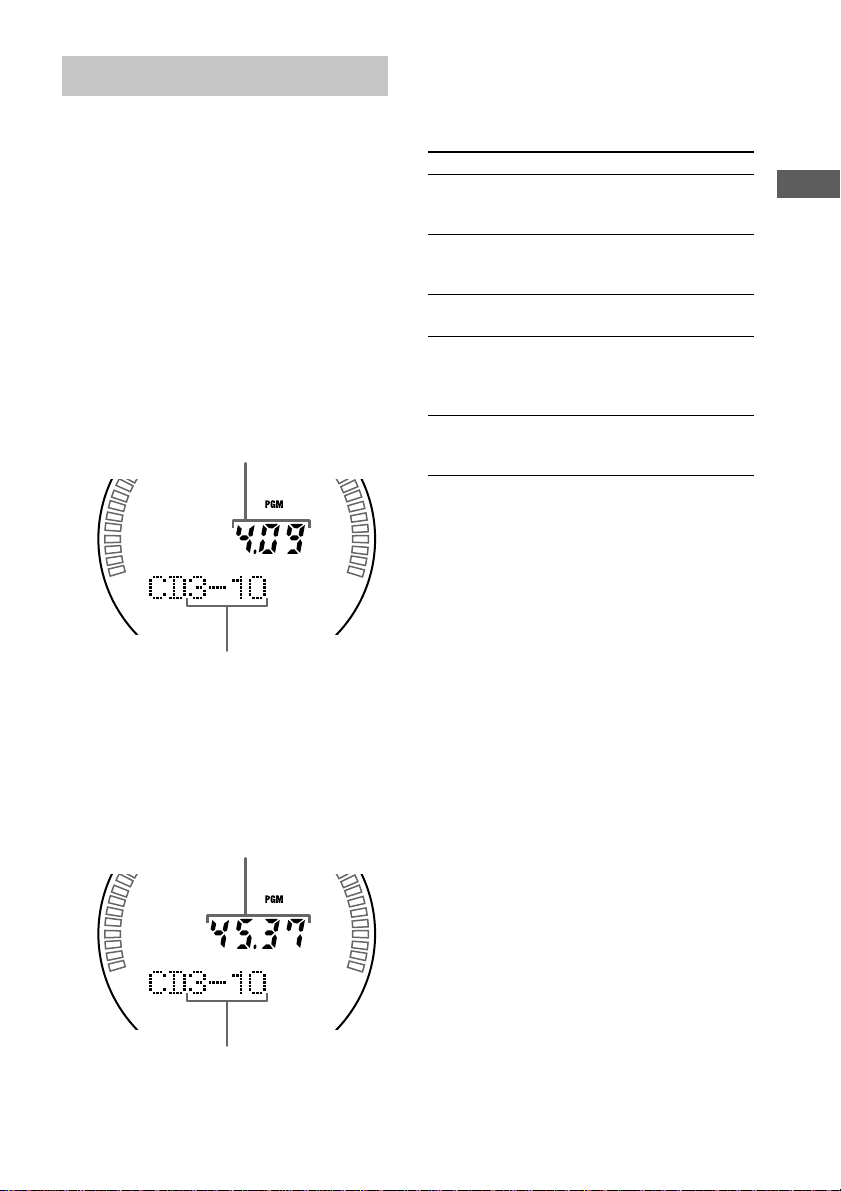
Programming CD tracks
— Programme Play
6 To programme additional tracks, repeat
steps 3 to 5.
7 Press CD NX (or N on the remote).
You can make a programme of up to 25 tracks.
1 Press FUNCTION repeatedly to switch
the function to CD.
2 Press PLAY MODE/DIRECTION
repeatedly until “PGM” appears.
3 Press CD 1 – 3 to select a CD.
To programme all the tracks on a CD at
once, proceed to step 5 with “AL”
displayed.
4 Turn ./> (or press . or > on
the remote) until the desired track
number appears.
Playing time of the selected track
Selected CD and track number
5 Press ENTER/YES.
The track is programmed.
“STEP” appears, followed by the number of
the track in the programmed sequence. The
number of the last programmed track or
“CD1-AL” appears, followed by the total
playing time of the programme.
Total playing time
To Do this
Cancel
Programme Play
Check the
programme
Clear a track
from the end
Clear a specific
track
Add a track to
the programme
in stop mode
Tips
• The programme you made remains after
Programme Play finishes. To play the same
programme again, press CD NX.
•“- -.- -” appears when the total CD programme time
exceeds 100 minutes, or when you select a CD track
whose number is 21 or over.
Press PLAY MODE/DIRECTION
repeatedly until “PGM” and
“SHUFFLE” disappear.
Press CHECK on the remote
repeatedly in stop mode. After the
last track, “Check End” appears.
Press CLEAR on the remote in
stop mode.
Press CHECK on the remote
repeatedly in stop mode until the
number of the track to be erased
lights up, then press CLEAR.
Perform steps 3 to 5.
CD
Last programmed track number
11
Page 12

Using the CD display
Labelling a CD
Press DISPLAY repeatedly.
When a CD TEXT disc is loaded, you can
check the information recorded on the disc,
such as the titles. The display changes
cyclically as follows:
During normal play
Elapsed playing time on the current track t
Remaining time on the current track t
Remaining time on the CD (“1 DISC” mode) or
“- -.- -” display (“ALL DISCS” mode) t
Track title of the current track* t Clock
display t Effect name
In stop mode
CD stopped display t CD disc title* t Total
number of tracks and total playing time t
Clock display t Effect name
* If a CD that has no title is loaded, nothing appears.
When the CD contains more than 20 tracks, CD
TEXT is not displayed from track 21 on.
— Disc Memo
You can label up to 50 CDs with titles of up to
20 symbols and characters. Whenever you load
a labelled CD, the title appears in the display.
Notes
• You cannot label a CD for which “CD-TEXT”
appears in the display.
• When labelling CDs for the first time, be
sure to erase all disc titles stored in the
system memory (see “Erasing a disc title”
on the next page).
1 Press FUNCTION repeatedly to switch
the function to CD.
2 Press DISC SKIP on the remote
repeatedly until the desired CD
appears.
If “SHUFFLE” or “PGM” appears in the
display, press PLAY MODE/DIRECTION
repeatedly until both disappear.
3 Press NAME EDIT/CHARACTER on the
remote.
The cursor starts flashing.
4 Press NAME EDIT/CHARACTER on the
remote to select the desired type of
character.
Each time you press the button, the display
changes cyclically as follows:
(Blank space) t A (Upper cases) t a
(Lower cases) t 0 (Numbers) t ’
(Symbols)
5 Turn ./> (or press . or > on
the remote) to select the desired
character.
To enter a blank space
Press M.
To enter a symbol
You can use the following symbols.
’ – / , . ( ) : ! ? & + < > _ = ” ; # $ % @
`
12
Page 13

6 Press M.
The character you selected in step 4 stops
flashing and the cursor shifts to the right.
7 Repeat steps 4 and 5 to complete the
entire title.
If you made a mistake
Press m or M until the character you
want to change flashes, then repeat steps 4
and 5.
To erase a character
Press m or M until the cursor shifts to
the character you want to erase, then press
CLEAR on the remote while the character is
flashing. You cannot insert characters.
8 Press ENTER/YES to complete the
labelling procedure.
To cancel labelling
Press MENU/NO.
Checking the disc titles
1 Press MENU/NO in stop mode.
2 Turn ./> (or press . or > on
the remote) until “Name Check ?” appears,
then press ENTER/YES.
3 Turn ./> (or press . or > on
the remote) to select the disc titles stored in
the system memory between 01 and 50.
To check the current disc title
Press SCROLL on the remote in stop mode.
Erasing a disc title
1 Press MENU/NO in stop mode.
2 Turn ./> (or press . or > on
the remote) until “Name Erase ?” appears,
then press ENTER/YES.
3 Turn ./> (or press . or > on
the remote) to select the disc title you want
to erase.
The disc title appears scrolling in the display.
“No Name” appears if no disc title is
labelled.
4 Press ENTER/YES again.
“Complete!” appears.
To erase all disc titles, press . or >
repeatedly until “All Erase?” appears in step 2,
then press ENTER/YES twice.
To cancel erasing
Press MENU/NO during steps 1 to 3.
Note
To ensure that disc titles are not erased from memory,
have the system connected to mains power at least
once a month.
CD
13
Page 14
MD – Play
Loading an MD
Insert an MD.
With the arrow
pointing toward
the deck and the
label side up
Playing an MD
— Normal Play/Shuffle Play/Repeat
Play
This system lets you play the MD in different
play modes.
1 Press FUNCTION repeatedly to switch
the function to MD.
2 Press PLAY MODE/DIRECTION
repeatedly until the mode you want
appears in the display.
Select To play
None
(Normal Play)
SHUFFLE
(Shuffle Play)
PGM
(Programme
Play)
An MD in original order.
All tracks on an MD in
random order.
The tracks on an MD in the
order you want them to be
played (see “Programming
MD tracks” on the next page).
Other Operations
To Do this
Stop play
Pause Press MD NX (or X on the
Select a track
Find a point in
a track
Remove the MD
Play repeatedly
(Repeat Play)
Tip
You can start playing from the desired track in
Normal Play or Programme Play. Turn ./> (or
press . or > on the remote) until the desired
track number appears after step 1.
Note
The play mode cannot be changed while playing a
disc.
Press x.
remote). Press again to resume
play.
Turn ./> clockwise (to go
forward) or counterclockwise (to
go back) and release it when you
locate the desired track (or press
. or > on the remote).
Keep pressing m or M during
play and release it at the desired
point.
Press Z.
Press REPEAT during play until
“REPEAT” or “REPEAT 1”
appears.
REPEAT: For all the tracks on the
MD up to five times.
REPEAT 1: For a single track
only.
To cancel playing repeatedly, press
REPEAT until “REPEAT” or
“REPEAT 1” disappears.
3 Press MD NX (or N on the remote).
14
Page 15
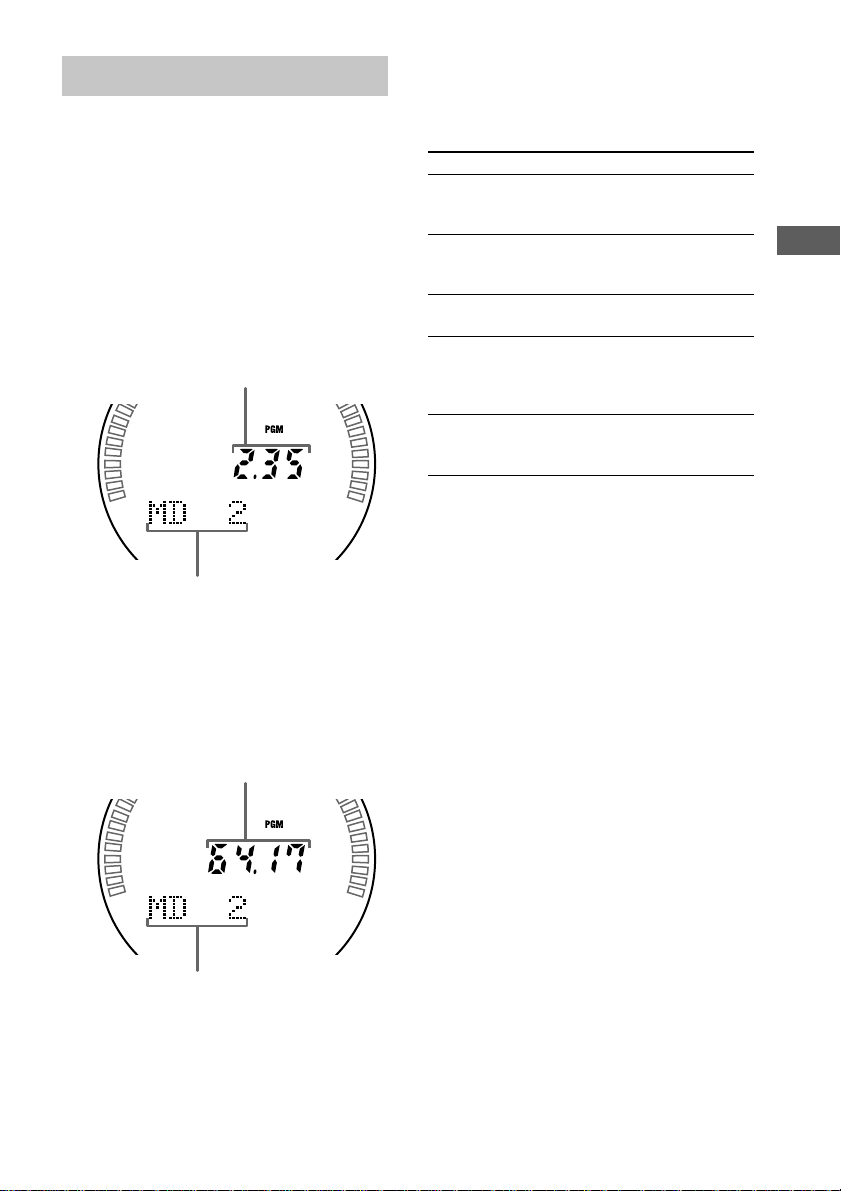
Programming MD tracks
— Programme Play
5 To programme additional tracks, repeat
steps 3 and 4.
6 Press MD NX (or N on the remote).
You can make a programme of up to 25 tracks.
1 Press FUNCTION repeatedly to switch
the function to MD.
2 Press PLAY MODE/DIRECTION
repeatedly until “PGM” appears in stop
mode.
3 Turn ./> (or press . or > on
the remote) until the desired track
appears.
Playing time of the selected track
Selected track number
4 Press ENTER/YES.
The track is programmed.
“STEP” appears, followed by the number of
the track in the programmed sequence. The
number of the last programmed track
appears, followed by the total playing time
of the programme.
Total playing time
To Do this
Cancel
Programme Play
Check the
programme
Clear a track
from the end
Clear a specific
track
Add a track to
the programme
in stop mode
Tips
• The programme you made remains after
Programme Play finishes. To play the same
programme again, press MD NX.
•“- -.- -” appears when the total MD programme time
exceeds 200 minutes.
Press PLAY MODE/DIRECTION
repeatedly until “PGM” and
“SHUFFLE” disappear.
Press CHECK on the remote
repeatedly in stop mode. After the
last track, “Check End” appears.
Press CLEAR on the remote in
stop mode.
Press CHECK on the remote
repeatedly in stop mode until the
number of the track to be erased
lights up, then press CLEAR.
Perform steps 3 and 4.
MD – Play
Last programmed track number
15
Page 16

MD – Recording
Using the MD display
Press DISPLAY repeatedly.
The display changes cyclically as follows:
During normal play
Elapsed playing time and the track number on
the current track t Remaining time and the
track number on the current track t
Remaining time on the MD t Track title of
the current track t Clock display t Effect
name
In stop mode
Total number of tracks and total playing time
t Remaining recordable time (Only for a
recordable MD) t Disc title appears for a premastered MD t Disc title t Clock display
t Effect name
Tip
You can check a track title at any time during play. If
you press SCROLL, a track title appears scrolling in
the display.
Press SCROLL at any point during the scroll display
to stop the scrolling. Press SCROLL again to restart
the scrolling.
Before you start recording
MDs (MiniDisc) let you digitally record and
play music with high quality sound. Another
feature of MDs is track marking. The track
marking feature lets you quickly locate a
specific point or easily edit the recorded tracks.
However, depending on the source you record,
the recording method and the way the track
numbers are recorded differ.
When the source you record from is:
• This system’s CD player
– The MD deck performs digital recording.*
– Track numbers are automatically marked as
on the original CD.
• Other digital components
connected to the CD DIGITAL IN
jack
– The MD deck performs digital recording.*
– Track numbers are marked differently
depending on the source you record.
• This system’s tuner and other
analogue components connected
to the VIDEO (AUDIO) IN jacks
– The MD deck performs analogue recording.
– A track number is marked at the beginning
of a recording, but when you turn on the
Level Synchro Recording function (see
“Marking track numbers” on page 21), track
numbers are automatically marked in sync
with the level of the input signal.
1
1
16
*1For details on the limitations of digital recording,
see “System limitations of MDs” on page 47.
If you use a partially recorded MD, recording
starts after the recorded tracks.
Page 17
Note on MD track numbers
On an MD, the track numbers (track sequence), track
start and end point information, etc., are recorded in
the TOC*2 area independent of the sound information.
You can edit recorded tracks quickly by modifying
the TOC information.
*2TOC: Table Of Contents
After recording
Press Z to remove the MD or press ?/1
(power) to turn off the system.
“TOC” lights up, or either “TOC” or
“STANDBY” starts flashing. The TOC is
updated and recording is completed.
Before pulling out the mains lead
MD recording is completed when the MD
Table of Contents (TOC) is updated. The TOC
is updated when you eject the MD or press ?/1
to turn off the system. Do not pull out the
mains lead before updating the TOC (while
“TOC” is lit) or while updating the TOC (while
“TOC” or “STANDBY” is flashing) to ensure a
complete recording.
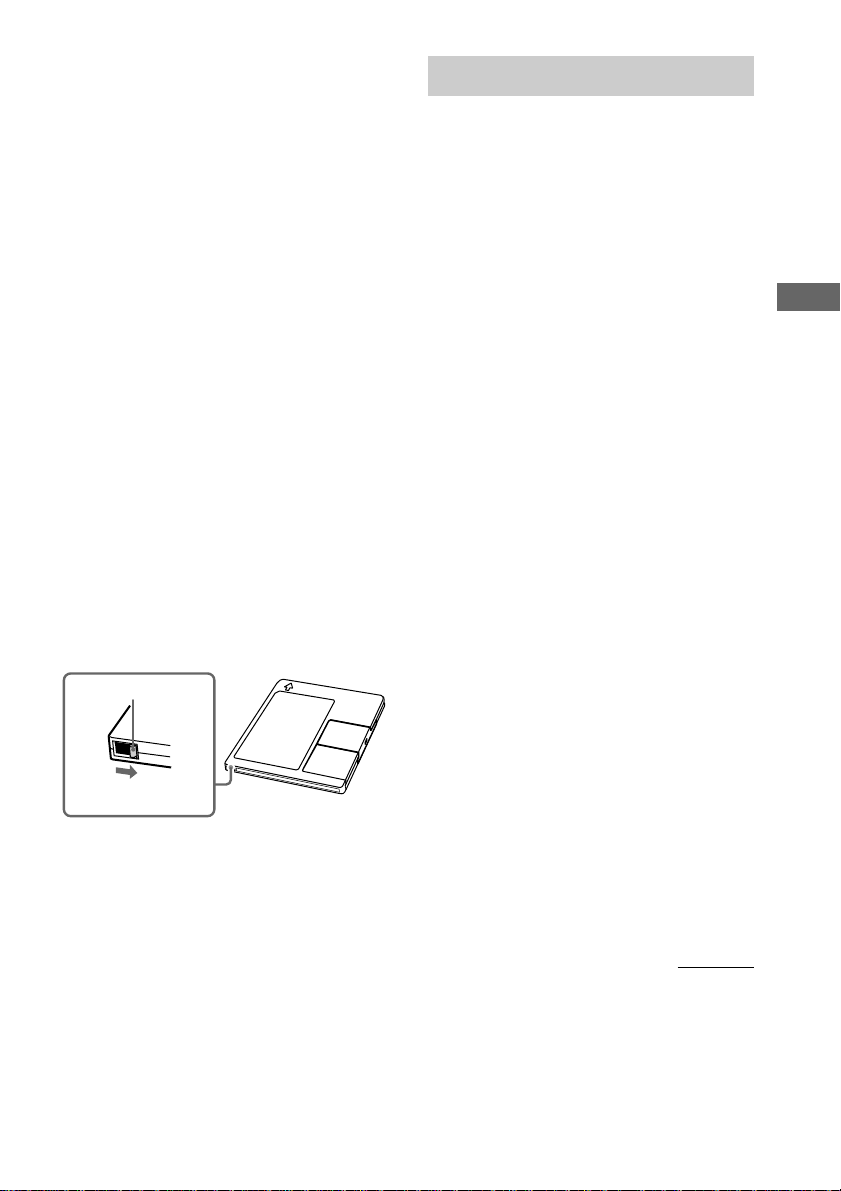
Protecting a recorded MD
To protect a recorded MD, slide the tab on the
side of the MD to open the slot. In this position,
the MD cannot be recorded. To record on the
MD, slide the tab to close the slot.
Tab
Slide the tab
Recording a CD on an MD
— CD-MD Normal-Speed Synchro
Recording/CD-MD High-Speed
Synchro Recording
In addition to normal-speed recording, you can
also record at high speed (approximately twice
the normal speed).
1 Load a recordable MD.
2 Load a CD you want to record.
3 Press FUNCTION repeatedly to switch
the function to CD.
4 Press PLAY MODE/DIRECTION
repeatedly until “1 DISC” appears in the
display.
5 Press SYNCHRO MODE repeatedly until
“CDtMD SYNC?” appears.
To record at high speed (CD-MD HighSpeed Synchro Recording), press
SYNCHRO MODE repeatedly until
“HISPEED SYNC?” appears.
6 Press ENTER/START.
The MD deck stands by for recording and
the CD player pauses for play.
7 Press ENTER/START again.
Recording starts. You cannot monitor the
recorded signal during high-speed
recording.
To record on an MD and a tape at the
same time
See “Recording a CD on a tape” on page 38.
If you stop recording or the MD runs
out of recording time during highspeed recording
The partial high-speed recorded track is not
recorded on the MD. Record the track again.
MD – Play/MD – Recording
continued
17
Page 18

Recording a CD on an MD (continued)
Recording a tape on an
If “Retry” flashes in the display after
you press ENTER/START in step 7
A reading failure has occurred, and the system
is trying to read the data again.
• If the retry was successful, the system
continues with High-Speed CD-MD Synchro
Recording.
• If the condition of the inserted CD or the
system is poor, and retry fails, High-Speed
CD-MD Synchro Recording is disabled. In
this case, “×1” flashes in the display and the
MD deck automatically starts recording.
Note that monitoring of the recorded signal
is not possible when this occurs.
To record on an MD for a long time
(MDLP recording)
See “Recording tips” on page 20.
To stop recording
Press x.
Tips
• Depending on the disc, CD TEXT information may
also be recorded (except when you record on an
MD and a tape at the same time). If “CD-TEXT”
flashes during recording, see “Labelling an MD” on
page 25.
• You can record only your favourite CD tracks with
Programme Play. After step 2, follow the same
procedures as step 1 to 6 in “Programming CD
tracks” on page 11. Then, go to step 5.
Notes
• You cannot pause recording during High-Speed
CD-MD Synchro Recording.
• If the play mode is set to Repeat Play or Shuffle
Play, it automatically switches to normal play at
step 6.
• The following items are either inoperative or cannot
be used during High-Speed CD-MD Synchro
Recording:
— The Auto Cut Function
— The recording level specified in the Setup menu
• If the MD becomes full during recording, the CD
player and the MD deck stop automatically.
MD
— TAPE-MD Synchro Recording
You can make an analogue recording of a tape
on an MD.
1 Load a recordable MD.
2 Insert a tape.
3 Press SYNCHRO MODE repeatedly until
“TAPEtMD SYNC?” appears.
4 Press ENTER/START.
The MD deck stands by for recording and
the tape deck pauses for play.
Tape playback side
>>> appears for the top side, and <<< for
the bottom side. To play the side not
indicated, press x and remove the cassette
to reverse the tape side, then perform steps
3 and 4 again.
5 Press ENTER/START again.
Recording starts.
To stop recording
Press x.
Note
If the MD becomes full during recording, the tape
deck and the MD deck stop automatically.
18
Page 19

Recording on an MD
manually
— Manual Recording
You can record just the portions you like from
a CD, or start recording from the middle of the
tape. You can also record a radio programme.
1 Load a recordable MD.
2 Press FUNCTION repeatedly to select
the desired source to record.
3 Press MD REC.
The MD deck stands by for recording.
4 Press MD NX and then start playing
the desired source to record.
To stop recording
Press x.
Tip
You can check the remaining recordable time on the
MD during recording by pressing DISPLAY on the
remote.
Starting recording with
When you press ENTER/
YES in step 5
6
seconds
Beginning of the source to be recorded
End of the source to be
recorded
Time
Recorded
portion
1 Load a recordable MD.
2 Press FUNCTION repeatedly to select
the desired source to record.
3 Press MD REC.
The MD deck stands by for recording.
4 Start playing the desired source to
record.
5 Press ENTER/YES at the desired point
to start recording.
Note
The MD deck starts storing audio data when the deck
stands by for recording in step 3 and you start playing
the source. If less than 6 seconds have passed when
you press ENTER/YES, Time Machine Recording
starts with less than 6 seconds of audio data.
MD – Recording
6 seconds of prestored
audio data
— Time Machine Recording
When recording from an FM or satellite
broadcast, the first few seconds of material are
often lost due to the time it takes you to
ascertain the contents and press the record
button. To prevent the loss of this material, the
Time Machine Recording feature constantly
stores the most recent audio data in a buffer
memory. This lets you record the sound from
6 seconds before starting recording, as shown
in the illustration below:
19
Page 20

Recording tips
Recording for long times
This system has two long time recording
modes: LP2 and LP4 (MDLP recording). When
recording in LP2 Stereo mode, you can record
2 times the normal recordable time, and in LP4
Stereo mode, you can record 4 times the
normal recordable time. In addition, the
recordable time for monaural recording is
approximately double the stereo recording
time.
LP4 Stereo mode (4× long time recording
mode) achieves a long stereo recording time by
use of a special compression system. When
placing emphasis on sound quality, Stereo
recording or LP2 Stereo recording (2× long
time recording mode) is recommended.
1 Press REC MODE repeatedly to select
the recording mode.
The display changes cyclically as follows:
STEREO REC (Stereo) t LP2 REC (LP2
Stereo) t LP4 REC (LP4 Stereo) t
MONO REC (Monaural)
2 Start the recording.
The source is recorded in the selected
recording mode.
Notes
• The selected recording mode is kept even after
recording has finished, so be sure to check the
recording mode before recording.
• Tracks recorded in MDLP (LP2 or LP4) Stereo
mode cannot be played back on a system that does
not support MDLP mode.
• Even if you press REC MODE during recording or
recording pause, you cannot change the recording
mode.
• Even if you press REC MODE repeatedly to select
MONO, the monitor signal during recording does
not become monaural.
• You cannot use S.F Edit and some other MD edit
functions for tracks recorded in MDLP mode.
• If you press REC MODE repeatedly to select
MONO REC, “MONO” appears.
To add “LP:” at the beginning of a
track name during MDLP recording
“LP:” appears when you try to play the track on
a system that does not support MDLP mode.
This convenient function lets you know at a
glance that the track cannot be played back.
The factory setting is “On”.
1 Press FUNCTION repeatedly to switch the
function to MD.
2 Press MENU/NO.
3 Turn ./> (or press . or > on
the remote) until “Setup ?” appears.
4 Press ENTER/YES.
5 Turn ./> (or press . or > on
the remote) until “LP Stamp Off” (or “LP
Stamp On”) appears, then press ENTER/
YES.
6 Turn ./> (or press . or > on
the remote) until “LP Stamp On” appears,
then press ENTER/YES.
7 Press MENU/NO.
Notes
• The recorded “LP:” is a stamp which appears to
indicate that the track cannot be played back when
you try to play the track on system that does not
support MDLP mode. It does not appear for systems
that support MDLP mode.
• When set to “On”, “LP:” is recorded as the track
name, so the number of characters that can be input
to an MD is reduced. In addition, when you copy a
track name with “LP:” added, “LP:” is
automatically added to the copied track name. If
you divide an “LP:” track using the Divide function,
“LP:” is also added to the latter track.
20
Page 21

Marking track numbers
• Automatically during recording
Track numbers are automatically marked as on
the original source during recording from this
system’s CD player or components connected
to CD DIGITAL IN jack. Use the Level
Synchro Recording function to automatically
mark track numbers during recording from this
system’s tuner or components connected to the
VIDEO (AUDIO) IN jacks.
• At any point during recording
You can mark track numbers during recording
of any source.
• After recording
Use the Divide Function (see “Dividing
recorded tracks” on page 29).
Marking track numbers
automatically during recording
— Level-Synchro Recording
The Level Synchro Recording function is
factory set to on, so the track numbers are
automatically marked. If “LEVEL-SYNC”
does not appear during recording, turn on the
Level Synchro Recording as follows. Track
numbers are automatically marked when the
input signal is continuously below a certain
level for more than two seconds and then
exceeds that level.
Notes
• You cannot mark track numbers automatically if the
sound source to be recorded is noisy (e.g., tapes or
radio programmes) or during timer-recording.
• If you pause recording during CD recording, a track
number is recorded at that point. Also, note that the
tracks might be recorded as the same single track
with a single track number when the same single
track of the same CD is recorded repeatedly.
1 Press MD REC to stand by for recording.
2 Press MENU/NO.
3 Turn ./> (or press . or > on
the remote) until “Setup ?” appears, then
press ENTER/YES.
4 Turn ./> (or press . or > on
the remote) until “T.Mark Off” (or “T.Mark
LSync”) appears, then press ENTER/YES.
5 Turn ./> (or press . or > on
the remote) to select the setting, then press
ENTER/YES.
To Select
Turn on the Level
Synchro Recording
function
Turn off the Level
Synchro Recording
function
T.Mark LSync
(factory setting)
T.Mark Off
When you set the Level Synchro Recording
function, “LEVEL-SYNC” lights up.
6 Press MENU/NO.
To continue and record, follow the
procedures described on the various
recording pages.
continued
MD – Recording
21
Page 22

Recording tips (continued)
To change the trigger level for Level
Synchro Recording
Perform the following procedure to change the
signal level that triggers Level Synchro
Recording.
1 Press FUNCTION repeatedly to switch the
function to MD.
2 Press MENU/NO.
3 Turn ./> (or press . or > on
the remote) until “Setup ?” appears, then
press ENTER/YES.
4 Turn ./> (or press . or > on
the remote) until “LS(T)” appears, then
press ENTER/YES.
5 Turn ./> (or press . or > on
the remote) to select the level, then press
ENTER/YES.
You can set the level at any value between
–72 dB and 0 dB, in 2 dB steps. When you
press CLEAR on the remote, the volume
returns to the factory setting (–50 dB).
6 Press MENU/NO.
Marking track numbers at a specific
point during recording
— Track Mark
You can mark track numbers at any time during
recording, regardless of the type of sound
source.
Press MD REC during recording at the
point you want to add a track mark.
The tracks following the added one are
renumbered.
Making a space between
tracks 3 seconds long
— Smart Space
The Smart Space function lets you make the
blank spaces between tracks 3 seconds long
automatically while making a digital recording
from a CD. For other types of recording, if the
Smart Space function is on and there is no
sound input for about 3 seconds or more (but
less than 30 seconds) while recording, the MD
deck replaces this silence with a blank of about
3 seconds and continues recording.
No sound input for less than 30 seconds
Off
On
Replaced with a blank of 3 seconds and
recording continues
Auto Cut: When the Smart Space function is
on, if there is no sound input for 30 seconds or
more, the MD deck replaces this silence with a
blank of about 3 seconds and enters recording
pause.
No sound input for 30 seconds or more
Off
On
Replaced with a blank of 3 seconds and
recording pauses
22
Page 23

1 Press MD REC to stand by for
recording.
2 Press MENU/NO.
3 Turn ./> (or press . or > on
the remote) until “Setup ?” appears,
then press ENTER/YES.
4 Turn ./> (or press . or > on
the remote) until “S.Space Off” (or
“S.Space On”) appears, then press
ENTER/YES.
5 Turn ./> (or press . or > on
the remote) to select the setting, then
press ENTER/YES.
To Select
Turn on the Smart
Space function
Turn off the Smart
Space function
S.Space On
(factory setting)
S.Space Off
6 Press MENU/NO.
To continue and record, follow the
procedures described on the various
recording pages.
Adjusting the recording level
When recording on an MD, you can adjust the
recording level to the desired volume. You can
adjust the recording level not only when
making an analogue recording, but also when
making a digital recording from a CD, etc.
1 Prepare the desired sound source to
record and start play.
2 Confirm that the MD deck is in
recording standby. If not, press MD
REC.
3 Press MENU/NO.
4 Turn ./> (or press . or > on
the remote) until “Setup ?” appears,
then press ENTER/YES.
5 Turn ./> (or press . or > on
the remote) until “Level Adjust ?”
appears, then press ENTER/YES.
6 Turn ./> (or press . or > on
the remote) to adjust the recording
level.
The recording level can be adjusted from
–∞ to +18, in 0.1 dB steps. While
monitoring the sound, adjust to the optimum
level while making sure that “OVER” does
not appear in the display at the loudest
portion.
7 Press ENTER/YES.
8 Press MENU/NO.
9 Press x.
10
When a CD or other sound source is
playing, stop playback.
To continue and record, follow the
procedures described on the various
recording pages.
Tips
• You can adjust the recording level in 1 dB step by
pressing m or M.
• You can also adjust the recording level during
recording.
• Once adjusted, the recording level is maintained
until you adjust it again.
MD – Recording
23
Page 24

MD – Editing
Before you start editing
Before editing
You can edit an MD only when:
• The MD is recordable.
• The MD play mode is normal play.
Check the following, before editing.
1 Check the tab of the MD to be edited.
If the MD is protected when you press
MENU/NO, “C11” and “Protected” appear
alternately and the MD cannot be edited.
Slide the tab to close the slot.
2 Press PLAY MODE/DIRECTION
repeatedly until both “PGM” and
“SHUFFLE” disappear.
You can edit the MD only in normal play
mode. You cannot edit the MD in Shuffle or
Programme Play mode.
To cancel the last edit
Use Undo Function to cancel the last edit and
restore the contents of the MD to the condition
before the edit (see page 31).
After editing
Press Z to remove the MD or press ?/1
(power) to turn off the system.
“TOC” lights up, or either “TOC” or
“STANDBY” starts flashing. The TOC is
updated and editing is completed.
Before pulling out the mains lead
MD editing is completed when the MD Table
of Contents (TOC) is updated. The TOC is
updated when you eject the MD or press ?/1
to turn off the system. Do not pull out the
mains lead before updating the TOC (while
“TOC” is lit) or while updating the TOC (while
“TOC” or “STANDBY” is flashing) to ensure a
complete editing.
To quit while editing
Press MENU/NO.
24
Page 25

Labelling an MD
— Name Function
You can create titles for your recorded MDs
and tracks as follows.
During recording
If “CD-TEXT” lights up or flashes during
recording, you can record the CD TEXT
information onto the MD as follows:
However, the CD TEXT information is not
recorded when recording a CD on an MD and a
tape at the same time.
• Automatically during recording
If you record on an unrecorded or
completely erased (see “Erasing all tracks”
on page 27) MD when “CD-TEXT” is lit, the
CD TEXT information is automatically
recorded.
• Manually during recording
When “CD-TEXT” flashes, press NAME
EDIT/CHARACTER on the remote, and
then press ENTER/YES on the remote to
record the title of the current track.
Note
Depending on the disc, the CD TEXT information
may not be recorded automatically.
After recording
Use Name Function on this page. You can
input a total of approximately 1700 characters
for the disc title and track titles on a single MD.
1 Press FUNCTION repeatedly to switch
the function to MD.
To label a track, turn ./> (or press
. or > on the remote) until the
desired track number appears.
2 Press NAME EDIT/CHARACTER on the
remote.
The cursor starts flashing.
3 Press NAME EDIT/CHARACTER on the
remote to select the desired type of
character.
Each time you press the button, the display
changes cyclically as follows:
(Blank space) t A (Upper cases) t a
(Lower cases) t 0 (Numbers) t ’
(Symbols)
4 Turn ./> (or press . or > on
the remote) to select the desired
character.
To enter a blank space
Press M.
To enter a symbol
You can use the following symbols.
’ – / , . ( ) : ! ? & + < > _ = ” ; # $ % @
5 Press M.
The character you selected in step 4 stops
flashing and the cursor shifts to the right.
6 Repeat steps 3 to 5 to complete the
entire title.
If you made a mistake
Press m or M until the character you
want to change flashes, then repeat steps 3
to 5.
To erase a character
Press CLEAR on the remote while the
character is flashing. You cannot insert
characters.
7 Press ENTER/YES to complete the
labelling procedure.
Note
You can label a track title during play. The playback
repeats until you finish labelling.
continued
MD – Editing
`
25
Page 26

Labelling an MD (continued)
Erasing the titles
Copying a disc or track title
You can copy a labelled disc or track title to
use it as a title of another track or the disc title
within a disc.
1 Press MENU/NO in stop mode.
2 Turn ./> (or press . or > on
the remote) until “Name ?” appears, then
press ENTER/YES.
3 Turn ./> (or press . or > on
the remote) until “Nm Copy ?” appears,
then press ENTER/YES.
4 Turn ./> (or press . or > on
the remote) to select “Disc” (when copying
the disc title) or the track number with the
title you want to copy, then press ENTER/
YES.
5 Turn ./> (or press . or > on
the remote) to select the copy destination
track number or “Disc” (when copying as
the disc title), then press ENTER/YES.
When “Overwrite ??” appears
The copy destination already has a disc or
track title. To continue and copy the title,
press ENTER/YES.
Checking the titles
To check the disc titles, press SCROLL on the
remote in stop mode. To check the track title,
press SCROLL on the remote during play. The
title appears scrolling in the display. To stop
scrolling, press SCROLL on the remote. Press
the button again to resume scrolling.
1 Press MENU/NO in stop mode.
2 Turn ./> (or press . or > on
the remote) until “Name ?” appears, then
press ENTER/YES.
3 Turn ./> (or press . or > on
the remote) until “Nm Erase ?” appears,
then press ENTER/YES.
4 Turn ./> (or press . or > on
the remote) until the desired title to erase
appears, then press ENTER/YES.
To erase all the titles, turn ./> (or press
. or > on the remote) until “Nm All
Ers?” appears in step 3, then press ENTER/
YES twice.
26
Page 27

Erasing recordings
— Erase Function
The MD deck lets you erase unwanted tracks
quickly and easily.
The three options for erasing recordings are:
• Erasing a single track. (Track Erase)
• Erasing all tracks. (All Erase)
• Erasing a portion of a track. (A-B Erase)
Erasing a single track
— Track Erase Function
You can erase a track simply by selecting its
track number. When you erase a track, the total
number of tracks on the MD decreases by one
and all the tracks following the erased one are
renumbered.
E.g.: Erasing track 2.
Track number
Original
tracks
After
ERASE
123
ACD
123
AC D
Erase track 2
4
B
1 Press FUNCTION repeatedly to switch
the function to MD.
2 Press MENU/NO to display “Edit
Menu”.
3 Turn ./> (or press . or > on
the remote) until “Tr Erase ?” appears,
then press ENTER/YES.
4 Turn ./> (or press . or > on
the remote) until the desired track
number appears.
5 Press ENTER/YES.
“Complete!” appears.
Note
“Erase???” appears when the track was recorded or
edited on another deck and then protected. To erase
the track, press ENTER/YES while “Erase???”
appears.
Erasing all tracks
— All Erase Function
You can erase the disc title, all recorded tracks
and their titles at once.
1 Press FUNCTION repeatedly to switch
the function to MD.
2 Press MENU/NO to display “Edit
Menu”.
3 Turn ./> (or press . or > on
the remote) until “All Erase?” appears,
then press ENTER/YES.
“All Erase??” appears.
4 Press ENTER/YES again.
“Complete!” appears.
MD – Editing
continued
27
Page 28

Erasing recordings (continued)
Erasing a portion of a track
— A-B Erase Function
You can specify a portion within a track and
erase the portion with ease. You can shift the
desired portion by frame*, minute or second
intervals.
* 1 frame is 1/86 second.
E.g.: Erasing a portion of track 2.
Track number
Original
tracks
After A-B
ERASE
12
AB-A
12
A
Point A Point B
B-B B-C
3
B(A+C)C
1 Press FUNCTION repeatedly to switch
the function to MD.
2 While playing an MD, press MD NX
(or X on the remote) at the starting
point of the portion to be erased (point
A).
The MD pauses.
3 Press MENU/NO to display
“Edit Menu”.
“A-B Erase?” appears.
4 Press ENTER/YES.
5 Press ENTER/YES again.
“Rehearsal” and “Point A ok?” appear
alternately while the deck plays the selected
track from the beginning to point A.
6While monitoring the sound, turn ./
> (or press . or > on the
remote) to find the starting point of the
portion to be erased (point A).
You can shift the starting point by 1/86
second (1 frame) intervals.
To shift the point by second or minute
intervals, press m or M so that “s” or
“m” flashes, then turn ./> (or press
. or > on the remote).
7Repeat step 6 until point A is played
correctly.
8Press ENTER/YES if point A is correct.
“Point B Set” appears and playback for
3
setting the ending point of the portion to be
erased (point B) starts.
9Continue playback until the deck
reaches point B, then press ENTER/
YES.
“A-B Ers” and “Point B ok?” appear
alternately and the deck repeats a portion of
the few seconds before point A and after
point B successively.
10
Turn ./> (or press . or > on
the remote) to find point B.
The procedure is the same as step 6.
11
Press ENTER/YES if point B is correct.
“Complete!” appears.
28
Page 29

Moving recorded tracks
Dividing recorded tracks
— Move Function
You can use this function to change the order
of any track on the disc. When you move
tracks, the tracks are automatically
renumbered.
E.g.: Moving track 3 to position 2.
Track
number
Original
tracks
After
MOVE
123
AB C D
23
1
CBDA
4
4
1 Press FUNCTION repeatedly to switch
the function to MD.
2 Press MENU/NO to display “Edit
Menu”.
3 Turn ./> (or press . or > on
the remote) until “Move ?” appears,
then press ENTER/YES.
4 Turn ./> (or press . or > on
the remote) until the desired track
number to move appears, then press
ENTER/YES.
5 Turn ./> (or press . or > on
the remote) until the new track position
appears.
Original track number
New track position
6 Press ENTER/YES.
“Complete!” appears.
— Divide Function
You can use this function to mark track
numbers after recording. The total number of
tracks increases by one and all the tracks
following the divided ones are renumbered.
E.g.: Dividing track 2 into two tracks.
Track
number
Original
tracks
After
DIVIDE
12 3
A
123 4
AB C D
CBD
Divide track 2 into
track B and C
1 Press FUNCTION repeatedly to switch
the function to MD.
2 Press MENU/NO to display “Edit
Menu”.
3 Turn ./> (or press . or > on
the remote) until “Divide ?” appears,
then press ENTER/YES.
4 Turn ./> (or press . or > on
the remote) until the desired track
number to divide appears, then press
ENTER/YES.
“Rehearsal” appears and the portion to be
divided is played repeatedly.
5 While monitoring the sound, turn
./> (or press . or > on the
remote) to adjust the point to be
divided.
You can shift the point by 1/86 second
(1 frame) intervals.
To shift the point by second or minute
intervals, press m or M so that “s” or
“m” flashes, then turn ./> (or press
. or > on the remote).
6 Press ENTER/YES.
“Complete!” appears.
MD – Editing
continued
29
Page 30

Dividing recorded tracks (continued)
Combining recorded
Note
If you divide a labelled track (see “Labelling an MD”
on page 25) into two tracks, only the first track retains
the track title.
E.g.:
12
Andante
Adagio
12433
Andante
Adagio
Allegro
45
Allegro
The new track is not labelled
tracks
— Combine Function
You can use this function to combine 2 tracks
into a single track. The total number of tracks
decreases by one and all tracks following the
combined ones are renumbered.
You can also use this function to erase
unnecessary track numbers.
E.g.: Combining track 3 to track 1.
Track
number
Original
tracks
After
COMBINE
E.g.: Combining track 1 to track 4.
Original
tracks
After
COMBINE
12
A
12
ACBD
12
A
12433
BC D A
43
DCB
3
DCB
5
4
30
1Press FUNCTION repeatedly to switch
the function to MD.
2Press MENU/NO to display “Edit
Menu”.
3Turn ./> (or press . or >
on the remote) until “Combine ?”
appears, then press ENTER/YES.
Page 31

4 Turn ./> (or press . or > on
the remote) until the first track number
of the two to be combined appears,
then press ENTER/YES.
5 Turn ./> (or press . or > on
the remote) until the second track
number of the two to be combined
appears.
6 Press ENTER/YES.
“Complete!” appears.
Note
If both of the combined tracks have track titles, the
title of the second track is erased.
Undoing the last edit
— Undo Function
You can use this function to cancel the last edit
and restore the contents of the MD to the
condition before the edit.
Note, however, that you cannot undo an edit if
you do any of the following after the edit:
• Do another edit.
• Start recording.
• Update the TOC by turning off the system or
ejecting the MD.
• Disconnect the mains lead.
You cannot undo the S.F Edit Function even if
you use the Undo Function.
1 Press MENU/NO in stop mode to
display “Edit Menu”.
2 Turn ./> (or press . or > on
the remote) until “Undo ?” appears.
“Undo ?” does not appear, when there is no
editing function that can be cancelled.
3 Press ENTER/YES.
A message appears.
4 Press ENTER/YES again.
“Complete!” appears.
MD – Editing
31
Page 32

Changing the recorded
level after recording
— S.F Edit Function
You can change the volume of recorded tracks
using S.F (Scale Factor) Edit. The original
track is recorded over at the new recording
level. When changing the recording level, you
can select Fade-in Recording to gradually
increase the signal level at the start of
recording, or Fade-out Recording to gradually
decrease the signal level at the end of the
recording.
Changing the overall
recording level
1 Press FUNCTION repeatedly to switch
the function to MD.
2 Press MENU/NO to display “Edit
Menu”.
3 Turn ./> (or press . or > on
the remote) until “S.F Edit?” appears,
then press ENTER/YES.
4 Turn ./> (or press . or > on
the remote) until “Tr Level?” appears,
then press ENTER/YES.
5 Turn ./> (or press . or > on
the remote) until the track number you
want to change the recording level
appears, then press ENTER/YES.
“Level 0dB” appears in the display.
6Turn ./> (or press . or > on
the remote) to change the recorded
level.
The recording level can be changed from
–12 dB to +12 dB, in 2 dB steps. While
monitoring the sound, change to the
optimum level while making sure that
“OVER” does not appear in the display at
the loudest portion.
7Press ENTER/YES.
“S.F Edit OK?” appears in the display.
8Press ENTER/YES again.
The deck starts recording over the existing
track. “S.F Edit: ** %” appears while the
track is being recorded. An amount of time
that is roughly equal to or longer than the
playback time of the track is required when
recording over the track. When the
recording finishes, “Complete!” appears in
the display for a few seconds.
32
Page 33

Fade-in and Fade-out
Recording
1 Press FUNCTION repeatedly to switch
the function to MD.
2 Press MENU/NO to display “Edit
Menu”.
3 Turn ./> (or press . or > on
the remote) until “S.F Edit?” appears,
then press ENTER/YES.
4 Turn ./> (or press . or > on
the remote) until “Fade In?” or “Fade
Out?” appears, then press ENTER/YES.
5 Turn ./> (or press . or > on
the remote) until the track number you
want to change the recording level
appears, then press ENTER/YES.
“Time 5.0s” appears in the display.
6 Turn ./> (or press . or > on
the remote) to change the Fade-in or
Fade-out recording time.
The system plays the portion that will be
recorded over using Fade-in or Fade-out
Recording. You can set the time at any
value between 1.0 second and 12.5 seconds,
in 0.1 second steps. You cannot set the time
longer than the track.
7 Press ENTER/YES.
“S.F Edit OK?” appears in the display.
8 Press ENTER/YES again.
The deck starts recording over the existing
track. “S.F Edit: ** %” appears while the
track is being recorded. When the recording
finishes, “Complete!” appears in the display
for a few seconds.
Notes
• Do not disconnect the mains lead or move the
system while recording is in progress. This may
damage the recording data preventing recording
from being performed properly.
• Do not use an MD that is damaged or dirty. This
may prevent recording data from being recorded
properly.
• Repeatedly changing the recording level results in
poor sound quality.
• The recording level will not return to the exact
original level once the recording level has been
changed even if it returned to the original level.
• The recording level cannot be changed while the
timer is activated.
MD – Editing
33
Page 34

Tuner
Presetting radio stations
You can preset 20 stations for FM and 10
stations for AM.
1 Press TUNER/BAND repeatedly to
select “FM” or “AM”.
Pressing TUNER/BAND turns on the
system.
2 Press and hold m or M until “AUTO”
appears.
3 Press m or M.
The frequency indication changes and the
scanning stops when the system tunes in a
station. “TUNED” and “STEREO” (for a
stereo programme) appear.
4 Press MENU/NO.
5 Turn ./> (or press . or > on
the remote) until “Memory?” appears,
then press ENTER/YES.
A preset number appears in the display. The
stations are stored from preset number 1.
Preset number
6Press ENTER/YES.
“Complete!” appears, and then the station is
stored.
7Repeat steps 1 to 6 to store other
stations.
To stop scanning
Press m or M.
To tune in a station with a weak
signal
Press m or M in step 2. “MANUAL”
appears. Then press m or M repeatedly to
tune in the station manually.
To set another station to an existing
preset number
Start over from step 1. After step 5, turn ./
> (or press . or > on the remote) to
select the preset number you want to store the
other station.
To change the AM tuning interval
(except for the European model)
The AM tuning interval is factory-set to 9 kHz
(10 kHz in some areas). To change the AM
tuning interval, tune in any AM station first,
then turn off the system. While holding
STEREO/MONO, turn the system back on.
When you change the interval, all the AM
preset stations are erased. To reset the interval,
repeat the same procedure.
Tip
The preset stations are retained for about a day even if
you disconnect the mains lead or if a power failure
occurs.
34
Page 35

Listening to the radio
— Preset Tuning
Preset radio stations in the tuner’s memory first
(see “Presetting radio stations” on page 34).
1 Press TUNER/BAND repeatedly to
select “FM” or “AM”.
2 Turn ./> (or press . or > on
the remote) to select the desired preset
station (or station name* or RDS
station name**).
* The station name appears only if you have
labelled the station (see “Labelling the preset
stations” on the next page).
**European model only.
Tips
• To improve broadcast reception, adjust the supplied
aerials, or connect a commercially available
external aerial.
• When an FM stereo programme has static noise,
press STEREO/MONO repeatedly until “MONO”
appears. There will be no stereo effect, but the
reception will improve.
To Do this
Turn off the radio Press ?/1.
Change the display Press DISPLAY repeatedly.
The display changes cyclically
as follows:
Frequency with station name*
t Clock display t Effect
name
* The station name appears when you label the preset
station (see “Labelling the preset stations” on the
next page) or the RDS broadcast is received (see
“Using the Radio Data System (RDS)” on the next
page).
Listening to non-preset radio
stations
• Press m or M in step 2. “MANUAL”
appears. Then press m or M to tune in
the desired station (Manual Tuning).
• Press and hold m or M until “AUTO”
appears in step 2. The frequency indication
changes and the scanning stops when the
system tunes in a station (Automatic
Tuning).
To cancel Automatic Tuning
Press m or M.
Tuner
35
Page 36

Labelling the preset
Using the Radio Data
stations
— Station Name
You can label each preset station with up to
12 characters (Station Name).
1 Tune the desired station you want to
label (see “Listening to the radio” on
page 35).
2 Follow the same procedures as from
step 3 to 8 of “Labelling a CD” on page
12.
To erase the name
1 Tune the station.
2 Press NAME EDIT/CHARACTER on the
remote.
3 Press CLEAR on the remote repeatedly to
erase the name.
4 Press ENTER/YES.
System (RDS)
(European model only)
What is the Radio Data
System?
Radio Data System (RDS) is a broadcasting
service that allows radio stations to send
additional information along with the regular
program signal. This tuner offers convenient
RDS features like station name display and
location of stations by program type. RDS is
available only on FM stations.*
Note
RDS may not work properly if the station you are
tuned in is not transmitting the RDS signal properly
or if the signal is weak.
* Not all FM stations provide RDS service, nor do
they provide the same types of services. If you are
not familiar with the RDS system, check with your
local radio stations for details on RDS services in
your area.
Receiving RDS broadcasts
Simply select a station from the FM band.
When you tune in a station that provides RDS
services, the station name appears in the
display.
36
Page 37

Tape – Play
Loading a tape
1 Open the lid with your hand and insert
a tape.
With the side
you want to
play facing up
2 Close the lid with your hand.
To remove the tape, lift up the tape from the
side as shown in the illustration.
Playing a tape
1 Press FUNCTION repeatedly to switch
the function to TAPE.
2 Press PLAY MODE/DIRECTION
repeatedly until g appears to play one
side or h (or j
3 Press TAPE n N (or N on the
remote).
Press TAPE n N (or N on the remote)
again to play the bottom side.
*1The tape deck stops automatically after repeating
the sequence five times.
1
*
) to play both sides.
To Do this
Stop play Press x.
Pause Press X on the remote. Press again
Find the
succeeding track
2
(AMS*
)
Find the
preceding track
(AMS*2)
Fast-forward or
rewind
*2The Automatic Music Sensor (AMS) feature
detects a blank space of more than four seconds
between tracks to locate tracks quickly.
Tip
The deck cannot identify the tape type, such as TYPE
I (normal), TYPE II (CrO
Notes
• If you do not close the lid, you cannot start playing
the tape.
• If you open the lid while playing a tape, the deck
stops playing.
• The AMS feature may not work in the following
cases:
– the blank space between tracks is four seconds
or less.
– the TV is too close to the system.
to resume play.
Turn ./> clockwise (or
press > on the remote) for the
top side during playback.
Turn ./> counterclockwise
(or press . on the remote) for
the bottom side during playback.
Turn ./> counterclockwise
(or press . on the remote) for
the top side during playback.
Turn ./> clockwise (or
press > on the remote) for the
bottom side during playback.
Press m or M.
) or TYPE IV (metal) .
2
Tuner/Tape – Play
37
Page 38

Tape – Recording
Recording a CD on a tape
Recording on an MD and a
tape at the same time
— CD-TAPE Synchro Recording
1 Load a blank tape.
2 Load a CD you want to record.
3 Press SYNCHRO MODE repeatedly until
“CDtTAPE SYNC?” appears.
4 Press ENTER/START.
The tape deck stands by for recording and
the CD player pauses for play.
When you want to record on the bottom
side, press TAPE n N.
5 Press PLAY MODE/DIRECTION
repeatedly until g appears to record
on one side or h (or j) to record on
both sides.
6 Press ENTER/START.
Recording starts.
To stop recording
Press x.
Tips
• When you record on both sides, be sure to start
from the top side. If you start from the bottom side,
recording stops at the end of the bottom side.
• If you select both sides recording and the tape
reaches the end of the top side part-way through a
track, the entire track is recorded again from the
beginning of the bottom side.
• You can record only your favourite CD tracks with
Programme Play. After step 2, follow the same
procedures as step 1 to 6 in “Programming CD
tracks” on page 11. Then go to step 3.
Place the CD you want to record.
Then, insert a blank tape and a recordable
MD. Press SYNCHRO MODE repeatedly
until “DUAL SYNC?” appears, then press
ENTER/START twice.
To stop recording
Press x.
Tips
• Even if the MD or the tape ends part-way through
the recording, the other continues recording.
• If you select both sides recording and the tape
reaches the end of the top side part-way through a
track, the entire track is recorded again from the
beginning of the bottom side. In this case, the entire
track may also be recorded again on the MD.
• You can record only your favourite CD tracks with
Programme Play. After inserting a blank tape and a
recordable MD, follow the same procedures as step
1 to 6 in “Programming CD tracks” on page 11.
Then press SYNCHRO MODE.
38
Page 39

Recording an MD on a
Recording on a tape
tape
— MD-TAPE Synchro Recording
1 Load a blank tape.
2 Load an MD.
3 Press SYNCHRO MODE repeatedly until
“MDtTAPE SYNC?” appears.
4 Press ENTER/START.
The tape deck stands by for recording and
the MD deck pauses for play.
5 Press ENTER/START.
MD playing and tape recording start.
To stop recording
Press x.
Tips
• When you record on both sides, be sure to start
from the top side. If you start from the bottom side,
recording stops at the end of the bottom side.
• If you select both sides recording and the tape
reaches the end of the top side part-way through a
track, the entire track is recorded again from the
beginning of the bottom side.
• You can record only your favourite MD tracks with
Programme Play. After step 2, follow the same
procedures as step 1 to 5 in “Programming MD
tracks” on page 15. Then, go to step 3.
Note
If the tape becomes full during recording, the MD
deck and the tape deck stop automatically.
manually
— Manual Recording
You can record just the portions you like from
a CD or an MD on a tape. You can also record
a radio programme.
The recording level is automatically adjusted.
1 Load a blank tape.
2 Press FUNCTION repeatedly to select
the desired source to record.
3 Press TAPE REC PAUSE/START.
The tape deck stands by for recording.
When you want to record on the bottom
side, press TAPE n N.
4 Press PLAY MODE/DIRECTION
repeatedly until g appears to record
on one side or h (or j) to record on
both sides.
5 Press TAPE REC PAUSE/START and
then start playing the desired source to
record.
Tips
• When you record on both sides, be sure to start
from the top side. If you start from the bottom side,
recording stops at the end of the bottom side.
• If you select both sides recording and the tape
reaches the end of the top side part-way through a
track, the entire track is recorded again from the
beginning of the bottom side.
Tape – Recording
39
Page 40

Sound Adjustment
Adjusting the sound
Enjoying the powerful sound
— GROOVE
You can listen to music with more powerful
sound.
Press GROOVE.
“GROOVE” appears in the display and the
volume switches to power mode (DBFB is also
turned on).
Press again to cancel GROOVE.
DBFB is also cancelled.
Tip
GROOVE is factory set to on.
Reinforcing the bass sound
— DBFB
You can listen to music with stronger bass
tones.
Press DBFB* on the remote.
“DBFB” appears in the display and the bass is
reinforced.
Press again to cancel DBFB.
* DBFB: Dynamic Bass Feedback
Tip
DBFB is factory set to on.
Adjusting the bass
1Press BASS/TREBLE.
2Press m or M repeatedly to adjust
the bass.
You can adjust the bass in 7 steps (from –3
to +3).
Adjusting the treble
1Press BASS/TREBLE twice.
2Press m or M repeatedly to adjust
the treble.
You can adjust the treble in 7 steps (from –3
to +3).
Tip
You can enjoy the original sound by setting BASS
and TREBLE to 0.
Selecting the surround effect
Press SURROUND on the remote.
“SURROUND” appears in the display.
Press again to cancel SURROUND.
40
Page 41

Timer
Selecting the preset
music menu
The audio emphasis menu lets you select the
sound characteristics according to the sound
you are listening to.
Press MUSIC MENU repeatedly to select
the preset you want.
The preset name appears in the display. See the
chart “Music menu options”.
To cancel the effect
Press MUSIC MENU repeatedly until “FLAT”
appears.
Music menu options
“SURROUND” appears if you select an effect
with surround effects.
Effect
ROCK
POP
JAZZ
DANCE
SOUL
ACTION
DRAMA
GAME
SF
FLAT
Standard music sources
Soundtracks and special listening
situations
Cancelling the effect
Falling asleep to music
— Sleep Timer
You can set the system to turn off after a
certain time, so that you can fall asleep to
music.
Press SLEEP on the remote.
Each time you press the button, the minute
display (the turn-off time) changes cyclically as
follows:
SLEEP OFF t AUTO* t 90min t 80min
t … t 10min
* The system automatically turns off after the current
CD, MD or tape finishes playing (up to 100
minutes).
When the function is TUNER, the system turns off
in 100 minutes.
To Press
Check the
remaining time
Change the time
to turn off
Cancel the Sleep
Timer function
Note
Do not set to “AUTO” during Synchro Recording on
an MD or a tape.
SLEEP on the remote once.
SLEEP on the remote to select the
time you want.
SLEEP on the remote repeatedly
until “SLEEP OFF” appears.
Sound Adjustment/Timer
41
Page 42

Waking up to music
— Daily Timer
You can wake up to music at a preset time.
Make sure you have set the clock (see “Setting
the time” on page 8).
1 Prepare the sound source you want to
play.
• CD: Place a CD. To start from a
specific track, make a programme (see
“Programming CD tracks” on page 11).
• MD: Insert an MD. To start from a
specific track, make a programme (see
“Programming MD tracks” on page 15).
• Tape: Insert a tape.
• Radio: Tune in a station (see
“Listening to the radio” on page 35).
2 Turn VOLUME (or press VOL+ or – on
the remote) to adjust the volume.
3 Press CLOCK/TIMER SET on the
remote.
“DAILY SET ?” appears.
4 Press ENTER/YES.
“ON” appears and the hour indication
flashes.
5 Set the time to start playing.
Turn ./> (or press . or > on
the remote) to set the hour, then press
ENTER/YES.
The minute indication flashes.
Turn ./> (or press . or > on
the remote) to set the minute, then press
ENTER/YES.
6 Set the time to stop playing following
the procedure in step 5.
7Turn ./> (or press . or > on
the remote) to select the desired sound
source.
The indication changes as follows:
t
TUNER y CD PLAY
t
TAPE PLAY y MD PLAY
T
T
8Press ENTER/YES.
The start time, the stop time, and the sound
source appear in turn, before the original
display returns.
9Press ?/1 to turn off the system.
To Do this
Check the setting Press CLOCK/TIMER
Change the setting Start over from step 1.
Cancel the timer Press CLOCK/TIMER
Notes
• If the system is on about 30 seconds before the
preset time, the Daily Timer will not be activated.
• Do not operate the system from the time the system
turns on until the play starts (about 30 seconds
before the preset time).
SELECT on the remote, then
turn ./> (or press
. or > on the remote)
until “DAILY SELECT?”
appears. Then, press ENTER/
YES.
SELECT on the remote, then
turn ./> (or press
. or > on the remote)
until “TIMER OFF” appears.
Then, press ENTER/YES.
42
Page 43

Timer recording radio
programmes
To timer record, you must first preset the radio
station (see “Presetting radio stations” on page
34) and set the clock (see “Setting the time” on
page 8).
1 Tune in the preset radio station (see
“Listening to the radio” on page 35).
2 Press CLOCK/TIMER SET on the
remote.
“DAILY SET ?” appears.
3 Turn ./> (or press . or > on
the remote) to select either “MD REC
SET ?” or “TAPE REC SET ?”, then
press ENTER/YES.
“ON” appears and the hour indication
flashes.
4 Set the time to start recording.
Turn ./> (or press . or > on
the remote) to set the hour, then press
ENTER/YES.
The minute indication flashes.
Turn ./> (or press . or > on
the remote) to set the minute, then press
ENTER/YES.
5 Set the time to stop recording following
the procedure in step 4.
6 When you record onto an MD, select
STEREO or MONO by turning ./>
(or pressing . or > on the remote)
then press ENTER/YES.
The timer recording settings appear, then
the original display returns.
7 Insert a recordable MD or tape.
If you use a partially recorded MD,
recording starts after the recorded tracks.
If you use a tape, recording starts from the
top side. Insert a tape with the side you want
to record on facing up.
8 Press ?/1 to turn off the system.
To Do this
Check the setting Press CLOCK/TIMER
SELECT on the remote and
turn ./> (or press
. or > on the remote)
to select either “MD REC” or
“TAPE REC”, then press
ENTER/YES.
Change the setting Start over from step 1.
Cancel the timer Press CLOCK/TIMER
SELECT on the remote and
turn ./> (or press
. or > on the remote)
to select “TIMER OFF”, then
press ENTER/YES.
Tip
When you record from the radio, the station name
(see “Labelling the preset stations” on page 36, or
frequency when the station is not labelled), the start
time and the stop time are automatically recorded on
the MD.
Notes
• The Smart Space and Level Synchro Recording
functions do not operate.
• Do not operate the system from the time the system
turns on until the recording starts (about 30 seconds
before the preset time).
• When you record on a brand new MD, the first
15 seconds are not recorded.
• If the system is on about 30 seconds before the
preset time, the timer-recording will not be
activated.
• The volume is reduced to minimum during
recording.
Timer
43
Page 44

Optional Components
Hooking up the optional
components
You can connect a digital or an analogue
component to this system. You can also
connect a personal computer to the PC LINK
connector and operate the system from the
personal computer.
To the audio output jacks of an analogue component
PC LINK
To Do this
Make a digital
recording from a
digital component
on an MD*
Listen to the
connected digital
component
Make an analogue
recording from an
analogue
component on an
MD or a tape
Listen to the
connected
analogue
component
Operate the system
from a personal
computer
* When you record on a tape, analogue recording is
performed.
Connect a digital cable.
Press FUNCTION repeatedly to
switch the function to OPTICAL
IN.
Connect the audio cords.
Press FUNCTION repeatedly to
switch the function to VIDEO.
Connect the personal computer
to the PC LINK connector using
a Sony PC connection kit
(option) that supports this
system.
To the digital output jack of a digital component
44
Page 45

Additional Information
Precautions
On operating voltage
Before operating the system, check that the
operating voltage of your system is identical
with the voltage of your local power supply.
On safety
• The unit is not disconnected from the AC power
source (mains) as long as it is connected to the wall
outlet, even if the unit itself has been turned off.
• Unplug the system from the mains if it is not to be
used for an extended period of time.
To disconnect the mains lead, pull it out by the
plug. Never pull the mains lead itself.
• Should any solid object or liquid fall into the
system, unplug the system and have it checked by
qualified personnel before operating it any further.
• AC power cord (mains lead) must be changed only
at the qualified service shop.
• When you connect the mains lead to the mains,
even if the power is off, the system begins charging
for remote and timer functions. Therefore the
surface of this unit become warm, this is normal.
• To prevent fire, do not Cover the ventilation of the
apparatus with news papers, table-cloths, curtains,
etc. And don’t place lighted candles on the
apparatus.
On placement
• Make sure the system fan is on during use.
Place the system in a location with adequate air
circulation, and do not place anything on top of the
system.
• Place the system in a location with adequate
ventilation to prevent heat build up.
• Do not place the system in an inclined position.
• Do not place the system in locations where it is;
– Extremely hot or cold
– Dusty or dirty
– Very humid
– Subject to vibrations
– Subject to direct sunlight.
On installing
When you move the system, remove the CD or MD.
On operation
• If the system is brought directly from a cold to a
warm location, or is placed in a very damp room,
moisture may condense on the lens inside the CD
player or the MD deck. Should this occur, the
system will not operate properly. Remove the CD or
MD and leave the system turned on for about an
hour until the moisture evaporates.
• When you move the system, take out any discs.
If you have any questions or problems concerning
your system, please consult your nearest Sony dealer.
On the speaker system
This speaker system is not magnetically shielded and
the picture on TV sets may become magnetically
distorted. In such a case, turn off the power of the TV
set once, and after 15 to 30 minutes turn it on again.
If there seems to be no improvement, locate the
speaker system further away from the TV set. Also,
be sure not to place objects in which magnets are
attached or used near the speaker system, such as
audio racks, TV stands, and toys. These may cause
magnetic distortion to the picture due to their
interaction with the system.
Notes on MDs
• If you try to force the shutter open, the disc may be
damaged. If the shutter opens, close it immediately
without touching the disc inside.
• Affix the label supplied with the disc only to the
specified label indentation. Do not affix the label
around the shutter or in other locations. Note that
the shape of the indentation depends on the disc.
Label
position
• Wipe the disc cartridge with a dry cloth to remove
dirt.
• Do not expose the MD to direct sunlight or heat
sources such as hot air ducts, nor leave it in a car
parked in direct sunlight.
Shutter
continued
Optional Components/Additional
Information
45
Page 46

Precautions (continued)
• With the following kinds of CDs, you may
experience a reading failure or noise when recorded
on an MD:
— CDs with adhesive labels attached to them
— Irregularly shaped CDs (for example, heart- or
star- shaped)
— CDs with printed text concentrated on one side
only
— Old CDs
— Scratched CDs
— Dirty CDs
— Warped CDs
• If the following occurs during CD playback or
recording, a reading error may occur or noise may
be produced in the recorded results:
— The CD tray or other part of the system is
bumped.
— The system is placed on an uneven or soft
surface.
— The system is located near a speaker, door, or
other source of vibration.
• If the above reading errors occur, a extra soundless
track may be created. You can erase these extra
tracks using Erase Function (see “Erasing
recordings” on page 27).
Notes on CDs
• Before playing, clean the CD with a cleaning cloth.
Wipe the CD from the centre out.
• Do not use a CD with tape, seals, or paste on it as
this may damage the player.
• Do not use solvents.
• Do not expose the CD to direct sunlight or heat
sources.
Note on CD-R/CD-RW playback
Discs recorded on CD-R/CD-RW drives may not be
played back because of scratches, dirt, recording
condition or the drive’s characteristics. Besides, the
discs, which are not yet finalized at the end of
recording, cannot be played back.
Cleaning the cabinet
Use a soft cloth slightly moistened with mild
detergent solution.
Before placing a cassette in the tape
deck
Take up any slack in the tape. Otherwise, the tape
may get entangled in the parts of the tape deck and
become damaged.
When using a tape longer than 90
minutes
The tape is very elastic. Do not change the tape
operations such as play, stop, and fast-winding
frequently. The tape may get entangled in the tape
deck.
To save a tape permanently
To prevent a tape from being accidentally recorded
over, break off the cassette tab from side A or B as
illustrated.
Side A
Tab of side A
Tab of side B
Break off the
cassette tab of
side A
If you later want to reuse the tape for recording, cover
the broken tab with adhesive tape.
Cleaning the tape heads
Clean the tape heads after every 10 hours of use.
Be sure to clean the tape heads before you start an
important recording or after playing an old tape.
Use a separately sold dry-type or wet-type cleaning
cassette. For details, refer to the instructions of the
cleaning cassette.
Demagnetising the tape heads
Demagnetise the tape heads and the metal parts that
have contact with the tape after every 20 to 30 hours
of use with a separately sold demagnetising cassette.
For details, refer to the instructions of the
demagnetising cassette.
46
Page 47

System limitations of MDs
The recording system in your MD deck has the
limitations described below.
Note, however, that these limitations are due to
the inherent nature of the MD recording system
itself, not to mechanical causes.
“Disc Full!” appears before the MD
has reached the maximum recording
time
When 255 tracks have been recorded on the MD,
“Disc Full!” appears regardless of the total recorded
time. More than 255 tracks cannot be recorded on the
MD. To continue recording, erase unnecessary tracks
or use another recordable MD.
“Disc Full!” appears before the
maximum number of tracks (255) is
reached
Fluctuations in emphasis within tracks are sometimes
interpreted as track intervals, increasing the track
count and causing “Disc Full!” to appear.
The remaining recording time does
not increase even after erasing
numerous short tracks
Tracks shorter than 12 seconds* are not counted, so
erasing them may not increase the recording time.
* During Stereo recording:
In Monaural or LP2 Stereo mode: about 24 seconds
In LP4 Stereo mode: about 48 seconds
“Impossible” appears when you use
A-B Erase Function or Combine
Function
This happens when you have edited the same track
many times. This is due to a technical limitation of
the MD system and is not a mechanical error.
Some tracks cannot be combined
with others
Track combination may become impossible when
repeated editing has been done to the track(s).
The total recorded time and the
remaining time on the MD do not add
up to the maximum recording time
Recording is done in minimum units of 2 seconds*
each, no matter how short the material. The recorded
contents may be shorter than the maximum recording
capacity. Disc space may also be reduced by
scratches.
* During Stereo recording:
In Monaural or LP2 Stereo mode: about 4 seconds
In LP4 Stereo mode: about 8 seconds
The sound may drop-out while
searching the edited tracks
Tracks created through editing may exhibit sound
dropout during searching because high-speed
playback requires time to search for the position on
the disc when the tracks are not in order.
Track numbers cannot be marked
When “LEVEL-SYNC” (page 21) lights up in the
display window during analogue recording, the track
numbers may not be marked at the beginning of the
track:
• if you repeatedly record the same track on the same
disc using 1-track repeat, etc.
• if you record tracks on different discs but which
have the same track number in succession.
• if the input signal is below a certain fixed level for
less than 2 seconds between tracks.
• if the input signal is below a certain fixed level for
more than 2 seconds in the middle of the track.
• if you record a track that is 4 seconds or less*.
* During Stereo, Monaural or LP2 Stereo recording
mode (In LP4 Stereo recording mode: 8 seconds or
less).
continued
Additional Information
47
Page 48

System limitations of MDs
(continued)
Troubleshooting
Guide to the Serial Copy
Management System
Digital audio components, such as CDs, MDs, and
DATs let you copy music easily with high quality by
processing music as a digital signal.
To protect the copyrighted music programmes, this
system uses the Serial Copy Management System that
allows you to make only a single copy of a digitally
recorded source through digital-to-digital
connections.
You can make only a first generation copy* through a
digital-to-digital connection.
For example:
1You can make a copy of a commercially available
digital sound programme (for example, a CD or
MD), but you cannot make a second copy from the
first-generation copy.
2You can make a copy of a digital signal from a
digitally recorded analogue sound programme (for
example, an analogue record or a music cassette
tape) or from a digital satellite broadcast
programme, but you cannot make a second copy.
* A first-generation copy means a digital recording of
a digital signal made on digital audio equipment.
For example, if you record from this system’s CD
player to the MD deck, you make a first-generation
copy.
Note
This copy management system doesn’t apply when
you make a recording through analogue-to-analogue
connections.
If you have any problem using this system, use
the following checklist.
First, check that the mains lead is connected
firmly and that the speakers are connected
correctly and firmly.
Should any problem persist, consult your
nearest Sony dealer.
General
There is no sound.
• Turn VOLUME clockwise (or press VOL+ or –
on the remote).
• Make sure the headphones are not connected.
• Check the speaker connections (see page 6).
• High-Speed CD-MD Synchro Recording is
underway.
Sound comes from one channel, or unbalanced
left and right volume.
• Connect the speaker cords properly (see page 6).
• Place the speakers as symmetrically as possible.
• Connect only one of the supplied speakers to
each set of speaker terminals.
• Connect the supplied speakers.
There is severe hum or noise.
• Move the system away from the source of noise.
• Connect the system to a different mains.
• Install a noise filter (commercially available) to
the mains line.
“0:00” (for the European model) or “12:00 AM”
(for other models) flashes in the display.
• Set the clock again (see page 8).
The timer cannot be set.
• Set the clock again (see page 8).
48
Page 49

The timer does not function.
• Press CLOCK/TIMER SELECT on the remote to
set the timer and light up “DAILY” or “REC” in
the display (see pages 42 and 43).
• Check the set contents and set the correct time
(see pages 42 and 43).
• Cancel the Sleep Timer function (see page 41).
• You cannot activate the Daily Timer and
recording timer at the same time.
The remote does not function.
• Remove the obstacle.
• Move the remote closer to the system.
• Point the remote at the system’s sensor.
• Replace the batteries (R6/size AA).
• Locate the system away from the fluorescent
light.
“PROTECT” and “PUSH POWER” appear
alternately.
• Press ?/1 (power) to turn off the system. Turn
on the system again after a while.
CD Player
The CD tray does not close.
• Place the CD correctly in the centre of the tray.
• Always close the tray by pressing CD 1 – 3 Z.
Trying to press the tray closed with your fingers
may cause problems with the CD player.
The CD does not eject.
• Consult your nearest Sony dealer.
Play does not start.
• Open the CD tray and check whether a CD is
loaded.
• Wipe the CD clean (see page 46).
• Replace the CD.
• Place the CD correctly in the centre of the tray.
• Place the CD in the tray with the label side up.
• Remove the CD and wipe away the moisture on
the CD, then leave the system turned on for a
few hours until the moisture evaporates.
• Press CD NX to start play.
The sound skips.
• Wipe the CD clean (see page 46).
• Replace the CD.
• Try moving the system to a place without
vibration (e.g., on top of a stable stand).
• Try moving the speakers away from the system,
or placing them on separate stands.
• When you listen to a track with bass sounds at
high volume, the speaker vibration may cause the
sound to skip.
Play does not start from the first track.
• Press PLAY MODE/DIRECTION repeatedly
until “PGM” or “SHUFFLE” disappears to return
to normal play.
“OVER” appears.
• You have reached the end of the CD. Press and
hold m to return to the desired playing
position.
MD Deck
An MD cannot be inserted.
• Insert the MD with the arrow side up and the
arrow pointing toward the deck.
The controls do not work.
• Replace the MD with a new one.
• Retry the operations after “TOC” or
“STANDBY” turns off.
Play does not start.
• Replace the MD.
• Insert the MD and leave the system turned on for
a few hours until the moisture evaporates.
• Press MD NX to start play.
The sound skips.
• Replace the MD.
• Try moving the system to a place without
vibration (e.g., on top of a stable stand).
• Try moving the speakers away from the system,
or placing them on separate stands.
When you listen to a track with bass sounds at
high volume, the speaker vibration may cause the
sound to skip.
• Insert the disc and wait for 10 to 20 minutes with
the system turned on.
Additional Information
continued
49
Page 50

Troubleshooting (continued)
Play does not start from the first track.
• Press PLAY MODE/DIRECTION repeatedly
until “PGM” or “SHUFFLE” disappears to return
to normal play.
“OVER” appears.
• You have reached the end of the MD. Press m
to return to the beginning of the MD.
“OVER” lights red during recording.
• Adjust the recording level lower (see page 23).
Recording or editing was done, but the TOC is
not updated.
• MD recording and editing contents are recorded
to the MD when the MD is removed, so make
sure you remove the MD after recording or
editing (see pages 17 and 24).
Recording is not possible.
• Remove the MD and slide the tab to close the
slot (see page 17).
• Connect the optional component properly (see
page 44).
• Switch to another sound source.
• Replace the MD with a recordable MD, or use
the Erase Function to erase unnecessary tracks
(see page 27).
The sound from an MD you recorded is too low
(or too high).
• Readjust the recording level (see page 32).
Tape Deck
The tape does not record.
• No cassette is inserted. Insert a cassette.
• The tab has been removed from the cassette.
Cover the broken tab with adhesive tape (see
page 46).
• The tape has wound to the end.
The tape does not record or play, or there is a
decrease in sound level.
• The heads are dirty. Clean them.
• The record/playback heads are magnetised.
Demagnetise them (see page 46).
The tape does not erase completely.
• The record/playback heads are magnetised.
Demagnetise them (see page 46).
There is excessive wow or flutter, or the sound
drops out.
• The capstans in the tape deck are dirty. Clean
them using a cleaning cassette.
Noise increases or the high frequencies are
erased.
• The record/playback heads are magnetised.
Demagnetise them (see page 46).
Optional components
There is no sound.
• Refer to General item “There is no sound.” on
page 48 and check the condition of the system.
• Connect the component properly (see page 44)
while checking:
– if the cords are connected properly.
– if the cord plugs are firmly inserted all the way.
• Turn on the connected component.
• Refer to the operating instructions included with
the connected component and start playing.
The sound is distorted.
• Adjust the recording level (see page 23).
50
Page 51

Tuner
Severe hum or noise/stations cannot be
received.
• Set the proper band and frequency (see page 34).
• Connect the aerial properly (see page 6).
• Find a place and an orientation that provide good
reception, then set up the aerial again. If you
cannot obtain good reception, we recommend
you connect a commercially available external
aerial.
• The supplied FM lead aerial receives signals
along its entire length, so make sure you extend
it fully.
• Locate the aerials as far away from the speaker
cords as possible.
• Consult your nearest Sony dealer if the supplied
AM aerial has come off the plastic stand.
• Try turning off surrounding electrical
equipments.
A stereo FM programme cannot be received in
stereo.
• Press STEREO/MONO until “STEREO” appears
in the display.
• See “Severe hum or noise/stations cannot be
received.”, and check the aerial condition.
Cyclical static noise is heard while recording on
an MD.
• Adjust the aerial orientation and position until
the noise stops.
If the system still does not operate
properly after performing the above
measures, reset the system as
follows:
1 Disconnect the mains lead.
2 Reconnect the mains lead.
3 Press ?/1 to turn on the system.
4 Press x, DISPLAY and CD 1 at the same
time.
5 Press ?/1 to turn on the system.
The system is reset to the factory settings. All
the settings you made such as the preset
stations, clock, timer and CD disc titles are
cleared and must be set again.
Additional Information
51
Page 52

Self-diagnosis display
This system has a Self-diagnosis display
function to let you know if there is a system
malfunction. The display shows a code made
up of three letters and a message alternately to
show you the problem. To solve the problem
refer to the following list. If any problem
persists, consult your nearest Sony dealer.
C11/Protected
The MD is protected against erasure.
cRemove the MD and slide the tab to close the
slot (see page 17).
C12/Cannot Copy
You tried to record a CD or MD with a format that
the system does not support, such as a CD-ROM.
cRemove the disc and turn off the system once,
then turn it on again.
C13/REC Error
Recording could not be performed properly.
cMove the system to a stable place, and start
recording over from the beginning.
The MD is dirty or scratched, or the MD does not
meet the standards.
cReplace the MD and start recording over from
the beginning.
C13/Read Error
The MD deck cannot read the disc information
properly.
cRemove the MD once, then insert it again.
C14/Toc Error
The MD deck cannot read the disc information
properly.
cReplace the MD.
cErase all the recorded contents of the MD using
the All Erase function on page 27.
C41/Cannot Copy
The sound source is a copy of a commercially
available music software, or you tried to record a
CD-R (Recordable CD).
cThe Serial Copy Management System prevents
making a digital copy (see page 48). You cannot
record a CD-R.
E0001/MEMORY NG
There is an error in the internal data that the system
needs in order to operate.
cConsult your nearest Sony dealer.
E0101/LASER NG
There is a problem with the optical pickup.
cThe optical pickup may have failed. Consult your
nearest Sony dealer.
Messages
One of the following messages may appear or
flash in the display during operation.
MD
Auto Cut
The MD deck is pausing the recording because
silence continued for 30 seconds or more during
digital recording.
Blank Disc
The inserted recordable MD is new, or all tracks on
the MD have been erased.
Cannot Edit
• A pre-mastered MD is in the deck.
• You tried to edit in Programme or Shuffle Play
mode.
Cannot REC
• A pre-mastered MD is in the deck.
• The function is switched to MD.
Cannot SYNC!
• There is no disc in the MD deck, or the MD is
protected against erasure.
• There is no time remaining on the MD.
52
Page 53

Complete!
The editing operation of MDs is completed.
Disc Full!
There is no time remaining on the MD.
Eject
The MD deck is ejecting the MD.
Impossible
• You tried to make an impossible editing
operation.
• You cannot combine or erase the tracks due to
the system limitations of MDs.
• You cannot specify the division point at the
beginning or end of a track.
Name Full
There is no more space to store track or disc titles.
No Change
While attempting to change the recording level
after recording, you pressed ENTER/YES without
actually changing the recording level, so no change
was made.
No Disc
There is no disc in the MD deck.
No Name
You tried to show the title of a non-labelled disc or
track.
OVER
You have reached the end of the MD while
pressing M during playing pause.
Program Full !
You tried to programme 26 or more tracks (steps).
Push STOP!
You pressed PLAY MODE/DIRECTION during
play.
Rehearsal
The MD is playing the specified dividing point for
confirmation during the Divide function.
S.F Edit!
You attempted to perform another operation while
in S.F Edit (changing the recording level after
recording, Fade-in, Fade-out) mode.
S.F Edit NOW
You pressed ?/1 while in S.F Edit (changing the
recording level after recording, Fade-in, Fade-out)
mode.
Smart Space
The signal was input again after silence continued
for 3 or more but less than 30 seconds during
digital recording.
Standby (flashing)
The timer settings have disappeared over time and
are not available for saving to disc, or Program
Play could not be activated since the program has
disappeared over time.
Text Protect
There is CD TEXT information which cannot be
recorded on the MD.
TOC Reading
The MD deck is reading the TOC information of
the MD.
TOC Writing
The MD deck is writing the information of
recorded or edited contents.
Track End
You have reached the end of the track while
adjusting the dividing point during the Divide
function.
continued
Additional Information
53
Page 54

Self-diagnosis display (continued)
Specifications
CD
Cannot Edit
You tried to label a CD TEXT disc.
Name Full
There are already 50 disc titles stored in the
system.
No Disc
There is no CD in any of CD 1 – 3.
OVER
You have reached the end of the CD while
pressing M during play or pause.
Push STOP!
You pressed PLAY MODE/DIRECTION during
play.
Step Full!
You tried to programme 26 or more tracks (steps).
TAPE
CANNOT SYNC!
There is no tape in the tape deck, or the tab has
been removed from the cassette.
No Tab
You cannot record the tape because the tab has
been removed from the cassette.
No Tape
There is no tape in the tape deck.
Open
You performed a tape operation with the tape deck
lid not completely shut.
Main Unit (HCD-CL5MD)
Amplifier section
European model:
DIN power output (Rated):40 + 40 watts
Continuous RMS power output (Reference):
Music power output (Reference):
Other models:
DIN power output (Rated):40 + 40 watts
Continuous RMS power output (Reference):
Inputs
VIDEO (AUDIO) IN (phono jacks):
CD DIGITAL IN (Supported sampling frequencies:
32 kHz, 44.1 kHz and 48 kHz)
Outputs
PHONES (stereo minijack):
SPEAKER: accepts impedance of 6 to
CD player section
System Compact disc and digital
Laser Semiconductor laser
Laser output Max. 44.6 µW*
Frequency response 20 Hz – 20 kHz (±0.5 dB)
(6 ohms at 1 kHz, DIN)
50 + 50 watts
(6 ohms at 1 kHz, 10%
THD)
95 + 95 watts
(6 ohms at 1 kHz, 10%
THD)
(6 ohms at 1 kHz, DIN)
50 + 50 watts
(6 ohms at 1 kHz, 10%
THD)
voltage 250 mV,
impedance 47 kilohms
accepts headphones of
8 ohms or more.
16 ohms.
audio system
(λ=795 nm)
Emission duration:
continuous
* This output is the value
measured at a distance
of 200 mm from the
objective lens surface on
the Optical Pick-up
Block with 7 mm
aperture.
54
Page 55

MD deck section
System MiniDisc digital audio
Laser Semiconductor laser
Sampling frequency 44.1 kHz
Frequency response 20 Hz – 20 kHz (±0.5 dB)
Tape deck section
Recording system 4-track 2-channel stereo
Frequency response 40 – 13,000 Hz (±3 dB),
Wow and flutter ±0.15% W. Peak (IEC)
Tuner section
FM stereo, FM/AM superheterodyne tuner
FM tuner section
Tuning range 87.5 – 108.0 MHz
Aerial FM lead aerial
Aerial terminals 75 ohms unbalanced
Intermediate frequency 10.7 MHz
AM tuner section
Tuning range
European model: 531 – 1,602 kHz
Other models: 531 – 1,602 kHz
Aerial AM loop aerial
Intermediate frequency 450 kHz
system
(λ=780 nm)
Emission duration:
continuous
using Sony TYPE I
cassettes
0.1% W. RMS (NAB)
±0.2% W. Peak (DIN)
(50 kHz step)
(with the interval set at
9 kHz)
(with the interval set at
9 kHz)
530 – 1,710 kHz
(with the interval set at
10 kHz)
External aerial terminals
Speaker (SS-SCL5)
Speaker system 2-way, bass-reflex type
Speaker units
Woofer: 17 cm dia., cone type
Tweeter: 5 cm dia., cone type
Nominal impedance 6 ohms
General
Power requirements
European model: 230 V AC, 50/60 Hz
Australian and New Zealand models:
Other models: 120 V, 220 V, 230 – 240
Power consumption
European model: 100 watts
Other models: 100 watts
Dimensions (w/h/d) incl. projecting parts and controls
Amplifier/Tuner/Tape/MD/CD section:
Speaker: Approx. 210 × 285 × 260
Mass
Amplifier/Tuner/Tape/MD/CD section:
Speakers: Approx. 3.8 kg net per
Supplied accessories Remote (1)
Design and specifications are subject to change
without notice.
230 – 240 V AC, 50/60
Hz
V AC, 50/60 Hz
Adjustable with voltage
selector
0.5 watts (at the Power
Saving Mode)
Approx. 215 × 285 × 421
mm
mm
Approx. 8.6 kg
speaker
R6 (size AA) batteries (2)
AM loop aerial (1)
FM lead aerial (1)
Speaker pads (8)
Additional Information
55
Page 56

Sony Corporation Printed in Malaysia
 Loading...