

Page 1
FM/AM
Compact Disc
Player
3-261-844-31 (1)
Operating Instructi on s
Manual de instruccion es
Owner’s Record
The model and serial numbers are located on the bot tom of the unit.
Record these numbers in the spa ce provided below.
Refer to these numbers whenever you call upon your Sony dealer regarding this produc t.
Model No. CDX-RW300 Serial No.
For installation and connections, see the supplied installation/connections manual.
Para obtener información sobre la instalación y las conexiones, consulte el ma nua l
de instalación/conexiones suministrado.
US
ES
CDX-RW300
© 2004 Sony Corporation
Page 2

Warning
p
r
r
–
–
–
–
t
Welcome !
This equipment has been tested and found to
comply with the limits for a Class B digital
device, pursuant to Part 15 of the FCC Rules.
These limits are designed to provide reasonable
rotection against harmful interference in a
esidential installation. This equipment
generates, uses, and can radiate radio frequency
energy and, if not installed and used in
accordance with the instructions, may cause
harmful interference to radio communications.
However, there is no guarantee that interference
will not occur in a particular installation. If this
equipment does cause harmful interference to
adio or television reception, which can be
determined by turning the equipment off and on,
the user is encouraged to try to correct the
interference by one or more of the following
measures:
Reorient or relocate the receiving antenna.
Increase the separation between the equipment
and receiver.
Connect the equipment into an outlet on a
circuit different from that to which the receiver
is connected.
Consult the dealer or an experienced radio/TV
technician for help.
You are cautioned that any changes or
modifications not expressly approved in this
manual could void your authority to operate this
equipment.
Thank you for purchasing this Sony Compact
Disc Player. You can enjoy its various features
even mo re with:
• Optional controller accessory
Card remote commander RM-X114
CAUTION
The use of optical instruments with this produc
will increase eye hazard.
2
Page 3

Table of Contents
Location of controls . . . . . . . . . . . . . . . . . . . 4
Precautions . . . . . . . . . . . . . . . . . . . . . . . . . . 5
Notes on discs . . . . . . . . . . . . . . . . . . . . . . . . 6
Getting Started
Resetting the unit. . . . . . . . . . . . . . . . . . . . . . 7
Detaching the front panel . . . . . . . . . . . . . . . 7
Setting the clock . . . . . . . . . . . . . . . . . . . . . . 8
CD Player
Playing a disc. . . . . . . . . . . . . . . . . . . . . . . . . 9
Display items. . . . . . . . . . . . . . . . . . . . . . . . 10
Playing tracks repeatedly
— Repeat Play . . . . . . . . . . . . . . . . . . . . 10
Playing tracks in ra ndom order
— Shuffle Play . . . . . . . . . . . . . . . . . . . . 10
Radio
Storing stations automatically
— Best Tuning Memory (BTM). . . . . . . 11
Receiving the stored stations. . . . . . . . . . . . 11
Storing only the desired stations . . . . . . . . . 12
Other Functions
Adjusting the sound characteristics . . . . . . 12
Quickly attenuating the sound . . . . . . . . . . 1 2
Changing the sound and display settings
— Menu . . . . . . . . . . . . . . . . . . . . . . . . . 13
Setting the equalizer (EQ3). . . . . . . . . . . . . 14
Additional Information
Maintenance . . . . . . . . . . . . . . . . . . . . . . . . 15
Removing the unit. . . . . . . . . . . . . . . . . . . . 16
Specifications . . . . . . . . . . . . . . . . . . . . . . . 17
Troubleshooting . . . . . . . . . . . . . . . . . . . . . 18
Error displays/Message. . . . . . . . . . . . . . . . 19
3
Page 4
Location of controls
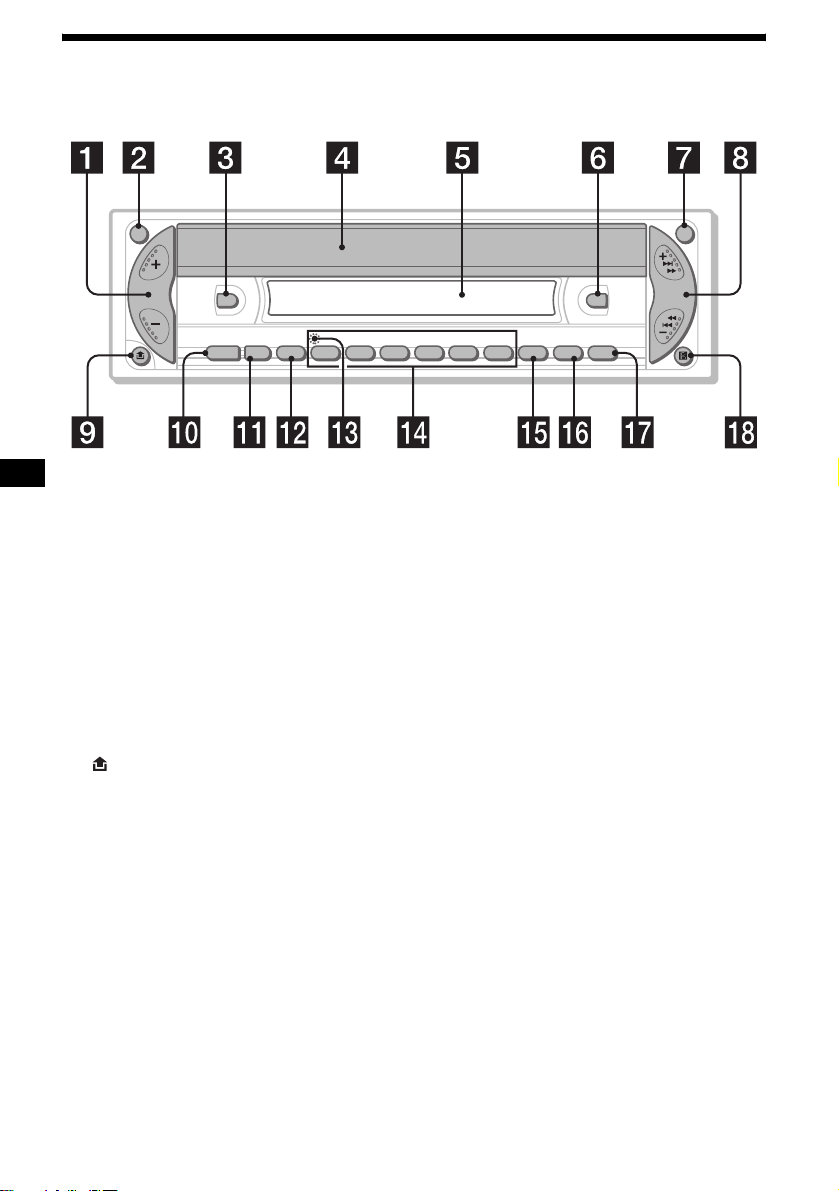
Refer to the pages listed for details.
ATT OFF
DSPL
SOURCE MODE
123456
SEL
a Volume +/– button
b ATT (attenuate) button 12
c DSPL (dis play mode change) button
8, 10
d OPEN/EJECT shutter 9
e Display window
f EQ3 button 14
g OFF (Stop/Power off) button* 7, 9
h SEEK +/– button
Radio:
To tune in stations automatically/find a
station manually.
CD:
To skip tracks/fast-forward, reverse a track.
i (front panel release) button 7
j SOURCE (Power on/Radio/CD) button
T o select the source.
k MODE button
To change the oper at i on.
l SEL (select) button
To select items.
m RESET button (located on t he fron t side of
the unit, behind the fr ont panel) 7
n Number buttons 13
To store the desired st at io n on each number
button.
SEEK
CDX-RW300
BTM
SENS
EQ3
SHUFREP
o SENS/BTM button 11, 12
p REP button 10
q SHUF button 10
r Receptor for the card remote
commander
* Warning when installing in a car without
an ACC (accessory) position on the
ignition switch
After turning off the ignition, be sure to press
and hold (OFF) on the unit until the display
disappears.
Otherwise, the display does not turn off and this
causes battery drain.
4
Page 5
Card remote commander RM-X114
(optional)
DSPL MODE
+
PRESET
LIST
+
DISC
MENU
–
SEEK
SOUND
SOURCE
DISC
PRESET –
+
VOL
+
SEEK
–
ENTER
ATTOFF
–
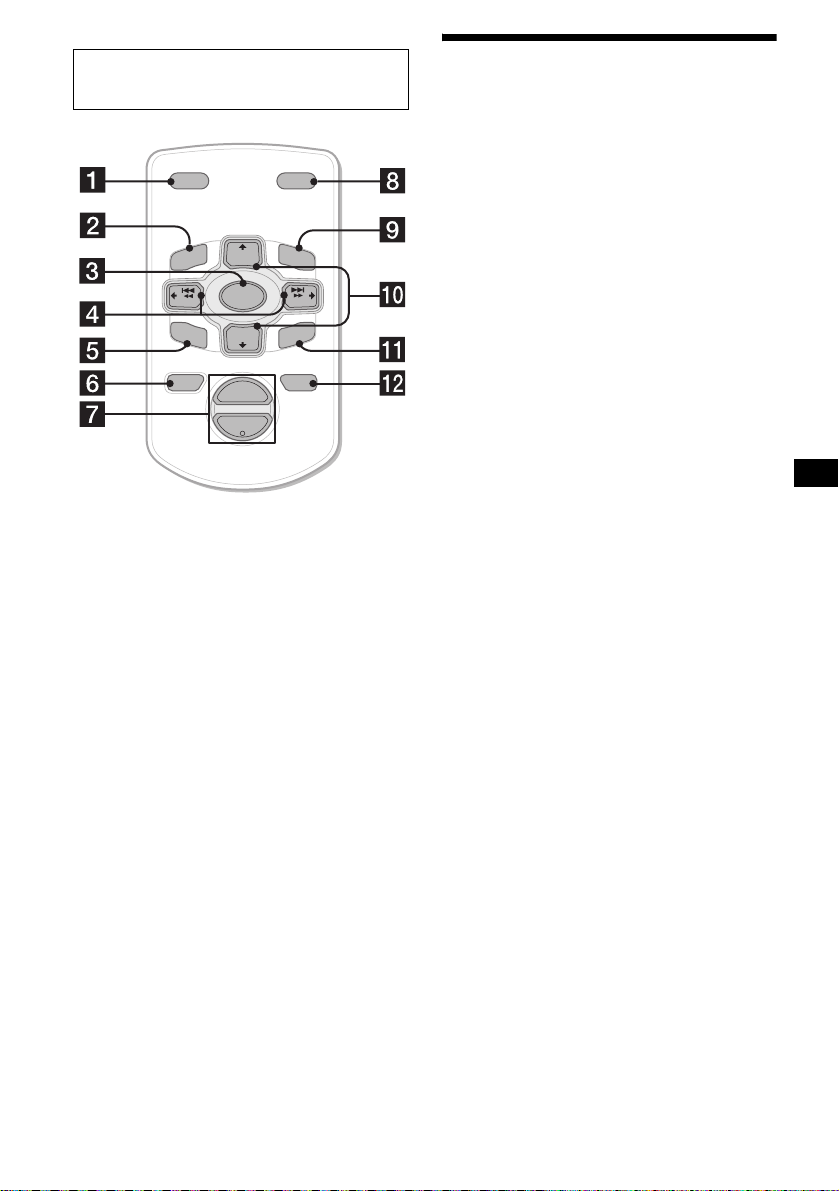
The corresponding buttons of the card
remote commander control the same
functions as those on this unit.
a DSPL button
b MENU button*
c SOURCE button
d SEEK (–/+) buttons
e SOUND button
f OFF button
g VOL (+/–) buttons
h MODE button
i LIST button*
j DISC*/PRESET (+/–) buttons
k ENTER button*
l ATT button
Precautions
• If your car has been parked in direct sunlight,
allow the unit to cool off befor e operating it.
• Power antenna will extend automatical ly while
the unit is o perating .
If you have any questions or probl em s
concerning your unit that are not covered in this
manual, please consult your nearest S ony dea ler.
Moisture condensation
On a rainy day or in a very dam p area, moisture
condensation may occur inside the lenses and
display of the unit. Should this occur, the unit
will not operate properly. In such a case, remove
the disc and wait for about an hour until the
moisture has evaporated.
To maintain high sound quality
Be careful not to splash jui ce or other soft drinks
onto the unit or discs.
* Not available for this unit
Note
If the display disappears by pressing (OFF), it cannot
be operated with the card remote commander unless
(SOURCE) on the unit is pressed, or a disc is inserted
to activate the unit first.
Tip
For details on how to replace the battery, see
“Replacing the lithium battery” on page 15.
5
Page 6
Notes on discs
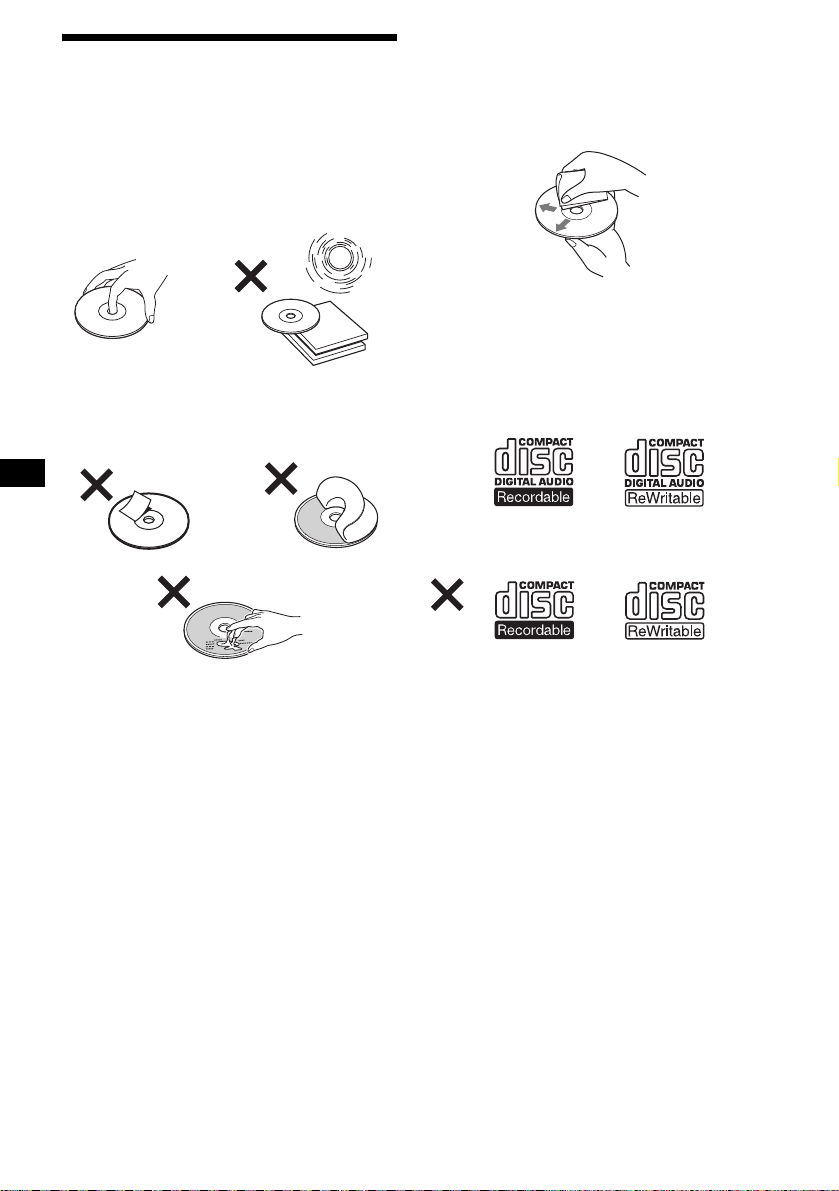
• To keep a disc clean, do not touch its surface.
Handle the disc by its edge.
• Keep your discs in the ir cases or disc
magazines when no t in use.
• Do not subject discs to heat/high temperature.
Avoid leaving them in a parked car or on a
dashboard/rear tray.
• Do not attach labels, or use discs with sticky
ink/residue. Such discs may stop spinni ng
when used, causing a malfunction, or may ruin
the disc.
• Before playing, cl ean the discs with a
commercially available cleaning cloth. Wipe
each disc from the center out. Do not use
solvents such as benzi ne, thinner , commerc ially
available cleaners, or antistatic spray intended
for analog discs.
Notes on CD-R/CD-RW discs
• You can play CD-Rs (recordable CDs)/CDRWs (rewritable CDs) desi gned for audio use
on this unit.
Look for these marks to distinguish CD-Rs/
CD-RWs for audio use .
These marks denote that a disc is not for audio
use.
• Do not use an y discs with label s or stickers
attached.
The following malfunctions may result from
using such discs:
– Inability to eject a disc (due to a label or
sticker peeling off and jam m in g t he eject
mechanism).
– Inability to read audio data corr ectly (e.g.,
playback skippin g, or no pl ayback) due to
heat shrinking of a st i cker or label causing a
disc to warp.
• Discs with non-s tandard shapes (e .g., heart,
square, star) ca nnot be played on this unit.
Attempting to do so may damage the unit. Do
not use such discs.
• You cannot play 8 cm (3 in) C D s.
6
• Some CD-Rs/CD-RWs (depending on the
equipment used for its recording or the
condition of the di sc) may not play on this unit.
• You cannot play a CD-R/a CD-RW that is not
finalized*.
* A process necessary for a recorded CD-R/CD-RW
disc to be played on the audio CD player.
Page 7
Getting Started
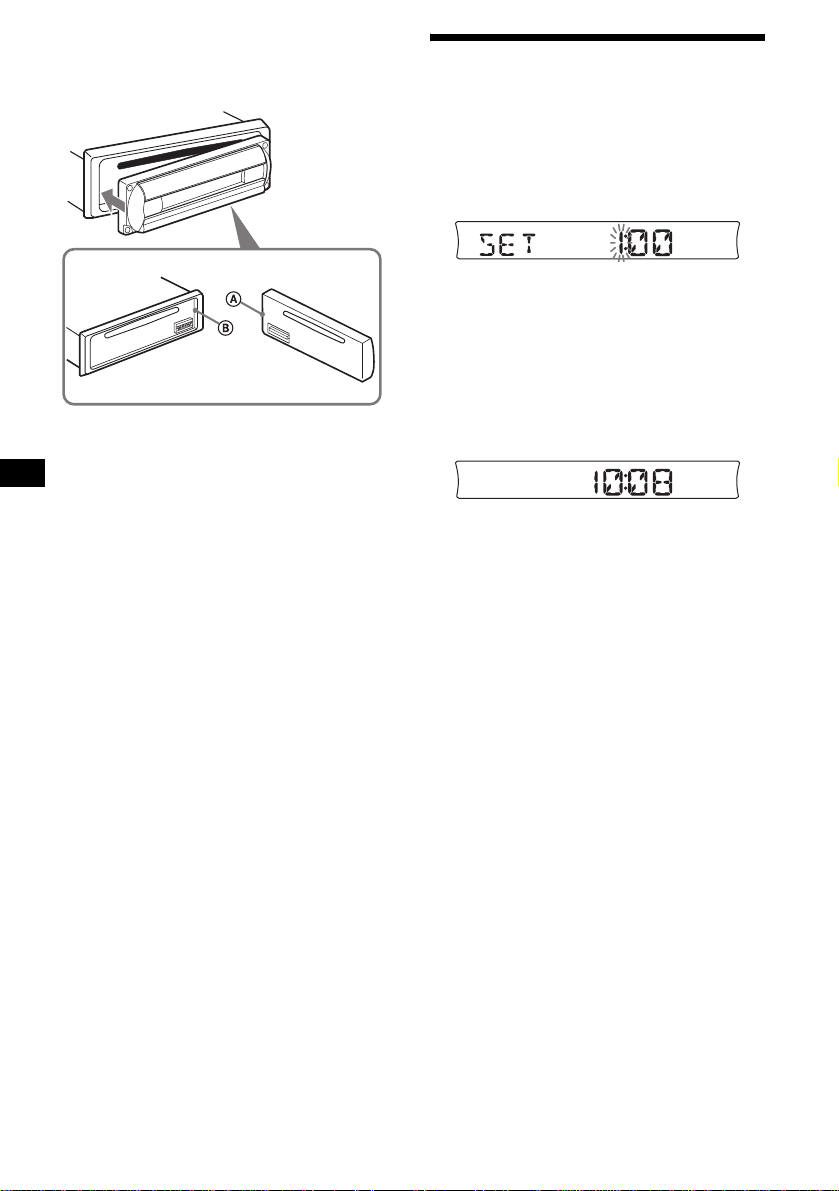
Detaching the front panel
You can detach the front panel of this unit to
protect the unit from being stolen.
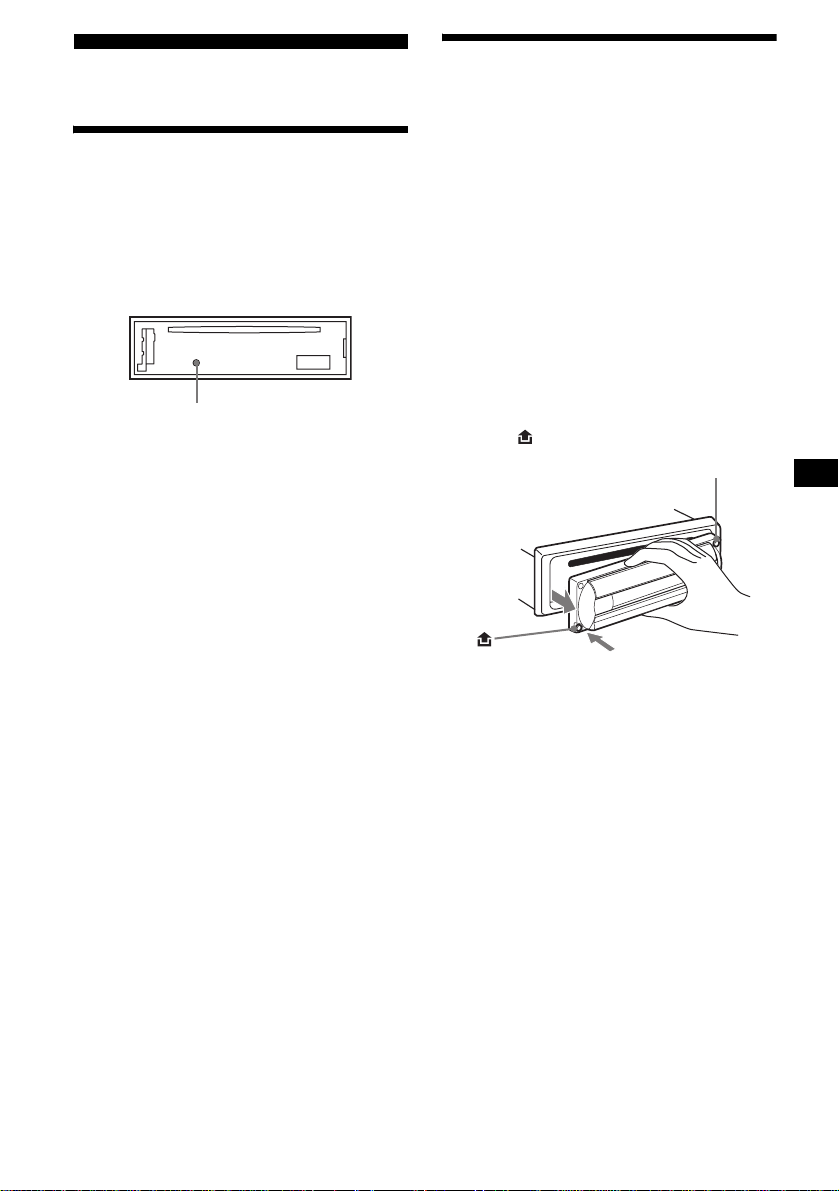
Resetting the unit
Before operating the unit for the first time, or
after replacing the car battery or chan ging the
connections, you must reset the unit.
Remove the front panel and press the RESET
button with a pointed object, such as a ball-point
pen.
RESET button
Note
Pressing the RESET button will erase the clock setting
and some stored contents.
Caution alarm
If you turn the ignition switch to the OFF
position without removing the front panel, the
caution alarm will beep for a few seconds.
If you connect an op ti onal amplifier and do not
use the built-in amplifier, the beep sound will be
deactivated.
1 Press (OFF)*.
CD playback or radio reception stops (the key
illumination and display remain on).
* If your car has no ACC (accessory) position on
the ignition switch, be sure to turn the unit off by
pressing (OFF) until the display disappears to
avoid car battery drain.
2 Press , then pull it off towards you.
(OFF)
T
C
E
J
E
/
N
E
P
O
Notes
• If you detach the panel while the unit is still turned
on, the power will turn off automatically to prevent
the speakers from being damaged.
• Do not drop or put excessive pressure on the front
panel and its display window.
• Do not subject the front panel to heat/high
temperature or moisture. Avoid leaving it in a parked
car or on a dashboard/rear tray.
Tip
When carrying the front panel with you, use the
supplied front panel case.
continue to next page t
7
Page 8
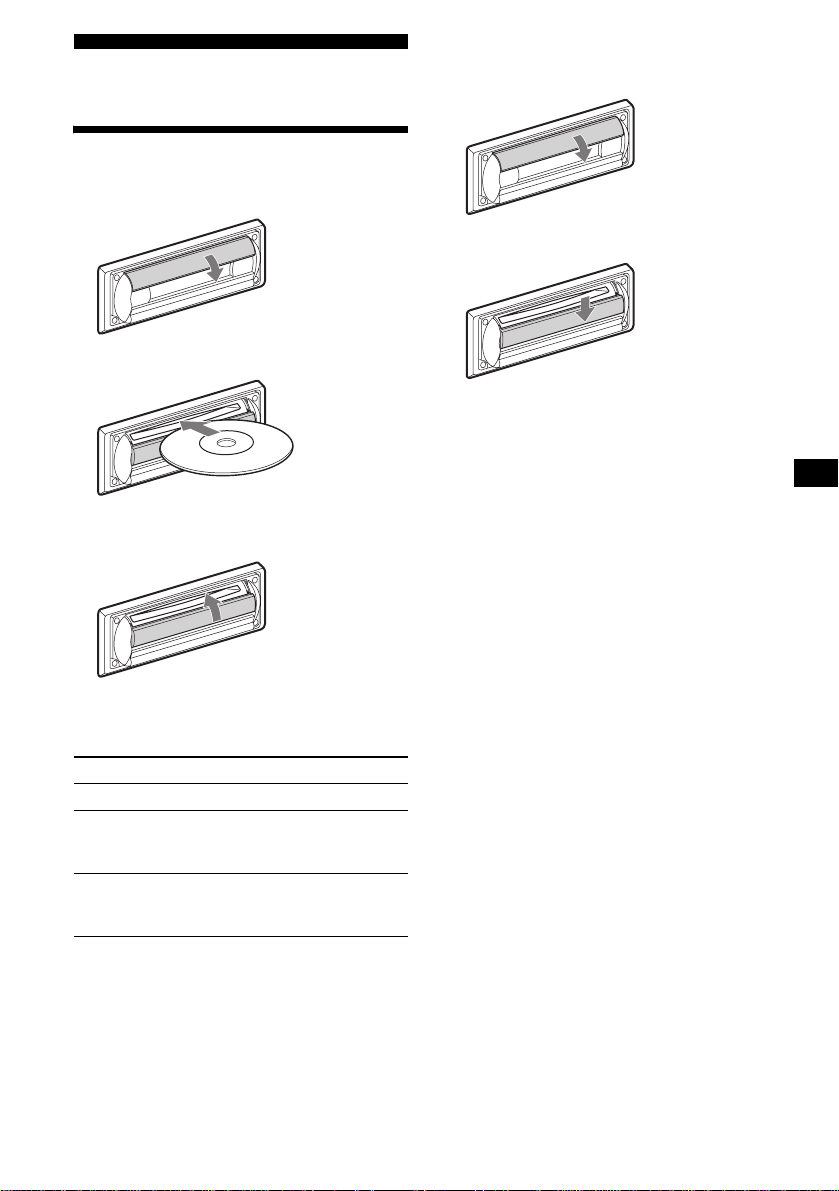
Attaching the front panel
Attach part A of the front panel to part B of the
unit as illustrated and push the left side into
position until it clicks.
T
C
E
J
E
/
N
E
P
O
Note
Do not put anything on the inner surface of the front
panel.
Setting the clock
The clock uses a 12-hour digital indica tion.
Example: To set the clock to 10:08
1 Press (DSPL) for 2 seconds.
The hour indication flashes.
1Press the volume +/– button to set
the hour.
2Press (SEL).
The minute indi cation flashes.
3Press the volume +/– button to set
the minute.
2 Press (DSPL).
The clock starts. Aft er th e cl ock setting is
completed, the display retu rn s to normal play
mode.
8
Page 9
To eject the disc
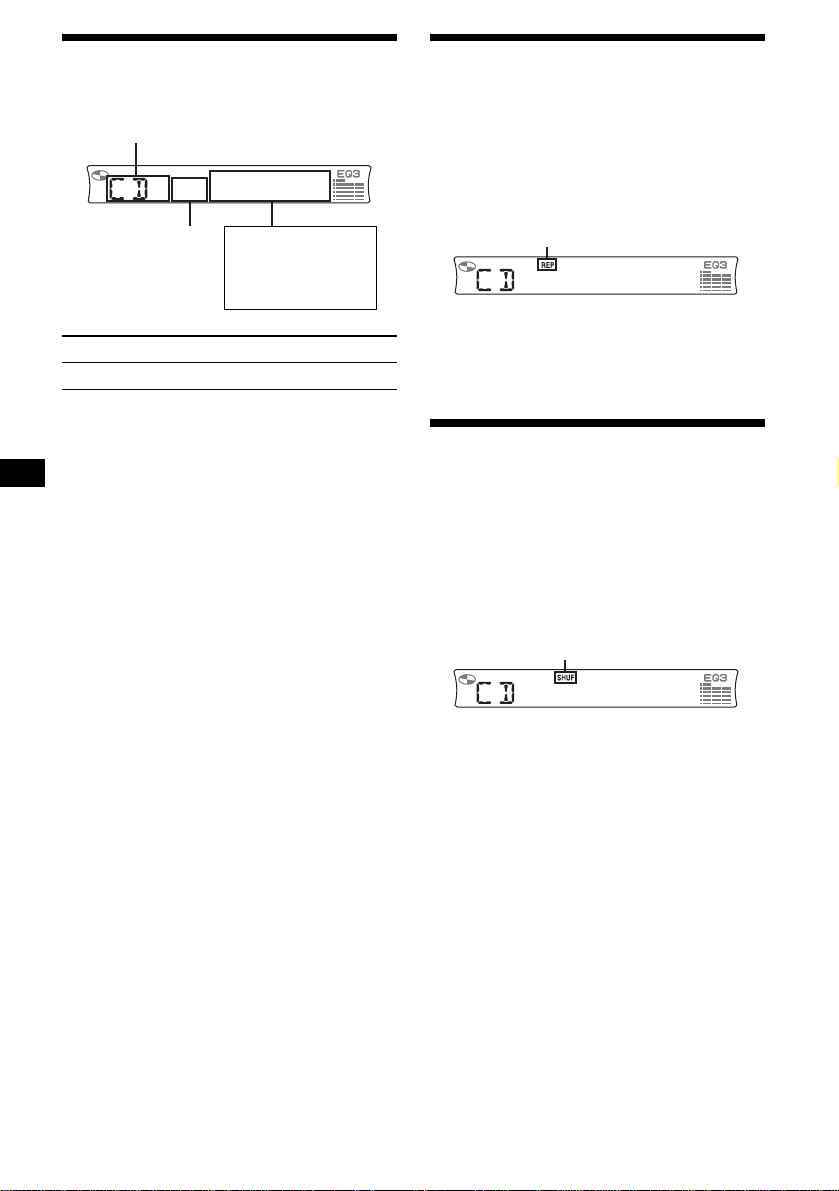
CD Player
Playing a disc
1 Open the shutter.
2 Insert the disc labele d si de up.
Playback starts automatically.
3 Close the shutter.
1 Open the shutter.
2 Push down th e shutter.
The disc is ejected.
Notes
• While ejecting or inserting a disc, do not close the
shutter. The disc may be caught and damaged.
• A disc may be ejected if you open the shutter
forcefully.
• While the first/last track on the disc is playing, if
(SEEK) (–) or (SEEK) (+) is pres se d, pl a ybac k ski ps
to the last/first track of the disc.
• When the last track on the disc is over, playback
restarts from the first track of the disc.
Tip
A disc can be played with the shutter opened or
closed.
If a disc is already inserted, press (SOURCE)
repeatedly unti l “ C D ” appears to start play back.
To Press
Stop playba ck (OFF)
Skip tracks
–Automatic
Music Sensor
Fast-forward/
reverse
–Manual Search
(SEEK) (–/+)
(./>)
[once for each tr ack]
(SEEK) (–/+)
(m/M)
[hold to desired p o i nt ]
9
Page 10
Display items
The following items can be di splayed.
Source
Track number
To Press
Switch display item (DSPL)
Displayable items
• Elapsed playing
time
•Clock
Playing tracks repeatedly
— Repeat Pla y
The current track will repeat itself when it
reaches the end.
During playback, press (REP) until
“REP” indicator appears in the
display.
“REP” indicator is displayed.
Repeat Play starts.
To return to normal play mode, press (REP)
again.
Playing tracks in random
order
— Shuffle Play
You can select to play the tracks in the disc in
random order.
During playback, press (SHUF) until
“SHUF” indicator appears in the
display.
“SHUF” indicator is displayed.
10
Shuffle Play starts.
To return to normal play mode, press (SHUF)
again.
Page 11
Radio
The unit can store up to 6 st at ions per band
(FM1, FM2, FM3, A M 1 and AM2).
Caution
When tuning in statio ns w hile driving, use Best
Tuning Memory to prevent accidents.
Storing stations
automatically
— Best Tuning Memory (BTM)
The unit selects the stations with the st rongest
signals within the selected band, and stores them
in the order of their fre q uency.
1 Press (SOURCE) repeatedly to select
the radio.
2 Press (MODE) repeatedly to select the
band.
3 Press (SENS) (BTM) for 2 seconds.
The unit stores stations in the order of their
frequencies on the number buttons.
A beep sounds when the setting is stored.
Notes
• If only a few stations can be received due to weak
signals, some number buttons will retain their former
settings.
• When a number is indicated in the display, the unit
starts storing stations fr om the one cu rrently
displayed.
Receiving the stored stations
1 Press (SOURCE) repeatedly to select
the radio.
2 Press (MODE) repeatedly to select the
band.
3 Press the number button ((1) to (6))
on which the desired station is stored.
If preset tuning does not work
— Automatic tuning/Local Seek Mode
Automatic tuning:
Press (SEEK) (+) or (SEEK) (–) to
search for the station.
Scanning stops wh e n th e unit receives a
station. Re peat the operation until the desired
station is receiv ed.
Local Seek Mode:
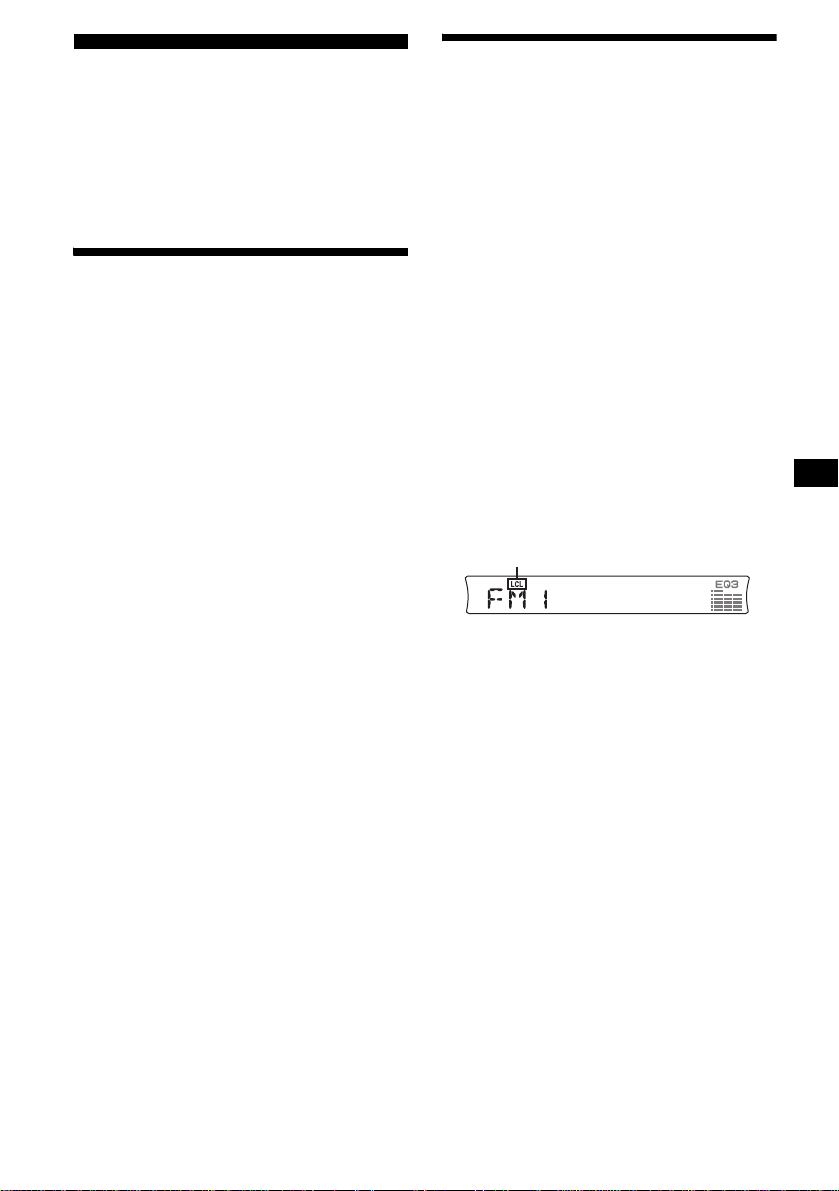
If the automatic tuning stops too
frequently, press (SENS) (BTM)
repeatedly until “LCL” indicator
appears in the display.
“LCL” indicator is displayed.
Only the stations with relatively strong
signals will be tuned in.
To cancel the local seek mode, pres s ( SENS)
(BTM) twice when rceiving FM.
Note
When receiving AM, to cancel the local seek mode,
press (SENS) (BTM) (“LCL” indicator turns off).
Tip
If you know the frequency of th e station you want to
listen to, press and hold (SEEK) (+) or (SEEK) (–) to
locate the approximate frequency, then press
(SEEK) (+) or (SEEK) (–) repeatedly to fine adjust to
the desired frequency (manual tuni n g) .
continue to next page t
11
Page 12
If FM stereo reception is poor
— Monaural Mode
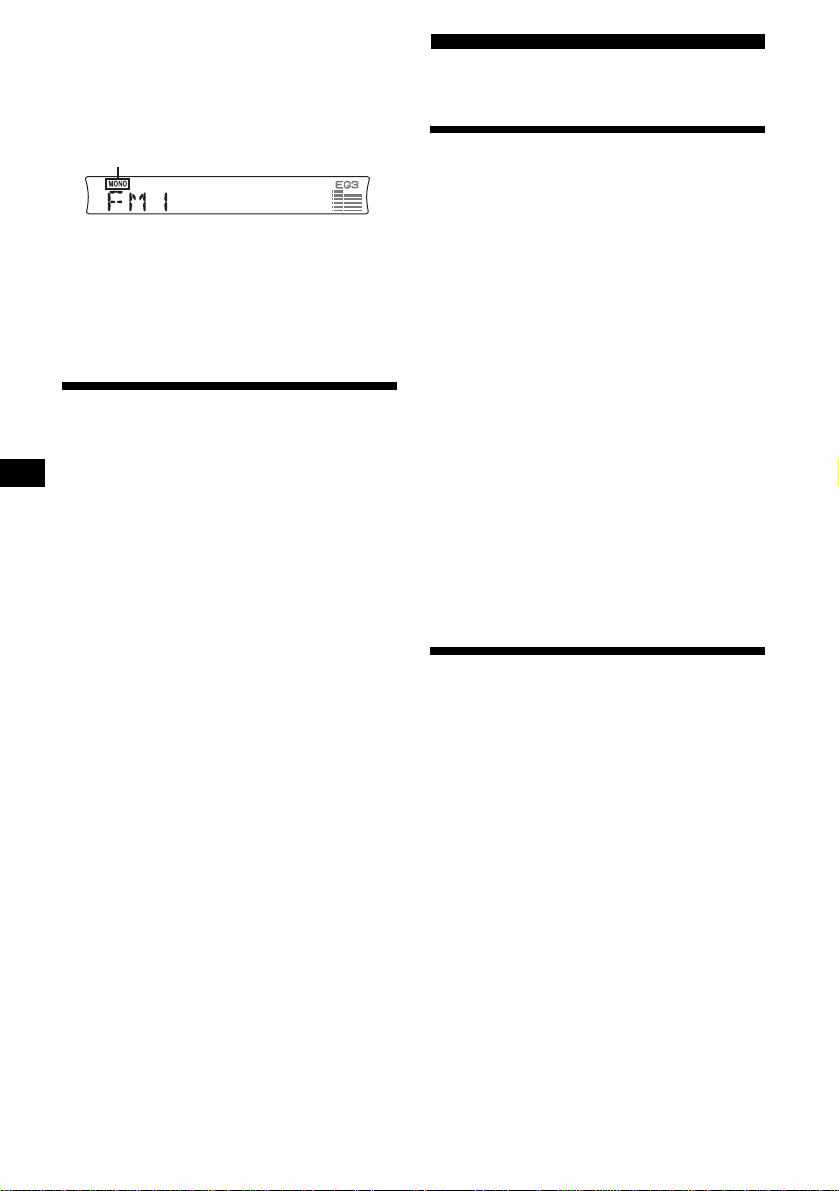
During radio reception, press (SENS)
(BTM) repeatedly until “MONO”
indicator appears in the displ ay.
“MONO” indicator is displayed.
The sound improves, but bec om es monaural
(“ST” disappears).
To return to normal radio receptio n m ode, press
(SENS) (BTM) again (“MONO” indicator turns
off).
Storing only the desired
stations
You can manually preset th e desired stations on
any chosen number button.
1 Press (SOURCE) repeatedly to select
the radio.
2 Press (MODE) repeatedly to select the
band.
3 Press (SEEK) (+) or (SEEK) (–) to tune
in the station that you want to store.
4 Press the desired number button ((1)
to (6)) for 2 seconds until “MEM”
appears.
The number button indication appears in the
display.
Note
If you try to store another station on the same number
button, the previously stored station will be erased.
Other Functions
Adjusting the sound
characteristics
You can adjust the balance, fader, low pass filter
and subwoofer volume.
1 Press (SEL) repeatedly until “BAL,”
“FAD,” “LPF” or “S U B ” appears.
Each time you press ( SEL ), the item changes
as follows:
1
LOW*
t MID*1 t HI*1 t
BAL (left-right) t F AD (front-rear) t
LPF (low pass fi lter)*
SUB (subwoofer volume)*
*1 When EQ3 is activated (page 14) .
*2 When “SUB” is selected (pa ge 13).
*3 The cut off frequency is adjustable to 78 Hz,
125 Hz or OFF.
*4 The volume level is adjustable between –10
and +10 steps. (Below –10, “ATT” is displayed.)
2 Press the volume +/– button to adjust
the selected item.
Note
Adjust within 3 seconds after selecting the item.
Quickly attenuating the
sound
Press (ATT).
“ATT” appe ars in the display.
To restore the previous volume level, press
(ATT) again.
2*3
t
2*4
12
Page 13

Changing the sound and
display settings
— Menu
The following items can be set:
Set up
• REAR/SUB* — to sw itch the audio output
REAR or SUB.
– Select “RE A R ” to output to a power
amplifier.
– Select “SU B ” t o output to a subwoofer.
• DEMO* — to turn the demonstration display
on or off.
– Select “ON” to activate the demonstration
display (The dem onstration starts about 10
seconds after the unit is turned off).
– Select “OF F ” to deactivate the
demonstration display.
• BEEP — to turn the beeps on or off.
• DIM — to change the brightness of the display.
– Sele c t “ ON” to dim th e display.
– Select “OF F ” to deactivate the Dimmer.
Switching the REAR/SUB*
Press (SEL) and then press the
volume + (REAR) or – (SUB) button.
After 3 seconds, the display returns to normal
play mode.
Selecting the desired item
Press (SEL) and the desired button
simultaneously.
(SEL) + (4): DEMO*
(SEL) + (6): BEEP
(SEL) + (DSPL): DIM
After the mode setting is completed, the display
returns to normal play mode.
To cancel the item, press (SEL) and the desired
button simultaneously again.
* When the unit is turned off.
13
Page 14

Setting the equalizer (EQ3)
You can select an equalizer cu rve for 7 music
types (XPLOD, VOCAL, CLUB, J AZZ, N-A GE,
ROCK, CUST and OFF (equalizer OFF)).
You can store a different equa lizer setting for
each source.
Selecting the equalizer curve
1 Press (SOURCE) to select a source
(Radio or CD).
2 Press (EQ3) repeatedly until the
desired equalizer curve.
Each time you press (EQ3), the item
changes.
To cancel the equalizing effect, select “OFF.”
Adjusting the equalizer curve
You can store and adjust the equalizer settings
for different tone ranges.
1 Press (SOURCE) to select a source
(Radio or CD).
2 Press (EQ3) repeatedly to select the
desired equalizer curve.
3 Adjusting the equalizer cur ve.
1Press (SEL) repeatedly to select the
desired tone range.
Each time you pr ess (SEL), the tone range
changes.
LOW t MID t HI (t BAL t FAD t
LPF t SUB)
2Press the volume +/– button
repeatedly to adjust to the desired
volume level.
The volume level is adjustable by 1 dB
steps from –10 dB to +10 dB.
3Repeat step 1 and 2 to adjust the
equalizer curve .
To restore the factory-set equali zer curve,
press (SEL) for 2 seconds.
Note
When EQ3 is set to “OFF,” you cannot adjust the
equalizer curve settings.
14
Page 15
Additional Information
Maintenance
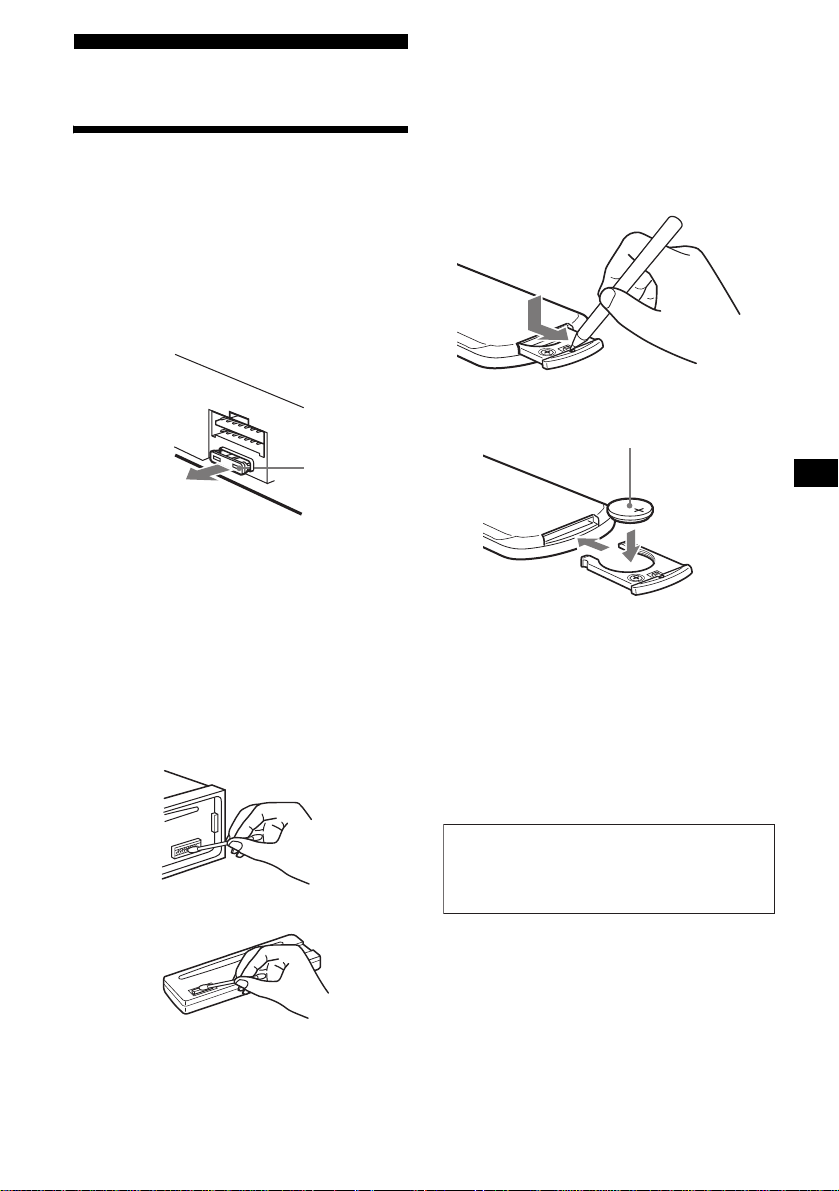
Fuse replacement
When replacing t he fuse, be sure to use on e
matching the amperage rating stated on the
original fuse. If the fuse blows, check the power
connection and replace the fuse. If the fuse blows
again after replacement, there may be an internal
malfunction. In su ch a case, consult your nearest
Sony dealer.
Fuse (10 A)
Warning
Never use a fuse with an amperage rating
exceeding the one supplied with the unit as this
could damage the u ni t.
Cleaning the connectors
The unit may not function properly if the
connectors between the unit and the front panel
are not clean. In order to prevent this, detach the
front panel (p age 7) and clean the conn ectors
with a cotton swab dipped in alco hol. Do not
apply too much force. Otherwise, the connectors
may be damaged.
Replacing the lithium battery
Under normal conditions, battery will last
approximately 1 year . (The serv ic e lif e may be
shorter, depending on the conditions of use.)
When the battery becomes weak, the range of the
card remote commander becomes shorter.
Replace the battery with a new CR2025 lithium
battery. Use of any other battery may present a
risk of fire or explosion.
x
+ side up
Notes on lithium battery
• Keep the lithium battery out of the reach of
children. Should th e battery be swallowed,
immediately consult a doctor.
• Wipe the battery with a dry cloth to assure a
good contact.
• Be sure to observe the correct polarity w hen
installing the battery.
• Do not hold the battery with metallic tweezers,
otherwise a shor t-circuit may occur.
Main unit
Back of the front panel
Notes
• For safety, turn off the ignition before cleaning the
connectors, and remove the key from the ignition
switch.
• Never touch the connectors directly with your fingers
or with any metal device.
WARNING
Battery may explode if mistreated.
Do not recharge, disassemble, or dispose of
in fire.
15
Page 16
Removing the unit
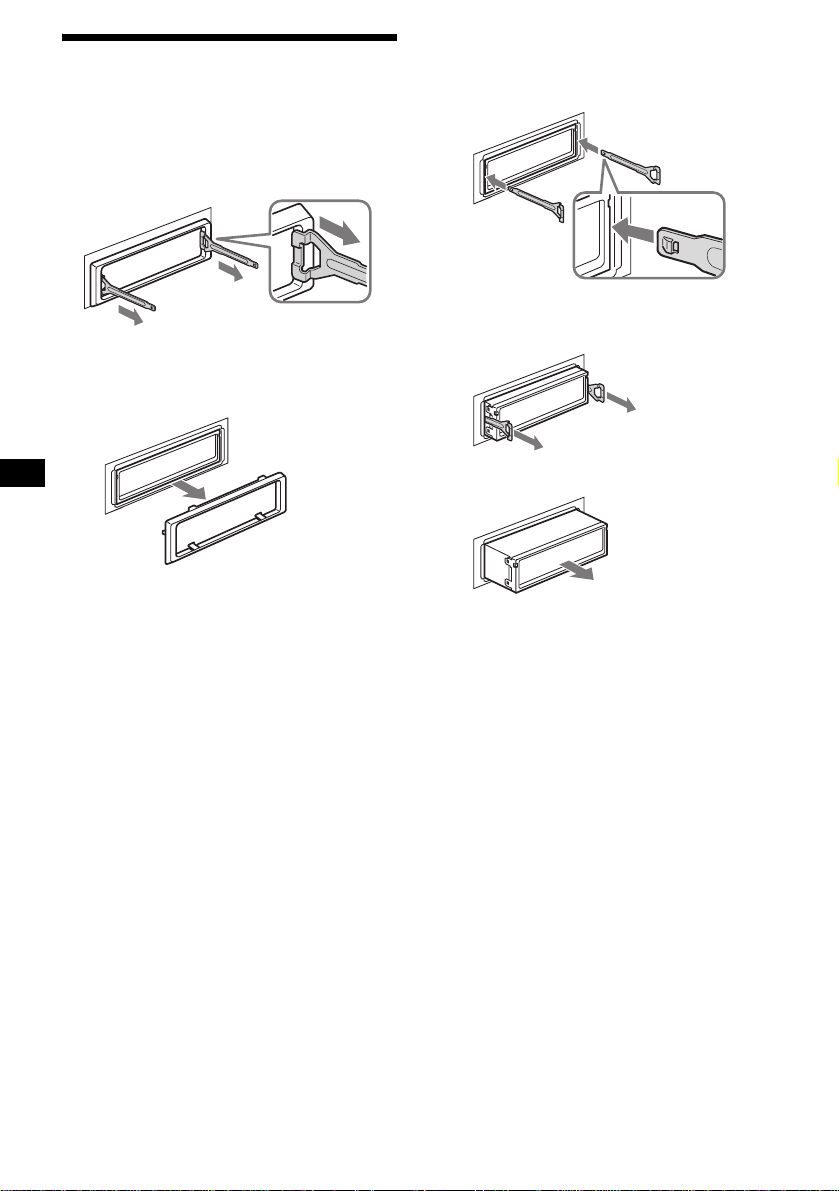
1 Remove the protection collar.
1 Detach the front panel (pag e 7).
2 Engage the release keys together
with the protection collar.
2 Remove the unit.
1Insert both releas e keys together
until they click.
Face the hook
inwards.
Orient the release
key correctly.
3 Pull out the release keys to remove
the protection collar.
2Pull the release keys to unseat the
unit.
3Slide the unit out of the mounting.
16
Page 17

Specifications
AUDIO POWER SPECIFICATIONS
POWER OUTPUT AND TOTAL HARMONIC DISTORTION
23.2 watts per channel minimum continuous average power into 4 ohms,
4 channels driven from 20 Hz to 20 kHz with no more than 5% total
harmonic distortion.
CD Player section
Signal-to-noise ratio 120 dB
Frequency response 10 – 20,000 Hz
Wow and flutter Below measurable limi t
Tuner section
FM
Tuning range 87.5 – 107.9 MHz
Antenna terminal External antenna connector
Intermediate frequency 10.7 MHz /450 kHz
Usable sensitivity 9 dBf
Selectivity 75 dB at 400 kHz
Signal-to-noise ratio 67 dB (stereo),
Harmonic distortion at 1 kHz
Separation 35 dB at 1 kHz
Frequency response 30 – 15,000 Hz
AM
Tuning range 530 – 1,710 kHz
Antenna terminal External antenna connector
Intermediate frequency 10.7 MHz/450 kHz
Sensitivity 30 µV
69 dB (mono)
0.5 % (stereo),
0.3 % (mono)
Power amplifier section
Outputs Speaker outputs
Speaker impedance 4 – 8 ohms
Maximum power output 52 W × 4 (at 4 ohms)
(sure seal connectors)
General
Outputs Audio outputs terminal
Input Antenna input terminal
Tone controls Low:
Power requirements 12 V DC car battery
Dimensions Approx. 178 × 50 × 179 mm
Mounting dimensions Approx. 182 × 53 × 161 mm
Mass Approx. 1.2 kg
Supplied accessori e s Parts for installation and
Optional accessory Card remote commander
Design and specifications are subject to change
without notice.
(rear/sub switchable)
Power antenna relay control
terminal
Power amplifier control
terminal
±10 dB at 60 Hz (XPLOD)
Mid:
±10 dB at 1 kHz (XPLOD)
High:
±10 dB at 10 kHz (XPLOD)
(negative ground)
1
(7
/8 × 2 × 7 1/8 in) (w/h/d)
1
(7
/4 × 2 1/8 × 6 3/8 in)
(w/h/d)
(2 lb 10 oz)
connections (1 set)
Front panel case (1)
RM-X114
17
Page 18

Troubleshooting
The following checklist will help you remedy
problems you may encounter with your un it.
Before going through the checklist below, check
the connect i on and operating procedures.
General
No sound.
• Press the volume + button to adjust the
volume.
• Cancel the ATT function.
• Set the fader contro l to the center posi tion for
a 2-speaker syste m.
The contents of the memory have been
erased.
• The RESET button has been pressed.
t Store again into the memory.
• The power lead or battery has been
disconnected.
• The power connecting lea d is not connected
properly.
No beep sound.
• The beep sound is canceled (page 1 3) .
• An optional power amp lifier is connected
and you are not using the built-in amplifier.
The display disappears from/does not
appear in the display window.
• The display disappears i f you press and ho l d
(OFF).
t Press and hold (OFF) again until the
display appears.
• Remove the front panel a nd clean the
connectors. For det ai ls see “Cleaning the
connectors” on pag e 15.
Stored stations and correct time are erased.
The fuse has blown.
Makes noise when the ignition key is in the
ON, ACC, or OFF posit ion.
The leads are no t matched correctly wi th the
car’s accessory power connect or.
No power is being supplied to the unit.
• Check the connect i on. If everything is in
order, check the fuse.
• The car does not have an ACC position.
t Press (SOURCE) (o r insert a disc) to turn
on the unit.
The power is continuously supplied to the
unit.
The car does not have an A CC position.
The power antenna does not extend.
The power antenna does not have a relay box.
CD playback
A disc cannot be loaded.
• Another CD is already loaded.
• The CD has been forcibly inserted upside
down or in the wrong way.
Playback does not begin.
• Defective or dirty CD.
• CD-R/CD-RW that is not finalized.
• You tried to play back a CD-R/CD-RW not
designed for audio use.
• Some CD-Rs/CD-RWs may not pla y due to
its recording equipment or the disc
condition.
A disc is automatically ejected.
The ambient tempe ra t ur e exceeds 50°C
(122°F).
The operation buttons do not function.
CD will not be ejected.
Press the RESET button.
The sound skips from vi br a tion.
• The unit is installed at an angle of mor e than
45°.
• The unit is not ins t al le d in a sturdy part of
the car.
The sound skips.
Dirty or defect ive disc.
18
Page 19
Radio reception
Preset tuning is not possible.
• Store the correct frequency in the memory.
• The broadcast signal is too weak.
The stations cannot be received.
The sound is hampered by noises.
• Connect a power ante nna control lead (b l ue)
or accessory power supply lead (red) to the
power supply lead of a car ’s antenna booster
(only when your ca r has built-in FM/AM
antenna in the rear/side glass).
• Check the connect i on of the car antenna.
• The auto ant enna will not go up.
t Check the connection of the power
antenna control lead.
• Check the frequency.
Automatic tuning is not possible.
• The local seek mode is set to “ON.”
t S et the local seek mode to “OFF”
(page 11).
• The broadcast signal is too weak.
t Perform manual tuning.
The “ST” indication flashes.
• Tune in the frequency accura te l y.
• The broadcast signal is too weak.
t Set the monaural reception mode to
“ON” (page 12).
A program broadcast in stereo is heard in
monaural.
The unit is in monaural reception mode.
t Canc el monaural recepti on m ode
(page 12).
Error displays/Message
Error displays
The following indica tions will flash for about 5
seconds (and in the case of “Err04,” an alarm will
be heard).
Err04
A CD is dirty or inserted upside down.
t Clean or insert the CD correctly.
Err50
The connection of speakers/amplifiers is
incorrect.
t See the installation guide manual of this
model to check the connection.
Err60
There may be an internal malfunction.
t Check the connection. If the error
indication remains on in the display,
consult your nearest Sony dealer.
Err99
The CD unit cannot be o per ated because of
some problem.
t Press the RESET button on the unit.
Message
“” or “”
You have reached the beginning or the end of
the disc and you ca nnot go any furt her.
If these solution s do not help improve the
situation, consul t y our nearest Sony dealer.
19
Page 20

¡Bienvenido!
Gracias por adquir ir este reproductor de dis cos
compactos Son y. Disfrutará aún más de sus
distintas funciones con:
• Accesorio de controlador opcional
Control remoto de tar je ta RM -X114
2
Page 21

Tabla de contenido
Ubicación de los controles . . . . . . . . . . . . . . 4
Precauciones . . . . . . . . . . . . . . . . . . . . . . . . . 5
Notas sobre los discos . . . . . . . . . . . . . . . . . . 6
Procedimientos iniciales
Restauración de la unidad . . . . . . . . . . . . . . . 7
Extracción del panel frontal. . . . . . . . . . . . . . 7
Ajuste del reloj . . . . . . . . . . . . . . . . . . . . . . . 8
Reproductor de CD
Reproducción de discos. . . . . . . . . . . . . . . . . 9
Elementos de la pantalla . . . . . . . . . . . . . . . 10
Reproducción repetida de pistas
— Reproducción repetida. . . . . . . . . . . . 10
Reproducción de pistas en orden aleatorio
— Reproducción aleatoria . . . . . . . . . . . 10
Radio
Almacenamiento automático de emisoras
— Memoria de emisoras con mejor sinton ía
(BTM). . . . . . . . . . . . . . . . . . . . . . . . . . . 11
Recepción de las emisoras memorizadas. . . 11
Almacenamiento de las emisoras
deseadas . . . . . . . . . . . . . . . . . . . . . . . . . 12
Otras funciones
Ajuste de las características del
sonido. . . . . . . . . . . . . . . . . . . . . . . . . . . 12
Atenuación rápida del sonido. . . . . . . . . . . 12
Cambio de los ajustes de sonido y la pantalla
— Menú . . . . . . . . . . . . . . . . . . . . . . . . . 13
Ajuste del ecualizador (EQ3) . . . . . . . . . . . 14
Información complementaria
Mantenimiento . . . . . . . . . . . . . . . . . . . . . . 15
Extracción de la unidad. . . . . . . . . . . . . . . . 16
Especificaciones . . . . . . . . . . . . . . . . . . . . . 17
Solución de problemas . . . . . . . . . . . . . . . . 1 8
Mensaje/indicaciones de le error . . . . . . . . 19
3
Page 22
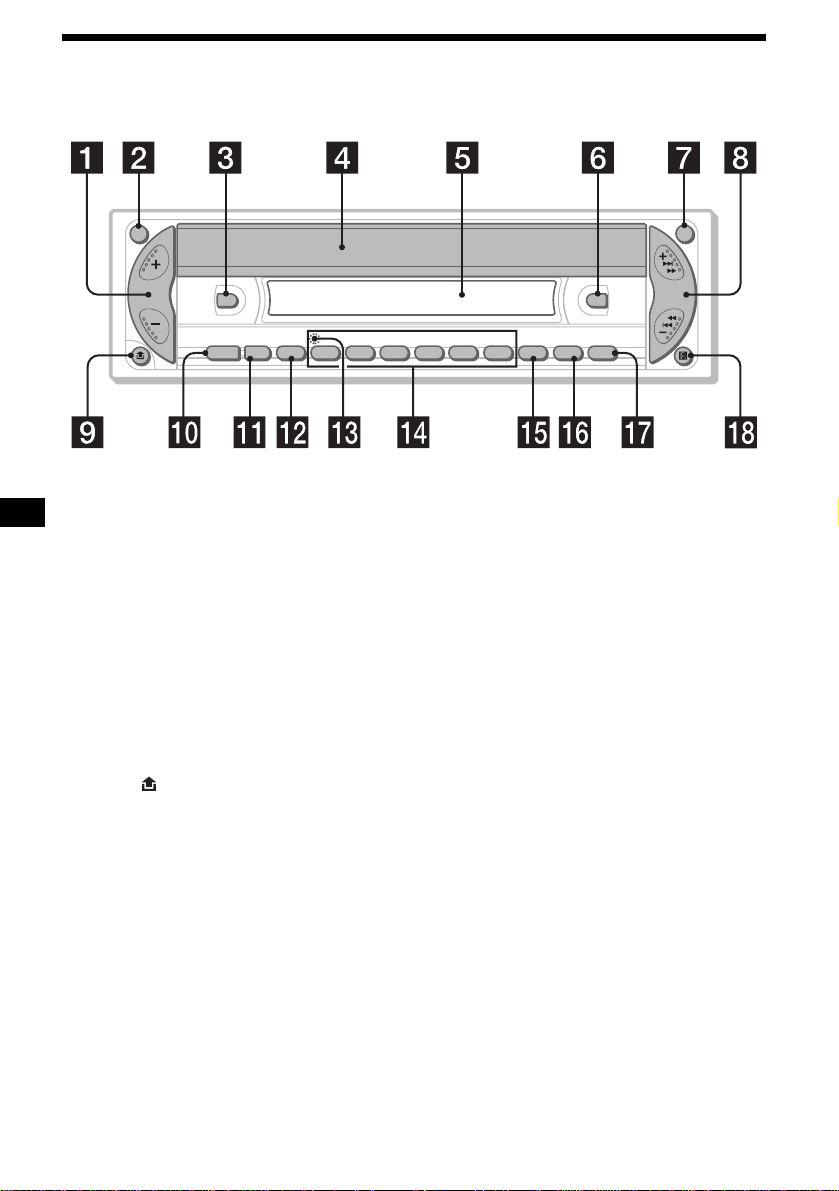
Ubicación de los controles
Consulte las páginas indicadas para obtener información detallada.
ATT OFF
DSPL
SOURCE MODE
123456
SEL
a Botón volumen +/–
b Botón ATT (atenuación) 12
c Botón DSPL (cambio del modo de
indicación) 8, 10
d Obturador OPEN/EJECT 9
e Pantalla
f Botón EQ3 14
g Botón OFF (detener/apagar)* 7, 9
h Botón SEEK +/–
Radio:
Sintonización aut om ática de emisoras/
localización manual de una emisora.
CD:
Omisión de pistas/avance o retroceso rápido
de una pista.
i Botón (extracción del panel frontal)
7
j Botón SOURCE (Encendido/Radio/
CD)
Para seleccio na r l a fu en te.
k Botón MODE
Para cambiar el funcionamiento.
l Botón SEL (selección)
Para seleccionar elem entos.
m Botón RESET (ubicado en l a parte frontal
de la unidad, detrás del panel frontal) 7
n Botones numéricos 13
Para almacenar la emisora deseada en cada
botón numérico.
SEEK
CDX-RW300
BTM
SENS
EQ3
SHUFREP
o Botón SENS/BTM 11, 12
p Botón REP 10
q Botón SHUF 10
r Receptor del control remoto de tarjeta
* Advertencia sobre la instalación en un
automóvil sin posición ACC (auxiliar) en el
interruptor de encendido
Después de apagar el motor, asegúrese de
presionar (OFF) en la unidad hasta que se
apague la pantalla.
Si no lo hace, la pantalla no se desactiva y la
batería se descarga .
4
Page 23

Control remoto de tarjeta RM-X114
(opcional)
DSPL MODE
+
PRESET
LIST
+
DISC
MENU
–
SEEK
SOUND
SOURCE
DISC
PRESET –
+
VOL
+
SEEK
–
ENTER
ATTOFF
–
Los botones correspondientes del
control remoto de tarjeta controlan las
mismas funciones que los de esta
unidad.
a Botón DSPL
b Botón MENU*
c Botón SOURCE
d Botones SEEK (+/–)
e Botón SOUND
f Botón OFF
g Botones VOL (+/–)
h Botón MODE
i Botón LIST*
j Botones DISC*/PRESET (+/–)
k Botón ENTER*
l Botón ATT
Precauciones
• Si estaciona el automóvil bajo la luz dire cta del
sol, deje que la unidad se enfríe antes de usarla.
• La antena motorizada se extenderá
automáticamente mientras la unidad se
encuentra en funcionamiento.
Si desea realizar alguna consulta o so lucionar
algún problema relativo a la unidad que no se
trate en este manual, póngase en contacto con el
distribuidor Son y más cerc ano a su domicilio.
Condensación de humedad
En días lluviosos o en zonas muy húmedas, es
posible que se condense humedad de nt ro de las
lentes y la pantalla de la unidad. Si e sto ocurre, la
unidad no funcionará correctamente. En este
caso, extraiga el disco y espere una hora
aproximadame nte h asta que s e ha ya e v apor ado la
humedad.
Para mantener una alta calidad de
sonido
Asegúrese de no derramar jugos ni refresco s
sobre la unidad o lo s discos.
* No disponible en esta unidad
Nota
Si la pantalla se apaga al presionar (OFF), no podrá
usarse con el control remoto de tarjeta a menos que
se presione (SOURCE) en la unidad o que se inserte
un disco para que dicha unidad se active primero.
Sugerencia
Para obtener información detallada sobre cómo
cambiar las pilas, consulte “Sustitución de la pila de
litio” en la página 15.
5
Page 24

Notas sobre los discos
• Para mantener los discos limpios, no toque su
superficie. Tómelos por los bordes.
• Guarde los discos en sus cajas o en los
cargadores de discos cu ando no los use.
• No someta los discos al calor ni a altas
temperaturas. Evite dejarlos en un automóvil
estacionado o sobre el tablero o la bandeja
trasera.
• No adhiera etiquetas, ni utilice discos con
residuos o tinta pegajosos. Tales discos pueden
dejar de girar durante el uso, causando fallas de
funcionamiento , o pueden dañarse.
• Antes de reali zar la reproducción, limpie los
discos con u n paño de li mpi eza di sponi ble en el
mercado. Hága lo desde el centro hacia los
bordes. No utilice disolventes como bencina,
diluyente, limpiadores disponibles en el
mercado ni aerosoles antiestáticos para discos
analógicos.
Notas sobre discos CD-R/CD-RW
• Puede reproducir discos CD-R (disco s
compactos grabables) y discos CD-R W (discos
compactos regrabables) diseñados para el uso
de audio en esta uni dad.
Busque estas marcas para dife renciar los dis cos
CD-R y CD-RW para el uso de audio.
Estas marcas indi can que el disco no es par a el
uso de audio.
• No use discos con eti quetas pegadas o
engomados.
Su uso puede prod ucir las siguientes fallas de
funcionamiento:
– Imposibilidad de expulsar el disco (dado que
se despegó la etiqueta o el engomado, y se
obstruye el mecanismo de expulsión ).
– Imposibilidad de leer los dato s de audio
correctamente (por ejemplo, se interrumpe la
reproducción o simplemente no la hay)
debido a que el cal or contrae el engo m ado o
la etiqueta y hace q ue el disco se deforme .
• Los discos con forma s no estand arizad as (como
corazón, cuadrado, estrella) no pueden
reproducirse en esta unidad. Si lo intenta,
puede dañar la unidad. No utilice tales discos.
• No es posible reproducir discos compactos de 8
cm.
6
• Según el estado del dis co o el equipo usado
para su grabación, es posible que algunos
discos CD-R/CD- RW no pueda n reproducirse
en esta unidad.
• No es posible repr oducir un disco CD-R o un
CD-R W que no esté finalizado *.
* Proceso necesario para reproducir en el reproductor
de CD de audio discos CD-R o CD-RW grabados.
Page 25

Procedimientos iniciales
Extracción del panel frontal
Puede extraer el panel frontal de esta unidad para
evitar que la roben.
Restauración de la unidad
Antes de usar la unidad por primera vez, o
después de sustituir la batería del automóvil o de
cambiar las conexi ones, debe restau rarla.
Extraiga el panel frontal y presione el botón
RESET con un objeto pun tiag udo, como por
ejemplo un bolígr af o.
Botón RESET
Nota
Al presionar RESET, se borra el ajuste del reloj y
algunos contenidos memorizados.
Alarma de precaución
Si gira el interru pt or de encendido hasta la
posición OFF sin haber extraído el panel fr ontal,
la alarma de precaución sonará durante unos
segundos.
Si conecta un amp lifica dor opcional y no usa el
incorporado , el sonido se desactiva.
1 Presione (OFF)*.
Se detiene la reproducción de CD o la
recepción de la radio (la iluminación de las
teclas y la pantalla permanecen activados).
* Si el automóvil no di s p one de un a p os ic i ó n ACC
(auxiliar) en la llave de encendido , asegúrese de
apagar la unidad presionando (OFF) hasta que
se apague la pantalla para evitar que se
descargue la batería del auto.
2 Presione y, a continuación, extraiga
el panel frontal hacia usted.
(OFF)
T
C
E
J
E
/
N
E
P
O
Notas
• Si extrae el panel con la unidad encendida, la
alimentación se desactiva automáticamente para
evitar que los altavoces se dañen.
• No deje caer el panel frontal ni su pantalla. T ampoco
ejerza excesiva presión sobre éstos.
• No someta el panel frontal al calor ni a temperaturas
altas o humedad. Evite dejarlo en un automóvil
estacionado o sobre el tablero o la bandeja trasera.
Sugerencia
Al transportar el panel frontal, utilice el estuche
suministrado.
continúa en la página siguiente t
7
Page 26
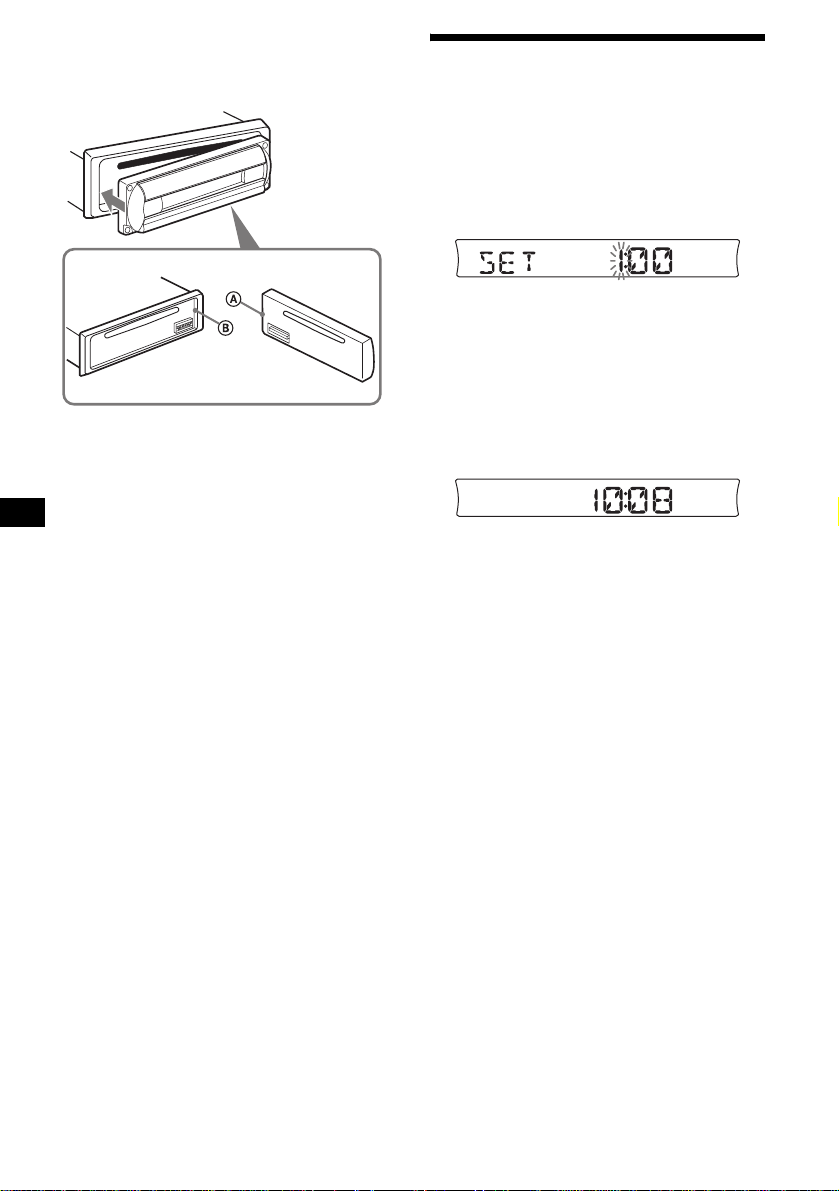
Instalación del panel frontal
Fije la parte A del panel frontal en la parte B de
la unidad, tal como muestra la ilustración, y
presione del lado izquierdo hasta que encaje.
Ajuste del reloj
El reloj emplea una in di cación digital de 12
horas.
T
C
E
J
E
/
N
E
P
O
Nota
No coloque nada sobre la superficie interior del panel
frontal.
Ejemplo: Para ajustar el reloj a las 10:08
1 Presione (DSPL) durante 2 segundos.
La indicación de hora parpadea.
1Presione el botón volumen +/– para
ajustar la hora.
2Presione (SEL).
La indicación de m inutos parpadea .
3Presione el botón volumen +/– para
ajustar el minuto.
2 Presione (DSPL).
El reloj se pone en funcionamiento. Al
finalizar el ajuste del reloj, la pantalla vuelve
al modo de reproducción normal.
8
Page 27
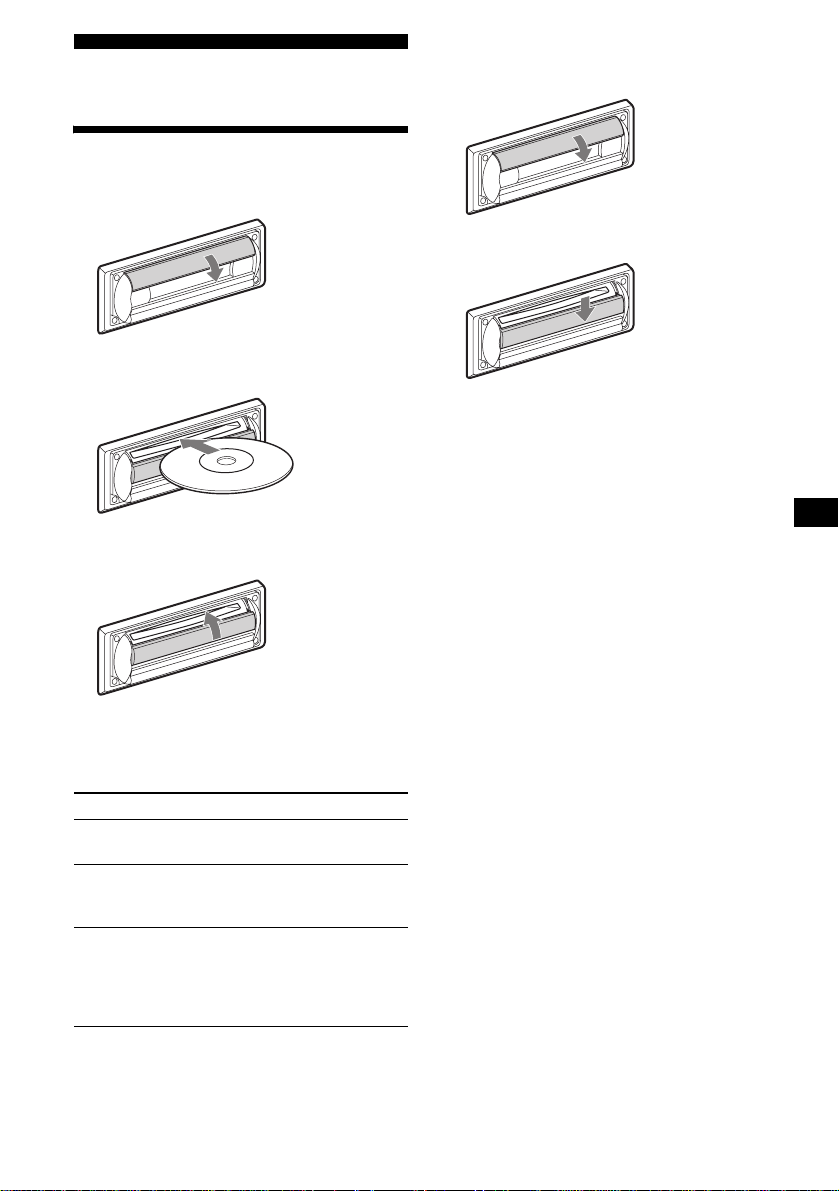
Para expulsar el disco
Reproductor de CD
Reproducción de discos
1 Abra el obturador.
2 Inserte el disco con la etiqu eta
orientada hacia ar riba.
La reproducción se inicia automáticamente.
3 Cierre el obturador.
1 Abra el obturador.
2 Presiónelo.
El disco se expulsa.
Notas
• No cierre el obturador mientras se expulse o inserte
un disco. Es posible que se bloquee y dañe el disco.
• Si abre el obturador a la fuerza, es posible que se
expulse el disco.
• Si se presiona (SEEK) (–) o (SEEK) (+), mientras se
reproduce la primera o la última p ista del disco, la
reproducción saltará a una de estas pistas.
• Cuando finalice la última pista del disco, la
reproducción se reiniciará a partir de la primera
pista del disco.
Sugerencia
Un disco puede reproducirse mientras el obturador
esté abierto o cerrado.
Si ya hay un disco ins er ta do, presione
(SOURCE) varias veces hasta que aparezca
“CD” para inicia r l a reproducción.
Para Presione
Detener la
reproducción
Omitir pistas
–Sensor de música
automático
Avanzar/retroceder
rápidamente
–Búsqueda
manual
(OFF)
(SEEK) (–/+)
(./>)
[una vez por pista]
(SEEK) (–/+)
(m/M)
[manténgalo presiona do
hasta alcanzar el punto
deseado]
9
Page 28
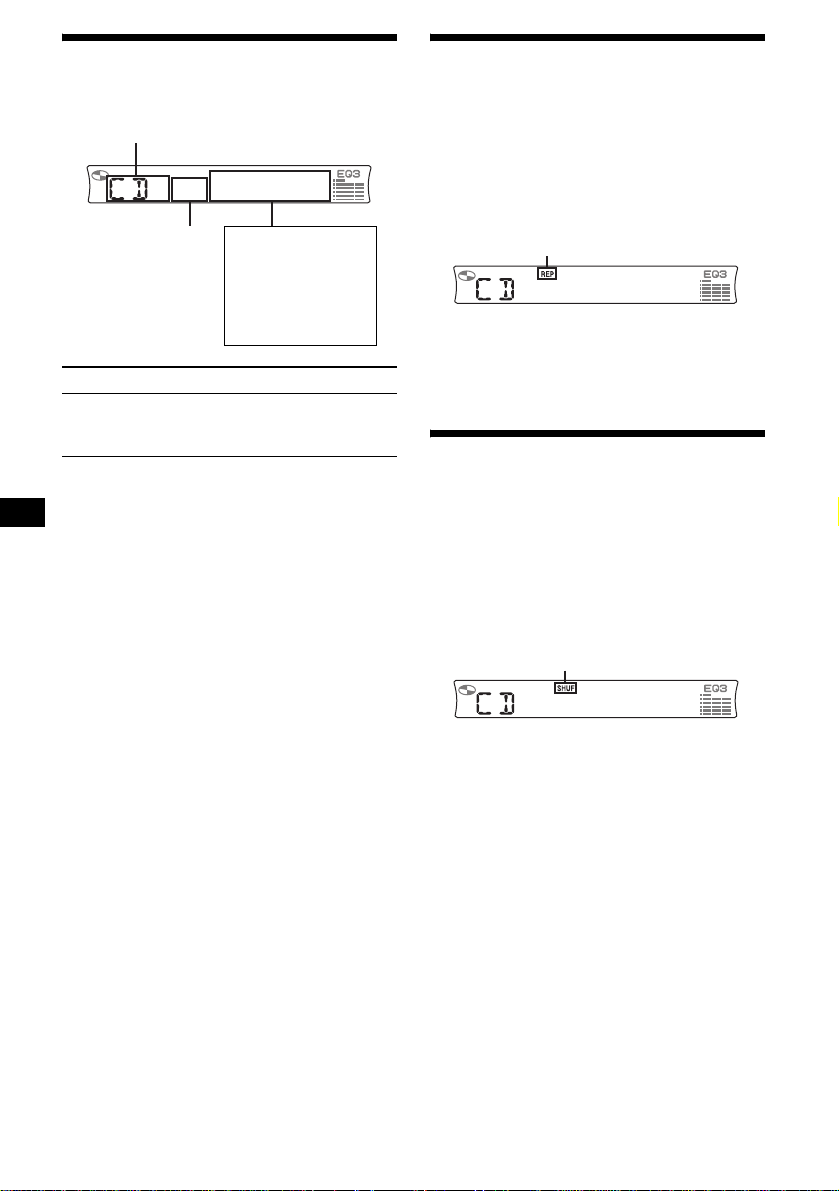
Elementos de la pantalla
Se pueden mostr ar los siguientes elementos.
Fuente
Número de pista
Elementos visi bles
en pantalla
• Tiempo de
reproducción
transcurrido
•Reloj
Reproducción repetida de
pistas
— Reproducción repetida
La pista actual se repetirá cuando ter m in e.
Durante la reproducción, presione
(REP) hasta que el indicador “REP”
aparezca en la pantalla.
Aparece el indicador “REP”.
Se inicia la reproducción repetida.
Para Presione
Cambiar el
elemento de la
pantalla
(DSPL)
Para volver al modo de reproducción normal,
presione (REP)de nuevo.
Reproducción de pistas en
orden aleatorio
— Reproducción aleatoria
Puede reproduc ir la s pi stas del disco en orden
aleatorio.
Durante la reproducción, presione
(SHUF) hasta que el indicador “SHUF”
aparezca en la pantalla.
Aparece el indicador “SHUF”.
Se inicia la reproducción aleatoria.
Para volver al modo de reproducción normal,
presione (SHUF) de nuevo.
10
Page 29
Radio
La unidad puede almacenar hasta 6 emisoras por
banda (FM1, FM2, FM3, AM1 y AM2).
Precaución
Para sintonizar emis oras mientra s maneja , util ice
la función Memoria de emisoras con mejor
sintonía para evitar accidentes.
Almacenamiento automático
de emisoras
— Memoria de emisoras con mejor sintonía
(BTM)
La unidad selecciona las emisoras de señal más
intensa dentro de la banda seleccionada y las
almacena por o rd en de frecuencia.
1 Presione (SOURCE) varias veces para
seleccionar la radio.
2 Presione (MODE) varias veces para
seleccionar la banda.
3 Presione (SENS) (BTM) durante 2
segundos.
La unidad alma cena l as estac iones en el ord en
de sus frecuencias en los botones de n úmeros.
La unidad emite un pitido al almacenar el
ajuste.
Notas
• Si se reciben pocas emisoras debido a que las
señales son débiles, algunos botones numéricos
conservarán sus valores anteriores.
• Si la pantalla muestra un número, la unidad
comienza a almacenar emisoras a partir del número
que se muestra actualmente.
Recepción de las emisoras
memorizadas
1 Presione (SOURCE) varias veces para
seleccionar la radio.
2 Presione (MODE) varias veces para
seleccionar la banda.
3 Presione el botón numérico ((1) a (6))
en el que esté almacenada la em isora
deseada.
Si la sintonización programada no
funciona
— Sintonización automática/Modo de
búsqueda local
Sintonización aut om ática:
Presione (SEEK) (+) o (SEEK) (–) para
buscar la emisora.
La búsqueda se detiene cuando la unidad
recibe una emisora. Repita la operación hasta
recibir la emisora deseada.
Modo de bús q ueda local:
Si la sintonización automática se
detiene con demasiada frecuen cia,
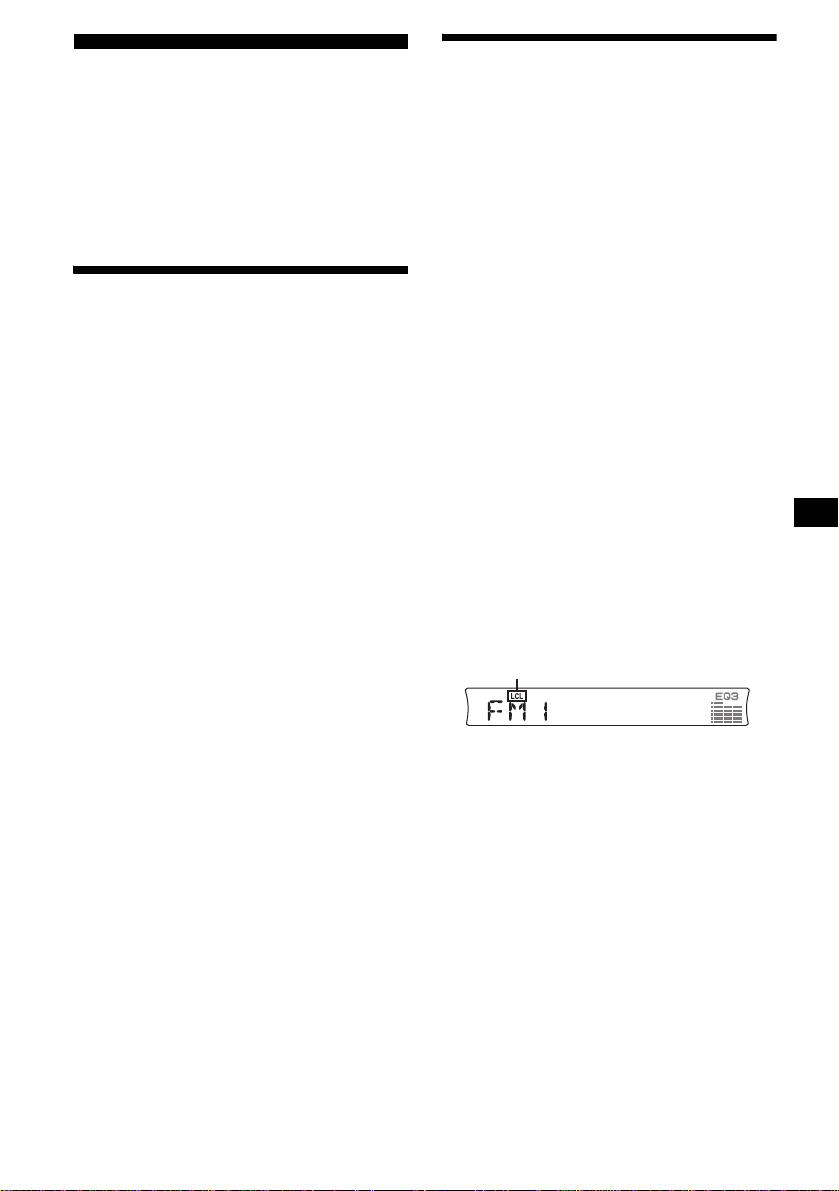
presione (SENS) (BTM) varias veces
hasta que a par ez ca el in di ca dor “L CL”
en la pantalla.
Aparece el indicador “L CL”.
Sólo se sintonizan las emisoras con señales
relativamente intensas.
Para cancelar el modo de búsqueda local,
presione (SENS) (BTM) do s veces durante la
recepción FM.
Nota
Durante la recepción AM, presione (SENS) (BTM)
para cancelar el modo de búsqueda local (se apaga el
indicador “LCL”).
Sugerencia
Si conoce la frecuencia de la emisora que desea
escuchar, mantenga presionado (SEEK) (+) o
(SEEK) (–) para localizar la frecuencia aproximada y
presione (SEEK) (+) o (SEEK) (–) varias veces para
ajustar la frecuencia deseada con mayor precisión
(sintonización manual).
continúa en la página siguiente t
11
Page 30
Si la recepción de FM en estéreo es de
mala calidad
— Modo monoaural
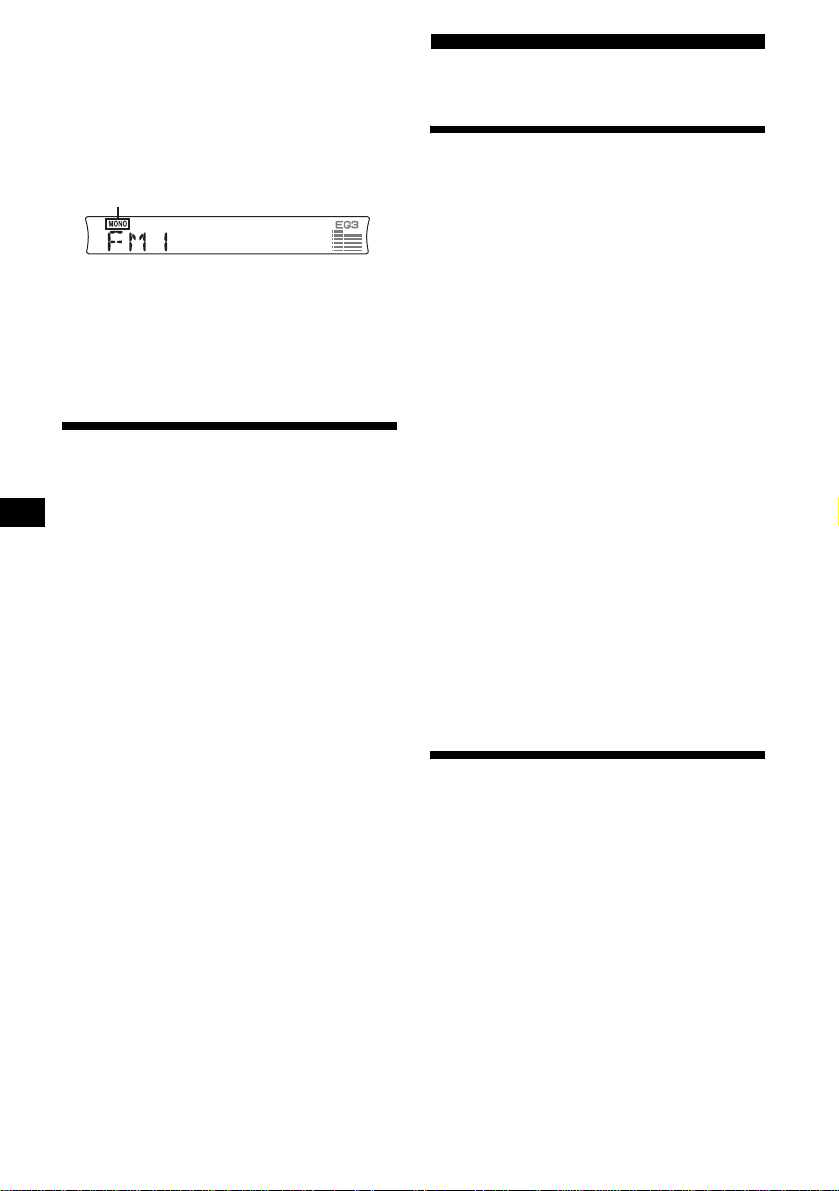
Durante la recepción de radio,
presione (SENS) (BTM) varias veces
hasta que aparezca el indicador
“MONO” en la pantalla.
Aparece el indicador “MONO”.
El sonido mejora, aunque es monoaural (“ST”
desaparece).
Para vol ver a la recepció n normal de radio,
presione (SENS) (BTM ) de nuevo (se apaga el
indicador “MONO”).
Almacenamiento de las
emisoras deseadas
Puede programar manualmente las emisoras que
desee en cualquier botón numérico.
1 Presione (SOURCE) varias veces para
seleccionar la radio.
2 Presione (MODE) varias veces para
seleccionar la banda.
3 Presione (SEEK) (+) o (SEEK) (–) para
sintonizar la emisora que desee
almacenar.
4 Presione el botón numérico que desee
((1) a (6)) durante 2 segundos hasta
que aparezca “MEM”.
La indicación de botón numérico aparece en
la pantalla.
Nota
Si intenta almacenar otra emisora en el mismo botón
numérico, se borrará la que estaba almacenada
previamente.
Otras funciones
Ajuste de las características
del sonido
Es posible ajustar el balance, el equilibrio, el
filtro de paso bajo y el volumen del altavoz
potenciador de graves.
1 Presione (SEL) varias veces hasta que
aparezca “BAL”, “FAD”, “LPF” o
“SUB”.
Cada vez que presione (SEL ), el elemento
cambia de la siguiente forma:
1
LOW*
t MID*1 t HI*1 t
BAL (izquierda-derecha) t
FAD (frontal-posterior) t
LPF (filtro de paso bajo)*
SUB (volumen del altavoz potenciador
de graves)*
*1 Si está activado EQ3 (página 14).
*2 Cuando se ha seleccionado “SUB” (página 13).
*3 La frecuencia de corte se puede ajustar en
78 Hz, 125 Hz u OFF.
*4 El nivel de volumen se puede ajustar entre
–10dB y +10dB. (Por debajo de –10 dB,
aparece “ATT”.)
2*4
2 Presione el botón volumen +/– para
ajustar el elemento selecc ionado.
Nota
Haga el ajuste antes de que transcurran 3 segundos
después de seleccionar el elemento.
Atenuación rápida del sonido
Presione (ATT).
Aparece “ATT” en la pantalla.
Para recuperar el nivel anter ior de volumen,
presione (ATT) de nuevo.
2*3
t
12
Page 31

Cambio de los ajustes de
sonido y la pantalla
— Menú
Es posible ajustar los siguientes element os :
Configuración
• REAR/SUB*— para cambiar la salida de
audio REAR o SUB.
– Seleccione “REAR” para emitir a un
amplificador de potenc ia .
– Seleccione “SUB” para emitir a un altavoz
potenciador de gr aves.
• DEMO*— para ac ti var o desactiv a r l a p anta ll a
de demostración.
– Seleccione “ON” para activar la pantalla de
demostración (l a demostración se inici a
aproximadamente 10 segundos después de
que se haya encend id o la unidad).
– Seleccione “OFF” para desactivar la pantalla
de demostració n.
• BEEP— para activar o desactivar los pitidos.
• DIM— para cambiar el brillo de la pantalla.
– Seleccione “ON” para que la pant al l a se
atenúe.
– Seleccione “OFF” para desact ivar el
atenuador.
Cambio de REAR/SUB*
Presione (SEL) y, a continuación, el
botón de volumen + (REAR) o – (SUB).
Transcurridos 3 segundos, la pantalla vuelve al
modo de reproducción normal.
Selección del elemento deseado
Presione simultáneament e (SEL) y el
botón que desee.
(SEL) + (4): DEMO*
(SEL) + (6): BEEP
(SEL) + (DSPL): DIM
Al finalizar el ajuste del modo, la pantalla vuelve
al modo de reproducción normal.
Para cancela r el elemento, vuelva a presionar
(SEL) y el botón que desee simultáneament e.
* Cuando la unidad se apaga.
13
Page 32

Ajuste del ecualizador (EQ3)
Es posible selecc io nar una curva de ecualizador
para 7 tipos de música distintos (XPLOD,
VOCAL, CLUB, JAZZ, N- AGE, ROCK, CUST
y OFF (ecualizador apagado)).
Puede almacenar un ajuste diferent e del
ecualizador para cada unidad fuente.
Selección de la curva de ecualizador
1 Presione (SOURCE) para seleccionar
una fuente (radio o CD).
2 Presione (EQ3) varias veces hasta
seleccionar la curva de ecualizador
que desee.
Cada vez que pr esione (EQ3), el elemento
cambiará.
Para cancelar el efecto de ecualización,
seleccione “OFF”.
Ajuste de la curva de ecualizador
Puede almacenar y definir los ajustes de l
ecualizador para distintos rangos tonales.
1 Presione (SOURCE) para seleccionar
una fuente (radio o CD).
2 Presione (EQ3) varias veces para
seleccionar la curva de ecua lizador
que desee.
3 Ajuste de la curva de ecualizador.
1Presione (SEL) varias vece s par a
seleccionar el rango de tonos
deseado.
Cada vez que presione (SEL), el ra ngo de
tonos cambiará.
LOW t MID t HI (t BAL t FAD t
LPF t SUB)
2Presione el botón de volumen +/–
varias ve ces par a aj us ta r el nive l de
volumen deseado.
El nivel de volumen puede ajustarse en
intervalos de 1 dB entre –10 dB y +10 dB.
3Repita los pasos 1 y 2 para
ajustar la curva de ecualizador.
Para restaurar la curva de ecualizador
ajustada en fábr ic a, presione (SEL)
durante 2 se gundos.
Nota
Si ajusta EQ3 en “OFF”, no podrá ajustar los valores
de la curva del ecualizador.
14
Page 33

Información
complementaria
Mantenimiento
Reemplazo del fusible
Al reemplazar el fusible, asegúrese de usa r uno
cuyo amperaje sea idéntico al especificado en el
original. Si el fusible se funde, verifique la
conexión de alimentación y sustitúyalo. Si el
fusible se funde de nuevo después de sustituir lo,
es posible que exista al guna falla de
funcionamiento interno. En tal caso, consulte con
el distribuidor Sony más cercano.
Notas
• Por razones de seguridad, apague el motor del
automóvil antes de limpiar los conectores y extraiga
la llave del interruptor de encendido.
• No toque nunca los conectores directamente con los
dedos ni con ningún dispositivo metálico.
Sustitución de la pila de litio
En condiciones normales, las pil as duran
aproximadamente 1 año. (La duración puede ser
menor en función de las condiciones de uso.)
Cuando la pila se de bi lita, el alcance del cont rol
remoto de tarjeta se reduce. Sustituya la pila por
una nueva de litio CR2025. El uso de cualquier
otra pila podría provocar un incendio o una
explosión.
Fusible (10 A)
Advertencia
Nunca use un fus ible cuy o amperaj e supere al del
suministrado con la unidad, ya que ésta podría
dañarse.
Limpieza de los conectores
La unidad puede no funcionar correctamente si
los conectores entr e di cha unidad y el panel
frontal están su ci os. Para prevenirlo, extraiga el
panel frontal (página 7) y limpie los conectores
con un hisopo de algo dón humedecido en
alcohol. No apliq ue demasiada fuerza o podría
dañar los conectores.
Unidad principal
Parte posterior del panel frontal
x
Lado + hacia arriba
Notas sobre la pila de litio
• Mantenga la pila de li t io fue ra del alcance de
los niños. Si la pila se i ngiere, póngase en
contacto inmediatamente con un médico.
• Limpie la pila con un paño seco pa ra g arantizar
un contacto óptimo.
• Asegúrese de ob servar la polaridad corr ecta al
instalar l a pila.
• No agarre la pila co n pi nzas metálicas porque
puede producirse un cortocircuito.
ADVERTENCIA
La pila puede explotar si no se emplea
adecuadamente.
No recargue la pila; tampoco la desmonte ni
la arroje al fuego.
15
Page 34
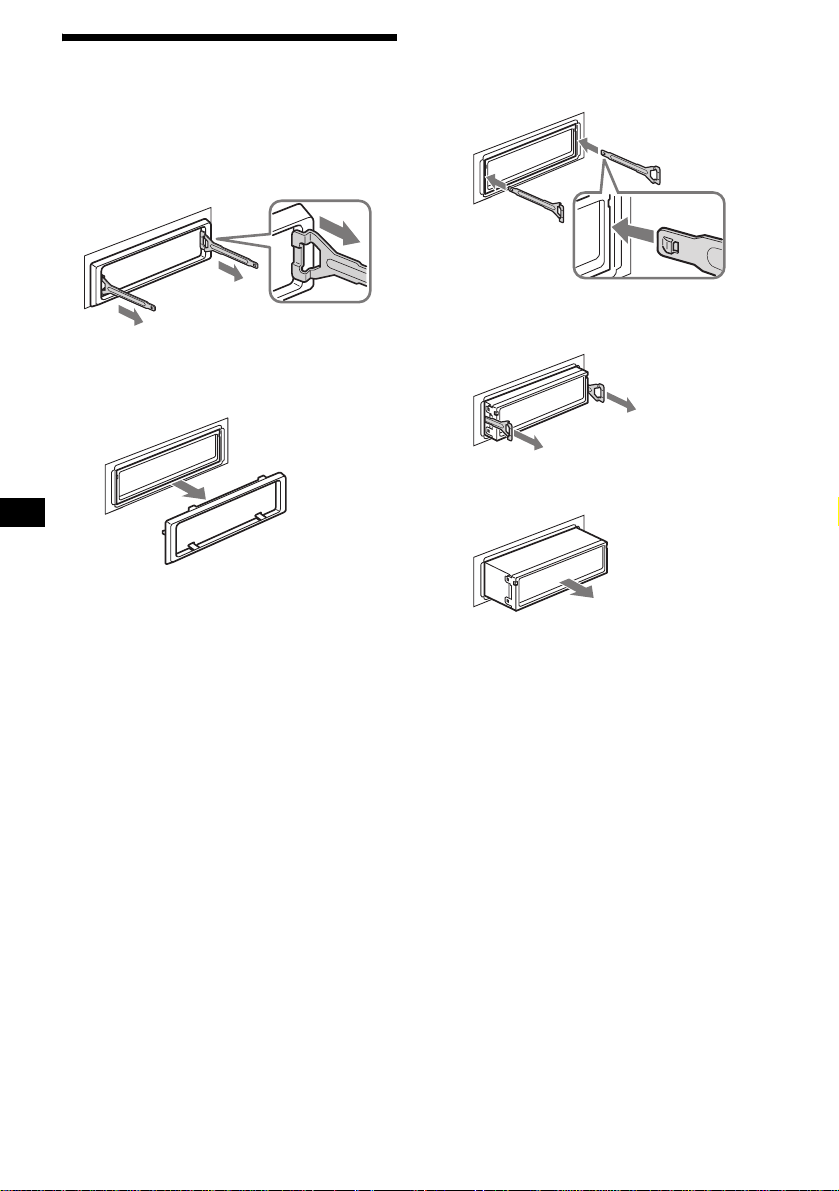
Extracción de la unidad
1 Extraiga el marco de protección.
1 Extraiga el panel frontal (página 7).
2 Fije las llaves de liberación al marco
de protección.
2 Extraiga la unidad.
1Inserte las dos llaves de liberación
a la vez hasta que oiga un “clic”.
El gancho
debe
encontrarse
en la parte
interior.
Oriente la llave de liberación
en la dirección correcta.
3 Tire de las llaves de liberación para
extraer el marco de protección.
2Tire de las llaves de liberación para
extraer la unidad.
3Deslice la unidad para extraerla de
la montura.
16
Page 35

Especificaciones
Sección del reproductor de CD
Relación señal-ruido 120 dB
Respuesta de frecuencia 10 – 20 000 Hz
Fluctuación y trémolo Inferior al límite medible
Sección del sintonizador
FM
Margen de sintonización 87, 5 – 107, 9 MHz
Terminal de antena Cone ct or de antena externa
Frecuencia intermedia 10,7 MHz/450 kHz
Sensibilidad útil 9 dBf
Selectividad de 75 dB a 400 kHz
Relación señal-ruido 67 dB (estéreo),
Distorsión armónica a 1 kHz
Separación 35 dB – 1 kHz
Respuesta de frecuencia 30 – 15 000 Hz
69 dB (mono)
0,5 % (stereo),
0,3 % (mono)
AM
Margen de sintonización 530 – 1 710 kHz
Terminal de antena Cone ct or de antena externa
Frecuencia intermedia 10,7 MHz/450 kHz
Sensibilidad 30 µV
Sección del amplificador de potencia
Salidas Salidas de altavoz
Impedancia de los altavocesde
Salida máxima de potencia
(conectores de sellado
seguro)
4 – 8 Ω
52 W × 4 (a 4 ohmios)
Generales
Salidas Ter minal de salidas de audi o
Entrada Terminal de entrada de la
Controles de tono Bajos:
Requisitos de alimentación
Dimensiones Aprox. 178 × 50 × 179 mm
Dimensiones de montaje Aprox. 182 × 53 × 161 mm
Peso Aprox. 1,2 kg
Accesorios suministrado s Componentes d e instalación
Accesorio opcional Control remoto de tarjeta
El diseño y las especificaciones están sujetos a
cambios sin previo aviso.
(se puede cambiar entre
posterior y sub)
Terminal de control del
relevador de la antena
motorizada
Terminal de control del
amplificador de potencia
antena
±10 dB a 60 Hz (XPLOD)
Medios:
±10 dB a 1 kHz (XPLOD)
Altos:
±10 dB a 10 kHz (XPLOD)
Batería de automóvil de cc
12 V (masa negativa)
(an/al/prf)
(an/al/prf)
y conexiones (1 juego)
Estuche para el panel frontal
(1)
RM-X114
17
Page 36
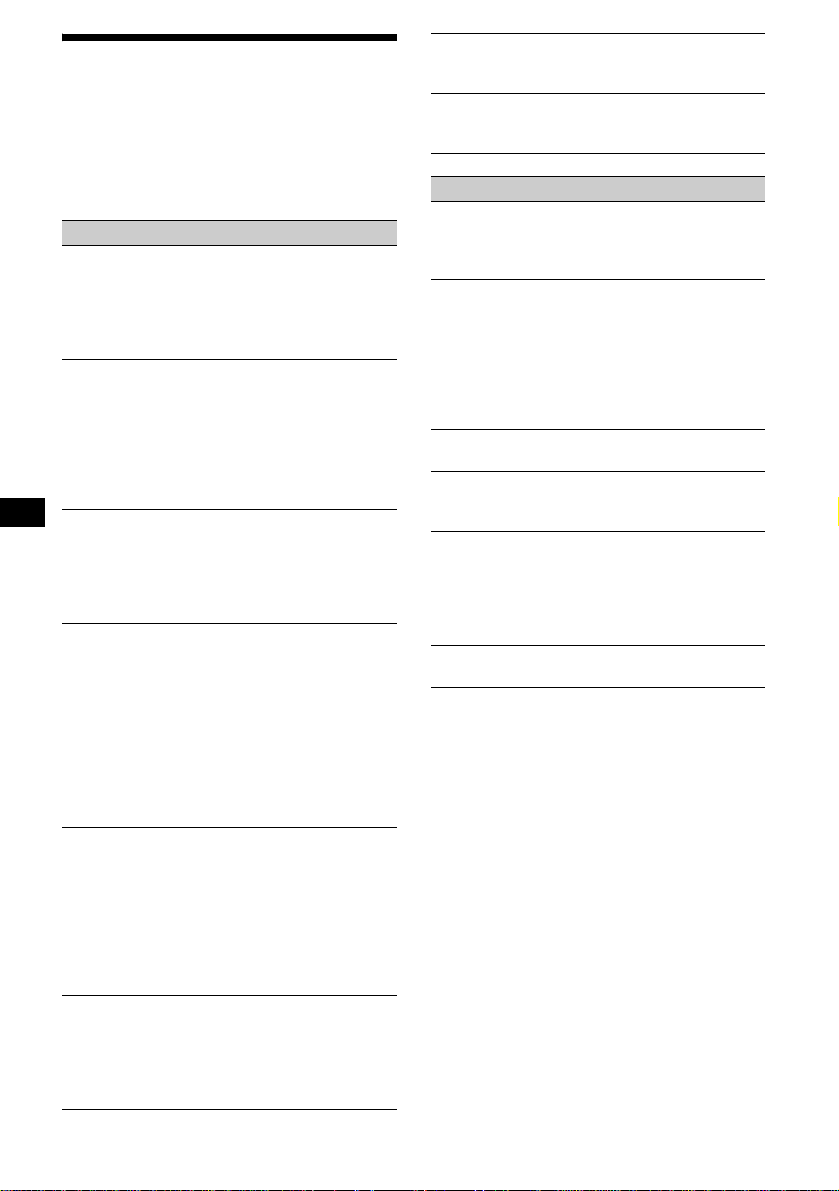
Solución de problemas
La siguiente lista de comprobación le ayudará a
solucionar los problemas que puedan pr oducirse
con la unidad.
Antes de consultarla, compruebe los
procedimientos de conexión y de
funcionamiento.
Generales
No se escucha el sonido.
• Presione el botón volume n + para ajustar el
volumen.
• Cancele la función ATT.
• Ajuste el control de equi librio en la posición
central para un si st ema de 2 altavoces.
El contenido de la memoria se borró.
• Presionó el botón RESET.
t Vuelva a almacenar los datos en la
memoria.
• Se han descon ectado el cabl e de
alimentación o las pilas.
• El cable de conexión de la alimentación no
está conectado correctamente.
No se escuchan los pitidos.
• El sonido de los pitidos está cancelado
(página 13).
• Hay conectado un amplificador opcional de
potencia y usted no est á usando el
amplificador incorporado.
Las indicaciones desaparecen de la
pantalla o no aparecen en ella.
• La pantalla se apaga si presiona y mantiene
presionado (OFF).
t Ma nt enga presionado (OFF)
nuevamente hasta que se ilum i ne la
pantalla.
• Extraiga el panel frontal y limpie los
conectores. Para obtener información
detalla d a, consulte “Limpieza de los
conectores” en la p ági na 15.
Las emisoras almacenadas y la hora
correcta se borraron.
El fusible se fundió.
Se escucha ruido cuando el interruptor de
encendido se encuentra en la posición ON,
ACC u OFF.
Los cables no co inciden correctam ente con el
conector de alimentación auxiliar del
automóvil.
La unidad no recibe alimentación.
• Verifique la conexión. Si todo está en orden,
compruebe el fusible.
• El auto no tiene una posición ACC.
t Presione (SOURCE) (o inserte un disco)
para que se encienda la unidad.
La unidad recibe alimentación en forma
continua.
El auto no tiene un a posición ACC.
La antena motorizada no se extiende.
La antena motoriza da no dispone de una caja
de relevador.
Reproducción de CD
No es posible insertar un disco.
• Ya hay un CD insertado.
• El CD se ha insert ado a la fuerza al revés o
de forma incorrecta.
La reproducción no s e inic ia.
• CD defectuoso o sucio.
• CD-R o CD-RW sin finalizar.
• Intentó reproduci r un CD -R o CD-RW no
diseñado para el uso de audio.
• Ciertos discos CD-R o CD-RW pueden no
reproducirse debido al equipo de grabación o
al estado del disco.
El disco se expulsa automáticamente.
La temperatura ambiente es superior a 50°C .
Los botones de operación no funcionan.
El CD no se expulsa.
Presione el botón RESET.
Se producen saltos de sonido debido a
vibraciones.
• La unidad está instalada en un ángulo
superior a 45°.
• La unidad no está instalada en una part e
firme del auto.
Se producen saltos de sonido.
Disco sucio o defectuoso.
18
Page 37
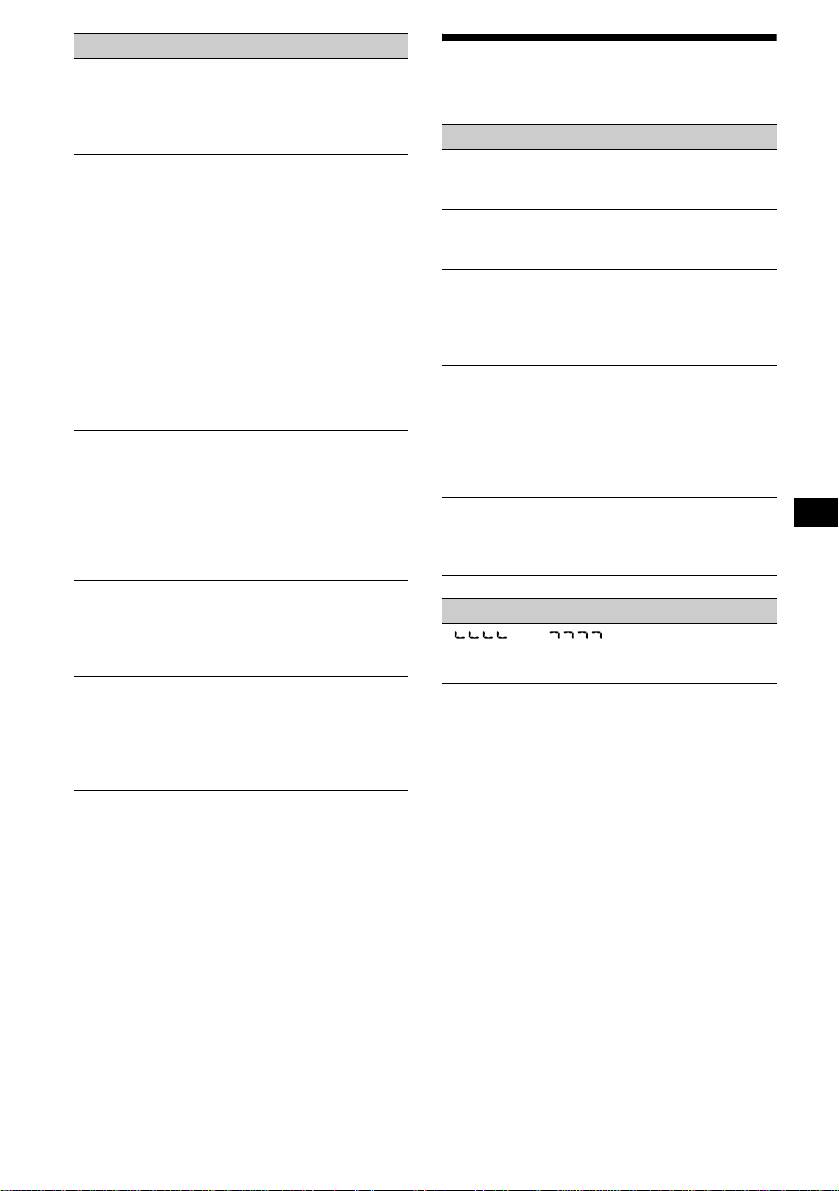
Recepción de radio
No es posible usar la sintonización
programada.
• Almacene la frecuencia correcta en la
memoria.
• La señal de emi si ón es demasiado débil.
No es posible recibir las emisoras.
Hay ruidos que obstaculizan el sonido.
• Conecte un ca ble de control de antena
motorizada (azul) o un cable de fuente de
alimentación auxiliar (rojo) al cable de
suministro de alimentación del amplificador
de antena del automóvil (sólo cuando el
automóvil tenga una antena de FM/AM
incorporada en el crista l trasero o lateral).
• Compruebe la conexi ón de la antena del
automóvil.
• La antena automática no se extiende.
t Compruebe la conexión del cable de
control de antena motorizada.
• Compruebe la frecuencia.
No es posible usar la sintonización
automática.
• El modo de búsqueda local está ajustado en
“ON”.
t Ajuste el modo de búsqueda local en
“OFF” (página 11).
• La señal de emi si ón es demasiado débil.
t U se la sintonización manual.
La indicación “ST” parpadea.
• Sintonice la frecu encia con precisión.
• La señal de emi si ón es demasiado débil.
t A juste el modo de recepción monoaural
en “ON” (pág ina 12).
Un programa emitido en estéreo se escucha
en monoaural.
La unidad se encuentra en el modo de
recepción mon oaural.
t Cancele el modo de recepción monoaura l
(página 12).
Mensaje/indicaciones de le
error
Indicaciones de error
Las siguientes indicaciones parpadearán durante
5 segundos aproxi m adamente (y, en el caso del
“Err04”, se escuchará una alarma) .
Err04
El CD está sucio o ins ertado al revés.
t Límpielo o insértelo correctamente.
Err50
La conexión de altavoces y ampl ificadores es
de funcionamiento interno.
t Consulte el manual de instalación de este
modelo para comprobar la conexión.
Err60
Es posible que se ha ya producido una falla de
funcionamiento interno.
t Verifique la conexión. Si el indicador de
error permane ce en la pantalla, póngase en
contacto co n el distribuidor Sony más
cercano.
Err99
La unidad de CD no puede usarse debido a
algún problema.
t Presione el botón RESET de la unidad.
Mensaje
“” o “”
Llegó al principio o al final del disco, por lo
que no es posible avanzar más.
Si estas soluciones no ayudan a mejorar la
situación, póngase en contacto con el distribuidor
Sony más cercano.
19
Page 38

Page 39

Page 40

• Lead-free solder is used for soldering certain parts.
• Halogenated flame retardants are not used in the certain printed wiring boards.
• Halogenated flame retardants are not used in cabinets.
• Paper is used for the packaging cushions.
Sony Corporation Printed in Korea
 Loading...