

Page 1

FM/MW/LW Compact Disc Player
3-251-042-22 (1)
FM/MW/LW
Compact Disc Player
Operating Instructi on s
Bedienungsanleitung
Mode d’emploi
Istruzioni per l’uso
Gebruiksaanwijzing
Wichtig!
Bitte nehmen Sie sich etw as Z eit, um den Gerä te-Pass vo llstän dig
auszufüllen. Dieser be findet sic h a uf der hinteren Umsc hla gseite d ieser
Bedienungsanleitung .
GB
DE
FR
IT
NL
Si dichiara che l’apparecchio è stato fabbricato in conformità all’art. 2, Comma 1 del D.M. 28.08.
1995 n. 548.
For installation and connections, see the supplied installation/connections manual.
Zur Installation und zum Anschluss siehe die mitgelieferte Ins tallatio ns-/Anschlussanleitung.
En ce qui concerne l’installation et les connexi ons, consulter le manuel d’installation/
raccordement fourni.
Per l’installazione e i collegamenti, fare riferimento a l manu ale di istru zi oni pe r
l’installazione e i collegamenti in dotazione.
Zie voor het monteren en aansluiten van het apparaat de bijgeleverde handleiding “Installatie
en aansluitingen”.
CDX-M1000TF
© 2003 Sony Corporation
Page 2
Welcome !
Thank you for purchas in g t hi s Sony Compact
Disc Player.
FEATURING:
• MP3 file playback recorded on a disc is
possible.
• CD-R/CD-RW whic h can have a session added
can be played (page 7).
• Discs recorded in Multi Session (CD-Extra,
Mixed CD, et c. ) can be played , depending on
the recording method (page 7).
• Optional CD/MD units (both changers and
players)*
•ID3 tag*
when an MP3 file is played).
• CD TEXT in formation (d isplayed when a C D
TEXT disc*
• Supplied controller accessory
Card remote commander RM-X132
• Optional controller accessories
Rotary commander RM-X4S
Wireless rotary commander RM-X6S
*1 This unit works with Sony products only.
*2 ID3 tag is an MP3 file that contains information
*3 A CD TEXT disc is an audio CD that includes
1
.
2
version 1 information (displayed
3
is played).
about album name, artist name, track name, etc.
information such as the disc name, artist name,
and track names. This information is recorded on
the disc.
Instructions in this manual describe how to use
the unit by mainly using the card remote
commander.
Illustrations in this manual may differ from the
actual device.
This label is located on the bottom of the
chassis.
CAUTION INVISIBLE
VIEW DIRECTLY WITH OPTICAL INSTRUMENTS
LASER RADIATIONWHEN OPEN
DO NOT STARE INTO BEAM OR
This label is located on the drive unit’s internal
chassis.
2
Page 3

Table of Contents
Location of controls. . . . . . . . . . . . . . . . . . . .4
Precautions. . . . . . . . . . . . . . . . . . . . . . . . . . .6
Notes on discs . . . . . . . . . . . . . . . . . . . . . . . .6
About MP3 files. . . . . . . . . . . . . . . . . . . . . . .7
General top menu display. . . . . . . . . . . . . . . .9
Getting Started
Resetting the unit . . . . . . . . . . . . . . . . . . . . .10
Setting the clock and the calendar . . . . . . . .10
CD Player
CD/MD Unit (optional)
Playing a disc . . . . . . . . . . . . . . . . . . . . . . . .11
Display items . . . . . . . . . . . . . . . . . . . . . . . .12
Playing tracks re peatedly
— Repeat Play. . . . . . . . . . . . . . . . . . . . .13
Playing trac ks in random orde r
— Shuffle Play . . . . . . . . . . . . . . . . . . . .13
Labelling a CD
— Disc Memo* . . . . . . . . . . . . . . . . . . . .14
Locating a disc by name
— List-up*. . . . . . . . . . . . . . . . . . . . . . . .15
* Functions available with optional CD/MD unit
Radio
Storing stations automatically
— Best Tuning Memory (BTM) . . . . . . .15
Display items . . . . . . . . . . . . . . . . . . . . . . . .16
Receiving the stored stations . . . . . . . . . . . .16
Storing only desired stations . . . . . . . . . . . .17
Tuning in a station through a list
— List-up. . . . . . . . . . . . . . . . . . . . . . . . . 17
RDS
Overview of RDS. . . . . . . . . . . . . . . . . . . . .18
Automatic retuning for best receptio n results
— AF function. . . . . . . . . . . . . . . . . . . . .19
Receiving traffic announcements
— TA/TP. . . . . . . . . . . . . . . . . . . . . . . . .20
Presetting RDS stations with AF and TA
setting . . . . . . . . . . . . . . . . . . . . . . . . . . .20
Tuning in stations by programme type
— PTY. . . . . . . . . . . . . . . . . . . . . . . . . . .21
Setting the clock automatically
— CT. . . . . . . . . . . . . . . . . . . . . . . . . . . .22
Image Settings
Selecting the display mode and display
pattern . . . . . . . . . . . . . . . . . . . . . . . . . . . 23
Clearing disp la y characters automatically
— AutoClear (Spectrum analyzer/Pano-
rama/Screen Saver mode). . . . . . . . . . . . 25
Changing the translucence ratio of the
characters
—BlendLevel (S pectrum analyzer/
Panorama/Screen Saver mode). . . . . . . . 25
Setting a Plaque
— Plaque. . . . . . . . . . . . . . . . . . . . . . . . . 26
Setting the charact er colour
— Color Sel . . . . . . . . . . . . . . . . . . . . . . 26
Selecting the display period of the ima ges
— AutoImage . . . . . . . . . . . . . . . . . . . . . 27
Other Functions
Using the rotary commander. . . . . . . . . . . . 28
Adjusting the sound characteristics. . . . . . . 29
Quickly attenuating the sound. . . . . . . . . . . 29
Changing the sound and display s ettings
— Menu . . . . . . . . . . . . . . . . . . . . . . . . . 30
Setting the Dynamic Soundstage Organis er
(DSO) . . . . . . . . . . . . . . . . . . . . . . . . . . . 31
Setting the equaliser (EQ7). . . . . . . . . . . . . 31
Adjusting the front and rear volume . . . . . . 32
Adjusting the volume of the
subwoofer(s). . . . . . . . . . . . . . . . . . . . . . 33
Connecting auxiliar y audio equipment . . . . 34
Setting the security code . . . . . . . . . . . . . . . 35
Additional Information
Maintenance . . . . . . . . . . . . . . . . . . . . . . . . 36
Removing the unit. . . . . . . . . . . . . . . . . . . . 37
Specifications . . . . . . . . . . . . . . . . . . . . . . . 38
Troubleshooting. . . . . . . . . . . . . . . . . . . . . . 39
Error displays/Message. . . . . . . . . . . . . . . . 40
3
Page 4
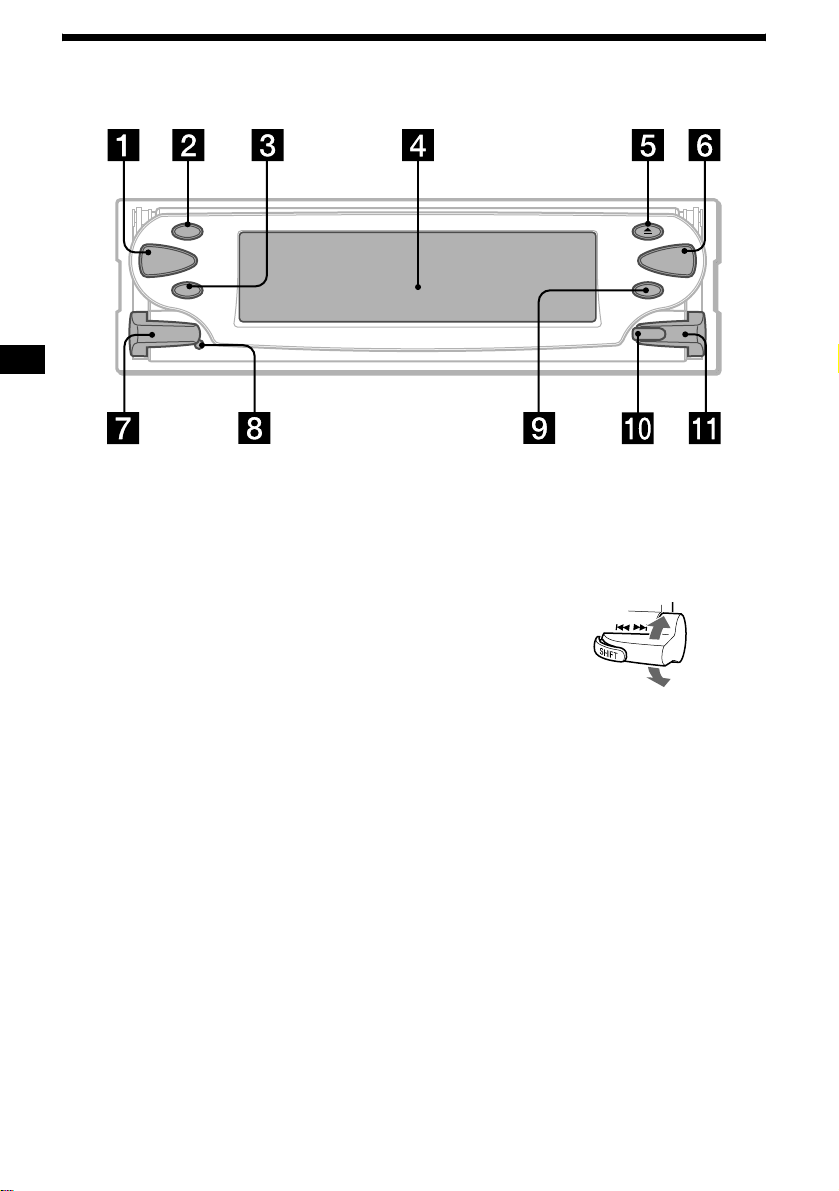
Location of controls
OFF
SOURCE SCREEN
MODE
VOL
Refer to the pages listed for details.
CDX-M1000TF
SHIFT
.
>
a SOURCE (Power on/Radio/CD/MD/
b OFF (Stop/Power off) button*
1
) button
AUX*
T o select the source.
2
11, 34
c MODE button
To change the oper at i on.
d Display window
e Z (eject) OPEN/CLOSE button
To eject a disc, if a disc is already in the unit.
To open/close the front panel.
f SCREEN button
T o select the display mode.
g VOL (volume) control lever
To turn up or down the volume by pressing
up or down the VOL lever.
h Reset button 10
i Receptor for the card remote
commander and wireless rotary
commander
j SHIFT (switching shift 1-3) button
To change the funct io n of the . >
lever (qa).
k . > lever
To select the desired radio station, the
desired item to be adjusted, or the desired
image by pressing up or down the . >
lever.
Press up
Press down
*1 When an op t io nal CD/MD unit is connected,
“AUX” is not displayed.
*2 Warning
when installing in a car without an
ACC (accessory) position on the
ignition switch
After turning off the ignition, be sure to
press and hold (OFF) on the unit until the
display disappears.
Otherwise, the cl ock di splay do es no t tu rn of f
and causes batte ry drain.
4
Page 5
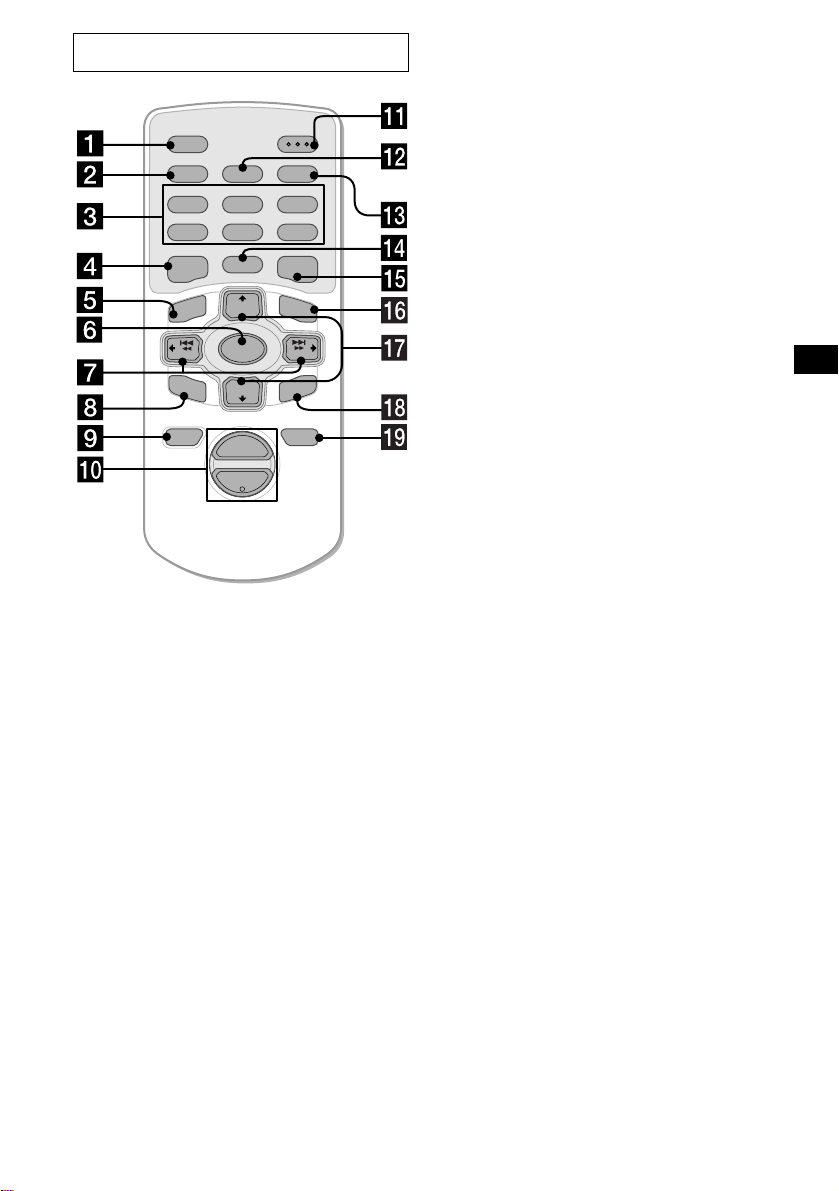
Card remote commander RM-X132
SHUF
2
5
+
VOL
–
ATT
3
6
LIST
+
+
SEEK
–
ENTER
BACK
MODE
PTY AF TA
REP
1
4
GRAPHIC
SCREEN IMAGE
DISC
MENU
SOURCE
–
SEEK
SOUND
DISC
OFF
The correspondin g buttons of th e ca rd
remote commander control the same
functions as those on this unit.
Instructions in this manual describe how to use
the unit by mainly using the card remote
commander.
Refer to the pages listed for details.
a MODE button
b PTY button
c Number buttons
(1) REP 13
(2) SHUF 13
To store stations and receive stored stations.
d SCREEN button
e MENU button
To display the general menus.
f SOURCE button
g </, (SEEK –/+) buttons
h SOUND button
To display the sound menus.
i OFF button
j VOL (+/–) buttons
k ATT button 29
l AF button 19
m TA b utton 20
n GRAPHIC button
To display the graphic menus.
o IMAGE button
To switch the display patterns.
p LIST button 15, 17
q M/m (DISC +/–) buttons
r ENTER button
To enter a setting.
s BACK button
In a setting, to return to a previous operation.
Note
If the display disappears by pressing (OFF), it cannot
be operated with the card remote commander unless
(SOURCE) on the unit is pressed, or a disc is inserted
to activate the unit first.
Tip
See “Replacing the lithium battery” on page 36 for
details on how to replace the batteries.
5
Page 6
Precautions
Notes on discs
• If your car was parked in direct sunlight, allow
the unit to cool off before operating it.
• Power aerials will extend automatically while
the unit is operating.
• Do not use the CUSTOM FILE feature while
driving, or perform any ot her function which
could divert your attention from the road.
If you have any quest ions or proble m s
concerning your unit that are not covered in this
manual, please co nsult your nearest Sony dealer.
Moisture condensation
On a rainy day or in a very damp area, moisture
condensation ma y occur inside the lense s and
display of the unit. Should this occur, the unit
will not operate properly. In such a case, remove
the disc and wait for about an hour until the
moisture has evaporated.
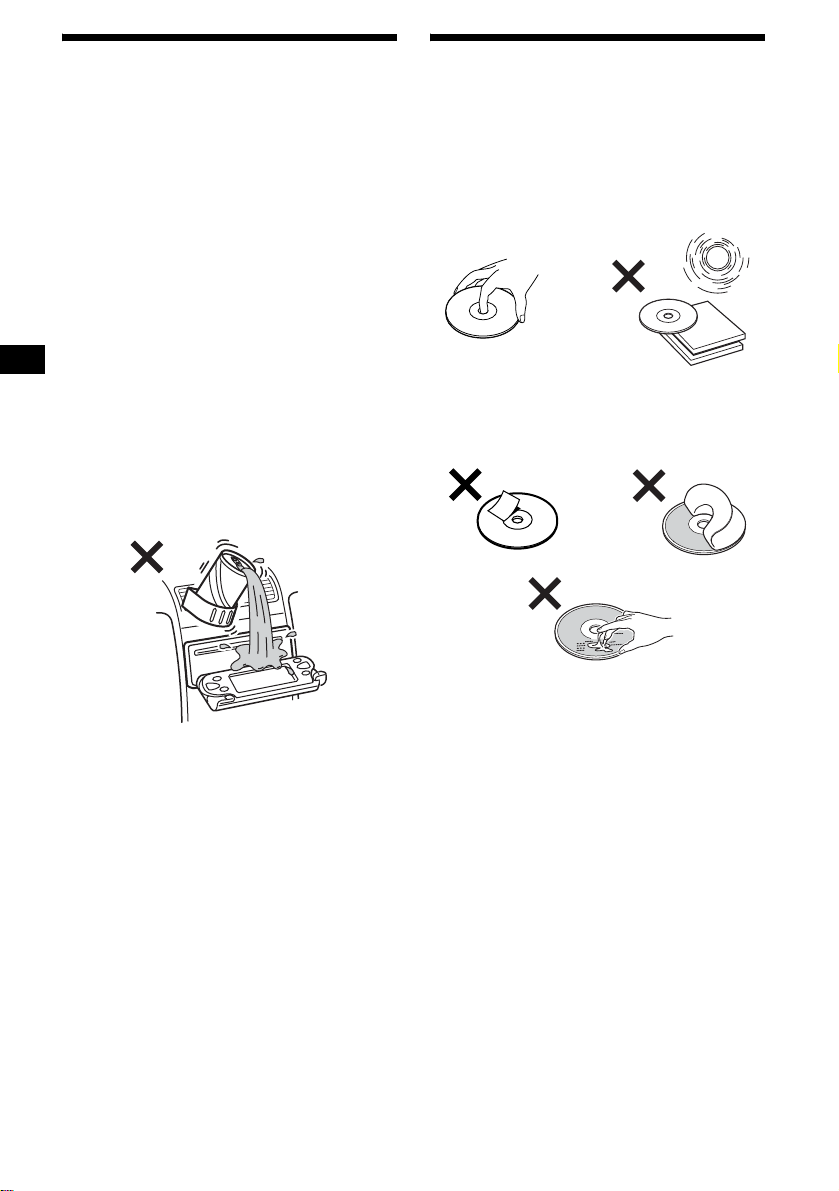
To maintain high sound quality
Be careful not to splash juice or other soft drinks
onto the unit or discs.
Notes on LCD display
• Do not push the LCD display strongly. It may
cause injury or damage the display.
• Bright points of light (red, blue, or green) or
black dots may appea r on th e LCD di splay.
This is not a malfunction. The LCD is made
with high-precision technology and more than
99.99 % of the picture element is intact.
However, tiny elements of the picture may
show the above symptoms.
• To keep discs clean, do not touch the sur face .
Handle a disc by its ed ge.
• Keep your discs in their cases or disc
magazines when not in use.
Do not subject the discs to heat/hig h
temperature. Avoid le a ving th em in park ed cars
or on dashboards/rear trays.
• Do not attach labels , or us e discs with sticky
ink/residue. Such discs may stop spinning
when used, caus in g a m alfunction, or may rui n
the disc.
• Do not use any discs wit h l abels or stickers
attached.
The following malfunctions may result from
using such discs:
– Inability to eject a disc (due to a label or
sticker peeling off and jamming the eject
mechanism).
– Inability to read audio data correctly (e.g.,
playback skippin g, or n o pl ayback) due to
heat shrinking of a sticker or label causing a
disc to warp.
• Discs with non-standard shapes (e.g., heart,
square, star) c annot be played on this unit.
Attempting to do so may damage the unit. Do
not use such discs.
• You cannot play 8 cm CDs.
6
Page 7
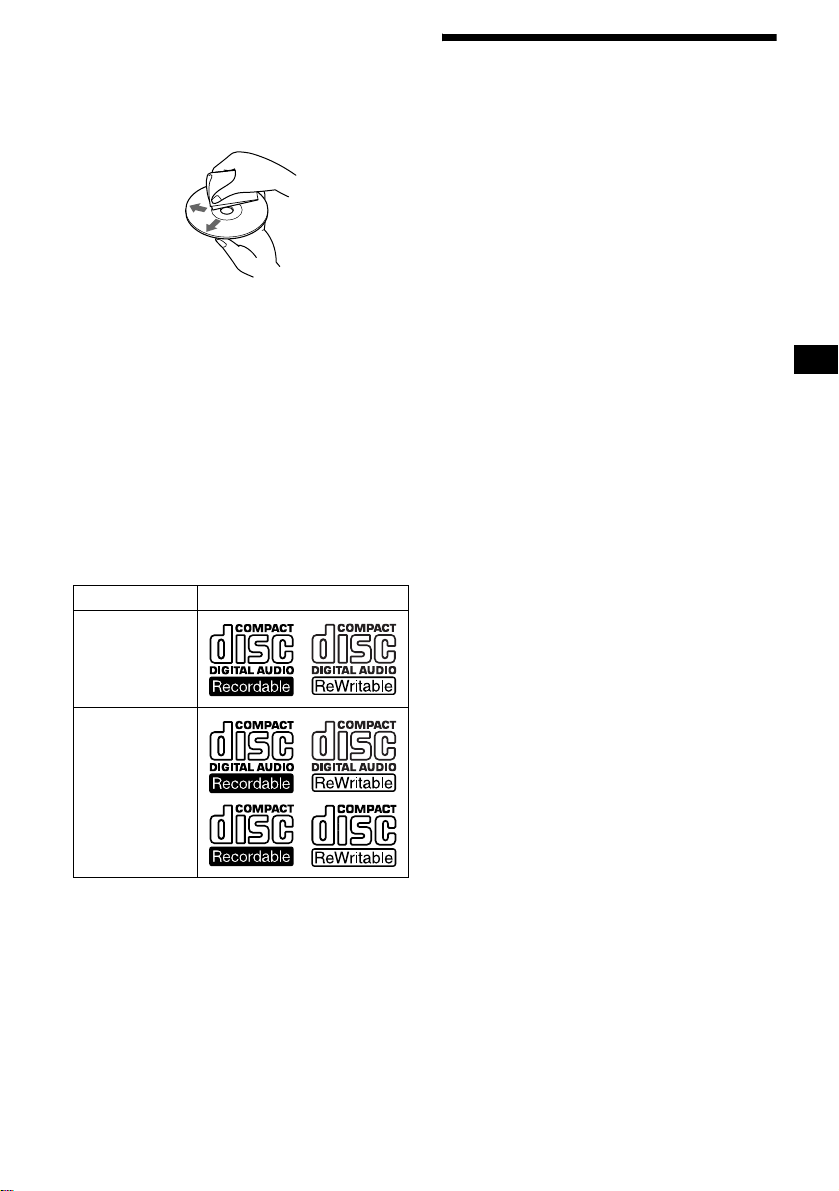
• Before playing, clean the discs with a
commercially available cleaning cloth. Wipe
each disc from the center out. Do not use
solvents such as ben zine, thinner , co mmercially
available cleaners, or antistatic spray intended
for analog discs.
Music discs encoded with copyright
protection
This product is designe d t o pl ay back discs that
conform to the Compact Disc (CD) sta ndard.
Recently, various music discs enc oded with
copyright protection ar e ma rketed by so me
record companies. Please be aware that among
those discs, there are some that do not conform to
the CD standard and ma y not be pl ayable by this
product.
Notes on CD-Rs (recordable CDs)/CDRWs (rewritable CDs)
This unit can play the following discs:
Type of discs Label on the disc
Audio CD
MP3 files
• Some CD-Rs/ C D - RWs (depen di ng on the
equipment used for its recording or the
condition of the disc) may not play on this unit.
• You cannot play a CD-R /CD-RW that is not
finalized*.
• You can play MP3 files recorded on CDROMs, CD-Rs, and CD-RWs.
• A CD-R/CD-RW to which a sess io n can be
added can be played.
* A process necessary for a recorded CD-R/CD-RW
disc to be played on the audio CD player.
About MP3 files
MP3 (MPEG 1 A udio Layer-3) is a standard
technology and format for compressing a soun d
sequence. Th e fi le i s comp ressed to a bout 1/ 10 of
its original size. Sounds outside the range of
human hearing are compressed while the sounds
we can hear are not compressed.
Notes on discs
You can play MP3 files recorded on CD-ROMs,
CD-Rs, and C D -RWs.
The disc must be in the ISO 9660*
level 2 format, or Joliet or Romeo in the
expansion format.
You can use a disc recorded in Mult i Session*
1
ISO 9660 Format
*
The most common international standard for
the logical format of files and folders on a
CD-ROM.
There are several specification levels. In
Level 1, file names must be in the 8.3 format
(no more than 8 characters in the name, no
more than 3 characters in the extension
“.MP3”) and in capital letters. Fold er names
can be no longer than 8 char act ers. There can
be no more than 8 nested folder levels. Level
2 specifications allow file names up to 31
characters long.
Each folder can have up to 8 tree s.
For Joliet or Romeo in t he expansion format,
make sure of the contents of the writing
software, etc.
2
*
Multi Session
This is a recording method that enables
adding of data using the Track-At-Once
method. Conventional CDs begin at a CD
control area called the Lead-in and en d at an
area called Lead-out. A Multi Session CD is a
CD having multiple sessions, with each
segment from Lead -i n t o Lead-out regarded
as a single session.
CD-Extra: The format which records audio
(audio CD data) as tracks on session 1, and
records data as tr acks on session 2.
Mixed CD: In this format , da ta is recorded as
track 1, and audio (audio CD data) is recorded
as track 2.
continue to next page t
1
level 1 or
2
.
7
Page 8
Notes
• With formats other than ISO 9660 le v el 1 an d lev el 2,
folder names or file names may not be displayed
correctly.
• When naming, be sure to add the file extension
“.MP3” to the file name.
• If you put the extension “.MP3” to a file other than
MP3, the unit cannot recognize the file properly and
will generate random noise that could damage your
speakers.
• The following discs take a longer time to start
playback.
– a disc recorded with complicated tree structure.
– a disc recorded in Multi Session.
– a disc to which data can be added.
Cautions when playing a disc that is recorded in
Multi Session
• When the first track of the first session is audio CD
data:
Only audio CD data is played back.
Non-audio CD data/MP3 file information (track
number, time, etc.) is displayed with no sound.
• When the first track of the first session is not audio
CD data:
– If an MP3 file is in the disc, only MP3 file(s) play
back and other data is skipped (Audio CD data is
not recognized).
– If no MP3 file is in the disc, “NO Music” is
displayed and nothing is played back (Audio CD
data is not recognized).
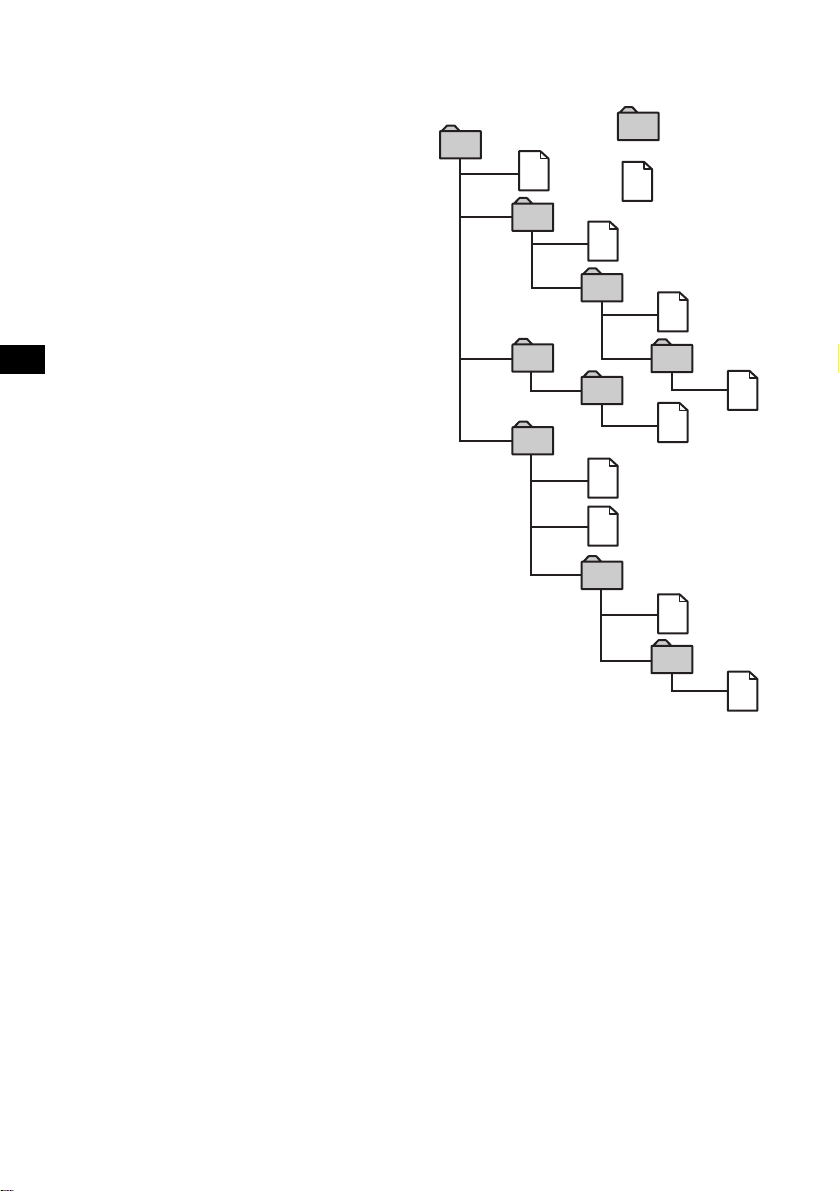
The playback order of the MP3 files
The playback order of the folders and files is a s
follows:
Folder (album)
1
1
MP3 file (track)
2
2
3
3
4
5
6
6
7
5
4
7
8
8
9
Tree 1
(root)
Notes
• A folder that does not include an MP3 file is skipped.
• Maximum folder number: 150 (including root folder
and empty folders).
• The maximum number of MP3 files and folders that
can be contained in a disc: 300.
When a file/folder name contains many characters,
this number may become less than 300.
• The maximum number of trees which can be played:
8.
Tip
To specify a desired playback order, before the folder
or file name, input the order by number (e.g., “01,”
“02”), then record contents onto a disc (The order
differs depending on the writing software).
Tree 2
Tree 3
Tree 4
Tree 5
8
Page 9
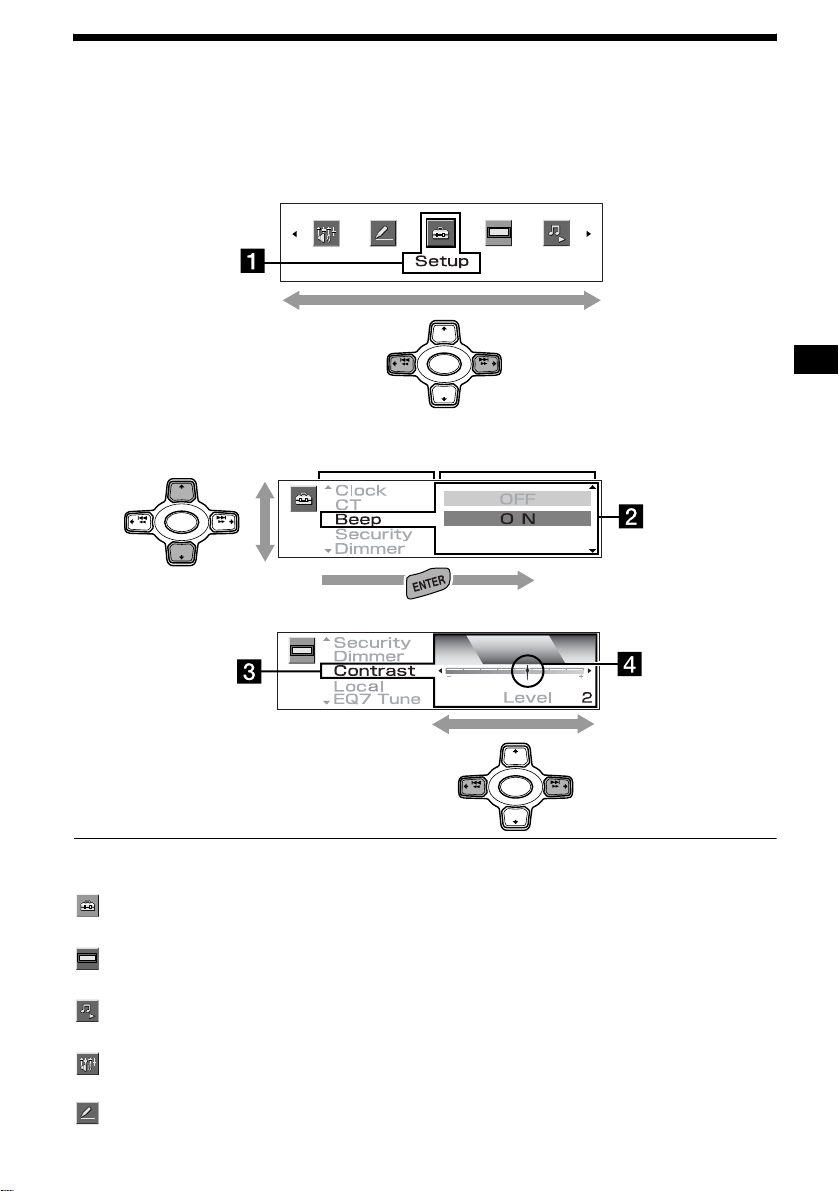
General top menu display
1
Press (MENU) to enter the general top menus, then select the category of menu. In the general menu
display you can select various settings. To select, press (ENTER). To return to a pre vious operat i on,
press (BACK). To complete the setting and return to the normal display, press (MENU).
General top menu display
+
DISC
SOURCE
DISC
+
SEEK
–
2
General menu display
+
DISC
SOURCE
DISC
+
SEEK
–
SEEK
–
SEEK
–
Icons and the contents of settings
Setup
Basic setting s
Display
Display set ti ng
PlayMode
Settings for playback and radio reception
SoundTuning
Precise settings for sound quality
Edit
Display character setting
+
DISC
SOURCE
DISC
+
SEEK
–
SEEK
–
a Selected cate g ory menu
Example: Setup
b Selected item and setting
Example: Beep ON
Note
To move 1 to 2, press (ENTER).
c Selected item and setting
Example: Contras t Level 2
d The light moves as the level changes
Note
The displayed item will differ depending on the source.
9
Page 10
Getting Started
Resetting the unit
Before operating the unit for the first time, or
after replacing the car battery or chan gi ng the
connections, you must reset the unit.
Press the reset button with a pointed object, such
as a ballpoi nt pen.
After the reset is complet e, the pre- stored images
are displayed. Press (IMAGE) on the card remote
commander to show the clock display and set the
clock and calendar.
Reset button
Note
Pressing the reset button will erase the clock/calendar
setting and some stored contents.
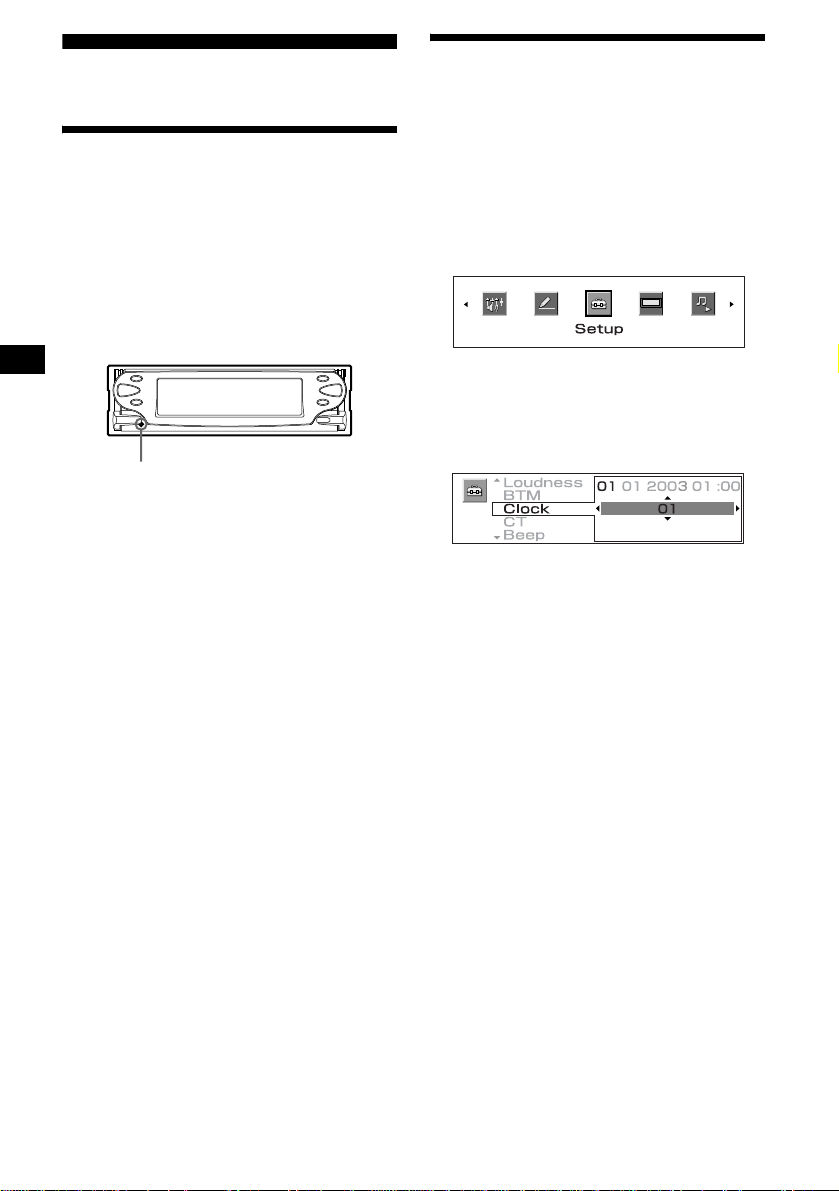
Setting the clock and the
calendar
The clock uses a 24-hour digital indica ti on (Day/
Month/Year Time).
The factory setting is “01/01/2003 01:00.”
1 Press (MENU).
2 Press < or , repeatedly to select
“Setup.”
3 Press (ENTER).
4 Press M or m repeatedly to select
“Clock.”
5 Press (ENTER).
1Press M or m repeatedly to set the
day.
Each time you pre ss M, the number of the
day increases.
Each time you pre ss m, the number of the
day decreases.
2Press , to move to the mo nth,
then press M or m repeatedly to set
the month.
If you press <, you can move back to the
left.
3Repeat step 2 to set the year, the
hour, and the minute.
6 Press (ENTER).
The settings for clock and calendar are stored,
and the display returns to the normal display.
Note
If your car has no ACC position, turn on the power of
this unit first, then set the clock and the calendar.
Tip
You can set the year from 2000 to 2099.
10
Page 11
CD Player
CD/MD Unit (optional)
In addition to playing a CD with this unit, you
can also control ext ernal CD/MD units.
Note
If you connect an optional CD unit with the CD TEXT
function, the CD TEXT information will appear in the
display when you play a CD TEXT disc.
: Operation by this unit
: Operation by card remote commander
To Press
Stop playback (OFF)
Skip tracks
– Automatic
</,
[once for each track]
Music Sensor
Fast-forward/
reverse
</,
[hold until the desired point]
– Manual Search
Skip discs
–Disc selection
Skip albums*
– Album selecti o n
M/m
[once for each disc]
M/m
[once for each album]
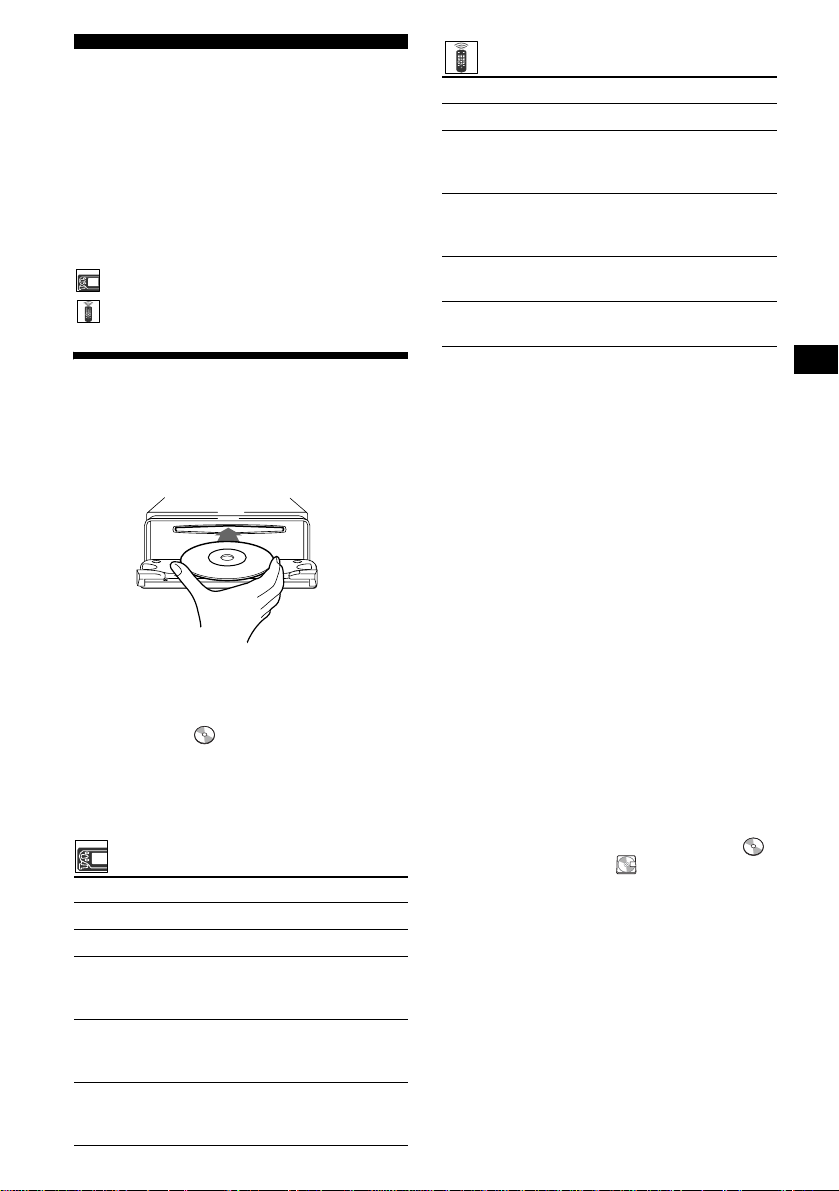
Playing a disc
(With this unit)
Press Z to open the front panel and
insert the disc (labelled side up).
The front panel cl oses and playback starts
automatically.
If a disc is already inserted, press (SOURCE)
repeatedly unti l “ (CD icon)”or “CD”
appears in the dis play, and playback starts.
Note
The front panel closes automatically after the caution
alarm beeps.
To Press
Stop playba ck (OFF)
Eject the disc Z
Skip tracks
–Automatic Music
Sensor
Fast-forward/
reverse
–Manual Search
Skip albums*
–Album selection
. > lever up/down
[once for each tr ack]
. > lever up/down
[hold until the desi red point]
(SHIFT), then
. >
lever up/down [once for
each album]
* Available only when an MP3 file is played.
Notes
• There is a delay for a few seconds after pressing Z
before the disc is ejected, while the data in the disc
is being read.
• If you press Z on the front panel to eject a disc and
leave it in the slot, the disc protective function will
work. The ejected disc will be automatically pulled in
the slot 15 seconds after being ejected.
• Do not apply excessive pressure to the front panel
(especially when it is open), as this may cause a
malfunction.
• Depending on the recording method used on the
disc, it may take a minute or more before playing the
first track.
• Depending on the condition of the disc, it may not
play back (page 6, 7).
• While the first/last track on the disc is playing, if m or
M is pressed, playback skips to the last/first track of
the disc.
• When the last track on the disc has finished,
playback restarts from the first track of the disc.
• With the optional unit connected, playback of the
same source will continue on to the optional CD/MD
unit.
(With optional unit)
1 Press (SOURCE) repeatedly until “
(CD icon),” “CD,” “ (MD icon),”
“MD,” or “MS*” appears.
2 Press (MODE) repeatedly until the
desired un it appears.
Playback starts.
* MS: MG Memory Stick System-up Player MGS-X1.
Locating a track and disc
See “Locating a disc by name” on page 15.
11
Page 12
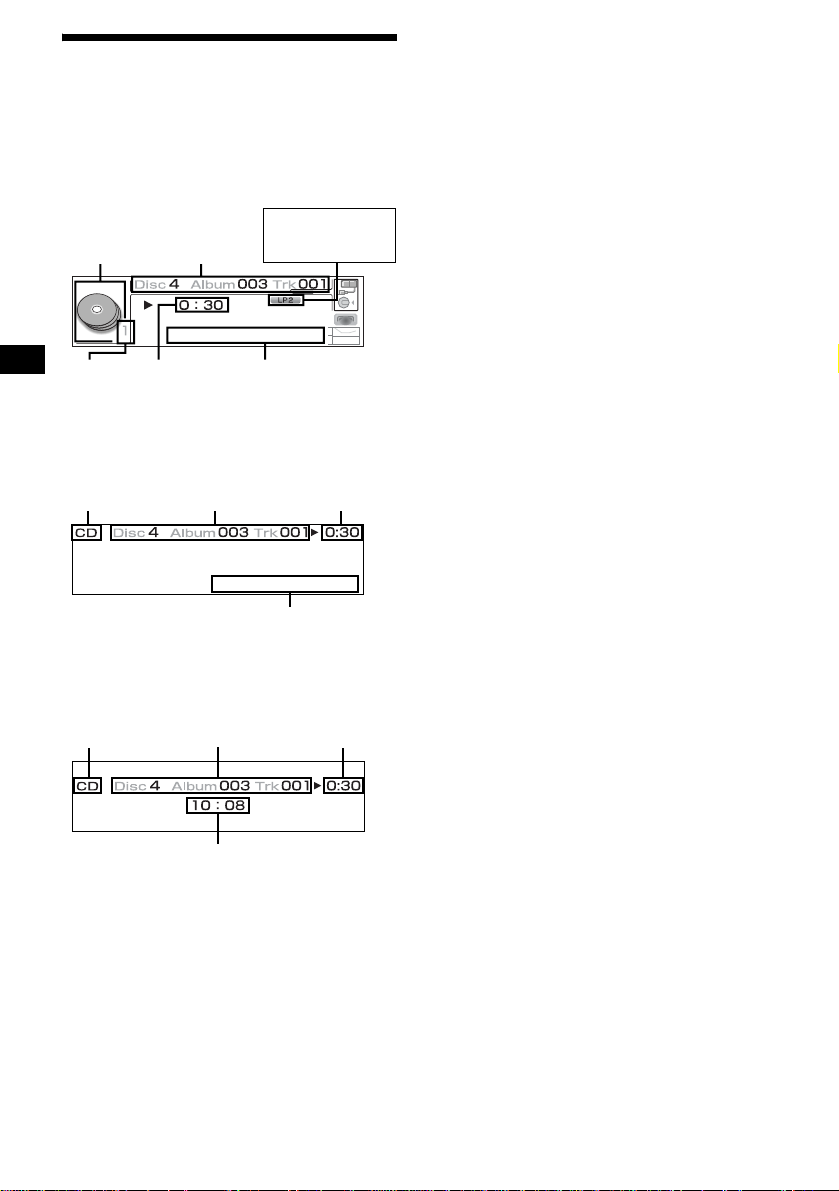
Display items
When the disc/album*1/track changes, any
prerecorded title of the new disc/album/track is
automatically displayed. If “AutoScroll” is set to
“ON, ” names will be scro lle d (pag e30).
Standard mode:
MDLP display*
1
CD/MD
icon
Unit
number*
Spectrum analyser/Panorama/Screen saver
mode:
Source
Disc/Album*
Track number
Elapsed
3
playing
time
Disc/Album*1/
Track number
LP2: LP2 playback
/
LP4: LP4 playback
Disc name*4/Artist name/
Album (folder) name*
Track (file) name
Elapsed
playing time
2
1
/
Notes
• Some characters cannot be displayed.
• For some CD TEXT discs with very many
characters, some information may not be displayed
nor scroll.
• This unit cannot display the artist name for each
track of a CD TEXT disc.
Notes on MP3
• When playing MP3 with ID3 tag, ID3 tag (artist
name/album name/track name) is displayed.
• ID3 tag applies only to version 1.
• The ID3 tag character codes comply with ASCII and
ISO 8859-1 standards. Joliet format discs can only
be displayed in ASCII. Incompatible characters will
be displayed as “ *.”
• In the following cases, elapsed playing time may not
be displayed accurately.
– when an MP3 file of VBR (variable bit rate) is
played.
– during fast-forward/reverse.
Tip
When “AutoScroll” is set to “OF F” and the disc/album/
track name is changed, the disc/album/track name
does not scroll.
Disc name*
Album (folder) name*
Track (file) name*
4
/Artist name/
Clock mode:
1
Elapsed
Clock
/
playing time
Source
*1 Available only when an MP3 file is played.
*2 Available only when an opti onal MD unit with the
MDLP function is connected, and an MDLP disc is
played.
*3 Available only when two or more optional CD (MD)
units are connected.
*4 If the disc has been labelled by this unit using the
CUSTOM FILE function, Disc Memo is displayed
accordingly.
Disc/Album*
Track number
12
1
/
1
Page 13

Playing tracks repeatedly
— Repeat Play
You can select:
REP
• — to repeat the cu rr ent track.
•*
album.
•*
disc.
*1 Available only when an MP3 file is played.
*2 Available only when one or more optional CD/MD
T o return to normal play mode, press (1) (REP)
repeatedly unti l th e icon disappears fr om t h e
display.
1
REP
REP
units are connected.
— to repeat the tracks in the current
2
— to repeat the tracks in the current
During playback, press (1) (REP)
repeatedly until the desired setting
appears in the display.
Repeat Play starts .
Playing tracks in random
order
— Shuffle Play
You can select:
•*
album in random order.
• — to play the tra cks on the current
disc in random order.
SHUF
•*
optional CD (MD) unit in random order.
SHUF All
•*
connected CD (MD) units (including this unit)
in random orde r.
*1 Available only when an MP3 file is played.
*2 Available only when one or more optional CD (MD)
*3 Available only when one or more optional CD units,
To return to normal play mode, press (2)
(SHUF) repeate dly until the icon disa ppears
from the display.
Note
“ ” will not shuffle tracks between CD units
SHUF All
and MD units.
1
SHUF
SHUF
units are connected.
or two or more optional MD units are connected.
— to play the tracks in the current
2
— to play the tracks in the cur rent
3
— to play all the tracks in all the
During playback, press (2) (SHUF)
repeatedly until the desired setting
appears in the display.
Shuffl e Play starts.
13
Page 14
Labelling a CD
— Disc Memo (With an optional CD unit w ith
the CUSTOM FILE function)
You can label each disc wit h a custom name
(Disc Memo). You can enter up to 8 characters
for a disc. If you la bel a CD , you can locate the
disc by name (page 15).
As a display item, the Disc Memo always takes
priority over any orig in al CD TEXT information.
Caution
Do not use the CUSTOM FILE feature while
driving, or perform any other function which
could divert your attention f rom the road.
1 Start playing a disc you want to label.
2 Press (MENU).
3 Press < or , repeatedly to select
“Edit.”
4 Press (ENTER).
5 Press M or m to select “Name Edit .”
6 Press (ENTER).
Tips
• Simply overwrite or enter a blank space to correct or
erase a name.
• You can label CDs on a unit without the CUSTOM
FILE function if that unit is connected along with a
CD unit that has the function. The Disc Memo will be
stored in the memory of the CD unit with the
CUSTOM FILE function.
Note
Repeat/shuffle play is suspended until the Name Edit
is complete.
Erasing the Disc Memo
1 Press (SOURCE) repeatedly to select
“CD.”
2 Press (MODE) repeatedly to select the
CD unit with the CUSTOM FILE
function.
3 Press (MENU).
4 Press < or , repeatedly to select
“Edit.”
5 Press (ENTER).
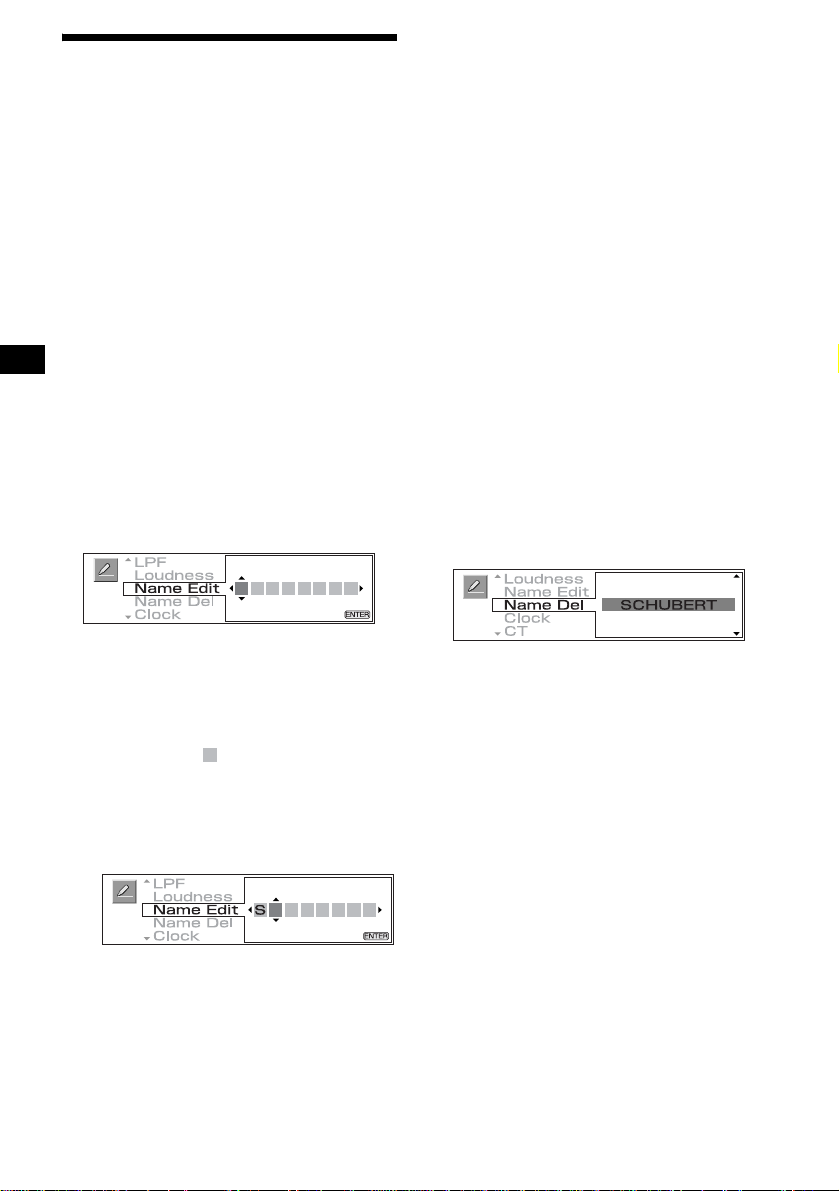
6 Press M or m to select “Name Del.”
7 Press (ENTER).
The stored names will appear.
7 Enter the characters.
1 Press M*
desired c haracter.
A
t B t C ... t 0 t 1 t 2 ... t + t
–
t * ... t
*1 For reverse order, press m.
*2 blank space
2 Press , after locating the desired
character.
If you press <, you can move back to the
left.
3 Repeat steps 1 and 2 to enter the
entire name.
1
repeatedly to select the
*2 t
A
8 Press (ENTER).
The display returns to the top menu display.
9 Press (MENU).
The display returns to the normal display.
14
8 Press M or m repeatedly to select the
disc name you want to erase.
9 Press (ENTER) for 2 seconds.
The name is erased.
Repeat steps 8 and 9 if you want to erase
other names.
10
Press (MENU).
The display returns to the normal display.
Notes
• When the Disc Memo for a CD TEXT disc is erased,
the original CD TEXT infor mat ion is displ ayed.
• If you cannot find the Disc Memo you want to erase,
try selecting a different CD unit in step 2.
Tips
• In step 7, if there is no Disc Memo, the display will
return to the normal display automatically.
• If all the Disc Memo is deleted in step 9, the display
will return to the normal display automatically .
Page 15
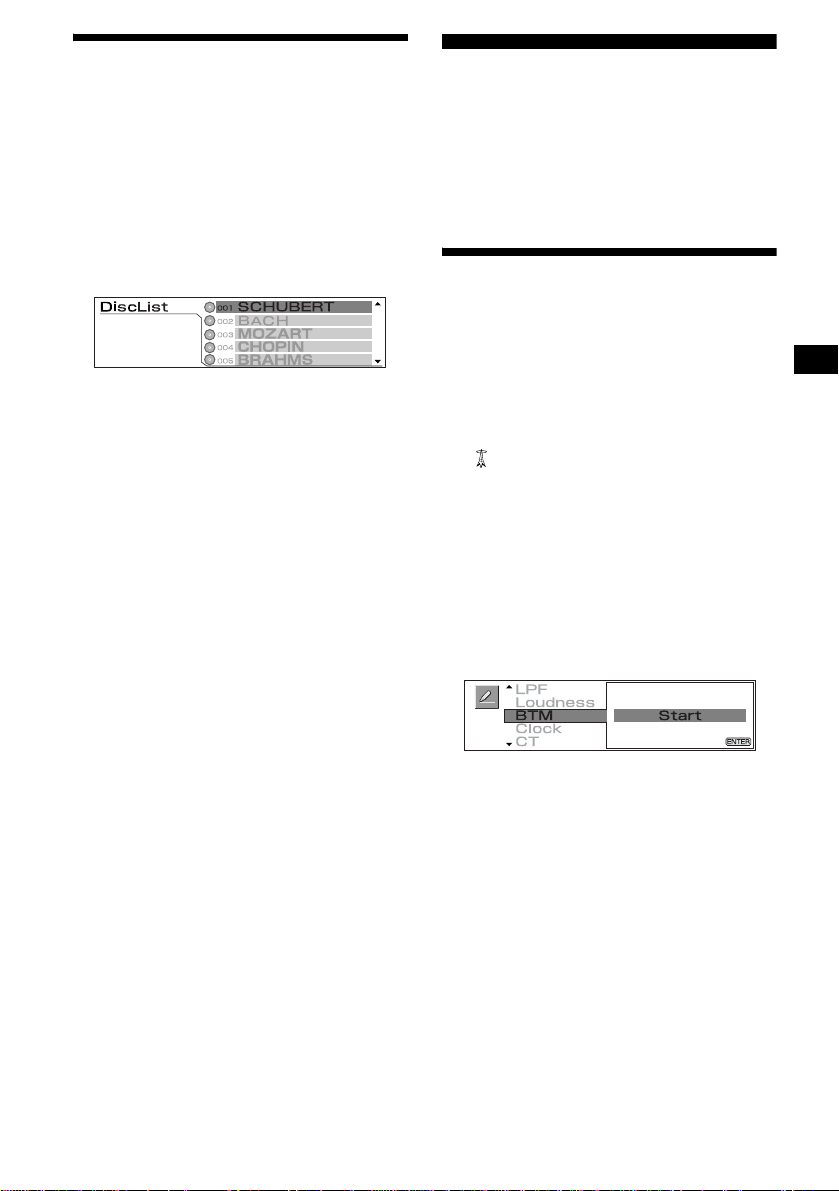
Locating a disc by name
— List-up
(With an optional CD unit with the CD TEXT/
CUSTOM FILE function, or an MD unit)
Y ou can use this function for discs that have been
assigned custom names*
2
discs*
.
1 Press (LIST).
The assigned di sc name appears in th e
display.
2 Press M or m repeatedly to selec t the
desired disc.
3 Press (ENTER).
*1 Locating a disc by its custom name: when you
assign a name for a CD (page 14) or an MD.
*2 Locating discs by the CD TEXT information: when
you play a CD TEXT disc on a CD unit with the CD
TEXT function.
Note
In the case of CD TEXT discs and MDs, some letters
cannot be displayed.
Tip
To stop selecting and return to the normal display,
press (LIST).
1
or for CD TEXT
Radio
The unit can store up to 6 stations per band
(FM1, FM2, FM3, M W, and LW).
Caution
When tuning in stations while driving, use Best
Tuning Memory (BTM) to prevent accidents.
Storing stations
automatically
— Best Tuning Memory (BTM)
The unit selects the stations with the strongest
signals within the selected band, and stores them
in the order of their frequency.
1 Press (SOURCE) repeatedly until
“ (tuner icon)” or the band appears.
2 Press (MODE) repeatedly to select the
band.
3 Press (MENU).
4 Press < or , repeatedly to select
“Edit.”
5 Press (ENTER).
6 Press M or m repeatedly to select
“BTM.”
7 Press (ENTER).
The stations with th e st rongest signals within
the selected band are stored in order of
frequency in the memory. To cancel storing,
press (ENTER) while s toring the st ations.
8 Press (MENU).
The display returns to the normal display.
Notes
• If only a few stations can b e received due to weak
signals, some stored preset numbers will retain their
former settings.
• When a preset number is indicated in the display,
the unit starts storing stations from the one currently
displayed.
15
Page 16
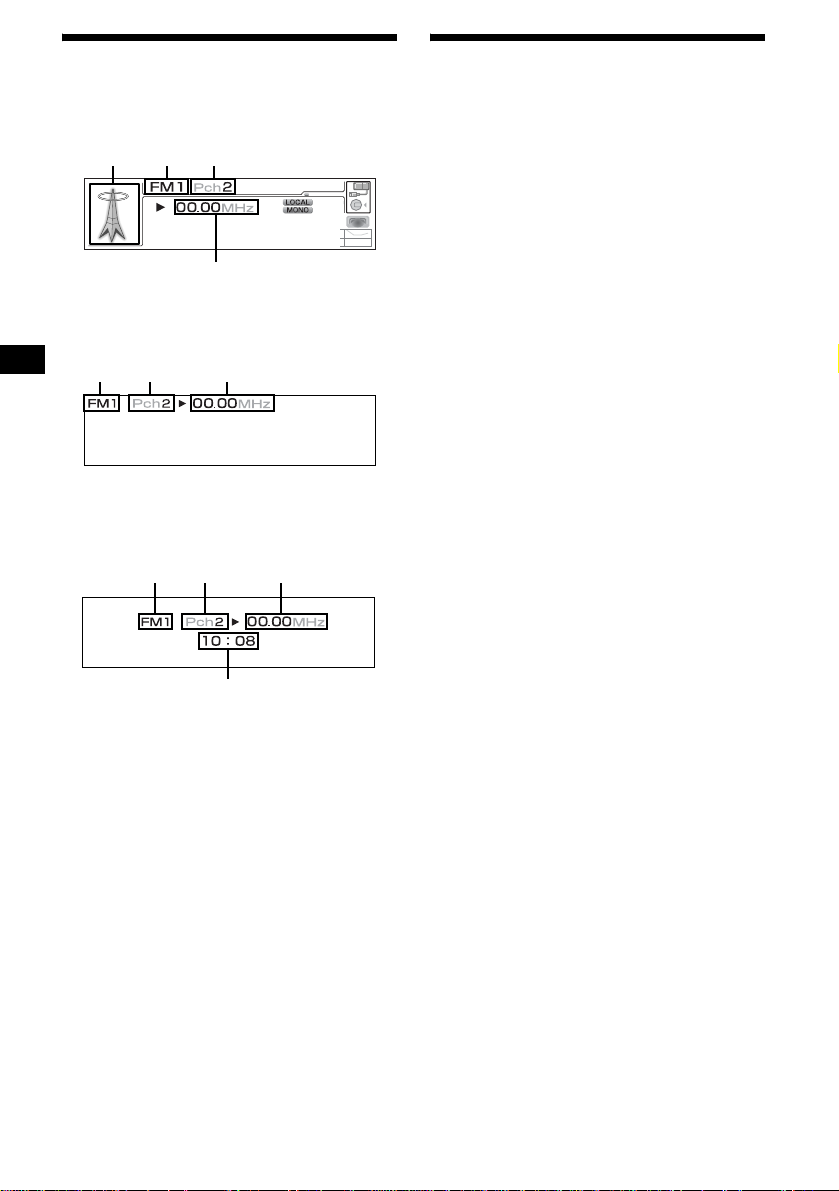
Display items
Receiving the stored stations
Standard mode:
Tuner
Radio
band
Preset
number
Frequency
Frequency
Preset
number
Clock
Frequency
icon
Spectrum analyser/Panorama/Screen saver
mode:
Preset
Radio
number
band
Clock mode:
Radio
band
1 Press (SOURCE) repeatedly to select
the radio.
2 Press (MODE) repeatedly to select the
band.
3 Press the number button ((1) to (6))
on which the desired station is stored.
Tip
Press M or m to receive the stations in the order they
are stored in the memory (Preset Search function).
If preset tuning does not work
— Automatic tuning
Press < (SE EK –) or , (SEEK +) to
search for the station (automatic
tuning).
Scanning stops when the unit receives a
station. Repeat the operation until the desired
station is received.
Tips
• If automatic tuning stops too frequently, turn on the
Local Seek to limit seek to stations with stronger
signals (see “Changing the sound and display
settings” on page 30).
• If you know the frequency of the station you want to
listen to, press and hold < or , to locate the
approximate frequency, then press the < or ,
repeatedly to fine adjust to the desired frequency
(manual tuning).
If FM stereo reception is poor
Select monaural reception mode
(see “Changing the sound and display
settings” on page 3 0).
The sound improves, but become s monaura l
(“STEREO” di sappears).
Tip
If FM broadcasts are difficult to hear, set “DSO” to
“OFF” (page 31) .
16
Page 17

Storing only desired stations
You can manually prese t t he desired stations on
any chosen number button.
1 Press (SOURCE) repeatedly to select
the radio.
2 Press (MODE) repeatedly to select the
band.
3 Press < (SEEK –) or , (SEEK +) to
tune in the station that you want to
store.
4 Press the desired number button ((1)
to (6)) for 2 seconds until “Memory”
appears.
The number of the button you pressed is
displayed, and then the selected station is
assigned to this nu m ber and stored.
Note
If you try to store another station on the same stored
number, the previously stored station will be erased.
Tuning in a station through a
list
— List-up
1 During radio reception, press (LIST)
momentarily.
The frequency or the nam e assigned to the
current s tation appears in the display.
2 Press M or m repeatedly to select the
desired station.
If no name is assigned to the station, the
frequency appears in th e display.
3 Press (ENTER) to tune in the desired
station.
After tuning is completed, the di sp lay returns
to the normal display.
Tip
To stop selecting and return to the normal display,
press (LIST).
17
Page 18
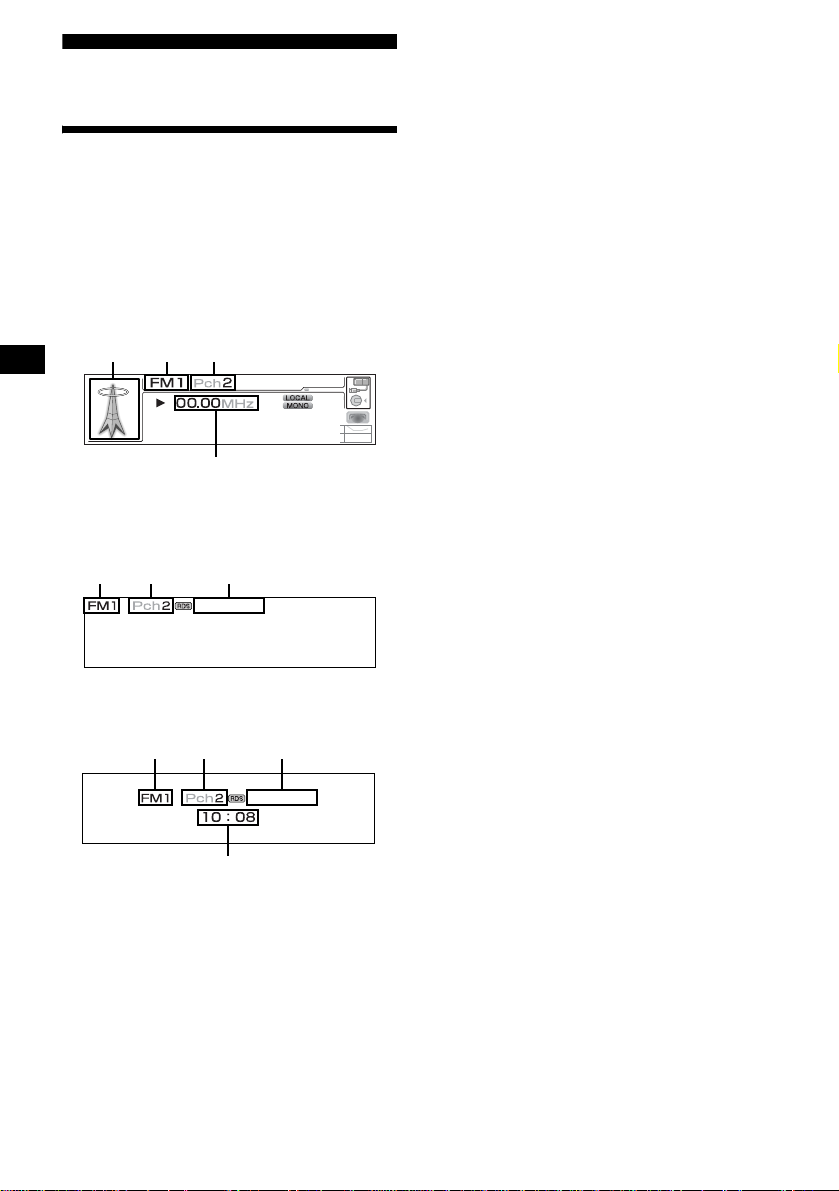
RDS
Overview of RDS
FM stations with Radio Data System (RDS)
service send in audible digital info rm ation along
with the regular radio programme signal. For
example, one of the fol lowing will be displayed
upon receiving a station with RDS capability.
Standard mode:
Tuner
Radio
band
Frequency/
Station name
Preset
number
Frequency/
Station name
icon
Spectrum analyser/Panorama/Screen saver
mode:
Preset
Radio
number
band
RDS services
RDS data offers you other conveniences, such as:
• Automatic retuning of a programme, helpful
during long-distance drives. — AF t page 19
• Receiving traffic announcements, even
when enjoyin g an other programme / source.
— TA t page 20
• Selecting stat i o ns by the type of
programme. — PTY t page 21
• Automatic clock time setting. — CT
t page 22
Notes
• Depending on the country or region, not all of the
RDS functions are available.
• RDS may not work properly if the signal strength is
weak or if the station you are tuned to is not
transmitting RDS data.
Clock mode:
18
Radio
band
Preset
number
Clock
Frequency/
Station name
Page 19
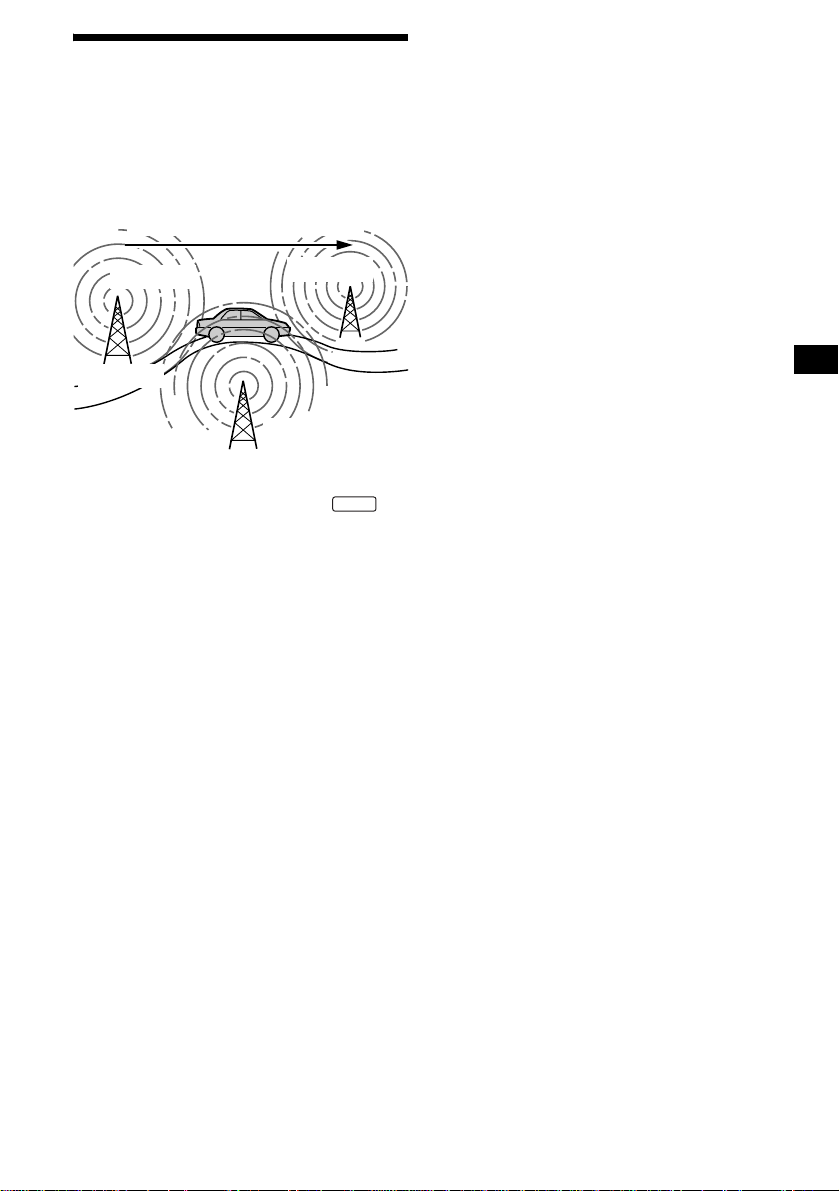
Automatic retuning for best
reception results
— AF function
The alternative frequenc ies (AF) function allows
the radio to always tune into the area’s strongest
signal for the st at ion you are listenin g to .
Frequencies change automatically.
98.5 MHz
Station
1 Select an FM station (page 15).
2 Press (AF) repeatedly until “ ”
appears.
The unit starts searching for an alternative
frequency with a s tro nger signal in the sa m e
network.
If “NO AF” is displayed, the currently tuned
station does not have an alternative frequency.
Note
When there is no alternative frequency in the area, or
when you do not need to search for one, turn the AF
function off.
96.0 MHz
102.5 MHz
A F
Staying with one regional programme
When the AF functio n is on: this unit’s factoryset setting restricts reception to a specific region ,
so you won’t be switche d t o another regional
station with a stronger frequency.
If you leave this re gi on al pro gr amme’s reception
area or would like to take advantage of the whole
AF function, select “Regional OFF” from the
Menu (page 30).
Note
This function does not work in the United Kingdom
and some other areas.
Local Link function (United Kingdom
only)
This function enables you to select other local
stations in the area, even if they are not stored on
your number buttons.
1 Press a number button ((1) to (6))
that has a local station stored on it.
2 Within 5 seconds, press the numbe r
button of the local station again.
3 Repeat this procedure until the
desired local station is received.
For stations without alternative
frequencies
Press < or , while the station name
is flashing (within 8 seconds).
The unit starts searching for another
frequency with the same PI (Programme
Identification) data (“PI Seek” appears).
If the unit cannot find the same PI, the unit
returns to the previous ly selected frequency.
19
Page 20

Receiving traffic
announcements
— TA/TP
By activating the Traffic Announcement (TA)
and Traffic Programme (TP), you can
automatically tune in an FM sta tion bro adcastin g
traffic announcements. These settings function
regardless of the current FM programme, or
source (CD/MD, AUX). The unit switches back
to the original source when the bulletin is over.
Press (TA) repeate dly until “ ”
appears.
The unit starts searching for traffic
information stations.
“ ” in dica tes re cept ion of such stati ons.
T P
The unit will continue searching fo r st ations
available with TP if “NO TP” appears
momentarily.
To cancel all traffic announ cements, disappear
“.”
T A
To Press
Cancel curren t
announcement
Tips
• You can also cancel the current announcement by
pressing (SOURCE) or (MODE).
• TA can also be set to on/off by pressing (MODE) on
the unit for 2 seconds.
Presetting the volume of traffic
announcements
You can preset the volume level of the traffic
announcements so you won’t miss hearing them.
(TA)
1 Press (VOL) to adjust the desired
volume level.
2 Press (TA) for 2 seconds.
“TA” appears and th e setting is stored.
T A
Presetting RDS stations with
AF and TA setting
When you preset RDS stations, the unit stores
each station’s AF/TA setting (on/off) as well as
its frequency. You can select a different se tt i ng
(for AF, TA, or both) for individual preset
stations, or the same setting for all preset
stations. If you preset stations with “ ” to
on, the unit automatically stores s tatio ns with the
strongest radi o si gnal.
Presetting the same setting for all
preset stations
1 Select an FM band (page 15).
2 Press (AF) and/or (TA) to display
“ ” and/or “ .”
A F T A
Note that deactivating “ ” and
“ ” applies to non-RDS stations as well
T A
as RDS stations.
A F
3 Press (MENU).
4 Press < or , to select “Edit.”
5 Press (ENTER).
6 Press M or m to select “BTM.”
7 Press (ENTER).
8 Press (MENU).
The display returns to the normal display.
Presetting different settings for each
preset station
1 Select an FM band, and tune in the
desired st ation (page 17).
2 Press (AF) and/or (TA) to display
“ ” and/or “ .”
A F T A
3 Press the desired number button ((1)
to (6)) until “Memory” appears.
A F
Receiving emergency announcements
If either AF or TA is on, the unit will switch to
emergency announceme nt s, if one comes in
while listening to an FM station, CD/MD, or
AUX.
20
Repeat from step 1 t o pr eset other stations.
Page 21
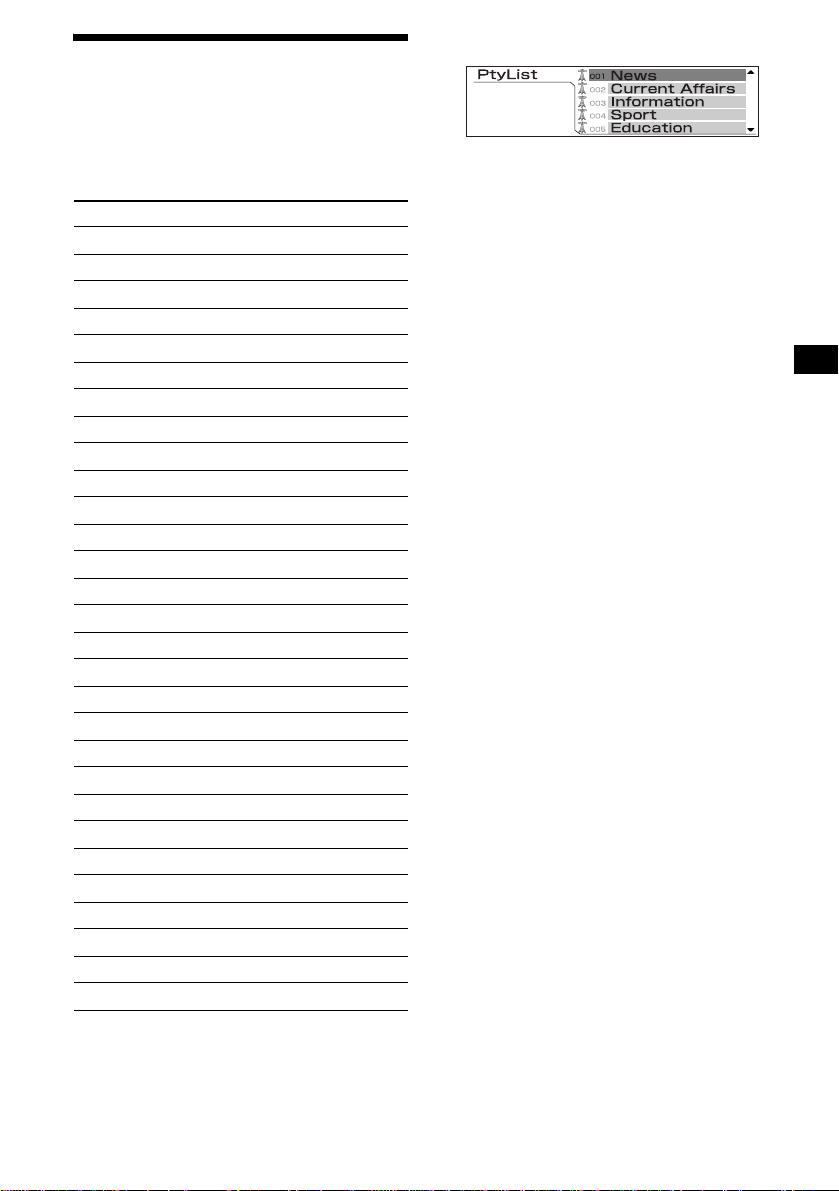
Tuning in stations by
programme type
— PTY
You can tune in a station by selecting the type of
programme you woul d like to listen to.
Programme types Display
News News
Current Affairs Current Affairs
Information Information
Sports Sport
Education Education
Drama Drama
Culture Cultures
Science Science
Varied Varied Spee ch
Popular Music Pop Music
Rock Music Rock Music
Easy Listening Easy Listening
Light Classical Light Classics M
Classical Serious Classi cs
Other Music Type Other Music
W e ath er Weather & Metr
Finance Finance
Children’s Programmes Children’s Progs
Social Affairs Social Affairs
Religion Religion
Phone In Phone In
Trave l Travel & Touring
Leisure Leisure & Hobby
Jazz Music Jazz Music
Country Music Coun tr y M usic
National Music National Music
Oldies Music Oldies Music
Folk Music Folk Music
Documentary Documentary
1 Press (PTY) during FM reception.
The current programme type name ap pears if
the station is transmitting the PTY data.
“--------” appears if the received station is not
an RDS station, or if the RDS data is not
received.
2 Press M or m repeatedly to select the
desired programme type.
The programme t ypes appear in the orde r
shown in the table.
“--------” appea rs if the pr ogramme type i s not
specified i n the RDS dat a.
3 Press (ENTER).
The unit starts sear ching for a station
broadcasting the selected programm e t ype.
Note
You cann ot use thi s funct i on in some cou ntr ie s where
no PTY (Programme Type selection) data is available.
21
Page 22
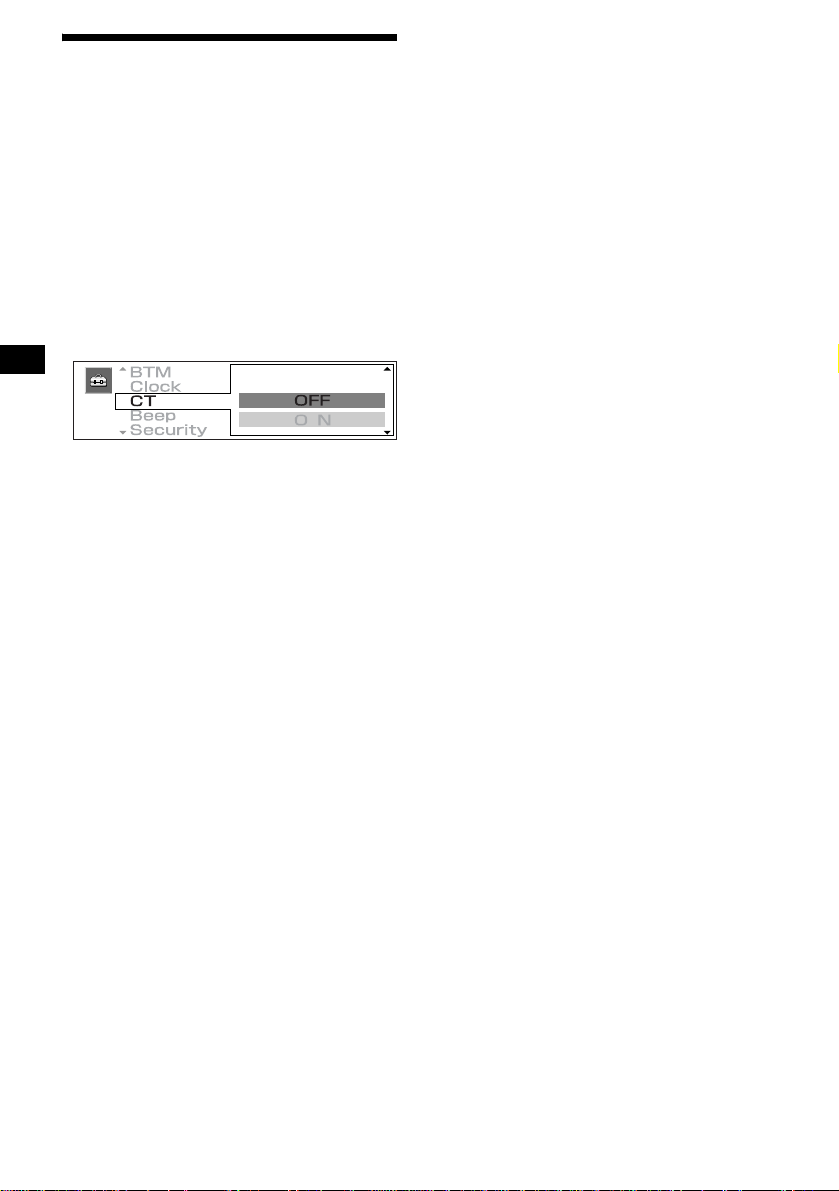
Setting the clock
automatically
— CT
The CT (Clock Time) data from the RDS
transmission sets the clock automatic ally.
1 Press (MENU).
2 Press < or , repeatedly to select
“Setup.”
3 Press (ENTER).
4 Press M or m repeatedly to select “CT.”
5 Press (ENTER).
6 Press M or m to select “ON.”
The clock is set.
7 Press (ENTER).
The display returns to the top menu display.
8 Press (MENU).
The display returns to the normal display.
To cancel the CT function, select “OFF” in
step 6.
Notes
• The CT function may not work even though an RDS
station is being received.
• There might be a difference between the time set by
the CT function and the actual time.
22
Page 23
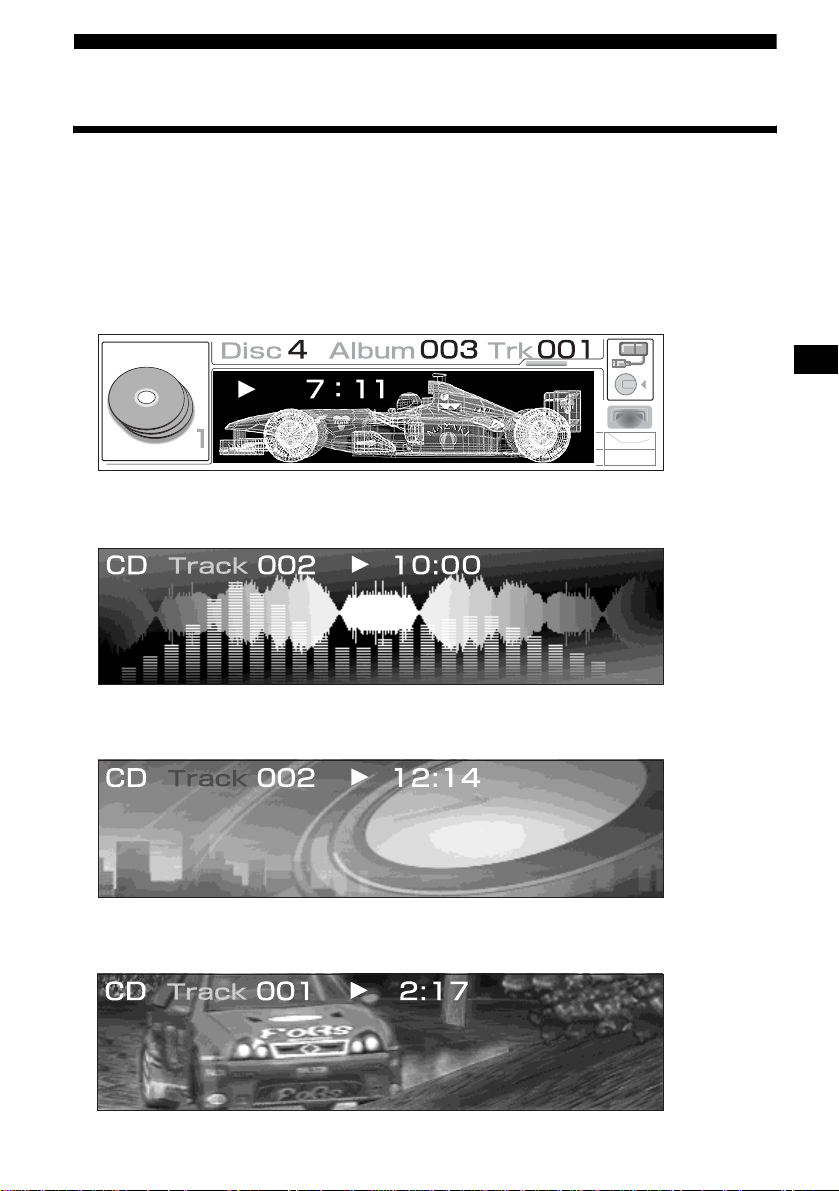
Image Settings
Selecting the display mode and display pattern
You can select from 5 different display modes. You can also select various display patterns in Standard,
Spectrum analyzer, Panorama, Screen saver, and clock mode.
Standard mode
Displays various information such as source, track number, elapsed playing time, disc name, track
name, and sound settings. You can display items such as an icon of the source on th e le ft si de of the
display, spectrum analyzer pattern in smaller size in the centre of the display.
Spectrum analyzer mode
Displays a pre-st ored spectrum anal yzer setting on the who le screen.
Panorama mode
Displays pre-st ored static images on the whole screen, and some of them scr oll automatically.
Screen Saver mode
Plays back a pre-st ored animation.
continue to nex t page t
23
Page 24

Clock mode
Displays playback or radio reception information and clock.
By the card remote commander
REP
SHUF
1
2
3
4
5
GRAPHIC
SCREEN IMAGE
LIST
+
DISC
MENU
SOURCE
–
SEEK
SOUND
DISC
SEEK
–
EN
6
TER
SCREEN
IMAGE
+
1 During playback or radio reception,
press (SCREEN) repeated ly to se l ect
the display mode.
Each time you press (SCREEN), the display
mode changes as follows:
Standard mode t Spectrum analyzer
mode t Panorama mode t
Screen saver mode t Clock mode*
t Standard mode
2 Press (IMAGE) repeatedly to select the
display pattern.
* You cannot select any display pattern in the Clock
mode.
By the unit
SCREEN
SHIFT
SCREEN
SHIFT
. >
lever
1 During playback or radio reception,
press (SCREEN) repeatedly to select
the display mode.
Each time you press (SCREEN), the display
mode changes as fol l ows:
Standard mode t Spectrum analyzer
mode t Panorama mode t
Screen saver mode t Clock mode*
t Standard mode
2 Press up or down the . > lever
while “Image” is displayed in the lower
right of the display to select the
display pattern.
* You cannot select any display pattern in the Clock
mode.
When switching only the display pattern, press
(SHIFT) until the desired image appears on the
display lower right, and press up or down the
. > lever until the desired image is
displayed (If source is AUX, you do not need to
press (SHIFT)).
24
Page 25

Clearing display characters
automatically
— AutoClear (Spectrum analyzer/Panorama/
Screen Saver mode)
You can make display characters disappear for a
moment in Spectrum analyzer/Panorama/Screen
Saver mode. When set to ON, yo u can display
the display characters only when the disc, album,
or track is changed or the source or display mode
is changed. You can enjoy full images.
1 Press (SOURCE) to select a source
(radio, CD, MD or AUX).
2 Press (GRAPHIC).
3 Press < or , repeatedly to selec t
“AutoClear.”
Each time you pr ess < or ,, the item
changes as follows:
AutoClear y BlendLevel y
Plaque y Color Sel y
AutoImage y AutoClear
4 Press (ENTER).
Changing the translucence
ratio of the characters
—BlendLevel (Spectrum analyzer/Panorama/
Screen Saver mode)
You can set the translucence ratio (Colour
density) of the characters in the Spectrum
analyzer/Panorama/S creen Sav er mode.
By setting this level down, you can adjust the
characters in the display to appear opaque.
1 Press (SOURCE) to select a source
(radio, C D, MD or AUX).
2 Press (GRAPHIC).
3 Press < or , repeatedly to select
“BlendLevel.”
Each time you press < or ,, the item
changes as follows:
AutoClear y BlendLevel y
Plaque y Color Sel y
AutoImage y Auto Clear
4 Press (ENTER).
5 Press (ENTER).
6 Press M or m to select “ON.”
To cancel the Auto Clear function, select
“OFF.”
7 Press (ENTER).
8 Press (GRAPHIC).
The display returns to th e normal display.
Note
In Standard/Clock mode, you cannot make the display
charact ers disappear automatically.
5 Press (ENTER).
6 Press < or , to select the
permeation ratio (Level 0-15).
The lower the level, the paler the display
characters.
7 Press (ENTER).
8 Press (GRAPHIC).
The display returns to the normal display.
Notes
• In Sta nd ard /Cl ock mode, you cannot change the
translucence ratio of the display characters.
• While “Plaque” is set to “ON,” “BlendLevel” has no
effect, regardless of setting.
25
Page 26
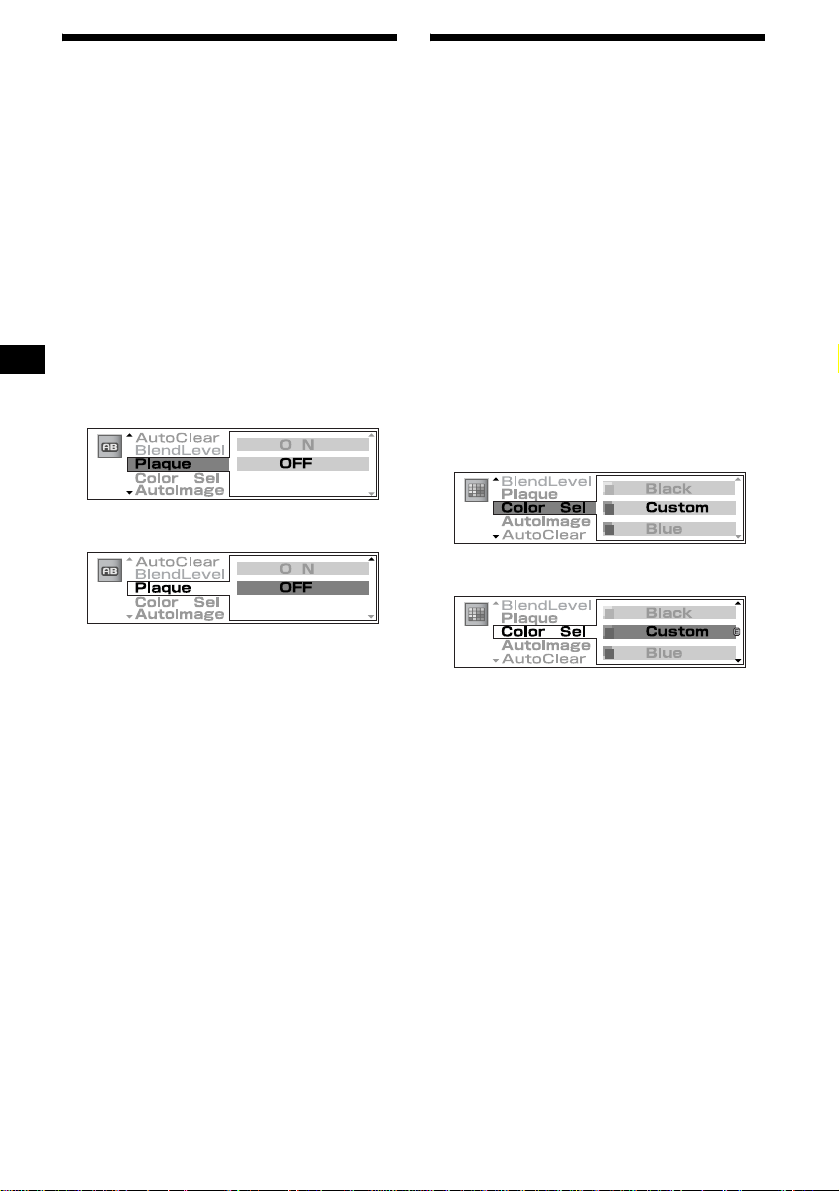
Setting a Plaque
— Plaque
If characters fade into a simila r coloured
background image, the plaque setting will make
the characters more readable.
Setting the character colour
— Color Sel
You can select one of 7 co lour settings for the
character di sp l ay. Besides, you can adju st an d
store the desire d colour in the unit.
1 Press (SOURCE) to select a source
(radio, CD, MD or AUX).
2 Press (GRAPHIC).
3 Press < or , repeatedly to select
“Plaque.”
Each time you press < or ,, the item
changes as foll ows:
AutoClear y BlendLevel y
Plaque y Color Sel y
AutoImage y AutoClear
4 Press (ENTER).
5 Press (ENTER).
6 Press M or m repeatedly to select
“ON.”
7 Press (ENTER).
8 Press (GRAPHIC).
The display returns to the normal display.
Note
If “Plaque” is set to “ON,” “BlendLevel” you adjusted
has no effect.
Selecting the character colour
1 Press (SOURCE) to select a source
(radio, CD, MD or AUX).
2 Press (GRAPHIC).
3 Press < or , repeatedly to select
“Color Sel.”
Each time you press < or ,, the item
changes as follows:
AutoClear y BlendLevel y
Plaque y Color Sel y
AutoImage y AutoClear
4 Press (ENTER).
5 Press (ENTER).
6 Press M or m repeatedly to select the
desired character colour.
Each time you press M or m, the character
colour changes.
Blue y White y Green y Pink
y Yellow y Purple y Black y
y Blue
Custom
7 Press (ENTER).
8 Press (GRAPHIC).
The display returns to the normal display.
26
Page 27
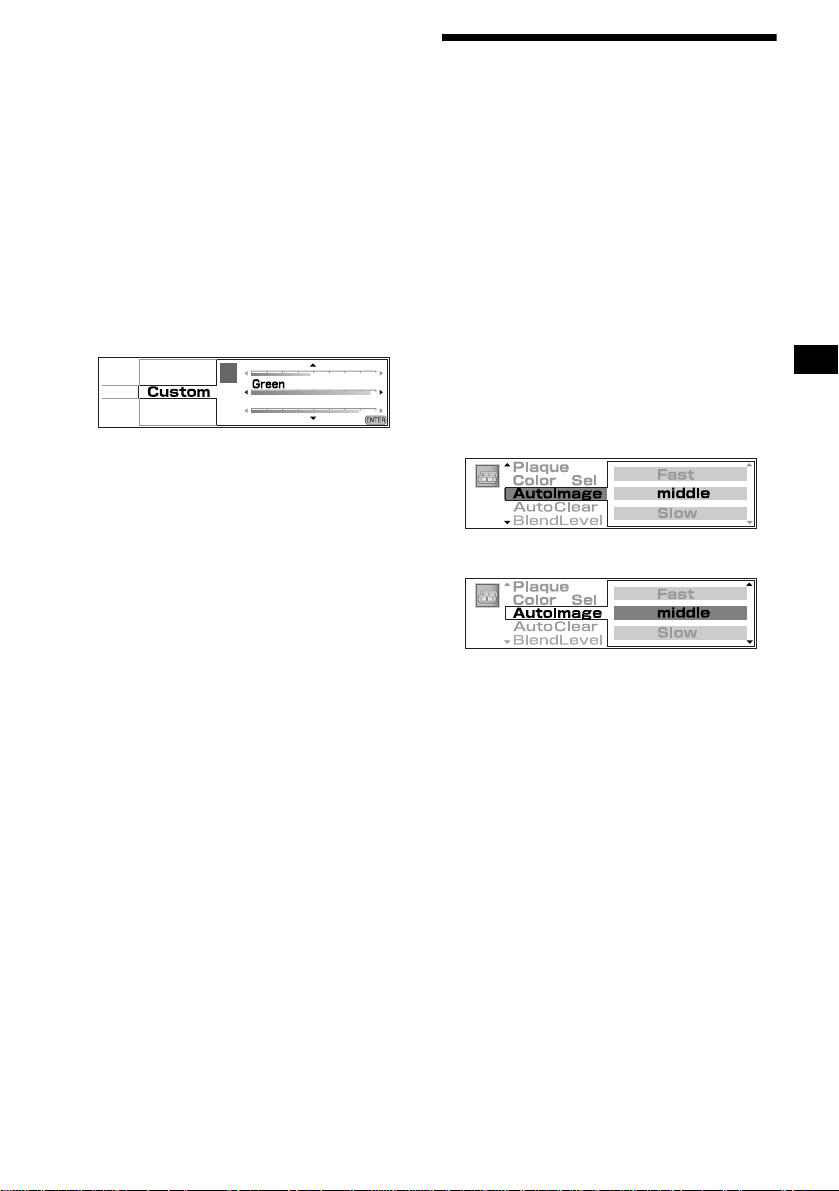
Adjusting the character colour
1 Press (SOURCE) to select a source
(radio, CD, MD or AUX).
2 Press (GRAPHIC).
3 Press < or , repeatedly to selec t
“Color Sel,” then press (ENTER).
Each time you pr ess < or ,, the item
changes as follows:
AutoClear y BlendLevel y
Plaque y Color Sel y
AutoImage y AutoClear
4 Press (ENTER).
5 Press M or m to select “Custom,” then
press (ENTER).
6 Press M or m repeatedly to select one
among Red-Green-Blue.
Each time you pr ess M or m, the item
changes.
7 Press < or , to adjust the level of
the colour.
Repeat steps 7 and 8 to set the character
display to your desired colour.
8 Press (ENTER).
9 Press M or m to select “Save, ” then
press (ENTER).
To return to the former character colour,
select “Cancel, ” t h en press (ENTER).
To restore the factory-set character colour,
select “Reset,” then press (ENTER).
10
Press (GRAPHIC).
The display returns to th e normal display.
Selecting the display period
of the images
— AutoImage
The pre-stored images switch in sequence
automatically. You can select the display period
for an image.
1 Press (SOURCE) to select a source
(radio, C D, MD, or AUX).
2 Press (GRAPHIC).
3 Press < or , repeatedly to select
“AutoImage.”
Each time you press < or ,, the item
changes as follows:
AutoClear y BlendLevel y
Plaque y Color Sel y
AutoImage y Auto Clear
4 Press (ENTER).
5 Press (ENTER).
6 Press M or m repeatedly to select the
display period for an image.
Each time you press M or m, the item changes
as follows:
Middle y Fast y OFF y Slow y
Middle
To cancel the Slid e Show function, select
“OFF.”
7 Press (ENTER).
8 Press (GRAPHIC).
The display returns to the normal display.
27
Page 28
Other Functions
You can also control the unit (and optional CD/
MD units) with a rotary commander (optional).
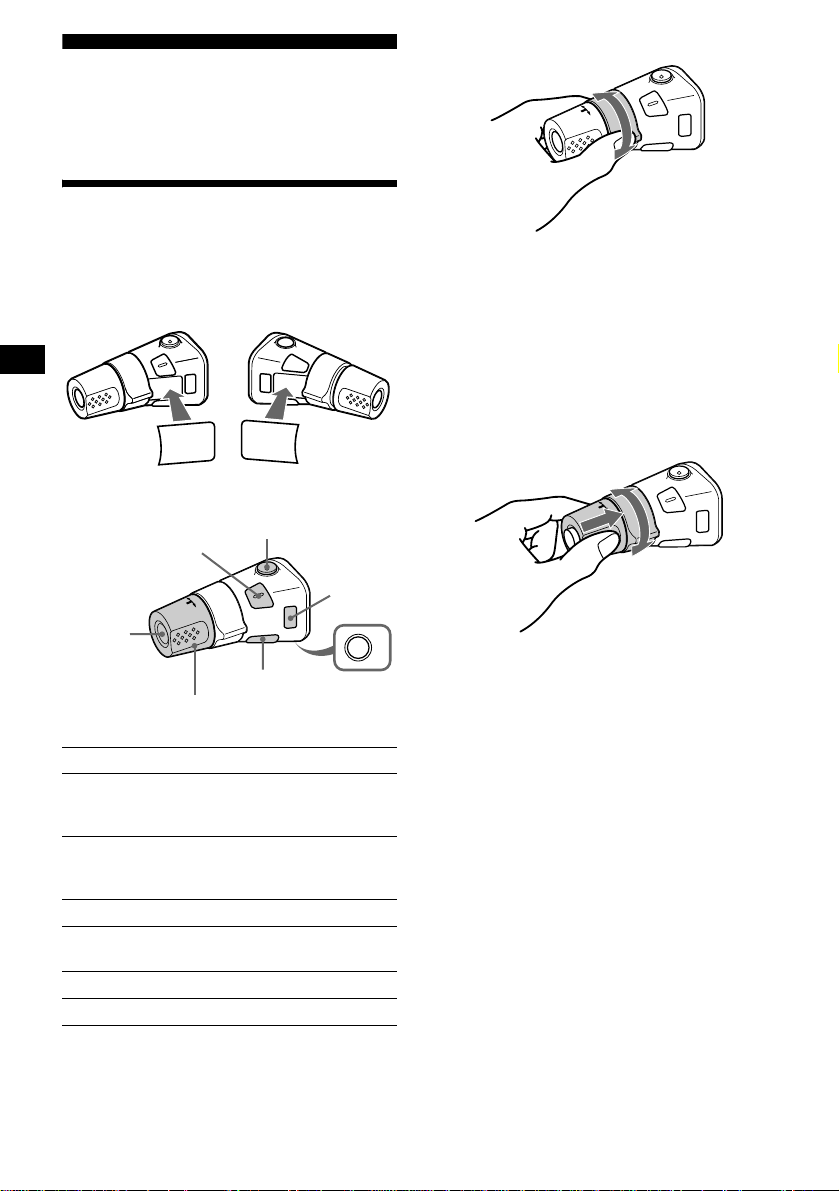
Using the rotary commander
By rotating the control
SEEK/AMS
control
First, attach the appropriate label depending on
how you want to mount the rotary commander.
The rotary commander works by pressing
buttons and/or rotatin g con tro ls.
SOUND
MODE
DSPL
MODE
SOUND
DSPL
By pressing buttons
(SOUND)
(SOURCE)
Rotate the VOL control
to adjust the volume.
Press To
(SOURCE) Change source
(ATT)
(DSPL)
(radio/CD/MD*
(MODE)
1
/AUX)/
(OFF)
Power on
(MODE) Change operation
(radio band/CD unit*
1
unit*
)
1
/MD
(ATT) Attenuate sound
(OFF)*
2
Stop playback or radio
reception/Power off
(SOUND) Display the soun d m enus
(DSPL) Select the display mode
Note
The DSPL button on the rotary commander works as
the SCREEN button for this unit.
Rotate and release to:
– Skip tracks.
To continuously skip tracks, rotate once and
rotate again within 2 second s and hold the
control.
– Tune in stations automatically.
Rotate, hold, and release to:
– Fast-forward/reverse a t ra ck.
– Find a station manually.
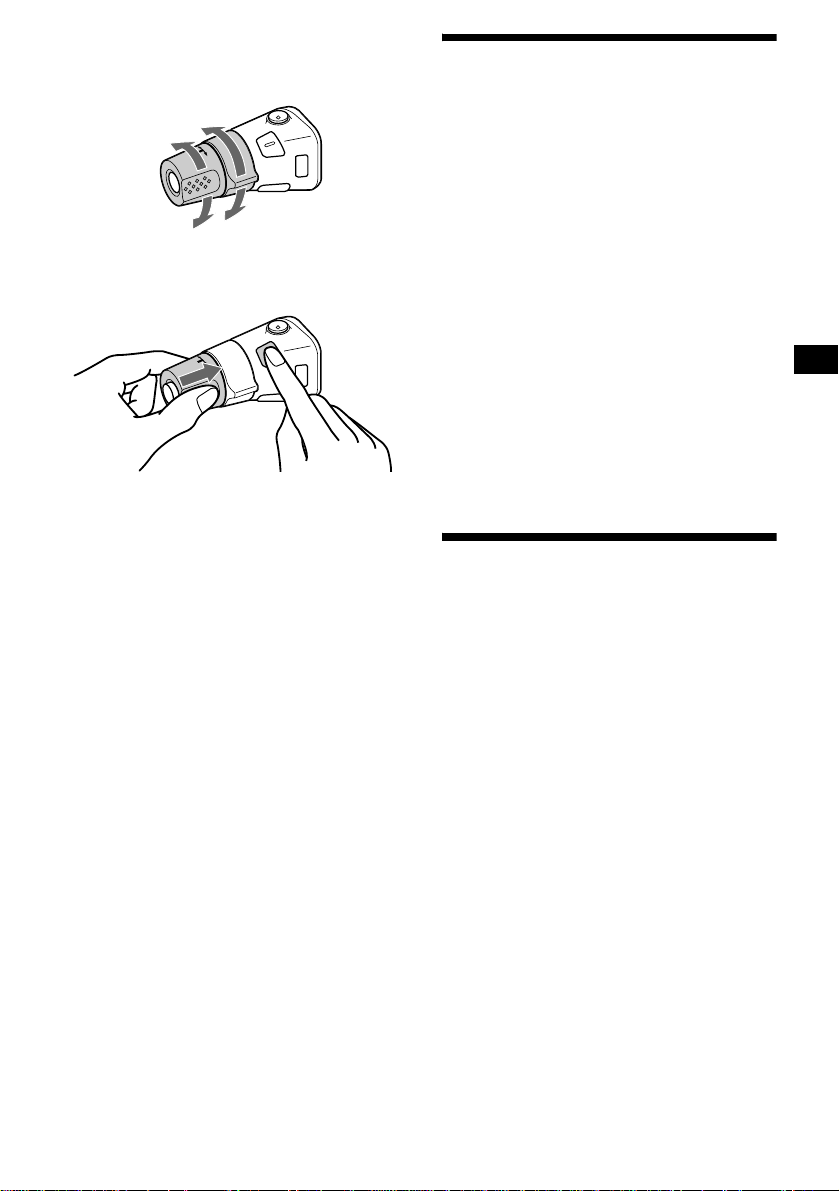
By pushing in and rotating the control
PRESET/DISC
control
OFF
Push in and rotate the control to:
– Receive preset stations.
– Change discs durin g CD (MD) playback*
During playback of a CD containing MP3
files
(With this unit)
Push in and rotate the control to:
– Change albums.
(With optional unit)
Push in and repeat rotating quickly to:
– Change discs one by one .
Push in, then rotate and hold for a
moment to:
– Enter the album skip mode. Within 2
seconds, push in and rotate again for
continuous skip.
*1 Only if the corresponding optional equipment is
connected.
*2 If your car has no ACC (accessory) position on the
ignition key switch, after turning off the ignition, be
sure to press and hold (OFF) until the display
disappears.
1
.
28
Page 29
Changing the operative direction
The operative direction of controls is factory-se t
as shown below.
To increase
To decrease
If you need to mount the rotary commander on
the right hand side of the steering column, you
can rev erse the operative direction.
Press (SOUND) for 2 seconds while
pushing the VOL control.
Note
If you pr es s (SOUND) for 2 seconds while pushing the
VOL control, “Normal” or “Reverse” appears in the
display .
– “Normal” is to use the rotary commander at the
factory-set position.
– “Reverse” is to use the rotary commander when it is
mounted on the right side of the steering column.
Adjusting the sound
characteristics
You can adjust the bass, treble, balance, f ader,
and subwoofer volume.
1 Press (SOURCE) to select a source
(radio, C D, MD, or AUX).
2 Press (SOUND).
3 Press < or , repeat edly to s elect the
item you want to adjust.
Each time you press < or ,, the item
changes as follows:
DSO y EQ7 y Bass y Treble
y Balance (left-right)
y Fader (front-re a r )
y SubWoofer (subwoofer volume)
4 Press (ENTER).
5 Adjust the selected item by pressing
< or ,.
6 Press (ENTER).
Quickly attenuating the
sound
Press (ATT).
“ATT” appears in the display for a while.
To restore the previous volume level, press
(ATT) again.
Tip
When the interface cable of a car telephone is
connected to the ATT lead, the unit decreases the
volume automatically when a telephone call comes in
(Telephone ATT function).
29
Page 30

Changing the sound and
display settings
— Menu
The following items can be set:
Setup
•Clock (page10)
• CT (Clock Time) (page 22)
• Beep — to turn the beeps on or off.
• AUX Skip*
source display on or off.
• Security (page 35) — to set the security code to
discourage theft.
Display
• Dimmer — to change the brightness of the
display.
– Select “AUT O” to dim the display only when
you turn the lights on.
– Select “ON” to dim th e display.
– Select “OFF” to deactivate the Dimmer.
• Contrast — to adjust the contrast if the
indications on the dis pl ay are not recognizab le
because of the unit’s installation position.
• AutoScroll*
– Select “ON” to scroll all automatically
displayed na m es.
– When “Auto scroll” is set to “OFF” and the
disc/track name is changed, the disc/track
name does not scroll.
PlayMode
• Local (Local Seek Mode) (page 16)
– Select “ON” to only tune into stations with
stronger signals.
• Mono (Monaural Mode) (page 16)
– Select “ON” to hear FM s te reo broadcast in
monaural. Select “OFF” to return to normal
mode.
• Regional (page 19)
1
(page 34) — to turn the AUX
2
SoundTuning
• EQ7 Tune (page 31) — to adjust the equaliser
curve.
• HPF (High pass filter) (page 32)
• LPF (Low pass filter) (page 33)
• Loudness — to en joy bass and treble even at
low volumes. The bass and treble will be
reinforced.
• AUX Lev el*
level of connected auxiliary equipment.
*1 Displayed only when the clock is displayed by
pressing (OFF).
*2 Displayed only when CD or MD is playing back.
*3 Displayed only when the source is AUX.
Note
Only when an optional CD/MD unit is not connected,
“AUX Skip” and “AUX Level” are displayed.
3
(page 34) — to adjust the volume
1 Press (MENU).
T o set “AutoScroll,” press (MENU) du ri ng
CD/MD playba ck.
2 Press < or , repeatedly to select the
desired it em.
3 Press (ENTER).
4 Press M or m repeatedly to select your
desired items to be adjusted.
5 Press (ENTER).
6 Press M or m repeatedly to select the
desired setting (Example: “ON” or
“OFF”).
7 Press (ENTER).
The display returns to the top menu display.
8 Press (MENU).
The display returns to the normal display.
Note
The displayed item will differ depending on the source.
30
Page 31

Setting the Dynamic
Soundstage Organiser (DSO)
If your speakers are installed into the lower part
of the doors, the so und will come from bel ow
and may not be clear.
The DSO (Dynamic So undstage Organiser)
function creates a more ambient sound as if there
were speakers above the da shboard (virtual
speakers).
You can store the DSO setting for each sou rce.
DSO mode and image of virtual speakers
*3
*2
*1
*4
*1 DSO 1
*2 DSO 2
*3 DSO 3
*4 DSO OFF
1 Press (SOURCE) to select a source
(radio, CD, MD, or A UX).
2 Press (SOUND).
3 Press < or , repeatedly to selec t
“DSO.”
4 Press (ENTER).
*3
*2
*1
*4
Setting the equaliser (EQ7)
You can select an equaliser curv e for 7 music
types (Xpl od, Vocal, Cl ub, Jaz z, Ne w A ge, Rock,
and Custom).
You can adjust a different equaliser setting for
each source.
Selecting the equaliser curve
1 Press (SOURCE) to select a source
(radio, C D, MD, or AUX).
2 Press (SOUND).
3 Press < or , repeatedly to select
“EQ7.”
4 Press (ENTER).
5 Press < or , repeat edly to s elect the
Equaliser mode.
To cancel the equalising effect, select “OFF.”
6 Press (ENTER).
Note
While DSO is active, equaliser settings are
automatically adjusted for best overall effect.
Adjusting the equaliser curve
Y ou can store and adjust the equaliser settings for
frequency and level.
5 Press < or , repeatedly to select the
DSO mode (DSO 1-3).
To cancel the DSO function, select “O FF.”
6 Press (ENTER).
Notes
• Depending on the type of car interior or type of
music, DSO may not have a desirable affect.
• If FM broadcasts are difficult to hear, set “DSO” to
“OFF. ”
Tip
The sound effect of the DSO mode increases as the
number increases.
1 Press (SOURCE) to select a source
(radio, C D, MD, or AUX).
2 Press (MENU).
3 Press < or , repeatedly to select
“SoundTuning.”
4 Press (ENTER).
5 Press M or m repeatedly to select “EQ7
Tune.”
6 Press (ENTER).
Example: EQ7 Tune “Xplod”
continue to next page t
31
Page 32

7 Press M or m repeatedly to select the
desired equaliser curve.
8 Press (ENTER).
9 Select the desired frequency and level.
1 Press < or , repeatedly to select
the desired frequency.
Each time you press < or ,, the
frequency changes .
62 Hz y 157 Hz y 396 Hz
y 1000 Hz y 2510 Hz
y 6340 Hz y 16000 Hz
Adjusting the front and rear
volume
1 Press (SOURCE) to select a source
(radio, CD, MD, or AUX).
2 Press (SOUND).
3 Press < or , repeatedly to select
“Fader.”
4 Press (ENTER).
2 Press M or m repeatedly to adjust
the desired level.
The level is adjustable by 1 dB steps from
–10 dB to +10 dB.
To restore the factory-set equaliser curve,
press (ENTER) for 2 seconds.
3 Repeat steps 1 and 2 to adjust the
equaliser curve.
10
Press (ENTER).
After the effect setting is complet ed, the
display returns to the normal display.
5 Press < or , repeatedly to adjust
the volume of fro n t/rear speakers.
6 Press (ENTER).
The display returns to the normal display.
Adjusting the cut-off frequency for the
front/rear speaker s
To match the characteristics of th e installed
speaker system, you can select the cut-off
frequency of the speakers.
Cut-off frequency
Level
off
Frequency (Hz)
1 During playback or radio reception,
press (MENU).
2 Press < or , repeatedly to select
“SoundTuning.”
3 Press (ENTER).
4 Press M or m repeatedly to select
“HPF.”
5 Press (ENTER).
32
Page 33

6 Press M or m repeatedly to selec t the
cut-off frequency.
Each time you pr ess M or m, the frequency
changes as follows:
OFF (default setting) y 78 Hz y 125 Hz
7 Press (MENU).
After the frequency setting is complete, the
display returns to the normal display.
Adjusting the volume of the
subwoofer(s)
1 Press (SOURCE) to select a source
(radio, CD, MD, or A UX).
2 Press (SOUND).
3 Press < or , repeatedly to selec t
“SubWoofer.”
4 Press (ENTER).
5 Press < or , repeatedly to adjust
the volume.
6 Press (ENTER).
The display returns to th e normal display.
Tip
The volume level is adjustable from –10 dB to +10 dB
(Below –10 dB, “– ∞ dB” is displayed).
Adjusting the cut-off frequency for the
subwoofer(s)
To match the characteristics of the connected
subwoofer(s), you can cut out the unwanted high
and middle frequency signals enter ing the
subwoofer(s). By setting the cut-off frequency
(see the diagram below), the subwoofer(s) will
output only low frequency signals for a cl earer
sound.
Cut-off frequency
Level
off
Frequency (Hz)
1 During playback or radio reception,
press (MENU).
2 Press < or , repeatedly to select
“SoundTuning.”
3 Press (ENTER).
4 Press M or m repeatedly to select
“LPF.”
5 Press (ENTER).
6 Press M or m repeatedly to select the
cut-off frequency.
Each time you press M or m, the frequency
changes as follows:
OFF (default setting ) y 125 Hz y 78 Hz
7 Press (MENU).
After the frequency setting is complete, the
display returns to the normal display.
33
Page 34

Connecting auxiliary audio
equipment
The unit’s AUX IN (external audio input)
terminal on this unit is also used as the BUS
AUDIO IN (audi o input) terminal.
You can listen to the sound from your ca r
speakers by connecting optional Sony portable
devices.
Note
If you connect an optional Sony CD/MD unit, you
cannot connect any portable devices and cannot
select “AUX.”
Selecting auxiliary equipment
Press (SOURCE) repeatedly to select
“AUX.”
Adjusting the volume level
You can adjust the volume for each connected
audio equipment.
1 Press (MENU).
2 Press < or , repeatedly to select
“SoundTuning.”
3 Press (ENTER).
4 Press M or m repeatedly to select
“AUX Level.”
5 Press (ENTER).
6 Press < or , repeatedly to adjust
the volume level.
The volume level is adjustable in 1 dB steps
from –6 dB to +6 dB.
7 Press (ENTER).
The display returns to the top menu display.
8 Press (MENU).
The display returns to the normal display.
To deactivate auxiliary equipment in
the music source display
1 Press (OFF).
CD/MD playback or radio reception stops
(the key illumination an d display remain on).
2 Press (MENU).
3 Press < or , repeatedly to select
“Setup.”
4 Press (ENTER).
5 Press M or m repeatedly to select
“AUX Skip.”
6 Press (ENTER).
7 Press m to select “ON.”
8 Press (MENU).
T o restore the indication, se l ect “A U X Sk ip
OFF.”
34
Page 35

Setting the security code
This unit has a sec urity functio n t o discourage
theft. Input a 4-digit nu mber as your security
code.
If you set it, you need to input the stored code to
turn on the unit should you re-install the unit in
another car or aft er changing the batte ry.
1 Press (MENU).
2 Press < or , repeatedly to selec t
“Setup.”
3 Press (ENTER).
4 Press M or m repeatedly to select
“Security.”
5 Press (ENTER).
Code Set display i s displayed.
1 Press M or m repeatedly to enter the
first digit (0-9).
2 Press , to move the cursor to the
2nd digit, then press M or m
repeatedly to enter the 2nd digit.
Each time you press M, a digit goes
up and each time you press m, a
digit falls.
3 Repeat step 2 to enter the 3rd digit
and the 4th digit.
6 Press (ENTER).
Check Code display appears.
7 Press M or m repeatedly to select
“YES.”
After the security code setup is
completed
Should you re-install the unit in another car or
change the battery, the Check Code di splay
appears after tur ning on the unit. Enter yo ur
stored 4-digit code with the cursor buttons
(M/m/,), and press (ENTER).
Code Input display
OK: returns to the calendar/clock display.
NG: “CODE ERROR” messa ge appears.
Input the correct code using the curs or butt ons.
Cancelling the security code
Repeat step 1 to 4 in “Setting the secur i ty code”
(Code Del display appears). Enter your stored
code with the cursor buttons (M/m/,), and
press (ENTER).
Code Del display
OK: returns to a normal display.
NG: the “CODE ERROR” message appears.
Input the correct code using the curs or butt ons.
Note
You cannot change the security code unless you
delete your stored code.
Tip
If the security code is not stored, the Code Del display
does not appear.
8 Press (ENTER).
The display returns to th e normal display.
Notes
• The security code cannot be entered by the number
buttons (1-6).
• Make sure not to forget your security code.
• If you select “NO” in step 7 and press (ENTER), the
display returns to the Code Set display in step 5.
35
Page 36

Additional Information
Maintenance
Fuse replacement
When replacing th e fuse, be sure to use one
matching the amperage rating stated on the
original fuse. I f t he fuse blows, check the power
connection and replace the fuse. If the fuse blows
again after replacement, there may be an internal
malfuncti on . In such a case, co nsult your nearest
Sony dealer.
Fuse (10 A)
Warning
Never use a fuse with an amperage rating
exceeding the one supplied with the unit as this
could damage the un it.
Replacing the lithium battery
Under normal conditions, batteries will last
approximately 1 y ear. (The servi ce life may be
shorter, depending on the conditions of use.)
When the batt ery bec omes wea k, the range o f the
card remote commander becomes shorter.
Replace the battery with a new CR2025 lithium
battery. Use of any other battery may present a
risk of fire or explosion.
x
+ side up
36
Notes on lithium battery
• Keep the lithium battery out of the reach of
children. Should the battery be swallowed,
immediately consult a doctor.
• Wipe the battery with a dry cloth to assure a
good contact.
• Be sure to observe the correct polarity when
installing the battery.
• Do not hold the battery with metallic tweezers,
otherwise a short-circuit may occur.
WARNING
Battery may explode if mistreated.
Do not recharge, disassemble, or dispose of
in fire.
Page 37

Removing the unit
1 Remove the protection collar.
1 Engage the release keys together
with the protection collar.
Orient the release
key correctly.
2 Pull out the release keys to remove
the protection collar.
2 Remove the unit.
1 Inser t bo th r el ease keys together
until they click.
Face the h ook
inwards.
2 Pull the rele ase keys to unseat the
unit.
3 Slide the unit out of the mounting.
37
Page 38

Specifications
CD Player section
Signal-to-noise ratio 90 dB
Frequency response 10 – 20,000 Hz
Wow and flutter Below measurable limit
Tuner section
FM
Tuning range 87.5 – 108 MHz
Aerial terminal External aerial connector
Intermediate frequency 10.7 MHz /450 kHz
Usable sensitivity 9 dBf
Selectivity 75 dB at 400 kHz
Signal-to-noise ratio 67 dB (stereo),
Harmonic distortion at 1 kHz
Separation 35 dB at 1 kHz
Frequency response 30 – 15,000 Hz
69 dB (mono)
0.5 % (stereo),
0.3 % (mono)
MW/LW
Tuning range MW: 531 – 1,602 kHz
Aerial terminal External aerial connector
Intermediate frequency 10.7 MHz /450 kHz
Sensitivity MW: 30 µV
LW: 153 – 279 kHz
LW: 40 µV
Power amplifier section
Outputs Speaker outputs
Speaker impedance 4 – 8 ohms
Maximum power output 52 W × 4 (at 4 ohms)
(sure seal connectors)
General
Outputs Audio outputs (front/rear)
Inputs Telephon e ATT control
Tone controls Bass ±8 dB at 100 Hz
Loudness +8 dB at 100 Hz
Power requirements 12 V DC car battery
Dimensions
Mounting dimensions
Mass Approx. 1.6 kg
Supplied accessories Card remote commander
Optional accessories Rotary commander
Optional equipment CD changer (6 discs)
Subwoofer output (mono)
Power aerial relay control
terminal
Power amplifier control
terminal
terminal
Illumination contr o l
terminal
BUS control input ter minal
BUS audio input/AUX IN
terminal
Aerial input termi nal
Treble ±8 dB at 10 kHz
+2 dB at 10 kHz
(negativ e eart h )
Approx. 178 × 50 × 181 mm
(w/h/d)
Approx. 182 × 53 × 160 mm
(w/h/d)
RM-X132 (1)
Parts for installation and
connections (1 set)
Front panel cover (1)
RM-X4S
Wireless rotary commander
RM-X6S
BUS cable (supplied with
an RCA pin cord)
RC-61 (1 m), RC-62 (2 m)
CDX-T70MX, CDX-T69
MD changer (6 discs)
MDX-66XLP
MG-MS System-up Player
MGS-X1
Source selector
XA-C30
AUX-IN Selector
XA-300
38
Note
This unit cannot be connected to a digital preamplifier
or an equaliser which is Sony BUS system compatible.
Design and specifications are subject to chan ge
without notice.
Page 39

Troubleshooting
The following checklist will help you remedy
problems you may encounter with your unit.
Before going t hrough the checkl ist belo w, check
the connection and operating procedur es.
General
The operation buttons do not function.
Press the reset button.
No sound.
• Press up the VOL control lever to adjust the
volume.
• Cancel the ATT function.
• Set the fader contro l to the centre posi tion for
a 2-speaker system.
The contents of the memory have been
erased.
• The reset button has been pressed.
t Store again into the memory.
• The power cord or battery has been
disconnected.
• The power connecting cor d i s not connected
properly.
No beep sound.
The beep sound is canc el le d (page 30).
The display disappears from/does not
appear in the display window.
The display disapp ears if you press and ho ld
(OFF).
t Press and hold (OFF) again until the
display appe ar s.
Stored stations and correct time are erased.
The fuse has blown.
Makes noise when the ignition key is in the
ON, ACC, or OFF position.
The leads are not matched correctly with the
car’s accessory power connec to r.
No power is being supplied to the unit.
• Check the connect i on. If everything is in
order, check the fuse.
• The car does not have an ACC position.
t Press (SOURCE) to turn on the unit
The power is continuously supplied to the
unit.
The car does not have an ACC position.
t A fter turning off the ignition, be sure to
press and hold (OFF) on the unit until
the display dis appears.
The power aerial does not extend.
The power aerial does not have a relay box.
CD/MD playback
Playback does not begin.
• Defective MD or dirty C D .
• Some CD-Rs/ CD - RWs may not pla y due to
its recording equipment or the disc
condition.
MP3 files cannot be played back.
• Recording was not performed according to
the ISO 9660 level 1 or level 2 format, or th e
Joliet or Romeo in the expansion format.
• The file extension “.MP3” is not added to the
file name.
• Files are not st ored in MP3 format.
Album name/track name/ID3 tag is not
displayed correctly.
• A disc is not compliant with ISO 9660 level
1.
t Use a compliant disc.
• The unit can only display the letter codes,
such as ASCII, half sized European letters
(ASCII only for Joliet), and Shift-J IS . Lette r
codes other than the above will not displ ay
correctly.
MP3 files take longer to play back than
others.
The following discs take a longer time to start
playback.
–a disc recorded with complicated tree
structure.
–a disc recorded in Multi Session.
– a disc to which data can be added.
The sound skips from vibration.
• The unit is installed at an angle of more than
60°.
• The unit is not installed in a sturdy part of
the car.
The sound skips.
• Defective or dirty disc.
• The CD-R/CD-RW has been damaged.
continue to next page t
39
Page 40

Radio reception
Preset tuning is not possible.
• Store the correct frequency in the memory.
• The broadcast sign al is too weak.
The stations cannot be received.
The sound is hampered by noises.
• Connect a power aerial control lead (blue) or
accessory power suppl y lead (red) to the
power supply lead of a ca r’s aerial booster.
(Only if your car has a built- in FM/MW/LW
aerial in the rear/side glass.)
• Check the connecti on of the car aerial.
• The auto aerial will not go up.
t Chec k t he connection of the power aeri al
control lead.
• Check the frequency.
• When the DSO mo de is on, the sound is
sometimes hampered by noises.
t Set the DSO mode to “OFF” (page 31).
Automatic tuning is not possible.
• The loca l seek mode is set to “ON.”
t Set th e local seek mode to “OFF”
(page 30).
• The broadcast sign al is too weak.
t Perform manual tuning.
The “STEREO” indication flashes.
• Tune in the frequency accurate ly.
• The broadcast sign al is too weak.
t Set to the monaural reception m ode
(page 30).
A programme broadcast in stereo is heard
in monaural.
The unit is in monaural reception mode.
t Canc el monaural reception m ode
(page 30).
RDS
Seek starts after a few seconds of listening.
The station is non- TP or has weak signal.
t Press (AF) or (TA) repeatedly until
“ ” or “ ” disappears.
A F T A
No traffic announcements.
• Activate TA function.
• The station does no t br oadcast any traffic
announcements de spite being TP.
t Tune in another station.
PTY displays “--------.”
• The current station is not an RDS station.
• RDS data has not b een received.
• The station does not specify the program me
type.
Error displays/Message
Error displays
(For this unit and optional CD/MD changers)
The following indications will flash for about
5 seconds, and an alarm sound will be heard.
1
Blank*
No tracks have been recor ded on an MD*2.
t Play an MD with recorded tracks on it.
1
Error*
• A CD is dirty or inserted upside down.*
t Clean or insert the CD correctly.
• A CD/MD cannot play because of some
problem.*
2
t Insert another CD /MD.
High Temp
The ambient temperature is more than 50°C.
t Wait until the temperature goes down
below 50°C.
NO Disc
No disc is inserted in the CD/MD unit.
t Insert discs in the CD/MD unit.
NO Magazine
The disc magazine is not inserted in the CD/
MD unit.
t Insert the magazine in the CD/MD unit.
NO Music*
1
A CD which is not a music file is inserted.
t Insert a music CD.
Not Ready
The lid of the MD unit is open or the MDs are
not inserted properly.
t Close the lid or insert the MDs properly.
Push Reset
The CD/MD unit ca nnot be operated because
of some problem.
t Press the reset button on the unit.
*1 When the CD/MD changer is connected to the unit,
the disc number of the CD or MD appears in the
display.
*2 The disc number of the disc causing the error
appears in the display.
If these solutions do not help improve the
situation, consult your nearest Sony dealer.
Message
Local Seek up/Local Seek down
The Local Seek mode is on during automatic
tuning (page 16).
2
40
Page 41

About ID3 tag version 2
Although not a malfunction, the following occurs
when an MP3 file containing ID3 tag ver.2 is
played:
– When skipping a portion of ID3 tag ver.2 (at the
beginning of the track), sound is not output.
Skip time changes depending ID3 tag ver.2
capacity.
– The displayed elapsed playing time when
skipping a portion of ID3 tag ver.2 is inaccurate.
For MP3 files of a bit rate other than 128 kbps,
time is not displayed accurately during playback.
– When an MP3 file is created with MP3
conversion software, ID3 tag ver.2 will
automatically be written.
41
Page 42

Willkommen!
Danke, dass Sie sich für diesen CD-Player von
Sony entschieden haben.
FUNKTIONEN UND MERKMALE:
• Wiedergabe von auf CDs aufgezeichneten
MP3-Dateien.
• Wiedergabe von CD-Rs/CD-RWs, zu denen
eine Sitzung hinzugefügt werden kann (Seite 7).
• Wiedergabe von Multi-Session-CDs (CDExtra, Misch-CD usw.) je nach
Aufnahmev erfahren (Seite 7) .
• Gesondert erhältliche CD/MD -G eräte
(Wechsler und Player)*
•ID3-Tag*
2
-Informationen, Version 1 (werden
bei der Wiederg abe ei ner MP3-D atei angezei gt).
• CD TEXT-Informationen (werden bei de r
Wiedergabe einer CD mit CD TEXT*
angezeigt).
• Mitgeliefertes Bedienungszubehör
Kartenfernbedienung RM-X132
• Gesondert erhältliches
Bedienungszubehör
Joystick RM-X4S
Drahtloser Joystick RM-X6S
*1 Dieses Gerät arbeitet nur zusammen mit Sony-
Produkten.
*2 Ein ID3-Tag ist eine MP3-Datei, die Informationen
wie die Namen von Alben, Interpreten, Titeln usw.
enthält.
*3 Eine CD mit CD TEXT ist eine Audio-CD, die
Informationen wie den Namen der CD, den Namen
des Interpreten und die Namen der Titel enthält.
Diese Daten sind auf der CD aufgezeichnet.
1
.
3
In dieser Bedienungsanleitung wird in erster
Linie beschrieben, w ie Sie das Gerät mit der
Kartenfernbedienung steuern.
Die Abbildungen in dieser Anleitung können
sich von dem eigentlichen Gerät unterschei den.
Dieses Etikett befindet sich an der Unterseite
des Gehäuses.
CAUTION INVISIBLE
VIEW DIRECTLY WITH OPTICAL INSTRUMENTS
LASER RADIATIONWHEN OPEN
DO NOT STARE INTO BEAM OR
Dieses Etikett befindet sich am internen
Chassis der Laufwerkseinheit.
2
Page 43

Inhalt
Lage und Funktion der T eile und Bedienele-
mente . . . . . . . . . . . . . . . . . . . . . . . . . . . . .4
Sicherheitsmaßnahmen . . . . . . . . . . . . . . . . .6
Hinweise zu CDs . . . . . . . . . . . . . . . . . . . . . .6
MP3-Dateien . . . . . . . . . . . . . . . . . . . . . . . . . 7
Die allgemeinen Hauptmenüs . . . . . . . . . . . .9
Vorbereitungen
Zurücksetzen des Geräts. . . . . . . . . . . . . . . .10
Einstellen von Uhrzeit und Datum. . . . . . . .10
CD-Player
CD/MD-Gerät (gesondert erhältlich)
Wiedergeben einer CD. . . . . . . . . . . . . . . . .11
Informationen im Display . . . . . . . . . . . . . .12
Wiederholtes Wiedergeben von Titeln
— Repeat Play. . . . . . . . . . . . . . . . . . . . .13
Wiedergeben vo n Ti te l n in will kürlicher Rei-
henfolge
— Shuffle Play . . . . . . . . . . . . . . . . . . . .13
Benennen einer CD
— Disc Memo* . . . . . . . . . . . . . . . . . . . .14
Ansteuern einer CD/MD anhand des Namens
— List-up*. . . . . . . . . . . . . . . . . . . . . . . .15
* Funktionen, wenn ein zusätzlich erhältlich es CD/
MD-Gerät angeschlossen ist
Radio
Automatisches Speichern von Radiosendern
— Best Tuning Memory (BTM) . . . . . . .15
Informationen im Display . . . . . . . . . . . . . .16
Einstellen gespeicherter Sender . . . . . . . . . . 16
Speichern bestimmter Radiosender . . . . . . .17
Einstellen eines Senders anhand einer Liste
— List-up. . . . . . . . . . . . . . . . . . . . . . . . . 17
RDS
Übersicht über RDS . . . . . . . . . . . . . . . . . . .18
Automatisch es Neueinstellen von Sendern für
optimale Empfangsqualität
— AF-Funktion. . . . . . . . . . . . . . . . . . . .19
Empfangen von V erkehrsdurchsagen
— TA/TP. . . . . . . . . . . . . . . . . . . . . . . . .20
Speichern von RDS-Sendern zusammen mit
der AF- und TA-Einstellung . . . . . . . . . .20
Einstellen von Sendern nach Programmtyp
— PTY. . . . . . . . . . . . . . . . . . . . . . . . . . .21
Automatisches Einstellen der Uhr
— CT. . . . . . . . . . . . . . . . . . . . . . . . . . . .22
Bildeinstellungen
Auswählen des Anzeigemodus und des An-
zeigemusters . . . . . . . . . . . . . . . . . . . . . . 23
Automatisches Ausblenden von Zeichen im
Display
— AutoClear (Spe kt rumanalysator- /Pano-
rama-/Bildschirmschonermodus) . . . . . . 25
Ändern der Transparenz der Zeichen im Display
— BlendLevel (Spek tr um analysator-/Pano-
rama-/Bildschirmschonermodus) . . . . . . 25
Einstellen einer Maske
— Plaque. . . . . . . . . . . . . . . . . . . . . . . . . 26
Einstellen der Zeiche nfarbe
— Color Sel . . . . . . . . . . . . . . . . . . . . . . 26
Auswählen d er Anzeigedauer für die Bilder
— AutoImage . . . . . . . . . . . . . . . . . . . . . 27
Weitere Funktionen
Der Joystick. . . . . . . . . . . . . . . . . . . . . . . . . 28
Einstellen der Klangeigenschaften . . . . . . . 29
Schnelles Dämpfen des Tons. . . . . . . . . . . . 29
Wechseln der Klang- und Anzeigeeinstellungen
— Menü . . . . . . . . . . . . . . . . . . . . . . . . . 30
Einstellen der DSO-Funktion (Dynamic
Soundstage Organizer) . . . . . . . . . . . . . . 31
Einstellen des Equalizers (EQ7) . . . . . . . . . 31
Einstellen der Lautstärke vorne und hinten . 32
Einstellen der Laut s tä rke des/der
Tiefsttonlautsprecher(s) . . . . . . . . . . . . . 33
Anschließen zu sätzlicher Audiogeräte . . . . 34
Einstellen des Sicherheitscodes. . . . . . . . . . 35
Weitere Informationen
Wartung. . . . . . . . . . . . . . . . . . . . . . . . . . . . 36
Ausbauen des Geräts . . . . . . . . . . . . . . . . . . 37
Technische Daten . . . . . . . . . . . . . . . . . . . . 38
Störungsbehebung . . . . . . . . . . . . . . . . . . . . 39
Fehleranzeigen/Meldung. . . . . . . . . . . . . . . 40
3
Page 44

Lage und Funktion der Teile und Bedienelemente
OFF
SOURCE SCREEN
MODE
VOL
CDX-M1000TF
Näheres finden Sie auf den angegebenen Seiten.
SHIFT
.
>
a Taste SOURCE (Einschalten/Radio/
CD/MD/AUX*
Dient zum Auswählen der Tonquelle.
b Taste OFF (Stopp/Ausschalten)*
1
)
2
11,
34
c Taste MODE
Dient zum Wechseln des Betriebsmodus.
d Display
e Taste Z (Auswerfen) O PEN/CLO S E
Dient zum Auswerfen der CD, so fern eine
CD in das Gerät eingelegt ist.
Dient zum Öffnen/Schließen der Frontplatte.
f Taste SCREEN
Dient zum Auswählen des Anzeigem odus.
g Lautstärkeregler VOL
Drücken Sie den Hebel VOL nach unt en
oder oben, um die Lautstärke zu verringern
bzw. zu erhöhen.
h Rücksetztaste 10
i Sensor für die Kartenfernbedienung
und den drahtlosen Joystick
j Taste SHIFT (Umschalten 1-3)
Dient zum Wechseln der Funktion des
Hebels . > (qa).
k Hebel . >
Drücken Sie den Hebel . > nach
unten oder oben, um den gewünschten
Radiosender, die einzustell ende Option oder
das gewünschte Bild auszuwählen.
Nach oben drücken
Nach unten drücken
*1 Wenn ein gesondert erhältliches CD/MD-
Gerät angeschlossen ist, wird „AUX“ nicht
angezeigt.
*2 Achtung
Warnhinweis zur Installation des
Geräts in einem A uto mit Zündsc hloss
ohne Zubehörposition ACC oder I
Nachdem Sie die Zündung ausgeschaltet
haben, halten Sie am Gerät unb edi ngt
(OFF) gedrückt, bis die Anzeige
ausgeblendet wird.
Andernfalls wird die Uhrzeitanzeige nicht
ausgeschaltet un d der Autobatterie w i rd
Strom entzogen.
4
Page 45

Kartenfernbedienung RM-X132
SHUF
2
5
+
VOL
–
ATT
3
6
LIST
+
+
SEEK
–
ENTER
BACK
MODE
PTY AF TA
REP
1
4
GRAPHIC
SCREEN IMAGE
DISC
MENU
SOURCE
–
SEEK
SOUND
DISC
OFF
Die entsprechenden Tasten auf der
Kartenfernbedienung haben dieselbe
Funktion wie die Tasten an diesem Gerät.
In dieser Bedienungsanleitung wird in erster
Linie beschrieben, wie Sie das Gerät mit der
Kartenfernbedi enung steuern.
Näheres finden Sie auf den angegebenen Seiten.
a Ta ste MODE
b Ta ste PTY
c Zahlentasten
(1) REP 13
(2) SHUF 13
Dienen zum Speichern von Sendern bzw.
zum Einstellen gespeicherter Sender.
d Ta ste SCREEN
e Ta ste MENU
Dient zum Anzeigen der allgemeinen
Menüs.
f Taste SOURCE
g Tasten </, (SEEK –/+)
h Ta ste SOUND
Dient zum Anzeigen der Tonmenüs.
i Ta ste OFF
j Tasten VOL (+/–)
k Ta ste ATT 29
l Ta ste AF 19
m Ta ste TA 20
n Taste GRAPHIC
Dient zum Anzeigen der Bildmenüs.
o Ta ste IMA G E
Dient zum Wechseln des Anzeigemusters.
p Taste LIST 15, 17
q Tasten M/m (DISC +/–)
r Ta ste ENTER
Dient zum Eing eben von Einstellungen.
s Ta ste BACK
Dient beim Vornehmen einer Einstellung
zum Zurücksc halten zur vorherigen
Funktion.
Hinweis
Wenn Sie die Anzeige ausblenden, indem Sie (OFF)
drücken, können Sie das Gerät nicht mit der
Kartenfernbedienung bedienen. Drücken Sie zunächst
(SOURCE) am Gerät oder legen Sie eine CD ein, um
das Gerät zu aktivieren.
Tipp
Einzelheiten zum Austauschen der Batterie finden Sie
unter „Austauschen der Lithiumbatterie“ auf Seite 36.
5
Page 46

Sicherheitsmaßnahmen
Hinweise zu CDs
• Wenn das Fahrzeug längere Zeit in direkte m
Sonnenlicht gepa rkt war, lassen Sie das Gerät
etwas abkühlen, b evor Sie es einschalten.
• Motorantennen werden automatisch
ausgefahren, w enn das Gerät eing es chaltet
wird.
• Ve rw e nden Sie die CUSTOM FILE-F unktion
nicht beim Fahren un d führen Sie auch keine
anderen Funktionen aus, die Sie vom
Straßenverkehr ablenken könnten.
Sollten an Ihrem Gerät Probleme auftreten oder
sollten Sie Fragen haben, auf die in dieser
Anleitung ni cht eingegangen wird, wenden Sie
sich bitte an Ihre n Sony-Händler.
Feuchtigkeitskondensation
Bei Regen oder bei sehr hoher Luftfeuchtigkeit
kann sich auf den Linsen im Inneren des G eräts
und im Display Feuc ht igkeit niederschlage n. In
diesem Fall funktioniert das Gerät nic h t m ehr
richtig. Nehmen Si e die CD heraus und warten
Sie etwa eine Stunde, bi s die Feuchtigkeit
verdunstet ist.
So bewahren Sie die hohe Tonqualität
Achten Sie darauf, kein e Säfte oder anderen
zuckerhal t i gen Getränke auf das Gerät oder die
CDs zu verschütten.
• Berühren Sie nicht die Oberfläche, damit die
CDs nicht vers chmutzt werden. F assen S ie CDs
nur am Rand an.
• Bewahren Sie CDs in ihrer Hülle oder in den
CD-Magazinen auf, wenn sie nicht abgespielt
werden.
Schützen Sie CDs vor Hitze bzw. hohen
Temperaturen. Lassen Sie sie nicht in
geparkten Autos, auf dem Armaturenbrett oder
auf der Hutablage liegen.
• Bringen Sie keine A ufkleber auf CDs an u nd
verwenden Sie keine CDs mit Rückständen von
Tinte oder Kle bstof fen. Solche CDs dr ehen si ch
beim Betrieb möglicherweise nicht mehr und
führen zu einer Fe hl funktion oder können
beschädigt werden.
Hinweise zum LCD-Display
• Drücken Sie nicht zu fest auf das LCD-Display.
Andernfalls können Sie sich verletzen und das
Display kann bes chädigt werden.
• Auf dem LCD-Display können permanent
schwarze od er hel le Lich tpun kte (ro t, bl au oder
grün) zu sehen sein. Dies ist keine
Fehlfunktion. Da s LCD-Display wird i n ei ner
Hochpräzisionstechnologie hergestellt und der
Anteil der effektiven Bildpunkte liegt bei über
99,99 %. Denn oc h kö nn en b ei ei ni ge n we ni gen
Bildelementen die oben genannten Phänom ene
auftreten.
6
• Verwenden Sie keine CDs, an denen Etiketten
oder Aufkleber angebracht sind.
Bei Verwendung solcher CDs kann es zu
folgenden Fehlfunktionen kommen:
– Die CD lässt sich nicht auswerfen, weil sich
ein Etikett oder Aufkleber gelöst hat und den
Auswurfmechanismus blockiert .
– Die Audiodaten werden nicht korrekt gelesen
(z. B. Tonsprünge bei der Wiedergabe, keine
Wiedergabe), weil ein Etikett oder Aufkleber
durch Wärmeeinwirkung geschrumpft ist und
die CD sich verzogen hat .
• CDs mit außergewöhnlichen Formen (z. B.
herzförmige, quadratische oder sternförmige
CDs) können mi t diesem Gerät nicht
wiedergegeben werden. Falls Sie es doch
versuchen , kann das Gerät beschä digt werden.
Verwenden Sie solche CD s nicht.
• Single-CDs (8-cm-CDs) können ebenfalls nicht
verwendet werd en.
Page 47

• Reinigen Sie CDs vor dem Abspielen mit einem
handelsüblichen Reinigungstuch. Wi schen Sie
dabei von der Mitte nach außen. Verwenden Sie
keine Lösungsmittel wie Benzin oder Verdünner
und keine handelsüblichen Reinigungsmittel
oder Antistatik-Sprays für Schallplatten.
Musik-CDs mit
Urheberrechtsschutzcodierung
Dieses Gerät ist auf die Wiedergabe von CDs
ausgelegt, die dem Compact Disc-Standard (CD)
entsprechen. Seit neuestem bringen einige
Anbieter Musik- CD s mit Kopierschutz auf den
Markt. Beachten Sie bitte, dass einige dieser CDs
nicht dem CD-Standard entsprechen und mit
diesem Produkt möglicherweise nicht
wiedergegeben werd en können.
Hinweise zu CD-Rs (bespielbare CDs)/
CD-RWs (wiederbeschreibba re CDs)
Folgende CDs können w i edergegeben werden:
CD-Typ Markierung auf der CD
Audio-CD
MP3-Dateien
• Je nach dem Gerät, mit de m d ie CD-R/CD-RW
bespielt wurde, oder dem Zustand de r CD - R /
CD-RW selbst ist eine Wiedergabe mit diesem
Gerät nicht in jedem Fall möglich.
• Nicht abgeschlos sene* CD-Rs/CD-RWs
können nicht wiedergegeben werden.
• Auf CD-ROMs, CD-Rs und CD-RWs
aufgezeichnete M P 3- D at eien können
wiedergegeben werden.
• CD-Rs/CD-RWs, zu denen eine Sitzung
hinzugefü gt werden kann, können
wiedergegeben werden.
* Dieser Vorgang ist notwendig, damit eine bespielte
CD-R/CD-RW auf einem Audio-CD-Player
abgespielt werden kann.
MP3-Dateien
MP3 (MPEG 1 Audio Layer 3) ist eine
Standardtechnologie und ein Standardformat zum
Komprimieren von Audiodaten. Dabei wird die
Datei auf etwa 1/10 ihrer ursprünglichen Größe
komprimiert. Töne, die für das menschliche Ohr
nicht hörbar sind, werden unterdrückt, während
Töne, die für das menschliche Ohr hörbar sind,
aufgezeichnet werden.
Hinweise zu CDs
Auf CD-ROMs, CD-Rs und CD-RWs
aufgezeichnete MP3-Dateien können
wiedergegeben werden.
Die CD muss im Form at ISO 9660*
oder Stufe 2, oder im erweiterten Joliet- bzw.
Romeo-Format vorliegen.
Auch Multi-Session*
2
-CDs können verwend et
werden.
1
*
Format ISO 9660
Ein international gängiger Standard für das
logische Format von Dateien und Ordnern auf
einer CD-ROM.
Es gibt verschiedene Stufen dieser Spezifikation.
Auf Stufe 1 müssen Dateinamen das Format 8.3
(maximal 8 Zeiche n im D ateina men , maxima l 3
Zeichen in der Erweiterung „.MP3“) aufweisen
und dürfen nur aus Großbuchstaben bestehen.
Ordnernamen dürfen maximal 8 Zeichen lang
sein. Es sind maximal 8 verschachtelte
Ordnerebenen zulässig. Die Stufe 2 der
Spezifikatio n unte rstüt zt Da teina men mit b is zu
31 Zeichen.
Für jeden Ordner sind bis zu 8 Hierarchieebenen
zulässig.
Im erweiterten Jo liet- bzw. Romeo-Format
stellen Sie sicher, dass Sie die richtige
Schreibsoftware usw. verwenden.
*2Multi-Session
Bei diesem Aufnahmeverfahren können
Daten mithilfe des T rack-At-Once-Verfahrens
hinzugefügt werden. Herkömmliche CDs
beginnen mit einem CD-Steuerungsbereich,
der als Lead-In bezeichnet wird, und enden
mit einem als Lead-Out bezeichneten
Bereich. Eine Multi-Session-CD weist
mehrere Sitzungen auf, wobei jedes Segment
zwischen Lead-I n und Lead-Out als einze l ne
Sitzung (Sessi on) betrachtet w i rd .
CD-Extra: Bei diesem Format werden
Audiodaten (Audio-CD-Daten) al s Spur in
Sitzung 1 und andere Daten als Spur in
Sitzung 2 aufgezeichnet.
Misch-CD: Bei diesem Format werden Daten
als Spur 1 und Audiodaten (Audio-CDDaten) als Spur 2 aufgezeichnet.
Fortsetzung auf der nächsten Seite t
1
, Stufe 1
7
Page 48

Hinweise
)
• Bei anderen Formaten als ISO 9660, Stufe 1 und 2,
werden Ordner- und Dateinamen möglicherweise
nicht korrekt angezeigt.
• Fügen Sie beim Benennen unbedingt die
Dateierweiterung „.M P3 “ zum Date i nam en hinzu.
• Wenn eine andere als eine MP3-Datei die
Erweiterung „.MP3“ hat, kann das Gerät die Datei
nicht richtig erkennen und erzeugt Störgeräusche,
die die Lautsprecher beschädigen könnten.
• Bei folgenden CDs dauert es länger, bis die
Wiedergabe beginnt:
– CDs mit einer komplizierten Datei-/Ordnerstruktur.
– Multi-Session-CDs.
– CDs, zu denen noch Daten hinzugefüg t werden
können.
Vorsicht bei der Wiedergabe einer Multi-SessionCD
• Wenn es sich beim ersten Titel der ersten S itzung
um Audio-CD-Daten handelt:
Nur Audio-CD-Daten werden wiedergegeben.
Andere Informationen als Audio-CD-Daten/MP3Dateien (Titelnummer, Zeit usw.) werden ohne Ton
angezeigt.
• Wenn es sich beim ersten Titel der ersten S itzung
nicht um Audio-CD-Daten handelt:
– Wenn die CD MP3-Dateien enthält, werden nur die
MP3-Dateien wiedergegeben und alle anderen
Daten werden übersprungen. Audio-CD-Daten
werden nicht erkannt.
– Wenn die CD keine MP3-Dateien enthält, wird „NO
Music“ angezeigt und es wird nichts
wiedergegeben. Audio-CD-Daten werden nicht
erkannt.
Die Wiedergabereihenfolge von MP3Dateien
Die Ordner und Dateien werden in folgender
Reihenfolge w i edergegeben:
Ordner (Album
1
1
MP3-Datei (Titel)
2
2
3
3
4
5
6
6
7
5
4
7
8
8
9
Ebene 1
(Stamm)
Hinweise
• Ein Ordner, der keine MP3-Datei enthält, wird
übersprungen.
• Höchstzahl an Ordnern: 150 (eins chli eßl ich
Stammordner und leer er Ord ne r).
• Höchstzahl an MP3-Dateien und Ordnern, die auf
einer CD enthalten sein können: 300.
Wenn ein Datei-/Ordnername viele Zeichen enthält,
ist die maximale Anzahl möglicherweise geringer als
300.
• Höchstzahl an Ebenen, die wiedergege ben werd en
können: 8.
Tipp
Wenn Sie eine bestimmte Wiedergabereihenfolge
festlegen wollen, geben Sie vor dem Ordner- oder
Dateinamen die entsprechende Nummer ein (z . B.
„01“, „02“) und zeichnen Sie die Daten dann auf einer
CD auf. Die Reihenfolge hängt von der
Schreibsoftware ab.
Ebene 2
Ebene 3
Ebene 4
Ebene 5
8
Page 49

Die allgemeinen Hauptmenüs
1
Rufen Sie mit (MENU) die allgemeinen Hauptmenüs auf und wählen Sie da nn die gewünschte
Menükategorie. I m ei nem so ausgewählten allg em einen Untermen ü können Sie verschiedene
Einstellungen ausw ählen. Um eine Einstellung auszuwählen, drücken Sie (ENTER). Um zum
vorherigen Menü zu rückzuschalten , drücken Sie (BACK). Wenn Sie den Einstellvorgang abschließen
und wieder zur normalen Anzeige zurückschalten wollen, drück en Sie (MENU).
Die allgemeinen Hauptmenüs
+
DISC
SOURCE
DISC
+
SEEK
–
2
Allgemeines Untermenü
+
DISC
SOURCE
DISC
+
SEEK
–
SEEK
–
SEEK
–
Symbole und Einstellmöglichkeiten
Setup
Grundlegende Einstel lu nge n
Display
Einstellungen für das Display
PlayMode
Einstellungen für Wiedergabe und Radioempfang
SoundTuning
Präzise Einstellung en für die Tonqualität
Edit
Zeicheneingabe
+
DISC
SOURCE
DISC
+
SEEK
–
SEEK
–
a Ausgewählte Menükatego rie
Beispiel: Setup
b Ausgewählte Option und Einstellung
Beispiel: Beep ON
Hinweis
Wenn Sie von 1 nach 2 wechseln wollen, drücken
Sie (ENTER).
c Ausgewählte Option und Einstellung
Beispiel: Contrast L evel 2
d Der Kontast ändert sich, wenn Sie die
Einstellung ändern.
Hinweis
Je nach aktueller Tonquelle werden unterschiedliche
Optionen angezeigt.
9
Page 50

Vorbereitungen
Zurücksetzen des Geräts
Bevor Sie das Gerät zum ersten Mal benutzen
oder wenn Sie die Autobatterie ausget auscht
haben oder die V erbindungen wechseln, müssen
Sie das Gerät zurücksetzen.
Drücken Sie die Rücksetztast e mit einem spitz en
Gegenstand wie z. B. einem Kugelschreiber.
Sobald das Zurücksetzen ausgefü hrt wurde,
werden werksei t ig im Gerät gespeicherte Bilder
angezeig t . Dr ücken Sie (IMAGE) auf der
Kartenfernbedienung, um die Uhrzeitanzeige
aufzurufen und die Uh rzeit sowie das Datum
einzustellen.
Rücksetztaste
Hinweis
Wenn Sie die Rücksetztaste drücken, werden die
Uhrzeit- und Datumseinstellungen sowie einige
weitere gespeicherte Einstellungen gelöscht.
Einstellen von Uhrzeit und
Datum
Die Uhr zeigt die Uhrzeit im 24-Stunden-Format
(Tag/Monat/Jahr Uhrzeit) digital an.
Werkseitig ist „01/01/2003 01:00“ eingestellt.
1 Drücken Sie (MENU).
2 Drücken Sie mehrmals < oder , und
wählen Sie „Setup“ aus.
3 Drücken Sie (ENTER).
4 Drücken Sie mehrmals M oder m und
wählen Sie „Clock“ aus.
5 Drücken Sie (ENTER).
1Drücken Sie mehrmals M oder m,
um den Wochentag einzustellen.
Mit jedem Tastendruck auf M erhöht sich
die Ziffer für den Wochentag.
Mit jedem Tastendruck auf m verringert
sich die Ziffer für den Wochentag.
2Wechseln Sie mit , zur
Monatsangabe und drücken Sie
dann mehrmals M oder m, um den
Monat einzustellen.
Wenn Sie < drücken, schalten Sie um
eine Stelle nach links.
3Stellen Sie wie in Schritt 2
beschrieben das Jahr, die Stunden
und die Minuten ein.
6 Drücken Sie (ENTER).
Die Einstellunge n für Uhrzeit und Da tu m
werden gespeichert und im Display er scheint
wieder die normal e A nzeige.
Hinweis
Wenn Ihr Fahrzeug nicht über ein Zündschloss mit
Zubehörposition ACC oder I verfügt, müssen Sie
dieses Gerät einschalten, bevor Sie Uhrzeit und
Datum einstellen können.
Tipp
Als Jahr können Sie einen Wert zwischen 2000 und
2099 einstellen.
10
Page 51

CD-Player
CD/MD-Gerät (gesondert
erhältlich)
Sie können mit diesem Gerät nicht nur CDs
wiedergeben, sond er n auch externe CD/MD Geräte steuern.
Hinweis
Wenn Si e ein ge so ndert erhä lt lic hes CD -Ger ät mi t CD
TEXT-Funktion anschließen, erscheinen bei der
Wiedergabe einer CD mit CD TEXT die CD TEXTInformationen im Display.
: Vorgehen mit diesem Gerät
: Vorgehen mit der Kartenfernbedienung
Wiedergeben einer CD
(Mit diesem Gerät)
Öffnen Sie mit Z die Frontplatte und
legen Sie eine CD mit der
beschrifteten Seite nach oben ein .
Überspring en von
Titeln
– Automatischer
den Hebel
. > nach
unten/oben
[pro Titel einmal]
Musiksensor
Vorwärts-/
Rückwärtssuchen
– Manuelle Suche
den Hebel
. > nach
unten/oben [bis zur
gewünsc hten Stel le gedrüc kt
halten]
Überspring en von
Alben*
– Albumauswahl
Funktion Dr ücken Sie
Stoppen der
(SHIFT) und dann den
Hebel
. > nach unten/
oben [pro Album einmal]
(OFF)
Wiedergabe
Überspring en von
Titeln
</,
[pro Titel einmal]
– Automatischer
Musiksensor
Vorwärts-/
Rückwärtssuchen
– Manuelle Suche
Überspring en von
CDs/MDs
– CD/MD-Auswahl
Überspring en von
Alben*
</,
[bis zur gewünschten Stel le
gedrückt halten]
M/m
[pro CD/MD einmal
drücken]
M/m
[pro Album einmal]
– Albumauswahl
Die Frontplatte schließt sich und die
Wiedergabe beginnt automatisch.
Wenn bereits eine CD eingelegt ist, drücken Sie
(SOURCE) so oft, bis „ (CD-Symbol)“ oder
„CD“ im Display erscheint. Die Wiedergabe
beginnt.
Hinweis
Ein Warnton wird ausgegeben und dann schließt sich
die Frontplatte automatisch.
Funktion Drücken Sie
Stoppen der
(OFF)
Wiedergabe
Auswerfen der CD Z
* Nur bei Wiedergabe einer MP3-Datei.
Hinweise
• Wenn Sie Z drücken, wird die CD mit einigen
Sekunden Verzögerung ausgeworfen, da zunächst
die Daten auf der CD eingelesen werden.
• Wenn Sie mit Z an der Frontplatte die CD auswerfen
lassen und dann nicht aus dem Einschub nehmen,
wird eine Funktion zum Schutz der CD aktiviert.
Diese Funktion bewirkt, dass die CD 15 Sekunden,
nachdem sie ausgeworfen wurde, wieder in den
Einschub eingezogen wird.
• Drücken Sie nicht zu fest auf die Frontplatte,
besonders wenn diese geöffnet ist. Andernfalls kann
es zu einer Fehlfunktion kommen.
• Je nach dem für die CD verwendeten
Aufzeichnungsverfahren kann es eine Minute oder
länger dauern, bis die Wiedergabe des ersten Titels
beginnt.
• Je nach dem Zustand der CD ist die Wiedergabe
eventuell nicht möglich (Seite 6, 7).
• Wenn Sie während der Wiedergabe des ersten/
letzten Titels auf einer CD m oder M drücken, wird
die Wiedergabe beim letzten/ersten Titel auf der CD
fortgesetzt.
Fortsetzung auf der nächsten Seite t
11
Page 52

• Wenn der letzte Titel auf der CD abgespielt wurde,
startet die Wiedergabe wieder mit dem ersten Titel
der CD.
• Wenn ein gesondert erhältliches Gerät
angeschlossen ist, wird die Wiedergabe derselben
Tonquelle auf dem gesondert erhältlichen CD/MDGerät fortgesetzt.
(Mit einem gesondert erhältlichen
Gerät)
1 Drücken Sie (SOURCE) so oft, bis „
(CD-Symbol)“ bzw. „CD“, „ (MDSymbol)“ bzw. „MD“ oder „MS*“
erscheint.
2 Drücken Sie (MODE) so oft, bis das
gewünschte Gerät angezeigt wird.
Die Wiedergabe beginnt.
* MS: MG Memory Stick System-up-Player MGS-X1.
Ansteuern eines Titels und einer CD/
MD
Weitere Informationen finden Sie u nt er
„Ansteuern einer CD/MD anhand des Nam ens“
auf Seite 15.
Informationen im Display
W enn die CD/MD, das Album *1 bzw. der T itel
wechselt, wird der gespeicherte Name, falls
vorhanden, der neue n CD/MD, des ne uen Alb ums
bzw. des neuen T itels automatisch angezeigt.
W enn „AutoScroll“ auf „ON“ gesetzt ist, laufen
die Namen im Display durch ( Sei te30).
Standardmodus:
CD/MDSymbol
Gerätenummer*
CD/MD-/
Album-*
Titelnummer
Verstrichene
3
Spieldauer
MDLP-Anzeige*
LP2: LP2-Wiedergabe
1
/
LP4: LP4-Wiedergabe
CD/MD-Name*4/
Interpretenname/
Albumname
(Ordnername)*
Titelname (Dateiname)
12
Spektrumanalysator-/Panorama-/
Bildschirmschonermodus:
Tonquelle
CD/MD-/Album-*1/
Titelnummer
CD/MD-Name*
Albumname (Ordnername)*
Titelname (Dateiname)*
Verstrichene
Spieldauer
4
/Interpretenname/
1
/
1
Uhrzeitmodus
Tonquelle
*1 Nur bei Wiedergabe einer MP3-Datei.
*2 Steht nur zur Verfügung, wenn ein gesondert
erhältliches MD-Gerät mit MDLP-Funktion
angeschlossen ist und eine MDLP wiedergegeben
wird.
*3 Nur verfügbar, wenn mindestens zwei gesondert
erhältliche CD/MD-Geräte angeschlossen sind.
*4 Wenn eine CD über dieses Gerät mit der CUSTOM
FILE-Funktion benannt wurde, wird das Disc
Memo angezeigt.
Hinweise
• Einige Zeichen können nicht angezeigt werden.
• Bei einigen CDs mit außergewöhnlich langem CD
TEXT werden einige Informationen möglicherweise
nicht angezeigt oder laufen nicht im Display durch.
• Mit diesem Gerät kann der Name des Interpreten
2
1
/
nicht einzeln für jeden Titel einer CD mit CD TEXT
angezeigt werden.
Hinweise zu MP3
• Bei der Wiedergabe einer MP3-Datei mit ID3-Tag
wird das ID3-Tag (Interpretenname/Albumname/
Titelname) angezeigt.
• ID3-Tags gelten nur in Version 1.
• Die ID3-Tag-Zeichencodes entsprechen den ASCII-
und ISO 8859-1-Standards. Bei CDs im JolietFormat können Zeichen nur im ASCII-Format
angezeigt werden. Inkompatible Zeichen werden als
„*“ angezeigt.
• Die verstrichene Spieldauer wird in den folgenden
Fällen möglicherweise nicht korrekt angezeigt.
– Eine MP3-Datei mit variabler Bitrate wird
wiedergegeben.
– Im Titel wird vorwärts oder rückwärts gesucht.
Tipp
Wenn die Funktion „AutoScroll“ auf „OFF“ gesetzt ist
und der Name der CD/MD, des Albums bzw. des Titels
wechselt, läuft der Name nicht im Display durch und
wird daher nicht ganz angezeigt.
CD/MD-/Album-*1/
Titelnummer
Uhrzeit
Verstrichene
Spieldauer
Page 53

Wiederholtes Wiedergeben
von Titeln
— Repeat Play
Sie haben folgende Mö gl i chkeiten:
REP
• — zum wied erho lte n W ie der ge ben d es
aktuellen Titels.
•*
der Titel im aktuellen Albu m.
•*
der Titel auf der aktuellen CD/MD.
*1 Nur bei Wiederga be einer MP3-Datei.
*2 Nur verfügbar, wenn mindestens ein gesondert
Wenn Sie wieder in den normalen
Wiedergabemodus schalten wol le n, drü cken Sie
(1) (REP) so oft, bis das Symbol im Display
ausgeblendet wird.
1
REP
REP
erhältliches CD/MD-Gerät angeschlossen ist.
— zum wiederholten Wiedergeben
2
— zum wiederholten Wiedergeben
Drücken Sie während der Wiedergabe
(1) (REP) so oft, bis die gewünschte
Einstellung im Display erscheint.
Repeat Play beginnt.
Wiedergeben von Titeln in
willkürlicher Reihenfolge
— Shuffle Play
Sie haben folgende Möglichkeiten:
SHUF
•*
aktuellen Album in willkürlicher Reihenfolge.
SHUF
• — zum Wiedergeben der Titel auf der
aktuellen CD in willkürlicher Reihenfolge.
SHUF
•*
aktuellen gesondert erhäl tlichen CD/MD-Gerät
in willkürlicher Reihenfolge.
SHUF All
•*
allen angeschlossenen CD/MD-Gerät en
(einschließlich dieses Geräts) in willkürlicher
Reihenfolge.
*1 Nur bei Wiedergabe einer MP3-Datei.
*2 Nur verfügbar, wenn mindestens ein gesondert
*3 Nur verfügbar, wenn mindestens ein gesondert
Wenn Sie wieder in den normalen
Wiedergabemodus schalten wollen, drücken Sie
(2) (SHUF) so oft, bi s das Symbol im Display
ausgeblendet wird.
Hinweis
Mit „ “ we rden nic ht Tite l v on CD- Ger äte n un d
MD-Geräten gemischt wiedergegeben.
1
— zum Wiedergeben der Titel im
2
— zum Wiedergeben der Titel im
3
— zum Wiedergeben aller Titel in
erhältliches CD/MD-Gerät angeschlossen ist.
erhältliches CD-Gerät bzw. mindestens zwei
gesondert erhältliche MD-Geräte angeschlossen
sind.
Drücken Sie während der Wiedergabe
(2) (SHUF) so oft, bis die gewünschte
Einstellung im Display erscheint.
Shuffle Play beginnt.
SHUF All
13
Page 54

Benennen einer CD
— Disc Memo (bei einem gesondert
erhältlichen CD-Gerät mit CUS TOM FILEFunktion)
Sie können für jede CD ein en individuellen
Namen speichern (Disc Memo). Sie können pro
CD bis zu 8 Zeichen eing eben. Wenn Sie einen
Namen für ei ne CD ei ngeb en, könne n Sie die CD
anhand des Nam ens ansteuern (Seit e 15).
Beim Anzeigen von Informationen hat das Disc
Memo immer Priorität vor einer ursprünglichen
CD TEXT-Information.
Achtung
Ver wenden Sie die CUSTOM FILE-Fu nktion
nicht beim Fahren und führen Sie auch keine
anderen Funktionen aus, die Sie vom
Straßenverkehr ablenken könnten.
3Wiederholen Sie Schritt 1 und 2,
bis Sie den ganzen Namen
eingegeben haben.
8 Drücken Sie (ENTER).
Im Display erscheint wieder das Ha upt menü.
9 Drücken Sie (MENU).
Im Display erscheint wieder die nor m ale
Anzeige.
Tipps
• Wenn Sie einen Namen korrigieren oder löschen
wollen, überschreiben Sie ihn einfach bzw. geben
Leerzeichen ein.
• Sie können CDs in einem Gerät ohne CUSTOM
FILE-Funktion benennen, wenn dieses in
Kombination mit einem CD-Gerät angeschlossen ist,
das über diese Funktion verfügt. Das Disc Memo
wird in diesem Fall in dem CD-Gerät mit CUSTOM
FILE-Funktion gespeichert.
Hinweis
Repeat bzw. Shuffle Play wird unterbrochen, bis das
Bearbeiten des Namens abgeschlossen ist.
1 Starten Sie die Wiedergabe der CD, die
Sie benennen wollen.
2 Drücken Sie (MENU).
3 Drücken Sie mehrmals < oder , und
wählen Sie „Edit“ aus.
4 Drücken Sie (ENTER).
5 Wählen Sie mit M oder m die Optio n
„Name Edit“.
6 Drücken Sie (ENTER).
7 Geben Sie die Zeichen für den Namen
ein.
1
1 Drücken Sie mehrmals M*
gewünschte Zeichen auszuwählen.
A
t
B t C ... t 0 t 1 t 2 ... t + t
–
t * ... t
*1 Die Zeichen erscheinen in umgekehrter
Reihenfolge, wenn Sie m drücken.
*2 Leerzeichen
2 Drücken Sie ,, wenn das
gewünschte Zeichen angezeigt wird.
*2 t
, um das
A
Löschen des Disc Memo
1 Drücken Sie mehrmals (SOURCE) und
wählen Si e „CD“ aus.
2 Drücken Sie mehrmals (MODE), um
das CD-Gerät mit CUSTOM FILEFunktion auszuwählen.
3 Drücken Sie (MENU).
4 Drücken Sie mehrmals < oder , und
wählen Sie „Edit“ aus.
5 Drücken Sie (ENTER).
6 Wählen Sie mit M oder m die Option
„Name Del“.
7 Drücken Sie (ENTER).
Die gespeicherte n N am en werden angezeigt.
8 Drücken Sie mehrmals M oder m und
wählen Sie den zu löschenden Namen
aus.
9 Drücken Sie 2 Sekunden lang (ENTER).
Der Name wird gelöscht.
Gehen Sie wie in Schritt 8 und 9 erläutert vor,
wenn Sie weitere Namen löschen wollen.
10
Drücken Sie (MENU).
Im Display erscheint wieder die nor m ale
Anzeige.
14
Wenn Sie < drücken, scha lt en Sie eine
Stelle nach links.
Page 55

Hinweise
• Wenn das Disc Memo einer CD mit CD TEXT
gelöscht wird, werden wieder die ursprünglichen CD
TEXT-Information en angezeigt.
• Wenn Sie das zu löschende Disc Memo nicht finden
können, wählen Sie in Schritt 2 ein anderes CDGerät aus und versuchen es damit.
Tipps
• Wenn Sie Schritt 7 ausführen und kein Disc Memo
vorhanden ist, erscheint im Display automatisch
wieder die normale Anzeige.
• Wenn Sie in Schritt 9 alle Disc Memos löschen,
erscheint im Display automatisch wieder die
normale Anzeige.
Ansteuern einer CD/MD
anhand des Namens
— List-up
(Mit einem gesondert erhältlichen CD-Gerät
mit CD TEXT/CUSTOM FILE-Funktion oder
einem MD-Gerät)
Sie können diese Fun k t i on bei CDs/MDs
benutzen, für die Si e ei nen Namen eingegeben
1
haben*
, oder bei CDs mit CD TEXT*2.
1 Drücken Sie (LIST).
Der Name der CD/MD erscheint im Display.
2 Drücken Sie mehrmals M oder m und
wählen Sie die gewünschte CD/MD
aus.
3 Drücken Sie (ENTER).
*1 Ansteuern einer CD/MD anhand des
eingegebenen Namens: wenn ein Name für eine
CD (Seite 14) bzw. eine MD gespeichert wurde.
*2 Ansteuern von CDs anhand der CD TEXT-
Informationen: wenn Sie eine CD mit CD TEXT auf
einem CD-Gerät mit CD TEXT-Funktion
wiedergeben.
Hinweis
Bei CDs mit CD TEXT und bei MDs können manche
Buchstaben nicht angezeigt werden.
Tipp
Um den Auswahlvorgang zu beenden und zur
normalen Anzeige zurückzuschalten, drücken Sie
(LIST).
Radio
Für jeden Frequenzbereich (FM1, FM2, FM3, MW
und LW) können Sie bis zu 6 Sender speichern.
Achtung
Wenn Sie während der Fahrt Sender einstellen,
sollten Sie die BTM-Funktion verwenden.
Andernfalls besteht Unfallg efahr.
Automatisches Speichern
von Radiosendern
— Best Tuning Memory (BTM)
Das Gerät wählt im ausgewählten
Frequenzbere ich die Sender mit den st ärksten
Signalen aus un d s p ei chert diese in der
Reihenfolge ihrer Frequenzen.
1 Drücken Sie (SOURCE) so oft, bis
„ (Tuner -Symbol)“ oder der
Frequenzbereich erscheint.
2 Drücken Sie mehrmals (MODE), um
den Frequenzbereich auszuwählen.
3 Drücken Sie (MENU).
4 Drücken Sie mehrmals < oder , und
wählen Sie „Edit“ aus.
5 Drücken Sie (ENTER).
6 Drücken Sie mehrmals M oder m und
wählen Sie „BTM“ aus.
7 Drücken Sie (ENTER).
Die Sender mit den stärksten Signalen
innerhalb des gewählten Frequenzbere ic hs
werden ausgewählt und in der Reihenfolge
ihrer Frequenzen gespeich ert. Um den
Speichervorgang abzubrechen, drücken Sie
(ENTER), während die Sender gespeichert
werden.
8 Drücken Sie (MENU).
Im Display erscheint wieder die normale An zeige.
Hinweise
• Wenn aufgrund schwacher Signale nur wenige
Sender in guter Qualität zu empfangen sind, bleiben
unter einigen Speichernummern die vorher
gespeicherten Sender erhalten.
• Wird im Display eine Speichernummer angezeigt,
beginnt das Gerät beim Speichern von Sendern mit
der angezeigten Nummer.
15
Page 56

Informationen im Display
Radi
Standardmodus:
TunerSymbol
Spektrumanalysator-/Panorama-/
Bildschirmschonermodus:
Radiofrequenzbereich
Uhrzeitmodus:
Radiofrequenzbereich
Speichernummer
ofrequenzbereich
Speichernummer
Frequenz
Frequenz
Speichernummer
Uhrzeit
Frequenz
Einstellen gespeicherter
Sender
1 Drücken Sie mehrmals (SOURCE), um
das Radio auszuwählen.
2 Drücken Sie mehrmals (MODE), um
den Frequenzbereich auszuwählen.
3 Drücken Sie die Stationstaste ((1) bis
(6)), auf der der gewünschte Sender
gespeichert ist.
Tipp
Drücken Sie M oder m, um die Send er in der
gespeicherten Reihenfolge zu empfangen
(Senderspeichersuchfunktion).
Wenn das Einstellen gespeicherter
Sender nicht funktioniert
— Automatischer Sendersuchlauf
Drücken Sie < (SEEK –) oder ,
(SEEK +), um den Sender zu s uc hen
(automatischer Sendersuchlauf).
Der Suchlauf stoppt, w enn ein Sender
empfange n w i rd . Wiederholen Sie diesen
Vorgang, bis das Gerät den gewünschten
Sender empfängt .
Tipps
• Wenn der automatische Sendersuchlauf zu oft
stoppt, aktivieren Sie den lokalen Suchmodus, so
dass die Suche auf Sender mit stärkeren Signalen
beschränkt wird (siehe „Wechseln der Klang- und
Anzeigeeinstellungen“ auf Seite 30).
• Wenn Sie die Frequenz des gewünschten Senders
kennen, halten Sie < oder , gedrückt, bis die
Frequenz annähernd erreicht ist, und drücken Sie
< oder , dann so oft, bis die gewünschte
Frequenz genau eingestellt ist (manuelle
Sendersuche).
16
Bei schlechtem UKW-Ste reoe mpfa ng
Wählen Sie den monauralen
Empfangsmodus
Weitere Informationen finden Sie u nt er
„Wechseln der Klang- und
Anzeigeeinstellungen“ auf Seite 30.
Die Tonqualität wird dadurch besser, der Ton
wird zugleich aber monaural (die Anze ige
„STEREO“ wird ausgeblendet).
Tipp
Wenn ein UKW-Sender schlecht zu hören ist, setzen
Sie „DSO“ auf „OFF“ (Seite 31).
Page 57

Speichern bestimmter
Radiosender
Sie können die gewünschten Sender manuell
unter einer beliebigen Stationstaste speichern.
1 Drücken Sie mehrmals (SOURCE), um
das Radio auszuwählen.
2 Drücken Sie mehrmals (MODE), um
den Frequenzbereich auszuwählen.
3 Drücken Sie < (SEEK –) oder ,
(SEEK +), um den Sender einzustellen,
den Sie speichern wollen.
4 Drücken Sie 2 Sekunden lang die
gewünschte Stationstaste ((1) bis
(6)), bis „Memory“ erscheint.
Die Nummer der Stationstaste, die Sie
gedrückt haben, w ir d angezeigt und dann
wird der einges t ellte Sender unter di eser
Nummer gespeichert.
Hinweis
Wenn Sie unter der gleichen Speichernummer einen
anderen Sender speichern, wird der zuvor
gespeicherte Sender gelöscht.
Einstellen eines Senders
anhand einer Liste
— List-up
1 Drücken Sie während des
Radioempfangs kurz (LIST).
Die Frequenz oder der Name des aktuell en
Senders erschein t i m D i spl ay.
2 Drücken Sie mehrmals M oder m und
wählen Sie den gewünschten Sender
aus.
Wenn für den Sender kein Name angegeben
ist, erscheint die Frequenz im Display.
3 Stellen Sie mit (ENTER) den
gewünschten Sender ein.
Nach Abschluss des Einstellvorgangs
erscheint im Display wieder die normale
Anzeige.
Tipp
Um den Auswahlvorgang zu beenden und zur
normalen Anzeige zurückzuschalten, drücken Sie
(LIST).
17
Page 58

RDS
Übersicht über RDS
UKW-Sender, die RDS (Radio Data System)
unterstützen, stra hl en zusammen mit den
normalen Radioprogrammsignalen nicht hörbare,
digitale Informationen aus. Beim Empfang eines
RDS-Senders könn en beispielsweise folgende
Informatio nen angezeigt werden.
Standardmodus:
Radiofreque
Radiofrequenzbereich
Frequenz/
Sendername
Speichernummer
Speichernummer
Frequenz/
Sendername
TunerSymbol
Spektrumanalysator-/Panorama-/
Bildschirmschonermodus:
RDS-Funktionen
Mit RDS-Daten stehe n I hnen weitere nützliche
Funktionen zur Verfügung, z. B.:
• Automatisches Neueinstellen eines
Senders, was vor allem bei langen Fahrten
über große Entfernungen hinweg hilfreic h i st .
— AF t Seite 19
• Empfangen von Ver kehrsdurchsagen, auch
wenn Sie einen an deren Sender oder ei ne
andere Tonquelle eingestellt haben.
— TA t Seite 20
• Auswählen eines Senders nach
Programmtyp. — PTY t Seite 21
• Automatisches Einstellen der Uhrzeit. — CT
t Seite 2 2
Hinweise
• Je nach Land oder Region stehen nicht alle RDSFunktionen zur Verfügung.
• Die RDS-Funktion arbeitet möglicherweise nicht
korrekt, wenn die Sendesignale zu schwach sind
oder wenn der eingestellte Sender keine RDS-Daten
ausstrahlt.
Uhrzeitmodus:
18
Radiofreque
Speichernummer
Uhrzeit
Frequenz/
Sendername
Page 59

Automatisches Neueinstellen
von Sendern für optimale
Empfangsqualität
— AF-Funktion
Mit der AF-Funktion (Alternative Freq uencies)
wird für den Sende r, den Sie ger ade hören,
automatisch die F requenz mit den stärks t en
Sendesignalen eingestellt.
Die Frequenzen werden also automatisch
gewechselt.
Unveränderter Empfang eines
Regionalsenders
Wenn die AF-Funktion aktiviert ist: Der
Empfang diese s G eräts wird werkseitig auf eine
bestimmte Region beschränkt, so dass nicht zu
einem anderen Regionalsender mit einer
stärkeren Frequenz gewechselt wird .
Wenn Sie den Empfangsbereich eines
Regionalprogra m m s verlassen oder liebe r die
gesamte AF-Fun kt io n nutz e n wo ll en, wäh le n Sie
„Regional OFF“ aus dem Menü (Seite 30).
Hinweis
Diese Funktion steht in Großbritannien und in einigen
anderen Regionen nicht zur Verfügung.
98,5 MHz
Sender
96,0 MHz
102,5 MHz
1 Wählen Sie einen UKW-Sender aus
(Seite 15).
2 Drücken Sie (AF) so oft, bis „ “
erscheint.
Das Gerät beginnt, im selben Netzwerk nach
einer Alternativfrequenz mit stärkeren
Signalen zu suchen.
Wenn „NO AF“ erscheint, gibt es für den
gerade eingestellten Sender keine
Alternativfrequenz.
Hinweis
Wenn im Sendebereich keine Alternativfrequenzen
vorhanden sind oder Sie nicht nach einem
Alternativsender zu suchen brauchen, schalten Sie
die AF-Funktion aus.
Bei Sendern ohne
Alternativfrequenzen
Drücken Sie < oder ,, während der
Sendername blinkt (innerhalb von
8 Sekunden).
Das Gerät beginnt dann mit der Suche nach
einer Frequen z mit dens elbe n PI- (Progr amme
Identification) Daten („PI Seek“ wird
angezeigt).
Wenn das Gerät keine Frequenz mit
denselben PI-Daten fin den kann , wech selt da s
Gerät wieder zur zuvor eingestellt en
Frequenz.
A F
Lokalsenderfunktion (nur
Großbritannien)
Mithilfe dieser Fu nktion können Sie andere
Lokalsender a uswählen, auch wenn diese zuvor
nicht unter ein e r S ta tionstaste gespeichert
wurden.
1 Drücken Sie eine der Stationstasten
((1) bis (6)), auf der ein Lokalsender
gespeichert ist.
2 Drücken Sie innerhalb von 5 Sekunden
erneut die Stationstaste des
Lokalsenders.
3 Wiederholen Sie diesen Vorgang, bis
das Gerät den gewünschten
Lokalsender empfängt.
19
Page 60

Empfangen von
Verkehrsdurchsagen
— TA/TP
W enn Sie die TA- (Traffic Announcem ent Verkehrsdurchsagen) und die TP-Funktion
(Traffic Programme - Verkehrsfunk) aktivieren,
können Sie automatisch einen UKW-Sender
einstellen, der Verkehrsdurchsagen ausstrahlt.
Dabei ist es unerheblich, welches UKWProgramm bzw. welche Tonquelle (CD/MD/
AUX) Sie gerade hören. Das Gerät wechsel t nach
der Durchsage zurück zur v orherigen Tonquelle.
Drücken Sie (TA) so oft, bis „ “
erscheint.
Das Gerät beginnt, nach V erkehrsfunksendern
zu suchen.
„ “ zeigt an, dass Verkehrsfunksender
T P
empfangen werden. Das Gerät setzt die Suche
nach Verkehrsfunksendern fort, wenn kurz
„NO TP“ angezeigt wi rd.
Wenn Sie alle Verkeh rs durchsagen ausschalten
wollen, blenden Sie „ “ aus.
Funktion Drücken Sie
Ausschalten der
aktuellen
Verkehrsdurchsage
Tipps
• Eine laufende Verkehrsdurchsage können Sie auch
mit der Taste (SOURCE) oder (MODE) abbrechen.
• Sie können TA auch ein-/ausschalten, indem Sie
(MODE) am Gerät 2 Sekunden lang drücken.
Speichern der Lautstärke von
Verkehrsdurchsagen
Sie können die Lautstä rke für di e
V erkehrsdurchsagen voreinstellen, so dass Sie sie
nicht überhören.
1 Stellen Sie mit (VOL) den
gewünschten Lautstärkepegel ein.
2 Drücken Sie 2 Sekunden lang (TA).
„TA“ erscheint und di e Ei nstellung wird
gespeichert.
Empfangen von
Katastrophenwarnungen
Wenn die AF- oder die TA-Funktion aktiviert ist
und während des Empfangs eines UKW-Senders,
der Wiedergabe einer CD/MD oder der
Wiedergabe einer AUX-Tonquelle eine
Katastrophenwar nung ausgestrahlt wird,
wechselt das Gerät automatisch zur
20
Katastrophenwarnung.
T A
(TA)
T A
Speichern von RDS-Sendern
zusammen mit der AF- und
TA-Einstellung
W enn Sie RDS-Sende r speichern, speichert das
Gerät zusammen mit der Frequenz auch die AF-/
TA-Einstellung (ein/aus) für jeden Sender. Sie
können für die einz el nen gespeicherten Sender
unterschiedliche Einstellungen (AF, TA oder
beides) oder für alle gespeicherten Sender
dieselbe Einstellung wählen. Wenn Sie Sender
mit „ “ speichern, werden automatisch di e
A F
Sender mit den stärksten Radiosignalen
gespeichert.
Speichern derselben Einstellung für
alle gespeicherten Sender
1 Wählen Sie einen UKW-
Frequenzbereich (Seite 15).
2 Drücken Sie (AF) und/oder (TA), so
dass „ “ und/oder „ “
angezeigt wird.
Beachten Sie, dass das Deaktivieren von
„ “ und „ “ nicht nur für RDSSender, s ond ern a uch fü r N icht -RDS- Sen der g ilt.
3 Drücken Sie (MENU).
4 Wählen Sie mit < oder , die Option
„Edit“.
5 Drücken Sie (ENTER).
6 Wählen Sie mit M oder m die Option
„BTM“.
7 Drücken Sie (ENTER).
8 Drücken Sie (MENU).
Im Display erscheint wieder die nor male
Anzeige.
Speichern unterschiedlicher
Einstellungen für die einzelnen
gespeich erten Sender
1 Wählen Sie einen UKW-
Frequenzbereich aus und stellen Sie
den gewün s chten Sender ein
(Seite 17).
2 Drücken Sie (AF) und/oder (TA), so
dass „ “ und/oder „ “
angezeigt wird.
3 Drücken Sie die gewünschte
Stationstaste ((1) bis (6)), bis
„Memory“ erscheint.
Weitere Sender können Sie wie in den Schr itt en
oben erläuter t speichern.
A F T A
A F T A
A F T A
Page 61

Einstellen von Sendern nach
Programmtyp
— PTY
Sie können einen Sender einstellen, indem Si e
den Programmtyp auswählen, den Si e hören
möchten.
Programmtypen Anzeige
Nachrichten News
Aktuelles Zeitg eschehen Current Affairs
Informationen Information
Sport Sport
Erziehung und Bildung Education
Hörspiele Drama
Kultur Cultures
Wissenschaft Science
Verschiedenes Varied Speech
Pop-Musik Pop Music
Rock-Musik Rock Music
Unterhaltungsmusik E asy Listening
Leichte Klassik L ig ht C la ss ics M
Klassik Serious Cla ss i cs
Sonstige Musik Ot her Music
W e tter W eather & Metr
Finanzberichte Finance
Kinderprogram m e Children’s Progs
Magazinsendungen Social Affairs
Religion Religion
Hörertelefon Phone In
Reiseinformationen Travel & Touring
Freizeitprogramm Leisure & Hobby
Jazz Jazz Music
Country-Musik Country Music
Volksmusik National Music
Oldies Oldies Music
Folk-Musik Folk Music
Dokumentarbeiträge Documentary
1 Drücken Sie während des UKW-
Empfangs (PTY).
Der Name des aktuellen Programmtyps
erscheint, wenn de r Sender PTY-Daten
ausstrahlt.
„--------“ ersc he int, wenn der eingestellte
Sender kein RDS-Sender ist oder wenn keine
RDS-Daten empfan ge n w erden.
2 Drücken Sie mehrmals M oder m, um
den gewünschten Programmtyp
auszuwählen.
Die Programmt ypen erscheinen in der
Reihenfolge, die in der T abelle angegeben ist.
„--------“ wird angezeigt, wenn der
Programmtyp in de n RD S-Daten nicht
angegebe n w i rd.
3 Drücken Sie (ENTER).
Das Gerät beginnt, nac h ei nem Sender zu
suchen, der den a usgewählten Programmtyp
ausstrahlt.
Hinweis
Sie können diese Funktion in Ländern, in denen keine
PTY -Daten (Programme Type selection) zur Verfügung
stehen, nicht verwenden.
21
Page 62

Automatisches Einstellen der
Uhr
— CT
Mit den CT-Daten (Clock Time), die von RDSSendern ausgestrahlt werden , l ässt sich die Uhr
automatisch einstellen.
1 Drücken Sie (MENU).
2 Drücken Sie mehrmals < oder , und
wählen Sie „Setup“ aus.
3 Drücken Sie (ENTER).
4 Drücken Sie mehrmals M oder m und
wählen Sie „CT“ aus.
5 Drücken Sie (ENTER).
6 Drücken Sie M oder m, um „ON“
auszuwählen.
Die Uhr wird eingestellt.
7 Drücken Sie (ENTER).
Im Display erscheint wieder das Hauptmenü.
8 Drücken Sie (MENU).
Im Display ersc hei nt wieder die normale
Anzeige.
Wenn Sie die CT-Funktion deak t ivieren wollen,
wählen Sie in Schritt 6 „OFF“.
Hinweise
• Die CT-Funktion steht möglicherweise nicht zur
Verfügung, auch wenn ein RDS-Sender empfangen
wird.
• Die mit der CT-Funktion eingestellte Uhrzeit ist nicht
immer korrekt.
22
Page 63

Bildeinstellungen
Auswählen des Anzeigemodus und des Anzeigemusters
Sie können aus 5 verschiedenen Anzeigemodi auswählen. Im Standardmodus,
Spektrumanalysatormodus, Panoramamodus, Bildschirmschonermodus sowie im Uhrzeitmodus
können Sie außerdem verschiedene Anzeigemuster wählen .
Standardmodus
Verschiedene Infor m ationen wie Tonquelle, Titelnummer, verstrichene Spie ld auer, CD/MD-Name,
Titelname und Toneinstellungen werden angezeigt. Sie können ein Symbol der Tonquelle links im
Display und ein Spektrumanalysator m uster verkleinert in der M itte des Displays anzei gen lassen.
Spektrumanalysatormodus
Eine werkseitig im Gerät gespeicherte Spektr umanalysato reinstellung wird im gesamten Displa y angezeigt.
Panoramamodus
Werkseitig im Gerät gespeicherte Standbilder werden im gesamten Display angezeigt. Einige dieser
Bilder laufen automatisch durch.
Bildschirmschonermodus
Eine werkseitig im Gerät gespeicherte Animation wird wiedergegeben.
Fortsetzung auf der nächsten Seite t
23
Page 64

Uhrzeitmodus
Im Display ersc hei nen Informationen zur Wiedergabe bzw. zum Radioempfang sowie die Uhrzeit.
Mit der Kartenfernbedienung
REP
SHUF
1
2
3
4
5
GRAPHIC
SCREEN IMAGE
LIST
+
DISC
MENU
SOURCE
–
SEEK
SOUND
DISC
SEEK
–
EN
6
TER
SCREEN
IMAGE
+
1 Drücken Sie während der Wiedergabe
bzw. des Radioempfangs mehrmals
(SCREEN), um den Anzeigemodus
auszuwählen.
Mit jedem Tastendruck auf (SCREEN)
wechselt die Anzeige folgender m aßen:
Standardmodus t
Spektrumanalysatormodus t
Panoramamodus t
Bildschirmschonermodus t
Uhrzeitmodus* t Standardmodus
2 Drücken Sie mehrmals (IMAGE) und
wählen Sie das Anzeig emuster aus.
* Im Uhrzeitmodus können Sie keine Anzeigemuster
wählen.
Mit dem Gerät
SCREEN
SHIFT
SCREEN
SHIFT
Hebel
. >
1 Drücken Sie während der Wiedergabe
bzw. des Radioempfangs mehrmals
(SCREEN), um den Anz eigemodus
auszuwählen.
Mit jedem Tastendruck auf (SCREEN)
wechselt die Anzeige folgendermaßen:
Standardmodus t
Spektrumanalysatormodus t
Panoramamodus t
Bildschirmschonermodus t
Uhrzeitmodus* t Standardmodus
2 Drücken Sie den Hebel . > nach
unten oder oben, während „Image“
unten rechts im Display angezeig t
wird, um das Anzeigemuster
auszuwählen.
24
* Im Uhrzeitmodus können Sie keine Anzeigemuster
wählen.
Wenn Sie nur das Anzeigemuster we chseln
wollen, drücken Sie (SHIFT), bis das
gewünschte Bild unten rechts im Display
erscheint, und drücken Sie dann den Hebel
. > nach unten oder oben, bis das
gewünschte Bild ange zeigt wird. Wenn als
Tonquelle AUX eingestellt ist, brauchen Sie
(SHIFT) nicht zu drücken.
Page 65

Automatisches Ausble nden
von Zeichen im Display
— AutoClear (Spektrumanalysator-/
Panorama-/Bildschirmschonermodus)
Im Spektrumanalysator-, Panorama- und
Bildschirmscho ner modus können Sie die
Zeichen im Display zeitweilig ausblenden . Wenn
Sie diese Option auf ON setzen, werden Zeichen
im Display nur angezeigt, wenn die CD/MD, das
Album bzw. der Titel wechselt oder Sie eine
andere Tonquelle oder einen anderen
Anzeigemodu s ei nstellen. So können Sie die
Bilder im Display bes se r sehen.
1 Wählen Sie mit (SOURCE) eine
Tonquelle (Radio, CD, MD oder AUX)
aus.
2 Drücken Sie (GRAPHIC).
3 Drücken Sie mehrmals < oder ,, um
„AutoClear“ auszuwählen.
Mit jedem Tastendruck auf < oder ,
wechselt die Option folgenderm aßen:
AutoClear y BlendLevel y
Plaque y Color Sel y
AutoImage y AutoClear
4 Drücken Sie (ENTER).
Ändern der Transparenz der
Zeichen im Display
— BlendLevel (Spektrumanalysator-/
Panorama-/Bildschirmschonermodus)
Im Spektrumanalysator-, Panorama- und
Bildschirmschonermodus könn en Sie die
Transparenz (Farbdicht e) der Zeichen einste llen.
Je niedriger der eingestellte Wert, desto
transparenter erscheinen die Zeichen im Display.
1 Wählen Sie mit (SOURCE) eine
Tonquelle (Rad io, CD, MD ode r AUX)
aus.
2 Drücken Sie (GRAPHIC).
3 Drücken Sie mehrmals < oder , und
wählen Sie „BlendLevel“ aus.
Mit jedem Tastendruck auf < oder ,
wechselt die Option folgendermaßen:
AutoClear y BlendLevel y
Plaque y Color Sel y
AutoImage y Auto Clear
4 Drücken Sie (ENTER).
5 Drücken Sie (ENTER).
5 Drücken Sie (ENTER).
6 Drücken Sie M oder m, um „ON“
auszuwählen.
Zum Deaktivieren der Funktion AutoClear
wählen Sie „OFF“.
7 Drücken Sie (ENTER).
8 Drücken Sie (GRAPHIC).
Im Display erscheint wieder die normale
Anzeige.
Hinweis
Im Standard- bzw. Uhrzeitmodus lassen sich die
Zeichen im Display nicht automatisch ausblenden.
6 Wählen Sie mit < oder , den
Transparenzwert (Level 0-15) aus .
Je niedriger de r Wert, desto tr ansparenter
erscheinen die Zei chen im Display.
7 Drücken Sie (ENTER).
8 Drücken Sie (GRAPHIC).
Im Display ersc heint wieder die normale
Anzeige.
Hinweise
• Im Standard- und im U hrzeitmodus können Sie die
Transparenz der Zeichen im Display nicht einstellen.
• Wenn „Plaque“ auf „ON“ gesetzt ist, hat „BlendLevel“
unabhängig von der Einstellung keine Wirkung.
25
Page 66

Einstellen einer Maske
— Plaque
Wenn die Zeichen vor einem Hintergrund mit
ähnlicher Farbe schwer zu erkennen sind, können
Sie mithilfe einer M aske erreichen, dass di e
Zeichen besser zu lesen sind.
Einstellen der Zeichenfarbe
— Color Sel
Sie können eine von 7 Farb ei ns tellungen für die
Zeichen im Display auswählen. Außerdem
können Sie die gewünsc hte Farbe einstellen und
im Gerät speichern.
1 Wählen Sie mit (SOURCE) eine
Tonquelle (Radio, CD, MD oder AUX)
aus.
2 Drücken Sie (GRAPHIC).
3 Drücken Sie mehrmals < oder , und
wählen Sie „Plaque“ aus.
Mit jedem Tastendruck auf < oder ,
wechselt die Opt i on folgendermaß en:
AutoClear y BlendLevel y
Plaque y Color Sel y
AutoImage y AutoClear
4 Drücken Sie (ENTER).
5 Drücken Sie (ENTER).
6 Drücken Sie mehrmals M oder m und
wählen Sie „ON“ aus.
7 Drücken Sie (ENTER).
8 Drücken Sie (GRAPHIC).
Im Display ersc hei nt wieder die normale
Anzeige.
Hinweis
Wenn „Plaque“ auf „ON“ gesetzt ist, hat „BlendLevel“
keine Wirkung.
Auswählen der Zeichenfarbe
1 Wählen Sie mit (SOURCE) eine
T onquelle (Radio, CD, MD oder AUX)
aus.
2 Drücken Sie (GRAPHIC).
3 Drücken Sie mehrmals < oder ,, um
„Color Sel“ auszuwählen.
Mit jedem Tastendruck auf < oder ,
wechselt die Option folgendermaßen:
AutoClear y BlendLevel y
Plaque y Color Sel y
AutoImage y AutoClear
4 Drücken Sie (ENTER).
5 Drücken Sie (ENTER).
6 Drücken Sie mehrmals M oder m und
wählen Sie die gewünschte
Zeichenfarbe aus.
Mit jedem Tastendruck auf M oder m
wechselt die Zeichenfarbe folgendermaßen:
Blue y White y Green y Pink
y Yellow y Purple y Black y
Custom y
Blue
7 Drücken Sie (ENTER).
8 Drücken Sie (GRAPHIC).
Im Display erscheint wieder die nor male
Anzeige.
26
Page 67

Definieren einer Zeichenfarbe
1 Wählen Sie mit (SOURCE) eine
Tonquelle (Radio, CD, MD oder AUX)
aus.
2 Drücken Sie (GRAPHIC).
3 Drücken Sie mehrmals < oder , ,
um „Color Sel“ auszuwählen, und
drücken Sie dann (ENTER)
Mit jedem Tastendruck auf < oder ,
wechselt die Option folgenderm aßen:
AutoClear y BlendLevel y
Plaque y Color Sel y
AutoImage y AutoClear
4 Drücken Sie (ENTER).
5 Wählen Sie mit M oder m die Option
„Custom“ aus und drücken Sie
(ENTER).
6 Drücken Sie mehrmals M oder m und
wählen Sie den Einstellbalken für Red
(Rot), Green (Grün) oder Blue (Blau)
aus.
Mit jedem Tastendruck auf M oder m
wechselt die Option.
7 Stelle n Sie mit < oder , den
ausgewählten Farbanteil ein.
Stellen Sie wie in Schritt 7 und 8 erläutert die
übrigen Farbanteil e ei n, um di e gewünschte
Farbe zu definieren.
8 Drücken Sie (ENTER).
9 Wählen Sie mit M oder m die Option
„Save“ aus und drücken Sie (ENTER).
Wenn Sie wieder die vorherige Zeichenfa rbe
aufrufen möchten, wählen Sie „Cancel“ und
drücken (ENTER).
Wenn Sie die werkseitig eingeste llte
Zeichenfarbe aufrufen möchten, wählen Sie
„Reset“ und dr ücken (ENTER).
10
Drücken Sie (GRAPHIC).
Im Display erscheint wieder die normale
Anzeige.
Auswählen der Anzeigedauer
für die Bilder
— AutoImage
Die werkseitig im Gerät gespeicherten Bilder
werden automat is ch der Reihe nach angeze ig t.
Sie können festlegen, wie schnell die B ilder
gewechselt werden.
1 Wählen Sie mit (SOURCE) eine
Tonquelle (Rad io, CD, MD ode r AUX)
aus.
2 Drücken Sie (GRAPHIC).
3 Drücken Sie mehrmals < oder ,, um
„AutoImage“ auszuwählen.
Mit jedem Tastendruck auf < oder ,
wechselt die Option folgendermaßen:
AutoClear y BlendLevel y
Plaque y Color Sel y
AutoImage y Auto Clear
4 Drücken Sie (ENTER).
5 Drücken Sie (ENTER).
6 Drücken Sie mehrmals M oder m und
wählen Sie aus, wie schnell die Bilder
gewechselt werden.
Mit jedem Tastendruck auf M oder m
wechselt die Einstell ung folgendermaßen:
Middle y Fast y OFF y Slow y
Middle
Wenn Sie das automatische Wechseln der
Bilder deaktivieren möchten, wählen Sie
„OFF“.
7 Drücken Sie (ENTER).
8 Drücken Sie (GRAPHIC).
Im Display ersc heint wieder die normale
Anzeige.
27
Page 68

Weitere Funktionen
Sie können das Gerät sowie gesondert erhältliche
CD/MD-Geräte mit einem Joystick (gesondert
erhältlich) steuern.
Drehen des Reglers
Regler
SEEK/AMS
Der Joystick
Bringen Sie zunächst je nach der Montage des
Joystick s den entsprechenden Aufklebe r an.
Der Joystick wird üb er Tasten und/oder
Drehregler bedient.
SOUND
MODE
DSPL
Drücken der Tasten
(SOUND)
(SOURCE)
Stellen Sie durch Drehen des
Reglers VOL die Lautstärke ein.
Drücken Sie Funktion
(SOURCE) Wechseln der Tonquelle
(MODE) Wechseln des Modus
(ATT) Dämpfen des Tons
2
(OFF)*
(SOUND) Anzeigen der Klangmenüs
(DSPL) Auswählen des
Hinweis
Die Taste DSPL am Joystick fungiert für dieses Gerät
28
als Taste SCREEN.
DSPL
MODE
SOUND
(ATT)
(DSPL)
(Radio/CD/MD*
Einschalten
(Radiofrequenzbereich/CD-
1
Gerät*
/MD-Gerät*1)
Stoppen der Wiedergabe bzw.
des Radioempfangs/
Ausschalten
Anzeigemodus
(MODE)
1
/AUX)/
(OFF)
Wenn Sie den Regler drehen und
loslassen, können Sie :
– Titel überspringen.
Wenn Sie mehrere Titel hintereinander
überspringen wollen, drehen Sie den Regler
einmal und innerha lb von 2 Sekunden
nochmals und halte n ih n dann gedreht.
– Sender automatisch einstellen.
Wenn Sie den Regler drehen, halten und
loslassen, können Sie :
– in einem Titel vorwärts-/rückwärtssuc hen.
– einen Sender manuel l e instellen.
Drücken und Drehen des Reglers
Regler
PRESET/DISC
OFF
Wenn Sie den Regler gleichzeitig
drücken und drehen, können Sie:
– gespeicherte Sender einstellen.
– CDs/MDs während der CD/MDWiedergabe wechseln*
1
.
Während der Wiedergabe einer CD mit MP3Dateien
(Mit diesem Gerät)
Wenn Sie den Regler gleichzeitig
drücken und drehen, können Sie:
– Alben wechseln.
(Mit einem gesondert erhältlichen Gerät)
Wenn Sie den Regler drücken und
wiederholt rasch drehen, können Sie:
– CDs nacheinander wechseln.
Wenn Sie den Regler drücken, drehen
und kurz gedreht halten, können Sie:
– in den Modus zum Überspringen von Alben
wechseln. Wenn Sie mehrere Alben
überspringen möchten, drücken und drehen Sie
den Regler innerhalb von 2 Sekunden erneut.
*1 Nur wenn die entsprechenden gesondert
erhältlichen Geräte angeschlossen sind.
*2 Wenn Ihr Fahrzeug nicht über ein Zündschloss mit
Position ACC oder I verfügt, drücken Sie nach dem
Ausschalten der Zündung unbedingt (OFF) so
lange, bis die Anzeige ausgeblendet wird.
Page 69

Wechseln der Drehrichtung
Die Drehrichtung der Re gler ist we rkseiti g wie in
der folgenden Ab bi ld ung zu sehen eingestel l t.
Erhöhen
Verringern
W enn Sie den Joystick rechts von der Lenksäul e
anbringen, könne n Si e di e Drehrichtung der
Regler ände rn.
Halten Sie den Regler VOL gedrückt
und drücken Sie (SOUND) 2 Sekunden
lang.
Hinweis
Wenn Sie den Regler VOL gedrückt halten und dann
(SOUND) 2 Sekunden lang drücken, erscheint
„Normal“ oder „Reverse“ im Display.
– Wählen Sie „Normal“, wenn die werkseitig
eingestellte Drehrichtung der Regler beibehalten
werden soll.
– Wählen Sie „Reverse“, wenn Sie den Joystick auf
der rechten Seite der Lenksäule anbringen.
Einstellen der
Klangeigenschaften
Sie können die Bäss e, di e H öhen, die Balance,
den Fader und di e Lautstärk e des
Tiefsttonlautsprechers einstellen.
1 Wählen Sie mit (SOURCE) eine
Tonquelle (Rad io, CD, MD ode r AUX)
aus.
2 Drücken Sie (SOUND).
3 Drücken Sie mehrmals < oder ,, um
die Option auszuwählen, die Sie
einstellen wollen.
Mit jedem Tastendruck auf < oder ,
wechselt die Option folgendermaßen:
DSO y EQ7 y Bass y Treble
y Balance (links-rechts)
y Fader (vorne-hinten)
y SubWoofer (Lautstärke des
Tiefsttonlautsprechers)
4 Drücken Sie (ENTER).
5 Stellen Sie die ausgewählte Option mit
< oder , ein.
6 Drücken Sie (ENTER).
Schnelles Dämpfen des Tons
Drücken Sie (ATT).
„ATT“ erscheint kurz im Display.
Wenn Sie wieder die vorherige Lautstärke
einstellen wollen, dr ücken Sie erneut (ATT).
Tipp
Wenn das Schnittstellenkabel eines Autotelefons mit
der ATT-Leitung verbunden ist und ein Telefonanruf
eingeht, senkt das Gerät die Lautstärke automatisch
(Stummschaltfunktion zum T elefonieren).
29
Page 70

Wechseln der Klang- und
Anzeigeeinstellungen
— Menü
Sie können folgende O pt i onen einstellen:
Setup (Konfiguration)
• Clock (Uhr) (Seite 10)
• CT (Uhrzeit) (Seite 22)
• Beep — Dient zum Ein- oder Ausschalten des
Signaltons.
• AUX Skip*
— Dient zum Ein- bzw. Ausblenden der AUXTonquelle.
• Security (Sicherheit) (Seite 35) — Dient zum
Einstellen des Sicherheitscodes zum Schutz vor
Diebstahl.
Display
• Dimmer — Dient zum W ec hseln der Helligk eit
im Display .
– Mit „AUTO“ wird das Display nu r dunkler,
wenn Sie die Beleuchtung einschalten.
– Mit „ON“ wird das Display dunkler.
– Mit „OFF“ wird der Dimmer deaktiviert.
• Contrast (Kontrast) — Dient zum Einstellen
des Kontrasts, wenn die Anzeigen im Display
aufgrund der Mo nta gep os iti on des Gerä ts ni ch t
zu lesen sind.
• AutoScroll*
– Wenn Sie „ON“ wählen, laufen alle
angezeigten Namen automatisch im Display
durch.
– Wenn die Funktion „AutoScroll“ auf „O FF“
gesetzt ist und der Name der CD/MD bzw.
des Titels wechselt, läuft dieser Name nicht
im Display durch.
PlayMode (Wiedergabemodus)
• Local (lokaler Suchmodus) (Seite 16)
– Wählen Sie „ON“, wenn Sie nur Sender mit
starken Signalen einstellen wollen.
• Mono (monaur al er Modus) (Seite 16)
– Wenn Sie „ON“ wählen, werden UKW-
Stereosender monaural wiedergegeben. Mit
„OFF“ schalten Sie in den norma len Modus
zurück.
• Regional (Seite 19)
1
(AUX auslassen) (Seite 34)
2
SoundTuning (Toneinstellungen)
• EQ7 Tune (Seite31) — Dient zum Einstellen
der Equalizer-Kurve.
• HPF (Hochpassfilter) (Seite 32)
• LPF (Niedrigpassfilter) (Seite 33)
• Loudness — Für eine gute Klangqua l ität der
Bässe und Höhen auch bei geringer Lautstärke.
Dabei werden die Bässe und Höhen verstär kt .
• AUX Level*
Einstellen der Lautstärke zusätzlic h
angeschlossener Geräte.
*1 Wird nur angezeigt, wenn Sie die Uhrzeit anzeigen
lassen, indem Sie (OFF) drücken.
*2 Wird nur während der CD- und MD-Wiedergabe
angezeigt.
*3 Wird nur angezeigt, wenn die Tonquelle AUX
auswählt ist.
Hinweis
„AUX Skip“ und „AUX Level“ werden nur angezeigt,
wenn kein gesondert erhältliches CD/MD-Gerät
angeschlossen ist.
3
(Seite 34) — Dient zum
1 Drücken Sie (MENU).
Zum Einstellen von „AutoScroll“ drücken Sie
(MENU) währ end der CD- bzw. MDWiedergabe.
2 Drücken Sie mehrmals < oder , und
wählen Sie das gewünschte Menü aus.
3 Drücken Sie (ENTER).
4 Drücken Sie mehrmals M oder m, um
die Option auszuwählen, die
eingestellt werden soll.
5 Drücken Sie (ENTER).
6 Drücken Sie mehrmals M oder m, um
die gewünschte Einstellung
auszuwählen (Beispiel: „O N “ oder
„OFF“).
7 Drücken Sie (ENTER).
Im Display erscheint wieder das Ha uptmenü.
8 Drücken Sie (MENU).
Im Display erscheint wieder die nor male
Anzeige.
Hinweis
Je nach aktueller Tonquelle werden unterschiedliche
Optionen angezeigt.
30
Page 71

Einstellen der DSO-Funktion
(Dynamic Soundstage
Organizer)
W enn d ie La utsp recher im untere n Teil der Türen
installiert sind, kommt de r Ton von unten und ist
unter Umständen nicht von zufrieden stellender
Qualität.
Die DSO-Funktion (Dynamic Soundstage
Organizer) verbessert di e Raumklangwirkung
und erzeugt einen K l ang, als befänden si ch die
Lautsprecher über dem Armaturenbrett (v irtuel le
Lautsprecher).
Sie können die DSO-Ei nstellung für jede
Tonquelle getre nnt speichern.
DSO-Modus und Darstellung der virtue llen
Lautsprecher
*3
*2
*1
*4
*3
*2
*1
*4
Einstellen des Equalizers
(EQ7)
Sie können für 7 Musiktypen (Xplo d, Vocal,
Club, Jazz, New Age, R ock und Custom) ei ne
spezielle Equalizer-Kurve auswählen.
Sie können die Equa lizer-Einstellung für jede
Tonquelle getrennt einstellen.
Auswählen einer Equalizer-Kurve
1 Wählen Sie mit (SOURCE) eine
Tonquelle (Rad io, CD, MD ode r AUX)
aus.
2 Drücken Sie (SOUND).
3 Drücken Sie mehrmals < oder ,, um
„EQ7“ auszuwählen.
4 Drücken Sie (ENTER).
*1 DSO 1
*2 DSO 2
*3 DSO 3
*4 DSO OFF
1
Wählen Sie mit
(Radio, CD, MD oder AUX) aus.
(SOURCE)
eine Tonquelle
2 Drücken Sie (SOUND).
3 Drücken Sie mehrmals < oder ,, um
„DSO“ auszuwäh l en.
4 Drücken Sie (ENTER).
5
Drücken Sie mehrmals < oder ,, um
den DSO-Modus (DSO 1-3) auszuwählen.
Zum Deaktivieren de r D SO-Funktion w ählen
Sie „OFF“.
6 Drücken Sie (ENTER).
Hinweise
• Je nach dem Innenraum des jeweiligen Fahrzeugs
bzw. dem Musiktyp hat die DSO-Funktion
möglicherweise nicht die gewünschte Wirkung.
• Wenn ein UKW - Send er s ch lech t zu hör en is t, s etz en
Sie „DSO“ auf „OFF“.
Tipp
Je höher der DSO-Modus, desto stärker ist der
Klangeffekt des DSO-Modus.
5 Drücken Sie mehrmals < oder , und
wählen Sie die Equalizer-Kurve aus.
Um den Equalizer-Effekt auszuschalten,
wählen Sie „OFF“.
6 Drücken Sie (ENTER).
Hinweis
Solange die DSO-Funktion aktiv ist, werden die
Equalizer-Einstellungen automatisch so gewählt, dass
der bestmögliche Gesamteffekt erzielt wird.
Einstellen der Equalizer-Kurve
Sie können die Equa lizer-Einstellungen für
Frequenz und Lau tst ärke auswählen und
speichern.
1 Wählen Sie mit (SOURCE) eine
Tonquelle (Rad io, CD, MD ode r AUX)
aus.
2 Drücken Sie (MENU).
3 Drücken Sie mehrmals < oder , und
wählen Sie „SoundTuning“ aus.
4 Drücken Sie (ENTER).
5 Drücken Sie mehrmals M oder m, um
„EQ7 Tune“ auszuwählen.
Fortsetzung auf der nächsten Seite t
31
Page 72

6 Drücken Sie (ENTER).
Beispiel: EQ7 Tune „Xplod“
7 Drücken Sie mehrmals M oder m, um
die gewünschte Equalizer-Kurve
auszuwählen.
8 Drücken Sie (ENTER).
9 Wählen Sie die gewünschte Frequenz
und Lautstärke aus.
1 Drücken Sie mehrmals < oder ,
und wählen Sie die gewünschte
Frequenz aus.
Mit jedem Tastendruck auf < oder ,
wechselt die Frequenz folgendermaßen:
62 Hz y 157 Hz y 396 Hz
y 1000 Hz y 2510 Hz
y 6340 Hz y 16000 Hz
2 Drücken Sie mehrmals M oder m
und wählen Sie den gewünschten
Pegel aus.
Der Pegel lässt sich in Schritten von 1 dB
auf einen Wert zwischen –10 dB und
+10 dB einstel len.
Einstellen der Lautstärke
vorne und hinten
1 Wählen Sie mit (SOURCE) eine
T onquelle (Radio, CD, MD oder AUX)
aus.
2 Drücken Sie (SOUND).
3 Drücken Sie mehrmals < oder ,, um
„Fader“ auszuwählen.
4 Drücken Sie (ENTER).
5 Drücken Sie mehrmals < oder , und
stellen Sie die Lautstärke der Frontbzw. Hecklautsprecher ein.
6 Drücken Sie (ENTER).
Im Display erscheint wieder die nor male
Anzeige.
Einstellen der Grenzfrequenz für die
Front-/Hecklautsprecher
Die Grenzfrequenz der Lautsprecher kann an die
Leistungsmerkmale des angeschlossenen
Lautsprecher systems angepasst werden.
Grenzfrequenz
Pegel
aus
Wenn Sie die werkseitig eingestellte
Equalizer-Kurve wieder herstellen wollen,
drücken Sie 2 Sekunden lang (ENTER).
3 Gehen Sie wie in Schritt 1 und 2
vor, wenn Sie weitere Frequenzen
der Equalizer-Kurve einstellen
wollen.
10
Drücken Sie (ENTER).
Nachdem Sie die Effekteinstellung
vorgenommen haben, erscheint im Display
wieder die normale Anzeige.
32
Frequenz (Hz)
1 Drücken Sie während der Wiedergabe
bzw. des Radioempfangs (MENU).
2 Drücken Sie mehrmals < oder , und
wählen Sie „SoundTuning“ aus.
3 Drücken Sie (ENTER).
4 Drücken Sie mehrmals M oder m und
wählen Sie „HPF“ aus.
5 Drücken Sie (ENTER).
Page 73

6 Drücken Sie mehrmals M oder m und
wählen Sie die Grenzfrequenz aus.
Mit jedem Tastendruck auf M oder m
wechselt die Frequenz folgenderm aßen:
OFF (Standardeinstellung) y 78 H z y
125 Hz
7 Drücken Sie (MENU).
Nachdem Sie die Fr equenzeinstellung
vorgenommen haben, erscheint im Display
wieder die normale Anzeige.
Einstellen der Lautstärke
des/der
Tiefsttonlautsprecher(s)
1 Wählen Sie mit (SOURCE) eine
Tonquelle (Radio, CD, MD oder AUX)
aus.
2 Drücken Sie (SOUND).
3 Drücken Sie mehrmals < oder , und
wählen Sie „SubWoofer“ aus.
4 Drücken Sie (ENTER).
5 Drücken Sie mehrmals < oder , und
stellen Sie die Lauts t ärke ein.
6 Drücken Sie (ENTER).
Im Display erscheint wieder die normale
Anzeige.
Tipp
Die Lautstärke lässt sich auf einen Pegel zwischen
–10 dB und +10 dB einstellen. (Unter –10 dB wird
„–∞ dB“ angezeigt.)
Einstellen der Grenzfrequenz des/der
Tiefsttonlautsprecher(s)
Um den Klang auf die Merkm ale des/der
angeschlossenen Tiefsttonlautsprecher(s)
abzustimmen, können Sie die unerwünschten
Signale hoher und m itt le re r Fr equenz
herausfi ltern, die in den/di e T iefst tonlaut sprech er
eingespeist werden. Wenn Sie die Grenzfrequenz
(siehe Abbildun g unten) festlegen, geben die
Tiefsttonlautsprech er nur die entsprechend en
niederfrequen te n Signale aus, so dass ein
klareres Klan gbild entste ht .
Grenzfrequenz
Pegel
aus
Frequenz (Hz)
1 Drücken Sie während der Wiedergabe
bzw. des Radioempfangs (MENU).
2 Drücken Sie mehrmals < oder , und
wählen Sie „SoundTuning“ aus.
3 Drücken Sie (ENTER).
4 Drücken Sie mehrmals M oder m und
wählen Sie „LPF“ aus.
5 Drücken Sie (ENTER).
6 Drücken Sie mehrmals M oder m und
wählen Sie die Grenzfrequenz aus.
Mit jedem Tastendruck auf M oder m
wechselt die Frequenz folgendermaßen:
OFF (Standardeinstellung) y 125 Hz y
78 Hz
7 Drücken Sie (MENU).
Nachdem Sie die Frequenzeinstellung
vorgenommen haben, er scheint im Display
wieder die normale Anzeige.
33
Page 74

Anschließen zusätzlicher
Audiogeräte
Der Anschluss AUX IN (externer Audioeingang)
des Geräts dient auch als Anschluss BUS
AUDIO IN (Audioeingang ).
Sie können gesondert erhältliche, tragbare Geräte
von Son y anschließe n und den Ton über die
Lautsprecher des Fahrzeugs wiedergeben lassen.
Hinweis
Wenn Sie ein gesondert erhältliches CD/MD-Gerät
von Sony anschließen, können Sie keine tragbaren
Geräte anschließen und „AUX“ kann nicht ausgewählt
werden.
Auswählen des zusätzlichen Geräts
Drücken Sie mehrmals (SOURCE) und
wählen Sie „AUX“ aus.
Einstellen der Lautstärke
Sie können die Lauts tä rke für je des
angeschlossene Audiogerät einstellen.
1 Drücken Sie (MENU).
2 Drücken Sie mehrmals < oder , und
wählen Sie „SoundTuning“ aus.
3 Drücken Sie (ENTER).
4 Drücken Sie mehrmals M oder m und
wählen Sie „AUX Level“ aus.
5 Drücken Sie (ENTER).
6 Drücken Sie mehrmals < oder , und
stellen Sie die Lautstärke ein.
Die Lautstärke lässt sich in Schritten von
1 dB auf einen Wert zwischen –6 dB und
+6 dB einstellen.
7 Drücken Sie (ENTER).
Im Display erscheint wieder das Hauptmenü.
8 Drücken Sie (MENU).
Im Display ersc hei nt wieder die normale
Anzeige.
So deaktivieren Sie zusätzliche Geräte
in der Musikquellenanzeige
1 Drücken Sie (OFF).
Die CD/MD-Wiedergabe bzw. der
Radioempfang wird beendet. Die
Tastenbeleucht ung und das Display blei be n
eingeschaltet.
2 Drücken Sie (MENU).
3 Drücken Sie mehrmals < oder , und
wählen Sie „Setup“ aus.
4 Drücken Sie (ENTER).
5 Drücken Sie mehrmals M oder m und
wählen Sie „AUXSkip“ aus.
6 Drücken Sie (ENTER).
7 Drücken Sie m und wählen Sie „ON“
aus.
8 Drücken Sie (MENU).
Wenn die Anzeige wieder aktiviert werden soll,
wählen Sie „AUX Skip OFF“.
34
Page 75

Einstellen des
Sicherheitscodes
Dieses Gerät ist zum Schutz vor Diebstahl mit
einer Sich erhe itsfu nkt ion a usge stat tet. Gebe n Si e
als Sicherheitscode eine 4-stellig e Zahl ein.
W enn Sie de n Si ch erhe it sc od e ein st el len un d da s
Gerät dann in einem anderen Auto installieren
oder die Autobatterie wechseln, lässt sich das
Gerät erst wieder einschalten, wenn der
gespeicherte C ode eingegeben wird.
1 Drücken Sie (MENU).
2 Drücken Sie mehrmals < oder , und
wählen Sie „Setup“ aus.
3 Drücken Sie (ENTER).
4 Drücken Sie mehrmals M oder m und
wählen Sie „Security“ aus.
5 Drücken Sie (ENTER).
Die Anzeige „Code Set“ erscheint im Display.
1 Drücken Sie mehrmals M oder m
und wählen Sie die erste Ziffer ( 0-9)
aus.
2 Stellen Sie den Cursor mit , an die
zweite Stelle und drücken Sie
mehrmals M oder m, um die zweite
Ziffer einzugeben.
Mit jedem Tastendruck auf M wird
die Ziffer um eins erhöht, mit jedem
Tastendruck auf m um eins
verringert.
3 Geben Sie die 3. und 4. Ziffer wie in
Schritt 2 erläutert ein.
6 Drücken Sie (ENTER).
Die Anzeige „C heck Code“ erschein t im
Display.
7 Drücken Sie mehrmals M oder m und
wählen Sie „YES“ aus.
Hinweise
• Der Sicherheitscode kann nicht über die
Zahlentasten (1-6) eingegeben werden.
• Merken Sie sich den Sicherheitscode unbedingt gut.
• Wenn Sie in Schritt 7 „NO“ wählen und (ENTER)
drücken, erscheint die Anzeige „Code Set“ aus
Schritt 5 wieder im Display.
Nach Eingabe des Sicherheitscodes
Wenn Sie das Gerät in einem anderen Auto
installieren oder die Autobatterie auswechseln,
erscheint die Anzeige „Check Code“ im Display,
nachdem Sie das Gerät eingeschaltet haben.
Geben Sie den gespei cherten 4-stelligen Code
über die Curs or tast en (M/m/,) ein und drücken
Sie (ENTER).
Anzeige „Code Input“
OK: Im Display erscheint wieder die Datums-/
Uhrzeitanzeige.
NG: Die Meldung „CODE ERROR“ erscheint.
Geben Sie über die Cursortasten den richtigen
Code ein.
Löschen des Sicherheitscod es
Gehen Sie wie in Schritt 1 bis 4 unter „ Einste ll en
des Sicherheitscodes“ erläutert vor. Die Anzeige
„Code Del“ erscheint. Geben Sie den
gespeichert en Code über die Cu rsortasten (M/m/
,) ein und drüc ken Si e (ENTER).
Anzeige „Code Del“
OK: Im Display erscheint wieder die normale
Anzeige.
NG: Die Meldung „CODE ERROR“ erscheint.
Geben Sie über die Cursortasten den richtigen
Code ein.
Hinweis
Sie können den Sicherheitscode nur ändern, indem
Sie den gespeicherten Code löschen.
Tipp
Wenn kein Sicherheitscode gespeichert ist, erscheint
die Anzeige „Code Del“ nicht.
8 Drücken Sie (ENTER).
Im Display erscheint wieder die normale
Anzeige.
35
Page 76

Weitere Inform ationen
Wartung
Austauschen der Sicherung
Wenn Sie eine Sicherung austauschen, achten Sie
darauf, eine Ersatz sicherung mit dem gl ei chen
Ampere-Wert wie die Origina ls i cherung zu
verwenden. Dieser ist auf der Originalsicherung
angegeben. Wenn die Sicherung durchb re nnt,
überprüfen Sie den Stromanschluss und tauschen
die Sicherung aus. Brennt die neue Sicherung
ebenfalls durch, kann eine interne Fehlfunktion
vorlie gen. Wenden Sie sich in einem solc hen F all
an Ihren Sony-Händler.
Sicherung
(10 A)
Achtung
Ver w enden Sie unter keinen Umständen eine
Sicherung mit eine m höheren Ampere-Wert als
dem der Sicherung, die ursprünglich mit dem
Gerät geliefert wurde. Andernfalls kann es zu
Schäden am Gerät kommen.
Austauschen der Lithiumbatterie
Unter normalen Bedingungen hält di e Batterie
etwa 1 Jahr. Die Lebensdauer der Batterie kann
je nach Gebrauch des Geräts jedoch auch kürzer
sein. Wenn die Batterie schwächer wird, verkürzt
sich die Reichweite der Kartenfernbedienung.
Tauschen Sie die Batterie gegen eine neue
CR2025-Lithiumbatterie au s. Bei Verwendung
eines anderen B at terietyps be steht Feuer- bzw.
Explosionsgefahr.
x
Mit der Seite + nach oben
Hinweise zur Lithiumbatterie
• Bewahren Sie die Lithiumbatterie außerhalb
der Reichweite von Kindern auf. Sollte eine
Lithiumbatterie verschluckt werden, ist
umgehend ein A rz t au fzusuchen.
• Wischen Sie die Batterie mit einem trockenen
Tuch ab, um einen guten Kontakt zwischen den
Batteriepolen und -anschlüssen si cherzustellen.
• Achten Sie beim Einlegen der Batterie au f di e
richtige Polarität.
• Halten Sie die Batterie nicht mit einer
Metallpinzette. Dies könnte zu einem
Kurzschluss führen.
36
VORSICHT
Die Batterie kann bei falscher Handhabung
explodieren!
Auf keinen Fall darf sie aufgeladen,
auseinander g enommen od er ins Feuer
geworfen werden
.
Page 77

Entsorgungshinweis: Bitte werfen Sie nur
entladene Batter ien in die Sammelboxen beim
Handel oder den Kommunen. Entladen sind
Batterien in der Regel dann, wenn das Gerät
abschaltet und signalisiert „Batterie leer“ oder
nach längerer Gebrauchsdauer der Batte rien
„nicht mehr einwandfrei funktioniert“.
Um sicherzugehe n, kleben Sie die Batteriepo le
z. B. mit einem Klebestreifen ab oder geben Sie
die Batterien einzeln in einen Plastikbeutel.
Ausbauen des Geräts
1 Entfernen Sie die Schutzumrandung.
1 Setzen Sie beide Löseschlüssel an
der Schutzumrandung an.
Richten Sie die Löseschlüssel
richtig aus.
2 Ziehen Sie die Schutzumran du ng
mithilfe der Löseschlüssel heraus.
2 Nehmen Sie das Gerät heraus .
1 Setzen Sie beide Löseschlüssel ein,
so dass sie mit einem Klicken
einrasten.
Der Haken muss
nach innen weisen.
2 Ziehen Sie an den Löseschlüsseln,
um das Gerät zu lösen.
3 Ziehen Sie das Gerät aus der
Halterung.
37
Page 78

Technische Daten
CD-Player
Signal-Rauschabstand 90 dB
Frequenzgang 10 – 20.000 Hz
Gleichlaufschwankungen Unterhalb der Messgrenze
Tuner
FM (UKW)
Empfangsbereich 87,5 – 108 MHz
Antennenanschluss Anschluss für
Zwischenfrequenz 10,7 MHz/450 kHz
Nutzbare Empfindlichkeit 9 dBf
Trennschärfe 75 dB bei 400 kHz
Signal-Rauschabstand 67 dB (stereo),
Harmonische Verzerrung bei 1 kHz
Kanaltrennung 35 dB bei 1 kHz
Frequenzgang 30 – 15.000 Hz
Außenantenne
69 dB (mono)
0,5 % (stereo),
0,3 % (mono)
MW/LW
Empfangsbereich MW: 531 – 1.602 kHz
Antennenanschluss Anschluss für
Zwischenfrequenz 10,7 MHz/450 kHz
Empfindlichkeit MW: 30 µV
LW: 153 – 279 kHz
Außenantenne
LW: 40 µV
Endverstärker
Ausgänge Lautsprecherausgänge
Lautsprecherimpedanz 4 – 8 Ohm
Maximale Leistungsabgabe
(versiegelte Anschlüsse)
52 W × 4 (an 4 Ohm)
Allgemeines
Ausgänge Audioausgänge (vorne/
Eingänge Steueranschluss für
hinten)
Ausgang für
Tiefsttonlautsprecher
(mono)
MotorantennenSteueranschluss
Steueranschluss für
Endverstärker
Stummschaltung beim
Telefonieren
Steueranschluss für
Beleuchtung
BUS-Steuereingang
BUS-Audioeingang/
Anschluss AUX IN
Antenneneingang
Klangregler Bässe ±8 dB bei 100 Hz
Loudness +8 dB bei 100 Hz
Betriebsspannung 12 V Gleichstrom,
Abmessungen
Einbaumaß
Gewicht ca. 1,6 kg
Mitgeliefertes Zubeh ö r Kartenfernbedienung
Sonderzubehör Joystick
Zusätzliche Gerä te CD-Wechsler (6 CDs)
Hinweis
Dieses Gerät kann nicht an einen digitalen
Vorverstärker oder an einen Equalizer, der mit dem
Sony-BUS-System kompatibel ist, angeschlossen
werden.
Änderungen, die dem technischen Fortschritt dienen,
bleiben vorbehalten.
Höhen ±8 dB bei 10 kHz
+2 dB bei 10 kHz
Autobatterie
(negative Erdung)
ca. 178 × 50 × 181 mm
(B/H/T)
ca. 182 × 53 × 160 mm
(B/H/T)
RM-X132 (1)
Montageteile und
Anschlusszubehör (1 Satz)
Frontplattenhülle (1)
RM-X4S
Drahtloser Joystick
RM-X6S
BUS-Kabel (mit einem
Cinchkabel geliefert)
RC-61 (1 m), RC-62 (2 m)
CDX-T70MX, CDX-T69
MD-Wechsler (6 MDs)
MDX-66XLP
MG-MS System-up-Player
MGS-X1
Signalquellenwähler
XA-C30
AUX IN-Quellenumschalter
XA-300
38
Page 79

Störungsbehebung
Anhand der fol gen de n Ch ec kl is te könn e n Si e di e
meisten Probleme, die möglicherw eise an Ihrem
Gerät auftreten , s el bst beheben.
Bevor Sie die folgende Checkl i st e durchgehen,
überprüfen Sie bi tte zunächst, ob Sie das Ge rät
richtig angeschlossen und bedient ha ben.
Allgemeines
Die Funktionstasten funktionieren nicht.
Drücken Sie die Rücksetztaste.
Es ist kein Ton zu hören.
• Drücken Sie den Hebel VOL nach oben, um
die Lautstärke zu erhö hen.
• Schalten Sie die ATT-Funktion aus.
• Stellen Sie den Fader-Regler bei ei nem
Zweilautsprechersystem in die mittlere
Position.
Der Speicherinhalt wurde gelöscht.
• Die Rücksetztaste w urde gedrückt.
t Speichern Sie die Einstellungen erneut.
• Das Netzkabel wurde gelöst oder die
Verbindung zur Batte ri e besteht nicht mehr.
• Das Stromversorgungs kabel ist nicht richtig
angeschlossen.
Kein Signalt o n e rtönt.
Der Signalton ist deaktiviert (Seite 30).
Die Anzeige wird ausgeblendet bzw.
erscheint nicht im Display.
Die Anzeige wird ausgeblendet, we nn Sie
(OFF) gedrückt halten.
t H alten Sie (OFF) erneut gedrückt, bis
die Anzeige eingeblendet wird.
Gespeicherte Sender und die korrekte
Uhrzeit werden gelöscht.
Die Sicherung ist dur chgebrannt.
Es kommt zu Störgeräuschen, wenn sich
der Zündschlüssel in der Po sit ion EIN (ON),
AUS (OFF) oder ACC bzw. I
(Zubehörposition) befindet.
Die Leitungen sind nicht korrekt an den
Hilfsstroman schluss im Auto angeschlossen.
Das Gerät wird nicht mit Strom versorgt.
• Überprüfen Sie die K abelverbindungen.
Wenn die Anschlüsse in Ordnung sind,
überprüfen Sie die Si cherung.
• Das Auto hat keine Zubehörposition (ACC
bzw. I).
t Schalten Sie das Gerät mit (SOURCE)
ein.
Das Gerät wird permanent mit Strom
versorgt.
Das Auto hat keine Zube hör position (ACC
bzw. I).
t Nachdem Sie die Zündung au sgeschaltet
haben, halten Sie am Gerät unbedingt
(OFF) gedrückt, bis die Anzeige
ausgeblendet wird.
Die Motorantenne wird nicht ausgefahren.
Die Motorantenne hat kein Relaiskäs tchen.
CD/MD-Wiedergabe
Die Wiedergabe startet nicht.
• Die MD ist besc hädigt bzw. die CD ist
verschmutzt.
• Einige CD-Rs/CD-RWs w erden je nach dem
Gerät, mit dem sie bespielt wurden, oder
dem Zustand der CD-R/CD-RW selbst unter
Umständen nicht wiedergegeben.
MP3-Dateien können nicht wiedergegeben
werden.
• Die Aufnahme erfolgte nicht im Format I SO
9660, Stufe 1 oder 2, bzw. im erweiterten
Joliet- oder Romeo-Format.
• Die Dateinamenerweiterung „.MP3“ wurde
nicht zum Dateinamen hinzugefügt.
• Die Dateien wurden nicht im MP3-Format
gespeichert.
Albumname, Titelname bzw. ID3-T ag werden
nicht korrekt angezeigt.
• Die CD entspr ic ht ni cht ISO 9660 Stufe 1.
t Ver w enden Sie eine kompatible CD.
• Bei diesem G e rät können nur Zeich encodes
wie ASCII, eu ropäische Buchstaben halber
Größe (nur ASCII bei Joliet) und Shift-JIS
angezeigt werden. Andere Zeichencodes
werden nicht korrekt angezeigt.
Es dauert länger, bis die Wiedergabe von
MP3-Dateien beginnt.
Bei folgenden C Ds dauert es länger, bis die
Wiedergabe beginnt:
–CDs mit einer komplizierten Datei-/
Ordnerstruktur.
–Multi-Session-CDs.
–CDs, zu de nen noch Daten hinzugefügt
werden können.
Aufgrund von Vibrati o ne n kommt es zu
Tonsprüngen.
• Das Gerät ist in einem Winkel von mehr als
60° installiert.
• Das Gerät wurde nicht an einem stabilen Teil
des Fahrzeugs installiert.
Tonsprünge treten auf.
• Die CD ist beschädigt oder verschmutzt .
• Die CD-R/CD-RW wurde beschädigt.
Fortsetzung auf der nächsten Seite t
39
Page 80

Radioempfang
Gespeicherte Sender lassen sich nicht
einstellen.
• Speichern Sie den/ di e Sender unter der
korrekten Frequenz ab.
• Das Sendesignal ist zu schwach.
Sender lassen sich nicht empfangen.
Der Ton ist stark gestört.
• Schließen Sie eine MotorantennenSteuerleitung (blau) oder eine
Stromver so rgungsleitung für Zubehörgeräte
(rot) an die Stromversorgungsleitung für den
Antennenverstärker eines Fahrzeugs an (nur,
wenn das Fahrzeug mit einer in der Heck-/
Seitenfe n sterscheibe integri e rten UKW/
MW/LW-Antenne ausgestattet ist).
• Prüfen Sie die Verbindung der Autoantenne.
• Die Autoantenne wird nicht ausgefahren.
t Prü fe n Si e di e Ver bindung der
Motorantennen-Steuerleitung.
• Überprüfen Si e die Frequenz.
• Wenn der DSO-Modus aktiviert ist, ist der
Ton manchmal ge st ört.
t Setzen Sie DSO auf „OFF“ (Seite 31).
Der automatische Sendersuchlauf
funktioniert nicht.
• Der lokale Sende rsuchmod u s ist auf „O N“
eingestellt.
t Set ze n Si e den lokalen Suchmod us auf
„OFF“ (Seite 30).
• Das Sendesignal ist zu schwach.
t Ste llen Sie die Sender manuel l ei n.
Die Anzeige „STEREO“ blinkt.
• Stellen Sie die Freq uenz genau ein.
• Das Sendesignal ist zu schwach.
t Scha l te n Si e i n den Mono-
Empfangsmodus (Seite 30).
Eine Stereosendung ist nur monaural zu
hören.
Das Gerät ist in den monauralen
Empfangsmodus geschaltet.
t Been den Sie den monauralen
Empfangsmodus ( S ei t e 30).
RDS
Der Sendersuchlauf (Seek) startet nach ein
paar Sekunden Radioempfang.
Der Sender ist kein Verkehrsfunkse nd er oder
die Sendesignal e sind zu schwach.
t Drücken Sie (AF) oder (TA) so oft, bis
„“ bzw. „“ ausgeblendet
A F T A
wird.
40
Es sind keine Verkehrsdurchsagen zu
hören.
• Aktivieren Sie die TA-Funktion.
• Der Sender sendet keine
Verkehrsdurchsagen, obwohl es sich um
einen Verkehrsfunksender handelt.
t Stellen Sie einen anderen Sender ein.
Bei der PTY-Funktion wird „--------“
angezeigt.
• Der aktuelle Sender ist kein RDS-Sender.
• Es wurden keine RDS-Daten empfangen.
• Der Sender gibt den Programmtyp nicht an.
Fehleranzeigen/Meldung
Fehleranzeigen
(Für dieses Gerät und für gesondert
erhältliche CD/MD-Wechsler)
Folgende Anzeigen blinken etwa 5 Sekunden
lang und ein Alarmton ist zu hören.
1
Blank*
Die MD enthält keine Titel*2.
t Legen Sie eine MD ein, auf der Titel
aufgezeichne t sind.
1
Error*
• Eine CD ist verschmutzt oder falsch herum
eingelegt.*
t Rei nigen Sie die CD bzw. legen Sie sie
• Eine CD/MD kann aufgrund einer Stör ung
nicht wiedergegeben werden.*
t Legen Sie eine andere CD/MD ein.
High Temp
Die Umgebungstemperatur ist höher als 50 °C.
t Warten Sie, bis die Temperatur unter 50 °C
sinkt.
NO Disc
Es befindet sich keine CD/MD im CD/MDGerät.
t Legen Sie CDs/MDs in das CD/MD-Gerät
ein.
NO Magazine
Das CD/MD-Magazin ist nicht in das CD/MDGerät eingelegt.
t Setzen Sie ein Magazin in das CD/MD -
Gerät ein.
NO Music*
Sie haben eine CD ohne Musikdateien
eingelegt.
t Legen Sie eine Musik-CD ein.
Not Ready
Der Deckel des MD-Geräts ist offen oder die
MDs wurden nicht korrekt eingelegt.
t Schließen Sie den Deckel bzw. legen Sie
die MDs korrekt ei n.
2
korrekt ein.
2
1
Page 81

Push Reset
Das CD/MD-Gerät kann wegen einer Störung
nicht bedient werden.
t Drücken Sie die Rücksetztas t e am G erät.
*1 Wenn ein CD/MD-Wechsler an das Gerät
angeschlossen ist, erscheint die Nummer der CD
bzw. MD im Display.
*2 Die Nummer der CD/MD, die den Fehler
verursacht, erscheint im Display.
Wenn sich das Problem mit diesen
Abhilfemaßnahmen nicht beheben lässt, wenden
Sie sich an einen Sony-Händler.
Meldung
Local Seek up/Local Seek down
Beim automatischen Sendersuchlauf ist der
lokale Suchmodus aktiviert (Seite 16).
ID3-Tag, Version 2
Die folgenden Phänomene treten auf, wenn eine
MP3-Datei mit einem ID3-Tag der Version 2
wiedergegeben wird. Es handelt sich dabei nicht
um Fehlfunktionen:
– Beim Überspringen eines T eils des ID3-T ags der
Version 2 (am Anfang des Titels) wird kein Ton
ausgegeben.
Welcher Teil des Titels übersprungen wird,
hängt von der Kapazität des ID3-Tags der
Version 2 ab.
– Die verstrichene Spieldauer wird nicht korrekt
angezeigt, wenn ein Teil eines ID3-Tags der
Version 2 übersprungen wird.
Bei MP3-Dateien mit einer anderen Bitrate als
128 Kbps wird die Dauer während der
Wiedergabe nicht korrekt angezeigt.
– Wenn eine MP3-Datei mit MP3-
Konvertierungssoftware erstellt wird, werden
automatisch ID3-Tags der Version 2
geschrieben.
41
Page 82

Félicitations !
Nous vous remercions d’avoir fait l’acquisition
de ce lecteur de disq ues compacts Sony.
PRINCIPALES CARA CTERISTIQUES :
• Possibilité de lecture d’un fichier MP3
enregistré sur disque.
• Il est possible de lire des CD-R ou CD-RW
auxquels une session peut être ajoutée (page 7).
• Possibilité de lecture de disques multisession
(CD-Extra, CD mixte, etc.), selon la méthode
d’enregistrement utilisée (page 7).
• Fonctionnement avec des lecteurs CD ou MD
en option (chang eurs et lecteurs)*
• Affichage de l’information des étiquettes ID3*
de version 1 pendant la lecture de fichiers MP3.
• Affichage des informations CD TEXT (pendant
la lecture d’un CD TEXT *
• Accessoire de commande fourni
Mini-télécomm ande RM-X132
• Accessoires de command e en option
Satellite de commande RM-X4S
Satellite de commande sans fil RM-X6S
*1 Cet appareil fonctionne uniquement avec des
produits Sony.
*2 Une étiquette ID3 est un fichier MP3 contenant des
informations telles que le nom de l’album, de
l’artiste ou de la plage, etc.
*3 Un disque CD TEXT est un CD audio contenant
des informations telles que le nom du disque, le
nom de l’artiste et les noms des plages. Ces
informations sont enregistrées sur le disque.
1
.
3
).
2
Les instructions de ce manuel décrivent
principalement l’utilisat io n de l’appare il à l’a id e
de la mini-télécommande.
Il est possible que les illustrations contenues
dans ce manuel diffèrent de l’apparence réelle de
l’appareil.
Cette étiquette est située sur la partie inférieure
du châssis.
CAUTION INVISIBLE
VIEW DIRECTLY WITH OPTICAL INSTRUMENTS
LASER RADIATIONWHEN OPEN
DO NOT STARE INTO BEAM OR
Cette étiquette est située sur le châssis interne
de l’unité du lecteur.
2
Page 83

Table des matières
Emplacement des commandes. . . . . . . . . . . .4
Précautions. . . . . . . . . . . . . . . . . . . . . . . . . . .6
Remarques sur les disques . . . . . . . . . . . . . . .6
A propos des fichiers MP3. . . . . . . . . . . . . . . 7
Affichage du menu général supérieur . . . . . .9
Préparation
Réinitialisation de l’appareil . . . . . . . . . . . .10
Réglage de l’horloge et du calendrier . . . . .10
Lecteur CD
Lecteur CD/MD (en option)
Lecture d’un disque . . . . . . . . . . . . . . . . . . .11
Rubriques d’affichage . . . . . . . . . . . . . . . . .12
Lecture de plages en boucle
— Lecture répétée . . . . . . . . . . . . . . . . . .13
Lecture des plages dans un ordre quelconque
— Lecture aléatoire. . . . . . . . . . . . . . . . .13
Identification d’un CD
— Fonction de mémo de disque* . . . . . . 14
Recherche d’un di sque par son nom
— Affichage automatique des titres* . . .15
* Fonctions disponibles avec un appareil CD ou MD
en option
Radio
Mémorisation automatique des stations
— Mémorisation des meilleurs accords
(BTM) . . . . . . . . . . . . . . . . . . . . . . . . . . .15
Rubriques d’affichage . . . . . . . . . . . . . . . . .16
Réception des stations mémorisées . . . . . . .16
Mémorisation des stations souhaitées
uniquement . . . . . . . . . . . . . . . . . . . . . . .17
Syntonisatio n d’ une station via une lis te
— Affichage automatique des titres . . . .17
Fonction RDS
Présentation de la fonction RDS . . . . . . . . .18
Resyntonisation automatique pour une meil-
leure récept i on
— Fonction AF . . . . . . . . . . . . . . . . . . . . 19
Ecoute des me ssages de radioguidage
— TA/TP. . . . . . . . . . . . . . . . . . . . . . . . .20
Préréglage des stations RDS avec les réglages
AF et TA . . . . . . . . . . . . . . . . . . . . . . . . .20
Réglage d’un e st ation en fonct ion du type
d’émission
— PTY. . . . . . . . . . . . . . . . . . . . . . . . . . .21
Réglage automatique de l’horloge
— CT. . . . . . . . . . . . . . . . . . . . . . . . . . . .22
Réglages de l’image
Sélection du mode et du motif
d’affichage . . . . . . . . . . . . . . . . . . . . . . . 23
Effacement automatique des caractères affichés
— AutoClear (Mode Analyseur de spectre/
Panorama/Economiseur d’écran) . . . . . . 25
Modification du degré de transparen ce des
caractères
— BlendLevel (Mod e An alyse ur de spec tre/
Panorama/Economiseur d’écran) . . . . . . 25
Définition d’un e pl aque
— Plaque. . . . . . . . . . . . . . . . . . . . . . . . . 26
Définition de la couleur des caractères
— Color Sel . . . . . . . . . . . . . . . . . . . . . . 26
Sélection de la du rée d’affichage de s i m ages
— AutoImage . . . . . . . . . . . . . . . . . . . . . 27
Autres fonctions
Utilisation du satellite de commande . . . . . 28
Réglage des caractéristiques du son . . . . . . 29
Atténuation rapide du son . . . . . . . . . . . . . . 29
Modification des réglages du son et de
l’affichage
— Menu . . . . . . . . . . . . . . . . . . . . . . . . . 30
Réglage du répartiteur dynamique du son émis
(DSO) . . . . . . . . . . . . . . . . . . . . . . . . . . . 31
Réglage de l’égaliseur (EQ7) . . . . . . . . . . . 31
Réglage du volume avant et arrière . . . . . . . 32
Réglage du volume du/des caisson(s) de
graves . . . . . . . . . . . . . . . . . . . . . . . . . . . 33
Raccordement d’un appareil audio
auxiliaire. . . . . . . . . . . . . . . . . . . . . . . . . 34
Réglage du code de sécurité . . . . . . . . . . . . 35
Informations complémentaires
Entretien . . . . . . . . . . . . . . . . . . . . . . . . . . . 36
Démontage de l’appareil . . . . . . . . . . . . . . . 37
Spécifications . . . . . . . . . . . . . . . . . . . . . . . 38
Dépannage. . . . . . . . . . . . . . . . . . . . . . . . . . 39
Affichage des erreurs et message . . . . . . . . 40
3
Page 84

Emplacement des commandes
OFF
SOURCE SCREEN
MODE
VOL
Pour plus de détails, reportez-vous aux pages indiquées.
CDX-M1000TF
SHIFT
.
>
a Touche SOURCE (Mise sous tension/
Radio/CD/MD/AUX*
1
)
Permet de sélectionner la source.
b Touche OFF (Arrêt/Mise hors
tension)*
2
11, 34
c Touche MODE
Permet de changer le mode de
fonctionnement.
d Fenêtre d’affichage
e Touche OPEN/CLOSE Z (éjection)
Permet d’éjecter un disque présent dans
l’appareil.
Permet d’ouvrir ou fermer la façade.
f Touche SCREEN
Permet de sélecti onner le mode d’affichage.
g Levier de commande VOL (volume)
Permet d’augmenter ou de diminuer le
volume en abaissant ou rele vant le levier
VOL.
h Touche de réinitialisation 10
i Récepteur des signaux de la mini-
télécommande et du satellite de
commande sans fil
j Touche SHIFT (levier de changement
de sens 1-3)
Permet de changer la fonction du levier
. > (qa).
k Levier . >
Permet de sélectionner la station de radio, le
paramètre à régler ou encore l’image de
votre choix en relevant ou en abaissant le
levier . >.
Relevez
Abaissez
*1 Lorsqu’un appa reil CD ou MD en option est
raccordé, « AUX » ne s’affiche pas.
*2 Avertissement
En cas d’installation de l’appareil dans
un véhicule dont le contact ne
comporte pas de position ACC
(accessoires)
Après avoir coupé le moteur, n’oubliez
pas de maintenir la touche (OFF) de
l’appareil enfoncée jusqu’à ce q ue
l’affichage disparaisse.
Sinon, l’affichage n’est pas d ésactivé et la
batterie se décha rge.
4
Page 85

Mini-télécommande RM-X132
SHUF
2
5
+
VOL
–
ATT
3
6
LIST
+
+
SEEK
–
ENTER
BACK
MODE
PTY AF TA
REP
1
4
GRAPHIC
SCREEN IMAGE
DISC
MENU
SOURCE
–
SEEK
SOUND
DISC
OFF
Les touches correspondantes de la minitélécommande commandent les mêmes
fonctions que celles de l’appareil.
Les instructions de ce manuel décrivent
principalement l’utilisation de l’appareil à l’aide
de la mini-télécommande.
Pour plus de détai l s, reportez-vous aux pages
indiquées.
a Touche MODE
b Touche PTY
c Touches numériques
(1) REP 13
(2) SHUF 13
Permet de mém or iser des stations et c apter
des stations mémorisées.
d Touche SCREEN
e Touche MENU
Permet d’afficher les me nus généraux.
f Touche SOURCE
g </, Touches (SEEK –/+)
h Touche SOUND
Permet d’affi cher les menus concernant l e
son.
i Touche OFF
j Touches VOL (+/–)
k Touche ATT 29
l Touche AF 19
m Touche TA 20
n Touche GRAPHIC
Permet d’afficher les me nus graphiques.
o Touche IMAGE
Permet de changer les motifs d’affichag e.
p Touche LIST 15, 17
q Touches M/m (DISC +/–)
r Touche ENTER
Permet de valider un réglage.
s Touche BACK
En cours de régl age, permet de revenir en
arrière.
Remarque
Si vous désactivez l’affichage en appuyant sur (OFF),
vous ne pouvez pas le réactiver avec la minitélécommande, sauf si vous activez d’abord l’appareil
en appuya nt sur sa touche (SOURCE) ou si vous
insérez un disque dans le lecteur.
Conseil
Reportez-vous à la section « Remplacement de la pile
au lithium » à la page 36 pour obtenir des informations
détaillées sur la façon de remplacer les piles.
5
Page 86

Précautions
Remarques sur les disques
• Si votre véhicule est resté stationné en plein
soleil, laissez refroidir l’appareil avant de
l’utiliser.
• Les antennes élect riques se déploien t
automatiquement lorsque l’appareil fonctionne.
• N’utilisez pas la fonction CUSTOM FILE
pendant que vous cond ui sez, ni aucune autre
fonction susceptible de diminuer l’attention
portée à la route.
Si vous avez des questions ou des problèmes
concernant cet appareil qui ne sont pas abordés
dans ce mode d’emploi, consultez votre
revendeur Sony.
Condensation d’humidité
Par temps de pluie ou dans des régions très
humides, de l’humi dité peut se condenser à
l’intérieur des lentilles et dans la fenêtre
d’affichage de l’appareil. Si cela se produit,
l’appareil ne fonct ionne pas correctem ent. Dans
ce cas, retirez le disque et attendez environ une
heure que l’humidité se soit évaporée.
Pour conserver un s on de hau te qualité
Veillez à ne pas renverser d e jus de fruit ou
d’autres boissons sucrées sur l’appareil ou sur les
disques.
• Pour que le disque reste propre, ne touchez pas
sa surface. Saisissez le disque par les bords.
• Rangez vos disques dans leur boîtier ou dans un
chargeur lorsque vous ne vous en servez pas.
Ne soumettez pas les disques à des températures
élevées. Evitez de les laisser dans un véhi cul e en
stationnement, sur le tableau de bord ou la plage
arrière.
• Ne collez pas d’ étiquettes sur les d i sques et
n’utilisez pas de disques rendus collants par de
l’encre ou des résidus. De tels disques peuvent
s’arrêter de tourner en cours de l ecture et
provoquer des problèmes de fonctionnement ou
être endommagé s.
Remarques sur l’affichage LCD
• N’exercez pas de forte pression sur l’affichage
LCD. Vous pourriez vous blesse r ou
endommager l’affichage.
• Il est possible que des points lumineux (rouges,
bleus ou verts) ou des points noirs apparaissent
sur l’affichage LCD. Il ne s’agit pas d’un
dysfonctionnem e n t . L’affichage LCD est
constitué de matériaux issus d’une technolo gi e
de haute précision et pl us de 99,99 % des
éléments formant l’image sont inta cts .
Cependant, il est possible que vous observiez
les symptômes précités sur de minuscules
portions de l’image.
6
• N’utilisez pas de disques sur lesquels sont
collés des étiqu ettes ou des autocollants.
L ’utilisation de tels disques peut entraîner les
problèmes de fonctionnement suivants :
– impossibilité d’éjecter un disque parce que
l’étiquette ou l’autocollant se décolle et
bloque le mécanisme d’éjection;
– erreurs de le ct ure des données audi o (p. ex.
sauts de lecture ou aucune lecture)
provo quées par une déformation du disque
suite au rétrécissement de l’étiquette ou de
l’autocollant sou s l’effet de la c h aleur.
• Les disques de f orme non standard (p. ex. en
forme de cœur, de carré ou d’étoile) ne peuvent
pas être lus avec cet ap pareil. Vous risquez
d’endommager votre appareil si vous essayez
de le faire. N’utilisez pas de tels disques.
• Cet appare il n e pe rme t p as la l ect ur e d es C D de
8cm.
Page 87

• Avant la lecture, nettoyez les disques avec un
chiffon de nettoyage disponible dans le
commerce. Essuyez chaque disque en partant
du centre. N’utilisez pas de sol v ants te ls que de
la benzine, du diluant, des produits de
nettoyage vendus dans le c ommerce ou des
sprays antistatiques destinés aux disques
analogiques.
Disques de musique encodés à l’aide
d’une technologie de protection des
droits d’auteur
Cet appareil est conçu pour la lecture des disques
conformes à la norme Compact Disc (CD).
Dernièrement, certaines mais ons de disque ont
lancé sur le marché divers types de disques de
musique encodés sel on des technologies de
protection des droi ts d’auteur. Notez que, parmi
ces types de disq ues, certains ne son t pas
conformes à la norme CD. La lecture de ces
disques peut alors être impossible avec cet
appareil.
Remarques sur les CD-R (CD
enregistrables) et le s CD-RW (CD
réinscriptibles)
Cet appareil permet la lecture des type s de
disques suivants :
Type de
disques
CD audio
Fichiers MP3
Symbole indiqué sur le
disque
• Ce lecteur perm et l a lecture des fichiers MP3
copiés sur des disque s CD -ROM, CD-R (CD
enregistrables ) et CD-RW (CD réinscri ptibles).
• Il est possible de lire des CD-R ou CD-RW
auxquels une session peut être ajoutée.
* Processus nécessaire pour qu’un disque CD-R ou
CD-RW enregistré puisse être lu sur un lecteur CD
audio.
A propos des fichiers MP3
La technologie normalisée MP3 (M PEG 1
couche audio 3 ) es t un fo rma t de comp ress io n de
séquences audio. Il permet la com pression des
fichiers audio à 1/10 de leur taille normale. Les
sons qui ne sont pas perçus par l’ouïe h um aine
sont comprimés, alors que les sons audibles ne le
sont pas.
Remarques sur les disques
Ce lecteur per m et la lecture des fichiers MP3
copiés sur des dis ques CD-ROM, CD -R (CD
enregistrabl es) et CD-RW (CD réinscriptibles).
Le disque doit être enregistré soit au format ISO
1
9660*
niveau 1 ou 2, soit au format d’extens io n
Joliet ou Romeo.
Le lecteur peu t ég al ement lire des di sques
enregistrés en multisession*
1
Format ISO 9660
*
Le format ISO 9660 est la norme
internationale la plus utilisée pour
l’organisation des fichiers et des dossiers sur
CD-ROM.
La structure normalisée compte plusieurs
niveaux. Au niveau 1, les noms des fichier s
doivent être écrits en majuscules, au format
8.3 (nom de 8 caractères ou moins, extension
de 3 caractères ou moins, p. ex. « .MP3 »).
Les noms de dossiers ne peuvent compter
plus de 8 caractères. La hiérarchie de dossiers
ne peut compter plus de 8 niveaux. La norme
de niveau 2 permet d’établir des noms de
fichiers d’une longueur de 31 caractères
maximum.
Chaque dossier peut compter jusqu’à 8
hiérarchies.
Avec les extensions Joliet et Romeo, véri fiez
bien le contenu du logiciel de copie et les
autres conditions .
2
.
• Il est possible que cet appareil ne puisse pas lir e
certains CD-R ou CD-RW (en fonction de
l’appareil utilisé pour l’enregistrement ou de
l’état du disque).
• Ce lecteur ne permet pas la lecture de CD-R ou
de CD-RW non finalisés*.
Suite à la page suivante t
7
Page 88

*2Multisession
Cette technologie de copie permet l’ajout de
données par la mét hode Track-At-Once. La
partie utile des CD ordinaires commence dans
une zone de contrôle, (amorce d’entrée ou
Lead-in) et se termine par une autre zone de
contrôle (amorce de fin ou Lead-out). Un CD
multisession est composé de plusieurs
sessions de copie distinctes. Chacune de ces
sessions commence par une amorce d’ entrée
et se termine pa r une amorce de fin distinct es.
CD-Extra: F ormat perm ettant de copier des
données audio (CD audio) sous forme de
plages dans la session 1 et d’autres types de
données sous forme de plages dans la session 2.
CD mixte: Format permettant d’enregistrer
des données de CD audio dans la plage 2 et
d’autres types de données dans la plage 1.
Remarques
• Lors de la lecture de disques enregistrés sous des
formats autres que le format ISO 9660 niveau 1 et
niveau 2, les noms de fichiers et de dossiers
peuvent ne pas s’afficher correctement.
• Lors de l’identification, veillez à ajouter l’extension
« .MP3 » au nom de chaque fichier.
• Si l’extension « .MP3 » est ajoutée au nom d’un
fichier de format autre que MP3, l’appareil ne peut
pas reconnaître ce fichier et génère des parasites
sonores aléatoires qui risquent d’endommager les
haut-parleurs.
• La lecture des types de disqu es suivants exige un
délai de démarrage plus long :
– disques comportant une hiérarchie de dossiers
complexe ;
– disques enregistrés en multisession ;
– disques auxquels il est possible d’ajouter des
données.
Précautions à prendre lors de la lecture de
disques enregistrés en multisession
• Lorsque la première plage de la première session
est composée de données CD audio :
Seules les données de CD audio sont reproduites.
Les informations des données non musicales et des
fichiers MP3 (numéro de la plage, durée, etc.)
s’affichent sans qu’aucun son ne soit émis.
• Lorsque la première plage de la première session
n’est pas composée de données CD audio :
– Si le disque contient au moins un fichier MP3,
seuls les fichiers MP3 sont lus. Les autres
données sont ignorées (Les données CD audio ne
sont pas reconnues).
– Si le disque ne contient aucun fichier MP3, le
message « NO Music » s’affiche et aucun son
n’est émis (Les données CD audio ne sont pas
reconnues).
Ordre de lecture des fichiers MP3
Les fichiers et dossiers sont lus dans l’ordre
suivant :
Dossier
(album)
1
1
Fichier MP3
(plage)
2
2
3
3
4
5
6
6
7
5
4
7
8
8
9
Hiérarchie 1
(répertoire
racine)
Remarques
• Les dossiers ne con tenant aucun fichier MP3 sont
ignorés.
• Nombre maximal de dossiers : 150 (y compris le
dossier racine et les dossiers vides).
• Nombre maximal de fichiers MP3 et de dossiers qui
peuvent être contenus sur un disque : 300.
Lorsqu’un nom de fichier/dossier contient de
nombreux caractères, ce nombre peut être inférieur
à 300.
• Nomb re ma xi mal de hi érar chie s de dossier s
pouvant être lues: 8.
Conseil
Pour programmer un ordre de lecture spécifique,
ajoutez des chiffres en ordre croissant au début des
noms des fichiers ou des dossiers (p. ex. « 01 »,
« 02 », etc.), puis copiez le tout sur un disque (L’ordre
varie selon le logiciel de copie).
Hiérarchie 2
Hiérarchie 3
Hiérarchie 4
Hiérarchie 5
8
Page 89

Affichage du menu général supérieur
1
Appuyez sur (MENU) pour entrer dans l es me nus généraux, puis sélectionnez la catégorie de menu.
Dans l’affichage du menu gé né ral, vous pouvez sélectionne r divers réglages. Pour effectuer une
sélection, appuyez sur (ENTER). Pour revenir à une opération pr écédente, appuyez s ur (BACK). Pour
compléter les r églages et revenir à l’affichage norma l, appuyez sur (MENU).
Affichage du menu général supérieur
+
DISC
SOURCE
DISC
+
SEEK
–
2
Affichage du menu général
+
DISC
SOURCE
DISC
+
SEEK
–
SEEK
–
SEEK
–
Icônes et contenu des réglages
Setup
Réglages de base
Display
Réglage de l’affichage
PlayMode
Réglages de lecture et de réception radio
SoundTuning
Réglages précis de la qualité du son
Edit
Réglage des caractères d’affichage
+
DISC
SOURCE
DISC
+
SEEK
–
SEEK
–
a Menu de la catégorie sélectionnée
Exemple : Setup
b Rubrique et réglage sélectionnés
Exemple : Beep ON (activé)
Remarque
Pour passer de 1 à 2, appuyez sur (ENTER).
c Rubrique et réglage sélectionnés
Exemple : Cont rast Level 2
d Le voyant se déplace en fonction du
niveau
Remarque
Les paramètres affichés diffèrent selon la source.
9
Page 90

Préparation
Réinitialisation de l’appareil
Avant la pre m ière mise e n service de l’ a ppareil,
après avoir remplacé la batterie du véhicule ou
modifié les raccordements, vous devez
réinitialiser l’appareil.
Appuyez sur la touche de réinitia lisation avec un
objet pointu comme un stylo à bille.
Une fois la réinitialisation terminée, les images
pré-mémoris ées s’affichent. Appuyez sur
(IMAGE) sur la mini-télécommande pour
afficher l’horloge et réglez l’ horloge et le
calendrier.
Touche de réinitialisation
Remarque
Une pression sur la touche de réinitialisation efface le
réglage de l’heure/calendrier et certaines fonctions
mémorisées.
Réglage de l’horloge et du
calendrier
L ’horloge numérique fonctionne suivant un cycle
de 24 heures (Jour/Mois/Année Heure).
Le réglage d’usin e es t « 01/01/2003 01:0 0 »
1 Appuyez sur (MENU).
2 Pour sélectionner « Setup » , app uyez
plusieurs fois sur < ou ,.
3 Appuyez sur (ENTER).
4 Appuyez plusieurs fois sur M ou m
pour sélectionner « Clock ».
5 Appuyez sur (ENTER).
1Appuyez plusi eurs fois su r M ou m
pour régler le jour.
A chaque fois que v ous appuyez sur M, le
nombre de jours au gm ente.
A chaque fois que v ous appuyez sur m, le
nombre de jours diminue.
2Appuyez sur , pour passer au
mois et appuyez plusi eurs fois su r
M ou m pour régler le mois.
Appuyez sur < pour revenir vers la
gauche.
3Répétez l’étap e 2 pour régler
l’année, les heures et les minutes.
6 Appuyez sur (ENTER).
Les réglages de l’h or loge et du calendrier
sont mémorisés et l’affichage revient à la
normale.
Remarque
Si votre voiture ne dispose pas d’une position ACC
(accessoires), allumez d’abord l’appareil, puis réglez
l’horloge et le calendri er.
Conseil
Vous pouvez régler l’année de 2000 à 2099.
10
Page 91

Lecteur CD
Lecteur CD/MD (en
option)
Cet appareil vous permet, en plus de la lecture
d’un CD, de commander des lecteurs CD/MD
externes.
Remarque
Si vous raccordez un lecteur CD en option disposant
de la fonction CD TEXT, les informations CD TEXT
apparaissent dans la fenêtre d’affichage lorsque vous
écoutez un disque CD TEXT.
: Commande à partir de l’appareil
: Commande à partir de la mini-
télécommande
Lecture d’un disque
(Avec cet appareil)
Appuyez sur Z pour ouvrir la façade et
insérez le disque (avec le côté imprimé
tourné vers le haut).
La façade se referme et la lecture commence
automatiquement.
Si un disque se trouve déj à dans l’appareil,
appuyez plusieurs fois sur (SOURCE) jusqu’à ce
que l’indication « (icône CD) » ou « CD »
s’affiche et que la lecture com m ence.
Remarque
La façade se referme automatiquement après le
retentissement de l’alarme d’avertissement.
Pour Appuyez sur
interrompre la
lecture
éjecter le disque Z
(OFF)
passer d’une plage
à l’autre
– Accès
le levier
. > vers le
haut ou vers le bas
[une fois pour chaque plage]
automatique aux
plages
avancer ou reculer
rapidement dans
une plage
– Recherche
le levier
. > vers le
haut ou vers le bas
[maintenez-le enfoncé
jusqu’à l’endroit souhaité]
manuelle
passer d’un album
à l’autre*
– Sélection d’un
album
Pour Appuyez sur
interrompre la
(SHIFT), puis le levier
. > vers le haut ou
vers le bas [une fois pour
chaque album]
(OFF)
lecture
passer d’une plage
à l’autre
</,
[une fois pour chaque plage]
– Accès
automatique
aux plages
avancer ou reculer
rapidement dans
une plage
– Recherche
</,
[maintenir la touc he
enfoncée jusq u’au point
souhaité]
manuelle
passer d’un disq ue
à l’autre
– Sélection d’un
M/m
[une fois pour chaque
disque]
disque
passer d’un album
à l’autre*
– Sélection d’un
M/m
[une fois pour chaque
album]
album
* Disponible uniquement lors de la lecture d’un fichier
MP3.
Remarques
• Après avoir appuyé sur la touche Z, il y a un délai
de quelques secondes avant que le disque soit
éjecté. Ce délai correspond au temps nécessaire à
la lecture des données du disque.
• Si vous appuyez sur la touche Z de la façade pour
éjecter un disque et le laisser dans la fente
d’insertion, la fonction de protection du disque est
inopérante. Le disque est automatiquement réinséré
dans la fente 15 secondes après avoir été éjecté.
• N’exercez pas une pression excessive sur la façade
(surtout lorsqu’elle est ouverte), car cela peut
entraîner des pannes.
Suite à la page suivante t
11
Page 92

• Selon la méthode de copie du disque, une minute ou
plus peut s’écouler avant que la lecture ne
commence.
• Selon l’état du disque, il se peut que sa lecture soit
impossible (page 6, 7).
• Pendant que la première ou la dernière plage est en
cours de lecture, si vous appuyez sur m ou M, la
lecture passe à la première ou à la dernière plage
du disque.
• Lorsque la dernière plage du disque est terminée, la
lecture reprend à partir de la première plage du
disque.
• Avec un appareil en option raccordé, la lecture de la
même source continue sur le lecteur CD ou MD en
option.
(Avec un appareil en option)
1 Appuyez sur (SOURCE) plusieurs fois
jusqu’à ce que « (icône CD) »,
« CD », « (icône MD) », « MD » ou
«MS* » apparaisse.
2 Appuyez plusieurs fois sur (MODE)
jusqu’à ce que l’appareil souhaité
s’affiche.
La lecture commen ce .
* MS : Lecteur MG Memory Stick System-up MGS-X1.
Recherche d’une plage et d’un disque
Reportez-vous à la secti on « Recherche d’un
disque par son nom » à la page 15.
Rubriques d’affichage
Lorsque le disque/l’album*1/la plage change, le
titre éventuellement pr é-enregistré du nouveau
disque/album/de la no uvel le pl age est
automatiquement affiché. Si la fonction
« AutoScroll » (défilement automatique) est
réglée sur « ON », les no m s défileront (page 30).
Mode Standard :
Affichage MDLP*
1
LP2 : lecture LP2
Icône
CD/MD
Numéro de
3
lecteur*
Disque/Album*
Numéro de plage
Temps de
lecture
écoulé
/
LP4 : lecture LP4
Nom du disque*4/
Nom de l’artiste/Nom de
l’album (répertoire)*
Nom de la plage (fichier)
12
Mode Analyseur de spectre/Panorama/
Economiseur d'écran :
Source
Disque/Album*1/
Numéro de plage
Nom du disque*
Nom de l’album (répertoir e) *
Nom de la plage (fichier)*
Temps de
lecture écoulé
4
/Nom de l’artiste/
1
/
1
Mode Horloge :
Source
*1 Disponible uniquement lors de la lecture d’un
fichier MP3.
*2 Disponible unique men t lor squ ’ un lecte ur MD en
option doté de la fonction MDLP est raccordé et
qu’un disque MDLP est en cours de lecture.
*3 Disponible uniquement lorsque deux lecteurs CD
(MD) en option ou davantage sont raccordés.
*4 Si le disque a été identifié par ce lecteur à l’aide de
la fonction CUSTOM FILE, la fonction de mémo de
disque est affichée en priori té.
Remarques
• Certains caractères ne peuvent pas être affichés.
• Pour certains disques CD TEXT contenant un grand
nombre de caractères, l’affichage ou le défilement
automatique des informations peut être inopérant.
• Cet appareil ne peut pas afficher le nom de l’artiste
de chaque plage d’un disque CD TEXT.
Remarques sur les MP3
• Lorsque vous lisez un MP3 portant une étiquette
ID3, l’étiquette ID3 (nom d’artiste/d’album/de plage)
s’affiche.
• La fonction d’étiquette (tag) ID3 n’est applicable que
2
1
/
pour les étiquettes de version 1.
• Les codes de caractères des étiquettes ID3 sont
conformes aux normes ASCII et ISO 8859-1. Les
informations des disques au format Joliet ne
peuvent s’afficher qu’en ASCII. Les caractères non
compatibles sont remplacés par le symbole « * » à
l’affichage.
• Le temps de lecture écoulé qui s’affiche peut être
inexact dans les cas suivants :
– lors de la lecture d’un fichier MP3 ou VBR (à débit
variable).
– pendant l’avance rapide ou le recul.
Conseil
Lorsque le défilement automatique « AutoScroll » est
désactivé « OFF » et que le nom du disque, de
l’album ou de la plage est modifié, ce nom ne défile
pas.
Disque/Album*1/
Numéro de plage
Horloge
Temps de
lecture écoulé
Page 93

Lecture de plages en boucle
— Lecture répé tée
Vous pouvez sélectionner :
REP
• — pour répéter la pl age en cours.
•*
l’album en cours.
•*
disque en cours.
*1 Disponible uniquement lors de la lecture d’un
*2 Disponible uniquement lorsqu’un ou plusieurs
Pour rev enir au mode de lect ure normale,
appuyez plusieur s f o i s s ur (1) (REP) jusqu’à ce
que l’icône disparaisse de la fenêtre d’affichage.
1
REP
REP
fichier MP3.
lecteurs CD ou MD en option sont raccordés.
— pour lire en boucle les plages de
2
— pour lire en boucle les plages du
En cours de lecture, app uyez
plusieu rs f ois sur (1) (REP) j usqu’ à ce
que le réglage souhaité apparaisse
dans la fenêtre d’af f ichage.
La lecture répétée commence.
Lecture des plages dans un
ordre quelconque
— Lecture aléatoire
Vous pouvez sélectionner :
SHUF
•*
l’album en cours dans un ordre aléatoire.
SHUF
• — pour écouter les plages du disque
en cours dans un ordre aléatoire.
SHUF
•*
CD (MD) en op tio n e n co ur s de le ct ur e d ans un
ordre aléatoire.
SHUF All
•*
lecteurs CD (MD) raccordés (y compris celles
de cet appareil) dans un or dre aléatoire.
*1 Disponible uniquement lors de la lecture d’un
*2 Disponible uniquement lorsqu’un ou plusieurs
*3 Disponible uniquement lorsqu’un ou plusieurs
Pour revenir au mode de le ct ure normale,
appuyez plusieurs fois sur (2) (SHUF) jusqu’à
ce que l’icône disparaisse de la fenêtre
d’affichage.
Remarque
« » ne passe pas de façon a léatoire des
plages des lecteurs CD aux plages des lecteurs MD.
1
— pour écouter le s pl ages de
2
— pour écouter les plages du lecteur
3
— pour écouter toutes les plages des
fichier MP3.
lecteurs CD ou MD en option sont raccordés.
lecteurs CD en option ou plusieurs lecteurs MD en
option sont raccordés
En cours de lecture, appuyez
plusieurs fois sur (2) (SHUF) jusqu’à
ce que le réglage souhaité apparaisse
dans la fenêtre d’affichage.
La lecture aléatoire commence.
SHUF All
13
Page 94

Identification d’un CD
— Fonction de mémo de disque (pour un
lecteur CD disp osant de la fonction CUSTOM
FILE)
Vous po uvez i dentifier chaque disque avec un
nom personnalisé ( mémo de disque). Vous
pouvez saisir jusqu’à 8 caractères pour un
disque. Lorsque vous iden tifiez un CD, vous
pouvez ensuite le retro uver grâce à son nom
(page 15).
En tant que rubrique d’ affichage, le mémo de
disque est toujou rs prioritaire sur toutes les
informations CD TEXT d’origine.
8 Appuyez sur (ENTER).
Le menu supérieur s’affiche de nouveau.
9 Appuyez sur (MENU).
L’affichage revient à la normale.
Conseils
• Pour corriger ou effacer un nom, procédez
simplement par réécriture ou insérez un espace.
• Vous pouvez identifier les CD d’un appareil ne
disposant pas de la fonction CUSTOM FILE si cet
appareil est raccordé à un lecteur CD disposant de
cette fonction. Le mémo de disque est alors
sauvegardé dans la mémoire du lecteur CD doté de
la fonction CUSTOM FILE.
Remarque
La lecture répétée ou aléatoire est interrompue
jusqu’à ce que l’édition du nom soit terminée.
Attention
N’utilisez pas la fonction CUSTOM FILE
pendant que vous conduis ez , n i a ucune autre
fonction susceptible de diminuer l’at te nti on
portée à la rout e.
1 Commencez à écouter le d isque que
vous souhaitez identifier.
2 Appuyez sur (MENU).
3 Appuyez plusieurs fois sur < ou ,
pour sélectionner « Edit ».
4 Appuyez sur (ENTER).
5 Appuyez sur M ou m pour sélectionner
« Name Edit ».
6 Appuyez sur (ENTER).
7 Saisissez les caractères.
1
1 Appuyez plusieurs fois sur M*
sélectionner le caractère souhaité.
A
t
B t C ... t 0 t 1 t 2 ... t + t
–
t * ... t
*1 Pour reculer, appuyez sur m.
*2 Espace
2 Appuyez sur , lo rsque vous avez
repéré le caractère souhaité.
*2 t
A
pour
Suppression du mémo de disque
1 Appuyez plusieurs fois sur la touche
(SOURCE) pour sélectionner « CD ».
2 Appuyez plusieurs fois sur (MODE)
pour sélectionner le lecteur CD
disposant de la fonction CUSTOM
FILE.
3 Appuyez sur (MENU).
4 Pour sélectionner « Edit », appuyez
plusieurs fois sur < ou ,.
5 Appuyez sur (ENTER).
6 Appuyez sur M ou m pour sélectionner
«Name Del».
7 Appuyez sur (ENTER).
Les noms mémorisés apparaissent.
8 Appuyez plusieurs fois sur M ou m
pour sélectionner le mémo de disque
que vous souhaitez effacer.
9 Appuyez sur (ENTER) pendant 2
secondes.
Le nom est effacé.
Répétez les étapes 8 et 9 pour effacer d’autres
noms.
10
Appuyez sur (MENU).
L’affichage revient à la normale.
Appuyez sur < pour revenir vers la gauche.
3 Répétez les étapes 1 et 2 pour
14
saisir le reste du nom.
Page 95

Remarques
• Lorsque le mémo d’un disque CD TE XT est effacé,
les informations CD TEXT d’origine s’affichent.
• Si vous ne réussissez pas à trouver le mémo de
disque que vous souhaitez effacer, essayez de
sélectionner un autre lecteur CD à l’étape 2.
Conseils
• A l’étape 7, s’il n’existe pas de mémo de disque,
l’affichage revient automatiquement à l’affichage
normal.
• Si tous les mémos de disque sont effacés à l’étape
9, l’affichage revient automatiquement à l’affichage
normal.
Recherche d’un disque par
son nom
— Affichage automatique des titres
(Avec un lecte ur C D en opt ion dis pos ant d e la
fonction CD TEXT/CUSTOM FILE ou un lecteur
MD)
Vous pouvez utiliser cette fonct io n pour les
disques auxquels vous avez attribué des mémos*
ou pour les disques CD TEXT*
1 Appuyez sur (LIST).
Le nom attribué au disq ue apparaît dans
l’affichage.
2 Appuyez plusieurs fois sur M ou m
pour sélectionner le disque souhaité.
3 Appuyez sur (ENTER).
*1 Recherche d’un disque par son nom mémorisé :
lorsque vous avez attribué un nom (mémo) au CD
(page 14) ou au MD.
*2 Recherche d’un disque grâce aux informations CD
TEXT : lorsque vous écoutez un disque CD TEXT
sur un lecteur CD disposant de la fonction CD
TEXT.
Remarque
Pour les disques CD TEXT et les MD, l’affichage de
certaines lettres est impossible.
Conseil
Pour interrompre les réglages et revenir à l’affichage
normal, appuyez sur (LIST).
2
.
Radio
L’appareil peut mé m oriser jusqu’à 6 stations
pour chaque bande de fréquences (FM1, FM2,
FM3, MW(PO) et LW(GO)).
Attention
Pour sélectionner des stations pe ndant que vous
conduisez, utilisez la fonction « Mémorisation
des meilleurs accords (BTM) » de façon à
réduire les risques d’accident.
Mémorisation automatique
des stations
— Mémorisation des meilleurs accords (BTM)
L’appareil sélectionne les stations émettant les
signaux les plus pui ssants pour la bande
sélectionnée et les mémorise selon l’ordre des
fréquences.
1
1 Appuyez plusieurs fois sur la touche
(SOURCE) jusqu’à ce que
« (icône du syntoniseur) » ou la
bande apparaisse.
2 Appuyez plusieurs fois sur (MODE)
pour sélectionner la bande .
3 Appuyez sur (MENU).
4 Pour sélectionner « Edit », appuyez
plusieurs fois sur < ou ,.
5 Appuyez sur (ENTER).
6 Appuyez plusieurs fois sur M ou m
pour sélectionner « BTM ».
7 Appuyez sur (ENTER).
L’appareil sélectionne les stations dont les
signaux sont les pl us puissants dans la bande
sélectionnée et les mémori se dans l’ordre des
fréquences. Pour annuler la mémo ri sation,
appuyez sur (ENTER) pendant la
mémorisation des stations.
8 Appuyez sur (MENU).
L’affichage revient à la normale.
Suite à la page suivante t
15
Page 96

Remarques
• Si quelques stations seulement peuvent être
captées en raison de la faiblesse des signaux,
certains numéros présélectionnés mémorisés
conserveront leur réglage précédent.
• Si un numéro présélectionné est indiqué dans la
fenêtre d’affichage, l’appareil commence la
mémorisation des stations à partir de la station
affichée.
Rubriques d’affichage
Mode Standard :
Icône du
syntoniseur
Mode Analyseur de spectre/Panorama/
Economiseur d’écr an :
Bande
radio
Mode Horloge :
Bande
radio
Fréquence
Numéro de
présélection
Bande
Numéro de
radio
présélection
Numéro de
présélection
Fréquence
Fréquence
Réception des stations
mémorisées
1 Appuyez plusieurs fois sur (SOURCE)
pour sélectionner la radio.
2 Appuyez plusieurs fois sur (MODE)
pour sélectionner la bande.
3 Appuyez sur la touche numérique ((1)
à (6)) sur laquelle la station souhaitée
est mémorisée.
Conseil
Appuyez sur M ou m pour syntoniser les stations dans
l’ordre où elles sont enregistrées dans la mémoire
(fonction de recherche de présélection).
Si la fonction de réglage des
présélections ne fonctionne pas
— Syntonisation automatique
Appuyez sur < (SEEK –) ou ,
(SEEK +) pour rechercher la station
souhaitée (syntonisation
automatique).
Le balayage s’interrompt lorsque l’appareil
capte une station . Répétez cette opéra tion
jusqu’à ce que vous captiez la station
souhaitée.
Conseils
• Si la syntonisation automatique s’arrête trop
fréquemment, activez la recherche locale pour
limiter la recherche aux stations dont les signaux
sont plus puissants (reportez-vous à la section
« Modificati on des réglages du son et de
l’affichage » à la page 30).
• Si vous connaissez la fréquence de la station que
vous souhaitez écouter, maintenez la touche < ou
, enfoncée pour régler approximativement la
fréquence, puis appuyez plusieurs fois sur < ou ,
pour la syntoniser avec précision (syntonisation
manuelle).
16
Horloge
Si la réception stéréo FM est mauvaise
Sélectionnez le mode de réception
mono
(reportez-vous à la sectio n « Modification des
réglages du son et de l’affichage » à la page
30).
La qualité sonore est améliorée, mais le son
est diffusé en mono (l’indication
« STEREO » disparaît).
Conseil
Si les programmes de la bande FM sont difficilement
audibles, réglez « DSO » sur « OFF » (page 31).
Page 97

Mémorisation des stations
souhaitées uniquement
Vous pouvez présélectionner les stations
souhaitées manuellement sur les touches
numériques de votre choix.
1 Appuyez plusieurs fois sur (SOURCE)
pour sélectionner la radio.
2 Appuyez plusieurs fois sur (MODE)
pour sélectionner la bande.
3 Pour syntoniser la station que vous
souhaitez mémoriser, appuyez sur <
(SEEK –) ou , (SEEK +).
4 Appuyez sur la touche numérique
souhaitée ((1) à (6)) pendant 2
secondes jusqu’à ce que l’indication
« Memory » apparaisse.
Le numéro de la touche s’affiche, puis la
station sélectionnée est attribuée à ce numéro
et mémorisée.
Remarque
Si vous mémorisez une nouvelle station sur le même
numéro de présélection, la station mémorisée
précédemment est effacée.
Syntonisation d’une station
via une liste
— Affichage automatique des titres
1 En cours de réception radio, ap puyez
brièvement sur (LIST).
La fréquence ou le nom attribué à la station
actuelle apparaît dans la fenêtre d’affichage.
2 Appuyez plusieurs fois sur M ou m
pour sélectionner la station souhaité e.
Si aucun nom n’est attribué à la station, la
fréquence appar aît dans la fenêtre
d’affichage.
3 Appuyez sur (ENTER) pour syntoniser
la station souhaitée .
Une fois la syntonisation terminée,
l’affichage revient à la normale.
Conseil
Pour interrompre les réglages et revenir à l’affichage
normal, appuyez sur (LIST).
17
Page 98

Fonction RDS
e
Présentation de la fonction
RDS
Les stations FM di sposant du systèm e RDS
(Radio Data System) transmettent des
informations numériques inaudibles en même
temps que le signal nor m al de leurs émissions
radio. Par exemple, l’une d es inf ormations
suivantes s’affiche lors de la réception d’une
station disposant de la fonction RDS.
Mode Standard :
Icône du
syntoniseur
Mode Analyseur de spectre/Panorama/
Economiseur d’écr an :
Bande
radio
Bande
radio
Fréquence/no m de
la station
Numéro de
présélection
Numéro de
présélection
Fréquence/nom de
la station
Services RDS
Les données RDS permettent d’obtenir d’a utres
service s , tels que :
•La resyntoni sat i on automatique d’une
émission, très pratique pour les longs trajets.
— AF t page 19
• La réception de m essages de
radioguidage, même si vous écoutez une
autre émission ou une autre source.
— TA t page 20
• La sélection de stations selon le type
d’émission. — PTY t page 21
• Le réglage automatique de l’horloge. — CT
t page 22
Remarques
• Selon le pays ou la région où vous vous trouvez, il
est possible que les services RDS ne soient pas
tous disponibles.
• La fonction RDS peut ne pas fonctionner
correctement si le signal capté est faible ou si la
station sélectionnée ne transmet pas de données
RDS.
Mode Horloge :
18
Bande
radio
Numéro de
présélection
Horloge
Fréquence/n om d
la station
Page 99

Resyntonisation automatique
pour une meilleure réception
— Fonction AF
Lorsque la foncti o n de fréquence alter native
(AF) est activée, l’appareil recherche toujours le
signal le plus puissant pour la station que vous
écoutez dans la zone où vous vous trouvez.
La fréquence change automatiquement.
98,5 MHz
Station
96,0 MHz
Ecoute continue d’une émission
régionale
Lorsque la fonction AF est activée : ce réglage
par défaut restreint la réception à une région
spécifique, afin qu’une station régionale ayant
une fréquence plus puissante ne soit pas captée.
Si vous quittez la zone de réception de cette
émission région al e ou si vous voulez profiter
pleinement de la fonction AF, sélectionnez
« Regional O FF » à partir du Menu (page 30) .
Remarque
Cette fonction est inopérante au Royaume-Uni et dans
certaines autres régions.
Fonction de liaison locale (RoyaumeUni uniquement)
Cette fonction vous permet de sélectionner
d’autres stations locales de la région, même si
elles ne sont pas asso ciées à vos touches
numériques.
102,5 MHz
1 Sélectionnez une station FM (page 15).
2 Appuyez plusieurs fois sur (AF)
jusqu’à ce que l’indication « »
apparaisse.
L’appareil entam e la recherche d’une
fréquence alte rnative dont le signal est plus
puissant dans le même réseau de
radiodiffusion.
Si « NO AF » s’affiche, la station synt onisée
ne dispose pas d’autre fréquence.
Remarque
S’il n’existe pas de fréquence alternati ve dans la
région ou si vous n’avez pas besoin d’en rechercher
une, désactivez la fonction AF.
Pour les stations sans fréquence
alternative
Appuyez sur < ou , tandis que le
nom de la station clignote (dans les 8
secondes).
L’appareil comm ence à rechercher une autre
fréquence avec les mêmes données
d’identification de programme (PI)
(l’indication « PI Seek » apparaît).
Si l’appareil ne parvient pas à trouver la
même PI, il revient à la fréquence réglée
précédemment.
A F
1 Appuyez sur une touche numérique
((1) à (6)) associée à une station
locale mémorisée.
2 Dans les 5 secondes qui sui vent,
appuyez de nouveau sur la touche
numérique de la station locale.
3 Répétez l’opération jusqu’à ce que
vous captiez la station locale
souhaitée.
19
Page 100

Ecoute des messages de
radioguidage
— TA/TP
Les fonctions de messages de radioguidage (TA)
et de programme s de radioguidage (T P)
permettent de synt oniser automatique m ent une
station FM diffusant des messages d’information
routière. Ces fonctions s’exécutent quel que soit
le programme FM en cours ou la source (CD/MD
ou AUX) écoutée. L’appareil rétablit la source
précédente lorsqu e le b ullet in de radiogui dage e st
terminé.
Appuyez plusieurs fois sur (TA)
jusqu’à ce que l’indication « »
apparaisse.
L’appareil commence à rechercher le s
stations diffusant des messages de
radioguidage.
« » indique la réception de ces
T P
stations. L’appareil continue la recherche des
stations disponibles avec TP si « NO TP »
s’affiche temporairement.
Pour désa ct iver la réception de tous les messages
de radioguidage, sélectionnez « ».
Pour Appuyez sur
interrompre le
bulletin en cours
Conseils
• Vous pouvez également interrompre le bulletin en
cours en ap puyant sur (SOURCE) ou (MODE).
• TA peut également être activé/désactivé en
appuyant sur (MODE) sur l’appareil pendant
2 secondes.
(TA)
Préréglage du volume sonore des
messages de radioguidage
Vous po uvez prérégler le niveau de volume des
messages de radioguidage de façon à ne manquer
aucune information.
1 Appuyez sur (VOL) pour régler le
niveau de volume souhaité.
2 Appuyez sur (TA) pendant 2
secondes.
L’indication « TA » apparaît et le réglage est
mémorisé.
T A
T A
Préréglage des stations RDS
avec les réglages AF et TA
Lorsque vous présélectionnez des stations RDS,
l’appareil mémorise le réglage AF/TA (on/off) de
chaque station ainsi que sa fréquence. Vous
pouvez effectuer un réglage différent (pour AF,
TA ou les deux) pour c haque station
présélectionnée ou vous pouvez effectuer le
même réglage pour toutes les statio ns
présélectionnées. Si vous préréglez des stations
avec « » réglé sur on, l’appareil
mémorise automatiquement les stations dont le
signal radio est le plus puissant.
Préréglage du même réglage pour
toutes les stations présélectionnées
1 Sélectionnez une bande FM (page 15).
2 Appuyez sur (AF) et/ou (TA) pour
3 Appuyez sur (MENU).
4 Appuyez plusieurs fois sur < ou ,
5 Appuyez sur (ENTER).
6 Appuyez sur M ou m pour sélectionner
7 Appuyez sur (ENTER).
8 Appuyez sur (MENU).
Préréglage de réglages différents pour
chaque station présélectionné e
1 Sélectionnez une bande FM et
2 Appuyez sur (AF) et/ou (TA) pour
3 Appuyez sur la touche numérique ((1)
A F
afficher « » et/ou « ».
Notez que la désactivation de « » et
« » s’appli que aux station RDS aussi
T A
bien qu’aux stations ne disposant pas de cette
fonction.
pour sélectionner « Edit ».
«BTM».
L’affichage revient à la normale.
sélectionnez la station souhaitée
(page 17).
afficher « » et/ou « ».
à (6)) souhaitée jusqu’ à ce que
l’indication « Me m or y » apparaisse.
A F T A
A F
A F T A
Réception de messages d’urgence
Lorsque la fonc t i o n AF ou TA est acti vée,
l’appareil pass e automatiqueme nt aux messages
d’urgence s’ils sont diffusés pendant que vous
écoutez une station FM, un CD, un MD ou une
20
source AUX.
Répétez les opérations à part i r de l’étape 1 pour
prérégler d’ autres station s.
 Loading...