

Page 1

3-275-367-52 (1)
©
FM/MW/SW
Compact Disc Player
Operating Instructions
To cancel the demonstration (DEMO) display, see page 11.
GB
CS
CDX-GT47U
2007 Sony Corporation
Page 2
For installation and connections, see the
supplied installation/connections manual.
This label is located on the bottom of the
chassis.
“ATRAC”, “ATRAC AD”, SonicStage and their
logos are trademarks of Sony Corporation.
“WALKMAN” and “WALKMAN” logo are
registered trademarks of Sony Corporation.
Microsoft, Windows Media,
and the Windows logo are
trademarks or registered
Corporation in the United States and/or other
countries.
Warning if your car’s ignition has no
ACC position
Be sure to set the Auto Off function (page 11).
The unit will shut off completely and
automatically in the set time after the unit is
turned off, which prevents battery drain.
If you do not set the Auto Off function, press
and hold (OFF) until the display disappears
each time you turn the ignition off.
trademarks of Microsoft
2
Page 3

Table of Contents
Welcome ! . . . . . . . . . . . . . . . . . . . . . . . . . . . . . 4
Getting Started
Resetting the unit. . . . . . . . . . . . . . . . . . . . . . . . 4
Preparing the card remote commander . . . . . . . 4
Setting the clock . . . . . . . . . . . . . . . . . . . . . . . . 4
Detaching the front panel . . . . . . . . . . . . . . . . . 5
Attaching the front panel . . . . . . . . . . . . . . . 5
Location of controls and basic
operations
Main unit. . . . . . . . . . . . . . . . . . . . . . . . . . . . 6
Card remote commander RM-X151 . . . . . . . 6
Searching for a track — Quick-BrowZer . . . 8
CD
Display items . . . . . . . . . . . . . . . . . . . . . . . . 9
Repeat and shuffle play. . . . . . . . . . . . . . . . . 9
Radio
Storing and receiving stations . . . . . . . . . . . . . . 9
Storing automatically — BTM . . . . . . . . . . . 9
Storing manually. . . . . . . . . . . . . . . . . . . . . . 9
Receiving the stored stations . . . . . . . . . . . . 9
Tuning automatically . . . . . . . . . . . . . . . . . . 9
Additional Information
Precautions . . . . . . . . . . . . . . . . . . . . . . . . . . . 14
Notes on discs . . . . . . . . . . . . . . . . . . . . . . 14
About USB devices . . . . . . . . . . . . . . . . . . 15
Playback order of MP3/WMA/AAC files
(CD-R/RW or Mass Storage Class) . . . . . . 15
About MP3 files . . . . . . . . . . . . . . . . . . . . . 15
About WMA files. . . . . . . . . . . . . . . . . . . . 15
About AAC files . . . . . . . . . . . . . . . . . . . . 15
About ATRAC files . . . . . . . . . . . . . . . . . . 15
Maintenance . . . . . . . . . . . . . . . . . . . . . . . . . . 16
Removing the unit. . . . . . . . . . . . . . . . . . . . . . 16
Specifications . . . . . . . . . . . . . . . . . . . . . . . . . 17
Troubleshooting . . . . . . . . . . . . . . . . . . . . . . . 18
Error displays/Messages. . . . . . . . . . . . . . . 19
USB devices
USB device playback . . . . . . . . . . . . . . . . . 10
Display items . . . . . . . . . . . . . . . . . . . . . . . 10
Listening to music on a Mass Storage
Class type audio device. . . . . . . . . . . . . . . . 10
Listening to music on a “Walkman”
(ATRAC Audio Device). . . . . . . . . . . . . . . 10
Other functions
Changing the sound settings . . . . . . . . . . . . . . 11
Adjusting the sound characteristics
— BAL/FAD/SUB . . . . . . . . . . . . . . . . . . . 11
Customizing the equalizer curve
— EQ3 . . . . . . . . . . . . . . . . . . . . . . . . . . . . 11
Adjusting setup items — SET. . . . . . . . . . . . . 11
Using optional equipment . . . . . . . . . . . . . . . . 12
Auxiliary audio equipment . . . . . . . . . . . . . 12
Rotary commander RM-X4S . . . . . . . . . . . 13
3
Page 4
Welcome !
Getting Started
Thank you for purchasing this Sony Compact
Disc Player. You can enjoy your drive with the
following functions.
• CD playback
You can play CD-DA (also containing CD
TEXT) and CD-R/CD-RW (MP3/WMA/AAC
files (page 15)).
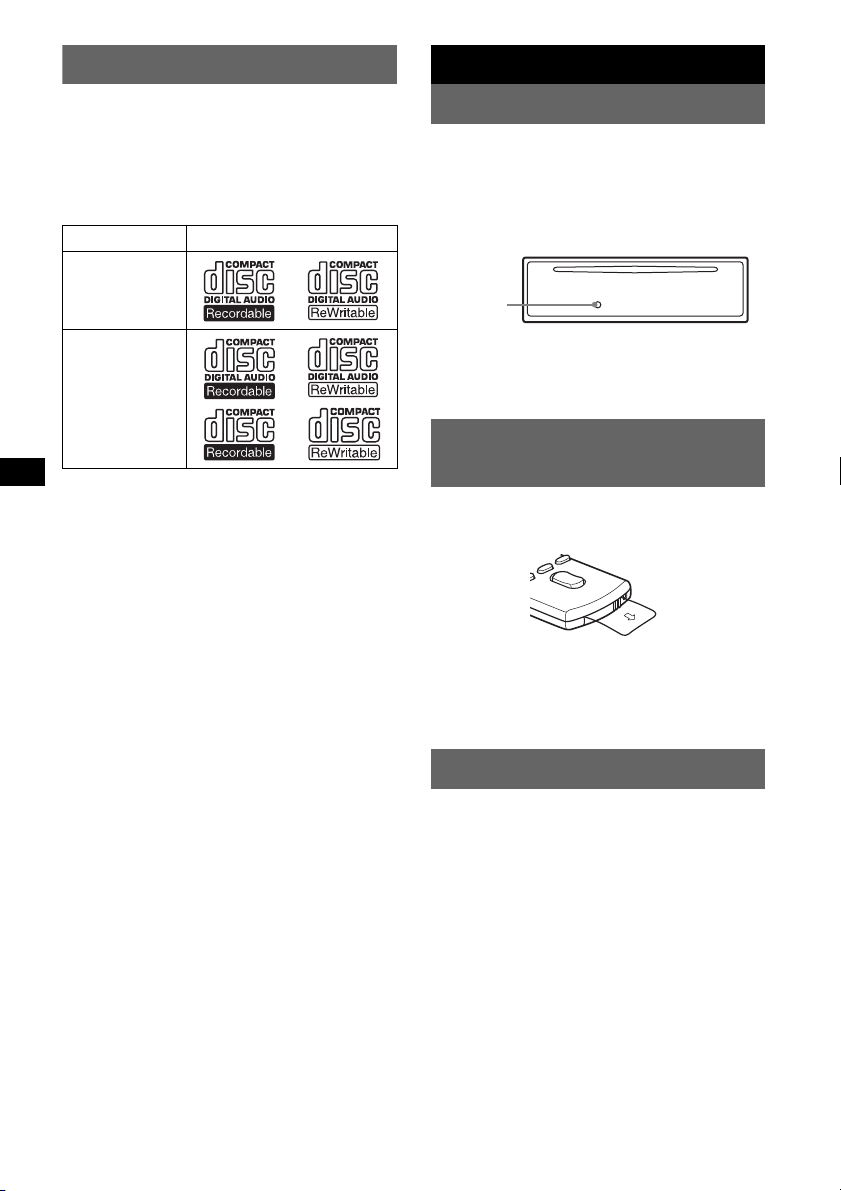
Type of discs Label on the disc
CD-DA
MP3
WMA
AAC
• Radio reception
– You can store up to 6 stations per band (FM1,
FM2, FM3, MW, SW1 and SW2).
– BTM (Best Tuning Memory): the unit selects
strong signal stations and stores them.
• Search function
Quick-BrowZer: You can quickly and easily
search for a track in the CD and USB device
connected to this unit (page 8).
• Sound adjustment
– EQ3 stage2: You can choose any one of 7
preset equalizer curves.
– Digital Music Plus (DM+): Improves
digitally compressed sound such as MP3.
• Optional device operation
USB device: A Mass Storage Class USB
device or “Walkman” (ATRAC Audio Device)
can be connected to the front USB terminal.
For details on usable devices, please refer to
About USB devices (page 15) or the Sony
support website (page 20).
• Auxiliary equipment connection
An AUX input jack on the front of the unit
allows connection of a portable audio device.
4
Resetting the unit
Before operating the unit for the first time, or
after replacing the car battery or changing the
connections, you must reset the unit.
Detach the front panel and press the RESET
button with a pointed object, such as a ball-point
pen.
RESET
button
Note
Pressing the RESET button will erase the clock setting
and some stored contents.
Preparing the card remote
commander
Before using the card remote commander for the
first time, remove the insulation film.
Tip
For how to replace the battery, see “Replacing the
lithium battery of the card remote commander” on
page 16.
Setting the clock
The clock uses a 12-hour digital indication.
1 Press and hold the select button.
The setup display appears.
2 Press the select button repeatedly
until “CLOCK-ADJ” appears.
3 Press (SEEK) +.
The hour indication flashes.
4 Rotate the control dial to set the hour
and minute.
To move the digital indication, press (SEEK)
–/+.
5 Press the select button.
The setup is complete and the clock starts.
To display the clock, press (DSPL). Press
(DSPL) again to return to the previous display.
Page 5
Detaching the front panel
You can detach the front panel of this unit to
prevent theft.
Caution alarm
If you turn the ignition switch to the OFF
position without detaching the front panel, the
caution alarm will sound for a few seconds.
The alarm will only sound if the built-in
amplifier is used.
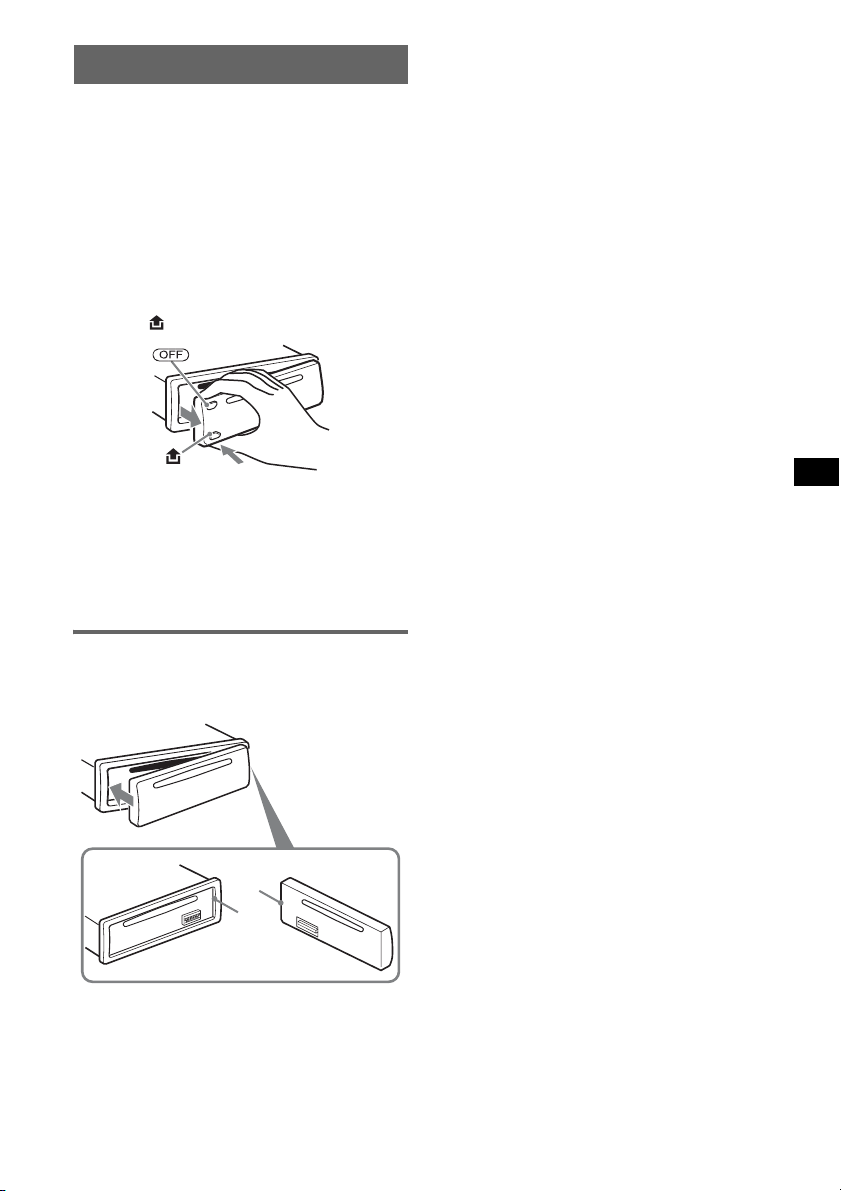
1 Press (OFF).
The unit is turned off.
2 Press , then pull it off towards you.
Notes
• Do not drop or put excessive pressure on the front
panel and display window.
• Do not subject the front panel to heat/high
temperature or moisture. Avoid leaving it in a parked
car or on a dashboard/rear tray.
• Do not detach the front panel during playback of the
USB device, otherwise USB data may be damaged.
Attaching the front panel
Engage part A of the front panel with part B of
the unit, as illustrated, and push the left side into
position until it clicks.
A
B
Note
Do not put anything on the inner surface of the front
panel.
5
Page 6
Location of controls and basic operations
Main unit
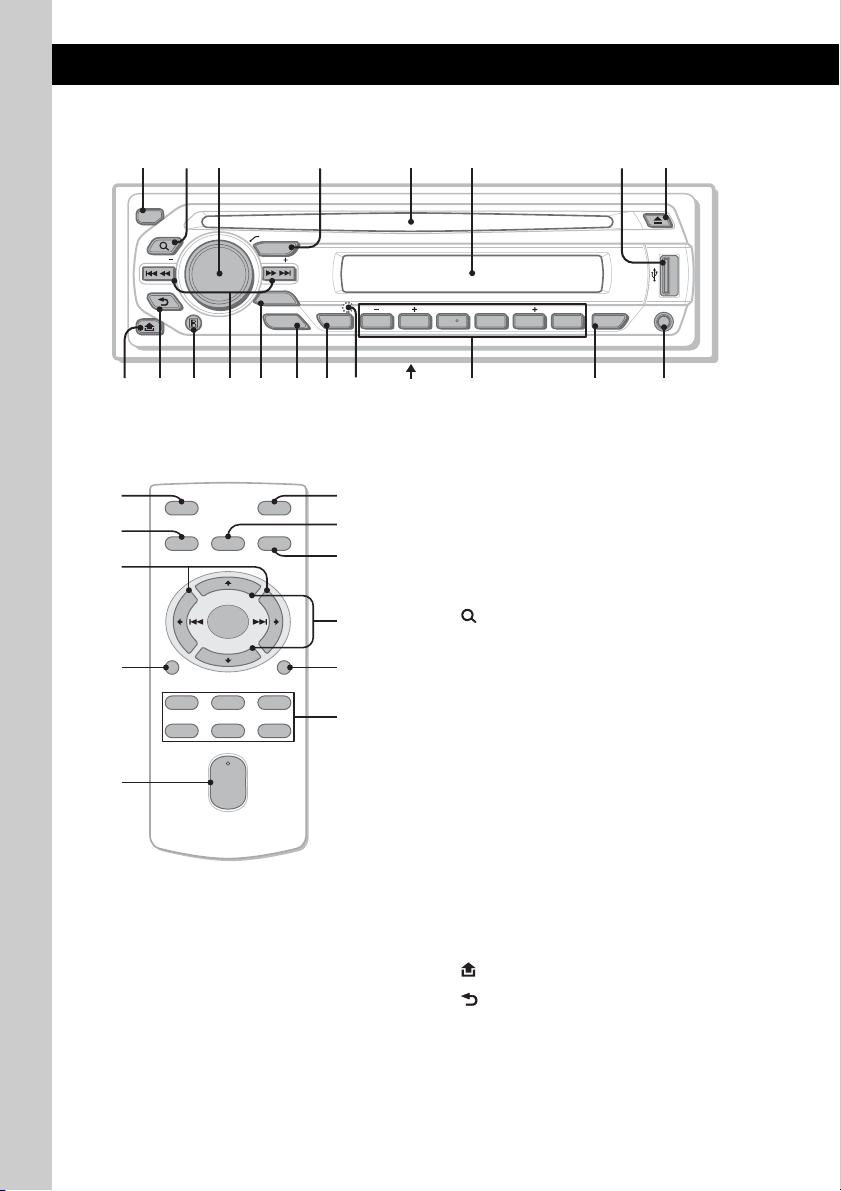
12 4 5 863
OFF
BROWSE
SEEK
BACK
PUSH ENTER / SELECT
SOURCE
SEEK
MODE
EQ3
ALBUM
123456
BTM
REP SHUF SCRL
qa qdq;9 qs qfqg7qh qlqkqj w;
PAUSE
DM
DSPL
AUX
Card remote commander
RM-X151
1
4
OFF
SOURCE
SEL
wa
+
–
ws
wd
DSPL
132
465
VOL
+
–
6
MODE
SCRL
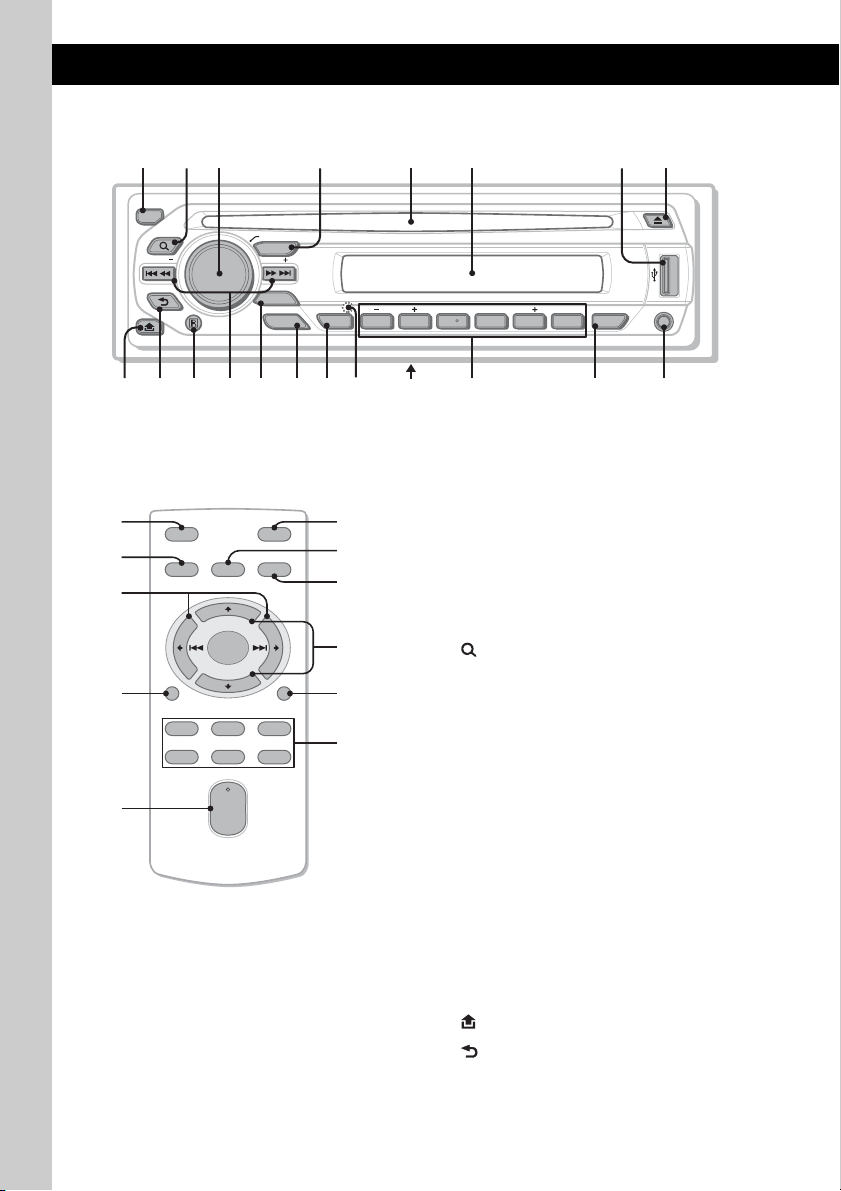
This section contains instructions on the location
of controls and basic operations. For details, see
the respective pages.
For USB device operation, see “USB devices” on
ATT
wf
wg
qd
page 10.
The corresponding buttons on the card remote
commander control the same functions as those
on the unit.
A OFF button
To power off; stop the source.
wh
B (BROWSE) button page 8
To enter the Quick-BrowZer mode.
wj
C Control dial/select button page 8, 11
To adjust volume/select search category
wk
(rotate); select setup items (press and rotate).
D SOURCE button
To power on; change the source (Radio/CD/
USB/AUX).
E Disc slot
Insert the disc (label side up), playback
starts.
F Display window
G USB terminal page 10
To connect to the USB device.
H Z (eject) button
To eject the disc.
I (front panel release) button page 5
J (BACK) button page 8
To return to the previous display.
K Receptor for the card remote
commander
Page 7

L SEEK –/+ buttons
CD/USB:
To skip tracks (press); skip tracks
continuously (press, then press again within
about 1 second and hold); reverse/fastforward a track (press and hold).
Radio:
To tune in stations automatically (press); find
a station manually (press and hold).
M MODE button page 9
To select the radio band (FM/MW/SW);
select the play mode of ATRAC Audio
Device.
N EQ3 (equalizer) button page 11
To select an equalizer type (XPLOD,
VOCAL, EDGE, CRUISE, SPACE,
GRAVITY, CUSTOM or OFF).
O BTM button page 9
To start the BTM function (press and hold).
P RESET button (located behind the front
panel) page 4
Q Frequency select switch (located on the
bottom of the unit)
See “Frequency select switch” in the
supplied installation/connections manual.
R Number buttons
CD/USB:
(1)/(2): ALBUM –/+
To skip albums (press); skip albums
continuously (press and hold).
(3): REP page 9
(4): SHUF page 9
(5): DM+ page 4
To activate the DM+ function, set
“DM+-ON.” To cancel, set “DM+OFF.”
(6): PAUS E
To pause playback. To cancel, press
again.
Radio:
To receive stored stations (press); store
stations (press and hold).
S DSPL (display)/SCRL (scroll) button
page 9
To change display items (press); scroll the
display item (press and hold).
T AUX input jack page 12
To connect a portable audio device.
The following buttons on the card remote
commander have also different buttons/functions
from the unit. Remove the insulation film before
use (page 4).
wa < (.)/, (>) buttons
To control CD/radio/USB, the same as
(SEEK) –/+ on the unit.
Setup, sound setting, etc., can be operated by
< ,.
ws DSPL (display) button
To change display items.
wd VOL (volume) +/– button
To adjust volume.
wf ATT (attenuate) button
To attenuate the sound. To cancel, press
again.
wg SEL (select) button
The same as the select button on the unit.
During the Quick-BrowZer mode, (SEL)
(select) is inactive.
wh M (+)/m (–) buttons
To control CD/USB, the same as (1)/(2)
(ALBUM –/+) on the unit.
Setup, sound setting, etc., can be operated by
M m.
wj SCRL (scroll) button
To scroll the display item.
wk Number buttons
To receive stored stations (press); store
stations (press and hold).
Notes
• When ejecting/inserting a disc, keep any USB
devices disconnected to avoid damage to the disc.
• If the unit is turned off and the display disappears, it
cannot be operated with the card remote
commander unless (SOURCE) on the unit is
pressed, or a disc is inser ted to activate the unit first.
About USB cap
When not using the USB terminal (G), use the
supplied USB cap to prevent dust or dirt enter ing.
Keep the USB cap out of the reach of children to
prevent accidental swallowing.
7
Page 8
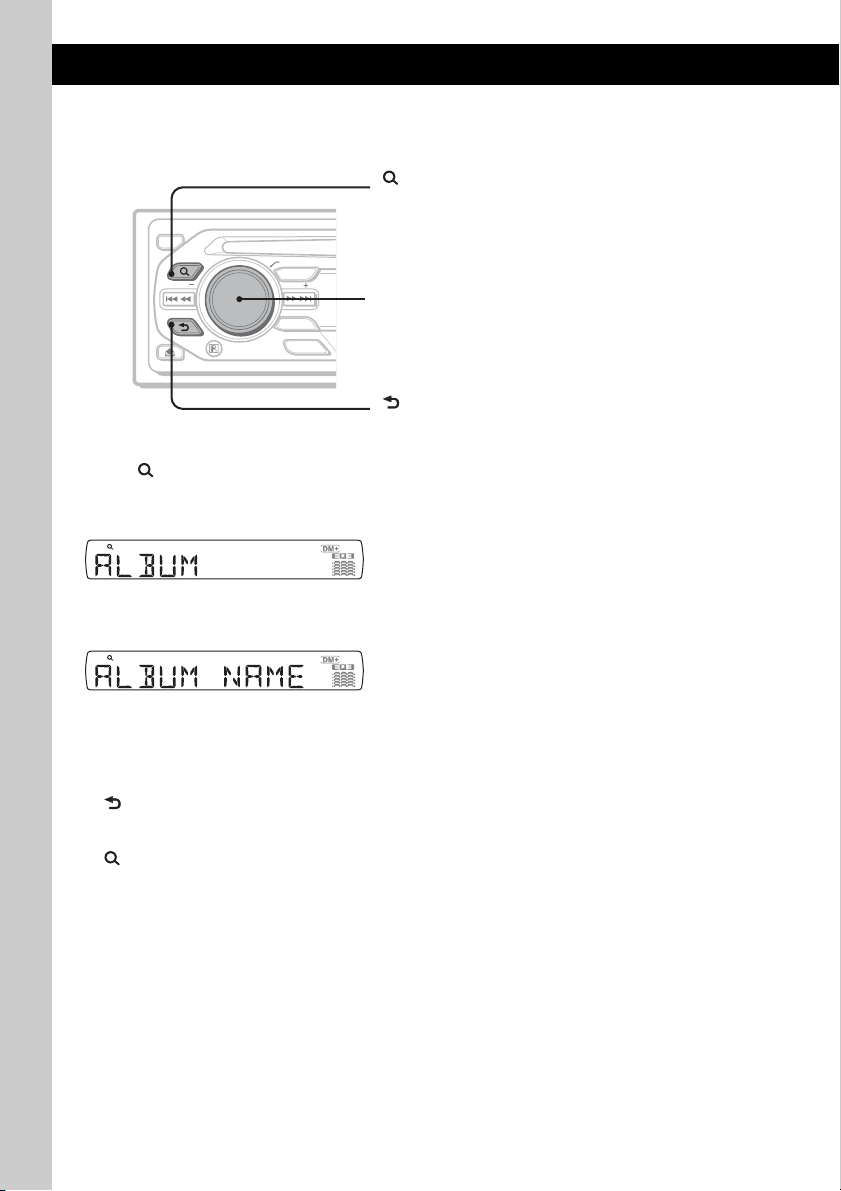
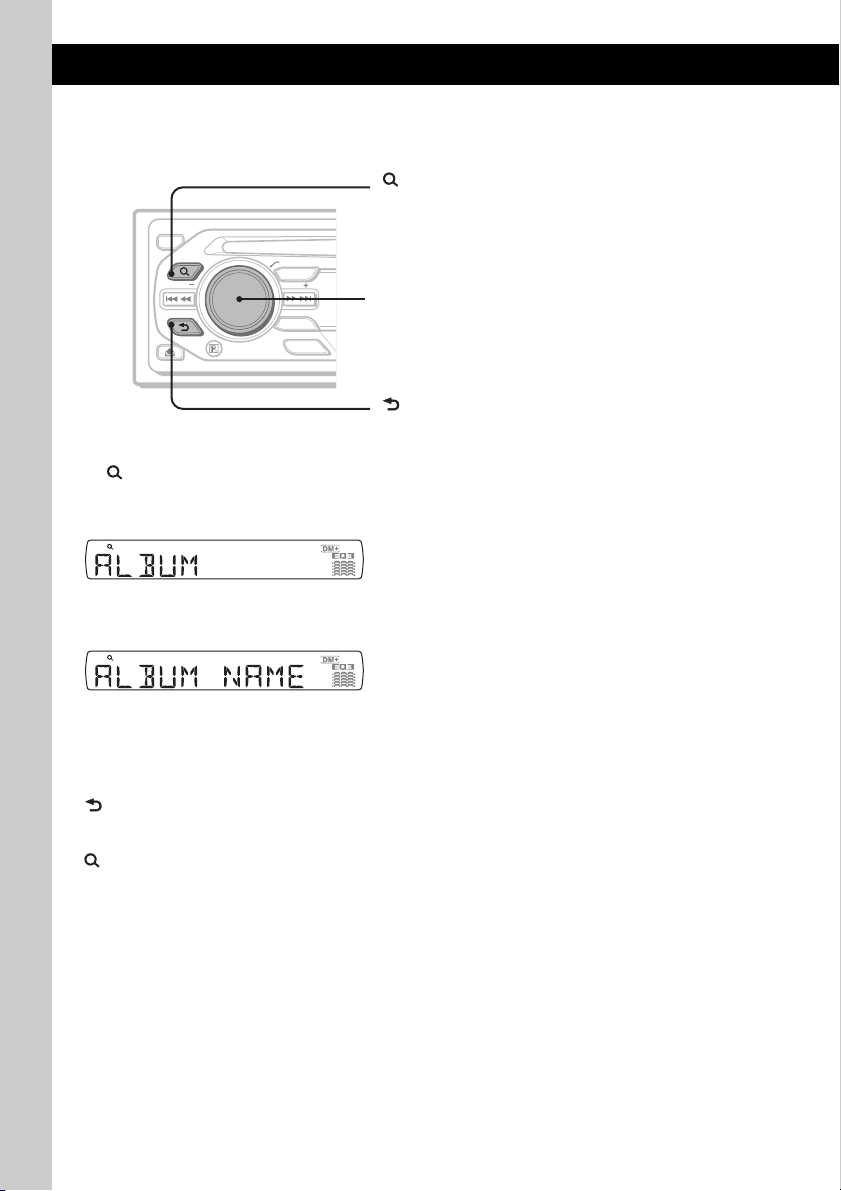
Searching for a track — Quick-BrowZer
You can search for a track in a CD or USB device (“Walkman”/Mass Storage Class) easily by category.
(BROWSE):
To enter/exit the Quick-BrowZer mode.
OFF
BROWSE
SEEK
BACK
PUSH ENTER / SELECT
SOURCE
SEEK
MODE
EQ3
Control dial:
To select the item (rotate); confirm the item (press).
(BACK):
To return to the previous display.
1 Press (BROWSE).
The unit enters the Quick-BrowZer mode, and the list of search categories appears.
Display items differ, depending on the type of device or disc.
2 Rotate the control dial to select the desired search category, then press it to confirm.
3 Repeat step 2 until the desired track is selected.
Playback starts.
To return to the previous display
Press (BACK).
To exit the Quick-BrowZer mode
Press (BROWSE).
Notes
• When entering the Quick-BrowZer mode, the repeat/shuffle setting is canceled.
• Depending on the USB device, display items may not appear correctly.
• Depending on the USB device, no sound may output during the Quick-BrowZer mode.
8
Page 9
CD
Radio
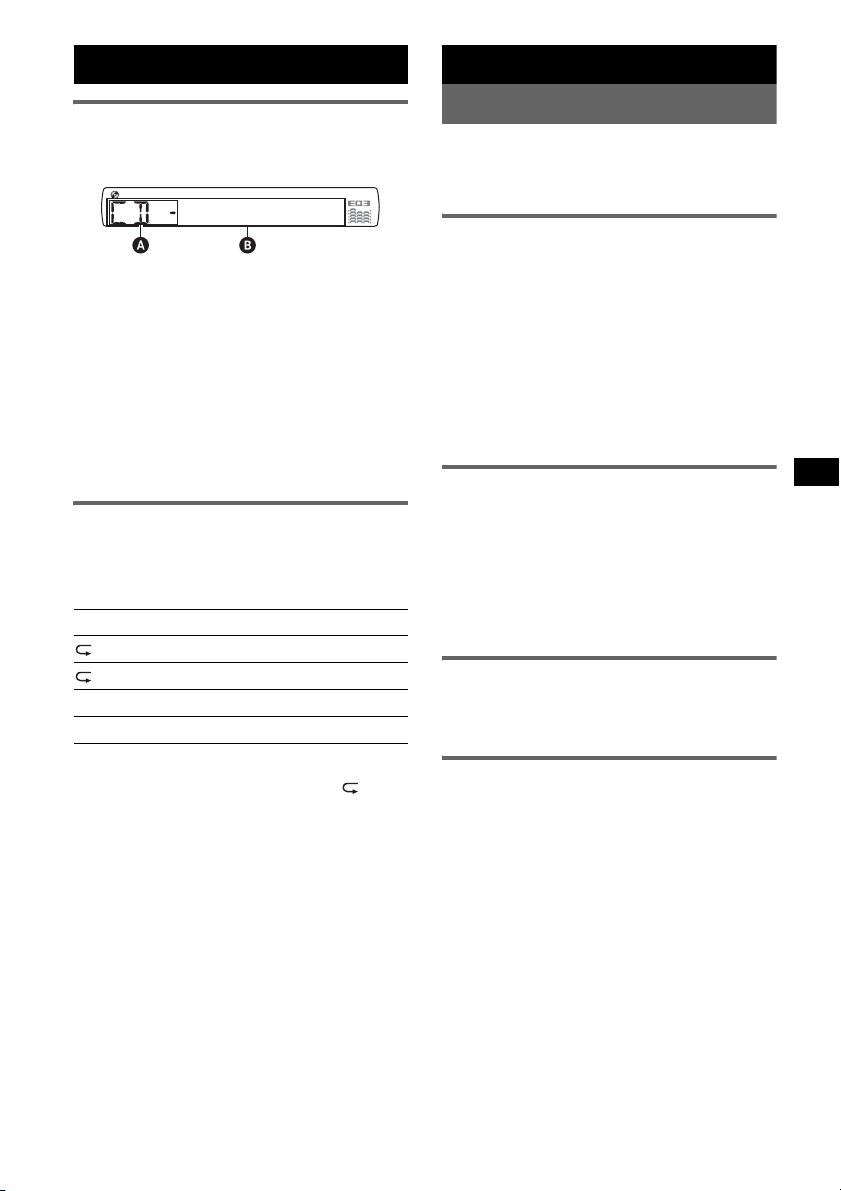
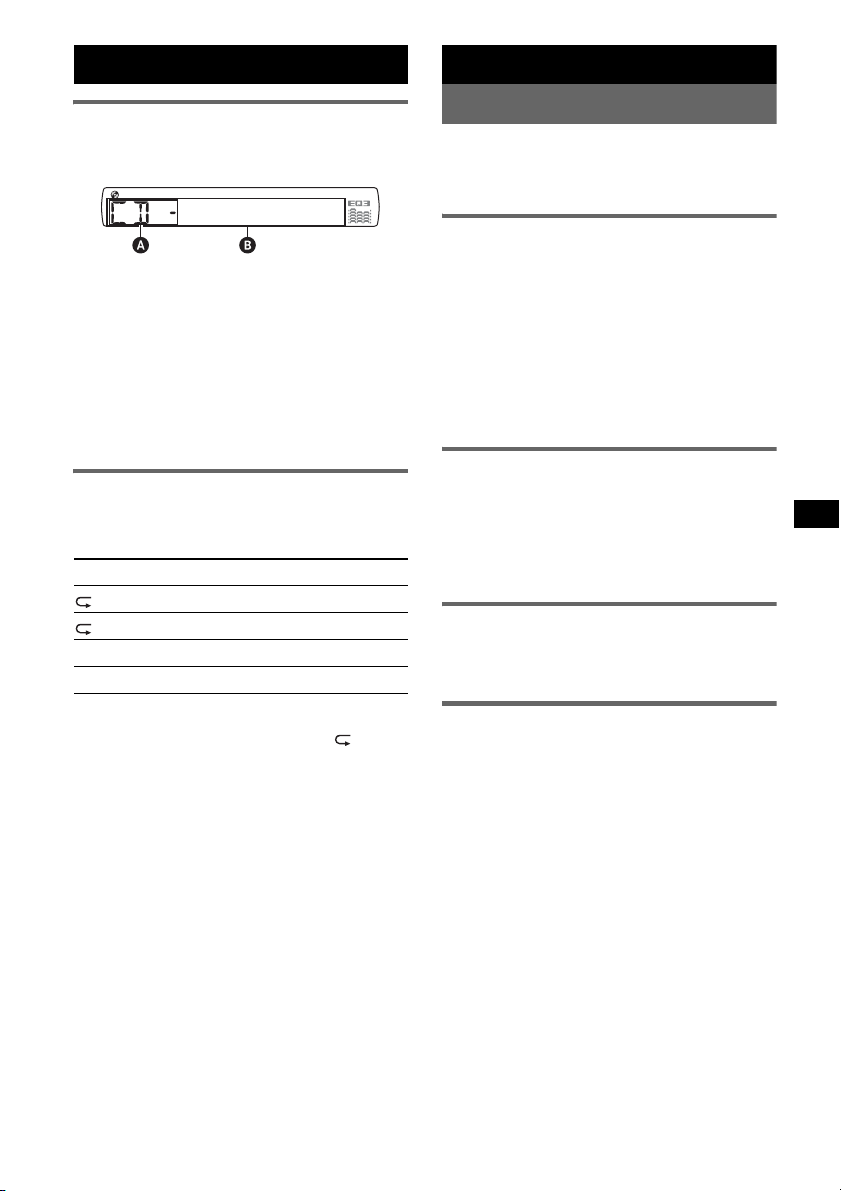
Display items
A Source
B Track number/Elapsed playing time, Disc/
artist name, Album number*, Album name,
Track name, Text information, Clock
* Album number is displayed only when the album is
changed.
To change display items B, press (DSPL).
Tip
Displayed items will differ, depending on the disc type,
recording format and settings. For details on MP3/
WMA/AAC, see page 15.
Repeat and shuffle play
1 During playback, press (3) (REP) or
(4) (SHUF) repeatedly until the
desired setting appears.
Select To play
TRACK track repeatedly.
ALBUM* album repeatedly.
SHUF ALBUM* album in random order.
SHUF DISC disc in random order.
* When an MP3/WMA/AAC is played.
To return to normal play mode, select “ OFF”
or “SHUF OFF.”
Storing and receiving stations
Caution
When tuning in stations while driving, use Best
Tuning Memory (BTM) to prevent an accident.
Storing automatically — BTM
1 Press (SOURCE) repeatedly until
“TUNER” appears.
To change the band, press (MODE)
repeatedly. You can select from FM1, FM2,
FM3, MW, SW1 or SW2.
2 Press and hold (BTM) until “BTM”
flashes.
The unit stores stations in order of frequency
on the number buttons.
A beep sounds when the setting is stored.
Storing manually
1 While receiving the station that you
want to store, press and hold a
number button ((1) to (6)) until
“MEM” appears.
Note
If you try to store another station on the same number
button, the previously stored station will be replaced.
Receiving the stored stations
1 Select the band, then press a number
button ((1) to (6)).
Tuning automatically
1 Select the band, then press (SEEK) –/+
to search for the station.
Scanning stops when the unit receives a
station. Repeat this procedure until the
desired station is received.
Tip
If you know the frequency of the station you want to
listen to, press and hold (SEEK) –/+ to locate the
approximate frequency, then press (SEEK) –/+
repeatedly to fine adjust to the desired frequency
(manual tuning).
9
Page 10
USB devices
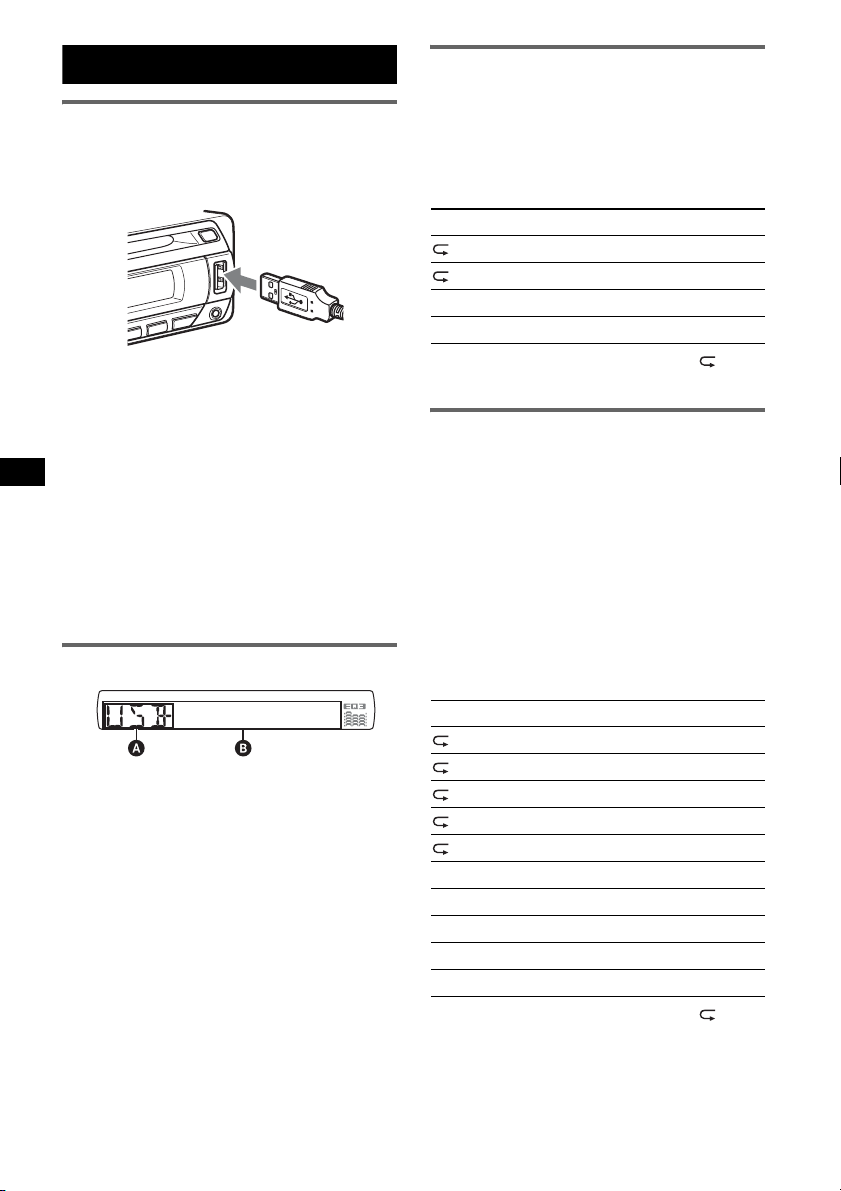
USB device playback
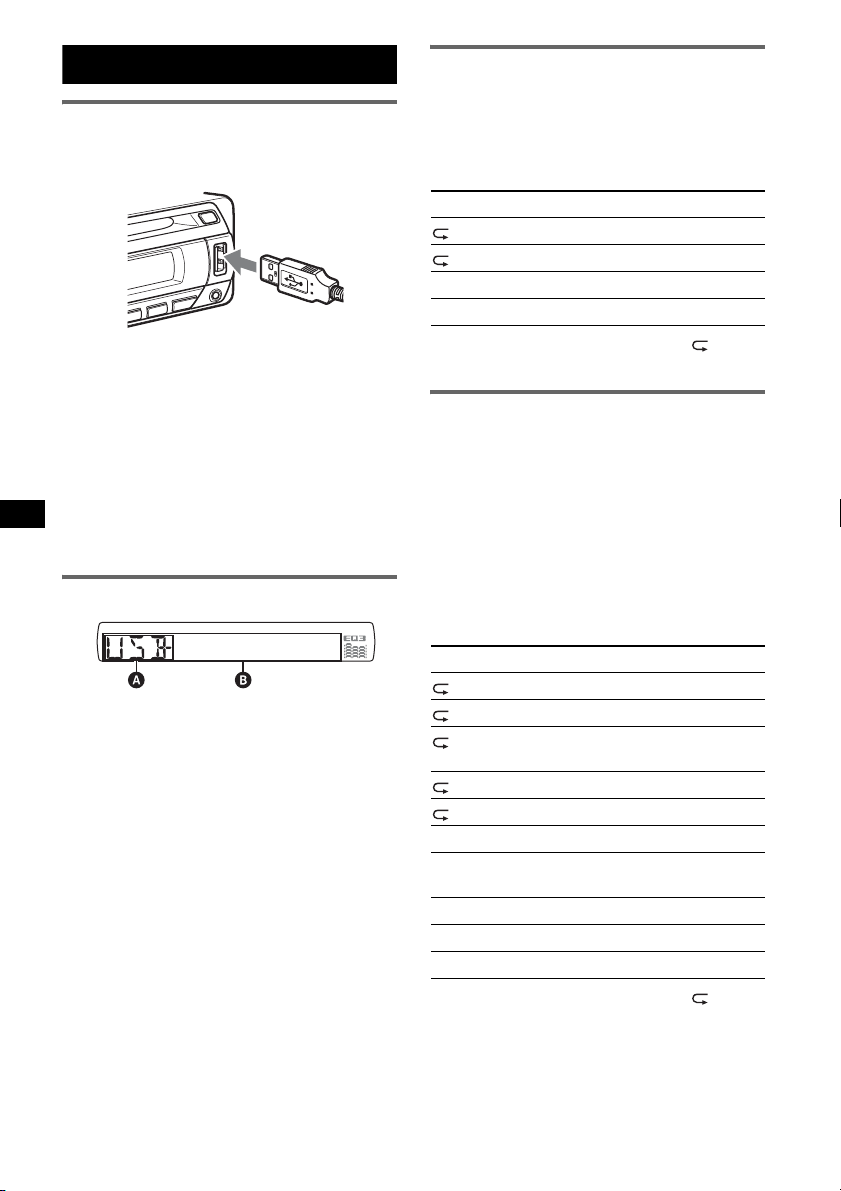
1 Connect the USB device to the USB
terminal.
Playback starts.
If a USB device is already connected, to start
playback, press (SOURCE) repeatedly until
“USB” appears.
Press (OFF) to stop playback.
Notes
• Before removing a USB device, be sure to stop
playback first. If you remove your USB device during
playback, data in the USB device may be damaged.
• Do not use USB devices so large or heavy that they
may fall down due to vibration, or cause a loose
connection.
• Do not detach the front panel during playback of the
USB device, otherwise USB data may be damaged.
Display items
A ATRAC Audio Device: AAD
Mass Storage Class: USB
B Track/Album/Artist/Playlist/Genre number,
Track/Album/Artist/Playlist/Genre name,
Elapsed playing time, Clock
To change display items B, press (DSPL).
Tip
Displayed items will differ, depending on the recorded
format and settings. For details on MP3/WMA/AAC/
ATRAC, see page 15.
Note
The display differs depending on the Mass Storage
Class type USB device, and ATRAC Audio Device.
Listening to music on a Mass
Storage Class type audio device
Repeat and shuffle play
1 During playback, press (3) (REP) or (4)
(SHUF) repeatedly until the desired setting
appears.
Select To play
TRACK track repeatedly.
ALBUM album repeatedly.
SHUF ALBUM album in random order.
SHUF DEVICE device in random order.
To return to normal play mode, select “ OFF”
or “SHUF OFF”.
Listening to music on a “Walkman”
(ATRAC Audio Device)
1 During playback, press (MODE)
repeatedly until the desired setting
appears.
The item changes as follows:
ALBUM t TRACK t GENRE t
PLAYLIST t ARTIST
Repeat and shuffle play
1 During playback, press (3) (REP) or (4)
(SHUF) repeatedly until the desired setting
appears.
Select To play
TRACK track repeatedly.
ALBUM album repeatedly.
ARTIST artist repeatedly.
PLAYLIST playlist repeatedly.
GENRE genre repeatedly.
SHUF ALBUM album in random order.
SHUF ARTIST artist in random order.
SHUF PLAYLIST playlist in random order.
SHUF GENRE genre in random order.
SHUF DEVICE device in random order.
To return to normal play mode, select “ OFF”
or “SHUF OFF. ”
10
Page 11
Other functions
Adjusting setup items — SET
Changing the sound settings
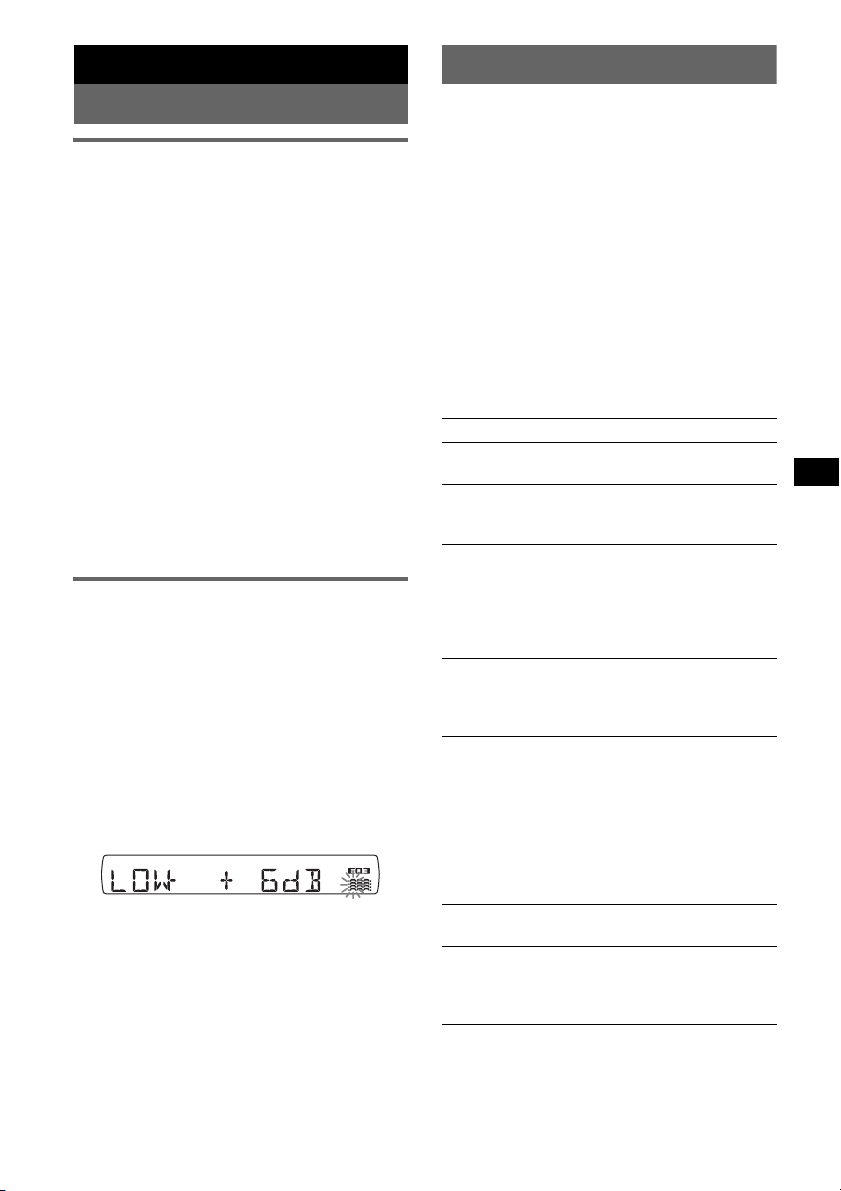
Adjusting the sound
characteristics — BAL/FAD/SUB
You can adjust the balance, fader, and subwoofer
volume.
1 Press the select button repeatedly
until “BAL,” “FAD” or “SUB” appears.
The item changes as follows:
1
LOW*
t MID*1 t HI*1 t
BAL (left-right) t FA D (front-rear) t
SUB (subwoofer volume)*
*1 When EQ3 is activated (page 11).
*2 When the audio output is set to “SUB”
(page 11).
“ATT” is displayed at the lowest setting, and can
be adjusted up to 21 steps.
*3 When AUX source is activated (page 12).
2 Rotate the control dial to adjust the
selected item.
After 3 seconds, the setting is complete and
the display returns to normal play/reception
mode.
Customizing the equalizer curve
— EQ3
“CUSTOM” of EQ3 allows you to make your
own equalizer settings.
1 Select a source, then press (EQ3)
repeatedly to select “CUSTOM.”
2 Press the select button repeatedly
until “LOW,” “MID” or “HI” appears.
3 Rotate the control dial to adjust the
selected item.
The volume level is adjustable in 1 dB steps,
from –10 dB to +10 dB.
Repeat steps 2 and 3 to adjust the equalizer
curve.
To restore the factory-set equalizer curve,
press and hold the select button before the
setting is complete.
After 3 seconds, the setting is complete and
the display returns to normal play/reception
mode.
Tip
Other equalizer types are also adjustable.
2
t AUX *
3
1 Press and hold the select button.
The setup display appears.
2 Press the select button repeatedly
until the desired item appears.
3 Rotate the control dial to select the
setting (example “ON” or “OFF”).
4 Press and hold the select button.
The setup is complete and the display returns
to normal play/reception mode.
Note
Displayed items will differ, depending on the source
and setting.
The following items can be set (follow the page
reference for details):
“
z” indicates the default settings.
CLOCK-ADJ (Clock Adjust) (page 4)
BEEP
To set “BEEP-ON” (z) or “BEEP-OFF.”
1
AUX-A*
To turn the AUX source display “AUX-A-ON”
(
A.OFF (Auto Off)
To shut off automatically after a desired time
when the unit is turned off.
– “A.OFF-NO” (
SUB/REAR*
To switch the audio output.
– “SUB-OUT” (
– “REAR-OUT”: to output to a power amplifier.
B.OUT (Black Out)
To turn off the illumination automatically for
any source (for example, during CD playback/
radio reception, etc.).
– “B.OUT-ON”*
– “B.OUT-OFF” (
To bring the light back on, press any button.
DEMO
To set “DEMO-ON” (z) or “DEMO-OFF.”
DIM (Dimmer)
To change the brightness of the display.
– “DIM-ON”: to dim the display.
– “DIM-OFF” (
(AUX Audio)
z) or “AUX-A-OFF” (page 12).
z), “A.OFF-30S (Seconds),”
“A.OFF-30M (Minutes)” or “A.OFF-60M
(Minutes).”
1
z): to output to a subwoofer.
2
: to turn off the illumination if
no operation is performed for 5 seconds.
function.
z): to deactivate the Black Out
(Demonstration)
z): to deactivate the dimmer.
continue to next page t
11
Page 12
M.DSPL (Motion Display)
To select the Motion Display mode.
– “M.DSPL-SA” (
z): to show moving patterns
and spectrum analyzer.
– “M.DSPL-OFF”: to deactivate the Motion
Display.
A.SCRL (Auto Scroll)
To scroll long displayed item automatically
when the disc/album/track is changed.
– “A.SCRL-ON” (
z): to scroll.
– “A.SCRL-OFF”: to not scroll.
LOCAL (Local Seek Mode)
– “LOCAL-ON” : to only tune into stations with
stronger signals.
– “LOCAL-OFF” (
3
MONO*
(Monaural Mode)
z): to tune normal reception.
To improve poor FM reception, select monaural
reception mode.
– “MONO-ON” : to hear stereo broadcast in
monaural.
– “MONO-OFF” (
z): to hear stereo broadcast in
stereo.
LPF*4 (Low Pass Filter)
To select the subwoofer cut-off frequency: “LPF
OFF” (
z), “LPF125Hz” or “LPF 78Hz.”
LOUD (Loudness)
To allow you to listen clearly at low volume
levels.
– “LOUD-ON” : to reinforce bass and treble.
– “LOUD-OFF” (
z): to not reinforce bass and
treble.
BTM (page 9)
*1 When the unit is turned off.
*2 When the black out function is activated, the unit
cannot be operated with the card remote
commander.
*3 When FM is received.
*4 When the audio output is set to “SUB.”
Using optional equipment
Auxiliary audio equipment
By connecting an optional portable audio device
to the AUX input jack (stereo mini jack) on the
unit and then simply selecting the source, you
can listen on your car speakers. The volume level
is adjustable for any difference between the unit
and the portable audio device. Follow the
procedure below:
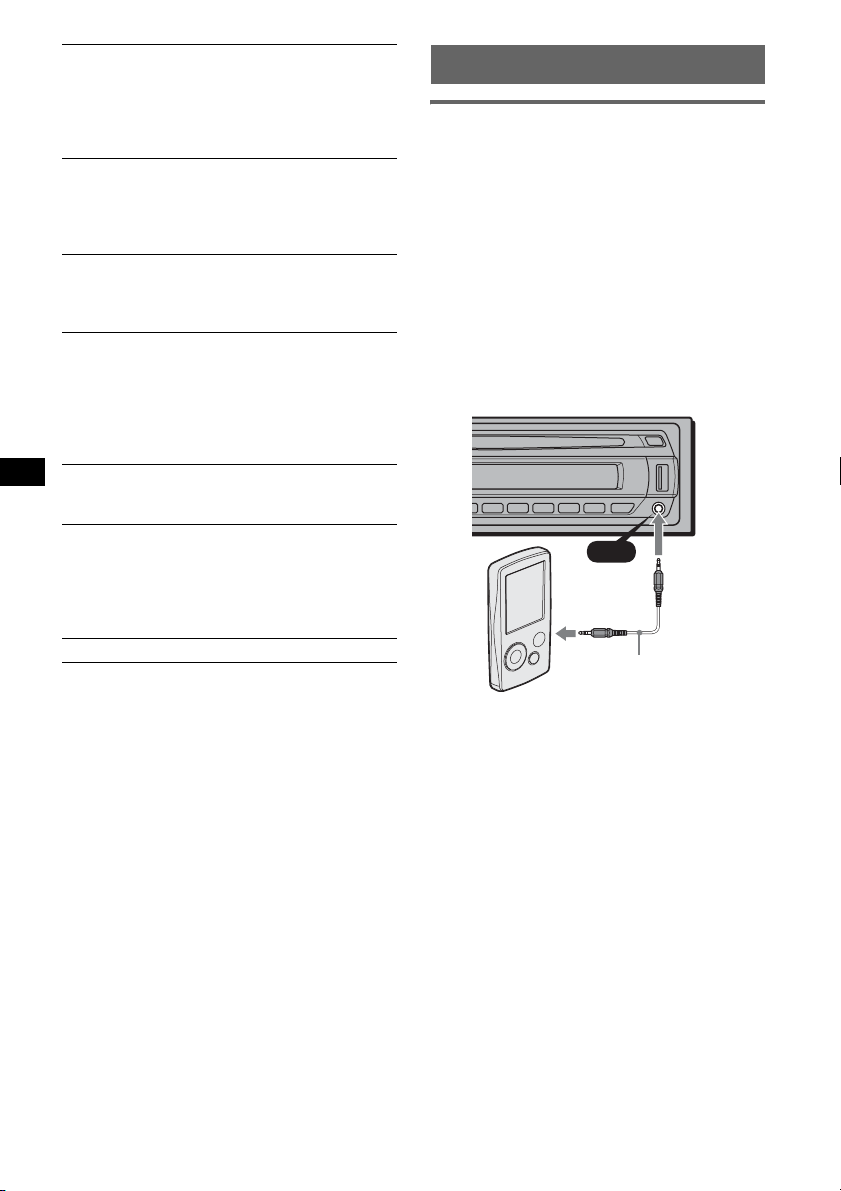
Connecting the portable audio
device
1 Turn off the portable audio device.
2 Turn down the volume on the unit.
3 Connect to the unit.
AUX
AUX
Connecting cord*
(not supplied)
* Be sure to use a straight type plug.
Adjust the volume level
Be sure to adjust the volume for each connected
audio device before playback.
1 Turn down the volume on the unit.
2 Press (SOURCE) repeatedly until “AUX”
appears.
“AUX FRONT IN” appears.
3 Start playback of the portable audio device at a
moderate volume.
4 Set your usual listening volume on the unit.
5 Press the select button repeatedly until “AUX”
appears, and rotate the control dial to adjust
the input level (–8 dB to +18 dB).
12
Page 13
Rotary commander RM-X4S
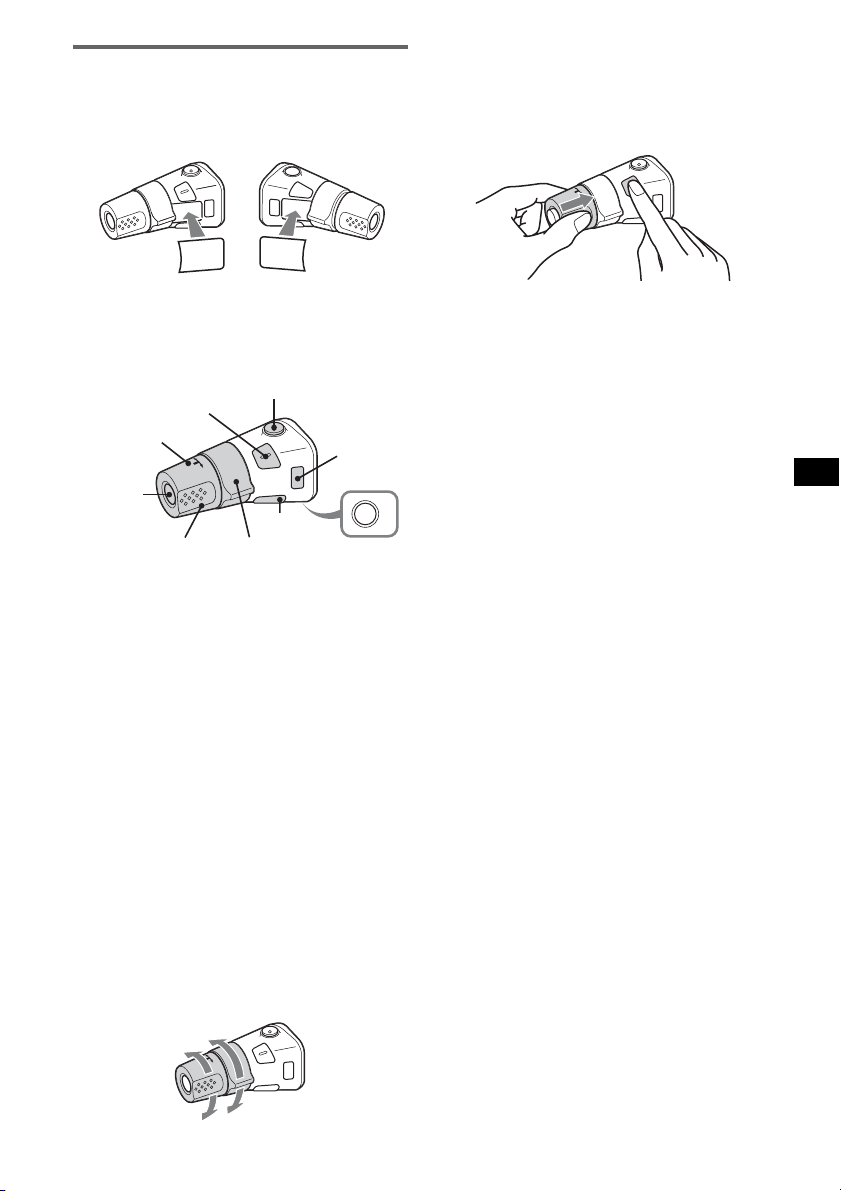
Attaching the label
Attach the indication label depending on how
you mount the rotary commander.
D
S
P
L
SE
E
D
O
M
L
P
DS
L
M
O
D
E
S
E
L
Location of controls
The corresponding buttons on the rotary
commander control the same functions as those
on this unit.
SEL
PRESET/
DISC
SOURCE
VOL
The following controls on the rotary commander
require a different operation from the unit.
• ATT (attenuate) button
To attenuate the sound. To cancel, press again.
• SEL (select) button
The same as the select button on the unit.
During the Quick-BrowZer mode, (SEL)
(select) is inactive.
• PRESET/DISC control
CD/USB: The same as (1)/(2) (ALBUM –/+)
on the unit (push in and rotate).
Radio: To receive stored stations (push in and
rotate).
• VOL (volume) control
The same as the control dial on the unit (rotate).
• SEEK/AMS control
The same as (SEEK) –/+ on the unit (rotate, or
rotate and hold).
• DSPL (display) button
To change display items.
ATT
DSPL
SEEK/ AMS
MODE
OFF
OFF
If you need to mount the rotary commander on
the right hand side of the steering column, you
can reverse the operative direction.
1 While pushing the VOL control, press and
hold (SEL).
Changing the operative direction
The operative direction of the controls is factoryset as shown below.
To increase
To decrease
13
Page 14
Additional Information
Precautions
• If your car has been parked in direct sunlight,
allow the unit to cool off before operating it.
• Power antenna (aerial) will extend automatically
while the unit is operating.
Moisture condensation
On a rainy day or in a very damp area, moisture
condensation may occur inside the lenses and
display of the unit. Should this occur, the unit will
not operate properly. In such a case, remove the disc
and wait for about an hour until the moisture has
evaporated.
To maintain high sound quality
Be careful not to splash juice or other soft drinks
onto the unit or discs.
Notes on discs
• To keep a disc clean, do not touch its surface.
Handle the disc by its edge.
• Keep your discs in their cases or disc magazines
when not in use.
• Do not subject discs to heat/high temperature.
Avoid leaving them in a parked car or on a
dashboard/rear tray.
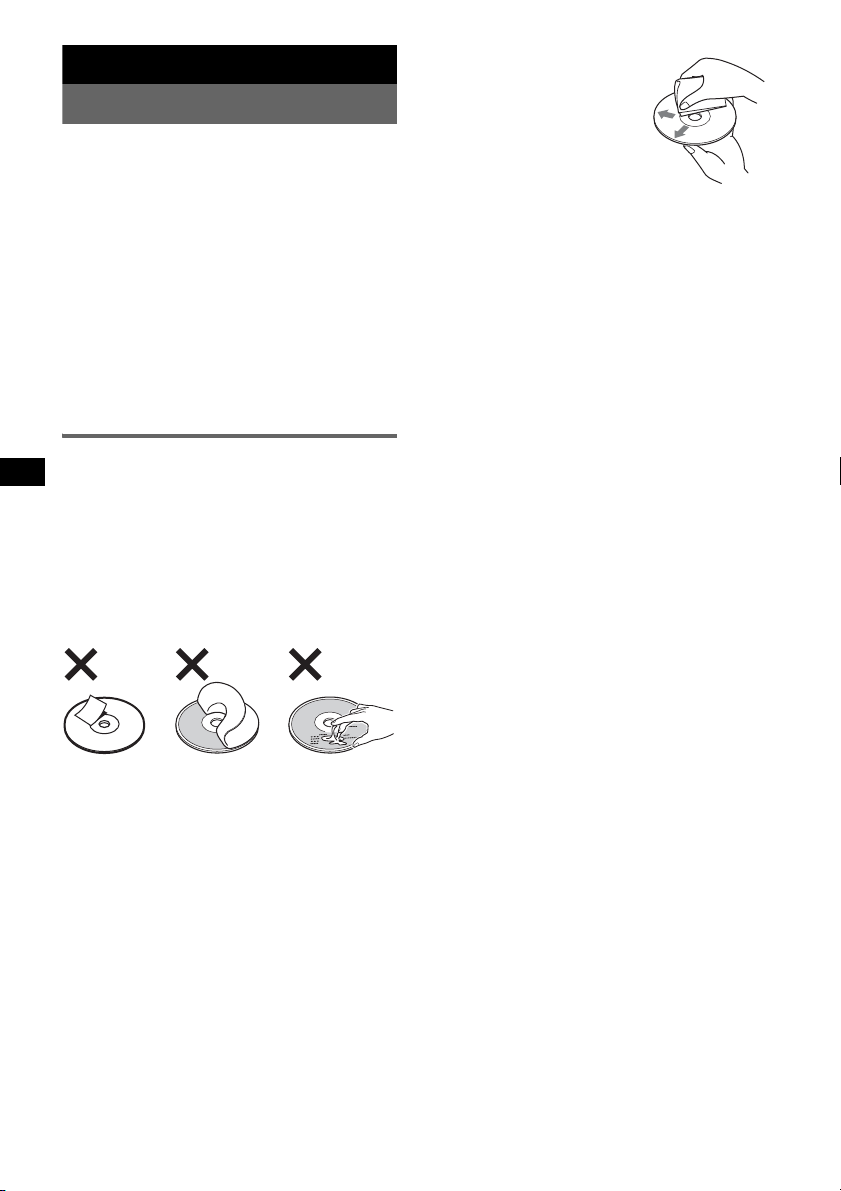
• Do not attach labels, or use discs with sticky ink/
residue. Such discs may stop spinning when used,
causing a malfunction, or may ruin the disc.
• Before playing, clean the discs
with a commercially available
cleaning cloth. Wipe each disc
from the center out. Do not use
solvents such as benzine,
thinner, commercially available
cleaners, or antistatic spray
intended for analog discs.
Notes on CD-R/CD-RW discs
• Some CD-Rs/CD-RWs (depending on the
equipment used for its recording or the condition
of the disc) may not play on this unit.
• You cannot play a CD-R/a CD-RW that is not
finalized.
• The unit is compatible with the ISO 9660 level 1/
level 2 format, Joliet/Romeo in the expansion
format, and Multi Session.
• The maximum number of:
– folders (albums): 150 (including root and empty
folders).
– files (tracks) and folders contained in a disc: 300
(if a folder/file names contain many characters,
this number may become less than 300).
– displayable characters for a folder/file name is
32 (Joliet), or 64 (Romeo).
• When the disc is recorded in Multi Session, only
the first track of the first session format is
recognized and played (any other format is
skipped). The priority of the format is CD-DA and
MP3/WMA/AAC.
– When the first track is a CD-DA, only CD-DA of
the first session is played.
– When the first track is not a CD-DA, the MP3/
WMA/AAC session is played. If the disc has no
data in any of these formats, “NO MUSIC” is
displayed.
• Do not use any discs with labels or stickers
attached.
The following malfunctions may result from using
such discs:
– Inability to eject a disc (due to a label or sticker
peeling off and jamming the eject mechanism).
– Inability to read audio data correctly (e.g.,
playback skipping, or no playback) due to heat
shrinking of a sticker or label causing a disc to
warp.
• Discs with non-standard shapes (e.g., heart,
square, star) cannot be played on this unit.
Attempting to do so may damage the unit. Do not
use such discs.
• You cannot play 8 cm (3
1
/4 in) CDs.
14
Music discs encoded with copyright
protection technologies
This product is designed to play back discs that
conform to the Compact Disc (CD) standard.
Recently, various music discs encoded with
copyright protection technologies are marketed by
some record companies. Please be aware that among
those discs, there are some that do not conform to
the CD standard and may not be playable by this
product.
Note on DualDiscs
A DualDisc is a two sided disc product which
mates DVD recorded material on one side with
digital audio material on the other side. However,
since the audio material side does not conform to
the Compact Disc (CD) standard, playback on this
product is not guaranteed.
Page 15
About USB devices
• Mass Storage Class and ATRAC Audio Device
type USB devices compliant with the USB
standard can be used. However, this unit cannot
recognize USB devices via a USB HUB. For
details on the compatibility of your USB device,
visit the Sony support website (page 20).
• Corresponding codec is different according to
device type.
– Mass Storage Class: MP3/WMA/AAC
– ATRAC Audio Device: ATRAC/MP3/WMA/
AAC
• DRM (Digital Rights Management) files other
than ATRAC may not be played.
• The maximum number of displayable data is as
follows.
Mass Storage Class:
– folders (albums): 128, files (tracks) per folder:
500
ATRAC Audio Device: ATRAC/MP3/WMA/AAC
– albums/artists/playlists/genres: 65,535, tracks:
65,535
Notes
• When using a cable, use the one supplied with the
USB device to connect.
• Do not use a USB device that is so large or heavy it
may interfere with driving operations.
• Do not leave a USB device in a parked car, as
malfunction may result.
• It may take time for playback to begin, depending on
the amount of recorded data.
• Backup of data in a USB device is recommended.
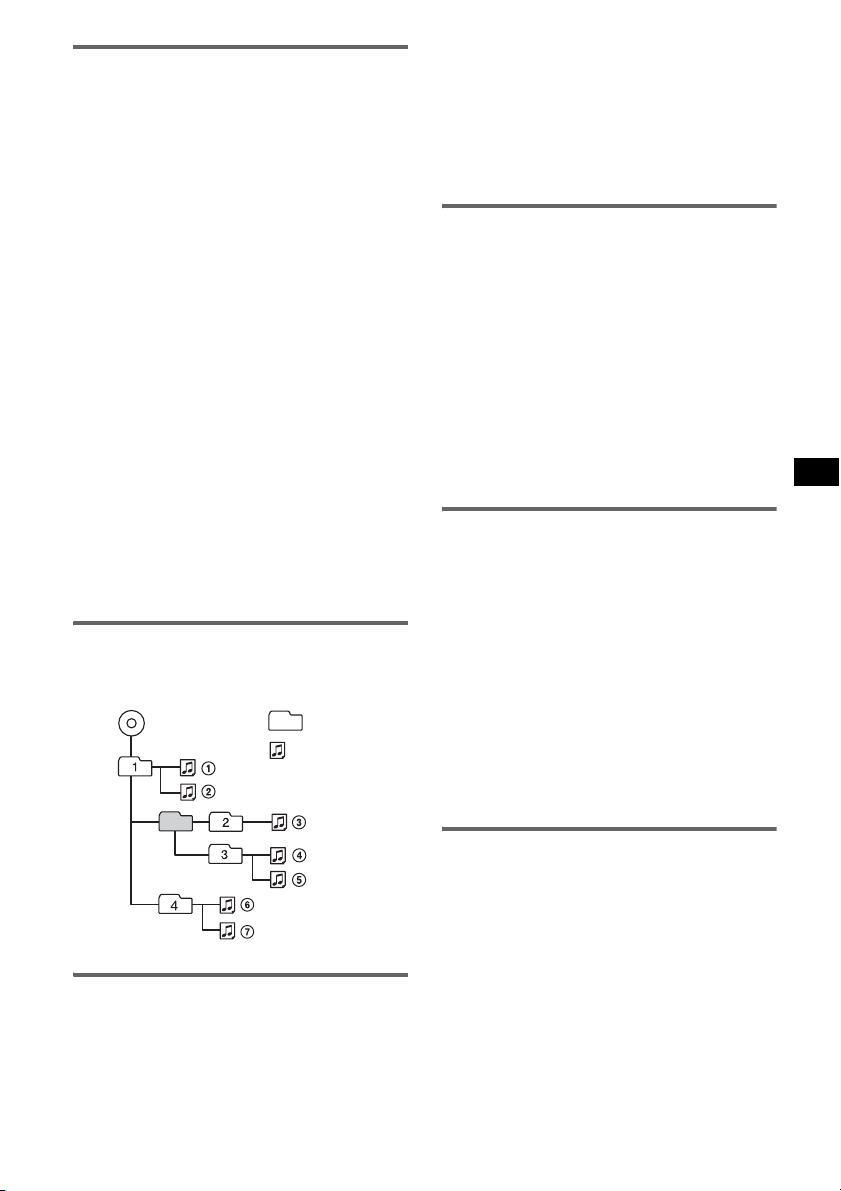
Playback order of MP3/WMA/AAC
files (CD-R/RW or Mass Storage
Class)
MP3/WMA/AAC
Folder
(album)
MP3/WMA/
AAC file
(track)
• When naming an MP3 file, be sure to add the file
extension “.mp3” to the file name.
• During playback or fast-forward/reverse of a VBR
(variable bit rate) MP3 file, elapsed playing time
may not display accurately.
Note
If you play a high-bit-rate MP3, such as 320 kbps,
sound may be intermittent.
About WMA files
• WMA, which stands for Windows Media Audio,
is a music file compression format standard. It
compresses audio CD data to approximately 1/22*
of its original size.
• WMA tag is 63 characters.
• When naming a WMA file, be sure to add the file
extension “.wma” to the file name.
• During playback or fast-forward/reverse of a VBR
(variable bit rate) WMA file, elapsed playing time
may not display accurately.
* only for 64 kbps
Note
Playback of the following WMA files is not supported.
– lossless compression
About AAC files
• AAC, which stands for Advanced Audio Coding,
is a music file compression format standard. It
compresses audio CD data to approximately 1/11*
of its original size.
• AAC tag is 126 characters.
• When naming an AAC file, be sure to add the file
extension “.m4a” to the file name.
• During playback or fast-forward/reverse of a VBR
(variable bit rate) AAC file, elapsed playing time
may not display accurately.
* only for 128 kbps
Note
Playback of the following AAC files is not supported.
– lossless compression
– copyright-protected
About MP3 files
• MP3, which stands for MPEG-1 Audio Layer-3, is
a music file compression format standard. It
compresses audio CD data to approximately 1/10
of its original size.
• ID3 tag versions 1.0, 1.1, 2.2, 2.3 and 2.4 apply to
MP3 only. ID3 tag is 15/30 characters (1.0 and
1.1), or 63/126 characters (2.2, 2.3 and 2.4).
About ATRAC files
ATRAC3plus format
ATRAC3, which stands for Adaptive Transform
Acoustic Coding3, is audio compression
technology. It compresses audio CD data to
approximately 1/10 of its original size.
ATRAC3plus, which is an extended format of
ATRAC3, compresses the audio CD data to
approximately 1/20 of its original size. The unit
accepts both ATRAC3 and ATRAC3plus format.
The characters for text information written by
SonicStage are displayed.
If you have any questions or problems concerning
your unit that are not covered in this manual, consult
your nearest Sony dealer.
15
Page 16
Maintenance
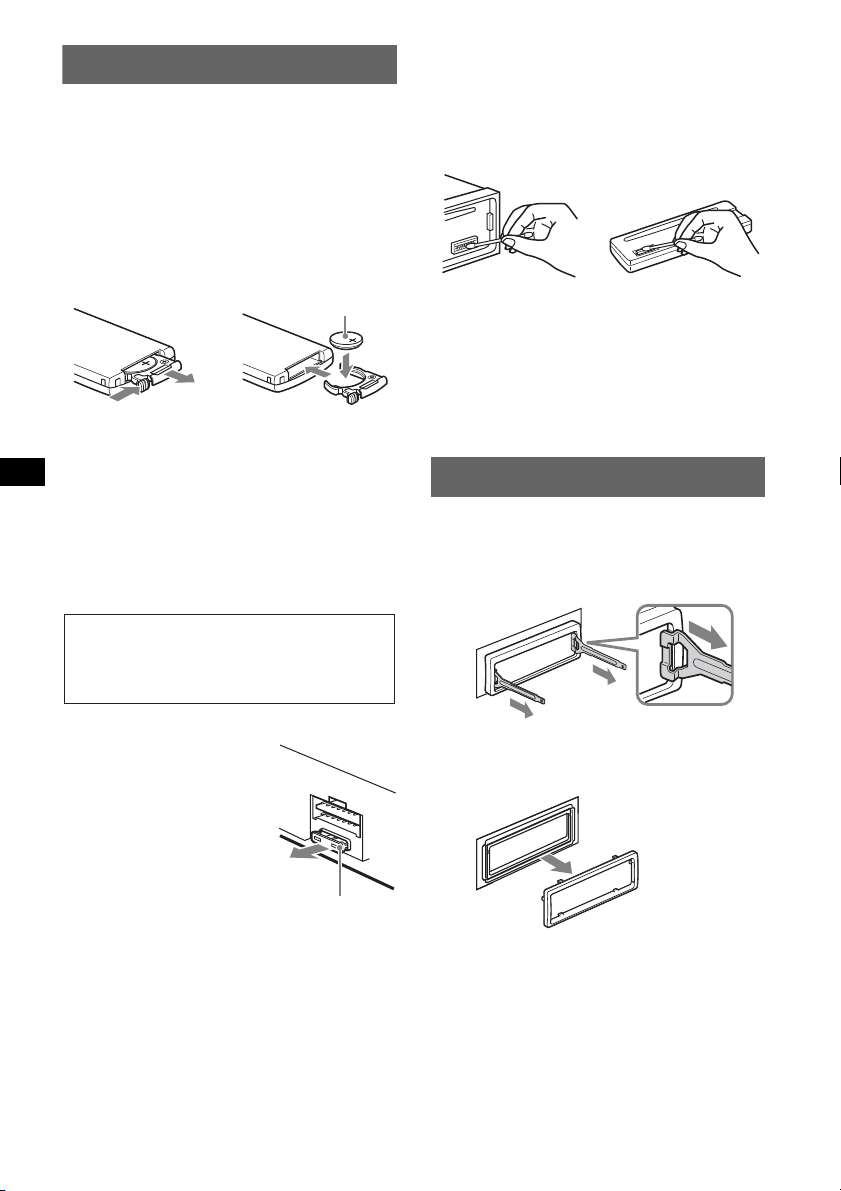
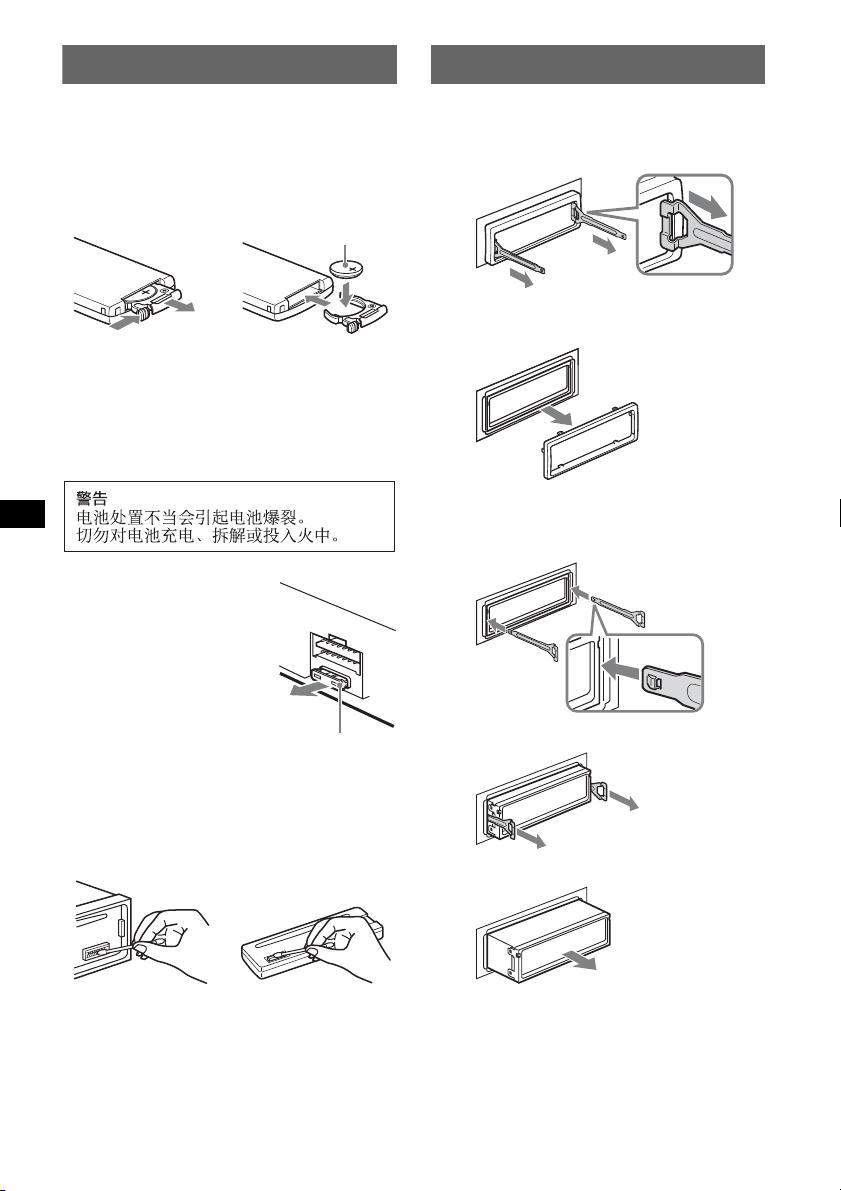
Replacing the lithium battery of the
card remote commander
Under normal conditions, the battery will last
approximately 1 year. (The service life may be
shorter, depending on the conditions of use.)
When the battery becomes weak, the range of the
card remote commander becomes shorter. Replace
the battery with a new CR2025 lithium battery. Use
of any other battery may present a risk of fire or
explosion.
Cleaning the connectors
The unit may not function properly if the connectors
between the unit and the front panel are not clean. In
order to prevent this, detach the front panel (page 5)
and clean the connectors with a cotton swab. Do not
apply too much force. Otherwise, the connectors
may be damaged.
+ side up
2
c
1
Notes on the lithium battery
• Keep the lithium battery out of the reach of children.
Should the battery be swallowed, immediately
consult a doctor.
• Wipe the battery with a dry cloth to assure a good
contact.
• Be sure to observe the correct polarity when
installing the battery.
• Do not hold the battery with metallic tweezers,
otherwise a short-circuit may occur.
WARNING
Battery may explode if mistreated.
Do not recharge, disassemble, or dispose of
in fire.
Fuse replacement
When replacing the fuse, be
sure to use one matching the
amperage rating stated on the
original fuse. If the fuse blows,
check the power connection and
replace the fuse. If the fuse
blows again after replacement,
there may be an internal
malfunction. In such a case,
consult your nearest Sony
dealer.
Fuse (10 A)
Main unit
Notes
• For safety, turn off the ignition before cleaning the
connectors, and remove the key from the ignition
switch.
• Never touch the connectors directly with your fingers
or with any metal device.
Back of the front
panel
Removing the unit
1 Remove the protection collar.
1Detach the front panel (page 5).
2Engage the release keys together with the
protection collar.
Orient the release
keys as shown.
3Pull out the release keys to remove the
protection collar.
16
Page 17
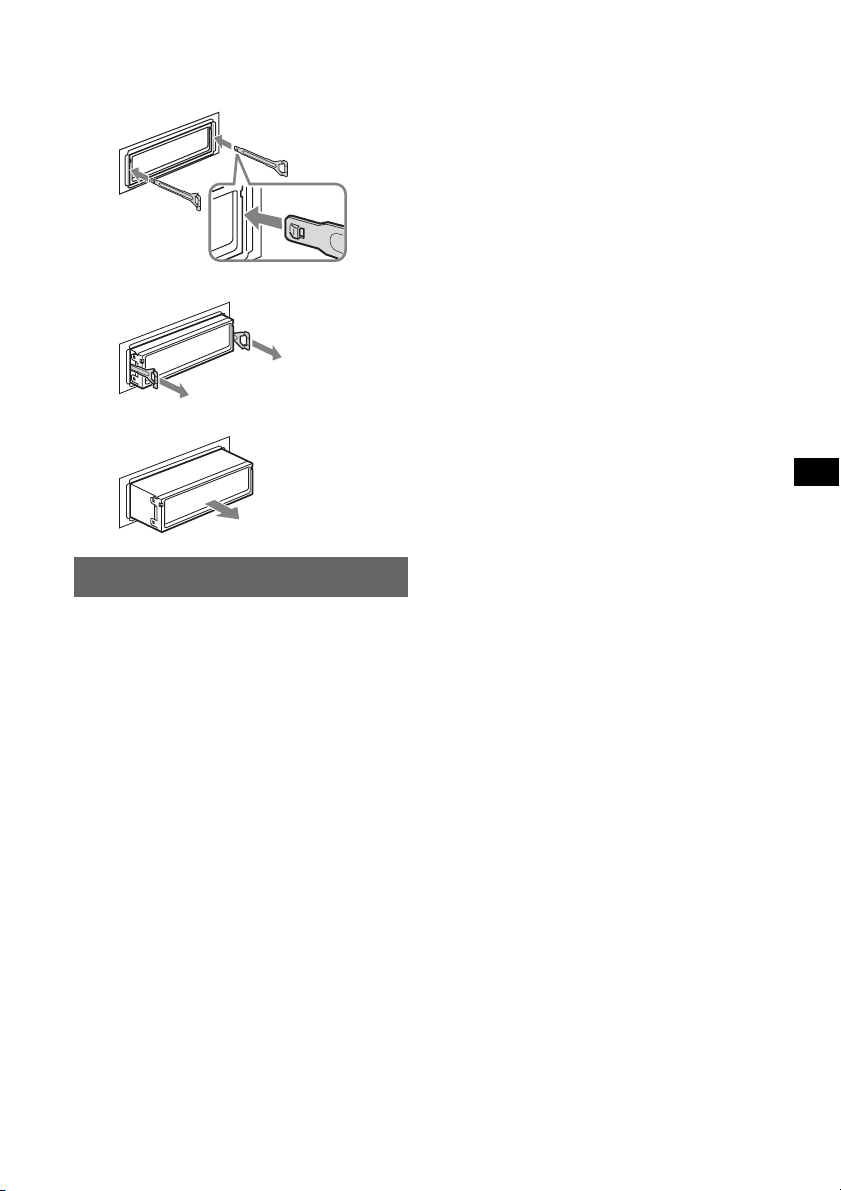
2 Remove the unit.
1 Insert both release keys simultaneously
until they click.
Hook facing
inwards.
2 Pull the release keys to unseat the unit.
3 Slide the unit out of the mounting.
Specifications
CD Player section
Frequency response: 20 Hz – 20,000 Hz (±2 dB)
Tuner section
FM
Tuning range:
87.5 MHz – 108.0 MHz (at 50 kHz step)
87.5 MHz – 107.9 MHz (at 200 kHz step)
FM tuning interval: 50 kHz/200 kHz switchable
Antenna (aerial) terminal:
External antenna (aerial) connector
Intermediate frequency: 10.7 MHz/450 kHz
MW
Tuning range:
531 kHz – 1,602 kHz (at 9 kHz step)
530 kHz – 1,710 kHz (at 10 kHz step)
MW tuning interval: 9 kHz/10 kHz switchable
Antenna (aerial) terminal:
External antenna (aerial) connector
Intermediate frequency: 10.7 MHz/450 kHz
SW
Tuning range:
SW1: 2,940 kHz – 7,735 kHz
SW2: 9,500 kHz – 18,135 kHz
(except for 10,140 kHz – 11,575 kHz)
Antenna (aerial) terminal:
External antenna (aerial) connector
Intermediate frequency: 10.7 MHz/450 kHz
USB Player section
Interface: USB (Full-speed)
Maximum current: 500mA
Power amplifier section
Outputs: Speaker outputs (sure seal connectors)
Speaker impedance: 4 ohms – 8 ohms
Maximum power output: 50 W per channel (1 kHz,
16 V, 4 ohms)
General
Output:
Audio outputs terminal (sub/rear switchable)
Power antenna (aerial) relay control terminal
Power amplifier control terminal
Inputs:
Remote controller input terminal
Antenna (aerial) input terminal
AUX input jack (stereo mini jack)
Power requirements: 12 V DC car battery
(negative ground (earth))
Power supply voltage: 11 V – 16 V
Dimensions: Approx. 178 mm × 50 mm × 179 mm
1
/8 in × 2 in × 71/8 in) (w/h/d)
(7
Mounting dimensions: Approx. 182 mm × 53 mm ×
162 mm (7
Mass: Approx. 1.2 kg (2 lb 11 oz)
Supplied accessories:
Card remote commander: RM-X151
Parts for installation and connections (1 set)
Optional accessory:
Rotary commander: RM-X4S
1
/4 in × 21/8 in × 61/2 in) (w/h/d)
Your dealer may not handle some of the above listed
accessories. Please ask the dealer for detailed
information.
US and foreign patents licensed from Dolby
Laboratories.
MPEG Layer-3 audio coding technology and
patents licensed from Fraunhofer IIS and Thomson.
This product is protected by certain intellectual
property rights of Microsoft Corporation. Use or
distribution of such technology outside of this
product is prohibited without a license from
Microsoft or an authorized Microsoft subsidiary.
continue to next page t
17
Page 18
Content providers are using the digital rights
management technology for Windows Media
contained in this device (“WM-DRM”) to protect
the integrity of their content (“Secure Content”) so
that their intellectual property, including copyright,
in such content is not misappropriated.
This device uses WM-DRM software to play
Secure Content (“WM-DRM Software”). If the
security of the WM-DRM Software in this device
has been compromised, owners of Secure Content
(“Secure Content Owners”) may request that
Microsoft revoke the WM-DRM Software’s right
to acquire new licenses to copy, display and/or
play Secure Content. Revocation does not alter the
WM-DRM Software’s ability to play unprotected
content. A list of revoked WM-DRM Software is
sent to your device whenever you download a
license for Secure Content from the Internet or
from a PC. Microsoft may, in conjunction with
such license, also download revocation lists onto
your device on behalf of Secure Content Owners.
Design and specifications are subject to change
without notice.
• Halogenated flame retardants are not used in the
certain printed wiring boards.
• Halogenated flame retardants are not used in
cabinets.
• Packaging cushions are made from paper.
Troubleshooting
The following checklist will help you remedy
problems you may encounter with your unit.
Before going through the checklist below, check the
connection and operating procedures.
No beep sound.
• The beep sound is canceled (page 11).
• An optional power amplifier is connected and you are
not using the built-in amplifier.
The contents of the memory have been erased.
• The RESET button has been pressed.
t Store again into the memory.
• The power supply lead or battery has been
disconnected.
• The power supply lead is not connected properly.
Stored stations and correct time are erased.
The fuse has blown.
Makes noise when the position of the ignition
is switched.
The leads are not matched correctly with the car’s
accessory power connector.
During playback or reception, demonstration
mode starts.
If no operation is performed for 5 minutes with
“DEMO-ON” set, demonstration mode starts.
t Set “DEMO-OFF” (page 11).
The display disappears from/does not appear
in the display window.
• The dimmer is set “DIM-ON” (page 11).
• The display disappears if you press and hold (OFF).
t Press and hold (OFF) on the unit until the
display appears.
• The connectors are dirty (page 16).
The Auto Off function does not operate.
The unit is turned on. The Auto Off function activates
after turning off the unit.
t Turn off the unit.
The display disappears while the unit is
operating.
The Black Out function is set to on (page 11).
Card remote commander operation is not
possible.
• If the Black Out function is activated (no lighting),
card remote commander operation is not possible
(page 11).
• Make sure the insulation film has been removed
(page 4).
General
No power is being supplied to the unit.
• Check the connection. If everything is in order, check
the fuse.
• If the unit is turned off and the display disappears, it
cannot be operated with the remote commander.
tTurn on the unit.
The power antenna (aerial) does not extend.
The power antenna (aerial) does not have a relay box.
No sound.
• The volume is too low.
• The ATT function is activated.
• The position of the fader control “FAD” is not set for
a 2-speaker system.
18
CD playback
The disc cannot be loaded.
• Another disc is already loaded.
• The disc has been forcibly inserted upside down or in
the wrong way.
The disc does not playback.
• Defective or dirty disc.
• The CD-Rs/CD-RWs are not for audio use (page 14).
MP3/WMA/AAC files cannot be played back.
The disc is incompatible with the MP3/WMA/AAC
format and version (page 15).
Page 19
MP3/WMA/AAC files take longer to play back
than others.
The following discs take a longer time to start
playback.
– a disc recorded with a complicated tree structure.
– a disc recorded in Multi Session.
– a disc to which data can be added.
The display items do not scroll.
• For discs with very many characters, those may not
scroll.
• “A.SCRL” is set to “OFF”.
t Set “A.SCRL-ON” (page 12).
t Press and hold (DSPL) (SCRL).
The sound skips.
• Installation is not correct.
t Install the unit at an angle of less than 45° in a
sturdy part of the car.
• Defective or dirty disc.
The operation buttons do not function.
The disc will not eject.
Press the RESET button (page 4).
USB playback
You cannot play back items via a USB HUB.
This unit cannot recognize USB devices via a USB
HUB.
Cannot play back items.
A USB device does not work.
t Reconnect it.
The USB device takes longer to play back.
The USB device contains files with a complicated tree
structure.
A beep sounds.
During playback, the USB device has been
disconnected.
t Before disconnecting a USB device, make sure to
stop playback first for data protection.
The sound is intermittent.
The sound may be intermittent at a high-bit-rate of
more than 320 kbps.
Error displays/Messages
Radio reception
The stations cannot be received.
The sound is hampered by noises.
• Connect a power antenna (aerial) control lead (blue)
or accessory power supply lead (red) to the power
supply lead of a car’s antenna (aerial) booster (only
when your car has built-in FM/MW/SW antenna
(aerial) in the rear/side glass).
• Check the connection of the car antenna (aerial).
• The auto antenna (aerial) will not go up.
t Check the connection of the power antenna
(aerial) control lead.
• Check the frequency.
Preset tuning is not possible.
• Store the correct frequency in the memory.
• The broadcast signal is too weak.
Automatic tuning is not possible.
• Setting of the local seek mode is not correct.
t Tuning stops too frequently:
Set “LOCAL-ON” (page 12).
t Tuning does not stop at a station:
Set “MONO-ON” (page 12).
• The broadcast signal is too weak.
t Perform manual tuning.
During FM reception, the “ST” indication
flashes.
• Tune in the frequency accurately.
• The broadcast signal is too weak.
t Set “MONO-ON” (page 12).
An FM program broadcast in stereo is heard in
monaural.
The unit is in monaural reception mode.
tSet “MONO-OFF” (page 12).
CHECKING
The unit is confirming the connection of a USB device.
t Wait until confirming the connection is finished.
ERROR
• The disc is dirty or inserted upside down.
t Clean or insert the disc correctly.
• A blank disc has been inserted.
• The disc cannot play due to a problem.
t Insert another disc.
• USB device was not automatically recognized.
t Reconnect it again.
• Press Z to remove the disc.
FAILURE
The connection of speakers/amplifiers is incorrect.
t See the installation/connections manual of this
model to check the connection.
HUB NO SUPRT
USB HUB is not supported on this unit.
L. SEEK +/–
The local seek mode is on during automatic tuning.
NO DEV (No Device)
(SOURCE) is selected without a USB device
connected. A USB device or a USB cable has been
disconnected during playback.
t Be sure to connect a USB device and USB cable.
NO INFO
Text information is not written in the MP3/WMA/
AAC file.
NO MUSIC
The disc/USB device does not contain a music file.
t Insert a music CD in this unit.
t Connect a USB device with a music file in it.
NO NAME
A disc/album/track name is not written in the track.
continue to next page t
19
Page 20
NO TRACK
The selected item in the USB device does not contain
an album/track.
OFFSET
There may be an internal malfunction.
t Check the connection. If the error indication
remains on in the display, consult your nearest
Sony dealer.
OVERL OAD
USB device is overloaded.
t Disconnect the USB device, then change the source
by pressing (SOURCE).
t Indicates that the USB device is out of order, or an
unsupported device is connected.
READ
The unit is reading all track and album information on
the disc/USB device.
t Wait until reading is complete and playback starts
automatically. Depending on the disc/USB device
structure, it may take more than a minute.
RESET
The CD unit cannot be operated due to a problem.
t Press the RESET button (page 4).
USB NO SUPRT (USB Not Support)
The connected USB device is not supported.
t Connect a USB device of Mass Storage Class
(page 15).
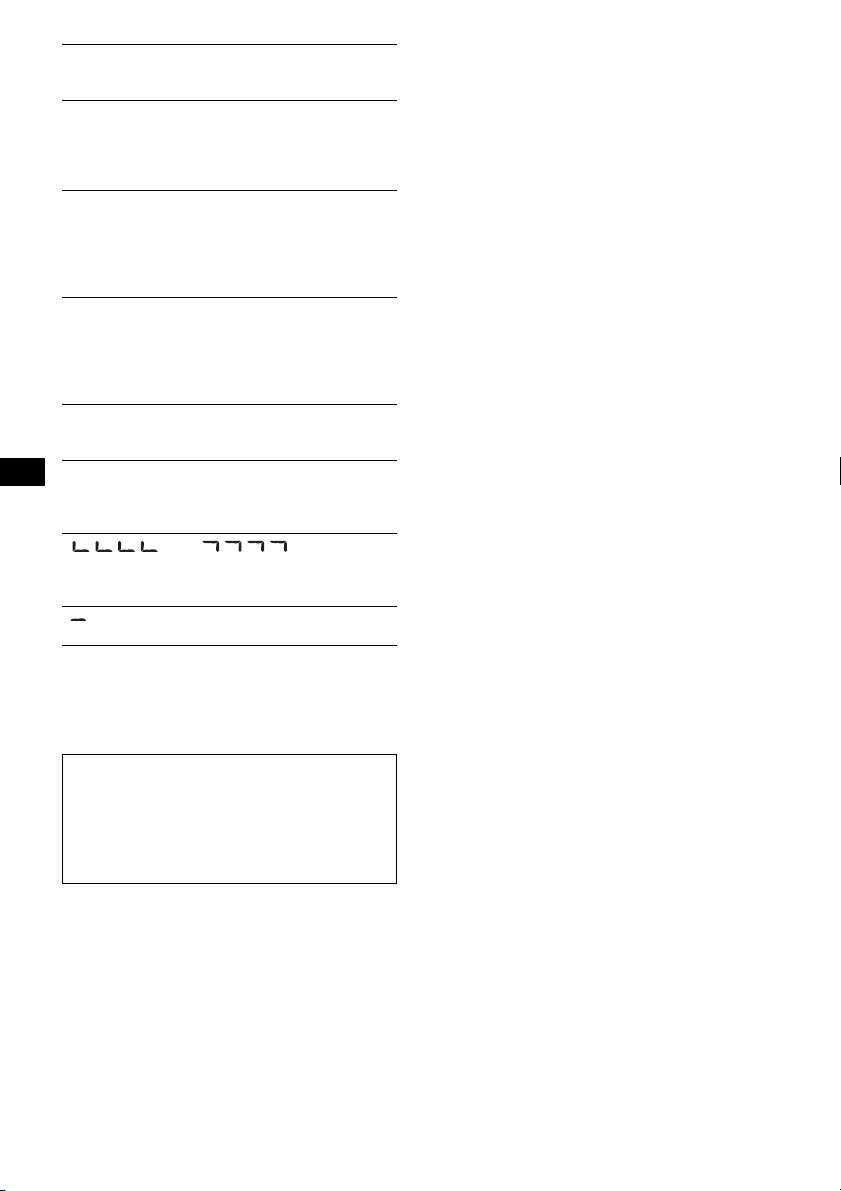
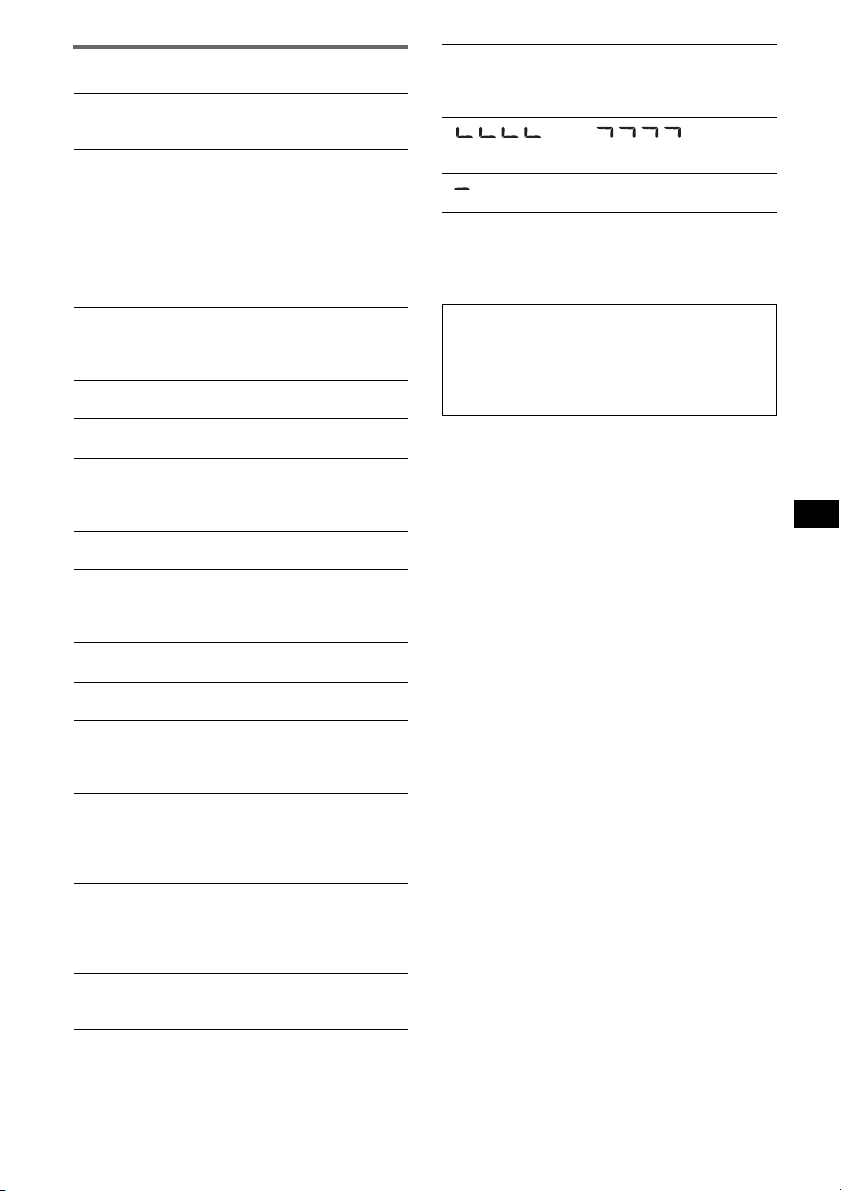
“” or “”
During reverse or fast-forward, you have reached the
beginning or the end of the disc and you cannot go any
further.
“”
The character cannot be displayed with the unit.
If these solutions do not help improve the situation,
consult your nearest Sony dealer.
If you take the unit to be repaired because of CD
playback trouble, bring the disc that was used at the
time the problem began.
Support site
If you have any questions or for the latest
support information on this product, please
visit the web site below:
http://www.css.ap.sony.com/
http://www.sony-asia.com/caraudio/
20
Page 21

Page 22
“ATRAC”、“ATRAC AD”、SonicStage 及其
标志是 Sony Corporation 的商标。
“WALKMAN”和 “WALKMAN”标志是 Sony
Corporation 的注册商标。
您的汽车引擎没有 ACC 位置时的警告
请务必设定自动断电功能 (第 11 页)。
本机将在本机关闭后设定的时间内自动彻
底关机,这样可防止电池消耗。
若未设定自动断电功能,每次关闭引擎时
请按住 (OFF) 直到显示消失为止。
2
Page 23
目录
鸣谢惠顾! ............................4
入门指南
重设本机 ..............................4
准备卡片式遥控器 ......................4
设定时钟 ..............................4
拆卸前面板 ............................5
安装前面板 .........................5
控制器位置和基本操作
主机 ...............................6
卡片式遥控器 RM- X151 ................6
搜索曲目 — Quick-BrowZer ...........8
CD
显示项目 ...........................9
重复和随机播放 .....................9
无线电
储存并接收电台 ........................9
自动储存 — BTM .....................9
手动储存 ...........................9
收听已储存的电台 ...................9
自动调谐 ...........................9
USB 设备
附加信息
使用前注意事项 ...................... 14
光盘注意事项 ......................14
关于 USB 设备 ...................... 14
MP3/WMA/AAC 文件 (CD-R/RW 或 Mass
Storage Class)的播放顺序 ......... 15
关于 MP3 文件 ...................... 15
关于 WMA 文件 ...................... 15
关于 AAC 文件 ...................... 15
关于 ATRAC 文件 .................... 15
保养 ................................ 16
取出本机 ............................ 16
规格 ................................ 17
故障排除 ............................ 17
出错显示 / 信息 .................... 19
USB 设备播放 .......................10
显示项目 ..........................10
听 Mass Storage Class 型音频设备
中的音乐 ..........................10
聆听 “Walkman”(ATRAC 音频设备)
中的音乐 ..........................10
其他功能
更改声音设定 .........................11
调整声音特性 — BAL/FAD/SUB ........11
自定义均衡曲线 — EQ3 ..............11
调节设定项目 — SET ..................11
使用选购设备 .........................12
辅助音频设备 ......................12
旋转式遥控器 RM-X4S ................13
3
Page 24
鸣谢惠顾!
入门指南
感谢您惠购 Sony 光盘播放机。 使用以下功
能,您可以享受驾驶的乐趣。
• CD 播放
您可播放 CD-DA (也包含 CD TEXT)和 CD-R/
CD-RW (MP3/WMA/AAC 文件 (第 15 页))。
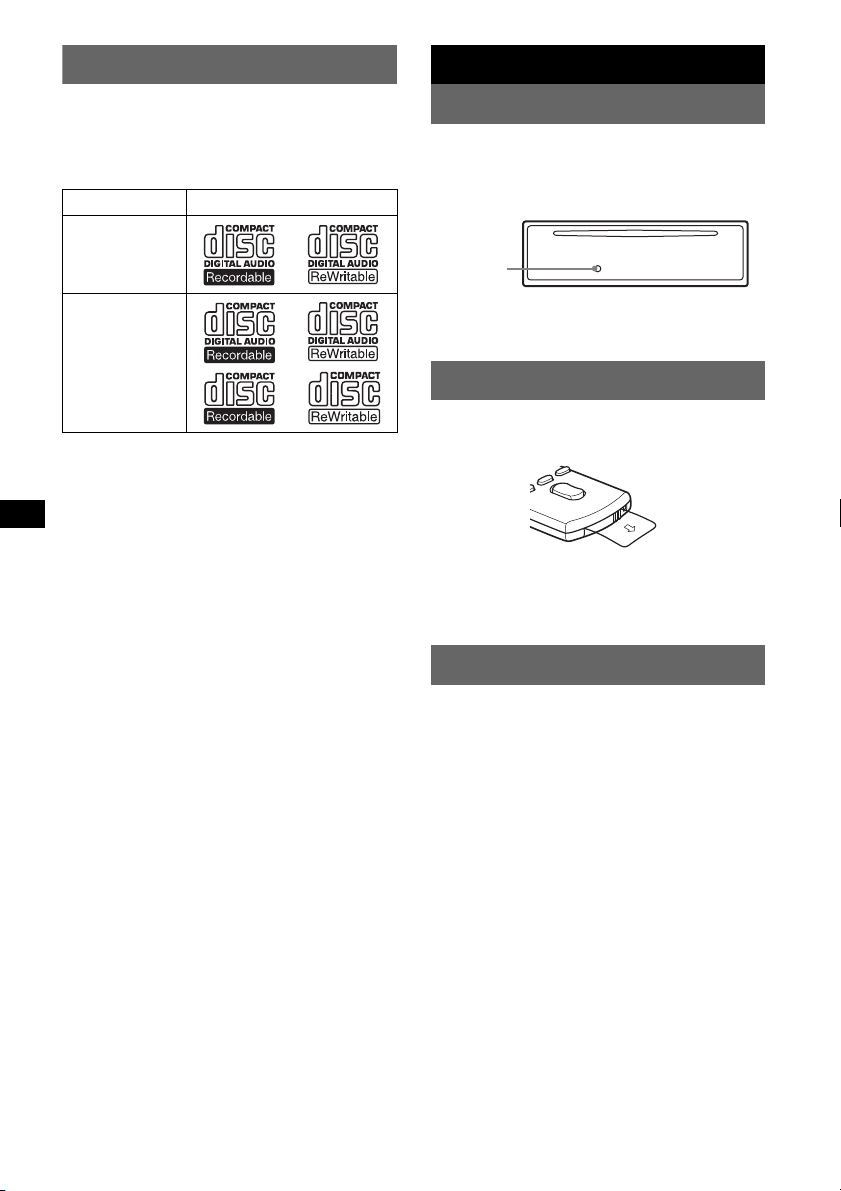
光盘类型 光盘上的标签
CD-DA
MP3
WMA
AAC
• 无线电接收
– 每个波段 (FM1、FM2、FM3、MW、SW1 和
SW2)最多可以存储 6 个电台。
– BTM (最佳调谐记忆):本机选择信号强
的电台并储存。
• 搜索功能
Quick-BrowZer:您可以快速而又简便地搜
索 CD 和与本机连接的 USB 设备中的曲目
(第 8 页)。
• 声音调节
– EQ3 stage2:您可以选择 7 个预设均衡曲
线中任何一个。
– Digital Music Plus(DM+):改善数字压
缩声音,如 MP3。
• 选购设备操作
USB 设备:Mass Storage Class USB 设备或
“Walkman”(ATRAC 音频设备)可与前面的
USB 端子连接。 关于可以使用设备的详细信
息,请参阅关于 USB 设备 (第 14 页)或
Sony 支持网站 (第 19 页)。
• 辅助设备连接
本机正面的 AUX 输入插孔可连接便携式音频
设备。
重设本机
在第一次使用本机前,或更换汽车电瓶或改
变连接后,必须重设本机。
卸下前面板,并用带尖头的物体,如圆珠笔
等,按 RESET 按钮。
RESET 按钮
注意
按 RESET 按钮,将消除时钟设定和某些已储存的内容。
准备卡片式遥控器
第一次使用卡片式遥控器之前,请先抽出绝
缘薄膜。
提示
关于如何更换电池,请参考第 16 页上的 “更换卡片式
遥控器的锂电池”。
设定时钟
时钟采用 12 小时制数字显示。
1 按住选择按钮。
出现设定显示画面。
2 反复按选择按钮直至出现 “CLOCK-ADJ”。
3 按 (SEEK) +。
小时指示闪烁。
4 转动控制拨盘,设定小时和分钟。
若要移动数字指示,按 (SEEK) -/+。
5 按选择按钮。
设定完成,时钟开始走时。
若要显示时钟,则按 (D SPL)。 再次按
(DSPL) 将返回到上一个画面。
4
Page 25

拆卸前面板
您可以拆下本机的前面板以防止本机被盗。
警报
若您未拆除前面板即把点火开关旋转至 OFF
档,警报器将发出数秒钟的警报声。
只有使用内置放大器时警报器才会发出警报
声。
1 按 (OFF)。
本机关闭。
2 按 ,然后向近前将它拉下来。
注意
• 切勿摔落或猛按前面板及显示窗。
• 切勿使前面板受热 / 高温或受潮。 避免将前面板遗留
在停放的车中或仪表盘 / 后托架上。
• 请勿在播放 USB设备过程中拆卸前面板,否则 USB数据
可能损坏。
安装前面板
如图所示将前面板上的 A 部分与本机的 B
部分嵌合在一起,然后将左侧推入直到听到
咔嚓声。
A
B
注意
切勿在前面板内表面放任何东西。
5
Page 26
控制器位置和基本操作
主机
12 4 5 863
OFF
BROWSE
SEEK
BACK
PUSH ENTER / SELECT
SOURCE
SEEK
MODE
EQ3
qa qdq;9 qs qfqg7qh qlqkqj w;
ALBUM
123456
BTM
REP SHUF SCRL
PAUSE
DM
DSPL
AUX
卡片式遥控器 RM- X151
1
4
OFF
SOURCE
SEL
wa
+
–
VOL
SCRL
+
–
ws
wd
DSPL
132
465
ATT
MODE
wf
wg
qd
wh
wj
wk
此部分包含控制器位置和基本操作的说明。
详细说明,请参阅相应的页。
关于 USB 设备操作,请参阅第 10 页上的
“USB 设备”。
卡片式遥控器上与本机上对应的按钮控制相
同的功能。
A OFF 按钮
关闭电源;停止音源。
B (BROWSE)按钮 第8页
进入 Quick-BrowZer 模式。
C 控制拨盘 / 选择按钮 第 8,11 页
调整音量 / 选择搜索类别 (转动);选
择设定项目 (按并转动)。
D SOURCE 按钮
打开电源;改变音源 (无线电 /CD/USB/
AUX)。
E 光盘插槽
插入光盘 (标签面朝上),开始播放。
F 显示窗
G USB 端子 第10页
连接 USB 设备。
H Z (退出)按钮
退出光盘。
I (前面板释放)按钮 第5页
J (BACK)按钮 第8页
返回到上一个画面。
K 卡片式遥控器的接收器
6
Page 27

L SEEK -/+ 按钮
CD/USB:
跳过曲目(按);连续跳过曲目(按,然
后约 1 秒钟内再按并保持不放);后退 /
快进一个曲目 (按住)。
无线电:
自动调入台 (按);手动搜台 (按住)。
M MODE 按钮 第9页
选择无线电波段 (FM/MW/SW);选择
ATRAC 音频设备的播放模式。
N EQ3 (均衡器)按钮 第11页
选择均衡器类型 (XPLOD、VOCAL、EDGE、
CRUISE、SPACE、GRAVITY、CUSTOM 或
OFF)。
O BTM 按钮 第9页
启动 BTM 功能 (按住)。
P RESET 按钮 (位于前面板后面) 第4页
Q 频率选择开关 (位于本机底部)
请参见附送的安装 / 线路连接说明书中的
“频率选择开关”。
R 数字按钮
CD/USB:
(1)/(2): ALBUM -/+
跳过专辑 (按)﹔连续跳过专辑
(按住)。
(3): REP 第9页
(4): SHUF 第9页
(5): DM+ 第 4 页
激活 DM+ 功能,设定 “DM+-ON”。
取消,设定 “DM+-OFF”。
(6): PAUSE
暂停播放。 若要取消,则再按一
次。
无线电:
接收已储存的电台 (按)﹔储存电台
(按住)。
S
DSPL (显示)/SCRL(滚动)按钮 第9页
改变显示项目 (按);滚动显示项目
(按住)。
T AUX 输入插孔 第12页
连接便携式音频设备。
卡片式遥控器上的以下按钮与本机上的按钮 /
功能不同。 使用前抽出绝缘薄膜 (第 4 页)。
wa < (.)/, (>)按钮
控制 CD/ 无线电 /USB,与本机的
(SEEK) -/+ 相同。
设定和声音设定等可通过 < , 操作。
ws DSPL (显示)按钮
改变显示项目。
wd VOL (音量)+/- 按钮
调节音量。
wf ATT (降低)按钮
降低声音。 若要取消,则再按一次。
wg SEL (选择)按钮
与本机上的选择按钮相同。在 QuickBrowZer 模式中, (SEL) (选择)无效。
wh M (+)/m (-) 按钮
控制 CD/USB,与本机上的 (1)/(2)
(ALBUM -/+) 相同。
设定和声音设定等可通过 M m 操作。
wj SCRL (滚动)按钮
滚动显示项目。
wk 数字按钮
接收已储存的电台 (按)﹔储存电台
(按住)。
注意
• 退出/插入光盘时,请勿连接任何USB设备以免损坏光
盘。
• 如果关闭本机且显示消失,除非先按本机上的
(SOURCE) 或插入光盘启动本机,否则无法使用卡片
式遥控器操作。
关于 USB 盖
不使用 USB 端子 (G)时请使用附送的 USB 盖,防止
灰尘或污垢进入。
请将 USB 盖放在儿童无法拿到的地方,防止被意外吞
入。
7
Page 28
搜索曲目 — Quick-BrowZer
您可以按类别轻松搜索 CD 或 USB 设备 (“Walkman”/Mass Storage Class)中的曲目。
(BROWSE):
进入 / 退出 Quick-BrowZer 模式。
OFF
BROWSE
SEEK
BACK
PUSH ENTER / SELECT
SOURCE
SEEK
MODE
EQ3
控制拨盘:
选择项目 (转动);确认项目 (按)。
(BACK):
返回到上一个画面。
1 按 (BROWSE)。
本机进入 Quick-BrowZer 模式,并且出现搜索类别列表。
显示的项目视设备或光盘类型而异。
2 旋转控制拨盘选择想要的搜索类别,然后按它进行确认。
3 反复操作步骤 2 直至选择了想要的曲目。
播放开始。
返回到上一个画面
按 (BACK)。
退出 Quick-BrowZer 模式
按 (BROWSE)。
注意
• 当进入 Quick-BrowZer 模式,重复 / 随机设定会被取消。
• 视 USB 设备而定,显示项目可能不会正确显示。
• 视 USB 设备而定,在 Quick-BrowZer 模式期间可能没有声音输出。
8
Page 29
CD
无线电
显示项目
A 音源
B 曲目编号 / 已播放时间,光盘 / 艺术家名
称,专辑编号 *,专辑名称,曲目名称,
文本信息,时钟
*
只有当更改专辑时才显示专辑编号。
若要更改显示项目 B,按 (DSPL)。
提示
显示的项目视光盘类型、录制格式和设定而异。 关于
MP3/WMA/AAC 的详细信息,请参阅第 15 页。
重复和随机播放
1 播放过程中,反复按 (3) (REP) 或
(4) (SHUF),直至出现所需设定。
选择 播放
TRACK 重复播放曲目。
ALBUM* 重复播放专辑。
SHUF ALBUM* 以随机顺序播放专辑。
SHUF DISC 以随机顺序播放光盘。
*
播放 MP3/WMA/AAC 时。
若要返回正常播放模式,则选择 “ OFF”
或 “SHUF OFF”。
储存并接收电台
警告
当在驾车过程中要调谐电台时,须使用最佳
调谐记忆 (BTM),以免发生事故。
自动储存 — BTM
1 反复按 (SOURCE),直至出现 “TUNER”。
若要改变波段,则反复按 (MODE)。 您 可
以从 FM1、FM2、FM3、MW、SW1 或 SW2 中
选择。
2 按住 (BTM),直到 “BTM”闪烁。
本机将各电台按其频率顺序储存在数字按
钮上。
当设定存储完毕时,本机发出一声提示
音。
手动储存
1
接收您要储存的电台时,按住一个数字按钮
(
(1)至(6)
注意
若您试图在同一个数字按钮上储存另一个电台,则以
前存入的电台将被替换。
收听已储存的电台
1 选择波段,然后按一个数字按钮 ((1) 至
(6))。
自动调谐
1 选择波段,然后按 (SEEK) -/+ 搜索电台。
当本机接收到一个电台时,扫描即停止。
如此反复操作直至接收到所要的电台。
提示
若您知道要收听的电台频率,请按住
到近似频率,然后反复按
需频率 (手动调谐)。
)不放,直至出现 “MEM”。
(SEEK) -/+ 找
(SEEK) -/+ 精确调整到所
9
Page 30
USB 设备
USB 设备播放
1 将 USB 设备连接至 USB 端子。
播放开始。
如果已经连接了 USB 设备,若要开始播放,
反复按 (SOURCE),直至出现 “USB”。
按 (OFF) 停止播放。
注意
• 移除 USB 设备之前,必须首先停止播放。 如果在播放
过程中移除 USB 设备,则 USB 设备中的数据可能损坏。
• 切勿使用较大或较重的 USB 设备,否则可能由于振动
掉落,或造成连接松脱。
• 请勿在播放USB设备过程中拆卸前面板,否则USB数据
可能损坏。
听 Mass Storage Class 型音频设备中
的音乐
重复和随机播放
1 播放过程中,反复按 (3) (REP) 或
(4) (SHUF),直至出现所需设定。
选择 播放
TRACK 重复播放曲目。
ALBUM 重复播放专辑。
SHUF ALBUM 以随机顺序播放专辑。
SHUF DEVICE 以随机顺序播放设备。
若要返回正常播放模式,则选择 “ OFF”
或 “SHUF OFF”。
聆听 “Walkman”(ATRAC 音频设备)
中的音乐
1 在播放过程中,反复按 (MODE),直至出
现想要的设定。
项目将改变如下:
ALBUM t TRACK t GENRE t
PLAYLIST t ARTIST
显示项目
A ATRAC 音频设备:AAD
Mass Storage Class:USB
B 曲目/ 专辑 /艺术家/播放列表/ 流派编号,
曲目 / 专辑 / 艺术家 / 播放列表 / 流派名
称,已播放时间,时钟
若要更改显示项目 B,按 (DSPL)。
提示
显示的项目视录制格式和设定而异。 关于 MP3/WMA/
AAC/ATRAC 的详细信息,请参阅第 15 页。
注意
根据不同的 Mass Storage Class 型 USB 设备和 ATRAC
音频设备,显示会有不同。
10
重复和随机播放
1 播放过程中,反复按 (3) (REP) 或
(4) (SHUF),直至出现所需设定。
选择 播放
TRACK 重复播放曲目。
ALBUM 重复播放专辑。
ARTIST 重复播放某艺术家歌
曲。
PLAYLIST 重复播放列表。
GENRE 重复播放流派。
SHUF ALBUM 以随机顺序播放专辑。
SHUF ARTIST 以随机顺序播放某艺术
家歌曲。
SHUF PLAYLIST 以随机顺序播放列表。
SHUF GENRE 以随机顺序播放流派。
SHUF DEVICE 以随机顺序播放设备。
若要返回正常播放模式,则选择 “ OFF”
或 “SHUF OFF”。
Page 31
其他功能
调节设定项目 — SET
更改声音设定
调整声音特性 — BAL/FAD/SUB
您可以调整平衡、音量衰减和超低音扬声器
音量。
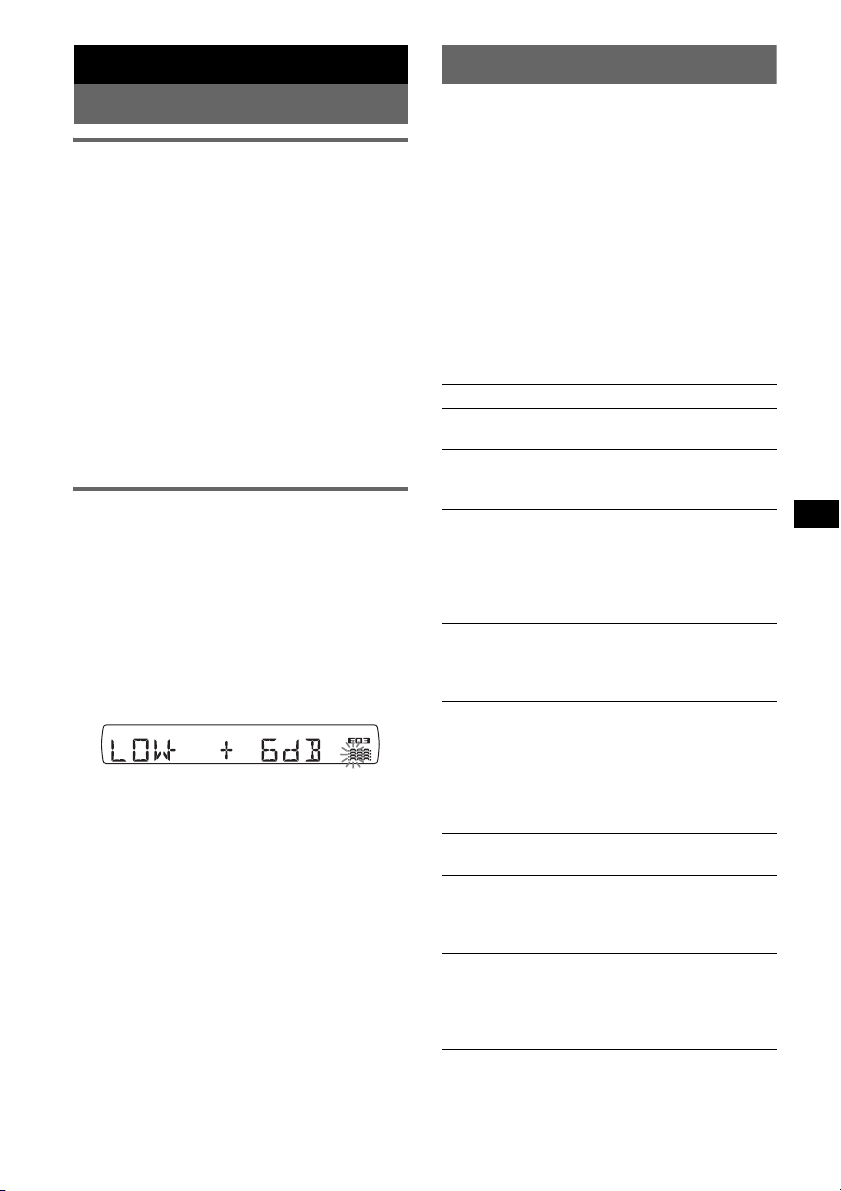
1 反复按选择按钮,直至出现 “BAL”、
“FAD”或 “SUB”。
项目将改变如下:
1
LOW*
t MID*1 t HI*1 t
BAL (左-右) t FAD (前-后) t
SUB (超低音扬声器音量) *
*1 启动 EQ3 时 (第 11 页)。
*2 音频输出设定至 “SUB”时 (第 11 页)。
最低设定时显示 “ATT”,最多能调整 21 级。
*3 当 AUX 音源激活时 (第 12 页)。
2 转动控制拨盘,调整选择的项目。
3 秒钟后,设定完成,显示返回正常播放 /
接收模式。
自定义均衡曲线 — EQ3
EQ3 的 “CUSTOM”可让您进行自己的均衡器
设定。
1 选择一个音源,然后反复按 (EQ3) 选择
“CUSTOM”。
2 反复按选择按钮,直至出现 “LOW”、
“MID”或 “HI”。
3 转动控制拨盘,调整选择的项目。
音量电平以 1 dB 为级差,从 -10 dB 至
+10 dB 进行调整。
重复步骤 2 和 3 调节均衡曲线。
若要恢复到出厂时的均衡曲线,在完成设
定之前请按住并保持选择按钮。
3 秒钟后,设定完成,显示返回正常播放 /
接收模式。
提示
其他均衡器类型也可调整。
2
t AUX*
1 按住选择按钮。
出现设定显示画面。
2 反复按选择按钮直至出现所需要的项目。
3 转动控制拨盘,选择设定 (例如,“ON”
或 “OFF”)。
4 按住选择按钮。
设定完成,显示返回正常播放 / 接收模
式。
注意
显示的项目视音源和设定而异。
3
可以设定以下项目 (详细说明请参阅参考
页):
z
“
”表示默认设定。
CLOCK-ADJ (时钟调节)(第 4 页)
BEEP
设定 “BEEP-ON”(z)或 “BEEP-OFF”。
1
(AUX 音源)
AUX-A*
让 AUX 音源显示变为 “AUX-A-ON”(
“AUX-A-OFF”(第 12 页)。
A.OFF (自动断电)
本机关闭时在所需的时间过后自动切断电
源。
–“A.OFF-NO”(
“A.OFF-30M (分)”或 “A.OFF-60M
( 分 )”。
SUB/REAR*
切换音频输出。
–“SUB-OUT”(
–“REAR-OUT”:输出至功率放大器。
B.OUT (关闭照明)
自动关闭所有音源的照明 (例如在 CD 播放 /
接收无线电等)。
–“B.OUT-ON” *
作将关闭照明。
–“B.OUT-OFF”(
若要重新亮灯,则按任意按钮。
DEMO (演示)
设定 “DEMO-ON”(
DIM (调光器)
改变显示屏亮度。
–“DIM-ON”:让显示画面变暗。
–“DIM-OFF”(
M.DSPL (动作显示)
选择动作显示模式。
–“M.DSPL-SA” (
分析图形。
–“M.DSPL-OFF”:关闭动作显示。
z
),“A.OFF-30S (秒)”,
1
z
):输出至超低音扬声器。
2
:若在 5 秒钟内没有任何操
z
):停用关闭照明功能。
z
)或 “DEMO-OFF”。
z
):关闭调光器。
z
):显示移动模式和频谱
z
)或
续下页 t
11
Page 32
A.SCRL (自动滚动)
更改了光盘 / 专辑 / 曲目时,自动滚动显示
较长的项目。
–“A.SCRL-ON”(
z
):滚动。
–“A.SCRL-OFF”:不滚动。
LOCAL (本地搜索模式)
–“LOCAL-ON”: 仅调频到信号较强的电台。
–“LOCAL-OFF”(
3
(单声道模式)
MONO*
z
):调频为正常接收。
若要改善信号较差的 FM 接收,则选择单声
道接收模式。
–“MONO-ON”:以单声道收听立体声广播。
–“MONO-OFF”(
z
):以立体声收听立体声
广播。
LPF*4(低通滤波器)
选择超低音扬声器截止频率:“LPF OFF”
z
(
)、“LPF125Hz”或 “LPF 78Hz”。
LOUD (响度)
可让您以低音量清楚聆听。
–“LOUD-ON”:加强低音和高音。
–“LOUD-OFF”(
z
):不加强低音和高音。
BTM (第9页)
*1 本机关闭时。
*2 当关闭照明功能处于开启状态时,本机无法用卡片
式遥控器操作。
*3 接收 FM 时。
*4 音频输出设定至 “SUB”时。
使用选购设备
辅助音频设备
通过将选购的便携式音频设备连接到本机的
AUX 输入插孔 (立体声迷你插孔),只要选
择该音源,就可通过汽车扬声器欣赏。 根据
本机与便携式音频设备之间的差异,可调节
音量电平。 请按照如下步骤操作:
连接便携式音频设备
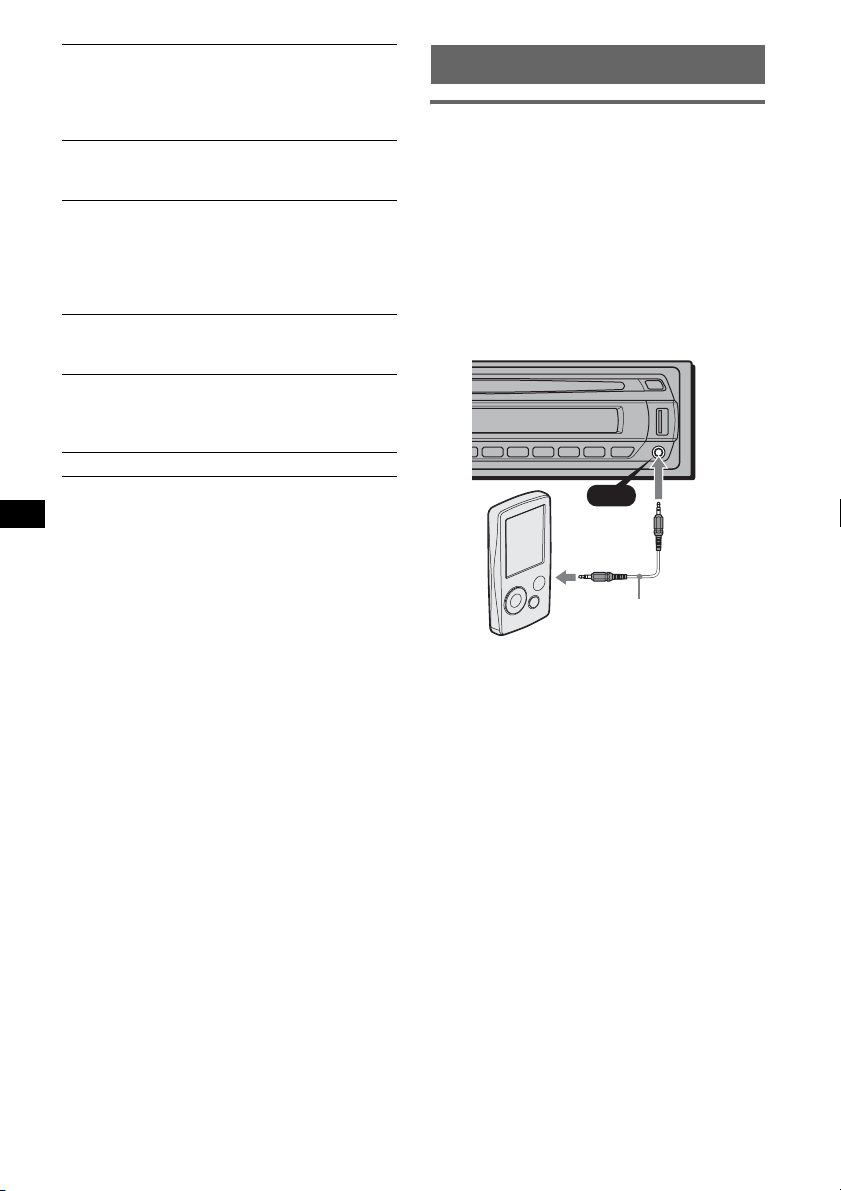
1 关闭便携式音频设备。
2 调低本机上的音量。
3 连接到本机。
AUX
AUX
连接线 * (不附送)
12
请务必使用直型插头。
*
调整音量电平
必须在播放之前调整每个连接的音频设备的
音量。
1 调低本机上的音量。
2 反复按 (SOURCE) 直至出现 “AUX”。
出现 “AUX FRONT IN”。
3 以适中的音量开始播放便携式音频设备。
4 在本机上设定通常的收听音量。
5 反复按选择按钮直到出现 “AUX”,转动控
制拨盘调节输入电平 (-8 dB 至 +18 dB)。
Page 33
旋转式遥控器 RM-X4S
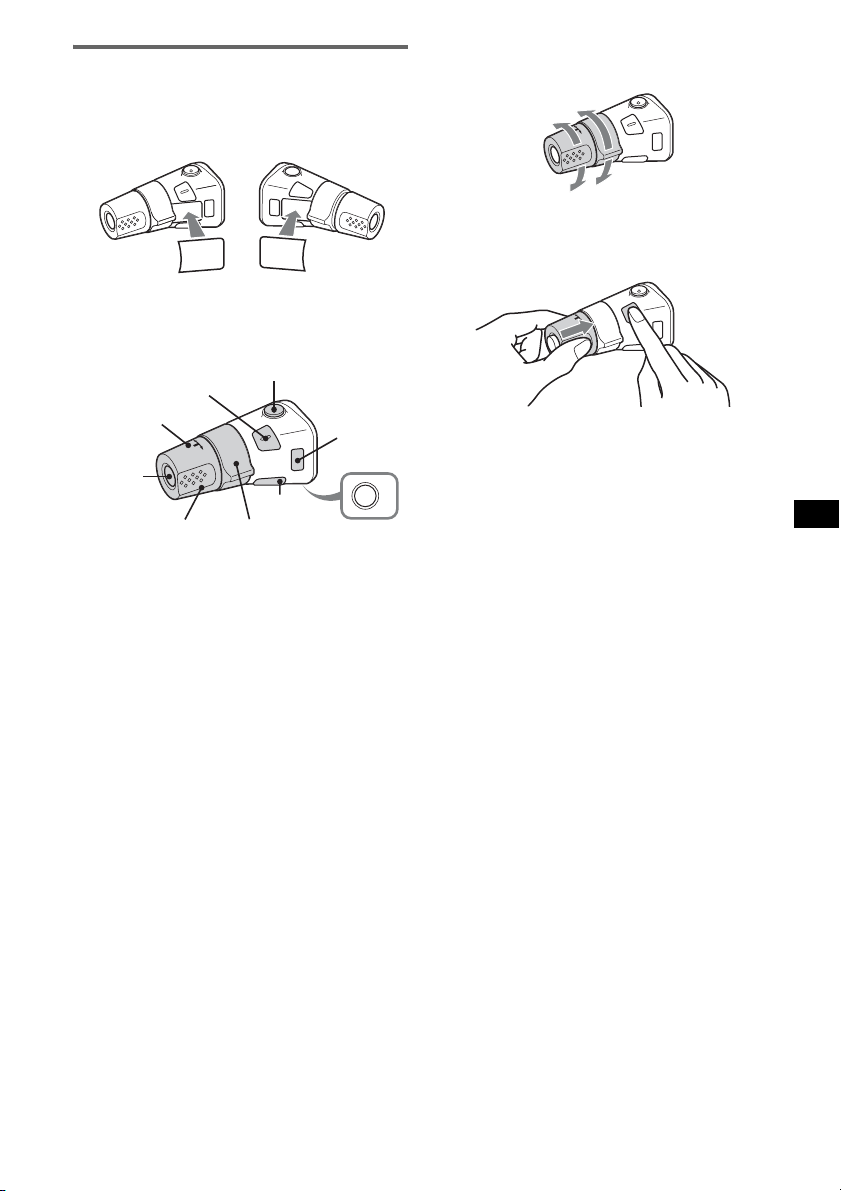
贴标签
根据您安装旋转式控制器的方法贴指示标
签。
D
S
P
L
SE
E
D
O
M
SPL
D
L
M
O
D
E
S
E
L
控制器位置
旋转式控制器上与本机上对应的按钮控制相
同的功能。
SEL
PRESET/
DISC
SOURCE
VOL
旋转式控制器上的以下控制器与本机的操作
不同。
• ATT (降低)按钮
降低声音。 若要取消,则再按一次。
• SEL (选择)按钮
与本机上的选择按钮相同。在 QuickBrowZer 模式中, (SEL) (选择)无效。
• PRESET/DISC 控制器
CD/USB:与本机上的 (1)/(2)
(ALBUM -/+)相同 (推入后旋转)。
无线电:接收已存储的电台 (推入后旋
转)。
• VOL (音量)控制
与本机上的控制拨盘相同 (转动)。
• SEEK/AMS 控制器
与本机上的 (SEEK) -/+ 相同 (转动,或
转动并保持)。
• DSPL (显示)按钮
改变显示项目。
ATT
DSPL
SEEK/ AMS
MODE
OFF
改变操作方向
控制器操作方向的工厂设定如下图所示。
调高
调低
若需要将旋转式控制器安装在汽车驾驶杆的
右侧,您可以将控制器的操作方向反置。
1 在推 VOL 控制器的同时,按住 (SEL)。
OFF
13
Page 34
附加信息
使用前注意事项
• 倘若您的汽车停在直射阳光下,则在操作前必
须先使本机充分冷却。
• 本机工作时,电动天线将自动伸出。
湿气凝结
在雨天或非常潮湿的地区,本机的透镜和显示
屏内会产生湿气凝结。 一旦如此,本机将无法
正常运行。 此时,请将光盘取出,并等待约一
小时,直至湿气蒸发。
保持高质量声音
请随时注意,切勿将果汁或其他软饮料溅在本
机或光盘上。
光盘注意事项
• 为保持光盘清洁,切勿接触其表面。 拿光盘
时请持其边缘。
• 不使用时请将光盘装入光盘盒或光盘匣。
• 切勿使光盘受到热源 / 高温的影响。 避免将光
盘遗留在停放的车中或仪表盘 / 后托架上。
• 切勿贴标签,或使用带有黏性墨水 / 残留物的
光盘。 这类光盘在使用时会停止转动,从而
造成故障或损坏光盘。
• 切勿使用任何贴有标签或贴纸的光盘。
使用此类光盘可能会引起如下故障:
– 不能退出光盘 (由于标签或贴纸剥落并卡住
弹出设备)。
– 不能正确读取音频数据 (例如,跳跃播放或
不播放),由于热源使贴纸或标签皱缩造成
光盘弯曲。
• 本机不能播放非标准形状的光盘 (例如,心
形、正方形、星形)。 若试图播放此类光盘,
则可能会损坏本机。 切勿使用此类光盘。
• 您不能播放 8 cm 的 CD。
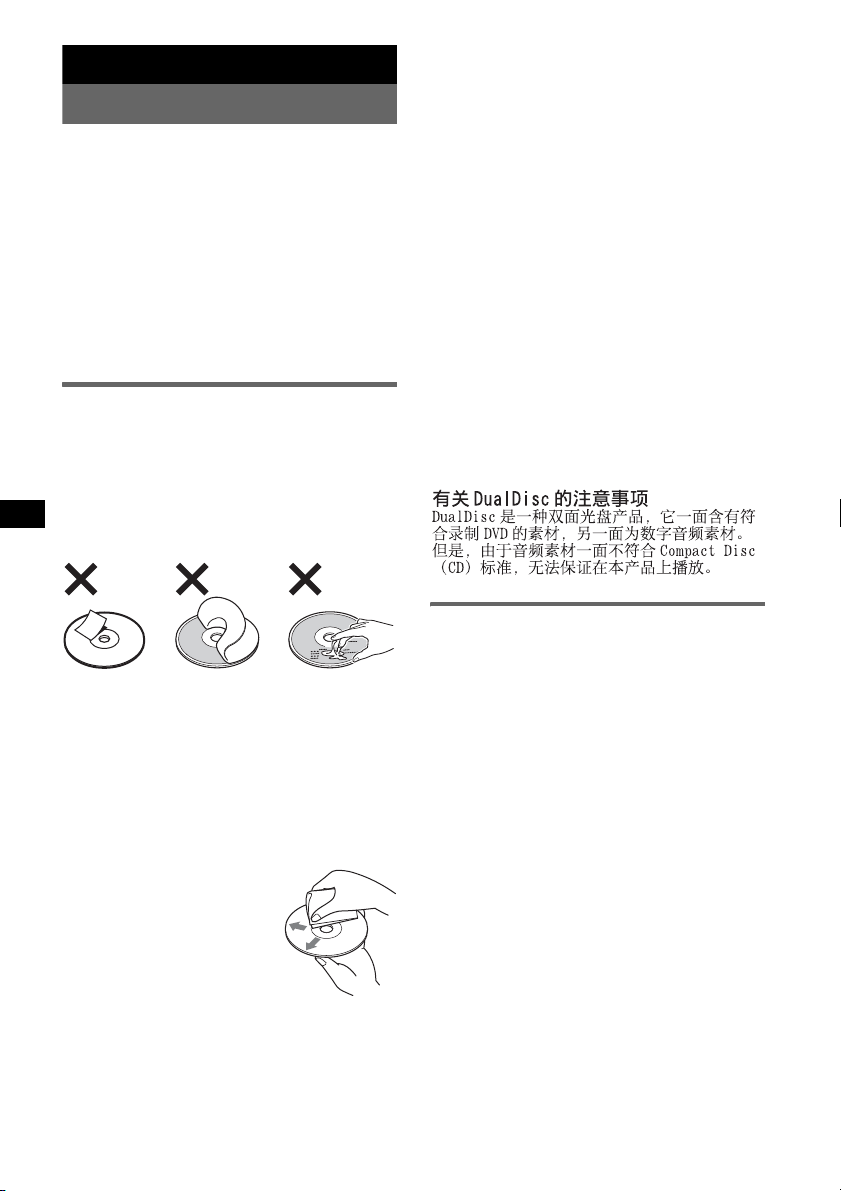
• 在播放之前,请使用市售清
洁布清洁光盘。 从光盘的中
心向外擦拭。 切勿使用汽
油、稀释剂、市场销售的清
洁剂以及用于模拟光盘的抗
静电喷雾剂等溶剂。
CD-R/CD-RW 光盘的注意事项
• 某些 CD-R/CD-RW (视用于录制的设备或光盘
情况而定)可能无法在本机上播放。
• 您无法播放未最终化的 CD-R/CD-RW。
• 本机与 ISO 9660 level 1/level 2 格式、
Joliet/Romeo 扩展格式和 Multi Session 兼
容。
14
• 最大数量:
– 文件夹 (专辑):150 (包括根文件夹和空
文件夹)。
– 光盘中含有的文件 (曲目)和文件夹:300
(如果文件夹/文件名称包含许多字符,该
数量可能小于 300)。
– 文件夹 / 文件名称的可显示字符数为
32 (Joliet)或 64 (Romeo)。
• 当光盘是以 Multi Session 录制时,只有第一
个区段格式的第一个曲目被识别并播放 (任
何其他格式被跳过)。 格式的优先顺序为 CDDA 和 MP3/WMA/AAC。
– 当第一个曲目为 CD-DA 时,只播放第一个区
段的 CD-DA。
– 当第一个曲目不是 CD-DA 时,播放 MP3/WMA/
AAC 区段。 如果光盘中没有这些格式的数
据,则显示 “NO MUSIC”。
采用版权保护技术编码的音乐光盘
本产品是专为播放符合 Compact Disc (CD)标
准光盘而设计。
近来,许多唱片公司都推出各种采用版权保护
技术编码的音乐光盘。 请注意,这些光盘中可
能会有不符合 CD 标准的光盘,并且可能无法使
用本产品播放。
关于 USB 设备
• 可以使用符合 USB 标准的 Mass Storage Class
和 ATRAC 音频设备型 USB 设备。 然而,本机
不能通过 USB HUB 识别 USB 设备。 关于您 USB
设备兼容性的详细信息,请访问 Sony 支持网
站(第19页)。
• 相应代码根据设备类型而不相同。
– Mass Storage Class:MP3/WMA/AAC
– ATRAC 音频设备:ATRAC/MP3/WMA/AAC
• 可能无法播放除 ATRAC 以外的 DRM (数字版权
管理)文件。
• 可显示数据的最大数量如下所示。
Mass Storage Class:
– 文件夹 (专辑):128,每个文件夹的文件
(曲目):500
ATRAC 音频设备:ATRAC/MP3/WMA/AAC
– 专辑 / 艺术家 / 播放列表 / 流派:65535,曲
目:65535
注意
• 使用电缆线时,请使用随 USB 设备附送的电缆线进行
连接。
• 切勿使用较大或较重的 USB 设备,否则可能干扰驾驶
操作。
• 切勿将 USB 设备遗留在停放的车内,否则可能引起故
障。
• 视记录的数据量而定,可能需要一定时间才开始播
放。
• 建议备份 USB 设备中的数据。
Page 35
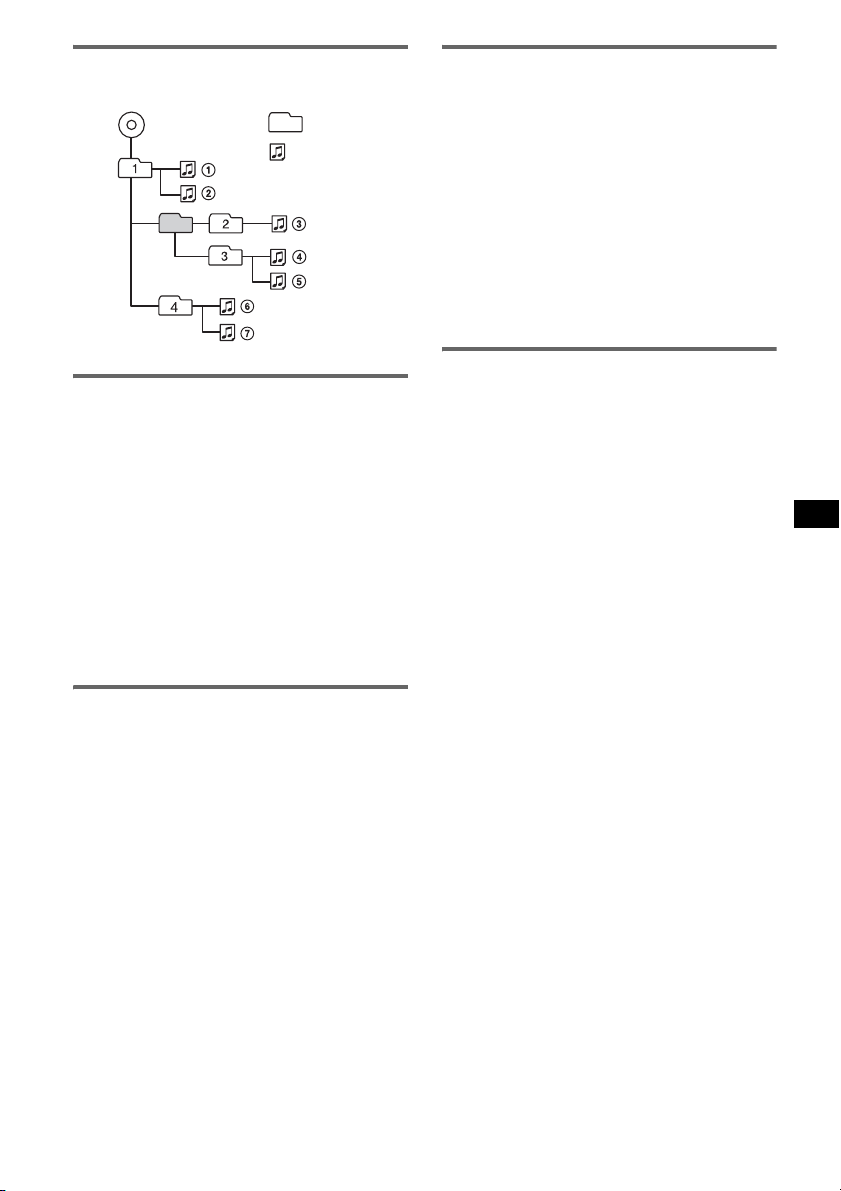
MP3/WMA/AAC 文件 (CD-R/RW 或 Mass
Storage Class)的播放顺序
MP3/WMA/AAC
文件夹
(专辑)
MP3/WMA/AAC
文件 (曲目)
关于 MP3 文件
• MP3 表示 MPEG-1 Audio Layer-3,是一项音乐
文件压缩格式标准。 此格式将音频 CD 数据压
缩到原大小的 1/10 左右。
• ID3 标记 1.0、1.1、2.2、2.3 和 2.4 版仅应
用于 MP3。 可显示的 ID3 标记为 15/30 个字符
(1.0 和 1.1 版),或 63/126 个字符 (2.2、
2.3 和 2.4 版)。
• 命名 MP3 文件时,必须在文件名称后加上文件
扩展名 “.mp3”。
• 在 VBR (可变比特率)MP3 文件播放过程中或
快进 / 后退过程中,已播放时间可能不会精确
显示。
注意
如果播放如 320 kbps 高比特率 MP3,则声音可能会断
断续续。
关于 AAC 文件
• AAC 表示 Advanced Audio Coding,为一项音乐
文件压缩格式标准。 此格式将音频 CD 数据压
缩到原大小的 1/11
* 左右。
• AAC 标记为 126 个字符数。
• 命名 AAC 文件时,必须在文件名称后加上文件
扩展名 “.m4a”。
• 在 VBR (可变比特率)AAC 文件播放过程中或
快进 / 后退过程中,已播放时间可能不会精确
显示。
* 仅限 128 kbps
注意
不支持播放下列 AAC 文件。
– 无损压缩
– 受版权保护
关于 ATRAC 文件
ATRAC3plus 格式
ATRAC3 表示 Adaptive Transform Acoustic
Coding3,是音频压缩技术。 此格式将音频 CD
数据压缩到原大小的 1/10 左右。 ATRAC3plus
是 ATRAC3 的扩充格式,将音频 CD 数据压缩到
原大小的 1/20 左右。 本机接受 ATRAC3 和
ATRAC3plus 格式。
显示由 SonicStage 写入的文本信息的字符。
如果您对设备有疑问或问题,而本说明书中未
提及,请向附近的 Sony 经销商咨询。
关于 WMA 文件
• WMA 表示 Windows Media Audio,为一项音乐
文件压缩格式标准。 此格式将音频 CD 数据压
缩到原大小的 1/22
• WMA 标记为 63 个字符。
• 命名 WMA 文件时,必须在文件名称后加上文件
扩展名 “.wma”。
• 在 VBR (可变比特率)WMA 文件播放过程中或
快进 / 后退过程中,已播放时间可能不会精确
显示。
* 仅适用于 64 kbps
注意
不支持播放下列 WMA 文件。
– 无损压缩
* 左右。
15
Page 36
保养
取出本机
更换卡片式遥控器的锂电池
一般情况下,电池能维持大约 1 年时间。(使用
寿命可能会变短,这取决于电池的使用状况。)
当电池的电力变弱时,卡片式遥控器的操控范
围将变短。 请更换一枚新的 CR2025 锂电池。 使
用其他电池可能会引起火灾或爆炸的危险。
+极面朝上
2
c
1
锂电池的注意事项
• 锂电池应放在儿童不易触及的地方。 万一误吞了电
池,请立即就医。
• 用干布擦拭电池,以保持接触良好。
• 安装电池时,必须保证极性正确。
• 切勿用金属镊子夹电池,否则可能会引起短路。
更换保险丝
更换保险丝时,必须确保所
使用的保险丝与原保险丝的
额定安培数相同。 如果保险
丝烧断,请检查电源连接并
更换保险丝。 如果保险丝更
换后又被烧断,则可能是内
部故障。 此时,请向附近的
Sony 经销商咨询。
保险丝 (10 A)
清洁连接器
如果本机与前面板之间的连接器不干净,则本
机可能会运作不正常。 为防止这种情况发生,
请卸下前面板 (第 5 页),然后用棉签清洁连
接器。 切勿施加太大的力量。 否则,可能会损
坏连接器。
1 拆卸保护环。
1拆卸前面板 (第 5 页)。
2将开锁钥匙与保护环接合。
如图所示定位开锁钥匙。
3拉出开锁钥匙以折下保护环。
2 取出本机。
1将两把开锁钥匙同时插入,直至听到喀
嗒声。
挂钩朝里。
2拉出开锁钥匙,使本机脱离原位。
3将本机从安装位置滑出。
主机
注意
• 为了安全起见,在清洁连接器之前,应关闭引擎并从
点火开关上拔下钥匙。
• 千万不要用手指或任何金属工具直接接触连接器。
前面板的背面
16
Page 37
规格
CD 播放机部分
频率响应:20 Hz - 20000 Hz (± 2 dB)
调谐器部分
FM
调谐范围:
87.5 MHz - 108.0 MHz (以 50 kHz 为一级)
87.5 MHz - 107.9 MHz (以 200 kHz 为一级)
FM 调谐间隔: 50 kHz/200 kHz 可切换
天线端子: 外接天线连接器
中频:10.7 MHz/450 kHz
MW
调谐范围:
531 kHz - 1602 kHz (以 9 kHz 为一级)
530 kHz - 1710 kHz (以 10 kHz 为一级)
MW 调谐间隔: 9 kHz/10 kHz 可切换
天线端子: 外接天线连接器
中频:10.7 MHz/450 kHz
SW
调谐范围:
SW1: 2940 kHz - 7735 kHz
SW2: 9500 kHz - 18135 kHz
(10140 kHz - 11575 kHz 除外)
天线端子: 外接天线连接器
中频:10.7 MHz/450 kHz
USB 播放机部分
接口:USB (全速)
最大电流:500 mA
功率放大器部分
输出:扬声器输出 (可靠的绝缘连接器)
扬声器阻抗:4 Ω - 8 Ω
最大功率输出:每声道 50 W
(1 kHz,16 V,4 Ω)
常规
输出:
音频输出端子 (副 / 后可切换)
电动天线继电器控制端子
功率放大器控制端子
输入:
遥控器输入端子
天线输入端子
AUX 输入插孔 (立体声迷你插孔)
电源要求:12 V DC 汽车电瓶 (负接地)
电源电压:11 V - 16 V
尺寸: 约 178 mm × 50 mm × 179 mm
(宽/高/深)
安装尺寸: 约 182 mm × 53 mm × 162 mm
(宽/高/深)
质量: 约 1.2 kg
附送的附件:
卡片式遥控器:RM-X151
安装和连接用配件 (1 套)
选购附件:
您的经销商可能不提供以上列出的部分附件。
关于详细信息,请询问经销商。
旋转式控制器:RM-X4S
设计和规格若有变更,恕不另行通知。
故障排除
下列检查表有助于解决您使用本机时可能遇到
的问题。
在使用下面的检查表之前,请检查连接和操作
步骤是否正确。
常规
本机无供电。
• 检查连接。 若一切正常,则请检查保险丝。
• 如果本机关闭且显示消失,则本机无法用遥控器
操作。
t 打开本机。
电动天线无法伸出。
电动天线未装继电器盒。
无声音。
• 音量太低。
• 启动了 ATT 功能。
• 未对 2 扬声器系统设定音量衰减控制器“FAD”的
位置。
续下页 t
17
Page 38
无提示音。
• 提示音被取消 (第 11 页)。
• 连接了选购的功率放大器,且您没有使用内置放
大器。
内存内容已被消除。
• 已按过 RESET 按钮。
t再将设定存入内存中。
• 电源线或电池已断开连接。
• 电源线连接不正确。
储存的电台及正确时间被消除。
保险丝已熔断。
切换点火开关位置时产生噪音。
导线与汽车附件电源连接器不匹配。
在播放或接收过程中,演示模式启动。
如果在设定了 “DEMO-ON”时没有执行操作达 5 分
钟,则演示模式启动。
t 请设定为 “DEMO-OFF”(第 11 页)。
显示从显示窗口消失 / 不出现在显示窗口中。
• 调光器被设定为 “DIM-ON”(第 11 页)。
• 如果按住 (OFF),则显示消失。
t按住本机上的 (OFF),直至出现显示。
• 连接器脏了 (第 16 页)。
自动断电功能不起作用。
本机已打开。 关闭本机后自动断电功能启动。
t 关闭本机。
本机正在工作时显示消失。
关闭照明功能设定为开启 (第 11 页)。
卡片式遥控器无法工作。
• 若开启了关闭照明功能 (无照明),则卡片式遥
控器操作将无效 (第 11 页)。
• 确认已经抽出绝缘薄膜 (第 4 页)。
CD 播放
无法装入光盘。
• 已装入另外的光盘。
• 强行将光盘反向插入或者插入方法不正确。
光盘不播放。
• 光盘有缺陷或脏了。
• CD-R/CD-RW 不作音频使用 (第 14 页)。
无法播放 MP3/WMA/AAC 文件。
光盘与 MP3/WMA/AAC 格式以及版本不兼容 (第 15
页)。
MP3/WMA/AAC 文件的开始播放时间较其他文件长。
以下光盘要花费较长时间才能开始播放。
– 以复杂的树形结构录制的光盘。
– 以 Multi Session 录制的光盘。
– 能增加数据的光盘。
显示项目不滚动。
• 对于有许多字符的光盘,可能无法滚动显示。
•“A.SCRL”设定为 “OFF”。
t请设定为 “A.SCRL-ON”(第 12 页)。
t按住 (DSPL) (SCRL)。
跳音。
• 安装不正确。
t 以小于 45° 的角度将本机安装在汽车平稳位
置。
• 光盘有缺陷或脏了。
操作按钮无效。
光盘不退出。
按 RESET 按钮 (第 4 页)。
无线电接收
无法接收电台。
有噪音干扰。
• 请将电动天线控制导线 (蓝色)或附件电源导线
(红色)连接至汽车天线升缩器的电源导线 (仅
当您的汽车在后 / 侧玻璃内有内置 FM/MW/SW 天
线时)。
• 检查汽车天线的连接。
• 自动天线不能上升。
t 检查电动天线控制导线的连接。
• 检查频率。
不能预设调谐。
• 将正确的频率储存在内存中。
• 广播信号太弱。
不能自动调谐。
• 本地搜索模式的设置不正确。
t 调谐停止得太频繁:
请设定为 “LOCAL-ON”(第 12 页)。
t 调谐在某台频率不停留:
请设定为 “MONO-ON”(第 12 页)。
• 广播信号太弱。
t 进行手动调谐。
FM 接收时,“ST”指示闪烁。
• 精确地调谐电台频率。
• 广播信号太弱。
t 请设定为 “MONO-ON”(第 12 页)。
收听到的立体声 FM 广播节目是单声道的。
本机处在单声道接收模式。
t 请设定为 “MONO-OFF”(第 12 页)。
USB 播放
您无法通过 USB HUB 播放项目。
本机不能通过 USB HUB 识别 USB 设备。
无法播放项目。
USB 装置不工作。
t 将其重新连接。
USB 装置需要花费较长时间才能播放。
USB 装置含有复杂树形结构的文件。
发出提示音。
在播放过程中,USB 设备连接断开。
t 断开 USB 设备连接之前必须先停止播放,以保护
数据。
声音断断续续。
当比特率超过 320 kbps 时,声音可能断断续续。
18
Page 39
出错显示 / 信息
CHECKING
本机正在确认 USB 设备连接。
t请稍等,直至确认连接结束。
ERROR
• 光盘脏了或被倒置插入。
t 将光盘擦拭干净或正确插入光盘。
• 插入了空白光盘。
• 由于故障无法播放光盘。
t 插入另一盘光盘。
• 未自动识别出 USB 设备。
t 请重新连接。
• 按 Z 取出光碟。
FAILURE
扬声器 / 放大器连接不正确。
t参阅此型号的安装/线路连接说明书进行连接检
查。
HUB NO SUPRT
本机不支持 USB HUB。
L. SEEK +/-
在自动调谐时,本地搜索模式为开启状态。
NO DEV (无设备)
选择了 (SOURCE) 而未连接 USB 设备。 在播放过
程中,USB 设备或 USB 电缆连接断开。
t必须连接 USB 设备和 USB 电缆。
NO INFO
在 MP3/WMA/AAC 文件中未写入文本信息。
NO MUSIC
光盘 /USB 设备未含音乐文件。
t请在本机中插入音乐光盘。
t请连接含有音乐文件的 USB 设备。
NO NAME
曲目中未写入光盘 / 专辑 / 曲目名称。
NO TRACK
USB 装置中所选的项目不包含专辑 / 曲目。
OFFSET
可能发生内部故障。
t检查连接。如果此出错指示仍然显示在显示屏
中,请联系附近的 Sony 经销商。
OVERLOAD
USB 设备过载。
t断开 USB 设备连接,然后按 (SOURCE) 更改音
源。
t表示 USB 设备故障,或连接了不支持的设备。
READ
本机正在读取光盘 /USB 设备上所有曲目和专辑信
息。
t请等待至读取完成并自动开始播放。 视光盘 /
USB 设备的结构而定,可能要花一分多钟。
RESET
由于故障,CD 机无法正常工作。
t按 RESET 按钮 (第 4 页)。
USB NO SUPRT (不支持 USB)
不支持所连接的 USB 设备。
t 请连接 Mass Storage Class 的 USB 设备(第 14
页)。
“”或“”
后退或快进过程中,您已到达光盘的开头或结尾,
无法再继续向前。
“”
本机无法显示此字符。
如果这些解答仍无法助您改善情况,请向您附
近的 Sony 经销商咨询。
如果因为 CD 播放故障而将本机送修,请带好出
现问题时所使用的光盘。
支持网站
如果您对本产品有任何疑问或需要相关的
最新支持信息,请访问以下网站:
http://www.css.ap.sony.com/
http://www.sony-asia.com/caraudio/
19
Page 40

Support site
If you have any questions or for the latest support
information on this product, please visit the web site
below:
http://www.css.ap.sony.com/
http://www.sony-asia.com/caraudio/
http://www.sony.net/
Sony Corporation
Printed in Thailand
 Loading...