

Page 1
FM/AM
Compact Disc
Player
Operating Instructions
Owner’s Record
The model and serial numbers are located on the bottom of the unit.
Record the serial number in the space provided below.
Refer to these numbers whenever you call upon your Sony dealer regarding this
product.
Model No. CDX-C760 Serial No.
For installation and connections, see the supplied installation/connections
manual.
EN
CDX-C760
1997 by Sony Corporation
Page 2

EN
Warning
This equipment has been tested and found to
comply with the limits for a Class B digital
device, pursuant to Part 15 of the FCC Rules.
These limits are designed to provide
reasonable protection against harmful
interference in a residential installation. This
equipment generates, uses, and can radiate
radio frequency energy and, if not installed
and used in accordance with the instructions,
may cause harmful interference to radio
communications. However, there is no
guarantee that interference will not occur in a
particular installation. If this equipment does
cause harmful interference to radio or
television reception, which can be determined
by turning the equipment off and on, the user
is encouraged to try to correct the interference
by one or more of the following measures:
— Reorient or relocate the receiving antenna.
— Increase the separation between the
equipment and receiver.
— Connect the equipment into an outlet on a
circuit different from that to which the
receiver is connected.
— Consult the dealer or an experienced radio/
TV technician for help.
You are cautioned that any changes or
modifications not expressly approved in this
manual could void your authority to operate
this equipment.
Welcome !
Thank you for purchasing the Sony Compact
Disc Player. This unit lets you enjoy a variety
of features by using either a supplied rotary
remote or an optional wireless remote.
In addition to the CD playback and radio
operations, you can expand your system by
connecting an optional CD/MD changer.
If you operate this unit or connect an optional
CD changer with the CD-TEXT function, the
CD-TEXT information will appear in the
display when you play back a CD-TEXT disc*.
* A CD-TEXT disc is an audio CD that includes
information such as the disc name, artist name and track
names.
This information is recorded on the disc.
CAUTION
The use of optical instruments with this
product will increase eye hazard.
2
Page 3
Table of Contents
This Unit Only
Getting Started
Resetting the unit ................................................ 4
Detaching the front panel .................................. 4
Preparing the rotary remote .............................. 4
Setting the clock .................................................. 5
CD Player
Listening to a CD ................................................ 5
Playing a CD in various modes ........................ 6
Creating a program
— CD Program Memory .............................. 7
Radio
Memorizing stations automatically
— Best Tuning Memory (BTM) ................... 9
Memorizing only the desired stations ........... 10
Receiving the memorized stations.................. 10
Storing the station names
— Station Memo .......................................... 11
Locating a station by name
— List-up ...................................................... 11
Other Functions
Using the rotary remote ................................... 12
Adjusting the sound characteristics ............... 13
Muting the sound.............................................. 13
Changing the sound and display settings ..... 14
With Optional Equipment
CD/MD Changer
Playing a CD or MD ......................................... 15
Scanning the tracks
— Intro Scan ................................................. 16
Playing tracks repeatedly
— Repeat Play .............................................. 16
Playing tracks in random order
— Shuffle Play .............................................. 16
Creating a program
— Program Memory ................................... 17
Labeling a CD
— Disc Memo ............................................... 19
Locating a disc by name
— List-up ...................................................... 20
Selecting specific tracks for playback
— Bank .......................................................... 21
EN
DSP
Selecting a surround menu .............................. 22
Storing a surround effect onto a CDs
— Digital Signal Processor (DSP)
Custom File................................................... 22
Selecting the listening position ....................... 23
Adjusting the fader (FAD) ............................... 24
Adjusting the volume of the subwoofer(s) .... 24
Adjusting the volume of the bass
and treble ...................................................... 25
Listening to each program source in its
registered surround menu
— Last Sound Memory (LSM) ................... 25
Changing the line output level ....................... 25
Additional Information
Precautions......................................................... 28
Maintenance....................................................... 29
Dismounting the unit ....................................... 30
Location of controls .......................................... 31
Specifications ..................................................... 33
Troubleshooting guide ..................................... 34
Index ................................................................... 36
TV/Video
Watching the TV ............................................... 26
Watching a video .............................................. 26
Memorizing TV channels automatically ........ 26
Memorizing only the desired TV channels .... 26
Storing the TV channel names ........................ 27
Displaying the information stored on discs .. 27
Watching the TV or video while listening to a
CD or MD
— Simultaneous Play .................................. 28
3
Page 4
EN
Getting Started
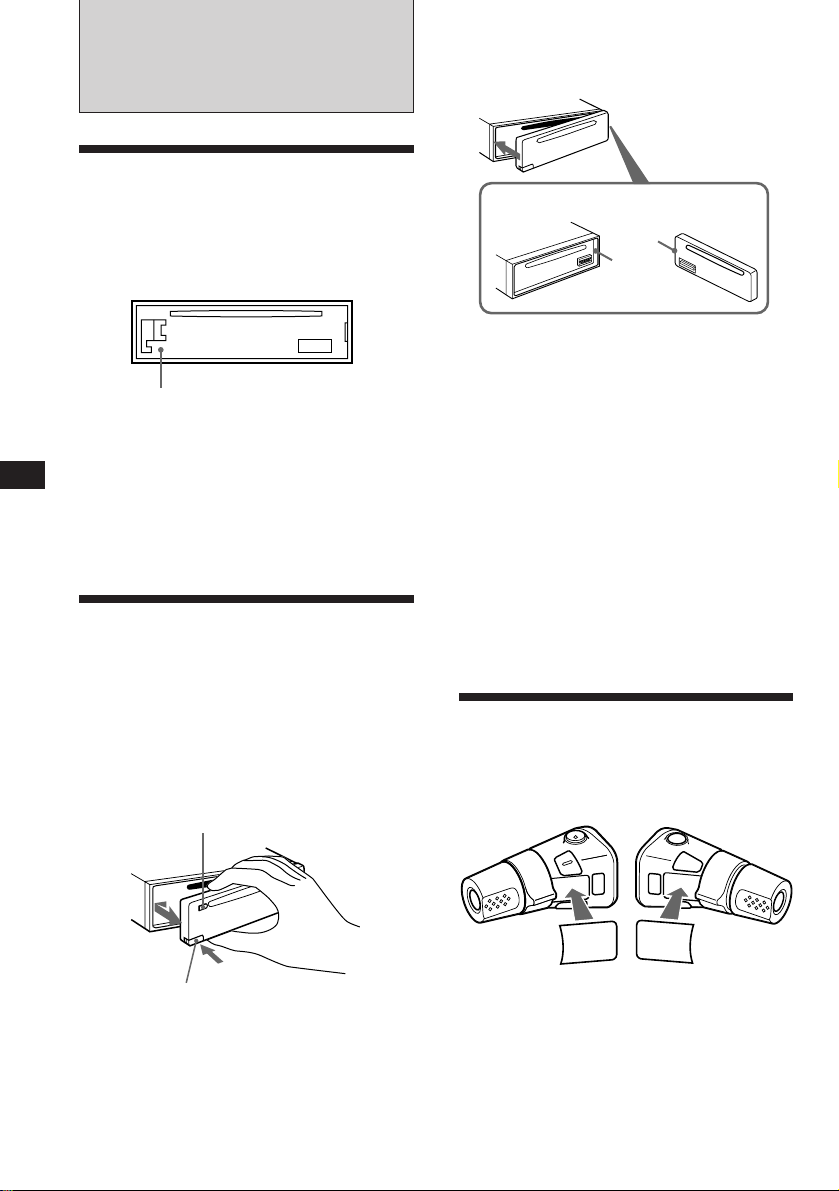
Resetting the unit
Before operating the unit for the first time or
after replacing the car battery, you must reset
the unit.
Press the reset button with a pointed object,
such as a ball-point pen.
Reset button
Notes
• Pressing the reset button will erase the clock and same
memorized functions.
• When you connect the power supply cord to the unit or
reset the unit, wait for about 10 seconds before you insert
a disc. If you insert a disc within these 10 seconds, the
unit will not be reset, and you will have to press the reset
button again.
Detaching the front panel
You can detach the front panel of this unit to
prevent the unit from being stolen.
Attaching the front panel
Align part A of the front panel to part B of
the unit as illustrated, and push until it clicks.
A
B
Notes
• Be sure not to attach the front panel upside down.
•Do not press the front panel hard against the unit when
attaching it. Press it lightly against the unit.
•Do not press hard or put excessive pressure on the
display windows of the front panel.
•Do not expose the front panel to direct sunlight, heat
sources such as hot air ducts, and do not leave it in a
humid place. Never leave it on the dashboard of a car
parked in direct sunlight where there may be a
considerable rise in temperature.
Caution alarm
If you turn the ignition key switch to the OFF
position without removing the front panel, the
caution alarm will beep for a few seconds
(only when the POWER SELECT switch is set
to the A position).
1 Press (OFF).
2 Press (RELEASE) to open up the front
panel. Then slide the front panel a little
to the left, and pull it off towards you.
(OFF)
(RELEASE)
Notes
• Be sure not to drop the panel when detaching it from the
unit.
• If you press (RELEASE) to detach the panel while the
unit is still on, the unit will turn off automatically to
prevent the speakers from being damaged.
• When you carry the front panel with you, put it in the
supplied front panel case.
4
Preparing the rotary
remote
When you mount the rotary remote, attach the
label in the illustration below.
SOUND
MODE
LIST
MODE
SOUND
LIST
Page 5
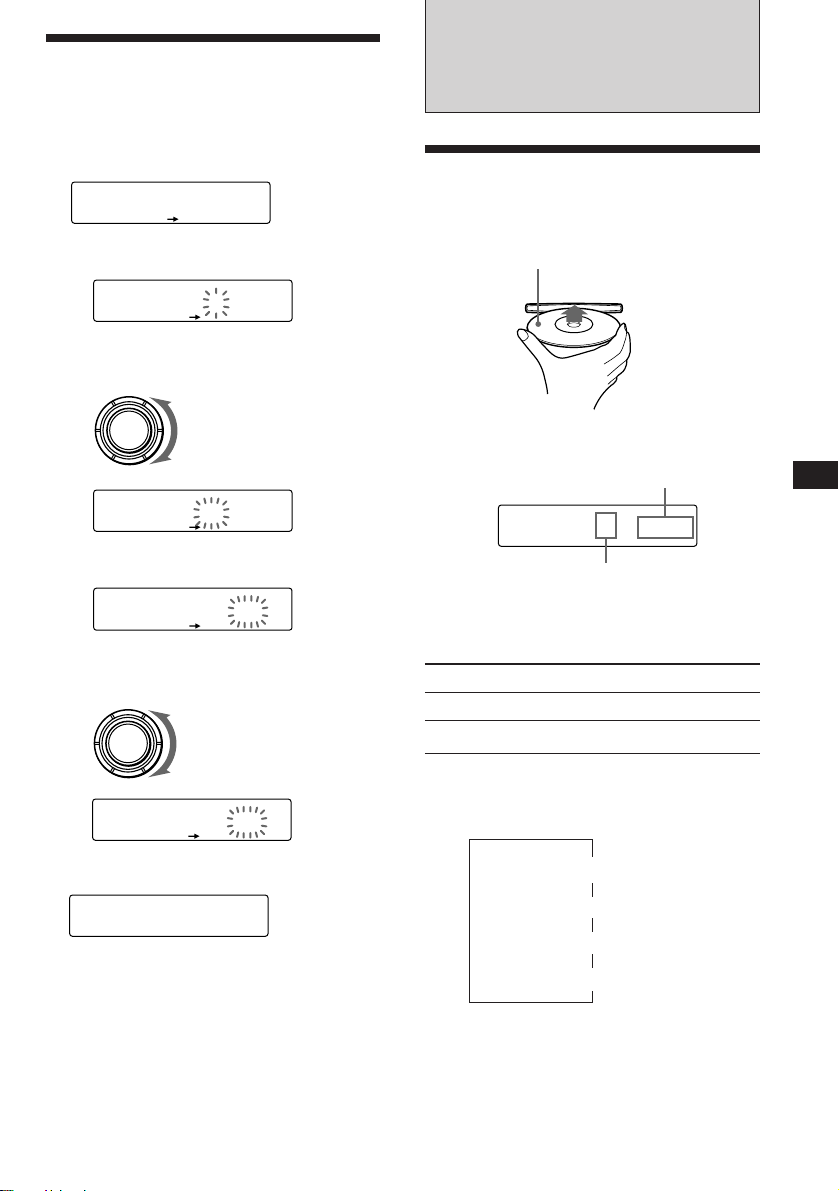
Setting the clock
EQSUR
TRACK
CD
5 2.15
The clock uses a 12-hour digital indication.
Example: Set the clock to 10:08
1 Press (SHIFT), then press (2) (SET UP).
Set
EQSUR
Clock
SET UP
1 Press (4) (n).
Set
EQSUR
1:‚‚
SET UP
The hour digit flashes.
2 Set the hour.
to go backward
SOURCE
Set
EQSUR
SET UP
to go forward
1‚:‚‚
CD Player
Listening to a CD
Simply insert the CD.
Playback starts automatically.
Labelled side up
If a CD is already inserted, press (SOURCE)
repeatedly until “CD” appears.
Elapsed playing time
EN
Getting Started/CD Player
3 Press (4) (n).
Set
EQSUR
1‚:‚‚
SET UP
The minute digits flash.
4 Set the minute.
SET UP
1‚:‚8
to go backward
to go forward
SOURCE
Set
EQSUR
2 Press (SHIFT).
EQSUR
1‚:‚8
The clock starts.
3 Press (SHIFT).
After the mode setting is complete, the
display goes back to normal playback
mode.
Note
If the POWER SELECT switch on the bottom of the unit is
set to the B position, turn the power on first, then set the
clock.
Track number
Note
To play back an 8 cm CD, use the optional Sony compact
disc single adapter (CSA-8).
To Press
Stop playback 6 or (OFF)
Eject the CD 6
Changing the displayed item
Each time you press (DSPL), the item changes
as follows:
Elapsed playback time
Disc name*
1
If you inserted a non-CD-TEXT disc, ”NO D.Name“ or
*
”NO T.Name“ appears in the display.
2
If you play a CD-TEXT disc, the artist name appears in
*
the display after the disc name. (Only for CD-TEXT
discs with the artist name)
Tip
If the name of the CD-TEXT disc is too long, you can scroll
it across the display by pressing (SHIFT), then (1) (N).
$
$
1
/Artist name*
$
Track name*
$
Clock
2
1
5
Page 6
EN
PLAY MODE
EQSUR
CD
Intro off
PLAY MODE
EQSUR
INTRO
CD
Intro on
Automatically scrolling a disc name
— Auto Scroll
If the disc name/artist name or track name on
a CD-TEXT disc exceeds 10 characters and the
Auto Scroll function is on, automatically
scrolls on the display as follows:
• The disc name appears when the disc has changed (if the
disc name is selected).
• The track name appears when the track has changed (if
the track name is selected).
• The disc or track name appears depending on the setting
when you press (SOURCE) to select a CD-TEXT disc.
If you press (DSPL) to change the display
item, the disc or track name of the CD-TEXT
disc is scrolled automatically whether you set
the function on or off.
1 During playback, press (SHIFT).
2 Press (2) (SET UP) repeatedly until
“A.Scrl” appears.
3 Press (4) (n) to select “A.Scrl on.”
4 Press (SHIFT).
To cancel Auto Scroll, select “A.Scrl off” in
step 2 above.
Note
For some CD-TEXT discs with extremely many characters,
the following cases may happen:
— Some of the characters are not displayed.
— Auto Scroll does not work.
Note
If “
means you have reached the beginning or the end of the
disc and you cannot go any further.
” or “ ” appears in the display, that
Playing a CD in various
modes
You can play CDs in various modes:
•Intro (Intro Scan) lets you play the first 10
seconds of all the tracks.
•Repeat (Repeat Play) repeats the current
track.
•Shuf (Shuffle Play) plays all the tracks in
random order.
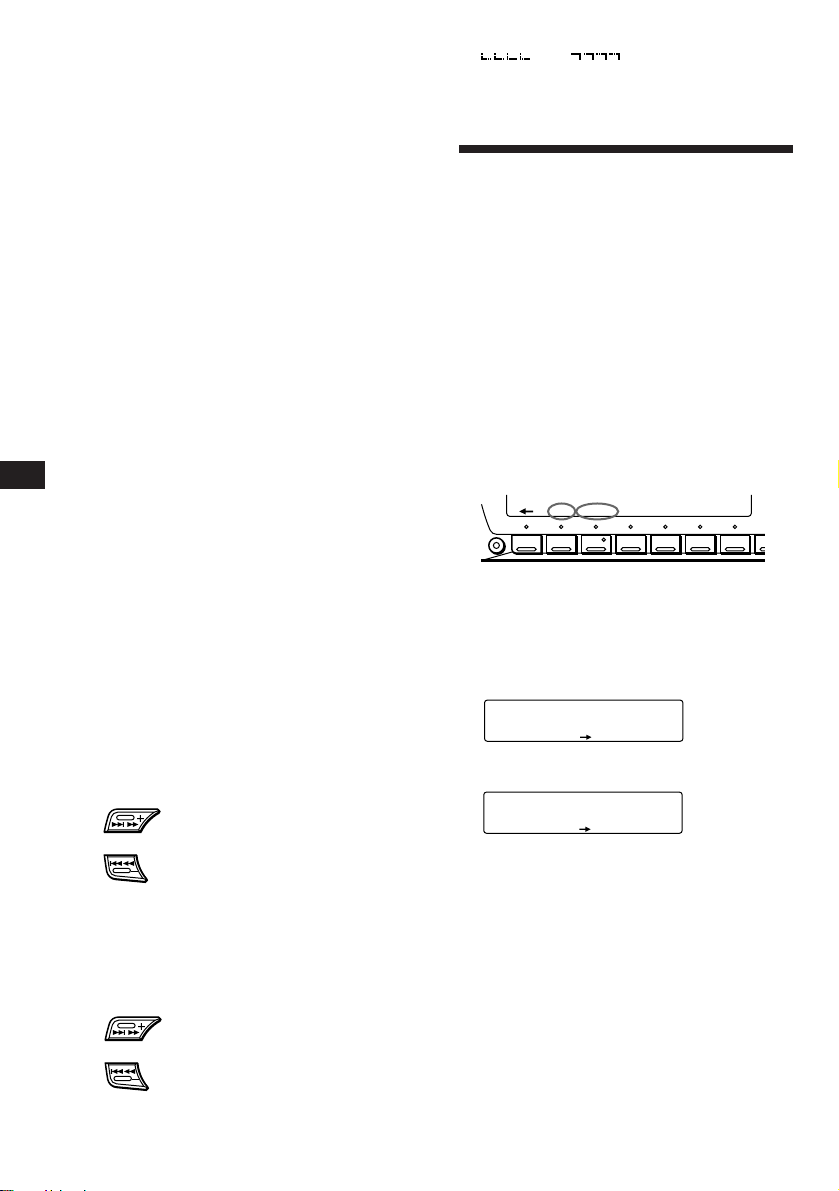
Searching for the desired track
— Intro scan
1 Press (SHIFT).
Every time you press (SHIFT), only the
items you can select light up.
SET UP PLAY MODE
SHIFT
1
234567
2 Press (3) (PLAY MODE) repeatedly until
“Intro” appears.
Each time you press (3) (PLAY MODE),
the item changes as follows:
Intro ˜ PGM
REP SHUF
6
Locating a specific track
— Automatic Music Sensor (AMS)
During playback, press either side of
(SEEK/AMS) momentarily.
To locate succeeding tracks
To locate preceding tracks
Locating a specific point in a track
— Manual Search
During playback, press and hold either
side of (SEEK/AMS). Release the button
when you have found the desired point.
To search forward
To search backward
3 Press (4) (n) to select “Intro on.”
Intro Scan starts.
4 Press (SHIFT).
To go back to normal playback mode, select
“Intro off” in step 3 above.
Page 7
Playing tracks repeatedly
— Repeat Play
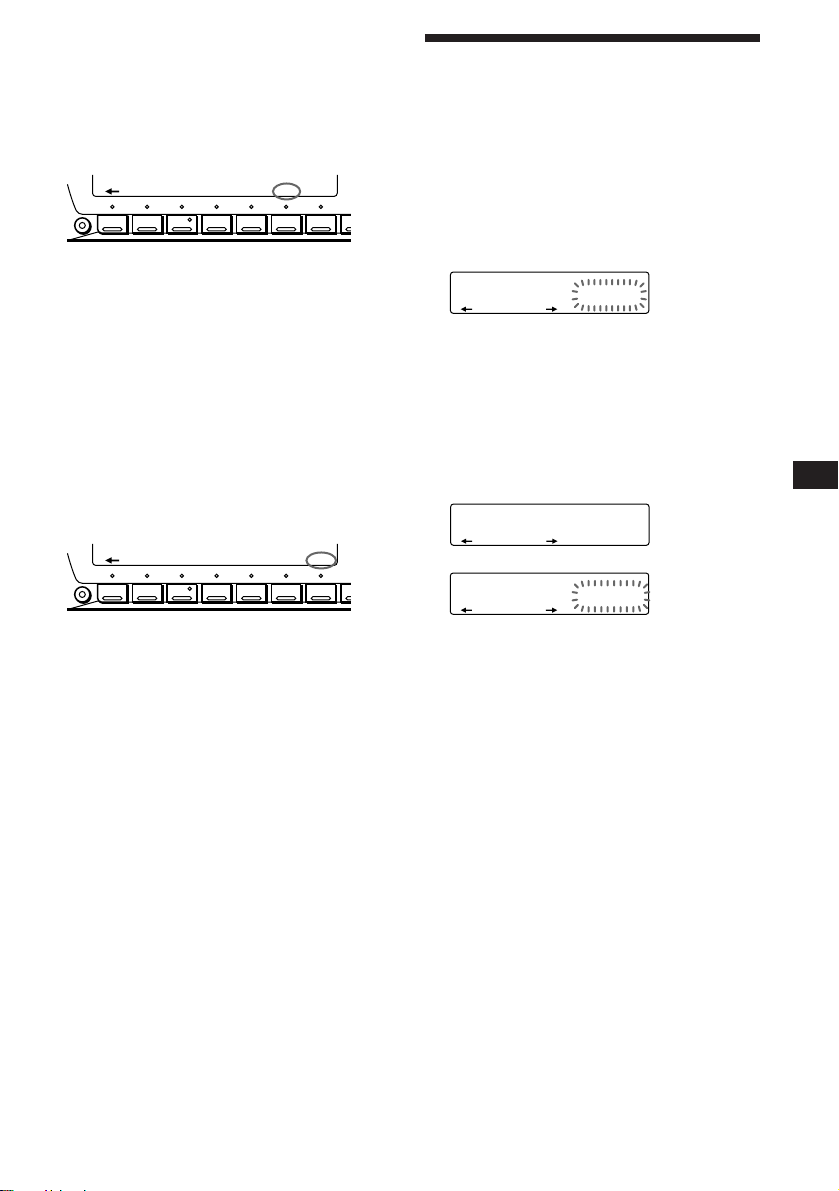
1 During playback, press (SHIFT).
2 Press (6) (REP) repeatedly until
”Repeat 1“ appears.
SET UP PLAY MODE
SHIFT
1
234567
Repeat Play starts.
REP SHUF
3 Press (SHIFT).
To go back to normal playback mode, select
“Repeat off” in step 2 above.
Playing tracks in random order
— Shuffle Play
1 During playback, press (SHIFT).
2 Press (7) (SHUF) repeatedly until
”Shuf 1“ appears.
SET UP PLAY MODE
SHIFT
1
234567
Shuffle Play starts.
REP SHUF
3 Press (SHIFT).
To go back to normal playback mode, select
“Shuf off” in step 2 above.
Creating a program
— CD Program Memory
You can play the tracks in the order you want
by making your own program. You can make
two programs: Program 1 and Program 2. You
can select up to 12 tracks for each program.
You can store the programs in memory.
1 Press (SHIFT), then press (3) (PLAY
MODE) for two seconds.
CD
EQSUR
“P 1” shows Program 1 is selected.
To select Program 2, press (4) (n)
repeatedly until “P 2” appears.
2 Press either side of (SEEK/AMS) to select
the track you want.
3 Press (5) (ENTER) momentarily.
P1
EQSUR
CD
EQSUR
4 To continue entering tracks, repeat steps
2 and 3.
5 When you finish selecting tracks, press
(3) (PLAY MODE) for two seconds.
TRACK
3 P1.‚1
PLAY MODE ENTER
+Enter+
PLAY MODE ENTER
µ
TRACK
3 P1.‚2
PLAY MODE ENTER
EN
CD Player
6 Press (SHIFT).
Notes
• “*Wait*” appears in the display while the unit is reading
the data.
• “*Mem Full*” appears in the display when you try to
enter more than 12 tracks into a program.
7
Page 8
EN
PLAY MODE ENTER
EQSUR
TRACK
CD
4 P1.‚3
PLAY MODE ENTER
EQSUR
P1
NO Data
Playing the stored program
You can select:
•PGM 1 to play Program 1.
•PGM 2 to play Program 2.
•PGM 1+2 to play Programs 1 and 2.
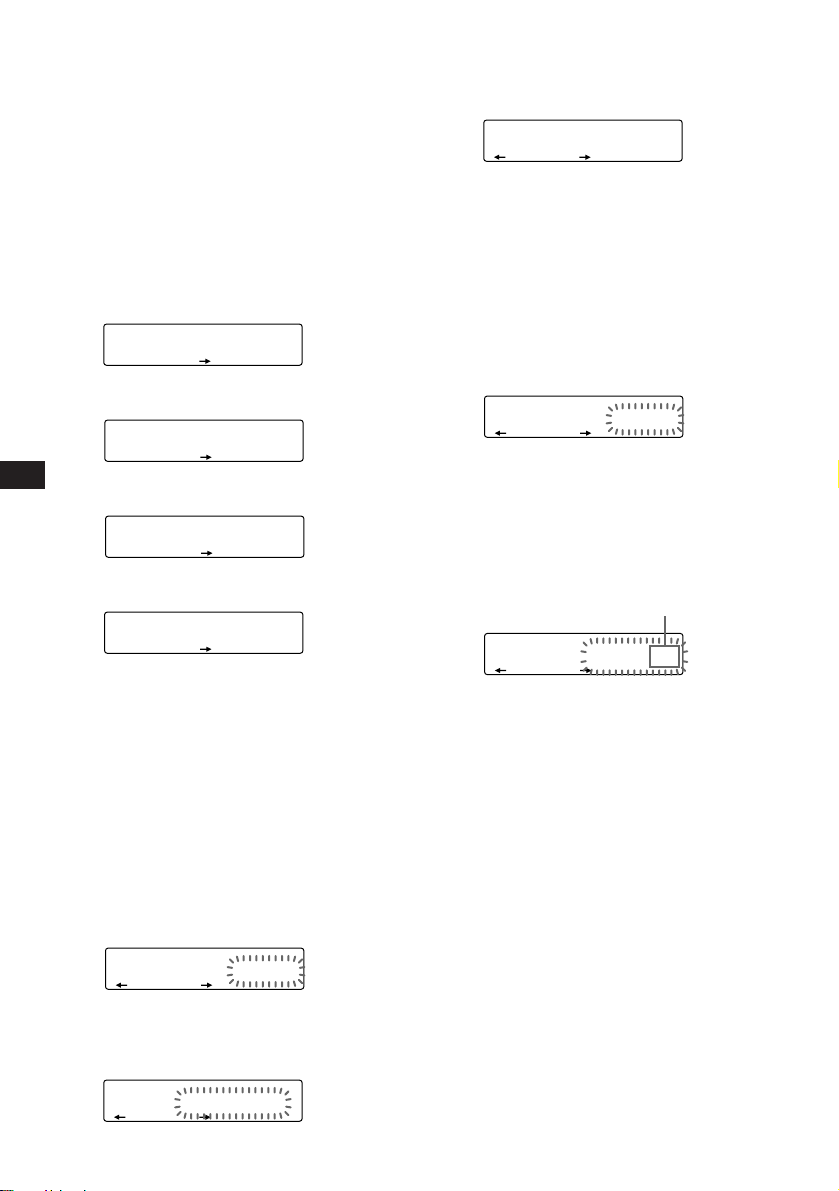
1 Press (SHIFT).
2 Press (3) (PLAY MODE) repeatedly until
“PGM” appears.
3 Press (4) (n) repeatedly until the
desired program appears.
Program 1 playback
PGM
CD
EQSUR
PGM 1
PLAY MODE
1
µ
Program 2 playback
CD
EQSUR
PGM 2
PLAY MODE
PGM
2
µ
Programs 1 and 2 playback
CD
EQSUR
PGM 1+2
PLAY MODE
+
PGM
12
µ
Normal playback
CD
EQSUR
PGM off
PLAY MODE
Program Play starts.
4 Press (SHIFT).
To delete Program 2, press (4) (n)
repeatedly until “PGM 2” appears.
3 Press (5) (ENTER) for two seconds.
The entire program is erased.
4 When you finish erasing programs, press
(3) (PLAY MODE) for two seconds.
5 Press (SHIFT).
Adding tracks to a program
1 Press (SHIFT), then press (3) (PLAY
MODE) for two seconds.
“P 1 ” shows Program 1 is selected.
To select Program 2, press (4) (n)
repeatedly until “P 2” appears.
2 Press (1) (N) or (4) (n) to select the
track slot number where you want to
insert a track.
Track slot number
CD
EQSUR
TRACK
2 P1.‚2
PLAY MODE ENTER
3 Press either side of (SEEK/AMS) to select
the track you want to insert.
8
To go back to normal playback mode, select
“PGM off” in step 3 above.
Note
“NO Data” appears in the display if no track is stored in
the program.
Erasing an entire program
1 Press (SHIFT), then press (3) (PLAY
MODE) for two seconds.
CD
EQSUR
“P 1” shows Program 1 is selected.
TRACK
7 P1.‚8
PLAY MODE ENTER
2 Press (1) (N) repeatedly until “DEL”
appears.
DEL
EQSUR
--PGM1--
PLAY MODE ENTER
4 Press (5) (ENTER) momentarily to enter
the track.
The current track in that slot number and
the succeeding tracks shift down.
5 To continue inserting tracks, repeat steps
2 through 4.
Note
Once all 12 slots have been filled, “*Mem Full*”
appears in the display, and you cannot insert tracks.
6 When you finish inserting tracks, press
(3) (PLAY MODE) for two seconds.
7 Press (SHIFT).
Page 9
Erasing tracks in a program
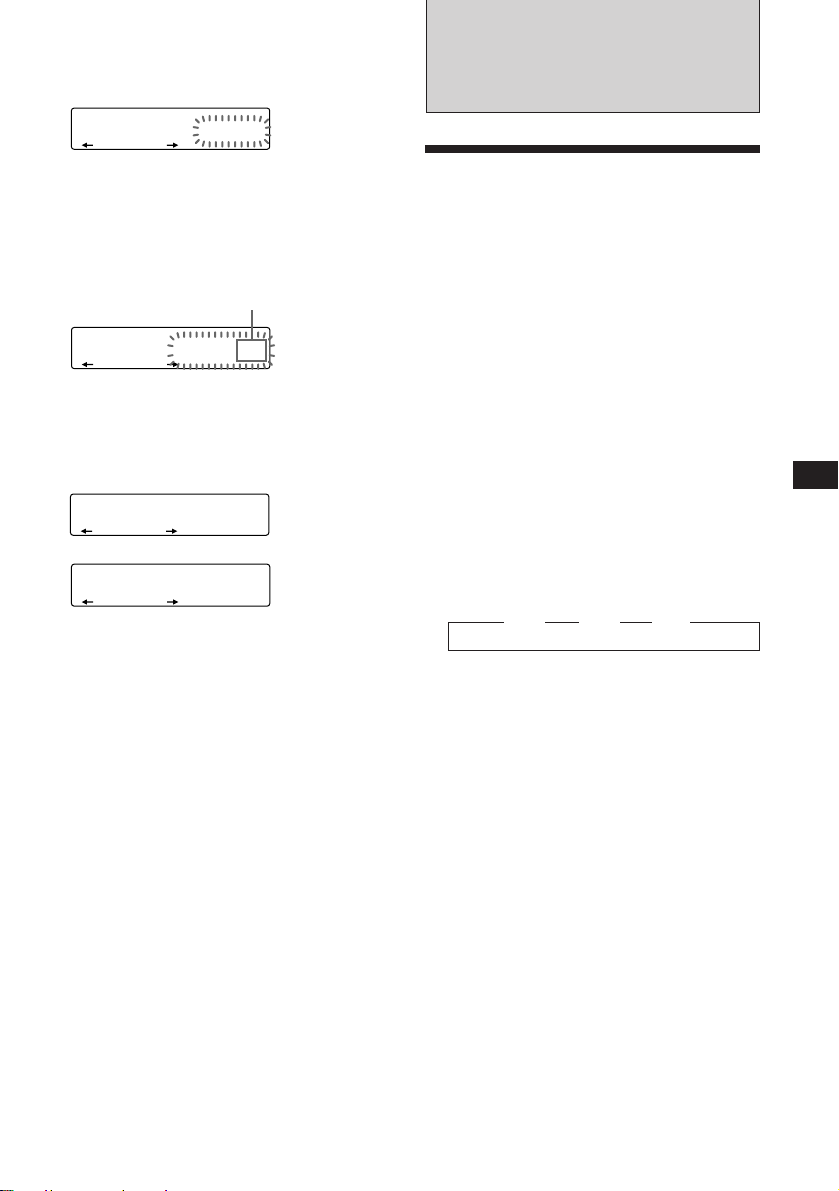
1 Press (SHIFT), then press (3) (PLAY
MODE) for two seconds.
CD
EQSUR
“P 1” shows Program 1 is selected.
To select Program 2, press (4) (n)
repeatedly until “P 2” appears.
TRACK
7 P1.‚8
PLAY MODE ENTER
2 Press (1) (N) or (4) (n) to select the
track you want to erase.
Track slot number
CD
EQSUR
The track currently registered in slot 6 of
Program 1.
TRACK
3 P1.‚6
PLAY MODE ENTER
Radio
Memorizing stations
automatically
— Best Tuning Memory (BTM)
The unit selects the stations with the strongest
signals and memorizes them in the order of
their frequencies. You can store up to 10
stations on each band (FM1, FM2 and AM).
Caution
When tuning in stations while driving, use
Best Tuning Memory to prevent accidents.
3 Press (5) (ENTER) for two seconds.
When you erase a track from a slot number,
the succeeding tracks shift up to fill the gap.
EQSUR
DISC TRACK
- -- P1.‚6
PLAY MODE ENTER
DEL
µ
CD
EQSUR
TRACK
7 P1.‚6
PLAY MODE ENTER
4 To continue erasing tracks, repeat steps
2 and 3.
5 When you finish erasing tracks, press (3)
(PLAY MODE) for two seconds.
6 Press (SHIFT).
1 Press (SOURCE) repeatedly to select the
tuner.
Each time you press (SOURCE), the source
changes as follows:
CD ˜ TUNER
2 Press (MODE) repeatedly to select the
band.
Each time you press (MODE), the band
changes as follows:
z FM1 z FM2 z AM
3 Press (SHIFT), then press (3) (PLAY
MODE) repeatedly until “B.T.M” appears.
4 Press (4) (n).
The unit stores stations in the order of their
frequencies on the number buttons.
A beep sound and the setting is stored.
5 Press (SHIFT).
Notes
• The unit does not store stations with weak signals. If
only a few stations are received, some number buttons
will retain heir former setting.
• When a number is indicated in the display, the unit
starts storing stations from the one currently displayed.
EN
CD Player/Radio
9
Page 10

Memorializing only the
desired stations
You can store up to 10 stations on each band
(20 for FM1 and FM2, 10 for AM) in the order
of your choice.
Receiving the memorized
stations
1 Press (SOURCE) repeatedly to select the
tuner.
EN
1 Press (SOURCE) repeatedly to select the
tuner.
2 Press (MODE) repeatedly to select the
band (FM1, FM2 or AM).
3 Press either side of (SEEK/AMS) to tune
in the station you want to store on the
number button.
4 Keep the desired number button ((1) to
(10)) pressed for two seconds until
“MEM” appears.
The number button indication appears in
the display.
Note
If you try to store another station on the same number
button, the previously stored station will be erased.
2 Press (MODE) repeatedly to select the
band (FM1, FM2 or AM).
3 Press the number button ((1) to (10))
momentarily where the desired station is
stored.
If you cannot tune in a preset
station
Press either side of (SEEK/AMS)
momentarily to search for the station
(automatic tuning).
Scanning stops when the unit receives a
station. Press either side of (SEEK/AMS)
repeatedly until the desired station is
received.
Note
If the automatic tuning stops too frequently, press
(SHIFT), then press (3) (PLAY MODE) repeatedly until
“Local” (local seek mode) is displayed. Then press (4)
(n) to select “Local on.” Press (SHIFT).
Only the stations with relatively strong signals will be
tuned in.
Tip
If you know the frequency of the station you want to listen
to, press and hold either side of (SEEK/AMS) for two
seconds until the desired frequency appears (manual
tuning).
If FM stereo reception is poor
— Monaural Mode
1 Press (SHIFT), then press (3) (PLAY
MODE) repeatedly until “Mono” appears.
10
2 Press (4) (n) repeatedly until “Mono
on“ appears.
The sound improves, but becomes
monaural (“ST” disappears).
3 Press (SHIFT).
To go back to normal mode, select
“Mono off” in step 2 above.
Changing the displayed items
Each time you press (DSPL), the item changes
as follows:
Frequency ˜ Clock
Page 11
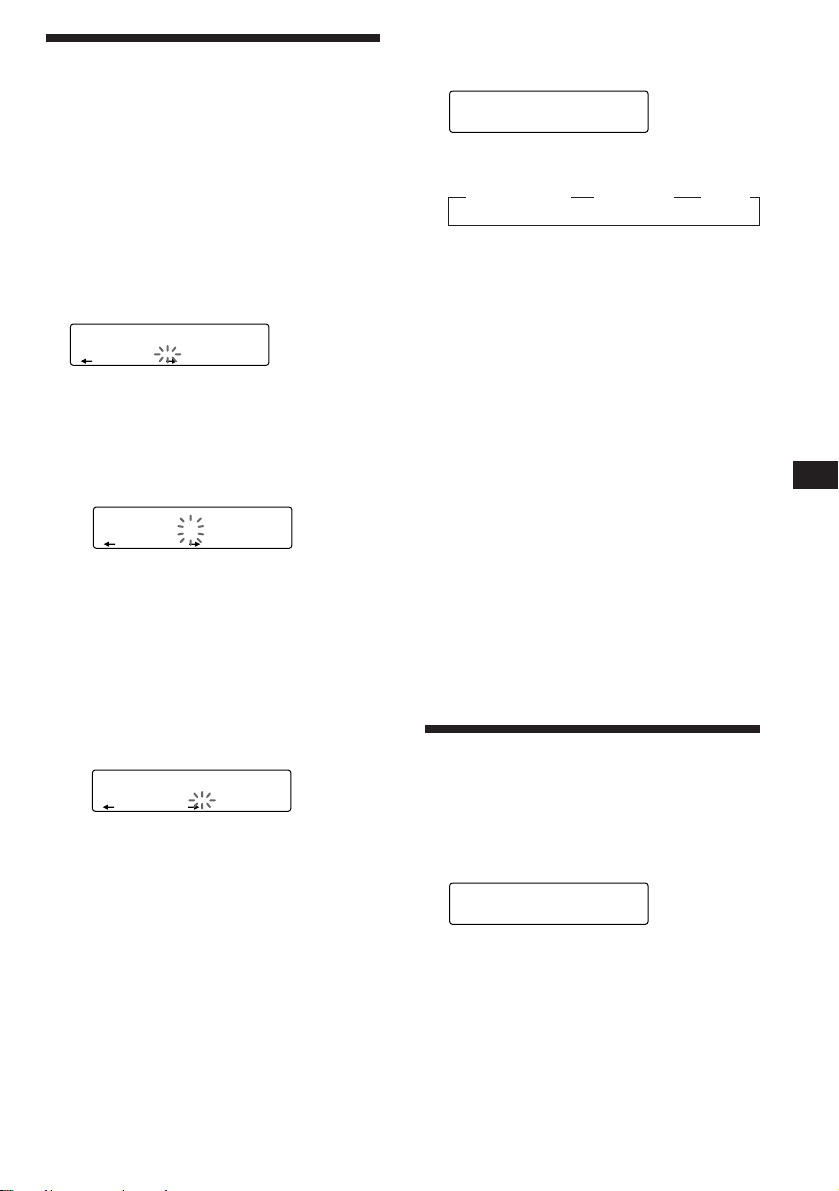
Storing the station names
—Station Memo
You can assign a name to each radio station
and store it in memory. The name of the
current station appears in the display. You can
store up to eight characters for each station.
Storing the station names
1 Tune in a station whose name you want
to store.
2 Press (LIST) for two seconds.
FM1
EQSUR
________
Displaying the station name
Press (DSPL) during radio reception.
FM1
EQSUR
3 WRKISS
Each time you press (DSPL), the item
changes as follows:
z Station name* z Frequency z Clock
* If the station name is not stored, “NO Name”
appears in the display for one second.
Erasing the station name
1 Tune in any station and press (LIST) for
two seconds.
3 Enter the characters.
1 Rotate the dial clockwise to select the
desired characters.
(A n B n C n ··· Z n 0 n 1 n 2 n
··· 9 n + n – n * n / n \ n > n <
n . n _ )
FM1
EQSUR
W_______
If you rotate the dial counterclockwise,
the characters appear in the reverse
order.
If you want to put a blank space
between characters, select “_” (underbar).
2 Press (4) (n) after locating the
desired character.
The flashing cursor moves to the next
space.
FM1
EQSUR
W_______
If you press (1) (N), the flashing cursor
moves to the left.
3 Repeat steps 1 and 2 to enter the
entire name.
4 To return to normal radio reception,
press (LIST) for two seconds.
Tip
To erase/correct a name, enter “_” (under-bar) for each
character.
2 Press (DSPL) for two seconds.
“Delete” and the station name appear in the
display.
3 Rotate the dial to select the name you
want to erase.
4 Press (5) (ENTER) for two seconds.
The name is erased.
Repeat steps 3 and 4 if you want to erase
other names.
5 Press (LIST) for two seconds.
The unit returns to normal radio reception
mode.
Locating a station by
name
1 Press (LIST) momentarily.
2 Press (LIST) repeatedly until you find the
3 Press (5) (ENTER) to tune in the desired
— List-up
The name assigned to the current station
appears in the display.
LST
EQSUR
3 WRKISS
ENTER
desired station.
station.
EN
Radio
Note
After the station name or frequency has been displayed for
five seconds, the display goes back to normal mode. To turn
off the display, press (DSPL).
11
Page 12

Other Functions
Using the rotary remote
The rotary remote works by pressing buttons
and/or rotating controls.
You can control an optional CD or MD
changer with the rotary remote.
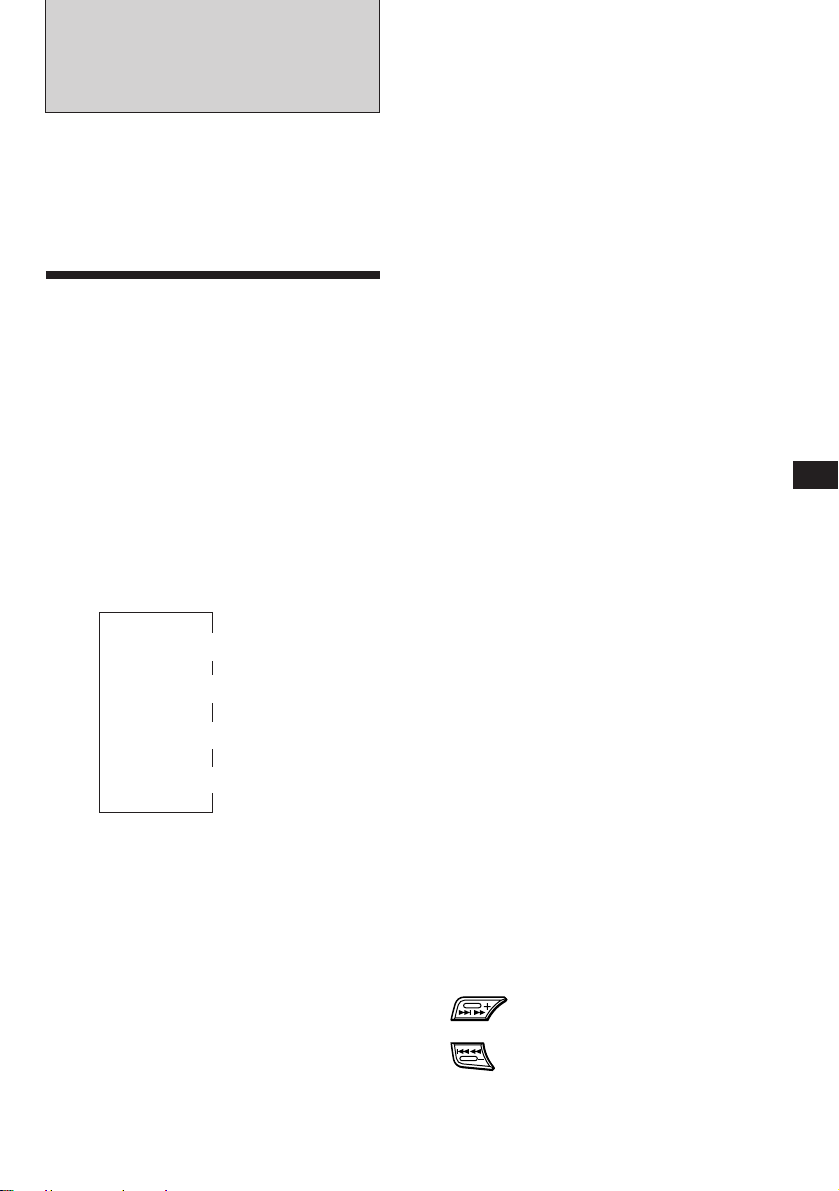
By pressing buttons (the SOURCE
and MODE buttons)
(SOURCE)
By rotating the control (the SEEK/
AMS control)
Rotate the control momentarily and
release it to:
•Locate a specific track on a disc. Rotate
and hold the control until you locate the
specific point in a track, then release it to
start playback.
•Tune in stations automatically. Rotate and
hold the control to tune in a specific
station.
EN
(MODE)
Each time you press (SOURCE), the
source changes as follows:
TENER n CD n MD n TV*
* When an optional TV tuner or Video is connected.
Pressing (MODE) changes the operation
in the following ways;
• Tuner: FM1 n FM2 n AM
• CD changer: CD1 n CD2 n …
• MD changer: MD1 n MD2 n …
• TV/Video: TV n Video1 n Video2 n …
Tip
When the POWER SELECT switch is set to position B,
you can turn on this unit by pressing (SOURCE) on the
rotary remote.
By pushing in and rotating the
control (the PRESET/DISC control)
Push in and rotate the control to:
•Receive the stations memorized on the
number buttons.
•Change the disc.
Other operations
Rotate the VOL control to
adjust the volume.
Press (SOUND) to adjust the
volume and sound menu.
Press (MUTE) to
mute the sound.
OFF
Press (OFF) to turn
off the unit.
12
Press (LIST) to display
memorized names.
Page 13
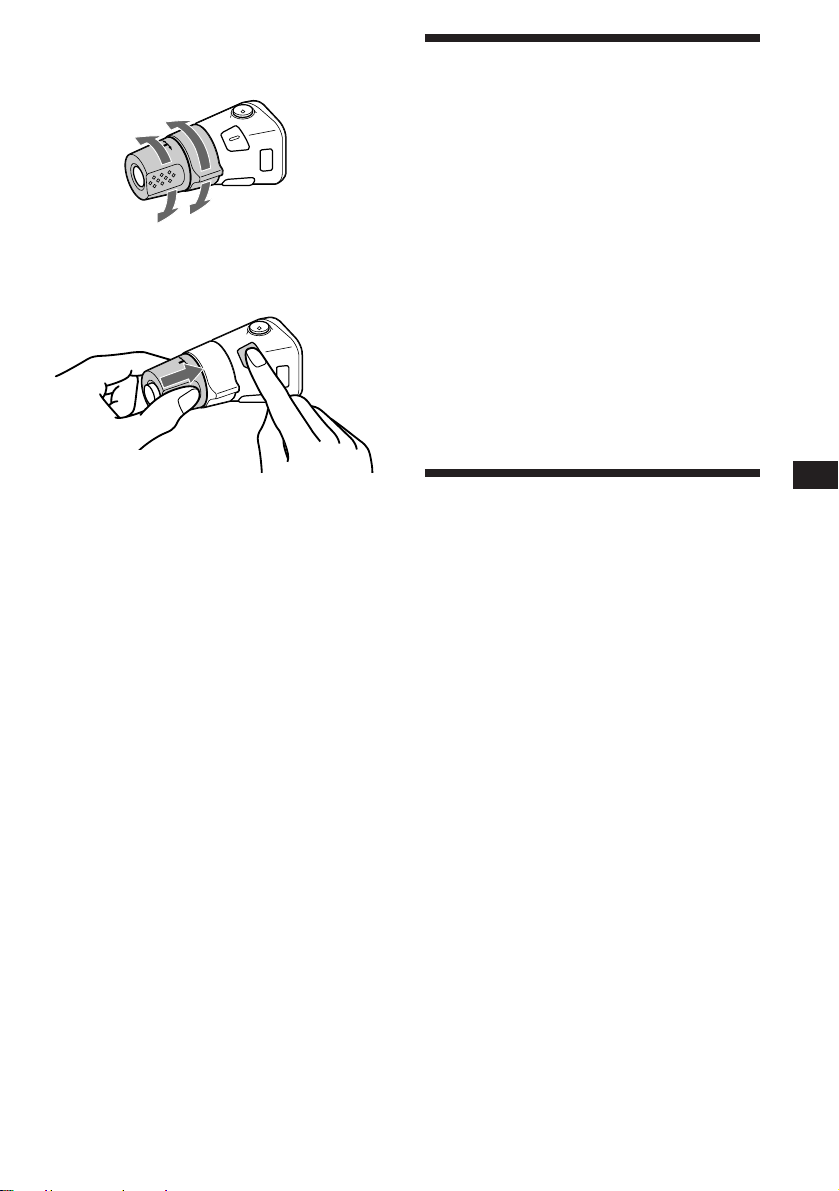
Changing the operative direction
The operative direction of controls is factoryset as in the illustration below.
To increase
Adjusting the sound
characteristics
You can adjust the bass, treble, balance and
fader.
Each source can store the bass and treble levels
respectively.
To decrease
If you need to mount the rotary remote on the
right side of the steering column, you can
reverse the operative direction.
Press (SOUND) for two seconds while
pushing the VOL control.
Tip
You can control the operative direction of controls with the
unit (page 14).
1 Select the item you want to adjust by
pressing (SOUND) repeatedly.
VOL (volume) n BAS (bass) n TRE
(treble) n BAL (balance) n FAD (fader)
2 Adjust the selected item by rotating the
dial.
Adjust within three seconds after selecting
the item. (After three seconds, the dial
functions work as the volume control.)
Muting the sound
Press (MUTE) on the rotary remote or
wireless remote.
“Mute on” flashes momentarily.
To restore the previous volume level, press
(MUTE) again.
Tip
The unit decreases the volume automatically when a
telephone call comes in (Telephone mute function).
EN
Other Functions
13
Page 14

EN
Changing the sound and
display settings
You can set:
•Clock (page 5).
•D.Info (Dual Information) to display the
clock and the play mode at the same time
(ON) or to display the information
alternately (OFF).
•Amber/Green to change the illumination
color to amber or green.
•Dimmer to change the brightness of the
display.
— Select “Auto” to dim the display only
when you turn the lights on.
— Select “on” to dim the display.
•Contrast to adjust the contrast if the
indications in the display are not
recognizable because of the unit‘s installed
position.
•Beep to turn on or off the beeps.
•RM (Rotary Remote) to change the operative
direction of the controls of the rotary remote.
— Select “norm” to use the rotary remote as
the factory-set position.
— Select “rev” when you mount the rotary
remote on the right side of the steering
column.
•Loud (Loudness) to enjoy bass and treble
even at low volume. The bass and treble will
be reinforced.
•A.Scrl (Auto Scroll) (page 6, 15).
•Disc MEMO/TEXT name (Disc memo/CDTEXT name) to set the priority display item
when you connect an optional CD changer
with the CD-TEXT and disc memo function
(page 19).
4 Press (SHIFT).
After the mode setting is complete, the
display goes back to normal playback
mode.
1 Press (SHIFT).
2 Press (2) (SET UP) repeatedly until the
desired item appears.
Each time you press (2) (SET UP), the item
changes as follows:
Clock n D.Info* n Amber/Green n Dimmer
n Contrast n Beep n RM n Loud* n
A.Scrl* n Disc MEMO/TEXT name*
* When you have not tune the station or there is no
CD/MD being played, these items will not appear.
Note
The displayed item will differ depending on the source.
3 Press (4) (n) to select the desired
setting (for example: on or off).
For the ”Contrast“ setting, pressing (4)
(n) makes the contrast higher, and
14
pressing (1) (N) makes the contrast lower.
Page 15
With Optional Equipment
CD/MD Changer
You can control up to 7 CD and MD changers
with this unit.
If you connect an optional CD changer with
the CD-TEXT function, the CD-TEXT
information will appear in the display when
you play back a CD-TEXT disc.
Automatically scrolling a disc name
— Auto Scroll
If the disc name/artist name or track name on
a CD-TEXT disc or MD exceeds 10 characters
and the Auto Scroll function is on,
automatically scrolls on the display as follows:
• The disc name appears when the disc has changed (if the
disc name is selected).
• The track name appears when the track has changed (if
the track name is selected).
• The disc or track name appears depending on the setting
when you press (SOURCE) to select an MD or CDTEXT disc.
Playing a CD or MD
1 Press (SOURCE) repeatedly to select the
CD or MD.
2 Press (MODE) until the desired changer
appears.
CD/MD playback starts.
When a CD or MD changer is connected, all
the tracks play from the beginning.
Changing the displayed item
Each time you press (DSPL) during CD, CDTEXT disc or MD playback, the item changes
as follows:
Elapsed playback time
Disc name*
1
*
If you have not labeled the disc or there is no disc name
prerecorded on the MD, “NO D.Name” appears in the
display.
2
If you play a CD-TEXT disc, the artist name appears in
*
the display after the disc name. (Only for CD-TEXT
discs with the artist name)
3
If the track name of a CD-TEXT disc or MD is not
*
prerecorded, “NO T.Name” appears in the display.
You can label a personalized name for CDs
and CD-TEXT discs with the disc memo
function, refer to “Labeling a CD” (page 19).
$
$
1
/Artist name*
$
Track name*
$
Clock
2
3
If you press (DSPL) to change the display
item, the disc or track name of the MD or CDTEXT disc is scrolled automatically whether
you set the function on or off.
1 During playback, press (SHIFT).
2 Press (2) (SET UP) repeatedly until
“A.Scrl” appears.
3 Press (4) (n) to select “A.Scrl on.”
4 Press (SHIFT).
To cancel Auto Scroll, select “A.Scrl off” in
step 2 above.
Note
For some CD-TEXT discs with extremely many characters,
the following cases may happen:
— Some of the characters are not displayed.
— Auto Scroll does not work.
Displaying the recording date of
the current MD
Press (DSPL) for two seconds during MD
playback.
The recording date of the track is displayed
for about three seconds.
Locating a specific track
— Automatic Music Sensor (AMS)
During playback, press either side of
(SEEK/AMS) once for each track you
want to skip.
To locate succeeding tracks
EN
Other Functions/CD/MD Changer
Tip
If the name of the MD or CD-TEXT disc is too long, you
can scroll it across the display by pressing (SHIFT), then
(1) (N).
To locate preceding tracks
15
Page 16
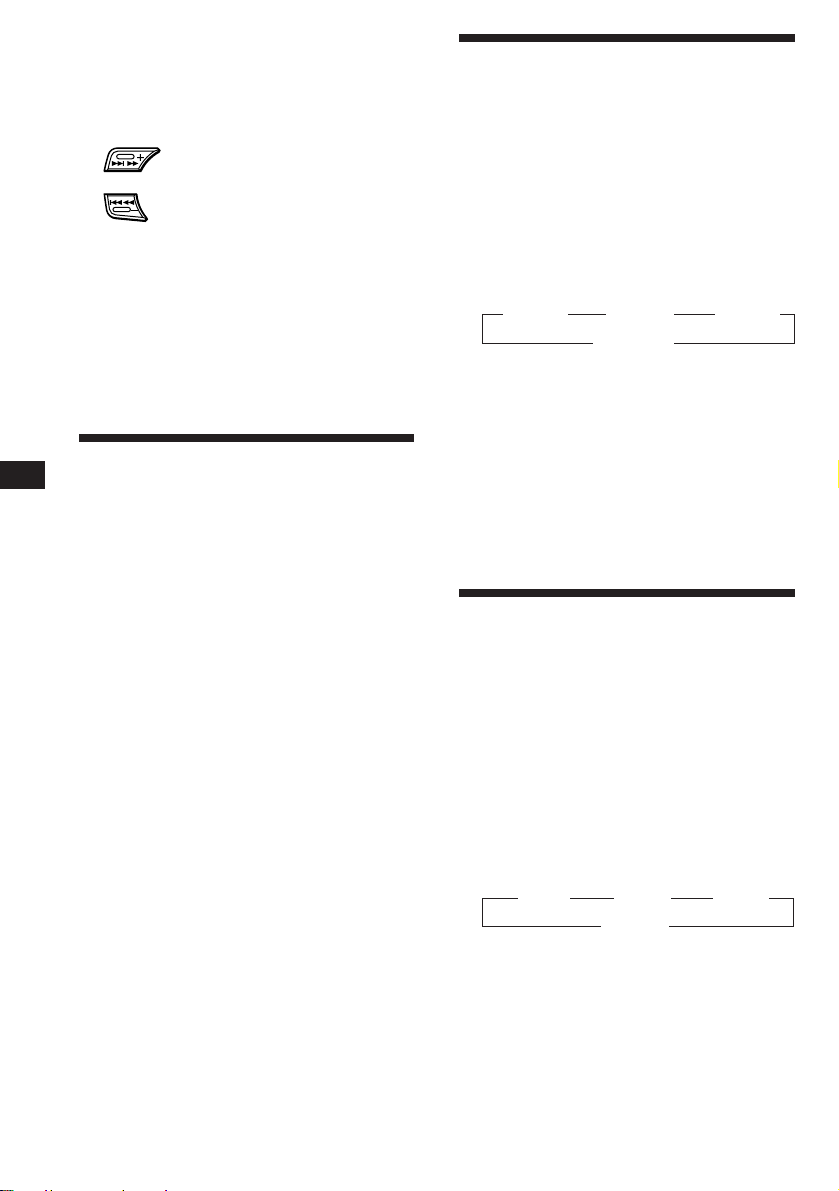
Locating a specific point in a track
— Manual Search
During playback, press and hold either
side of (SEEK/AMS). Release the button
when you have found the desired point.
To search forward
To search backward
Locating a disc by disc number
— Direct Disc Selection
Press the number button that
corresponds with the desired disc
number.
The desired disc in the current changer
begins playback.
Playing tracks repeatedly
— Repeat Play
You can select:
•Repeat 1 to repeat a track.
•Repeat 2 to repeat a disc.
•Repeat 3 to repeat all the discs in the current
changer.
1 During playback, press (SHIFT).
2 Press (6) (REP) repeatedly until the
desired setting appears.
z Repeat 1 z Repeat 2 z Repeat 3
Repeat off Z
Repeat Play starts.
3 Press (SHIFT).
EN
Scanning the tracks
— Intro Scan
You can play the first 10 seconds of all the
tracks on the current disc.
1 During playback, press (SHIFT), then
press (3) (PLAY MODE) repeatedly until
“Intro” appears.
2 Press (4) (n) to select “Intro on.”
Intro Scan starts.
3 Press (SHIFT).
To go back to normal playback mode, select
“Intro off” in step 2 above.
To go back to normal playback mode, select
“Repeat off” in step 2 above.
Note
When you play back a CD on this unit, Repeat 3 has the
same function as Repeat 2.
Playing tracks in random
order
You can select:
•Shuf 1 to play the tracks on the current disc in
random order.
•Shuf 2 to play the tracks in the current
changer in random order.
•Shuf 3 to play all the tracks in random order.
1 During playback, press (SHIFT).
2 Press (7) (SHUF) repeatedly until the
3 Press (SHIFT).
— Shuffle Play
desired setting appears.
z Shuf 1 z Shuf 2 z Shuf 3
Shuf off Z
Shuffle Play starts.
16
To go back to normal playback mode, select
“Shuf off” in step 2 above.
Page 17
Creating a program
— Program Memory (CD/MD changer with
the program memory function)
You can play tracks in the order you want by
making your own program. You can make two
programs: Program 1 and Program 2. You can
select up to 12 tracks for each program. You
can store the programs in memory.
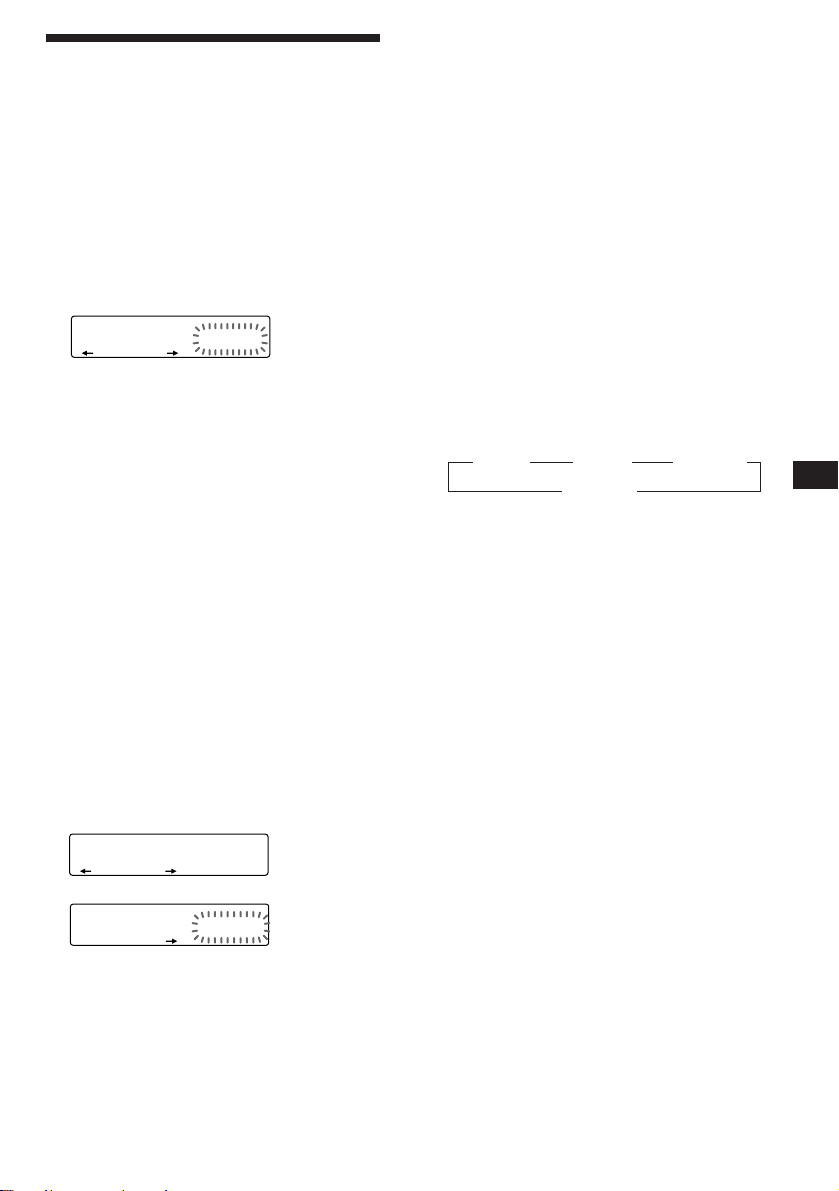
1 Press (SHIFT), then press (3) (PLAY
MODE) for two seconds.
Program edit mode
CD2
“P 1” shows Program 1 is selected.
If you have labelled the disc, the bank edit
mode appears. Press (3) (PLAY MODE) to
display “P 1” above.
To select Program 2, press (4) (n)
repeatedly until “P 2” appears.
2 Select the track you want.
1 Press (SOURCE) repeatedly to select
2 Press (MODE) repeatedly to select the
3 Press (SHIFT), then press the number
4 Press (SHIFT).
5 Press either side of (SEEK/AMS) to
3 Press (5) (ENTER) momentarily.
P1
CD2
DISC TRACK
EQSUR
2 3 P1.‚1
PLAY MODE ENTER
CD or MD.
changer.
button to select the disc.
select the track.
EQSUR
+Enter+
PLAY MODE ENTER
µ
DISC TRACK
EQSUR
3 2 P1.‚2
PLAY MODE
Notes
• “*Wait*” appears in the display while the unit is reading
the data, or when a disc has not been put into the unit.
• “*Mem Full*” appears in the display when you try to
enter more than 12 tracks into a program.
Playing the stored program
Changing the disc order in the changer will not
affect program memory play.
You can select:
•PGM 1 to play Program 1.
•PGM 2 to play Program 2.
•PGM 1+2 to play Programs 1 and 2.
1 Press (SHIFT).
2 Press (3) (PLAY MODE) repeatedly until
“PGM” appears.
3 Press (4) (n) repeatedly until the
desired program appears.
z PGM 1 z PGM 2 z PGM 1+2
PGM off Z
Program Play starts.
4 Press (SHIFT).
To go back to normal playback mode, select
“PGM off” in step 3 above.
Notes
• If you press the number button during program memory
play, program memory play is interrupted, and playback
of the selected disc starts.
• “NO Data” appears in the display if no track is stored in
the program.
• If a track stored into the program memory is not in the
disc magazine, the track will be skipped.
• When the disc magazine contains no tracks stored into
the program memory, or when the program information
has not been loaded yet, “Not Ready” appears.
EN
CD/MD Changer
4 To continue entering tracks, repeat steps
2 and 3.
5 When you finish entering tracks, press
(3) (PLAY MODE) for two seconds.
6 Press (SHIFT).
17
Page 18
EN
PLAY MODE ENTER
EQSUR
DISC TRACK
CD2
3 2 P1.‚7
PLAY MODE ENTER
EQSUR
DISC TRACK
DEL
- -- P1.‚6
PLAY MODE ENTER
EQSUR
DISC TRACK
CD2
4 7 P1.‚6
Erasing an entire program
1 Press (SHIFT), then press (3) (PLAY
MODE) for two seconds.
EQSUR
DISC TRACK
4 7 P1.‚8
PLAY MODE ENTER
CD2
“P 1” shows Program 1 is selected.
If you have labelled the disc, the bank edit
mode appears. Press (3) (PLAY MODE) to
display “P 1” above.
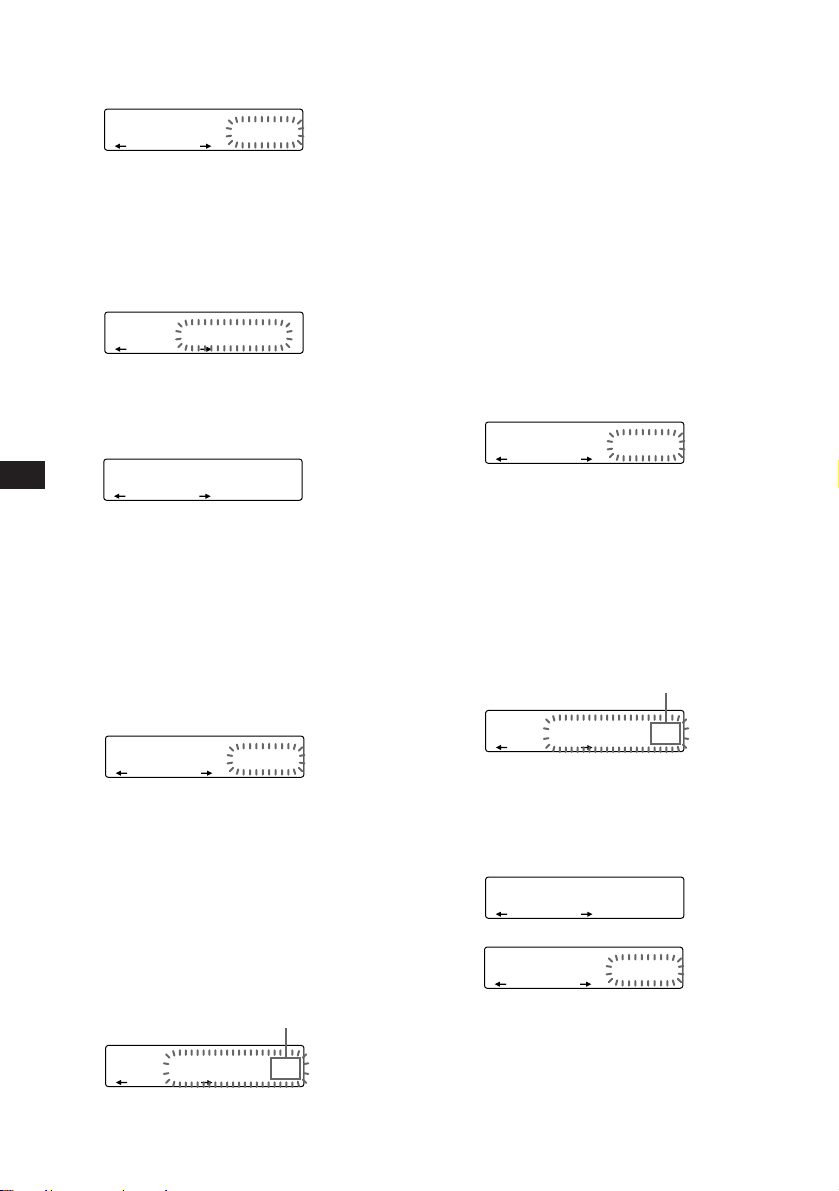
2 Press (1) (N) repeatedly until “DEL”
appears.
DEL
EQSUR
--PGM1--
PLAY MODE ENTER
To erase Program 2, press (4) (n)
repeatedly until “PGM 2” appears.
3 Press (5) (ENTER) for two seconds.
P1
EQSUR
NO Data
PLAY MODE ENTER
The entire program is erased.
4 When you finish erasing programs, press
(3) (PLAY MODE) for two seconds.
5 Press (SHIFT).
Adding tracks to a program
1 Press (SHIFT), then press (3) (PLAY
MODE) for two seconds.
EQSUR
DISC TRACK
4 7 P1.‚8
PLAY MODE ENTER
CD2
“P 1” shows Program 1 is selected.
4 Press (5) (ENTER) momentarily to enter
the track.
The current track in that slot number and
the succeeding tracks shift down.
To continue inserting tracks, repeat steps 2
through 4.
Note
Once all 12 slots have been filled, “*Mem Full*”
appears in the display, and you cannot insert tracks.
5 When you finish inserting tracks, press
(3) (PLAY MODE) for two seconds.
6 Press (SHIFT).
Erasing tracks in a program
1 Press (SHIFT), then press (3) (PLAY
MODE) for two seconds.
“P 1” shows Program 1 is selected.
If you have labelled the disc, the bank edit
mode appears. Press (3) (PLAY MODE) to
display “P 1” above.
To select Program 2, press (4) (n)
repeatedly until “P 2” appears.
2 Press (1) (N) or (4) (n) to select the
track you want to erase.
Track slot number
EQSUR
DISC TRACK
3 3 P1.‚6
PLAY MODE ENTER
CD2
The track currently registered in slot 6 of
Program 1.
18
If you have labelled the disc, the bank edit
mode appears. Press (3) (PLAY MODE) to
display “P 1” above.
To select Program 2, press (4) (n)
repeatedly until “P 2” appears.
2 Press (1) (N) or (4) (n) to select the
track slot number where you want to
insert a track.
Track slot number
EQSUR
DISC TRACK
3 2 P1.‚5
PLAY MODE ENTER
CD2
3 Press either side of (SEEK/AMS) to select
the track you want to insert.
3 Press (5) (ENTER) for two seconds.
When you erase a track from a slot number,
the succeeding tracks shift up to fill the gap.
µ
4 To continue erasing tracks, repeat steps
2 and 3.
5 When you finish erasing tracks, press (3)
(PLAY MODE) for two seconds.
6 Press (SHIFT).
Page 19
Labeling a CD — Disc Memo
(CD changer with the custom file function)
You can label each disc with a personalized
name. You can enter up to eight characters for
a disc. If you label a CD, you can locate the
disc by name (page 20) and select the specific
tracks for playback (page 21).
Displaying the disc memo name or
CD-TEXT name
When you play back a CD-TEXT disc, you can
set the priority display item to be the disc
memo name or the CD-TEXT name.
1 Press (SHIFT) during CD-TEXT disc
playback.
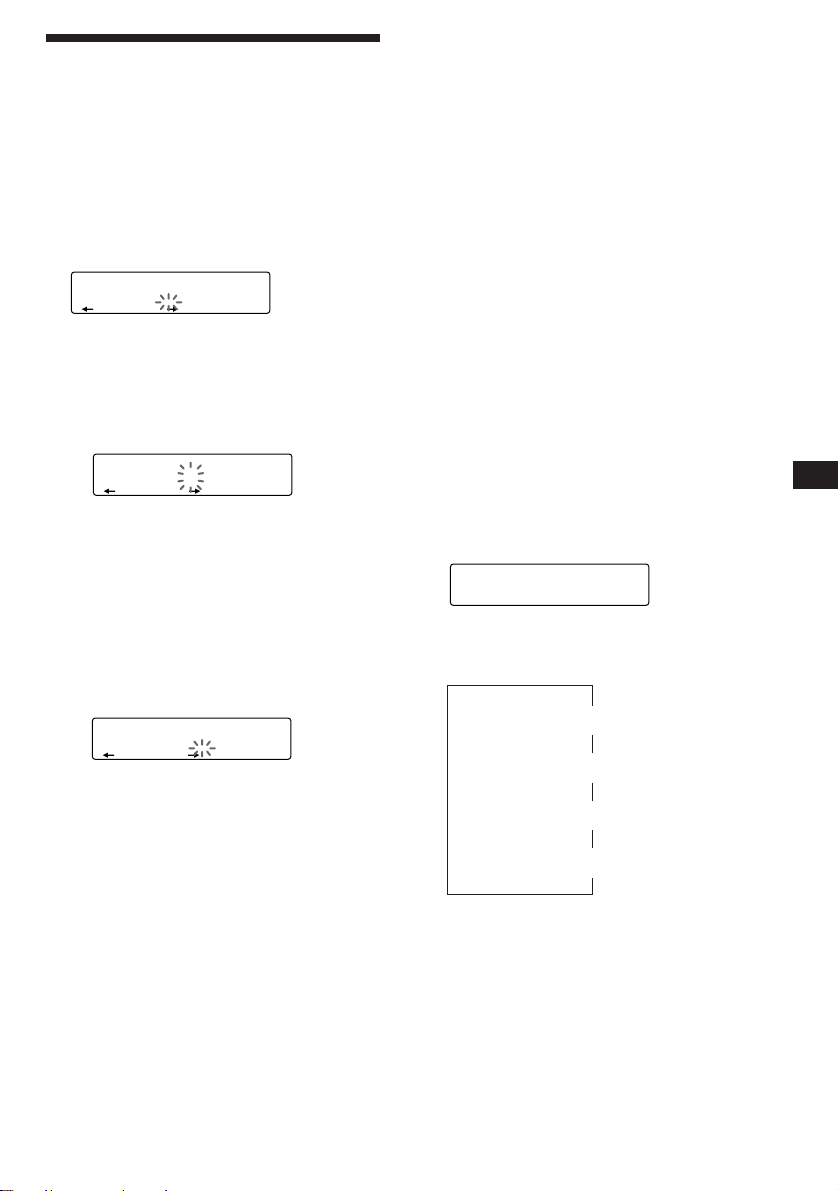
1 Play the CD and press (LIST) for two
seconds.
CD2
DISC NAME
EQSUR
1 ________
2 Enter the characters.
1 Rotate the dial clockwise to select the
desired characters.
(A n B n C n ··· Z n 0 n 1 n 2 n
··· 9 n + n – n * n / n \ n > n <
n . n _ )
CD2
If you rotate the dial counterclockwise,
the characters appear in the reverse
order.
If you want to put a blank space
between characters, select “_” (underbar).
2 Press (4) (n) after locating the
desired character.
The flashing cursor moves to the next
space.
CD2
If you press (1) (N), the flashing cursor
moves to the left.
3 Repeat steps 1 and 2 to enter the
entire name.
DISC NAME
EQSUR
1 S_______
DISC NAME
EQSUR
1 S_______
2 Press (2) (SET UP) repeatedly until “Disc
MEMO“ or “TEXT name” appears.
3 Press (4) (n) to select “Disc MEMO“ or
“TEXT name.”
4 Press (SHIFT).
After the mode setting is complete, the
display goes back to normal playback
mode.
If you want to change to the other setting, you
can do so in step 3.
Displaying the disc memo name
Press (DSPL) during CD/CD-TEXT disc
playback.
CD2
Each time you press (DSPL) during CD/
CD-TEXT disc playback, the item changes
as follows:
DISC NAME
EQSUR
1 SCHUBERT
Elapsed playback time
Disc name/Artist name*
Track name*
$
$
$
$
Clock
1
2
EN
CD/MD Changer
3 To return to normal CD playback mode,
press (LIST) for two seconds.
Tip
To erase/correct a name enter “_” (under-bar) for each
character.
1
When you connect an optional CD changer with the
*
CD-TEXT function, the personalized label or the
CD-TEXT disc name appears. See below to change
the display.
— To change the displayed item press (4) (n).
— To change the display using display settings
(“Displaying the disc memo name or CD-TEXT
name”).
continue to next page n
19
Page 20

EN
ENTER
EQSUR
DISC
LST
1 SCHUBERT
The display item will change depending on the setting
as follows:
Type of
Priority display
disc
setting
Disc MEMO
A
TEXT name
Disc MEMO
B
TEXT name
Disc MEMO
C
TEXT name
Disc MEMO
D
TEXT name
A:CD-TEXT disc with disc memo
B:Normal CD with disc memo
C:CD-TEXT disc without disc memo
D:Normal CD without disc memo
2
If you connect an optional CD changer with the
*
CD-TEXT function, the CD-TEXT information
will appear in the display when you playback a CDTEXT disc.
Actual display
Disc memo
CD-TEXT information
Disc memo
CD-TEXT information
NO D.Name
Erasing the disc memo
1 Press (SOURCE) repeatedly to select CD.
2 Press (MODE) repeatedly to select the CD
changer.
3 Press (LIST) for two seconds.
4 Press (DSPL) for two seconds.
5 Rotate the dial to select the name you
want to erase.
6 Press (5) (ENTER) for two seconds.
The name is erased.
Repeat steps 5 and 6 if you want to erase
other names.
7 Press (LIST) for two seconds.
The unit returns to normal CD playback
mode.
Locating a disc by name
— List-up (CD changer with the custom file
function or MD changer)
You can use this function for discs that have
been assigned a custom name. For more
information on disc names, refer to “Labeling a
CD” (page 19).
1 Press (LIST) momentarily.
The name assigned to the current disc
appears in the display.
If you add disc memo labels to a CD-TEXT
disc, the display setting you make will
determine which information is displayed.
If the disc has only one set of information
(either CD-TEXT or disc memo labels), that
information will be displayed regardless of
the display setting you make.
2 Press (LIST) repeatedly until you find the
desired disc.
3 Press (5) (ENTER) to play back the disc.
Notes
• After a disc name has been displayed for five seconds, the
display goes back to normal playback mode. To turn off
the display, press (DSPL).
• The track names are not displayed during MD playback.
• If there are no discs in the magazine, “NO Disc”
appears in the display.
• If a disc has not been assigned a custom file, “********”
appears in the display.
• If the disc information has not been read by the unit, “?”
appears in the display. To load the disc, first press the
number button, then choose the disc that has not been
loaded.
• The information appears only in upper case. There are
also some letters which cannot be displayed (during MD
playback).
20
Page 21
Selecting specific tracks
for playback
— Bank
(CD changer with the custom file function)
If you label the disc, you can set the unit to
skip tracks and play only the tracks you want.
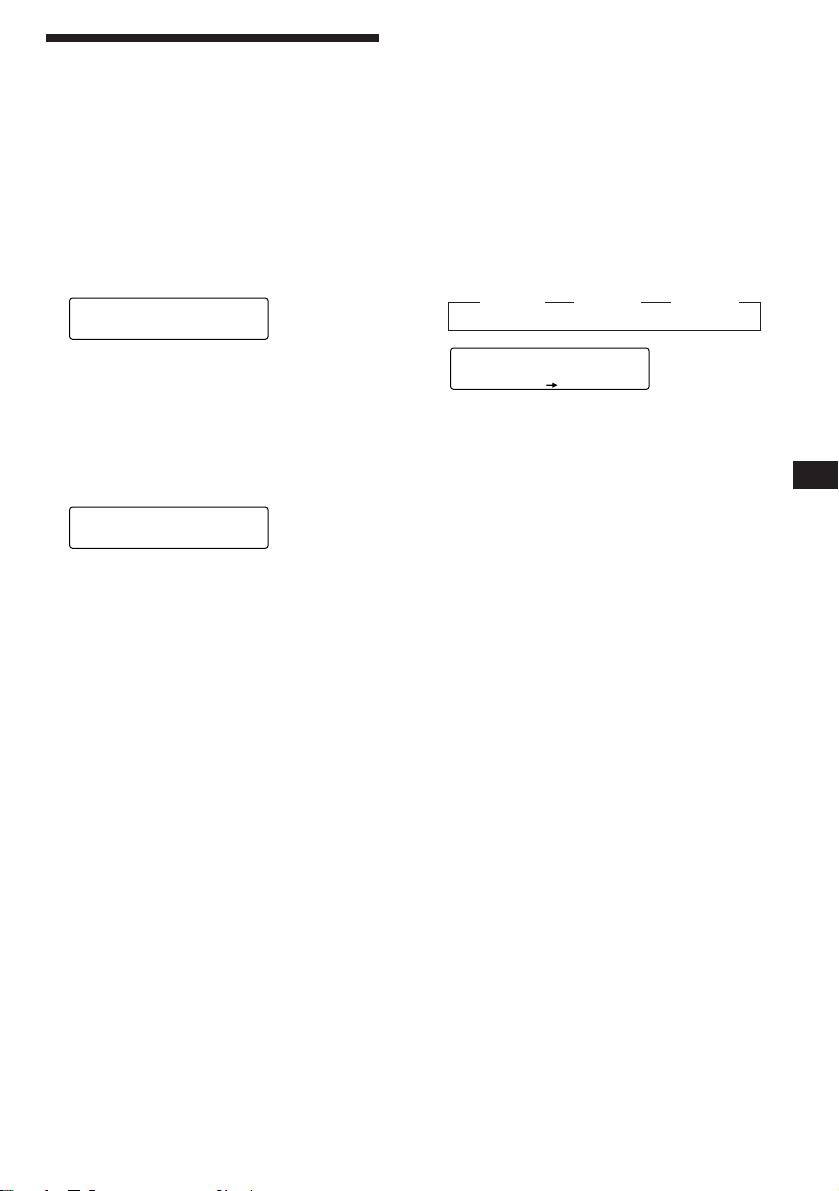
1 Start playing the disc and press (SHIFT).
Then press (3) (PLAY MODE) for two
seconds.
Bank edit mode.
EQSUR
EQSUR
DISC TRACK
5 1 Play
PLAY MODE ENTER
DISC TRACK
5 3 Skip
PLAY MODE ENTER
CD2
Note
If you have not labeled the disc, the bank edit mode
does not appear and the programme edit mode appears.
To go back to normal playback mode, press (SHIFT).
2 Press either side of (SEEK/AMS) to select
the track number you want to skip and
press (5) (ENTER).
CD2
The indication changes from “Play” to
“Skip.” If you want to return to “Play,"
press (5) (ENTER) again.
Playing the specific tracks only
You can select:
•Bank on to play the tracks with the “Play”
setting.
•Bank inv (Inverse) to play the tracks with the
“Skip” setting.
1 During playback, press (SHIFT), then
press (3) (PLAY MODE) repeatedly until
“Bank” appears.
2 Press (4) (n) to repeatedly until the
desired setting appears.
z Bank on z Bank inv z Bank off
BANK
CD1
EQSUR
Bank on
PLAY MODE
Playback starts from the track following the
current one.
3 Press (SHIFT).
To go back to normal playing mode, select
“Bank off“ in step 2 above.
EN
CD/MD Changer
3 Repeat step 2 to set the “Play” or “Skip”
mode on all the tracks.
4 Press (3) (PLAY MODE) for two seconds.
The unit returns to normal CD playback
mode.
5 Press (SHIFT).
Notes
• You can set the “Play” and “Skip” mode on up to 24
tracks.
• You cannot set the “Skip” mode on all the tracks.
21
Page 22
EQSUR
SUR
-DEFEAT-
EQSUR
SUR
HALL
EQSUR
CD1
-DEFEAT-
DSP
EQSUR
SUR
Effect 3‚%
EQSUR
SUR
Effect 9‚%
Adjusting the effect level
1 Press (SOURCE) to select a source (tuner,
CD or MD).
EN
With the optional XDP-U50D
connected
The optional XDP-U50D lets you add some
effects to the sound field of the currently
selected source.
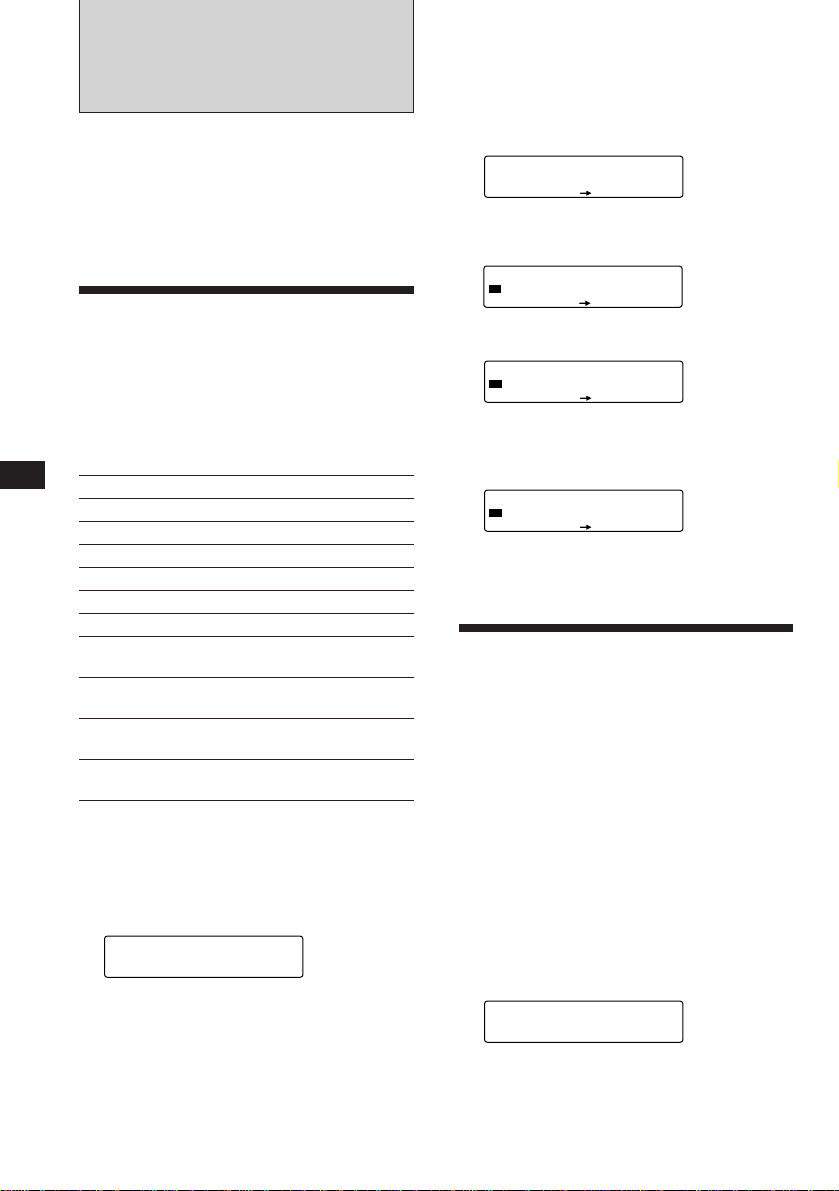
Selecting a surround menu
You can select a desired surround menu to
best fit the audio source. The following menus
can simulate different sound fields and
enhance the sound so that you can feel as if
you are in a live concert.
Surround menu
HALL Concert hall
JAZZ Jazz club
DISCO Disco with thick walls
THEATER Movie theater
PARK Big open space
LIVE Live concert
OPERA Opera house
CHURCH Church/chapel with a lot of
reverberation
STADIUM Open-air concert in a
stadium
CELLAR Cellar with a lot of
reverberation
DEFEAT Normal sound without any
DSP effects
1 Press (SOURCE) to select a source (tuner,
CD or MD).
2 Press (SOUND) for two seconds.
3 Rotate the dial until the desired
surround menu appears.
4 Press (4) (n).
5 Rotate the dial to adjust the level.
You can adjust the level from 0 to 100%.
Increase the level to enhance the effect.
6 Press (SOUND) for two seconds.
Storing a surround effect
onto CDs
— Digital Signal Processor (DSP) Custom
File (CD changer the with custom file
function)
Once you have registered the desired surround
menu onto the discs, you can enjoy the same
surround menu every time you play that disc.
(Only when you have labeled a disc by the
Custom File function.)
22
2 Press (SOUND) repeatedly until “SUR”
appears.
SUR
EQSUR
-DEFEAT-
3 Rotate the dial to select the desired
surround menu.
The surround menu appear in the order
shown above.
After three seconds, the display goes back
to normal mode.
1 Press (LIST) for two seconds.
2 Press (LIST) until the surround menu
appears.
DSP custom file mode
3 Rotate the dial to select the desired
surround menu.
Page 23
4 Press (LIST) for two seconds.
After the effect setting is complete, the
display goes back to normal playback
mode.
Playing the disc with the stored
surround menu
1 Press (SHIFT), then press (3) (PLAY
MODE) repeatedly until “D.File”
appears.
2 Press (4) (n) to select the “D.File on.”
After five seconds, the display goes back to
normal playback mode.
3 Press (SHIFT).
To cancel to play the disc with stored surround
menu, select “D.File off” in step 2.
Changing the stored surround
effect
Play the disc whose surround mode you want
to change, and follow the steps of “Storing the
surround effect onto CDs.”
Erasing the stored surround effect
Select “DEFEAT” in step 3 of “Storing the
surround effect onto CDs.”
1 Press (SOUND) momentarily until “LP1”
appears.
LP1
EQSUR
All
2 Rotate the dial to select the desired
listening position.
The listening positions appear in the order
shown above.
After three seconds, the display goes back
to normal playback mode.
Adjusting the listening position
1 Press (SOUND) for two seconds.
2 Press (SOUND) repeatedly until the
desired listening position appears.
3 Press (4) (n).
LP1
EQSUR
L R
4 Rotate the dial to adjust the center of
the sound field to the left or right. Then
set the center of the sound field.
SOURCE
Center moves to the L (left).
Center moves to the R (right).
EN
DSP
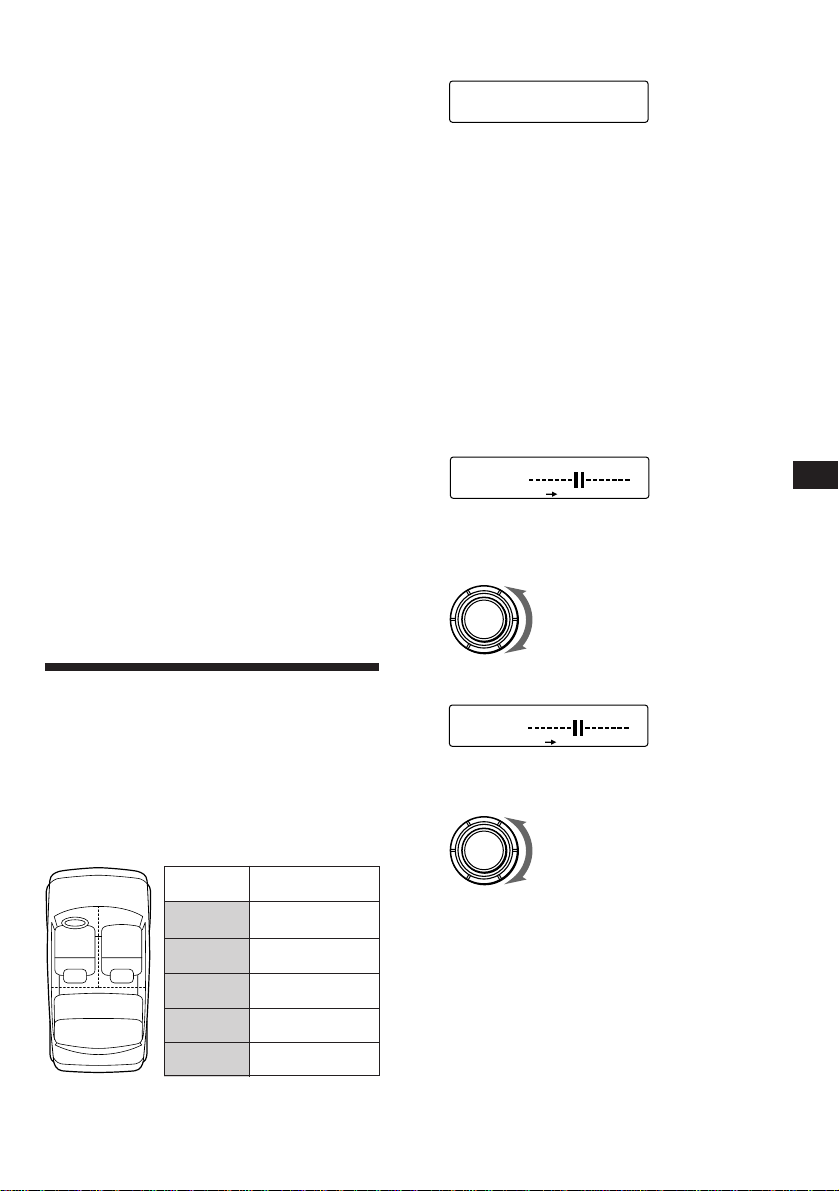
Selecting the listening
position
You can set the time for the sound to reach the
listeners from the speakers.
The unit can simulate a natural sound field so
that you can feel as if you are in the center of
the sound field wherever you sit in the car.
3
Display
window
LP1
21
All
LP2
Front
LP3
Front R
LP4
Front L
LP5
Rear
Center of sound
field
Normal setting
(1 + 2 + 3)
Front part
(1 + 2)
Right front (2)
Left front (1)
Rear part (3)
5 Press (4) (n).
LP1
EQSUR
R F
6 Rotate the dial to adjust the center of
the sound field to the front or rear.
SOURCE
Center moves to the R (rear).
Center moves to the F (front).
7 Press (SOUND) for two seconds.
After the position setting is complete,
normal playback mode appears.
23
Page 24
Adjusting the fader (FAD)
EQSUR
SUB
C.off125Hz
Normally, with the DSP mode on, the volume
of the output sound from the rear speakers is
lowered automatically to improve the
efficiency of the listening position setting. If
you want to raise the rear speaker volume,
adjust the fader.
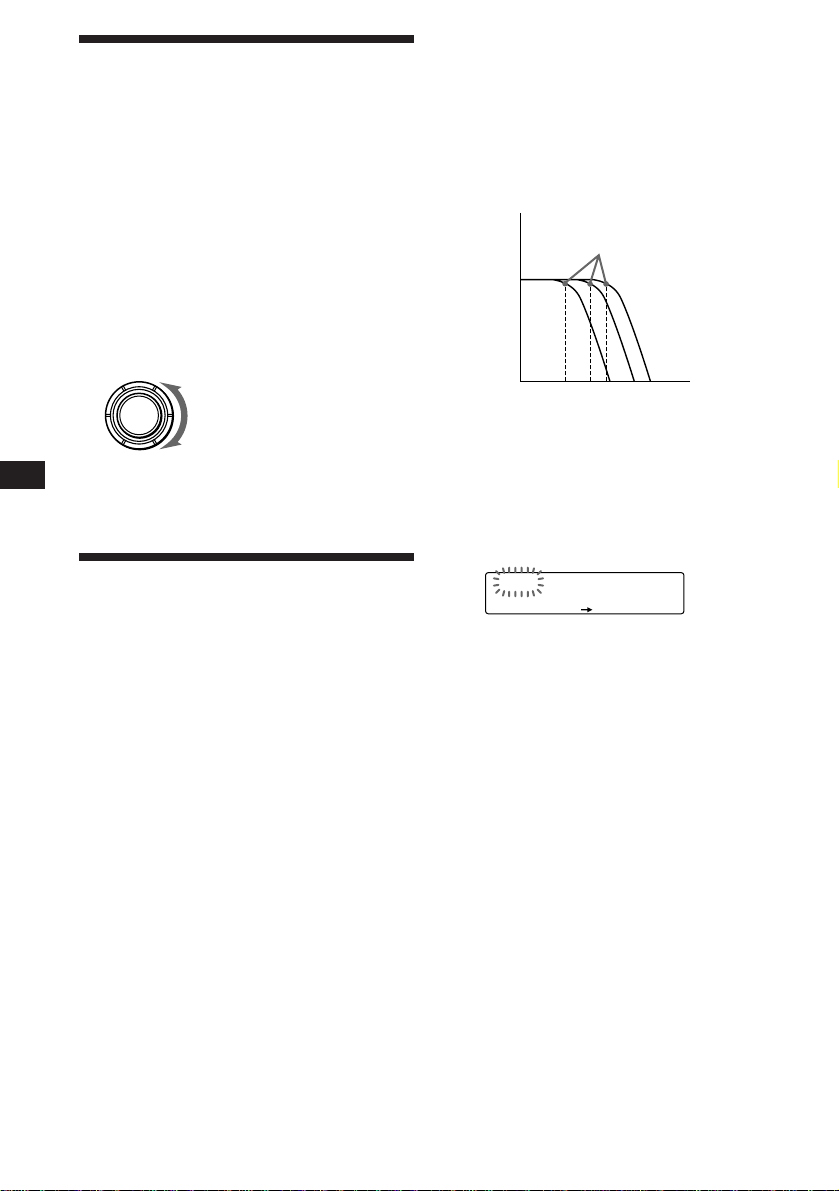
Adjusting the frequency of the
subwoofer(s)
To match the characteristics of the connected
subwoofer(s), you can cut out the unwanted
high and middle frequency signals entering
the subwoofer(s). By setting the cut-off
frequency (see the diagram below), the
subwoofer(s) will output only low frequency
signals so you can get a clearer sound image.
EN
1 Follow steps 1 through 3 of “Selecting a
surround menu” (page 22).
2 Press (SOUND) repeatedly until “FAD”
appears.
3 Rotate the dial to adjust the fader.
Decreases front speaker volume
SOURCE
Increases front speaker volume
After three seconds, the display goes back
to normal playback mode.
Adjusting the volume of
the subwoofer(s)
1 Press (SOURCE) to select a source (tuner,
CD or MD).
2 Press (SOUND) repeatedly until “SUB”
appears.
3 Rotate the dial to adjust the volume.
After three seconds, the display goes back
to normal playback mode.
Tip
When you rotate the dial to turn the volume all the way
down, “Sub mute” appears and the cutout frequency of the
subwoofer is disabled.
Level
Cut-off frequency
62 125 198
Frequency (Hz)
1 Press (SOURCE) to select a source (tuner,
CD or MD).
2 Press (SOUND) for two seconds.
3 Press (SOUND) repeatedly until “SUB”
appears.
4 Rotate the dial to select the desired cut-
off frequency.
The cut-off frequency in the display
changes.
62 n 78 n 99 n 125* n 157 n 198 Hz
* Factory-set frequency
5 Press (SOUND) for two seconds.
After the frequency setting is complete, the
display goes back to normal playback
mode.
24
Page 25
Adjusting the volume of
the bass and treble
You can adjust the volume of the bass and
treble to best fit the acoustic characteristics
inside your car.
1 Press (SOURCE) to select a source (tuner,
CD or MD).
2 Press (SOUND) repeatedly until “BAS” or
“TRE” appears.
3 Rotate the dial to adjust the volume.
After three seconds, the display goes back
to normal playback mode.
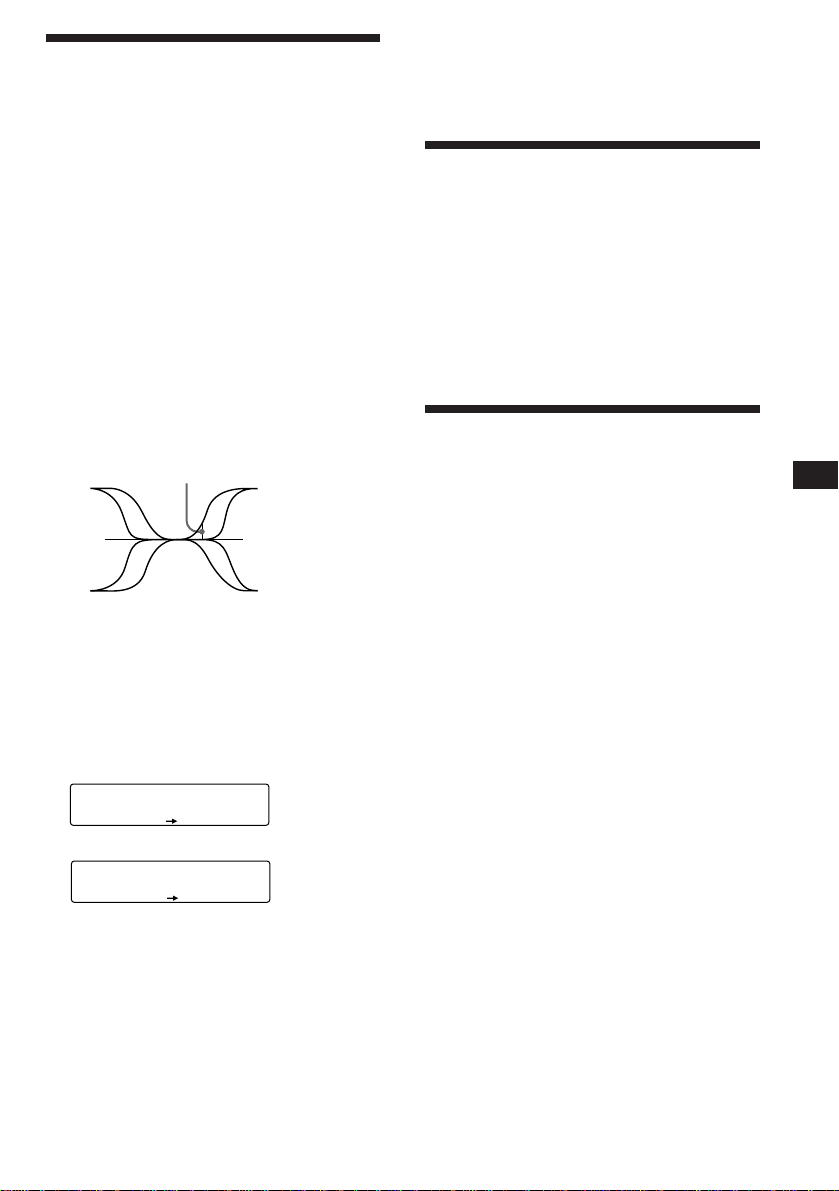
Adjusting the turn-over frequency
You can adjust the bass and treble turn-over
frequencies.
Turn-over frequency
Frequency (Hz)
5 Press (SOUND) for two seconds.
The display goes back to normal playback
mode.
Listening to each program
source in its registered
surround menu
— Last Sound Memory (LSM)
You can listen to the same source always in the
same surround menu even after changing the
program source or turning the unit on and off
again.
Changing the line output
level
You can change the line output level if you
hear distortion or other noise.
1 Press (SHIFT), then press (2) (SET UP)
until “L.OUT” appears.
EN
DSP
1 Press (SOURCE) to select a source (tuner,
CD or MD).
2 Press (SOUND) for two seconds.
3 Press (SOUND) repeatedly until “BAS” or
“TRE” appears.
Bass adjusting mode
BAS
EQSUR
314 Hz
Treble adjusting mode
TRE
EQSUR
3.1kHz
4 Rotate the dial to select the turn-over
frequency.
The turn-over frequencies change as
follows:
Bass:
198 Hz n 250 Hz n 314 Hz* n 396 Hz
Treble:
2.0 kHz n 3.1 kHz* n 4.0 kHz n 5.0 kHz
* Factory-set frequency
2 Press (4) (n) to select the desired
setting (–10 dB or –16 dB).
3 Press (SHIFT).
25
Page 26
TV/Video
With the optional TV tuner and TV
monitor connected
Watching the TV
4 Press (SHIFT).
Notes
•The unit does not store TV channels with weak signals.
If only a few TV channels are received, some number
buttons will remain empty.
•When a preset number is indicated in the display, the
unit starts storing TV channels from the one currently
displayed.
EN
1 Press (SOURCE) repeatedly until “TV”
appears.
2 Press either side of (SEEK/AMS) to select
the desired TV band.
Watching a video
1 Press (SOURCE) repeatedly until
“TV” appears.
2 Press (MODE) repeatedly to select
“Video 1.”
Play back the video.
Note
“Video 2” appears if the VIDEO 2 terminal of the TV
monitor is selected.
Memorizing TV channels
automatically
The unit selects the TV channels with the
strongest signals and memorizes them in the
order of their frequency.
Memorizing only the
desired TV channels
You can store up to 10 channels on the number
buttons in the order of your choice.
1 Press (SOURCE) repeatedly until “TV”
appears.
2 Press either side of (SEEK/AMS) to tune
in the TV program you want to store on
the number button.
3 Keep the desired number button ((1) to
(10)) pressed for two seconds until you
hear a beep tone.
The number button indication appears in
the display.
Note
If you try to store another program on the same number
button, the previously stored program will be erased.
Caution
When tuning in a station while driving, use
Best Tuning Memory to prevent accidents.
1 Press (SOURCE) repeatedly until “TV”
appears.
2 Press (SHIFT), then press (3) (PLAY
MODE) repeatedly until “Auto mem”
appears.
3 Press (4) (n).
The unit stores TV channels in the order of
their frequencies on the number buttons.
26
A beep sound and the setting is stored.
Page 27

Storing the TV channel
names
Follow the steps in “Storing the station
names” (page 10).
Displaying the TV or radio station
names
Press (LIST) momentarily during TV or
radio reception.
Example: When receiving the FM1 band
FM
1
1
W
C
B
W
B
L
W
K
T
WR K I
W
E
V
W
R
F
01 .9
1
02 .7
1
WWPYLNYJ
S
S
U
S
S
D
M
2
3
2
3
4
1
5
6
7
8
9
1 0
1 Preset number
2 Stored station names
3 Frequencies*
* If the name of a station is not stored, the frequency of
that station will be displayed instead.
Notes
• It may take some time before all indications appear in the
display.
• The TV monitor does not appear during list display.
• The contents of the preset memory cannot be listed when
the unit is in the simultaneous play mode (page 25).
Turning off the display
During radio reception, press (LIST)
again.
During TV reception, the list display on the
TV monitor will automatically turn off after
a few seconds.
Displaying the
information stored on
discs
Press (LIST) momentarily during CD/MD
playback.
Example: When CD changer 1 is selected.
CD 1
1
S
C
H
U
B
E
Z
A
R
C
H
I
S
Z
T
O
P
*****
?
?
1
2
RT
T
I
N
2
3
4
5
2
M
O
3
B
A
4
L
5
C
1 0
6
7
8
9
H
*
******
1
1 Disc numbers
2 Titles stored as custom files
3 No disc is loaded*
4 No stored titles*
5 TOC information has not been identified
3
yet*
*1A blank space is displayed next to a disc numbers
representing empty slots in the disc magazine.
2
If a title is not registered in the custom file, “******” is
*
displayed.
3
If the disc information has not been read yet, “?” is
*
displayed.
Notes
• It may take some time until all indications appear in the
display.
• The TV program does not appear during list display.
• The contents of the preset memory cannot be listed when
the unit is in the simultaneous play mode.
Turning off the display
Press (LIST) again.
EN
TV/Video
27
Page 28
Watching the TV or video
while listening to a CD or
MD
— Simultaneous Play
The simultaneous play function does not work
while you are listening to the radio.
Additional
Information
Precautions
EN
1 Press (SOURCE) for two seconds.
SML
EQSUR
CD --
2 Press (1) (N).
SML
EQSUR
CD --
3 Press (SOURCE) repeatedly to select a CD
or MD.
SML
EQSUR
MD --
4 Press (4) (n).
SML
EQSUR
MD --
5 Press (SOURCE) repeatedly to select a TV
or video.
SML
EQSUR
MD TV
6 Press (SOURCE) for two seconds.
Simultaneous Play starts.
Returning to normal mode
To cancel the CD or MD, follow the steps
above and select “– –” in step 3.
• If your car was parked in direct sunlight
resulting in a considerable rise in
temperature inside the car, allow the unit to
cool off before operating it.
• If no power is being supplied to the unit,
check the connections first. If everything is in
order, check the fuse.
• If no sound comes from the speakers of
two-speaker systems, set the fader control to
the center position.
•If your car is equipped with a power aerial, it
will extend automatically while the unit is
operating.
If you have any questions or problems
concerning your unit that are not covered in
this manual, please consult your nearest Sony
dealer.
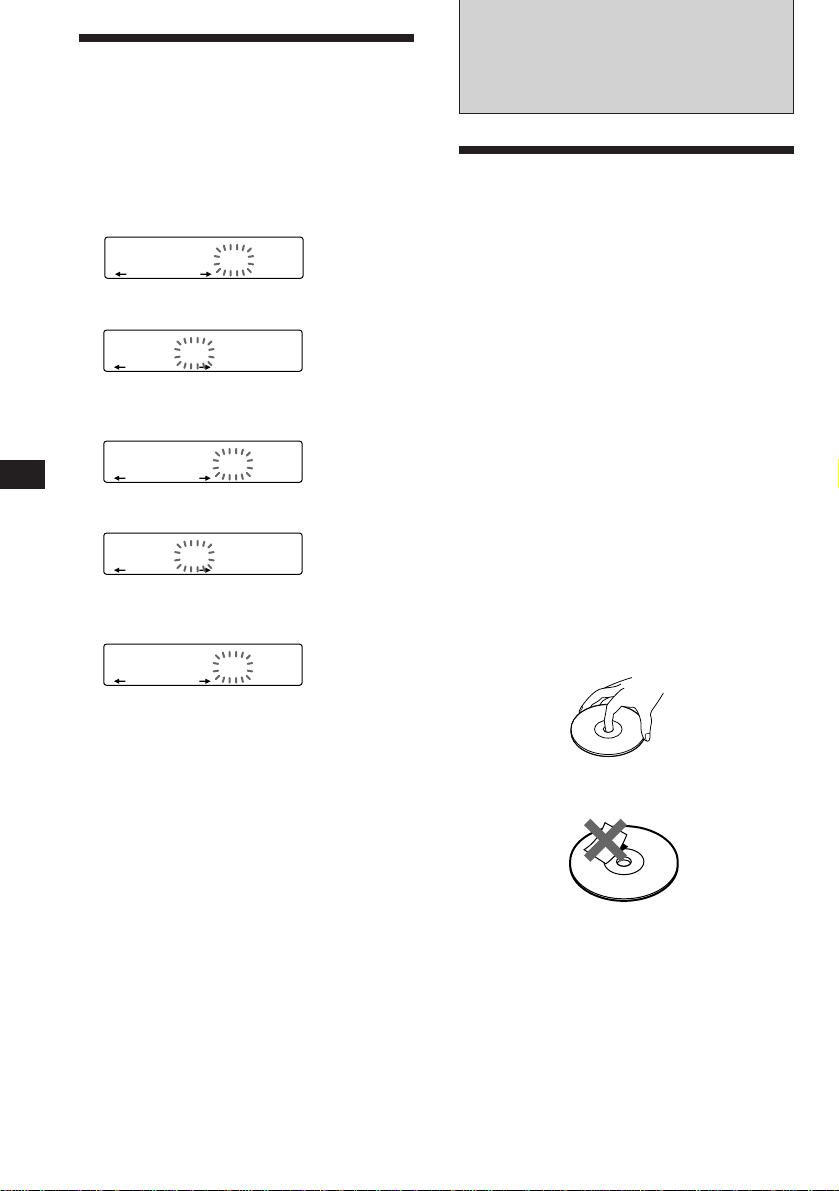
Notes on handling CDs
A dirty or defective disc may cause sound
dropouts while playing. To enjoy optimum
sound, handle the disc as follows.
Handle the disc by its edge. To keep the disc
clean, do not touch the surface.
Do not stick paper or tape on the labelled
surface.
To cancel the TV or video, follow the
steps above and select “– –” in step 5.
Notes
If you press the EJECT button on a CD/MD changer while
the unit is in simultaneous play mode, Simultaneous Play
is canceled.
28
Page 29
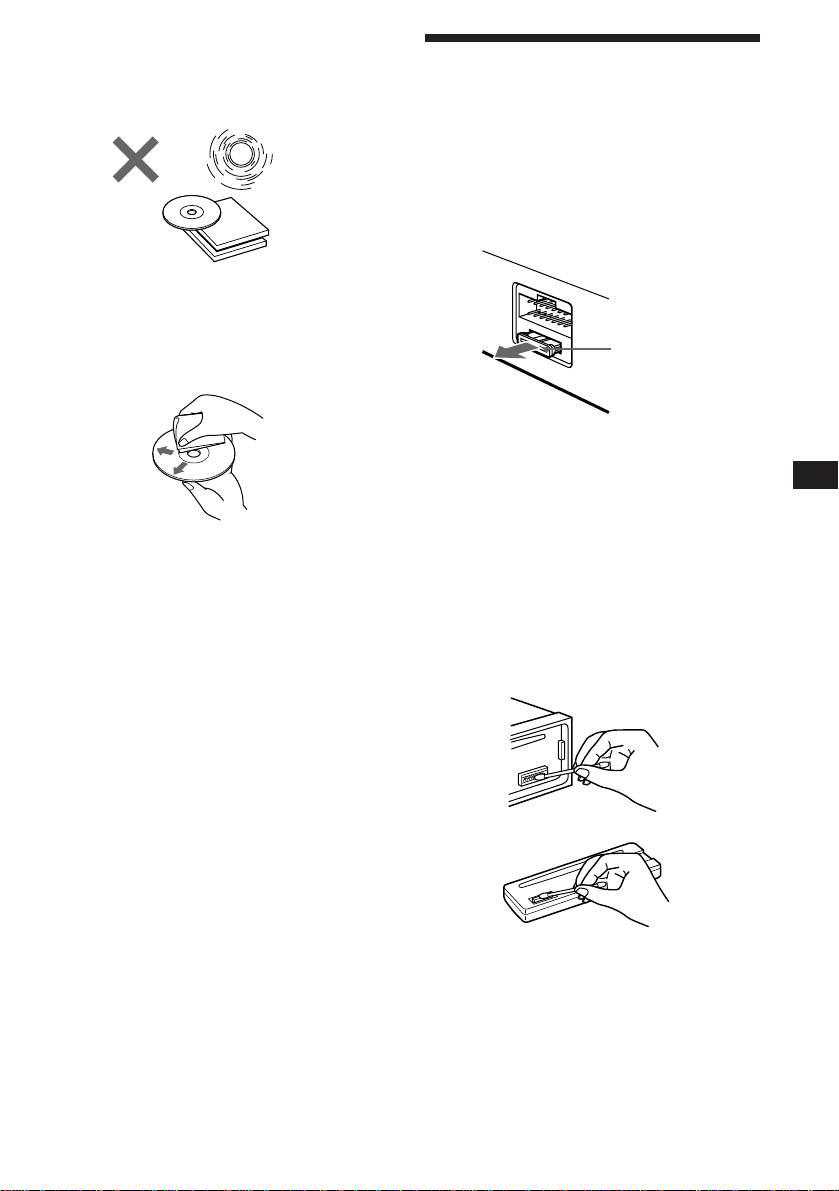
Do not expose the discs to direct sunlight or
heat sources such as hot air-ducts, or leave
them in a car parked in direct sunlight where
there can be a considerable rise in the
temperature inside the car.
Before playing, clean the discs with an optional
cleaning cloth. Wipe each disc from the center
out.
Do not use solvents such as benzine, thinner,
commercially available cleaners or antistatic
spray intended for analog discs.
Maintenance
Fuse replacement
When replacing the fuse, be sure to use one
that matches the amperage described on the
fuse. If the fuse blows, check the power
connection and replace the fuse. If the fuse
blows again after replacement, there may be an
internal malfunction. In such a case, consult
your nearest Sony dealer.
Fuse (10 A)
Warning
Never use a fuse with an amperage rating
exceeding the one supplied with the unit as
this could damage the unit.
EN
TV/VideoAdditional Information
Notes on moisture condensation
On a rainy day or in a very damp area,
moisture may condense on the lenses inside
the CD player. Should this occur, the unit will
not operate properly. In this case, remove the
disc and wait for about an hour until the
moisture evaporates.
When you play 8 cm CDs
Use the optional Sony compact disc single
adapter (CSA-8) to protect the CD player from
being damaged.
Cleaning the connectors
The unit may not function properly if the
connectors between the unit and the front
panel are not clean. To prevent this, open the
front panel by pressing (RELEASE), then
detach it and clean the connectors with a
cotton swab dipped in alcohol. Do not apply
too much force. Otherwise, the connectors may
be damaged.
Main unit
Back of the front panel
29
Page 30
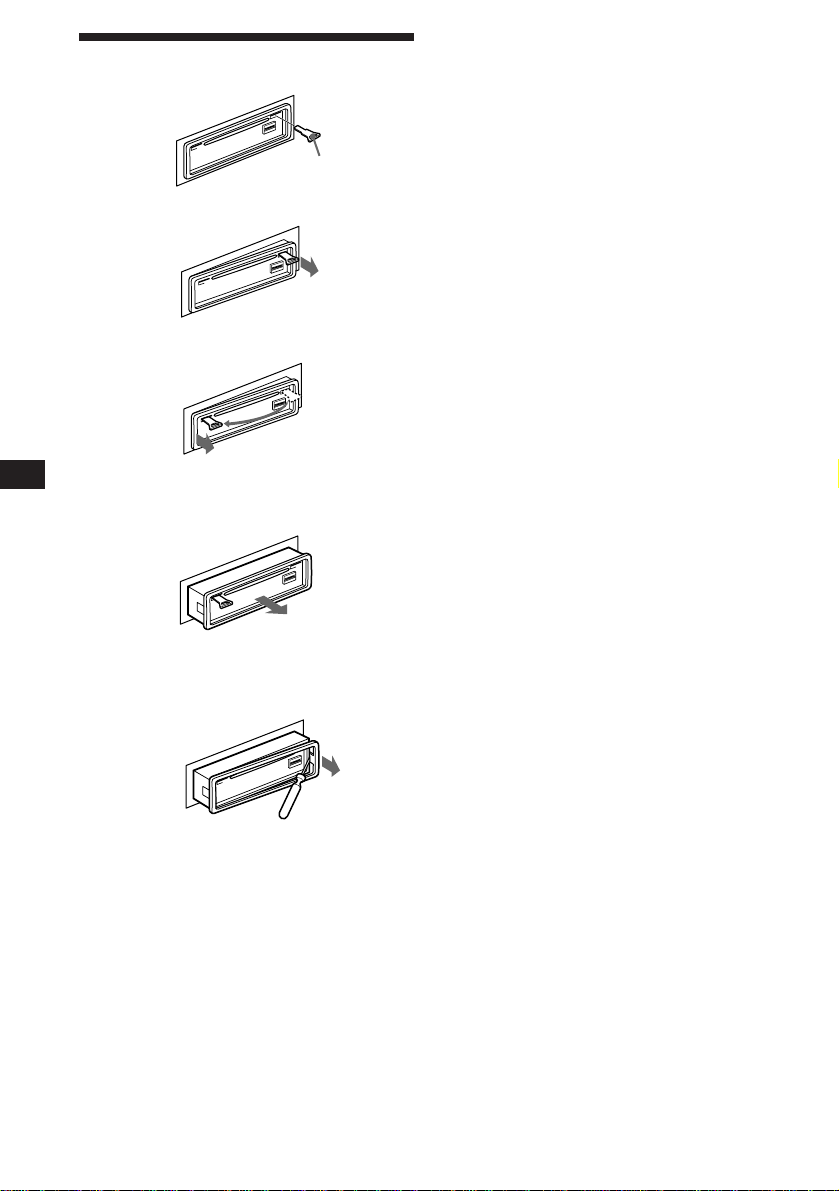
Dismounting the unit
Release key
(supplied)
µ
µ
EN
µ
Pull the unit out while the release key is inserted.
µ
Press the clip inside the front cover with a thin
screwdriver, and lever the front cover free.
30
Page 31
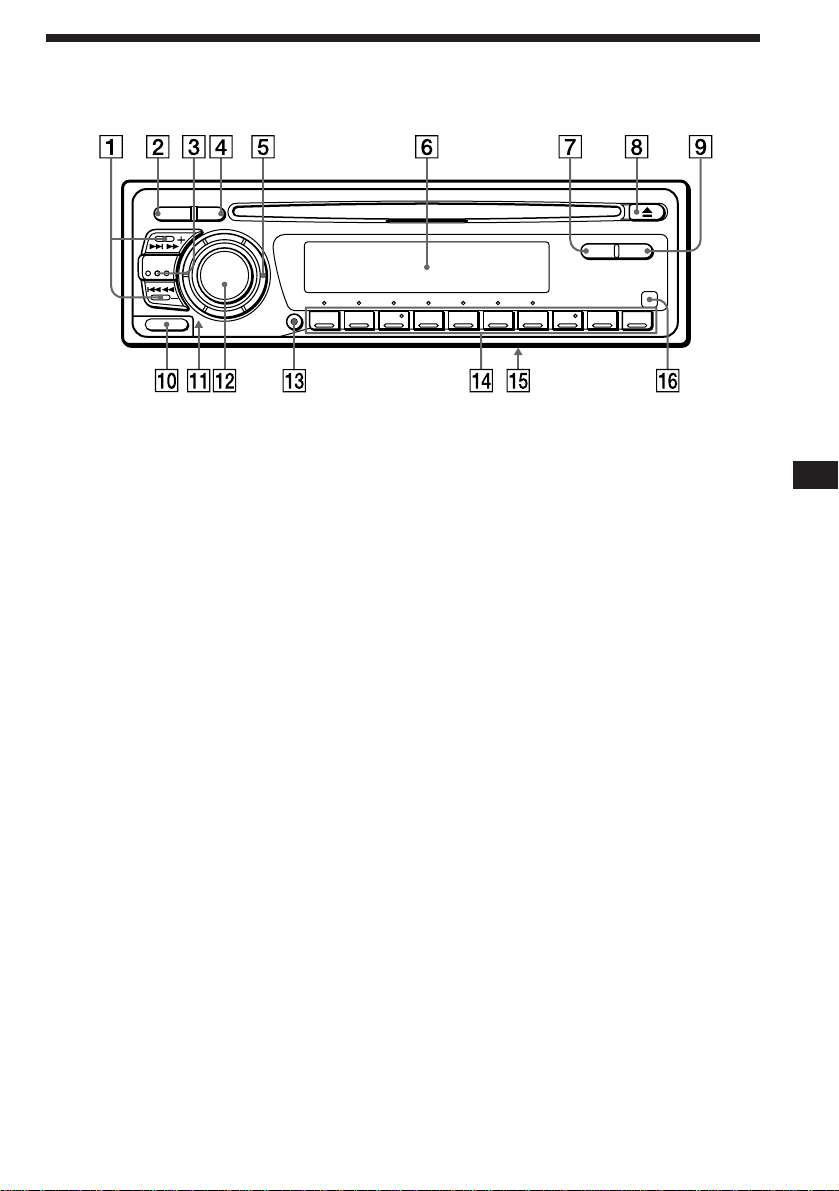
Location of controls
SOUND
OFF
SEEK/AMS
MODE
SOURCE
RELEASE
DSPL LIST
SHIFT
110
23456789
Refer to the pages for details.
1 SEEK/AMS (seek/Automatic Music
Sensor/manual search) button 6, 7, 8,
10, 15, 16, 17, 18, 21, 26
2 SOUND button 13, 22, 23, 24, 25
3 MODE (band/changer select) button 9,
10, 15, 17, 20, 26
4 OFF button 4, 5
5 Dial (volume/surround menu/listening
position/sub woofer volume/bass/
treble/balance/fader control) 5, 11, 19,
22, 23, 24, 25
6 Display window
7 DSPL (display mode change) button 5,
6, 10, 11, 15, 19, 20
8 6 (eject) button 5
9 LIST button
Disc Memo 19, 20
List-up 11, 20, 22, 23
Station memo 11, 27
!º RELEASE (front panel release) button 4,
29
!¡ Reset button (located on the front side
of the unit behind by the front panel) 4
!™ SOURCE (source select) button 5, 6, 9,
10, 15, 17, 20, 22, 24, 25, 26, 28
!£ SHIFT button
PLAY MODE 6, 7, 8, 9, 10, 16, 17, 18, 21,
23, 26
REP 7, 16
SET UP 5, 6, 14, 15, 19, 25
SHUF 7, 16
!¢ During radio/TV reception:
Number buttons 10, 26
During CD/MD playback:
Direct disc selection buttons 16
!∞ POWER SELECT switch (located on the
bottom of the unit)
See “POWER SELECT Switch” in the
Installation/Connections manual.
!§ Receptor for the optional wireless
remote
EN
Additional Information
31
Page 32
EN
Location of controls
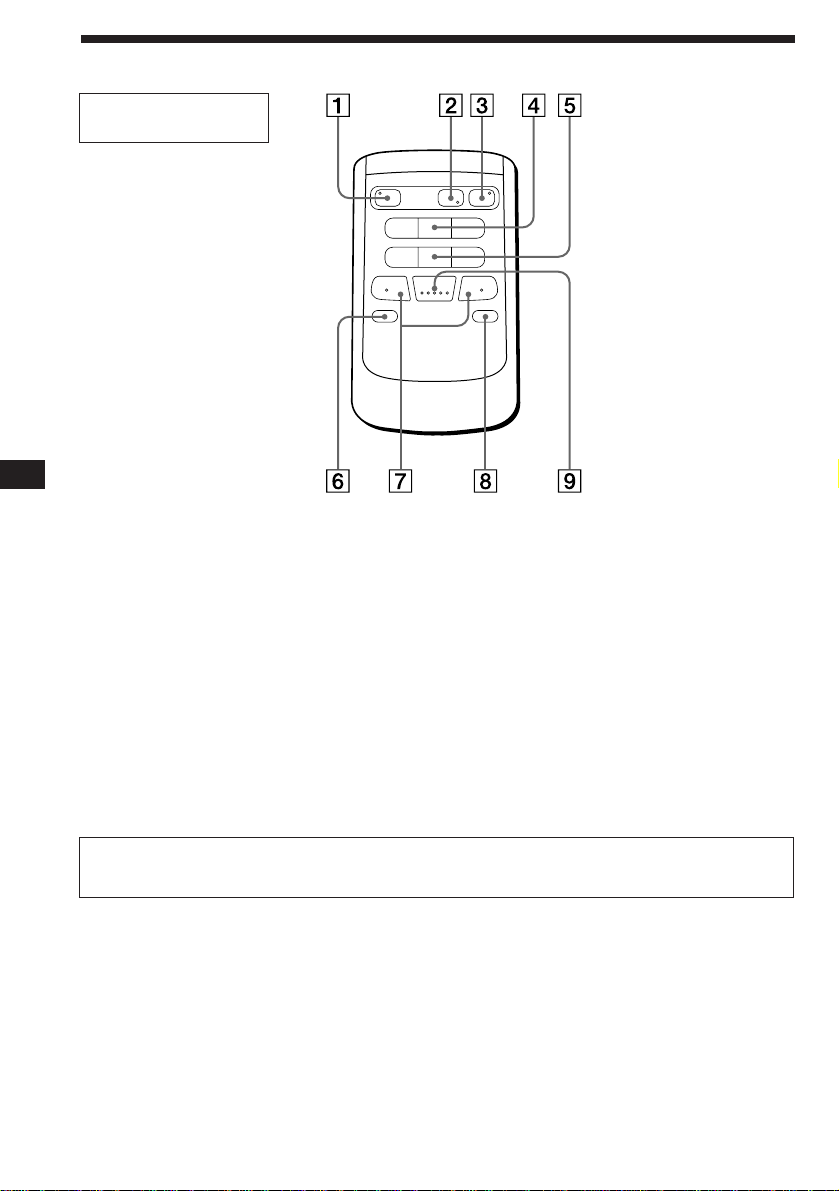
Optional wireless
remote (RM-X41)
The buttons of the wireless remote
work the same functions as those on
this unit.
1 OFF button
2 MODE/DIR button
Function as (MODE) on this unit.
3 SOURCE button
4 SEEK/AMS button
5 PRESET/DISC button
You cannot do manual search and manual tuning
with the remote.
DIR
SEEK
AMS
PRESET
DISC
SOUND
SEL
MODE
+
+
+
FF
SOURCE
OFF
–
=
–
REW
–
MUTE DSPL
6 MUTE button
7 (–) (+) buttons
8 DSPL button
9 SOUND button
+
32
When the POWER SELECT switch is set to the B position, the unit cannot be operated with the
wireless remote unless (SOURCE) on the unit is pressed or a CD is inserted to activate the unit
first.
Page 33

Specifications
AUDIO POWER SPECIFICATIONS
POWER OUTPUT AND TOTAL HARMONIC DISTORTION
17 watts per channel minimum continuous average power into
4 ohms, 4 channels driven from 20 Hz to 20 kHz with no more than
1 % total harmonic distortion.
Other specifications
CD player section
System Compact disc digital audio
system
Signal-to-noise ratio 99 dB
Frequency response 10 – 20,000 Hz
Wow and flutter Below measurable limit
Laser Diode Properties
Material GaAlAs
Wavelength 780 nm
Emission Duration Continuous
Laser output power Less than 44.6 µW*
* This output is the value measured at a distance of
200 mm from the objective lens surface on the Optical
Pick-up Block.
Tuner section
FM
Tuning range 87.5 – 107.9 MHz
Antenna terminal External antenna connector
Intermediate frequency 10.7 MHz
Usable sensitivity 8 dBf
Selectivity 75 dB at 400 kHz
Signal-to-noise ratio 62 dB (stereo),
65 dB (mono)
Harmonic distortion at 1 kHz
0.9 % (stereo),
0.5 % (mono)
Separation 35 dB at 1 kHz
Frequency response 30 – 15,000 Hz
Capture ratio 2 dB
AM
Tuning range 530 – 1,710 kHz
Antenna terminal External antenna connector
Intermediate frequency 10.71 MHz/450 kHz
Sensitivity 30 µV
Power amplifier section
Outputs Speaker outputs
(sure seal connectors)
Speaker impedance 4 – 8 ohms
Maximum power output 40 W × 4 (at 4 ohms)
General
Outputs Line outputs (2)
Tone controls Bass ±10 dB at 100 Hz
Power requirements 12 V DC car battery
Dimensions Approx. 188 × 58 × 177 mm
Mounting dimensions Approx. 178 × 50 × 154 mm
Mass Approx. 1.5 kg (3 lb.
Supplied accessories Rotary remote (1)
Optional accessories Wireless remote RM-X41
Optional equipment CD changer
Power antenna relay
control lead
Power amplifier control
lead
Treble ±10 dB at 10 kHz
(negative ground)
1
/2 × 2 3/8 × 7 in.)
(7
(w/h/d)
1
/8 × 2 × 6 1/8 in.)
(7
(w/h/d)
4.9 oz.)
Parts for installation and
connections (1 set)
Front panel case (1)
BUS cable (supplied with
an RCA pin cord)
RC-61 (1 m), RC-62 (2 m)
RCA pin cord
RC-63 (1 m), RC-64 (2 m),
RC-65 (5 m)
Cleaning cloth XP-CD1
Compact disc single
adapter CSA-8
CDX-805 (10 discs),
CDX-705 (10 discs),
CDX-T65 (6 discs),
CDX-T62 (6 discs)
MD changer
MDX-60, MDX-61
Digital preamplifier
XDP-U50D
Source selector
XA-C30
TV tuner
XT-40V, etc.
EN
Additional Information
Design and specifications are subject to change without
notice.
33
Page 34
EN
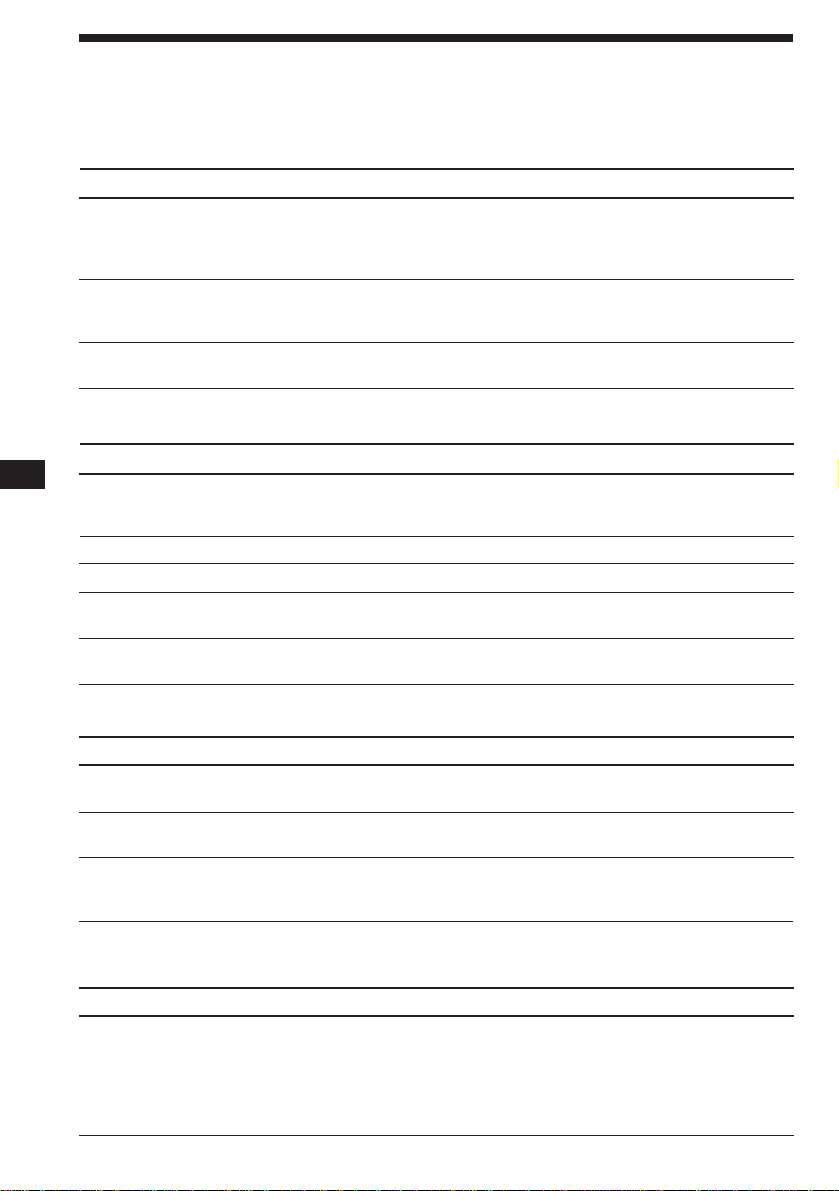
Troubleshooting guide
The following checklist will help you remedy the problems you may encounter with your unit.
Before going through the checklist below, check the connection and operating procedures.
General
Problem
No sound.
The contents of the memory
have been erased.
Indications do not appear in the
display.
CD/MD playback
Problem
A disc cannot be loaded.
Playback does not begin.
A disc is automatically ejected.
The operation buttons do not
function.
The sound skips due to
vibration.
Cause/Solution
•Cancel the MUTE function.
•Set the fader control to the center position for two-speaker
systems.
•Rotate the dial in a clockwise direction to adjust the volume.
• The power cord or battery has been disconnected.
• The reset button has been pressed.
n Store again into the memory.
Remove the front panel and clean the connectors. See “Cleaning
the connectors” (page 29) for details.
Cause/Solution
•Another CD is already loaded.
•The CD is forcibly inserted upside down or in the wrong way
(MD).
Defective MD or dusty CD.
The ambient temperature exceeds 50 °C (122 °F).
Press the reset button.
• The unit is installed at an angle of more than 20°.
• The unit is not installed in a sturdy part of the car.
Radio reception
Problem
Preset tuning is not possible.
Automatic tuning is not
possible.
The “ST” indication flashes.
DSP functions
Problem
No sound, or sound is too low.
34
Cause/Solution
• Memorize the correct frequency.
• The broadcast signal is too weak.
The broadcast signal is too weak.
n Use manual tuning.
•Tune in the frequency accurately.
•The broadcast signal is too weak.
n Set to the MONO mode (page 10).
Cause/Solution
The volume of the rear speakers may have been automatically
lowered in order to maximize the effect of the listening position
adjustment.
n Rotate the dial in a clockwise direction to adjust the balance.
The speaker balance can be set separately for DSP on mode
and DSP off mode (page 22).
Page 35
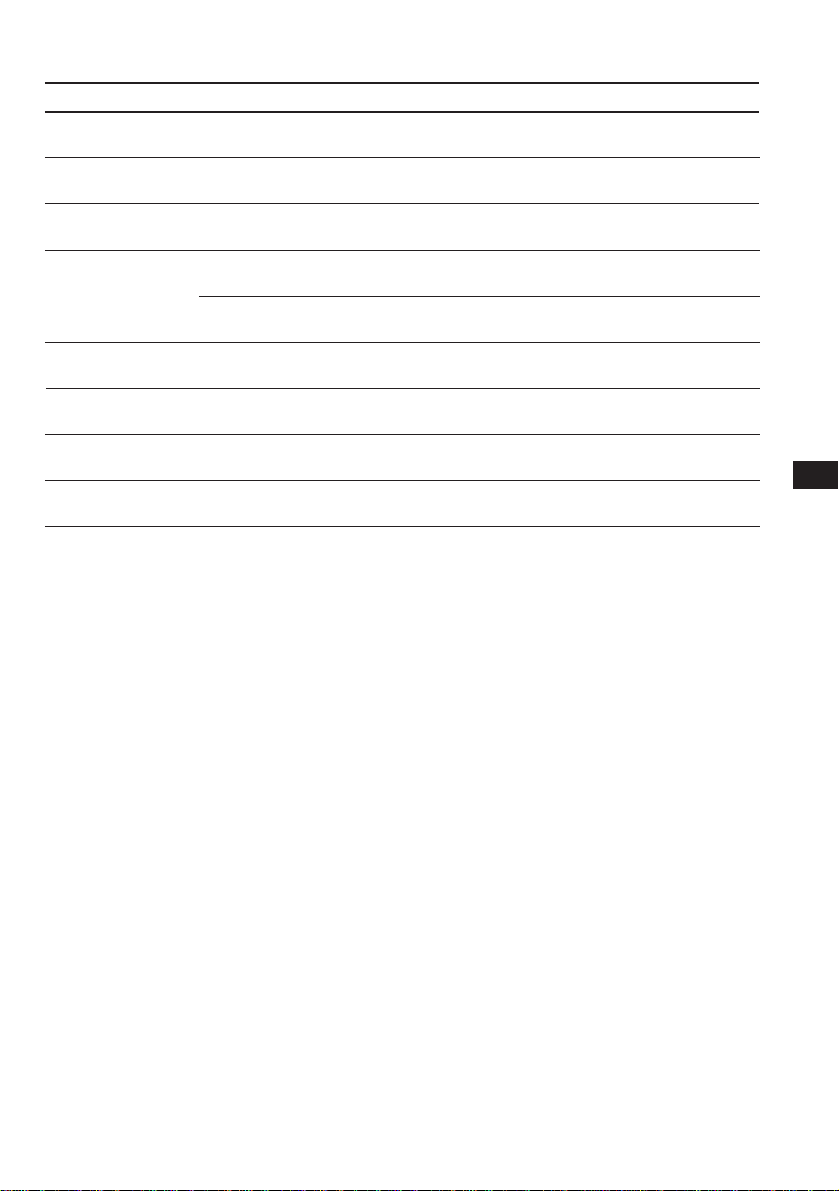
Error displays (when an optional CD/MD changer is connected)
The following indications will flash for about five seconds, and an alarm sound will be heard.
Display
NO Mag
NO Disc
NG Discs
Error
Blank
PushReset
Not Ready
HighTemp
*1 When an error occurs during playback of an MD or CD, the disc number of the MD or CD dose not appear in the display.
2
The disc number of the disc causing the error appears in the display.
*
If the above-mentioned solutions do not help improve the situation, consult your nearest Sony
dealer.
Cause
The disc magazine is not inserted in
the CD/MD changer.
No disc is inserted in the CD/MD
changer.
A CD/MD cannot play because of
some problem.
A CD is dirty or inserted upside
2
down.*
1
*
An MD does not play because of some
problem.*
No tracks have been recorded on an
1
*
MD.*
The CD/MD changer cannot be
operated because of some problem.
The lid of the MD changer is open or
MDs are not inserted properly.
The ambient temperature is more than
50 °C (122 °F).
2
2
Solution
Insert the disc magazine in the CD/
MD changer.
Insert discs in the CD/MD changer.
Insert another CD/MD.
Clean or insert the CD correctly.
Insert another MD.
Play an MD with tracks recorded on
it.
Press the reset button of the unit.
Close the lid or insert the MDs
properly.
Wait until the temperature goes down
below 50 °C (122 °F).
EN
Additional Information
35
Page 36

Index
EN
A
Automatic Music Sensor (AMS) 6, 15
Automatic tuning 10
Auto Scroll 6, 15
B
Balance 13
Bass 13, 25
Bank Play 21
Beep tone 14
Best Tuning Memory (BTM) 9
C
Caution alarm 4
CD playback 5, 15
CD program memory 7
CD-TEXT 15, 19
Clock 5
D
Digital Signal Processor (DSP) 22
Dimmer 14
Direct disc selection 16
Disc Memo 19
Display 5, 10, 11, 15, 19
Dual information 14
E
Effect 22
F, G, H
Fader 13, 24
Front panel 4
Fuse 29
I, J, K
Illumination color 14
Intro Scan 6, 16
L
Last Sound Memory (LSM) 25
List-up 11, 20
Listening position 23
Local seek 10
Locating
a disc 15, 20
a specific point 6, 16
a specific track 6, 15
Loudness 14
M, N, O
Manual search 6, 16
Manual tuning 10
MD playback 15
Memorizing a station 10
Memorizing TV channel 26
Monaural mode 10
Mute 13
P, Q
PLAY MODE
Bank 21
Intro 6, 16
Local 10
Mono 10
PGM 8, 17
Program memory 17
R
Radio 9
Repeat Play 7, 16
Reset 4
Rotary remote 4, 12, 14
S
SET UP
Amber 14
A.Scrl 14
Beep 14
Clock 5
Dimmer 14
D.Info 14
Disc MEMO 19
Green 14
Loud 14
RM 14
TEXT name 19
Shuffle Play 7, 16
Simultaneous Play 28
Station Memo 11
Subwoofer 24
Surround 22
T, U
Treble 13, 25
TV 26
V
Video 26
Volume 13
36
W, X, Y, Z
Wireless remote 32
*I-3-859-507-11*(2)Sony Corporation Printed in Japan
 Loading...