

Page 1
Compact Disc
Player
3-810-322-21 (1)
Operating Instructions
CDP-XE500
CDP-XE400
1995 by Sony Corporation
Page 2
WARNING
To prevent fire or shock
hazard, do not expose
the unit to rain or
moisture.
To avoid electrical shock,
do not open the cabinet.
Refer servicing to
qualified personnel only.
– Reorient or relocate the receiving
antenna.
– Increase the separation between the
equipment and receiver.
– Connect the equipment into an outlet
on a circuit different from that to
which the receiver is connected.
– Consult the dealer or an experienced
radio/TV technician for help.
CAUTION
You are cautioned that any changes or
modification not expressly approved in
this manual could void your authority to
operate this equipment.
• AC power cord must be changed only
at the qualified service shop.
On placement
• Place the player in a location with
adequate ventilation to prevent heat
build-up in the player.
• Do not place the player on a soft
surface such as a rug that might block
the ventilation holes on the bottom.
• Do not place the player in a location
near heat sources, or in a place subject
to direct sunlight, excessive dust or
mechanical shock.
Owner’s Record
The model and serial numbers are
located at the rear of the unit.
Record the serial number in the space
provided below. Refer to them whenever
you call upon your Sony dealer
regarding this product.
This symbol is intended to alert
the user to the presence of
uninsulated “dangerous voltage”
within the product’s enclosure
that may be of sufficient
magnitude to constitute a risk of
electric shock to persons.
Model No. _________________________
Serial No. _________________________
Precautions
This symbol is intended to alert
the user to the presence of
important operating and
maintenance (servicing)
instructions in the literature
accompanying the appliance.
INFORMATION
This equipment has been tested and
found to comply with the limits for a
Class B digital device, pursuant to Part
15 of the FCC Rules. These limits are
designed to provide reasonable
protection against harmful interference
in a residential installation. This
equipment generates, uses, and can
radiate radio frequency energy and, if
not installed and used in accordance
with the instructions, may cause harmful
interference to radio communications.
However, there is no guarantee that
interference will not occur in a particular
installation. If this equipment does cause
harmful interference to radio or
television reception, which can be
determined by turning the equipment off
and on, the user is encouraged to try to
correct the interference by one or more of
2
the following measures:
On safety
• Caution — The use of optical
instruments with this product will
increase eye hazard.
• Should any solid object or liquid fall
into the cabinet, unplug the player and
have it checked by qualified personnel
before operating it any further.
On power sources
• Before operating the player, check that
the operating voltage of the player is
identical with your local power
supply. The operating voltage is
indicated on the nameplate at the rear
of the player.
• The player is not disconnected from
the AC power source (mains) as long
as it is connected to the wall outlet,
even if the player itself has been
turned off.
• If you are not going to use the player
for a long time, be sure to disconnect
the player from the wall outlet. To
disconnect the AC power cord (mains
lead), grasp the plug itself; never pull
the cord.
• If the player is brought directly from a
cold to a warm location, or is placed in
a very damp room, moisture may
condense on the lenses inside the
player. Should this occur, the player
may not operate properly. In this case,
remove the disc and leave the player
turned on for about an hour until the
moisture evaporates.
On adjusting volume
• Do not turn up the volume while
listening to a portion with very low
level inputs or no audio signals. If you
do, the speakers may be damaged
when a peak level portion is played.
On cleaning
• Clean the cabinet, panel and controls
with a soft cloth slightly moistened
with a mild detergent solution. Do not
use any type of abrasive pad, scouring
powder or solvent such as alcohol or
benzine.
If you have any questions or
problems concerning your player,
please consult your nearest Sony
dealer.
On operation
Page 3
Getting Started
Welcome!
Thank you for purchasing the Sony
Compact Disc Player. Before operating
the unit, please read this manual
thoroughly and retain it for future
reference.
About This Manual
The instructions in this manual are for
models CDP-XE500 and CDP-XE400. The
CDP-XE500 is the model used for
illustration purposes. Any difference in
operation is clearly indicated in the text,
for example, “CDP-XE500 only.”
Conventions
• Instructions in this manual describe
the controls on the player.
You can also use the controls on the
remote if they have the same or
similar names as those on the player.
In the instructions, the buttons on the
remote are indicated in parentheses.
• The following icons are used in this
manual:
Indicates that you can do the
task using the remote.
(Note that the CDP-XE400
cannot do the tasks marked
with this icon.)
Indicates hints and tips for
making the task easier.
TABLE OF CONTENTS
Getting Started
Unpacking........................................................................................................ 4
Hooking Up the System................................................................................. 4
Playing a CD........................................................................................................ 6
Playing CDs
Using the Display ........................................................................................... 7
Locating a Specific Track or a Particular Point in a Track ........................ 8
Playing Tracks Repeatedly ............................................................................ 8
Playing in Random Order (Shuffle Play) .................................................... 9
Creating Your Own Program (Program Play)............................................ 9
Recording From CDs
Recording Your Own Program...................................................................11
Recording a CD by Specifying Tape Length (Time Edit)........................12
Fading In or Out............................................................................................13
Adjusting the Recording Level (Peak Search) ..........................................14
Additional Information
Notes on CDs.................................................................................................14
Troubleshooting............................................................................................15
Specifications .................................................................................................15
Index
Index ................................................................................................ Backcover
3
Page 4
Getting Started
Getting Started
White
(L)
Red
(R)
White
(L)
Red
(R)
What cords will I need?
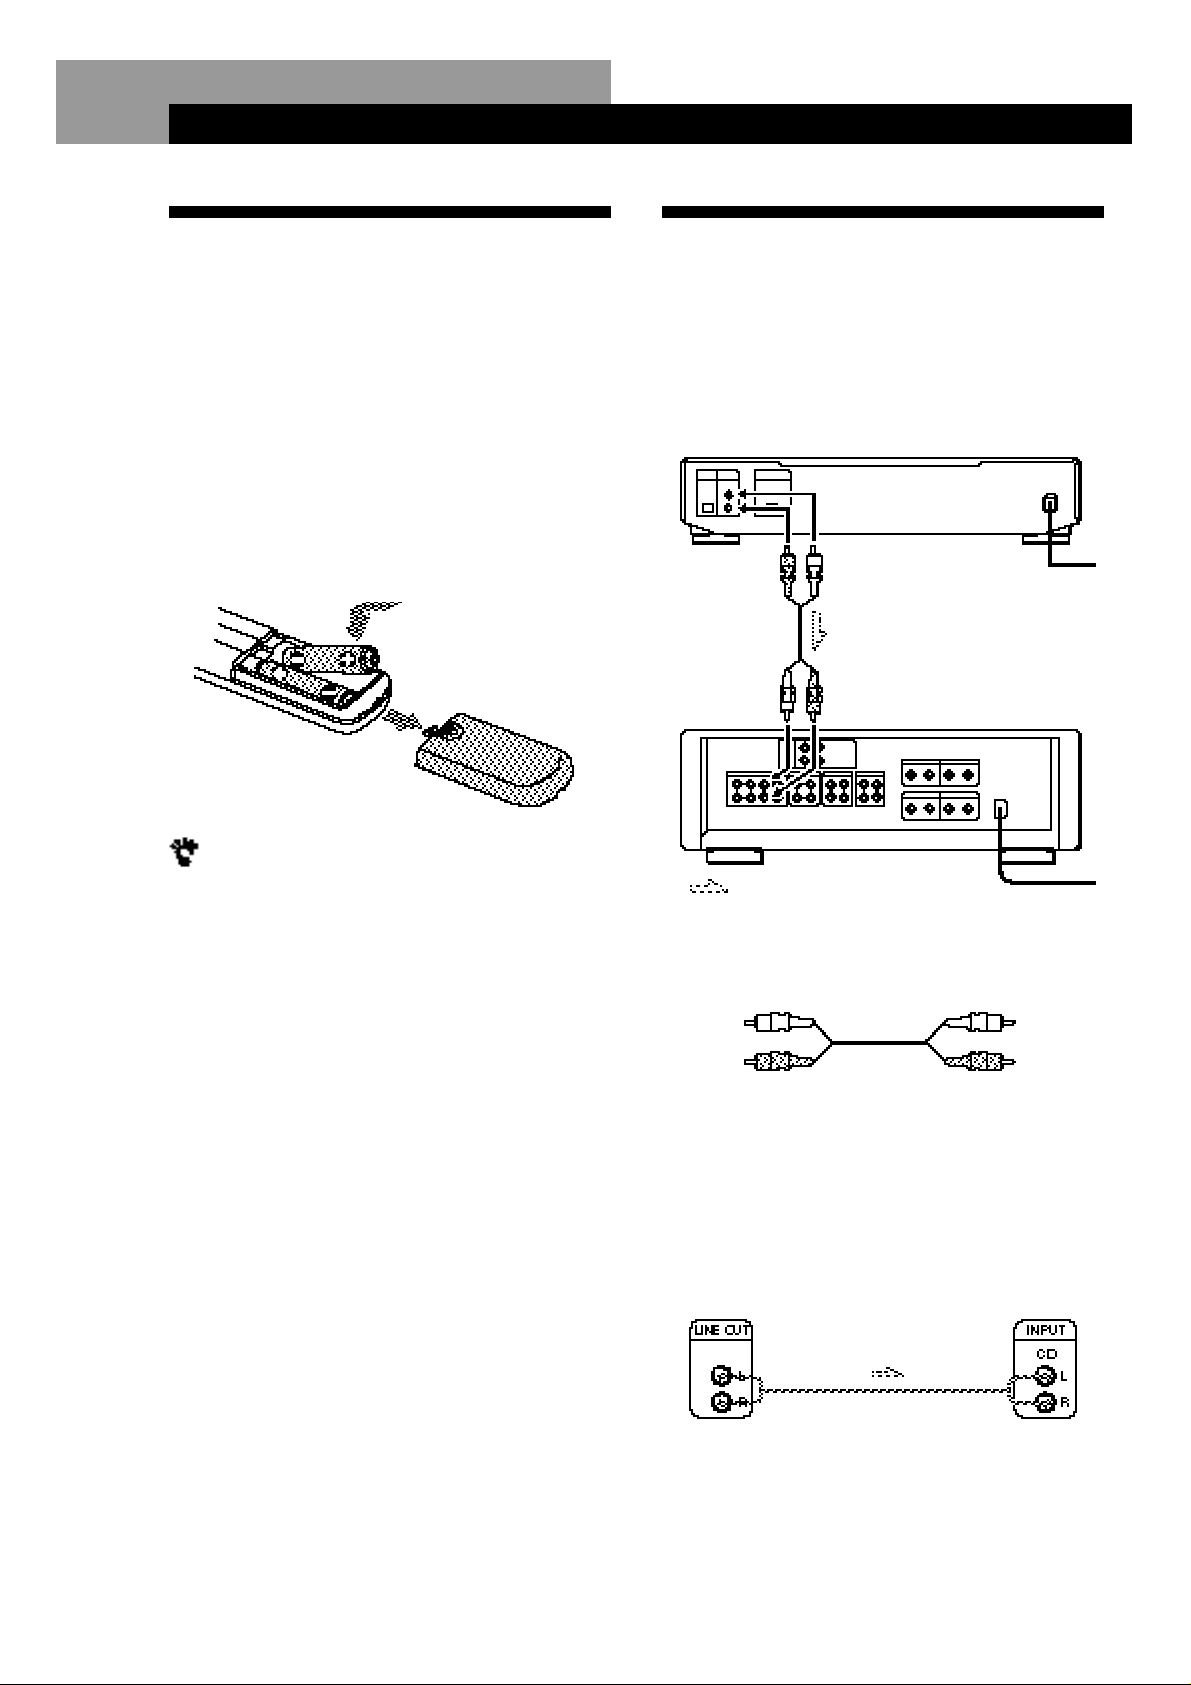
Audio cord (supplied) (1)
Hookups
When connecting an audio cord, be sure to match the
color-coded cord to the appropriate jacks on the
components: Red (right) to Red and White (left) to
White. Be sure to make connections firmly to avoid
hum and noise.
Getting Started
CD player
Audio input
(L)
: Signal flow
Amplifier
Unpacking
Check that you received the following items:
• Audio connecting cord (1)
• Remote commander (remote) (CDP-XE500 only) (1)
• Sony SUM-3 (NS) batteries (CDP-XE500 only) (2)
Inserting batteries into the remote (CDPXE500 only)
You can control the player using the supplied remote.
Insert two size AA (R6) batteries by matching the +
and – on the batteries. When using the remote, point it
at the remote sensor g on the player.
Hooking Up the System
Overview
This section describes how to hook up the CD player to
an amplifier. Be sure to turn off the power of each
component before making the connections.
LINE OUT
(R)
LINE OUT
(L)
Audio input
(R)
To an AC outlet
When to replace batteries
With normal use, the batteries should last for about six
months. When the remote no longer operates the player,
replace all the batteries with new ones.
Notes
• Do not leave the remote near an extremely hot or humid
place.
• Do not drop any foreign object into the remote casing,
particularly when replacing the batteries.
• Do not expose the remote sensor to direct sunlight or
lighting apparatuses. Doing so may cause a malfunction.
• If you don’t use the remote for an extended period of time,
remove the batteries to avoid possible damage from battery
leakage and corrosion.
To an AC outlet
AmplifierCD player
4
Page 5
Getting Started
Getting Started
You can adjust the output level to the amplifier
(CDP-XE500 only)
Press LINE OUT LEVEL +/– on the remote. You can
reduce the output level up to –20 dB.
When you reduce the output level, appears in the
display.
When you turn off the player, the output level
automatically returns to the maximum level.
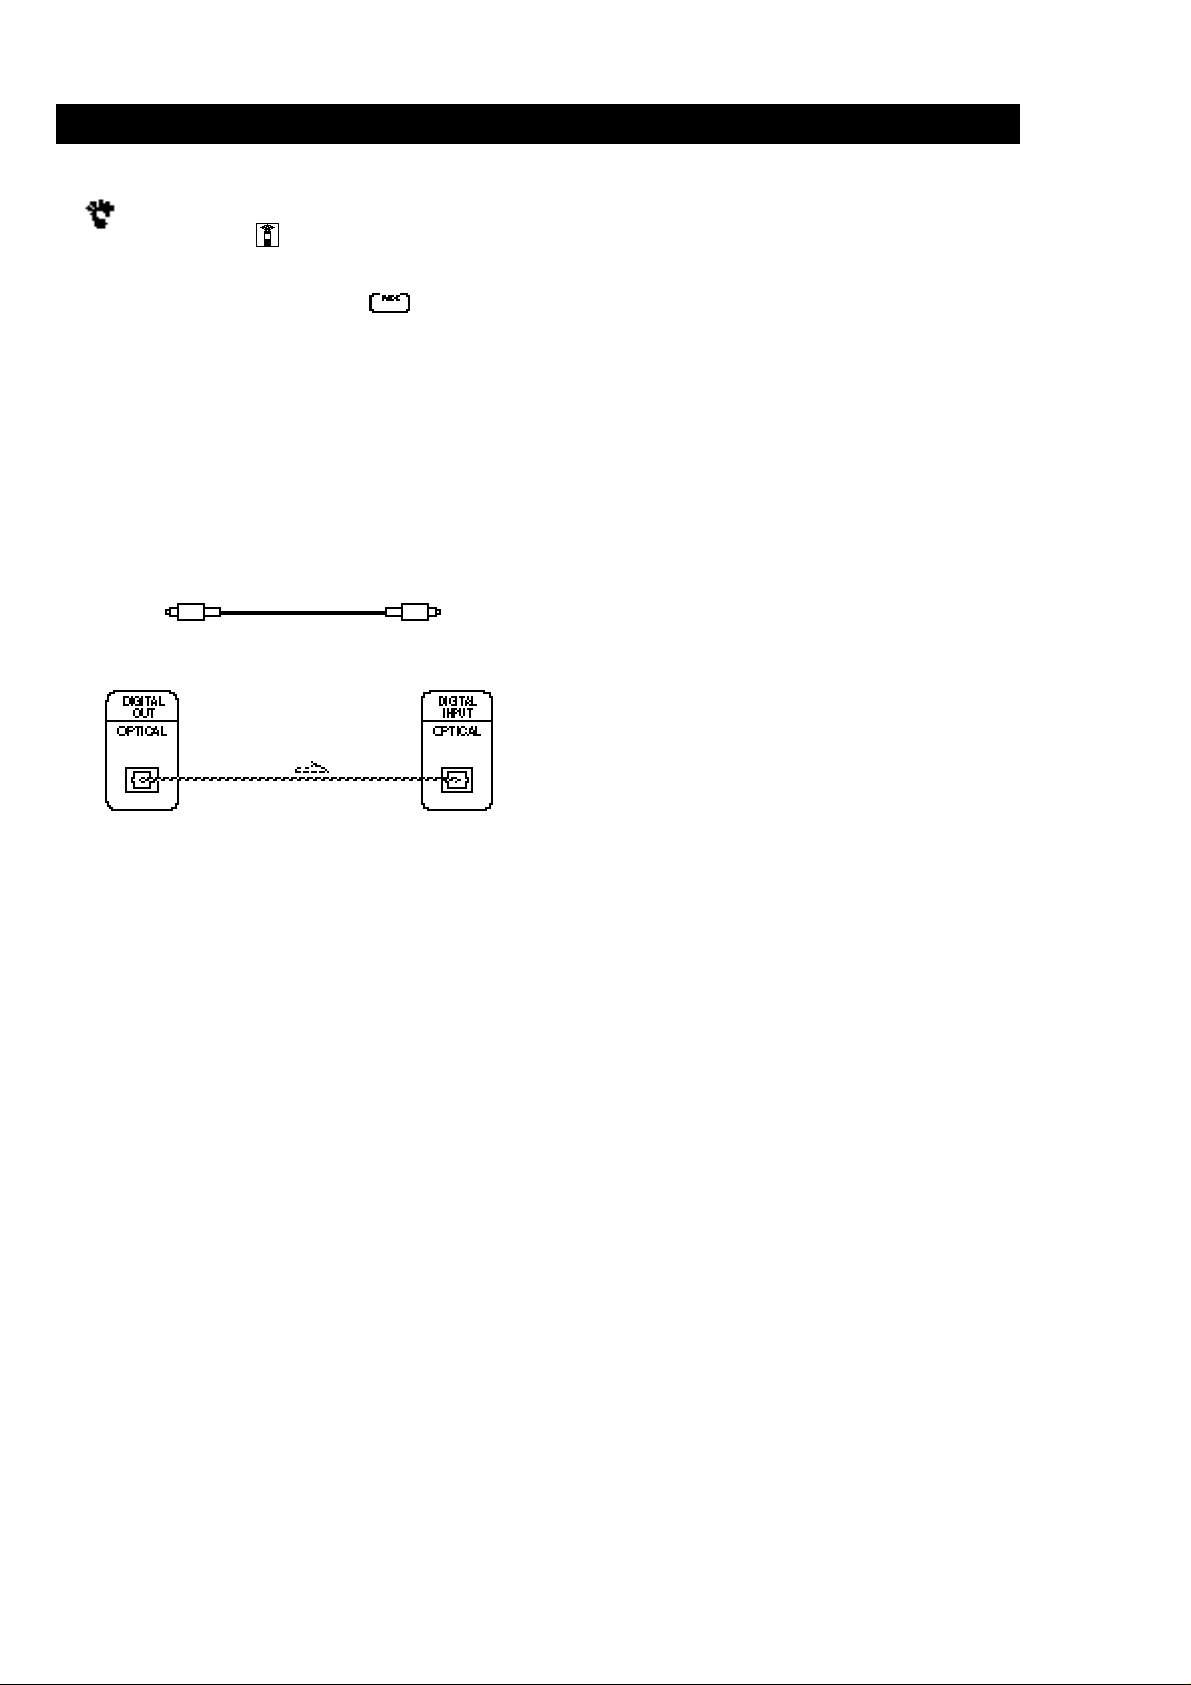
• If you have a digital component such as a digital
amplifier, D/A converter, DAT or MD (CDP-XE500 only)
Connect the component via the DIGITAL OUT (OPTICAL)
connector using the optical cable (not supplied). Take off
the cap and plug in the optical cable.
Note that you cannot use fading in or out (page 13) and
Time Fade (page 13) functions when making this
connection.
POC-15
Optical cable (not supplied)
CD player
Digital component
Connecting the AC power cord
Connect the AC power cord to a wall outlet.
Where do I go next?
Now you’re ready to use your player.
If you aren’t familiar with how to play CDs, go to the section
“Playing a CD” on page 6.
Then, go to the following sections for other operations.
Note
When you connect via the DIGITAL OUT (OPTICAL)
connector, noise may occur when you play CD software other
than music, such as a CD-ROM.
5
Page 6
Basic Operations
6
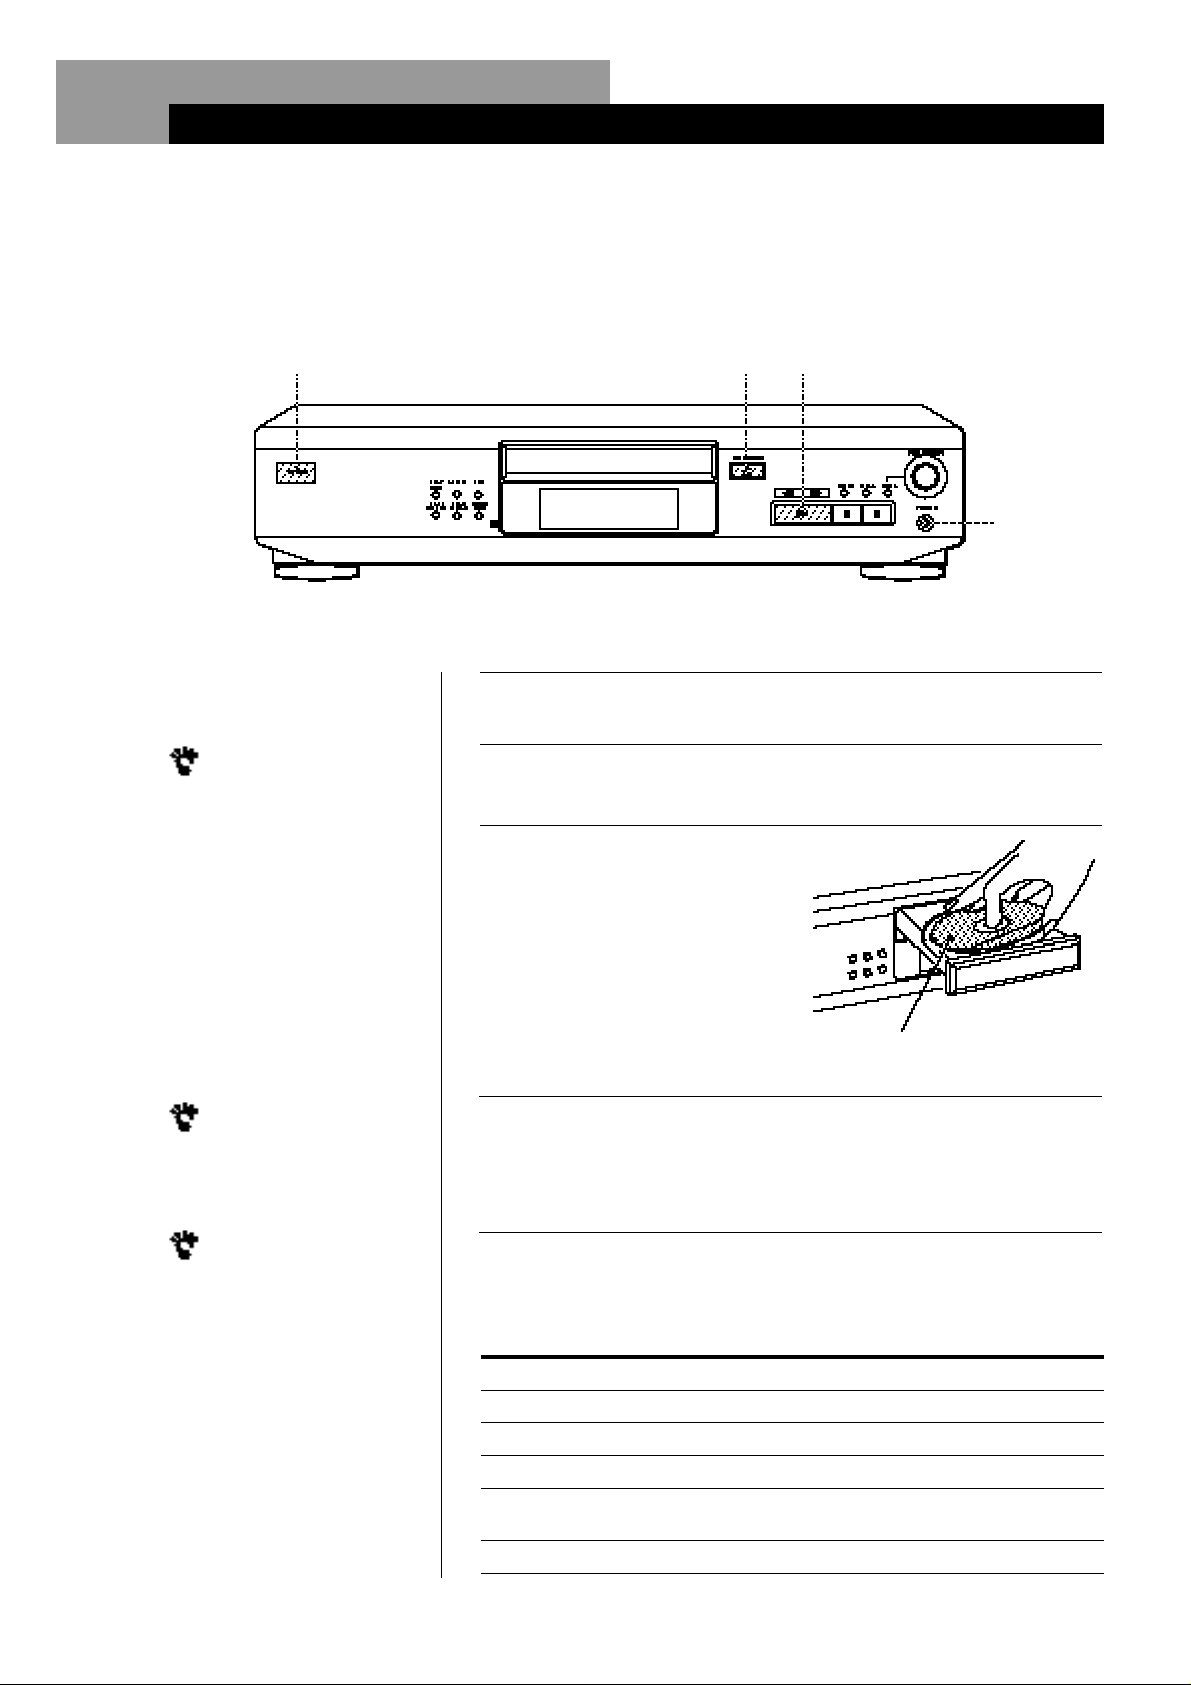
Turn on the amplifier and select the CD player position so that
you can listen to the sound from this player.
Press POWER to turn on the player.
Press § OPEN/CLOSE,
and place a disc on the
disc tray.
Press · .
The disc tray closes and the player plays all the tracks once
(Continuous Play).
Adjust the volume on the amplifier.
To stop playback
Press p.
1
2
3
Playing a CD
• See pages 4 – 5 for the hookup
information.
To
Pause
Resume play after pause
Go to the next track
Go back to the preceding track
Stop play and remove the CD
You need to
Press P
Press P or ·
Turn ≠ AMS ± clockwise
Turn ≠ AMS ±
counterclockwise
Press § OPEN/CLOSE
4
2 3 4
Connect the
headphones.
With the label side up
If you turn on the player with
a CD in the tray
You can start playing
automatically from the
beginning of the CD. If you
connect a commercially
available timer, you can start
playing the CD at any time
you want.
You can adjust the output
level with the LINE OUT LEVEL
+/– on the remote (CDP-XE500
only) Z
You can adjust the
headphones volume on the
remote (CDP-XE500 only) Z
Connect the headphones to
the PHONES jack and adjust
the volume with the LINE
OUT LEVEL +/– on the
remote.
Page 7
Using the Display
You can check information about the disc using the
display.
Display information while playing a disc
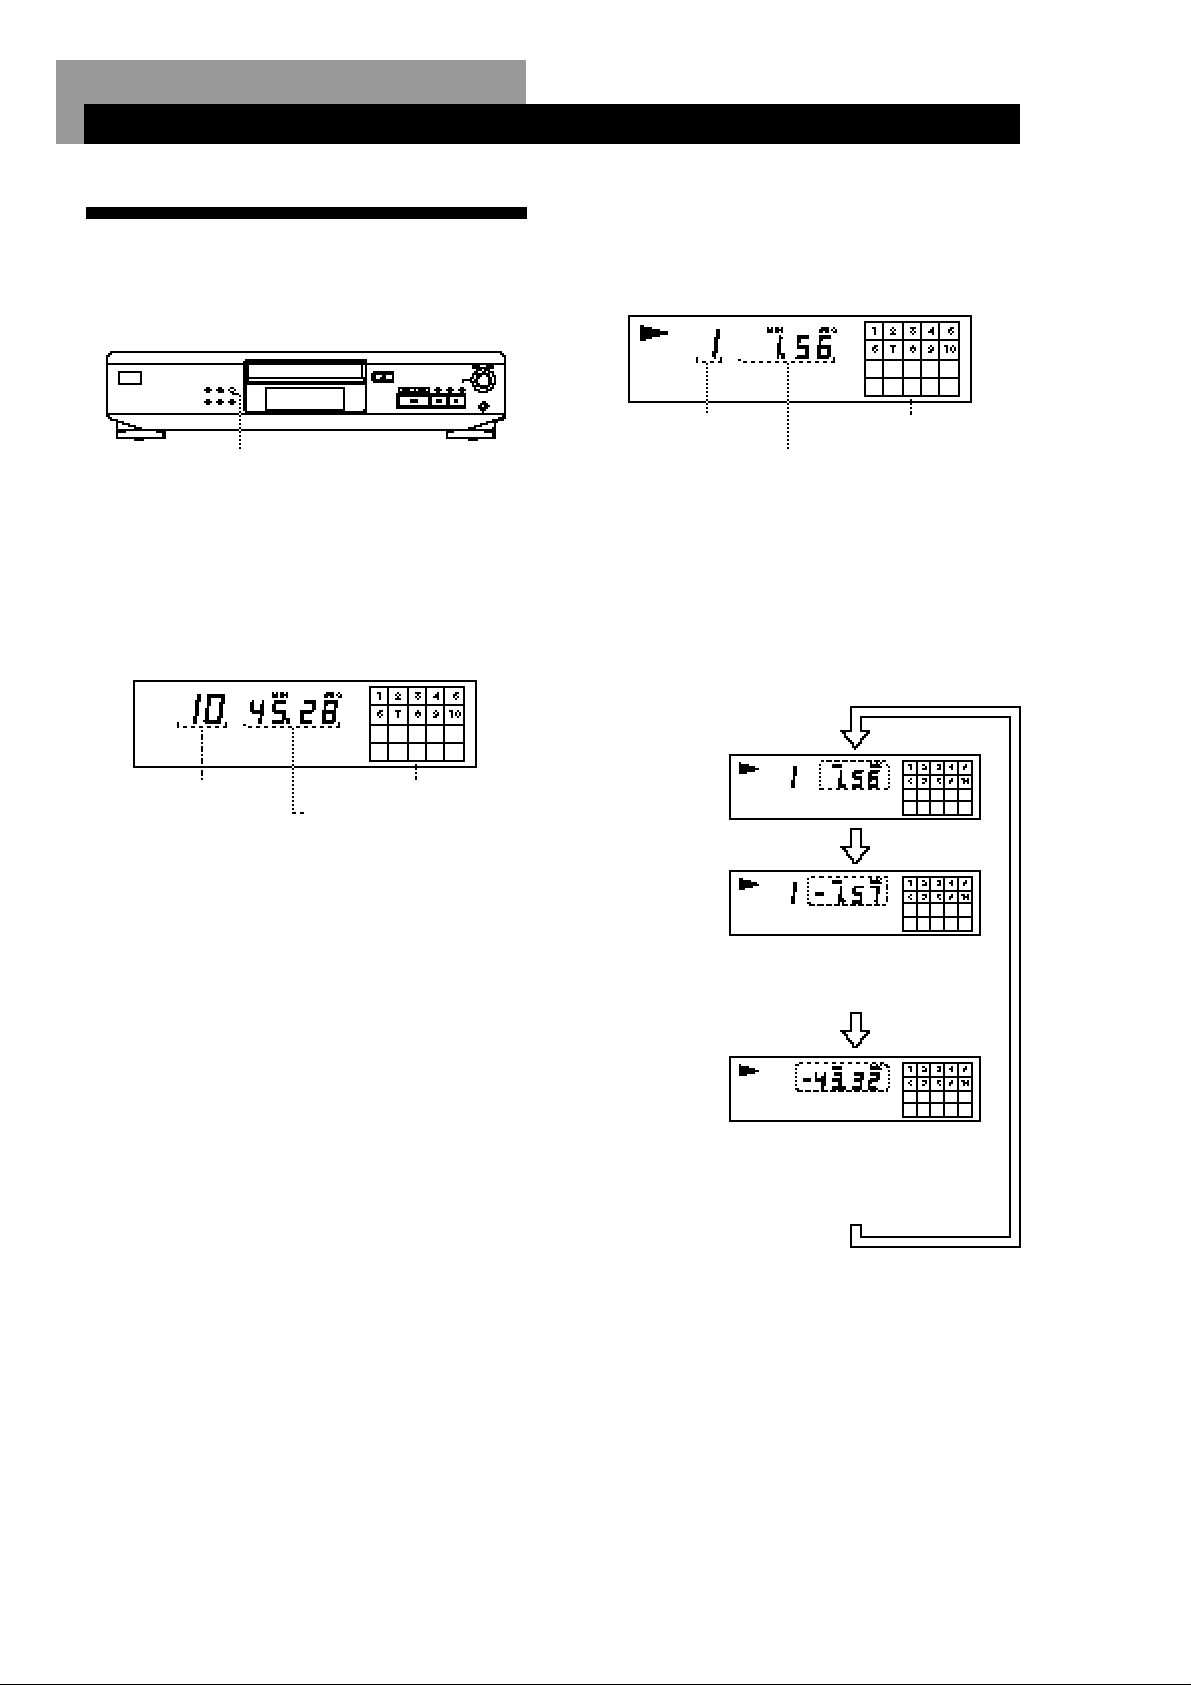
While playing a disc, the display shows the current
track number, playing time and the music calendar.
Playing CDs
Playing CDs
Playing CDs
TIME
Checking the total number and playing
time of the tracks
Press TIME before you start playing.
The display shows the total number of tracks, total
playing time and music calendar.
Total number of
tracks
While in Shuffle Play mode (“SHUFFLE” appears in
the display; see page 9), a one-second access time blank
is added between each track. This increase is
automatically added to the total playing time in the
display.
The information also appears when you press
§ OPEN/CLOSE to close the disc tray.
Music calendar
Total playing time
Current track
number
The track numbers in the music calendar disappear
after they are played.
Playing time
Music calendar
Checking the remaining time
Each time you press TIME while playing a disc, the
display changes as shown in the chart below.
Playing time and
number of the
current track
Press
Remaining time on
the current track
If the track number exceeds 68,
“– – . – –” appears instead of the
remaining time.
Press
Remaining time on
the disc
If the remaining time exceeds 100
minutes in Program Play mode,
“– – . – –” appears instead of the
remaining time.
Press
7
Page 8
Playing CDs
Locating a Specific Track or a
Particular Point in a Track
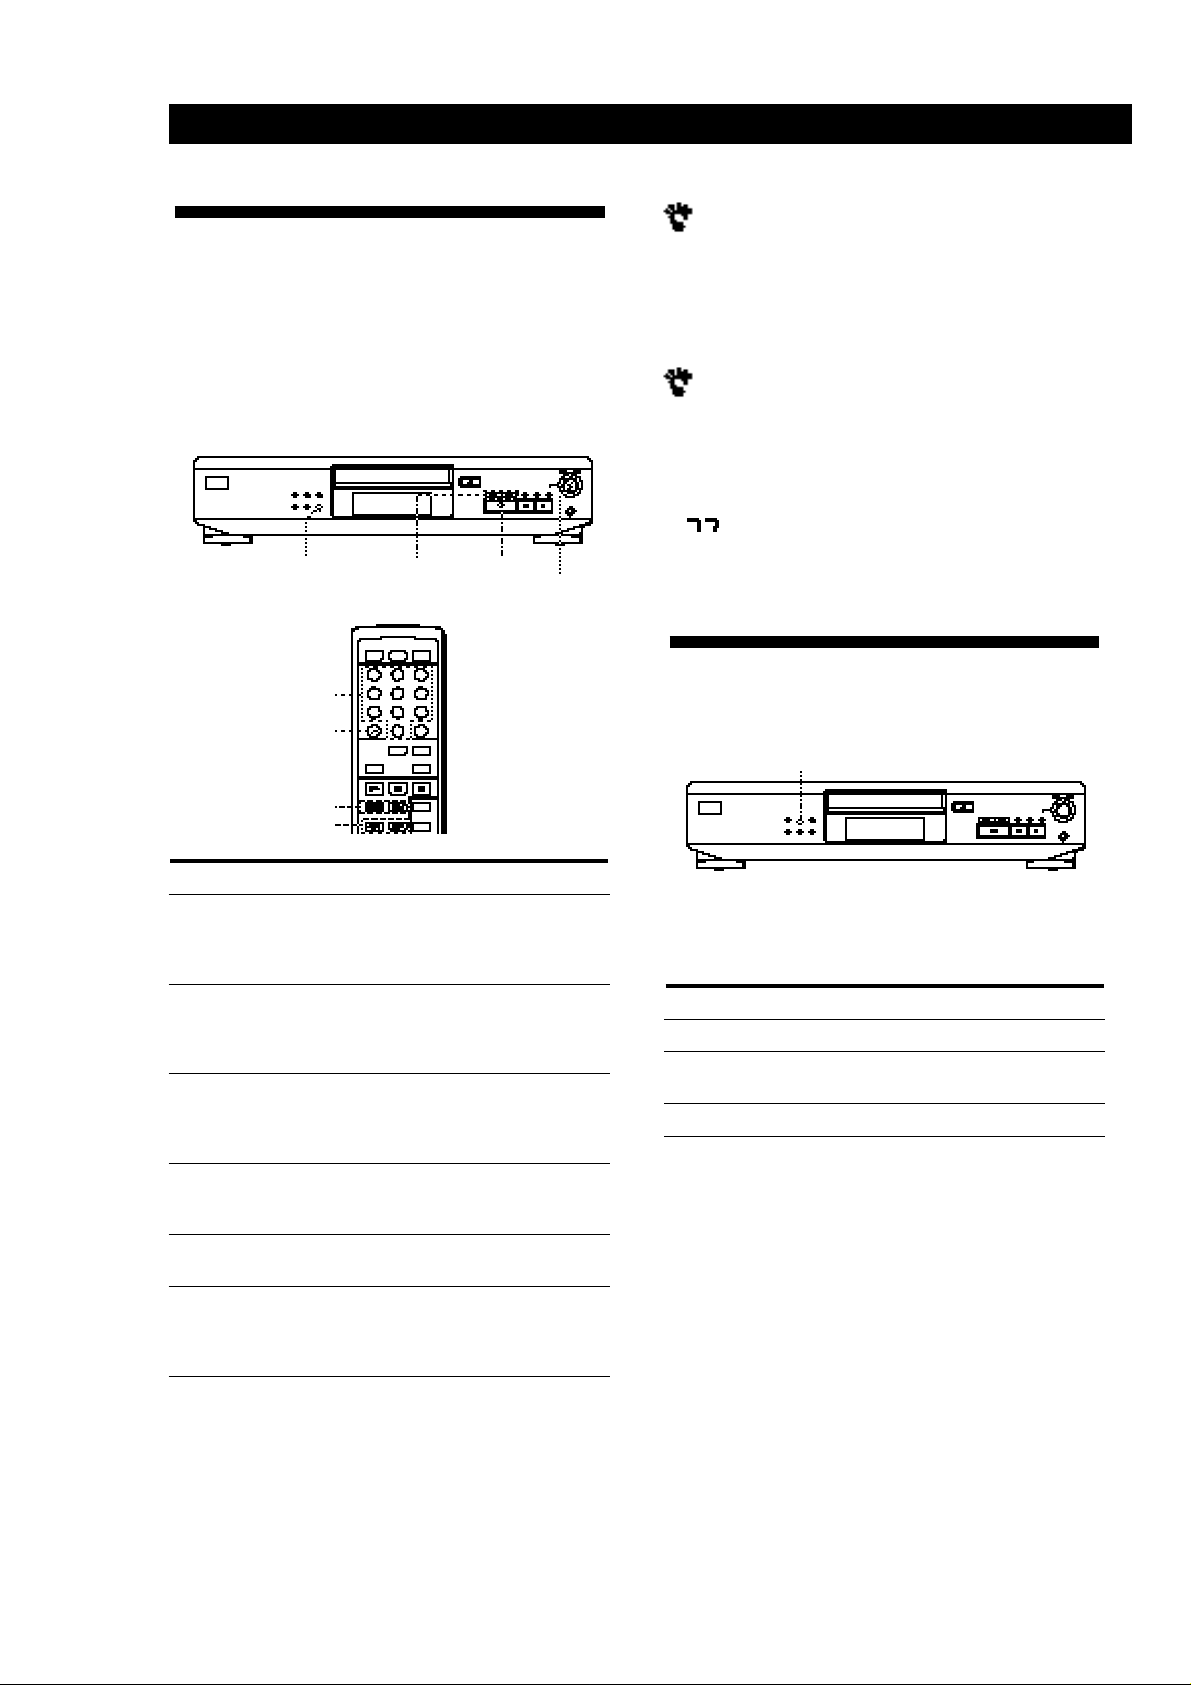
You can quickly locate any track while playing a disc
using the AMS (Automatic Music Sensor) on the player
or number buttons on the remote.
You can also locate a particular point in a track while
playing a disc.
MUSIC SCAN
Number
buttons
>10
0 / )
·
≠ A M S ±
(CDP-XE500 only)
When you directly locate a track numbered over 10
when using the remote (CDP-XE500 only)
Press >10 first, then the corresponding number buttons.
To enter “0,” use button 10.
Example: To play track number 30
Press >10 first, then 3 and 10.
You can extend the playing time during Music Scan
Press MUSIC SCAN repeatedly until the playing time
you want (10, 20 or 30) appears in the display. Each time
you press the button, the playing time changes cyclically.
Note
If “ ” appears in the display, the disc has reached the end
while you were pressing ). Press 0 or turn ≠ AMS ±
counterclockwise to go back.
Playing Tracks Repeatedly
You can play tracks repeatedly in any play mode.
REPEAT
= / +
0 / )
To locate
The next or
succeeding tracks
The current or
preceding tracks
A specific track
directly
By scanning each
track for 10 seconds
(Music Scan)
A point while
monitoring the sound
A point quickly by
observing the display
during pause
You need to
Turn ≠ AMS ± clockwise until
you find the track.
When using the remote, press +
repeatedly until you find the track.
Turn ≠ AMS ± counterclockwise
until you find the track.
When using the remote, press =
repeatedly until you find the track.
Turn ≠ AMS ± until you find the
track number you want appears in the
display. When using the remote, press
number button of the track.
Press MUSIC SCAN. When you find
the track you want, press · to start
playing the track.
) (forward) or 0 (backward) and
hold down until you find the point
) (forward) or 0 (backward) and
hold down until you find the point.
You will not hear the sound during the
operation.
Press REPEAT while playing a disc.
“REPEAT” appears in the display. The player repeats
the tracks as follows:
When the disc is played in
Continuous Play (page 6)
Shuffle Play (page 9)
Program Play (page 9)
The player repeats
All the tracks
All the tracks in random
orders
The same program
To cancel Repeat Play
Press REPEAT repeatedly until “REPEAT” disappears from
the display.
Repeating the current track
You can repeat only the current track in any playmode.
While the track you want is being played, press
REPEAT repeatedly until “REPEAT 1” appears in the
display.
8
Page 9
Playing CDs
Playing CDs
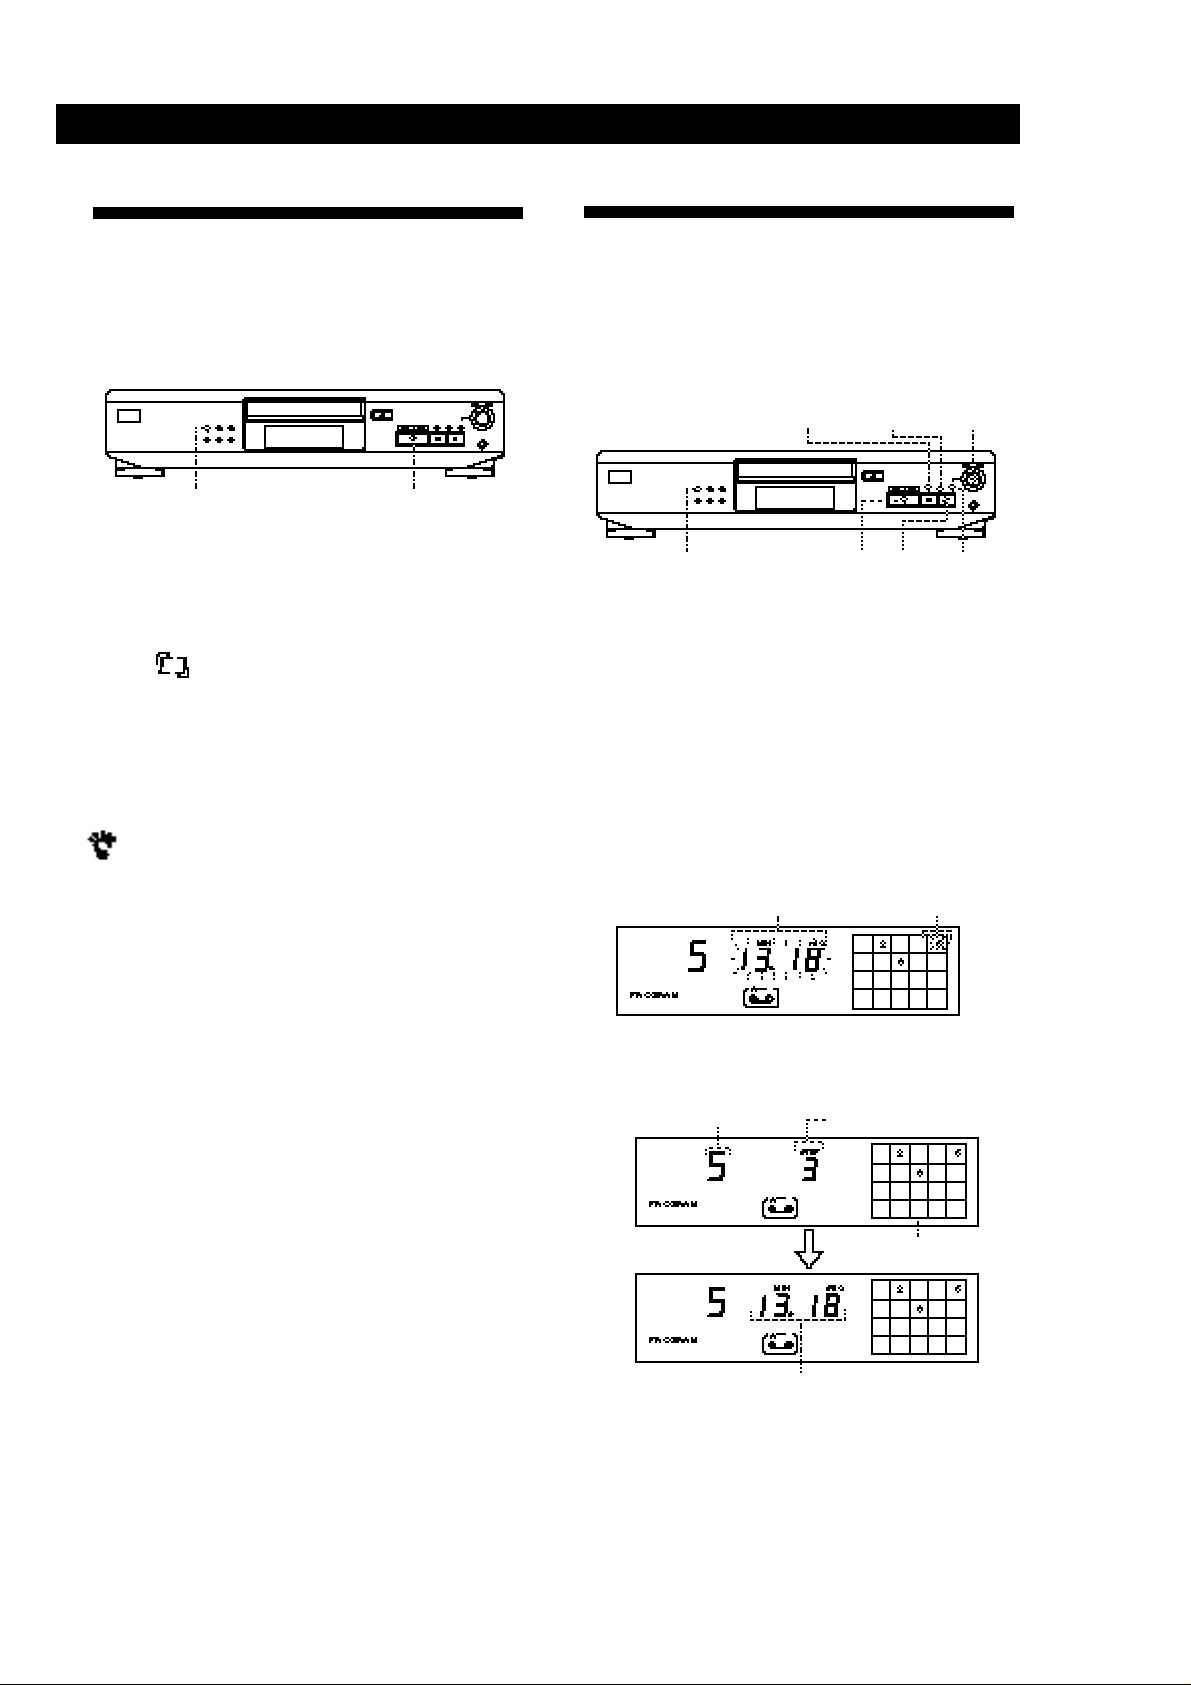
Playing in Random Order
(Shuffle Play)
You can have the player “shuffle” tracks and play in a
random order.
·PLAYMODE
1 Press PLAYMODE repeatedly until “SHUFFLE”
appears in the display.
When using the remote, press SHUFFLE.
2 Press · to start Shuffle Play.
The indication appears while the player is
“shuffling” the tracks.
To cancel Shuffle Play
Press PLAYMODE twice.
When using the remote, press CONTINUE (CDP-XE500 only).
You can start Shuffle Play while playing
Press PLAYMODE repeatedly until “SHUFFLE” appears
in the display. When using the remote, press SHUFFLE
(CDP-XE500 only). Shuffle Play starts from the current
track.
Creating Your Own Program
(Program Play)
You can arrange the order of the tracks on a disc and
create your own program. The program can contain up
to 24 tracks.
CLEAR
CHECK
PLAYMODE
Creating a program on the player
1 Press PLAYMODE repeatedly until “PROGRAM”
appears in the display before you start playing.
2 Turn ≠ AMS ± until the track number you
want appears in the display.
The total playing time and the track numbers
being programmed are flashing in the display.
≠ A M S ±
ENTER
p
·
Track numbers being
programmedTotal playing time
3 Press ENTER to select the track.
Last programmed track Playing order
After one second
Total playing time
If you’ve made a mistake
Press CLEAR, then repeat Steps 2 and 3.
Programmed tracks
(Continued)
9
Page 10
Playing CDs
4 Repeat Steps 2 and 3 to program the tracks in the
order you want.
5 Press · to start Program Play.
To cancel Program Play
Press PLAYMODE.
When tracks, which aren’t numerically consecutive on
the disc, are programmed consecutively (i.e. 1, 3, 5
etc.)
A one-second access time blank is added between the
tracks.
The program remains even after the Program Play
ends
When you press ·, you can play the same program
again.
Notes
• The total playing time doesn’t appear in the display when it
exceeds 100 minutes.
• “FULL” appears in the display when you try to add a track
to a program which already contains 24 tracks.
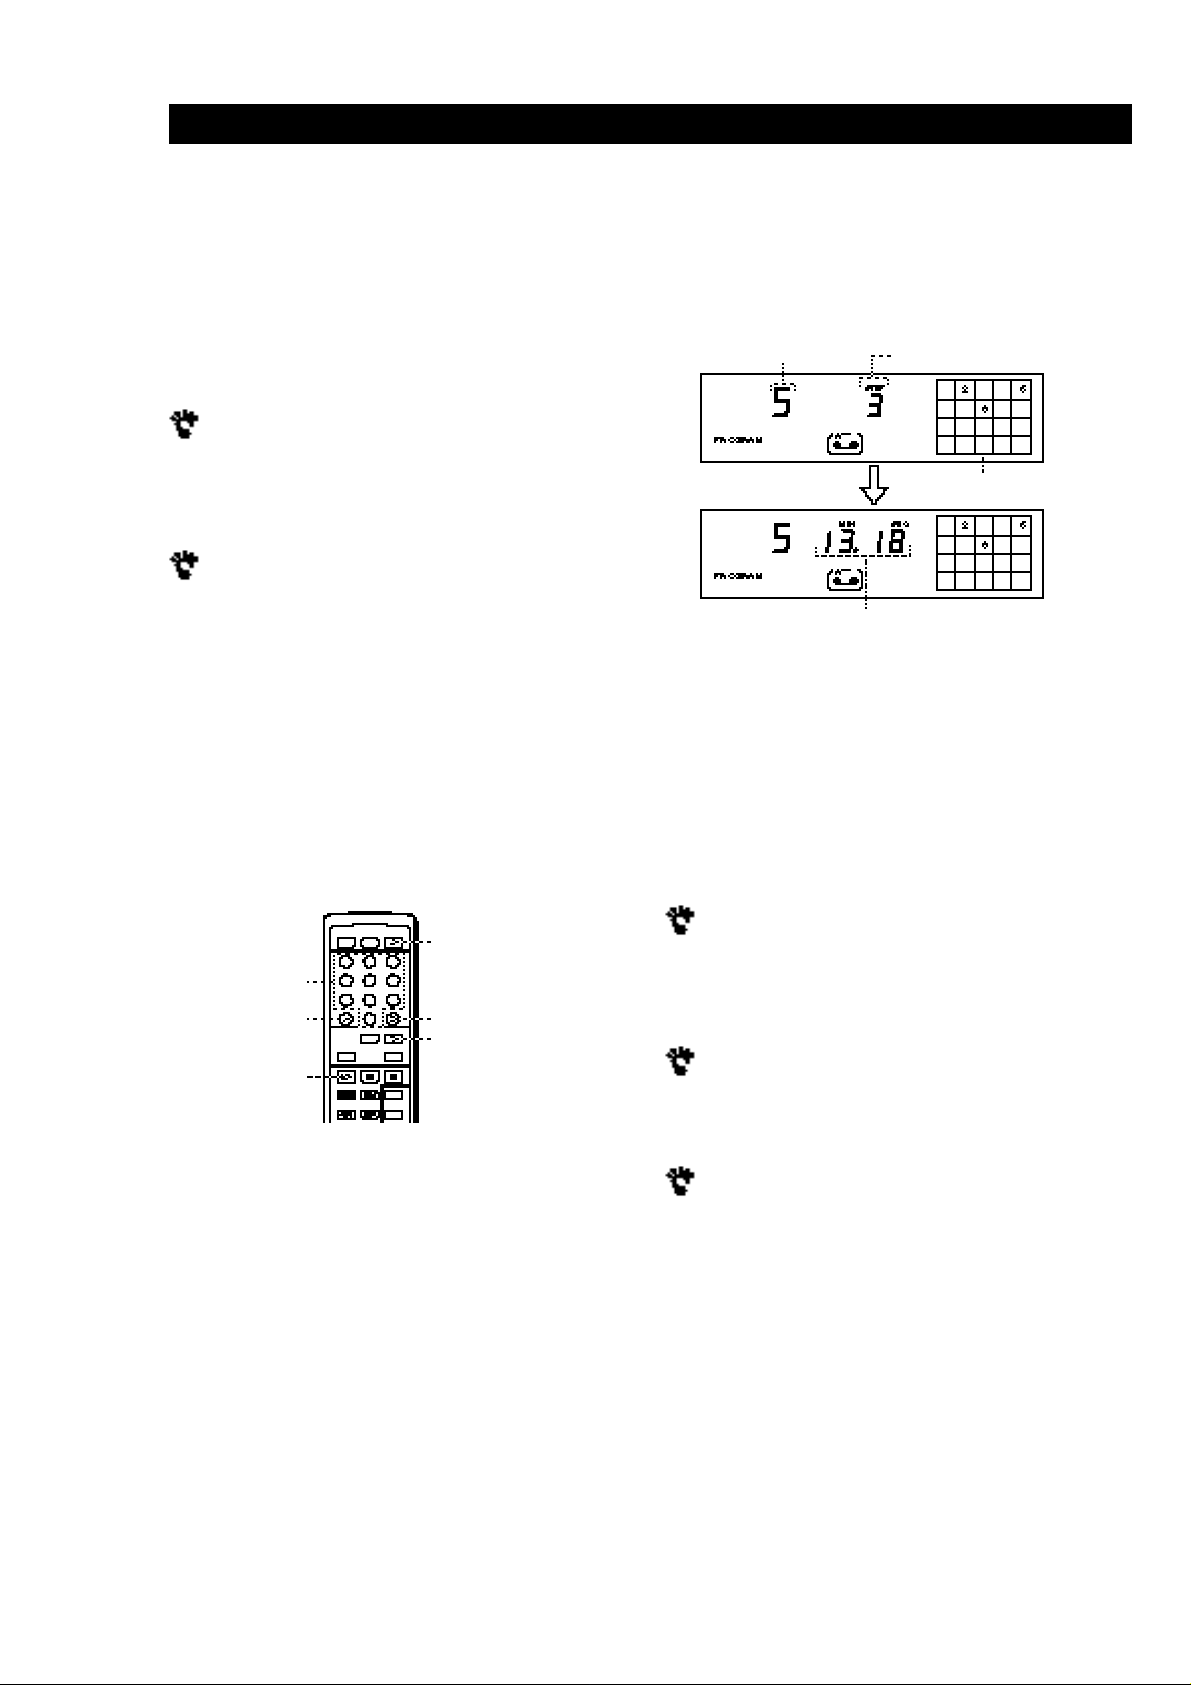
2 Press number buttons of the tracks you want to
program in the order you want.
Example: To program the tracks 2, 8 and 5.
Press number buttons in the order 2, 8
and 5.
Last programmed track
After one second
Total playing time
Playing order
Programmed tracks
To select a track with a number over 10
Use >10 button (see page 8).
If you’ve made a mistake
Press CLEAR, then press the correct track number.
3 Press ( to start Program Play.
Creating a program using the remote (CDPXE500 only) Z
PROGRAM
Number buttons
>10
(
CLEAR
CHECK
1 Press PROGRAM before you start playing.
“PROGRAM” appears in the display.
To cancel Program Play
Press CONTINUE.
When tracks, which aren’t numerically consecutive on
the disc, are programmed consecutively (i.e. 1, 3, 5
etc.)
A one-second access time blank is added between the
tracks.
The program remains even after the Program Play
ends
When you press (, you can play the same program
again.
You can check the total playing time while
programming using the remote (Program Edit)
To select a track, press = or + and check the total
playing time. Then press PROGRAM to confirm your
selection.
Notes
• The total playing time doesn’t appear in the display when it
exceeds 100 minutes.
• “FULL” appears in the display when you try to add a track
to a program which already contains 24 tracks.
10
Page 11
Playing CDs
Checking the track order
You can check your program before or after you start
playing.
Press CHECK.
Each time you press this button, the display shows the
track number in the programmed order. After the last
track in the program, the display shows “End” and
returns to the original display. If you check the order
after you start playing, the display shows only the
remaining track numbers.
Changing the track order
You can change your program before you start playing.
To
Erase a track
Erase the last track in the
program
Add tracks to the end of the
program
Change the whole program
completely
Recording from CDs
Recording Your Own Program
You can record the program you’ve created on a tape,
DAT or MD. The program can contain up to 24 tracks.
By inserting a pause during programming, you can
divide the program into two for recording on both
sides of a tape.
Playing CDs
You need to
Press CHECK until the track
you don’t want appears in
the display, then press
CLEAR
Press CLEAR. Each time you
press the button, the last
track will be cleared.
Turn ≠ AMS ± until
track number you want to
add appears, then press
ENTER.
When using the remote,
press the number button of
the tracks to be added.
Press p (stop). Create a new
program following the
programming procedure.
≠ A M S ±
ENTER
·
PPLAYMODE
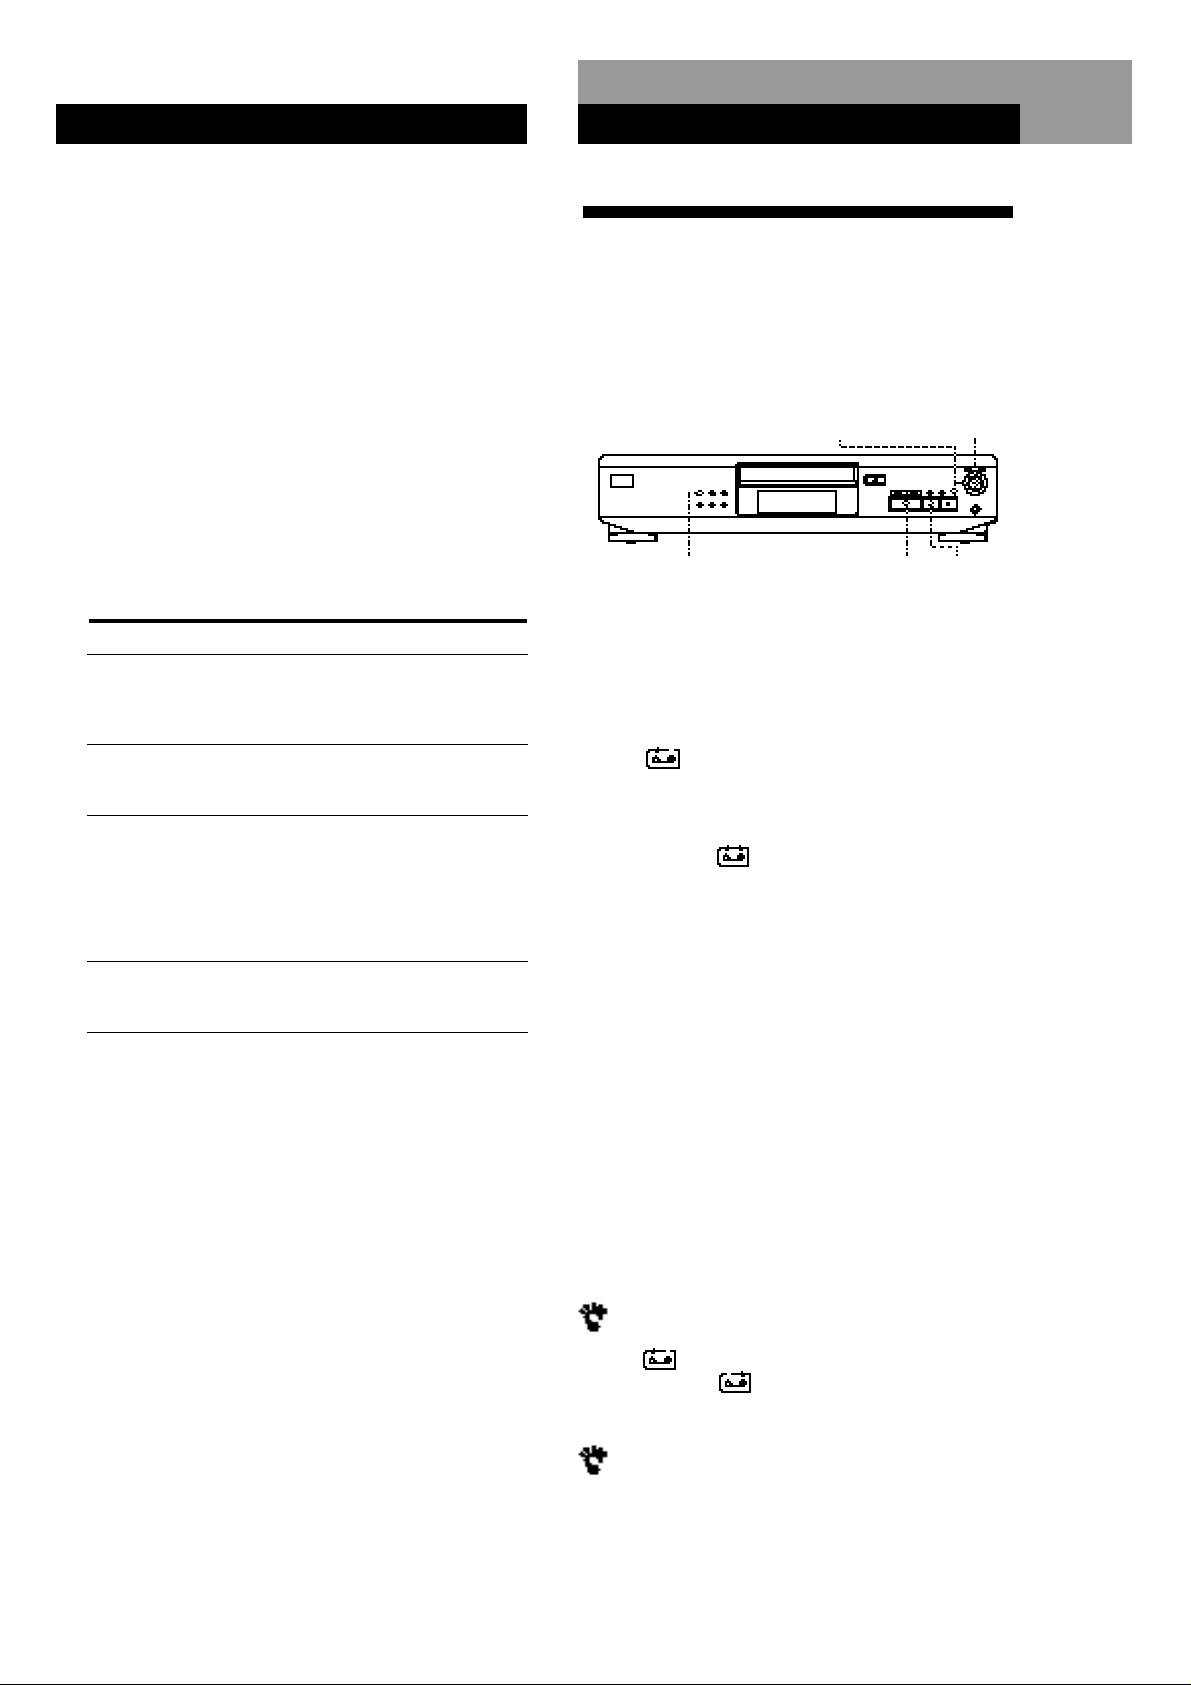
1 Create your program (for side A when recording
on a tape) while checking the total playing time
indicated in the display.
Follow Steps 1 to 4 in “Creating a program on the
player” on page 9 or Steps 1 and 2 in “Creating a
program using the remote” on page 10.
The
Playing CDs
2 When you record on both sides of the tape, press
P to insert a pause.
The “P” and indications appear in the display
and the playing time is reset to “0.00.”
When you record on one side of the tape or on a
DAT or MD, skip this step and go to Step 4.
A pause is counted as one track
You can program up to 23 tracks when you insert a
pause.
indication appears in the display.
3 Repeat Step 1 to create the program for side B.
4 Start recording on the deck and then press · on
the player.
When you record on both sides of the tape, the
player pauses at the end of the program for side A.
5 When you record on side B, reverse the tape and
press · or P on the player to resume playing.
To check and change your program
See the left column of this page.
The indication appears while checking the program
for side A and while checking the program for side
B.
When tracks, which aren’t numerically consecutive on
the disc, are programmed consecutively (i.e. 1, 3, 5
etc.)
A one-second access time blank is added between the
tracks.
11
Page 12
Recording From CDs
Recording a CD by Specifying
Tape Length (Time Edit)
You can have the player create a program that will fit
the length of the tape.
The player automatically creates a program, keeping
the original order of the disc.
The program can contain up to 24 tracks (a pause
inserted between tracks is counted as one track).
Note that tracks whose numbers are over 24 cannot be
programmed automatically.
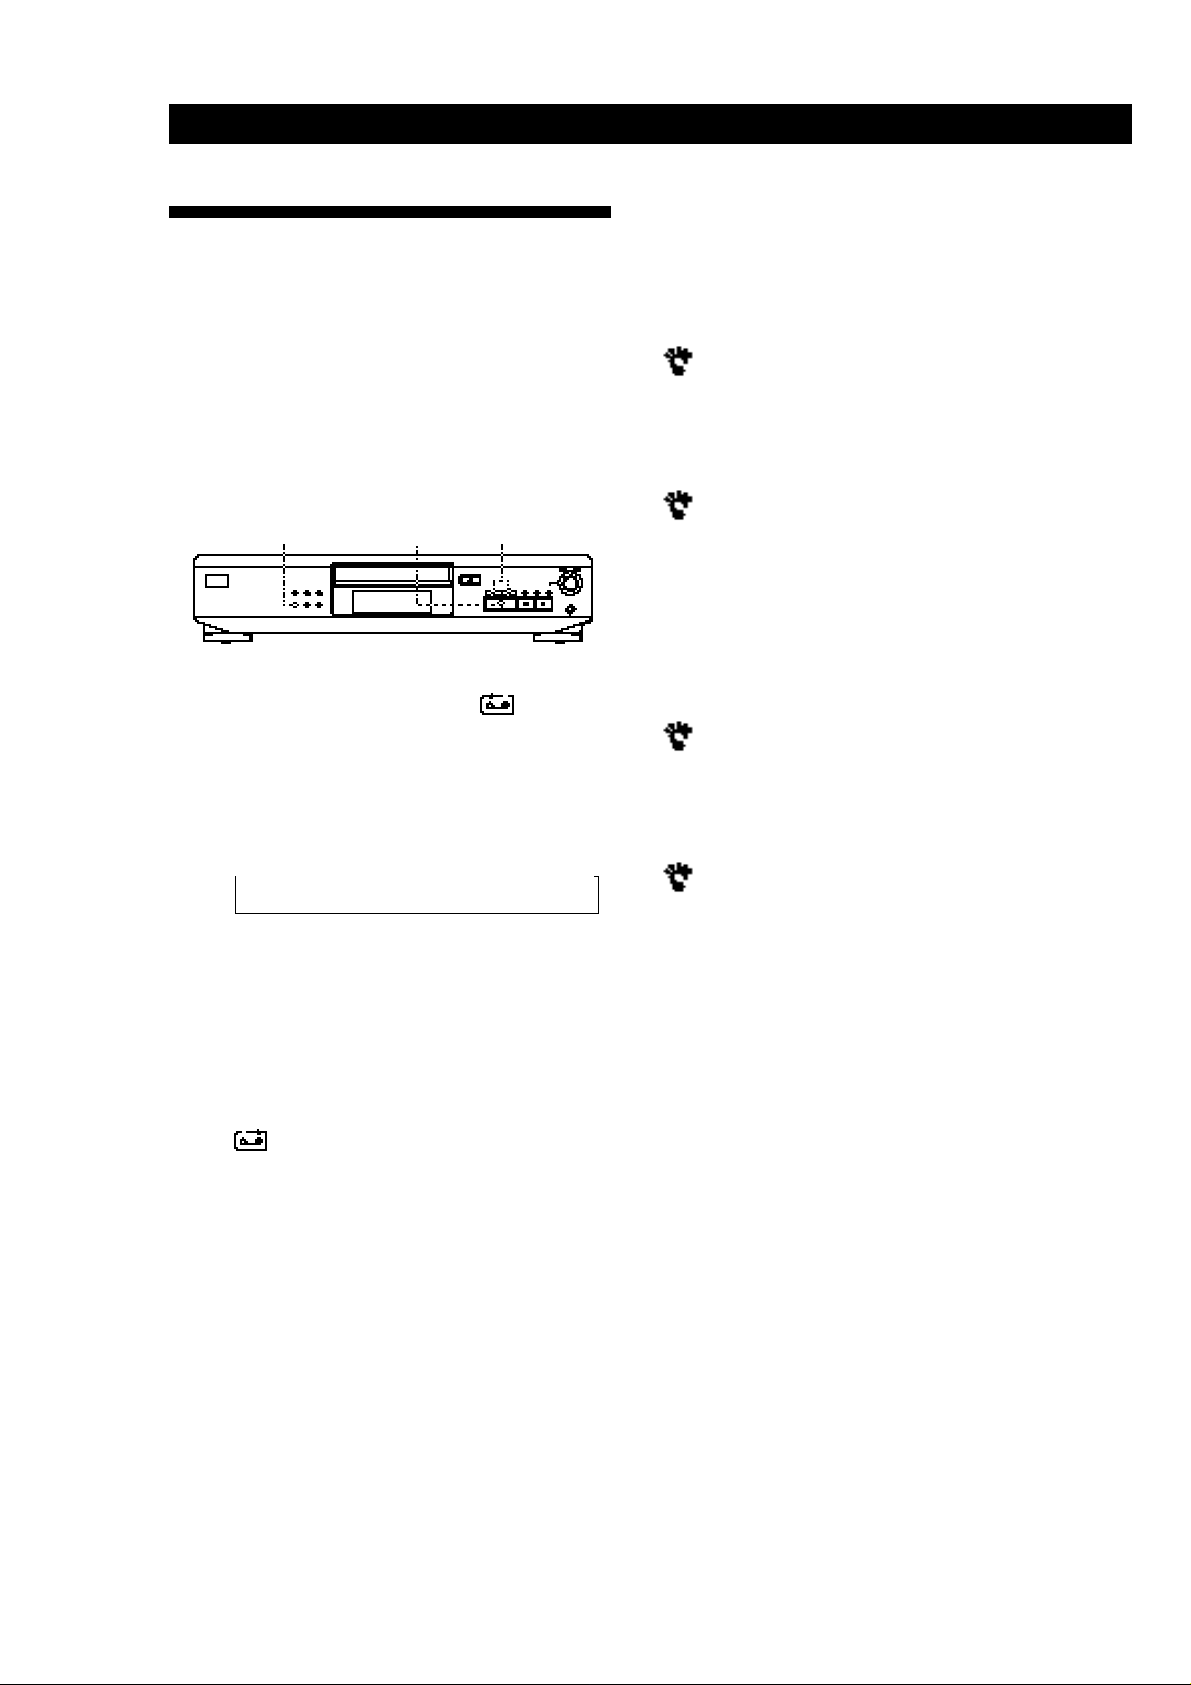
EDIT/TIME FADE
1 Press EDIT/TIME FADE before you start playing
until EDIT appears and “A” in the indication
flashes in the display.
2 Press 0 or ) to specify the tape length.
Each time you press these buttons, the display
changes as shown below, with the tape length of
one side following each indication.
n HALF ˜ C-46 ˜ C-54 ˜ C-60 ˜ C-74 ˜ C-90 ˜ - -. - - N
(23.00) (27.00) (30.00) (37.00) (45.00)
·
0 / )
To cancel Time Edit
Press PLAYMODE until “SHUFFLE” and “PROGRAM”
disappear from the display.
When using the remote, press CONTINUE (CDP-XE500
only).
You can program the tracks you want in advance
Select the tracks before doing the above procedure. The
player creates a program from the remaining tracks. In
this case, you cannot select “HALF” to specify the tape
length.
You can freely specify the tape length
Set the tape length using ≠AMS±.
Example: When the tape length of one side is 30 minutes
and 15 seconds
1 To set the minutes, turn ≠ AMS ± until
“30” appears in the display, then press
ENTER .
2 To set the seconds, turn ≠ AMS ± until
“15” appears in the display, then press
ENTER .
When tracks, which aren’t numerically consecutive on
the disc, are programmed consecutively (i.e. 1, 3, 5
etc.)
A one-second access time blank is added between the
tracks.
To check and change your program
See page 11.
When you select “HALF”
The player sets the program of each side to a half of the
total playing time of the disc. Note that you cannot select
“HALF” when the disc has more than 24 tracks.
3 Press EDIT/TIME FADE to have the player create
the program.
The display shows the tracks to be recorded. “B” in
the indication flashes in the display.
4 When you record on both sides of the tape, press
EDIT/TIME FADE again.
The player inserts a pause, then creates the
program for side B. The display shows the
programmed tracks.
When you record on one side of the tape or on a
DAT or MD, skip this step.
5 Start recording on the deck and then press · on
the player.
When you record on both sides of the tape, the
player pauses at the end of the program for side A.
6 When you record on side B, reverse the tape and
press · or P on the player to resume playing.
12
Page 13
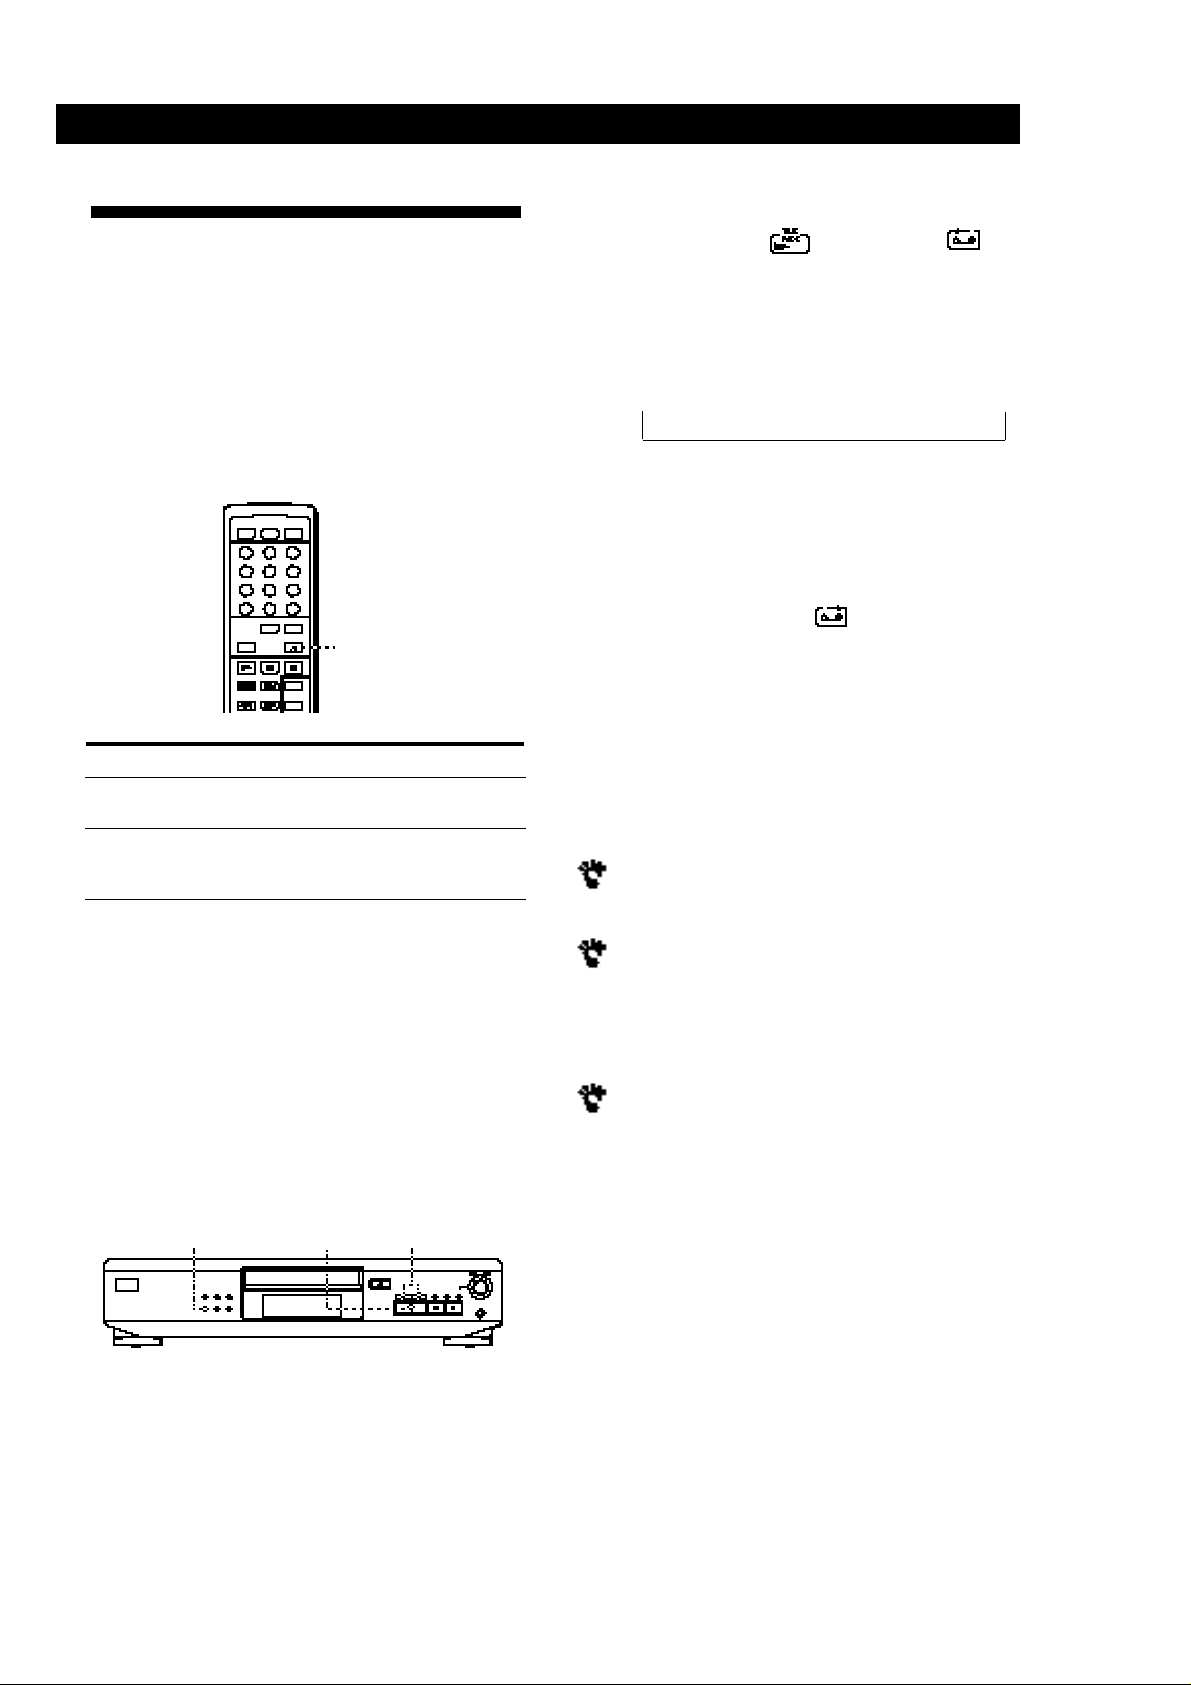
Fading In or Out
You can manually fade in or out to prevent tracks from
starting or ending abruptly.
Note that you cannot use this effect when you use the
DIGITAL OUT (OPTICAL) connector (for CDP-XE500).
Fading in or out at the point you want
(CDP-XE500 only) Z
FADER
To
Start play fading in
End play fading out
Press FADER
During pause. The Q indication
flashes and play fades in.
When you want to start fading out.
The q indication flashes. The play
fades out and the player pauses.
Recording From CDs
Recording From CDs
1 Press EDIT/TIME FADE repeatedly before you
start playing until “ ” and “A” in the
indication appear in the display.
2 Press 0 or ) to specify the playing time.
Each time you press these buttons, the display
changes as shown below, with the playing time of
one side following each indication.
n HALF ˜ C-46 ˜ C-54 ˜ C-60 ˜ C-74 ˜ C-90 ˜ - - .- - N
When you select “HALF”
The player sets the playing time to a half of the total
playing time.
(23.00) (27.00) (30.00) (37.00) (45.00)
3 Press · to start playing.
At the specified time the play fades out and the
player pauses. “B” in the indication appears
in the display.
4 To record on side B, reverse the tape and press ·
or P on the player to resume playing.
Again, the play fades out at the specified time.
To cancel Time Fade
Press EDIT/TIME FADE.
You can freely specify the playing time
See “You can freely specify the tape length” on page 12 .
Fading time lasts for 5 seconds. If you press FADER
during Music Scan (page 8), fading time changes to 2
seconds.
Fading out at the specified time (Time
Fade)
You can have the player fade out automatically by
specifying the playing time. Once you set the Time
Fade, it works twice, that is, the play fades out at the
end of both sides of a tape.
EDIT/TIME FADE
·
0 / )
You can change discs during Time Fade
If the play ends before the specified fade-out time, (for
example, when you record CD-singles on a tape) change
the disc. The specified fade-out time is counted only
during playing.
You can fade in to resume playing in Step 4
(CDP-XE500 only)
After you reverse the tape, press FADER on the remote.
Note
Time Fade will be cancelled if you press 0 or ) during
the operation.
13
Page 14
Recording From CDs
Adjusting the Recording Level
(Peak Search)
The player locates the highest level among the tracks to
be recorded to let you adjust the recording level before
you start recording.
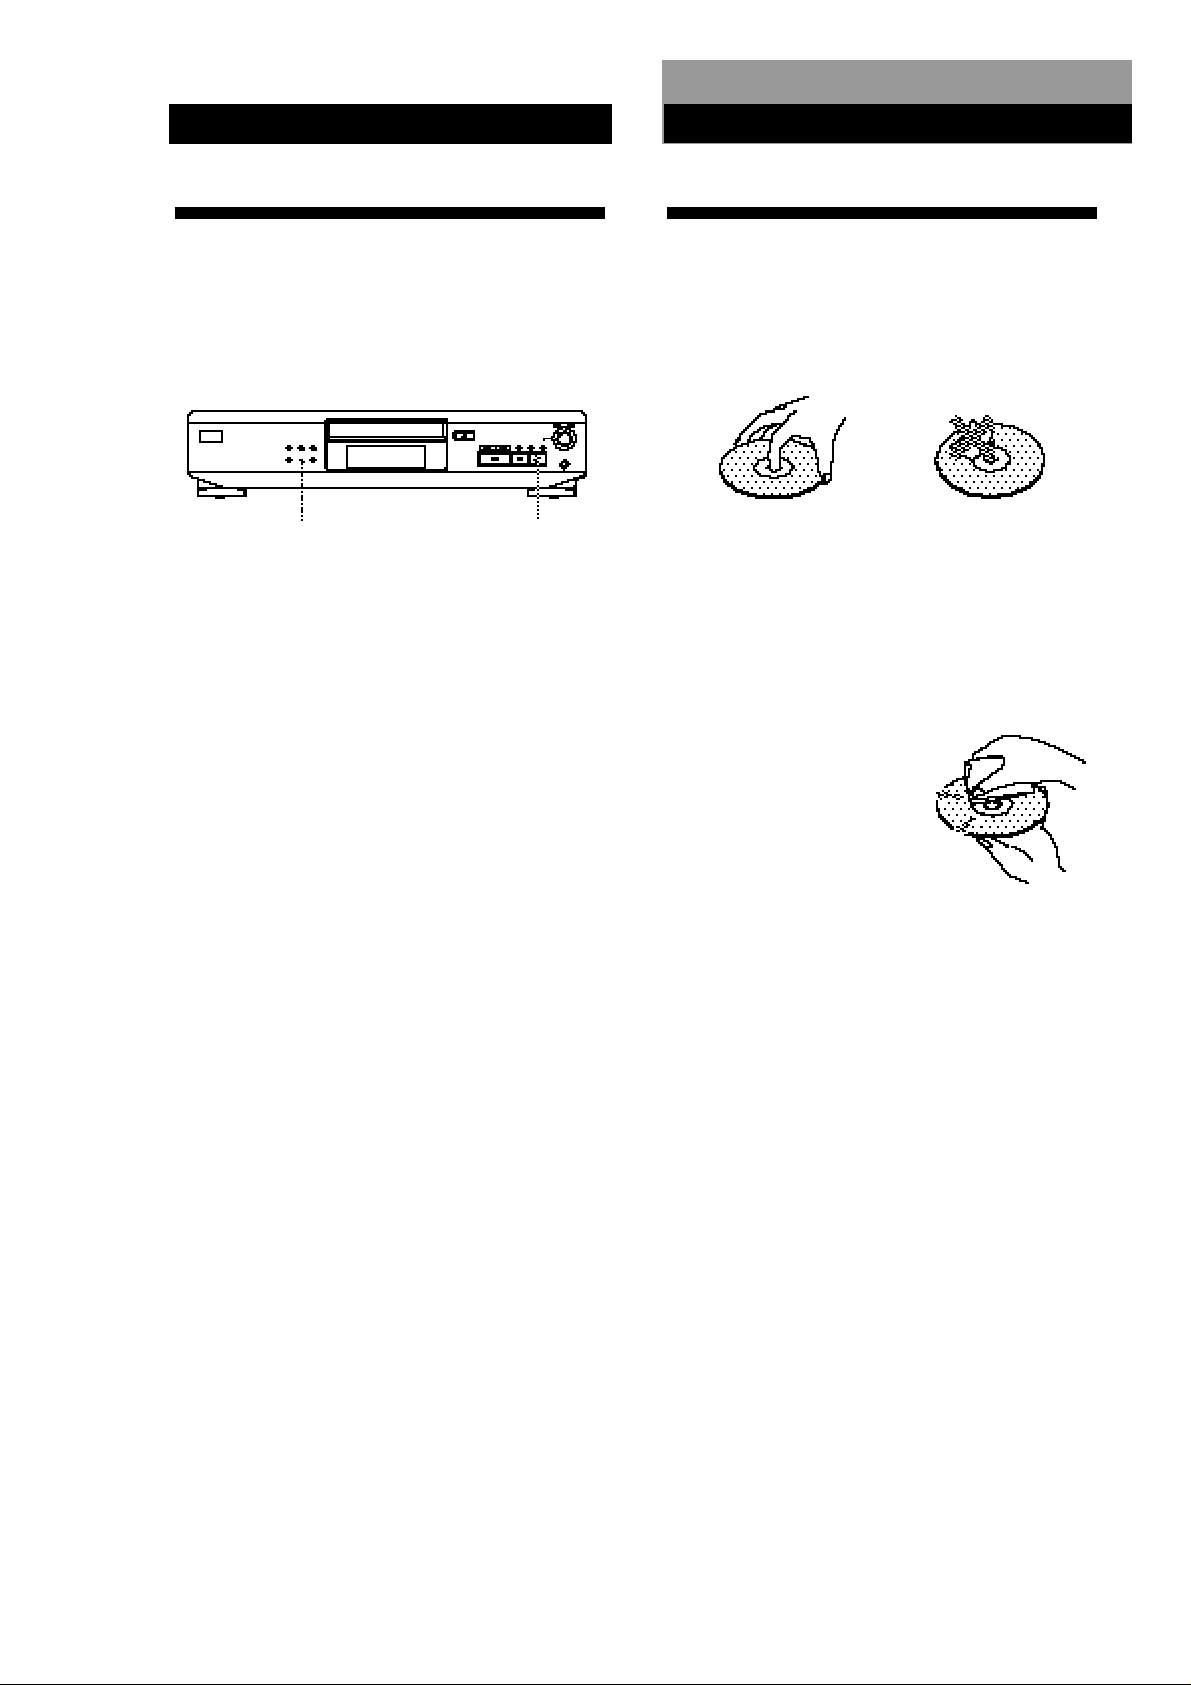
Notes on CDs
On handling CDs
• To keep the disc clean, handle the disc by its edge. Do not
touch the surface.
• Do not stick paper or tape on the disc.
• Do not expose the disc to direct sunlight or heat sources
such as hot air ducts, nor leave it in a car parked in direct
sunlight as there can be considerable rise in temperature
inside the car.
• Do not use any commercially available stabilizer. If you do,
the disc and the player may be damaged.
• After playing, store the disc in its case.
On cleaning
• Before playing, clean the
disc with a cleaning cloth.
Wipe the disc from the
center out.
Additional Information
Not this way
PEAK SEARCH
1 Before you start playing, press PEAK SEARCH.
“PEAK” flashes in the display and the player
repeats the portion of the highest level.
2 Adjust the recording level on the deck.
3 Press p on the player to stop Peak Search.
“PEAK” disappears from the display.
Note
The portion with the highest level may differ every time you
try the adjustment on the same disc. The difference is,
however, so slight that you won’t find any problem in
adjusting the recording level precisely.
p
• Do not use solvents such as benzine, thinner,
commercially available cleaners or anti-static spray
intended for vinyl LPs.
14
Page 15

Additional Information
Additional Information
Troubleshooting
If you experience any of the following difficulties while
using the player, use this troubleshooting guide to help
you remedy the problem. Should any problem persist,
consult your nearest Sony dealer.
There’s no sound.
/ Check that the player is connected securely.
/ Make sure you operate the amplifier correctly.
/ Adjust the output level with LINE OUT LEVEL +/–
on the remote (CDP-XE500 only).
The CD does not play.
/ There’s no CD inside the player (“no dISC” appears).
Insert a CD.
/ Place the CD with the label side up on the disc tray
correctly.
/ Clean the CD (see page 14).
/ Moisture has condensed inside the player. Remove
the disc and leave the player turned on for about an
hour (see page 2).
The recording level has changed (CDP-XE500 only).
/ The recording level changes if you adjust the output
level with LINE OUT LEVEL +/– on the remote
during recording.
The remote does not function (CDP-XE500 only).
/ Remove the obstacles in the path of the remote and
the player.
/ Point the remote at the remote sensor g on the player.
/ Replace all the batteries in the remote with new ones
if they are weak.
Specifications
Compact disc player
Laser Semiconductor laser (λ = 780 nm)
Laser output Max 44.6 µW*
Frequency response 2 Hz to 20 kHz ± 0.5 dB
Signal-to-noise ratio More than 100 dB
Dynamic range More than 98 dB
Harmonic distortion Less than 0.0045%
Channel separation More than 95 dB
Outputs
Jack
type
LINE OUT
DIGITAL
OUT
(OPTICAL)
(CDP-XE500
only)
PHONES
Phono
jacks
Optical
output
connector
Stereo
phone
jack
Emission duration: continuous
* This output is the value measured at
a distance of 200 mm from the
objective lens surface on the Optical
Pick-up block with 7 mm aperture.
Maximum
output
level
2 V
(at 50 kilohms)
–18 dBm
10 mW
Load
impedance
Over 10 kilohms
Wave length: 660 nm
32 ohms
General
Power requirements 120 V AC, 60 Hz
Power consumption 10 W
Dimensions (approx.) 430 × 95 × 295 mm
(w/h/d) (17 × 3 3/4 × 11 5/8 in.) incl. projecting
Mass (approx.) 3.0 kg (6 lbs 10 oz)
parts
Supplied accessories
Audio cord (2 phono plugs – 2 phono plugs) (1)
Remote commander (remote) (CDP-XE500 only) (1)
Sony SUM-3 (NS) batteries (CDP-XE500 only) (2)
Design and specifications are subject to change without notice.
15
Page 16

Index
16
Names of controls
Buttons
CHECK 11
CLEAR 11
CONTINUE 6
EDIT/TIME FADE 12
FADER 13
LINE OUT LEVEL +/– 6
MUSIC SCAN 8
§ OPEN/CLOSE 6
PEAK SEARCH 14
PLAYMODE 9
PROGRAM 9
REPEAT 8
SHUFFLE 9
TIME 7
· 6
P 6
p 6
0 / ) 8
= / + 8
>10 8
Number 8
Switch
POWER 6
Connector
DIGITAL OUT (OPTICAL) 5
Jacks
PHONES 6
LINE OUT 5
Others
Disc tray 6
Display 7
≠ AMS ± 6
g 4
Index
A, B
AMS 8
Automatic Music Sensor. See
AMS
C, D
Connecting 4
Continuous Play 6
E
Editing. See Recording
F, G
Fading 13
Time Fade 13
H, I, J, K
Half disc (HALF) 12
Handling CDs 15
Hookups 4
overview 4
L
Locating
by monitoring 8
by observing the display 8
by scanning 8
directly 8
using AMS 8
M, N, O
Music Scan 8
P, Q
Peak Search 14
Playback
Continuous Play 6
Program Play 9
Repeat Play 8
Shuffle Play 9
Program 9
changing 11
checking 11
for recording 12
Program Edit 11
R
Recording 11
a program 11
using Time Edit 12
Remaining time 7
Remote control 4
Repeating
all 8
the current track 9
S
Scanning. See Music Scan
Searching. See Locating
Shuffle Play 9
T
Time Edit 12
Time Fade 13
Total playing time 7
Troubleshooting 15
U, V, W, X, Y, Z
Unpacking 4
Sony Corporation Printed in China
 Loading...