

Page 1
3-810-423-11(1)
Operating Instructions
Mode d’emploi
Bedienungsanleitung
Manual de instrucciones
GB
F
D
E
CDP-X5000
1996 by Sony Corporation
Page 2
WARNING
To prevent fire or shock
hazard, do not expose the unit
to rain or moisture.
To avoid electrical shock, do
not open the cabinet. Refer
servicing to qualified
personnel only.
Do not install the appliance in
a confined space, such as a
bookcase or built-in cabinet.
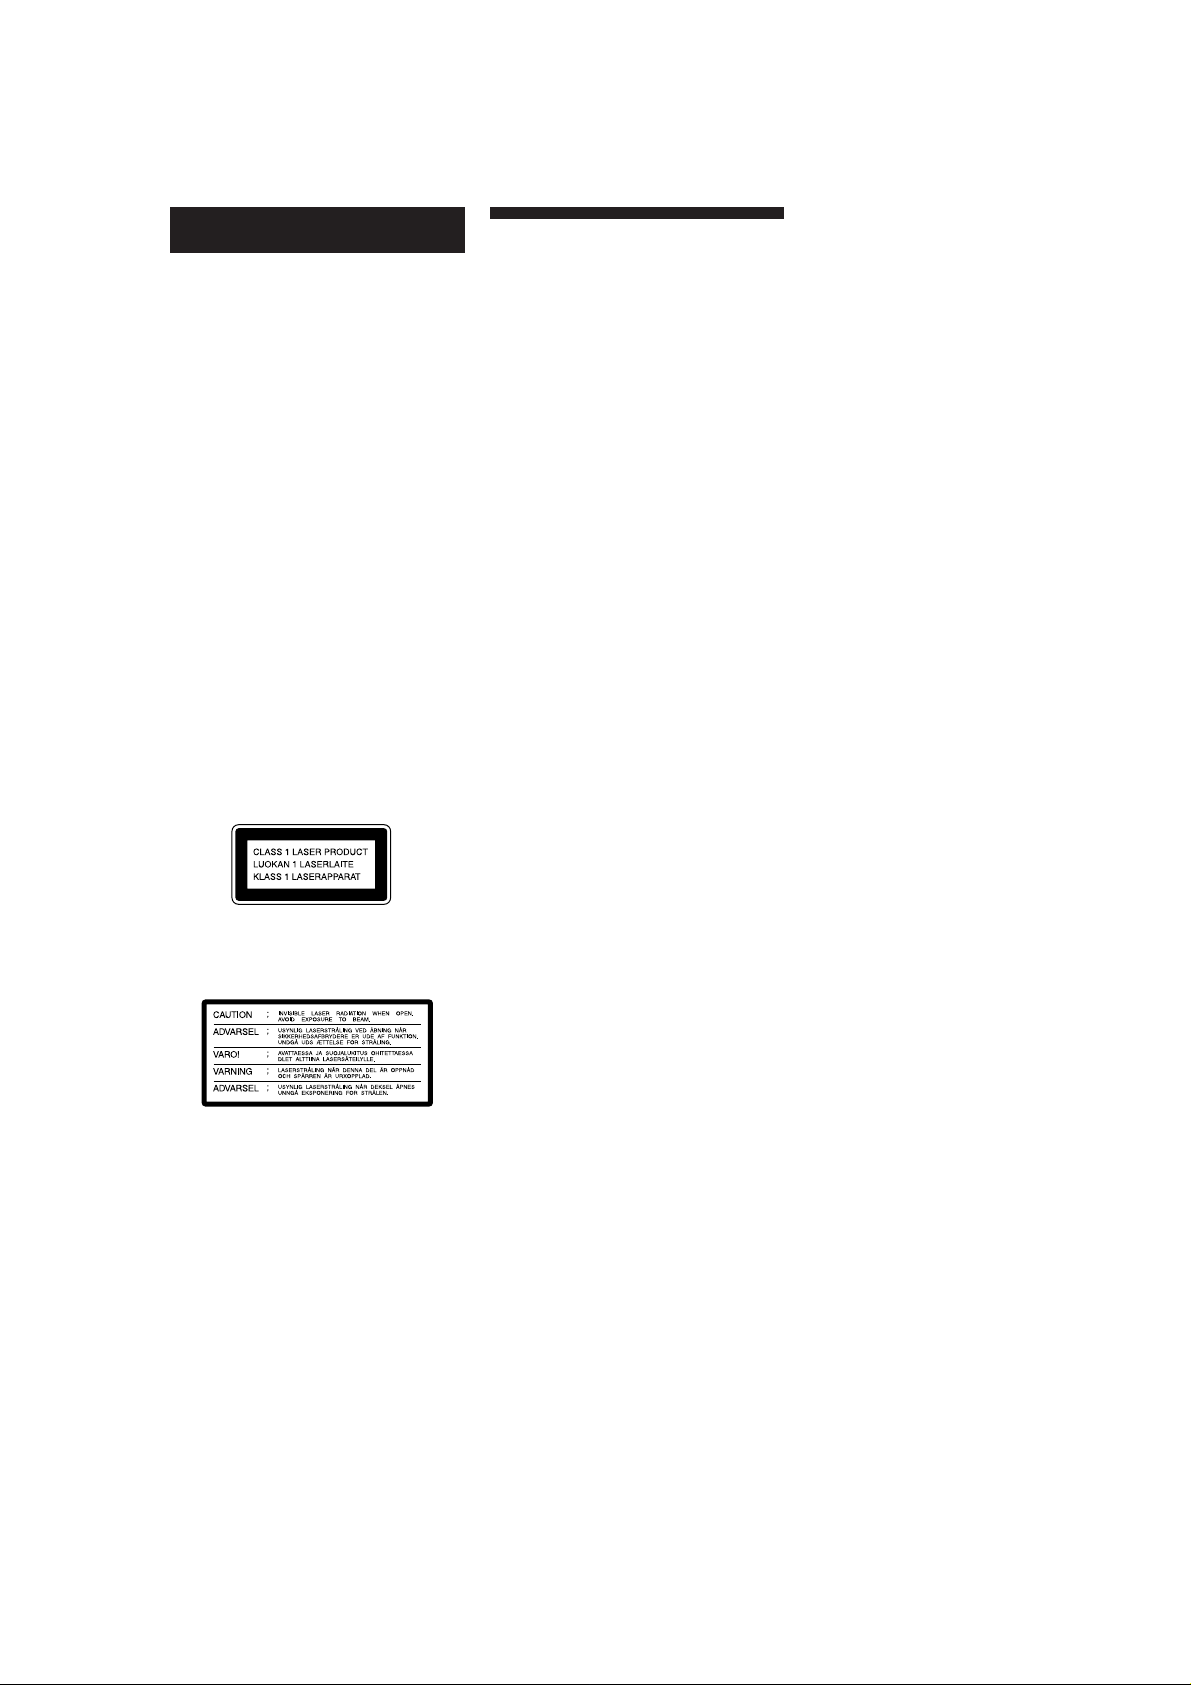
This appliance is classified as a
CLASS 1 LASER product. The
CLASS 1 LASER PRODUCT
MARKING is located on the rear
exterior.
The following caution label is
located inside the unit.
Precautions
On safety
• Caution - The use of optical
instruments with this product will
increase eye hazard.
• Should any solid object or liquid fall
into the cabinet, unplug the player
and have it checked by qualified
personnel before operating it any
further.
• Be careful not to close the disc lid on
your finger.
On power sources
• Before operating the player, check
that the operating voltage of the
player is identical with your local
power supply. The operating voltage
is indicated on the nameplate at the
rear of the player.
• The unit is not disconnected from the
AC power source (mains) as long as it
is connected to the wall outlet, even if
the unit itself has been turned off.
• If you are not going to use the player
for a long time, be sure to disconnect
the player from the wall outlet. To
disconnect the AC power cord (mains
lead), grasp the plug itself; never pull
the cord.
On placement
• Place the player in a location with
adequate ventilation to prevent heat
build-up in the player.
• Do not place the player on a soft
surface such as a rug that might block
the ventilation holes on the bottom.
• Do not place the player in a location
near heat sources, or in a place subject
to direct sunlight, excessive dust or
mechanical shock.
On preserving sound quality
• Do not touch the lens inside.
On operation
• Use your hand to open or close the
disc lid.
• Do not touch the rotating parts (a
disc, etc.) during operation.
• If the player is brought directly from a
cold to a warm location, or is placed
in a very damp room, moisture may
condense on the lenses inside the
player. Should this occur, the player
may not operate properly. In this case,
remove the disc and leave the player
turned on for about an hour until the
moisture evaporates.
On adjusting volume
• Do not turn up the volume while
listening to portions with very low
level inputs or no audio signals. If
you do, the speakers may be damaged
when a peak level portion is played.
On placing a disc
• You may hear a whistling sound from
the player. This indicates that the
player is automatically adjusting its
internal mechanisms according to the
inserted disc.
On cleaning
• Clean the cabinet, panel and controls
with a soft cloth slightly moistened
with a mild detergent solution. Do not
use any type of abrasive pad, scouring
powder or solvent such as alcohol or
benzine.
• When the inside of the disc lid is
dirty, remove the disc lid using a
hexagonal spanner (the subtense, 2.5
mm).
Note
Never open any part of the CD player
other than a disc lid.
On transportation
• Be sure to remove the CD and the
stabilizer.
On using the stabilizer
• Be sure to use the supplied stabilizer.
If you use any other stabilizer, you
may damage the player.
• The bottom of the stabilizer is
delicate, and flaws may effect the
sound quality.
When replacing discs, place the
stabilizer on the supplied felt or a soft
cloth.
GB
2
problems concerning your player,
please consult your nearest Sony
dealer.
If you have any questions or
Page 3
Welcome!
Thank you for purchasing the Sony
Compact Disc Player. Before operating
the unit, please read this manual
thoroughly and retain it for future
reference.
TABLE OF CONTENTS
Getting Started
Unpacking 4
Hooking Up the System 4
Playing a CD 7
About This Manual
Conventions
• Instructions in this manual describe
the controls on the remote.
You can also us the controls on the
player if they have the same or
similar names as those on the remote.
• The following icons are used in this
manual:
Indicates that you can use only
the remote to do the task.
Indicates hints and tips for
making the task easier.
Playing CDs
Using the Display 9
Locating a Specific Track 10
Locating a Particular Point in a Track 10
Playing Tracks Repeatedly 11
Playing in Random Order (Shuffle Play) 12
Creating Your Own Programme (Programme Play) 12
Playing Only Specific Tracks (Delete Play) 13
GB
Recording From CDs
Recording Your Own Programme 15
Fading In or Out 16
Useful Tips for Recording 16
Storing Information About CDs (Custom Files)
What You Can Do With the Custom Files 18
Indexing a Disc (Custom Index) 19
Storing Specific Tracks of a Disc (Delete Bank) 20
Additional Information
Notes on CDs 21
Troubleshooting 21
Specifications 22
Rear Panel Descriptions 22
Index 23
GB
3
Page 4
Getting Started
Unpacking
Check that you received the following items:
• Audio connecting cord (1)
• Remote commander (remote) (1)
• Sony SUM-3 (NS) batteries (2)
• Stabilizer (1)
• Felt (1)
• Mains lead (1)
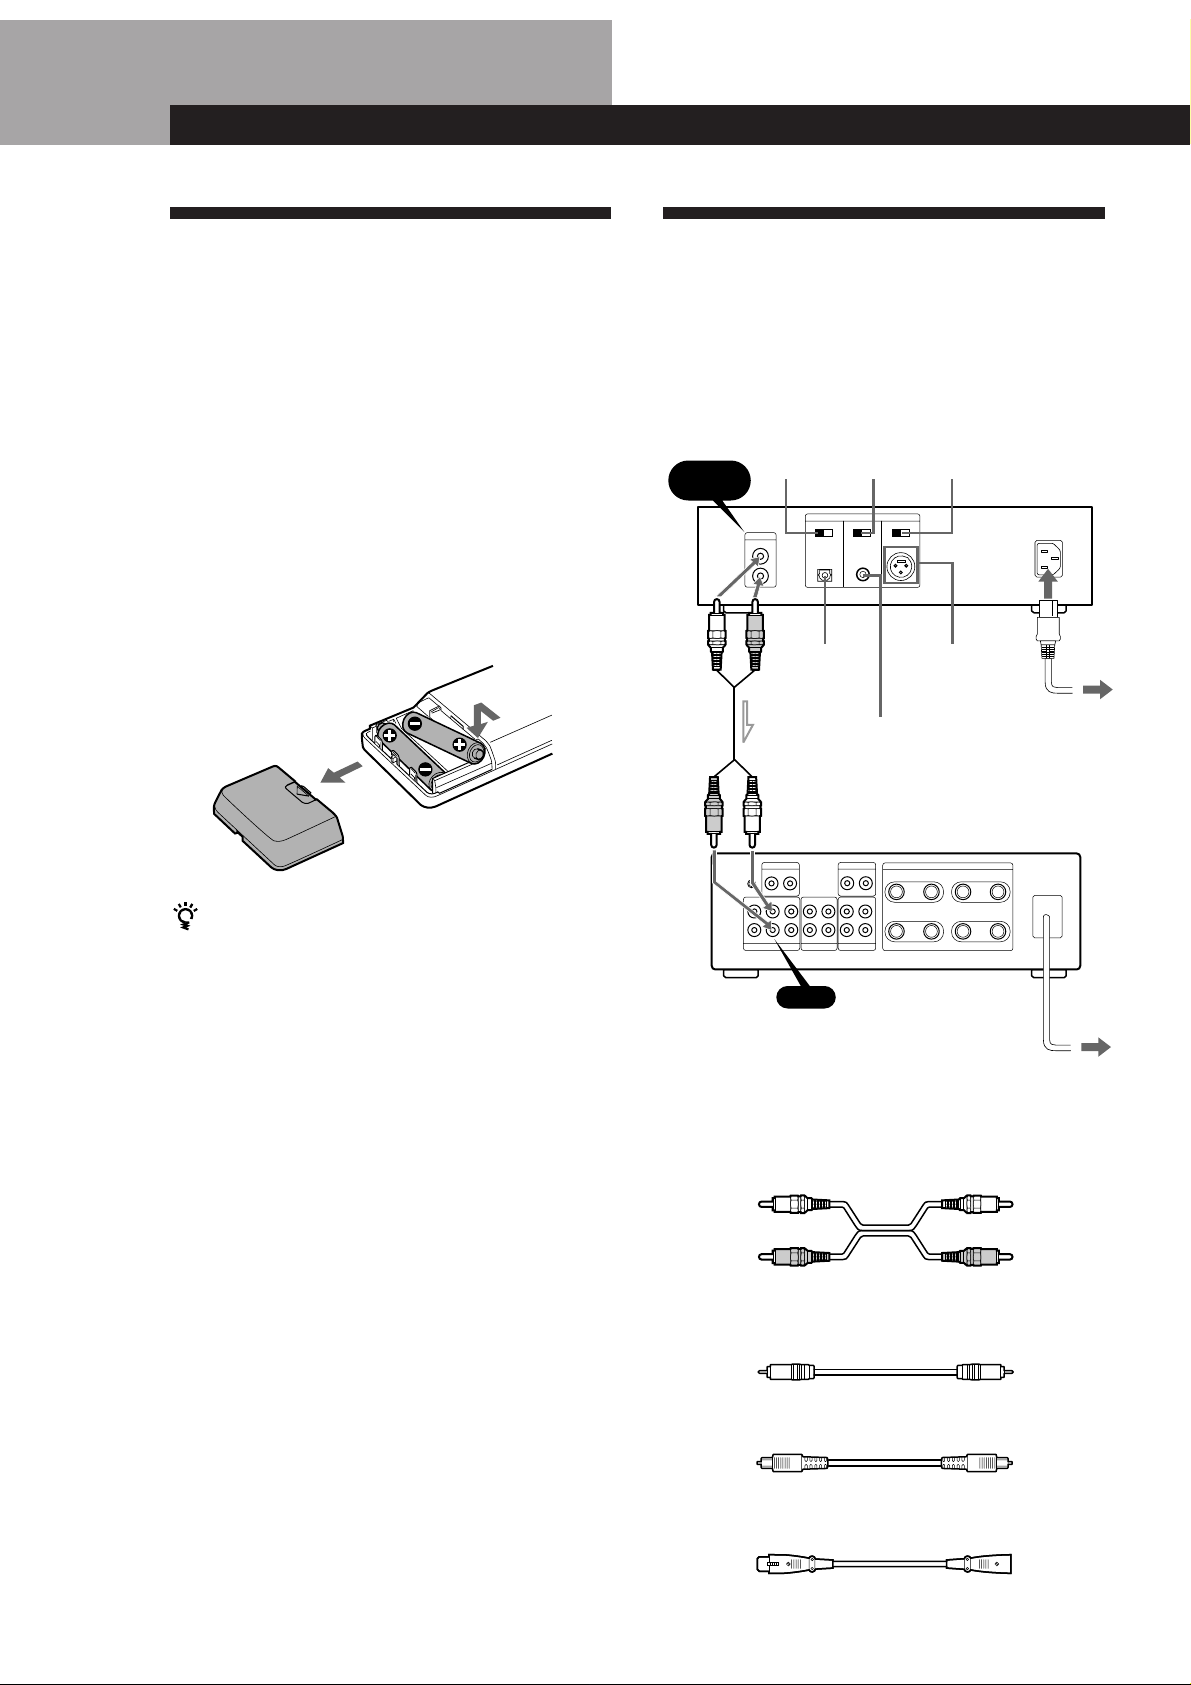
Inserting batteries into the remote
You can control the player using the supplied remote.
Insert two size AA (R6) batteries by matching the +
and – on the batteries. When using the remote, point it
at the remote sensor g on the player.
Hooking Up the System
Overview
This section describes how to hook up the CD player to
an amplifier. Be sure to turn off the power to all
components before making the connections.
OPTICAL
switch
LINE OUT
LINE OUT
DIGITAL OUT
OFF ON
L
R
OPTICAL
COAXIAL
switch
DIGITAL OUT
OPTICAL
COAXIAL
OFF ON
DIGITAL OUT
COAXIAL
BALANCED
switch
BALANCED
OFF ON
DIGITAL OUT
BALANCED
CDP-X5000
AC IN (230V)
To an AC outlet
When to replace batteries
With normal use, the batteries should last for about six
months. When the remote no longer operates the player,
replace all the batteries with new ones.
Notes
• Do not leave the remote near an extremely hot or humid
place.
• Do not drop any foreign object into the remote casing,
particularly when replacing the batteries.
• Do not expose the remote sensor to direct sunlight or
lighting apparatuses. Doing so may cause a malfunction.
• If you don’t use the remote for an extended period of time,
remove the batteries to avoid possible damage from
battery leakage and corrosion.
CD
ç: Signal flow
What cords will I need?
p When making analog hookups
• Audio cord (supplied) (1)
White (L)
Red (R)
p When making digital hookups
• Coaxial cable VMC-10G (not supplied)
• Optical cable POC-15A (not supplied)
Amplifier
To an AC outlet
White (L)
Red (R)
• Balance cable with cannon connector XLR-3-32 (not
supplied)
GB
4
Page 5
Getting Started
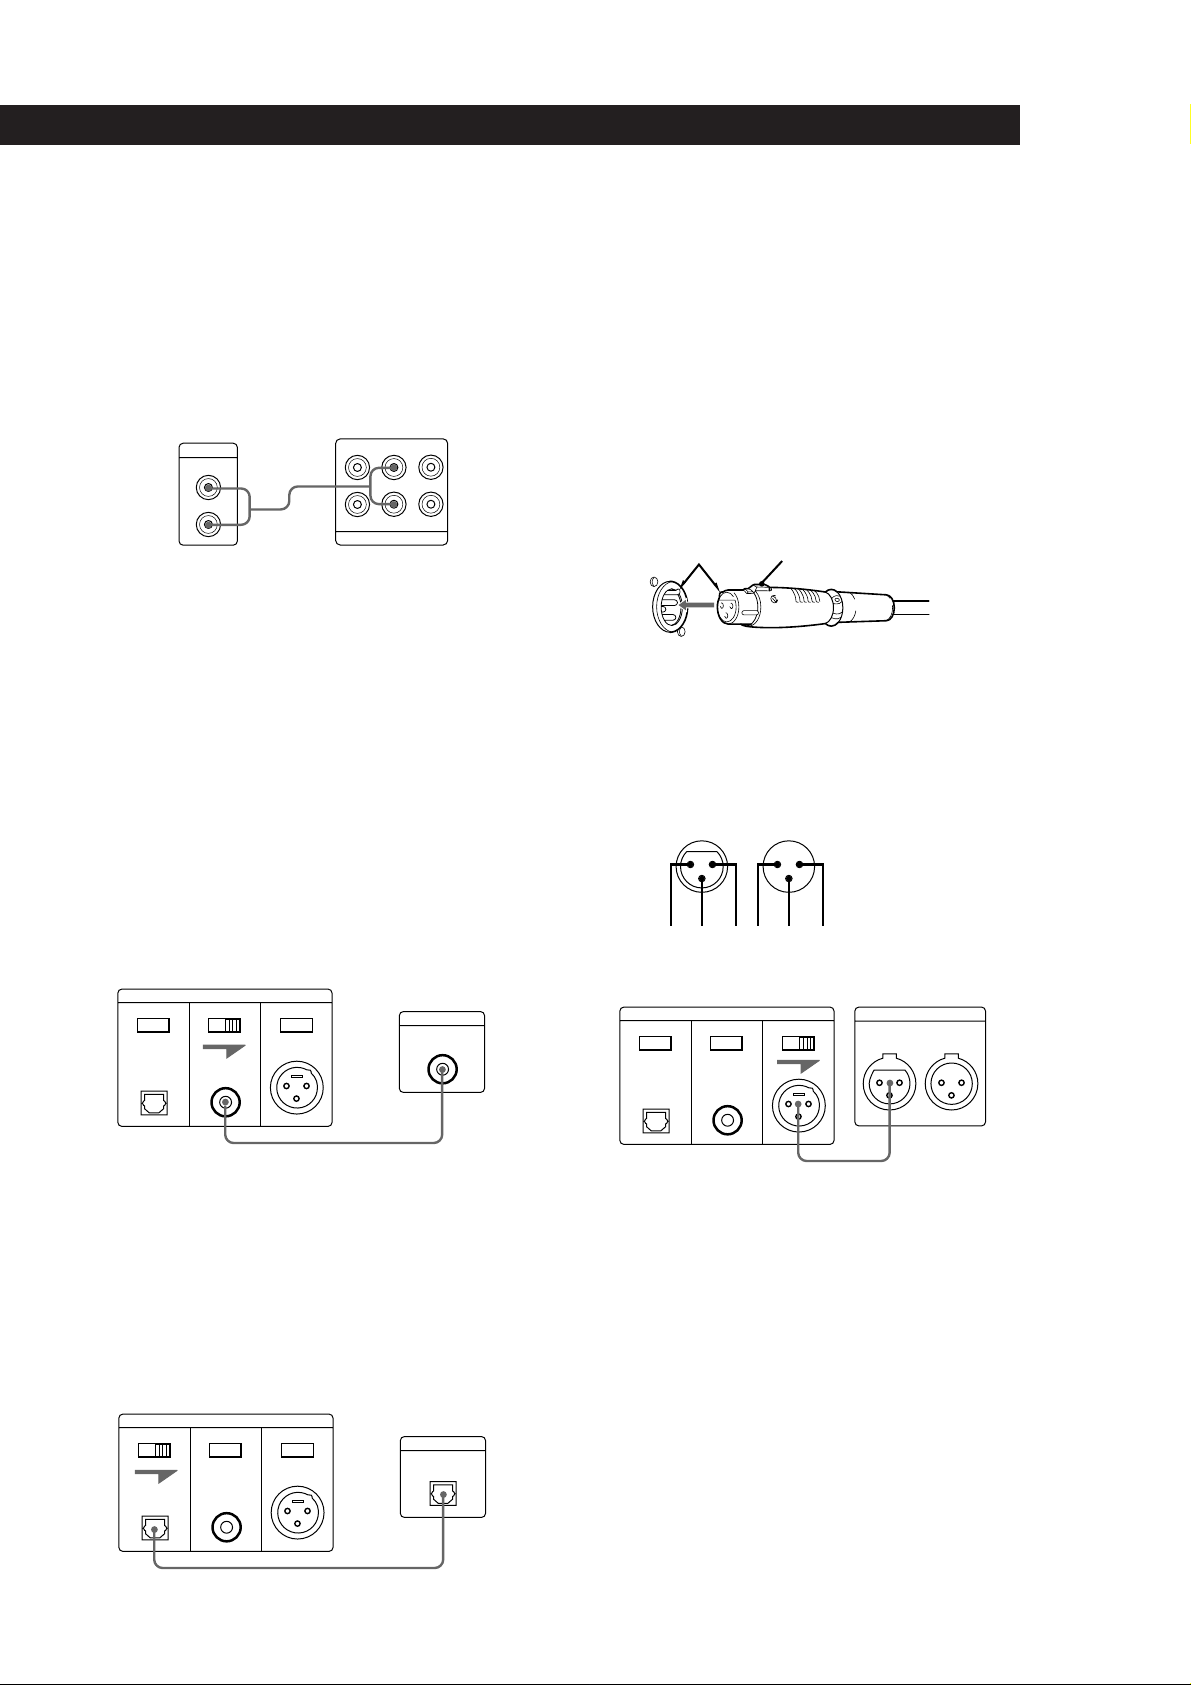
Hookups
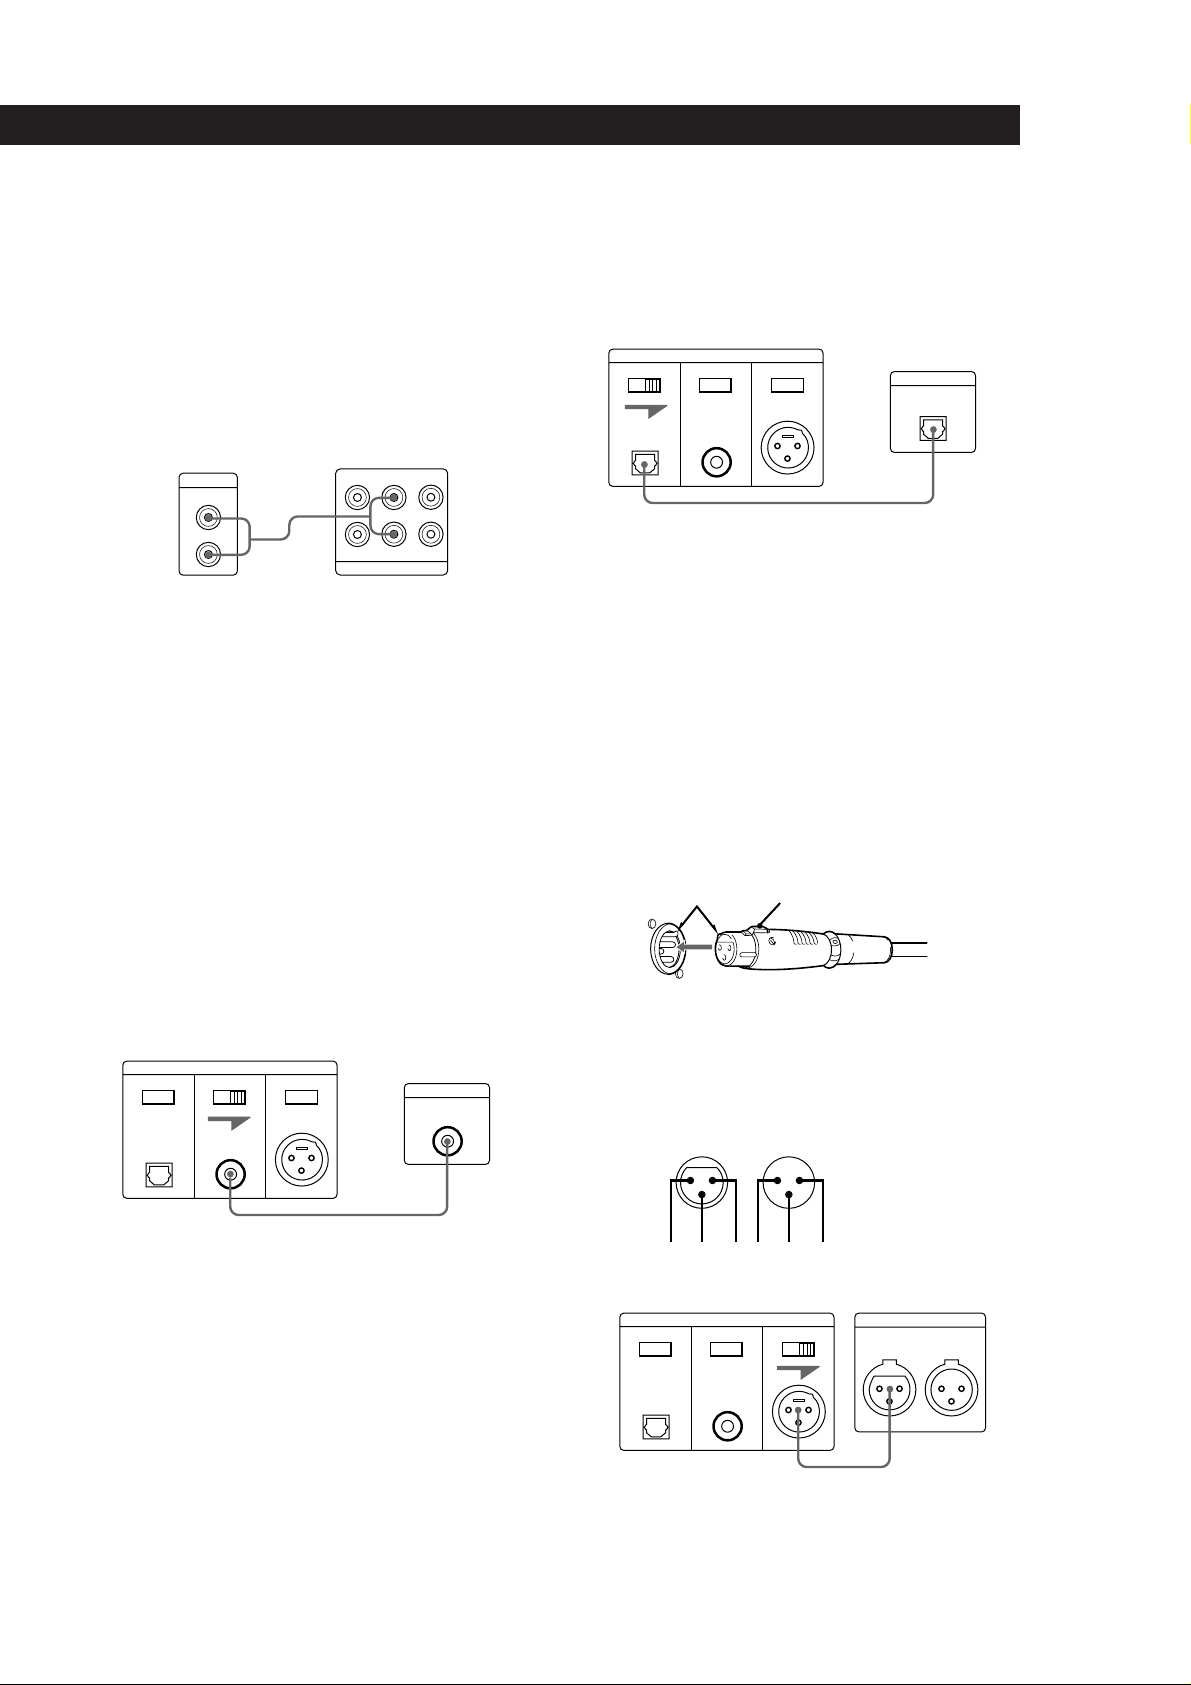
p When making analog hookups
When connecting an audio cord, be sure to match the
color-coded cord to the appropriate jacks on the
components: Red (right) to Red and White (left) to
White. Be sure to make connections firmly to avoid
hum and noise.
CD player
LINE OUT
L
R
p When making digital hookups
Digital hookups allow you to transmit the digital
source signal from the CD directly to another
component without any deterioration. You can
connect the digital outputs to other digital
components such as a digital amplifier, D/A
converter, DAT, or MD. When you connect a DAT or
MD, you can make digital recordings from CDs.
Note that you cannot use the fade in or fade out
function (page 16) when recording with this
connection.
• If you have a digital component with a coaxial digital
input connector
Connect the component via the DIGITAL OUT
(COAXIAL) connector using the coaxial cable (not
supplied).
CD player
DIGITAL OUT
OPTICAL
OFF ON
COAXIAL
OFF ON
BALANCED
OFF ON
Amplifier
TUNER CD AUX
L
R
INPUT
Digital component
DIGITAL IN
COAXIAL
After making connections, set the DIGITAL OUT
OPTICAL switch on the rear to ON. When not using
the optical output, set the switch to OFF.
• If you have a digital component (such as an amplifier)
with a balanced input connector
Connect the component via the BALANCED connector
using a XLR-3-32 cannon connector or equivalent (not
supplied). A balanced connection is highly resistant to
external noise and often used by professionals in studios
and broadcasting stations.
Using a XLR-3-32 cannon connector or equivalent
(not supplied)
A
B
To plug in the connector
Align parts A and insert the connector firmly.
To detach the connector,
Hold down the lock button B and pull the connector out.
Pin assignment
23 1
OPTICAL
OFF ON
CD player
DIGITAL OUT
COAXIAL
OFF ON
OUTIN
132
BALANCED
OFF ON
1: GND
2: HOT
3: COLD
D/A converter, etc.
DIGITAL
AES/EBU
IN OUT
After making connections, set the DIGITAL OUT
COAXIAL switch on the rear to ON. When not
using the coaxial output, set the switch to OFF.
• If you have a digital component with an optical digital
input connector
Connect the component via the DIGITAL OUT (OPTICAL)
connector using the optical cable (not supplied). Take off
the cap and plug in the optical cable.
OPTICAL
OFF ON
CD player
DIGITAL OUT
COAXIAL
OFF ON
BALANCED
OFF ON
Digital component
DIGITAL IN
OPTICAL
After making connections, set the DIGITAL OUT
BALANCED switch on the rear to ON. When not
using the balanced output, set the switch to OFF.
(continued)
GB
5
Page 6
Getting Started
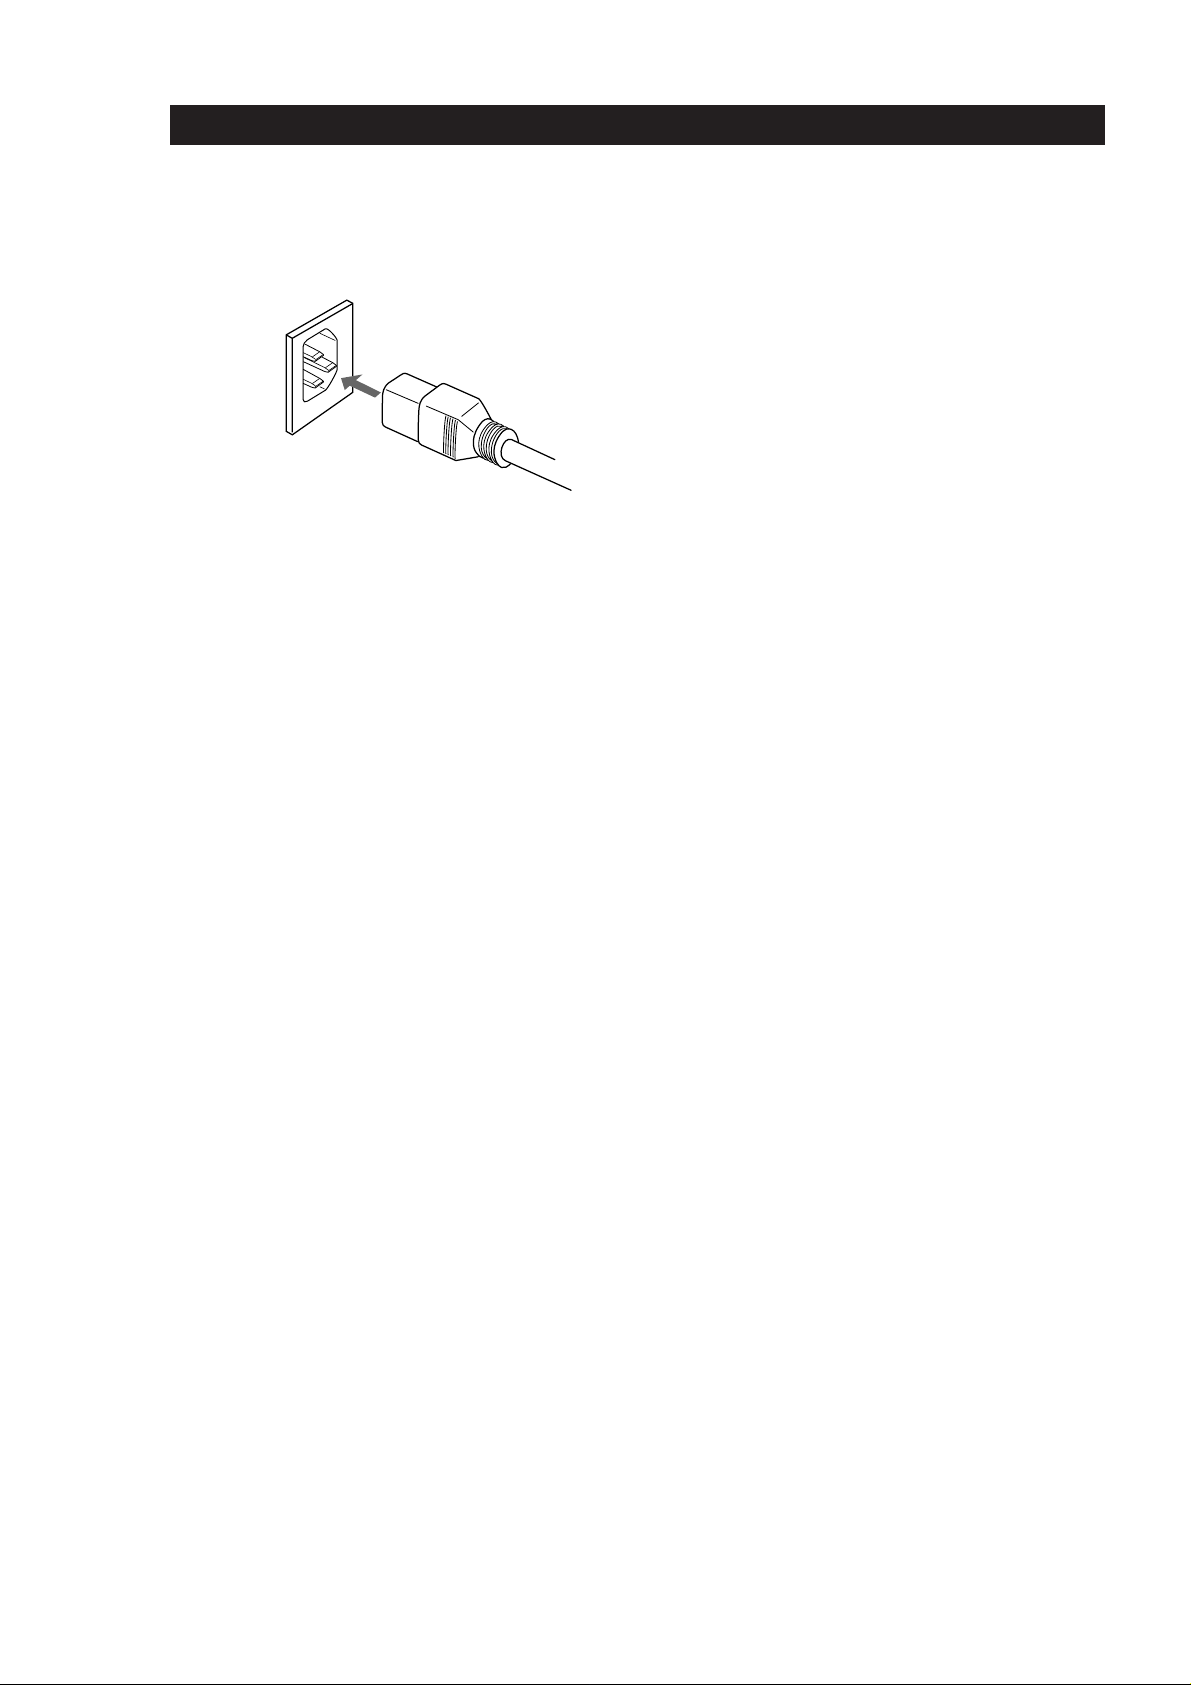
Connecting the mains lead
1 Connect the supplied mains lead to the AC IN
(230 V) terminal on the rear of the player.
2 Connect the other end of the mains lead to a wall
outlet.
Where do I go next?
Now you’re ready to use your player.
Then, go to the following sections to play a CD.
GB
6
Page 7
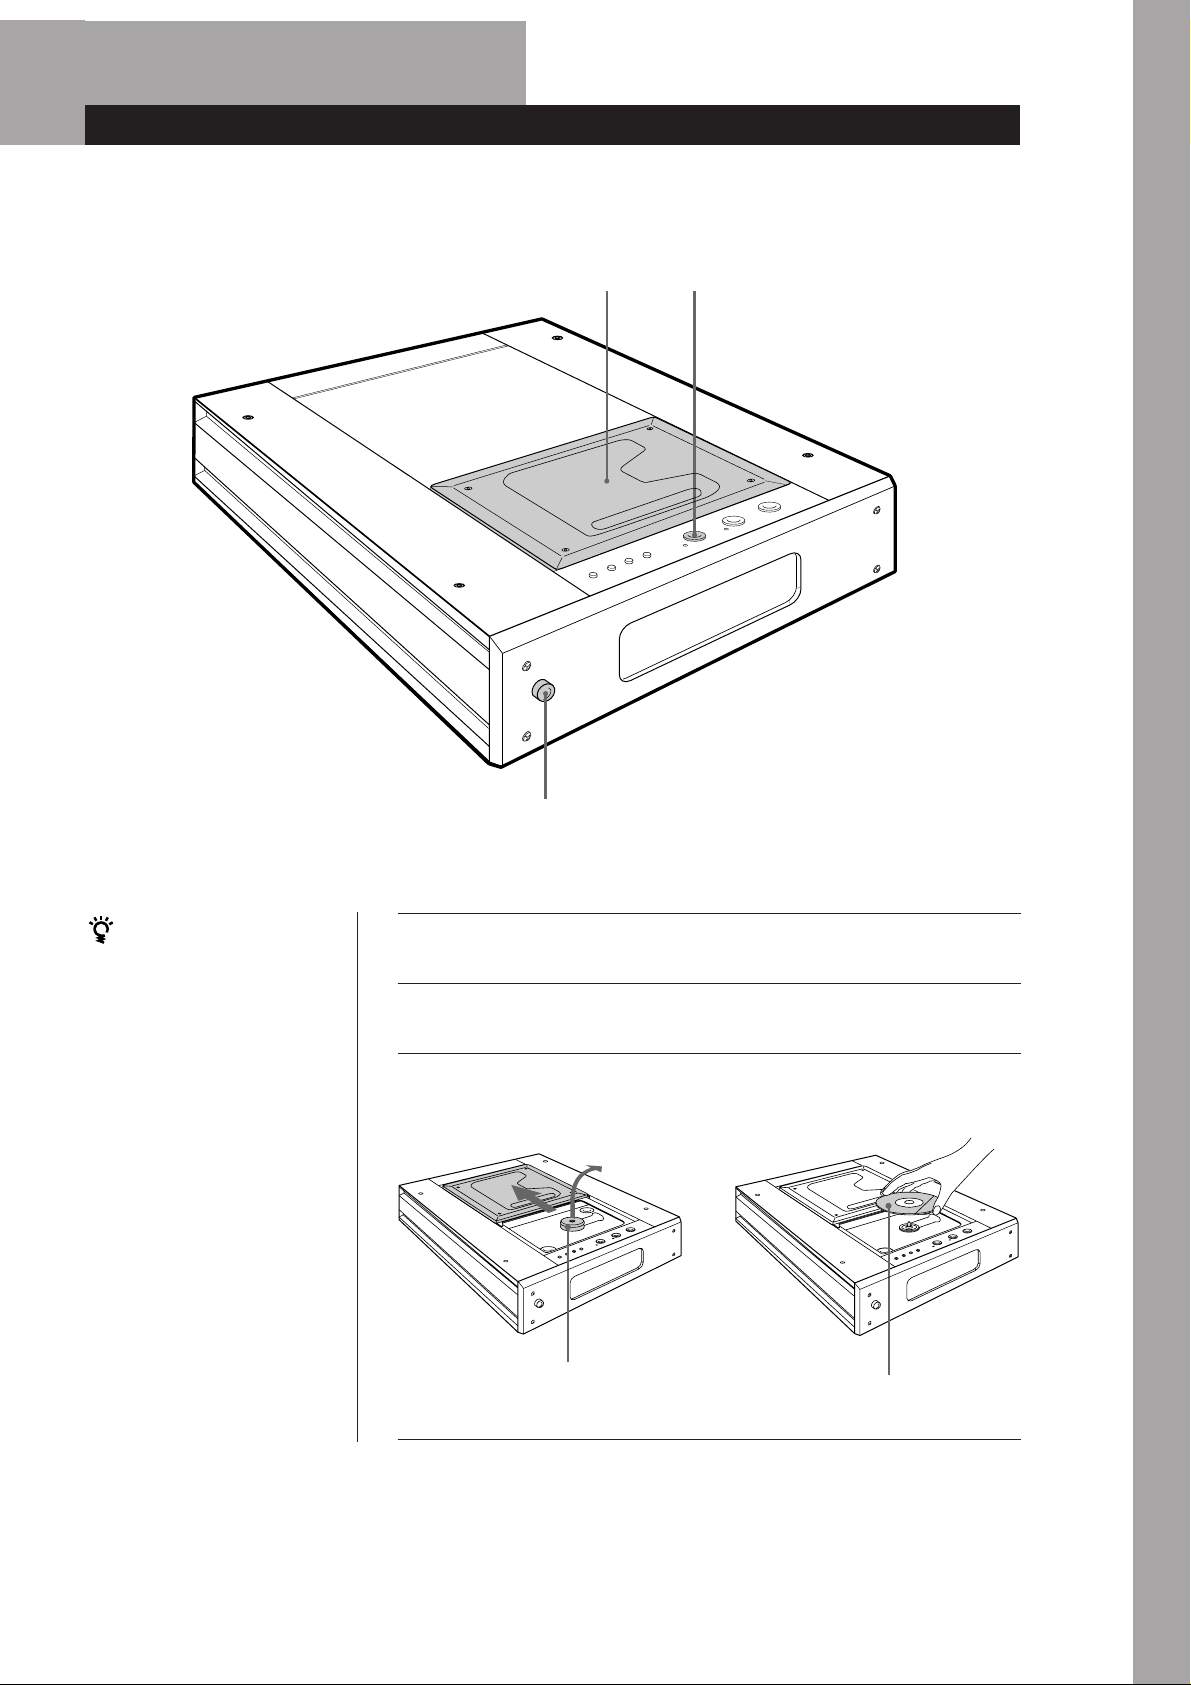
Basic Operations
Playing a CD
power
53, 4
f
p
P
Æ
+
=
)
0
S
If you turn on the player
with a CD in the player
Playback starts about 10
seconds after the power is
turned on. If you connect a
commercially available timer,
you can start playing a CD
any time you want. To start
playback even more quickly,
press P or · while
“PAUSE” blinks.
Notes
• In step 3, do not place more than
one CD at a time. If you do so,
you may damage the discs and/
or the player.
• Do not touch the lens inside
when you place or take out a
CD.
1
Press POWER to turn on the player.
1
Turn on the amplifier and select the CD player.
2
Open the disc lid with your hand, take out the stabilizer, and
place a CD.
3
p
P
Æ
+
=
)
S
0
power
÷
Basic Operations
p
P
Æ
+
=
)
S
0
power
stabilizer (supplied)
with the label side up
(continued)
GB
7
Page 8
Basic Operations
Supplied stabilizer
(Illustration shows a side
view of the stabilizer.)
top
bottom
Note
After placing a CD, put the
supplied stabilizer on the
CD.
You can also start
playback by pressing ·
and then close the disc
lid.
If play doesn’t start from
the first track
1 Press CONTINUE on the
remote repeatedly until
“SHUFFLE”, “PROGRAM”
and “CUSTOM INDEX”
disappear from the
display.
2 Press ·.
display
SHUFFLE
PROGRAM
CUSTOM INDEX
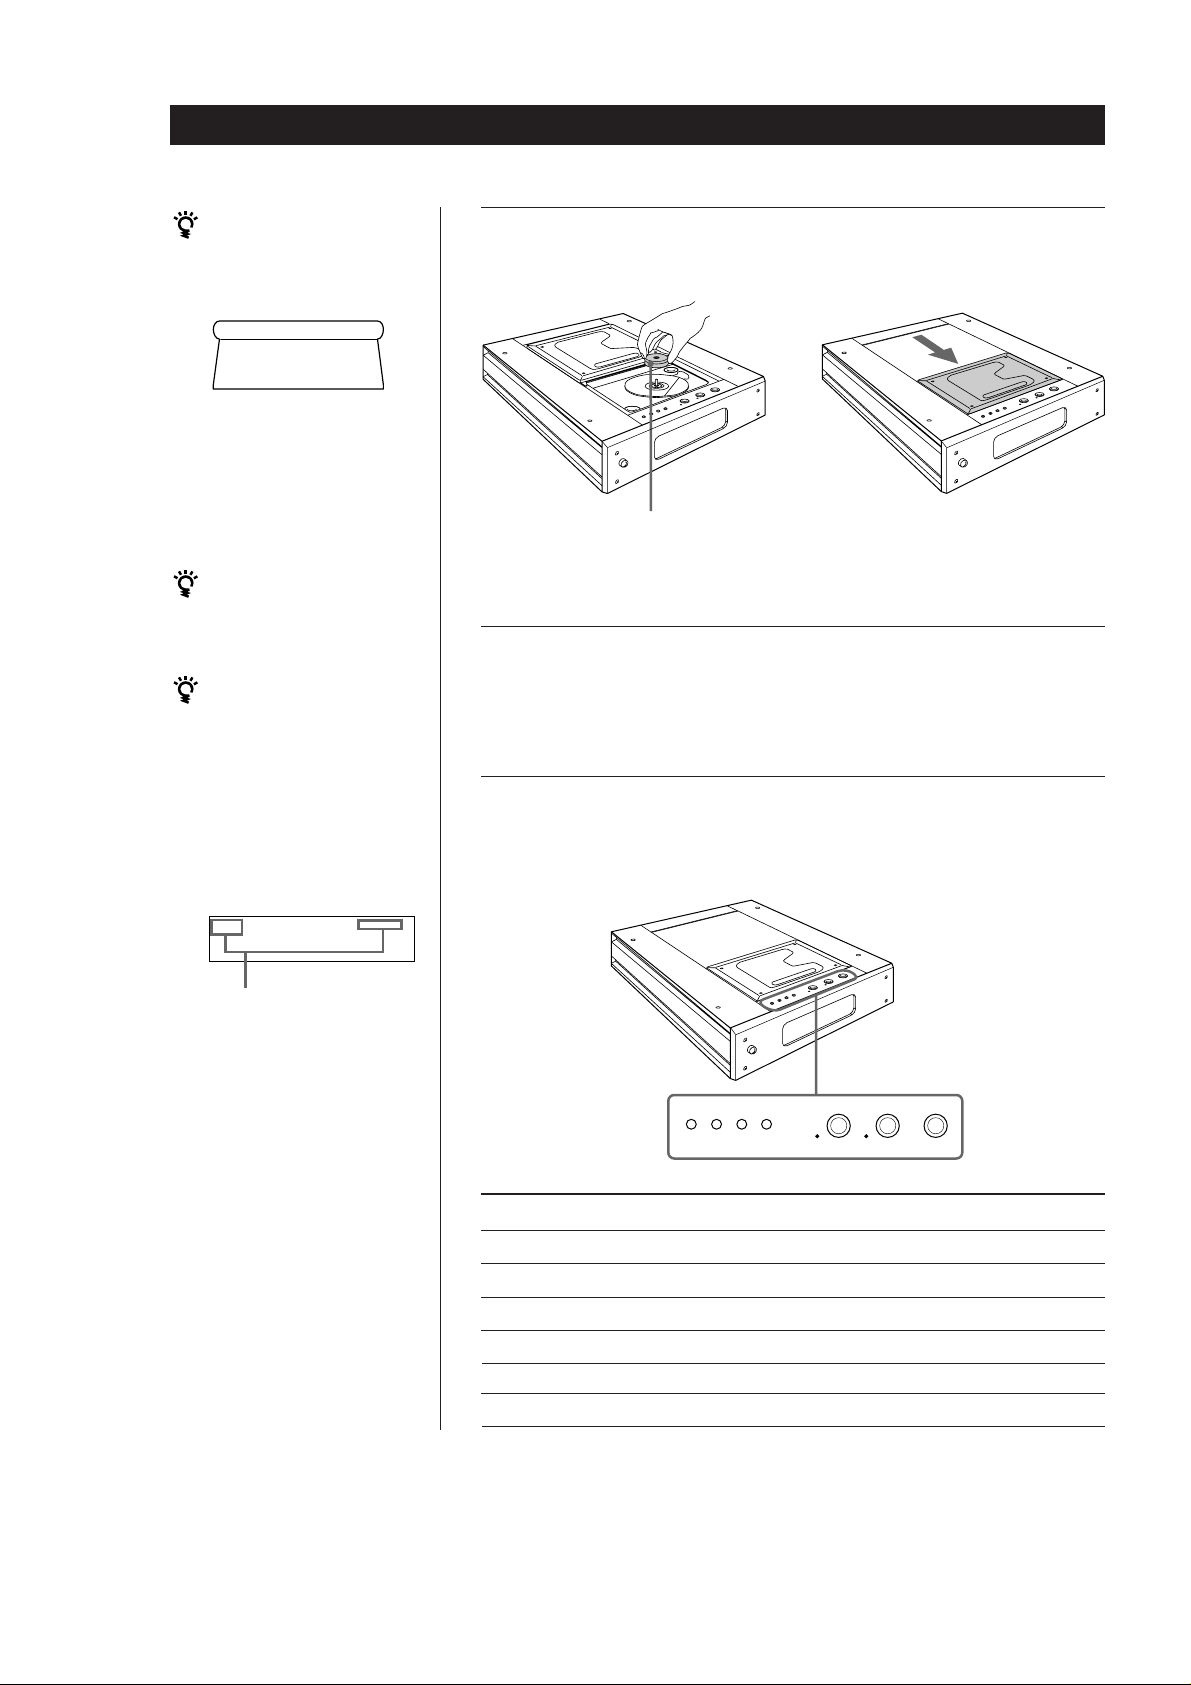
Place the stabilizer on the CD, and then close the disc lid with
your hand.
4
p
P
Æ
+
=
)
S
0
power
÷
power
Place the supplied stabilizer on
the CD. (Be careful not to place
the stabilizer upside-down.)
Press ·.
5
The · indicator lights, and playing starts from the first track.
Adjust the volume on the amplifier.
To stop playback
Press p.
p
P
Æ
+
=
)
S
0
These indicators will
disappear when pressing
CONTINUE.
0)=+
When you want to
Pause
Resume play after pause
Go to the next track
Go back to the preceding track
Go forward quickly in a track
Go backwards quickly in a track
p
P
Æ
+
=
)
S
0
power
ÆPp
Press
P
P or ·
+
=
)
0
GB
8
Page 9
Playing CDs
Using the Display
You can check information about the disc using the
display.
Playing CDs
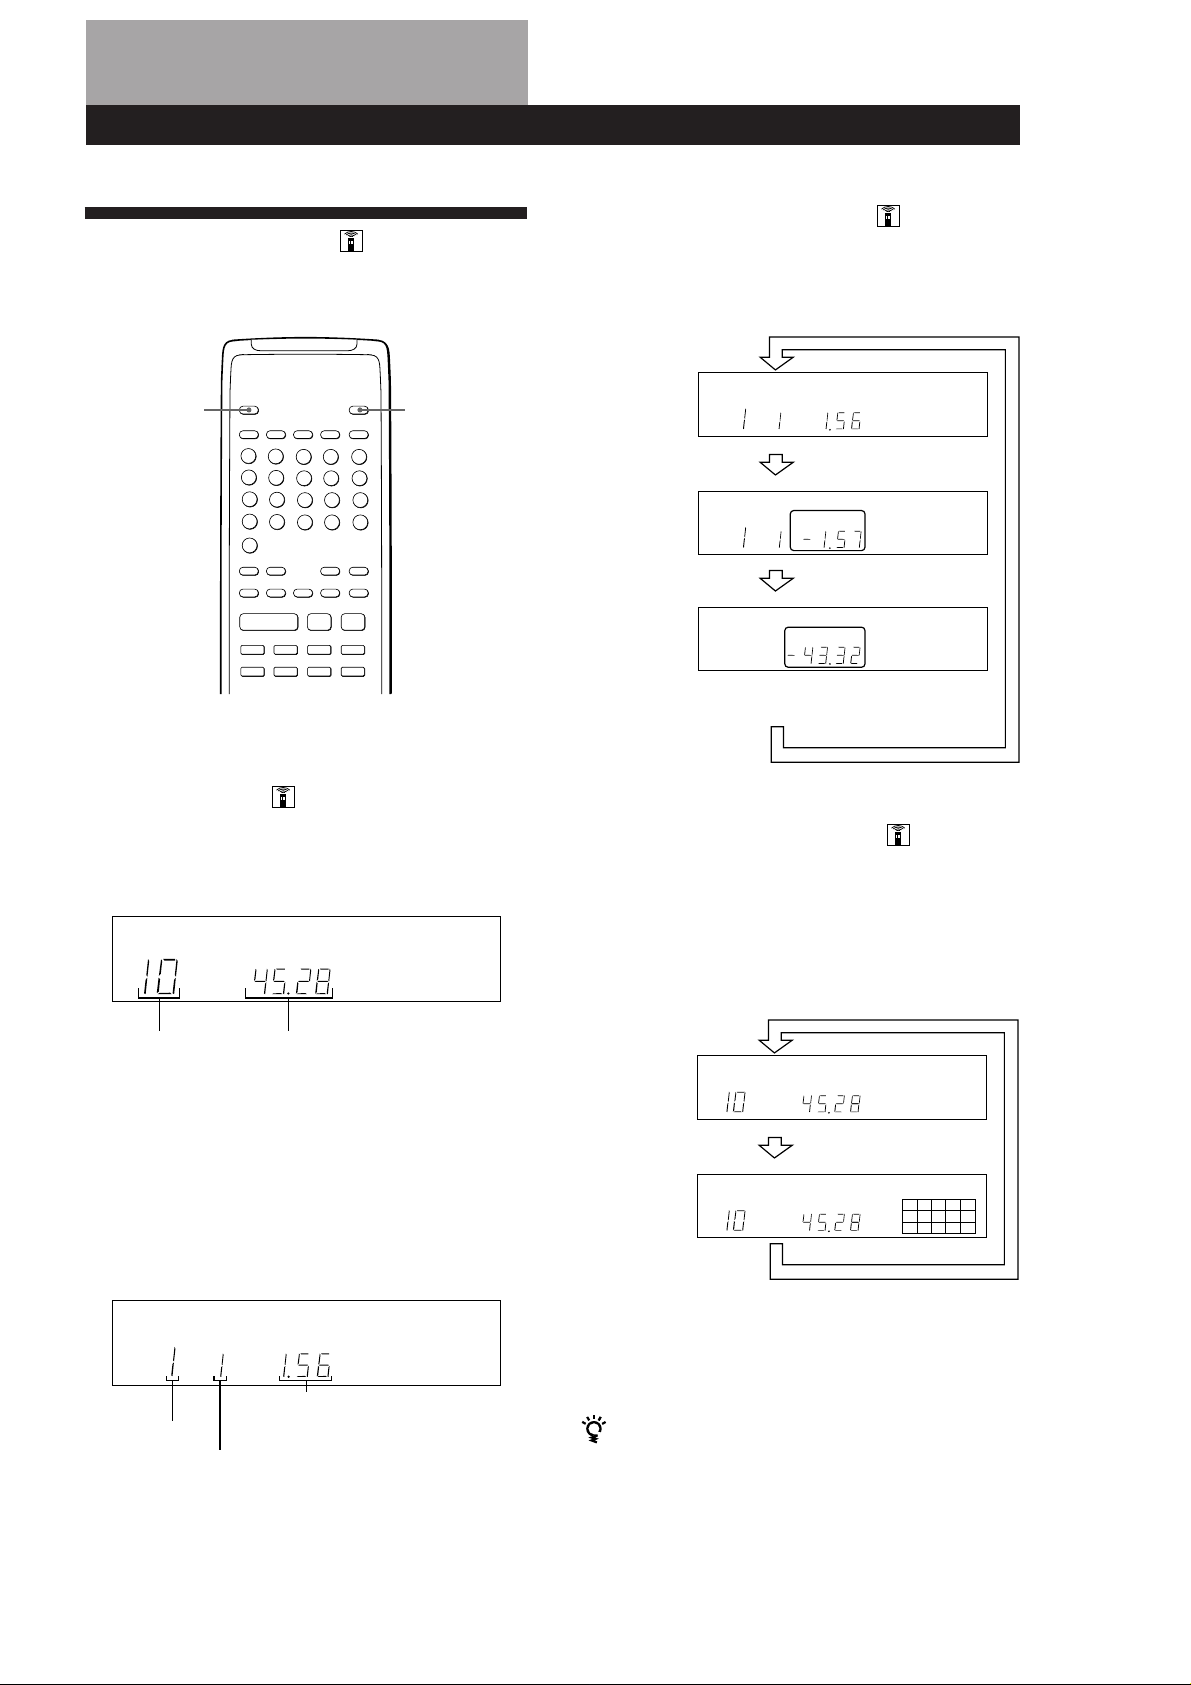
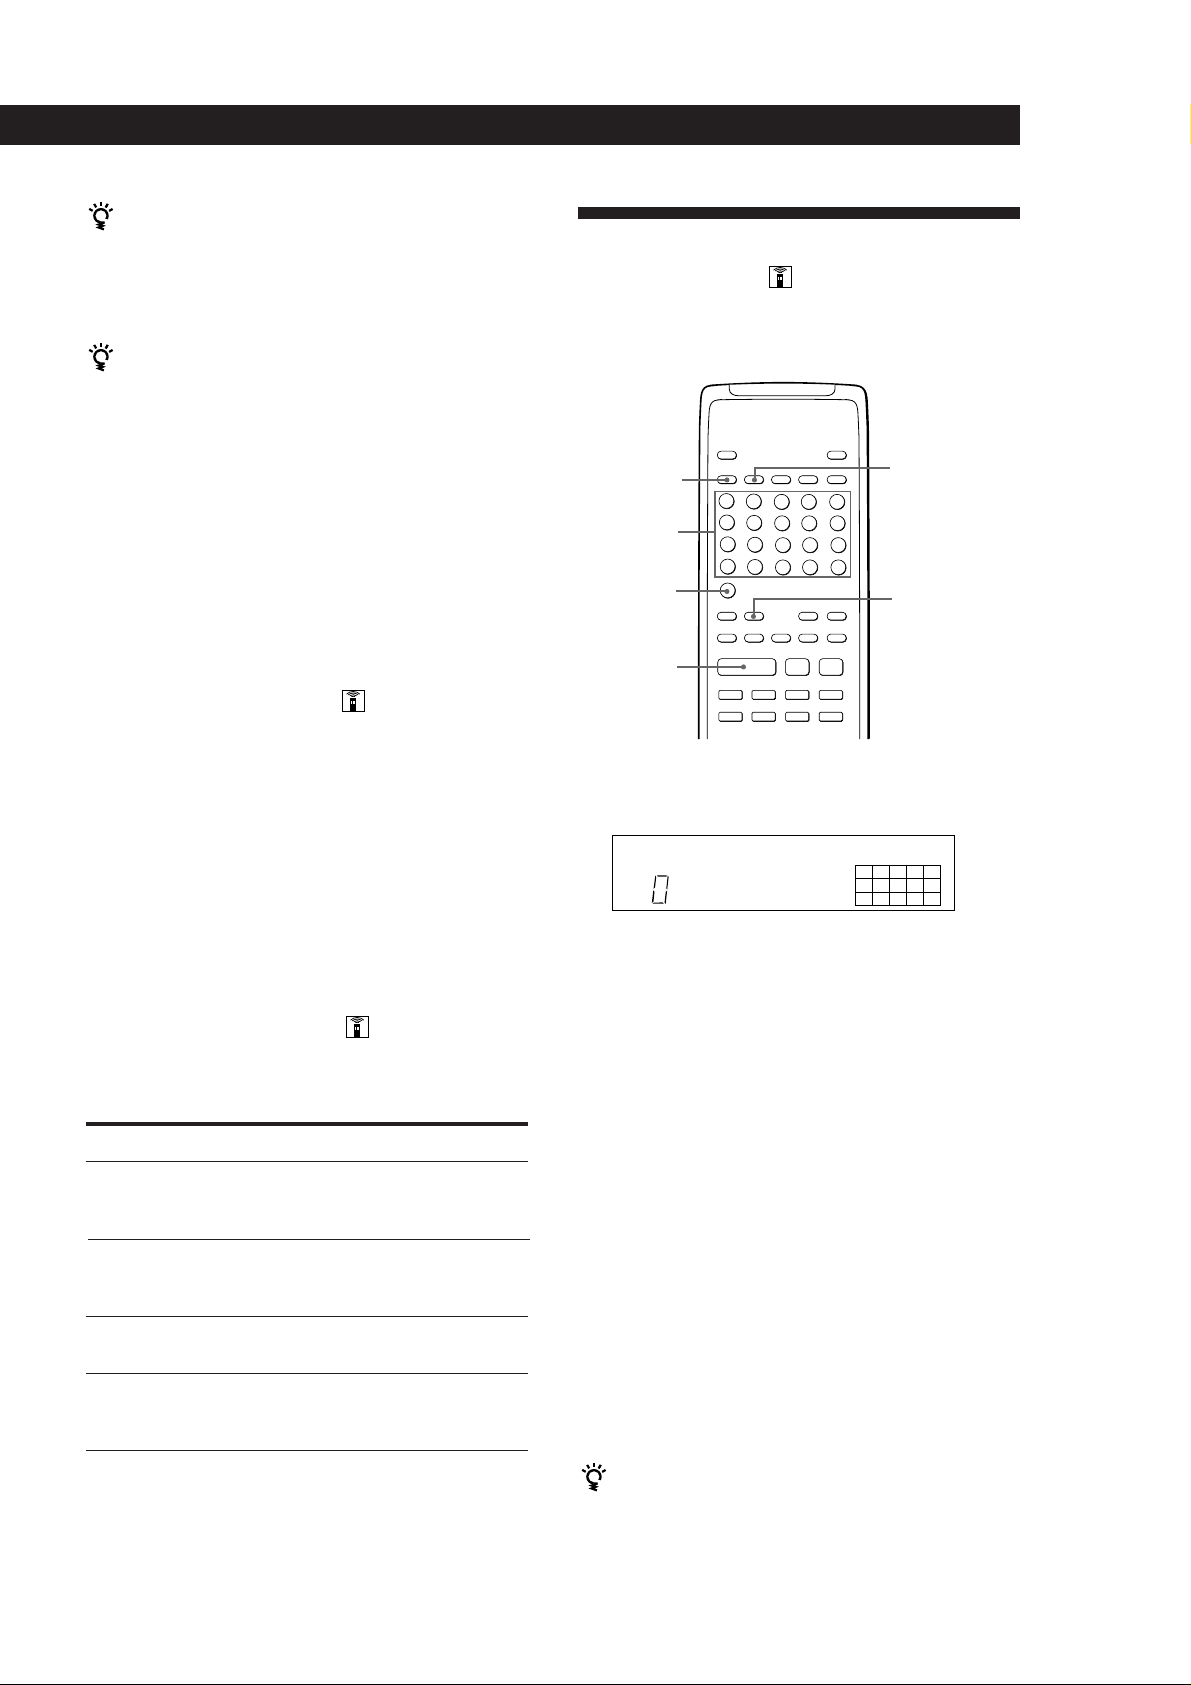
Checking the remaining time
Press TIME on the remote while playing a disc.
Each time you press TIME, the display changes as
shown in the chart below.
TIMEDISPLAY
MODE
Pp
Æ
))00+c=
C
Checking the total number and playing
time of the tracks
Press TIME on the remote in stop mode.
The display shows the total number of tracks and total
playing time.
SECMIN
Playing time
and number
INDEX
SECMIN
of the current
track
Press
Remaining
time on the
INDEX
SECMIN
current
track
Press
Remaining
time on the
SECMIN
disc
If the remaining time exceeds 100 minutes in
programme mode, “––.––” appears instead of the
remaining time.
Press
Displaying the music calendar
Music calendar shows all the track numbers on the
current CD.
Press DISPLAY MODE on the remote.
Each time you press DISPLAY MODE, the display
changes as shown in the chart below.
Total number
Total playing time
of tracks
This information also appears when you close the disc
lid.
Display information while playing a disc
While playing a disc, the display shows the current
track number, index number and playing time.
SECMININDEX
Playing time
Current track
number
Index number (page 10) or Custom Index
number (page 19)
SECMIN
Press
SECMIN
162738495
10
Press
• If the disc has more than 15 tracks, the ” indication
appears next to 15 on the music calendar.
• The track numbers in the music calendar disappear after
they are played.
The music calendar display setting is memorized
even when the player is turned off.
However, the music calendar appears automatically
during programme play, delete play, delete shuffle play
or custom index play. You can also turn off the music
calendar during playback in these playing mode, but it
will appear again when you change the mode.
GB
9
Page 10
Playing CDs
Æ
Pp
))00+c=
C
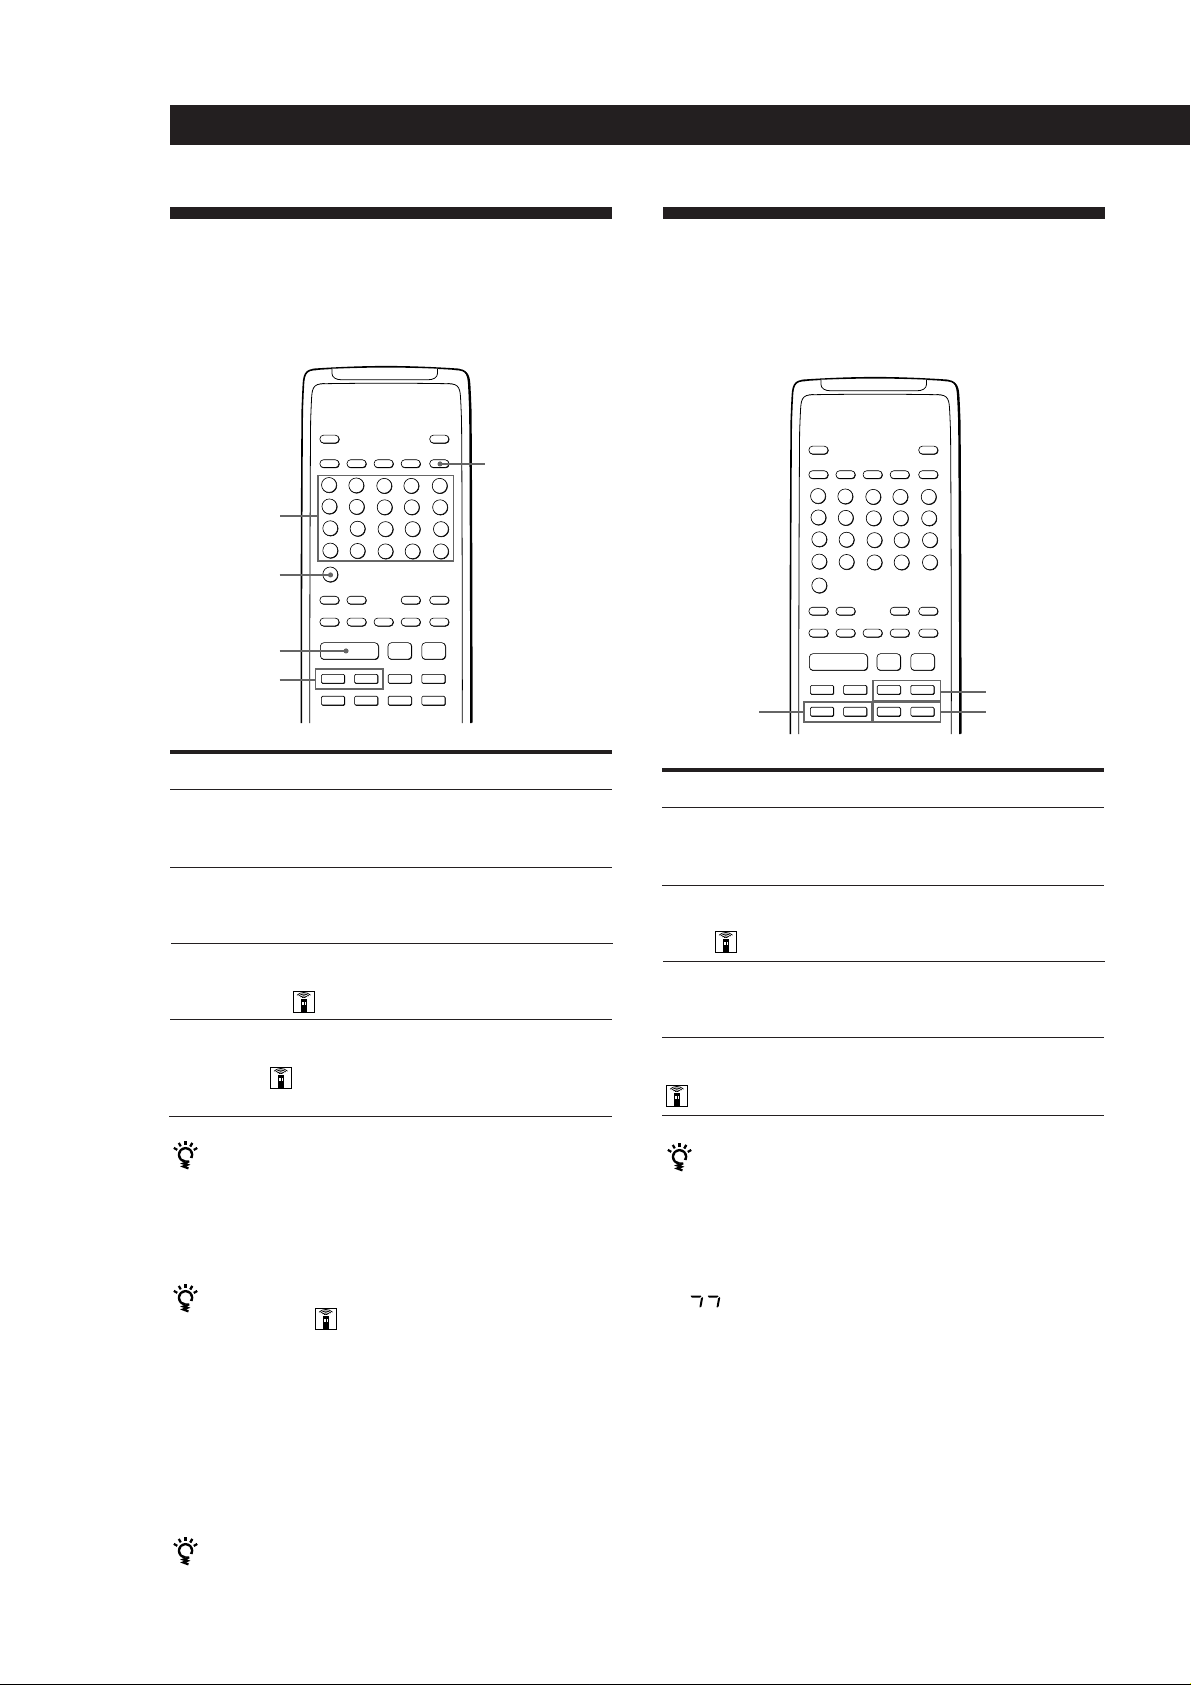
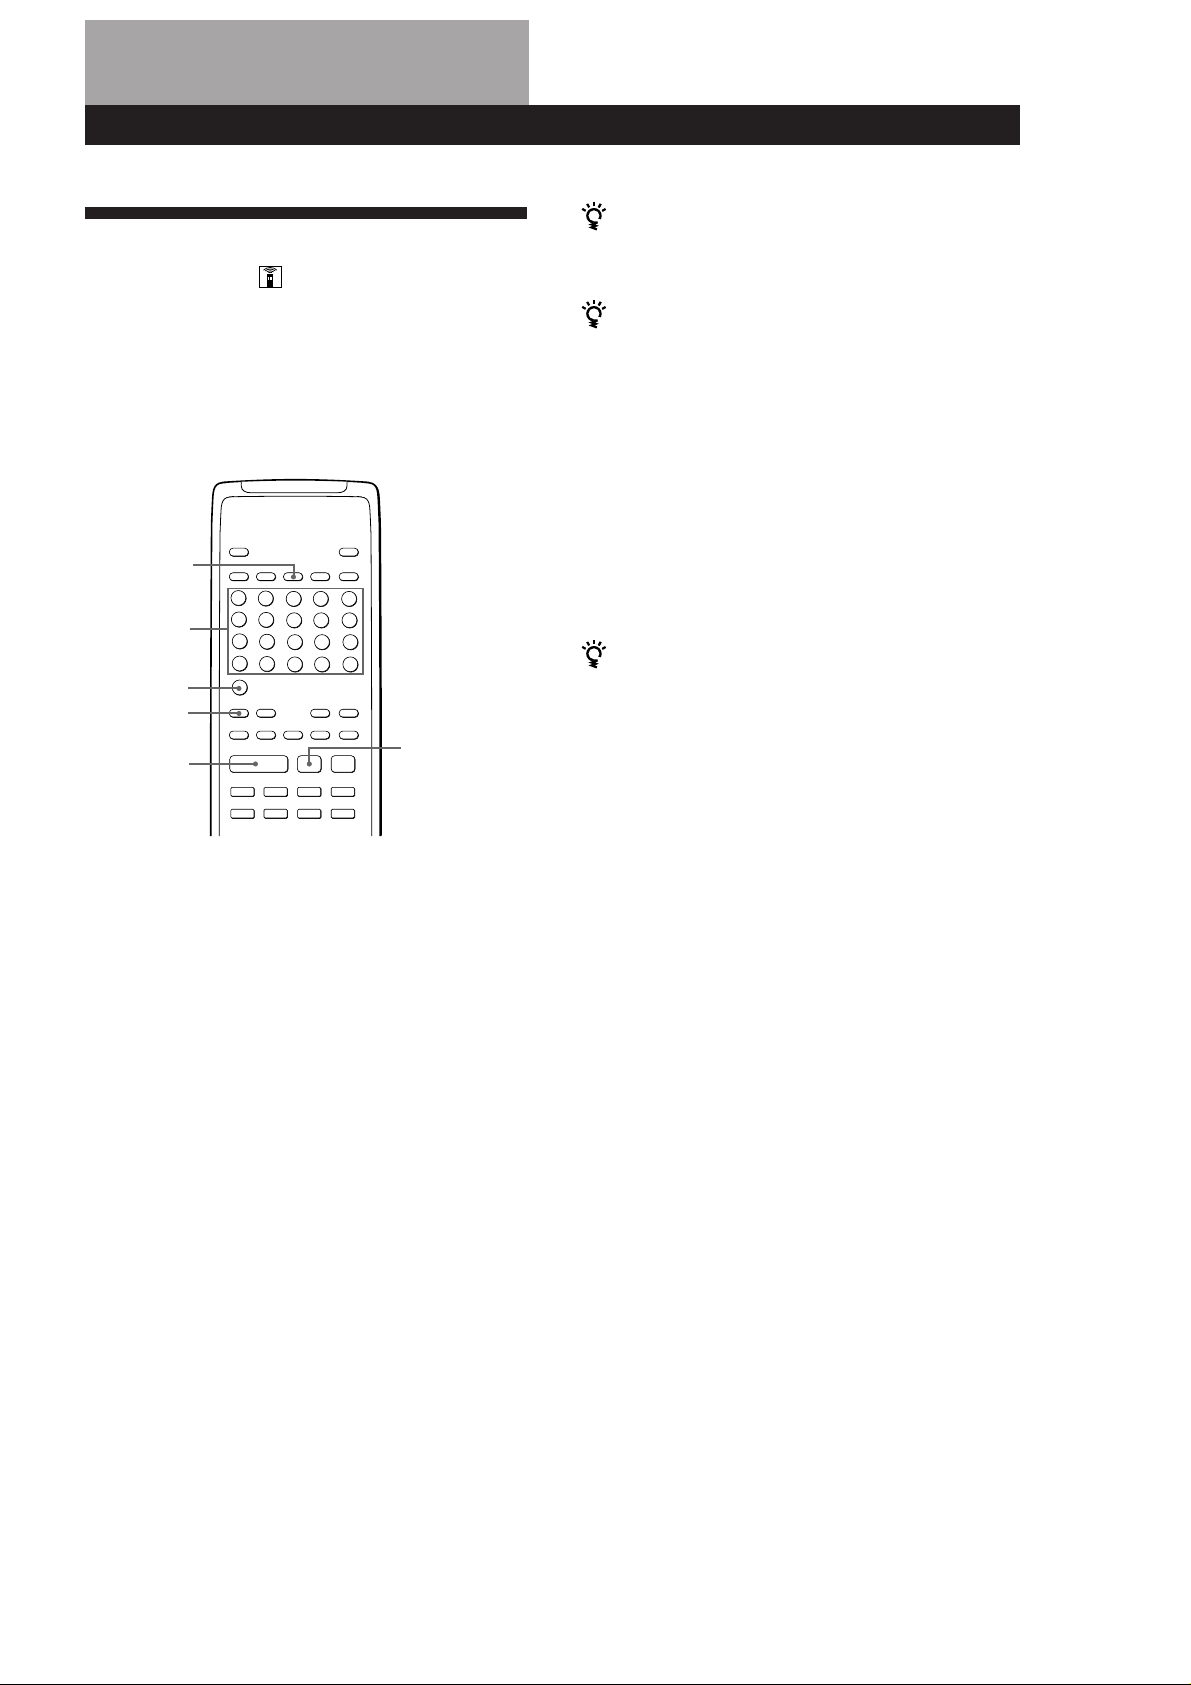
Locating a Specific Track
You can quickly locate any track while playing a disc
by using the =/+ (AMS: Automatic Music
Sensor) buttons or the number buttons on the remote.
MUSIC SCAN
Number
buttons
>20
Pp
·
= / +
To locate
The next or
succeeding tracks
(AMS)
The current or
preceding tracks
(AMS)
A specific track
directly (Direct
music selection)
By scanning each
track for 10 seconds
(Music Scan)
Æ
))00+c=
C
Press
+ repeatedly during playback until
you find the track
= repeatedly during playback until
you find the track
Number button of the track
1 MUSIC SCAN on the remote before
or during playback.
2 When you find the track you want,
press · to start playing.
Locating a Particular Point in a
Track
You can also locate a particular point in a track while
playing a disc.
C / c
To locate a point
While monitoring the
sound
Slowly by
monitoring the
sound
Quickly by observing
the display in pause
mode
Using an index (only
for indexed discs)
Press
+ (forward) or = (backward)
and hold down until you find the
point
0/) SLOW on the remote and
hold down until you find the point
0/) and hold down until you
find the point. You will not hear
the sound during the operation.
C/c on the remote
repeatedly in playback or pause
mode until you find the point
0 / )
0 / ) SLOW
To directly locate tracks numbered greater than 20
Press >20 on the remote first, then the corresponding
number buttons. To enter “0,” use button 10.
Example: To play track number 30
Press >20 first, then 3 and 10.
What is an index?
It is a number that divides a track or a disc into sections,
enabling you to easily locate a desired point. You can
determine if a disc uses indexes by its packaging.
Note
You can extend the playing time during Music Scan (or
in stop mode)
Press MUSIC SCAN on the remote repeatedly until the
playing time you want (10, 20 or 30) appears in the
display. Each time you press the button, the playing time
changes cyclically.
Each time you press MUSIC SCAN during scanning
playback, the playing time is extended by the displayed
time.
If “ ” appears in the display, the disc has reached the
end while you were pressing. Press 0 or = to go back.
You can use music scan during repeat play, shuffle play
GB
10
or programme play.
Page 11
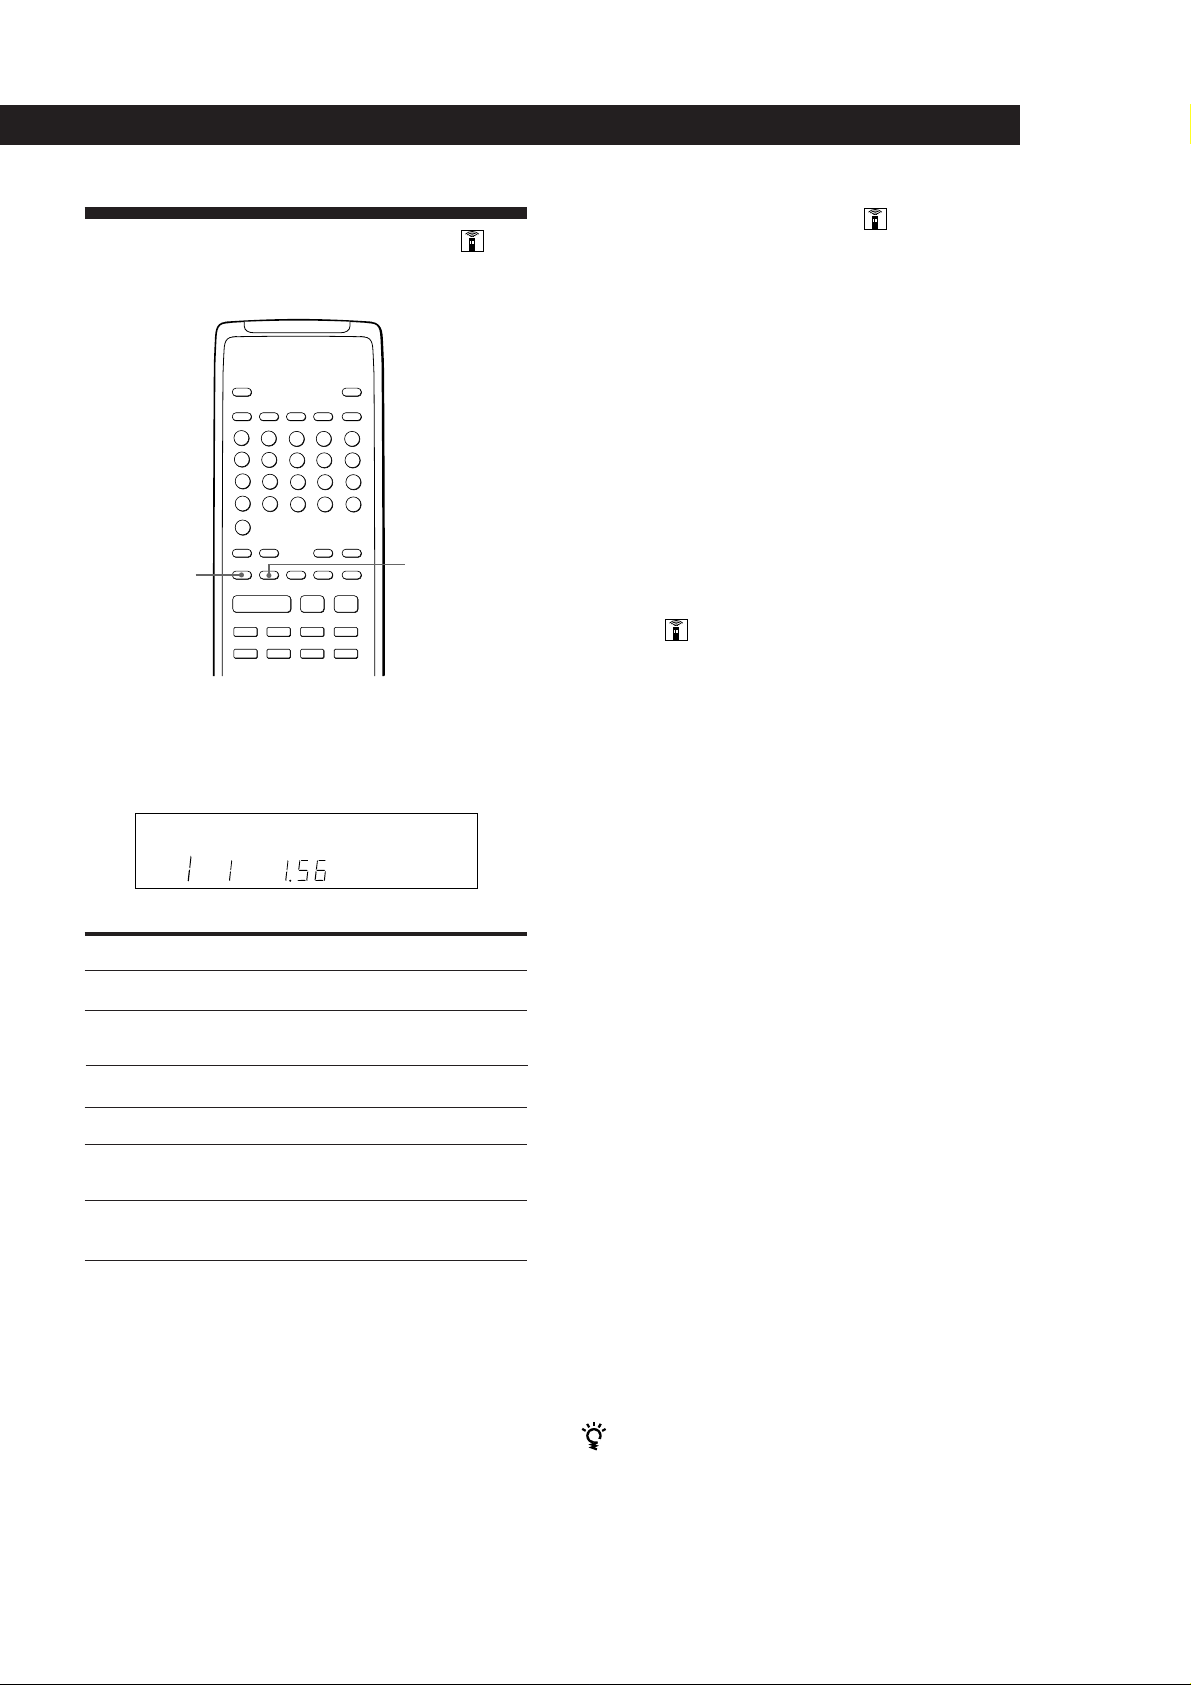
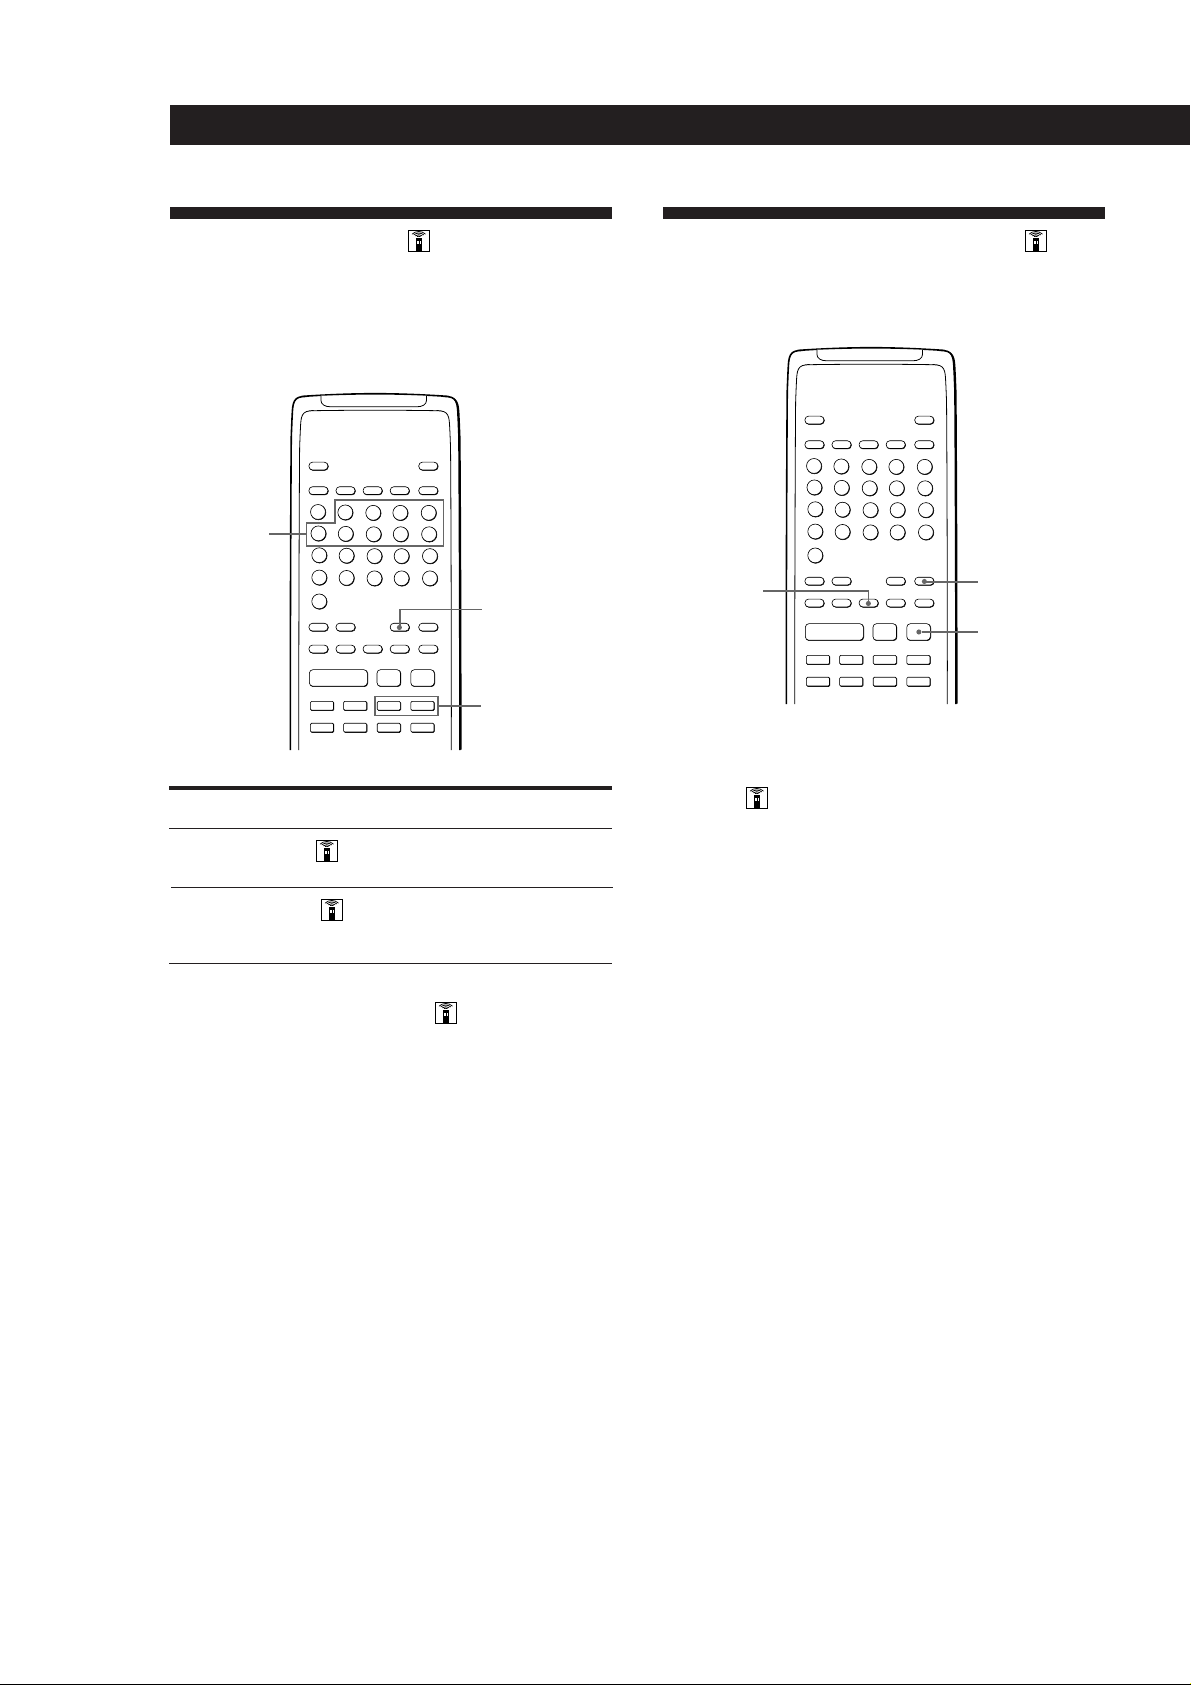
Playing T racks Repeatedly
You can play tracks repeatedly in any play mode.
REPEAT
Pp
Æ
))00+c=
C
Press REPEAT on the remote while playing a disc.
“REPEAT” appears in the display. The player repeats
the tracks as follows:
A ˜ B
Playing CDs
Repeating the current track
You can repeat only the current track.
While the track you want is being played, press
REPEAT on the remote repeatedly until “REPEAT 1”
appears in the display.
To cancel the repeating the current track
Press REPEAT.
Note
You cannot repeat the current track while the disc is played
in Custom Index Play mode (see page 19).
Repeating a Specific Portion (A˜B
Repeat)
You can play a specific portion in a track repeatedly.
This might be useful when you want to memorize
lyrics.
Note that you cannot repeat a section that extends
between two tracks.
REPEAT
SECMININDEX
When the disc is played in
Continuous Play (page 7)
Shuffle Play (page 12)
Programme Play (page 12)
Delete Play (page 13)
Delete Shuffle Play
(page 12, 14)
Custom Index Play
(page 19)
The player repeats
All the tracks
All the tracks in random
orders
The same programme
All the remaining tracks
All the remaining tracks in
random orders
The portion between two
indexes
To cancel Repeat Play
Press REPEAT repeatedly until “REPEAT” disappears from
the display.
1 While playing a disc, press A ˜B on the remote
at the point you want to start from (point A).
“A-” of “REPEAT A-” flashes in the display.
2 When you reach the end point (point B), press
A˜ B again.
“REPEAT A-B” appears. The player plays this
specific portion repeatedly.
To cancel A˜B Repeat
Press REPEAT.
Setting a new starting point
You can move the portion being repeated ahead by
changing the starting point.
1 Press A ˜B while the player is repeating the specific
portion.
The end point (point B) becomes the new starting
point (point A). “A-” of “REPEAT A-” flashes in the
display.
2 When you reach the end point (point B), press A ˜B
again.
“REPEAT A-B” appears. The player repeats between
the new starting and end points.
You can start again from point A at any time
Press · during A˜B Repeat.
11
GB
Page 12
Playing CDs
Æ
Pp
))00+c=
C
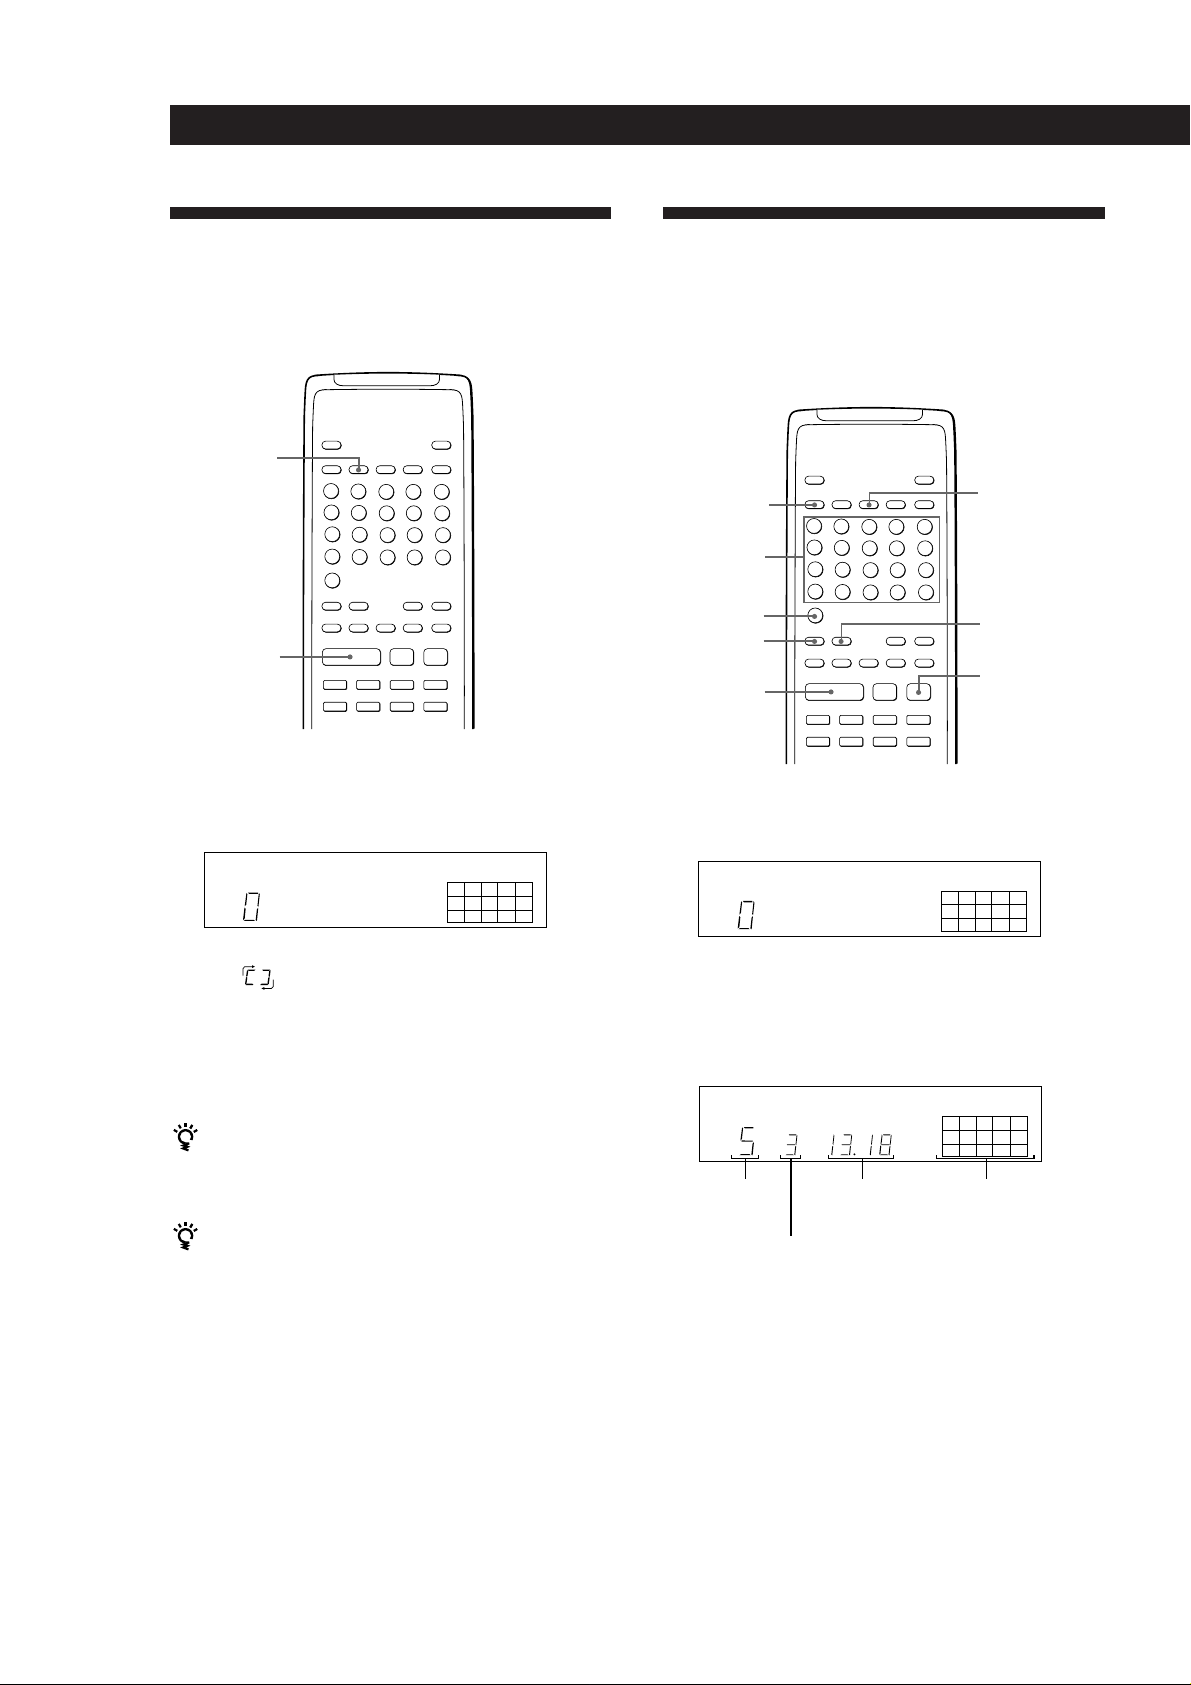
Playing in Random Order
(Shuffle Play) Z
You can have the player “shuffle” the tracks and play
them in a random order.
SHUFFLE
Pp
·
1 Press SHUFFLE on the remote.
“SHUFFLE” and the music calendar appear in
the display.
SHUFFLE
Æ
))00+c=
C
162738495
10
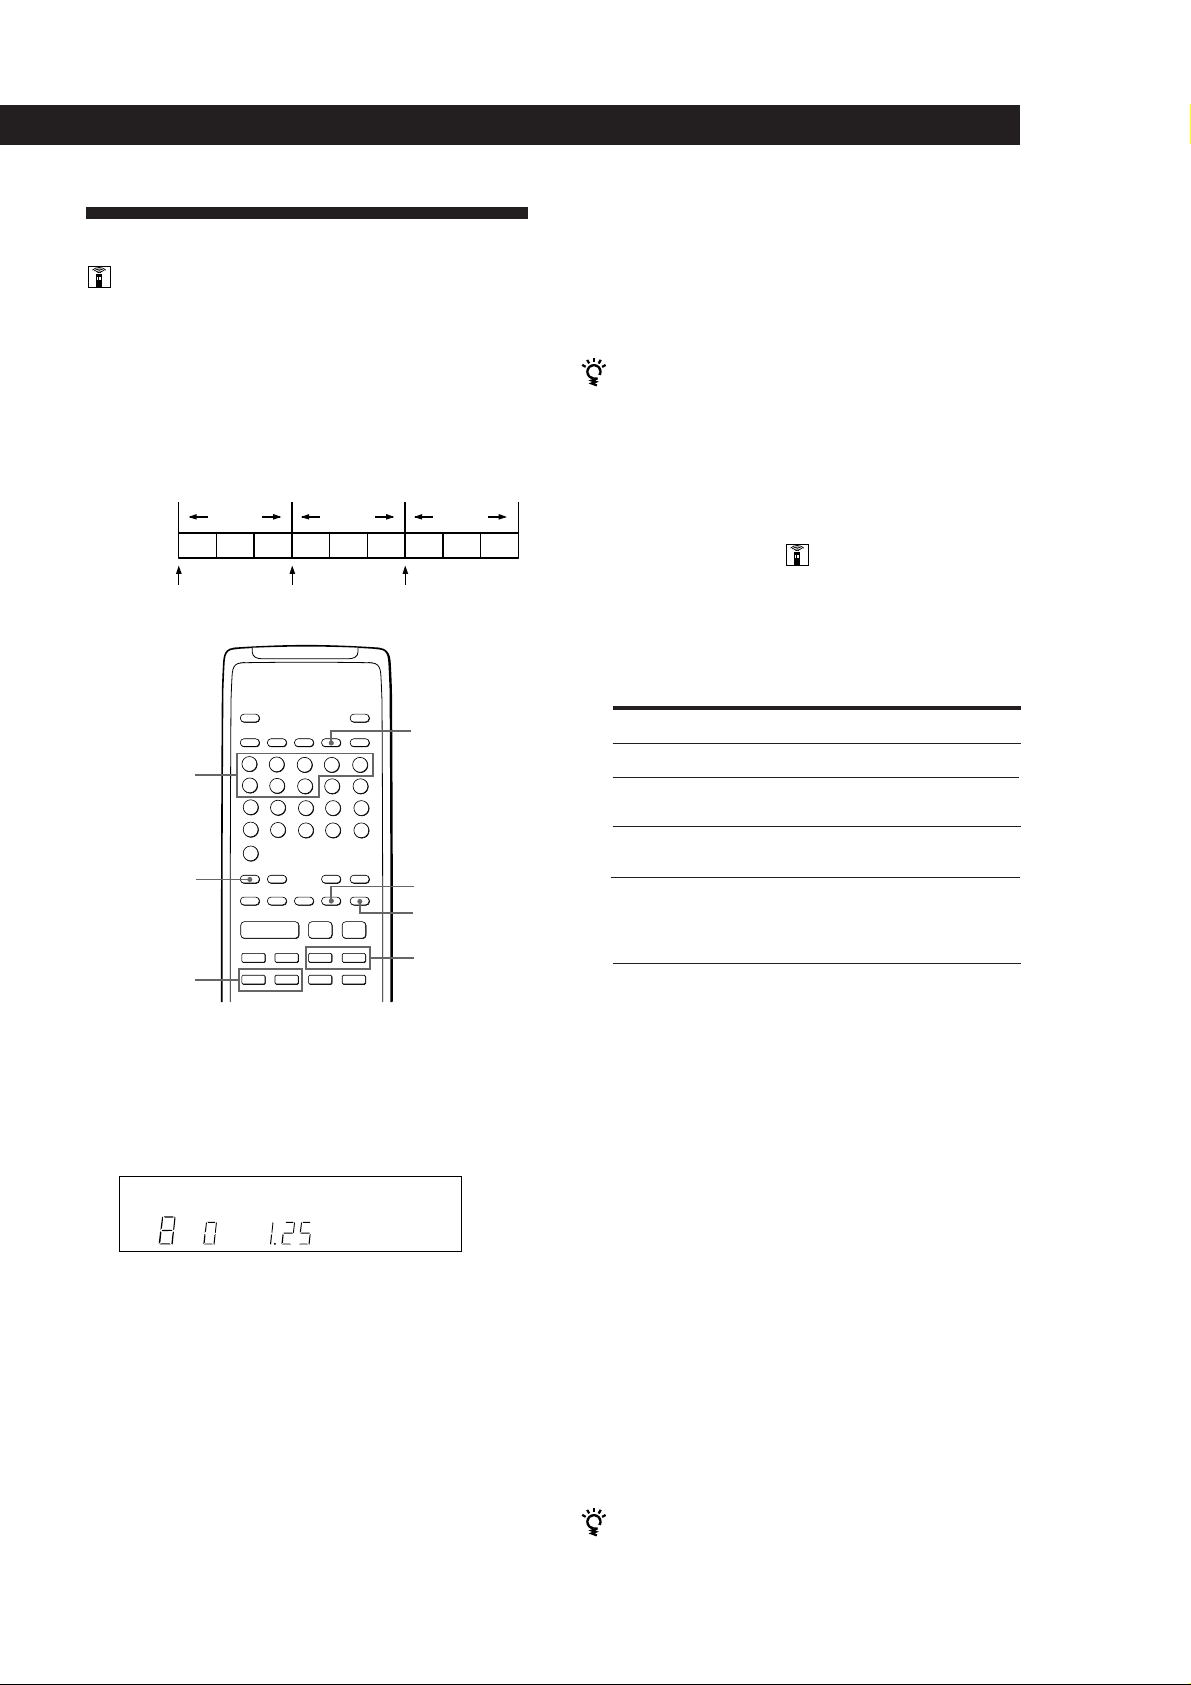
Creating Your Own Programme
(Programme Play) Z
You can arrange the order of the tracks on a disc and
create your own programme. The programme can
contain up to 24 tracks.
CONTINUE
Number
buttons
>20
CHECK
·
1 Press PROGRAM on the remote.
“PROGRAM” appears in the display.
PROGRAM
PROGRAM
CLEAR
p
162738495
10
2 Press · to start Shuffle Play.
The
“shuffling” the tracks.
To cancel Shuffle Play
Press CONTINUE on the remote.
You can start Shuffle Play while playing
Press SHUFFLE on the remote, and Shuffle Play starts
from the current track.
You can delete unwanted tracks during Shuffle Play
(Delete Shuffle Play)
Press the number button of the track you want to delete
while “SHUFFLE” appears in the display.
The track number and “OFF” appear in the display, and
then the track number disappears from the music
calendar.
If you want to restore the track, press the number
button again.
To restore all the tracks, press p in stop mode.
indication appears while the player is
2 Press the number buttons for the tracks you want
to programme in the order you want.
To programme the track numbered over 20, use
the >20 button on the remote (see page 10).
PROGRAM
STEP
Last
programmed
track
Playing order
SECMIN
Total playing
time
2
5
8
Programmed
tracks
If you’ve made a mistake
Press CLEAR, then press the correct number button.
3 Press · to start Programme Play.
To cancel Programme Play
Press CONTINUE on the remote.
GB
12
Page 13
When tracks, which aren’t numerically consecutive
Æ
Pp
))00+c=
C
on the disc, are programmed consecutively (i.e. 1, 3,
5, etc.)
A one-second access time blank is added between the
tracks.
The programme remains even after the Programme
Play ends
When you press ·, you can play the same programme
again.
Playing CDs
Playing Only Specific Tracks
(Delete Play)
You can delete unwanted tracks and play only the
remaining tracks.
Notes
• “––.––” appears instead of the total playing time in the
display when it exceeds 100 minutes.
• “FULL” appears in the display when you try to add a
track to a programme which already contains 24 tracks.
• When the power is turned off, programmed tracks are
deleted, and the play mode returns to the continuous play
mode.
Checking the track order
You can check your programme before or after you
start playing.
Press CHECK.
Each time you press this button, the display shows the
track number in the programmed order and the total
playing time. After the last track in the programme, the
display shows “End” and returns to the original
display. If you check the order after you start playing,
the display shows only the remaining track numbers.
Changing the track order
You can change your programme before you start
playing.
CONTINUE
Number
buttons
>20
·
SHUFFLE
CLEAR
1 Press SHUFFLE on the remote.
“SHUFFLE” appears in the display.
SHUFFLE
162738495
10
2 Press the number buttons of the tracks you want
to delete.
The track numbers disappear from the music
calendar after the track number and “OFF”
appear for a while.
To delete a track numbered over 20, use the >20
button (see page 10).
To
Erase a track
Erase the last track in
the programme
Add tracks to the end
of the programme
Change the whole
programme
completely
Press
CHECK until the track you don’t
want appears in the display, then
press CLEAR
CLEAR in stop mode. Each time you
press the button, the last track will
be cleared.
Number buttons of the tracks to be
added
p in stop mode. Create a new
programme following the
programming procedure.
If you’ve made a mistake
Press the number button of that track again. The track
number and “ON” appear in the display and the track
will be restored.
3 After you’ve deleted all the tracks you don’t want,
press CONTINUE.
“SHUFFLE” disappears from the display.
4 Press · to start Delete Play.
To cancel Delete Play
Press p in stop mode. All the deleted tracks will appear.
The player keeps the deleted tracks in memory even
after the Delete Play ends
When you press ·, you can play only the remaining
tracks again.
(continued)
13
GB
Page 14

Playing CDs
You can play the tracks in random order (Delete
Shuffle Play)
Just skip Step 3 in the above procedure.
You can delete a track while playing
Press CLEAR while the track is being played. The
player deletes the track and starts playing the next
track.
You can store the deleted tracks of each disc
See “Storing Specific Tracks of a Disc” on page 20.
14
GB
Page 15
Recording From CDs
Recording Y our Own
Programme
You can record the programme you’ve created on a
tape, DAT or MD. The programme can contain up to 24
tracks.
By inserting a pause during programming, you can
divide the programme into two for recording on both
sides of a tape.
PROGRAM
Number
buttons
>20
CHECK
Pp
·
Æ
))00+c=
C
P
Recording From CDs
You can automatically insert a blank space of 3
seconds between each track
Use the Auto Space function (see page 17).
You can check the total playing time while
programming (Programme Edit)
This feature helps you find the last track that will fit on
one side of the tape.
1 Press PROGRAM on the remote.
“PROGRAM” appears in the display.
2 Press = or + until the track you want to
programme appears in the display.
The total playing time including the selected track
appears in the display and the step number of the
programme flashes.
3 Press PROGRAM on the remote to confirm your
selection.
4 Repeat Steps 2 and 3 to programme other tracks.
To check and change your programme
See page 13.
“SIDE-A” appears while checking the programme for
side A and “SIDE-B” while checking the programme for
side B.
1 Create your programme (for side A when
recording on a tape) while checking the total
playing time indicated in the display.
Follow Steps 1 and 2 in “Creating Your Own
Programme” on page 12.
2 When you record on both sides of the tape, press
P to insert a pause.
The “P” indication appears in the display and the
playing time is reset to “0.00”.
When you record on one side of the tape or on a
DAT or MD, skip this step and go to Step 4.
A pause is counted as one track
You can programme up to 23 tracks when you insert a
pause.
3 Repeat Step 1 to create the programme for side B.
4 Start recording on the deck and then press · on
the player.
When you record on both sides of the tape, the
player pauses at the end of the programme for
side A.
5 When you record on side B, reverse the tape and
press P or · on the player to resume playing.
15
GB
Page 16
Recording From CDs
Æ
Pp
))00+c=
C
Fading In or Out
You can manually fade in or out to prevent tracks from
starting or ending abruptly.
Note that you cannot use this effect when using the
DIGITAL OUT connections.
Number
buttons
FADER
Pp
Æ
))00+c=
C
To
Start play fading in
End play fading out
Press FADER
in pause mode. “FADE” flashes
and play fades in.
when you want to start fading out.
“FADE” flashes. The play fades
out and the player pauses.
Changing the fading time
You can change the fading time from 2 to 10 seconds
before fading in or out. If you don’t change it, fading
lasts for 5 seconds.
1 Press FADER on the remote before you start
playing.
“5 SEC” appears and “FADE” flashes in the
display.
2 Press the number button (2 - 10) to specify the
fading time.
(Or press 0 or ) repeatedly until desired time
is displayed.)
0 / )
Useful Tips for Recording
Using these functions makes recording CDs more
convenient.
SPACE
Adjusting the Recording Level (Peak
Search)
The player locates the highest level among the tracks to
be recorded to let you adjust the recording level before
you start recording.
1 Before you start playing, press PEAK SEARCH on
the remote.
“PEAK” flashes in the display and the player
repeats the portion of the highest level for about
four seconds.
2 Adjust the recording level on the deck.
3 Press p on the player to stop Peak Search.
“PEAK” disappears from the display.
Note
The portion with the highest level may differ every time you
try the adjustment on the same disc. The difference is,
however, so slight that you should not have any problem in
adjusting the recording level precisely.
PEAK SEARCH
p
Notes
• The fading time remains even when you turn off the
player.
• When you use the Custom File function (page 18), the
fading time is memorized for each disc.
GB
16
Page 17

Locating each track on a tape using the
AMS function (Auto Space)
The auto space function inserts a blank space of 3
seconds between each track while playing, and enables
you to locate each track using the tape deck’s AMS
function.
Before you start playing, press SPACE.
“AUTO SPACE” appears in the display.
To cancel Auto Space
Press SPACE until “AUTO SPACE” disappears in the
display.
Note
If you use the Auto Space function when recording, for
example, a medley or symphony, the sound may be
interrupted where the track number changes. This will
happen whenever track numbers are assigned in the middle
of a piece.
Recording From CDs
17
GB
Page 18

Storing Information About CDs (Custom Files)
You can check how many discs you can file
What You Can Do With the
Custom Files
The player can store 2 types of information called
“Custom Files” for each disc. Once you have stored
Custom Files for a disc, the player automatically recalls
what you have stored whenever you insert the disc.
Custom Files will be remain in memory even if you
don’t use the player for about 1 month.
1 Remove the disc from the player.
2 Close the disc lid.
3 Press TIME while the music calendar is not being
displayed.
The number of Custom Files you can file appears
in the display.
Erasing Custom Files
You can store this information:
When you use
Custom Index (page 19)
Delete Bank (page 20)
The Custom File indication lights up when you store
the corresponding information.
When you store a Custom File for a disc, the player
remembers how you played that disc last time even if
you removed the disc from the player (last mode
memory). When you insert the same disc again,
therefore, the player plays in the same play mode. The
player also remembers the duration of fade in/out time
if you’ve changed the time.
Note that if you start playback by pressing · and
then closing the disc lid, the player plays in the
currently selected play mode instead of the stored one.
You can
Index the disc at up to 8 points
(for a disc with 32 tracks or less)
or 5 points (for a disc with over
32 tracks)
Delete unwanted tracks and
store only the tracks you want
C.FILE
DELETE
INDEX
Delete Bank
Custom Index
If the memory for Custom Files becomes full, the
player displays “FULL” when you press FILE to store
information and you cannot store any more disc
information. If necessary, erase the Custom Files as
follows:
To erase all Custom Files of all discs
While holding down 0 and p, press POWER to turn on the
player. “AL-CLr” appears in the display and all the custom
files will be erased.
18
Where are Custom Files stored?
Custom Files are stored in the player’s memory, not on
the disc. This means you cannot use the Custom File
when you play the disc on other players.
How many discs can you file?
You can file up to 224 discs in the Custom File.
Note that the player counts a disc as two when you
store a Custom Index and Delete Bank at the same
time.
GB
Page 19
Storing Information About CDs (Custom Files)
Indexing a Disc (Custom Index)
5 Press FILE again to store the Custom Index.
“INDEX” in the Custom File indication lights up in
the display.
You can index a disc at up to 8 points (for a disc with
32 tracks or less) or 5 points (for a disc with over 32
tracks) so that you can easily locate a desired point.
This might be useful when you play discs of
symphonies or concertos that divide one piece into
several tracks (see the example below).
Example
Track No.
Custom
Index No.
Number
buttons
C / c
First
piece
123456789
123
CHECK
Æ
C
Second
piece
Pp
))00+c=
Third
piece
C.INDEX
FILE
ERASE
0 / )
1 Place a disc.
6 To mark more Custom Indexes, repeat Steps 3 to 5.
When you’ve already decided where to index
You can directly mark an index without adjusting the
point. When you find the point to be indexed, first press
P to pause playing and press FILE to mark an index.
“INDEX” appears in the display.
Playing from an indexed point
(Custom Index Play)
1 Press C.INDEX on the remote.
“CUSTOM INDEX” appears in the display.
2 Locate the Custom Index you want as follows:
To locate
The next Custom Index
The current Custom
Index
A specific Custom Index
directly
By scanning the indexed
points for 10 seconds
Playback starts from the selected Custom Index to
the end of the disc.
Press
c during playback
C during playback
Number button of the Custom
Index
MUSIC SCAN in stop or play
mode. When you find the point
you want, press · to start
playing.
2 Press C.INDEX on the remote.
“CUSTOM INDEX” appears in the display.
The music calendar disappears.
C.INDEX
SECMIN
CUSTOM INDEX
3 Press FILE at the point you want to index.
The Custom Index number flashes in the display.
The player repeats the portion for 3 seconds from
the point to be indexed.
4 Press 0 or ) to adjust the point so that the
player repeats from the exact point you want to
index.
Pressing these buttons 7 times moves the point by
about 1 second ahead or behind.
If you don’t want to index at the point
Press CLEAR and search another point to be indexed.
To cancel the Custom Index Play
Press CONTINUE on the remote.
Notes
• You cannot use the index search function (see page 10).
• Use C/c buttons to locate the next or the current
Custom Indexes, instead of =/+ buttons.
Playing from one index to the next one (Custom Index
Single Play)
1 Press C.INDEX on the remote.
“CUSTOM INDEX (1)” appears in the display.
2 Press the number button of the Custom Index you want.
Playback starts from the selected Custom Index and
stops at the beginning of the next index.
To cancel the Custom Index Single Play, press C.INDEX on
the remote).
You can play the portion between two indexes
repeatedly
Press REPEAT.
19
GB
Page 20

Storing Information About CDs (Custom Files)
Erasing the Custom Index
1 Place a disc.
2 Press C.INDEX.
“CUSTOM INDEX” appears in the display.
3 Press CHECK repeatedly until the Custom Index
number you want to erase flashes.
4 Press ERASE while the number is flashing to erase
the Custom Index.
The succeeding Custom Index numbers decrease
by one.
Storing Specific Tracks of a
Disc (Delete Bank)
You can delete unwanted tracks and store only the
tracks you want. This allows you to start playing your
favourite tracks without deleting the other tracks each
time you insert the CD.
Playing using the Delete Bank
1 Press CONTINUE.
The Delete Bank is recalled and the selected track
numbers appear on the music calendar.
2 Press · to start playing.
To cancel playing using the Delete Bank
Press p.
To start playing using the Delete Bank again
When “PROGRAM” or “CUSTOM INDEX” appear in the
display, press CONTINUE or SHUFFLE repeatedly until these
indications disappear from the display. The Delete Bank is
recalled and you can start playing by pressing ·.
You can play in a random order using the Delete Bank
In Step 1, press SHUFFLE on the remote repeatedly until
“SHUFFLE” appears in the display.
Erasing the Delete Bank
1 Place a disc.
2 Press CONTINUE or SHUFFLE.
The display shows the stored Delete Bank.
FILE
Pp
·
Æ
))00+c=
C
ERASE
1 Place a disc.
2 Delete tracks you don’t want.
Follow Steps 1 to 3 in “Playing Only Specific
Tracks” on page 13.
3 Press FILE on the remote to store the remaining
tracks.
“DELETE” in the Custom File indication lights up
in the display.
3 Press ERASE to erase the Delete Bank.
“DELETE” in the Custom File indication
disappears.
20
GB
Page 21
Additional Information
Additional Information
Notes on CDs
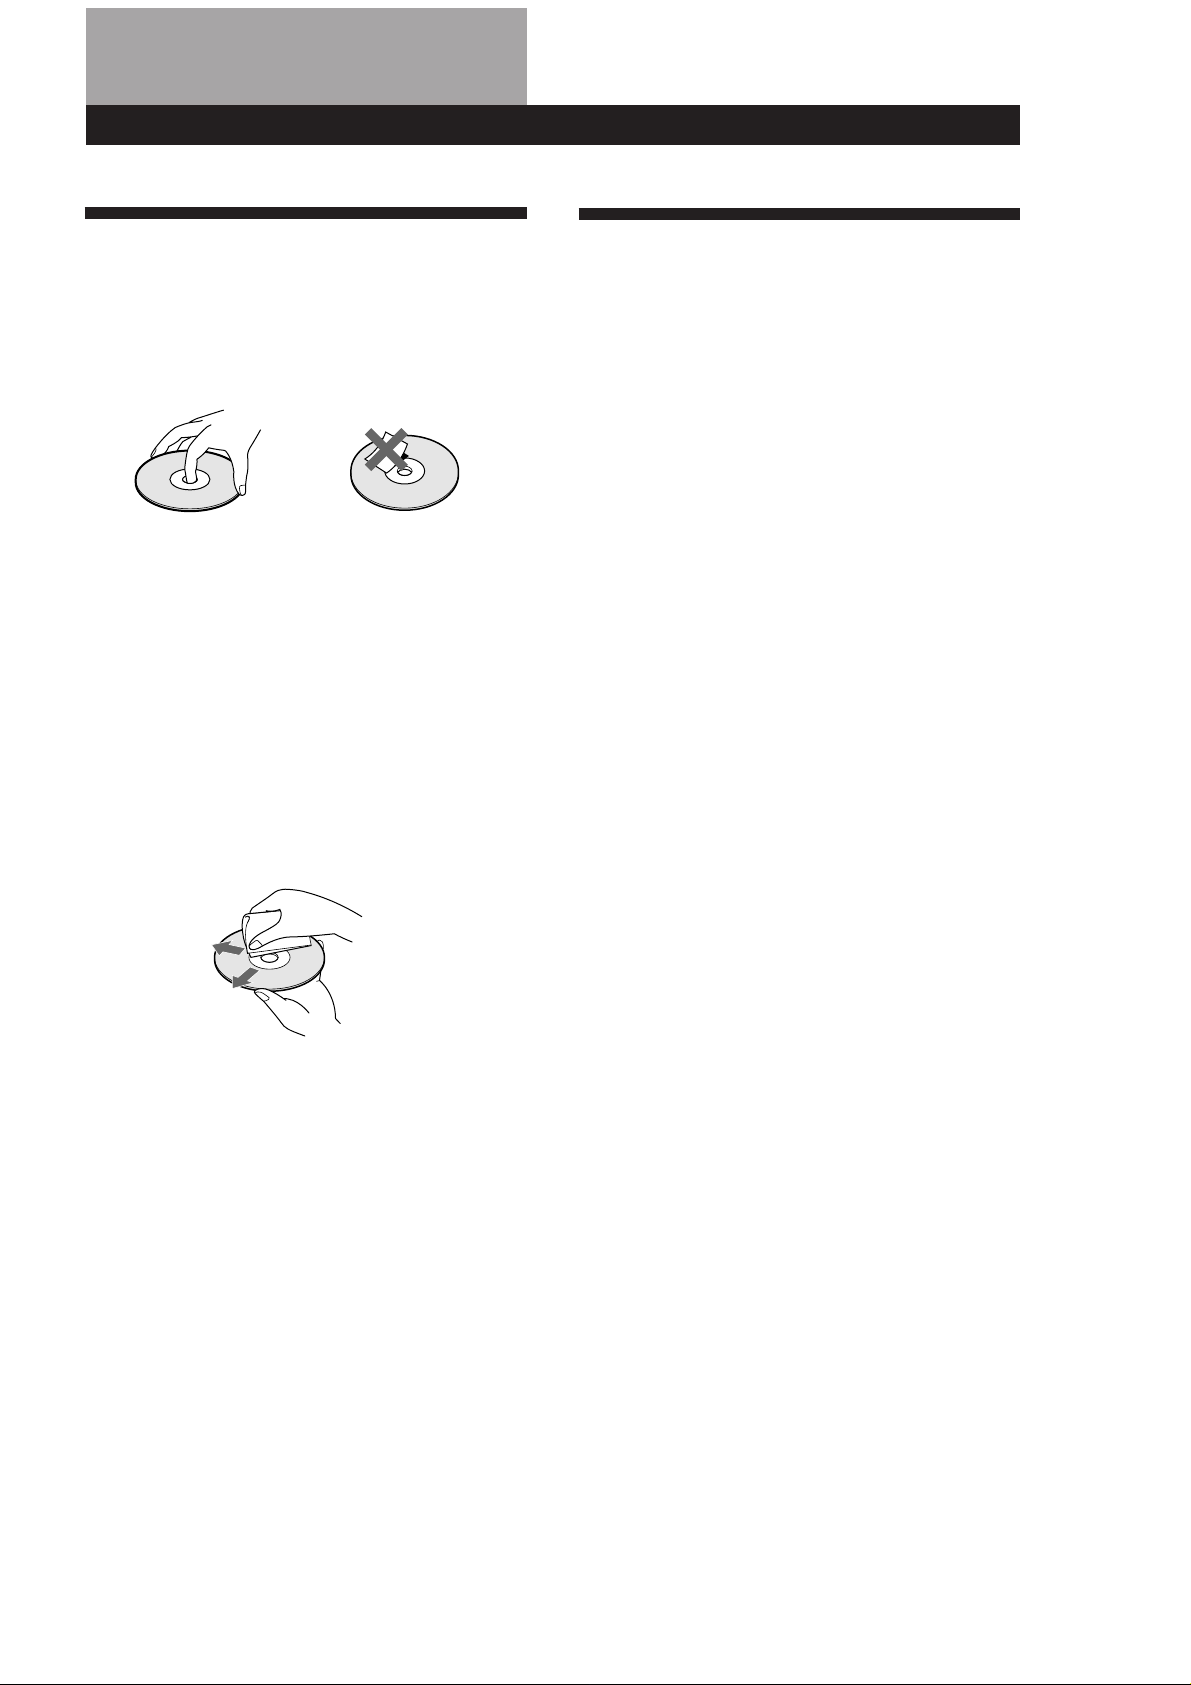
On handling CDs
• To keep the disc clean, handle the disc by its edge. Do not
touch the surface.
• Do not stick paper or tape on the disc.
Not this way
• Do not expose the disc to direct sunlight or heat sources
such as hot air ducts, nor leave it in a car parked in direct
sunlight as there can be considerable rise in temperature
inside the car.
• Do not use any commercially available stabilizer and/or
disc protector. If you do, the disc and the player may be
damaged.
• After playing, store the disc in its case.
On cleaning
• Before playing, clean the disc with a cleaning cloth. Wipe
the disc from the center out.
Troubleshooting
If you experience any of the following difficulties while
using the player, use this troubleshooting guide to help
you remedy the problem. Should any problem persist,
consult your nearest Sony dealer.
There’s no sound.
/Check that the player is connected securely.
/Make sure you operate the amplifier correctly.
/Adjust the playback level using the LINE OUT/
PHONE LEVEL control.
/Each DIGITAL OUT switch on the rear is set to
OFF. When using digital connections, set the
respective switch to ON.
The CD does not play.
/There’s no CD inside the player. Insert a CD.
/Use the stabilizer.
/Place the CD with the label side up on the disc
tray correctly.
/Clean the CD.
/Moisture has condensed inside the player.
Remove the disc and leave the player turned on
for about an hour (see page 2).
• Do not use solvents such as benzine, thinner,
commercially available cleaners or anti-static spray
intended for vinyl LPs.
The remote does not function.
/Remove the obstacles in the path of the remote
and the player.
/Point the remote at the remote sensor g on the
player.
/Replace all the batteries in the remote with new
ones if they are weak.
21
GB
Page 22
Additional Information
Specifications
Compact disc player
Laser Semiconductor laser (λ = 780 nm)
Emission duration: continuous
Laser output Max 44.6 µW*
* This output is the value measured at
a distance of 200 mm from the
objective lens surface on the Optical
Pick-up Block with 7 mm aperture.
Wavelength 780 – 790 nm
Frequency response 2 Hz to 20 kHz ± 0.3 dB
Dynamic range More than 100 dB
Channel separation More than 100 dB
Harmonic distortion Less than 0.003%
Outputs
General
Power requirements 220 V – 230 V AC, 50/60 Hz
Power consumption 18 W
Dimensions (approx.) 280 × 90 × 370 mm
(w/h/d) (11 × 3 9/16 × 14 9/16 in.) incl. projecting
parts
Mass (approx.) 6 kg (13 lbs 4 oz)
Supplied accessories
Audio connecting cord (1)
Remote commander (remote) (1)
Sony SUM-3 (NS) batteries (2)
Stabilizer (1)
Felt (1)
Mains lead (1)
Design and specifications are subject to change without notice.
Output
level
2.5 V
(at 50 kilohms)
0.5Vp-p
(75 ohms)
–18 dBm
(Wave length:
660 nm)
5 V
(at 50 kilohms)
Load
impedance
Over 1 kilohm
75 ohms
_
Over 100 ohms
LINE OUT
DIGITAL
OUT
(COAXIAL)
DIGITAL
OUT
(OPTICAL)
DIGITAL
OUT
(BALANCED)
Jack
type
Phono
jacks
Coaxial
output
connector
Optical
output
connector
XLR-3-32
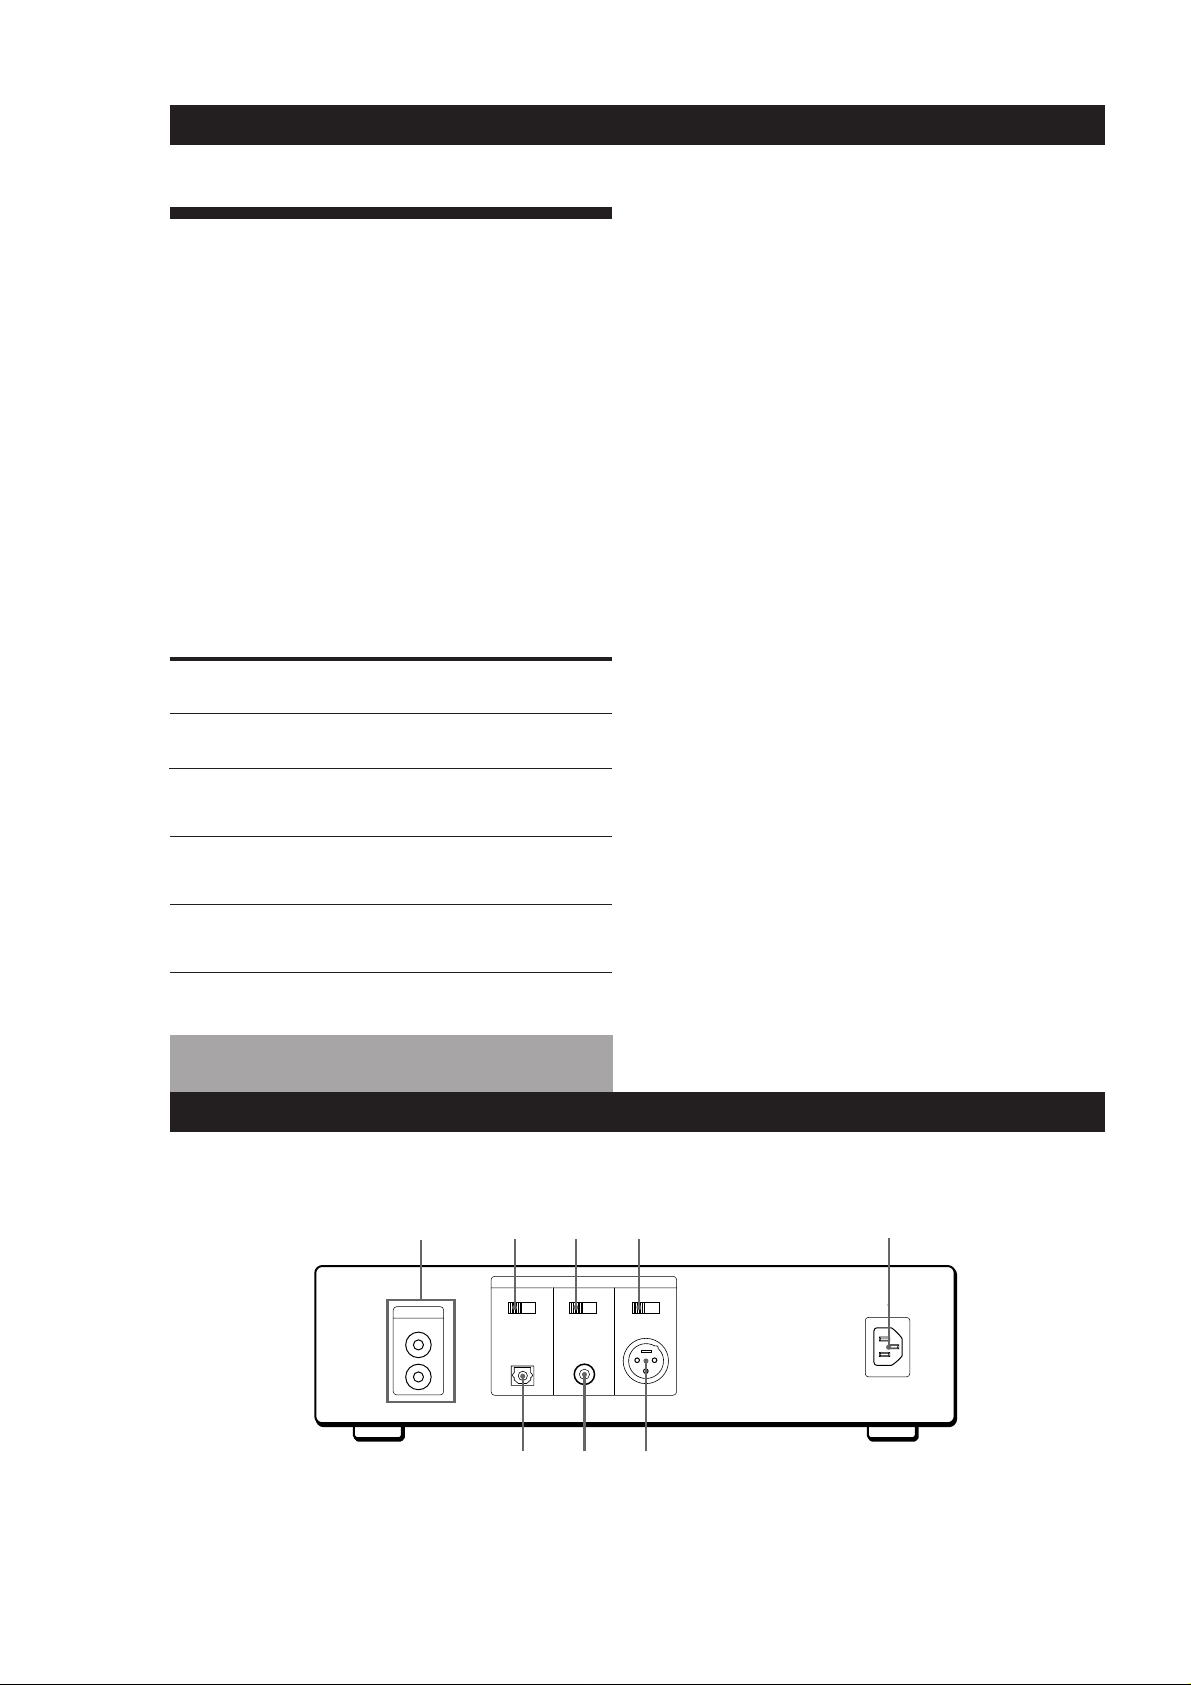
Rear Panel Descriptions
Refer to the pages in parenthesis for details.
1
234
5
22
1 LINE OUT (5)
2 DIGITAL OUT OPTICAL switch (5)
3 DIGITAL OUT COAXIAL switch (5)
4 DIGITAL OUT BALANCED switch (5)
GB
LINE OUT
DIGITAL OUT
OPTICAL
OFF ON
L
R
COAXIAL
OFF ON
BALANCED
OFF ON
AC IN (230V)
8 7 6
5 AC IN (230 V) (6)
6 DIGITAL OUT BALANCED (5)
7 DIGITAL OUT COAXIAL (5)
8 DIGITAL OUT OPTICAL (5)
Page 23

Index
Additional Information
A, B
A-B repeat 11
AMS 10
Automatic Music Sensor. See
AMS
Auto Space 17
C
Connecting 4, 5, 6
Continuous Play 7
Custom Files 18
Custom Index 19
Delete Bank 20
what you can do with 18
Custom Index 19
Custom Index Play 19
Custom Index Single Play 19
D
Delete Bank 20
Delete Play 13
Delete Shuffle Play 14
E
Editing. See Recording
Erasing
Custom Files 19
Custom Index 19
Delete Bank 20
F, G
Fading 16
H
Handling CDs 21
Hookups 4, 5, 6
overview 4
I, J, K
Index 10
Custom 19
L
Last mode memory 18
Locating
by monitoring 10
by observing the display 10
by scanning 10
directly 10
using AMS 10
using Custom Index 19
using index 10
M, N, O
Music Calendar 9
Music Scan 10
P, Q
Peak Search 16
Playback
Continuous Play 7
Custom Index Play 19
Custom Index Single
Play 19
Delete Play 13
Delete Shuffle Play 14
Programme Play 12
Repeat Play 11
Shuffle Play 12
Programme 12, 13
changing 13
checking 13
for recording 15
Programme Edit 15
R
Recording 15
a programme 15
Remaining time 9
Remote control 9
Repeating
all 11
a specific portion 11
S
Scanning. See Music Scan
Searching. See Locating
Shuffle Play 12
Stabilizer 2
Storing
information about CDs 18
specific tracks 20
T
Total playing time 9
Troubleshooting 21
U, V, W, X, Y, Z
Unpacking 4
Names of controls
Buttons
A˜ B11
SPACE 17
CHECK 13
C.INDEX 19
CLEAR 14
CONTINUE 8
DISPLAY MODE 9
ERASE 20
FADER 16
FILE 19
C / c 10, 19
MUSIC SCAN 10
PEAK SEARCH 16
PROGRAM 12
REPEAT 11
SHUFFLE 12
0 / ) SLOW 10
TIME 9
· 8
P 8
p 8
0 / ) 8, 10
= / + 8, 10
>20 10
Number 10
Switch and selector
DIGITAL OUT 5
POWER 7
Others
Display 9
g 4
23
GB
Page 24
Fonctionnement
AVERTISSEMENT
Afin d’éviter tout risque
d’incendie ou d’électrocution, ne
pas exposer cet appareil à la pluie
ou à l’humidité.
Afin d’éviter tout risque de choc
électrique, ne pas ouvrir le coffret.
Confier toute réparation à un
technicien qualifié uniquement.
N’installez pas l’appareil dans un
espace confiné comme dans une
bibliothèque ou un meuble
encastré.
Cet appareil est classé produit laser
de classe 1. L’indication CLASS 1
LASER PRODUCT est collée à
l’arrière, à l’extérieur de l’appareil.
Cette étiquette de précaution se
trouve à l’intérieur de l’appareil.
Précautions
Sécurité
• Attention - L’utilisation d’instrument
optique avec cet appareil augmente
les risques pour la vue.
• Si un solide ou un liquide pénétrait
dans le coffret, débranchez le lecteur
et faites-le vérifier par un
professionnel avant de le remettre en
service.
• Veillez à ne pas vous laisser prendre
les doigts sous le volet.
Source d’alimentation
• Avant d’utiliser le lecteur, vérifiez si
sa tension de fonctionnement est
identique à celle de l’alimentation
secteur locale. La tension de
fonctionnement est indiquée à
l’arrière du lecteur.
• Le lecteur n’est pas déconnecté de la
source d’alimentation secteur tant
qu’il est branché sur la prise murale,
même s’il a été mis hors tension.
• Si vous ne comptez pas utiliser le
lecteur pendant un certain temps,
débranchez-le de la prise secteur.
Pour débrancher le cordon, tirez sur
la fiche. Ne jamais tirer sur le cordon
proprement dit.
Installation
• Installez le lecteur dans un endroit
bien ventilé afin d’éviter toute
surchauffe interne.
• Ne posez pas le lecteur sur une
surface moelleuse, comme une
couverture, qui pourrait obstruer les
orifices de ventilation sous le lecteur.
• N’installez pas le lecteur près d’une
source de chaleur et ne l’exposez pas
à la lumière directe du soleil, à une
poussière intense ni à des chocs
mécaniques.
Qualité sonore
• Afin de conserver la qualité sonore du
lecteur, ne pas toucher la lentille à
l’intérieur du lecteur.
• Ouvrez et fermez le volet du
logement de disque à la main.
• Ne touchez pas les pièces mobiles
(disque, etc.) pendant que le lecteur
fonctionne.
• Si le lecteur est emporté sans
transition d’un endroit froid dans une
pièce chaude, ou installé dans une
pièce très humide, de la condensation
d’humidité risque de se déposer sur la
lentille. Le cas échéant, le lecteur ne
fonctionnera pas normalement.
Enlevez le disque et n’utilisez pas le
lecteur pendant une heure environ
jusqu’à ce que l’humidité se soit
évaporée.
Réglage du volume
• N’augmentez pas le volume pendant
l’écoute d’un passage sans signaux
audio ou à faible niveau sonore. Les
haut-parleurs pourraient être
endommagés lorsqu’un passage à
niveau de crête est reproduit.
Mise en place du disque
• Vous pouvez entendre une sorte de
sifflement quand vous posez un
disque. Ce bruit vous indique que le
lecteur est en train d’ajuster le
mécanisme interne pour le disque
inséré.
Nettoyage
• Nettoyez le coffret, le panneau et les
commandes avec un chiffon doux
légèrement imprégné d’une solution
détergente neutre. N’utilisez pas de
tampon abrasif, poudre à récurer ou
solvant comme l’alcool ou la benzine.
• Si l’intérieur du volet est sale, enlevez
le volet avec une clé hexagonale (côté
2,5 mm).
Remarque
A l’exception du volet, ne jamais
ouvrir d’autres parties du lecteur.
Transport
• N’oubliez pas d’enlever le CD et le
stabilisateur.
Utilisation du stabilisateur
• Veillez à utiliser le stabilisateur
fourni, à l’exclusion de tout autre,
pour ne pas endommager le lecteur.
• Le dessous du stabilisateur est fragile
et tout défaut peut influencer la
qualité du son.
Quand vous remplacez des disques,
F
2
posez le stabilisateur sur le feutre
fourni ou sur un chiffon doux.
Pour toute question ou problème
concernant cet appareil, veuillez
consulter le revendeur Sony le plus
proche.
Page 25
Bienvenue !
Nous vous remercions pour l’achat de
ce lecteur de disque compact Sony.
Avant la mise en service du lecteur,
veuillez lire attentivement le mode
d’emploi et le conserver pour toute
référence future.
A propos du mode
d’emploi
Conventions
• Les instructions de ce mode d’emploi
décrivent les touches de la
télécommande.
Vous pouvez aussi utiliser les
commandes du lecteur qui ont le
même nom ou un nom similaire à
celles de la télécommande.
• Les symbôles suivants sont utilisés
dans ce manuel:
Indique que vous pouvez utiliser
la télécommande pour effectuer
cette opération.
Donne des conseils
supplémentaires pour faciliter
l’utilisation.
TABLE DES MATIÈRES
Préparatifs
Déballage 4
Raccordement du lecteur 4
Lecture d’un CD 7
Lecture de CD
Affichage d’informations 9
Localisation d’une plage particulière 10
Localisation d’un point particulier d’une plage 10
Lecture répétée de plages 11
Lecture de plages dans un ordre quelconque (Lecture aléatoire) 12
Création de votre propre programme (Lecture programmée) 12
Lecture de plages particulières (Lecture avec effacement de plages) 13
Enregistrement de CD
Enregistrement de votre propre programme 15
Entrée et sortie en fondu16
Conseils utiles pour l’enregistrement 16
Mémorisation d’informations (Fichiers personnels)
Possibilités offertes par les fichiers personnels 18
Indexation d’un disque (Index personnels) 19
Mémorisation de plages particulières d’une disque
(Banque de plages effacées) 20
F
Informations complémentaires
Remarques sur les CD 21
Guide de dépannage 21
Spécifications 22
Description du panneau arrière 22
Index 23
F
3
Page 26

Préparatifs
Déballage
Vérifiez si tous les éléments suivants se trouvent dans
l’emballage.
• Cordon de liaison audio (1)
• Télécommande (infrarouge) (1)
• Piles Sony SUM-3(NS) (2)
• Stabilisateur (1)
• Feutre (1)
• Cordon d’alimentation (1)
Mise en place des piles dans la
télécommande
Vous pouvez contrôler le lecteur avec la télécommande
fournie. Insérez deux piles de format AA (R6) en
faisant correspondre les pôles + et – des piles avec les
indications dans le logement. Quand vous utilisez la
télécommande, dirigez-la vers le capteur de rayons
infrarouges g du lecteur.
Raccordement du lecteur
Aperçu
Ce paragraphe explique comment raccorder le lecteur à
un amplificateur. Veillez à éteindre tous les appareils
avant de faire les liaisons.
OFF ON
L
R
OPTICAL
Commutateur
COAXIAL
DIGITAL OUT
OPTICAL
COAXIAL
OFF ON
DIGITAL OUT
COAXIAL
Commutateur
BALANCED
BALANCED
OFF ON
DIGITAL OUT
BALANCED
CDP-X5000
AC IN (230V)
à une prise secteur
LINE OUT
Commutateur
OPTICAL
LINE OUT
DIGITAL OUT
Remplacement des piles
En principe, les piles durent environ six mois. Quand la
télécommande ne parvient plus à contrôler le lecteur,
vous devez remplacer les piles usées par des neuves.
Remarques
• Ne pas laisser la télécommande dans un endroit exposé à
une humidité ou à une chaleur intense.
• Ne pas laisser tomber d’objet dans la télécommande et
faites particulièrement attention quand vous changéz les
piles.
• Evitez d’exposer le capteur de télécommande au soleil ou
à un éclairage puissant. La télécommande risquerait de ne
pas fonctionner correctement.
• Pour éviter tout dommage dû à une fuite d’électrolyte et à
la corrosion, enlevez les piles quand vous n’utilisez pas la
télécommande pendant longtemps.
CD
ç: Sens du signal
Quels cordons utiliser ?
p Liaisons analogiques
• Cordons audio (fourni) (1)
Blanc (G)
Rouge (D)
p Liaisons numériques
• Câble coaxial VMC-10G (non fourni)
• Câble optique POC-15A (non fourni)
Amplificateur
à une prise secteur
Blanc (G)
Rouge (D)
• Câble symétrique à connecteur Cannon XLR-3-32 (non
fourni)
F
4
Page 27
Préparatifs
Raccordements
p Liaisons analogiques
Quand vous raccordez un cordon audio, branchez le
cordon codé couleur sur les prises appropriées des
appareils: rouge (droit) sur rouge et blanc (gauche)
sur blanc. Assurez-vous que les cordons sont insérés
à fond dans les prises afin d’éviter tout bruit et
bourdonnement.
Lecteur CD
LINE OUT
L
R
p Liaisons numériques
Les liaisons numériques vous permettent de
transmettre le signal numérique d’un lecteur CD
directement à un autre appareil sans détérioration du
signal. Vous pouvez relier les sorties numériques à
d’autres appareils, tel un amplificateur numérique,
un convertisseur N/A, une platine DAT ou MD. Si
vous raccordez une platine DAT ou MD, vous
pourrez effectuer des enregistrements numériques
de CD.
Quand vous utilisez cette liaison pour
l’enregistrement, vous ne pouvez pas utiliser l’entrée
et la sortie en fondu (page 16).
Amplificateur
TUNER CD AUX
L
R
INPUT
• Si vous avez un appareil numérique avec connecteur
d’entrée numérique optique
Raccordez le lecteur par le connecteur DIGITAL OUT
(OPTICAL) avec un câble optique (non fourni). Enlevez le
cache-connecteur et branchez le câble optique.
Appareil
numérique
DIGITAL IN
OPTICAL
OPTICAL
OFF ON
Lecteur CD
DIGITAL OUT
COAXIAL
OFF ON
BALANCED
OFF ON
Après avoir fait les liaisons, réglez le commutateur
DIGITAL OUT OPTICAL à l’arrière du lecteur sur
ON. Si vous n’utilisez pas la sortie optique, réglez le
commutateur sur OFF.
• Si vous avez un appareil numérique (ex. amplificateur)
avec un connecteur d’entrée symétrique
Raccordez le lecteur par le connecteur BALANCED en
utilisant un connecteur Cannon XLR-3-32 ou un
connecteur équivalent (non fourni). Une liaison
symétrique est très résistante au bruit externe et souvent
utilisée par les professionnels des studios
d’enregistrement ou des stations de radiodiffusion.
Utilisation d’un connecteur Cannon XLR-3-32 ou d’un
connecteur équivalent (non fourni)
A
B
• Si vous avez un appareil numérique avec connecteur
d’entrée numérique coaxiale
Raccordez le lecteur par le connecteur DIGITAL OUT
(COAXIAL) avec un câble coaxial (non fourni).
OPTICAL
OFF ON
Lecteur CD
DIGITAL OUT
COAXIAL
OFF ON
BALANCED
OFF ON
Appareil
numérique
DIGITAL IN
COAXIAL
Après avoir fait les liaisons, réglez le commutateur
DIGITAL OUT COAXIAL à l’arrière du lecteur sur
ON. Si vous n’utilisez pas la sortie coaxiale, réglez le
commutateur sur OFF.
Pour brancher le connecteur
Alignez les parties A et insérez le connecteur à fond.
Pour débrancher le connecteur
Appuyez sur le taquet B et tirez sur le connecteur.
Brochage
OUTIN
1: Masse
2: Chaud
3: Froid
23 1
OPTICAL
OFF ON
Lecteur CD
DIGITAL OUT
COAXIAL
OFF ON
132
BALANCED
OFF ON
Convertisseur N/A, etc.
DIGITAL
AES/EBU
IN OUT
Après avoir fait les liaisons, réglez le commutateur
DIGITAL OUT BALANCED à l’arrière du lecteur sur
ON. Quand vous n’utilisez pas la sortie symétrique,
réglez le commutateur sur OFF.
(continuer page suivante)
F
5
Page 28

Préparatifs
Raccordement au secteur
1 Raccordez le cordon secteur fourni à la prise AC
IN (230 V) à l’arrière du lecteur.
2 Raccordez l’autre extrémité du cordon secteur à
une prise murale.
Que faire ensuite?
Vous pouvez maintenant utiliser le lecteur.
Lisez les paragraphes suivants pour écouter un CD.
F
6
Page 29

Fonctionnement de base
Lecture d’un CD
53, 4
f
p
P
Æ
+
=
)
0
S
Si vous mettez le lecteur
CD sous tension quand un
disque est dans le lecteur
La lecture commence environ
10 secondes après la mise
sous tension. Si vous
raccordez une minuterie en
vente dans le commerce,
vous pourrez régler l’heure
de mise sous tension
automatique du lecteur. Pour
que la lecture commence plus
rapidement, appuyez sur P
ou · quand “PAUSE”
clignote.
Remarques
• A l’étape 3, ne posez pas plus
d’un CD à la fois pour ne pas
endommager les disques et/ou
le lecteur.
• Ne touchez pas la lentille à
l’intérieur du lecteur quand
vous insérez ou sortez un CD.
power
1
Appuyez sur POWER pour mettre le lecteur sous tension.
1
Allumez l’amplificateur et sélectionnez le lecteur CD.
2
Ouvrez le volet à la main, sortez le stabilisateur et posez un
CD.
3
p
P
Æ
+
=
)
S
0
power
Stabilisateur (fourni)
÷
Face imprimée vers le haut
Fonctionnement de base
p
P
Æ
+
=
)
S
0
power
(continuer page suivante)
F
7
Page 30

Fonctionnement de base
Stabilisateur fourni
(vue latérale du
stabilisateur)
haut
bas
Remarque
Après avoir posé un CD,
mettez le stabilisateur fourni
sur le CD.
Vous pouvez aussi
commencer la lecture en
appuyant sur · et
fermant le volet du
logement de disque.
Si la lecture ne commence
pas par la première plage
du disque
1 Appuyez de façon répétée
sur CONTINUE de la
télécommande jusqu’à ce
que “SHUFFLE”,
“PROGRAM” et
“CUSTOM INDEX”
disparaissent de
l’afficheur.
2 Appuyez sur ·.
Affichage
SHUFFLE
PROGRAM
CUSTOM INDEX
Posez le stabilisateur sur le CD puis fermez le volet du
logement de disque à la main.
4
p
P
Æ
+
=
)
S
0
power
÷
power
Posez le stabilisateur fourni sur
le CD. (Veillez à le mettre dans le
bon sens.)
Appuyez sur ·.
5
L’indicateur · s’allume et la lecture commence à partir de la
première plage.
Réglez le volume sur l’amplificateur.
Pour arrêter la lecture
Appuyez sur p.
p
P
Æ
+
=
)
S
0
power
p
P
Æ
+
=
)
S
0
Ces indicateurs
disparaissent quand vous
appuyez sur CONTINUE.
Quand vous voulez
faire une pause
poursuivre la lecture après la pause
passer à la plage suivante
revenir à la plage précédente
avancer rapidement sur une plage
reculer rapidement sur une plage
F
8
0)=+
ÆPp
Appuyez sur
P
P ou ·
+
=
)
0
Page 31

Lecture de CD
Affichage d’informations
Vous pouvez afficher les diverses informations
concernant le disque pour les contrôler.
Lecture de CD
Affichage du temps restant
Appuyez sur TIME de la télécommande pendant la
lecture d’un disque.
A chaque pression sur TIME, l’affichage change
comme indiqué sur l’illustration suivante.
TIMEDISPLAY
MODE
Pp
Æ
))00+c=
C
Affichage du nombre total de plages et du
temps de lecture des plages
Appuyez sur TIME de la télécommande en mode
d’arrêt.
L’afficheur indique le nombre total de plages et le
temps de lecture total.
SECMIN
Temps de
lecture et
INDEX
SECMIN
numéro de la
plage actuelle
Appuyez
Temps
restant sur
INDEX
SECMIN
la plage
actuelle
Appuyez
Temps restant
sur le disque
SECMIN
Si le temps restant est supérieur à 100 minutes en mode
de programmation, “––.––” apparaît au lieu du temps
restant.
Appuyez
Affichage du répertoire musical
Le répertoire musical indique tous les numéros de
plage du CD en place.
Appuyez sur DISPLAY MODE de la télécommande.
A chaque pression sur DISPLAY MODE, l’affichage
change comme indiqué sur l’illustration suivante.
Nombre total
Temps de lecture total
de plages
Ces informations apparaissent quand vous fermez le
volet du logement de disque.
Affichage d’informations pendant la lecture
d’un disque
Pendant la lecture d’un disque, l’afficheur indique le
numéro de la plage actuelle, le numéro d’index et le
temps de lecture.
SECMININDEX
Temps de
Numéro de la
plage actuelle
Numéro d’index (page 10) ou numéro
d’index personnel (page 19)
lecture
SECMIN
Appuyez
SECMIN
162738495
Appuyez
• Si le disque contient plus de 15 plages, le symbole ”
apparaît à côté de 15 sur le répertoire musical.
• Les numéros de plage dans le répertoire musical
disparaissent au fur et à mesure que les plages sont
reproduites.
Les numéros de plages indiqués sur le répertoire
musical sont mémorisés même si le lecteur est mis
hors tension.
Cependant, le répertoire musical apparaît
automatiquement pendant la lecture programmée, la
lecture avec effacement de plages, la lecture aléatoire
avec effacement de plages ou la lecture indexée. Vous
pouvez éteindre le répertoire musical pendant la lecture
dans ces différents modes, mais il réapparaîtra quand
vous changerez de mode.
10
F
9
Page 32

Lecture de CD
Æ
Pp
))00+c=
C
Localisation d’une plage
particulière
Vous pouvez rapidement localiser une plage pendant
la lecture d’un disque en utilisant les touches =/
+ (AMS: Automatic Music Sensor - Localisation
automatique de plage) ou les touches numériques de la
télécommande.
MUSIC SCAN
Touches
numériques
>20
Vous pouvez utiliser le balayage des intros avec la
lecture répétée, la lecture aléatoire et la lecture
programmée.
Localisation d’un point
particulier d’une plage
Vous pouvez localiser un point particulier d’une plage
tout en écoutant un disque.
Pp
·
= / +
Pour localiser
La plage ou les plages
suivantes (AMS)
La plage actuelle ou les
plages précédentes
(AMS)
Directement une plage
(sélection directe de
plage)
Une plage en écoutant
les 10 premières
secondes de chaque
plage (Balayage des
intros)
Pour localiser directement une plage supérieure à 20
Appuyez sur >20 de la télécommande, puis sur les
touches numériques correspondantes. Pour entrer “0”,
utilisez la touche 10.
Exemple: Pour écouter la plage numéro 30
Appuyez d’abord sur >20, puis sur 3 et 10.
Vous pouvez prolonger le temps de balayage des intros
(pendant la lecture ou à l’arrêt)
Appuyez de façon répétée sur MUSIC SCAN de la
télécommande jusqu’à ce que le temps de lecture
souhaité (10, 20 ou 30) apparaisse sur l’afficheur. A
chaque pression sur la touche, le temps de lecture
change de manière cyclique.
Chaque fois que vous appuyez sur MUSIC SCAN
pendant le balayage des intros, le temps de lecture est
F
10
prolongé en fonction du temps affiché.
Æ
))00+c=
C
Appuyez
de façon répétée sur + pendant
la lecture jusqu’à ce que vous
trouviez la plage
de façon répétée sur =
pendant la lecture jusqu’à ce que
vous trouviez la plage
sur la touche numérique
correspondante
1 sur MUSIC SCAN de la
télécommande avant ou pendant
la lecture.
2 Quand vous avez trouvé la
plage, appuyez sur · pour
commencer la lecture.
0 / )
C / c
Pour localiser un point
tout en écoutant le son
lentement tout en
écoutant le son
rapidement en
observant l’affichage
pendant la pause
avec un index (disques
indexés seulement)
Appuyez
sur + (avant) ou = (arrière)
et tenez enfoncée jusqu’à ce que
vous trouviez le point.
sur 0/) SLOW de la
télécommande et tenez enfoncée
jusqu’à ce que vous trouviez le
point.
sur 0/) et tenez enfoncée
jusqu’à ce que vous trouviez le
point. Dans ce cas, vous
n’entendez pas le son.
de façon répétée sur C/c de
la télécommande pendant la
lecture ou la pause jusqu’à ce que
vous trouviez le point.
0 / ) SLOW
Qu’est qu’un index ?
C’est un numéro qui divise une plage ou un disque en
sections permettant ainsi de repérer facilement un
point. Pour sávoir si un disque est indexé, contrôlez
l’emballage.
Remarque
Si “ ” apparaît sur l’afficheur, c’est que le disque a
atteint la fin de la dernière plage quand vous appuyez sur
les touches d’avance. Appuyez sur 0 ou = pour revenir
en arrière.
Page 33

Lecture répétée de plages
Vous pouvez écouter plusieurs fois de suite des plages
dans n’importe quel mode.
Lecture de CD
Répétition de la plage actuelle
Seule la plage que vous êtes en train d’écouter est
répétée.
Pendant que vous écoutez une plage, appuyez
plusieurs fois sur REPEAT de la télécommande jusqu’à
ce que “REPEAT 1” apparaisse sur l’afficheur.
Pour annuler la répétition de la plage actuelle
Appuyez sur REPEAT.
Remarque
Pendant la lecture d’un passage indexé, la plage actuelle ne
peut pas être répétée (voir page 19).
REPEAT
Pp
Æ
))00+c=
C
A ˜ B
Appuyez sur REPEAT de la télécommande tout en
écoutant un disque.
“REPEAT” apparaît sur l’afficheur. Le lecteur répète
les plages de la façon suivante:
REPEAT
SECMININDEX
Quand vous choisissez
La lecture continue (page 7)
La lecture aléatoire
(page 12)
La lecture programmée
(page 12)
La lecture avec effacement
de plages (page 13)
La lecture aléatoire avec
effacement de plages
(page 12, 14)
La lecture de passage
indexé (page 19)
Le lecteur répète
Toutes les plages
Toutes les plages dans un
ordre aléatoire
Le même programme
Toutes les plages restantes
Toutes les plages restantes
dans un ordre aléatoire
Le passage entre deux index
Pour annuler la lecture répétée
Appuyez plusieurs fois sur REPEAT jusqu’à ce que
“REPEAT” disparaisse de l’afficheur.
Répétition d’un passage particulier
(Répétition de A ˜ B)
Vous pouvez écouter de façon répétée un passage
précis d’une plage. Cette fonction est utile si l’on veut
apprendre un texte, par exemple.
Vous devez toutefois noter qu’il n’est pas possible de
répéter un passage s’étendant sur deux plages.
1 Pendant la lecture d’un disque, appuyez sur A
˜ B de la télécommande au point où la
répétition doit commencer (point A).
“A-” de “REPEAT A-” clignote sur l’afficheur.
2 Quand vous avez atteint la fin du passage (point
B), appuyez une nouvelle fois sur A ˜ B.
“REPEAT A-B” apparaît. Le lecteur répète ce
passage précis.
Pour annuler la répétition de A ˜ B
Appuyez sur REPEAT.
Réglage d’un nouveau début
Vous pouvez passer au passage suivant en changeant
seulement le point indiquant le début.
1 Appuyez sur A ˜ B quand le lecteur répète un
passage particulier.
La fin du passage (point B) devient le début du
nouveau passage (point A). “A-” de “REPEAT A-”
clignote sur l’afficheur.
2 Quand vous atteignez la fin du passage (point B),
appuyez une nouvelle fois sur A ˜ B.
“REPEAT A-B” apparaît. Le lecteur répète le passage
entre les deux nouveaux points.
Vous pouvez recommencer à partir du point A quand
vous voulez
Appuyez sur · pendant la répétition de A ˜ B.
11
F
Page 34

Lecture de CD
Æ
Pp
))00+c=
C
Lecture de plages dans un
ordre quelconque (Lecture
aléatoire) Z
Le lecteur peut mélanger les plages pour les reproduire
dans un ordre aléatoire.
SHUFFLE
Pp
·
1 Appuyez sur SHUFFLE de la télécommande.
“SHUFFLE” et le répertoire musical apparaissent
sur l’afficheur.
SHUFFLE
Æ
))00+c=
C
162738495
10
Création de votre propre
programme (Lecture
programmée) Z
Vous pouvez choisir l’ordre des plages d’un disque
pour créer votre propre programme. Un programme
peut contenir au maximum 24 plages.
CONTINUE
Touches
numériques
>20
CHECK
·
1 Appuyez sur PROGRAM de la télécommande.
“PROGRAM” apparaît sur l’afficheur.
PROGRAM
PROGRAM
CLEAR
p
162738495
10
2 Appuyez sur · pour commencer la lecture
aléatoire.
Le symbole
apparaît pendant que le lecteur
mélange les plages.
Pour annuler la lecture aléatoire
Appuyez sur CONTINUE de la télécommande.
Vous pouvez démarrer la lecture aléatoire en cours
de lecture
Appuyez sur SHUFFLE de la télécommande. La lecture
aléatoire commence à partir de la plage en cours.
Vous pouvez exclure des plages pendant la lecture
aléatoire (Lecture aléatoire avec effacement de
plages)
Appuyez sur la touche numérique correspondant à la
plage que vous voulez effacer pendant que “SHUFFLE”
apparaît sur l’afficheur.
Le numéro de plage et “OFF” apparaissent sur
l’afficheur, puis le numéro de plage disparaît du
répertoire musicale.
Si vous voulez rétablir une plage, appuyez de nouveau
sur la touche numérique.
Pour rétablir toutes les plages, appuyez sur p˛ quand le
F
12
lecteur est à l’arrêt.
2 Appuyez sur les touches numériques
correspondant aux plages que vous voulez
programmer dans un certain ordre.
Pour programmer des plages supérieures à 20,
utilisez la touche >20 de la télécommande (voir
page 10).
PROGRAM
STEP
Dernière plage
programmée
Ordre de
lecture
SECMIN
Temps de
lecture total
2
5
8
Plages
programmées
En cas d’erreur
Appuyez sur CLEAR, puis appuyez sur la touche
numérique correcte.
3 Appuyez sur · pour commencer la lecture
programmée.
Pour annuler la lecture programmée
Appuyez sur CONTINUE de la télécommande.
Page 35

Quand des plages non consécutives du disque sont
Æ
Pp
))00+c=
C
programmées dans un ordre consécutif (ex. 1, 3, 5,
etc.)
Un passage vierge d’une seconde est programmé entre
les plages.
Lecture de CD
Lecture de plages particulières
(Lecture avec effacement de
plages)
Le programme n’est pas supprimé après la lecture
programmée
Quand vous appuyez sur ·, vous pouvez écouter une
nouvelle fois le même programme.
Remarques:
• “––.––” apparaît au lieu du temps de lecture total si la
programmation dépasse 100 minutes.
• “FULL” apparaît sur l’afficheur quand vous essayez
d’ajouter une plage à un programme qui en contient déjà
24.
• La programmation est supprimée à la mise hors tension
du lecteur seulement et le mode de lecture redevient
normal (lecture continue).
Vérification de l’ordre des plages
Vous pouvez vérifier l’ordre de plages que vous avez
programmées avant d’écouter le disque.
Appuyez sur CHECK.
A chaque pression sur cette touche, l’afficheur indique
un numéro de plage dans l’ordre programmé et le
temps de lecture total. Après la dernière plage du
programme, l’afficheur indique “End” puis l’affichage
original réapparaît. Si vous vérifiez l’ordre des plages
alors que la lecture a déjà commencé, seuls les numéros
des plages restantes apparaissent.
Changement de l’ordre des plages
Vous pouvez modifier la programmation avant de
commencer la lecture.
Vous pouvez exclure certaines plages pour n’écouter
que les plages qui restent.
CONTINUE
Touches
numériques
>20
·
SHUFFLE
CLEAR
1 Appuyez sur “SHUFFLE” de la télécommande.
“SHUFFLE” apparaît sur l’afficheur.
SHUFFLE
162738495
10
2 Appuyez sur les touches numériques
correspondant aux plages que vous voulez
effacer.
Les numéros de plage disparaissent du répertoire
musical après l’affichage momentané du numéro
de plage et de “OFF”.
Pour exclure une plage supérieure à 20, utilisez la
touche >20 (voir page 10).
Pour
Effacer une plage
Effacer la dernière
plage du programme
Ajouter des plages à
la fin du programme
Changer
complètement le
programme
Appuyez sur
CHECK jusqu’à ce que la plage que
vous voulez effacer apparaisse, puis
appuyez sur CLEAR
CLEAR à l’arrêt. A chaque pression
sur la touche, la dernière plage est
effacée.
Les touches numériques
correspondant aux plages qui
doivent être ajoutées
p à l’arrêt. Créez un nouveau
programme comme indiqué
ci-dessus.
En cas d’erreur
Appuyez une nouvelle fois sur la touche numérique
correspondant à la plage. Le numéro de plage et “ON”
apparaissent sur l’afficheur et la plage est rétablie.
3 Quand vous avez exclu toutes les plages que vous
ne voulez pas écouter, appuyez sur CONTINUE.
“SHUFFLE” disparaît de l’afficheur.
4 Appuyez sur · pour commencer la lecture.
Pour annuler la lecture avec effacement de plages
Appuyez sur p quand le lecteur est à l’arrêt. Toutes les
plages effacées réapparaissent.
Le lecteur conserve en mémoire les plages effacées
même quand la lecture est terminée
Quand vous appuyez sur ·, vous pouvez écouter une
nouvelle fois les plages restantes seulement.
13
F
Page 36

Lecture de CD
Vous pouvez écouter les plages dans un ordre
aléatoire (Lecture aléatoire avec effacement de
plages)
Sautez l’étape 3 de l’opération précédente.
Vous pouvez effacer une plage en cours de lecture
Appuyez sur CLEAR quand une plage est reproduite.
Le lecteur exclut cette plage et la plage suivante est
reproduite.
Les plages effacées de chaque disque peuvent être
mémorisées
Voir “Mémorisation de certaines plages particulières
d’un disque” à la page 20.
14
F
Page 37

Enregistrement de CD
Enregistrement de votre
propre pr ogramme
Vous pouvez enregistrer le programme que vous avez
créé sur une cassette, une cassette DAT ou un MD. Le
programme peut contenir au maximum 24 plages.
En insérant une pause pendant la programmation,
vous pouvez scinder le programme en deux pour
l’enregistrement sur les deux faces d’une cassette.
PROGRAM
Touches
numériques
>20
CHECK
Pp
·
Æ
))00+c=
C
P
Enregistrement de CD
Un espace vierge de 3 secondes peut être inséré
automatiquement entre chaque plage
Utilisez l’espacement automatique (voir page 17).
Vous pouvez vérifier le temps de lecture total
pendant la programmation (Montage programmé)
Vous pouvez ainsi trouver la dernière plage pouvant
s’insérer sur une face de la cassette.
1 Appuyez sur PROGRAM de la télécommande.
“PROGRAM” apparaît sur l’afficheur.
2 Appuyez sur = ou + jusqu’à ce que la plage
souhaitée apparaisse sur l’afficheur.
Le temps total de lecture et la plage sélectionnée
apparaissent sur l’afficheur et le numéro de
programmation clignote.
3 Appuyez sur PROGRAM de la télécommande pour
confirmer votre choix.
4 Refaites les opérations 2 et 3 pour programmer
d’autres plages.
Pour vérifier ou changer votre programme
Voir page 13.
“SIDE-A” apparaît pendant le contrôle des plages
programmées pour la face A et “SIDE-B” pendant le
contrôle des plages programmées pour la face B.
1 Créez un programme (pour la face A lors de
l’enregistrement sur une cassette) tout en vérifiant
le temps total de lecture sur l’afficheur.
Effectuez les opérations 1 et 2 de “Création de
votre propre programme” à la page 12.
2 Si vous enregistrez sur les deux faces de la
cassette, appuyez sur P pour insérer une pause.
L’indication “P” apparaît sur l’afficheur et le
temps de lecture revient à “0:00”.
Si vous enregistrez sur une seule face de la
cassette ou sur une cassette DAT ou un MD,
sautez cette étape et passez à l’étape 4.
Une pause compte comme plage
Vous pouvez programmer 23 plages si vous insérez une
pause.
3 Refaites l’opération 1 pour créer le programme
pour la face B.
4 Commencez l’enregistrement sur la platine, puis
appuyez sur ·du lecteur.
Si vous enregistrez sur les deux faces de la
cassette, le lecteur fait une pause à la fin du
programme créé pour la face A.
5 Quand vous enregistrez sur la face B, inversez la
cassette et appuyez sur P ou · du lecteur pour
poursuivre la lecture.
15
F
Page 38

Enregistrement de CD
Æ
Pp
))00+c=
C
Entrée et sortie en fondu
Vous pouvez effectuer manuellement un fondu pour
que les plages ne commencent pas et ne s’arrêtent pas
abruptement.
Vous ne pouvez pas utiliser le fondu avec les liaisons
DIGITAL OUT.
Touches
numériques
FADER
Pp
Æ
))00+c=
C
Pour
Commencer la lecture
avec un fondu
Terminer la lecture avec
un fondu
Appuyez sur FADER
pendant la pause. “FADE”
clignote et la lecture commence en
fondu.
quand vous voulez commencer la
sortie en fondu. “FADE” clignote
et la lecture sort en fondu, puis le
lecteur fait une pause.
Changement de la durée du fondu
Vous pouvez changer la durée du fondu et choisir de 2
et 10 secondes avant l’entrée ou la sortie en fondu. Si
vous ne faites aucun changement, la durée est
automatiquement de 5 secondes.
0 / )
Conseils utiles pour
l’enregistrement
L’utilisation des fonctions suivantes facilite
l’enregistrement de CD.
SPACE
Réglage du niveau d’enregistrement
(Recherche de crête)
Le lecteur localise le niveau le plus élevé de toutes les
plages qui doivent être enregistrées pour ajuster le
niveau d’enregistrement avant que vous ne
commenciez l’enregistrement.
1 Avant de commencer la lecture, appuyez sur
PEAK SEARCH de la télécommande.
“PEAK” clignote sur l’afficheur et le lecteur
répète le passage dont le niveau est le plus élevé
pendant quatre secondes.
2 Ajustez le niveau d’enregistrement sur la platine.
PEAK SEARCH
p
1 Appuyez sur FADER de la télécommande avant
de commencer la lecture.
“5 SEC” apparaît et “FADE” clignote sur
3 Appuyez sur p˛ du lecteur pour arrêter la
recherche de crête.
“PEAK” disparaît de l’afficheur.
l’afficheur.
Remarque
2 Appuyez sur la touche numérique (2 - 10) pour
désigner la durée du fondu.
(Vous pouvez aussi appuyer de façon répétée sur
0 ou ) jusqu’à ce que la durée souhaitée
Le passage au niveau le plus élevé peut être un peu différent
chaque fois que vous faites le réglage pour le même disque.
Cette différence est cependant minime et ne devrait pas
empêcher de régler précisément le niveau d’enregistrement.
apparaisse.)
Remarques
• La durée de fondu désignée ne change pas même à la mise
hors tension du lecteur.
• Quand vous utilisez la fonction de fichier personnel (page
18), la durée de fondu est mémorisée pour chaque disque.
F
16
Page 39

Localisation de chaque plage avec la
fonction AMS (Espacement automatique)
L’espacement automatique permet d’insérer un
passage vierge de 3 secondes entre chaque plage
pendant la lecture et de localiser ensuite chaque plage
en utilisant la fonction AMS de la platine à cassette.
Avant de commencer la lecture, appuyez sur SPACE.
“AUTO SPACE” apparaît sur l’afficheur.
Pour annuler l’espacement automatique
Appuyez sur SPACE jusqu’à ce que “AUTO SPACE”
disparaisse de l’afficheur.
Remarque
Si vous utilisez la fonction d’espacement automatique
pendant l’enregistrement, par exemple, d’un pot-pourri ou
d’une symphonie, le son peut être interrompu quand le
numéro de plage change, et en particulier quand les
numéros de plage changent au milieu d’un morceau.
Enregistrement de CD
17
F
Page 40

Mémorisation d’informations (Fichiers personnels)
Combien de disques peut-on classer ?
Possibilités offertes par les
fichiers personnels
Le lecteur peut mémoriser 2 types d’informations pour
chaque disque dans ce qu’on appelle les “Fichiers
personnels”. Quand vous avez mémorisé des fichiers
personnels pour un disque, le lecteur rappelle
automatiquement tout ce qui a été mémorisé quand
vous insérez le disque.
Les fichiers mémorisés peuvent rester en mémoire
même si vous n’utilisez pas le lecteur pendant 1 mois.
Les informations suivantes peuvent être
mémorisées:
Quand vous utilisez
L’indexation
personnelle (page 19)
La banque de plages
effacées (page 20)
L’indicateur de fichier personnel correspondant
s’allume quand vous mémorisez des informations.
Vous pouvez
marquer jusqu’à 8 points sur le
disque (pour un disque de 32
plages ou moins) ou 5 points
(pour un disque de plus de 32
plages)
effacer des plages et mémoriser
seulement les plages souhaitées.
C.FILE
DELETE
INDEX
Banque de plages
effacées
Indexation
personnelle
Vous pouvez classer jusqu’à 224 disques dans les
fichiers personnels. Un disque compte pour deux
quand vous mémorisez un index personnel et la
banque de plages effacées en même temps.
Vous pouvez savoir combien de disques ont
été classés
1 Enlevez le disque du lecteur.
2 Fermez le volet du logement de disque.
3 Appuyez sur TIME quand le répertoire musical
n’est pas affiché.
Le nombre de fichiers personnels que vous pouvez
faire apparaît sur l’afficheur.
Effacement de fichiers personnels
Quand la mémoire de fichiers personnels est pleine, le
lecteur affiche “FULL” quand vous appuyez sur FILE
pour mémoriser des informations, et vous ne pouvez
pas stocker d’informations pour d’autres disques. Le
cas échéant, effacez des fichiers de la manière suivante:
Pour effacer les fichiers personnels de tous les disques
Tout en tenant 0 et p enfoncées, appuyez sur POWER pour
mettre le lecteur sous tension. “AL-CLr” apparaît sur
l’afficheur et tous les fichiers personnels sont effacés.
18
Quand vous mémorisez un fichier personnel pour un
disque, le lecteur se souvient de la manière dont le
disque a été lu avant que vous ne l’enleviez du lecteur
(mémorisation du dernier mode). Quand vous insérez
à nouveau le même disque, il est reproduit dans le
même mode. La durée du fondu que vous avez
éventuellement préréglée est aussi mémorisée.
Notez toutefois que si vous commencez la lecture en
appuyant sur · et fermant le volet, le disque est
reproduit dans le mode actuellement sélectionné et non
pas dans le mode mémorisé.
Où sont stockés les fichiers personnels ?
Les fichiers personnels sont stockés dans la mémoire
du lecteur et non pas sur le disque. Par conséquent,
vous ne pouvez pas utiliser un fichier personnel si le
disque est reproduit sur un autre lecteur.
F
Page 41

Mémorisation d’informations (Fichiers personnels)
Indexation d’un disque (Index
personnels)
5 Appuyez une nouvelle fois sur FILE pour
mémoriser l’index personnel.
“INDEX” de l’indicateur de fichier personnel
s’allume sur l’afficheur.
Vous pouvez inscrire 8 index sur un disque de 32
plages au maximum ou 5 index sur un disque de plus
de 32 plages, ce qui vous permettra de localiser
facilement un point précis par la suite.
Cette fonction peut être utile quand vous écoutez des
symphonies ou concertos, par exemple, où un morceau
est divisé en plusieurs plages (voir l’exemple suivant).
Exemple
No. de
plage
No. d’index
personnel
Touches
numériques
CHECK
C / c
Premier
morceau
123456789
123
Æ
C
Second
morceau
Pp
))00+c=
Troisième
morceau
C.INDEX
FILE
ERASE
0 / )
1 Posez un disque.
2 Appuyez sur C.INDEX de la télécommande.
“CUSTOM INDEX” apparaît sur l’afficheur.
Le répertoire musical disparaît.
C.INDEX
SECMIN
CUSTOM INDEX
3 Appuyez sur FILE au point où vous voulez inscrire
l’index.
Le numéro d’index personnel clignote sur
l’afficheur. Le lecteur répète le passage pendant 3
secondes à partir du point qui doit être indexé.
4 Appuyez sur 0 ou ) pour trouver le point
exact où l’index doit être inscrit.
Si vous appuyez 7 fois sur ces touches, le point est
déplacé d’une seconde environ vers la droite ou la
gauche.
6 Pour inscrire d’autres index personnels, refaites les
opérations 3 à 5.
Si vous savez déjà où vous voulez inscrire l’index
Vous pouvez directement inscrire l’index sans ajuster le
point. Quand vous trouvez le point, appuyez d’abord sur
P pour interrompre la lecture, puis sur FILE pour
inscrire l’index.
“INDEX” apparaît sur l’afficheur.
Lecture à partir d’un point indexé (Lecture
indexée)
1 Appuyez sur C.INDEX de la télécommande.
“CUSTOM INDEX” apparaît sur l’afficheur.
2 Localisez l’index personnel que vous souhaitez de
la façon suivante:
Pour localiser
L’index personnel
suivant
L’index personnel actuel
Un index personnel
précis
Tous les passages indexés
en les balayant pendant
10 secondes
La lecture commence à partir de l’index
sélectionné et se poursuit jusqu’à la fin du disque.
Pour annuler la lecture indexée
Appuyez sur CONTINUE de la télécommande.
Remarques
• Vous ne pouvez pas utiliser dans ce cas la recherche
automatique d’index (voir page 10).
• Utilisez les touches C/c pour localiser les index
précédents ou suivants au lieu des touches =/+.
Lecture d’un passage entre deux index (Lecture de
passage indexé)
1 Appuyez sur C.INDEX de la télécommande.
“CUSTOM INDEX (1)” apparaît sur l’afficheur.
2 Appuyez sur la touche numérique correspondant à
l’index souhaité.
La lecture commence à partir de cet index et s’arrête au
début de l’index suivant.
Pour annuler cette fonction, appuyez sur C.INDEX de la
télécommande.
Appuyez sur
c pendant la lecture
C pendant la lecture
la touche numérique
correspondant à l’index
personnel
MUSIC SCAN pendant l’arrêt
ou la lecture. Quand vous avez
trouvé le point souhaité,
appuyez sur · pour
commencer la lecture.
Si vous ne voulez pas inscrire d’index à cet endroit
Appuyez sur CLEAR et recherchez un autre point.
Un passage entre deux index peut être répété
Appuyez simplement sur REPEAT.
19
F
Page 42

Mémorisation d’informations (Fichiers personnels)
Effacement des index personnels
1 Posez un disque.
2 Appuyez sur C.INDEX.
“CUSTOM INDEX” apparaît sur l’afficheur.
3 Appuyez de façon répétée sur CHECK jusqu’à ce
que le numéro d’index qui doit être effacé clignote.
4 Appuyez sur ERASE pendant que le numéro
clignote pour effacer l’index.
Les numéros d’index suivants diminuent d’une
unité.
Mémorisation de plages
particulières d’une disque
(Banque de plages effacées)
Vous pouvez exclure les plages que vous n’aimez pas
et mémoriser seulement celles qui restent, ce qui vous
permet d’écouter vos plages préférées sans avoir à
supprimer celles que vous n’aimez pas chaque fois que
vous insérez un disque.
Lecture avec la banque de plages effacées
1 Appuyez sur CONTINUE.
La banque de plages effacées est rappelée et les
numéros de plage sélectionnés apparaissent dans
le répertoire musical.
2 Appuyez sur · pour commencer la lecture.
Pour arrêter la lecture avec la banque de plages effacées
Appuyez sur p.
Pour reprendre la lecture avec la banque de plages
effacées
Quand “PROGRAM” ou “CUSTOM INDEX” apparaît sur
l’afficheur, appuyez de façon répétée sur CONTINUE ou
SHUFFLE jusqu’à ce que ces indications disparaissent de
l’afficheur. La banque de plages effacées est rappelée et vous
pouvez commencer la lecture en appuyant sur ·.
La lecture aléatoire est possible quand vous utilisez la
banque de plages effacées
A l’étape 1, appuyez de façon répétée sur SHUFFLE de la
télécommande jusqu’à ce que “SHUFFLE” apparaisse sur
l’afficheur.
Suppression de la banque de plages
effacées
FILE
Pp
·
Æ
))00+c=
C
ERASE
1 Posez un CD.
2 Effacez les plages que vous ne voulez pas écouter.
Effectuez les opérations indiquées dans 1 à 3 de
“Lecture de plages particulières” à la page 13.
3 Appuyez sur FILE de la télécommande pour
mémoriser les plages restantes.
“DELETE” dans l’indicateur de fichier personnel
s’allume sur l’afficheur.
1 Posez un disque.
2 Appuyez sur CONTINUE ou SHUFFLE.
La banque de plages effacées apparaît sur
l’afficheur.
3 Appuyez sur ERASE pour supprimer la banque de
plages effacées
“DELETE” dans l’indicateur de fichier personnel
disparaît.
20
F
Page 43

Informations complémentaires
Informations complémentaires
Remarques sur les CD
Manipulation des CD
• Tenez les disques par le bord pour ne pas les salir. Ne
touchez pas la surface.
• Ne collez pas d’étiquette ni de ruban adhésif sur les
disques.
Non
• Ne pas exposer le disque à la lumière directe du soleil ni à
une source de chaleur, comme un conduit d’air chaud. Ne
pas les laisser dans une voiture garée en plein soleil, car la
température à l’intérieur de l’habitacle peut s’élever
considérablement.
• Ne pas utiliser de stabilisateur en vente dans le commerce
ni d’enveloppe de protection. Les disques aussi bien que le
lecteur pourraient être endommagés.
• Après avoir écouté un disque, rangez-le dans son boîtier.
Nettoyage
• Avant d’écouter un disque, nettoyez-le avec un chiffon de
nettoyage. Essuyez du centre vers la périphérie.
Guide de dépannage
Si les problèmes suivants se présentent quand vous
utilisez le lecteur, lisez ce guide pour essayer de
trouver la solution. Si la difficulté persiste, contactez
votre revendeur Sony.
Aucun son.
/Vérifiez si le lecteur est bien raccordé.
/Vérifiez si vous utilisez l’amplificateur
correctement.
/Réglez le niveau de lecture avec la commande
LINE OUT/PHONE LEVEL.
/Tous les commutateurs DIGITAL OUT à
l’arrière du lecteur sont sur OFF. Quand vous
utilisez une liaison numérique, réglez le
commutateur correspondant sur ON.
Le CD n’est pas reproduit.
/Il n’y a pas de CD dans le lecteur. Insérez un
CD.
/Utilisez le stabilisateur.
/Posez le CD correctement sur le plateau avec la
face imprimée dirigée vers le haut.
/Nettoyez le CD.
/De la condensation d’humidité s’est formée à
l’intérieur du lecteur.
Enlevez le disque et laissez le lecteur sous
tension pendant environ une heure
(voir page 2).
• Ne pas utiliser de solvants comme la benzine, ni de
diluants, produits de nettoyage ou produits antistatiques
pour disques vinyle en vente dans le commerce.
La télécommande ne fonctionne pas.
/Enlevez les obstacles entre la télécommande et
le lecteur.
/Dirigez la télécommande vers la capteur de
rayons infrarouges g du lecteur.
/Remplacez toutes les piles de la télécommande
par des neuves si elles sont faibles.
21
F
Page 44

Informations complémentaires
Spécifications
Lecteur de disque compact
Laser Laser semiconducteur (λ = 780 nm)
Durée d’émission: continue
Sortie laser Max. 44,6 µW*
* Cette sortie est la valeur mesurée à
une distance de 200 mm de la surface
du bloc du capteur optique avec une
ouverture de 7 mm
Longueur d’onde 780 - 790 nm
Réponse en fréquence 2 Hz à 20 kHz ± 0,3 dB
Plage dynamique supérieure à 100 dB
Séparation des canaux supérieure à 100 dB
Distorsion harmonique Inférieure à 0,003%
Sorties
Généralités
Alimentation Secteur 220-230 V, 50/60 Hz
Consommation 18 W
Dimensions hors tout Env. 280 x 90 x 370 mm
(l/h/p) (11 x 3
Poids Env. 6 kg (13 li. 4 on.)
9
/16 x 14 9/16 po.)
Accessoires fournis
Cordon de liaison audio (1)
Télécommande (infrarouge) (1)
Piles Sony SUM-3(NS) (2)
Stabilisateur (1)
Feutre (1)
Cordon d’alimentation (1)
La conception et les spécifications sont modifiables sans préavis.
Impédance de
charge
Supérieure à
1 kilohm
75 ohms
_
Supérieure à
100 ohms
LINE OUT
DIGITAL
OUT
(COAXIAL)
DIGITAL
OUT
(OPTICAL)
DIGITAL
OUT
(BALANCED)
Type de
prise
Prises
Cinch
Connecteur
de sortie
coaxiale
Connecteur
de sortie
optique
XLR-3-32
Niveau de sortie
maximal
2,5 V (à 50
kilohms)
0,5 Vc-c
(75 ohms)
–18 dBm
(Longueur
d’ondes: 660 nm)
5 V (à 50 kilohms)
Description du panneau arrière
Reportez-vous aux pages entre parenthèses pour les détails.
1
LINE OUT
234
DIGITAL OUT
OPTICAL
OFF ON
L
R
COAXIAL
OFF ON
BALANCED
OFF ON
5
AC IN (230V)
22
1 Sortie de ligne (LINE OUT) (5)
2 Commutateur de sortie numérique optique
(DIGITAL OUT OPTICAL) (5)
3 Commutateur de sortie numérique coaxiale
(DIGITAL OUT COAXIAL) (5)
4 Commutateur de sortie numérique symétrique
F
(DIGITAL OUT BALANCED) (5)
8 7 6
5 Entrée secteur (AC IN (230 V)) (6)
6 Sortie numérique symétrique (DIGITAL OUT
BALANCED) (5)
7 Sortie numérique coaxiale (DIGITAL OUT
COAXIAL) (5)
8 Sortie numérique optique (DIGITAL OUT
OPTICAL) (5)
Page 45

Index
Informations complémentaires
A
AMS 10
B, C
Balayage des intros 10
Balayage. Voir Balayage des
intros
Banque de plages effacées 20
D
Déballage 4
E
Effacement
Banque de plages effacées
20
Fichiers personnels 19
Index personnel 19
Enregistrement 15
d’un programme 15
Espacement automatique 17
F
Fichiers personnels 18
Banque de plages effacées
20
Indexation personnelle 19
Possibilités offertes 18
Fondu 16
G, H
Guide de dépannage 21
Index 10
Personnel 19
I, J, K
Indexation personnelle 19
M, N, O
Manipulation des CD 21
Mémorisation
informations CD 18
du dernier mode 18
plages particulières 20
Montage. Voir Enregistrement
Montage programmé 15
P, Q
Programme 12, 13
changement 13
pour l’enregistrement 15
vérification 13
R
Raccordement 4, 5, 6
Aperçu
Recherche automatique de
plage. Voir AMS
Recherche de crête 16
Recherche. Voir Localisation
Répertoire musical 9
Répétition
toutes les plages 11
un passage particulier 11
Répétition A ˜ B 11
S
Stabilisateur 2
T, U, V, W, X, Y, Z
Télécommande 9
Temps de lecture total 9
Temps restant 9
Nomenclature
Touches
A˜ B11
SPACE 17
CHECK 13
C.INDEX 19
CLEAR 14
CONTINUE 8
DISPLAY MODE 9
ERASE 20
FADER 16
FILE 19
C / c 10, 19
MUSIC SCAN 10
PEAK SEARCH 16
PROGRAM 12
REPEAT 11
SHUFFLE 12
0/ ) SLOW 10
TIME 9
· 8
P 8
p 8
0 / ) 8, 10
= / + 8, 10
>20 10
Numériques 10
Interrupteurs et
sélecteurs
DIGITAL OUT 5
POWER 7
Divers
Afficheur 9
g 4
L
Lecture
aléatoire 12
aléatoire avec effacement de
plages 14
avec effacement de plages 13
continue 7
de passage indexé 19
indexée 19
programmée 12
répétée 11
Localisation
avec l’AMS 10
avec les index 10
avec les index personnels 19
directe 10
en balayant les intros 10
en écoutant le son 10
en observant l’afficheur 10
23
F
Page 46

• Die Unterseite des Stabilisators ist
VORSICHT
Zur besonderen
Beachtung
Um Feuer und die Gefahr eines
elektrischen Schlages zu
verhindern, darf das Gerät
weder Regen noch
Feuchtigkeit ausgesetzt
werden.
Um einen elektrischen Schlag
zu vermeiden, darf das
Gehäuse nicht geöffnet
werden. Überlassen Sie
Wartungsarbeiten nur einem
Fachmann.
Stellen Sie das Gerät nicht in
ein Bücherregal oder einen
geschlossenen Schrank.
Achten Sie darauf, daß
ausreichend Luftzufuhr um das
Gerät gewährleistet ist.
Bei diesem Gerät handelt es sich um
ein Produkt der Laser-Klasse 1. Ein
entsprechender Aufkleber befindet
sich an der Rückseite des Geräts.
Dieser Achtungsaufkleber befindet
sich im Gerät.
D
2
Zur Sicherheit
• Vorsicht: Benutzung von optischen
Instrumenten in der Nähe dieses
Geräts erhöht die Verletzungsgefahr
für Augen.
• Sollte ein Festkörper oder Flüssigkeit
in das Gehäuse gelangen, trennen Sie
das Gerät ab und lassen Sie es von
einem Fachmann überprüfen, bevor
Sie es weiterverwenden.
• Achten Sie darauf, daß Ihr Finger
nicht in der Plattenabdeckung
eingeklemmt wird.
Zur Stromversorgung
• Vor dem Betrieb des Geräts
vergewissern Sie sich, daß die
Betriebsspannung mit der örtlichen
Netzspannung übereinstimmt. Die
Betriebsspannung steht auf dem
Typenschild an der Rückseite des
Geräts.
• Das Gerät ist auch im ausgeschalteten
Zustand nicht vollständig vom
Stromnetz getrennt, solange es noch
an der Steckdose angeschlossen ist.
• Wenn das Gerät längere Zeit nicht
benutzt wird, trennen Sie es von der
Wandsteckdose ab. Zum Abtrennen
des Netzkabels fassen Sie stets am
Stecker und niemals am Kabel an.
Zur Aufstellung
• Stellen Sie das Gerät so auf, daß
ausreichende Luftzirkulation
gewährleistet ist, um einen internen
Hitzestau zu vermeiden.
• Stellen Sie das Gerät nicht auf eine
weiche Unterlage (Decke, Teppich,
usw.), da sonst die
Ventilationsöffnungen an der
Unterseite blockiert werden können.
• Stellen Sie das Gerät nicht in die Nähe
von Heizungen und auch nicht an
Plätze, die direktem Sonnenlicht,
starker Staubentwicklung oder
mechanischen Stößen ausgesetzt sind.
Für optimale Tonqualität
• Berühren Sie niemals die Linse im
Geräteinneren.
Zur Verwendung des Stabilisators
• Verwenden Sie nur den mitgelieferten
Stabilisator. Durch einen anderen
Stabilisator kann das Gerät beschädigt
werden.
sehr empfindlich; Kratzer
beeinträchtigen die Tonqualität.
Beim Auswechseln der CD legen Sie
den Stabilisator auf die mitgelieferte
Filzunterlage oder ein weiches Tuch.
Zum Betrieb
• Die Plattenabdeckung wird per Hand
geöffnet und geschlossen.
• Berühren Sie während des Betriebs
keine rotierenden Teile (CD usw.).
• Wenn das Gerät direkt von einem
kalten an einen warmen Ort gebracht
oder in einem sehr feuchten Raum
betrieben wird, kann Feuchtigkeit auf
den Linsen im Inneren kondensieren.
Das Gerät arbeitet dann nicht
einwandfrei. Nehmen Sie in einem
solchen Fall die CD heraus und
warten Sie im eingeschalteten
Zustand etwa eine Stunde lang ab, bis
die Feuchtigkeit verdunstet ist.
Zur Lautstärkeeinstellung
• Stellen Sie die Lautstärke während
der Wiedergabe einer leisen Passage
nicht zu hoch ein. Ansonsten können
bei plötzlich einsetzenden
hochpegligen Teilen die Lautsprecher
beschädigt werden.
Zum Einlegen der CD
• Nach dem Einlegen der CD ist
möglicherweise ein Pfeifgeräusch zu
hören. Dieses Geräusch wird durch
den internen
Plattenanpassungsmechanismus
verursacht.
Zur Reinigung
• Reinigen Sie das Gehäuse, das
Bedienungspult und die
Bedienungselemente mit einem
weichen, leicht mit mildem
Haushaltsreiniger angefeuchteten
Tuch. Scheuerschwämme,
Scheuerpulver und Lösungsmittel wie
Alkohol oder Benzin dürfen nicht
verwendet werden.
• Wenn das Innere der
Plattenabdeckung verschmutzt ist,
nehmen Sie die Abdeckung unter
Verwendung eines
Sechskantschlüssels (2,5 mm) ab.
Hinweis
Nur die Plattenabdeckung kann vom
Benutzer abgenommen werden.
Versuchen Sie nicht, andere Teile des
Geräts abzumontieren.
Page 47

Beim Transport
• Nehmen Sie stets die CD und den
Stabilisator heraus.
Bei weiterführenden Fragen wenden
Sie sich bitte an den nächsten Sony
Händler.
Willkommen!
Wir beglückwünschen Sie zum Kauf
dieses Sony CD-Spielers. Bevor Sie das
Gerät in Betrieb nehmen, lesen Sie diese
Anleitung sorgfältig durch, und heben
Sie sie zum späteren Nachschlagen gut
auf.
Zu dieser Anleitung
INHALTSVERZEICHNIS
Vorbereitung
Nach dem Auspacken 4
Anschluß 4
Wiedergabe einer CD 7
CD-Wiedergabebetrieb
Informationen im Display 9
Aufsuchen eines bestimmten Titels10
Aufsuchen einer bestimmten Stelle in einem Titel 10
Wiederholspielbetrieb 11
Zufalls-Wiedergabe (Shuffle) 12
Programm-Wiedergabe 12
Wiedergabe nur der Wunschtitel (Delete-Wiedergabe) 13
Überspielen einer CD
Überspielen von programmierten CD-Titeln 15
Ein- und Ausblenden 16
Nützliche Funktionen zur Erleichterung des Aufnahmebetriebs 16
D
Bitte beachten
• Die Anleitung behandelt die
Bedienungselemente an der
Fernbedienung. Sie können jedoch
auch die gleich oder ähnlich
markierten Tasten am Gerät
verwenden.
• Bedeutung der in der Anleitung
benutzten Symbole:
Steuerung nur über
Fernbedienung möglich.
Zusatzinformationen und Tips
zur Bedienungserleichterung.
Speichern von CD-Informationen (Custom File)
Wozu dienen die Custom Files? 18
Setzen von individuellen Indexpunkten (Custom Index)19
Speichern der Wunschtitel (Delete Bank) 20
Zusatzinformationen
Hinweise zu den CDs 21
Störungsüberprüfungen 21
Technische Daten 22
Teile an der Rückseite 22
Stichwortverzeichnis 23
D
3
Page 48

Vorbereitung
Nach dem Auspacken
Vergewissern Sie sich, daß die folgenden Teile
vorhanden sind:
• Audiokabel (1)
• Fernbedienung (1)
• Sony Batterien SUM-3 (NS) (2)
• Stabilisator (1)
• Filz (1)
• Netzkabel (1)
Einlegen der Batterien in die
Fernbedienung
Das Gerät kann von der mitgelieferten Fernbedienung
aus gesteuert werden. Legen Sie zwei Mignonzellen
(R6, Größe AA) mit richtiger +/– Polarität ein, und
richten Sie die Fernbedienung auf den mit g
gekennzeichneten Sensor am Gerät aus.
Anschluß
Überblick
Im folgenden wird der Anschluß des CD-Spielers an
den Verstärker behandelt. Bevor Sie Kabel anschließen,
schalten Sie alle Geräte aus.
OPTICAL-
Schalter
LINE OUT
LINE OUT
COAXIAL-
Schalter
DIGITAL OUT
OPTICAL
COAXIAL
OFF ON
L
R
OFF ON
DIGITAL OUT
OPTICAL
DIGITAL OUT
COAXIAL
BALANCED-
Schalter
BALANCED
OFF ON
DIGITAL OUT
BALANCED
CDP-X5000
AC IN (230V)
an Wandsteckdose
Wann müssen die Batterien ausgewechselt werden?
Bei normalem Betrieb halten die Batterien etwa sechs
Monate. Wenn keine Steuerung mit der Fernbedienung
mehr möglich ist, wechseln Sie die beiden Batterien aus.
Hinweise
• Legen Sie die Fernbedienung nicht an heiße und feuchte
Plätze.
• Achten Sie insbesondere beim Batteriewechsel darauf, daß
keine Fremdkörper in das Gehäuse der Fernbedienung
gelangen.
• Der Fernbedienungssensor darf keinem direkten
Sonnenlicht und keinen anderen hellen Lichtquellen
ausgesetzt sein, da es sonst zu Fehlfunktionen kommt.
• Wenn die Fernbedienung längere Zeit nicht benutzt wird,
nehmen Sie die Batterien heraus, um eine Beschädigung
durch Auslaufen und Korrosion zu vermeiden.
CD
ç: Signalfluß
Welche Kabel werden benötigt?
p Für Analoganschluß
• Audiokabel (mitgeliefert) (1)
Weiß (L)
Rot (R)
p Für Digitalanschluß
• Koaxialkabel VMC-10G (nicht mitgeliefert)
• Optokabel POC-15A (nicht mitgeliefert)
Verstärker
an Wandsteckdose
Weiß (L)
Rot (R)
• Symmetrisches Kabel mit Cannon-Steckern XLR-3-32
(nicht mitgeliefert)
D
4
Page 49

Vorbereitung
Anschluß
p Analoganschluß
Beachten Sie beim Anschließen der Kabel die Farben
der Buchsen am Gerät: Verbinden Sie Rot (rechter
Kanal) mit Rot und Weiß (linker Kanal) mit Weiß.
Stecken Sie die Stecker fest in die Buchsen ein, um
Brummen und andere Störgeräusche zu vermeiden.
CD-Spieler
LINE OUT
L
R
p Digitalanschluß
Bei dieser Anschlußart wird das Digitalsignal der
Signalquelle in digitaler Form übertragen, so daß
keine Qualitätsbeeinträchtigungen auftreten können.
Der Digitalausgang des CD-Spielers kann
beispielsweise mit dem Digitaleingang eines
Verstärkers, D/A-Konverters, DAT-Decks oder MDDecks verbunden werden. Ist ein DAT- oder MDDeck über ein Digitalkabel an den CD-Spieler
angeschlossen, können Sie die CD digital
überspielen. Beachten Sie, daß bei dieser
Anschlußart kein Ein- und Ausblenden (siehe Seite
16) des Aufnahmesignals möglich ist.
• Anschluß eines Digitalgeräts mit digitalem
Koaxialeingang
Schließen Sie das Digitalgerät über ein Koaxialkabel (nicht
mitgeliefert) an die DIGITAL OUT (COAXIAL)-Buchse
des CD-Spielers an.
CD-Spieler
DIGITAL OUT
OPTICAL
OFF ON
COAXIAL
OFF ON
BALANCED
OFF ON
Verstärker
TUNER CD AUX
L
R
INPUT
Digitalgerät
DIGITAL IN
COAXIAL
CD-Spieler
Digitalgerät
DIGITAL IN
OPTICAL
OPTICAL
OFF ON
DIGITAL OUT
COAXIAL
OFF ON
BALANCED
OFF ON
Nachdem Sie das Kabel angeschlossen haben, stellen
Sie den DIGITAL OUT OPTICAL-Schalter an der
Rückseite auf ON. Bei Nichtverwendung des
Optoausgangs stellen Sie den Schalter auf OFF.
• Anschluß eines Digitalgeräts (z.B. Verstärker) mit
symmetrischer Eingangsbuchse
Schließen Sie das Gerät über ein XLR-3-32-Cannonkabel
oder ein entsprechendes Kabel (nicht mitgeliefert) an die
BALANCED-Buchse an. Symmetrische Anschlüsse sind
aufgrund der Störeinstrahlungsfestigkeit häufig in
Tonstudios und im Rundfunkbereich zu finden.
Verwendung eines XLR-3-32-Kabels oder eines
entsprechenden Kabels (nicht mitgeliefert)
A
B
Einstecken des Steckers
Richten Sie die Teile A aufeinander aus, und stecken Sie
den Stecker fest ein.
Abtrennen des Steckers
Drücken Sie die Verriegelungstaste B, und ziehen Sie den
Stecker heraus.
Stiftbelegung
OUTIN
1: Erde
2: Phase
3: Masse
Nachdem Sie das Kabel angeschlossen haben, stellen
Sie den DIGITAL OUT COAXIAL-Schalter an der
Rückseite auf ON. Bei Nichtverwendung des
Koaxialausgangs stellen Sie den Schalter auf OFF.
• Anschluß eines Digitalgeräts mit digitalem
Optoeingang
Schließen Sie das Digitalgerät über ein Optokabel (nicht
mitgeliefert) an die DIGITAL OUT (OPTICAL)-Buchse des
CD-Spielers an. Nehmen Sie vor Anschluß des Optokabels
die Schutzkappe ab.
23 1
OPTICAL
OFF ON
CD-Spieler
DIGITAL OUT
COAXIAL
OFF ON
132
BALANCED
OFF ON
D/A-Konverter usw.
DIGITAL
AES/EBU
IN OUT
Nachdem Sie das Kabel angeschlossen haben, stellen
Sie den DIGITAL OUT BALANCED-Schalter an der
Rückseite auf ON. Bei Nichtverwendung des
symmetrischen Ausgangs stellen Sie den Schalter auf
OFF.
(Siehe Fortsetzung)
D
5
Page 50

Vorbereitung
Netzanschluß
1 Stecken Sie das mitgelieferte Netzkabel in die AC
IN (230 V)-Buchse an der Rückseite des Geräts.
2 Stecken Sie den Netzstecker des Kabels in die
Steckdose.
Die nächsten Schritte
Der CD-Spieler ist nun betriebsbereit.
Zur Wiedergabe einer CD siehe das nächste Kapitel.
D
6
Page 51

Grundlegender Betrieb
Wiedergabe einer CD
53, 4
f
Æ
+
=
power
)
0
S
p
P
Grundlegender Betrieb
Wenn der CD-Spieler mit
eingelegter CD
eingeschaltet wird
Etwa zehn Sekunden nach
dem Einschalten setzt
automatisch die Wiedergabe
ein. Ist ein handelsüblicher
Timer angeschlossen, kann
die Wiedergabe zu einer
vorprogrammierten Zeit
gestartet werden. Zum
exakteren Starten der
Wiedergabe drücken Sie P
oder ·, während PAUSE
blinkt.
Hinweise
• Legen Sie in Schritt 3 nur eine
CD ein. Wenn mehrere CDs
eingelegt werden, können die
CDs und/oder der CD-Spieler
beschädigt werden.
• Achten Sie beim Einlegen und
Herausnehmen der CD darauf,
die Linse im Inneren nicht zu
berühren.
1
Drücken Sie POWER, um den CD-Spieler einzuschalten.
1
Schalten Sie den Verstärker ein, und wählen Sie den Eingang
des CD-Spielers.
2
Öffnen Sie per Hand die Plattenabdeckung, nehmen Sie den
Stabilisator heraus, und legen Sie die CD ein.
3
p
P
=
)
0
power
Stabilisator
(mitgeliefert)
Æ
+
S
÷
mit der beschrifteten
Seite nach oben
(Siehe Fortsetzung)
p
P
Æ
+
=
)
S
0
power
D
7
Page 52

Grundlegender Betrieb
Mitgelieferter Stabilisator
(Seitenansicht)
oben
unten
Hinweis
Nach dem Einlegen der CD
legen Sie den mitgelieferten
Stabilisator auf die CD.
Die Wiedergabe kann
durch Drücken von ·
gestartet werden, bevor
Sie die Plattenabdeckung
schließen.
Wenn die Wiedergabe
nicht am ersten Titel
einsetzt
1 Drücken Sie wiederholt
CONTINUE an der
Fernbedienung, bis
SHUFFLE, PROGRAM
und CUSTOM INDEX im
Display erlischt.
2 Drücken Sie ·.
Display
SHUFFLE
PROGRAM
CUSTOM INDEX
Legen Sie den Stabilisator auf die CD, und schließen Sie dann
per Hand die Plattenabdeckung.
4
p
P
Æ
+
=
)
S
0
power
÷
power
Den mitgelieferten Stabilisator
auf die CD legen. (Darauf
achten, den Stabilisator
richtigherum auszurichten.)
Drücken Sie ·.
5
Die Anzeige · leuchtet auf, und die Wiedergabe beginnt am
ersten Titel.
Stellen Sie nun die Lautstärke am Verstärker ein.
Zum Stoppen der Wiedergabe
Drücken Sie p.
p
P
Æ
+
=
)
S
0
Beim Drücken von
CONTINUE erlöschen diese
Anzeigen.
=
)
0
power
0)=+
Gewünschte Funktion
Pause
Fortsetzen der Wiedergabe nach der Pause
Sprung zum nächsten Titel
Sprung zum vorausgegangenen Titel
Schnellvorlauf innerhalb eines Titels
Schnellrücklauf innerhalb eines Titels
p
P
Æ
+
S
ÆPp
Drücken Sie
P
P oder ·
+
=
)
0
D
8
Page 53

CD-Wiedergabebetrieb
Informationen im Display
Verschiedene Informationen können in das Display
abgerufen werden.
CD-Wiedergabebetrieb
Zum Anzeigen der Restzeit
Drücken Sie während der CD-Wiedergabe TIME an
der Fernbedienung.
Durch wiederholtes Drücken von TIME können
nacheinander die folgenden Informationen in das
Display abgerufen werden.
TIMEDISPLAY
MODE
Pp
Æ
))00+c=
C
Zum Anzeigen der Gesamtanzahl und der
Gesamtspielzeit der Titel
Drücken Sie im Stoppbetrieb TIME an der
Fernbedienung.
Gesamtanzahl und Gesamtspielzeit der Titel
erscheinen dann wie folgt im Display.
SECMIN
Spielzeit und
Nummer des
momentanen
Titels
Drücken
Restzeit des
momentanen
Titels
Drücken
Restzeit der
CD
Wenn im Programmbetrieb die Restzeit länger als 100
Minuten ist, erscheint statt der Restzeit die Anzeige
––.––.
Drücken
INDEX
INDEX
SECMIN
SECMIN
SECMIN
Zum Anzeigen des Musikkalenders
Der Musikkalender zeigt alle Titelnummern der
momentanen CD übersichtlich an.
Drücken Sie DISPLAY MODE an der Fernbedienung.
Durch wiederholtes Drücken von DISPLAY MODE
kann zyklisch zwischen den folgenden Anzeigen
umgeschaltet werden.
Gesamtanzahl
der Titel
Gesamtspielzeit
Diese Informationen erscheinen auch nach Schließen
der Plattenabdeckung.
Angezeigte Informationen während der CDWiedergabe
Während eine CD wiedergegeben wird, zeigt das
Display die momentane Titelnummer, die
Indexnummer und die Spielzeit an.
SECMININDEX
Spielzeit
Momentane
Titelnummer
Indexnummer (siehe Seite 10) oder
Custom-Indexnummer (siehe Seite 19)
SECMIN
Drücken
SECMIN
Drücken
• Wenn die CD mehr als 15 Titel enthält, erscheint im
Musikkalender neben der Ziffer 15 das Symbol ”.
• Wenn ein Titel abgespielt ist, erlischt die betreffende
Nummer im Titelkalender.
162738495
Beim Ausschalten des CD-Spielers wird die
Musikkalender-Einstellung gespeichert.
Im Programm-Wiedergabebetrieb, im WunschtitelWiedergabebetrieb (Delete), im Wunschtitel-ZufallsWiedergabebetrieb (Delete Shuffle) und im PassagenWiedergabebetrieb (Custom Index) wird der
Musikkalender automatisch zunächst angezeigt. Sie
können den Musikkalender in diesen
Wiedergabebetriebsarten zwar ausschalten, beim
Umschalten der Betriebsart erscheint er jedoch wieder.
10
D
9
Page 54

CD-Wiedergabebetrieb
Æ
Pp
))00+c=
C
Aufsuchen eines bestimmten
Titels
Während der CD-Wiedergabe können durch Drücken
der =/+ AMS-Tasten (Automatic Music Sensor)
oder der Nummerntasten der Fernbedienung zu einem
beliebigen anderen Titel gesprungen werden.
Wird MUSIC SCAN während der Music ScanWiedergabe gedrückt, verlängert sich die Spielzeit um
den angegebenen Wert.
Auch im Wiederholspielbetrieb, im Zufalls- und
Programmbetrieb kann die Music Scan-Funktion
verwendet werden.
Aufsuchen einer bestimmten
Nummerntasten
>20
·
= / +
Suchbetrieb
Sprung zum Anfang des
nächsten oder eines
nachfolgenden Titels
(AMS)
Sprung zum Anfang des
momentanen oder eines
vorausgegangenen
Titels (AMS)
Sprung zu einem
bestimmten Titel
(Direktsprung)
Zehnsekündiges
Anspielen aller Titel
(Music Scan)
MUSIC SCAN
Pp
Æ
))00+c=
C
Drücken Sie
+ wiederholt während der
Wiedergabe, bis der gewünschte
Titel erreicht ist.
= wiederholt während der
Wiedergabe, bis der gewünschte
Titel erreicht ist.
die Nummerntasten des Titels.
1 Vor oder während der
Wiedergabe MUSIC SCAN an
der Fernbedienung drücken.
2 Wenn der gewünschte Titel
erreicht ist, die Wiedergabe
durch Drücken von · starten.
Stelle in einem Titel
Während der Wiedergabe können Sie wie folgt zu
einer anderen Stelle des Titels vor- oder zurückfahren.
0 / )
C / c
Suchbetrieb
Anhand des
Mithörtons
Langsame Suche
anhand des
Mithörtons
Bedienung
+ (für Vorwärtsrichtung) oder
= (für Rückwärtsrichtung)
gedrückt halten, bis der
gewünschte Punkt gefunden ist.
0/) SLOW an der
Fernbedienung gedrückt halten,
bis der gewünschte Punkt
gefunden ist.
0 / ) SLOW
Um direkt zu einem Titel mit einer über 20 liegenden
Nummer zu springen
Drücken Sie vor der Zifferneingabe die Taste >20 an der
Fernbedienung. Die Taste 10 dient zur Eingabe von 0.
Beispiel: Zum Aufrufen von Titel 30
Zuerst >20, dann 3 und 10 drücken.
Schnelle Suche aus
dem Pausenbetrieb
heraus anhand der
Display-Anzeige
Anhand der
Indexpunkte (nur
mit indizierten CDs
möglich)
0/) gedrückt halten, bis der
gewünschte Punkt gefunden ist.
Der Ton ist in diesem Fall nicht zu
hören.
C/c an der Fernbedienung
wiederholt im Wiedergabe- oder
Pausenbetrieb drücken, bis der
gewünschte Punkt gefunden ist.
Um die Spielzeit im Music Scan-Betrieb (oder im
Stoppbetrieb) zu verlängern
Drücken Sie MUSIC SCAN an der Fernbedienung
wiederholt, bis die gewünschte Spielzeit (10, 20 oder 30
Sekunden) im Display angezeigt wird. Bei Drücken der
Taste wird die Spielzeit zyklisch umgeschaltet.
D
10
Was sind Indexpunkte?
Durch Indexpunkte wird der CD-Titel oder die CD
unterteilt, wobei jeder Indexpunkt gezielt angefahren
werden kann. Auf der CD-Schachtel ist angegeben, ob
die CD Indexpunkte enthält.
Page 55

CD-Wiedergabebetrieb
Hinweis
Wenn während des Suchvorgangs das Ende der CD erreicht
wird, erscheint im Display. Drücken Sie dann 0
oder =, um weiter auf der CD zurückzufahren.
Wiederholspielbetrieb
In jeder beliebigen Betriebsart können die Titel
wiederholt abgespielt werden.
REPEAT
Pp
Æ
))00+c=
C
Drücken Sie während der Wiedergabe REPEAT an der
Fernbedienung, so daß REPEAT im Display angezeigt
wird. Die Titel werden wie folgt wiederholt:
REPEAT
SECMININDEX
A ˜ B
Einzeltitel-Wiederholbetrieb
Nur der momentane Titel kann wiederholt abgespielt
werden.
Während der Wiedergabe des gewünschten Titels
drücken Sie REPEAT an der Fernbedienung, bis
REPEAT 1 im Display angezeigt wird.
Zum Abschalten des Einzeltitel-Wiederholspielbetriebs
Drücken Sie REPEAT.
Hinweis
Im Custom Index-Wiedergabebetrieb (siehe Seite 19) ist es
nicht möglich, einen einzelnen Titel wiederholt abzuspielen.
Passagen-Wiederholbetrieb
(Repeat A˜B)
Eine beliebige Titelpassage kann wiederholt abgespielt
werden. So können Sie beispielsweise eine bestimmte
Strophe einstudieren.
Beachten Sie, daß sich die Wiederholpassage nicht über
zwei Titel erstrecken kann.
1 Drücken Sie während der CD-Wiedergabe am
Anfangspunkt der Passage (Punkt A) die Taste
A˜B an der Fernbedienung.
A- in der Anzeige REPEAT A- blinkt dann.
2 Wenn der Endpunkt (Punkt B) erreicht ist,
drücken Sie A˜B erneut.
REPEAT A-B erscheint, und die Passage wird
wiederholt abgespielt.
Wiedergabe-Betriebsart
Kontinuierliche Wiedergabe
(Continue, Seite 7)
Zufalls-Wiedergabe (Shuffle,
Seite 12)
Programm-Wiedergabe (Seite
12)
Wunschtitel-Wiedergabe
(Delete, Seite 13)
Wunschtitel-ZufallsWiedergabe (Delete Shuffle,
Seite 12, 14)
Passagen-Wiedergabe
(Custom Index, Seite 19)
Wiederholte Titel
Alle Titel
Alle Titel in zufälliger
Reihenfolge
Das Titelprogramm
Alle nicht gelöschten Titel
Alle nicht gelöschten Titel in
zufälliger Reihenfolge
Passage zwischen zwei
Indexpunkten
Zum Abschalten des Wiederholspielbetriebs
Drücken Sie REPEAT wiederholt, bis REPEAT im Display
erlischt.
Zum Abschalten des A˜B-Wiederholspielbetriebs
Drücken Sie REPEAT.
Festlegen eines neuen Startpunktes
Durch die folgenden Schritte können Sie bequem eine
neue, sich direkt an die momentane Passage
anschließende Passage programmieren.
1 Drücken Sie A˜B, während die momentane
Passage wiederholt wiedergegeben wird.
Der Endpunkt (Punkt B) wird zum neuen Startpunkt
(Punkt A), und A- in der Anzeige REPEAT A- blinkt.
2 Wenn der Endpunkt (Punkt B) erreicht ist, drücken
Sie A˜B erneut.
REPEAT A-B erscheint, und die Passage zwischen
dem neuen Start- und Endpunkt wird wiederholt
abgespielt.
Um während der Wiedergabe zu Punkt A
zurückzukehren
Drücken Sie während A˜B-Wiederholspielsbetriebs
die Taste ·.
11
D
Page 56

CD-Wiedergabebetrieb
Æ
Pp
))00+c=
C
Zufalls-Wiedergabe (Shuffle) Z
Der CD-Spieler kann die Titel in zufälliger Reihenfolge
wiedergeben.
SHUFFLE
Pp
·
1 Drücken Sie SHUFFLE an der Fernbedienung.
SHUFFLE und der Musikkalender erscheinen im
Display.
SHUFFLE
Æ
))00+c=
C
162738495
10
Programm-Wiedergabe Z
Bis zu 24 Titel können in beliebiger Reihenfolge
programmiert werden.
CONTINUE
Nummerntasten
>20
CHECK
·
1 Drücken Sie PROGRAM an der Fernbedienung.
PROGRAM erscheint dann im Display.
PROGRAM
PROGRAM
CLEAR
p
162738495
10
2 Drücken Sie ·, um die Zufalls-Wiedergabe zu
starten.
Während der CD-Spieler nun eine ZufallsReihenfolge zusammenstellt, erscheint
Display.
Zum Abschalten des Zufalls-Wiedergabebetriebs
Drücken Sie CONTINUE an der Fernbedienung.
Während der normalen Wiedergabe kann direkt auf
Zufalls-Wiedergabe umgeschaltet werden.
Drücken Sie hierzu SHUFFLE an der Fernbedienung.
Ab dem momentanen Titel setzt dann die ZufallsWiedergabe ein.
Bei der Zufalls-Wiedergabe können unerwünschte
Titel gelöscht werden (Delete Shuffle)
Drücken Sie hierzu die Nummerntaste des zu
löschenden Titels, während SHUFFLE im Display
angezeigt wird.
Die Titelnummer und OFF erscheinen dann im Display;
anschließend erlischt die Titelnummer im
Musikkalender.
Durch erneutes Drücken der Nummerntaste kann der
gelöschte Titel wieder aktiviert werden.
Durch Drücken von p im Stoppbetrieb können alle Titel
wieder aktiviert werden.
im
2 Drücken Sie die Nummerntasten der Titel in der
gewünschten Reihenfolge.
Zum Programmieren einer über 20 liegenden
Titelnummer verwenden Sie die Taste >20 (siehe
Seite 10).
PROGRAM
STEP
Zuletzt
programmierter
Titel
Abfolgenummer
SECMIN
2
5
8
Gesamtspielzeit Programmierte
Titel
Bei einem Eingabefehler
Drücken Sie CLEAR, und geben Sie dann die richtige
Titelnummer mit den Nummerntasten ein.
3 Drücken Sie ·, um die Programm-Wiedergabe
zu starten.
Zum Abschalten des Programm-Wiedergabebetriebs
Drücken Sie CONTINUE an der Fernbedienung.
D
12
Page 57

Wenn nicht aufeinanderfolgende Titel programmiert
Æ
Pp
))00+c=
C
werden (z.B. 1, 3, 5)
In diesem Fall entsteht zwischen Titeln eine Zugriffszeit
von einer Sekunde.
CD-Wiedergabebetrieb
Wiedergabe nur der
Wunschtitel (Delete-
Das Titelprogramm bleibt auch nach dem Abspielen
gespeichert
Durch Drücken von · können Sie dasselbe
Titelprogramm erneut abspielen.
Hinweise
• Wenn die Gesamtspielzeit über 100 Minuten liegt,
erscheint statt der Gesamtspielzeit die Anzeige ––.––.
• Wenn bereits 24 Titel programmiert sind, erscheint beim
Versuch, einen weiteren Titel zu programmieren, die
Anzeige FULL.
• Beim Ausschalten des Geräts wird das Titelprogramm
gelöscht und auf normalen kontinuierlichen
Wiedergabebetrieb zurückgeschaltet.
Überprüfen des Titelprogramms
Sowohl vor als auch nach dem Wiedergabestart kann
das Titelprogramm überprüft werden.
Drücken Sie CHECK.
Bei wiederholtem Drücken dieser Taste erscheint
jeweils die nächste Titelnummer des Programms und
die Gesamtspielzeit. Wenn der letzte Titel des
Programms erreicht ist, erscheint „End“ und dann
wieder die ursprüngliche Anzeige. Wird das
Titelprogramm während der Wiedergabe überprüft,
zeigt das Display nur die restlichen Titelnummern.
Ändern des Titelprogramms
Das Titelprogramm kann vor dem Wiedergabestart
wie folgt geändert werden.
Wiedergabe)
Die unerwünschten Titel können gelöscht werden; das
Gerät gibt dann nur die verbleibenden Wunschtitel
wieder.
CONTINUE
Nummerntasten
>20
·
1 Drücken Sie SHUFFLE an der Fernbedienung.
SHUFFLE erscheint im Display.
SHUFFLE
2 Drücken Sie die Nummerntasten der zu
löschenden Titel.
Die Titelnummer und OFF erscheinen kurzzeitig
im Display; anschließend erlöschen im
Musikkalender die betreffenden Titelnummern.
Zum Löschen einer Titelnummer über 20
verwenden Sie die Taste >20 (siehe Seite 10).
SHUFFLE
CLEAR
162738495
10
Zum
Löschen eines Titels
Löschen des letzten
Titels des Programms
Hinzufügen eines
Titels am Ende des
Programms
Ändern des ganzen
Programms
Drücken Sie
CHECK, bis der zu löschende Titel
im Display angezeigt wird, und
dann CLEAR.
CLEAR im Stoppbetrieb. Bei jedem
Drücken dieser Taste wird der
jeweils letzte Titel gelöscht.
die Nummerntasten des
hinzuzufügenden Titels.
p im Stoppbetrieb. Danach kann
eine neue Titelabfolge programmiert
werden.
Bei einem Eingabefehler
Drücken Sie die Nummerntaste des betreffenden Titels
erneut. Die Titelnummer und ON erscheinen dann im
Display, und der Titel ist wieder aktiviert.
3 Nachdem Sie alle unerwünschten Titel gelöscht
haben, drücken Sie CONTINUE.
Im Display erlischt dann die Anzeige SHUFFLE.
4 Drücken Sie ·, um die Wiedergabe der
gewünschten Titel zu starten.
Zum Abschalten des Delete-Wiedergabebetriebs
Drücken Sie p im Stoppbetrieb. Alle gelöschten Titel werden
dann wieder aktiviert.
Auch am Ende der Delete-Wiedergabe bleiben die
gelöschten Titel gespeichert
Durch Drücken von · können die gewünschten Titel
erneut abgespielt werden.
13
D
Page 58

CD-Wiedergabebetrieb
Die ausgewählten Titel können auch in zufälliger
Abfolge wiedergegeben werden
Sie brauchen hierzu lediglich den obigen Schritt 3 zu
überspringen.
Auch während der Wiedergabe können Titel gelöscht
werden
Drücken Sie hierzu CLEAR, während der unerwünschte
Titel wiedergegeben wird. Der Titel wird dann gelöscht,
und die Wiedergabe mit dem nächsten Titel fortgesetzt.
Für jede Platte können individuelle gelöschte Titel
gespeichert werden
Siehe hierzu unter „Speichern der Wunschtitel“ auf
Seite 20.
14
D
Page 59

Überspielen einer CD
Überspielen von
programmierten CD-Titeln
Überspielen einer CD
5 Um den Überspielvorgang mit Cassettenseite B
fortzusetzen, drehen Sie die Cassette um und
drücken Sie dann P oder · am CD-Spieler.
Die programmierten CD-Titel (bis zu 24 Titel) können
auf eine Cassette, ein DAT-Band oder eine MD
überspielt werden.
Dabei ist es auch möglich, eine Pause
einzuprogrammieren, um die Titel bequem auf die
beiden Cassettenseiten zu überspielen.
PROGRAM
Nummerntasten
>20
CHECK
Pp
·
Æ
))00+c=
C
P
1 Programmieren Sie die Titel unter Beachtung der
im Display angezeigten Gesamtspielzeit (beim
Überspielen auf Cassette programmieren Sie die
für Cassettenseite A bestimmten Titel).
Führen Sie hierzu die Schritte 1 und 2 des
Abschnitts „Programm-Wiedergabe“ auf Seite 12
aus.
Zwischen die Titel können automatisch 3sekündige
Leerstellen eingefügt werden
Verwenden Sie hierzu die Auto Space-Funktion (siehe
Seite 17).
Während des Programmiervorgangs kann die
Gesamtspielzeit überprüft werden
Dies erleichtert das Programmieren einer auf das
Cassettenband passenden Abfolge.
1 Drücken Sie PROGRAM an der Fernbedienung.
PROGRAM erscheint im Display.
2 Drücken Sie = oder +, bis der zu
programmierende Titel im Display erscheint.
Das Display zeigt die Gesamtspielzeit (einschließlich
des soeben gewählten Titels) an; außerdem blinkt die
Abfolgenummer dieses Titels.
3 Drücken Sie PROGRAM an der Fernbedienung, um
den Titel zu speichern.
4 Wiederholen Sie die Schritte 2 und 3 zum
Programmieren weiterer Titel.
Zum Überprüfen und Ändern des Titelprogramms
Siehe Seite 13.
Beim Überprüfen des für Cassettenseite A bestimmten
Programms erscheint die Anzeige SIDE-A und beim
Überprüfen des für Seite B bestimmten Programms die
Anzeige SIDE-B.
2 Wenn auf beide Cassettenseiten überspielt
werden soll, drücken Sie p, um eine Pause
einzuprogrammieren.
„P“ erscheint dann im Display, und die
Gesamtspielzeit wird auf 0.00 zurückgesetzt.
Wenn nur auf eine Cassettenseite, auf ein DATBand oder auf eine MD überspielt werden soll,
überspringen Sie diesen Schritt und gehen Sie
direkt zu Schritt 4 über.
Die Pause wird wie ein Titel gezählt
Wenn eine Pause einprogrammiert worden ist, können
insgesamt nur 23 Titel programmiert werden.
3 Wiederholen Sie Schritt 1, um die Titel für
Cassettenseite B zu programmieren.
4 Starten Sie die Aufnahme am Deck, und drücken
Sie dann · am CD-Spieler.
Wenn auf beide Cassettenseiten überspielt wird,
schaltet der CD-Spieler am Ende der für Seite A
bestimmten Titel auf Pause.
15
D
Page 60

Überspielen einer CD
Æ
Pp
))00+c=
C
Ein- und Ausblenden
Der Titel kann am Anfang ein- und am Ende
ausgeblendet werden (damit beispielsweise am Ende
der Cassette der Ton nicht abrupt abbricht).
Beachten Sie jedoch, daß beim Überspielen über die
DIGITAL OUT-Buchse keine Ein- und Ausblendung
möglich ist.
Hinweise
• Die eingestellte Ein-/Ausblendzeit bleibt auch bei
ausgeschaltetem CD-Spieler gespeichert.
• Mit der Custom File-Funktion (siehe Seite 18) kann für
jede CD eine andere Ein-/Ausblendzeit gespeichert
werden.
Nützliche Funktionen zur
Erleichterung des
Aufnahmebetriebs
Nummerntasten
FADER
Pp
Æ
Zum
Einblenden am Anfang
der Wiedergabe
Ausblenden am Ende
der Wiedergabe
))00+c=
C
Drücken Sie FADER
iim Pausenbetrieb. FADE blinkt
dann, und das Wiedergabesignal
wird langsam eingeblendet.
an dem Punkt, an dem das
Ausblenden beginnen soll. FADE
blinkt dann, und das
Wiedergabesignal wird langsam
ausgeblendet. Anschließend
schaltet der CD-Spieler auf Pause.
0 / )
Ändern der Ein-/Ausblendzeit
Für den Ein-/Ausblendvorgang kann wie folgt eine
Zeitspanne zwischen 2 und 10 Sekunden eingestellt
werden. Wird keine Einstellung vorgenommen, dauert
die Ein-/Ausblendung 5 Sekunden.
1 Drücken Sie vor dem Wiedergabestart FADER an
der Fernbedienung.
Die Anzeige 5 SEC und blinkende Anzeige FADE
erscheinen im Display.
Die im folgenden behandelte Peak Search- und Auto
Space-Funktion erleichtert den Aufnahmebetrieb.
SPACE
PEAK SEARCH
p
Peak Search-Funktion zum Aufsuchen der
Passage mit dem höchsten Pegel
Der CD-Spieler kann automatisch die Passage mit dem
höchsten Pegel aufsuchen und wiederholt abspielen, so
daß Sie am Aufnahmedeck den Aufnahmepegel
bequem einstellen können.
1 Drücken Sie vor dem Wiedergabestart PEAK
SEARCH an der Fernbedienung.
PEAK blinkt im Display, und der CD-Spieler gibt
etwa vier Sekunden lang die Passage mit dem
höchsten Pegel wieder.
2 Geben Sie die gewünschte Ein-/Ausblendzeit mit
den Nummerntasten (2 - 10) ein.
2 Stellen Sie im Aufnahmedeck den
Aufnahmepegel ein.
(Wahlweise kann auch 0 oder )wiederholt
gedrückt werden, bis die gewünschte Zeit
angezeigt wird.)
3 Drücken Sie p am CD-Spieler, um die Peak
Search-Funktion abzuschalten.
Die Anzeige PEAK im Display erlischt.
D
16
Page 61

Hinweis
Wenn mit derselben CD die Peak Search-Funktion
wiederholt eingesetzt wird, ermittelt das Gerät
möglicherweise jedes Mal eine andere Spitzenpegelpassage.
Der Unterschied ist jedoch vernachlässigbar gering; Sie
können die vom Gerät ermittelte Passage bedenkenlos zum
Einstellen des Aufnahmepegels verwenden.
Auto Space-Funktion zum automatischen
Einfügen von Leerstellen für die AMSFunktion
Die Auto Space-Funktion fügt automatisch Leerstellen
von 3 Sekunden zwischen den Titeln ein. Beim
Überspielen auf ein Cassettenband wird durch diese
Leerstellen sichergestellt, daß die AMS-Funktion des
Cassettendecks einwandfrei arbeitet.
Drücken Sie vor dem Wiedergabestart die Taste
SPACE.
AUTO SPACE erscheint dann im Display.
Überspielen einer CD
Zum Abschalten der Auto Space-Funktion
Drücken Sie SPACE, so daß die Anzeige AUTO SPACE im
Display erlischt.
Hinweis
Einige Musikstücke (beispielsweise Sinfonien) sind
manchmal durch Titelnummern unterteilt. Die Auto SpaceFunktion fügt dann Leerstellen in das Musikstück ein und
sollte ggf. ausgeschaltet werden.
17
D
Page 62

Speichern von CD-Informationen (Custom File)
Für wie viele CDs können Custom Files
Wozu dienen die Custom Files?
gespeichert werden?
In den Custom Files können für jede CD zwei
verschiedene Informationen (Indexpunkte und
Wunschtitel) gespeichert werden. Beim Einlegen der
CD werden diese Informationen automatisch
zurückgerufen. Die Custom Files bleiben auch bei
Nichtverwendung des CD-Spielers noch etwa einen
Monat lang gespeichert.
Erläuterung der speicherbaren
Informationen:
Information
Custom Index (Seite 19)
Delete Bank (Seite 20)
Beim Abspeichern einer Information leuchtet die
betreffende C.FILE-Anzeige auf.
Erläuterungen
Bis zu 8 Indexpunkte (bei einer
CD mit 32 oder weniger Titeln)
bzw. 5 Indexpunkte (bei einer
CD mit mehr als 32 Titeln)
können gespeichert werden.
Nach dem Löschen der
unerwünschten Titel können die
verbleibenden Wunschtitel
gespeichert werden.
C.FILE
DELETE
INDEX
Delete Bank
Custom Index
Custom Files können für bis zu 224 CDs gespeichert
werden. Beachten Sie jedoch, daß die Custom File
doppelt gezählt wird, wenn für eine CD sowohl
Custom Index- als auch Delete Bank-Informationen
gespeichert sind.
So ermitteln Sie, für wie viele CDs noch
Custom Files gespeichert werden können
1 Nehmen Sie die CD aus dem CD-Spieler heraus.
2 Schließen Sie die Plattenabdeckung.
3 Drücken Sie TIME, während der Musikkalender
nicht im Display angezeigt wird.
Die Anzahl der noch speicherbaren Custom Files
erscheint im Display.
Löschen von Custom Files
Wenn der Custom File-Speicher voll ist, erscheint beim
Versuch, weitere Informationen durch Drücken von
FILE zu speichern, die Anzeige FULL. Falls
erforderlich, können Sie die Custom Files wie folgt
löschen:
Zum Löschen aller Custom Files aller CDs
Während Sie 0 und p gedrückt halten, schalten Sie den
CD-Spieler durch Drücken von POWER ein. AL-CLr erscheint
dann im Display und alle Custom Files werden gelöscht.
In der Custom File einer CD wird auch die letzte
Wiedergabebetriebsart gespeichert. Beim nächsten
Einlegen der CD schaltet das Gerät zunächst wieder
auf diese Betriebsart. Außerdem wird auch die
eingestellte Ein-/Ausblendzeit gespeichert.
Beachten Sie, daß die Wiedergabe nicht in der
gespeicherten, sondern in der momentan gewählten
Betriebsart ausgeführt wird, wenn Sie die Wiedergabe
durch Drücken von · starten und dann die
Plattenabdeckung schließen.
Wo werden die Custom Files gespeichert?
Die Custom Files werden im CD-Spieler (nicht auf der
CD) gespeichert. Somit stehen die Informationen nicht
zur Verfügung, wenn die CD auf einem anderen
CD-Spieler wiedergegeben wird.
18
D
Page 63

Speichern von CD-Informationen (Custom File)
Setzen von individuellen
Indexpunkten (Custom Index)
Durch siebenmaliges Drücken dieser Tasten wird
der Punkt um etwa eine Sekunde vor- bzw.
zurückverschoben.
Auf eine CD können bis zu 8 eigene Indexpunkte (im
Falle einer CD mit 32 oder weniger Titeln) bzw. fünf
Indexpunkte (im Falle einer CD mit mehr als 32 Titeln)
gesetzt werden. Sie haben dann direkten Zugriff auf
diese Punkte. Die Custom Index-Funktion erweist sich
auch bei Sinfonien und anderen Musikstücken, die in
mehrere Titel unterteilt sind, als zweckmäßig (siehe
folgendes Beispiel).
Beispiel
Titel-Nr.
Custom
Index-Nr.
Nummerntasten
Erste
Passage
Zweite
Passage
Dritte
Passage
123456789
1
23
C.INDEX
Wenn an dieser Stelle kein Indexpunkt gesetzt
werden soll
Drücken Sie CLEAR, und suchen Sie eine andere Stelle,
an der ein Indexpunkt gesetzt werden soll.
5 Drücken Sie FILE erneut, um den Custom
Indexpunkt zu speichern.
INDEX im C.FILE-Feld leuchtet auf.
6 Zum Setzen weiterer Custom Indexpunkte
wiederholen Sie die Schritte 3 bis 5.
Setzen eines Indexpunktes an einer bekannten Stelle
Ein Indexpunkt kann direkt an der momentanen Stelle
gesetzt werden, ohne eine Feineinstellung vorzunehmen:
Schalten Sie am gewünschten Punkt zunächst durch
Drücken von P auf Pause, und drücken Sie dann FILE.
An der betreffenden Stelle wird nun ein Indexpunkt
gesetzt, und INDEX erscheint im Display.
Wiedergabestart an einem Custom
Indexpunkt
1 Drücken Sie C.INDEX an der Fernbedienung.
CUSTOM INDEX erscheint im Display.
CHECK
C / c
Pp
Æ
))00+c=
C
FILE
ERASE
0 / )
1 Legen Sie die CD ein.
2 Drücken Sie C.INDEX an der Fernbedienung.
CUSTOM INDEX erscheint im Display; der
Musikkalender erlischt.
C.INDEX
SECMIN
CUSTOM INDEX
3 Drücken Sie FILE an der Stelle, an der ein
Indexpunkt gesetzt werden soll.
Die Custom Index-Nummer blinkt im Display,
und der CD-Spieler gibt eine an diesem Punkt
beginnende dreisekündige Passage wiederholt
wieder.
4 Verschieben Sie durch Drücken von 0 oder )
den Punkt so, daß die Wiederholpassage exakt an
der Stelle, an der ein Indexpunkt gesetzt werden
soll, beginnt.
2 Suchen Sie den gewünschten Custom Indexpunkt
wie folgt auf:
Suchbetrieb
Sprung zum nächsten
Custom Indexpunkt
Sprung zum
momentanen Custom
Indexpunkt
Direkteingabe des
Custom Indexpunktes
Zehnsekündiges
Anspielen aller Custom
Indexpunkte
Die Wiedergabe beginnt am gewählten Custom
Indexpunkt und wird bis zum Ende der CD
fortgeführt.
Zum Abschalten des Custom Index-Wiedergabebetriebs
Drücken Sie CONTINUE an der Fernbedienung.
Hinweise
• Die Index-Suchfunktion (siehe Seite 10) kann nicht
verwendet werden.
• Zum Aufsuchen des nächsten oder momentanen Custom
Indexpunktes verwenden Sie die Tasten C/c statt der
Tasten =/ + .
Bedienung
c während der Wiedergabe
drücken.
C während der Wiedergabe
drücken.
Nummerntaste des Custom
Indexpunktes drücken.
MUSIC SCAN im Stopp- oder
Wiedergabebetrieb drücken.
Wenn der gewünschte Punkt
gefunden ist, die Wiedergabe
durch Drücken von · starten.
(Siehe Fortsetzung)
19
D
Page 64

Speichern von CD-Informationen (Custom File)
Wiedergabe einer durch zwei Indexpunkte begrenzten
Passage
1 Drücken Sie C.INDEX an der Fernbedienung.
CUSTOM INDEX (1) erscheint im Display.
2 Drücken Sie die Nummerntaste des gewünschten
Custom Indexpunktes.
Die Wiedergabe beginnt am gewählten Custom
Indexpunkt und wird bis zum nächsten Custom
Indexpunkt fortgeführt.
Zum Abschalten dieses Wiedergabebetriebs drücken Sie
C.INDEX an der Fernbedienung.
Die Passage zwischen zwei Indexpunkten kann auch
wiederholt abgespielt werden
Drücken Sie hierzu REPEAT.
Löschen eines Custom Indexpunktes
1 Legen Sie die CD ein.
2 Drücken Sie C.INDEX.
CUSTOM INDEX erscheint im Display.
3 Drücken Sie CHECK wiederholt, bis die Nummer
des zu löschenden Custom Indexpunktes blinkt.
4 Drücken Sie ERASE bei blinkender Nummer, um
den Custom Indexpunkt zu löschen.
Die Nummern der nachfolgenden Custom
Indexpunkte reduzieren sich um eins.
1 Legen Sie die CD ein.
2 Löschen Sie die unerwünschten Titel.
Führen Sie hierzu die Schritte 1 bis 3 des
Abschnitts „Wiedergabe nur der Wunschtitel” auf
Seite 13 aus.
3 Drücken Sie FILE an der Fernbedienung, um die
restlichen Wunschtitel zu speichern.
DELETE im C.FILE-Anzeigefeld leuchtet auf.
Wiedergabe mit Hilfe der Delete Bank
1 Drücken Sie CONTINUE.
Die Delete Bank-Informationen werden abgerufen,
und im Musikkalender erscheinen die Wunschtitel.
2 Drücken Sie ·, um die Wiedergabe zu starten.
Zum Abschalten des Delete Bank-Wiedergabebetriebs
Drücken Sie p.
Um wieder auf Delete Bank-Wiedergabe zurückzuschalten
Wenn PROGRAM oder CUSTOM INDEX im Display
angezeigt wird, drücken Sie CONTINUE oder SHUFFLE
wiederholt, bis diese Anzeigen im Display erlöschen. Die
Speicherung der Delete Bank wird dann abgerufen, und die
Wiedergabe der Wunschtitel kann durch Drücken von ·
gestartet werden.
20
Speichern der Wunschtitel
(Delete Bank)
Nach dem Löschen unerwünschter Titel kann der CDSpieler die verbleibenden Wunschtitel abspeichern. So
können Sie stets Ihre Lieblingstitel abspielen, ohne bei
jedem Einlegen der CD die unerwünschten Titel erneut
löschen zu müssen.
Pp
·
D
Æ
))00+c=
C
Die Wunschtitel können auch in zufälliger Reihenfolge
wiedergegeben werden
Drücken Sie hierzu im Schritt 1 die Taste SHUFFLE an
der Fernbedienung wiederholt, bis SHUFFLE im Display
angezeigt wird.
Löschen der Delete Bank
1 Legen Sie die CD ein.
2 Drücken Sie CONTINUE oder SHUFFLE.
Das Display zeigt die gespeicherte Delete Bank an.
3 Drücken Sie ERASE, um die Delete Bank zu
löschen.
DELETE im C.FILE-Feld erlischt.
FILE
ERASE
Page 65

Zusatzinformationen
Hinweise zu den CDs
Zur Handhabung der CDs
• Fassen Sie die CD stets an der Kante an, damit sie nicht
verschmutzt. Berühren Sie auf keinen Fall die Oberfläche.
• Kleben Sie kein Papier und kein Klebeband auf die CD.
falsch
• Schützen Sie die CD vor direktem Sonnenlicht und
Wärmequellen wie Heizungen. Lassen Sie sie auch nicht in
einem in der Sonne geparkten Wagen zurück, da die
Innentemperatur sehr hoch ansteigen kann.
• Verwenden Sie keinen im Handel erhältlichen Stabilisator
und/oder CD-Schoner, da sonst die CD und der Spieler
beschädigt werden können.
• Legen Sie die CD nach dem Abspielen in ihre Schachtel
zurück.
Zur Reinigung
• Reinigen Sie die CD vor dem Abspielen mit einem
Reinigungstuch, indem Sie von der Mitte nach außen
wischen.
Störungsüberprüfungen
Im folgenden sind einige Probleme und
Abhilfemaßnahmen zusammengestellt. Gehen Sie bei
Problemen zunächst diese Zusammenstellung durch.
Wenn das Problem nicht behoben werden kann,
wenden Sie sich an Ihren Sony Händler.
Kein Ton.
/Sicherstellen, daß der CD-Spieler richtig
angeschlossen ist.
/Überprüfen, ob der Verstärker richtig eingestellt
ist.
/Den Wiedergabepegel am LINE OUT/PHONE
LEVEL-Regler richtig einstellen.
/Der DIGITAL OUT-Schalter an der Rückseite
steht auf OFF. Bei einem Digitalanschluß den
betreffenden Schalter auf ON stellen.
Keine CD-Wiedergabe möglich.
/Es ist keine CD eingelegt. Eine CD einlegen.
/Den Stabilisator verwenden.
/Die CD mit der Beschriftungsseite nach oben
einlegen.
/Die CD reinigen.
/Feuchtigkeit hat sich im Inneren
niedergeschlagen. Die CD herausnehmen und
bei eingeschaltetem CD-Spieler etwa eine
Stunde lang abwarten (siehe Seite 2).
• Verwenden Sie keine Lösungsmittel wie Benzin oder
Verdünner und auch keine handelsübliche, für
Analogplatten bestimmte Antistatiksprays.
Die Fernbedienung arbeitet nicht.
/Zwischen Fernbedienung und CD-Spieler
befindet sich ein Hindernis.
/Die Fernbedienung auf den mit g markierten
Fernbedienungssensor des CD-Spielers
ausrichten.
/Wenn die Batterien der Fernbedienung
erschöpft sind, die Batterien auswechseln.
21
D
Page 66

Zusatzinformationen
Technische Daten
CD-Spieler
Laser Halbleiter (λ = 780 nm)
Emissionsdauer: kontinuierlich
Laser-Ausgangsleistung Max. 44,6 µW*
* In einem Abstand von 200 mm vor
der Linsen-Oberfläche auf einem
optischen Abtastblock mit einer
7-mm-Blende gemessener Wert.
Wellenlänge 780 - 790 nm
Frequenzgang 2 Hz bis 20 kHz ±0,3 dB
Dynamikumfang Über 100 dB
Kanaltrennung Über 100 dB
Klirrgrad Unter 0,003%
Ausgänge
Allgemeines
Stromversorgung 220 V - 230 V Wechselspannung,
50/60 Hz
Leistungsaufnahme 18 W
Abmessungen (B/H/T) ca. 280 x 90 x 370 mm,
einschl. vorspringender Teile
Gewicht ca. 6 kg
Mitgeliefertes Zubehör
Audiokabel (1)
Fernbedienung (1)
Sony Batterien SUM-3 (NS) (2)
Stabilisator (1)
Filz (1)
Netzkabel (1)
Änderungen, die dem technischen Fortschritt dienen, bleiben
vorbehalten.
LINE OUT
DIGITAL
OUT
(COAXIAL)
DIGITAL
OUT
(OPTICAL)
DIGITAL
OUT
(BALANCED)
Buchsentyp
Cinchbuchsen
KoaxialAusgangsbuchse
OptoAusgangsbuchse
XLR-3-32
Ausgangspegel
2,5 V
(an 50 kOhm)
0,5 Vss
(75 Ohm)
–18 dBm
(Wellenlänge:
660 nm)
5 V
(an 50 kOhm)
Lastimpedanz
Über 1 kOhm
75 Ohm
_
Über 100 Ohm
Teile an der Rückseite
Einzelheiten entnehmen Sie bitte den in Klammern angegebenen Seiten.
1
234
5
22
LINE OUT
1 LINE OUT-Buchsen (5)
2 DIGITAL OUT OPTICAL-Schalter (5)
3 DIGITAL OUT COAXIAL-Schalter (5)
4 DIGITAL OUT BALANCED-Schalter (5)
D
DIGITAL OUT
OPTICAL
COAXIAL
OFF ON
OFF ON
L
R
BALANCED
OFF ON
AC IN (230V)
8 7 6
5 AC IN (230 V)-Buchse (6)
6 DIGITAL OUT BALANCED-Buchse (5)
7 DIGITAL OUT COAXIAL-Buchse (5)
8 DIGITAL OUT OPTICAL-Buchse (5)
Page 67

Stichwortverzeichnis
A, B
AMS 10
Anschluß 4, 5, 6
Anspielen; siehe Music Scan
Aufnahme 15
von programmierten CD-
Titel 15
Auto Space 17
Automatic Music Sensor; siehe
AMS
C
Custom Files 18
Custom Index 19
Delete Bank 20
Wozu dienen die Custom
Files? 18
Custom Index 19
D
Delete Bank 20
E
Ein- und Ausblenden 16
Ändern der Ein-/
Ausblendzeit 16
F
Fernbedienung 9
G
Gesamtspielzeit 9
H
Hinweise zu den CDs 21
I, J, K
Index 10
Custom 19
L
Löschen
Custom Files 19
Custom Index 19
Delete Band 20
M
Music Scan 10
Musikkalender 9
N, O
Nach dem Auspacken 4
P, Q
Passagen-Wiederholbetrieb
(Repeat A ˜ B) 11
Peak Search-Funktion 16
Programmieren von Titel
12, 13
Ändern des Titelprogramms
13
Überprüfen des
Titelprogramms 13
Überspielen 15
R
Restspielzeit 9
S, T
Schnittbetrieb; siehe Aufnahme
Setzen von individuellen
Indexpunkten 19
Shuffle-Funktion 12
Speichern
von Informationen zur CD
18
der Wunschtitel 20
Speicherung der letzten
Betriebsart 18
Stabilisator 2
Störungsüberprüfungen 21
Suchbetrieb
anhand der Display-Anzeige
10
anhand der Indexpunkte 10
anhand des Mithörtons 10
Direktsprung 10
durch Anspielen aller Titel
(Music Scan) 10
mit dem AMS 10
mit Hilfe der Custom
Indexpunkte 19
U, V
Überblick 4
Überprüfen der Gesamtspielzeit
beim Programmieren 15
W, X, Y, Z
Wiedergabe
Delete-Wiedergabe 13
Delete-Wiedergabe mit
zufälliger Abfolge 14
Kontinuierlich 7
Programm-Wiedergabe 12
Wiedergabestart an einem
Custom Indexpunkt 19
Wiederholspielbetrieb 11
Zufalls-Wiedergabe 12
Wiedergabe einer CD 7
Wiedergabestart an einem
Custom Indexpunkt 19
Wiederholspielbetrieb
alle Titel 11
Passage 11
Bezeichnung der Teile
Tasten
A˜ B11
SPACE 17
CHECK 13
C.INDEX 19
CLEAR 14
CONTINUE 8
DISPLAY MODE 9
ERASE 20
FADER 16
FILE 19
C / c 10, 19
MUSIC SCAN 10
PEAK SEARCH 16
PROGRAM 12
REPEAT 11
SHUFFLE 12
0 / ) SLOW 10
TIME 9
· 8
P 8
p 8
0 / ) 8, 10
= / + 8, 10
>20 10
Nummerntasten 10
Schalter und Wähler
DIGITAL OUT 5
POWER 7
Sonstiges
Display 9
g 4
23
D
Page 68

ADVERTENCIA
Para evitar incendios o el
riesgo de electrocución, no
exponga la unidad a la lluvia
ni a la humedad.
Para evitar descargas
eléctricas, no abra la unidad.
En caso de avería, solicite los
servicios de personal
cualificado.
No instale el aparato en un
espacio cerrado, como una
estantería para libros o un
armario empotrado.
Este aparato está clasificado como
productor láser de clase 1 (CLASS 1
LASER). la etiqueta CLASS 1
LASER PRODUCT se encuentra en
la parte posterior exterior.
Precauciones
Seguridad
• Precaución - La utilización de
instrumentos ópticos con este
producto aumentará el riesgo de
daño de sus ojos.
• Si dentro del reproductor cae algún
objeto o líquido, desenchúfelo y haga
que sea comprobado por personal
cualificado antes de volver a
utilizarlo.
• Tenga cuidado de no cerrar la tapa
del disco con su dedo.
Fuentes de alimentación
• Antes de utilizar el reproductor,
compruebe si su tensión de
alimentación es idéntica a la de la red.
La tensión de alimentación está
indicada en la placa de características
del panel posterior del reproductor.
• El reproductor no se desconectará de
la fuente de alimentación de CA (red)
mientras esté conectado a una toma
de la red, incluso aunque desconecte
su alimentación.
• Cuando no vaya a utilizar el
reproductor durante mucho tiempo,
desenchufe el cable de alimentación
de CA (red), tire del enchufe; no tire
nunca del propio cable.
Operación
• Para abrir y cerrar la tapa del disco,
utilice su mano.
• No toque las partes giratorias (disco,
etc,) durante la operación.
• Si traslada el reproductor
directamente de un lugar frío a otro
cálido, o si lo coloca en una sala muy
húmeda, es posible que se condense
humedad en el interior del
reproductor. Cuando ocurra esto, el
reproductor no funcionará. Extraiga
el disco compacto y deje el sistema
con la alimentación conectada durante
una hora hasta que se evapore la
humedad.
Ajuste del volumen
• No aumente el volumen mientras esté
escuchando partes con entradas de
nivel muy bajo o sin señales de audio.
Si lo hiciese, los altavoces podrían
dañarse cuando reprodujese una parte
de nivel de pico.
Colocación de un disco
• Es posible que el reproductor emita
un pitido. Esto indicará que el
reproductor está ajustando
automáticamente su mecanismo
interno de acuerdo con el disco
insertado.
Esta etiqueta de protección se
encuentra en el interior de la unidad.
Ubicación
• Coloque el reproductor en un lugar
adecuadamente ventilado a fin de
evitar su recalentamiento.
• No coloque el reproductor sobre una
superficie blanda, como una
alfombra, ya que podría bloquear los
orificios de ventilación de su base.
• No coloque el reproductor cerca de
fuentes térmicas, ni en un lugar
sometido a la luz solar directa, polvo
excesivo, ni golpes.
Preservación de la calidad del sonido
• No toque el interior del objetivo.
Limpieza
• Limpie la caja, el panel, y los controles
con paño suave ligeramente
humedecido en una solución poco
concentrada de detergente. No utilice
ningún tipo de estropajo, polvos
abrasivos, ni disolventes tales como
alcohol o bencina.
• Cuando se ensucie la parte interior de
la tapa del disco, extráigala utilizando
una llave hexagonal (2,5 mm),
Nota
No abra nunca ninguna parte del
reproductor de discos compactos que
no sea la tapa del disco.
Transporte
Utilización del estabilizador
• Cerciórese de utilizar el estabilizador
suministrado. Si utilizase cualquier
otro estabilizador podría dañar el
reproductor.
• La base del estabilizador es delicada,
y las grietas podrían afectar la
cualidad del sonido.
Cuando reemplace los discos, coloque
el estabilizador sobre el fieltro
E
2
suministrado o sobre un paño suave.
• Cerciórese de extraer el disco
compacto y el estabilizador.
Si tiene alguna pregunta o problema
con respecto a su reproductor,
consulte a su proveedor Sony.
Page 69

¡Bienvenido!
Muchas gracias por la adquisición de
este reproductor de discos compactos
Sony. Antes de utilizar la unidad, lea
detenidamente este manual de
instrucciones, y consérvelo para futuras
referencias.
Sobre este manual
Convencionalismos
• En las instrucciones de este manual se
describen los controles del telemando.
Usted también podrá utilizar los
controles del reproductor si poseen
nombres iguales o similares a los del
telemando.
• En este manual se utilizan los iconos
siguientes:
Indica que usted podrá utilizar el
telemando para realizar la tarea.
Indica consejos y sugerencias
para facilitar las tareas.
ÍNDICE
Preparativos
Desembalaje 4
Conexión a un sistema 4
Reproducción de un disco compacto 7
Reproducción de discos compactos
Utilización del visualizador 9
Localización de una canción específica 10
Localización de un punto particular de una canción 10
Reproducción repetida de canciones 11
Reproducción en orden arbitrario (Reproducción aleatoria)12
Creación de su propio programa (Reproducción programada) 12
Reproducción de canciones específicas solamente
(Reproducción con borrado) 13
Grabación de discos compactos
Grabación de su propio programa 15
Aumento gradual y desvanecimiento 16
Sugerencias útiles para la grabación 16
E
Almacenamiento de información sobre los discos compactos
(Archivos de usuario)
Posibilidades de los archivos de usuario18
Indización de un disco (Índice de usuario) 19
Almacenamiento de canciones específicas de un disco
(Banco de borrado) 20
Información adicional
Notas sobre los discos compactos 21
Solución de problemas 21
Especificaciones 22
Descripción del panel posterior 22
Índice alfabético 23
E
3
Page 70

Preparativos
Desembalaje
Compruebe si ha recibido los ítemes siguientes:
• Cable conector de audio (1)
• Telemando (1)
• Pilas SUM-3 (NS) Sony (2)
• Estabilizador (1)
• Fieltro (1)
• Cable de alimentación (1)
Colocación de las pilas en el telemando
Usted podrá controlar el reproductor utilizando el
telemando suministrado. Inserte dos pilas de tamaño
AA (R6) haciendo coincidir las marcas + y – de las
mismas. Cuando utilice el telemando, apunte con él
hacia el sensor de control remoto g del reproductor.
Conexión a un sistema
Descripción general
En esta sección se describe cómo conectar el
reproductor de discos compactos a un amplificador.
Antes de realizar cualquier conexión, cerciórese de
desconectar la alimentación de todos los componentes.
LINE OUT
Interruptor
OPTICAL
LINE OUT
L
R
DIGITAL OUT
Interruptor
OPTICAL
OFF ON
OPTICAL
DIGITAL OUT
COAXIAL
DIGITAL OUT
COAXIAL
BALANCED
OFF ON
OFF ON
COAXIAL
Interruptor
BALANCED
CDP-X5000
AC IN (230V)
DIGITAL OUT
BALANCED
a un tomacorriente
de CA
Cuándo reemplazar las pilas
En utilización normal, las pilas deberán durar unos seis
meses. Cuando el telemando no pueda controlar ya el
reproductor, reemplace todas las pilas por otras nuevas.
Notas
• No deje el telemando cerca de lugares extremadamente
cálidos o húmedos.
• No deje que ningún objeto extraño entre en el controlador
remoto, especialmente cuando reemplace las pilas.
• No exponga el sensor de control remoto a la luz solar
directa, ni a la de aparatos de iluminación. Si lo hiciese,
podría causar su mal funcionamiento.
• Cuando no vaya a utilizar el reproductor durante mucho
tiempo, extráigale las pilas para evitar el daño que podría
causar el electrólito de la mismas.
CD
ç: Flujo de la señal
¿Qué cables se necesitan?
p Cuando realice conexiones analógicas
• Cable de audio (suministrado) (1)
Blanca (canal
izquierdo)
Roja (canal
derecho)
p Cuando realice conexiones digitales
• Cable coaxial VMC-10G (no suministrado)
Amplificador
A un tomacorriente
de CA
Blanca (canal
izquierdo)
Roja (canal
derecho)
• Cable óptico POC-15A (no suministrado)
• Cable de equilibrio con conector de cañón XLR-3-32
(no suministrado)
E
4
Page 71

Preparativos
Conexiones
p Para realizar conexiones analógicas
Para conectar un cable de audio, cerciórese de hacer
coincidir las clavijas del cable codificado en colores
con las tomas apropiadas de los componentes. roja
(canal derecho) a roja, y blanca (canal izquierdo) a
blanca. Cerciórese de realizar las conexiones
firmemente para evitar zumbidos y ruidos.
Reproductor de
discos
compactos
LINE OUT
L
R
p Para realizar conexiones digitales
Las conexiones digitales le permitirán transmitir la
señal fuente digital del reproductor de discos
compactos directamente a otro componente sin
ningún deterioro. Usted podrá conectar las salidas
digitales a otros componentes digitales, tales como
un amplificador digital, un convertidor digital/
analógico, un deck de cinta audiodigital, o un deck
de minidiscos. Si ha conectado un deck de cinta
audiodigital o un deck de minidiscos, podrá realizar
conexiones digitales de discos compactos. Tenga en
cuenta que, cuando grabe con esta conexión, no
podrá utilizar la función de aumento gradual ni la de
desvanecimiento (página 16).
• Si usted posee un componente digital con conector de
entrada digital coaxial
Conecte el componente a través del conector DIGITAL
OUT (COAXIAL) utilizando un cable coaxial (no
suministrado).
Reproductor de discos
compactos
DIGITAL OUT
OPTICAL
OFF ON
COAXIAL
OFF ON
BALANCED
OFF ON
Amplificador
TUNER CD AUX
L
R
INPUT
Componente
digital
DIGITAL IN
COAXIAL
Reproductor de discos
OPTICAL
OFF ON
compactos
DIGITAL OUT
COAXIAL
OFF ON
BALANCED
OFF ON
Componente
digital
DIGITAL IN
OPTICAL
Después de haber realizado las conexiones, ponga el
interruptor DIGITAL OUT OPTICAL del panel
posterior en ON. Cuando no vaya a utilizar la salida
coaxial, póngalo en OFF.
• Si posee un componente digital (como un amplificador)
con conector de entrada equilibrado
Conecte el componente a través del conector BALANCED
utilizando un conector de cañón XLR-3-32o equivalente
(no suministrado). La conexión equilibrada es muy
resistente al ruido y suelen utilizarla los profesionales en
estudios y emisoras de radiodifusión.
Utilización de un conector de cañón XLR-3-32 o
equivalente (no suministrado)
A
B
Para enchufar el conector
Alinee las partes A e inserte firmemente el conector.
Para desconectar el conector
Mantenga presionado la tecla de bloqueo B y extraiga el
conector.
Asignación de contactos
23 1
OUTIN
132
1: TIERRA
2: ACTIVO
3: PASIVO
Después de haber realizado las conexiones, ponga el
interruptor DIGITAL OUT COAXIAL del panel
posterior en ON. Cuando no vaya a utilizar la salida
coaxial, póngalo en OFF.
• Si posee un componente digital con conector de
entrada digital óptica
Conecte el componente a través del conector DIGITAL
OUT (OPTICAL) utilizando un cable óptico (no
suministrado). Quite el tapón y enchufe el cable óptico.
Reproductor de discos
compactos
DIGITAL OUT
OPTICAL
OFF ON
COAXIAL
OFF ON
BALANCED
OFF ON
Convertidor digital/
analógico, etc.
DIGITAL
AES/EBU
IN OUT
Después de haber realizado las conexiones, ponga el
interruptor DIGITAL OUT BALANCED del panel
posterior en ON. Cuando no vaya a utilizar la salida
equilibrada, póngalo en OFF.
(Continúa)
E
5
Page 72

Preparativos
Conexión del cable de alimentación
1 Conecte el cable de alimentación suministrado a
la toma AC IN (230 V) del panel posterior del
reproductor.
2 Conecte el enchufe del cable de alimentación a
una toma de la red.
¿Qué hacer a continuación?
Ahora podrá utilizar el reproductor.
Pase a las secciones siguientes para reproducir un disco
compacto.
E
6
Page 73

Operaciones básicas
Reproducción de un disco
compacto
53, 4
f
p
P
Æ
+
=
)
0
S
Si conecta la alimentación
del reproductor con un
disco compacto en el
mismo
La reproducción se iniciará
unos 10 segundos después de
haberse conectado la
alimentación. Si conecta un
temporizador, adquirido en
un establecimiento del ramo,
podrá iniciar la reproducción
de un disco compacto a la
hora que desee. Para iniciar
la reproducción de forma
más rápida, presione P o ·
mientras esté parpadeando
“PAUSE”.
Notas
• En el paso 3, no coloque más de
un disco compacto cada vez. Si
lo hiciese, podría dañar los
discos y/o el reproductor.
• Cuando inserte o extraiga un
disco compacto, no toque el
interior del objetivo.
power
1
Presione POWER para conectar la alimentación del
reproductor.
1
Conecte la alimentación del amplificador y seleccione el
reproductor de discos compactos.
2
Abra la tapa del disco con la mano, extraiga el estabilizador, y
coloque un disco compacto.
3
p
P
+
=
)
0
power
Estabilizador
(suministrado)
Æ
S
÷
power
con la cara de la
etiqueta hacia arriba
Operaciones básicas
p
P
Æ
+
=
)
S
0
(Continúa)
E
7
Page 74

Operaciones básicas
Estabilizador
suministrado
(En la ilustración se muestra
la vista lateral del
estabilizador.)
Parte superior
Parte inferior
Nota
Después de haber
reemplazado el disco
compacto, coloque el
estabilizador suministrado
sobre el mismo.
Usted también podrá
iniciar la reproducción
presionando · cerrando
después la tapa del disco.
Si la reproducción no se
inicia desde la primera
canción
1 Presione repetidamente
CONTINUE del telemando
hasta que “SHUFFLE”,
“PROGRAM” o “CUSTOM
INDEX” desaparezca del
visualizador.
2 Presione ·.
Visualizador
SHUFFLE
PROGRAM
CUSTOM INDEX
Coloque el estabilizador en el disco, y después cierre la tapa
del disco con la mano.
4
p
P
Æ
+
=
)
S
0
power
÷
Coloque el estabilizador
suministrado en el disco compacto.
(Tenga cuidado de no colocar el
estabilizador al revés.)
Presione ·.
5
El indicador · se encenderá, y la reproducción se iniciará
desde la primera canción.
Ajuste el volumen del amplificador.
Para parar la reproducción
Presione p.
p
P
Æ
+
=
)
S
0
power
p
P
Æ
+
=
)
S
0
power
Estos indicadores
desaparecerán al presionar
CONTINUE.
Cuando desee
realizar una pausa
reanudar la reproducción después de una pausa
pasar a la canción siguiente
retroceder a la canción anterior
avanzar rápidamente por una canción
retroceder rápidamente por una canción
E
8
0)=+
ÆPp
presione
P
P o ·
+
=
)
0
Page 75

Reproducción de discos compactos
Utilización del visualizador
Usted podrá comprobar la información sobre el disco
utilizando el visualizador.
Reproducción de discos compactos
Comprobación del tiempo restante
Presione TIME del telemando durante la reproducción
de un disco.
Cada vez que presione esta tecla, la visualización
cambiará de la forma siguiente.
TIMEDISPLAY
MODE
Pp
Æ
))00+c=
C
Comprobación del número y del tiempo de
reproducción totales de las canciones
Presione TIME del telemando en el modo de parada.
El visualizador mostrará el número y el tiempo de
reproducción totales.
SECMIN
Tiempo de
reproducción
INDEX
SECMIN
y número de
la canción
actual
Presione
Tiempo
restante de
INDEX
SECMIN
la canción
actual
Presione
Tiempo
restante del
SECMIN
disco
Si el tiempo restante es superior a 100 minutos en el
modo de programa, en vez del tiempo restante
aparecerá “––.––”.
Presione
Visualización del calendario de canciones
El calendario de canciones mostrará todos los números
de canciones del disco compacto actual.
Presione DISPLAY MODE del telemando.
Cada vez que presione testa tecla, la visualización
cambiará como se muestra a continuación.
Número total
de canciones
Tiempo de
reproducción total
Esta información también aparecerá cuando cierre la
tapa del disco.
Visualización de información durante la
reproducción de un disco
Durante la reproducción de un disco, el visualizador
mostrará el número de canción actual, el número de
índice, y el tiempo de reproducción.
SECMININDEX
Tiempo de
Número de
la canción
actual
Número de índice (página 10) o número
de índice de usuario (página 19)
reproducción
SECMIN
Presione
SECMIN
162738495
10
Presione
• Si el disco posee más de 15 canciones, al lado de 15 del
calendario de canciones aparecerá ”.
• Los números de canciones del calendario de canciones
desaparecerán a medida que vayan reproduciéndose.
El ajuste de la visualización del calendario de
canciones permanecerá memorizado incluso aunque
desconecte la alimentación del reproductor.
Sin embargo, el calendario de canciones aparecerá
automáticamente durante la reproducción programada,
la reproducción con borrado, la reproducción aleatoria,
y la reproducción con señales de índice de usuario.
Usted también podrá hacer que desaparezca el
calendario de canciones durante la reproducción en
estos modos, pero volverá a aparecer si cambia de
modo.
E
9
Page 76

Reproducción de discos compactos
Æ
Pp
))00+c=
C
Localización de una canción
específica
Usted podrá localizar rápidamente cualquier canción
durante la reproducción de un disco utilizando las
teclas =/+ (AMS: Automatic Music Sensor =
sensor automático de canciones) o las teclas numéricas
del telemando.
MUSIC SCAN
Teclas
numéricas
>20
Cada vez que presione MUSIC SCAN durante la
reporducción con exploración, la duración de
reproducción se prolongará el tiempo visualizado.
Usted podrá utilizar la exploración de canciones durante
la reproducción repetida, la reproducción aleatoria, o
la reproducción programada.
Localización de un punto
particular de una canción
Usted también podrá localizar un punto particular de
una canción durante la reproducción de un disco.
Pp
·
= / +
Para localizar
la canción siguiente
u otras posteriores
(AMS)
la canción actual u
otras anteriores
(AMS)
directamente una
canción específica
(Selección directa de
canciones)
explorando cada
canción durante 10
segundos
(Exploración de
canciones)
Para localizar directamente canciones de número
superior a 20
Presione en primer lugar >20 del telemando, y después
las teclas numéricas correspondientes. Para introducir
“0”, utilice la tecla “10”.
Por ejemplo: Para reproducir la canción número 30
Usted podrá prolongar el tiempo de reproducción
durante la exploración de canciones (o en el modo
de parada)
Presione repetidamente MUSIC SCAN del telemando
hasta que en el visualizador aparezca el tiempo de
reproducción deseado (10, 20, o 30). Cada vez que
E
10
presione esta tecla, el tiempo de reproducción cambiará
cíclicamente.
Æ
))00+c=
C
presione
+ repetidamente durante la
reproducción hasta que encuentre la
canción deseada.
= repetidamente durante la
reproducción hasta que encuentre la
canción deseada.
las teclas numéricas correspondientes
a la canción.
1 MUSIC SCAN del telemando antes
o durante la reproducción.
2 Cuando encuentre la canción
deseada, presione · para iniciar la
reproducción.
Presione en primer lugar >20,
y después 3 y 10.
0 / )
C / c
Para localizar un
presione
0 / ) SLOW
punto
+ (avance) o = (retroceso), y
escuchando el sonido
lentamente
escuchando el sonido
rápidamente
observando el
visualizador en el
modo de pausa
utilizando una señal
de índice (solamente
para discos
indizados)
manténgala así hasta que
encuentre el punto deseado.
0/) SLOW del telemando, y
manténgala así hasta que
encuentre el punto deseado.
0/ ) del telemando, y
manténgala así hasta que
encuentre el punto deseado. Usted
no oirá durante esta operación.
C/c repetidamente del
telemando durante la
reproducción o en el modo de
pausa hasta que encuentre el
punto deseado.
¿Qué es una señal de índice?
Es un número que divide una canción o un disco en
secciones, permitiéndole localizar fácilmente el punto
deseado. Usted podrá determinar si un disco utiliza
señales de índice por su paquete.
Nota
Si en el visualizador aparece “ ”, el disco finalizó
mientras estaba presionando. Para retroceder, presione 0
o = .
Page 77

Reproducción r epetida de
canciones
Usted podrá reproducir repetidamente canciones en
cualquier modo de reproducción.
REPEAT
Pp
Æ
))00+c=
C
Presione REPEAT del telemando durante la
reproducción de un disco.
En el visualizador aparecerá “REPEAT”. El
reproductor repetirá las canciones de la forma
siguiente:
REPEAT
SECMININDEX
Cuando esté
El reproductor repetirá
reproduciéndose un disco
Reproducción continua
(página 7)
Reproducción aleatoria
(página 12)
Reproducción programada
(página 12)
Reproducción con borrado
(página 13)
Reproducción aleatoria con
borrado (página 12, 14)
Reproducción con señales de
índice de usuario (página 19)
Todas las canciones
Todas las canciones en orden
aleatorio
El mismo programa
Todas las canciones restantes
Todas las canciones restantes
en orden aleatorio
La parte entre dos señales de
índice
Para cancelar la reproducción repetida
Presione repetidamente REPEAT hasta que “REPEAT”
desaqparezca del visualizador.
A ˜ B
Reproducción de discos compactos
Repetición de la canción actual
Usted podrá repetir solamente la canción actual.
Mientras esté reproduciéndose la canción actual,
presione repetidamente REPEAT del telemando hasta
que en el visualizador aparezca “REPEAT 1”.
Para cancelar la repetición de la canción actual
Presione REPEAT.
Nota
Usted no podrá repetir la canción actual mientras el disco
esté reproduciéndose en el modo de reproducción con
señales de índice de usuario (consulte la página 19).
Repetición de una parte específica
(Repetición de A ˜ B)
Usted podrá reproducir repetidamente una parte
específica de una canción.
Esto puede ser muy útil cuando desee memorizar
letras de canciones.
Tenga en cuenta que usted no podrá repetir una
sección que se encuentre entre dos canciones.
1 Durante la reproducción de un disco, presione A
˜ B del telemando en el punto de comienzo
(punto A).
En el visualizador parpadeará “A-” de “REPEAT
A-”.
2 Cuando llegue al punto de finalización (punto B),
vuelva a presionar A ˜ B.
Aparecerá “REPEAT A-B”. El reproductor
reproducirá repetidamente esta parte específica.
Para cancelar la repetición de A ˜B
Presione REPEAT.
Determinación de un nuevo punto de inicio
Usted podrá mover hacia adelante la parte que desee
reproducir repetidamente cambiando el punto de
comienzo.
1 Presione A ˜ B mientras el reproductor esté
repitiendo la parte específica.
El punto de finalización (punto B) pasará a ser el
nuevo punto de comienzo (punto A). En el
visualizador parpadeará “A-” de “REPEAT A-”.
2 Cuando llegue al punto de finalización deseado
(punto B), vuelva a presionar A ˜ B.
Aparecerá “REPEAT A-B”. El reproductor repetirá
la parte comprendida entre los nuevos puntos de
comienzo y finalización.
Usted podrá volver a comenzar desde el punto A en
cualquier momento.
Presione · durante la reproducción repetida de
A ˜ B.
11
E
Page 78

Reproducción de discos compactos
Æ
Pp
))00+c=
C
Reproducción en or den
arbitr ario (Reproducción
aleatoria) Z
Usted podrá hacer que el reproductor “ordene
aleatoriamente” las canciones y las reproduzca en
orden arbitrario.
SHUFFLE
Pp
·
Æ
))00+c=
C
Creación de su pr opio
programa (Reproducción
programada) Z
Usted podrá disponer el orden de las canciones de un
disco y crear su propio programa. El programa podrá
contener hasta 24 canciones.
CONTINUE
Teclas
numéricas
>20
CHECK
·
PROGRAM
CLEAR
p
1 Presione SHUFFLE del telemando.
En el visualizador aparecerán “SHUFFLE” y el
1 Presione PROGRAM del telemando.
En el visualizador aparecerá “PROGRAM”.
calendario de canciones.
SHUFFLE
162738495
10
2 Para iniciar la reproducción aleatoria, presione
· .
Mientras el reproductor esté “ordenando
aleatoriamente” las canciones aparecerá la
indicación .
PROGRAM
162738495
10
2 Presione las teclas numéricas correspondientes a
las canciones que desee programar en el orden
deseado.
Para programar una canción de número superior
a 20, utilice la tecla >20 del telemando (consulte la
página 10).
Para cancelar la reproducción aleatoria
Presione CONTINUE del telemando.
Usted podrá iniciar la reproducción aleatoria
PROGRAM
STEP
SECMIN
2
5
8
durante la reproducción.
Presione SHUFFLE del telemando, y la reproducción
aleatoria se iniciará desde la canción actual.
Usted podrá borrar las canciones no deseadas
durante la reproducción aleatoria (Reproducción
aleatoria con borrado)
Presione la tecla numérica correspondiente a la canción
que desee borrar mientras esté visualizándose
“SHUFFLE”.
En el visualizador aparecerán el número de la canción y
“OFF”, y después el número de la canción desaparecerá
del calendario de canciones.
Si desea restablecer la canción, vuelva a presionar la
tecla numérica.
Para restablecer todas las canciones, presione p en el
E
12
modo de parada.
Útima canción
programada
Tiempo de
reproducción
total
Orden de
reproducción
Canciones
programadas
Si ha cometido un error
Presione CLEAR y después la tecla numérica correcta.
3 Para iniciar la reproducción programada,
presione ·.
Para cancelar la reproducción programada
Presione CONTINUE del telemando.
Page 79

Cuando programe consecutivamente canciones que
Æ
Pp
))00+c=
C
no sean numéricamente consecutivas en el disco (p.
ej., 1, 3, 5, etc.)
Entre las canciones se añadirá un espacio en blanco de
un segundo entre las canciones.
El programa se conservará incluso después de haber
finalizado la reporducción programada
Presionando ·, podrá volver a reporducir el mismo
programa.
Notas
• Cuando el tiempo de reproducción sea superior a 100
minutos, en vez del tiempo de reproducción total, en el
visualizador aparecerá “––.––”.
• Cuando trate de añadir una canción a un programa que ya
contenga 24 canciones, en el visualizador aparecerá
“FULL”.
• Cuando desconecte la alimentación, las canciones
programadas se borrarán, y el modo de reproducción
volverá al de reproducción continua.
Reproducción de discos compactos
Reproducción de canciones
específicas solamente
(Reproducción con borrado)
Usted podrá borrar las canciones que no desee y
reproducir solamente las restantes.
CONTINUE
Teclas
numéricas
>20
SHUFFLE
CLEAR
Comprobación del orden de las canciones
Usted podrá comprobar el orden de las canciones de su
programa antes o después de haber iniciado la
reproducción.
Presione CHECK.
Cada vez que presione esta tecla, el visualizador
mostrará los números de las canciones en el orden de
su programación y el tiempo de reproducción total.
Después de la última canción del programa, el
visualizador mostrará “End” y volverá a aparecer la
visualización original. Si comprueba el orden después
de haber iniciado la reproducción, el visualizador
solamente mostrará los números de las canciones
restantes.
Cambio del orden de las canciones
Usted podrá cambiar su programa antes de iniciar la
reproducción.
Para
borrar una canción
borrar la última
canción del programa
añadir canciones al
final del programa
cambiar
completamente todo
el programa
presione
CHECK hasta que en el visualizador
aparezca la canción que desee
borrar, y después presione CLEAR.
CLEAR en el modo de parada. Cada
vez que presione la tecla, se borrará
la última canción.
las teclas numéricas
correspondientes a las canciones que
desee borrar.
p en el modo de parada. Cree un
nuevo programa siguiendo el
procedimiento de programación.
·
1 Presione SHUFFLE del telemando.
En el visualizador aparecerá “SHUFFLE”.
SHUFFLE
162738495
10
2 Presione las teclas numéricas correspondientes a
las canciones que desee borrar.
Los números de las canciones desaparecerán del
calendario de canciones después de que
aparezcan durante un momento el número de la
canción y “OFF”.
Para borrar una canción de número superior a 20,
utilice la tecla >20 (consulte la página 10).
Si ha cometido un error
Vuelva a presionar la tecla numérica. En el visualizador
aparecerán el número de la canción y “ON” y la canción
se restablecerá.
3 Después de haber borrado todas las canciones no
deseadas, presione CONTINUE.
En el visualizador aparecerá “SHUFFLE”.
4 Para iniciar la reproducción con borrado, presione
· .
Para cancelar la reproducción con borrado
Presione p en el modo de parada. Aparecerán todas las
canciones borradas.
(Continúa)
13
E
Page 80

Reproducción de discos compactos
El reproductor mantendrá en la memoria las
canciones borradas incluso después de que haya
finalizado la reproducción con borrado.
Si presiona ·, podrá volver a reproducir solamente las
canciones restantes.
Usted podrá reproducir las canciones en orden
arbitrario (reproducción aleatoria con borrado)
Simplemente salte el paso 3 del procedimiento anterior.
Usted podrá borrar una canción durante la
reproducción.
Presione CLEAR mientras esté reproduciéndose la
canción. El reproductor borrará la canción e iniciará la
reproducción desde la canción siguiente.
Usted podrá almacenar las canciones borradas de
cada disco.
Consulte “Almacenamiento de canciones específicas de
un disco” de la página 20.
14
E
Page 81

Grabación de discos compactos
Grabación de su propio
programa
Grabación de discos compactos
Usted podrá insertar automáticamente un espacio en
blanco ce 3 segundos entre cada canción.
Utilice la función de separación automática (consulte la
página 17).
Usted podrá grabar el programa que haya creado en
un cassette, una cinta audiodigital, o un minidisco. El
programa podrá contener hasta 24 canciones.
Insertando una pausa durante la programación, podrá
dividir el programa en dos para grabar en ambas caras
de un cassette.
PROGRAM
Teclas
numéricas
>20
CHECK
Pp
·
Æ
))00+c=
C
P
1 Cree su programa (para la cara A cuando grabe en
un cassette) comprobando el tiempo de
reproducción total indicado en el visualizador.
Realice los pasos 1 y 2 de “Creación de su propio
programa” de la página 12.
Usted podrá comprobar el tiempo de reproducción
total durante la programación (Edición de programa)
Esta función le ayudará a buscar la última canción que
quepa en una cara del cassette.
1 Presione PROGRAM del telemando.
En el visualizador aparecerá “PROGRAM”.
2 Presione = o + hasta que en el visualizador
aparezca la canción que desee programar.
En el visualizador aparecerá el tiempo de
reproducción total, incluyendo la canción
seleccionada, y el número de paso del programa
parpadeará.
3 Presione PROGRAM del telemando para confirmar su
selección.
4 Repita los pasos 2 y 3 para programar otras canciones.
Para comprobar y cambiar su programa
Consulte la página 13.
Mientras esté comprobando el programa para la cara A,
aparecerá “SIDE-A”, y mientras esté comprobando el
programa para la cara B, aparecerá “SIDE-B”.
2 Para grabar en ambas caras del cassette, presione
P a fin de insertar una pausa.
En el visualizador aparecerá la indicación “P” y el
tiempo de reproducción se repondrá a “0.00”.
Para grabar en una sola cara de un cassette, o en
una cinta audiodigital o en un minidisco, salte
este paso y vaya al paso 4.
Una pausa se contará como una canción.
Cuando haya insertado una pausa, podrá programar
hasta 23 canciones.
3 Para crear un programa para la cara B, repita el
paso 1.
4 Inicie la grabación en el deck y presione · del
reproductor.
Cuando grabe en ambas caras de un cassette, el
reproductor realizará una pausa al final del
programa para la cara A.
5 Para grabar en la cara B, dé la vuelta al cassette y
presione P o · del reproductor para reanudar la
reproducción.
15
E
Page 82

Grabación de discos compactos
Æ
Pp
))00+c=
C
Aumento gradual y
desvanecimiento
Usted podrá realizar manualmente el aumento gradual
y el desvanecimiento para evitar que las canciones
comiencen o finalice bruscamente.
Tenga en cuenta que usted no podrá utilizar este efecto
cuando haya realizado las conexiones a DIGITAL OUT.
Teclas
numéricas
FADER
Notas
• La duración de aumento gradual/desvanecimiento se
conservará incluso aunque desconecte la alimentación.
• Cuando utilice la función de archivo de usuario (página
18), la duración de aumento gradual/desvanecimiento se
memorizará para cada disco.
Sugerencias útiles par a la
grabación
La utilización de estas funciones hará más conveniente
la grabación de discos compactos.
Pp
Æ
C
Para
comenzar la
reproducción con
aumento gradual
finalizar la reproducción
con desvanecimiento
))00+c=
presione FADER
en el modo de pausa. Parpadeará
“FADE” y la reproducción
comenzará con aumento gradual.
cuando desee iniciar el
desvanecimiento. Parpadeará
“FADE”. La reproducción se
desvanecerá y el reproductor
realizará una pausa.
0 / )
SPACE
PEAK SEARCH
p
Ajuste del nivel de grabación (Búsqueda de
pico)
Cambio de la duración de aumento gradual/
desvanecimiento
Usted podrá cambiar la duración de aumento gradual/
desvanecimiento de 2 a 10 segundos. Si no la cambia,
será de 5 segundos.
1 Presione FADER del telemando antes de iniciar la
reproducción.
En el visualizador aparecerá “5 SEC” y
parpadeará “FADE”.
El reproductor localizará el nivel más alto entre las
canciones a grabarse para permitirle ajustar el nivel de
grabación antes de comenzar ésta.
1 Antes de iniciar la grabación, presione PEAK
SEARCH del telemando.
En el visualizador parpadeará “PEAK” y el
reproductor repetirá la parte de nivel más alto
durante unos cuatro segundos.
2 Ajuste el nivel de grabación en el deck.
2 Presione la tecla numérica (2-10) correspondiente
para especificar la duración de aumento gradual/
desvanecimiento.
(O presione repetidamente 0 o ) hasta que se
visualice la duración deseada.)
E
16
3 Para parar la búsqueda de pico, presione p del
reproductor.
“PEAK” desaparecerá del visualizador.
Nota
La parte de nivel más alto puede diferir cada vez que intente
el ajuste en el mismo disco. Sin embargo, la diferencia será
tan pequeña que usted no tendrá ningún problema para
ajustar el nivel de grabación con precisión.
Page 83

Localización de cada canción de una cinta
utilizando la función del sensor automático
de canciones (AMS) (Separación
automática)
La función de separación automática insertará un
espacio en blanco de 3 segundos entre cada canción
durante la reproducción, que le permitirá localizar
canciones utilizando la función del AMS del deck de
cassettes.
Antes de iniciar la reproducción, presione SPACE.
En el visualizador aparecerá “AUTO SPACE”.
Para cancelar la separación automática
Presione SPACE hasta que “AUTO SPACE” desaparezca del
visualizador.
Nota
Si utiliza la función de separación automática cuando grabe,
por ejemplo, una melodía o una sinfonía, el sonido puede
interrumpirse donde cambie el número de canción. Esto
sucederá cuando haya números de canciones asignadas en
medio de una pieza.
Grabación de discos compactos
17
E
Page 84

Almacenamiento de información sobre los discos compactos (Archivos de usuario)
¿Cuantos discos pueden archivarse?
Posibilidades de los ar chivos
de usuario
El reproductor podrá almacenar 2 tipos de información
denominados “Archivos de usuario” para cada disco.
Después de haber almacenado los archivos de usuario
para un disco, el reproductor invocará
automáticamente lo que haya almacenado cada vez
que inserte el disco.
Los archivos de usuario permanecerán en la memoria
incluso aunque no utilice el reproductor durante
aproximadamente 1 mes.
Usted podrá almacenar la información
siguiente:
Usted podrá almacenar hasta 224 discos en el archivo
de usuario. Tenga en cuenta que el reproductor
contará un disco como dos cuando haya almacenado al
mismo tiempo una señal de índice de usuario y un
banco de borrado.
Usted podrá comprobar cuántos discos
puede archivar.
1 Extraiga el disco del reproductor.
2 Cierre la tapa del disco.
3 Presione TIME mientras no esté visualizándose el
calendario de canciones.
En el visualizador aparecerá el número de
archivos de usuario que podrá almacenar.
Cuando utilice
señales de índice de
usuario (página 19)
banco de borrado
(página 20)
La indicación de archivo de usuario aparecerá cuando
almacene la información correspondiente.
podrá
indizar el disco hasta 8 puntos
(para un disco con 32 o menos
canciones) o 5 puntos (para un
disco con más de 32 canciones).
borrar las canciones no
deseadas y almacenar solamente
las que desee.
C.FILE
DELETE
INDEX
Cuando almacene un archivo de usuario para un disco,
el reproductor recordará cómo reprodujo tal disco la
última vez, incluso aunque lo haya extraído del
reproductor (memoria del último modo). Cuando
vuelva a insertar el mismo disco, el reproductor lo
reproducirá con idéntico modo. El reproductor
también recordará la duración de aumento gradual/
desvanecimiento, si usted la cambió.
Tenga en cuenta que si usted inicia la reproducción
presionando · y después cerrando la tapa del disco,
el reproductor reproducirá en el modo de
reproducción actualmente seleccionado en vez del
almacenado.
Banco de borrado
Índice de usuario
Borrado de archivos de usuario
Si la memoria para archivos de usuario se llena, el
reproductor visualizará “FULL” cuando presione FILE
para almacenar información, y no podrá almacenar
más información sobre discos. Si es necesario, borre
los archivos de usuario de la forma siguiente:
Para borrar todos los archivos de usuario de todos los
discos
Manteniendo pulsada 0 y p, presione POWER para
conectar la alimentación del reproductor. En el visualizador
aparecerá “AL-CLr” y se borrarán todos los archivos de
usuario.
18
¿Dónde se almacenan los archivos de
usuario?
Los archivos de usuario se almacenan en la memoria
del reproductor, no en el disco. Esto significa que
usted no podrá utilizar el archivo de usuario cuando
reproduzca el disco en otros reproductores.
E
Page 85

Almacenamiento de información sobre los discos compactos (Archivos de usuario)
Si no desea indizar en un punto
Indización de un disco (Índice
Presione CLEAR y busque el punto siguiente que desee
indizar.
de usuario)
5 Para almacenar la señal de índice de usuario,
Usted podrá indizar un disco hasta en 8 puntos (para
un disco con 32 o menos canciones) o 5 puntos (para un
disco con más de 32 canciones) a fin de poder localizar
fácilmente el punto deseado.
Esto puede resultar muy útil cuando reproduzca discos
de sinfonías o conciertos en los que una pieza esté
dividida en varias canciones (pistas) (consulte el
ejemplo siguiente).
Ejemplo
Núm. de
canción
Núm. de
índice de
usuario
Primera
pieza
123456789
1
Segunda
pieza
23
Tercera
pieza
vuelva a presionar FILE.
En el visualizador aparecerá “INDEX” de la
indicación de archivo de usuario.
6 Para marcar más señales de índice de usuario,
repita los pasos 3 a 5.
Cuando ya haya decidido dónde indizar
Usted podrá marcar directamente una señal de índice
sin ajustar el punto. Cuando encuentre el punto que
desee indizar, presione en primer lugar P para realizar
una pausa en la reproducción, y después presione FILE
para marcar una señal de índice.
En el visualizador aparecerá “INDEX”.
Reproducción desde un punto de indización
(Reproducción con señales de índice de
usuario)
C.INDEX
Teclas
numéricas
CHECK
C / c
Pp
Æ
))00+c=
C
FILE
ERASE
0 / )
1 Coloque un disco.
2 Presione C.INDEX del telemando.
En el visualizador aparecerá “CUSTOM INDEX”.
El calendario de canciones desaparecerá.
C.INDEX
SECMIN
CUSTOM INDEX
3 Presione FILE en el punto que desee indizar.
En el visualizador parpadeará el número de
índice de usuario.
El reproductor repetirá la parte de 3 segundos a
partir del punto a indizarse.
1 Presione C.INDEX del telemando.
En el visualizador aparecerá “CUSTOM INDEX”.
2 Localice la señal de índice de usuario deseada de
la forma siguiente:
Para localizar
la siguiente señal de
índice de usuario
la señal de índice de
usuario actual
directamente una señal
de índice de usuario
específica
explorando los puntos
indizados durante 10
segundos
La reproducción se iniciará desde la señal de
índice de usuario seleccionada y continuará hasta
el final del disco.
Para cancelar la reproducción con señales de índice de
usuario
Presione CONTINUE del telemando.
presione
c durante la reproducción.
C durante la reproducción.
la tecla numérica
correspondiente a la señal de
índice de usuario.
MUSIC SCAN en el modo de
parada o en el de reproducción.
Cuando encuentre el punto
deseado, presione · para
iniciar la reproducción.
4 Presione 0 o ) para ajustar el punto para que
el reproductor repita desde el punto exacto que
desee indizar.
Si presiona estas teclas 7 veces, el punto se
moverá aproximadamente 1 segundo hacia
adelante o hacia atrás.
Notas
• Usted no podrá utilizar la función de búsqueda de señales
de índice (consulte la página 10).
• Para localizar la señal de índice de usuario siguiente o la
actual, utilice las teclas C/c en vez de las teclas
= / + .
(Continúa)
19
E
Page 86

Almacenamiento de información sobre los discos compactos (Archivos de usuario)
Reproducción desde una señal de índice hasta la
siguiente (Reproducción entre señales de índice
consecutivas)
1 Presione C.INDEX del telemando.
En el visualizador aparecerá “CUSTOM INDEX (1)”.
2 Presione la tecla numérica correspondiente a la señal de
índice de usuario a partir de la que desee iniciar la
reproducción.
La reproducción se iniciará desde la señal de índice de
usuario seleccionada y se parará al comienzo de la
siguiente.
Para cancelar la reproducción entre señales de índice
consecutivas, presione C.INDEX del telemando.
Usted podrá reproducir repetidamente la parte
comprendida entre dos señales de índice.
Presione REPEAT.
Borrado de señales de índice de usuario
1 Coloque un disco.
2 Presione C.INDEX.
En el visualizador aparecerá “CUSTOM INDEX”.
3 Presione repetidamente CHECK hasta que
parpadee el número de índice de usuario que
desee borrar.
1 Coloque un disco.
2 Borre las canciones que no desee.
Realice los pasos 1 a 3 de “Reproducción de
canciones específicas solamente” de la página 13.
3 Presione FILE del telemando para almacenar las
canciones restantes.
En el visualizador aparecerá “DELETE” de la
indicación de archivo de usuario.
Reproducción utilizando el banco de
borrado
1 Presione CONTINUE.
El banco de borrado se invocará y en el calendario
de canciones aparecerán los números de las
canciones seleccionadas.
2 Para iniciar la reproducción, presione ·.
Para cancelar la reproducción utilizando el banco de
borrado
Presione p.
4 Para borrar el índice de usuario, presione ERASE
mientras el número esté parpadeando.
Los números de índice de usuario siguientes
disminuirán en uno.
Almacenamiento de canciones
específicas de un disco (Banco
de borrado)
Usted podrá borrar las canciones no deseadas y
almacenar solamente las que desee. Esto le permitirá
iniciar la reproducción de sus canciones favoritas sin
borrar las demás cada vez que inserte un disco
compacto.
Para iniciar la reproducción volviendo a utilizar el banco
de borrado
Cuando esté visualizándose “PROGRAM” o “CUSTOM
INDEX”, presione repetidamente CONTINUE o SHUFFLE
hasta que estas indicaciones desaparezcan del visualizador.
El banco de borrado se invocará y usted podrá iniciar la
reproducción presionando ·.
Usted podrá reproducir en orden arbitrario
utilizando el banco de borrado
En el paso 1, presione repetidamente SHUFFLE del
telemando hasta que en el visualizador aparezca
“SHUFFLE”.
Borrado del banco de borrado
1 Coloque un disco.
2 Presione CONTINUE o SHUFFLE.
El visualizador mostrará el bando de borrado
almacenado.
3 Presione ERASE para borrar el banco de borrado.
“DELETE” de la indicación del archivo de usuario
desaparecerá del visualizador.
20
FILE
Pp
·
E
Æ
))00+c=
C
ERASE
Page 87

Información adicional
Información adicional
Notas sobre los discos
compactos
Manejo de los discos compactos
• Para mantener limpios los discos, tómelos por sus bordes.
No toque su superficie.
• No pegue papeles ni cintas en los discos.
Así no
• No exponga los discos a la luz solar directa ni a fuentes
térmicas, tales como conductos de aire cálido, ni los deje en
un automóvil aparcado al sol, ya que la temperatura podría
aumentar considerablemente.
• No utilice ningún estabilizador ni protector de disco, de
venta en establecimientos del ramo. Si lo hiciese, podría
dañar el disco y el reproductor.
• Después de la reproducción, guarde el disco en su caja.
Limpieza
• Antes de la reproducción, frote el disco con un paño de
limpieza. Hágalo del centro hacia afuera.
Solución de problemas
Si experimenta cualquiera de las dificultades siguientes
cuando utilice el reproductor, utilice esta guía para
solucionar el problema. Si el problema persiste,
consulte a su proveedor Sony.
No hay sonido.
/Compruebe si el reproductor está conectado con
seguridad.
/Compruebe si está utilizando correctamente el
amplificador.
/Ajuste el nivel de reproducción utilizando el
control LINE OUT/PHONE LEVEL.
/Los interruptores DIGITAL OUT del panel
posterior están en OFF. Para realizar
conexiones digitales, póngalos en ON.
El disco compacto no se reproduce.
/No hay disco compacto en el interior del
reproductor. Inserte uno.
/Utilice el estabilizador.
/Coloque correctamente el disco compacto con la
cara de la etiqueta hacia arriba en la bandeja del
disco.
/Limpie el disco compacto.
/En el interior del reproductor se ha condensado
humedad.
Extraiga el disco y deje el reproductor con la
alimentación conectada durante
aproximadamente una hora (consulte la página
2).
• No utilice disolventes, tales como bencina, diluidor de
pintura, ni limpiadores ni rociadores antiestáticos
destinados a discos analógicos a la venta en
establecimientos del ramo.
El telemando no funciona.
/Elimine los obstáculos entre el telemando y el
reproductor.
/Apunte con el telemando hacia el sensor de
control remoto g del reproductor.
/Si las pilas del telemando están débiles,
reemplace todas por otras nuevas.
21
E
Page 88

Información adicional
Especificaciones
Reproductor de discos compactos
Láser Láser de semiconductor (λ = 780 nm)
Duración de la emisión: continua
Salida de láser 44,6 µW como máximo*
* Esta salida es el valor medido a una
distancia de 200 mm de la superficie
del objetivo del bloque captor óptico
con una apertura de 7 mm.
Longitud de onda 780 - 790 nm
Respuesta en frecuencia 2 Hz a 20 kHz ±0,3 dB
Gama dinámica Más de 100 dB
Separación entre canales Más de 100 dB
Distorsión armónica Menos de 0,003%
Salidas
Generales
Alimentación 220 V - 230 V CA, 50/60 Hz
Consumo 18 W
Dimensiones (aprox.) 280 x 90 x 370 mm,
(an/al/prf) incluyendo partes y controles
salientes
Masa (aprox.) 6 kg
Accesorios suministrados
Cable conector de audio (1)
Telemando (1)
Pilas SUM-3 (NS) Sony (2)
Estabilizador (1)
Fieltro (1)
Cable de alimentación (1)
El diseño y las especificaciones están sujetos a cambio sin previo
aviso.
LINE OUT
DIGITAL
OUT
(COAXIAL)
DIGITAL
OUT
(OPTICAL)
DIGITAL
OUT
(BALANCED)
Tipo de
toma
Tomas
fono
Conector
de salida
coaxial
Conector
de salida
óptico
XLR-3-32
Nivel máximo de
salida
2,5 V (a 50
kiloohmios)
0,5 Vp-p
(75 ohmios)
–18 dBm
(Longitud de
onda: 660 nm)
5 V (a 50
kiloohmios)
Impedancia de
entrada
Más de 1 kiloohmio
75 ohmios
_
Más de 100 ohmios
Descripción del panel posterior
Con respecto a los detalles, consulte las páginas indicadas entre paréntesis.
1
234
5
22
LINE OUT
L
R
1 Salida de línea (LINE OUT) (5)
2 interruptor de salida digital óptica (DIGITAL OUT
OPTICAL) (5)
3 Interruptor de salida digital coaxial (DIGITAL
OUT COAXIAL) (5)
4 Interruptor de salida digital equilibrada (DIGITAL
E
OUT BALANCED) (5)
DIGITAL OUT
OPTICAL
OFF ON
COAXIAL
OFF ON
8 7 6
BALANCED
OFF ON
AC IN (230V)
5 Entrada de alimentación [AC IN (230 V)] (6)
6 Salida digital equilibrada (DIGITAL OUT
BALANCED) (5)
7 Salida digital coaxial (DIGITAL OUT COAXIAL)
(5)
8 Salida digital óptica (DIGITAL OUT OPTICAL) (5)
Page 89

Índice alfabético
Información adicional
A
Almacenamiento
canciones específicas 20
información sobre los discos
compactos 18
AMS 10
Archivos de usuario 18
Banco de borrado 20
Posibilidades 18
Señal de índice de usuario 18
Aumento gradual/
desvanecimiento 16
B
Banco de borrado
Borrado
Archivos de usuario 19
Banco de borrado 20
Señales de índice de usuario 19
Búsqueda. Consulte
Localización
Búsqueda de nivel de pico 16
C
Calendario de canciones 9
Conexión 4, 5, 6
Conexiones 4, 5, 6
descripción general 4
D
Desembalaje 4
E, F
Edición. Consulte Grabación.
Edición de programa 15
Estabilizador 2
Exploración. Consulte
Exploración de canciones.
Exploración de canciones 10
G, H
Grabación 15
de un programa 15
M, N, O
Manejo de los discos compactos
21
Memoria del último modo 18
P, Q
Programa 12, 13
cambio 13
comprobación 13
para grabación 15
R
Repetición
de todas las canciones 11
de una parte específica 11
Repetición de A-B 11
Reproducción
Reproducción aleatoria 12
Reproducción aleatoria con
borrado 14
Reproducción con borrado 13
Reproducción con señales de
índice de usuario 19
Reproducción continua 7
Reproducción entre señales de
índice de usuario
consecutivas 19
Reproducción programada 12
Reproducción repetida 11
Reproducción aleatoria 12
Reproducción aleatoria con
borrado 14
Reproducción con borrado 13
Reproducción continua 7
Reproducción entre señales de
índice de usuario
consecutivas 19
S
Sensor automático de canciones.
Consulte AMS.
Señal de índice de usuario 19
Separador automático 17
Solución de problemas 21
Denominación de los
controles
Teclas
A˜ B11
SPACE 17
CHECK 13
C.INDEX 19
CLEAR 14
CONTINUE 8
DISPLAY MODE 9
ERASE 20
FADER 16
FILE 19
C / c 10, 19
MUSIC SCAN 10
PEAK SEARCH 16
PROGRAM 12
REPEAT 11
SHUFFLE 12
0 / ) SLOW 10
TIME 9
· 8
P 8
p 8
0 / ) 8, 10
= / + 8, 10
>20 10
Número 10
Interruptor y selector
DIGITAL OUT 5
POWER 7
Otros
Display 9
g 4
I, J, K
Indización 10
Señal de índice de usuario 19
L
Localización
directa 10
escuchando 10
explorando 10
observando el visualizador
10
utilizando el AMS 10
utilizando señales de índice
de usuario
T, U, V, W, X, Y, Z
Telemando 9
Tiempo de reproducción total 9
Tiempo restante 9
23
E
Page 90

Sony Corporation Printed in Japan
 Loading...