

Page 1

SONY 3-756-446-21 (1)
Video Camera Recorder B___________
CCD-FX620
AC Power Adaptor
AC‘V25S
Operation Manual
Before operating the unit, please read this manual
thoroughly and retain it for future reference.
Owner’s Record
The model and serial numbers are located on the bottom of
the camcorder and AC power adaptor. Record the serial
numbers in the space provided on the right hand.
Refer to these numbers whenever you call upon your Sony
dealer regarding this product.
Mode! No. CCD-FX620
Serial No.
____________
Model No. AC-V25S
Serial No. __________
1
Videos Handycam
) 1993 by Sony Corporation
J
Page 2
About This Manual
If you want to shoot as soon as possible, read the chapters 'Getting Started" ana "Sasic Operations ' tirst. As
you reaa through this manual, buttons and settings on the camcorder are shown ir> capital letters,
e.g. Set the POWER switch to CAMERA.
Not* on TV Cotor Systwn
TV color systems differ from country to country
To view your recordings on a TV. you need an NTSC system based TV When you want to use a PAL M
system based TV, you will need an NTSC/PAL-M transcoder i.as this is an NTSC based camcorder! Please
check the list on page ii to see the TV color system ot your country
Noté on the Supplied RFU Adaptor
Precaution on Copyright
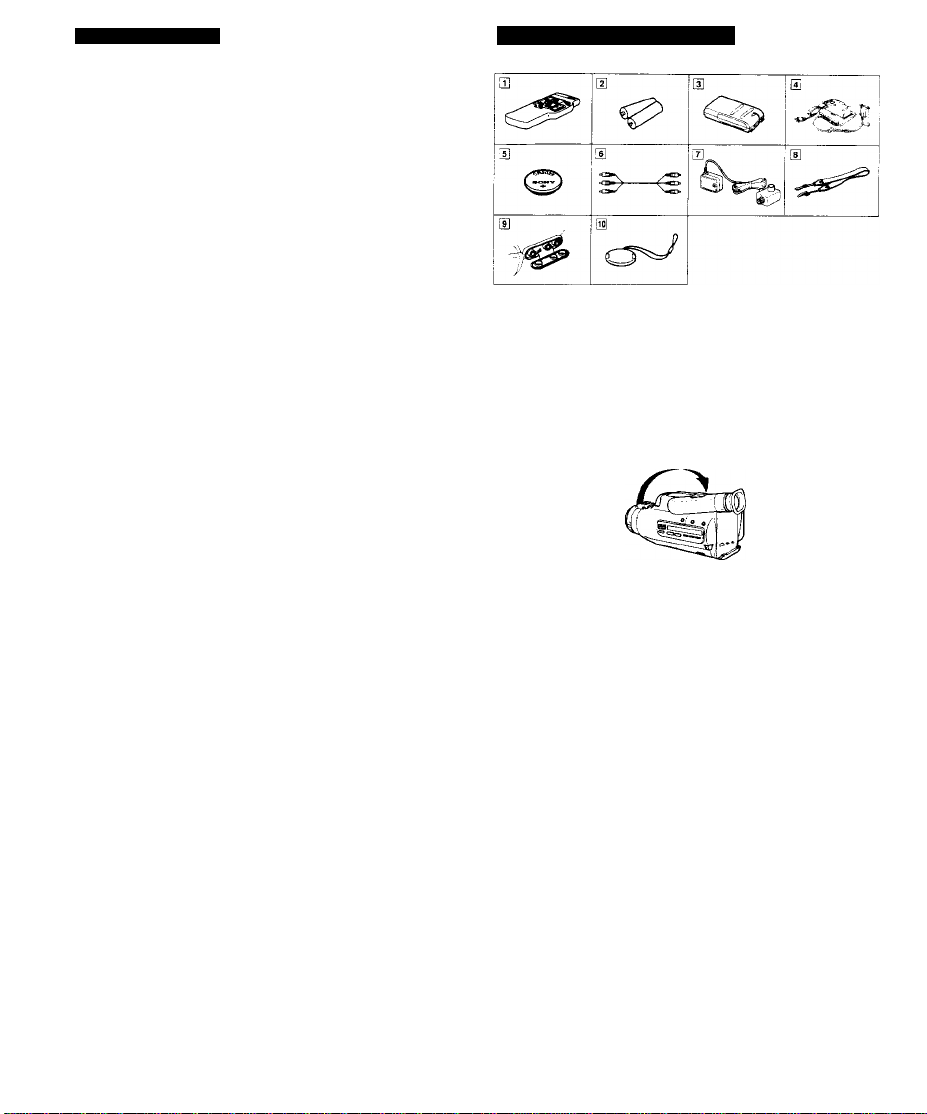
Checking Supplied Accessories
Check that the following accessories are supplied with your camcorder
^ Wireless Remote Commart(ler<l){p. 26)
Size AA (R6) Batteries lor Remote Commander (2) <p. 26)
^ Battery Pack NP-5S(1)(p. 6)
^ AC Power Adaptor AC-V25S <1) <p. 6]
It LithiumBattaryCfl2025(1)<p. 10)
U A/V Connacting Cable (1) (p. 22)
l7] RFU Adaptor RFU-90UC(1)(p. 23]
S Sboutder Strap (1)(p. 49)
Jack Cover (1) (attached to the camcorder)
H Lena Cap (1) (attached to the camcorder) (p. 17)
After You Take the Camcorder Out of the Box
Move the viewfinder barrel m the direction ot the arrow
'L
Page 3

WARNING
To prevent fire or shock
hazard, do not expose the unit
to rain or moisture.
This symbol IS intended to alen
me user to the presence of
uninsulated "dangerous
voltage" within the product's
enclosure that may be ot
Sufficient magnitude to
constitute a risk ot electnc
shock to persons.
This symbol is intended to alert
the user to the presence ot
important operating and
maintenance (servicing)
instructions in the literature
accompanying the appliance.
Notte* for Iho eustomor« In Ceneda
This apparatus complies with the Class 8 limits lor
radio noise emissions set out m Radio Interference
Regulations.
Vou are cautioned that any changes or modifications
not expressly approved m this manual could void
your authority to operate this equipment
This equipment has been tested and found to
comply with the limits for a Class 8 digital device,
pursuant to Part 15 ot the FCC Buies These limits
are designed to provide reasonable protection against
harmful interterence m a residential installation. This
equipment generates, uses, and can radiate radio
frequency energy and, it not installed and used in
accordance with the instructions, may cause harmful
interference to radio communications. However, there
IS no guarantee that interference will not occur in a
particular installation, it this equipment does cause
harmful interference to radio or television reception,
which can be determined by turning the equipment oft
and or. the user is encouraged to try to correct the
interference by one or more of the following
measures:
— Reorient or relocate the receiving antenna.
— Increase me seoaration between the equipment
and receiver.
— Connect the equipment into an outlet on a circuit
ditterent from that to which the receiver is
connected.
— Consult the dealer or an experienced raoio/TV
technician for help.
FOR THE CUSTOMERS IN USA AND
CANADA
CAUTION
TO PREVENT ELECTRIC SHOCK, DO NOT
USE THIS POLARIZED AC PLUG WITH AN
EXTENSION CORD. RECEPTACLE OR OTHER
OUTLET UNLESS THE BLADES CAN BE
FULLY INSERTED TO PREVENT BLADE
EXPOSURE.
Welcome to Video El
Congratulatiorts on your purchase of this Sony Handycam* Camcorder. With your Handycam. you can
capture life s precious moments with superior picture and sound quality Your Handycam is loaded with
advanced features, but at the same time it is very easy to use. You will soon be producing home video that
you can enjoy tor years to come.
Table of Contents
Before You Begin
About This Manual 4
Checking Supplied Accessories 5
Getting Started
Charging and Installing the Battery Pack 6
Tips for Using the Battery Pack 8
Installing the Lithium Battery tO
Setting the Date and Time n
Storing a Birth Date m Your Camcorder 12
Inserting a Cassette 14
Adjusting the Viewfinder Lens 15
BEEP Feature i5
Hints for Better Shooting 16
Basic Operations
Camera Recording 17
Using the Zoom Feature 19
Recording the Date or Time 19
Recording an Age 20
Checking the Recorded Picture m the Viewfinder 21
Connections tor Playback 22
Connecting to a TV or VCR Using the Connecting Adaptor 22
Connecting to a TV or VCR Directly with A/V Connecting Caoie 24
Connecting to a TV Directly without ArV Connecting Cable 24
Playing Back a Tape 25
Various Playback Modes 26
Preparing the Remote Commander 26
Advanced Operations
Using Alternative Power Sources 27
Compensating tor Backlighting 29
Focusing Manually 30
Using the PROGRAM AE Function 32
Fade-in and Fade-out 34
Using the Tape Counter 35
Inserting a Scene in the Middle ot a Recorded Tape 36
Editing onto Another Tape 37
Recording from a TV or VCR 38
Additional Information
Maintenance Information and Precautions 40
Using Your Camcorder Abroad 44
lOentitying the Parts 45
Specifications 50
Trouble Check 5l
Indicators in the Viewfinder and the Display Window 53
Index 55
L
Page 4

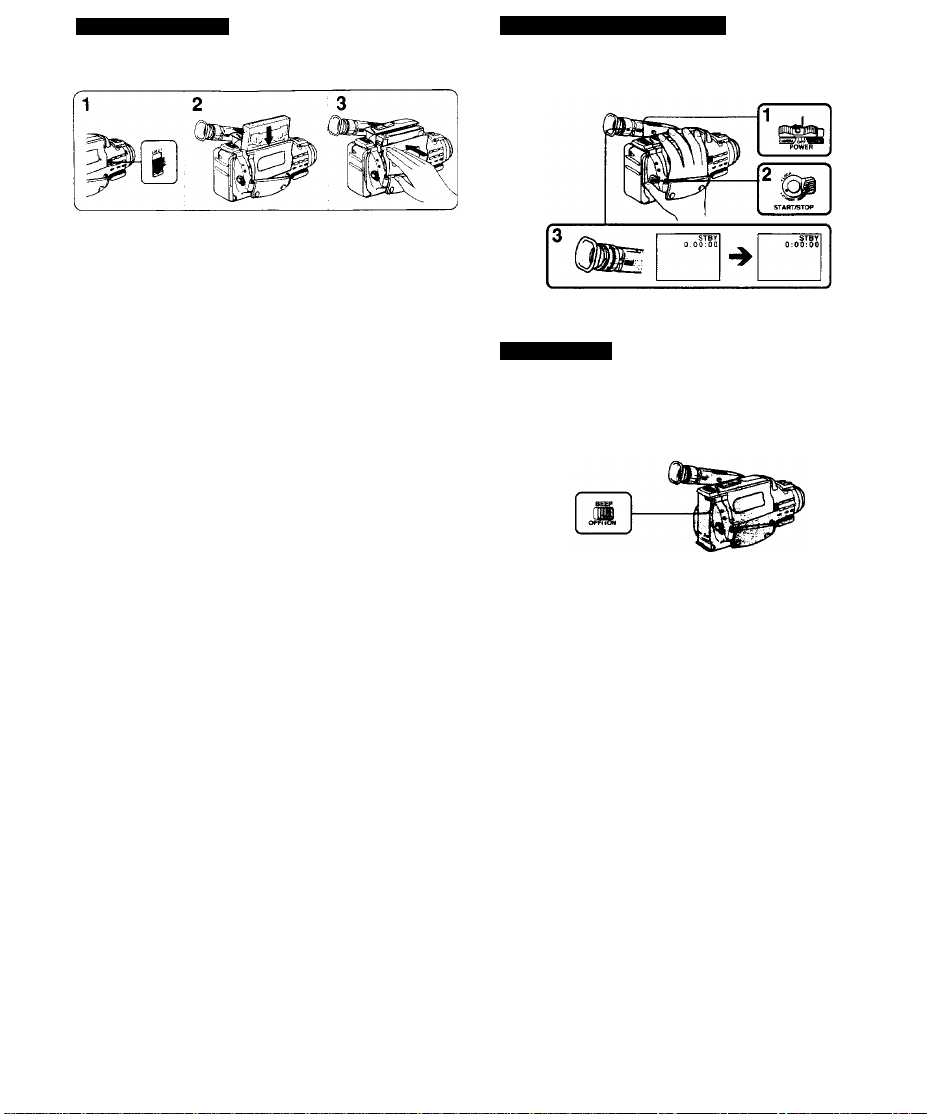
Charging and Installing the Battery Pack
Before using your camcorder, you need to cfiarge and install the battery pack. The supplied battery pack is
not charged when you purchase the camcorder. Use the supplied AC-V25S AC Power Adaptor lor charging.
ChOT^ng me Battery Pack
{11 Connea the power cord of me AC power adaptor to a waii outlet. (2) Attach the flat side of the battery pack
to the AC power adaptor by aligning the lines on the AC power adaptor and battery pack While pressing the
battery pack, slide it m the direction of the arrow until it cIicks. i3) Set the VTR lOC OUTVCHARGE selector to
CHARGE. The POWER lamp and CHARGE lamp will light up. The charging will begin.
When the battery is fully charged, the CHARGE lamp goes out Set the VTR (DC OUT|/CHARGE selector to
OFF. The POWER lamp goes out Then disconnect the power cord from the wall outlet.
Detaching the Battery Pack from the AC Power Adaptor
Slide the battery pack m the opposite direction of the arrow on the battery pack.
Charging time and battery life
Type of battery pack
HequiieO chaiginq time* TO
Battery life" 50
Important)
Use the batiery completely before charging!
Before you charge the battery, make sure it has been used (discharged) completely to avoid capacity
down of the batiery caused by excessive charging.
To use up the battery, remove the video cassette and simply slide the POWER switch oh the camcorder to
CAMERA with the battery attached, and leave the camcorder until the (X! mdicatof appears flashing and
a red lamp Hashes in the viewfinder. The CD indicator also flashes m the display window.
NP-55 '
(suopksd)
NP-77H
NP-77HO
NP-77 NP-бвН
160 UO 120
no 90 85
NP-S5H
80
60
Notes on №• AC power adaptor
• The camcorder canrtot be operated while charging the batiery pack.
• The POWER lamp will remain lit for a while even rf the battery pack is detached and the power cord is
disconnected after charging the battery pack. This is normal.
• If the POWER lamp does not light, set the VTR(DC OUT)/CHARGE selector to OFF and disconnect the
power cord After about one minute, reconnect the power cord and set the VTR(DC OUT)/CHARGE selector
to CHARGE again.
Installing the Battery Peck
(1) Lift up the viewfinder barrel. |2) Make sure you hold the battery pack properly. Align the right side of the
battery pack with the white line on the camcorder. While pressing the battery pack, slide it to the right until it
clicks.
Detsching the Battery Pack
(1) Lift up the viewfinder barrel. (2) While pressing ВАТТ in the direction of the arrow, and slide oi
pack to the left.
I the battery (л
Page 5
Charging and Installing the Battery Pack
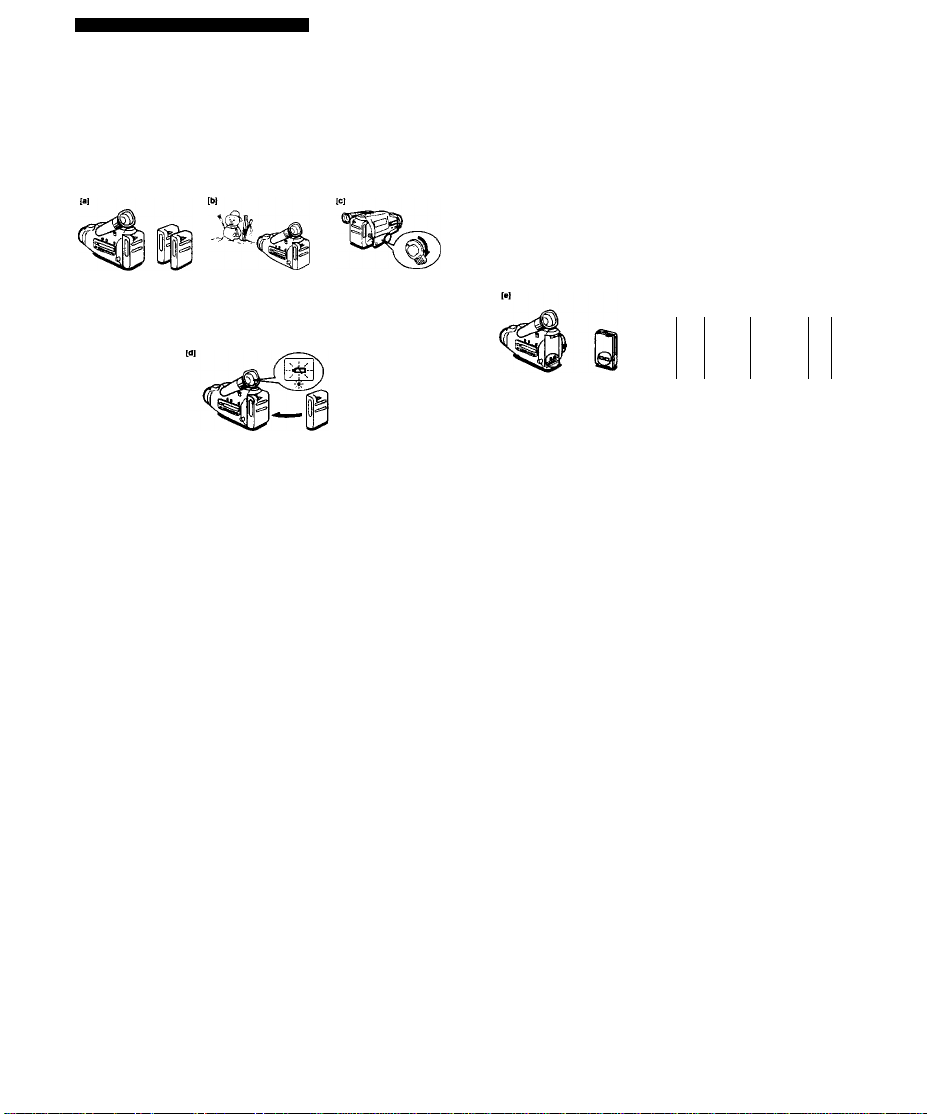
Tips for IWng the Battery Padi
Preparing the Rechargeable Battery Pack
Have sutticient battery pack power to do 2 or 3 times as much recordirtg than you have planned [a]
'Sattery life " mdicaied m this manual is measured Oy the cormnuous recording time oi me camcorder, at roon
temperature using a luNy charged Datlery.
Turn STANDBY of the camcorder down when not recording to save battery power [c]
A smootn transition between scenes can be made even if recording is stopped and started again.
While positioning the subieci or selecting an angle, or looking through me viewfinder tens, the lens moves
automatically mside me camcorder and the battery is used. The battery is also used when a tape is inserted or
ejected
When the Rechargeable Battery Pack Should Be Replaced
When the indicator and red lamp in the viewfindar, and the CD irtdlcator in the display window
change from slow blinhing to rapid biinking while you are recording [d]
Turn oft the power switch of the camcorder and replace the battery pack. Leave the tape m the camcorder to
obtain a smooth iransiiion between scenes after the battery pack is replaced
Notes on Charging
Before using the battery pack, charge it sufficiently
A brand-new battery pack is not charged.
Make sure you use up the battery before recharging
• It recording is completed before theOD indicator appears m the viewfinder, you should remove the tape, set
the POWER switch to CAMERA, turn STANDBY up before recharging. Leave the camcorder until the OG
indicator blinks rapidly which means the battery is used up.
• When you use the AC-StO AC Power Adaptor, the DC-SIO Car Battery Charger or BC-S10 Portable Battery
Charger, you can discharge the battery with iherr discharging function.
• Repeated charging without using up the battery may lower battery capacity. However, the onginal battery
capacity can be recovered it you fully discharge (use up) and then charge the battery again.
Ill be u: d up more quickly
Recharge the battery pack after lortg storage
It the battery pack is charged fully but then not used tor a long time (about t year), it becomes discharged.
Charge it again but in this case the battery life will be shorter than normal.
After several charging and discharging cycles, the battery iite will recover its original capacity.
Keep the Terminals Clean [e|
if the terminals (metal parts on the back) are not clean, the battery duration will be shortened.
When the terminals are not clean or when the battery pack has not been used lor a long time, install and
detach the battery pack from time to time. This will improve the contact condition. Also, wipe the * and terminals with a soft cloth or paper.
Notes on the Rechargeable Battery Pack
Why the battery pack neats up? (f)
During charging or recording, the battery pack heats up. This is caused by energy that has been generated
and chemical change has occurred inside the battery pack, and this is not cause tor concern.
How to care for the battery pack
• Detach the battery pack from the camcorder after using <t. and Keep it m
IS on the camcorder, a small amount of current flows to the camcorder e'
causes overdischargmg and shortens battery life.
• A charged battery pack always discharges even when it is not m use after charging.
Thus, It IS recommended that you charge the battery right before using.
How to use the switch on the battery pack |g]
This switch is provided so that you can remember the charging status. Set the switch to the no mark ’ position
when charging is completed. Set the switch to the "red mark' position when the battery is used up.
Ф'
How many times can the battery peck be recharged?
The battery pack can be fully charged and discharged about 500 times under normal temperatures. If the (XI
indicator flashes rapidly just after turning on the camcorder with a fully charged battery pack, the battery pack
should be replaced with a new tjily charged one.
Recommended temperatures during charging
The lemjjerature range of charging is 4PF to 95=F (5“C to 35'C). However, to provide maximum battery
efficiency, the recommended temperature range when charging is 50'F to 86-F (io C to 30X).
Be sure to observe the foliowing:
• To prevent an accident caused by a short circuit, do not ailow metal ob)ects such as a necklace to
touch tho battery lerminala. Carry the battery pack attaching to the termlnai cover,
• Keep the battery pack away from fire.
• Keep the battery pack dry.
• Do not open nor convert the battery pack.
• Do not expose the battery pack to any mechanical shock.
c
Page 6
Installing the Lithium Battery
A lithium batiery has positive and negative poiarities.
Positive side of Ihe battery is marked * Negative side has no polarity sign.
Installing the Lithhim Batteiy
To activate the clock and store birth dates in the camcorder's memory, you must first install a lithium battery.
(1) Remove the lithium battery holder located below ihe gnp strap ot the camcorder ¡2} Inslall the supplied
CR2025 lithium battery with the » side lacmg down. (3)Pul the lithium battery holder into the camcorder.
Lithium Battery Life
The battery will last for approximately t year under normal conditions. When the lithium battery becomes
weak, the £> indicator will flash in the viewfinder tor about 5 seconds when you turn STANDBY up while the
POWER switch IS set to CAMERA. In this case, reptene the battery with a Sony CR2025 or Ouraceil
DL-202S. Use of any other battery may prasant a risk of fira or axpiosion.
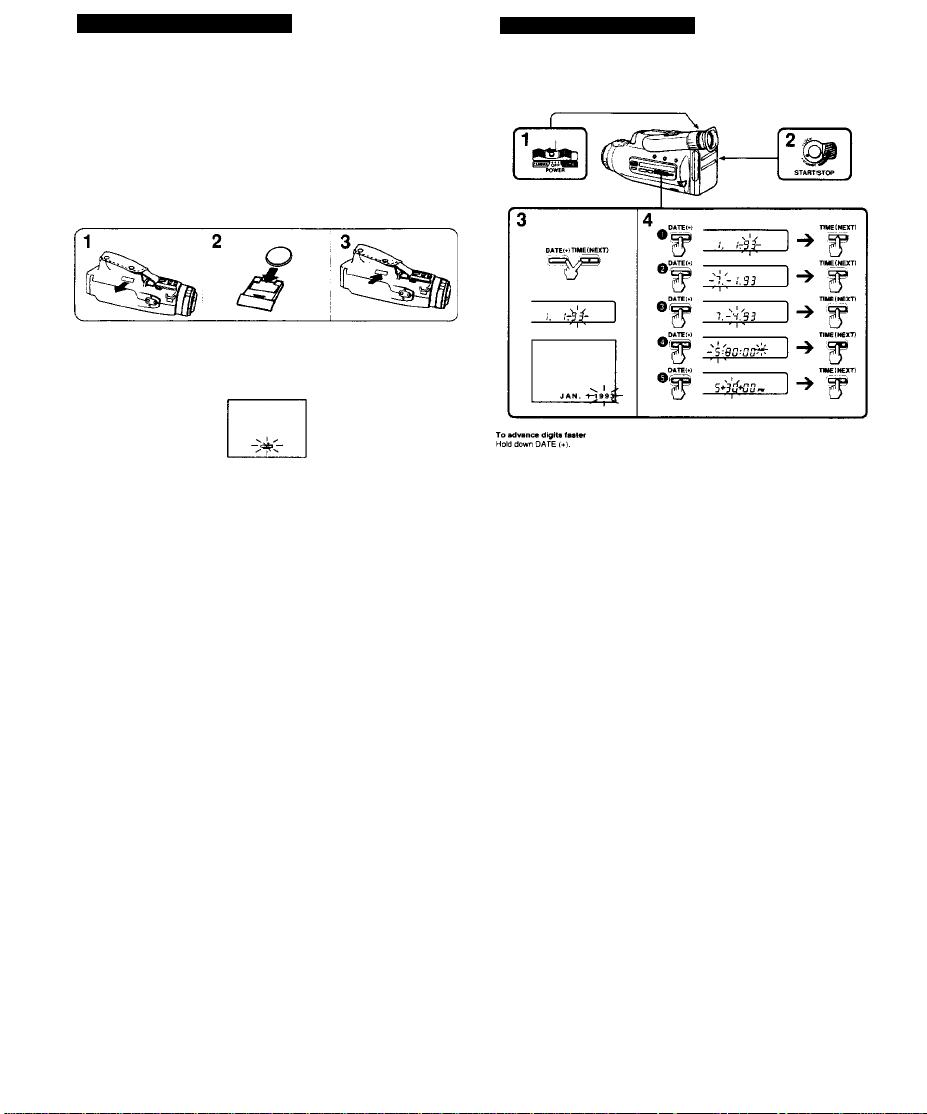
Setting the Date and Time
Before setting the dock, make sure a power source and lithium battery are installed. (1) While pressing the
small green button on the POWER switch, slide the POWER switch to CAMERA. (2) Turn STANDBY up.
(3) Press DATE |*) and TIME (NEXT) simultaneously for a few seconds until the year indicator flashes m the
display window. (4) Adjust the flashing digits for the year, month, day. hour, and mmule by using DATE (*)
and TIME(NEXT) The clock starts from '00" second after you press TIME (NEXT) following the adjustment of
the minutes. If you press TIME (NEXT) again, the time indicator will disappear.
When replacing the lithium battery, keep the battery pack or other power source attached. Otherwise. Input
data will be cleared and you have to store the data agam.
Warning
Battery may explode it mistreated. Do not recharge, disassemble or dispose of m fire.
Caution
Keep the lithium battery out ot the reach ot children. Should the battery be swallowed, consult a doctor
immediately.
10
To check the preset date and time
Press DATE (+) to display the date indicator m the display window and in the viewfinder. Press TIME (NEXT)
to display the lime indicator. When you press the same button again, the indicator goes out, and. in the
display window, the tape counter appears.
The year irtdlcator changes as follows:
93 (1993)
--------
* 99 {1999) - 00 (2000)
Note on the time iiHlIcator
The internal clock of this camcorder operates on a 12-hour cycle.
12;00 AM stands for midnight 12:00 PM stands tor noon.
--------
*20 (2020)
H
Page 7
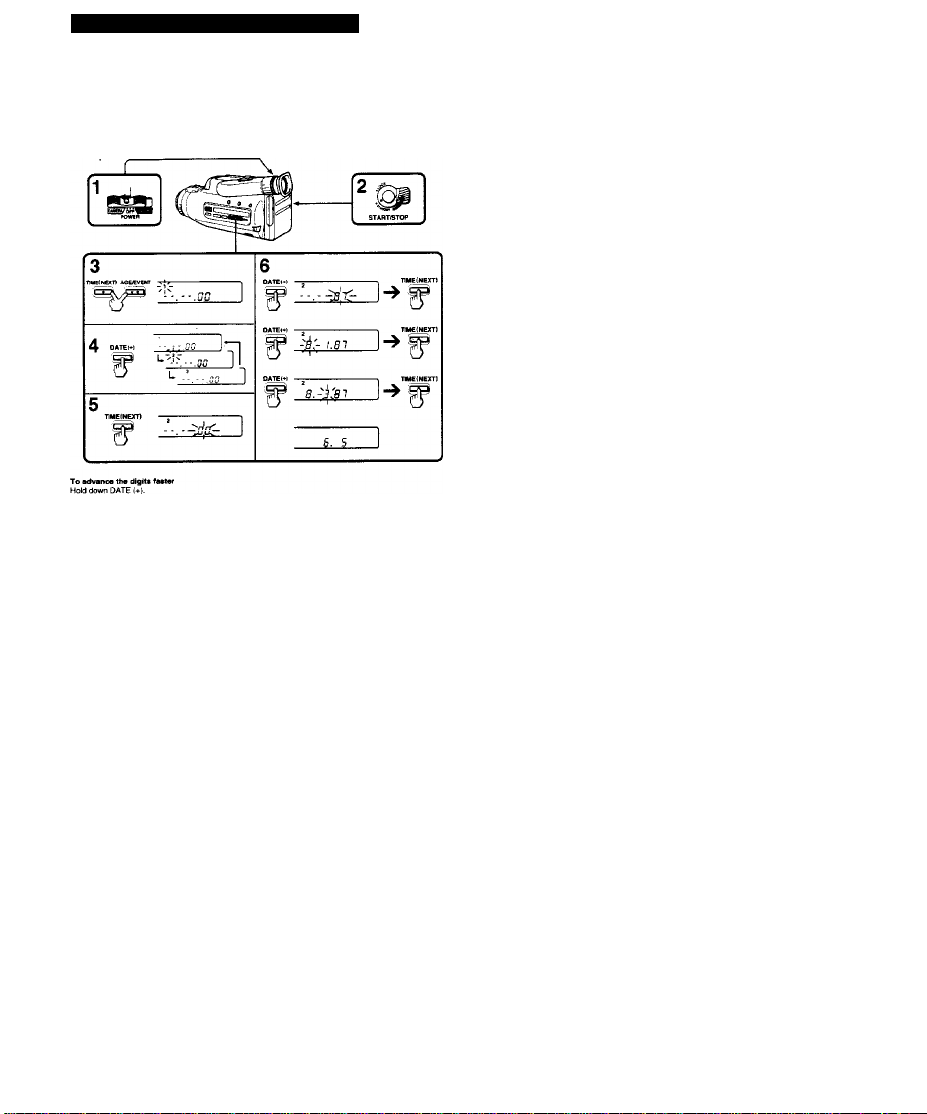
storing a Birth Date in Your Camcorder
By presetting your cftitd's birth date in your camcorder, you can record your child’s age in years and months
on your tape. Once you enter the birth date ot your child, the camcorder's clock will automatically update the
age ot your child. You can preset up to Btree birth dates or everts m the camcorder's memory.
Before stonng a birth date, make sure a power source and the lithium battery are installed, and the date
setting IS correct. The following procedure stores "Aug. 3 1987" as an example m memory 2. (i) While
pressing the small green button on the POWER switch, slide the POWER switch to CAMERA. (2) Turn
STANDBY up. (3) Press TIME (NEXT) and AGE/EVENT simultaneously for a few seconds until the" i—.—
.00" indicator appears in the display window. (4) Press DATE (*| to select memory 2. (5) Press TIME (NEXT).
The "00" indicator flashes. (6) Enter the birth date by adjusting the flashing indicators for the year, month and
day by usirtg DATE (■••) and TIME (NEXT).
Not« on the birth or «vent date Indicator
Each time you press DATE (+), the Indicator in the display
window changes from "i'' to "2", "3" and comes back to "1"
In the viewfinder, the indicator ch^ges as follows;
IjBIHTHDAY-* 5]BIRTHDAY ^ 3EVENT
To erase the Age liMlIeator in the Viewfinder
12 Press AGE/EVENT repeatedly untii no indicator appears.
If You Missed the Currect Number with DATE («■)
The indicafors in the display window -thange as follows;
year '00" (1900) -• "01" (1901)-----------------»Current year
^
.......
Current year minus 99 *
To Correct and Change the Setting
Follow the procedures from step 3 on page f2 again.
To Preset the Year Before 1900
(1) After step 5 on page t2, hold down DATE (.») until the current year is displayed.
(2) Press DATE (•) again. The year goes back 99 years.
(3) Go to step 6 on page 12.
When in 2000
"—. — or is displayed m step 3 on page i2. Alter that, it advances every year as 02.03
To Cancel the Stored Birth Date
(1) Press AGE'EVENT and TIME (NEXT) simultaneously to display "1" in the display window. Press DATE(4|
to select a birth date to cancel.
(2) Press TIME (NEXT) twice. The month indicator flashes.
(3) Press DATE (♦) repeatedly until"—.—appears.
(4) Press TIME (NEXT). The time indicator flashes in the display window.
The selected birth date is canceled from the memory and is not displayed when you press AGE/EVENT.
---------
!
.........
13
Page 8
Inserting a Cassette
Маке sure a power source is attached. (1) While pressing the small blue button on EJECT, slide EJECT
down. The cassette holder automatically moves up and opens. (2) Insert a cassette {not supplied) with the
winrtow facing out. 0) Press the PUSH marK on the cassette holder until it clicKs to close n The cassette
holder will automatically slide down.
Ejecting the Cassette
While pressing the blue button on EJECT, slide EJECT down
Adjusting the Viewfinder Lens
Before you use the camcorder for the hrst time, or after someone else has used it. focus the viewfinder lens.
Make sure a power source is attached. (1) While pressing the small green button on the POWER switch, slide
the POWER switch to CAMERA. (2) Turn STANDBY up. {3) Turn the viewfinder adjustment ring so that the
indicators in the viewfinder come into sharp focus.
BEEP Feature
When you purchase the camcorder, BEEP is set to ON.
The c^corder will beep:
• Once when you start recording
• Twice when you stop recording
• Repeatedly when warning of unusual conditions Ip.53)
These beeps are not recorded on a tape. To deactivate the beep, detach the battery pack (p.7) to reach BEEP
and set it to OFF.
Page 9
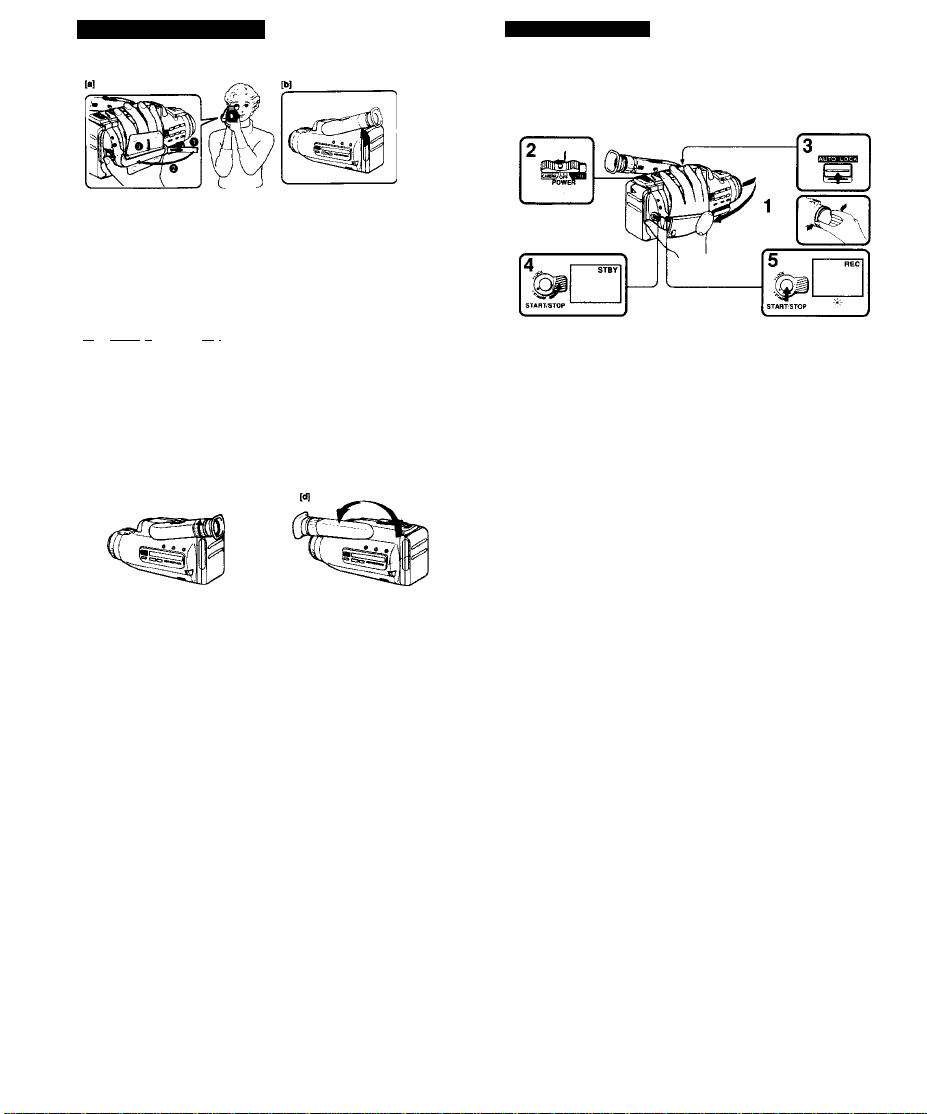
Hints for Better Shooting
For hand-held shots, you «wll get Oetter result by holding the camcorder according to the (ollowing
suggestions:
• Hold the camcoroer firmly and secure it with the grip strap so that you can easily manipulate the controls
with your thumb, [a]
• Place your right elbow against your s<de.
< Place your left hand under the camcorder to support it.
• Place the viewfiixler eyecup firmly against your eye.
• Use the viewtinder trame as a guide to determine the horizontal plane.
• You can also record m a low position to get an interesting recording angle Turn the viewfinder up for
recording from a low position.dt can be turned up to 160 degrees.) [b}
Place the catncorder on a flat surface or uae a tripod
Try placing the camcorder on a table or any other flat surface of suitable height, it you have a tripod for a still
camera, you can also use it with the camcorder (p.47). Make sure the tripod screw is shorter than 6.5 mm
(9/32 in).
Using th» yitwllndf a« ■ Sports Tfciiir /
What is a Sports Finder?
It IS a function that enables you to monitor the picture while your eye is at a distance trom the eyecup it is
convenient when moving around to shoot scenes.
Adjusting the Viewfinder Lens for the Sports Finder [c]
Turn the viewtinder adjustment ring clockwise completely.
Returning to the Normai Viewfinder
Turn the viewfinder adjustment ring counterclockwise until indicators that appear in the viewfinder come into
sharp focus when placing the eyecup against your eye.
When Storing Your Camcorder [d]
Turn the viewfinder barrel to the front.
I Basic Operations
Camera Recording
Make sure a power source is attached artd a cassette is inserted. Before you record one-time events, you may
want to make a trial recordirtg to make sure you are using the camcorder correctly. (i) By pressing the
releases on the lens cap, remove the lens cap and attach it to the grip belt. (2) While pressing the small green
button on the POWER switch, slide the POWER switch to CAMERA. (3) Set AUTO LOCK to the green
position. (A green bar appears under auto LOCK.) (4) Turn STANDBY up. (5) Press START.'STOP {red
button). The camcorder starts recording and the "REC" mdicaior appears and the red lamp hghis m the
viewfinder. The camera recording/battery lamp on the viewtinder barrel also lights.
To Stop Recording Momentarily
Press START/STOP again. The "STBY' indicator appears in the viewfinder (Standby mode).
To Finish Recording
Turn STANDBY down and slide the POWER swttch tc OFF.
Then eiect the cassette (p. 14). To protect the lens attach the lens cap to the lens by pressing the releases on
the cap.
Note on Standby mode
If you leave the camcorder for more than 5 minutes with a cassette inserted m Standby mode, the camcorder
goes off automatically. This is to prevent the battery from being expended unnecessarily and is to protect the
tape trom wearing out. To resume Standby mode, turn STANDBY down once and up again. To start
recording, press START/STOP.
Note on recording
When you record from the beginning ot the tape, run the tape for about 15 seconds before actual recording.
This is 10 prevent the camcorder from missing any start-up scenes when you play back the cassette.
Note on the tape counter (P. 35)
The tape counter indicates the elapsed recording or playback time. Use it as
discrepancy for several seconds from the actual time. To set the counter to zi
above the display window.
16
<1 page for further mtormalion 1 ~I
Page 10

To Chock the Tape Remaining [a] or the Battery Capacity Remaining [b]
Press TAPE/BATT CHECK whtle recording, or in Slandby or VTR mode. The indicator appears
above in the viewfinder. *S" means Start. "E" means End. The black bar indicates the tape remaining. While
the 91
......
t indicator appears the tape remaining i$ being caluculated. [a] The indicator appears below
m the viewfinder. Black indicates banery capacity, [bj
Notes on the tape remaining indicator
• The tape remaining indicator does not change while using EDITSEAftCH, or
• In playback mode the indicator does not show the minutes remaining.
Notes on the battery capacity remaining indicator
• The battery capacity remaining indicator of the camcorder may indicate a different remaining capacity from
that of the NP-77HD battery pack.
• Charge the battery pack when a low-capacity is indicated (p. 6).
To Prevent Accidental Erasure
Slide the tab on the cassette to expose the red mark.
If you try to record with the red mark exposed, the and A indicators flash in the viewfinder and the display
window, and you cannot record on the tape. To re-record on this tape, slide the tab back out to cover the red
18
'C
Zooming is a recording technique that enables you to change the size of the subject m the scene. You can
also use the zoom to focus manually or to decide on a shootirrg angle before you start recording. For more
OrofessionaMooking recordings, use the zoom sparingly.
T side for telephoto (subject appears closer)
W side for wide-angle {subject appears farther away)
When you shoot a subtect using a tataphoto zoom
It you cannot get a sharp focus while in extreme telephoto zoom, press the W side ot the power zoom button
until the focus IS sharp. You can shoot a subject that is at least i .2 m (about 47'/. inches) away from the lens
surface in the telephoto position, or 1 cm (about i/2 inches) m the wide-angle position.
Ftocording Date or Hmt ' • ^ - ’ - -
You can record the date or time displayed in the viewfinder with the scene while making a camera recording
(p. 17). Make sure the date «set (p. 12). Set the POWER switch to CAMERA. Turn STANDBY up Press
DATE (*) or TIME (NEXT). The date or time indicator appears in the screen. You cannot record the date and
time at the same time. Except for the date, time or age (p. 20) indicators, no indicators m the viewfinder are
recorded.
To Stop Recording the Dete or Time
Press DATE (.r) or TIME (NEXT) whichever the indicator rs m the screen again The camera recording does
not stop if you cancel recording the date or time. 0
Page 11

Camera Recording
You can record the age displayed in the viewtinder with the scene while mailing a camera recording (p. 17).
Make sure the date is preset (p. it) After setting the POWER switch to CAMERA and turning STANDBY up.
press AGE'EVENT to select the IT. ,2_ or T you can record the time elapsed since the date set. tor example,
your child's OirihOay. You can also check the age m the display window. Except for the age, date or time
ip. 19) indicators, no indicators are recorded.
Note on the age indicator
Each time you press AGE/EVENT, the indicator changes from T "The first age' to l?
•The third age ' and back to no indicator. No-preset item will be skipped. The LU, 2, >
after one second.
To Stop Recording the Age
Press AGE/EVENT repeatedly until the indicator goes out.
To Select or Change an Age in the Memory to Record White Recording
Press AGE/EVENT_repeaiei^ until the indicator you want to record appears. Recording of the indicator you
select starts after i_i_, jj, or 2 indicator goes out.
When the camcorder is connected to a TV
The age indicator wiil appear on the TV screen when the []], 2. of if] indicator goes out from the viewfinder.
It appears even if the data-screen function controlled by the Remote Commander is off )p 49).
20
T
Checking ttw ftoeorded ncitir» in N1» VhnvflndOT
Using EOITSEARCH. you can review the last recorded scene and check the recorded picture in the
viewfinder. (1) While pressing the small green outton on the POWER switch, slide the POWER switch to
CAMERA. (2) Turn STANDBY up. 13) Press the - Э side of EDITSEARCH momentarily, you can view the last
lew seconds ol the recorded portion (Rec Review), Keep pressing EOITSEARCH. You can view the recorded
portion {Edit Search). To stop playback, release EDITSEARCH.
+ side: to view the playback picture forward
- Side, to view the playback picture m reverse
Note on using EDtTSEARCH
When you raise the viewfinder and use EDtTSEARCH. hold the viewfinder with your thumb to prevent
movement.
Monitoring the Sound White Viewing the Playback Picture in the Viewfinder
Connect an headphone (not supplied) to the 0 jack. Play back the tape in VTR mode (p. 25).
To Begin Re-recording
Press START,'STOP. Re-recording begins from the point you released EDITSEARCH Provided you do n<
eject the tape, the transition between the last scene you recorded and the next scene you record will be
smooth
Page 12

Connections for Playback
You can use this camcorder as a VCR by connecting it to your TV for olayback. There are three ways to
connect your camcorder to a TV.
• Connecting by using the AC connecting adaptor
• Connecting directly by using AiV connecting cable
• Connecting directly without AJV connecting cable
We recommend you to use house current for mdoor use ot the camcorder (p 27).
Connecting to a TV or VCR Using the Connecting Adaptor
Use the supplied connecting adaptor and AC-V25S AC Power Adaptor
Preparing the Connecting Adaptor
It IS convenient connecting the connecting adaptor and your TV previousiy. Whenever you want to monitor th
picture from the camcorder, you can do it by ]ust connecting the camcorder and the connecting piale of the
connecting adaptor.
If your TV or VCR has audio/video Input jacks
It your TV or VCR IS a stereo type use the supplied A/v connecting cable, it your TV or VCR is a monaural
type use a VMC-910MS/920MS Aj'V Connecting Cable (not supplied). (11 Connect your TV or VCR and the
connecting adaptor with the Ai'V connecting cable i2) Put the AC power adaptor on the connecting adaptor
and while pressing the AC power adaptor, slide it m the direction of the arrow Connect the power cord of the
AC power adaptor to a wall outlet.
22
If your TV does not have audlo/vldeo Input jacks
(1) Connect your TV and the connecting adaptor by using supplied RFU-90UC RFU Adaptor. (2) Set the
channel selector of the RFU adaptor to 3CH or 4CH whichever is not active m your area. (3) Put the AC power
adaptor on the connecting adaptor and while pressing the AC power adaptor slide it m the direction ot the
arrow. Connect the power cord of AC power adaptor to a wall outlet.
The playback sound is monaural when you use the RFU adaptor.
Connect the Camcorder and the Connecting Plate
(1) Align the right side ot the connectirtg plate of the connecting adaptor to a white line on the camcorder And
while pressing the connecting plate slide it in the direction of the arrow. (2) Set the VTR (DC OUT)/CHARG£
selector on the AC power adaptor to VTR (DC OUT).
Page 13

Connections lor Playback
Connecttiia to a TV or VCR Directly wtth A/V Connecting Cable
If your TV or VCR IS a slereo type use the supplied connecting cable, tl your TV or VCR is a monaural
type use a VMC-910MS/920MS A;V Connecting Cable (not suppiiedj. M) Connect the camcorder and your TV
or VCR with the A/V connecting cable. i2i Set IN/OUT on the camcorder to OUT. (3) Align me ngnt side ot me
AC power adaptor with a white line on me camcorder and while pressing the AC power adaptor, slide it m the
directioh of tr>e arrow. (4) Set the VTR (DC OUT),CHARGE selector ot the AC power adaptor to VTR (DC
OUT).
Connecting to a TV Directly vrithout A/V Connecting Calrta
(1) Connect the camcorder and the TV by using the supplied RFU adaptor (2) Set the channel selector on the
HFU adaptor to 3CH or 4CH whichever is not active m your area. (3) Set IN/OUT of me camcorder to OUT (4)
Align the right side ot the AC power adaptor with a white line on the camcorder and while pressing il, slide it in
the direction of the arrow. (5) Set the VTR (DC OUT)/CHARGE selector of the AC power adaptor to VTR (DC
OUT)
The playback sound is monaural wlien you use (he RFU adaptor
When you view a TV program
Set the VTR (DC OUTVChaRGE selector ot the AC power adaptor to OFF oi
camcorder to OFF.
24
я the POWER switch of the
Playing Back a Tape
Vou car monitor the playback picture in the viewfinder. You can also monitor it on a TV screen after
connecting the camcorder Ю a TV/VCR (p. 22). You can use the Remote Commander to remotely operate the
camcorder, if HOLD on the commander is set to the right, slide it in the opposite direction.
(11 While pressing the smalf green button on the POWER switch, set the POWER switch to VTR (2) Insert a
recorded cassette with the window facing out (p.i4). (3) Press >. Playback starts.
To stop playback, press C.
To rewind the tape, press
To advance the tape repfdfy, press
Note on (ha recordlng/pfayback modes
You can record a tape m SP (standard play) mode onty. You can play back tapes m both SP and LP (long
play) modes.
The LP indicator appears in the viewfinder when you play back a tape recorded m LP mode. There is no SP,
LP indicator in SP mode.
See ne>i page for further information 25
Page 14

Playing Back a Tape
To View a Still Picture {Playback Pause)
Press II during playback. To resume playback, press II or >.
To Locate a Scene {Picture Search)
Keep pressing or ►► during playback. To resume normal playback, release the button.
To Monitor the High-speed Picture During Fast-forward or Rewind (Skip Scan)
Keep pressing while rewinding, or while advancing the tape. To resume normal playback, press >
To View the Picture in a Sequence of Stop-motion Images
Press EDITSEARCH repeatedly in playback pause mode It you keep pressing EOlTSEARCH, you can view
the playback picture forward (+) or reverse (-).
To View the Picture at 1 /5 Speed {Slow Playback) {only with the Commander)
Press 1» on the commander during ptayback. To resume normal playback, press >. When slow playback
lasts lor about i minute, it shifts to the normal speed starts automatically.
Notes on playback
• Streaks may appear and the sound may be muted depending on playback mode.
• When still picture mode lasts for about 5 minutes, the camcorder automatically enters stops.
To display the viewfinder screen Indicators on a TV
Press DATA SCREEN on the Remote Commander.
To erase the indicators, press DATA SCREEN again.
Playing Back a Tape wHh Dual Sound Tracks
• Normally set the Hi-Fi SOUND switch to the • position.
• When the tape with dual sound tracks is played back, set the Hi-Fi SOUND switch to the desired sound, 1 or
I Advanced Operation« I
Using Alternative Power Sources
Vou can choose any of the tollowmg power sources for your camcorder: Battery pack (p. 6), house current,
and 12;24 V car battery.
The appropriate power source for you to choose depends on the place where you want to use your
camcorder.
Place Power source
Outdoors
Battery pack
Indoors House current
In the car 12 V or 24 V car battery
Note on power sources
Disconnecting the power source or detaching the battery pack during recording or playback may damage the
inserted tape. If (his happens, supply the power again immediately.
UsingHouMCurrwit
With the Connecting Adaptor
Use the supplied AC-V25S AC Power Adaptor and connectir>g adaptor.
(1) Attach the connecting plate ol the connecting adaptor to the camcorder (p.22). Attach the AC power
adaptor to the connecting adaptor (p.22). And connect the power code ol the AC power adaptor to a wall
outlet. (2) Set the VTR (DC OUT)/CHARGE selector on the AC power adaptor to VTR (DC OUT).
Accessory to be used
Battery pack NP-55 (supplied). NP-77H/77HD, NP-77.
NP-66H orNP-55H
AC power adaptor AC-V25S (supplied), or AC-S10
DC pack DCP-77
PwpBrlngthi ftomot» CqmnMiniiif“
To use the supplied Remote Commander for playback and camera racording. do the following: (1) Insert
supplied two size AA (R6| batteries with correct polarity (2) Set ■ REMOTE COMMANDER on the battery
mounting surface of the camcorder to ON.
Notes on the Remote Commander
• Keep the remote sensor away from strong light such as direct sunlight or illumination. Remote control with
the Remote Commander may not be effective.
• The command mode of the Remote Commartder is VTR2. Avoid using the Sony VCRs wlh the same
20 command mode at the same time.
Î2SJ;.,
See next page for further information 27
Page 15

Using Alternative Power Sources
Without the Connecting Adaptor
Use ibe Supplied AC-V26S AC Power Adaptor. (11 Align ihe flat side ot the AC power adaptor with the white
line on the camcorder. While pressing the AC power adaptor, slide it to the right until it clicks. I2| Connect the
power cord ol the AC power adaptor to a wall outlet. 13) Set the VTR (DC OUT),CHARGE selector on the AC
power adaptor to VTR (DC OUT).
Datach it 1 the Si le way you do it with the battery pack (p. 7].
Notes on the AC power adaptor
• Before attaching the AC power adaptor to the camcorder, detach the battery pack from the AC power
adaptor.
• The camcorder does not operate unless the VTR (DC OUT),'CHARGE selector is set to VTR (OC OUT),
• The POWER lamp will remain lit lor a while even if the battry pack is detached and me power cord is
disconnected after charging the battry. This is normai.
• It the power lamp does not light, set the VTR (DC OUT),'CHARGE selector to OFF and disconnect the power
cord. In about one minute, reconnect the power cord and set the VTR (DC OUT)/CHARGE selector to VTR
(DC OUT) again.
Using a Cw Battaiy
When you want to use a car battery as a power source tor your camcorder, use the DCP-77 DC Pack (not
supplied). By attaching DCP-77 OC Pack to your camcorder and connecting the power cord of the DC pack to
the cigarette lighter socket ot a car (12 V or 24 V), the car battery supplies power to your camcorder.
Options for Charging Battery
AC-S10 AC Power Adaptor
Completely discharge a battery pack before recharging it to its full capacity.
BC-77, BC-S10 Portable Battery Charger
Charge a battery pack on 100 - 240 V AC. BC-SiO has a discharging tuhciioh.
It has a discharging function.
Compensating for Backlighting
When shooting a subteci that is rather dark because the light source is behind the subject (a) you can
compensate tor me bnghmess tor the sub|ect. (t) Slide AUTO LOCK down. (2) Press BACK LIGHT. The 13
mdicaior appears in the viewfinder. |b|
After shcoling
Be sure lo release this adjustment condition by pressing BACK LIGHT again. The 13 indicator in the
viewfinder goes out. Otherwise, the picture will be too bright under normal lighiirtg condition.
This function is also efioctive undor following conditions:
• On the snow e.g. at the ski resort
• At the beach under strong sunshine
• A subject with a light source nearby or a mirror reflecting light
• A white subject against a white background. Especially when you shoot a person wearing shiny clothes
made ot silk or synmetic liber, his or her face tends to become dark if you do not use this lunction.
28
29
Page 16

Focusing Manually
1*1^——
wINQ W’vHvflVWBi PPQ^^ ,
Use manual tocus under the tollowing conditions:
• Insufficient light {a]
• Subiects with little contrast - walls, sky. etc. [b]
• Too much brightness behind the subject [c]
• Horizontal stripes [d]
• Subjects through frosted glass
• Subjects beyond nets. etc.
• Bright subject or subject reflecting light
• Shooting a stationary subject when using a thpod
When focusing manually, first focus in telephoto before recording, and then reset the shot length. |1) Slide
AUTO LOCK down. (2) Press FOCUS. The ® indicator appears m the viewfinder and “MANUAL" appears m
the display window (3) Keep pressing the T side (telephoto) of the power zoom button until the zooming
stops. (4) Turn the focus ring to achieve sharp focus. |5) Set the desired shot length using the power zoom
button.
Press FOCUS. The “AUTO" appears in the display window and indicator disappears in the viewfinder.
To return to Autofocue mode
Slide AUTO LOCK up. The indicator in the viewfinder disappears.
Note on the focue ring
The focus ring does not have a stop position.
30
31
c
Page 17

Using the PROGRAM AE Function
You can select the suitable mode among three PROGRAM AE (Auto Exposure) modes depending on
shooting situations. When you use PROGRAM AE. you can get a Portrait effect (the subject is m locus and
the Oackground is out of tocusi or capture nigh-soeedaction with Sports mode or High-Speed Shutter mode.
Selecting the Beet Mode
Select the best mode following the examples below.
& Portrait mode [a]
• A si'll subject such as a person or flower
• Subject behind an obstacle such as a net
• Zooming in on a subfect in lelehpoto
High-speed Shutter mode [cj
• A golf swing or a tennis match m tine weather with the ban captured clearly
• Playing back certain scenes with high-speed movements m clear, sharp picture
Using the PROGRAM AE PuncHon
Note on shutter speed
The shutter speed m each PROGRAM AE mode is as follows;
Portrait mode - between 1/60 and 1/2000
Sports mode • between 1/60 and 1/500
High-speed Shutter mode • 1/4000
Page 18

Fade-in and Fade-out
You can fade in or fade out to give your recording a professional appearance. When fadirtg in. the picture will
gradually appear from black or mosaic. The sound will also gradually increase. When lading out. the picture
will gradually lade to black or mosaic. The sound will also decrease.
When Fading in [a]
(1) During the camcorder is m Standby mode, press FADER The FADER indicator starts flashing.
(21 Press START/STOP to start recording. The FADER indicator stops flashing.
When Fading out [b]
(Ч During recording, press FADER. The FADER indicator si
recording. The FADER indicator stops flashing.
• #
‘ili. 1
To Cancel the Fade*in/out Fur>ction
Before pressing STAPT/STOP. press FADER once or twice until you have neither the FADER nor M.FADER
indicator in the viewfinder.
34
1
.iBiA-
s Hashing. (2) Press START-STOP to stop
rjj
_
Using the Tape Counter
During recording or playback, the tape counter indicates the elapsed recording or playback time.
Referring to the Amount of Elapsed Time and a Particular Point
Press COUNTER RESET at the beginning of the tape. The counter m the viewfinder displays "0:00:00‘. The
counter shows the elapsed time so that you can refer to the amount of elapsed time You can also use the
counter as an index to find a particular point
Returning to a Pre-registered Position
You can easily go back to the desired point on a tape after playback.
11) During playback, press COUNTER RESET at the point you later want to locale. The counter shows
0 OO'OO" (21 Press I when you want to stop olayback. |3) Press ZERO MEM to stop rewinding at the
counter's zero point. The "ZERO MEM" indicator flashes in the display window. (4) Press The tape stops
automatically when the counter reaches approximately zero.
COUHT^R
--- -
1
1
Notes on the tape counter
• Something must be recorded on the tape m order for the tape counter to function. Tape counter does not
work on a blank tape.
• There may be a discrepancy of several seconds from the actual time.
Note« on ZERO MEM
• The ZERO MEM mode is cancelled automatically once the tape is rewound or sent forward to the point you
pre-registered.
• Be sure to press ZERO MEM after stopping the tape. It does not function during recording or playing back.
• When you press ZERO MEM, the counter’s zero point is memorized.
Using this function in Reverse
You can locale a desired position after rewinding with this function. Press COUNTER RESET at the point
where you want to locale later. Press Press Z when you want to slop rewinding. Press ZERO MEM.
Press The tape automatically stops near the zero point you first set.
Page 19

Inserting a Scene in the Middle of a Recorded Tape
? • Ar
"
I'#-.
; 'siAi?
[»-a-
[a]
(1) While looking tn ihe viewfinder in Standby mode, keep pressing the * or - side ol EDITSEARCH and
release the button where you want to end the insertion (b). (2) Press COUNTER RESET to set counter to
zero. (3) While looking m the viewfinder, keep pressing the - side ot EDITSEARCH and release the button
wnere you want lo start the insertion [a|. (A) Press ZERO MEM to stop recording of insert at the counter s ze
point. (5) Press STARTi'STOP Insert recording begins. The insert recording stops automatically at the
counter s zero point.
Canceling the ZERO MEM
Press ZERO MEM The ZERO MEM indicator disappears.
36
'
[b]
Editing onto Another Tape
^editing with any other II 8 mm. HiOl HiS. IQ Betamax. vus VMS.
S-VHSC VCR that has audio/video inputs.
Before Editing
After connecting the camcorder to your VCR (p. 22-24). |1) Set the POWER switch to VTR. (2| If you do n
use the connecting adaptor, set IN/OUT to OUT. (3) Slide EDIT on the camcorder m the direction ot the an
To Start Editing
(1) Insert a blank tape (or a tape you want to record oven into the recording VCR Then insert your recorded
tape into the camcorder (2) Play back the recorded tape on the camcorder until you locate the point where
you want to start editing. Then set the camcorder to playback pause mode. (3) Set the recording VCR to
recording pause mode. (4) Press II on the camcorder and VCR simultaneously to start editing.
To Edit More Scenes
Repeat steps 2 to 4.
To Slop Editing
Press (” Oh the camcorder ^d VCR.
Use of the EDITSEARCH button
To play back a tape m the forward or reverse direction, keep pressing EDITSEARCH during playback pause.
You can play back still pictures successively at specific intervals by pressing EDITSEARCH intermittently.
Note on the DATA SCREEN function
II you have displayed the viewfinder screen indicators on the TV (DATA SCREEN function), erase the
indicators by pressing DATA SCREEN on the Remote Commander so that they will not be recorded on the
edited tape.
Notes on EDIT
• It functions when using the camcorder as a VCR for playback.
• By using EDIT, you can keep picture and sound deterioration resulting from editing to a minimum
• Avoid recording re-recorded tapes
37
Page 20

Recording from a TV or VCR
Von can insert a new scene from a tape on a VCR into your originally recorded tape by setting the starting point
and stopping point.
To Check the Picture from a TV or VCR before Recording
Slide e. and then press II to checK the picture in the viewfinder. It ycu take time to press II after sliding e
recording starts.
To Stop Recording
Press □.
Before starting insert editing, set your VCR to the playback pauae mode at lha baginning o< the scarta to ba
racordad. (1) On your camcorder, locate the end pom! where the insert should end by pressing ■♦d or ►►
after pressing > [b]. (2) At the end point, press COUNTER RESET to set the counter to zero. (3) Locate the
point where you want to start the insertion by pressing and press
into recording pause nrode. The picture in the viewfinder switches to the VCR. (5) Press ZERO MEM to stop
recording at the counter's zero point. The end point of the insert is stored in memory. (6) Press II on the
cantcorder and the VCR to start insert editing. You car moritor the picture being inserted in the viewfinder
screen. The insert recording stops aotomabcaJly near the zero point on the camcorder's counter
To Change the End Point
Press ZERO MEM so that the ZERO MEM indicatof disappears, and begin again from step 1
{•]
II [a], (4) Slide e to set the camcorder
[b]
Page 21

■ Additkt^ knfo^^ I
Maintenance Information and Precautions
If the camcorder is brought directly from a cold place lo a warm place, moisture may condense inside the
camcorder, on the surface of the tape, or on the lens. K this happens, the tape may sticK to the head drum and
be damaged or the camcorder may not operaie correctly. To prevent possible damage under these
circumstances, the camcorder is furnished with moisture sensor. However, take the following precautions.
Inside the Camcorder
When the S) and ± indicators flash in the display window anp the viewfinder, moisture has condensed inside
the camcorder. If this happens, none of the functions encept cassette election will work
the tape, turn off the camcorder, and leave it wHh the cassette compartment open tor about 1
hour.
It the ai indicator does not light up when you turn on the power, you can use the camcorder agam.
On the Surface of the Tape
If there IS moisture on the surface of the tape when you insert the tape and press a tape transport button, the
± indicator flashes in the viewfinderand №e display window if this happens, none of the tunction except
cassette election will work.
Eject the tepe end let it sit for about 1 hour.
It the £ indicator does not light up when you insert the tape and press a tape transport button, you can use
the camcorder again.
On the Lens
No indicator will appear, but the picture becomes dim. Turn off the power and do not use the camcorder (or
about 1 hour.
How to Prevent Moisture Condensation
When bnr>ging the camcorder from a cold place to a warm place, put the camcorder in a plastic bag and allow
it to adapt to room conditions over a period of time.
(1) Be sure to tightly seal the plastic bag containing the camcorder.
(2) Remove the bag when the air temperature inside it has reached the temperature surrounding n (after about
1 hour).
Video Heed Cleaning
To ensure clear pictures, dean the video heads periodically When playback pictures are 'noisy ', or hardly
visible, the video heads may be contaminated.
[a] Slight contamination
jb) Critical contamination
If this happens, clean the video heads with the Sony V8-25CLH cleaning cassette (not supplied) After
checking the picture, it it is still ' noisy", repeat the cleaning. (Do not repeat cleaning more than 5 times.)
a commercially available wet-type cleaning cassette. It rnay damage the video heads
If the V8-25CLH cleaning cassette rs not available rn your area, consult your Sor^y service facility
Removing Dust from insW» the Vtmrtliuhr
(1) While holding down me switch on the viewfirtder barrel, turn the eyecup in the direction ot the arrow anc
pull It up to detach the eyecup. (2) Remove the small leos irom the inside ol me viewfinder (31 Clean the
surface of the screen with a commercially available blower.
Page 22

Maintenance Information and Précautions
To Reattach the Eyecup
(1) Replace the small lens inside the viewfinder (2) Align the groove on the eyecup wuh the • mark on the
barrel. (3) Turn the eyecup clockwise.
Precautions
Camcorder Operation
• operate the camcoroer on 5.0 V (battery pack) or 7 5 V (AC power adaptor).
• For DC or AC operation, use the accessories recommended in this manual.
• Stioukl arty soM object or hguid la№ into the casing, detach the power source from the camcoroer and have
the camcorder checked by qualified personnel before operating it any further
• Do not hold the camcorder by the viewfinder.[a]
• Avoid rough handling or mechanical shock. № particularly careful ol the lens.
• Keep the lens cap on the lens when not using the camera.
• Do not wrap up the camcorder and operate it since heat may build up intemalfy.
• Keep the camcorder away from strong magrtefic fields or mechanical vibration.
• Do not M sand gel Into the camcorder. When you use the camcorder on a sandy beach or dusty
place, protect it from the sand or dust. Sand or dust may causa the unit to malfunction and
sometimes the malfunction cannot be repaired.[b]
• Do not let the camcorder get wet. Keep the camcorder from rain or sea water. It may cause a
malfunction and someOmea the malfunction cannot be repaired.[c]
Camcorder Care
• Never leave the camcorder under temperatures above 140°F I60°C). such as in a car parked in the sun or
under direct sunlight.
• When the camcorder is not to be used tor a long time, disconnect the power source and remove the tape.
Periodically turn on the power, operate the camera and VTR sections and play back a tape for about 3
• Clean the lens with a soft brush
cloth.
• Clean the camcorder body with a soft dry doth, or a soft cloth lightly moistened
solution. Do not use any type of solvent which may damage the finish.
Handling Tapes
• Do not insert anything into the small holes oi
type, thickness of the tape, or it the tab is out or in
AC Power Adaptor Care
Charging
• Repeated charging while soma capacity remains causes a lowering of battery capacity. However, the
original battery capacity can be recovered if you use the battery completely and charge it fully again.
• Charge the battery on a flat place without vibration.
• The battery will get hot during charging. But It is normal.
• Do not continuously recharge a charged battery pack as that will cause the battery pack efticiency to
deteriorate.
Charging temperature
The temperature range for charging is At to 95°F (5’C to 35‘C). However, to prevent maximum battery
efficiency, the recommended temperature range is 50’F to 86'F (10-C to 30^C).
Others
• The model for USA or Canada One blade of the plug is wider than the other for the purpose of safety and
will fit into the power outlet only one way. If you are unable to insert the plug fully into the outlet, contact your
dealer.
• Disconnect the AC power cord of the unit from the wall outlet when not in use for a long time. To disconnect
the cord, pull it out by the plug. Never pull the cord itself.
• Do not operate the unit with a damaged cord or if it has been oropo^ or damaged.
> Do not bend The AC power cord forcibly, or put a heavy object on it. This will damage the cord and may
cause a fire or an electrical shock.
• Be sure that nothing metallic comes into contact with the metal parts of the connecting surface, if it does, a
short may occur and the unit may be damaged.
• Always keep the metal contacts clean.
• Do not disassemble the unit.
• Do not apply mechanical shock or drop the unit.
• While the unit is in use, particularly dunng charging, keep it away from AM receiver and video equipment
because it will disturb AM reception and video operation.
> Do r>oi place the unit in locations where it is:
—Extremely hot or cold
—Dusty or dirty
—Very humid
—Vibrating
• If any difficulty should arise, disconnect the AC power cord ot the ui
remove dust, it there are fingerprints on the lens, remove them with a soft
lid detergent
IT of the cassette. These holes are used to sense the
d connect the nearest Sony dealer.
42
43
Page 23

Using Your Camcorder Abroad
eiectncity and TV color systems. Before using your camcorder abroad, check tne
PowvrSowees -
You can use your camcorder in any country with the supplied AC power adaptor within 1 tO V to 240 V AC, 50/
60 Hz. If you cannot attach the power adaptor to the wall outlet, use the commercially available AC plug
adaptor [a]. Depending on the design of the wall outlet |b|.
Identifying the Parts
-Cfc '
Ж ■
Offfer«nc8 in Color Systems
This camcorder is an NTSC system-based camcorder it you want to view the playback picture on a TV. it
must be an NTSC system-based TV. When you want to use a PAL-M system-based TV, you will need an
NTSC/PAL-M transcoder (as this is an NTSC based camcorder). For TV system information check the
loHowing alphabetical list.
NTSC system countries
Bahama Islands, Bolivia. Canada. Central America, Chile, Colombia. Ecuador. Jamaica. Japan. Korea.
Mexico, Peru. Sunnam. Taiwan, the Philippines, the U.S.A.. Venezuela, etc.
PAL system countriee
Australia, Austria. Belgium, China, Denmark. Finland. Germany (former West Germany), Great Brtain,
Holland. Hong Kong, Italy. Kuwait. Malaysia. New Zealand. Norway. Portugal. Singapore. Spam, Sweden,
Switzerland. Thailand, etc.
T POWER switch (p. 11)
CAMERA: for camera recording
VTR: tor playing back or editing tape
OFF: power off
REMOTE V (LANC) control jecit
Connect the LANC M connecting cabte ol a
wired remote control unit such as an editing
controller. In this case, set ■ REMOTE
COMMANDER 10 OFF <p. 26)
tt (LANC) stands for Local Application
Control Bus System. The tt control jack Is
used lor controlling the tape transport of
video equipment and peripherals connected
to it. This jack has the same function as the
connectors Indlcsted as CONTROL L or
REMOTE.
[1] .T (hssdphorto) jack (mlnljsck) (p. 21)
Connect headphones (not suppliM) to monitor
the sound while viewing the playback or the
recording tHcture.
I] START/STOP button (p. 17)
To start recording, press t aher setting the
POWER switch to CAMERA and turning
STANDBY up.
To stop recording momentarily, press it again.
STANDBY switch (p. 11)
To set the camcorder to Standby mode
(recording standby mode), set it up. To stop
recordirtg or to prevent from accidentally
recording and wearing down the battery, set it
3 EDITSEARCH (and Si recording review)
button <p. 21)
Press It to check the recorded scene m the
viewfinder in Standby mode.
+ side: to view the playback picture forward
- side: to view the playback picture m reverse
\T; Power zoom button (p. 19)
Press it to change the size of the subiect m tne
scene.
T side: for telephoto (subject appears closer)
W side: lor wide-angle (subiect appears lurther
away)
J] Stereo buin>in microphone
T EJECT {cassette e)ect) button (p. 7)
While pressing the blue button, slide it down to
insert or eiect a cassette.
i]g Cassette holder (p. 14)
Lithium battery holder (p. 10)
Insert a lithium battery here to activate the clock.
[it] Grip strap (p. 16)
Put your harid ihorugh the grip strap to hold the
camcorder. Adjust the length ol the strap so that
your thumb can easily touch START,STOP.
Page 24

Identifying the Parts
Tape iranaport buttons (p. 25)
' STOP
REW (rewind)
> PLAY (playback)
►► FF (fast forward)
II PAUSE
• REC (recording)
These buttons will (unction in vf B mode.
I«| Lons cap (p. 17)
Attach It to the lens when not using the camera.
Put it on the grip strap while camera recordirtg.
)MICi»ck
Connect an optional external microphone
(stereo). This jack also accepts a 'plug-in-power'
microphone. It the microphone has two plugs,
connect the DC IN plug to the RFU DC OUT |ack
on the camcorder.
Remote control sensor <p. 49)
Aim the Remote Commander here (or remote
control.
W (№OUT (video and audio Input/outpul)
selector (p. 23)
Set i( to OUT whan ¡¡laying back the tape. Sat it
to IN when recording or editing from a TV another
VCR.
[iai EDIT switch (p. 37)
Set it in the direction of the arrow when editing
onto another tape.
Hook for shoulder strap (p. 49)
M HLFI SOUND selector (p. 25)
Normally set it to • position. When the tape with
dual sound tracks Is played back, set it to
desired sound. 1 or 2.
]i] AUDIO/V10EO (acks (p. 23)
These jacks work as both input and output jacks
by switching the IN/OUT selector on the
camcorder. To view the recorded prcture on the
TV Of to record onto another tape, connect
these jacks and the audio/video input lacks on
the TV Of VCR using the A/V connecting cable
(not supplied). To record from a TV or a VCR.
connect these tacks and the audio/video output
jacks on the TV or VCR.
1
! RFU DC OUT (RFU adaptor DC output) jack
(P-23)
To view the recorded picture on the TV that has
oriiy an antenna mout. conned the RFU
ad^lor he/a.
c
^ Accessory shoe
Attach the external microphone (not supplied)
here.
Remote control sensor (p. 49)
Aim the Remote Commander here (or remote
control
Bj Focus ring (p. 31)
Turn it to adjust the focus manually and to
achieve a sharp focus m manual focus mode.
S FADER button (p. 34)
When starting recording with fading in, press the
button and (hen start rscoróing. When you
conclude recording by lading out. press the button
arid then press START/STOP to stop recording.
You can seled black fader by pressing it once or
mosaic lader by pressing it twice.
^ Tripod receptad« (bottom) (p. 16)
Attach a tripod (not supplied) here. When
attaching a non-Sony tripod, make sure that the
length of the camera mounting screw is shorter
than 6.5 mm (9/32 inches). Otherwise, the screw
might damage the inner part of the camcorder.
IS AUTO LOCK switch (p. 17)
Set It to the green position to make every
adjustment automatic.
S BACK UGHT button (p. 29)
Press It when a recording subject is loo dark
because of excessrvely bright backgroand.
S PROGRAM AE button (p. 32)
Set tne desired PROGRAM AE mode (Portrait/
Sports/High-Speed Shutter mode) to fit the
shooting situation.
FOCUS button (p. 31)
Press to Icicus manually while AUTO LOCK
function is not working.
Ш DATE(-t-) and ЛМЕ(НЕХТ) buttons (p. 11)
Each button has two functions. One is to display
the date or time indicator m the display window
and the viewfinder. The other is to set the date
and time. Pressing DATE (*) advances digits
and pressing TIME (NEXT) sets the next factor
while seRing date and time.
1
AGE/EVENT button (p. 12)
Press when setting the birth date (or event date),
or when displaying and turning off tne age
indicator in the viewfinder and the display
window.
ВАТТ (battery eject) knob (p. 7)
Keep pressing to detach the battery pack.
IHi Hook for shoukler strap
Page 25

Identifying the Parts
WIrelM» Remot* Commander
361 Viewrtinder (p. IS)
You can monitor the monochrome picture being
recorded or played back. For details on the
indicators m the viewfinder, see page 54.
№ Camera racording/battary lamp (p. 17)
This red lamp lights up while camera recordihg.
when It flashes, the battery is almost empty or the
tape IS near its end.
3 COUNTER RESET button (p. 17, 3S)
Press to reset the tape counter to zero.
3 ZERO MEM bvrtton {p. 3$, 36)
Press to memorize the zero point of the tape
counter. This will stop the tape at the counter's
zero point. Press it while Ihe tape transport is
stopped or paused.
3 TAPE/BATT CHECK button {p. 18)
Press to display the tape remaining indicator or
battery capacity remaining indicator m Ihe
viewfinder.
48
Viewfinder adjustment ring (p. IS)
To focus the viewfinder lens, turn this ring until
the indicator in the viewfinder comes into sharp
focus. To adjust the sports tinder, turn the ring
clockwise completely.
3 Eyecup
VVhen looking in the viewfinder with glasses,
bend back the eyecup.
S BEEPswftcb (p. IS)
5ei 10 ON 10 beep when starting ana stopping
camera recording or when unusual conditions
occur. To deactivate the beep, set it to OFF
¡3 ■ REMOTE COMMANDER switch (p. 26)
Set to ON to use the Remote Commander
(supplied). When you connect a wired remote
control unit to the camcorder, set it OFF.
3 Battery mounting surface
to remotely control the camcorder Activate the
camcorder before you use the Bemoto
Commander.
T Tape transport buttons (p. 2S]
¡h DATA SCREEN button
Press to display the viewfinder screen indicators
on a TV when you connect the camcorder to a TV.
To erase the indicators, press it again.
Attaching tha ShouWar Strap
Attach the supplied shoulder strap to the hooks.
buttons from being accidentally pressed. Before
using this Remote Commander, slide m the
opposite direction of the arrow
Ï START/STOP button (p. 17)
[6] Power zoom button <p. 19)
49
Page 26

Specifications
Video recorOing system
Audio recording system
Video signai NTSC color, eia standards
Usable cassette 9 mm video format cassette
Tape speed SP mode Approx, i 43 cm
Fast-lorward'rewmo tir
Image device CCD (Charge Coupled Device)
Viewfinder Electronic viewfinder
Lens GomOined 12 I power ipom lens
Color temperature Auto
Minimum illumination 2 Jx
Illumination range 2 ix to 100.000 ix
Recommended illumination
Aperture correaion Automatic
Video inpuVdutpui
Audio inpuVOUtpul
HFU DC OUT Specaai minijack, 5 V DC
Headphone lack Stereo ттчвск, S-oTtm
Remote tt jack Stereo mmi-mmijack
MIC jack Stereo mmijack. -66 OBs. low
Microphone power output jack special minijack, 5 V DC
Rotary two heaos. Helical
scanning FM system
Rotary head. FM system
«inch)/sec.
UP mode. Approx 0.72 cm
Ipiayoack only)
•s(P6-l20)
rs (P6-120)
LPm
rs(P6-l20l
Approx. 5 min. 30 sec. iP6-l20l
lOiack and white)
(•6.0 to 72 mm (' . to 2‘'a inches)
Approx. 44 to 528 mm ( l "u to
20^.< inches) converted mto the
focal length of a 35-mm sun
camera.
F 1 8 to 2 8 with macro
Filter diameter. 37 mm (i'u
inches;
TTL autotocus system inner
focus wide macro system
(0.2 to 9294 footcandles)
More than too lx
(9 (ootcamHest
With backlight adjustment
Phono tack, t Vp-p. 75 ohms
unbalanced sync negative
Phono jack (L, R)
Input' -7 5 OBs. input
impedance more than
47 kiiohms
Output -7.5 oes, (at load
Impedance 47 kilohmg)
Impedance less than i kiiohm
impedance
impedance w/ih 2 5 to 3 V DC
Output. Impedance
Power reouiremenis On battery mounting surface
Power consumption 6.0 W (camera recording;
insiaiiaw
Operating temperature
Storage temperature -4 F to
Dimensions Approx. 118 « 108 ■ 267 mm
Mass Approx 860 g |l lb 14 oz)
Uicropnone Eiectrei condenser microphone.
Supplied accessories See page 5
Power reouirements
Power consumption
Output voltage
Appiici
Operating temperature
Storage temperature -4'F to 140=F (-20’C to eO^C)
Dimensions Approx 103 < 49 * 63 mm (w.'h/
Wetghi Approx. 290g (to Oi)
Weight Appro». 180 9 (6 oil
• Canadian Standard Association (CSA) ceriilies 120 V
AC only
'* The speciticaiians depend on the eguipment which
is connected to this connecting adaptor.
Design and specifications are subject to cnanga
without notice.
6 0 V (battery pack)
7 5 V \AC power adaptor)
including irie viewfinder
Vertically, horuoniaiiy
32 F to
04 F (C
i-20'Cl
0 C)
(w/lvOI |4>'. .< 4Vi • 10'hin.i
excluding the Battery pack,
lithium battery, and cassette
Approx 1 too g (2 lb 6 Oil
including the Battery pack
NP 55. lithium battery CR2025.
ano cassette P6-120
omniareciionai. stereo type
MO-240 VAC* 50/60 H
.2 A in
DC OUT: 7.5 V
operating mode
Battery charge terminal: 10 V.
1 t A in charge mode
Sony Paitery pack NP-5S,
NP-55H. NP-66H NP-77.
NP-77H. NP-77HD
32"F to t04’F (O'CIOAOXI
d) (4’'i- t'A'-i X 2’'2 inches)
including projecting pahs and
controls
Special minijack, 5 V DC
Phono lack (1)1 Vp-p. 75 O
unpaiaced. sync negative
Phono jack (3: monaural, stereo
L'R) -7.5 dBa
Output impedance: less than
1 КИ
Approx. 120 « 29 X
m(w<
Trouble Check
If you run into any problems using the camcorber. use the following table to troubleshoot the problem.
Symptom
The power does not
goon.
The power goes off.
1
0.
The battery pack is
Quickly discharged.
START/STOP does
not operate.
The cassette cannot
be removed from the
s
compartment.
No function except for
1
cassette ejection
works.
The tape does not
move when a tape
transport button is
pressed.
The autolocus
function does not
CauM
The battery is not attached.
The battery is empty.
The AC power adaptor is
not connected to a wail
ou/fel.
White being operated in
CAMERA mode, the
camcorder has been m the
pause mode tor more than 5
minutes.
The battery is emcty.
The ambient temperature is
loo low.
The battery pack has not
been charged tully.
The battery pack Is
completely dead, and
cannot be recharged.
The tape is stuck to the
drum.
The tape has run out.
The POWER switch is set to
VTR.
The tab on the cassette is
out (red)
The battery is exhausted.
Moisture condensation has
occurred.
The POWER switch is set to
CAMERA or OFF,
The tape has run out.
FOCUS IS set to MANUAL.
Shooting conditions are not
surtabie forautofocus
operation.
Corrective Action*
Anaoh a battery source.
Use a charged battery.
Connect the adaptor to a wall
outlet.
Turn STANDBY down at once
and turn it up again
Use a charged battery 6
-
Charge the battery pack
Use another battery pack.
Eject the tape.
Rewind the tape or use a new
Set It to CAMERA.
Use a new tape or slide the
red tab.
Use a charged battery or (he
AC power adaptor.
Remove the cassede and do
not use the camcorder for at
least an hour.
Set It to VTR.
Rewind the tape or use a new
Set it to AUTO. 17
Set FOCUS to MANUAL to
aiTiust (he focus manualfy.
p*g*
7. 27
6,27
6
27
17
S
$
8
,4
25
17
18
40
25
25
30
51
Page 27

Symptom Causo
The image on the
viewfinder screen is not
A venicai band appears
when a suoieci such as
lights Of a candle flame
IS shoi against a dark
background.
The playback picture is
not clear.
ê
1
S
a,
When the TV is
connected to me
camcorder using the
AUDiOAflOEO jacks,
the picture on the TV is
not clear o< moves
vertically
The supplied Remote
Commander does not
5
There IS Oust inside the
viewtmOer.
When the CHARGE Lamp on the AC Power Adaptor Flashes
Check itifQugh the ioHowihg chart.
Remove №e battery pack from the AC power
I adaptor.
_____________________________
1 1! the CHARGE lamp hashes again, install
I another battery.
I The CHARGE lamp lights up.
I The CHARGE lamp Hashes.
’ II you use a battery pack which you have just brought or which has been left unused for a long time, the
CHARGE lamp may flash at the hrst charging. But this is not a problem. Continue to charge with the same
battery pack.
Note on the POWER lemp
The POWER lamp wiH remain lit for a while ei
IS normal.
The viewfinder lens is not
adjusteo
The contrast between me
subiect ano background 'S too
high: The camcorder is not
malfunctioning.
EDIT IS working.
The channel or input for the
camcorder is not selected on
me TV
The video heads rnay be
contaminated.
The IN/OUT selector rs ser to
The HOLD switch is working. Slide if in the opposite direction
The REMOTE COMMANDER
switch IS set to OFF
The batteries are not inserted
wjth the correct polaniy
The battenes are dead. Insert new ones.
-
______________
if the powrer cord of the unit is disconnected atter using. This
Corrective Actions
Adjust the viewfinder lens.
Change locations
Set EDIT m the opposite direction
of the arrow
Select correctly.
Clean the neaOs using the Sony
V8-2&CLH cleaning cassette.
Set If to OUT.
of the arrow
Set It 10 ON.
Insert the battenes wnh Ihe
correct polarity.
Pull out the viewfinder and clean
the viewfinder screen or
viewfinder lens.
I Install the same t?attery again.
I If the CHARGE lamplights up and goes out '
I
after a while, the batteiy is operating correctly.-
—i It the CHARGE lamp goes Out after a while, the
I
problem IS with the battery firstly installed.______
•H The problem is with the AC povrer adaptor.
I
Please contact your nearest Sony dealer
_______
P*0*
Indicators in the Viewfinder and the Display Window
Warning imttcctort ■
15
-
37
-
23
25
26
26
26
If indicators Hash m ihe viewfinder, or a caution lamp on the camcorder flashes, check the following:
m
j
E
....
a
m
i 1993 -
3
Battery Capacity Remaining
Slow flashing: The battery is weak.
Past flashing; The battery is empty.
J] The tape is near the end.
When you press TAPEBATT CHECK, the
following Indicators appear m the viewfinder.
[sj The tape has run out. /
3 No cassette has twen Insarisd.
means the camcorder beeps when BEEP is si
Al The tab on the cassette is out (red) <p. 18).
iS Moisture cortdensation has occurred (p. 40).
lZ The vicMo heads may be contaminated
(P- 41).
Si Some other trouble has occurred. /
Disconnect the power source and contact your
Sony dealer or local authorized facility.
IZ The lithium battery is weak or the lithium
battery is not rnstafled (p. 10).
53
Page 28

Indicators in the Viewfinder and the Display Window
0-
IE
M*nua( focusing (p. 30)
Ti BACK LIGHT indicator (p. 29)
l3.' program ae mode indicator (p. 32)
Power zoom Indicator (p. 1S)
[5] FADER Indicator (p. 34)
^ Warning IndKators (p. 53}
IE Camera recording/cautlon iamp(p. 17)
L§J Lights up when piaying back a tape recorded
'ioj Tape counter (p. 17.35)
IT Tape remaining indicator (p. 16)
^ ZERO MEM indicator (p. 35)
T^ Age irtdicator (p. 20)
H Dateor Time Indicator (p. 11)
in the IMsplay Window
SS:SS;SSlSi^
± PROGRAM AE setting (p. 30)
Hi FOCUS mode (p. 30)
^ AQE/EVENT memory number (p. 12)
± Tape speed mode (p. 25)
i£ Appears in counter mode (p. 35}
^ ZERO MEM is pressed (p. 35)
Jj "Replace the tape or no tape inside." (p. 14)
1] "Moisture has condensed." (p. 40)
[fj "Trouble has occurred" (p. S3)
Tg Counter or time/date/age Indicator (p. 11.12,
H] AM;PM Indicator (p. 11)
in LP mode (p. 25)
Tape transport mode (p. 11,25)
Battery capacity remaining indicator (p. 16)
nil [ij] ëL
35)
Remaining capacity of battery (p. 16)
A
AC power adaptor
Accessory shoe
Adjusting viewfinder....
age button
Ajdio/video cable
Autofocus
AUTO LOCK
SACK LIGHT ...............
Battery ..
Battery lamp ................
Battery pack ...
BEEP...........
c
CAMERA rnode
Camera recording lamp
Car battery operation
Charging battery
Cleaning video head
Clockset
Close-up ......
Connecting adapto
Connection ...
COUNTER RESET
DATA SCREEN
OATE/TIME
Oew indicator
EDIT switch..
Editing
EDITSEARCH
EJECT
Exposure.......................
F.G,
Fade-in/tade-out
Fast-torwaro
Haadptwie jack
High-speed shutter
HOLD switch
.........
..........
................
..............
......
.................
............
..........
...............
...........
.............
.............
........
.......
liJ.KiL
... S. 22 indoor
.......
.......
.......
........
.......
........
.......
.......
......
28
, . 6
.. . .41
.......
19
.......
......
35
......
37 Sports mode
... 37
.. 32
. . 25
........................
47
Insert
.......................
IS
l-ANC ........................
12
22
Lithium battery ..........
17
T7
M,N,0,P
Manual FOCUS ...
PAUSE button ........
29 PUT
........................
playback on TV
6
Portrait mode
48
Power sources
6
Power zoom
15
PROGRAM AE..........
R
11
17 REC review
Pecord/pause
REMOTE
COMMANDER ... ... 25, 26
11
REMOTE control jack
Rewind ......................
RFU adaptor
s
Shoulder strap
Skip-scan
Slow
........................
Specifications
Sports tinder...............
STANDBY
Still picture .................
21
14 STOP.... ....17, 25
Supplied accessones . 5
32
TAPE/BATT CHECK ...
TAPE COUNTER
34 Tripod mounting
25 Troubles
VTB mode..................
21
VHF antenna
Video cassette tapes...
Viewfinder indicators ..
........
...........
.........
.............
................
.............
..............
..................
..................
.............
...............
..................
........
......................
...............
.......
..........27
10, 14. 36
.........
.....
10
.........
.........
........
.........
........
.. . 6. 27
........
.........
........
........
.........
........
.........
.........
.........
.........
.........
.........
.........
........
. .35
...16, 47
........
........
........
...14, T8
........
45
17
30
25
25
25
32
19
32
21
17
45
25
22
49
26
26
50
16
32
11
26
16
51
25
22
54
W,X,Y,Z
Wireless Remote
Commander
ZERO MEM 35
Zoom ..................................19
.............
. ..2, 53warning...............
25.26
55
 Loading...