

Page 1

Camera Control Box
Instruction Manual
4-735-433-11(1)
CCB-WD1
Page 2
English
WARNING
To reduce fire or shock hazard,
do not expose the unit to rain or
moisture.
IMPORTANT SAFETY
INSTRUCTIONS
-SAVE THESE
INSTRUCTIONS
DANGER
TO REDUCE THE RISK
OF FIRE OR ELECTRIC
SHOCK, CAREFULLY
FOLLOW THESE
INSTRUCTIONS
If the shape of the plug does
not fit the power outlet, use an
attachment plug adaptor of the
proper configuration for the power
outlet.
Use a nearby wall outlet (wall
socket) when using the AC
Adaptor/Battery Charger. If any
malfunction occurs, disconnect
the plug from the wall outlet (wall
socket) immediately to disconnect
from the power source.
If you use the product with a
charge lamp, note that the product
is not disconnected from the
power source even when the lamp
turns off.
GB
2
CAUTION
For safety, do not connect the
connector for peripheral device
wiring that might have excessive
voltage to LAN terminal. Follow
the instructions for LAN terminal.
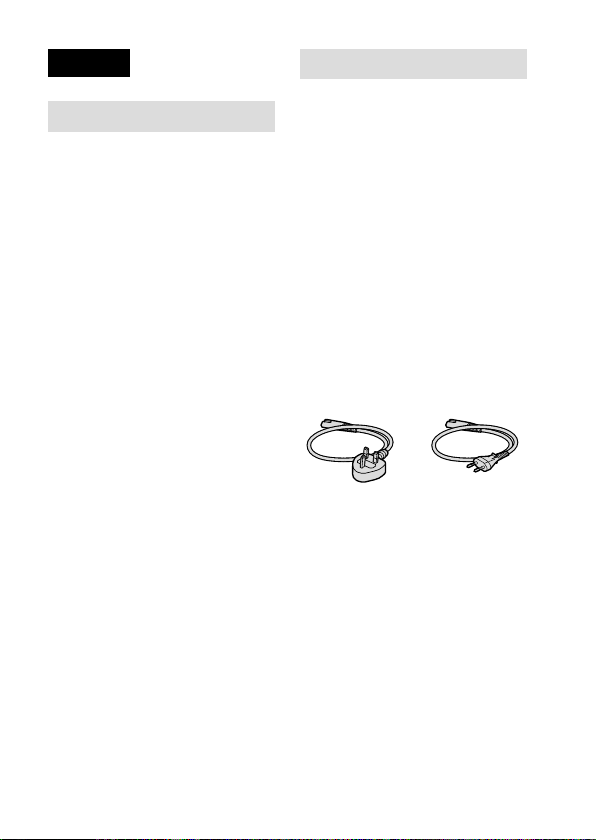
Power Cord
For the customers in the UK,
Ireland, Malta, Cyprus and Saudi
Arabia
Use the power cord (A). For safety
reasons, the power cord (B) is not
intended for above countries/
regions and shall therefore not be
used there.
For the customers in other EU
countries/regions
Use the power cord (B).
(A) (B)
LAN cable
Use a Category 5e or higher
Shielded Twisted Pair (STP) cable
with high shielding performance.
Page 3

For Customers in the U.S.A.
For question regarding your
product or for the Sony Service
Center nearest you, call 1-800-222SONY (7669).
Declaration of Conformity
Trade Name: SONY
Model No.: CCB-WD1
Responsible Party: Sony
Electronics Inc.
Address: 16535 Via Esprillo, San
Diego, CA 92127 U.S.A.
Telephone Number: 858-942-2230
This device complies with part
15 of the FCC rules. Operation
is subject to the following two
conditions: (1)This device may not
cause harmful interference, and
(2)this device must accept any
interference received, including
interference that may cause
undesired operation.
For Customers in Canada
CAN ICES-3 B/NMB-3 B
Notes on using
your product
• Refer to the Sony website for the
compatible models.
• Along with this manual, refer to
the Help Guide (page 12) of this
product and the instruction manual
of your camera.
Notes on handling the product
• This product is neither dust-proof,
nor splash-proof, nor water-proof.
• Do not leave the product or
the supplied accessories within
the reach of infants. They may
be accidentally swallowed. If
this occurs, consult a doctor
immediately.
On the data specifications
described in this manual
The data on performance and
specifications are defined under
the following conditions, except
as described in this manual: at an
ordinary ambient temperature of
25ºC (77°F).
GB
3
Page 4

Notes to avoid access by
unintended third parties
Depending on the environment of
use, unintended third parties may
access your network. Only connect
this product to networked devices
managed by you. Connection
to other networked devices is
performed at your own risk. This
product may be accessed without
authorization and the contents of
communications may be intercepted.
Notes on discarding this product,
transferring it to others, or
returning a rented product
To prevent your data from being
leaked, execute the “Initialize”
function by following the procedure
below before you discard the
product, transfer it to others, or
return a rented product.
1 Connect the product to a
computer (page10).
2 Connect the product to the
AC Adaptor, and then turn the
product on (page11).
3 Launch a web browser on the
computer, and then execute the
“Initialize” function (page12).
• Initialization may take a long time.
Connect the product to a stable
power source so that it does not
turn off partway through.
• Set the MASTER/CLIENT switch
on the product as described on
page9.
Checking the
product and the
supplied items
The number in parentheses
indicates the number of pieces.
• Camera control box (1)
• Multi terminal connecting cable
(S) (1)
• Multi terminal connecting cable
(L) (1)
Two cables with different
lengths are supplied.
• Micro USB cable (1)
• AC Adaptor (1)
The shape of the AC Adaptor
may differ depending on the
country/region.
• Power cord (mains lead) (1)*
(supplied in some countries/
regions)
* Multiple power cords may be
supplied with this equipment.
Use the appropriate one that
matches your country/region.
See page2.
• Cable protector (1)
• Set of printed documentation
GB
4
Page 5
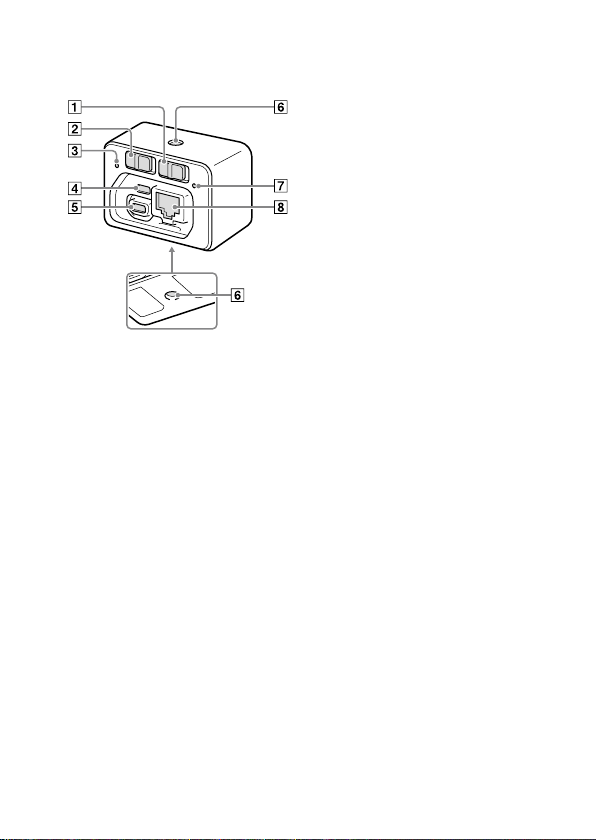
Identifying parts
ON/OFF (Power) switch
This switch turns the power on
or off.
MASTER/CLIENT (Master/
Client) switch
Set this switch to “MASTER”
for one of the camera control
boxes, and to “CLIENT” for the
others.
Access lamp
Micro USB connector
Use this connector to connect
the product to the AC Adaptor
(supplied).
Multi terminal
Use this terminal to connect
the product to a camera.
Tripod socket hole
Use a tripod with a screw less
than 5.5mm (7/32inches)
long. Otherwise, you cannot
firmly secure the product, and
damage to the product may
occur.
Power lamp
LAN terminal
Use this terminal to connect
the product to a computer or a
switching hub.
GB
5
Page 6

Connecting to a camera and a computer
Connect this product to a camera and a computer to operate the camera
from the computer.
You can operate multiple cameras at once from a single computer by
connecting them as illustrated below.
Set the MASTER/CLIENT switch on one of the products (camera control
boxes) to “MASTER.” Then, set the MASTER/CLIENT switches on the others
to “CLIENT.”
Conceptual diagram
DSC-RX0 Camera control box
Switching hub Computer
Note
• You can connect one camera to this product. To use multiple cameras, you
must connect each camera to a separate camera control box.
• It is recommended that you use 1000BASE-T switching hubs and LAN cables
rated as category 5e or higher.
GB
6
Page 7

Cable protector
Use the cable protector to prevent the cables from being disconnected.
Run all the cables through the cable protector, and then connect the
cables to the product.
Attach the cable protector
to the product so that it
aligns with the shape of the
connector compartment,
and then secure the cable
protector by tightening the
two attachment screws.
Secure the cables with the
fixing dial.
Fixing dial
Attachment screws
GB
7
Page 8

Connecting the product to a camera
Connect the product to the camera using the multi terminal connecting
cable (supplied).
• On the camera, set MENU (Setup) [USB Connection] to
[PC Remote] before you connect it.
• On the camera, set MENU
[Still Img. Save Dest.] to [PC+Camera].
• Insert a memory card into the camera.
• If you will be using the camera for a long period of time, it is
recommended that you set MENU
[Auto Pwr OFF Temp.] to [High] on the camera.
1
Connect the multi terminal on the product with the Multi/
Micro USB Terminal on the camera using the multi terminal
connecting cable (supplied).
• You cannot connect the camera to the micro USB connector on the
product.
DSC-RX0
(Setup) [PC Remote Settings]
(Setup)
Camera control box
Hint
• Two cables with different lengths are supplied. Use the appropriate one for
the installation environment.
GB
8
Page 9

Setting the MASTER/CLIENT (Master/Client) switch
Set the MASTER/CLIENT switch to
“MASTER” if you will be using one
camera.
To use multiple cameras at once,
set the switch on one of the camera
control boxes to “MASTER.” Then,
set the switches on the others to
“CLIENT.”
MASTER/CLIENT switch
When you change the setting
Set the ON/OFF (Power) switch to “OFF” to turn off the product before
changing the setting of the MASTER/CLIENT switch.
GB
9
Page 10

Connecting the product to a computer or switching hub
Connect the product to a computer or switching hub using a commercially
available LAN cable.
1
Connect the LAN terminal on the product with the LAN port on
the computer or switching hub using a LAN cable.
• You cannot connect the computer or switching hub to the micro USB
connector or multi terminal on the product.
To the LAN port on the
computer or switching hub
• If you connect this product to a switching hub, connect your
computer to the same network.
Note
• Use a device without a router function or a device whose router function is
disabled as the switching hub to which you connect this product.
10
GB
Page 11

Turning the power on
Connect the product to a power source using the AC Adaptor (supplied).
1
Connect the micro USB connector on the product with the USB
connector on the AC Adaptor (supplied) using the micro USB
cable (supplied), and then connect the AC Adaptor to a wall
outlet (wall socket).
• Do not connect the AC Adaptor to the multi terminal on the product.
ON/OFF (Power) switch
To the AC Adaptor
2
Make sure that the MASTER/CLIENT (Master/Client) switch on
the product is set properly (page9).
3
Set the ON/OFF (Power) switch to “ON.”
The product will turn on, and the power lamp will light up.
• If the power lamp blinks, the product is not connected to the network
properly. For details, refer to page13.
GB
11
Page 12

Operating the camera from the computer
You can operate the camera from a web browser on the computer by
connecting the product to the camera and the computer.
Recommended computer environment
OS: Windows 7/Windows 8.1/Windows 10
Mac OS X 10.11/macOS 10.12 - 10.13
Web browser: Google Chrome/Internet Explorer/Safari
1
Launch a web browser on the computer, and then enter the
following URL into the address bar.
URL:
http://169.254.200.200/
• The URL can also be found on the bottom of the product.
The screen for operating the camera will appear on the web browser.
2
Turn the camera on.
• Make sure that the battery inside the camera is sufficiently charged.
• You can also turn the camera on from the web browser.
For details on how to operate the camera from the web browser, refer to
the “Help Guide.”
“Help Guide” (Web manual)
http://rd1.sony.net/help/dsc/1760/h_zz/
12
GB
Page 13

Troubleshooting
The power does not turn on.
• Make sure that the AC
Adaptor is a genuine Sony
AC-UUD12/AC-UUE12.
The power turns off suddenly.
• Make sure that the AC
Adaptor is a genuine Sony
AC-UUD12/AC-UUE12.
The connected camera does
not appear on the web
browser.
• Make sure that the camera is
turned on.
• Make sure that
[USB Connection] is set to
[PC Remote] on the camera
(page8).
• Check the MASTER/CLIENT
switch on the product
(page9).
• Make sure that the camera
software is the latest version.
For details, refer to the support
page for the camera.
• Depending on the network
settings of the computer, the
computer may not be able
to connect to the product.
Deactivate any automatic
configuration scripts or proxy
server settings in the network
settings of the computer.
The camera turns off.
• On the camera, set
MENU
[Auto Pwr OFF Temp.] to [High].
This may extend the recording
time.
(Setup)
The power lamp blinks.
• Check whether the
MASTER/CLIENT switch is set
properly (page9).
Note
• The product may get warm with
use. This is normal.
GB
13
Page 14

Precautions
Do not use/store the product in
the following places
• In an extremely hot, cold or humid
place
In places such as in a car parked
in the sun, the product body may
become deformed and this may
cause a malfunction.
• Storing under direct sunlight or
near a heater
The product body may become
discolored or deformed, and this
may cause a malfunction.
• In a location subject to rocking
vibration
• Near strong magnetic place
• In sandy or dusty places
Be careful not to let sand or dust
get into the product. This may
cause the product to malfunction,
and in some cases this malfunction
cannot be repaired.
On storing
If the product is dirty after use, clean
it. Water, sand, dust, salt, etc. left in
the product may cause a malfunction.
For customers bringing the
product abroad
This product is compatible with
electric voltages in the range of
100V–240V, and can be used
worldwide.
Do not connect the product to
a voltage transformer (travel
converter). This may cause the
product to generate heat or
malfunction.
The shape of the wall outlet (wall
socket) varies depending on the
country/region. Check in advance
whether you will need a plug
adapter.
14
GB
Page 15

Specifications
Camera Control Box
[Input/Output connectors]
Micro USB connector
LAN terminal: 10BASE-T/
100BASE-TX/1000BASE-T (RJ-45)
Multi terminal:
USB communication:
Hi-Speed USB (USB 2.0)
USB power supply/USB charging:
up to 500mA
[General]
Power consumption:
Approx. 5.1W
Operating temperature:
0 to 40°C (32 to 104°F)
Storage temperature:
–20 to 55°C (–4 to 131°F)
Dimensions (W/H/D) (Approx.):
59.0 × 40.5 × 29.8mm
23/8 × 15/8 × 13/16in.
Mass (Approx.): 90g (3.2oz)
AC Adaptor AC-UUD12/UUE12
Rated input: 100–240V ,
50/60Hz, 0.2A
Rated output: 5V
Design and specifications are subject
to change without notice.
, 1.5A
• Google Chrome is a trademark or
registered trademark of Google Inc.
In addition, system and product
names used in this manual are, in
general, trademarks or registered
trademarks of their respective
developers or manufacturers.
However, the ™ or ® marks may not
be used in all cases in this manual.
On GNU GPL/LGPL applied
software
The software that is eligible for the
following GNU General Public License
(hereinafter referred to as “GPL”) or
GNU Lesser General Public License
(hereinafter referred to as “LGPL”) are
included in the product.
This informs you that you have a
right to have access to, modify,
and redistribute source code for
these software programs under the
conditions of the supplied GPL/LGPL.
Source code is provided on the web.
Use the following URL to download it.
http://oss.sony.net/Products/Linux/
We would prefer you do not contact
us about the contents of source code.
You can check the licenses (in
English) on the operating screen of
the product. Licenses can be found
under “License” on the operating
screen.
Trademarks
• Microsoft, Windows and Internet
Explorer are registered trademarks
or trademarks of Microsoft
Corporation in the United States
and/or other countries.
• Mac and Safari are registered
trademarks or trademarks of Apple
Inc., registered in the U.S. and other
countries.
Additional information on this
product and answers to frequently
asked questions can be found at our
Customer Support Website.
GB
15
Page 16

©2018 Sony Corporation Printed in China
 Loading...