

Sony CBK-WA100,CBK-WA101 Operating Instructions Manual

4-485-296-12 (1)
Wireless Adapter
Operating Instructions
CBK-WA100
CBK-WA101
© 2013 Sony Corporation

Table of Contents
Overview
Features .................................................................. 3
Compatible Models and Functions ...................... 4
Compatible models ............................................ 4
Required device to use the function ................... 4
Compatible terminal devices .............................. 4
Location and Function of Parts ............................ 5
Preparations
Attaching the Wireless Adapter to a Camcorder/
Recorder ................................................................. 7
Turning on the Power ............................................ 7
Connecting to the Terminal Device via a Wireless
LAN ........................................................................ 8
Connecting in the wireless LAN access point
mode (AP mode) .............................................. 8
Connecting in the wireless LAN station mode
(STA mode) ...................................................... 9
Checking the status of the wireless LAN
settings ........................................................... 10
Connecting to the Internet .................................. 10
Connecting to the Internet by using a
modem ............................................................ 10
Connecting to the Internet in the wireless LAN
station mode (STA mode) .............................. 11
Turning off the Power ......................................... 12
Operations
Recording the Video/Audio of a Camcorder/
Recorder ............................................................... 13
Preparations ...................................................... 13
Recording ......................................................... 13
Checking files that are recorded on an SD
card ................................................................. 15
Uploading a File ................................................... 16
Preparations ...................................................... 16
Selecting the file and uploading ....................... 16
Controlling the Camcorder/Recorder
Remotely ............................................................... 18
Settings
About the Web Menu ...........................................19
Initial screen .....................................................19
About the setting menu .....................................19
Format Settings ....................................................20
System settings .....................................................21
User and password settings ...............................21
Date and time settings .......................................22
Wireless LAN Settings .........................................23
Checking the wireless LAN settings ................24
Modem Settings ....................................................24
Checking the modem settings ...........................24
Upload Settings ....................................................25
Register the server for uploading ......................25
Changing the registered server settings ............26
Deleting the registered server ...........................26
Job List ..................................................................26
Maintenance
Updating the Wireless Adapter ..........................27
To Return to the Factory Setting ........................28
Appendix
Important Notes on Operation ...........................29
Troubleshooting ....................................................30
Error/Warning Indicator ....................................31
Licenses .................................................................31
MPEG-4 AVC ..................................................31
END USER LICENSE AGREEMENT ............31
On accessing software to which the GPL/LGPL
applies .............................................................35
Open software licenses .....................................35
Specifications ........................................................36
Trademarks ..........................................................37
2
Table of Contents

Overview
Features
The CBK-WA100/CBK-WA101 Wireless Adapter is the
wireless adapter for connecting the PMW-500/400/300/
200/160/150 Solid-State Memory Camcorder (called
“camcorder” in this document) or PMW-50 Portable
Memory Recorder (called “recorder” in this document)
to a computer or mobile device via a wireless LAN, or
connecting to the 3G/4G/LTE line and sending files via
the Internet.
The USB Wireless LAN Module (sold separately) may
not be available in some countries/regions.
To use the 3G/4G/LTE services, you need to contract
with a cell phone company.
Remote operation of the camcorder/recorder
via a wireless LAN
You can operate a camera or media of a camcorder/
recorder remotely from a smartphone/tablet/computer
that is connected to the wireless adapter via a wireless
LAN.
“Content Browser Mobile” application*
You can operate a camcorder/recorder remotely by
streaming the audio/video of the camcorder/recorder,
and perform the settings of the wireless adapter from a
smartphone/tablet by using the “Content Browser
Mobile” application.
* For details about the “Content Browser Mobile” application,
contact your Sony dealer or a Sony service representative.
Overview
Creating and recording a proxy file
The wireless adapter creates a proxy file (low
resolution) and records it on an SD card that is inserted
into the wireless adapter, from the video and audio
signals that are shot or played on the camcorder/recorder
and are input from the HD-SDI connector. The created
file is called “XAVC
Recording starts/stops automatically by interlocking to
the camcorder/recorder with the Rec/Stop control
signals that are included on the HD-SDI signals.
Uploading a file via a wireless LAN or 3G/4G/
LTE line
You can upload a proxy file (low resolution) that is
recorded on an SD card or original file (high resolution)
that is recorded on the camcorder/recorder, to a server on
the Internet via the wireless LAN or 3G/4G/LTE line.
Streaming the video/audio of a camcorder/
recorder via a wireless LAN
The wireless adapter can create the stream (H.264/AACLC compression) from the video/audio of a camcorder/
recorder. You can watch the video/audio streaming by
using the “Content Browser Mobile” application that is
installed on the smartphone/tablet/computer via a
wireless LAN.
®
Proxy.”
Features
3

Compatible Models and
Required device to use the function
Overview
Functions
Compatible models
The following camcorder/recorders are compatible with
the wireless adapter, and you can use the wireless
adapter by attaching to them.
• Solid-State Memory Camcorder
PMW-500*, PMW-400*, PMW-300, PMW-200*,
PMW-160*, PMW-150*
• Portable Memory Recorder
PMW-50*
* Will be compatible with the wireless adapter by updating
the firmware.
PMW-500: Ver.1.6 or later
PMW-400: Ver.1.1 or later
PMW-200: Ver.1.3 or later
PMW-160: Ver.1.2 or later
PMW-150: Ver.1.2 or later
PMW-50: Ver.1.2 or later
The following functions are available for compatible
models.
• Displaying the wireless adapter’s status on the
viewfinder of the camcorder
• Creating a proxy file that inherits the information and
size from an original file that is recorded on the
camcorder/recorder when the camcorder/recorder is
recording.
• Creating a proxy file when the recorder is playing the
original file. (PMW-50 only)
When using a device that is not
compatible with the wireless adapter
You can use a device that has the SDI output. In this
case, the following functions are available.
• Streaming a video/audio of the camcorder/recorder
via the wireless LAN
• Creating a proxy file from the original file that is
recorded on the camcorder/recorder when the
camcorder/recorder is recording.*
• Uploading a file via a wireless LAN or 3G/4G/LTE
line (only for the proxy file that is recorded on an SD
card in the wireless adapter)
* When the Rec/Stop control signals is included on the SDI
signals, recording starts/stops automatically by interlocking
to the camcorder/recorder. The proxy file does not inherit
the information and size from the original file.
Function Required device Required
connection
Recording the
proxy file
Playing the proxy
file
Uploading the
proxy file
Uploading the file
of the camcorder/
recorder
Remote control of
the camcorder/
recorder
Monitoring the live
4
video*
*1Not needed for the CBK-WA101.
2
The USB wireless LAN module (called “wireless LAN
*
module” in this document) is sold separately.
3
The 3G/4G/LTE USB modem (called “modem” in this
*
document) is sold separately.
Not needed when connecting to the access point of a
wireless LAN or tethering on a smartphone/tablet.
4
You need a smartphone/tablet on which the “Content
*
Browser Mobile” application is installed.
SD card BNC cable*
•SD card
•USB wireless
LAN module*
•SD card
•USB wireless
LAN module*
• 3G/4G/LTE USB
modem*
•USB wireless
LAN module*
• 3G/4G/LTE USB
modem*
USB wireless LAN
module*
USB wireless LAN
module*
3
3
2
2
2
2
2
Not needed
Not needed
USB cable
USB cable
BNC cable*
1
1
Compatible terminal devices
For setting and operating the wireless adapter, use a
smartphone, tablet, or computer (called “terminal
device” in this document). Compatible terminal devices,
OS, browser are as follows.
Terminal device OS Browser
Smartphone Android 4.1/4.2/4.3 Chrome
iOS 6 Safari
Tablet Android 4.1/4.2/4.3 Chrome
iOS 6 Safari
Computer Microsoft Windows
Vis ta/
Microsoft Windows 7/
Microsoft Windows 8
Mac OS x 10.7/10.8 Safari
Chrome/Safari
4
Compatible Models and Functions
Location and Function
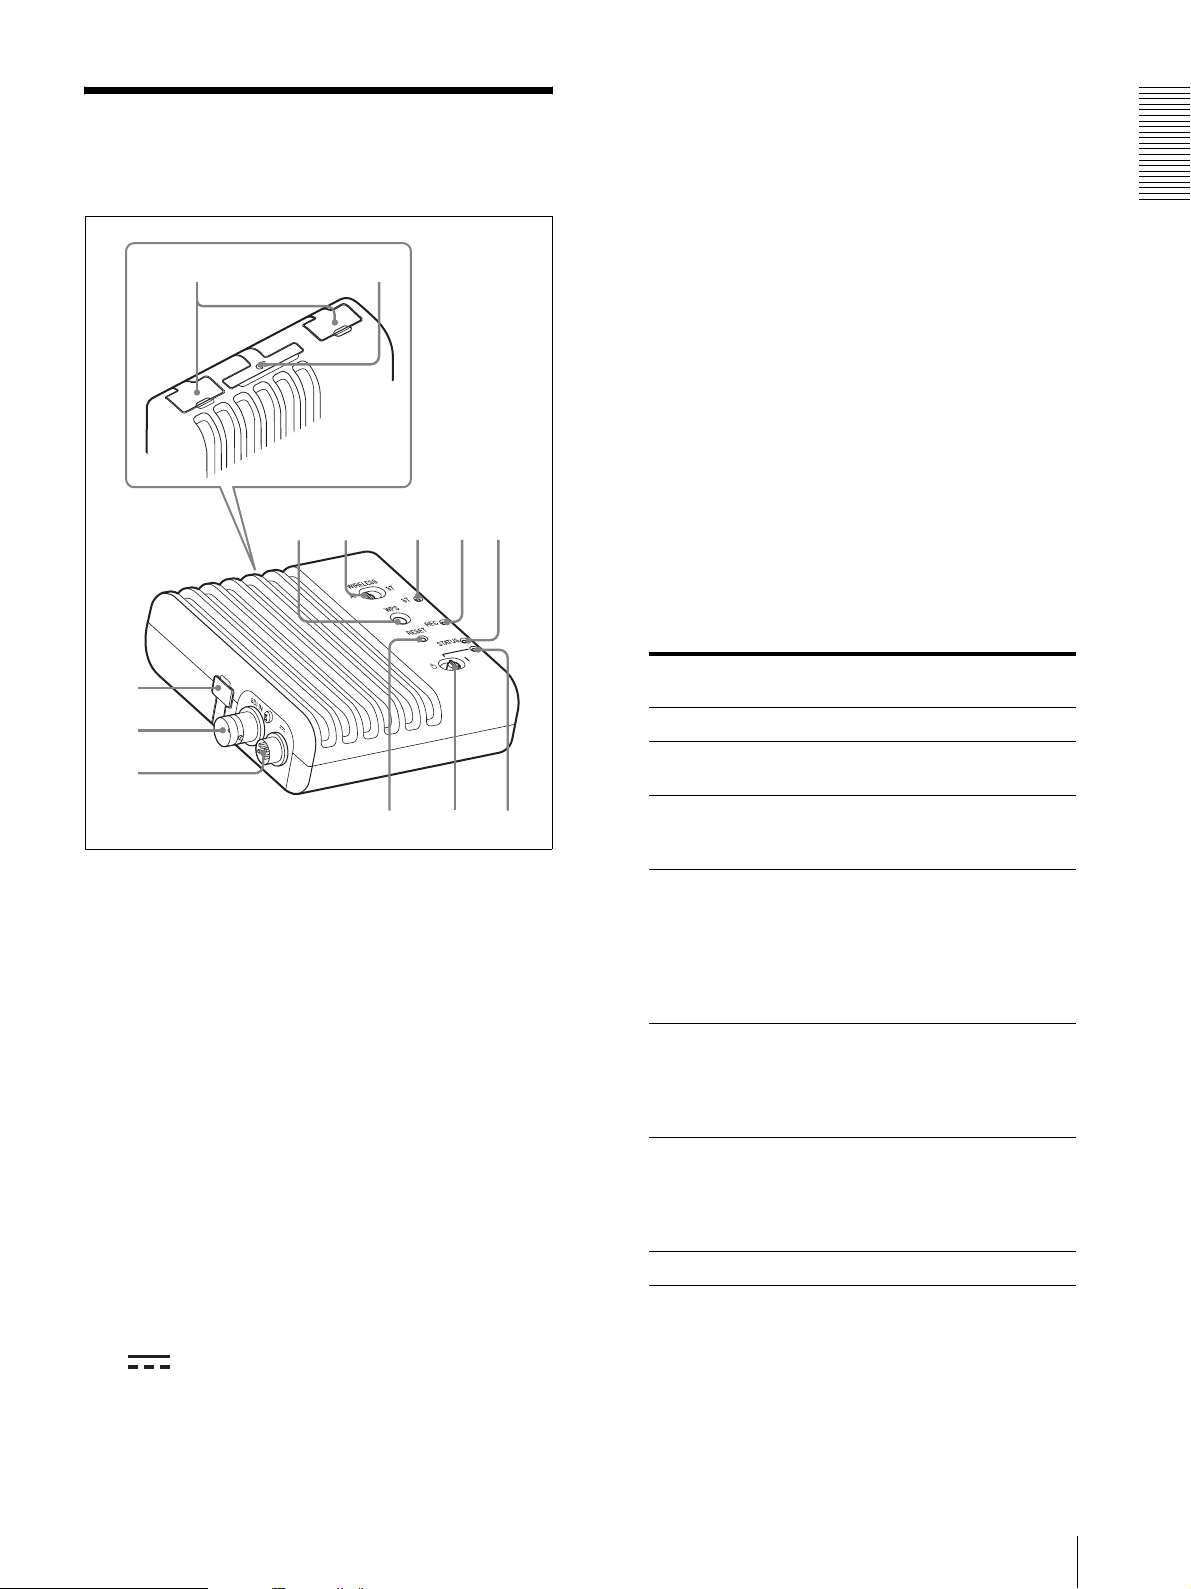
q
q
q
of Parts
1
2
F WPS button
Use for the WPS function.
You can set the connecting device and access point
semi automatically by using the WPS (Wi-Fi
Protected Setup) function.
Overview
G WIRELESS (wireless LAN mode setting) switch
Sets the wireless LAN mode of the wireless
adapter.
“AP”: AP mode (Access point mode) (page 8)
“ST”: STA mode (Station mode) (page 9)
H ST indicator
Lights in blue when the wireless adapter is in the
STA mode. (Turns off when the wireless adapter is
in the AP mode.)
Flashes in blue while the WPS function is running.
9
s
0
d
3
4
5
6 7
8
a
A USB connector (type A)
Connect the optional wireless LAN module or
optional modem. Remove the cover to make the
connection.
B SD card slot
Insert an optional SD card. Remove the cover to
insert the card.
C CAM connector (USB mini type B)
Connect to a camcorder/recorder with the supplied
USB cable. Remove the cover to make the
connection.
D SDI IN (HD-SDI input) connector (BNC type)
(CBK-WA100 only)
Connect to a camcorder/recorder with the supplied
BNC cable. This connector inputs the HD-SDI
signals that are output from the camcorder/recorder.
E (DC input) connector (CBK-WA100 only)
Connect to a camcorder/recorder with the supplied
DC power cable.
I REC indicator
Lights in red while recording on an SD card.
J STATUS indicator
Indicates the status of the wireless adapter.
STATUS
indicator
Off Turned off
Lights up in light
green
Flashes in light
green quickly (0.2
second intervals)
Flashes in red
slowly (0.5 second
intervals)
Flashes in red
quickly (0.2 second
intervals)
Lights in orange • Unable to connect to the
Flashes in orange The upload has failed.
Status of the wireless
adapter
Turned on (during normal
condition)
Uploading the file
• The camcorder/recorder is
turned off
• No input from the SDI IN
connector
• There is a disturbance in the
input signal from the SDI IN
connector
• Error during initial setup when
starting up
• A wireless LAN module or
modem is not compatible with
the wireless adapter
Internet by using the modem
• Unable to connect to the
access point (during the STA
mode)
K RESET button
Returns the wireless adapter to the factory setting.
L Power switch
To turn the wireless adapter on, set to “@.” To t u r n
the wireless adapter off, set to “1.”
Location and Function of Parts
5

Overview
M Power indicator
Lights up in light green when the wireless adapter
is turned on.
6
Location and Function of Parts

Preparations
Attaching the Wireless
Adapter to a Camcorder/
Turning on the Power
1
Make sure that the wireless adapter is attached to
the camcorder/recorder correctly.
For details about attaching to the camcorder/
recorder, refer to the supplied “Installation
Manual.”
Recorder
The wireless adapter is used by attaching it to the
camcorder/recorder and connecting the supplied DC
power cable.
Connect the supplied USB cable and BNC cable
according to the function that you use (page 4).
For details about attaching to the camcorder/recorder
and connecting cables, refer to the supplied “Installation
Manual.”
2
Turn the wireless adapter on by setting the power
switch to “@.”
The wireless adapter starts up with the settings
when you turn the wireless adapter off last, then the
power indicator and STATUS indicator light in light
green.
About start-up settings
The wireless adapter starts up in the wireless LAN mode
according the WIRELESS switch setting.
When the WIRELESS switch is set to “AP”
The wireless adapter starts up in the AP mode (page 8).
When the WIRELESS switch is set to “ST”
The wireless adapter starts up in the STA mode (page 9).
The wireless adapter starts to connect to the access point
that the wireless adapter connects last.
Preparations
Attaching the Wireless Adapter to a Camcorder/Recorder / Turning on the Power
7
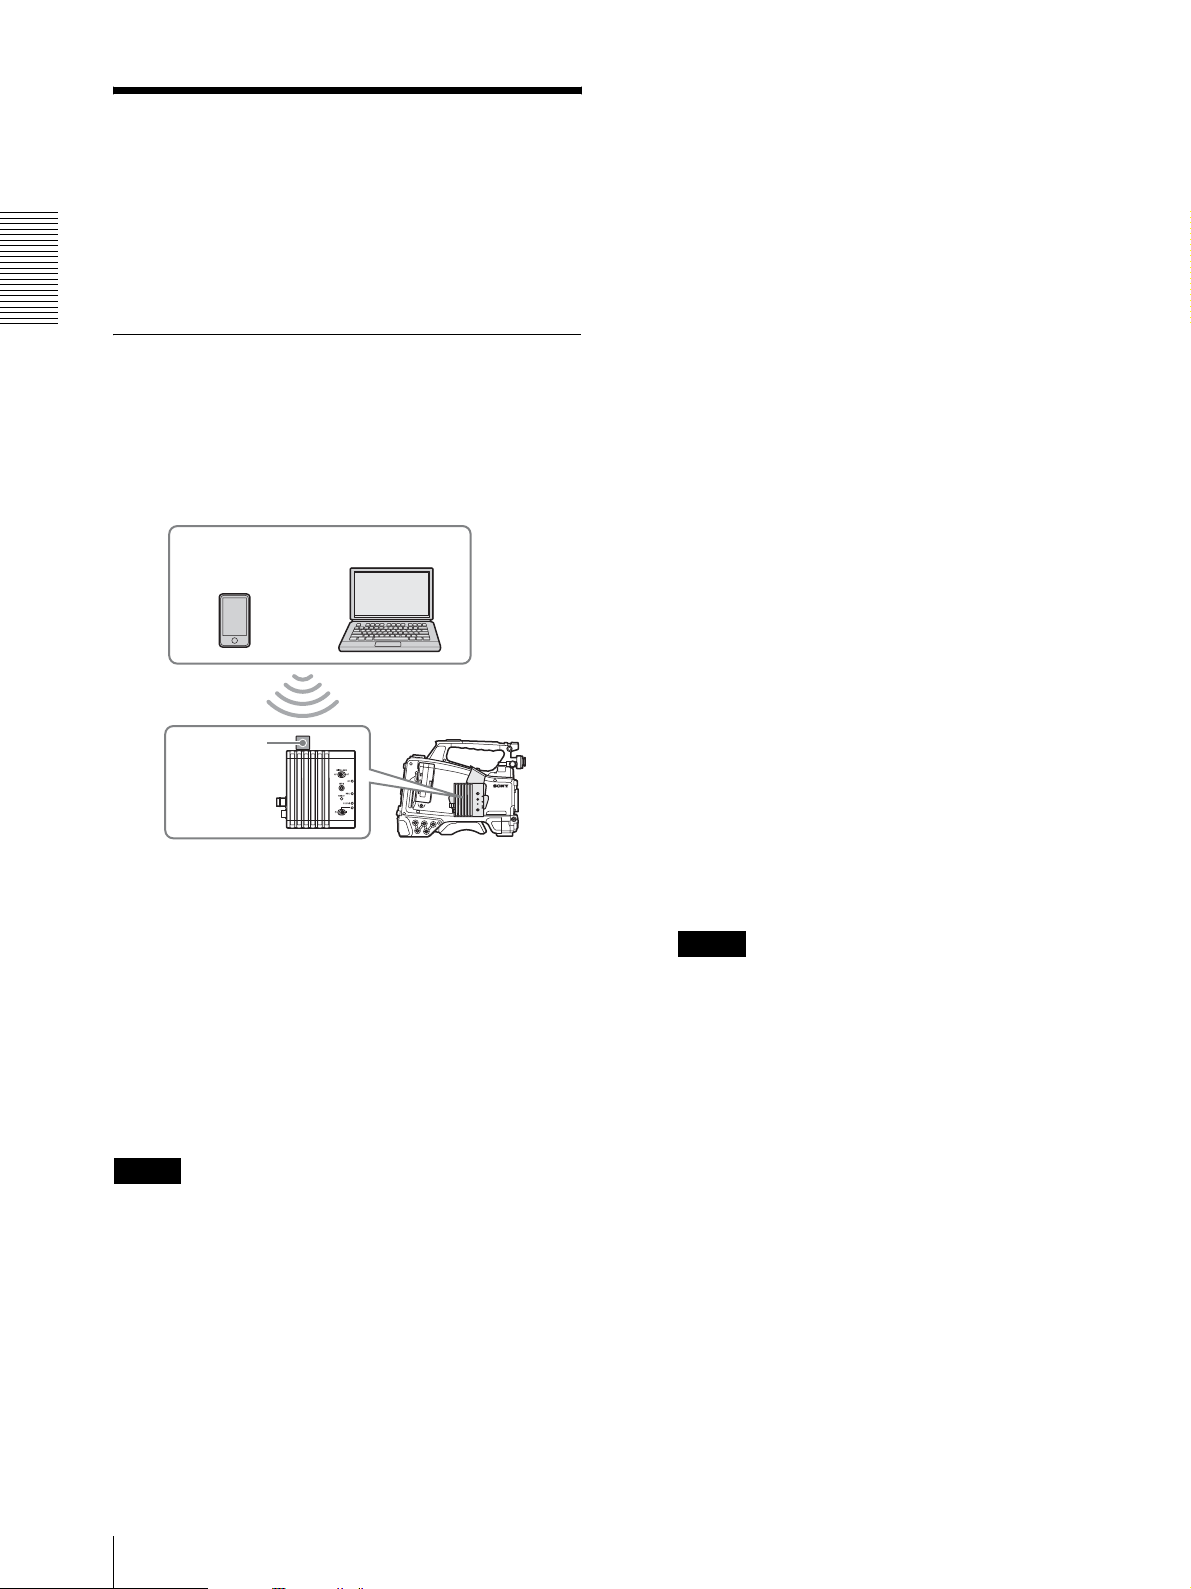
To connect
Connecting to the
1
Set the WIRELESS switch to “AP,” then turn the
Terminal Device via a
Wireless LAN
Connect the wireless adapter and the terminal device via
the wireless LAN.
Preparations
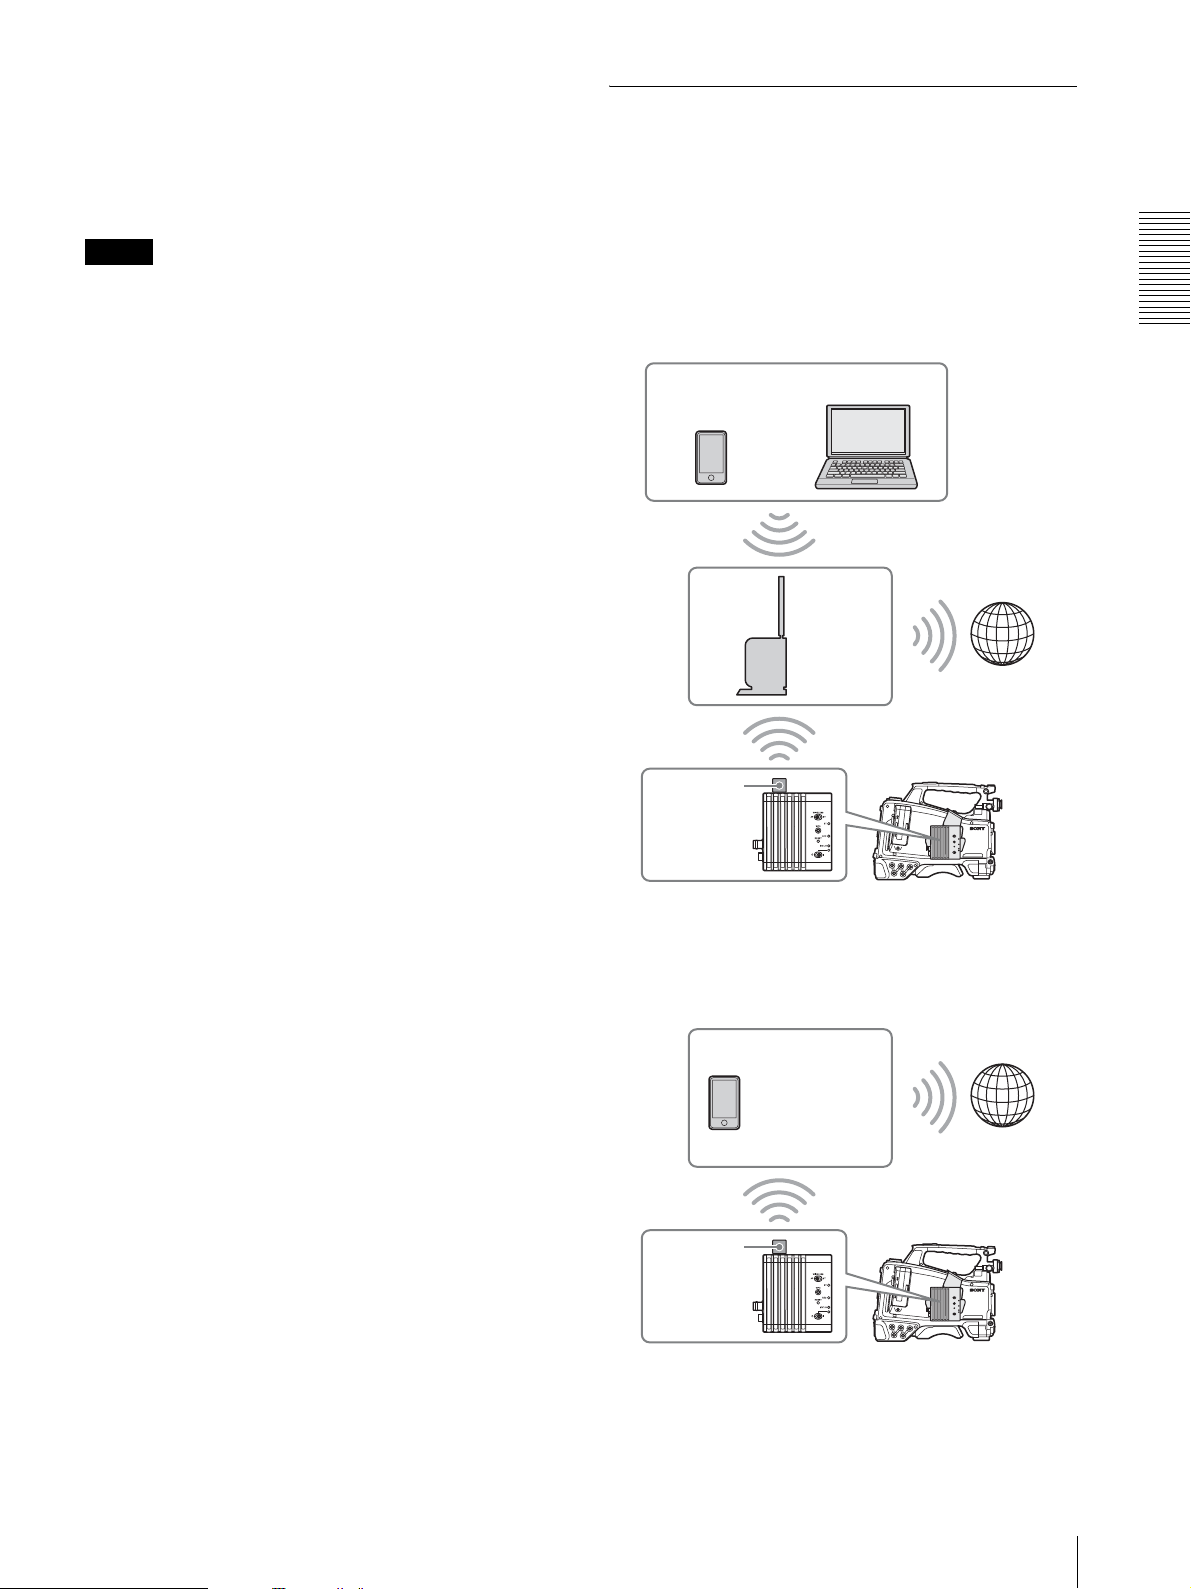
Connecting in the wireless LAN access point mode (AP mode)
The wireless adapter works as the access point. Connect
the terminal device to the wireless adapter via the
wireless LAN.
Smartphone/
tablet
Wireless
LAN
module
(not
supplied)
Computer
Camcorder/recorder +
CBK-WA100/CBK-WA101
wireless adapter on.
The wireless adapter starts up in the AP mode.
2
If the terminal device is compatible with the WPS
function:
Press the WPS button for 3 seconds.
The ST indicator flashes in blue.
Perform the following steps within 2 minutes after
pressing the WPS button.
If the terminal device is not compatible with the
WPS function:
Proceed to the next step.
3
Set “Network setting” > “Wireless LAN setting” of
the terminal device to on.
For the wireless LAN setting of the terminal device,
refer to its operating instructions.
4
If the terminal device is compatible with the WPS
function:
Select the wireless adapter’s SSID
“DIRECT_taP0:WA100-012345” from the SSID
list, then select “WPS Push Button” from the
options.
If the terminal device is not compatible with the
WPS function:
Select the wireless adapter’s SSID
“DIRECT_taP0:WA100-012345” from the SSID
list, then input “abcdefgh” for the password.
To connect a wireless LAN module to the
wireless adapter
Remove the cover of the USB connector, then connect
the optional wireless LAN module to the USB
connector.
For details of connecting, refer to the supplied
“Installation Manual.”
For compatible wireless LAN modules, contact your
Sony dealer or a Sony service representative.
Notes
• Do not connect or disconnect a wireless LAN module
while the wireless adapter is turned on.
• If a wireless LAN module that is not compatible with
the wireless adapter is connected, the STATUS
indicator flashes in red quickly. In this case, connect a
compatible wireless LAN module.
Note
The SSID and password of the wireless adapter are
printed on the label of the wireless adapter.
5
Start up the browser on the terminal device, then
access http://192.168.1.1:8080/index.html.
The screen for inputting the user name and
password appears on the browser.
6
Input the user name and password, then touch
“OK.”
“User Name”: “admin” (default setting)
“Password”: “cbk-wa100” (default setting for the
CBK-WA100) or “cbk-wa101” (default setting for
the CBK-WA101)
The Web menu of the wireless adapter appears on
the browser. For details, see “About the Web Menu”
(page 19).
8
Connecting to the Terminal Device via a Wireless LAN
Note
You can change the user name and password
(page 21).
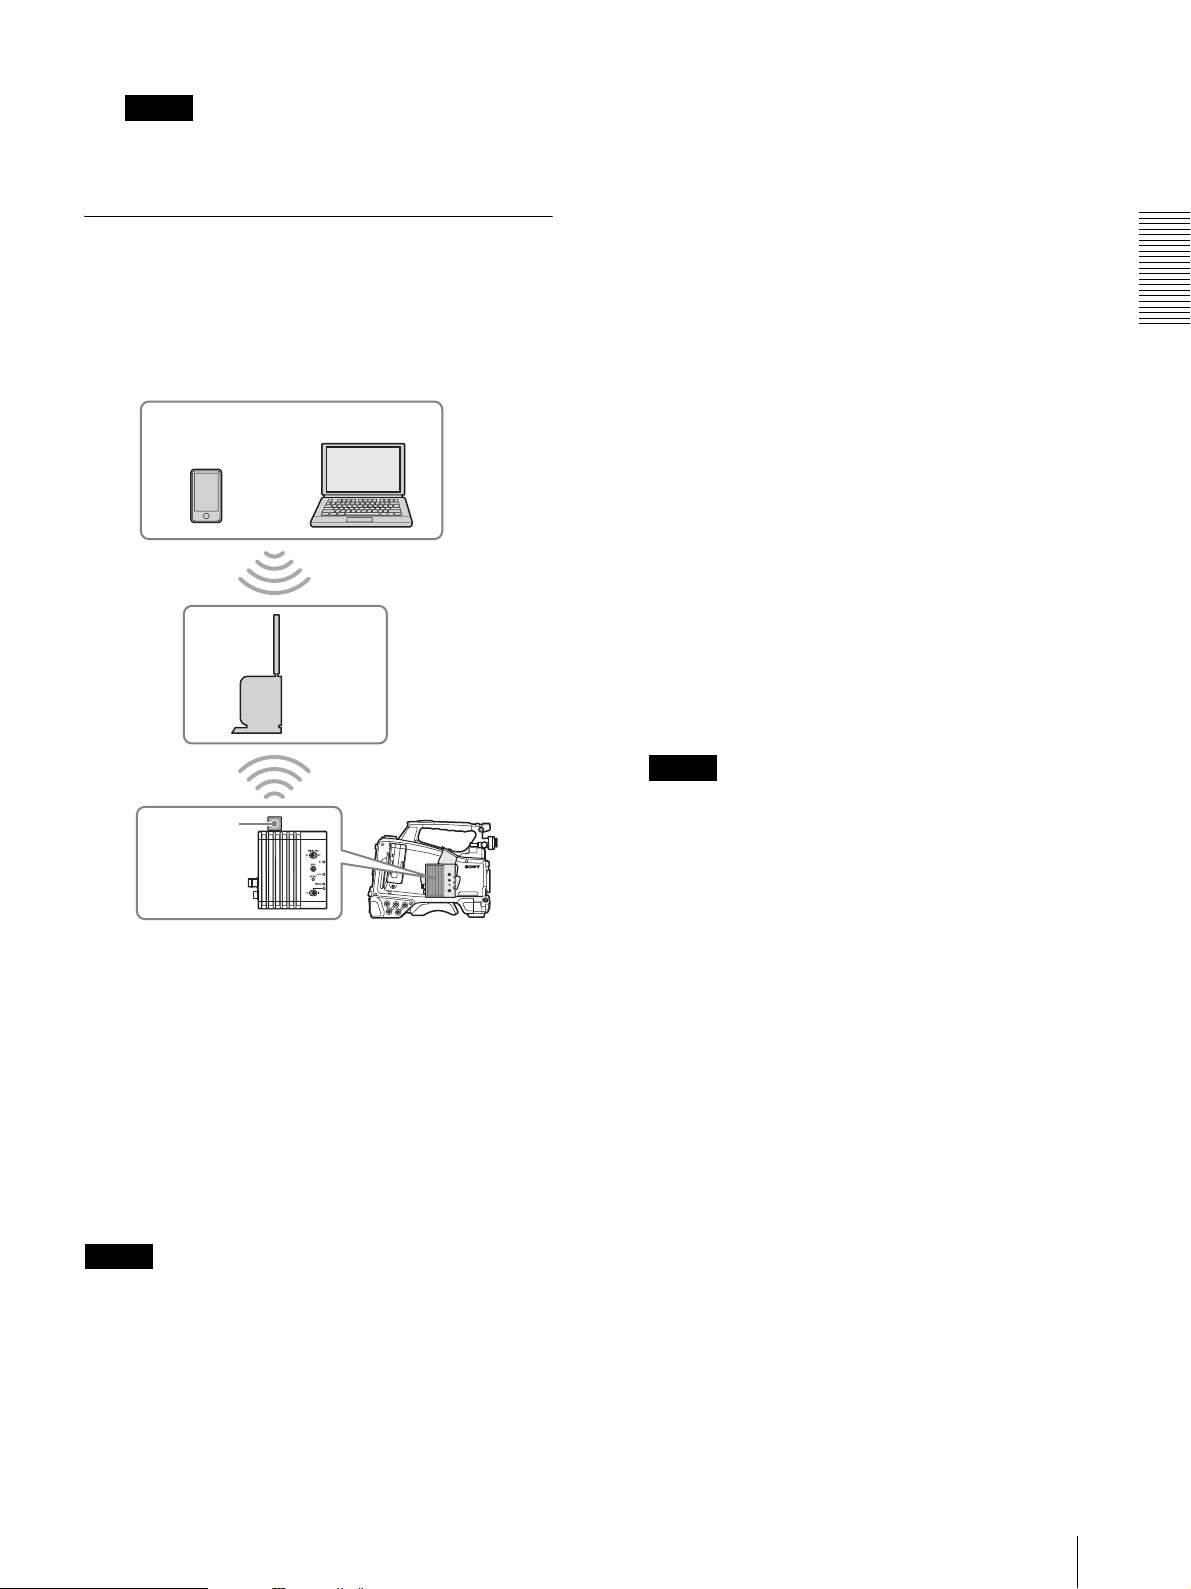
Connecting in the wireless LAN station mode (STA mode)
The wireless adapter connects to the access point as a
client. Connect the wireless adapter and terminal device
via the access point.
Smartphone/
tablet
Computer
Access
point
Connecting to the access point with the
WPS function
If the access point is compatible with the WPS function,
you can connect to the access point with the simple
settings. If the access point is not compatible with the
WPS function, see “To connect to the access point in the
STA mode without the WPS function” (page 23).
1
Turn the access point on.
2
Set the WIRELESS switch to “ST,” then turn the
wireless adapter on.
The wireless adapter starts up in the STA mode.
3
Press the WPS button of the wireless adapter for 3
seconds.
The ST indicator flashes in blue.
Perform the following steps within 2 minutes after
pressing the WPS button.
4
Press the WPS button of the access point.
For the operation of the WPS button, refer to the
operating instructions of the access point.
When the connection is completed, the ST indicator
lights in blue and the STATUS indicator lights in
light green.
Preparations
Wireless
LAN
module (not
supplied)
Camcorder/recorder +
CBK-WA100/CBK-WA101
To connect a wireless LAN module to the
wireless adapter
Remove the cover of the USB connector, then connect
the optional wireless LAN module to the USB
connector.
For details of connecting, refer to the supplied
“Installation Manual.”
For compatible wireless LAN modules, contact your
Sony dealer or a Sony service representative.
Notes
• Do not connect or disconnect a wireless LAN module
while the wireless adapter is turned on.
• If a wireless LAN module that is not compatible with
the wireless adapter is connected, the STATUS
indicator flashes in red quickly. In this case, connect a
compatible wireless LAN module.
Note
If the connection fails, the ST indicator turns off. In
this case, perform steps from the step 1.
5
Connect the terminal device to the access point.
For connecting, refer to the operating instructions
of the terminal device.
6
Start up the browser on the terminal device, then
access to the wireless adapter.
Input one of the following addresses.
• http://<IP address that the access point assigns to
the wireless adapter>:8080/index.html
You can check the assigned IP address on the
webpage of the access point. For details, refer to
the operating instructions of the access point.
• http://WA100-<serial number of the wireless
adapter>:8080/index.html
“WA100-<serial number of the wireless
adapter>” can be changed as the host name
(page 21).
The screen for inputting the user name and
password appears on the browser.
Connecting to the Terminal Device via a Wireless LAN
9
7
Input the user name and password, then touch
“OK.”
“User Name”: “admin” (default setting)
“Password”: “cbk-wa100” (default setting for the
CBK-WA100) or “cbk-wa101” (default setting for
the CBK-WA101)
The Web menu of the wireless adapter appears on
the browser. For details, see “About the Web Menu”
(page 19).
Preparations
Note
You can change the user name and password
(page 21).
Using the “Content Browser Mobile”
application
You can access the wireless adapter from the terminal
device simply, without inputting the IP address.
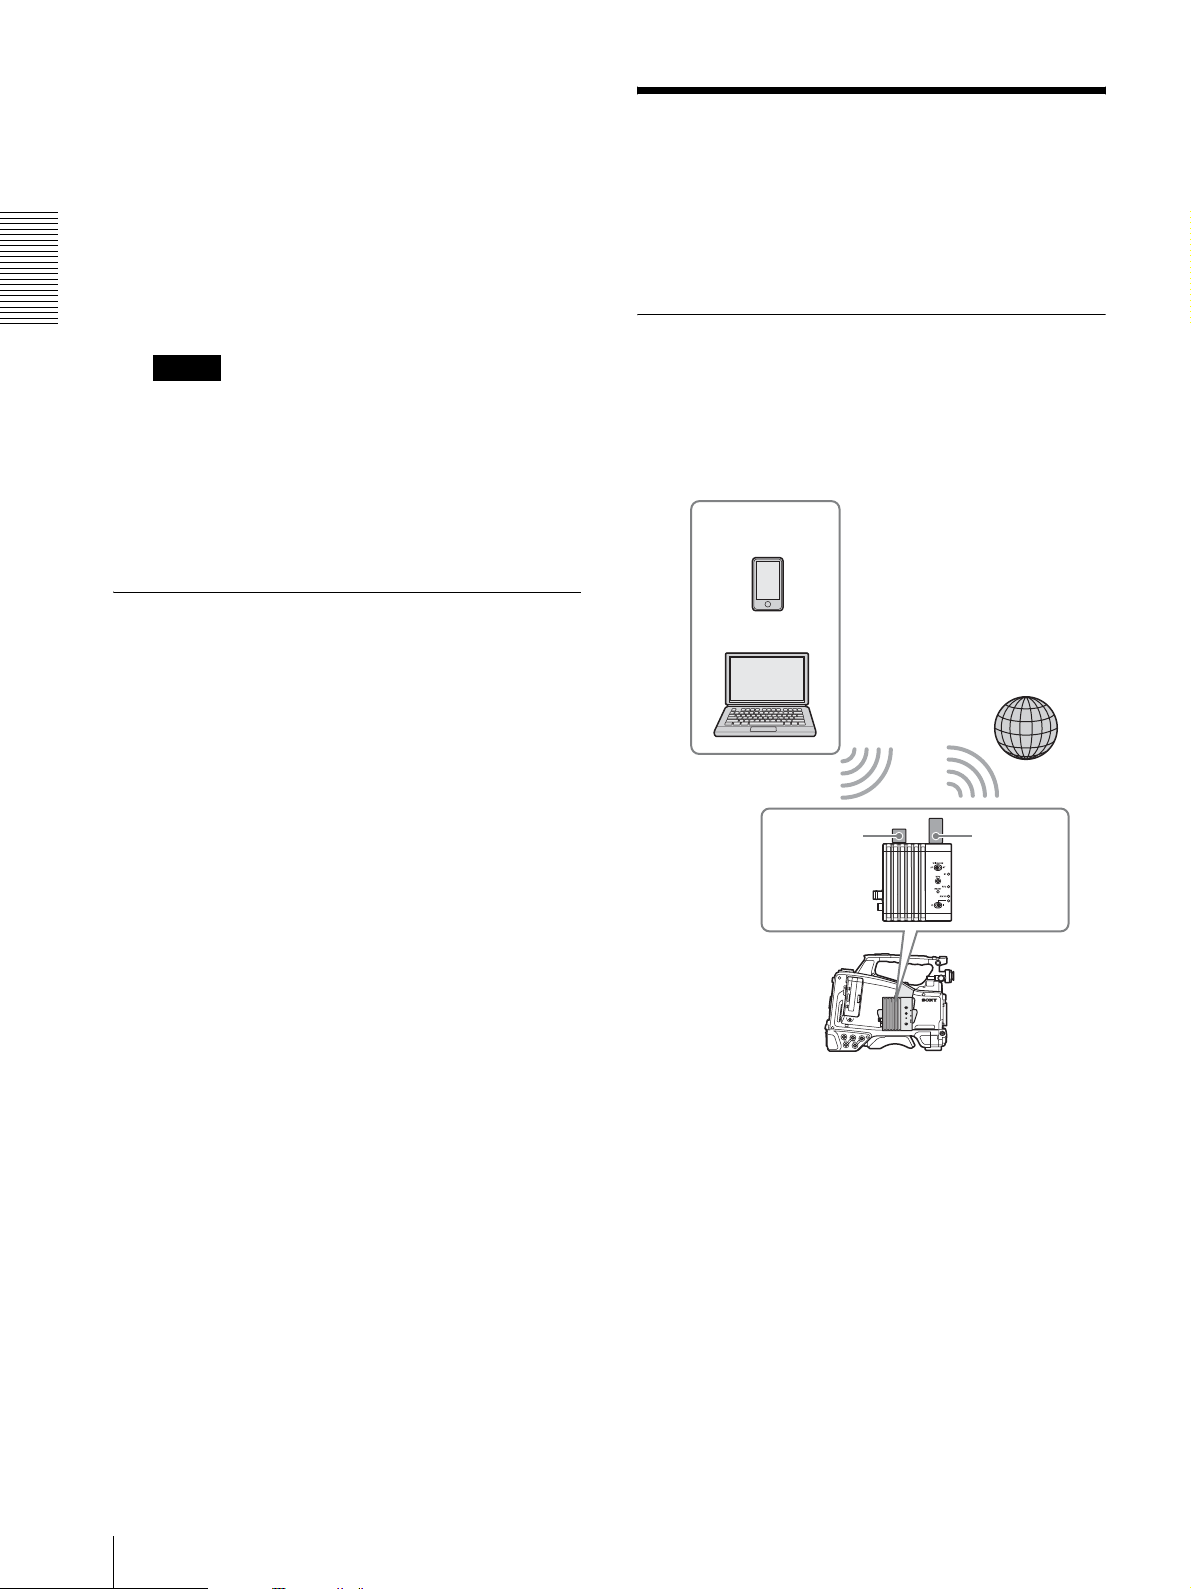
Connecting to the Internet
You can connect the wireless adapter to the Internet by
using an optional modem, or via an optional 3G/4G/LTE
access point.
Connecting to the Internet by using a modem
You can connect the wireless adapter to the Internet via
the 3G/4G/LTE line by connecting the optional modem
to the wireless adapter.
Smartphone/
Ta bl e t
Checking the status of the wireless LAN settings
You can check the status of the wireless LAN settings on
the “Status” screen (page 24).
The displayed items differ depending on the wireless
LAN mode of the wireless adapter (AP or STA mode).
Computer
Internet
Wireless
LAN
module (not
supplied)
Camcorder/recorder +
CBK-WA100/CBK-WA101
modem
(not
supplied)
To connect the modem to the wireless
adapter
Remove the cover of the USB connector on the right,
then connect the optional modem to the USB connector.
For details of connecting, refer to the supplied
“Installation Manual.”
When connecting the modem that is compatible with the
wireless adapter, the connection settings are made
automatically, and the wireless adapter is ready for
connecting to the Internet.
For compatible modems, contact your Sony dealer or a
Sony service representative.
10
Connecting to the Internet
The information of the modem appears on the “Modem
Settings” screen (page 24).
If you need to change the settings (when using a leased
line, etc.), perform the settings of “Modem Settings”
(page 24).
Notes
• Do not connect or disconnect a modem while the
wireless adapter is turned on.
• If a modem that is not compatible with the wireless
adapter is attached, the STATUS indicator flashes in
red quickly. In this case, attach a compatible modem.
To check the modem settings
You can check the modem settings on the “Status”
screen (page 24).
Connecting to the Internet in the wireless LAN station mode (STA mode)
You can connect the wireless adapter to the Internet in
the STA mode via the optional 3G/4G/LTE access point
or by tethering on a smartphone/tablet.
When connecting via the 3G/4G/LTE access
point
Smartphone/
Ta bl e t
Computer
3G/4G/LTE
access
point (not
supplied)
Internet
Preparations
Wireless
LAN
module (not
supplied)
Camcorder/recorder +
CBK-WA100/CBK-WA101
When connecting by tethering on a
smartphone/tablet
Tethering on the
smartphone/
tablet
Wireless
LAN
module (not
supplied)
Camcorder/recorder +
CBK-WA100/CBK-WA101
Internet
Connecting to the Internet
11

To connect
If the access point or smartphone/tablet is compatible
with the WPS function, connect the wireless adapter to
the Internet by performing procedures of “Connecting to
the access point with the WPS function” (page 9). If the
access point or smartphone/tablet is not compatible with
the WPS function, connect the wireless adapter to the
Internet by performing procedures of “To connect to the
access point in the STA mode without the WPS
Preparations
function” (page 23).
Before connecting, turn the access point or smartphone/
tablet on, and activate its tethering function.
Turning off the Power
When the power switch is set to “1,” the wireless
adapter is turned off and the power indicator is turned
off.
Turn the wireless adapter off before turning the
camcorder/recorder off.
Note
When you set the power switch to “1,” the wireless
adapter is turned off instantly. If the settings of the
wireless adapter are changed, the settings are stored on
the internal memory instantly.
12
Turning off the Power
 Loading...