

Sony CBK-MH01 Operating Instructions Manual
Monitor Hood
1
2
1
2
4-419-194-01 (1)
日本語
安全のために
ソニー製品は安全に充分配慮して設計されています。しかし、電気製品は、まち
がった使いかたをすると、感電やその他の事故によりけがをしたり周辺の物品に
損害を与えたりすることがあります。事故を防ぐために次のことを必ずお守り
ください。
安全のための注意事項を守る。
故障したり破損したら使わずに、ソニーのサービス窓口に相談する。
モニターフードホルダー
Monitor hood holder
BA
ルーペホルダー
Magnifying lens holder
取扱説明書
Operating Instructions
お買い上げいただきありがとうございます。
電気製品は、安全のための注意事項を守らないと、
けがをしたり周辺の物品に損害を与えることがあります。
この取扱説明書には、事故を防ぐための重要な注意事項と製品の取り扱いかたを示し
てあります。この取扱説明書をよくお読みのうえ、製品を安全にお使いください。お
読みになったあとは、いつでも見られるところに必ず保管してください。
CBK-MH01
© 2011 Sony Corporation
Printed in Japan
警告表示の意味
この取扱説明書および製品では、次のような表示
をしています。表示の内容をよく理解してから本
文をお読みください。
この表示の注意事項を守らないと、感電やその他
の事故によりけがをしたり周辺の物品に損害を与
えたりすることがあります。
下記の注意を守らないと、
物品に損害
を与えることがあります。
行為を指示する記号
をしたり周辺の
けが
機器や部品の取り付けは正しく行う
ネジを締めずに使うと、
の原因となるおそれがあります。
モニターへの衝撃などで落下して、けが
LCD
保証書とアフターサービス
保証書
この製品には保証書が添付されていますので、お買い上げの際お受け取りくだ
さい。
所定の事項の記入および記載内容をお確かめのうえ、大切に保存してください。
アフターサービス
調子が悪いときはまずチェックを
この説明書をもう一度ご覧になってお調べください。
それでも具合が悪いときは
お買い上げ店、または添付の「ソニー業務用製品のご相談窓口のご案内」にあるお
近くのソニーのサービス窓口にご相談ください。
保証期間中の修理は
保証書の記載内容に基づいて修理させていただきます。詳しくは保証書をご覧
ください。
保証期間経過後の修理は
修理に よって機能が維持できる場合、ご要望により有料修理させていただき ま
す。保証期間中の修理など、アフターサービスについてご不明な点は、お買い上
げ店、またはソニーのサ
ービス窓口にお問い合わせください。
固定つまみ
Fixing knob
日本語
CBK-MH01
F3L(
モニターの画面を見ることができるモニターフードです。
最大
直接
は、ソ ニ ー ソ リ ッ ドステートメモリ ー カ ム コ ー ダ ー
以後、カムコーダーと呼ぶ)の
°までの角度で
75
モニター画面を見ることもできます。
LCD
モニターの角度を変えたり、ルーペ部分をはね上げて
LCD
モニターに取り付け、ルーペを通して
LCD
PMW-F3K/
使用上のご注意
カムコーダーの
BRIGHT
た後は使えません。取り付け前に調整するか、カムコーダーのメニューを使っ
モニターの明るさを調整してください。
て
LCD
調整のしかたは、
カムコーダーを持ち運ぶ際はモニターフードをはずしてください。振動や衝
撃で固定つまみが緩み、カムコ
あります。
が
LCD B.LIGHT(
(液晶ディスプレイ明るさ調整)ボタンはモニターフードを取り付け
PMW-F3K/F3L
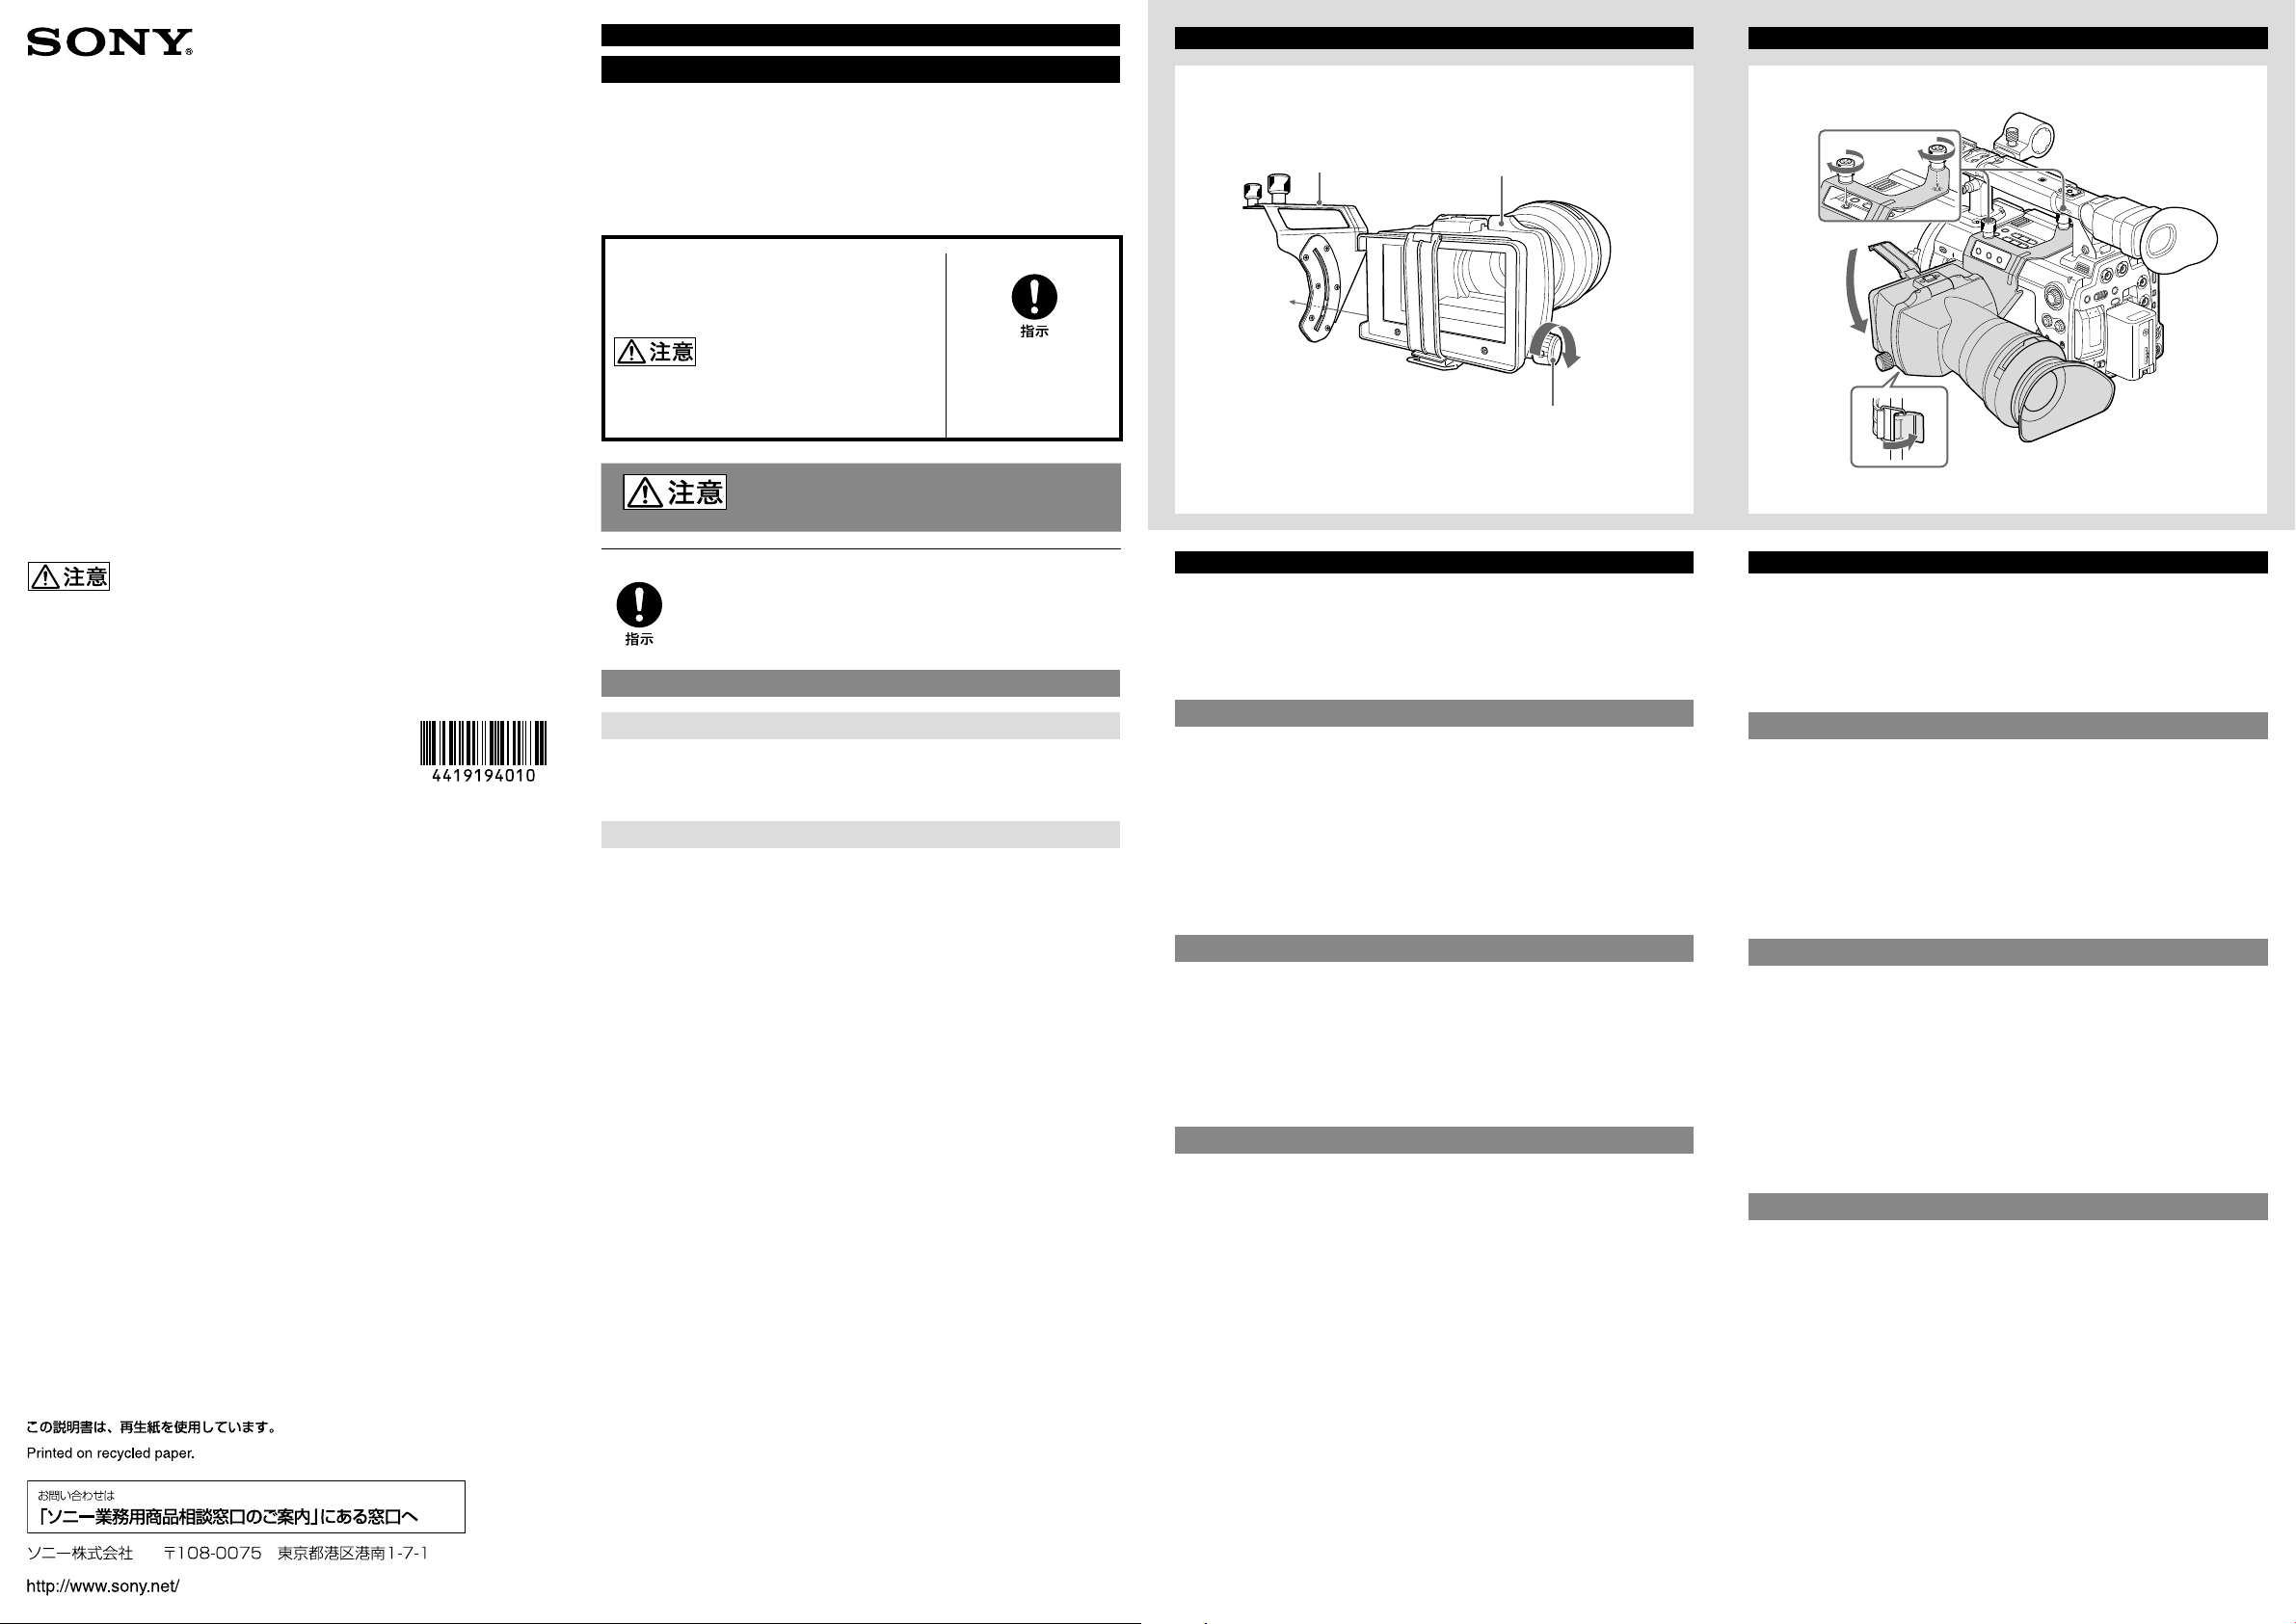
モニターフードを組み立てる
モニターフード
モニターフードホルダー
ルーペホルダー(アイピース装着済み)
最初にモニターフードを組み立ててください。
モニターフードホルダーの穴にルーペホルダーの軸を差し込む。
1
固定つまみを右へ(
2
CBK-MH01
モニターフードを取り付ける
カムコーダー
ダーへ取り付けます。
LCD
る」をご覧ください。
ルーペホルダーを
1
カムコーダーのアクセサリー取り付けネジ穴(2か所)へモニター
2
フードホルダーをネジ止めする。
PMW-F3K/F3LのLCD
モニターの開き方は、
液晶ディスプレイバックライト)スイッチと
の取扱説明書をご覧ください。
ーダーやモニターフードの破損につながる恐れ
は、出荷時に以下の2つの部分に分かれています。
方向へ)回して締める。
LOCK
モニターを開き、モニターフードをカムコー
PMW-F3K/F3L
モニターにはめ込み、バンドを留める。
LCD
の取扱説明書の「
モニターを調整す
LCD
LCD
LCD
English
The CBK-MH01 Monitor Hood is designed to be attached to the LCD monitor of
the PMW-F3K/F3L Solid-State Memory Camcorder (hereinafter “the camcorder”)
to enable viewing the screen of the LCD monitor through the magnifying lens of
the CBK-MH01.
The CBK-MH01 allows you to adjust the angle of the LCD monitor within 75
degrees or to view the LCD monitor screen directly by flipping up the eyepiece.
Precautions
The LCD B.LIGHT (LCD backlight) switch and LCD BRIGHT (LCD brightness)
button cannot be operated after the monitor hood has been mounted on
the camcorder. Operate the switch/button before mounting or use the
camcorder’s menu to adjust the brightness of the LCD monitor.
For the adjustment, refer to the camcorder’s Operating Instructions.
Detach the monitor hood before transporting the camcorder. Otherwise the
fixing knob may be loosened by shock or vibrations and cause damage to the
camcorder and/or the monitor hood.
Assembling the Monitor Hood
The CBK-MH01 Monitor Hood comes from the factory with the following two
pieces:
Monitor hood holder
Magnifying lens holder (with the eyepiece mounted)
First assemble the monitor hood.
1 Insert the axis on the magnifying lens holder into the hole on
the monitor hood holder.
2 Tighten the fixing knob by rotating it clockwise (toward the
LOCK direction).
Attaching the Monitor Hood to the Camcorder
Open the LCD monitor on the PMW-F3K/F3L camcorder and attach the monitor
hood to the camcorder.
For how to open the LCD monitor, refer to “Adjusting the LCD Monitor” in the camcorder’s
Operating Instructions.
1 Fit the magnifying lens holder onto the LCD monitor and
fasten the buckle of the belt.
2 Tighten the two screws on the monitor hood holder in the
accessory mounting screw holes on the camcorder.
1
2
3
1
2
1
2
4
3
C D E F
最大75°
Max. 75 degrees
固定つまみ
Fixing knob
日本語
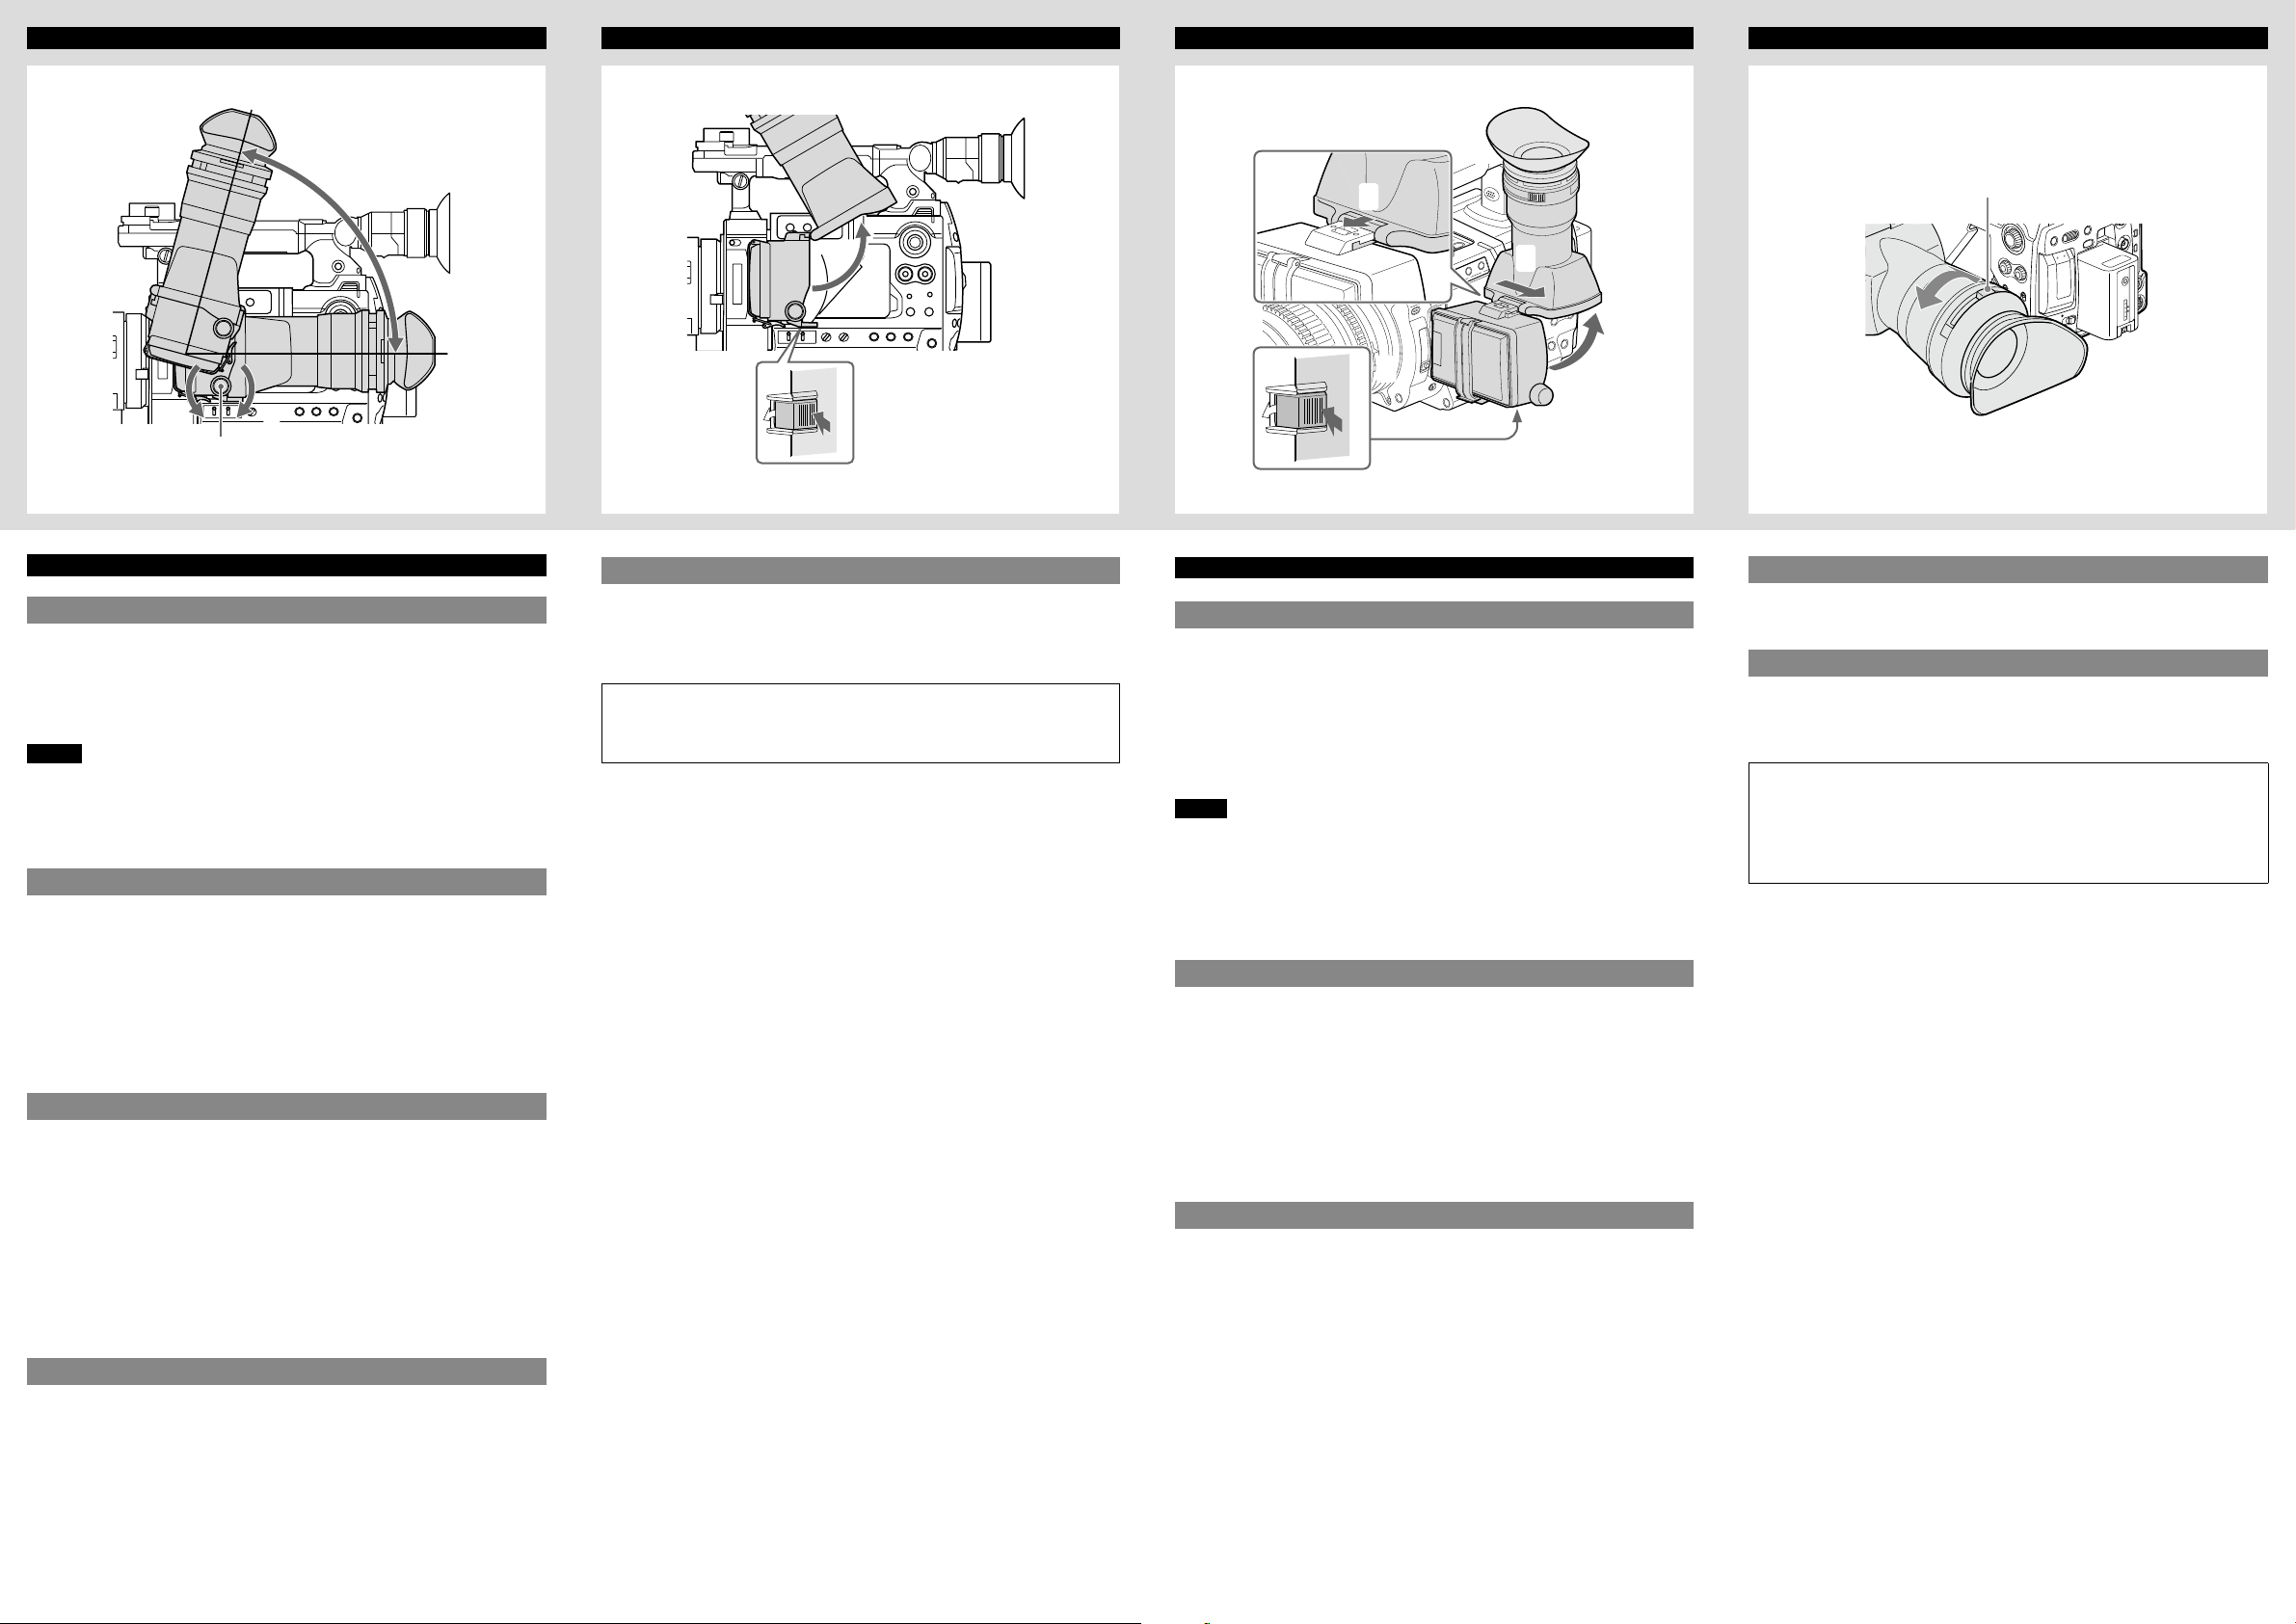
アイピースの角度調整をする
最大75°の範囲で
ルーペホルダーの固定つまみを左へ回してゆるめる。
1
アイピースの角度を調整する(最大75°)。
2
固定つまみを右へ(
3
ご注意
アイ ピース 部分を 持っ てカム コーダ ーを持 ち上げ たり しない でくだ さい。
モニターのヒンジに過度の力が加わり、壊れる恐れがあります。
LCD
固定つまみを締めた状態で無理に力を加えないでください。カムコーダーや
モニターフードが破損する場合があります。
アイピースを開く
アイピースを開けると
ルーペホルダー底面のクリップを押してはずす。
1
アイピースを上に開く。
2
アイピースは、
通常はロック位置で使用してください。
ロック位置からさらに開くこともできますが
合は、いったん元の閉じた位置まで戻してから開き直してください。
モニターとアイピースの角度を調整することができます。
LCD
方向へ)回して締める。
LOCK
モニターの画面を直接見ることができます。
LCD
°開いた位置でロックします。
120
アイピースを取りはずす
モニターフードホルダーとルーペホルダーをカムコーダーに取り付けたまま、ア
イピースだけを取りはずすことができます。
ルーペホルダー底面のクリップを押してはずす。
1
アイピースのルーペ面がルーペホルダーの上面と平行になるよ
2
うに上に開く。
ルーペホルダー上面のボタンをアイピースと反対の方向にスラ
3
イドさせ、ロックをはずす。
アイピースを水平にスライドさせて取りはずす。
4
アイピースの視度を調整する
アイピース上の視度調整リングを操作して、画像がはっきり見えるように調整す
ることができます。
、再度
°の位置でロックしたい場
120
主な仕様
質量
仕様および外観は、改良のため予告なく変更することがありますが、ご了承くだ
さい。
お使いになる前に、必ず動作確認を行ってください。故障その他に伴う営業
上の機会損失等は保証期間中および保証期間経過後にかかわらず、補償はい
たしかねますのでご了承ください。
約
440 g
English
Adjusting the Angle of the Eyepiece
The angle of the LCD monitor and eyepiece can be adjusted within 75 degrees.
1 Loosen the fixing knob on the magnifying lens holder by
rotating it counterclockwise.
2 Adjust the angle of the eyepiece (as much as 75 degrees).
3 Tighten the fixing knob by rotating it clockwise (toward the
LOCK direction).
Notes
Do not lift up the camcorder holding the eyepiece.
Doing so may damage the camcorder, as excessive force may be applied to
the hinge of the LCD monitor.
Do not apply excessive force to the camcorder and/or monitor hood when the
fixing knob is tightened. It may lead to damage to the camcorder and/or the
monitor hood.
Opening the Eyepiece
You can directly view the LCD monitor screen by opening the eyepiece.
1 Push to release the clip on the bottom of the magnifying lens
holder.
2 Flip up the eyepiece.
It locks at the 120-degree position.
Normally use the eyepiece in the locked position.
Although you can open it farther from the locked position, once return it to the
closed position to lock at the 120-degree position again.
Detaching the Eyepiece
You can detach the eyepiece only with the monitor hood holder and magnifying
lens holder attached to the camcorder.
1 Push to release the clip on the bottom of the magnifying lens
holder.
2 Flip up the eyepiece until the magnifying lens surface
becomes parallel to the top panel of the magnifying lens
holder.
3 Slide the knob on the top of the magnifying lens holder to the
opposite side of the eyepiece to unlock.
4
Detach the eyepiece by horizontally sliding it.
視度調整リング
Eyepiece focusing ring
Adjusting the Focus in the Eyepiece
The eyepiece focusing ring can be adjusted so that the operator can view the
image clearly in the eyepiece.
Specifications
Mass Approx. 440 g (1 lb)
Design and specifications are subject to change without notice.
Always verify that the unit is operating properly before use. SONY WILL NOT BE
LIABLE FOR DAMAGES OF ANY KIND INCLUDING, BUT NOT LIMITED TO,
COMPENSATION OR REIMBURSEMENT ON ACCOUNT OF THE LOSS OF PRESENT
OR PROSPECTIVE PROFITS DUE TO FAILURE OF THIS UNIT, EITHER DURING THE
WARRANTY PERIOD OR AFTER EXPIRATION OF THE WARRANTY, OR FOR ANY
OTHER REASON WHATSOEVER.
 Loading...