

Sony Bravia OLED KD-77AG9, Bravia OLED KD-765AG9, Bravia OLED KD-755AG9 Reference Manual [en, de, fr, it, es +2]
Page 1
4-748-699-13(1)
Television
Reference Guide
Guide de référence
Guía de referencia
Referentiegids
Referenzanleitung
Guia de referência
Guida di riferimento
Referensmaterial
Referencevejledning
Viiteopas
Referanseveiledning
Przewodnik
GB
FR
ES
NL
DE
PT
IT
SE
DK
FI
NO
PL
KD-77AG9 / 65AG9 / 55AG9
Referenční příručka
Referenčná príručka
Felhasználói útmutató
Ghid de referinţă
Информация за продукта
Οδηγός αναφοράς
Başvuru Kılavuzu
CZ
SK
HU
RO
BG
GR
TR
Page 2
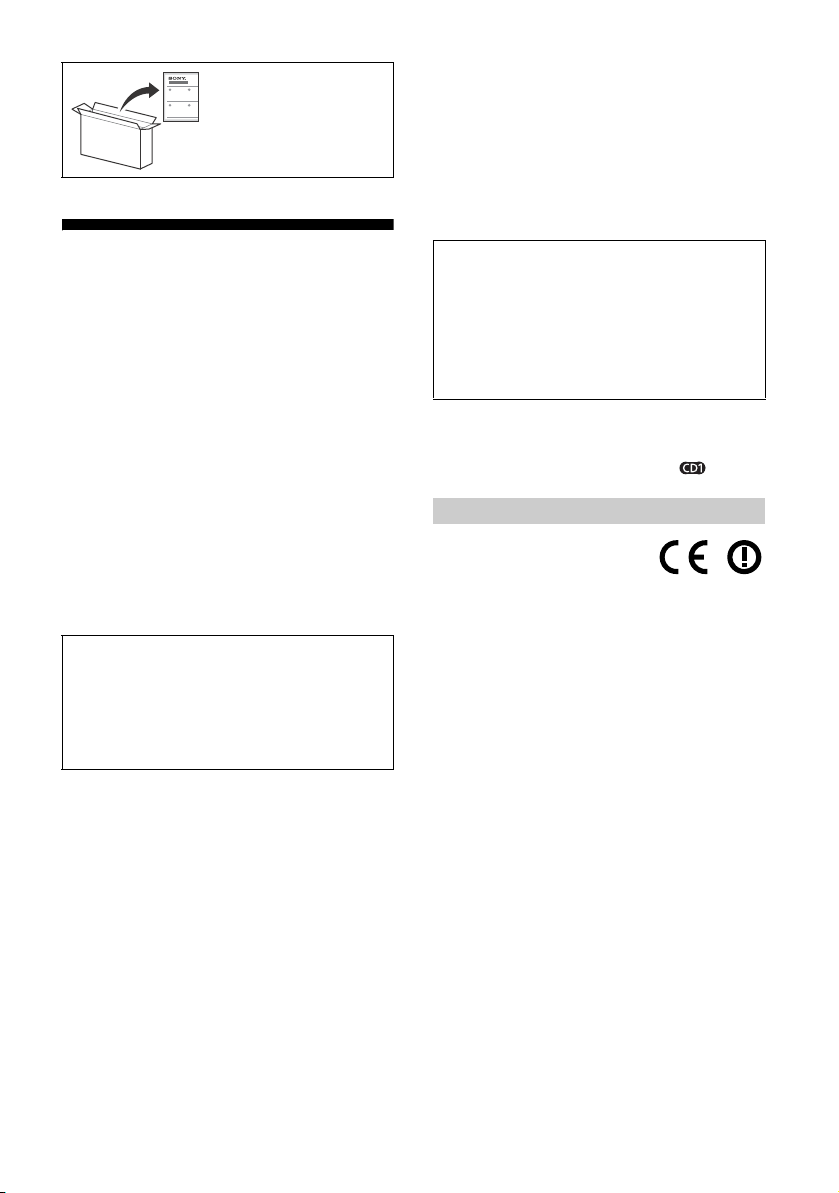
Note
To attach the Table-Top
Stand, refer to the Setup
Guide.
Table of Contents
IMPORTANT NOTICE . . . . . . . . . . . . . . . . . . . . 2
Safety Information . . . . . . . . . . . . . . . . . . . . .3
Protecting the TV Screen (OLED TV) . . . . . . .4
Remote Control and TV . . . . . . . . . . . . . . . 5
Connection Diagram . . . . . . . . . . . . . . . . . 6
Installing the TV to the Wall . . . . . . . . . . . 9
Using the optional Wall-Mount Bracket
(SU-WL850 or SU-WL450) . . . . . . . . . . . . . . .9
Troubleshooting. . . . . . . . . . . . . . . . . . . . .11
Troubles and Solutions. . . . . . . . . . . . . . . . . 11
Specifications . . . . . . . . . . . . . . . . . . . . . . 12
Internet Connection and Data Privacy
This product connects to the internet during initial setup as soon
as a network is connected in order to confirm internet
connection, and later to configure the Home screen. Your IP
address is used in these and all other internet connections. If
you do not want your IP address be used at all, do not set-up the
wireless internet function and do not connect an internet cable.
Please refer to the privacy information presented in the set-up
screens for further details of internet connections.
Introduction
Thank you for choosing this Sony product.
Before operating the TV, please read this manual thoroughly and
retain i t for future reference.
• Before operating the TV, please read the “Safety Information”
(page 3).
• Read the supplied Safety Information for additional safety
information.
• Images and illustrations used in the Setup Guide and this
manual are for reference only and may differ from the actual
product.
Help
Find more troubleshooting and other useful information
directly from your TV. Press HELP on the remote control to
display a list of topics, or to search by keyword.
Help Guide (Manual)
For more detailed information, select [Help Guide] from the
Help menu on your TV. You can also check the Help Guide from
your PC or smartphone (information provided on the back
cover of this manual).
Location of the identification label
Labels for the TV Model No., Production Date (year/month) and
Power Supply rating are located on the rear of the TV or package.
They can be found by removing the stand cover .
IMPORTANT NOTICE
Notice for Radio Equipment
Hereby, Sony Visual Products Inc. declares
that the radio equipment types
KD-77AG9, KD-65AG9, KD-55AG9 are in
compliance with Directive 2014/53/EU. The full text of the EU
declaration of conformity is available at the following internet
address:
http://www.compliance.sony.de/
Notice for customers: the following information is only applicable
to equipment sold in countries applying EU directives.
For this radio equipment, the following restrictions on putting into
service or of requirements for authorization of use apply in
AT, BE, HR, CY, CZ, DK, EE, FI, FR, DE, EL, HU, IE, IT, LV, LT, LU, MT,
NL, PL, PT, SK, SI, ES, SE, UK, IS, L I, NO, CH, BG, RO, TR, AL, BA, MK,
MD, RS, ME, Kosovo :
5150 - 5350 MHz band is restricted to indoor operations only.
GB
2
Page 3
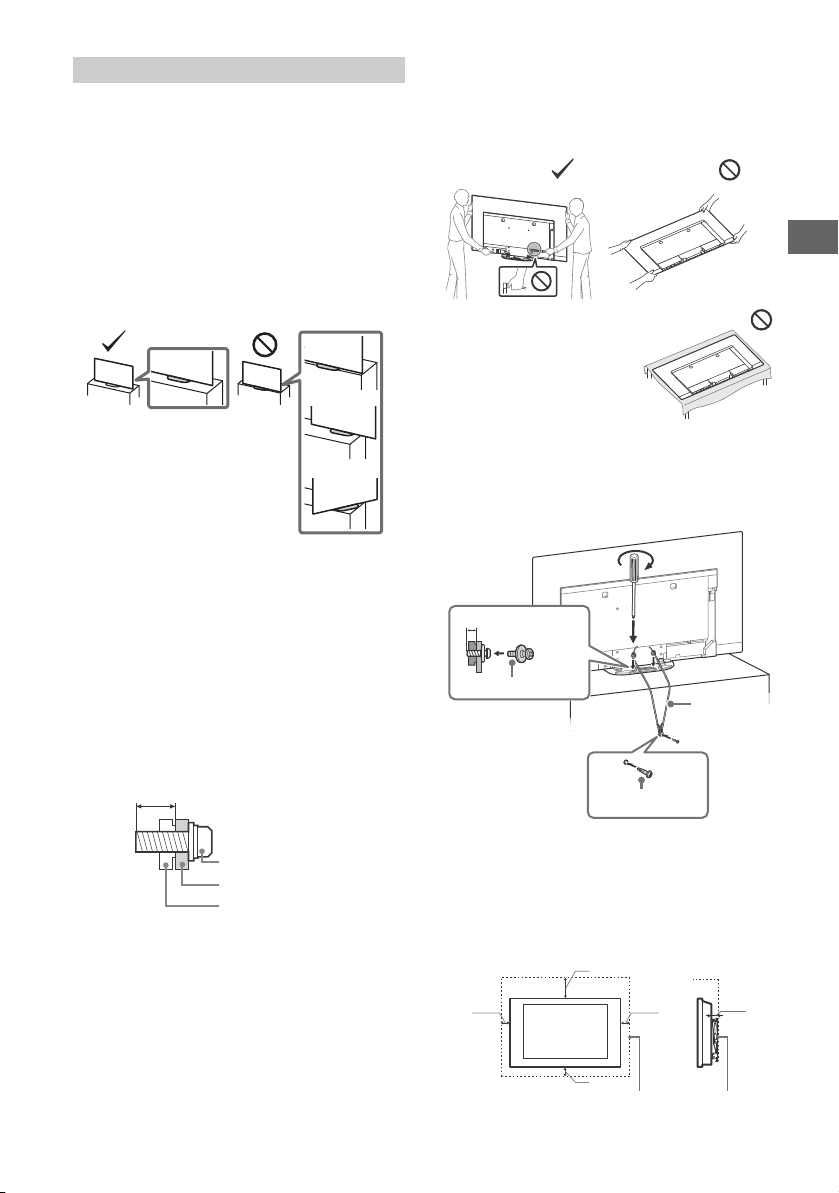
GB
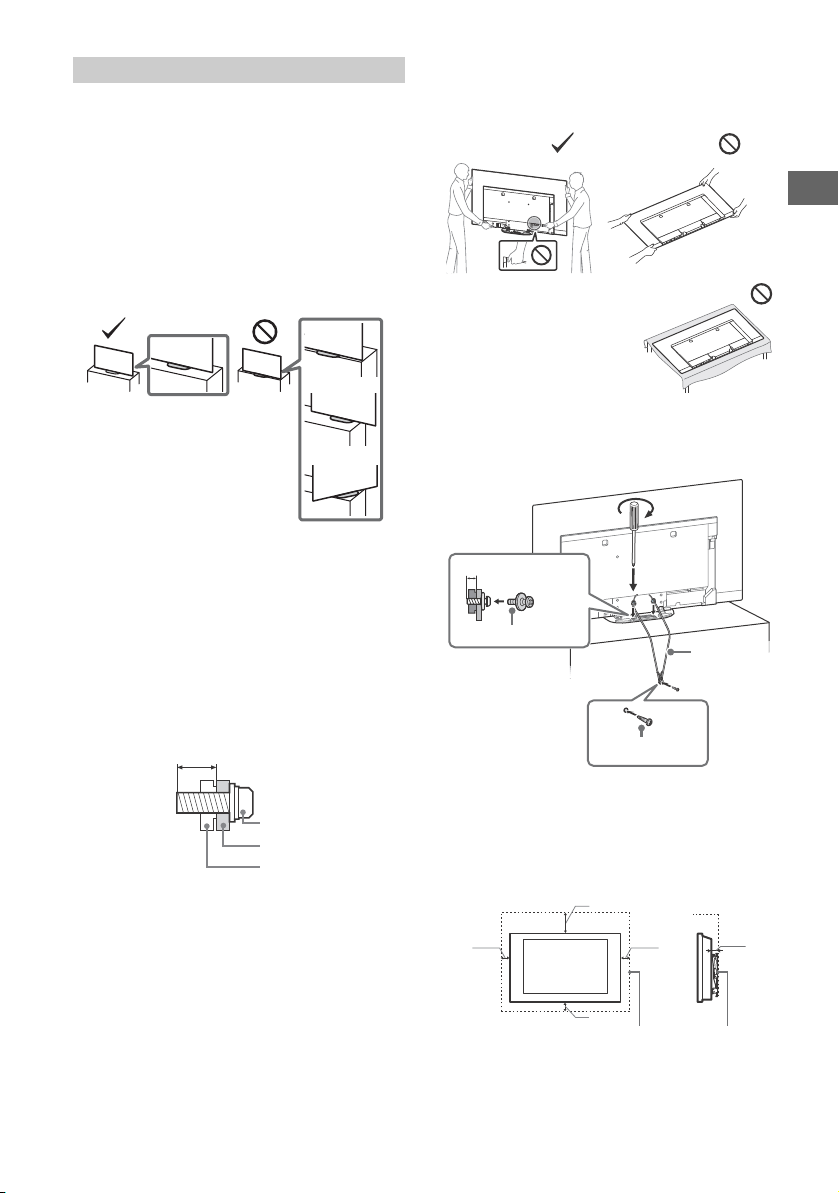
Screw (M6)
Wall-Mount Bracket
9 mm - 13 mm
TV’s rear cover
M4 screw (not supplied)
1.5 N·m
{15 kgf·cm}
Screw (not supplied)
6 mm - 7 mm
Cord (not
supplied)
30 cm
10 cm
10 cm
10 cm
Leave at least this much space around the set.
1 cm
Safety Information
Installation/Set-up
Install and use the TV set in accordance with the instructions
below in order to avoid any risk of fire, electric shock or damage
and/or injuries.
Installation
• The TV set should be installed near an easily accessible mains
socket.
• Place the TV set on a stable, level surface to prevent it from
falling over and causing personal injury or property damage.
• Install the TV where it cannot be pulled, pushed, or knocked
over.
• Install the TV so that the TV’s Table-Top Stand does not protrude
out from the TV stand (not supplied). If the TV’s Table-Top Stand
protrudes out from the TV stand, it may cause TV set to topple
over, fall down, and cause personal injury or damage to the TV.
• For safety reasons, be sure to attach the centre covers to the
rear of the TV when TV in Table-Top condition.
• Only qualified service personnel should carry out wall-mount
installations.
• For safety reasons, it is strongly recommended that you use
Sony accessories, including:
Wall-Mount Bracket SU-WL850
Wall-Mount Bracket SU-WL450
• Be sure to use the screws supplied with the Wall-Mount Bracket
when attaching the Wall-Mount Bracket to the TV set. The
supplied screws are designed as indicated by illustration when
measured from the attaching surface of the Wall-Mount Bracket.
The diameter and length of the screws differ depending on the
Wall-Mount Bracket model.
Use of screws other than those supplied may result in internal
damage to the TV set or cause it to fall, etc.
Tran spo rti ng
• Before transporting the TV set, disconnect all cables.
• Two or three people are needed to transport a large TV set.
• When transporting the TV set by hand, hold it as shown below.
Do not put stress on the panel and the frame around the screen.
• When handling or mounting the
TV set, do not lay down the TV.
• When transporting the TV set, do
not subject it to jolts or excessive vibration.
• When transporting the TV set for repairs or when moving, pack
it using the original carton and packing material.
Topple prevention
Ventilation
• Never cover the ventilation holes or insert anything into the
cabinet.
• Leave space around the TV set as shown below.
• It is strongly recommended that you use a Sony Wall-Mount
Bracket in order to provide adequate air circulation.
Installed on the wall
GB
3
Page 4
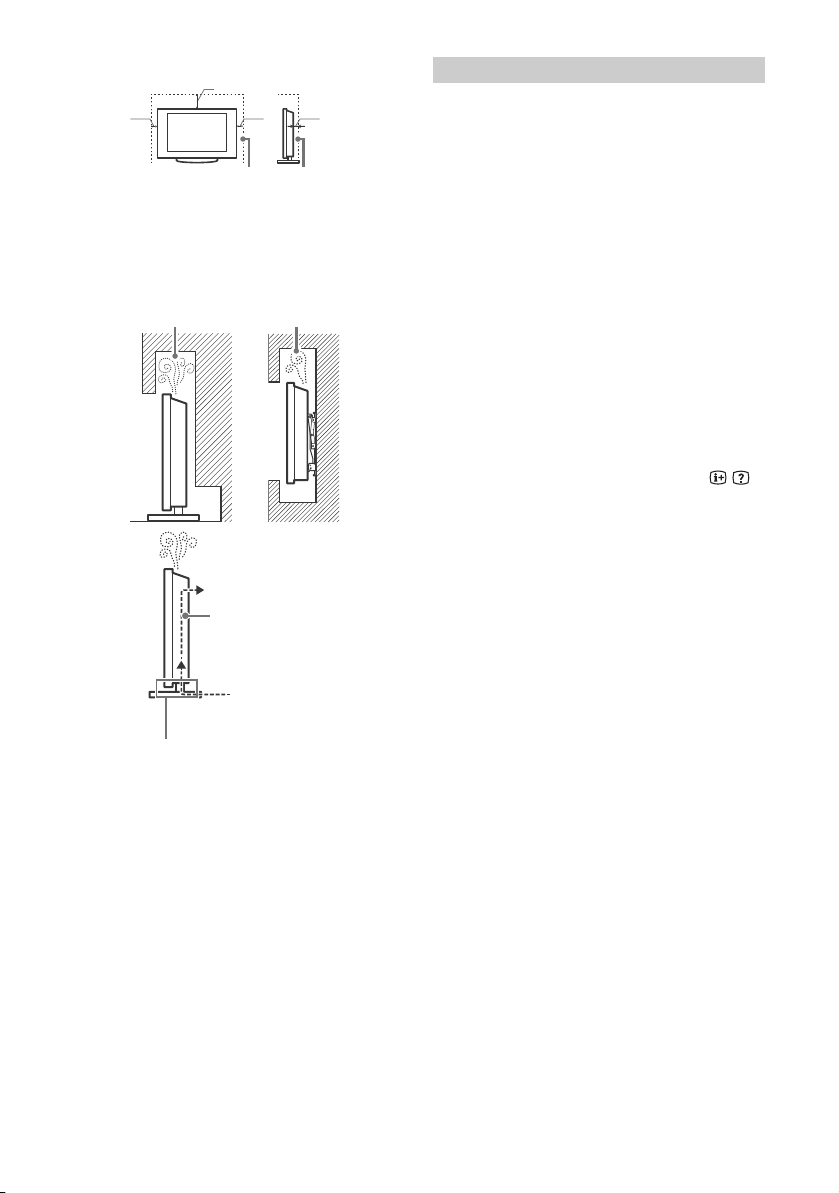
Installed with stand
30 cm
10 cm
10 cm
Leave at least this space around the set.
6 cm
Do not block the air circulation area.
Air circulation
Wall
Air circulation is blocked.
Wall
• To ensure proper ventilation and prevent the collection of dirt or
dust:
Do not lay the TV set flat, install upside down, backwards, or
sideways.
Do not place the TV set on a shelf, rug, bed or in a closet.
Do not cover the TV set with a cloth, such as curtains, or items
such as newspapers, etc.
Do not install the TV set as shown below.
Protecting the TV Screen (OLED TV)
Precautions to Protect the Screen from
Damage
Image retention
OLED TV‘s are susceptible to image retention (burn-in) due to the
characteristics of the materials used. Image retention may occur if
images are displayed in the same location on the screen
repeatedly or over extended periods of time. This is not a
malfunction of the TV. Avoid displaying images that may cause
image retention.
The following are examples of images that may
cause image retention:
• Content with black bars either on the top and bottom and/or
the left and right sides of the screen. (for example, Letterboxed,
4:3 screen, Standard definition)
• Static images such as photos.
• Video games that might have static content in some part of the
screen.
• On-screen menus, programme guides, channel logos etc.
• Static content from applications.
• On-screen tickers, such as those used for news and headlines.
To red uce the ris k of ima ge retention :
• Sony recommends that you turn off the TV normally by pressing
the power button on the remote control or the TV.
• Fill the screen by changing [Wide mode] to eliminate the black
bars. Select [Wide mode] other than [Normal].
• Turn off the OSD (On Screen Display) by pressing the /
button, and turn off the menus from connected equipment. For
details, refer to the instruction manuals for the connected
equipment.
• Avoid displaying static images with bright colours (including
white), clocks or logos on any portion of the screen.
• Set the picture settings based on the ambient conditions. The
Standard Picture is recommended for home use and when
viewing content that often displays the station logos, etc.
The TV has following features to help reduce/prevent image
retention.
Panel refresh
Panel refresh will automatically run to adjust the uniformity of the
TV screen after it has been in use for long periods of time. Panel
refresh can also be performed manually and should only be used
if image retention is very noticeable or you see the following
message: [Panel refresh did not finish…]
Caution:
• The Panel refresh function may affect the panel. As a reference,
perform the Panel refresh only once a year, do not perform it
more than once a year as it may affect the usable life of the
panel.
• Panel refresh takes about one hour to complete.
• A white line may be displayed on the screen during the Panel
refresh, this is not a malfunction of the TV.
• Panel refresh will only work when the room temperature is
between 10 ºC and 40 ºC.
Pixel shift
Automatically moves the image on the screen to prevent image
retention.
Other feature
The screen brightness is automatically reduced when displaying
still images, clocks, bright colours or logos etc.
GB
4
Page 5
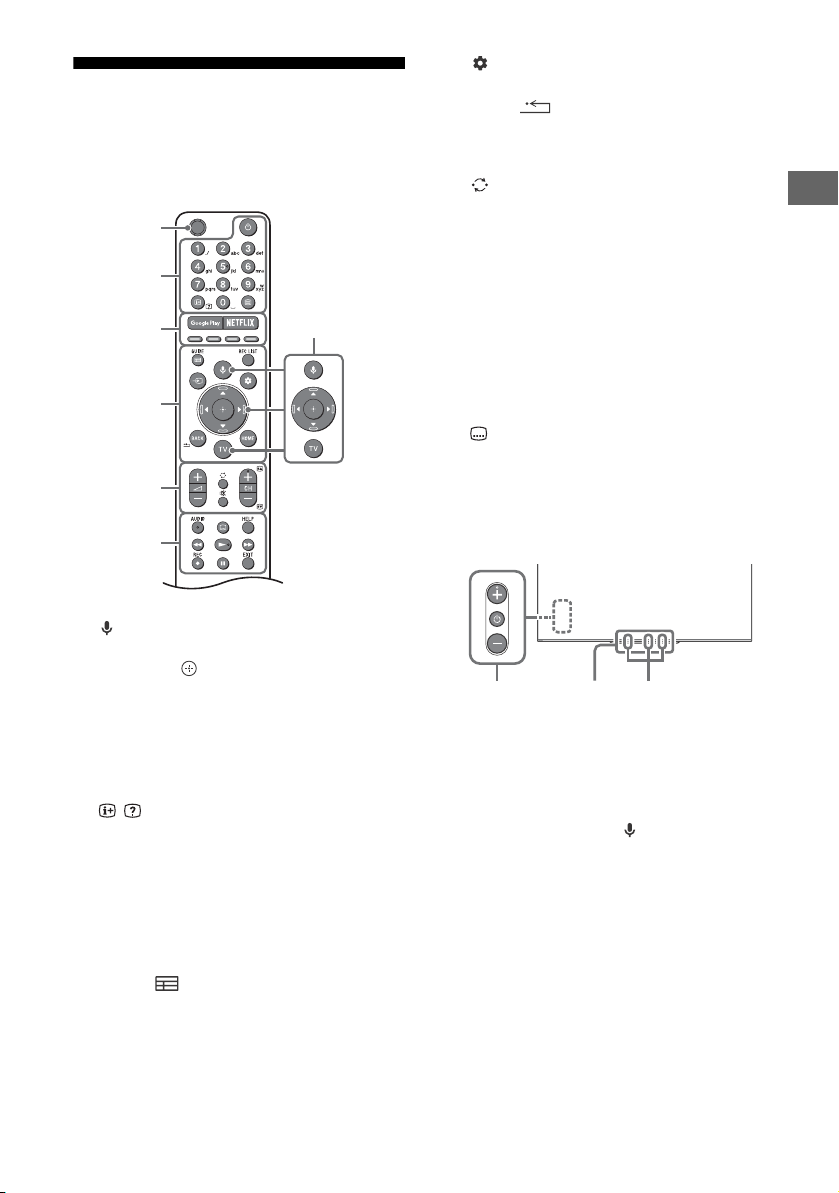
GB
Hint
MIC
Ȫ
ȫ
Ȭ
ȭ
Ȯ
ȩ
ȯȱ
Remote Control and TV
The remote control shape, location,
availability and function of remote control
buttons may vary depending on your region/
country/TV model.
(Quick settings): Display Quick
Settings.
BACK/
HOME
+/– (Volume)
(Jump)
(Mute)
• The accessibility shortcut service can be turned
on or off by pressing and holding .
CH +/–//
In TV mode: Select the channel.
In Text mode: Select the next () or
previous () page.
AUDIO: Select the sound of multilingual
source or dual sound (depend on
programme source).
(Subtitle setting)
HELP:
Display the Help menu.
///
Record the currently viewed
REC:
programme on the USB HDD, or DVR*2.
EXIT
(Microphone): Use voice search. (e.g.,
Search various content by voice.)*
//// (Navigation D-Pad): On
screen menu navigation and selection.
TV: Switch to a TV channel or input and
display the TV menu.
(TV standby)
Number buttons
/ (Info/Text reveal): Display
information.
(Text):
Display text information.
Google Play
NETFLIX (Only on limited region/
country/TV model)
Colour buttons
GUIDE/ :
guide, or EPG of cable/satellite box*
REC LIST: Display the Rec list of USB HDD, or
DVR*
Display the digital programme
2
.
(Input select): Display and select the
input source, etc.
1
(Power)
Remote Control sensor / Light sensor /
Illumination LED
1*3
Built-in MIC*
built-in MIC, press the (MIC) button on the
remote control and follow the on-screen
instructions. For more information, refer to
the Help Guide.
*1 The voice search requires an Internet connection.
*2 [Cable/Satellite box setup] setting is required (only
on limited region/country/TV model). For more
information, refer to the Help Guide.
2
.
*3 Only on limited region/country/language. Standby
power consumption will increase when the voice
search with the built-in MIC is enabled.
/ LED: To enable the
GB
5
Page 6
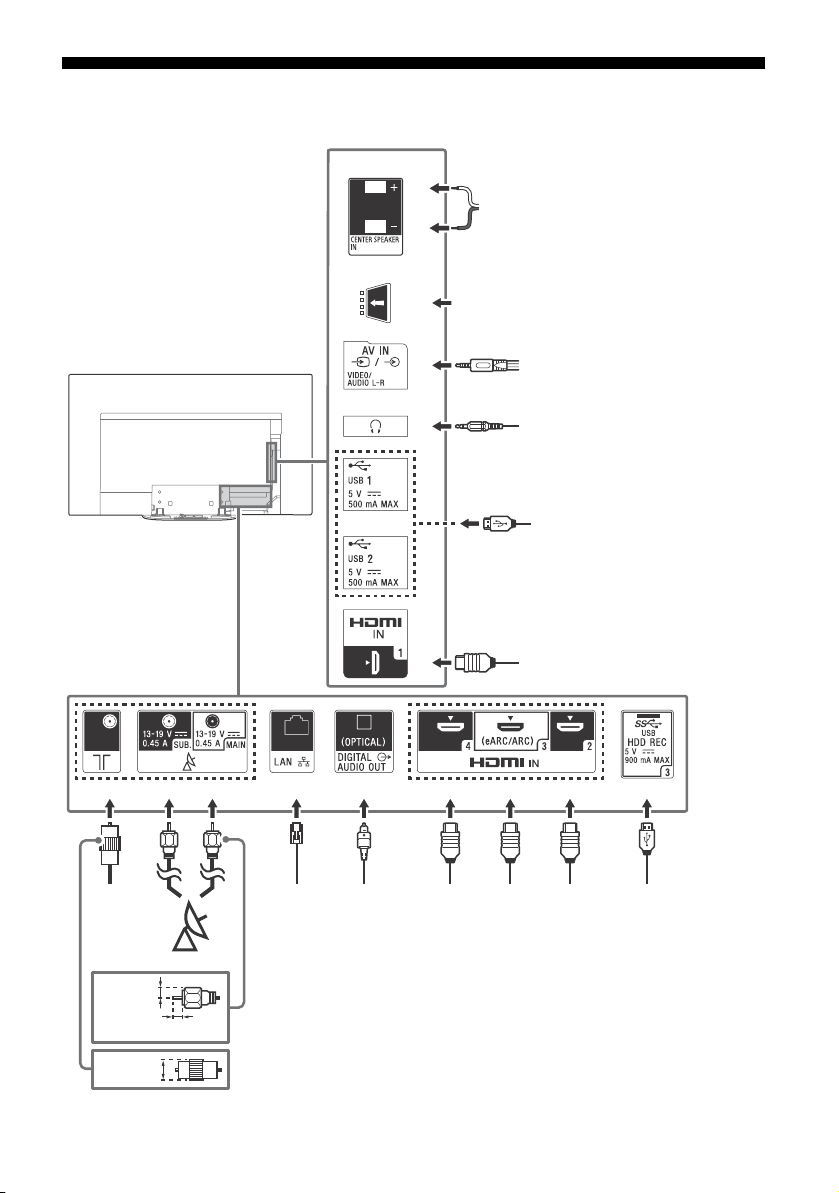
Connection Diagram
<
<
<
ȭȯ
Ȫ
ȩ
ȫ
Ȭ
ȭ
Ȯ
Cable/
Antenna/
External
Box
Router
Satellite
Headphone
7 mm
HDMI Device
HDMI
Device
VCR/Video game equipment/DVD
player/Camcorder/External Box*
1
14 mm
Conditional Access Module
HDMI
Device
Audio
System
with
Optical
Audio
Input
AV Receiver
Digital still
camera/
Camcorder/
USB storage
media/
USB HDD
device
Digital still camera/Camcorder/
USB storage media
Audio
System
with
eARC/
ARC/
HDMI
Device
1.5 mm
For more information on connections, refer to the Help Guide by pressing HELP on the remote control.
6
GB
Page 7
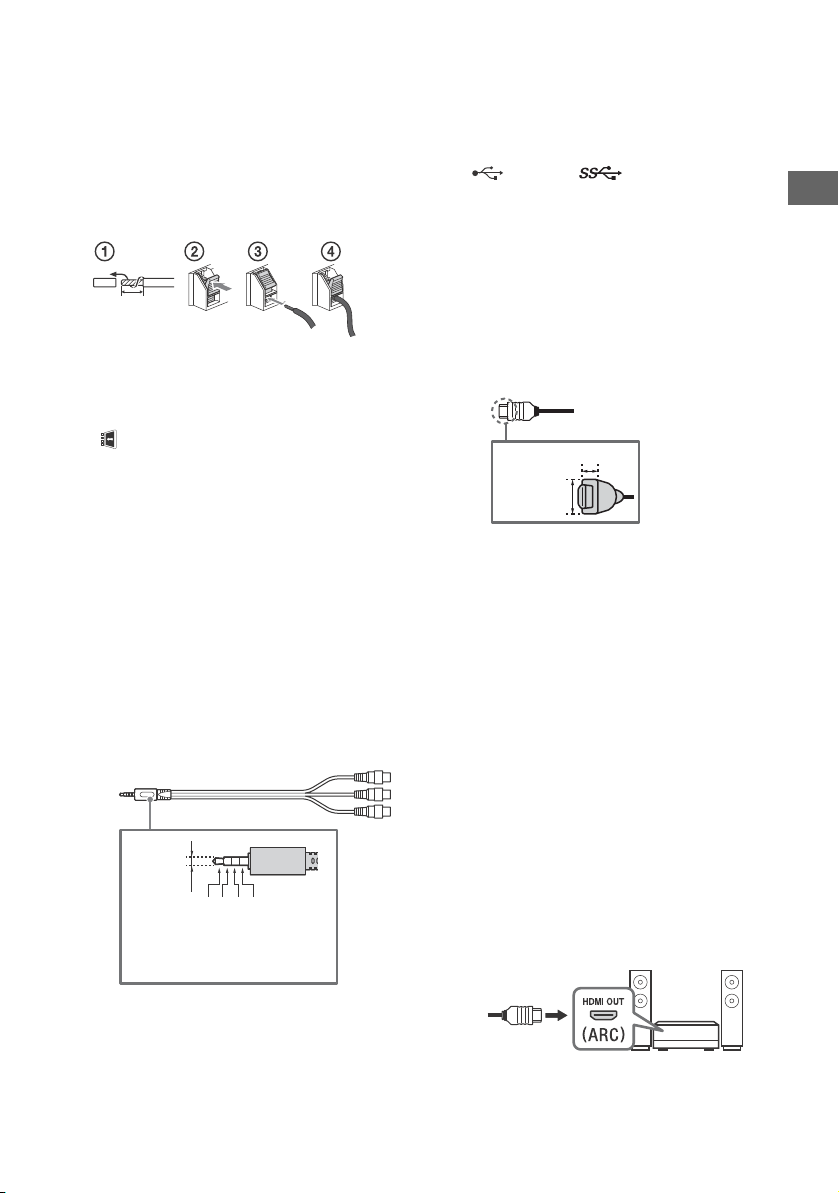
GB
10 mm
3.5 mm
1234
1: L
2: Video
3: Ground
4: R
< 12 mm
< 21 mm
CENTER SPEAKER IN
• To use your TV speakers as the centre
speaker, connect the output of your AV
receiver to the CENTER SPEAKER IN on
your TV.
• Before connecting cables, disconnect the
mains lead of both TV and AV receiver.
• Make sure the [Speakers] is set to [Audio
system].
To prevent hiss when not connecting the
CENTER SPEAKER IN to an AV receiver,
disable [TV centre speaker mode]. For
details, refer to the Help Guide.
CAM (Conditional Access Module)
• Provides access to pay TV services. For
details, refer to the instruction manual
supplied with your CAM.
• Do not insert the smart card directly into
the TV CAM slot. It must be fitted into the
Conditional Access Module provided by
your authorised dealer.
• CAM is not supported in some countries/
areas. Check with your authorised dealer.
• A CAM message may appear when you
switch to a digital programme after using
the Internet video.
/ AV IN
• For a composite connection, use an
Analogue Extension Cable (not supplied).
•
(Headphone)
• Supports 3-pole stereo mini jack only.
• You cannot output sound from both the
headphone and the TV speakers at the
same time.
USB 1/2, USB 3 (HDD REC)*
• Connecting a large USB device may
interfere with other connected devices
beside it.
• When connecting a large USB device,
connect to the USB 1 port.
• Connect a USB HDD device to the USB 3
port (blue).
HDMI IN 1/2/3/4
• HDMI interface can transfer the digital
video and audio on a single cable.
•
• To enjoy high quality 4K 50p/60p
contents, connect a Premium High Speed
HDMI cable and set the [HDMI signal
format] to [Enhanced format].
Do this setting individually for each
connected HDMI IN terminal. For details of
supported formats, refer to the
“Specifications“ in this manual (page 12-
13).
• HDMI IN 3 eARC/ARC (Enhanced Audio
Return Channel/Audio Return Channel)
Connect your audio system to the
HDMI IN 3 to route TV audio to your audio
system. An audio system that supports
HDMI eARC/ARC can send video to the TV,
and receive audio from the TV via the
same HDMI cable. If your audio system
does not support HDMI eARC/ARC, an
additional connection with DIGITAL AUDIO
OUT (OPTICAL) is necessary.
• Use the HDMI cable with Ethernet to
connect audio system with eARC.
2
GB
7
Page 8

(RF input), (Satellite input)
Note
• Connections for terrestrial/cable and
satellite. Connection steps: SUB. MAIN
Antenna
• For SUB. jack, connect only when you are
using twin tuner mode except for Single
Cable Distribution EN50494.
*1 For an external device which has only SCART AV
OUT, use a SCART-RCA adaptor and Analogue
Extension Cable.
*2 Only on limited region/country/TV model.
• You cannot attach the side cover while the
cables are connected to side terminal.
• Be sure to store the side cover in a safe place for
future use.
GB
8
Page 9
GB
Installing the TV to the Wall
Using the optional Wall-Mount Bracket (SU-WL850 or SU-WL450)
To Customers:
For product protection and safety reasons, Sony strongly recommends that installation of your TV be
performed by Sony dealers or licensed contractors. Do not attempt to install it yourself.
To Sony Dealers and Contractors:
Provide full attention to safety during the installation, periodic maintenance and examination of this
product.
Wall-Mount Bracket Installation Information
This TV’s instruction manual only provides the steps to prepare the TV for Wall-Mount installation
before it is installed on the wall.
For instructions on Wall-Mount Bracket installation, see the Installation Information (Wall-Mount
Bracket) on the product page for your TV model.
www.sony.eu/support/
Preparing for Wall-Mount Installation
Use the Wall-Mount Bracket SU-WL850 (not supplied) or SU-WL450 (not supplied) to install the TV to
the wall.
Make sure to attach the Table-Top Stand before installing the TV to the wall by referring to the Setup
Guide.
• Prepare the TV for the Wall-Mount Bracket before making cable connections.
• Follow the instruction guide provided with the Wall-Mount Bracket for your model. Sufficient
expertise is required in installing this TV, especially to determine the strength of the wall for
withstanding the TV’s weight.
• Be sure to entrust the attachment of this product to the wall to Sony dealers or licensed contractors
and pay adequate attention to safety during the installation. Sony is not liable for any damage or
injury caused by mishandling or improper installation.
• The screws for Wall-Mount Bracket are not supplied.
• Be sure to store the unused screws and Table-Top Stand in a safe place until you are ready to
attach the Table-Top Stand. Keep the screws away from small children.
GB
9
Page 10
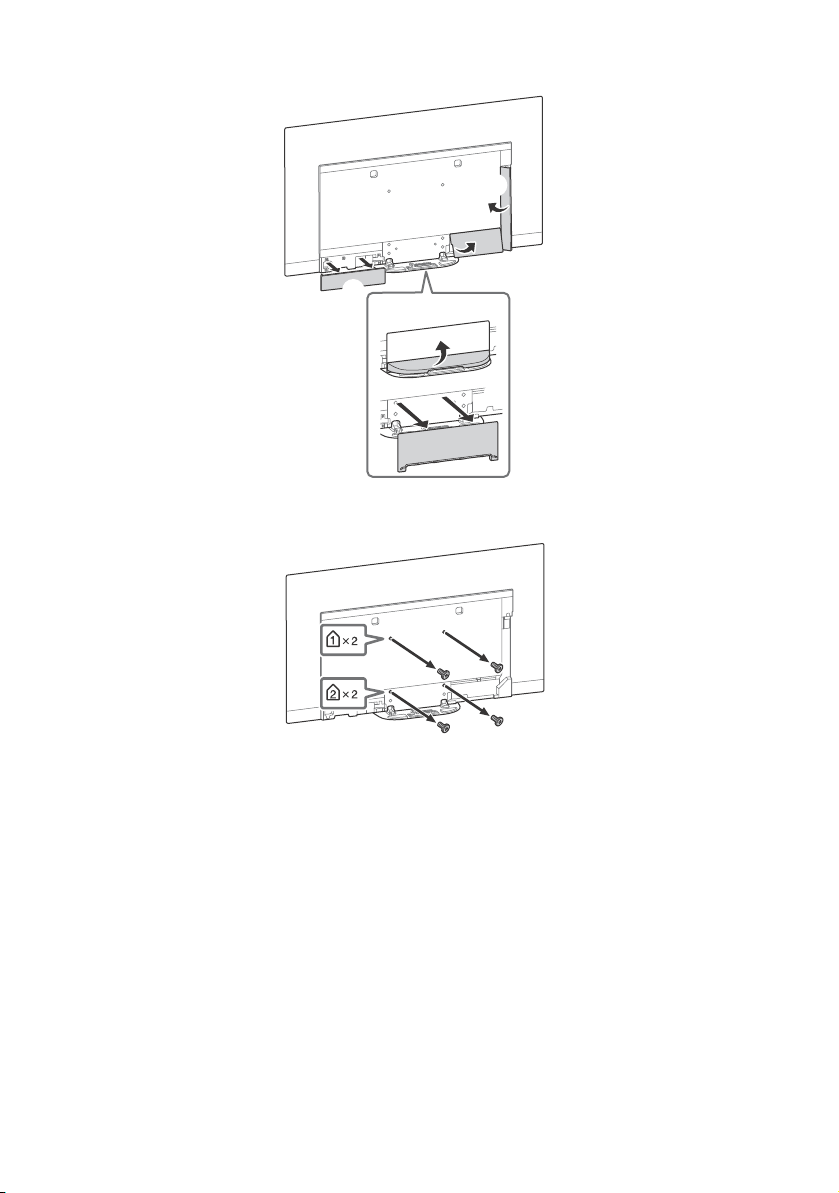
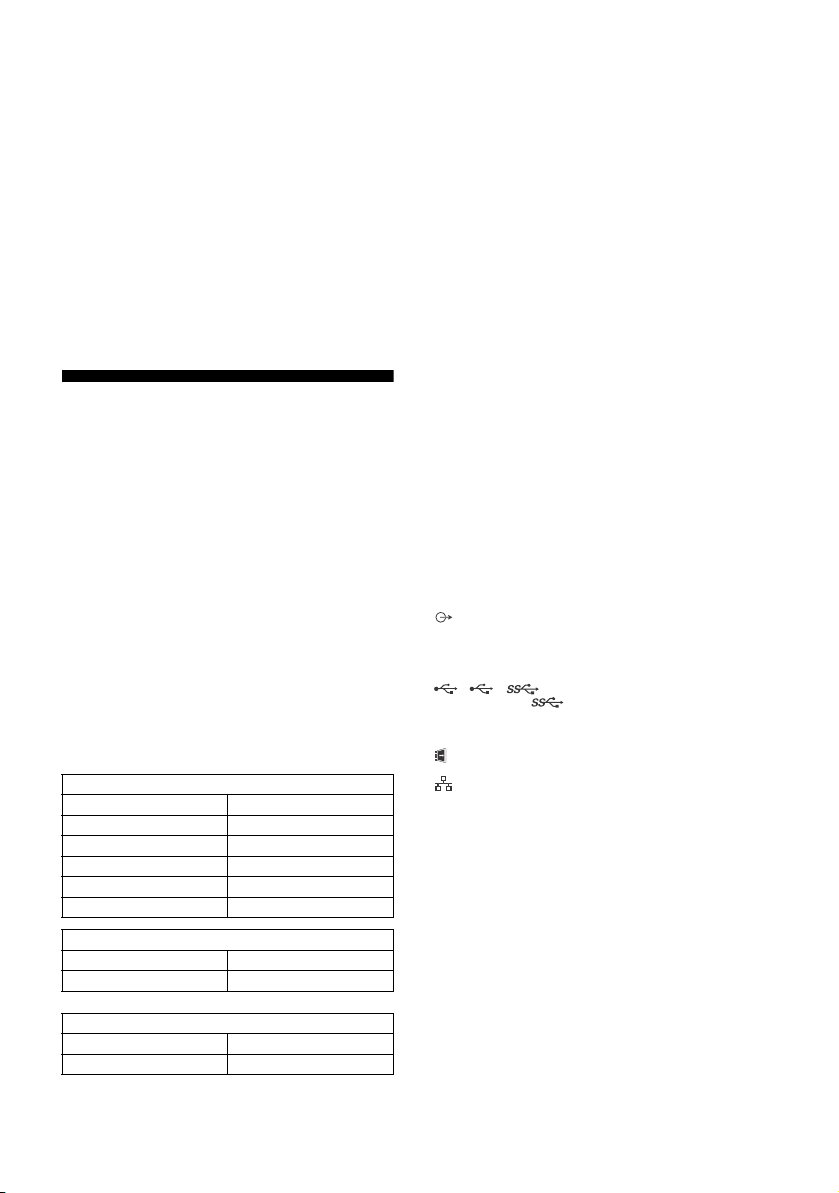
1 Remove the stand cover and terminal covers.
ʕ
2 Remove the screws from the rear of the TV.
10
GB
Page 11

GB
Note
Troubleshooting
General troubleshooting for issues like: black
screen, no sound, frozen picture, TV does not
respond, or network is lost, do the following
steps.
1 Restart your TV by pressing the power button
on the remote control until a message
appears. The TV will restart. If the TV does not
recover, try unplugging the mains lead. Then
press the power button on the TV and wait for
two minutes, and plug in the mains lead.
2 Refer to the Help menu by pressing HELP on
the remote control.
3 Connect your TV to the Internet and perform
a software update. Sony recommends you to
keep your TV software updated. Software
updates provide new features and
performance improvements.
4 Visit Sony support website (information
provided on the front cover of this manual).
When you plug in the TV, the TV may not be
able to turn on for a while even if you press
the power button on the remote control or
the TV.
It takes time to initialize the system. Wait for
about one minute, then operate it again.
Troubles and Solutions
When the illumination LED is flashing in red.
Count how many times it flashes (interval time is
three seconds).
Reboot the TV by disconnecting the mains lead
until the illumination LED stopped flashing in red,
then turn on the TV.
If the problem persists, disconnect the mains
lead, and contact your dealer or Sony service
centre with the number of times the illumination
LED flashes.
Terrestrial/cable service cannot be received.
Check the antenna (aerial)/cable connection and
booster settings.
Select terrestrial/cable service by pressing TV on
the remote control, and then select [Digital] if the
broadcasting service is not displayed.
Terrestrial signal might be suppressed if there is a
strong signal supplied nearby. Set [LNA (CH ---)]
to [Off] in digital tuning settings.
After moving to a new house or trying to receive
new services, attempt a service search by
selecting [Digital tuning].
Satellite service cannot be received.
Check the satellite cable connection.
When [No signal. LNB overload detected…]
message is displayed, unplug the mains lead.
Then, ensure the satellite cable is not damaged
and the satellite signal line is not short-circuited
in the satellite connector.
The remote control does not function.
Replace the batteries.
The parental lock for broadcast password has
been forgotten.
Enter 9999 for the PIN code and select [Change
PIN code].
The TV surrounds become warm.
When the TV is used for an extended period, the
TV surrounds become warm. You may feel hot
when touching there by the hand.
The screen becomes darker while watching
TV.
If the whole image or part of the image remains
still, the screen brightness will be gradually
reduced to prevent image retention. This is not a
malfunction of the TV.
You are concerned about image retention.
If the same image is displayed repeatedly or for
long periods of time, image retention may
occur. To reduce image retention, we
recommend that you turn off the TV normally by
pressing the power button on the remote
control or the TV.
• Perform Panel refresh manually only when image
retention is particularly noticeable. As a reference,
perform it only once a year. Avoid performing it more
than once a year because it may affect the usable life
of the panel.
• Images that include clocks, logos and bright colours
(including white) easily cause image retention. Avoid
displaying these types of images for long periods of
time, otherwise image retention may occur.
A white line appears on the screen.
Panel refresh automatically runs after the TV has
been used for long periods of time to reduce
image retention. Panel refresh starts after the TV
is turned off and takes about one hour to
complete. A white line may be displayed on the
screen during the Panel refresh. This is not a
malfunction of the TV.
GB
11
Page 12
The message [Panel refresh did not finish…] is
displayed.
Panel refresh automatically runs after the TV has
been used for long periods of time to reduce
image retention. If the TV is turned on, the
mains lead is unplugged, or the room
temperature falls outside of the range between
10 ºC and 40 ºC during the Panel refresh, the
process will not be completed and this message
will appear.
If Panel refresh started automatically, it will restart
when you turn off the TV with the remote control.
If Panel refresh initiated manually, you must
select it again.
Specifications
System
Panel system
OLED (Organic Light Emitting Diode) Panel
TV system
Depending on your country/area selection/TV model
Analogue: B/G, D/K, I
Digital: DVB-T/DVB-C
DVB-T2*
Satellite*1: DVB-S/DVB -S2
Colour system
PAL/SECAM/NTSC3.58 (Video only)/NTSC4.43 (Video only)
Channel coverage
Depending on your country/area selection/TV model
Analogue: UHF/VHF/Cable
Digital: UHF/VHF/Cable
Satellite*
Sound output
20 W + 20 W + 10 W + 10 W
Wireless technology
Protocol IEEE802.11ac/a/b/g/n
(IEEE802.11ac may not be available depending on countries/
regions.)
Bluetooth Version 4.2
Frequency band(s)
RMF-TX600E
1
1
: IF Frequency 950-2,150 MHz
Wireless LAN (IEEE802.11ac/a/b/g/n)
Frequency range Output Power
2400 - 2483.5 MHz < 20.0 dBm
5150 - 5250 MHz < 23.0 dBm
5250 - 5350 MHz < 20.0 dBm
5470 - 5725 MHz < 20.0 dBm
5725 - 5850 MHz < 13.9 dBm
Bluetooth
Frequency range Output Power
2400 - 2483.5 MHz < 10.0 dBm
Bluetooth
Frequency range Output Power
2400 - 2483.5 MHz < 10.0 dBm
Software version
This radio equipment is intended to be used with the approved
version(s) of software that are indicated in the EU Declaration of
Conform ity.
Press HELP on th e remote control to know the software vers ion.
Remote control: _._.__.___
Select [Remote control] [Software version] from [Settings].
For more information, refer to the Help Guide.
The software loaded on this radio equipment is verified to
comply with the essential requirements of the Directive 2014/
53/EU.
Input/Output jacks
Antenna (aerial)/cable
75 ohm external terminal for VHF/UHF
Satellite antenna*
Female F Type Connector, 75 ohm.
DiSEqC 1.0, LNB 13 V/18 V & 22 kHz tone, Single Cable
Distribution EN50494.
/ AV IN
Video/Audio input (mini jack)
HDMI IN 1/2/3/4 (support 4K resolution, HDCP 2.3compatible)
Video:
4096 × 2160p (50, 60 Hz)*
3840 × 2160p (50, 60 Hz)*
1080p (30, 50, 60, 100, 120 Hz), 1080/24p, 1080i (50, 60 Hz),
720p (30, 50, 60 Hz), 720/24p, 576p, 480p, PC Formats*
Audio:
In eARC (Enhanced Audio Return Channel) mode*
Refer to the Help Guide for details.
Except eARC mode
5.1 channel linear PCM: 32/44.1/48/88.2/96/176.4/192 kHz
16/20/24 bits, Dolby Digital, Dolby Digital Plus, DTS
eARC/ARC (Enhanced Audio Return Channel/Audio Return
Channel) (HDMI IN 3 only)
In eARC mode*
Refer to the Help Guide for details.
In ARC mode
Two channel linear PCM: 48 kHz 16 bits, Dolby Digital, Dolby
Digital Plus, DTS
DIGITAL AUDIO OUT (OPTICAL)
Digital optical jack (Two channel linear PCM:
48 kHz 16 bits, Dolby Digital, DTS)
(Stereo mini jack)
Headphone
1, 2, 3 (HDD REC)*
USB device port ( 3 USB HDD device for REC feature)
USB port 1 and 2 support High Speed USB
(USB 2.0)
USB port 3 supports Super Speed USB (USB 3.1 Gen 1)
CAM (Conditional Access Module) slot
LAN
10BASE-T/100BASE-TX connector (Depending on the operating
environment of the network, connection speed may differ. The
communication rate and quality are not guaranteed.)
CENTER SPEAKER IN
Centre speaker input terminal
1
2*3
, 4096 × 2160p (24 Hz)*2,
3
, 3840 × 2160p (24, 25, 30 Hz),
4
5
5
6
Others
Optional accessories
Wall-Mount Bracket: SU-WL850
Wall-Mount Bracket: SU-WL450
Operating temperature
0 ºC – 40 ºC
Operating humidity
10 % – 80 % RH (non-condensing)
Power, Product Fiche and others
Power requirements
220 V - 240 V AC, 50 Hz
Energy Efficiency Class
KD-77AG9: A
KD-65AG9: B
KD-55AG9: B
GB
12
Page 13

GB
Note
Screen size (measured diagonally) (Approx.)
KD-77AG9: 194.7 cm / 77 inches
KD-65AG9: 163.9 cm / 65 inches
KD-55AG9: 138.8 cm / 55 inches
Power consumption
In [Standard] mode
KD-77AG9: 211 W
KD-65AG9: 169 W
KD-55AG9: 132 W
In [Vivid] mode
KD-77AG9: 674 W
KD-65AG9: 490 W
KD-55AG9: 394 W
Annual energy consumption*
KD-77AG9: 293 kWh per year
KD-65AG9: 234 kWh per year
KD-55AG9: 183 kWh per year
Standby power consumption*8*
KD-77AG9: 0.50 W (29 W in software/EPG update mode)
KD-65AG9: 0.50 W (27 W in software/EPG update mode)
KD-55AG9: 0.50 W (27 W in software/EPG update mode)
Display resolution
3,840 dots (horizontal) × 2,160 lines (vertical)
Output Rating
USB 1/2
5 V , 500 mA MAX
USB 3
5 V , 900 mA MAX
7
9
Dimensions (Approx.) (w × h × d)
with Table-Top Stand
KD-77AG9: 172.1 × 100.1 × 30.2 cm
KD-65AG9: 144.7 × 83.8 × 25.5 cm
KD-55AG9: 122.6 × 71.4 × 25.5 cm
without Table-Top Stand
KD-77AG9: 172.1 × 99.6 × 4.9 cm
KD-65AG9: 144.7 × 83.4 × 4.0 cm
KD-55AG9: 122.6 × 71.0 × 4.0 cm
Mass (Approx.)
with Table-Top Stand
KD-77AG9: 39.7 kg
KD-65AG9: 24.8 kg
KD-55AG9: 22.3 kg
without Table-Top Stand
KD-77AG9: 35.3 kg
KD-65AG9: 21.2 kg
KD-55AG9: 18.7 kg
*1 Not all the TV sets have DVB-T2 or DVB-S/S2 technology or
satellite antenna terminal.
*2 When 4096 × 2160p is input and [Wide mode] is set to
[Normal], the resolution is displayed as 3840 × 2160p. To
display 4096 × 2160p, set [Wide mode] setting to [Full 1] or
[Full 2].
*3 To support 18 Gbps, set [HDMI signal format] to [Enhanced
format].
*4 Refer to the Help Guide for details.
*5 eARC mode is active when [eARC mode] is set to [Auto],
[Speakers] is set to [Audio system] and eARC compatible
audio system is connected.
*6 Only on limited region/country/TV model.
*7 Energy consumption in kWh per year, based on the power
consumption of the television operating 4 hours per day for
365 days.
The actual energy consumption will depend on how the
television is used.
*8 Specified standby power is reached after the TV finishes
necessary internal processes.
*9 Standby power consumption will increase when your TV is
connected to the network.
Notes on Digital TV function
• Digital TV (DVB terrestrial, satellite and cable), interactive
services and network functions may not be available in all
countries or areas. Some functions might not be enabled or
might not operate correctly with some providers and network
environments. Some TV service providers may charge a fee for
their services.
• This TV supports digital broadcasting using MPEG-2, H.264/
MPEG-4 AVC and H.265/HEVC codecs, but compatibility with
all operator/service signals, which may change over time,
cannot be guaranteed.
Trademark Information
• The terms HDMI and HDMI High-Definition Multimedia
Interface, and the HDMI Logo are trademarks or registered
trademarks of HDMI Licensing Administrator, Inc. in the United
States and other countries.
• Dolby, Dolby Vision, Dolby Audio, and the double-D symbol are
trademarks of Dolby Laboratories. Manufactured under license
from Dolby Laboratories. Confidential unpublished works.
Copyright © 1992-2015 Dolby Laboratories. All rights reserved.
• “BRAVIA”, and BRAVIA Sync are trademarks or
registered marks of Sony Corporation.
• Gracenote, the Gracenote logo and logotype, “Powered by
Gracenote” logo are either registered trademarks or
trademarks of Gracenote, Inc. in the United States and/or other
countries.
• Vewd® Core. Copyright 1995-2019 Vewd Software AS. All rights
reser ved.
• Google, Google Play, Chromecast, YouTube, Android TV and
other related marks and logos are trademarks of Google LLC.
• Wi-Fi®, Wi-Fi Alliance® and Wi-Fi Direct® are registered
trademarks of Wi-Fi Alliance.
• The Wi-Fi CERTIFIED™ Logo is a certification mark of Wi-Fi
Alliance.
• For DTS patents, see http://patents.dts.com. Manufactured
under license from DTS, Inc. DTS, the Symbol, & DTS and the
Symbol together are registered trademarks, and DTS Digital
Surround is a trademark of DTS, Inc. © DTS, Inc. All Rights
Reserved.
• The Bluetooth® word mark and logos are registered trademarks
owned by the Bluetooth SIG, Inc. and any use of such marks by
Sony Corporation is under license. Other trademarks and trade
names are those of their respective owners.
• Netflix is a registered trademark of Netflix, Inc.
• DiSEqC™ is a trademark of EUTELSAT. This TV supports DiSEqC
1.0. This TV is not intended for controlling motorized antennas.
• TUXERA is a registered trademark of Tuxera Inc. in the US and
other countries.
• USB-IF SuperSpeed USB Trident logo is a registered trademark
of USB Implementers Forum, Inc.
• All other trademarks are the property of their respective
owners.
• Do not remove the dummy card or cover (availability depends
on TV model) from TV CAM (Conditional Access Module) slot
other than to insert a smart card fitted in CAM.
• Optional accessories availability depends on countries/region/
TV model/stock.
• Design and specifications are subject to change without notice.
GB
13
Page 14
Remarque
Pour attacher le support
de table, reportez-vous au
Guide d’installation.
Table des matières
AVIS IMPORTANT. . . . . . . . . . . . . . . . . . . . . . . 2
Consignes de sécurité . . . . . . . . . . . . . . . . . .3
Protection de l’écran du téléviseur
(Téléviseur OLED) . . . . . . . . . . . . . . . . . . . . . . 4
Télécommande et téléviseur. . . . . . . . . . . 5
Schéma de connexion . . . . . . . . . . . . . . . . 7
Installation du téléviseur au mur . . . . . . 10
Utilisation du Support de fixation murale
en option (SU-WL850 ou SU-WL450) . . . . . 10
Dépannage. . . . . . . . . . . . . . . . . . . . . . . . 12
Problèmes et solutions . . . . . . . . . . . . . . . . 12
Spécifications . . . . . . . . . . . . . . . . . . . . . . 13
Connexion Internet et confidentialité des données
Ce produit se connecte à Internet au cours de la configuration
initiale dès qu’un réseau est connecté afin de confirmer la
connexion Internet, puis ultérieurement pour configurer l’écran
d’accueil. Votre adresse IP est utilisée dans ces connexions
Internet et toutes les autres. Si vous ne voulez pas que votre
adresse IP soit utilisée, ne configurez pas la fonction Internet
sans fil et ne connectez pas de câble Internet. Veuillez vous
référer aux informations de confidentialité présentées dans les
écrans de configuration pour en savoir plus sur les connexions
Internet.
Introduction
Sony vous remercie d’avoir choisi ce téléviseur.
Avant de l’utiliser, nous vous invitons à lire attentivement ce
manuel et à le conserver pour vous y référer ultérieurement.
• Avant d’utiliser le téléviseur, lisez les « Consignes de sécurité »
(page 3).
• Veuillez lire les Consignes de sécurité fournies pour plus
d’informations sur la sécurité.
• Les images et illustrations reprises dans ce manuel et dans le
Guide d’installation sont fournies pour référence uniquement et
peuvent présenter des différences par rapport au produit
proprement dit.
Aide
Vous trouverez des renseignements supplémentaires sur le
dépannage et d’autres informations utiles directement sur
votre téléviseur. Appuyez sur HELP sur la télécommande pour
afficher une liste de thèmes ou cherchez par mot-clé.
Guide d’aide (Manuel)
Pour obtenir des informations supplémentaires, sélectionnez
[Guide d'aide] du menu Aide sur votre téléviseur. Vous pouvez
également consulter le Guide d’aide depuis votre PC ou
smartphone (informations fournies sur le cache arrière de ce
manuel).
Emplacement de l’étiquette d’identification
Les étiquettes reprenant le numéro de modèle, la date de
production (année/mois) et les caractéristiques nominales de
l’alimentation se trouvent à l’arrière du téléviseur ou de
l’emballage. Vous les trouverez en retirant le couvercle du support
.
AVIS IMPORTANT
Avis concernant les
équipements radio
Le soussigné, Sony Visual Products Inc.,
déclare que les équipements radioélectriques de type
KD-77AG9, KD-65AG9, KD-55AG9 sont conformes à la directive
2014/53/UE. Le texte complet de la déclaration UE de conformité
est disponible à l’adresse internet suivante :
http://www.compliance.sony.de/
Avis aux clients : les informations suivantes s’appliquent
uniquement aux appareils vendus dans les pays qui appliquent
les directives de l’UE.
Pour cet équipement radio, les restrictions de mise en service ou
de demandes d’autorisation d’utilisation suivantes s’appliquent
en AT, BE, HR, CY, CZ, DK, EE, FI, FR, DE, EL, HU, IE, IT, LV, LT, LU, MT,
NL, PL, PT, SK, SI, ES, SE, UK, IS, L I, NO, CH, BG, RO, TR, AL, BA, MK,
MD, RS, ME, Kosovo :
La bande 5 150-5 350 MHz est limitée aux utilisations en intérieur
uniquement.
FR
2
Page 15
FR
Vis (M6)
Support de fixation murale
9 mm - 13 mm
Couvercle arrière du téléviseur
Vis M4 (non fournie)
1,5 N·m
{15 kgf·cm}
Vis (non fournie)
6 mm - 7 mm
Cordon (non
fourni)
30 cm
10 cm
10 cm
10 cm
Laissez au moins cet espace libre autour du téléviseur.
1 cm
Consignes de sécurité
Installation/Mise en place
Installez et utilisez le téléviseur conformément aux instructions
ci-dessous afin d’éviter tout risque d’incendie, d’électrocution ou
autre dommage et/ou blessure.
Installation
• Le téléviseur doit être installé à proximité d’une prise de courant
aisément accessible.
• Positionnez le téléviseur sur une surface stable et horizontale
afin d'éviter qu'il ne tombe, n'entraîne des blessures ou
n'endommage des biens.
• Installez le téléviseur dans un endroit où vous ne risquez pas de
le pousser, de le tirer ou de le renverser.
• Installez le téléviseur de façon à ce que son support de table ne
dépasse pas du support TV (non fourni). Si le support de table
dépasse du support TV, le téléviseur risque d’être renversé, de
tomber, d’être endommagé ou de provoquer des blessures.
• Pour des raisons de sécurité, assurez-vous de fixer le couvercle
central du téléviseur lorsque le téléviseur est posé sur le dessus
d'une table.
• L’installation murale du téléviseur doit être confiée à un
technicien spécialisé.
• Pour des raisons de sécurité, il est vivement recommandé
d’utiliser les accessoires Sony, notamment :
Support de fixation murale SU-WL850
Support de fixation murale SU-WL450
• Veillez à bien utiliser les vis fournies avec le Support de fixation
murale lors de la mise en place du Support de fixation murale
sur le téléviseur. Les vis fournies sont conçues de la manière
illustrée, mesurées à partir de la surface de fixation du Support
de fixation murale.
Leur diamètre et leur longueur varient suivant le modèle de
Support de fixation murale.
L’utilisation de vis autres que celles fournies peut occasionner
des dégâts à l’intérieur du téléviseur ou provoquer sa chute, etc.
Tran spo rt
• Avant de transporter le téléviseur, débranchez tous ses câbles.
• La présence de deux ou trois personnes est nécessaire pour le
transport des téléviseurs de grande taille.
• Pour transporter le téléviseur à la main, saisissez-le de la
manière illustrée. N’exercez aucune pression sur le panneau et
le cadre qui l’entoure.
• Lors de la manipulation ou du
montage du téléviseur, ne
couchez pas le téléviseur.
• Lorsque vous transportez le téléviseur, ne le soumettez pas à
des secousses ou des vibrations excessives.
• Lorsque vous transportez le téléviseur pour le porter à réparer
ou lorsque vous déménagez, glissez-le dans son emballage et
son carton d’origine.
Prévention des basculements
Aération
• Vous ne devez jamais obstruer les orifices d’aération du boîtier
ni y introduire un objet quelconque.
• Laissez un espace libre autour du téléviseur, comme indiqué
ci-dessous.
• Il est vivement recommandé d’utiliser le support de fixation
murale Sony pour favoriser la circulation adéquate de l’air.
Installation murale
FR
3
Page 16
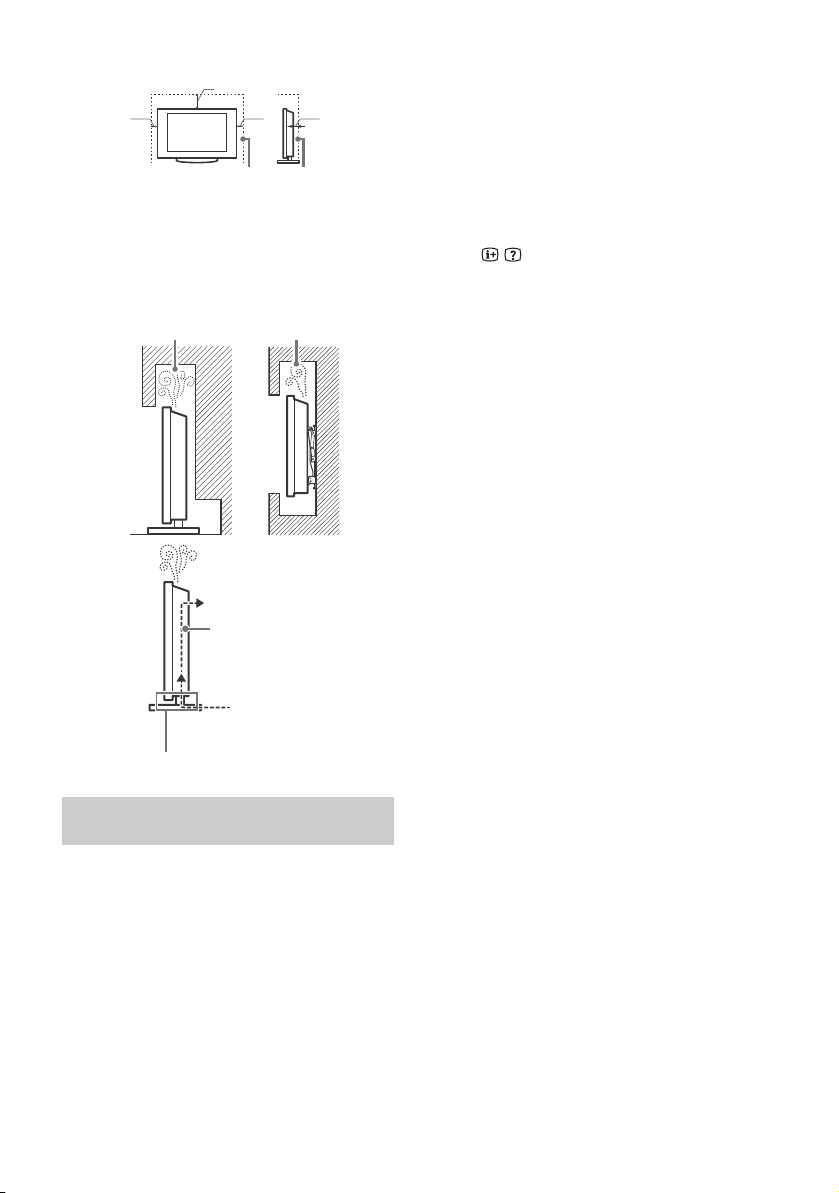
Installation sur pied
30 cm
10 cm
10 cm
Laissez au moins cet espace libre autour du téléviseur.
6 cm
Ne bloquez pas la zone de circulation d’air.
Circulation d’air
Mur
La circulation de l’air est bloquée.
Mur
• Pour une ventilation correcte, sans accumulation de salissures ni
de poussière :
Ne placez pas le téléviseur à plat, à l’envers, vers l’arrière ou
sur le côté.
Ne placez pas le téléviseur sur une étagère, un tapis, un lit ou
dans un placard.
Ne couvrez pas le téléviseur avec des tissus tels que des
rideaux, pas plus qu’avec des journaux, etc.
N’installez pas le téléviseur comme illustré ci-dessous.
Protection de l’écran du téléviseur (Téléviseur OLED)
Précautions à prendre pour protéger l’écran
des dommages
Rémanence d’image
Les téléviseurs OLED sont sensibles à la rémanence d’image en
raison des caractéristiques des matériaux utilisés. La rémanence
d’image peut survenir si des images s’affichent plusieurs fois au
même emplacement sur l’écran ou pendant des périodes
prolongées. Il ne s’agit pas d’un dysfonctionnement du téléviseur.
Évitez d’afficher des images pouvant causer une rémanence
d’image.
Voici des exemples d’images pouvant causer une
rémanence d’image :
• Contenu avec des bandes noires en haut et en bas et/ou sur la
gauche et la droite de l’écran. (ex : écran 4:3 « letterboxé »,
définition Standard)
• Images statiques, comme des photos.
FR
4
• Jeux vidéo pouvant avoir un contenu statique sur une partie de
l’écran.
• Menus à l’écran, guides des programmes, logos des chaînes,
etc.
• Contenu statique des applications.
• Téléscripteurs à l’écran, comme ceux utilisés dans les journaux
télévisés et les titres.
Pour réduire le risque de rémanence d’image :
• Sony vous recommande de mettre le téléviseur hors tension
normalement en appuyant sur le bouton marche de la
télécommande ou du téléviseur.
• Remplissez l’écran en modifiant [Mode Large] pour éliminer les
bandes noires. Sélectionnez un [Mode Large] autre que [4:3].
• Désactivez l’OSD (affichage sur écran) en appuyant sur le
bouton / puis désactivez les menus de l’appareil
raccordé. Pour plus de détails, reportez-vous au mode d’emploi
de l’appareil raccordé.
• Évitez d’afficher des images statiques aux couleurs vives (y
compris du blanc), des horloges ou des logos sur une partie de
l’écran.
• Configurez les réglages de l’image en fonction des conditions
ambiantes. L’image Standard est recommandée pour un usage
domestique et lors de la visualisation d’un contenu affichant
souvent les logos de la station, etc.
Le téléviseur possède les fonctionnalités suivantes pour aider à
réduire/empêcher la rémanence d’image.
Actualisation du panneau
L’actualisation du panneau s’exécute automatiquement pour
ajuster l’uniformité de l’écran du téléviseur après qu’il a été utilisé
pendant de longues périodes. L’actualisation du panneau peut
également être effectuée manuellement et ne doit être utilisée
que si la rémanence d’image est très visible ou si vous voyez le
message suivant : [L'actualisation du panneau ne s'est pas
terminée…]
Attention :
• La fonction Actualisation du panneau peut affecter le panneau.
En guise de référence, effectuez l’actualisation du panneau une
seule fois par an et pas plus, car elle peut réduire la durée de vie
du panneau.
• L’actualisation du panneau dure environ une heure.
• Une ligne blanche peut s’afficher sur l’écran lors de
l’actualisation du panneau ; il ne s’agit pas d’un
dysfonctionnement du téléviseur.
• L’actualisation du panneau ne fonctionne que lorsque la
température ambiante est comprise entre 10 ºC et 40 ºC.
Décalage des pixels
Place automatiquement l’image sur l’écran pour empêcher la
rémanence d’image.
Autre fonctionnalité
La luminosité de l’écran est automatiquement réduite lors de
l’affichage d’images fixes, d’horloges, de couleurs vives ou de
logos, etc.
Page 17
FR
Conseil
MIC
Ȫ
ȫ
Ȭ
ȭ
Ȯ
ȩ
ȯȱ
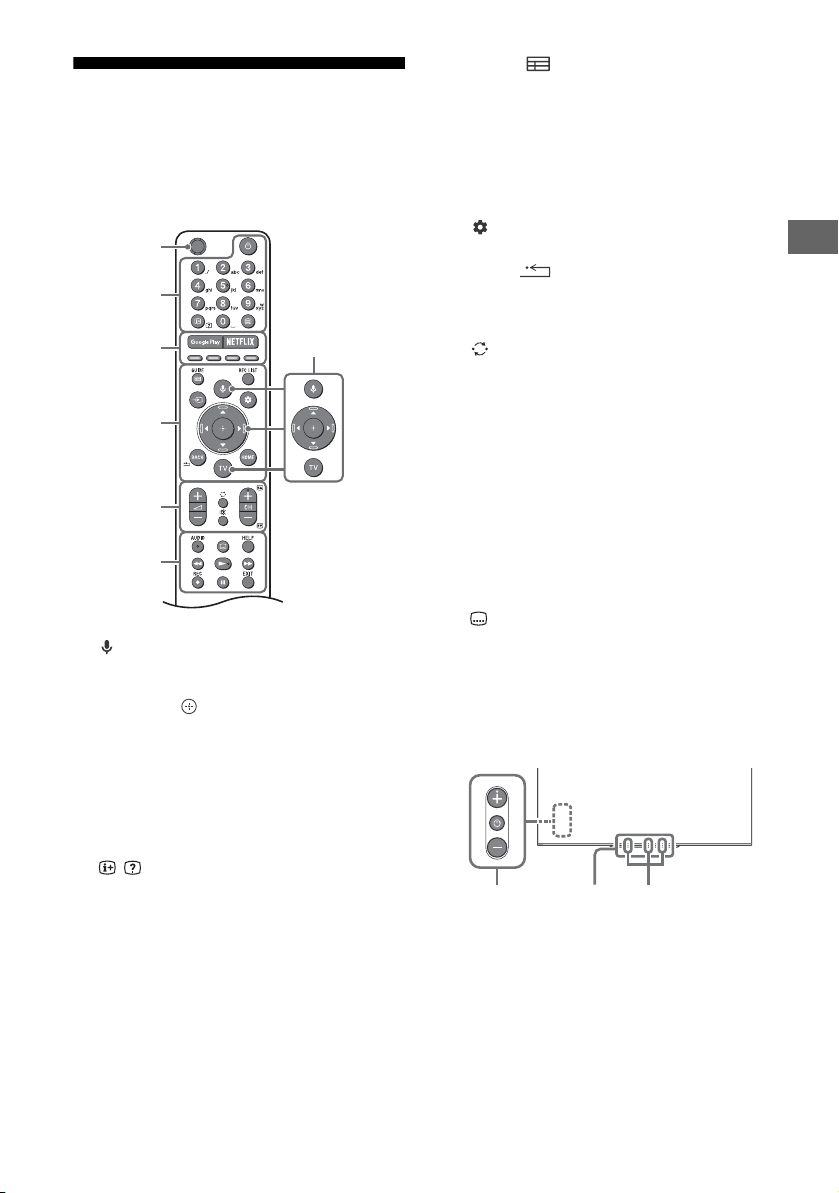
Télécommande et téléviseur
La forme de la télécommande,
l’emplacement, la disponibilité et la fonction
des touches de la télécommande peuvent
varier selon votre région/pays/modèle de
téléviseur.
(Microphone) : Utilisez la recherche
vocale. (par ex., recherchez différents
contenus par la voix.)*
//// (Touches directionnelles
de navigation) :
menu à l’écran.
TV : Commutez une chaîne télévisée ou une
entrée et affichez le menu TV.
(Veille du téléviseur)
Touches numériques
/ (Affichage des infos/du
Télé tex t e) : Affichez des informations.
(Télétexte) :
de Télétexte.
Google Play
NETFLIX (Uniquement dans certains
pays ou certaines régions/modèle de
téléviseur)
Touches de couleurs
1
Navigation et sélection du
Affichez les informations
GUIDE/ :
programmes numériques, ou l’EPG du
câble/satellite*2.
Pour afficher le guide des
REC LIST : Pour afficher la liste des
enregistrements du disque dur USB ou
DVR*2.
(Sélection de l’entrée) : Pour afficher
et sélectionner la source d’entrée, etc.
(Paramètres rapides) : Pour afficher
les Paramètres rapides.
BACK/
HOME
+/– (Volume)
(Saut)
(Coupure du son)
• Le service des raccourcis d’accessibilité peut être
activé ou désactivé en maintenant les touche
enfoncée.
CH +/–//
En mode TV: Sélectionnez la chaîne.
En mode Télétexte: Sélectionnez la page
suivante () ou précédente ().
AUDIO : Pour sélectionner le son d’une
source multilingue ou un double son (selon
la source du programme).
(Réglage des sous-titres)
HELP :
Affichez le menu Aide.
///
REC :
cours de visionnage sur le disque dur USB
ou DVR*2.
Pour enregistrer le programme en
EXIT
(Alimentation)
Capteur de télécommande / Capteur de
lumière / Affichage LED
FR
5
Page 18

MICRO intégré*1*3 / LED : Pour activer le
micro intégré, appuyez sur la touche
(MIC) de la télécommande et suivez les
instructions qui s’affichent à l’écran. Pour
plus d’informations, consultez le Guide
d’aide.
*1 La recherche vocale nécessite une connexion à
Internet.
*2 Le paramètre [Configuration de votre récepteur
câble/satellite] est requis (uniquement dans
certains pays ou certaines régions/modèle de
téléviseur). Pour plus d’informations, consultez le
Guide d’aide.
*3 Uniquement pour certaines régions, certains pays
ou certaines langues. La consommation électrique
en veille augmente lorsque la recherche vocale avec
le micro intégré est activée.
FR
6
Page 19
FR
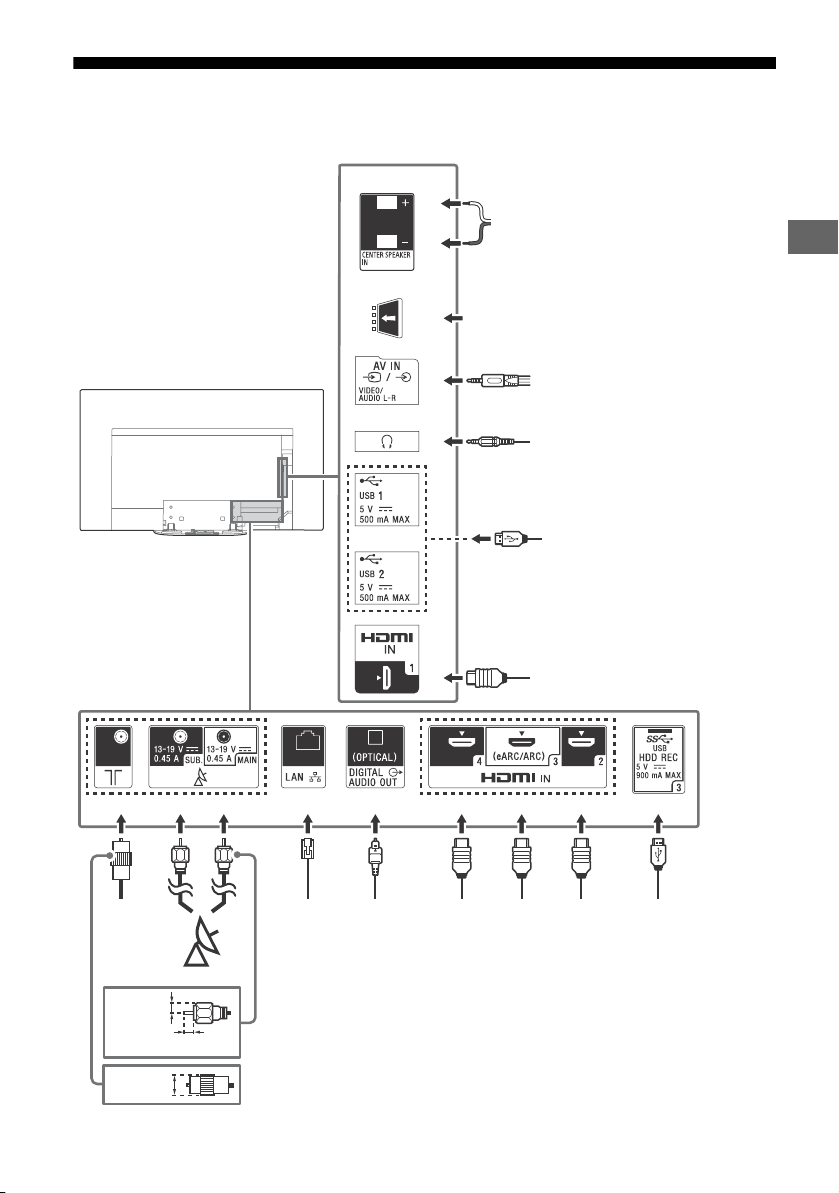
Schéma de connexion
<
<
<
ȭȯ
Ȫ
ȩ
ȫ
Ȭ
ȭ
Ȯ
Câble/
Antenne/
Boîtier
Externe
Routeur
Satellite
Casque
7 mm
Périphérique HDMI
Périphériq ue
HDMI
Magnétoscope/Matériel de jeu vidéo/
Lecteur DVD/Caméscope/Boîtier
Externe*
1
14 mm
Module pour système à contrôle d’accès
Périphérique
HDMI
Système
audio
avec
Entrée
audio
optique
Récepteur AV
Appareil photo
numérique/
Caméscope/
Support de
stockage USB/
Péri phériq ue
USB à disque
dur
Appareil photo numérique/
caméscope/support de stockage USB
Système
audio
avec
périphérique
eARC/ARC/
HDMI
1,5 mm
Pour plus d’informations sur les connexions, consultez le Guide d’aide en appuyant sur la touche HELP
de la télécommande.
FR
7
Page 20
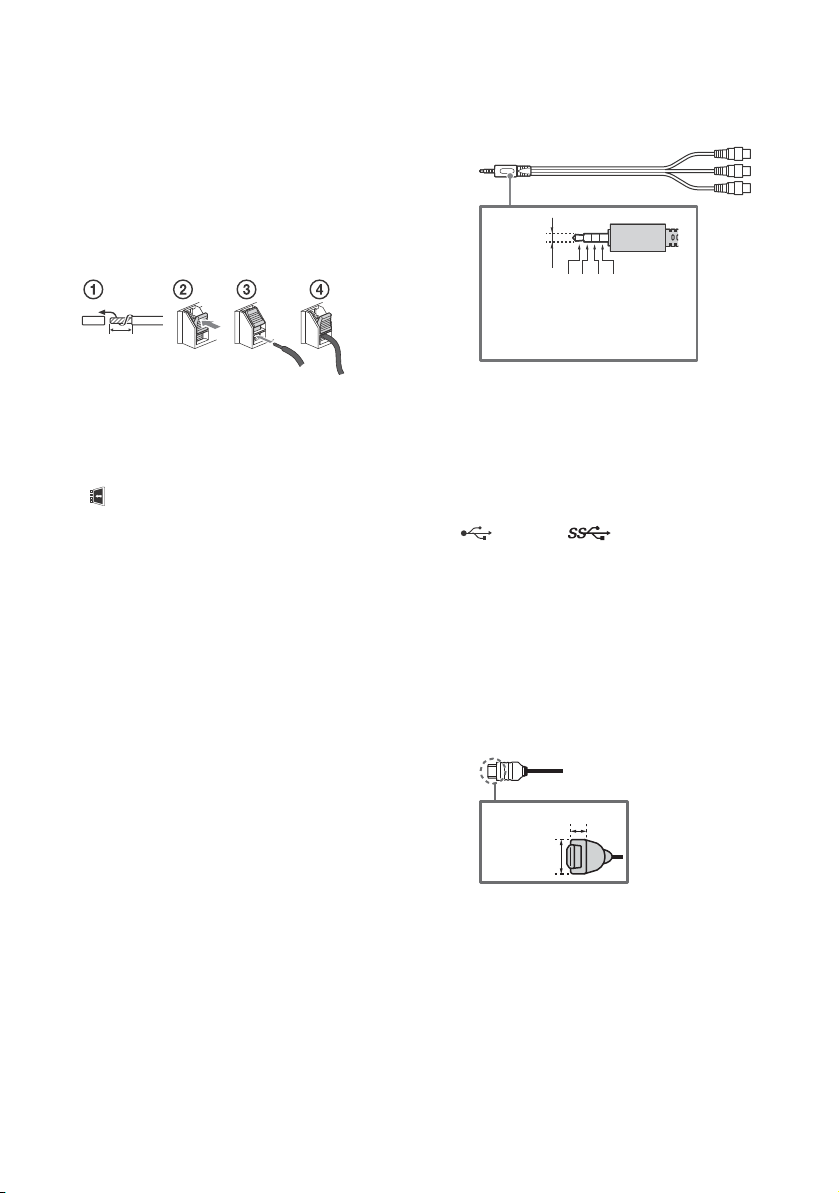
CENTER SPEAKER IN
10 mm
3,5 mm
1234
1 : L
2 : Vidéo
3 : Terre
4 : R
< 12 mm
< 21 mm
• Pour utiliser les haut-parleurs de votre
téléviseur en tant que haut-parleur
central, raccordez la sortie de votre
récepteur AV à l’entrée CENTER SPEAKER
IN de votre téléviseur.
• Avant de raccorder des câbles,
débranchez le cordon d’alimentation du
téléviseur et du récepteur AV.
• Assurez-vous que [Haut-parleurs] est
réglé sur [Système audio].
/ AV IN
• Dans le cas d’une connexion composite,
utilisez un câble d’extension analogique
(non fourni).
•
Pour éviter les grésillements lorsque le
CENTER SPEAKER IN n'est pas connecté à un
récepteur AV, désactivez [Mode haut-parleur
central TV]. Pour plus de détails, consultez le
Guide d’aide.
CAM (Module pour système à
contrôle d’accès)
• Permet d’accéder à un service télévisuel
payant. Pour plus de détails, reportezvous au mode d’emploi fourni avec votre
CAM.
• N’insérez pas la carte à puce directement
dans l’emplacement CAM du téléviseur.
Elle doit être insérée dans le module CAM
(Module pour système à contrôle d’accès)
fourni par votre revendeur agréé.
• CAM n’est pas pris en charge dans certains
pays ou certaines régions. Vérifiez auprès
de votre revendeur agréé.
• Il se peut qu’un message CAM s’affiche
lorsque vous basculez vers un programme
numérique après l’utilisation de la vidéo
Internet.
FR
8
(Casque)
• Prend en charge une mini-prise stéréo à
3 pôles uniquement.
• Vous ne pouvez pas reproduire le son en
sortie du casque et des haut-parleurs du
téléviseur simultanément.
USB 1/2, USB 3 (HDD REC)*
• Le raccordement d’un grand périphérique
USB peut interférer avec les autres
périphériques raccordés.
• Pour raccorder un grand périphérique
USB, branchez-le au port USB 1.
• Raccordez un périphérique USB à disque
dur au port USB 3 (bleu).
HDMI IN 1/2/3/4
• L’interface HDMI peut transférer la vidéo
et l’audio numériques sur un seul câble.
•
• Pour profiter de contenus de haute qualité
en 4K 50p/60p, raccordez un câble HDMI
haute vitesse premium et réglez [Format
du signal HDMI] sur [Format amélioré].
Effectuez ce même réglage
individuellement pour chaque terminal
HDMI raccordé. Pour plus détails sur les
formats pris en charge, reportez-vous aux
« Spécifications » dans ce manuel (page
13-14).
2
Page 21
FR
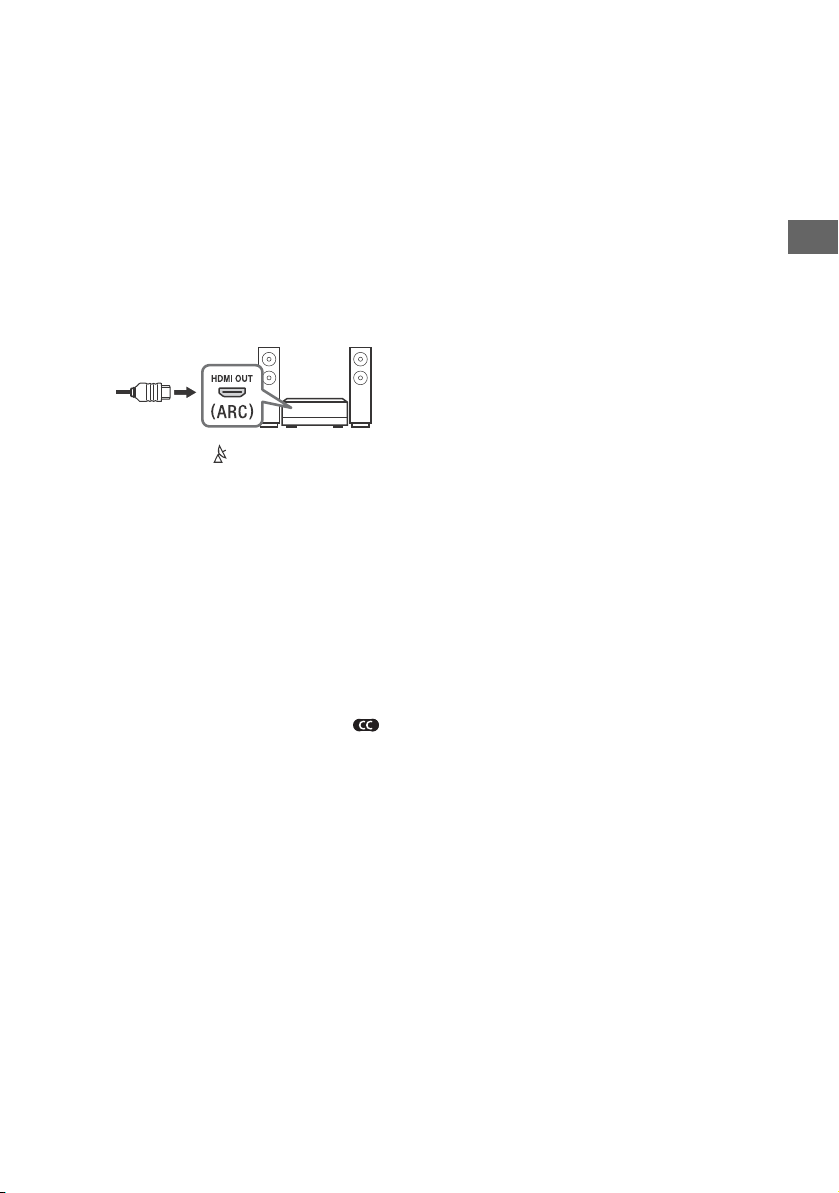
• HDMI IN 3 eARC/ARC (Enhanced Audio
Remarque
Return Channel/Audio Return Channel)
Raccordez votre système audio au HDMI
IN 3 pour acheminer l’audio de votre
téléviseur vers votre système audio. Un
système audio compatible avec HDMI
eARC/ARC peut envoyer des vidéos au
téléviseur et recevoir l’audio du téléviseur
via le même câble HDMI. Si votre système
audio n’est pas compatible avec HDMI
eARC/ARC, un raccordement
supplémentaire à DIGITAL AUDIO OUT
(OPTICAL) est nécessaire.
• Utilisez le câble HDMI avec Ethernet pour
raccorder le système audio avec eARC.
(Entrée RF), (Entrée satellite)
• Raccordements pour le terrestre/câble et
le satellite. Étapes de raccordement : SUB.
MAIN Antenne
• Pour la prise SUB., n’effectuez le
raccordement que lorsque vous utilisez le
mode double tuner pour la distribution
par câble simple EN50494.
*1 Pour un périphérique externe qui n’a que SCART AV
OUT, utilisez un adaptateur SCART-RCA et un câble
d’extension analogique.
*2 Uniquement dans certains pays ou certaines
régions/modèle de téléviseur.
• Vous ne pouvez pas fixer le couvercle latéral
tant que les câbles sont connectés à la borne latérale.
• Assurez-vous de conserver la protection latérale dans
un endroit sûr pour utilisation ultérieure.
FR
9
Page 22

Installation du téléviseur au mur
Utilisation du Support de fixation murale en option (SU-WL850 ou SU-WL450)
A l’attention des clients :
Pour protéger le produit et pour des raisons de sécurité, Sony conseille vivement de confier
l’installation de votre téléviseur à des revendeurs ou des installateurs agréés Sony. N’essayez pas de
l’installer vous-même.
A l’attention des revendeurs et installateurs Sony :
Soyez particulièrement attentif à la sécurité pendant l’installation, l’entretien périodique et l’examen
du produit.
Informations sur l’installation du support de fixation murale
Ce mode d’emploi du téléviseur illustre uniquement les étapes nécessaires à la préparation du
téléviseur pour son installation murale avant sa fixation au mur.
Pour obtenir les instructions de l'installation du support de fixation murale, veuillez vous reporter à la
section Informations sur l'installation (Support de fixation murale) sur la page du produit
correspondant à votre modèle de téléviseur.
www.sony.eu/support/
Préparation à l’installation murale
Utilisez le support de fixation murale SU-WL850 (non fourni) ou SU-WL450 (non fourni) pour installer le
téléviseur sur le mur.
Assurez-vous de fixer le support de table avant d’installer le téléviseur au mur en vous reportant au
Guide d’installation.
• Préparez le téléviseur pour le support de fixation murale avant d’effectuer les raccordements de
câbles.
• Suivez le guide d’instructions fourni avec le support de fixation murale concernant votre modèle.
Une expertise suffisante est nécessaire pour réussir l’installation du téléviseur, notamment pour
déterminer la résistance du mur au poids du téléviseur.
• Veillez à confier la fixation de ce produit au mur à un revendeur ou installateur agréé Sony et
accordez une attention suffisante à la sécurité pendant l’installation. Sony n’est pas responsable des
dommages ou blessures provoqués par une mauvaise manipulation ou une installation incorrecte.
• Les vis pour le support de fixation murale ne sont pas fournies.
• Veillez à conserver les vis inutilisées et le support de table en lieu sûr jusqu’à ce que vous soyez prêt
à fixer le support de table. Gardez les vis hors de portée des jeunes enfants.
10
FR
Page 23
FR
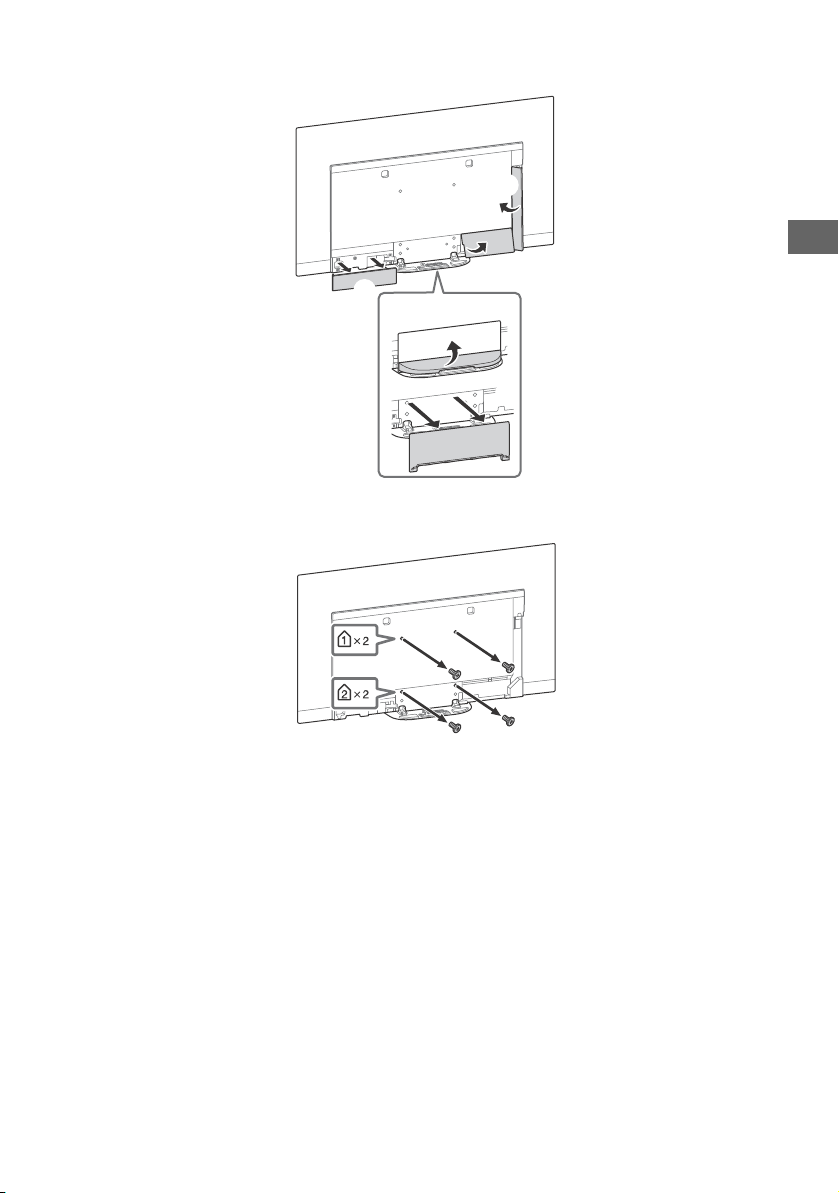
ʕ
1 Enlevez le cache du support et les caches de borne.
2 Retirez les vis à l’arrière du téléviseur.
FR
11
Page 24

Dépannage
Pour les dépannages généraux tels que : écran
noir, absence de son, image figée, téléviseur ne
réagissant plus pas de réaction du téléviseur ou
perte de réseau, suivez les étapes ci-après.
1 Redémarrez votre téléviseur en appuyant sur
la touche d’alimentation de la télécommande
jusqu’à ce qu’un message s’affiche. Le
téléviseur redémarre. Si le téléviseur n’est pas
remis en état, essayez de débrancher le
cordon d’alimentation secteur. Puis appuyez
sur le bouton marche/arrêt du téléviseur et
attendez deux minutes, et branchez le cordon
d’alimentation secteur.
2 Consultez le menu d’aide en appuyant sur la
touche HELP de la télécommande.
3 Raccordez votre téléviseur à Internet et
effectuez une mise à jour du logiciel. Sony
vous recommande de mettre à jour le logiciel
de votre téléviseur régulièrement. Les mises à
jour fournissent de nouvelles fonctionnalités
et améliorent les performances.
4 Allez sur le site Web d’assistance Sony
(informations fournies sur la première de
couverture de ce manuel).
Lorsque vous branchez le téléviseur, il est
possible que vous ne puissiez pas allumer le
téléviseur immédiatement même si vous
appuyez sur la touche de mise en marche de
la télécommande ou du téléviseur.
L’initialisation du système prend du temps.
Attendez environ une minute, puis utilisez-le
normalement.
Problèmes et solutions
Lorsque l’affichage LED clignote en rouge.
Comptez le nombre de clignotements (l’intervalle
est de trois secondes).
Réinitialisez le téléviseur en débranchant le
cordon d’alimentation secteur jusqu’à ce que
l’affichage LED arrête de clignoter en rouge, puis
remettez le téléviseur sous tension.
Si le problème persiste, déconnectez le cordon
d’alimentation secteur et contactez votre
revendeur ou un Centre de Service Après-Vente
Sony en indiquant le nombre de clignotements la
LED d’éclairage.
Le service terrestre/par câble ne peut pas être
réceptionné.
Vérifiez le raccordement de l’antenne/câble et les
réglages de l’amplificateur.
Sélectionnez le service terrestre/par câble en
appuyant sur la touche TV de la télécommande,
puis sélectionnez [Numérique] si le service de
diffusion n’est pas affiché.
Le signal terrestre peut être supprimé si un signal
fort est fourni à proximité. Réglez [LNA (Canal ---)]
sur [Non] dans les réglages de syntonisation
numérique.
Après avoir emménagé dans un nouveau
domicile ou essayé de recevoir de nouveaux
services, tentez une recherche de service en
sélectionnant [Recherche des chaînes
numériques].
Le service satellite ne peut pas être
réceptionné.
Vérifiez le raccordement du câble satellite.
Lorsque le message [Signal absent. Surcharge
LNB détectée…] s’affiche, débranchez le cordon
d’alimentation secteur. Ensuite, assurez-vous que
le câble satellite n’est pas endommagé et que la
ligne du signal satellite n’est pas court-circuitée
dans le connecteur satellite.
La télécommande ne fonctionne pas.
Remplacez les piles.
Le contrôle parental pour le mot de passe de
diffusion a été oublié.
Saisissez 9999 comme code PIN et sélectionnez
[Modifiez le code PIN].
La température augmente autour du
téléviseur.
Si vous utilisez le téléviseur pendant une période
prolongée, la température augmente dans la
zone qui l’entoure. Si vous le touchez, vous
remarquerez peut-être qu’il est chaud.
L’écran s’assombrit alors que vous regardez le
téléviseur.
Si l’image entière ou une partie de l’image
demeure immobile, la luminosité de l’écran est
progressivement réduite afin d’éviter la
rémanence d’image. Il ne s’agit pas d’un
dysfonctionnement du téléviseur.
FR
12
Page 25
FR
Remarque
La rémanence d’image vous inquiète.
Si la même image s’affiche plusieurs fois ou
pendant une période prolongée, la rémanence
d’image est possible. Pour réduire la rémanence
d’image, nous vous recommandons d’éteindre
le téléviseur normalement en appuyant sur la
touche Alimentation de la télécommande ou du
téléviseur.
• Effectuez manuellement une actualisation du
panneau uniquement lorsque la rémanence d’image
est particulièrement visible. Effectuez-la une seule
fois par an. Évitez de l’effectuer plus souvent, car elle
peut réduire la durée de vie du panneau.
• Les images comportant des horloges, logos ou
couleurs vives (y compris du blanc) causent
facilement la rémanence d’image. Évitez d’afficher
ces types d’images pendant des périodes
prolongées, car cela pourrait provoquer une
rémanence d’image.
Une ligne blanche apparaît à l’écran.
L’actualisation du panneau s’exécute
automatiquement pour réduire la rémanence
d’image après que le téléviseur a été utilisé
pendant des périodes prolongées. L’actualisation
du panneau démarre après la mise hors tension
du téléviseur et dure environ une heure. Une ligne
blanche peut s’afficher à l’écran lors de
l’actualisation du panneau. Il ne s’agit pas d’un
dysfonctionnement du téléviseur.
Le message [L'actualisation du panneau ne
s'est pas terminée…] s’affiche.
L’actualisation du panneau s’exécute
automatiquement pour réduire la rémanence
d’image après que le téléviseur a été utilisé
pendant des périodes prolongées. Si le
téléviseur est mis sous tension, le cordon
d’alimentation secteur est débranché ou la
température ambiante sort de la plage de 10 ºC
à 40 ºC pendant l’actualisation du panneau, le
processus ne se termine pas et ce message
apparaît.
Si l’actualisation du panneau a démarré
automatiquement, elle redémarre lorsque vous
mettez le téléviseur hors tension avec la
télécommande.
Si l’actualisation du panneau a été lancée
manuellement, vous devez la sélectionner à
nouveau.
Spécifications
Système
Type d’affichage
Panneau OLED (diode électroluminescente organique)
Norme de télévision
Selon le pays/la région sélectionnée/le modèle de téléviseur
Analogique : B/G, D/K, I
Numérique : DVB-T/DVB-C
DVB-T2*
Satellite*1 : DVB-S/DVB-S2
Standard couleur
PAL/SECAM/NTSC3.58 (Vidéo uniquement)/NTSC4.43 (Vidéo
uniquement)
Canaux couverts
Selon le pays/la région sélectionnée/le modèle de téléviseur
Analogique : UHF/VHF/Câble
Numérique : UHF/VHF/Câble
1
Satellite*
Sortie son
20 W + 20 W + 10 W + 10 W
Technologie sans fil
Protocole IEEE802.11ac/a/b/g/n
(Selon votre région/pays, il se peut que l’IEEE802.11ac ne soit
pas disponible.)
Bluetooth Version 4.2
Bande(s) de fréquence
Plage de fréquences Puissance de sortie
2 400 - 2 483,5 MHz < 20,0 dBm
5 150 - 5 250 MHz < 23,0 dBm
5 250 - 5 350 MHz < 20,0 dBm
5 470 - 5 725 MHz < 20,0 dBm
5 725 - 5 850 MHz < 13,9 dBm
Plage de fréquences Puissance de sortie
2 400 - 2 483,5 MHz < 10,0 dBm
RMF-TX600E
Plage de fréquences Puissance de sortie
2 400 - 2 483,5 MHz < 10,0 dBm
Version du logiciel
Cet équipement radio est destiné à être utilisé avec la ou les
version(s) approuvée(s) du logiciel qui sont indiquées dans la
déclaration de conformité de l’UE.
Appuyez sur la touche HELP de la télécommande pour
connaître la version logicielle.
Télécommande : _._.__.___
Sélectionnez [Télécommande] [Version du logiciel] dans
[Paramètres]. Pour plus d’informations, consultez le Guide
d’aide.
Le logiciel chargé sur cet équipement radio est certifié
conforme aux exigences essentielles de la Directive 2014/53/
UE.
Prises d’entrée/sortie
Câble d’antenne
Borne 75 ohms externe pour VHF/UHF
Antenne satellite*
Connecteur femelle type F, 75 ohms.
DiSEqC 1.0, LNB 13 V/18 V & 22 kHz tone, Diffusion par câble
unique EN50494.
/ AV IN
Entrée audio/vidéo (mini-prise)
1
: Fréquence IF 950-2 150 MHz
LAN sans fil (IEEE802.11ac/a/b/g/n)
Bluetooth
Bluetooth
1
FR
13
Page 26

HDMI IN 1/2/3/4 (accepte une résolution de 4k, Compatible
Remarque
HDCP 2.3)
Vidéo :
4096 × 2160p (50, 60 Hz)*
2160p (50, 60 Hz)*
50, 60, 100, 120 Hz), 1080/24p, 1080i (50, 60 Hz), 720p (30, 50,
60 Hz), 720/24p, 576p, 480p, Formats PC*
Audio :
En mode eARC (Enhanced Audio Return Channel)*
Reportez-vous au Guide d’aide pour plus de détails.
Sauf mode eARC
PCM linéaire 5,1 canaux : 32/44,1/48/88,2/96/176,4/192 kHz
16/20/24 bits, Dolby Digital, Dolby Digital Plus, DTS
eARC/ARC (Enhanced Audio Return Channel/Audio Return
Channel) (HDMI IN 3 uniquement)
En mode eARC*
Reportez-vous au Guide d’aide pour plus de détails.
En mode ARC
PCM linéaire deux canaux : 48 kHz 16 bits, Dolby Digital, Dolby
Digital Plus, DTS
DIGITAL AUDIO OUT (OPTICAL)
Prise optique numérique (PCM linéaire deux canaux : 48 kHz
16 bits, Dolby Digital, DTS)
(mini-prise stéréo)
Casque
1, 2, 3 (HDD REC)*
Port de périphérique USB. ( 3 Disque dur USB pour la
fonction REC)
Les ports USB 1 et 2 prennent en charge la High Speed USB (USB
2.0)
Le port USB 3 prend en charge la Super Speed USB (USB 3.1 Gen
1)
Fente CAM (Module pour système à contrôle d’accès)
LAN
Connecteur 10BASE-T/100BASE-TX (La vitesse de connexion du
réseau peut varier en fonction de l’environnement
d’exploitation. Le débit et la qualité de la communication ne
sont pas garantis.)
CENTER SPEAKER IN
Centrer borne d'entrée du haut-parleur
5
2*3
, 4096 × 2160p (24 Hz)*2, 3840 ×
3
, 3840 × 2160p (24, 25, 30 Hz), 1080p (30,
4
5
6
Autres
Accessoires en option
Support de fixation murale : SU-WL850
Support de fixation murale : SU-WL450
Températures de fonctionnement
0 ºC – 40 ºC
Humidité de fonctionnement
10 % – 80 % HR (sans condensation)
Puissance, fiche produit et autres
Tension d’alimentation
220 V – 240 V CA, 50 Hz
Classe d’efficacité énergétique
KD-77AG9 : A
KD-65AG9 : B
KD-55AG9 : B
Taille d’écran (mesurée en diagonale) (Environ.)
KD-77AG9 : 194,7 cm / 77 pouces
KD-65AG9 : 163,9 cm / 65 pouces
KD-55AG9 : 138,8 cm / 55 pouces
Consommation électrique
En mode [Standard]
KD-77AG9 : 211 W
KD-65AG9 : 169 W
KD-55AG9 : 132 W
En mode [Intense]
KD-77AG9 : 674 W
KD-65AG9 : 490 W
KD-55AG9 : 394 W
Consommation énergétique annuelle*
KD-77AG9 : 293 kWh par an
KD-65AG9 : 234 kWh par an
KD-55AG9 : 183 kWh par an
7
Consommation électrique en veille*8*
KD-77AG9 : 0,50 W (29 W en mode de mise à jour du logiciel/
EPG)
KD-65AG9 : 0,50 W (27 W en mode de mise à jour du logiciel/
EPG)
KD-55AG9 : 0,50 W (27 W en mode de mise à jour du logiciel/
EPG)
Résolution d’affichage
3 840 points (horizontal) × 2 160 lignes (vertical)
Puissance de sortie nominale
USB 1/2
5 V , 500 mA MAX
USB 3
5 V , 900 mA MAX
9
Dimensions (approx.) (l × h × p)
Avec support de table
KD-77AG9 : 172,1 × 100,1 × 30,2 cm
KD-65AG9 : 144,7 × 83,8 × 25,5 cm
KD-55AG9 : 122,6 × 71,4 × 25,5 cm
Sans support de table
KD-77AG9 : 172,1 × 99,6 × 4,9 cm
KD-65AG9 : 144,7 × 83,4 × 4,0 cm
KD-55AG9 : 122,6 × 71,0 × 4,0 cm
Poids (approx.)
Avec support de table
KD-77AG9 : 39,7 kg
KD-65AG9 : 24,8 kg
KD-55AG9 : 22,3 kg
Sans support de table
KD-77AG9 : 35,3 kg
KD-65AG9 : 21,2 kg
KD-55AG9 : 18,7 kg
*1 Tous les téléviseurs ne sont pas dotés de la technologie DVB-
T2 ou DVB-S/S2 ou d’une borne d’antenne satellite.
*2 Si la valeur d’entrée est 4096 × 2160p et que [Mode Large] est
réglé sur [Normal], la résolution s’affiche à 3840 × 2160p. Pour
afficher au format 4096 × 2160p, réglez le paramètre [Mode
Large] sur [Etiré 1] ou [Etiré 2].
*3 Pour la prise en charge de 18 Gbps, réglez [Format du signal
HDMI] sur [Format amélioré].
*4 Reportez-vous au Guide d’aide pour plus de détails.
*5 Le mode eARC est actif lorsque [Mode eARC] est réglé sur
[Auto], [Haut-parleurs] est réglé sur [Système audio] et
lorsque le système audio compatible eARC est raccordé.
*6 Uniquement dans certains pays ou certaines régions/modèle
de téléviseur.
*7 Consommation énergétique en kWh par an, en considérant la
consommation électrique du poste lorsqu’il reste allumé 4
heures par jour pendant 365 jours.
La consommation réelle dépendra du mode d’utilisation du
téléviseur.
*8 La consommation spécifiée en mode de veille est atteinte
une fois que le téléviseur a terminé tous les processus
internes nécessaires.
*9 La consommation électrique en veille augmentera lorsque
votre téléviseur sera connecté au réseau.
• Ne retirez pas la carte factice ou le cache (disponibilité selon le
modèle de téléviseur) de la fente TV CAM (Module pour
système à contrôle d’accès), sauf pour la remplacer par une
carte à pu ce insérée dans le CAM.
• La disponibilité des accessoires en option varie selon les pays,
les régions, les modèles de téléviseur et les stocks.
• La conception et les spécifications sont sujettes à modification
sans préavis.
Remarques sur la fonction de télévision numérique
• La télévision numérique (DVB terrestre, satellite et câble), les
services interactifs et les fonctions réseau peuvent ne pas être
disponibles dans tous les pays ou régions. Certaines fonctions
pourraient ne pas être activées ou pourraient ne pas
fonctionner correctement avec certains opérateurs et
environnements réseau. Il est possible que certains opérateurs
de services télévisuels facturent des frais pour leurs services.
FR
14
Page 27
FR
• Ce téléviseur prend en charge la diffusion numérique en
utilisant les codecs MPEG-2, H.264/MPEG-4 AVC et H.265/
HEVC, mais la compatibilité avec tous les signaux de
l’opérateur/service, susceptibles de changer au fil du temps,
ne peut pas être garantie.
Informations sur les marques commerciales
• Les termes HDMI et High-Definition Multimedia Interface ainsi
que le logo HDMI sont des marques commerciales ou des
marques déposées de HDMI Licensing Administrator, Inc. aux
États-Unis et dans d’autres pays.
• Dolby, Dolby Vision, Dolby Audio et le symbole double-D sont
des marques de Dolby Laboratories. Fabriqué sous licence de
Dolby Laboratories. Travaux confidentiels et non publiés.
Copyright © 1992-2015 Dolby Laboratories. Tous droits
réser vés.
• « BRAVIA », et BRAVIA Sync sont des marques
commerciales ou marques déposées de Sony Corporation.
• Gracenote, le logo et le graphisme Gracenote ainsi que le logo
« Powered by Gracenote » sont des marques commerciales ou
des marques déposées de Gracenote, Inc. aux États-Unis et/ou
dans d’autres pays.
• Vewd® Core. Copyright 1995-2019 Vewd Software AS. All rights
reser ved.
• Google, Google Play, Chromecast, YouTube, Android TV et les
autres marques et logos associés sont des marques de Google
LLC.
• Wi-Fi®, Wi-Fi Alliance® et Wi-Fi Direct® sont des marques
déposées de Wi-Fi Alliance.
• Le logo Wi-Fi CERTIFIED™ est une marque de certification de
Wi-Fi Alliance.
• Pour les brevets DTS, visitez http://patents.dts.com. Fabriqué
sous licence de DTS, Inc. DTS, le symbole, & DTS et le symbole
utilisés conjointement sont des marques déposées tandis que
DTS Digital Surround est une marque commerciale de DTS, Inc.
© DTS, Inc. Tous droits réservés.
• Les logos et le mot de marque Bluetooth® sont des marques
déposées appartenant à Bluetooth SIG, Inc. et toute utilisation
de ces marques par Sony Corporation est couverte par une
licence. Les autres marques commerciales et noms de marque
appartiennent à leurs propriétaires respectifs.
• Netflix est une marque déposée de Netflix, Inc.
• DiSEqC™ est une marque déposée de EUTELSAT. Ce téléviseur
prend en charge DiSEqC 1.0. Ce téléviseur n’est pas destiné à
commander des antennes à moteur.
• TUXERA est une marque déposée de Tuxera Inc. aux États-Unis
et dans d’autres pays.
• Le logo USB-IF SuperSpeed USB Trident est une marque
déposée de USB Implementers Forum, Inc.
• Toutes les autres marques commerciales appartiennent à leurs
propriétaires respectifs.
FR
15
Page 28
Nota
Para fijar el soporte de
sobremesa, consulte la
Guía de configuración.
Índice
AVISO IMPORTANTE . . . . . . . . . . . . . . . . . . . .2
Información de seguridad . . . . . . . . . . . . . . . 3
Protección de la pantalla del televisor
(Televisor OLED) . . . . . . . . . . . . . . . . . . . . . . . 4
Mando a distancia y televisor. . . . . . . . . . 5
Diagrama de conexiones. . . . . . . . . . . . . . 7
Instalación del televisor en una
pared. . . . . . . . . . . . . . . . . . . . . . . . . . . . . 10
Utilización del Soporte de pared
opcional (SU-WL850 o SU-WL450) . . . . . . . 10
Solución de problemas . . . . . . . . . . . . . . 12
Problemas y soluciones . . . . . . . . . . . . . . . . 12
Especificaciones. . . . . . . . . . . . . . . . . . . . 13
Conexión a Internet y privacidad de datos
Al conectarse una red, este producto se conecta a Internet
durante la configuración inicial para, en primer lugar, confirmar
la conexión a Internet y, después, configurar la pantalla de inicio.
Su dirección IP se utiliza en esta y en otras conexiones a Internet.
Si no desea que se utilice su dirección IP en absoluto, no
configure la función inalámbrica de Internet y no conecte un
cable de Internet. Para obtener más detalles sobre las
conexiones a Internet, consulte la información de privacidad
mostrada en la pantalla de configuración.
Introducción
Gracias por elegir este producto Sony.
Antes de utilizar el televisor, lea este manual atentamente y
consérvelo para consultarlo en el futuro.
• Antes de utilizar el televisor, lea el apartado “Información de
seguridad” (página 3).
• Lea la Información de seguridad suministrada para obtener más
información sobre seguridad.
• Las imágenes y las ilustraciones utilizadas en la Guía de
configuración y este manual son solo ejemplos y pueden no
coincidir con el producto real.
Ayuda
Encontrará más soluciones de problemas y otra información
importante directamente en su televisor. Pulse HELP en el
mando a distancia para mostrar una lista de temas o para
buscar por palabra clave.
Guía de ayuda (manual)
Para obtener información más detallada, seleccione [Guía de
ayuda] en el menú Ayuda de su televisor. También puede
consultar la Guía de ayuda desde su PC o smartphone
(encontrará la información en la contraportada de este
manual).
Ubicación de la etiqueta identificativa
Las etiquetas correspondientes al Número de modelo, a la Fecha
de producción (año/mes) y al voltaje de la Fuente de
alimentación se encuentran situadas en la parte posterior del
televisor o el embalaje. Se pueden encontrar extrayendo la tapa
del soporte .
AVISO IMPORTANTE
Nota sobre equipos
inalámbricos
Por la presente, Sony Visual Products Inc.
declara que los tipos de equipo radioeléctrico
KD-77AG9, KD-65AG9, KD-55AG9 son conformes con la Directiva
2014/53/UE. El texto completo de la declaración UE de
conformidad está disponible en la dirección Internet siguiente:
http://www.compliance.sony.de/
Aviso para los clientes: la siguiente información solamente es
aplicable a los equipos comercializados en los países que
cumplan las directivas de la UE.
Para este equipo de radio, aplican las siguientes restricciones de
puesta en servicio o requisitos de autorización de uso en AT, BE,
HR, CY, CZ, DK, EE, FI, FR, DE, EL, HU, IE, IT, LV, LT, LU, MT, NL, PL,
PT, SK, SI, ES, SE, UK, IS, LI, NO, CH, BG, RO, TR, AL, BA, MK, MD,
RS, ME, Kosovo:
La banda de 5 150-5 350 MHz solo está permitida para
operaciones en interiores.
ES
2
Page 29
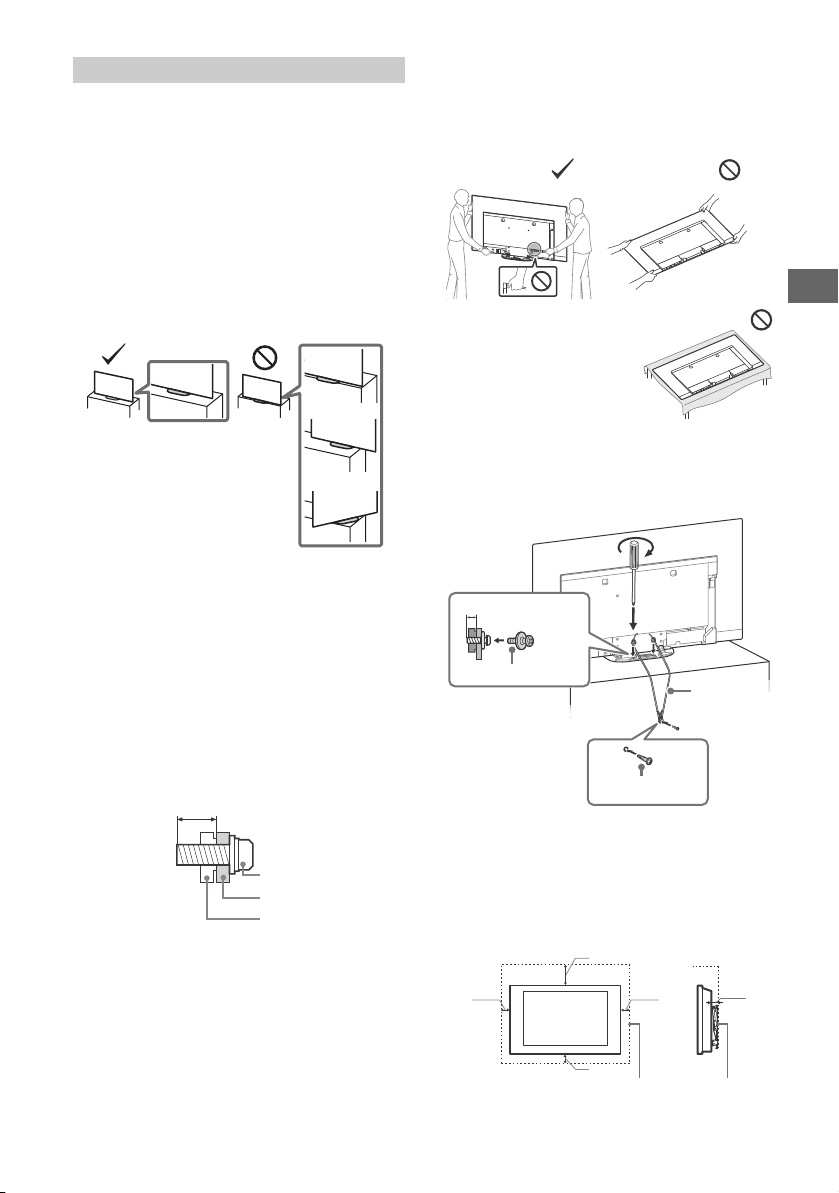
ES
Tornillo (M6)
Soporte de pared
9 mm - 13 mm
Tapa trasera del televisor
Tornillo M4 (no suministrado)
1,5 N·m
{15 kgf·cm}
Tornillo (no
suministrado)
6 mm - 7 mm
Cable (no
suministrado)
30 cm
10 cm
10 cm
10 cm
Deje, como mínimo, estas distancias alrededor del televisor.
1 cm
Información de seguridad
Instalación/configuración
Instale y utilice el televisor siguiendo las instrucciones que se
indican a continuación para evitar el riesgo de incendios,
descargas eléctricas u otros daños y/o lesiones.
Instalación
• Debe instalar el televisor cerca de una toma de corriente de fácil
acceso.
• Coloque el televisor sobre una superficie nivelada y estable para
evitar que pueda caerse y provocar daños personales o
materiales.
• Instale el televisor en lugares donde no pueda caerse ni sufrir
golpes.
• Instale el televisor de modo que el soporte de sobremesa del
televisor no sobresalga del soporte para TV (no suministrado). Si
el soporte de sobremesa sobresale del soporte para TV, el
televisor podría desequilibrarse, caerse y provocar daños
personales o estropearse.
• Por motivos de seguridad, asegúrese de colocar las cubiertas
centrales en la parte posterior del televisor si instala el televisor
sobre una superficie.
• La instalación en pared solo puede ser realizada por personal
cualificado.
• Por razones de seguridad, se recomienda utilizar accesorios
Sony como:
Soporte de pared SU-WL850
Soporte de pared SU-WL450
• Asegúrese de utilizar los tornillos suministrados con el Soporte
de pared al fijar el Soporte de pared al televisor. Los tornillos
suministrados han sido diseñados tal y como indica la
ilustración si se miden desde la superficie de colocación del
Soporte de pared.
El diámetro y longitud de los tornillos varían en función del
modelo de Soporte de pared.
Si utiliza otros tornillos, puede provocar un daño interno en el
televisor o éste puede caerse, etc.
Tran spo rte
• Desconecte todos los cables antes de transportar el televisor.
• Se necesitan dos o tres personas para transportar un televisor
grande.
• Al transportar el televisor manualmente, sujételo de la forma
descrita a continuación. No ejerza mucha presión sobre el panel
y el marco alrededor de la pantalla.
• Cuando manipule o monte el
televisor, no lo tumbe boca abajo.
• Durante el transporte, no someta
el televisor a sacudidas o vibraciones excesivas.
• Cuando transporte el televisor para repararlo o cuando lo
cambie de sitio, embálelo con la caja y el material de embalaje
originales.
Prevención de volcado
Ventilación
• Nunca obstruya, cubra ni inserte nada en los orificios de
ventilación del aparato.
• Deje espacio alrededor del televisor, tal y como se muestra a
continuación.
• Se recomienda utilizar el soporte de pared de Sony para que el
aire circule correctamente.
Instalación en la pared
3
ES
Page 30
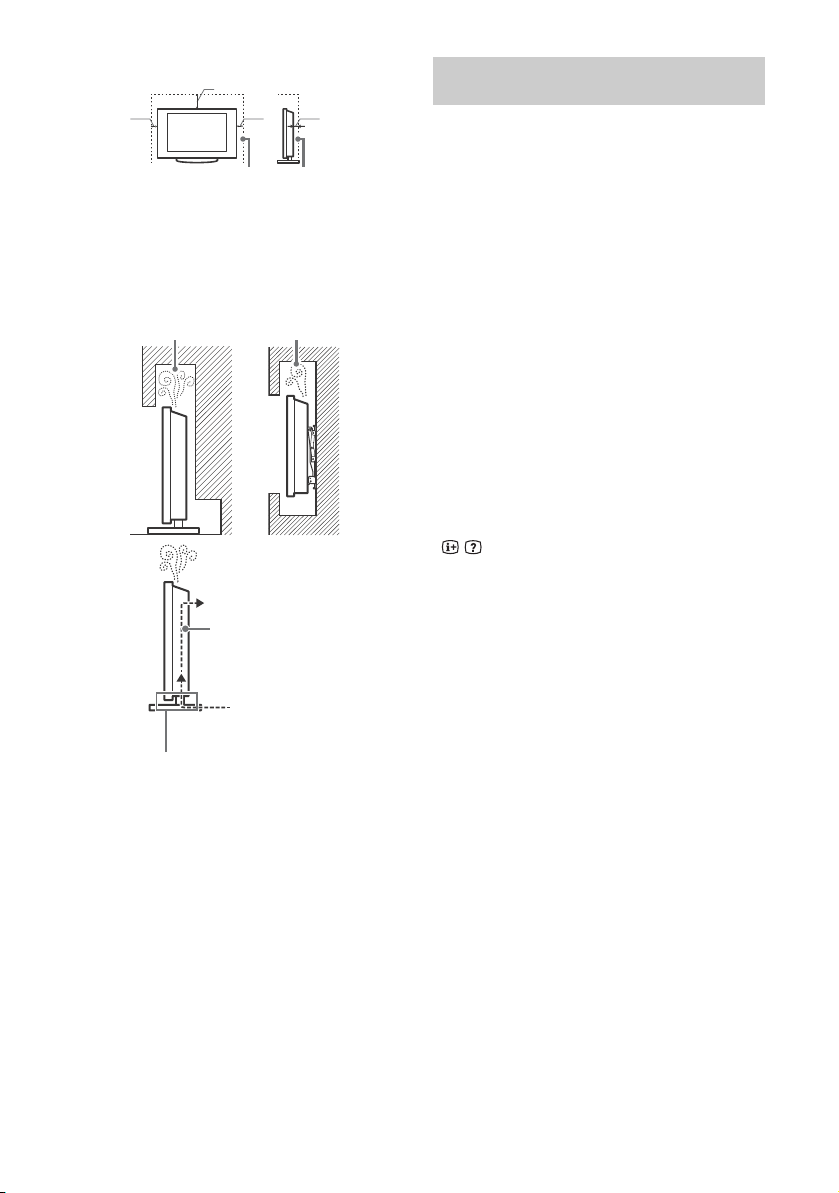
Instalación sobre pedestal
30 cm
10 cm
10 cm
Deje, como mínimo, estas distancias alrededor del televisor.
6 cm
No bloquee la zona de circulación de aire.
La circulación de aire
Pared
La circulación de aire queda obstruida.
Pared
• Para garantizar una ventilación apropiada y evitar la
acumulación de suciedad o polvo:
No instale el televisor boca arriba, boca abajo, hacia atrás ni
de lado.
No instale el televisor en un estante, sobre una alfombra,
sobre una cama o dentro de un armario.
No cubra el televisor con tejidos como cortinas, ni otros
objetos como periódicos, etc.
No instale el televisor como se muestra a continuación.
ES
4
Protección de la pantalla del televisor (Televisor OLED)
Precauciones para evitar daños en la pantalla
Retención de imagen
Los televisores OLED son propensos a retención de imagen
(quemado) debido a las características de los materiales
utilizados. Es posible que se produzca retención de imagen si las
imágenes aparecen en la misma ubicación de la pantalla
repetidamente o durante largo períodos de tiempo. Esto no es
una avería del televisor. Evite mostrar imágenes que puedan
causar retención de imagen.
A continuación puede ver algunos ejemplos de
imágenes que pueden causar retención de
imagen:
• Contenido con barras de color negro en la parte superior e
inferior y/o a la izquierda y a la derecha de la pantalla. (por
ejemplo, pantalla ancha, pantalla 4:3, definición Estándar)
• Imágenes estáticas como por ejemplo fotografías.
• Videojuegos que pueden tener contenido estático en alguna
parte de la pantalla.
• Menús en pantalla, guías de programas, logotipos de canal, etc.
• Contenido estático de aplicaciones.
• Teletipos en pantalla, como por ejemplo los utilizados para
noticias y titulares.
Para reducir el riesgo de retención de imagen:
• Sony recomienda apagar el televisor de forma normal pulsando
el botón de encendido del mando a distancia o el televisor.
• Ajuste la pantalla cambiando [Modo horizontal] para eliminar
las barras de color negro. Seleccione [Modo horizontal] en lugar
de [Normal].
• Apague la OSD (visualización en pantalla) pulsando el botón
/ y apague los menús del equipo conectado Para obtener
información, consulte los manuales de instrucciones para el
equipo conectado.
• Evite mostrar imágenes estáticas con colores brillantes (blanco
incluido), relojes o logotipos en cualquier parte de la pantalla.
• Establezca los ajustes de la imagen basándose en las
condiciones ambientales. La imagen estándar es recomendable
para uso doméstico y cuando visualice contenido que suele
mostrar los logotipos de emisoras, etc.
El televisor tiene las características siguientes para ayudar a
reducir/evitar retención de imagen.
Actualización del panel
Se ejecutará la actualización del panel automáticamente para
ajustar la uniformidad de la pantalla del televisor después de
haber estado en uso durante largos períodos de tiempo. La
actualización del panel también se puede realizar manualmente y
solo debe utilizarse si la retención de imagen es muy notable o si
aparece el siguiente mensaje: [La actualización del panel no ha
finalizado…]
Precaución:
• La función de actualización del panel puede afectar al panel.
Como referencia, realice la actualización del panel solo una vez
al año, no la realice más de una vez al año ya que puede afectar
a la vida útil del panel.
• La actualización del panel tarda aproximadamente una hora en
completa rse.
• Es posible que aparezca una línea de color blanco en la pantalla
durante la actualización del panel, esto no es una avería del
televisor.
• La actualización del panel solo funcionará cuando la
temperatura de la sala se encuentre entre 10 ºC y 40 ºC.
Desplazamiento de píxeles
Mueve automáticamente la imagen de la pantalla para evitar
retención de imagen.
Otras características
El brillo de la pantalla se reduce automáticamente al mostrar
imágenes fijas, relojes, colores brillantes o logotipos, etc.
Page 31
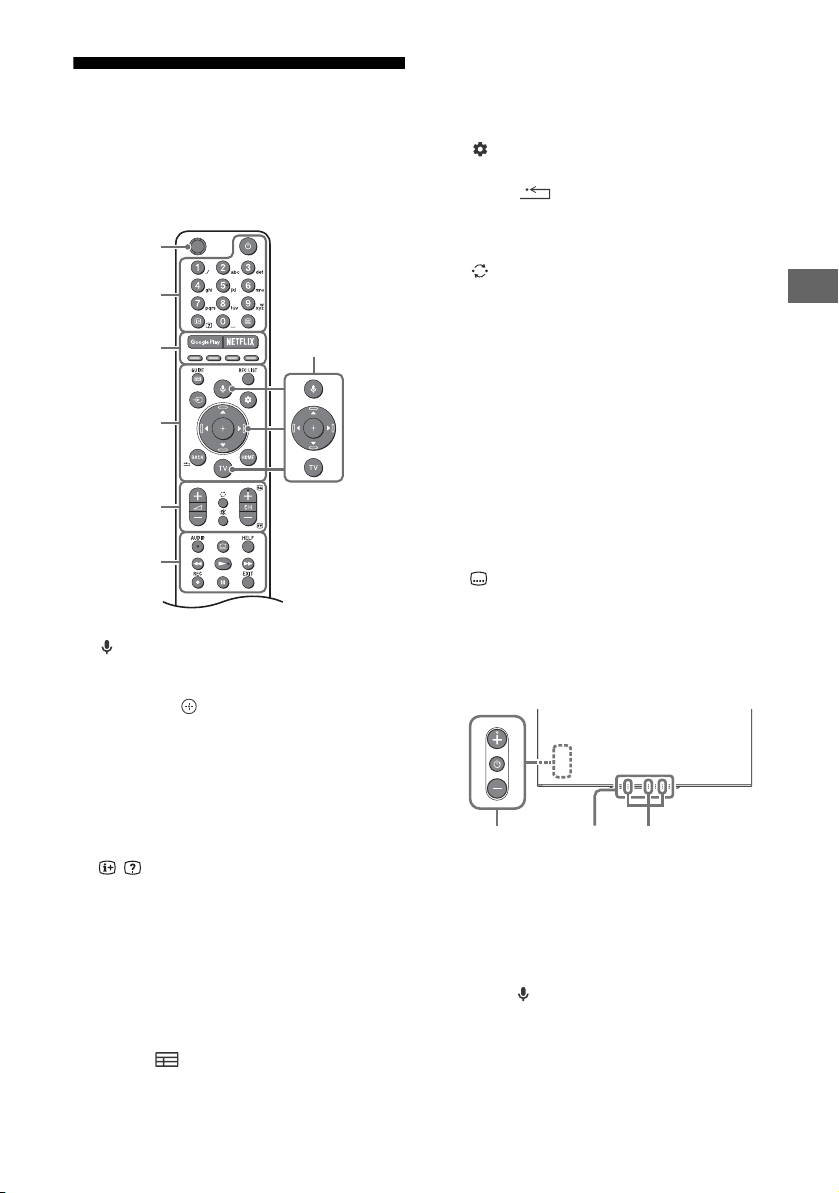
ES
Sugerencia
MIC
Ȫ
ȫ
Ȭ
ȭ
Ȯ
ȩ
ȯȱ
Mando a distancia y televisor
La forma del mando a distancia, la posición,
la disponibilidad y la función de los botones
del mando a distancia pueden variar en
función del país, la región o el modelo de
televisor.
(Micrófono): Utilice la búsqueda por voz.
(Por ejemplo, puede buscar distintos
contenidos a través de comandos de voz.)*
//// (D-Pad direccional):
Navegación y selección de menús en
pantalla.
TV: Permite cambiar a un canal de televisión
o a una entrada y ver el menú del TV.
(Modo en espera del televisor)
Botones numéricos
/ (Información/datos de texto):
Permite acceder a información.
(Texto):
de texto.
Google Play
NETFLIX (solo en algunos países/
regiones/modelos de televisor)
Botones de colores
GUIDE/ :
digitales o el EPG del decodificador de
cable/satélite*2.
Permite acceder a información
Visualice la guía de programas
REC LIST: Visualice la lista de grabación de
USB HDD o DVR*2.
(Selección de la entrada): Permite ver
y seleccionar la fuente de entrada u otras.
(Configuración rápida): Visualice la
configuración rápida.
BACK/
HOME
+/– (Volumen)
(Saltar)
(Silenciamiento)
• El servicio de atajos de accesibilidad se puede
activar o desactivar si se presiona y se mantiene
.
CH +/–//
En el modo televisión: Permite seleccionar el
canal.
En el modo texto: Permite seleccionar la
página siguiente () o la página anterior
().
AUDIO: Seleccione el sonido de la fuente
multilingüe o el sonido dual (según la fuente
del programa).
(Ajuste de subtítulos)
Permite acceder al menú de ayuda.
HELP:
///
REC:
Grabe el programa que está
1
mirando en el USB HDD o el DVR*2.
EXIT
(Alimentación)
Sensor del mando a distancia / Sensor
de luz / LED de iluminación
1*3
Micrófono integrado*
habilitar el micrófono integrado, pulse el
botón (micrófono) en el mando a
distancia y, luego, siga las instrucciones en
pantalla. Para obtener más información,
consulte la Guía de ayuda.
/ LED: Para
ES
5
Page 32

*1 La función de búsqueda por voz requiere una
conexión a Internet.
*2 El ajuste de [Configuración del decodificador de
cable/satélite] es necesario (solo en algunos países/
regiones/modelos de televisor). Para obtener más
información, consulte la Guía de ayuda.
*3 Solo en algunos países/regiones/idiomas. El
consumo de energía en espera aumenta cuando se
activa la función de búsqueda por voz con el
micrófono integrado.
ES
6
Page 33
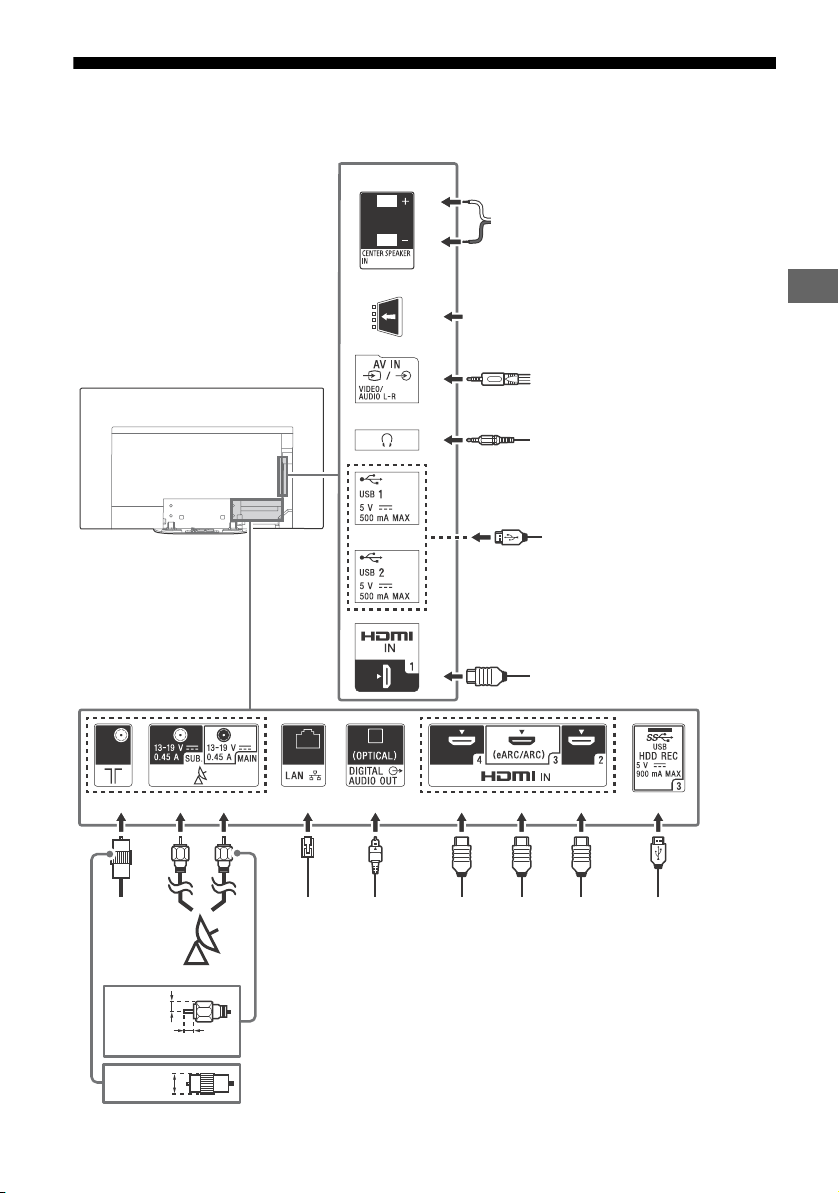
ES
Diagrama de conexiones
<
<
<
ȭȯ
Ȫ
ȩ
ȫ
Ȭ
ȭ
Ȯ
Cable/
Antena/
Decodificador
Router
Satélite
Auricular
7 mm
Dispositivo HDMI
Dispositivo
HDMI
Video-grabadora/Equipo de
videojuego/Reproductor de DVD/
Cámara de vídeo/Decodificador*
1
14 mm
Módulo de acceso condicional
Dispositivo
HDMI
Sistema
de audio
con
entrada
de audio
óptica
Receptor de AV
Cámara de capturas
digitales/ Cámara
de vídeo/Soporte
de almacenamiento
USB/Dispositivo
HDD USB
Cámara de capturas digitales/
Cámara de vídeo/ Soporte de
almacenamiento USB
Sistema
de audio
con
dispositivo
eARC/
ARC/
HDMI
1,5 mm
Para obtener más información sobre las conexiones, pulse HELP en el mando a distancia para
consultar la Guía de ayuda.
ES
7
Page 34
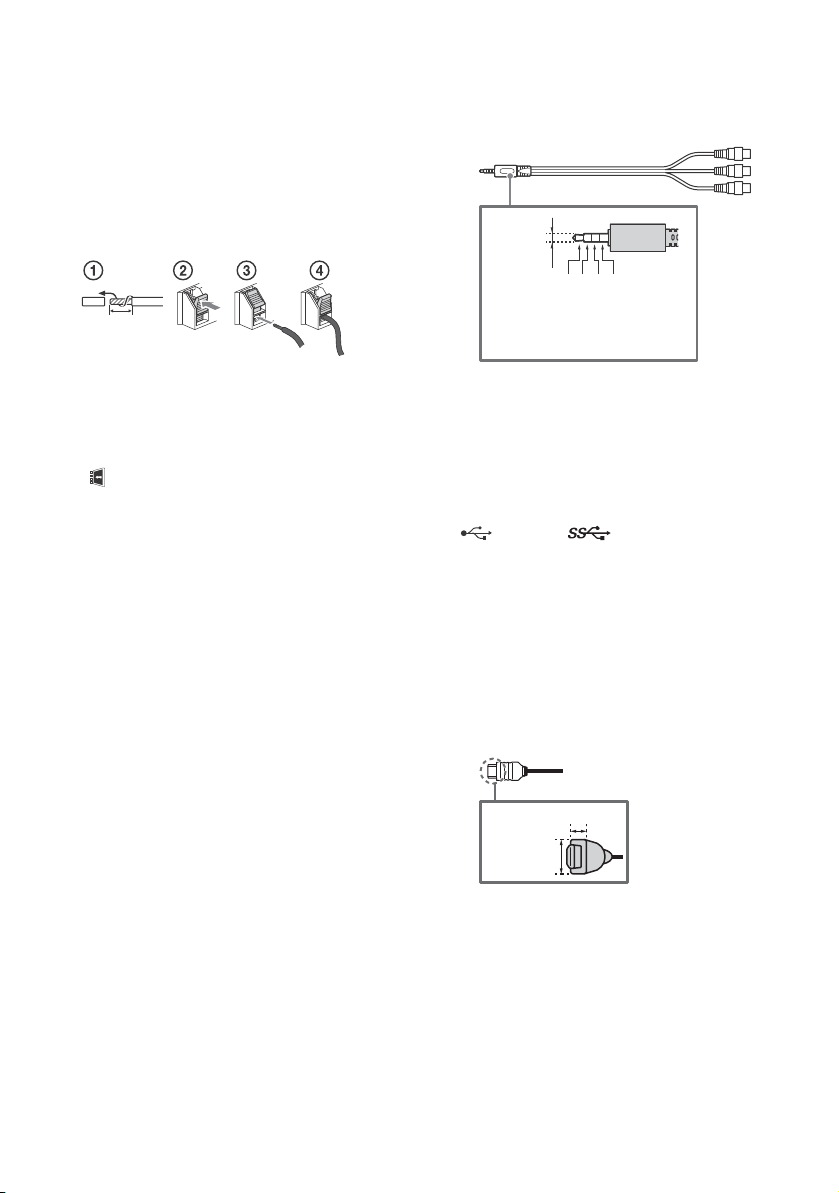
CENTER SPEAKER IN
10 mm
3,5 mm
1234
1: L
2: Vídeo
3: Tierra
4: R
< 12 mm
< 21 mm
• Para utilizar los altavoces del televisor
como altavoz central, conecte la salida de
su receptor de AV a la entrada CENTER
SPEAKER IN de su televisor.
• Antes de conectar los cables, desconecte
el cable de alimentación tanto del
televisor como del receptor de AV.
• Asegúrese de que [Altavoz] está
configurado como [Sistema de Audio].
Para evitar los silbidos cuando no se conecta
la toma CENTER SPEAKER IN a un receptor
AV, desactive el [Modo altavoz central de
TV]. Para obtener más información, consulte
la Guía de ayuda.
CAM (módulo de acceso condicional)
• Permite acceder a servicios de televisión
de pago. Para obtener más información,
consulte el manual de instrucciones
suministrado con su CAM.
• No inserte la tarjeta inteligente
directamente en la ranura CAM del
televisor. Debe colocarse en el módulo de
acceso condicional proporcionado por su
distribuidor autorizado.
• No es posible utilizar la tecnología CAM en
algunos países y zonas. Consúltelo a su
distribuidor autorizado.
• Es posible que aparezca un mensaje del
CAM al acceder a un programa digital
después de utilizar el vídeo por Internet.
/ AV IN
• Para una conexión compuesta, use un
cable de extensión analógico (no
suministrado).
•
(Auricular)
• Soporta solo mini conector estéreo de
3 polos.
• No es posible emitir sonido desde el
auricular y los altavoces del televisor al
mismo tiempo.
USB 1/2, USB 3 (HDD REC)*
• La conexión de un dispositivo USB grande
puede interferir con otros dispositivos
conectados que tenga al lado.
• Cuando tenga que conectar un dispositivo
USB grande, conéctelo a la toma USB 1.
• Conecte un dispositivo HDD USB al puerto
USB 3 (azul).
HDMI IN 1/2/3/4
• La interfaz HDMI es capaz de transmitir el
vídeo y el audio digital por un solo cable.
•
2
ES
8
Page 35
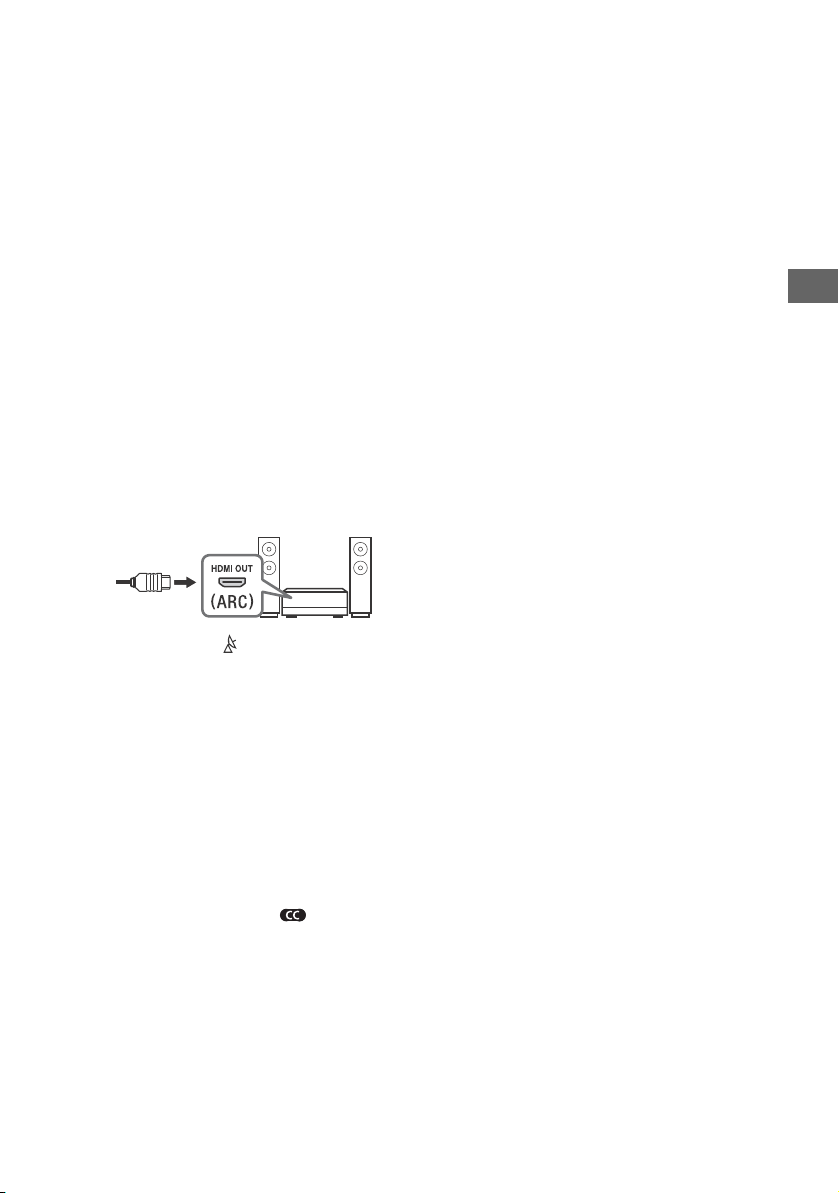
ES
Nota
• Para disfrutar de contenidos 4K 50p/60p
de alta calidad, conecte un cable HDMI
premium de alta velocidad y cambie
[Formato de señal HDMI] a [Formato
mejorado].
Realice este ajuste individualmente para
cada terminal HDMI IN conectado. Para
obtener más información sobre los
formatos compatibles, consulte
“Especificaciones“ en este manual (página
13-14).
• HDMI IN 3 eARC/ARC (Enhanced Audio
Return Channel/Audio Return Channel)
Conecte su sistema de audio a HDMI IN 3
para enviar el audio del televisor a su
sistema de audio. Un sistema de audio
que admita HDMI eARC/ARC es capaz de
enviar la señal de vídeo al televisor y
recibir el audio del televisor por el mismo
cable HDMI. Si su sistema de audio no
admite HDMI eARC/ARC, necesitará una
conexión adicional con DIGITAL AUDIO
OUT (OPTICAL).
• Use el cable HDMI con Ethernet para
conectar el sistema de audio con eARC.
(Entrada RF), (Entrada de satélite)
• Conexiones para televisión terrestre/cable
y satélite. Pasos para la conexión: SUB.
MAIN Antena
• Para el conector SUB., conéctelo solo
cuando utilice el modo de sintonizador
doble excepto para Distribución de cable
único EN50494.
*1 Para un dispositivo externo que solo dispone de
SCART AV OUT, utilice un adaptador SCART-RCA y un
cable de extensión analógico.
*2 Solo en algunos países/regiones/modelos de
televisor.
• No puede montar la tapa lateral mientras hay
cables conectados al terminal lateral.
• Guarde la tapa lateral en un lugar seguro para
utilizarla más adelante.
ES
9
Page 36

Instalación del televisor en una pared
Utilización del Soporte de pared opcional (SU-WL850 o SU-WL450)
Para los clientes:
Por motivos de protección del producto y de seguridad, Sony recomienda dejar la instalación del
televisor en manos de distribuidores Sony o proveedores autorizados. Nunca intente realizar la
instalación sin ayuda.
Para proveedores y distribuidores Sony:
Preste especial atención a la seguridad durante la instalación, el mantenimiento periódico y las
revisiones de este producto.
Información para la instalación del soporte de pared
El manual de instrucciones de este televisor solo muestra los pasos para preparar la instalación del
televisor antes del montaje en la pared.
Para obtener instrucciones acerca de la instalación del Soporte de pared, consulte la información de
instalación (Soporte de pared) en la página del producto de su modelo de televisor.
www.sony.eu/support/
Preparación de la instalación en pared
Utilice el soporte de pared SU-WL850 (no suministrado) o SU-WL450 (no suministrado) para instalar el
televisor en la pared.
Asegúrese de montar el soporte de sobremesa antes de instalar el televisor en la pared según las
instrucciones de la Guía de referencia.
• Prepare el TV para el Soporte de pared antes de realizar las conexiones de cables.
• Siga el manual de instrucciones incluido con el soporte de pared para su modelo. Se requiere cierto
nivel de experiencia para instalar el TV, sobre todo para determinar si la pared tiene la fuerza
suficiente para soportar el peso del TV.
• Deje siempre la instalación de este producto en la pared en manos de distribuidores Sony o
proveedores autorizados y preste especial atención a la seguridad durante la instalación. Sony no se
hace responsable de daños o lesiones provocados por una manipulación o una instalación
incorrectas.
• Los tornillos para el soporte de pared no están incluidos.
• Asegúrese de almacenar los tornillos que no utilice y el Soporte de sobremesa en un lugar seguro
hasta que esté preparado para instalar de nuevo el Soporte de sobremesa. Mantenga los tornillos
alejados de los niños.
10
ES
Page 37
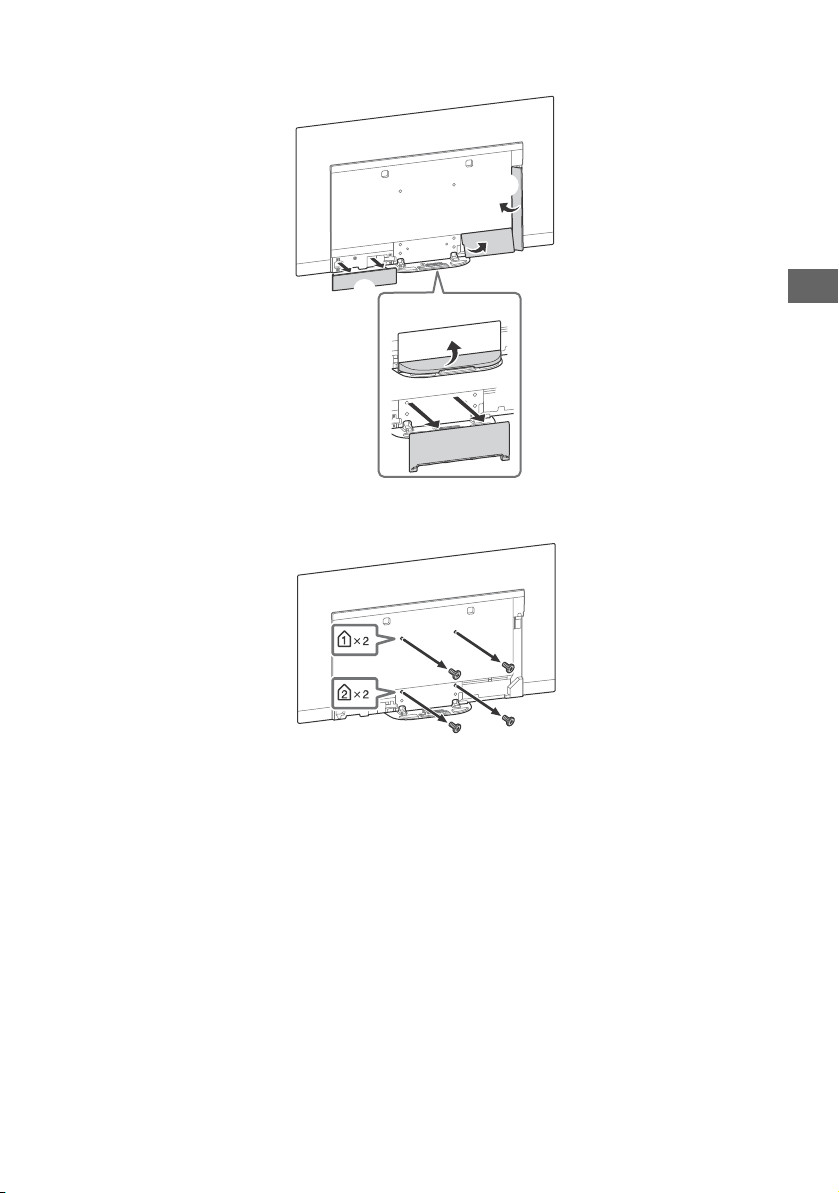
ES
ʕ
1 Retire la tapa de la base y las tapas de los terminales.
2 Retire los tornillos de la parte trasera del televisor.
ES
11
Page 38

Solución de problemas
Para la solución de problemas generales en
situaciones como, por ejemplo, pantalla negra,
no hay sonido, imagen congelada, el televisor
no responde o la conexión de red se ha perdido,
realice los pasos siguientes.
1 Reinicie el televisor pulsando el botón de
encendido en el mando a distancia hasta que
aparezca un mensaje. El televisor se
reiniciará. Si el televisor no se recupera,
intente desenchufar el cable de corriente.
Luego presione el botón de encendido del
televisor y espere dos minutos; luego vuelva
a conectar el cable de electricidad.
2 Para consultar el menú Ayuda, pulse HELP en
el mando a distancia.
3 Conecte el televisor a Internet y realice una
actualización de software. Sony recomienda
actualizar siempre el software del televisor.
Las actualizaciones de software mejoran el
rendimiento del televisor y añaden nuevas
funciones.
4 Visite el sitio web de soporte de Sony
(encontrará la información en la portada de
este manual).
Al conectar el televisor, es posible que no se
encienda aunque pulse el botón de
encendido del mando a distancia o del
televisor.
El sistema tarda un tiempo en inicializarse.
Espere aproximadamente un minuto y vuelva a
intentarlo.
Problemas y soluciones
Cuando el LED de iluminación parpadea en
rojo.
Cuente las veces que ha parpadeado (el intervalo
de tiempo es de tres segundos).
Reinicie el televisor desconectándolo de la
corriente hasta que el LED de iluminación deje de
emitir destellos rojos; luego encienda el televisor.
Si el problema continúa, desconecte el cable de
alimentación y póngase en contacto con su
distribuidor o centro de servicio Sony e indique
las veces que el LED de iluminación ha
parpadeado.
No se recibe el servicio terrestre/cable.
Revise la conexión de la antena/cable y la
configuración del sintonizador.
Seleccione el servicio de cable/tierra presionando
TV en el control remoto y luego seleccione
[Digital] si el servicio de transmisión no se
muestra.
La señal terrestre puede quedar anulada si está
cerca de otra señal intensa. Ajuste
[LNA (Canal ---)] a [No] en los ajustes de
sintonización digital.
Después de mudarse a un nuevo hogar o intentar
recibir nuevos servicios, seleccione [Sintonización
Digital] para probar un servicio.
No se recibe el servicio de satélite.
Revise la conexión del cable de satélite.
Cuando aparezca el mensaje [Sin señal. Se
detecta sobrecarga en el LNB…], desenchufe el
cable de alimentación. A continuación, asegúrese
de que el cable de satélite no esté dañado y que
la línea de la señal de satélite no esté
cortocircuitada en el conector de satélite.
El mando a distancia no funciona.
Cambie las pilas.
Se ha olvidado la contraseña del bloqueo
paterno de emisión.
Introduzca el código PIN 9999 y seleccione
[Cambiar el código PIN].
La carcasa del televisor se calienta.
Cuando se utiliza el televisor durante un largo
período de tiempo, la carcasa del televisor se
calienta. Es posible que note el calor si la toca con
la mano.
La pantalla se oscurece mientras ve el
televisor.
Si toda la pantalla o parte de la imagen se queda
fija, el brillo de la pantalla se reducirá
gradualmente para evitar retención de imagen.
Esto no es una avería del televisor.
ES
12
Page 39
ES
Nota
Le preocupa la retención de imagen.
Si aparece la misma imagen repetidamente o
durante largos períodos de tiempo, es posible
que se produzca retención de imagen. Para
reducir la retención de imagen, recomendamos
apagar el televisor pulsando el botón de
apagado del mando a distancia o del televisor.
• Realice una actualización manual del panel solo si la
retención de imagen es especialmente notable. Como
referencia, realícela solo una vez al año. Evite
realizarla más de una vez al año porque puede
afectar a la vida útil del panel.
• Las imágenes que incluyen relojes, logotipos y
colores brillantes (blanco incluido) causan fácilmente
retención de imagen. Evite mostrar estos tipos de
imágenes durante largos períodos de tiempo, de lo
contrario es posible que se produzca retención de
imagen.
Aparece una línea de color blanco en la
pantalla.
La actualización del panel se ejecuta
automáticamente tras utilizar el televisor durante
largos períodos de tiempo para reducir la
retención de imagen. La actualización del panel
comienza tras apagar el televisor y tarda
aproximadamente una hora en completarse. Es
posible que aparezca una línea de color blanco en
la pantalla durante la actualización del panel. Esto
no es una avería del televisor.
Aparece el mensaje [La actualización del
panel no ha finalizado…].
La actualización del panel se ejecuta
automáticamente tras utilizar el televisor
durante largos períodos de tiempo para reducir
la retención de imagen. Si el televisor se
enciende, el cable de alimentación está
desenchufado, o la temperatura de la sala cae
fuera del intervalo entre 10 ºC y 40 ºC durante la
actualización del panel, el proceso no se
completará y aparecerá este mensaje.
Si la actualización del panel comenzó
automáticamente, se reiniciará cuando apague el
televisor con el mando a distancia.
Si la operación de Actualización del panel se ha
iniciado manualmente, debe seleccionarla de
nuevo.
Especificaciones
Sistema
Sistema de panel
Panel OLED (Diodo emisor de luz orgánica)
Sistema de televisión
Según el país/selección de área/modelo de televisor
Analógico: B/G, D/K, I
Digital: DVB-T/DVB-C
DVB-T2*
Satélite*1: DVB-S/DVB -S2
Sistema de color
PAL/SECAM/NTSC3.58 (Solo video)/NTSC4.43 (Solo video)
Cobertura de canales
Según el país/selección de área/modelo de televisor
Analógico: UHF/VHF/Cable
Digital: UHF/VHF/Cable
Satélite*
Salida de sonido
20 W + 20 W + 10 W + 10 W
Tecnología inalámbrica
Protocolo IEEE802.11ac/a/b/g/n
(Es posible que IEEE802.11ac no esté disponible en función de
los países/regiones.)
Bluetooth versión 4.2
Bandas de frecuencia
Intervalo de frecuencias Potencia de salida
Intervalo de frecuencias Potencia de salida
RMF-TX600E
Intervalo de frecuencias Potencia de salida
Versión del software
Este equipo de radio está diseñado para ser usado con las
versiones aprobadas del software que se indican en la
Declaración de Conformidad de la UE.
Para conocer la versión del software pulse HELP en el mando a
distancia.
Mando a distancia: _._.__.___
Seleccione [Control remoto] [Versión del software] en
[Ajustes]. Para obtener más información, consulte la Guía de
ayuda.
El software cargado en este equipo de radio está verificado y
cumple con los requisitos esenciales de la Directiva 2014/53/
EU.
Conectores de entrada/salida
Antena/Cable
Terminal externo de 75 ohmios para VHF/UHF
Antena de satélite*
Conector tipo F hembra, 75 ohmios.
DiSEqC 1.0, LNB 13 V/18 V y tono de 22 kHz, Distribución de
cable único EN50494.
/ AV IN
Entrada de vídeo/audio (miniconector)
1
1
: Frecuencia IF 950-2 150 MHz
LAN inalámbrica (IEEE802.11ac/a/b/g/n)
2 400 - 2 483,5 MHz < 20,0 dBm
5 150 - 5 250 MHz < 23,0 dBm
5 250 - 5 350 MHz < 20,0 dBm
5 470 - 5 725 MHz < 20,0 dBm
5 725 - 5 850 MHz < 13,9 dBm
Bluetooth
2 400 - 2 483,5 MHz < 10,0 dBm
Bluetooth
2 400 - 2 483,5 MHz < 10,0 dBm
1
ES
13
Page 40

HDMI IN 1/2/3/4 (compatibles con resolución 4K,
Nota
Compatible con HDCP 2.3)
Vídeo:
4096 × 2160p (50, 60 Hz)*
2160p (50, 60 Hz)*
50, 60, 100, 120 Hz), 1080/24p, 1080i (50, 60 Hz), 720p (30, 50,
60 Hz), 720/24p, 576p, 480p, Formatos de PC*
Audio:
En el modo eARC (Enhanced Audio Return Channel)*
Consulte la Guía de ayuda para obtener más detalles.
Excepto en el modo eARC
PCM lineal de 5,1 canales: 32/44,1/48/88,2/96/176,4/192
kHz 16/20/24 bits, Dolby Digital, Dolby Digital Plus y DTS
eARC/ARC (Enhanced Audio Return Channel/Audio Return
Channel) (sólo HDMI IN 3)
En el modo eARC*
Consulte la Guía de ayuda para obtener más detalles.
En el modo ARC
PCM lineal de dos canales: 48 kHz 16 bits, Dolby Digital, Dolby
Digital Plus, DTS
DIGITAL AUDIO OUT (OPTICAL)
Toma digital óptica (PCM lineal de dos canales: 48 kHz 16 bits,
Dolby Digital, DTS)
(mini conector estéreo)
Auricular
1, 2, 3 (HDD REC)*
Puerto para dispositivo USB. ( 3 dispositivo HDD USB para
función REC)
Los puertos USB 1 y 2 son compatibles con USB de alta
velocidad (USB 2.0)
El puerto USB 3 es compatible con Super Speed USB (USB 3.1
Gen 1)
Ranura CAM (módulo de acceso condicional)
LAN
Conector 10BASE-T/100BASE-TX (La velocidad de conexión
puede variar según el entorno operativo de la red. No se
garantizan la frecuencia y la calidad de comunicación).
CENTER SPEAKER IN
Terminal de entrada de altavoz central
2*3
, 4096 × 2160p (24 Hz)*2, 3840 ×
3
, 3840 × 2160p (24, 25, 30 Hz), 1080p (30,
4
5
6
5
Otros
Accesorios opcionales
Soporte de pared : SU-WL850
Soporte de pared : SU-WL450
Temperatura de funcionamiento
0 °C – 40 °C
Humedad de funcionamiento
10 % - 80 % RH (sin condensación)
Alimentación, ficha de producto y otros
Requisitos de alimentación
220 V - 240 V CA, 50 Hz
Categoría de eficiencia energética
KD-77AG9: A
KD-65AG9: B
KD-55AG9: B
Tamaño de la pantalla (medida diagonalmente) (Aprox.)
KD-77AG9: 194,7 cm / 77 pulgadas
KD-65AG9: 163,9 cm / 65 pulgadas
KD-55AG9: 138,8 cm / 55 pulgadas
Consumo de energía
En el modo [Estándar]
KD-77AG9: 211 W
KD-65AG9: 169 W
KD-55AG9: 132 W
En el modo [Viva]
KD-77AG9: 674 W
KD-65AG9: 490 W
KD-55AG9: 394 W
Consumo de energía anual*
KD-77AG9: 293 kWh por año
KD-65AG9: 234 kWh por año
KD-55AG9: 183 kWh por año
7
Consumo de energía en modo de espera*8*
KD-77AG9: 0,50 W (29 W en el modo de actualización del
software/EPG)
KD-65AG9: 0,50 W (27 W en el modo de actualización del
software/EPG)
KD-55AG9: 0,50 W (27 W en el modo de actualización del
software/EPG)
Resolución de la pantalla
3 840 puntos (horizontal) × 2 160 líneas (vertical)
Potencia de salida
USB 1/2
5 V , 500 mA MÁX
USB 3
5 V , 900 mA MÁX
9
Dimensiones (Aprox.) (an × al × prf)
con el soporte de sobremesa
KD-77AG9: 172,1 × 100,1 × 30,2 cm
KD-65AG9: 144,7 × 83,8 × 25,5 cm
KD-55AG9: 122,6 × 71,4 × 25,5 cm
sin el soporte de sobremesa
KD-77AG9: 172,1 × 99,6 × 4,9 cm
KD-65AG9: 144,7 × 83,4 × 4,0 cm
KD-55AG9: 122,6 × 71,0 × 4,0 cm
Peso (Aprox.)
con el soporte de sobremesa
KD-77AG9: 39,7 kg
KD-65AG9: 24,8 kg
KD-55AG9: 22,3 kg
sin el soporte de sobremesa
KD-77AG9: 35,3 kg
KD-65AG9: 21,2 kg
KD-55AG9: 18,7 kg
*1 No todos los televisores cuentan con la tecnología DVB-T2 o
DVB-S/S2 o un terminal de antena satélite.
*2 Si se introduce 4096 × 2160p y [Modo horizontal] se cambia a
[Normal], la resolución mostrada será 3840 × 2160p. Para ver
4096 × 2160p, cambie el ajuste de [Modo horizontal] a
[Completo 1] o [Completo 2].
*3 Para admitir los 18 Gbps, cambie [Formato de señal HDMI] a
[Formato mejorado].
*4 Consulte la Guía de ayuda para obtener más detalles.
*5 El modo eARC está activo cuando [Modo eARC] está ajustado
en [Auto], [Altavoz] en [Sistema de Audio] y se conecta un
sistema de audio compatible con eARC.
*6 Solo en algunos países/regiones/modelos de televisor.
*7 Consumo de energía en kWh al año, con el televisor
funcionando 4 horas al día durante 365 días.
El consumo de energía real depende de la frecuencia de uso
del televisor.
*8 El consumo de energía en modo de espera especificado se
alcanza cuando el televisor termina los procesos internos
necesarios.
*9 El consumo de energía en espera aumenta si el televisor está
conectado a la red.
• No retire la tarjeta simulada ni la tapa (depende del modelo de
TV) de la ranura TV CAM (módulo de acceso condicional) a
menos que vaya a introducir una tarjeta inteligente alojada en
un CAM.
• La disponibilidad de los accesorios opcionales depende del
país, la región, el modelo de televisor y las existencias.
• El diseño y las especificaciones están sujetos a cambios sin
previo aviso.
Nota sobre la función de Televisión digital
• Es posible que los servicios interactivos y las funciones de la
red de televisión digital (DVB terrestre, por satélite o por cable)
no estén disponibles en todos los países o regiones. Es posible
que algunas funciones estén inhabilitadas o que no funcionen
correctamente con algunos proveedores y entornos de red.
Algunos proveedores de servicio de televisión pueden cobrar
una tarifa por sus servicios.
ES
14
Page 41

ES
• Este televisor es compatible con emisiones digitales con
codificación MPEG-2, H.264/MPEG-4 AVC y H.265/HEVC,
aunque no es posible garantizar la compatibilidad con todos
los operadores y señales de servicio, dado que con el tiempo
pueden variar.
Información sobre las marcas comerciales
• Los términos HDMI y HDMI High-Definition Multimedia
Interface, y el Logotipo HDMI son marcas comerciales o marcas
registradas de HDMI Licensing Administrator, Inc. en los
Estados Unidos y en otros países.
• Dolby, Dolby Vision, Dolby Audio y el símbolo de la doble D son
marcas comerciales de Dolby Laboratories. Fabricado con la
licencia de Dolby Laboratories. Documentos confidenciales sin
publicar. Copyright © 1992-2015 Dolby Laboratories. Todos los
derechos reservados.
• “BRAVIA”, y BRAVIA Sync son marcas comerciales o
marcas registradas de Sony Corporation.
• Gracenote, el símbolo y el logotipo de Gracenote y el logotipo
“Powered by Gracenote” son marcas comerciales registradas o
marcas comerciales de Gracenote, Inc. en Estados Unidos y/u
otros países.
• Vewd® Core. Copyright 1995-2019 Vewd Software AS. All rights
reser ved.
• Google, Google Play, Chromecast, YouTube, Android TV y otras
marcas y logotipos relacionados son marcas comerciales de
Google LLC.
• Wi-Fi®, Wi-Fi Alliance® y Wi-Fi Direct® son marcas registradas
de Wi-Fi Alliance.
• El logotipo Wi-Fi CERTIFIED™ es una marca de certificación de
Wi-Fi Alliance.
• Para obtener información sobre las patentes DTS, consulte
http://patents.dts.com. Fabricado con licencia de DTS, Inc.
DTS, su símbolo y DTS y el símbolo son marcas comerciales
registradas y DTS Digital Surround es una marca co mercial de
DTS, Inc. © DTS, Inc. Todos los derechos reservados.
• Los logotipos y el nombre de la marca Bluetooth® son marcas
registradas propiedad de Bluetooth SIG, Inc. y el uso de dichas
marcas por parte de Sony Corporation es siempre con la
licencia correspondiente. El resto de marcas comerciales y
nombres comerciales son propiedad de sus respectivos
propietarios.
• Netflix es una marca comercial registrada de Netflix, Inc.
• DiSEqC™ es una marca comercial de EUTELSAT. Este televisor
es compatible con DiSEqC 1.0. Este televisor no está diseñado
para controlar antenas motorizadas.
• TUXERA es una marca comercial registrada de Tuxera Inc. en
los EEUU y otros países.
• El símbolo del tridente de USB SuperSpeed de USB-IF es una
marca com ercial registrada de USB Implementers Forum, Inc.
• Todas las demás marcas comerciales son propiedad de sus
respectivos propietarios.
ES
15
Page 42
Opmerkingen
Zie de
installatiehandleiding voor
het bevestigen van de
tafelstandaard.
Inhoudsopgave
BELANGRIJK BERICHT . . . . . . . . . . . . . . . . . . .2
Veiligheidsinformatie. . . . . . . . . . . . . . . . . . . 3
Het TV-scherm beschermen (OLED TV) . . . .4
Afstandsbediening en tv. . . . . . . . . . . . . . 5
Aansluitschema . . . . . . . . . . . . . . . . . . . . . 7
De televisie op de wand installeren. . . . 10
De optionele Wandmontagesteun
gebruiken (SU-WL850 of SU-WL450) . . . . . 10
Problemen oplossen . . . . . . . . . . . . . . . . 12
Problemen en oplossingen . . . . . . . . . . . . . 12
Specificaties . . . . . . . . . . . . . . . . . . . . . . . 13
Internetverbinding en privacy van de gegevens
Dit product maakt, zodra een netwerk is aangesloten,
verbinding met het internet bij de eerste instelling om de
internetverbinding te bevestigen en later om het homescherm
te configureren. Hiervoor en voor alle andere
internetverbindingen wordt uw IP-adres gebruikt. Als u wilt dat
uw IP-adres helemaal niet wordt gebruikt, moet u de draadloze
internetfunctie niet instellen en geen internetkabel aansluiten.
Zie hiervoor de privacyinformatie die op de instelschermen
wordt weergegeven voor meer details over de
internetverbinding.
Inleiding
Bedankt dat u hebt gekozen voor dit Sony product.
Alvorens de televisie te gebruiken, dient u deze handleiding
volledig door te lezen. Bewaar de handleiding voor raadpleging in
de toekomst.
• Lees voor het bedienen van de televisie de
"Veiligheidsinformatie" (pagina 3).
• Lees de meegeleverde veiligheidsinformatie voor extra
informatie over veiligheid.
• De afbeeldingen en illustraties die in de installatiehandleiding
en de handleiding worden gebruikt, gelden uitsluitend als
referentie en kunnen van het actuele product afwijken.
Help
U kunt meer informatie over probleemoplossing en andere
handige tips direct op uw televisie vinden. Druk op de
afstandsbediening op HELP voor een lijst met onderwerpen of
om op trefwoord te zoeken.
Helpgids (handleiding)
Selecteer voor meer gedetailleerde informatie [Helpgids] in
het helpmenu op uw televisie. U kunt ook de helpgids bekijken
op uw pc of smartphone (informatie aangegeven op de
achterkant van deze handleiding).
Locatie van het identificatielabel
Het label met het modelnummer, de productiedatum (jaar/
maand) en de voedingsklasse bevinden zich op de achterkant van
de tv en verpakking. U kunt ze vinden door de afdekking van de
standaard te verwijderen .
BELANGRIJK BERICHT
Opmerking voor
radioapparatuur
Hierbij verklaart Sony Visual Products Inc.
dat de types radioapparatuur
KD-77AG9, KD-65AG9, KD-55AG9 conform zijn met Richtlijn 2014/
53/EU. De volledige tekst van de EU-conformiteitsverklaring kan
worden geraadpleegd op het volgende internetadres:
http://www.compliance.sony.de/
Opmerking voor klanten: de volgende informatie is enkel van
toepassing voor apparaten die verkocht worden in landen die de
EU-richtlijnen in acht nemen.
Voor deze radioapparatuur gelden in AT, BE, HR, CY, CZ, DK, EE, FI,
FR, DE, EL, HU, IE, IT, LV, LT, LU, MT, NL, PL, PT, SK, SI, ES, SE, UK, IS,
LI, NO, CH, BG, RO, TR, AL, BA, MK, MD, RS, ME en Kosovo de
volgende beperkingen op het in gebruik nemen of op de
voorschriften voor toestemming tot het gebruik:
de 5.150-5.350 MHz-band mag uitsluitend binnen worden
gebruikt.
NL
2
Page 43
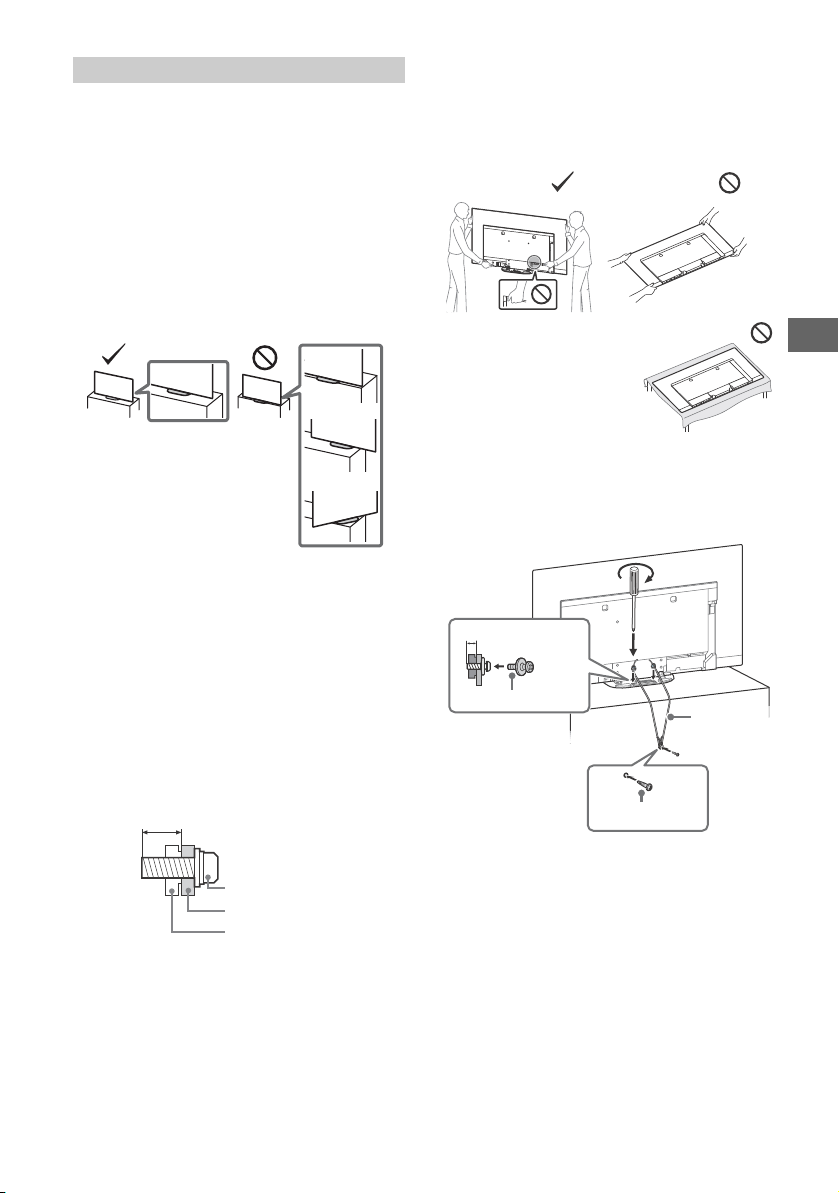
NL
Schroef (M6)
Wandmontagesteun
9 mm - 13 mm
Achterpaneel van de televisie
M4 Schroef (niet bijgeleverd)
1,5 N·m
{15 kgf·cm}
Schroef (niet
bijgeleverd)
6 mm - 7 mm
Kabel (niet
bijgeleverd)
Veiligheidsinformatie
Installatie/configuratie
Installeer en gebruik de televisie volgens de instructies hieronder
om het risico op brand, elektrische schok, schade en/of letsel te
vermijden.
Installatie
• Het televisietoestel moet in de buurt van een goed toegankelijk
stopcontact worden geplaatst.
• Plaats de televisie op een stabiel, horizontaal oppervlak om te
vermijden dat hij valt en persoonlijk letsel of schade aan
eigendommen veroorzaakt.
• Zet de televisie op een plaats waar er niet aan getrokken of
tegen geduwd kan worden, en waar deze niet omver kan vallen.
• Plaats de tv zo dat de tv-standaard niet buiten de rand van het
televisiemeubel (niet bijgeleverd) steekt. Als de tv-standaard
buiten de rand van het televisiemeubel steekt, kan de tv
omkantelen of vallen en dat kan persoonlijk letsel of
beschadiging van het toestel tot gevolg hebben.
• Zorg er omwille van veiligheidsredenen voor dat de middelste
panelen bevestigd zijn aan de achterkant van de TV als de TV in
de tafelstand staat.
• Laat wandinstallaties alleen door gekwalificeerd
servicepersoneel uitvoeren.
• Het wordt om veiligheidsredenen aanbevolen accessoires van
Sony te gebruiken, zoals:
Wandmontagesteun SU-WL850
Wandmontagesteun SU-WL450
• Gebruik de schroeven die bij de Wandmontagesteun geleverd
zijn voor het bevestigen van de Wandmontagesteun aan het
televisietoestel. De bijgeleverde schroeven zijn ontworpen zoals
aangegeven op de afbeelding, wanneer gemeten vanaf het
bevestigingsoppervlak van de Wandmontagesteun.
De diameter en de lengte van de schroeven verschillen naar
gelang het model van de Wandmontagesteun.
Het gebruik van andere schroeven dan de meegeleverde
schroeven kan resulteren in interne schade van het
televisietoestel of kan ertoe leiden dat de televisie valt enz.
Tran spo rt
• Voordat u het televisietoestel transporteert, moet u alle snoeren
loskoppelen.
• Voor het transport van een groot televisietoestel zijn twee of
drie personen nodig.
• Wanneer de televisie met de hand wordt gedragen, dient u deze
als volgt vast te houden. Druk niet op het paneel en het frame
rond het scherm.
• Bij de behandeling of montage
van de televisie, mag u de
televisie niet plat neerleggen.
• Wanneer u het televisietoestel vervoert, mag u dit niet
blootstellen aan schokken of sterke trillingen.
• Als u het televisietoestel naar de reparateur brengt of vervoert,
verpakt u het in de oorspronkelijke doos en
verpakkingsmaterialen.
Omvalpreventie
Ventilatie
• Bedek nooit de ventilatie-openingen en steek nooit iets
daardoor naar binnen.
• Houd ruimte vrij rond het televisietoestel zoals hierna wordt
aangegeven.
• Het wordt aanbevolen de wandmontagesteun van Sony te
gebruiken voor een goede luchtcirculatie.
NL
3
Page 44
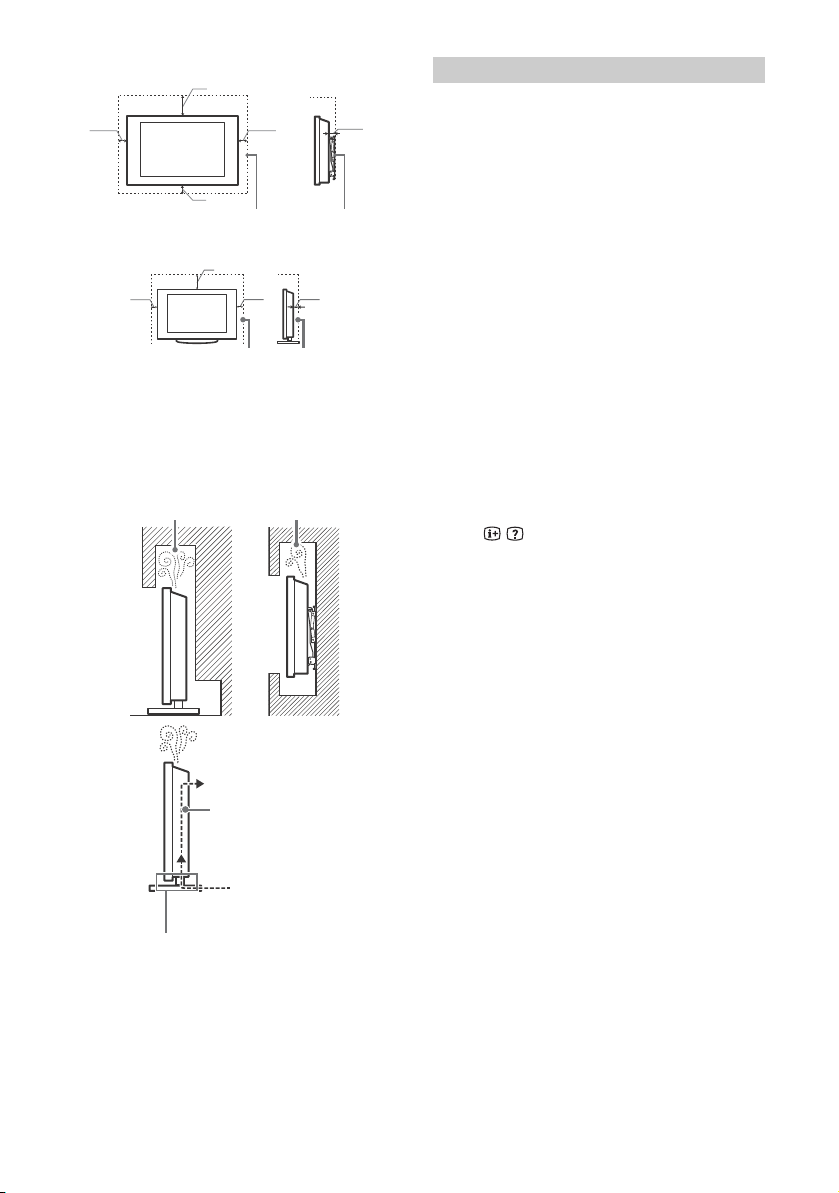
Installatie aan de wand
30 cm
10 cm
10 cm
10 cm
Houd minimaal deze ruimte vrij rond het toestel.
1 cm
30 cm
10 cm
10 cm
Houd minimaal deze ruimte vrij rond het toestel.
6 cm
Zorg ervoor dat de luchtcirculatiezone niet geblokkeerd is.
Lucht-circulatie
Wand
Luchtcirculatie geblokkeerd.
Wand
Installatie op de standaard
• Voor een goede ventilatie en om ophoping van vuil en stof te
voorkomen:
Plaats het televisietoestel niet plat op de grond en installeer
het niet ondersteboven, achterstevoren of gedraaid.
Installeer het televisietoestel niet op een plank, kleed, bed of
in een kast.
Dek het televisietoestel niet af met een doek, zoals gordijnen,
of voorwerpen als kranten enz.
Installeer het televisietoestel niet zoals hierna wordt getoond.
NL
4
Het TV-scherm beschermen (OLED TV)
Voorzorgsmaatregelen om het scherm te
beschermen tegen schade
Inbranden van nabeelden
OLED-TV's vatbaar voor inbranden van nabeelden als gevolg van
de kenmerken van de gebruikte materiaal. Inbranden van
nabeelden kan plaatsvinden indien beelden herhaaldelijk of
gedurende een lange periode op dezelfde plaats op het scherm
worden weergegeven. Dit is geen defect van de TV. Vermijd de
weergave van beelden die inbranden van nabeelden zouden
kunnen veroorzaken.
Enkele voorbeelden van beelden die zouden
kunnen leiden van inbranden van nabeelden:
• Content met zwarte stroken aan de boven- of onderkant en/of
de linker- en rechterzijde van het scherm. (bijvoorbeeld van het
formaat Letterbox, 4:3, standaarddefinitie)
• Statische beelden, zoals foto's.
• Videogames waarbij een gedeelte van het scherm wordt
ingenomen door statische content.
• Menu's op het scherm, programmagidsen, zenderlogo's enz.
• Statische content in toepassingen.
• Tickers op het scherm, zoals in nieuwsuitzendingen en koppen.
Hoe kunt u het risico op inbranden van
nabeelden verkleinen?
• Sony raadt aan om de TV op een normale manier af te zetten
door op de aan/uit-knop te duwen van de afstandsbediening
op de TV.
• Vul het scherm door over te stappen op [Wide-modus] om de
zwarte stroken weg te werken. Selecteer [Wide-modus] in
plaats van [Normaal].
• Druk op / om de OSD (On Screen Display) uit te schakelen
en schakel de menu's van aangesloten apparatuur uit.
Raadpleeg de handleidingen van de aangesloten apparatuur
voor meer informatie.
• Vermijd de weergave van statische beelden met felle kleuren
(ook wit), klokken of logo's op hetzelfde gedeelte van het
scherm.
• Pas de beeldinstellingen aan aan de
omgevingsomstandigheden. Het Standaardbeeld wordt
aanbevolen voor thuisgebruik en voor het bekijken van content
waarbij de zenderlogo's enz. vaak worden weergegeven.
De TV beschikt over de volgende functies om inbranden van
nabeelden te helpen verminderen/voorkomen.
Schermvernieuwing
Schermvernieuwing wordt automatisch uitgevoerd om de
uniformiteit van het TV-scherm te regelen nadat het gedurende
een lange tijd is gebruikt. Schermvernieuwing kan ook handmatig
worden uitgevoerd en mag alleen worden gebruikt indien
inbranden van nabeelden duidelijk is of indien u de volgende
melding ziet: [Schermvernieuwing is niet voltooid…]
Voorzichtig:
• De functie Schermvernieuwing kan een invloed hebben op het
scherm. Ter indicatie bevelen wij aan om Schermvernieuwing
slechts één keer per jaar uit te voeren. Voer het niet meer dan
één keer per jaar uit, omdat het een invloed kan hebben op de
levensduur van het scherm.
• Schermvernieuwing neemt ongeveer een uur in beslag.
• Het is mogelijk dat een witte lijn op het scherm verschijnt
tijdens de Schermvernieuwing, maar dat is geen defect van de
TV.
• Schermvernieuwing werkt alleen bij een kamertemperatuur van
10 ºC tot 40 ºC.
Pixelverschuiving
Hiermee wordt het beeld automatisch verplaatst op het scherm
om inbranden van nabeelden te voorkomen.
Andere functie
De helderheid van het scherm wordt automatisch verminderd
wanneer stilstaande beelden, klokken, felle kleuren of logo's en
dergelijke worden weergegeven.
Page 45
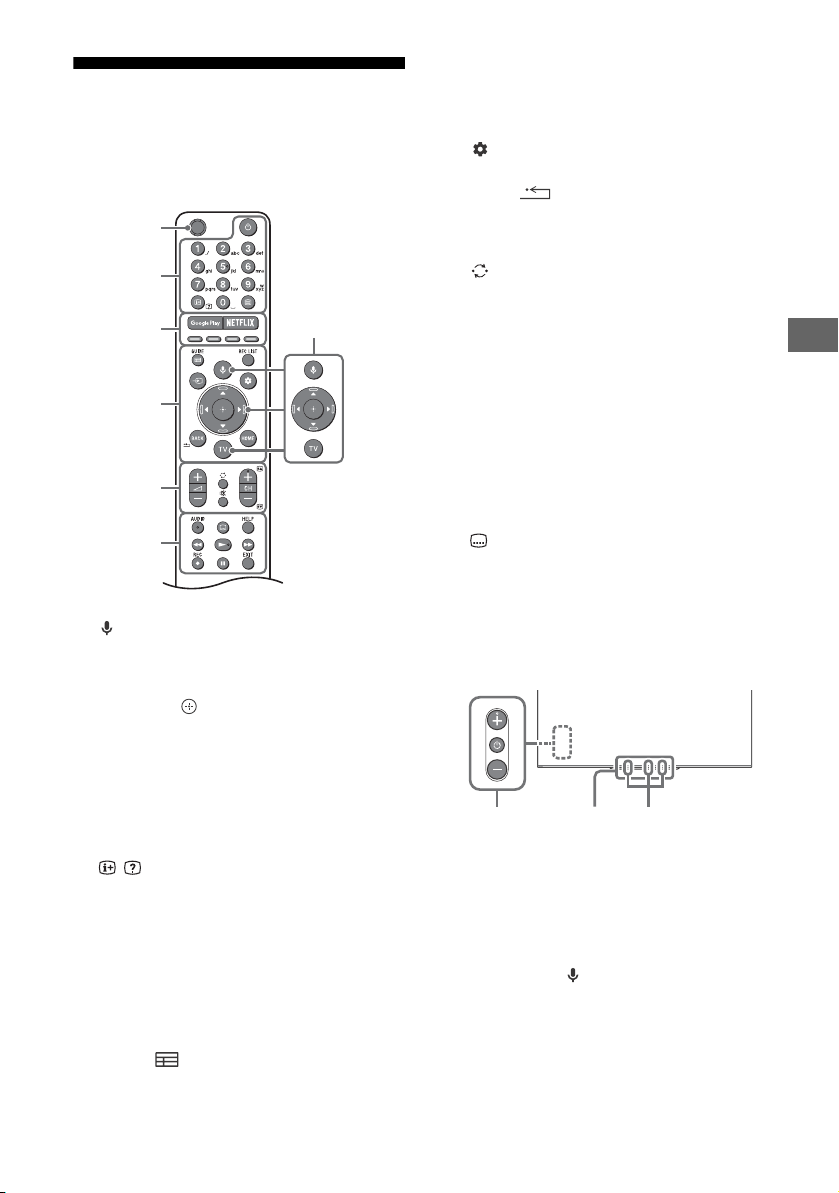
NL
Tip
MIC
Ȫ
ȫ
Ȭ
ȭ
Ȯ
ȩ
ȯȱ
Afstandsbediening en tv
De vorm van de afstandsbediening, locatie,
beschikbaarheid en functie van de toetsen
van de afstandsbediening kunnen verschillen
afhankelijk van uw regio/land/tv-model.
(Microfoon): Gebruik gesproken
zoekopdrachten. (bv. verschillende types
inhoud zoeken aan de hand van
spraakopdrachten.)*
//// (navigatie pijltjesknop):
Menu voor navigatie en selectie op het
scherm.
TV: Overschakelen naar een televisiekanaal
of ingang en weergave van het tv-menu.
(tv-stand-by)
Cijfertoetsen
/ (Info/Tekst tonen): Hiermee kunt u
informatie weergeven.
(Teletekst):
tekstinformatie weergeven.
Google Play
NETFLIX (beperkt tot bepaalde regio's/
landen/tv-modellen)
Kleurtoetsen
GUIDE/ :
programmagids of EPG of kabel-/
satellietaansluitkastje*2.
1
Hiermee kunt u
Weergave van de digitale
REC LIST: Weergave van de opnamelijst van
USB HDD of DVR*2.
(Ingangsselectie): De ingangsbron
weergeven en selecteren enz.
(Snelle instellingen): Weergave van
snelle instellingen.
BACK/
HOME
+/– (Volume)
(Overschakelen)
(Dempen van het geluid)
• De snelkoppeling naar de toegankelijkheid kan
aan- en uitgezet worden door ingedrukt te
houden.
CH +/–//
In de televisiestand: De zender selecteren.
In de teletekststand: De volgende () of
vorige () pagina selecteren.
AUDIO: Selecteer het geluid van een
meertalige bron of tweevoudig geluid
(afhankelijk van de programmabron).
(Ondertiteling instellen)
HELP:
Hiermee kunt u het helpmenu
openen.
///
Opnemen van het programma dat
REC:
nu bekeken wordt, op de USB HDD of DVR*2.
EXIT
(Aan/uit)
Afstandsbedieningssensor /
Lichtsensor / Verlichtingsled
1*3
Ingebouwde microfoon*
om de ingebouwde microfoon in te
schakelen op (MIC)-knop op de
afstandsbediening en volg de aanwijzingen
op het scherm. Zie de Helpgids voor meer
informatie.
/ led: Druk
NL
5
Page 46

*1 Voor gesproken zoekopdrachten is een
internetverbinding nodig.
*2 Instelling van de [Instelling kabel/satellietbox] is
vereist (beperkt tot bepaalde regio's/landen/tvmodellen). Zie de Helpgids voor meer informatie.
*3 Beperkt tot bepaalde regio's/landen/talen. Het
stroomverbruik in stand-by stijgt als de functie
gesproken zoekopdrachten met de ingebouwde
microfoon is geactiveerd.
NL
6
Page 47
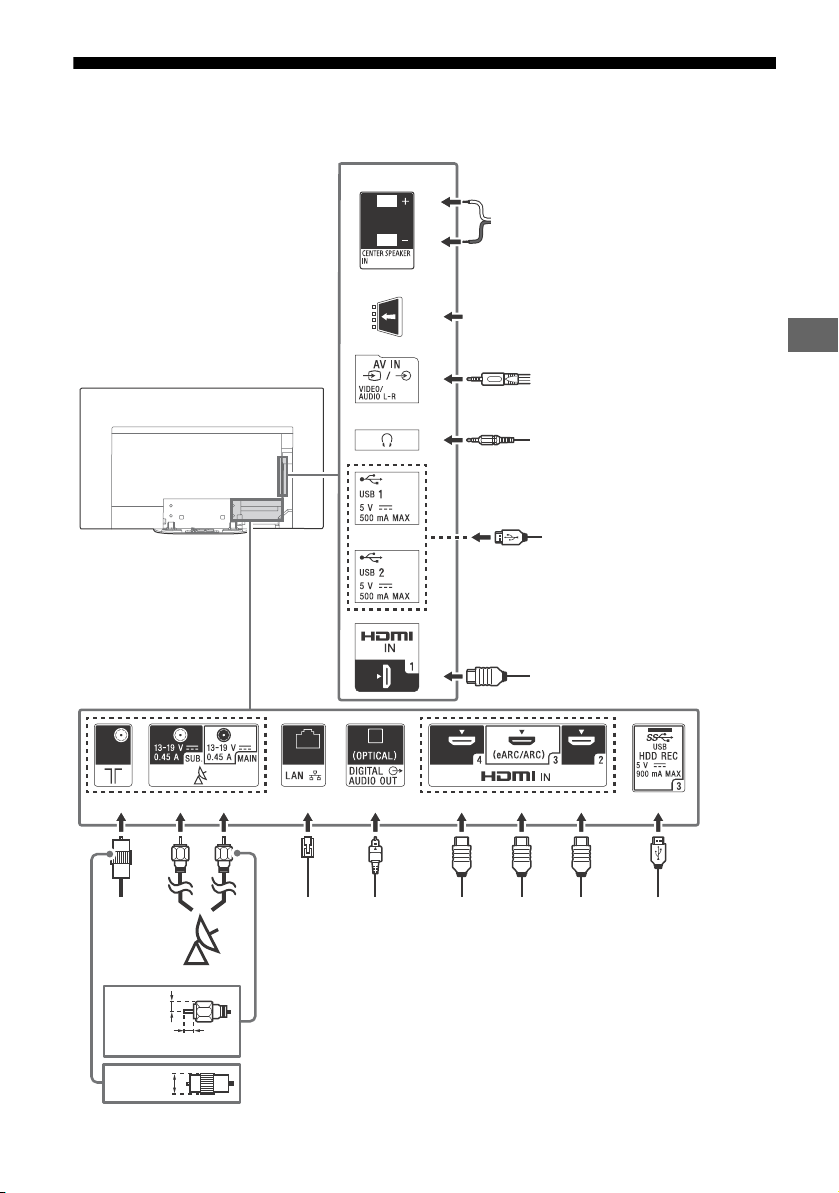
NL
Aansluitschema
<
<
<
ȭȯ
Ȫ
ȩ
ȫ
Ȭ
ȭ
Ȯ
Kabel/
antenne/
Extern
aansluitkastje
Router
Satelliet
Hoofdtelefoon
7 mm
HDMI-apparaat
HDMIapparaat
Videorecorder/Spelconsole-apparatuur/
DVD-speler/Camcorder/Set Top Box*
1
14 mm
Voorwaardelijke toegangsmodule (CAM)
HDMIapparaat
Audio
Systeem
met
optische
audioingang
AV-on tvan ger
Digitale camera/
Camcorder/USBopslagmedium/
USB HDDapparaat
Digitale camera/Camcorder/
USB-opslagmedium
Audio
systeem
met
eARC/
ARC/
HDMIapparaat
1,5 mm
Zie de Helpgids voor meer informatie over aansluitingen, door HELP in te drukken op de
afstandsbediening.
NL
7
Page 48
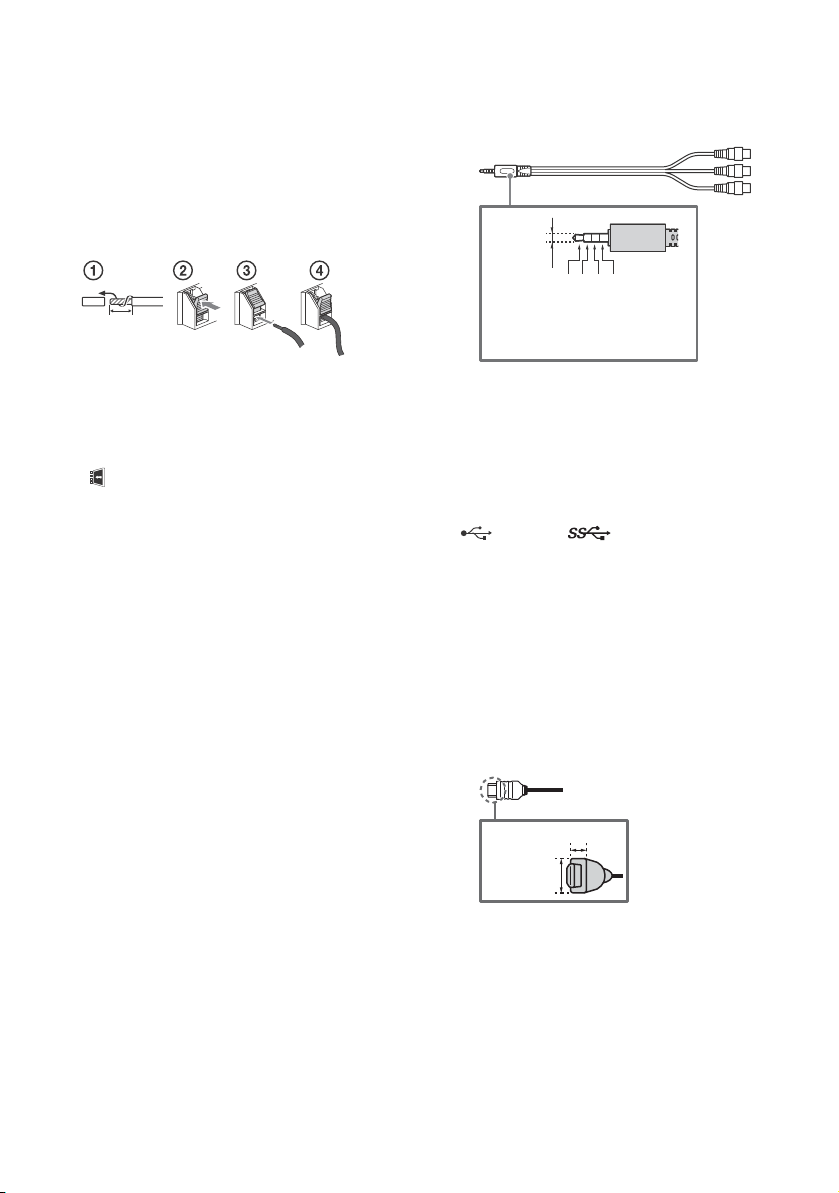
CENTER SPEAKER IN
10 mm
3,5 mm
1234
1: L
2: Video
3: Aarde
4: R
< 12 mm
< 21 mm
• Om de TV-speakers als middenspeaker te
gebruiken, verbindt u de uitgang van uw
AV-ontvanger met CENTER SPEAKER IN op
uw TV.
• Voor u kabels verbindt, moet u zowel de
stekker van de TV als van de AV-ontvanger
uit het stopcontact halen.
• Zorg ervoor dat [Speakers] ingesteld is op
[Audiosysteem].
Schakel [Modus TV-middenspeaker] uit om
ruis tegen te gaan wanneer de CENTER
SPEAKER IN niet op een AV-ontvanger
aangesloten is. Raadpleeg de helpgids voor
meer details.
CAM (Conditional Access Module)
• Biedt u toegang tot
betaaltelevisieservices. Raadpleeg de
gebruikershandleiding die bij uw CAM
werd geleverd voor meer informatie.
• Plaats de smartcard niet rechtstreeks in de
CAM-sleuf van de televisie. U moet deze
plaatsen in de Conditional Access Module
die u hebt gekregen van uw erkende
verdeler.
• CAM wordt niet in alle landen/regio's
ondersteund. Doe navraag bij uw erkende
verdeler.
• Er kan een CAM-melding verschijnen als u
overschakelt naar een digitaal programma
nadat u internetvideo gebruikt hebt.
/ AV IN
• Gebruik voor een Composite-aansluiting
een analoge verlengkabel (niet
bijgeleverd).
•
(Hoofdtelefoon)
• Ondersteunt alleen een 3-polige stereo
mini-aansluiting.
• U kunt het geluid niet gelijktijdig
weergeven via de luidsprekers van uw tv
en uw hoofdtelefoon.
USB 1/2, USB 3 (HDD REC)*
• Als u hierop een groot USB-apparaat
aansluit, kan dit andere aangesloten
apparaten hinderen.
• Sluit grote USB-apparaten aan op de
USB 1-aansluiting.
• Sluit een USB HDD-apparaat aan op de
USB 3-poort (blauw).
HDMI IN 1/2/3/4
• Met de HDMI-interface kunnen digitale
video en audio over een enkele kabel
worden verzonden.
•
2
NL
8
Page 49
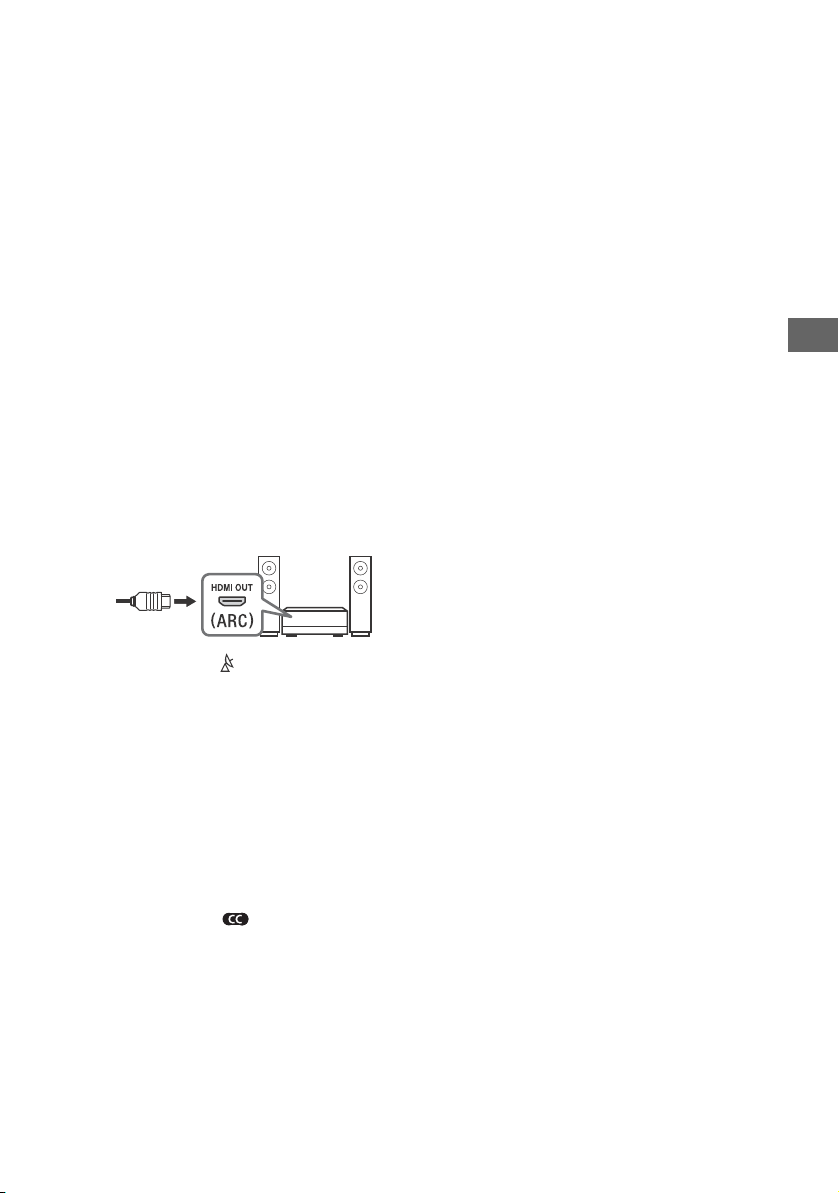
NL
Opmerkingen
• Als u wilt genieten van kwalitatief
hoogwaardig geluid op 4K 50p/60p, sluit
dan een kwalitatief hoogwaardige HDMIkabel voor hoge snelheden aan en zet de
[Indeling HDMI-signaal] op [Verbeterde
indeling].
Zet deze instelling afzonderlijk voor elke
HDMI IN-aansluiting die aangesloten is.
Zie de "Specificaties" in deze handleiding
(pagina 13-14) voor details over de
ondersteunde formaten.
• HDMI IN 3 eARC/ARC (Enhanced Audio
Return Channel/Audio Return Channel)
Wilt u het audiosignaal van de televisie
naar het audiosysteem sturen, sluit dan
uw audiosysteem aan op HDMI IN 3. Een
audiosysteem dat HDMI eARC/ARC
ondersteunt, kan via dezelfde HDMI-kabel
video naar de televisie sturen en audio
van de televisie ontvangen. Als uw
audiosysteem geen HDMI eARC/ARC
ondersteunt, is een extra aansluiting met
DIGITAL AUDIO OUT (OPTICAL) nodig.
• Gebruik de HDMI-kabel met ethernet om
een audiosysteem met eARC aan te
sluiten.
(RF-ingang), (satellietingang)
*1 Gebruik voor een extern apparaat dat alleen SCART
*2 Beperkt tot bepaalde regio's/landen/tv-modellen.
• U kunt de zijafdekking niet bevestigen wanneer
• Sla de zijbescherming in een veilige plek op voor later
• Aansluitingen voor terrestrische, kabel- en
satelliettelevisie. Stappen voor
aansluiting: SUB. MAIN Antenne
• Voor SUB.-aansluiting, alleen aansluiten
als u een dubbele tunerstand gebruikt
m.u.v. de Single Cable Distribution
EN50494.
AV OUT heeft, een SCART-RCA-adapter en een
analoge verlengkabel.
er kabels aangesloten zijn op de zijaansluitingen.
gebruik.
NL
9
Page 50

De televisie op de wand installeren
De optionele Wandmontagesteun gebruiken (SU-WL850 of SU-WL450)
Voor klanten:
Om redenen van productbescherming en veiligheid adviseert Sony ten stelligste dat de installatie van
uw televisie wordt uitgevoerd door een Sony-verkoper of door een erkende aannemer. Probeer de
televisie niet zelf te installeren.
Voor Sony-verkopers en aannemers:
Schenk voldoende aandacht aan de veiligheid tijdens de installatie, het periodiek onderhoud en het
onderzoek van dit product.
Installatie-informatie wandmontagesteun
De handleiding van deze televisie toont alleen de stappen om de installatie van de televisie voor te
bereiden vooraleer hij op de wand wordt geïnstalleerd.
Zie voor instructies over montage van de wandmontagesteun de installatie-informatie
(wandmontagesteun) op de productpagina van uw televisiemodel.
www.sony.eu/support/
De wandmontage-installatie voorbereiden
Gebruik de Wandmontagebeugel SU-WL850 (niet bijgeleverd) of SU-WL450 (niet bijgeleverd) om de tv
aan de muur te bevestigen.
Zorg ervoor dat u de tafelstandaard bevestigt voordat u de tv aan de muur monteert door de
installatiehandleiding te raadplegen.
• Bereid de TV voor de wandmontagesteun voor voordat u kabels aansluit.
• Volg de installatiehandleiding die bij de wandmontagesteun van uw model is meegeleverd. Er is
voldoende deskundigheid vereist om de TV te installeren, in het bijzonder om te bepalen of de wand
sterk genoeg is om het gewicht van de TV te dragen.
• Vertrouw de bevestiging van dit product op de wand toe aan Sony-verkopers of erkende aannemers
en schenk voldoende aandacht aan de veiligheid tijdens de installatie. Sony is niet aansprakelijk
voor schade of letsels als gevolg van onjuist handelen of onjuiste installatie.
• De schroeven voor de wandmontagesteun zijn niet bijgeleverd.
• Zorg ervoor dat u de ongebruikte schroeven en de tafelstandaard op een veilige plaats bewaart tot u
klaar bent om de tafelstandaard te bevestigen. Houd de schroeven uit de buurt van jonge kinderen.
10
NL
Page 51
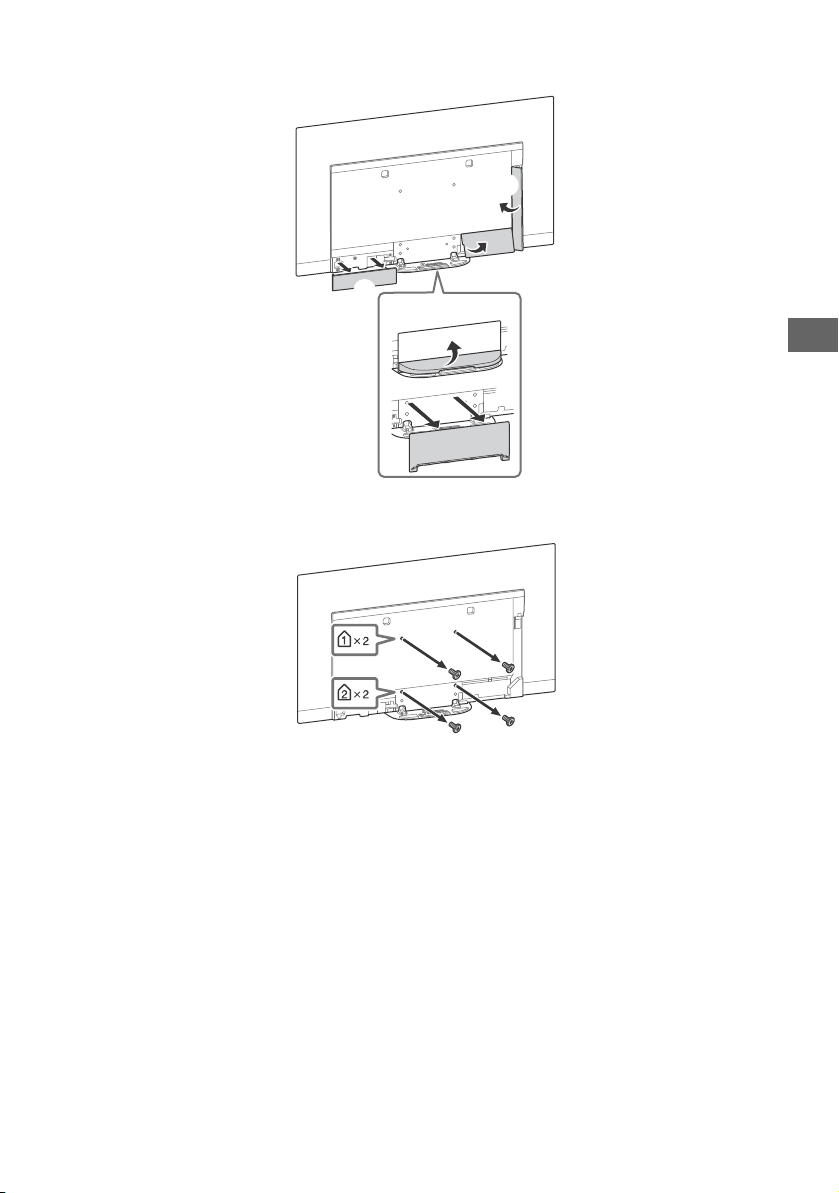
NL
ʕ
1 Verwijder de afdekkingen van de standaard en aansluitingen.
2 Verwijder de schroeven aan de achterzijde van de televisie.
NL
11
Page 52

Problemen oplossen
Voer de volgende stappen uit bij het oplossen
van algemene problemen zoals: zwart scherm,
geen geluid, bevroren beeld, televisie reageert
niet of geen verbinding met netwerk.
1 Herstart de televisie door de aan/uit-knop op
de afstandsbediening in te drukken tot een
bericht verschijnt. De televisie zal herstarten.
Haal de stekker uit het stopcontact als de tv
niet wordt hersteld. Druk dan de aan-/
uitknop op de tv in, wacht twee minuten en
steek dan de stekker weer in het stopcontact.
2 Zie het Helpmenu door HELP in te drukken op
de afstandsbediening.
3 Sluit de televisie aan op het internet en voer
een software-update uit. Sony adviseert u om
de software van uw tv up to date te houden.
Software-updates zorgen voor nieuwe
functies en betere prestaties.
4 Bezoek de Sony Support-website (zie
informatie op de voorkant van deze
handleiding).
Wanneer u de stekker van de televisie in het
stopcontact steekt, kan de televisie mogelijk
gedurende enige tijd niet worden
ingeschakeld, zelfs als u op de aan/uit-knop
op de afstandsbediening of op de televisie
drukt.
Het duurt enige tijd om het systeem te
initialiseren. Wacht ongeveer een minuut en
probeer het daarna opnieuw.
Problemen en oplossingen
Als de verlichtingsled rood knippert.
Tel hoeveel keer het lampje knippert (intervaltijd
is drie seconden).
Start de televisie opnieuw op door het netsnoer
los te koppelen totdat de verlichtingsled niet
langer rood knippert en vervolgens de televisie in
te schakelen.
Als het probleem zich nog steeds voordoet, neem
dan contact op met de dealer of het Sonyservicecentrum en vermeld hoe vaak de
verlichtingsled knippert.
Werking via ether/kabel is niet beschikbaar.
Controleer de aansluiting van antenne/kabel en
de instellingen van de versterker.
Selecteer werking via ether/kabel door TV op de
afstandsbediening in te drukken en vervolgens
[Digitaal] te selecteren als de zender niet wordt
weergegeven.
Het signaal via de ether kan worden onderdrukt
als er dichtbij een sterk signaal wordt
uitgezonden. Stel [LNA (CH ---)] in op [Uit], in de
digitale afstemmingsinstellingen.
Probeer een nieuwe zoekopdracht nadat u bent
verhuisd of nieuwe diensten probeert te
ontvangen, door [Digitale afstemming] te kiezen.
Werking via satelliet is niet beschikbaar.
Controleer de aansluiting van de satellietkabel.
Als het bericht [Geen signaal. LNB opverbelasting
detectie…] wordt weergegeven, moet het
netsnoer losgekoppeld worden. Controleer dan of
de satellietkabel niet is beschadigd en de lijn van
het satellietsignaal niet kortgesloten is in de
connector.
De afstandsbediening werkt niet.
Vervang de batterijen.
U bent het wachtwoord voor uitzendingen
met kinderslot vergeten.
Voer 9999 in voor de pincode en kies [Wijzig PIN-
code].
De ruimte rond de tv wordt warm.
Als de tv langdurig wordt gebruikt, wordt de
ruimte rond de tv warm. U kunt daar warmte
voelen bij aanraking met de hand.
Het scherm wordt donkerder tijdens TVkijken.
Indien het volledige beeld of een gedeelte van
het beeld stilstaand is, zal de helderheid van het
scherm geleidelijk worden verminderd om
inbranden van nabeelden te voorkomen. Dit is
geen defect van de TV.
NL
12
Page 53
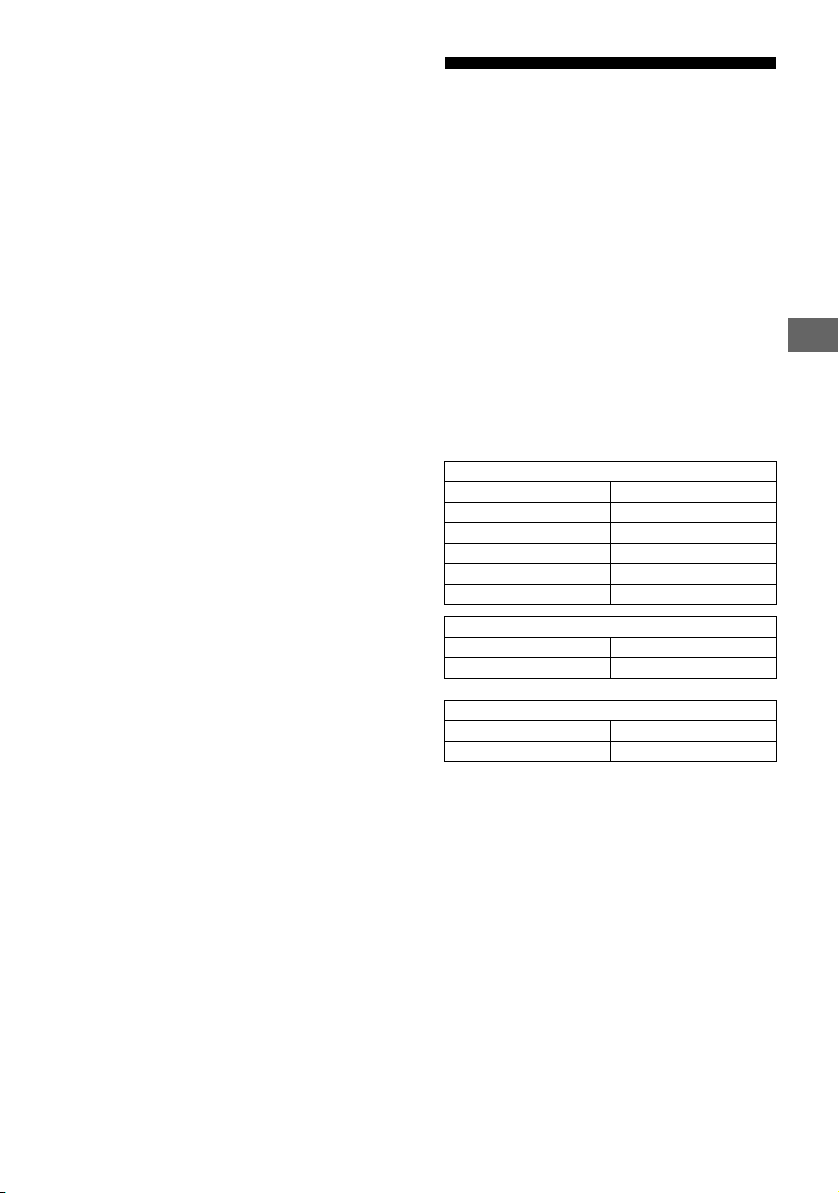
NL
Opmerkingen
U maakt zich zorgen over inbranden van
nabeelden.
Indien hetzelfde beeld herhaaldelijk of
gedurende een lange tijd wordt weergegeven,
kan inbranding van beeld ontstaan. Om
nabeelden te voorkomen, raden wij u aan de TV
normaal uit te schakelen door op de aan/uitknop op de afstandsbediening of op de TV te
drukken.
• Voer de Schermvernieuwing alleen uit wanneer de
inbranden van nabeelden goed zichtbaar is. Ter
indicatie bevelen wij aan om dit één keer per jaar uit
te voeren. Voer het liever niet meer dan één keer per
jaar uit, omdat het een invloed kan hebben op de
levensduur van het scherm.
• Beelden met klokken, logo's en felle kleuren (ook wit)
kunnen gemakkelijk inbranden van nabeelden
veroorzaken. Vermijd om dergelijke beelden
gedurende een lange periode weer te geven, anders
is het mogelijk dat inbranden van nabeelden
ontstaat.
Er verschijnt een witte lijn op het scherm.
Schermvernieuwing wordt automatisch
uitgevoerd nadat de TV gedurende een lange
periode is gebruikt, om inbranden van nabeelden
te verminderen. Schermvernieuwing start nadat
de TV is uitgeschakeld en neemt ongeveer een
uur in beslag. Het is mogelijk dat een witte lijn op
het scherm verschijnt tijdens de
Schermvernieuwing. Dit is geen defect van de TV.
De melding [Schermvernieuwing is niet
voltooid…] wordt weergegeven.
Schermvernieuwing wordt automatisch
uitgevoerd nadat de TV gedurende een lange
periode is gebruikt, om inbranden van
nabeelden te verminderen. Indien de TV
ingeschakeld is, het netsnoer uitgetrokken is of
de kamertemperatuur lager is dan 10 ºC of
hoger dan 40 ºC tijdens de Schermvernieuwing,
wordt de procedure niet voltooid en verschijnt
dit bericht.
Indien de Schermvernieuwing automatisch was
gestart, wordt ze opnieuw gestart wanneer u de
TV uitschakelt met de afstandsbediening.
Wanneer schermvernieuwing manueel ingesteld
is, moet u het opnieuw selecteren.
Specificaties
Systeem
Beeldschermsysteem
OLED-scherm (Organic Light Emitting Diode)
Televisiesysteem
Afhankelijk van uw land/regioselectie/televisiemodel
Analoog: B/G, D/K, I
Digitaal: DVB-T/DVB-C
DVB-T2*
Satelliet*1: DVB-S/DVB -S2
Kleurensysteem
PAL/SECAM/NTSC3.58 (alleen video)/NTSC4.43 (alleen video)
Beschikbare kanalen
Afhankelijk van uw land/regioselectie/televisiemodel
Analoog: UHF/VHF/kabel
Digitaal: UHF/VHF/Kabel
Satelliet*
Geluidsuitgang
20 W + 20 W + 10 W + 10 W
Draadloze technologie
Protocol IEEE802.11ac/a/b/g/n
(IEEE802.11ac is mogelijk niet beschikbaar afhankelijk van uw
land/regio.)
Bluetooth versie 4.2
Frequentieband(en)
2.400 - 2.483,5 MHz < 20,0 dBm
5.250 - 5.350 MHz < 20,0 dBm
5.725 - 5.850 MHz < 13,9 dBm
2.400 - 2.483,5 MHz < 10,0 dBm
RMF-TX600E
2.400 - 2.483,5 MHz < 10,0 dBm
Softwareversie
Deze radioapparatuur is bedoeld voor gebruik met de
goedgekeurde versie(s) van de software die in de EUconformiteitsverklaring zijn aangegeven.
Druk op HELP op de afstandsbediening om de softwareversie
te zien.
Afstandsbediening: _._.__.___
Selecteer [Afstandsbediening] [Softwareversie] in de
[Instellingen]. Zie de Helpgids voor meer informatie.
Er is gecontroleerd dat de software die in deze radioapparatuur
is geladen, voldoet aan de essentiële eisen van Richtlijn 2014/
53/EU.
Ingangen/uitgangen
Antenne/kabel
75 ohm externe aansluiting voor VHF/UHF
Satellietantenne*
Vrouwelijke F-aansluiting, 75 ohm.
DiSEqC 1.0, LNB 13 V/18 V & 22 kHz-toon, Distributie van één
kabel EN50494.
/ AV IN
A/V-ingang (miniaansluiting)
1
1
: IF-frequentie 950-2.150 MHz
Draadloos LAN (IEEE802.11ac/a/b/g/n)
Frequentiebereik Uitgangsvermogen
5.150 - 5.250 MHz < 23,0 dBm
5.470 - 5.725 MHz < 20,0 dBm
Bluetooth
Frequentiebereik Uitgangsvermogen
Bluetooth
Frequentiebereik Uitgangsvermogen
1
NL
13
Page 54

HDMI IN 1/2/3/4 (ondersteunt 4K-resolutie, Voldoet aan
Opmerkingen
HDCP 2.3)
Video:
4096 × 2160p (50, 60 Hz)*
2160p (50, 60 Hz)*
50, 60, 100, 120 Hz), 1080/24p, 1080i (50, 60 Hz), 720p (30, 50,
60 Hz), 720/24p, 576p, 480p, Pc-formaten*
Audio:
In eARC (Enhanced Audio Return Channel)-modus*
Voor meer informatie zie de helpgids.
Behalve eARC-modus
5,1-kanaals lineaire PCM: 32/44,1/48/88,2/96/176,4/192 kHz
16/20/24 bits, Dolby Digital, Dolby Digital Plus, DTS
eARC/ARC (Enhanced Audio Return Channel/Audio Return
Channel) (alleen HDMI IN 3)
In eARC-modus*
Voor meer informatie zie de helpgids.
In ARC-modus
Tweekanaals lineaire PCM: 48 kHz 16 bits, Dolby Digital, Dolby
Digital Plus, DTS
DIGITAL AUDIO OUT (OPTICAL)
Digitale optische aansluiting (tweekanaals lineaire PCM: 48 kHz
16 bits, Dolby Digital, DTS)
(Stereo ministekker)
Hoofdtelefoon
1, 2, 3 (HDD REC)*
Poort USB-apparaat. ( 3 USB HDD-apparaat voor RECfunctie)
USB-poort 1 en 2 bieden ondersteuning voor High Speed USB
(USB 2.0)
USB-poort 3 biedt ondersteuning voor Super Speed USB (USB
3.1 Gen 1)
CAM-sleuf (Conditional Access Module)
LAN
10BASE-T/100BASE-TX-stekker (Afhankelijk van de
besturingsomgeving van het netwerk kan de
verbindingssnelheid variëren. De communicatiesnelheid en
kwaliteit zijn niet gegarandeerd.)
CENTER SPEAKER IN
Ingangsaansluiting centrale luidspreker
2*3
, 4096 × 2160p (24 Hz)*2, 3840 ×
3
, 3840 × 2160p (24, 25, 30 Hz), 1080p (30,
4
5
6
5
Andere
Optionele accessoires
Wandmontagesteun: SU-WL850
Wandmontagesteun: SU-WL450
Bedrijfstemperatuur
0 ºC – 40 ºC
Bedrijfsvochtigheid
10 % – 80 % relatieve luchtvochtigheid (zonder condensatie)
Voeding, productfiche en overige
Stroomvereisten
220 V – 240 5V AC, 50 Hz
Energie-efficiëntieklasse
KD-77AG9: A
KD-65AG9: B
KD-55AG9: B
Schermgrootte (diagonaal gemeten) (Ong.)
KD-77AG9: 194,7 cm / 77 inch
KD-65AG9: 163,9 cm / 65 inch
KD-55AG9: 138,8 cm / 55 inch
Vermogensverbruik
In [Standaard] -stand
KD-77AG9: 211 W
KD-65AG9: 169 W
KD-55AG9: 132 W
In [Levendig] -stand
KD-77AG9: 674 W
KD-65AG9: 490 W
KD-55AG9: 394 W
Jaarlijks energieverbruik*
KD-77AG9: 293 kWh per jaar
KD-65AG9: 234 kWh per jaar
KD-55AG9: 183 kWh per jaar
Stand-by vermogensgebruik*8*
KD-77AG9: 0,50 W (29 W in de stand voor bijwerken van de
software/EPG)
KD-65AG9: 0,50 W (27 W in de stand voor bijwerken van de
software/EPG)
KD-55AG9: 0,50 W (27 W in de stand voor bijwerken van de
software/EPG)
Beeldschermresolutie
3.840 punten (horizontaal) × 2.160 lijnen (verticaal)
Uitvoervermogen
USB 1/2
5 V , 500 mA MAX
USB 3
5 V , 900 mA MAX
7
9
Afmetingen (Ong.) (b × h × d)
met tafelstandaard
KD-77AG9: 172,1 × 100,1 × 30,2 cm
KD-65AG9: 144,7 × 83,8 × 25,5 cm
KD-55AG9: 122,6 × 71,4 × 25,5 cm
zonder tafelstandaard
KD-77AG9: 172,1 × 99,6 × 4,9 cm
KD-65AG9: 144,7 × 83,4 × 4,0 cm
KD-55AG9: 122,6 × 71,0 × 4,0 cm
Gewicht (Ong.)
met tafelstandaard
KD-77AG9: 39,7 kg
KD-65AG9: 24,8 kg
KD-55AG9: 22,3 kg
zonder tafelstandaard
KD-77AG9: 35,3 kg
KD-65AG9: 21,2 kg
KD-55AG9: 18,7 kg
*1 Niet alle tv-sets zijn uitgerust met DVB-T2- of DVB-S/S2-
technologie of hebben een satellietantenneaansluiting.
*2 Als 4096 × 2160p de invoer is en [Wide-modus] is ingesteld op
[Normaal], dan wordt de resolutie weergegeven als 3840 ×
2160p. Om 4096 × 2160p weer te geven, stel [Wide-modus] in
op [Volb. 1] of [Volb. 2].
*3 Voor ondersteuning van 18 Gbps stel [Indeling HDMI-signaal]
in op [Verbeterde indeling].
*4 Voor meer informatie zie de helpgids.
*5 eARC-modus is actief wanneer [eARC-modus] op [Auto] en
[Speakers] op [Audiosysteem] staat en eARC-compatibel
audiosysteem is aangesloten.
*6 Beperkt tot bepaalde regio's/landen/tv-modellen.
*7 Energieverbruik per jaar in kWh, gebaseerd op het
stroomverbruik van een televisie die 365 dagen werkt
gedurende 4 uur per dag.
Het eigenlijke energieverbruik zal afhangen van de manier
waarop de televisie wordt gebruikt.
*8 Het gespecificeerde stand-by vermogen wordt bereikt als de
televisie de benodigde interne processen heeft voltooid.
*9 Het stroomverbruik tijdens stand-by neemt toe als uw
televisie aangesloten is op het netwerk.
• Verwijder de namaakkaart of afdekking (afhankelijk van het tv-
model) van de CAM-sleuf (Conditional Access Module) van de tv
alleen als u een smartcard in de CAM wilt plaatsen.
• De beschikbaarheid van optionele accessoires is afhankelijk van
uw land/regio/tv-model/voorraad.
• Ontwerp en specificaties kunnen zonder voorafgaande
kennisgeving worden gewijzigd.
Opmerkingen betreffende de digitale televisiefunctie
• Digitale televisie (DVB, ether, satelliet en kabel), interactieve
diensten en netwerkfuncties zijn wellicht niet in alle landen of
gebieden beschikbaar. Sommige functies kunnen niet zijn
ingeschakeld of werken wellicht niet goed bij bepaalde
aanbieders en netwerkomgevingen. Bepaalde aanbieders van
televisiediensten kunnen voor hun service kosten in rekening
brengen.
14
NL
Page 55

NL
• Deze televisie ondersteunt digitale uitzendingen met gebruik
van MPEG-2, H.264/MPEG-4 AVC en H.265/HEVC codecs, maar
ondersteuning van alle bedienings-/onderhoudssignalen die
in de loop der tijd kunnen wijzigen, kan niet worden
gegarandeerd.
Informatie over handelsmerken
• De begrippen HDMI, HDMI High-Definition Multimedia
Interface en het HDMI-logo zijn handelsmerken of
geregistreerde handelsmerken van HDMI Licensing
Administrator, Inc. in de Verenigde Staten en andere landen.
• Dolby, Dolby Vision, Dolby Audio, en het dubbele-D-symbool
zijn handelsmerken van Dolby Laboratories. Geproduceerd
onder licentie van Dolby Laboratories. Vertrouwelijke
ongepubliceerde werken. Copyright © 1992-2015 Dolby
Laboratories. Alle rechten voorbehouden.
• "BRAVIA", en BRAVIA Sync zijn handelsmerken of
geregistreerde merken van Sony Corporation.
• Gracenote, het Gracenote-logo en -logotype, en het logo
"Powered by Gracenote" zijn geregistreerde handelsmerken of
handelsmerken van Gracenote, Inc. in de Verenigde Staten en/
of in andere landen.
• Vewd® Core. Copyright 1995-2019 Vewd Software AS. All rights
reser ved.
• Google, Google Play, Chromecast, YouTube, Android TV en
andere hieraan gerelateerde merken en logo's zijn
handelsmerken van Google LLC.
• Wi-Fi®, Wi-Fi Alliance® en Wi-Fi Direct® zijn gedeponeerde
handelsmerken van Wi-Fi Alliance.
• Het Wi-Fi CERTIFIED™-logo is een keurmerk van Wi-Fi Alliance.
• Raadpleeg http://patents.dts.com voor meer informatie over
DTS-patenten. Geproduceerd onder licentie van DTS, Inc., DTS,
het overeenkomstige symbool en DTS gecombineerd met het
overeenkomstige symbool zijn gedeponeerde handelsmerken,
en DTS Digital Surround is een handelsmerk van DTS, Inc. ©
DTS, Inc. Alle rechten voorbehouden.
• Het Bluetooth® woordmerk en logo's zijn gedeponeerde
handelsmerken van Bluetooth SIG, Inc. en het gebruik van deze
merken door Sony Corporation gebeurt onder licentie. Andere
handelsmerken en handelsnamen zijn het eigendom van hun
respectieve eigenaars.
• Netflix is een gedeponeerd handelsmerk van Netflix, Inc.
• DiSEqC™ is een handelsmerk van EUTELSAT. Deze tv biedt
ondersteuning voor DiSEqC 1.0. Deze tv is niet geschikt voor
het aansturen van gemotoriseerde antennes.
• TUXERA is een gedeponeerd handelsmerk van Tuxera Inc. in de
VS en andere landen.
• Het USB-IF SuperSpeed USB-drietandlogo is een gedeponeerd
handelsmerk van USB Implementers Forum, Inc.
• Alle andere handelsmerken zijn eigendom van de betreffende
eigenaren.
NL
15
Page 56
Hinweis
Bezüglich der Installation
des Tischständers nehmen
Sie das
Einrichtungshandbuch zur
Hand.
Inhaltsverzeichnis
WICHTIGER HINWEIS. . . . . . . . . . . . . . . . . . . .2
Sicherheitsinformationen . . . . . . . . . . . . . . . 3
Den Bildschirm des Fernsehgeräts
schützen (OLED-Fernsehgerät) . . . . . . . . . . .4
Fernbedienung und Fernseher . . . . . . . . . 5
Anschlussschema. . . . . . . . . . . . . . . . . . . . 7
Montieren des Fernsehgeräts an der
Wand. . . . . . . . . . . . . . . . . . . . . . . . . . . . . 10
Verwenden der optionalen
Wandhalterung (SU-WL850 oder
SU-WL450). . . . . . . . . . . . . . . . . . . . . . . . . . . 10
Störungsbehebung . . . . . . . . . . . . . . . . . 12
Probleme und Lösungen . . . . . . . . . . . . . . . 12
Technische Daten. . . . . . . . . . . . . . . . . . . 13
Internetverbindung und Datenschutz
Dieses Produkt verbindet sich bei Ersteinrichtung mit dem
Internet, sobald eine Netzwerkverbindung besteht, um die
Internetverbindung zu prüfen und später den Startbildschirm zu
konfigurieren. Ihre IP-Adresse wird bei dieser und allen anderen
Internetverbindungen verwendet. Wenn Sie überhaupt nicht
möchten, dass Ihre IP-Adresse verwendet wird, richten Sie die
WLAN-Internetfunktion nicht ein und schließen kein InternetKabel an. Weitere Informationen zu Internetverbindungen
entnehmen Sie bitte den in den Einrichtungsbildschirmen
angezeigten Informationen zum Datenschutz.
Einleitung
Vielen Dank, dass Sie sich für ein Produkt von Sony entschieden
haben.
Bitte lesen Sie dieses Handbuch aufmerksam durch, bevor Sie das
Fernsehgerät verwenden, und bewahren Sie es auf, um später bei
Bedarf darin nachschlagen zu können.
• Lesen Sie sich vor der Bedienung des Fernsehgeräts die
„Sicherheitsinformationen“ durch (Seite 3).
• Für weitere Sicherheitsinformationen lesen Sie die
mitgelieferten Sicherheitsinformationen.
• Darstellungen und Abbildungen, die im Einrichtungshandbuch
und in dieser Anleitung verwendet werden, dienen nur der
Referenz und können vom tatsächlichen Produkt abweichen.
Hilfe
Weitere Informationen zur Störungsbehebung und andere
nützliche Informationen finden Sie direkt auf Ihrem
Fernsehgerät. Drücken Sie HELP auf der Fernbedienung, um
eine Liste mit Themen anzuzeigen oder nach Stichworten zu
suchen.
Hilfe (Anleitung)
Um detailliertere Informationen zu erhalten, wählen Sie [Hilfe]
aus dem Hilfemenü Ihres Fernsehgeräts. Sie können die Hilfe
auch von Ihrem PC oder Smartphone aus aufrufen
(Informationen finden Sie auf der hinteren Umschlagseite
dieser Anleitung).
Position des Bezeichnungsschildes
Aufkleber mit Modellnummer, Herstellungsdatum (Jahr/Monat)
und Betriebsspannung befinden sich auf der Rückseite des
Fernsehgeräts oder auf der Verpackung. Sie finden sie, wenn Sie
die Ständerabdeckung entfernen .
WICHTIGER HINWEIS
Hinweis für Funkgeräte
Hiermit erklärt Sony Visual Products Inc.,
dass die Funkanlagentypen
KD-77AG9, KD-65AG9, KD-55AG9 der
Richtlinie 2014/53/EU entsprechen. Der vollständige Text der EUKonformitätserklärung ist unter der folgenden Internetadresse
verfügbar:
http://www.compliance.sony.de/
Hinweis für Kunden: Die folgenden Informationen gelten nur für
Geräte, die in Ländern verkauft werden, in denen EU-Richtlinien
gelten.
Für dieses Funkgerät gelten die folgenden Einschränkungen für
die Inbetriebnahme oder Anforderungen an die
Betriebszulassung in AT, BE, HR, CY, CZ, DK, EE, FI, FR, DE, EL, HU,
IE, IT, LV, LT, LU, MT, NL, PL, PT, SK, SI, ES, SE, UK, IS, LI, NO, CH, BG,
RO, TR, AL, BA, MK, MD, RS, ME, Kosovo:
Das Frequenzband 5.150 - 5.350 MHz ist auf den Einsatz drinnen
beschränkt.
DE
2
Page 57
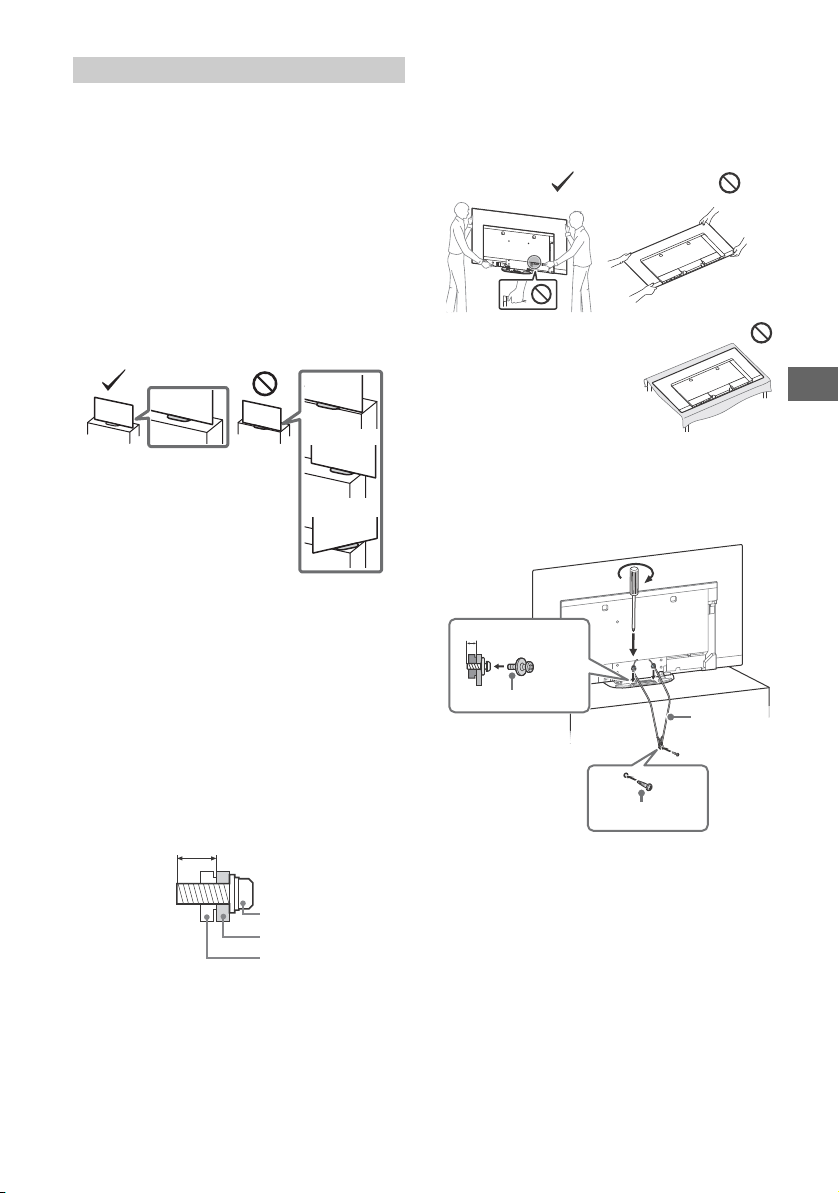
DE
Schraube (M6)
Wandhalterung
9 mm - 13 mm
Rückwärtige Abdeckung
des Fernsehgeräts
M4 Schraube (nicht mitgeliefert)
1,5 N·m
{15 kgf·cm}
Schraube (nicht
mitgeliefert)
6 mm - 7 mm
Kabel (nicht
mitgeliefert)
Sicherheitsinformationen
Installation/Einstellung
Installieren und benutzen Sie das Fernsehgerät unter
Berücksichtigung der im Folgenden angegebenen Anweisungen,
um alle Risiken wie Feuer, Stromschlag oder Beschädigungen
und/oder Verletzungen zu vermeiden.
Installation
• Das Fernsehgerät sollte neben einer frei zugänglichen
Netzsteckdose installiert werden.
• Stellen Sie das Fernsehgerät auf eine stabile, ebene Oberfläche,
um zu verhindern, dass es herunterfällt und Personenschäden
oder Sachschäden verursacht.
• Stellen Sie das Fernsehgerät an einem Ort auf, an dem es nicht
gezogen, verschoben oder umgestoßen werden kann.
• Stellen Sie das Fernsehgerät so auf, dass der Tischständer des
Fernsehgeräts nicht über den Fernsehständer (nicht
mitgeliefert) hinausragt. Wenn der Tischständer über den
Fernsehständer hinausragt, kann das Fernsehgerät umkippen
und herunterfallen, was zu Verletzungen bzw. Schäden am
Fernsehgerät führen kann.
• Achten Sie aus Sicherheitsgründen darauf, die mittleren
Abdeckungen an der Rückseite des Fernsehgeräts anzubringen,
wenn das Fernsehgerät in der Tischvariante verwendet wird.
• Wandeinbauten sollten nur von qualifiziertem Fachpersonal
ausgeführt werden.
• Aus Sicherheitsgründen wird dringend empfohlen,
ausschließlich Sony Zubehörteile zu verwenden, inklusive:
Wandhalterung SU-WL850
Wandhalterung SU-WL450
• Verwenden Sie unbedingt die Schrauben im Lieferumfang der
Wandhalterung, wenn Sie die Wandhalterung am Fernsehgerät
befestigen. Die mitgelieferten Schrauben sind, gemessen von
der Befestigungsfläche der Wandhalterung, wie in der
Abbildung dargestellt konzipiert.
Durchmesser und Länge der Schrauben variieren je nach Modell
der Wandmontagehalterung.
Durch die Verwendung anderer als der mitgelieferten
Schrauben kann das Fernsehgerät beschädigt werden oder
herunterfallen.
Tran spo rt
• Vor dem Transport des Fernsehgeräts ziehen Sie bitte alle Kabel
aus dem Gerät.
• Zum Transport eines großen Fernsehgeräts sind zwei oder drei
Personen nötig.
• Wenn Sie das Fernsehgerät ohne Hilfsmittel transportieren,
halten Sie es wie unten dargestellt. Belasten Sie das BildschirmPanel und den Rahmen um den Bildschirm nicht.
• Legen Sie das Fernsehgerät
während Handhabung und
Montage nicht hin.
• Setzen Sie das Fernsehgerät beim Transport weder Stössen
noch starken Erschütterungen aus.
• Wenn Sie das Fernsehgerät für Reparaturen oder bei einem
Umzug transportieren müssen, verpacken Sie es mithilfe der
Originalverpackungsmaterialien im Originalkarton.
Verhinderung des Umkippens
Luftzirkulation
• Decken Sie nie die Lüftungsöffnungen ab und stecken Sie nichts
in das Gehäuse.
• Lassen Sie ausreichend Platz um das Fernsehgerät (siehe
Abbildung).
• Es wird dringend empfohlen, die offizielle Sony
Wandmontagehalterung zu verwenden, um eine ausreichende
Luftzirkulation zu gewährleisten.
3
DE
Page 58
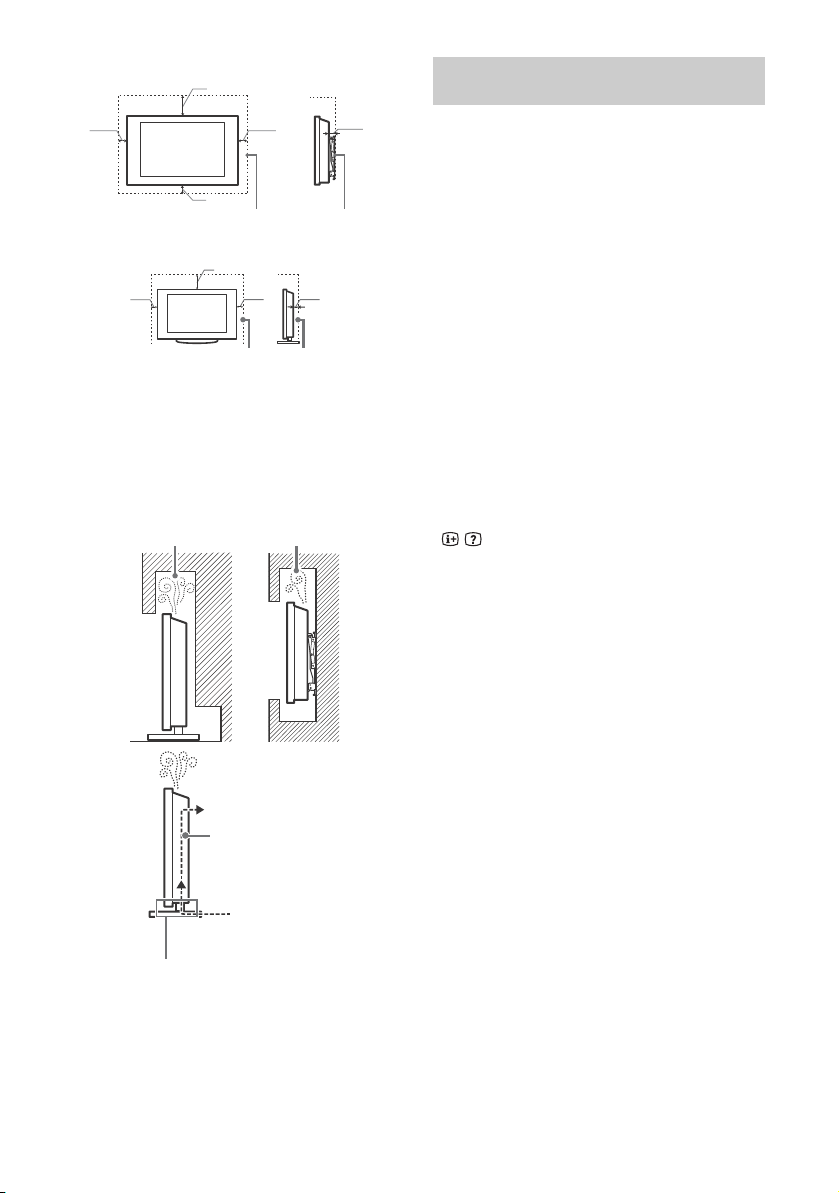
Installation an der Wand
30 cm
10 cm
10 cm
10 cm
Lassen Sie mindestens so viel Platz um das Gerät.
1 cm
30 cm
10 cm
10 cm
Lassen Sie mindestens so viel Platz um das Gerät.
6 cm
Blockieren Sie nicht den Bereich der Luftzirkulation.
Luftzirkulation
Wand
Die Luftzirkulation wird unterbunden.
Wand
Aufstellung auf dem Standfuß
• Um eine ausreichende Belüftung zu gewährleisten und Stauboder Schmutzablagerungen zu vermeiden:
Stellen Sie das Fernsehgerät weder flach noch auf dem Kopf
stehend, falsch herum oder seitwärts geneigt auf.
Stellen Sie das Fernsehgerät weder auf einem Regal, einem
Teppich, einem Bett oder in einem Schrank auf.
Decken Sie das Fernsehgerät nicht mit Decken oder
Vorhängen ab und legen Sie keine Gegenstände wie
Zeitungen usw. darauf.
Installieren Sie das Fernsehgerät nicht wie auf der Abbildung
gezeigt.
DE
4
Den Bildschirm des Fernsehgeräts schützen (OLED-Fernsehgerät)
Vorsichtsmaßnahmen zum Schutz des
Bildschirms vor Schäden
Bildeinbrennen
OLED-Fernsehgeräte neigen aufgrund der Eigenschaften der in
ihnen verwendeten Materialien zu Bildeinbrennen
(Nachwirkeffekt). Bildeinbrennen kann auftreten, wenn Bilder
wiederholt oder für längere Zeit an derselben Stelle angezeigt
werden. Dies ist keine Störung des Fernsehgeräts. Vermeiden Sie
die Anzeige von Bildern, die zu Bildeinbrennen führen.
Beispielsweise führen die folgenden Bilder
potenziell zu Bildeinbrennen:
• Inhalte mit schwarzen Streifen auf der oberen und unteren und/
oder linken und rechten Seite des Bildschirms. (Zum Beispiel
Letterboxed, 4:3-Bildschirm, Standardauflösung)
• Statische Bilder wie etwa Fotos.
• Videospiele, bei denen auf einigen Teilen des Bildschirms Inhalt
dauerhaft angezeigt wird.
• Bildschirmmenüs, Programmzeitschriften, Kanallogos usw.
• Statische Inhalte von Anwendungen.
• Bildschirm-Ticker wie etwa für Nachrichten und Überschriften.
So senken Sie das Risiko des Bildeinbrennens:
• Sony empfiehlt, das Fernsehgerät normal auszuschalten, indem
Sie die Netztaste auf der Fernbedienung oder am Fernsehgerät
drücken.
• Füllen Sie den Bildschirm, indem Sie [Wide-Modus] ändern, um
die schwarzen Streifen zu beseitigen. Wählen Sie einen anderen
[Wide-Modus] als [Normal].
• Schalten Sie die OSD (Bildschirmanzeige) aus, indem Sie die
/ Taste drücken, und schalten Sie die Menüs
angeschlossener Geräte aus. Einzelheiten finden Sie in der
Anleitung des angeschlossenen Geräts.
• Vermeiden Sie die Anzeige statischer Bilder mit hellen Farben
(einschließlich Weiß), Uhren oder Logos auf dem Bildschirm.
• Legen Sie die Bildeinstellungen entsprechend den
Umgebungsbedingungen fest. Für den Hausgebrauch und bei
der Betrachtung von Inhalten, bei denen häufig Logos usw.
erscheinen, wird das Standardbild empfohlen.
Das Fernsehgerät besitzt folgende Funktionen, die helfen,
Bildeinbrennen zu reduzieren/zu verhindern.
Panelaktualisierung
Panelaktualisierung wird automatisch ausgeführt, um die
Gleichmäßigkeit des Bildschirms des Fernsehgeräts nach langem
Gebrauch anzupassen. Panelaktualisierung kann auch manuell
durchgeführt werden und sollte nur verwendet werden, wenn das
Bildeinbrennen sehr auffällig ist oder Sie die folgende Meldung
sehen: [Panelaktualisierung konnte nicht abgeschlossen
werden…]
Vorsicht:
• Die Funktion Panelaktualisierung kann das Bildschirm-Panel
beeinträchtigen. Es wird empfohlen, die Panelaktualisierung nur
einmal jährlich durchzuführen; wird sie öfter als einmal jährlich
durchgeführt, kann dies die Lebensdauer des Bildschirm-Panels
verkürzen.
• Die Panelaktualisierung nimmt etwa eine Stunde in Anspruch.
• Während der Panelaktualisierung kann eine weiße Linie auf
dem Bildschirm erscheinen; dies ist keine Störung des
Fernsehgeräts.
• Panelaktualisierung funktioniert nur bei einer Raumtemperatur
zwischen 10 ºC und 40 ºC.
Pixelverschiebung
Bewegt das Bild auf dem Bildschirm automatisch, um
Bildeinbrennen zu verhindern.
Weitere Funktion
Die Bildschirmhelligkeit wird bei der Anzeige von Standbildern,
Uhren, hellen Farben oder Logos usw. automatisch reduziert.
Page 59
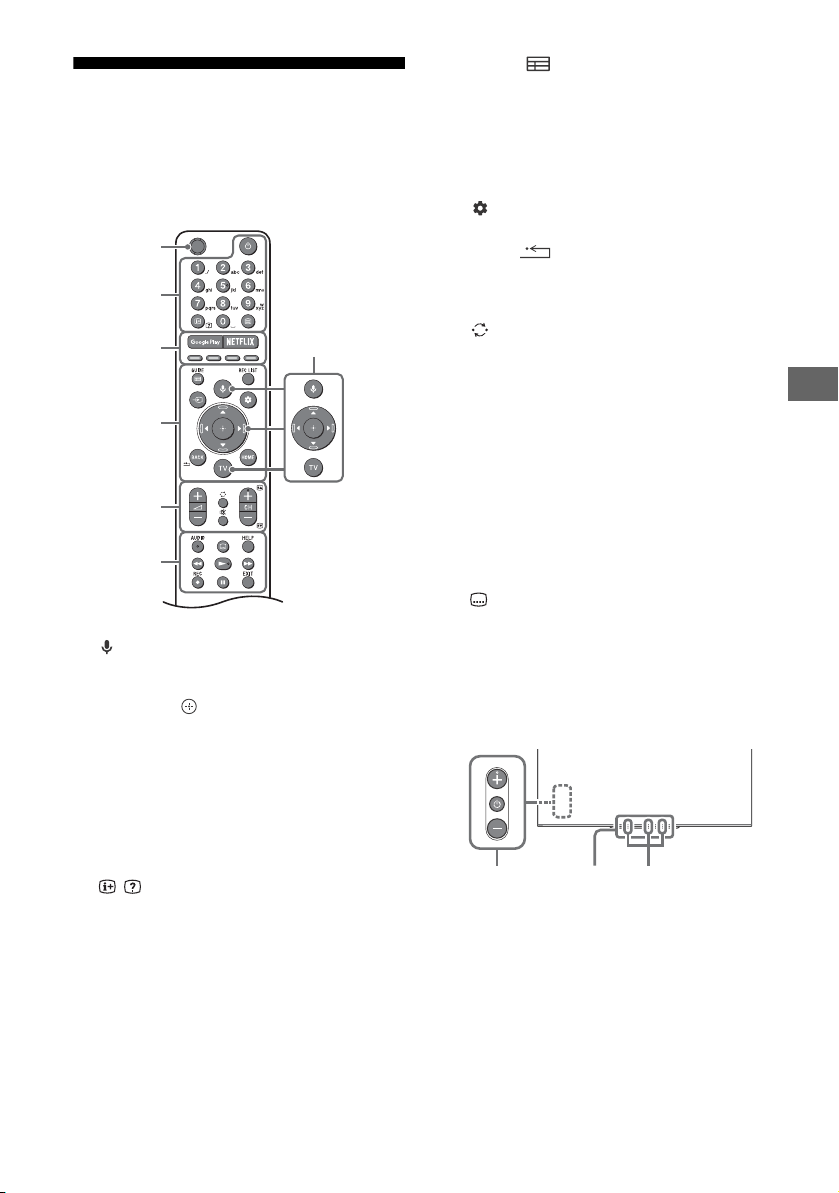
DE
Tipp
MIC
Ȫ
ȫ
Ȭ
ȭ
Ȯ
ȩ
ȯȱ
Fernbedienung und Fernseher
Die Form der Fernbedienung sowie die
Position, Verfügbarkeit und Funktion der
Fernbedienungstasten kann abhängig von
der Region/vom Land/vom FernsehgerätModell variieren.
(Mikrofon): Verwenden der
Sprachsuche. (Zum Beispiel: Suche
verschiedener Inhalte über die Stimme.)*
//// (Steuerkreuz zur
Navigation):
dem Bildschirmmenü.
TV: Schalten Sie zu einem Fernsehkanal
oder einem anderen Eingang um und zeigen
Sie das TV-Menü an.
(TV-Bereitschaft)
Zifferntasten
/ (Info/Text aufdecken): Zeigt
Informationen an.
(Text):
Textinformationen an.
Google Play
NETFLIX (Nur in bestimmten Regionen/
Ländern bzw. für bestimmte
Fernsehmodelle)
Farbtasten
Navigation und Auswahl auf
Diese Taste zeigt
GUIDE/ :
Programmübersicht oder den EPG der
Kabelbox/des Satellitenempfängers*2 an.
Zeigen Sie die digitale
REC LIST: Aufnahmeliste von USB HDD oder
DVR*2 anzeigen lassen.
(Eingangswahl): Eingangsquelle usw.
anzeigen lassen und auswählen.
(Schnelleinstellungen):
Schnelleinstellungen anzeigen lassen.
BACK/
HOME
+/– (Lautstärke)
(Springen)
(Stummschalten)
• Die Tastenkombinationen für Eingabehilfen kann
durch Drücken und Halten von ein- und
ausgeschaltet werden.
CH +/–//
Im TV-Modus: Wählen Sie den Kanal.
Im Text-Modus: Wählen Sie die nächste ()
oder vorherige () Seite.
AUDIO: Auswahl von mehrsprachigem Ton
oder Zweikanalton (abhängig von der
Programmquelle).
(Untertiteleinstellung)
Zeigen Sie das Hilfe-Menü an.
HELP:
///
REC:
1
Aufnahme des Programms, das
derzeit wiedergegeben wird, auf USB HDD
oder DVR*2.
EXIT
(Ein/Aus)
Sensor der Fernbedienung /
Lichtsensor / Beleuchtungs-LED
DE
5
Page 60

Integriertes Mikrofon*1*3 / LED: Um das
integrierte Mikrofon zu aktivieren, drücken
Sie auf der Fernbedienung die Taste (MIC)
und folgen Sie den Anweisungen auf dem
Bildschirm. Weitere Informationen finden
Sie in der Hilfe.
*1 Die Sprachsuche erfordert eine Internetverbindung.
*2 Die Einstellung [Kabel-/Satelliten-Box-Einrichtung]
ist erforderlich (nur in bestimmten Regionen/
Ländern bzw. für bestimmte Fernsehmodelle).
Weitere Informationen finden Sie in der Hilfe.
*3 Nur in bestimmten Regionen/Ländern/Sprachen.
Die Leistungsaufnahme im Standby erhöht sich,
wenn die Sprachsuche mit dem integrierten
Mikrofon aktiviert ist.
DE
6
Page 61
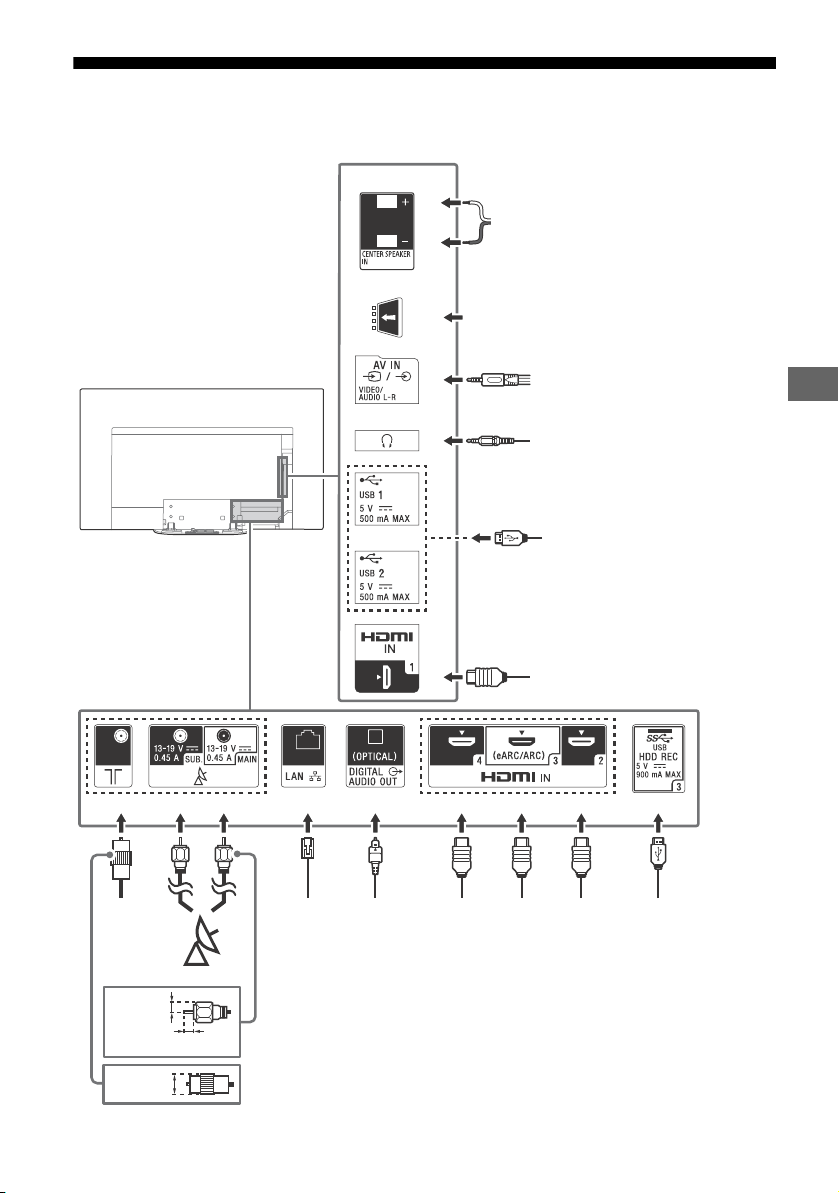
DE
Anschlussschema
<
<
<
ȭȯ
Ȫ
ȩ
ȫ
Ȭ
ȭ
Ȯ
Kabel/
Antenne/
Externe
Box
Router
Satellit
Kopfh örer
7 mm
HDMI-Gerät
HDMIGerät
VCR/ Video-spielkonsolen/DVD-Player/
Camcorder/Externe Box*
1
14 mm
Zugangskontrollmodul
HDMIGerät
Audiosystem mit
optischem
Audioeingang
AV-Receiver
StandbildDigitalkamera/
Camcorder/ USBSpeichermedien/
USB-HDD-Gerät
Standbild-Digitalkamera/
Camcorder/USB-Speichermedien
Audiosystem
mit
eARC/
ARC/
HDMIGerät
1,5 mm
Weitere Informationen zu den Anschlüssen finden Sie in der Hilfe, indem Sie auf der Fernbedienung
die Taste HELP drücken.
DE
7
Page 62
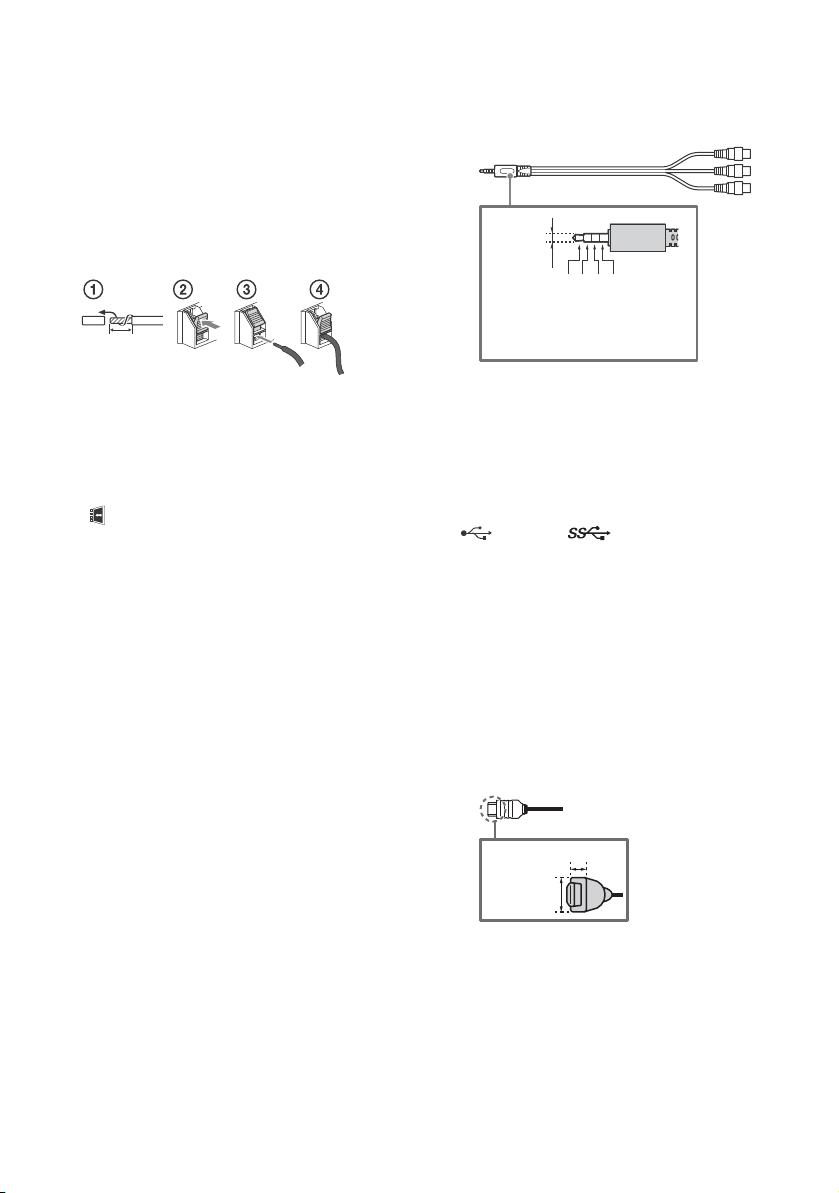
CENTER SPEAKER IN
10 mm
3,5 mm
1234
1: L
2: Video
3: Erde
4: R
< 12 mm
< 21 mm
• Um die Lautsprecher Ihres Fernsehers als
Center-Lautsprecher zu verwenden,
verbinden Sie den Ausgang Ihres AVReceivers mit CENTER SPEAKER IN am
Fernseher.
• Trennen Sie das Netzkabel des Fernsehers
und des AV-Receivers, bevor Sie Kabel
anschließen.
• Stellen Sie sicher, dass [Lautsprecher] auf
[Audiosystem] eingestellt ist.
/ AV IN
• Bei einer Composite-Verbindung
verwenden Sie ein Verlängerungskabel für
analoge Eingänge (nicht mitgeliefert).
•
Um Zischgeräusche zu verhindern, wenn der
CENTER SPEAKER IN nicht mit einem AVReceiver verbunden ist, deaktivieren Sie
[TV-Center-Lautsprechermodus].
Ausführliche Informationen finden Sie in der
Hilfe.
CAM (Zugangskontrollmodul)
• Dieser Steckplatz bietet Zugang zu PayTV-Diensten. Erläuterungen dazu finden
Sie in der Bedienungsanleitung im
Lieferumfang des CAM.
• Stecken Sie die Smart-Card nicht direkt in
den CAM-Steckplatz des Fernsehgeräts.
Sie muss in das Conditional Access
Module eingesetzt werden, das Sie von
Ihrem autorisierten Händler erhalten
haben.
• CAM wird in einigen Länder/Gegenden
nicht unterstützt. Fragen Sie dazu einen
autorisierten Händler.
• Möglicherweise wird eine CAM-Meldung
angezeigt, wenn Sie nach der Wiedergabe
von Internetvideos zu einem
Digitalprogramm umschalten.
(Kopfhörer)
• Unterstützt nur 3-polige StereoMinibuchse.
• Sie können den Ton nicht gleichzeitig über
die Kopfhörer und die Lautsprecher des
Fernsehgeräts ausgeben.
USB 1/2, USB 3 (HDD REC)*
• Wenn Sie hier ein großes USB-Gerät
anschließen, kann das die daneben
angeschlossenen Geräte behindern.
• Wenn Sie ein großes USB-Gerät
anschließen, schließen Sie es an die
Buchse USB 1 an.
• Schließen Sie ein USB-HDD-Gerät an den
USB 3-Anschluss (blau) an.
HDMI IN 1/2/3/4
• Per HDMI-Schnittstelle können digitale
Video- und Audiodaten mit einem
einzigen Kabel übertragen werden.
•
2
DE
8
Page 63
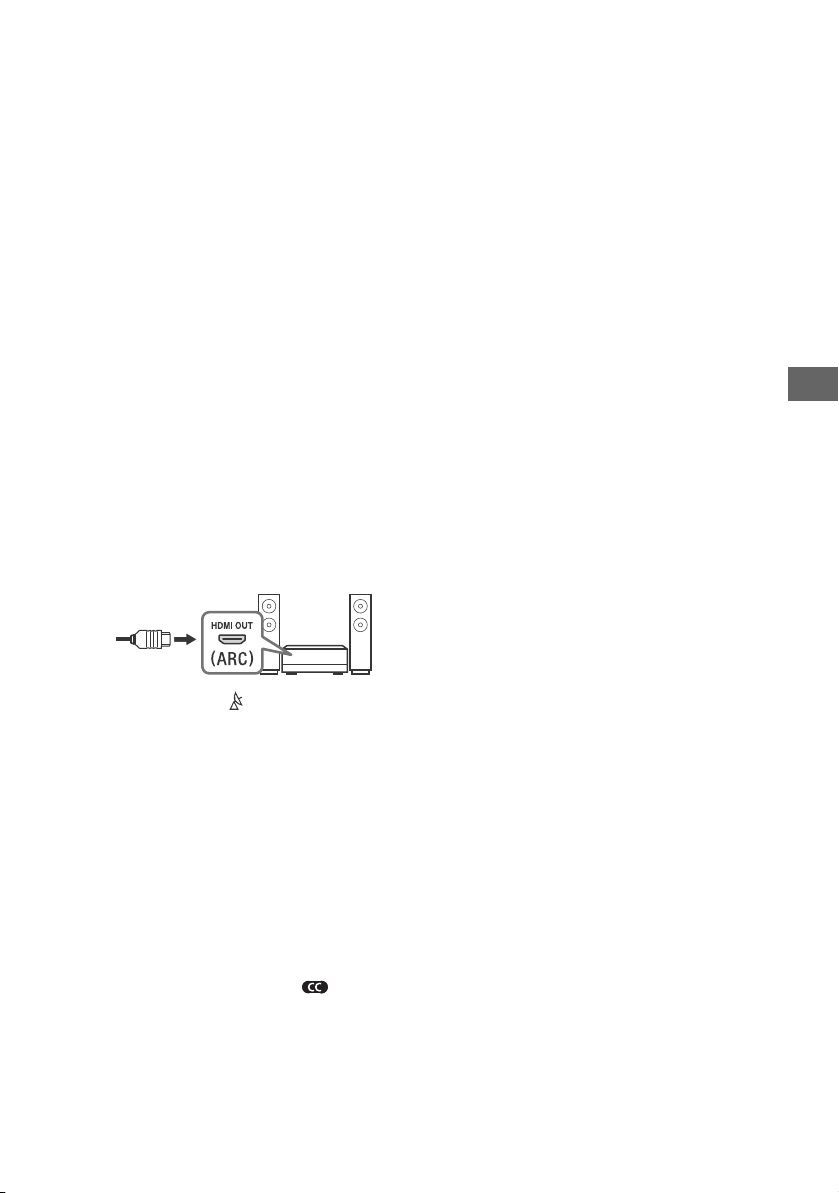
DE
Hinweis
• Um qualitativ hochwertige 4K-50p/60pInhalte zu genießen, schließen Sie ein
Premium High-Speed-HDMI-Kabel an und
setzen Sie [HDMI-Signalformat] auf
[Optimiertes Format].
Führen Sie diese Einstellung einzeln für
jeden angeschlossenen HDMI INAnschluss durch. Einzelheiten zu den
unterstützten Formaten finden Sie in
dieser Anleitung unter „Technische Daten“
(Seite 13-14).
• HDMI IN 3 eARC/ARC (Enhanced Audio
Return Channel/Audio Return Channel)
Schließen Sie Ihr Audiosystem an HDMI IN
3 an, um den Fernsehton an Ihr
Audiosystem weiterzuleiten. Ein
Audiosystem, das HDMI eARC/ARC
unterstützt, kann Videosignale an das
Fernsehgerät senden und über dasselbe
HDMI-Kabel Audiosignale vom
Fernsehgerät empfangen. Wenn Ihr
Audiosystem HDMI eARC/ARC nicht
unterstützt, ist eine zusätzliche
Verbindung mit DIGITAL AUDIO OUT
(OPTICAL) erforderlich.
• Verwenden Sie das HDMI-Kabel mit
Ethernet zur Verbindung des
Audiosystems mit eARC.
(RF-Eingang), (Satelliteneingang)
• Anschlüsse für terrestrisch/Kabel und
Satellit. Anschlussschritte: SUB. MAIN
Antenne
• Was die SUB.-Buchse betrifft, stellen Sie
diese Verbindung nur her, wenn Sie den
Twin-Tuner-Modus verwenden
(Ausnahme: Unicable EN50494).
*1 Für ein externes Gerät, das nur einen Anschluss vom
Typ SCART AV OUT hat, verwenden Sie einen SCARTCinch-Adapter und ein Erweiterungskabel für den
analogen Eingang.
*2 Nur in bestimmten Regionen/Ländern bzw. für
bestimmte Fernsehmodelle.
• Sie können die seitliche Abdeckung nicht
anbringen, während die Kabel mit dem seitlichen
Anschluss verbunden sind.
• Bewahren Sie die seitliche Abdeckung zur künftigen
Verwendung an einem sicheren Ort auf.
DE
9
Page 64

Montieren des Fernsehgeräts an der Wand
Verwenden der optionalen Wandhalterung (SU-WL850 oder SU-WL450)
An die Kunden:
Aus Gründen des Produktschutzes und aus Sicherheitsgründen empfiehlt Sony dringend, die Montage
des Fernsehgeräts von Sony-Händlern oder lizenzierten Fachleuten durchführen zu lassen. Versuchen
Sie nicht, es selbst zu montieren.
An Sony-Händler und -Fachleute:
Widmen Sie während der Montage, der regelmäßigen Wartung und der Überprüfung dieses Produkts
Ihre volle Aufmerksamkeit der Sicherheit.
Installationsinformationen Wandhalterung
Die Bedienungsanleitung des Fernsehgeräts zeigt nur die Schritte zur Vorbereitung der Montage des
Fernsehgeräts vor der Montage an der Wand.
Anleitungen zur Montage der Wandhalterung finden Sie in den Installationshinweisen
(Wandhalterung) auf der Produktseite Ihres Fernsehgerätmodells.
www.sony.eu/support/
Vorbereitung für die Wandmontage
Verwenden Sie die Wandhalterung SU-WL850 (nicht mitgeliefert) oder SU-WL450 (nicht mitgeliefert),
um den Fernseher an der Wand zu installieren.
Stellen Sie sicher, dass Sie den Tischständer anbringen, bevor Sie den Fernseher an der Wand
befestigen. Beachten Sie dazu das Einrichtungshandbuch.
• Bereiten Sie den Fernseher für die Wandhalterung vor, bevor Sie die Kabelverbindungen herstellen.
• Befolgen Sie das Anweisungshandbuch im Lieferumfang der Wandhalterung für Ihr Modell.
Ausreichende Fachkenntnisse sind für die Montage des Fernsehers erforderlich, insbesondere zum
Bestimmen der Stärke der Wand, damit die Wand auch das Gewicht des Fernsehers tragen kann.
• Achten Sie darauf, dass Sie die Befestigung des Produkts an der Wand Sony-Händlern oder
lizenzierten Fachleuten überlassen, und achten Sie während der Montage ausreichend auf die
Sicherheit. Sony haftet nicht für Schäden oder Verletzungen durch eine fehlerhafte Handhabung
oder unsachgemäße Montage.
• Die Schrauben für die Wandhalterung werden nicht mitgeliefert.
• Stellen Sie sicher, dass Sie unbenutzte Schrauben und den Tischständer an einem sicheren Ort
aufbewahren, bis Sie mit der Anbringung des Tischständers anfangen können. Bewahren Sie die
Schrauben außerhalb der Reichweite von kleinen Kindern auf.
10
DE
Page 65
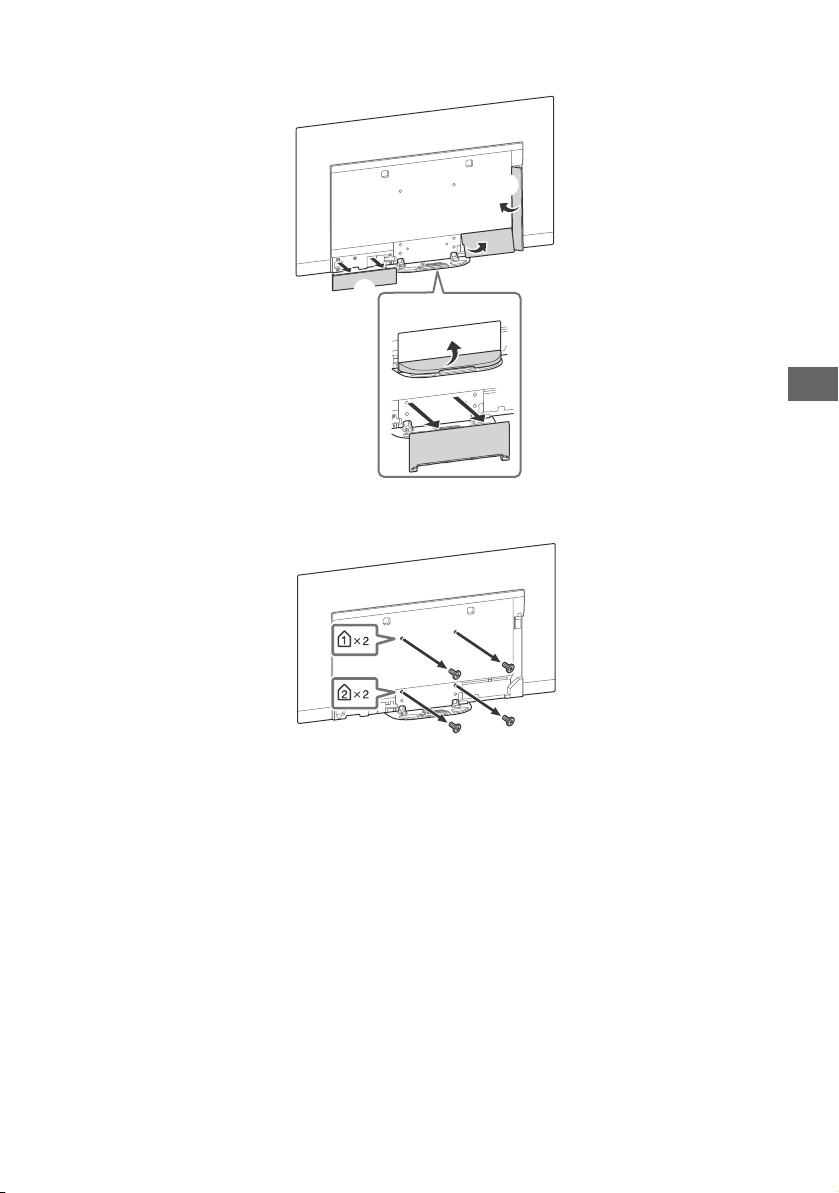
DE
ʕ
1 Entfernen Sie die Ständerabdeckung und die Anschlussabdeckungen.
2 Entfernen Sie die Schrauben von der Rückseite des Fernsehgeräts.
DE
11
Page 66

Störungsbehebung
Zur allgemeinen Problembehandlung bei
Fehlern wie Schwarzbild, kein Ton,
eingefrorenes Bild, Fernsehgerät reagiert nicht
oder Netzwerk verloren führen Sie die
folgenden Schritte aus.
1 Starten Sie Ihr Fernsehgerät neu, indem Sie
die Netztaste auf der Fernbedienung
drücken, bis eine Meldung angezeigt wird.
Das Fernsehgerät wird neu gestartet. Wenn
das Fernsehgerät nicht wiederhergestellt
wird, ziehen Sie das Netzkabel. Drücken Sie
dann auf die Ein-/Ausschalttaste am
Fernsehgerät, warten Sie zwei Minuten und
stecken Sie dann das Netzkabel ein.
2 Schlagen Sie im Hilfe-Menü nach, indem Sie
auf der Fernbedienung die Taste HELP
drücken.
3 Verbinden Sie Ihr Fernsehgerät mit dem
Internet, und führen Sie ein Softwareupdate
durch. Sony empfiehlt, die Software des
Fernsehgeräts zu aktualisieren.
Softwareupdates verbessern die Leistung
oder fügen neue Funktionen hinzu.
4 Besuchen Sie die Sony-Supportwebsite
(Informationen finden Sie auf der vorderen
Umschlagseite dieser Anleitung).
Wenn Sie das Fernsehgerät anschließen, lässt
es sich unter Umständen nicht sofort wieder
durch Drücken der Ein-/Ausschalttaste auf
der Fernbedienung oder am Fernsehgerät
einschalten.
Es dauert eine Weile, das System zu
initialisieren. Warten Sie ungefähr eine Minute
und versuchen Sie es dann erneut.
Probleme und Lösungen
Wenn die Beleuchtungs-LED rot blinkt.
Zählen Sie, wie oft sie blinkt (die Intervallzeit
beträgt drei Sekunden).
Starten Sie das Fernsehgerät, indem Sie das
Netzkabel abziehen und warten, bis die
Beleuchtungs-LED nicht mehr rot blinkt, und
schalten Sie dann das Fernsehgerät ein.
Wenn das Problem weiterhin besteht, trennen Sie
das Netzkabel. Wenden Sie sich dann an Ihren
Händler oder den Sony-Kundendienst und geben
Sie an, wie häufig die Beleuchtungs-LED blinkt.
Es kann kein terrestrisches bzw. Kabelsignal
empfangen werden.
Prüfen Sie die Antennen- oder Kabelverbindung
bzw. die Verstärkereinstellungen.
Wählen Sie den terrestrischen bzw.
Kabelempfang durch Drücken von TV auf der
Fernbedienung und wählen Sie dann [Digital],
wenn der Rundfunkdienst nicht angezeigt wird.
Das terrestrische Signal ist evtl. unterdrückt, wenn
in der Nähe ein starkes Signal anliegt. Setzen Sie
[LNA (Ka ---)] in den Einstellungen des digitalen
Suchlaufs auf [Aus].
Führen Sie nach dem Umzug in eine neue
Wohnung oder für den Empfang neuer Dienste
einen Dienstesuchlauf aus, indem Sie [Digitaler
Suchlauf] wählen.
Es kann kein Satellitensignal empfangen
werden.
Prüfen Sie die Satellitenkabelverbindung.
Wenn die Meldung [Kein Signal. LNB Überlastung
festgestellt…] angezeigt wird, trennen Sie das
Netzkabel. Vergewissern Sie sich anschließend,
dass das Satellitenkabel nicht beschädigt und die
Satellitensignalleitung am Sat-Anschluss nicht
kurzgeschlossen ist.
Die Fernbedienung funktioniert nicht.
Tauschen Sie die Batterien aus.
Das Passwort für die Kindersicherung wurde
vergessen.
Geben Sie 9999 als PIN-Code ein, und wählen Sie
[PIN-Code ändern].
Das Gehäuse des Fernsehgeräts erwärmt
sich.
Wenn das Fernsehgerät lange Zeit verwendet
wird, erwärmt sich das Gehäuse des
Fernsehgeräts. Es fühlt sich möglicherweise heiß
an, wenn Sie es mit der Hand berühren.
Während des Fernsehens mit dem
Fernsehgerät wird der Bildschirm dunkler.
Wenn das gesamte Bild oder ein Teil des Bildes
statisch bleibt, wird die Bildschirmhelligkeit
allmählich reduziert, um Bildeinbrennen zu
verhindern. Dies ist keine Störung des
Fernsehgeräts.
DE
12
Page 67
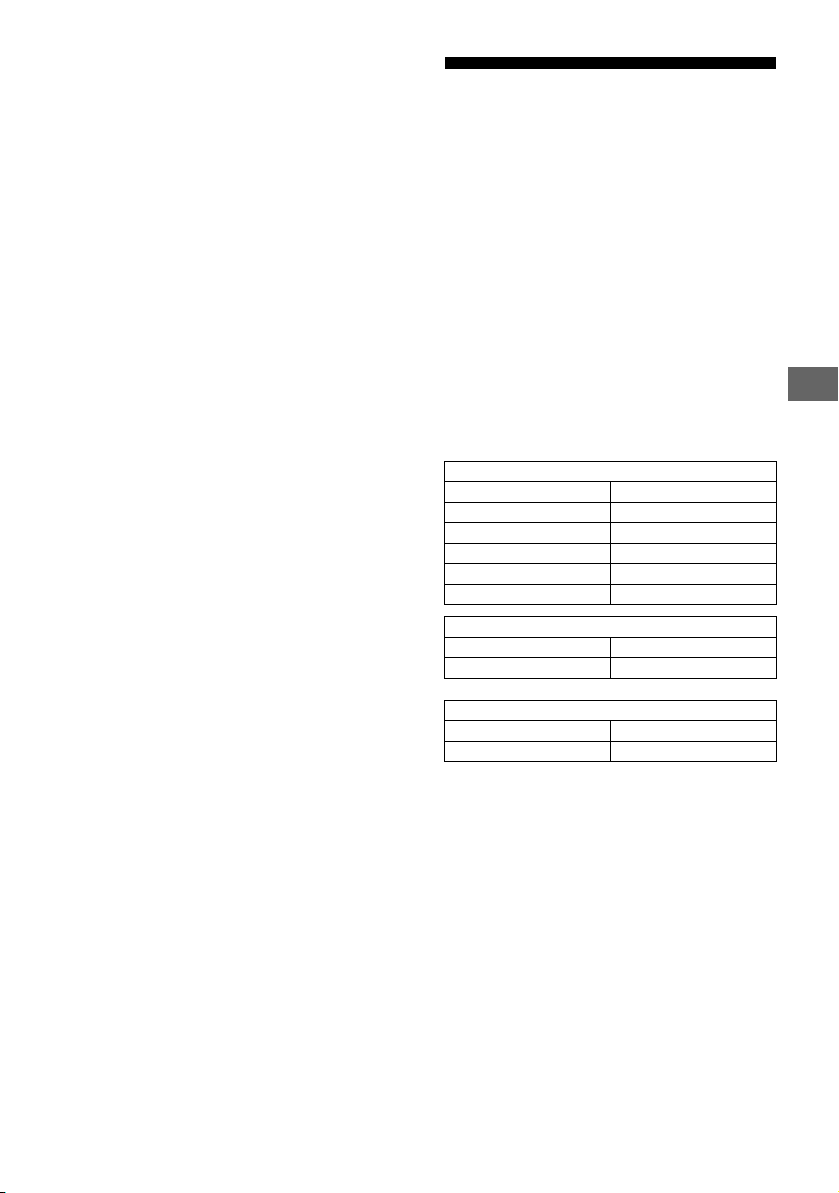
DE
Hinweis
Sie sorgen sich wegen Bildeinbrennen.
Wenn dasselbe Bild wiederholt oder für längere
Zeit angezeigt wird, kann es zu Bildeinbrennen
kommen. Um das Bildeinbrennen zu reduzieren,
empfehlen wir Ihnen, das Fernsehgerät normal
auszuschalten, indem Sie die Netztaste auf der
Fernbedienung oder am Fernsehgerät drücken.
• Führen Sie die Panelaktualisierung nur manuell durch,
wenn das Bildeinbrennen besonders auffällig ist. Es
wird empfohlen, sie nur einmal jährlich
durchzuführen. Vermeiden Sie es, sie öfter als einmal
jährlich durchgeführt, da dies die Lebensdauer des
Bildschirm-Panels verkürzen kann.
• Bilder mit Uhren, Logos und hellen Farben
(einschließlich Weiß) führen leicht zu Bildeinbrennen.
Vermeiden Sie das längere Anzeigen dieser Bilder, da
es anderenfalls zu Bildeinbrennen kommen kann.
Eine weiße Linie erscheint auf dem
Bildschirm.
Die Panelaktualisierung wird automatisch
ausgeführt, wenn das Fernsehgerät über lange
Zeit verwendet wurde, um das Bildeinbrennen zu
reduzieren. Die Panelaktualisierung beginnt nach
dem Ausschalten des Fernsehgeräts und dauert
etwa eine Stunde lang. Während der
Panelaktualisierung kann eine weiße Linie auf
dem Bildschirm erscheinen. Dies ist keine Störung
des Fernsehgeräts.
Die Meldung [Panelaktualisierung konnte
nicht abgeschlossen werden…] wird
angezeigt.
Die Panelaktualisierung wird automatisch
ausgeführt, wenn das Fernsehgerät über lange
Zeit verwendet wurde, um das Bildeinbrennen
zu reduzieren. Wenn während der
Panelaktualisierung das Fernsehgerät
eingeschaltet wird, das Netzkabel gezogen wird
oder die Raumtemperatur außerhalb des
Bereichs zwischen 10 ºC und 40 ºC liegt, wird der
Prozess nicht abgeschlossen und diese
Meldung erscheint.
Wenn die Panelaktualisierung automatisch
gestartet wurde, startet sie neu, wenn Sie das
Fernsehgerät mit der Fernbedienung ausschalten.
Wenn die Panelaktualisierung manuell gestartet
wurde, müssen Sie sie erneut auswählen.
Technische Daten
TV-System
Bildschirmsystem
OLED (Organic Light Emitting Diode)-Panel
Fernsehnorm
Abhängig von Landes-/Bereichsauswahl/Fernsehgerätemodell
Analog: B/G, D/K, I
Digital: DVB-T/DVB-C
DVB-T2*
Satellit*1: DVB-S/DVB -S2
Farbsystem
PAL/SECAM/NTSC3.58 (nur Video)/NTSC4.43 (nur Video)
Kanalbereich
Abhängig von Landes-/Bereichsauswahl/Fernsehgerätemodell
Analog: UHF/VHF/Kabel
Digital: UHF/VHF/Kabel
Satellit*
Tonausgänge
20 W + 20 W + 10 W + 10 W
Wireless-Technologie
Protokoll IEEE802.11ac/a/b/g/n
(Abhängig vom Land/der Region ist IEEE802.11ac
möglicherweise nicht verfügbar.)
Bluetooth Version 4.2
Frequenzbänder
RMF-TX600E
Software-Version
Dieses Funkgerät ist für die Verwendung mit der/den
genehmigten Version(en) der Software bestimmt, die in der EUKonformitätserklärung angegeben sind.
Drücken Sie HELP auf der Fernbedienung, um die
Softwareversion anzuzeigen.
Fernbedienung: _._.__.___
Wählen Sie [Fernbedienung] [Software-Version] aus
[Einstellungen]. Weitere Informationen finden Sie in der Hilfe.
Die auf dieses Rundfunkgerät geladene Software wurde
geprüft und erfüllt die grundlegenden Anforderungen der
Richtlinie 2014/53/EU.
Eingangs-/Ausgangsbuchsen
Antenne/Kabel
75 Ohm, externer Anschluss für VHF/UHF
Satellitenantenn*
Buchsenverbindung vom Typ F, 75 Ohm.
DiSEqC 1.0, LNB 13 V/18 V & 22 kHz Ton,
Unicable EN50494.
/ AV IN
Video/Audio-Eingang (Minibuchse)
1
1
: IF Frequency 950-2.150 MHz
WLAN (IEEE802.11ac/a/b/g/n)
Frequenzbereich Ausgangsleistung
2.400 - 2.483,5 MHz < 20,0 dBm
5.150 - 5.250 MHz < 23,0 dBm
5.250 - 5.350 MHz < 20,0 dBm
5.470 - 5.725 MHz < 20,0 dBm
5.725 - 5.850 MHz < 13,9 dBm
Bluetooth
Frequenzbereich Ausgangsleistung
2.400 - 2.483,5 MHz < 10,0 dBm
Bluetooth
Frequenzbereich Ausgangsleistung
2.400 - 2.483,5 MHz < 10,0 dBm
1
DE
13
Page 68

HDMI IN 1/2/3/4 (unterstützen 4K-Auflösung, HDCP 2.3-
Hinweis
kompatibel)
Video:
4096 × 2160p (50, 60 Hz)*
2160p (50, 60 Hz)*
50, 60, 100, 120 Hz), 1080/24p, 1080i (50, 60 Hz), 720p (30, 50,
60 Hz), 720/24p, 576p, 480p, Computerformate*
Audio:
Im eARC (Enhanced Audio Return Channel)-Modus*
Weitere Einzelheiten finden Sie in der Hilfe.
Außer eARC-Modus
5,1-Kanal linear PCM: 32/44,1/48/88,2/96/176,4/192 kHz
16/20/24 Bit, Dolby Digital, Dolby Digital Plus, DTS
eARC/ARC (Enhanced Audio Return Channel/Audio Return
Channel) (nur bei HDMI IN 3)
Im eARC-Modus*
Weitere Einzelheiten finden Sie in der Hilfe.
Im ARC-Modus
Zwei Kanäle, lineares PCM: 48 kHz 16 Bit, Dolby Digital, Dolby
Digital Plus, DTS
DIGITAL AUDIO OUT (OPTICAL)
Optische Digitalbuchse (zwei Kanäle, lineares PCM: 48 kHz
16 Bit, Dolby Digital, DTS)
(Stereo-Minibuchse)
Kopfhörer
1, 2, 3 (HDD REC)*
USB-Geräteanschluss. ( 3 USB-HDD-Gerät für RECFunktion)
USB-Anschluss 1 und 2 unterstützen High-Speed-USB (USB 2.0)
Der USB-Anschluss 3 unterstützt SuperSpeed-USB (USB 3.1 Gen
1)
Einschub CAM (Zugangskontrollmodul)
LAN
10BASE-T/100BASE-TX-Anschluss (Je nach Betriebsumgebung
des Netzwerks kann die Verbindungsgeschwindigkeit variieren.
Kommunikationsrate und Kommunikationsqualität können
nicht garantiert werden.)
CENTER SPEAKER IN
Center-lautsprecher eingang
2*3
, 4096 × 2160p (24 Hz)*2, 3840 ×
3
, 3840 × 2160p (24, 25, 30 Hz), 1080p (30,
5
6
4
5
Sonstiges
Sonderzubehör
Wandhalterung: SU-WL850
Wandhalterung: SU-WL450
Betriebstemperatur
0 ºC – 40 ºC
Betriebsluftfeuchtigkeit
10 % – 80 % relative Luftfeuchtigkeit (nicht kondensierend)
Stromversorgung, Produktdatenblatt und
anderes
Spannungsversorgung
220 V – 240 V Wechselstrom, 50 Hz
Energieeffizienzklasse
KD-77AG9: A
KD-65AG9: B
KD-55AG9: B
Bildschirmgröße (Diagonale) (Ca.)
KD-77AG9: 194,7 cm / 77 Zoll
KD-65AG9: 163,9 cm / 65 Zoll
KD-55AG9: 138,8 cm / 55 Zoll
Leistungsaufnahme
Im [Standard]-Modus
KD-77AG9: 211 W
KD-65AG9: 169 W
KD-55AG9: 132 W
Im [Brillant]-Modus
KD-77AG9: 674 W
KD-65AG9: 490 W
KD-55AG9: 394 W
Jährlicher Energieverbrauch*
KD-77AG9: 293 kWh pro Jahr
KD-65AG9: 234 kWh pro Jahr
KD-55AG9: 183 kWh pro Jahr
7
Stromverbrauch im Standby-Betrieb*8*
KD-77AG9: 0,50 W (29 W im Software-/
EPGAktualisierungsmodus)
KD-65AG9: 0,50 W (27 W im Software-/
EPGAktualisierungsmodus)
KD-55AG9: 0,50 W (27 W im Software-/
EPGAktualisierungsmodus)
Anzeigeauflösung
3.840 Punkte (horizontal) × 2.160 Zeilen (vertikal)
Ausgangsleistung
USB 1/2
5 V , 500 mA MAX
USB 3
5 V , 900 mA MAX
9
Abmessungen (Ca.) (B × H × T)
mit Tischständer
KD-77AG9: 172,1 × 100,1 × 30,2 cm
KD-65AG9: 144,7 × 83,8 × 25,5 cm
KD-55AG9: 122,6 × 71,4 × 25,5 cm
ohne Tischständer
KD-77AG9: 172,1 × 99,6 × 4,9 cm
KD-65AG9: 144,7 × 83,4 × 4,0 cm
KD-55AG9: 122,6 × 71,0 × 4,0 cm
Gewicht (Ca.)
mit Tischständer
KD-77AG9: 39,7 kg
KD-65AG9: 24,8 kg
KD-55AG9: 22,3 kg
ohne Tischständer
KD-77AG9: 35,3 kg
KD-65AG9: 21,2 kg
KD-55AG9: 18,7 kg
*1 Nicht alle Fernsehgeräte verfügen über DVB-T2- oder DVB-S/
S2-Technologie oder Satellitenantennenanschluss.
*2 Wenn 4096 × 2160p eingegeben wird und [Wide-Modus] auf
[Normal] eingestellt ist, wird die Auflösung als 3840 × 2160p
angezeigt. Um 4096 × 2160p anzuzeigen, setzen Sie die
Einstellung [Wide-Modus] auf [Voll 1] oder [Voll 2].
*3 Um 18 Gbps zu unterstützen, setzen Sie [HDMI-Signalformat]
auf [Optimiertes Format].
*4 Weitere Einzelheiten finden Sie in der Hilfe.
*5 Der eARC-Modus ist aktiv, wenn [eARC-Modus] auf [Autom.]
gesetzt ist, [Lautsprecher] auf [Audiosystem] und wenn ein
mit eARC kompatibles Audiosystem angeschlossen ist.
*6 Nur in bestimmten Regionen/Ländern bzw. für bestimmte
Fernsehmodelle.
*7 Der Energieverbrauch in kWh pro Jahr wurde basierend auf
der Leistungsaufnahme des Fernsehgeräts bei einer
Betriebsdauer von 4 Stunden täglich an 365 Tagen berechnet.
Der tatsächliche Energieverbrauch hängt von der
Verwendung des Fernsehgeräts ab.
*8 Die angegebene Leistungsaufnahme im Standby-Betrieb wird
erreicht, nachdem das Fernsehgerät die notwendigen
internen Prozesse abgeschlossen hat.
*9 Die Leistungsaufnahme im Standbybetrieb steigt, wenn der
Fernseher mit dem Netzwerk verbunden ist.
• Entfernen Sie nicht die Kartenattrappe oder
-abdeckung (die Verfügbarkeit hängt von Fernsehgerätemodell
ab) aus dem Einschub TV CAM (Zugangskontrollmodul), außer
wenn Sie eine passende Smartcard in einem CAM einsetzen
möchten.
• Die Verfügbarkeit des optionalen Zubehörs hängt vom Land/
der Region/dem Fernsehmodell/der Lagerhaltung ab.
• Änderungen, die dem technischen Fortschritt dienen, bleiben
vorbehalten.
Hinweise zu Funktionen für digitale Sender
• Digitalfernsehen (terrestrisches DVB-T, Satellit und Kabel),
interaktive Dienste und Netzwerkfunktionen sind
möglicherweise nicht in allen Ländern oder Regionen
verfügbar. Einige Funktionen sind möglicherweise bei einigen
Anbietern und in manchen Netzwerkumgebungen nicht
aktiviert oder funktionieren evtl. nicht ordnungsgemäß. Einige
TV-Dienstleister verlangen u. U. eine Gebühr für ihre Dienste.
DE
14
Page 69
DE
• Dieses Fernsehgerät unterstützt Digitalrundfunk mit MPEG-2-,
H.264/MPEG-4 AVC- und H.265/HEVC-Codecs. Eine
Kompatibilität mit allen Betreibern/Dienstsignalen, die sich im
Laufe der Zeit ändern können, kann jedoch nicht garantiert
werden.
Information zu Warenzeichen
• Die Begriffe HDMI und HDMI High-Definition Multimedia
Interface sowie das HDMI- Logo sind Marken oder
eingetragene Marken von HDMI Licensing Administrator, Inc. in
den Vereinigten Staaten und anderen Ländern.
• Dolby, Dolby Vision, Dolby Audio und das Doppel-D-Symbol
sind Warenzeichen von Dolby Laboratories. In Lizenz von Dolby
Laboratories gefertigt. Vertrauliche unveröffentlichte Werke.
Copyright © 1992-2015 Dolby Laboratories. Alle Rechte
vorbehalten.
• „BRAVIA“, und BRAVIA Sync sind Marken oder
eingetragene Marken der Sony Corporation.
• Gracenote, das Gracenote-Logo und der Schriftzug sowie das
Logo „Powered by Gracenote“ sind eingetragene Marken oder
Marken von Gracenote, Inc. in den Vereinigten Staaten und/
oder anderen Ländern.
• Vewd® Core. Copyright 1995-2019 Vewd Software AS. All rights
reser ved.
• Google, Google Play, Chromecast, YouTube, Android TV und
andere verwandte Marken und Logos sind Marken von Google
LLC.
• Wi-Fi®, Wi-Fi Alliance® und Wi-Fi Direct® sind eingetragene
Marken der Wi-Fi Alliance.
• Das Wi-Fi CERTIFIED™-Logo ist ein Gütezeichen der Wi-Fi
Alliance.
• Die DTS-Patente finden Sie unter http://patents.dts.com.
Hergestellt unter Lizenz von DTS, Inc. DTS, das Symbol, & DTS
und das Symbol zusammen sind eingetragene Markenzeichen
und DTS Digital Surround ist ein Markenzeichen von DTS, Inc. ©
DTS, Inc. Alle Rechte vorbehalten.
• Die Bluetooth® Wortmarke und -Logos sind eingetragene
Marken, die Eigentum der Bluetooth SIG, Inc. sind und von der
Sony Corporation unter Lizenz verwendet werden. Andere
Markenzeichen und Markennamen sind Eigentum der
jeweiligen Rechteinhaber.
• Netflix ist eine eingetragene Marke von Netflix, Inc.
• DiSEqC™ ist ein Markenzeichen der EUTELSAT. Dieses
Fernsehgerät unterstützt DiSEqC 1.0. Dieses Fernsehgerät
eignet sich nicht zum Steuern von Motorantennen.
• TUXERA ist ein eingetragenes Markenzeichen der Tuxera Inc. in
den USA und in anderen Ländern.
• Das USB-IF SuperSpeed USB-Dreizack-Logo ist eine
eingetragene Marke von USB Implementers Forum, Inc.
• Alle anderen Marken befinden sich im Besitz ihrer jeweiligen
Eigentümer.
DE
15
Page 70
Nota
Consulte o Guia de
Configuração para obter
informações sobre como
montar o Suporte de mesa
do televisor.
Índice
AVISO IMPORTANTE . . . . . . . . . . . . . . . . . . . .2
Informações de segurança . . . . . . . . . . . . . . 3
Proteção do ecrã do televisor (Televisor
OLED) . . . . . . . . . . . . . . . . . . . . . . . . . . . . . . . .4
Telecomando e Televisor. . . . . . . . . . . . . . 5
Diagrama de Ligações. . . . . . . . . . . . . . . . 7
Instalar o televisor na parede . . . . . . . . . 10
Utilizar o Suporte de parede opcional
(SU-WL850 ou SU-WL450) . . . . . . . . . . . . . . 10
Resolução de problemas. . . . . . . . . . . . . 12
Problemas e soluções . . . . . . . . . . . . . . . . . 12
Características técnicas . . . . . . . . . . . . . . 13
Ligação de Internet e Privacidade de dados
Este produto liga-se à Internet durante a configuração inicial
assim que a rede é ligada de forma a confirmar a ligação à
Internet e posteriormente para configurar o ecrã Inicial. O seu
endereço IP é utilizado nestas e todas as outras ligações à
Internet. Se não quiser que o seu endereço IP seja utilizado, não
configure a função de Internet sem fios e não ligue um cabo de
Internet. Consulte as informações de privacidade apresentadas
nos ecrãs de configuração para mais informações acerca das
ligações à Internet.
Introdução
Obrigado por escolher este produto Sony.
Antes de utilizar o televisor, leia este manual com atenção e
guarde-o para futuras consultas.
• Antes de utilizar o televisor, leia as “Informações de segurança”
(página 3).
• Leia as Informações de Segurança para obter informações de
segurança adicionais.
• As imagens e ilustrações utilizadas no Guia de configuração e
neste manual destinam-se a ser utilizadas apenas como
referência e podem ser diferentes do produto real.
Ajuda
Encontre mais resoluções de problemas e outras informações
úteis diretamente no seu televisor. Carregue HELP no
telecomando para apresentar uma lista de tópicos, ou para
procurar por palavras.
Guia de Ajuda (Manual)
Ajuda a partir do seu PC ou smartphone (informações
indicadas na contracapa). Também pode verificar o Guia de
Ajuda a partir do seu PC ou smartphone (informações
indicadas na contracapa deste manual).
Localização da etiqueta de identificação
As etiquetas com o N.º de Modelo, a Data de Fabrico (ano/mês) e
a classificação de Alimentação encontram-se na parte traseira do
televisor ou na embalagem. Podem ser encontrados removendo
a tampa do suporte .
AVISO IMPORTANTE
Aviso para Equipamento de
Rádio
A Sony Visual Products Inc. declara que os
tipos de equipamento de rádio
KD-77AG9, KD-65AG9, KD-55AG9 estão em conformidade com a
Diretiva 2014/53/UE. O texto integral da declaração de
conformidade está disponível no seguinte endereço de Internet:
http://www.compliance.sony.de/
Nota para os clientes: as seguintes informações apenas se
aplicam a equipamento comercializado em países que aplicam as
diretivas da UE.
No que diz respeito a este equipamento de rádio, as seguintes
restrições relativas à colocação em serviço ou dos requisitos de
autorização de utilização aplicam-se em AT, BE, HR, CY, CZ, DK,
EE, FI, FR, DE, EL, HU, IE, IT, LV, LT, LU, MT, NL, PL, PT, SK, SI, ES, SE,
UK, IS, LI, NO, CH, BG, RO, TR, AL, BA, MK, MD, RS, ME, Kosovo:
a banda 5.150-5.350 MHz está restringida apenas a operações no
interior.
PT
2
Page 71
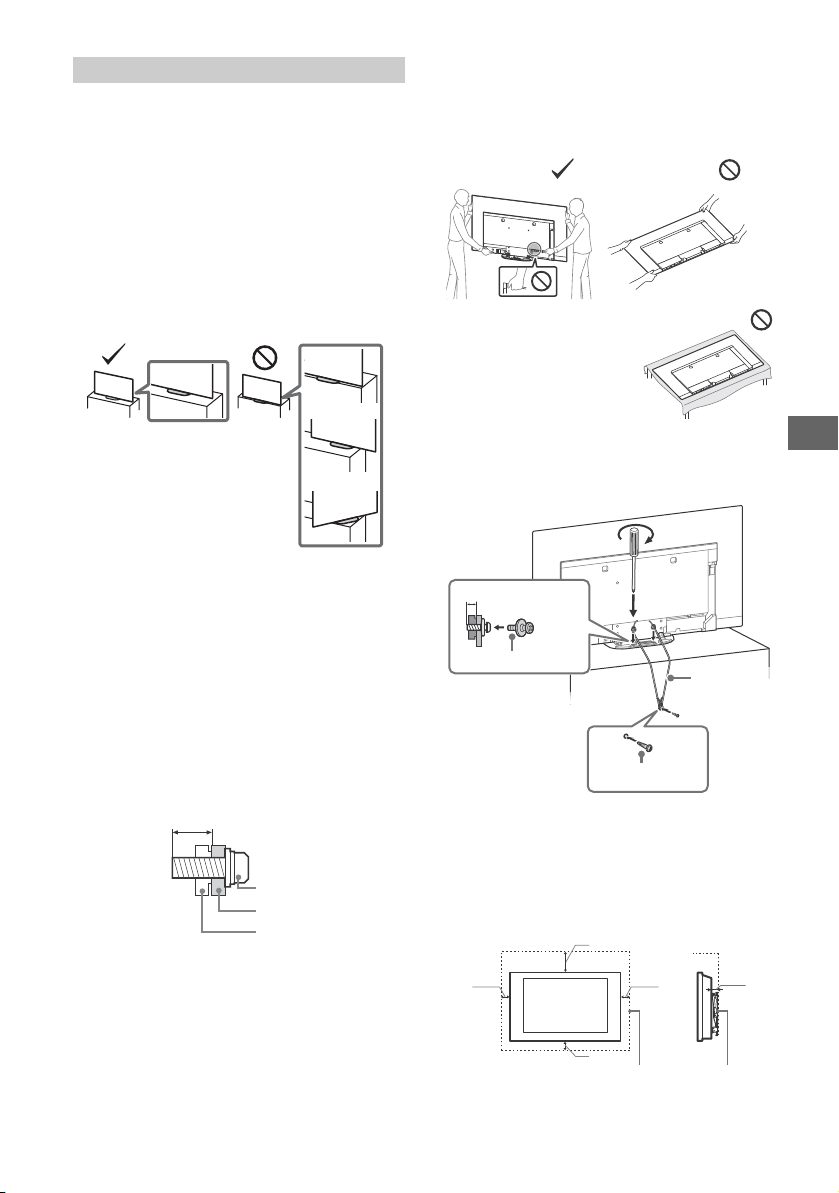
PT
Paraf uso (M6)
Suporte de parede
9 mm - 13 mm
Tampa traseira do televisor
Parafuso M4 (não fornecido)
1,5 N·m
{15 kgf·cm}
Para fuso ( não
fornecid o)
6 mm - 7 mm
Cabo (não
fornecido)
30 cm
10 cm
10 cm
10 cm
Deixe pelo menos este espaço à volta do televisor.
1 cm
Informações de segurança
Instalação/Programação
Instale e utilize o televisor conforme as instruções abaixo para
evitar todo o risco de incêndio, choque elétrico ou avaria e/ou
feridas.
Instalação
• O televisor deve ser instalado perto de uma tomada de corrente
elétrica facilmente acessível.
• Coloque o televisor numa superfície nivelada e estável, para
evitar que caia e provoque ferimentos pessoais ou danos no
produto.
• Instale o televisor num local onde não possa ser puxado,
empurrado ou derrubado.
• Instale o televisor de forma a que o Suporte de mesa do
televisor não fique de fora do suporte do televisor (não
fornecido). Se o Suporte de mesa ficar de fora do suporte do
televisor, poderá levar a que o aparelho caia e provoque
ferimentos pessoais ou danos no televisor.
• Por motivos de segurança, não se esqueça de fixar as tampas
centrais na parte de trás do Televisor quando tiver o Televisor
instalado sobre uma mesa.
• Só técnicos de assistência qualificados devem realizar as
instalações de suporte de parede.
• Por razões de segurança, recomendamos fortemente que utilize
acessórios da Sony, a incluir:
Suporte de parede SU-WL850
Suporte de parede SU-WL450
• Certifique-se de que utiliza os parafusos fornecidos com o
suporte de parede quando instalar o suporte de parede no
televisor. Os parafusos fornecidos têm a dimensão indicada
pela ilustração quando medidos a partir da superfície de fixação
do suporte de parede.
O diâmetro e o comprimento dos parafusos são diferentes
dependendo do modelo de Suporte para montagem na parede.
A utilização de parafusos diferentes dos fornecidos pode
provocar avarias internas no televisor ou fazer com que caia,
etc.
Tran spo rte
• Antes de transportar o televisor, desligue todos os cabos.
• São necessárias duas ou mais pessoas para transportar um
televisor de tamanho grande.
• Ao transportar manualmente o televisor, segure-o conforme é
apresentado abaixo. Não exerça pressão sobre o painel e a
estrutura em volta do ecrã.
• Ao manusear ou instalar o
televisor, não deite o televisor.
• Não exponha o televisor a
choques ou vibrações excessivas durante o transporte.
• Se tiver que transportar o televisor ou levá-lo para reparações,
utilize a caixa e os materiais de embalagem originais.
Prevenir quedas
Ventilação
• Nunca tape os orifícios de ventilação nem introduza nenhum
objeto na caixa.
• Deixe espaço à volta do televisor como mostrado abaixo.
• Recomendamos fortemente que utilize o suporte para
montagem na parede da Sony para permitir uma circulação de
ar adequada.
Instalação na parede
PT
3
Page 72
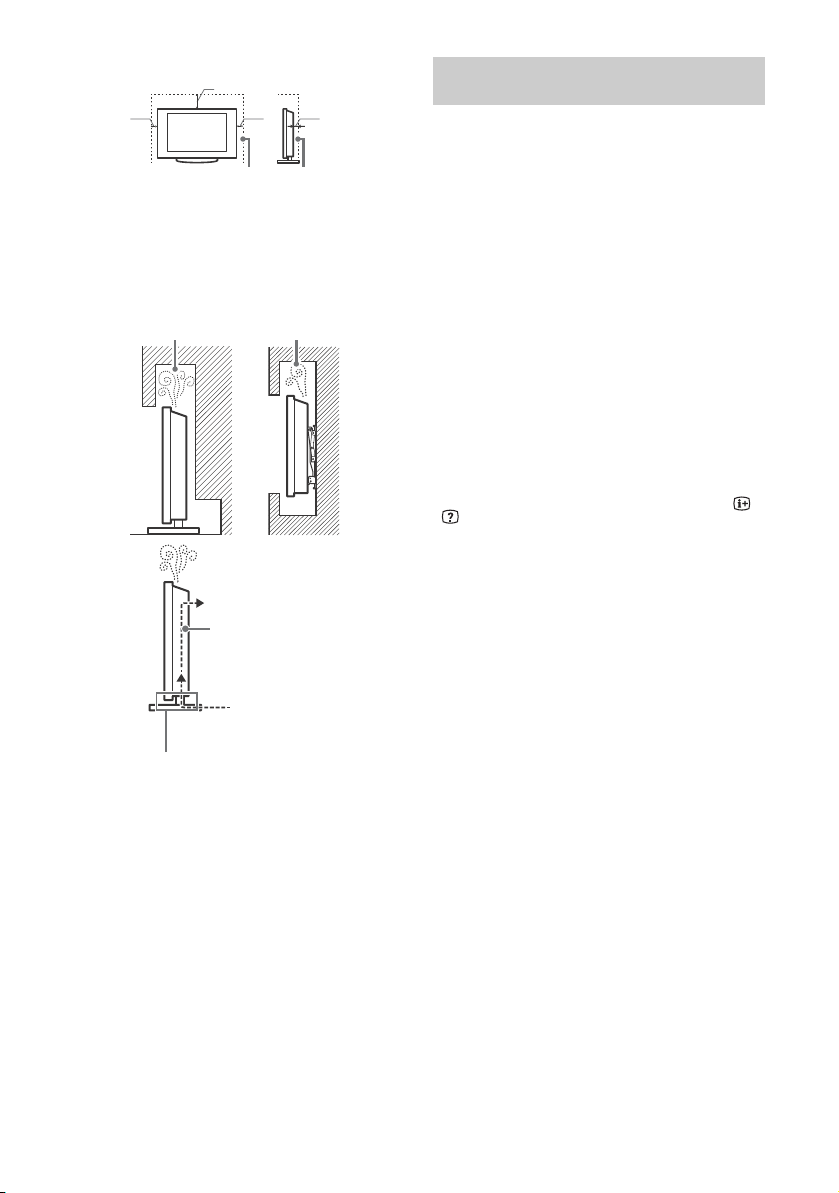
Instalação com base
30 cm
10 cm
10 cm
Deixe pelo menos este espaço à volta do televisor.
6 cm
Não obstrua a área da circulação de ar.
Circulação de ar
Pared e
Circulação de ar bloqueada.
Pared e
• Para assegurar uma ventilação adequada e evitar a acumulação
de sujidade ou poeira:
Não instale o televisor em posição horizontal, às avessas,
para trás ou de lado.
Não coloque o televisor numa estante, num tapete, numa
cama ou num armário.
Não tape o televisor com panos, por exemplo, cortinas nem
com outros objetos, como jornais, etc.
Não instale o televisor como mostrado abaixo.
PT
4
Proteção do ecrã do televisor (Televisor OLED)
Precauções para proteger o ecrã de danos
Retenção de imagem
Os televisores OLED são suscetíveis à retenção de imagem
(burn-in) devido às características dos materiais utilizados. A
retenção de imagem poderá ocorrer se forem apresentadas
imagens no mesmo local do ecrã repetidamente ou durante
longos períodos de tempo. Isto não é uma avaria do televisor.
Evite apresentar imagens que possam causar retenção de
imagem.
Seguem-se exemplos de imagens que poderão
causar retenção de imagem:
• Conteúdo com barras pretas tanto na parte superior como
inferior e/ou no lado esquerdo e direito do ecrã. (por exemplo,
panorâmico, ecrã 4:3, definição standard)
• Imagens estáticas como fotografias.
• Videojogos que possam ter conteúdo estático em alguma parte
do ecrã.
• Menus no ecrã, guia de programação, logótipos de canal, etc.
• Conteúdo estático de aplicações.
• Vistos no ecrã, como os que são utilizados nas notícias e
manchetes.
Para reduzir o risco de retenção de imagem:
• A Sony recomenda que desligue o Televisor normalmente
premindo o botão de desligar no Telecomando ou no Televisor.
• Preencha o ecrã alterando [Modo expandido] para eliminar as
barras pretas. Selecione [Modo expandido] em vez de [Normal].
• Desligue o OSD (On Screen Display) carregando no botão /
desligue os menus de equipamento ligado. Para mais
informações, consulte os manuais de instruções do
equipamento ligado.
• Evite apresentar imagens estáticas de cores brilhantes
(incluindo branco), relógios ou logótipos em qualquer parte do
ecrã.
• Ajuste as definições de imagem com base nas condições
ambiente. A Imagem Standard é recomendada para utilização
em casa e durante a visualização de conteúdo que apresenta
muitas vezes logótipos das estações, etc.
O televisor tem as seguintes funcionalidades para ajudar a
reduzir/prevenir a retenção de imagem.
Atualização do painel
A atualização do painel irá ser executada automaticamente para
ajustar a uniformidade do ecrã do televisor após este ter sido
utilizado durante longos períodos de tempo. A atualização do
painel pode também ser executada manualmente e apenas
deverá ser utilizada se a retenção de imagem for muito visível ou
se vir a seguinte mensagem: [A atualização do painel não foi
concluída…]
Atenção:
• A função de atualização do painel poderá afetar o painel. Como
referência, execute a atualização do painel apenas uma vez por
ano, não a execute mais do que uma vez por ano, pois poderá
afetar o tempo de vida útil de utilização do painel.
• A atualização do painel demora cerca de uma hora para
completa r.
• Poderá ser apresentada uma linha branca no ecrã durante a
atualização do painel, isto não é uma avaria do televisor.
• A atualização do painel apenas funcionará quando a
temperatura ambiente estiver entre os 10 ºC e os 40 ºC.
Ajuste de pixel
Move automaticamente a imagem no ecrã para prevenir retenção
de imagem.
Outras funcionalidades
O brilho do ecrã é reduzido automaticamente quando apresenta
imagens paradas, relógios, cores brilhantes ou logótipos, etc.
Page 73
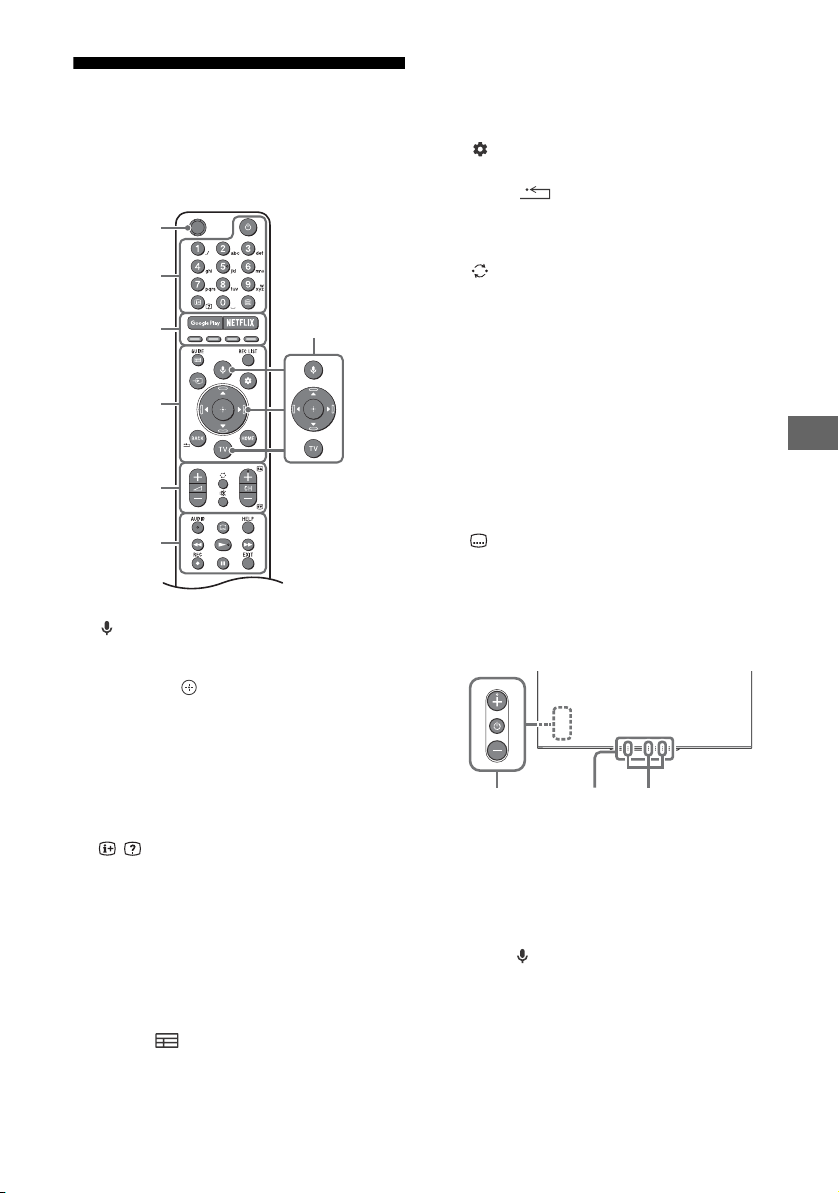
PT
Sugestão
MIC
Ȫ
ȫ
Ȭ
ȭ
Ȯ
ȩ
ȯȱ
Telecomando e Televisor
A forma, localização, disponibilidade e função
dos botões do telecomando pode variar,
dependendo da região/país/modelo de
televisor.
(Microfone): Utilize a função pesquisa
por voz. (p. ex., procure vários conteúdos
por voz.)*
//// (Navegação D-Pad): Menu
de navegação e seleção no ecrã.
TV: Muda para um canal de televisão ou
entra e mostra o menu TV.
(Televisor em modo de espera
(standby))
Botões numéricos
Tele te xt o): Apresentar informações.
(Teletexto):
teletexto.
Google Play
NETFLIX (Apenas em determinadas
regiões/países/modelos de televisor)
Botões coloridos
GUIDE/ :
digital, ou EPG da caixa de televisão por
cabo/satélite*2.
1
/ (Revelação de Informação/
Apresentar informações de
Apresente o guia de programas
REC LIST: Apresenta a lista Rec do USB HDD
ou DVR*2.
(Seleção de entrada): Apresenta e
seleciona a fonte de entrada, etc.
(Definições Rápidas): Apresenta as
Definições Rápidas.
BACK/
HOME
+/– (Volume)
(Saltar)
(Sem som)
• É possível ativar ou desativar o serviço do atalho
de acessibilidade premindo ininterruptamente
.
CH +/–//
No modo de televisão: Selecionar o canal.
No modo de Teletexto: Selecionar a página
seguinte () ou anterior ().
AUDIO: Selecione o som da fonte
multilíngue ou som duplo (dependendo da
fonte do programa).
(Configurar legendas)
HELP:
Apresentar menu de Ajuda.
///
Grave o programa em visualização
REC:
atualmente no USB HDD ou DVR*2.
EXIT
(Alimentação)
Sensor do telecomando / Sensor de
luz / Iluminação LED
1*3
Microfone incorporado*
ativar o microfone incorporado, prima o
botão (MIC) no telecomando e cumpra as
instruções apresentadas no ecrã. Para mais
informações, consulte o Guia de ajuda.
/ LED: Para
PT
5
Page 74

*1 A pesquisa por voz requer uma ligação à Internet.
*2 [Configuração da caixa de cabo/satélite] é
necessária a configuração (apenas em
determinadas regiões/países/modelos de
televisor). Para mais informações, consulte o Guia
de ajuda.
*3 Apenas em determinadas regiões/países/idiomas.
O consumo de energia em modo de espera
aumentará quando a pesquisa por voz com o
microfone incorporado está ativada.
PT
6
Page 75
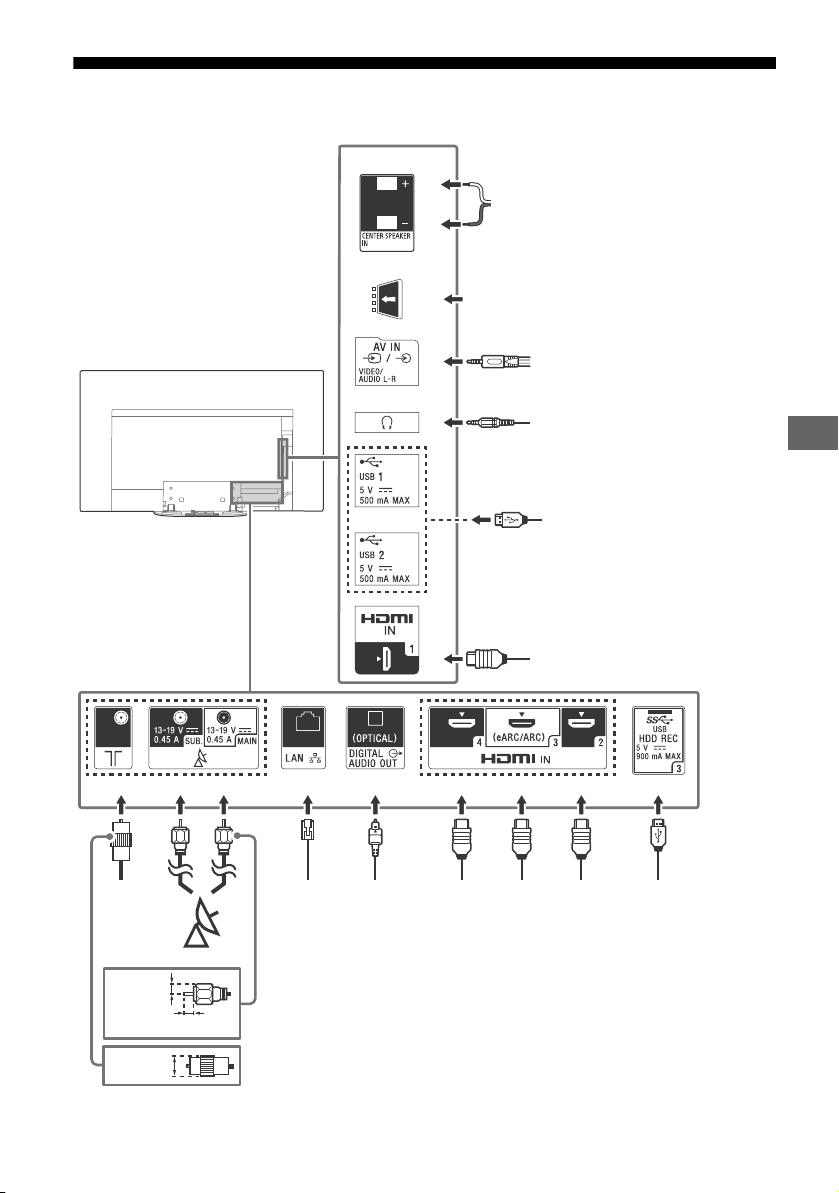
PT
Diagrama de Ligações
<
<
<
ȭȯ
Ȫ
ȩ
ȫ
Ȭ
ȭ
Ȯ
Cabo/
Antena/
Caixa
Externa
Router
Satélite
Auscultador
7 mm
Dispositivo HDMI
Dispositivo
HDMI
Video-gravador/Equipamento de
videojogos/Leitor de DVD/Câmara
de vídeo/Caixa Externa*
1
14 mm
Módulo de Acesso Condicional
Dispositivo
HDMI
Sistema
de
Áudio
com
Entrada
Áudio
Ótico
Recetor de AV
Câmara
fotográfica
digital/Câmara
de vídeo/
Dispositivo USB/
Dispositivo USB
HDD
Câmara fotográfica digital/Câmara
de vídeo/Dispositivo USB
Sistema
de Áudio
com
Dispositivo
eARC/ARC/
HDMI
1,5 mm
Para mais informações sobre ligações, consulte o Guia de ajuda carregando em HELP no telecomando.
PT
7
Page 76
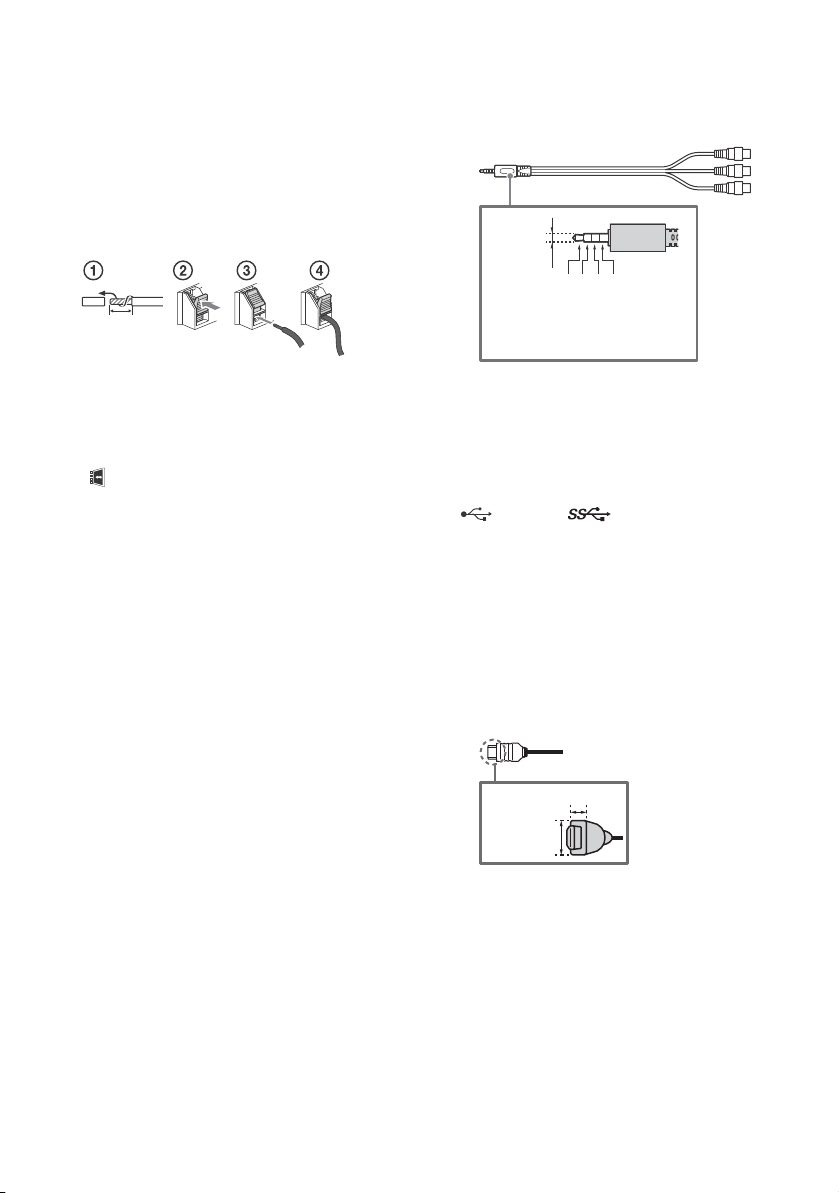
CENTER SPEAKER IN
10 mm
3,5 mm
1234
1: L
2: Vídeo
3: Ligação à terra
4: R
< 12 mm
< 21 mm
• Para utilizar os altifalantes do seu televisor
como altifalante central, ligue a saída do
seu recetor de AV à CENTER SPEAKER IN
do seu televisor.
• Antes de ligar os cabos, desligue o cabo
de alimentação do televisor e do recetor
de AV.
• Certifique-se de que [Altifalante] está
definido para [Sistema de áudio].
Para evitar um silvo quando não ligar a
entrada CENTER SPEAKER IN a um recetor de
AV, desative o [Modo de altifalante central
da TV]. Consulte os detalhes no Guia de
ajuda.
CAM (Módulo de Acesso
Condicional)
• Permite o acesso a serviços de televisão
pagos. Para mais informações, consulte o
manual de instruções fornecido com o
CAM.
• Não introduza o smart card diretamente
na ranhura CAM do televisor. Tem de ser
introduzido no Módulo de Acesso
Condicional fornecido pelo seu agente
autorizado.
• O CAM não é suportado em todos os
países/regiões. Verifique com o seu
agente autorizado.
• Pode aparecer uma mensagem do CAM
quando muda para um programa digital
depois de utilizar vídeo Internet.
/ AV IN
• Para uma ligação composta, utilize um
cabo de extensão analógica (não
fornecido).
•
(Auscultador)
• Compatível apenas com cabo Minitomada estéreo de 3-pólos.
• Não pode obter som do auscultador e dos
altifalantes da TV simultaneamente.
USB 1/2, USB 3 (HDD REC)*
• Ligar um grande dispositivo USB pode
interferir com outros dispositivos ligados
junto do mesmo.
• Ao ligar um grande dispositivo USB, ligue
à tomada USB 1.
• Ligue um dispositivo USB HDD à porta USB
3 (azul).
HDMI IN 1/2/3/4
• O interface HDMI consegue transferir o
vídeo e áudio digital em apenas um cabo.
•
2
PT
8
• Para apreciar os conteúdos de alta
qualidade 4K 50p/60p, ligue um cabo
HDMI de Alta Velocidade Premium e
defina o [Formato de sinal HDMI] para
[Formato avançado].
Faça isto individualmente para cada
terminal HDMI IN ligado. Para detalhes
sobre os formatos suportados, consulte as
“Características técnicas” neste manual
(página 13-14).
Page 77
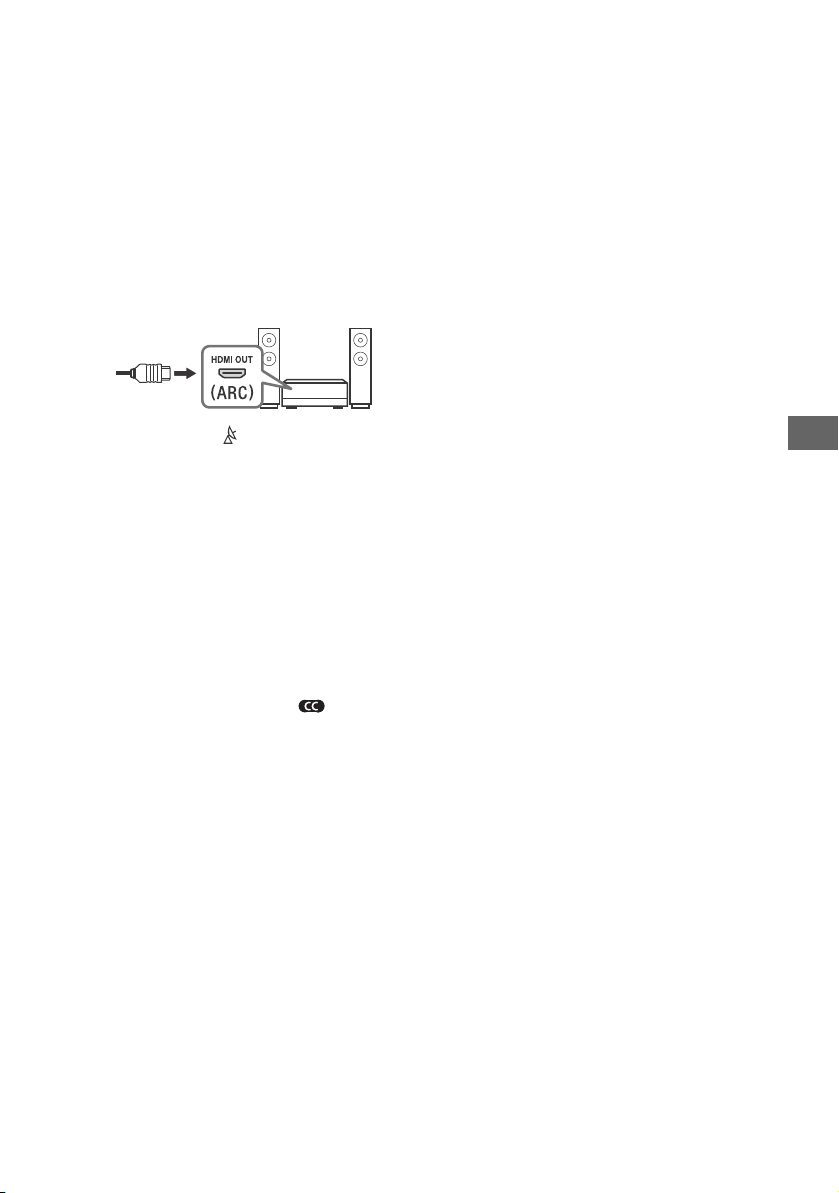
PT
Nota
• HDMI IN 3 eARC/ARC (Enhanced Audio
Return Channel/Audio Return Channel)
Ligue o seu sistema de áudio a HDMI IN 3
para encaminhar o áudio do televisor para
o seu sistema de áudio. Um sistema de
áudio que suporta HDMI eARC/ARC pode
enviar vídeo para o televisor e receber
áudio do televisor através do mesmo cabo
HDMI. Se o seu sistema de áudio não
suporta HDMI eARC/ARC, uma ligação
adicional com DIGITAL AUDIO OUT
(OPTICAL) é necessária.
• Use o cabo HDMI com Ethernet para ligar
o sistema de áudio ao eARC.
(Entrada RF), (Entrada satélite)
• Ligações para antena terrestre/cabo e
satélite. Passos da ligação: SUB. MAIN
Antena
• Para tomada SUB., ligue apenas quando
estiver a usar o modo de sintonizador
duplo para o Cabo de Distribuição Único
EN50494.
*1 Para um dispositivo externo que tenha apenas
SCART AV OUT, utilize um adaptador SCART-RCA e
um Cabo de Extensão Analógico.
*2 Apenas em determinadas regiões/países/modelos
de televisor.
• Não é possível fixar a tampa lateral se existirem
cabos ligados no terminal lateral.
• Guarde a tampa lateral num local seguro para
utilização futura.
PT
9
Page 78

Instalar o televisor na parede
Utilizar o Suporte de parede opcional (SU-WL850 ou SU-WL450)
Para os clientes:
Para proteção do produto e por razões de segurança, a Sony recomenda vivamente que a instalação
do seu televisor seja efetuada por agentes Sony ou contratantes licenciados. Não tente instalá-lo por
si próprio.
Para os agentes e contratantes da Sony:
Preste total atenção às medidas de segurança durante a instalação, manutenção periódica e análise
deste produto.
Informações de instalação do Suporte de parede
Este manual de instruções do televisor mostra apenas os passos de preparação do televisor, antes de
o instalar na parede.
Para obter instruções sobre a instalação do Suporte de Parede, veja a Informação de Instalação
(Suporte de Parede) na página do produto para o modelo do seu televisor.
www.sony.eu/support/
Preparação para a instalação na parede
Utilize o Suporte de parede SU-WL850 (não fornecido) ou SU-WL450 (não fornecido) para instalar o
televisor na parede.
Certifique-se de que fixa o Suporte de mesa antes de instalar o Televisor na parede, consultando o
Guia de configuração.
• Prepare o televisor para o Suporte de parede antes de ligar os cabos.
• Siga o guia de instruções fornecido com o Suporte de parede para o seu modelo. A instalação do
televisor requer experiência suficiente, especialmente para determinar se a parede possui a
resistência necessária para suportar o peso do televisor.
• Certifique-se de que a instalação deste produto na parede é efetuada por agentes Sony ou por
contratantes licenciados e preste atenção às medidas de segurança durante a instalação. A Sony
não se responsabiliza por quaisquer danos ou ferimentos causados pela utilização indevida ou
instalação incorreta.
• Os parafusos para o Suporte de parede não são fornecidos.
• Não se esqueça de guardar os parafusos que não utilizar e o Suporte de mesa num local seguro até
precisar de fixar o Suporte de mesa. Mantenha os parafusos afastados de crianças pequenas.
10
PT
Page 79
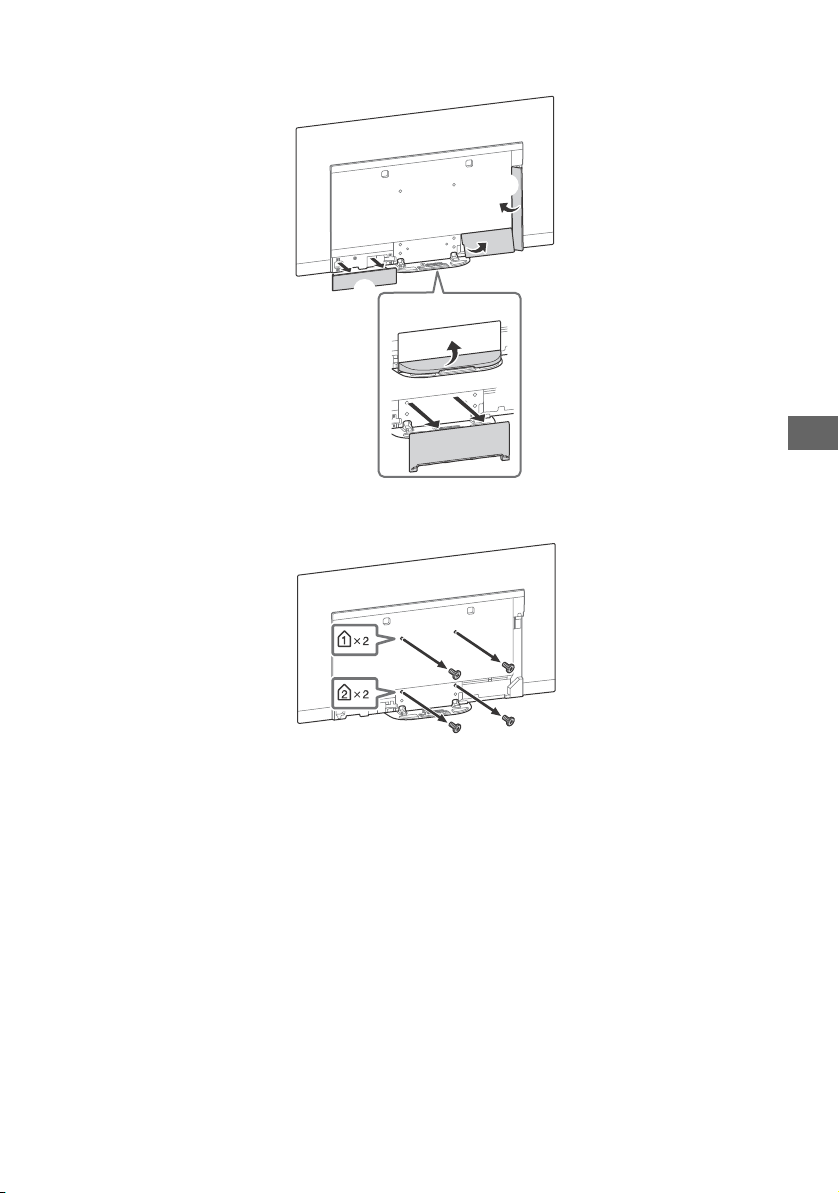
PT
ʕ
1 Retire a tampa do suporte e as tampas dos terminas.
2 Retire os parafusos da parte de trás do televisor.
PT
11
Page 80

Resolução de problemas
Resolução de problemas geral de questões
como: ecrã preto, sem som, imagem
bloqueada, o televisor não responde ou se
perdeu a rede, realize os passos seguintes.
1 Reinicie o seu televisor carregando no botão
de alimentação no telecomando até que surja
uma mensagem. O televisor vai reinicia.
Tente desligar o cabo de alimentação se o
televisor não recuperar. Prima então o botão
de alimentação no televisor e aguarde dois
minutos e ligue o cabo de alimentação.
2 Consulte o menu Ajuda carregando em HELP
no telecomando.
3 Ligue o televisor à Internet e realize uma
atualização de software. A Sony recomenda-o
a manter o software do seu televisor
atualizado. As atualizações de software
proporcionam novas funcionalidades e
melhoram o desempenho.
4 Visite o Web site de apoio da Sony
(informações indicadas na capa deste
manual).
Quando liga o televisor, o televisor pode
demorar algum tempo a ligar mesmo que
carregue no botão de alimentação no
telecomando ou no televisor.
Demora algum tempo para inicializar o sistema.
Aguarde cerca de um minuto e, em seguida,
volte a operar.
Problemas e soluções
Quando o LED de iluminação estiver a piscar a
vermelho.
Anote o número de vezes que pisca (o tempo de
intervalo é de três segundos).
Reinicie o televisor desligando o cabo de
alimentação até o LED de iluminação parar de
piscar a vermelho e, em seguida, ligue o televisor.
Se o problema persistir, desligue o cabo de
alimentação e contacte o seu agente ou centro de
assistência Sony e indique o número de vezes que
o LED de Iluminação pisca.
Não se recebe o serviço terrestre/cabo.
Verifique a ligação da antena/cabo e definições
do amplificador.
Selecione o serviço terrestre/por cabo premindo
TV no telecomando e, em seguida, selecione
[Digital] se o serviço de transmissão não for
apresentado.
O sinal terrestre pode ser suprimido se existir um
sinal forte disponibilizado nas proximidades.
Defina [LNA (Canal ---)] para [Desativar] nas
definições da sintonia digital.
Depois de se mudar para uma casa nova ou
tentar receber novos serviços, tente uma
pesquisa de serviço selecionando [Sintonia
Digital].
Não se recebe o serviço satélite.
Verifique a ligação do cabo de satélite.
Quando é apresentada a mensagem [Nenhum
sinal. Overload do LNB…], desligue o cabo de
alimentação. Em seguida, certifique-se de que o
cabo de satélite não está danificado e que a linha
do sinal de satélite não está em curto-circuito no
conector de satélite.
O telecomando não funciona.
Substitua as pilhas.
Esqueceu a palavra-passe do bloqueio
parental de transmissão.
Introduza 9999 para o código PIN e selecione
[Altere o código PIN].
A área na proximidade do televisor aquece.
Quando o televisor é utilizado durante um
período de tempo prolongado, a área na
proximidade do televisor aquece. Poderá sentir a
superfície quente ao tocar com a mão.
O ecrã fica mais escuro enquanto vê televisão.
Se a imagem completa ou parte da imagem se
mantiver parada, o brilho do ecrã será
gradualmente reduzido para prevenir retenção de
imagem. Isto não é uma avaria do televisor.
PT
12
Page 81
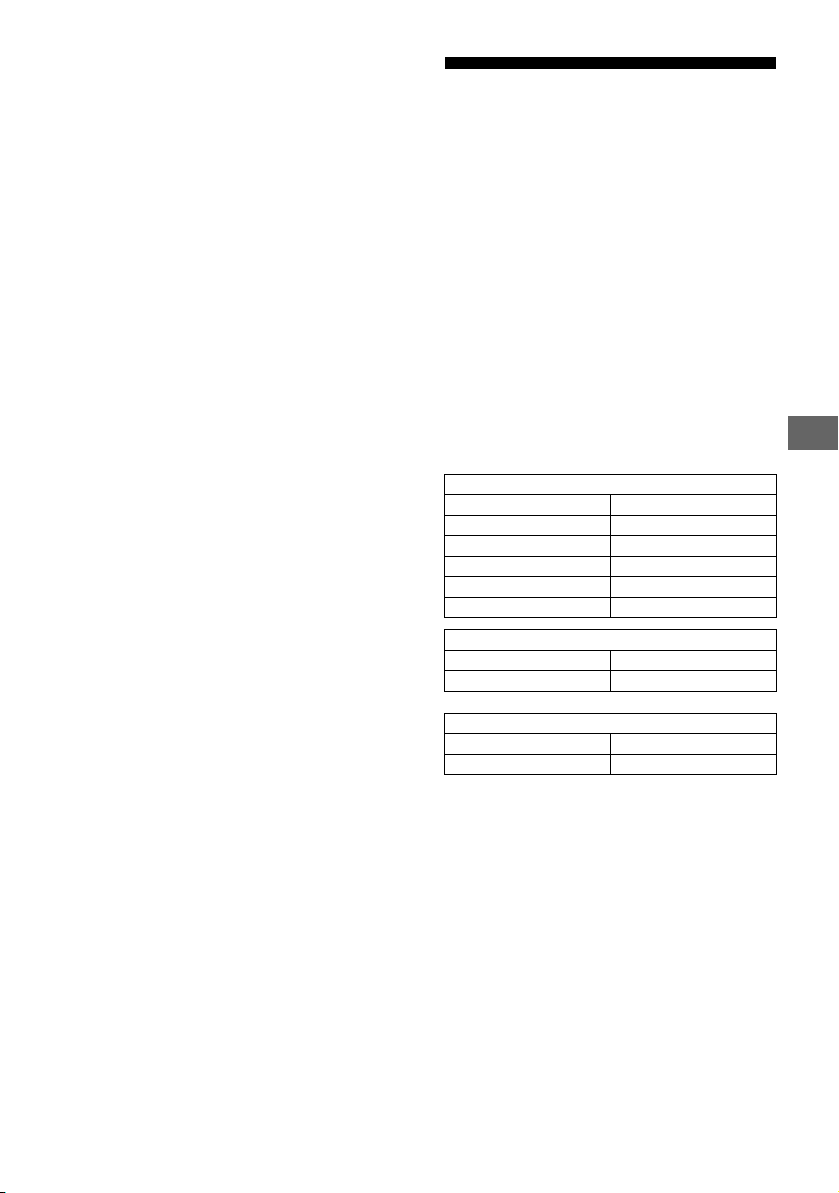
PT
Nota
Tem preocupações sobre a retenção de
imagem.
Se a mesma imagem for apresentada
repetidamente ou durante um longo período de
tempo, poderá ocorrer retenção de imagem.
Para reduzir a retenção de imagem,
recomendamos que desligue o Televisor
normalmente premindo o botão de desligar no
telecomando ou no Televisor.
• Execute a atualização do painel manualmente apenas
quando a retenção de imagem for particularmente
visível. Como referência, execute-a apenas uma vez
por ano. Evite executá-la mais do que uma vez por
ano, uma vez que poderá afetar o tempo de vida útil
de utilização do painel.
• Imagens que incluam relógios, logótipos e cores
brilhantes (incluindo branco) causam facilmente
retenção de imagem. Evite apresentar estes tipos de
imagens durante longos períodos de tempo, caso
contrário poderá ocorrer retenção de imagem.
É apresentada uma linha branca no ecrã.
A atualização do painel é executada
automaticamente após o televisor ter sido
utilizado durante longos períodos de tempo para
reduzir a retenção de imagem. A atualização do
painel inicia após o televisor ser desligado e
demora cerca de uma hora para completar.
Poderá ser apresentada uma linha branca no ecrã
durante a atualização do painel. Isto não é uma
avaria do televisor.
É apresentada a mensagem [A atualização do
painel não foi concluída…].
A atualização do painel é executada
automaticamente após o televisor ter sido
utilizado durante longos períodos de tempo
para reduzir a retenção de imagem. Se o
televisor for ligado, o cabo de alimentação CA
for desligado ou a temperatura ambiente saia
do intervalo de 10 ºC a 40 ºC durante a
atualização do painel, o processo não será
completado e será apresentada esta
mensagem.
Se a atualização do painel tiver iniciado
automaticamente, esta irá reiniciar quando
desligar o televisor com o telecomando.
Se a Atualização do painel tiver iniciado
manualmente, é necessário selecioná-la
novamente.
Características técnicas
Sistema
Sistema do ecrã
Painel OLED (Organic Light Emitting Diode)
Sistema de televisão
Dependendo do país/área/modelos de televisor
Analógico: B/G, D/K, I
Digital: DVB-T/DVB-C
DVB-T2*
Satélite*1: DVB-S/DVB -S2
Sistema de Cor
PAL/SECAM/NTSC3.58 (Apenas vídeo)/NTSC4.43 (Apenas
vídeo)
Cobertura de canais
Dependendo do país/área/modelos de televisor
Analógico: UHF/VHF/Cabo
Digital: UHF/VHF/Cabo
Satélite*
Saída de som
20 W + 20 W + 10 W + 10 W
Tecnologia sem fios
Protocolo IEEE802.11ac/a/b/g/n
(IEEE802.11ac pode não estar disponível dependendo da sua
região/país.)
Bluetooth Versão 4.2
Banda de frequência(s)
RMF-TX600E
Vers ão d o software
Este equipamento de rádio destina-se a ser utilizado com a(s)
versão(ões) de software aprovada(s) que está(ão) indicada(s)
na Declaração de Conformidade da UE.
Carregue em HELP no telecomando para saber qual a versão
do software.
Telecomando: _._.__.___
Selecione [Telecomando] [Versão do Software] em
[Definições]. Para mais informações, consulte o Guia de ajuda.
O software carregado neste equipamento de rádio está
verificado e de acordo com os requisitos essenciais da Diretiva
2014/53/UE.
Tomadas de Entrada/Saída
Antena (aérea)/cabo
Terminal externo de 75 ohm para VHF/UHF
Antena do satélite*
Conector de tipo F fêmea, 75 ohm.
DiSEqC 1.0, LNB 13 V/18 V & tom 22 kHz, Distribuição por um
Cabo EN50494.
/ AV IN
Entrada de vídeo/áudio (Mini-tomada)
1
1
: Frequência IF 950-2.150 MHz
LAN sem fios (IEEE802.11ac/a/b/g/n)
Gama de frequência Potência de Saída
2.400 - 2.483,5 MHz < 20,0 dBm
5.150 - 5.250 MHz < 23,0 dBm
5.250 - 5.350 MHz < 20,0 dBm
5.470 - 5.725 MHz < 20,0 dBm
5.725 - 5.850 MHz < 13,9 dBm
Bluetooth
Gama de frequência Potência de Saída
2.400 - 2.483,5 MHz < 10,0 dBm
Bluetooth
Gama de frequência Potência de Saída
2.400 - 2.483,5 MHz < 10,0 dBm
1
PT
13
Page 82

HDMI IN 1/2/3/4 (suporta resolução 4K, HDCP 2.3-
Nota
compatível)
Vídeo:
4096 × 2160p (50, 60 Hz)*
2160p (50, 60 Hz)*
50, 60, 100, 120 Hz), 1080/24p, 1080i (50, 60 Hz), 720p (30, 50,
60 Hz), 720/24p, 576p, 480p, Formatos PC*
Áudio:
No modo eARC (Enhanced Audio Return Channel)*
Consulte o Guia de Ajuda para mais detalhes.
Exceto no modo eARC
PCM linear do canal 5,1: 32/44,1/48/88,2/96/176,4/192 kHz
16/20/24 bits, Dolby Digital, Dolby Digital Plus, DTS
eARC/ARC (Enhanced Audio Return Channel/Audio Return
Channel) (Apenas nos modelos HDMI IN 3)
No modo eARC*
Consulte o Guia de Ajuda para mais detalhes.
No modo ARC
PCM linear de dois canais: 48 kHz 16 bits, Dolby Digital, Dolby
Digital Plus, DTS
DIGITAL AUDIO OUT (OPTICAL)
Tomada digital ótica (PCM linear de dois canais: 48 kHz 16 bits,
Dolby Digital, DTS)
(Mini-tomada estéreo)
Auscultador
1, 2, 3 (HDD REC)*
Porta do dispositivo USB. ( 3 dispositivo USB HDD para a
funcionalidade REC)
As portas USB 1 e 2 suportam High Speed USB (USB 2.0)
A porta USB 3 suporta Super Speed USB (USB 3.1 Gen 1)
Ranhura CAM (Módulo de Acesso Condicional)
LAN
Conector 10BASE-T/100BASE-TX (Dependendo do ambiente de
operação da rede, a velocidade de ligação pode variar. A taxa
de comunicação e qualidade de comunicação não são
garantidas.)
CENTER SPEAKER IN
Terminal de entrada da coluna central
2*3
, 4096 × 2160p (24 Hz)*2, 3840 ×
3
, 3840 × 2160p (24, 25, 30 Hz), 1080p (30,
4
5
6
5
Outros
Acessórios opcionais
Suporte de parede: SU-WL850
Suporte de parede: SU-WL450
Temperatura de operação
0 ºC – 40 ºC
Humidade operacional
10 % – 80 % HR (não condensada)
Alimentação, Ficha de Produto e outros
Requisitos de alimentação
220 V - 240 V CA, 50 Hz
Classe de eficiência energética
KD-77AG9: A
KD-65AG9: B
KD-55AG9: B
Dimensões do ecrã (medido diagonalmente) (Aprox.)
KD-77AG9: 194,7 cm / 77 polegadas
KD-65AG9: 163,9 cm / 65 polegadas
KD-55AG9: 138,8 cm / 55 polegadas
Consumo de energia
No modo [Standard]
KD-77AG9: 211 W
KD-65AG9: 169 W
KD-55AG9: 132 W
No modo [Vívido]
KD-77AG9: 674 W
KD-65AG9: 490 W
KD-55AG9: 394 W
Consumo anual de energia*
KD-77AG9: 293 kWh por ano
KD-65AG9: 234 kWh por ano
KD-55AG9: 183 kWh por ano
7
Consumo de energia no modo de espera*8*
KD-77AG9: 0,50 W (29 W no modo de atualização do EPG/
software)
KD-65AG9: 0,50 W (27 W no modo de atualização do EPG/
software)
KD-55AG9: 0,50 W (27 W no modo de atualização do EPG/
software)
Resolução do ecrã
3.840 pontos (horizontal) × 2.160 linhas (vertical)
Potência nominal
USB 1/2
5 V , 500 mA MÁX
USB 3
5 V , 900 mA MÁX
9
Dimensões (Aprox.) (larg. × alt. × prof.)
com suporte de fixação para mesas
KD-77AG9: 172,1 × 100,1 × 30,2 cm
KD-65AG9: 144,7 × 83,8 × 25,5 cm
KD-55AG9: 122,6 × 71,4 × 25,5 cm
sem suporte de fixação para mesas
KD-77AG9: 172,1 × 99,6 × 4,9 cm
KD-65AG9: 144,7 × 83,4 × 4,0 cm
KD-55AG9: 122,6 × 71,0 × 4,0 cm
Peso (Aprox.)
com suporte de fixação para mesas
KD-77AG9: 39,7 kg
KD-65AG9: 24,8 kg
KD-55AG9: 22,3 kg
sem suporte de fixação para mesas
KD-77AG9: 35,3 kg
KD-65AG9: 21,2 kg
KD-55AG9: 18,7 kg
*1 Nem todos os televisores têm tecnologia DVB-T2 ou DVB-S/
S2 ou terminal de antena satélite.
*2 Quando é introduzido 4096 × 2160p e [Modo expandido] é
configurado para [Normal], a resolução é mostrada em 3840
× 2160p. Para visualizar em 4096 × 2160p, configure [Modo
expandido] para [Integral 1] ou [Integral 2].
*3 Para suportar 18 Gbps, configure [Formato de sinal HDMI]
para [Formato avançado].
*4 Consulte o Guia de Ajuda para mais detalhes.
*5 O modo eARC está ativo quando [Modo eARC] está definido
para [Auto], [Altifalante] está definido para [Sistema de áudio]
e o sistema de áudio compatível com eARC está ligado.
*6 Apenas em determinadas regiões/países/modelos de
televisor.
*7 Consumo de energia em kWh por ano, com base no consumo
de energia verificado com o televisor a funcionar 4 horas por
dia durante 365 dias.
O consumo de energia real irá depender da forma como o
televisor é utilizado.
*8 A energia em modo de espera (standby) especificada é
atingida depois de o televisor concluir os processos internos
necessários.
*9 O consumo de energia em modo de espera (standby) irá
aumentar quando o televisor estiver ligado à rede.
• Não retire o cartão fictício ou cobertura (a disponibilidade
depende do modelo do televisor) da ranhura TV CAM do
televisor (Módulo de Acesso Condicional) exceto para inserir
um cartão colocado no CAM.
• A disponibilidade dos acessórios opcionais depende dos
países/região/modelo de televisor/stock.
• O design e as características técnicas estão sujeitos a alteração
sem aviso prévio.
Aviso para a função de televisão digital
• A Televisão Digital (DVB terrestre, satélite e cabo), serviços
interativos e funções de rede, podem não estar disponíveis em
todos os países e áreas. Algumas funções podem não ser
permitidas ou podem não funcionar corretamente com alguns
fornecedores e ambientes de rede. Alguns fornecedores de
serviço de Televisão podem cobrar uma taxa pelos seus
serviços.
PT
14
Page 83
PT
• Este televisor suporta transmissão digital utilizando codecs
MPEG-2, H.264/MPEG-4 AVC e H.265/HEVC, mas a
compatibilidade com todos os sinais do operador/serviço, que
pode mudar com o tempo, não pode ser garantida.
Informação da marca registada
• Os termos HDMI e High-Definition Multimedia Interface e o
logotipo HDMI são marcas ou marcas registradas da HDMI
Licensing Administrator, Inc. nos Estados Unidos e em outros
países.
• Dolby, Dolby Vision, Dolby Audio e o símbolo duplo D são
marcas da Dolby Laboratories. Fabricado sob licença da Dolby
Laboratories. Trabalhos confidenciais não publicados.
Copyright © 1992-2015 Dolby Laboratories. Todos os direitos
reser vados.
• “BRAVIA”, e BRAVIA Sync são marcas comerciais ou
registadas da Sony Corporation.
• Gracenote, o logótipo Gracenote, o logo “Powered by
Gracenote” são marcas comerciais registadas ou marcas
comerciais da Gracenote, Inc. nos Estados Unidos e/ou noutros
países.
• Vewd® Core. Copyright 1995-2019 Vewd Software AS. All rights
reser ved.
• Google, Google Play, Chromecast, YouTube, Android TV e
outras marcas relacionadas e logos são marcas comerciais da
Google LLC.
• Wi-Fi®, Wi-Fi Alliance® e Wi-Fi Direct® são marcas comerciais
registadas da Wi-Fi Alliance.
• O logo Wi-Fi CERTIFIED™ é uma marca de certificação da Wi-Fi
Alliance.
• Para obter informações sobre patentes DTS, consulte http://
patents.dts.com. Fabricado sob licença da DTS, Inc. DTS, o
símbolo, & DTS e o símbolo em conjunto são marcas
comerciais registadas e Digital Surround é uma marca
comercial da DTS, Inc. © DTS, Inc. Todos os direitos reservados.
• O símbolo da palavra e os logótipos Bluetooth® são marcas
comerciais registadas da Bluetooth SIG, Inc. e qualquer
utilização desses símbolos por parte da Sony Corporation está
sob licença. Outras marcas comerciais e nomes comerciais são
propriedade dos respetivos proprietários.
• Netflix é uma marca registada da Netflix, Inc.
• DiSEqC™ é uma marca comercial da EUTELSAT. Este televisor
suporta DiSEqC 1.0. Este televisor não se destina ao controlo de
antenas motorizadas.
• TUXERA é uma marca comercial registada da Tuxera Inc. nos
EUA e outros países.
• O logótipo USB-IF SuperSpeed USB Trident é uma marca
comercial registada da USB Implementers Forum, Inc.
• Todas as outras marcas registadas são propriedade dos seus
respetivos proprietários.
PT
15
Page 84
Nota
Per fissare il supporto da
tavolo, consultare la Guida
di installazione.
Sommario
NOTA IMPORTANTE. . . . . . . . . . . . . . . . . . . . .2
Informazioni di sicurezza. . . . . . . . . . . . . . . . 3
Protezione dello schermo TV (TV OLED). . . . 4
Telecomando e televisore . . . . . . . . . . . . . 5
Schema di collegamento. . . . . . . . . . . . . . 7
Installazione del televisore a parete. . . . 10
Uso della staffa di montaggio a parete
opzionale (SU-WL850 o SU-WL450) . . . . . . 10
Risoluzione dei problemi. . . . . . . . . . . . . 12
Problemi e soluzioni. . . . . . . . . . . . . . . . . . . 12
Caratteristiche tecniche. . . . . . . . . . . . . . 13
Connessione Internet e privacy dei dati
Questo prodotto si connette a Internet durante la configurazione
iniziale non appena si collega una rete, al fine di verificare la
connessione a Internet e, in seguito, per configurare la
schermata Home. L’indirizzo IP viene utilizzato in questa e in
tutte le altre connessioni a Internet. Se non si desidera utilizzare
l’indirizzo IP, non configurare la funzione Internet wireless e non
collegare un cavo Internet. Consultare le informazioni sulla
privacy presentate nelle schermate di configurazione per
ulteriori dettagli sulle connessioni a Internet.
Introduzione
Grazie per avere scelto questo prodotto Sony.
Prima di mettere in funzione il televisore, si prega di leggere
attentamente il presente manuale e di conservarlo per farvi
riferimento in futuro.
• Prima di mettere in funzione il televisore, leggere le
“Informazioni di sicurezza” (pagina 3).
• Leggere le Avvertenze sulla sicurezza per ulteriori informazioni
sulla sicurezza.
• Le immagini e le illustrazioni utilizzate nella Guida
all’installazione e nel presente manuale servono
esclusivamente come riferimento e possono differire dal
prodotto effettivo.
Guida
Consultare ulteriori informazioni sulla risoluzione dei problemi
e altre informazioni utili direttamente dal televisore. Premere
HELP sul telecomando per visualizzare un elenco di argomenti
o per la ricerca con parola chiave.
Guida (manuale)
Per informazioni più dettagliate, selezionare [Guida] dal menu
Guida del televisore. È inoltre possibile controllare la Guida dal
PC o dallo smartphone (le informazioni sono fornite nella
copertina posteriore del presente manuale).
Ubicazione della targhetta di identificazione
Le etichette indicanti il modello, la data di produzione (anno/
mese) e la tensione di alimentazione sono ubicate sul retro del
televisore o sull’imballo. È possibile individuarle rimuovendo il
coperchio del piedistallo .
NOTA IMPORTANTE
Nota per le apparecchiature
radio
Il fabbricante, Sony Visual Products Inc.,
dichiara che i tipi di apparecchiatura radio
KD-77AG9, KD-65AG9, KD-55AG9 sono conformi alla direttiva
2014/53/UE. Il testo completo della dichiarazione di conformità
UE è disponibile al seguente indirizzo Internet:
http://www.compliance.sony.de/
Avviso per i clienti: le seguenti informazioni si riferiscono
esclusivamente ad apparecchi venduti in paesi che applicano le
direttive UE.
Per la presente apparecchiatura radio, si applicano le seguenti
restrizioni relative alla messa in servizio o relative ai requisiti per
l’autorizzazione all’uso in AT, BE, HR, CY, CZ, DK, EE, FI, FR, DE, EL,
HU, IE, IT, LV, LT, LU, MT, NL, PL, PT, SK, SI, ES, SE, UK, IS, LI, NO, CH,
BG, RO, TR, AL, BA, MK, MD, RS, ME, Kosovo:
la restrizione della banda 5.150-5.350 MHz si limita
esclusivamente al funzionamento in interni.
IT
2
Page 85
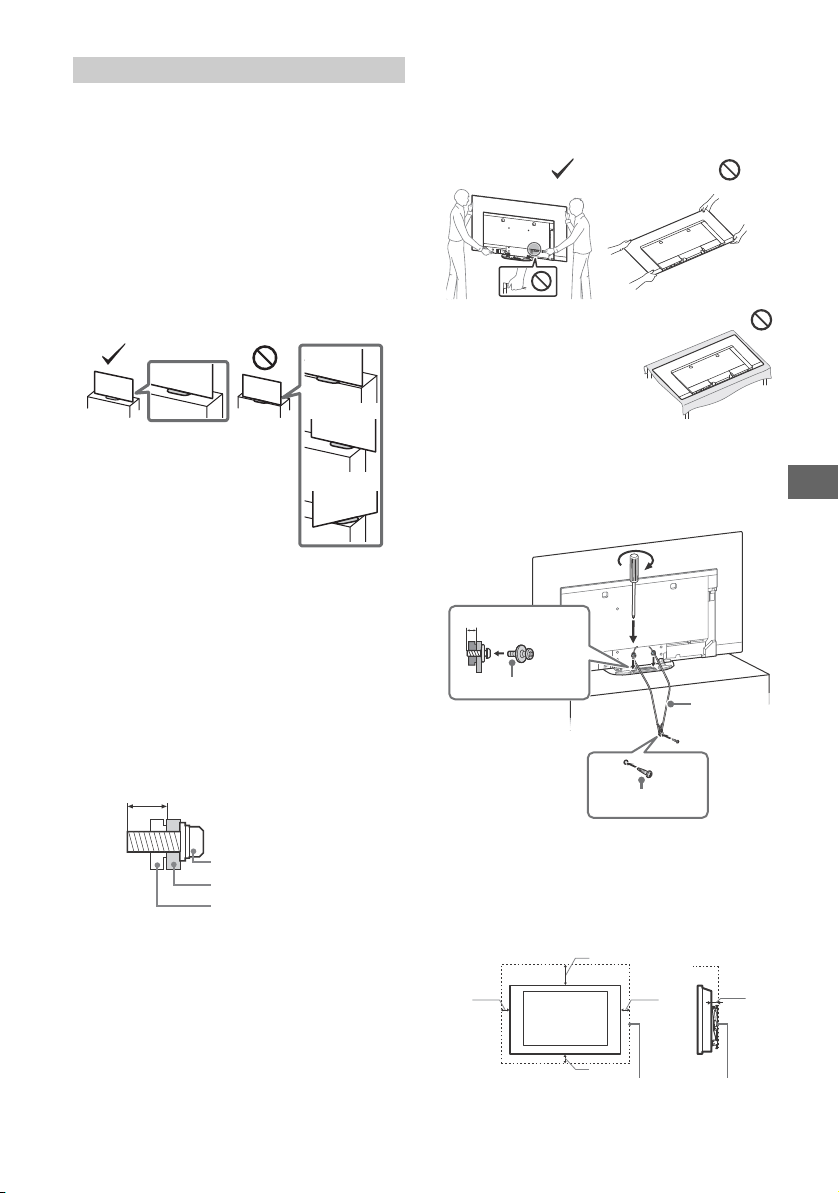
IT
Informazioni di sicurezza
Vite (M6)
Staffa di montaggio a parete
9 mm - 13 mm
Coperchio posteriore del televisore
Vite M4 (non in dotazione)
1,5 N·m
{15 kgf·cm}
Vite (non in
dotazione)
6 mm - 7 mm
Cavo (non in
dotazione)
30 cm
10 cm
10 cm
10 cm
Spazio minimo indispensabile attorno al televisore.
1 cm
Installazione/Impostazione
Installare e utilizzare il televisore attenendosi alle istruzioni di
seguito al fine di evitare il rischio di incendi, scosse elettriche o
danni e/o lesioni.
Installazione
• Il televisore deve essere installato in prossimità di una presa di
corrente facilmente accessibile.
• Posizionare il televisore su una superficie stabile e piana per
evitare che possa cadere e causare lesioni personali o danni
materiali.
• Installare il televisore in una posizione che non permetta di
tirarlo, spingerlo o rovesciarlo.
• Installare il televisore in modo che il relativo supporto da tavolo
non sporga dal supporto del televisore (non in dotazione). Se il
supporto da tavolo sporge dal supporto del televisore, il
televisore potrebbe rovesciarsi o cadere e causare danni alle
persone o al televisore stesso.
Tras por to
• Prima di trasportare il televisore, scollegare tutti i cavi.
• Per trasportare un televisore di grandi dimensioni sono
necessarie due o tre persone.
• Quando si trasporta il televisore manualmente, sostenerlo come
mostrato sotto. Non sollecitare il pannello e il telaio intorno allo
schermo.
• Durante lo spostamento o il
montaggio del televisore, non
posare il televisore.
• Durante il trasporto, non sottoporre il televisore a urti o
vibrazioni eccessive.
• Nel caso in cui si renda necessario trasportare il televisore per
farlo riparare o per un trasloco, richiuderlo sempre
nell’imballaggio originale.
Prevenzione delle cadute
• Per motivi di sicurezza, verificare di aver collegato i coperchi
centrali alla parte posteriore del TV quando questo si trova su un
piano.
• Per l’installazione a parete rivolgersi esclusivamente a
personale qualificato.
• Per motivi di sicurezza, si consiglia caldamente di utilizzare
esclusivamente accessori Sony, compresi:
Staffa di montaggio a parete SU-WL850
Staffa di montaggio a parete SU-WL450
• Fissare la staffa di montaggio a parete al televisore utilizzando
esclusivamente le viti fornite in dotazione. Le viti in dotazione
sono come appaiono nell’illustrazione, misurate dalla superficie
di fissaggio della staffa di montaggio a parete.
Il diametro e la lunghezza delle viti differiscono in base al
modello di staffa per il montaggio a parete.
L’uso di viti diverse da quelle in dotazione può determinare
danni interni al televisore o provocarne la caduta, ecc.
Ventilazione
• Non coprire i fori di ventilazione o inserire oggetti nel mobile.
• Lasciare spazio intorno al televisore come mostrato sotto.
• Si raccomanda caldamente di utilizzare la staffa di montaggio a
parete Sony al fine di consentire un’adeguata circolazione
dell’aria.
Installato a parete
3
IT
Page 86
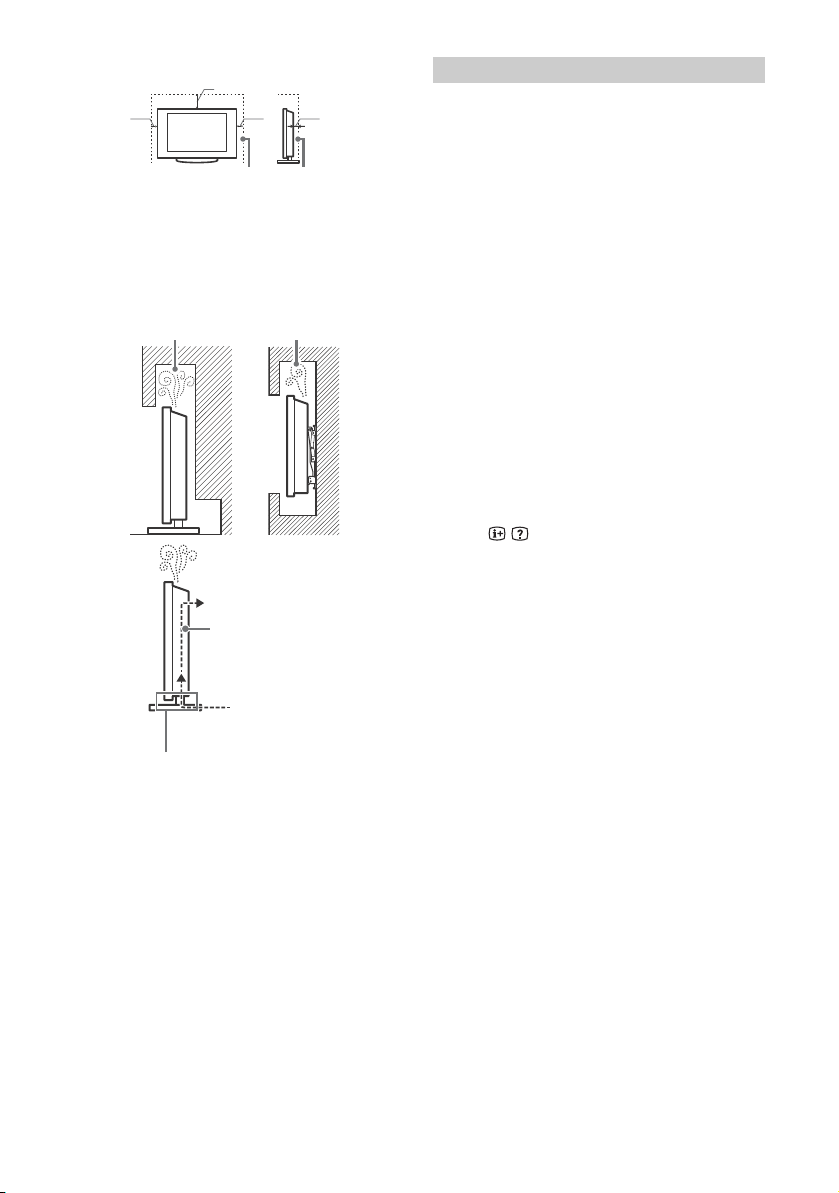
Installato sul piedistallo
30 cm
10 cm
10 cm
Spazio minimo indispensabile attorno al televisore.
6 cm
Non bloccare l’area che assicura un’adeguata circolazione dell’aria.
Circolazione dell’aria
Paret e
Circolazione dell’aria bloccata.
Paret e
• Per garantire una ventilazione adeguata ed evitare l’accumulo di
sporcizia e polvere:
Non posare il televisore piatto, né installarlo in posizione
capovolta, girato all’indietro o lateralmente.
Non posizionare il televisore su uno scaffale o dentro un
armadio.
Non coprire il televisore con tessuti od oggetti, come per
esempio tende, giornali e simili.
Non installare il televisore nel modo indicato di seguito.
IT
4
Protezione dello schermo TV (TV OLED)
Precauzioni per proteggere lo schermo da
danni
Persistenza delle immagini
I TV OLED sono suscettibili a persistenza d’immagine (burn-in) a
causa delle caratteristiche dei materiali usati. La persistenza
d’immagine può verificarsi se le immagini sono visualizzate
ripetutamente nella stessa posizione sullo schermo o per un
periodo di tempo prolungato. Non si tratta di un
malfunzionamento del TV. Evitare la visualizzazione di immagini
che possono provocare la persistenza d’immagine.
Di seguito sono riportati alcuni esempi di
immagini che potrebbero causare la persistenza
d’immagine:
• Contenuti con barre nere nella parte superiore e inferiore e/o
alla sinistra e alla destra dello schermo. (ad esempio,
Letterboxed, schermo a 4:3, definizione standard)
• Immagini fisse come le foto.
• Videogiochi con contenuti statici in alcune parti dello schermo.
• Menu sullo schermo, guide ai programmi, logo di canali e così
via.
• Contenuti statici di applicazioni.
• Ticker sullo schermo, come quelli utilizzati per le notizie e i titoli.
Per ridurre la persistenza d’immagine:
• Sony consiglia di spegnere il TV normalmente premendo il
pulsante di accensione sul telecomando o sul TV.
• Riempire lo schermo modificando il [Formato Immagine] al fine
di eliminare le barre nere. Selezionare un [Formato Immagine]
diverso da [4:3].
• Disattivare la funzione OSD (On Screen Display) premendo il
pulsante / e disattivare i menu dalle apparecchiature
collegate. Per dettagli, fare riferimento ai manuali di istruzioni
per le apparecchiature collegata.
• Evitare la visualizzazione di immagini fisse con colori luminosi
(incluso il bianco), orologi e logo su qualsiasi parte dello
schermo.
• Impostare le impostazioni dell’immagine in base alle condizioni
ambientali. Si consiglia Immagine standard per l’uso domestico
e durante la visualizzazione di contenuti in cui vengono spesso
visualizzati i logo delle stazioni e così via.
Il TV è dotato delle seguenti funzioni per ridurre/prevenire la
persistenza d’immagine.
Aggiornamento pannello
Aggiornamento pannello viene eseguito automaticamente per
regolare l’uniformità dello schermo del TV dopo un uso
prolungato. Aggiornamento pannello può essere eseguito anche
manualmente e solo se la persistenza d’immagine è molto visibile
o viene visualizzato il seguente messaggio: [L'aggiornamento del
pannello non è stato completato…]
Attenzione:
• La funzione Aggiornamento pannello può interessare il
pannello. Come riferimento, eseguire Aggiornamento pannello
solo una volta l’anno. Un utilizzo più frequente può interessare
la vita del pannello.
• Aggiornamento pannello richiede circa un’ora per il
completa mento.
• Durante Aggiornamento pannello, sullo schermo potrebbe
essere visualizzata una linea bianca: non si tratta di un
malfunzionamento del TV.
• Aggiornamento pannello funziona con una temperatura della
stanza compresa tra 10 ºC e 40 ºC.
Spostamento pixel
Sposta automaticamente l’immagine sullo schermo al fine di
evitare la persistenza d’immagine.
Altre funzioni
La luminosità dello schermo viene ridotta automaticamente
durante la visualizzazione di immagini fisse, orologi, colori
luminosi o logo e così via.
Page 87
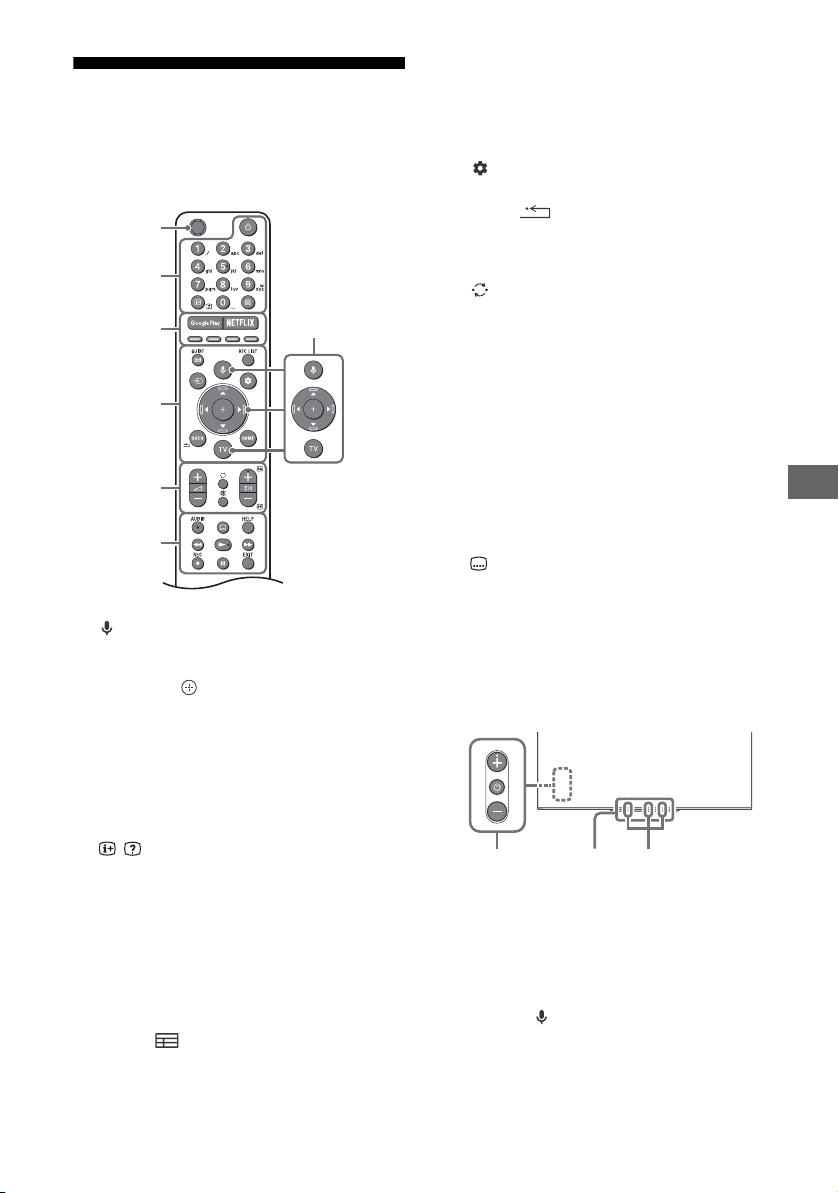
IT
Suggerimento
MIC
Ȫ
ȫ
Ȭ
ȭ
Ȯ
ȩ
ȯȱ
Telecomando e televisore
La forma del telecomando, la posizione, la
disponibilità e le funzioni dei tasti del
telecomando possono variare a seconda della
regione/del paese/del modello del televisore.
(Microfono): Consente di utilizzare la
ricerca vocale. (per es. di cercare svariati
contenuti tramite comandi vocali.)*
//// (D-Pad di navigazione):
Navigazione e selezione nel menu su
schermo.
TV: Cambiare programma TV o un ingresso
e visualizzare il menu TV.
(Standby TV)
Tasti numerici
/ (Info/Mostra testo): Consente di
visualizzare le informazioni del Televideo.
(Televideo):
informazioni del Televideo.
Google Play
Consente di visualizzare le
NETFLIX (Solo per alcune Regioni /
Paesi / Modelli TV)
Tasti colorati
GUIDE/ :
guida TV o EPG via cavo/satellitare*2.
Consente di visualizzare la
1
REC LIST: Consente di visualizzare l’elenco
Rec dell’USB HDD o DVR*2.
(Selezione ingresso): Consente di
visualizzare e selezionare la sorgente di
ingresso, ecc.
(Impostazioni rapide): Consente di
visualizzare le Impostazioni rapide.
BACK/
HOME
+/– (Volume)
(Salto)
(Disattivazione audio)
• Il servizio di collegamento rapido all’accesso può
essere attivato o disattivato tenendo premuto .
CH +/–//
In modalità televisore: Selezione del canale.
In modalità Televideo: Consente di
selezionare la pagina successiva () o
precedente ().
AUDIO: Consente di selezionare l’audio di
una sorgente multilingue o dual (a seconda
della sorgente del programma).
(Impostazione Sottotitoli)
Consente di visualizzare il menu
HELP:
Guida.
///
Consente di registrare il programma
REC:
attualmente visualizzato sull’USB HDD o
DVR*2.
EXIT
(Accensione)
Sensore del telecomando / Sensore di
luce / Indicatore LED
1*3
Microfono integrato*
abilitare il microfono integrato, premere il
pulsante (MIC) sul telecomando e seguire
le istruzioni sullo schermo. Per ulteriori
informazioni, consultare la Guida.
/ LED: Per
IT
5
Page 88

*1 La ricerca vocale richiede una connessione Internet.
*2 È necessaria l'impostazione [Configurazione
decoder cavo/satellite] (solo per alcune regioni /
Paesi / modelli TV). Per ulteriori informazioni,
consultare la Guida.
*3 Solo per alcune regioni / Paesi / lingue. Il consumo
energetico in standby aumenta quando è abilitata la
ricerca vocale con microfono integrato.
IT
6
Page 89
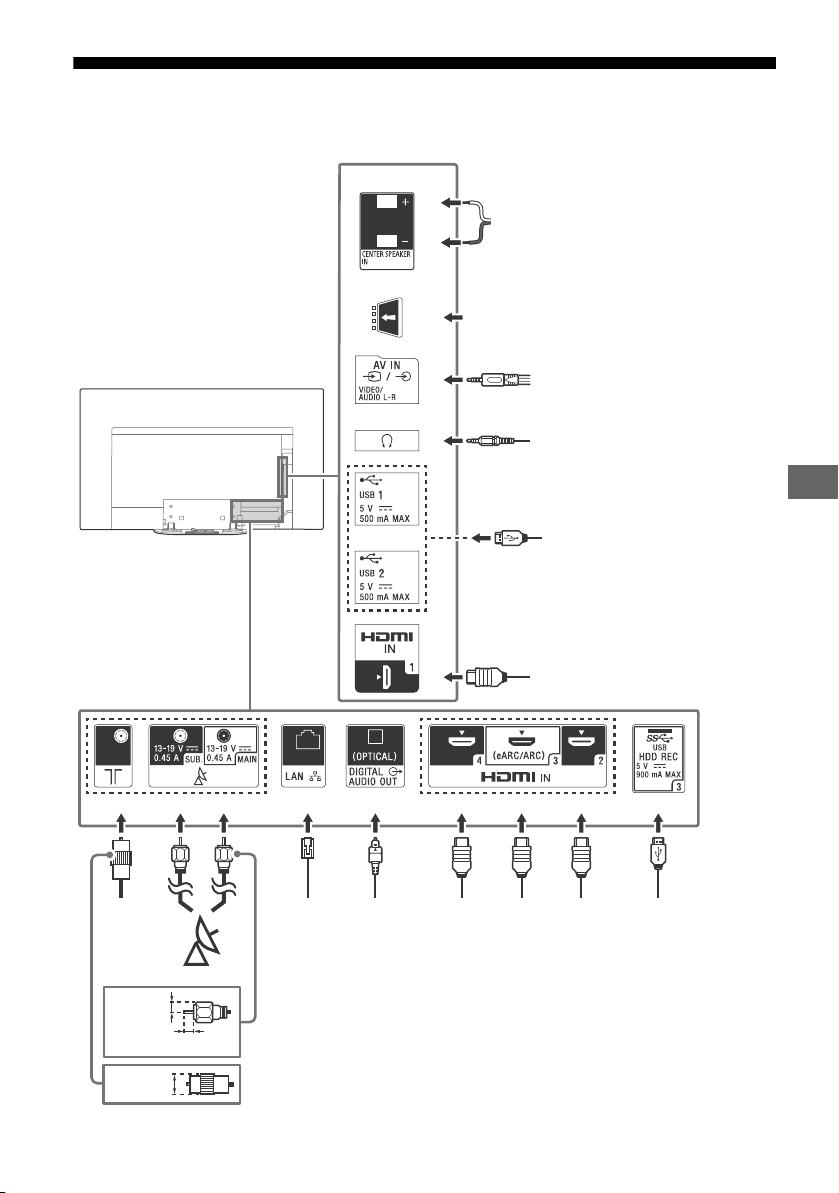
IT
Schema di collegamento
<
<
<
ȭȯ
Ȫ
ȩ
ȫ
Ȭ
ȭ
Ȯ
Cavo/
antenna/
decoder
esterno
Router
Satellite
Cuffia
7 mm
Dispositivo HDMI
Dispositivo
HDMI
Video-registratore/Dispositivo per
videogioco/Lettore DVD/Videocamera/
decoder esterno*
1
14 mm
Modulo ad accesso condizionato
Dispositivo
HDMI
Sistema
audio
con
ingresso
audio
ottico
Ricevitore AV
Fotocamera
digitale/Videocamera/Supporto
di memorizzazione USB/
dispositivo HDD
USB
Fotocamera digitale/Video-camera/
Supporto di memorizza-zione USB
Sistema
audio
con
dispositivo
eARC/ARC/
HDMI
1,5 mm
Per ulteriori informazioni sui collegamenti, consultare la Guida premendo il tasto HELP sul
telecomando.
IT
7
Page 90
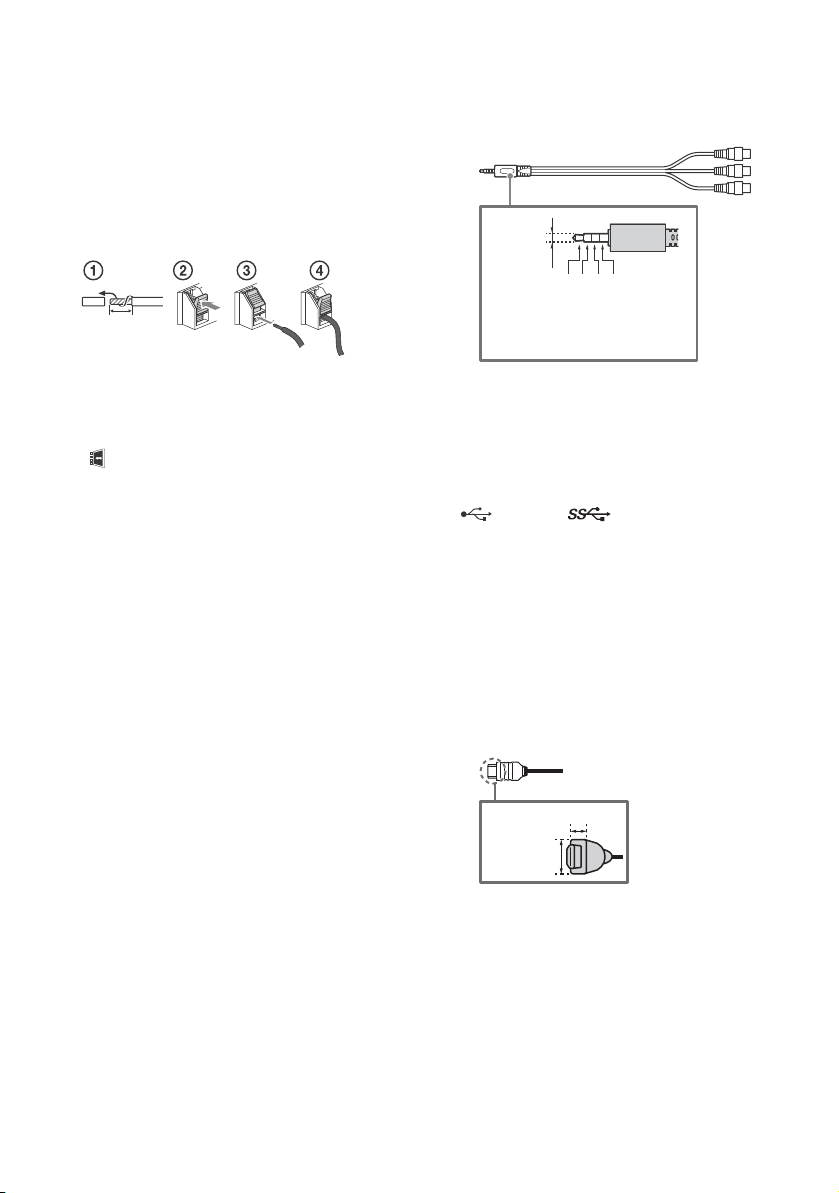
CENTER SPEAKER IN
10 mm
3,5 mm
1234
1: L
2: Video
3: Terra
4: R
< 12 mm
< 21 mm
• Per utilizzare gli altoparlanti del televisore
come altoparlante centrale, collegare
l’uscita del ricevitore AV al CENTER
SPEAKER IN sul televisore.
• Prima di collegare i cavi, disinserire il cavo
di alimentazione di televisore e ricevitore
AV dalla presa di rete.
• Accertarsi che [Altoparlante] sia impostato
su [Sistema audio].
Per evitare sibili quando CENTER SPEAKER IN
non è collegato a un ricevitore AV,
disabilitare [Modalità Altoparlante centrale
TV]. Per dettagli, fare riferimento alla Guida.
CAM (Conditional Access Module,
modulo ad accesso condizionato)
• Consente l’accesso ai servizi televisivi a
pagamento. Per ulteriori dettagli, fare
riferimento al manuale d’uso in dotazione
alla CAM.
• La smart card non va inserita direttamente
nell’alloggiamento CAM del televisore, ma
nell’apposita fessura della CAM, la quale è
reperibile presso i rivenditori autorizzati di
zona.
• L’uso della CAM non è supportato in alcuni
paesi/aree. Rivolgersi a un rivenditore
autorizzato di zona per verificarne la
possibilità di utilizzo.
• Un messaggio CAM può apparire quando
si passa a un programma digitale dopo
aver visualizzato video su Internet.
/ AV IN
• Per un collegamento composito, utilizzare
una prolunga analogica (non in
dotazione).
•
(Cuffia)
• Supporta solo il minijack stereo tripolare.
• Non è possibile trasmettere il suono
contemporaneamente dalle cuffie e dagli
altoparlanti del televisore.
USB 1/2, USB 3 (HDD REC)*
• Collegare un dispositivo USB di grandi
dimensioni potrebbe interferire con altri
dispositivi collegati.
• Quando si collega un dispositivo USB di
grandi dimensioni, utilizzare la presa
USB 1.
• Collegare un dispositivo USB HDD alla
porta USB 3 (blu).
HDMI IN 1/2/3/4
• L’interfaccia HDMI è in grado di trasferire il
video e l’audio digitale su un singolo cavo.
•
2
IT
8
• Per ottenere contenuti 4K 50p/60p di alta
qualità, collegare un cavo High Speed
HDMI Premium e impostare [Formato
segnale HDMI] su [Formato avanzato].
Eseguire questa impostazione per ogni
singolo terminale HDMI IN. Per dettagli sui
formati supportati, fare riferimento a
“Caratteristiche tecniche” nel presente
manuale (pagina 13-14).
Page 91
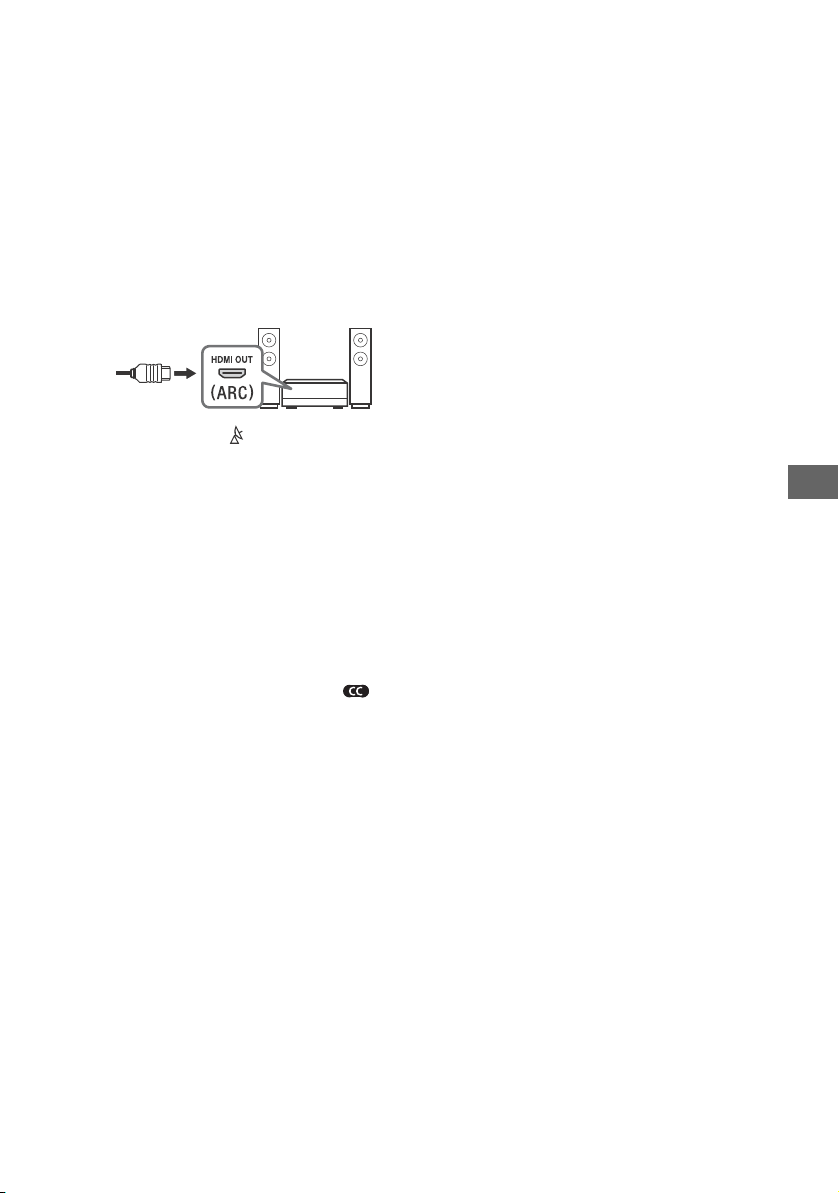
IT
• HDMI IN 3 eARC/ARC (Enhanced Audio
Nota
Return Channel/Audio Return Channel)
Collegare il sistema audio a HDMI IN 3 per
dirigere l’audio del televisore verso il
sistema audio. Un sistema audio con
supporto HDMI eARC/ARC è in grado di
inviare il video al televisore e di ricevere
l’audio dal televisore tramite lo stesso
cavo HDMI. Se il sistema audio non
supporta HDMI eARC/ARC, è necessario
un ulteriore collegamento a DIGITAL
AUDIO OUT (OPTICAL).
• Utilizzare il cavo HDMI con Ethernet per
collegare il sistema audio a eARC.
(Ingresso RF), (Ingresso satellite)
• Collegamenti per trasmissione terrestre/
via cavo e via satellite. Fasi di
collegamento: SUB. MAIN Antenna
• Per la presa SUB., collegare solo quando si
utilizza la modalità sintonizzatore Twin ad
eccezione della Distr. via cavo singolo
EN50494.
*1 Per un dispositivo esterno che dispone solo di
SCART AV OUT, utilizzare un adattatore SCART-RCA e
una prolunga analogica.
*2 Solo per alcune Regioni / Nazioni / Modelli TV.
• Non è possibile fissare il coperchio laterale
mentre i cavi sono collegati al terminale laterale.
• Assicurarsi di riporre il coperchio laterale in un luogo
sicuro per un uso futuro.
IT
9
Page 92

Installazione del televisore a parete
Uso della staffa di montaggio a parete opzionale (SU-WL850 o SU-WL450)
Per i clienti:
Per evitare di danneggiare il prodotto e per ragioni di sicurezza, Sony raccomanda vivamente di
affidare l’installazione del televisore a rivenditori o a installatori autorizzati Sony. Non cercare di
eseguire l’installazione personalmente.
Per i rivenditori e installatori Sony:
Prestare massima attenzione alla sicurezza durante gli interventi di installazione, manutenzione
periodica e controllo del prodotto.
Informazioni di installazione per la staffa di montaggio a parete
Il manuale d’uso del televisore spiega solo le fasi di preparazione all’installazione a parete.
Per istruzioni sull’installazione della staffa di montaggio a parete, consultare le informazioni di
installazione (staffa di montaggio a parete) sulla pagina del prodotto per il modello del televisore.
www.sony.eu/support/
Preparazione per l’installazione a parete
Utilizzare la staffa di montaggio a parete SU-WL850 (non in dotazione) o SU-WL450 (non in dotazione)
per installare la TV alla parete.
Verifica di fissare il piedistallo prima di installare la TV a parete, facendo riferimento alla Guida di
installazione.
• Predisporre la TV per la staffa di montaggio a parete prima di eseguire i collegamenti dei cavi.
• Seguire le istruzioni indicate nella guida fornita con la staffa di montaggio a parete per il modello.
Per l’installazione della presente TV è necessaria una certa esperienza e competenza, soprattutto
per determinare la solidità della parete e la sua capacità di sopportare il peso della TV.
• Affidare il fissaggio di questo prodotto alla parete a rivenditori o a installatori autorizzati Sony e
prestare attenzione adeguata alla sicurezza durante l’installazione. Sony non potrà essere ritenuta
responsabile per danni o lesioni causate da usi non appropriati del prodotto o da installazione non
corretta.
• Le viti per la staffa di montaggio a parete non sono in dotazione.
• Accertarsi di conservare le viti non utilizzate e il piedistallo in un luogo sicuro finché non si è pronti al
fissaggio del piedistallo. Tenere le viti lontano dai bambini.
10
IT
Page 93
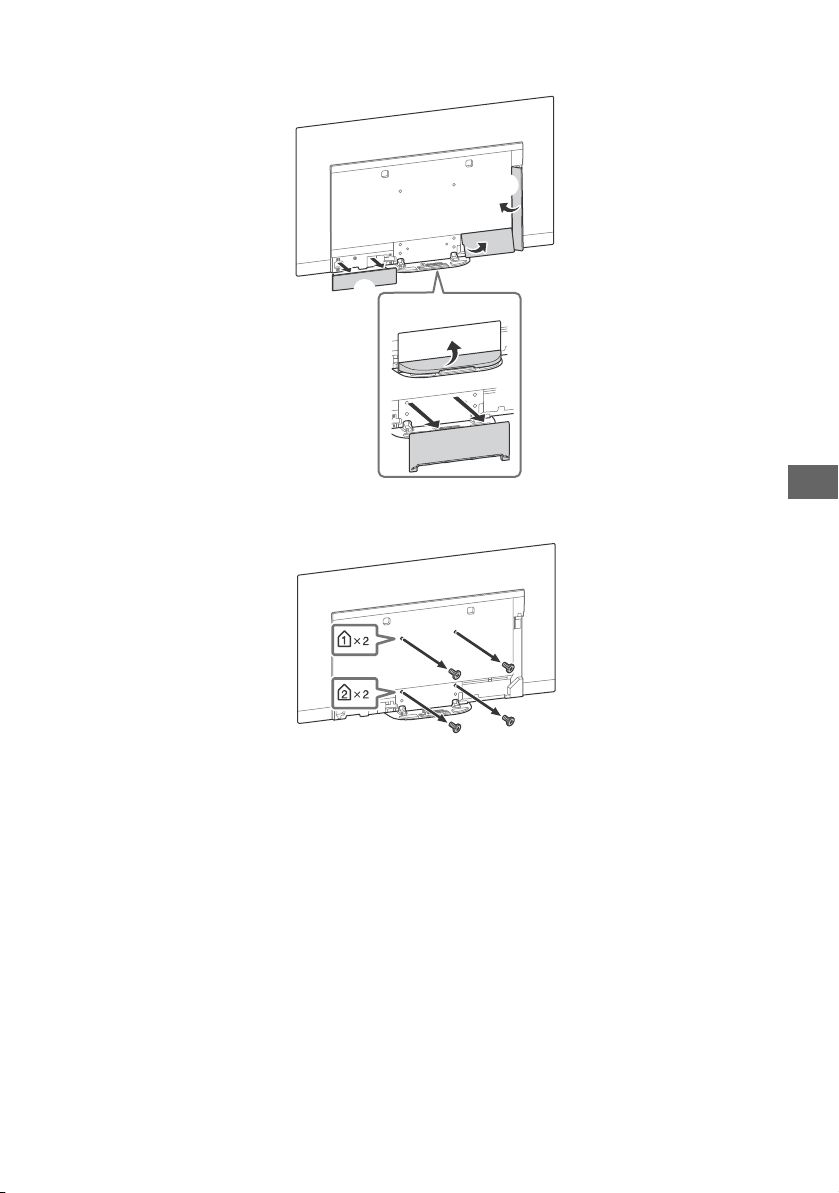
IT
1 Rimuovere il coperchio del piedistallo e i coperchi dei terminali.
ʕ
2 Rimuovere le viti dal retro del televisore.
IT
11
Page 94

Risoluzione dei problemi
Per risolvere problemi come: assenza di
immagine, assenza di suono, immagine
bloccata, nessuna reazione ai comandi, o
problemi di connessione alla rete, provare ad
eseguire le seguenti operazioni.
1 Riavviare il televisore premendo il tasto di
accensione sul telecomando finché non viene
visualizzato un messaggio. Se il televisore
non si ripristina, provare a scollegare il cavo di
alimentazione. Quindi premere il tasto di
accensione sul televisore e attendere per due
minuti, ricollegare il cavo di alimentazione.
2 Consultare il menu Guida premendo il tasto
HELP sul telecomando.
3 Connettere il televisore a Internet ed eseguire
l’aggiornamento del software. Sony consiglia
di mantenere aggiornato il software del
televisore. Gli aggiornamenti software
forniscono nuove funzioni e miglioramenti
delle prestazioni.
4 Consultare il sito Web di assistenza Sony (le
informazioni sono fornite nella copertina
anteriore del presente manuale).
Alla prima accensione, o dopo un periodo
d’inattività, è possibile che il televisore non si
accenda immediatamente anche se si preme
il tasto di accensione sul telecomando oppure
sul televisore.
L’inizializzazione del sistema necessita di un po’
di tempo. Attendere circa un minuto, quindi
riprovare.
Problemi e soluzioni
Se l’illuminazione del LED lampeggia in rosso.
Contare il numero di lampeggi (l’intervallo è di tre
secondi).
Riavviare il televisore scollegando il cavo di
alimentazione fino a quando l’indicatore LED
smette di lampeggiare in rosso, quindi accendere
il televisore.
Se il problema persiste, scollegare il cavo di
alimentazione e rivolgersi al rivenditore o al
centro servizi Sony comunicando il numero di
volte in cui l’illuminazione del LED lampeggia.
Impossibile ricevere il servizio terrestre/via
cavo.
Controllare i collegamenti dell’antenna/TV via
cavo.
Selezionare il servizio digitale terrestre/TV via
cavo premendo il tasto TV sul telecomando,
quindi selezionare [Digitale] se il servizio di
trasmissione non viene visualizzato.
Il segnale terrestre potrebbe essere soppresso se
è presente un forte segnale nelle vicinanze.
Impostare [LNA (Canale ---)] su [Disattivato] nelle
impostazioni di sintonizzazione digitale.
Dopo essersi trasferiti in una nuova casa o dopo
aver cercato di ricevere nuovi servizi, tentare una
ricerca del servizio selezionando [Ricerca
automatica dei canali TV DTT].
Impossibile ricevere il servizio satellitare.
Controllare il collegamento del cavo satellitare.
Quando viene visualizzato il messaggio [Nessun
segnale. Rilevato sovraccarico LNB…], scollegare il
cavo di alimentazione. Quindi, assicurarsi che il
cavo satellitare non sia danneggiato e che la linea
del segnale satellitare non sia in corto circuito nel
connettore satellitare.
Il telecomando non funziona.
Sostituire le batterie.
Il blocco parentale per la password di
trasmissione è stato dimenticato.
Digitare 9999 per il codice PIN e selezionare
[Modifica codice PIN].
Le aree in prossimità del televisore si
riscaldano.
È normale che le aree attorno al TV si riscaldino
dopo un uso prolungato. Toccandola con la mano,
è perciò normale avvertire un calore intenso.
Lo schermo diventa più scuro durante il
funzionamento del TV.
Se l’intera immagine o parte dell’immagine
rimane fissa, la luminosità dello schermo viene
ridotta gradualmente per evitare la persistenza
d’immagine. Non si tratta di un
malfunzionamento del TV.
IT
12
Page 95
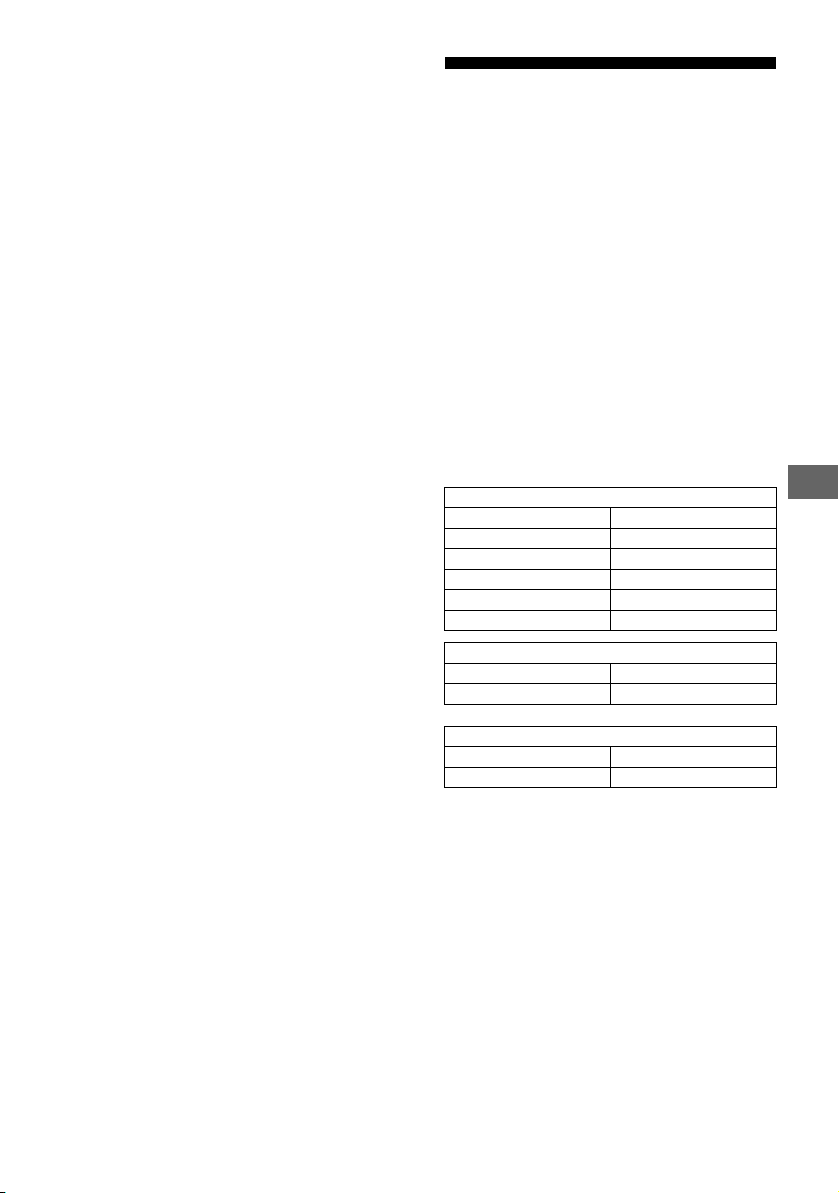
IT
L’utente è preoccupato per la persistenza
Nota
d’immagine.
Se la stessa immagine viene visualizzata
ripetutamente o per un periodo di tempo
prolungato, potrebbe verificarsi la persistenza
d’immagine. Per ridurre la persistenza delle
immagini, consigliamo di spegnere il TV
normalmente premendo il pulsante di
accensione sul telecomando o sul TV.
• Eseguire Aggiornamento pannello solo quando la
persistenza d’immagine è molto evidente. Come
riferimento, eseguirlo una volta l’anno. Evitare di
eseguirlo più spesso, perché tale operazione può
interessare la vita del pannello.
• Le immagini che includono orologi, logo e colori
luminosi (incluso il bianco), possono causare
facilmente la persistenza d’immagine. Evitare la
visualizzazione di questi tipi di immagini per un
periodo di tempo prolungato: potrebbe verificarsi la
persistenza d’immagine.
Sullo schermo viene visualizzata una linea
bianca.
Aggiornamento pannello viene eseguito
automaticamente dopo che il TV è stato utilizzato
per un periodo di tempo prolungato al fine di
ridurre la persistenza d’immagine.
Aggiornamento pannello viene avviato dopo che
il TV è stato spento e richiede circa un’ora per il
completamento. Durante Aggiornamento
pannello, sullo schermo potrebbe essere
visualizzata una linea bianca. Non si tratta di un
malfunzionamento del TV.
Viene visualizzato il messaggio
[L'aggiornamento del pannello non è stato
completato…].
Aggiornamento pannello viene eseguito
automaticamente dopo che il TV è stato
utilizzato per un periodo di tempo prolungato al
fine di ridurre la persistenza d’immagine. Se il
TV è acceso, il cavo di alimentazione CA è
scollegato o la temperatura della stanza non
rientra nell’intervallo compreso tra 10 ºC e 40 ºC
durante l’Aggiornamento pannello, il processo
non verrà completato e verrà visualizzato
questo messaggio.
Se Aggiornamento pannello viene avviato
automaticamente, verrà riavviato allo
spegnimento del TV con il telecomando.
Se l’Aggiornamento pannello viene iniziato
manualmente, selezionarlo nuovamente.
Caratteristiche tecniche
Sistema
Tipo di pannello
Pannello OLED (Organic Light Emitting Diode)
Sistema TV
In base alla nazione/regione seleziona/al modello del
televisore
Analogico: B/G, D/K, I
Digitale: DVB-T/DVB-C
DVB-T2*
Satellite*1: DVB-S/DVB -S2
Sistema colore
PAL/SECAM/NTSC3.58 (Solo video)/NTSC4.43 (Solo video)
Gamma di sintonia
In base alla nazione/regione seleziona/al modello del
televisore
Analogico: UHF/VHF/TV via cavo
Digitale: UHF/VHF/TV via cavo
Satellite*
Potenza d’uscita audio
20 W + 20 W + 10 W + 10 W
Tecnologia wireless
Protocollo IEEE802.11ac/a/b/g/n
(IEEE802.11ac potrebbe non essere disponibile a seconda dei
paesi/delle regioni.)
Bluetooth Versione 4.2
Bande di frequenza
Gamma di frequenza Potenza in uscita
2.400 - 2.483,5 MHz < 20,0 dBm
5.250 - 5.350 MHz < 20,0 dBm
5.725 - 5.850 MHz < 13,9 dBm
Gamma di frequenza Potenza in uscita
2.400 - 2.483,5 MHz < 10,0 dBm
RMF-TX600E
Gamma di frequenza Potenza in uscita
2.400 - 2.483,5 MHz < 10,0 dBm
Version e so ftware
Questa apparecchiatura radio deve essere utilizzata con le
versioni approvate del software indicate nella Dichiarazione di
conformità UE.
Premere HELP sul telecomando per conoscere la versione
software.
Telecomando: _._.__.___
Selezionare [Telecomando] [Versione software] da
[Impostazioni]. Per ulteriori informazioni, consultare la Guida.
Il software caricato su questa apparecchiatura radio è stato
verificato per essere conforme ai requisiti essenziali della
Direttiva 2014/53/UE.
Prese Ingressi/Uscite
Antenna / cavo
Terminale esterno 75 ohm per VHF/UHF
Presa per antenna satellitare*
Connettore di Tipo F Femmina, 75 ohm.
DiSEqC 1.0, LNB 13 V/18 V e tono a 22 kHz, Distribuzione a cavo
singolo EN50494.
/ AV IN
Ingresso audio/video (mini jack)
1
1
: Frequenza IF 950-2.150 MHz
LAN wireless (IEEE802.11ac/a/b/g/n)
5.150 - 5.250 MHz < 23,0 dBm
5.470 - 5.725 MHz < 20,0 dBm
Bluetooth
Bluetooth
1
IT
13
Page 96

HDMI IN 1/2/3/4 (supporta risoluzione 4K, Compatibile
Nota
HDCP 2.3)
Video:
4096 × 2160p (50, 60 Hz)*
2160p (50, 60 Hz)*
50, 60, 100, 120 Hz), 1080/24p, 1080i (50, 60 Hz), 720p (30, 50,
60 Hz), 720/24p, 576p, 480p, Formati PC*
Audio:
In modalità eARC (Enhanced Audio Return Channel)*
Per i dettagli, consultare la Guida.
Eccetto modalità eARC
PCM lineare 5,1 canali: 32/44,1/48/88,2/96/176,4/192 kHz
16/20/24 bit, Dolby Digital, Dolby Digital Plus, DTS
eARC/ARC (Enhanced Audio Return Channel/Audio Return
Channel) (Solo HDMI IN 3)
In modalità eARC*
Per i dettagli, consultare la Guida.
In modalità ARC
PCM lineare due canali: 48 kHz 16 bit, Dolby Digital, Dolby
Digital Plus, DTS
DIGITAL AUDIO OUT (OPTICAL)
Presa ottica digitale (PCM lineare due canali: 48 kHz 16 bit,
Dolby Digital, DTS)
(presa mini jack stereo)
Cuffia
1, 2, 3 (HDD REC)*
Porta del dispositivo USB. (dispositivo USB HDD 3 per
funzione REC)
Le porte USB 1 e 2 supportano USB High Speed (USB 2.0)
La porta USB 3 supporta USB Super Speed (USB 3.1 Gen 1)
Alloggiamento CAM (modulo ad accesso condizionato)
LAN
Connettore 10BASE-T/100BASE-TX (La velocità di connessione
può variare a seconda delle caratteristiche operative della rete.
La velocità di comunicazione e la qualità non sono garantite.)
CENTER SPEAKER IN
Terminale di ingresso altoparlante centrale
2*3
, 4096 × 2160p (24 Hz)*2, 3840 ×
3
, 3840 × 2160p (24, 25, 30 Hz), 1080p (30,
4
5
6
5
Altri
Accessori opzionali
Staffa di montaggio a parete: SU-WL850
Staffa di montaggio a parete: SU-WL450
Temperatura di funzionamento
Da 0 ºC a 40 ºC
Umidità di funzionamento
Dal 10 % all’80 % di u. r. (senza condensa)
Potenza, caratteristiche prodotto e altro
Requisiti di alimentazione
220 V – 240 V CA, 50 Hz
Classe di efficienza energetica
KD-77AG9: A
KD-65AG9: B
KD-55AG9: B
Dimensioni schermo (diagonale) (Approssimative)
KD-77AG9: 194,7 cm / 77 pollici
KD-65AG9: 163,9 cm / 65 pollici
KD-55AG9: 138,8 cm / 55 pollici
Potenza assorbita
In modalità [Standard]
KD-77AG9: 211 W
KD-65AG9: 169 W
KD-55AG9: 132 W
In modalità [Brillante]
KD-77AG9: 674 W
KD-65AG9: 490 W
KD-55AG9: 394 W
Consumo energetico annuo*
KD-77AG9: 293 kWh all’anno
KD-65AG9: 234 kWh all’anno
KD-55AG9: 183 kWh all’anno
7
Potenza assorbita in modalità standby*8*
KD-77AG9: 0,50 W (29 W durante l’aggiornamento software o
della Guida TV elettronica)
KD-65AG9: 0,50 W (27 W durante l’aggiornamento software o
della Guida TV elettronica)
KD-55AG9: 0,50 W (27 W durante l’aggiornamento software o
della Guida TV elettronica)
Risoluzione schermo
3.840 punti (orizzontale) × 2.160 linee (verticale)
Valori nominali uscita
USB 1/2
5 V , 500 mA MAX
USB 3
5 V , 900 mA MAX
9
Dimensioni circa (l × a × p)
con supporto da tavolo
KD-77AG9: 172,1 × 100,1 × 30,2 cm
KD-65AG9: 144,7 × 83,8 × 25,5 cm
KD-55AG9: 122,6 × 71,4 × 25,5 cm
senza supporto da tavolo
KD-77AG9: 172,1 × 99,6 × 4,9 cm
KD-65AG9: 144,7 × 83,4 × 4,0 cm
KD-55AG9: 122,6 × 71,0 × 4,0 cm
Peso circa
con supporto da tavolo
KD-77AG9: 39,7 kg
KD-65AG9: 24,8 kg
KD-55AG9: 22,3 kg
senza supporto da tavolo
KD-77AG9: 35,3 kg
KD-65AG9: 21,2 kg
KD-55AG9: 18,7 kg
*1 Non tutti i televisori dispongono di tecnologia DVB-T2 o DVB-
S/S2 o di terminale antenna satellitare.
*2 Se la risoluzione di ingresso è 4096 × 2160p e [Formato
Immagine] è impostato su [Normale], la risoluzione viene
impostata come 3840 × 2160p. Per visualizzare 4096 × 2160p,
impostare [Formato Immagine] su [Intero 1] o [Intero 2].
*3 Per supportare 18 Gbps, impostare [Formato segnale HDMI]
su [Formato avanzato].
*4 Per i dettagli, consultare la Guida.
*5 La modalità eARC è attiva quando [Modalità eARC] è
impostata su [Auto], [Altoparlante] è impostato su [Sistema
audio] e il sistema audio compatibile con eARC è connesso.
*6 Solo per alcune Regioni / Paesi / Modelli TV.
*7 Consumo energetico annuale in kWh, basato sulla potenza
assorbita di un televisore che funzioni 4 ore al giorno per 365
giorni.
Il consumo energetico effettivo dipenderà dal modo in cui
verrà utilizzato il televisore.
*8 Il valore dell’assorbimento di potenza specificato in stand-by
viene raggiunto dopo alcuni minuti dallo spegnimento, cioè
dopo che il televisore avrà terminato tutti i processi interni.
*9 Quando la TV è connessa alla rete, il consumo energetico in
standby aumenta.
• Rimuovere la scheda fittizia o il coperchio (la disponibilità
dipende dal modello del televisore) dell’alloggiamento CAM
(modulo ad accesso condizionato) del televisore
esclusivamente per inserire una smart card in CAM.
• La disponibilità degli accessori opzionali dipende dai paesi/
dalle regioni/dai modelli di televisore/dalle scorte.
• Design e caratteristiche tecniche sono soggetti a modifiche
senza preavviso.
Note sul funzionamento della TV Digitale
• La TV digitale (digitale terrestre, satellite e TV via cavo), i servizi
interattivi e le funzioni di rete internet potrebbero non essere
disponibili in tutti i Paesi o le regioni. Alcune funzioni
potrebbero non essere abilitate o potrebbero non funzionare
correttamente con alcuni fornitori di servizi o reti internet.
Alcuni provider di servizi TV potrebbero applicare tariffe per i
loro servizi.
IT
14
Page 97
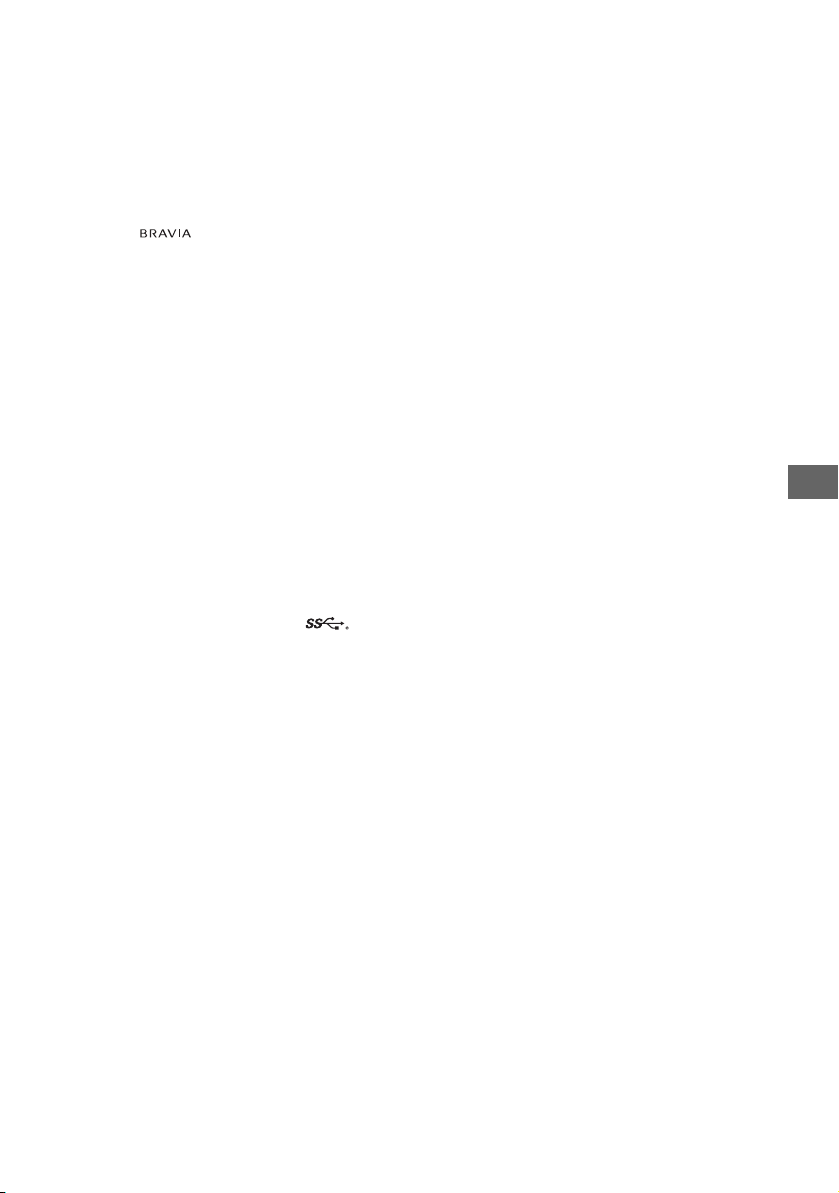
IT
• Questo televisore supporta trasmissione digitale con i codec
MPEG-2, H.264/MPEG-4 AVC e H.265/HEVC, ma non si
garantisce la compatibilità con tutti i segnali dell’operatore/del
servizio, che potrebbero cambiare nel tempo.
Informazioni sui marchi
• I termini HDMI e HDMI High-Definition Multimedia Interface e il
logo HDMI sono marchi o marchi registrati di HDMI Licensing
Administrator, Inc. negli Stati Uniti e in altri paesi.
• Dolby, Dolby Vision, Dolby Audio e il simbolo della doppia D
sono marchi di Dolby Laboratories. Prodotto su licenza di Dolby
Laboratories. Opere riservate non pubblicate. Copyright ©
1992-2015 Dolby Laboratories. Tutti i diritti riservati.
• “BRAVIA”, e BRAVIA Sync sono marchi di fabbrica o
marchi di fabbrica registrati di Sony Corporation.
• Gracenote, il logo e il logotipo Gracenote, nonché il logo
“Powered by Gracenote” sono marchi di fabbrica o marchi di
fabbrica registrati di Gracenote, Inc. negli Stati Uniti e/o in altri
paesi.
• Vewd® Core. Copyright 1995-2019 Vewd Software AS. All rights
reser ved.
• Google, Google Play, Chromecast, YouTube, Android TV e altri
loghi e marche correlati sono marchi di Google LLC.
• Wi-Fi®, Wi-Fi Alliance® e Wi-Fi Direct® sono marchi registrati di
Wi-Fi Alliance.
• Il logo Wi-Fi CERTIFIED™ è un marchio di certificazione di Wi-Fi
Alliance.
• Per i brevetti DTS, consultare il sito http://patents.dts.com.
Prodotto su licenza di DTS, Inc. DTS, il simbolo, & DTS e il
simbolo insieme sono marchi di fabbrica registrati e DTS Digital
Surround è un marchio di fabbrica di DTS, Inc. © DTS, Inc. Tutti i
diritti riservati.
• Il marchio denominativo e i loghi Bluetooth® sono marchi
registrati di proprietà di Bluetooth SIG, Inc. e sono utilizzati da
Sony Corporation su licenza. Tutti gli altri marchi di fabbrica o
nomi commerciali sono di proprietà delle rispettive aziende.
• Netflix è un marchio registrato di Netflix, Inc.
• DiSEqC™ è un marchio di fabbrica di EUTELSAT. Questo
televisore supporta DiSEqC 1.0 ma non è progettato per il
controllo di antenne motorizzate.
• TUXERA è un marchio di fabbrica registrato di Tuxera Inc. negli
Stati Uniti e in altri Paesi.
• Il logo USB-IF SuperSpeed USB Trident è un marchio di fabbrica
registrato di USB Implementers Forum, Inc.
• Tutti gli altri marchi di fabbrica sono di proprietà delle rispettive
aziende.
IT
15
Page 98
Anmärkning
För att fästa bordsstativet,
se Startguiden.
Innehållsförteckning
VIKTIGT MEDDELANDE . . . . . . . . . . . . . . . . . .2
Säkerhetsinformation. . . . . . . . . . . . . . . . . . .3
Skydda TV-skärmen (OLED-TV) . . . . . . . . . . .4
Fjärrkontroll och TV . . . . . . . . . . . . . . . . . . 5
Kopplingsschema. . . . . . . . . . . . . . . . . . . . 6
Montera TV:n på väggen. . . . . . . . . . . . . . 9
Använda Väggfästet (tillval) (SU-WL850
eller SU-WL450) . . . . . . . . . . . . . . . . . . . . . . .9
Felsökning. . . . . . . . . . . . . . . . . . . . . . . . . .11
Problem och lösningar. . . . . . . . . . . . . . . . . 11
Specifikationer . . . . . . . . . . . . . . . . . . . . . 12
Internetanslutning och datasekretess
Denna produkt ansluter till internet under första inställningen så
fort ett nätverk är anslutet för att bekräfta internetanslutning,
och senare för att konfigurera Hemskärmen. Din IP-adress
används i dessa och i alla andra internetanslutningar. Om du
inte vill att din IP-adress används alls, ställ inte in den trådlösa
internetfunktionen och anslut inte en internetkabel. Se
informationen om sekretess som visas på inställningsskärmarna
för mer information om internetanslutningar.
Inledning
Tack för att du har valt denna produkt från Sony.
Innan du använder TV:n bör du läsa igenom den här
bruksanvisningen noga och spara den för framtida bruk.
• Innan du slår på TV:n ska du läsa “Säkerhetsinformation”
(sidan 3).
• Läs medföljande Säkerhetsinformation för ytterligare
säkerhetsinformation.
• De bilder och illustrationer som används i startguiden och i
denna handbok är bara referenser och kan skilja sig från
utseendet på den faktiska produkten.
Hjälp
Hitta mer felsökning och annan användbar information direkt
från din TV. Tryck på HELP på fjärrkontrollen för att visa en lista
över ämnen, eller sök efter nyckelord.
Hjälpguide (Manual)
För mer detaljerad information, välj [Hjälpguide] i Hjälpmenyn
på din TV. Du kan även kolla Hjälpguiden från din PC eller
smartphone (information finns på baksidan av denna manual).
Identifieringsetikettens placering
Etiketter för modellnr, tillverkningsdatum (år/månad) och
strömförsörjning finns på TV:ns eller förpackningens baksida.
Avlägsna stativskyddet för att hitta dem .
VIKTIGT MEDDELANDE
Meddelande för
radioutrustning
Härmed försäkrar Sony Visual Products
Inc. att denna typ av radioutrustning
KD-77AG9, KD-65AG9, KD-55AG9 överensstämmer med direktiv
2014/53/EU. Den fullständiga texten till EU-försäkran om
överensstämmelse finns på följande webbadress:
http://www.compliance.sony.de/
Meddelande till kunder: följande information gäller endast för
utrustning som sålts i länder där EU-direktiv gäller.
För denna radioutrustning tillämpas följande begränsningar för
uppstart eller behörighetskrav för användning i AT, BE, HR,
CY, CZ, DK, EE, FI, FR, DE, EL, HU, IE, IT, LV, LT, LU, MT, NL, PL, PT, SK,
SI, ES, SE, UK, IS, LI, NO, CH, BG, RO, TR, AL, BA, MK, MD, RS, ME,
Kosovo:
5 150-5 350 MHz-bandet är begränsat till inomhusanvändning
endast.
2
SE
Page 99
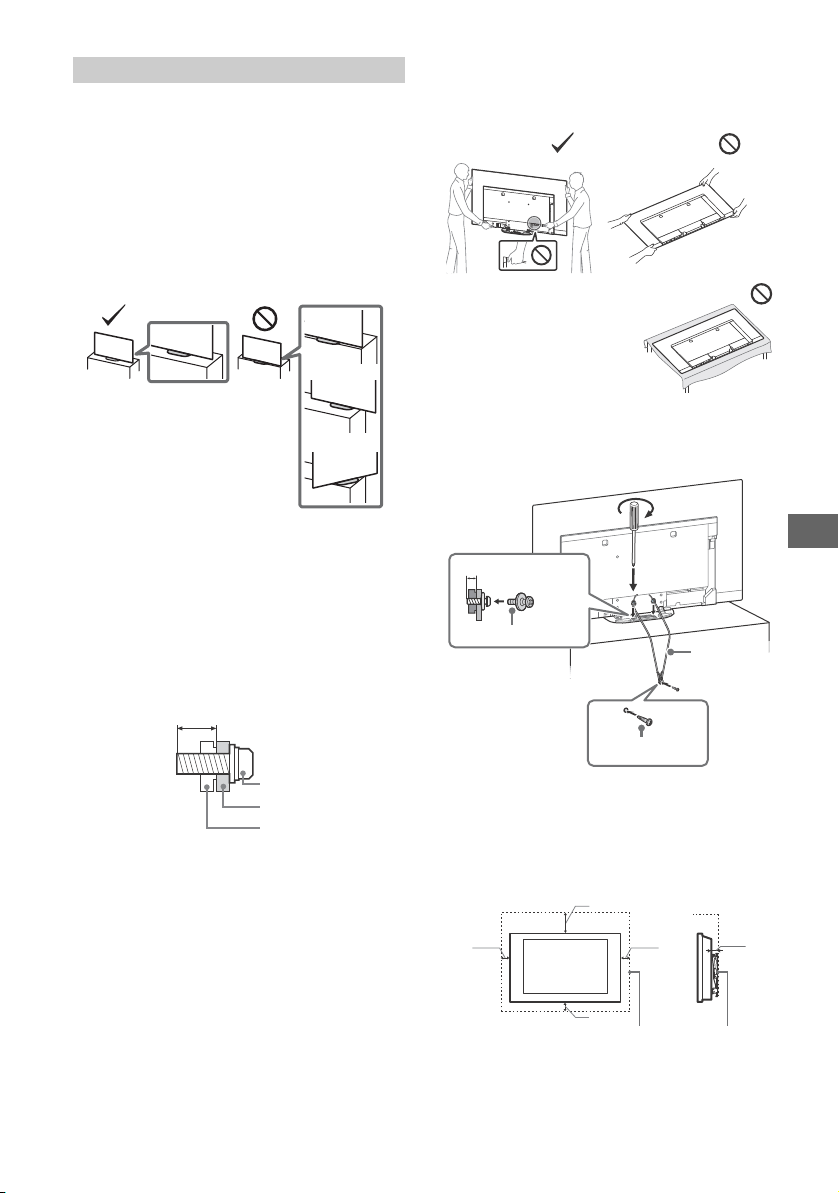
SE
Säkerhetsinformation
Skruv (M6)
Väggfäste
9 mm - 13 mm
TV:ns bakre hölje
M4-skruv (medföljer ej)
1,5 N·m
{15 kgf·cm}
Skruv (medföljer ej)
6 mm - 7 mm
Kabel
(medföljer ej)
30 cm
10 cm
10 cm
10 cm
Lämna minst så här mycket fritt utrymme runt TV:n.
1 cm
Installation
Installera och använd TV:n enligt följande anvisningar för att
undvika brandrisk, elektriska stötar eller skador på person eller
egendom.
Installation
• TV:n bör placeras nära ett lätt åtkomligt eluttag.
• Placera TV:n på en stabil, plan yta för att undvika att den faller
ner och orsakar personskada eller egendomsskada.
• Placera TV:n på en plats där den inte kan dras, tryckas eller
vältas omkull.
• Montera TV:n så att TV:ns bordsstativ inte skjuter ut från TVbänken (medföljer ej). Om bordsstativet skjuter ut från TVbänken, kan det hända att TV:n välter, faller i golvet och orsakar
personskada eller skada på TV:n.
Tran spo rt
• Lossa alla kablar från TV:n innan du transporterar den.
• Det krävs två eller tre personer för att bära en stor TV-apparat.
• När TV:n ska transporteras bör den hållas enligt nedan. Tryck
inte hårt på kontrollpanelen och ramen runt skärmen.
• Lägg inte TV:n ner när du
hanterar eller monterar den.
• Se till att TV:n inte utsätts för
stötar eller kraftiga vibrationer när den transporteras.
• Du bör använda originalkartongen och dess emballage när du
sänder in TV:n för reparation eller om du flyttar.
Förebyggande av fall
• Montera av säkerhetsskäl de mellersta skyddenpå baksidan av
TV:n när TV:n är monterad på bordsstativet.
• Endast en behörig servicetekniker bör utföra vägginstallationer.
• Av säkerhetsskäl rekommenderar vi bestämt att du endast
använder tillbehör från Sony, inklusive:
Väggfäste SU-WL850
Väggfäste SU-WL450
• Använd de skruvar som levererades med väggfästet när denna
skall monteras på TV:n. De medföljande skruvarna är utformade
enligt bilden mätt från väggfästets kontaktyta.
Skruvarnas diameter och längd varierar beroende på väggfästemodell.
Användning av andra skruvar kan skada TV:n internt eller
medföra att den faller ned.
Ventilation
• Täck inte för och stoppa inte in några föremål i TV:ns
ventilationshål.
• Lämna fritt utrymme runt TV:n enligt nedanstående figur.
• Vi rekommenderar bestämt att du använder Sonys Väggfäste för
att säkerställa tillräcklig luftcirkulation.
Monterad på väggen
SE
3
Page 100
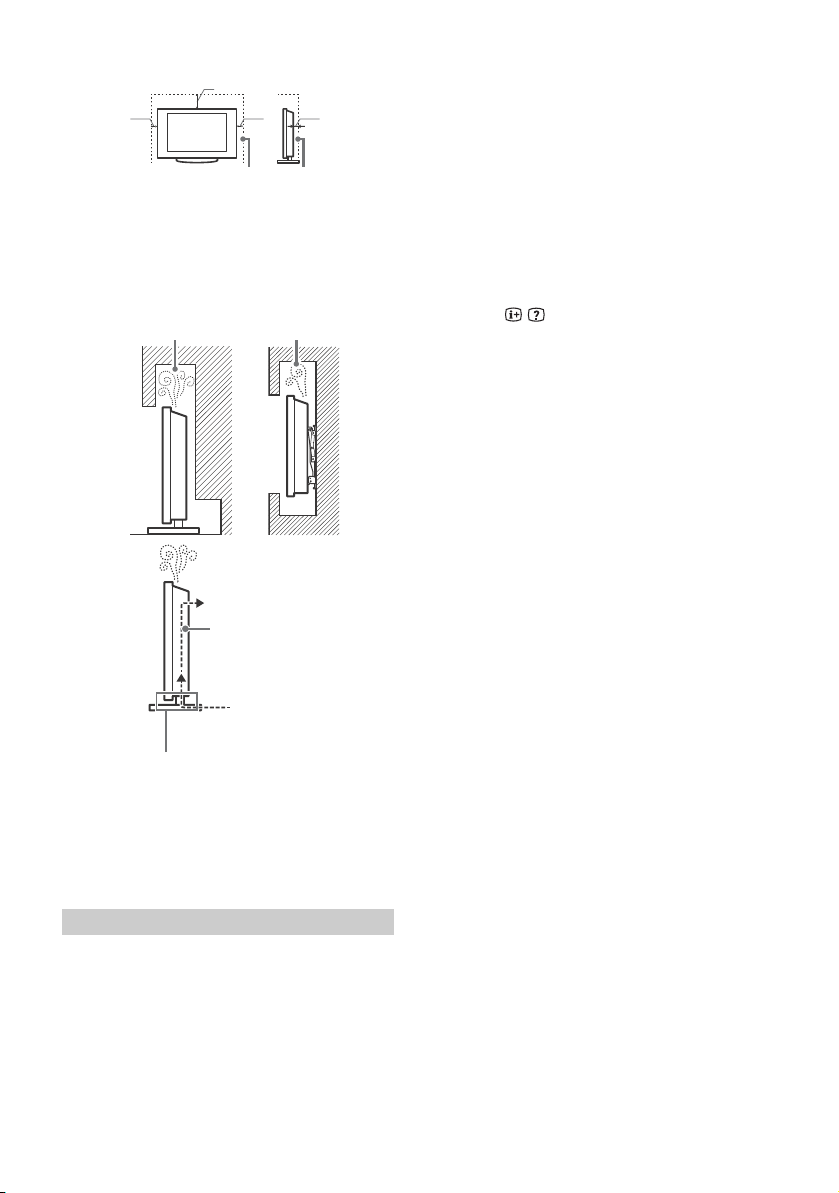
Monterad på stativ
30 cm
10 cm
10 cm
Lämna minst så här mycket fritt utrymme runt TV:n.
6 cm
Blockera inte luftcirkulationsområdet.
Luft-cirkulation
Vägg
Luften kan inte cirkulera fritt.
Vägg
• För att säkerställa korrekt ventilation och förhindra ansamling av
damm eller smuts:
Lägg inte TV:n platt ned och installera den inte upp-och-ned,
bakvänd eller vänd sidledes.
Placera inte TV:n på en hylla eller matta, i en säng eller i en
garderob.
Täck inte över TV:n med tyg såsom gardiner och lägg inte
tidningar och liknande på den.
Installera inte TV:n såsom figurerna nedan visar.
Varn ing!
Utrustning som är kopplad till skyddsjord via jordat vägguttag
och/eller via annan utrustning och samtidigt är kopplad till kabelTV nät kan i vissa fall medföra risk för brand.
För att undvika detta skall vid anslutning av utrustningen till
kabel-TV nät galvanisk isolator finnas mellan utrustningen och
kabel-TV nätet.
Följande är exempel på bilder som kan orsaka
bildretention:
• Innehåll med svarta fält antingen på toppen och botten och/
eller till vänster eller höger sida av skärmen. (t.ex. letterboxade
bilder, 4:3-bilder, standardupplöst innehåll)
• Statiska bilder, t.ex. foton.
• TV-spel som kan ha statiskt innehåll på vissa delar av skärmen.
• Skärmmenyer, programguider, kanallogotyper etc.
• Statiskt innehåll från appar.
• Skärmbanderoller, t.ex. sådana som används för nyheter och
rubriker.
Så här minskar du risken för bildretention:
• Sony rekommenderar att du stänger av TV:n normalt genom att
trycka på strömbrytaren på fjärrkontrollen eller TV:n.
• Fyll skärmen genom att växla till [Bredbildsläge] för att eliminera
de svarta fälten. Välj en annan inställning för [Bredbildsläge] än
[Normal].
• Stäng av OSD-funktionen (On Screen Display) genom att trycka
på knappen / och sedan stänga av menyerna från
ansluten utrustning. Mer information finns i
användarhandböckerna för den anslutna utrustningen.
• Undvik att visa statiska bilder med ljusa färger (inklusive vitt),
klockor eller logotyper på någon del av skärmen.
• Ställ in bildinställningarna baserat på omgivande förhållanden.
Standardbilden rekommenderas för användning i hemmet och
när du tittar på innehåll som ofta visar kanallogotyper mm.
TV:n har följande funktioner som hjälper till att minska/förhindra
bildretention.
Uppdatera panel
Uppdatera panel körs automatiskt för att justera enhetligheten på
TV-skärmen när den använts under längre perioder. Uppdatera
panel kan också utföras manuellt och bör endast användas om
bildretentionen är väldigt påtaglig eller om du ser följande
meddelande: [Paneluppdateringen slutfördes inte…]
Varning:
• Funktionen Uppdatera panel kan påverka panelen. Som
tumregel kan man säga att Uppdatera panel bara bör utföras en
gång om året. Mer frekvent användning kan påverka panelens
användbara livslängd.
• Uppdatera panel tar ungefär en timme att slutföra.
• En vit linje kan visas på skärmen under tiden som Uppdatera
panel utförs. Detta betyder inte att det är något fel på TV:n.
• Uppdatera panel fungerar bara när rumstemperaturen är mellan
10 ºC och 40 ºC.
Pixelläge
Flyttar automatiskt bilden på skärmen för att undvika
bildretention.
Annan funktion
Skärmens ljusstyrka sänks automatiskt vid visning av stillbilder,
klockor, ljusa färger eller logotyper och liknande.
Skydda TV-skärmen (OLED-TV)
Försiktighetsåtgärder för att skydda skärmen
från skador
Bildretention
OLED-TV-apparater kan drabbas av bildretention (inbränning) på
grund av egenskaperna hos de material som används.
Bildretention kan uppstå om bilder visas på samma plats på
skärmen upprepade gånger eller under längre perioder. Detta
innebär inte att det är något fel på TV:n. Undvik att visa bilder
som orsaka bildretention.
SE
4
 Loading...