

Sony BRAVIA KLV-50W672G, BRAVIA KLV-32W622G, BRAVIA KLV-32W672G, BRAVIA KLV-43W672G, BRAVIA KLV-32R422G Reference Manual
HOME
Help Guide
Television
Reference Guide
4-748-168-11(2)
(Except KLV-32R422G)
Customer Support and Contact:
http://www.sony-asia.com/support
KLV-50W672G / 43W672G / 32W672G / 32W622G / 32R422G

To attach the Table-Top
Stand, refer to the Setup
Guide.
Table of Contents
Safety Information . . . . . . . . . . . . . . . . . . . . . 3
Parts and Controls . . . . . . . . . . . . . . . . . . . 4
Controls and Indicators . . . . . . . . . . . . . . . . .4
Using Remote Control . . . . . . . . . . . . . . . . 5
Remote Control Parts Description. . . . . . . . . 5
Setting up the Internet Connection . . . . . 7
Type 1: Secured network with Wi-Fi
Protected Setup™ (WPS) . . . . . . . . . . . . . . . . 7
Type 2: Secured network without Wi-Fi
Protected Setup™ (WPS) . . . . . . . . . . . . . . . .8
Type 3: Unsecured network with any type
of wireless LAN router . . . . . . . . . . . . . . . . . . 8
Type 4: Wired network setup . . . . . . . . . . . . 8
Preparing a Wired Network . . . . . . . . . . . . . . 9
Viewing the Network Status . . . . . . . . . . . . . 9
USB Tethering . . . . . . . . . . . . . . . . . . . . . . . 9
Privacy Policy . . . . . . . . . . . . . . . . . . . . . . 10
Changing the Viewing Style . . . . . . . . . . .11
Changing the Wide Mode . . . . . . . . . . . . . . 11
Setting Scene Select . . . . . . . . . . . . . . . . . . . 11
Navigating through Home Menu . . . . . . .11
Apps/All Apps. . . . . . . . . . . . . . . . . . . . . . . . 11
Channels . . . . . . . . . . . . . . . . . . . . . . . . . . . . 13
Media . . . . . . . . . . . . . . . . . . . . . . . . . . . . . . . 13
Settings . . . . . . . . . . . . . . . . . . . . . . . . . . . . . 15
Network Setup . . . . . . . . . . . . . . . . . . . . . . . 22
Customer Support . . . . . . . . . . . . . . . . . . . . 22
Help Guide . . . . . . . . . . . . . . . . . . . . . . . . . . 22
Home Screen . . . . . . . . . . . . . . . . . . . . . . 23
Recommendations Row. . . . . . . . . . . . . . . . 23
Recent Channels . . . . . . . . . . . . . . . . . . . . . . 23
Connection Diagram . . . . . . . . . . . . . . . . 24
Using Audio and Video Equipment . . . . 27
Using Screen mirroring . . . . . . . . . . . . . . 27
Installing the TV to the Wall . . . . . . . . . . 28
Troubleshooting . . . . . . . . . . . . . . . . . . . 29
Picture . . . . . . . . . . . . . . . . . . . . . . . . . . . . . .29
Sound. . . . . . . . . . . . . . . . . . . . . . . . . . . . . . . 29
Channels . . . . . . . . . . . . . . . . . . . . . . . . . . . .30
Network . . . . . . . . . . . . . . . . . . . . . . . . . . . . .30
General . . . . . . . . . . . . . . . . . . . . . . . . . . . . . 31
Specifications . . . . . . . . . . . . . . . . . . . . . .32
GB
2
Introduction
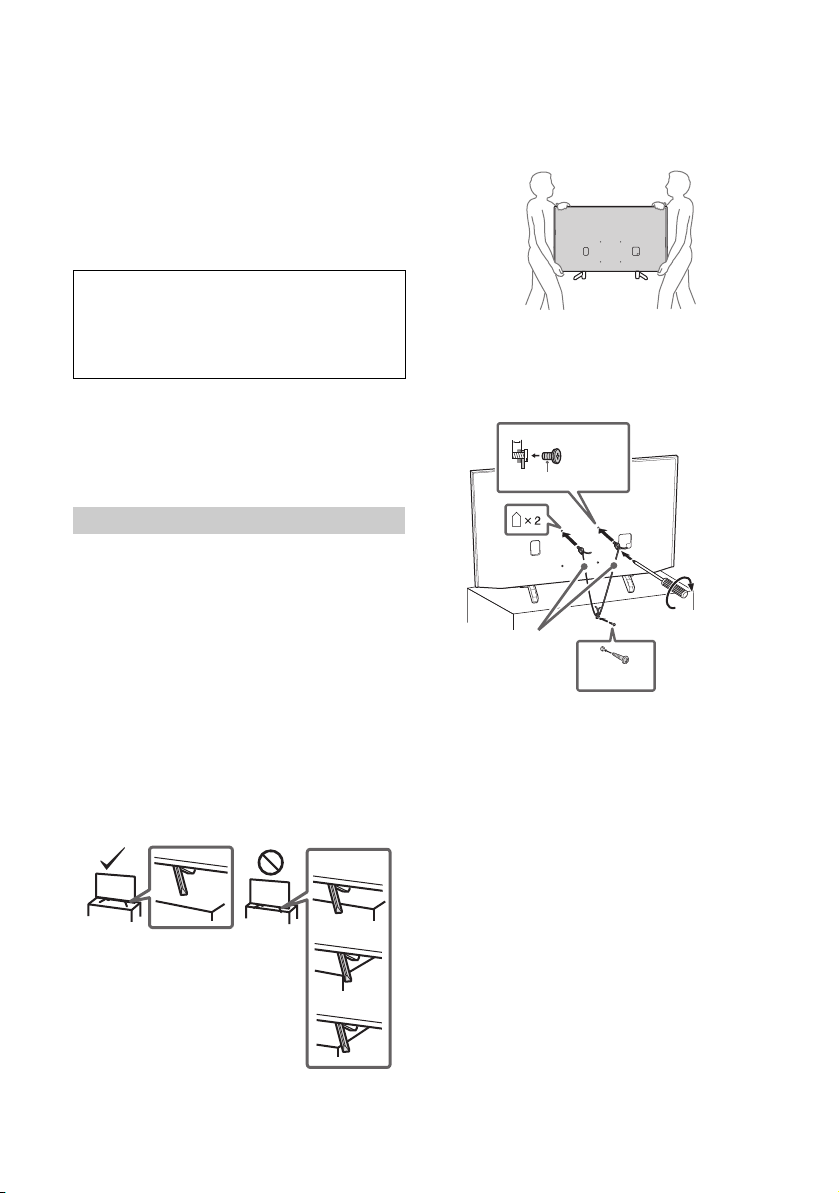
1
M6 screw (not supplied)
8 mm - 12 mm
1.5 N·m/{15 kgf·cm}
Screw
(not supplied)
Cord
(not supplied)
Thank you for choosi ng this Sony product.
Before operating the TV, please read this manual tho roughly and
retain it for f uture re ference .
Note
• Before operating the TV, please read the “Safety Information”
(page 3).
• Read the sup plied Safety Information for ad ditional safety
information.
• Instructions a bout “Installing the TV to the Wall” are included
within this TV’s instruction manual.
• Images an d illustrations used in the S etup Guide and this
manual are for reference only and may differ from the actual
product.
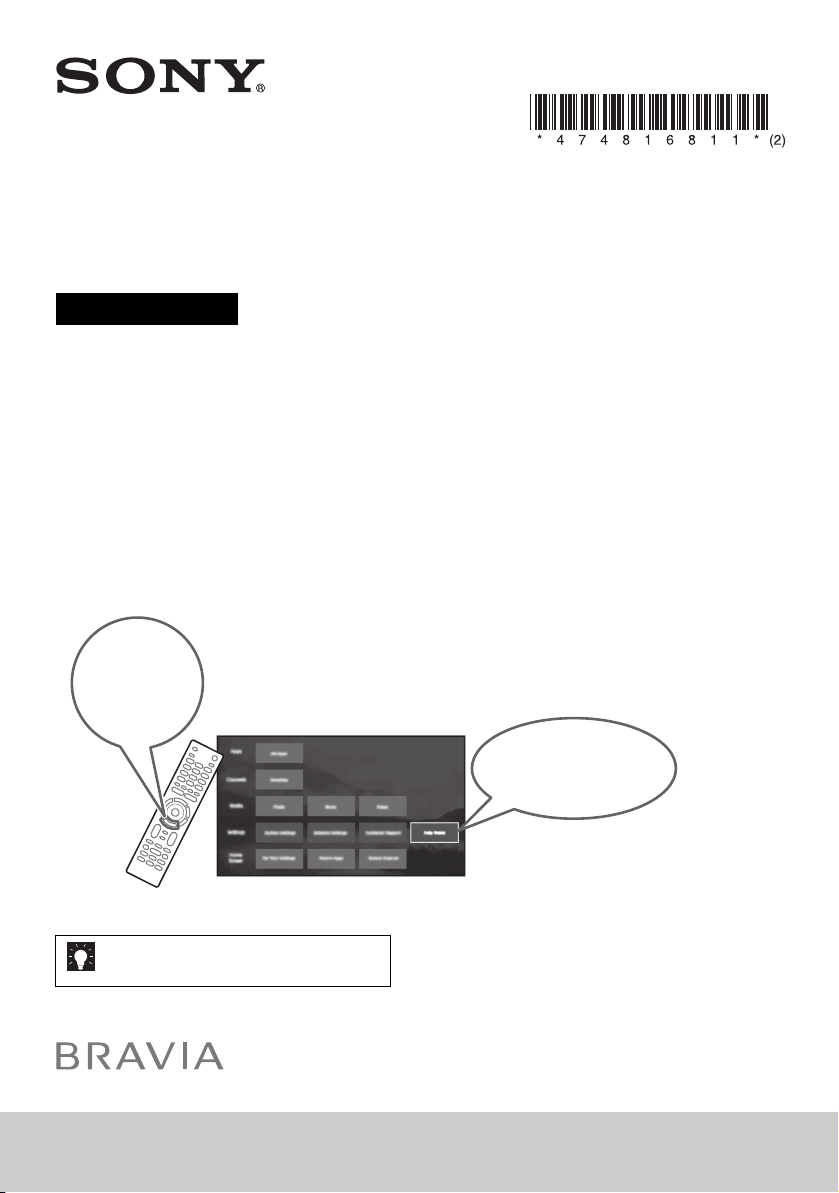
Help Guide (Manual) (Only on limited
region/country/TV model)
For more detailed information, press HOME o n the remote
control, then select [Help Guide] under [Settings] menu. You
can also check the Hel p Guide from your PC or sm artphone
(information provided on the back cover of this manual).
Location of the identification label
Labels for the TV Model No. and Power Supply rating are located
on the rear of the TV.
For models with supplied AC adapter:
Labels for AC adapter Model No. and Serial No. are located at the
bottom of AC adapter.
Safety Information
Installation/Set-up
Install and use the TV s et in accordance with the instructi ons
below in order to avoid any risk of fire, electric shock or damage
and/or in juries.
Apparatus connected to the protective e arthing of the buildi ng
installation through the ma ins connection or through oth er
apparatus with a connection to protective earthing – and to a
television distribution system using coaxial cable, may in some
circumstances create a fire haza rd. Connection to a television
distribution system therefore has to be provided through a device
providing electrical isolation be low a certain frequency range
(galvanic isolator, see EN 60728-11).
Installation
• The TV se t should be insta lled near an easily accessible AC
power outlet (mains socket).
• Place the TV set o n a stable, level surface to preve nt it from
falling over and causing personal injury or property damage.
• Instal l the TV so that the TV’s Table-Top Stand does not protrude
out from the TV stand (not supplied). If the Table-Top Stand
protrudes out from the TV stand, it may cause TV set to topple
over, fall down, and cause personal injury or damage to the TV.
Tran spo rti ng
• Before transporting the TV set, disconnect all cables.
• Two or three people are needed to transport a large TV set.
• When transpo rting the TV set by han d, hold it as shown belo w.
Do not put stress on the LCD panel and the frame around the
screen.
• When lifting or moving the TV set, hold it firmly from the
bottom.
• When transpo rting the TV set, do not s ubject it to jolts or
excessive vibration.
• When transpo rting the TV set for repai rs or when moving, pa ck
it using the original carton and packing material.
Topple prevention
(Except models with supplied support belt kit)
GB
3
Parts and Controls
ȩ
ȩ
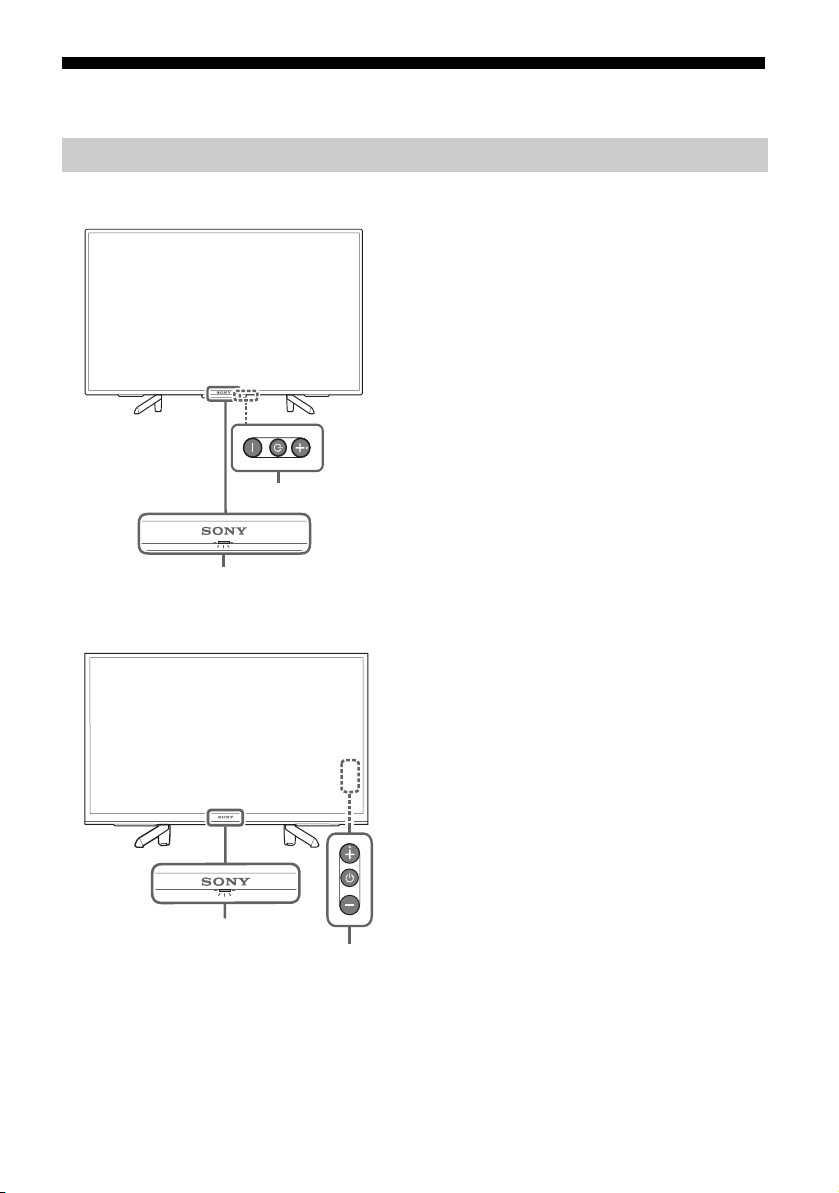
Controls and Indicators
KLV-50W672G / 43W672G
KLV-32W672G / 32W622G / 32R422G
(Power) /+/–
When the TV is off,
Press to power on.
When the TV is on,
Press and hold to power off.
Press repeatedly to change the function,
then press + or – button to:
• Adjust the volume.
• Select the channel.
• Select the input source of TV.
Sensors/LED indicator
• Receives signals from the remote control.
Do not put anything over the sensor.
Doing so may affect its function.
• Lights up in amber when the [Sleep
Timer]* or [On Timer]* is set, or the TV is in
Photo Frame Mode*.
• Lights up in white when [Power Saving]* is
set to [Picture Off]*.
• Lights up in white when the TV is turned
on.
• Does not light up when the TV is in
standby mode.
• Flashes while the remote control is being
operated.
(Only on limited region/country/TV model)
* For more detailed information, press HOME on the
remote control, then select [Help Guide] under
[Settings] menu.
Note
• Make sure that the TV is completely turned off before
unplugging the AC power cord (mains lead).
• To disconnect the TV from the AC power (mains)
completely, pull the plug from the AC power outlet
(mains socket).
• Please wait for a while when perform input selection
to change to other input.
GB
4
Using Remote Control
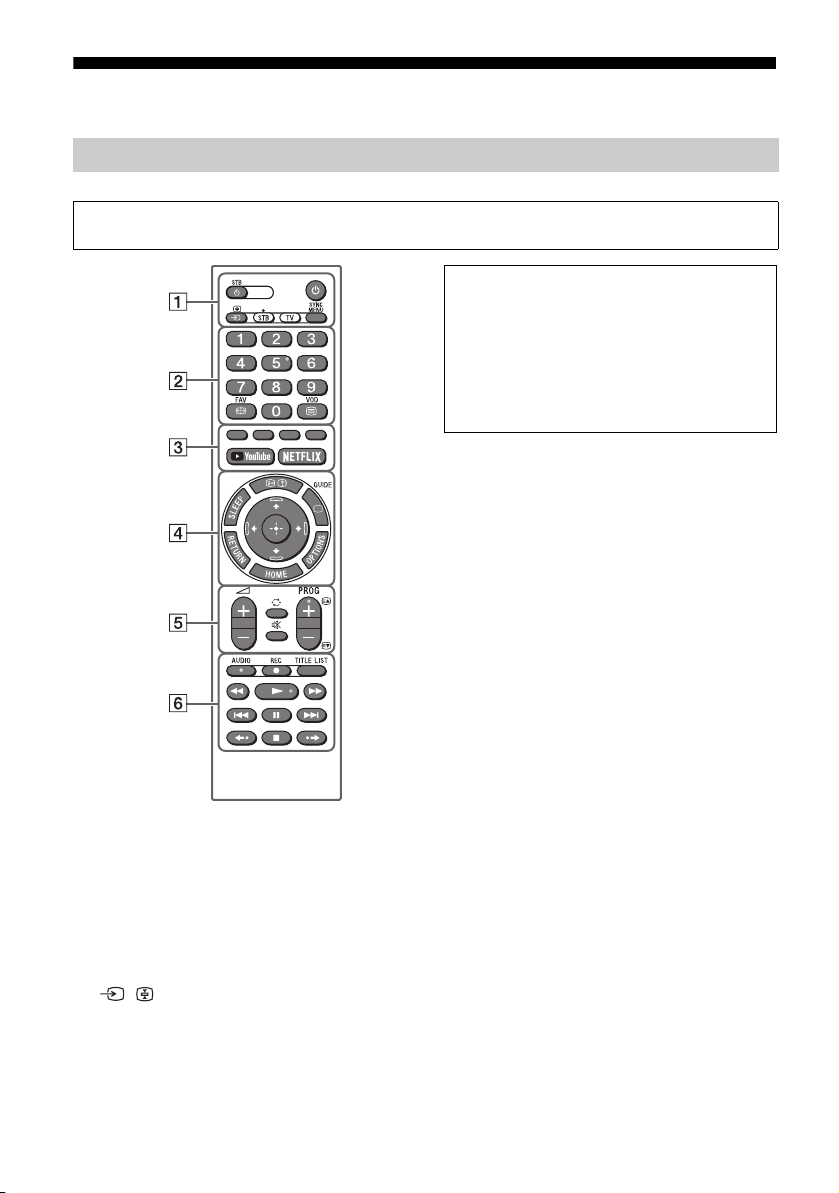
Remote Control Parts Description
The remote control shape, location, availability and function of remote control buttons may
vary depending on your region/country/TV model.
Note
• The number 5, , PROG + and AUDIO buttons
have tactile dots. Use the tactile dots as references
when operating the TV.
• The buttons with yellow characters printed on it
are activated after pressing the STB selector.
For more detailed information on STB related button
operation, press HOME on the remote control, then
select [Help Guide] under [Settings] menu.
STB (STB Standby) (STB)
Turn the STB on or switch to standby mode
(refer Help Guide).
(TV standby) (TV)
Turn on or turn off the TV (standby mode).
/ (Input select/Text hold) (TV)
In TV mode: Display and select the input
source.
In Text mode: Hold the current page.
TV/STB Selector (TV/STB)
Change Remote to TV/STB Mode (refer Help
Guide).
SYNC MENU (TV)
Press to display the BRAVIA Sync Menu and
then select connected HDMI equipment
from [Device Selection].
The following options can be selected from
BRAVIA Sync Menu.
5
GB

Device Control:
Use the [Device Control] to operate
equipment that is compatible with BRAVIA
Sync Control. Select options from [Home
(Menu)], [Options], [Content List] and [Power
Off] to operate the equipment.
Speakers:
Select [TV Speakers] or [Audio System] to
output the TV’s sound from the TV speakers
or connected audio equipment.
TV Control:
Use the [TV Control] menu to operate the TV
from the [Home (Menu)] or [Options] menu.
Return to TV:
Select this option to return to the TV
programme.
Number buttons (TV/STB)
(Wide Mode) (TV)/FAV (STB)
• Adjust the screen display. Press repeatedly
to select the desired wide mode.
• FAV (favourite) for STB (refer Help Guide).
(Text) (TV)/VOD (STB)
• Display text information.
• VOD (Video on Demand) Access On
Demand Service (refer Help Guide).
Colour buttons (TV/STB)
Execute corresponding function at that time.
YouTube (Only on limited region/
country/TV model) (TV)
Access the “YouTube” online service.
NETFLIX (Only on limited region/
country/TV model) (TV)
Access the “NETFLIX” online service.
/ (Info/Text reveal) (TV/STB)
Display information.
SLEEP (TV)
Press repeatedly until the TV displays the
time in minutes ([Off]/[15 min]/[30 min]/
[45 min]/[60 min]/[90 min]/[120 min]) that
you want the TV to remain on before
shutting off. To cancel the sleep timer, press
SLEEP repeatedly until [Off] appears.
(TV)/GUIDE (STB)
• Exit Text mode, or switch to a TV display
when displaying external input.
• Guide to browse channel (EPG) in STB
(refer Help Guide).
RETURN (TV/STB)
Return to the previous screen.
OPTIONS (TV)
Display a list that contain shortcuts to
some setting menus.
The listed options vary depending on the
current input and content.
HOME (TV/STB)
Display the TV Home menu.
//// (Navigation D-Pad) (TV/
STB)
On screen menu navigation and selection.
+/– (Volume) (TV/STB)
Adjust the volume.
(Jump) (TV/STB)
Return to the previous channel or input
viewed more than 15 seconds.
(Mute) (TV/STB)
Mute the sound. Press again to restore the
sound.
PROG +/–// (TV/STB)
In TV mode: Select the channel.
In Text mode: Select the next ( ) or
previous ( ) page.
AUDIO (TV)
Select the sound of multilingual source or
dual sound for the programme currently
being viewed (Depend on programme
source).
REC (STB)
Record the current programme.
TITLE LIST (STB)
Display the Title list.
//////
• Operate media contents on the TV and
connected BRAVIA Sync-compatible
device.
• This key also can be used to operate VOD
(Video on demand) service playback.
Availability is depend on VOD service.
(Except KLV-32R422G)
/ are not supported for STB.
•
(TV)
Replay the scene/briefly fast forwards the
scene.
(TV/STB)
GB
6
Setting up the Internet Connection
(Except KLV-32R422G)
To use the network features of your TV it needs
to be connected to the Internet. The setup
procedure differs depending on the type of
network and LAN router. Before setting up the
Internet connection, be sure to set up a LAN
router. Check your wireless LAN environment
using the following chart.
Wireless LAN
Secure Wireless LAN? NO
YES m
Do you use a wireless LAN
router compatible with Wi-Fi
Protected Setup™ (WPS)?
YES m
Type 1 *
Wired LAN , Type 4
* Type 1 is easier to set up if your router has an
automatic setting button, e.g. Air Station One-Touch
Secure System (AOSS). Most of the latest routers have
this function. Check your router.
Type 1 : Follow the configuration for Secured
network with Wi-Fi Protected Setup™
(WPS).
Type 2 : Follow the configuration for Secured
network without Wi-Fi Protected
Setup™ (WPS).
Type 3 : Follow the configuration for Unsecured
network with any type of wireless
LAN router.
Type 4 : Follow the configuration for Wired
network setup.
k Typ e 3
NO
k Typ e 2
Type 1: Secured network with Wi-Fi Protected Setup™ (WPS)
The WPS standard makes security of a wireless
home network as straightforward as pressing
the WPS button on the wireless LAN router.
Before setting up a wireless LAN, check the
location of the WPS button on the router and
verify how to use it.
For security purpose, [WPS (PIN)] provides a PIN
code for your router. PIN code is renewed every
time you select [WPS (PIN)].
1 Press HOME, then select [Settings]*
[System Settings] [Setup]
[Network] [Network Setup].
2 IP Address setting/Proxy server:
– automatic setting:
[Set up network connection] [Easy]
– manual setting:
[Set up network connection] [Expert]
[Wired Setup] or [Wireless Setup]
3 Select [WPS (Push Button)] for Push
Button method or [WPS (PIN)] for PIN
method.
Note
Button name of the WPS may differ depending on
the router (e.g. AOSS button).
4 Follow the instructions on the setup
screen.
Note
• If you use WPS for network setup, the security
settings of the wireless LAN router activate, and any
equipment previously connected to the wireless LAN
in a non-secure status will be disconnected from the
network.
In this case, activate the security settings of the
disconnected equipment and then reconnect . Or, you
can deactivate the security settings of the wireless
LAN router, and then connect the equipment to a TV
in a non-secure status.
• To use the network with IPv6, select [Settings]*
[System Settings] [Setup] [Network]
[IPv6/IPv4 Priority] [IPv6], then select [Easy] in
[Set up network connection].
• When IPv6 is selected, HTTP Proxy cannot be set.
GB
7

Type 2: Secured network without Wi-Fi Protected Setup™ (WPS)
To set up a wireless LAN, SSID (wireless network
name) and security key (WEP or WPA key) will be
required. If you do not know them, consult the
instruction manual of your router.
1 Press HOME, then select [Settings]*
[System Settings] [Setup]
[Network] [Network Setup].
2 IP Address setting/Proxy server:
– automatic setting:
[Set up network connection] [Easy]
– manual setting:
[Set up network connection] [Expert]
[Wired Setup] or [Wireless Setup]
3 Select [Scan], then select a network from
the list of scanned wireless networks.
4 Follow the instructions on the setup
screen.
Note
• To use the network with IPv6, select [Settings]*
[System Settings] [Setup] [Network]
[IPv6/IPv4 Priority] [IPv6], then select [Easy] in
[Set up network connection].
• When IPv6 is selected, HTTP Proxy cannot be set.
• Please make sure your surrounding is secure when
you key in your password.
Type 3: Unsecured network with any type of wireless LAN router
To set up a wireless LAN, SSID (wireless network
name) will be required.
1 Press HOME, then select [Settings]*
[System Settings] [Setup]
[Network] [Network Setup].
2 IP Address setting/Proxy server:
– automatic setting:
[Set up network connection] [Easy]
– manual setting:
[Set up network connection] [Expert]
[Wired Setup] or [Wireless Setup]
3 Select [Scan], then select a network from
the list of scanned wireless networks.
4 Follow the instructions on the setup
screen.
Note
• Security key (WEP or WPA key) will not be required
because you do not need to select any security
method in this procedure.
• To use the network with IPv6, select [Settings]*
[System Settings] [Setup] [Network]
[IPv6/IPv4 Priority] [IPv6], then select [Easy] in
[Set up network connection].
• When IPv6 is selected, HTTP Proxy cannot be set.
Type 4: Wired network setup
Enter the respective alphanumeric values for
your router if necessary. The items that need to
be set (e.g. IP Address, Subnet Mask, DHCP)
may differ depending on the Internet service
provider or router. For details, refer to the
instruction manuals provided by your Internet
service provider, or those supplied with the
router.
1 Press HOME, then select [Settings]*
[System Settings] [Setup]
[Network] [Network Setup].
2 IP Address setting/Proxy server:
– automatic setting:
[Set up network connection] [Easy]
– manual setting:
[Set up network connection] [Expert]
[Wired Setup] or [Wireless Setup]
3 Follow the instructions on the setup
screen.
GB
8
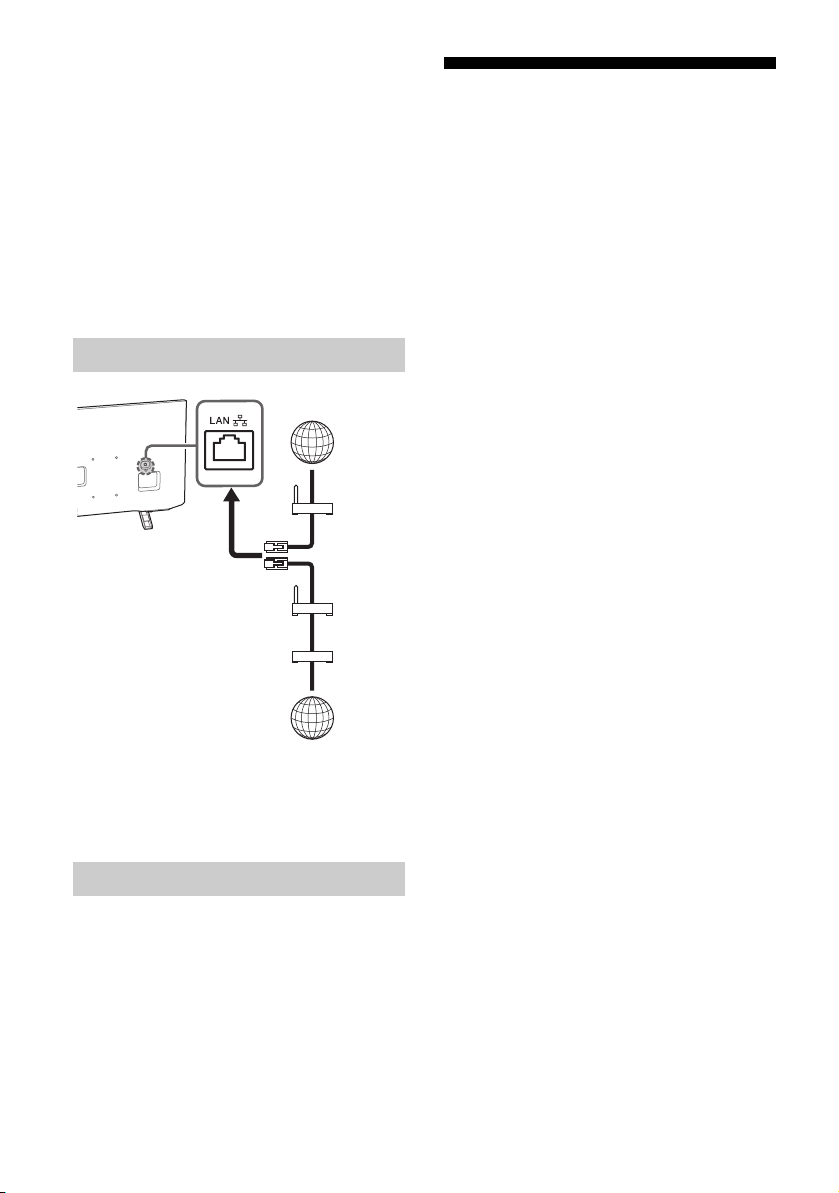
[Network Setup] can also be set from [Auto
Internet
Modem
with
router
functions
or
Router
Modem
Internet
TV
*
Startup] menu.
Note
• Allows automatic configuration of your wired/
wireless network.
When connecting with LAN cable: Wired
When connecting with built-in Wireless LAN:
Wireless
When connecting with both of the cables: Wired
• Set to [Easy], sets the IP address automatically. For
proxy server is not use.
• To use the network with IPv6, select [Settings]*
[System Settings] [Setup] [Network]
[IPv6/IPv4 Priority] [IPv6], then select [Easy] in
[Set up network connection].
• When IPv6 is selected, HTTP Proxy cannot be set.
Preparing a Wired Network
USB Tethering
(Except KLV-32R422G)
Your smartphone (depending on models/
compatible OS version) can be used as a
wireless modem to share its mobile data
connection with the TV via USB cable.
Your TV will automatically detect USB Tethering
connection if a compatible mobile with USB
Tethering turned ON is connected.
To confirm your USB Tethering status
Press HOME, then select [Settings]*
[System Settings] [Setup] [Network]
[USB Tethering Status].
* Only on limited region/country/TV model.
* Terminals and labels may vary depending on TV
model.
Note
• For LAN connections, use a Category 7 cable (not
supplied).
Viewing the Network Status
You can confirm your network status.
1 Press HOME, then select [Settings]*
[System Settings] [Setup]
[Network] [Network Setup].
2 Select [View Network setting and
status].
* Only on limited region/country/TV model.
GB
9

Privacy Policy
(Except KLV-32R422G)
When you use the following functions to
connect to the Internet, certain information will
be sent to Sony Visual Products Inc. global
servers, which is considered to be personal
information, and requires your agreement in
order for service providers to use it.
• System software updates by connecting to
Sony Visual Products Inc. global servers via
the Internet.
• Internet content or other Internet services
from service providers like YouTube.
This TV has the setting screens in auto startup
sequence or [Setup] menu to confirm your
agreement to this after you read the detail of
the Privacy Policy. If you want to use these
functions, please check [Enable Smart TV] in
each setting screen. If [Disable Smart TV] is
checked, the above two functions are not
available.
However, even in this case, if [On] is selected at
[Automatic Software Download] in auto startup
sequence or [Customer Support] menu, the
system software updating is available.
You can change this setting by pressing HOME,
then select [Settings]* [System Settings]
[Setup] [Privacy Policy].
* Only on limited region/country/TV model.
10
GB
Changing the Viewing Style
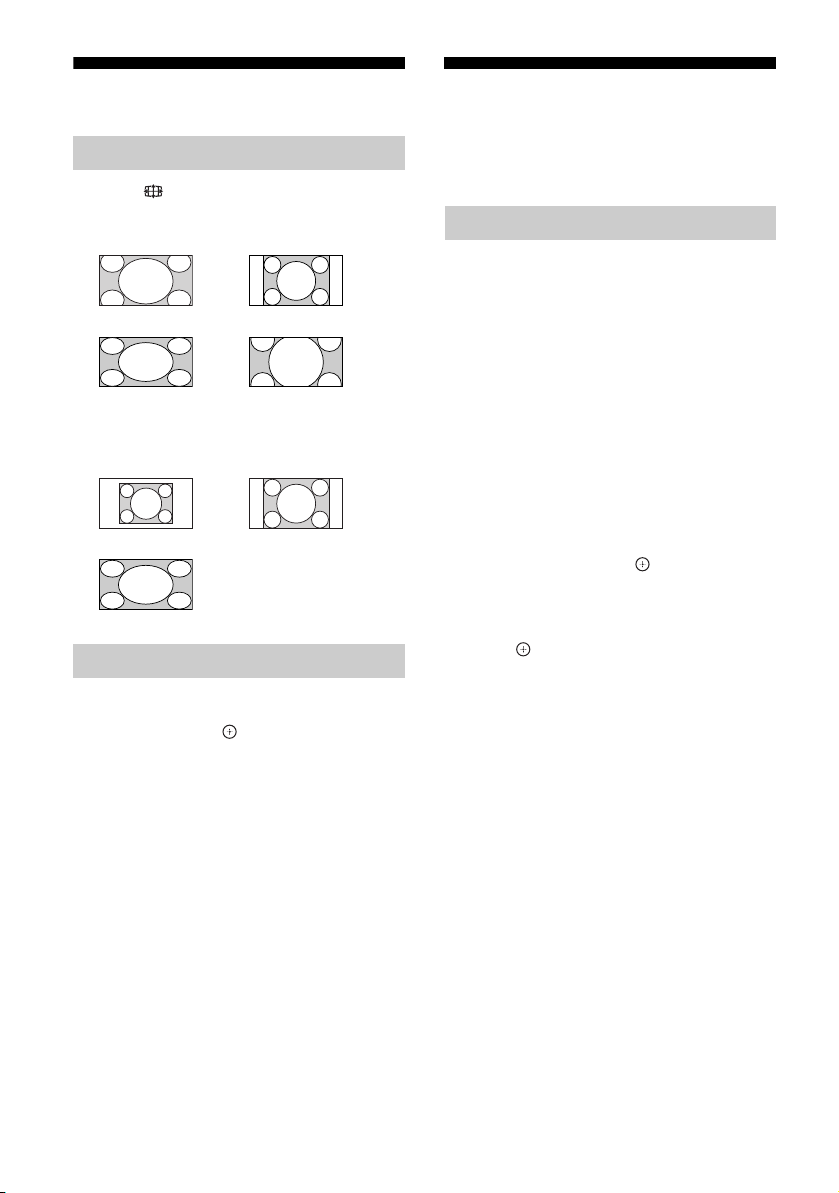
Changing the Wide Mode
1 Press repeatedly to select the wide
mode.
[Wide Zoom]* [Normal]
[Full] [Zoom]*
* Parts of the top and bottom of the picture may
be cut off.
For HDMI PC Input (PC timing)
[Normal] [Full 1]
Navigating through Home Menu
The HOME button allows you to access a variety
of TV settings and features.
Apps/All Apps
(Only on limited region/country/TV
model)
Internet Content delivers a variety of ondemand entertainment straight to your TV. You
can enjoy your favourite internet content
(Except KLV-32R422G), Photo Sharing Plus
(Except KLV-32R422G), Photo Frame Mode and
FM Radio.
Note
• Be sure to connect your TV to the Internet and
complete [Network Setup] (page 18).
To use Internet Content
[Full 2]
Setting Scene Select
1 Press OPTIONS.
2 Press / then to select [Scene
Select].
When you select the desired scene option,
the optimum picture and sound quality for
selected scene are automatically set. The
options you can select may vary. Unavailable
options are greyed out.
1 Press HOME.
2 Press /// then to select [Apps].
3 Press /// to select the desired
internet service in service list.
4 Press to launch the desired internet
content.
To exit Internet Content
Press HOME.
Note
• If you experience difficulties with this feature, check
that the Internet connection is set up properly.
• The interface to Internet content depends on the
Internet conten t providers.
• To update Internet Content services, press HOME,
then select [System Settings] [Setup] [Network]
[Refresh Internet Content].
To use NETFLIX
Press NETFLIX button on the remote control to
launch menu.
Note
• It is possible that Netflix cannot be used via a Proxy
server.
GB
11
 Loading...