

Sony Bravia KDL-65W950B,Bravia KDL-55W950B Operating Instructions Manual

Television
Operating Instructions
KDL-65W950B / 55W950B
Before operating the TV,
please read this manual
thoroughly and retain it for
future reference.
产品注册
为了给您提供更多更完善的服
务, 我们已经开通了 “ 网上产
品注册 ” 服务项目,凡购买我
们的产品,并上网注册后,您将
获更多优惠。
详情请点击
http://www.sony.com.cn/
productclub

Introduction
Thank you for choosing this
Sony product.
~
• The illustrations used in this
manual may differ depending
on your TV model.
• The illustrations of the remote
control used in this manual
are of the RMF-SD005
(Touchpad Remote Control)
and RM-SD023 (IR (infrared)
Remote Control) unless
otherwise stated.
Trademark
information
The terms HDMI and HDMI
High-Definition Multimedia
Interface, and the HDMI
Logo are trademarks or
registered trademarks of
HDMI Licensing LLC in the
United States and other
countries.
®
DLNA
and DLNA CERTIFIED
trademarks, service marks,
or certification marks of the
Digital Living Network
Alliance.
Manufactured under license
from Dolby Laboratories.
Dolby and the double-D
symbol are trademarks of
Dolby Laboratories.
“BRAVIA” and are
trademarks of Sony
Corporation.
TrackID is a trademark or
registered trademark of
Sony Mobile
Communications AB.
Gracenote, Gracenote
eyeQ, Gracenote VideoID,
Gracenote Video Explore,
Gracenote MusicID, the
Gracenote logo and
logotype, and the “Powered
by Gracenote” logo are
either registered
trademarks or trademarks
of Gracenote in the United
States and/or other
countries.
, the DLNA Logo
®
are
®
Opera
Devices SDK from
Opera Software ASA.
Copyright 1995-2014 Opera
Software ASA. All rights
reserved.
Wi-Fi, Wi-Fi Direct and
Miracast are trademarks or
registered trademarks of
Wi-Fi Alliance.
“Sony Entertainment
Network logo” and “Sony
Entertainment Network” are
trademarks of Sony
Corporation.
MHL, Mobile High-Definition
Link and the MHL Logo are
trademarks or registered
trademarks of MHL
Licensing, LLC.
For DTS patents, see
http://patents.dts.com.
Manufactured under license
from DTS Licensing Limited.
DTS, the Symbol, & DTS
and the Symbol together
are registered trademarks,
and DTS Digital Surround is
a trademark of DTS, Inc.
© DTS, Inc. All Rights
Reserved.
Designed with UEI
Technology
TM
Under
License from Universal
Electronics Inc. Portions
© UEI 2000 – 2013
The Bluetooth
®
word mark
and logos are owned by the
Bluetooth SIG, Inc. and any
use of such marks by Sony
Corporation is under
license. Other trademarks
and trade names are those
of their respective owners.
®2014 RealNetworks, Inc.
Patents Pending. All rights
reserved. RealNetworks
logo is a trademark of
RealNetworks, Inc.
The N Mark is a trademark
or registered trademark of
NFC Forum, Inc. in the
United States and in other
countries.
GB
2

无线相关规定
①不得擅自更改发射频率、
加大发射功率 ( 包括额外加
装射频功率放大器 ),不得
擅自外接天线或改用其它发
射天线。
②使用时不得对各种合法的
无线电业务产生有害干扰;
一旦发现有干扰现象时,应
立即停止使用,并采取措施
消除干扰后方可继续使用。
③使用微功率无线电设备,
必须忍受各种无线电业务的
干扰或工业、科学及医疗应
用设备的辐射干扰。
④不得在飞机和机场附近使
用。
⑤
该频段的无线接入系统仅
限室内使用 , 且距离同频段
的卫星无线电测定 ( 空对地 )
业务和卫星固定 ( 空对地 )
业务的地球站大于 3km。
⑥仅在室内结合 IEEE
802.11a (5 GHz) 标准使用
无线局域网功能。
Notes on using
Internet features
• You agree to comply with
any and all terms and
conditions that any
content on the Web may
require for said content’s
service and usage.
• Your ability to access
Internet content is subject
to your Internet provider’s
service and terms, and
your network environment.
• Sony shall have no
responsibility for Internet
content.
• Sony may add, change,
discontinue, remove, or
suspend any services or
Sony content services,
temporarily or
permanently, at any time,
without notice and without
liability.
• By using this feature, you
agree to be bound by
above terms and
conditions.
Location of the
identification label
Labels for the Model No.
and Power Supply rating
are located on the rear of
the TV.
GB
3

无线局域网功能的主要技术参数及其指标值
频率范围 2.4000 GHz-2.4835 GHz/
5.15 GHz-5.25 GHz/
5.25 GHz-5.35 GHz/
5.725 GHz-5.850 GHz
频率容限 ≤ 20 ppm
占用带宽 2.4 GHz ≤ 22 MHz
5 GHz ≤ 40 MHz
发射功率
杂散发射限值 ≤ -30 dBm
2.4 GHz
5.15 GHz-5.35 GHz
5.725 GHz-5.850 GHz
≤ 20 dBm (EIRP)
≤ 23 dBm (EIRP)
≤ 33 dBm (EIRP)
蓝牙功能的主要技术参数及其指标值
频率范围 2.4000 GHz-2.4835 GHz
频率容限 ≤ 20 ppm
占用带宽 ≤ 2 MHz
发射功率 ≤ 4 dBm (EIRP)
杂散发射限值 ≤ -30 dBm
GB
4
安全信息
警告
GB
5
About this manual
This manual explains how to set up your TV. For more
information on how to use your BRAVIA TV, refer to the
“Electronic manual”.
Operating Instructions
Electronic manual
(i-Manual)
Explains how to set up your TV such as connections,
initial set-up, and basic operations.
For more information, see the i-Manual
Explains how to use all the features. See page 23 on
how to use the i-Manual.
Images and illustrations used in this manual may differ from
the actual screen.
(Operating Instructions)
GB
6

Table of Contents
Getting Started
Checking the accessories.........................................................................8
Inserting batteries into the remote control................................................. 8
1: Attaching the Table-Top Stand .............................................................9
2: Connections ........................................................................................10
3: Preventing the TV from toppling over..................................................13
4: Bundling the cables ............................................................................14
5: Connecting the TV to the Internet........................................................15
6: Performing the initial set-up.................................................................16
Watching TV ............................................................................................17
Using the remote control ......................................................................... 18
Using Your BRAVIA TV
Discovering the contents you like (Discover)..........................................20
Enjoying social networking while watching TV (Social Viewing) ............. 20
Selecting various contents and tools (Home Menu) ............................... 21
Looking for Instructions
Looking for instructions in the
electronic manual
(i-Manual)
B
.................................. wd
Additional Information
Troubleshooting....................................................................................... 25
Specifications ..........................................................................................27
Installing Wall-Mount Attachment for Wall-Mount Bracket ...................... 30
Safety Information....................................................................................32
Precautions..............................................................................................34
GB
7
Getting Started
OR
Checking the accessories
IR Remote Control (1)
Touchpad Remote Control (1)
Size AAA batteries (R03 type) (4)
Cable clamper (2)
Table-Top Stand (2)
Fixing screws for Table-Top Stand
(M5 × 16) (4)
Wall-Mount Attachment (M6) (long) (2)
Wall-Mount Attachment (M5) (short) (2)
Passive 3D Glasses (1)
Isolator (1)
Operating Instructions (this manual) and
other documents
Inserting batteries into the remote control
Insert two size AAA batteries (supplied) by
matching e and E on the batteries to the
diagram inside the battery compartment of
the remote control.
Touchpad Remote Control
1 Remove the protection sheet.
2 Press the latch and lift the cover to
open.
IR Remote Control
1 Remove the protection sheet.
2 Push and slide the cover to open.
GB
8
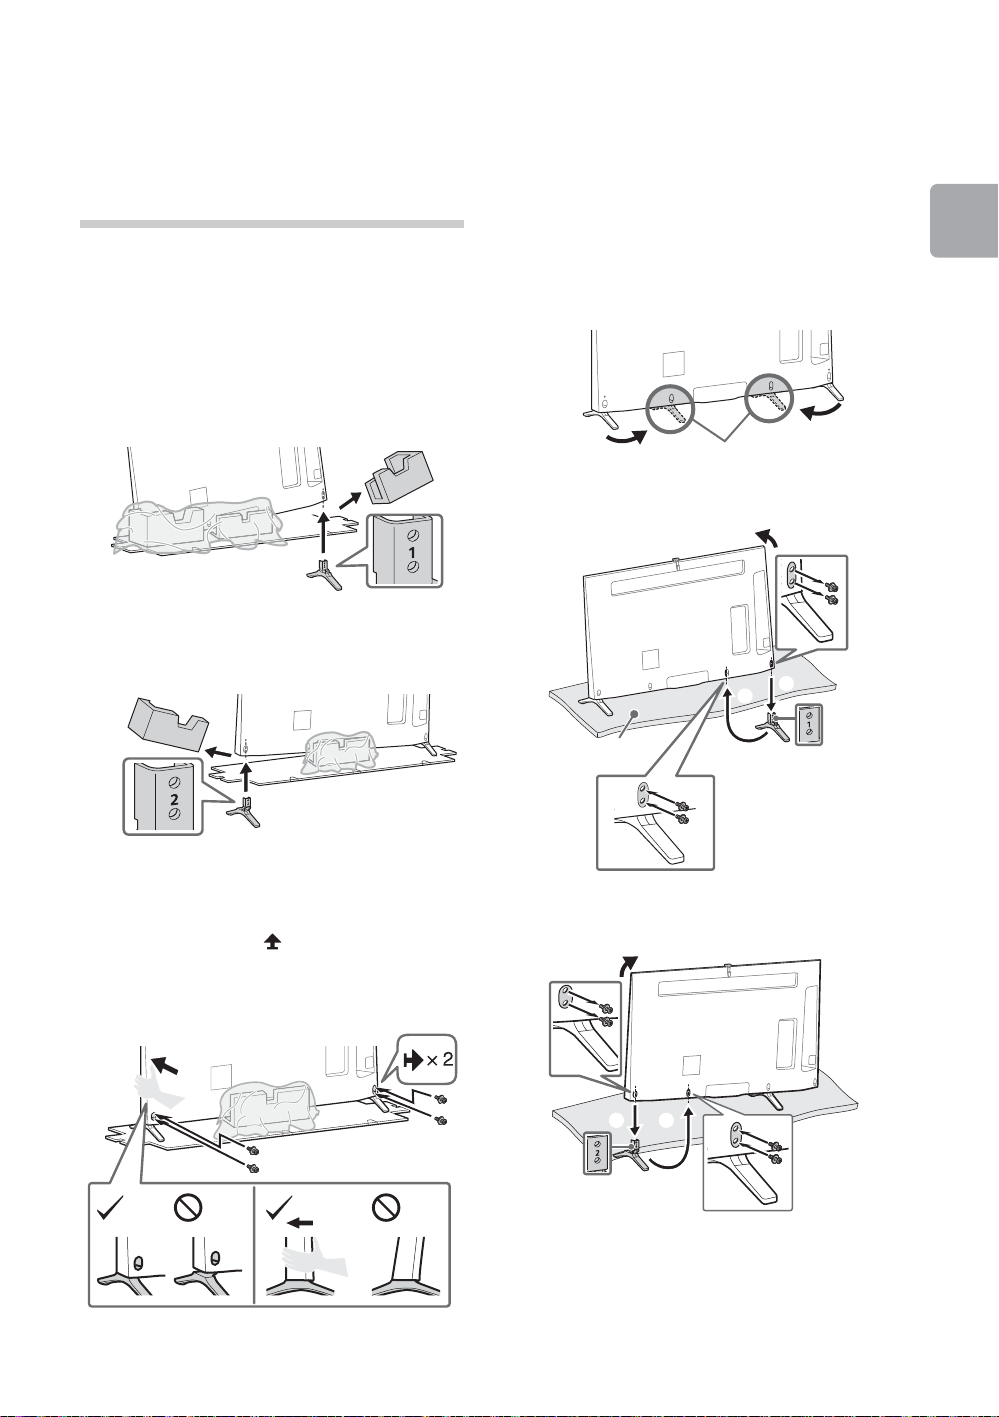
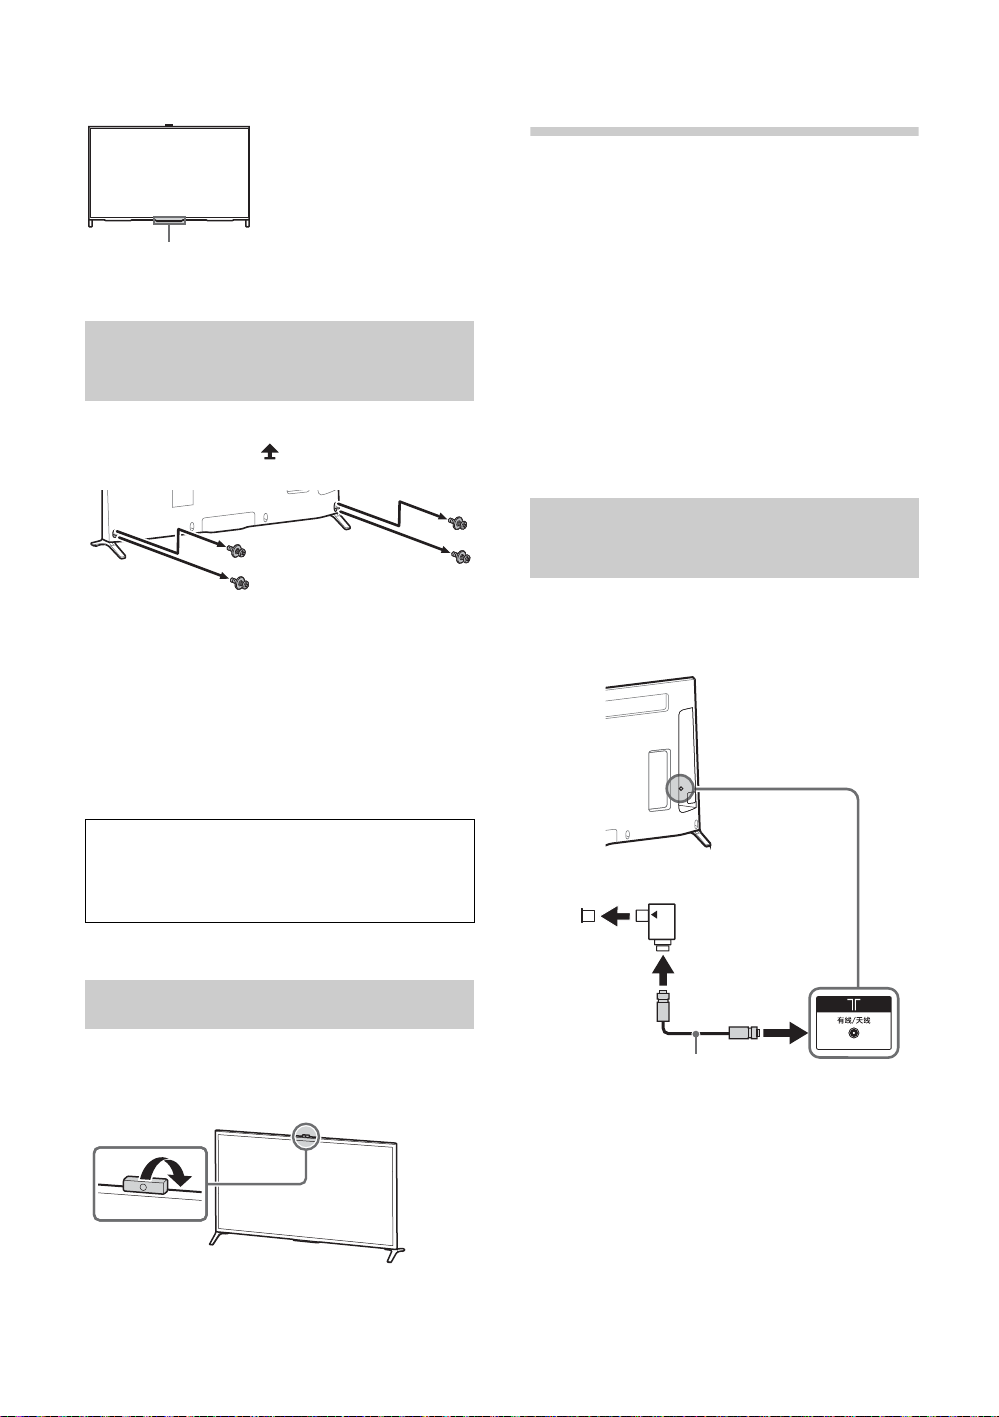
1: Attaching the
Middle position
Thick cushion
Table-Top
Stand
xRecommended (edge position)
Refer to the supplied Table-Top Stand
leaflet for proper attachment.
1 Remove the cushion of the right side 1,
and attach the Table-Top Stand to the
TV 2.
~
• If using an electric screwdriver, set the
torque at approximately 1.5 N·m {15 kgf·cm}.
• Two or more people are needed to carry out
this installation.
• Be careful not to pinch the finger during
installation.
xAlternative (middle position)
You can change the Table-Top Stand from
the edge to the middle position by referring
to the instructions below.
1
1
Getting Started
2 Repeat step 1 for the left side.
3 Fix the TV to the Table-Top Stand using
the supplied screws.
The arrow marks indicate the
location of the screw holes used for
securing the Table-Top Stand.
2
1
2
3
3
2
(Continued)
GB
9
~
IR Sensor
Antenna (aerial) cable
(not supplied)
天线隔离器
(随机提供)
有线
网络
端子
• Ensure that there are no objects in front of the TV.
Detaching the Table-Top
Stand from the TV
To detach the Table-Top Stand from the TV,
remove the screws .
~
• Do not remove the Table-Top Stand for any
reason other than to install corresponding
accessories on the TV.
• For bracket installation, refer to the instruction
guide provided by the Wall-Mount Bracket model
for your TV. Sufficient expertise is required in
installing this TV, especially to determine the
strength of the wall for withstanding the TV’s
weight.
For product protection and safety reasons,
Sony strongly recommends that you use
the Wall-Mount Bracket model designed for
your TV and the wall-mounting of your TV
should be performed by Sony dealers or
licensed contractors.
2: Connections
~
• Use an antenna (aerial) cable connector no
greater than 14 mm in thickness.
• Use an HDMI cable connector within 12 mm
(thickness) × 21 mm (width).
• 在将电视机与有线网络连接时,请务必在天线电缆
与有线网络端子之间接入随机提供的天线隔离器。
否则可能会引起着火等危险。
• 如果有线网络端子的形状特殊、无法与天线隔离器
连接,请另行购买可将二者匹配的转接头连接使
用。
• To select an input device connected to the TV,
press 输入选择 .
• For more information on connections, refer to the
i-Manual.
Connecting an antenna
(aerial)/cable/VCR
xTo connect an antenna (aerial)/
cable
Hiding the camera
If you do not wish to use the camera, hide it
as illustrated.
GB
10
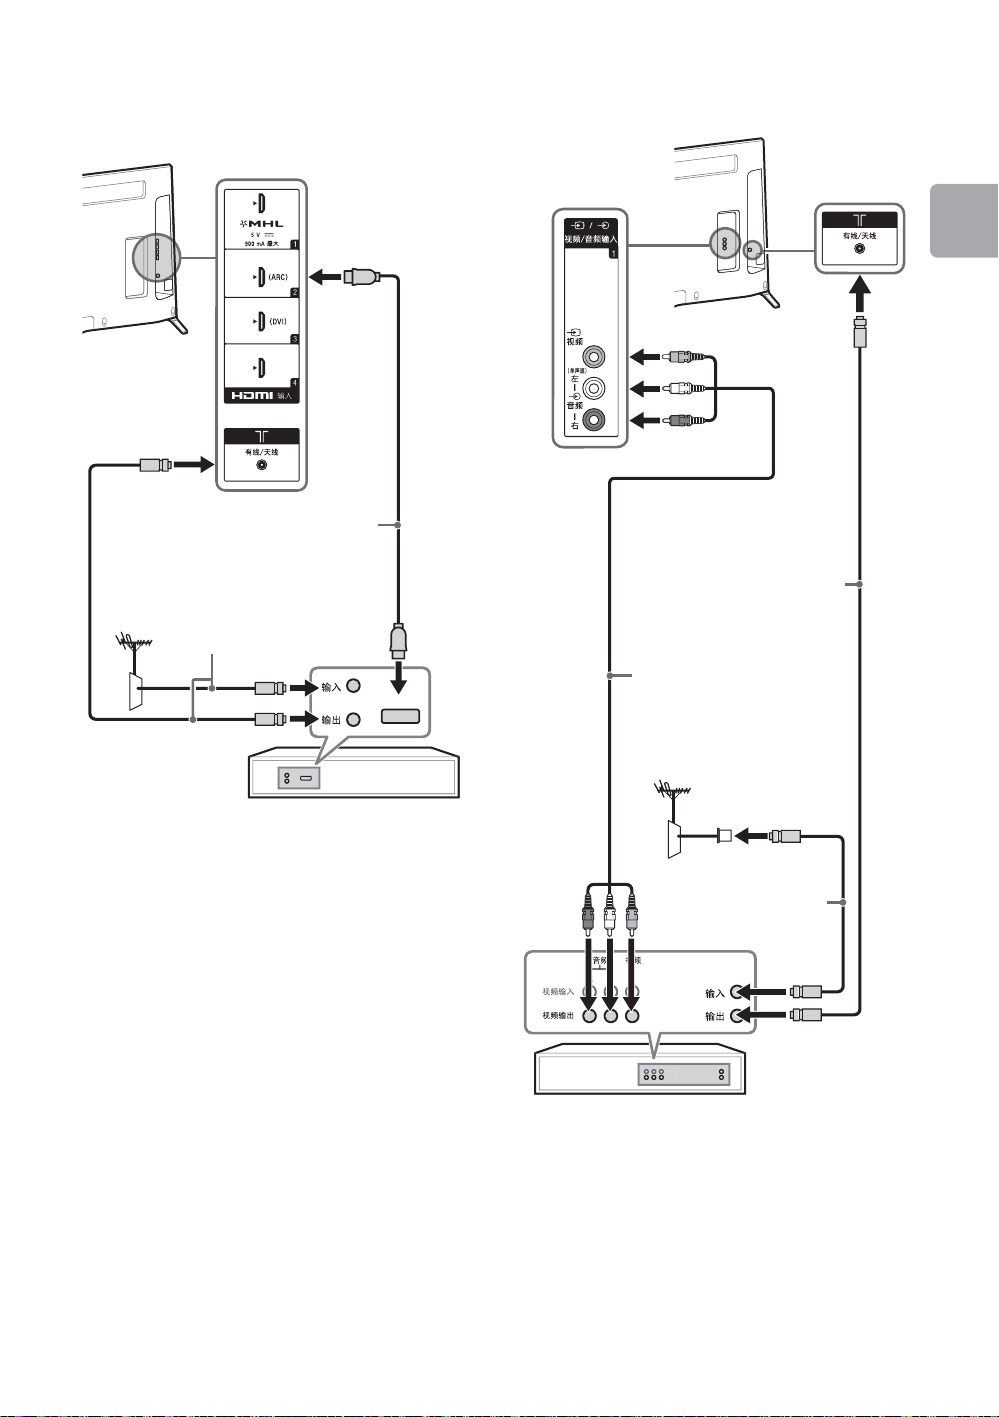
xTo connect a Set Top Box/
Set Top Box/recorder (e.g. DVD recorder)
Antenna (aerial) cable
(not supplied)
HDMI cable
(not supplied)
Antenna (aerial)
cable (not supplied)
Antenna (aerial)
cable (not supplied)
AV composite cable
(not supplied)
Set Top Box/VCR
recorder (e.g. DVD recorder)
with HDMI
xTo connect an antenna (aerial)/
cable and Set Top Box/VCR
Getting Started
(Continued)
11
GB
Connecting audio/video
Component
cable
(not supplied)
Antenna
(aerial) cable
(not supplied)
DVD Player
Antenna
(aerial) cable
(not supplied)
Use authorized
MHL 2 CABLE
with MHL logo
(not supplied)
MHL device
SD HD
Picture Quality
• AV composite cable
• Antenna (aerial) cable
Standard definition (SD) videos have
picture signals with a vertical resolution
of 480 (NTSC) or 576 (PAL/SECAM) lines.
• Component cable • HDMI cable
High definition (HD) videos have
picture signals with a vertical
resolution of 720 or 1080 lines.
devices
Connecting MHL device
The TV simultaneously charges the
MHL-compatible connected device while
playing album/music/video files. You can
use the TV remote control to control the
connected MHL-compatible device.
~
• If “Auto Input Change (MHL)” is set to “On”, the
TV automatically switches to HDMI 输入 1/MHL
from other input when MHL-compatible device is
connected to HDMI 输入 1/MHL jack. The
availability of “Auto Input Change (MHL)”
depends on whether the MHL-compatible device
can support this feature.
• If “MHL Charging during Standby” is set to “On”,
you can continue charging the MHL-compatible
device even when the TV is in standby mode.
12
GB
 Loading...