

Sony Bravia KDL-46S504, Bravia KDL-40S504 Operating Instructions Manual
LCD
Digital
Color
TV
KDL-46S504
KDL-40S504
© 2009 Sony Corporation
Sony Customer Support
U.S.A.:
Canada:
United States
1.800.222.S0NY
Please Do
the
www.sony.com/tvsupport
www.sony.ca/support
Canada
1.877.899.S0NY.
Not
Return
Producttothe
Store
Owner's Record
The
model and serial
Record these numbers in the
them
whenever
TV.
numbers
you call upon
are located at the rear
spaces
provided below. Refer
your
Sony
dealer
regarding this
Model Name
Serial No.
CAUTION
To
prevent
this
polarizedACplug with an extension cord, receptacle
other
o
o Avoid
electric shock and blade
outlet unless the blades
Operate
(5 °C).
theTVonlyon120 V AC.
operating
the
TVattemperatures
exposure,
can
be fully inserted.
Declaration of Conformity
Trade
Name:
SONY
Model:
Responsible Party: Sony Electronics Inc.
Address:
San Diego,
Telephone
KDL-40S504/KDL-46S504
16530
Via Esprillo.
CA
92127 U.S.A.
Number:
858-942-2230
of
the TV. i
do not use
below
41°F
FCC Related Information
This
equipment
to
--'
or
the limits for a
of
the
FCC
reasonable protection against harmful interference in a
residential installation.
can
radiate radio frequency energy
usedinaccordance
harmful interference to
I
!
there is no
I
i
particular installation. If this
harmful interferencetoradioortelevision reception,
can be
determined
userisencouraged
or
moreofthe following measures:
o
Reorientorrelocate
o Increase the
recetver.
o
Connect
different from that to which the receiver is
o
Consult
technician for help.
PursuanttoFCC
changesormodifications not
I
manual
equipment.
could
has
Class
Rules.
These
guarantee
by turning the
separation
the
equipment
the
dealeroran
regulations,
void
been
tested and
B digital device. pursuant to Part IS
limits are
This
equipment
with
the instructions. may
radio
that interference will not
equipment
to trytocorrect
the receiving antenna.
between
your
authoritytooperate
foundtocomply
designed
and.ifnot installed
communications.
equipment
the interference by
into an outlet on a circuit
experienced
you
are cautioned that any
expressly
to provide
generates. uses
cause
However,
occurina
does
cause
off
and
the
equipment
connected.
radiolTV
approved in this
this
with
and
and
which
on.
one
and
the
This
device complies with part15of
Operation is subject to the following
This device may not cause harmful interference, and (2)
this device must accept any interference received,
including interference that may cause undesired
the
FCC
two
conditions:
rules. I
~_operation.
For customersinCanada
This
Class
B digital apparatus
ICES-003.
complies
with
Canadian
(I)
~
The
,.11
I
shielded
must
be used with this
the limits
15ofFCC
interface
for
a digital device
Rules.
cable
recommended
equipmentinordertocomply
pursuanttoSubpartBof
Note
This
television includes a
allow
youtoreceive
programming
provider. Availability
programminginyour
programming
provider.
via
subscription
and
signal
QAM
demodulator
unscrambled
servicetoa cable service
of
digital
cable
area
depends
providedbyyour
digital cable television
television
on the type
For Customersinthe United States
The lamp in this product contains mercury.
Disposal
due to environmental considerations. For
disposal
contact your local authorities
Industries Alliance (www.eiae.org).
of
these materials may be regulated
or
recycling information. please
or
the Electronic
in this
manual
with
which should
of
cable service
Part
2
Compatible Wall Mount Bracket Information
Use the following Sony WALL-MOUNT BRACKET with
your TV model.
SonyTVModel
KDL
-405504/KDL
No.
-465504
Sony
Wall-Mount
Bracket
Model
Use with other WALL-MOUNT BRACKETS may cause
instability and could result in property damages or injury.
To Customers
Sufficient expertise is required forTVinstallations. Be
sure to subcontract the installation to a Sony dealer or
licensed contractor and pay adequate attention to safety
during the installation.
Licensing Information
Macintoshisa trademarkofApple Inc., registered in the
U.S. and other countries.
No.
5U-WL500
Your BRAVIA TV
qualified in the "Home" mode.
It meets strict energy efficiency guidelines
set by the U.S. Environmental Protection
Agency and Department
ENERGY STAR
agencies. designed to promote energy efficient products
and practices.
o When the TV is initially set up, it
ENERGY STAR requirements.
is
ENERGY
STAR<!>
II
of
Energy.
is
a joint programofthese government
11'1i;JIt~ih,ij
is
designed to meet
o Changes to certain features, settings, and
functionalities
Sensor, Power Savings) can slightly change the
power consumption.
Depending upon such changed settings, the power
consumption may increase which possibly could exceed the
limits required for the ENERGY STAR qualification.
of
this TV (i.e. Picture/Sound, Light
HDMI, the HDMI logo and High-Definition Multimedia
Interface are trademarks or registered trademarks
Licensing, LLC.
Fergason Patent Properties, LLC:
U.S. Patent No. 5,717,422
U.S. Patent No. 6,816,141
Manufactured under license from Dolby Laboratories.
Dolby and the double-D symbol are trademarks
Laboratories.
TruSurround XT, SRS and
SRS Labs, Inc. TruSurround XTtechnologyisincorporated
under license from SRS Labs, Inc.
Blu-ray Disc
"BRAVIA",
trademarks or registered trademarks
"PlayStation"
trademark
is
a trademark.
BRAVIA,
is
a registered trademark and "PS3"isa
of
Sony Computer Entertainment Inc.
(e)
symbol are trademarks
BRAVIA Sync andIIare
of
Sony Corporation.
of
of
HDMI
Dolby
of
[I]DOLB~
HIGH-DEFINITION TELEVISION
DIGITAL I
3
Contents
Introducing Your New BRA
Welcome to the World of
Experiencing Stunning HD with Your
BRAVIA 5
The Four Steps to a Full HD Experience 6
TV Feature Highlights 6
BRAVIA@
VIA®
Getting Started
Setting Up Your TV 7
Locating Inputs and Outputs 8
Connecting Other Equipment 10
Bundling the Connecting Cables
Securing the TV
Inserting Batteries into the Remote
Control 12
Initial Setup 12
11
11
Operating the TV
Remote Control Button Description 13
TV Controls and Indicators 15
Using Features
5
Using
Favorites 17
Wide Mode 18
Wide Mode with
BRAVIA@
HOM!. 16
Sync™
PC
with Control for
Using the Menus
Navigating through TV Menus 20
Other Information
How to Care for Your BRAVIA
Things to consider
Troubleshooting
Specifications 22
Index 23
19
21
21
21
Customer Support
-.">
'0"
0
./
United States
http://www.sony.com/tvsupport
Canada
http://www.sony.ca/support
4
On-line Registration
United States
http://productregistration.sony.com
Canada
http://www.SonyStyle.ca/registration
Introducing
Welcome
Thank you for purchasing this Sony BRAVIA high-definition television. Use the
documentation listed below to get the most out of your
Safety Booklet
Provides precautionary measures
to keep you and your TV safe. Read
this information prior to setting up
your
Operating Instructions
Provides general
information that will allow you to
view your TV with minimal
customizations.
TV.
to
the
Your
World
TV
operation
New
of
BRAV/A®
BRAVIA@
TV.
Quick Setup Guide
Provides TV setup information,
illustrates sample optional equipment
connection diagrams.
Reference Book
Offers the most complete
operation information available for
your TV and presents advanced
customization details. Access it at
www.sony.com/referencebook.
TV
•
5"
-
a
~
CO)
~.
~
c:
..,
~
:e
~
:s
):;
@>
'\
~.,
Experiencing Stunning
The quality of the image you see on your BRAVIA TVisonly as good as the quality of the
signal
access to
from:
• Over-the-air broadcasting via HD-quality antenna
• HD cable subscription
• HD satellite subscription
• Blu-ray
Contact your cable or satellite provider for information on upgrading to HD programming.
The TV operation information above has been designedinan eco-friendly
manner to reduce the consumption of natural resources.
it
receives.
HD
To
experience the stunning detail of your new BRAVIA
programming.
Disc™
player or other HD compatible external equipment
HD
Your
BRAVIA TV can receive and display HD programming
with
Your
BRAV/A
TV,
you need
This manualisfor 40 and 46 inch BRAVIA KDL-S504 series models with screen size measured diagonally.
5
The Four Steps to a Full HD Experience
Set, Sound, Source, and Setup
Along with your BRAVIA TV set, a complete HD system requires an HD sound system, a
source of HD programming and a proper connection setup. Refer to the Quick Setup
Guide, enclosed separately, for connecting other optional equipment.
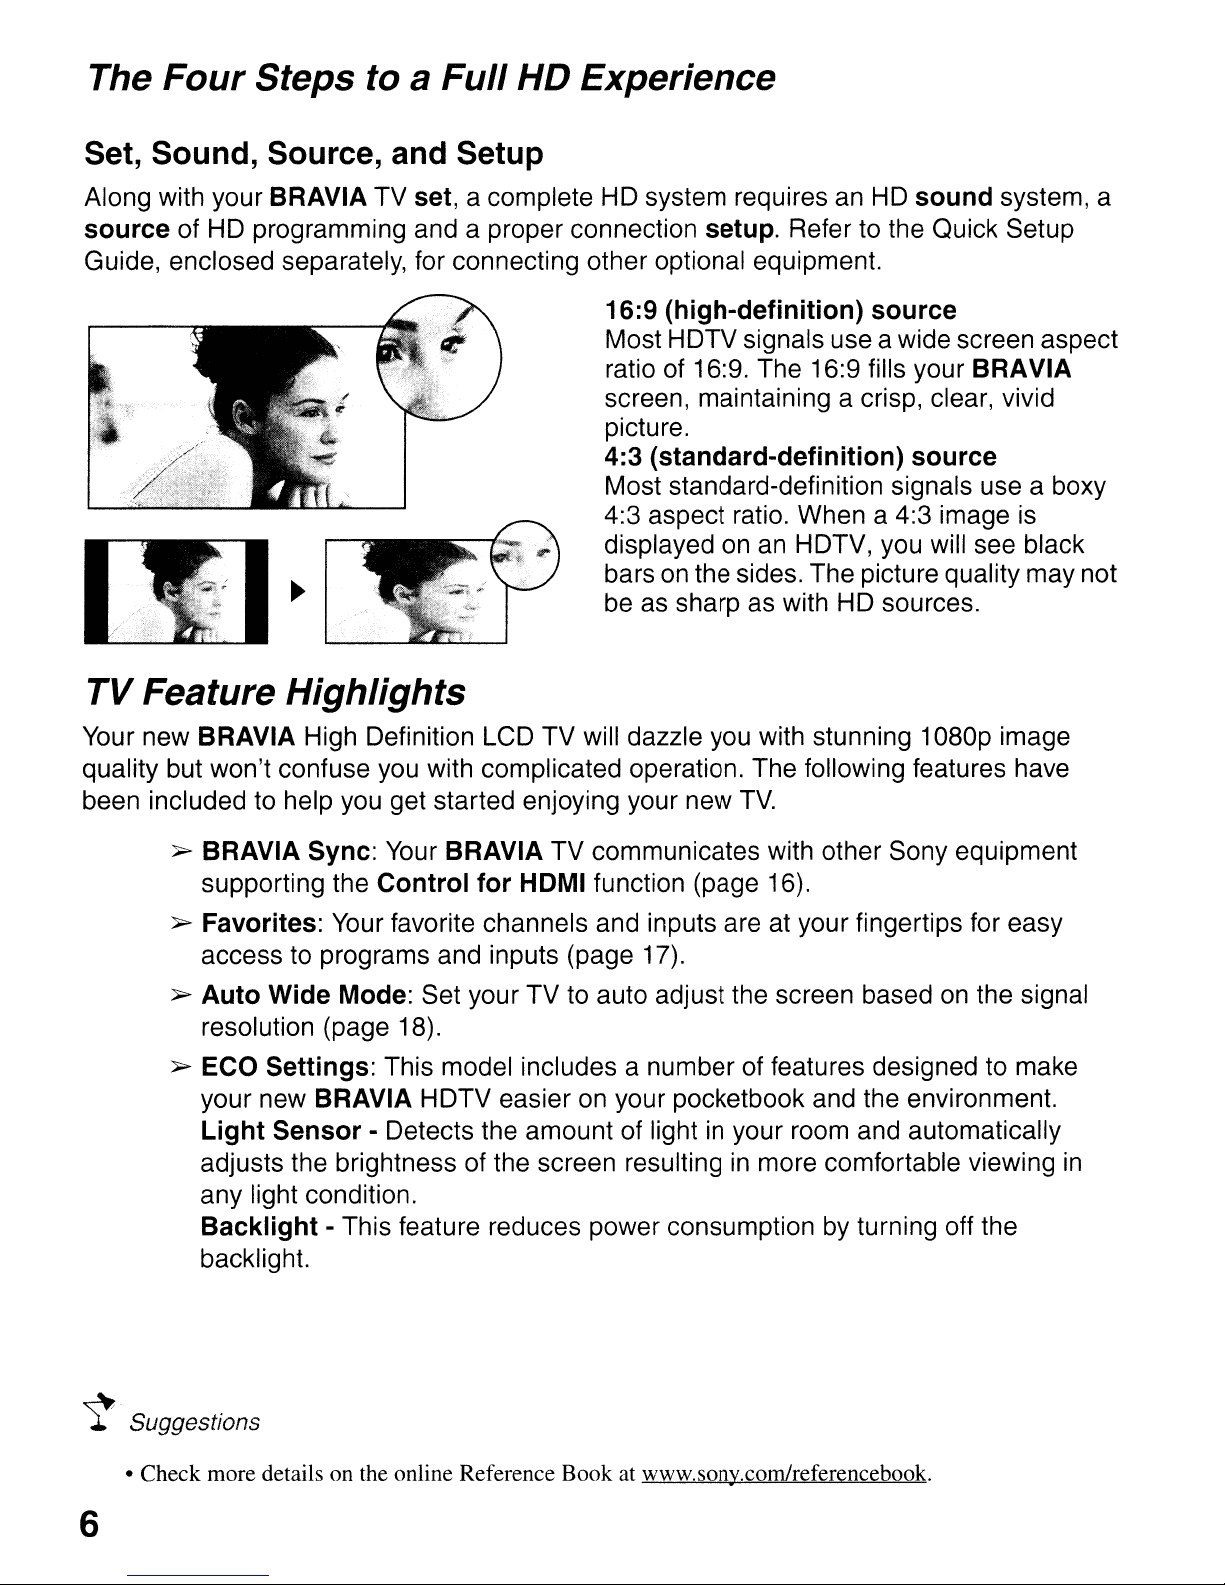
16:9 (high-definition) source
Most HDTV signals use a wide screen aspect
ratio of 16:9. The 16:9 fills your
screen, maintaining a crisp, clear, vivid
picture.
4:3 (standard-definition) source
Most standard-definition signals use a boxy
4:3 aspect ratio. When a 4:3 image is
an
displayed on
on
bars
be as sharp as with HD sources.
the sides. The picture quality may not
HDTV, you will see black
BRAVIA
TV Feature Highlights
Your new BRAVIA High Definition LCD TV will dazzle you with stunning 1
quality but won't confuse you with complicated operation. The following features have
been included to help you get started enjoying your new
~
BRAVIA Sync:
supporting the
~
Favorites: Your favorite channels and inputs are at your fingertips for easy
access to programs and inputs (page 17).
~
Auto Wide Mode: Set your TV to auto adjust the screen based
resolution (page 18).
~ ECO Settings: This model includes a number of features designed to make
your new
Light Sensor - Detects the amount of light
adjusts the brightness of the screen resulting
any light condition.
Backlight - This feature reduces power consumption by turning off the
backlight.
BRAVIA HDTV easier on your pocketbook and the environment.
Your
BRAVIA TV communicates with other Sony equipment
Control for HOMI function (page 16).
TV.
in
your room and automatically
in
more comfortable viewing
D8Dp
on
the signal
image
in
~
Suggestions
• Check more details on the online Reference Book at www.sony.com/referencebook.
6
Getting Started
.~.'
y
Setting Up Your
Some TV models are packaged with a detached Table-Top Stand so you can mount it to a wall •
right away.
You
will need a Phillips screwdriver and the supplied screws to complete the task. Look for the
instructions attached to the
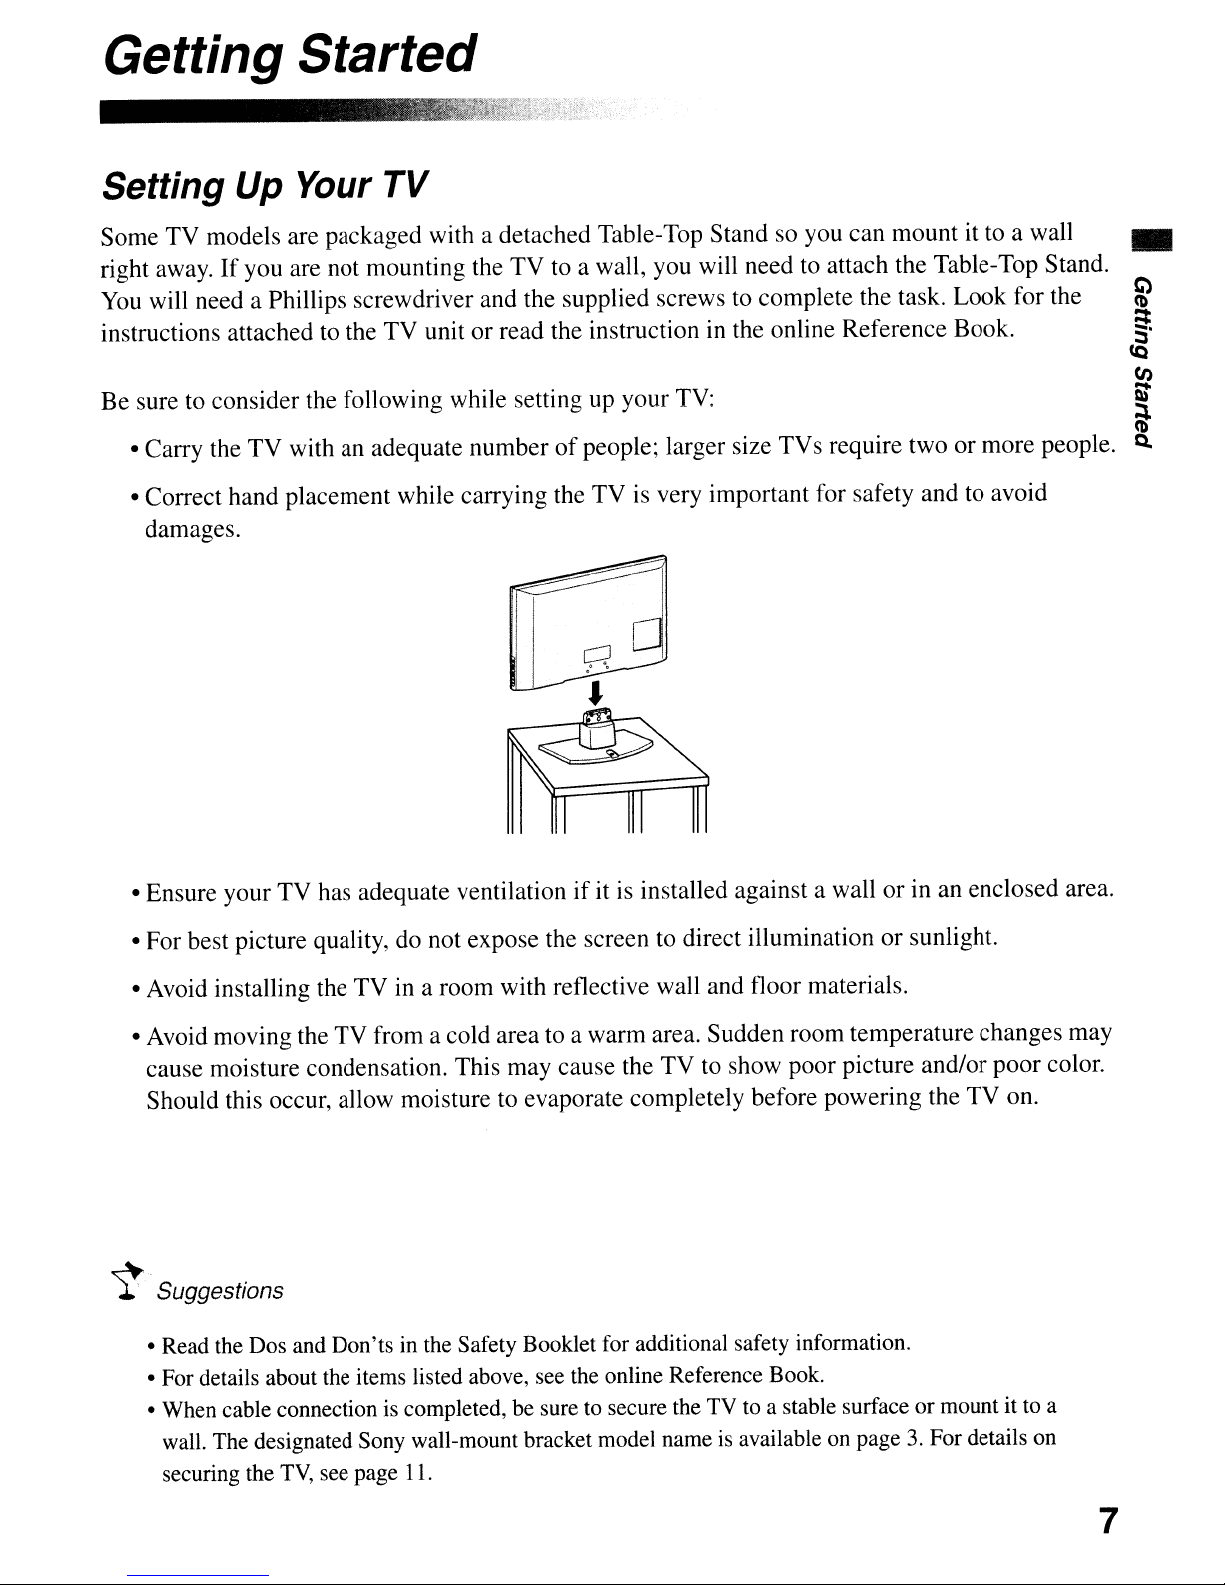
Be sure to consider the following while setting up your
• Carry the
• Correct hand placement while carrying the TV is very important for safety and to avoid
damages.
If
you are not mounting the
TV
with an adequate numberofpeople; larger size TVs require two or more people.
TV
TV
to a wall, you will need to attach the Table-Top Stand.
TV
unit or read the instruction in the online Reference Book.
TV:
~
~
CQ
(I)
!it
ii
Q.
TV
• Ensure your
• For best picture quality, do not expose the screen to direct illumination or sunlight.
• Avoid installing the
• Avoid moving the TV from a cold area to a warm area. Sudden room temperature changes may
cause moisture condensation. This may cause the
Should this occur, allow moisture to evaporate completely before powering the
~
Suggestions
• Read the Dos and Don'ts in the Safety Booklet for additional safety information.
• For details about the items listed above, see the online Reference Book.
• When cable connection is completed, be sure to secure the TV to a stable surface or mount it to a
wall. The designated Sony wall-mount bracket model name
securing the
has adequate ventilationifit is installed against a wall or in an enclosed area.
TV
in a room with reflective wall and floor materials.
TV
to show poor picture and/or poor color.
TV
on.
is
available on page3.For details on
TV,
see page
11.
7

Locating Inputs
and
Outputs
Rear Panel
I
WlEIAHTEWJ
0
7
Side Panel
AUOIO
<0
5
VlOEO
..
I(V
VIDEO
IJ~
1*-'1
II@
AUDIO
~O
2
VIDEOIH
[ID
Item Description
[I] SERVICE
[g]
VIDEO
COMPONENT
IN
1080in20pl
480p/480i)1
L-AUDIO-R
1
(1080pl
IN
11
This port i to be u ed when ervice i required.
This input port can be used a composite video input (VIDEO
video input (COMPONENT
Y
Nideo
for video and use audio
connection, use
audio signal.
You
mu
t configure the input
type
if
the input is used a
composite or component
video input. Otherwise a black
& white or distorted picture
may occur.
To
configure the input type
press
MENU, select Channel
menu then select
Video/Component 1 to
choose
Video 1 or
Component 1 a shown
here.
Y,
PB
1). For composite use, connect the yellow
Land
PR
for video ignals and also connect the audio
R for audio signal. For component
1)
or as component
jack
Land
to
R for
8
Item Description
~
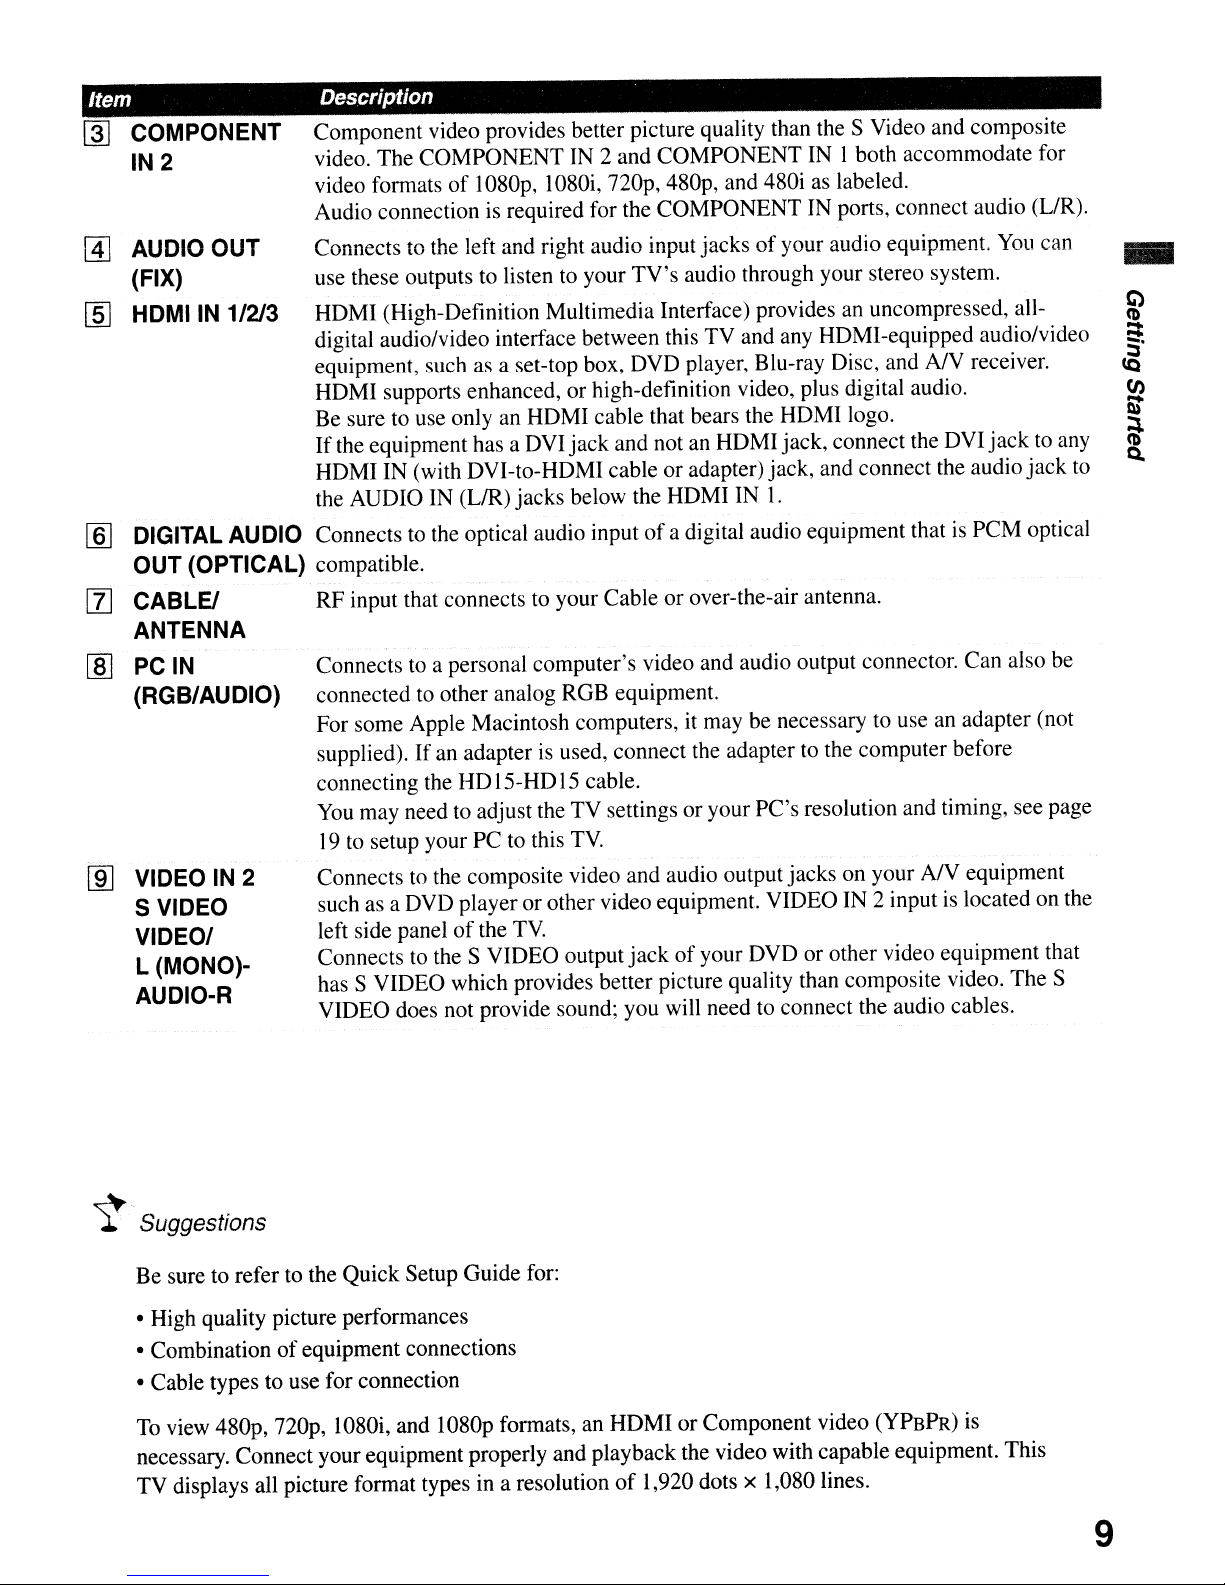
COMPONENT Component video provides better picture quality than the S Video and composite
IN
IN 2 video. The COMPONENT IN 2 and COMPONENT
@]
AUDIO OUT
(FIX)
I]J
HDMIIN
1/213
video formats
Audio connection is required for the COMPONENT IN ports, connect audio (UR).
Connects
use these outputs to listen to your
HDMI (High-Definition Multimedia Interface) provides an uncompressed, all-
digital audio/video interface between this TV and any HDMI-equipped audio/video
equipment, such as a set-top box, DVD player, Blu-ray Disc, and
HDMI supports enhanced, or high-definition video, plus digital audio.
Be sure to use only an HDMI cable that bears the HDMI logo.
If
the equipment has a DVI jack and notanHDMI jack, connect the DVI
HDMI IN (with DVI-to-HDMI cable or adapter) jack, and connect the audio jack
the AUDIO IN
of
1080p, 1080i,
to
the left and right audio input jacksofyour audio equipment.
(UR)
jacks below the HDMI IN
nap,
480p, and 480iaslabeled.
TV's
audio through your stereo system.
1.
I both accommodate for
NV
You
receiver.
jack
can
-
to any
to
[§] DIGITAL AUDIO Connects
OUT (OPTICAL) compatible.
[Z]
CABLE! RF input that connectstoyour Cable or over-the-air antenna.
ANTENNA
[ID
PC
IN
(RGB/AUDIO)
ill] VIDEO IN 2
S VIDEO
VIDEO/
L (MONO)AUDIO-R
Connects to a personal computer's video and audio output connector. Can also be
connected
For some Apple Macintosh computers,
supplied).
connecting the HD15-HD15 cable.
You
19tosetup your PC to this
Connectstothe composite video and audio output jacks on your A/V equipment
such as a DVD player or other video equipment. VIDEO IN 2 input
left side panel
Connectstothe S VIDEO output
has S VIDEO which provides better picture quality than composite video. The S
VIDEO does not provide sound; you will need to connect the audio cables.
to
the optical audio inputofa digital audio equipment thatisPCM optical
to
other analog RGB equipment.
it
may be necessary to use an adapter (not
Ifanadapterisused, connect the adapter to the computer before
may need to adjust the TV settings or your PC's resolution and timing, see page
TV.
of
the
TV.
jackofyour DVD or other video equipment that
is
located on the
~.
Suggestions
Be sure to refer to the Quick Setup Guide for:
• High quality picture performances
• Combination
• Cable types to use for connection
To view
necessary. Connect your equipment properly and playback the video with capable equipment. This
TV displays all picture format types in a resolution
48Op,
of
equipment connections
nap,
1080i, and 1080p formats, an HDMIorComponent video (YPBPR) is
of
1,920 dots x 1,080 lines.
9
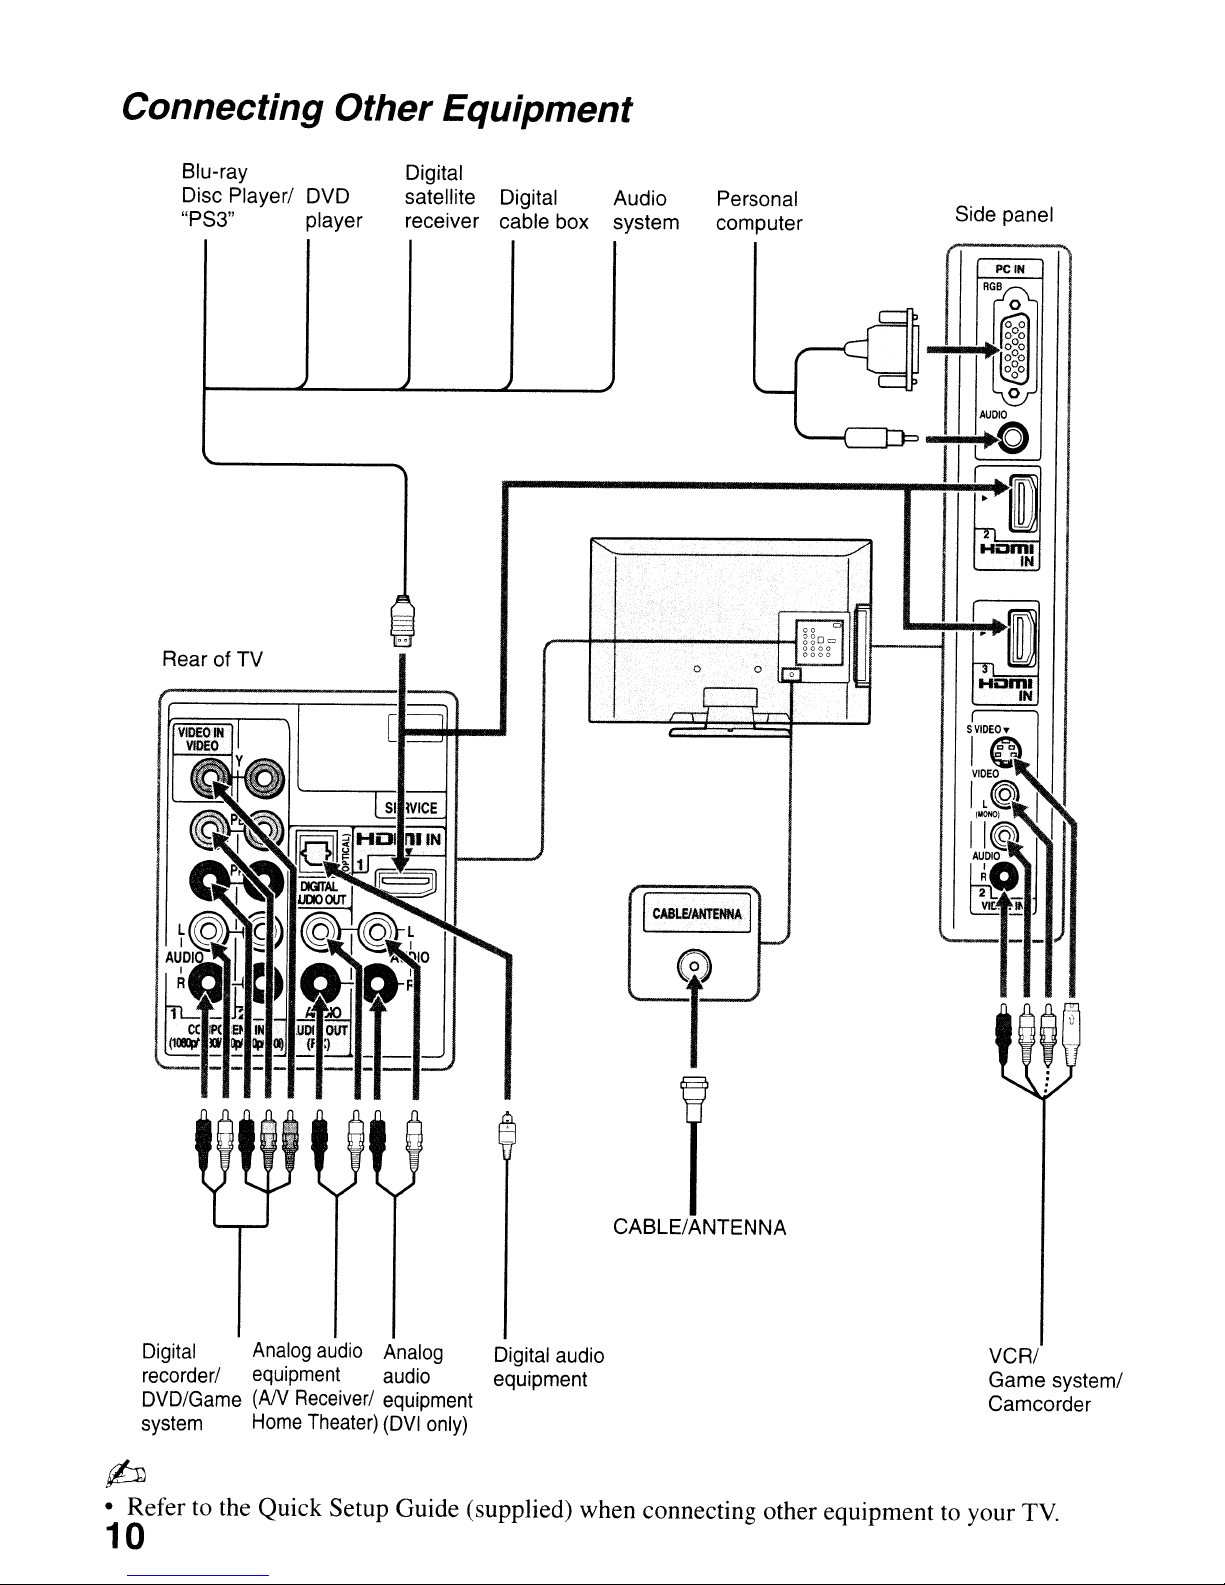
Connecting Other Equipment
Blu-ray
Disc Player/ DVD
"PS3" player
Rear of TV
Digital
satellite Digital
receiver cable box
.,
Audio
system
I"':
Personal
computer
Side panel
AUDIO
II
~O
~~
Haml
Homl
rD~
VIDEO
IN
IN
Digital
recorder/
DVD/Game (AN
system
Analog
equipment
Home
audio
Receiver/
Theater)
Analog
audio equipment
equipment
(DVI
only)
Digital audio
I·
CABLEIANTENN~
I
e
f
CABLE/ANTENNA
IL~
IIMr~
AUDIO
I
I
~O
~;
VCR/
Game system/
Camcorder
p
• Refer to the Quick Setup Guide (supplied) when connecting other equipment to your
10
TV
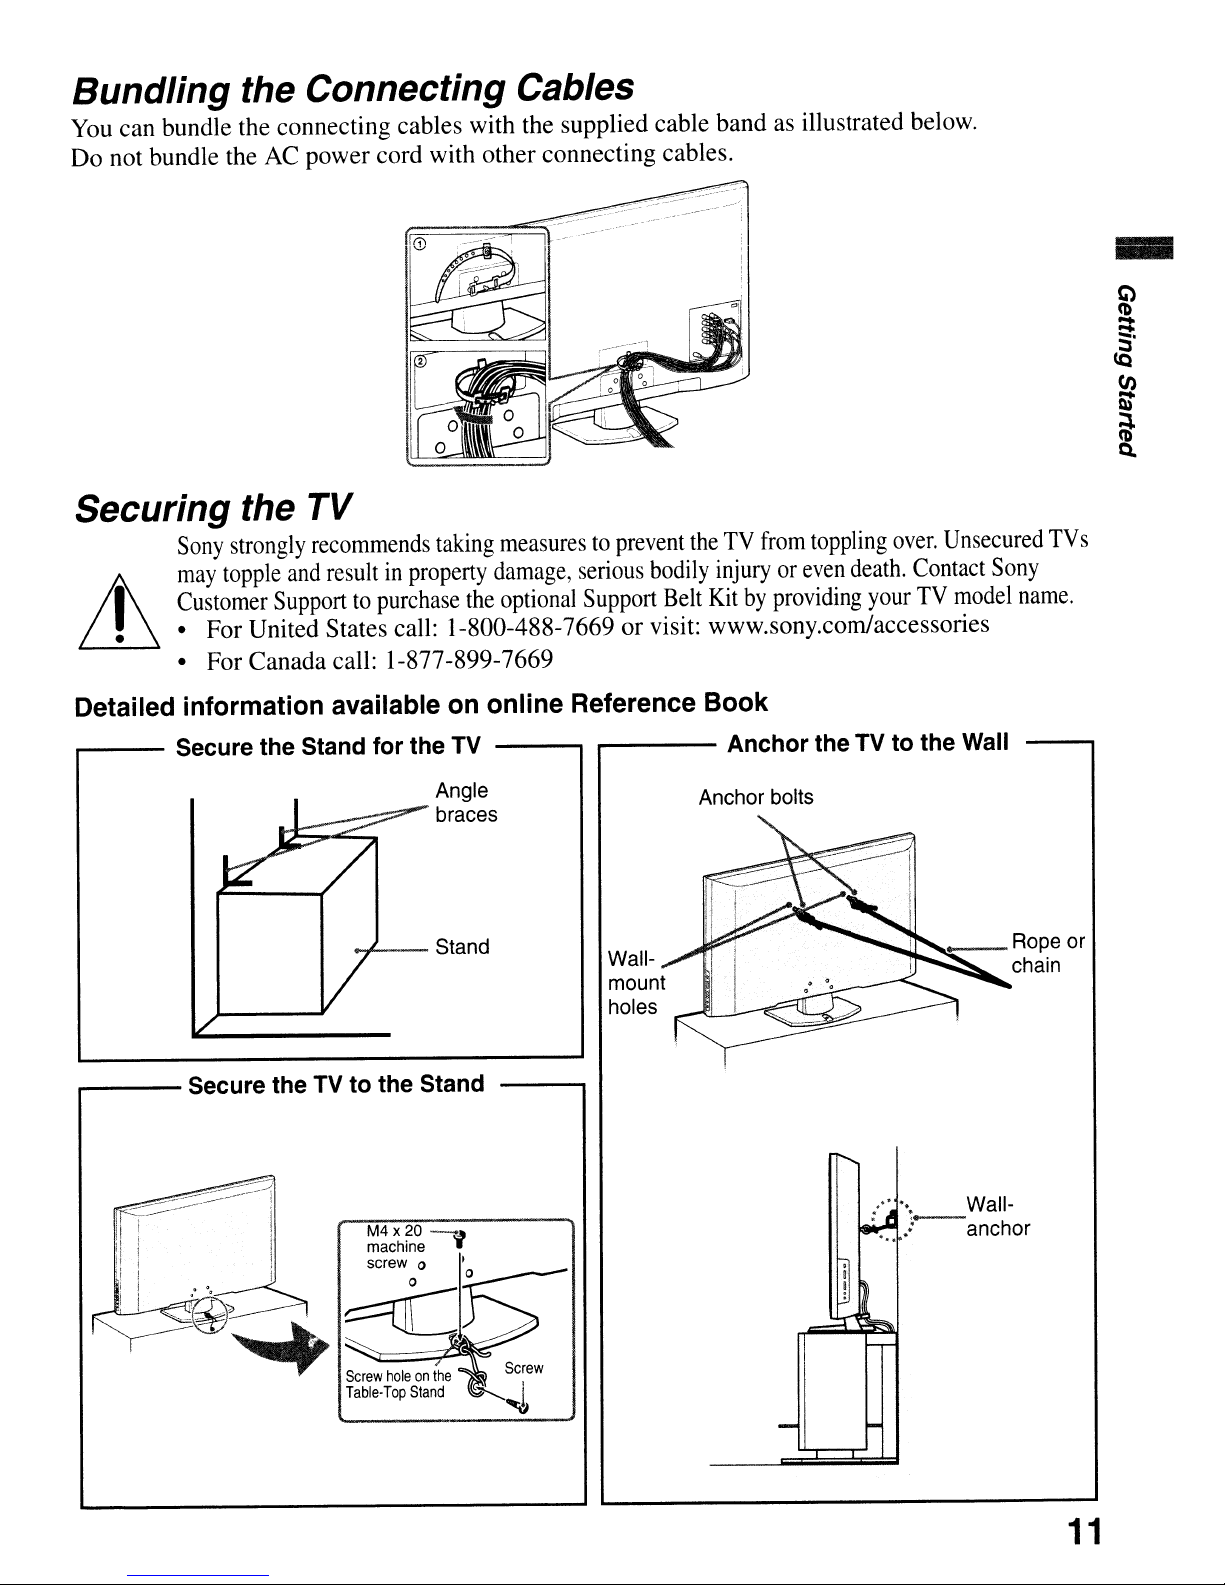
Bundling the Connecting Cables
You
can bundle the connecting cables with the supplied cable bandasillustrated below.
AC
Do not bundle the
power cord with other connecting cables.
Securing the TV
Sony
strongly
may
topple
I
it,
• • For United States call: 1-800-488-7669 or visit: www.sony.com/accessories
Customer
• For Canada call: 1-877-899-7669
recommends
and
resultinproperty
Supporttopurchase
taking
measurestoprevent
damage,
the
optional
serious
Support
the
TV
bodily
injuryoreven
Belt
Kitbyproviding
from
toppling
death.
your
over.
Contact
TV
Unsecured
Sony
model
name.
-
TVs
Detailed information available
,.---
.-----
Secure the Stand for the TV Anchor the TV to the
'*7---
Secure the TV to the Stand
on
online Reference Book
Angle
braces
Stand
Wallmount
holes
Anchor bolts
Wall
• Wall-
,-
'" .: anchor
11
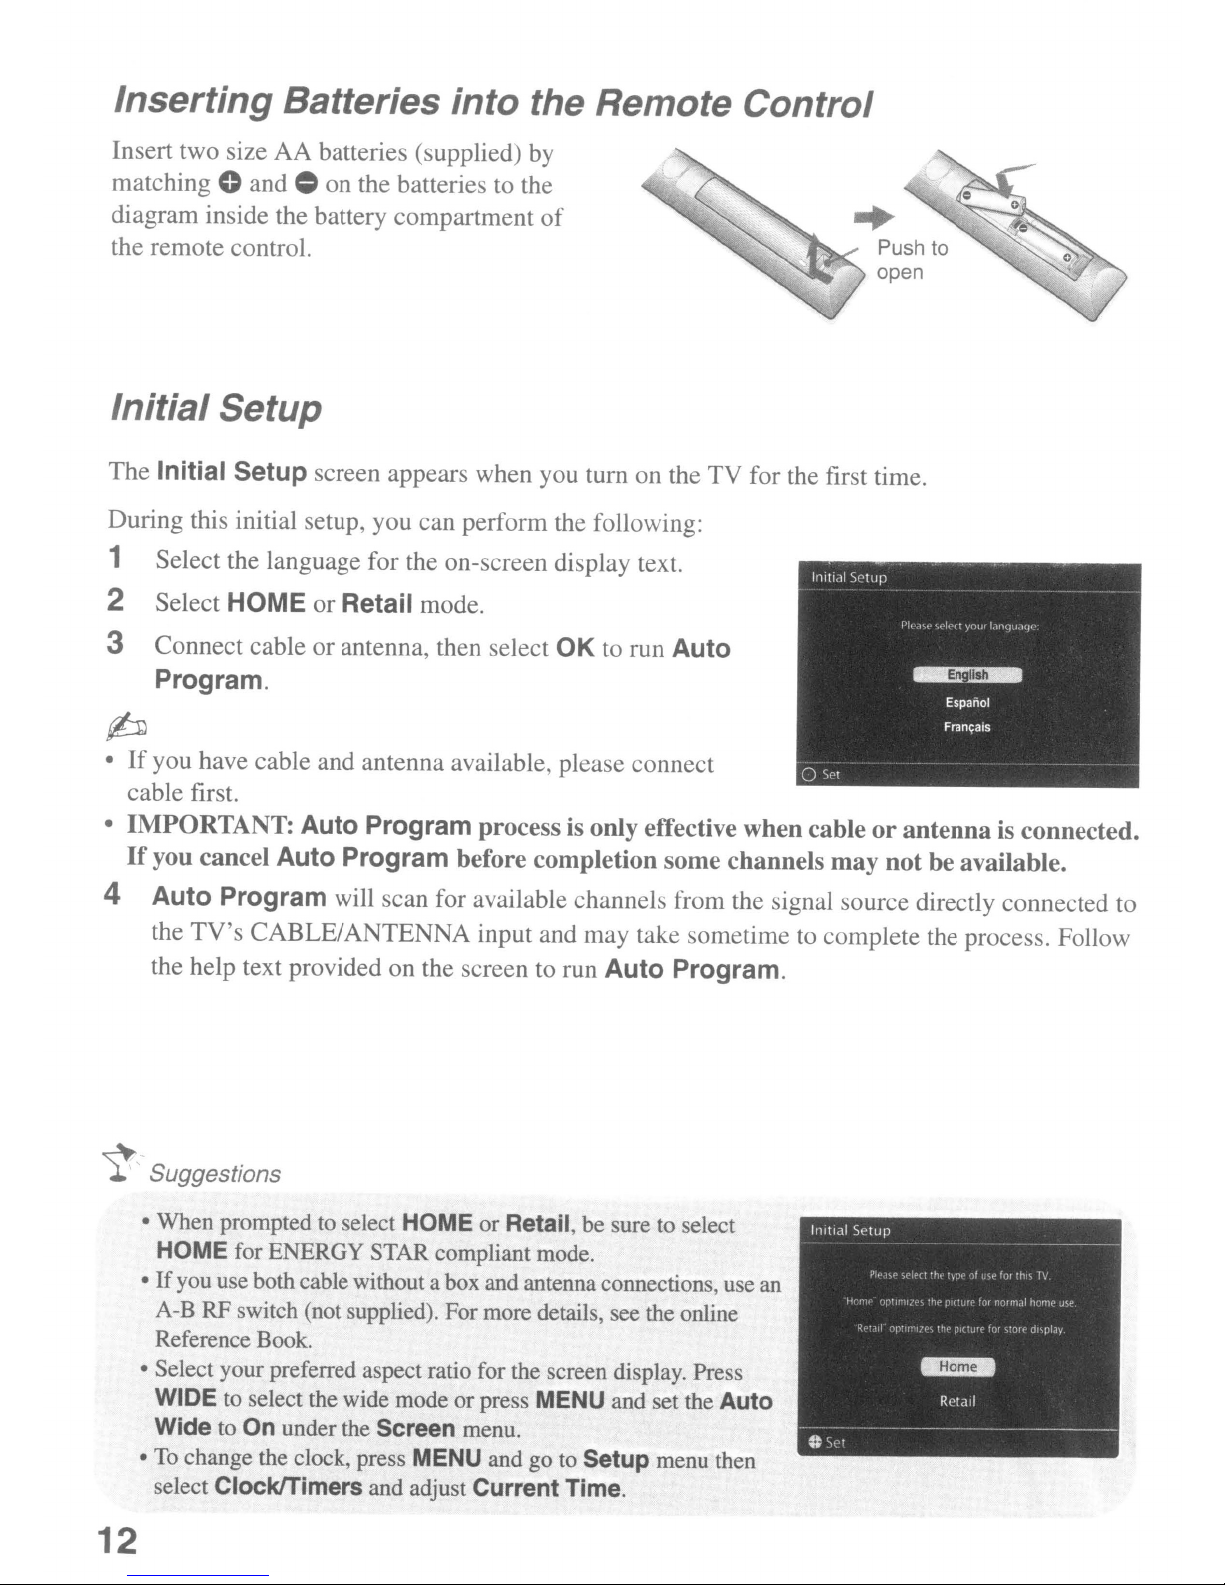
Inserting Batteries into the Remote Control
Insert two size AA batteries ( upplied) by
matching
diagram inside the battery compartment
the remote control.
0 and 0 on the batterie to the
of
Push to
open
Initial Setup
The Initial Setup screen appear when you turn on the TV for the first time.
During this initial setup, you can perform the following:
1 Select the language for the on-screen
2 Select HOME
or
Retail mode.
di
play text.
3 Connect cable or antenna, then select OK to run Auto
Program.
p
•Ifyou have cable and antenna available, please connect
cable first.
• IMPORTANT: Auto Program process is only effective
when
Ifyou cancel Auto Program before completion some channels
4 Auto Program will scan for available channels from the signal source directly connected to
TV's
the
the help text provided on the screen to run Auto Program.
CABLE/ANTENNA input and may take ometime to complete the proces.Follow
cableorantenna
may
not
be available.
is connected.
~
Suggestions
• When prompted to select HOME or Retail, be sure to select
HOME for ENERGY STAR compliant mode.
If
you use both cable without a box and antenna connections, use an
•
A-B RF witch (not supplied). For more details, see the online
Reference Book.
• Select your preferred aspect ratio for the creen display. Press
WIDE to select the wide mode
Wide
To
•
12
to On under the Screen menu.
change the clock, press MENU and go to Setup menu then
elect
ClocklTimers and adjust Current Time.
or
press MENU and set the Auto
Operating the TV
, ,
,'.'m.-
"
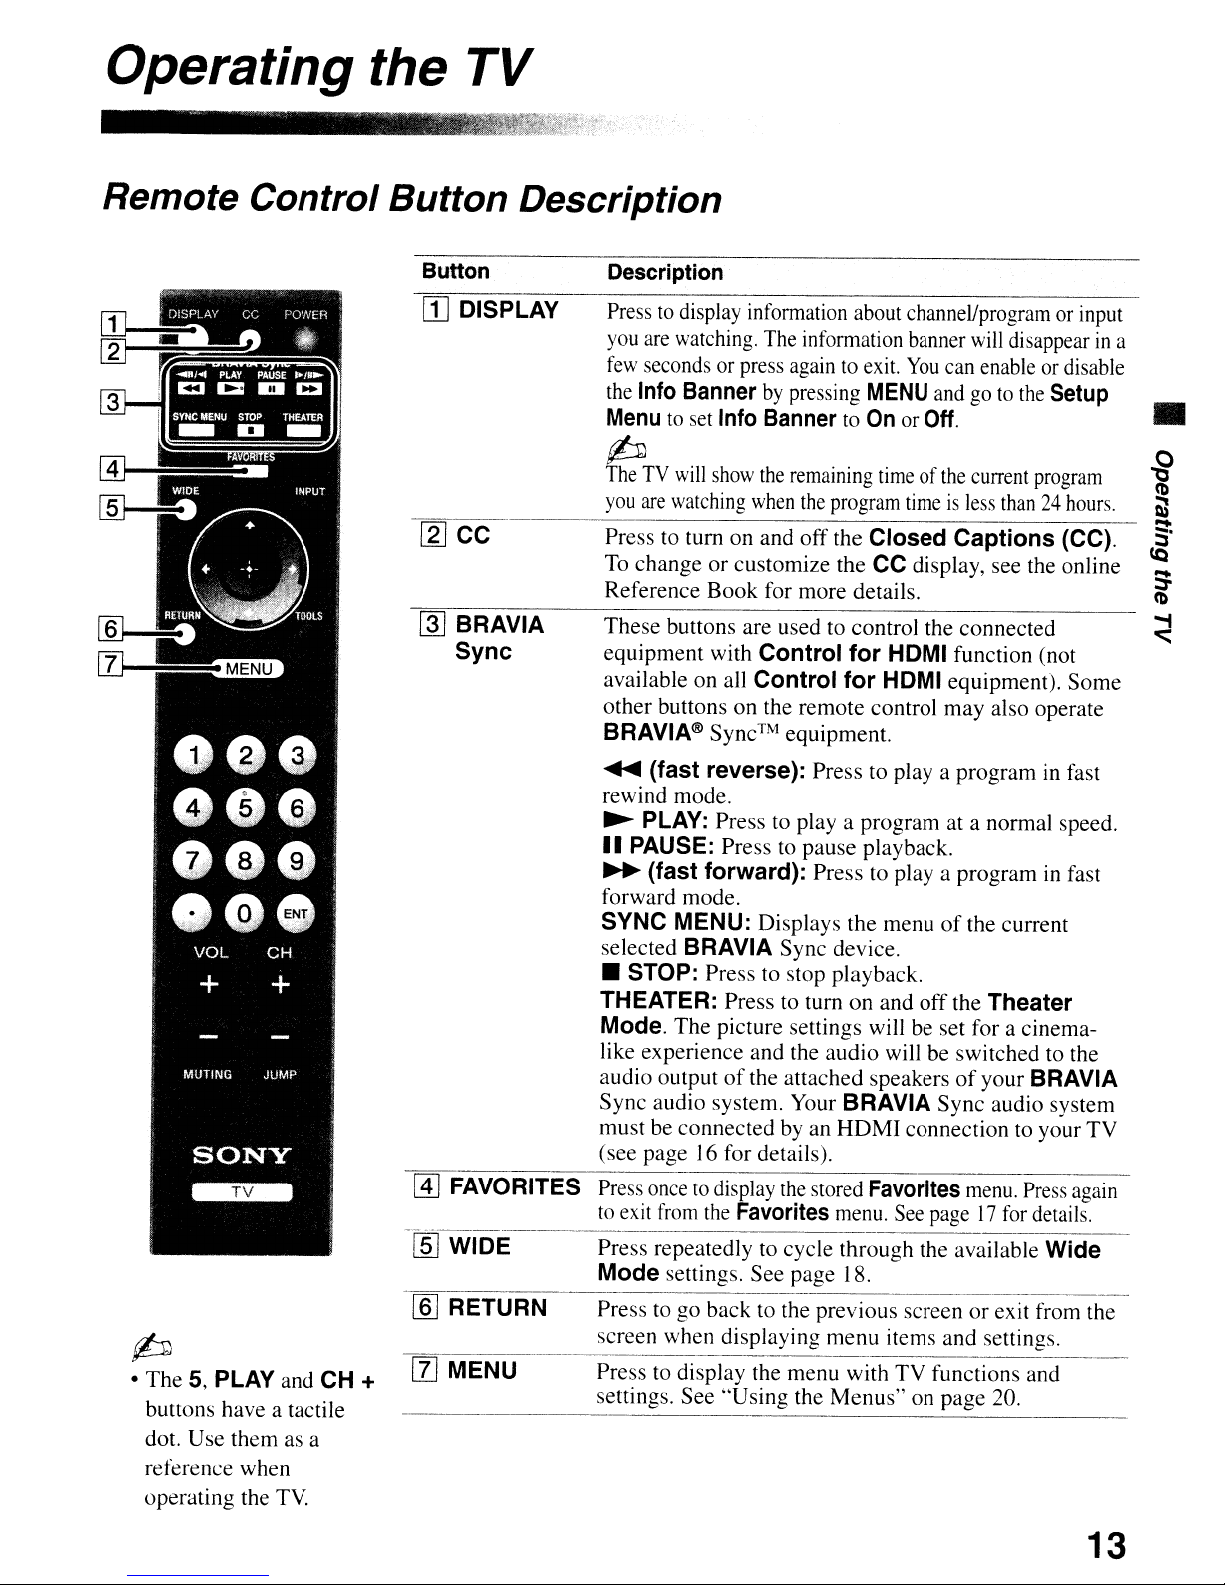
Remote Control Button Description
Button
[jJ DISPLAY
[gJ
CC
~
BRAVIA
Sync
Description
Presstodisplay
you
are
watching,
few
secondsorpress
the
Info
Banner
Menu
to
set
(b
TheTVwill
you
are
watching
Presstoturnonand off the Closed Captions (CC).
To
change or customize the
Reference Book for more details.
These buttons are used
equipment with
available
other buttons on the remote control may also operate
BRAVIA®
on
information
The
againtoexit.
by
pressing
Info
BannertoOnorOff.
show
the
remaining
when
Control for HDMI function (not
all
Control for HDMI equipment). Some
Sync™
equipment.
about
channel/programorinput
information
the
program
to
banner
You
MENU
control the connected
andgoto
timeofthe
timeisless
CC
display, see the online
will
disappearina
can
enableordisable
current
than24hours.
the
Setup
program
•
@]
FAVORITES
-rnJ
WIDE
[ill
RETURN
....
(fast reverse): Press
rewind mode.
~
PLAY: Press
II
PAUSE: Press
~
(fast forward): Press
forward mode.
SYNC MENU: Displays the menu ofthe current
selected
• STOP: Press
THEATER: Press
Mode.
like experience and the audio
audio output of the attached speakers
Sync audio system.
must
(see page
BRAVIA Sync device.
The picture settings willbeset for a cinema-
be
connectedbyan
16
to
playa
to
pause playback.
to
stop playback.
to
turn on and off the Theater
Your
for details).
to
playa
program at a normal speed.
to
playa
willbeswitchedtothe
BRAVIA Sync audio system
HDMI
programinfast
programinfast
of
your BRAVIA
connectiontoyour TV
(b
• The 5, PLAY
buttons have a tactile
dot. Use them
reference when
operating the
and
as
TV.
CH +
a
[1]
MENU
13
 Loading...