

Sony Bravia KDL-46EX729, Bravia 40EX729, Bravia 32EX729, KDL-55HX729, KDL-46HX729 Instruction Manual
...
i-Manual online
1
How to Use i-Manual
“BRAVIA” TV Features
Watching TV
Print Font Size
Top Page
Settings/Home Menu
Using Other
Equipment/Internet
Parts Description
Troubleshooting
Bookmarks
Index
i-Manual online map
Copyright 2011 Sony Corporation
KDL-46EX729/40EX729/32EX729
Trademark information
i-Manual online
2
Print Font Size
Top Page > How to Use i-Manual
How to Use i-Manual
“BRAVIA” TV Features
Watching TV
Settings/Home Menu
Using Other
Equipment/Internet
Parts Description
Troubleshooting
Bookmarks
Index
i-Manual online map
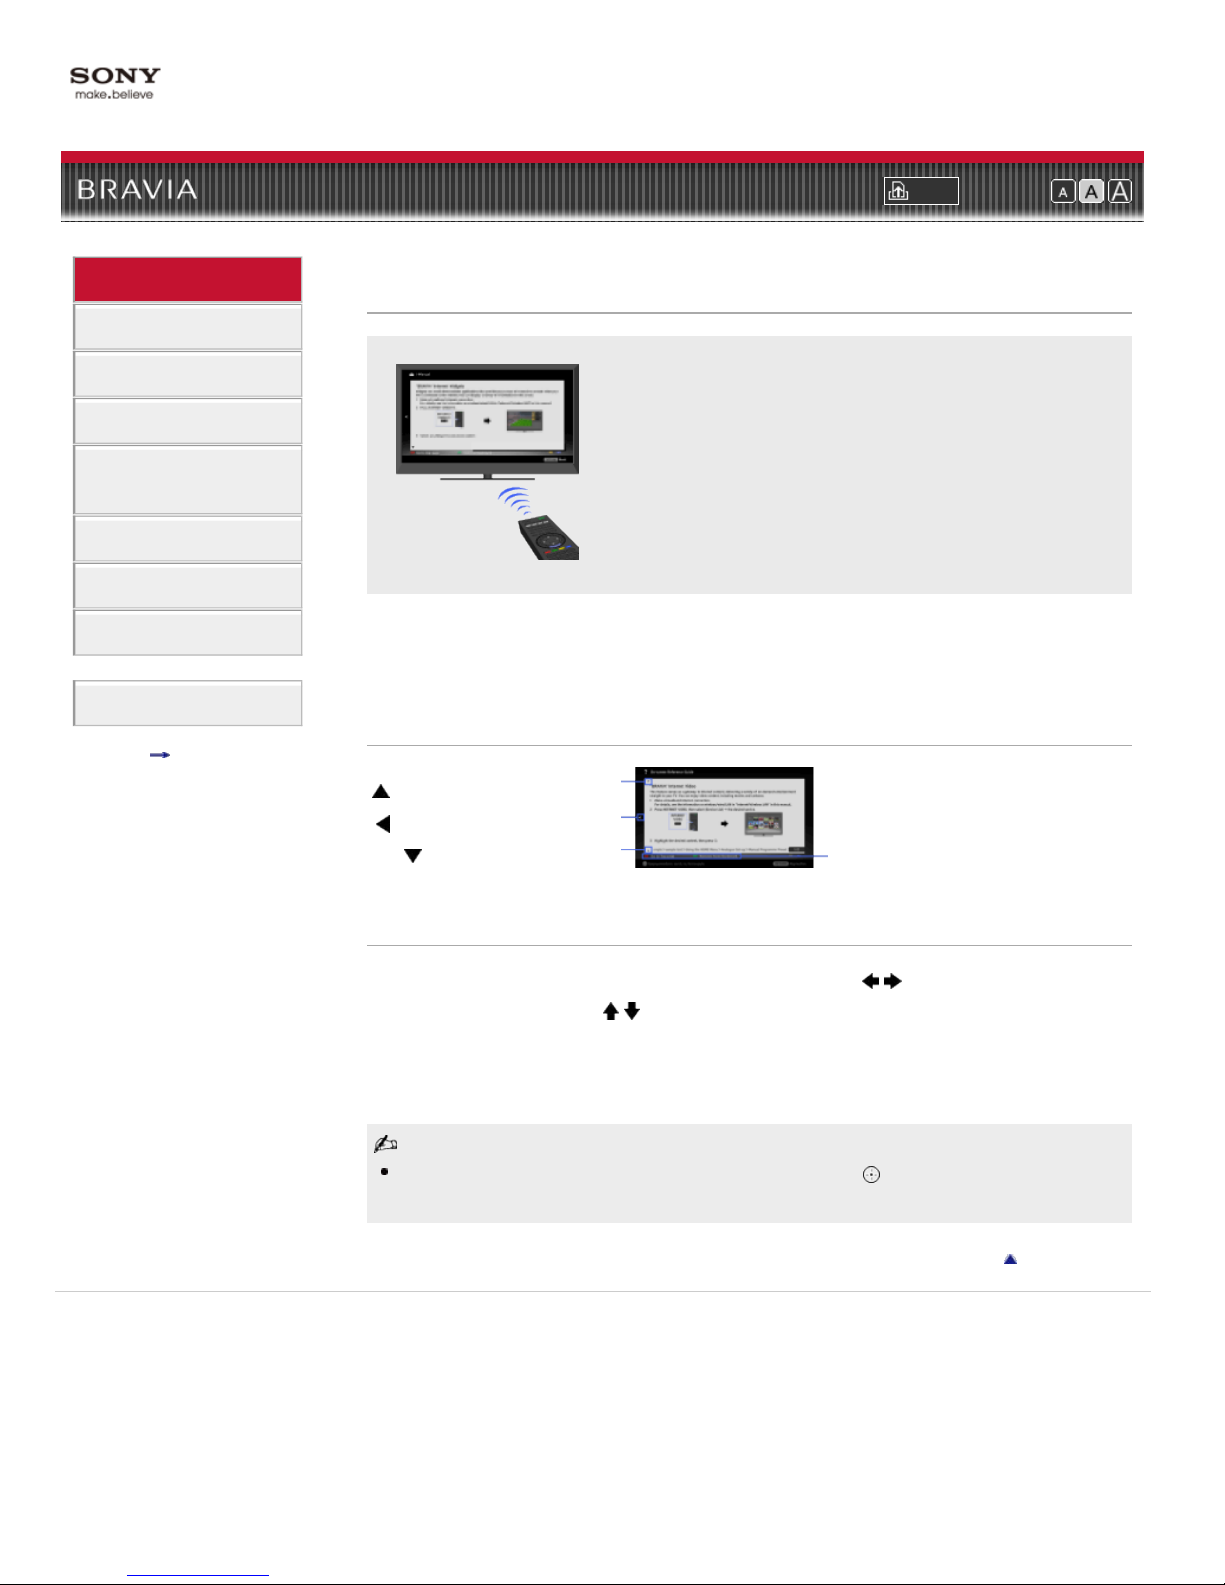
How to Use i-Manual
Displays the on-screen instruction manual (this manual).
Displays the on-screen instruction manual (this manual).
Please review the Setup Guide (Operating Instructions) accompanying this television for
important information on usage.
Indicators on the i-Manual screen
: Previous page indicator
: Previous layer indicator
: Next page indicator
Color button operation indicator
Copyright 2011 Sony Corporation
i-Manual operations
To return to the previous layer/proceed to the next layer, press / .
To step through pages, press
To jump to the top page of i-Manual, press the corresponding color button.
To bookmark the page/remove bookmark, press the corresponding color button.
To operate the TV or change settings, press i-MANUAL to exit i-Manual.
Some features can be started directly from the i-Manual. Press to start the feature when [Use
this feature] is displayed at the bottom of the screen.
/ .
Return to Top
i-Manual online
3
How to Use i-Manual
“BRAVIA” TV Features
Print Font Size
Top Page > “BRAVIA” TV Features
“BRAVIA” TV Features
Watching TV
Settings/Home Menu
Using Other
Equipment/Internet
Parts Description
Troubleshooting
Bookmarks
Index
i-Manual online map
Copyright 2011 Sony Corporation
3D Feature
Presence Sensor
“BRAVIA” Internet Video
Wireless LAN Ready
“BRAVIA” Sync with “Control for HDMI”
Skype Ready
TrackID™/Music Search/Video Search
Return to Top
i-Manual online
4
How to Use i-Manual
Watching TV
Print Font Size
Top Page > Watching TV
“BRAVIA” TV Features
Watching TV
Settings/Home Menu
Using Other
Equipment/Internet
Parts Description
Troubleshooting
Bookmarks
Index
i-Manual online map
Copyright 2011 Sony Corporation
3D Feature
Rovi On Screen Guide™
Favorites
Wide Mode
Picture Mode
Photos/Music/Videos
Twin Picture (PIP)
Twin Picture (P&P)
Return to Top
i-Manual online
5
How to Use i-Manual
Settings/Home Menu
Print Font Size
Top Page > Settings/Home Menu
“BRAVIA” TV Features
Watching TV
Settings/Home Menu
Using Other
Equipment/Internet
Parts Description
Troubleshooting
Bookmarks
Index
i-Manual online map
Copyright 2011 Sony Corporation
About the Home Menu
Settings
Picture & Display
Sound
Preferences
i-Manual
Channels & Inputs
Network
Product Support
Return to Top
i-Manual online
6
How to Use i-Manual
Using Other Equipment/Internet
Print Font Size
Top Page > Using Other Equipment/Internet
“BRAVIA” TV Features
Watching TV
Settings/Home Menu
Using Other
Equipment/Internet
Parts Description
Troubleshooting
Bookmarks
Index
i-Manual online map
Copyright 2011 Sony Corporation
VCR/DVD Player
Audio System
USB Device (e.g. Digital Camera)
Picture Frame
HDMI Equipment
Internet/Wireless LAN
Home Network
Media Remote
PC
Return to Top
i-Manual online
7
How to Use i-Manual
Parts Description
Print Font Size
Top Page > Parts Description
“BRAVIA” TV Features
Watching TV
Settings/Home Menu
Using Other
Equipment/Internet
Parts Description
Troubleshooting
Bookmarks
Index
i-Manual online map
Copyright 2011 Sony Corporation
Remote Control
Top
Upper
Middle
Lower
Bottom
Rear
TV Controls and Indicators
Front
Right
Terminals
Rear
Right
Return to Top
i-Manual online
8
How to Use i-Manual
Troubleshooting
Print Font Size
Top Page > Troubleshooting
“BRAVIA” TV Features
Watching TV
Settings/Home Menu
Using Other
Equipment/Internet
Parts Description
Troubleshooting
Bookmarks
Index
i-Manual online map
Copyright 2011 Sony Corporation
Picture Symptoms: General
Picture Symptoms: TV Program
Picture Symptoms: 3D
Picture Symptoms: Connected Equipment
Sound Symptoms
Wireless Network Connection Symptoms
Internet Video Symptoms
Internet Widget Symptoms
Home Network (DLNA) Symptoms
Other Symptoms
Return to Top
i-Manual online
9
How to Use i-Manual
Bookmarks
Print Font Size
Top Page > Bookmarks
“BRAVIA” TV Features
Watching TV
Settings/Home Menu
Using Other
Equipment/Internet
Parts Description
Troubleshooting
Bookmarks
Index
i-Manual online map
Copyright 2011 Sony Corporation
How to Use Bookmarks
Return to Top
i-Manual online
10
Programs/Broadcasts/Channels
Print Font Size
Top Page > Index
Age restriction
Auto Program
Favorite items
Picture/Display
Current Time
External input display settings
External input selection
Light Sensor
Motionflow
PC
Picture Frame
Picture settings
Sound
Audio out settings (external)
Headphones settings
Sound settings
Initial Setup
Recommendations
Presence Sensor
Pro Picture Setup
Scene Select
Screen settings
Screen settings (for PC)
Screen types
Side-by-side picture display
Two picture display
Speaker settings
TV start-up sound
Remote Control Buttons
3D
GUIDE
HOME
Connection
Audio System
Digital Still Camera
HDMI device
Home Network
Other Equipment
“BRAVIA” Sync-compatible equipment
Digital Still Camera
Photo/music/video playback
Network
INTERNET VIDEO
TrackID
PC
Wired LAN
Wireless LAN Adapter (USB)
Slideshow
Sync Menu
USB Auto Start

DLNA-certified media server
11
Internet content update
Internet Video
Other
Renderer settings
Wireless LAN
Auto Shut-off
Eco settings
Home Menu
Copyright 2011 Sony Corporation
Idle TV Standby
Power Saving
Timer
Return to Top
i-Manual online
12
“BRAVIA” TV Features
3D Feature
Presence Sensor
“BRAVIA” Internet Video
Wireless LAN Ready
“BRAVIA” Sync with “Control for HDMI”
Skype Ready
TrackID™/Music Search/Video Search
Print Font Size
Top Page > i-Manual online map
Watching TV
3D Feature
Rovi On Screen Guide™
Favorites
Wide Mode
Picture Mode
Photos/Music/Videos
Twin Picture (PIP)
Twin Picture (P&P)
Settings/Home Menu
About the Home Menu
Settings
Picture & Display
Picture Adjustments
3D Settings
Screen (for inputs other than a PC)
Screen (for PC input)
Pro Picture Setup
Sound
Sound Adjustments
MTS Audio
Speakers
Headphone/Audio Out
Headphone Speaker Link
Audio Out
HDMI/DVI Audio Source
Key Tone
Startup Sound
TV Position
Return to Top
Return to Top

Preferences
Scene Select
13
Eco
Clock/Timers
Language
Region
Closed Captions (CC)
Parental Lock
Info Banner
Recommendation
Picture Adjustments Lock
Control4
Initial Setup
i-Manual
Channels & Inputs
Manage Inputs
Cable/Antenna
Auto Program
Add Digital Channels
Show/Hide Channels
Edit Channel Labels
Program Information Source
Analog Fine Tune
Video 2/Component Selection
HDMI Settings
USB Auto Start
Network
Network Setup
Refresh Internet Content
Home Network Setup
Product Support
Contact Sony
Signal Diagnostics
Automatic Software Download
Software Update
Using Other Equipment/Internet
VCR/DVD Player
Audio System
USB Device (e.g. Digital Camera)
Picture Frame
HDMI Equipment
Connecting HDMI Equipment
Viewing from HDMI Equipment
“BRAVIA” Sync with “Control for HDMI”
Internet/Wireless LAN
Wireless LAN Ready
Wired LAN
Return to Top

Browsing Websites
“BRAVIA” Internet Video
14
Photomap
What’s New
Home Network
Connecting to a Home Network
Renderer
Display Settings for Media Servers
Media Server Troubleshooting
Media Remote
PC
Parts Description
Remote Control
Top
Upper
Middle
Lower
Bottom
Rear
TV Controls and Indicators
Front
Right
Terminals
Rear
Right
Troubleshooting
Picture Symptoms: General
Picture Symptoms: TV Program
Picture Symptoms: 3D
Picture Symptoms: Connected Equipment
Sound Symptoms
Wireless Network Connection Symptoms
Internet Video Symptoms
Internet Widget Symptoms
Home Network (DLNA) Symptoms
Other Symptoms
Return to Top
Return to Top
Bookmarks
How to Use Bookmarks
Copyright 2011 Sony Corporation
Return to Top
Return to Top
i-Manual online
15
Print Font Size
Top Page > Licensing Information
Licensing Information
Macintosh is a trademark of Apple Inc., registered in the U.S. and other countries.
HDMI, the HDMI Logo, and High-Definition Multimedia Interface are trademarks or registered trademarks of HDMI Licensing LLC in
the United States and other countries.
Fergason Patent Properties, LLC:
U.S. Patent No. 5,717,422
U.S. Patent No. 6,816,141
Manufactured under license from Dolby Laboratories. Dolby and the double-D symbol are trademarks of Dolby Laboratories.
Rovi and Rovi On Screen Guide are trademarks of Rovi Corporation and/or its subsidiaries.
The Rovi On Screen Guide system is manufactured under license from Rovi Corporation and/or its subsidiaries.
The Rovi On Screen Guide system is protected by one or more United States patents of Rovi Corporation and/or its subsidiaries.
Rovi Corporation and/or its subsidiaries and related affiliates are not in any way liable for the accuracy or availability of the program
schedule information or other data in the Rovi On Screen Guide system and cannot guarantee service availability in your area. In no
event shall Rovi Corporation and/or its related affiliates be liable for any damages in connection with the accuracy or availability of the
program schedule information or other data in the Rovi On Screen Guide system.
Blu-ray Disc is a trademark.
“BRAVIA” and
, S-Force, BRAVIA Sync, and are trademarks or registered marks of Sony Corporation.
“PlayStation” is a registered trademark and “PS3” is a trademark of Sony Computer Entertainment Inc.
DLNA®, the DLNA Logo and DLNA CERTIFIED® are trademarks, service marks, or certification marks of the Digital Living Network
Alliance.
TrackID is a trademark or registered trademark of Sony Ericsson Mobile Communications AB.
Music and video recognition technology and related data are provided by Gracenote®. Gracenote is the industry
standard in music recognition technology and related content delivery.
For more information, please visit
www.gracenote.com.
CD, DVD, Blu-ray Disc, and music and video-related data from Gracenote, Inc., copyright © 2000-present Gracenote. Gracenote
Software, copyright © 2000-present Gracenote. One or more patents owned by Gracenote apply to this product and service. See the
Gracenote website for a nonexhaustive list of applicable Gracenote patents. Gracenote, CDDB, MusicID, MediaVOCS, the Gracenote
logo and logotype, and the “Powered by Gracenote” logo are either registered trademarks or trademarks of Gracenote in the United

States and/or other countries.
Your BRAVIA TV is ENERGY STAR® qualified in the “Home” mode.
16
It meets strict energy efficiency guidelines set by the U.S.
Environmental Protection Agency and Department of Energy. ENERGY STAR is a joint program of these government agencies,
designed to promote energy efficient products and practices.
Changes to certain features, settings, and functionalities of this TV (i.e. Rovi On Screen Guide, Picture/Sound, Light Sensor, Power
Savings) can increase or change the power consumption.
Depending upon such changed settings, the power consumption may exceed the limits required for the ENERGY STAR qualification in
the “Home” mode.
Applicable trademark information depends on your TV model/region/country.

Copyright 2011 Sony Corporation
17
Return to Top

i-Manual online
18
Print Font Size
Top Page > “BRAVIA” TV Features > 3D Feature
How to Use i-Manual
“BRAVIA” TV Features
Watching TV
Settings/Home Menu
Using Other
Equipment/Internet
Parts Description
Troubleshooting
Bookmarks
Index
i-Manual online map
3D Feature
Brings you the experience of 3D (threedimensional) pictures and graphics using 3D
Glasses.
This feature lets you experience powerful 3D entertainment, such as stereoscopic 3D games and
3D Blu-ray Discs.
Turn the 3D Glasses on, then put them on to watch 3D content.
3D Glasses TDG - BR250
3D effect is available only when pictures are displayed in full screen.
Additional viewers with 3D Glasses can also enjoy 3D content.
The 3D Glasses are supplied or available as an optional accessory, depending on your TV model.
In some regions/countries, the 3D Glasses may not be available.
The 3D Glasses TDG-BR250 may not be available in some regions/countries. If unavailable, use
other compatible 3D Glasses.
If [Motionflow] is set to other than [Off], the smooth movement of the picture may be lost as the
picture process to minimize screen flicker is applied. In such a case, set [Motionflow] to [Off] to
display the original picture.
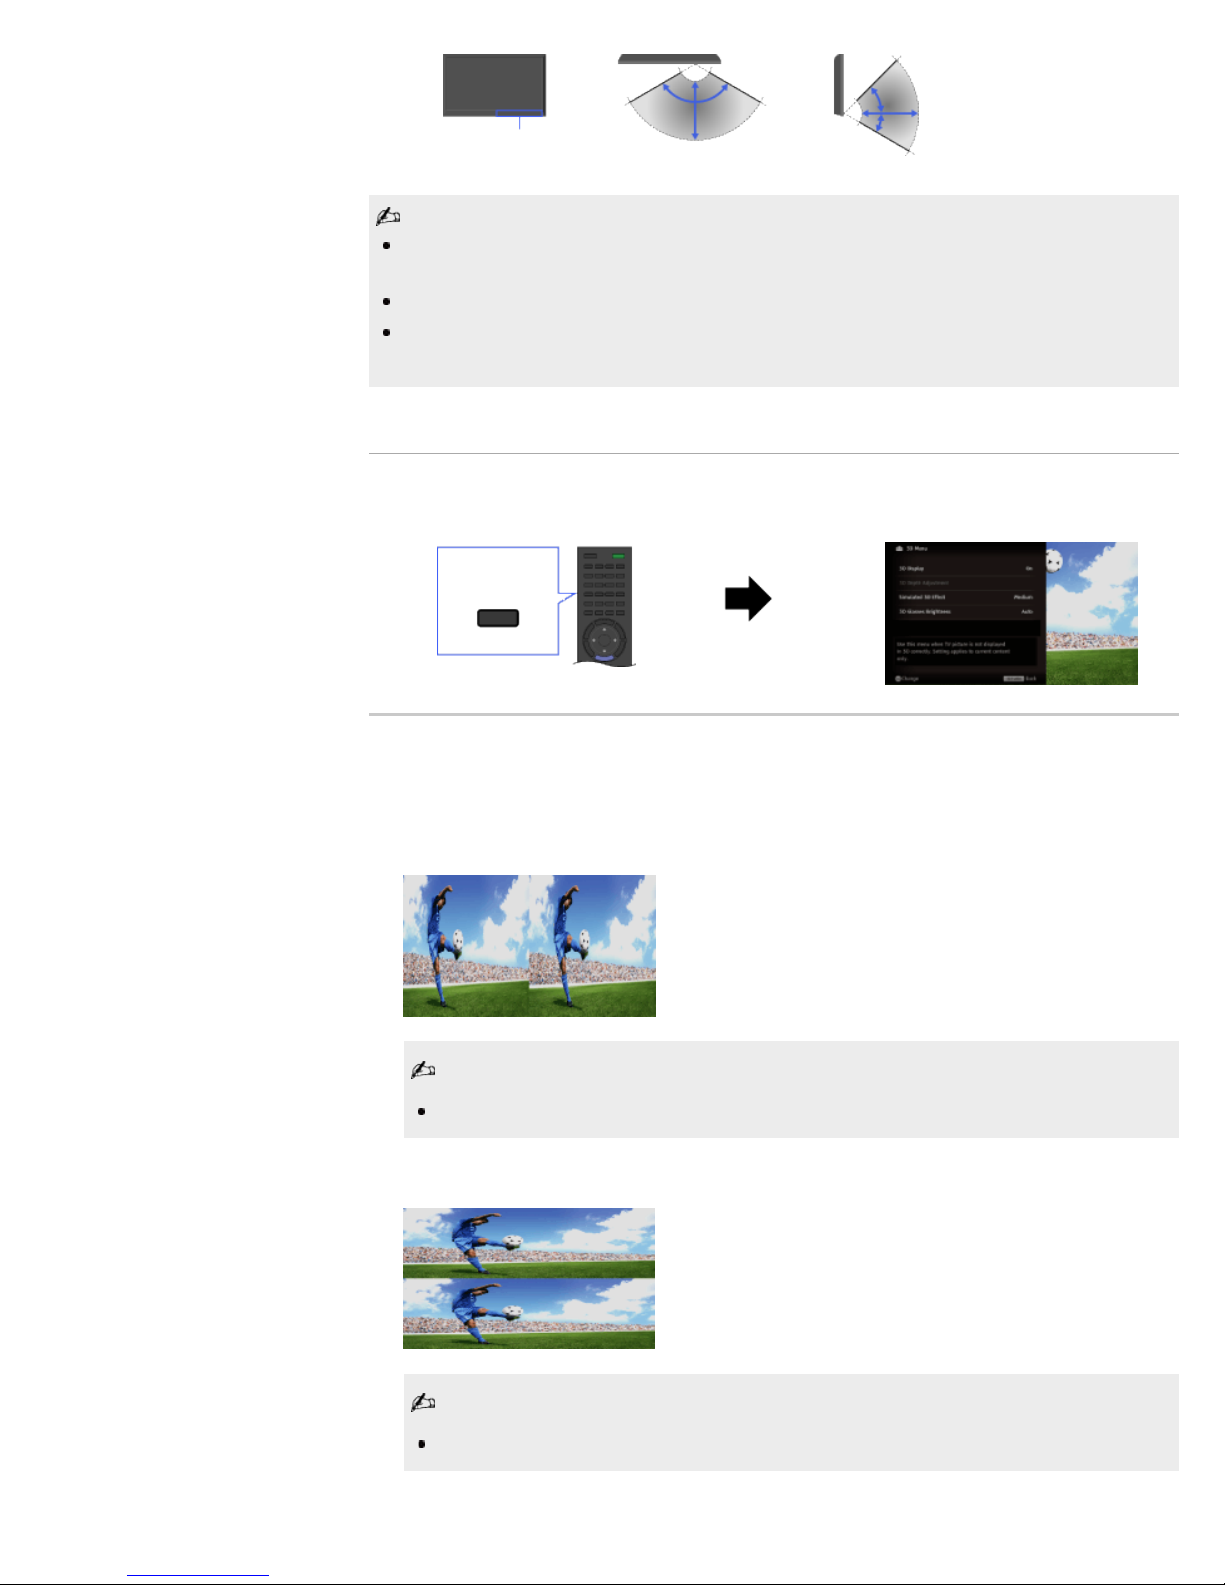
Watching the following pictures in 3D
Regular 2D picture Side-by- side picture Over-under picture

1. Press 3D to display the 3D Menu.
19
3D
2. Press 3D repeatedly to toggle through [3D Display] modes.
[Simulated 3D]: Displays regular 2D pictures in simulated 3D.
[Side-by-Side]: Displays side-by-side pictures in 3D.
[Over-Under]: Displays over-under pictures in 3D.
[Off]: Displays pictures as they are.
3. Press RETURN to exit the 3D Menu.
Simulated 3D effect may be less pronounced with some picture sources.
Perceived simulated 3D effect may vary from person to person.
Simulated 3D display mode automatically switches back to 2D display mode an hour after its
activation.
Watching 3D content in 2D
Press 3D to display the 3D Menu.
1.
3D
2. Press 3D to select [Off] in [3D Display].
3. Press RETURN to exit the 3D Menu.
The 3D display mode is automatically selected when a 3D signal is detected.
To prevent 3D display mode from being automatically selected when a 3D signal is detected,
press HOME, then select
→ [Picture & Display] → [3D Settings] → [Auto 3D] → [Off].
3D Sync Transmitter and 3D Glasses communication range
The recommended viewing angle and distance are shown in the illustrations. To enjoy the best
3D effect, the preferred viewing position needs to be kept within the range where the 3D Sync
Transmitter works.
Side viewOverhead view
45°
120°
20
1-6 m (3-20 ft.)
3D Sync Transmitter
Recommended viewing angle and distance may vary depending on the TV’s location and room
conditions.
Do not put anything in front of the 3D Sync Transmitter. Doing so may affect its function.
Signals between the 3D Sync Transmitter and 3D Glasses may be interrupted if an infrared device
is used near the TV.
1-6 m (3-20 ft.)
30°
3D Menu
You can adjust the following settings from the 3D Menu.
Press 3D, then select the desired setting → the desired option.
3D
3D Display
When 3D pictures are displayed:
Switches between the 3D and 2D display modes.
When non-3D pictures are displayed:
[Simulated 3D]: Displays regular 2D pictures in simulated 3D.
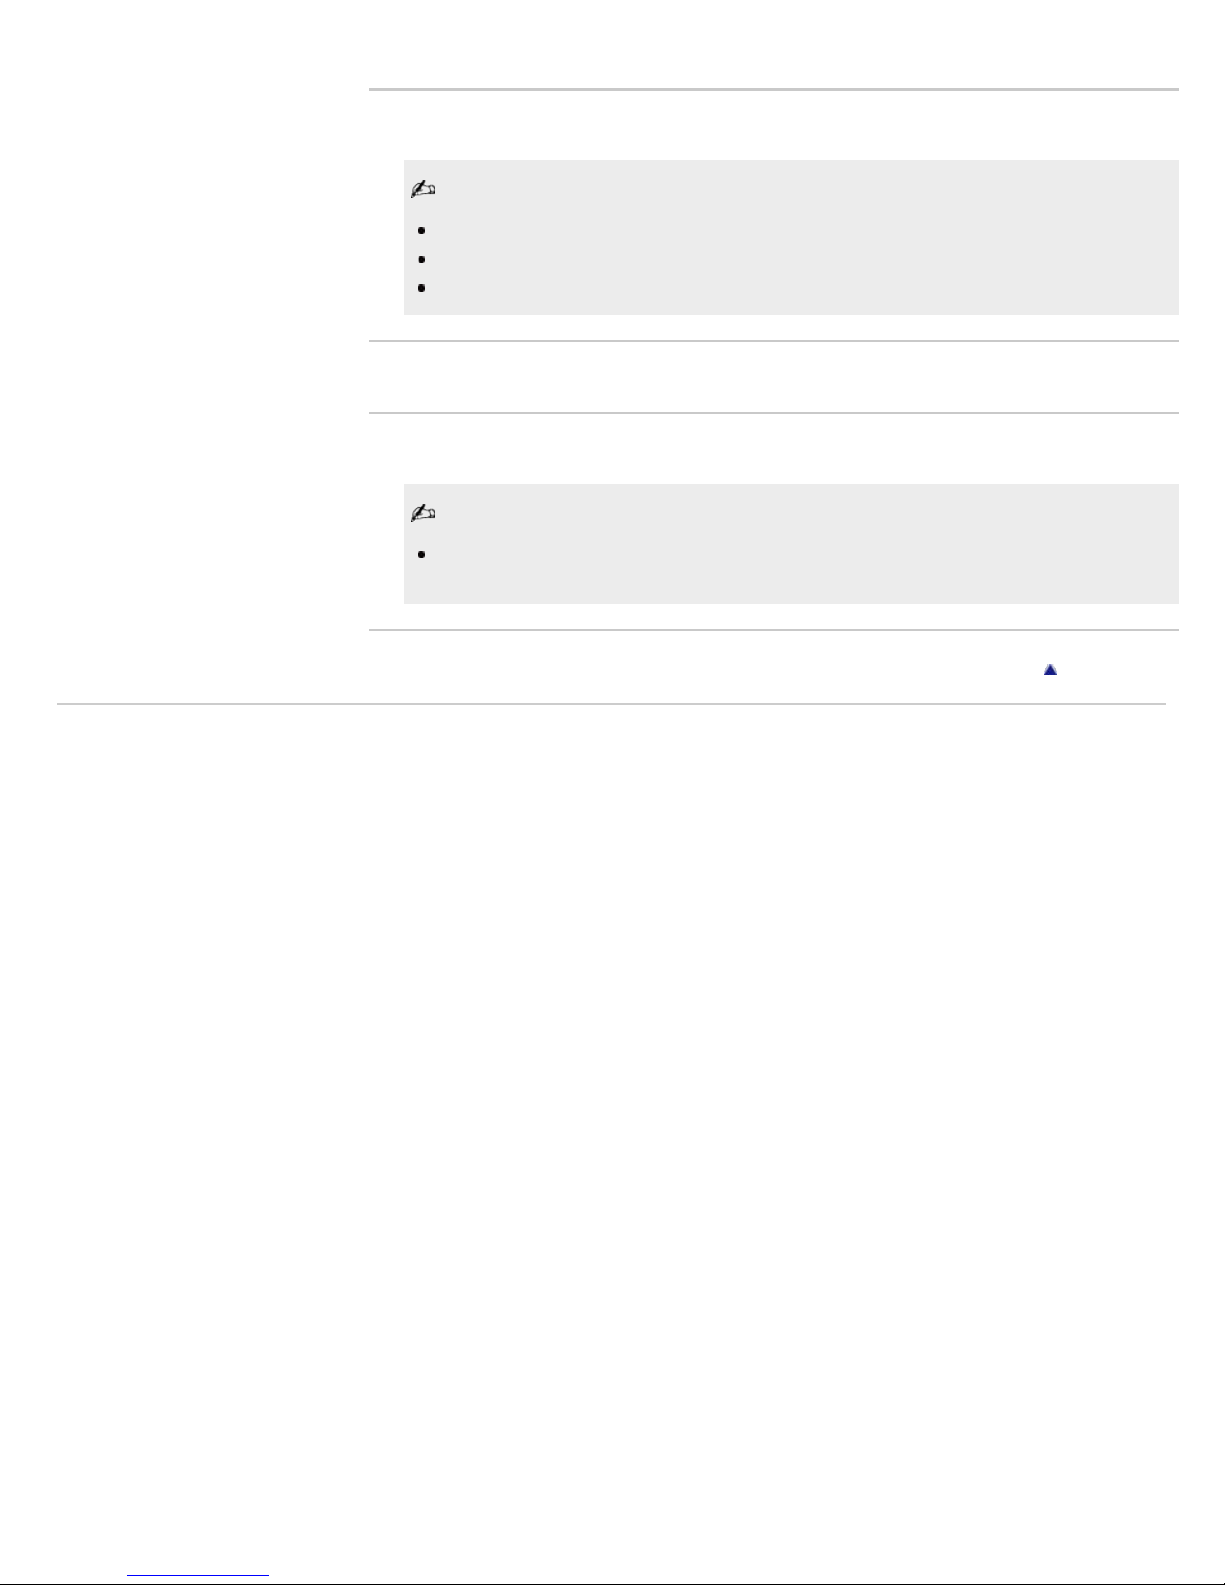
[Side-by-Side]: Displays side-by-side pictures in 3D.
Two near-identical pictures for 3D viewing are displayed side-by-side.
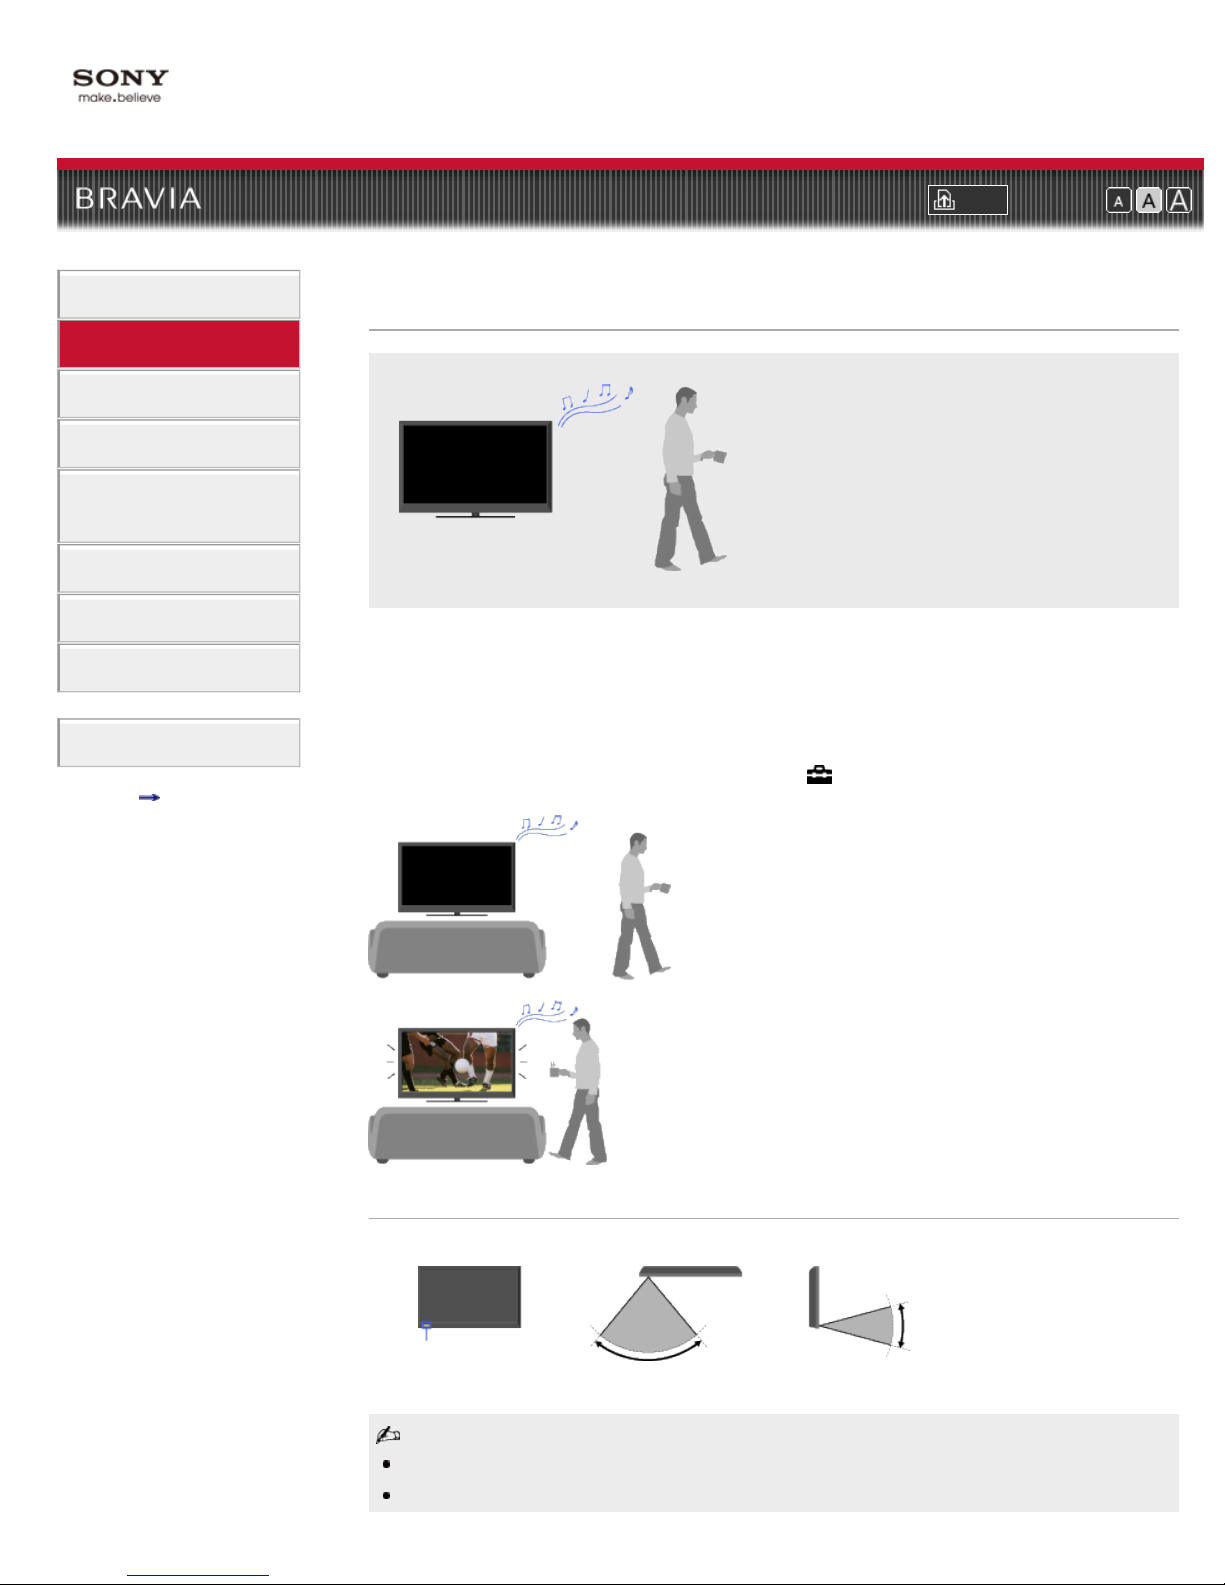
[Over-Under]: Displays over-under pictures in 3D.
Two near-identical pictures for 3D viewing are displayed one above the other.
[Off]: Displays pictures as they are.
3D Depth Adjustment
21
Adjusts the depth of 3D pictures on the screen.
Available only for content with 3D signals.
Selecting [0] is recommended for normal use.
3D effect may be less pronounced depending on the settings.
Simulated 3D Effect
Heightens/lessens the 3D effect when you display 2D pictures in simulated 3D.
3D Glasses Brightness
Sets the image brightness when using 3D display mode.
By selecting [Auto], image brightness through the 3D Glasses is automatically adjusted in
conjunction with the [Picture Mode] setting.
Return to Top
Copyright 2011 Sony Corporation
i-Manual online
22
Print Font Size
Top Page > “BRAVIA” TV Features > Presence Sensor
How to Use i-Manual
“BRAVIA” TV Features
Watching TV
Settings/Home Menu
Using Other
Equipment/Internet
Parts Description
Troubleshooting
Bookmarks
Index
i-Manual online map
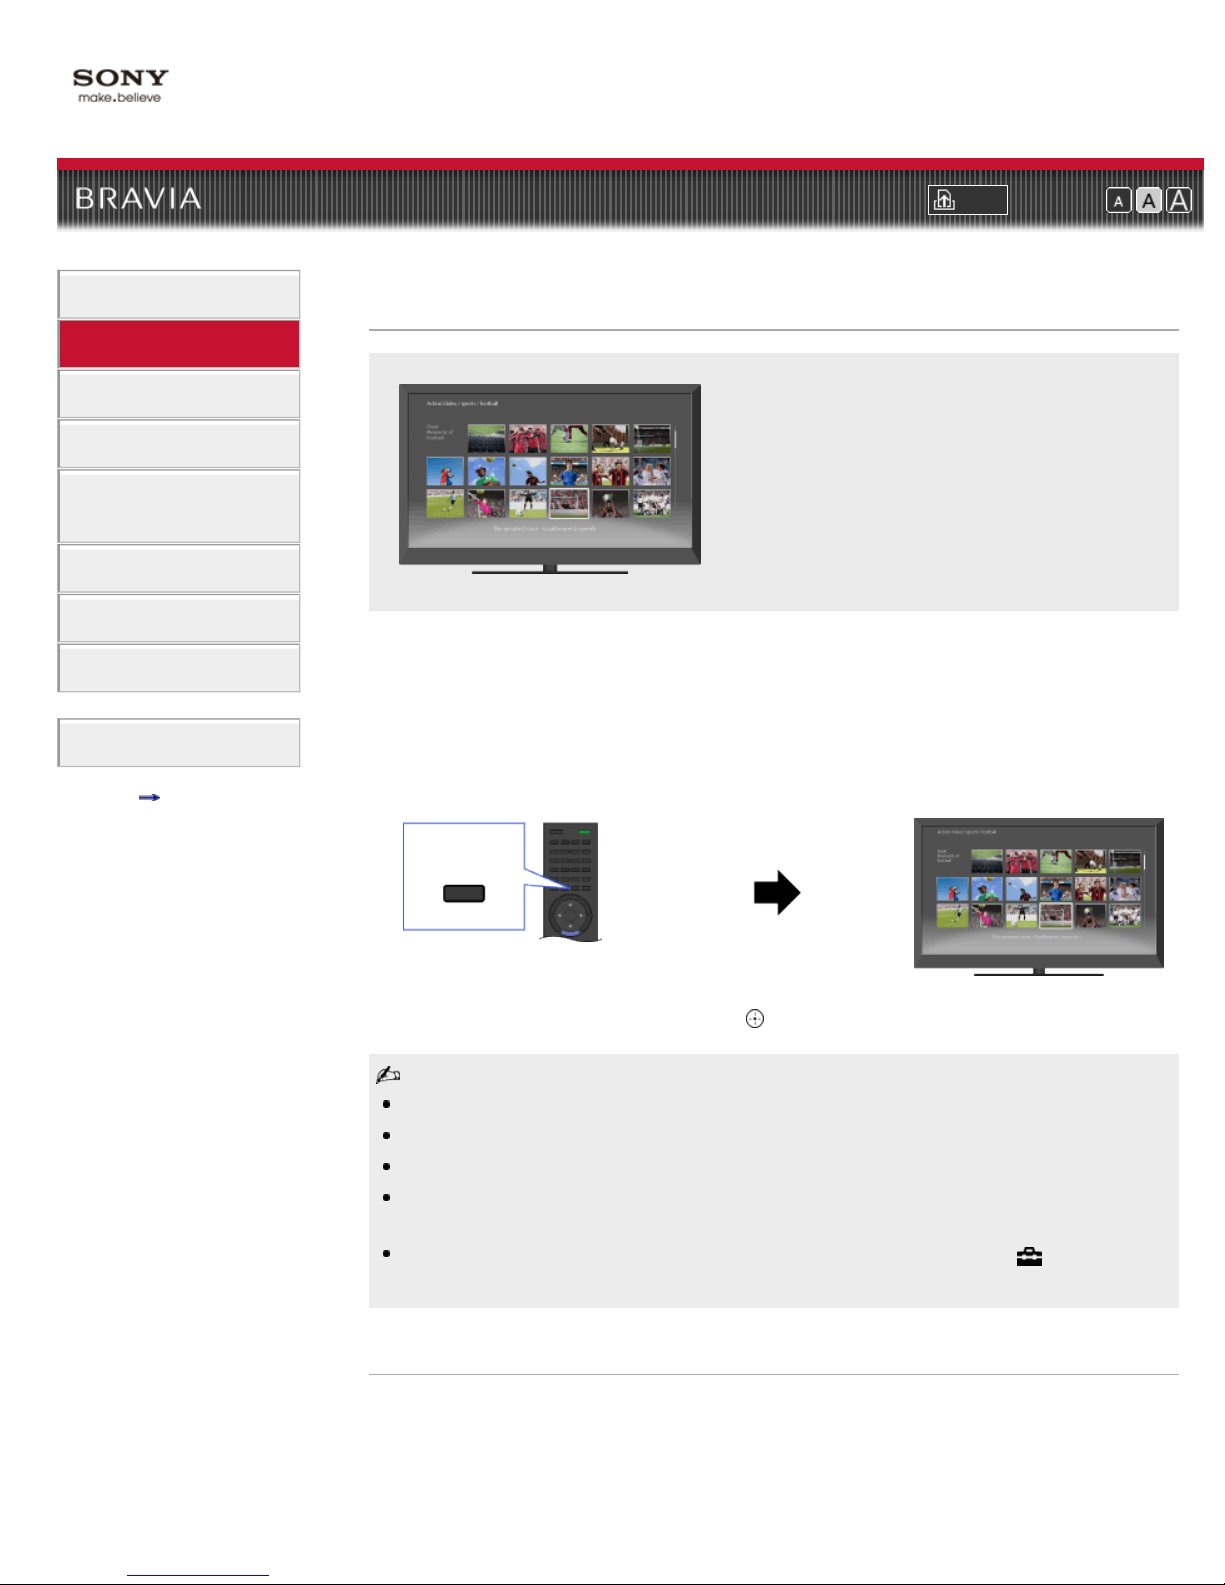
Presence Sensor
Reduces power consumption by automatically
turning the picture off and switching the TV to
standby mode when no viewer is detected.
This feature reduces power consumption by monitoring a viewer presence via the built-in sensor.
When no viewer is detected in front of the TV for a preset time, the picture automatically turns
off, while leaving only the TV sound on. Additionally, after 30 minutes in picture off mode, the TV
will switch to standby mode.
To set [Presence Sensor], press HOME, then select
Sensor] → the desired option.
→ [Preferences] → [Eco] → [Presence
Presence Sensor detection range
Presence Sensor
Sensor detection range illustrated in the figure is based on normal room conditions.
Even if a person is in front of the TV, the sensor may not detect anything if the person does not
Overhead view
6 m
(20 ft.)
80°
Side view
6 m (20 ft.)
30°

move.
Copyright 2011 Sony Corporation
23
The sensor may not work when the ambient temperature changes due to air conditioning, etc.
The sensor is sensitive to movement from side to side and up and down and is less sensitive to
the viewer’s forward or backward movement.
Sensor detection range may vary depending on the TV’s location, room temperature and lighting
conditions.
Return to Top
i-Manual online
24
Print Font Size
Top Page > “BRAVIA” TV Features > “BRAVIA” Internet Video
How to Use i-Manual
“BRAVIA” TV Features
Watching TV
Settings/Home Menu
Using Other
Equipment/Internet
Parts Description
Troubleshooting
Bookmarks
Index
i-Manual online map
“BRAVIA” Internet Video
Brings videos, movies and much more through the
broadband Internet connection to your TV.
This feature serves as a gateway to Internet content, delivering a variety of on-demand
entertainment straight to your TV. You can enjoy video content, including movies and cartoons.
1. Make a broadband Internet connection.
For details, see the information on wireless/wired LAN in “Internet/Wireless LAN” in this
manual.
2. Press INTERNET VIDEO, then select [BRAVIA Internet Video] → the desired service.
INTERNET
VIDEO
3. Highlight the desired content, then press .
If you experience difficulties with this feature, check that the Internet connection is set up properly.
Information about the highlighted icon appears in the information banner.
The interface to Internet content depends on the Internet content providers.
Services block video content based on the [Parental Lock] setting of the TV. Some service
providers do not support this function.
To update “BRAVIA” Internet Video content services, press HOME, then select
[Refresh Internet Content].
Seeking forward/backward in video content
Press the buttons on the remote control that correspond with the control indications on the
screen.
→ [Network] →

Copyright 2011 Sony Corporation
25
Control indications
Return to Top
i-Manual online
If your wireless router
26
Print Font Size
Top Page > “BRAVIA” TV Features > Wireless LAN Ready
How to Use i-Manual
“BRAVIA” TV Features
Watching TV
Settings/Home Menu
Using Other
Equipment/Internet
Parts Description
Troubleshooting
Bookmarks
Index
i-Manual online map
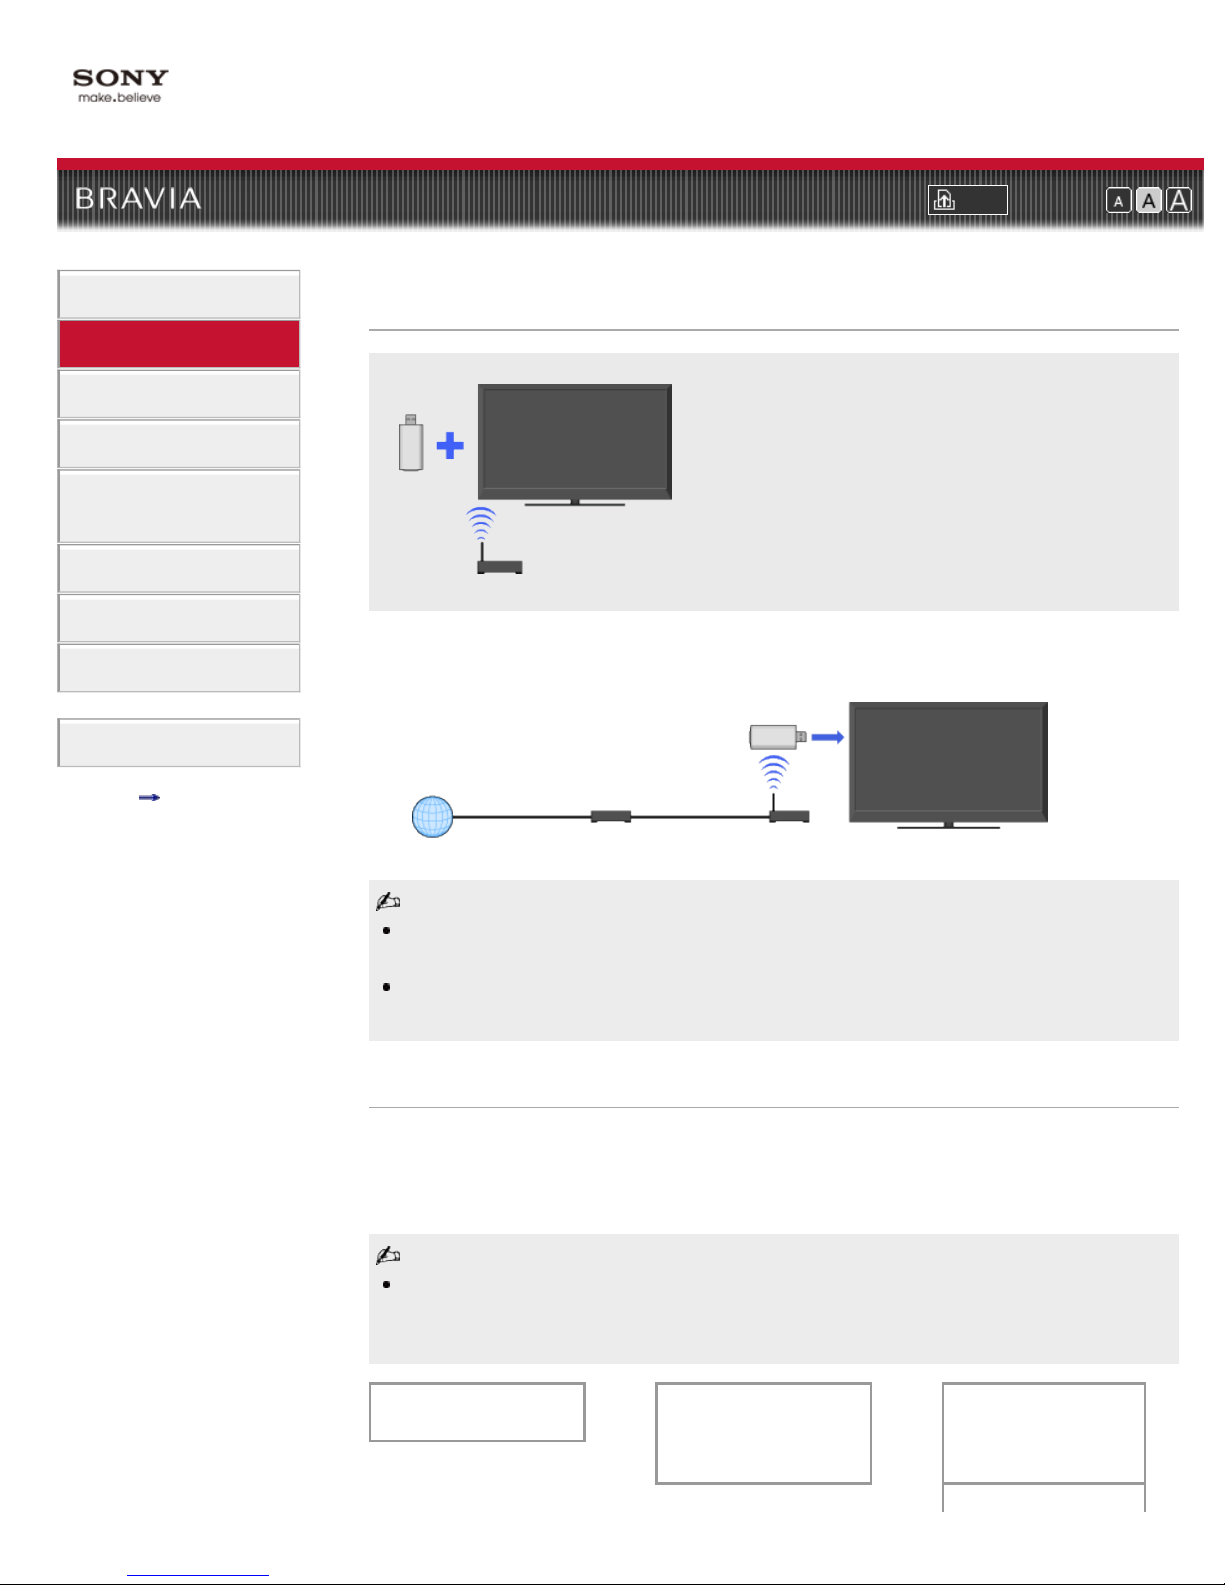
Wireless LAN Ready
Provides a wireless network connection for your TV
by inserting a USB Wireless LAN Adapter into your
TV’s USB port.
By inserting the USB Wireless LAN Adapter UWA-BR100 (as of December 2010) into your TV’s
USB port, you can create a wireless network connection.
USB Wireless LAN Adapter
Internet
Modem Wireless router
(access point)
TV
The USB Wireless LAN Adapter is supplied or available as an optional accessory, depending on
your TV model. In some regions/countries, the USB Wireless LAN Adapter may not be available.
If your TV has two USB ports, be sure to connect the USB Wireless LAN Adapter to the upper
USB port.
Connecting to your wireless LAN
Set up your wireless router (or access point).
1.
For details, refer to the instruction manual of your wireless router (or access point).
2. Check your wireless LAN environment using the following chart.
Tip for smooth video streaming: Change the setting of your wireless router (or access point) to
802.11n and 5GHz if possible. For details on how to change the setting, refer to the instruction
manual of your wireless router (or access point).
Do you use a secure
wireless LAN?
YES →
Do you use a wireless
router (or access point)
compatible with Wi-Fi
Protected Setup (WPS)?
YES →
If your wireless router
(or access point) has a
WPS button, proceed to
TYPE 1.

(or access point) has a
PIN code, proceed to
27
NO
↓
Proceed to TYPE 4. Proceed to TYPE 3.
NO
↓
TYPE 2.
If your wireless router
(or access point) has
both a WPS button and
PIN code, proceed to
TYPE 1.
TYPE 1: Secured network using the WPS button
Check the WPS button location on your wireless router (or access point) and verify how to
1.
use it.
2. Press HOME, then select → [Network] → [Network Setup].
The start-up screen appears.
3. Select [Wireless Setup] → [WPS (Push Button)], then follow the on-screen instructions.
TYPE 2: Secured network using the PIN code
Press HOME, then select → [Network] → [Network Setup].
1.
The start-up screen appears.
2. Select [Wireless Setup] → [WPS (PIN)], then follow the on-screen instructions.
TYPE 3: Secured network using SSID and security key
Check the SSID (wireless network name) and security key (WEP or WPA key) of your
1.
wireless router (or access point).
If you do not know them, refer to the instruction manual of your wireless router (or access
point).
2. Press HOME, then select → [Network] → [Network Setup].
The start-up screen appears.
3. Select [Wireless Setup] → [Scan].
4. Select a network from the list of scanned wireless networks, then follow the on-screen
instructions.
TYPE 4: Unsecured network using only SSID
Check the SSID (wireless network name).
1.
If you do not know the SSID, refer to the instruction manual of your wireless router (or
access point).
2. Press HOME, then select → [Network] → [Network Setup].
The start-up screen appears.
3. Select [Wireless Setup] → [Scan].
4. Select a network from the list of scanned wireless networks, then follow the on-screen
instructions.
Copyright 2011 Sony Corporation
Return to Top

i-Manual online
28
Print Font Size
Top Page > “BRAVIA” TV Features > “BRAVIA” Sync with “Control for HDMI”
How to Use i-Manual
“BRAVIA” TV Features
Watching TV
Settings/Home Menu
Using Other
Equipment/Internet
Parts Description
Troubleshooting
Bookmarks
Index
i-Manual online map
“BRAVIA” Sync with “Control for HDMI”
Helps communicate with “BRAVIA” Synccompatible equipment (e.g. BD player, AV
amplifier) using HDMI CEC.
With the “Control for HDMI” function, “BRAVIA” Sync helps communicate with “BRAVIA” Synccompatible equipment using HDMI CEC (Consumer Electronics Control).
Activating “Control for HDMI” (“BRAVIA” Sync)
Press HOME, then select → [Channels & Inputs] → [HDMI Settings] → [Control for
1.
HDMI] → [On].
2. Activate “Control for HDMI” on the connected equipment.
For details, refer to the instruction manual of the connected equipment.
“Control for HDMI” (“BRAVIA” Sync) is only available for the connected Sony equipment that has
the “BRAVIA” Sync logo or is compatible with “Control for HDMI.”
When specific Sony equipment compatible with “Control for HDMI” (“BRAVIA” Sync) is connected
and powered on, and [Control for HDMI] is set to [On], “BRAVIA” Sync is automatically activated
on the equipment.
Available “BRAVIA” Sync operations
BD/DVD player
Automatically turns the “BRAVIA” Sync-compatible equipment on and switches the input to that
equipment when you select it from the Home Menu or Sync Menu.
Automatically turns the TV on and switches the input to the connected equipment when the
equipment starts to play.
Automatically turns the connected equipment off when you turn the TV off.
Controls menu operation (
connected equipment through the TV’s remote control.
AV amplifier
Automatically turns the connected AV amplifier on and switches the sound output from the TV
speaker to the audio system when you turn the TV on. This function is only available if you
have previously used the AV amplifier to output TV sound.
/ / / ), playback (e.g. , ) and channel selection of the

Automatically switches the sound output to the AV amplifier by turning the AV amplifier on when
29
the TV is turned on.
Automatically turns the connected AV amplifier off when you turn the TV off.
Adjusts the volume (VOL +/–) and mutes the sound (MUTING) of the connected AV amplifier
through the TV’s remote control.
When connecting a digital audio system that is compatible with Audio Return Channel (ARC)
technology, connect to HDMI IN 1 with an HDMI cable. If connecting a system that is
incompatible with “Control for HDMI” or Audio Return Channel, an additional audio
connection via DIGITAL AUDIO OUT (OPTICAL) is necessary.
Video camera
Automatically turns the TV on and switches the input to the connected video camera when the
connected video camera is turned on.
Automatically turns the connected video camera off when you turn the TV off.
Controls menu operation (
connected equipment through the TV’s remote control.
/ / / ), playback (e.g. , ) and channel selection of the
Controlling “BRAVIA” Sync- compatible equipment
You can control “BRAVIA” Sync-compatible equipment by the TV’s remote control.
Press SYNC MENU, then select [HDMI Device Selection] → the desired equipment.
SYNC MENU
Any “BRAVIA” Sync-compatible equipment (except audio system) is listed as a new input source
under
[Inputs] in the Home Menu.
Sync Menu
Sync Menu provides the following items.
Press SYNC MENU, then select the desired item.
HDMI Device Selection
Enables selection of “BRAVIA” Sync-compatible equipment to control by the TV’s remote control.
Device Control
Speakers
TV Control
Displays the menu, options and title list of the connected equipment, or turns the equipment off.
Switches the speaker output between the TV and connected audio equipment.
Displays the menu and options of the TV, or shows/hides the display items on the TV screen.

Copyright 2011 Sony Corporation
30
Return to TV
Returns to the TV tuner.
Return to Top
 Loading...