

Sony BRAVIA KDL-48W655D, BRAVIA KDL-40W655D, BRAVIA KDL-32W655D Operating Instructions Manual
Television
Getting Started
Operating Instructions
Parts and Controls
Connecting TV to the Internet
Watching TV
Navigating through Home Menu
Viewing Pictures from Connected
Equipment
Additional Information
Reading the manual with attention, you will be
able to use your unit correctly, taking
advantages of the most of their technical
resources.
• Read the instruction manual before using the
TV.
• The correct use of the unit prolongs its life.
• Keep this manual for future reference.
KDL-48W655D / 40W655D / 32W655D
Sony Customer Support
http://esupport.sony.com/BR/
Please Do Not Return
the Product to the Store

Table of Contents
IMPORTANT NOTICE . . . . . . . . . . . . . . . . . . . . 4
Safety Information . . . . . . . . . . . . . . . . . . . . .5
Introducing Your BRAVIA® TV . . . . . . . . . . 7
Getting Started
Setting Up Your TV. . . . . . . . . . . . . . . . . . . 8
Securing the TV . . . . . . . . . . . . . . . . . . . . . 8
Preventing the TV from Toppling . . . . . . . . .8
Recommended Measures to Secure the
TV . . . . . . . . . . . . . . . . . . . . . . . . . . . . . . . . . . . 9
Precautions . . . . . . . . . . . . . . . . . . . . . . . . . . 10
Parts and Controls
TV. . . . . . . . . . . . . . . . . . . . . . . . . . . . . . . . .11
Remote Control . . . . . . . . . . . . . . . . . . . . 12
Guidelines for Remote Control . . . . . . . . 14
Connecting TV to the Internet
Setting up the Internet Connection . . . . 15
Type 1: Secured network with Wi-Fi
Protected Setup™ (WPS) . . . . . . . . . . . . . . . 15
Type 2: Secured network without Wi-Fi
Protected Setup™ (WPS) . . . . . . . . . . . . . . . 16
Type 3: Unsecured network with any type
of wireless LAN router . . . . . . . . . . . . . . . . . 16
Type 4: Wired network set-up. . . . . . . . . . . 16
Preparing a Wired Network . . . . . . . . . . . . . 17
Viewing the Network Status . . . . . . . . . . . . 17
If You Cannot Connect to the
Internet . . . . . . . . . . . . . . . . . . . . . . . . . . . 17
Privacy Policy . . . . . . . . . . . . . . . . . . . . . . 17
Watching TV
Select Your Content Source . . . . . . . . . . . . . 18
Adjust Screen Shape and Aspect Ratio . . . 18
Customize Sound and Picture Quality . . . . 18
Changing the Viewing Style. . . . . . . . . . .19
Changing the Wide Mode . . . . . . . . . . . . . . 19
Setting Scene Select. . . . . . . . . . . . . . . . . . . 19
Navigating through Home
Menu
All Apps . . . . . . . . . . . . . . . . . . . . . . . . . . 20
Photo Sharing Plus . . . . . . . . . . . . . . . . . . . .20
Using the TV as a Photo Frame Mode. . . . . 21
Listening to FM Radio. . . . . . . . . . . . . . . . . . 21
DTVi (Ginga) Interactivity . . . . . . . . . . . . . . . 21
Favorites. . . . . . . . . . . . . . . . . . . . . . . . . . .22
Digital (EPG). . . . . . . . . . . . . . . . . . . . . . . .22
Media . . . . . . . . . . . . . . . . . . . . . . . . . . . . .22
Playback Photo/Music/Video via USB . . . . 22
Home Network . . . . . . . . . . . . . . . . . . . . 24
Connecting to a Home Network . . . . . . . . . 24
Renderer . . . . . . . . . . . . . . . . . . . . . . . . . . . . 24
Display Settings for Media Servers . . . . . . .24
Settings . . . . . . . . . . . . . . . . . . . . . . . . . . 24
Preferences . . . . . . . . . . . . . . . . . . . . . . . . . . 24
Customer Support . . . . . . . . . . . . . . . . . . . . 32
US
2

Viewing Pictures from
Connected Equipment
Connection Diagram . . . . . . . . . . . . . . . . 33
Connecting the TV. . . . . . . . . . . . . . . . . . 34
Showing a Set Top Box with HDMI
connection . . . . . . . . . . . . . . . . . . . . . . . . . . 34
Cable System or VHF/UHF Antenna
System . . . . . . . . . . . . . . . . . . . . . . . . . . . . . 35
Showing HD BRAVIA® Sync™ Basic
Connection . . . . . . . . . . . . . . . . . . . . . . . . . . 36
Showing HD Basic Connection with Home
Theater System . . . . . . . . . . . . . . . . . . . . . . 37
Showing PC Connection with SD
VCR/DVD . . . . . . . . . . . . . . . . . . . . . . . . . . . 38
Using Audio and Video Equipment . . . . 39
Using Screen Mirroring . . . . . . . . . . . . . . 39
Additional Information
Using a Wall-Mount Bracket . . . . . . . . . . 40
Detaching the Table-Top Stand from the
TV . . . . . . . . . . . . . . . . . . . . . . . . . . . . . . . . . 40
Installing the TV Against a Wall or
Enclosed Area . . . . . . . . . . . . . . . . . . . . . 41
Troubleshooting. . . . . . . . . . . . . . . . . . . . 41
Picture. . . . . . . . . . . . . . . . . . . . . . . . . . . . . . 41
Sound . . . . . . . . . . . . . . . . . . . . . . . . . . . . . . 42
Channels. . . . . . . . . . . . . . . . . . . . . . . . . . . . 42
Network . . . . . . . . . . . . . . . . . . . . . . . . . . . . 42
General . . . . . . . . . . . . . . . . . . . . . . . . . . . . . 44
Specifications . . . . . . . . . . . . . . . . . . . . . . 45
US
US
3
Introduction
ATTENTION
RISK OF ELECTRICTRIC SHOCK
DO NOT OPEN IT
ATTENTION
To prevent risk of electric shock:
DO NOT OPEN THE COVER.
In the event of damage, consult only
technicians qualified by Sony
Thank you for choosing this Sony product. Before operating the
TV, please read this manual thoroughly and retain it for future
reference.
Note
• Images and illustrations used in the Setup Guide and this
manual are for reference only and may differ from the actual
product.
The 48” class has a 47.6 inch (120.9 cm) viewable image size,
the 40” class has a 40 inch (101.6 cm) viewable image size and
the 32” class has a 31.5 inch (80.0 cm) viewable image size
(measured diagonally).
Location of the Setup Guide
Setup Guide is placed on top of the cushion inside the TV carton.
Location of the identification label
Labels for the TV Model No. and Power Supply rating are located
on the rear of the TV. Labels for the AC adapter Model No. and
Serial No. are located on the bottom of the AC adapter.
Nota
Este aparelho destina-se ao uso doméstico e não profissional.
IMPORTANT NOTICE
Owner’s Record
The model and serial numbers are located at the side and
rear of the TV. Record these numbers in the spaces
provided below. Refer to them whenever you call upon
your Sony dealer regarding this TV.
Model Name
Serial No.
Doubts & Additional Information
If after reading this instruction manual you still
have doubts about Sony TV, call the Client
Relationship Center, phone 4003 7669 for
capitals and metropolitan areas / 0800 880 7669
for others areas and State of Rio de Janeiro, or
with Sony’s Authorized Service.
WARNING & CAUTION
To avoid risks of spark or electric shock do not expose this TV to
rain or moisture.
This symbol is intended to alert the user to the
presence of uninsulated “dangerous voltage” within
the product’s enclosure that may be of sufficient
magnitude to constitute a risk of electric shock to
persons.
This symbol is intended to alert the user to the
presence of important operating and maintenance
(servicing) instructions in the literature accompanying
the appliance.
For your Safety
This apparatus should not be exposed to dripping or splashing,
and do not place objects filled with liquids, such as vases and
cups, as this may damage the unit and expose the consumer to
unnecessary risks.
CAUTION
To reduce the risk of electric discharge, do not use the AC power
cord with an extension cord or other power outlet unless the
blades can be fully inserted.
SAFETY
• Use the power AC cable specified by Sony and appropriate
voltage to the local feeding;
• If any liquid or object fall into the cabinet, unplug the TV
immediately from the outlet and have it checked by qualified
personnel before operating it any further.
• If your are not going to use the TV for a long period, unplug the
power cord by pulling the body of the plug and not the cord
itself.
• For more information about safety precautions, see “Flyer of
Safety Instructions” (supplied).
Installation
• The TV should be installed to a near and easy access wall outlet;
• To prevent internal overheating, do not block the ventilation
openings;
• Do not install the TV in a hot or humid place, nor where it is
exposed to excessive amounts of dust or mechanical vibration.
• If the TV is moved directly from a cold to hot place, or if the
temperature changes suddenly, the picture may be blurry or
display colors of poor quality due to moisture condensation. In
this case, wait some hours for the moisture to evaporate before
turning the TV on again;
• To obtain a better picture quality, do not expose the screen
directly to a lighting or direct sunlight. We recommend using a
reflector roof directed down or cover the windows that are
facing the screen with an opaque curtain. It is desirable to install
the TV in a room where the floor and the walls are not of
reflect ive material .
For the Customer
• For installing this product, experienced installers are required.
Be sure to subcontract installers authorized by Sony and pay
special attention to safety during the installation.
US
4
US
Modelo : J20H090
After used, the batteries must be sent to the
commercial establishments or the authorized chain of
technical assistance.
This equipment operates on a secondary basis and, consequently,
is not entitled to protection against harmful interference, even of
the same type stations, and cannot cause interference to systems
operating on a primary basis.
WARNING
Avoid prolonged use of the device at high volume (power more
than 85 decibels), because this may damage your hearing
(Federal Law No. 11291/06). Below, we have included a table with
sound intensity levels in decibels and corresponding examples of
situations for your reference.
Decibel
level
30 Quiet library, whisper
40 Living room, refrigerator, bedroom far from traffic
50 Light traffic, normal conversation, quiet office
60 Air-conditioner at a distance of 6m, sewing
machine
70 Vacuum, hair dryer, noisy restaurant
80 Medium city traffic noise, garbage collector,
alarmclock at a distance of 60cm
NOISE BELOW CAN BE DANGEROUS IN CASE OF PROLONGED
EXPOSURE
90 Subway platform, motorcycle, truck traffic, lawn-
mower
100 Garbage truck, electric saw, pneumatic drill
120 Rock concert (in front of the speakers),
thunderclap
140 Gun shot, jet plane
180 Rocket launch
Information courtesy from Deafness Research Foundation
Examples
BATTERY DISPOSAL
Non-rechargeable Batteries
Attention:
• Check the instructions on the use of the appliance being
certified that the polarities (+) and (-) are in the appropriate
position. The batteries can leak or explode if the polarities are
reversed, exposed to the fire, taken apart or rech arged.
• Avoid mixing them with batteries of another type or with used
batteries, transporting or storing them united, sinceit increases
the risk of leak.
• Remove the batteries if the appliance is not being used, to
avoid possible damages in case of leaking happens.
• The batteries must be stored in dry and ventilated place.
• In case of leaking of the battery, avoid the contact with it. Wash
any part of the body affected with abundant water. If irritation
happens, look for medical help.
• Do not remove the covering of the battery.
• Keep away from children. If swallowed contact doctor
immediately.
Cleaning
When cleaning, be sure to unplug the power cord to avoid any
chance of electric shock.
• Wipe the LCD screen gently with a soft cloth.
• Stubborn stains may be removed with a cloth slightly moistened
with a solution of mild soap and warm water.
• If using a chemically pretreated cloth, please follow the
instruction provided on the package.
• Never use strong solvents such as a thinner, alcohol or benzine
for cleaning.
• See the supplied Safety Booklet for additional information.
Safety Information
WARNING
Never place a television set in an unstable
location. A television set may fall, causing
serious personal injury or death. Many injuries,
particularly to children, can be avoided by
taking simple precautions such as:
Using cabinets or stands recommended by the
manufacturer of the television set.
Only using furniture that can safely support the
television set.
Ensuring the television set is not overhanging the
edge of the supporting furniture.
Not placing the television set on tall furniture (for
example, cupboards or bookcases) without
anchoring both the furniture and the television
set to a suitable support.
Not placing the television set on cloth or other
materials that may be located between the
television set and supporting furniture.
Educating children about the dangers of climbing
on furniture to reach the television set or its
controls.
If your existing television set is being retained
and relocated, the same considerations as
above should be applied.
US
5
NOTE ON AC ADAPTER
Warning
To reduce the risk of fire or electric shock, do not
expose this apparatus to rain or moisture.
To prevent fire or shock hazard, do not place
objects filled with liquids, such as vases, on the
apparatus.
Do not install this equipment in a confined
space, such as a bookshelf or similar unit.
Please ensure that the AC power outlet (mains
socket) is installed near the equipment and shall
be easily accessible.
Be sure to use the supplied AC adapter and AC
power cord (mains lead). Otherwise it may cause
a malfunction.
Connect the AC adapter to an easily accessible AC
power outlet (mains socket).
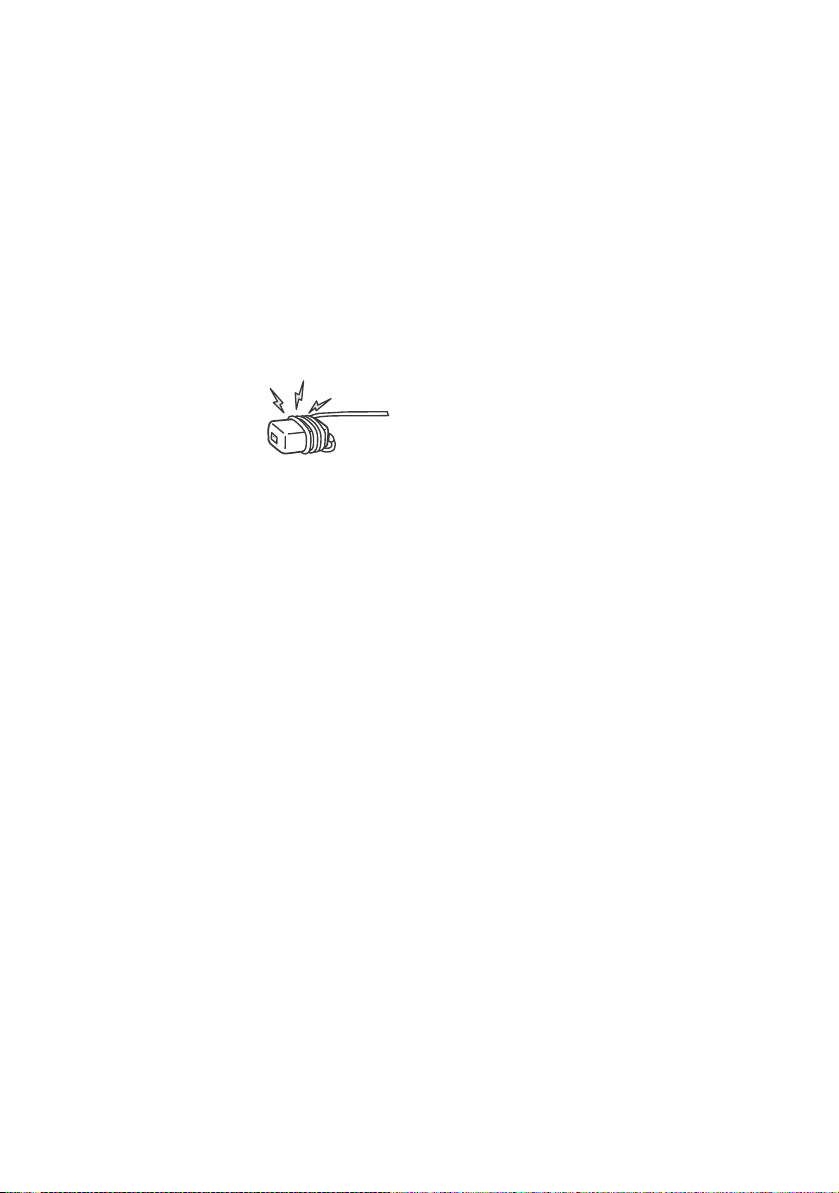
Do not coil the AC power
cord (mains lead) around
the AC adapter. The core
wire may be cut and/or it
may cause a malfunction of
the TV.
Do not touch the AC adapter with wet hands.
If you notice an abnormality in the AC adapter,
disconnect it from the AC power outlet (mains
socket) immediately.
The set is not disconnected from the AC source as
long as it is connected to the AC power outlet
(mains socket), even if the set itself has been
turned off.
As the AC adapter will become warm when it is
used for a long time, you may feel hot when
touching it by hand.
US
6
US
16:9 (high-definition) source
Most HDTV signals use a wide screen aspect
ratio of 16:9. The 16:9 fills your BRAVIA
screen, maintaining a crisp, clear, vivid
picture.
4:3 (standard-definition) source
Most standard-definition signals use a boxy
4:3 aspect ratio. When a 4:3 image is
displayed on an HDTV, you will see black bars
on the sides. The picture quality may not be
as sharp as with HD sources.
Audio/Video Performance
Introducing Your BRAVIA® TV
Experiencing Stunning HD with Your BRAVIA TV
To experience the stunning detail of your new BRAVIA TV, you need access to high-definition (HD)
programming. Your BRAVIA TV can receive and display HD programming from:
• Over-the-air broadcasting via HD-quality antenna
•HD cable subscription
• HD satellite subscription
• Blu-ray Disc™ player or other HD compatible external equipment
Contact your cable, satellite or HD service provider for information on upgrading to HD programming.
The Four Steps to a Full HD Experience
Set, Sound, Source, and Setup
Along with your BRAVIA TV set, a complete HD system requires an HD sound system, a source of HD
programming and a proper connection setup.
The following chart shows the high-definition (HD) and standard-definition (SD) video formats
supported by BRAVIA TV inputs.
VIDEO AUDIO High or Standard Definition Quality
Connection
HDMI connection
Component
connection
HDMI cable
carries both
video and
audio signals.
Audio L/R
1080/
1080p
24p
HD HD HD HD SD SD *
1080i 720p 480p 480i PC
HD HD HD SD SD
High
INPUT
Connector
HDMI 1 (ARC)/
HDMI 2
COMPONENT
VIDEO Composite
Standard
*1For supported PC formats refer to the “Specification” in this manual.
video
connection
Audio L/R
SD
1
US
7
Getting Started
Setting Up Your TV
Some TV models are packaged with a detached
Table-Top Stand so you can mount your TV to a
wall right away. See page 40 (Using a WallMount Bracket) if you want to mount the TV to a
wall. If you are not mounting the TV to a wall,
you will need to attach the Table-Top Stand. You
will need a Phillips screwdriver (not supplied)
and the supplied screws to complete the task.
Look for the supplied Setup Guide.
Be sure to consider the following while setting
up your TV:
Disconnect all cables when carrying the TV.
Carry the TV with the adequate number of
people; larger size TVs require two or more
people.
Correct hand placement while carrying the TV
is very important for safety and to avoid
damage.
Do not put stress on the LCD panel or the
frame around the screen.
Securing the TV
Sony strongly recommends taking
measures to prevent the TV from
toppling over. Unsecured TVs may topple
and result in property damage, serious
bodily injury or even death.
Preventing the TV from Toppling
Secure the TV to a wall and/or stand.
Do not allow children to play or climb on
furniture and TV sets.
Avoid placing or hanging items on the TV.
Never install the TV on:
slippery, unstable and/or uneven surfaces.
furniture that can easily be used as steps,
such as a chest of drawers.
Install the TV where it cannot be pulled,
pushed, or knocked over.
Install the TV so that the TV’s Table-Top Stand
does not protrudes out from the Stand (not
supplied). If the Table-Top Stand protrudes out
from the Stand, it may cause TV set to topple
over, fall down, and cause personal injury or
damage to the TV.
Ensure your TV has adequate ventilation, see
page 41.
For best picture quality, do not expose the
screen to direct illumination or sunlight.
Avoid installing the TV in a room with
reflective wall and floor materials.
Avoid moving the TV from a cold area to a
warm area. Sudden room temperature
changes may cause moisture condensation.
This may cause the TV to show poor picture
and/or poor color. Should this occur, allow
moisture to evaporate completely before
powering the TV on.
US
8
Route all AC power cords and connecting
cables so that they are not accessible to
curious children.
Getting Started
US
Angle braces
(not supplied)
Stand
Screw
(not supplied)
Rope or
chain
(not
supplied)
Screw hole
on the rear
cover
M6 machine
screw
(not supplied)
10 mm - 12 mm
Screw M6
Rope or chainTV
VS
VS
Wall-mount holes
Rope or chain
(not
supplied)
M6 eye
bolts
(not
supplied)
Wall-anchor
(not supplied)
VS
10 mm - 12 mm
M6 eye
bolt
TV’s rear cover
Recommended Measures to Secure the TV
Consider the following measures when securing
your TV to a Stand (not supplied).
1 Secure the Stand for the TV.
Make sure the Stand can adequately
support the weight of the TV. Use two
angle braces (not supplied) to secure the
Stand.
For each angle brace use the
appropriate hardware to:
Attach one side of the angle brace to the
wall stud.
Attach the other side to the Stand.
2 Secure the TV to the Stand.
Use the optional hardware listed as
follow (not supplied):
M6 machine screws (screwed into the TV’s
rear cover).
A screw or similar (attach it to the Stand).
Rope or chain (strong enough to support
the weight of the TV). Make sure that there
is no excess slack in the rope or chain.
The length of the M6 machine screw differs
depending on the rope or chain diameter.
Please refer to below illustration.
3 Anchor the TV to the wall by using bolts,
wall anchor and chain (or rope).
Please see below illustration for M6 eye bolt
length.
Note
• Securing the TV to the Stand without securing the TV
and the Stand to the wall provides minimum
protection against the TV toppling over. For further
protection, be sure to follow the three measures
recommended.
9
US
Precautions
How to care for your BRAVIA TV
Safety is very important. Please read and follow
the safety documentation (Safety Booklet)
separately provided.
Unplug the TV and other
connected equipment
from the wall outlet
before you begin cleaning
your TV.
Wipe the LCD screen
gently with a soft cloth.
Stubborn stains may be
removed with a cloth
slightly moistened with a solution of mild soap
and warm water.
If using a chemically pretreated cloth, please
follow the instruction provided on the
package.
Never spray water or detergent directly on the
TV set. It may drip to the bottom of the screen
or exterior parts and enter the TV set, and may
cause damage to the TV set.
Never use strong solvents such as a thinner,
alcohol or benzine for cleaning.
Do not plug in the TV into the wall outlet until
the moisture from cleaning has evaporated.
The TV should also be placed on a stable
surface to prevent it from toppling over (see
page 8). If you have young children or pets at
home, check regularly to ensure the TV is
securely fastened.
10
US
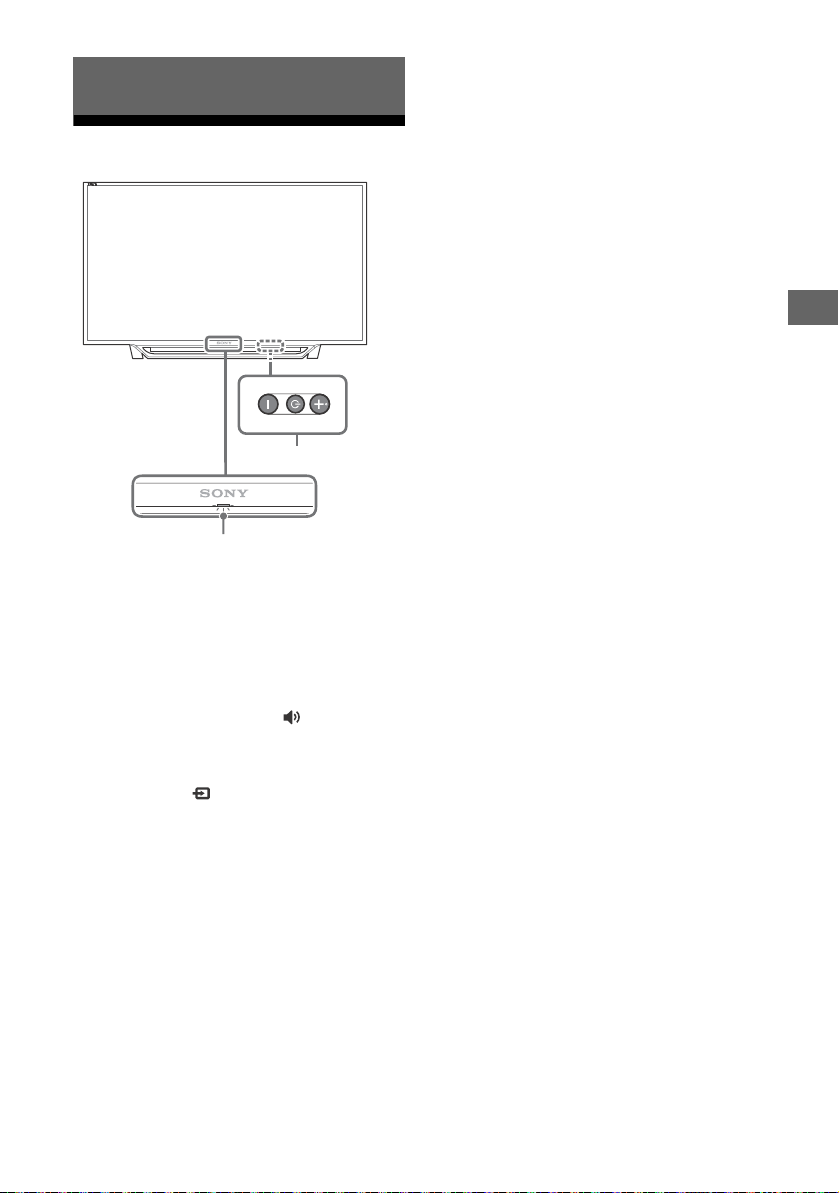
Parts and Controls
US
2
1
Parts and Controls
TV
(Power) / + / –
Short press to turn the TV on.
Long press until the TV turn off.
When the TV is on,
Volume
Press + or – button to increase/decrease the
volume.
You can also press until notification is
displayed. Increases/decreases the volume
by pressing the + or – button.
Input
Press until notification is displayed.
Moves the selected input source by pressing
+ (up) or – (down) button.
Channel
Press until CH notification is displayed.
Select the channel by pressing + (next) or –
(previous) button.
(Sensors/LED indicator)
• Receives signals from the remote control.
Do not put anything over the sensor.
Doing so may affect its function.
• Lights up in amber when the [Sleep Timer]
or [On Timer] is set (page 29), or the TV is
in Photo Frame Mode (page 21).
• Lights up in green when [Power Saving] is
set to [Picture Off] (page 31).
• Lights up in green when the TV is turned
on.
• Does not light up when the TV is in
standby mode.
• Flashes while the remote control is being
operated.
Note
• Make sure that the TV is completely turned off before
unplugging the AC power cord.
• To disconnect the TV from the AC power completely,
pull the plug from the AC power outlet.
• Please wait for a while when perform input selection
to change to other input.
US
11
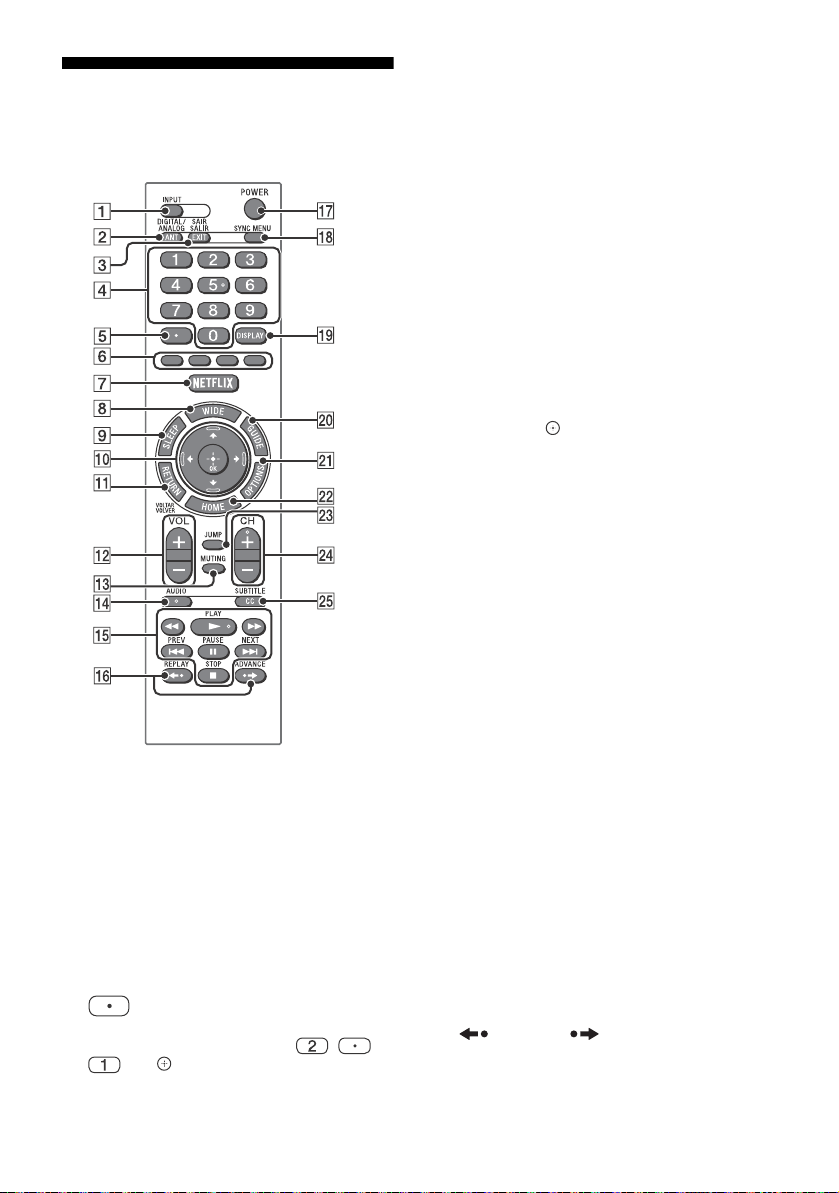
Remote Control
The remote control shape, location, availability
and function of remote control button may vary
depending on your region/country/TV model.
INPUT
Displays and selects the input source.
ANT/DIGITAL/ANALOG
Switches to Cable and Antenna channels.
EXIT/SAIR/SALIR
Press to exit.
0-9
Select channels. For channel numbers 10
and above, enter the next digit quickly.
Use with
For example, to enter 2.1, press , ,
0-9
to select digital channels.
and .
Color buttons
Displays operation guide (when colored
buttons are available).
NETFLIX (Only on limited region/
country/TV model)
Accesses the “NETFLIX” online service.
WIDE
Adjusts the screen display. Press repeatedly
to select the desired wide mode (page 19).
SLEEP
Press repeatedly until the TV displays the
time in minutes [Off]/[15 min]/[30 min]/
[45 min]/[60 min]/[90 min]/[120 min] that
you want the TV to remain on before
shutting off. To cancel the sleep timer, press
SLEEP repeatedly until [Off] appears.
////
• Select or adjust items.
• Confirm selected items.
RETURN/VOLTAR/VOLVER
• Returns to the previous screen of any
displayed menu.
• Stops playback when playing photo/
music/video file.
VOL +/–
Adjusts the volume.
MUTING
Mutes the sound. Press again to restore the
sound.
AUDIO
Selects the sound of multilingual source or
dual sound for the program currently being
viewed (depending on program source).
(fast rewind)/ (PLAY)/
(fast forward)/ (PREV)/
(PAUSE)/ (STOP)/
(NEXT)
• Operate media contents on TV and
connected BRAVIA Sync-compatible
device.
• This key also can be used to operate VOD
(Video on demand) service playback.
Availability is depend on VOD service.
(REPLAY)/ (ADVANCE)
Replays the scene/briefly fast forwards the
scene (USB and IPTV Video playback only).
US
12

Parts and Controls
US
POWER
Turns the TV on or switches to standby
mode.
SYNC MENU
Press to display the BRAVIA Sync Menu and
then select connected HDMI equipment
from [Device Selection].
The following options can be selected from
BRAVIA Sync Menu.
Device Control:
Use the [Device Control] to operate
equipment that is compatible with BRAVIA
Sync Control. Select options from [Home
(Menu)], [Options], [Content List] and [Power
Off] to operate the equipment.
Speakers:
Select [TV Speakers] or [Audio System] to
output the TV’s sound from the TV speakers
or connected audio equipment.
TV Control:
Use the [TV Control] menu to operate the TV
from the [Home (Menu)] or [Options] menu.
Return to TV:
Select this option to return to TV program.
DISPLAY
Displays information. Press once to display
information about the program/input you
are viewing. Press again to remove the
display from the screen.
GUIDE
Displays the Digital EPG (Electronic Program
Guide) (page 22).
OPTIONS
Displays a list that contains shortcuts to
some setting menus.
The listed options vary depending on the
current input and content.
HOME
Displays or cancels the menu.
Hint
• The number 5, , CH + and AUDIO buttons have a
tactile dots. Use the tactile dots as references when
operating the TV.
JUMP
Returns to the previous channel or input
viewed more than 15 seconds.
CH +/–
Select the next (+) or previous (–) channel.
CC/SUBTITLE
Changes the subtitle setting (page 29).
US
13
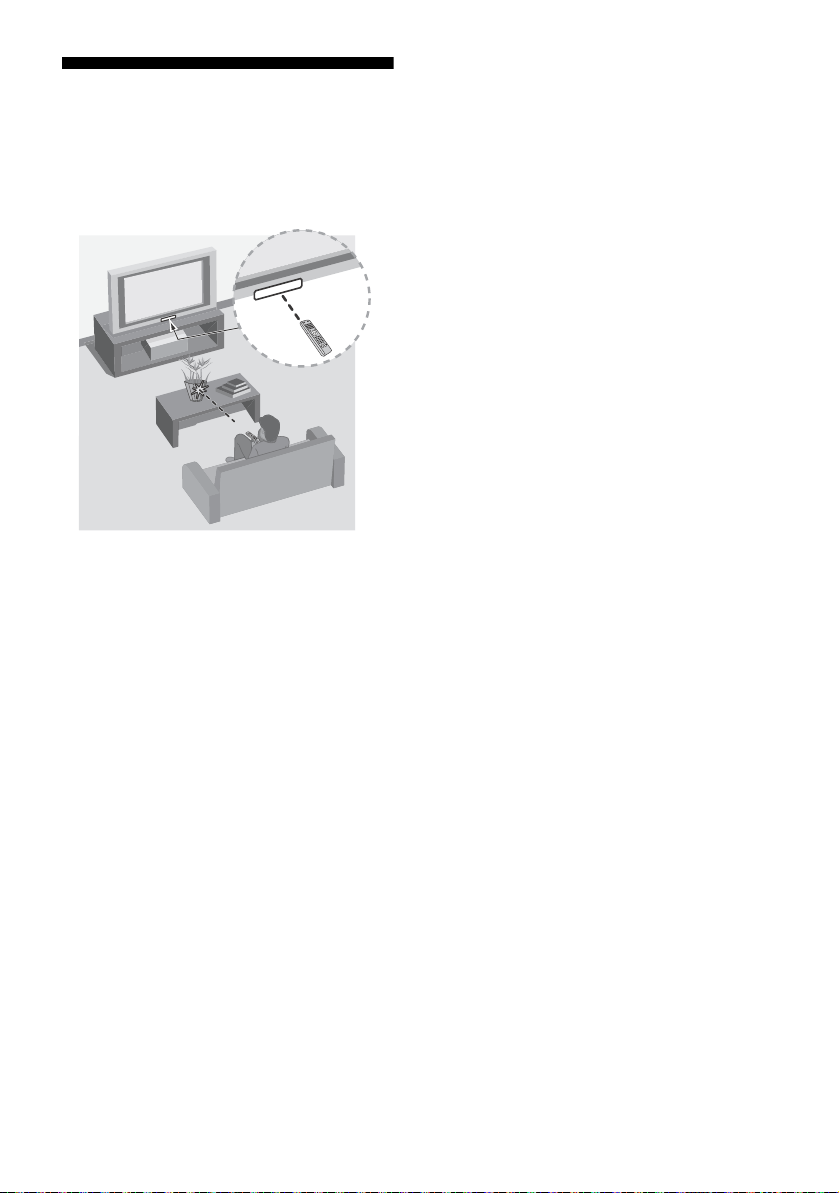
Guidelines for Remote Control
Point your remote control directly at the IR
sensor located on your TV.
Make sure that no objects are blocking the
path between the remote control and the IR
sensor on your TV.
Fluorescent lamps can interfere with your
remote control; try turning off the fluorescent
lamps.
If you are having problems with the remote
control, reinsert or replace your batteries and
make sure that they are correctly inserted.
US
14
Connecting TV to the Internet
US
Connecting TV to the Internet
Setting up the Internet Connection
To use the network features of your TV it needs
to be connected to the Internet. The set-up
procedure differs depending on the type of
network and LAN router. Before setting up the
Internet connection, be sure to set up a LAN
router. Check your wireless LAN environment
using the following chart.
Wireless LAN
Secure Wireless LAN? NO
YES m
Do you use a wireless LAN
router compatible with Wi-Fi
Protected Setup™ (WPS)?
YES m
Typ e 1*
Wired LAN , Type 4
* Type 1 is easier to set up if your router has an
automatic setting button, e.g. Air Station One-Touch
Secure System (AOSS). Most of the latest routers have
this function. Check your router.
Typ e 1: Follow the configuration for Secured
network with Wi-Fi Protected Setup™
(WPS).
Typ e 2: Follow the configuration for Secured
network without Wi-Fi Protected
Setup™ (WPS).
Typ e 3: Follow the configuration for Unsecured
network with any type of wireless
LAN router.
Typ e 4: Follow the configuration for Wired
network set-up.
k Typ e 3
NO
k Typ e 2
Type 1: Secured network with Wi-Fi Protected Setup™ (WPS)
The WPS standard makes security of a wireless
home network as straightforward as pressing
the WPS button on the wireless LAN router.
Before setting up a wireless LAN, check the
location of the WPS button on the router and
verify how to use it.
For security purpose, [WPS (PIN)] provides a PIN
code for your router. PIN code is renewed every
time you select [WPS (PIN)].
1 Press HOME, then select [Settings]
[Preferences] [Setup] [Network]
[Network Setup].
2 IP Address setting/Proxy server:
– automatic setting:
[Set up network connection] [Easy]
– manual setting:
[Set up network connection] [Expert]
[Wired Setup] or [Wireless Setup]
3 Select [WPS (Push Button)] for Push
Button method or [WPS (PIN)] for PIN
method.
Note
Button name of the WPS may differ depending on
the router (e.g. AOSS button).
4 Follow the instructions on the set-up
screen.
Note
• If you use WPS for network set-up, the security
settings of the wireless LAN router activate, and any
equipment previously connected to the wireless LAN
in a non-secure status will be disconnected from the
network.
In this case, activate the security settings of the
disconnected equipment and then reconnect. Or, you
can deactivate the security settings of the wireless
LAN router, and then connect the equipment to a TV
in a non-secure status.
• To use the network with IPv6, select [Settings]
[Preferences] [Setup] [Network]
[IPv6/IPv4 Priority] [IPv6], then select [Easy] in [Set
up network connection].
• When IPv6 is selected, HTTP Proxy cannot be set.
US
15
 Loading...