

Sony Bravia KDL-48R470B, Bravia KDL-40R470B, Bravia KDL-32R420B Operating Instructions Manual
SONY:
Television
Televiseur
Operating
(Setup Guide)
Mode
(Guide
Sony
U.S.A.:
http:/
Canada:
http:/
Instructions
d'emploi
d'installation)
Customer
/www.sony.com/tvsupport
/www.sony.ca/support
us
I
FR
I
Support
BRA
VIA
United States
1.800.222.SONY
Please
the Product to the
Service
Canada:
http:/
·Etats-Unis
http:/
Canada
1.877.899.SONY
Ne
Do
Not Return
Store
a
Ia
/support.sony.ca/fr
:
/www.sony.com/tvsupport
retournez pas
le
Canada
1.877.899.SONY
clientele
Etats-Unis
1.800.222.SONY
produit
au
magasin
Sony
Owner's
The model and serial numbers are located at
of
the
Refer
regarding this
Model Name
Serial
Record
TV.
Record these numbers in the spaces provided below.
to
them
whenever you call upon your Sony dealer
TV.
No.
CAUTION
To
prevent electric shock and blade exposure,
AC
plug
with
blades can be fully inserted.
• Operate the
The
class has a
diagonally).
an extension cord, receptacle or other
TV
only on
DC
19.5
V (with
32
class has a
31.5
47.6
inch viewable image size and the 48
inch viewable image size (measured
AC
the
do
not
adapter)
side and rear
use this polarized
outlet
unless the
Location
Labels for the
applicable safety regulation) and Manufacturing date are located on
the rear
are located on
of
of
the
identification
TV
Model No., Power Supply rating (in accordance
the
TV.
Labels for the
the
bottom
of
AC
the
label
adapter Model No. and Serial No.
AC
adapter.
with
Note:
• The illustrations
RM-YD092 unless otherwise stated.
• The illustrations used in this manual may differ depending on your
TV
model.
of
the remote control used in this manual
are
of
the
Cleaning
When cleaning, be sure
of
electric shock.
• Wipe the
• Stubborn stains may be removed
with
If
•
provided on the package.
• Never use strong solvents such
cleaning.
See
•
LCD
a solution
using a chemically pretreated cloth, please
the supplied Safety Booklet for additional information.
to
unplug the power cord
screen gently
of
mild soap and warm water.
with
a soft cloth.
with
as
a thinner, alcohol
to
avoid any chance
a cloth slightly moistened
follow
the
instruction
or
benzine for

Table
of
Contents
Introducing Your
New
Getting Started
Checking
Inserting Batteries into
Remote Control
Setting
Attaching
Connecting
Cable System
Cable System and VHF/UHF Antenna
System
HD
Securing
Preventing
Recommended Measures
Bundling
Running Initial Setup
the
Accessories
................
the
........................
Up
Your
TV
.....................
the
Table-Top Stand
the
TV
.....................
or
VHF/UHF Antenna System
.................................
Cable Box/HD Satellite Box
the
TV
........................
the
TV
from
Toppling
to
the
Cables
....................
...................
BRAVIA®
...........
.............
............
Secure
the
TV
...
...
6
6
7
7
8
8
8
8
9
9
9
11
11
Navigating through Home
Favorites
Applications
Using
Photo Share
Media
Playing back
Settings
Preferences
Customer Support
............................
.........................
the
TV
as
a Photo Frame
...........................
................................
Photo/Music/Video
.............................
............................
.......................
Menu
............
via
USB
....
16
16
16
17
17
17
19
19
26
Viewing Pictures from Connected
Equipment
Connection Diagram
Using Audio and Video Equipment
Using Screen Mirroring
...................
.................
.......
27
28
28
Parts and Controls
TV
..................................
Remote Control
.......................
Watching TV
Changing
Changing
Setting Scene Select
the
Viewing Style
the
Wide
Mode
......................
.............
.................
12
13
15
15
15
Additional Information
Using a Wall-Mount Bracket
Bundling
Installing
Enclosed Area
Troubleshooting
Picture
Sound
Channels
General
Specifications
Safety Information
the
AC
Adapter
the
TV
Against a Wall or
........................
......................
................................
..................................
...............................
.................................
........................
....................
............
.................
29
29
30
30
30 .
31
31
31
32
34
Customer Support
United States
http:/
/www.sony.com/tvsupport
Canada
http:/
/www.sony.ca/support
On-line Registration
United States
http:/
/productregistration.sony.com
Canada
http:/
/www.sony.ca/registration
New
Introducing
Welcome
Thank you for choosing this
definition
below
to get the most
Your
World
the
to
television.
of
the documentation
Use
out
Sony
of
BRA
BRA
BRA
your
VIA®
VIA®
VIA®
TV.
high-
listed
Safety
Contains
keep you and your
information prior
Operating
Provides the most
to
Quick Setup Guide
Provides
sample connection diagrams.
Please
U.S.A.:
Canada:
take a
http:/
http:/
Experiencing
Booklet
precautionary measures to
Instructions
operate your
TV
moment
/productregistration.sony.com
/www.sony.ca/registration
TV.
setup information
register your
to
Stunning
TV
experience the stunning
To
you need access
BRAVIA
programming. Your
display
Over-the-air broadcasting via
•
HD
•
HD
•
• Blu-ray
external
Contact
for
TV,
BRAVIA
programming from:
HD
subscription
cable
satellite subscription
or other
Disc™
your
information on upgrading to
player
equipment
cable, satellite
Read
safe.
TV
setting up your
to
detailed
HD
detail
to
TV
or
information
TV
Your
with
your new
of
high-definition
receive and
can
HD-quality
compatible
HD
service provider
HD
programming.
HD
this
with
at:
BRA
antenna
TV.
(HD)
•
VIA
Steps
Four
The
Sound,
Set,
Along
with your
system requires
programming and a proper connection setup.
HD
Refer to the Quick
separately,
to
Source,
for connecting
and
BRAVIA
HD
an
Setup
sound system, a
Setup
set, a complete
TV
Guide,
enclosed
optional
Experience
HD
Full
a
HD
sour:ce
equipment.
of
sus

Getting
Started
Inserting
Batteries
into
the
Checking
Remote control
Size
AAA batteries
AC
power
AC
adapter
Cable holder
Table-Top Stand
Fixing screws
Operating Instructions
Quick Setup Guide
Safety and Regulatory Booklet
Software License
Stand Installation Guide
* Please refer
control.
the
Accessories
{1
)*
{2)
cord
{1)
{1)
{3)
{1)
for
Table-Top Stand
{1)
{1)
{1)
{1)
to
the model name printed on the remote
{1)
{MS
x 20) {2)
Remote
Control
1 Remove the protection sheet.
2
Push
and slide
Guidelines
• Point your remote control directly at
located on your
• Make sure
between
your
for
that
the
TV.
the
cover
Remote
TV.
no objects are blocking
remote control and
to
open.
Control
theIR
theIR
the
sensor on
sensor
path
• Fluorescent lamps can interfere
try
control;
•
If
you are having problems
control, reinsert
make sure
turning
that
off
the
fluorescent lamps.
with
or
replace your batteries and
they
are correctly inserted.
with
the
your
remote
remote
\
I
I
fiUS
Setting
Up
Your
TV
Attaching
the
Table-Top
Stand
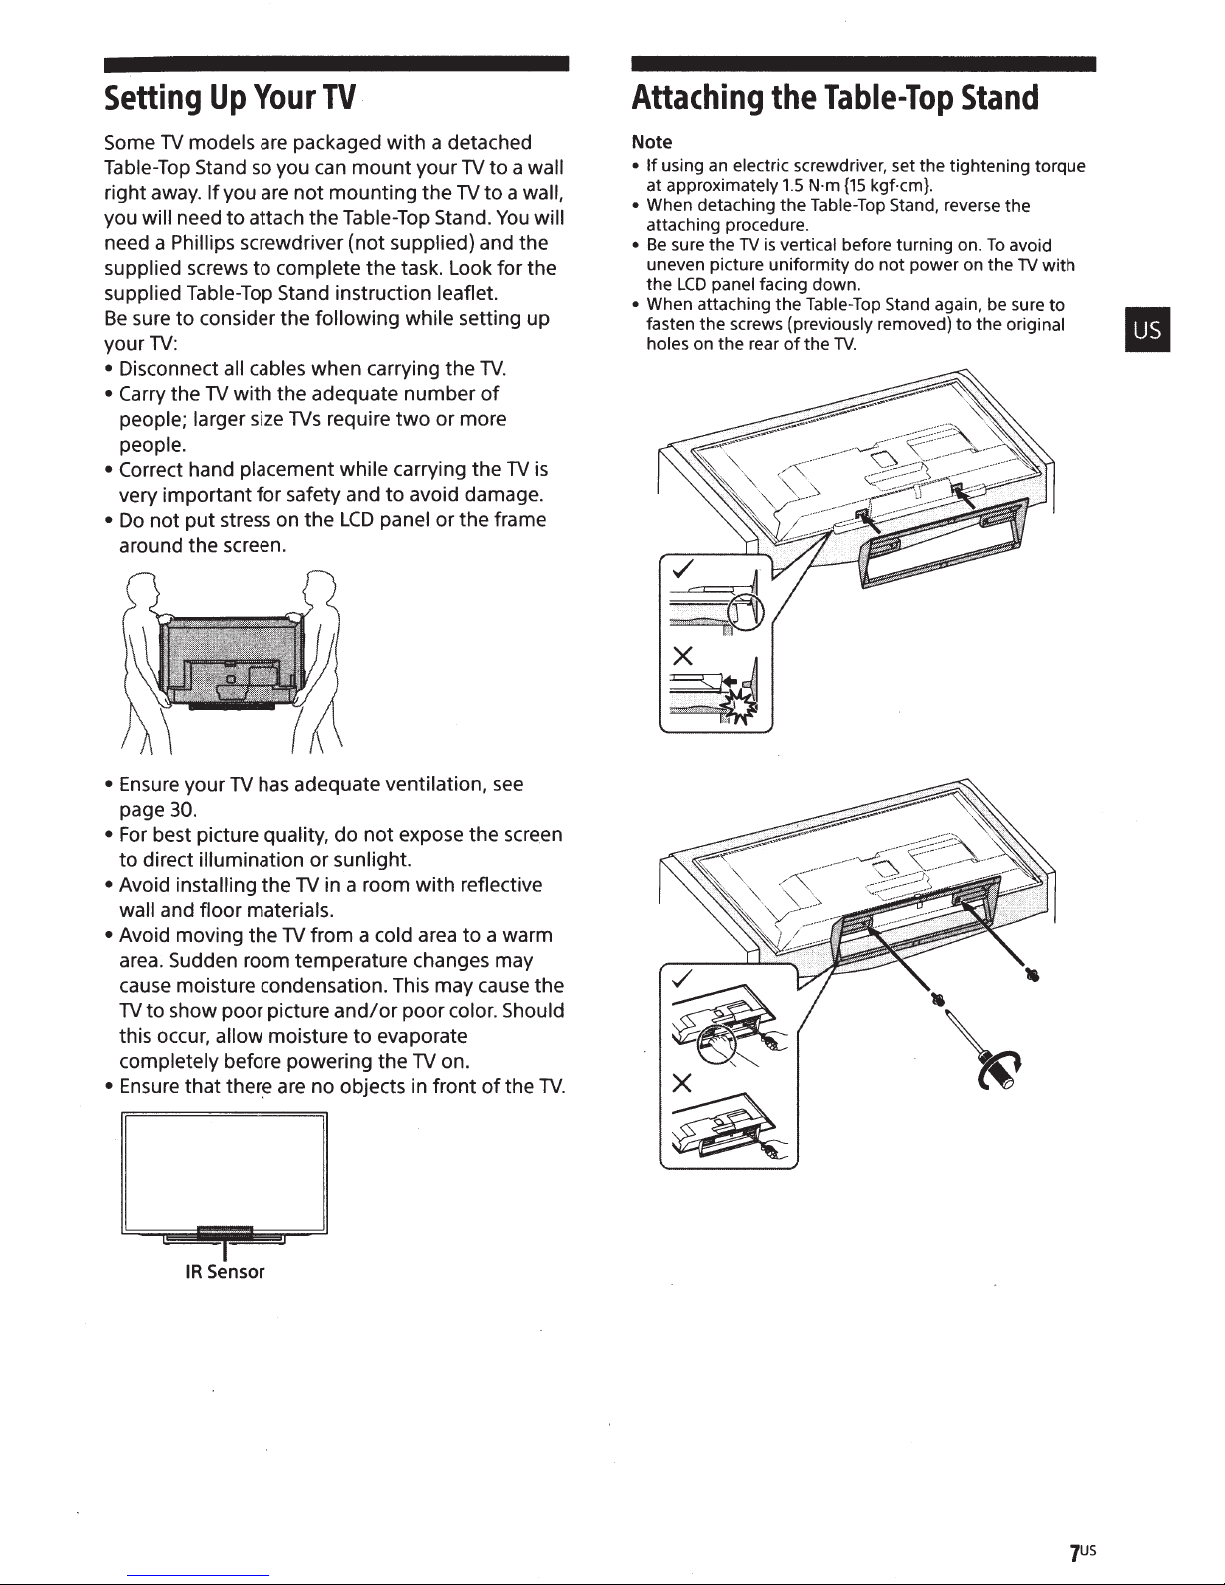
Some
TV
models are packaged
so
Table-Top Stand
right away.
you will need
need a Phillips screwdriver (not supplied) and the
supplied screws
supplied Table-Top Stand instruction leaflet.
Be
sure
your
• Disconnect all cables when carrying the
• Carry the
people; larger size
people.
• Correct hand placement while carrying the
very important
•
Do
around the screen.
to
consider the
TV:
not
put
If
TV
you can
you are
to
with
stress on
not
attach the Table-Top Stand.
to
complete
following
the adequate
TVs
for
safety and
the
with
mount
mounting
require
LCD
your
the
the
task. Look
while setting up
number
two
to
avoid damage.
panel or the frame
a detached
TV
to
a wall
TV
to
a wall,
You
for
TV.
of
or more
TV
will
the
is
Note
•
If
using
an
at approximately
• When detaching
attaching procedure.
•
Be
sure the
uneven picture uniformity
the
• When attaching the Table-Top Stand again, be sure
fasten the screws (previously removed)
holes on the rear
electric screwdriver, set the tightening torque
1.5
N·m
{15
kgf·cm}.
the
Table-Top Stand, reverse the
TV
is
vertical before turning on.
LCD
panel facing down.
of
the
do
not power on the
TV.
to
To
avoid
TV
the original
with
to
TV
• Ensure your
page 30.
For
best picture quality, do
•
to
direct illumination or sunlight.
• Avoid installing the
wall and
• Avoid moving the
area. Sudden room temperature changes may
cause moisture condensation. This may cause
TV
this occur, allow moisture
completely before powering the
• Ensure
floor
to
show poor picture
that
has adequate ventilation,
not
expose the screen
TV
in a room
materials.
TV
from
a cold area
ther~
are no objects in
and/or
poor
to
evaporate
TV
with
front
see
reflective
to
a warm
color. Should
on.
of
-
I
IR
Sensor
the
the
TV.
Connecting
cable
You
definition digital
area) along
programming.
This
programming for both
external
Cable
system
enjoy high-definition and standard-
can
capable
is
TV
VHF/UHF
VHF/UHF
or
the
VHFtUHF
ori
programming (if
with standard-definition
receiving
of
antenna
(or
TV
cable
VHF
$vsteb1
.
~
Ant•n
unscrambled digital
(QAM
(ATSC).
n
available
analog
8VSB)
and
only)
in your
and
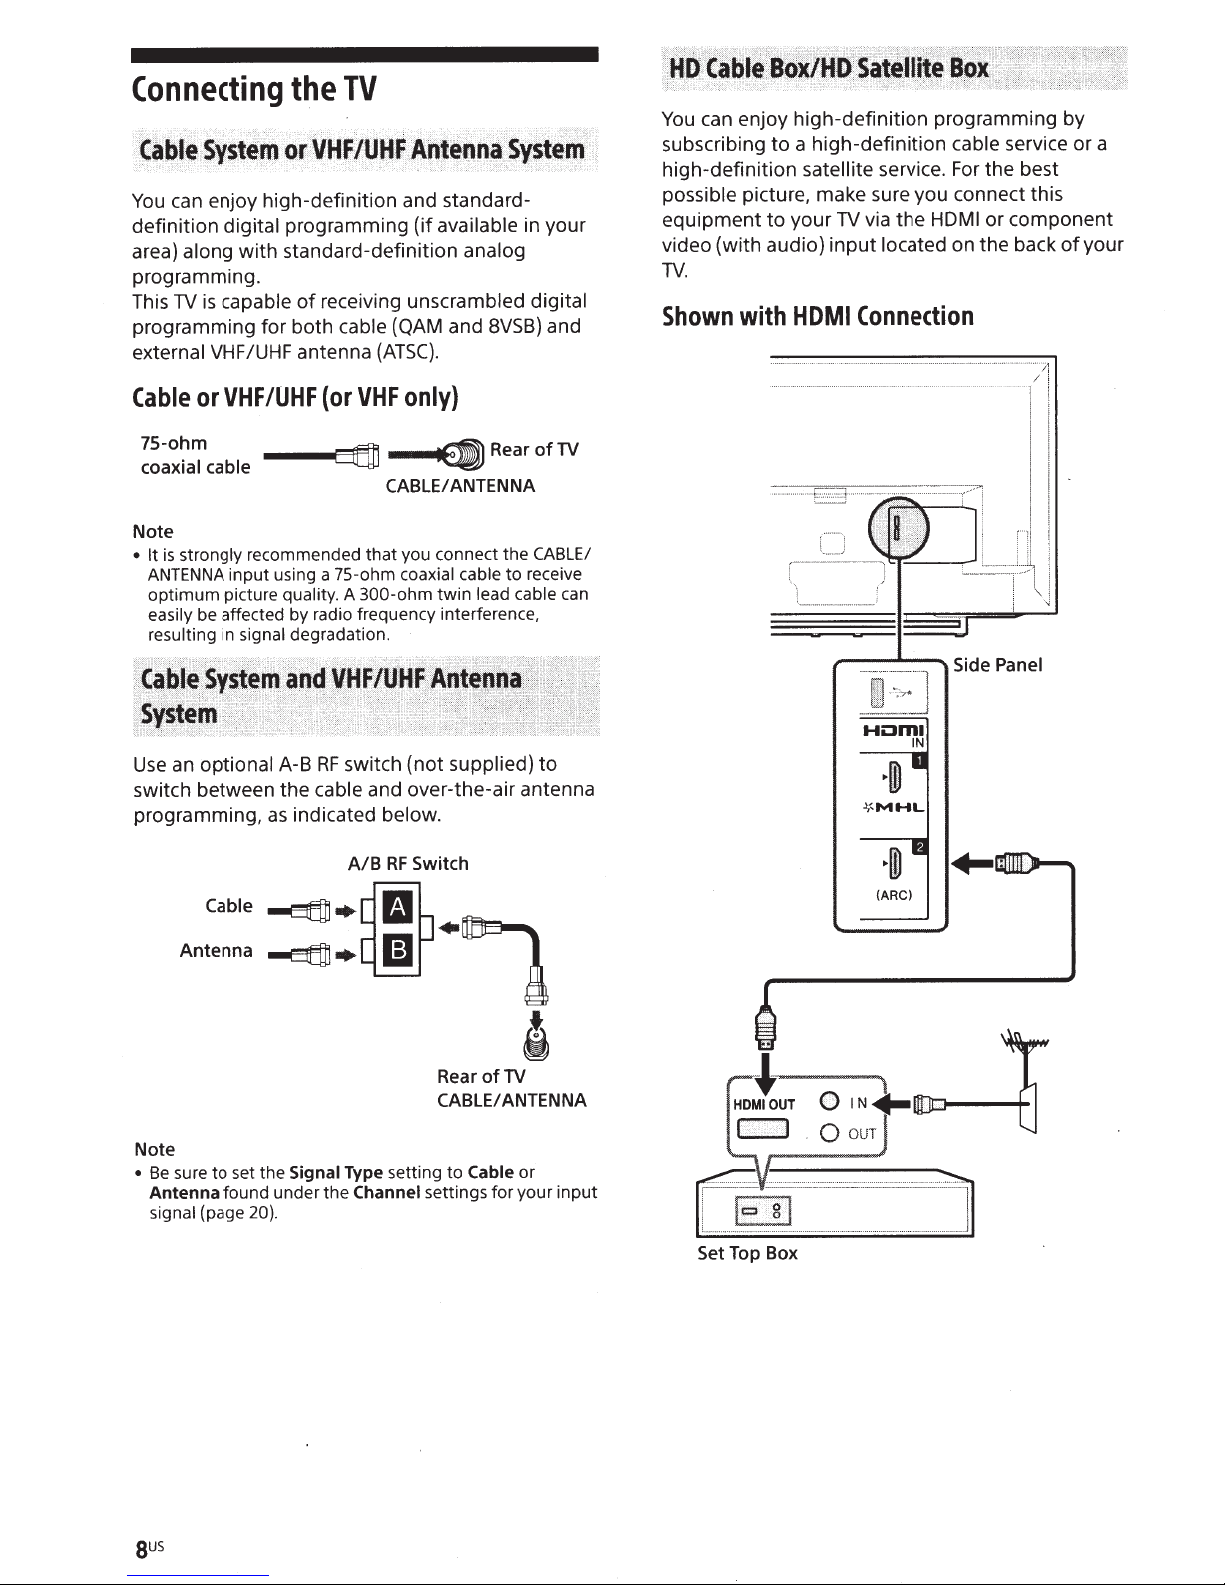
can enjoy high-definition programming by
You
a high-definition
subscribing
high-definition satellite
possible
equipment
video (with audio) input
.
TV
Shown
to
picture, make sure you connect this
via the
TV
your
to
with
HDMI
Connection
service.
located
cable
the best
For
or component
HDMI
on the back
service or a
your
of
75-ohm
coaxial cable
Note
strongly
is
• It
ANTENNA
optimum picture
be
easily
resulting
optional
an
Use
switch between the
programming,
--~c:::t5IJ""'fA
recommended that you connect the
input using a 75-ohm
quality. A
affected by radio frequency interference,
signal degradation.
in
A-B
indicated
as
Cable
~·M
Antenna
~·~·~
-tEl)
CABLE/
300-ohm
switch (not
RF
and over-the-air antenna
cable
below.
RF
A/B
ANTENNA
coaxial cable
twin
supplied)
Switch
of
Rear
CABLE/
to receive
lead cable
to
TV
can
(ARC)
Note
sure to set the
Be
•
Antenna
signal
sus
found under the
(page
Signal Type setting to
Channel
20).
TV
of
Rear
CABLE/
settings for your input
ANTENNA
'
Cable or
Set
Top Box
C)
Q
...
IN
'
OUT
...
· .
~
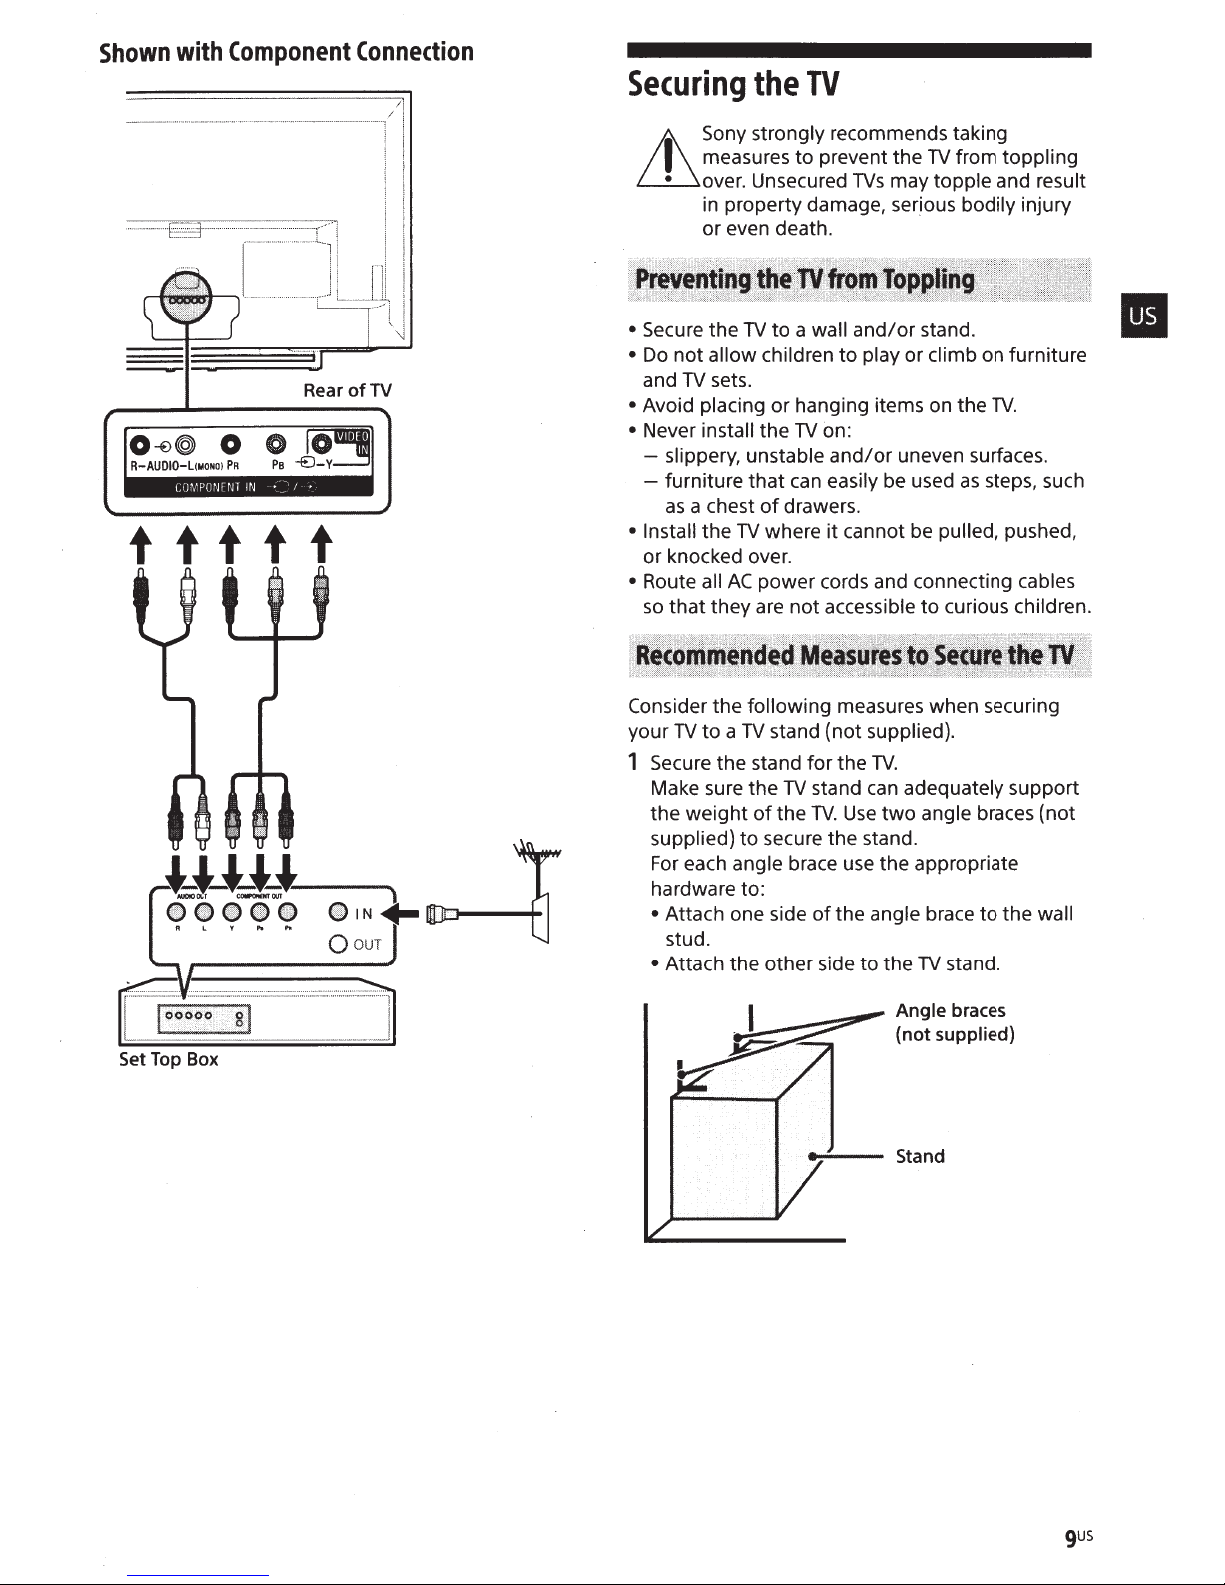
Shown
with
Component
Connection
ttttt
RearofTV
Securing
• Secure the
•
Do
not allow children
TV
and
• Avoid placing or hanging items on the
• Never install the
- slippery, unstable
- furniture
as
a chest
• Install the
or knocked over.
• Route all
so
that
the
TV
Sony strongly recommends taking
measures to prevent the
over. Unsecured
in property damage, serious bodily injury
or
even death.
TV
to a wall
sets.
that
can
of
drawers.
TV
where it cannot be pulled, pushed,
AC
power cords and connecting cables
they are not accessible
TVs
and/or
to
play or climb on furniture
TV
on:
and/or
easily be used
TV
from toppling
may topple and result
stand.
uneven surfaces.
as
to
curious children.
•
TV.
steps, such
Consider the following measures when securing
your
TV
to a TV
1 Secure the stand for the
Make sure the
the
weight
supplied)
For
each angle brace use the appropriate
hardware to:
}!!-!~-.-/(
Set
Top
R L y
Box
.. ..
1---.N~~
QouT
··•···
...
• Attach one side
stud.
• Attach the other side to the
~·
stand (not supplied).
TV
stand
can
of
the
TV.
Use
to
secure the stand.
of
the angle brace
~
)11
TV.
adequately support
two
angle braces (not
TV
stand.
Angle braces
(not supplied)
to
the wall
gus
the stand.
to
Secure the
2
the optional hardware listed below
Use
TV
supplied):
M6 machine screw (screwed
•
TV).
the
of
hole
A screw or similar (attach
•
chain (strong enough
or
Rope
•
Make sure
TV).
the
weight
of
excess slack in the rope or chain.
it
into
to
the
to
that
(not
screw
the
stand).
TV
support the
no
is
there
the
to
Anchor the
3
TV
anchor and chain (or rope).
Anchor bolts
--tr--i-+-+-
(not
supplied)
wall by using bolts,
wall
Wall-mount
--r---+--
'T.~~-.!.(!..
;;?,
.........
holes
chain
or
Rope
(not supplied)
or
Rope
chain
(not
supplied)
the M6 machine screw differs
The length
of
depending on the rope or chain diameter. Please
below illustration.
to
refer
mm
8-12
Screw M6
chain
or
Rope
TV
Note
is
TV
Your
•
depending on the
TV
holes
screw
two
upper
Securing the
•
the stand
against the
follow
to
sure
I
shipped
screws prior
to
with
wall
for
the stand
to
TV
wall
the
toppling
TV
three measures recommended.
the
'
j.,_
screws attached
model.
TV
mounting.)
anchoring the
to
without
over.
minimum
For
provides
Wall-anchor
(not supplied)
the
to
a
wall.
TV
of
and
the rear
(They are fastened in the
Be
to
remove the
to
sure
TV
securing the
protection
further protection, be
1QUS
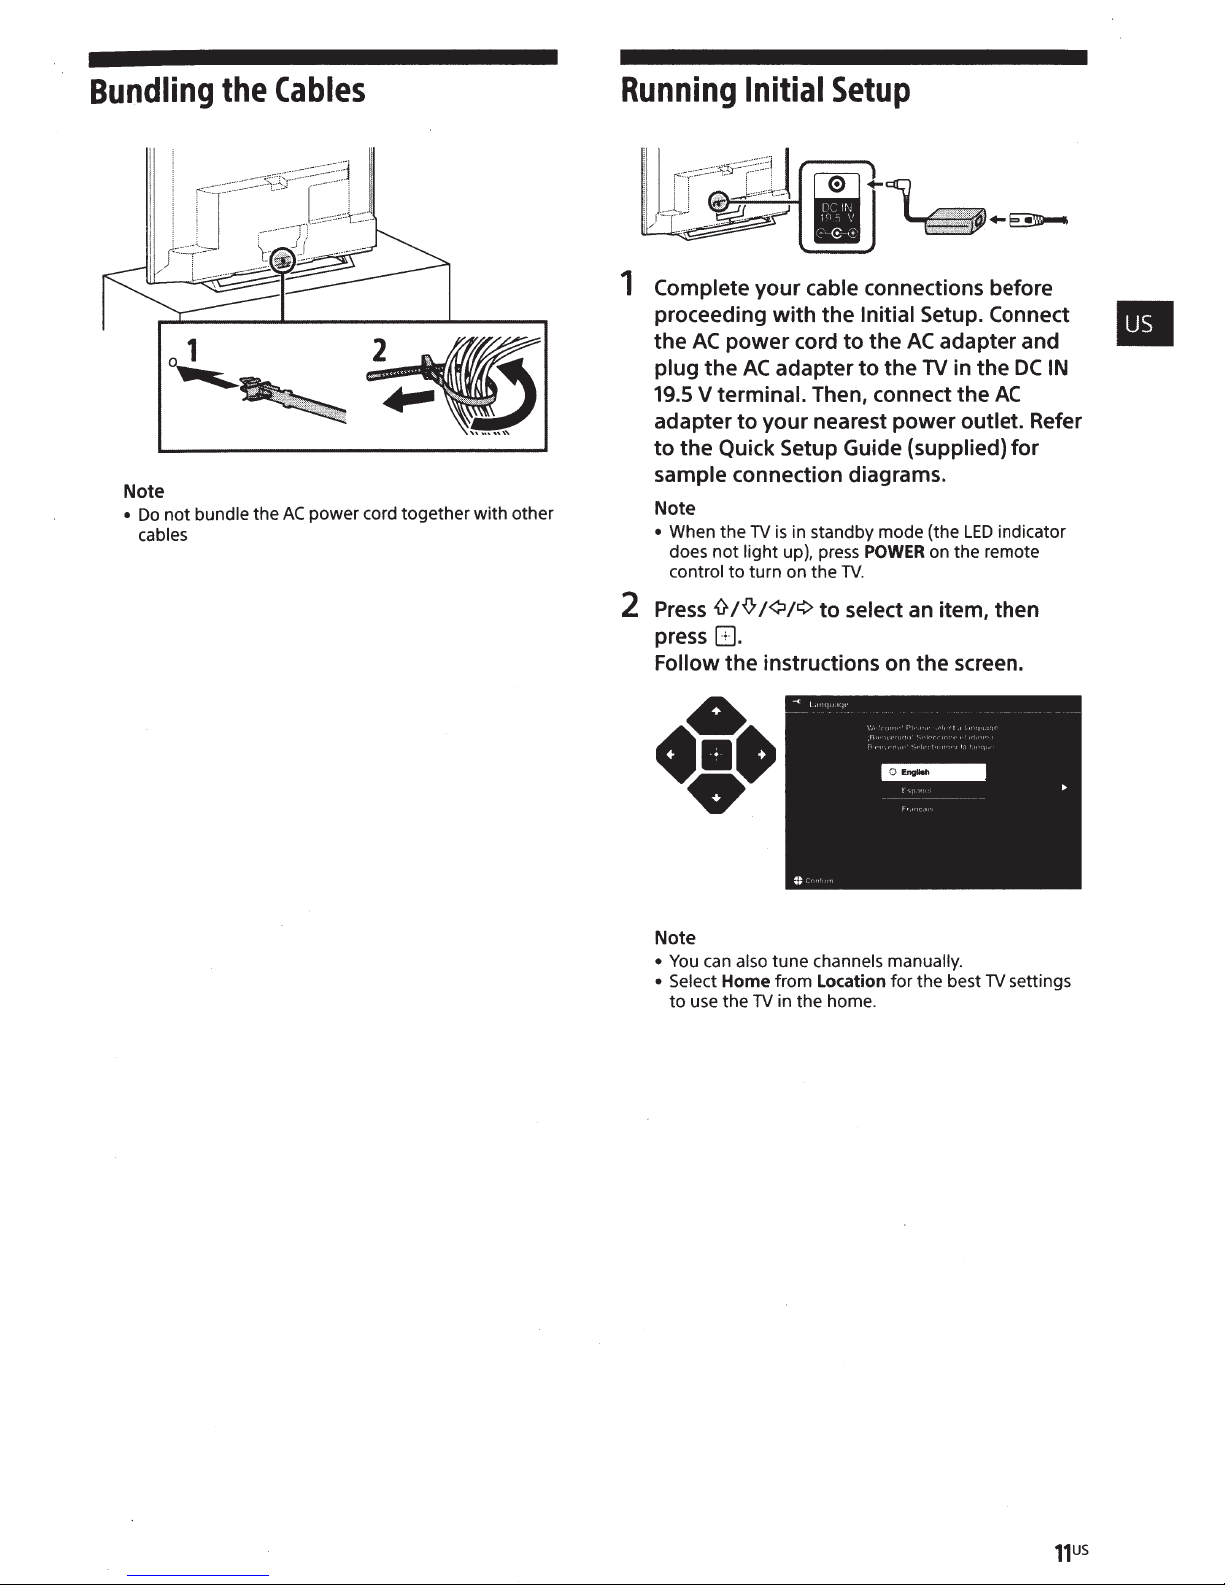
Bundling
the
a 1
~
Note
•
Do
not
bundle the
cables
Cables
AC
power
cord together with other
Running
Initial
Setup
1 Complete your cable connections before
proceeding
the
AC
plug the
19.5
V terminal. Then, connect the
adapter
to
the Quick Setup Guide (supplied)
sample connection diagrams.
Note
• When the
does
not
control
2
Press
press
Follow the instructions on the screen.
with
power
AC
adapter
to
your
TV
is
light up), press
to
turn on the
{}
tfl
/¢/¢
G.
the Initial Setup. Connect
cord
to
the
AC
adapter and
to
the
TV
in the
DC
AC
nearest power outlet. Refer
for
in standby mode (the
POWER
TV.
to
select an item, then
LED
on the remote
indicator
IN
Note
•
You
can also tune channels manually.
• Select
to
use the
Home
TV
from Location
in the home.
for
the best
TV
settings
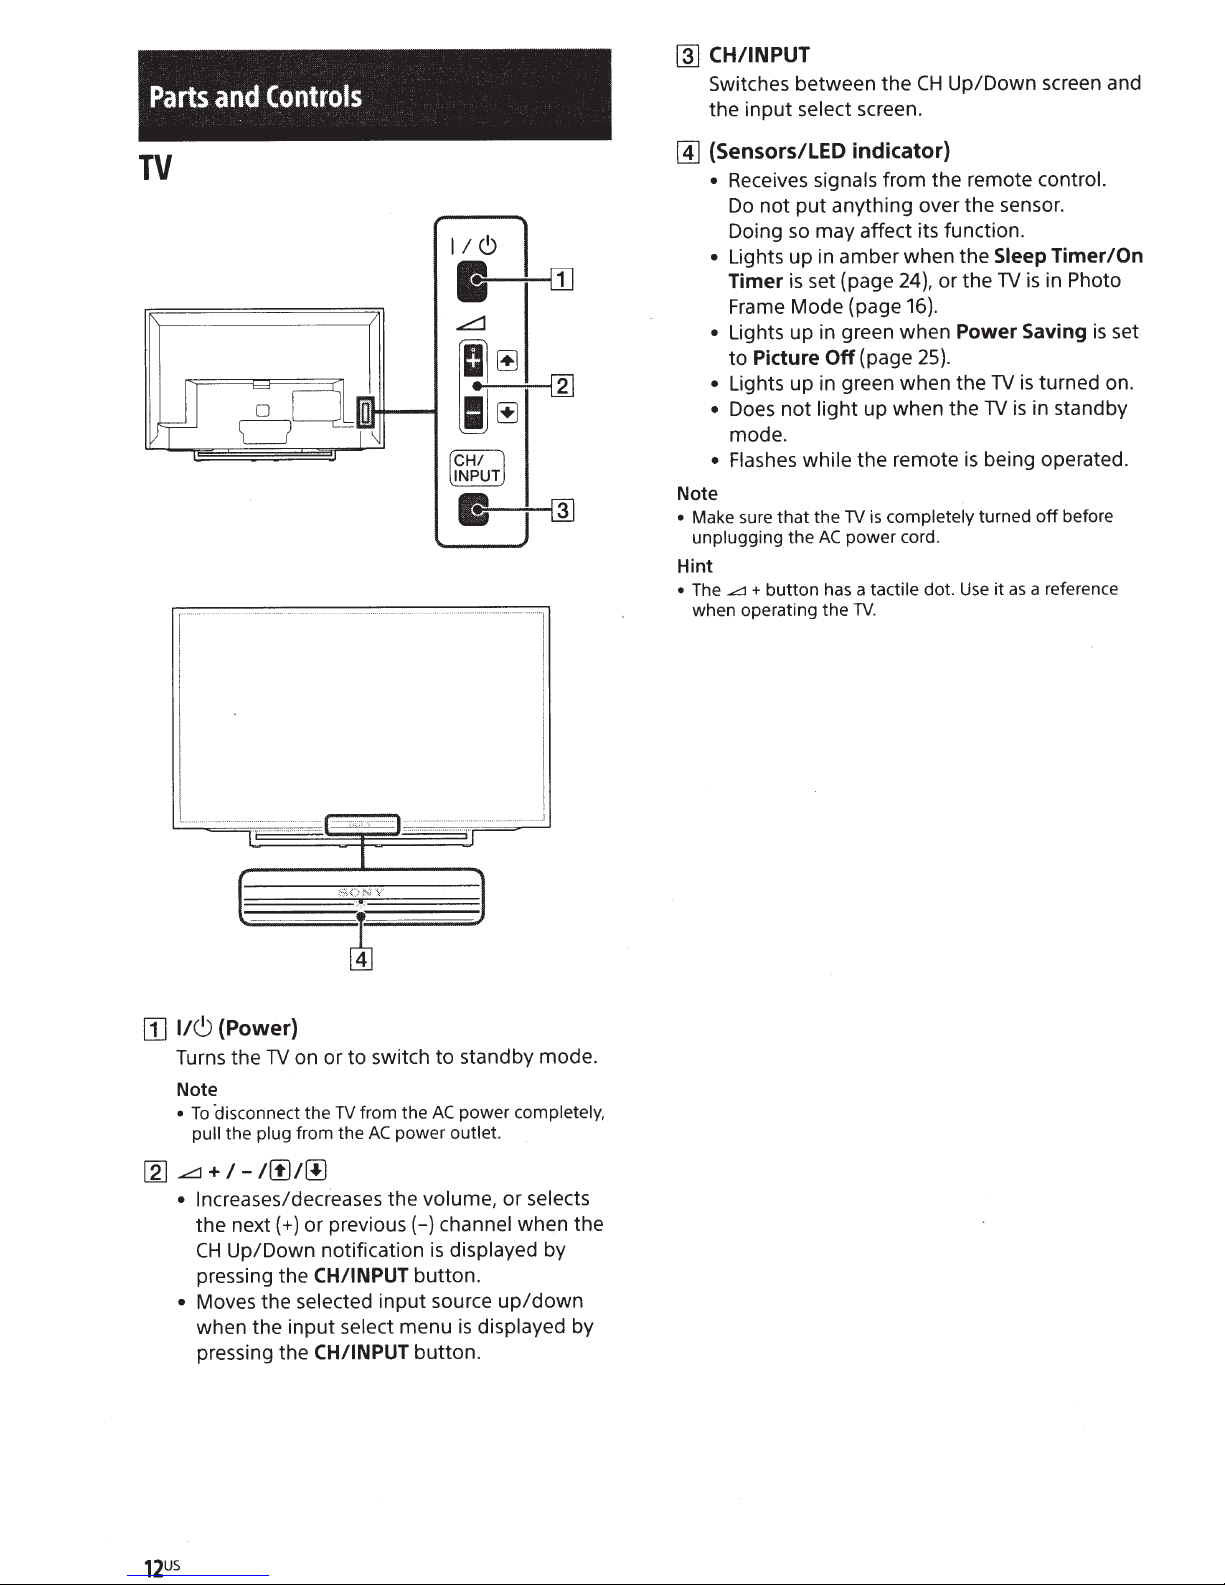
Parts
and
TV
~
Controls
/DIIlll
I~
~i
\
116
I
..:::::::::1
~~
~
T
~
•
CH/INPUT
~
Switches between the
screen.
select
input
the
(Sensors/LED indicator}
~
Receives
•
Do
Doing
Lights up in amber when the
•
Timer
Frame Mode {page
Lights up in green when
•
Picture
to
Lights up in green when the
•
• Does
mode.
• Flashes while
Note
• Make sure
unplugging the
Hint
+
...c::::::1
The
•
when operating the
signals
anything over the sensor.
put
not
may affect its function.
so
set {page
is
{page
Off
up when the
light
not
the remote
is
TV
the
that
power cord.
AC
button has a
tactile
TV.
Up/Down
CH
from the remote
Sleep
TV
or the
24},
.
16}
Power
25}.
is
TV
is
TV
being operated.
is
dot.
turned
Use
as
it
completely
screen and
control.
Timer/On
in Photo
is
Saving
in standby
a reference
is
turned on.
before
off
set
....
T
{
I I
(Power}
116
[I]
on or to switch to standby mode.
Turns the
Note
To
•
pull
...:::::1
[g]
Increases/decreases the
•
the next {
CH
pressing the
Moves the
•
when the input
pressing the
TV
disconnect the
the
I
+
Up/Down notification
-
plug
I(!]
from the
I
+)
·····
·•
I .
from the
TV
power
AC
!!J
or previous {-)
CH/INPUT
selected
CH/INPUT
input source
select
menu
J
power
AC
outlet.
volume,
channel
displayed
is
button.
is
button.
I
completely,
selects
or
when the
by
up/down
displayed
by
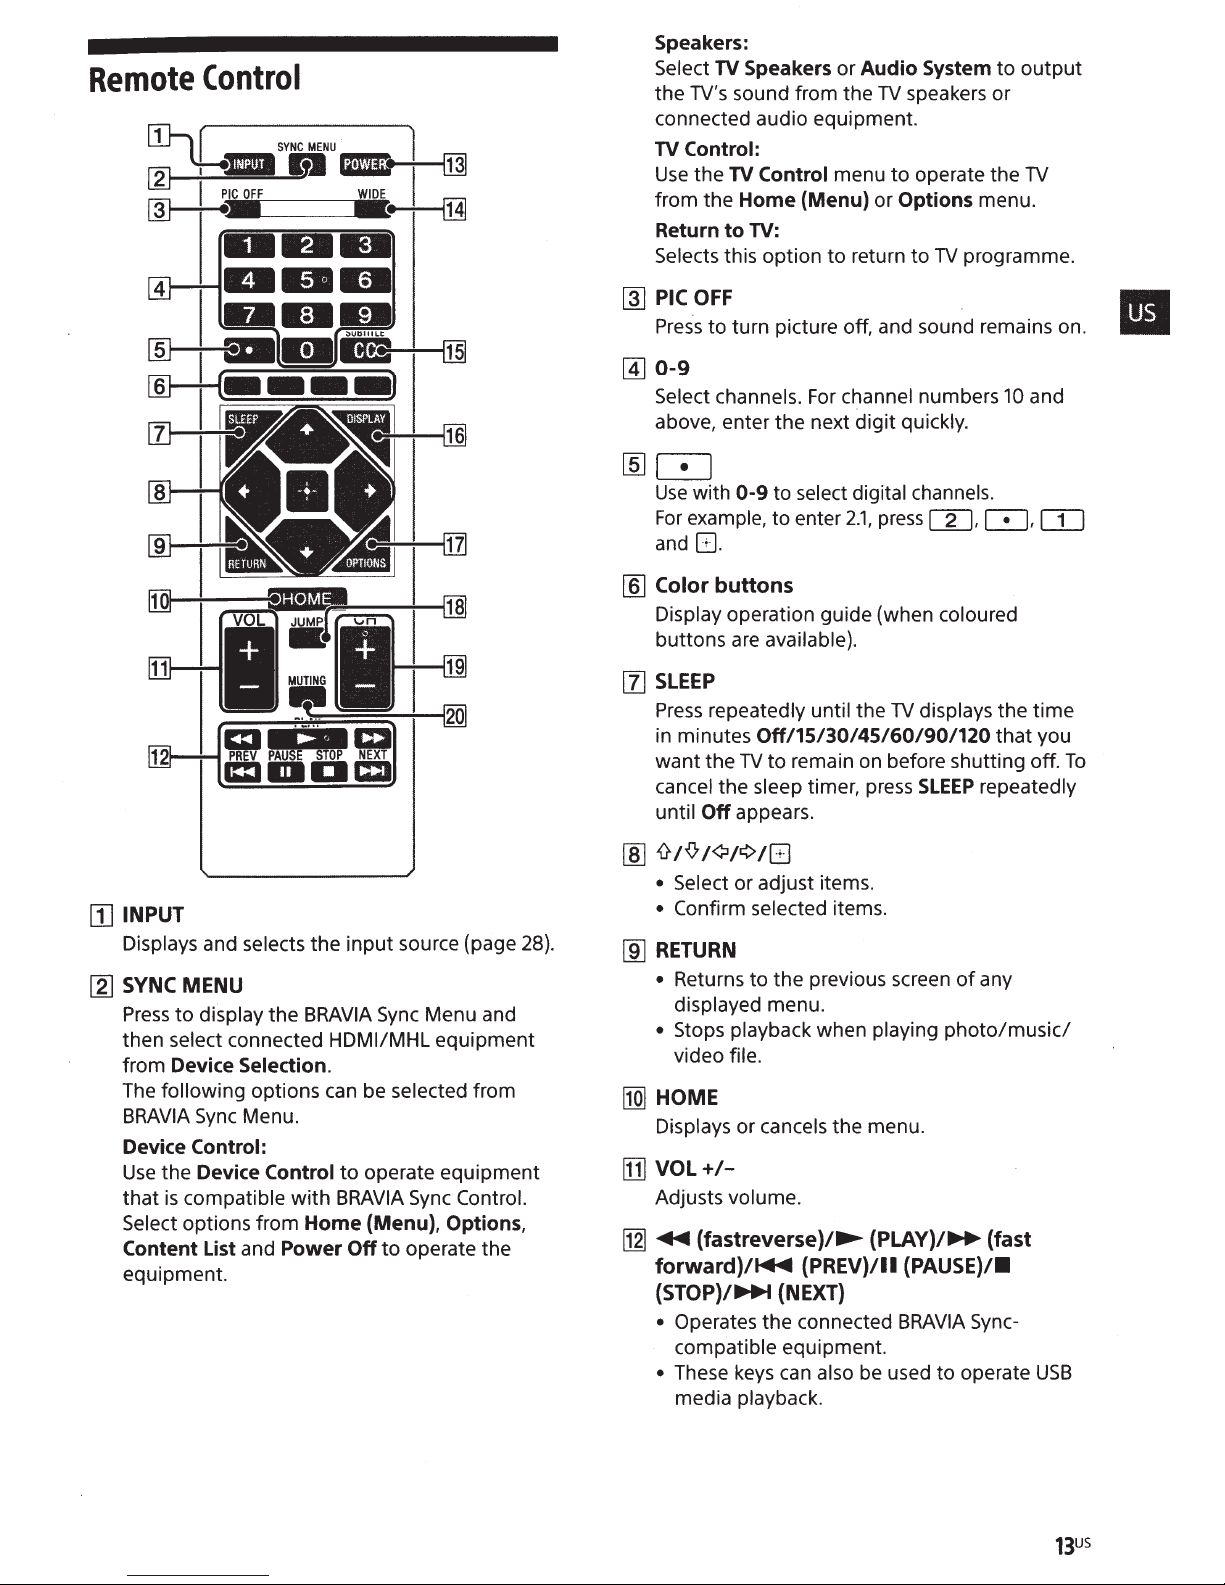
Remote
Control
Speakers:
Select
the
connected audio equipment.
TV
Use
from
Selects this option
~
@]
0-9
Select channels.
above, enter
TV
Speakers
TV's sound from the
Control:
the
TV
Control menu
the Home (Menu)
Return to
PICOFF
Press
TV:
to
turn picture off, and sound remains on.
the
or
Audio System
TV
speakers
to
operate the
or
Options menu.
to
return
to
For
channel numbers
next
digit
quickly.
TV
rnJ8
Use
with
0-9
to select digital channels.
For
example,
and
G.
[§]
Color
Display operation guide (when coloured
buttons are available}.
to
buttons
enter
2.1,
press
[g],
to
output
or
TV
programme.
10
and
~.[I]
[1]
INPUT
the
input
Displays and selects
[2]
SYNC MENU
Press
to
display
then select connected HDMI/MHL
from Device Selection.
following
The
BRAVIA
Device Control:
Use
that
Select options from Home (Menu), Options,
Content
equipment.
Sync
the
Device Control
is
compatible
List
the
BRA
options can be selected from
Menu.
with
BRAVIA
and Power Off
source (page 28}.
VIA
Sync
Menu and
to
operate
Sync
to
operate the
equipment
equipment
Control.
[1]
SLEEP
Press
repeatedly until the
in minutes
want
cancel the sleep timer, press
until Off appears.
[ID
\ttfl
• Select or adjust items.
• Confirm selected items.
[ID
RETURN
• Returns
displayed menu.
• Stops playback when playing
video file.
I1Q]
HOME
Displays or cancels the menu.
[1]
VOL+/-
Adjusts volume.
[12]
~
forward)/~
(STOP)/~
• Operates the connected
compatible equipment.
• These keys can also be used
media playback.
Off/15/30/45/60/90/120
the
TV
to
remain on before shutting off.
/¢/¢/GJ
to
the
previous screen
(fastreverse)/...,...
(PREV)/11
(NEXT)
TV
displays the
SLEEP
of
photo/music/
(PLAY)/_..
(PAUSE)/•
BRA
VIA Sync-
to
operate
time
that
you
To
repeatedly
any
(fast
USB
~POWER
Turns
the
TV
on or switches
IH]
WIDE
Adjusts the screen display.
select
the
desired wide mode (page
~
CC/SUBTITLE
to
standby mode.
Press
Changes the subtitle setting (page
[§]DISPLAY
Displays information.
information about
Press
viewing.
again
Press
once
the
program/input
to
remove the display from
the screen.
l1ZJ
OPTIONS
Press
to
display a list
that
contains shortcuts
some setting menus.
The listed options vary depending on the
current input and content.
~JUMP
Returns to the previous channel or
15
more than
seconds.
repeatedly
15).
23).
to
display
you are
input
viewed
to
to
ljjJ
CH
+/-
Select
the
I2QI
MUTING
Mutes
the
sound.
Hint
• The number
Use
the tactile dots
next (
sound.
5,
..,.. and
+)
or previous
Press
CH
+ buttons have a tactile dots.
as
references when operating
again
(-)
channel.
to
restore
the
the
TV.
14US
Watching
1
Press
1/C)
remote control
2
Press
PIC
remains on.
3
Press
the
select a
4
Press
VOL+/-
TV
on
the
OFF
number
TV
channel.
to
to
to
turn
TV
or
POWER
turn
on
picture off, and sound
buttons
adjust
the
the
TV.
or
CH
volume.
on
+/-to
the
Changing
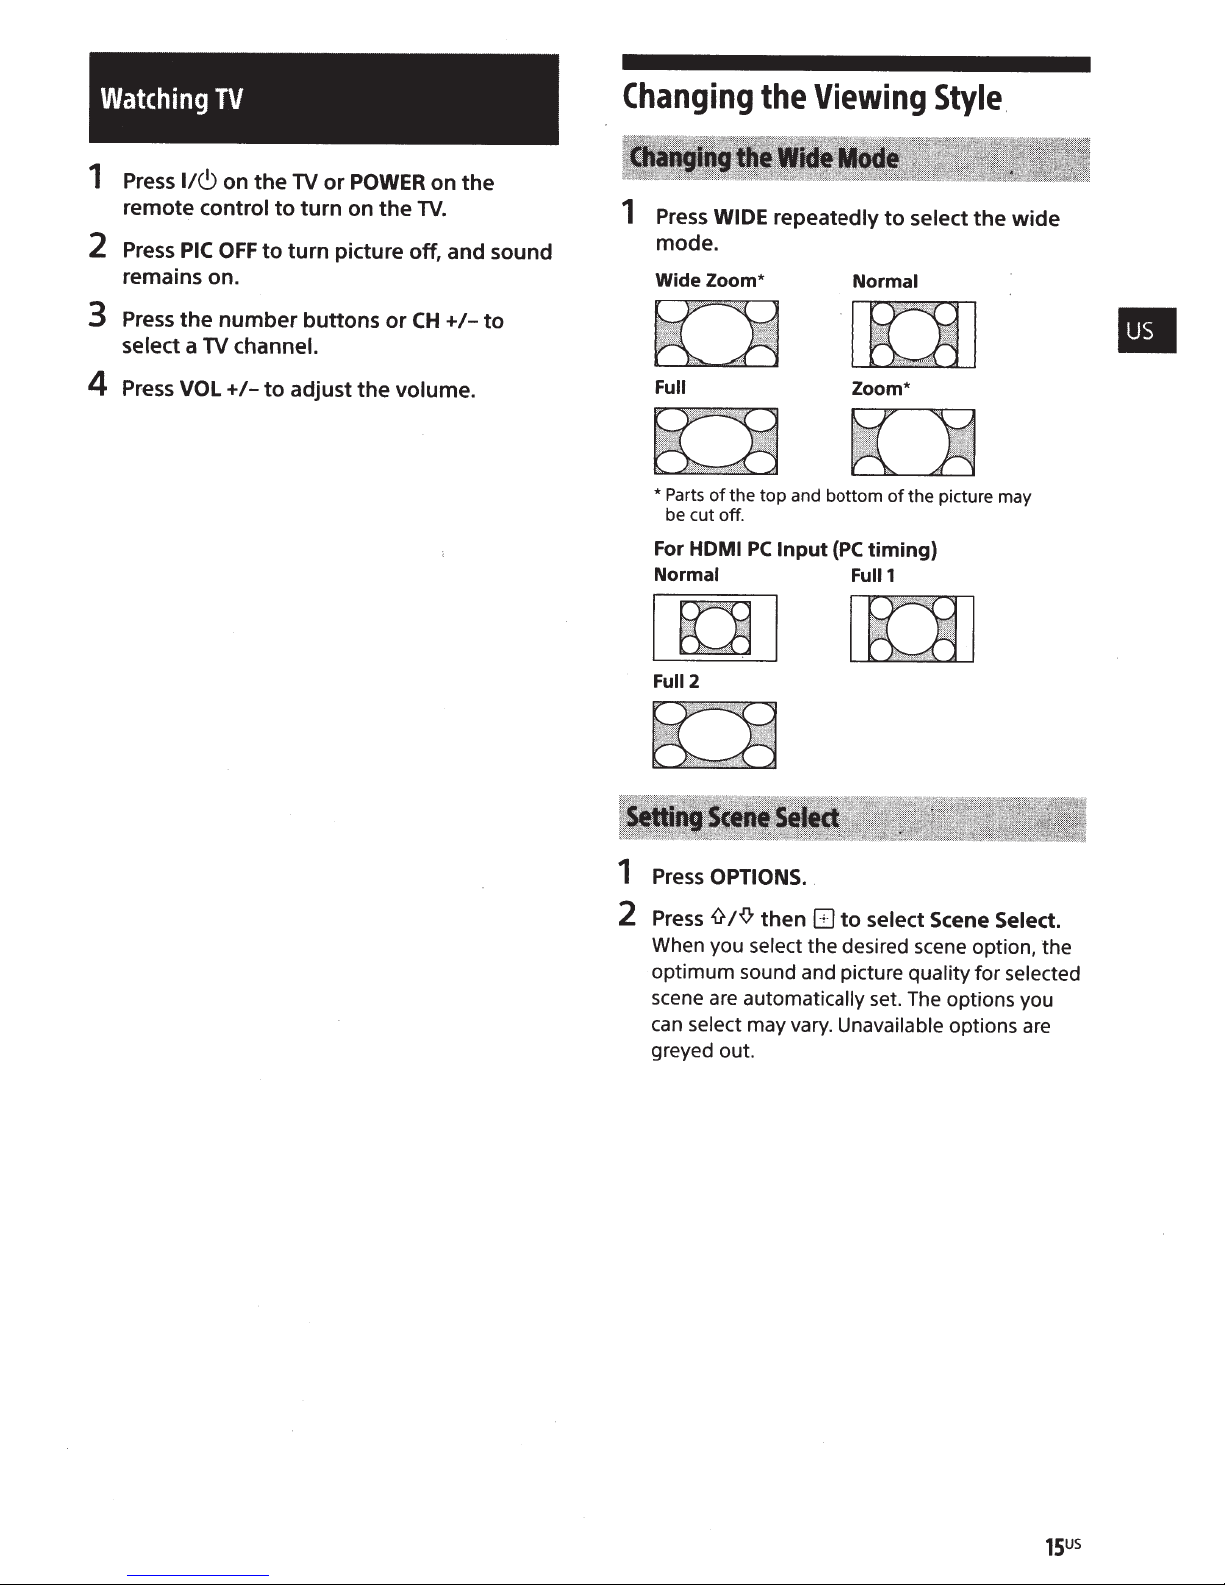
1
Press
mode.
Wide Zoom*
Full
*
Parts
be
cut off.
For
HOM I
Normal Full1
WIDE
of
the
the
Viewing
repeatedly
top
and bottom
PC
Input
Normal
Zoom*
(PC
Style
to
select
of
the picture may
timing)
the
.
wide
•
[K]J
Full2
1
Press
OPTIONS.
2
Press
0
!fl
then
El
to
select Scene Select.
When you select
optimum
scene are automatically set. The options you
can select may vary. Unavailable options are
greyed out.
sound and picture quality
the
desired scene option,
.
.
for
selected
the
15US
Navigating
through
Home
Menu
Applications
HOME
The
settings and features.
TV
Press
1
Press
2
button allows
HOME.
to
J{l
'!)
o.
Favorites
you to
select an
access
option,
a variety
then
press
of
Using
Photo
same time
music.
1·
2
3
To
1
the
Frame
Press
Press
Press
Mode.
select
Press
music
or
as
TV
displays
displaying
as
HOME.
then
J{l
'!)
then
J{l
'!)
photo
OPTIONS
or
file.
Photo
a
the
G
G
music
while
Frame
and
clock
a photo and
select
to
select
to
playing
Applications.
Photo
USB
from
calendar
listening
Frame
memory
a
back
at the
to
photo
Press
1
Press
2
Press
3
program.
HOME.
then
J{l
'!)
!¢!¢
J{l
'!)
select Favorites.
to
G
to
G
then
select a
to
G
then
J{l
'!)
Press
2
launch
Mode
select
To
You
selecting Display
Settings (page
select
To
You
selecting Clock
Settings (page
Note
This
•
clock. Therefore,
disconnect the power cord, be sure
date and
to
Display
change the photo frame
can
Clock
among three
select
can
not
does
TV
.
time
Photo
mode
the Photo Frame
in
Mode
23).
Display
Display in the Photo Frame
23).
have a battery powered backup for the
there
if
mode
a power
is
Duration
continually plays
power, the
save
To
photo frame mode for up to
powering
off, do not
hour to avoid
You
Photo Frame Settings (page
off
use
change the setting
can
TV
automatically. After automatic power
photo frame mode for at
burn-in.
panel
select
Photo
Frame.
display
clock display
failure or
reset the current
to
hours before
24
the Duration
of
23).
Frame
by
modes by
you
if
back in
one
least
the
in
16U5
avoid panel
To
photo,
automatically
clock
position
burn-in,
and calendar are switched
every hour.
the
of
the
Photo
Share
Media
Connect, copy and view favourite photos on
using your devices (eg. smart phones or tablets).
1
Press
HOME.
2
Press
{t
;{}
then
G
to
select Photo Share.
3
Follow
connect your device
4
Open
connections are established, then
the instructions on
URL.
To
display
1
Tap
2
Select a photo, then tap
device.
To
save
1
Tap
the photo
2
Select Save.
Note
• Thumbnail
Connect
•
Up
to
TV
at the same time.
•
Maximum
the instructions on the screen to
to
the
TV.
web
browser on device after
the
screen
photo
on your device
a
photo
thumbnail on
history
USB
10
flash drive to keep up to
smart phones or
file
displayed
to
open
in
size
of
on
TV
to
start.
your
the
context menu.
your device
tablets
each photos
the;.
on
TV
device, then hold .
will
keep up to 5 photos.
50
can be connected to the
is
10MB.
to
icon on your
photos.
TV
all
follow
access
You
can
enjoy
photo/music/video
Sony
digital still camera or camcorder through a
USB
cable
or
USB
storage device on your
1
Connect a supported
2
Press
HOME.
3
Press
{t
f{}
then
4
Press
{t
f{}
then
Video.
If
a
Card
Reader
button
Selection
5
Press
folder.
Playback
Press
playback
To
adjust
1
Press
2
Press
Adjustments.
3
Press
an item.
to
{t
f{}
Method
the
yellow color
settings.
the
OPTIONS
.0/lJ
.0/lJ/¢/¢
select
to
select the appropriate
/¢/¢then
picture
then
is
Playback
G
then
USB
G
to
select Media.
G
to
select Photo, Music
connected, press the
G
button
quality
during video playback.
to
select Picture
G
files
device
Method
to
select a file
to
display list
of
to
select and adjust
stored in a
TV.
to
then
USB
USB
video
the
TV.
yellow
Device
device.
or
of
USB
-
lill
or
.
To
play
a
photo
1
Press
the blue button in thumbnail
start slideshow.
To
set
Slideshow
Speed, press
Method.
To
stop a slideshow, press
as
a
slideshow
Effect and
OPTIONS
Slideshow
--+
Playback
RETURN.
(Photo)
view
to
Note
device,
accessing the data on a
is
While the
•
observe the following:
-Do
-Do
-Do
The
• Sony will
data on the recording media due to a malfunction
connected devices or the
USB
•
camera folder (DCF-compliant, highest-numbered
folder).
USB
•
digital
When you connect a
•
camera's
Storage."
mode, refer to the instructions supplied
camera.
Use
•
Storage
The file system on the
•
and
The
•
in
a selected file
If
•
incomplete,
TV
TV.
the
off
turn
not
disconnect the
not
remove the
not
data on the
Auto
Auto
a
NTFS.
file name and folder name may
some cases.
be held liable for any damage to, or loss of,
not
Start
Start
cameras
still
USB
more information about
For
storage device
USB
Class
it
USB
USB
shows photo files in the newest digital
not
may
are
Sony
connection mode to
standards.
incorrect container information, or
has
cannot be played back.
cable.
USB
device.
device may be damaged.
TV.
work automatically when some
connected.
digital
is
that
device supports
USB
USB
camera, set the
still
"Auto"
USB
with
compliant
display correctly
not
or "Mass
connection
with
FAT16,
any
of
still
"DCIM"
your digital
Mass
USB
FAT32
(.avi)
format
XviD, MPEG-4
MPEG1,
MPEG2
MP,
SP/ASP, H.264 BP/MP/HP,
Motion
Video
USB
AVI
•
Video Codec:
JPEG
Audio
Codec:
PCM,
AAC (2ch), MPEG4
MPEG4
Digital (2ch),
(.wmv, .asf)
ASF
•
Video Codec:
Audio
MP4 (.mp4, .mov, .3gp)
•
Codec:
Video Codec:
WMV v9, XviD,
MP3, WMA v8
MPEG-4 SP/ASP, H.264
BP/MP/HP, H.263,
AudiQ
Codec:
MPEG1
AAC,
MPEG1
Layer1/2,
HE-AAC
(2ch), Dolby
WMA
VC-1
Layer1/2, MP3,
MPEG4
AAC,
MPEG2
(2ch),
AAC
v8
Motion
MPEG2
MPEG4
JPEG
HE-AAC
MKV (.mkv)
•
Video Codec:
is
Codec:
Audio
WebM
•
(.webm)
Video Codec:
Audio
PS
•
Video
Audio
TS
•
Video
Codec:
(.mpg, .mpeg, .vro, .vob)
Codec:
Codec:
(.ts, .m2ts)
Codec:
WMV v9, MPEG-4 SP/ASP, H.264
BP/MP/HP,-VC-1,
MPEG1
PCM,
MPEG2
AAC
(2ch), MPEG4
Digital (2ch),
Dolby
VORBIS
2.0,
DTS
VP8
Layer1/2, MP3,
(2ch), MPEG4
HE-AAC
(2ch),
WMA
AAC
v8,
DTS,
VP8
VORBIS
MPEG1,
MPEG1
MPEG2
Layer1/2, MP3, Dolby
Digital (2ch),
MPEG2
MP,
MP
2.0
DTS
DTS,
H.264 BP/MP/HP,
VC-1
Audio
Codec:
MPEG1
MPEG4
AAC,
HE-AAC,
2.0
DTS
Layer1/2, MP3,
AAC,
Dolby Digital (2ch),
MPEG2
MPEG4
DTS,
format
Music
USB
LPCM
•
•
WMA v8 (.wma)
•
USB
JPEG
•
(.wav)
MPEG1,
Photo
(.jpg, .
audio
format
Note
the above file formats
• Playback
of
layer3 (.mp3)
jpeg)
not guaranteed.
is
Settings
Note
•
The
options you
situation.
displayed.
Unavailable
can
adjust vary depending on the
options
are
greyed out or not
CineMotion
Provides improved picture movement when
playing
taken on film,
graininess.
film-based
Note
• If
BD
(Biu-ray
Select
content
the image contains irregular signals
noise, CineMotion
if
Auto
is
selected.
Disc),
DVD
reducing picture blur
Auto
to represent
as
it
is.
is
automatically
or
VCR
and
or too much
turned
images
original
off
even
Picture
Sets
The options
depending on the
Mode
a picture mode.
that
can
Scene Select
be
selected
Reset
Resets
Mode
all the
to
the
Picture
default
settings except
settings.
Backlight
Adjusts the brightness
of
the
backlight.
Picture
Increases
or decreases picture contrast.
Brightness
Brightens or darkens the picture.
Color
Increases
or decreases color
intensity.
Hue
Increases
red tones.
or decreases the green tones and
differ
settings.
Picture
Advanced
Sets
Reset:
Picture
Resets
Settings
settings
in
more
detail.
all the advanced settings
the factory settings.
f\dv.
Contrast Enhancer: Automatically
adjusts Backlight and Picture to the
most suitable settings judging from the
brightness
of
the screen. This setting
especially effective for dark images
scenes, and
distinction
will
increase the contrast
of
the darker picture scenes.
Black Corrector: Enhances black areas
the picture for stronger contrast.
Gamma: Adjusts the balance between
bright and dark
areas
of
the picture.
Clear White: Emphasises white colors.
Live Color: Makes colors more vivid.
LED
Motion Mode: Reduces blur
by
controlling
the
LED
backlight source,
in
movies
but the brightness decreases.
to
is
of
Sharpness
Sharpens or softens
Color
Temperature
Adjusts the whiteness
Noise
Reduction
Reduces the picture noise (snowy picture)
weak broadcast signal.
MPEG
Noise
Reduction
Reduces the picture noise in
compressed video.
the
picture.
of
the picture.
MPEG-
in
a
Sound
Select
enjoy.
Mode
according to content you want to
Reset
Resets
Mode,
default
all
the
Sound
MTS
Audio
settings.
settings except
and
Altenate
Audio
Equalizer
Adjusts sound frequency settings.
Sound
Produces a
emphasising the bass sounds.
Clear
Makes voices sound
Booster
fuller
Voice
sound for more impact, by
clearer.
Sound
to
the
Steady
Select
programs and commercials.
Select
Sound
stabilize the volume across all
to
On
disable this function.
to
Off
Display
Auto
Select On
area based upon the content or
from the Display Area options.
Area
automatically adjusts the display
to
Off
choose
to
Balance
right speaker balance.
Emphasizes left
Volume
Adjusts the volume
relative to other inputs.
Offset
or
level
the current input
of
MTSAudio
programs.
mono
Enjoy stereo,
bilingual
Stereo: Select for stereo reception when
program broadcast in stereo.
viewing
Auto
the
a signal
present, the
Mono:
a
Select
SAP:
second audio programs when
to
TV
received.
is
TV
Select for mono reception.
reduce noise during weak stereo
broadcasts.
Alternate
Digital channels only.
Audio
Select among the available options
switch among the alternate audio
streams. The program you are tuned
may be broadcasted in a different
language in the alternate audio streams.
and
automatically switch
to
If
no
SAP
signal
is
remains in Stereo mode.
to
Use
to
to
Display
Adjusts the picture display area.
Horizontal
Adjusts the horizontal position
Vertical
Adjusts the vertical position
PC
Selects screen mode or adjust the display
position
input
·
Signal
Cable:
Anten.na: Select
Area
Center
Center
Settings
the picture when receiving
of
signal.
Type
Select
channels via
the picture.
of
the picture.
of
you are receiving cable
if
provider.
TV
Cable
you are using
if
an
PC
antenna.
Program
Auto
Automatically sets up the channel list on the
receivable channels.
all
for
TV
Program.
Select
Auto
Select OK
to
start
Auto
Program.
Mode
Wide
15.
page
details about wide mode,
For
Wide
Auto
Automatically changes the wide mode
according to the input signal from an external
keep your setting, select
equipment.
Hint
Even
•
always
WIDE repeatedly.
Default
4:3
the default
Sets
signal.
To
is
Wide
Auto
if
modify the format
Wide
set
to
Mode
see
Off,
or
On
the screen
of
for a 4:3 input
you can
pressing
by
Off.
Digital
Add
Select
Select
Show/Hide
Allows you
appear when you use the
'1:!/f/
Press
you find the channel you want
hide. Then press
'1:!/f/
Press
shown or hidden. Then press
Channels
Add
OK
Digital
to
Channels.
add digital channels.
Channels
show or hide channels
to
CH
scroll through the channels until
to
select it.
to
EJ
the channel
determine
to
if
that
+/-buttons.
show or
to
will
to select it.
El
be
2QUS
Edit
Channel
Allows
call letters) to channel numbers.
Press
<Jifl
numbers. Then press
number that you want to assign a label.
Press
<Jifl
characters
the next character. Repeat the previous steps
to add up
When finished, press
Analog
Allows
channel
tuning adjustment may improve picture
quality. Select
appropriate analog channel.
you to fine-tune the selected analog
labels
you
to
assign labels (such
to
scroll
through the channel
G
to
scroll through the label
(A-Z, 0-9,
to
seven characters
etc.).
G.
Fine
Tune
manually
if
you feel that a slight
Auto
to
adjust
as
station
to select the channel
Press¢>
to
to
the label.
to
the most
move to
Rating
Off:
Turn
are blocked
Child:
Youth:
Young
Custom:
Maximum
U.S.:
TV-Y,
Canada:
Maximum
U.S.: TV-PG,
Canada:
Adult:
are:
U.S.: TV-14,
Canada:
U.S
.:
See
Canada:
Parental Lock
from
viewing.
ratings
TV-G, G
C,
G,
TV-Y
ratings
PG
C8+,
PG,
8 ans+,
Maximum
PG-13
14+,
13
ans+, TV-14
Select
page
See
to
set ratings ma.nually.
22
for
page
22
off. No
permitted
permitted
TV-PG
ratings
details.
for
details.
programs
are:
are:
permitted
1!1
Audio
Select
channels when distortion occurs in mono
broadcasts.
Filter
On
to
improve the sound
of
individual
Password
Sets
up
TV
to
block channel or external input.
Use
0-9
on the remote
password.
Change
Select
Password
to
change your password.
to
enter a four-digit
Country
U.S.A.:
Canada:
(page
(page
Select
22).
Select
22).
to
use U.S.A.
to
use
ratings
Canadian
ratings
Downloadable
(Available only
ratings exist)
Off:
Turn
No
programs
ratings are
Custom:
on
downloadable
Clear
All:
downloadable
U.S.
Rating
in
U.S.A.
Downloadable
that
contain
blocked
Select
Select
from
to
block
ratings.
to
clear
rating system.
where advanced
U.S. Rating
downloadable
viewing.
programs based
the
entire
Unrated
(Available only when
Allow:
Block:
Channel
Allows you to block channels regardless
program ratings.
To
Press
then
Allows
are broadcasted
Blocks
are
broadcasted
all
Block
View a
Blocked
G
when tuned to the blocked channel
enter the password.
Country
programs and
without
programs
without
and
Channel
is
set to
movies
a rating.
movies
a rating.
off.
U.S.A.)
that
that
of
 Loading...