

Sony BRAVIA KDL-40R370C, BRAVIA KDL-32R320C Operating Instructions Manual
Television
Getting Started
Operating Instructions
Parts and Controls
Watching TV
Navigating through Home Menu
Viewing Pictures from Connected
Equipment
Additional Information
Lea este manual antes de usar el
producto
Centro de Asistencia de
Sony
KDL-40R370C / 32R320C
http://esupport.sony.com/ES/LA/
Llame al número telefónico que aparece en
su póliza de garantía.
Por favor no devuelva el producto a la tienda
donde adquirió el producto.

Table of Contents
IMPORTANT NOTICE . . . . . . . . . . . . . . . .3
Safety Information . . . . . . . . . . . . . . . . .3
Getting Started
Setting Up Your TV . . . . . . . . . . . . . . . 6
Securing the TV. . . . . . . . . . . . . . . . . . 6
Preventing the TV from Toppling. . . . . .6
Recommended Measures to Secure
the TV . . . . . . . . . . . . . . . . . . . . . . . . . . . .7
Precautions . . . . . . . . . . . . . . . . . . . . . . .8
Parts and Controls
TV . . . . . . . . . . . . . . . . . . . . . . . . . . . . . 9
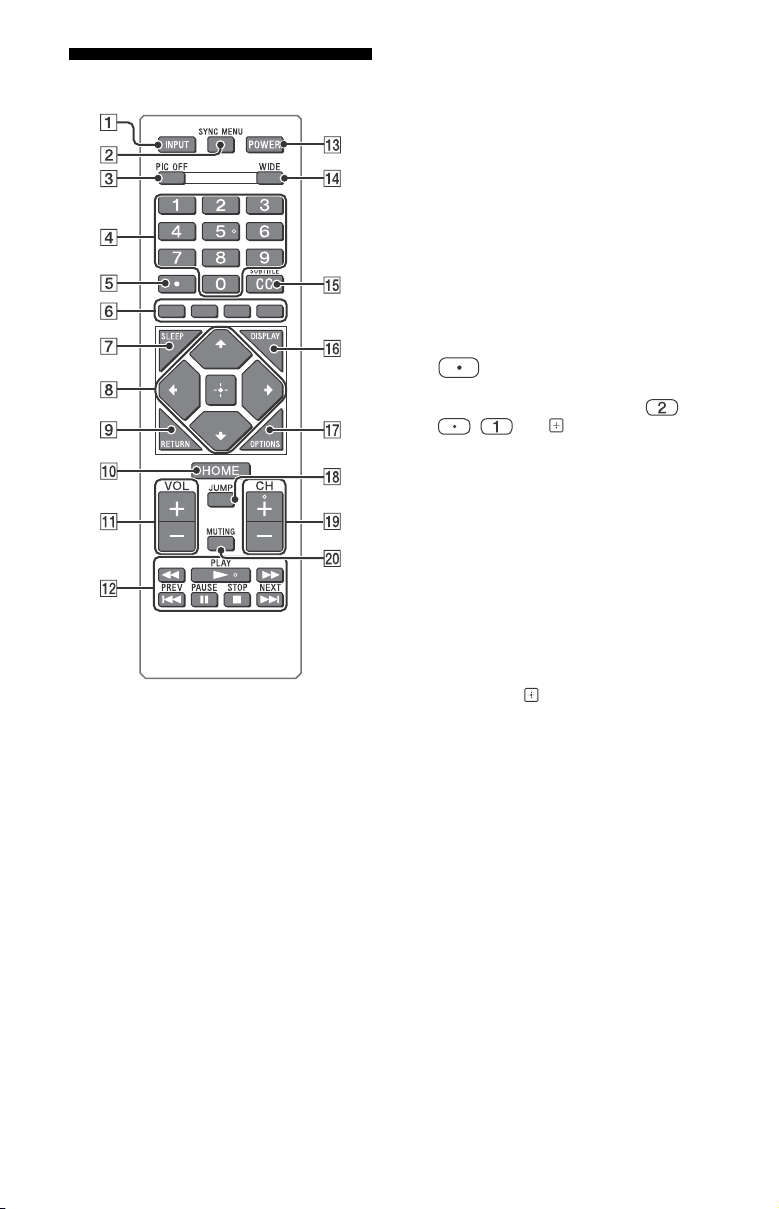
Remote Control . . . . . . . . . . . . . . . . . 10
Guidelines for Remote Control . . . . . 11
Watching TV
Select Your Content Source . . . . . . . . . 12
Adjust Screen Shape and Aspect
Ratio . . . . . . . . . . . . . . . . . . . . . . . . . . . . 12
Customize Sound and Picture
Quality . . . . . . . . . . . . . . . . . . . . . . . . . . 12
Changing the Viewing Style. . . . . . . 13
Changing the Wide Mode . . . . . . . . . . 13
Setting Scene Select . . . . . . . . . . . . . . . 13
Navigating through Home
Menu
Favorites . . . . . . . . . . . . . . . . . . . . . . 14
Applications. . . . . . . . . . . . . . . . . . . . 14
Using the TV as a Photo Frame . . . . . . 14
Media . . . . . . . . . . . . . . . . . . . . . . . . . 15
Playback Photo/Music/Video via
USB . . . . . . . . . . . . . . . . . . . . . . . . . . . . . 15
Settings . . . . . . . . . . . . . . . . . . . . . . . .17
Preferences . . . . . . . . . . . . . . . . . . . . . . 17
Customer Support. . . . . . . . . . . . . . . . .24
Viewing Pictures from
Connected Equipment
Connection Diagram . . . . . . . . . . . . .25
Connecting the TV . . . . . . . . . . . . . . .26
Showing a Set Top Box with HDMI
connection . . . . . . . . . . . . . . . . . . . . . . 26
Showing a Set Top Box with
COMPONENT connection. . . . . . . . . . . 27
Cable System or VHF/UHF Antenna
System. . . . . . . . . . . . . . . . . . . . . . . . . . 27
Showing HD BRAVIA® Sync™ Basic
Connection . . . . . . . . . . . . . . . . . . . . . . 28
Showing HD Basic Connection with
Home Theater System . . . . . . . . . . . . . 29
Showing PC Connection with SD
VCR/DVD. . . . . . . . . . . . . . . . . . . . . . . . 30
Using Audio and Video
Equipment . . . . . . . . . . . . . . . . . . . . . 31
Additional Information
Using a Wall-Mount Bracket . . . . . . .32
Detaching the Table-Top Stand from
the TV . . . . . . . . . . . . . . . . . . . . . . . . . . 32
Installing the TV Against a Wall or
Enclosed Area. . . . . . . . . . . . . . . . . . .33
Troubleshooting. . . . . . . . . . . . . . . . .33
Picture . . . . . . . . . . . . . . . . . . . . . . . . . . 33
Sound . . . . . . . . . . . . . . . . . . . . . . . . . . 34
Channels . . . . . . . . . . . . . . . . . . . . . . . . 34
General . . . . . . . . . . . . . . . . . . . . . . . . . 34
Specifications . . . . . . . . . . . . . . . . . . .35
US
2
Introduction
Thank you for choosing this Sony product. Before operating
the TV, please read this manual thoroughly and retain it for
future reference.
Note
• Images and illustrations used in Startup Guide and this
manual are for reference only and may differ from actual
product appearance.
The 40” class has a 40 inch (101.6 cm) viewable image
size and 32” class has a 31.5 inch (80 cm) viewable image
size (measured diagonally).
Location of the identification label
Labels for the TV Model No. and Power Supply rating are
located on the rear of the TV. Labels for the AC adapter
Model No. and Serial No. are located on the bottom of the
AC adapter.
IMPORTANT NOTICE
Owner’s Record
The model and serial numbers are located at the side
and rear of the TV. Record these numbers in the
spaces provided below. Refer to them whenever you
call upon your Sony dealer regarding this TV.
Model Name
Serial No.
CAUTION
To prevent electric shock and blade exposure, do not use
this AC plug with an extension cord, receptacle or other
outlet unless the blades can be fully inserted.
• Operate the TV only on DC 19.5 V (with AC adapter).
Cleaning
When cleaning, be sure to unplug the power cord to avoid
any chance of electric shock.
• Wipe the LCD screen gently with a soft cloth.
• Stubborn stains may be removed with a cloth slightly
moistened with a solution of mild soap and warm water.
• If using a che mically pretreated cloth, please fo llow the
instruction provided on the package.
• Never use strong solvents such as a thinner, alcohol or
benzine for cleaning.
• See the supplied Safety Booklet for additional information.
Safety Information
Note
This television includes a QAM demodulator which
should allow you to receive unscrambled digital
cable television programming via subscription
service to a cable service provider. Availability of
digital cable television programming in your area
depends on the type of programming and signal
provided by your cable service provider.
WARNING
Never place a television set in an unstable
location. A television set may fall, causing
serious personal injury or death. Many
injuries, particularly to children, can be
avoided by taking simple precautions such
as:
Using cabinets or stands recommended by
the manufacturer of the television set.
Only using furniture that can safely support
the television set.
Ensuring the television set is not overhanging
the edge of the supporting furniture.
Not placing the television set on tall furniture
(for example, cupboards or bookcases)
without anchoring both the furniture and the
television set to a suitable support.
Not placing the television set on cloth or
other materials that may be located between
the television set and supporting furniture.
Educating children about the dangers of
climbing on furniture to reach the television
set or its controls.
If your existing television set is being
retained and relocated, the same
considerations as above should be applied.
US
US
3
NOTE ON AC ADAPTER
Warn ing
To reduce the risk of fire or electric shock,
do not expose this apparatus to rain or
moisture.
To prevent fire or shock hazard, do not place
objects filled with liquids, such as vases, on
the apparatus.
Do not install this equipment in a confined
space, such as a bookshelf or similar unit.
Please ensure that the AC power outlet is
installed near the equipment and shall be
easily accessible.
Be sure to use the supplied AC adapter and
AC power cord. Otherwise it may cause a
malfunction.
Connect the AC adapter to an easily
accessible AC power outlet.
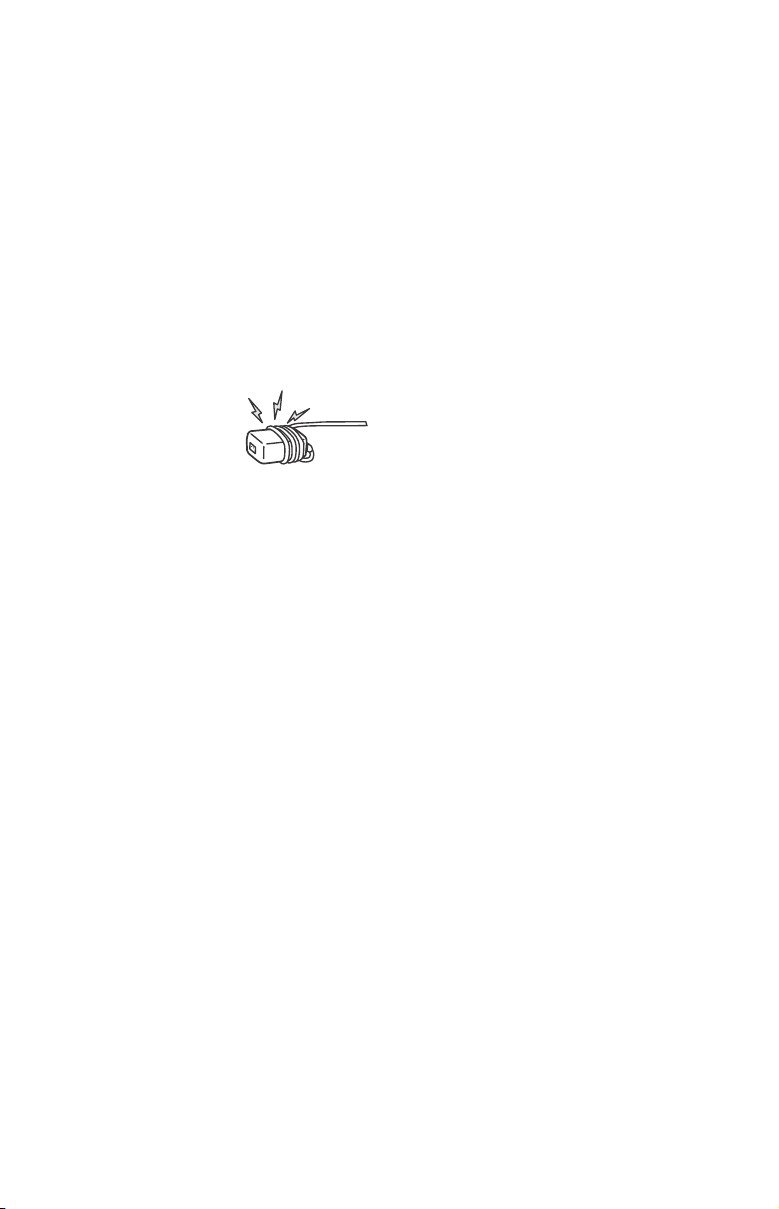
Do not coil the AC
power cord around the
AC adapter. The core
wire may be cut and/or
it may cause a
malfunction of the TV.
Do not touch the AC adapter with wet hands.
If you notice an abnormality in the AC
adapter, disconnect it from the AC power
outlet immediately.
The set is not disconnected from the AC
source as long as it is connected to the AC
power outlet, even if the set itself has been
turned off.
As the AC adapter will become warm when it
is used for a long time, you may feel hot
when touching it by hand.
US
4
The New BRAVIA® LCD HDTV
Audio/Video Performance
Congratulation! Your new BRAVIA® TV
opens the door to the “Stunning HD
Experience” This document will help you
get the most out of your TV.
Please take a moment to register your TV
at:
http://esupport.sony.com/LA/perl/
registration.pl
Four Steps to a Stunning HD
Experience
Set, Source, Sound, and Setup.
1 Set
Now that you have made the best
selection in LED backlit LCD TV
technology, be sure to remove all
accessory contents from the packaging
before setting up your TV.
2 Source
To experience the stunning detail of your
Receive over-the-air HD broadcasts with
an HD-quality antenna connected
directly to the back of your TV.
Visit http://www.antennaweb.org for
more information on antenna selection
and setup.
Discover the wealth of entertainment
now available on super-high resolution
Blu-ray Disc™ player and other Sony HD
equipment.
3 Sound
Complete the high-definition experience
with a BRAVIA Sync™ surround sound
system or A/V receiver from Sony.
4 Setup
Install your TV and connect your sources.
See page 25 for sample connection
diagrams. To help assure the highest
quality for your HD experience, use Sony
HDMI (High-Definition Multimedia
Interface) cables.
BRAVIA TV, you need access to HD
programming.
Upgrade your signal or content source
to high-definition (HD) by contacting
your HD service provider.
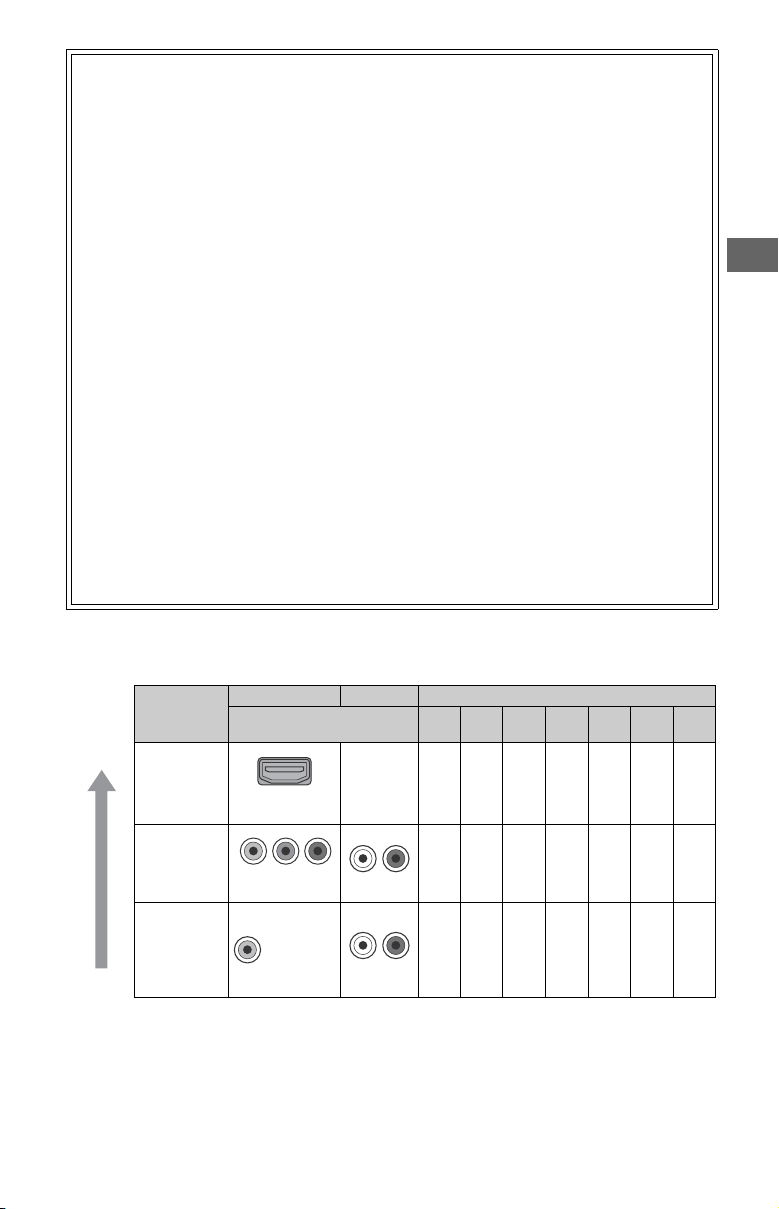
The following chart shows the high-definition (HD) and standard-definition (SD) video formats
supported by your BRAVIA TV inputs.
VIDEO AUDIO High or Standard Definition Quality
Connection
HDMI
connection
HDMI cable
carries both
video and
audio
signals.
1080/
1080p
24p
HD HD HD HD SD SD *
1080i 720p 480p 480i PC
1
High
INPUT
Connector
HDMI 1 (ARC)/
HDMI 2
US
COMPONENT
VIDEO
Standard
*1For supported PC formats refer to the “Specification” in this manual.
Compone nt
connection
Composite
video
connection
Audio L/R
Audio L/R
HD HD HD SD SD
SD
US
5
Getting Started
Setting Up Your TV
Some TV models are packaged with a
detached Table-Top Stand so you can
mount your TV to a wall right away. See
page 32 (Using a Wall-Mount Bracket) if you
want to mount the TV to a wall. If you are
not mounting the TV to a wall, you will need
to attach the Table-Top Stand. You will need
a Phillips screwdriver (not supplied) and the
supplied screws to complete the task. Look
for the supplied Startup Guide.
Be sure to consider the following while
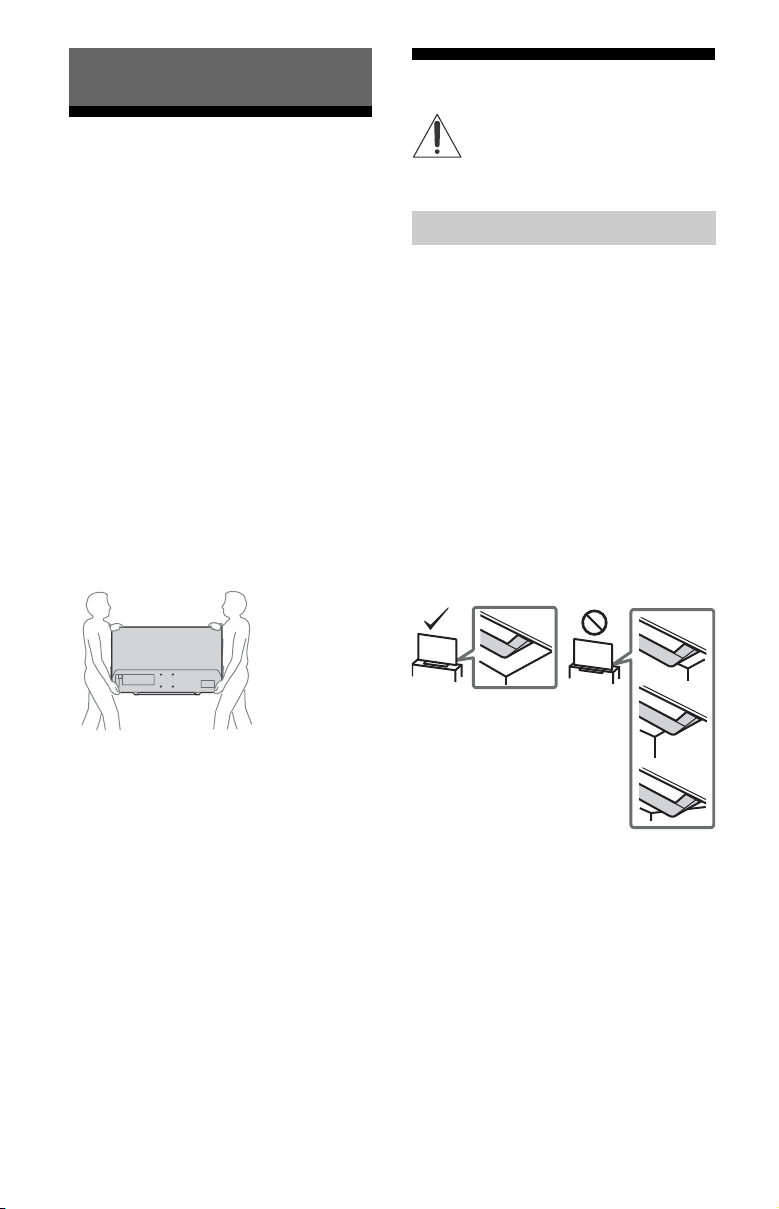
setting up your TV:
Disconnect all cables when carrying the
TV.
Carry the TV with the adequate number of
people; larger size TVs require two or
more people.
Correct hand placement while carrying the
TV is very important for safety and to
avoid damage.
Do not put stress on the LCD panel or the
frame around the screen.
Securing the TV
Sony strongly recommends taking
measures to prevent the TV from
toppling over. Unsecured TVs may
topple and result in property damage,
serious bodily injury or even death.
Preventing the TV from Toppling
Secure the TV to a wall and/or Stand.
Do not allow children to play or climb on
furniture and TV sets.
Avoid placing or hanging items on the TV.
Never install the TV on:
slippery, unstable and/or uneven
surfaces.
furniture that can easily be used as
steps, such as a chest of drawers.
Install the TV where it cannot be pulled,
pushed, or knocked over.
Install the TV so that the TV's Table-Top
Stand does not protrudes out from the
Stand (not supplied). If the Table-Top
Stand protrudes out from the Stand, it
may cause TV set to topple over, fall
down, and cause personal injury or
damage to the TV.
Ensure your TV has adequate ventilation,
see page 33.
For best picture quality, do not expose the
screen to direct illumination or sunlight.
Avoid installing the TV in a room with
reflective wall and floor materials.
Avoid moving the TV from a cold area to a
warm area. Sudden room temperature
changes may cause moisture
condensation. This may cause the TV to
show poor picture and/or poor color.
Should this occur, allow moisture to
evaporate completely before powering
the TV on.
US
6
Route all AC power cords and connecting
cables so that they are not accessible to
curious children.
Getting Started
US
Angle braces
(not supplied)
Stand
Screw
(not supplied)
Rope or
chain
(not
supplied)
Screw
hole on
the rear
cover
M4
machine
screw
(not
supplied)
8 - 12 mm
Screw M4
Rope or chainTV
Wall-mount holes
Rope or
chain (not
supplied)
Eye bolt
(M4) (not
supplied)
Wall-anchor
(not supplied)
8 - 12 mm
M4 eye bolt
TV’s rear cover
Recommended Measures to Secure the TV
Consider the following measures when
securing your TV to a Stand (not supplied).
1 Secure the Stand for the TV.
Make sure the Stand can adequately
support the weight of the TV. Use
two angle braces (not supplied) to
secure the Stand.
For each angle brace use the
appropriate hardware to:
Attach one side of the angle brace to
the wall stud.
Attach the other side to the Stand.
2 Secure the TV to the Stand.
Use the optional hardware listed as
follows (not supplied):
M4 machine screws (screwed into the
TV's rear cover).
A screw or similar (attach it to the
Stand).
Rope or chain (strong enough to
support the weight of the TV). Make
sure that there is no excess slack in the
rope or chain.
The length of the M4 machine screw
differs depending on the rope or chain
diameter. Please refer to below
illustration.
3 Anchor the TV to the wall by using
bolts, wall anchor and chain (or
rope).
Please see below illustration for M4 eye
bolt length.
Note
• Your TV is shipped with screws attached to the
rear of the TV depending on the TV model. (They
are fastened in the screw holes for wall
mounting.)
• Securing the TV to the Stand without securing
the TV and the Stand to the wall provides
minimum protection against the TV toppling
over. For further protection, be sure to follow the
three measures recommended.
US
7
Precautions
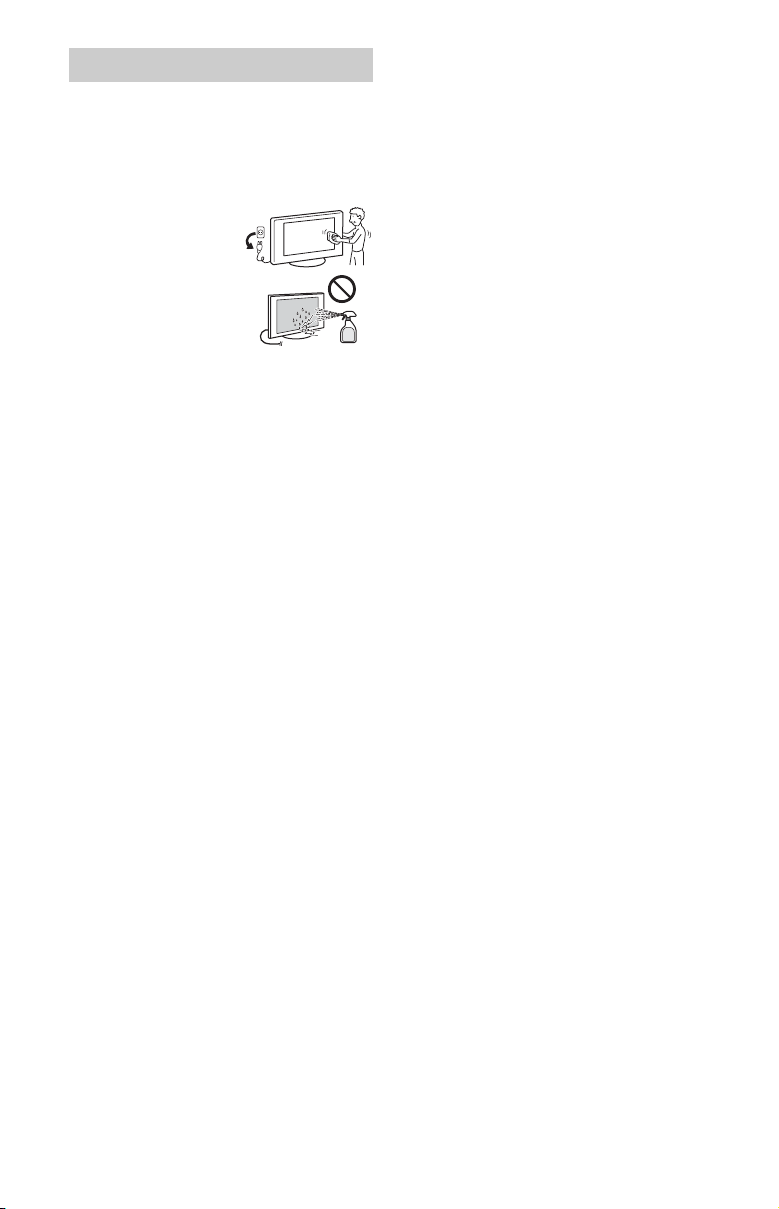
How to care for your BRAVIA TV
Safety is very important. Please read and
follow the safety documentation (Safety
Booklet) separately provided.
Unplug the TV and
other connected
equipment from the
wall outlet before you
begin cleaning your
TV.
Wipe the LCD
screen gently with a
soft cloth.
Stubborn stains may be removed with a
cloth slightly moistened with a solution of
mild soap and warm water.
If using a chemically pretreated cloth,
please follow the instruction provided on
the package.
Never spray water or detergent directly on
the TV set. It may drip to the bottom of the
screen or exterior parts and enter the TV
set, and may cause damage to the TV set.
Never use strong solvents such as a
thinner, alcohol or benzine for cleaning.
Do not plug in the TV into the wall outlet
until the moisture from cleaning has
evaporated.
The TV should also be placed on a stable
surface to prevent it from toppling over (see
page 6). If you have young children or pets
at home, check regularly to ensure the TV is
securely fastened.
US
8
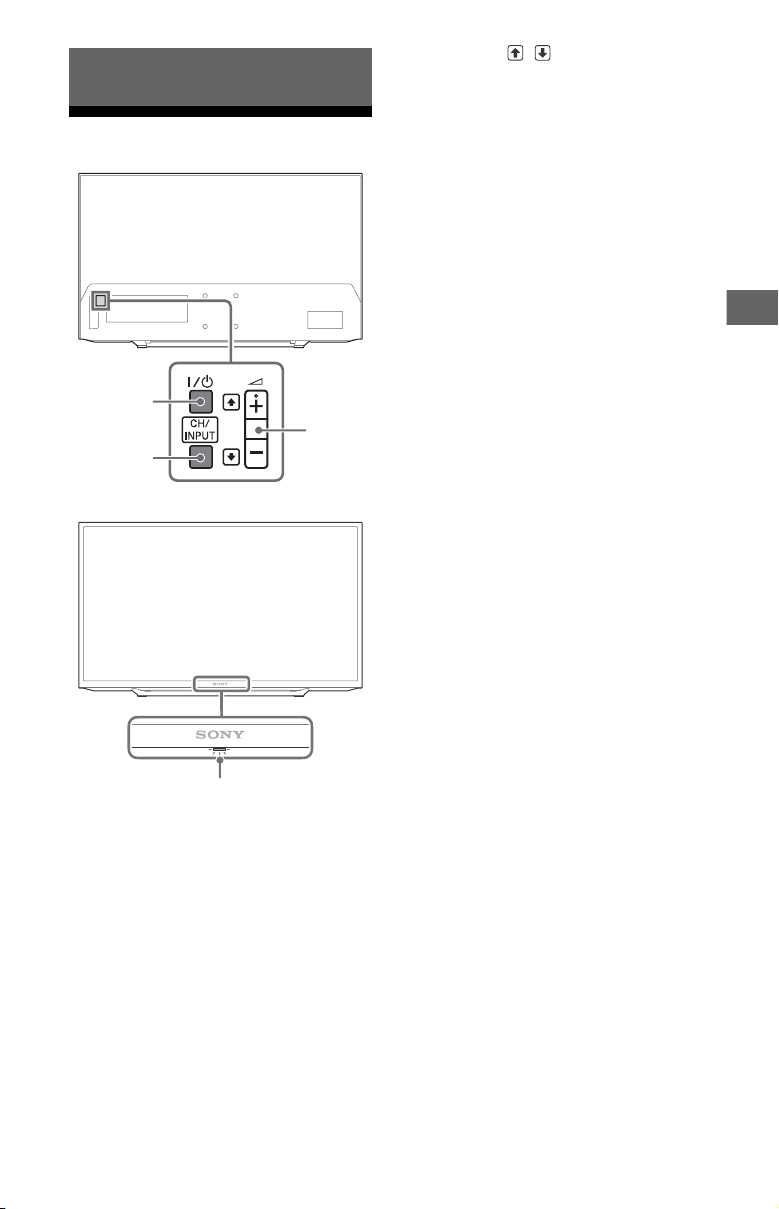
Parts and Controls
US
4
1
2
3
+ / – / /
Parts and Controls
TV
• Increases/decreases the volume, or
selects the next (+) or previous (–)
channel when the CH Up/Down
notification is displayed by pressing
the CH/INPUT button.
• Moves the selected input source up/
down when the input select menu is
displayed by pressing the CH/INPUT
button.
(Sensors/LED indicator)
• Receives signals from remote control.
Do not put anything over the sensor.
Doing so may affect its function.
• Lights up in amber when the [Sleep
Timer] or [On Timer] is set (page 22),
or the TV is in [Photo Frame Mode]
(page 14).
• Lights up in green when [Power
Saving] is set to [Picture Off]
(page 24).
• Lights up in green when the TV is
turned on.
• Does not light up when the TV is in
standby mode.
• Flashes while the remote is being
operated.
Note
• Make sure that the TV is completely turned off
before unplugging the AC power cord.
Hint
•The + button has a tactile dot. Use it as a
reference when operating the TV.
/ (Power)
Turns the TV on or switches to standby
mode.
Note
• To disconnect the TV from the AC power
completely, pull the plug from the AC power
outlet.
CH/INPUT
Switches between the CH Up/Down
screen and the input select screen.
US
9
Remote Control
INPUT
Displays and selects the input source
(page 31).
SYNC MENU
Press to display the BRAVIA Sync Menu
and then select connected HDMI
equipment from [Device Selection].
The following options can be selected
from BRAVIA Sync Menu.
Device Control:
Use the [Device Control] to operate
equipment that is compatible with
BRAVIA Sync Control. Select options
from [Home (Menu)], [Options], [Content
List] and [Power Off] to operate the
equipment.
Speakers:
Select [TV Speakers] or [Audio System]
to output the TV’s sound from the TV
speakers or connected audio
equipment.
TV Control:
Use the [TV Control] menu to operate
the TV from the [Home (Menu)] or
[Options] menu.
Return to TV:
Select this option to return to TV
program.
PIC OFF
Press to turn picture off, and sound
remains on.
0-9
Select channels. For channel numbers
10 and above, enter the next digit
quickly.
Use with
For example, to enter 2.1, press ,
0-9
to select digital channels.
, and .
Color buttons
Displays operation guide (when colored
buttons are available).
SLEEP
Press repeatedly until the TV displays
the time in minutes [Off]/[15 min]/
[30 min]/[45 min]/[60 min]/[90 min]/
[120 min] that you want the TV to remain
on before shutting off. To cancel the
sleep timer, press SLEEP repeatedly until
[Off] appears.
////
• Select or adjust items.
• Confirm selected items.
RETURN
• Returns to the previous screen of any
displayed menu.
• Stops playback when playing photo/
music/video file.
HOME
Displays or cancels the menu.
VOL +/–
Adjusts volume.
(fast rewind)/ (PLAY)/
(fast forward)/ (PREV)/
(PAUSE)/ (STOP)/ (NEXT)
• Operates the connected BRAVIA Synccompatible equipment.
• These keys can also be used to
operate USB media playback.
10
US
Parts and Controls
US
POWER
Turns the TV on or switches to standby
mode.
WIDE
Adjusts the screen display. Press
repeatedly to select the desired wide
mode (page 13).
CC/SUBTITLE
Changes the subtitle setting (page 21).
DISPLAY
Displays information. Press once to
display information about the program/
input you are viewing. Press again to
remove the display from the screen.
OPTIONS
Displays a list that contains shortcuts to
some setting menus.
The listed options vary depending on
the current input and content.
JUMP
Returns to the previous channel or input
viewed more than 15 seconds.
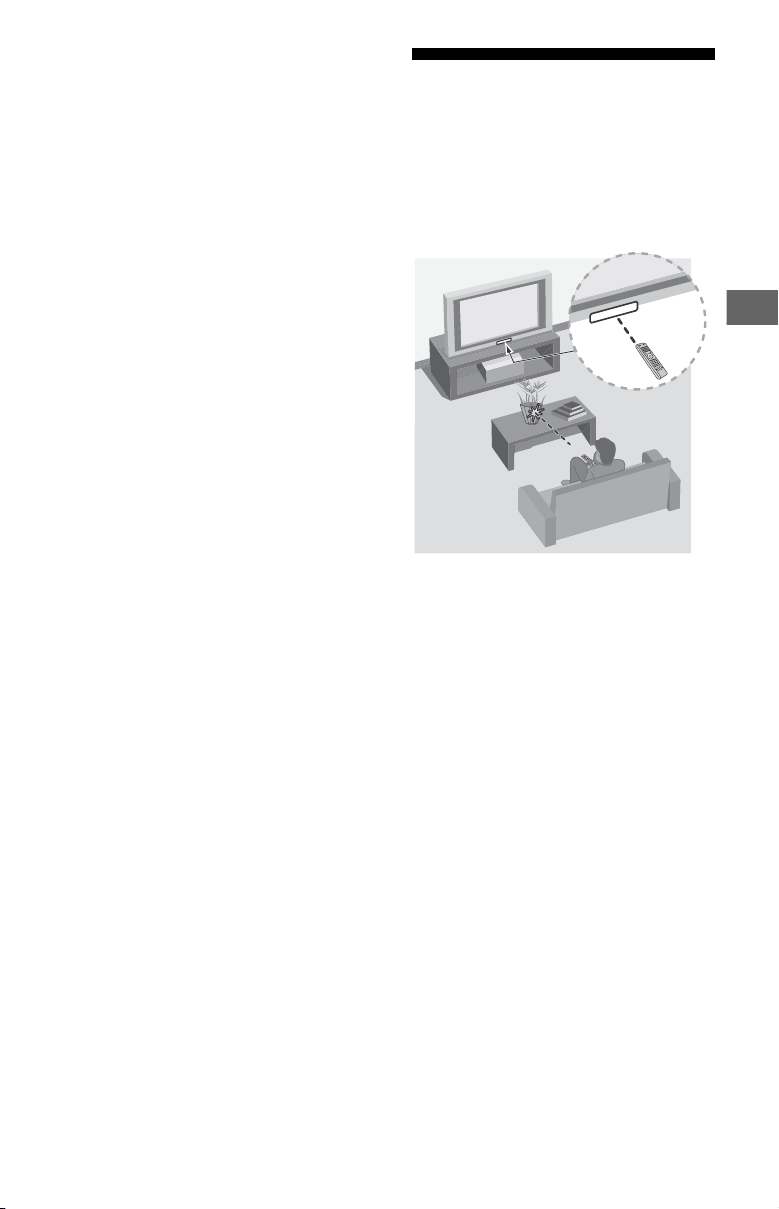
Guidelines for Remote Control
Point your remote control directly at the IR
sensor located on your TV.
Make sure that no objects are blocking the
path between the remote control and the
IR sensor on your TV.
CH +/–
Select the next (+) or previous (–)
channel.
MUTING
Mutes the sound. Press again to restore
the sound.
Hint
• The number 5, and CH + buttons have a
tactile dots. Use the tactile dots as references
when operating the TV.
Fluorescent lamps can interfere with your
remote control; try turning off the
fluorescent lamps.
If you are having problems with the
remote control, reinsert or replace your
batteries and make sure that they are
correctly inserted.
US
11
Watching TV
1 Press / on the TV or POWER on
the remote control to turn on the TV.
2 Press PIC OFF to turn picture off, and
sound remains on.
3 Press the number buttons or CH +/–
to select a TV channel.
4 Press VOL +/– to adjust the volume.
Select Your Content Source
Whether you are watching cable or
broadcast TV; playing a VCR, DVD or Blu-ray
Disc; or connecting to your PC, you need to
choose the correct input using your remote
control:
•Press the INPUT button repeatedly until
your selection is highlighted on-screen.
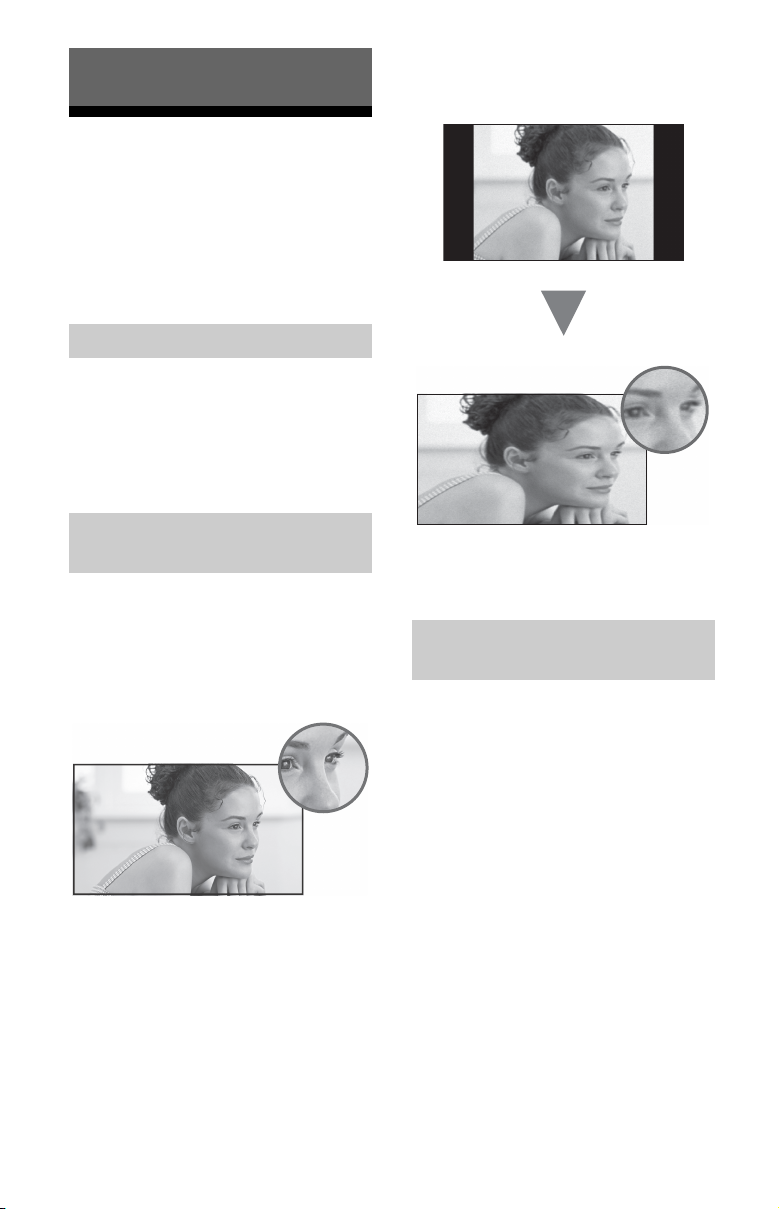
Adjust Screen Shape and Aspect Ratio
High Definition and Standard Definition
signals are transmitted with different aspect
ratios (the width-to-height ratio of the
image).
The 16:9 aspect ratio (common to most HD
signals) looks perfect on your BRAVIA.
The boxy 4:3 aspect ratio (common to most
SD signals) must be adjusted to fill the
screen.
•Press the WIDE button on your remote
control to display the [Wide Mode] setting
of your preference.
Customize Sound and Picture Quality
You can choose optimum sound and picture
settings to match the content you are
displaying on your TV:
• Press the remote control’s HOME button,
select [Settings] [Preferences], then
select the [Picture] and [Sound] settings to
adjust the picture and sound quality of
your content.
Refer to your operating instructions manual
for more information on adjusting or
customizing your settings.
US
12
 Loading...