

Sony BRAVIA RMF-TX600C, BRAVIA KD-85Z9G, BRAVIA RMF-TX600P, BRAVIA RMF-TX600T Reference Manual [en, zh]
Page 1
5-001-732-11(1)
Customer Support and Contact:
䒩ㆷ㒰㍵␍俰䳢澢
Television
Reference Guide
GB
CT
KD-85Z9G
Page 2
Note
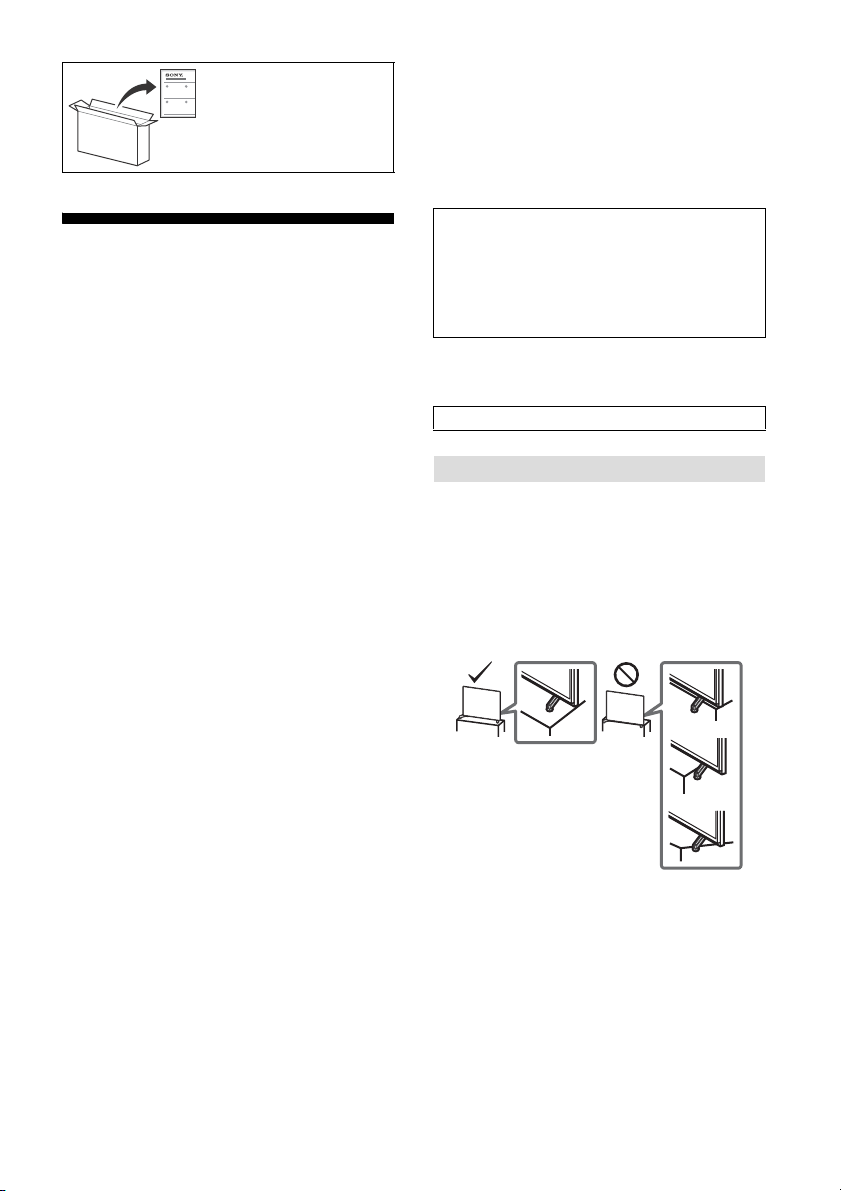
For information on setting
up your TV, refer to the
Setup Guide.
Table of Contents
Safety Information . . . . . . . . . . . . . . . . . . . . .2
Parts and Controls . . . . . . . . . . . . . . . . . . . 5
Controls and Indicators . . . . . . . . . . . . . . . . . 5
Using Remote Control . . . . . . . . . . . . . . . . 6
Remote Control Parts Description. . . . . . . . . 6
Connection Diagram . . . . . . . . . . . . . . . . . 8
Installing the TV to the Wall . . . . . . . . . . 10
Troubleshooting. . . . . . . . . . . . . . . . . . . . 12
Troubles and Solutions. . . . . . . . . . . . . . . . . 12
Specifications . . . . . . . . . . . . . . . . . . . . . . 13
Introduction
Thank you for choosing this Sony product.
Before operating the TV, please read this manual thoroughly and
retain i t for future reference.
• Before operating the TV, please read the “Safety Information”
(page 2).
• Read the supplied Safety Information for additional safety
information.
• Instructions about “Installing the TV to the Wall” are included
within this TV’s instruction manual.
• Images and illustrations used in the Setup Guide and this
manual are for reference only and may differ from the actual
product.
Help
Find more troubleshooting and other useful information
directly from your TV. Press HELP on the remote contro l to
display a list of topics, or to search by keyword.
Help Guide (Manual)
For more detailed information, select [Help Guide] from the
Help menu on your TV. You can also check the Help Guide
from your PC or smartphone (information provided on the
back cover of this manual).
Location of the identification label
Labels for the TV Model No. and Power Supply rating are located
on the rear of the TV. They can be found by removing the terminal
cover.
This television is designed for use in Hong Kong and ensured
the usage in Hong Kong only.
Safety Information
Installation/Set-up
Install and use the TV set in accordance with the instructions
below in order to avoid any risk of fire, electric shock or damage
and/or injuries.
Installation
• The TV set should be installed near an easily accessible AC
power outlet (mains socket).
• Place the TV set on a stable, level surface to prevent it from
falling over and causing personal injury or property damage.
• Install the TV where it cannot be pulled, pushed, or knocked
over.
• Install the TV so that the TV’s Table-Top Stand does not protrude
out from the TV stand (not supplied). If the Table-Top Stand
protrudes out from the TV stand, it may cause TV set to topple
over, fall down, and cause personal injury or damage to the TV.
• Only qualified service personnel should carry out wall-mount
installations.
GB
2
Page 3
GB
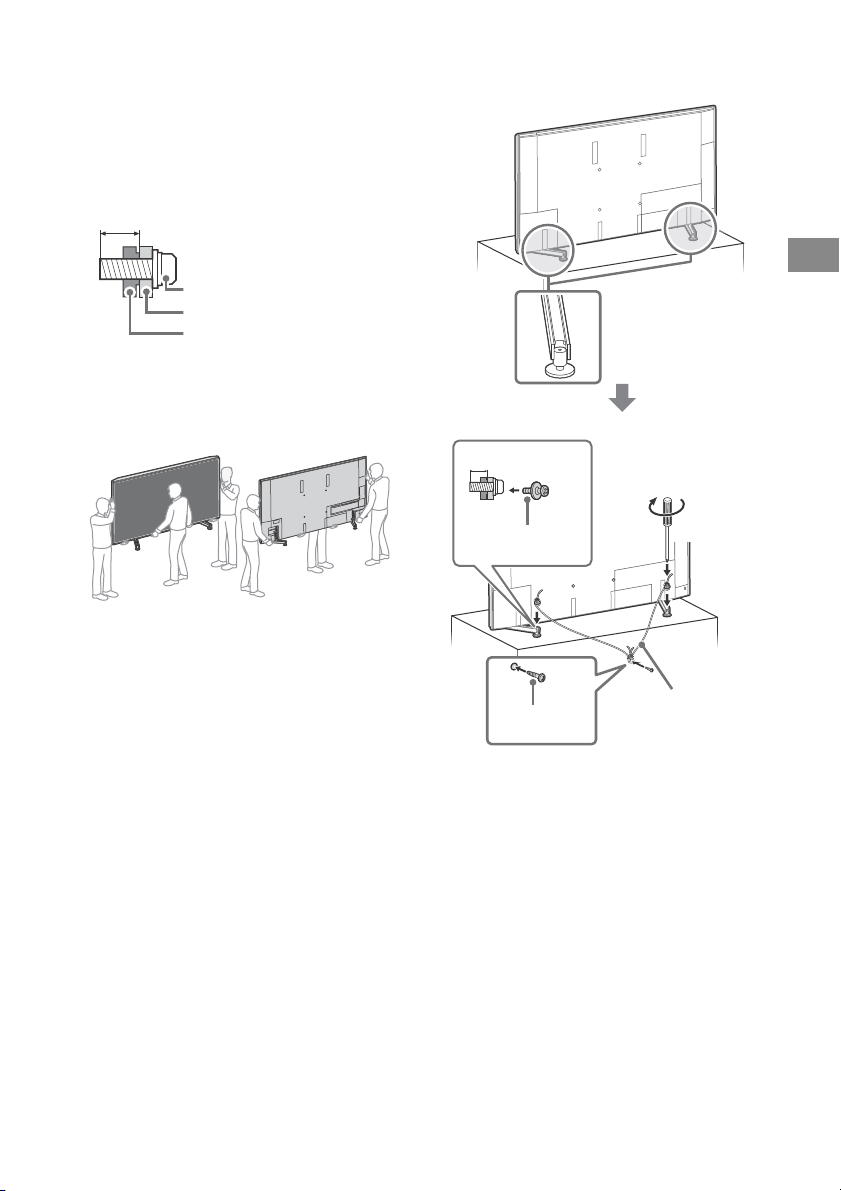
• For safety reasons, it is strongly recommended that you use
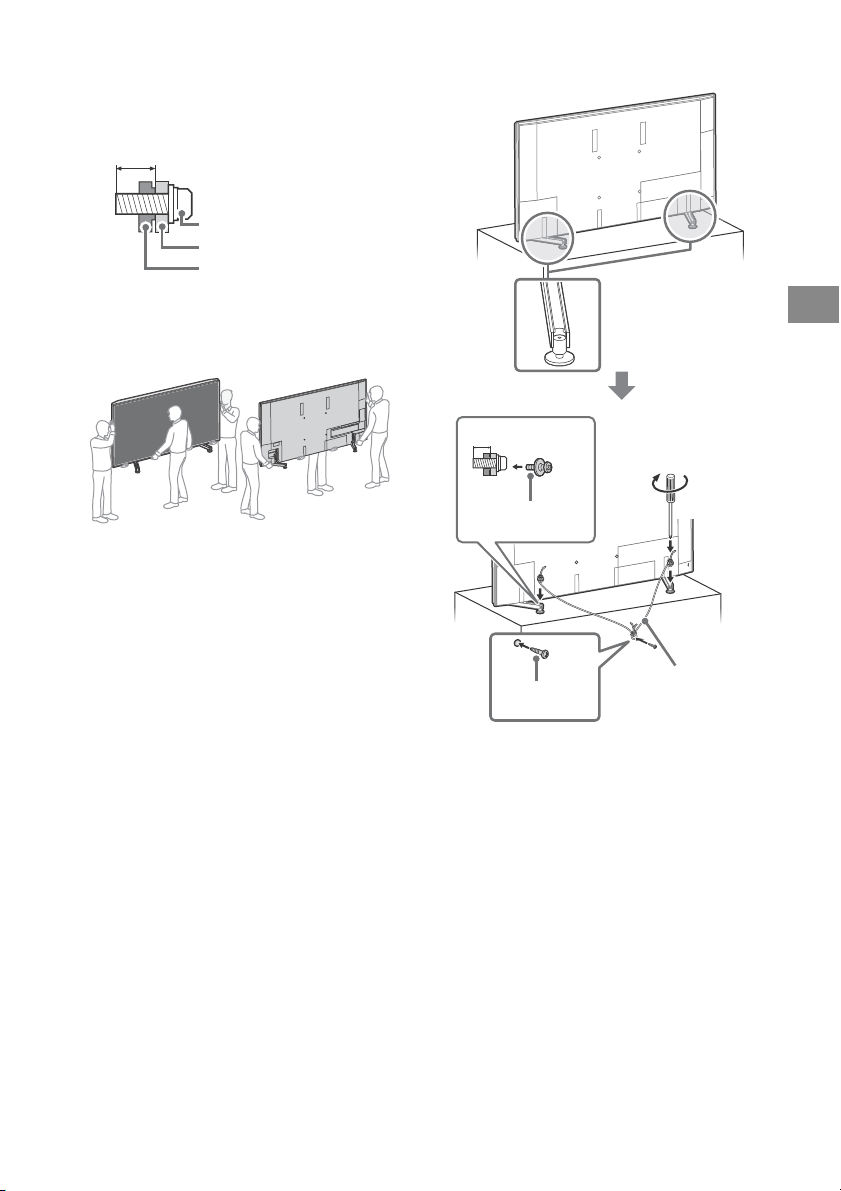
Screw (M6)
Wall-Mount Bracket
10 mm - 12 mm
TV set
M4 screw (not
supplied)
Cord (no t
supplied)
Screw (not
supplied)
4 mm - 7 mm
1.5 N·m
{15 kgf·cm}
Sony accessories, including:
Wall-Mount Bracket SU-WL450
• Be sure to use the screws supplied with the Wall-Mount Bracket
when attaching the Wall-Mount Bracket to the TV set. The
supplied screws are designed as indicated by illustration when
measured from the attaching surface of the Wall-Mount Bracket.
The diameter and length of the screws differ depending on the
Wall-Mount Bracket model.
Use of screws other than those supplied may result in internal
damage to the TV set or cause it to fall, etc.
Topple prevention
Tran spo rti ng
• Before transporting the TV set, disconnect all cables.
• Three or more people are needed to transport a large TV set.
• When transporting the TV set by hand, hold it as shown below.
Do not put stress on the LCD panel and the frame around the
screen.
• When transporting the TV set, do not subject it to jolts or
excessive v ibration.
• When transporting the TV set for repairs or when moving, pack
it using the original carton and packing material.
GB
3
Page 4
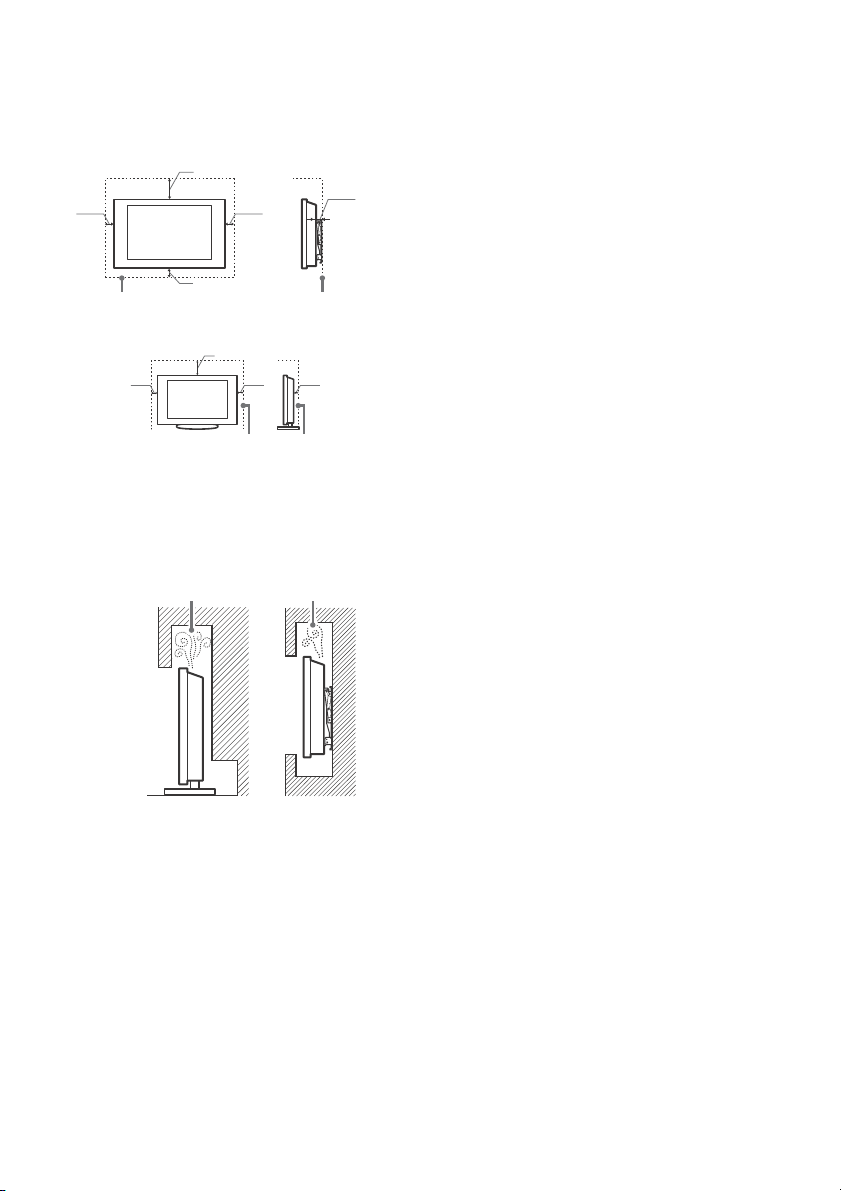
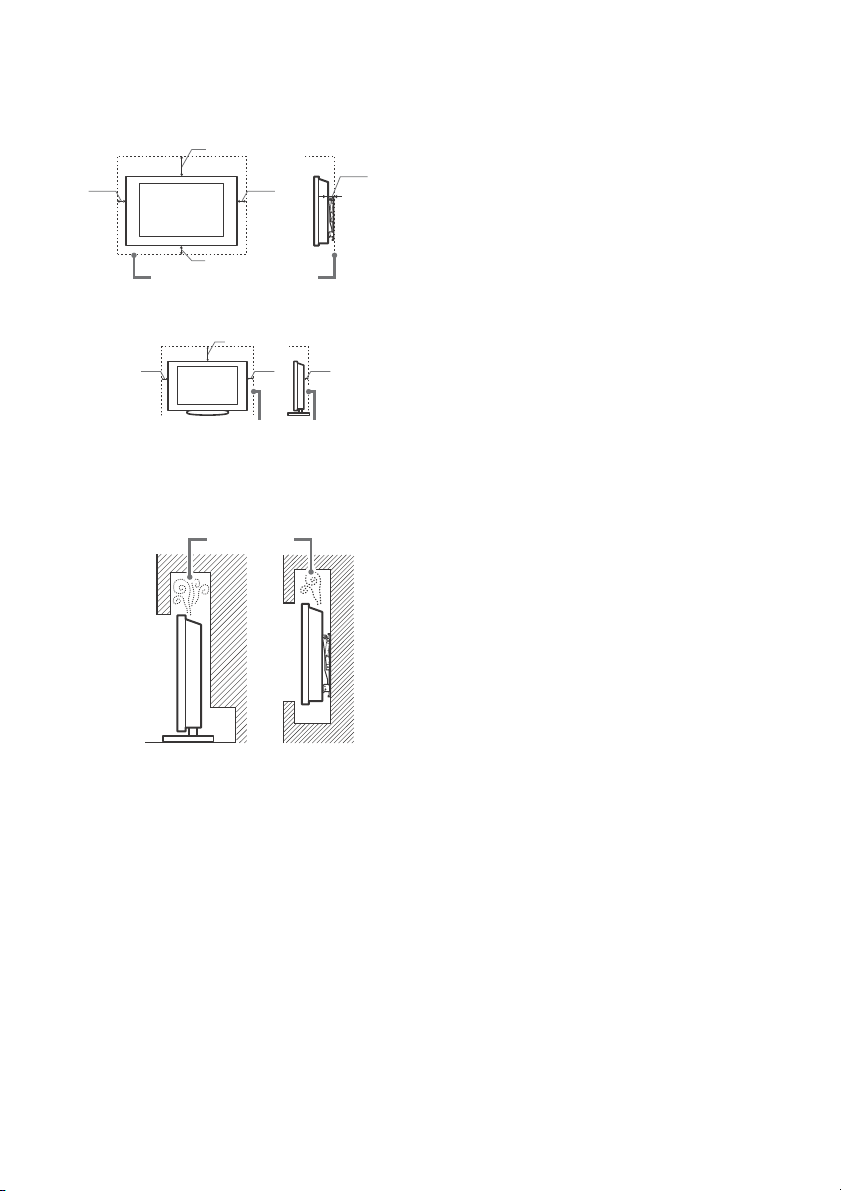
Ventilation
30 cm
10 cm
10 cm
10 cm
Leave at least this space around the set.
2 cm
30 cm
10 cm
10 cm
Leave at least this space around the set.
6 cm
Wall
Air circulation is blocked.
Wall
• Never cover the ventilation holes or insert anything in the
cabinet.
• Leave space around the TV set as shown below.
• It is strongly recommended that you use a Sony Wall-Mount
Bracket in order to provide adequate air circulation.
Installed on the wall
Installed with stand
• To ensure proper ventilation and prevent the collection of dirt or
dust:
Do not lay the TV set flat, install upside down, backwards, or
sideways.
Do not place the TV set on a shelf, rug, bed or in a closet.
Do not cover the TV set with a cloth, such as curtains, or items
such as newspapers, etc.
Do not install the TV set as shown below.
GB
4
Page 5
GB
ȩ
Parts and Controls
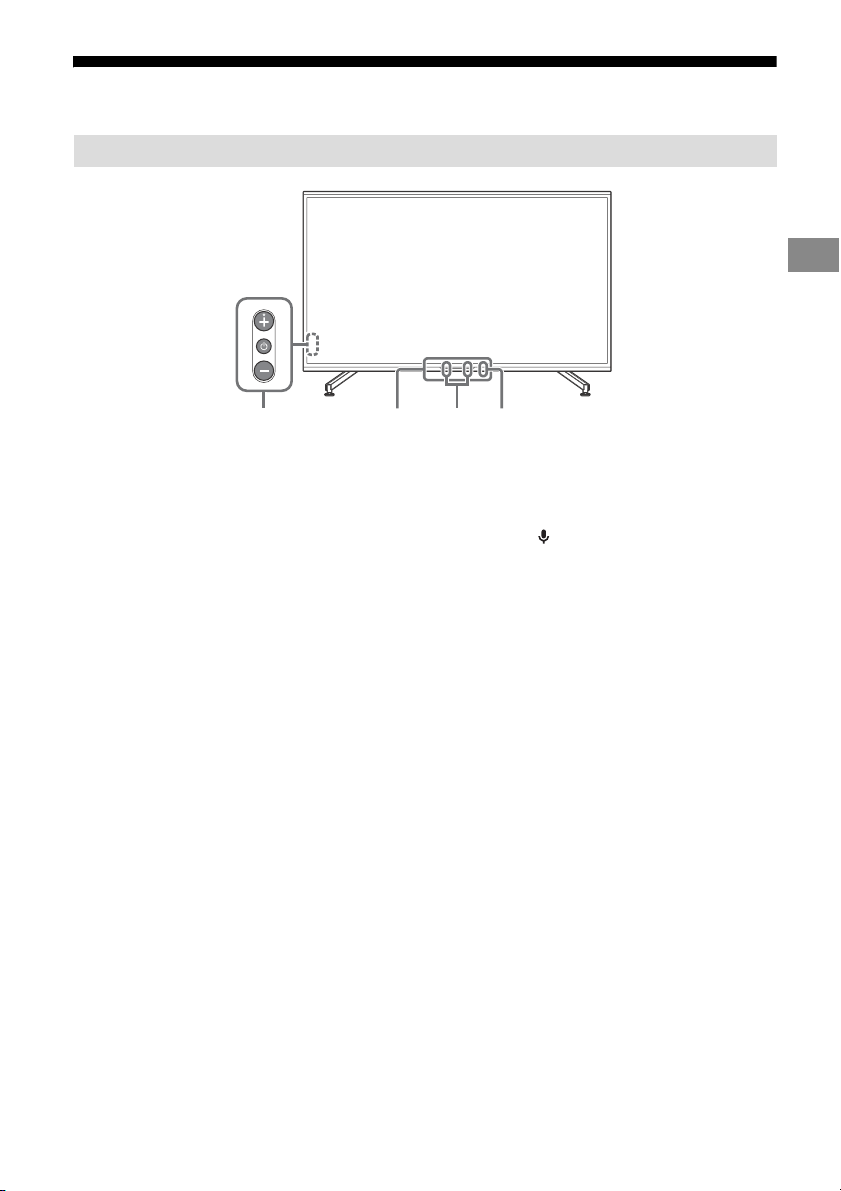
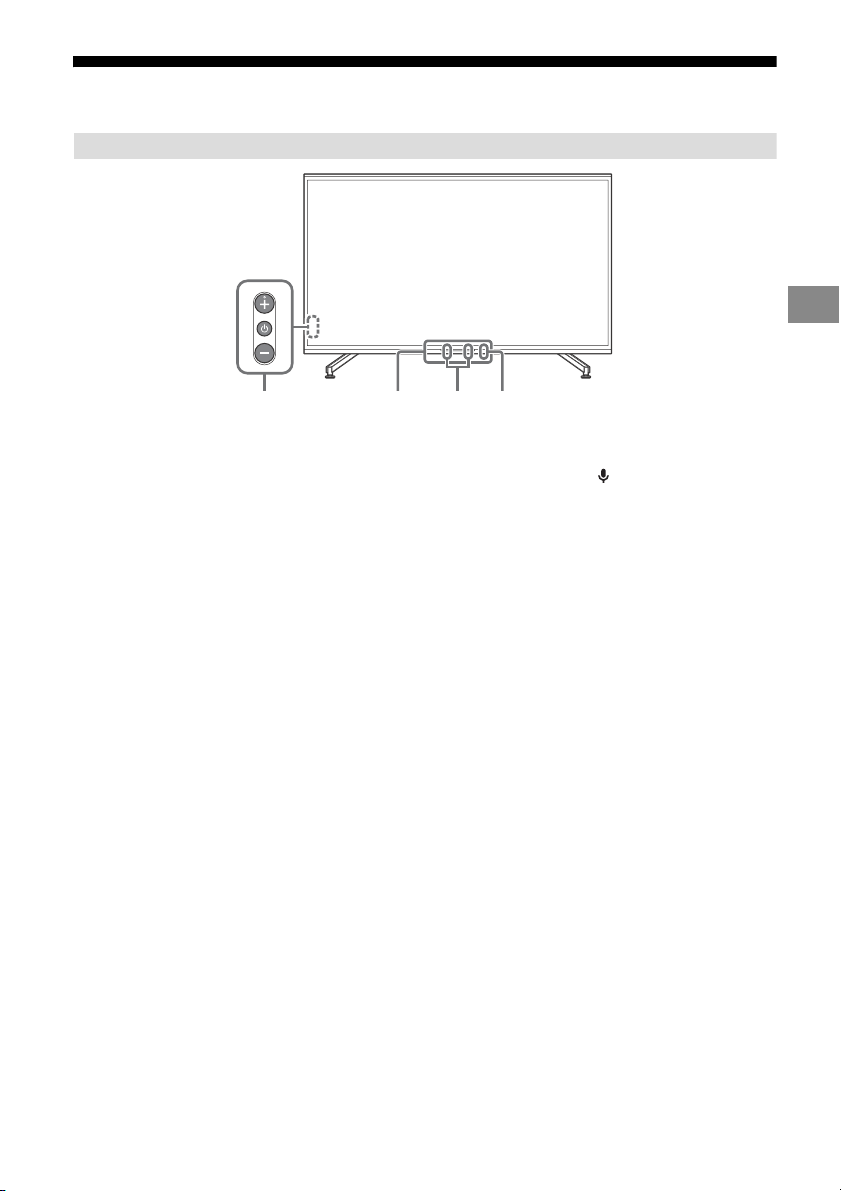
Controls and Indicators
(Power) / + / –
When the TV is off,
Press to power on.
When the TV is on,
Press and hold to power off.
Press repeatedly to change the function,
then press + or – button to:
• Adjust the volume.
• Select the channel.
• Select the input source of TV.
Remote Control sensor*1 /
Light sensor*
The illumination LED lights up or blinks
according to the status of the TV.
For more information, refer to the Help
Guide.
1
/ Illumination LED
Built-in MIC*2*
Use the hands-free built-in microphone for
voice search. To enable the built-in MIC,
follow the on-screen instructions when you
press the button.
3
Built-in MIC LED
The built-in MIC LED lights up in amber
when the built-in MIC is enabled. The builtin MIC LED can be disabled.*
*1 Do not place anything near the sensor.
*2 The voice search requires an Internet connection.
The voice search with the built-in MIC is available
only on limited region/country/language.
Standby power consumption will increase because
the built-in MIC is always listening when the voice
search with the built-in MIC is enabled.
*3 For more information, see the Online Help Guide
(page 2).
3
GB
5
Page 6
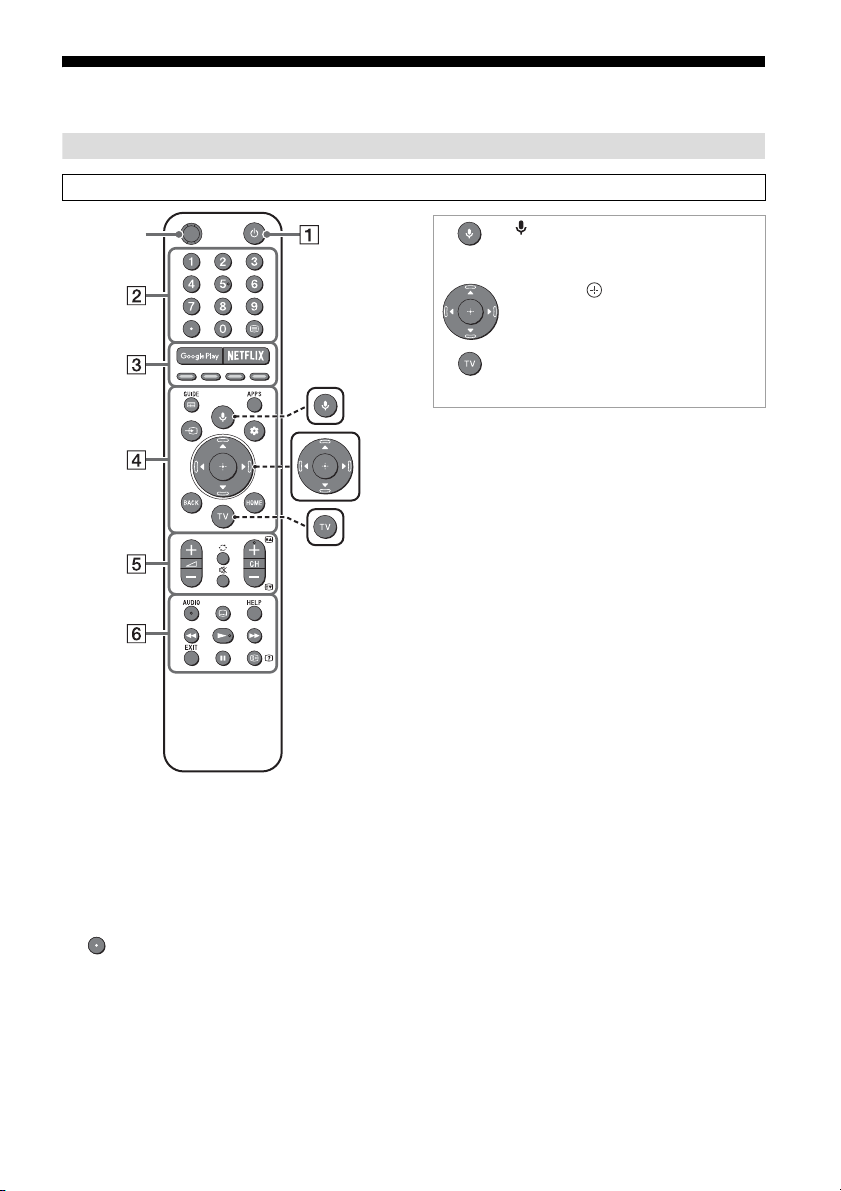
Using Remote Control
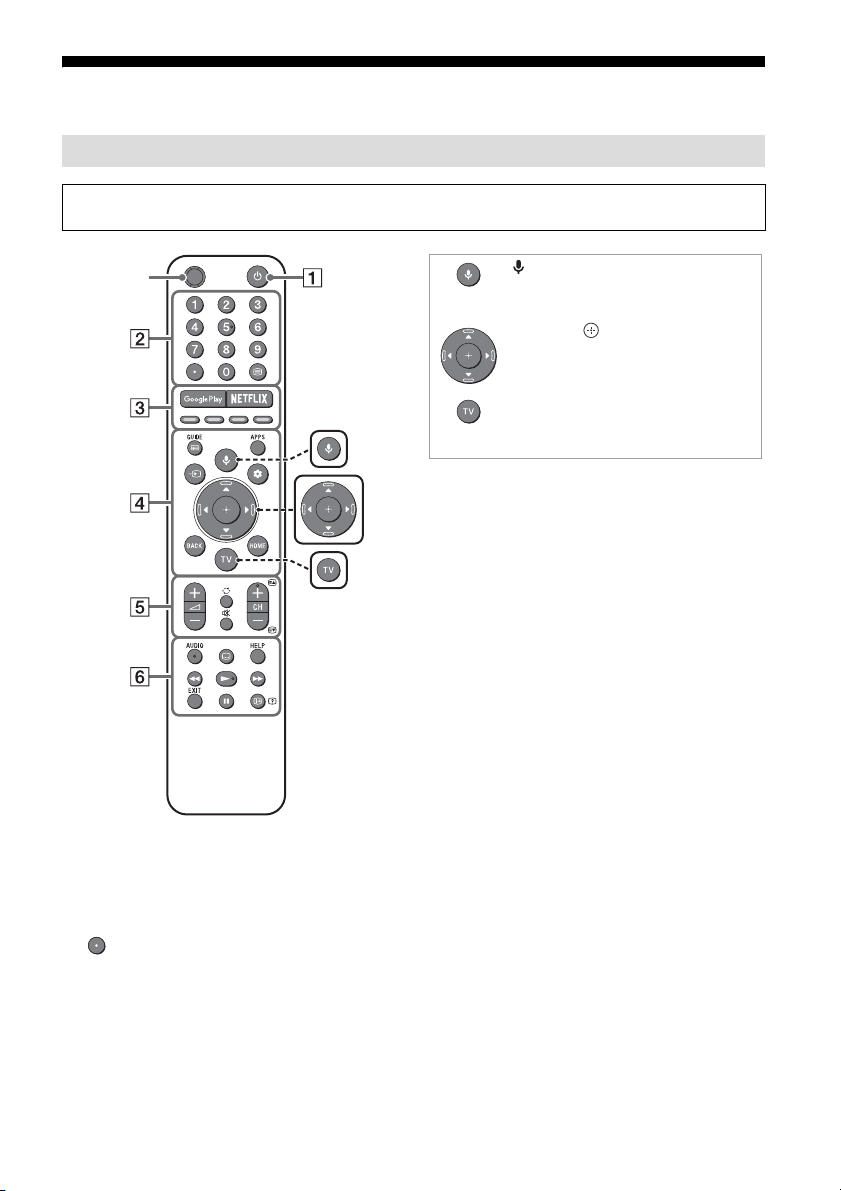
MIC
(Microphone)
Use voice search*. (e.g., Search
various content by voice.)
//// (Navigation D-Pad)
On screen menu navigation and
selection.
TV
Switch to a TV channel or input and
display the TV menu.
* The voice search requires an Internet connection.
Remote Control Parts Description
The remote control shape, location, availability and function of remote control buttons may vary
depending on your region/country/TV model.
(TV standby)
Turn on or turn off the TV (standby mode).
Number buttons
Use with the 0-9 buttons to select digital
channels.
(Text)
Display text information.
GB
6
Google Play
Access the “Google Play” online service.
NETFLIX (Only on limited region/
country/TV model)
Access the “NETFLIX” online service.
Colour buttons
Execute corresponding function at that time.
Page 7

GB
Hint
GUIDE/
Display the digital programme guide.
APPS
Display a list of installed apps.
(Input select)
Display and select the input source, etc.
(Quick settings)
Display Quick Settings.
BACK
Return to the previous screen.
HOME
Display the TV Home Menu.
+/– (Volume)
Adjust the volume.
(Jump)
Jump back and forth between two channels
or inputs. The TV alternates between the
current channel or input and the last
channel or input that was selected.
(Mute)
Mute the sound. Press again to restore the
sound.
• The accessibility shortcut service can be turned
on or off by pressing and holding .
CH +/–//
In TV mode: Select the channel.
In Text mode: Select the next () or
previous () page.
AUDIO
Select the sound of multilingual source or
dual sound for the programme currently
being viewed (depend on programme
source).
(Subtitle setting)
Turn subtitles on or off (when the feature is
available).
HELP
Display the Help menu. Help Guide can be
accessed from here.
///
Operate media contents on the TV and
connected BRAVIA Sync-compatible device.
EXIT
Return to the previous screen or exit from
the menu. When an Interactive Application
service is available, press to exit from the
service.
/ (Info/Text reveal)
Display information.
GB
7
Page 8
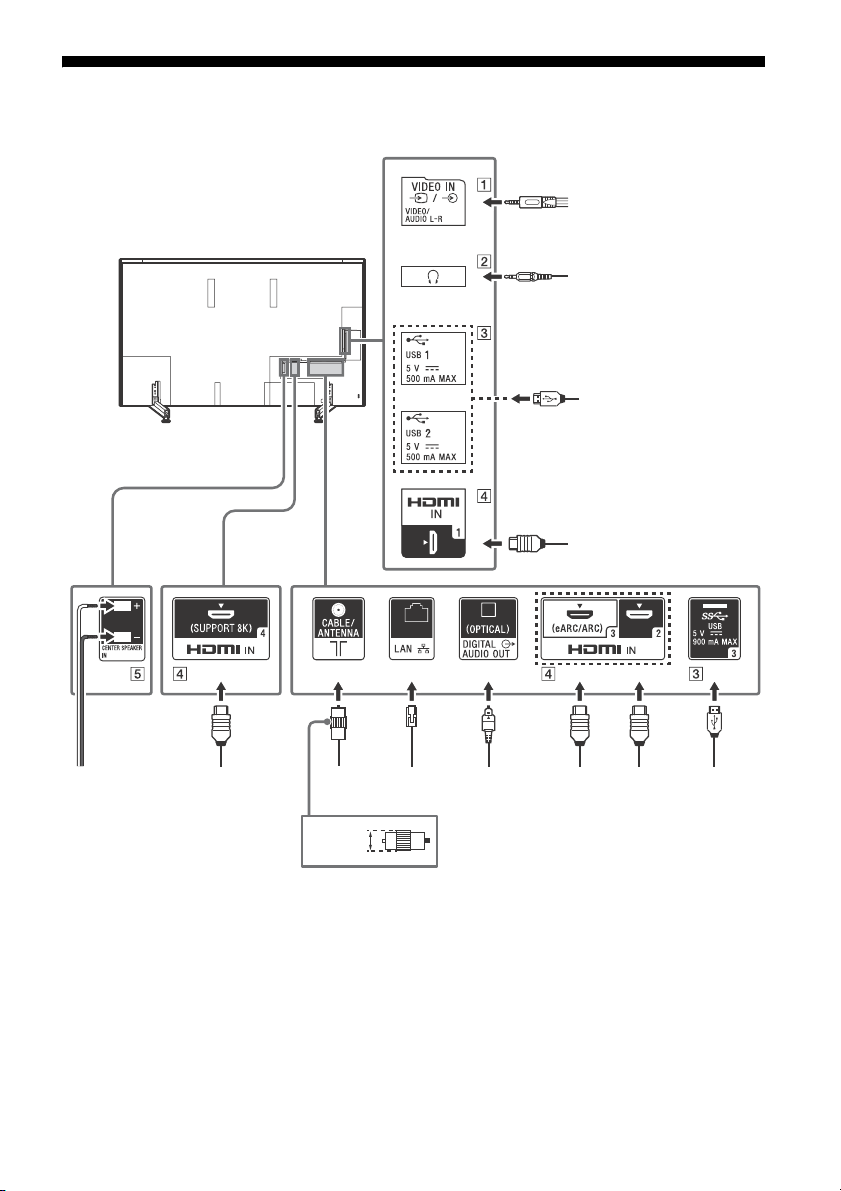
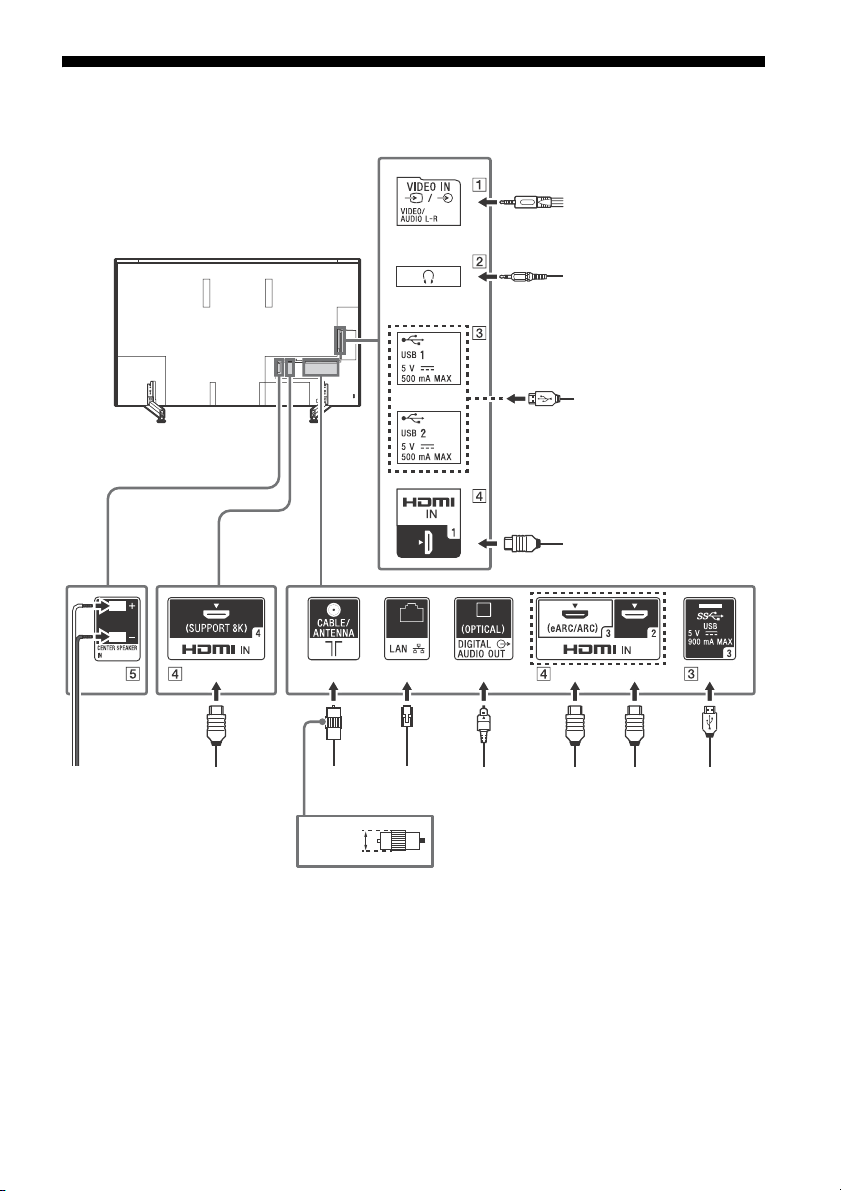
Connection Diagram
Cable/
Antenna
Router Audio
System
with
eARC/
ARC/
HDMI
Device
Digital still camera/
Camcorder/USB
storage media
Headphone
< 14 mm
HDMI
Device
HDMI Device
VCR/Video game
equipment/DVD player/
Camcorder
Digital still
camera/
Camcorder/
USB storage
media
HDMI
Device
Audio System
with Optical
Audio Input
AV Rece iv er
For more information on connections, refer to the Help Guide by pressing HELP on the remote control.
8
GB
Page 9
GB
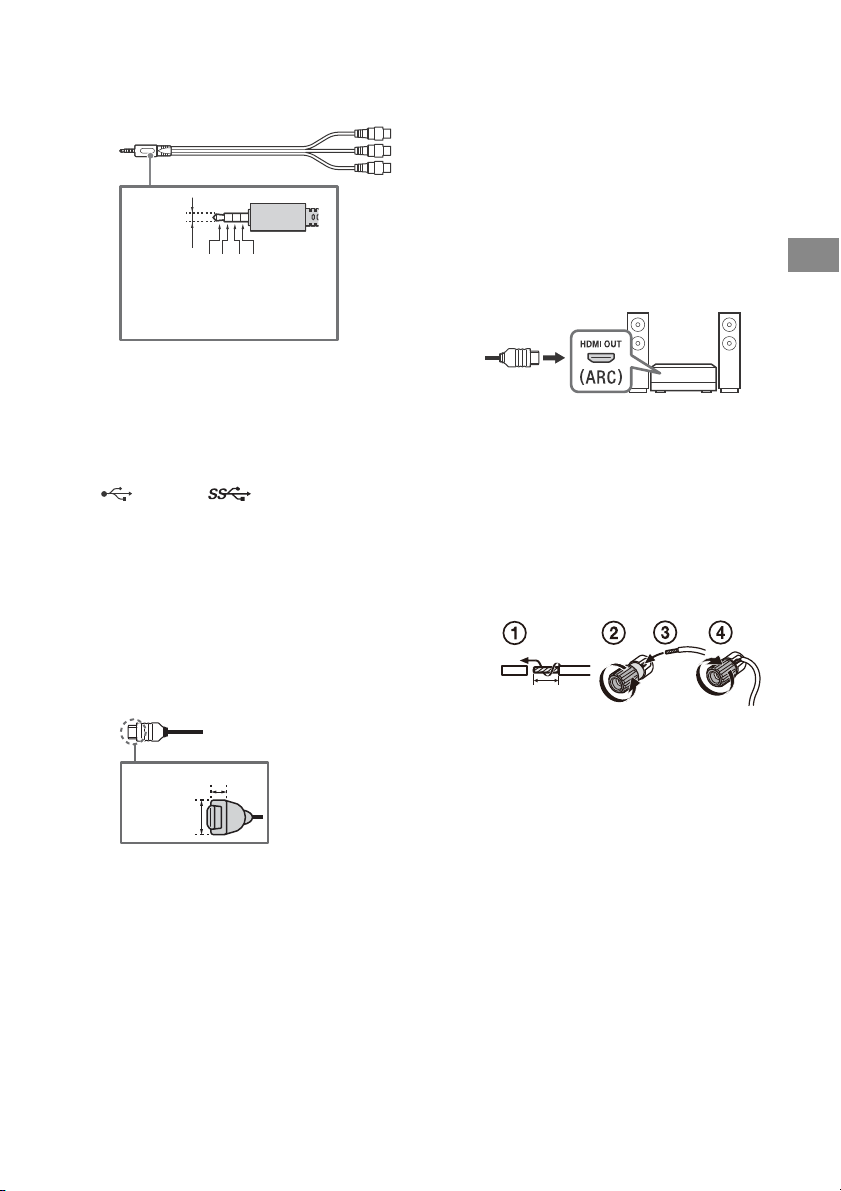
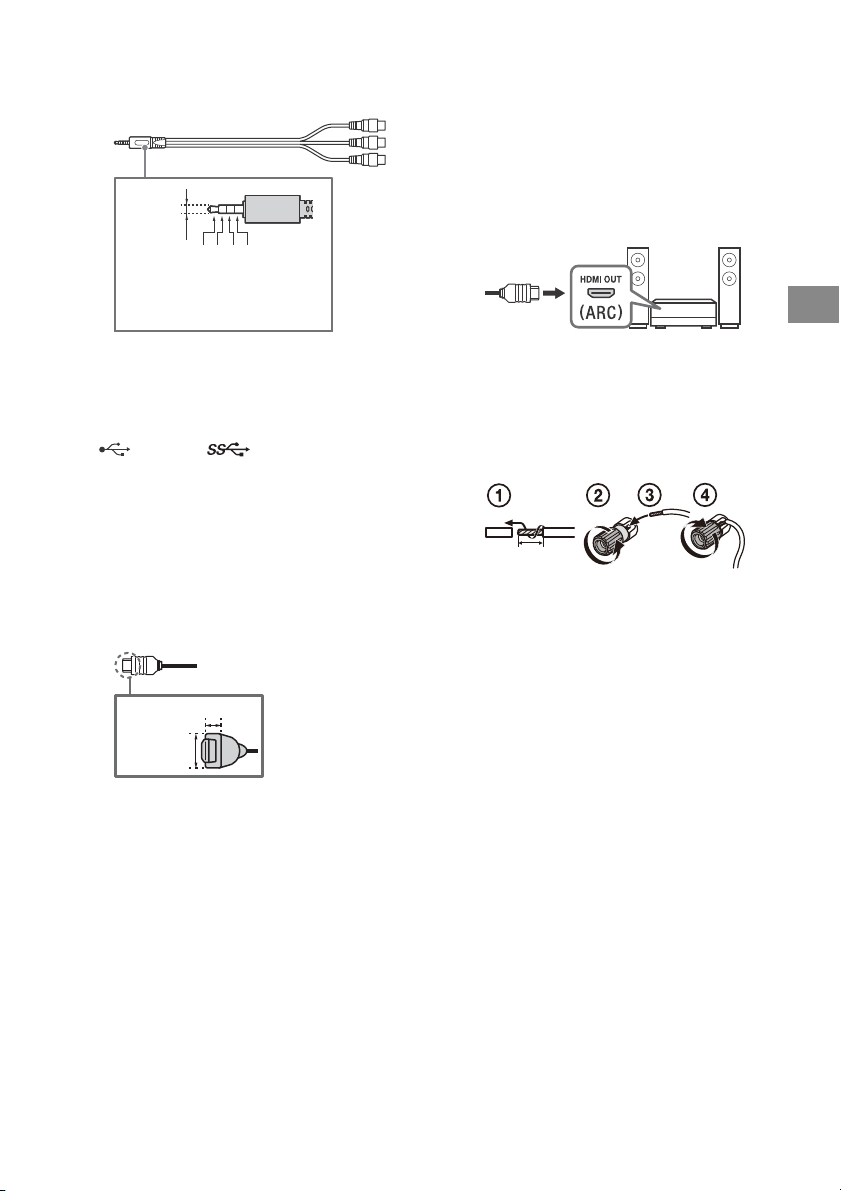
3.5 mm
1234
1: L
2: Video
3: Ground
4: R
< 12 mm
< 21 mm
10 mm
/ VIDEO IN
• For a composite connection, use an
Analogue Extension Cable (not supplied).
•
(Headphone)
• Supports 3-pole stereo mini jack only.
• You cannot output sound from both the
headphone and the TV speakers at the
same time.
USB 1/2, USB 3
• Connecting a large USB device may
interfere with other connected devices
beside it.
• When connecting a large USB device,
connect to the USB 1 port.
HDMI IN 1/2/3/4
• HDMI interface can transfer the digital
video and audio on a single cable.
• When connecting an 8K supported device,
connect to the HDMI IN 4 terminal.
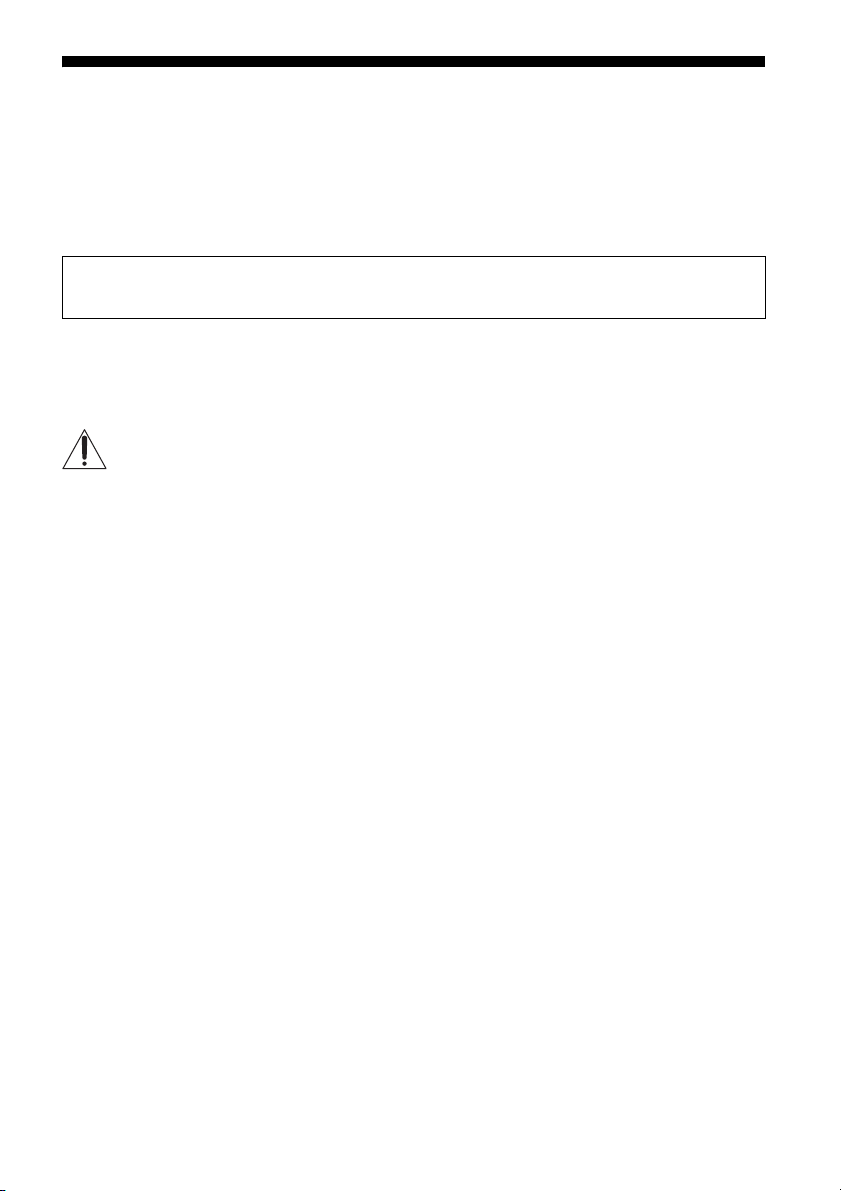
•
• HDMI IN 3 eARC/ARC (Enhanced Audio
Return Channel/Audio Return Channel)
Connect your audio system to the
HDMI IN 3 to route TV audio to your audio
system. An audio system that supports
HDMI eARC/ARC can send video to the TV,
and receive audio from the TV via the
same HDMI cable. If your audio system
does not support HDMI eARC/ARC, an
additional connection with DIGITAL AUDIO
OUT (OPTICAL) is necessary.
• Use the HDMI cable with Ethernet to
connect audio system with eARC.
CENTER SPEAKER IN
• To use your TV speakers as the centre
speaker, connect the output of your AV
receiver to the CENTER SPEAKER IN on
your TV.
• Before connecting cables, disconnect the
AC power cord (mains lead) of both TV
and AV receiver.
• Make sure the [Speakers] is set to [Audio
system].
To prevent hiss when not connecting the
CENTER SPEAKER IN to an AV receiver,
disable [TV centre speaker mode]. For
details, refer to the Help Guide.
• To enjoy high quality 4K 50p/60p
contents, connect a Premium High Speed
HDMI cable and set the [HDMI signal
format] to Enhanced format.
Do this setting individually for each
connected HDMI IN terminal. For details of
supported formats, refer to the
“Specifications“ in this manual (page 13-
14).
GB
9
Page 10
Installing the TV to the Wall
Note
This TV’s instruction manual only provides the steps to prepare the TV for Wall-Mount installation
before it is installed on the wall.
To Customers:
For product protection and safety reasons, Sony strongly recommends that installation of your TV be
performed by Sony dealers or licensed contractors. Do not attempt to install it yourself.
To Sony Dealers and Contractors:
Provide full attention to safety during the installation, periodic maintenance and examination of this
product.
Sufficient expertise is required for installing this product, especially to determine the strength of the wall for
withstanding the TV’s weight. Be sure to entrust the attachment of this product to the wall to Sony dealers or
licensed contractors and pay adequate attention to safety during the installation. Sony is not liable for any
damage or injury caused by mishandling or improper installation.
Use the Wall-Mount Bracket SU-WL450 (not supplied) to install the TV to the wall.
When installing the Wall-Mount Bracket, also refer to the Operating Instructions and Installation Guide
supplied with the Wall-Mount Bracket.
• Be sure to store the removed screws in a safe place, keeping them away from children.
For instructions on Wall-Mount Bracket installation, see the Installation Information (Wall-Mount
Bracket) on the product page for your TV model.
http://www.sony-asia.com/support
10
GB
Page 11
GB
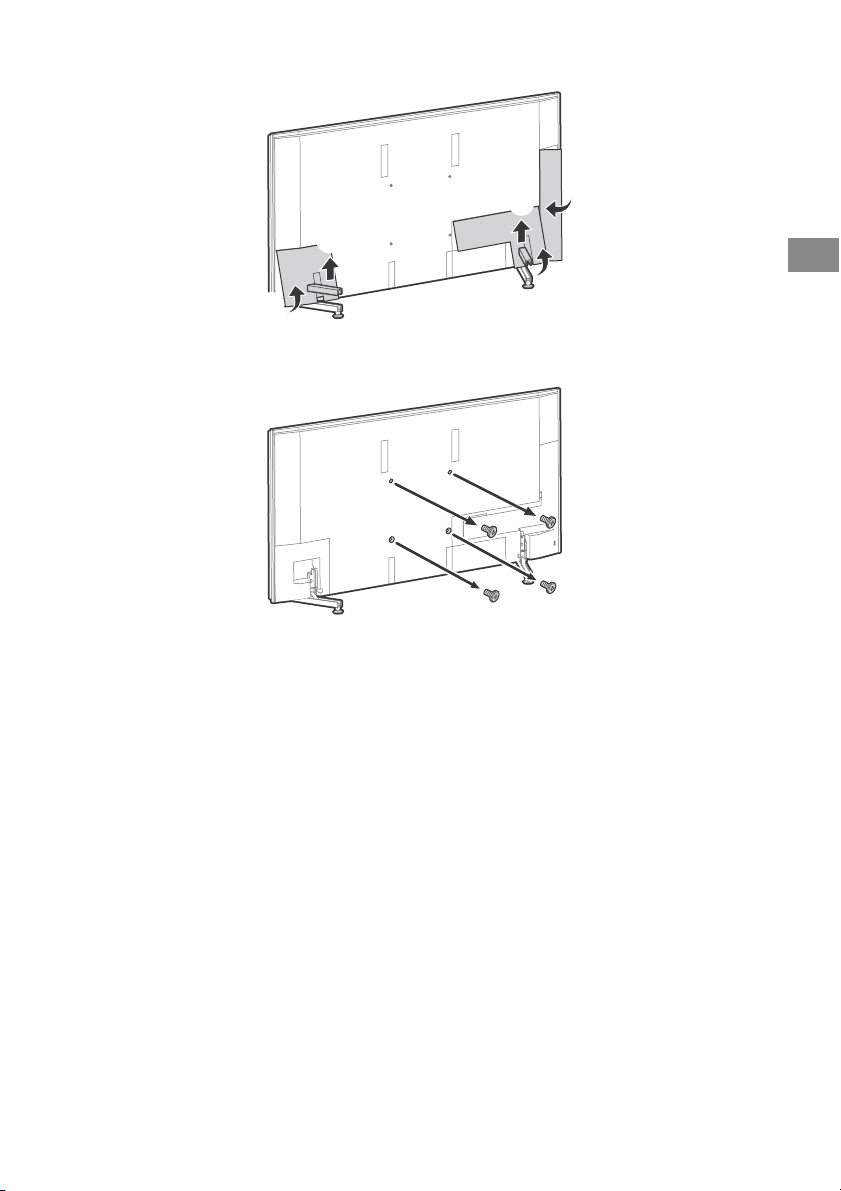
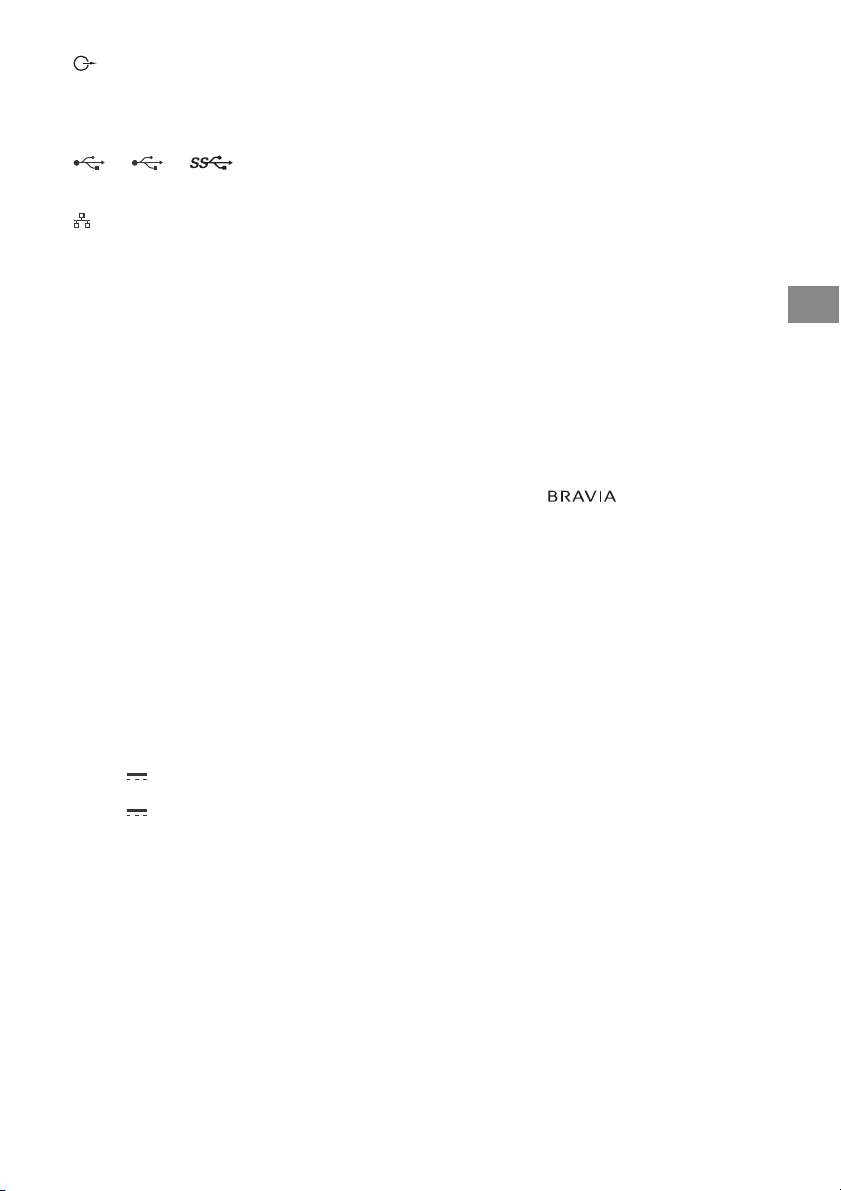
1 Remove the stand cover and terminal covers.
ʓ
ʔ
ʔ
ʕ
ʓ
2 Remove the screws from the rear of the TV.
GB
11
Page 12

Troubleshooting
General troubleshooting for issues like: black
screen, no sound, frozen picture, TV does not
respond, or network is lost, do the following
steps.
1 Restart your TV by pressing the power button
on the remote control until a message
appears. The TV will restart. If the TV does not
recover, try unplugging the AC power cord
(mains lead). Then press the power button on
the TV and wait for two minutes, and plug in
the AC power cord (mains lead).
2 Refer to the Help menu by pressing HELP on
the remote control.
3 Connect your TV to the Internet and perform
a software update. Sony recommends you to
keep your TV software updated. Software
updates provide new features and
performance improvements.
4 Visit Sony support website (information
provided on the front cover of this manual).
When you plug in the TV, the TV may not be
able to turn on for a while even if you press
the power button on the remote control or
the TV.
It takes time to initialize the system. Wait for
about one minute, then operate it again.
The remote control does not function.
Replace the batteries.
The parental lock for broadcast password has
been forgotten.
Enter 9999 for the PIN code and select [Change
PIN code].
The TV surrounds become warm.
When the TV is used for an extended period, the
TV surrounds become warm. You may feel hot
when touching there by the hand.
Troubles and Solutions
When the illumination LED is flashing in red.
Count how many times it flashes (interval time is
three seconds).
Reboot the TV by disconnecting the AC power
cord (mains lead) until the illumination LED
stopped flashing in red, then turn on the TV.
If the problem persists, disconnect the AC power
cord (mains lead), and contact your dealer or Sony
service centre with the number of times the
illumination LED flashes.
There is no picture (screen is dark) and no
sound.
Check the antenna (aerial)/cable connection.
Connect the TV to the AC power (mains), and
press the power button on the TV or the remote
control.
Some programmes cannot be tuned.
Check the antenna (aerial)/cable connection.
GB
12
Page 13

GB
Specifications
System
Panel system
LCD (Liquid Crystal Display) Panel, LED Backlight
TV system
Analogue: I, D/K, B/G, M
Digital: DTMB
Colour system
PAL/SECAM/NTSC3.58/NTSC4.43
Channel coverage
Analogue: UHF/VHF/Cable
Digital: UHF
Sound output
10 W + 10 W + 10 W + 10 W + 10 W + 10 W + 10 W +
10 W
Wireless technology
Protocol IEEE802.11ac/a/b/g/n
Bluetooth Version 4.2
Input/Output jacks
Antenna (aerial)/cable
75 ohm external terminal for VHF/UHF
/ VIDEO IN
Video/Audio input (mini jack)
HDMI IN 1/2/3/4 (support 4K resolution, HDCP
2.3-compatible)
Video:
4096 × 2160p (50, 60 Hz)*
1
(24 Hz)*
, 3840 × 2160p (50, 60 Hz)*2,
3840 × 2160p (24, 25, 30 Hz), 1080p (30, 50,
60, 100, 120 Hz), 1080/24p, 1080i (50, 60 Hz),
720p (30, 50, 60 Hz), 720/24p, 576p, 480p,
PC Formats*
7680 × 4320p (24, 25, 30Hz)*3*4, 3840 × 2160p
(100, 120Hz)*
Audio:
In eARC (Enhanced Audio Return Channel)
mode*
Refer to the Help Guide for details.
Except eARC mode
5.1 channel linear PCM: 32/44.1/48/88.2/96/
176.4/192 kHz 16/20/24 bits, Dolby Digital,
Dolby Digital Plus, DTS
3
3*4
5
eARC/ARC (Enhanced Audio Return Channel/
Audio Return Channel) (HDMI IN 3 only)
In eARC mode*
Refer to the Help Guide for details.
In ARC mode
Two channel linear PCM: 48 kHz 16 bits, Dolby
Digital, Dolby Digital Plus, DTS
5
1*2
, 4096 × 2160p
DIGITAL AUDIO OUT (OPTICAL)
Digital optical jack (Two channel linear PCM:
48 kHz 16 bits, Dolby Digital, DTS)
(Stereo mini jack)
Headphone
1, 2, 3
USB port 1 and 2 support High Speed USB
(USB 2.0)
USB port 3 supports Super Speed USB (USB 3.1
Gen 1)
LAN
10BASE-T/100BASE-TX connector (Depending on
the operating environment of the network,
connection speed may differ. The communication
rate and quality are not guaranteed.)
CENTER SPEAKER IN
Centre speaker input (Binding post)
Others
Optional accessories
Wall-Mount Bracket: SU-WL450
Operating temperature
0 ºC – 40 ºC
Operating humidity
10 % – 80 % RH (non-condensing)
Power and others
Power requirements
220 V – 240 V AC, 50 Hz
Screen size (measured diagonally) (Approx.)
85 inches / 214.8 cm
Power consumption
Indicated on the rear of the TV
Standby power consumption*6*
0.5 W
7
Display resolution
7,680 pixels (horizontal) × 4,320 lines (vertical)
Output Rating
USB 1/2
5 V , 500 mA MAX
USB 3
5 V , 900 mA MAX
Dimensions (Approx.) (w × h × d)
with Table-Top Stand
1,913 × 1,226 × 432 mm
without Table-Top Stand
1,913 × 1,141 × 120 mm
Mass (Approx.)
with Table-Top Stand
74.5 kg
without Table-Top Stand
71.7 kg
GB
13
Page 14

*1 When 4096 × 2160p is input and [Wide mode] is
Note
set to [Normal], the resolution is displayed as
3840 × 2160p. To display 4096 × 2160p, set
[Wide mode] setting to [Full 1] or [Full 2].
*2 To support 18 Gbps, set [HDMI signal format] to
Enhanced format.
*3 Refer to the Help Guide for details.
*4 HDMI IN 4 only.
*5 eARC mode is active when [eARC mode] is set to
[Auto], [Speakers] is set to [Audio system] and
eARC compatible audio system is connected.
*6 Specified standby power is reached after the TV
finishes necessary internal processes.
*7 Standby power consumption will increase when
your TV is connected to the network.
• Optional accessories availability depends on
countries/region/TV model/stock.
• Design and specifications are subject to change
without notice.
Trademark Information
• The terms HDMI and HDMI High-Definition
Multimedia Interface, and the HDMI Logo
are trademarks or registered trademarks of
HDMI Licensing Administrator, Inc. in the
United States and other countries.
• Dolby, Dolby Vision, Dolby Audio, and the
double-D symbol are trademarks of Dolby
Laboratories. Manufactured under license
from Dolby Laboratories. Confidential
unpublished works. Copyright © 1992-2015
Dolby Laboratories. All rights reserved.
• “BRAVIA”, and BRAVIA Sync are
trademarks or registered marks of Sony
Corporation.
• Gracenote, the Gracenote logo and
logotype, “Powered by Gracenote” logo are
either registered trademarks or trademarks
of Gracenote, Inc. in the United States and/
or other countries.
• Vewd® Core. Copyright 1995-2019 Vewd
Software AS. All rights reserved.
• Google, Google Play, Chromecast,
YouTube, Android TV and other related
marks and logos are trademarks of Google
LLC.
• Wi-Fi®, Wi-Fi Alliance® and Wi-Fi Direct® are
registered trademarks of Wi-Fi Alliance.
• The Wi-Fi CERTIFIED™ Logo is a
certification mark of Wi-Fi Alliance.
• For DTS patents, see
http://patents.dts.com. Manufactured
under license from DTS, Inc.
DTS, the Symbol, & DTS and the Symbol
together are registered trademarks, and
DTS Digital Surround is a trademark of DTS,
Inc. © DTS, Inc. All Rights Reserved.
• The Bluetooth® word mark and logos are
registered trademarks owned by the
Bluetooth SIG, Inc. and any use of such
marks by Sony Corporation is under
license. Other trademarks and trade names
are those of their respective owners.
• Netflix is a registered trademark of Netflix,
Inc.
• RealMedia © 2018 RealNetworks, Inc. All
rights reserved. RealMedia, RealNetworks,
and their logos are trademarks or
registered trademarks of RealNetworks,
Inc.
• TUXERA is a registered trademark of Tuxera
Inc. in the US and other countries.
• USB-IF SuperSpeed USB Trident logo is a
registered trademark of USB Implementers
Forum, Inc.
• All other trademarks are the property of
their respective owners.
GB
14
Page 15

Page 16
有關安裝電視機的資訊,請
參閱安裝指南。
目錄
安全資訊 . . . . . . . . . . . . . . . . 2
組件及控件 . . . . . . . . . . . . . . 5
控件及指示燈 . . . . . . . . . . . . . . 5
使用遙控器 . . . . . . . . . . . . . . 6
遙控器組件說明 . . . . . . . . . . . . . 6
連接圖 . . . . . . . . . . . . . . . . 8
將電視機安裝在牆上 . . . . . . . . . 10
故障排除 . . . . . . . . . . . . . . 12
故障及解決方案 . . . . . . . . . . . . 12
規格 . . . . . . . . . . . . . . . . 12
簡介
感謝您購買這項 Sony 產品。
使用電視機之前,請詳閱本手冊,並保留下來以便將來參考。
註
• 使用電視機之前,請詳讀 “ 安全資訊 ” (第 2 頁)。
• 有關其他安全資訊,請閱讀隨附的安全資訊。
• 有關 “將電視機安裝在牆上 ” 的指示已包含在這台電視機的使用說
明書。
• 安裝指南和本說明書中使用的影像和插圖僅作參考並可能與實際產
品不同。
說明
直接從電視機獲取更多故障排除資訊和其他有用資訊。按遙控器上
的 HELP 以顯示主題清單,或透過關鍵字搜尋。
說明指南 (說明書)
有關更多資訊,請從電視機上的說明選單選擇 [ 說明指南 ]。您也
可以從您的 PC 或智能手機查看說明指南 (本說明書封底提供的
資訊)。
識別標籤的位置
電視機型號和電源等級的標籤位於電視機背面。拆除端子蓋即可找到
這些標籤。
本電視設計在香港使用,只保證能在香港使用。
安全資訊
安裝 / 設定
為了避免火災、觸電或損壞及 / 或受傷等危險,請遵照下列指示來安
裝和使用電視機。
安裝
• 應將電視機安裝在易於插拔的 AC 電源插座附近。
• 將電視機放在一個穩定的平面,以防止墜落和引起個人傷害或財產
損壞。
• 應將電視機安裝在不容易被拉、推或碰倒之處。
• 安裝電視機,使電視機的桌面底座不會從電視機櫃 (非附帶)凸
出。如果桌面底座從電視機櫃凸出,可能導致電視機翻倒、掉落及
人身傷害或對電視機造成損壞。
• 僅可由合格的維修人員執行掛壁安裝。
• 為了安全起見,強烈建議您使用 Sony 配件,包括:
壁掛式支架 SU-WL450
CT
2
Page 17
• 將掛鉤 (底座)/ 壁掛式支架安裝於電視機上時,務必要使用隨附
螺絲 (M6)
壁掛式支架
電視機
10 毫米 – 12 毫米
4 毫米 – 7 毫米
M4 螺絲 (非附帶)
螺絲 (非附帶)
導線 (非附帶)
1.5 N·m
{15 kgf·cm}
CT
於壁掛式支架的螺絲。隨附螺絲如插圖所示設計從掛鉤 (底座)/
壁掛式支架安裝表面量起。
螺絲的直徑和長度會因為壁掛式支架的型號而有所不同。
使用隨附螺絲以外的螺絲可能會造成電視機內部損壞或者掉落等
等。
搬動
• 搬動電視機之前,請斷開所有纜線的連接。
• 搬運大型電視機需要至少三個人。
• 用手搬動電視機時,請如下圖所示抓握。請勿對液晶面板以及螢幕
周圍的框邊施加壓力。
• 搬動電視機時,請勿使其受到搖晃或過度震動。
• 搬動電視機以進行維修或移動時,請使用原有的紙箱和包裝材料進
行包裝。
防止傾倒
CT
3
Page 18
通風
30 厘米
10 厘米
2 厘米
10 厘米
10 厘米
在電視機周圍至少留出所示的空間。
30 厘米
10 厘米
6 厘米
10 厘米
在電視機周圍至少留出所示的空間。
空氣流通被阻擋。
牆壁
牆壁
• 切勿遮擋通風孔或將任何物體插入機殼內。
• 如下圖所示,在電視機周圍保留通風空間。
• 強烈建議您使用 Sony 壁掛式支架以確保足夠的空氣流通。
安裝在牆壁上
安裝在底座上
• 為了確保正確通風及防止髒物或灰塵堆積:
請勿將電視機平放、上面朝下安裝、向後安裝或側面安裝。
請勿將電視機放置於架子、地毯、床或壁櫥中。
請勿用布 (如窗簾)或物件 (如報紙等)覆蓋電視機。
請勿如下圖所示安裝電視機。
CT
4
Page 19
組件及控件
ȩ
CT
控件及指示燈
(電源)/+/–
當電視機處於關機狀態時,
請按 開機。
打開電視機時,
按住 關機。
重複按 以變更功能,然後按 + 或 – 按鈕
執行下列操作:
• 調節音量。
• 選擇頻道。
• 選擇電視機輸入源。
遙控器感應器 *1 / 光感應器 *1/ 照明 LED
根據電視機的狀態,照明 LED 會亮起或閃爍。
有關更多資訊,請參閱說明指南。
內建 MIC*2*
使用免持內建 MIC 進行語音搜尋。若要啟用內
建 MIC,請在按下 按鈕後依螢幕上的指示
操作。
3
內建 MIC LED
啟用內建 MIC 時,內建 MIC LED 亮琥珀色
光。可停用內建 MIC LED。 *
*1 請勿在感應器附近放置任何物品。
*2 語音搜尋需要網際網路連線。採用內建 MIC 的語音搜
尋僅在限制的區域 / 國家 / 以限制的語言提供。
待機耗電量會增加,因為啟用採用內建 MIC 的語音搜
尋時,一直在聆聽內建 MIC。
*3 有關更多資訊,請參閱線上說明指南 (第 2 頁)。
3
CT
5
Page 20
使用遙控器
MIC
遙控器組件說明
遙控器外形、按鈕的位置、可用性與功能視您的國家 / 區域 / 電視機型號而可能略有不同。
使用語音搜尋 *。(例如,透過語音搜尋
各種內容。)
//// (十字鍵)
在螢幕選單導航和選擇上。
TV
切換為電視機頻道或輸入並顯示電視選
單。
* 語音搜尋需要網際網路連線。
(麥克風)
(電視待機)
開啟或關閉電視機 (待機模式)。
數字按鈕
使用 0-9 按鈕選擇數位頻道。
(文字)
顯示文字資訊。
CT
6
Google Play
訪問 “Google Play” 線上服務。
NETFLIX(僅限限制的區域 / 國家 / 電視機型
號)
訪問 “NETFLIX” 線上服務。
顏色按鈕
屆時執行相應的功能。
Page 21

GUIDE/
CT
顯示數位節目指南。
APPS
顯示已安裝應用程式的清單。
(輸入選擇)
顯示並選擇輸入來源等。
(快速設定)
顯示快速設定。
BACK
返回上一個畫面。
HOME
顯示電視主選單。
+/– (音量)
調節音量。
(跳轉)
在兩個頻道或兩次輸入之間前後跳轉。電視在
當前頻道 / 輸入以及選擇的上一個頻道 / 輸入
之間交替切換。
(靜音)
將聲音消除。再次按下可恢復聲音。
提示
• 按住 可開啟或關閉輔助使用快捷鍵服務。
CH +/–//
電視模式︰選擇頻道。
文字模式︰選擇下一個 ()或上一個
()頁面。
AUDIO
為當前觀賞的節目選擇多語言源的聲音或雙聲
道 (視乎節目源而定)。
(字幕設定)
開啟或關閉字幕 (此功能可用時)。
HELP
顯示說明選單。可以從此處訪問說明指南。
///
運行電視機和相連的 BRAVIA Sync 相容裝置上
操作媒體內容。
EXIT
返回至上一個畫面,或從選單退出。如果交互
式應用服務可供使用,按下即可退出服務。
/ (顯現資訊 / 文字)
顯示資訊。
CT
7
Page 22
連接圖
數碼相機 /
攝像機/USB
儲存媒介
數碼相機 / 攝像機 /
USB 儲存媒介
錄影機 / 電玩設備 /
DVD 播放機 / 攝像機
帶有 eARC/
ARC 的音訊
系統 /HDMI
裝置
HDMI 裝置
纜線/天線
路由器 帶有光學音訊輸
入的音訊系統
HDMI
裝置
HDMI 裝置
耳機
< 14 毫米
AV 接收器
有關連接的更多資訊,請按遙控器上的 HELP 以參閱說明指南。
CT
8
Page 23
/ VIDEO IN
3214
3.5 毫米
1:左
2:視訊
3:接地
4:右
< 12 毫米
< 21 毫米
10 毫米
CT
• 如需完成複合連接,請使用模擬延長纜線
(非附帶)。
•
• HDMI IN 3 eARC/ARC (Enhanced Audio
Return Channel/Audio Return Channel)
將音訊系統連接至 HDMI IN 3 以傳送電視機
音訊至音訊系統。支援 HDMI eARC/ARC 的音
訊系統可將視訊傳送至電視機,並透過同一
HDMI 纜線從電視機接收音訊。如果音訊系統
不支援 HDMI eARC/ARC,必須額外連接
DIGITAL AUDIO OUT (OPTICAL)。
• 使用支援乙太網路連接的 HDMI 纜線連接帶
有 eARC 的音訊系統。
(耳機)
• 僅支援 3 極立體聲迷你插孔。
• 您無法同時從耳機和電視機揚聲器輸出聲
音。
USB 1/2、 USB 3
• 連接大型 USB 裝置可能會干擾旁邊連接的其
他裝置。
• 連接大型 USB 裝置時,請連接至 USB 1
埠。
HDMI IN 1/2/3/4
• HDMI 介面可使用單個纜線傳輸數位視訊和音
訊。
• 連接支援 8K 的裝置時,請連接至
HDMI IN 4 端子。
•
• 要享受高品質 4K 50p/60p 內容,連接優質
速度 HDMI 接線,並將 [HDMI 訊號格式 ]
設為增強的格式。
為每個連接的 HDMI IN 端子單獨完成此設
定。有關支援格式的細節,請參考本手冊中
的 “ 規格 ” (第 12-13 頁)。
CENTER SPEAKER IN
• 如需將電視機揚聲器設為中心揚聲器,請將
AV 接收器的輸出端連接至電視機的 CENTER
SPEAKER IN。
• 連接纜線前,請先斷開電視機與 AV 接收器
的 AC 電源線。
• 確保 [ 喇叭 ] 設為 [ 音訊系統 ]。
若要防止 CENTER SPEAKER IN 未連接至 AV
接收器時的嘶嘶聲,請停用 [ 電視中置喇叭
模式 ]。詳情請參閱說明指南。
CT
9
Page 24
將電視機安裝在牆上
本電視機使用說明書僅提供將電視機安裝到牆上前準備電視機進行壁掛式安裝的步驟。
致客戶:
出於產品保護及安全原因,Sony 強烈建議由 Sony 經銷商或授權的承包商安裝電視機。請勿嘗試自行安裝
電視機。
致 Sony 經銷商和承包商:
安裝、定期維護及檢查本產品時,請充分注意安全。
安裝本產品須具備充足的專業知識,確定牆壁是否能夠承受電視重量時尤為如此。務必委託 Sony 經銷商或授權
的承包商將本產品安裝至牆壁上,並在安裝期間充分注意安全。對於因錯誤操作或安裝不當引致的任何損害,
Sony 概不負責。
使用壁掛式支架 SU-WL450 (非附帶)將電視機安裝到牆上。
安裝壁掛式支架時,亦請參閱壁掛式支架附帶的使用說明書及安裝指南。
註
• 務必將取下的螺絲存放在兒童接觸不到的安全位置。
有關壁掛式支架安裝的說明,請參閱您的電視機型號的產品頁上的安裝訊息 (壁掛式支架)。
http://www.sony-asia.com/support
10
CT
Page 25
1 移除底座罩以及終端罩。
ʓ
ʔ
ʔ
ʕ
ʓ
CT
2 從電視機背面卸下螺絲。
CT
11
Page 26

故障排除
以下問題的一般故障排除:黑螢幕、沒有聲音、凍
結畫面、電視機沒有反應或網絡丟失,請依照以下
步驟操作。
1 按遙控器上的電源按鈕重新啟動電視機,直到
顯示一則訊息。電視機將重新啟動。如果電視
機未恢復正常,請嘗試拔下 AC 電源線。然後按
電視機上的電源按鈕,並等候兩分鐘,隨後插
入 AC 電源線。
2 請按遙控器上的 HELP 以參閱說明選單。
3 將電視機連接至網路,然後執行軟件更新。
Sony 建議您不斷更新您的電視機軟件。軟件更
新將提供新功能和效能改善。
4 造訪 Sony 支持網站 (本說明書封面提供的資
訊)。
在插入電視機時,即使按遙控器或電視機上的電源
按鈕,電視機也可能在一定時間不能開啟。
系統初始化需要一定時間。等待大約一分鐘,然後
再次操作。
故障及解決方案
當照明 LED 閃爍紅燈時。
• 統計該照明 LED 閃爍的次數 (間隔時間為三秒)。
斷開 AC 電源線直到照明 LED 停止閃爍紅燈時重新
啟動電視機,然後開啟電視機。
如果此問題仍然存在,請斷開 AC 電源線,然後聯
絡您的經銷商或 Sony 服務中心並告知照明 LED 閃
燈的次數。
沒有畫面 (螢幕是黑的)也沒有聲音。
• 檢查天線 / 訊號線連接。
• 將電視機連接至 AC 電源,然後按電視機或遙控器
上的電源按鈕。
無法調諧某些節目。
• 檢查天線 / 訊號線連接。
遙控器無效。
• 更換電池。
忘記廣播密碼的家長鎖定。
• PIN 碼輸入 9999,然後選擇 [ 輸入 PIN 號碼 ]。
電視機周圍溫度升高。
• 當長時間使用電視機時,電視機周圍溫度會升高。
用手觸摸這些地方時可能會覺得很燙。
規格
系統
面板系統
LCD (液晶顯示)面板,LED 背光源
電視系統
模擬:I,D/K,B/G,M
數位:DTMB
彩色系統
PAL/SECAM/NTSC3.58/NTSC4.43
頻道涵蓋範圍
模擬:UHF/VHF/ 纜線
數位:UHF
聲音輸出
10 瓦 + 10 瓦 + 10 瓦 + 10 瓦 + 10 瓦 +
10 瓦 + 10 瓦 + 10 瓦
無線技術
IEEE802.11ac/a/b/g/n 協議
藍牙版本 4.2
輸入 / 輸出插孔
天線 / 纜線
VHF/UHF 的 75 歐姆外接端子
/ VIDEO IN
視訊 / 音訊輸入 (迷你插孔)
HDMI IN 1/2/3/4 (支援 4K 解析度、HDCP 2.3 相
容)
視訊:
4096 × 2160p (50, 60 Hz)*
1
(24 Hz)*
× 2160p (24, 25, 30 Hz), 1080p (30, 50, 60,
100, 120 Hz), 1080/24p, 1080i (50, 60 Hz),
720p (30, 50, 60 Hz), 720/24p, 576p, 480p,
PC 格式 *
7680 × 4320p (24, 25, 30 Hz)*3*4,
3840 × 2160p (100, 120 Hz)*
音訊:
在 eARC (Enhanced Audio Return Channel) 模式
下 *
eARC 模式除外
, 3840 × 2160p (50, 60 Hz)*2, 3840
3
5
有關詳情,請參閱說明指南。
5.1 聲道線性 PCM:32/44.1/48/88.2/96/
176.4/192 kHz 16/20/24 位元 , Dolby
Digital, Dolby Digital Plus, DTS
eARC/ARC (Enhanced Audio Return Channel/
Audio Return Channel) (僅限 HDMI IN 3)
在 eARC 模式下 *
有關詳情,請參閱說明指南。
在 ARC 模式下
兩聲道線性 PCM:48 kHz 16 位元 , Dolby
Digital, Dolby Digital Plus, DTS
5
1*2
, 4096 × 2160p
3*4
CT
12
Page 27
DIGITAL AUDIO OUT (OPTICAL)
CT
數位光纖插孔 (兩聲道線性 PCM:48 kHz 16 位元,
Dolby Digital,DTS)
(立體聲迷你插孔)
耳機
1、 2、 3
USB 連接埠 1 和 2 支援高速 USB (USB 2.0)
USB 連接埠 3 支援超快速 USB (USB 3.1 Gen 1)
LAN
10BASE-T/100BASE-TX 接頭 (視網絡的作業環境而
定,連線速度可能不同。不保證通訊率和通訊品
質。)
CENTER SPEAKER IN
中心揚聲器輸入 (接線柱)
其他
選用的配件
壁掛式支架:SU-WL450
作業溫度
0 ºC - 40 ºC
操作濕度
10 % - 80 % 相對濕度 (非冷凝)
電源和其他規格
電源需求
220 V - 240 V AC, 50 Hz
螢幕尺寸 (對角測量)(大約)
85 英寸 / 214.8 厘米
耗電量
見電視機背面
待機耗電量 *6*
0.5 瓦
7
顯示解析度
7680 畫素 (水平)× 4320 條線 (垂直)
輸出率
USB 1/2
5 V ,500 mA 最大值
USB 3
5 V ,900 mA 最大值
尺寸 (大約)(寬 × 高 × 深)
包含桌面底座
1913 × 1226 × 432 毫米
不含桌面底座
1913 × 1141 × 120 毫米
重量 (大約)
包含桌面底座
74.5 千克
不含桌面底座
71.7 千克
*1 當輸入 4096 × 2160p 且 [ 寬螢幕模式 ] 設為 [ 正常
模式 ] 時,解析度將顯示為 3840 × 2160p。要顯示
4096 × 2160p,請將 [ 寬螢幕模式 ] 設定設為 [ 全螢
幕模式 1] 或 [ 全螢幕模式 2]。
*2 若要支援 18 Gbps,將 [HDMI 訊號格式 ] 設定為增強
的格式。
*3 有關詳情,請參閱說明指南。
*4 僅限 HDMI IN 4。
*5 eARC 模式在 [eARC 模式 ] 設為 [ 自動 ]、[ 喇叭 ] 設
為 [ 音訊系統 ] 及連接 eARC 相容音訊系統時啟用。
*6 電視機完成所需的內部處理后,達到規定的待機功率。
*7 當您的電視機連接至網絡時,待機耗電量將有所增加。
註
• 選購配件的供應視國家 / 區域 / 電視機型號 / 存貨而定。
• 設計與規格可能變更而不事先通知。
商標資訊
• HDMI、HDMI 高畫質多媒體介面及 HDMI 標誌
為 HDMI Licensing Administrator, Inc. 在
美國及其他國家的商標或註冊商標。
• Dolby、杜比、Dolby Vision、Dolby Audio、
和雙 D 符號是杜比實驗室的商標。本產品經
過杜比實驗室的許可而製造。未公佈的機密作
品。版權所有 © 1992-2015 杜比實驗室。保
留所有權利。
• “BRAVIA”、 和 BRAVIA Sync 是
Sony Corporation 的商標或註冊商標。
• Gracenote、Gracenote 標誌和標誌字型以及
“Powered by Gracenote” 標誌是
Gracenote, Inc. 在美國和 / 或其他國家的註
冊商標或商標。
• Vewd® Core. Copyright 1995-2019 Vewd
Software AS. All rights reserved.
• Google、Google Play、Chromecast、
YouTube、Android TV 和其他相關標記和徽標
是 Google LLC 的商標。
• Wi-Fi®、Wi-Fi Alliance® 和 Wi-Fi Direct®
是 Wi-Fi Alliance 的註冊商標。
• Wi-Fi CERTIFIED™ 標誌是 Wi-Fi Alliance
的認證標誌。
• 有關 DTS 專利,請參閱
http://patents.dts.com。由 DTS, Inc. 授
權製造。DTS、其標誌、& DTS 連同其標誌是
註冊商標,而 DTS Digital Surround 是
DTS, Inc. 的商標。 © DTS, Inc. 保留所有
權利。
• 藍牙 ® 文字標記和徽標是 Bluetooth SIG,
Inc. 持有的註冊商標,任何使用此商標的
Sony Corporation 均需獲得授權。其他商標
和商標名稱為各自所有者的商標和商名。
• Netflix 是 Netflix, Inc. 的註冊商標。
• RealMedia © 2018 RealNetworks, Inc. 保
留所有權利。RealMedia,RealNetworks 以及
它們的標誌是 RealNetworks, Inc. 的商標或
註冊商標。
CT
13
Page 28

• TUXERA 是 Tuxera Inc. 在美國及其他國家 /
地區的註冊商標。
• USB-IF SuperSpeed USB Trident 標誌是 USB
Implementers Forum, Inc. 的註冊商標。
• 所有其他商標屬於其各自的所有者。
CT
14
Page 29

Page 30

Page 31

Page 32
http://r
http://rd1.sony.net/help/tv/gga2/h_ga/
Help Guide
娫㖏㊈⋘
© 2019 Sony Visual Products Inc. Printed in Japan
 Loading...