

Page 1

2-891-424-02 (1)
Streaming Receiver
Adaptor
Operating Instructions
BKM-FW50
2006 Sony Corporation
Page 2
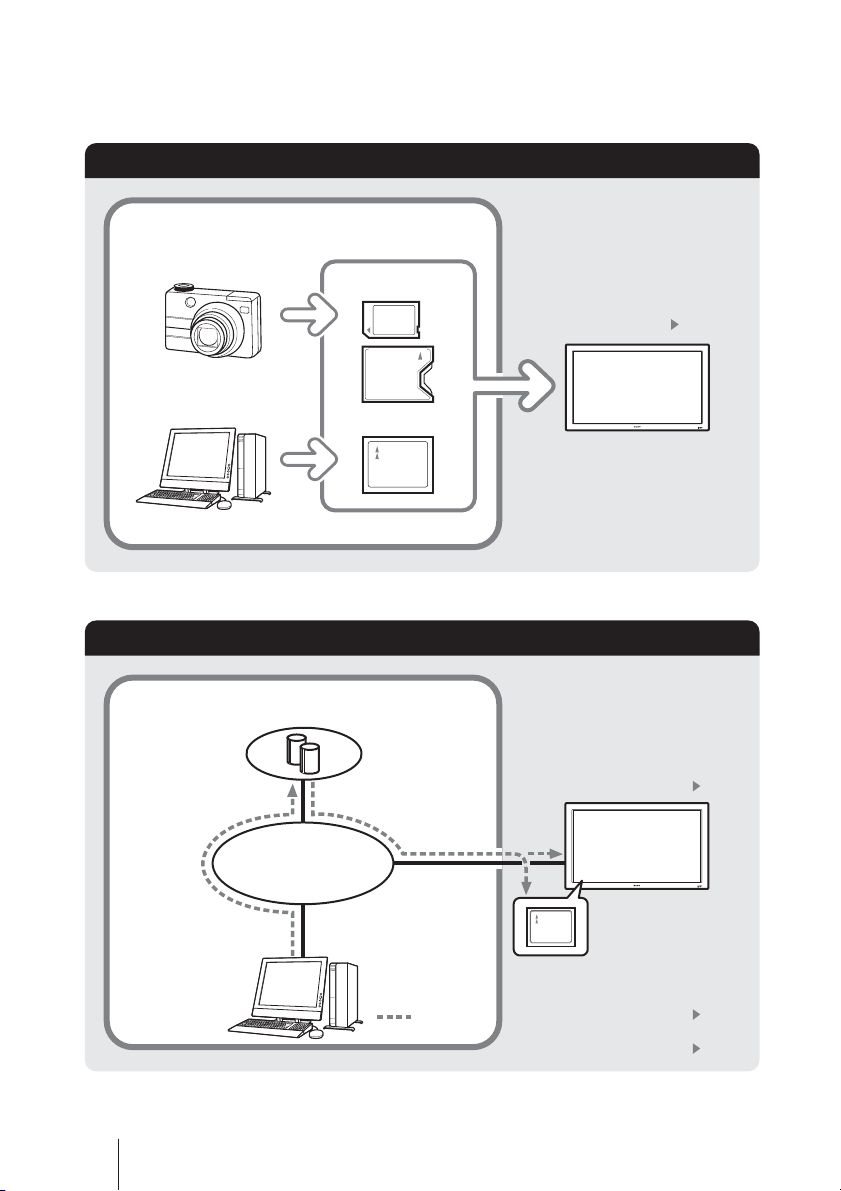
Using the BKM-FW50 Streaming Receiver Adaptor
When not connected to a network
■
Playback still image or video files from a memory card
Preparations
Take pictures with a
digital camera
Copy still image/video
files from your
computer
When connected to a network
■
1
Memory Stick Duo
CF card
Playback still image or video files downloaded from a network
2
1 “Local Play”
page 16
Preparations
Upload still image/
video files
Web/HTTP server
3
Download still
image/video files
from the Web/
HTTP server
View on a Flat Panel Display
To set up 1 “Streaming Play”
page 14
Network
Save/playback from a CF card
To set up 1 “Store Local”
flow of data
1 Memory card reader/writer required. 2 CF slot adaptor required. 3 Apache and IIS (Internet Information Server) are
the only supported servers for downloading and playing back still image and video files.
To set up 1 “Local Play”
page 14
page 16
2
Page 3

Table of Contents
Precautions............................................... 4
About This Manual ................................... 4
Names and Functions of Parts and
Installation ................................................ 6
Playback of Still Images or Video From a
Preparations for Using the Network
Computer Operation .............................. 11
Troubleshooting ..................................... 28
Other ....................................................... 33
Specifications ......................................... 34
Controls ................................................. 5
CF Card .................................................. 7
Compatible media and file formats.............. 7
Inserting a CF card ....................................... 7
Using slide show playback .......................... 8
Functions ............................................... 9
Assigning a fixed IP address to
the BKM-FW50 ................................ 9
Automatically obtaining an IP address ...... 10
Controlling the display............................... 11
Setting items on respective screens............ 11
List of Error Codes .................................... 30
Scheduling playback by time table ............ 33
3
Page 4

Precautions
About This Manual
• The software specifications of this unit
are subject to change for improvements
without notice.
• Screens shown by application software
may differ slightly from the illustrations
shown in this manual.
• For safety, connect the port of this unit
only to a network where there is no
danger of excessive voltage or voltage
surges.
• The steps described in this manual are
guaranteed only for use under the
following environment conditions.
Operating system:
Microsoft Windows XP
Browser:
Microsoft Internet Explorer 6.0 or
later
• The following may result in damage to
data or damage to the CF (CompactFlash)
card or Microdrive:
– Ejecting a CF card while it is being
accessed
– Placing a Microdrive near a strong
magnet
• The Microdrive is a compact hard disk
drive. Because it is storage medium
utilizing a rotating disk, it is more
susceptible to shocks and impact when
compared to flash memory devices such
as the Memory Stick and the CF card.
• To ensure security on the network, setting
a user name and password is
recommended. For information on how to
make these settings, see the section
“Setup screen” (page 25).
• Because the unit reaches high
temperatures when placed near the
display and used for a long period of
time, be careful when removing it from
the display.
................................................................................................................................................................
• Microsoft and Windows are registered trademarks of Microsoft Corporation in the United
States of America and/or other countries.
• CompactFlash and CF card are trademarks of SanDisk USA.
• Microdrive is a registered trademark of Hitachi Global Storage Technologies.
• Memory Stick and Memory Stick Duo are trademarks of Sony Corporation.
• All other product names, company names, etc. mentioned in this manual are trademarks or
registered trademarks of their respective owners.
This manual describes use and operation of
the BKM-FW50 as installed in a Flat Panel
Display of the FWD series and connected
to a network.
For information on regular operation of the
display, consult the operating instructions of
the FWD series product.
Precautions / About This Manual
4
Page 5
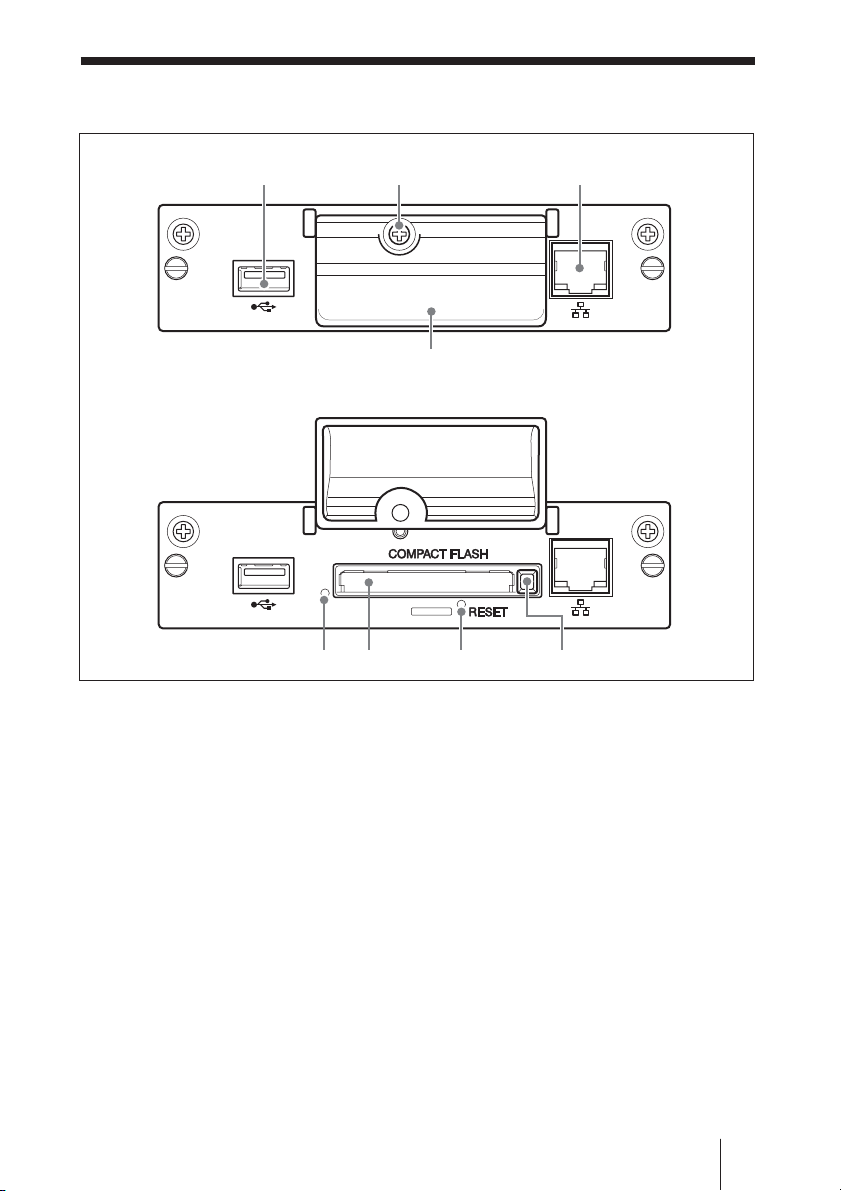
Names and Functions of Parts and Controls
1
5786
1 USB port
The port will be used for expanded
functions to be introduced in future.
2 Memory card slot cover fastening
screw
3 Network connector (10BASE-T/
100BASE-TX)
Serves to connect the unit to a network,
using a 10BASE-T/100BASE-TX LAN
cable.
4 Memory card slot cover
5 Access indicator
Lights green when a CF card is being
accessed by the unit.
Before inserting a CF card, make sure to
read “Precautions” on page 4.
2
4
6 Memory card slot
Accepts a CF card or a Microdrive.
7 RESET button
When this button is pressed and held for
more than 3 seconds, all settings of the unit
revert to the default condition.
When performing the reset operation, make
sure the display on the unit is set to
standby.
8 Eject button
Press this button to remove a CF card from
the memory card slot.
3
Names and Functions of Parts and Controls
5
Page 6
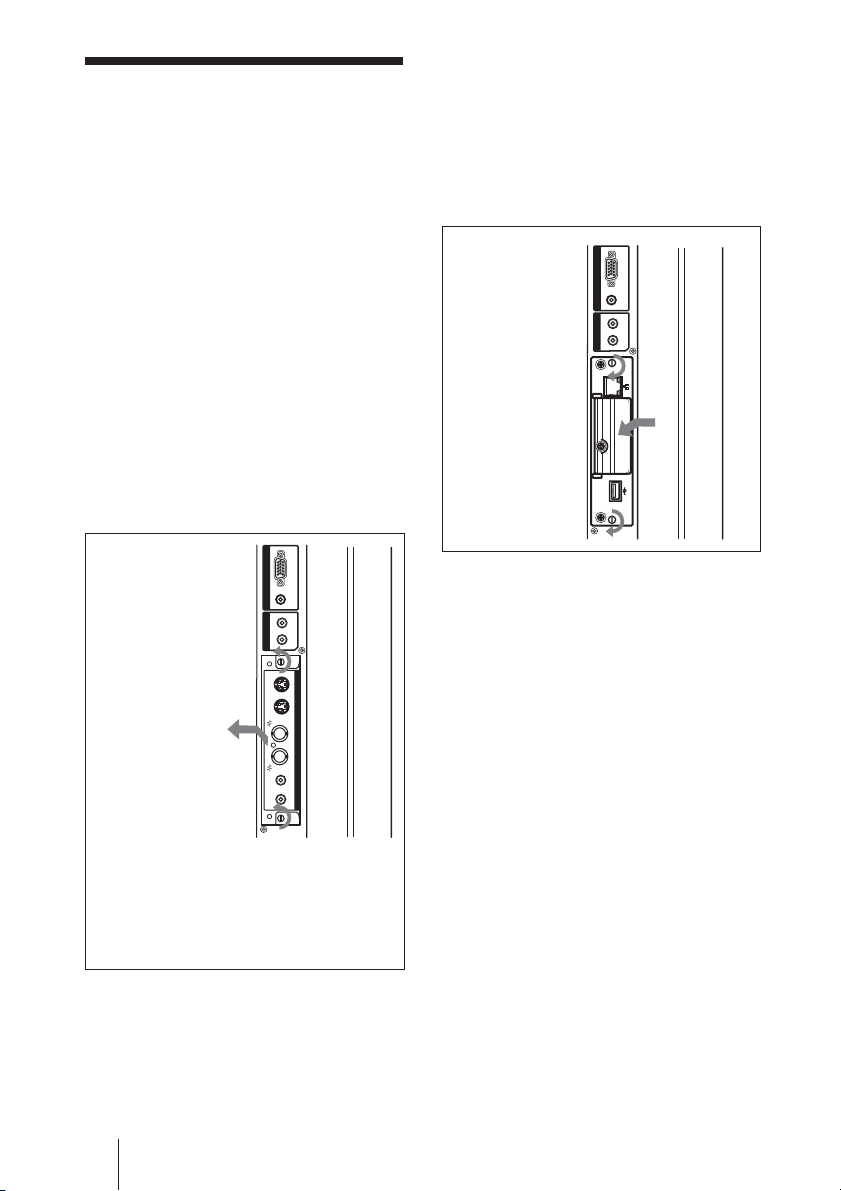
Installation
Before installation
• Turn off power to the display and all
other equipment connected to the display.
For the display, proceed as follows: press
1 to put the display into standby mode
and then disconnect the power cord from
the AC outlet.
• While carrying out the installation, the
display must be firmly secured.
Install the BKM-FW50 inside the display
as follows.
2 Insert the BKM-FW50 into the
display with correct orientation.
Make sure that the adaptor is firmly
seated in the internal connector of the
display. Then tighten the fastening
screws (top and bottom) with a flatblade
screwdriver and perform the necessary
connections.
RGB / COMPONENT
INPUT 2
AUDIO
L
OUT
R
AUDIO
2
1 If an optional adaptor is installed,
loosen its fastening screws (top and
bottom) by turning counterclockwise
with a flatblade screwdriver and then
carefully pull out the adaptor from
the display.
When option slot is at
left of display *
2
* The location of the option slot differs
according to the model. On models with
multiple option slots, use a slot that
supports video/communication functions
(VIDEO/COM port). Consult the
documentation of the FWD series product
for more information.
1
1
INPUT 2
OUT
AUDIO
AUDIO RGB / COMPONENT
L
R
INOUTINOUTRL
S VIDEO
VIDEO
VIDEO INPUT ADAPTOR
AUDIO IN
1
2
Caution
Do not touch the connector section
Never touch the connector section inside
the display. Otherwise there is a risk of
accidents or damage.
Installation
6
Page 7
Playback of Still Images or Video From a CF Card
The BKM-FW50 is equipped with a
memory card slot that accepts
CompactFlash cards (not supplied). If you
insert a CF card that contains images shot
with a digital still camera into the slot of
the BKM-FW50, the images can be viewed
on the display in a slide show format.
You can make various settings for playback
of still images or video. For information on
how to make these settings, see the section
“Computer Operation” (page 11).
SanDisk: SDCFB 64M (64 MB)
SDCFB 512M (512 MB)
SDCFH 512MB (512 MB)
SDCFH 2GB (2 GB)
Hagiwara Sys-Com:
HPC-CF64V (64 MB)
HPC-CF512V (512 MB)
HPC-CF512ZP (512 MB)
COMPACTVAULT
Sony: RHMD5G (5 GB)
Microdrive
Hitachi: HMS360402D5CF00 (2 GB)
HMS360604D5CF00 (4 GB)
• Compatibility with CF cards and
Microdrives has been confirmed but is
not guaranteed for all CF cards and
Microdrives.
Compatible media and file formats
Media: CF (CompactFlash) card,
Microdrive
File format: JPEG format, MPEG2
format etc. (For details, see
page 13.)
Recommended resolutions:
1360 × 768, 1280 × 768,
1024 × 768
Maximum resolution*:
2592 × 1944
Minimum resolution:
640 × 480
* The higher the resolution, the longer images
take to display.
Notes
• The following may result in damage to
data or damage to the CF card or
Microdrive:
– Ejecting a CF card while it is being
accessed
– Placing a Microdrive near a strong
magnet
• A CF card, COMPACTVAULT or a
Microdrive can be used as storage media
for the BKM-FW50.
CF card
Buffalo: RCF-G256MB (256 MB)
RCF-G512MB (512 MB)
RCF-X64MY (64 MB)
RCF-X256MY (256 MB)
RCF-X512MY (512 MB)
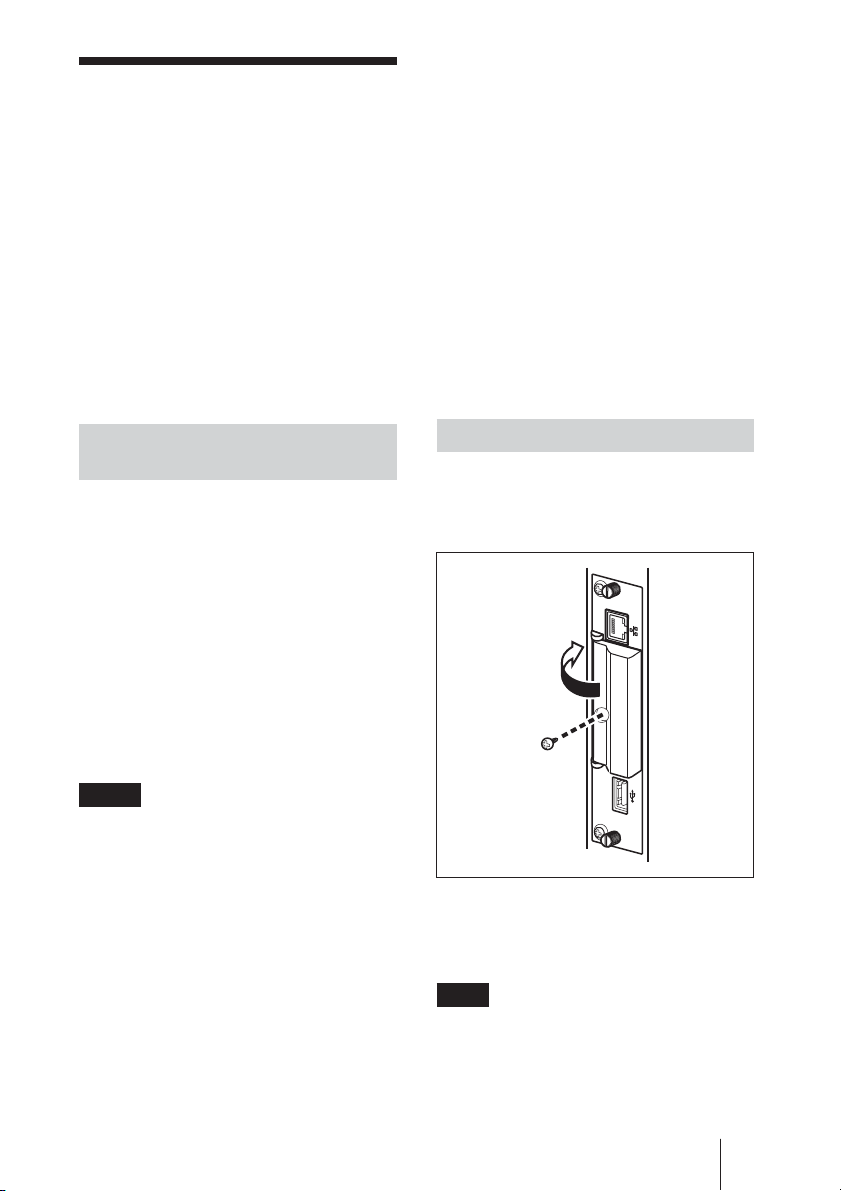
Inserting a CF card
1 Remove the memory card slot cover
fastening screw with a Phillips
screwdriver.
2 Open the memory card slot cover and
insert the CF card into the memory
card slot.
Note
Take care to insert the CF card with correct
orientation, as shown in the illustration.
Playback of Still Images or Video From a CF Card
7
Page 8
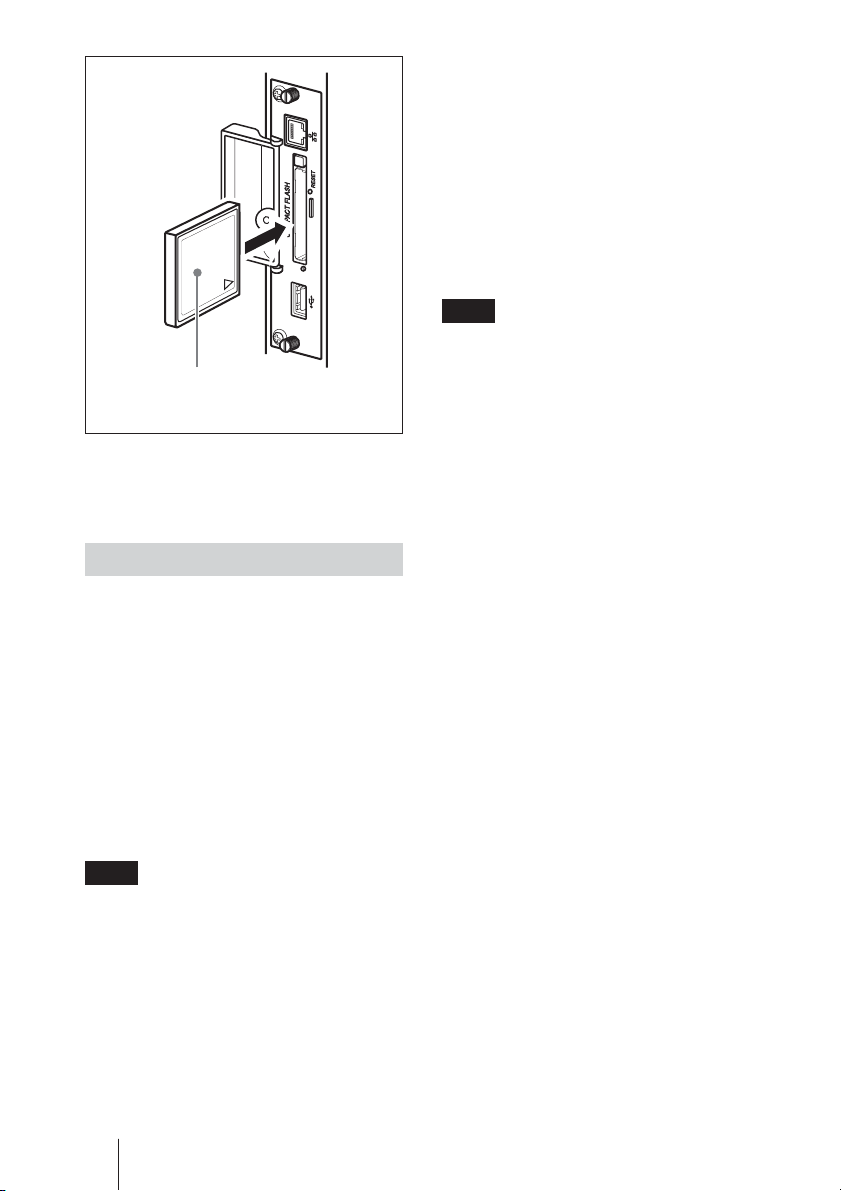
Insert the CF card completely into the slot,
aliging the label with the arrow facing as
shown.
Detailed control of playback
method
When the display is connected to a network
via the BKM-FW50, any still image or
video file stored on the CF card can be
shown on the display. For information on
settings and operation in this case, see the
section “Computer Operation” (page 11).
Removing the CF card
Note
When the access indicator is lit, images are
being stored or read. Never eject a CF card
or turn the power off during this time.
Doing so may result in damage to data or
the CF card itself.
3 Replace the memory card slot cover
and tighten the fastening screw with a
Phillips screwdriver.
Using slide show playback
When a CF card which contains still images
taken with a digital still camera is inserted
into the BKM-FW50, JPEG format still
image files will be automatically detected,
and the images will be shown on the
display as a slide show. (The input signal
for the display must be set to OPTION 1
RGB at this time. For details, consult the
operating instructions of the display.)
In addition, the BKM-FW50 is set to
automatically display any still image or
video slide show saved on the CF card, as
the factory default.
Note
When inserting a Memory Stick Duo into
the BKM-FW50, insert it into a
commercially available Memory Stick Duo
to CF adaptor first.
1 Remove the memory card slot cover
fastening screw with a Phillips
screwdriver.
2 Press the eject button to remove the
CF card.
3 Replace the memory card slot cover
and tighten the fastening screw with a
Phillips screwdriver.
Playback of Still Images or Video From a CF Card
8
Page 9

Preparations for Using the Network Functions
The BKM-FW50 can be connected to a
network with 10BASE-T/100BASE-TX
LAN cable.
When connected to a LAN, the IP
addresses of the BKM-FW50 can be set
using one of the following two methods.
Consult your network administrator
regarding details about IP address selection.
• Assigning a fixed IP address to the
BKM-FW50
Normally this method should be used.
• Automatically obtaining an IP
address
If the network to which the BKM-FW50
is connected has a DHCP server, you can
have the DHCP server automatically
assign an IP address. Note that in this
case the IP address will change every
time the display in which the BKMFW50 is installed is turned on.
Assigning a fixed IP address to the BKM-FW50
Note that a separate IP address is necessary
for the display control function and for the
still image/video playback function.
Regarding details of IP address selection,
consult your network administrator.
Setting an IP address for the
display control function
First, assign an IP address to the display
control function, using the following
procedure. The IP address assigned in this
way is used for calling the display control
function of the BKM-FW50 from a
computer on the network. Also consult the
operating instructions of the display.
3 Press the MENU button on the
display to bring up the main menu.
4 Use the M/m buttons to select
“INITIAL SETUP/INFORMATION”
and press the ENTER button. The
“INITIAL SETUP/INFORMATION”
menu appears.
5 Use the M/m buttons to select “IP
Address Setup” and press the ENTER
button.
6 Use the M/m buttons to select
“Manual” and press the ENTER
button.
7 Enter the necessary items.
1) Use the M/m buttons to select the
item to enter manually and press
the ENTER button. A cursor
appears in the leftmost field of the
selected item.
2) Use the M/m buttons or the
numeric buttons on the remote
control to enter a three-digit
number (0 - 255). When you
press the ENTER button or the
, button, the cursor moves to
the next field on the right. Enter a
number in the same way.
3) When all four fields of an item
have been set, pressing the
ENTER button or the , button
confirms the entry for that item.
4) Make settings for the other items
in the same way.
8 Use the M/m buttons to select
“Execute” and press the ENTER
button.
Next, assign an IP address to the still
image/video playback function.
1 Connect the BKM-FW50 installed in
the display to the network, using
suitable LAN cable.
2 Turn power to the display on and
wait for about 30 seconds.
Setting an IP address for the still
image/video playback function
1 Start the browser of the computer
(Internet Explorer 6.0 or later).
Preparations for Using the Network Functions
9
Page 10

2 Enter the IP address that was
assigned to the display control
function into the address field, in the
format “http://xxx.xxx.xxx.xxx”.
Then press the Enter key on the
keyboard.
When a user name and password
have been set, the “Network
Password” screen appears. Enter the
user name and password that were
set, and then proceed to the next step.
3 Click the “Setup” tab.
The “Setup” screen appears. This
screen lets you set up the Network
Password. The factory default
settings are as follows:
Name: root
Password: fw50ad
4 Click the “Network” button.
5 Under “Internet Protocol (TCP/IP)”,
click “Specify an IP address”. Then
enter the IP address for the still
image/video playback function in the
input fields.
6 Click “Apply”.
Automatically obtaining an IP address
If you set up the display as described
below, an IP address can be assigned
automatically by a DHCP server on the
network.
1 Connect the BKM-FW50 installed in
the display to the network, using
suitable LAN cable.
2 Turn power to the display on and
wait for about 30 seconds.
4 Use the M/m buttons to select
“INITIAL SETUP/INFORMATION”
and press the ENTER button. The
“INITIAL SETUP/INFORMATION”
menu appears.
5 Use the M/m buttons to select “IP
Address Setup” and press the ENTER
button.
6 Use the M/m buttons to select
“DHCP” and press the ENTER
button.
7 Use the M/m buttons to select
“Execute” and press the ENTER
button.
Note
The IP address may not be obtained
correctly, depending on the router being
used. Confirm the specifications and
operations of the router before use.
Checking the automatically
assigned IP address
When an IP address has been automatically
assigned, you can call up the display
control screen of the BKM-FW50 as
follows and check which IP address has
been assigned. The IP address changes each
time power to the display is turned on.
Therefore you must check the IP address as
described here every time after turning
power to the display off and on again.
1 Press the MENU button on the
display to bring up the main menu.
2 Use the M/m buttons to select
“INITIAL SETUP/INFORMATION”
and press the ENTER button. The
“INITIAL SETUP/INFORMATION”
menu appears.
3 Press the MENU button on the
display to bring up the main menu.
Preparations for Using the Network Functions
10
3 Use the M/m buttons to select
“INFORMATION” and press the
ENTER button.
4 Check the IP address that is displayed
in the “IP address” field.
Page 11
Computer Operation
Setting items on respective screens
Controlling the display
You can make various display settings on
the screen of the computer.
Make sure that the BKM-FW50 is properly
installed in the display, and that the BKMFW50, computer, and router or hub are
properly connected with network cable.
Then turn on power to the display, the
computer, and the router or hub.
There are five display screens, divided by
function: “Information” screen,
“Configure” screen, “Control” screen,
“Player” screen, and “Setup” screen.
For details on button functions, consult the
operating instructions of the FWD series
product.
1 Start the browser of the computer
(Internet Explorer 6.0 or later).
2
Enter the IP address that was assigned
to the display control function into the
address field, in the format “http://
xxx.xxx.xxx.xxx”. Then press the
Enter key on the keyboard.
When a user name and password
have been set, the “Network
Password” screen appears. Enter the
user name and password that were
set, and then proceed to the next step.
3 Click the function tab at the top of the
screen and select the desired screen.
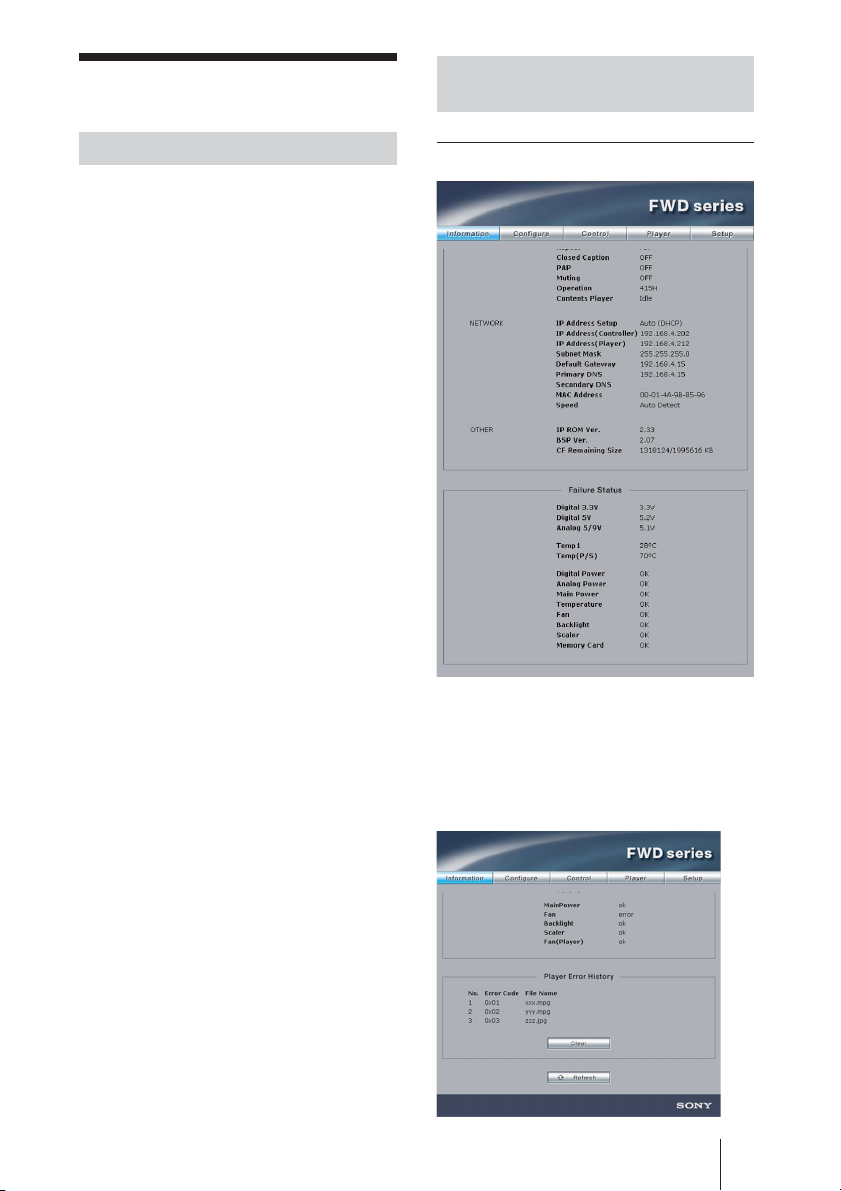
Information screen
This screen shows the model name, serial
number and other display information, as
well as the power status and the input
signal selection.
The screen is for information only. There
are no items that can be set.
This screen also displays error information.
Computer Operation
11
Page 12

For details on error information, see “List
of Error Codes” (page 30).
Clear (Delete)
Lets you delete error information displayed
in the Player Error History.
Note
Up to 30 errors appear in the Player Error
History in the order that they occurred. As
new errors occur after this maximum is
reached, old error information is deleted,
starting with the oldest.
Configure screen
Notes
• For details on these functions, consult the
operating instructions of the FWD series
product. Not all functions are supported
by all display models.
• Before setting the “Timer” function,
make sure to configure the time setting
on the Setup screen (page 25).
Control screen
POWER
Switches the display on or off.
Timer
Lets you make settings for the timer
function.
Click “Apply” when done.
Screen Saver
Lets you make settings for the screen saver
function.
Click “Apply” when done.
Picture and Picture
Lets you make settings for the Picture and
Picture function.
Click “Apply” when done.
Computer Operation
12
INPUT
Lets you select the input signal.
PICTURE MODE
Lets you select the picture mode.
ASPECT
Lets you switch the aspect ratio of the
image.
CLOSED CAPTION
Lets you control the display of subtitles on
the screen.
Volume +/– buttons
Adjust the display volume.
Contrast +/– buttons
Adjust the screen contrast.
Page 13

Brightness +/– buttons
Adjust the screen brightness.
Chroma +/– buttons
Adjust the color intensity.
Phase +/– buttons
Adjust the color balance.
Reset button
Resets the settings from “Contrast” to
“Phase” to their factory default values.
Notes
• For details on each function, refer also to
the operating instructions for the display
(FWD series).
• Depending on the display model, some
functions on this screen may not be
available. In addition, some functions
may be disabled with some PICTURE
MODE settings.
• When no signal is input, adjustments may
not be possible with the functions on this
screen.
Player screen
Supported file formats
The following formats are supported for
still image/video playback.
File type File format Extension
Still JPEG format jpg, jpe, jpeg
image GIF format gif
PNG format png
BMP format bmp
Video*
MPEG2 PS format
mpg, m2v,
(Up to 15 Mbps; mpeg
480i/480p/576p
recommended)
Audio MP3 format mp3
* Format of audio in video files:
• Linear PCM
• MPEG-1 Audio Layer-2 (MP2)
• MPEG-1 Audio Layer-3 (MP3)
Prohibited characters for file names
The following characters cannot be used for
file names on this unit. File name data that
includes these characters cannot be read:
\ : / * ? " < > | # { } % & ~ ' , ;
About folder sublevels
This unit supports a maximum number of
32 folder sublevels.
This screen lets you make settings for still
image and video playback and operate the
PC Presentation function of the BKMFW50.
Supported servers
The following Web/HTTP server formats
are supported:
• Apache
• IIS
The server software must be installed
beforehand. For details, consult the
respective operating instructions of each
server software.
Computer Operation
13
Page 14

Streaming Play
This screen lets you make settings for
display and playback of still image and
video files stored on a Web/HTTP server.
A maximum of 1,000 files can be
downloaded with Store Local. Each file can
be no larger than 2 GB in size.
Note
A maximum of 1,000 files are playable
with Streaming Play. Each file can be no
larger than 2 GB in size.
• Files are played in ASCII code order.
Naming files in alphabetical or numerical
order is recommended.
Repeat
Select this check box if the still images or
video files are to be played back repeatedly.
Save
Saves the settings made on this screen.
Play
Starts playback of the selected file or of the
still image/video files in the folder
specified in “Play file/folder name”.
Stop
Stops still image/video playback that was
initiated by clicking the “Play” button.
Store Local
Server Address
Enter the address of the Web/HTTP server
where the still image or video files are
stored. When entering the IP address of the
server, enter it in the format, “http://
xxx.xxx.xxx.xxx” (“xxx” represents a
figure no more than three digits).
Play file/folder name
Specifies the location of the still image or
video files on the Web/HTTP server
specified in the “Server Address” field. You
can either enter the location in the text box or
click the “Browse” button and select the file
or folder location on the screen that appears.
Notes
• If an “index.html” file is stored in the
folder, other files and folders contained in
the folder are not displayed.
• Only the still images and videos in the
specified folder are played. Still images
and videos saved in any subfolders are
not played.
Computer Operation
14
This screen lets you download still image/
video playback files stored on the Web/
HTTP server and save them on a CF card
(not supplied) inserted in the memory card
slot of the BKM-FW50.
Note
A maximum of 1,000 files can be
downloaded with Store Local. Each file can
be no larger than 2 GB in size.
Server Address
Enter the IP address of the Web/HTTP
server.
Page 15

Play file/folder name
Specifies the location of the still image or
video files on the Web/HTTP server
specified in the “Server Address” field.
You can either enter the location in the text
box or click the “Browse” button and select
the file or folder location on the screen that
appears.
Note
If an “index.html” file is stored in the
folder, other files and folders contained in
the folder are not displayed.
Folder name
Specifies the save location on the CF card
inserted in the memory card slot. You can
either enter the location in the text box or
click the “Browse” button and select the
file or folder location on the screen that
appears.
Delete
Deletes a file or folder saved on the
memory card inserted in the unit.
New Folder
Creates a new folder on the memory
card inserted in the unit.
Store
Starts downloading the still image or video
file or the contents of the folder specified in
“Play file/folder name”.
Scheduled Download
This function lets you periodically
download still image or video files from a
Web/HTTP server to an inserted memory
card. You can select the day of the week,
the time, and the interval.
Check to clear the local folder before
download
When you select this check box, all files in
the folder on the CF card (specified in
“Folder name”) are deleted before
downloading starts from the Web/HTTP
server. When this check box is not selected,
any files on the CF card with the same
name as content downloaded from the
Web/HTTP server will be overwritten.
Notes
• Before setting the “Scheduled Download”
function, make sure to configure the time
setting on the Setup screen (page 25).
• When setting the start time for the
scheduled download function, select a
time when the display will be turned off.
If the display is already on when
download begins, displaying the image
on the screen takes priority over the
download. In such a case, a file may not
be downloaded properly.
• When setting the start time for download,
take the on/off timer setting on the
display into consideration, as well as
Time Table Play settings (page 23).
• Do not turn the display off while a file is
in the process of being downloaded.
Doing so may cause the file to be
downloaded improperly.
• When there is no space left on the CF
card, an error will occur in the Scheduled
Download function, and automatic
downloading of new content will stop.
Computer Operation
15
Page 16

Local Play
Rename
Renames a file or folder saved on the
memory card inserted in the unit.
Delete
Deletes a file or folder saved on the
memory card inserted in the unit.
Note
Files are played in ASCII code order.
Naming files in alphabetical or numerical
order is recommended.
Repeat
Select this check box if the still images or
video files are to be played back repeatedly.
This screen lets you make settings for
display and playback of still image and
video files stored on a CF card inserted in
the memory card slot of the BKM-FW50.
Note
A maximum of 1,000 files are playable
with Local Play. Each file can be no larger
than 2 GB in size.
Play file/folder name
Specifies the location of the still image or
video files on the CF card. You can either
enter the location in the text box or click
the “Browse” button and select the file or
folder location on the screen that appears.
When a folder is specified, the still images
and videos saved in any subfolders are also
played.
Save
Saves the settings made on this screen.
Play
Starts playback of the selected file or of the
still image/video files in the folder
specified in “Play file/folder name”.
Stop
Stops still image/video playback that was
initiated by clicking the “Play” button.
PC Presentation
Computer Operation
16
This screen lets you start and stop the PC
Presentation function of the BKM-FW50.
By showing the contents of the computer
desktop on the display, the PC Presentation
function allows using the display as an
external monitor for the computer.
Page 17

Note
To enable use of the PC Presentation
function, UltraVNC must be installed on
the computer.
UltraVNC is free software licensed under
GNU GPL.
Connect PC
Select this to enable the PC Presentation
function of the BKM-FW50. The following
items also need to be set.
IP Address:
Enter the IP address of the computer.
Enter the IP address in the following
format: “xxx.xxx.xxx.xxx” (“xxx”
represents a figure no more than three
digits)
Password:
Enter the password that was set during
the installation of UltraVNC.
PC Resolution:
Select the screen resolution of the
connected computer.
If the resolution selected here differs
from the computer’s actual resolution,
the screen will not display at the proper
size. Select a resolution so the screen
size matches the display.
Connect
Starts the PC Presentation function. When
you click this button, the desktop screen of
the computer at the specified IP address
appears on the display.
Disconnect
Select this to disable the PC Presentation
function.
Play Settings
This screen lets you make settings for the
slide show function and for automatic
display and playback of still image and
video files.
Auto Play
This setting specifies whether still image/
video file playback should start
automatically when the display in which
the BKM-FW50 is installed is turned on. In
combination with the ON timer of the
display, this also allows automatic playback
at a scheduled time.
To enable the function, select the “On”
setting. From the “Contents” drop-down
list, select “Streaming” (automatic playback
of still image/video files stored on a
computer on the network), “Local”
(automatic playback of still image/video
files stored on a CF card inserted in the
BKM-FW50), or “Play List” (playback of
still image/video files in accordance with a
previously created play list). “On” is
selected as the factory default.
Check to cancel auto play when
“Scheduled Download” overlaps
When you are using the Scheduled
Download function (page 15) under Store
Local on the Player screen, specify whether
to give priority to data downloads with the
Scheduled Download function or to Auto
Play (automatic playback of still image or
video files).
Computer Operation
17
Page 18

When you select this check box, priority is
given to data downloads with the Scheduled
Download function. If the specified time for
Auto Play falls during a download,
automatic playback for that day is canceled.
When this check box is not selected, Auto
Play will begin after data finishes
downloading.
Slide Show
The following items can be set for the slide
show function.
Interval:
Specifies the time interval until
switching to the next still image or
video.
Background Music:
Lets you specify background music to
be played during the slide show. Only
music files (or folders containing music
files) stored on a CF card inserted in the
BKM-FW50 can be used for this
function. Only the music files in the
specified folder are played. (Music files
saved in any subfolders are not played.)
The background music used for time
table playback can be set the from the
time table editing screen (page 24).
Notes
When a folder has been specified, pay
careful attention to the following points.
•A maximum of 1,000 music files are
playable. Each file can be no larger
than 2 GB in size.
• Files are played in ASCII code order.
Naming files in alphabetical or
numerical order is recommended.
You can either enter the file name in the
text box, or enter the folder name, click
the “Browse” button, and specify the
file in the screen that appears.
Rename
Renames a file or folder saved on the
memory card inserted in the unit.
Delete
Deletes a file or folder saved on the
memory card inserted in the unit.
Check to use background music
during video playback (video audio
will be muted):
When this check box is selected,
Background Music playback will be
available while any video files
contained in the slide show are played
back, but audio included in the video
files will be muted.
Check to display still pictures in High
Resolution Mode:
When this check box is selected, still
images are displayed at high resolution
(WXGA or XGA). If the folder
includes both video files and still
images, the screen turns off for several
seconds to switch resolution when
changing from a still image to a video
(and vice versa).
The following aspect ratios can be
selected for the input images.
16:9 (WXGA): View 16:9 images in
full screen display.
4:3 (XGA): View 4:3 images on 4:3
normal screen.
AUTO: Automatically detects
the aspect ratio.
Computer Operation
18
Page 19

Make selections based on the aspect
ratios of the images you wish to view.
When viewing still image files, we
recommend making the aspect ratios of
each file the same.
Notes
• When playing files with mixed aspect
ratios, black bars may appear on
either side of the display, or the
image may be stretched lengthwise.
• Still images with aspect ratios other
than 16:9 or 4:3 can also be
displayed, but black bars may appear
at the top, bottom, and either side of
the display, or the image may be
stretched lengthwise.
• When the RGB mode on the display
is set to DTV mode, the unit
automatically enters over scan mode,
and any text on the outer edges of an
image will be cut off. For the FWD40LX1/32LX1R/50PX2, set the over
scan mode to OFF.
Standard Resolution Mode
(Default Values): 480p
Input still image
Display
Standard resolution
The input still image is converted to
standard resolution, and is enlarged
according to the aspect ratio of the display.
Display: Full mode
Display
Display: Full mode
Display
The input still image is displayed in
the original aspect ratio.
Computer Operation
Black bar
19
Page 20

High Resolution Mode: 16:9
(WXGA)
Input still image
High resolution mode: 4:3 (XGA)
Input still image
Display
Display: Full mode
Display
The input still image is displayed in
the original aspect ratio.
Display
Display: Full mode
Display
The input still image is stretched
lengthwise but fills the entire screen.
Display: Normal mode
Display
20
Computer Operation
Black bar
The input still image is displayed in
the original aspect ratio.
Page 21

Video Resolution
Select Auto, NTSC (480i), NTSC (480p),
or PAL (576p) as the playback resolution
for video.
Guide Message
Specify whether to display a message that
enables you to tell the display is turned on
when no still images or videos are playing.
Background Color
Select “Black,” “Dark Gray,” or “Gray” as
the display color to use when no still
images or videos are playing.
Apply
Click here to save the settings.
Player screen (advanced settings)
When you click the “Advanced” button on
the Player screen, three buttons –“List
Play,” “Edit Play List,” and “Time Table”–
appear, allowing you to make more
advanced settings for still image and video
playback. In this state, the “Advanced”
button switches to the “Easy” button, which
you can click to hide the three advanced
settings buttons.
List Play
This screen lets you select a previously
created play list and make settings for
playing still image and video files in
accordance with the selected play list.
Note
To use the play list playback function, a CF
card must be inserted in the memory card
slot on the unit.
List Name
Previously created play lists are displayed
in the drop-down list. Select a play list for
playback.
Preview
Previews the play list currently selected in
“List Name.”
Repeat
Select this check box to play back the play
list repeatedly.
Save
Saves the settings made on this screen.
Play
Starts playback of the play list selected in
“List Name.”
Stop
Stops playback of the play list that was
initiated by clicking the “Play” button.
Computer Operation
21
Page 22

Edit Play List
This screen lets you edit play lists and
create new play lists.
Note
To edit play lists, a CF card must be
inserted in the memory card slot on the
unit.
Edit Play List
This feature can be used to change the
content of previously created play lists. The
following buttons are available to perform
editing and other tasks on the play list
selected in the drop-down list.
Edit
Displays a screen for changing the
content of the play list selected in the
drop-down list.
On this screen, you can use the
following operations to browse for still
image and video files to add to the play
list.
• To add still image or video files to the
play list from the CF card inserted in
the memory card slot on the unit,
click the “Browse” button without
entering anything for “Selected
Folder.” The folders on the CF card
are displayed in a tree structure on the
left side of the screen. Select the
folder that contains the still image or
video files to be added to the play list.
• To add still image or video files to the
play list from a Web/HTTP server,
enter the server’s address in “Selected
Folder” and then click the “Browse”
button. The folders on the server are
displayed in a tree structure on the
left side of the screen. Select the
folder that contains the still image or
video files to be added to the play list.
When a folder in the tree structure is
selected, the files contained in that
folder are listed next to the tree
structure. After selecting a file, click
the “Add” button and the file will be
added to the playlist on the right side of
the screen.
You can use the “Up” and “Down”
buttons to change the order of files in
the play list, the “Preview” button to
preview the play list, and the “Delete”
button to delete files from the play list.
When you have finished editing the
play list, click the “OK” button. The
play list editing screen closes.
Preview
Displays, in order, a preview of the still
image files contained in the play list
selected in the drop-down list.
Delete
Deletes the play list selected in the
drop-down list from the list.
Download
Downloads the play list selected in the
drop-down list from the CF card to the
computer. By editing the downloaded
play list with a text editor or similar
software, you can change the contents
of the play list. For details, contact your
nearest Sony dealer.
Computer Operation
22
Page 23

Create New Play List
This feature can be used to create a new
play list. Enter a name for the play list in
the text box, and then use the following
buttons to create the play list.
Create
Displays a screen for editing a new play
list. The operations available on this screen
are the same as when you click the “Edit”
button in the “Edit Play List” section.
Browse
Click this button to specify a play list file
that has been saved on the computer.
• Before scheduling a time table, make sure
to configure the time setting on the Setup
screen (page 25).
Time Table Play
Specifies whether to perform playback by
time table.
When performing playback by time table,
click “ON” and then set the weekly
playback schedule.
Note
When Time Table Play is set to “On,” the
timer setting on the main display unit is
disabled.
Upload
Uploads a play list specified with the
“Browse” button* to the CF card. The
uploaded play list file is added to the dropdown list in the “Edit Play List” section.
* Button name depends on the operating
system language.
Time Table
This screen lets you create time tables and
configure them to play any still image or
video file during any time slot.
Notes
• To use the time table function, a CF card
must be inserted in the memory card slot
on the unit.
For each day in the time table, specify the
data to play back in each time slot. You can
create a maximum of seven time tables (A
to G) and specify which days of the week to
use them on the weekly schedule display.
To edit the contents of each time table,
click the “Go” button on the right side of
the weekly schedule display. The time table
editing screen appears.
On the time table editing screen, playback
data and settings are listed. For each item in
the list, you can specify the save location
and background music for the playback
data and configure playback start time and
repeat settings.
File/Folder/List Name
Specify the save location and file name
of the still image or video file to play
back. You can also specify a folder
where still images or video files are
saved.
Computer Operation
23
Page 24

• To specify still image or video files
from the CF card inserted in the
memory card slot on the unit, click
the “File Browse” button without
entering anything in the text box, and
specify a file or folder on the screen
that appears.
• To specify still image or video files
from a Web/HTTP server, enter the
server’s address in the text box, click
the “File Browse” button, and specify
a file or folder on the screen that
appears.
• You can also specify a play list (page
21) if you have created one. Click the
“List Browse” button, and specify a
play list on the screen that appears.
Background Music
You can specify a music file to use as
background music when playing back
still images. Enter the location of the
music file in the text box, or click the
“File Browse” button and specify a
music file.
Start Time
Specify the time at which playback of
the data will start. To play back the data
repeatedly, select the “Repeat” check
box.
The start time of the first data file is
used as the on timer setting on the
display.
End Time
If you want playback by time table to
end at a certain time, select this check
box and specify an end time.
This setting is used as the off timer
setting on the display.
Add
Adds a new item to the list of data to
play back.
Delete
When the leading check box is selected
for items in the list, clicking this button
deletes those items from the list.
Save
Saves the settings made on this screen.
When you have finished making settings,
click the “OK” button to close the time
table editing screen. For each time table
you create (A to G), specify which days of
the week to use the time table on the
weekly schedule display. Each click of a
“PLAY” icon on the weekly schedule
display turns the specified time table on or
off for the specified day of the week.
Operations During Time Table Playback
• When the display is set to Standby, all
remaining playback scheduled by time
table is canceled for that day.
• Each file can be stopped with the “Stop”
button during playback. In this case, time
table playback resumes from the next file
in the time table at that file’s scheduled
start time.
• During time table playback, you can start
playback of a different file with the
“Play” button. In this case, time table
playback resumes from the next file in
the time table at that file’s scheduled start
time.
• To stop time table playback, set Time
Table Play to “Off,” and stop the
currently playing file with the “Stop”
button.
Computer Operation
24
Page 25

Note
You can specify a time anywhere in the
range of 0:00 to 35:59 (11:59 a.m. the next
day) for both the data playback start time
and the time table end time. As a result,
data set to play back in a time slot on the
next day may be superseded by a time table
scheduled to start playback that day.
Generally, when playback time slots
overlap like this, playback scheduled for
the current day is always given priority. For
details, see “Scheduling playback by time
table” (page 33).
Play mode when “Scheduled Download”
overlaps
When you are using the Scheduled
Download function (page 15) under Store
Local on the Player screen, specify
“Delay,” “Skip,” or “Cancel” as the action
to take when the time scheduled for still
image or video file playback by time table
overlaps with the time specified with the
Scheduled Download function for
downloading data.
Delay: Playback of the overlapping
content begins after data finishes
downloading with the Schedule
Download function.
Skip: Only the overlapping content is
skipped, and playback begins
again from the next scheduled
content.
Cancel:All playback by time table for that
day is canceled.
Save
Saves the settings made on this screen.
Setup screen
This screen lets you set up the Network
Password. The factory default settings are
as follows:
Name: root
Password: fw50ad
After you have made any changes or
entered information, click “Apply” at the
bottom of each screen to enable the settings.
Special characters cannot be used in the
text fields.
Owner Information
Owner
Enter owner information here.
Display Location
Enter information about the display
installation location here.
Note
Do not use spaces when entering the
information. Doing so may cause the file
name to display incorrectly.
Memo
You can enter auxiliary information here.
Time
Time
Enter the time and the day of the week
here.
Computer Operation
25
Page 26

Network
Internet Protocol (TCP/IP)
Select “Specify an IP address” to enter each
value in the IP address’s numeric string.
Select “Obtain an IP address (DHCP)” to
acquire an IP address automatically from
the DHCP server. In this case, be aware
that the IP address will change each time
the display attached to the BKM-FW50 is
turned on.
Note
The BKM-FW50 requires a separate IP
address for the display control function and
the still image/video playback function.
The IP address for the display control
function can be set from the menu of the
display attached to the BKM-FW50. For
details, see “Setting an IP address for the
display control function” (page 9).
Password
The administrator and user name and
password information can be entered here.
The administrator name is fixed to “root”.
Each can be a maximum of 8 characters
long.
Once a user name and password are set, the
“Network Password” screen appears
whenever the display control screen of the
BKM-FW50 is called up. To ensure
security on the network, setting a user name
and password is recommended.
Mail Report
When a display function error has occurred,
an error report is immediately sent by email (error notification).
However, there is no error notification
when an error occurs with the Player.
Address
Enter the target e-mail address here. Up to
four addresses can be specified, for
simultaneous sending of an error report.
The maximum length for each address is 64
characters.
Mail Account
Mail Address:
Enter the allocated mail address here.
The maximum length for the address is
64 characters.
Outgoing Mail Server (SMTP):
Enter the mail server address here.
The maximum length for the address is
64 characters.
Requires the use of POP
Authentication before Send e-mail
(POP before SMTP):
If POP authentication is required when
connecting to the SMTP server, select
this check box.
Incoming Mail Server (POP3):
When POP authentication is used for
the “POP before SMTP” setting, enter
the POP3 server address here.
Account Name:
Enter the mail account name here.
Password:
Enter the mail password here.
Send Test Mail:
To test whether mail can be sent
successfully to the specified
address(es), select this check box and
click “Apply”. A test mail will be sent.
Note
If any of the following items is not set or
not set correctly, an error message appears,
and test mail cannot be sent:
• Target address
• Mail account address and mail server
address (SMTP)
Advanced
Gives access to advanced settings to enable
use of various applications on the network.
Make the settings as required by the
respective application.
Advertisement
Lets you make settings for the
Advertisement and Broadcast functions on
the network.
Computer Operation
26
Page 27

ID Talk
Lets you make settings for the ID Talk
function. ID Talk is a protocol that allows
network-based control of the display in
which the BKM-FW50 is installed.
Controlled items includes various settings
and adjustments such as color temperature
and gamma. For information about
supported ID Talk commands, contact your
local Sony dealer.
SNMP
The BKM-FW50 is a network device which
supports SNMP (Simple Network
Management Protocol). Besides standard
MIB-II, Sony Enterprise MIB is also
supported. This screen allows making
settings for SNMP.
For information about supported SNMP
commands, contact your local Sony dealer.
Returning to default settings
To reset all settings made on the Setup
screen to the factory default condition, use
a thin pointed object to press and hold the
RESET button on the front panel of the unit
(page 5) for at least 3 seconds.
Computer Operation
27
Page 28

Troubleshooting
Before requesting service, please check the following points. If the problem persists, contact
your local Sony dealer.
Problem Cause/Remedy
Cannot connect to network.
Storage medium is not recognized.
Cannot playback files saved on
the storage medium.
• BKM-FW50 is not correctly installed in
display.
t Push the BKM-FW50 fully into the slot,
and tighten the fastening screws.
• Cable is not connected correctly to network
port.
t Plug the cable firmly into the network port.
• Network settings are incorrect.
t When using a web browser from the
computer, check the network settings of the
computer.
Press and hold the RESET button of the
BKM-FW50 for at least 3 seconds to return
the unit to the default condition. Then
perform setup again.
• Cable type is incorrect.
t Select a straight cable or a cross-wired
cable, as required by the network
environment.
• The storage medium is broken.
t Try using a different storage medium.
• The storage medium being used is not
compatible.
t Try using a storage medium from another
maker.
• The file formats are incorrect.
t Change the files to the appropriate format.
• There are over 1,000 files saved on the storage
medium.
t Remove files until the number of files does
not exceed 1,000.
• There is a file exceeding 2 GB in size.
t Make sure no file exceeds 2 GB in size.
• The storage medium is broken.
t Try using a different storage medium.
Troubleshooting
28
Page 29

Problem Cause/Remedy
Cannot save files from a server to
local storage.
Streaming playback is unavailable.
The display control screen
(the Web screen displaying the
unit’s GUI) does not display.
•A storage medium is not inserted in the BKMFW50.
t Insert a storage medium.
• The storage medium is broken.
t Try using a different storage medium.
• There is a problem with the network
environment.
t Confirm the network settings.
• There is a problem with the network
environment.
t Confirm the network settings.
t There may be a high amount of network
traffic. Change the network settings for
optimal performance.
• The file formats are incorrect.
t Change the files to the appropriate format.
• Click the refresh or reload button on your Web
browser.
• Make sure the IP address is correct.
• Use Internet Explorer 6.0 or later.
Troubleshooting
29
Page 30

List of Error Codes
When an error occurs while using the BKM-FW50, an error code along with error
information is displayed on the Information screen (page 11).
The following explains the meanings of error codes and the methods of dealing with them.
Error code When it occurs What it means How to deal with it
(Hex)
0x10
0x11
0x12
0x13
0x14
0x15
0x16
0x20
0x30
Streaming Play
Local Play
The specified file/folder
does not exist.
It may also be that there is
an “index.html” file within
the specified folder.
The specified file is of an
extension not supported by
the BKM-FW50.
Playable file extensions
include (not casesensitive):
Video: mpg, m2v, mpeg
Still image: gif, png,
bmp, jpe, jpg, jpeg
The specified folder does
not contain a playable file.
The specified file is of a
non-playable format.
The specified file (within a
folder) is damaged.
The specified MPEG file
(within a folder) is an
MPEG1 file.
A network error has
occurred.
An error has occurred with
the Player during playback.
The specified file/folder
does not exist.
Make sure the file/folder
you specified exists.
Or, move the contents of
the folder to a folder that
does not contain an
“index.html” file, and
specify that folder.
Confirm the extension of
the file you specified.
Make sure a file with the
appropriate extension
exists in the folder.
Confirm the format of the
file.
Check the file.
Check the file.
Check the network
environment.
Contact your local Sony
dealer.
Make sure a CF card is
inserted in the memory
card slot.
Also, make sure the file/
folder exists at the location
you specified.
Troubleshooting
30
Page 31

Error code When it occurs What it means How to deal with it
(Hex)
0x31
0x32
Local Play
0x33
0x34
0x35
0x40
0x50
0x51
0x52
Store Local
0x53
The specified file is of an
extension not supported by
the BKM-FW50.
Playable file extensions
include (not casesensitive):
Video: mpg, m2v, mpeg
Still image: gif, png,
bmp, jpe, jpg, jpeg
The specified folder does
not contain a playable file.
The specified file is of a
non-playable format.
The specified file (within a
folder) is damaged.
The specified MPEG file
(within a folder) is an
MPEG1 file.
An error has occurred with
the Player during playback.
The specified file/folder
does not exist in the
specified server.
It may also be that there is
an “index.html” file within
the specified folder.
The folder in the specified
server does not contain a
downloadable file.
The specified file is of an
extension not supported by
the BKM-FW50.
Playable file extensions
include (not casesensitive):
Video: mpg, m2v, mpeg
Still image: gif, png,
bmp, jpe, jpg, jpeg
The specified folder does
not exist on the CF card.
Confirm the extension of
the file you specified.
Make sure a file with the
appropriate extension
exists in the folder.
Check the format of the
file.
Check the file.
Check the file.
Contact your local Sony
dealer.
Make sure the file/folder
exists at the location you
specified.
Or, move the contents of
the folder to a folder that
does not contain an
“index.html” file, and
specify that folder.
Make sure a file with the
appropriate extension
exists in the folder.
Confirm the extension of
the file you specified.
Make sure a CF card is
inserted in the memory
card slot.
Also, check the folders on
the CF card.
Troubleshooting
31
Page 32

Error code When it occurs What it means How to deal with it
(Hex)
0x54
0x55
0x56
0x57
0x58
0x59
0x5A
0x70
0x71
Store Local
PC Presentation
A network error has
occurred.
The storage capacity on the
CF card is insufficient.
The file/folder specified to
be deleted does not exist.
The file specified to be
deleted is currently being
accessed.
The path specified to
create a new folder is
incorrect.
The file/folder to be
renamed does not exist.
A file/folder already exists
with the new name
specified for a renamed
file/folder.
A connection error has
occurred.
(The server does not exist,
cannot connect to the
network, etc.)
The user name and
password entered are
incorrect.
Check the network
environment.
Check the remaining
storage capacity of the CF
card.
Also, delete any
unnecessary files/folders
on the CF card.
Make sure the specified
file/folder exists on the CF
card.
Before specifying to delete
a file, make sure the file is
closed.
This error occurs when a
new folder that does not
exist is specified. Confirm
the new folder.
Make sure the specified
file/folder exists on the CF
card.
Specify a different name
for the file/folder.
Make sure that the server is
running and that the
network environment is
functioning.
Make sure the user name
and password match the
ones registered on the
server.
Troubleshooting
32
Page 33

Other
Scheduling playback by time table
When you create a time table and perform scheduled playback of still image or video files,
some files may not be played back, depending on the content of the schedule. When creating
a time table, you can specify any time slot from 0:00 (midnight of the current day) to 35:59
(11:59 a.m. the next day) as the playback time of the still image or video files. If the playback
time for certain files is set for the next day (24:00 to 35:59), it may be superseded by the
playback time of files scheduled by time table to start that day. As a rule, playback scheduled
for the current day is given priority in this case, and files held over from the previous day are
not played back.
Note
If the display is set for automatic power off, the display will turn off automatically at the
specified time, even if content is playing back.
Other
33
Page 34

Specifications
Input/output
Network 10BASE-T/100BASE-
TX (connection
speeds may differ,
depending on the
Memory card slot CF Type II
USB Type A
General
Dimensions (including projecting parts)
Mass Approx. 300 g
Power consumption
Operating temperature
Storage temperature
LED indicators Link (green)/
Cable length Max. 100 m
network environment)
135 × 32 × 95 mm
3
(5
/8 × 1 5/16 × 3 3/4
inches) (W/H/D)
(10.6 oz.)
Approx. 10 W
0 to +35°C
(+32 to +95°F)
(environment
conditions for display
in which BKM-FW50
is installed)
–10 to +40°C
(+14 to +104°F)
Act (orange)
(Category 5)
Design and specifications are subject to
change without notice.
Specifications
34
Page 35

Sony Corporation
 Loading...