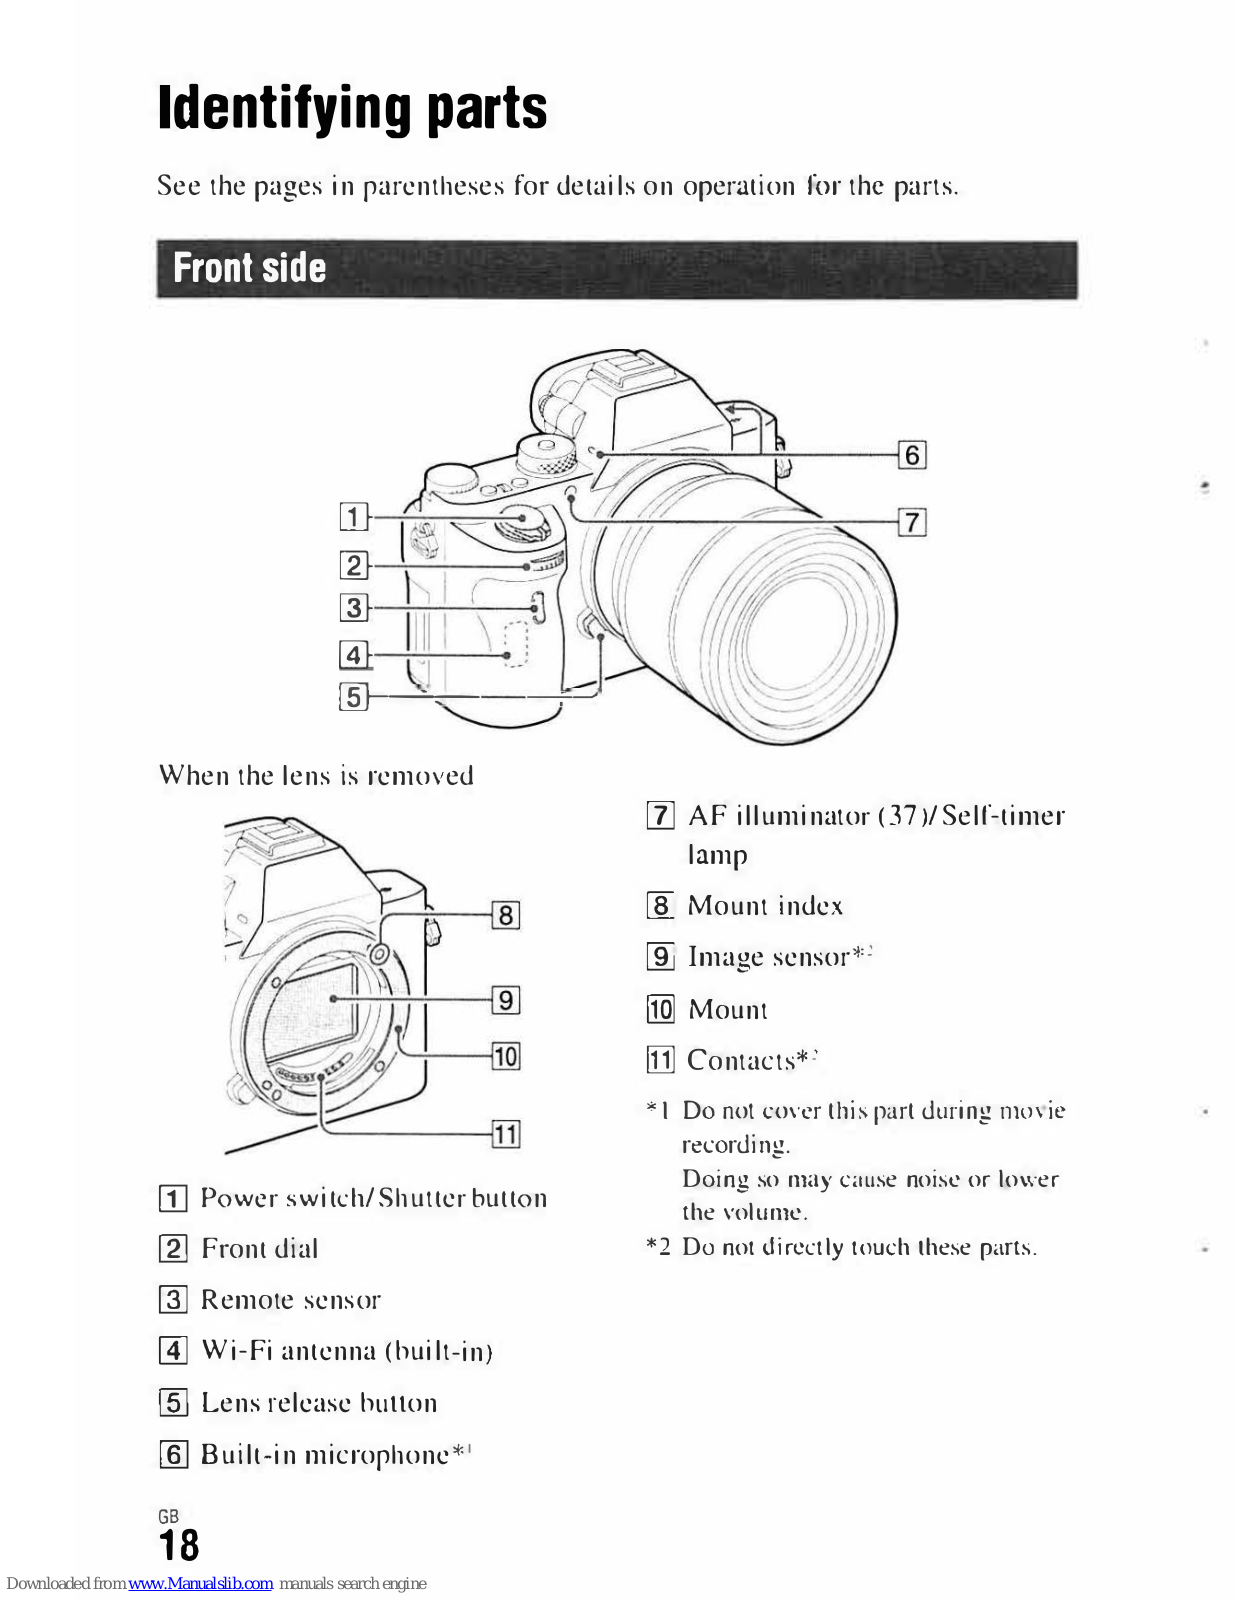
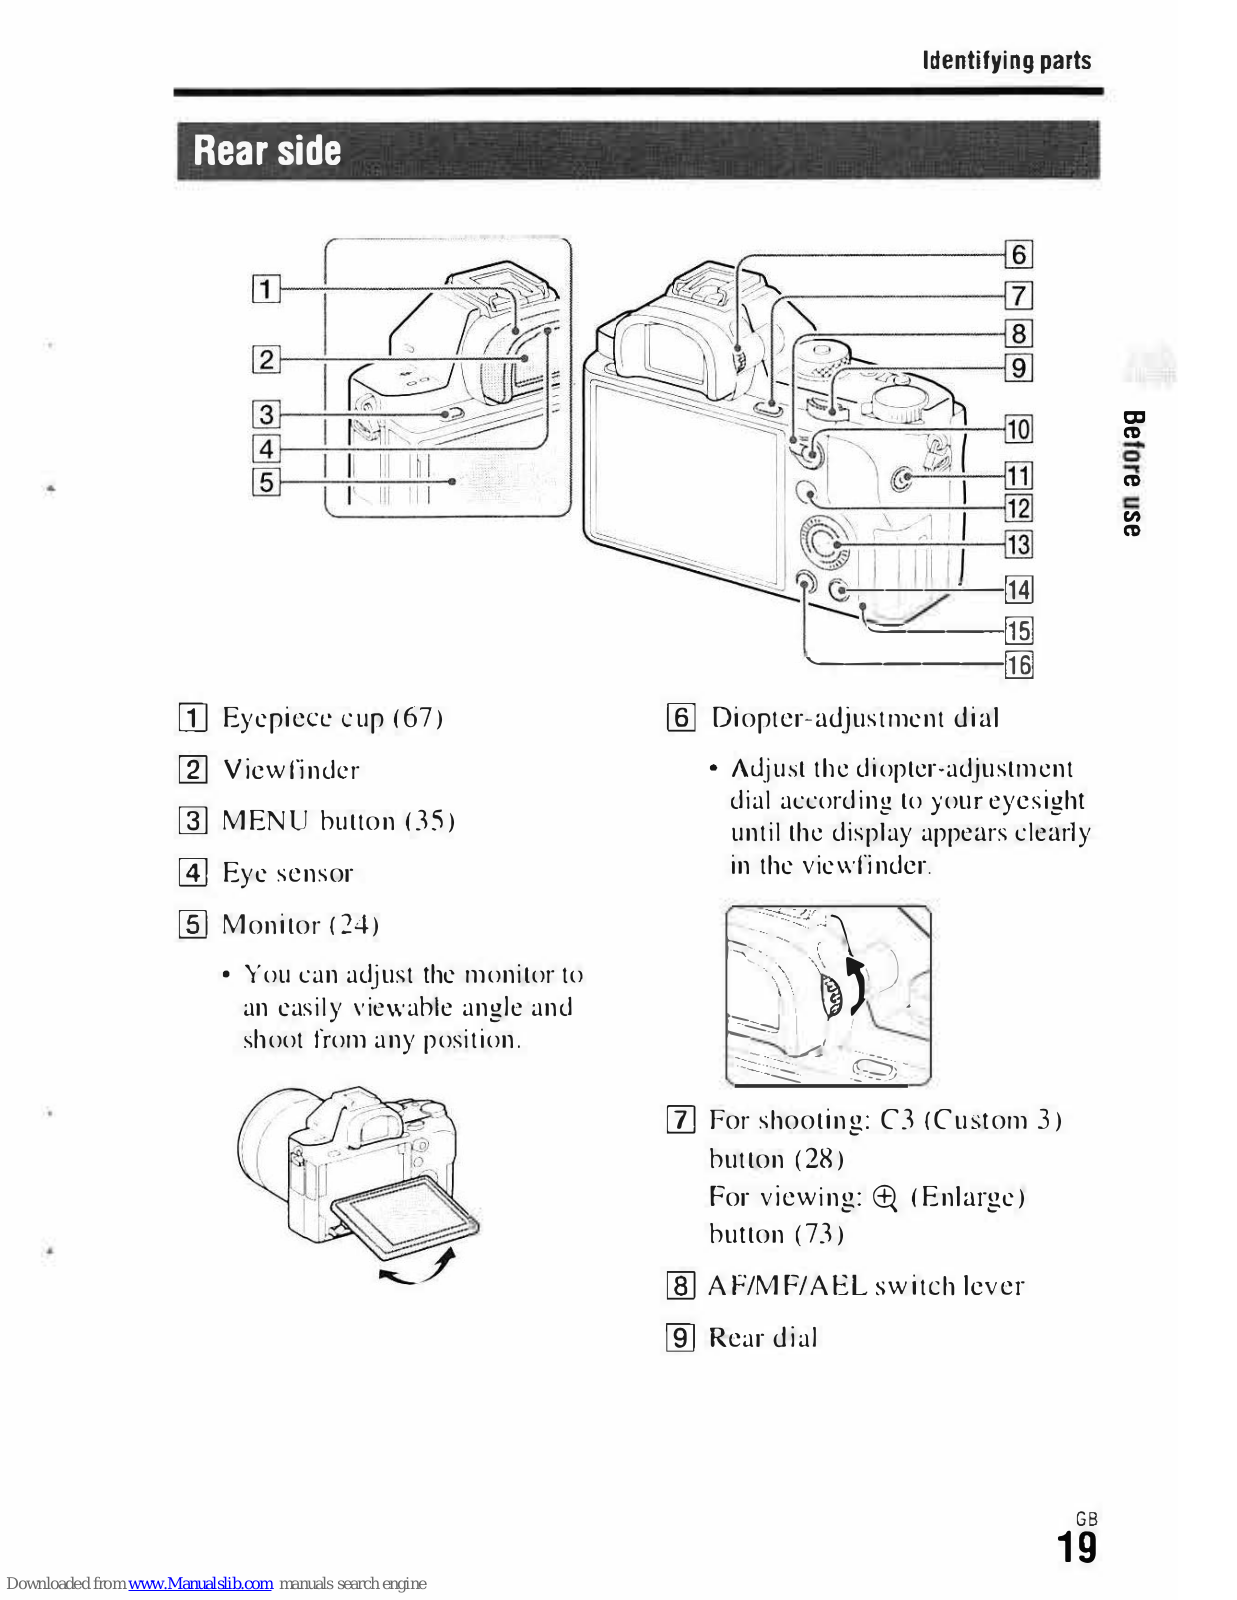
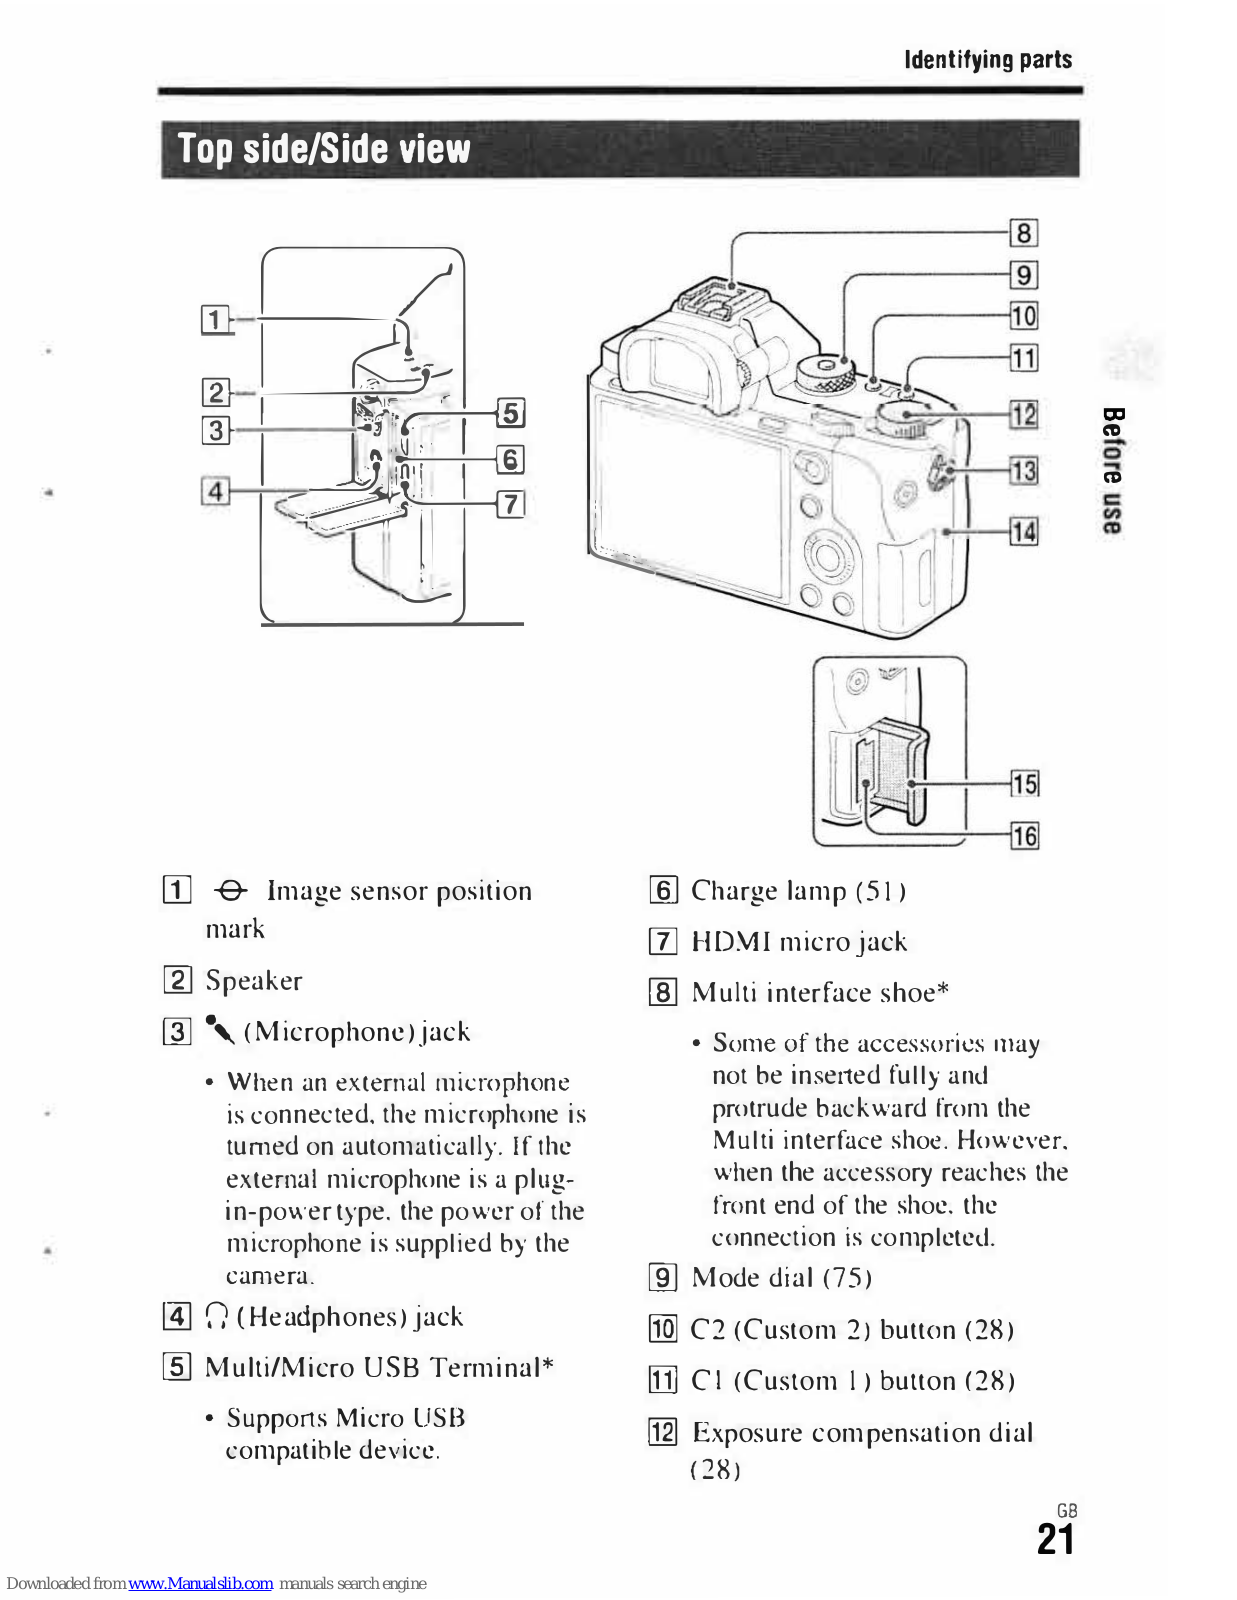
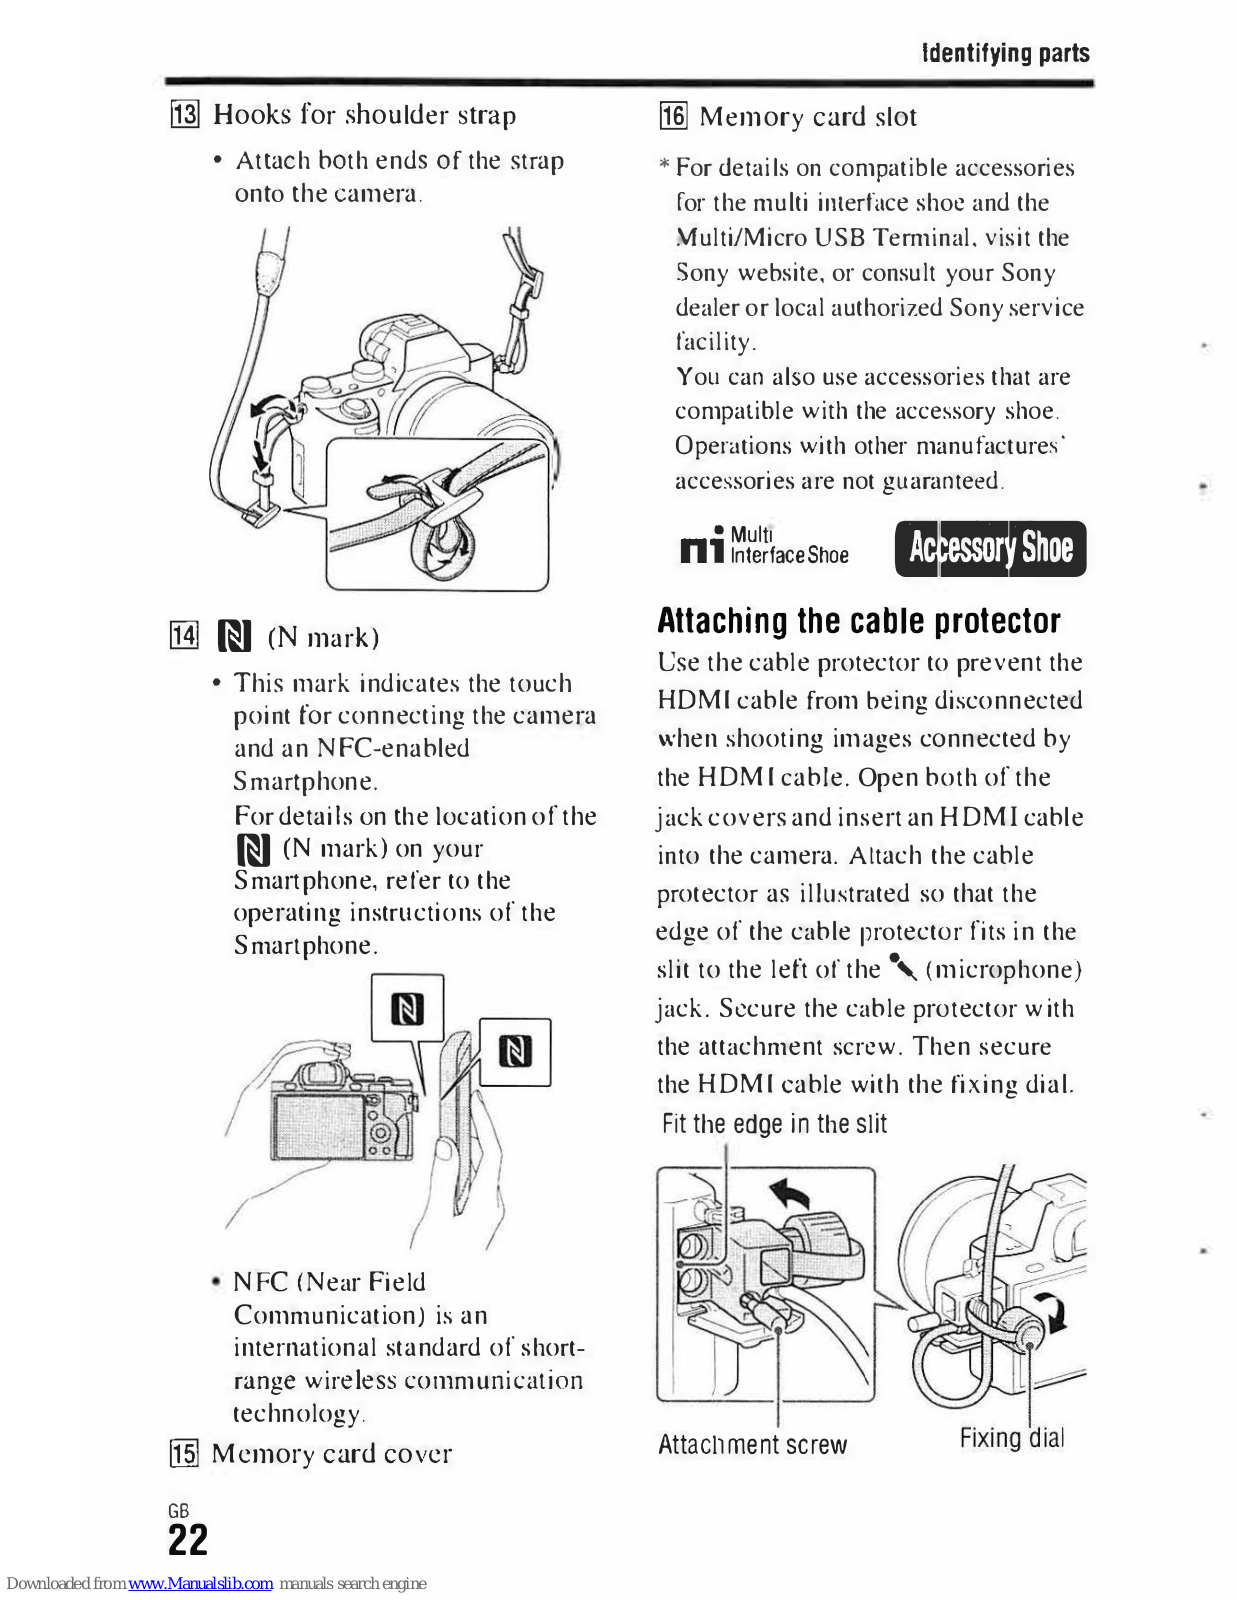
SONY: |
4-581-534-12( 1) |
|
Interchangeable Lens Digital Camera
,,
<X7sn
E-mount
Instruction Manual
"Help Guide" (Web manual)
Refer to "Help Guide" for in-depth instructions on the many functions of the camera.
http://rd1.sony.net/help/ilc/1530/h_zz/
IL.:CE 7SM2
Downloaded from www.Manualslib.com manuals search engine
mt!ffl1ti
Learning more about the camera ("Help Guide")
"Help Guide" is an on-line manual. You can read the "Help Guide" on your computer or smartphone. Refer to it for in-depth instructions on the many functions of the camera.
URL: http://rdI.sony.net/help/ilc/1530/ h_zz/
The model and serial numbers arc localed |
||
Owner's |
Record |
|
on the bottom. Record |
serialthenumber in |
|
the spate provided below. |
RcfCr lo these |
|
numbers whenever you caJI your Sony |
||
dealer regarding this product. |
||
Serial No. |
----- - - |
|
Model |
. WW898259 (ILCE 7SM2) |
|
Serial No. |
----- - - - |
|
Model No. AC UD10/AC |
UUDI I |
WARNING
To reduce fire or shock hazard, do not expose the unit to rain or moisture.
IMPORTANT SAFETY INSTRUCTIONS -SAVE THESE INSTRUCTIONS DANGER TO REDUCE THE RISK OF FIRE OR ELECTRIC SHOCK, CAREFULLY FOLLOW THESE INSTRUCTIONS If the shape uf the plug docs not fit 1he power outh:l, use an attachment plug ad..iptor of the proper configuration for the power outlet.
GB
Downloaded from www.Manualslib.com manuals search engine
&CAUTION
IfBatterythe hatlL'T"Ypackpack is mishandled, the h,11tcry pack can hurst. cause a fireor even che111iL·,t1 hurns. Observe the following cauli<HIS.
Duo 1111101 Jisasscmhk1.:ru:-.h .111J dn. 1101 expose the balti:ry pack lo any shock or force such as hammering. dropping or stepping on it. Do not short circuit ;md do not allo\\ mdal Dhj,xts to i:ornc into contact with tht: hallay terminals.
Do not cxposi: to high temperature above 600(' (I-W°F) SLH.:h ,1.s in direct sunligh1 or in a car parked in the sun.
Do not incincr,1tc or Uispuse or in lire. Do not handle d,1111..tged or leaking lithium ion batteries.
Be sure chargl'. the hattery pack using a gcnuinl..'toSony ba!lery ch.irgcr or a device that can charge lht: haltcry pack.
Kt:ep the battery p<K·k out of the rcad1 of small children.
Kt:L'P the hatlery pack dry.
Rcplaci.: only with thi.: samt: or equivalent type rl..'L·ommcnded by Sony.
Disposl..' of used halh:ry packs promptly as described in thi.: instructions.
ACUse Adaptorthe ni.:arby wall outlet (wall socket) whi.:n using lhe AC Adaptor. Disconnect the AC Adaptor frum the wall omlet (wall sockd) immcdiatdy if any malfunction occurs whi\c using the apparatus.
UseBattery1hc nearbychargerwall outlet (wall socket) wht:n using the Cliargcr. Disconnect the Charger from the wall outlet (wall socket) immt:diatdy if any malfunction occurs while u:-ing the apparatus.
The power cord (mains lead). if supplied. is designed specifically for use with this camera only. and should not he used with other cleL·trical equip111enl.
ForCustomers in the U.S.A. andCanada
RECYCLING LITHIUM-ION
BATTERIES
Lithium-Ion ballcrics arc rccyclahlc.
You cm hdp preserve our cnviron111c1ll by returning your used rechargeable ballcries tu
the collcc1ion and recycling location nearest you.
For more information ri.:garding recycling of rcchargcabk hatteries, call toll free 1-800-822-8837. or visit http://www.call2recyclc.org/
Caution: Do not hanclk damaged or leaking Lithium-Ion batteries.
ThisFor supplied<.h::vicc L·omplicsaccessorieswith Part 15 of the FCC Ruks. Oper.ition is subject to the following two conditions:
(I) Thi, device may not causeharmful interfcrencl.'.. and (2) this device must accept any interference received. including interference that may cause undesired operation.
CAN ICES..J13/NMB-.113
GB
Downloaded from www.Manualslib.com manuals search engine
This equipmenl complies with FCC/IC radiation exposure limits sci forth for an uncontrolled environment and meets [he FCC radio frequency (RF) Exposure Guidelines and RSS-102 of the IC radio frequency (RF) Exposure rules. This equipment has very low levels of RF energy that are deemed to comply without testing of specific absorption ratio (SAR).
' forCu!IOmers in the O_.s.
If you have any questions about this product, you may call:
Sony Customer Information Center
1-800-222-SONY (7669).
The number below is for the FCC related matters only.
Regulatory Information
TradeDeclarationName: SONYof Conformity
Model No.. WW898259
Responsible Party: Sony Electronics Inc.
Address: 16535 Via Esprillo,
San Diego. CA 92127 U.S.A.
Telephone No.: 858-942-2230
This device complies with Part15 of the FCC Rules. Operation is subject to the following two condilions: (I) This device may not cause harmful in1erference, and (2) this device must accept any interference received. including interference that may cause undesired operation.
This equipment must not be co.Jocated or opcr.ited in conjunction wi1h any olher antenna or transmiller.
YouCAUTIONare cautioned that any changes or modifications not expressly approved in this manual could void your authority lO operate this equipment.
GB
4
This equipmenl has been tested and found |
||
Note: |
|
|
to comply wi1h the limits for a Class B |
||
digital device, pursuant to Part 15 of the |
||
FCC Rules. |
|
|
These limits arc designed to provide |
||
reasonable protection ag.iinst harmful |
||
interference in a residential installation. |
||
This equipment generates. uses. and can |
||
radiate radio frequency energy and, if not |
||
installed and used in .:u.:i:ordance with 1he |
||
inslructions. may cause harmful |
||
interference to radio communications. |
||
However. there is no guarantee that |
||
inlerference will not occur in a particular |
||
installation. If this equipment does cause |
||
harmful interference to radio or television |
||
reception, which can be dch.::rminedby |
||
turning the equipment off and on, the user |
||
is encouraged to |
tryto correct the |
|
interference by one or more of the |
||
following |
measures: |
|
- Reorient or relocate the receiving |
||
antenna. |
|
|
- Increase the separation between the |
||
equipment and receiver. |
|
|
- Connect the equipmcnl inlo an outlet on a |
||
circuit different from |
tothatwhich the |
|
receiver is connected. |
|
|
- Consult the dealer or an experienced |
||
radiorrv technician for help. |
||
ll1e supplied intcrf;.1ce c;.ible must be used |
||
with the equipment in order to comply with |
||
the limits for a digital device pursuanl to |
||
Subpart B of Part |
IS of FCC Rules. |
Downloaded from www.Manualslib.com manuals search engine
For Customers in C,mada.
This devi..:c complies with Industry Canada licenccxempt RSS standard(s). Operation is subjet:t to the following two t:onditions: (I) this device may not t:ause intcrferen..:e. and (2) this device must accept any interference, including interfcrent:c that may cause undesired operation of the devit.:e.
For Customers in Europe
Notice for the customers in the countries applying EU Directives
Manufai..:turcr: Sony Corporation, 1-7-1 Kanan Minato-ku Tokyo. 108-0075 Japan For EU product compliance: Sony Deutschl,111d HedclfingerGmbH. Strasse
61, 70 27 Stuttgart. Germany
CE:
Hereby. Sony Corporation. declares that 1his equipment is in compliani..:e with the essential requirements and other relevant provisions of Directive 1999/5/EC. For details. please access rhe following URL: ht1p://www.compliance.sony.de/
Notice
If statii.'. electricity or elei..:tromagnctism l.'<.tuses data transfer to discontinue midway (fail), restart the application or disconnect ,rnd connect the communication cable (USB. !.!tel again.
This product has hcen tested and found i..:omplia111 with the limits set out in the EMC regulation for using connection cables shorter than 3 meters (9.8 feet).
The clcctromagneti<.: fields at the spe<.:ilk frequcndes may innucnce the picture ,md sound of this unit.
Disposal of waste batteries and electrical and electronic equipment (applicable in the European Union and other European countrieswith separate collection systems)
This symbol on the product. the baucry or on the packaging indicates that the product 1.md the battery shall not be treated ,1s household waste. On
cert,1in batteries this symbol |
bemightused |
in combination with a <.·hemical symbol. |
|
The chemical symbols for mercury (Hg) or |
lead (Pb) are added if the baucry contains more than 0.0005% mercury or 0.004% lead. By ensuring these products and batteries arc disposed of corrc..:tly, you will help prevent potentially negative consequences for the environment and human health which could otherwise be caused by in.ipproprfate waste handling. The recycling of the materials will help to conserve natural resources.
In 1..·asc of products that for safety. |
|
performance or data integrity reasons |
|
require a permanent connection with an |
|
incorporated battery. this baucry |
shouldbe |
replaced by qualified service staff only. To |
|
ensure that the. battery and the clcc1rical and |
electronic equipment will be treated properly. hand over these prodm:ts at en<l of life 10 the applicable collection point for the recycling of electrical and elcclronic equipment. for all other batteries. please view the section on how to remove the bauery from the product safely. Hand th battery over to the applicable t:ollection point for the recycling of waste battcril.!s.
GB
5
Downloaded from www.Manualslib.com manuals search engine
For more dctailc<l infornrntion |
abou1 |
recycling of this prodw.:tor |
bat1cryph. .:asc |
contact your loi.:al Civic Office, your |
household waste disposal scrvkc or the shop where you purchased theproduct or battery.
For Customers in Singapore
Complies with
IDA Standards
DB00353
For Customers in Malaysia
MC:MC:
CIOF15000002
For customers who purchased their camera from a store in Japan that caters to tourists
Note
Some i.:crtific,1tion marks for stanUarUs supported by the camera can be confirmed on the screen of the camera.
Sclc..:t MENU-+;;_ (Setup)-+ [Certification LogoI.
Irdisplay is not possible dut.: to problems such as 1,;amcra failure. contal:t your Suny dealer orlocal authorized Sony scrvicc facility.
, For Customers in U.A.E.
TRA
REGISTERED No:
ER0098751/12
DEALER No:
DA0073692/11
GB
6
Downloaded from www.Manualslib.com manuals search engine
Table of contents |
|
||
|
Introduction of functions ................................................. |
I 0 |
|
Before use |
|
|
|
|
Notes on using your camera ............................................ |
13 |
|
|
Checking the supplied items ............................................ |
17 |
|
|
Ide; !ts1cie3'.:1. ..:::::::::::::::::::::::::::::::::::::::::::::::::::::::::::::: : : |
||
|
Rear side |
..................................................................... |
19 |
|
!: ; e:!! ..e . '. ::::::::::::::::::::::::::::::::::::::::::::::::::::: ! |
||
|
List of icons ............................................ |
theon monitor |
24 |
Functions list Functions that ....can be operated using the buttons/dials |
28 |
||
|
How to use the ..................................Quick Navi screen |
29 |
|
|
Operating the .......................................................camera |
31 |
|
|
How to use .....................................the control wheel |
31 |
|
|
How to use ..............................the frontdial/rear dial |
32 |
|
|
Selecting a function .......using the Fn (Function) button |
33 |
|
|
Functions that can be registered using the Fn |
|
|
|
(Function) ...............................................button |
34 |
|
|
Functions |
can bethat selected using the MENU |
|
|
button ........................................................................... |
|
35 |
|
Using the In- .............................................Camera Guide |
48 |
GB
7
Downloaded from www.Manualslib.com manuals search engine
Preparing the camera |
|
|
Charging the battery pack ................................................ |
|
49 |
Charging time (Full charge) |
....................................... |
52 |
Charging by connecting to |
computera ...................... |
53 |
Checking the remaining battery charge ...................... |
53 |
|
Supplying power from a wall outlet (wall socket) ..... |
54 |
|
To remove the battery pack ........................................ |
|
55 |
Inserting a memory card (sold separately) ...................... |
56 |
|
Formatting the memory card |
...................................... |
57 |
Memory cards that can be used .................................. |
57 |
|
Attaching a lens ............................................................... |
|
59 |
Setting the language and the clock .................................. |
62 |
|
Checking or resetting the date/time and area ............. |
63 |
|
Shooting a clear image without camera shake ................ |
64 |
|
Camera shake warning indicator ................................ |
64 |
|
Using the SteadyShot function ................................... |
64 |
|
Holding the camera properly |
...................................... |
66 |
Removing the Eyepiece cup ............................................ |
|
67 |
Shooting and viewing images |
|
|
Shooting still images ....................................................... |
|
68 |
Recording movies ............................................................ |
|
70 |
Playing back images ........................................................ |
|
71 |
Switching between still images and movies ............... |
72 |
|
Playback functions ..................................................... |
|
73 |
Deleting images ............................................................... |
|
74 |
Selecting a shooting mode |
|
|
Selecting a shooting mode ............................................... |
|
75 |
Functions available for each shooting mode ................... |
76 |
|
Various functions |
|
|
Using the various functions ............................................. |
|
77 |
ES! Image Size (still image) |
...................................... |
77 |
Ill File Format ........................................................... |
|
78 |
Ill Record Setting ...................................................... |
|
79 |
Auto focus functions .................................................. |
|
81 |
ES! Silent Shooting .................................................... |
|
82 |
GB |
|
|
8 |
|
|
Downloaded from www.Manualslib.com manuals search engine
Using Wi-Fi functions |
|
Using the Wi-Fi and NFC one-touch functions _ ------------- |
84 |
Connecting the camera to a wireless access point |
..... 85 |
Using applications
Adding applications to the camera (PlayMemories Camera Apps) _ Downloading applications .
Launching the application
----------- -------- 86
------------- 86
-- -------------- 87
|
Using a computer |
|
|
|
|
|
Developing RAW images (Image Data Convener) --------- |
|
88 |
||
e |
|
|
|
|
|
|
Installing Image Data Converter |
_ _________ 88 |
|||
|
Importing images to your computer and using them |
|
|
||
|
(PlayMemories Home) _ . |
|
|
__ 89 |
|
|
Installing PlayMemories Home __ |
|
|
0 |
|
|
Controlling the camera using |
cyomputerur |
|
|
|
|
(Remote Camera Control) __ |
|
------ |
|
91 |
|
Installing Remote Camera Control |
---------- |
|
91 |
|
|
Others |
|
|
|
|
|
Checking the number of images and recordable time of |
|
|||
|
movies |
|
|
|
2 |
|
Specifications |
|
------------------ |
|
97 |
|
Index ............................................................ |
|
|
102 |
For details on the Wi-Fi and NFC One-touch functions. refer to the attached document "Wi-Fi Connection/One-touch (NFC) Guide" or to the "Help Guide."
GB
9
Downloaded from www.Manualslib.com manuals search engine
Introduction of functions
This section introduces some frequently used shooting functions and other unique functions.
See the pages in parentheses for details.
Shooting functions used frequently
Exposure Comp. (37)
You can adjust the exposure to change the brightness of the entire image. Even when the shooting mode is set to M, you can adjust the exposure if the ISO sensitivity is set to [ISO AUTO].
ISO/Multi Frame NR (37)
You can adjust the luminous sensitivity.
The ISO sensitivity can be adjusted between ISO 50 and ISO 409600.
White Balance (37)
You can adjust the color tones.
You can select an option to suit a light source, perform fine adjustments using color temperature and color filters.
Drive Mode (36)
You can select an appropriate drive mode to suit your purposes, such as single shooting, continuous shooting. or bracket shooting.
Focus Mode (81 )/Focus Area (81 )/Focus Settings (37)
You can adjust various sellings for the focus.
You can select the focusing |
methodorfocusing area as desired to match |
your subject. |
|
Focus Magnifier (38)/MF Assist (39)
Enlarge the image to make checking the focus easier when focusing manually.
GB
10
Downloaded from www.Manualslib.com manuals search engine
Introduction of functions
Features of this camera
4K movie recording (78)
You can record high-detailed movies in 4K resolution (3840x2 I 60) using a lens compatible with the 35 mm full-frame format. (When recording 4K movies. [APS-C/Super 35mm] is locked to [Off].J
Slow motion movie recording (39)
You can record slow motion movies (4x or Sx slow motion) in full HD resolution (I920x 1 OSOJ.
Picture Profile (38)
You can change the color tone and gradation of recorded images.
5-axis in-body image stabilization (64)
Reduce bluning caused by venical shift and horizontal shift pitch and yaw, and roll.
Silent Shooting (82)
You can shoot images without the shutter producing a sound.
GB
11
Downloaded from www.Manualslib.com manuals search engine
Introduction of functions
How to operate or customize the camera
Display information |
(40) |
When you look into the viewfinder, the viewfinder mode is activated. and when you move your face away from the viewfinder. the viewing mode reverts to monitor mode (default settings). You can change the screen display mode by pressing DISP on the control wheel.
Quick Navi (29)
In [For viewfinder] screen. you can quickly switch from the monitor to the Quick Navi screen by pressing the Fn button. You can set the items with an intuitive operation by using the fronUrear dial and the control wheel.
Customization (42)
The camera are equipped with the Custom buttons, where you can assign desired function on each button. You can also assign functions lo other buttons. such as the AEL button.
GB
12
Downloaded from www.Manualslib.com manuals search engine
Notes on using your camera
Screen language
You can select the language displayed
on thee screen using the menu (page 46).
Shooting procedure
This camera has 2 modes for monitoring subjects: the monitor mode using the moni1or. and the viewfinder mode using the viewfinder.
Functions built into this camera
•This camera is compatible with 1080 60p or 50p-format movies. Unlike standard recording modes up to now. which record in an interlacing mcthod. this camera records using a progressive method. This increases the resolution, and provides a smoother, more realistic image.
•This camaa is compatible with -lK 30p/ 4K 25p/4K 24p recording. Movies can be recorded in a higha resolution.
Creating an image database file
If you insert a memorycard that docs 1101 contain an image database tileinto the camera and turn on thc power. the camera i.lUtomatically creates an image database file using some of the memory canl's. capacity
Thi.! process may take a long time and you cannot operate the L"amaa until the process is i.:omplcted. If a database file error occurs. export all imagcs to your computer using PlayMemorics Homen1 • and then format 1he memory card using the camera.
Notes on recording/playback
In order to stabilize the operation of the |
|
||
memory card. it is recommended that you |
|
||
format the memory card on the camera |
|
||
when you use it with that camera |
thefor |
|
|
first time. |
|
|
|
Once you format the memory card, alI the |
|
||
data recorded on 1he memory card will be |
c:c |
||
deleted and cannot be restored. Before |
"' |
||
"' |
|||
formatting. copy the data to a computer |
|||
|
|||
or other device |
|
C |
|
If you repeatedly record and delete |
|
"' |
|
|
"' |
images over a Jong period. thefiles on the memory card may become fragmented and movie recording may be suspended partwaythrough. If thisoccurs. copy the dau1 to a computer or 01her devii;e and then perform [ Format].
Before you start recording, make a trial recording to make sure that the camera is working corrct:tly.
This camera is designed to be dust and moisture-resistant. but is not waterproof or splash-proof.
Back up recommendation for a memory card
If you turn the cameraoff, remove the battery pack or the memory card, or disconnect the USB cable while ..tl'l'CSsthe lamp is fbshing. the data on the memory card may become damaged. To avoid data loss. always copy (back up) data to another device.
GB
13
Downloaded from www.Manualslib.com manuals search engine
No compensation for damaged content or recording failure Sony c..·,111 prO\··idc no guarantees in the
event of failure 10 record or loss or damage of recorded images or audio dala due to a malfunction of the camera recording media. etc. \Ve recommend barking up important data.
Shooting with an E-mount lens compatible APS-C size
This cr.imt:ra is equipped with a 35 mm. full-frami.: CMOS image sensor. However. the imagc size is automatically set to that of the APS-C size setting and the image size is smalkr when an E-mount lens compatible APS-C sii'.c is used (ddault scuings). When recording 4K movies. tht: recorded image size is locked to full-frame. Thus. if you use an E-molmt kns compatible with lhc APS C size. the edges of the screen appearm;.1y dark. Be c,ircful when recording -iK movies.
Notes on the monitor, electronic
viewfinder, lens, and image sensor Thi..: monitor mid clcr.:tronii.: vii..:wfindcr are 111anufai..:turcd using cxtrcmdy high prcr.:ision li..:chnology. and over 99.99% of the pixels arc operational fur r.:ffi..:r.:tivc usc. 1-lowi..:vcr. there may be some small blar.:k dots and/or hright dols (whiti..:. red. blue or green in L·olor) 1ha1 r.:onstantly appl.!ar on the monitor and dcr.:troniL· viewfimJcr. These dots arc normal due to the 111am1focturing process an<l du not affecl lhc images in any way.
Do not hold the c.:amera by the monitor. \Vhcn using the power zoom kns. be careful not to get your fingers or any other t)bjccts r.:nught in the lcn .
Do not i..:xpose the camera tn a strong light suurr.:i..: sur.:h as a sunlight. The intl.!nwl r.:omponents may becomr.: damagi..:d.
GB
14
Notes on using your camera
Do not look at sunlight or a strong light source through the 1cm when ii is delachcd. This may result in unrecoverable damage to the eyes or cause a malfunction.
Do not use.: the camaa in areas where strong radio waves or radiation arc. being cmi1tcd. Ri..:L·ording and pl,1ybackmay not function comxtly.
Images may trail across on the screen in a cold location. This is not a malfunction. \Vhcn lllrning on the c.1111era in r.a:old location. the sr.:rr.::cn may het.:ome temporarily dark. When the camera warms up. the screen will function normally.
The rcL·or<lcd image may he different from thr.:: image you monitored before recording.
Notes on using the lenses and accessories
It is rccommcndr.::d lh;ll you use Sony lenses/accessories designed to suit thl.! i.:haractcristics of this camaa. Using this camera with productsfrom other manufacturers may :1ffcct its performance, leading to <.IL"ddi;nts or rn;ilfunction. Sony bears no responsibility for sui.:h acr.:idi..:nts or malfunction.
Notes on the multi interlacesho \\,'hen attaching or dctad1ing accessories such ;1s an external llash 10 the muiii interface shoe. first turn the power to OFF. When atrnching the accessories. tigh1c11 1he sc.:-rews all 1hc way and confirm tlwt it is firmly fastened to the camera.
Do not usi..: an external !lash with a high voltage flash sync terminal or inverse polarity. This nwy re ult in malfurn:tion.
Downloaded from www.Manualslib.com manuals search engine
|
|
Notes on using your camera |
Notes on shooting with the |
Notes on recording for long periods |
|
viewfinder |
|
of time or recording 4K movies |
This camera is equipped with an Organic |
Depending on the camera and battery |
|
Elcctro-Lumincsccncc viewfinder with |
temperature. you may be unable tu record |
|
high resolution and high colllrast. This |
movies or the power may turn off |
|
viewfinder achieves a wide viewing angle |
automatically to protect the camera. |
|
and a long eye relief. This camera i:" |
A message wiII be displayed on the |
|
designed to provide an easily viewable |
screen before the power turns off or you |
|
vicw!indcr by appropriately b,tlancing |
can no longer record movies. In this case, |
|
various elemems. |
leave the power off and wait until the |
|
The image may be slightly distorted near |
camera and battery temperature goi.:s |
|
the corners of 1he viewfinder. This is not |
down. Iryou turn on the power withou1 |
|
a malfunction. When you want to see the |
lc1ting the camera and battery cool |
|
full composition with all its details. you |
enough. the power may cum off again or |
|
can also |
theusemonitor. |
you may be unable to record movies. |
If you pan the camera while looking into |
Under high ambient temperatures. the |
|
theviewfinder or move your eyesaround, |
tcmperaturc of the.: camera rises tJuickly. |
|
the image in the viewfinder may be |
When the temperature of the camera |
|
distorted or the color of the image may |
rises, the image quality may deteriorate. |
|
change. This is a d1arac1cristic of1hc lens |
It is ret.:ommcnded that you wait until the |
|
or display device and is not a |
temperature of the camera drops before |
|
malrunction. When you shoot an image. |
continuing to shoot. |
|
we recommend 1h,1t you look at the |
The surf..tci.: orthe camera may gd warm. |
|
center <.m.::a of the viewfinder. |
This is not a malfunction. |
|
When shooting with the viewfinder. you |
Especially during -1-K movie shooting. the |
|
may expericn(e symptoms such a:i |
recording time may be shona under low |
|
eyestrain. fatigue. trav..::l sickness. or |
temperature conditions. Warm up the |
|
nausea. We recommend that you take a |
batlery pack or replace it with a new |
|
break .ti regular intervals whl.!n you arc |
battery. |
|
shooting with the viewfinder. |
of Noles on importing XAVC S movies |
|
The required length or frequency th!.! |
||
break m<.1y differ depending on the |
and AVCHD movies lo a computer |
|
individuals. so you arc advis..::d to decide |
When importing XAVC S movies or |
|
at your own discretion. In case you may |
AVCHD movies 10 a computer. download |
|
feel uncomfortable. refrain from using |
and use the software PlayMcmorics Home |
|
the viewfinder until your condition |
from the following website: |
|
recovers. and consult your dot.:tor as |
http://www.sony.net/pm/ |
necessary.
GB
15
"'
cil
"'
Downloaded from www.Manualslib.com manuals search engine
Notes when playing movies on other devices
Movies recorded with this camera may not be played back correctly on other dcvil'.t!S. Also, movies recorded with other devices may nol be played back correctly on this t..:amcra.
Discs created from AVCHD movies recordt:d by this camera can be played b,1ck only on AVCHD-compatiblc devices. DVD players or recorders cannot play back discs L'.rcatcd from
AVCHD movies, ;.1s they arc incompatihlc with the AVCHD format. Also. DVD players or recorders may fail to eject HD discs rci:orded in AVCHD format.
Movies recorded in 1080 60p/1080 50p format <::an be pl.tycd back only on 1080 60p/1080 50p-supportcd devices.
Movies recorded in XAVC S format can be played onlybackon XAVC S suppuncLI t.Jcvit..:t::s.
Warning on copyright
Television programs. films. videot:.ipcs. and 01hcr ma1crials may be copyrighted. Un:.iuthorizcd recording of such materials may be contrary to the provisions of the copyright laws.
To prevent !"Copyright Info] from being used illegally. leave JSct Photographer/ and (Set CopyrightJ blank when you lend or transfer the camera.
Sony bears no responsibility for any trouble or damage nmscd by unauthorized usc of !Copyright lnfo].
The pictures used in this manual
The photogr,1phs ust:d as examples of pictures in this manual arc reproduced images. and arc not actual images shot using this i.:amt:ra.
GB
16
Notes on using your camera
On the data specifications described in this manual
Thedata on performanceand specifo.:a1ions are defined under tht: following conditions, except as described in this manual: at an ordinary ambient temperature of 25°C {77cF), and using ;i hattery pack that has been fully charged until the charge lamp has turned off.
How to turn off wireless network functions (Wi-Fi and NFC, etc.) temporarily
When you board <Ill uirplanc. etc., you i.:an turn off all wirdcssnetworkfunctions temporarily.
Select MENU huuun--+ . (Wireless)--+ (Airplane Model - (On(.
Jr you set (Airplane Model to [OnJ. an+ (airplane) mark will be displayed on the screen.
Notes on wireless LAN
If your c:.1111era is lost or stolen, Sony bears no responsibility for the loss or damage caused by illcg il al'.i.:css or use of the registered access point on the camera.
Notes on security when using wireless LAN products
•Always make sure that you are using a secure wireless LAN to avoid hacking. access by malidous third parties. or other vulnerabilities.
•It is important that you set the securi1y settings when using a wireless LAN.
•If a securi1y problem arises because no security prec..:autionsare in place or due to any inevitable circumstances when using a wireless LAN. Sony bears no responsibility for the loss or damage.
Downloaded from www.Manualslib.com manuals search engine
Checking the |
supplieditems |
The nu111ber in parentheses indicates the number of pieces.
•Camera (IJ
•AC Adaptor (I)
The shape of !he AC Adaptor may
differ depending on the country/ region.
•Battery charger BC-VWI (I)
•Power cord (mains lead) (I)* (nol supplied in the U.S.A. and Canada)
* Multiple power con.is may be supplied with your camera. Use the appropriate one that matches your country/region.
•Rechargeable battery pack NP FW50 (2)
• Micro USB cable (IJ
•Body cap (I) (Attached on the ca111era)
•Cable protector (I)
For how to auach the cable protector to the camera. refer to page 22.
•Shoe cap (I) (Attached on the camera)
•Eyepiece Cup (IJ (Allached on the ca111cra)
•Instruction Manual {I) (this manual)
•Wi-Fi Connection/One-touch {NFC) Guide (IJ
This guide explains the functions that require a Wi-Fi connection.
• Shoulder strap (I)
""
"'
"'
"'C
For how to attach the shoulder strap to the camera. refer to page 22.
GB
17
Downloaded from www.Manualslib.com manuals search engine
Identifying parts
See the pages in parentheses for details on operation for the parts.
Front side
IIl
Cg]
@]
[fil1- ---;-
When the lens is removed
[I] Power switch/Shutterbutton
Cg] Front dial
Remote sensor
@] Wi-Fi antenna (built-in)
[fil Lens release bullon
[ID Built-in microphone*'
GB
18
[I]AF illuminator (37)/Self-timer lamp
[[ Mount index [ID Image sensor* ' [j]] Mount
[j] Contacts*'
* I Do not cover this part during mo\·ie
recording.
Doing so may cm1se noise or lower the volume.
*2 Do not dircttly touch these parts.
Downloaded from www.Manualslib.com manuals search engine
Identifying parts
Rear side
< , -
[I] Eyepiece cup (67)
[gJ Viewfinder
I]] MENU button (35)
@] Eye sensor
[fil Monitor (24)
•You can adjust the monitor to an easily viewable angle and shoot from any position.
co
(I)
(I)
"'
(I)
'-'-'- -[HJ
=--- |
[§] |
---- |
[j] |
[§]Diopter-adjustment dial
•Adjust the diopter-adjustment dial according to your eyesight until the display appears clearly in the viewfinder.
; 1 \JJ , ,) _
_} -
[zJ For shooting: C3 (Custom 3) button (28)
For viewing:<$ (Enlarge) button (73)
[ID AF/MF/AEL switch lever
[ID Rear dial
GB
19
Downloaded from www.Manualslib.com manuals search engine
Identifying parts
[Qi For shooting: AF/MF (Auto focus/manual focus) button/ AEL button (28)
For viewing: (Image index) button (73)
ID] MOVIE button (70)
G1] For shooting: Fn button (33) For viewing: AE] (Send to Smartphone) button
•You can display the screen for [Send to SmartphoneJ by
pressing this button.Control wheel (31)
IHI For shooting: C4 (Custom 4) button (28)
For viewing: ffij (Delete) button (74)
[j] Access lamp
11§] IE (Playback) button (71)
GB
20
Downloaded from www.Manualslib.com manuals search engine
Identifying parts
Top side/Side view
[I) |
\ |
|
[gJ |
|
|
|
I |
|
I |
|
|
l' Y |
|
|
|
I k |
|
|
|
L |
[I) |
-e- |
Image sensor position |
|
mark |
|
[gJ Speaker |
•, (Microphone)jack
•When an external microphone is connected, the microphone is tumed on automatically. If the external microphone is a plug in-powertype. the power of the
|
microphone is supplied by the |
|
camera. |
@] 0 (Headphones)jack |
|
I]] Multi/Micro USB Terminal* |
|
• |
Suppons Micro USB |
|
compatible device. |
[ID Charge lamp (51) |
|
[I] |
HD\ill microjack |
[ID |
Multi interface shoe* |
•Some of the accessories may not be inse11ed fully and
protrude backward from the Multi interface shoe. However. when the accessory reaches the front end of the shoe. the connection is completed.
[ID Mode dial (75) [j]) C2 (Custom button2)(28) ITIJ CI (Custom I) button (28)
ll1J Exposure compensation dial (28)
GB 21
"" ('O
('O
Downloaded from www.Manualslib.com manuals search engine
[j]] Hooks for shoulder strap
•Attach both ends of the strap onto the camera.
IHI m (N mark)
•This mark indicates the touch point for connecting the camera and an NFC-enabled Smarlphone.
For detaiIs on the location of the
m) (N mark) on your Smartphone, refer to the operating instructions of the Smarlphone.
NFC (Near Field Communication) is an international standard of short
range wireless communication technology.
[j] Memory card cover
GB
22
Identifying parts
jj]] Memory card slot
*For details on compatible accessories for the multi imerface shoe and the Multi/Micro USB Terminal. visit the Sony website, or consult your Sony dealer or local authorized Sony service facility.
You can also use accessorie;:s that are compatible with the accessory shoe. Open.1tionswith other manufactures· accessories are not guaranteed.
n1 )\aceShoe &MW!Mlfili
Attaching the cable protector
Use the cable protector to prevent the HDMI cable from being disconnected when shooting images connected by the HDMI cable. Open both of the jackcoversand insert an HDMI cable into the camera. Altach the cable protector as illustrated so that the
edge of the cable |
protectorfitsin the |
slit to the left of the |
•,(microphone) |
jack. Secure the cable protector with the attachment screw. Then secure the HDMI cable with the fixing dial. Fit the edge in the slit
Attacl1ment screw
Downloaded from www.Manualslib.com manuals search engine
Identifying parts
Bottom view
"'CD
---- -@] CII
'-- -,;--[ID "'
[I] Battery insertion slot (49)
[gJ Battery cover (49)
lli] Tripod socket hole
• Use triaoli with a screw less
p
than5.5 mm (7/32 inches) long. Otherwise, you cannot firmly secure the camera. and damage to the camera may occur.
@] Battery cover locking button
[ID Battery cover release lever
•When you attach a vertical grip (sold separately), remove the battery cover.
Connection plate cover
Use this when using an AC-PW20 AC Adaptor (sold separately). Insert the connection plate into the battery compartment. and then pass the cord through the connection plate cover as shown below.
•Make sure that the cord is not pinched when you close the cover.
GB
23
Downloaded from www.Manualslib.com manuals search engine
List of icons on the monitor
The status of the monitor is set to [Display All Info.] in the default settings. When you change the [DlSP Button] setting, and press DISP on the control wheel. the screen status will change to the viewfinder mode. You can also display the histogram by pressing DISP. The displayed contents and their position belshownarejust a guideline, and may differ from the actual display.
Monitor mode |
For playback |
|
Basic information display |
2
|
|
I |
|
|
|
|
=====' |
||
3f----- |
|
|
|
|
Viewfinder mode |
|
Histogram display |
|
|
Auto Mode or Scene Selection mode |
|
|
|
|
|
|
11 |
|
|
|
|
2 |
||
|
|
, , |
||
|
|
,, |
|
|
|
2 |
3 -1 --==--==--==-=-====l r.:l= |
||
|
|
|||
|
|
.1 |
I |
P/A/S/M/Sweep Panorama mode
2
GB
24
Downloaded from www.Manualslib.com manuals search engine
Display. |
Indication |
,. |
|
||
|
|
|
iOiO+ |
Shooting mode (75) |
|
t:::l PP* AS |
|
|
M,;,J f..) |
|
|
'<Is_
C\1(,))
jlt] |
lt]p |
|
|
lt]A lt]5 |
|
||
lt]M |
llliJp |
|
|
llliJA |
llliJs |
|
|
llliJM |
|
|
|
[Dill |
|
Register number (75) |
|
CT][fil |
|
||
|
|
|
|
..) - |
|
Scene Recognition |
|
,;,'1l,:i |
iJ |
icons |
|
rlll\i ,;,J |
i |
||
|
|||
Ci) |
|
||
D |
|
|
Memory card (56)/ |
NO CARO |
Upload (45) |
ii i:ioFF
D t 6: 6! Du
100Remaining number of recordable images
im |
Aspect ratio of still |
|
images (36) |
12M 10M |
Image size of still |
5.1M 4.3M |
images (36) |
3.0M 2.6M |
|
1.3M 1.1M |
|
IEIWIDE |
|
IEISTD |
|
RAW RAW+J Image quality of still
111lll li!ill!l•J |
images (36) |
x.FINE |
|
FINE STD |
|
|
|
|
List of icons on the monitor |
|||||
|
|
|
|
|
|
|
||
Display_ |
|
Indication |
|
|
||||
|
|
|
|
|
|
|
|
|
120p 60p 60i |
Frame rate of movies |
|
|
|||||
30p 24p |
|
|
|
|
|
|
||
100p 50p 50i |
|
|
|
|
|
|||
25p |
|
|
|
|
|
|
|
|
|
Image size of movies |
|
|
|||||
UJI 11!!11 |
|
(79) |
|
|
|
|
||
IE!IIID |
|
|
|
|
|
(D"" |
||
GIIIIB |
|
|
|
|
|
|||
llliJITill Ifill |
|
|
|
|
0 |
|||
|
|
|
|
|
|
|
||
|
|
|
|
|
|
|
|
"'(D |
@ml100% |
|
Remaining battery (53) |
|
nl |
||||
g |
|
|
Remaining battery |
|
|
|||
|
|
|
|
warning |
|
|
||
@ml jp |
|
USB power supply (54) |
|
|
||||
|
|
|
||||||
. |
|
|
|
Flash charge in |
|
|
||
|
|
|
|
progress |
|
|
||
[ ] |
|
|
|
APS-C/Super 35111111 |
|
|
||
|
|
|
|
(42) |
|
|
|
|
D |
|
|
Setting Effect OFF (40) |
|
|
|||
|
|
|
|
|
|
|
||
.CON |
|
|
AF llluminator (37) |
|
|
|||
|
|
|
|
|
|
|
|
|
m |
|
|
|
NFC is activated |
|
|
||
|
|
|
|
|
|
|
|
|
+ |
|
|
|
Airplane Mode |
|
|
||
|
|
|
|
|
|
|
|
|
""" |
|
|
|
No audio recording of |
|
|
||
|
|
|
|
movies (39) |
|
|
||
|
|
|
|
|
|
|
||
to |
|
|
Wind Noise Reduction |
|
|
|||
|
|
|
|
(39) |
|
|
|
|
l(iJt,tlfl:: |
|
SteadyShot ofl/on. |
|
|
||||
|
Camera shake warning |
|
|
|||||
|
|
|
|
|
|
|||
1111::o |
|
(64) |
|
|
|
|
||
ufnaa |
|
SteadyShot Focal |
|
|
||||
8mm |
|
|
|
|||||
nfu |
|
m |
|
Length/Camera shake |
|
|
||
8 |
|
|
warning (64) |
|
|
|||
|
|
|
|
|
|
|||
|
|
|
|
|
|
|||
[El |
|
|
Overheating warning |
|
|
|||
ULL |
"' |
|
Database file full/ |
|
|
|||
lliROA |
|
|
|
|||||
|
|
|
|
Database file error |
|
|
||
|
|
|
|
|
|
GB |
|
|
|
|
|
25 |
|
|
Downloaded from www.Manualslib.com manuals search engine
Display s c
D
C's
C'MP4
C'AVCHD
CXAVCS
HD
CXAVCS
4K
100-0003 o-n
XAVC S 4K XAVC S HD AVCHD MP4
DPOF
s
llm 11m 11m !Im 11m
-PC- o'!J
8;;I
©
120fps
100fps
Anlst1 Anist1
LHogl U-L vl
GB
26
|
|
|
|
|
|
|
|
|
|
|
List of icons on the monitor |
||
|
Indication |
'• |
|
|
|
|
|
|
|
|
|
|
|
|
|
|
|
|
|
|
|
|
|
|
|||
|
Smart Zoom/Clear |
|
|
|
lspl y |
> J :, 1:lndicatlon ''" 1,;hj( |
|
||||||
|
Image Zoom/Digital |
|
|
|
DIJJ |
Drive mode (36) |
|
||||||
|
Zoom |
|
|
|
|
|
|||||||
|
|
|
|
&10 |
0ll |
|
|
|
|
||||
|
|
|
|
|
|
|
|
|
|
||||
|
View Mode (72) |
|
|
|
|
|
|
|
|||||
|
|
|
|
|
C8!:l( |
|
lilll:IS |
|
|
|
|||
|
|
|
|
|
|
|
0.3EV3 |
0.3£V3 |
|
|
|
||
|
|
|
|
|
|
|
1€:i:JC 11iBS |
|
|
|
|||
|
|
|
|
|
|
|
0.3EV3 |
0.3EV3 |
|
|
|
||
|
|
|
|
|
|
|
QJ;I |
|
|
|
|
|
|
|
|
|
|
|
|
|
WSHI DROLO |
|
|
|
|||
|
|
|
|
|
|
|
i:::.>1mJ |
|
i:::.>1(]!1 |
|
|
|
|
|
|
|
|
|
|
|
WBHI |
|
DROLO |
|
|
|
|
|
|
|
|
|
|
|
|
|
|
|
|||
|
|
|
|
|
(!) .1, |
$ |
...) |
Flash mode (37)/Red- |
|
||||
|
|
|
|
|
|
|
A ..!$ ""'l<I> |
eye reduction (37) |
|
||||
|
Folder - file number |
|
|
|
!Zl ±0.0 |
|
Flash compensation |
|
|||||
|
|
|
|||||||||||
|
Protect (44) |
|
|
|
|
|
|
|
|
(37) |
|
|
|
|
|
|
|
|
|
|
|
|
|
|
|
||
|
|
|
|
|
CE CE |
Focus mode (37) |
|
||||||
|
|
|
|
|
|
|
|
||||||
|
Recording mode of |
|
|
||||||||||
|
|
|
|
m l:ll!D |
|
|
|
||||||
|
movies |
|
|
|
|
|
|
|
|||||
|
|
|
|
|
|
|
|
|
|
|
|
||
|
|
|
|
|
|
|
bl |
AF area |
|
|
|||
|
DPOF sec |
|
|
|
|
ID] |
|
m |
|
|
|
||
|
Auto Object Framing |
|
|
|
[!J |
|
|
|
|
|
|
||
|
Dual Video REC (36) |
|
|
|
D,. |
bl, |
|
|
|
||||
|
|
|
|
ID],. |
m. |
|
|
|
|||||
|
|
|
|
|
|
|
|
|
|
||||
|
|
|
|
|
|
|
[fJ |
|
|
|
|
|
|
|
|
|
|
|
|
|
t. |
|
|
|
|
|
|
|
PC Remote |
|
|
|
|
1'l0ff l:l, |
Face Detection/Smile |
|
|
||||
|
Silent Shooting (82) |
|
|
|
eo, eo, |
Shutter (38) |
|
|
|||||
|
|
|
|||||||||||
|
BrightMonitoring |
|
|
|
|
eo, |
|
|
|
|
|
|
|
|
|
|
|
|
|
|
1'23lfil]0 |
Metering mode (37) |
|
|
|||
|
Write Copyright |
|
|
|
|||||||||
|
Information |
|
|
(46) |
35mm |
|
Lens focal length |
|
|
||||
|
|
|
|
|
|
|
|
|
|
|
|||
|
Frame rate for HFR |
|
|
|
|
|
|
|
|
||||
|
|
|
|
AWB ,,, |
c.. |
White balance (Auto, |
|
|
|||||
|
shooting (39) |
|
|
|
|
.. ,!;!, 1)¥.f-1 |
Preset. Underwater |
|
|
||||
|
|
|
|
|
|
|
|||||||
|
|
|
|
|
|
1)¥.fo 1)¥.{•1 1)¥.{•2 |
Auto, Custom, Color |
|
|
||||
|
Ganuna Disp. Assist |
|
|
||||||||||
|
(45) |
|
|
|
|
|
\B - b..•..a |
temperature. Color |
|
|
|||
|
|
|
|
|
|
|
7500K A5 G5 |
filter) (37) |
|
|
|||
|
|
|
|
|
|
||||||||
|
|
|
|
|
|
|
|
|
|
|
|||
|
|
|
|
|
|
|
|
D-Range Optimizer/ |
|
|
|||
|
|
|
|
|
|
|
|
|
|
|
Auto HDR (37) |
|
|
Downloaded from www.Manualslib.com manuals search engine
Display |
Indication .i' t · - |
gg Creative Style (38)/ |
|
g |
Contrast, Saturation, |
gg |
Sharpness |
|
|
i;;;;;; |
|
+3 +3 +3 |
Picture Effect (38) |
@@)@ |
|
8® |
|
'Bl 'Bl 'Bl |
|
@@® |
|
®@S |
|
®®\Ziff |
|
|
|
1e1 |
Smile detection |
|
sensitivity indicator |
· |
|
|
.m-rm Picture Profile (81) |
||
F |
|
|
© |
|
Copyright Information |
PEAK |
PEAK |
Focus peaking (40) |
HI |
MID |
|
PEAK |
PEAK |
|
LO |
OFF |
|
|
|
|
|
Display |
Indication· |
,:- |
|
• Lock-on |
Lock-on AF guide |
||
AF |
|
|
|
·S· ··•· J··l··l ··O ··l·-1- +-4· · •S |
Bracket indicator |
|
|
|
Exposurecompensation |
||
|
(37)/Metered Manual |
||
STBY |
Movie recording |
|
|
|
standby |
|
|
REC 0:12 |
Recording time of the |
|
|
|
movie (m:s) |
|
|
.((•)) (()) |
Focus |
|
|
|
|
|
List of icons on the monitor |
|||||||
|
|
|
|
|
|
|
|
|
|
|
.Display. |
, |
·"' Indication_ "" |
.,.,-,. |
|
|
|||||
1/250 |
|
|
|
|
Shutter speed |
|
|
|
||
F3.5 |
|
|
|
|
Aperture Value |
|
|
|
|
|
IS0400 |
|
|
|
ISO sensitivity (37) |
|
|
||||
ISO AUTO |
|
|
|
|
|
|
|
|
||
*h |
|
|
|
|
AE lock/FEL lock |
|
|
|
||
..J |
|
|
Shutter speed indicator |
|||||||
|
|
|
|
|
|
(D |
||||
--------- |
|
|
Aperture indicator |
|
|
|||||
... ,i; |
|
|
|
|
|
|
|
CD |
||
|
|
|
|
|
Histogram |
|
|
(D |
||
|
|
|
|
|
Digital level gauge |
|
|
|||
+ Jf |
|
|
"' |
|||||||
|
|
|
|
|
|
|
|
|
|
(D |
on |
• |
, |
|
|
Audio level (40) |
|
|
|
||
(HJ |
|
|
|
|
|
|||||
CiEOFF |
|
|
D-Range Optimizer/ |
|
|
|||||
|
|
|
|
|
Auto HOR/Auto HOR |
|||||
lillll] |
image warning |
|
|
|
||||||
D |
|
|
|
|
|
|
|
|
||
. . |
|
|
Picture Effect error |
|
|
|
||||
2015-1-1 |
|
|
Date of recording |
|
|
|
||||
10:37PM |
|
|
|
|
|
|
|
|
||
3(7 |
|
|
|
|
File number/Number of |
|
||||
|
|
|
|
|
images in the view |
|
|
|
||
|
|
|
|
|
mode |
|
|
|
(@llEC(@STl!Y REC Control
0Spot metering area
|
|
00:00:00:00 |
Time code |
|
(hour:minute:second: |
|
frame) (45) |
00 00 00 00 |
User bit (45) |
GB
27
Downloaded from www.Manualslib.com manuals search engine
Functions can bethatoperated using the buttons/dials
You can set up or operate various functions using these buttons/dials. For the location of the buttons/dials, see "Identifying parts" (page 18).
Mode dial (75)
MENU button (35)
MOVIE button (70)
AF/MF button/AEL button/button
Switches the shoaling mode.
Di.splays the menu screen for setting menu items.
Records movies.
Switches autofocusthe und manual focus temporarily.I Fixes the exposure of the entire screen./Displays multiple images on the screen simultaneously.
<±{ button (73)
Fn button (33)/'t] button
Scales an image up when viewing images.
Displays the setup screen for functionsset using the Fn button. In [For viewfinder] screen. switches to the Quick Navi screen.fin playback mode. pressing •:::J button switches to "Send to Smartphone'" screen.
Exposure compensation |
|
Sets the range for exposure adjustment. |
||
dial |
|
|
||
button (71) |
Plays back images. |
|||
|
|
|
|
|
mi button (74) |
Deletes images. |
|||
|
|
|
|
|
Custom button |
|
Assigns a frequently-used function to the button. |
||
|
||||
|
|
|
The following function is assigned to each button in the |
|
|
|
|
default settings. |
|
|
|
|
CI (Custom I) button: White Balance |
|
|
|
|
C2 |
(Custom 2) button: Focus Settings |
|
|
|
C3 |
(Custom 3) button: Focus Mode |
|
|
|
C4 |
(Custom 4) button:Not set |
|
|
|
|
|
GB
28
Downloaded from www.Manualslib.com manuals search engine
How useto the Quick Navi screen
Using the Quick Navi screen. you can change settings directly on the recording information display when the screen mode is set to [For viewfinder] (Quick Navi).
1MENU button-+ O (Custom Settings)-+ [DISP Button)-+ [Monitor)-+ [For viewfinder] -+ [Enter)
2Press the DISP on the control wheel to set the screen mode to [For viewfinder).
|
|
|
|
|
|
|
|
|
|
|
|
|
|
|
||||||||||||
3 Press the Fn button to switch to the Quick Navi screen. |
||||||||||||||||||||||||||
|
|
|
|
|
|
|
|
|
|
|
|
|
|
|
|
|
|
|
|
|
|
|
|
|
|
|
|
|
!....J....1.· |
|
11 |
|
L |
. !00· 1--- |
|
- |
I ' |
Ci) "0 |
· "" == |
||||||||||||||
|
|
|
1 |
|
|
|
|
|
|
|
||||||||||||||||
|
In Auto Mode or Scene Selection mode |
|
|
|
|
|
|
|
||||||||||||||||||
|
|
CJ 100 UJ l"" FIN(&Op Cl |
|
|
|
|
|
|
|
|
|
|
|
|
|
|
|
|
|
|||||||
|
|
-1.a. - - |
|
|
|
|
|
|
|
|
|
|
|
- |
|
|||||||||||
|
|
j |
|
|
f_ |
|
1 ;:.- |
|
|
|
|
iO ---l·· 1.::, |
|
|
i- |
- - |
||||||||||
|
|
|
|
|
J |
|
|
I:::: |
- |
|
|
|
WI |
|
|
|
|
|
|
|||||||
|
i----- |
.......-· |
|
|
|
|
|
|
|
|
|
|
|
|
|
|
|
|
|
|||||||
|
In P/A/S/M/Sweep Panorama mode |
|
|
|
|
|
|
|
||||||||||||||||||
|
|
|
|
|
|
|
|
|
|
|
|
|
|
|
|
|
|
|
|
|
|
|
|
|
|
|
|
|
|
|
|
|
f |
|
|
|
=I-= |
|
|
· |
|
|
|
|
|
|
|
||||||
|
|
|
(!JIWRNE60pl.:IRI |
|
|
|
|
|
|
|
|
|
|
|
|
|
|
|
|
|
||||||
|
0100e_ ,, --1- |
- |
|
|
|
|
|
|
|
|
|
|
|
|
||||||||||||
|
':-,-++:-,-; |
|
- |
|
+++-+++-'.' |
g - - |
|
|||||||||||||||||||
|
|
|
|
|
|
|
|
i ;- |
|
|
|
|
|
|
|
|
||||||||||
|
|
i |
|
Jf |
|
l ,uro |
|
|
|
|
|
|
|
|
|
|||||||||||
|
|
|
|
|
|
|
•: I |
. = -:= |
|
|||||||||||||||||
|
.... |
- |
|
- - |
, 1 |
|
|
|
|
|
|
|
|
|
|
|
|
|||||||||
|
llllOO-. |
|
|
|
|
|
|
|
|
|
|
|
|
|
|
|
|
|
|
|
|
|
|
|
||
|
|
|
|
|
|
|
|
|
|
|
|
|
|
|
|
|
|
|
|
|
|
|
|
|
|
|
•The displayed con1ents and their position shown are just a guideline. and may differ from 1hc actual display.
4 Select the desired item with J;./T/"4/ on the control wheel.
GB
29
"T1 C ::,
!?o·.
::, CII
Downloaded from www.Manualslib.com manuals search engine
How to use the Quick Navi screen
5Set the item with the front dial.
•Some selling values can be finely adjusted by turning the rear dial.
•Pressing the center of the control wheel turns on the designated screen used
to set up the selected item |
(page31). |
•Pressing the Fn bulton again turns off the Quick Navi screen and the screen goes back to the original one.
Functions available on the Quick Navi screen
Drive Mode |
|
Flash Mode |
Flash Comp. |
|
|
|
|
|
|
Focus Mode |
|
Focus Area |
Exposurc Comp. |
|
ISO |
|
|
Metering Mode |
While Balance |
ORO/Auto HOR |
|
|
Creative Style |
Picture Effect |
Picture Profile |
|
Smile/Face Detect. |
6 Image Size |
|
6 Aspect Ratio |
|
6 Quality |
S1eadySho1 |
|
Auto Mode |
|
Scene Selection |
|
|
|
Peaking Level |
|||
|
|
|
|
|
Notes
•Gray i1 111s on 1he Quick Navi screen are not available.
•When using [Creative Style[ (page 38) or [Picture Profile[ (page 38). some of the setup tasks can be accomplished only on a designated screen.
GB
30
Downloaded from www.Manualslib.com manuals search engine