

Page 1

Live Content
Producer
Operating Instructions
Software Version 2.25 and Later
4-151-286-11(1)
AWS-G500E
©2009 Sony Corporation
Page 2

Table of Contents
Usage Notes .......................................................................... 10
Chapter 1 Overview
Features of This System .......................................................13
Example Applications ...........................................................15
Names and Functions of Parts ............................................17
Chapter 2 Preparations
Installation/Default Settings ................................................. 45
Connections ..........................................................................57
Settings Related To Input Signals .......................................66
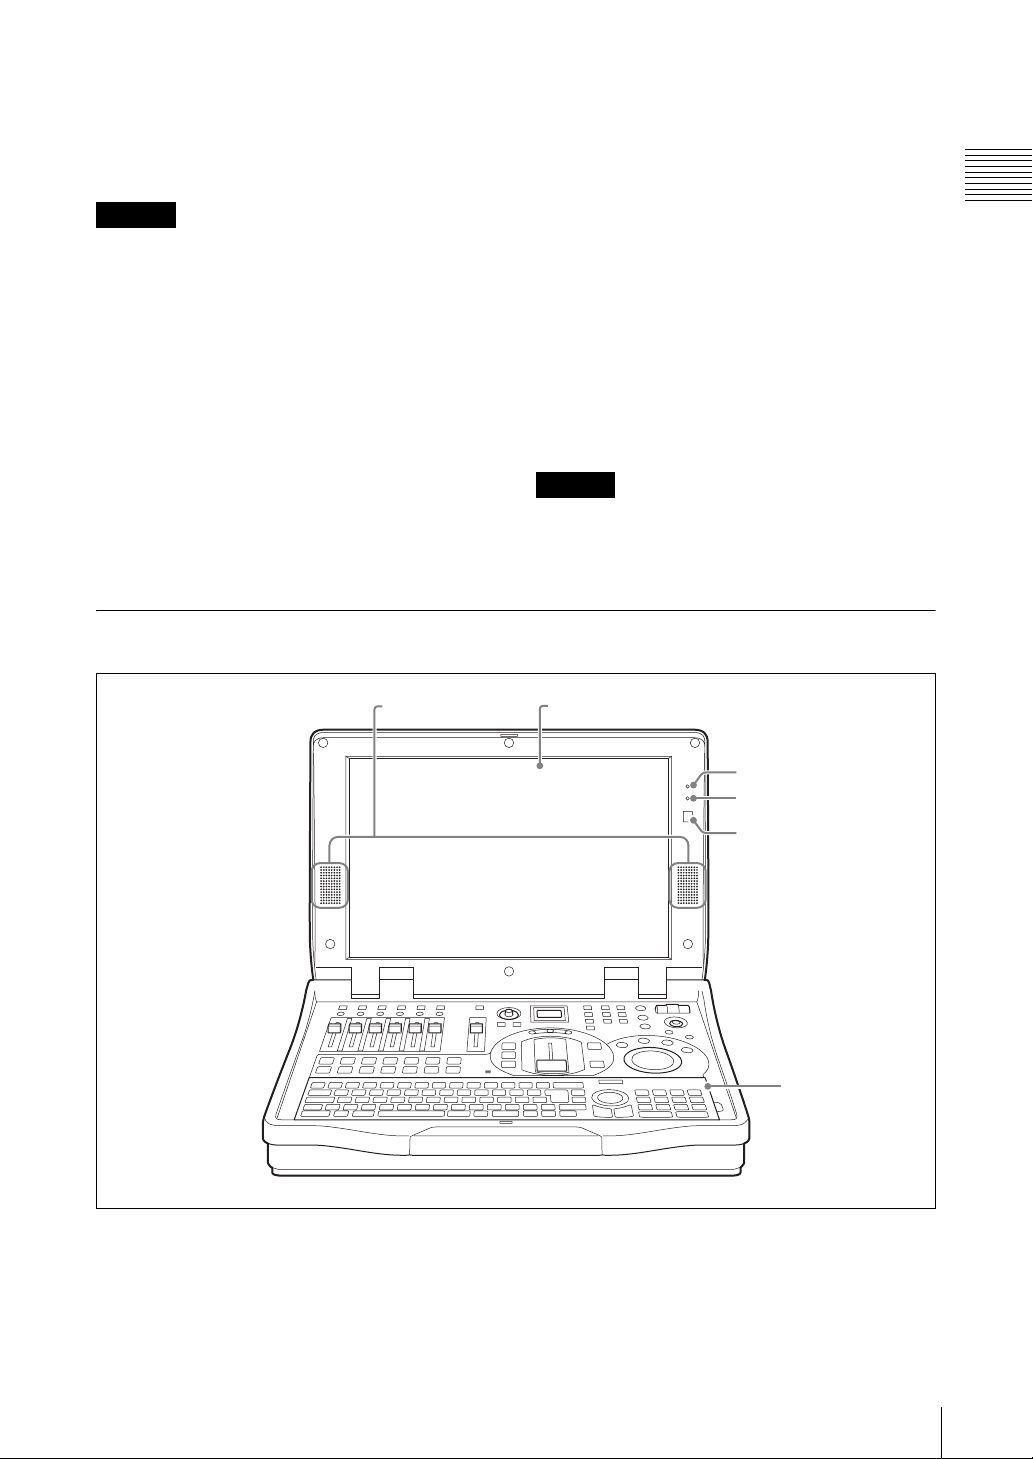
Front Panel............................................................................
Rear Panel............................................................................. 22
Side Panel ............................................................................. 26
Other Parts ............................................................................ 27
Operation Screen .................................................................. 28
Menu Operations .................................................................. 34
Operation Screen (Text Typing Tool Software)................... 37
Installing the Unit .................................................................
Installing Option Modules.................................................... 46
Connecting the power........................................................... 46
Fitting a Keyboard................................................................ 47
Starting and Closing Down the Unit .................................... 49
Selecting the Language......................................................... 51
Setting the Time Zone .......................................................... 51
Setting the Date and Time .................................................... 52
Adjusting the Display Brightness......................................... 52
Selecting the Video Output Signal Format........................... 53
Setting the PGM Output Aspect Ratio ................................. 53
Setting the System Timecode ............................................... 55
Connecting a Camera With VISCA Support........................
Connecting a Microphone .................................................... 60
Connecting a Computer (RGB Input)................................... 60
Connecting a Camcorder ...................................................... 61
Connecting a VCR................................................................ 62
Connecting an External Hard Disk....................................... 63
Connecting a Plasma Display/Projector/Monitor................. 63
Connecting an Amplifier ...................................................... 65
Preventing Accidental Cable Disconnection........................ 65
Relation Between Input Signals and System Components...
Video Signal Related Settings .............................................. 67
Registering Cameras To Be Controlled................................ 69
Stretching 16:9 SQ Source Materials Into 16:9 Aspect
Ratio................................................................................
17
45
59
66
70
2
Page 3

Chapter 3 Operations
Audio Signal Related Settings.............................................. 71
Video Switching .................................................................... 77
Basics of Video Switching....................................................
77
Changing the Video With a Cut............................................ 78
Changing the Video With a Effect Transition....................... 80
Changing the Transition Time.............................................. 84
Changing the Effect Pattern.................................................. 85
Using Picture-in-Picture (PinP) for Combining Videos....... 85
Adjusting the Picture-in-Picture (PinP)................................ 87
Using Fade-to-Black (FTB).................................................. 89
Using Color Bars and Color Mattes ..................................... 90
Using the Downstream Key (DSK) Function To Add Text
or an Image .....................................................................
90
Accessing Graphics Files Quickly........................................ 94
Showing a Logo on the Screen............................................. 97
Using Luminance Keying..................................................... 99
Using Chroma Keying........................................................ 103
Cropping Unwanted Portions From the Video Being
Combined......................................................................
109
Applying Edge Effects ....................................................... 109
Checking the Results of Combining Videos
(Effect Preview)............................................................
110
Giving Priority to Displaying the PVW Viewer................. 113
Recalling Video Effects Instantly
(Video Effect Snapshots)..............................................
113
Creating a Title Graphic With the Text Typing Tool .........117
Features of the Text Typing Tool Software .......................
117
Flow of Operations ............................................................. 118
Starting Up.......................................................................... 120
Closing Down..................................................................... 121
Standard Operations ........................................................... 121
File Operations ................................................................... 124
Working on Text Objects ................................................... 130
Working on Line Objects ................................................... 137
Shadow Operations............................................................. 139
Background Color Operations (Creating Telop and Flip) .. 141
Color Operations ................................................................ 144
Object Layout ..................................................................... 148
Adding and Deleting Sheets ............................................... 151
Simulating the Keying Effects............................................ 151
Key Combination in the Anycast Station Main Software .. 153
Importing a Font File.......................................................... 155
Deleting a Font File ............................................................ 156
Controlling Cameras ........................................................... 158
Controlling Camera Manually............................................
158
Storing a Camera Preset ..................................................... 160
3
Page 4

Setting the Camera Control ................................................ 163
Resetting the Camera.......................................................... 165
Linking the VISCA Camera’s Power to the Unit’s Power . 166
Using the FACTORY USE Connector ................................167
Using Camera Tallies .........................................................
167
Operating the PGM and NEXT Selection Buttons From an
External Device.............................................................
169
Audio Mixing ........................................................................171
Recording Video and Audio to an External Hard Disk ....172
Formatting an External Hard Disk .....................................
172
Preparing for Recording to an External Hard Disk ............ 174
Simultaneously Recording Input Material and Program Output
to an External Hard Disk (ON LINE Recording) .........
177
Manually Recording Program Output on an External
Hard Disk......................................................................
177
Manually Recording Each Input Material on an
External Hard Disk .......................................................
178
Operations on Files on the External Hard Disk ................ 181
Playing Files .......................................................................
181
Other Playback Operations................................................. 183
Auto Repeat Playback ........................................................ 184
Closing a File...................................................................... 186
About Deleting Files........................................................... 186
Displaying the System Timecode in Viewers .................... 186
Registering Cue-Up Points................................................. 187
Accessing Cue-Up Points................................................... 188
Deleting Cue-Up Points...................................................... 188
Disconnecting the External Hard Disk............................... 189
Recovering an External Hard Disk..................................... 189
Recording Video and Audio to a VCR ...............................191
Recording Program Output to a VCR ................................
191
Operating the Unit to Record Program Outputs to a
VCR ..............................................................................
195
Controlling VCR Playback From the Unit .........................197
Registering the VCR to be Controlled................................
197
Performing Playback .......................................................... 197
Other Playback Operations................................................. 198
Registering Cue-Up Points................................................. 199
Accessing Cue-Up Points................................................... 201
Deleting Cue-Up Points...................................................... 201
Using AVI Files Created on Other Devices .......................202
Using a Computer To Play Files Recorded on an External
Hard Disk ........................................................................205
Using the Intercom Function .............................................206
Connecting the Intercom System........................................
206
Speaking on the Intercom System ...................................... 207
4
Page 5

Monitoring Audio ................................................................208
Determining the Audio Signal Output Destinations...........
208
Displaying the Audio Signal Output Destinations ............. 209
Monitoring Output Audio................................................... 210
Monitoring the Audio of a Particular Channel Only.......... 211
Video/Audio Signal Adjustments and Settings ................212
Adjusting Analog Video Input Signals...............................
212
Making the Gradation of SDI Input Signals Appear Smooth
(When Using a Serial Digital Interface Module or HD
Serial Digital Interface Module) ...................................
213
Converting 4:3 Source Materials to Wide Screen.............. 213
Adjusting the Clock Phase of RGB Signals ....................... 214
Adjusting the Screen Size of RGB Signals ........................ 214
Adjusting the Screen Position of RGB Signals .................. 214
Adjusting Color Matte........................................................ 215
Applying an Offset to the Program Output Video.............. 215
Setting the RGB Output Signal Format.............................. 216
Adding Aspect Ratio Information to Composite/S-Video
Output Signals...............................................................
217
Applying Filters to the Program Output Video .................. 218
Adjusting the Audio Input Signal Levels........................... 218
Cutting High Frequency or Low Frequency....................... 219
Adjusting the Equalizer ...................................................... 219
Using the Limiter or Compressor....................................... 220
Adjusting the Audio Left and Right Channel Balance....... 221
Adjusting the Output Levels for Each Destination............. 221
If the Output Video Is Delayed With Respect to the
Audio ............................................................................
222
Adjusting the Output Using the Oscillator Signal.............. 223
Saving and Loading Various Settings ...............................224
Storable Data ......................................................................
224
Saving Various Settings Data............................................. 225
Loading Various Saved Settings Data................................ 225
Deleting Various Saved Settings Data ............................... 226
Exporting Various Settings Data ........................................ 227
Importing Various Settings Data ........................................ 228
Using the Switching Information of the Unit on a Nonlinear
Editing System ...............................................................230
Creating EDL......................................................................
230
Exporting EDL ................................................................... 232
Deleting EDL Files............................................................. 233
Using an EDL Created on the Unit on a Nonlinear Editing
System...........................................................................
233
Importing, Renaming, and Deleting Files .........................235
Importable Files..................................................................
235
Importing Graphics Files.................................................... 235
Importing Logo Files.......................................................... 237
Renaming Files................................................................... 238
Exporting VOD Files.......................................................... 238
5
Page 6

Appendix
Deleting Files...................................................................... 240
Checking the Internal Hard Disk Remaining Capacity ...... 242
Formatting a “Memory Stick” ............................................243
Formatting a USB Flash Memory .......................................245
Streaming .............................................................................247
What Is Streaming? ............................................................
247
Configuring the Network Settings...................................... 248
Setting Live Streaming Transmission ...............................251
Saving Live Streaming Transmissions as Files for VOD...
258
Starting and Stopping Streaming........................................ 261
Settings Required for Viewing Streaming.......................... 263
Placing Streaming Links in a Web Site.............................. 264
Activating Each Function Simultaneously With the ON LINE
Button .............................................................................266
Activating the Functions With the ON LINE Button.........
266
Deactivating the Functions With the ON LINE Button ..... 267
Maintenance ........................................................................269
Checking the Operating Software Version.........................
269
Upgrading the Operating Software..................................... 270
Menu Items .......................................................................... 274
Top Menu ...........................................................................
274
ACCESS Menu................................................................... 282
Messages .............................................................................284
Message Structure ..............................................................
284
List of Messages................................................................. 286
Troubleshooting .................................................................. 294
“Memory Stick” Media ........................................................298
Notes on Using “Memory Stick” Media....................................... 298
About Data.................................................................................... 298
Notes on Using “Memory Stick Duo”.......................................... 298
Notes on Using the Memory Select Function............................... 298
Specifications ......................................................................299
Dimensions ..........................................................................303
Glossary ...............................................................................304
Index .....................................................................................308
6
Page 7

Owner’s Record
The model and serial numbers are located at the
bottom.
Record these numbers in the spaces provided
below. Refer to them whenever you call upon your
Sony dealer regarding this product.
Mo del No.
Serial No.
WARNING
To reduce the risk of fire or electric
shock, do not expose the unit to rain
or moisture.
To avoid electrical shock, do not open
the cabinet. Refer servicing to
qualified personnel only.
THIS APPARATUS MUST BE EARTHED.
WARNUNG
Um die Gefahr von Bränden oder
elektrischen Schlägen zu verringern,
darf dieses Gerät nicht Regen oder
Feuchtigkeit ausgesetzt werden.
Um einen elektrischen Schlag zu
vermeiden, darf das Gehäuse nicht
geöffnet werden. Überlassen Sie
Wartungsarbeiten stets nur
qualifiziertem Fachpersonal.
DIESES GERÄT MUSS GEERDET
WERDEN.
AVERTISSEMENT
Afin de réduire les risques d’incendie
ou d’électrocution, ne pas exposer cet
appareil à la pluie ou à l’humidité.
Afin d’écarter tout risque
d’électrocution, garder le coffret
fermé. Ne confier l’entretien de
l’appareil qu’à un personnel qualifié.
CET APPAREIL DOIT ÊTRE RELIÉ À
LA TERRE.
WARNING
When installing the unit, incorporate a readily
accessible disconnect device in the fixed wiring,
or connect the power plug to an easily accessible
socket-outlet near the unit. If a fault should occur
during operation of the unit, operate the
disconnect device to switch the power supply off,
or disconnect the power plug.
WARNUNG
Beim Einbau des Geräts ist daher im Festkabel ein
leicht zugänglicher Unterbrecher einzufügen, oder
der Netzstecker muss mit einer in der Nähe des
Geräts befindlichen, leicht zugänglichen
Wandsteckdose verbunden werden. Wenn
während des Betriebs eine Funktionsstörung
auftritt, ist der Unterbrecher zu betätigen bzw. der
Netzstecker abzuziehen, damit die
Stromversorgung zum Gerät unterbrochen wird.
AVERTISSEMENT
Lors de l’installation de l’appareil, incorporer un
dispositif de coupure dans le câblage fixe ou
brancher la fiche d’alimentation dans une prise
murale facilement accessible proche de l’appareil.
En cas de problème lors du fonctionnement de
l’appareil, enclencher le dispositif de coupure
d’alimentation ou débrancher la fiche
d’alimentation.
WARNING: THIS WARNING IS
APPLICABLE FOR USA ONLY.
If used in USA, use the UL LISTED power cord
specified below.
DO NOT USE ANY OTHER POWER CORD.
Plug Cap Parallel blade with ground pin
(NEMA 5-15P Configuration)
Cord Type SJT, three 16 or 18 AWG wires
Length Minimum 1.5 m, Less than 2.5 m
(8 ft 3 in)
Rating Minimum 10 A, 125 V
Using this unit at a voltage other than 120 V may
require the use of a different line cord or
attachment plug, or both. To reduce the risk of fire
or electric shock, refer servicing to qualified
service personnel.
WARNING: THIS WARNING IS
APPLICABLE FOR OTHER COUNTRIES.
7
Page 8

1. Use the approved Power Cord (3-core mains
lead) / Appliance Connector / Plug with
earthing-contacts that conforms to the safety
regulations of each country if applicable.
2. Use the Power Cord (3-core mains lead) /
Appliance Connector / Plug conforming to the
proper ratings (Voltage, Ampere).
If you have questions on the use of the above
Power Cord / Appliance Connector / Plug, please
consult a qualified service personnel.
WARNUNG
1. Verwenden Sie ein geprüftes Netzkabel (3adriges Stromkabel)/einen geprüften
Geräteanschluss/einen geprüften Stecker mit
Schutzkontakten entsprechend den
Sicherheitsvorschriften, die im betreffenden
Land gelten.
2. Verwenden Sie ein Netzkabel (3-adriges
Stromkabel)/einen Geräteanschluss/einen
Stecker mit den geeigneten Anschlusswerten
(Volt, Ampere).
Wenn Sie Fragen zur Verwendung von Netzkabel/
Geräteanschluss/Stecker haben, wenden Sie sich
bitte an qualifiziertes Kundendienstpersonal.
AVERTISSEMENT
1. Utilisez un cordon d’alimentation (câble
secteur à 3 fils)/fiche femelle/fiche mâle avec
des contacts de mise à la terre conformes à la
réglementation de sécurité locale applicable.
2. Utilisez un cordon d’alimentation (câble
secteur à 3 fils)/fiche femelle/fiche mâle avec
des caractéristiques nominales (tension,
ampérage) appropriées.
communications. Operation of this equipment in a
residential area is likely to cause harmful
interference in which case the user will be required
to correct the interference at his own expense.
You are cautioned that any changes or
modifications not expressly approved in this
manual could void your authority to operate this
equipment.
All interface cables used to connect peripherals
must be shielded in order to comply with the limits
for a digital device pursuant to Subpart B of Part
15 of FCC Rules.
This device complies with Part 15 of the FCC
Rules. Operation is subject to the following two
conditions: (1) this device may not cause harmful
interference, and (2) this device must accept any
interference received, including interference that
may cause undesired operation.
For the customers in Canada
This Class A digital apparatus complies with
Canadian ICES-003.
Pour les clients au Canada
Cet appareil numérique de la classe A est
conforme à la norme NMB-003 du Canada.
IMPORTANT
The nameplate is located on the bottom.
IMPORTANT
La plaque signalétique se situe sous l’appareil.
WICHTIG
Das Namensschild befindet sich auf der Unterseite
des Gerätes.
Pour toute question sur l’utilisation du cordon
d’alimentation/fiche femelle/fiche mâle ci-dessus,
consultez un technicien du service après-vente
qualifié.
For the customers in the USA
This equipment has been tested and found to
comply with the limits for a Class A digital device,
pursuant to Part 15 of the FCC Rules. These limits
are designed to provide reasonable protection
against harmful interference when the equipment
is operated in a commercial environment. This
equipment generates, uses, and can radiate radio
frequency energy and, if not installed and used in
accordance with the instruction manual, may
cause harmful interference to radio
8
CAUTION
Danger of explosion if battery is incorrectly
replaced.
Replace only with the same or equivalent type
recommended by the manufacturer.
When you dispose of the battery, you must obey
the law in the relative area or country.
ATTENTION
Il y a danger d’explosion s’il y a remplacement
incorrect de la batterie. Remplacer uniquement
avec une batterie du même type ou d’un type
équivalent recommandé par le constructeur.
Lorsque vous mettez la batterie au rebut, vous
devez respecter la législation en vigueur dans le
pays ou la région où vous vous trouvez.
Page 9

VORSICHT
Explosionsgefahr bei Verwendung falscher Batterien.
Batterien nur durch den vom Hersteller empfohlenen
oder einen gleichwertigen Typ ersetzen.
Wenn Sie die Batterie entsorgen, müssen Sie die
Gesetze der jeweiligen Region und des jeweiligen
Landes befolgen.
For the customers in Europe,
Australia and New Zealand
WARNING
This is a Class A product. In a domestic
environment, this product may cause radio
interference in which case the user may be
required to take adequate measures.
veuillez consulter les adresses indiquées dans les
documents de service ou de garantie séparés.
Ne pas utiliser cet appareil dans une zone résidentielle.
Für Kunden in Europa
Der Hersteller dieses Produkts ist Sony Corporation,
1-7-1 Konan, Minato-ku, Tokyo, Japan.
Der autorisierte Repräsentant für EMV und
Produktsicherheit ist Sony Deutschland GmbH,
Hedelfinger Strasse 61, 70327 Stuttgart,
Deutschland. Bei jeglichen Angelegenheiten in
Bezug auf Kundendienst oder Garantie wenden Sie
sich bitte an die in den separaten Kundendienst- oder
Garantiedokumenten aufgeführten Anschriften.
Pour les clients en Europe, Australie
et Nouvelle-Zélande
AVERTISSEMENT
Il s’agit d’un produit de Classe A. Dans un
environnement domestique, cet appareil peut provoquer
des interférences radio, dans ce cas l’utilisateur peut être
amené à prendre des mesures appropriées.
Für Kunden in Europa, Australien und
Neuseeland
WARNUNG
Dies ist eine Einrichtung, welche die FunkEntstörung nach Klasse A besitzt. Diese
Einrichtung kann im Wohnbereich Funkstörungen
verursachen; in diesem Fall kann vom Betreiber
verlangt werden, angemessene Maßnahmen
durchzuführen und dafür aufzukommen.
For the customers in Europe
The manufacturer of this product is Sony
Corporation, 1-7-1 Konan, Minato-ku, Tokyo, Japan.
The Authorized Representative for EMC and product
safety is Sony Deutschland GmbH, Hedelfinger
Strasse 61, 70327 Stuttgart, Germany. For any service
or guarantee matters please refer to the addresses
given in separate service or guarantee documents.
This apparatus shall not be used in the residential area.
Pour les clients en Europe
Le fabricant de ce produit est Sony Corporation, 17-1 Konan, Minato-ku, Tokyo, Japon.
Le représentant autorisé pour EMC et la sécurité des
produits est Sony Deutschland GmbH, Hedelfinger
Strasse 61, 70327 Stuttgart, Allemagne. Pour toute
question concernant le service ou la garantie,
Dieser Apparat darf nicht im Wohnbereich
verwendet werden.
For kundene i Norge
Dette utstyret kan kobles til et ITstrømfordelingssystem.
For the customers in the USA
Lamp in this product contains mercury. Disposal
of these materials may be regulated due to
environmental considerations. For disposal or
recycling information, please contact your local
authorities or the Electronic Industries Alliance
(www.eiae.org).
For the State of California, USA only
Perchlorate Material - special handling may apply,
See
www.dtsc.ca.gov/hazardouswaste/perchlorate
Perchlorate Material : Lithium battery contains
perchlorate.
Für Kunden in Deutschland
Dieses Gerät ist nur für den Gebrauch in Gewerbe
und Leichtindustrie bestimmt.
Für Kunden in Deutschland
Entsorgungshinweis: Bitte werfen Sie nur entladene
Batterien in die Sammelboxen beim Handel oder den
Kommunen. Entladen sind Batterien in der Regel
dann, wenn das Gerät abschaltet und signalisiert
„Batterie leer“ oder nach längerer Gebrauchsdauer
der Batterien „nicht mehr einwandfrei funktioniert“.
Um sicherzugehen, kleben Sie die Batteriepole z.B.
mit einem Klebestreifen ab oder geben Sie die
Batterien einzeln in einen Plastikbeutel.
9
Page 10

For the customers in Taiwan only
Usage Notes
Copyright
Using this unit for video and/or audio switching,
or distribution over the Internet or otherwise may
in some cases require the permission of the
copyright holder of the video or audio.
To protect copyright, observe the following points
carefully when using this unit.
• When connecting a recording device to this and
recording video or audio, carefully observe laws
relating to copyright.
• Without the permission of the copyright holder,
the showing or distribution of video or audio
material of which the copyright is held by a third
party, or the act of recording on the hard disk of
this unit, sharing folders, and permitting of
access to a private group or to the public is
prohibited by law.
• Even with the right to show or distribute, the act
of using this unit to edit original content with
wipes or dissolves, for example, may be
prohibited by law.
• With a software upgrade or functional
extension, with the object of protecting
copyright, the specifications for the video and
audio signals that can be input may be changed
without notice.
• Under copyright law, you may not use recorded
video or audio other than for your personal
enjoyment without the permission of the
copyright holder. Note that at live performances,
shows and exhibitions, even for your personal
entertainment shooting may be restricted.
10
Points To Check Before Using
Devices
• When recording or streaming valuable data, be
sure to check the device connections
beforehand, or carry out a streaming test, to
make sure that the system is operating normally.
• If when using a camera or videocassette
recorder, tape or similar there should be a failure
in another device preventing recording, no
responsibility can be taken for any loss of the
material which was to have been recorded.
Usage Notes
Page 11

Regarding Cables
Use cables (particularly generic RGB) which are
as short as possible.
IEEE1394 (i.LINK) Cables
Use cables with enhanced shielding, ferrite cores,
and similar noise-reduction measures.
About the LCD Display
• Do not wipe the surface of the LCD display with
a wet object. Water that gets inside the unit may
cause it to malfunction.
• Do not set or drop objects on the LCD display.
Also, do not put pressure on the display, such as
by leaning on it with your hand or elbow.
• Condensation may form on the LCD display
when the unit is moved from a cold place to a
warm place, such as from the outdoors to room
temperature. If condensation forms, thoroughly
wipe off any moisture before using the unit. We
recommend using tissues to wipe up any
condensed moisture. If you wipe up the
condensed moisture while the LCD display is
still cold, the condensation may form again.
Therefore it is best to wait until the LCD display
has warmed up to room temperature.
• The LCD panel fitted to this unit is
manufactured with high precision technology,
giving a functioning pixel ratio of at least
99.99%. Thus a very small proportion of pixels
may be “stuck,” either always off (black),
always on (red, green, or blue), or flashing. In
addition, over a long period of use, because of
the physical characteristics of the liquid crystal
display, such “stuck” pixels may appear
spontaneously. These problems are not a
malfunction.
Precautions for Products With
Built-In HDD
This unit has a built-in hard disk drive (HDD). The
HDD is a precision device. If subject to shock,
vibration, static electricity, high temperature or
humidity, data loss can occur. When installing and
using the unit, closely observe the following
precautions.
Protect from shocks and vibrations
When subject to shocks or vibrations, the HDD
can be damaged and loss of data on the HDD can
occur.
• When transporting the unit, use the specified
packing material. When transporting on a dolly
or similar, use a type which does not transmit
excessive vibrations. Excessive shocks and
vibrations can damage the HDD.
• Never move the unit while it is powered.
• Do not remove panels or outer parts of the unit.
• When placing the unit on a floor or other
surface, make sure to put the unit down
carefully.
• Do not place the unit near other devices that may
become a source of vibrations.
Wait for 30 seconds after turning
power off
For a brief interval after the power is turned off,
the platters inside the HDD will still keep spinning
and the heads will be in an insecure position.
During this interval, the unit is more susceptible to
shocks and vibrations than during normal
operation. For a period of at least 30 seconds after
turning power off, avoid subjecting the unit even
to very light shocks. After this period, the hard
disk will be fully stopped and the unit can be
manipulated.
When HDD seems to be faulty
Even if the HDD is showing signs of malfunction,
be sure to observe all the above precautions. This
will prevent further damage from occurring until
the problem can be diagnosed and corrected.
HDD replacement
The HDD, fan, and battery of the unit are
consumable parts that will need periodic
replacement. When operating at room
temperature, a normal replacement cycle will be
about three years (five years for the built-in
lithium battery). However, this represents only a
general guideline and does not imply that the life
expectancy of these parts is guaranteed. Regarding
parts replacement, consult your dealer or your
Sony service representative.
Usage Notes
11
Page 12

External Hard Disk
• The hard disk is vulnerable to vibration and
shock. Be sure to install the hard disk in the best
possible environment, following the operating
instructions supplied with the drive.
• Even using the recommended hard disk,
depending on the operating environment or
conditions, or in the event of deterioration
because of age, the full performance of the hard
disk may not always be obtained.
• Even when using the recommended hard disk to
store material, the characteristics of the hard
disk mean that frame drop or other problems
may occur.
• To connect the recommended hard disk to this
unit, use the interface cable supplied with the
recommended hard disk.
Ensuring Good Performance
From This Unit
Operation and storage
Avoid using or storing the unit in the following
places.
• Where it is subject to extremes of cold or heat
(operating temperature 0ºC to 40ºC (32ºF to
104ºF))
• Where it is subject to direct sunlight for
extended periods, or close to heating equipment
(Note that the temperature inside a car with the
windows closed on a summer day can exceed
60ºC (140ºF))
• In conditions of high humidity or much dust
• Where it is subject to severe vibration
• Close to a source of strong magnetic fields
• Close to a radio, television, or other source of
powerful electromagnetic radiation
Care of the unit
Clean dirt from the cabinet and panel by wiping
gently with a dry cloth. If the unit is very dirty,
wipe with a cloth steeped in a little neutral
detergent, then wipe dry. Do not use alcohol,
thinners, insecticides, or other volatile solvents, as
this may cause the case to deform or damage the
finish.
Shipping
Pack in the original carton, or similar packaging,
to cushion the unit from violent shocks.
Install in a level place
This unit is designed to be operated in a level
place. Do not turn it vertically, or incline at an
angle of 20 degrees or more.
Do not apply strong shocks
Dropping the unit, or subjecting it to other strong
shocks may cause it to break.
Do not obstruct the ventilation holes
To prevent the temperature from rising, do not, for
example, wrap the unit in a blanket while
operating.
Usage Notes
12
Page 13

Overview
Features of This System
The AWS-G500E Anycast Station Live Content
Producer is an audiovisual production system
equipped with camera control, video switching,
and live Internet distribution systems.
The following are the principal features.
All-in-One
AWS-G500E is light and conveniently portable,
while combining video switching and audio
mixing functions with video monitor and camera
control, to provide an inclusive package for live
content generation. Whereas previously it was
necessary to assemble various devices, this is no
longer necessary, and the time and effort required
to install, connect, and adjust the equipment has
been greatly reduced.
Video Switching
• You can switch between a maximum of six
analog, DV, SDI, HD analog, HD SDI, or RGB
input images with the optional interface
modules.
• The system provides both mix (dissolve) and
wipe transition effects, Picture-in-Picture for
combining videos, and luminance and chroma
keying functions.
• Before carrying out a switching operation, you
can preview the next selected image in the PVW
viewer.
• You can mix video using a maximum of five
effects at one time, such as incorporating
(keying) a separate video clip when switching
between two video clips with a wipe or other
transition effect, as well as superimposing text
(downstream key) and displaying a copyright
logo.
Chapter
Superimposed text
(downstream key)
• You can register video effect settings as
snapshots and recall them quickly when
necessary.
1
LogoImage keyed in
Text Typing Tool Software
The system includes installed Text Typing Tool
software, which allows easy creation of titles.
Titles created with the Text Typing Tool software
can be used in the DSK (downstream key) or as
luminance keys.
Audio Mixing
You can mix up to six audio inputs.
Each channel is provided with a range of
functions, including fader, input trim, filter
equalizer, limiter, and compressor pan (balance),
allowing the sound quality and level to be adjusted
on each channel separately.
In addition, each channel has a prefader listen
function, allowing you to monitor the input audio
before any effects are applied by the fader, and
each output has a delay function to correct any
discrepancies between the audio and video timing.
Remote Camera Control
• Using a camera with VISCA support, you can
remotely control the camera movements,
including panning, tilting, and zoom.
• The camera preset function allows you to store
camera pan, tilt, and zoom settings. Using the
camera preset function, you can immediately set
the camera to the preset state when required just
by pressing a button.
Chapter 1 Overview
Features of This System
13
Page 14

Recording on an External
Hard Disk
Switching the Aspect Ratio
for PGM Output
You can record (.avi) program outputs and video
Chapter 1 Overview
material (video and audio) being input to the unit
to an external hard disk connected to the i.LINK
connector of the SD video interface module
(BKAW-570) or the serial digital interface module
(BKAW-580). By connecting the external hard
disk containing the recorded material to a
nonlinear editing system, you can go straight into
editing operations, without the need to transfer
data from video tape to the nonlinear editing
system.
You can also play files recorded on the external
hard disk as input source material.
This system can use three with the addition of an
option module, recording maximum six channels
simultaneously.
Caution
Connectivity with all nonlinear editing systems is
not guaranteed. Commercially available software
must be installed on the computer for
recognization of the hard disk.
The system supports both 4:3 and 16:9 output
aspect ratios.
Menu items, viewer displays, and program outputs
from the system are all adjusted according to the
aspect ratio mode selected. Input materials of
different aspect ratios can coexist regardless of the
mode selected.
VCR Playback Operations
You can perform playback operations for VCRs
connected to the DV connectors of the SD video
interface module (BKAW-570) from this unit.
You can also register specific positions on a
videotape and access them whenever necessary.
Creating and Exporting EDL
You can save the switching information
performed on this unit as an EDL (Edit Decision
List), export it to a “Memory Stick” or USB flash
memory, and then use it on a nonlinear editing
system.
If you perform switching while creating an EDL,
and simultaneously record material (video and
audio) to an external hard disk, there is no need to
start editing work from the beginning because you
can transfer the EDL you created and the external
hard disk to a nonlinear editing system.
Streaming Broadcast
You can encode in Real Media streaming file
format (.rm) in real time, for a live broadcast. In
addition, you can store live broadcasts as VOD
files on the unit’s internal hard disk and transmit
them using the internal server, or you can export
the VOD files and transmit them from a separate
server.
Features of This System
14
Page 15
Example Applications
The following are examples of applications utilizing the functions of AWSG500E.
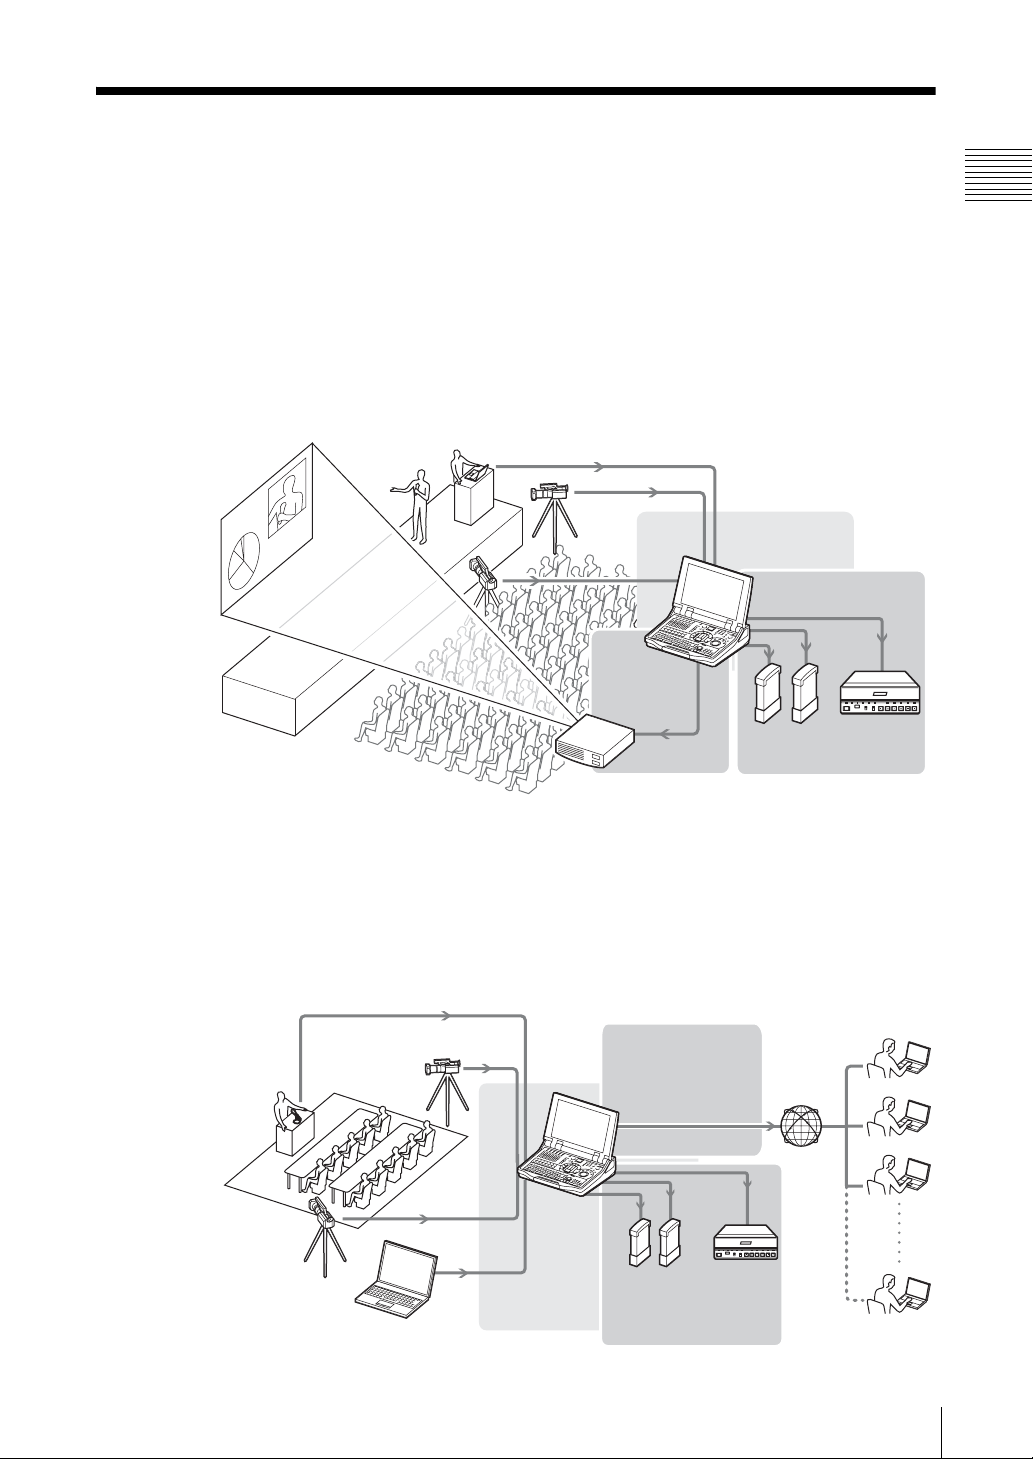
Event and presentation support
At seminars, events, and presentations you can use this unit to switch among
camera inputs and data from a computer, while displaying the output on a
projector or large monitor.
Principal functions used: video switching (such as cut switching or picture-inpicture), audio mixing, RGB input/output
RGB input
Video output
, (page 215)
RGB output
Switching
, (page 77)
Recording
(pages 172, 191)
,
External hard
disk
Chapter 1 Overview
VCR
Internet live broadcast
This unit includes a streaming server function. For broadcast to small audiences
(about 20 people) over an intranet, this unit can be used as the streaming server
without requiring an external server.
Principal functions used: video switching (such as a wipe transition), audio
mixing, streaming encode, streaming server
Switching
, (page 77)
Streaming settings/
broadcast
, (page 247)
External
hard disk
Recording
, (pages 172, 191)
VCR
Example Applications
15
Page 16
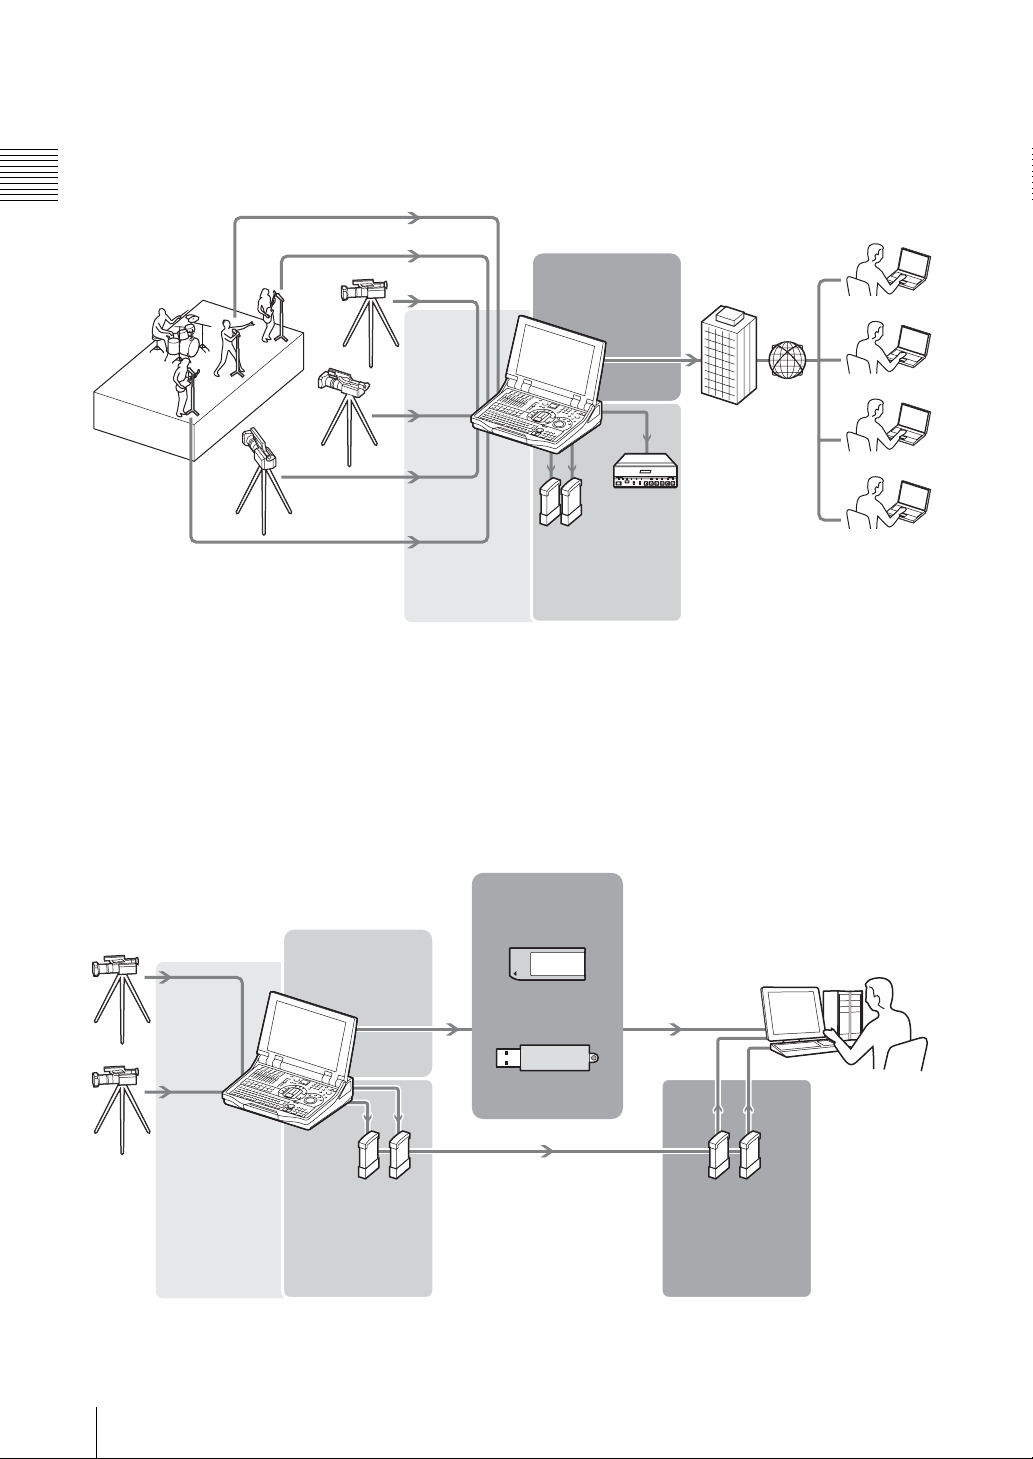
For the broadcast of things like live events to large audiences, you can broadcast
via a streaming server (Helix server).
Principal functions used: video switching (such as a mix transition), audio
Chapter 1 Overview
mixing, streaming encode, camera presets
Streaming
, (page 247)
External
hard disk
Switching
, (page 77)
Recording
(pages 172, 191)
,
Broadcast
Internet
provider
VCR
Simplification of re-editing after events
If you export an EDL (Edit Decision List) file with switching information from
an event saved and then use it on a nonlinear editing system in combination with
a material file recorded on an external hard disk, you can complete re-editing
work by just modifying the EDL.
Principal functions used: creating EDL, exporting EDL
Creating EDL
, (page 230)
USB flash memory
External hard
disk
Switching
, (page 77)
Recording
, (page 172)
Exporting EDL
, (page 232)
“Memory Stick”
Nonlinear
editing system
External hard
disk used for
recording the
material
, (page 205)
Example Applications
16
Page 17
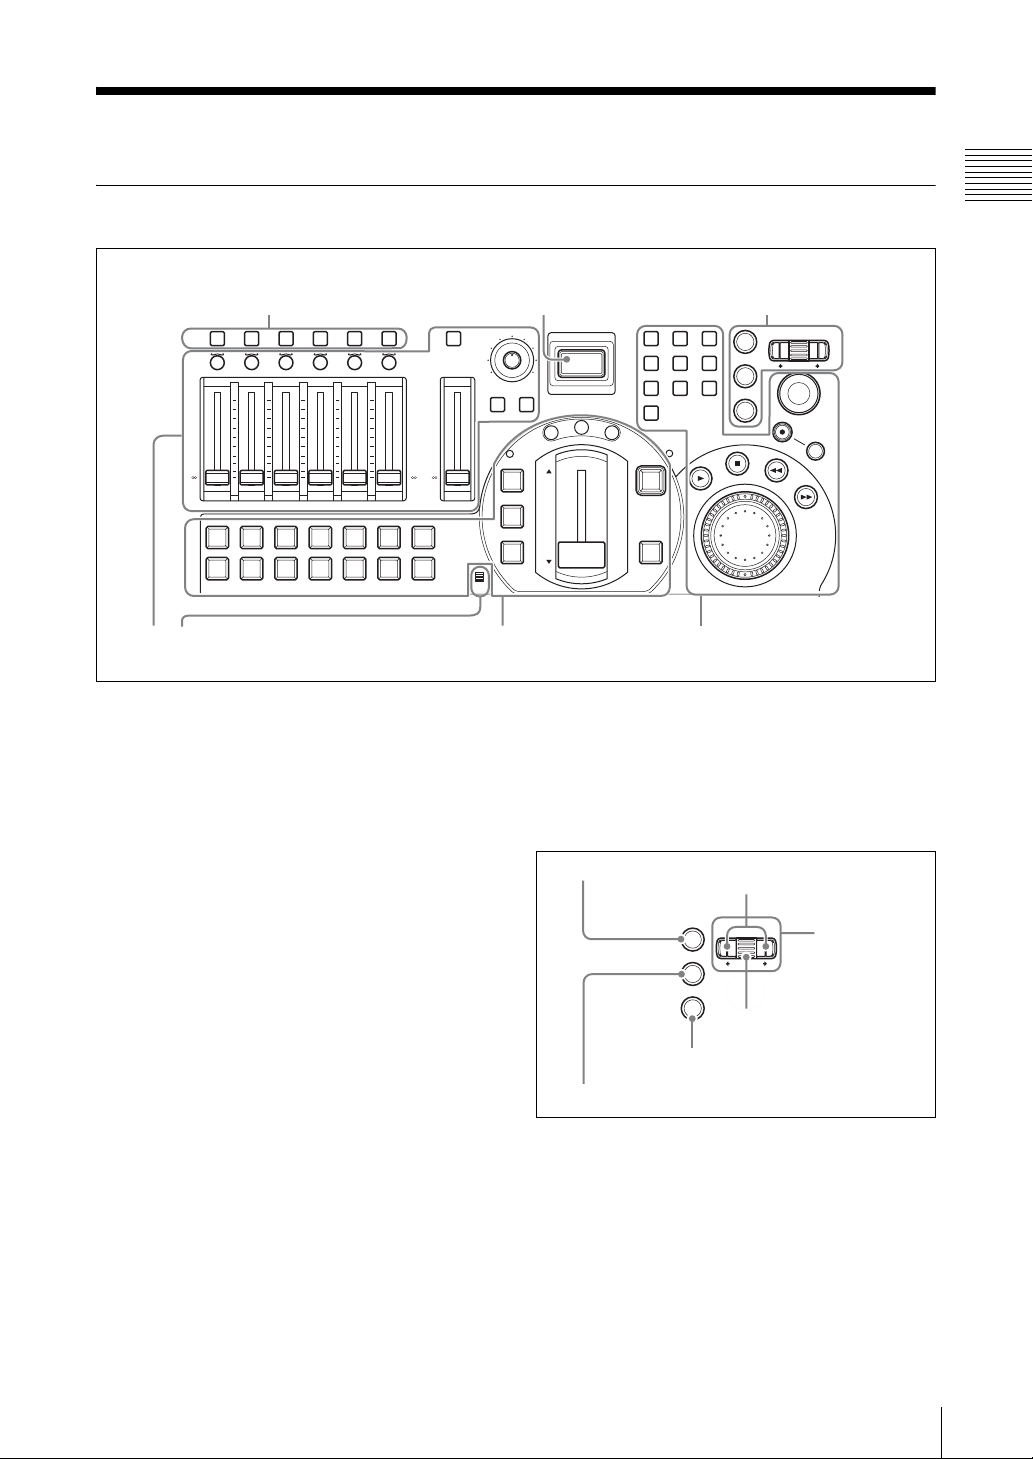
Names and Functions of Parts
Front Panel
ACCESS/
PFL
CH ON
+
10
+
5
0
-
5
-
10
-
20
-
30
-
40
-
60
-
2 Audio operation section
(see page 18)
a ACCESS buttons
These buttons are used for displaying the
ACCESS menu (page 35) and monitoring audio
(page 211). When you press an ACCESS button in
one of columns 1 to 6, the ACCESS menu appears
allowing adjustment of the related video and audio
settings.
Information on input signals appears on the left
side of the menu. If you hold down the ACCESS
button in one of columns 1 to 6 for 0.5 seconds or
more, you can monitor the audio assigned to the
channel fader in the same column, and display the
audio level meter for that channel only.
By holding down two or more ACCESS buttons
simultaneously, you can monitor multiple audio
channels.
b ON LINE button
This button has the following functions.
• Execute/stop streaming broadcast (page 261)
• Start/stop recording of material and program
output to external hard disks (page 177)
• Start/stop recording to VCRs connected to the
DV connectors (page 195)
• Start/end EDL creation (page 231)
You can also start all these functions
simultaneously.
AUDIO MONITOR
+
10
+
10
+
5
+
5
0
0
-
5
-
5
-
10
-
10
-
20
-
20
-
30
-
30
-
40
-
40
-
60
-
60
-
-
654321
654321
PGM
PGM
NEXT
INT
MIC
2 ON LINE button1 ACCESS buttons
P
V
W
789
456
1023
FTB
DSK
0
MONI LEVEL
DIM TB
KEY
CUT
AUTO
TRANS
ON LINE
10
E
F
C
F
T
E
X
I
M
3 Video switcher section
(see page 19)
4 Device control section
1 Menu control section
ENTER
ESC
MENU
X-Y
REC
SHIFT
JOG/SHUTTLE
(see page 20)
1 Menu control section
Use these controls to operate the top menus and
ACCESS menus.
For details of operations, see “Menu Operations”
(page 34).
1 ENTER button
2 ESC button
Arrow buttons
ENTER
ESC
MENU
Roller
3 MENU button
4 Jog roller
a ENTER button
This button confirms an item or input value in
menu operations.
b ESC button
This button closes the top menu and ACCESS
menu or cancels numeric and character input and
returns to one level above.
Chapter 1 Overview
Names and Functions of Parts
17
Page 18

Furthermore, pressing the ON LINE button while
holding down the ESC button enables you to
forcibly stop the following operations.
ESC + ON LINE buttons • Stop recording to an
Chapter 1 Overview
external hard disk
• Stop recording to a VCR
• Stop streaming
• Stop EDL creation
2 Audio operation section
Use these controls for audio settings and
operations.
1 Audio channel faders 2 CH ON buttons 3 PGM fader
CH ON
+
10
+
5
0
-
5
-
10
-
20
-
30
-
40
-
60
-
c MENU button
This toggles the top menu on or off.
d Jog roller
Turn the roller up and down to select a menu item.
Pressing the roller like a button has the same effect
as pressing the ENTER button.
Use the arrow buttons when a menu operation
requires movement to left or right.
4 AUDIO MONITOR button
5 Monitor level adjustment knob
10
6 DIM button
7 TB button
0
+
10
+
10
+
5
+
5
0
0
-
5
-
5
-
10
-
10
-
20
-
20
-
30
-
30
-
40
-
40
-
60
-
60
-
-
654321
MONI LEVEL
DIM TB
PGM
a Audio channel faders
These buttons adjust the input levels of the audio
assigned to channels 1 to 6, in the range from –∞
to +10 dB (page 171).
For details of audio signal assignment, see “Audio
Signal Related Settings” (page 71).
b CH ON buttons
These buttons select whether the audio channels 1
to 6 are enabled or disabled.
Pressing a button enables the audio assigned to the
corresponding audio channel. Channels for which
the button is not lit are disabled (page 171).
You can also link the enabling of the audio
channels with the switching of the PGM selection
buttons (page 74).
c PGM fader
This button adjusts the overall audio output level
of the program output, in the range from –∞ to +10
dB (page 171).
MIC
8 Microphone
d AUDIO MONITOR button
This button switches the monitoring target.
Pressing if cycles the audio to be monitored
through the sequence PGM
t AUX1 t AUX2
t MIX t PGM (page 210).
e Monitor level adjustment knob
This button adjusts the level of the monitor output
and the output from the internal speakers and from
the headphones (page 210).
f DIM button
This button enables the “audio attenuate” function.
This reduces each of the level of the monitor
output and the output from the internal speakers
and from the headphones by 20 dB.
g TB button
This button lets you to speak while
communicating on an external intercom system.
While the TB button is lit, sound from the front
panel microphone and headset microphone is
output over the intercom system (page 207).
Names and Functions of Parts
18
Page 19
h Microphone
This button lets you speak on an external intercom
system. While the TB button is lit, sound from the
microphone is output over the intercom system
(page 207).
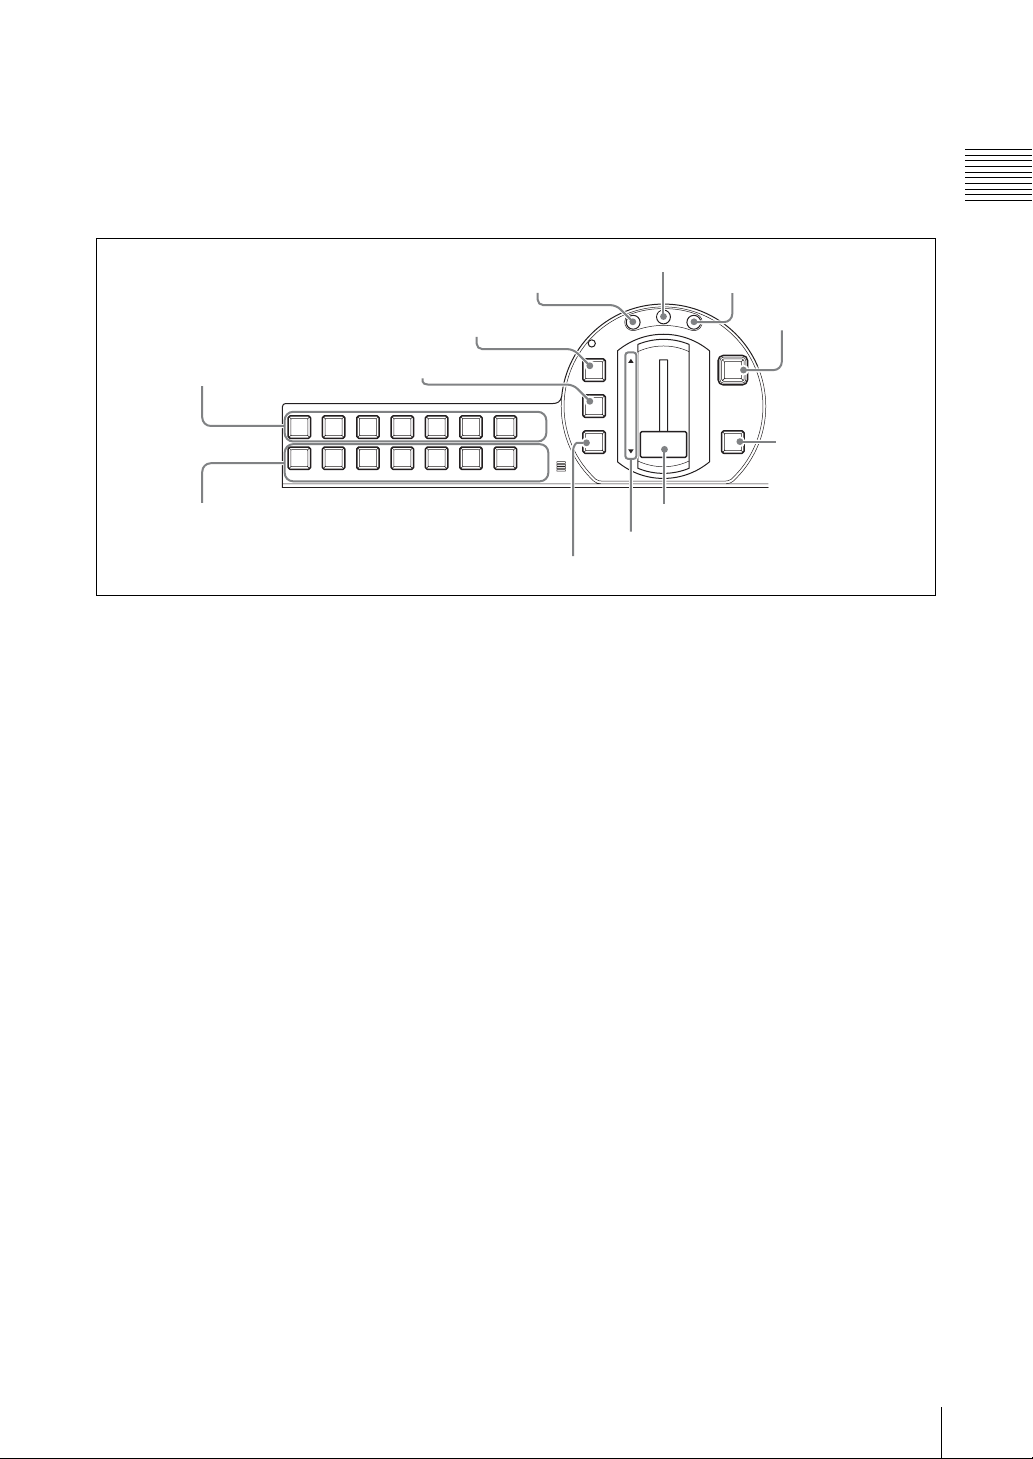
3 Video switcher section
This switches video.
4 KEY button
1 PGM selection buttons
2 NEXT selection buttons
3 CUT button
654321
a PGM selection buttons
These buttons select the video which will be
displayed on the program output (page 78).
Buttons 1 to 6 select the corresponding assigned
video, and the INT button selects a video image
generated internally by this unit (color matte, color
bars, graphics files).
When you press one of these buttons, lighting it
red, the video assigned to the button is sent to the
program output.
For details of video assignment, see “Video Signal
Related Settings” (page 67).
6 EFFECT button
7 PVW button5 MIX button
FTB
DSK
8 FTB button
9 DSK button
E
F
C
F
T
E
P
V
X
I
W
M
KEY
CUT
PGM
AUTO
NEXT
INT
TRANS
MIC
0 Transition lever
qa Indicators
qs AUTO TRANS button
A graphic file (SD_Safe_Area.tga (straight line:
90%, dotted line: 80%)) is provided for displaying
safe areas.
c CUT button
This button instantaneously switches the video
(page 77).
d KEY button
This button effectuates keying (page 99). When
this key lights green, the NEXT selection buttons,
MIX button, AUTO TRANS button, CUT button,
and transition lever are then assigned to keying.
Chapter 1 Overview
b NEXT selection buttons
The NEXT selection buttons have the following
functions.
• Selecting the video to be output on the program
output after next switching transition (page 79)
• Selecting the video to be used for picture-inpicture (page 86)
• Selecting the video to be used when inserting a
key in the program output (page 99)
• Specifying a camera to be controlled during
camera control operations (page 158)
• Selecting the video for recording or playback
(pages 179, 181)
Buttons 1 to 6 select the corresponding assigned
video, and the INT button selects a video image
generated internally by this unit (color matte, color
bars, graphics files).
e MIX button
This button effectuates a dissolve (gradually
blending a new video into the existing image).
When applying an effect it gradually blends in the
effect (page 81).
f EFFECT button
This button enables an effect other than dissolve in
a transition or when applying an effect (page 82).
You can also use it as a shortcut to the [Effect
Pattern] menu (page 85).
g PVW button
With this button you can check the result of keying
and picture-in-picture before switching it to
program output, on the PVW viewer (page 110).
Names and Functions of Parts
19
Page 20
Chapter 1 Overview
789
456
123
ENTER
X-Y
REC
SHIFT
JOG/SHUTTLE
FTB
DSK
h FTB button
This button fades the video in from or out to a
black screen (“fade-to-black”) (page 89).
i DSK button
This button add is used to images or text to the
program output video (page 90). You can use it to
superimpose text and so on.
j Transition lever
This lever allows you to manually execute a
transition or effect (page 81).
k Indicators (Ff)
These indicators show the direction in which the
transition lever is being moved. Moving the
transition lever in the direction of the lit indicator
starts the transition or effect.
However, supposing you press the AUTO TRANS
button after moving the transition lever to the
middle, for example, an inconsistency between the
position of the fader and the application of the
effect will arise and both indicators will light.
l AUTO TRANS button
This button carries out an automatic transition
with a preset transition time, either from one video
to another or when applying an effect (page 81).
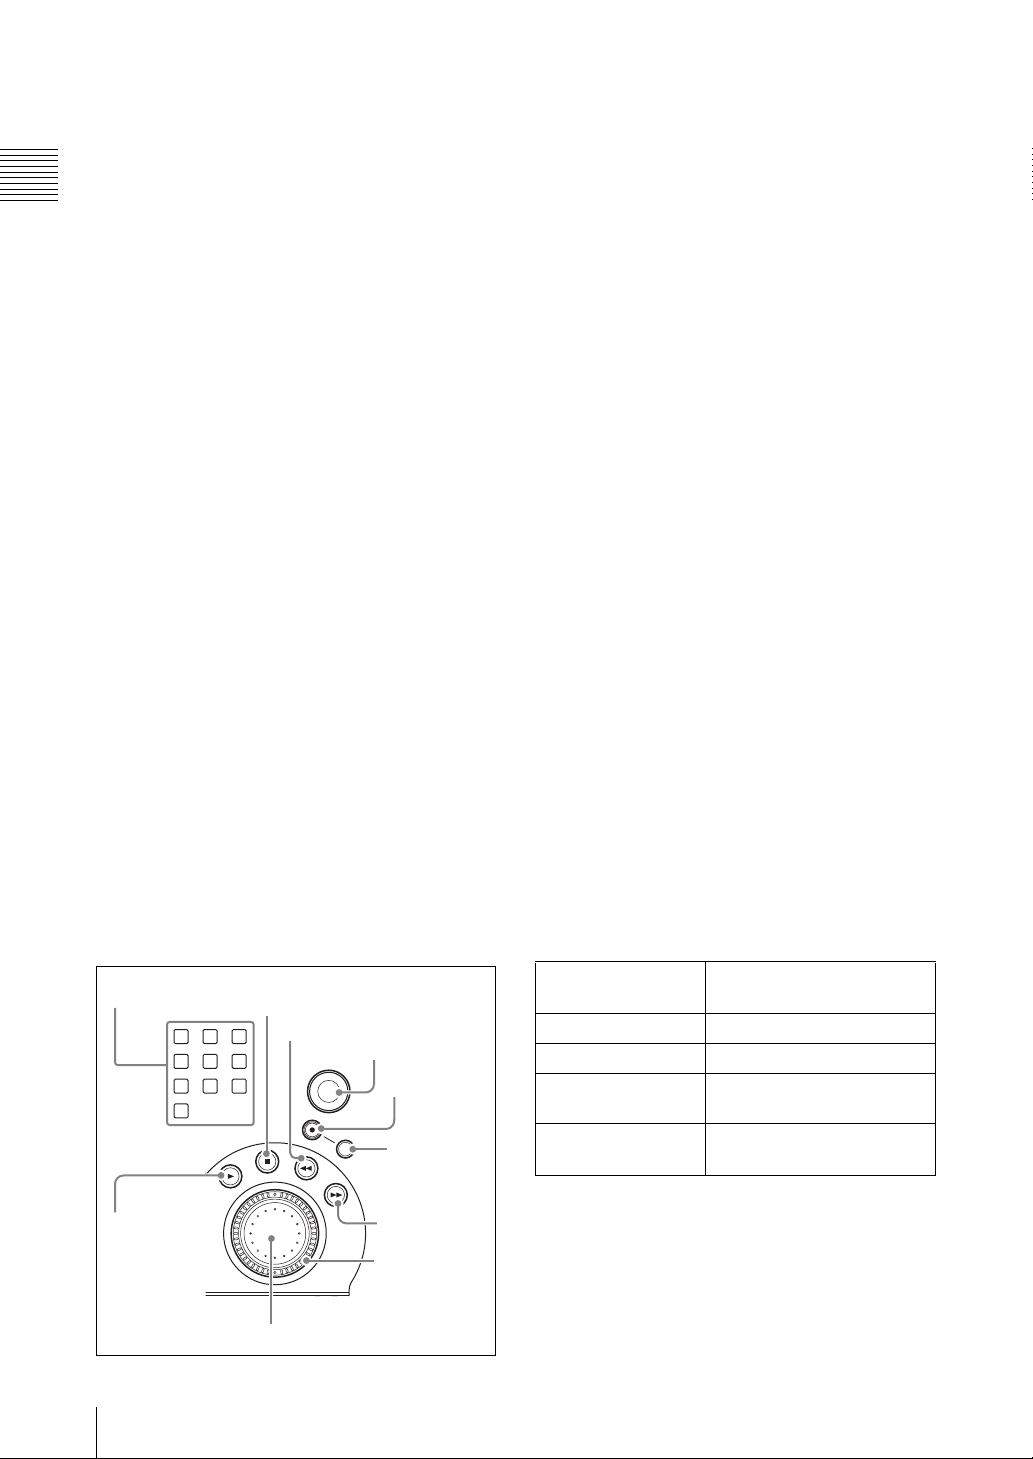
4 Device control section
Use these controls to remotely control a camera
with VISCA support connected to this unit (page
158), perform hard disk operations (material
recording, file playback) (pages 179, 181), perform
VCR playback operations (page 197), or to access
graphics files quickly (page 94).
1 Numeric buttons
2 PLAY
button
3 STOP button
4 REW button
8 Positioner
6 REC button
7 SHIFT
button
5 FFWD
button
9 Shuttle dial
0 Jog dial
a Numeric buttons
These buttons are used to access graphics files
quickly, register and recall video effect snapshots,
register and recall camera presets, reset cameras,
and cue up files (pages 94, 113, 160, 165, 187).
b PLAY button
This button plays back a file at normal speed.
Hold down the REC button and press this button,
to start recording on the hard disk (page 178).
c STOP button
This button stops file playback. Press shift and
then press this button to switch the source viewer
back from viewing a file on the hard disk to normal
input (page 183).
While recording to an external hard disk, press this
button while holding down the REC button to stop
recording (page 180).
While recording program output, press this button
while holding down the SHIFT and REC buttons
to stop recording (page 178).
d REW button
During file playback, play back fast in the reverse
direction. Each time you press, the reverse speed
increases (in six steps) (page 183).
e FFWD button
During file playback, play back fast in the forward
direction. Each time you press, the playback speed
increases (in six steps) (page 183).
f REC button
This button is used to start or stop the external hard
disk recording (page 179).
REC + NEXT
selection buttons
REC + PLAY buttons Start material recording
REC + STOP buttons Stop material recording
SHIFT + REC +
PLAY buttons
SHIFT + REC +
STOP buttons
Reserve or cancel material
recording
Start program output
recording
Stop program output
recording
g SHIFT button
This button is pressed while using other controls to
perform the following operations.
Names and Functions of Parts
20
Page 21

SHIFT + jog dial Aperture (iris) adjustment on
camera with VISCA support
SHIFT + numeric
buttons (1 to 6)
SHIFT + numeric
buttons (1 to 9)
SHIFT + numeric
buttons (0)
SHIFT + numeric
buttons (8)
SHIFT + numeric
buttons (9)
SHIFT + REW
buttons
SHIFT + FFWD
buttons
SHIFT + STOP
buttons
SHIFT + ENTER
buttons
SHIFT + ESC buttons Process all files excluding
SHIFT + REC +
PLAY buttons
SHIFT + REC +
STOP buttons
• Set camera presets
• Register hard disk and
VCR cue-up points
• Register quick access
graphics files
• Register video effect
snapshots
Camera reset
Register a start point for auto
repeat
Register an end point for auto
repeat
• Skip to the beginning of a
file
• Move back one frame on a
VCR
• Skip to the end of a file
• Move forward one frame on
a VCR
• Close a file
• Pause playback on a VCR
• Delete preset data
simultaneously
• Process all files including
files that will be
overwritten
files that will be overwritten
Start program output
recording
Stop program output
recording
corresponds to the amount the dial was turned
(pages 159, 183).
j Jog dial (inner dial)
This dial controls the camera focus and iris (page
159) and performs playback operations for VCRs
or files stored on the external hard disk (page 183).
Chapter 1 Overview
h Positioner
This control is used to pan or tilt the camera. You
can also control the speed of the camera by
adjusting how hard you press this button (page
159).
This control can also be used to change the display
positions for picture-in-picture and logos
(pages 88, 99), and to move the Auto Chroma Key
cursor (page 106).
i Shuttle dial (outer ring)
This dial controls the camera zoom.
During file or VCR playback, turning this dial
clockwise plays the file in the forward direction at
a speed that corresponds to the amount the dial
was turned and turning this dial counterclockwise
plays the file in the reverse direction at a speed that
Names and Functions of Parts
21
Page 22

Rear Panel
SD
PC
SDI
Chapter 1 Overview
1 Audio inputs
VISCA
1
connector
4 SD video interface module (option)
(see page 23)
Cable clips
2
LINE MIC/LINE
87 6 54 3
AC IN
4 Power supply
connector
AUDIO IN
MIX
RRLL
HEADPHONES
2 Audio outputs
(see page 23)
PUSH PUSH
MIC/LINE
21
OFF
ON
AUX P GM RGB
21
MONI INTERCOM
RL
AUDIO OUT VIOEO OUT
15
69
COMPOSITE
RGB PGM
3 Video outputs
(see page 23)
I.LINK
S400
S VIDEO
(~AC IN)
5 Ground terminal
3 Intercom interface connector
* This figure is when an optional interface modules are installed in slots of
the AWS-G500E. The blank panels are installed in all slot of the AWSG500E at the time of shipment.
a VISCA connector
To connect the chain of cameras with VISCA
support to this unit for remote control operation,
connect the VISCA cable (page 59).
Caution
The ground terminal is close to the audio input
connectors, so when connecting the grounding
lead be careful not to touch the audio input
b Cable clips
connectors.
Use these clips to prevent cables from accidentally
disconnecting (page 65).
1 Audio inputs
VIDEO IN
S VIDEO
COMPOSITE
OFF
RGB RGB
S VIDEO
COMPOSITE
1
OFF
ON
ON
2
3
5 Serial digital interface
module (option)
(see page 24)
6 PC video interface module
(option) (see page 25)
7 HD video interface module
(option) (see page 25)
8 HD serial digital interface
module (option) (see page 25)
c Intercom interface connector
Connect an external intercom system (page 207).
d Power supply connector (~AC IN)
Use to connect to an AC outlet (page 46).
Caution
When using a DC-AC inverter, the use of a 50 Hz
(±3%) or 60 Hz (±3%) sine wave is recommended.
Do not use a general-purpose inverter with a
square output waveform.
e Ground terminal
When using this unit, connect the ground terminal
to a grounding lead.
Names and Functions of Parts
22
1 Microphone/line input connectors
(MIC/LINE) 1/2
AUDIO IN
LINE MIC/LINE
87 6 5 43
PUSH PUSH
MIC/LINE
21
+
45V
OFF
ON
2 +48V switch
3 Microphone/line input connectors
(MIC/LINE) 3/4/5/6
4 Line input connectors (LINE) 7/8
a Microphone/line input connectors (MIC/
LINE) 1/2 (XLR 3-pin, TRS shared
balanced type)
Input an analog audio signal from a microphone or
audio device.
Page 23
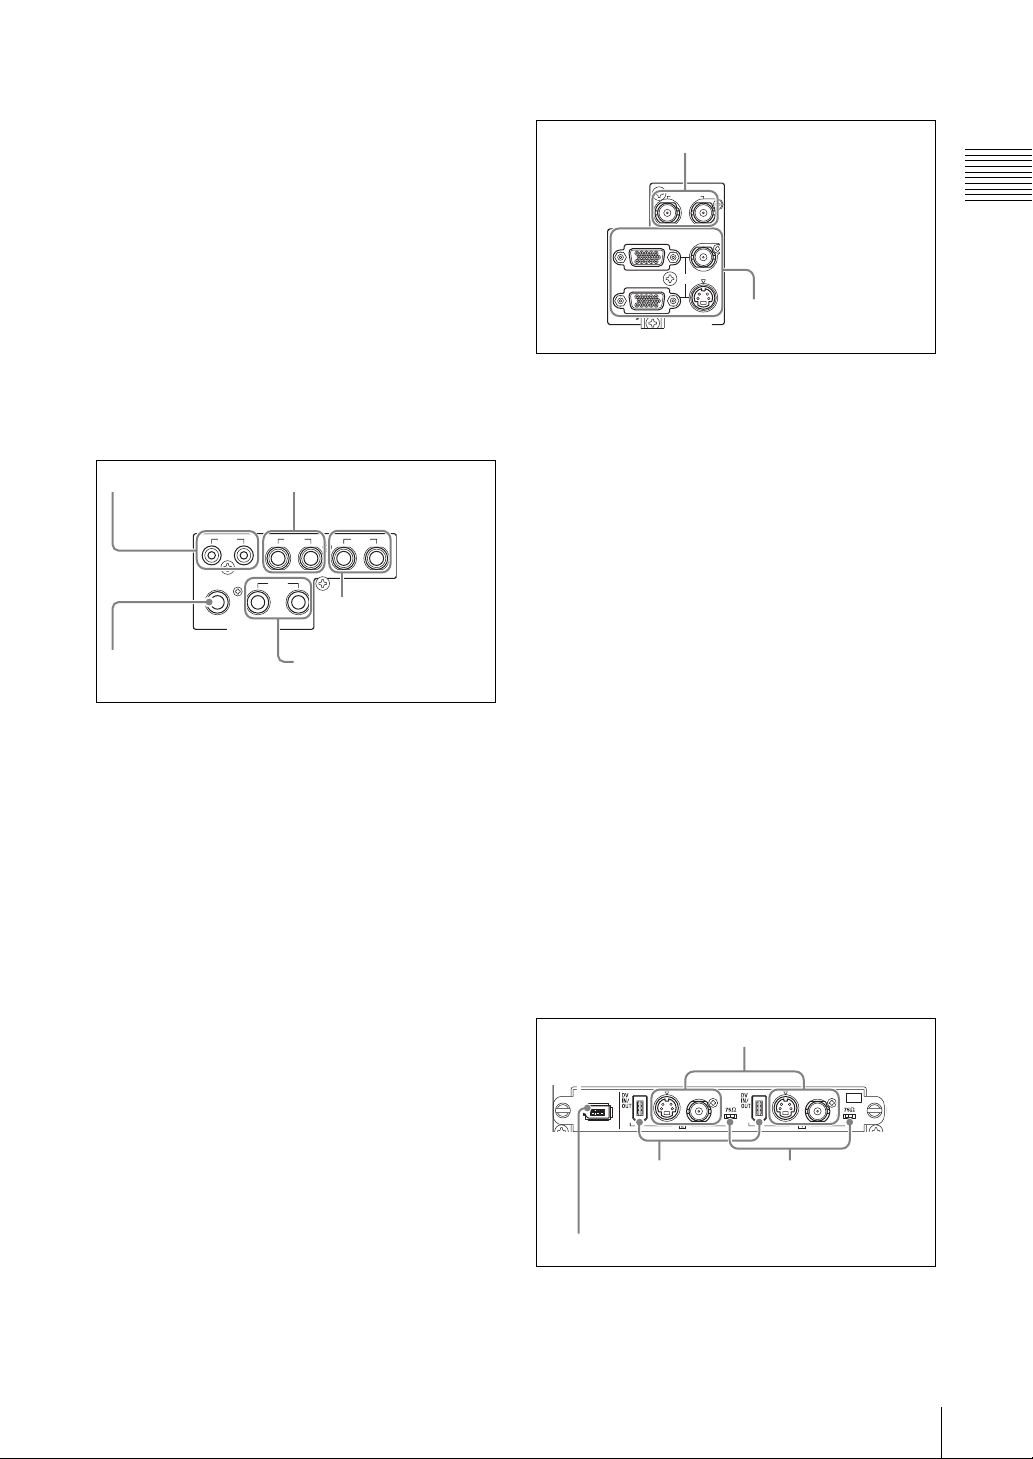
b +48V switch
SD
Use this switch when a capacitor microphone
requiring a power supply is connected to the
microphone/line input connectors (MIC/LINE) 1/2.
When this is in the ON position, +48V is supplied.
c Microphone/line input connectors (MIC/
LINE) 3/4/5/6 (TRS balanced type)
Input an analog audio signal from a dynamic
microphone or audio device.
d Line input connectors (LINE) 7/8 (RCA)
Input an analog audio signal from an audio device.
2 Audio outputs
1 MIX output connector
(MIX)
2 AUX output connector
(AUX) 1/2
3 Video outputs
1 Reference output
connectors (REF OUT)
REF OUT
RGB
COMPOSITE
S VIDEO
RGB PGM
VIOEO OUT
2 PGM video output
connectors (PGM)
a Reference output connectors (REF OUT)
× 2
These output either a 60 Hz (NTSC) or 50 Hz
(PAL) reference signal to match the program
output signal.
Chapter 1 Overview
RRL
HEADPHONES
Headphone connector
5
(HEADPHONES)
MIX
MONI
RL
AUDIO OUT
AUX PGM
4 Monitor output
L21
3 PGM audio output
connectors (PGM)
connectors (MONI)
a MIX output connector (MIX) L/R (RCA)
These connect to an external acoustic device to
output audio signals (page 209).
b AUX output connector (AUX) 1/2 (TRS,
balanced)
These connect to an external acoustic device to
output audio signals. The output level can be
adjusted (page 208).
c PGM audio output connectors (PGM) L/
R (TRS, balanced)
These output the final audio (program audio)
created by this unit (page 208).
d Monitor output connectors (MONI) L/R
(TRS, balanced)
These provide monitor outputs of any of the PGM/
AUX1/AUX2/MIX audio (page 210).
e Headphone connector (HEADPHONES)
(standard phone jack)
This outputs one of the PGM/AUX1/AUX2/MIX
audio (page 209).
The output level can be adjusted with the front
panel monitor level adjustment knob (MONI
LEVEL) (page 210).
b PGM video output connectors (PGM)
• Composite video output connector
(COMPOSITE) (BNC) × 1
• S-video output connector (S VIDEO) (S
connector) × 1
These output the final program (PGM) video.
You can switch to NTSC (60 Hz) or PAL (50
Hz) (page 71).
• RGB output connectors (RGB) (D-sub 15-pin) × 2
These output the final program (PGM) video as
analog RGB signals and video RGB signals.
Connect a projector or external display.
The following signals can be output (page 71).
- XGA (1,024 × 768) 60 Hz/75 Hz
- SXGA (1,280 × 1,024) 60 Hz
- WXGA (1,280 × 768) 60 Hz/75 Hz
- 15k RGB 50 Hz/59.94 Hz
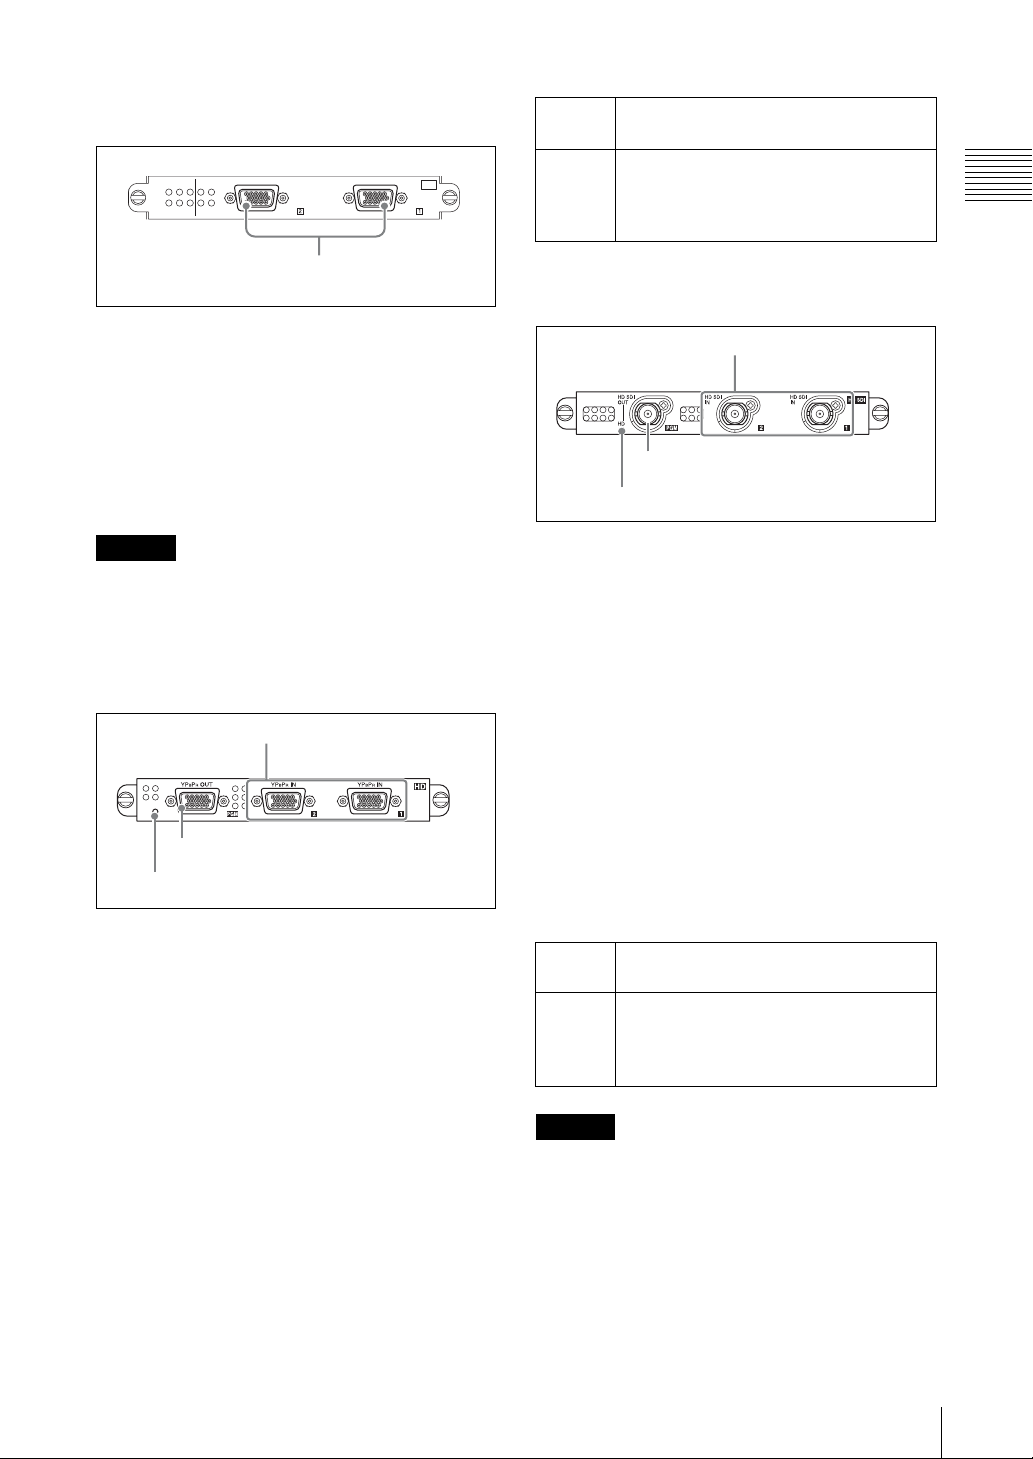
4 SD video interface module
(BKAW-570) (Option)
1 Analog video input
connectors
S VIDEO
I.LINK
S400
4 i.LINK connector (HDD)
COMPOSITE
OFF
3 DV connectors
(DV IN/
DV PGM OUT)
S VIDEO
COMPOSITE
ON
2 75-Ω termination
switch
OFF
ON
a Analog video input connectors
Composite video input connectors
(COMPOSITE) (BNC) × 2
Names and Functions of Parts
23
Page 24

S-video input connectors (S connector) × 2
Input analog video signals.
b 75-Ω termination switch
Set this switch to the OFF position when using a
Chapter 1 Overview
loop-through connection for a video monitor or the
like by connecting a branch connector to the
composite video input connector (COMPOSITE).
Note
The factory default setting is ON.
Use the end of a sharp implement such as a pen to
operate the switch.
c DV connectors (DV IN/DV PGM OUT)
(i.LINK 6-pin) × 2
Input and output digital video audio signals.
b SDI output connector (SDI OUT) (BNC)
× 1
Outputs final video and audio (program video +
audio) as SDI signals (page 193).
c i.LINK connector (HDD) (i.LINK 6 pins)
× 1
If an external hard disk is connected, material and
program output can be recorded.
The following three types of recording are
available for an external hard disk.
• Manually record video input to the same interface
module in combination with audio that has the
same source number as the video (page 178).
• Manually record program output (page 177).
• Simultaneously record material and program
output (ON LINE recording) (page 177).
Notes
• Only one of the Composite/S-video/DV inputs
can be used for each of IN1and IN2.
• If the DV connector is set as the output, material
cannot be recorded from composite and S-video
connectors (page 193).
d i.LINK connector (HDD) (i.LINK 6-pin) × 1
If an external hard disk is connected, material and
program output can be recorded.
The following three types of recording are
available for an external hard disk.
• Manually record video input to the same interface
module in combination with audio that has the
same source number as the video (page 178).
• Manually record program output (page 177).
• Simultaneously record material and program
output (ON LINE recording) (page 177).
5 Serial digital interface module
(BKAW-580) (Option)
1 SDI input
connectors
(SDI IN)
Serial digital interface module
(BKAW-581) (Option)
1 SDI input connectors
(SDI IN)
2 SDI output connector (SDI OUT)
3 SD indicator
a SDI input connectors (SDI IN) (BNC) × 2
Inputs SDI signals.
b SDI output connector (SDI OUT) (BNC)
× 1
Outputs final video and audio (program video +
audio) as SDI signals (page 193).
c SD indicator
This lights or turns off in the following situations.
Lights When output of SDI signals is possible
(4:3 and 16:9 SD modes (page 54)).
Turns off When output of SDI signals is not possible
(16:9 HD mode (page 54)).
A black image signal is output.
2 SDI output connector
(SDI OUT)
3 i.LINK connector (HDD)
a SDI input connectors (SDI IN) (BNC) × 2
Inputs SDI signals.
Names and Functions of Parts
24
Page 25
6 PC video interface module
RGB RGB
PC
(BKAW-550) (Option)
Lights When output of HD analog signals is
possible (16:9 HD mode (page 54)).
Turns off When output of HD analog signals is not
possible (4:3 and 16:9 SD modes (page
54)).
A black image signal is output.
Chapter 1 Overview
RGB input connectors
(RGB)
RGB input connectors (RGB) (D-sub 15-
× 2
pin)
Input analog RGB signals from a computer or
other source. The following image size and
frequency combinations are supported.
• XGA (1,024 × 768) 60 Hz, 70 Hz, 75 Hz
• SXGA (1,280 × 1,024) 60 Hz, 75 Hz
• WXGA (1,280 × 768) 60 Hz
Caution
WXGA inputs will be vertically reduced
approximately 6%.
7 HD video interface module
(BKAW-560) (Option)
1 HD analog input
connectors (YP
HD
2 HD analog output connector (YP
BPR IN)
BPR OUT)
8 HD serial digital interface module
(BKAW-590) (Option)
1 HD SDI input connectors
(HD SDI IN)
2 HD SDI output connector (HD SDI
OUT)
3 HD indicator
a HD SDI input connectors (HD SDI IN)
(BNC) × 2
These input HD SDI signals. The following signal
formats for input are supported.
• 720/59.94p, 720/50p
• 1080/59.94i, 1080/50i
b HD SDI output connector (HD SDI OUT)
(BNC) × 1
This outputs HD SDI signals. The following signal
formats for output are supported.
• 720/59.94p, 720/50p
• 1080/59.94i, 1080/50i
3 HD indicator
a HD analog input connectors (YPBPR IN)
(D-sub 15-pin) × 2
These input HD analog signals. The following
signal formats for input are supported.
• 720/59.94p, 720/50p
• 1080/59.94i, 1080/50i
b HD analog output connector (YPBPR
OUT) (D-sub 15-pin) × 1
This outputs HD analog signals. The following
signal formats for output are supported.
• 720/59.94p, 720/50p
• 1080/59.94i, 1080/50i
c HD indicator
This lights or turns off in the following situations.
c HD indicator
This lights or turns off in the following situations.
Lights When output of HD SDI signals is possible
(16:9 HD mode (page 54)).
Turns off When output of HD SDI signals is not
possible (4:3 and 16:9 SD modes (page
54)).
A black image signal is output.
Caution
If the HD SDI IN connectors of the HD serial
digital interface module are open, a malfunction
may occur in the HD SDI circuit due to noise from
the nearby equipment. When using this module, be
sure to attach 75 Ω terminators to the HD SDI IN
connectors so as not to be open.
Names and Functions of Parts
25
Page 26
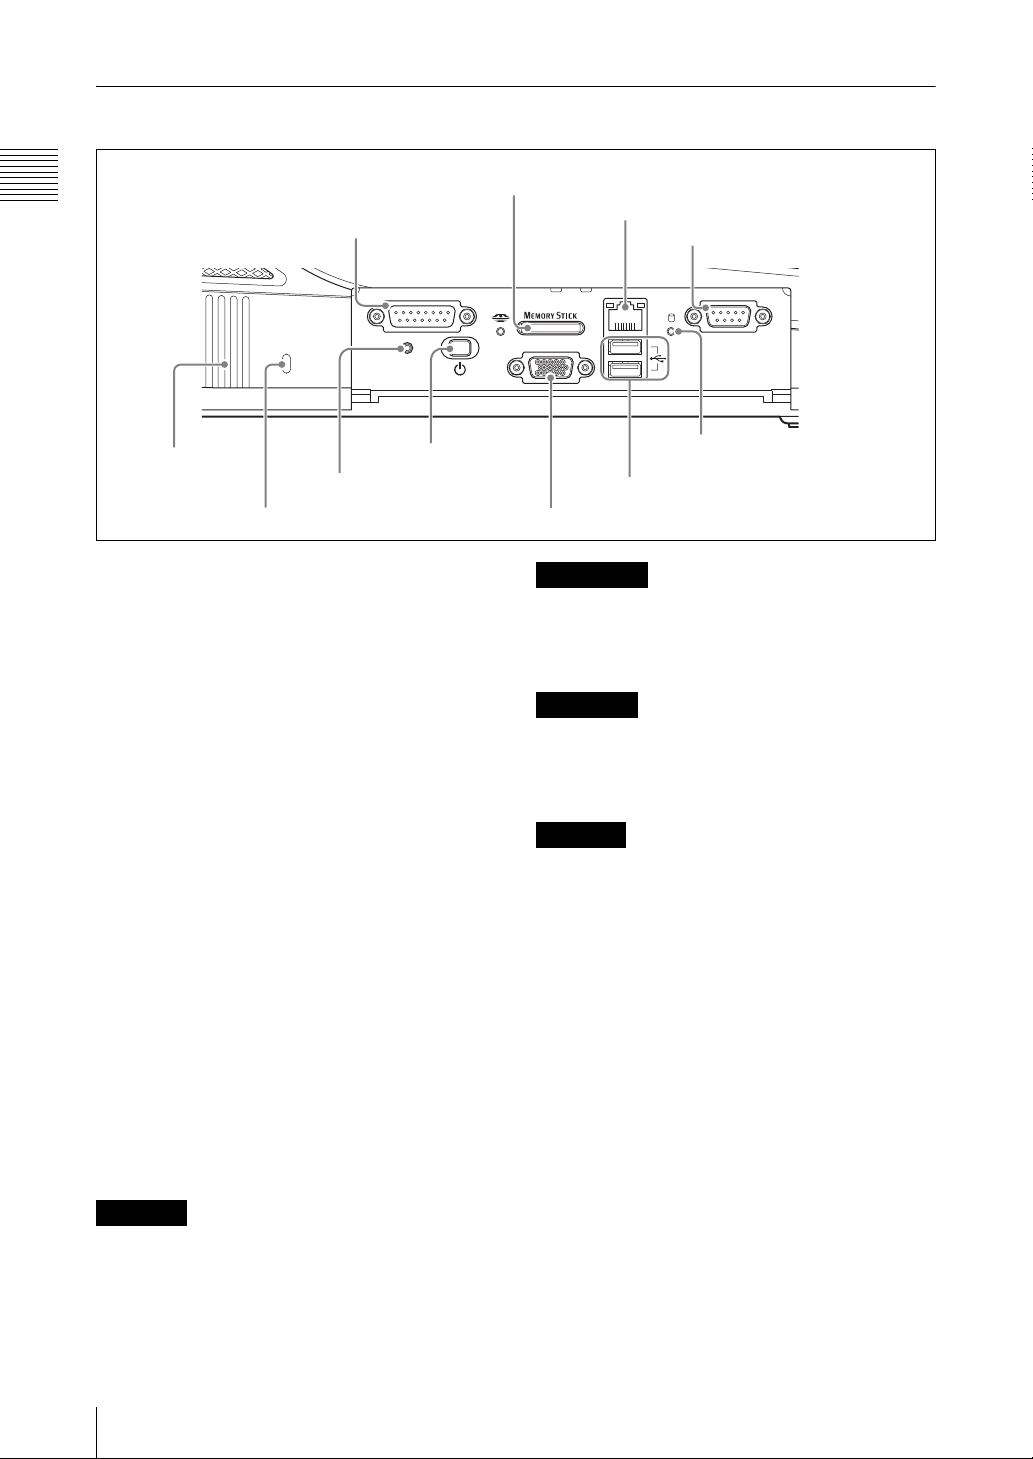
Side Panel
With the protective panel opened
Chapter 1 Overview
1 FACTORY USE
connector
qa Ventilation
holes
0 Hole for anti-theft wire
9 RESET button
a FACTORY USE connector
Inputs and outputs GPI signals.
• Connecting this connector and the tally
connector of a CCU (camera control unit) or
other device enables the tally lamp of the camera
to light (page 167).
• When an external device is connected, you can
perform PGM and NEXT selection button
operations from the external device (page 169).
b “Memory Stick” slot
This slot takes a “Memory Stick.” Use it for
upgrading the operating software (page 270),
importing font files (page 155), exporting/
importing job data (pages 227, 228), exporting
EDL, importing graphics and logo files (page
235), exporting graphics files created with Text
Typing Tool (page 129), exporting VOD files
(page 238), etc.
While the “Memory Stick” is being accessed, the
access indicator to the left of the slot lights.
2 “Memory Stick” slot
3 NETWORK connector
4 REMOTE (remote control)
connector
FACTORY USE REMOTE
15 9
RESET
8 1 (power)
18
button
)
RGB(GUI
7 Operating monitor connector (RGB (GUI))
NETWORK
96
USB
5 Internal hard disk
access indicator
6 USB connectors
ATTENTION
Par mesure de sécurité, ne raccordez pas le
connecteur pour le câblage de périphériques
pouvant avoir une tension excessive à ce port.
Suivez les instructions pour ce port.
VORSICHT
Aus Sicherheitsgründen nicht mit einem
Peripheriegerät-Anschluss verbinden, der zu
starke Spannung für diese Buchse haben könnte.
Folgen Sie den Anweisungen für diese Buchse.
CAUTION
When you connect the network cable of the unit to
peripheral device, use a shielded-type cable to
prevent malfunction due to radiation noise.
d REMOTE (remote control) connector
This connector is provided for future functional
expansion.
15
c NETWORK connector (RJ-45)
Connect an external network adaptor or router.
This supports 10Base-T and 100Base-TX
Ethernet.
The green indicator blinks while the network is
active.
An amber LED lights while the unit is connected
by 100Base-TX.
CAUTION
For safety, do not connect the connector for
peripheral device wiring that might have excessive
voltage to this port. Follow the instructions for
this port.
Names and Functions of Parts
26
e Internal hard disk access indicator
This indicator lights while the internal hard disk is
being accessed.
f USB connectors (USB) (USB
compatible)
The upper connector is number 1, and the lower
connector is number 2.
Use these connectors to connect a USB keyboard.
Also use them for connecting USB flash memory,
upgrading the operating software (page 270),
importing font files (page 155), exporting/
importing job data (pages 227, 228), exporting
EDL, importing graphics and logo files (page
235), exporting graphics files created with Text
Typing Tool (page 129), exporting VOD files
(page 238), etc.
Page 27
For details of the keyboards that can be used,
consult your dealer or your Sony service
representative.
When using the Text Typing Tool software, you
can connect and use a USB mouse.
Caution
• These do not support input from a USB camera.
• A USB mouse cannot be used with the main
software.
h 1 (power) button
This button powers the unit on or off. If you hold
down the power button for at least 4 seconds, this
forces a shutdown.
After a forced shutdown, the settings of the unit
may not be preserved.
i RESET button
This button is provided for future functional
expansion.
Chapter 1 Overview
g Operating monitor connector (RGB
(GUI)) (D-Sub 15-pin)
This connector outputs the operation screen to an
external display at WXGA (1,280 × 800) size, at
60 Hz.
For information on which devices can be used,
consult your dealer or your Sony service
representative.
Other Parts
j Hole for anti-theft wire
This hole accepts a standard anti-theft wire (3 mm
× 7 mm).
k Ventilation holes
Caution
Be careful not to obstruct the ventilation holes. If
the ventilation holes are obstructed, the unit may
overheat, leading to fire or breakdown.
2 Display1 Built-in speakers
3 Num Lock indicator
4 Caps Lock indicator
5 Infrared receptor
a Built-in speakers
You can monitor the audio using these speakers.
There is no output from the built-in speakers when
a headphone is connected to the headphone
connector.
6 Keyboard
b Display
This shows the operation screen (page 28).
c Num Lock indicator
This lights green when the unit is in Num Lock
mode.
Names and Functions of Parts
27
Page 28
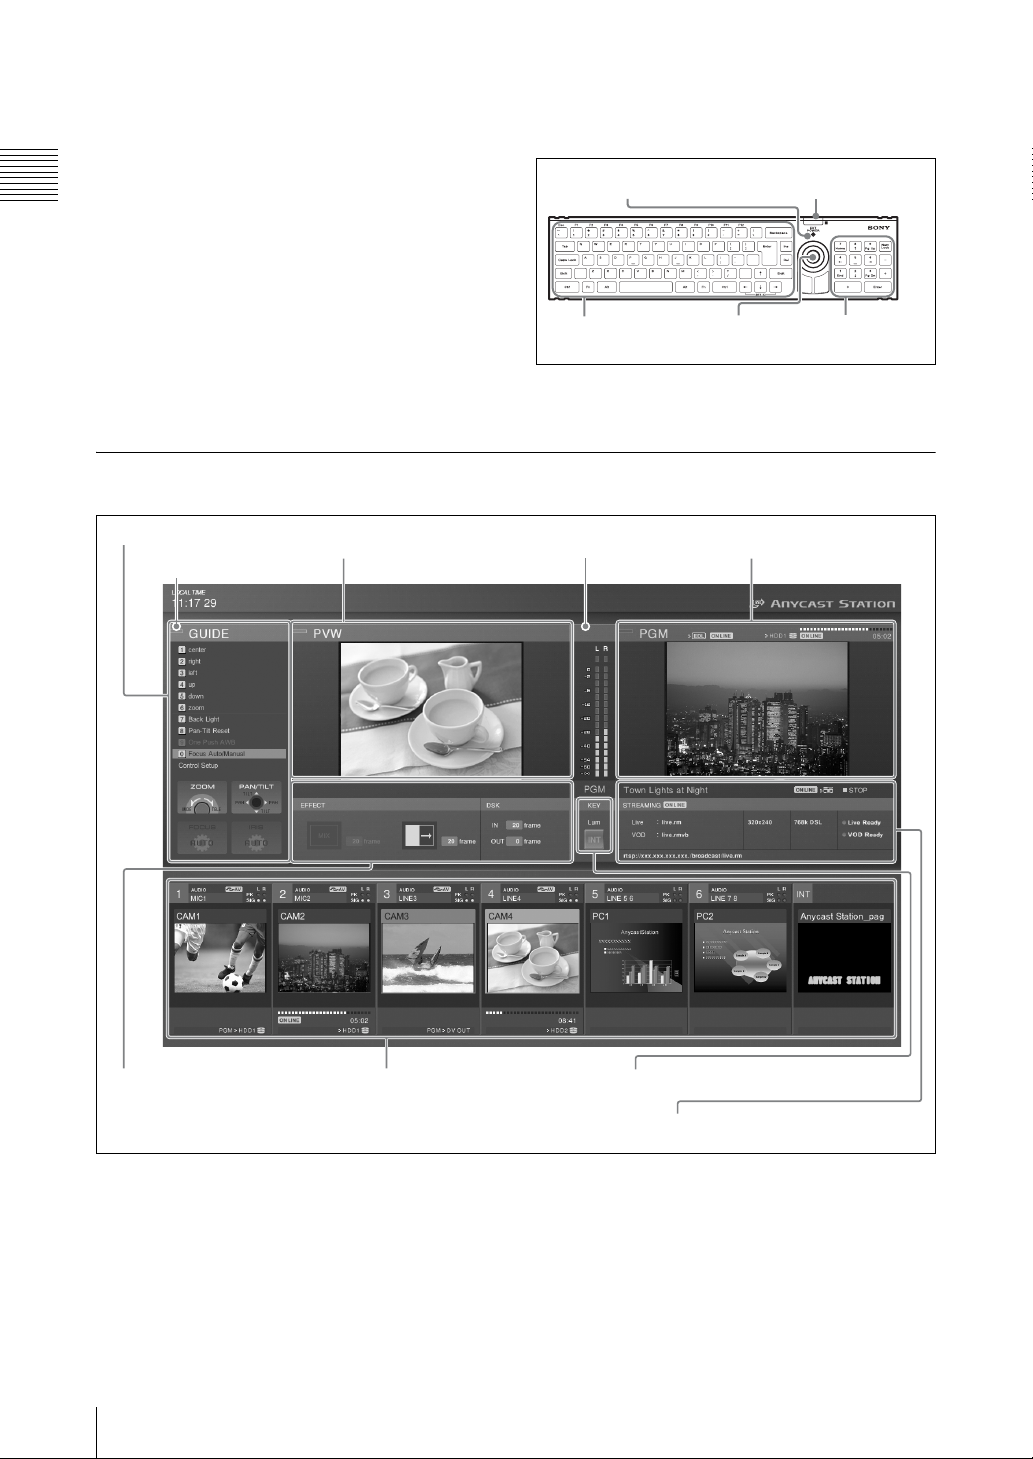
d Caps Lock indicator
This lights green when the unit is in Caps Lock
mode.
When using Esc and the F1 to F12 keys, hold
down the Fn key and press the required key in the
topmost row.
e Infrared receptor
Chapter 1 Overview
This accepts signals from the keyboard supplied
with this unit (page 49).
f Keyboard
Use this for text and numeric input.
You can also use the keyboard for menu
operations (page 35).
While the keyboard is mounted to the unit, the
EXT POWER indicator on the keyboard lights
green.
Operation Screen
1 Menu display
2 Guidance object
indication
2 PVW viewer
EXT POWER indicator
PointerCharacter input keys
Infrared receptor
Numeric
keys
For details on changing the keyboard language,
see “Selecting the Language” (page 51).
3 Audio level meter
1 PGM viewer
4 Source viewer5 Effect display
* This example screen shows the streaming settings displayed.
Normally the streaming display cannot be viewed.
a Menu display
This displays the top menus (page 34), the INT
material selection menu (pages 91, 215), the
graphics preset menu (page 94), the camera guide
menu (pages 158, 160), the HDD guide menu
(page 181), and the VCR guide menu (page 197).
Names and Functions of Parts
28
4 KEY status display
3 Streaming display
b Guidance object indication
The color of the guidance object indication has the
following significance.
Amber: When a video subject to camera control
(page 158), external hard disk control (page
178), or VCR playback control (page 197), or
INT is selected with the NEXT selection
buttons (while the KEY button is not lit).
Page 29
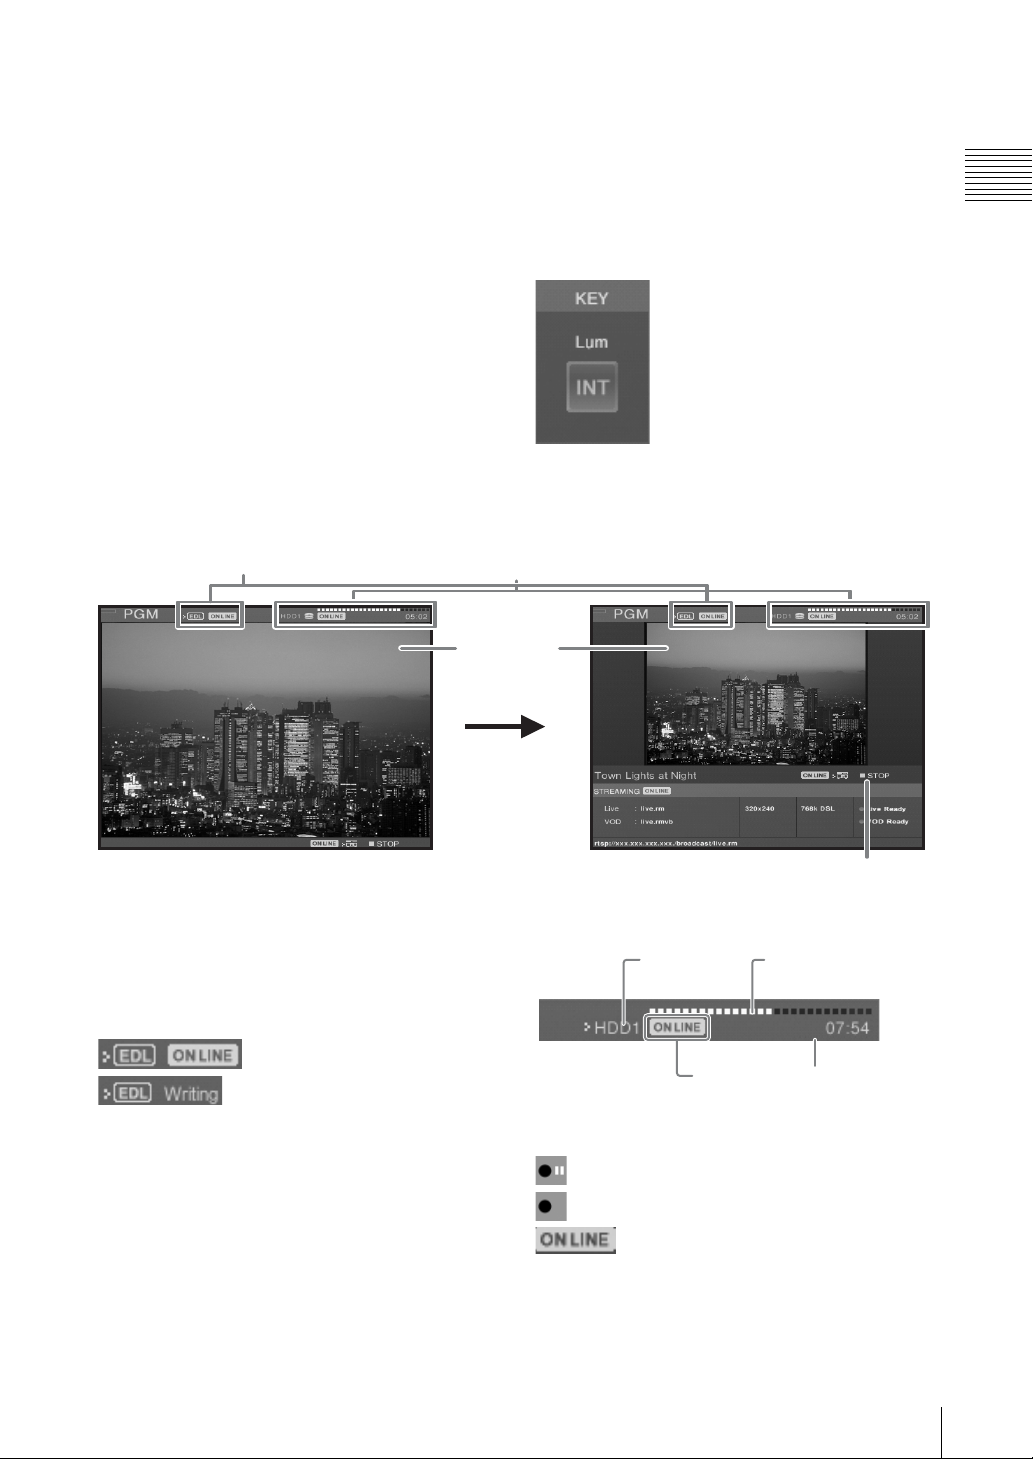
Green: When a video subject to camera control,
external hard disk control, or VCR playback
control, or INT is specified with the NEXT
selection buttons (while the KEY button is lit).
Off: When other than a video subject to camera
control and external hard disk control or INT
is specified with the NEXT selection buttons.
c Audio level meter
When monitoring the any of the PGM/AUX1/
AUX2/MIX audio outputs or Pre Fader Listen
(PFL) result, this shows the audio level. An
indication below the meter shows which of PGM/
AUX1/AUX2/MIX or PFL is being monitored.
When the level exceeds the meter range, the
uppermost indicator lights red (page 210).
1 PGM viewer
This shows a program output.
3Program
d KEY status display
The indicator lights red during keying to program
output video. The number (1 to 6) or “INT” of the
source selected for keying appears.
In addition, when [Chroma Key] (page 103) or
[Luminance Key] (page 99) is selected for [Key
Type] in the Video Effect menu, “Chroma” or
“Lum” appears respectively.
2Hard disk status1EDL status
video
Chapter 1 Overview
Normal
a EDL status
During EDL creation, this shows the status of the
creation operation.
Creation operation indications
: ON LINE reservation status
: ON LINE execution status
(EDL creation in progress)
b Hard disk status
During program output recording, this shows the
hard disk status, remaining capacity, and
recording operation.
4VCR status
When configuring streaming settings
Hard disk
drive number
Recording
operation
Remaining capacity is
indicated by a progress bar
Remaining time
Recording operation indications
REC PAUSE: Recording on standby
REC: Recording
: ON LINE recording reservation (press
the ON LINE button to enter a recording start
state)
Unformatted: Formatting required
Names and Functions of Parts
29
Page 30
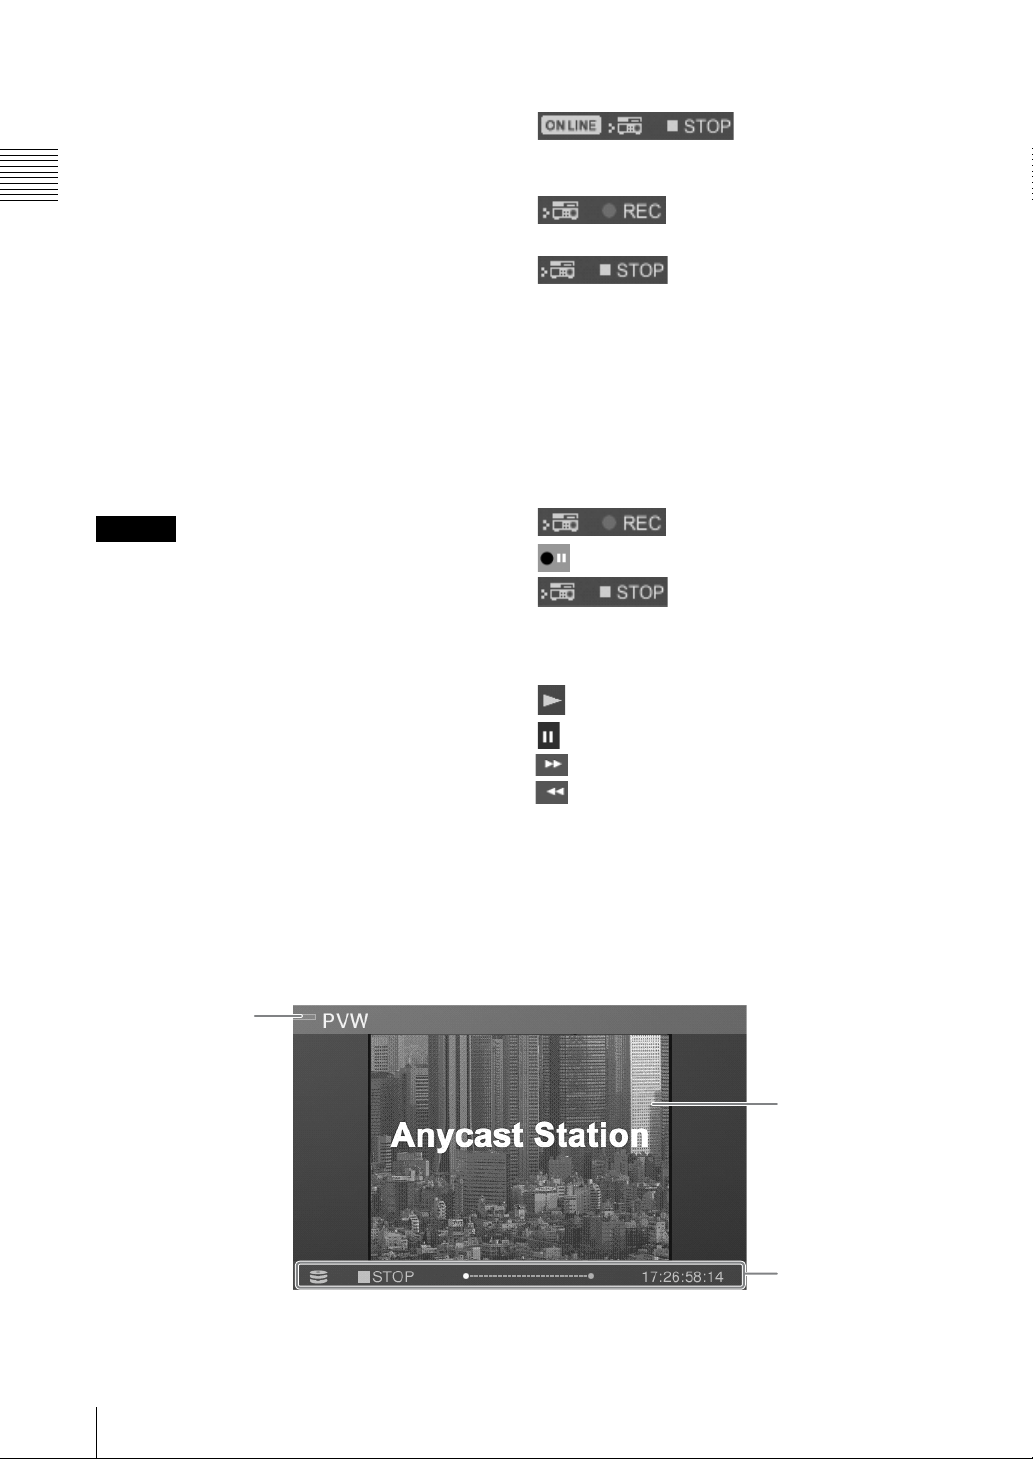
Disk Full: No disk space left (200 MB or less)
File Number Full: The number of files that can be
recorded has been exceeded
Device Error: It became impossible to recognize
Chapter 1 Overview
the hard disk during recording
c Program video
Displays the program output video. The size of the
video differs, depending on the PGM output
aspect ratio setting (page 53).
• When using 4:3 mode
The video is displayed at 480 × 360 pixels at
about 30 fps (about 25 fps for PAL). During
streaming, the size is 320 × 240 pixels.
• When using 16:9 SD or 16:9 HD mode
The video is displayed at 426 × 240 pixels at
about 30 fps (about 25 fps for PAL).
Recording operation indications
: ON LINE reservation
status (You can start recording by pressing the
ON LINE button.)
: ON LINE execution status
(Recording to VCR in progress.)
: Recording has stopped due to
reasons including the tape ending
No Cassette: There is no videocassette, disc, or
other medium inserted
No Response: Cannot control playback from the
unit
Indications when manual playback
controls are performed during recording
control
Caution
• Video displayed on the PGM viewer lags several
frames behind the video output from the PGM
video output connectors.
• In any of the video viewers displayed on the
operation screen (PGM/PVW/source) the video
REC PAUSE: Recording on standby
No Cassette: There is no videocassette, disc, or
other medium inserted
No Response: Interface has not been established
: Recording
: Stopped
may deteriorate, but this is an artifact of the
display system. There is no effect on the video
output from the program video output
connectors.
d VCR status
PLAY: Playback
STILL: Paused
: Fast forward
: Fast reverse
While recording to a VCR, this shows the status of
the recording operation.
2 PVW viewer
This shows a preview of the video.
This allows you to check the input video selected to be shown next, keying, or picture-in-picture result
before switching to program output.
1 What the preview
is showing
2 Preview video
Names and Functions of Parts
30
3 Status
Page 31

a What the preview is showing
Amber: When showing the video selected by the
NEXT selection button.
Green: When showing the video selected by the
NEXT selection button when the KEY button
is lit (video with a key inserted).
b Preview video
Under normal conditions, this displays the video
selected with the NEXT selection buttons. The
size of the video differs, depending on the PGM
output aspect ratio setting (page 53).
• When using 4:3 mode
The video is displayed at 320 × 240 pixels at
about 15 fps (about 12 to 13 fps for PAL).
• When using 16:9 SD or 16:9 HD mode
The video is displayed at 426 × 240 pixels at
about 15 fps (about 12 to 13 fps for PAL).
c Status
The status shown here differs as follows
depending on the video to be previewed.
Note
The x1/8, x1/2, and x1 indications are also
displayed while you are using the shuttle dial for
playback operations.
Play position
This shows the file play position.
When the play position is at the beginning or end,
z of each end lights.
Play position
While auto repeat playback is set, an icon is
displayed on the right side, and the positions of the
start and end points are indicated if they have been
set (page 184).
Chapter 1 Overview
When showing video from a remotely
controlled VISCA compliant camera
The status of the VISCA compliant camera is
shown.
No Response: Communication cannot be
established with the camera.
Initializing: Appears at system startup and during
camera reset.
When showing an INT graphics file
Loading: While file is loading
When playing a file on an external hard
disk
The status of file operations is shown.
Play position Timecode
File operation
File operation indications
Opening: Opening a file
PLAY: Playback
STOP: Stopped
STILL: Playback speed is set to zero with the
shuttle dial, or playback is stopped with the
jog dial
JOG: Using the jog dial
x2: Fast forward (x2, x4, x8, x16, x32, x64)
x2: Fast reverse (x2, x4, x8, x16, x32, x64)
Start point End point Icon
When performing playback on a VCR
Timecode
VCR playback operation
VCR playback indications
PLAY: Playback
STOP: Stopped
STILL: Playback speed has been set to zero
with the shuttle dial, or playback has been
stopped with the jog dial
JOG: The jog dial operation in progress
: Fast forward
: Fast reverse
No Cassette: There is no videocassette, disc, or
other medium inserted
No Response: Interface has not been established
REC: Recording
REC PAUSE: Recording on standby
Names and Functions of Parts
31
Page 32

3 Streaming display
This shows the settings and status of the streaming
broadcast.
1 VOD icon
Chapter 1 Overview
2 ON LINE icon
3 Information display4 Live access
URL
5 Title
a VOD icon
This appears when a VOD file has been saved and
the internal server is running.
b ON LINE icon
This appears when streaming can be started after
the ON LINE button has been pressed.
c Information display
This shows the following information:
• the file name registered in the top menu
• video size set in the top menu
• transfer rate set in the top menu
• the status of the server or encoder
Initializing Starting server or encoder
Live Ready
and/or VOD
Ready
Starting Encoder connecting to server
Broadcasting
and/or
Recording
Stopping Ending the encoder
Reconnecting While re-establishing a connection
Failed When a connection failed to be
Error The encoder had failed to end, or an
Server started up, and encoder ready
Encoding
to the server.
established because of the settings
of the unit, the status of the network
or external server, etc.
error occurred.
d Live access URL
This appears when the unit is used as a server for
a broadcast. Audience members can view the
broadcast by accessing this URL.
e Title
This shows the streaming title.
4 Source viewer
1 Thumbnails
2 Source number 3 Audio source name 4 Video source name
9 Device status 7 Selection frame8 Hard disk status
a Thumbnails
These show the video assigned to the selection
buttons at 160 × 120 pixels, at about 10 fps (about
8 to 9 fps for PAL).
The video display is squeezed for 16:9 input
materials.
b Source number
This is the number (1 to 6 and INT) assigned to the
source (video or audio).
5 Input signal indication
6 Peak indication
Note
Names and Functions of Parts
32
Page 33

These correspond to the PGM selection button, the
NEXT selection button, and the audio channel
fader numbers.
c Audio source name
This shows the name of the audio signal assigned
to the channel fader (page 71) or the file name on
the external hard disk (page 181).
d Video source name
In viewers 1 to 6, this shows the name of the video
signal assigned to the selection button (page 67) or
the file name on the external hard disk (page 181).
For the INT viewer, this displays the color matte
and color bars, or the graphics file name selected
in the INT source selection menu.
Recording operation indications
REC PAUSE: Recording on standby
No Signal: Recording is stopped because
there is no video signal input
REC: Recording
: ON LINE recording reservation (press
the ON LINE button to enter a recording start
state)
Unformatted: Error requiring formatting
Disk Full: No disk space left (200 MB or less)
File Number Full: The number of files that can be
recorded has been exceeded
Device Error: It became impossible to recognize
the hard disk during recording
Chapter 1 Overview
e Input signal indication
If the input level of the audio assigned to a channel
fader is -60 dBFS or more, this lights green, and
you can check that there is an audio input.
For stereo you can check left and right channels
separately; for monaural both channels are shown
the same.
f Peak indication
If the input level of the audio assigned to a channel
fader is -8 dBFS or more, this lights red.
For stereo you can check left and right channels
separately; for monaural both channels are shown
the same.
g Selection frame
Depending on the selection state, the frame color
changes.
Red: Video selected with PGM selection button
Amber: Video selected with NEXT selection
button
Green: Video selected with NEXT selection
button when the KEY button is lit (video with
a key inserted)
h Hard disk status
When an external hard disk is connected, this
shows the status of the hard disk, the remaining
recording capacity, and the recording operations.
Remaining capacity shown by progress bar
Available
recording time
Recording
operations
Hard disk
drive number
i Device status
The content displayed differs as follows
depending on the material.
Video from a VISCA-compatible camera
being controlled remotely
Displays the VISCA-compatible camera’s status.
No Response: Communication cannot be
established with the camera.
Initializing: Appears at system startup and during
camera reset.
INT graphics file
Loading: File is loading
When playing a file on the external hard
disk
Displays the status during file operation or VCR
playback.
File operation
Timecode
Play position
Corresponding hard
disk number
File operation and VCR playback
indications
No Response: The VCR is not responding
No Cassette: There is no videocassette inside the
VCR
Opening: Opening a file
PLAY: Playback
STOP: Stopped
STILL: During file operation
Names and Functions of Parts
33
Page 34

• Playback speed has been set to zero with the
shuttle dial
• Playback has been stopped with the jog dial
During VCR playback
Chapter 1 Overview
• Playback speed has been set to zero with the
shuttle dial
• Playback has been stopped with the jog dial
• Playback has been paused with the SHIFT +
STOP buttons
• Moved back one frame with the SHIFT +
REW buttons
• Moved forward one frame with the SHIFT +
FFWD buttons
JOG: Using the jog dial
x8: Fast forward (x2, x4, x8, x16, x32, x64)
x8: Fast reverse (x2, x4, x8, x16, x32, x64)
Notes
• The x1/8, x1/2, and x1 indications are also
displayed while you are using the shuttle dial for
playback operations.
Menu Operations
• During VCR playback, only or
appears.
Play position
This shows the file play position.
When the play position is at the beginning or end,
z of each end lights.
While auto repeat playback is set, an icon is
displayed on the right side, and the positions of the
start and end points are indicated if they have been
set (page 184).
Start point End point Icon
5 Effect display
This shows the video transition effect types and
patterns and transition time (page 84).
This unit includes top menus, which are used to make various operational
settings, and ACCESS menus, which are used to make adjustments to the video
and audio being input to this unit.
This section describes the basic operations common to these menus.
Displaying top menus and ACCESS menus
Top menus
Press the MENU button, to display the top menu in the menu display.
Top menu
Names and Functions of Parts
34
Page 35

When you select and confirm an item in the top menu, submenus appear, three
levels deep.
Sub-menu
Note
You can set priority to be given to displaying the PVW viewer while submenus
are open (page 113).
ACCESS menu
Press the ACCESS button corresponding to the number of input you want to
adjust, to display the ACCESS menus, three levels deep, in the source viewer
together with the viewer for that number.
Chapter 1 Overview
Menu operations
Selecting a menu item
Turn the jog roller up or down.
You can also use the R and r keys on the
keyboard.
Caution
Starting with Software Version 2.00, the menu displays will differ depending on
the interface module in use and video signal assignments.
Video Effect
DSK
Fade To Black
Logo
File Manager
Job
ON LINE Manager
Streaming
Network
Video Input Assign
Names and Functions of Parts
35
Page 36

Confirming an item and proceeding to the next layer
ENTER
Chapter 1 Overview
Press the ENTER button.
or
Press the jog roller.
Zoom Enable
Focus Auto
lris(Exposure) Auto
White Balance Auto
or
Press the t button by the jog roller.
You can also use the t key or ENTER key
on the keyboard.
Disable
Auto
Enable
Returning to the higher level
Press the T button by the jog roller.
You can also use the T key on the
keyboard.
Zoom Enable
Focus Auto
lris(Exposure) Auto
White Balance Auto
Disable
Auto
Enable
Confirming a selection
Press the ENTER button.
or
Press the jog roller.
You can also use the ENTER key on the
keyboard.
Zoom Enable
Focus Auto
lris(Exposure) Auto
White Balance Auto
Disable
Auto
Enable
Confirmation
Slider operation
Turn the jog roller up or down.
You can also press R or r on the keyboard.
Entering numeric or text values
Moving the cursor to the next item:
Press the T or t button by the jog roller.
You can also press the T or t keys while
holding down Ctrl on the keyboard.
Entering numeric or text values:
Confirmation:
ENTER
Enter with the keyboard.
Press the ENTER button.
or
Press the jog roller.
You can also use the ENTER key on the
keyboard.
2007/01/01 00:00
Names and Functions of Parts
36
Page 37

Closing a menu
For a top menu: Press the MENU button or ESC button.
For an ACCESS menu: Press the same ACCESS button used to display, or the ESC button.
Notes
• Pressing an ACCESS button while the top menu is displayed closes the top menu and opens the
ACCESS menu.
• Pressing the MENU button while the ACCESS menu is displayed closes the ACCESS menu and
opens the top menu.
Operation Screen (Text Typing Tool Software)
1 File operation section
1 File name
3 Font operation section2 Tool operation section
Chapter 1 Overview
6 View operation
section
7 Sheet operation section
2 Exit button
a File name
This shows the name of the open file.
b Exit button
Click this to exit the Text Typing Tool software,
and start the Anycast Station main software.
5 Page operation section 4 Modifier operation
section
Names and Functions of Parts
37
Page 38

1 File operation section
1 New button
2 Open button
Chapter 1 Overview
3 Save button
4 Save as...
button
5 Import FONT...
button
6 Delete FONT
button
7 Export TIFF...
button
8 Export TGA...
button
9 Delete button
0 Close button
a New button
This creates a new file (page 124).
b Open button
This opens a previously saved file. A list of
existing files appears (page 125).
c Save button
This saves a file (page 125).
The file is also simultaneously saved in the
Anycast Station main software, and the file name
appears in the INT selection menu.
d Save as... button
This saves the file with a different name (page
127).
i Delete button
This deletes unwanted files (page 128).
j Close button
This closes the open file, and displays a new sheet.
2 Tool operation section
Select the tools needed to create and edit an object.
1 Selection tool
2 Eyedropper tool
3 Line tool
4 Text tool
a Selection tool
When you click this, the mouse pointer changes to
, and you can select, adjust, and move an object
(page 123).
An orange frame appears around the selected
object.
b Eyedropper tool
When you click this, the mouse pointer changes to
, and you can set the color of the selected object
to be the same as the color of another object or the
background image (page 145).
c Line tool
You can create a straight line (page 137).
You can create three types of line: solid, broken,
and dotted.
e Import FONT... button
This imports a font file from a “Memory Stick” or
USB flash memory (page 155).
f Delete FONT button
This deletes unwanted font files (page 156).
g Export TIFF... button
This saves the open file to a “Memory Stick” or
USB flash memory in TIFF format (page 129).
h Export TGA... button
This saves the open file to a “Memory Stick” or
USB flash memory in TARGA format (page 129).
Names and Functions of Parts
38
d Text tool
When you click this, you can create a text object
(page 130).
Note
When the selection tool is selected, you can move
the selected object with the keyboard arrow keys.
Hold down the Shift key while pressing the arrow
keys to speed up the movement.
Page 39

5 Bring to front tool
6 Bring forward tool
7 Move backward tool
8 Move to back tool
e Bring to front tool
This brings the selected object to the front (page
148).
f Bring forward tool
This brings the selected object one level forward
(page 148).
g Move backward tool
This moves the selected object one level back
(page 148).
h Move to back tool
This moves the selected object to the back (page
148).
9 Vertical centering tool
l Lower-third memory tool
If you select an object and then click this tool, the
lowest part of the selected object is set as the
lower-third position.
m Lower-third reset tool
Restores the lower-third position to its default
setting.
3 Font operation section
1 Font
name
2 Size
3 Bold
button
4 Italic
button
5 Underline
button
6 Kerning
7 Spacing
0 Right align button
9 Center align button
8 Left align button
Chapter 1 Overview
0 Horizontal centering tool
qa Lower/third positioning tool
qs Lower-third memory tool
qd Lower-third reset tool
i Vertical centering tool
This moves the selected object to the vertical
center of the screen (page 149).
j Horizontal centering tool
This moves the selected object to the horizontal
center of the screen (page 149).
k Lower/third positioning tool
This moves the selected object so that its lowest
part is aligned to a predetermined position (page
149).
a Font name
This selects the font for a text object (page 131).
The currently selected font always appears.
b Size
This selects the size of a text object (page 132).
c Bold button
This sets the text object to bold face (page 133).
d Italic button
This sets the text object to italic face (page 133).
e Underline button
This underlines the text object (page 133).
f Kerning
This sets the inter-character spacing of the text
object (page 134).
g Spacing
This sets the line spacing of the text object (page
134).
Names and Functions of Parts
39
Page 40

h Left align button
2
Aligns a text object comprising multiple lines to
the left (page 134).
i Center align button
Chapter 1 Overview
Aligns a text object comprising multiple lines to
j Right align button
Aligns a text object comprising multiple lines to
the right (page 134).
the center (page 134).
4 Modifier operation section
Click the mark on a tab to select it, and bring it to the front.
The modifier operation section has three tabs: [Text], [Line], and [BG]. The [Text] tab and [Line] tab are
further divided into three tabs.
x Text tab
You can set the color and other settings of a text object. This tab is divided into the Color tab, Edge tab,
and Shadow tab.
Edge style selection buttons
1
Text color selection
buttons
3 Width
4 Edge color selection buttons
Color tab Edge tab Shadow tab
a Text color selection buttons
Select the color of a text object (page 135).
b Edge style selection buttons
Select whether the object has an outline ([None]
for no outline), and select the shape of corners
(page 136).
5 Shadow style
selection button
6 Shadow creation
section
Direction indicator
7 Color creation section
8 Gradation pattern
9 Transparency
c Width
Set the width of the outline. Select or enter a
numeric value (page 136).
d Edge color selection buttons
Select the color of the outline (page 136).
Names and Functions of Parts
40
Page 41

e Shadow style selection button
Select whether the object has a shadow ([None] for
Softness: Set a numerical value for the degree of
blurring of the shadow.
no shadow), and select the style of the shadow
(page 139).
g Color creation section
When [Paint] is selected in the Color tab and Edge
f Shadow creation section
Adjust the angle, distance, and degree of blurring
tab, you can create your own color for the outline
and shadow of the object (page 144).
of the shadow (page 139).
Direction indicator: Click this to move the
needle, and change the direction of the
shadow of the object to that of the needle.
h Gradation pattern
Apply gradation to the color of the object (page
147).
Degree: Set a numerical value for the direction of
the shadow.
Distance: Set a numerical value for the distance of
the shadow.
i Transparency
Set the transparency of each of the color and
shadow of the object and the background created
with paint (page 146).
x Line tab
You can set the color and other settings of a line object. This tab is divided into the Color tab, Edge tab,
and Shadow tab.
0 Line style selection buttons
qa Width
qs Line color selection buttons
Chapter 1 Overview
Color tab Edge tab Shadow tab
j Line style selection buttons
Select the color of the line object (page 138).
k Width
Set the line width of the line object. Select or enter
a numeric value (page 138).
These sections are
the same as 2 to
9 of the [Text] tab.
l Line color selection buttons
Select the line style of the line object (page 139).
Names and Functions of Parts
41
Page 42

x BG tab
You can set the background color.
5 Page operation section
This is used for sheet display, sheet turning, and
resequencing.
Chapter 1 Overview
qd Background color
selection buttons
This section is the
same as 7 of the
[Text] tab.
qf Transparency
m Background color selection buttons
Select the background color (page 141).
n Transparency
Set the transparency of the background created
with paint.
1 Top button 2 Sheet Move
5 Next sheet
button
button (forward)
6 Sheet Move
button
(rearward)
3 Prev Sheet
button
4 Page display
7 End button
a Top button
Click this to display the first sheet.
b Sheet Move button (forward)
Click this to exchange the currently displayed
sheet with the previous sheet.
c Prev Sheet button
Click this to display the previous sheet.
d Page display
This shows the sheet number of the currently
displayed sheet.
e Next Sheet button
Click this to display the next sheet.
Names and Functions of Parts
42
f Sheet Move button (rearward)
Click this to exchange the currently displayed
sheet with the next sheet.
g End button
Click this to display the last sheet.
Page 43

6 View operation section
1 Background
display
selection button
2 Capture button
7 Sheet operation section
1 New Sheet
button
Chapter 1 Overview
2 Delete Sheet
button
3 Safe Area
a Background display selection button
Set the background display (page 152).
Checker: Displays a checkered pattern as the
background.
Live: Displays the program output video of the
main software (page 151).
BG: Displays the background selected on the
[BG] tab (page 151).
b Capture button
The program output video image of the main
software is captured each time this button is
clicked (page 152).
c Safe Area
When this is selected, a dotted line shows the safe
area (page 153).
Off: Does not display the safe area.
4:3: Displays a dotted line showing the safe area
for 4:3 aspect ratio.
16:9: Displays a dotted line showing the safe area
for 16:9 aspect ratio.
a New Sheet button
This adds a sheet to the open file (page 151). You
can create up to 99 sheets.
b Delete Sheet button
This deletes the open sheet (page 151).
Names and Functions of Parts
43
Page 44

Chapter 1 Overview
Names and Functions of Parts
44
Page 45

2
Preparations
Installation/Default Settings
This section describes the procedure for installing the unit, connecting the power
cord, starting up the system, and setting the date, time, and video output signal
format.
Installing the Unit
Install the unit in a level place. The unit weighs about 8 kg (17.7 lbs). Check that
the installation location is strong and spacious enough to accommodate the unit
before installing.
There are ventilation holes on both sides of the unit. To ensure adequate air flow,
there must be a space of at least 300 mm (12 inches) on each side of the unit.
Chapter
Num
Caps
Chapter 2 Preparations
300 mm
(12 inches)
300 mm
(12 inches)
Installation/Default Settings
45
Page 46

Installing Option Modules
N
4
To install the option modules, first remove the blank panels fitted to the unit, and
install the new interfaces in the slots.
Note
You can install an option module in any slot.
Chapter 2 Preparations
1
Remove the blank panel fitted as standard.
2
Insert the option module into the slot.
3
Tighten the screws.
Caution
When installing an option module, always turn the unit off first. If you install an
option module with the unit powered on, this may damage the option module.
Connecting the power
Connect the power cord to the power inlet on the unit and the wall outlet.
1
2
3
LINE MIC/LI
87 65
AC IN
Installation/Default Settings
46
Page 47

Note
Use a 3-pin - 2-pin conversion adaptor, if required.
Caution
Connect the grounding lead of the 3-pin/2-pin adaptor to the ground terminal.
If grounding is not possible, consult your dealer or your Sony service
representative.
Fitting a Keyboard
To install the keyboard in this unit, align it with the keyboard space, with the keys
upward, and slide in the direction shown by the arrow. Power is supplied to the
keyboard from the main unit, and the EXT POWER indicator on the keyboard
lights.
3-pin - 2-pin
conversion adaptor
Chapter 2 Preparations
Note
When not using the keyboard, you can insert it upside down. In this case, no
power is supplied to the keyboard.
Installation/Default Settings
47
Page 48

Using the keyboard away from the unit
You can use the keyboard away from the unit. In this case, it is necessary to insert
a pair of standard batteries (CR2032) to power the keyboard.
Caution
The unit is factory shipped with batteries inserted in the keyboard. Be sure to
remove the insulation sheet before use.
Chapter 2 Preparations
To detach the keyboard
Using the groove locating at the right of the keyboard space, lift the keyboard out.
To insert batteries in the keyboard
1
Detach the keyboard from the main unit.
2
Detach the battery holder from the keyboard.
Caution
To remove the battery holder, use the end of a sharp implement such as a pen.
Installation/Default Settings
48
3
Load two batteries (CR2032) in the battery holder, and insert in the keyboard.
Make sure the
positive (+)
terminal of
each battery is
facing upward.
Caution
If batteries are inserted incorrectly, this may lead to electrolyte leakage or
other damage. Note the following carefully.
• Check that the polarity is correct.
• Do not use new and old batteries together, or batteries of different types.
• Do not attempt to charge the batteries.
• When not using the keyboard for a long period, remove the batteries.
• If a battery should leak, remove any spilled fluid from the battery holder,
before inserting a new battery.
Page 49

Infrared transmitting range
The range over which the keyboard can operate with infrared control is shown in
the following figure.
Within 6 feet
6 inches (2 m)
20°
60°
0 - 95°
Starting and Closing Down the Unit
Starting
Press the 1 (power) button on the side panel.
The startup screen appears.
40°
40°
Chapter 2 Preparations
Closing down
When the startup completes, the operation screen appears.
Caution
If the display is closed while the unit is operating, the temperature will rise, and
this may cause failure.
Press down the 1 (power) button on the side panel.
The following message appears.
Notes
• The last set data is saved.
• If an external hard disk is connected, it is automatically unmounted (page 189).
Installation/Default Settings
49
Page 50

This closes down the operating software, and powers off.
It takes a little while before the power turns off after the screen disappears.
Caution
• If you hold down the power button for at least 4 seconds, this forces a
shutdown. After a forced shutdown, the settings of the unit may not be
preserved.
• When restarting the unit immediately after shutting down, wait at least 5
Chapter 2 Preparations
seconds after shutdown before pressing the power button.
• Button operations performed while an application is closing will not be
properly reflected on the system.
Using the timer to shut down the system/Releasing the timer setting
You can use a timer to shut down the unit.
Caution
Do not shut down the system using the timer while recording to an external hard
disk. The recorded file may become damaged and unusable.
1
While the Anycast Station main software is running, hold down the keyboard
Alt and Ctrl keys, and press the T key.
The following confirmation message appears.
Note
It is not possible to use this function while the Text Typing Tool software is
running.
2
To set the timer, press the ENTER button.
To release the timer, press the ESC button.
When setting the timer
The timer indication appears to the right of “LOCAL TIME.”
When the text entry tool is started, the timer display disappears, but the timer
function continues to operate.
Note
The countdown appears from -120 min.
After two hours the system is powered off.
When releasing the timer
The timer display disappears.
Installation/Default Settings
50
Page 51

Selecting the Language
Set the language to correspond to the keyboard being used.
The default setting is “English (US).”
1
Press the MENU button.
2
In the top menu, select [System].
3
1 Select [Language], and confirm; 2 select the appropriate language from
the list, and confirm.
12
Date/Time
Time Zone
System TC xx:xx:xx:xx
Language
The operation screen appears as shown below.
Chinese (Simplified)
Chinese (Traditional)
English
B English
French Français
German Deutsch
Italian Italiano
Japanese
Korean
Portuguese Português
Spanish Español
(UK) English (UK)
(US) English (US)
Chapter 2 Preparations
4
Confirm the message that appears, and press the ENTER button.
5
Press the MENU button to close the menu.
6
Restart the system.
Setting the Time Zone
Set the time zone for your geographical location.
1
Press the MENU button.
2
In the top menu, select [System].
3
1 Select [Time Zone], and confirm; 2 select the area, and confirm;
3 select the region, and confirm.
Data/Time
Time Zone
System TC xx:xx:xx:xx
Language
1
23
Africa
America
US Time Zones
Canada Time Zones
Asia
Atlantic Ocean
Australia
Europe
Indian Ocean
Pacific Ocean
B None of the above
B GMT
GMT + 0
GMT + 1
GMT + 2
GMT + 3
GMT + 4
GMT + 5
GMT + 6
GMT + 7
GMT + 8
4
Press the MENU button to close the menu.
Installation/Default Settings
51
Page 52

Note
The notation system for displaying time zone data in relation to GMT is based on
the form POSIX minutes-west-of-GMT in which the hour decreases as you move
east and increases as you move west.
Setting the Date and Time
Chapter 2 Preparations
Set the internal clock.
1
Press the MENU button.
2
In the top menu, select [System].
3
1 Select [Date/Time], and confirm; 2 enter the date and time in the input
box, and confirm.
1
Data/Time
Time Zone
System TC xx:xx:xx:xx
Language
Using the arrow buttons on the jog roller (or the T and t keys while
holding the Ctrl key on the keyboard), select the item to change and enter a
numeric value with the keyboard.
2007/01/01 00:00
The time set in “LOCAL TIME” appears at the upper left of the operation
screen.
2
2004 /05/18 12:25
GMT
Each whole value between the separators (/, :, or space) is selected.
4
Press the MENU button to close the menu.
Caution
If this unit is operated for a long period, the clock may drift out of its correct
setting. Resetting the clock at regular intervals is recommended.
Adjusting the Display Brightness
Adjust the brightness of the display on which the operation screen is shown.
1
Press the MENU button.
2
In the top menu, select [Display].
3
1
Select [LCD Backlight], and confirm; 2 move the slider to adjust brightness.
Installation/Default Settings
52
Page 53

LCD Backlight
12
1
2
Viewer Priority PGM
File TC Off
4
Press the MENU button to close the menu.
Selecting the Video Output Signal Format
Select the format for the signals output from the PGM output connectors
(COMPOSITE/S VIDEO), the SD video interface module’s DV connectors, and
the SDI output, HD analog output, HD SDI output, and reference output
connectors on the rear panel.
1
Press the MENU button.
2
In the top menu, select [Video Output].
3
1
Select [PGM OUT], and confirm; 2 select the signal format, and confirm.
PGM OUT NTSC/60Hz
PGM OUT Aspect 4:3
PGM OUT Level
B NTSC/60Hz
PAL/50Hz
A confirmation message appears.
4
Press the ENTER button.
A shutdown message appears, and the system shuts down.
Caution
• Carrying out this selection may cause momentary breakup of the output video.
• When [PAL/50Hz] is selected, small portions of the top and bottom of PAL
input videos will be missing. To avoid this, set the RGB output signal format
to [Video RGB] (page 216).
Chapter 2 Preparations
Note
Video input in a different signal format than this setting can still be displayed
(i.e., displaying a PAL video input when set to “NTSC” or vice versa), but the
video quality cannot be guaranteed.
Setting the PGM Output Aspect Ratio
Select the size (ratio between width and height) of the program output video.
1
Press the MENU button.
2
In the top menu, select [Video Output].
3
1 Select [PGM OUT Aspect], and confirm; 2 select a size for the program
output video, and confirm.
Installation/Default Settings
53
Page 54

Chapter 2 Preparations
1
PGM OUT NTSC/60Hz
PGM OUT Aspect 4:3
PGM OUT Level
DV OUT
B 4:3
16:9 SD
16:9 HD
2
[4:3]: Creates programs in the 4:3 aspect ratio.
Select this when the output destinations are primarily SD (4:3).
[16:9 SD]: Creates programs in the 16:9 aspect ratio.
Select this when the output destinations are primarily SD (4:3) or when
giving priority to PGM recording to external hard disks.
[16:9 HD]: Creates programs in the 16:9 aspect ratio.
Select this when the output destinations are primarily HD (16:9).
4
Press the MENU button to close the menu.
Relation between aspect ratio settings and output signals
Output connector / PGM recording to HDD
PGM recording
to external hard
disk drives
4:3
mode
SD output*1 HD output
4:3
Black &
silent signal
*2
RGB output*3
4:3 4:3
XGA/SXGA
Black &
silent signal
16:9
16:9 squeeze
WXGA
16:9
XGA/SXGA
16:9 squeeze
WXGA
16:9
16:9 squeeze
PGM recording to
external hard disk
drives is
unavailable
Output signals
16:9 SD
mode
16:9 HD
mode
16:9 squeeze
Composite,
S-video
16:9 squeeze
No signal for DV
SDI
Black & silent
signal
*1 Output from the built-in composite or S-Video output connector, the SD video
interface module or serial digital interface module.
*2 Output from the HD video interface module or HD serial digital interface module.
*3 Output from the built-in RGB output connector.
Caution
• When [4:3] or [16:9 SD] is selected, program output from the HD video
interface module (BKAW-560) or HD serial digital interface module
(BKAW-590) is disabled.
Installation/Default Settings
54
Page 55

4:3
mode
16:9 SD
mode
• When [16:9 HD] is selected, program output from the SD video interface
module (BKAW-570) or serial digital interface module (BKAW-580/
BKAW-581) and recording to external hard disks are disabled.
Relation between aspect ratio settings, input signals, and viewer
displays
Input signals
SD input HD input RGB input CG
1
4:3*
4:3
squeeze*
16:9 squeeze
2
*
16:9
16:9 XGA/SXGA WXGA 4:3/5:4 16:9/16:10/
1
16:9 squeeze
4:3
16:9 squeeze
3
*
4:3
16:9 squeeze
4
*
5:3
Chapter 2 Preparations
Wide scree n
PGM/PVW viewer display
Center
16:9 HD
mode
Wide scree n
Center
16:9
2
*
16:9 16:9
*1 Specify the aspect ratio of the input signals in the top menu with [Source Aspect] of [Video Input
Assign].
*2 Changes depending on the [Wide Zoom] setting in the ACCESS menu.
*3 Adjust [Resize] in the ACCESS menu to convert to center display.
*4 Changes depending on the [CG Wide Zoom] setting in the INT source selection menu.
16:9
Setting the System Timecode
Set the system timecode to add to files and output signals recorded on an external
hard disk.
The system timecode is used for the following functions.
• The timecode of a file recorded for program output
• The timecode of an EDL
• The timecode of a file recorded for material (except DV material)
• The timecode to add to DV signals output from a DV output connector
• The timecode to add to SDI signals output from a SDI output connector
Wide sc reen
Wide sc reen
16:9
3
*
16:9
Wide sc reen
Center
Wide sc reen
Center
16:9
4
*
16:9
Note
The system timecode added with this unit is a drop frame timecode (except when
PAL is set).
Setting the time to use as the system timecode
You can set the time to use as the system timecode.
Installation/Default Settings
55
Page 56

Chapter 2 Preparations
Note
At the time of purchase, the time set for [Date/Time] (local time) in the top menu
is configured to be used as the system timecode.
1
Press the MENU button.
2
Select [System] in the top menu.
3
1 Select [System TC], and confirm; 2 select [User Preset], confirm, and
select [Timecode]; 3 set a time in the input box, and confirm.
123
Date/Time
Time Zone
System TC 00:00:00:00
Language
Local Time
B User Preset
Timecode
00: 00: 00: 00
The timecode display for [System TC] is updated to the set value.
Note
When you configure this setting, the timecode is preset at the time of
configuration and when the unit is started, and from then on, the count
increases.
4
Press the MENU button to close the menu.
Installation/Default Settings
56
Page 57

Connections
This section describes how to connect devices for input and output of video and
audio. The following figure shows a sample system configuration and signal
flow. Refer to the pages indicated for details of how to make connections.
In addition, after connecting each device, you must configure settings on the unit
for each input and output signal. See page 66 for details on the settings of each
input and output signal.
System configuration example 1: When a serial digital interface module is connected
Chapter 2 Preparations
Amplifier (page 65)
Camera with
VISCA support
(page 59)
Microphone (page 60)
Anycast Station
AUDIO IN
MIC/LINE
LINE
VISCA
VIDEO IN (OUT)
SD video
interface module
(BKAW-570)
S VIDEO
COMPOSITE
DV (IN/OUT)
HDD (IN/OUT)
Serial digital
interface module
(BKAW-580)
HDD (IN/OUT)
SDI OUT
SDI IN
* Depending on the device, signal
input/output settings may be
required.
Refer also to the manuals provided
with the devices you are connecting.
Speaker
Plasma display (page 63)
AUDIO OUT
VIDEO OUT
PGM
RGB
Projector (page 63)
Camcorder
(page 61)
VCR (page 62)
External hard disk
(page 63)
PC video
interface module
(BKAW-550)
RGB
Camcorder
(page 61)
Monitor
(page 63)
INTERCOM
Computer (page 60)
Intercom system (page 206)
Signal flow
Connections
57
Page 58

System configuration example 2: When an HD video interface or HD serial digital
interface module is connected
* Depending on the device, signal
input/output settings may be
required.
Refer also to the manuals provided
with the devices you are connecting.
Amplifier (page 65)
Microphone (page 60)
Chapter 2 Preparations
Camera with
VISCA support
(page 59)
Camcorder
(page 61)
AUDIO IN
MIC/LINE
LINE
VISCA
VIDEO IN (OUT)
HD video
interface module
(BKAW-560)
YP
BPR IN
YP
BPR IN
YP
BPR OUT
HD serial digital
interface module
(BKAW-590)
HD SDI IN
HD SDI IN
HD SDI OUT
PC video
interface module
(BKAW-550)
RGB
Anycast Station
Speaker
Plasma display (page 63)
AUDIO OUT
VIDEO OUT
PGM
RGB
Projector (page 63)
INTERCOM
58
VCR (page 62)
Connections
Computer (page 60)
VCR (page 62)
Intercom system (page 206)
Camcorder
(page 61)
Signal flow
Caution
• Use the shortest possible cable type (especially with unregulated RGB).
Shorter cables are recommended because, in general, using long cables to
connect devices increases the risk of signal noise. Even when connecting this
unit to another, it is best to use the shortest cables possible.
Page 59

• Be careful with the connector portions of the interface modules, which may
SD
PC
SDI
become hot depending on the conditions of operation.
Connecting a Camera With VISCA Support
When an SD video interface module is connected
Color video camera
BRC-H700, BRC-300, EVI-D100, EVI-D70 etc.
VISCA OUT
VISCA IN
VIDEO OUT
15
69
To S-Video input
connectors
I.LINK
COMPOSITE
S VIDEO
RGB PGM
S400
VIDEO IN
S VIDEO
COMPOSITE
OFF
ON
RGB RGB
S VIDEO
COMPOSITE
1
OFF
ON
2
3
LINE MIC/LINE
87 654 3
AC IN
VISCA cable
PUSH PUSH
AUDIO IN
RRLL
HEADPHONES
MIC/LINE
21
OFF
ON
AUX PGM RGB
MIX
21
MONI INTERCOM
RL
AUDIO OUT VIOEO OUT
When an HD video interface module is connected
VISCA OUT
VISCA IN
To Composite
input connectors
BNC
cable
Chapter 2 Preparations
To VISCA
connector
VISCA cable
HD
To HD analog
input connectors
VIDEO OUT
To HD analog
input connectors
VGA
cable
Notes
• VISCA cables up to 15 m (50 ft) are recommended to operate correctly.
• When connecting a BNC cable, an RCA-BNC adaptor is required.
• When connecting a BRC-300 camera, connect to the DV, RGB, and SDI input
connectors in accordance with the camera’s option board.
• When connecting a BRC-H700 camera, connect to the RGB, SDI, and HD
analog input connectors in accordance with the camera’s option board.
• For information about VISCA cameras that can be connected to the unit, visit
the following Anycast Station portal site:
https://servicesplus.us.sony.biz/SoftwarePlusSerch.aspx (for customers in
U.S.A.)
Connections
59
Page 60

https://www.sonybiz.net/anycast (for customers in Europe, Middle East and
SD
PC
SDI
SD
PC
SDI
Africa)
https://www.ecspert.sony.biz/ecsite/ (for the other customers)
Connecting a Microphone
Dynamic microphone
Chapter 2 Preparations
(F-720/2, etc.)
LINE MIC/LINE
87 654 3
AC IN
Connecting a Computer (RGB Input)
When a PC video interface module is connected
LINE MIC/LINE
87 654 3
AC IN
To Microphone/line input connectors
PUSH PUSH
AUDIO IN
RRLL
HEADPHONES
AUDIO IN
RRLL
HEADPHONES
MIC/LINE
21
OFF
ON
AUX PGM RGB
MIX
21
MONI INTERCOM
RL
AUDIO OUT VIOEO OUT
PUSH PUSH
MIC/LINE
21
OFF
ON
AUX PGM RGB
MIX
21
MONI INTERCOM
RL
AUDIO OUT VIOEO OUT
RGB PGM
15
69
RGB PGM
15
69
Capacitor microphone
(C-38B, etc.)
S VIDEO
COMPOSITE
OFF
RGB RGB
S VIDEO
COMPOSITE
OFF
RGB RGB
COMPOSITE
S VIDEO
COMPOSITE
S VIDEO
I.LINK
S400
I.LINK
S400
VIDEO IN
S VIDEO
ON
VIDEO IN
S VIDEO
ON
To RGB input
connectors
COMPOSITE
COMPOSITE
1
OFF
ON
2
3
1
OFF
ON
2
3
60
Connections
RGB cable
Computer
Note
To reduce the effects of external noise, use a cable with an attached ferrite core.
Page 61

Connecting a Camcorder
SD
PC
SDI
When an SD video interface module is connected
LINE MIC/LINE
87 654 3
AC IN
DVCAM camcorder
(DSR-PD170, etc.)
When an HD video interface module is connected
PUSH PUSH
AUDIO IN
RRLL
HEADPHONES
MIC/LINE
21
OFF
ON
AUX PGM RGB
MIX
21
MONI INTERCOM
RL
AUDIO OUT VIOEO OUT
RGB PGM
15
69
For DV connection
VGA cable
I.LINK
S400
COMPOSITE
S VIDEO
For SDI connection
For analog connection
BNC cable
VIDEO IN
S VIDEO
COMPOSITE
S VIDEO
OFF
ON
RGB RGB
To DV connectors
i.Link cable
To Composite
input connectors
COMPOSITE
1
OFF
ON
2
3
Chapter 2 Preparations
BNC cable
To HD analog
input connectors
HD
When an HD serial digital interface module is connected
BNC cable
To HD SDI input
connectors
Note
i.LINK cables between 80 cm and 3.5 m (2.5 to 11.5 ft) are recommended.
Caution
• The frequency precision of the reference output signal is within 50 ppm. When
building a system that includes devices such as a camera with a Gen Lock
input, be sure to test it thoroughly before use.
• The color frame of the program output signal does not reflect the color frame
sequence of the reference output signal.
Connections
61
Page 62

Connecting a VCR
SD
PC
SDI
Chapter 2 Preparations
• If video or audio is not output or signal noise occurs when connected to another
DV device, the problem can often be resolved by reconnecting the cables or
turning the DV device or the unit off and then on again.
When an SD video interface module is connected
Digital video cassette
recorder (DSR series, etc.)
For analog connection
S-Video cable
To Line input
connectors
Audio cable
LINE MIC/LINE
87 654 3
AC IN
PUSH PUSH
AUDIO IN
RRLL
HEADPHONES
MIC/LINE
21
OFF
ON
AUX PGM RGB
MIX
21
MONI INTERCOM
RL
AUDIO OUT VIOEO OUT
RGB PGM
15
69
COMPOSITE
S VIDEO
I.LINK
S400
VIDEO IN
S VIDEO
COMPOSITE
OFF
ON
RGB RGB
To S-Video input
connectors
S VIDEO
COMPOSITE
OFF
ON
To DV connectors
For DV connection
i.Link cable
When an HD video interface module is connected
VGA cableVGA cable
To HD analog
input connectors
HD
When an HD serial digital interface module is connected
BNC cableBNC cable
1
2
3
62
Connections
To HD SDI input
connectors
Note
i.LINK cables between 80 cm and 3.5 m (2.5 to 11.5 ft) are recommended.
Caution
• If when connected to another DV device the video or audio is not output, or
there is noise, reconnect the cable, or power the DV device or this unit off and
on again. This may solve the problem.
• It is not possible to connect more than one VCR to a single DV connector.
Page 63

Connecting an External Hard Disk
SD
PC
SDI
SD
PC
SDI
For information about external hard disks, visit the following Anycast Station
portal site:
https://servicesplus.us.sony.biz/SoftwarePlusSerch.aspx (for customers in U.S.A.)
https://www.sonybiz.net/anycast (for customers in Europe, Middle East and Africa)
https://www.ecspert.sony.biz/ecsite/ (for the other customers)
When an SD video interface module or a serial digital interface
module (BKAW-580) is connected
PUSH PUSH
AUDIO IN
LINE MIC/LINE
87 654 3
AC IN
Caution
• If using a hard disk with a standby function, make sure that the standby
function is disabled before connecting to this unit.
• Power on the connected hard disk before powering on this unit.
• Connect the i.LINK connector directly to the hard disk.
• It is not possible to connect more than one hard disk to a single i.LINK
connector (daisy-chaining connection not possible).
• If you disconnect the i.LINK cable, or power off the hard disk without carrying
out the necessary preparations for disconnecting the disk, then files may be
corrupted, or the disk may need to be recovered. For details of unmounting, see
“Disconnecting the External Hard Disk” (page 189).
21
OFF
ON
AUX PGM RGB
MIX
RRLL
21
HEADPHONES
MONI INTERCOM
RL
AUDIO OUT VIOEO OUT
Chapter 2 Preparations
MIC/LINE
I.LINK
S400
COMPOSITE
S VIDEO
RGB PGM
15
69
From i.Link connectors
i.Link cable
VIDEO IN
S VIDEO
COMPOSITE
OFF
ON
RGB RGB
S VIDEO
COMPOSITE
1
OFF
ON
2
3
Connecting a Plasma Display/Projector/Monitor
For RGB connection For analog connection
Flat panel display
(FWD series, etc.)
LINE MIC/LINE
87 654 3
AC IN
To RGB IN connectors
RGB cable
PUSH PUSH
AUDIO IN
RRLL
HEADPHONES
MIC/LINE
21
OFF
ON
AUX PGM RGB
MIX
21
MONI INTERCOM
RL
AUDIO OUT VIOEO OUT
RGB PGM
15
69
COMPOSITE
S VIDEO
S-Video cable
S VIDEO
I.LINK
S400
RGB RGB
COMPOSITE
VIDEO IN
S VIDEO
COMPOSITE
1
OFF
OFF
ON
ON
2
3
Connections
63
Page 64

Chapter 2 Preparations
SD
PC
SDI
BNC cable
LINE MIC/LINE
87 654 3
AC IN
AUDIO IN
RRLL
HEADPHONES
MIC/LINE
21
OFF
ON
AUX PGM RGB
MIX
21
MONI INTERCOM
RL
AUDIO OUT VIOEO OUT
RGB PGM
15
69
COMPOSITE
S VIDEO
I.LINK
S400
PUSH PUSH
S-Video cable
Projector
(VPL series, etc.)
RGB Cable
For RGB connection For analog connection
When an HD video interface module is connected
Projector
VGA cable
(VPL series, etc.)
Monitor
(LMD series, etc.)
VIDEO IN
S VIDEO
COMPOSITE
S VIDEO
COMPOSITE
OFF
ON
RGB RGB
1
OFF
ON
2
3
HD
When an HD serial digital interface module is connected
BNC cable
Notes
Flat panel display
(FWD series, etc.)
• For more information on setting the resolution/clock phase and format, see
“Setting the RGB Output Signal Format” (page 216).
• To reduce the effects of external noise, use a cable with an attached ferrite core.
64
Connections
Page 65

Connecting an Amplifier
SD
PC
SDI
Audio cable
To Line input connectors or Microphone/line input connectors
PUSH PUSH
LINE MIC/LINE
87 654 3
AC IN
AUDIO IN
RRLL
HEADPHONES
MIC/LINE
21
OFF
ON
AUX PGM RGB
MIX
21
MONI INTERCOM
RL
AUDIO OUT VIOEO OUT
RGB PGM
15
69
COMPOSITE
S VIDEO
Preventing Accidental Cable Disconnection
Use the cable clip as necessary to secure cables and prevent accidental
disconnection.
1
Using a flat head screwdriver, open the lever compartment as illustrated
below.
I.LINK
S400
VIDEO IN
S VIDEO
COMPOSITE
OFF
ON
RGB RGB
S VIDEO
COMPOSITE
1
OFF
ON
2
3
Chapter 2 Preparations
2
Pass the cables through the cable clip.
Allow some slack when routing the cables to prevent them from bending
sharply.
3
Close the lever compartment.
Connections
65
Page 66

Settings Related To Input Signals
NEXT
INT
654321
PGM
654321
+
10
+
5
0
-
5
-
10
-
20
-
30
-
40
-
60
-
+
10
+
5
0
-
5
-
10
-
20
-
30
-
40
-
60
-
PGM
+
10
+
5
0
-
5
-
10
-
20
-
30
-
40
-
60
-
These settings allow video and audio signals input from devices connected to the
unit to be handled within the unit.
Relation Between Input Signals and System Components
Chapter 2 Preparations
You can assign input video and audio signals to buttons on the front panel and
channel faders, then operate these to carry out switching, mixing, and combining.
The operation screen continuously displays information about the video and
audio input to this unit, and the video and audio program output.
The following figure shows the relation between the input signals and system
components, and the display on the operation screen.
Next selection video selected
with the NEXT selection buttons
Shows video
and audio for
each source
number
Microphones
and acoustic
devices
Program output video selected
with the PGM selection buttons
Settings Related To Input Signals
66
Cameras, VCR.
Video signals generated
internally by this unit
• Color mattes
• Color bars
• Imported graphics files
Page 67

Video Signal Related Settings
These are preparations for handling video signals with the unit.
Assigning video input signals to the selection buttons
Assign video signals to the selection buttons 1 - 6 (PGM selection and NEXT
selection buttons).
Note
You can confirm assignments and information on input signals using each of the
corresponding ACCESS menus. The signal names displayed in the menus are
those of signals that are capable of being accepted as determined by the unit. Not
all standard signal names are displayed.
1
Press the MENU button.
2
In the top menu, select [Video Input Assign].
3
From the list select the number of the selection button, and confirm, then set
the following items in the submenu.
Assigning a name for the video
Assign a name for the video. The name assigned here appears in the source
viewer with the same number as the selection button.
1 Select [Source Name], and confirm; 2 enter the name in the input box,
and confirm.
12
1
2
3
4
5
6
Source Name
Input S1-1 Composite
Source Aspect 4:3
Control Off
[
CAM1
]
Enter up to 20 characters.
* The source viewer can only
display a limited number of
characters.
Chapter 2 Preparations
Specifying a video input connector
Specify the video input connector to which the video signals assigned to the
selection button are input.
1 Select [Input], and confirm; 2 select the video input connector from the
list, and confirm.
• When an SD video interface module and a PC video interface module
are connected
12
1
2
3
4
5
6
Source Name
Input S1-1 Composite
Source Aspect 4:3
Control Off
No Assign
B SLOT1 IN1 Composite
S-Video
DV
SLOT1 IN2 Composite
S-Video
DV
SLOT2 IN1 Composite
S-Video
DV
SLOT2 IN2 Composite
S-Video
DV
SLOT3 IN1 RGB
SLOT3 IN2 RGB
Settings Related To Input Signals
67
Page 68

Chapter 2 Preparations
• When a serial digital interface module is installed
The SDI input connectors appear.
1
2
3
4
5
6
Source Name
Input S1-1 Composite
Source Aspect 4:3
Control Off
No Assign
B SLOT1 IN1 Composite
S-Video
DV
SLOT1 IN2 Composite
S-Video
DV
SLOT2 IN1 SDI
SLOT2 IN2 SDI
SLOT3 IN1 RGB
SLOT3 IN2 RGB
When installed in slot 2
• When an HD video interface module is installed
The HD analog input connectors appear.
1
2
3
4
5
6
Source Name
Input S1-1 Composite
Source Aspect 4:3
Control Off
No Assign
B SLOT1 IN1 Composite
S-Video
DV
SLOT1 IN2 Composite
S-Video
DV
SLOT2 IN1 HD Analog
SLOT2 IN2 HD Analog
SLOT3 IN1 RGB
SLOT3 IN2 RGB
When installed in slot 2
• When an HD serial digital interface module is installed
The HD SDI input connectors appear.
1
2
3
4
5
6
Caution
Source Name
Input S1-1 Composite
Source Aspect 4:3
Control Off
No Assign
B SLOT1 IN1 Composite
S-Video
DV
SLOT1 IN2 Composite
S-Video
DV
SLOT2 IN1 HD SDI
SLOT2 IN2 HD SDI
SLOT3 IN1 RGB
SLOT3 IN2 RGB
When installed in slot 2
• You can only use one of the following from the same video input on the
SD video interface module: Composite (Composite video input
connector), S-Video (S-Video input connector), or DV (DV connector).
• It is not possible to assign more than one selection button to a single video
input connector. If you attempt to assign to a different selection button a
video input connector which has already been assigned to a selection
button, a confirmation message appears. If you then select [OK], the
assignment switches to the new selection button, and the source viewer for
the originally assigned selection button shows the indication “No Input
Assign.”
Settings Related To Input Signals
68
Page 69

• About the DV signal lock time
When DV is selected for the input video, there is a delay until the DV
signal locks and the video appears.
Notes
• The items in the list depend on the interface module installed in this unit.
• For details on [Control] and [Source Aspect] in the menu for 1, see
“Controlling Camera Manually” (page 158) and “Converting 4:3 Source
Materials to Wide Screen” (page 213), respectively.
4
If required, repeat step 3 similarly for the remaining selection buttons.
5
Press the MENU button to close the menu.
Registering Cameras To Be Controlled
By registering a camera supporting the VISCA protocol with this unit you can
control it from the unit.
You can connect up to seven cameras supporting VISCA protocol to this unit in
a daisy-chain, and control the cameras from this unit at addresses VISCA 1 to
VISCA 7 in sequence. In this unit, you control a camera by specifying one of
these addresses.
Caution
Chapter 2 Preparations
The maximum number of simultaneous video signal inputs to this unit is six.
12 3456 7
1
Connect the camera(s) supporting VISCA protocol to this unit.
For camera connection, see “Connecting a Camera With VISCA Support”
(page 59).
2
Assign the input signal from the camera to a selection button.
For assigning the input signal, see “Assigning video input signals to the
selection buttons” (page 67).
3
1 Select the number of the selection button assigned to the camera
supporting VISCA protocol, and confirm; 2 select [Control], and confirm;
3 select the camera address, and confirm.
1
1
2
3
4
5
6
2
Source Name
Input S1-1 Composite
Control Off
OFF
VISCA 1
VISCA 2
VISCA 3
B VISCA 4
VISCA 5
VISCA 6
VISCA 7
AV/C Player
3
Settings Related To Input Signals
69
Page 70

Note
VISCA camera information display
By pressing the
t button on the jog roller or the t key on the keyboard
while the camera address is selected, you can display the model name for the
camera, as shown below, for as long as you hold down the button or key.
4
Chapter 2 Preparations
Press the MENU button to close the menu.
Stretching 16:9 SQ Source Materials Into 16:9 Aspect Ratio
When the output aspect ratio setting is set to 16:9 SD or 16:9 HD mode, you can
configure settings to stretch 16:9 SQ materials from the analog video input and
SDI input connectors into normal 16:9 aspect ratio.
In addition, when you record material for which this setting has been configured
to an external hard disk and play them back on the unit or certain computers, the
material will automatically be stretched into 16:9 aspect ratio.
Caution
The aspect type of source materials inputted is not detected automatically.
1
Press the MENU button.
2
In the top menu, select [Video Input Assign].
3
1 Select the number for the selection button from the list, and confirm; 2
select [Source Aspect], and confirm; 3 select the aspect type for the
materials to be input, and confirm.
1
1
2
3
4
5
6
2
Source Name
Input S1-1 Composite
Source Aspect 4:3
Control Off
B 4:3
16:9 SQ
3
The functions of the setting items are as follows.
[4:3]: Select this when the SD/SDI signals input are 4:3 source materials.
The materials input are handled as they are as 4:3 materials.
[16:9 SQ]: Select this when the SD/SDI signals input are 16:9 squeeze
source materials.
The materials input are handled as 16:9 materials. When you select [16:9
SQ] and record materials to an external hard disk, the materials are
automatically played back in 16:9 aspect ratio during playback.
Note
When DV 16:9 squeeze material is input:
• You can stretch the display with the [Wide Zoom] setting (page 213).
• The display is automatically stretched to 16:9 aspect ratio if files of
material recorded to an external hard disk are played back.
Settings Related To Input Signals
70
Page 71

4
1
2
Press the MENU button to close the menu.
Audio Signal Related Settings
These are preparations for handling audio signals on the unit.
Assigning audio input signals to channel faders
Assign audio signals input from the audio input connectors or signals input from
the interface modules of the rear panel to channel faders 1 to 6.
If you assign different audio signals to the left and right channels (L/R) of the
channel faders, they become stereo faders, and if you assign the same audio
signal to both channels, they become monaural faders.
Caution
If you assign DV signals, SDI signals, or HD SDI signals, they become stereo
faders.
Note
You can confirm assignments and information on input signals using each of the
corresponding ACCESS menus.
1
Press the MENU button.
Chapter 2 Preparations
2
In the top menu, select [Audio Input Assign].
3
Select the channel fader number from the list, and confirm, then set the
following items in the submenu.
Assigning a name
Assign a name to the audio signal. The name assigned here appears in the
source viewer with the same number as the channel fader.
1 Select [Source Name], and confirm; 2 enter the name in the input box,
and confirm.
[
1
2
3
4
5
6
Source Name
Input (L) MIC/LINE 1
Input (R) MIC/LINE 1
Link to Video Off
MIC1
]
Enter up to 20 characters.
* The source viewer can only
display a limited number of
characters.
Specifying an audio input connector
Specify the audio signal to be assigned to the channel fader. For stereo audio,
specify the source for each of the left and right channels separately.
For monaural audio, specify the same input for both left and right channels.
Settings Related To Input Signals
71
Page 72

Chapter 2 Preparations
1 Select [Input (L)], and confirm; 2 select the audio input connector from
the list, and confirm.
2
B MIC/LINE 1
MIC/LINE 2
MIC/LINE 3
MIC/LINE 4
MIC/LINE 5
MIC/LINE 6
LINE 7
LINE 8
SLOT1 DV IN1
SLOT1 DV IN2
1
2
3
4
5
6
Notes
1
Source Name
Input (L) MIC/LINE 1
Input (R) MIC/LINE 1
Link to Video Off
• When an SD video interface module is installed
- If in [Input (L)] you select the DV input connector, the same input
connector is automatically assigned to [Input (R)].
• When a serial digital interface module is installed
- The SDI input connectors for individual channels are displayed.
1
2
3
4
5
6
Source Name
Input (L) MIC/LINE 1
Input (R) MIC/LINE 1
Link to Video Off
B MIC/LINE 1
MIC/LINE 2
MIC/LINE 3
MIC/LINE 4
MIC/LINE 5
MIC/LINE 6
LINE 7
LINE 8
SLOT1 DV IN1
SLOT1 DV IN2
SLOT2 SDI IN1 CH(1/2)
SDI IN1 CH(3/4)
SLOT2 SDI IN2 CH(1/2)
SDI IN2 CH(3/4)
When installed in slot 2
- If you select CH (1/2) of the SDI input connector for either [Input (L)]
or [Input (R)], CH (1) and CH (2)are assigned automatically to [Input
(L)] and [Input (R)], respectively.
When you select CH (3/4) of the SDI input connector, CH (3) and CH
(4) are assigned automatically to [Input (L)] and [Input (R)],
respectively.
1
2
3
4
5
6
Source Name
Input (L) S2 SDI IN1 CH1
Input (R) S2 SDI IN1 CH2
Link to Video Off
When CH (1/2) of SDI IN1 is assigned
MIC/LINE 1
MIC/LINE 2
MIC/LINE 3
MIC/LINE 4
MIC/LINE 5
MIC/LINE 6
LINE 7
LINE 8
SLOT1 DV IN1
SLOT1 DV IN2
B SLOT2 SDI IN1 CH(1/2)
SDI IN1 CH(3/4)
SLOT2 SDI IN2 CH(1/2)
SDI IN2 CH(3/4)
• When an HD serial digital interface module is installed
- The HD SDI input connectors for individual channels are displayed.
Settings Related To Input Signals
72
Page 73

1
2
3
4
5
6
Source Name
Input (L) MIC/LINE 1
Input (R) MIC/LINE 1
Link to Video Off
B MIC/LINE 1
MIC/LINE 2
MIC/LINE 3
MIC/LINE 4
MIC/LINE 5
MIC/LINE 6
LINE 7
LINE 8
SLOT1 DV IN1
SLOT1 DV IN2
SLOT2 HD SDI IN1 CH(1/2)
HD SDI IN1 CH(3/4)
SLOT2 HD SDI IN2 CH(1/2)
HD SDI IN2 CH(3/4)
When installed in slot 2
- If you select CH (1/2) of the HD SDI input connector for either [Input
(L)] or [Input (R)], CH (1) and CH (2) are assigned automatically to
[Input (L)] and [Input (R)], respectively.
When you select CH (3/4) of the HD SDI input connector, CH (3) and
CH (4) are assigned automatically to [Input (L)] and [Input (R)],
respectively.
1
2
3
4
5
6
Source Name
Input (L) S2 HD SDI IN1 CH1
Input (R) S2 HD SDI IN1 CH2
Link to Video Off
MIC/LINE 1
MIC/LINE 2
MIC/LINE 3
MIC/LINE 4
MIC/LINE 5
MIC/LINE 6
LINE 7
LINE 8
SLOT1 DV IN1
SLOT1 DV IN2
B SLOT2 HD SDI IN1 CH(1/2)
HD SDI IN1 CH(3/4)
SLOT2 HD SDI IN2 CH(1/2)
HD SDI IN2 CH(3/4)
Chapter 2 Preparations
When CH (1/2) of HD SDI IN1 is assigned
Caution
• When an SD video interface module is installed
- For DV input, it is not possible to assign more than one selection button
to a single DV input connector. If you attempt to assign to a different
selection button a DV input connector which has already been assigned
to a selection button, a confirmation message appears. If you then select
[OK], the assignment switches to the new selection button, and the
originally assigned selection button returns to the default setting.
- About the DV signal locking time
When DV is selected for the input audio, there is a delay until the DV
signal locks and the audio can be heard.
• When a serial digital interface module or HD serial digital interface
module is installed
- SDI/HD SDI embedded audio can only be assigned to the channel fader
of the source number assigned to video that is input to the same SDI
input connector or HD SDI input connector. It cannot be combined with
analog input video, DV input video, or video of the other SDI input
connector or HD SDI input connector.
- SDI embedded audio cannot be assigned simultaneously to CH (1/2) and
CH (3/4) of the same SDI input connector or HD SDI input connector.
Settings Related To Input Signals
73
Page 74

Similarly, select [Input (R)], and confirm; select the audio input connector
from the list, and confirm.
When the input audio signal reaches the reference level, the input signal
indication in the source viewer lights green and you can confirm that there is
an audio input.
Input signal indication
Chapter 2 Preparations
4
Press the MENU button to close the menu.
Linking program output video to audio of the same source number and
outputting simultaneously
When video is switched over to program output, you can set audio that has been
assigned to the same source number as the video to be enabled and output
simultaneously with this setting.
1
Press the MENU button.
2
In the top menu, select [Audio Input Assign].
3
1 From the list, select the number for the channel fader to link to the video,
and confirm; 2 select [Link to Video], and confirm.
The setting turns on or off each time it is selected.
12
1
2
3
4
5
6
4
Press the MENU button to close the menu.
Source Name MIC1
Input (L) MIC/LINE 1
Input (R) MIC/LINE 1
Link to Video Off
The icon appears in the source viewer of the source number for
which the link was set.
When the video of the viewer in which the icon appears is program output,
the CH ON button lights and the audio channel is enabled simultaneously.
When program is not output, the CH ON button dims.
Setting the MIC/LINE level of an audio input
If the peak indication appears (when set to the default MIC/LINE
level of “Middle (-20 dB)”)
If the input audio signal is too loud, the peak indication in the source viewer lights
red.
In this case, since the MIC/LINE level exceeds the standard input level, use the
following procedure to adjust it.
Settings Related To Input Signals
74
Page 75

Example: When the peak indication has lit with MIC/LINE 2 connected to R and
MIC/LINE 1 connected to L, as illustrated below.
RL
Chapter 2 Preparations
AUDIO IN
LINE MIC/LINE
8 76543
PUSH PUSH
MIC/LINE
21
OFF
ON
MIC/LINE2MIC/LINE
1
1
Press the MENU button.
2
In the top menu select [Audio MIC/LINE Level].
3
1 Select the number of the MIC/LINE input connector to which is
connected the target audio signal, and confirm; 2 select [High(+4dB)], and
confirm.
In this example, both [MIC/LINE 1] and [MIC/LINE 2] are set to [High
(+4dB)].
12
MIC/LINE 1 Middle
MIC/LINE 2 Middle
MIC/LINE 3 Middle
MIC/LINE 4 Middle
MIC/LINE 5 Middle
MIC/LINE 6 Middle
4
Press the MENU button to close the menu.
B High(+4dB)
Middle(-20dB)
Low(-44dB)
If no input signal indication appears (when set to the default
microphone/line level of “Middle (-20 dB)”)
If no input signal indication appears in the source viewer even though an audio
signal is input, the microphone/line level is not reaching the reference level.
Using the same procedure as detailed in “If the peak indication appears” above,
select the number of the microphone/line input connector, and at step 3-2, select
[Low (-44dB)], and confirm.
Settings Related To Input Signals
75
Page 76

Chapter 2 Preparations
Settings Related To Input Signals
76
Page 77

3
Operations
Video Switching
This section describes how to switch the video signals input to the unit, and
output the final video (output program) from the PGM output connectors.
With this unit, you can also apply some video effects.
Chapter
Note
First, make the settings described in “Video Signal Related Settings” (page 67).
Basics of Video Switching
This section describes only the most basic switching operations. See the relevant
sections for details of switching and effect operations.
Cut switching
This is the most basic and commonly used type of switching. The video changes
instantaneously from A to B.
For details, see “Changing the Video With a Cut” (page 78).
A
Switching with a transition effect
In a transition effect, the image gradually switches from one video to another
through the application of one of various effects.
For details, see “Changing the Video With a Effect Transition” (page 80).
Chapter 3 Operations
B
Video Switching
77
Page 78

Changing the Video With a Cut
This switches the video instantaneously, with no added effects. This is the most
basic form of switching.
Basic operation for a video cut
There are two methods of making a cut, as follows.
• Switching directly by pressing a PGM selection button
Chapter 3 Operations
• Checking the next video in the PVW viewer, then pressing the CUT button
The following diagram shows the flow of operations in carrying out a video cut.
Press the PGM selection buttons to select the program
output video.
Press a different PGM
selection button to
switch the video.
Press a NEXT selection
button to select the next
output.
Press the CUT button.
Switching directly by pressing a PGM selection button
To switch from one video to another, you can simply press the PGM selection
button to which the new video is assigned.
1
In the source viewer, select the video for program output.
Example: You may select video 4.
2
Press the PGM selection button with the same number as the selected video.
Press button 4.
PGM
78
Video Switching
654321
NEXT
INT
The PGM selection button you pressed lights red, and the selected video
appears in the PGM viewer.
The same video as shown in the PGM viewer is now output from the PGM
output connectors.
Page 79

A red frame appears around the source viewer for the selected video.
3
Determine on the next video, then repeat the procedure in step 2.
Switching with the CUT button after checking the next video in the PVW viewer
To switch while checking the new video in the PVW viewer, use the CUT button.
1
In the source viewer, select the video you want to switch to (the next program
output).
Example: You may want
to switch to video 3.
2
Press the NEXT selection button with the same number as this video.
Lit red.
654321
Press button 3.
Current program output video
PGM
NEXT
INT
Chapter 3 Operations
The NEXT selection button you pressed lights amber, and the selected video
appears in the PVW viewer.
An amber frame appears around the source viewer for the next video.
Video Switching
79
Page 80

3
Press the CUT button.
This interchanges the video in the PGM viewer and PVW viewer, and
switches the program output video.
At the same time, the lit PGM selection button and NEXT selection button
interchange, and the colors of the frames in the source viewer also
interchange.
Lit red.
PGM
Before you press the CUT button
654321
Lit amber.
NEXT
INT
Chapter 3 Operations
Lit red.
654321
Lit amber.
Each press of the CUT button interchanges the program output video and the
NEXT selection video.
Changing the Video With a Effect Transition
Instead of an instantaneous cut, you can gradually switch from one video to
another through the application of one of various effects.
Basic transition effect operations
The basic procedure for applying an effect to a transition is as follows.
Set the transition effect.
Select the next video to be output
using the NEXT selection buttons.
PGM
After you pressed the CUT button
NEXT
INT
80
Video Switching
Carry out the transition.
There are two ways of executing a transition:
• Automatic execution with the AUTO TRANS button
• Manual execution using the transition lever
0
T
P
V
W
FTB
DSK
AUTO TRANS button
E
F
C
F
E
X
I
M
KEY
CUT
AUTO
TRANS
IC
Transition lever
Page 81

AUTO TRANS button
Pressing the AUTO TRANS button carries out the transition automatically, using
the preset transition time.
Transition lever
Moving the transition lever in the direction shown by the LED indicators (fF)
progresses the transition in sync with the lever movement.
Switching with a dissolve
In a dissolve, one video image fades into another.
Basic operation for a dissolve
The basic procedure for a dissolve is as follows.
Select the next video to be output
using the NEXT selection buttons.
Chapter 3 Operations
Press the MIX button.
Carry out the transition.
1
Press the MIX button.
MIX button
IC
DIM TB
KEY
CUT
AUTO
TRANS
E
F
C
F
T
E
X
I
M
0
P
V
W
FTB
DSK
The MIX button lights amber, and the effect indication on the operation
screen shows the current mix state (progress of the dissolve).
Video Switching
81
Page 82

Chapter 3 Operations
Switching with a wipe
Current mix state
Notes
• The mix state shows the current transition time setting.
• You can still change the transition time at this point. To make this change,
follow the procedure in “Changing the Transition Time” (page 84).
2
Determine the next program output video, and select this with the NEXT
selection button.
The selected video appears in the PVW viewer.
3
Carry out the transition with the AUTO TRANS button or transition lever.
The NEXT selection video dissolves into the program output video.
Each press of the AUTO TRANS button, or operation of the transition lever,
carries out a dissolve transition from the program output video to the NEXT
selection video.
In a wipe, two video images occupy the display simultaneously, with the area
occupied by one growing until if wipes out the other. You can choose from
sixteen different wipe patterns.
82
Video Switching
Page 83

Basic operation for a wipe transition
The basic procedure for a wipe transition is as follows.
Press the EFFECT button.
Select the effect pattern in the top
menu with [Effect Pattern].
Select the next video to be output
using the NEXT selection buttons.
Carry out the transition.
1
Press the EFFECT button.
EFFECT button
IC
DIM TB
KEY
CUT
AUTO
TRANS
E
F
C
F
T
E
X
I
M
0
P
V
W
FTB
DSK
The EFFECT button lights amber, and the effect indication shows the current
effect state.
Chapter 3 Operations
Current effect state
Notes
• The current effect state shows the transition time and effect pattern
settings.
• You can change the transition time. To change the setting, follow the
procedure in “Changing the Transition Time” (page 84).
Video Switching
83
Page 84

2
Select the effect pattern.
To change the effect pattern, follow the procedure in “Changing the Effect
Pattern” (page 85).
3
Determine the next program output video, and select this with the NEXT
selection button.
The selected video appears in the PVW viewer.
4
Carry out the transition with the AUTO TRANS button or transition lever.
The program output video changes to the NEXT selection video by a wipe
transition.
Chapter 3 Operations
Each press of the AUTO TRANS button, or operation of the transition lever,
the program output video changes to the NEXT selection video by a wipe
transition.
Note
You can apply an edge effect to the wipe pattern. For details, see “Applying Edge
Effects” (page 109).
Changing the Transition Time
Before carrying out a transition with the AUTO TRANS button, set the transition
time.
1
Press the MIX button or EFFECT button.
The current settings appear in the effect display.
2
Press the MENU button.
3
In the top menu, select [Video Effect].
4
1 Select [Transition Time], and confirm; 2 move the slider to set the
transition time.
The transition time is set in frame units.
1
Effect Pattern
Transition Time 20F
Edge Off
Key Type Luminance
Key Adjust
5
Press the MENU button to close the menu.
The set transition time appears in the effect display.
2
84
Video Switching
Page 85

Changing the Effect Pattern
1
Press the EFFECT button.
The current settings appear in the effect display.
Note
Here you can also press the EFFECT button once more to recall the [Effect
Pattern] menu, and skip from step 2 below as far as 1 within step 4.
2
Press the MENU button.
3
In the top menu, select [Video Effect].
4
1 Select [Effect Pattern], and confirm; 2 select the wipe pattern from the
list, and confirm.
Chapter 3 Operations
1
Effect Pattern
Transition Time 20F
Edge Off
Key Type Luminance
Key Adjust
Auto Chroma Key
Crop Off
Size Small
Location
Preset
Delete
Data Name
5
Press the MENU button to close the menu.
2
User Program 1
User Program 2
User Program 3
User Program 4
User Program 5
User Program 6
1080 T
1100 A
B 0001 T
0002 T
0003 T
0004 T
0009 T
0010 T
0011 T
MIX
Note
You can also close the menu by pressing the EFFECT button.
The selected effect pattern appears in the effect display.
Using Picture-in-Picture (PinP) for Combining Videos
You can generate a picture-in-picture effect by embedding a video within another
video.
Video Switching
85
Page 86

Note
2
When you use a picture-in-picture for combining videos, you can check the
results in the PVW viewer before program output. For details, see “Checking the
Results of Combining Videos (Effect Preview)” (page 110).
Basic picture-in-picture operations
Chapter 3 Operations
The basic procedure for using a picture-in-picture for combining videos is as
follows.
Select a picture-in-picture from [Effect
Pattern] of the top menu.
Press a NEXT selection button to select
a video to embed within the video.
Embedded
video
Execute the transition.
For details on executing transitions, see “Basic transition effect operations”
(page 80).
1
Press the MENU button.
2
In the top menu, select [Video Effect].
3
1 Select [Effect Pattern], and confirm; 2 select a picture-in-picture from
the list, and confirm.
1
Effect Pattern
Transition Time 20F
Edge Off
Key Type Luminance
Key Adjust
Auto Chroma Key
Crop Off
Size Small
Location
Preset
Delete
Data Name
User Program 1
User Program 2
User Program 3
User Program 4
User Program 5
User Program 6
1080 T
1100 A
0001 T
0002 T
B 0003 T
0004 T
0009 T
0010 T
0011 T
MIX
The picture-in-picture information appears in the effect display.
86
Video Switching
Page 87

4
Press the MENU button to close the menu.
5
Decide which video to embed, and then press the corresponding NEXT
selection button to specify the video.
The selected video is displayed in the PVW viewer.
Caution
When the following material is selected, the NEXT selection button flashes
and the picture-in-picture effect is not applied.
• Material assigned to INT
• Material being used for program output
• Material being used for keying
6
Use the AUTO TRANS button, CUT button, or transition lever to execute
the transition.
The NEXT selection video is embedded in the program output video.
The NEXT selection button changes to red when the transition is complete.
Chapter 3 Operations
Press the AUTO TRANS button or CUT button once more or move the
transition lever in the opposite direction to remove the embedded video and
return the color of the NEXT selection button to orange.
Caution
The transition time is always 0.
Notes
• You can crop the unwanted portions from the embedded video. For details,
see “Cropping Unwanted Portions From the Video Being Combined”
(page 109).
• You can apply an edge to the frame of the video to be embedded. For
details, see “Applying Edge Effects” (page 109).
Adjusting the Picture-in-Picture (PinP)
You can set the size and display position of the video embedded using a picturein-picture.
Video Switching
87
Page 88

Note
You can make picture-in-picture adjustments while viewing the results in the
PVW viewer before program output. For details, see “Checking the Results of
Combining Videos (Effect Preview)” (page 110) and “Giving Priority to
Displaying the PVW Viewer” (page 113).
Changing the size of the video embedded
1
Perform steps 1 to 6 of “Basic picture-in-picture operations” (page 86).
2
Press the MENU button.
3
In the top menu, select [Video Effect].
Chapter 3 Operations
4
1 Select [Size], and confirm; 2 select a size, and confirm.
Large
B Medium
Small
2
1
Effect Pattern
Transition Time 20F
Edge Off
Key Type Luminance
Key Adjust
Auto Chroma Key
Crop Off
Size Small
Location
The functions of the setting items are as follows.
[Large]: 1/4 of size
[Medium]: 9/64 of size
[Small]: 1/16 of size
Large Medium Small
5
Press the MENU button to close the menu.
Specifying the position to embed the video
1
Perform steps 1 to 6 of “Basic picture-in-picture operations” (page 86).
88
Video Switching
2
Press the MENU button.
3
In the top menu, select [Video Effect].
4
1 Select [Location], and confirm; 2 select [X] or [Y], and confirm; 3
specify the position with the slider.
1
Effect Pattern
Transition Time 20F
Edge Off
Key Type Luminance
Key Adjust
Auto Chroma Key
Crop Off
Size Small
Location
2
X 200
Y -150
3
X-Y
Page 89

The functions of the setting items are as follows.
[X]: Specifies the horizontal position.
[Y]: Specifies the vertical position.
Note
After step 1, you can specify the vertical or horizontal position by pressing
up, down, left, or right on the positioner. (When using the positioner, you do
not need to select [X] and [Y].)
Caution
When adjusting the position of the picture-in-picture image up, down, left, or
right, the image shifts in 10-point increments.
5
Press the MENU button to close the menu.
Using Fade-to-Black (FTB)
This fades the video in from or out to a black screen.
Press the FTB button.
This fades out the program output to a black screen, except for any superimposed
logo.
LOGO LOGO LOGO
Press the FTB button once more to fade in the video from the black screen.
LOGO LOGO LOGO
Note
While the screen is black, the PGM selection buttons change to amber.
Chapter 3 Operations
Fading in a different video after fading out
1
After fading to a black screen, select a different video with the PGM
selection buttons.
2
Press the FTB button.
This fades in the newly selected video.
Setting the fade to black transition time
1
Press the MENU button.
2
In the top menu, select [Fade To Black].
Video Switching
89
Page 90

3
1 Select [Transition Time], and confirm; 2 move the slider to set the
transition time.
1
Transition Time 20F
4
Press the MENU button to close the menu.
Using Color Bars and Color Mattes
The Internal Color Bar is provided for adjustment and test transmission. The
Internal Color Matte is provided for a background.
1
Chapter 3 Operations
Press INT in the NEXT selection buttons.
The INT source selection menu appears in the menu display.
2
Select the color bars or color matte you want to show, and confirm.
Black
White
Color Bars
B Color Matte
Lum 11%
Sat 95%
Hue 351˚
Text Typing Tool F5
aaaaaaaa
bbbbbbbb
cccccccc
SD_Safe_Area.tga
2
Note
This unit can output the following color bars for each video output signal
format and PGM output aspect ratio setting.
PGM output aspect
ratio
4:3 mode SMPTE color bar (75%) EBU color bar (100%)
16:9 SD mode SMPTE color bar EBU color bar
16:9 HD mode EBU color bar
Video output signal format
NTSC/60 Hz PAL/50 Hz
The selected internal video signal appears in the “INT” source viewer.
Note
You can change the color of the color matte. For details, see “Adjusting Color
Matte” (page 215).
Using the Downstream Key (DSK) Function To Add Text or an Image
You can add text or an image to video that already includes an effect or
combination.
This is useful for adding subtitles, for example.
90
Video Switching
Page 91

DSK (downstream) key
Basic downstream key operations
The basic procedure for downstream keying is as follows.
Select the image to be imported.
Select a graphics file from the INT source
selection menu.
Press the DSK button to insert the key.
Inserting a downstream key
In order to use a downstream key for text or graphics, it must first be imported
onto the internal hard disk of this unit.
For details on creating a graphics file, see “Creating a Title Graphic With the Text
Typing Tool” (page 117).
For details on importing a graphics file, see “Importing Graphics Files” (page 235).
Note
You can also register graphics files to the numeric buttons on the front panel and
access them whenever necessary. For details, see “Accessing Graphics Files
Quickly” (page 94).
Chapter 3 Operations
1
Press INT in the NEXT selection buttons.
The INT source selection menu appears.
2
Use the jog roller to select a graphics file displayed in the lower part of the
INT source selection menu, and confirm.
Black
White
Color Bars
Color Matte
Lum 11%
Sat 95%
Hue 351˚
Text Typing Tool F5
aaaaaaaa
bbbbbbbb
ccccccccc b
SD_Safe_Area.tga
Graphics files
Video Switching
91
Page 92

The selected graphics file appears in the “INT” source viewer.
Notes
• While the graphics file is being read in, the message “Loading...” appears
at the bottom of the PVW viewer and in the device status in the source
viewer.
• File information display
By pressing the t button on the jog roller or the t key on the keyboard
Chapter 3 Operations
while a graphics file is selected, you can display information on the
graphics file and a thumbnail, as shown below, for as long as you hold
down the button or key.
3
Press the DSK button.
DSK button lights red, and the graphics file image appears in the PGM
viewer.
If you press the DSK button once more, the inserted image is removed. Each
press of the DSK button alternately inserts or removes the image.
Note
If you change the video to a black screen using FTB, no downstream key is
output. In this case, the DSK button lights amber.
Setting the downstream key transition times
You can set the DSK transition times which are the times taken for the text or
image to be gradually inserted, or to be gradually removed. These are set in frame
units.
1
Press the MENU button.
2
In the top menu, select [DSK].
92
Video Switching
Page 93

3
1 Select [IN Trans. Time], and confirm; 2 move the slider to set the time
until the image appears.
1
IN Trans. Time 20F
OUT Trans. Time 0F
Key Adjust
Crop Off
4
1 Select [OUT Trans. Time], and confirm; 2 move the slider to set the time
2
to disappear.
1
IN Trans. Time 20F
OUT Trans. Time 0F
Key Adjust
Crop Off
5
Press the MENU button to close the menu.
2
The DSK transition time setting appears in the DSK display of the effect
display in the operation screen.
Adjusting the downstream key
You can adjust the parameters for inserting text or image, or crop unwanted
portions.
Chapter 3 Operations
1
Press the DSK button to insert the image.
2
Press the MENU button.
3
In the top menu, select [DSK].
4
In the submenu, set the following adjustment items.
Adjusting the outline of the text or image
1 Select [Key Adjust], and confirm; 2 select the item to adjust, and
confirm; 3 adjust the sliders.
1
IN Trans. Time 20F
OUT Trans. Time 0F
Key Adjust
Crop Off
23
Clip 0%
Gain 0
Density 100%
Key Invert Off
The functions of the setting items are as follows.
[Clip]: Adjusts the threshold level for keying.
[Gain]: Adjusts the sharpness of the key outline.
[Density]: Adjusts the density of the text or image to be inserted.
Note
If you have recalled and adjusted a graphics file, the adjusted values of the
graphics file change as follows depending on the next file recalled:
Video Switching
93
Page 94

• When a file with no alpha channel is recalled: adjusted values remain
unchanged.
• When a file with an alpha channel is recalled: values return to their default
settings.
Inverting the key
You can invert the displayed parts and non-displayed parts of the combined
material.
1 Select [Key Adjust], and confirm; 2 select [Key Invert], and confirm.
[Key Invert] turns on or off each time it is selected.
1
IN Trans. Time 20F
Chapter 3 Operations
OUT Trans. Time 0F
Key Adjust
Crop Off
Cropping unwanted portions of the text or image
1 Select [Crop], and confirm; 2 select [On], and confirm; 3 select the side
(top, bottom, left, or right) to be displayed, and confirm; 4 move the slider
to crop.
1
IN Trans. Time 20F
OUT Trans. Time 0F
Key Adjust
Crop Off
5
Press the MENU button to close the menu.
Accessing Graphics Files Quickly
If you register a graphics file to one of the numeric buttons on the front panel, you
can quickly access that file whenever necessary.
Registering graphics files as presets
2
Clip 0%
Gain 0
Density 100%
Key Invert Off
23 4
Off
B On
Top 270
Left -350
Right 350
Bottom -270
94
Video Switching
1
Press INT in the NEXT selection buttons, and press it again after the INT
source selection menu appears.
The graphics preset menu appears.
Page 95

2
1 Select the number to register the graphics file to, and confirm; 2 select
[Preset], and confirm.
A list of graphics files that you can register appears.
Example: When registering to numeric button [2].
Chapter 3 Operations
Preset
Delete
Data Name
Preset
Delete
Data Name
2
Anycast Station b
Anycast Station_001
Anycast Station_002
aaaaaaa.tif
bbbbbbb.tif
SD_Safe_Area.tga
B Anycast Station b
Anycast Station_001
Anycast Station_002
aaaaaaa.tif
bbbbbbb.tif
SD_Safe_Area.tga
1
1
2
3
4
5
6
7
8
9
3
Select a graphics file, and confirm.
1
2
3
4
5
6
7
8
9
The graphics file is registered as a preset, and the file name appears next to
the number selected previously.
1
2 Anycast Station
3
4
5
6
7
8
9
Preset
Delete
Data Name
B Anycast Station b
Anycast Station_001
Anycast Station_002
aaaaaaa.tif
bbbbbbb.tif
SD_Safe_Area.tga
4
Press the MENU button to close the menu.
Video Switching
95
Page 96

Registering graphics files without displaying the menu
You can also register graphics files without displaying the graphics preset menu.
1
Press INT in the NEXT selection buttons.
The menu that appears next is unimportant.
2
Display the graphics file to register in the INT source viewer.
3
Press a numeric button (from 1 to 9) while holding down the SHIFT
button.
Chapter 3 Operations
Applying a name to the preset
ENTER
ESC
3
MENU
X-Y
REC
Hold down the SHIFT button, and press one of
numeric buttons 1 to 9.
SHIFT
P
V
W
789
456
102
In the graphics preset menu, 1 select the number of the preset to apply a name
to, and confirm; 2 select [Data Name], and confirm; 3 enter the data name in
the input box, and confirm.
23
Preset
Delete
Data Name
[
aaaaaaaaaa
Enter up to 20 characters.
]
1
2 Anycast Station
3
4
1
The data name is registered.
1
2 aaaaaaaaaa
3
4
Preset
Delete
Data Name
[
aaaaaaaaaa
]
Accessing the graphics files
1
2
Deleting a registered preset
1
2
Video Switching
96
Press INT in the NEXT selection buttons.
The menu that appears next is unimportant.
Press the numeric button to which the graphics file is assigned.
The accessed graphics file appears in the INT source viewer.
Press INT in the NEXT selection buttons, and press it again after the INT
source selection menu appears.
The graphics preset menu appears.
1 Select the number for the preset you want to delete, and confirm; 2 select
[Delete], and confirm.
Page 97

Preset
Delete
Data Name
2
1
1
2 Anycast Station
3
4
The following confirmation message appears.
Note
By pressing the ENTER button while holding down the SHIFT button, you
can delete all of the presets registered to the numeric buttons 1 to 9
simultaneously.
3
Press the ENTER button.
The preset is deleted, and the number display turns gray.
Showing a Logo on the Screen
For copyright protection purposes, you can superimpose a logo (160×120 pixel
graphic) on the video.
When the logo is enabled, the logo is superimposed on the program output video.
Basic operation for showing a logo
The basic procedure for showing a logo is as follows.
Import a logo.
Chapter 3 Operations
Select the logo source file.
The logo is displayed.
Showing a logo in the video
To show a logo, first it is necessary to import the logo file to the internal hard disk
of this unit.
For details on importing a logo file, see “Importing Logo Files” (page 237).
1
Press the MENU button.
2
In the top menu, select [Logo].
Video Switching
97
Page 98

3
1 Select [Logo Source], and confirm; 2 select the logo file from the list,
and confirm.
None
B aaaaaaaa.tif
bbbbbbbb.tif
ccccccccc.bmp
dddddddd.bmp
2
1
Logo Source None
Clip 0%
Gain 50
Density 100%
Location
The image is inserted in both the PGM viewer and PVW viewer.
Notes
• By selecting a logo file from the list, it always appears in the program
output video. If you do not want to show the logo, select [None].
Chapter 3 Operations
• File information display
By pressing the t button on the jog roller or the t key on the keyboard
while a logo file is selected, you can display information on the logo file
and a thumbnail, as shown below, for as long as you hold down the button
or key.
Adjusting the logo display
Video Switching
98
4
Press the MENU button to close the menu.
Adjust the parameters for logo insertion, and set the logo position.
1
Show the logo.
For details of the operation, see “Showing a logo in the video” (page 97).
2
Press the MENU button.
3
In the top menu, select [Logo].
4
In the submenu, set the following adjustment items.
Adjusting the outline of the logo
1 Select one of [Clip], [Gain], and [Density], and confirm; 2 adjust the
slider.
1
Logo Source None
Clip 0%
Gain 50
Density 100%
Location
2
Page 99

The functions of the setting items are as follows.
[Clip]: Adjusts the threshold level for the logo key.
[Gain]: Adjusts the sharpness of the outline.
[Density]: Adjusts the density of the text to be inserted.
Note
When you have recalled a logo file and made adjustments, the logo file
adjustment values for the logo file depend on the next recalled file as follows:
• When a file with no alpha channel is recalled: the adjustments are
maintained as is.
• When a file with an alpha channel is recalled: the adjustments are returned
to their default values.
Specifying the position of the logo display
1 Select [Location], and confirm; 2 select [X] or [Y], and confirm; 3
specify the position with the sliders.
1
Logo Source None
Clip 0%
Gain 50
Density 100%
Location
The functions of the setting items are as follows.
[X]: Specifies the horizontal position.
[Y]: Specifies the vertical position.
Note
After Step 1, you can specify the vertical or horizontal position by just
pressing the top, bottom, left, or right part of the positioner. (If you use the
positioner, there is no need to select [X] and [Y].)
5
Press the MENU button to close the menu.
Using Luminance Keying
Video A and video B images are combined by comparing the components of
brightness (luminance) to cut unneeded portions of the video B image.
Generally, bright lettering is drawn on a black background, and this is used as the
key.
A
2
X 290
Y 210
B
Chapter 3 Operations
3
X-Y
AB
Video Switching
99
Page 100

Notes
• Pressing the KEY button switches to key mode (the KEY button, NEXT
selection buttons, MIX button or EFFECT button light green, and the AUTO
TRANS button, CUT button, and transition lever now apply a keying
operation).
• You can also register graphics files to the numeric buttons on the front panel
and access them whenever necessary. For details, see “Accessing Graphics
Files Quickly” (page 94).
Basic operation for luminance keying
The basic procedure for luminance keying is as follows.
Chapter 3 Operations
Press the KEY button (Switches to key mode).
Select the key video with a NEXT selection
button.
Select [Luminance Key] for [Key Type] in the
top menu.
Select the effect pattern with the MIX button
or EFFECT button.
Adjust the key video.
Carry out the transition.
1
Press the KEY button.
The KEY button, NEXT selection buttons, and the MIX or EFFECT button
light green and are now used for video keying.
100
Video Switching
2
Select the video for keying by pressing the NEXT selection button assigned
to it.
A green frame appears around the selected video in the source viewer.
When 5 is selected
3
Press the MENU button.
4
In the top menu, select [Video Effect].
 Loading...