

Page 1

Live Content
Producer
Operating Instructions
Software Version 1.30
3-869-710-14(1)
AWS-G500
©2005 Sony Corporation
Page 2

Table of Contents
Usage Notes ............................................................................ 9
Chapter 1 Overview
Features of This System .......................................................11
Example Applications ...........................................................13
Names and Functions of Parts ............................................15
Chapter 2 Preparations
Installation/Default Settings .................................................41
Connections ..........................................................................49
Settings Related to Input Signals ........................................56
Relation Between Program Output Display and Input and
Front Panel............................................................................
Rear Panel............................................................................. 19
Side Panel ............................................................................. 23
Other Parts............................................................................ 24
Operation Screen .................................................................. 25
Menu Operations .................................................................. 30
Operation screen (Text Typing Tool Software) ................... 33
Installing the Unit .................................................................
Fitting a Keyboard................................................................ 42
Starting and Closing Down the Unit .................................... 44
Selecting the Keyboard Language........................................ 46
Setting the Time Zone .......................................................... 46
Setting the Date and Time .................................................... 47
Adjusting the Display Brightness......................................... 47
Selecting the Video Output Signal Format........................... 48
Connecting a Camera with VISCA Support.........................
Connecting a Microphone .................................................... 50
Connecting a Computer (RGB Input)................................... 51
Connecting a Camcorder ...................................................... 51
Connecting a VCR................................................................ 52
Connecting an External Hard Disk....................................... 52
Connecting a Plasma Display/Projector/Monitor................. 53
Connecting an Amplifier ...................................................... 54
Preventing Accidental Cable Disconnection........................ 54
Installing Option Modules.................................................... 55
Relation Between Input Signals and System Components...
Video Signal Related Settings.............................................. 57
Audio Signal Related Settings.............................................. 59
Output Formats ................................................................63
15
41
50
56
2
Page 3

Chapter 3 Operations
Video Switching ....................................................................65
Basics of Video Switching ...................................................
65
Changing the Video with a Cut ............................................ 66
Changing the Video with a Effect Transition....................... 68
Changing the Transition Time.............................................. 72
Changing the Effect Pattern.................................................. 73
Using Picture-in-Picture (PinP) for Combining Videos ....... 73
Adjusting the Picture-in-Picture (PinP)................................ 75
Using Fade-to-Black (FTB).................................................. 77
Using Color Bars and Color Mattes ..................................... 78
Using the Downstream Key (DSK) Function to Add Text
or an Image .....................................................................
78
Showing a Logo on the Screen............................................. 82
Using Luminance Keying..................................................... 84
Adjusting the Combined Video ............................................ 86
Cropping Unwanted Portions From the Video Being
Combined........................................................................
87
Applying Edge Effects ......................................................... 87
Checking the Results of Combining Videos
(Effect Preview)..............................................................
88
Giving Priority to Displaying the PVW Viewer................... 90
Creating a Title Graphic with the Text Typing Tool ...........91
Features of the Text Typing Tool Software .........................
91
Flow of Operations............................................................... 92
Starting Up............................................................................ 94
Closing Down....................................................................... 95
Standard Operations ............................................................. 95
File Operations ..................................................................... 98
Working on Text Objects ................................................... 104
Working on Line Objects ................................................... 111
Shadow Operations............................................................. 113
Background Color Operations (Creating Telop and Flip).. 115
Color Operations ................................................................ 118
Object Layout ..................................................................... 122
Adding and Deleting Sheets ............................................... 125
Simulating the Keying Effects............................................ 125
Key Combination in the Anycast Station Main Software .. 127
Importing a Font File.......................................................... 129
Deleting a Font File............................................................ 130
Controlling Cameras ...........................................................132
Registering Cameras to be Controlled................................
132
Controlling Camera Manually............................................ 133
Storing a Camera Preset ..................................................... 134
Setting the Camera Control ................................................ 137
Resetting the Camera.......................................................... 138
About Camera Tallies......................................................... 139
Audio Mixing ........................................................................141
3
Page 4

Recording Video and Audio on an External Device .........142
Recording Program Output on a VCR................................
142
Recording Inputs on an External Hard Disk....................... 144
Operations on Files on the External Hard Disk.................. 147
Disconnecting the External Hard Disk ............................... 150
Recovering an External Hard Disk..................................... 151
Using a Computer to Play Files Recorded on an External
Hard Disk ........................................................................153
Using the Intercom Function .............................................154
Connecting the Intercom System........................................
154
Speaking on the Intercom System ...................................... 155
Monitoring Audio ................................................................156
Determining the Audio Signal Output Destinations...........
156
Displaying the Audio Signal Output Destinations ............. 157
Monitoring Output Audio................................................... 158
Monitoring the Audio of a Particular Channel Only .......... 159
Video/Audio Signal Adjustments and Settings ................160
Adjusting Analog Video Input Signals...............................
160
Making the Gradation of SDI Input Signals Appear Smooth
(When Using the Serial Digital Interface Module).......
161
Adjusting the Clock Phase of RGB Signals ....................... 161
Adjusting Color Matte........................................................ 161
Applying an Offset to the Program Output Video.............. 162
Setting the RGB Output Signal Format.............................. 162
Applying Filters to the Program Output Video .................. 163
Adjusting the Audio Input Signal Levels ........................... 164
Cutting High Frequency or Low Frequency....................... 164
Adjusting the Equalizer ...................................................... 165
Using the Limiter or Compressor....................................... 166
Adjusting the Audio Left and Right Channel Balance....... 166
Adjusting the Output Levels for Each Destination............. 166
If the Output Video Is Delayed with Respect to the Audio 167
Adjusting the Output Using the Oscillator Signal.............. 168
Saving and Loading Various Settings ...............................170
Storable Data ......................................................................
170
Saving Various Settings Data............................................. 171
Loading Various Saved Settings Data................................ 171
Deleting Various Saved Settings Data ............................... 172
Exporting Various Settings Data........................................ 173
Importing Various Settings Data........................................ 174
Importing and Deleting Files ..............................................175
Importable Files..................................................................
175
Importing Graphics Files.................................................... 175
Importing Logo Files.......................................................... 176
Deleting Files...................................................................... 177
Checking the Internal Hard Disk Remaining Capacity ...... 178
Formatting an External Hard Disk .....................................179
Formatting a “Memory Stick” ............................................181
4
Page 5

Chapter 4 Appendix
Formatting a USB Flash Memory ....................................... 183
Streaming .............................................................................185
What Is Streaming? ............................................................
185
Configuring the Network Settings...................................... 186
Setting Live Streaming Transmission ...............................188
Starting and Stopping Streaming........................................
195
Settings Required for Viewing Streaming.......................... 195
Placing Streaming Links in a Web Site.............................. 197
Maintenance ........................................................................199
Checking the Operating Software Version.........................
199
Upgrading the Operating Software..................................... 200
Messages .............................................................................203
Message Structure ..............................................................
203
List of Messages................................................................. 205
Troubleshooting ..................................................................211
“Memory Stick” Media ........................................................ 215
Notes on using “Memory Stick” media ........................................ 215
About data..................................................................................... 215
Notes on using “Memory Stick Duo”........................................... 215
Notes on using the Memory Select function................................. 215
Specifications ......................................................................216
Dimensions ..........................................................................219
Glossary ...............................................................................220
Index .....................................................................................223
5
Page 6

6
Page 7

Owner’s Record
The model and serial numbers are located at the
bottom.
Record these numbers in the spaces provided
below. Refer to them whenever you call upon your
Sony dealer regarding this product.
Mo del No .
Ser ial No.
WARNING
To reduse the risk of fire or electric
shock, do not expose the unit to rain
or moisture.
fermé. Ne confier l’entretien de
l’appareil qu’à un personnel qualifié.
CET APPAREIL DOIT ÊTRE RELIÉ À
LA TERRE.
WARNING
This unit has no power switch.
When installing the unit, incorporate a readily
accessible disconnect device in the fixed wiring,
or connect the power cord to a socket-outlet which
must be provided near the unit and easily
accessible.
If a fault should occur during operation of the unit,
operate the disconnect device to which the power
supply off, or disconnect the power cords.
To avoid electrical shock, do not open
the cabinet. Refer servicing to
qualified personnel only.
THIS APPARATUS MUST BE
EARTHED.
WARNUNG
Um Feuergefahr und die Gefahr eines
elektrischen Schlages zu vermeiden,
darf das Gerät weder Regen noch
Feuchtigkeit ausgesetzt werden.
Um einen elektrishen Schlag zu
vermeiden, darf das Gehäuse nicht
geöffnet werden. Überlassen Sie
Wartungsarbeiten stets nur
qualifiziertem Fachpersonal.
DIESES GERÄT MUSS GEERDET
WERDEN.
AVERTISSEMENT
Afin d’éviter tout risque d’incendie ou
d’électrocution, ne pas exposer cet
appareil à la pluie ou à l’humidité.
Afin d’écarter tout risque
d’électrocution, garder le coffret
WARNUNG
Dieses Gerät hat keinen Netzschalter.
Beim Einbau des Geräts ist daher im Festkabel ein
leicht zugänglicher Unterbrecher einzufügen, oder
das Netzkabel muß mit einer in der Nähe des
Geräts befindlichen, leicht zugänglichen
Wandsieckdose verbunden werden.
Wenn während des Betriebs eine
Funktionsstörung auftritt, ist der Unterbrecher zu
betätigen bzw. das Netzkabel abzuziehen, damit
die Stromversorgung zum Gerät unterbrochen
wird.
AVERTISSEMENT
Cet appareil ne possède pas d’interrupteur
d’allmentation.
Lors de l’lnstallation de l’appareil, incorporer un
dispositif de coupre dans le cablage fixe ou
brancher le cordon d’alimentation dans une prise
murale proche de l’appareil et facilement
accessible.
En cas de problème lors du fonctionnement de
l’appareil, enclencher le dispositif de coupre
d’alimentation ou dèbrancher le cordon de la prise.
WARNING: THIS WARNING IS
APPLICABLE FOR USA ONLY.
If used in USA, use the UL LISTED power cord
specified below.
DO NOT USE ANY OTHER POWER CORD.
Plug Cap Parallel blade with ground pin
(NEMA 5-15P Configuration)
Cord Type SJT, three 16 or 18 AWG wires
7
Page 8

Length Minimum 1.5 m, Less than 2.5 m
(8 ft 3 in)
Rating Minimum 10 A, 125 V
Using this unit at a voltage other than 120 V may
require the use of a different line cord or
attachment plug, or both. To reduce the risk of fire
or electric shock, refer servicing to qualified
service personnel.
WARNING: THIS WARNING IS
APPLICABLE FOR OTHER COUNTRIES.
1. Use the approved Power Cord (3-core mains
lead) / Appliance Connector / Plug with
earthing-contacts that conforms to the safety
regulations of each country if applicable.
2. Use the Power Cord (3-core mains lead) /
Appliance Connector / Plug conforming to the
proper ratings (Voltage, Ampere).
If you have questions on the use of the above
Power Cord / Appliance Connector / Plug, please
consult a qualified service personnel.
AVERTISSEMENT:
Bei Frage über die Eignung und Sicherheit von
Netzkabeln (dreiadrig), Geräteanschlüssen und
Netzkabelsteckern wenden Sie sich bitte an einen
qualifizierten Electrotechniker.
For the customers in the USA
This equipment has been tested and found to
comply with the limits for a Class A digital device,
pursuant to Part 15 of the FCC Rules. These limits
are designed to provide reasonable protection
against harmful interference when the equipment
is operated in a commercial environment. This
equipment generates, uses, and can radiate radio
frequency energy and, if not installed and used in
accordance with the instruction manual, may
cause harmful interference to radio
communications. Operation of this equipment in a
residential area is likely to cause harmful
interference in which case the user will be required
to correct the interference at his own expense.
You are cautioned that any changes or
modifications not expressly approved in this
manual could void your authority to operate this
equipment.
1. Utiliser un cordon d’alimentation approuvé
(conducteur d’alimentation 3 âmes)/
connecteur d’appareil/prise avec contacts de
mise à la terre conforme aux règles de sécurité
de chaque pays si applicable.
2. Utiliser un cordon d’alimentation approuvé
(conducteur d’alimentation 3 âmes)/
connecteur d’appareil/prise conforme aux
valeurs nominales (tension, ampérage)
correctes.
S’adresser à un personnel de service qualifié pour
toute question concernant l’emploi du cordon
d’alimentation/connecteur d’appareil/prise
cidessus.
WARNUNG:
1. Verwenden Sie Netzkabel(dreiadrig),
Geräteanschlüsse und Netzkabelstecker mit
Masseleitung, die den Sicherheitsrichtlinien
des jeweiligen Landes entspricht.
2. Verwenden Sie Netzkabel (dreiadrig),
Geräteanschlüsse und Netzkabelstecker mit
Masseleitung, die den vor Ort herrschenden
Spannungsanforderungen (Spannug,
Stromstärke) entsprechen.
The shielded interface cable recommended in this
manual must be used with this equipment in order
to comply with the limits for a digital device
pursuant to Subpart B of Part 15 of FCC Rules.
IMPORTANT
The nameplate is located on the bottom
CAUTION
Danger of explosion if battery is incorrectly
replaced.
Replace only with the same or equivalent type
recommended by the manufacturer.
Dispose of used batteries according to the
manufacturer’s instructions.
IMPORTANT
La plaque signalétique se situe sous l’appareil.
ATTENTION
Risque d’explosion si la batterie n’est pas
remplacée correctement.
Utilisez uniquement le même type de batterie ou
une batterie équivalente recommandée par le
fabricant.
Jetez les batteries usagées selon les instructions du
fabricant.
8
Page 9

WICHTIG
Das Namensschild befindet sich auf der Unterseite
des Gerätes.
Usage Notes
VORSICHT
Explosionsgefahr bei Verwendung falscher
Batterien.
Batterien nur durch den vom Hersteller
empfohlenen oder einen gleichwertigen Typ
ersetzen.
Verbrauchte Batterien entsprechend den
Anweisungen des Herstellers entsorgen.
For the customers in Europe
WARNING
This is a Class A product. In a domestic
environment, this product may cause radio
interference in which case the user may be
required to take adequate measures.
Pour les utilisateurs en Europe
AVERTISSEMENT
Il s’agit d’un produit de Classe A. Dans un
environnement domestique, cet appareil peut
provoquer des interférences radio, dans ce cas
l’utilisateur peut être amené à prendre des mesures
appropriées.
Für Kunden in Europa
Warnung
Dies ist eine Einrichtung, welche die FunkEntstörung nach Klasse A besitzt. Diese
Einrichtung kann im Wohnbereich Funkstörungen
verursachen; in diesem Fall kann vom Betreiber
verlangt werden, angemessene Maßnahmen
durchzuführen und dafür anfzukommen.
Für Kunden in Deutschland
Dieses Gerät ist nur für den Gebrauch in Gewerbe
und Leichtindustrie bestimmt.
For Customers in Taiwan only
Copyright
Using this unit for video and/or audio switching,
or distribution over the Internet or otherwise may
in some cases require the permission of the
copyright holder of the video or audio.
To protect copyright, observe the following points
carefully when using this unit.
• When connecting a recording device to this and
recording video or audio, carefully observe laws
relating to copyright.
• Without the permission of the copyright holder,
the showing or distribution of video or audio
material of which the copyright is held by a third
party, or the act of recording on the hard disk of
this unit, sharing folders, and permitting of
access to a private group or to the public is
prohibited by law.
• Even with the right to show or distribute, the act
of using this unit to edit original content with
wipes or dissolves, for example, may be
prohibited by law.
• With a software upgrade or functional
extension, with the object of protecting
copyright, the specifications for the video and
audio signals that can be input may be changed
without notice.
Points to check before using
devices
• When recording or streaming valuable data, be
sure to check the device connections
beforehand, or carry out a streaming test, to
make sure that the system is operating normally.
• If when using a camera or videocassette
recorder, tape or similar there should be a failure
in another device preventing recording, no
responsibility can be taken for any loss of the
material which was to have been recorded.
• Under copyright law, you may not use recorded
video or audio other than for your personal
enjoyment without the permission of the
copyright holder. Note that at live performances,
shows and exhibitions, even for your personal
entertainment shooting may be restricted.
Usage Notes
9
Page 10

Regarding cables
Use cables (particularly generic RGB) which are
as short as possible.
disk mean that frame drop or other problems
may occur.
• To connect the recommended hard disk to this
unit, use the interface cable supplied with the
recommended hard disk.
IEEE1394 (i.LINK) cables
Use cables with enhanced shielding, ferrite cores,
and similar noise-reduction measures.
About the LCD Display
• Do not wipe the surface of the LCD display with
a wet object. Water that gets inside the unit may
cause it to malfunction.
• Do not set or drop objects on the LCD display.
Also, do not put pressure on the display, such as
by leaning on it with your hand or elbow.
• Condensation may form on the LCD display
when the unit is moved from a cold place to a
warm place, such as from the outdoors to room
temperature. If condensation forms, thoroughly
wipe off any moisture before using the unit. We
recommend using tissues to wipe up any
condensed moisture. If you wipe up the
condensed moisture while the LCD display is
still cold, the condensation may form again.
Therefore it is best to wait until the LCD display
has warmed up to room temperature.
• The LCD display is made with extremely high
precision technology. Nonetheless, in some
cases black dots may appear, and red, green, and
blue dots may not disappear. In addition,
depending on the angle the LCD display is
viewed from, you may see stripes of irregular
color or brightness. This is due to the
construction of the LCD display and is not a
malfunction.
Ensuring Good Performance
From This Unit
Operation and Storage
Avoid using or storing the unit in the following
places.
• Where it is subject to extremes of cold or heat
(operating temperature 0ºC to 40ºC (32ºF to
104ºF))
• Where it is subject to direct sunlight for
extended periods, or close to heating equipment
(Note that the temperature inside a car with the
windows closed on a summer day can exceed
50ºC (122ºF))
• In conditions of high humidity or much dust
• Where it is subject to severe vibration
• Close to a source of strong magnetic fields
• Close to a radio, television, or other source of
powerful electromagnetic radiation
Install in a level place
This unit is designed to be operated in a level
place. Do not turn it vertically, or incline at an
angle of 20 degrees or more.
Do not apply strong shocks
Dropping the unit, or subjecting it to other strong
shocks may cause it to break.
Do not obstruct the ventilation holes
To prevent the temperature from rising, do not, for
example, wrap the unit in a blanket while
operating.
External Hard disk
• The hard disk is vulnerable to vibration and
shock. Be sure to install the hard disk in the best
possible environment, following the operating
instructions supplied with the drive.
• Even using the recommended hard disk,
depending on the operating environment or
conditions, or in the event of deterioration
because of age, the full performance of the hard
disk may not always be obtained.
• Even when using the recommended hard disk to
store material, the characteristics of the hard
Usage Notes
10
Care of the unit
Clean dirt from the cabinet and panel by wiping
gently with a dry cloth. If the unit is very dirty,
wipe with a cloth steeped in a little neutral
detergent, then wipe dry. Do not use alcohol,
thinners, insecticides, or other volatile solvents, as
this may cause the case to deform or damage the
finish.
Shipping
Pack in the original carton, or similar packaging,
to cushion the unit from violent shocks.
Page 11

Overview
Features of This System
The Anycast Station Live Content Producer
AWS-G500 is an audiovisual production system
including camera control, video switching, and a
live distribution system for the Internet.
The following are the principal features.
Chapter
Superimposed text
(downstream key)
1
Chapter 1 Overview
LogoImage keyed in
All-in-One
AWS-G500 is light and conveniently portable,
while combining video switching and audio
mixing functions with video monitor and camera
control, to provide an inclusive package for live
content generation. Whereas previously it was
necessary to assemble various devices, this is no
longer necessary, and the time and effort required
to install, connect, and adjust the equipment has
been greatly reduced.
Video Switching
• You can switch among up to six video inputs:
analog, DV, SDI (when using a serial digital
interface module), and RGB.
• The system provides both mix (dissolve) and
wipe transition effects, Picture-in-Picture for
combining videos, and luminance keying
functions.
• Before carrying out a switching operation, you
can preview the next selected image in the PVW
viewer.
• You can mix video using a maximum of five
effects at one time, such as incorporating
(keying) a separate video clip when switching
between two video clips with a wipe or other
transition effect, as well as superimposing text
(downstream key) and displaying a copyright
logo.
Text Typing Tool Software
The system includes installed text typing tool
software, which allows easy creation of titles.
Titles created with the text typing tool software
can be used in the DSK (downstream key) or as
luminance keys.
Audio Mixing
You can mix up to six audio inputs.
Each channel is provided with a range of
functions, including fader, input trim, filter
equalizer, limiter, and compressor pan (balance),
allowing the sound quality and level to be adjusted
on each channel separately.
In addition, each channel has a prefader listen
function, allowing you to monitor the input audio
before any effects are applied by the fader, and
each output has a delay function to correct any
discrepancies between the audio and video timing.
Remote Camera Control
• Using a camera with VISCA support, you can
remotely control the camera movements,
including panning, tilting, and zoom.
• The camera preset function allows you to store
camera pan, tilt, and zoom settings. Using the
camera preset function, you can immediately set
the camera to the preset state when required just
by pressing a button.
Features of This System
11
Page 12

External Recording Material
on an External Hard Disk
You can record (.avi) video material (video and
Chapter 1 Overview
audio) being input to the unit to an external hard
disk connected to the i.LINK connector. By
connecting the external hard disk containing the
recorded material to a nonlinear editing system,
you can go straight into editing operations,
without the need to transfer data from video tape
to the nonlinear editing system.
You can also play files recorded on the external
hard disk as input source material.
This system can use two external hard disks as
standard, or three with the addition of an option
module, recording four channels (maximum six
channels) simultaneously.
Streaming Broadcast
You can encode in Real Media streaming file
format (.rm) in real time, for a live broadcast.
Features of This System
12
Page 13
Example Applications
The following are examples of applications utilizing the functions of AWSG500.
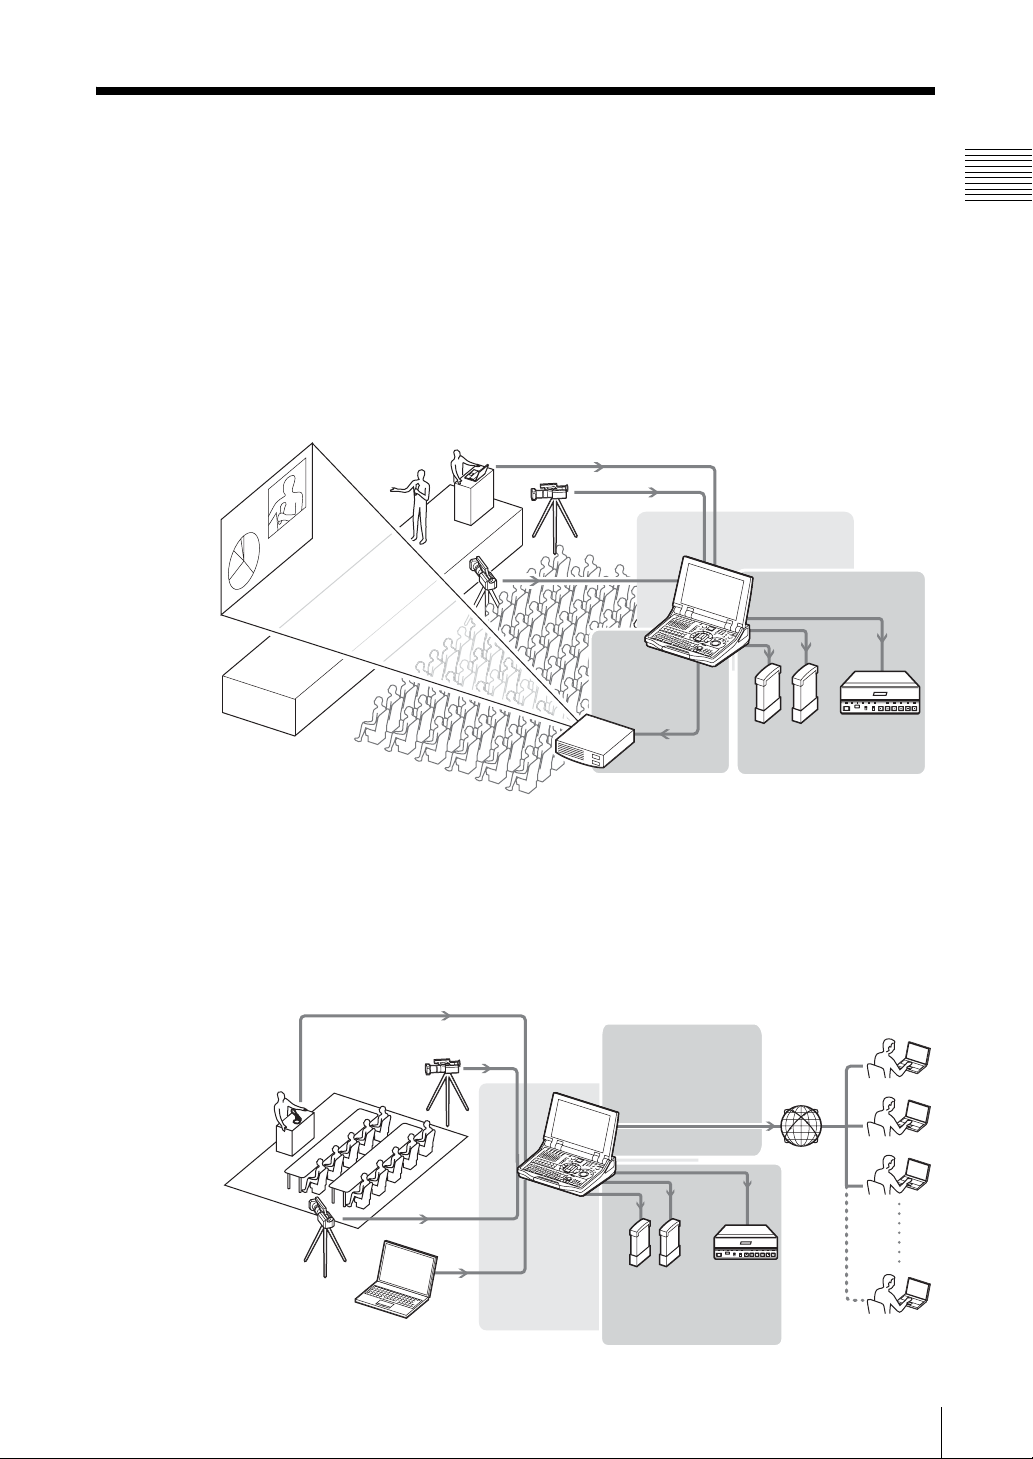
Event and presentation support
At seminars, events, and presentations you can use this unit to switch among
camera inputs and data from a computer, while displaying the output on a
projector or large monitor.
Principal functions used: video switching (such as cut switching or picture-inpicture), audio mixing, RGB input/output
RGB input
Video output
, (page 162)
RGB output
Switching
, (page 65)
Recording
, (page 142)
External hard
disk
Chapter 1 Overview
VTR
Internet live broadcast
This unit includes a streaming server function. For broadcast to small audiences
(about 20 people) over an intranet, this unit can be used as the streaming server
without requiring an external server.
Principal functions used: video switching (such as a wipe transition), audio
mixing, streaming encode, streaming server
Switching
, (page 65)
Streaming settings/
broadcast
, (page 185)
External
hard disk
Recording
, (page 142)
VTR
Example Applications
13
Page 14
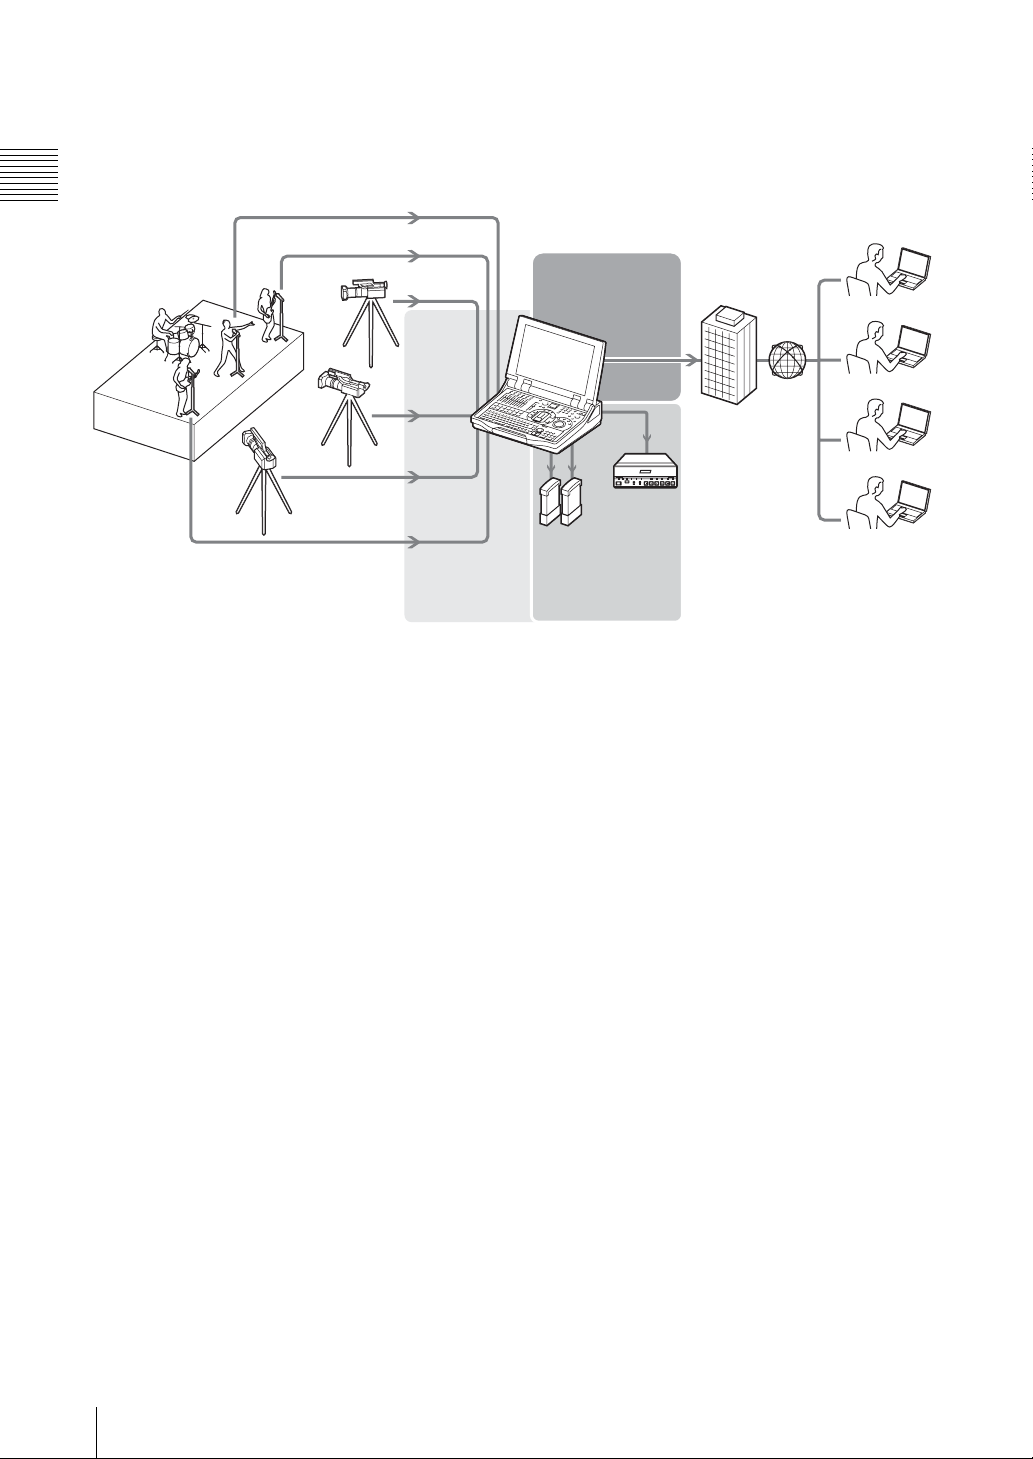
For the broadcast of things like live events to large audiences, you can broadcast
via a streaming server (Helix server).
Principal functions used: video switching (such as a mix transition), audio
Chapter 1 Overview
mixing, streaming encode, camera presets.
Streaming
, (page 185)
External
hard disk
Switching
, (page 65)
Recording
, (page 142)
VTR
Internet
provider
Broadcast
Example Applications
14
Page 15
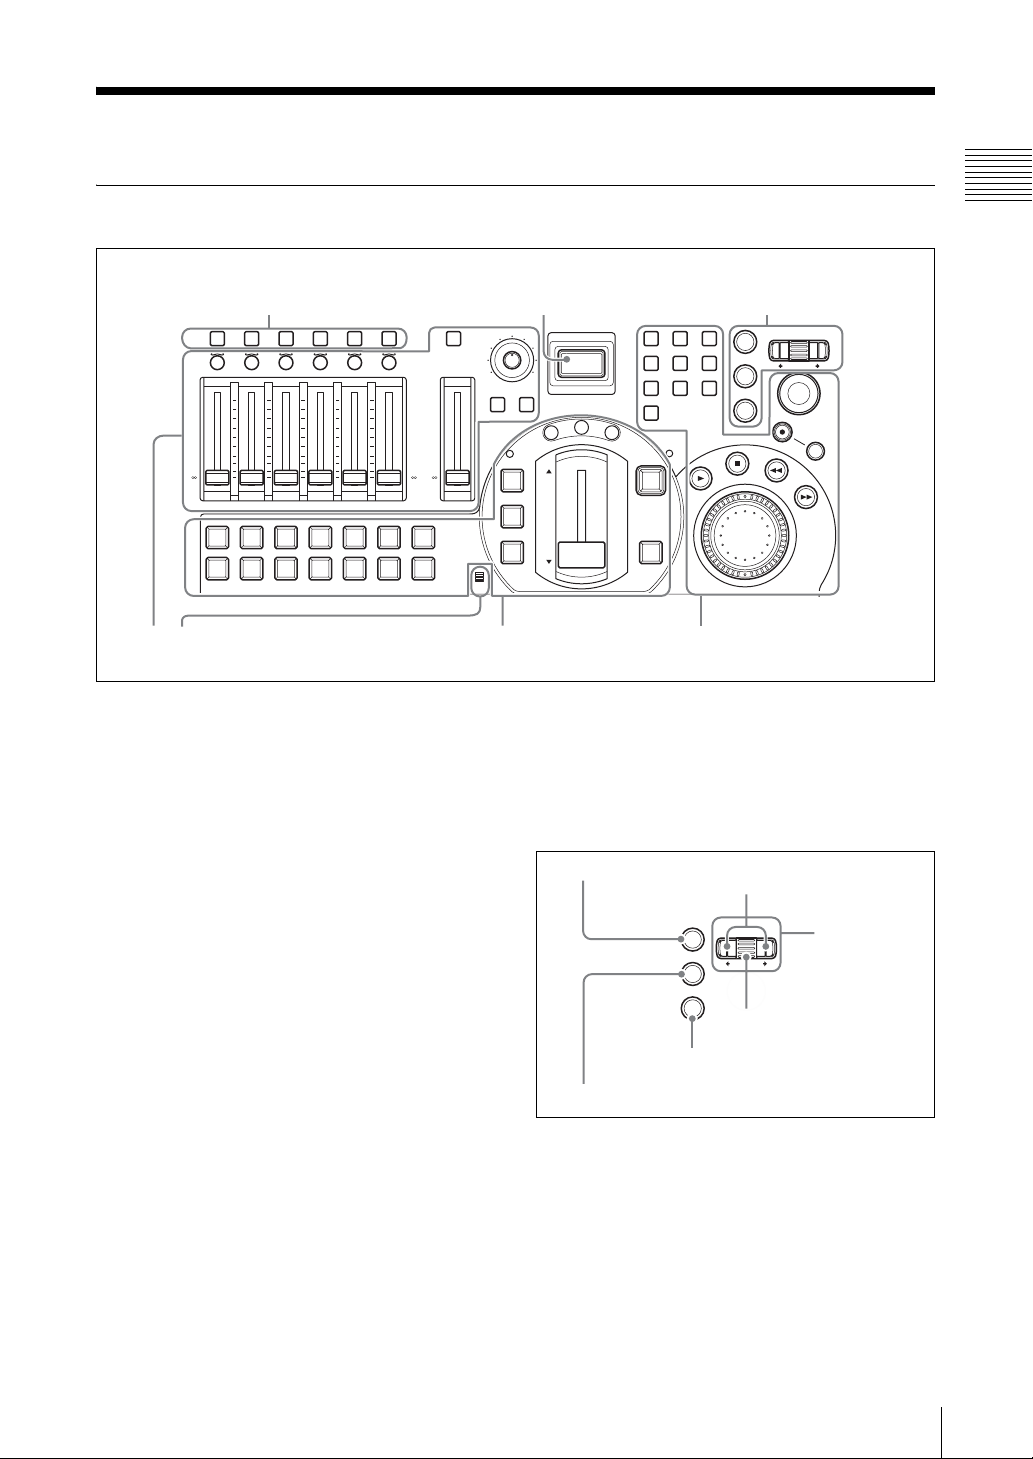
Names and Functions of Parts
Front Panel
ACCESS/
PFL
CH ON
+
10
+
5
0
-
5
-
10
-
20
-
30
-
40
-
60
-
2 Audio operation section
(see page 16)
a ACCESS buttons
These buttons display the ACCESS menu (page
30), and for audio monitoring (page 159). When
you press an ACCESS button in one of columns 1
to 6, the ACCESS menu appears allowing
adjustment of the related video and audio settings.
If you hold down the ACCESS button in one of
columns 1 to 6 for 0.5 seconds or more, you can
monitor the audio assigned to the channel fader in
the same column, and display the audio level
meter for that channel only.
By holding down two or more ACCESS buttons
simultaneously, you can monitor multiple audio
channels.
b ON LINE button
This button starts and stops streaming broadcast
(page 195).
AUDIO MONITOR
+
10
+
10
+
5
+
5
0
0
-
5
-
5
-
10
-
10
-
20
-
20
-
30
-
30
-
40
-
40
-
60
-
60
-
-
654321
654321
PGM
PGM
NEXT
INT
MIC
2 ON LINE button1 ACCESS buttons
P
V
W
789
456
1023
FTB
DSK
0
MONI LEVEL
DIM TB
KEY
CUT
AUTO
TRANS
ON LINE
10
E
F
C
F
T
E
X
I
M
3 Video switcher section
(see page 17)
4 Device control section
1 Menu control section
ENTER
ESC
MENU
X-Y
REC
SHIFT
JOG/SHUTTLE
(see page 18)
1 Menu control block
Use these controls to access the menus and
settings.
For details of operations, see “Menu Operations”
(page 30).
1 ENTER button
2 ESC button
Arrow buttons
ENTER
ESC
MENU
Roller
3 MENU button
4 Jog roller
a ENTER button
Chapter 1 Overview
This button confirms an item or input value in
menu operations.
b ESC button
This button closes the current menu. In
alphanumeric input mode, it cancels, and returns
one level up the menu tree.
Names and Functions of Parts
15
Page 16
c MENU button
This toggles the top menu on or off.
Chapter 1 Overview
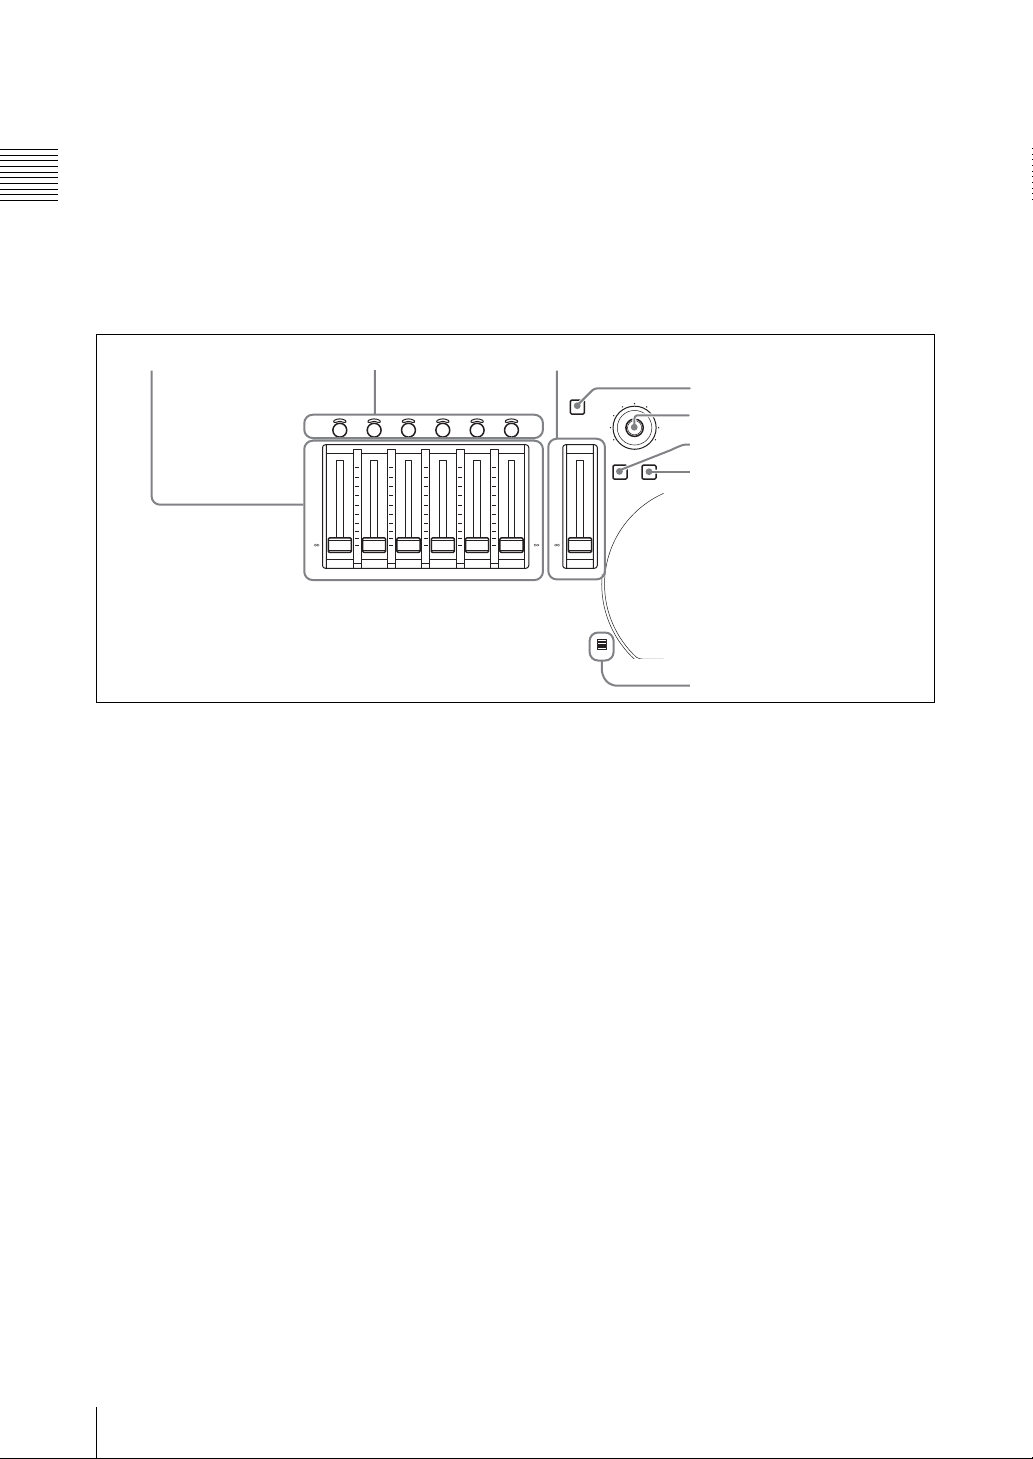
2 Audio operation section
Use these controls for audio settings and
operations.
1 Audio channel faders 2 CH ON buttons 3 PGM fader
CH ON
d Jog roller
Turn the roller up and down to select a menu item.
Pressing the roller like a button has the same effect
as pressing the ENTER button.
Use the arrow buttons when a menu operation
requires movement to left or right.
4 AUDIO MONITOR button
5 Monitor level adjustment knob
10
6 DIM button
7 TB button
0
+
10
+
5
0
-
5
-
10
-
20
-
30
-
40
-
60
-
+
10
+
10
+
5
+
5
0
0
-
5
-
5
-
10
-
10
-
20
-
20
-
30
-
30
-
40
-
40
-
60
-
60
-
-
654321
MONI LEVEL
DIM TB
PGM
MIC
a Audio channel faders
These buttons adjust the input levels of the audio
assigned to channels 1 to 6, in the range from –∞
to +10 dB (page 141).
For details of audio signal assignment, see “Audio
Signal Related Settings” (page 59).
b CH ON buttons
These buttons select whether the audio channels 1
to 6 are enabled or disabled.
Pressing a button enables the audio assigned to the
corresponding audio channel. Channels for which
the button is off are disabled (page 141).
c PGM fader
This button adjusts the overall audio output level
of the program output, in the range from –∞ to +10
dB (page 141).
d AUDIO MONITOR button
This button switches the monitoring target.
Pressing if cycles the audio to be monitored
through the sequence PGM
t AUX1 t AUX2
t MIX t PGM (page 158).
8 Microphone
e Monitor level adjustment knob
This button adjusts the level of the monitor output
and the output from the internal speakers and from
the headphones (page 158).
f DIM button
This button enables the “audio attenuate” function.
This reduces each of the level of the monitor
output and the output from the internal speakers
and from the headphones by 20 dB.
g TB button
This button lets you to speak while
communicating on an external intercom system.
While the TB button is lit, sound from the front
panel microphone and headset microphone is
output over the intercom system (page 155).
h Microphone
This button lets you speak on an external intercom
system. While the TB button is lit, sound from the
microphone is output over the intercom system
(page 155).
Names and Functions of Parts
16
Page 17

3 Video switcher section
This switches video.
1 PGM selection buttons
4 KEY button
3 CUT button
654321
INT
6 EFFECT button
7 PVW button5 MIX button
FTB
DSK
8 FTB button
9 DSK button
E
F
C
F
T
E
P
V
X
I
W
M
KEY
CUT
PGM
AUTO
NEXT
TRANS
MIC
Chapter 1 Overview
2 NEXT selection buttons
a PGM selection buttons
These buttons select the video which will be
displayed on the program output (page 66).
Buttons 1 to 6 select the corresponding assigned
video, and the INT button selects a video image
generated internally by this unit (color matte, color
bars, graphics files).
When you press one of these buttons, lighting it
red, the video assigned to the button is sent to the
program output.
For details of video assignment, see “Video Signal
Related Settings” (page 57).
b NEXT selection buttons
The NEXT selection buttons have the following
functions.
• Selecting the video to be output on the program
output after next switching transition (page 67)
• Selecting the video to be used for picture-inpicture (page 74)
• Selecting the video to be used when inserting a
key in the program output (page 84)
• Specifying a camera to be controlled during
camera control operations (page 133)
• Selecting the video for recording or playback
(page 145, 147)
Buttons 1 to 6 select the corresponding assigned
video, and the INT button selects a video image
generated internally by this unit (color matte, color
bars, graphics files).
0 Transition lever
qa Indicators
qs AUTO TRANS button
d KEY button
This button effectuates keying (pages 84). When
this key lights green, the NEXT selection buttons,
MIX button, AUTO TRANS button, CUT button,
and transition lever are then assigned to keying.
e MIX button
This button effectuates a dissolve (gradually
blending a new video into the existing image).
When applying an effect it gradually blends in the
effect (page 69).
f EFFECT button
This button enables an effect other than dissolve in
a transition or when applying an effect (page 70).
You can also use it as a shortcut to the [Effect
Pattern] menu.
g PVW button
With this button you can check the result of keying
and picture-in-picture before switching it to
program output, on the PVW viewer (page 88).
h FTB button
This button fades the video in from or out to a
black screen (“fade-to-black”) (page 77).
i DSK button
This button add is used to images or text to the
program output video (page 78). You can use it to
superimpose text and so on.
c CUT button
This button instantaneously switches the video
(page 65).
j Transition lever
This lever allows you to manually execute a
transition or effect (page 69).
Names and Functions of Parts
17
Page 18
k Indicators (Ff)
789
456
123
ENTER
X-Y
REC
SHIFT
JOG/SHUTTLE
FTB
DSK
These indicators show the direction in which the
transition lever is being moved. Moving the
transition lever in the direction of the lit indicator
starts the transition or effect.
Chapter 1 Overview
However, supposing you press the AUTO TRANS
button after moving the transition lever to the
middle, for example, an inconsistency between the
position of the fader and the application of the
effect will arise and both indicators will light.
l AUTO TRANS button
This button carries out an automatic transition
with a preset transition time, either from one video
to another or when applying an effect (page 69).
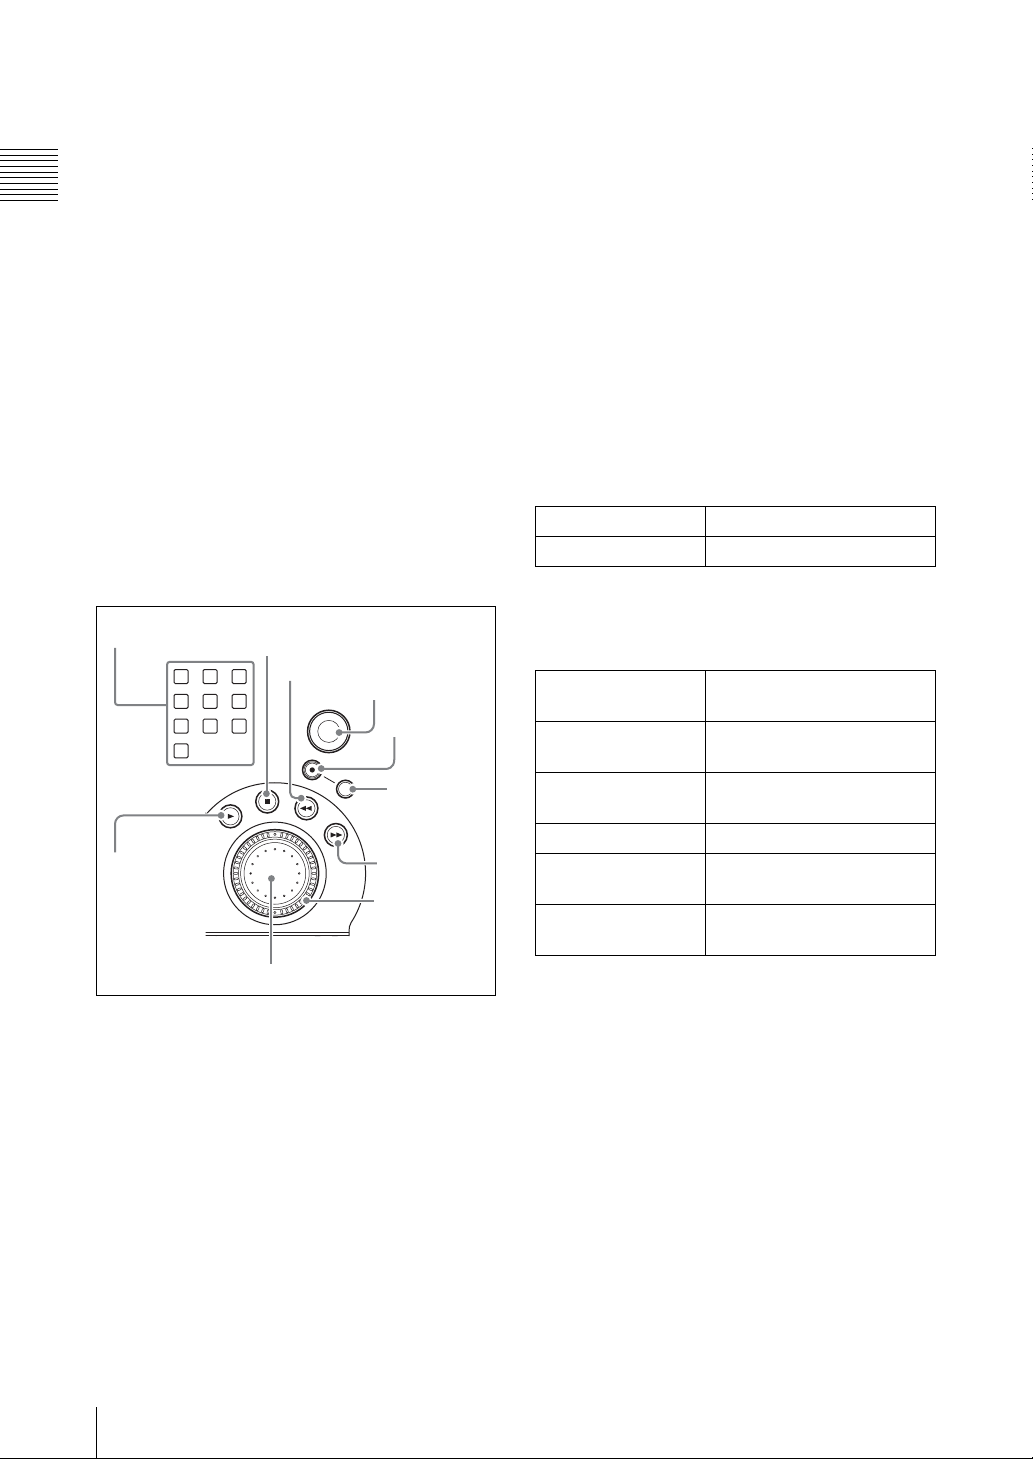
4 Device control section
Use these controls for remote control of a camera
with VISCA support connected to this system
(page 132) or hard disk operations (material
recording, file playback) (page 144, 147).
1 Numeric buttons
2 PLAY
button
3 STOP button
4 REW button
8 Positioner
5 FFWD
9 Shuttle dial
6 REC button
7 SHIFT
button
button
During recording on the hard disk, hold down the
REC button and press this button to stop recording
(page 146).
d REW button
During file playback, play back fast in the reverse
direction. Each time you press, the reverse speed
increases (in six steps) (page 149).
e FFWD button
During file playback, play back fast in the forward
direction. Each time you press, the playback speed
increases (in six steps) (page 149).
f REC button
This button is used to start or stop the external hard
disk recording (page 145).
REC + PLAY button Start hard disk recording
REC + STOP button Stop hard disk recording
g SHIFT button
This button is pressed while using other controls to
perform the following operations.
SHIFT + jog dial Aperture (iris) adjustment on
camera with VISCA support
SHIFT + numeric
button (1 to 6)
SHIFT + numeric
button (0)
SHIFT + REW button Skip to the beginning of a file
SHIFT + FFWD
button
SHIFT + STOP
button
Set camera presets
Camera reset
Skip to the end of a file
Close the file
18
0 Jog dial
a Numeric buttons
These buttons are used to save or recall a camera
preset, or reset a camera (page 134, 138).
b PLAY button
This button plays back a file at normal speed.
Hold down the REC button and press this button,
to start recording on the hard disk (page 144).
c STOP button
This button stops file playback. Press shift and
then press this button to switch the source viewer
back from viewing a file on the hard disk to normal
input (page 149).
Names and Functions of Parts
h Positioner
This control is used to pan or tilt the camera. You
can also control the speed of the camera by
adjusting how hard you press this button (page
134).
You can also change the picture-in-picture and
logo display positions (page 76, 83).
i Shuttle dial (outer ring)
This dial controls the camera zoom.
During file playback, turning this dial clockwise
plays the file in the forward direction at a speed
that corresponds to the amount the dial was turned
(one of seven speeds) and turning this dial
counterclockwise plays the file in the reverse
direction at a speed that corresponds to the amount
the dial was turned (one of seven speeds)
(page 134, 149).
Page 19

j Jog dial (inner dial)
SD
PC
SDI
This dial controls the camera focus and iris.
During file playback, turning this dial plays the
file at a slow speed that corresponds to the speed
at which the dial is turned (page 134, 149).
Rear Panel
1 Audio inputs
1
VISCA
connector
4 SD video interface module
(see page 21)
Cable clips
2
Chapter 1 Overview
LINE MIC/LINE
87 6 54 3
AC IN
4 Power supply
connector
AUDIO IN
MIX
RRLL
HEADPHONES
2 Audio outputs
(see page 20)
PUSH PUSH
MIC/LINE
21
OFF
ON
AUX P GM RGB
21
MONI INTERCOM
RL
AUDIO OUT VIOEO OUT
15
69
COMPOSITE
RGB PGM
3 Video outputs
(see page 21)
I.LINK
S400
S VIDEO
(~AC IN)
5 Ground terminal
3 Intercom interface connector
* This figure is when an optional serial digital interface module (BKAW-580)
is installed in slot 2 of the AWS-G500. An SD interface module is installed
in slot 2 of the AWS-G500 at the time of shipment.
a VISCA connector
To connect the chain of cameras with VISCA
support to this unit for remote control operation,
e Ground terminal
When using this unit, connect the ground terminal
to a grounding lead.
connect the VISCA cable (page 50).
Caution
b Cable clips
Use these clips to prevent cables from accidentally
disconnecting (page 54).
c Intercom interface connector
The ground terminal is close to the audio input
connectors, so when connecting the grounding
lead be careful not to touch the audio input
connectors.
Connect an external intercom system (page 155).
VIDEO IN
S VIDEO
COMPOSITE
OFF
RGB RGB
S VIDEO
COMPOSITE
1
OFF
ON
ON
2
3
5 Serial digital interface
module (option)
(see page 22)
6 PC video interface module
(see page 22)
d Power supply connector (~AC IN)
Use to connect to an AC outlet (page 41).
Caution
When using a DC-AC inverter, the use of a 50 Hz
(±3%) or 60 Hz (±3%) sine wave is recommended.
Do not use a general-purpose inverter with a
square output waveform.
Names and Functions of Parts
19
Page 20

1 Audio inputs
2 Audio outputs
1 Microphone/line input connectors
(MIC/LINE) 1/2
Chapter 1 Overview
LINE MIC/LINE
87 6 5 43
3 Microphone/line input connectors
(MIC/LINE) 3/4/5/6
4 Line input connectors (LINE) 7/8
AUDIO IN
PUSH PUSH
21
+
45V
OFF
ON
2 +48V switch
a Microphone/line input connectors (MIC/
LINE) 1/2 (XLR 3-pin, TRS shared
balanced type)
Input an analog audio signal from a microphone or
audio device.
b +48V switch
Use this switch when a capacitor microphone
requiring a power supply is connected to the
microphone/line input connectors (MIC/LINE) 1/
2. When this is in the ON position, +48V is
supplied.
c Microphone/line input connectors (MIC/
LINE) 3/4/5/6 (TRS balanced type)
Input an analog audio signal from a dynamic
microphone or audio device.
d Line input connectors (LINE) 7/8 (RCA)
Input an analog audio signal from an audio device.
MIC/LINE
1 MIX output connector
(MIX)
MIX
RRL
HEADPHONES
Headphone connector
5
(HEADPHONES)
2 AUX output connector
(AUX) 1/2
AUX PGM
MONI
RL
AUDIO OUT
3 PGM audio output
4 Monitor output
connectors (MONI)
L21
connectors (PGM)
a MIX output connector (MIX) L/R (RCA)
These connect to an external acoustic device to
output audio signals (page 157).
b AUX output connector (AUX) 1/2 (TRS,
balanced)
These connect to an external acoustic device to
output audio signals. The output level can be
adjusted (page 156).
c PGM audio output connectors (PGM) L/
R (TRS, balanced)
These output the final audio (program audio)
created by this unit (page 156).
d Monitor output connectors (MONI) L/R
(RCA)
These provide monitor outputs of any of the PGM/
AUX1/AUX2/MIX audio (page 158).
e Headphone connector (HEADPHONES)
(standard phone jack)
This outputs one of the PGM/AUX1/AUX2/MIX
audio (page 157).
The output level can be adjusted with the front
panel monitor level adjustment knob (MONI
LEVEL) (page 158).
Names and Functions of Parts
20
Page 21
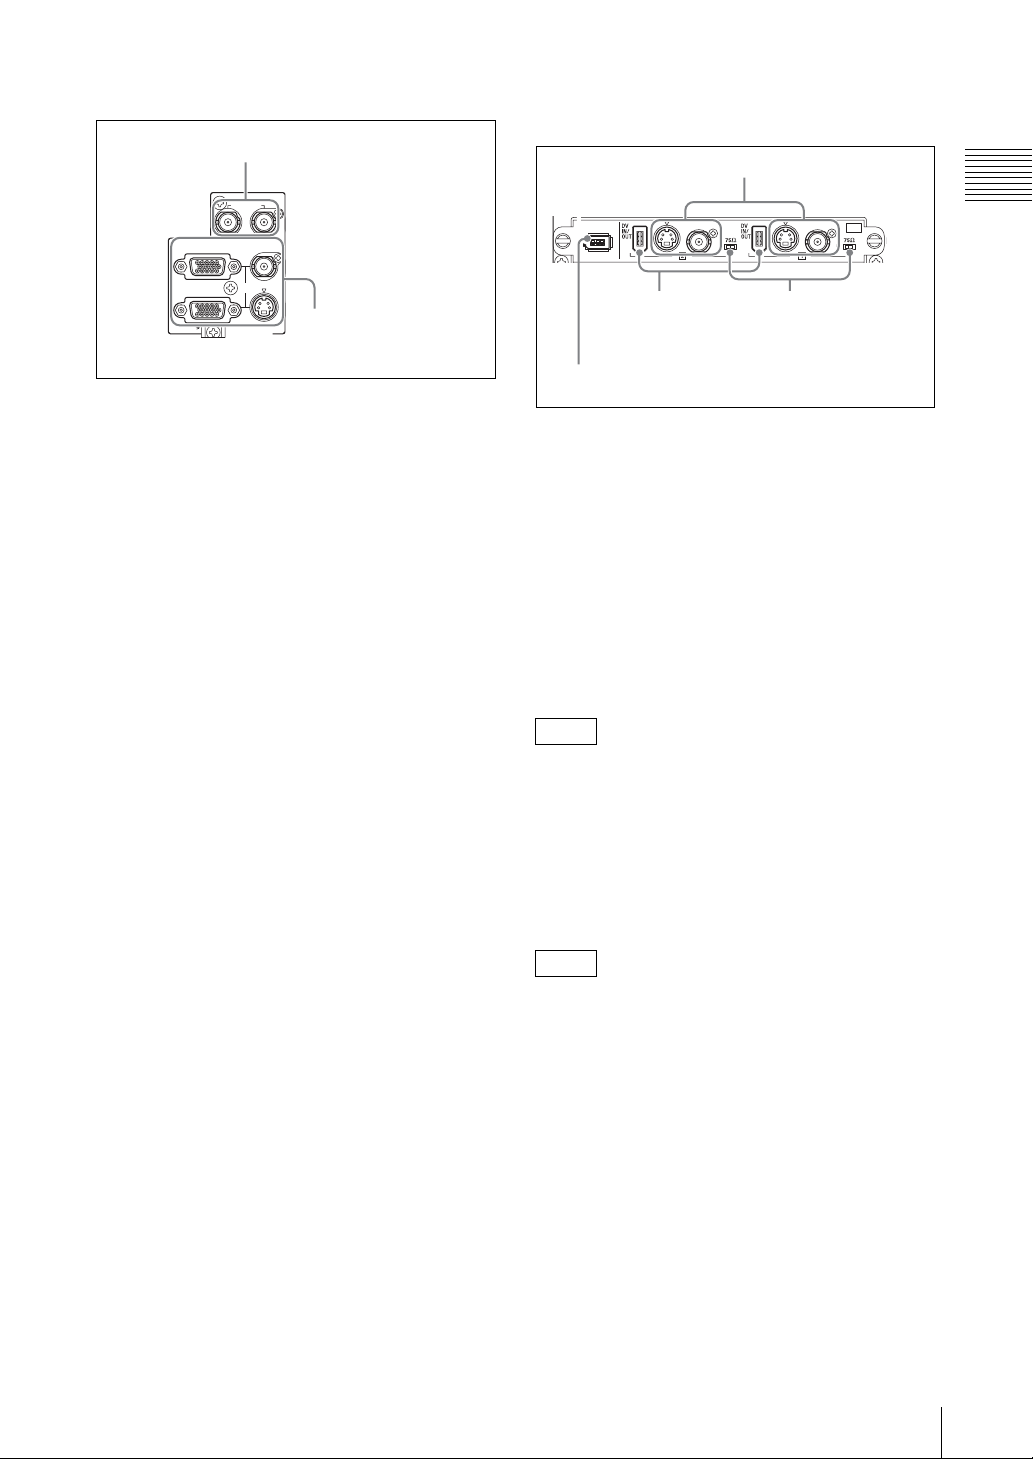
3 Video outputs
SD
1 Reference output
connectors (REF OUT)
REF OUT
RGB
COMPOSITE
S VIDEO
RGB PGM
VIOEO OUT
2 PGM video output
connectors (PGM)
a Reference output connectors (REF OUT)
× 2
These output either a 59.94 Hz (NTSC) or 50 Hz
(PAL) black burst signal to match the program
output signal.
b PGM video output connectors (PGM)
• Composite video output connector
(COMPOSITE) (BNC) × 1
• S-video output connector (S VIDEO) (S
connector) × 1
These output the final program (PGM) video.
You can switch to NTSC or PAL (page 59).
• RGB output connectors (RGB) (D-sub 15-pin) ×
2
These output the final program (PGM) video as
analog RGB signals and video RGB signals.
Connect a projector or external display.
The following signals can be output (page 59).
- XGA (1,024 × 768) 60 Hz/75 Hz
- SXGA (1,280 × 1,024) 60 Hz
- 15k RGB 50 Hz/59.94 Hz
4 SD video interface module
(BKAW-570)
1 Analog video input
connectors
S VIDEO
I.LINK
S400
4 i.Link connector (HDD)
COMPOSITE
OFF
3 DV connectors
(DV IN/
DV PGM OUT)
S VIDEO
COMPOSITE
ON
2 75-Ω termination
switch
OFF
ON
a Analog video input connectors
Composite video input connectors
(COMPOSITE) (BNC) × 2
S-video input connectors (S connector) × 2
Input analog video signals.
b 75-Ω termination switch
Set this switch to the OFF position when using a
loop-through connection for a video monitor or the
like by connecting a branch connector to the
composite video input connector (COMPOSITE).
Note
The factory default setting is ON.
Use the end of a sharp implement such as a pen to
operate the switch.
c DV connectors (DV IN/DV PGM OUT)
(i.LINK 6-pin) × 2
Input and output digital video audio signals.
Chapter 1 Overview
Notes
• Only one of the Composite/S Video/DV inputs
can be used for each of IN1and IN2.
• If the DV connector is set as the output, material
cannot be recorded from composite and S-video
connectors (page 143).
d i.LINK connector (HDD) (i.LINK 6-pin)
× 1
When a hard disk drive is connected, video input
to the same module and audio with the same
source number as the video can be recorded in
combination (page 144).
Names and Functions of Parts
21
Page 22

5 Serial digital interface module
RGB RGB
PC
(BKAW-580) (Option)
Chapter 1 Overview
6 PC video interface module
(BKAW-550)
1SDI input
connectors
(SDI IN)
2PGM SDI output
connector (SDI OUT)
3i.LINK connector (HDD)
a SDI input connectors (SDI IN) (BNC) × 2
Inputs SDI signals.
b PGM SDI output connector (SDI OUT)
(BNC) × 1
Outputs final video and audio (program video +
audio) as SDI signals (page 143).
c i.LINK connector (HDD) (i.LINK 6 pins)
× 1
If an external hard disk is connected, you can
record together both the video and the audio,
which is assigned the same source number as the
video, being input to the same module (page 144).
RGB input connectors
(RGB)
RGB input connectors (RGB) (D-sub 15pin) × 2
Input analog RGB signals from a computer or
other source. The following image size and
frequency combinations are supported.
• XGA (1,024 × 768) 60 Hz 75 Hz
• SXGA (1,280 × 1,024) 60 Hz
Names and Functions of Parts
22
Page 23
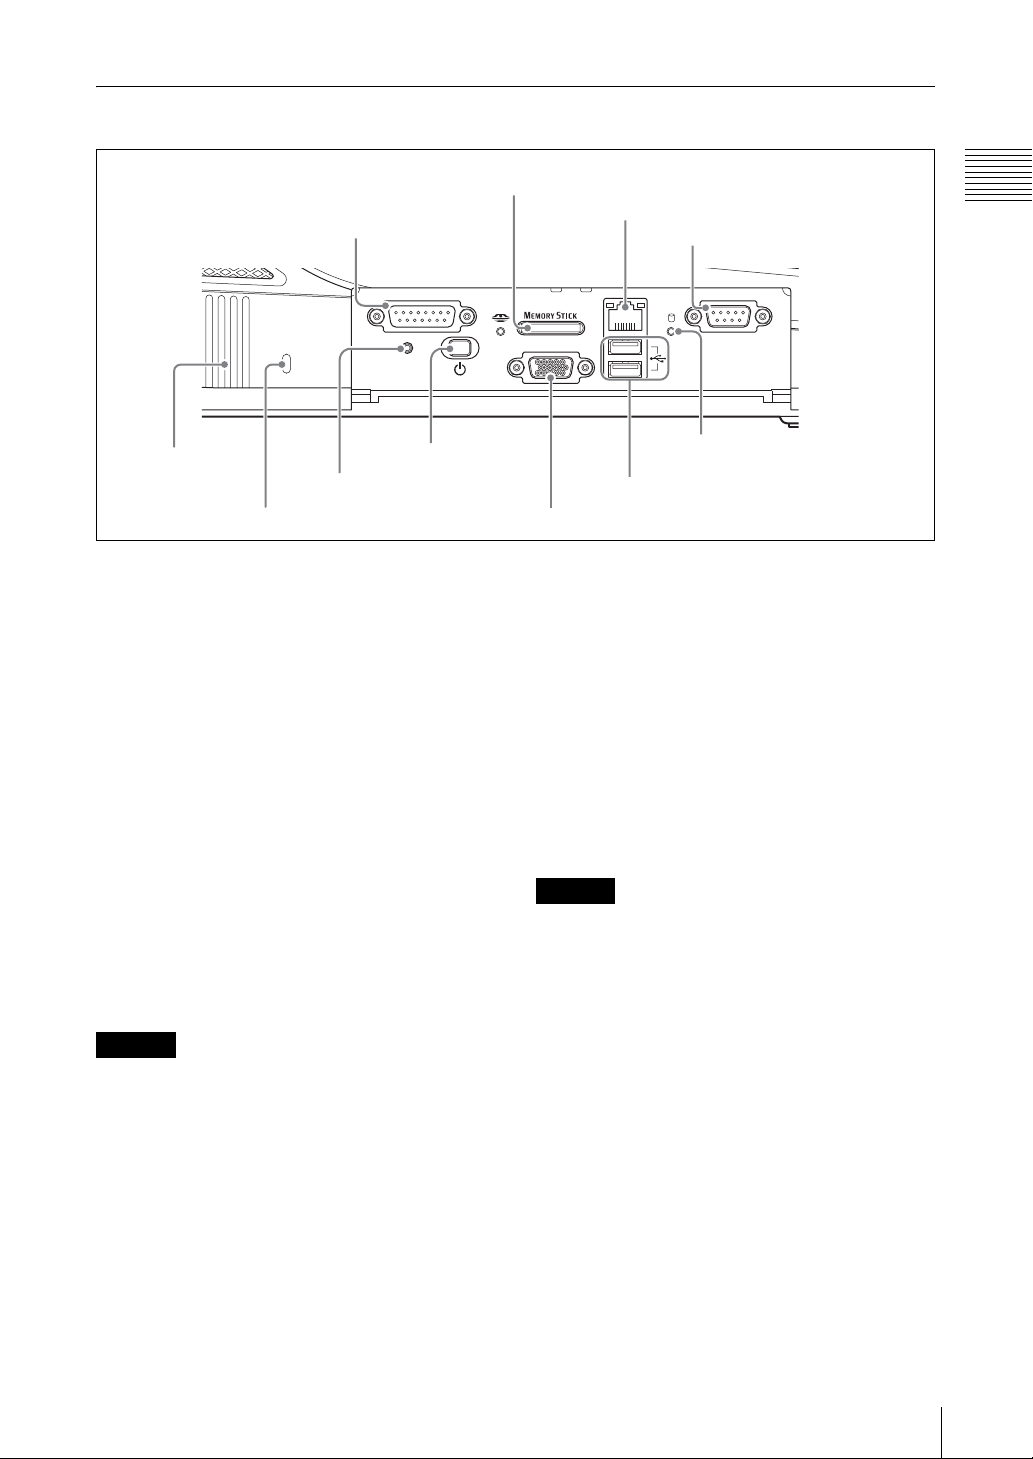
Side Panel
With the protective panel opened
1 FACTORY USE
connector
qaVentilation
holes
FACTORY USE REMOTE
9 RESET button
0 Hole for anti-theft wire
15 9
RESET
8 1 (power)
18
button
a FACTORY USE connector
Output a tally signal. Connecting this connector
and the tally connector of a CCU (camera control
unit) or other device enables the tally lamp of the
camera to light (page 139).
b “Memory Stick” slot
This slot takes a “Memory Stick.” Use it for
upgrading the operating software (page 200),
importing font files (page 129), exporting/
importing job data (page 173 and 174), importing
graphics files (page 175), etc.
While the “Memory Stick” is being accessed, the
access indicator to the left of the slot lights.
c NETWORK connector (RJ-45)
Connect an external network adaptor or router.
This supports 10Base-T and 100Base-TX
Ethernet.
The green indicator blinks while the network is
active.
An amber LED lights while the unit is connected
by 100Base-TX.
Caution
When making Network connections
For safety, do not connect the Network connector
to circuits which may be subjected to excessive
voltage.
d REMOTE (remote control) connector
This connector is provided for future functional
expansion.
e Internal hard disk access indicator
This indicator lights while the internal hard disk is
being accessed.
2 “Memory Stick” slot
3 NETWORK connector
4 REMOTE (remote control)
connector
NETWORK
)
RGB(GUI
7 Operating monitor connector (RGB (GUI))
USB
6 USB connectors
15
96
5Internal hard disk
access indicator
f USB connectors (USB) (USB
compatible)
The upper connector is number 1, and the lower
connector is number 2.
Use these connectors to connect a USB keyboard.
Also use them for connecting USB flash memory,
upgrading the operating software (page 200),
importing font files (page 129), exporting/
importing job data (page 173 and 174), importing
graphics files (page 175), etc.
For details of the keyboards that can be used,
consult your dealer or your Sony service
representative.
When using the text typing tool software, you can
connect and use a USB mouse.
Caution
• These do not support input from a USB camera.
• A USB mouse cannot be used with the main
software.
g Operating monitor connector (RGB
(GUI)) (D-Sub 15-pin)
This connector outputs the operation screen to an
external display at WXGA (1,280 × 800) size, at
60 Hz.
For information on which devices can be used,
consult your dealer or your Sony service
representative.
h 1 (power) button
This button powers the unit on or off. If you hold
down the power button for at least 4 seconds, this
forces a shutdown.
After a forced shutdown, the settings of the unit
may not be preserved.
i RESET button
This button is provided for future functional
expansion.
Names and Functions of Parts
Chapter 1 Overview
23
Page 24
j Hole for anti-theft wire
This hole accepts a standard anti-theft wire (3 mm
× 7 mm).
k Ventilation holes
Caution
Chapter 1 Overview
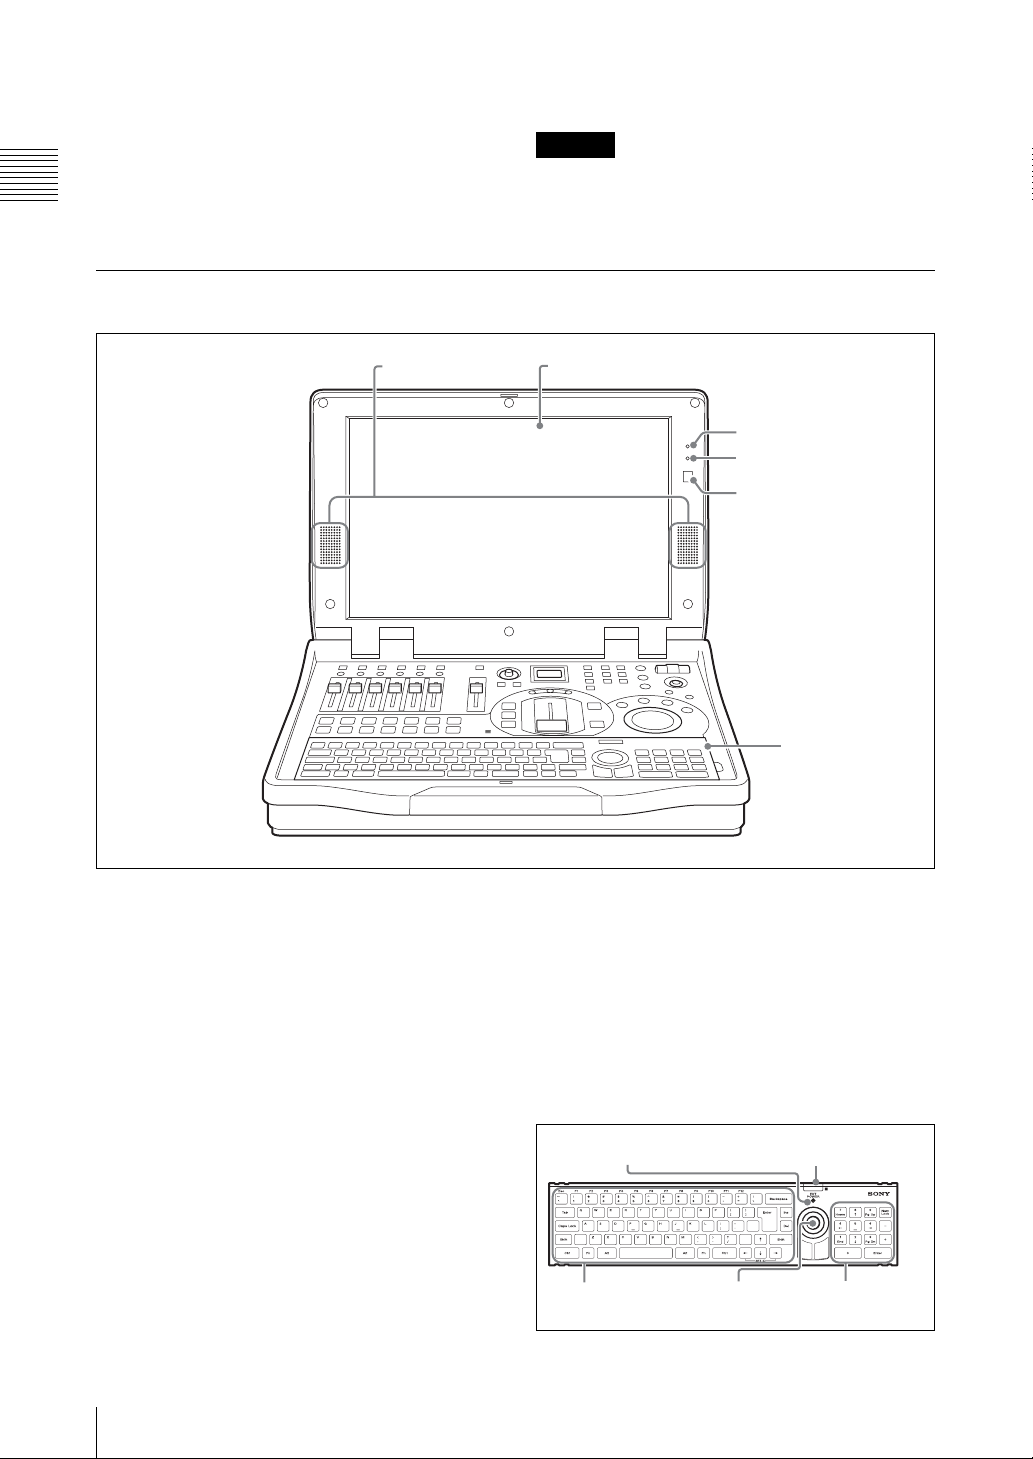
Other Parts
Be careful not to obstruct the ventilation holes. If
the ventilation holes are obstructed, the unit may
overheat, leading to fire or breakdown.
2 Display1 Built-in speakers
3 Num Lock indicator
4 Caps Lock indicator
5 Infrared receptor
6 Keyboard
a Built-in speakers
You can monitor the audio using these speakers.
There is no output from the built-in speakers when
a headphone is connected to the headphone
connector.
b Display
This shows the operation screen (page 25).
c Num Lock indicator
This lights green when the unit is in Num Lock
mode.
d Caps Lock indicator
This lights green when the unit is in Caps Lock
mode.
e Infrared receptor
This accepts signals from the keyboard supplied
with this unit (page 44).
Names and Functions of Parts
24
f Keyboard
Use this for text and numeric input.
You can also use the keyboard for menu
operations (page 31).
While the keyboard is mounted to the unit, the
EXT POWER indicator on the keyboard lights
green.
When using Esc and the F1 to F12 keys, hold
down the Fn key and press the required key in the
topmost row.
EXT POWER indicator
PointerCharacter input keys
Infrared receptor
Numeric
keys
For details on changing the keyboard language,
see “Selecting the Keyboard Language” (page
46).
Page 25
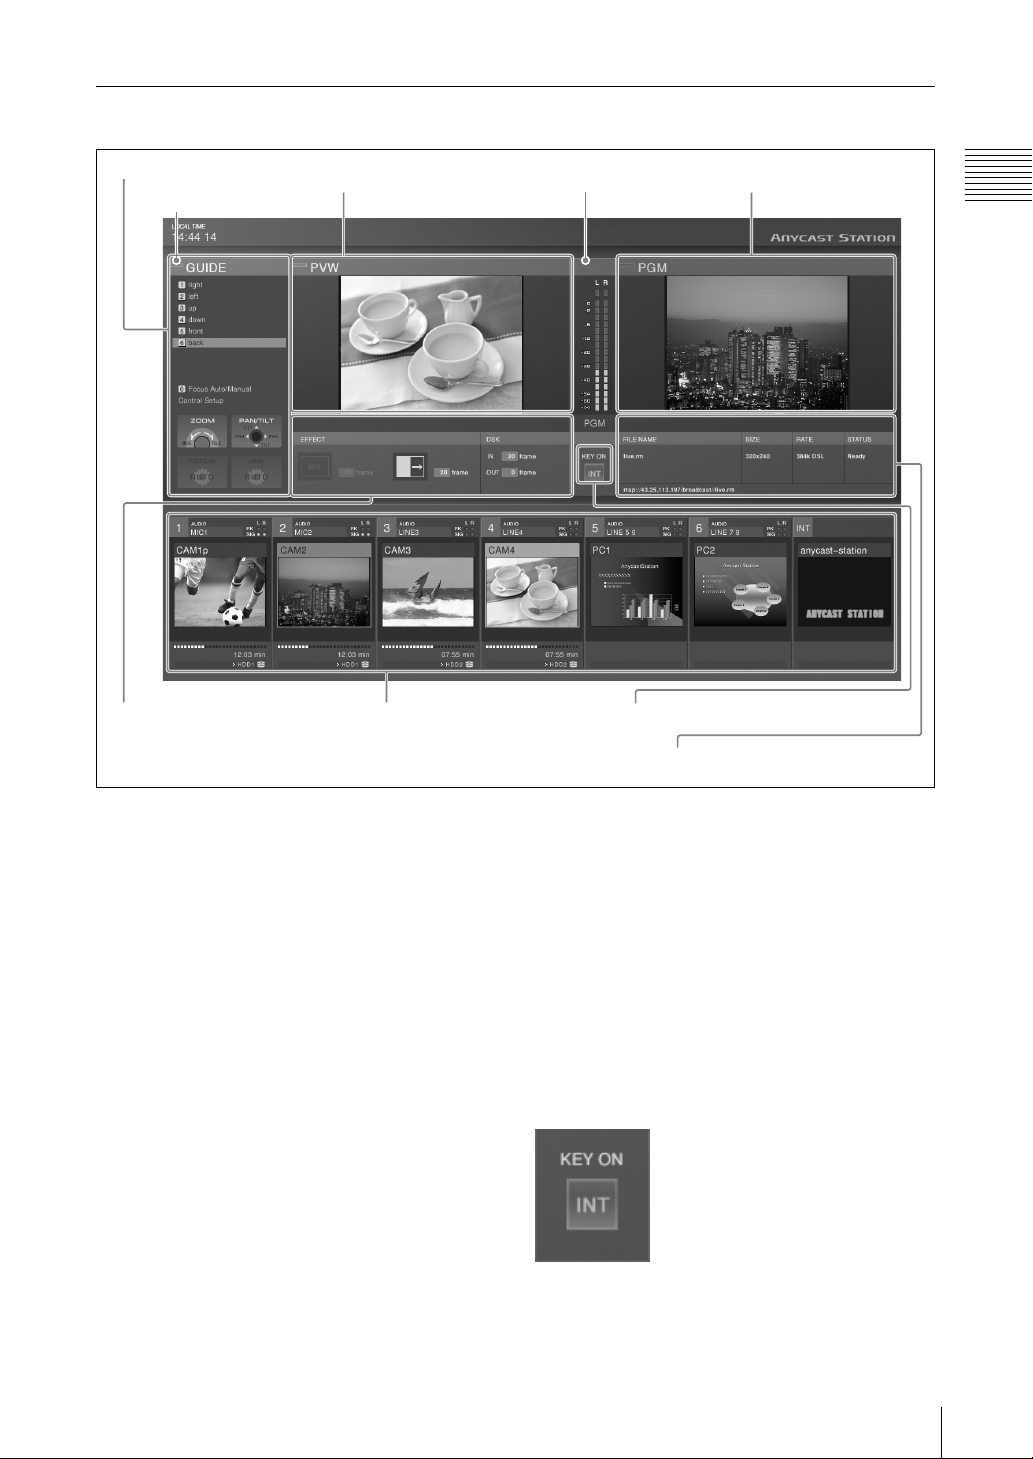
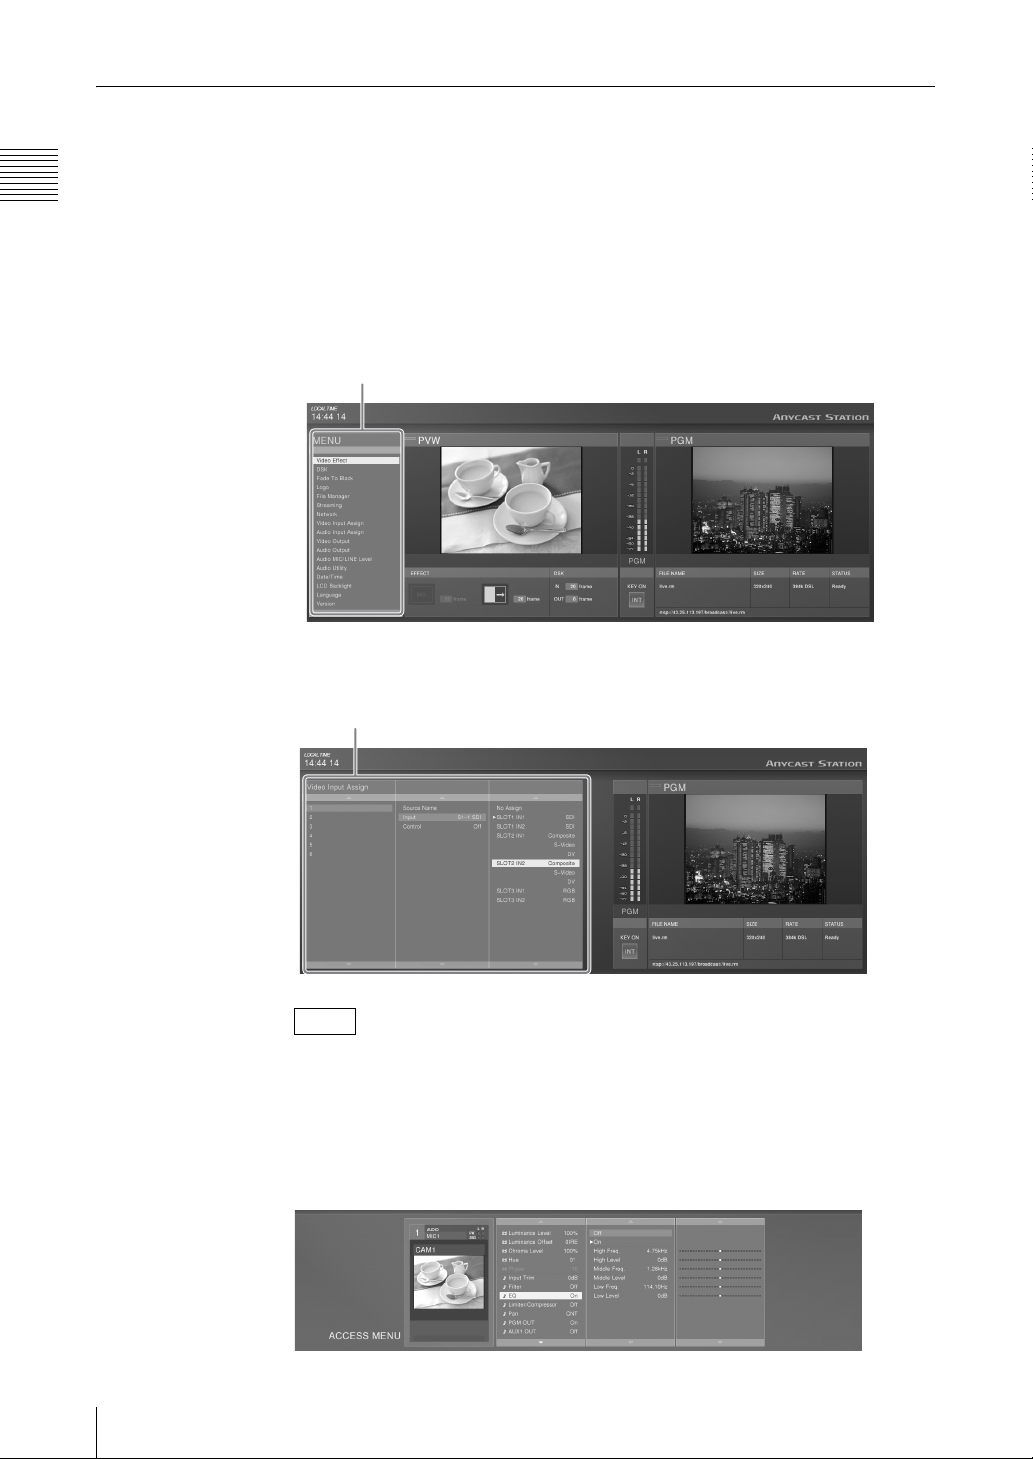
Operation Screen
1 Menu display
2 Guidance object indication
2 PVW viewer
4 Source viewer5 Effect display
3 Audio level meter
4 KEY ON
1 PGW viewer
Chapter 1 Overview
* This example screen shows the streaming settings displayed.
Normally the streaming display cannot be viewed.
a Menu display
This displays the top menus (page 30), the INT
material selection menu (pages 79, 161), the
camera guide menu (pages 133, 134), and the
HDD guide menu (page 147).
b Guidance object indication
The color of the guidance object indication has the
following significance.
Amber:when a video subject to camera control
(page 132) and external hard disk control
(page 144) or INT is selected with the NEXT
selection buttons (while the KEY button is not
lit).
Green:when a video subject to camera control and
external hard disk control or INT is specified
with the NEXT selection buttons (while the
KEY button is lit).
Off:when other than a video subject to camera
control and external hard disk control or INT
is specified with the NEXT selection buttons.
3 Streaming display
c Audio level meter
When monitoring the any of the PGM/AUX1/
AUX2/MIX audio outputs or Pre Fader Listen
(PFL) result, this shows the audio level. An
indication below the meter shows which of PGM/
AUX1/AUX2/MIX or PFL is being monitored.
When the level exceeds the meter range, the
uppermost indicator lights red (page 158).
d KEY ON
The indicator lights red during keying to program
output video. The number (1 to 6) or “INT” of the
source selected for keying appears.
Names and Functions of Parts
25
Page 26

1 PGM viewer
This shows a program output.
Chapter 1 Overview
Normal
Program video
The program output video is shown at 480 × 360
pixels, 30 fps (25 fps for PAL). During streaming,
the size is 320 × 240 pixels.
Program
video
When configuring streaming settings
Caution
• Video displayed on the PGM viewer lags several
frames behind the video output from the PGM
video output connectors.
• In any of the video viewers displayed on the
operation screen (PGM/PVW/source) the video
may deteriorate, but this is an artifact of the
display system. There is no effect on the video
output from the program video output
connectors.
2 PVW viewer
This shows a preview of the video.
This allows you to check the input video selected to be shown next, keying, or picture-in-picture result
before switching to program output.
1What the preview
is showing
2 Preview video
3 Status
a What the preview is showing
Amber: when showing the video selected by the
NEXT selection button.
Green: when showing the video selected by the
NEXT selection button when the KEY button
is lit (video with a key inserted).
b Preview video
Normally the video selected with the NEXT
selection buttons is shown at 320 × 240 pixels, 15
fps (12 to 13 fps for PAL).
Names and Functions of Parts
26
Page 27
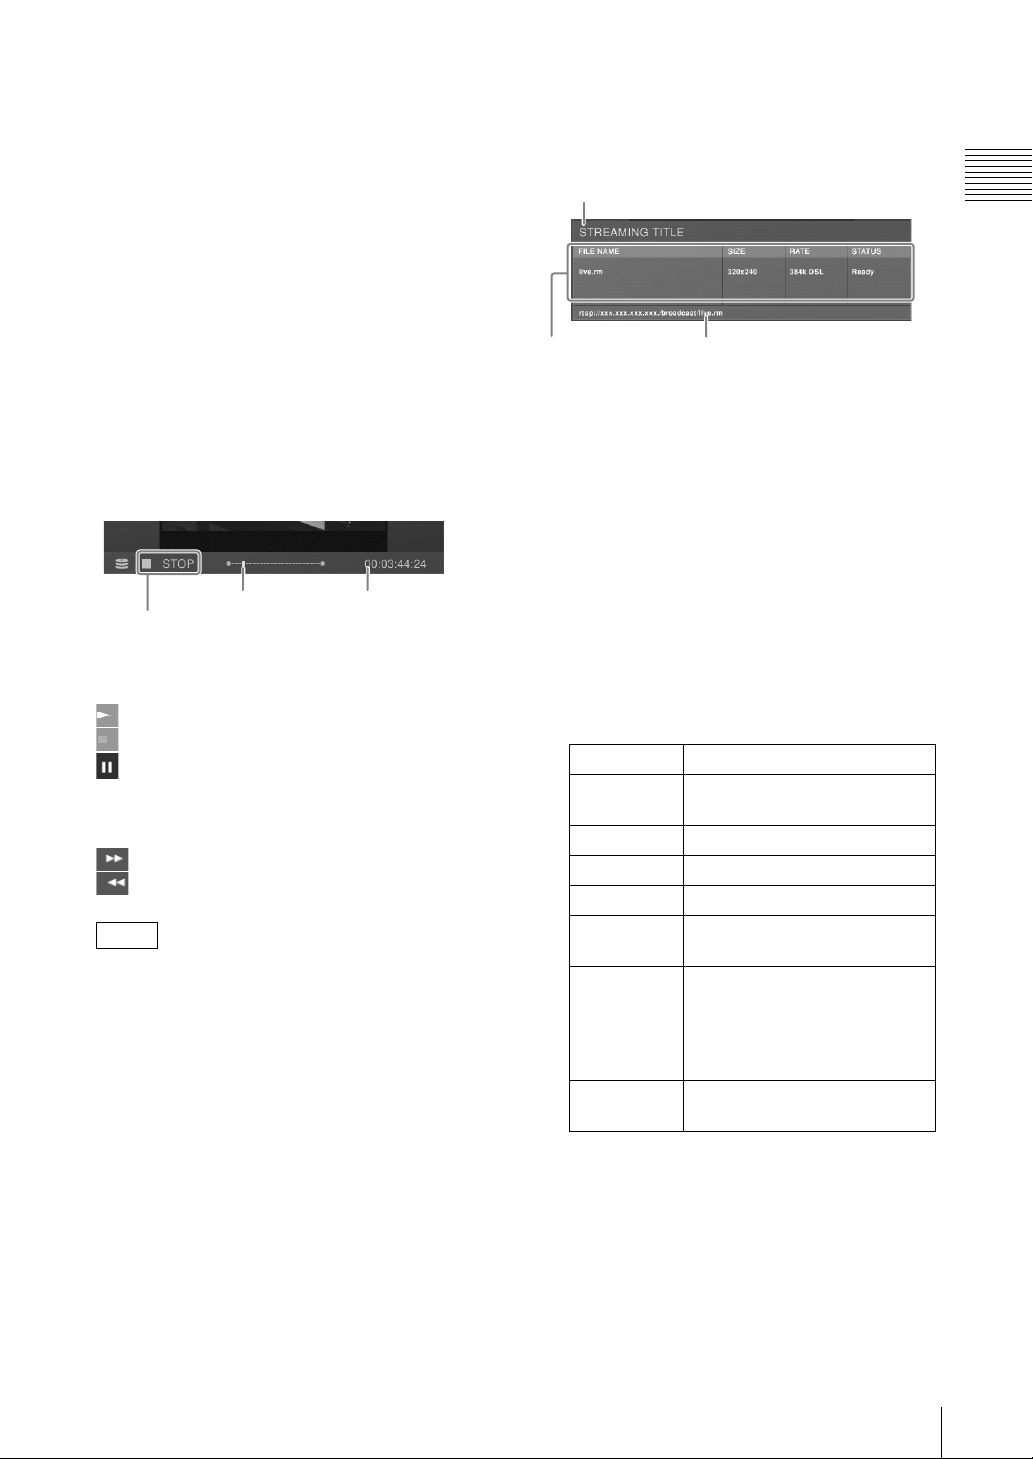
c Status
The status shown here differs as follows
depending on the video to be previewed.
3 Streaming display
This shows the settings and status of the streaming
broadcast.
When showing video from a remotely
controlled VISCA compliant camera
The status of the VISCA compliant camera is
shown.
No Response:communication cannot be
established with the camera.
Initializing:appears at system startup and during
camera reset.
When showing an INT graphics file
Loading:while file is loading
When playing a file on an external hard
disk
The status of file operations is shown.
Play position Timecode
File operation
File operation indications
Opening: while opening a file
PLAY: during playback
STOP: when stopped
STILL: when playback speed is set to zero
with the shuttle dial or playback is stopped
with the jog dial.
JOG: while using the jog dial.
x2: fast forward (x2, x4, x8, x16, x32, x64)
x2: fast reverse (x2, x4, x8, x16, x32, x64)
Note
The x1/8, x1/2, and x1 indications are also
displayed while you are using the shuttle dial for
playback operations.
Play position
This shows the file play position.
When the play position is at the beginning or end,
z of each end lights.
An icon appears on the right while auto repeat
playback is set (page 150).
1 Title
2 Access URL3 Information display
a Title
This shows the streaming title.
b Access URL
This appears when the unit is used as a server for
a broadcast. Audience members can view the
broadcast by accessing this URL.
c Information display
This shows the following information:
FILE NAME: the file name of the broadcast
SIZE: video size set in the top menu
RATE: transfer rate set in the top menu
STATUS: the status of the server or encoder
Initializing Starting server or encoder
Ready Server started up, and encoder
ready
Starting Encoder connecting to server
Running Encoding
Stopping Ending the encoder
Reconnecting While re-establishing a
connection to the server.
Failed When a connection failed to be
established because of the
settings of the unit, the status of
the network or external server,
etc.
Error The encoder had failed to end, or
an error occurred.
Chapter 1 Overview
Names and Functions of Parts
27
Page 28
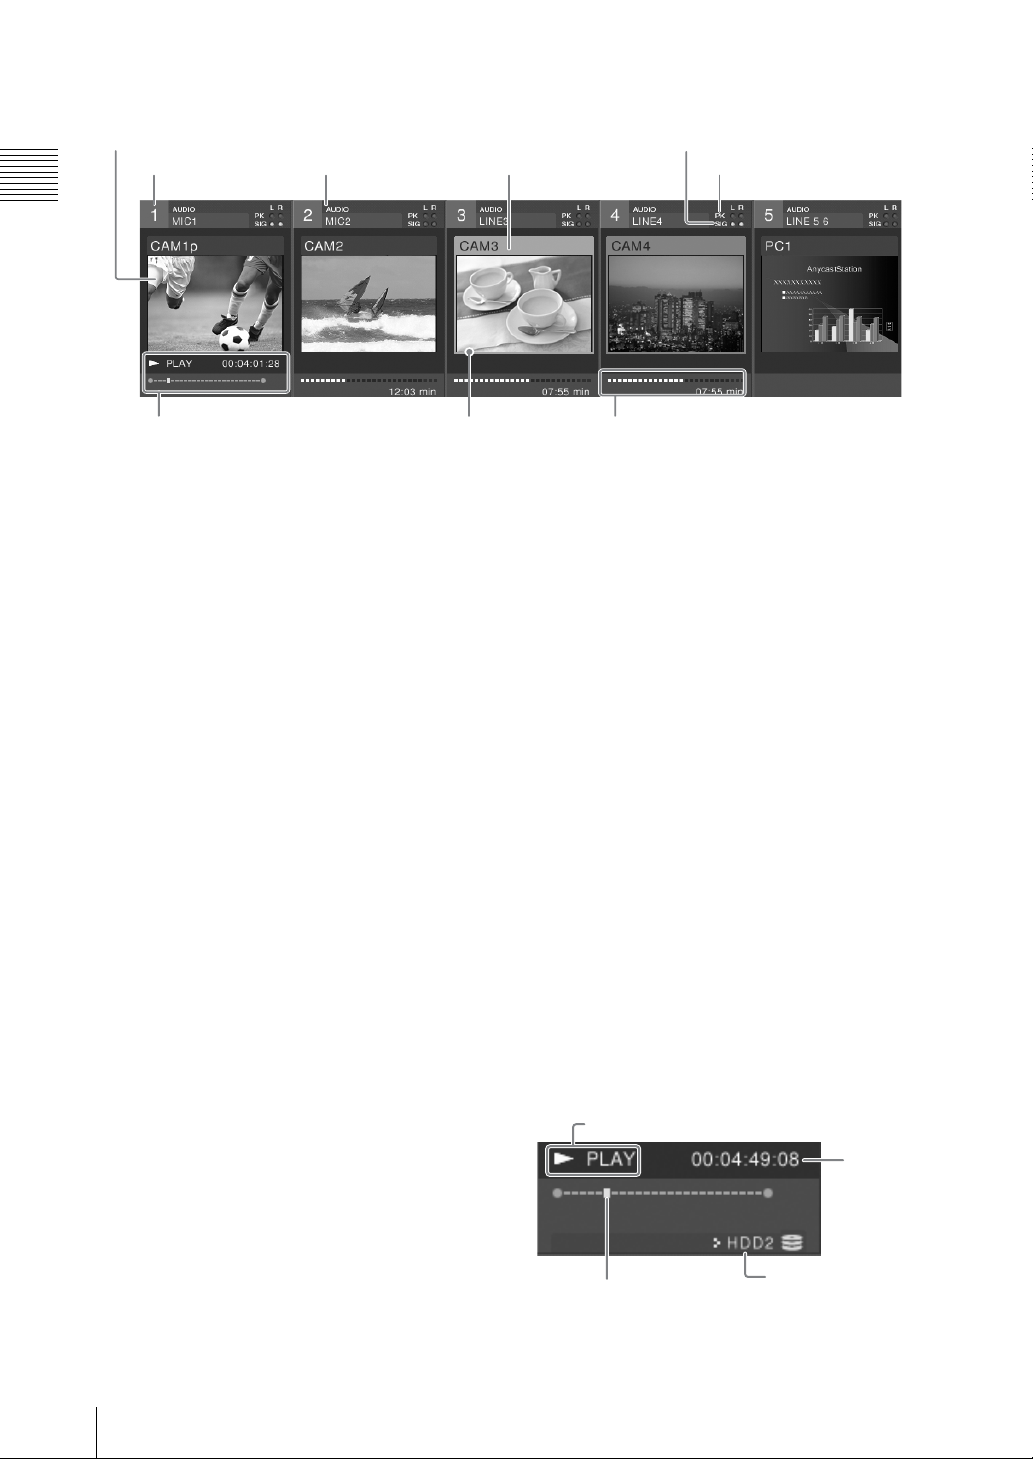
4 Source viewer
1 Thumbnails
2 Source number 3 Audio source name 4 Video source name
Chapter 1 Overview
8 Device status 7 Selection frame 9 Hard disk status
a Thumbnails
These show the video assigned to the selection
buttons at 160 × 120 pixels, at 10 fps (8 to 9 fps for
PAL).
b Source number
This is the number (1 to 6 and INT) assigned to the
source (video or audio).
These correspond to the PGM selection button, the
NEXT selection button, and the audio channel
fader numbers.
c Audio source name
This shows the name of the audio signal assigned
to the channel fader (page 59) or the file name on
the external hard disk (page 147).
d Video source name
In viewers 1 to 6, this shows the name of the video
signal assigned to the selection button (page 57) or
the file name on the external hard disk (page 147).
For the INT viewer, this displays the color matte
and color bars, or the graphics file name selected
in the INT source selection menu.
e Input signal indication
If the input level of the audio assigned to a channel
fader is -60 dBFS or more, this lights green, and
you can check that there is an audio input.
For stereo you can check left and right channels
separately; for monaural both channels are shown
the same.
5 Input signal indication
6 Peak indication
g Selection frame
Depending on the selection state, the frame color
changes.
Red: video selected with PGM selection button
Amber: video selected with NEXT selection
button
Green: video selected with NEXT selection
button when the KEY button is lit (video with
a key inserted)
h Device status
The content displayed differs as follows
depending on the material.
Video from a VISCA-compatible camera
being controlled remotely
Displays the VISCA-compatible camera’s status.
No Response: communication cannot be
established with the camera.
Initializing: appears at system startup and during
camera reset.
INT graphics file
Loading:while file is loading
When playing a file on the external hard
disk
The status of file operation is shown.
File operation
Timecode
f Peak indication
If the input level of the audio assigned to a channel
fader is -8 dBFS or more, this lights red.
For stereo you can check left and right channels
separately; for monaural both channels are shown
the same.
Names and Functions of Parts
28
Play position
Corresponding hard
disk number
Page 29
File operation indications
r
Opening: while opening a file
PLAY: during playback
STOP: when stopped
STILL: when playback speed is set to zero
with the shuttle dial or playback is stopped
with the jog dial.
JOG: while using the jog dial.
x2: fast forward (x2, x4, x8, x16, x32, x64)
x2: fast reverse (x2, x4, x8, x16, x32, x64)
Note
The x1/8, x1/2, and x1 indications are also
displayed while you are using the shuttle dial for
playback operations.
Play position
This shows the file play position.
When the play position is at the beginning or end,
z of each end lights.
An icon appears on the right while auto repeat
playback is set (page 150).
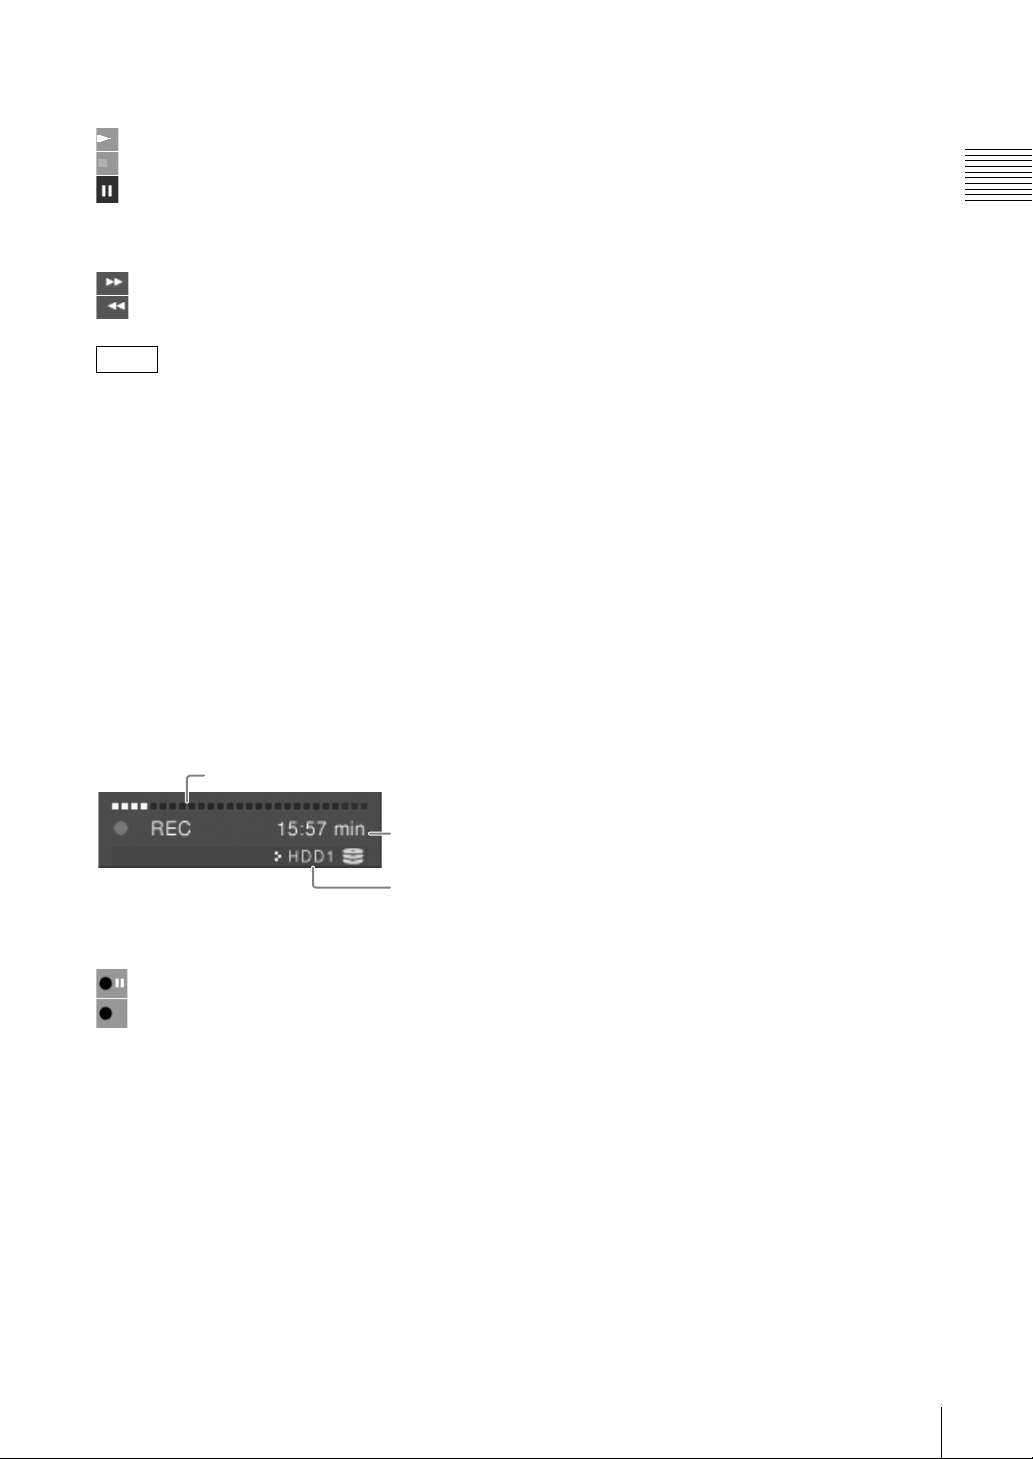
i Hard disk status
When an external hard disk is connected, this
shows the status of the hard disk, the remaining
recording capacity, and the recording status.
Chapter 1 Overview
Remaining capacity shown by progress ba
Available
recording time
Hard disk
drive number
Recording operations
REC PAUSE: recording on standby
REC: recording
Unformatted: error requiring formatting
Disk Full: no disk space left (200 MB or less)
File Number Full: the number of files that can be
recorded has been exceeded
Device Error: it became impossible to recognize
the hard disk during recording
REC Error: recording error
5 Effect display
This shows video transition effect types and
patterns, and transition time (page 72).
Names and Functions of Parts
29
Page 30
Menu Operations
This unit includes top menus, which are used to make various operational
settings, and ACCESS menus, which are used to make adjustments to the video
Chapter 1 Overview
Displaying top menus and ACCESS menus
and audio being input to this unit.
This section describes the basic operations common to these menus.
Top menus
Press the MENU button, to display the top menu in the menu display.
Top menu
When you select and confirm an item in the top menu, submenus appear, three
levels deep.
Sub-menu
Names and Functions of Parts
30
Note
You can set priority to be given to displaying the PVW viewer while submenus
are open (page 90).
ACCESS menu
Press the ACCESS button corresponding to the number of input you want to
adjust, to display the ACCESS menus, three levels deep, in the source viewer
together with the viewer for that number.
Page 31

Menu operations
Selecting a menu item
Turn the jog roller up or down.
You can also use the R and r keys on the
keyboard.
Confirming an item and proceeding to the next layer
ENTER
Returning to the higher level
Press the ENTER button.
or
Press the jog roller.
or
Press the t button by the jog roller.
You can also use the t key or ENTER key
on the keyboard.
Press the T button by the jog roller.
You can also use the T key on the
keyboard.
Streaming
Disk Recording
File Manager
Job
Video Frequency 58.94Hz
Video Input Assign
Video Output
Audio Input Assign
Audio Output
Pan / Tilt Enable
Zoom Enable
Focus Auto
lris Auto
White Balance Auto
Pan / Tilt Enable
Zoom Enable
Focus Auto
lris Auto
White Balance Auto
Disable
Enable
Disable
Enable
Chapter 1 Overview
Confirming a selection
Press the ENTER button.
or
Press the jog roller.
You can also use the ENTER key on the
keyboard.
Slider operation
Turn the jog roller up or down.
You can also press R or r on the keyboard.
Pan / Tilt Enable
Zoom Enable
Focus Auto
lris Auto
White Balance Auto
Disable
Enable
Confirmation
Names and Functions of Parts
31
Page 32

Entering numeric or text values
Moving the cursor to the next item:
Press the T or t button by the jog roller.
Chapter 1 Overview
You can also press the T or t keys while
holding down Ctrl on the keyboard.
2004/05/18 12:25
Entering numeric or text values:
Confirmation:
ENTER
Enter with the keyboard.
Press the ENTER button.
or
Press the jog roller.
You can also use the ENTER key on the
keyboard.
Closing a menu
For a top menu: Press the MENU button or ESC button.
For an ACCESS menu: Press the same ACCESS button used to display, or the ESC button.
Notes
• While a top menu is displayed, pressing the ACCESS button clears the top menu.
• While an ACCESS menu is displayed, pressing the MENU button clears the ACCESS menu.
Names and Functions of Parts
32
Page 33

Operation screen (Text Typing Tool Software)
1File operation section
1File name
section
7Sheet operation section
2Exit button6View operation
3Font operation section2Tool operation section
Chapter 1 Overview
5Page operation section 4Modifier operation
section
a File name
This shows the name of the open file.
b Exit button
Click this to exit the text typing tool software, and
start the Anycast Station main software.
1File operation section
1New button
2Open button
3Save button
4Save as...
button
5Import FONT...
button
6Delete FONT
button
7Export TIFF...
button
8Export TGA...
button
9Delete button
0Close button
a New button
This creates a new file (page 98).
Names and Functions of Parts
33
Page 34

b Open button
This opens a previously saved file. A list of
existing files appears (page 98).
c Save button
Chapter 1 Overview
This saves a file (page 99).
The file is also simultaneously saved in the
Anycast Station main software, and the file name
appears in the INT selection menu.
d Save as... button
This saves the file with a different name (page
100).
An orange frame appears around the selected
object.
b Eyedropper tool
When you click this, the mouse pointer changes to
, and you can set the color of the selected object
to be the same as the color of another object or the
background image (page 119).
c Line tool
You can create a straight line.
You can create three types of line: solid, broken,
and dotted.
e Import FONT... button
This imports a font file from a “Memory Stick” or
USB flash memory (page 129).
f Delete FONT button
This deletes unwanted font files (page 130).
g Export TIFF... button
This saves the open file to a “Memory Stick” or
USB flash memory in TIFF format (page 102).
h Export TGA... button
This saves the open file to a “Memory Stick” or
USB flash memory in TARGA format (page 102).
i Delete button
This deletes unwanted files (page 101).
j Close button
This closes the open file, and displays a new sheet.
2Tool operation section
Select the tools needed to create and edit an object.
d Text tool
When you click this, you can create a text object
(page 104).
Note
When the selection tool is selected, you can move
the selected object with the keyboard arrow keys.
Hold down the Shift key while pressing the arrow
keys to speed up the movement.
5Bring to front tool
6Bring forward tool
7Move backward tool
8Move to back tool
e Bring to front tool
This brings the selected object to the front (page
122).
1Selection tool
2Eyedropper tool
3Line tool
4Text tool
a Selection tool
When you click this, the mouse pointer changes to
, and you can select, adjust, and move an object
(page 97).
Names and Functions of Parts
34
f Bring forward tool
This brings the selected object one level forward
(page 122).
g Move backward tool
This moves the selected object one level back
(page 122).
h Move to back tool
This moves the selected object to the back (page
122).
Page 35

9Vertical centering tool
3Font operation section
1Font name
0Horizontal centering tool
qaLower/third positioning tool
qsLower-third memory tool
qdLower-third reset tool
i Vertical centering tool
This moves the selected object to the vertical
center of the screen (page 123).
j Horizontal centering tool
This moves the selected object to the horizontal
center of the screen (page 123).
k Lower/third positioning tool
This moves the selected object so that its lowest
part is aligned to a predetermined position (page
123).
l
Lower-third memory tool
If you select an object and then click this tool, the
lowest part of the selected object is set as the
lower-third position.
m Lower-third reset tool
Restores the lower-third position to its default
setting.
2Size
3Bold
button
4Italic
button
5Underline
button
6Kerning
7Spacing
0Right align button
9Center align button
8Left align 8Left align button
a Font name
This selects the font for a text object (page 105).
The currently selected font always appears.
b Size
This selects the size of a text object (page 106).
c Bold button
This sets the text object to bold face (page 107).
d Italic button
This sets the text object to italic face (page 107).
e Underline button
This underlines the text object (page 107).
Chapter 1 Overview
f Kerning
This sets the inter-character spacing of the text
object (page 107).
g Spacing
This sets the line spacing of the text object (page
108).
h Left align button
Aligns a text object comprising multiple lines to
the left (page 108).
i Center align button
Aligns a text object comprising multiple lines to
the center (page 108).
j Right align button
Aligns a text object comprising multiple lines to
the right (page 108).
Names and Functions of Parts
35
Page 36

4Modifier operation section
2
Click the mark on a tab to select it, and bring it to the front.
The modifier operation section has three tabs: [Text], [Line], and [BG]. The [Text] tab and [Line] tab are
further divided into three tabs.
Chapter 1 Overview
xText tab
You can set the color and other settings of a text object. This tab is divided into the Color tab, Edge tab,
and Shadow tab.
Mark
1Text color selection
buttons
Edge style selection buttons
3Width
4Edge color selection buttons
5Shadow style selection
button
6Shadow creation
section
Direction indicator
Color tab Edge tab Shadow tab
a Text color selection buttons
Select the color of a text object (page 109).
b Edge style selection buttons
Select whether the object has an outline ([None]
for no outline), and select the shape of corners
(page 110).
c Width
Set the width of the outline. Select or enter a
numeric value (page 110).
d Edge color selection buttons
Select the color of the outline (page 110).
7Color creation section
8Gradation pattern
9Transparency
e Shadow style selection button
Select whether the object has a shadow ([None] for
no shadow), and select the style of the shadow
(page 113).
f Shadow creation section
Adjust the angle, distance, and degree of blurring
of the shadow (page 113).
Direction indicator: Click this to move the
needle, and change the direction of the
shadow of the object to that of the needle.
Degree: Set a numerical value for the direction of
the shadow.
Distance: Set a numerical value for the distance of
the shadow.
Softness: Set a numerical value for the degree of
blurring of the shadow.
Names and Functions of Parts
36
Page 37

g Color creation section
When [Paint] is selected in the Color tab and Edge
tab, you can create your own color for the outline
and shadow of the object (page 118).
i Transparency
Set the transparency of each of the color and
shadow of the object and the background created
with paint (page 120).
h Gradation pattern
Apply gradation to the color of the object (page
121).
xLine tab
You can set the color and other settings of a line object. This tab is divided into the Color tab, Edge tab,
and Shadow tab.
0Line color selection buttons
qaWidth
qsLine style selection buttons
Chapter 1 Overview
Color tab Edge tab Shadow tab
j Line color selection buttons
Select the color of the line object (page 112).
k Width
Set the line width of the line object. Select or enter
a numeric value (page 112).
l Line style selection buttons
Select the line style of the line object (page 113).
These sections are
the same as 2 to
9 of the [Text] tab.
Names and Functions of Parts
37
Page 38

xBG tab
You can set the background color.
Chapter 1 Overview
qdBackground color
selection buttons
5Page operation section
This is used for sheet display, sheet turning, and
resequencing.
1Top button 2Move Forward
5Next sheet
display button
button
6Move Rearward
button
3Prev Sheet
display button
4Page display
7End button
This section is the
same as 7 of the
[Text] tab.
qfTransparency
m Background color selection buttons
Select the background color (page 115).
n Transparency
Set the transparency of the background created
with paint.
a Top button
Click this to display the first sheet.
b Move Forward button
Click this to exchange the currently displayed
sheet with the previous sheet.
c Prev Sheet button
Click this to display the previous sheet.
d Page display
This shows the sheet number of the currently
displayed sheet.
e Next Sheet button
Click this to display the next sheet.
f Move Rearward button
Click this to exchange the currently displayed
sheet with the next sheet.
g End button
Click this to display the last sheet.
Names and Functions of Parts
38
Page 39

6View operation section
1Background
display selection
button
2Capture button
3Safe Zone
button
a Background display selection button
Set the background display (page 126).
Checker: display a checkered pattern as the
background.
Live: display the program output video of the
main software (page 125).
BG: display the background selected on the [BG]
tab (page 125 and 125).
b Capture button
The program output video image of the main
software is captured each time this button is
clicked (page 126).
7Sheet operation section
1New Sheet
button
Chapter 1 Overview
2Delete Sheet
button
a New Sheet button
This adds a sheet to the open file (page 125). You
can create up to 99 sheets.
b Delete Sheet button
This deletes the open sheet (page 125).
c Safe Zone button
When this is selected, a dotted line shows the safe
zone (page 127).
Names and Functions of Parts
39
Page 40

Chapter 1 Overview
Names and Functions of Parts
40
Page 41

2
Preparations
N
4
Installation/Default Settings
This section describes the procedure for installing the unit, connecting the power
cord, starting up the system, and setting the date, time, and video output signal
format.
Installing the Unit
Install the unit in a level place. The unit weighs about 17.7 lbs (8 kg). Check that
the installation location is strong and spacious enough to accommodate the unit
before installing.
There are ventilation holes on both sides of the unit. To ensure adequate air flow,
there must be a space of at least 12 inches (300 mm) on each side of the unit.
Chapter
Num
Caps
Chapter 2 Preparations
Connecting the power
Connect the power cord to the power inlet on the unit and the wall outlet.
12 inches
(300 mm)
12 inches
(300) mm
87 65
AC IN
LINE MIC/LI
Installation/Default Settings
41
Page 42

Chapter 2 Preparations
Fitting a Keyboard
Note
Use a 3-pin - 2-pin conversion adaptor, if required.
3-pin - 2-pin
conversion adaptor
Caution
Connect the grounding lead of the 3-pin/2-pin adaptor to the ground terminal.
If grounding is not possible, consult your dealer or your Sony service
representative.
To install the keyboard in this unit, align it with the keyboard space, with the keys
upward, and slide in the direction shown by the arrow. Power is supplied to the
keyboard from the main unit, and the EXT POWER indicator on the keyboard
lights.
Installation/Default Settings
42
Note
When not using the keyboard, you can insert it upside down. In this case, no
power is supplied to the keyboard.
Page 43

Using the keyboard away from the unit
You can use the keyboard away from the unit. In this case, it is necessary to insert
a pair of standard batteries (CR2032) to power the keyboard.
Detaching the keyboard
Using the groove locating at the right of the keyboard space, lift the keyboard out.
Inserting batteries in the keyboard
1
Detach the keyboard from the main unit.
2
Detach the battery holder from the keyboard.
Chapter 2 Preparations
Caution
To remove the battery holder, use the end of a sharp implement such as a pen.
3
Load two batteries (CR2032) in the battery holder, and insert in the
keyboard.
Make sure the
positive (+)
terminal of
each battery is
facing upward.
Caution
If batteries are inserted incorrectly, this may lead to electrolyte leakage or
other damage. Note the following carefully.
• Check that the polarity is correct.
• Do not use new and old batteries together, or batteries of different types.
• Do not attempt to charge the batteries.
• When not using the keyboard for a long period, remove the batteries.
• If a battery should leak, remove any spilled fluid from the battery holder,
before inserting a new battery.
Installation/Default Settings
43
Page 44

Infrared transmitting range
The range over which the keyboard can operate with infrared control is shown in
the following figure.
Within 6 feet
6 inches (2 m)
Chapter 2 Preparations
20°
60°
0 - 95°
Starting and Closing Down the Unit
Starting
Press the 1 (power) button on the side panel.
The startup screen appears.
40°
40°
Closing down
Installation/Default Settings
44
When the startup completes, the operation screen appears.
Caution
If the display is closed while the unit is operating, the temperature will rise, and
this may cause failure.
Press down the 1 (power) button on the side panel.
The following message appears.
Notes
• The last set data is saved.
• If an external hard disk is connected, it is automatically unmounted (page 150).
Page 45

This closes down the operating software, and powers off.
It takes a little while before the power turns off after the screen disappears.
Caution
If you hold down the power button for at least 4 seconds, this forces a shutdown.
After a forced shutdown, the settings of the unit may not be preserved.
Using the timer to shut down the system/Releasing the timer setting
1
While the Anycast Station main software is running, hold down the keyboard
Alt and Ctrl keys, and press the T key.
The following confirmation message appears.
Note
It is not possible to use this function while the text typing tool software is
running.
2
To set the timer, press the ENTER button.
To release the timer, press the ESC button.
When setting the timer
The timer indication appears to the right of “LOCAL TIME”.
When the text entry tool is started, the timer display disappears, but the timer
function continues to operate.
Chapter 2 Preparations
Note
The countdown appears from -120 min.
After two hours the system is powered off.
When releasing the timer
The timer display disappears.
Installation/Default Settings
45
Page 46

Selecting the Keyboard Language
Set the language to correspond to the keyboard being used.
The default setting is “English.”
1
Press the MENU button.
2
In the top menu, select [Language].
3
Chapter 2 Preparations
Select the appropriate language from the list, and confirm.
Language B English
The operation screen appears as shown below.
4
Confirm the message that appears, and press the ENTER button.
5
Press the MENU button to close the menu.
Japanese
6
Restart the system.
Setting the Time Zone
Set the time zone for your geographical location.
1
Press the MENU button.
2
In the top menu, select [Date/Time].
3
1 Select [Time Zone], and confirm; 2 select the area, and confirm;
3 select the region, and confirm.
Data/Time
Time Zone
4
Press the MENU button to close the menu.
Note
1
23
America
US Time Zones
Canada Time Zones
Asia
Atlantic Ocean
Australia
Europe
Indian Ocean
Pacific Ocean
B None of the above
B GMT
GMT + 0
GMT + 1
GMT + 2
GMT + 3
GMT + 4
GMT + 5
GMT + 6
GMT + 7
GMT + 8
Installation/Default Settings
46
The notation system for displaying time zone data in relation to GMT is based on
the form POSIX minutes-west-of-GMT in which the hour decreases as you move
east and increases as you move west.
Page 47

Setting the Date and Time
Set the internal clock.
1
Press the MENU button.
2
In the top menu, select [Date/Time].
3
1 Select [Date/Time], and confirm; 2 enter the date and time in the input
box, and confirm.
Chapter 2 Preparations
1
Data/Time
Time Zone
Using the arrow buttons on the jog roller (or the T and t keys while
holding the Ctrl key on the keyboard), select the item to change and enter a
numeric value with the keyboard.
2004/05/18 12:25
The time set in “Local Time” appears at the upper left of the operation
screen.
4
Press the MENU button to close the menu.
Caution
2
2004 /05/18 12:25
Each whole value between the separators (/, :, or space) is selected.
If this unit is operated for a long period, the clock may drift out of its correct
setting. Resetting the clock at regular intervals is recommended.
Adjusting the Display Brightness
Adjust the brightness of the display on which the operation screen is shown.
1
Press the MENU button.
2
In the top menu, select [LCD Backlight].
3
Move the slider to adjust the brightness.
LCD Backlight
Viewer Priority PVW
4
Press the MENU button to close the menu.
Installation/Default Settings
47
Page 48

Selecting the Video Output Signal Format
1
2
Select the format of the signal output from the PGM output connectors
(COMPOSITE/S VIDEO), SD video interface module DV connectors, and the
reference output connector on the rear panel.
1
Press the MENU button.
2
Chapter 2 Preparations
In the top menu, select [Video Output].
3
1 Select [PGM OUT], and confirm; 2 select the signal format, and
confirm.
PGM OUT NTSC
PGM OUT Level
RGB OUT SXGA (60 Hz)
4
Press the MENU button to close the menu.
Caution
B NTSC
PAL
Carrying out this selection may cause momentary breakup of the output video.
Note
Video input in a different signal format than this setting can still be displayed
(i.e., displaying a PAL video input when set to “NTSC” or vice versa), but the
video quality cannot be guaranteed.
Installation/Default Settings
48
Page 49

Connections
This section describes how to connect devices for video and audio input and
output. The following figure shows an example system configuration and signal
flow. Refer to the pages indicated for details of how to make connections.
In addition, after connecting each device, you must configure settings on the unit
for each input and output signal. See page 56 for details on the settings of each
input and output signal.
Amplifier (page 54)
Microphone (page 50)
Chapter 2 Preparations
* Depending on the device, signal
input/output settings may be
required.
Refer also to the manuals provided
with the devices you are connecting.
Camera with
VISCA support
(page 50)
Camcorder
(page 51)
AUDIO IN
MIC/LINE
LINE
VISCA
VIDEO IN (OUT)
SD Video
Interface Module
(BKAW-570)
S VIDEO
COMPOSITE
DV (IN/OUT)
HDD (IN/OUT)
Serial Digital
Interface Module
(BKAW-580)
HDD (IN/OUT)
SDI OUT
SDI IN
PC Video
Interface Module
(BKAW-550)
RGB
Anycast Station
Speaker
Plasma display (page 53)
AUDIO OUT
VIDEO OUT
PGM
RGB
Projector (page 53)
INTERCOM
VCR (page 52)
External hard disk
(page 52)
Camcorder
(page 51)
Monitor
(page 53)
Computer (page 51)
Intercom system (page 154)
Signal flow
Connections
49
Page 50

Caution
SD
PC
SDI
SD
PC
SDI
• Use the shortest possible cable type (especially with unregulated RGB).
Shorter cables are recommended because, in general, using long cables to
connect devices increases the risk of signal noise. Even when connecting this
unit to another, it is best to use the shortest cables possible.
• Be careful with the connector portions of the interface modules, which may
become hot depending on the conditions of operation.
Chapter 2 Preparations
Connecting a Camera with VISCA Support
Color video camera
BRC-H700, BRC-300, EVI-D100, EVI-D70 etc.
VISCA OUT
VISCA IN
VIDEO OUT
LINE MIC/LINE
87 65 43
AC IN
15
69
To S-Video input
connectors
RGB PGM
VISCA cable
PUSH PUSH
AUDIO IN
RRLL
HEADPHONES
MIC/LINE
21
OFF
ON
AUX PGM RGB
MIX
21
MONI INTERCOM
RL
AUDIO OUT VIOEO OUT
COMPOSITE
S VIDEO
I.LINK
S400
VIDEO IN
S VIDEO
COMPOSITE
OFF
ON
RGB RGB
S VIDEO
COMPOSITE
1
OFF
ON
To Composite
input connectors
2
3
BNC
cable
Notes
• VISCA cables up to 15 m (50 ft) are recommended to operate correctly.
• When connecting a BNC cable, an RCA-BNC adaptor is required.
• If the camera is a BRC-H700, connect it to the RGB input connector or the SDI
input connector to correspond to the camera.
Connecting a Microphone
Connections
50
Dynamic microphone
(F-720/2, etc.)
LINE MIC/LINE
87 65 43
AC IN
To Microphone/line input connectors
PUSH PUSH
AUDIO IN
RRLL
HEADPHONES
MIC/LINE
21
OFF
ON
AUX PGM RGB
MIX
21
MONI INTERCOM
RL
AUDIO OUT VIOEO OUT
RGB PGM
15
69
Capacitor microphone
(C-38B, etc.)
S VIDEO
COMPOSITE
OFF
RGB RGB
COMPOSITE
S VIDEO
I.LINK
S400
VIDEO IN
S VIDEO
COMPOSITE
1
OFF
ON
ON
2
3
Page 51

Connecting a Computer (RGB Input)
SD
PC
SDI
SD
PC
SDI
PUSH PUSH
LINE MIC/LINE
87 65 43
AC IN
AUDIO IN
RRLL
HEADPHONES
MIC/LINE
21
OFF
ON
AUX PGM RGB
MIX
21
MONI INTERCOM
RL
AUDIO OUT VIOEO OUT
VIDEO IN
S VIDEO
COMPOSITE
S VIDEO
I.LINK
S400
COMPOSITE
S VIDEO
RGB PGM
15
69
RGB RGB
COMPOSITE
1
OFF
OFF
ON
ON
2
3
Note
To reduce the effects of external noise, use a cable with an attached ferrite core.
Connecting a Camcorder
LINE MIC/LINE
87 65 43
AC IN
PUSH PUSH
AUDIO IN
RRLL
HEADPHONES
MIC/LINE
21
OFF
ON
AUX PGM RGB
MIX
21
MONI INTERCOM
RL
AUDIO OUT VIOEO OUT
RGB PGM
15
69
COMPOSITE
S VIDEO
I.LINK
S400
To DV connectors
i.Link cable
To RGB input
connectors
RGB cable
Computer
For analog connection
BNC cable
VIDEO IN
S VIDEO
COMPOSITE
S VIDEO
COMPOSITE
OFF
RGB RGB
OFF
ON
To Composite
input connectors
1
ON
2
3
BNC cable
Chapter 2 Preparations
For DV connection
DVCAM camcorder
(DSR-PD170, etc.)
For SDI connection
Note
i.LINK cables between 80 cm and 3.5 m (2.5 to 11.5 ft) are recommended.
Caution
• The frequency precision of the reference output signal is within 50 ppm. When
building a system that includes devices such as a camera with a Gen Lock
input, be sure to test it thoroughly before use.
• The color frame of the program output signal does not reflect the color frame
sequence of the reference output signal.
Connections
51
Page 52

Connecting a VCR
SD
PC
SDI
SD
PC
SDI
Chapter 2 Preparations
• If video or audio is not output or signal noise occurs when connected to another
DV device, the problem can often be resolved by reconnecting the cables or
turning the DV device or the unit off and then on again.
Digital video cassette
recorder (DSR series, etc.)
For analog connection
S-Video cable
To Line input
connectors
Audio cable
LINE MIC/LINE
87 65 43
AC IN
PUSH PUSH
AUDIO IN
21
OFF
ON
AUX PGM RGB
MIX
RRLL
21
HEADPHONES
MONI INTERCOM
RL
AUDIO OUT VIOEO OUT
For RGB connection For analog connection
For DV connection
Note
i.LINK cables between 80 cm and 3.5 m (2.5 to 11.5 ft) are recommended.
Caution
• If when connected to another DV device the video or audio is not output, or
there is noise, reconnect the cable, or power the DV device or this unit off and
on again. This may solve the problem.
• It is not possible to connect more than one VCR to a single DV connector.
Connecting an External Hard Disk
To S-Video input
connectors
MIC/LINE
I.LINK
S400
COMPOSITE
S VIDEO
RGB PGM
15
69
VIDEO IN
S VIDEO
COMPOSITE
OFF
ON
RGB RGB
S VIDEO
COMPOSITE
1
OFF
ON
2
3
To DV connectors
i.Link cable
52
Connections
For information about external hard disks, visit the following Anycast Station
portal site:
https://www.ecspert.sony.biz/ecsite/
https://servicesplus.us.sony.biz/SoftwarePlusSearch.aspx (for the customers in
the U.S.A.)
https://www.sonybiz.net/anycast (for the customers in Europe)
PUSH PUSH
LINE MIC/LINE
87 65 43
AC IN
AUDIO IN
RRLL
HEADPHONES
MIC/LINE
21
OFF
ON
AUX PGM RGB
MIX
21
MONI INTERCOM
RL
AUDIO OUT VIOEO OUT
RGB PGM
15
69
COMPOSITE
S VIDEO
I.LINK
S400
i.Link cable
VIDEO IN
S VIDEO
COMPOSITE
S VIDEO
OFF
ON
RGB RGB
From i.Link connectors
COMPOSITE
1
OFF
ON
2
3
Page 53

Caution
SD
PC
SDI
SD
PC
SDI
• If using a hard disk with a standby function, make sure that the standby
function is disabled before connecting to this unit.
• Power on the connected hard disk before powering on this unit.
• Connect the i.LINK connector directly to the hard disk.
• It is not possible to connect more than one hard disk to a single i.LINK
connector (daisy-chaining connection not possible).
• If you disconnect the i.LINK cable, or power off the hard disk without carrying
out the necessary preparations for disconnecting the disk, then files may be
corrupted, or the disk may need to be recovered. For details of unmounting, see
“Disconnecting the External Hard Disk” (page 150).
Connecting a Plasma Display/Projector/Monitor
Chapter 2 Preparations
Flat panel display
(PFM series, etc.)
Projector
(VPL series, etc.)
To RGB IN connectors
COMPOSITE
S VIDEO
S-Video cable
S VIDEO
I.LINK
S400
RGB RGB
COMPOSITE
VIDEO IN
S VIDEO
OFF
ON
LINE MIC/LINE
87 65 43
AC IN
RGB cable
PUSH PUSH
AUDIO IN
RRLL
HEADPHONES
MIC/LINE
21
OFF
ON
AUX PGM RGB
MIX
21
MONI INTERCOM
RL
AUDIO OUT VIOEO OUT
RGB PGM
15
69
Monitor
(LMD series, etc.)
BNC cable
PUSH PUSH
LINE MIC/LINE
87 65 43
AC IN
AUDIO IN
RRLL
HEADPHONES
For RGB connection For analog connection
MIC/LINE
21
OFF
ON
AUX PGM RGB
MIX
21
MONI INTERCOM
RL
AUDIO OUT VIOEO OUT
15
69
RGB Cable
RGB PGM
COMPOSITE
S VIDEO
S VIDEO
I.LINK
S400
RGB RGB
S-Video cable
COMPOSITE
VIDEO IN
S VIDEO
COMPOSITE
OFF
ON
COMPOSITE
1
OFF
ON
2
3
1
OFF
ON
2
3
Connections
53
Page 54

Notes
SD
PC
SDI
• For more information on setting the resolution/clock phase and format, see
“Setting the RGB Output Signal Format” (page 162)
• To reduce the effects of external noise, use a cable with an attached ferrite core.
Connecting an Amplifier
Chapter 2 Preparations
Audio cable
To Line input connectors or Microphone/line input connectors
LINE MIC/LINE
87 65 43
AC IN
AUDIO IN
RRLL
HEADPHONES
MIC/LINE
21
OFF
ON
AUX PGM RGB
MIX
21
MONI INTERCOM
RL
AUDIO OUT VIOEO OUT
PUSH PUSH
Preventing Accidental Cable Disconnection
Use the cable clip as necessary to secure cables and prevent accidental
disconnection.
1
Using a flat head screwdriver, open the lever compartment as illustrated
below.
VIDEO IN
S VIDEO
COMPOSITE
S VIDEO
I.LINK
S400
COMPOSITE
S VIDEO
RGB PGM
15
69
RGB RGB
COMPOSITE
1
OFF
OFF
ON
ON
2
3
54
Connections
2
Pass the cables through the cable clip.
Allow some slack when routing the cables to prevent them from bending
sharply.
Page 55

3
Close the lever compartment.
Installing Option Modules
To install an option module, first remove the interface module fitted to the unit
as standard, and install the new interface in the slot.
Note
You can install an option module in any slot.
Chapter 2 Preparations
2
1
1
Loosen the two screws fixing the interface module fitted as standard.
2
Pull out the interface module.
3
Insert the option module into the slot.
4
Tighten the screws.
Caution
When installing an option module, always turn the unit off first. If you install an
option module with the unit powered on, this may damage the option module.
3
4
Connections
55
Page 56

Settings Related to Input Signals
NEXT
INT
654321
PGM
654321
+
10
+
5
0
-
5
-
10
-
20
-
30
-
40
-
60
-
+
10
+
5
0
-
5
-
10
-
20
-
30
-
40
-
60
-
PGM
+
10
+
5
0
-
5
-
10
-
20
-
30
-
40
-
60
-
These settings allow video and audio signals input from devices connected to the
unit to be handled within the unit.
Relation Between Input Signals and System Components
Chapter 2 Preparations
You can assign input video and audio signals to buttons on the front panel and
channel faders, then operate these to carry out switching, mixing, and combining.
The operation screen continuously displays information about the video and
audio input to this unit, and the video and audio program output.
The following figure shows the relation between the input signals and system
components, and the display on the operation screen.
Next selection video selected
with the NEXT selection buttons
Shows video
and audio for
each source
number
Microphones
and acoustic
devices
Program output video selected
with the PGM selection buttons
Settings Related to Input Signals
56
Cameras, VCR.
Video signals generated
internally by this unit
• Color mattes
• Color bars
• Imported graphics files
Page 57

Video Signal Related Settings
These are preparations for handling video signals or the unit.
Assigning video input signals to the selection buttons
Assign video signals to the selection buttons 1 - 6 (PGM selection and NEXT
selection buttons).
1
Press the MENU button.
2
In the top menu, select [Video Input Assign].
3
From the list select the number of the selection button, and confirm, then set
the following items in the submenu.
Assigning a name for the video
Assign a name for the video. The name assigned here appears in the source
viewer with the same number as the selection button.
1 Select [Source Name], and confirm; 2 enter the name in the input box,
and confirm.
Chapter 2 Preparations
[
CAM1
2
]
Enter up to 20
alphanumeric characters.
* The source viewer can only
display a limited number of
characters.
1
1
2
3
4
5
6
Source Name CAM1
Input S1-1 Composite
Control Off
Specifying a video input connector
Specify the video input to be assigned to the selection button is input.
1 Select [Input], and confirm; 2 select the video input connector from the
list, and confirm.
1
1
2
3
4
5
6
Source Name CAMERA1
Input S1-1 Composite
Control Off
2
No Assign
B SLOT1 IN1 Composite
S-Video
DV
SLOT1 IN2 Composite
S-Video
DV
SLOT2 IN1 Composite
S-Video
DV
SLOT2 IN2 Composite
S-Video
DV
SLOT3 IN1 RGB
SLOT3 IN2 RGB
Settings Related to Input Signals
57
Page 58

Notes
If a serial digital interface module is installed, the SDI input connectors
appear in the list.
1
2
3
4
5
6
Chapter 2 Preparations
Source Name CAMERA1
Input S1-1 Composite
Control Off
Caution
No Assign
B SLOT1 IN1 Composite
S-Video
DV
SLOT1 IN2 Composite
S-Video
DV
SLOT2 IN1 SDI
SLOT2 IN2 SDI
SLOT3 IN1 RGB
SLOT3 IN2 RGB
When installed in slot 2
• You can only use one of the following from the same video input on the
same interface module: Composite (Composite video input connector), SVideo (S-Video input connector), or DV (DV connector).
• It is not possible to assign more than one selection button to a single video
input connector. If you attempt to assign to a different selection button a
video input connector which has already been assigned to a selection
button, a confirmation message appears. If you then select [OK], the
assignment switches to the new selection button, and the material viewer
for the originally assigned selection button shows the indication “No Input
Assign”.
• About the DV signal lock time
When DV is selected for the input video, there is a delay until the DV
signal locks and the video appears.
• When a serial digital interface module is installed
You cannot assign the following audio to channel faders of source
numbers assigned for video of SDI signals.
- DV input audio
- Audio of SDI signals input through the other SDI input connector.
Settings Related to Input Signals
58
Notes
• The items in the list depend on the interface module installed in this unit.
• For details of [Control] in the menu 1, see “Registering Cameras to be
Controlled” (page 132).
4
If required, repeat step 3 similarly for the remaining selection buttons.
5
Press the MENU button to close the menu.
Page 59

Audio Signal Related Settings
1
2
These are preparations for handling audio signals on the unit.
Assigning audio input signals to channel faders
Assign audio signals input from the audio input connectors or signals input from
the interface modules of the rear panel to channel faders 1 to 6.
If you assign different audio signals to the left and right channels (L/R) of the
channel faders, they become stereo faders, and if you assign the same audio
signal to both channels, they become monaural faders.
Caution
If you assign DV signals or SDI signals, they become stereo faders.
1
Press the MENU button.
2
In the top menu, select [Audio Input Assign].
3
Select the channel fader number from the list, and confirm, then set the
following items in the submenu.
Assigning a name
Assign a name to the audio signal. The name assigned here appears in the
source viewer with the same number as the channel fader.
Chapter 2 Preparations
1 Select [Source Name], and confirm; 2 enter the name in the input box,
and confirm.
1
2
3
4
5
6
Source Name MICI
Input (L) MIC/LINE
Input (R) Assign(R)
[
MIC1
]
Enter up to 20
alphanumeric characters.
* The source viewer can only
display a limited number of
characters.
Specifying an audio input connector
Specify the audio signal to be assigned to the channel fader. For stereo audio,
specify the source for each of the left and right channels separately.
For monaural audio, specify the same input for both left and right channels.
1 Select [Input (L)], and confirm; 2 select the audio input connector from
the list, and confirm.
1
1
2
3
4
5
6
Source Name MIC1
Input (L) MIC/LINE1
Input (R) MIC/LINE1
2
B MIC/LINE 1
MIC/LINE 2
MIC/LINE 3
MIC/LINE 4
MIC/LINE 5
MIC/LINE 6
LINE 7
LINE 8
SLOT1 DV IN1
SLOT1 DV IN2
Settings Related to Input Signals
59
Page 60

Notes
• If in [Input (L)] you select the DV input connector, the same input
connector is automatically assigned to [Input (R)].
• When a serial digital interface module is installed
- The SDI input connectors for individual channels are displayed.
1
2
3
4
Chapter 2 Preparations
5
6
Source Name
Input (L) MIC/LINE1
Input (R) MIC/LINE1
B MIC/LINE 1
MIC/LINE 2
MIC/LINE 3
MIC/LINE 4
MIC/LINE 5
MIC/LINE 6
LINE 7
LINE 8
SLOT1 DV IN1
SLOT1 DV IN2
SLOT2 SDI IN1 CH(1/2)
SDI IN1 CH(3/4)
SLOT2 SDI IN2 CH(1/2)
SDI IN2 CH(3/4)
When installed in slot 2
- If you select CH (1/2) of the SDI input connector for either [Input (L)]
or [Input (R)], CH (1) and CH (2)are assigned automatically to [Input
(L)] and [Input (R)], respectively.
When you select CH (3/4) of the SDI input connector, CH (3) and CH
(4) are assigned automatically to [Input (L)] and [Input (R)],
respectively.
1
2
3
4
5
6
Source Name
Input (L) SDI IN1 CH1
Input (R) SDI IN1 CH2
MIC/LINE 1
MIC/LINE 2
MIC/LINE 3
MIC/LINE 4
MIC/LINE 5
MIC/LINE 6
LINE 7
LINE 8
SLOT1 DV IN1
SLOT1 DV IN2
B SLOT2 SDI IN1 CH(1/2)
SDI IN1 CH(3/4)
SLOT2 SDI IN2 CH(1/2)
SDI IN2 CH(3/4)
Settings Related to Input Signals
60
When CH (1/2) of SDI IN1 is assigned
Caution
• For DV input, it is not possible to assign more than one selection button to
a single DV input connector. If you attempt to assign to a different
selection button a DV input connector which has already been assigned to
a selection button, a confirmation message appears. If you then select
[OK], the assignment switches to the new selection button, and the
originally assigned selection button returns to the default setting.
• About the DV signal locking time
When DV is selected for the input audio, there is a delay until the DV
signal locks and the audio can be heard.
• When a serial digital interface module is installed
- SDI embedded audio can only be assigned to the channel fader of the
source number assigned to video that is input to the same SDI input
connector. It cannot be combined with analog input video, DV input
video, or video of the other SDI input connector.
Page 61

- SDI embedded audio cannot be assigned simultaneously to CH (1/2) and
CH (3/4) of the same SDI input connector.
Similarly, select [Input (R)], and confirm; select the audio input connector
from the list, and confirm.
When the input audio signal reaches the reference level, the input signal
indication in the source viewer lights green and you can confirm that there is
an audio input.
Input signal indication
4
Press the MENU button to close the menu.
Setting the MIC/LINE level of an audio input
If the peak indication appears (when set to the default MIC/LINE
level of “Middle (-20 dB)”)
If the input audio signal is too loud, the peak indication in the source viewer lights
red.
In this case, since the MIC/LINE level exceeds the standard input level, use the
following procedure to adjust it.
Example: When the peak indication has lit with MIC/LINE 2 connected to R and
MIC/LINE 1 connected to L, as illustrated below.
Chapter 2 Preparations
AUDIO IN
LINE MIC/LINE
8 76543
1
Press the MENU button.
2
In the top menu select [Audio MIC/LINE Level].
21
OFF
ON
MIC/LINE2MIC/LINE
RL
PUSH PUSH
MIC/LINE
1
Settings Related to Input Signals
61
Page 62

3
1 Select the number of the MIC/LINE input connector to which is
connected the target audio signal, and confirm; 2 select [High(+4dB)], and
confirm.
In this example, both [MIC/LINE 1] and [MIC/LINE 2] are set to [High
(+4dB)].
B High(+4dB)
Middle(-20dB)
Low(-44dB)
2
1
MIC/LINE 1 Middle
MIC/LINE 2 Middle
MIC/LINE 3 Middle
Chapter 2 Preparations
MIC/LINE 4 Middle
MIC/LINE 5 Middle
MIC/LINE 6 Middle
4
Press the MENU button to close the menu.
If no input signal indication appears (when set to the default
microphone/line level of “Middle (-20 dB)”)
If no input signal indication appears in the source viewer even though an audio
signal is input, the microphone/line level is not reaching the reference level.
Using the same procedure as detailed in “If the peak indication appears” above,
select the number of the microphone/line input connector, and at step 3-2, select
[LOW (-44dB)], and confirm.
Settings Related to Input Signals
62
Page 63

Relation Between Program Output Display and Input and Output Formats
Depending on the format and resolution of the input signal, the size and cropping
of the output video is as follows.
Material with a 4:3 aspect ratio
Material with a 5:4 aspect ratio
Chapter 2 Preparations
Relation Between Program Output Display and Input and Output Formats
63
Page 64

Chapter 2 Preparations
Relation Between Program Output Display and Input and Output Formats
64
Page 65

3
Operations
Video Switching
This section describes how to switch the video signals input to the unit, and
output the final video (output program) from the PGM output connectors.
With this unit, you can also apply some video effects.
Chapter
Note
First, make the settings described in “Video Signal Related Settings” (page 57).
Basics of Video Switching
This section describes only the most basic switching operations. See the relevant
sections for details of switching and effect operations.
Cut switching
This is the most basic and commonly used type of switching. The video changes
instantaneously from A to B.
For details, see “Changing the Video with a Cut” (page 66).
A
Switching with a transition effect
In a transition effect, the image gradually switches from one video to another
through the application of one of various effects.
For details, see “Changing the Video with a Effect Transition” (page 68).
Chapter 3 Operations
B
Video Switching
65
Page 66

Changing the Video with a Cut
This switches the video instantaneously, with no added effects. This is the most
basic form of switching.
Basic operation for a video cut
There are two methods of making a cut, as follows.
• Switching directly by pressing a PGM selection button
Chapter 3 Operations
• Checking the next video in the PVW viewer, then pressing the CUT button
The following diagram shows the flow of operations in carrying out a video cut.
Press the PGM selection buttons to select the program
output video.
Press a different PGM
selection button to
switch the video.
Press a NEXT selection
button to select the next
output.
Press the CUT button .
Switching directly by pressing a PGM selection button
To switch from one video to another, you can simply press the PGM selection
button to which the new video is assigned.
1
In the source viewer, select the video for program output.
Example: You may select video 4.
2
Press the PGM selection button with the same number as the selected video.
Press button 4.
PGM
66
Video Switching
654321
NEXT
INT
The PGM selection button you pressed lights red, and the selected video
appears in the PGM viewer.
The same video as shown in the PGM viewer is now output from the PGM
output connectors.
Page 67

A red frame appears around the source viewer for the selected video.
3
Determine on the next video, then repeat the procedure in step 2.
Switching with the CUT button after checking the next video in the PVW viewer
To switch while checking the new video in the PVW viewer, use the CUT button.
1
In the source viewer, select the video you want to switch to (the next program
output).
Example: You may want
to switch to video 3.
2
Press the NEXT selection button with the same number as this video.
Lit red.
654321
Press button 3.
Current program output video
PGM
NEXT
INT
Chapter 3 Operations
The NEXT selection button you pressed lights amber, and the selected video
appears in the PVW viewer.
An amber frame appears around the source viewer for the next video.
Video Switching
67
Page 68

3
Press the CUT button.
This interchanges the video in the PGM viewer and PVW viewer, and
switches the program output video.
At the same time, the lit PGM selection button and NEXT selection button
interchange, and the colors of the frames in the source viewer also
interchange.
Lit red.
PGM
Before you press the CUT button
654321
Lit amber.
NEXT
INT
Chapter 3 Operations
Lit red.
Lit amber.
Each press of the CUT button interchanges the program output video and the
NEXT selection video.
Changing the Video with a Effect Transition
Instead of an instantaneous cut, you can gradually switch from one video to
another through the application of one of various effects.
Basic transition effect operations
The basic procedure for applying an effect to a transition is as follows.
Set the transition effect.
Select the next video to be output
using the NEXT selection buttons.
PGM
After you pressed the CUT button
654321
NEXT
INT
68
Video Switching
Carry out the transition.
There are two ways of executing a transition:
• Automatic execution with the AUTO TRANS button
• Manual execution using the transition lever
0
T
P
V
W
FTB
DSK
AUTO TRANS button
E
F
C
F
E
X
I
M
KEY
CUT
AUTO
TRANS
IC
Transition lever
Page 69

AUTO TRANS button
Pressing the AUTO TRANS button carries out the transition automatically, using
the preset transition time.
Transition lever
Moving the transition lever in the direction shown by the LED indicators (fF)
progresses the transition in sync with the lever movement.
Switching with a dissolve
In a dissolve, one video image fades into another.
Basic operation for a dissolve
The basic procedure for a dissolve is as follows.
Select the next video to be output
using the NEXT selection buttons.
Chapter 3 Operations
Press the MIX button.
Carry out the transition.
1
Press the MIX button.
MIX button
IC
DIM TB
KEY
CUT
AUTO
TRANS
E
F
C
F
T
E
X
I
M
0
P
V
W
FTB
DSK
The MIX button lights amber, and the effect indication on the operation
screen shows the current mix state (progress of the dissolve).
Video Switching
69
Page 70

Chapter 3 Operations
Switching with a wipe
Current mix state
Notes
• The mix state shows the current transition time setting.
• You can still change the transition time at this point. To change the setting,
follow the procedure in “Changing the Transition Time” (page 72).
2
Determine the next program output video, and select this with the NEXT
selection button.
The selected video appears in the PVW viewer.
3
Carry out the transition with the AUTO TRANS button or transition lever.
The NEXT selection video dissolves into the program output video.
Each press of the AUTO TRANS button, or operation of the transition lever,
carries out a dissolve transition from the program output video to the NEXT
selection video.
In a wipe, two video images occupy the display simultaneously, with the area
occupied by one growing until if wipes out the other. You can choose from
sixteen different wipe patterns.
70
Video Switching
Page 71

Basic operation for a wipe transition
The basic procedure for a wipe transition is as follows.
Press the EFFECT button.
Select the effect pattern in the top
menu with [Effect Pattern].
Select the next video to be output
using the NEXT selection buttons.
Carry out the transition.
1
Press the EFFECT button.
EFFECT button
IC
DIM TB
KEY
CUT
AUTO
TRANS
E
F
C
F
T
E
X
I
M
0
P
V
W
FTB
DSK
The EFFECT button lights amber, and the effect indication shows the current
effect state.
Chapter 3 Operations
Current effect state
Notes
• The current effect state shows the transition time and effect pattern
settings.
• You can change the transition time. To change the setting, follow the
procedure in “Changing the Transition Time” (page 72).
Video Switching
71
Page 72

2
Select the effect pattern.
To change the effect pattern, follow the procedure in “Changing the Effect
Pattern” (page 73).
3
Determine the next program output video, and select this with the NEXT
selection button.
The selected video appears in the PVW viewer.
4
Carry out the transition with the AUTO TRANS button or transition lever.
The program output video changes to the NEXT selection video by a wipe
transition.
Chapter 3 Operations
Each press of the AUTO TRANS button, or operation of the transition lever,
the program output video changes to the NEXT selection video by a wipe
transition.
Note
You can apply an edge effect to the wipe pattern. For details, see “Applying Edge
Effects” (page 87).
Changing the Transition Time
Before carrying out a transition with the AUTO TRANS button, set the transition
time.
1
Press the MIX button or EFFECT button.
The current settings appear in the effect display.
2
Press the MENU button.
3
In the top menu, select [Video Effect].
4
1 Select [Transition Time], and confirm; 2 move the slider to set the
transition time.
The transition time is set in frame units.
1
Effect Pattern 0004
Transition Time 30 F
Edge Off
Key Off
Crop Off
5
Press the MENU button to close the menu.
The set transition time appears in the effect display.
2
72
Video Switching
Page 73

Changing the Effect Pattern
1
Press the EFFECT button.
The current settings appear in the effect display.
Note
Here you can also press the EFFECT button once more to recall the [Effect
Pattern] menu, and skip from step 2 below as far as 1 within step 4.
2
Press the MENU button.
3
In the top menu, select [Video Effect].
4
1 Select [Effect Pattern], and confirm; 2 select the wipe pattern from the
list, and confirm.
Chapter 3 Operations
1
Effect Pattern 0001
Transition Time 30F
Edge Off
Key Off
Crop Off
5
Press the MENU button to close the menu.
2
1080 T
1100 A
B 0001 T
0002 T
0003 T
0004 T
0009 T
0010 T
0011 T
0012 T
0013 T
0014 T
0015 T
0016 T
0019 T
0020 T
0021 T
0022 T
MIX
Note
You can also close the menu by pressing the EFFECT button.
The selected effect pattern appears in the effect display.
Using Picture-in-Picture (PinP) for Combining Videos
You can generate a picture-in-picture effect by embedding a video within another
video.
Video Switching
73
Page 74

Note
When you use a picture-in-picture for combining videos, you can check the
results in the PVW viewer before program output. For details, see “Checking the
Results of Combining Videos (Effect Preview)” (page 88).
Basic picture-in-picture operations
Chapter 3 Operations
The basic procedure for using a picture-in-picture for combining videos is as
follows.
Select a picture-in-picture from [Effect
Pattern] of the top menu.
Press a NEXT selection button to select
a video to embed within the video.
Embedded
video
Execute the transition.
For details on executing transitions, see “Basic transition effect operations”
(page 68).
1
Press the MENU button.
2
In the top menu, select [Video Effect].
3
1 Select [Effect Pattern] and confirm; 2 select a picture-in-picture from the
list and confirm.
1
Effect Pattern 0003
Transition Time 30F
Edge Off
Key Off
Crop Off
Size Small
Location
2
1080 T
1100 A
0001 T
0002 T
B 0003 T
0004 T
0009 T
0010 T
0011 T
0012 T
0013 T
0014 T
0015 T
0016 T
0019 T
0020 T
0021 T
0022 T
MIX
74
The picture-in-picture information appears in the effect display.
Video Switching
Page 75

4
Press the MENU button to close the menu.
5
Decide which video to embed, and then press the corresponding NEXT
selection button to specify the video.
The selected video is displayed in the PVW viewer.
Caution
When the following material is selected, the NEXT selection button flashes
and the picture-in-picture effect is not applied.
• Material assigned to INT.
• Material being used for program output
• Material being used for keying.
6
Use the AUTO TRANS button, CUT button, or transition lever to execute
the transition.
The NEXT selection video is embedded in the program output video.
The NEXT selection button changes to red when the transition is complete.
Chapter 3 Operations
Press the AUTO TRANS button or CUT button once more or move the
transition lever in the opposite direction to remove the embedded video and
return the color of the NEXT selection button to orange.
Caution
The transition time is always 0%.
Notes
• You can crop the unwanted portions from the embedded video. For details,
see “Cropping Unwanted Portions From the Video Being Combined”
(page 87).
• You can apply an edge to the frame of the video to be embedded. For
details, see “Applying Edge Effects” (page 87).
Adjusting the Picture-in-Picture (PinP)
You can set the size and display position of the video embedded using a picturein-picture.
Video Switching
75
Page 76

Note
You can make picture-in-picture adjustments while viewing the results in the
PVW viewer before program output. For details, see “Checking the Results of
Combining Videos (Effect Preview)” (page 88) and “Giving Priority to
Displaying the PVW Viewer” (page 90).
Changing the size of the video embedded
1
Perform Steps 1 to 6 of “Basic picture-in-picture operations” (page 74).
2
Press the MENU button.
3
In the top menu, select [Video Effect].
Chapter 3 Operations
4
1 Select [Size] and confirm; 2 select a size and confirm.
Large
B Medium
Small
2
1
Effect Pattern 0004
Transition Time 30F
Edge Off
Key Off
Crop Off
Size Small
Location
The meanings of these items are as follows.
[Large]: 1/4 of size
[Medium]: 9/64 of size
[Small]: 1/16 of size
Large Medium Small
5
Press the MENU button to close the menu.
Specifying the position to embed the video
1
Perform Steps 1 to 6 of “Basic picture-in-picture operations” (page 74).
2
Press the MENU button.
76
Video Switching
3
In the top menu, select [Video Effect].
4
1 Select [Location] and confirm; 2 select [X] or [Y] and confirm; 3
specify the position with the slider while checking the PVW viewer.
1
Effect Pattern 0004
Transition Time 30F
Edge Off
Key Off
Crop Off
Size Small
Location
2
X 200
Y -150
3
X-Y
Page 77

The meanings of these items are as follows.
[X]: Specify the horizontal position.
[X]: Specify the vertical position.
Note
After Step 1, you can specify the vertical or horizontal position by just
pressing the top, bottom, left, or right part of the positioner. (If you use the
positioner, there is no need to select [X] and [Y].)
Caution
When adjusting the position of the picture-in-picture image up, down, left, or
right, the image shifts in 10-point increments.
5
Press the MENU button to close the menu.
Using Fade-to-Black (FTB)
This fades the video in from or out to a black screen.
Press the FTB button.
This fades out the program output to a black screen, except for any superimposed
logo.
LOGO LOGO LOGO
Press the FTB button once more to fade in the video from the black screen.
LOGO LOGO LOGO
Note
While the screen is black, the PGM selection buttons change to amber.
Chapter 3 Operations
Fading in a different video after fading out
1
After fading to a black screen, select a different video with the PGM
selection buttons.
2
Press the FTB button.
This fades in the newly selected video.
Setting the Fade to Black transition time
1
Press the MENU button.
2
In the top menu, select [Fade To Black].
Video Switching
77
Page 78

3
1 Select [Transition Time], and confirm; 2 move the slider to set the
transition time.
1
Transition Time 20 F
4
Press the MENU button to close the menu.
Using Color Bars and Color Mattes
The Internal Color Bar is provided for adjustment and test transmission. The
Internal Color Matte is provided for a background.
1
Chapter 3 Operations
Select the internal (INT) source using the NEXT buttons.
The INT source selection menu appears in the menu display.
2
Select the color bars or color matte you want to show, and confirm.
Black
White
Color Bar
B Color Matte
Lum 0
Sat 0
Hue 0
Text Typing Tool F5
aaaaaaaa
bbbbbbbb
cccccccc
dddddddd
2
Note
This unit can output the following 2 color bars for each video output signal
format setting.
• With NTSC: SMPTE color bar (75%)
• With PAL: EBU color bar (100%)
The selected internal video signal appears in the “INT” source viewer.
Note
You can change the color of the color matte. For details, see “Adjusting Color
Matte” (page 161).
Using the Downstream Key (DSK) Function to Add Text or an Image
You can add text or an image to video that already includes an effect or
combination.
This is useful for adding subtitles, for example.
78
Video Switching
Page 79

DSK (downstream) key
Basic downstream key operations
The basic procedure for downstream keying is as follows.
Select the image to be impated.
Select a graphics file from the INT source
selection menu.
Press the DSK button to insert the key.
Inserting a downstream key
In order to use a downstream key for text or graphics, it must first be imported
onto the internal hard disk of this unit. You can use the alpha channel of a
graphics file in targa format as the key source, which allows high-quality
downstream keying.
For details on importing a graphics file, see “Importing Graphics Files” (page 175).
1
Press INT in the NEXT selection buttons.
The INT source selection menu appears.
2
Use the jog roller to select a graphics file displayed in the lower part of the
INT source selection menu, and confirm.
Chapter 3 Operations
Black
White
Color Bar
Color Matte
Lum 0
Sat 0
Hue 0
Text Typing Tool F5
aaaaaaaa
bbbbbbbb
B ccccccccc
dddddddd
Graphics files
The selected graphics file appears in the “INT” source viewer.
Video Switching
79
Page 80

Note
While the graphics file is being read in, the message “Loading...” appears at
the bottom of the PVW viewer and in the device status in the source viewer.
3
Press the DSK button.
DSK button lights red, and the graphics file image appears in the PGM
viewer.
Chapter 3 Operations
If you press the DSK button once more, the inserted image is removed. Each
press of the DSK button alternately inserts or removes the image.
Note
If you change the video to a black screen using FTB, no downstream key is
output. In this case, the DSK button lights amber.
Setting the downstream key transition times
You can set the DSK transition times which are the times taken for the text or
image to be gradually inserted, or to be gradually removed. These are set in frame
units.
1
Press the MENU button.
2
In the top menu, select [DSK].
3
1 Select [On Trans. Time], and confirm; 2 move the slider to set the time
until the image appears.
1
On Trans. Time 20 F
Off Trans. Time 0 F
Key Adjust
Crop Off
4
1 Select [Off Trans. Time], and confirm; 2 move the slider to set the time
2
to disappear.
80
Video Switching
1
On Trans. Time 20 F
Off Trans. Time 0 F
Key Adjust
Crop Off
5
Press the MENU button to close the menu.
2
The DSK transition time setting appears in the DSK display of the effect
display in the operation screen.
Page 81

Adjusting the downstream key
You can adjust the parameters for inserting text or image, or crop unwanted
portions.
1
Press the DSK button to insert the image.
2
Press the MENU button.
3
In the top menu, select [DSK].
4
In the submenu, set the following adjustment items.
Adjusting the outline of the text or image
1 Select [Key Adjust], and confirm; 2 select the item to adjust, and
confirm; 3 adjust the sliders.
1
On Trans. Time 20 F
Off Trans. Time 0 F
Key Adjust
Crop Off
23
Clip 0
Gain 0
Density 100
Key Invert Off Off
On
The items you can adjust are as follows.
[Clip]: Adjusts the threshold level for keying.
[Gain]: Adjusts the sharpness of the key outline.
[Density]: Adjusts the density of the text or image to be inserted.
Note
If you have recalled and adjusted a graphics file, the adjusted values of the
graphics file change as follows depending on the next file recalled:
• When a file with no alpha channel is recalled: adjusted values remain
unchanged.
• When a file with an alpha channel is recalled: values return to their default
settings.
Chapter 3 Operations
Inverting the key
You can invert the displayed parts and non-displayed parts of the combined
material.
1 Select [Key Adjust], and confirm; 2 select [Key Invert], and confirm; 3
select [On], and confirm.
1
On Trans. Time 20 F
Off Trans. Time 0 F
Key Adjust
Crop Off
23
Clip 0
Gain 0
Density 100
Key Invert Off Off
B On
Video Switching
81
Page 82

Cropping unwanted portions of the text or image
1 Select [Crop], and confirm; 2 select [On], and confirm; 3 select the side
(top, bottom, left, or right) to be displayed, and confirm; 4 move the slider
to crop.
1
On Trans. Time 20 F
Off Trans. Time 0 F
Key Adjust
Crop Off
5
Press the MENU button to close the menu.
Showing a Logo on the Screen
Chapter 3 Operations
For copyright protection purposes, you can superimpose a logo (160×120 pixel
graphic) on the video.
When the logo is enabled, the logo is superimposed on the program output video.
Basic operation for showing a logo
The basic procedure for showing a logo is as follows.
Import a logo.
23 4
Off
B On
Top 320
Left -400
Right 400
Bottom -320
Select the logo source file.
The logo is displayed.
Showing a logo in the video
To show a logo, first it is necessary to import the logo file to the internal hard disk
of this unit.
For details on importing a logo file, see “Importing Logo Files” (page 176).
1
Press the MENU button.
2
In the top menu, select [Logo].
3
1 Select [Logo Source], and confirm; 2 select the logo file from the list,
and confirm.
Logo Source None
Clip 0
Gain 0
Density 100
Location
1
None
B aaaaaaaa.tif
bbbbbbbb.tif
ccccccccc.bmp
dddddddd.bmp
2
82
Video Switching
Page 83

The image is inserted in both the PGM viewer and PVW viewer.
Note
By selecting a logo file from the list, it always appears in the program output
video. If you do not want to show the logo, select [None].
4
Press the MENU button to close the menu.
Adjusting the logo display
Adjust the parameters for logo insertion, and set the logo position.
1
Show the logo.
For details of the operation, see “Showing a logo in the video” (page 82).
2
Press the MENU button.
3
In the top menu, select [Logo].
4
In the submenu, set the following adjustment items.
Adjusting the outline of the logo
1 Select one of [Clip], [Gain], and [Density], and confirm; 2 adjust the
slider.
Chapter 3 Operations
1
Logo Source None
Clip 0
Gain 0
Density 100
Location
2
The items you can adjust are as follows.
[Clip]: Adjusts the threshold level for the logo key.
[Gain]: Adjusts the sharpness of the outline.
[Density]: Adjusts the density of the text to be inserted.
Note
When you have recalled a logo file and made adjustments, the logo file
adjustment values for the logo file depend on the next recalled file as follows:
• When a file with no alpha channel is recalled: the adjustments are
maintained as is.
• When a file with an alpha channel is recalled: the adjustments are returned
to their default values.
Specifying the position of the logo display
1 Select [Location], and confirm; 2 select [X] or [Y], and confirm; 3
specify the position with the sliders.
1
Logo Source None
Clip 0
Gain 0
Density 100
Location
2
X 320
Y 280
3
X-Y
Video Switching
83
Page 84

The meaning of these items are as follows.
[X]: Specifies the horizontal position.
[Y]: Specifies the vertical position.
Note
After Step 1, you can specify the vertical or horizontal position by just
pressing the top, bottom, left, or right part of the positioner. (If you use the
positioner, there is no need to select [X] and [Y].)
5
Press the MENU button to close the menu.
Using Luminance Keying
Chapter 3 Operations
Video A and video B images are combined by comparing the components of
brightness (luminance) to cut unneeded portions of the video B image.
Generally, bright lettering is drawn on a black background, and this is used as the
key.
A
Note
Pressing the KEY button switches to key mode (the KEY button, NEXT selection
buttons, MIX button and EFFECT button light green, and the AUTO TRANS
button, CUT button, and transition lever now apply a keying operation).
Basic operation for luminance keying
The basic procedure for luminance keying is as follows.
Press the KEY button (Switches to key mode).
Select the key video with a NEXT selection
button.
B
AB
84
Video Switching
Select the effect pattern with the MIX button
or EFFECT button.
Carry out the transition.
1
Press the KEY button.
The KEY button, NEXT selection buttons, and MIX button or EFFECT
button light green and are now used for keying video.
Page 85

2
Select the video for keying with the NEXT selection button.
A green frame appears around the selected video in the source viewer.
When 5 is selected
3
Press the MIX button or EFFECT button.
The button green, and the details of the current effect appear in the effect
display.
EFFECT buttonMIX button
DIM TB
E
F
C
F
E
X
I
M
0
T
P
V
W
Chapter 3 Operations
KEY
CUT
AUTO
TRANS
IC
FTB
DSK
Notes
• You can change the transition time. To make this change, use the
procedure in “Changing the Transition Time” (page 72).
• You can change the effect pattern. To make this change, use the procedure
in “Changing the Effect Pattern” (page 73).
• In key mode, you can maintain the transition time, effect pattern, and edge
adjustments for keying.
4
Apply the video effect using the AUTO TRANS button, CUT button, or
transition lever.
This keys the NEXT selection into the program output video.
The “KEY ON” indicator on the operation screen lights red.
Press the AUTO TRANS button or CUT button once more, or operate of the
transition lever in the opposite direction, to remove the combined video
effect.
Video Switching
85
Page 86

The “KEY ON” indicator on the operation screen also turns off.
Each press of the AUTO TRANS button or CUT button or operation of the
transition level alternately inserts or removes the video effect.
Adjusting the Combined Video
You can make keying adjustments while viewing the results in the PVW viewer
before program output. For details, see “Checking the Results of Combining
Videos (Effect Preview)” (page 88) and “Giving Priority to Displaying the PVW
Viewer” (page 90).
1
Perform keying.
2
Chapter 3 Operations
Press the MENU button.
3
In the top menu, select [Video Effect].
4
Select [Key], and confirm, then make the following settings in the submenu.
Sharpening the outline of the key
1 Select one of [Clip], [Gain], and [Density], and confirm; 2 adjust the
slider.
Effect Pattern 0004
Transition Time 30 Frame
Edge Off
Key Chroma Key
Crop Off
1
B Luminance Key
Clip 0%
Gain
Density 100%
Key Invert Off
2
The meaning of these items are as follows.
[Clip]: Adjusts the threshold for background cutout.
[Gain]: Adjusts the sharpness of the outline.
[Density]: Adjust the density of the video to be combined.
Note
If you have recalled and adjusted a graphics file, the adjusted values of the
graphics file change as follows depending on the next file recalled:
• When a file with no alpha channel is recalled: adjusted values remain
unchanged.
• When a file with an alpha channel is recalled: values return to their default
settings.
Inverting the luminance key
1 Select [Key Invert], and confirm; 2 select [On], and confirm.
1
Effect Pattern 0004
Transition Time 30 Frame
Edge Off
Key Chroma Key
Crop Off
5
Press the MENU button to close the menu.
B Luminance Key
Clip 0%
Gain
Density 100%
Key Invert Off Off
2
B On
86
Video Switching
Page 87

Cropping Unwanted Portions From the Video Being Combined
1
Combine videos using a picture-in-picture or keying.
2
Press the MENU button.
3
In the top menu, select [Video Effect].
4
1 Select [Crop], and confirm; 2 select [On], and confirm; 3 select the side
(top, bottom, left, or right) to crop, and confirm; 4 move the slider to crop.
Effect Pattern 0004
Transition Time 30F
Edge Off
Key Luminance
Crop Off
5
Press the MENU button to close the menu.
Applying Edge Effects
Apply an edge to a video border when using a wipe effect or to a picture-inpicture frame.
For a wipe For a picture-in-picture
1
First set the effect pattern.
2
Press the MENU button.
3
In the top menu, select [Video Effect].
1
23
Off
B On
Top -270
Left -350
Right 350
Bottom -270
Edge
4
Chapter 3 Operations
4
1 Select [Edge], and confirm; 2 select [On], and confirm; 3 select the
item to be set, and confirm; 4 adjust the slider.
1
Effect Pattern 0004
Transition Time 30F
Edge Off
Key Luminance
Crop Off
23
Off
B On
Width 0
Softness 0
Color Matte
Lum 100%
Sat 0%
Hue 0%
4
The meaning of these items are as follows.
[Width]: Adjusts the width of the border.
[Softness]: Adjusts the blurriness of the edge.
[Color Matte]: Changes the color of the border. Select [Lum] (luminance),
[Sat] (saturation), or [Hue], and adjust the slider.
Video Switching
87
Page 88

Checking the Results of Combining Videos (Effect Preview)
You can preview and adjust the results of executing picture-in-pictures and
keying in the PVW viewer before program output.
You can set the PVW viewer to not be hidden while the menu is displayed when
you are making adjustments. For details, see “Giving Priority to Displaying the
PVW Viewer” (page 90).
Note
Press the PVW button to switch to PVW mode (in which the PVW viewer is used
for effect preview).
Chapter 3 Operations
Basic operation for previewing in the PVW viewer
The basic procedure for previewing in the PVW viewer is as follows.
For picture-in-picture
Select a picture-in-picture from [Video Effect] of the top menu.
For keying
Press the KEY button (the NEXT selection buttons switch to
keying video selection).
For picture-in-picture
1
2
Select the key video with a NEXT selection button.
Press the PVW button (switch to PVW mode).
Carry out the transition (switch to program output).
Perform Steps 1 to 5 of “Basic picture-in-picture operations” (page 74).
Press the PVW button.
The PVW button lights orange and a preview of the results of combining
videos is displayed in the PVW viewer.
88
Check and adjust the results of combining videos and perform the following
operation to execute program output.
For details on making picture-in-picture adjustments, see “Adjusting the
Picture-in-Picture (PinP)” (page 75).
Video Switching
Page 89

For keying
3
Use the AUTO TRANS button, CUT button, or transition lever to combine
the videos.
The results of combining videos are sent as program output and displayed in
the PGM viewer.
The preview in the PVW viewer disappears (changes to the results of the next
transition).
4
Press the PVW button to end PVW mode.
The PVW viewer returns to the video selected with the NEXT selection
button.
1
Press the KEY button.
The KEY button, NEXT selection buttons, and MIX or EFFECT button light
green, and are now used for keying video.
Chapter 3 Operations
2
Press the NEXT selection button assigned to the video to be combined.
A green border appears around the selected video in the material viewer, and
the video appears in the PVW viewer.
3
Press the PVW button, to switch to PVW mode.
The PVW button lights orange, and a preview of the combined result appears
in the PVW viewer.
Check and adjust the combined result, use the following operation to switch
to program output.
Video Switching
89
Page 90

For details on making keying adjustments, see “Adjusting the Combined
Video” (page 86).
4
With the AUTO TRANS button, CUT button, or transition lever, carry out
the keying.
The combined result is sent to program output, and appears in the PGM
viewer.
The preview in the PVW viewer disappears (changes to the result of the next
transition).
Chapter 3 Operations
5
Press the PVW button, to end PVW mode.
The PVW viewer returns to the video selected from the NEXT selection
buttons.
Giving Priority to Displaying the PVW Viewer
With the default setting, the PVW viewer on the left is hidden when three levels
of submenus of the top menu are displayed. If you give priority to displaying the
PVW viewer, the preview is always viewable because the PVW viewer shifts to
the right (and the PGM viewer is hidden) when three levels of submenus are
displayed. The effect display below the PVW viewer also moves with the PVW
viewer.
1
Press the MENU button.
2
Select [Display] in the top menu.
3
1 Select [Viewer Priority] and confirm; 2 select [PVW] and confirm.
LCD Backlight
Viewer Priority
1
B PGM
PVW
2
90
Video Switching
Page 91

Creating a Title Graphic with the Text Typing Tool
Features of the Text Typing Tool Software
The text typing tool software is an application for creating simple titles.
You can switch between the Anycast Station main software (the main software)
and this application as you proceed.
• A file created with the text typing tool software is simultaneously saved in the
Anycast Station main software, and can be used as a DSK (downstream key)
or luminance key source.
Text typing tool software
Chapter 3 Operations
Anycast Station main software
• By capturing one scene of the program output video and showing it as a
background, you can get an impression of the final result of superimposing of
the key, and position objects (characters and lines) accurately.
Creating a Title Graphic with the Text Typing Tool
91
Page 92

Sheets and files
In the text typing tool software, you create one title as a single sheet.
Created sheet superimposed result
You can save multiple related sheets (for example, for a single program) together
in a file.
Chapter 3 Operations
Flow of Operations
File
When creating similar title, you can copy a object to create the sheet, and
therefore eliminate the trouble of creating a new file from scratch.
To use the text typing tool software, it is first necessary to upgrade the operating
software (When the software version you are using is 1.00).
For details of how to upgrade, see the section “Upgrading the Operating
Software” (page 200) in the Live Content Producer Operating Instructions.
1
Press the 1 (power) button on the side panel.
The operation screen appears.
2
Creating a Title Graphic with the Text Typing Tool
92
Press the keyboard F5 (Fn+5) key.
You can work by switching between the Anycast Station main software and
the text typing tool software.
Page 93

Anycast Station main software Text typing tool software
1Carry out the operation to start the text
typing tool, and switch to the text typing
tool.
Saved simultaneously
5Key combination.
Note
“Memory Stick” or USB flash memory
Font
2Create an object.
Edit the object, to complete a title.
Chapter 3 Operations
3Save the file.
File
4Carry out the close down
operation, and switch to
the main software.
“Memory Stick”
or USB flash
memory
With a “Memory Stick” or USB flash memory, you can import font files, and
export created titles. You can use exported files on such as a computer.
Caution
• It is not possible to use a USB mouse with the Anycast Station main software.
• If the USB mouse does not respond in the text typing tool software, try
disconnecting it and connecting to the other USB connector.
Creating a Title Graphic with the Text Typing Tool
93
Page 94

Starting Up
Chapter 3 Operations
1
In the Anycast Station main software, press the “INT” NEXT selection
button.
The INT material selection menu appears in the menu display.
2
Select [Text Typing Tool].
The following confirmation message appears.
3
Press the ENTER button on the front panel.
The screen goes black and the text typing tool software starts.
Caution
• If you switch while using the Anycast Station main software, the image or
sound may be distorted.
• If you switch while the Anycast Station main software is starting up, the
system may not function correctly. Check that all viewers (PGM/PVW/
material) have started up before switching to the text typing tool software.
Note
You can also use the keyboard F5 (Fn+5) key to switch to the text typing tool
software.
Creating a Title Graphic with the Text Typing Tool
94
Page 95

Closing Down
To power off the unit
Press the 1 power button on the side panel.
The following message appears, the text typing tool software ends, and the power
is turned off.
Caution
If there is a file in the process of creation, the program will end without saving it.
To close the text typing tool software and start the Anycast Station main
software
1
Click the [Exit] button at the lower left of the screen.
The screen goes black and the Anycast Station main software starts.
Note
You can also use the keyboard F5 (Fn+5) key to switch to the Anycast
Station main software.
In this case, following confirmation message appears.
If a file is being created, a message appears to confirm whether to save the
file.
Chapter 3 Operations
2
Click the [Enter].
Standard Operations
This section describes standard operations used as various points in the text
typing tool software.
Mouse operations
• By connecting a USB mouse to the USB connector on the side panel, you can
carry out mouse operations.
• You can also carry out mouse operations with the pointer of the supplied
keyboard.
Creating a Title Graphic with the Text Typing Tool
95
Page 96

Standard button operations
Click a button to carry out its function.
Standard checkbox operations
Click a checkbox to insert or remove the check mark. The function is active as
long as a check mark is present.
Chapter 3 Operations
Standard pull-down list operations
This section describes standard pull-down list operations.
Click the V button to display the pull-down list.
V button
Standard keyboard operations
• The R and r keys move the focus (in reverse video) within the pull-down list.
• Press the Enter key to confirm the item which currently has the focus.
• Press the Fn+~` key (Esc) to cancel the selection, and close the pull-down list.
Standard operations for text input
The following are standard keyboard operations for text input.
Key Operation
T, t Move the cursor horizontally one position at a time.
R Move the cursor up one position at a time.
r Move the cursor down one position at a time.
Shift + T,
Shift + t
Delete When there is a character selection: delete the selection.
Select one character at a time, horizontally from the cursor position.
When there is no character selection: delete the character following the
cursor.
Cursol
Creating a Title Graphic with the Text Typing Tool
96
Page 97

Key Operation
Backspace When there is a character selection: delete the selection.
Enter Newline
Esc Remove the cursor leaving the characters unchanged.
Space Insert a space.
Home Move the cursor to the beginning.
End Move the cursor to the end.
Alt + Enter Confirm the entered text and exit the text input mode.
Standard tool operations
By clicking a tool in the tool operation section, you can use the function provided
by the tool.
The tool operation continues until you select a different tool.
Other standard operations
The following standard operations can be carried out with the keyboard alone.
Key Operation
Ctrl + z Return to the previous state (Undo function)
Ctrl + y Advance to the next state (Redo function)
Ctrl + x Cut out an object
Ctrl + c Copy an object
Ctrl + v Paste an object
Ctrl + a Select all objects
Delete,
Backspace
When there is no character selection: delete the character before the
cursor.
Chapter 3 Operations
In text input mode: copy the selected text
In text input mode: paste the copied or cut text with the existing attributes
where it is being pasted
Delete an object
Object selection operations
1
Click the selection tool.
The icon turns green, and you can now select an object.
2
Click an object, or define a range by dragging.
Click
Drag
Creating a Title Graphic with the Text Typing Tool
97
Page 98

An orange border appears around the object.
This is the selected state.
Notes
• If you drag over a range, this selects all objects within the range.
• When there are multiple objects, you can use the keyboard Tab key to move the
selection to the next object.
Chapter 3 Operations
File Operations
Creating a new file
Tab
Selection moves
Press the Shift+Tab keys to move the selection in the reverse direction.
• Hold down the Shift key and click an object to add to the selection.
• Double-click on the selected text object to switch to text input mode (page
105).
This section describes file operations, including saving and deleting titles created
with the typing tool software, export, and so on.
1
In the file operation section, click the [New] button.
Opening an existing file
1
Creating a Title Graphic with the Text Typing Tool
98
A new sheet appears.
In the file operation section, click the [Open] button.
The [Open] screen appears.
Page 99

2
Select the file name from the list.
Last saved date of selected file
3
Click the [Enter].
This opens the selected file.
Note
If even one of the fonts used by the file you are opening has been deleted
from the unit, a message appears to confirm whether to substitute any
missing font with another font on the unit when displaying the file.
Clicking [Enter] displays the font selection list. If you select a font and click
enter, the selected font is used and the file opens. If multiple fonts have been
deleted, all the fonts are substituted with the selected font.
Chapter 3 Operations
Saving a file
1
In the file operation section, click the [Save] button.
The [Save] screen appears.
2
Enter the file name in [File Name].
Creating a Title Graphic with the Text Typing Tool
99
Page 100

Caution
You can enter a file name as up to 20 alphanumeric characters, but there may
not be room for the full name in text boxes or lists, or in the Anycast Station
main software INT material selection menu.
3
Click the [Enter].
A message appears while saving, and the file is saved.
Chapter 3 Operations
Saving a file with a new name
The file is simultaneously saved in the Anycast Station main software. In the
Anycast Station main software, the saved file appears if you press the “INT”
NEXT selection button.
Caution
If a file of the same name exists in the Anycast Station main software, it will
be overwritten.
Notes
• When a file consisting of multiple sheets is saved, the second and
subsequent sheets are named as follows with the file name + sheet number
in the Anycast Station main software.
First sheet (file name
only)
Second sheet (file
name + sheet number)
• A saved TIFF/TARGA file is saved with an alpha channel.
100
1
In the file operation section, click the [Save as...] button.
The [Save] screen appears.
Creating a Title Graphic with the Text Typing Tool
 Loading...