

Sony AVP-800 Operating Instructions Manual

AVP-800.3-800-709-31 [ En, C ]
Operating Instructions
AVP-800
1995 by Sony Corporation
3-800-709-31(1)
EN
C
VIDEO CD/CD/LD Player
AVP-800.3-800-709-31 [ En, C ]
2
-EN
Introduction
WARNING
To prevent fire or shock hazard, do not expose the unit
to rain or moisture.
To avoid electrical shock, do not open the cabinet. Refer
servicing to qualified personnel only.
This Video CD/Laser Disc Player is classified as a
CLASS 1 LASER product.
CAUTION
The use of optical instruments with this product
will increase eye hazard.
As the laser beam used in this player is harmful to
the eyes, do not attempt to disassemble the cabinet.
Refer servicing to qualified personnel only.
Precautions
Safety
• If any liquid or solid object falls into the cabinet,
unplug the unit and have it checked by qualified
personnel before operating it any further.
• The unit is not disconnected from the house current
as long as it is connected to the AC outlet, even if the
unit itself has been turned off.
• Unplug the unit from the wall outlet if you do not
intend to use it for an extended period of time. To
disconnect the cord, pull it out by the plug, never by
the cord itself.
• Take care that your fingers or other objects do not
get pinched by the front cover of the unit when you
place a disc on the disc tray. The front cover
automatically slides up and down when the disc tray
opens and closes.
Installing
• Allow adequate air circulation to prevent internal
heat buildup.
• Do not place the unit on surfaces (rugs, blankets,
etc.) or near materials (curtains, draperies) that may
block the space under the unit.
• Do not install the unit near heat sources such as
radiators or air ducts, or in a place subject to direct
sunlight, excessive dust, mechanical vibration or
shock.
• Do not install the unit in an inclined position. It is
designed to be operated in a horizontal position
only.
• Do not place heavy objects on the unit.
• Do not place the unit on soft surfaces (such as rugs,
blankets, or matresses) or any projections that may
block the movement of the front cover.
• If the unit is brought directly from a cold to a warm
location, moisture may condense inside the unit. If
this happens, playback may not start. When you first
install the unit, or when you move it from a cold to a
warm location, wait for about one hour before
operating the unit.
Operating voltage and AC plug
Before operating the player, make sure that the
operating voltage of your unit is identical with that of
your local power supply.
Models other than Hong Kong and China models
• Models other than the Hong Kong and China models
have a voltage selector at the rear. If necessary, reset
the voltage selector to the voltage corresponding to
your local power supply. The voltage selector of this
unit is set to 220–240 V AC originally.
For Set to
110–127 volts AC 110–127 V
200–240 volts AC 220–240 V
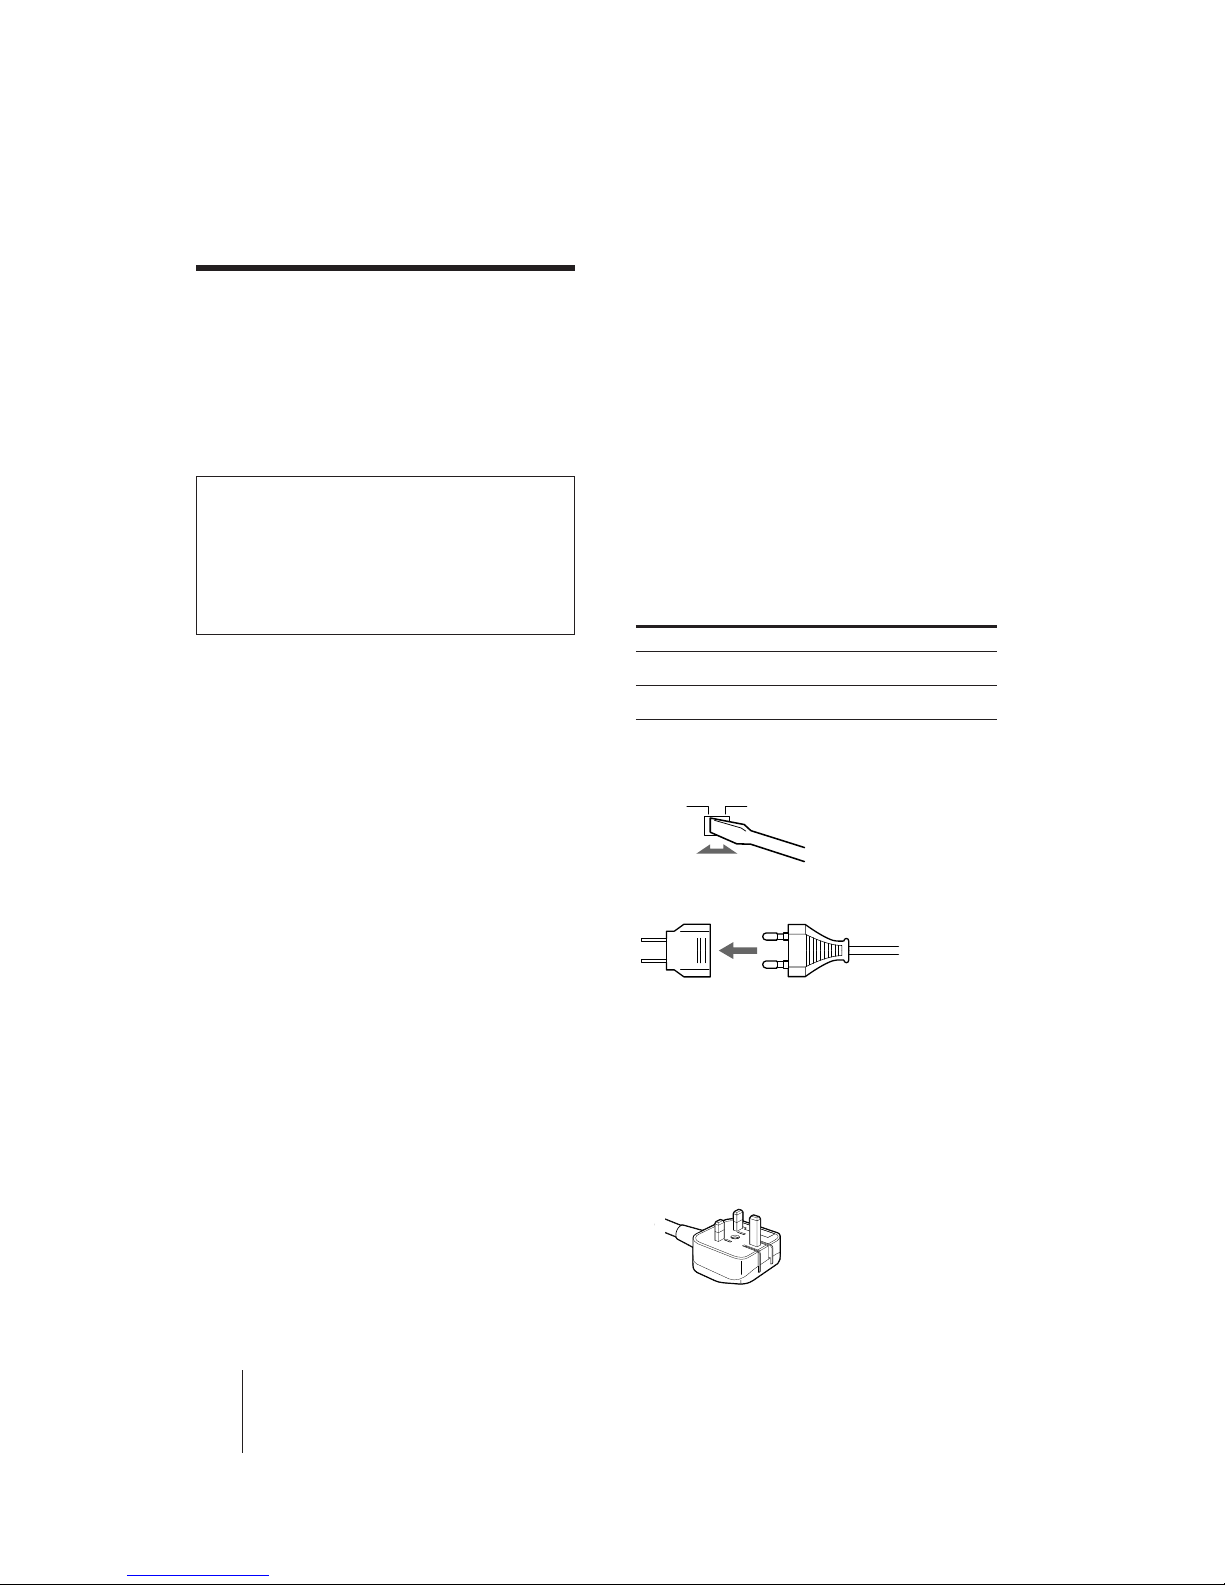
To set the voltage selector, disconnect the AC power
cord and set the selector to the appropriate position
with a blade screwdriver.
• If the AC plug of your unit does not fit into the wall
outlet, attach the supplied AC plug adaptor.
Models for Hong Kong and China
The models for Hong Kong and China do not have a
voltage selector. Operate the unit between 220 and 240
V AC, 50/60 Hz.
Model for Hong Kong
The model for Hong Kong has an AC plug as shown
below. The AC plug adaptor is not supplied with these
units.
If you have any questions or problems concerning your
unit, please contact your nearest BODYSONIC dealer.
220–240110–127

AVP-800.3-800-709-31 [ En, C ]
Introduction
3
-EN
4 Welcome!
Getting Started
5 Step 1: Unpacking
5 Step 2: Inserting batteries into the remote commander
6 Step 3: Connecting the player
Basic Operations
8 Playing a disc
10 Playing karaoke
12 Playing a VIDEO CD using PBC functions (PBC Playback)
Additional Operations
13 Understanding on-screen indications
15 Selecting a chapter or track directly (Chapter/Track Search)
16 Searching by frame, time, or scene number
(Frame/Time/Scene Search)
17 Searching for a particular point on a disc
18 Viewing frame-by-frame action
19 Resuming LD playback (Auto Resume)
20 Resuming VIDEO CD Playback from a point you like
(Book Mark)
21 Playing a section repeatedly (Repeat Play)
23 Playing songs in random order (Shuffle Play)
25 Playing songs in any order you like (Program Play)
26 Using the sound control functions
27 Selecting karaoke song order (Reserve)
30 Using karaoke functions
Additional Information
34 Troubleshooting
35 Specifications
36 Optical discs
38 Index to parts and controls
40 Glossary
40 Index
EN
Table of contents

AVP-800.3-800-709-31 [ En, C ]
4
-EN
Introduction
Thank you for purchasing the BODYSONIC Video CD/Laser Disc
Player.
The AVP-800, an easy-to-operate laser disc player, allows you to:
• Play many types of optical discs, LDs, CDs, CD-Gs, and VIDEO CDs
• Play a double sided LD without turning it over
• Play VIDEO CDs which conform to Ver. 2.0 of VIDEO CD standards,
using its Play Back Control (PBC) functions which allow you to:
– Perform interactive playback using menu screens
– View high-resolution still pictures
• Mark a point on a VIDEO CD where you want to resume playback—
Book Mark
• Play PAL VIDEO CDs on both PAL and NTSC TVs
• Continue an LD from the exact point at which you stopped— Auto
Resume
• Use enjoyable functions such as Program, Shuffle, or Repeat play
• Play karaoke (sing along with a disc)
Features include:
– 9 song reservation from two discs for non-stop karaoke
entertainment—Reserve
– Digital key controller to adjust backup key to your voice
– Two microphone jacks for duets
– Digital echo to create the ideal mood
– Singing along with the original vocals—Vocal Select
– Automatic applause—Auto Effect
– Getting help when you forget words or melody—Vocal Support
– Playing karaoke with non-karaoke discs—Karaoke Pon
– Playing karaoke with video tapes—LINE IN input
Conforming to Ver. 2.0 of VIDEO CD standards
This player conforms to both Ver. 1.1 and Ver. 2.0 of the VIDEO CD
standards. If you use a Ver. 2.0 VIDEO CD, Play Back Control (PBC)
functions (the new part of Ver. 2.0 of the VIDEO CD standards) enable
you to play the disc interactively following menus on the screen. You
can also enjoy high-resolution still pictures, as well as normal playback
of moving pictures and sound.
Compatible color systems
This player plays video discs recorded in the NTSC color system,
and VIDEO CDs in both the NTSC and PAL color systems.
Welcome!
AVP-800.3-800-709-31 [ En, C ]
Getting Started
Getting Started
5
-EN
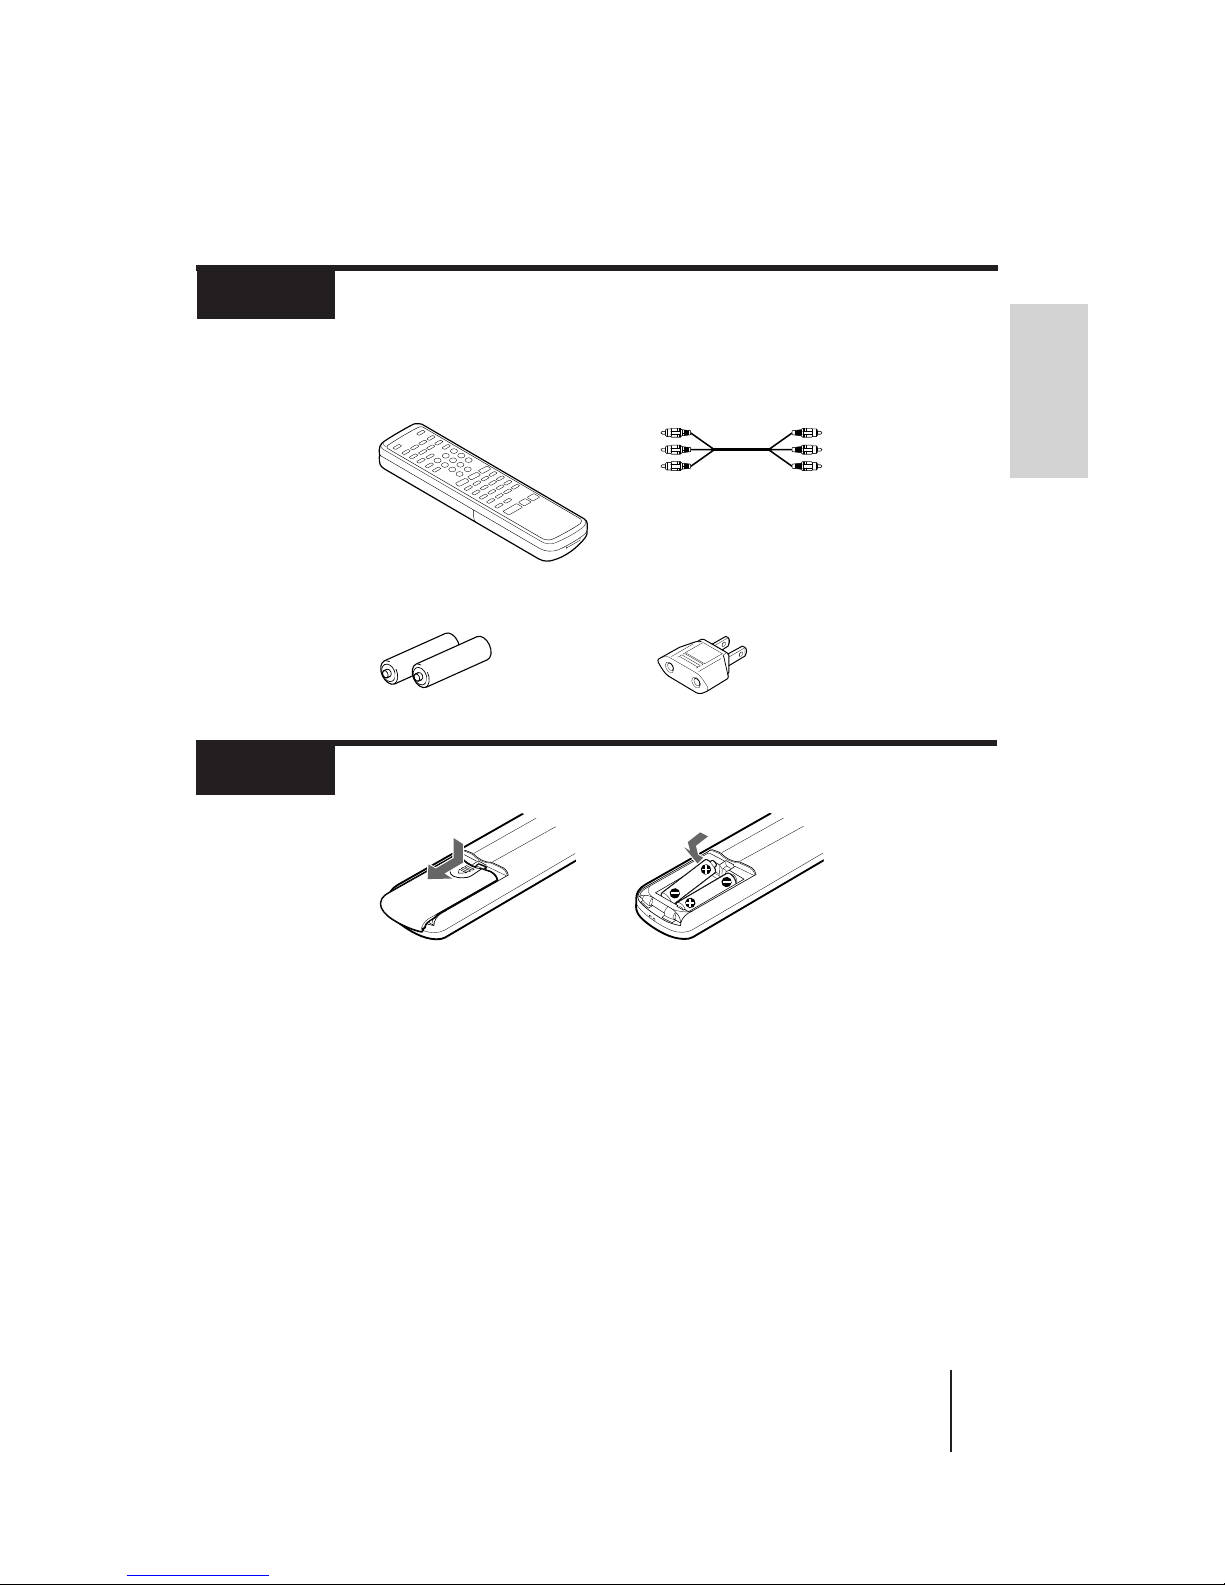
• Remote commander
WL-AVP800
• Two R6 (size AA) batteries
• Audio/Video cable
• AC plug adaptor (supplied with models other
than Hong Kong and China models)
Unpacking
Step 1
Check that you have the following items:
Notes
• With normal use, the batteries should last for approximately six months.
• Use two size R6 (AA) batteries.
• If you use the batteries incorrectly, they may leak or explode. See notes
below for correct usage.
–Insert the batteries with correct polarity as shown above.
–Do not use a new battery together with an old one.
–Do not use different types of batteries together.
–Do not recharge the batteries.
–If you are not going to use the remote commander for an extended period
of time, remove the batteries to avoid possible damage from battery
leakage.
–If battery leakage should occur, wipe off the leakage from the battery
compartment, then insert new batteries.
• Do not let direct sunlight or powerful artificial light fall directly on the
remote sensor on the front panel of the player. Such light interferes with
the signals from the remote commander, causing the remote commander to
fail to operate correctly.
Inserting batteries into the remote commander
Step 2
3 Close the cover.
1 Turn the commander
over, and remove the
cover.
2 Check the polarities and
position two R6 (size
AA) batteries correctly.
AVP-800.3-800-709-31 [ En, C ]
6
-EN
Getting Started
Television hook-up
To play LDs, CD-Gs, or VIDEO CDs, hook up a television to the player. Take out the
supplied audio/video connecting cable (yellow, red, and white plugs). Use this to connect
the player to the television. Once you have hooked up the television, set the input selector on
the TV to “Video.” Before connecting or disconnecting any cables, turn off all equipment.
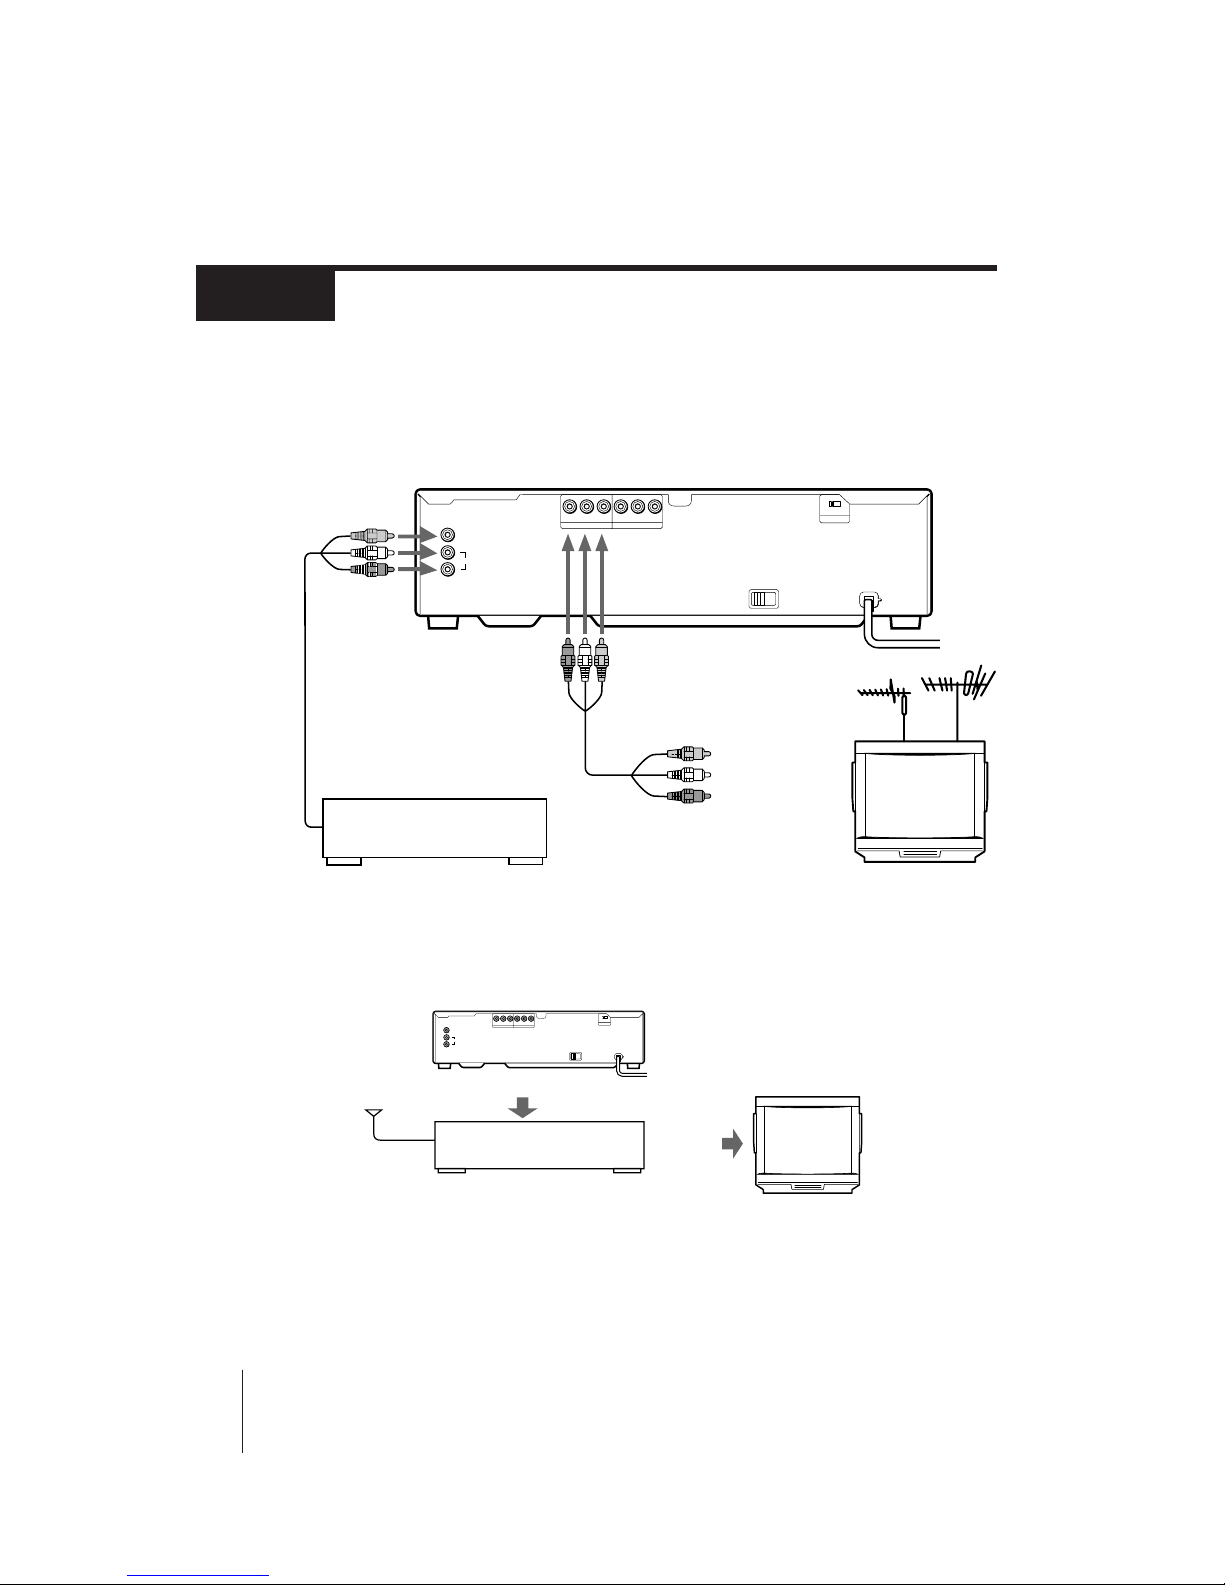
Connecting the player
Step 3
Television/VCR hook-up
Connect the player to the VCR’s inputs when:
–the video inputs of the TV are already used for the VCR or a similar machine.
–the TV has only an antenna input.
When you connect this player using the VCR’s inputs, do not use the LINE IN jacks of the player to
connect the VCR because doing so will cause interference with the sound or picture.
Notes
• Make sure all equipment is turned off before connecting or disconnecting any cables.
• Connection methods may differ; when in doubt about a connection, consult the TV or VCR
manufacturer’s manual.
• If the sound or picture is disturbed by noise, try moving the equipment farther apart.
• Firmly insert plugs into the jacks. A loose connection may cause noise.
• To prevent interference with TV broadcast reception, turn off all equipment connected but not currently
in use.
• If the TV only has a monaural phono jack for audio input, use a Connecting Cable (not supplied).
AUDIO VIDEO
LINE OUT 1
RL
LINE OUT 2
AUDIO VIDEO
RL
LINE IN
VIDEO
L
AUDIO
R
OFF ON
ATT
Audio/Video
Cable (supplied)
Yellow plug / Video In
Red & White
plugs / Audio In
Television
to AC outlet
VCR
Audio/Video
Cable (not supplied)
Video Out jack
Audio Out jacks
Connect to the external video/audio inputs of a VCR.
Antenna
Input
VCR
Input jacks
(Video/Audio)
VHF Out
terminals or
Video/Audio
Out jacks
Television
AUDIO VIDEO
LINE OUT 1RLLINE OUT 2
AUDIO VIDEO
RL
LINE IN
VIDEO
L
AUDIO
R
OFF ON
ATT

AVP-800.3-800-709-31 [ En, C ]
Getting Started
Getting Started
7
-EN
Audio equipment hook-up
To achieve full stereo sound from the player, hook up a stereo system following the diagram
below. Use an Audio Connecting Cable (not supplied) to connect the player to your
amplifier or receiver. Before connecting or disconnecting any cables, turn off all equipment.
Notes
• Make sure all equipment is turned off before making any connections.
• Firmly insert plugs into the jacks. A loose connection may cause noise.
• When listening to a radio broadcast, turn off the player to get better
reception.
To TV or VCR
RK-C310/C315
Audio Cable (not supplied)
Audio In
Amplifier
Speakers
CD or AUX
to AC outlet
to AC outlet
AUDIO VIDEO
LINE OUT 1
RL
LINE OUT 2
AUDIO VIDEO
RL
LINE IN
VIDEO
L
AUDIO
R
OFF ON
ATT
AVP-800.3-800-709-31 [ En, C ]
8
-EN
Basic Operations
Basic Operations
Playing a disc
This section shows you how to play an LD, CD, CD-G, or VIDEO CD.
Before you start...
Connect the player to your TV and set the input selector on the TV to
“Video” (see “Connecting the player” on page 6).
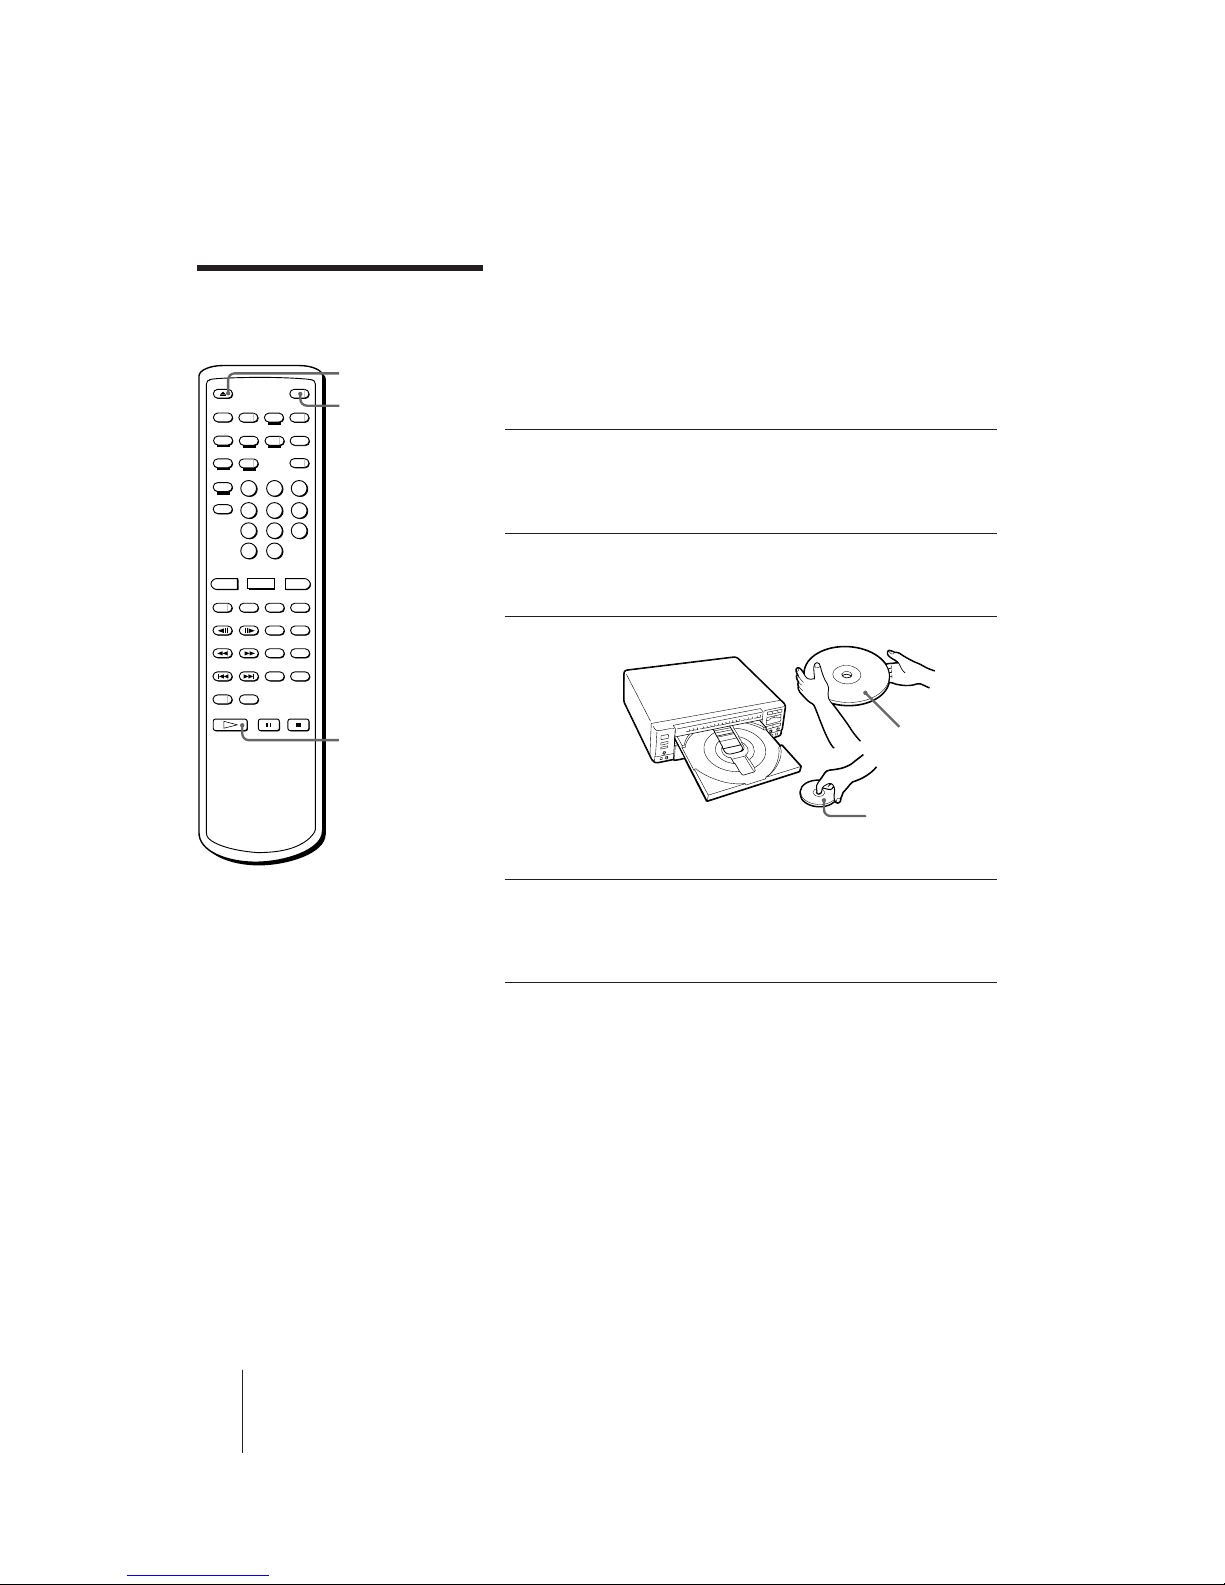
Loading and playing a disc
1 Press POWER to turn on the player.
You can also directly turn on the player by
pressing · SELECT/PLAY on the remote
commander or player.
2 Press 6 OPEN/CLOSE to open the disc tray.
The front cover of the player automatically slides
down and the disc tray comes out.
3 Place a disc on the disc tray.
Place only one disc on the tray,
carefully fitting it in the circle on the
tray.
4 Press · SELECT/PLAY.
The disc tray closes and the disc starts
playing. You can also start playing by
pressing the disc tray to close it.
When you play a double-sided LD
The upper side of the LD (side A) starts playing. When the upper side
ends, the other side (side B) starts playing automatically.
To play a VIDEO CD with Play Back Control (PBC) functions
(Ver. 2.0 VIDEO CD)
Ver. 2.0 VIDEO CDs have Play Back Control (PBC) functions, which
allow you to play them interactively. When press · SELECT/PLAY or
push in the disc tray in step 4, a menu appears on the screen and the
player waits for you to play the disc using the PBC functions. To play a
VIDEO CD using PBC functions, see “Playing a VIDEO CD using PBC
functions” on page 12 for details.
To view a PAL VIDEO CD
Press VIDEO CD PAL OUT on the player to turn on the VIDEO CD
PAL OUT button indicator. If you use an NTSC TV, the image is a little
enlarged vertically, and the top and bottom part of the image is cut. To
see a normal image, use a PAL TV.
6
OPEN/CLOSE
POWER
·
SELECT/PLAY
LD (Side A)
CD, VIDEO CD, CD-G,
or LD Single
(Label faces up)
Tip
• You can also turn on the
player by pressing
§ OPEN/CLOSE on the
player.
Notes
• If you place more than one
disc on the tray, or if the
disc is not seated properly,
the disc may not start
playing, and may cause
damage the disc or player.
• Do not transport the player
while playing a disc as
doing so may damage your
disc or player.
• Do not use a CD stabilizer
when playing a CD, CD-G,
or VIDEO CD as doing so
may damage your disc or
player.
• You see no image unless
the VIDEO CD PAL OUT
button indicator is lit when
you play a PAL VIDEO CD.
AVP-800.3-800-709-31 [ En, C ]
Basic Operations
9
-EN
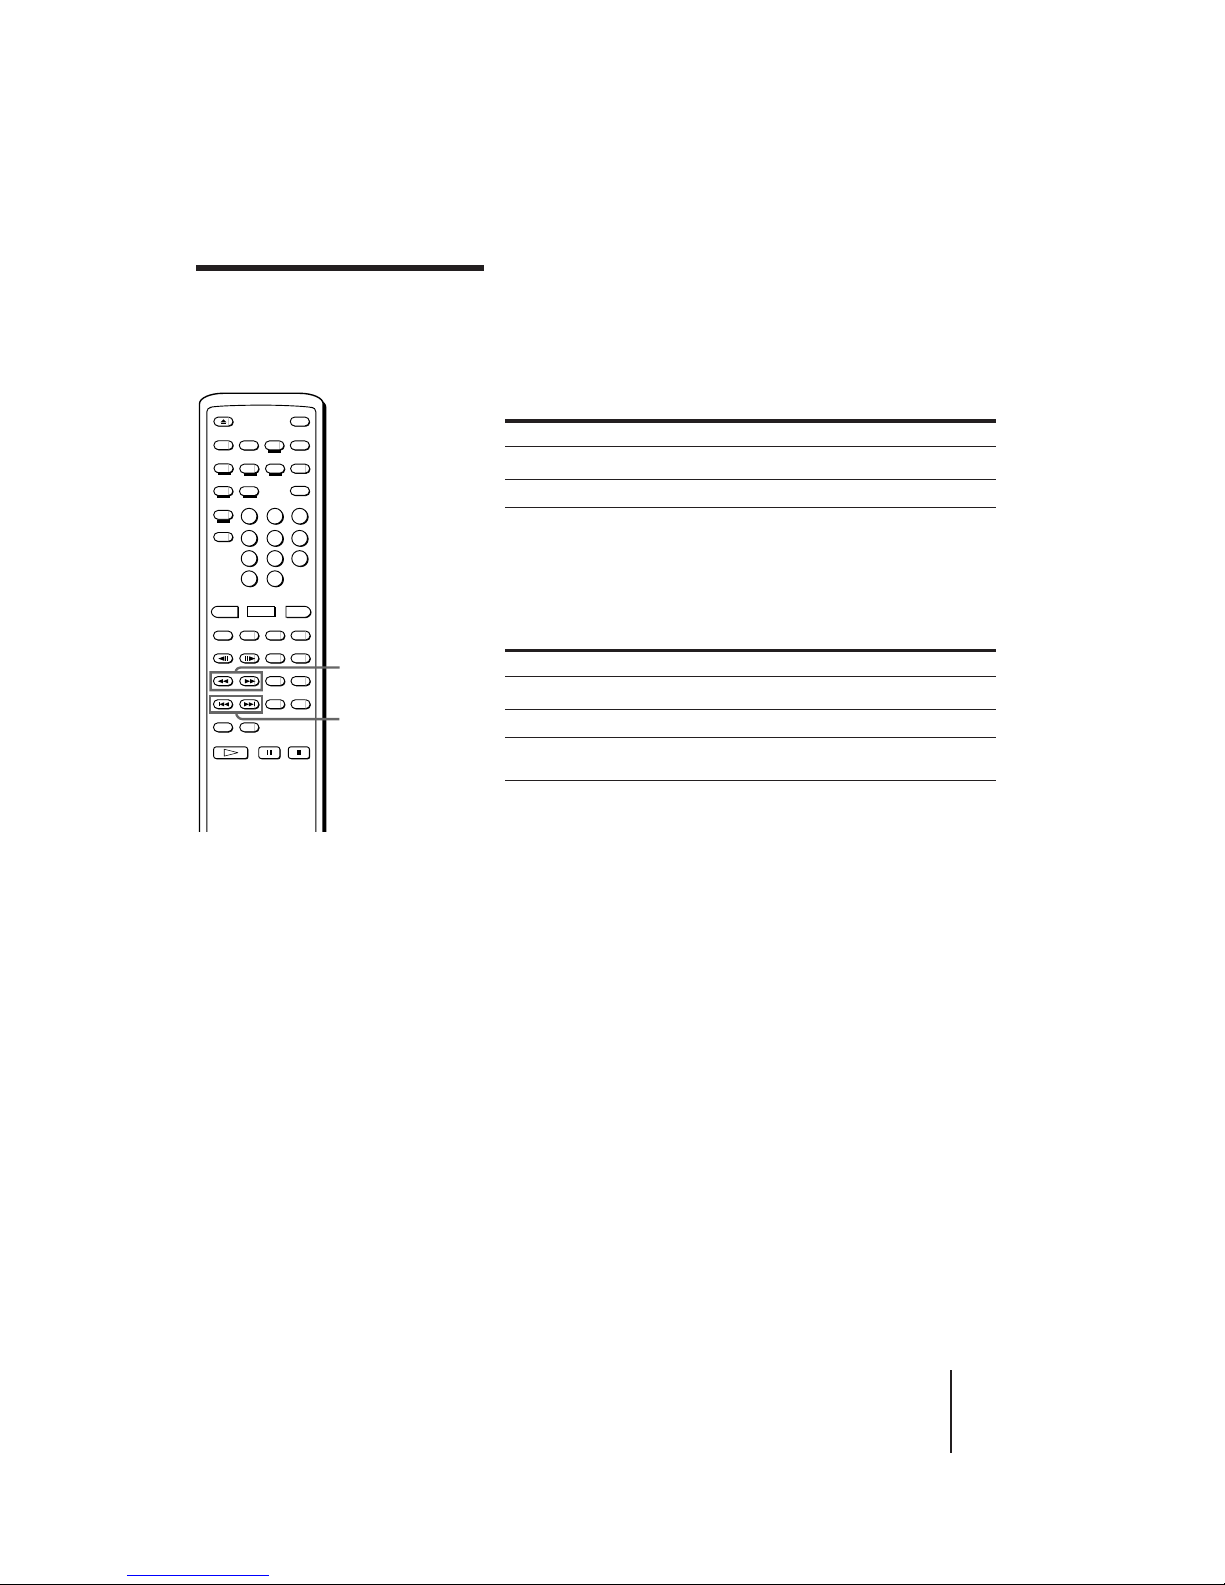
To Press
Stop play p STOP
Pause play P PAUSE
Resume play after pause P PAUSE or · SELECT/PLAY
Scan forward or backward 0/) SCAN
Skip chapters or tracks =/+ PREV/NEXT (ACS/AMS)
Play step by step /7 STILL/STEP (CAV LDs only)
Go to a chapter/track Number button
During PBC VIDEO CD playback, press
number buttons to select items in the onscreen menu (see page 12 for details).
Remove the disc 6 OPEN/CLOSE
To start playing from the beginning of either LD side
Press DISC SIDE A to play the upper side of the LD from the beginning.
Press DISC SIDE B to play the other side of the LD from the beginning.
To pause playing just before starting
Press P PAUSE instead of pressing · SELECT/PLAY after you place
the disc on the tray.
The disc tray closes and the player waits at the start of the disc until you
press · SELECT/PLAY or P PAUSE. If you want to start from side B
of an LD, press P PAUSE, then DISC SIDE B.
To stop playing and turn off the player
Press POWER.
You can resume playback of an LD from the point you stopped at by
simply pressing · SELECT/PLAY (see “Resuming LD playback” on
page 19).
To stop playing and remove the disc
Press 6 OPEN/CLOSE.
Remove the disc and press 6 OPEN/CLOSE again to close the empty
tray.
To listen with headphones
Plug headphones into the PHONES jack on the front panel and adjust
the volume with the level control beside the jack.
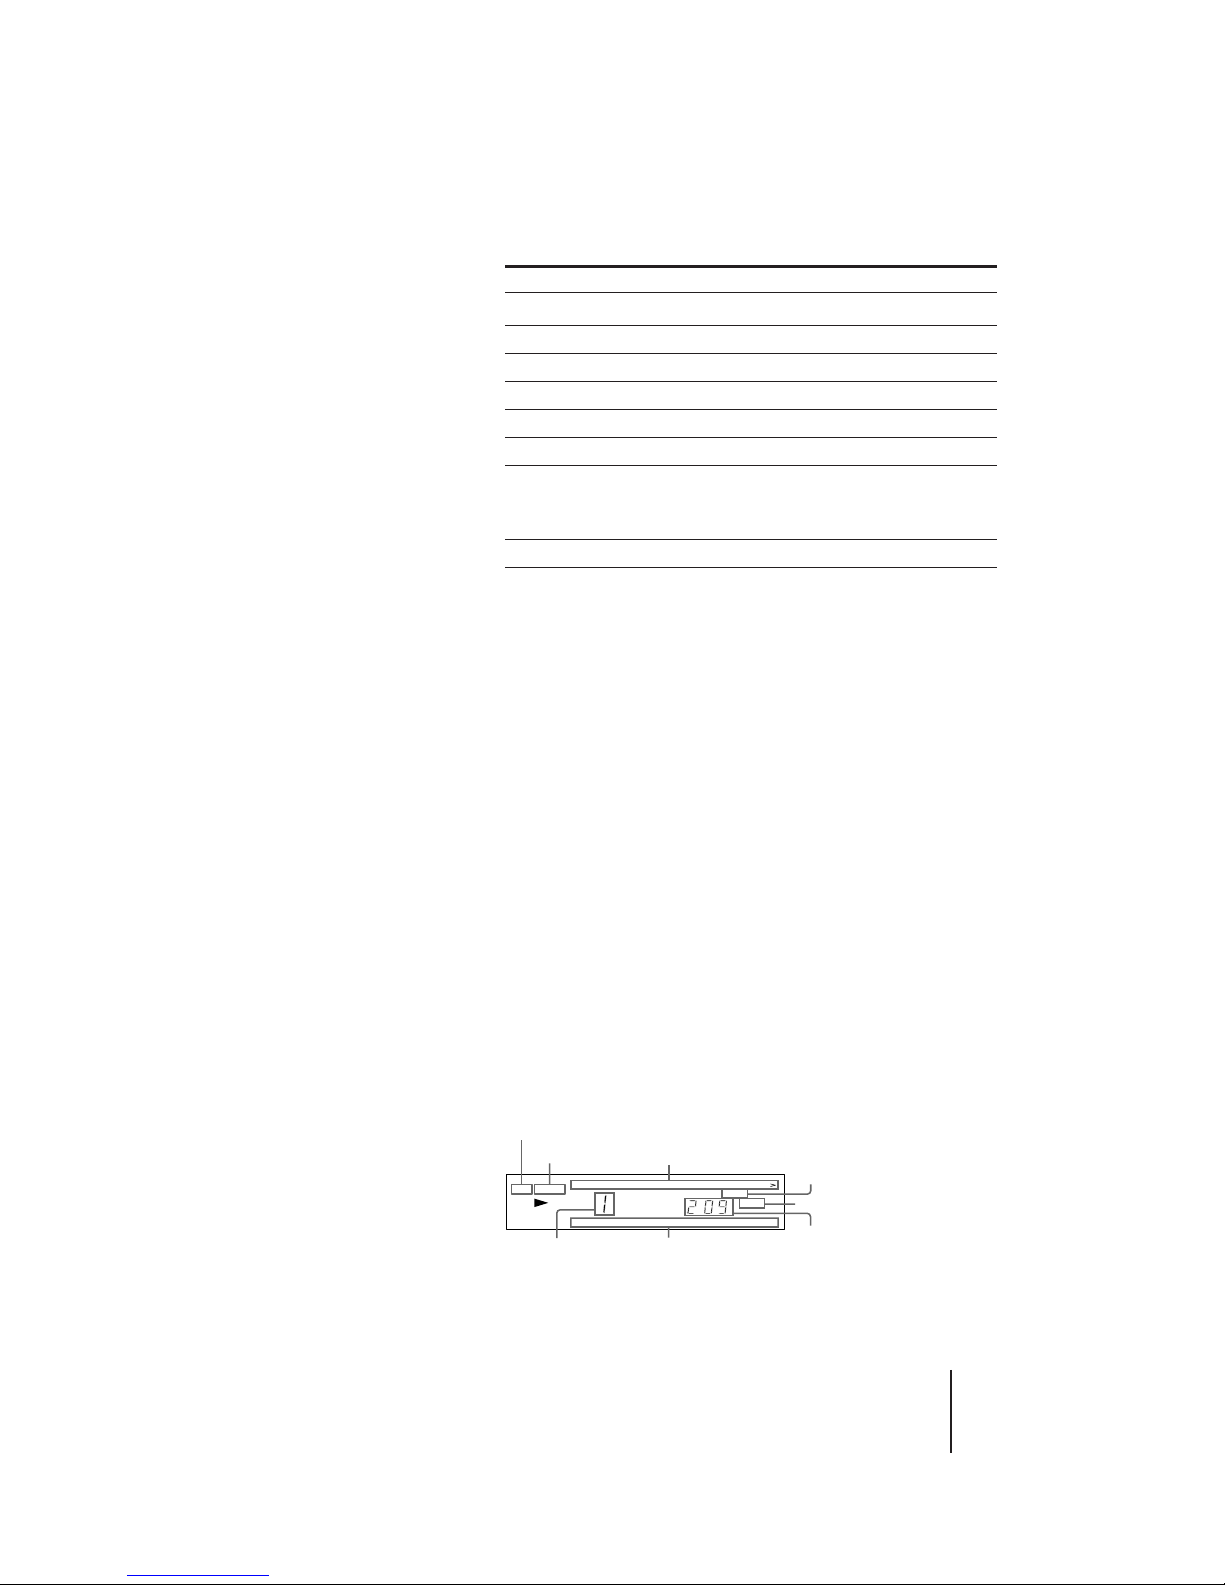
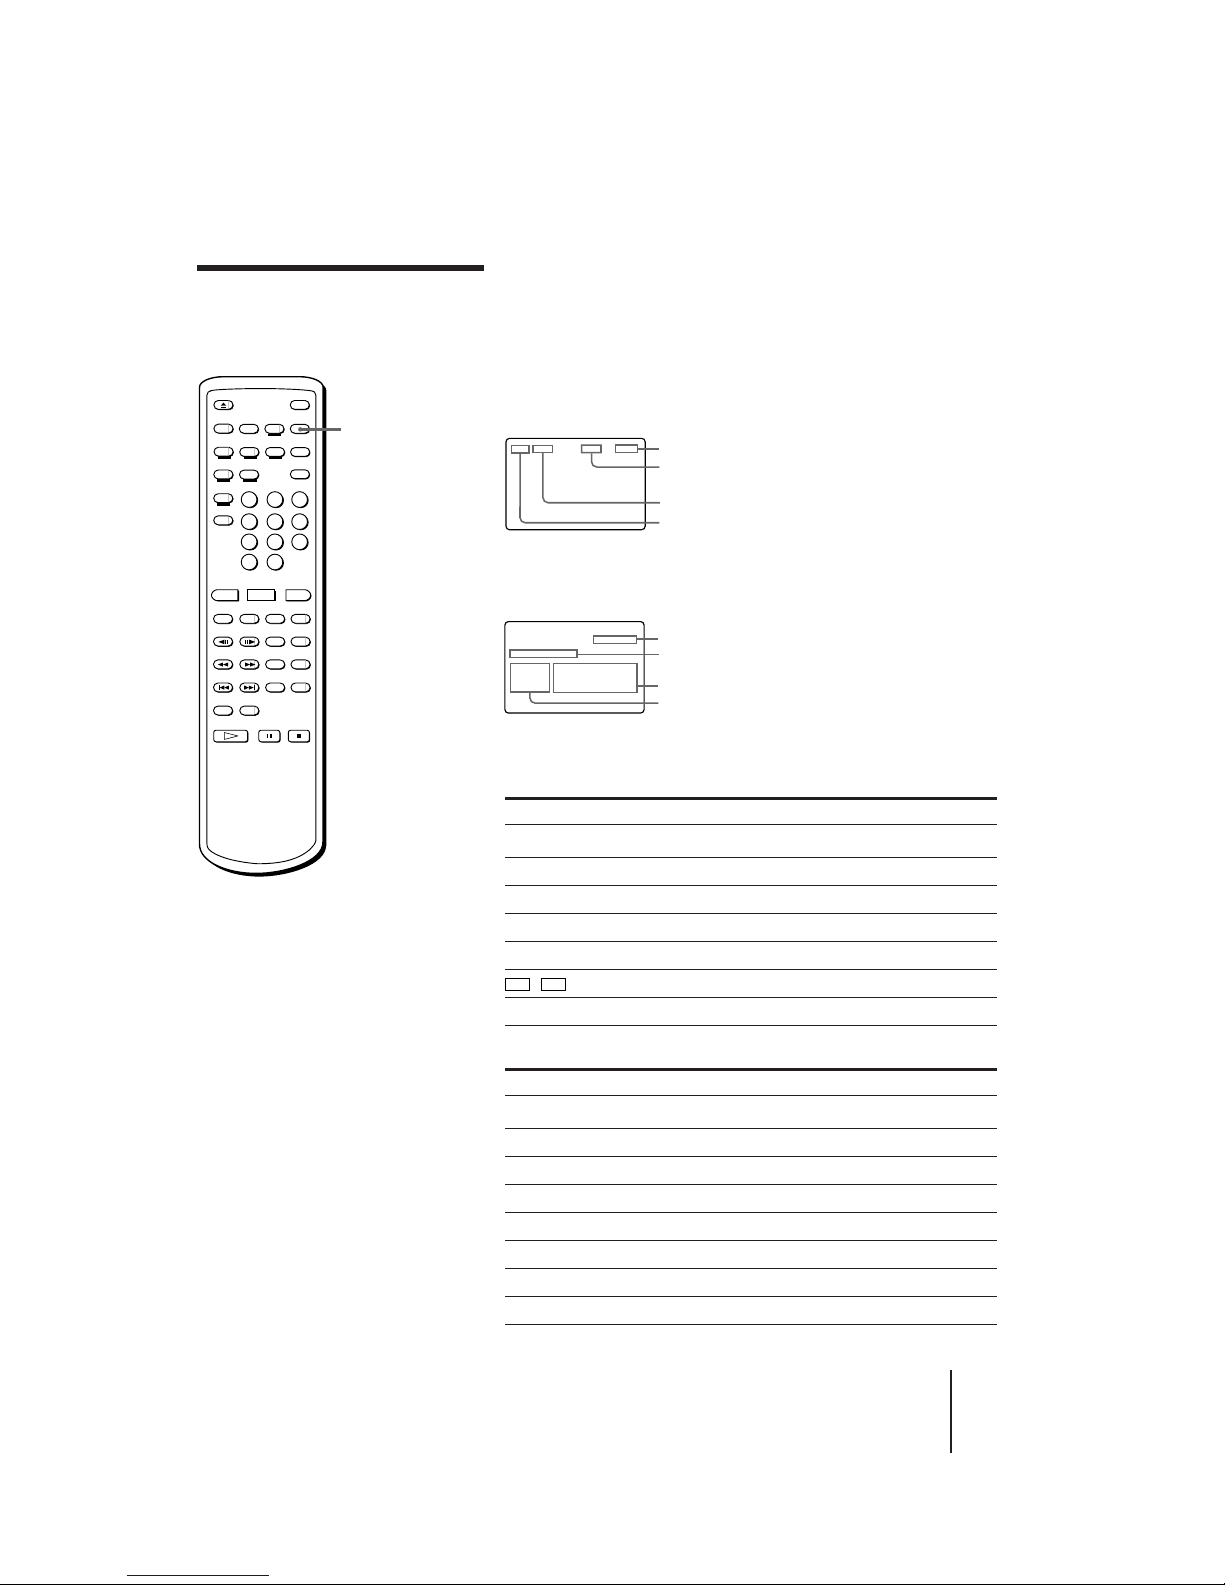
Reading the front panel display
The illustration below is an example of what is displayed on the front
panel of the player.
Viewing the on-screen display
Press DISPLAY twice. The on-screen display appears (see
“Understanding on-screen indications” on page 13).
Note
• When you press P PAUSE,
the picture goes blank
when playing a CLV LD,
and the picture freezes
when playing a CAV LD or
VIDEO CD (see “Viewing
frame-by-frame action” on
page 18).
Tips
• When playing a doublesided LD, the player
determines that the upper
side of the disc is side “A”
and the other side is “B,”
regardless of the label “A”
or “B” printed on the disc.
• When playing side A of an
LD, CD, CD-G, or VIDEO
CD, or when the player is
stopped, the SIDE A button
indicator on the player
lights up. When playing
side B of an LD, the SIDE B
button indicator lights up.
• When playback of LD side
B ends, the player stops.
• When playing a CD, CD-G,
LD single, or VIDEO CD,
the DISC SIDE B button
does not function.
7
Tips
• The AV calendar shows the
chapters/tracks remaining
on the disc. As chapters/
tracks are played, the
corresponding numbers on
the calendar disappear.
• While playing a Ver. 2.0
VIDEO CD using PBC
functions, the AV calendar
shows the numbers you can
use to select items from the
menu.
• When there is no disc in the
player, “NO dISC” appears
on the front panel display.
Notes
• The AV calendar is
available for LDs containing
TOC (Table of Contents)
data, CDs, CD-Gs, or
VIDEO CDs.
• When you play a VCR or a
similar machine using LINE
IN, the current key level
always appears on the front
panel instead of a chapter/
track number (see “Playing
karaoke using auxiliary
equipment” on page 33).
12345678 9
10
11
12 13 14 20
15
16 17 18 19
SIDE ALD
1/L2/R
REPEAT
AV calendar on side A
(“>” indicates that the disc contains
more than 20 chapters/tracks)
Chapter number
Playing disc side
Selected function
Time (hr/min/sec) or
frame numberAV calendar on side B
Output sound
MS
Playing disc type
AVP-800.3-800-709-31 [ En, C ]
10
-EN
Basic Operations
Playing Karaoke
Tips
• You can plug in two
microphones.
• To control the player from
the karaoke microphone,
plug the control plug into
the CONTROL jack (see
“Using the optional
karaoke microphone” on
page 33).
• You can enjoy karaoke
using auxiliary equipment
such as a VCR (see “Playing
karaoke using auxiliary
equipment” on page 33).
Notes
• If you insert more than one
disc, or if the disc is not
seated properly, the disc
may not start playing, and
may damage the disc or
player.
• When playing a double-
sided LD, the player
determines that the upper
side of the disc is side “A”
and the other side is “B,”
regardless of the label “A”
or “B” printed on the disc.
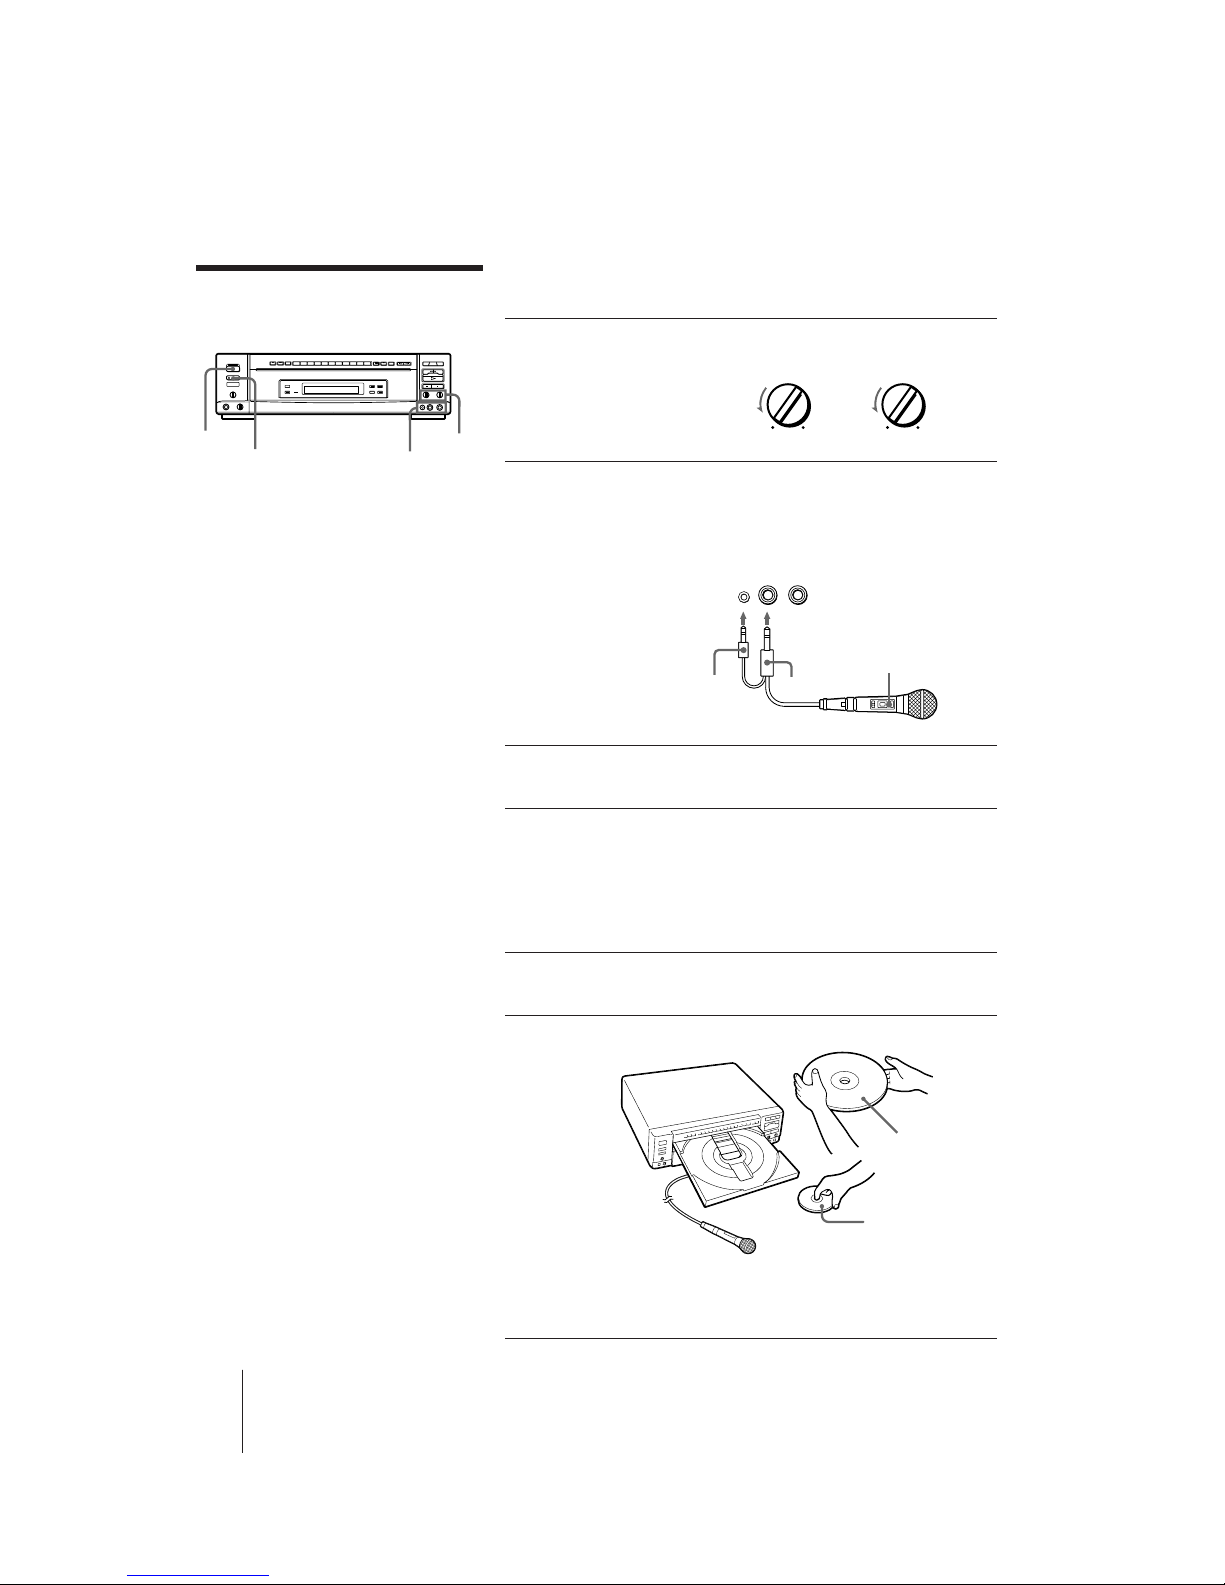
This section gives you short instructions for playing “karaoke” (singing
along with a disc).
1 Set the MIC LEVEL 1 and 2 controls
on the player to MIN.
2 Plug a microphone into the MIC 1
or 2 jack on the player.
When using the karaoke microphone
Sony F-KM1 (not supplied), plug the
CONTROL plug into the CONTROL
(MIC 1/2) jack.
3 Press POWER to turn on the
player.
4 Turn on the TV and stereo system.
TV:
Set to “Video.”
Stereo system:
Turn on the amplifier or receiver and
select CD or AUX for audio output.
5 Press § OPEN/CLOSE.
The disc tray comes out.
6 Place a disc on the disc tray.
Place only one disc on the tray, carefully
fitting it in the circle on the tray.
Control plug
MIC plug
Sony
Karaoke microphone
F-KM1
(not supplied)
(MIC 1/2)
CONTROL
MIC 1
MIC 2
MIN MAX
1 MIC LEVEL 2
MIN MAX
MIC 1/
2
POWER
§ OPEN/CLOSE
MIC LEVEL 1/
2
CD, VIDEO CD, CD-G,
or LD Single
(Label faces up)
LD (Side A)
AVP-800.3-800-709-31 [ En, C ]
Basic Operations
11
-EN
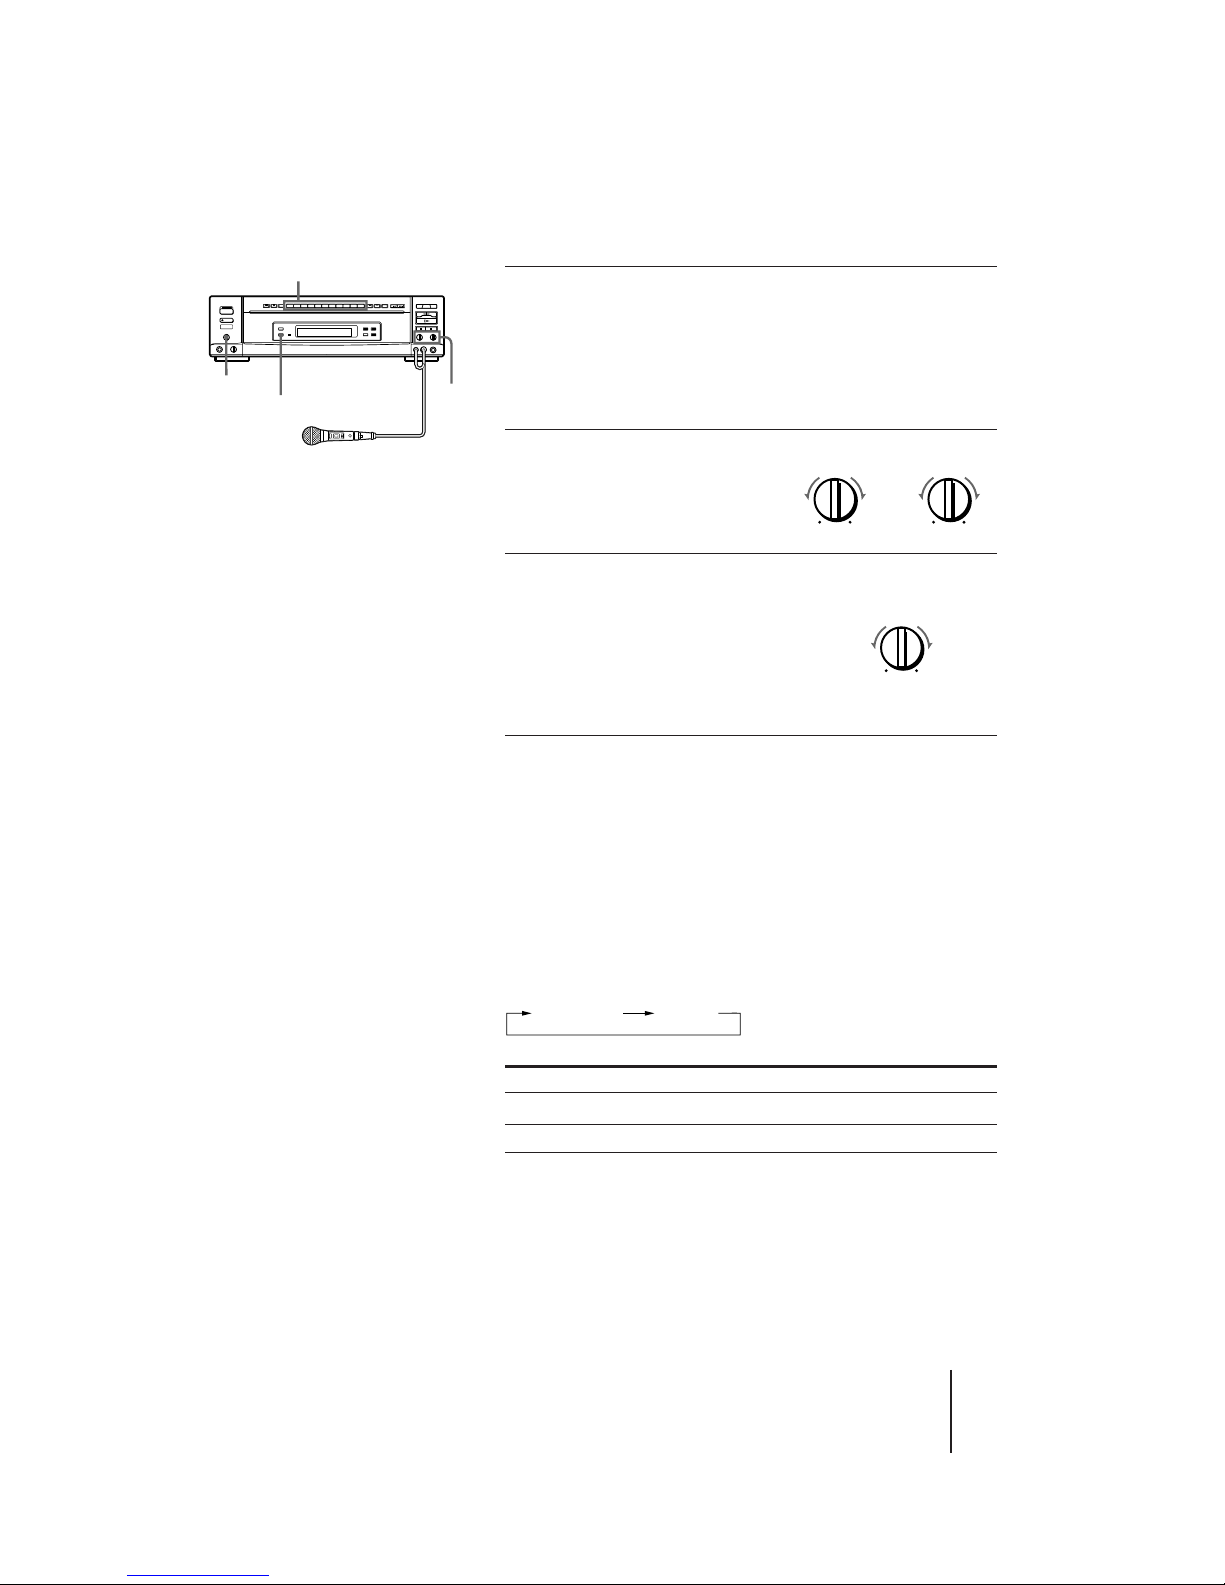
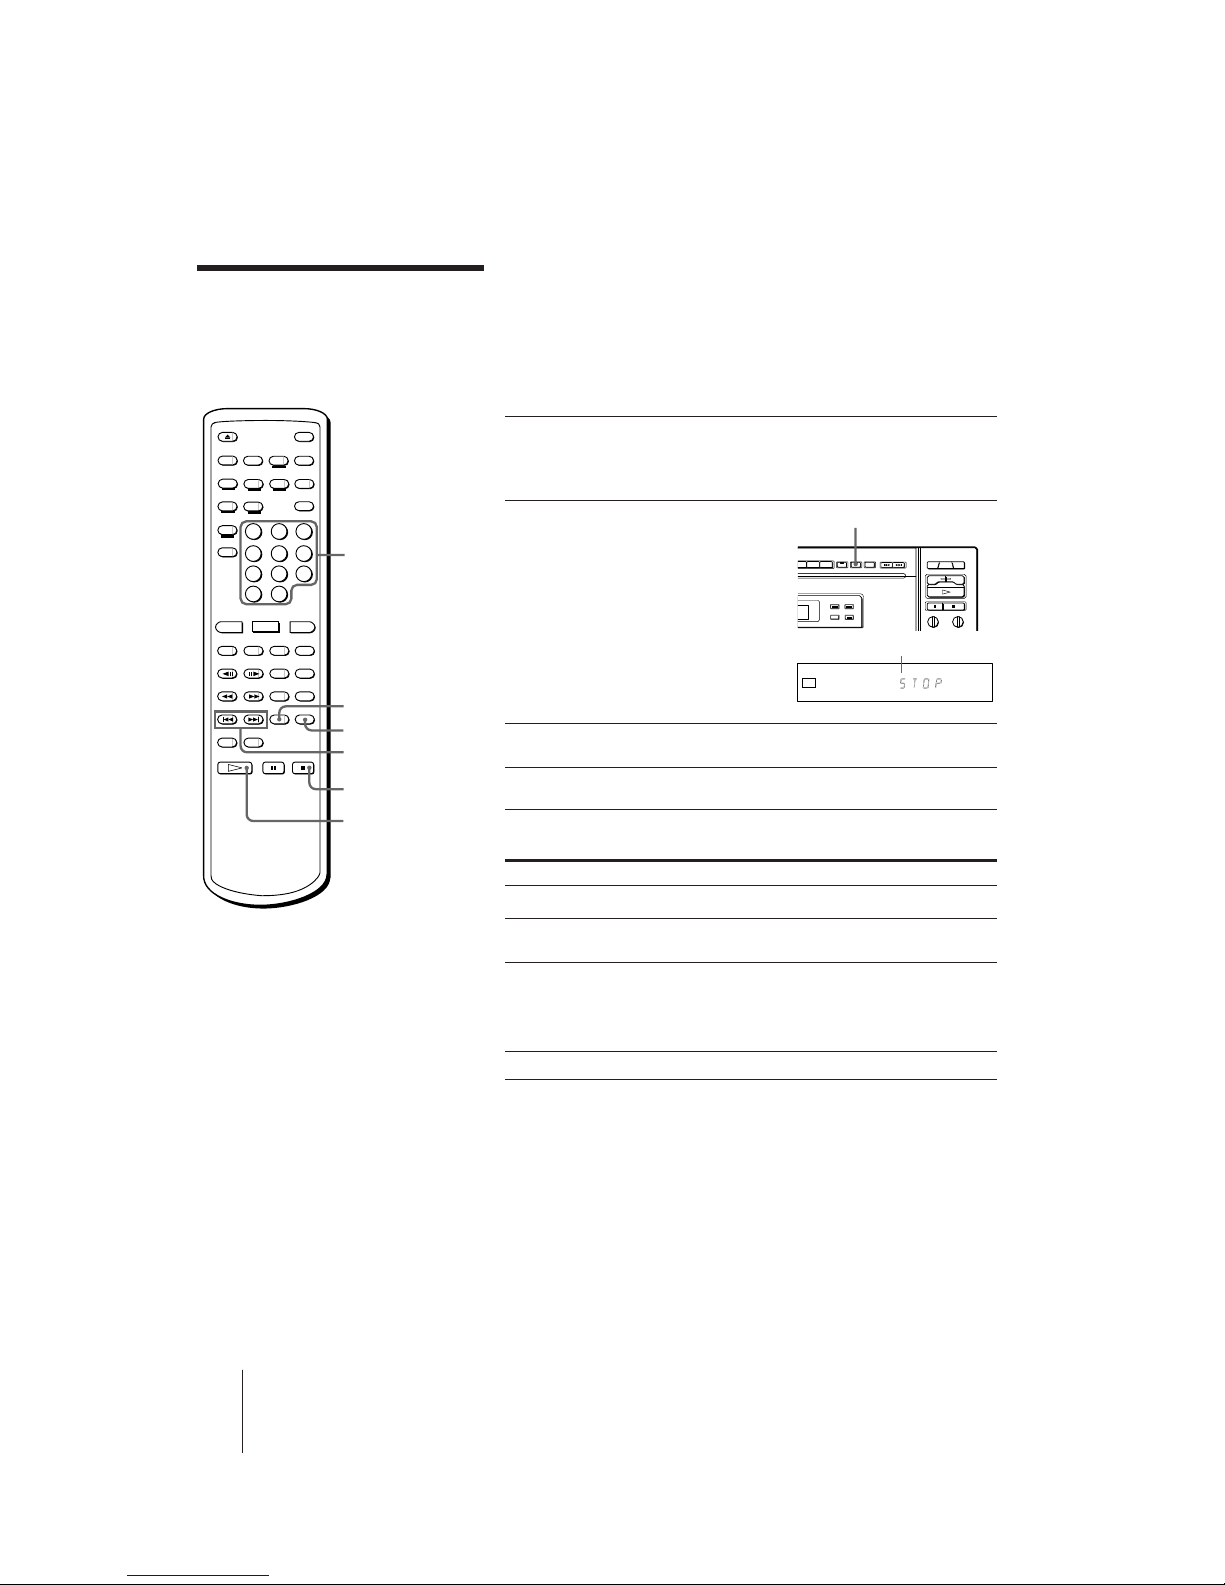
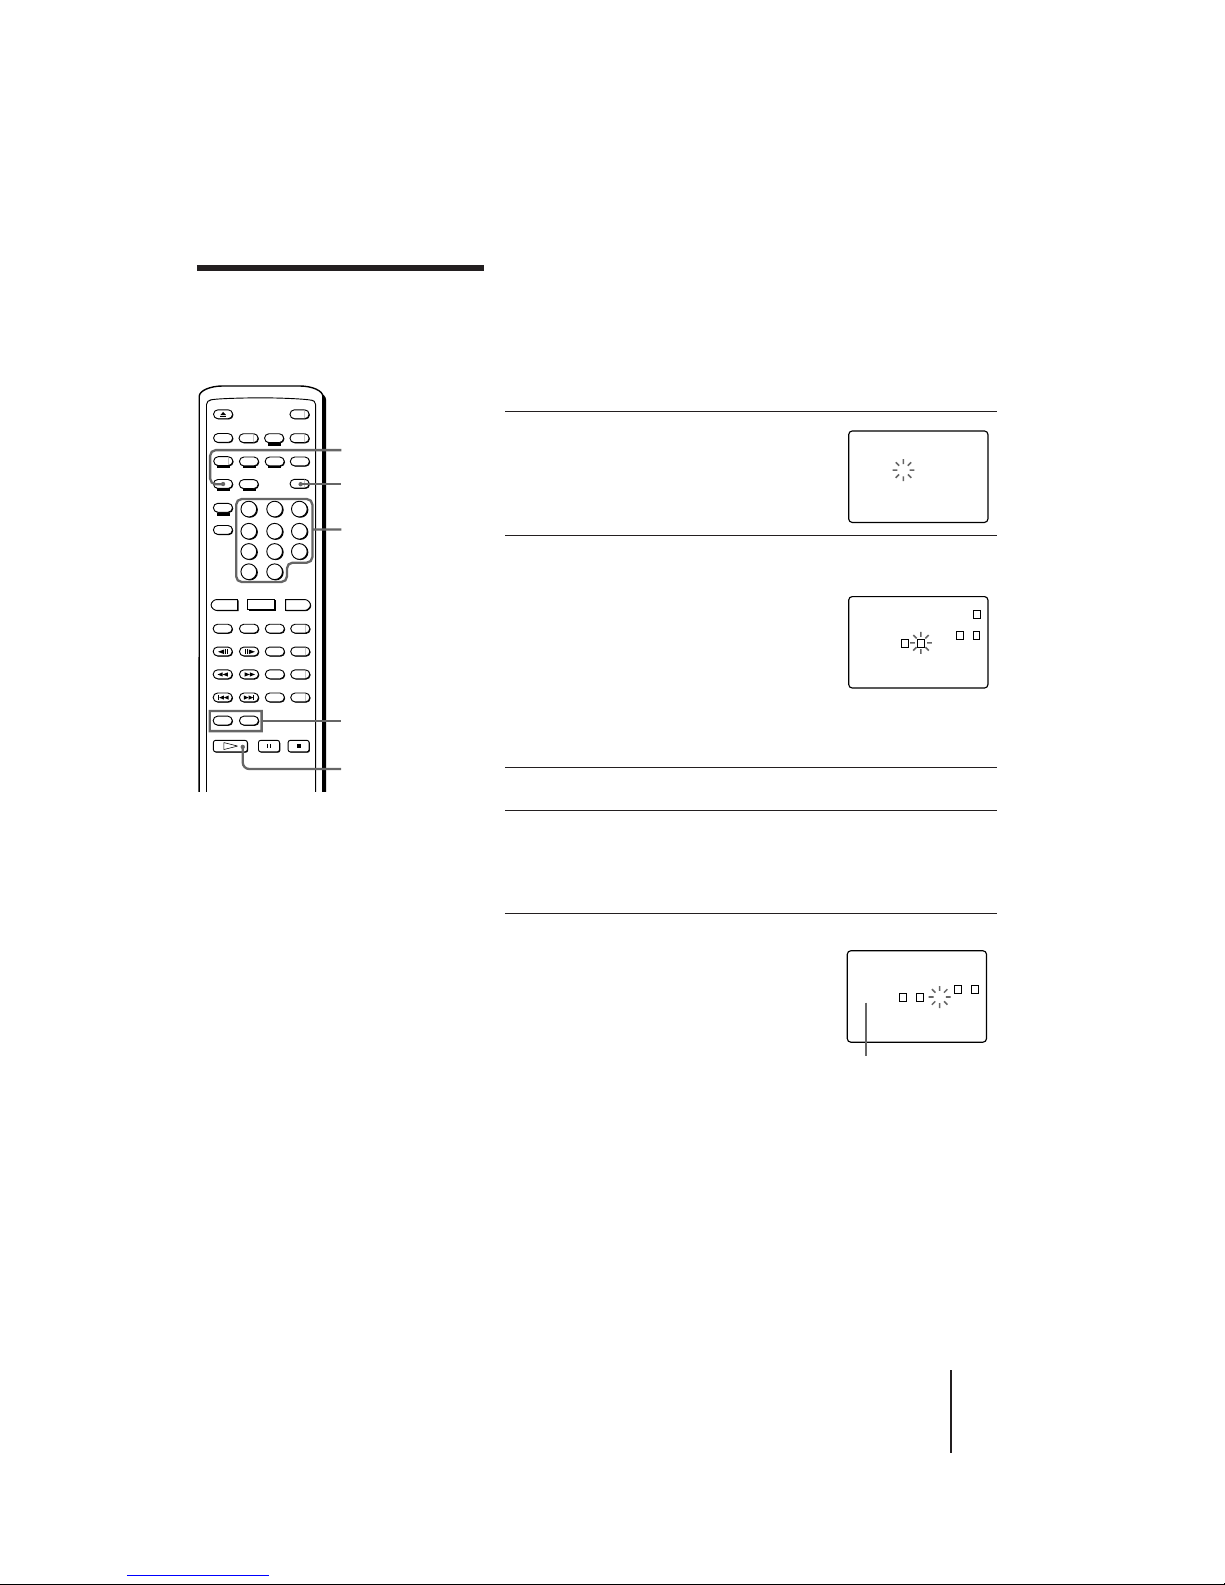
7 Press one of the number buttons
to enter the song number.
The song starts playing. To select a song
on side B of an LD, press DISC SIDE B,
then press the number button. To enter
a song number greater than 10, see page
15.
8 Set the ON/OFF switch on the
microphone to ON and turn
the MIC LEVEL 1 or 2 control
to adjust microphone
volume.
9 Turn the ECHO LEVEL control to
adjust the echo strength.
The same echo level is applied to both
MIC 1 and MIC 2.
Now you can enjoy playing karaoke.
When the song finishes, the player
pauses until you enter the next song
number.
Pausing automatically in karaoke mode
When you connect a microphone, the AVP-800 automatically switches
to karaoke mode. In karaoke mode, the player pauses every time a song
is played (Auto Pause).
To play songs on the disc continuously in karaoke mode
Press AUTO PAUSE.
“A. PAUSE OFF” appears on the screen briefly and the AUTO PAUSE
button indicator on the player goes off.
Each time you press AUTO PAUSE, the on-screen indication changes as
follows and the AUTO PAUSE button indicator on the player turns off
or on.
AUTO PAUSE button indicator Songs are played
On Pausing at end of each song
Off Continuously
1 MIC LEVEL 2
MIN MAX MIN MAX
ECHO LEVEL
MIN MAX
A. PAUSEA. PAUSE OFF
Tips
• If you press p STOP, § OPEN/
CLOSE or POWER while playing a
song in karaoke mode (with
microphones connected), the sound
automatically fades out before
playback stops (Auto Fade Out).
• If howling occurs
– Move the microphone
away from the speakers.
– Lower the microphone
volume or echo level.
– Lower the volume.
• If the sound is distorted or the picture
flickers when listening through your
TV speakers, set the ATT switch at the
rear of the player to ON to lower the
output level.
Notes
• If you want to use the menu of a Ver.
2.0 karaoke VIDEO CD, make sure that
the PBC ON/OFF button indicator on
the player is lit and press · SELECT/
PLAY to display the menu before
entering the song number. If the PBC
ON/OFF button indicator is not lit,
press p STOP to stop playing the disc,
then press the PBC (ON/OFF) button
to turn it on (see “Playing a VIDEO CD
using PBC functions” on page 12 for
details).
• To stop playing a song on a Ver. 2.0
karaoke VIDEO CD and return to the
menu, press the RETURN button
instead of p STOP.
• If you reserve several songs (see
”Selecting karaoke song order” on
page 27), the player plays them
continuously, then pauses.
• You can also use the Auto Pause
function in non-karaoke mode
(without microphones connected).
Each time you press the AUTO PAUSE
button, the Auto Pause function is
turned on/off.
• Auto Pause does not function during
PBC playback on a Ver. 2.0 VIDEO CD
(if the PBC ON/OFF button indicator
on the player is lit). However, if the
disc is a karaoke VIDEO CD with a
menu for song selection, playback
automatically pauses and returns to
the menu each time a song is played.
ECHO LEVEL
Number buttons
MIC
LEVEL
1
/
2
AUTO PAUSE
AVP-800.3-800-709-31 [ En, C ]
12
-EN
Basic Operations
Playing a VIDEO CD
using PBC functions
(PBC Playback)
VIDEO CDs conforming to Ver. 2.0 of the VIDEO CD standards have
Play Back Control (PBC) functions, which enable you to play the VIDEO
CD interactively, following menus on the screen. Operation methods
may differ depending on the disc. For details, refer to the instructions
supplied with the disc. Use the number buttons, · SELECT/PLAY,
=/+ PREV/NEXT (ACS/AMS), and RETURN during PBC
playback.
1 Place a Ver. 2.0 VIDEO CD (with PBC functions) on the
disc tray, then press · SELECT/PLAY to close the disc
tray.
2 Check to see that the PBC
ON/OFF button indicator on
the player lights up.
A menu appears on the screen
and the player waits for you to
select a number on the menu. On
some discs, moving pictures may
play for a while before the menu
appears.
3 Enter a number to select the item in the menu.
4 Play the VIDEO CD interactively, following the menus.
Playing a Ver. 2.0 VIDEO CD interactively
To Press
Select an item in the menu Number button
Jump to another scene when · SELECT/PLAY or a number
“SELECT” flashes on a moving picture button
Go back to the menu RETURN
Operation methods may differ
depending on the disc. For details,
refer to the instructions supplied
with the disc.
Scroll the menu =/+ PREV/NEXT (ACS/AMS)
If “??” appears on the screen
You have pressed an unoperable button. Use the operable buttons,
following the menu.
Canceling PBC playback
Press p STOP to stop playing the VIDEO CD, then press PBC on the
remote commander, or PBC ON/OFF on the player to turn off the PBC
ON/OFF button indicator. Now you can play the VIDEO CD
continuously but menus for interactive playback are not displayed.
To turn on PBC playback again
The PBC ON/OFF button indicator must be lit to use PBC functions. If
it is not lit, press p STOP to stop playing the disc, then press the PBC
(ON/OFF) button to turn it on. Press · SELECT/PLAY to display a
menu.
·
SELECT/PLAY
p
STOP
=/+ PREV/NEXT
(ACS/AMS)
RETURN
Number
buttons
PBC
Tips
• To select a song over 10,
Press >10, then press two
number buttons, first the
tens digit, then the ones
digit (see page 15).
• You can view highresolution still pictures on
some Ver. 2.0 VIDEO CDs.
Note
• If no menus appear on the
screen:
– check that the disc is a
Ver. 2.0 VIDEO CD
– turn on the PBC ON/OFF
button indicator
– press · SELECT/PLAY
to display a menu
123456789
10
VIDEO
CD
1/L2/R
Lights up
PBC
PBC ON/OFF button and indicator
AVP-800.3-800-709-31 [ En, C ]
Additional Operations
13
-EN
You can view the operating status of the player or disc information on
the TV screen.
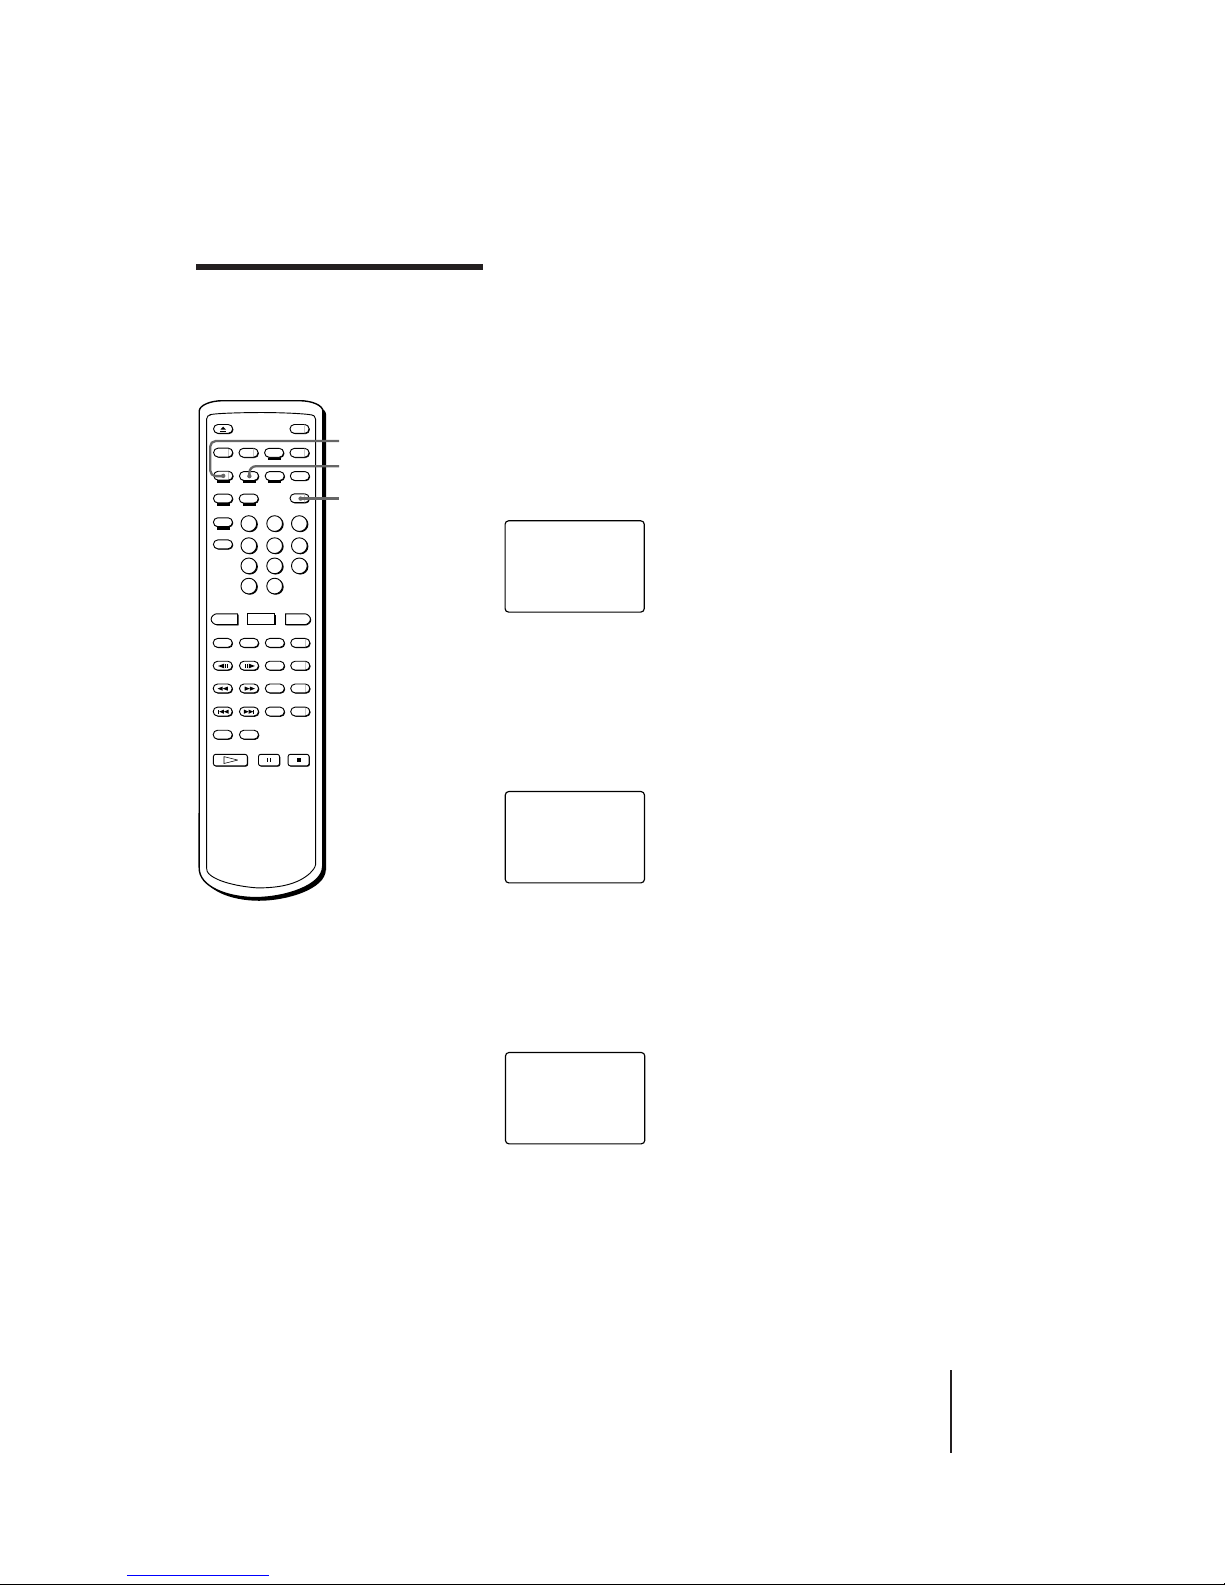
Displaying on-screen indications
Press DISPLAY.
The operating status of the player is displayed on the screen.
Press DISPLAY again.
Operating status and disc information are displayed on the screen.
Press DISPLAY once again to turn off the indications.
Message 1
Display Current status of the player
OPEN Disc tray open
CLOSE Disc tray closed
PLAY Playing a disc
STOP Operation stopped
PAUSE Operation momentarily stopped
Speed scanning
SEARCH Searching
Message 2
Display Currently playing
LD SIDE A Side A of LD
LD SIDE B Side B of LD
CD CD
VIDEO CD VIDEO CD
1/L First soundtrack/left channel
2/R Second soundtrack/right channel
≥ DIGITAL Digital sound
≥ ANALOG Analog sound
Additional Operations
Understanding onscreen indications
Notes
• The AV calendar for LDs
(display of remaining
chapter numbers) is only
available for LDs with TOC
data.
• When playing an LD
without TOC data, total
playing time of the disc
does not appear.
• When playing an LD
without chapters, the
chapter number does not
appear.
• When playing a CLV LD
without time data to the
second, a two-digit number
such as “22:”, meaning 22
minutes, appears.
• Messages concerning sound
control functions such as
“1/L, 2/R” or “≥ DIGITAL,
≥ ANALOG” appear only
briefly when you press the
AUDIO MONITOR or
ANALOG/´ button.
DISPLAY
Message 1 (see table below)
Current frame number or
elapsed time
Current chapter, track, or scene number
C–3 5484 PLAY
Index number
Selected functions
Message 2 (see table below)
C–3 5484 PLAY
LD SIDE A
VIDEO 1- 6 24:31
ONE SIDE
REPEAT
Number of chapters/tracks and total playing time
(only for LDs with TOC, CDs, and VIDEO CDs)
AV calendar (chapters/tracks remaining to be played)
0)
/
14
-EN
Additional Operations
AVP-800.3-800-709-31 [ En, C ]
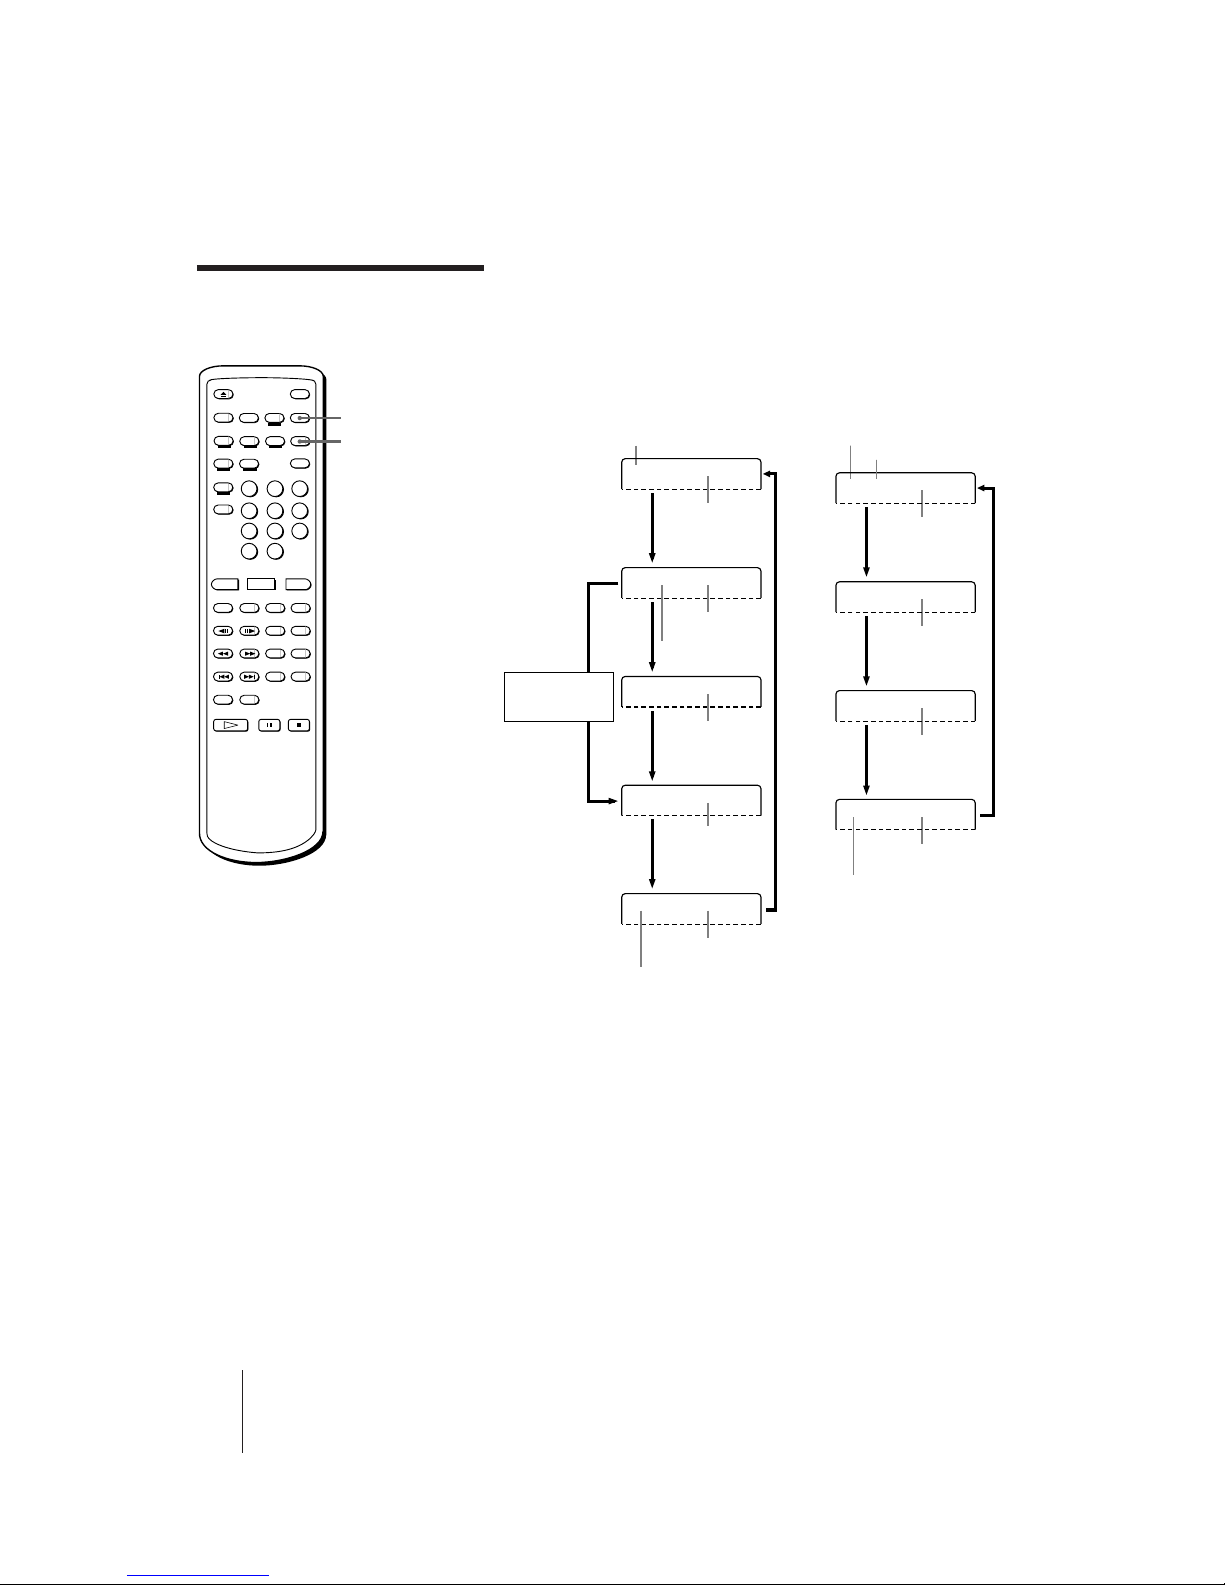
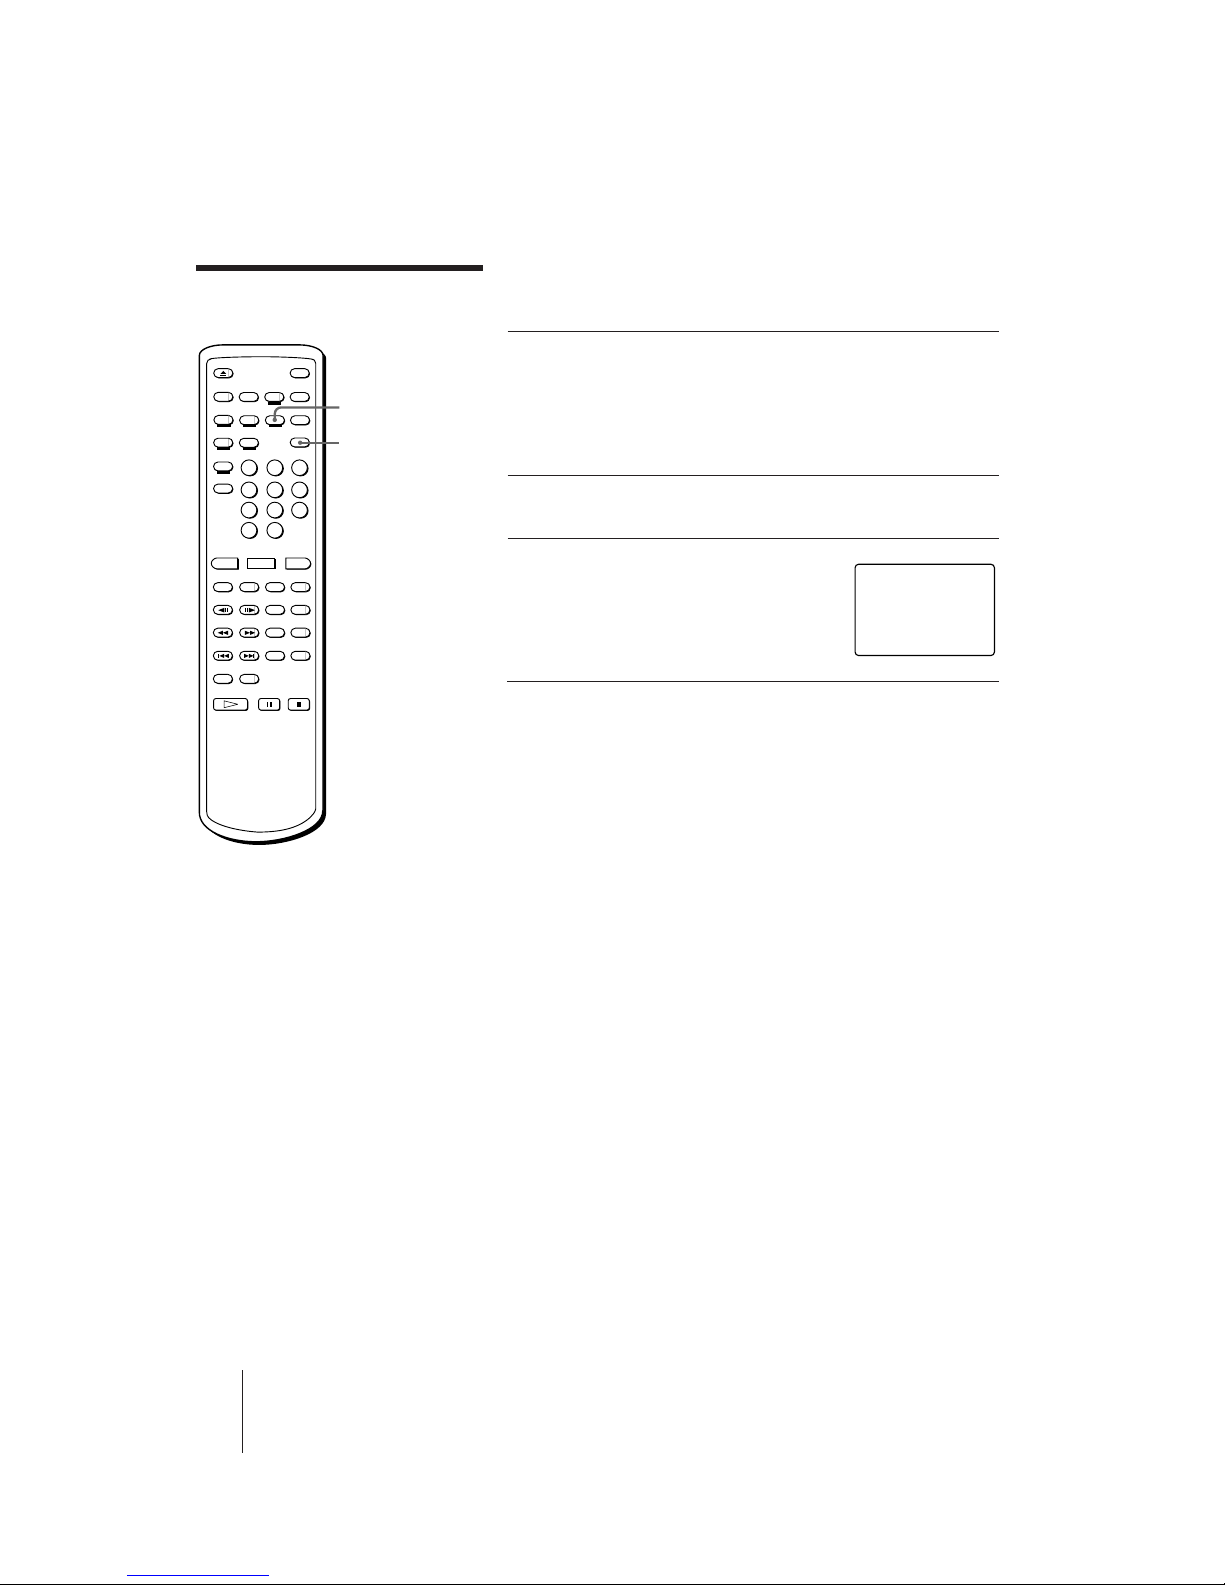
Checking the elapsed or remaining time of the disc
You can check the elapsed or remaining time on the TV screen.
Press DISPLAY, then press AV TIME repeatedly.
Each time you press AV TIME, the on-screen display changes as
follows:
Understanding on-screen
indications (continued)
AV TIME
DISPLAY
LDs with TOC
C–6 24:22 PLAY
Total elapsed time
for a CLV disc
(or frame number
for a CAV disc)
Chapter number
C–6 I–1 1:28 PLAY
Elapsed time
for chapter
Index number
C–6 25:30 PLAY
Total elapsed time
for a CAV disc
C–6 –3:40 PLAY
Remaining time
for chapter
–5 –22:24 PLAY
Total remaining
play time
Remaining chapters
on the disc
This display is
skipped when
playing a CLV disc.
CDs/VIDEO CDs
T–5 I–1 1:11 PLAY
Elapsed time for
track
Track number or scene number
T–5 11:19 PLAY
Total elapsed time
for the disc
T–5 –1:05 PLAY
Remaining time
for track
–14 –38:52 PLAY
Total remaining
play time
Index number
Remaining tracks
on the disc
Notes
• When playing an LD
without TOC data, you can
only view the total elapsed
time (for a CLV disc) or
current frame number (for a
CAV disc).
• When playing a Ver. 2.0
VIDEO CD using PBC
functions:
– the scene number (such as
“S-5”) is displayed
instead of the track
number
– you can only view the
elapsed time for the
current scene
• The display does not show
remaining time for chapters
or tracks that are 51 or more
chapters or tracks away
from the beginning of the
disc.
AVP-800.3-800-709-31 [ En, C ]
Additional Operations
15
-EN
Selecting a chapter
or track directly
(Chapter/Track
Search)
LDs are divided into sections called “chapters.” CDs and VIDEO CDs
are divided into sections called “tracks.” Simply enter the desired
chapter/track number to start playing it immediately.
Locating a particular chapter/track
Press one of the number buttons to enter the chapter/track number.
To play a chapter on the opposite side of the LD, press DISC SIDE B (or
A), then enter the chapter number.
To enter a number greater than 10
Press
10
>
, then press two number buttons in sequence, first the tens
digit, then the ones digit. If you press
10
>
by mistake, press
10
>
again,
then enter the correct one digit number.
To Press
Enter 10
10
/0
Enter 14
10
>
, then 1, then
4
Enter 20
10
>
, then 2, then
10
/0
Enter 25
10
>
, then 2, then
5
To check the current chapter/track number on the screen
Press DISPLAY to display the chapter/track number.
The number appears in the upper left-hand corner of the screen. If the
LD does not contain chapter numbers, no number is displayed.
Number
buttons
SEARCH
SIDE A
CHAPTER 8 LD
Tips
• In addition to normal play mode,
you can do Chapter/Track Search
while in Freeze Frame (CAV LDs
or VIDEO CDs), Repeat, or Pause
mode. When the selected chapter
or track is located after the search,
playback continues in the same
mode.
• When you do Chapter/Track
search while a song is
automatically paused in karaoke
mode, the selected chapter or track
starts playing immediately,
without entering pause mode.
• You can enter 0 to select chapter 0
on LDs.
To enter 0, press >10, then press
10/0.
Notes
• Chapter Search does not function
properly if the LD does not contain
chapter numbers, or if the chapter
number entered does not exist.
• You cannot use Track Search when
you play a Ver. 2.0 VIDEO CD
using PBC functions. Entering a
number selects an item in the
menu.
C-5 24:22 PLAY
16
-EN
Additional Operations
AVP-800.3-800-709-31 [ En, C ]
Searching by frame,
time, or scene
number (Frame/Time/
Scene Search)
Tips
• In addition to normal play
mode, you can do Frame/
Time/Scene Search while in
Freeze Frame, Repeat, or
Pause mode. When the
specified frame, time, or
scene is located after the
search, playback continues
in the same mode.
• In karaoke mode, you can
also do Frame/Time/Scene
Search if the player is
stopped.
Number
buttons
·
SELECT/PLAY
FRAME/
TIME/
SCENE
Video scenes are counted as a series of still pictures or “frames.” When
playing a CAV (standard-play) LD, the player keeps track of the
number of frames, allowing you to locate a scene on the CAV disc by
specifying the frame number.
When playing a CLV (extended-play) LD, the player keeps track of the
elapsed playing time, allowing you to locate a particular point on the
CLV LD by specifying the total elapsed time.
On Ver. 2.0 VIDEO CDs (with PBC functions), “scene numbers” are
assigned to some points on moving pictures and to each still picture,
allowing you to locate a scene you want to view on the VIDEO CD by
specifying the scene number. This is only available during PBC
playback (when the PBC ON/OFF button indicator on the player is lit).
You can check the scene number by pressing the DISPLAY button
during PBC playback (see “Checking the elapsed or remaining time of
the disc” on page 14).
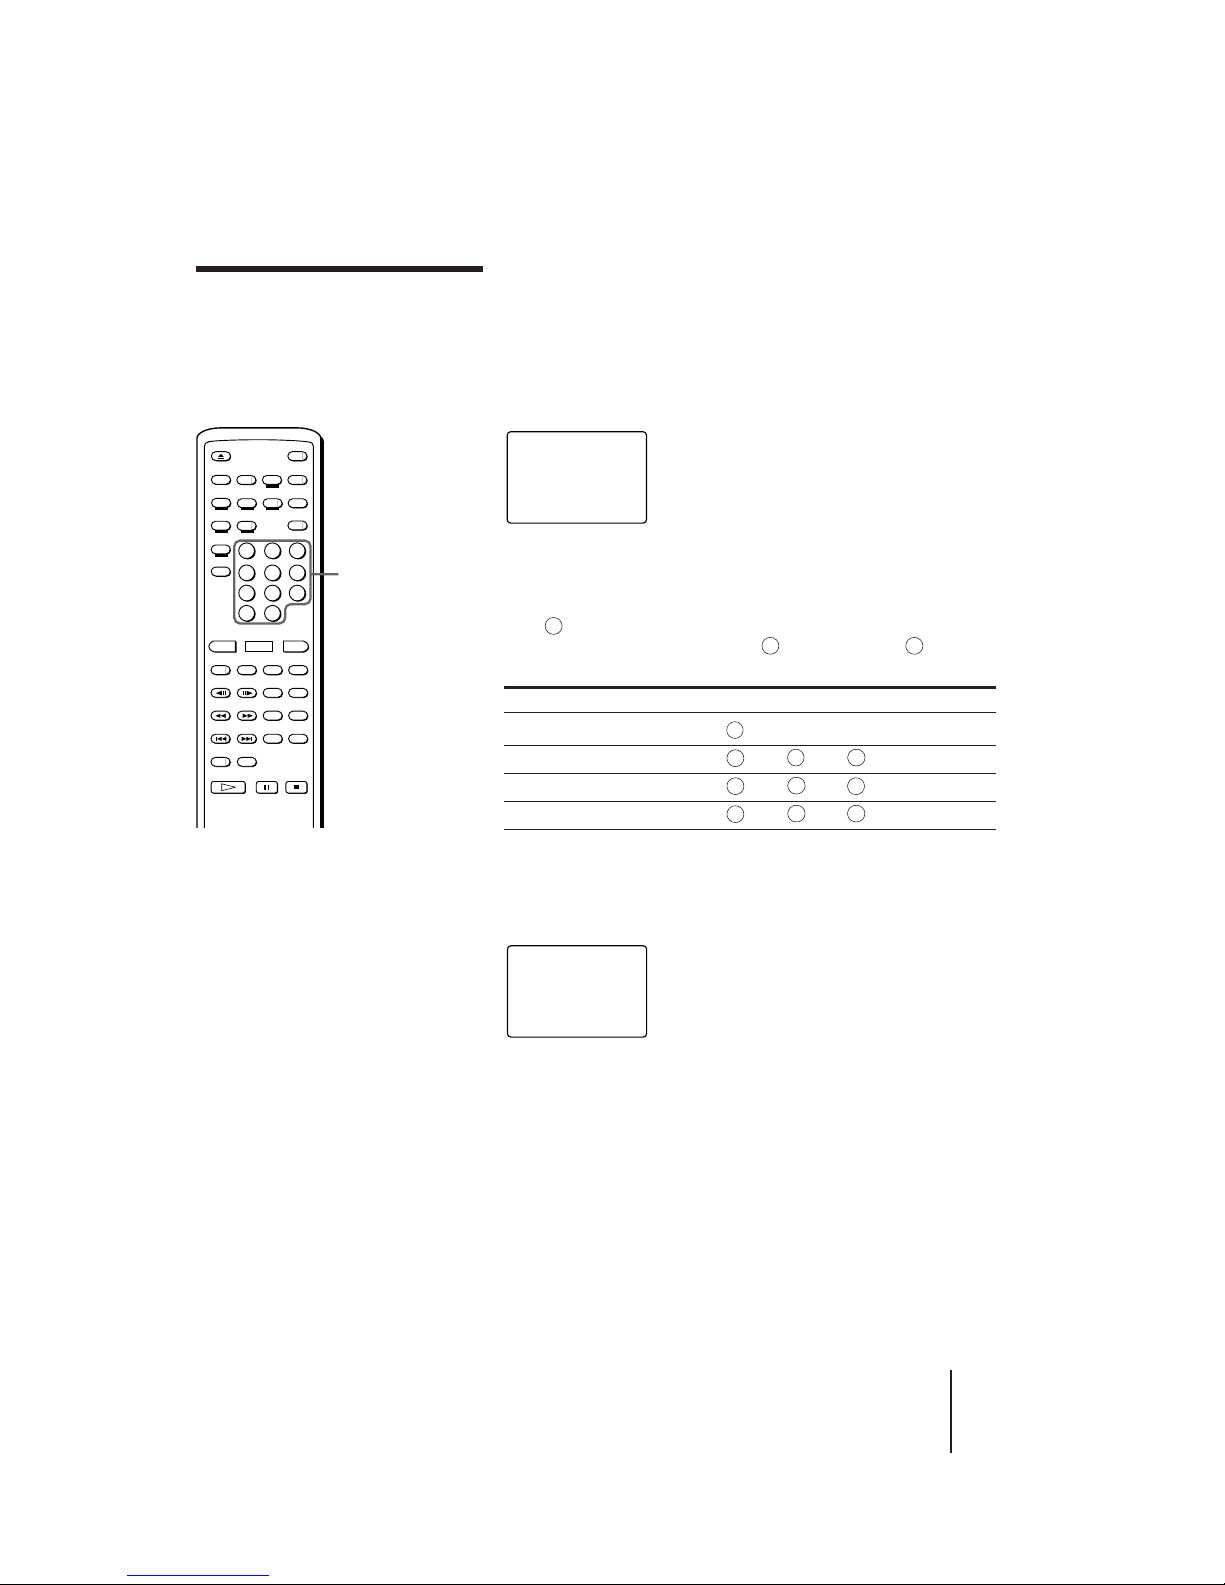
Entering the frame number, elapsed time, or scene
number
1 Press FRAME/TIME/SCENE while playing the disc.
When playing Indication
CAV LD FRAME 00000
CLV LD TIME 0:00:00
Ver. 2.0 VIDEO CD SCENE 00000
(with PBC functions)
2 Enter the multi-digit number corresponding to the
frame, time or scene you want to locate.
To locate frame number 12340 on the CAV LD, press 1, 2, 3,
4
and
10
/0
.
To locate the 12 minutes, 5 second point on the CLV LD, press
1
, 2,
10
/0
and 5.
To locate scene 123 on the VIDEO CD, press 1, 2 and 3.
If you enter the wrong number, press FRAME/TIME/SCENE to
clear the number, then enter the correct number.
3 Press · SELECT/PLAY.
Playback starts from the frame, time, or scene you entered.
To check the frame number or time
Press DISPLAY.
The current frame number, time, or scene number is displayed.
To cancel Frame/Time Search
Press CLEAR before pressing · SELECT/PLAY.
FRAME 00000
LD SIDE A
TIME 0:00:00
LD SIDE A
SCENE 00000
VIDEO CD
AVP-800.3-800-709-31 [ En, C ]
Additional Operations
17
-EN
Searching for a
particular point on a
disc
You can locate a particular point on a disc by scanning scenes or
skipping chapters/tracks.
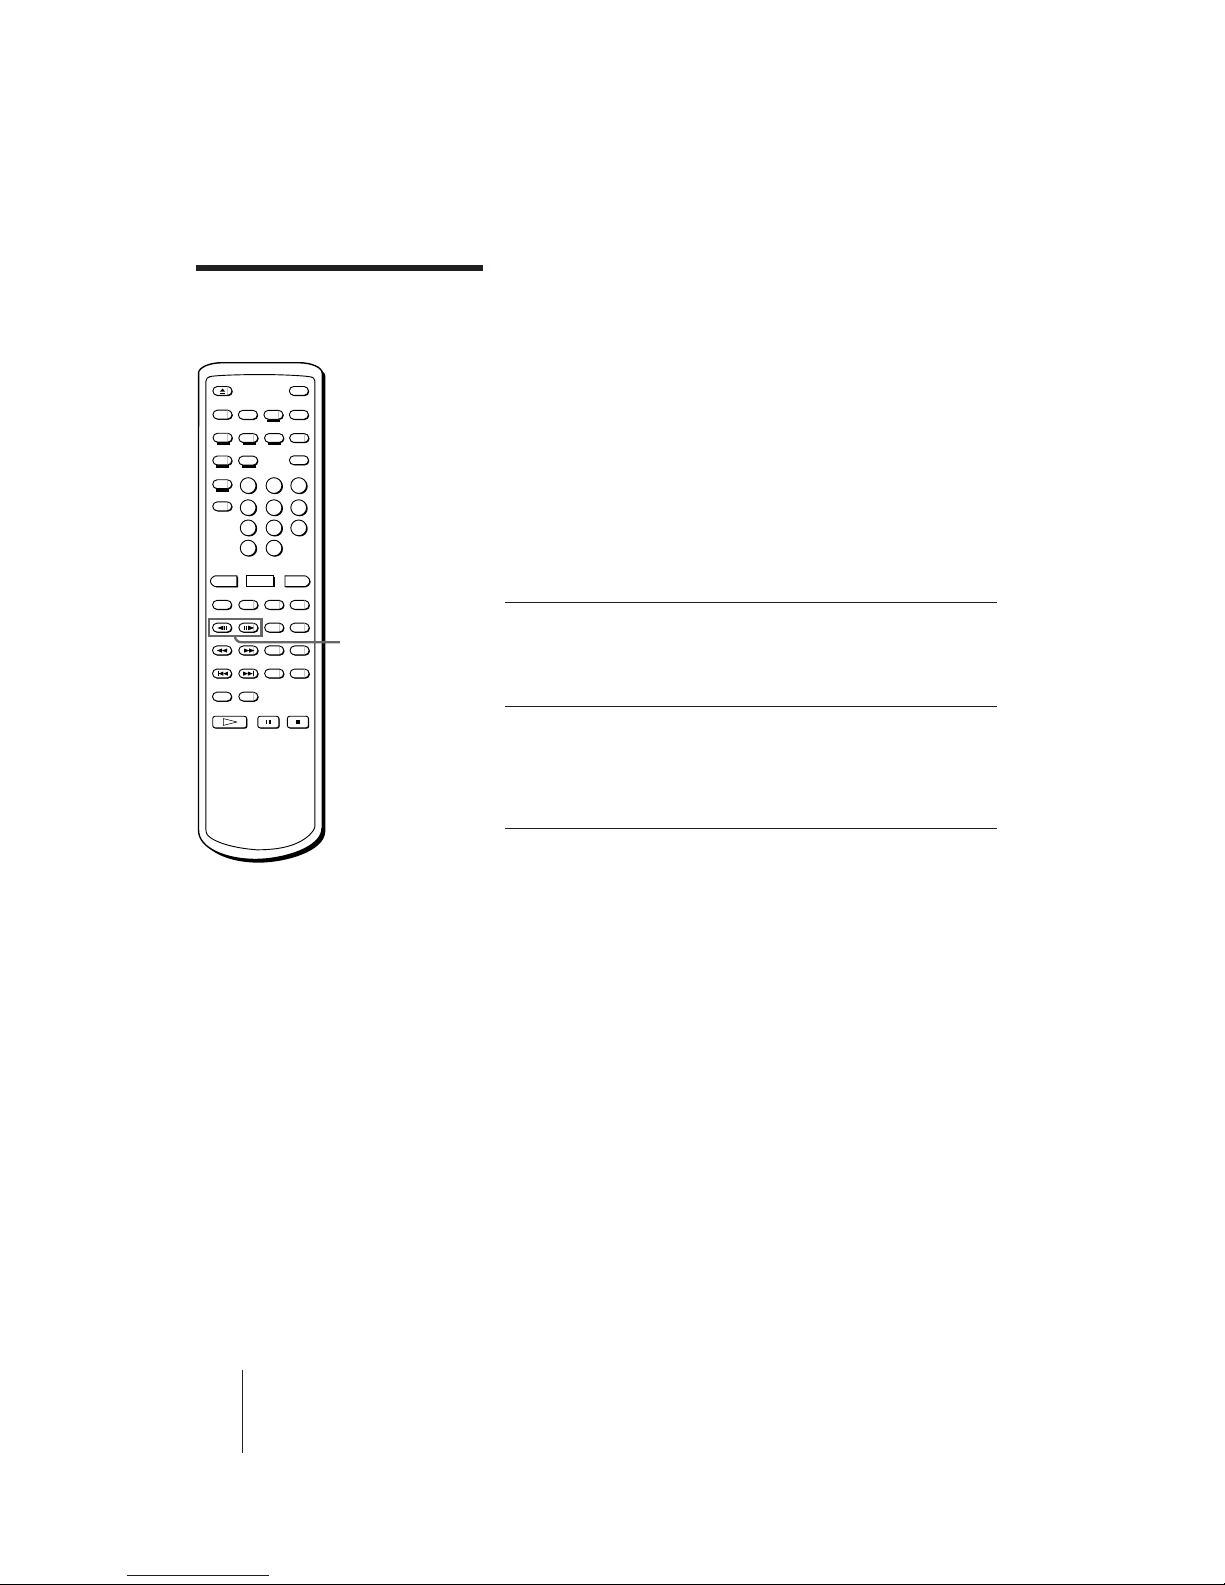
Scanning a disc quickly (Speed Scan)
Hold down 0/) SCAN while playing the disc.
To Hold down
Scan forward ) SCAN
Scan backward 0 SCAN
To resume normal playback, release 0/) SCAN.
Skipping chapters or tracks (Skip Search)
Press or hold down =/+ PREV/NEXT (ACS/AMS).
To go to the beginning of Press
Next chapter/track + NEXT (ACS/AMS) once
Current chapter/track = PREV (ACS/AMS) once
Previous chapter/track = PREV (ACS/AMS) twice before the
picture or sound resumes
Hold down + or = to skip chapters/tracks continuously.
0/)
SCAN
=/+ PREV/NEXT
(ACS/AMS)
Notes
• When scanning a CLV LD or
VIDEO CD, frames are skipped.
• A certain amount of visual noise
and instability is inevitable when
scanning an LD.
Tips
• ACS/AMS is the abbreviation for
Automatic Chapter Sensor/
Automatic Music Sensor.
• In addition to normal play mode,
you can also do Speed Scan and
Skip Search while in Freeze Frame
(CAV LDs or VIDEO CDs), Repeat,
or Pause mode. After the scan or
search, playback continues in the
same mode.
• If you hold down 0/) SCAN
after pressing P PAUSE while
playing a VIDEO CD, the scanning
speed increases. The picture where
you pressed P PAUSE freezes and
remains on the screen. Navigate by
using the time display. Release
0/) SCAN to display the
picture at the indicated time. The
new picture freezes. Press ·
SELECT/PLAY to resume
playback.
18
-EN
Additional Operations
AVP-800.3-800-709-31 [ En, C ]
Viewing frame-byframe action
During any scene, you can freeze play into a still picture, and then
advance or reverse the action frame-by-frame.
Freezing the action (Freeze Frame)
You can use this function for CAV LDs and VIDEO CDs.
Press P PAUSE while playing a CAV LD or VIDEO CD.
The sound mutes and the picture freezes.
To resume normal playback
Press · SELECT/PLAY.
Playing frame-by-frame (Step Play)
You can use this function only for CAV LDs.
1 Press /7 STILL/STEP while
playing a CAV LD.
The sound mutes and the picture
freezes.
2 Press /7 repeatedly to
advance or reverse the action
frame-by-frame.
Hold down /7 to view continuous
frame-by-frame action.
To resume normal playback
Press · SELECT/PLAY.
Tip
• When you play a CLV LD,
Freeze Frame and Step Play
are not available. When you
press P PAUSE, the screen
goes blank. If you press
/7 STILL/STEP, “CLV
SIDE A” appears briefly.
/7
STILL/STEP
7
7
7
7
7
AVP-800.3-800-709-31 [ En, C ]
Additional Operations
19
-EN
Resuming LD
playback (Auto
Resume)
This function operates automatically only for LDs in non-karaoke mode
(without microphones connected). Once you press p STOP or POWER
to stop playing an LD, the player memorizes the point you stopped at so
that you can continue viewing from the same point.
1 Press p STOP (or POWER) to stop
playing an LD.
The AUTO RESUME indicator on the
player lights up and the point you
stopped at is stored (if you press
POWER, the indicator lights up briefly,
then goes off with the power).
2 Press · SELECT/PLAY.
The player searches for the scene at
which you stopped playing, then
playback starts.
To pause playing just before starting
If the player is turned on, press P PAUSE instead of · SELECT/
PLAY.
If the player is turned off, press POWER or · SELECT/PLAY to turn
on the player, then press P PAUSE.
To view from the beginning of the LD
Press DISC SIDE A to start playing from the beginning of side A.
Press DISC SIDE B to start playing from the beginning of side B.
The point at which you stopped is cleared.
POWER
·
SELECT/PLAY
p
STOP
Tips
• Each time you stop playing, the point at
which you stopped last is memorized.
• The point at which you stopped playing is
cleared when:
– you completely open the disc tray, press
DISC SIDE A/B or =/+ PREV/
NEXT (ACS/AMS)
– you do a Chapter Search
– you do a Frame/Time Search
– you unplug the AC power cord of the
player
If you press 6 OPEN/CLOSE to close the
disc tray while it is opening, the point at
which you stopped is retained.
Notes
• The point at which you stopped is not
memorized if you stop playback during a
Chapter Search or Frame/Time Search.
• If you press · SELECT/PLAY when the
power is off, the player turns on
automatically. If a disc is loaded, playback
resumes where you last stopped.
• If you connect a microphone (switching
the player to karaoke mode), Auto
Resume is canceled. Although Auto
Resume is not canceled if you switch the
player’s input mode to LINE IN, it is
canceled if you connect a microphone.
20
-EN
Additional Operations
AVP-800.3-800-709-31 [ En, C ]
This is available for VIDEO CDs. You can mark any point you like on
the disc with a “Book Mark” so that you can resume playback from that
point. The player memorizes the point even after you remove the disc or
turn off the player. You can make one Book Mark for one disc. Each
time you make a new Book Mark, the old Book Mark is erased.
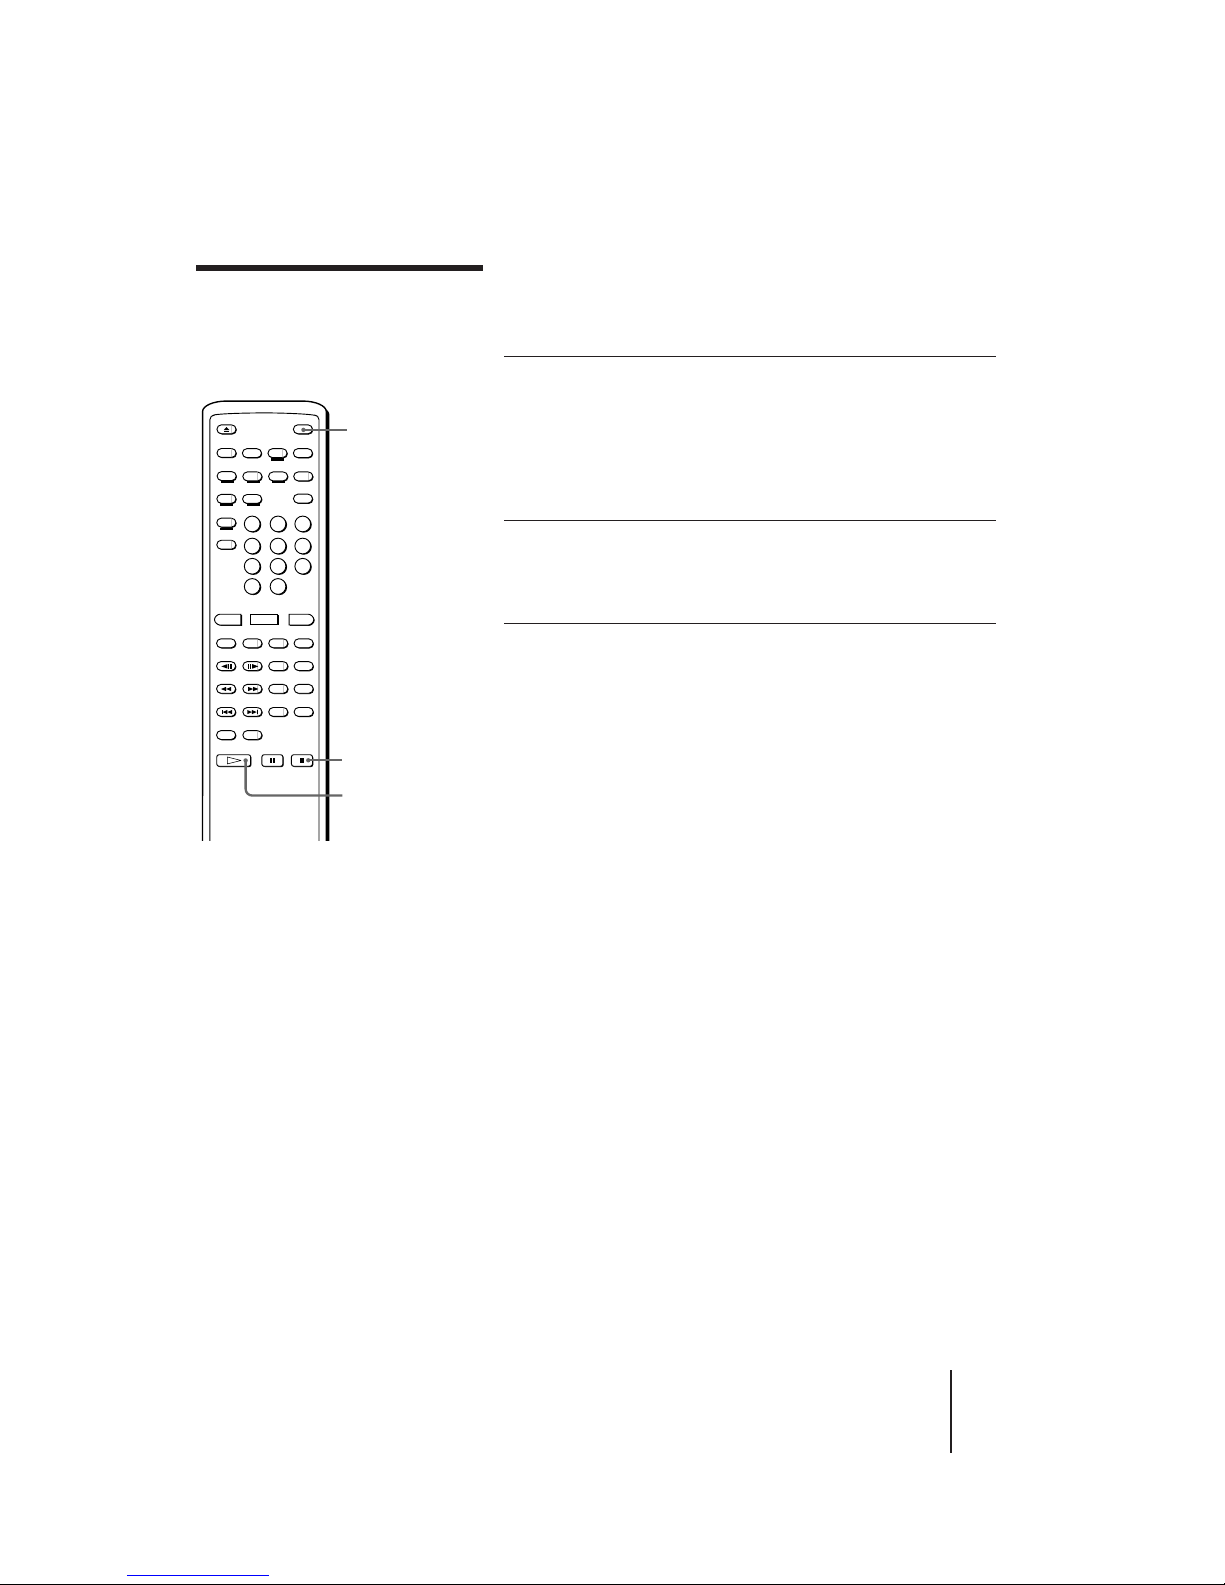
Making a Book Mark
Play the VIDEO CD on which you want to
make a Book Mark, then press VIDEO CD
MARK on the remote commander at a point
you like.
Resuming playback using the Book Mark
Press VIDEO CD M.PLAY.
The player searches for the point you marked,
then starts playing.
Resuming VIDEO CD
playback from a
point you like (Book
Mark)
VIDEO CD MARK
VIDEO CD M.PLAY
PLAY
VIDEO CD
MARK SET
SEARCH
VIDEO CD
MARK
Tips
• Each time you press the
VIDEO CD MARK button
while playing a disc, the
Book Mark moves (the old
Book Mark is erased and a
new Book Mark is made).
• You can use Book Marks on
both Ver. 1.1 and Ver. 2.0
VIDEO CDs.
• The Book Mark remains
even after you unplug the
AC power cord of the
player.
Note
• The PBC ON/OFF button
indicator must be lit to use
a Book Mark on a Ver. 2.0
VIDEO CD. If it is not lit,
press p STOP to stop
playing the disc, then press
the PBC (ON/OFF) button
to turn it on.
AVP-800.3-800-709-31 [ En, C ]
Additional Operations
21
-EN
Playing a section
repeatedly
(Repeat Play)
Repeat play allows you to play the disc over and over. You can replay
both sides, a single side, or one chapter of an LD; a whole disc or a
single track on a CD or VIDEO CD; or a selected portion of the disc.
Repeating the whole disc (All Disc Repeat)
Press REPEAT.
“REPEAT” appears on the screen briefly. “REPEAT” lights up on the
front panel display. When playing an LD, the player plays through both
sides of the LD repeatedly. When playing a CD or VIDEO CD, the
player plays all the tracks on the disc repeatedly.
Repeating the current side of the LD (One Side
Repeat)
Press 1/SIDE/ALL twice, then press REPEAT.
“ONE SIDE” and “REPEAT” appear on the screen briefly. “REPEAT 1
SIDE” lights up on the front panel display. The player plays the selected
disc side repeatedly.
Repeating the selected chapter/track (Single
Repeat)
Press 1/SIDE/ALL once, then press REPEAT.
“SINGLE” and “REPEAT” appear briefly. “REPEAT 1” lights up on the
front panel display. The player plays the selected chapter/track
repeatedly.
To check the repeat status
Press DISPLAY twice.
Canceling Repeat Play
Press CLEAR.
SINGLE
REPEAT
Notes
• You cannot use Repeat and
Reserve at the same time.
• You cannot use Repeat
while using PBC functions
on a Ver. 2.0 VIDEO CD. To
use Repeat on a Ver. 2.0
VIDEO CD, press p STOP
to stop playing, then press
the PBC (ON/OFF) button
to turn off the PBC ON/
OFF button indicator on the
player.
REPEAT
CLEAR
1/SIDE/ALL
REPEAT
ONE SIDE
REPEAT
22
-EN
Additional Operations
AVP-800.3-800-709-31 [ En, C ]
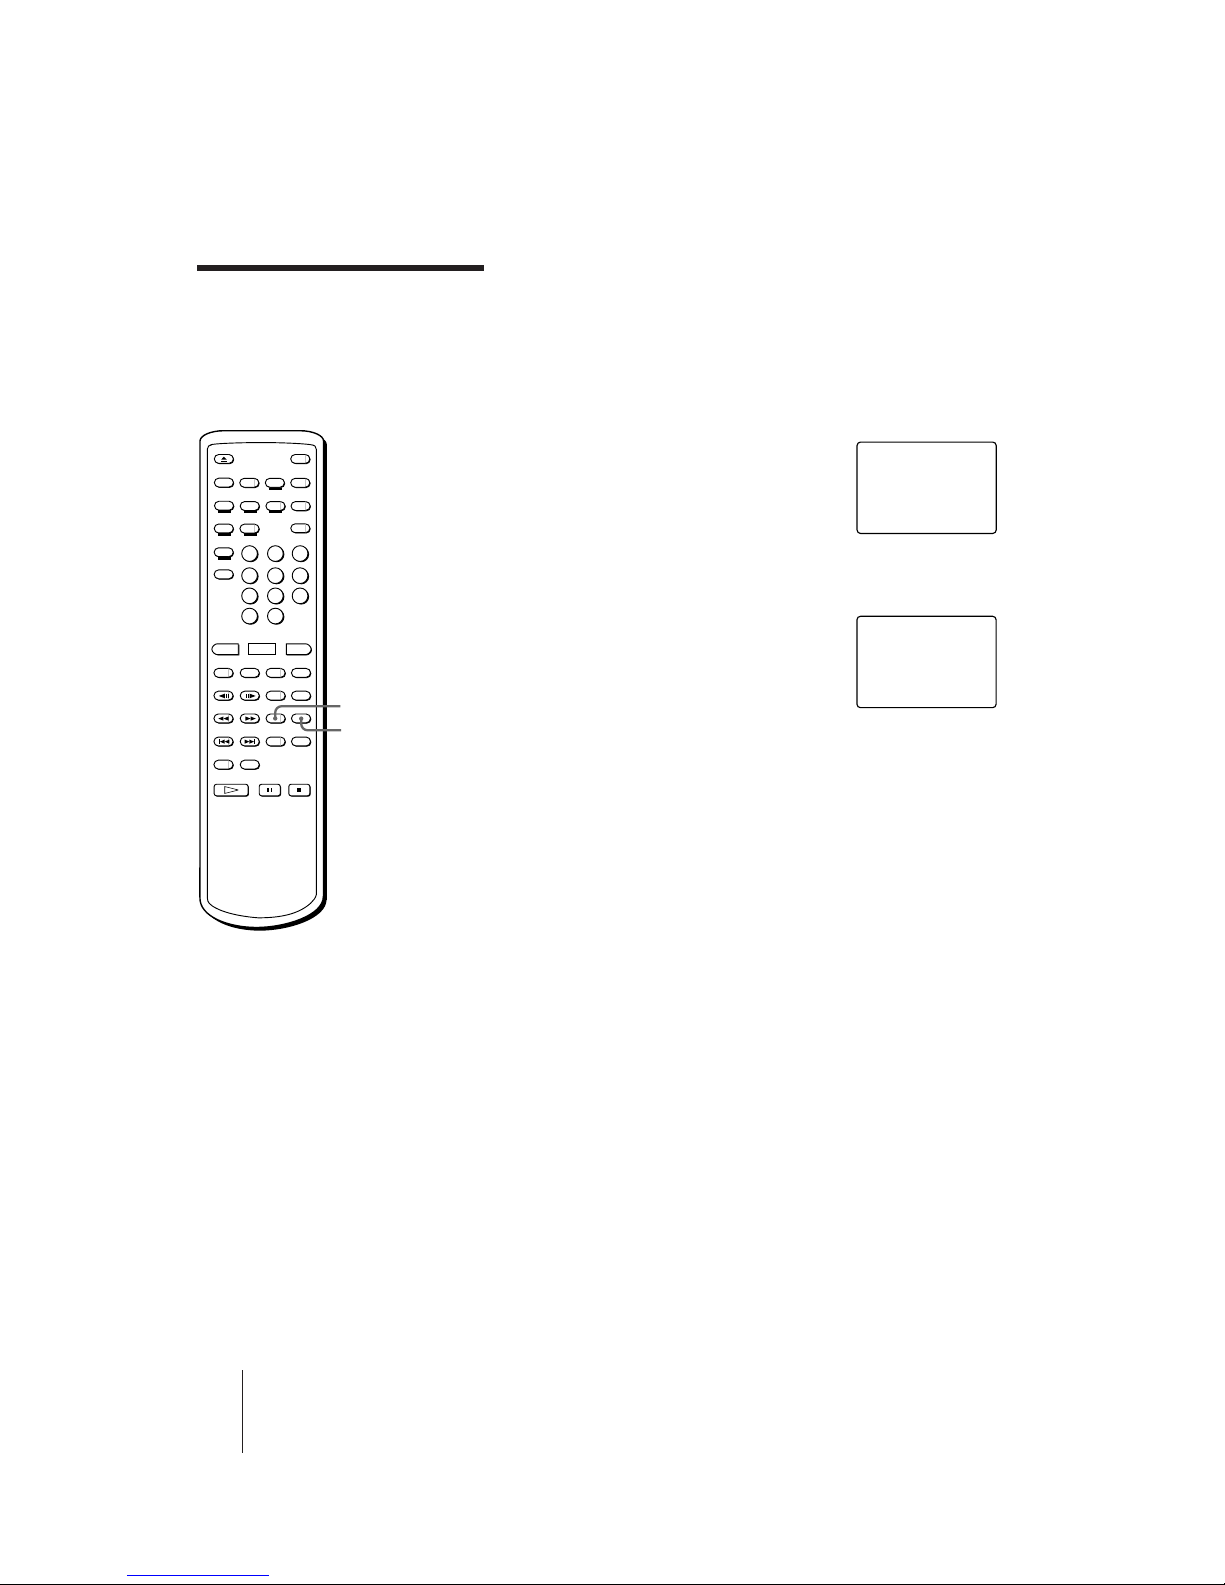
Replaying a selected portion on the disc
(Repeat A˜B)
1 Press REPEAT A˜B at the
beginning of the scene or phrase
you want to repeat.
This tells the player where to start.
“REPEAT” and “A-” appear, and “B”
flashes.
2 Let the player run to the end of
the scene or phrase.
3 Press REPEAT A˜B again.
This tells the player where to end.
“REPEAT” and “A-B” appear. The
player repeatedly plays the scenes or
phrases between the two points you
specified.
To repeat a different portion
Repeat steps 1 to 3 to reenter new start and end points.
To cancel Repeat A˜B
Press CLEAR.
SEARCH
CAV SIDE A
FRAME 12345
A-B
REPEAT
Playing a section repeatedly
(continued)
REPEAT A˜B
CLEAR
Tip
• You can scan the disc
between points A and B by
holding down 0/)
SCAN.
Note
• You can do Repeat A˜B
only on the current side of
an LD. You cannot do it on
both sides of the LD.
AVP-800.3-800-709-31 [ En, C ]
Additional Operations
23
-EN
Playing songs in
random order
(Shuffle Play)
You can play the songs on a disc in random order, each song once
(Shuffle Play). If you select the songs you want to play in advance, the
player plays only selected songs in random order (Delete Shuffle). The
player needs the TOC data of the disc to do Shuffle Play and Delete
Shuffle Play, so these functions are available only on LDs containing
TOC data, CDs, and VIDEO CDs.
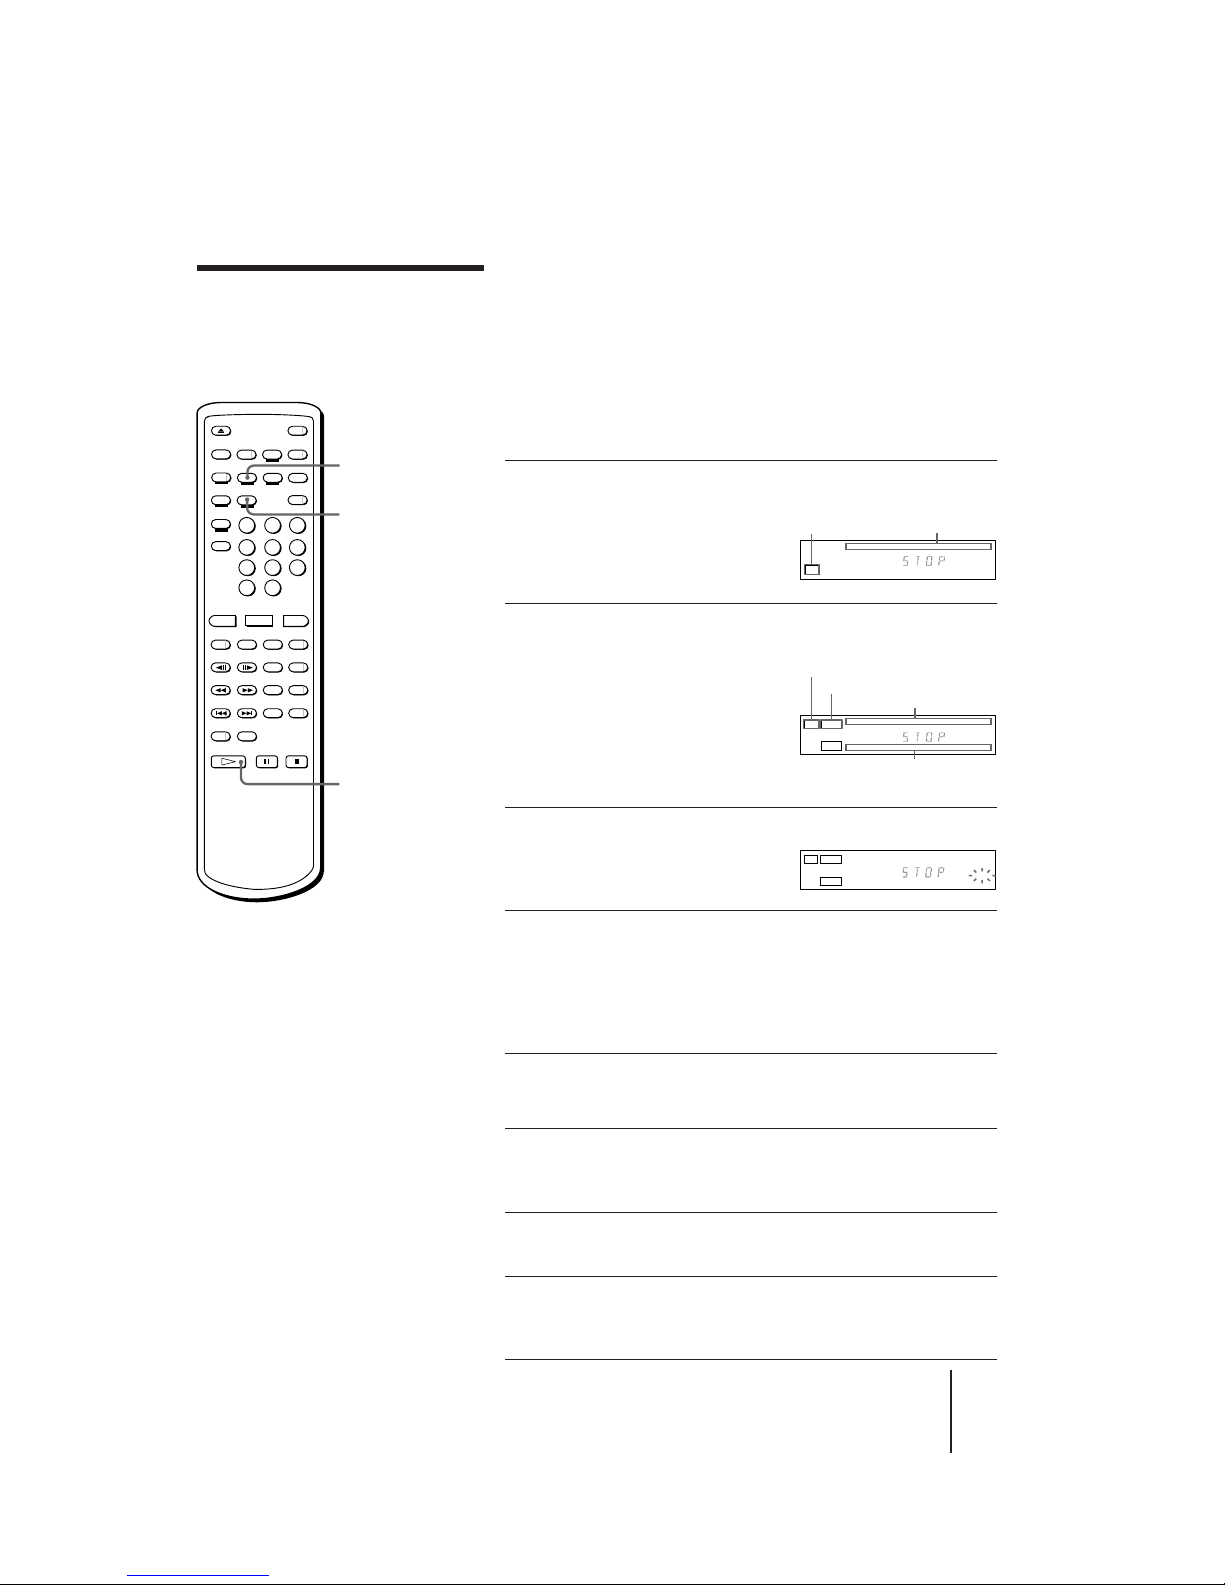
Shuffle playing on one side of a disc
(One Side Shuffle)
1 Place a disc on the disc tray, then press 6 OPEN/CLOSE
to close the tray.
When you use a CD or VIDEO
CD, the AV calandar appears on
the front panel display, showing
that TOC data was read.
2 (This step is for an LD. Skip this step when playing a CD
or VIDEO CD.)
Press · SELECT/PLAY and
wait for the AV calendar to
appear on the front panel
display, then press p STOP
to stop playing.
The player reads the TOC data of
the LD.
3 Press SHUFFLE on the remote
commander.
“SHUFFLE” flashes on the front
panel display.
4 Press · SELECT/PLAY.
Songs start playing. All songs on the disc are played once in
random order. To play side A of a double-sided LD, press DISC
SIDE A, then press · SELECT/PLAY. To do Shuffle Play on side
B, perform steps 3 and 4 in playback mode or pause mode while
on side B.
Shuffle playing on both sides of a double-sided LD
(Both Sides Shuffle)
1 Follow steps 1 to 3 above to enter SHUFFLE mode.
Make sure that both AV calendars for side A and side B appear,
and “SHUFFLE” flashes on the front panel display.
2 Press 1/SIDE/ALL on the remote commander to turn off
“1 SIDE” on the front panel display.
3 Press · SELECT/PLAY.
The songs on side A are played in random order, then the songs
on side B are played in random order.
1/SIDE/ALL
·
SELECT/PLAY
SHUFFLE
Tip
• You can skip the current song to
the next song which will be
randomly selected by pressing the
+ NEXT (ACS/AMS) button.
The = PREV (ACS/AMS) button
does not function during Shuffle or
Delete Shuffle Play.
Notes
• If the LD does not contain TOC
data, or if the player has not read
the TOC data of the LD, “NO
TOC” appears on the screen when
you press SHUFFLE, and you
cannot do Shuffle or Delete Shuffle
Play.
• You cannot do Shuffle or Delete
Shuffle Play while using PBC
functions on a Ver. 2.0 VIDEO CD.
To do Shuffle or Delete Shuffle
Play on a Ver. 2.0 VIDEO CD, press
p STOP to stop playing, then press
the PBC (ON/OFF) button to turn
off the PBC ON/OFF button
indicator on the player.
123456789
10 11 12
1
/L2/
R
AV calendar
Playing disc type
CD
123456789
10
123456789
10
11
12
SIDE ALD
1/L2/R
AV calendar on side A
Playing disc side
AV calendar on side B
Playing disc type
SIDE B
123456789
10
123456789
10
11
12
SIDE ALD
1/L2/R
SHUFFLE
SIDE B
24
-EN
Additional Operations
AVP-800.3-800-709-31 [ En, C ]
Playing only your favorite songs in random order
(One Side Delete Shuffle)
To select your favorite songs in random order, delete the songs you do
not want to play from the disc. If you use an LD, make sure the AV
calendars appear on the front panel display.
1 Press SHUFFLE to enter SHUFFLE
mode.
“SHUFFLE” flashes on the front panel display.
2 Press DISPLAY twice to use the on-screen display.
3 Press the number buttons to
delete songs you do not want to
play.
The deleted song numbers are
displayed on the screen.
If you enter a wrong number, press CLEAR. With each press, the
last song you entered is restored (the number on the screen
disappears).
4 Press · SELECT/PLAY.
The remaining songs on the disc are played once in random order.
To play the remaining songs on side A of a double-sided LD,
press DISC SIDE A, then press · SELECT/PLAY. To play with
the Delete Shuffle function on side B, perform steps from 1 to 4 in
playback mode or pause mode while on side B.
Delete shuffle playing on both sides of an LD (Both
Sides Delete Shuffle)
1 Follow steps 1 to 3 above to delete songs.
To delete songs on side B of a double-sided LD, press DISC SIDE
B, then press the number buttons. The songs deleted from side B
appear in squares.
2 Press 1/SIDE/ALL on the remote commander to turn off
“1 SIDE” on the front panel display.
3 Press · SELECT/PLAY.
The remaining songs on side A are played in random order, then
the remaining songs on side B are played in random order.
Canceling Shuffle Play or Delete Shuffle Play
Press CLEAR.
“SHUFFLE” on the front panel goes off. The player exits Shuffle mode.
All the deleted songs are restored.
Tips
• You can delete songs
numbered up to 99. To
delete a song over 10, press
>10, then press two number
buttons in sequence, first
tens digit, then the ones
digit (see page 15).
• You can repeat Shuffle and
Delete Shuffle Play. Press
REPEAT on the remote
commander. Each time
repeat finishes, the order of
the songs is reshuffled.
Playing songs in random
order (continued)
1/SIDE/ALL
·
SELECT/PLAY
Number
buttons
SHUFFLE
DISPLAY
VIDEO 1-12 52:07 SIDE A
DELETE 2 7 - - - - - SHUFFLE - - - - - - - - - -
- - - - - - - - - -
- - - - - - - - - -
- - - - - - - - - -
AVP-800.3-800-709-31 [ En, C ]
Additional Operations
25
-EN
Playing songs in any
order you like
(Program Play)
You can select up to 25 songs to be played in any order you like,
regardless of disc side, even while a song is being played. The songs are
played continuously in the order you specify. This is available in nonkaraoke mode (without microphones connected). Use Reserve in
karaoke mode (see “Selecting karaoke song order” on page 27).
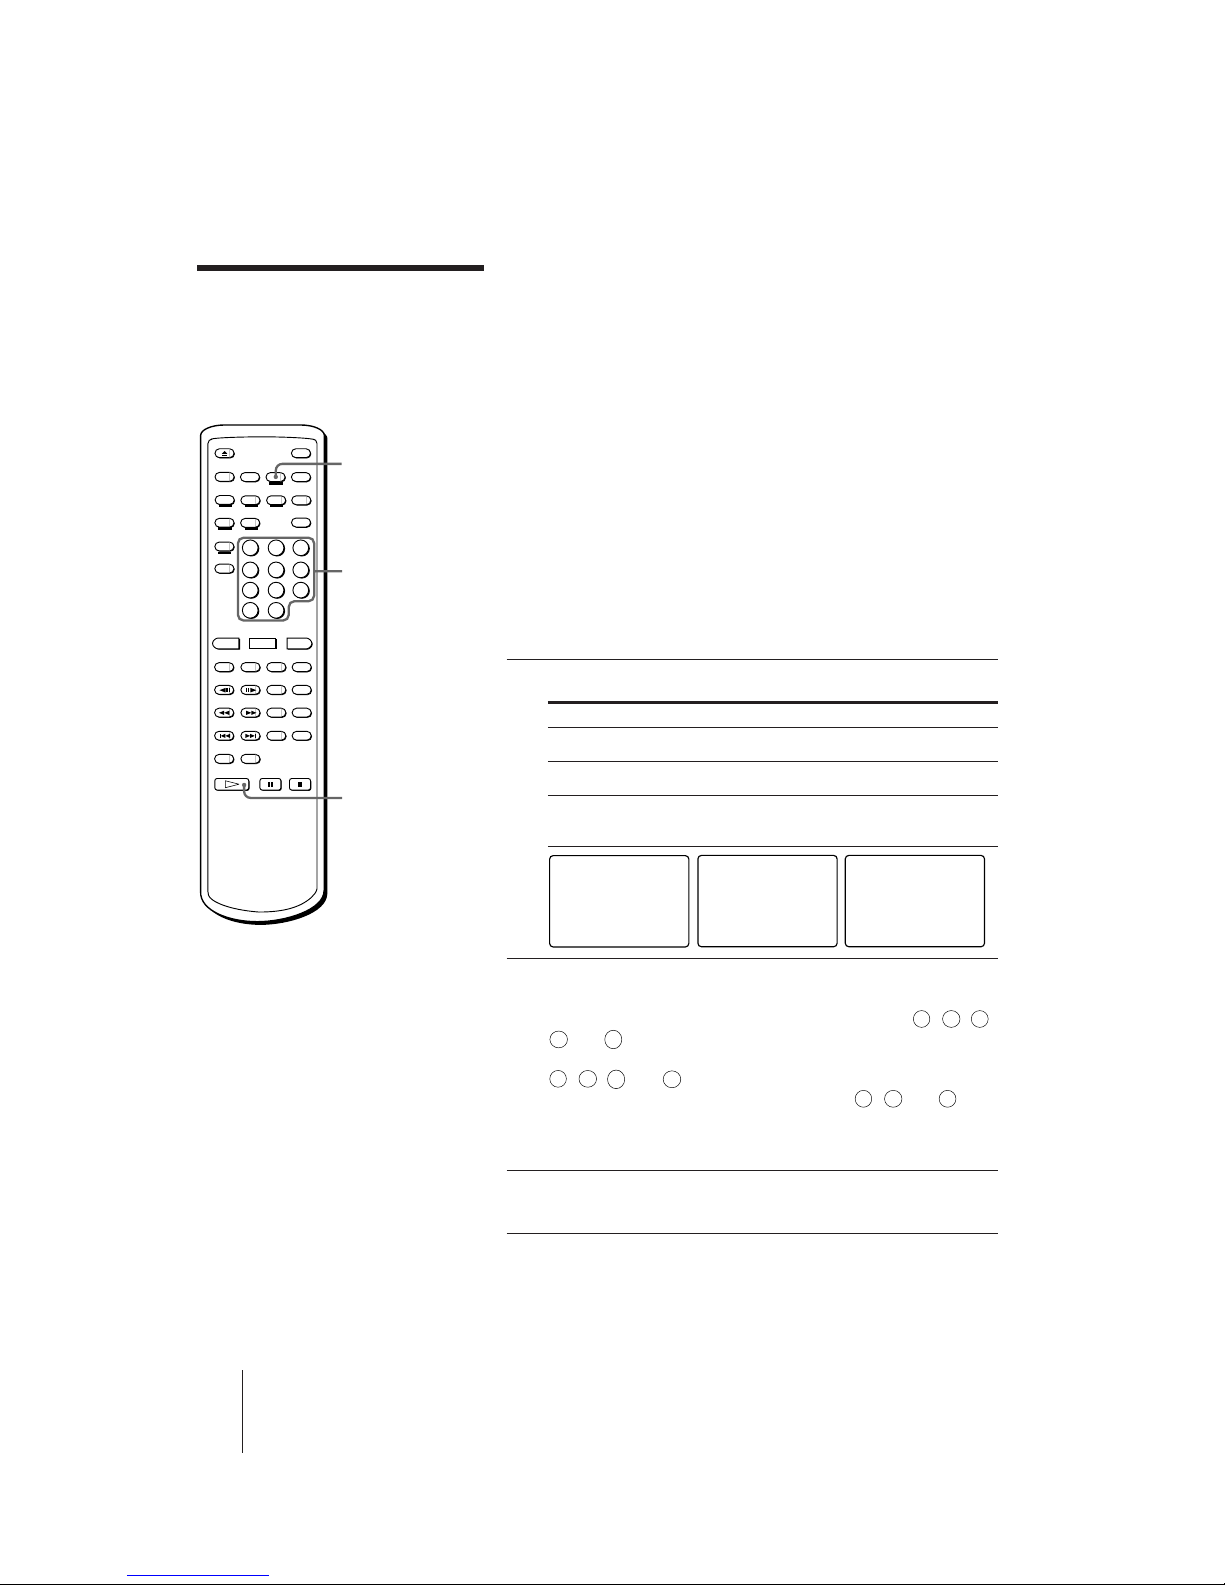
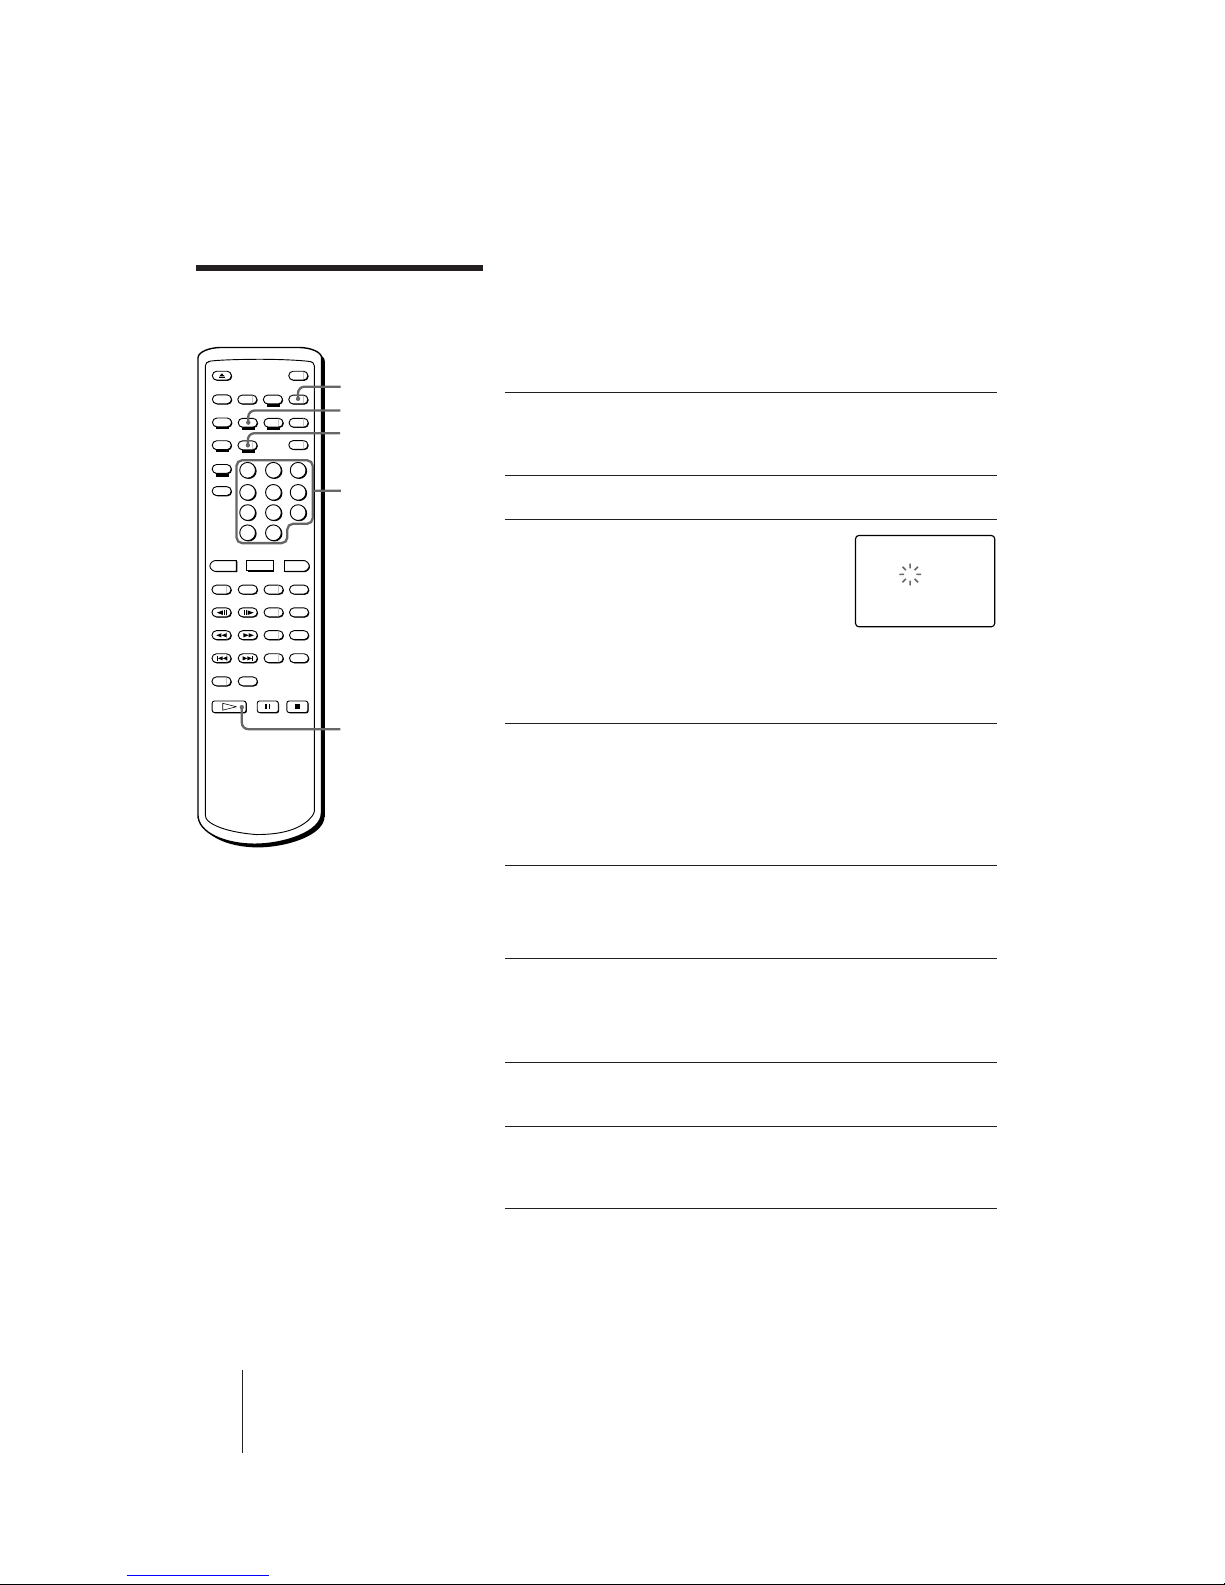
Selecting songs to make a program
1 Press PROGRAM/RESERVE.
“PROGRAM” appears. “PGM” flashes
on the front panel display.
2 Press the number buttons to select songs in the order
you want them to play.
When you play a double-sided LD,
select the disc side by pressing DISC
SIDE A (or B), then press the number
buttons to select songs in the order you
want them to play. The songs selected
from side B appear in squares.
If you enter a wrong number, press CLEAR. With each press, the
last song you entered is deleted.
3 Repeat step 2 until you finish selecting songs.
4 Press · SELECT/PLAY.
The selected songs are programmed and the on-screen display
disappears. “PGM” lights up on the front panel display. The
selected songs are played in order you selected them.
To make a program while checking the
total playing time
You can check the total playing time of the
program while selecting songs. The time is
displayed both on the screen and front panel
displays. Each time you select a song, its
playing time is added.
If you enter P PAUSE in the program
You can enter P PAUSEs among songs you select, to make the player
automatically pause during the program. If you enter a P PAUSE, the
total playing time is re-counted from --:-- (zero).
To check the contents of the program
Press DISPLAY twice.
The numbers of the selected songs appear. If playing a song, its number
flashes.
Canceling Program Play
Press CLEAR.
“CLEAR” appears briefly and the player exits Program mode. All the
programmed songs are cleared.
PROGRAM
/RESERVE
CLEAR
Number
buttons
DISC SIDE
A/B
·
SELECT/PLAY
VIDEO 1-10 48:31 SIDE A
PROGRAM - - - - - - - - - – – : – – - - - - - - - - - -
- - - - - - - - - -
- - - - - - - - - -
- - - - - - - - - -
VIDEO 1-12 52:07 SIDE B
PROGRAM 4 2 10 5 1
36 : 41 3 - - - - - - - -
- - - - - - - - - -
- - - - - - - - - -
- - - - - - - - - -
Tips
• You can select songs numbered up to 99. To
select a song over 10, Press >10, then press
two number buttons, first the tens digit, then
the ones digit (see page 15).
• You can skip to the previous or next song in
the program by pressing the =/+
PREV/NEXT (ACS/AMS) button.
• Even when the playback of the whole
program is complete, the program is not
cleared. The program is cleared when:
– you press CLEAR (except while the
PROGRAM/RESERVE button indicator on
the player is flashing) to exit Program mode.
– you open the disc tray or turn off the player
• To repeat playing the program automatically,
press REPEAT on the remote commander.
Notes
• You cannot use Program while using PBC
functions on a Ver. 2.0 VIDEO CD. To use
Program on a Ver. 2.0 VIDEO CD, press p
STOP playing, then press the PBC (ON/OFF)
button to turn off the PBC ON/OFF button
indicator on the player.
• When you play a VIDEO CD or CD, the DISC
SIDE B button does not function.
• To check the total playing time of the program
on an LD:
– Use an LD with TOC data
– Press · SELECT/PLAY (and press SIDE
B) make the player read the LD’s TOC data,
before you press PROGRAM/RESERVE.
• If you select songs numbered over 50, or if the
total playing time exceeds 100 minutes, the
time display changes to “--:--.”
VIDEO 1-10 48:31 SIDE A
PROGRAM 4 2 10 5 1
52: 18 3 7 6 - - - -
- - - - - - - - - -
- - - - - - - - - -
- - - - - - - - - -
Total playing time of the
program
 Loading...