

Page 1
3-257-259-11(1)
_
_
Portable
MiniDisc Recorder
Operating Instructions
Recorder Operation ____________________________
Software Operation _____________________________
page 12
page 38
AM-NX9
© 2003 Sony Corporation
Page 2

WARNING
To prevent fire or shock hazard, do
not expose the unit to rain or
moisture.
Do not install the appliance in a
confined space, such as a bookcase or
built-in cabinet.
To prevent fire, do not cover the
ventilation of the apparatus with news
papers, table clot hs, curtains, etc. And
don’t place lighted candles on the
apparatus.
To prevent fire or shock hazard, do not
place objects filled with liquids, such as
vases, on the apparatus.
Certain countries may regulate disposal of
the battery used to power t his product.
Please consult with your local authority.
Caution
The use of optical instruments with this
product will incre as e eye hazard.
CAUTION
RADIATION WHEN OPEN
AVOID EXPOSURE TO BEAM
Information
IN NO EVENT SHALL SELLER BE
LIABLE FOR ANY DIRECT,
INCIDENTAL OR
CONSEQUENTIAL DAMAGES OF
ANY NATURE, OR LOSSES OR
EXPENSES RESULTING FROM
ANY DEFECTIVE PRODUCT OR
THE USE OF ANY PRODUCT.
— INVISIBLE LASER
The validity of the CE marking is
restricted to only th ose countries where i t
is legally enforced, mainly in the
countries EEA (European Economic
Area).
For customers who purchased
this product in the USA
Owner’s Record
The serial number is located at the rear of
the disc compartment lid and the model
number is located at the top and bottom.
Record the serial number in the space
provided below. Refer to them whenever
you call upon your Aiwa dealer regarding
this product.
Model No. AM-NX9
Serial No.
Declaration of Conformity
Trade Name: AIWA
Model No.: AM-NX9
Responsible Party: Sony Electronics
Inc.
Address: 680 Kin d erkamack Road,
Oradell, NJ 07649 U S A
Telephone No.: 201-930-6973
This device complies with Part 15 of
the FCC Rules. Operation is subject to
the following two conditions: (1) This
device may not cause ha rmful
interference, and (2) this device mu st
accept any interference received,
including interference that may cause
undesired operation.
2
Page 3

This equipment has been tested and found
to comply with the limits for a Class B
digital device, pursuant to Part 15 of the
FCC Rules. These limits are designed to
provide reasonable pr ot ection against
harmful interference in a residential
installation. This equipment generates,
uses, and can radi ate radio frequency
energy and, if not installe d and used in
accordance wit h the instructio ns, may
cause harmful interference to radio
communications. However, there is no
guarantee that interference will not occur
in a particular installation. If this
equipment does cause harmful
interference to radio or televisio n
reception, which can be determined by
turning the equipment off and on, the user
is encouraged to try to correct the
interference by one or more of the
following measures:
— Reorient or reloc ate the receiving
antenna.
— Increase the separation between the
equipment and re ceiver.
— Connect the equipment into an outlet
on a circuit different fro m that to
which the receiver is connec te d.
— Consult the deal er or an exper i enced
radio/TV technician for help.
You are cautioned that any changes or
modifications not ex pressly approved in
this manual could void your authority to
operate this equipment.
• SonicSta ge, OpenMG and th e O penMG
logo, MagicGate Memory Stick and t he
MagicGate Memo ry Stick logo,
Memory Stick and the Memory Stick
logo, Net MD and the Net MD log o,
ATRAC, ATRAC3 and ATRAC3 plus
are trademarks of Sony Corporation.
• Microsoft, Windows, Windows NT and
Windows Media are trademarks or
registered trademarks of Microsoft
Corporation in the United States and /or
other countries.
• IBM and PC/AT are registered
trademarks of In ternational Bus iness
Machines Corpo ra ti on.
• Macintos h i s a t r ademark of Apple
Computer, Inc. in the United States and/
or other count ries.
• Pentium is a registered trademark of
Intel Corporation.
• All other trademar ks and registered
trademarks are tra demarks or registered
trademarks of their respective holders.
• ™ and ® marks are omitted in this
manual.
AM-NX9
Tested To Comply
With FCC Sta ndards
FOR HOME OR OFFICE USE
3
Page 4

Notice for users
On the supplied software
• Copyright la ws prohi bit re prod ucin g the
software or t he man ual acco mp an yi ng i t
in whole or in part , or renting the
software without the permission of the
copyright holder.
• In no event will SONY be liable f or any
financial damage, or lo ss of profits,
including claims made by th ird parties,
arising out of the use of the software
supplie d with this recorder.
• In the event a problem occurs with this
software as a result of defective
manufacturing, SONY will replace it.
However, SONY bears no other
responsibility.
• The software provided with this
recorder cann ot be us ed with eq ui pme nt
other than that wh ic h i s so designated.
• Please note that, due to contin ued effo rts
to improve quality, the software
specifications may be changed without
notice.
• Operation of this recorder with software
other than that provided is not covered
by the warranty.
Program © 2001, 2002, 2003 Sony
Corporation
Documentation © 2003 Sony Corporation
4
Page 5

5
Page 6

Table of contents
Recorder Operations
Looking at the controls ..................................13
Getting started! ..............................................15
Using your computer to record from an audio
CD! ................................................................... 16
Playing an MD right away! ..............................19
Various ways of playback ..............................21
Selecting the play mode ........................................................................21
Adjusting treble or bass (Digital Sound Preset) ....................................22
Selecting the sound quality .............................................................22
Adjusting the sound quality ............................................................22
Using the group function ................................24
What is the group function? ..................................................................24
Playing a track in group play ..........................................................24
Selecting the play mode for group play (Group Play Mo de ) .........25
Other Operations ............................................26
Viewing various informat ion ..................... .... ... ....................................26
Turning off the beep sound ...................................................................27
Starting the playback quickly (Quick Mode) ........................................27
Protecting your hearing (EAR G.) ........................................................28
Locking the controls (HOLD) ...............................................................28
Power sources ................................................29
When to replace the battery ..................................................................29
Battery life ......................................................................................29
Using house current ................................... .... .......................................29
6
Page 7

Additional information ....................................30
Precautions ........................................................................................... 30
Specifications ....................................................................................... 32
Troubleshooting and explanations ................33
Troubles and solutions ......................................................................... 33
While playing ................................................................................. 33
While recording .............................................................................34
While using group function ...........................................................34
Others ............................................................................................. 35
Explanations ......................................................................................... 36
7
Page 8

Software Operation
What is a Net MD? ..........................................39
Basic Operations ............................................40
Basic operational flow using the Net MD ....................... ... .... ..............40
Providing the required system environment .........................................41
System requirements ......................................................................41
Installing the software onto your computer ..........................................42
Before installing the software .........................................................42
Installing SonicStage Ver.1.5 .........................................................43
Connecting the Net MD to your computer ...........................................45
Storing audio data to your computer .....................................................46
Starting SonicStage ........................................................................46
Recording audio CDs to the hard disk drive ..................................47
Labeling audio data ........................................................................49
Transferring aud io data from your com puter to the
Net MD (Check-out) .................. .... ... .... ...........................................50
Checking out audio files to the Net MD .........................................50
Listening to an MD ............................. ........................................... .... ...53
Listening to an MD with the Net MD connected to the
Listening to an MD with the Net MD disconnected from the
computer ..........................................................................53
computer ..........................................................................53
Advanced operations ......................................54
Using other functions! ........................ ... ............................................ ...54
Using the SonicStage onlin e help .......................... .........................54
8
Page 9

Other information ...........................................56
Settings and Precautions ...................................................................... 56
Settings according to OS ................................................ .... .... ........ 56
For users with OpenMG Jukebox, SonicStage, SonicStage
Premium, or SonicStage Simpl e Burner installed on their
computer ......................................................................... 58
Note on hard disk drive space ........................................................59
Notes on system suspend/hibernation mode ..................................59
Backing up the audio data ..................... .........................................59
Uninstalling the SonicStage software ..................................................60
For Windows XP users .................................................................. 60
For Windows Millennium Edition/Windows 98 Second Edition
For Windows 2000 users ...............................................................6 1
Troubleshooting ................................................................................... 62
If your computer does not recognize the Net MD ......................... 64
If the installation was not successful ............................................. 64
Information and explanatio ns ............................................................... 66
Net MD FAQ ................................................................................. 66
On copyright protection ....................................... .......................... 67
Glossary ...............................................................................................69
Index ..................................................................................................... 71
users ................................................................................ 60
9
Page 10
Before using this product
_
_
This recorder can only record materials from the connected computer. This manual
explains the record er operations and the installation and b as ic use of the supplied
SonicStage soft wa re. For details on the various operations, refer to the pages indicated
below.
When using the recorder
Recorder Operation (pages 12 to 36)
Pages 12 to 36 in this manual explain the use of the Net MD as an
ordinary MiniD is c recorder.
Portable
MiniDisc Recorder
Operating Instructions
Recorder Operation ____________________________
Software Operation _____________________________
Tro ubleshootin g and explanations (page 33)
This section shows the troubles you may find while using the recorder,
and their solutions.
AM-NX9
© 2003 Aiwa Corporation
When using the Net MD (the recorder) connected to your
computer
For SonicStage Ver. 1.5 software
Software Operation (pages 38 to 70)
Pages 38 to 70 in this manual e xplain the insta llation and bas ic operatio ns of the suppl ied
SonicStage soft ware. Refer to these page s f or details.
Other information (page 56)
This section shows the troubles you may find while using the SonicStage software, and
their solutions. It also has the list o f fr equently asked questions and answ ers.
SonicStage Ver. 1.5 Help
This is an onli ne help that you can view on your computer
screen.
Refer to online help for details on the use of the software.
To display the help w indow, see page 54.
For Net MD Simple Burner Ver. 1.2 software
Net MD Simple Burner Ver. 1.2 Operating
Instructions
This manual explains the installation and operations of the supplied Net
MD Simple Burner software.
Net MD
Simple Burner Ver. 1.2
Operating Instructions
© 2003 Sony Corporation
3-257-259-11(1)
page12
page36
3-257-334-11(1)
10
Page 11

Notes on the “Software Operation” section
• The displayed items in the illustrations that appear in th is section may diff e r fro m th e act u al items
displayed by the software.
• Explanations in this section assume familiarity with basic Windows operations. For details on the use
of your computer and the operating syste m, ple a se refer to the r es pe ct ive manuals.
• Explanations in this section cover general Net MD products. For this reason, some explanations (and
some illustrations) may not be applicable to your Net MD. Please refer to the operating instructions of
your Net MD as well.
11
Page 12

Checking the supplied accessories
AC power adaptor (1)
Headphones/earphones (1)
Dedicated USB cable (1)
CD-ROM (SonicStage Ver. 1.5 and Net MD Simple Burner Ver. 1.2) (1)*
∗Do not play a CD-ROM on an audio CD player.
12
Page 13
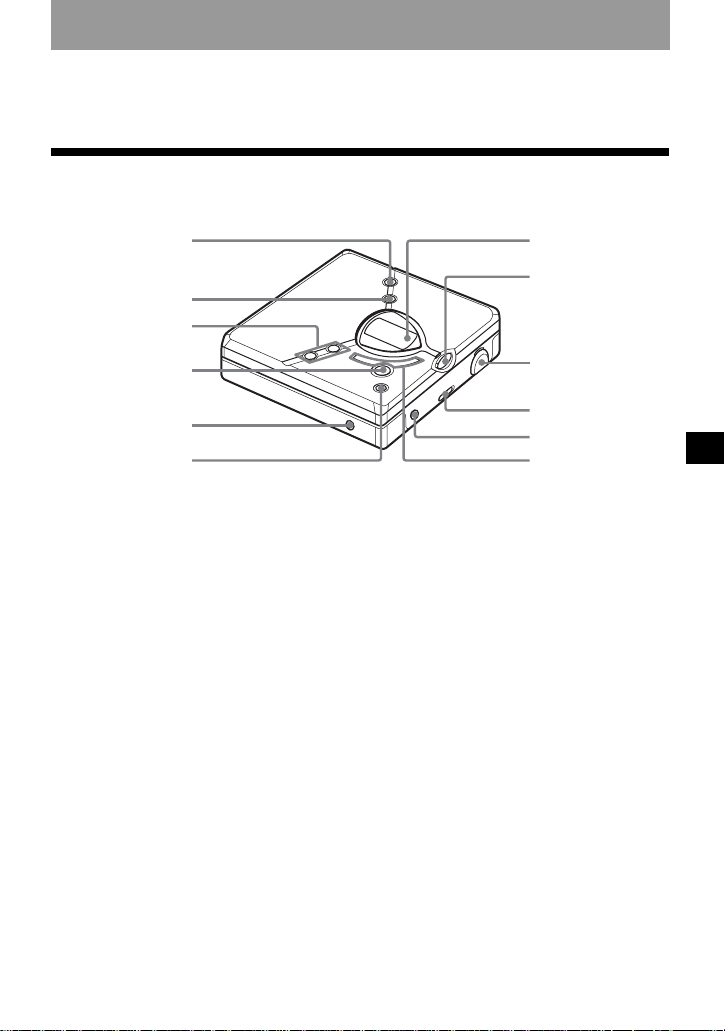
Looking at the controls
1
6q
Front of the recorder
2
3
7
8
4
5
A GROUP button
B MENU button
C VOL +* and – buttons
∗ The VOL + button has a tactile dot.
D NX/ENTER (play/paus e/enter)
button*
∗ The NX/ENTER button has a tactile
dot.
E DC IN 3V jack
9
q;
qa
s
F xSTOP/CANCEL (stop/ca ncel)
button
G Display window
H DOWNLOAD button
I USB jack
When connecting to your computer,
connect the dedica te d U SB cable to
this jack .
J HOLD switch
K i (headphones/earph ones) jack
L . and > (skip/search) buttons
Recorder Operation
13
Page 14

Back of the recorder
1
2
3
A OPEN button
B Hand strap hole
Use the hole to attach your own strap.
C Battery compartment lid
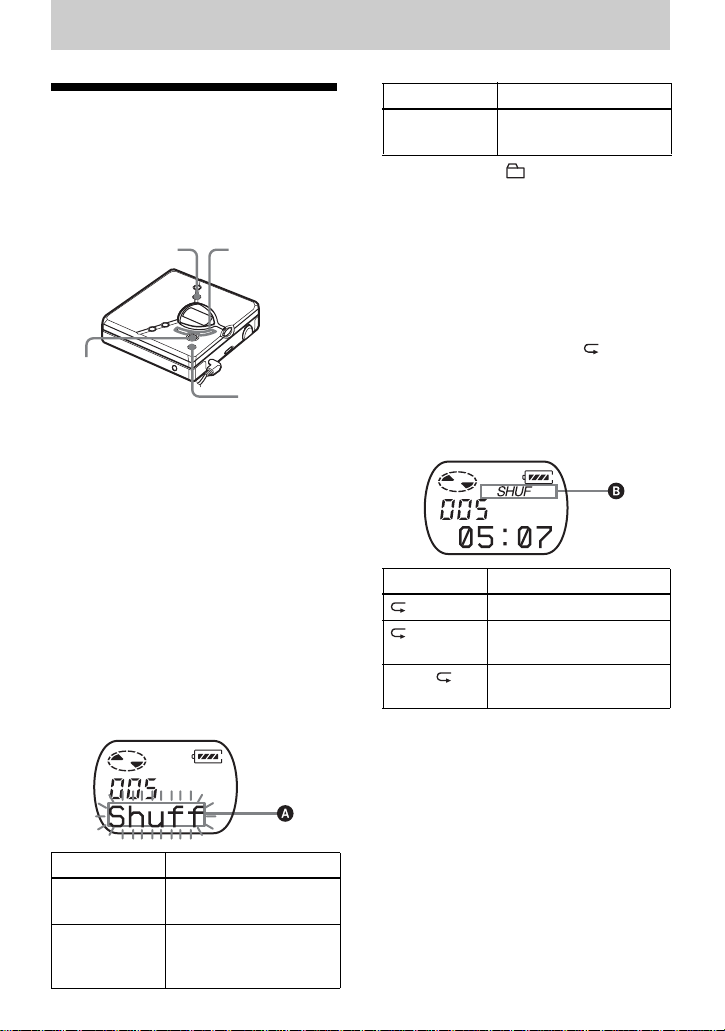
The display window of the recorder
1
2
3
A Disc indication
B Group mode indication
Lights up when group mode is on.
C Track number display
D Battery leve l indication
Shows approximate battery condition.
E Play mode indication
Shows play mode of th e MD.
F SOUND indication
G Disc, group, track indication
H Character information display
Displays the track names, elapsed
time, etc.
4
5
6
7
8
14
Page 15
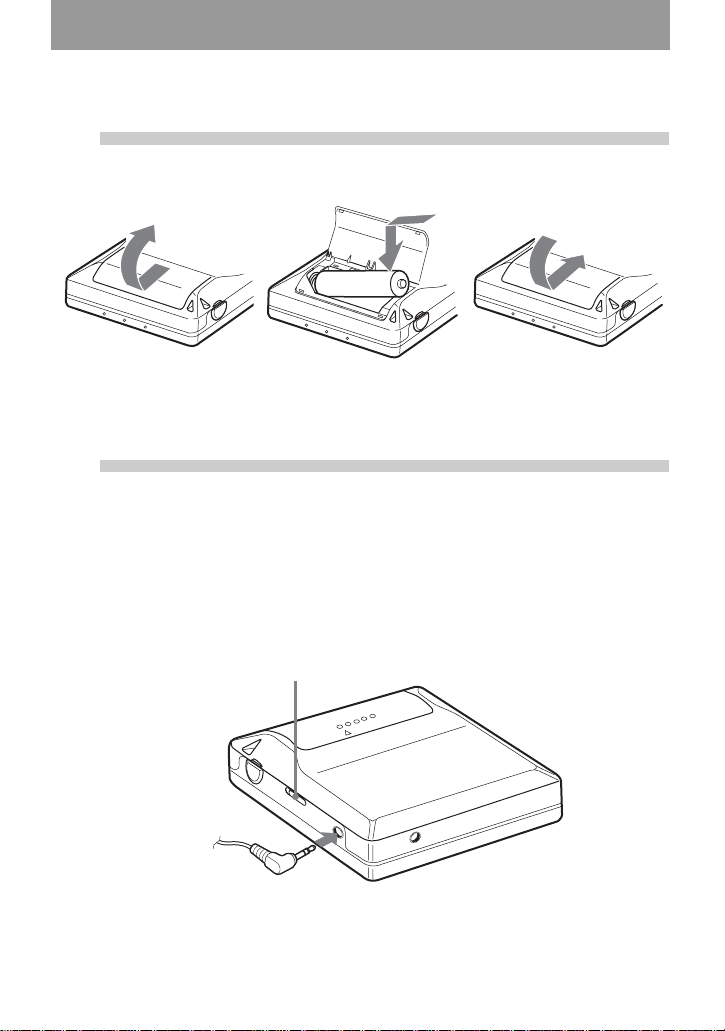
Getting started!
1
2
Insert an alkaline dry battery.
Slide to open the battery
compartment lid.
Insert one LR6 (size AA) alkaline
dry battery mi nus end first.
Make connections and unlock the
control.
1 Connect the headphones/e arphones to
i.
HOLD
E
e
Close the lid.
2 Slide HOLD in the opposite direction of
the arrow indicated on the recorder
(HOLD .) to unlock the control.
Connect firmly.
to i
15
Page 16

Using your computer to recor d
from an audio CD!
You can record track s from an aud io CD inserted in the CD-ROM
drive of your computer to an MD by connecting the recorder to the
computer with the dedicated USB cabl e. For this procedure, you must
first install the supplied “Net MD Simp le Burner” so ftware.
The following procedure explains the use of the recorder’s
DOWNLOAD button to perform recording. For details on installing
the software and othe r recording oper ations, see the su pplied “Net MD
Simple Burner Ver. 1.2 Operating Instructions”.
1
Install the Net MD Simple Burner
software.
If you are installing the software for the first time, use the supplied CD-ROM. Refer to the
supplied “Net MD Simple Burner Ver. 1.2 Operating Instructions” for details.
2
Insert a recordable MD into the
recorder.
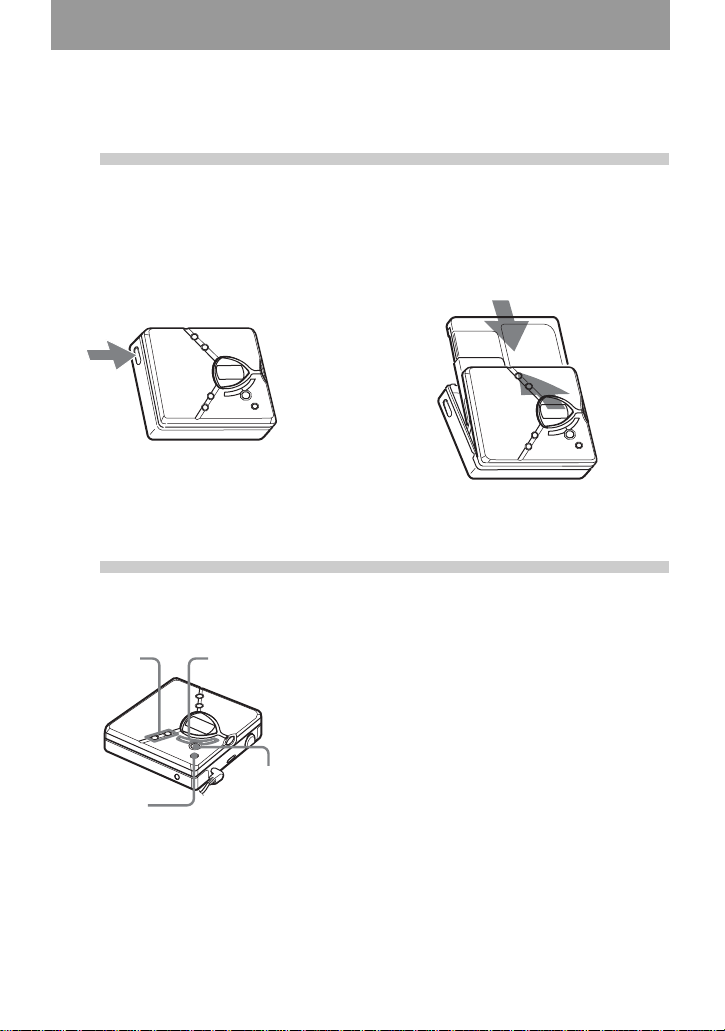
1 Press OPEN t o op en the recorde r. 2 Insert a recordable MD to the direction
of the arrow with the label side facing
front.
3 Press th e lid down to close.
16
Make sure the
record-protect
tab is close d .
Page 17
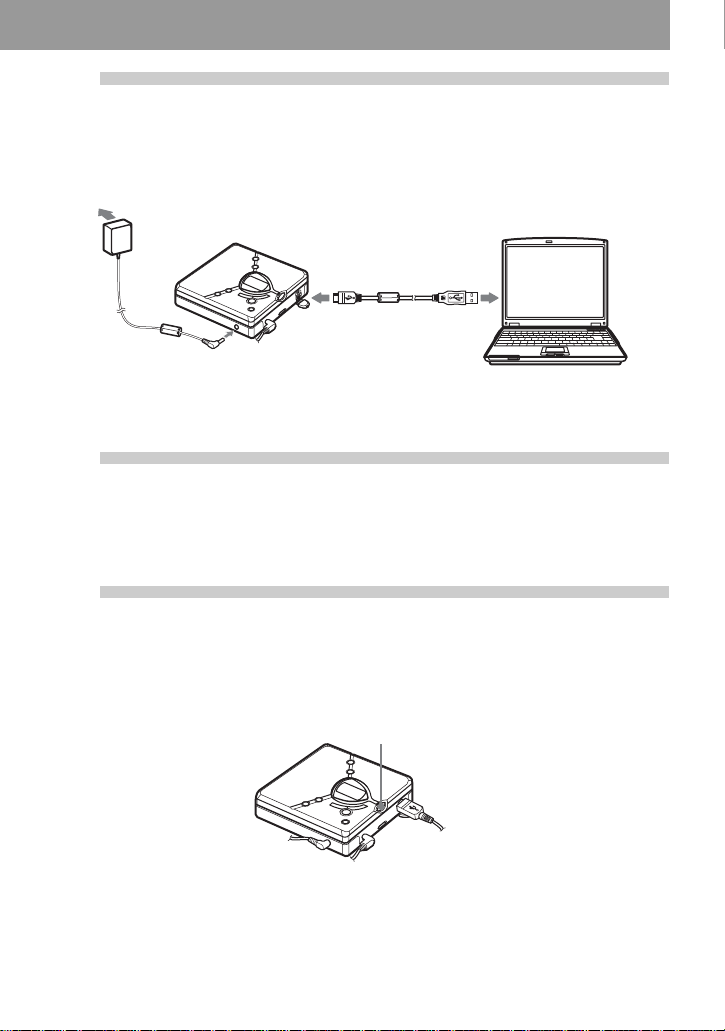
3
Connect the AC power adaptor to th e recorder and the dedicated USB cable from the
recorder to the computer.
Make the necessary connections.
AC
power
adaptor
To the DC IN
jack
To the USB
jack
To the USB
connecting
terminal
Dedicated
USB cable
Computer
4
Insert an audio CD into the CDROM drive of your computer.
5
Make sure all connections are
correct.
If all connections are correct, the DOWNLOAD button lights up.
DOWNLOAD
17
Page 18
6
Press DOWNLOAD for 2 seconds or
more.
The DOWNLOAD button starts flashing and recording starts. New material will be
recorded after the end of the existing contents.
DOWNLOAD
To stop recording
Click [Abort] in the display of your com puter.
You can also stop recording by pressin g the
xSTOP/CANCEL button on the recorder only
when the first track is being recorded.
To remove the MD
Press x and wait until “Edit” disapp ears from
the display.
Notes
• Do not disconnect the dedicated USB cable or
the AC power adap t or while the
DOWNLOAD button is flashing. If you do, a
mis-operation may occur.
• Place the recorder on a stable surface so that
the dedicated USB cable does not become
detached.
18
Page 19
Playing an MD right away!
1
Insert an MD.
1 Press OPEN to open the lid. 2 Insert an MD to the direction of the
arrow with the label side fa ci ng f ront,
and press the lid down to clos e.
3 Insert a new LR6 (size AA) alkaline dry
battery.
2
Play an MD.
1 Press NX.
VOL +, –
xSTOP/
CANCEL
., >
NX/ENTER
2 Press VOL + or – to adjust the volume.
The volume indicator appears in the
display allowing you to check the
volume level.
To stop play, press x.
Playback starts from the po int you last stopped
playing.
To start playback from the beginning of the first
track, hold down
NX for 2 seconds or more.
19
Page 20

To Operation
Pause Press NX.
Press NX again to resume play.
Find the beginning of th e current track or
the previous track
1)
Press ..
Press . repeatedly until the beginning of
the desired track appears.
Find the beginning of th e next track
2)
Press > once.
Go backwards o r forward while pla yi ng Hold down . or >.
Search for a point in a track while viewing
While pausing, press and hold . or >.
the elapsed time (Time sear ch )
Search for a specific tr ack while viewing
track numbers (I ndex search)
Remove the MD Press x, and then press OPEN.
1)
If you press . twice continuously while playing the first track of the disc, the recorder goes to the
beginning of the last track on the disc.
2)
If you press > during the last track of the disc, the recorder goe s to the beginning of the first trac k
on the disc.
3)
If you open the lid, the playback will beg in f ro m the be ginning of the first track (except whe n g ro up
mode is on).
While the recorder is stopped, p ress and
hold . or >.
3)
Suppressing the skip of the sound (E • A • S • S GP)
The E • A • S • S GP function wa s developed to provide a hi gher lev el of shock resist ance
than that of existing players in order to all ow the recorder to be used while jogging.
Note
The playback sound may skip if:
• the recorder receives stronger co ntinuous shock.
• a dirty or scratched Mini Disc is played.
z
• The AM-NX9 supports DSP TYPE- S for ATRAC/ATRAC3. It thus allows you to enjoy TYPE-S
high-quality sound from MD s reco rde d in MDLP mode on TYPE-S-equipped MD decks, etc.
• The recorder can play the track recorded by 2 × or 4 × long playing mode (LP2 or LP4). Normal stereo
playback, LP2 stereo p layback, LP4 stereo playback or monaural playback is automatically selected
to match the audio source.
20
Page 21
Various ways of playback
Selecting the play
mode
Y o u can sele ct v ari ous play m odes such a s
normal play, single-track pl ay (1 Trk), or
shuffle play (Shuff). You can also select
repeat play with the selected play mo de.
MENU
NX/
ENTER
., >
xSTOP/
CANCEL
1 Press MENU.
2 Press . or > repeatedly until
“P-MODE” appears in the disp lay,
and then press NX/ENTER.
3 Press . or > repeatedly to
select the play mo de, and then press
NX/ENTER.
Each time you press >, the display
item indicated by A changes as
follows:
Pressing NX/ENTE R while A is
flashing causes the play mode to
enter.
Pressing > repeatedly changes A.
Display A1)Play mode
Shuff
(shuffle play)
1)
Group play mode ( ) appears whenever you
play a disc with group settings. For more
details, see “Playing a track in group play”
(page 24).
All the tracks are
played in random order.
4 Press . or > repeatedly until
“RepOFF” or “RepON” (playing a
track repeatedly) appears in t he
display , and then press NX/ENTER
to enter the selection.
If you select “RepON”, “ ” appears
on B and the playback repeats w i th
the play mode selected in step 3.
lights up when you press NX/
B
ENTER
.
Display B Play mode
Repeat play of all tr acks
1 Repeat play of a sele cted
SHUF Repeat shuffle play of all
To cancel the procedure
Press MENU
track
tracks
.
Display A
Normal
(normal play)
1 Trk
(single-track
play)
1)
Play mode
All the tracks are
played once.
A single track is played
once.
To return the preceding
settings
Press xSTOP/CANCEL.
21
Page 22
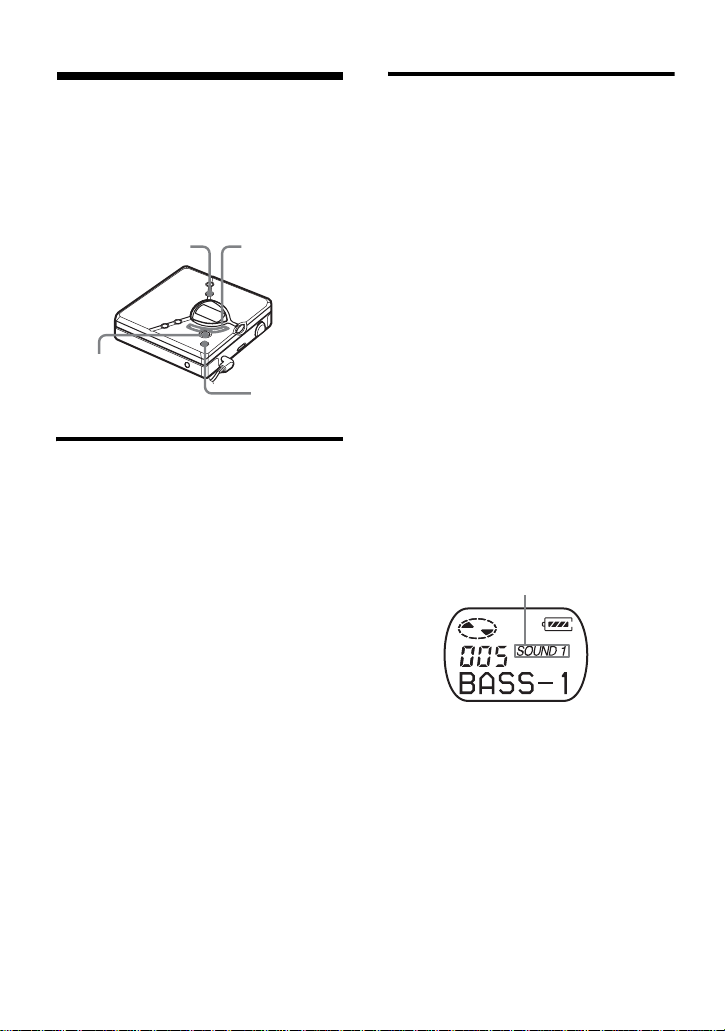
Adjusting treble or bass
(Digital Sound Preset)
You can adjust the trebl e and bass to suit
your taste. The play er can store two sets
of treble-bass adjustments, which can
then be selected later during playback.
MENU
NX/
ENTER
., >
xSTOP/
CANCEL
Selecting the sound quality
Factory settings
Factory settings of the digital sound preset
are as follows:
•“SOUND1”: bass +1, treble ±0
•“SOUND2”: bass +3, treble ±0
1 While playing, pr ess MENU.
2 Press . or > repeatedly until
“SOUND” appears in the display, and
press NX/ENTER.
3 Press . or > repeat edly to
select “SOUND1”, “SOUND2”, or
“OFF” in the displa y, and then press
NX/ENTER to enter the selection.
Selecting “OFF” turns off the digital
sound preset function.
Adjusting the sound quality
You can change the prese t sound quality.
To change the preset sound quality, select
“SOUND1” or “SOUND2”, the one you
want to change, in advance.
1 While playing, pr ess MENU.
2 Press . or > repeatedly until
“SOUND” appears in the display, and
then press NX/ENTER.
3 Press . or > repeatedly until
“SET” appears in the di splay, and
then press NX/ENTER.
4 Press . or > repeatedly until
“SOUND1” or “SOUND2” appears
in the display, and then press NX/
ENTER.
The display shows the currently
“BASS” so un d setting.
5 Press . or > repeatedly to
adjust the sound level.
Shows “SOUND1” or
“SOUND2” is selec t ed
The sound can be adjus ted in 8 steps.
(–4, –3, ...±0, ...+2, +3)
6 Press NX/ENTER.
“BASS” is set and the display
changes to “TRE” (treble) setting
mode.
7 Press . or > repeatedly to
adjust the sound leve l, and th en pres s
NX/ENTER to enter the selection.
“TRE” (treble) is set.
The sound setting s ar e saved and the
playback displa y appears again.
22
Page 23

To cancel the procedure
Press MENU.
To return the preceding
settings
Press xSTOP/CANCEL.
Note
When using a digital sound preset, the sound
may break or become distorted if the volume is
turned up too high, depending on the settings or
the track. In this case, change the settings of the
sound quality.
23
Page 24

Using the gro up function
What is the group
function?
The group function is pr ovide d to allow
playback of discs with group settings. The
group function is convenient for playback
of MDs on which several album s or CD
singles have been recorded in MDLP
(LP2/LP4) mode.
What is a disc with group
settings?
The recorder can operate various
functions in units of group; that is tracks
that have been recorded on a disc as part
of separate groups, as shown below.
Before group settings are m ade
Disc
3
2 4 5 6 7 8 1213 1415
1
Track 1 to 5 are assigned to group 1.
Track 8 to12 are assigned to group 2.
Track 13 to15 are assigned to group 3.
m
Track 6 to 7 are assigned to no group.
After setting the group (group pl ay)
Disc
Group 1
1
2345 6
Group 2
712345
Group 3
1
23
Note
The recorder does not support the recording of
group settings on the recorder. Use the supplied
SonicStage software to assign tracks to group.
For details, see “Software Operation” section
(page 38).
., >
NX/
ENTER
GROUP
MENU
xSTOP/
CANCEL
Playing a track in group play
In group play, all groups are played in
order, starting with group 1, followed by
the unassigned tracks (“GP --”). Playback
stops after all the tracks have been played.
1 Press MENU.
2 Press . or > repeatedly until
“P-MODE” appears in the display,
and then press NX/ENTER.
3 Press . or > repeatedly until
“ ” and “Normal” appear in the
display, and then press NX/
ENTER.
4 Press . or > repeatedly until
“RepOFF” appears in the display, and
then press NX/ENTER to enter the
selection.
Tracks that were not assigned to a group
are treated as being part of “GP --”.
You can create a maximum of 99 groups
on a disc.
24
To cue to the start of a group
(Group Skip)
1 While playing, press GROUP.
2 Press . or >.
Pressing the . or > button cues to the
first track of the previous or next group.
Page 25

Selecting the play mode for
group play (Group Play Mode)
The shuffle play and repeat play function
can be used during group play mode.
1 Press MENU.
2 Press . or > until “P-MODE”
appears in the display, and then press
NX/ENTER.
3 Press . or > repeatedly to
select the play mo de, and then press
NX/ENTER.
After normal pla yba ck (page 21), the
following play mode s are displayed.
Display Play mode
, Normal
(Normal
Group Play)
, Shuff
(In-Group
Shuffle)
All tracks in the groups
play back once (starting
with the first track in
group 1).
Shuffle play starts with
the group that is
currently playi ng, and
continues with the
succeeding gro ups .
4 Press . or > repeatedly until
“RepOFF” or “RepON” appears in
the display, and then press NX/
ENTER to enter the selection.
If you select “RepON ”, “ ” appears
in the display and playback repeats in
the respective group play mode
(Group Repeat Play).
Display Play mode
, Repeat play of tracks
, SHUF Repeat shuffle play of
within a group
tracks within a group
To return the preceding
settings
Press xSTOP/CANCEL.
To cancel the procedure
Press MENU.
25
Page 26

Other Operations
Viewing various
information
You can check the track name, disc name,
etc. during playback. Group-related items
appear only when a track with group
settings is played.
MENU
NX/
ENTER
ABC
Track nu m ber — The elapsed
Track number Track name
The number of
total tracks in
the groups
The number of
total tracks
Track number — Track mode
GP Group name
., >
xSTOP/
CANCEL
time
Disc name
3 Press . or > repeatedly until
the information that you want appears
in the display, and then press NX/
ENTER to enter the selection.
Each time you press NX/ENTER,
the display changes as follo ws:
Display Meaning
LapTim The elapsed time of the
current track
T:N am e Track name
G:Name Group name
D:Name Disc name
T–MODE Indicates the reco rd in g
mode selected on the MD
recorder used; i.e., “SP”,
“LP2”, “LP4”, or
“MONO”.
Notes
• Depending on the group settings, the
operating conditions and the disc settings, you
may not be able to select certain indications or
the indications may appear di fferently.
• The “T–MODE” indication appe ars onl y
during playback. It appears for a few seconds,
and is then replaced by th e elap sed tim e of the
current track.
To cancel the procedu re
Press MENU.
To return the preceding
settings
Press xSTOP/CANCEL.
1 Press MENU.
2 Press . or > repeatedly until
“DISP” appears in the display, and
then press NX/ENTER.
26
Page 27

Turning off the beep
sound
You can turn off the beep sound in t he
headphones/earphones.
MENU
., >
Starting the playback
quickly (Quick Mode)
After pressin g t h e pl ayback button or
cueing to the track, the playback can start
quickly.
MENU
., >
NX/
ENTER
xSTOP/
CANCEL
1 Press MENU.
2 Press . or > repeatedly until
“OPTION” appears in the displ ay,
and then press NX/ENTER.
3 Press . or > repeatedly until
“BEEP” appears in th e display, and
then press NX/ENTER.
4 Press . or > repeatedly until
“OFF” appears i n th e di splay, and
then press NX/ENTER.
To turn on the beep sound
Select “ON” in step 4.
To cancel the procedure
Press MENU.
To return the preceding
settings
Press xSTOP/CANCEL.
NX/
ENTER
xSTOP/
CANCEL
1 Press MENU.
2 Press . or > repeatedly until
“OPTION” appears in the displ ay,
and then press NX/ENTER.
3 Press . or > repeatedly until
“Power” app ears in the display, and
then press NX/ENTER.
4 Press . or > repeatedly until
“QUICK” appears in the display, and
then press NX/ENTER.
To switch back to the normal
setting
Select “NORMAL” in step 4.
To cancel the procedure
Press MENU.
To return the preceding
settings
Press xSTOP/CANCEL.
27
Page 28

Notes
• When the power mode is set to “QUICK”, the
power remains on within the recorder even
when nothing appears in the display. This
leads to a shorter battery life.
• If no recorder operation (including opening or
closing of the lid) occurs fo r an hour, the
power in the recorder automatically turn off.
For this reason, the next time you start
playback or do another operation, the recorder
will not respond quickly. the unit, however,
will return to quick mode afterwards .
Protecting your hearing
(EAR G.)
The EAR G. (Ear Guar d) function keeps
down the maximum volume to protect
your ears.
MENU
., >
To cancel the EAR G. functio n
Select “OFF” in step 4.
To cancel the procedu re
Press MENU.
To return the preceding
settings
Press xSTOP/CANCEL.
Locking the controls
(HOLD)
To prevent the buttons from being
accidentally operated when you carry the
player, use this function .
HOLD
NX/
ENTER
xSTOP/
CANCEL
1 Press MENU.
2 Press . or > repeatedly until
“OPTION” appear s i n the display,
and then press NX/ENTER.
3 Press . or > repeatedly until
“EAR G.” appears in the display, and
then press NX/ENTER.
4 Press . or > repeatedly until
“ON” appears in the display, and then
press NX/ENTER to enter the
selection.
“ON” appears in the display, and after
a few seconds, the playback display
appears again.
28
1 Slide HOLD in the direction of the
. to lock.
To unlock the con trols
Slide HOLD to the opposite direction of
the arrow.
Page 29

Power source s
You can power the reco rder not only wi th
alkaline dry battery but also with house
current. You cannot, ho w ever, use
manganese dry battery.
When to replace the
battery
You can check the battery condition with
the battery indicator which is displayed
while using th e recorder. The battery
indicator chan ges due to the battery
condition.
The battery level indica tor is ap proximate.
Using house current
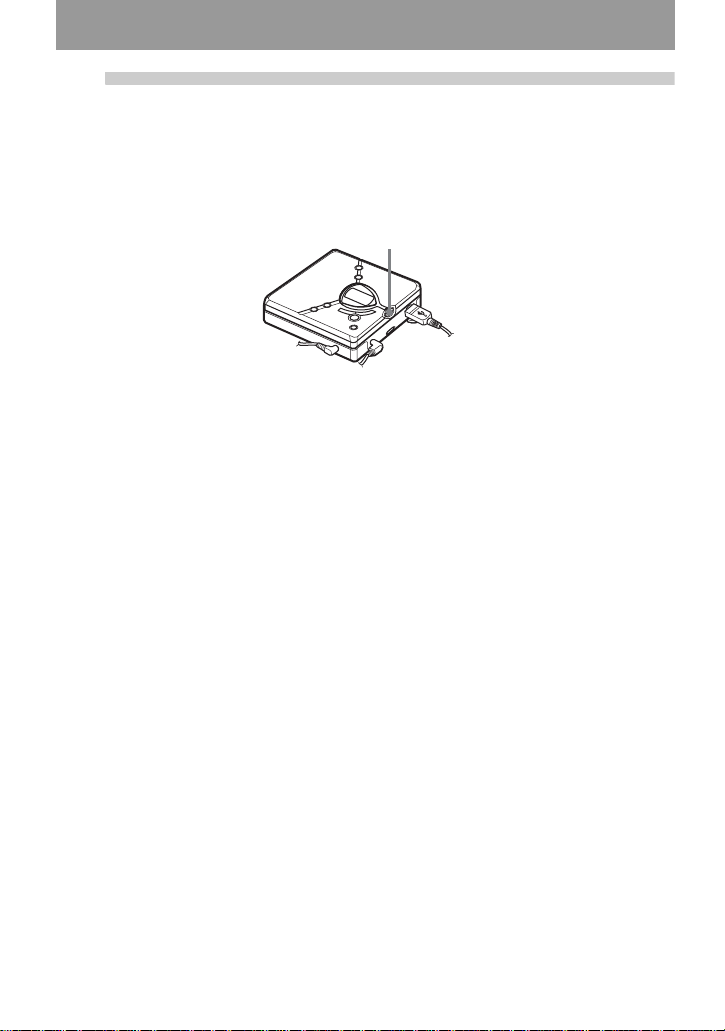
1 Connect the AC power adaptor to DC
IN 3V.
2 Connect the AC power adaptor to th e
wall outlet.
To wall outlet
AC power
adaptor
Battery indicator
Battery power decreasing
m
Weak battery
m
The battery has gone out .
“LoBATT ” flashes in the
display on the recorder, and
the power goes off.
Battery life
The battery life may be shorter due to operating
conditions and the temperature of the location.
1)
Unit: approx.hours (JEITA2))
When SP
stereo
LP2
stereo
LP4
stereo
playing 42 48 56
1)
When using a new Sony LR6 (size AA)
“STAMINA” alkaline dry battery (produced
in Japan).
2)
Measured in accordance with the JEITA
(Japan Electronics and Information
Technology Industries Association) standard.
Note
The battery life may be shor te r than that
specified, depending on the operating
conditions, the temperature of the location, and
varieties of a battery.
To DC IN 3V
Notes
• For use in your house: Use the AC power
adaptor. Do not use an AC power adaptor
other than the recommended one since it may
cause the recorde r to malfunction.
Polarity of the
plug
• There are regional differences in the supplied
AC power adaptor specifications. For this
reason, you should verify that the power
requirements and plug configuratio n are
appropriate for your area before you purchase
the recorder.
• Connect the AC po wer ad ap to r t o an easi l y
accessible AC outlet. Should you notice an
abnormality in the AC power adapto r,
disconnect it from the AC outlet immediate ly.
29
Page 30

Additional information
Precautions
On safety
• Do not put any foreign objects in the DC I N
3V jack.
• Do not carry or store the dry ba ttery in the
same place with metallic object s such as
coins, key rings, or necklaces. This may cause
a short-circuit and the generation of heat.
• Incorrect battery usage may cause the battery
fluid to leak or battery to burst. To prevent
such accidents, make sure the battery is
installed with the + and – poles orient ed
correctly.
• If a battery leak should develop, carefully and
thoroughly wipe away the battery fluid in the
battery compartment before inse r ti ng a new
battery.
• If you will not use the recorde r for a lo ng
time, be sure to remove the dry battery.
On power sources
• Use LR6 (size AA) batteries, house current, or
car battery.
• The recorder is not disconnected from the AC
power source (mains) as long as it is
connected to the w all outlet, even if the
recorder itself has been turned off.
• If you are not going to use th is r ec or de r for a
long time, be sure to disconnect the power
supply (the AC power adaptor, dry battery, or
car battery cord). To remove the AC power
adaptor from the wall outlet , grasp the adapt or
plug itself; never pull the cord.
On Handling
• Do not drop or bump the recorder. This may
cause the recorder to malfunction.
• Do not pull headphones/earphones cords.
• Do not plac e the recorder in the following
places:
—An extremely hot place
—A place exposed to direct sunlight or near a
heater
—In a car with the windows rolled up
(especially in the summer)
—In a damp place such as a bathroom
—Near a source of electromagnetic fields
such as a magnet, speaker, or TV
—In a dusty place
30
On heat build-up
Heat may build up in the recorder if it is used
for an extended period of time. This, however,
is not a malfunction.
On mechanical noise
The recorder emits mechanical noise while
operating, which is caused by the power-saving
system of the recorder. This is not a
malfunction.
On installation
• Never use the recorder where it will be
subjected to extremes of light, temperature,
moisture or vibratio n.
• Never wrap the recorder in anything when it is
being used with the AC power adaptor. Heat
build-up in the recorder may cause
malfunction or damage.
On the MiniDisc cartridge
• Do not touch the internal disc directly. Forcing
the shutter open may damage the internal disc.
• When transporting a MiniDisc, kee p it in its
case.
• Do not place the cart ri dge where it will be
subjected to light, temperature, moistur e or
dust.
• Do not affix the label outside of the specified
area on the MD. Make sur e th e l ab el is placed
within the recessed space on the disc.
On the headphones/earphones
Road safety
Do not use headphones/earphones while
driving, cycling, or operating any motorized
vehicle. This may lead to a traffic accident and
is illegal in many areas. It ca n also be
potentially dangerous to play your reco rd er a t
high volumes while walk ing, especially at
pedestrian crossings. You should exercise
extreme caution or discontinue using the
recorder in potentially hazardous situations.
Preventing hearing damage
Avoid using headphones/earphone s at high
volumes. Hearing experts advise against
continuous, loud and extended play. If you
experience a ringing in your ears, reduce the
volume or discontinue use.
Page 31

Caring for others
Keep the volume at a moderate level. This wi ll
allow you to hear outside sounds and to be
considerate of the people around you .
On cleaning
• After wip i n g the recorder casing w i th a soft
cloth slightly moistened with water, wipe it
again with a dry cloth. Do not use any type of
abrasive pad, scouring powder or solvent such
as alcohol or benzene as this may mar the
finish on the casi ng.
• Wipe the disc cartridge with a dry cloth to
remove dirt.
• Dust on the lens may prevent the unit from
operating properly. Be sure to close the disc
compartment lid after inserting or ejecting an
MD.
• To maintain good sound quality, use a soft
cloth to clean the plugs of the headphones/
earphones. A dirty plug may cause noise or
intermittent breaks in the sound during
playback.
• Clean the terminals per iodi c al ly wit h a cotton
swab or a soft cloth as illustr ated.
Dry battery compartment
Terminals
To protect a recorded MD
To record -p ro t ect an MD, slide open the tab at
the side of the MD. In this posit ion, the MD
cannot be recorded. To record again, slide the
tab back so the tab is visible.
Tab
Back of the MD
Recorded material is
protected.
Recorded material is
not protected.
If you have any questions or problems
concerning your recorder, please consult your
nearest Aiwa dealer. (If a trouble occurred
when the disc was in the recorder, we
recommend that the disc be left in the recorder
when you consult your Aiwa dealer so that the
cause of trouble may be better unde rstood.)
When consulting your Aiwa dealer, be sure to
bring the recorder and the headphon es /
earphones.
31
Page 32

Specifications
MD recorder
Audio playing system
MiniDisc digital audio syste m
Laser diode properties
Material: GaAlAs
Wavelength: λ = 790 nm
Emission duration: continuous
Laser output: less than 44.6 µW
(This output is th e value measured at a distance
of 200 mm from the objective lens surface on
the optical pick-up block with 7 mm aper tur e . )
Recording and playback time (when
using MDW-80)
Maximum 160 min. in monaural
Maximum 320 min. in LP4 stereo
Revolutions
Approx. 380 rpm to 2,700 rpm
Error correction
ACIRC (Advanced Cross Interleave Reed
Solomon Code)
Sampling frequency
44.1 kHz
Coding
ATR AC (Adaptive TRansform Acoustic
Coding)
ATR AC3 — LP2/LP4
Modulation system
EFM (Eight to Fourteen Modu la tion)
Number of channels
2 stereo channels
1 monaural channel
Frequency response
20 to 20,000 Hz ± 3 dB
Outputs
i: stereo mini-jack, ma ximum output level
2 mW + 2 mW, load impedance 16 Ω
(European models)
5 mW + 5 mW, load impedance 16 Ω (other
models)
General
Power requirements
AC Power Adaptor connected at th e D C IN 3V
jack:
120 V AC, 60 Hz (Models for USA, Canada,
Mexico, and Taiwan)
230 V AC, 50/60 Hz (Models for continental
Europe and Chili)
240 V AC, 50 Hz (Model for Australia)
220 V AC, 50 Hz (Model for China)
230 V AC, 50 Hz (Models for U.K. and
Hong Kong)
220 V AC, 60 Hz (Model for Korea)
100 - 120 V/220 - 240 V AC, 50/60 Hz
(Other models)
The recorder:
One LR6 (size AA) alkaline battery (not
supplied)
Recommended temperature for
check-in/check-out
+5 °C (+41°F) or higher
Battery operation time
See “Battery life” (page 29)
Dimensions
Approx. 81.6 × 29.9 × 75.0 mm (w/h/d) (31/4 ×
3
/16 × 3 in.) without projections.
1
Mass
Approx. 104 g (3.7 oz) the recorder only
US and foreign patents licensed fro m Dolby
Laboratories.
Design and specifications are subject to change
without notice.
Your dealer may not handle some of the above
listed accessories. Please ask the dealer for
detailed information ab out the accessories in
your country.
32
Page 33

Troubleshooting and e xplanations
Troubles and solutions
If you find any troubles operating the reco rder, follow the steps below.
1 Check this sec ti on, “Troubles and solutio ns” (page 33).
2 If you cannot solve the problem after you m ade checks, consult yo ur nearest Aiwa
dealer.
While playing
Symptom Cause/Remedy
An MD is not
played normally.
An MD is not
played from the
first track.
The digital sound
preset function
does not work.
Playback sound
skips.
Sound has a lot of
static.
Noise is
momentarily heard.
Volume cannot be
turned up.
• Repeat play is selected.
, Use MENU on the recorder to change back to the normal play
(page 21).
• Playback mode is changed.
, Use MENU on the recorder to change back to the normal play
(page 21).
• Disc playing stopped before it came to the last track .
, Press NX for 2 seconds or more to start playing.
• Group play mode is selected.
, Use MENU on the recorder to change back to the normal play
(page 21), and then press NX for 2 s econds or more to st art
playing.
• The digital sound prese t is off.
, Select “SOUND1” or “SOUND2” (page 22).
• The record er is placed where it receive s continuous vibration.
, Put the rec order on a stable plac e.
• A very short track may cause sound to skip.
, Try not to create a tr ack under one second l o ng.
• Strong magnetism fr om a television or such device is interfering
with operation.
, Move the recorder away from the so urce of strong mag n et i sm.
• The sound wa s recorded in LP4 stereo mode.
, Because of the nature of the compression method used in LP4
mode, noise may be output on very rare occasions during
playback of sound recorded in this mode.
• EAR G. is on.
, Release EA R G. settings (pag e 28).
33
Page 34

Symptom Cause/Remedy
No sound comes
through the
headphones/
earphones.
The recorder ski ps
to several tracks
ahead or behind
when you press
. or >.
The edited tracks
may exhibit sound
dropout during
search operations.
• The headphone s/ earphones plug is not firml y connected.
, Plug in the p lu g of th e headphones/earphones firmly to i.
• Volume is too low.
, Adjust the volume by pr essing VOL + or –.
• The plug is dirty.
, Clean the plug.
• The GROUP button has been pressed ( is flashing in the
display).
, The recorder returns to normal if no operation has made for 5
seconds.
• This occurs due to the MiniDisc system limitation. The
fragmentati on of data may caus e sound dropout whi le searching
because the tracks are played in higher speed than normal
playback.
While recording
Symptom Cause/Solut ion
Recording does
not occur when
you press the
DOWNLOAD
button
• The recorder is not connected to the computer.
, Connect th e recorder to the co m put er with the dedicated USB
cable.
• An audio CD is not inserted in the CD-ROM drive of the computer.
, Insert an audio CD into the CD-ROM drive of the computer.
• There isn’t enough rec ordable space on the inserted MD.
, Insert another recordable MD.
• The disk in your computer’s CD-ROM drive is not an audio CD.
, Insert an audio CD.
• The record-protect tab is opened (page 31).
, Close the record-protect tab.
While using group function
Symptom Cause/Remedy
The group function
does not operate.
• While using a disc with no group set ting, a n attempt was ma de to
select some group-related menu (“No Gp” appears in the
display).
, Use a disc with group setting.
34
Page 35

Symptom Cause/Remedy
A track cannot be
checked out to a ne w
group. A new group
cannot be created on
the supplied
SonicStage
software.
• This is due to the MiniDisc system limitations. Group
information has been written to the area where the disc name is
stored. The disc name and track names are recorded in t he same
area, which can store a maximum of appr oxi mately 1,700
characters. If the total number exceeds this amount, a new group
cannot be created even though group mode is on. It i s al so
impossible to make group settings at this time.
Others
Symptom Cause/Remedy
The recorder
does not work or
works poorly.
• The volum e is low.
, Turn up the volume.
• No disc is inserted (“NoDISC” appears in the display).
, Insert a recorded disc.
• The HOLD function is turned on (“HOLD” appears in the display
when you press an op eration button on the recor der).
, Disa bl e HOLD by slidi ng the HOLD switch to the opposite
direction of th e ar row.
• The lid is not firmly closed.
, Close the lid until it clicks.
• Moisture has conde nsed inside the recor der.
, Take the MD ou t and leave the recorder in a w arm place for
several hours until the moisture evaporates.
• The dry battery is weak (“LoBATT” flashes or nothing appears).
, Replace the dry battery with a new one.
• The dry battery has been inserted incorrectly.
, Insert the battery correctly.
• An MD with nothing recorded on is i n s e r ted (“BLANK” appears in
the display).
, Insert a recorded MD.
• The disc is damaged o r does not contain prop er recording (“Rd
ERR” appears in t he display).
, Reinsert the disc. If the error message still appears, replace it
with another d is c.
• While operating, t he recorder received a mechanical shock, too
much static, abnormal power voltage caused by lightning, etc.
, Restart the operation as follows.
1 Disconnect all the power sources.
2 Leave the recorder for about 30 seconds.
3 Connect the power source.
35
Page 36

Explanations
About the DSP TYPE-S for ATRAC/ATRAC3
This recorder supports playba ck with the DSP TYPE-S specification for high -level MiniDi sc
decks equipped with dig ital signal pr ocessor s (DSP ). This speci f icat ion allo ws trac ks recor ded in
MDLP mode to be played back with hig h qua lity sound. Sin ce thi s rec ord er also supports DSP
TYPE-R specification, superb sound is produced during playback in SP (normal stereo) mode as
well.
Suppressing the skips of the sound (E•A•S•S GP)
The E•A•S•S GP function was developed to provide a higher level of shock resistance than that of
existing players.
36
Page 37

37
Page 38

Recording audio data to
your computer
You can record audio data to your computer from
sources such as audio CDs and the Internet (page 46).
Audio CDs
Internet
On the computer
Listening
You can listen to an audio CD in the CDROM drive of your comp uter, or audio
data in the hard disk drive (page 53).
38
Page 39

What is a Net MD?
Net MD is a standard that enables th e transf er of audio data from a computer to a MiniDisc
device. To use this Net MD with your computer requires a software application called
“SonicStage”.
SonicStage software provides a database for managing audio data in the computer and
functions for playing the audio data in various play modes, editing the data, and
transferring th e results to other d evice s and hardware con nected to the comp ut er. It is an
integrated software application with a variety of functions for enj oying music.
Transferring audio data to
the Net MD
You can transfer audio data stored in your computer to an MD
(page50).
To a Net MD
Software Operation
Editing
You can easily edit audio data or add
labels fro m t he keyboard (p age 49).
Creating a music
library
You can create a music library of your
favorite songs on your computer.
39
Page 40

Basic Operations
Basic operational flow using the Net MD
The following is the bas ic steps that y o u will take following the purchase of your reco rder.
Through these steps, you will prepare and set up your computer for use of your recorder as
a Net MD. Do the following steps, and refer to the indicated pages for details.
1 Providing the required system
environment.
(page 41)
2 Installing the software onto your
computer.
(page 42)
3 Connecting the Net MD to your computer .
(page 45)
4 Storing audio data to your computer.
In this manual, reco rdi ng from an audio CD is explained.
(page 46)
5 Transferring audio data from your
computer to an MD (Check-out).
6 Listening to an MD.
You can listen to audio data that have been checked out from your computer to your Net
MD.
40
(page 50)
(page 53)
Page 41

Providing the required system environment
System requirements
The following hardwar e and software are requi red in order to use the So nicStage software
for the Net MD.
Computer IBM PC/AT or Compatible
• CPU: Pentium I I 400 MH z or hi ghe r (Pe nti um II I 45 0 MHz or hig her
is recommended.)
• Hard disk drive space1): 120 MB or more
• RAM: 64 MB or more (128 MB or more is recommended)
Others
• CD-ROM drive (capable of digita l playback by WDM)
• Sound Board
• USB port (supports USB (conventionally called USB 1.1))
Operating
System
Display High Color (16bit) or higher, 800 × 480 dots or better (800 × 600 dots
Others • Internet access: for EMD services and CD information services
1)
See page 5 9 for de tails.
This software is not supported by the following environments:
• Macintosh
• Windows XP versions other than Home Edition or Professional
• Windows 2000 versions other than Professional
• Windows 98 versions other than Second Edition
• Windows NT
• Windows 95
• Personally constructe d PC s or opera ti ng systems
• An environment that is an upgrade of the original manufacturer-installed operating system
• Multi-boot environment
• Multi-monitor environment
Notes
• We do not ensure trouble-free operation on all comp ute r s tha t sa tisfy the system requirements.
• We do not ensure trouble-free operation of the system suspend, sleep, or hibernation function on al l
computers.
Factory installed:
Windows XP Home Edition/Windows XP Professional/Windows
Millennium Edition/Windows 2000 Professional /Windows 98 Second
Edition
or better is recomme nded)
• Windows Media Player (version 7.0 or higher) installed for playing
WMA files
41
Page 42

Installing the software onto your computer
This section explains the in stall ation o f the Soni cStage Ver. 1.5 sof tware suppli ed with you r
Net MD.
Before installing the software
1 Make sure to note the following before installing t he software.
Do not connect the dedicated USB cable before the installation!
The SonicStage softw ar e m ay not correctly load or operate if the dedica t ed U SB
cable is connecte d to your computer dur in g t he installation.
Close all other Windows applications before startin g the in stal lation!
Make sure to close any virus-check software, as such software usually demand large
amounts of system resources.
2 Depending on the following operating system or software already installed
on your comp uter, refer to the reference pages befor e i nstalling t he
software.
Windows XP
, page 56
Windows Millennium Edition
, page 57
Windows 2000
, page 57
OpenMG Jukebox,
SonicStage, SonicStage
Premium, or SonicStage
Simple Burner
, page 58
• To install this software, you must log on with a
user name with “Computer Administrator”.
• If you perfor m the “System Restor e” function in
the Windows “System Tools” menu, the tracks
managed by SonicStage may become corrupte d
and rendered unp layable.
• If you perfor m the “System Restore” function of
the Windows “System Tools” menu, the tracks
managed by SonicStage may become corrupte d
and rendered unp layable.
• You must log on as “Admini strator” before
installing the software.
• Depending on th e version of your softwar e, th e
existing software may be ov er written by the new
version or it may co-exist with SonicStage
Ver.1.5. As the installation proces s w i ll depend
on the version, see the reference page for details.
42
Page 43

Installing SonicStage Ver.1 .5
1 Turn on your computer and start up Windows.
2 Insert the installation CD-ROM for SonicStage into the CD-ROM drive of
your computer.
The setup progra m st arts up automatic al ly
and the SonicStage Ver.1.5 installation
window appears.
3 Click to select [SonicStage 1.5].
To use this software with the Net MD, you must install SonicStage Ver.1.5 and the Net
MD driver.
Click [SonicStage 1.5]
• When installing SonicStage for
the first time
• When OpenMG Jukebox,
SonicStage, SonicStage
Premium, or SonicStage
Simple Burner is installed on
the computer
continued
43
Page 44

4 Follow the displayed instructions.
Read the instructions carefully.
The installation may take 20 to 30 minutes,
depending on yo ur system environment
(page 65).
5 After the installation is completed, click [Restart] to restart the computer.
Make sure to restart your computer only after
the installation has completed.
Was the installation successful?
If any trouble occurs during the installation, see “Troubleshooting” (page 62).
Notes
• Do not delete, move, or edit any of the installed folders using Explorer or any other application. Doing
so could cause the SonicStage da ta ba se to become unstable or corrupted.
• While the installation is still in progress, do not interrupt the operation or take the CD-ROM out of the
CD-ROM drive. Doing so may render it impossible to install the software thereafter.
44
Page 45

Connecting the Net MD to your computer
After the software installation is completed, connect the Net MD to your computer.
Refer to the operating instructions of the Net MD as well.
1 Insert a recordable disc into the Net MD.
2 Make the power source and the dedicated USB cable connections with the Net
MD and the computer.
AC
power
adaptor
To the DC IN
jack
* If a cradle is supplied with your Net MD, connect the dedicated USB cable to the
USB cradle and place the Net MD onto the USB cradle.
To the USB jack/
dedicated jack
Net MD
devices*
Dedicated
USB cable
To the USB
connecting
terminal
Computer
3 Check the connections.
When the connecti ons have been properly
made, “PCppMD”* appears in th e di s p l ay of
the Net MD.
*Depending on the device, “Net MD” may be
displayed.
Notes
• When using the Net MD connecte d to your computer, make sure to run the recorder from an AC
outlet. We do not assure the results should there be a mis-operation, ch ec k- out failure , or destruction
of audio data caused by insufficient battery power.
• Place the recorder on a stable surface so that the dedicated USB cable does not become detached.
45
Page 46

Storing audio data to your computer
This section e x plai ns ho w to reco rd an d st or e audi o d ata from an audi o CD to t he h ard di sk
drive of your computer.
The procedure in th is section is used to record all tracks on an aud io C D . To record only
specific tracks from a CD , or from other sound s ources, see the online help for details
(page 54).
Note
The system may malfu nction if your computer changes to system suspend or hibernation mode while
the software is playing, recordin g, or co nne c ting to an external device or media* such as a Net MD.
Make sure to disable any changes to suspend or hibe r na ti on mode. See page 59 f or det ai ls.
∗ For this software, the word “MD” refers to the built-in MD slot on the computer, and “Device/
Media” to a Net MD that is externally connected over a USB cable.
Starting SonicStage
Do one of the following:
• Double click ([SonicStage] icon) on the computer.
• Select [Start] - [Programs]* - [SonicStage] - [SonicStage].
∗ [All Programs] in the case of Windows XP
SonicStage starts up and the main window appe ar s.
46
Page 47

Recording audio CDs to the hard disk drive
In SonicStage Ver.1.5, the hard disk d rive is called the “Music Drive”. The Musi c D rive
manages all audio data stored by SonicStage.
1 Insert the audio CD that you want to record into the CD-ROM drive of your
computer.
The CD window appears i n t he di splay.
Note
When you record an audio CD from your CD-ROM drive for
the first time, the “CD Drive Optimization” dialog box
appears when you insert the audio CD. Cl ic king [Start]
initiates a check of the CD-ROM drive to verify that the CDROM drive is able to perform the recording properly.
2 Click .
The recording navigation window* appears in the
display.
∗The recording navigation window makes it easy to make a
recording. Simply by doing 1, 2 and 3 in the next step,
you can select the audio source in the left panel and the
recording destination in the right pa ne l.
3 Select (CD) for [1 Music Source] and (Music Drive) for [2
Destination], then click 3 [Jump to Record Window].
The display changes to the recording w indow.
continued
47
Page 48

4 Click in the middle of the recording window and
select the recording mode.
When recording data in LP2 mode:
select ATRAC3 132kbps
When recording data in LP4 mode:
select ATRAC3 66kbps
Click here
5 If the list panel is not displayed, click .
List panels appear under the recording w i ndow. The
contents of the audio CD appear in the left list panel.
6 Click [Record All].
Recording start s.
Upon completio n, rec orded tracks appear i n t he r ight list panel.
To sto p reco rding
Click ([Stop]).
To resume recording, click . When recording is resumed, it starts from the beginning
of the track that was last stopped.
48
Page 49

Labeling audio data
After recording has completed, y ou can label th e audio data in the Music Dri v e. Once audio
data in the Music Drive is labeled, the label information will be transferred to a disc along
with the audio data, allowing you to view the data on your Net MD.
1 Start up SonicStage (page 46) and click (Music Drive).
“All Playlists” appears and all the al bums sto red on the
Music Drive appear in the
Music Drive window.
2 Double click the desired album name.
A list of the audio file s in that album appears.
3 Click in the lower right part of the display.
The editing panel appears in the display.
4 Select an item by clicking [Title], [Album], [Artist], or [Genre], and then
right-click and select [Rename].
Y ou can also click [V] at [Alb um] or [Arti st] to disp lay a dr opdo wn li st, an d then se lect
an item from the list.
5 When the track title is highlighted, enter the text data from the keyboard.
z
The ([CD Info]) button for track and album labeling can also be used to import names from Internet
databases. See the online hel p for de ta ils (page 54) .
49
Page 50

Transferring audio data from your computer to the
Net MD (Check-out)
Audio data stored on t he Music Drive can be transfer red to your Net MD. Th is process is
called “Check-out”. The number of times a track can be checked out is restricted in this
software for the protection of copyrights (page 67).
Playlist
Checking out audio files to the Net MD
This section explains how to check out all audio files in a playl i st *.
∗ A playlist is a container that allows the stored audio files in the Music Drive to be classified by
genre, artist, etc.
Note
Check-outs should be done at a te mperature of +5 °C (+41 °F) or higher.
1 Click to display the recording navigation window.
2 Select (Music Drive) for [1 Music Source] and (Device/Media)
for [2 Destination], then click 3 ([Jump to Record Window]).
The display changes to the recording window.
50
Page 51

3 Click in the middle of the display and select the
recording mode ( pa g e48).
Standard transfer mode: Data are transferred in the format of the original files.
Maximum available transfer space: All data are transferred in LP4 mode.
SP transfer mode: All da ta are converted and transferre d in n or m al stereo mode. Select
this mode if you listen to checked-out data on equipment that does not support
MDLP mode.
4 If the list panel is not displayed, click .
A playlist appear s i n the display.
5 Confirm that the audio files you are about to check out are okay for checking
out.
The music notations beside the track number in the left
panel of the list represent the number of times the file
can be checked out (e.g. = the track can be checked
out three more times). If appears beside the track
number, the file cannot be checked ou t.
6 Click [Check-Out All].
Checking out of the files starts.
All files in the playlis t are checked out to the conn ect ed Net MD.
To cance l a chec k-out
Click ([Stop]).
51
Page 52

Notes
• Make sure not to disconnect the dedicated USB cable or power source until the operation has
completed once the check-out (or chec k- in) operation has begun. Failu re to do this may result in the
loss of check-out authorization. Even if a check-out fails, the audio file may be considered checked
out on the SonicStage side and the file’s check-out authorization may be reduced.
• Make sure not to bump the Net MD after chec k- out ha s started. If you do, the contents of the
recording may not be stored correctly.
• Due to the limitations of the MD system , you may not be able to record the full amount of remaining
recording time .
• Due to the limitations of the MD system, a maximum of about 1,700 characters can be stored for disc
name, group names and track names on the disc. Take note of this fact when checking out a large
number of tracks.
52
Page 53

Listening to an MD
You can listen to an MD on the Net MD while it is connected to your computer. When
disconnected from your computer, the Net MD can be used as an ordinary MiniDisc
device.
For details on Net MD operations, refer to the “Recorder Operations” section.
Listening to an MD with the Net MD connect ed to the
computer
If you listen to an MD with the Net MD connected to the computer, be sure to listen with
the Net MD itself (connecting to the headphones/earphones, speakers, etc.). The MD sound
cannot be heard from headphones/ earphones that ar e connected to the computer.
Listening to an MD with the Net MD disconnected from the
computer
Listen to the MD af t er disconnecting th e dedicated USB cab le from the comput er and the
Net MD.
Notes
Generally, you cannot erase or divide/combine checked-out audio files. If you want to edit such files,
check them back in first. Checked-out files can be edit ed on some MD de vices ; h o we v er, erasing a track
will decrease the number of time s the file can be checked out, and dividing or combining tracks will
render the file impossible to check back into the computer (page66).
53
Page 54

Advanced operation s
Using other functions!
Using the SonicStage online help
This manual explains onl y the basic operatio ns of the SonicStage so ft w ar e. H owever, the
software has a host of other functions that allow you to carry out various operations, such
as importing audi o files from the Internet , cl assifying and managing audio files, and
playing in various play m odes. For information and details on the vario u s menus and
operations, go to the online help.
To display online help
Click (help) while the SonicStage
software is runnin g.
z
You can display the online help by selecting the following:
[Start]–[Programs]*–[SonicStage]–[SonicStage Help]
∗ [All Prog ram s] in the case of Windows XP.
54
Page 55

Viewing online help
The Tabs
The left side frame
The right side frame
Let’s find out how to use the online help first. An explanation on the use of the online he lp
can also be foun d in the online help.
1 Double click [Overview] in the left-hand frame.
2 Click [About this Help file].
The explanation wil l a ppear in the right-ha nd frame.
3 Read the text.
Scroll the display if necessary.
Click underlined words to jump to their explanations.
Note
In the online help, “Device/Media’ is the
general term for external devices such as Net
MDs and MusicClips.
Device/Media
55
Page 56

Other information
Settings and Precautions
Settings according to OS
The settings and precautions will differ according to the operating system being used.
Check the items tha t a ppl y t o your system.
For Windows XP users
Restrictions when running the SonicStage software unde r W indows XP
• To install this software, you must log on with a user name with “Computer
Administrator”* as an attribute.
• You must log on with the user name “Administrators” or “Power Users” to use the
SonicStag e software.
• Both edition of Windows XP (Hom e/ Professional) can be used.
• The NTFS form at of Windows XP H ome Edition or Windows XP Professi onal (factory
installed) can be used only with the standard (factory) settings.
∗ To check whether the user name has the attribute of “Computer Administrator”
Go to [Start]- [Control Panel]-[User Account], and then check the user name displayed on the
window.
When using SonicStage under Windows XP
If you use the “System Restore” function in Windows “System Tools”, audio data managed
by SonicStage may become corrupted and rendered unpla yable.
Before executing the system restoration procedure, you should first back up all audio files
and restore them after doing the system restoration procedure.
For details about backup procedures, ref er to online help.
Note
Restoring backup data requires access to the Internet. If an audio file becomes unplayable after
restoring the system, an error dia log b ox ma y ap pe ar. If this occurs, do as instr uc te d by the me ssa ge .
56
Page 57

For Windows Millennium Edition users
When using SonicStage under Windows Millen nium Edition
If you use the “System Res tore” functio n in Windows “System Tools”, audio data managed
by SonicStage may be come corrupted and r endered unplayabl e.
Before executing the s ystem restoration p rocedure, you should first back up all audio files
and restore them after doing the syst em restoration proc edure.
For details about backup procedures, refer to online help.
Note
Restoring backup data requ ires access to the Internet. If an audio file becomes unplay ab le after
restoring the system, an erro r di alog box may appear. If this occurs, do as instructed by the message.
For Windows 2000 users
Restrictions when running the SonicStage sof tw ar e under Windows 2000
• You must log on as “Administrator” to install the SonicStage software.
• You must log on with the user name “Administrators” or “Power Users” to use the
SonicStage software.
• Of the Windows 2000 versions, SonicSta ge i s s upported only by Windows 2000
Professional.
• The NTFS format of Windows 2000 Pr ofessional (factory in stalled) can be used only
with the standard (factory) settings.
For Windows 98 Second Edition users
Importing MP3 files to the computer or playing WAV files on the computer
Microsoft Medi a Pl ayer version 7.0 or high er is required for importi ng MP3 files or
playing WA V fi les. Users of earlier v ersions can do wnload the most recent vers ion from the
Microsoft website (http://www.microsoft.com/).
57
Page 58

For users with OpenMG Jukebox, SonicStage, SonicStage
Premium, or SonicStage Simple Bur n e r installed on their compu t e r
Note
Confirm whether any track s have been checked out from your computer.
If tracks have been checked ou t fr om O penMG Jukebox, an earlier version of SonicStage,
or SonicStage Premium, it may not be possible to check those tracks back in with
SonicStage Ver. 1.5. It is recommend ed to check in the track s be fore installing So nicStage
Ver.1.5.
Check the following contents before installing Soni cSt age Ver.1.5.
The install at ion items and procedure will vary de pending on the so ft ware installed on your
computer.
Users with OpenMG Jukebox inst alled
Installed Version What to do
Ver.1.0~2.1 Install SonicStage 1.5. OpenMG Jukebox Ver.1.0-2.1 is
automatically un i nstalled and replac ed.
Ver.2.2 OpenMG Jukebox Ver.2.2 and SonicStage Ver.1.5 can co-
exist in the computer.
If you install SonicStage Ve r.1.5, then OpenM G Jukebox
Ver.2.2 will be automatically upgraded to the latest version.
1)
Audio files recorded with OpenMG Juke box Ver.1.0 -2 .1 ar e automatically converted to Sonic St ag e
Ver.1.5 files. For safety sake, it is reco mm e nde d that you back up your audio data with the back-up
tool before doing the upgrade to Sonic St ag e Ver.1. 5.
Users with an earlier version of SonicStage installed
Installed Version What to do
Ver.1.0~1.5 Install SonicStage Ver.1.5. The earlier version is
automatically uninstalled and replaced.
1)
Audio files recorded with SonicStage Ver.1.0-1.5 are automatically converted to SonicStage Ver.1.5
files. For safety sake, it is recommended that you back up your audio data with the back-up tool before
doing the upgrade to SonicStage Ver.1.5.
1)
1)
Users with a SonicStage Premium installed
Installed Version What to do
SonicStage Premium Install SonicStage Ver.1.5. SonicStage Premium and
SonicStage Ver.1.5 can co-exist in the computer.
Users with a SonicStage Simple Burner installed
Installed Version What to do
SonicStage Simple Burner Install SonicStage Ver.1.5. SonicStage Simple Burner and
SonicStage Ver.1.5 can co-exist in the computer.
58
Page 59

Precautions on the co-existence of SonicStage Ver. 1.5 with OpenMG Jukebox
Ver.2.2 or SonicStage Premium
• Make sure the OpenMG Jukebox V er .2.2 icon is not displayed in the task tray. If it is, the Net MD may
not be recognized by your computer.
• Audio data recorded on the compute r are store d in a com mon file and used by both applications.
Therefore, if you delete an audio file (e.g., one album) in one application, it will be deleted in the other
software as well.
Precaution on using a computer on which OpenMG Jukebox Ver.1.0-2.1 or
SonicStage Ver.1.0-1.2 is installed
After installing SonicStage Ver. 1.5, make sure you do not replace SonicStage Ver.1.5 with OpenMG
Jukebox Ver.1.0-2.1 or SonicStage Ve r.1.0-1.2, as all audio data in the Music Drive may be lost. If you
begin the installation of OpenMG Juke box Ver.1.0-2.1 or SonicStage Ver.1.0-1.2 by mistake, stop the
installation im mediately.
Note on hard disk drive space
120 MB or more f re e space on the hard dis k drive is required. If your com puter does not
have enough space, the software will not be properly installed. The required free space
differs according to the version of your Windows OS, or the amount of audio files that you
handle.
Notes on system suspend/hibernation mode
• If the computer changes to system suspend/hibernation mode during the recording of a
CD or the checking in/out of a data file, the audio data may be lost or the computer may
not wake up properly. The computer susp end/hibernation f unction should therefore be
turned off.
• If you change the media while the computer is in system suspend/hibernation mode,
audio data may be lo st af ter the computer wa kes up.
• If the computer changes to system suspend/hibernation mode, the computer may not
recognize the Net M D w h en it wakes up. If this hap pens, disconnect the dedicated USB
cable and reconne ct it again.
Backing up the audio data
Before doing any pr ocedure that may affect the operating system itself (such as a system
recovery), you should back up all of your audio dat a w ith the [SonicStage backup tool]
from the [Start] - [Programs] - [SonicStage].
59
Page 60

Uninstalling the SonicStage software
To uninstall the SonicStage software, follow the procedures b el ow.
For Windows XP users
Log on with a user name with “Computer Administrator” as an attribute.
Refer to the operating instructions of your computer for details on logging on as an
administrator.
1 Click [Start]–[Control Panel].
The “Control Panel” wi ndow appears.
2 Double-click [Add/Remove Programs].
The “Add/Remove Progra m s” dialog box appears.
3 Click [Change or Remove Programs].
4 Click [SonicStage 1.5.XX] in the “Currently Installed Programs” list, and
then click [Change and Remove].
5 Click [OpenMG Secure Module 3.X]* in the “Currently Installed Programs”
list, and then click [Change and Remove].
Do as instructed by the message and restart the computer. When the computer restarts,
the uninstallation will be completed.
* If SonicStage Ver.1.5 is co-existing with OpenMG Jukebox Ver.2.2 or SonicStage Premium on your
computer, and you uninstall one or th e oth er, ma ke sur e [Ope nMG Secure Module 3.X] is not
uninstalled since it is commonly used wit h both software applications.
For Windows Millennium Edition/Windows 98 Second Edition
users
1 Click [Start]–[Settings]–[Control Panel].
The “Control Panel” wi ndow appears.
60
Page 61

2 Double-click [Add/Remove Programs].
The Add/Remove Programs Properties window ap pears.
3 Click [SonicStage 1.5.XX] in the list of programs for automatic removal, and
then click [Add/Remove].
4 Click [OpenMG Secure Module 3.X]* in the list of programs for automatic
removal, and then click [Add/Remove].
Do as instructed by the m essage and restart the co mputer. When the computer restarts,
the uninstallation will be completed.
For Windows 2000 users
Log on as “Administrator”, and then follow the instructions below.
Refer to the opera ting instructions of your computer for de ta il s on logging on as an
administrator.
1 Click [Start]–[Settings]–[Control Panel].
The “Control Panel” window appears.
2 Double-click [Add/Remove Programs].
The “Add/Remove Programs” dialog box appears.
3 Click [Change or Remove Programs].
4 Click [SonicStage 1.5.XX] in the “Currently Installed Programs” list, and
then click [Change/Remove].
5 Click [OpenMG Secure Module 3.X]* in the “Currently Installed Programs”
list, and then click [Change/Remove].
Do as instructed by the m essage and restart the co mputer. When the computer restarts,
the uninstallation will be completed.
* If SonicStage Ver.1.5 is co-existing with OpenMG Jukebox Ver.2.2 or SonicStage Premium on your
computer, and you uninstall one or the othe r , make sure [OpenMG Se c ure M odule 3.X] is not
uninstalled since it is commo n ly us ed with both software applications.
61
Page 62

Troubleshooting
Please do the following steps if you encounter a problem while using the SonicStage
software. In case a m essage appears, it is recommended that you write it down.
Step 1: Check the symptoms in this “Troubleshooting” section.
A variety of inf ormat ion ca n also be fo und in t he ope rati ng pro cedu res and “Sett ings and
Precautions” (page 56) as well.
Step 2: Check the symptoms in the SonicStage 1.5 online help
(page 54).
Check “Troubleshooting” under “Additional information” in the online help.
Useful information may also be found in other sections in the online help.
Step 3: If the trouble cannot be solved after checking the above
references.
Check the following table and then consult your nearest Aiwa dealer.
62
Page 63

Computer
• Manufacturer:
• Model:
• Type: Desktop type / Laptop type
Name of operating system:
RAM capacity:
Hard disk drive (contai ni ng SonicStage and aud io data)
• Capacity of the drive:
• Free space:
Installed folde r containing SonicStage (if other than th e default folder)
1)
• Location of the installed folder:
Version of the software (Son i cStage Ver.1.5)2):
Error Message (if one appeared):
If an externally co nnected CD-ROM drive is used
• Manufacturer:
• Model:
• Type: CD-ROM / CD-R/RW / DVD-ROM / Other ( )
• Type of connection to the computer: PC card / USB / IEEE1394 / Other ( )
If another device with USB connection is used
• Name of the device (or devices):
1)
If you do not specify the destination, the software is installed at C: \P r ogr a m Fi le s\ Sony\SonicStage.
2)
To check the SonicStage software version, go to [Menu] - [About SonicStage] in the SonicStage
window, or see the version information on the supplied CD-ROM.
63
Page 64

If your computer does not recognize the Net MD
• Is the Net MD connected correctly to your computer?
— If the Net MD is not firmly connected to the computer, the Net MD will not be
recognized by your c om puter.
— Reconnect the dedicated USB cab le . If t he computer still does not recognize the N et
MD, disconnect t he N et MD, restart the computer, and connect the de di cated USB
cable again.
• Is an MD inserted in the Net MD?
Check if an MD is inserted in the Net MD.
• If your computer does not recognize your Net MD even when the Net MD is
connected and a disc is in serted, the Net MD driver may not be correctly
installed.
Go to the [USB Controller] in the Windows Device Manager window to verify that your
Net MD is correctly recognized.
A [!] mark in the Device Manager window in dicates that your Net MD is not correctly
recognized. Re install the Net MD driver.
[Start]–[Settings]–[Control Panel].
1 Click
2 Double click [System] in the control panel.
1)
2)
3 Click the [Hardware]3) tab, and then click [Device Manager].
The Device Manager window appears.
1)
In Windows XP, select [Start]–[Control Panel].
2)
In Windows XP, double click [System] if the contr ol panel is in the “classic” format, or clic k
[Performance and Main tena nce] and th en [ System ] if t he c ontro l p anel i s in the “ cat egory ” format .
3)
Depending on your system, the [Hardware] tab may not be provided. In this case, click the [Device
Manager] tab to display the Device Manager window.
If the installation was not successful
• Be sure to close all Windows applications before you start the installation.
If you start the inst al l at ion while other programs are running, a m al f unction may occur.
This is especially true for programs that require large amounts of system resources, such
as virus-chec k software.
• Be sure not to connect the Net MD to your computer before you start the
installation.
If the dedicated USB cable is connect ed to your computer before the installa ti on, the
installa t ion cannot be done correctly. Connect the dedicated USB cable af t er the
installation completed.
• Make sure your computer has enough hard disk drive space.
120 MB of free space or more on the hard di sk drive is required. If your computer does
not have enough space, the installation may not be possible.
64
Page 65

• If the installation seems to be stopped
It may take 30 minutes or more for the installation to complete, depending on your
computer or CD- ROM drive.
During the installation, watch out for the occurrence of any of the following problems.
Problem Cause/Remedy
The installation appears to have
stopped before it has
completed.
The progress bar on the display
is not moving. The access lamp
has not lit for a few minutes.
• If the installation is still unsuccessful after all that you have done.
— The installati on can be done by copying all files t o th e hard disk as follows:
1 Create a new folder on the hard di sc.
2 Insert the supplied CD-ROM (SonicStage Ver.1.5) into the CD-R OM drive.
3 When the installation window appears, click [Exit] to cancel the installation.
4 Right-click the star t m enu and start up Explorer.
5 Select [SS15E] on the C D -ROM dr ive, and then click [Edit] -[Se le ct A ll].
6 Click [Edit]-[Copy to Folder] (or [Edit]-[Copy]) to copy all files to the folder that you
created in step 1.
7 Remove the CD-ROM from the CD-ROM d ri ve, open the fo lder that w as co pied t o the
hard disk and doub l e -click [setup.exe].
8 When the installation window appears, follow the displayed instructions to install
[SonicStage 1.5].
— The installation may be done by installing the software from [Start]-[Run].
Check for the appearance of an error message beneath
the installation window.
t Press the [Tab] key while holding down th e [Alt]
key. If an error message has appeared, press the [Enter]
key. The installation will resume. If there is no
message, the installatio n is s till in progr ess. Wait a little
while longer.
The installation is progressing normally. Please wait.
65
Page 66

Information and explanations
Net MD FAQ
This section intro duces frequently as ked questions and ans w er s on the Net MD.
On the Net MD
What is a “Net MD”?
Net MD is a specification that allows audio data in a computer to be transferred to a
MiniDisc through a USB cable.
Till now, MiniDiscs could be used to record only analog sources (through a microphone or
analog input) or P C M sources such as CDs . Recording audio files on a computer was
impossible. However, thanks to SonicStage and other music management software based
on such cop yrigh t pro tecti on te chno logy a s “OpenMG ”
audio files to the ATRA C or ATRAC3
3)
format used on MDs became possible, enabling the
recording of computer files to MDs.
1)
Copyright protection techn ology for managing audio data recorde d on computers, etc.
2)
Technology for verifying the cop yr ight - pr ote c tion status of audio data in check-out/c he c k- in
operations between a computer and a Net MD de vice.
3)
File type for recording to an MD.
How does the SonicStage software make using MDs mor e co nvenient?
• It allows you to record audio data from your computer to your MD.
• Editing opera t io ns are easily done using on-screen oper at ions.
— Labeling: Al lows use of keyboard for easy la beling of contents.
— Moving tracks or gro ups: Allows tracks or groups t o be moved simply by dragging
and dropping. Track movements are easy to see.
— Group settings: Groups are easy to create or release.
These operations can be used to edit tracks on a disc in the Net MD. If you w ant to edit
the contents of an MD , connect the Net MD to your computer, and edit the tracks in the
SonicStage Device/Media window.
1)
and “MagicGa te”2), conversion of
Can tracks recorded on the Net MD be checked in to a comput er ?
No, they cannot.
Audio data that was originally checked out from a computer can only be checked back into
the same comp ut er. Tracks that ar e r ec orde d on t he Ne t MD usi ng a micr op hon e or thr ou gh
an analog or digital connection cannot be t ransferred to the com puter or copied.
Computer k MiniDisc : OK.
MiniDisc k Computer : OK only for tracks originally checked out from the computer.
66
Page 67

On copyright protection
The OpenMG technology* allows you to enjoy digital music, while maintaining the
copyrights of its ho ld er s. OpenMG Jukebox encrypts audio files in Ope nM G format and
stores them on the hard disk of your computer to prevent unauthorized distributio n.
* The copyright protection technolo gy of this software conforms to SDMI (Secur e Digit al Music
Initiative) specif ications.
This software places some restr ic ti ons on recordin g and playback to protect copyrights.
You can check in audio files only to the same computer from whic h the y were ch ecke d out.
They cannot be copi ed or checked in to other computers.
For details, see “Features by copyright protection by OpenMG” ( page 68).
You can check-in audio files
only to the computer whic h
they were checke d ou t .
Check-out can
be made for
three times.
You cannot copy or
move audio files to
another computer.
continued
67
Page 68

Restrictions on audio content
High-quality digital audio content is widely a vailable through music distribution services
on the Internet. To protect the copyrig h ts of its hol d ers from unauthor ized distri bution,
some audio con te n t is distributed with certain restrictio ns on recording an d pl ayback. For
example, the playback p er iod o r p l ayb ac k cou n t fo r the data may be limited. In such cas es ,
checking out of the audio contents may n ot be possible.
Depending on the contents, some au di o data that could be checked out are subjec t to
editing restricti ons on the Net MD; e.g., audio contents cannot be erased or tra ck marks
cannot be added or er ased.
It is not possible to ch eck in tracks other than those that were checked out from your
computer (for example, tracks recorded using a microphone or through analog or digital
connection).
Features by copyright protection by OpenMG
The SonicStage software features OpenMG, a copyright protection technology developed
by Sony to protect music copyrights. OpenMG uses high-level cryptographic technology to
protect music contents with computers.
Users should be aware o f t he r estrictions descri be d below.
• Music record ed on the hard disk using the SonicStage software canno t be pl ayed when
copied to other computers.
• Installation of the same SonicStage software to other computers is not permitted.
• Usage Rules
If Usage Rules are included in the music by way of the copyr ight holder or the distrib utor ,
operation will be restric ted to use permitted by the Usage Rule. For music, such as
compact discs, that does not contain a Usage Rule, the Default Usage Rule of SDMI will
apply. This Default Usage Rule states that one file can be checked out up to th ree times
only.
• On music contents that are not compatible with the SonicStage software
Under the supervision of SDMI, this so ftware prohibits recording of music with a copy
prohibition signal.
• Upgrading Soni cStage software
This software was developed in accordance w i th the current arran gement between Sony
and SDMI. If this arrangement is modified in the future, some of the software functions
may become unavailable. Sony m ay offer an upgrade kit in t hi s case at additional u se r
expense.
68
Page 69

Glossary
ATRAC3
ATRAC3, which stands for Adaptive Transform Acoustic Coding3, is audio compression
technology that sat i sfie s t he demand for high sound quality and high compression rat es.
The ATRAC3 compression rate is approximately 10 times higher than that of the Audio
CD, resulting an increased data capacity for the media.
“Check-In /Check-Out”
Check-out is to t ra nsfer music files from a personal comput er to an external device/media
(such as a Net MD). Returning check ed-out music f iles to the same computer i s to check in.
(You cannot move checked-out music f iles to another computer.)
You can check out a music fil e, check it back in , and then check it ou t again an infinite
number of times. The SDMI rules provide that up to four copies of a music file can be
checked out at one time. OpenMG employs a method whereby three copies of a song can
be checked out simultaneously, while the fourth copy is maintained as a master on your PC.
Electronic Music Distribution (EMD) service*
EMD is a website that distributes music files which are available for purchase.
The use of EMD services requires installation of player software on your computer. Audio files should
be downloaded in a format that is supported by the SonicStage sof twa re (suc h as Labe l Ga te MQ
format). For details on EMD services support by Sonic S ta ge , please c onta c t to the res pective
companies.
* EMD may not be available in certain areas of the wor ld.
MP3
MP3, which stands for MPEG-1 Audio Layer3, is a standard for audio file compression
determined by the Motion Picture Experts Gr oup, an ISO (Internati onal Organization for
Standardization) working group. It enables compression of audio files to about 1/10 of the
data size of a standard compact disc. Since the MP3 encoding algorithm is disclosed, there
are vario us en coder s/de coders that are compl iant wi th th is st anda rd, in cludi ng fr ee ware that
is available for no charge. The MP3 standard is therefore widely used in the computer field.
Music Drive
Music Drive is a music database for managin g audio data on a computer. In Music Dri ve,
audio files can be managed along with such i nf ormation as artist nam es, track names, and
CD jacket images, or can be combined and categorized in different playlists.
OpenMG
Copyright protec tion technology for t he import and manag em ent of musical content from
distribution services or CDs. By using software that are compliant with OpenMG, audio
contents can be encrypted before storage on a hard disk drive to allow playback of those
audio files on that computer. OpenMG also pre vents the unauthorized distribution of the
contents via th e Internet or other net w orks.
continued
69
Page 70

Playlist
A playlist is like a container that can be used to hold and categorize files stored in Music
Drive. For example, by making a “jazz” playlist and then put ting your favorite jazz tracks
into the playlist, yo u can play all of the tracks r epeatedly or check the m all out at the same
time.
Recording mode (Bit rate)
This is a measure of data volume per s econd. The r ate is expr essed in bp s (bit s per second ).
In SonicStage, the bit rate can be selec te d for recording an au di o CD or converting MP3
and WAV format audio files into ATRAC3 format from among three rates: 132 kbps, 105
kbps or 66 kbps. In the case of 105 kbps, 105,000 bits of information is processed per
second. If the bit rate is large, that means a large amount of information is used to play the
music. Thus, 105 kbp s data produces bette r s ound quality than 66 kbp s data, and 132 kbps
data provides better sound quality than 105 kbps data. However, audio files in formats such
as MP3 have different encoding methods, and so the sound quality is not determined by the
bit rate alone.
SDMI
SDMI, which stands for Secure Digital Music Init iat ive, is a forum that consists of over
130 companies in the fields of r ecorded audio cont ent , com puters, and consum er
electronics. It is dedicated to the development of integrated copyright protection
technology that can be used worldwide.
SDMI is working to create a framework for preventing the improper usage of audio files
and to promote legal music distribution services. The copyright protection technology
OpenMG is based on the SDMI standard .
Windows Media Technology (WMT)
This is a technology t hat in cl udes a contents management system called Windows Media
Rights Manager w hich encrypts con t ents and distributes mu s ic contents along w ith their
conditions for u sage, distribution, etc. C opyright-protected audio files supported by
Windows Media Technology (WMT) cannot be c onverted to the ATRAC3 form at and
coded in the OpenM G f ormat.
Windows Media Audio (WMA)
This is an audio compression technology that includes the m anagement system called
“Windows Media Rights Manager”. Windows Media Audio (WMA) format files supported
by Window Media Technology (WMT) cannot be co nverted to the ATRAC3 format and
coded in the OpenM G f ormat.
70
Page 71

Index
A
ATRAC3 66, 69
Audio CD 38, 47
B
back up 59
Battery life 29
BEEP 27
C
CD-ROM 41
Check-in 66, 69
Check-out 50, 66, 69
Cleaning 31
Connecting 45
copyright protection 67
D
delete (software) 60
Device/Media 50, 55
Digital Sound Preset 22
DSP TYPE-S 36
E
E • A • S • S GP 20
EAR G. (Ear Guard) 28
EMD services 69
G
Group
H
hard disk
HOLD 15, 28
I
Index search 20
Installing 43
L
labeling 49
M
MP3 69
Music Drive 47, 69
24
function
play 24
skip 24
free space
storing 47
41, 59
N
Net MD 39, 66
Net MD driver 64
O
Online help 54
OpenMG 69
OpenMG Jukebox software 42, 58
P
Play mode
group
25
tracks 21
Playlist 50, 70
Q
Quick Mode 27
R
Recordin g mode (Bit rat e) 48, 51, 70
Recording navigatio n window 47
S
SDMI 70
SonicStage Premium 42, 58
SonicStage software (earlier version) 42, 58
start (software) 46
Supplied accessories 12
System environment 41
System limitations 41
T
Time search 20
Transferring
to the computer
to the Net MD 50
46
U
Uninstalling
Windows 2000
Windows 98 Second Edition 60
Windows Millennium Edition 60
Windows XP 60
USB cable 12
61
W
Windows 2000 61
Windows 98 Second Edition 60
Windows Millennium Edition 60
Windows XP 60
WMA 70
WMT 70
71
Page 72

http://www.aiwa.com/
Print e d in Malaysi a
 Loading...