

3-253-939-11(1)
_
_
Portable
MiniDisc Recorder
Operating Instructions
Recorder Operation ____________________________
Software Operation _____________________________
page 9
page 42
AM-NX1
©2003 Sony Corporation

WARNING
To prevent fire or shock hazard, do
not expose the unit to rain or
moisture.
Do not install the appliance in a
confined space, such as a bookcase or
built-in cabinet.
To prevent fire, do not cover the
ventilation of the apparatus with news
papers, table clot hs, curtains, etc. And
don’t place lighted candles on the
apparatus.
To prevent fire or shock hazard, do not
place objects filled with liquids, such as
vases, on the apparatus.
Certain countries may regulate disposal of
the battery used to power t his product.
Please consult with your local authority.
Caution
The use of optical instruments with this
product will incre as e eye hazard.
CAUTION
RADIATION WHEN OPEN
AVOID EXPOSURE TO BEAM
— INVISIBLE LASER
Information
IN NO EVENT SHALL SELLER BE
LIABLE FOR ANY DIRECT,
INCIDENTAL OR
CONSEQUENTIAL DAMAGES OF
ANY NATURE, OR LOSSES OR
EXPENSES RESULTING FROM
ANY DEFECTIVE PRODUCT OR
THE USE OF ANY PRODUCT.
The validity of the CE marking is
restricted to only th ose countries where i t
is legally enforced, mainly in the
countries EEA (European Economic
Area).
• SonicStage, O p enMG and the Ope nMG
logo, MagicG at e M emory Stick and the
MagicGate Memory Stick logo,
Memory Stick and the Memory Stick
logo, Net MD and the Net MD logo,
ATRAC, ATRAC3 and ATRAC3 plus
are trademarks of Sony Corporation.
• Microsoft, Windows, Windows NT and
Windows Media are trademarks or
registered trademarks of Microsoft
Corporation in the United States and /or
other countr i es.
• IBM and PC/AT are registered
trademarks of Inter national Business
Machines Corporation.
• Macintosh is a tra demark of Apple
Computer, Inc. in the United States and/
or other countries.
• Pentium is a registered trademark of
Intel Corporation.
• All other trademarks and registered
trademarks ar e trademarks or registered
trademarks of their respective holders.
• ™ and ® marks are omitted in this
manual.
2

Notice for users
On the supplied software
• Copyright laws prohibit reproducing the
software or the manual accompanying it
in whole or in part, or renting the
software without the permission of the
copyright holder.
• In no event will SONY be liable for any
financial damage, or loss of profits,
including claims made by third parties,
arising out of the use of the software
supplied with this recorder.
• In the event a problem occurs with this
software as a result of defective
manufacturing, SONY will replace it.
However, SONY bears no other
responsibility.
• The software provided with this
recorder cannot be used with equipment
other than that which is so designated.
• Please note that, due to continued efforts
to improve quality, the software
specifications may be changed without
notice.
• Operation of this reco rder with soft ware
other than that provided is not covered
by the warranty.
Program © 2001, 2002, 2003 Sony
Corporation
Documentatio n © 2003 Sony Corporation
3

Table of contents
Recorder Operation
Looking at controls ............................. ............10
Getting started ...............................................13
Playing an MD right away! ..............................16
Various ways of playback ..............................18
Viewing various informat ion ..................... .... ... ...................... .... ... .......18
Selecting the play mode ........................................................................18
Playing a track repeatedly (Repeat Play) .............................. ... .... ...19
Listening to tracks in a desired sequence (Program Play) ..............19
Adjusting the sound (Virtual-Surround • Digital Sound Equalizer) .....20
Varying the virtual sound to create different acoustics (Virtual-
Selecting the sound quality (Digital Sound Equalizer) ..................20
Changing playback speed (Digital Speed Control) ...............................21
Using the group function ................................23
What is the group function? ..................................................................23
Using the group function when play in g .................................. .... ..........23
Playing a track in group play ..........................................................23
Selecting the play mode for group play (Group Play Mo de ) .........24
Repeat play for the selected group play mode
Playing groups in a desired sequence (Group Program Play) ........24
Surround) .........................................................................20
(Group Repeat Play) ........................................................24
4

Other operations .............................................25
Useful settings ............................... ... .... ...................... ... ...................... .25
How to use the menu items .............................. .... ..................... .... .26
Turning off the beep sound ............................................................ 26
Preserving battery power (Power Save Mode) .............................. 26
Starting the playback quickly (Qu ick Mod e ) ................. ................27
Protecting your hearing (EAR GUARD) .......................................27
Turning on/off the backlight ..........................................................28
Storing the settings for individua l discs
(Playback Information Memory) .................................... 28
List of menus .......................... ..................... .... .... ..................... .... .29
Power sources ................................................30
Battery life ................... ..................... .... .... ..................... .... .... ........ 30
Additional information ....................................31
Precautions ...........................................................................................31
Specifications ....................................................................................... 34
Troubleshooting and explanations ................35
Troubleshooting ................................................................................... 35
While charging ............................................................................... 35
While playing ................................................................................. 36
While using group function ...........................................................37
Others .............................................................................................37
Messages .............................................................................................. 39
Explanations ......................................................................................... 40
5

Software Operation
What is a Net MD? ..........................................43
Basic Operations ............................................44
Basic operational flow using the Net MD ............ ...................... ... .......44
Providing the required system environment .........................................45
System requirements ......................................................................45
Installing the software onto your computer ..........................................46
Before installing the software .........................................................46
Installing SonicStage Ver.1.5 .........................................................47
Connecting the Net MD to your computer ...........................................49
Storing audio data to your computer .....................................................50
Starting SonicStage ........................................................................50
Recording audio CDs to the hard disk drive ..................................51
Labeling audio data ........................................................................53
Transferring aud io data from your com puter to the
Net MD (Check-out) .................. .... ... .... ...................... ... .... ..............54
Checking out audio files to the Net MD .........................................54
Listening to an MD ............................. ...................... ... ...................... ...57
Listening to an MD with the Net MD connected to the
Listening to an MD with the Net MD disconnected from the
computer ..........................................................................57
computer ..........................................................................57
Advanced operations ......................................58
Using other functions! ............................... .... ..................... .... .... ..........58
Using the SonicStage onlin e help .......................... ...................... ...58
6

Other information ...........................................60
Settings and Precautions ...................................................................... 60
Settings according to OS ........................... ... ...................... .... ... ..... 60
For users with OpenMG Jukebox, SonicStage, SonicStage Premium,
or SonicStage Si mple Burner ins talled on
their computer .................................................................62
Note on hard disk drive space ........................................................63
Notes on system suspend/hibernation mode ..................................63
Backing up the audio data ..................... ...................... ... ................63
Uninstalling the SonicStage software ..................................................64
For Windows XP users ..................................................................6 4
For Windows Millennium Edition/Windows 98 Second Edition
For Windows 2000 users ...............................................................65
Troubleshooting ................................................................................... 66
If your computer does not recognize the Net MD ......................... 68
If the installation was not successful ............................................. 68
Information and explanatio ns ................................. .... ... ...................... .70
Net MD FAQ ................................................................................. 70
On copyright protection ....................................... ..................... .... .71
Glossary ...............................................................................................73
Index ..................................................................................................... 75
users ................................................................................ 64
7
Before using this product
_
_
This manual explains the recorder operations and the installation and basic use of the
supplied SonicSta ge software. For details on the various operations, refer to the pages
indicated below.
When using the recorder
Recorder Operation (pages 9 to 40)
Pages 9 to 40 in t his man ua l e xp la in t he use of t he Net MD a s an or di na ry
MiniDisc recorder.
3-253-939-11(1)
Portable
MiniDisc Recorder
Operating Instructions
page9
Recorder Operation ____________________________
page42
Software Operation _____________________________
Troubleshooting and explanations (page 35)
This section shows the troubles you may find while using the recorder,
and their solutions.
AM-NX1
©2003 Sony Corporation
When using the Net MD (the recorder) connected to your
computer
Software Operation (pages 42 to 74)
Pages 42 to 74 in this manual explain the instal la tion and basic operations of the suppli ed
SonicStage software. Refer to these pages for details.
Other information (page 60)
This section shows the tr oubles you may find while using the SonicStage software, and
their solutions. It al so has the list of frequently asked questions and answers .
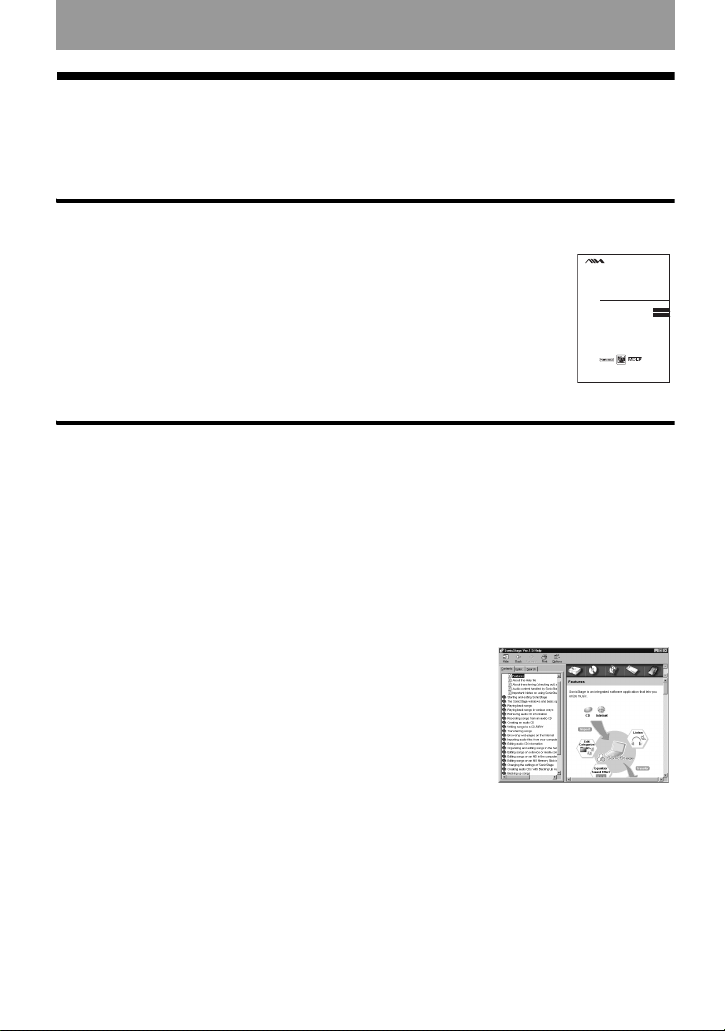
SonicStage Ver. 1.5 Help
This is an online help that you can view on your computer
screen.
Refer to online help for details on the use of the software . To
display the help window, see page 58.
Notes on the “Software Operation” section
• The displayed items in the illustrations that appe ar in this section may differ from the actual items
displayed by the software.
• Explanations in this section assume familiarity with basic Windows operations. For details on the use
of your computer and the operating system, please refer to the respective manuals.
• Explanations in this section cover general Net M D pro duc ts. For th is rea son, some explanations (and
some illustrations) may not be applicable to your Net MD. Please refer to the operating instructions of
your Net MD as well.
8
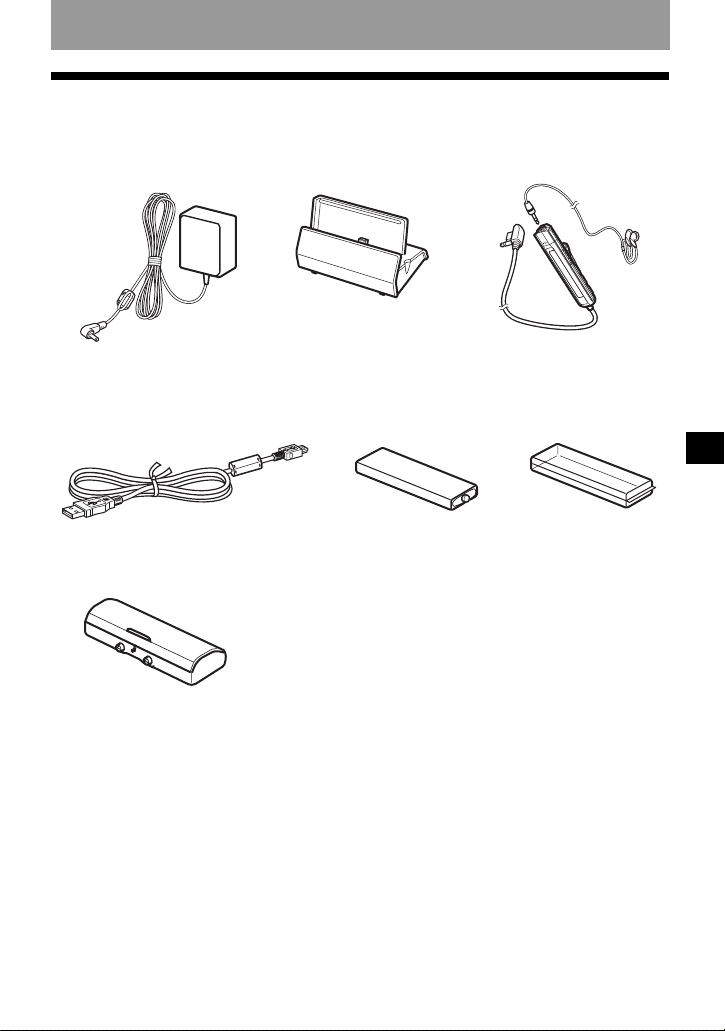
Checking the supplied accessories
AC power adaptor (1) Battery charging sta nd (1) Headphones/earphones
Dedicated US B cable (1)
Dry battery case (1)
NH-14WM Nickel metal
hydride rechargea bl e
battery (1)
with a remote control (1)
Battery carrying
case (1)
Recorder Operation
CD-ROM (SonicStage Ver. 1.5) (1)*
Carrying pouc h (1)
∗ Do not play a CD-ROM on an audio CD player.
9
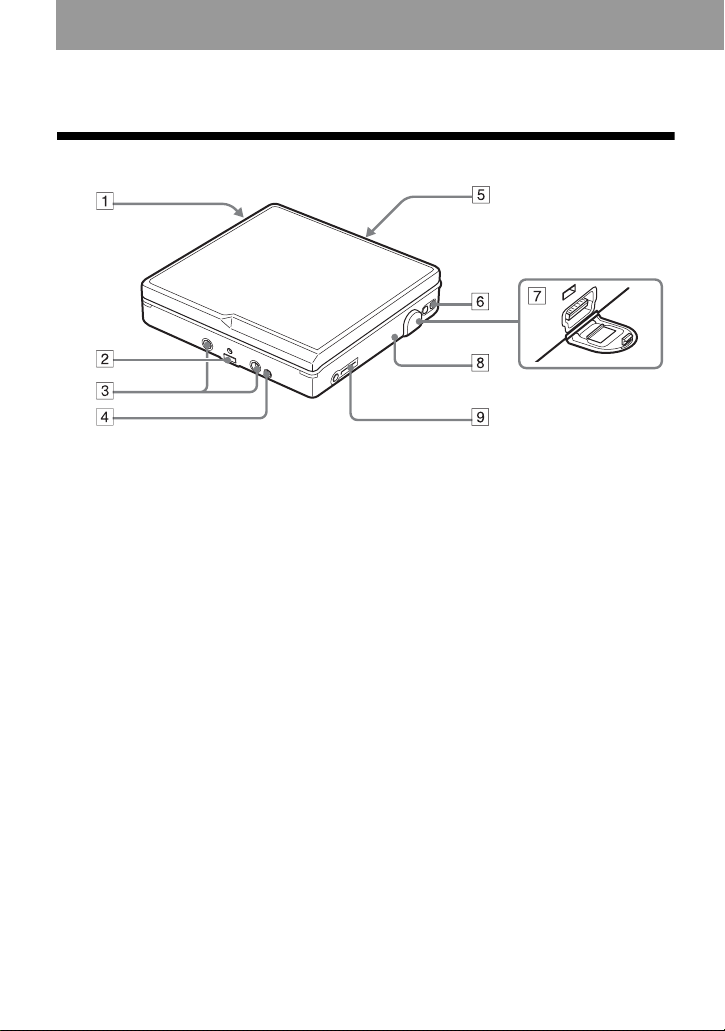
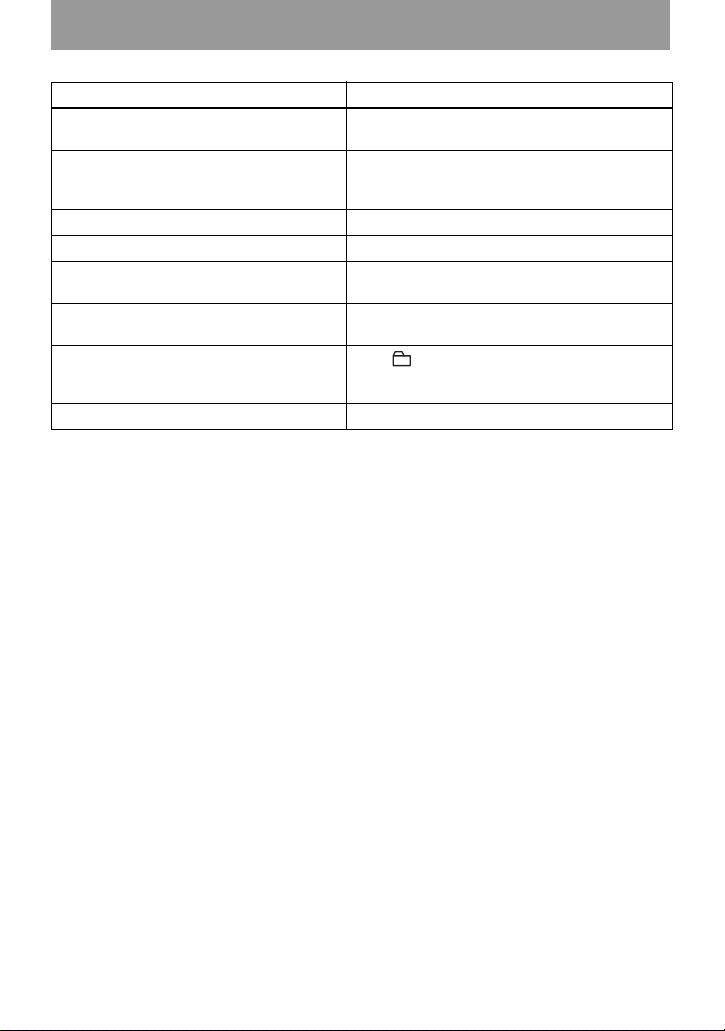
Looking at controls
The recorder
A Battery compartment
B Terminals for attaching a battery
charging stand
C Terminals for attaching a dry battery
case
D DC IN 3V jack
E OPEN switch
F Handstrap hole
Use the hole to attach your own strap.
G Dedicated USB cable connecting jack
H CHARGE/DATA indicator
I i (headphones/earphones) jack
10
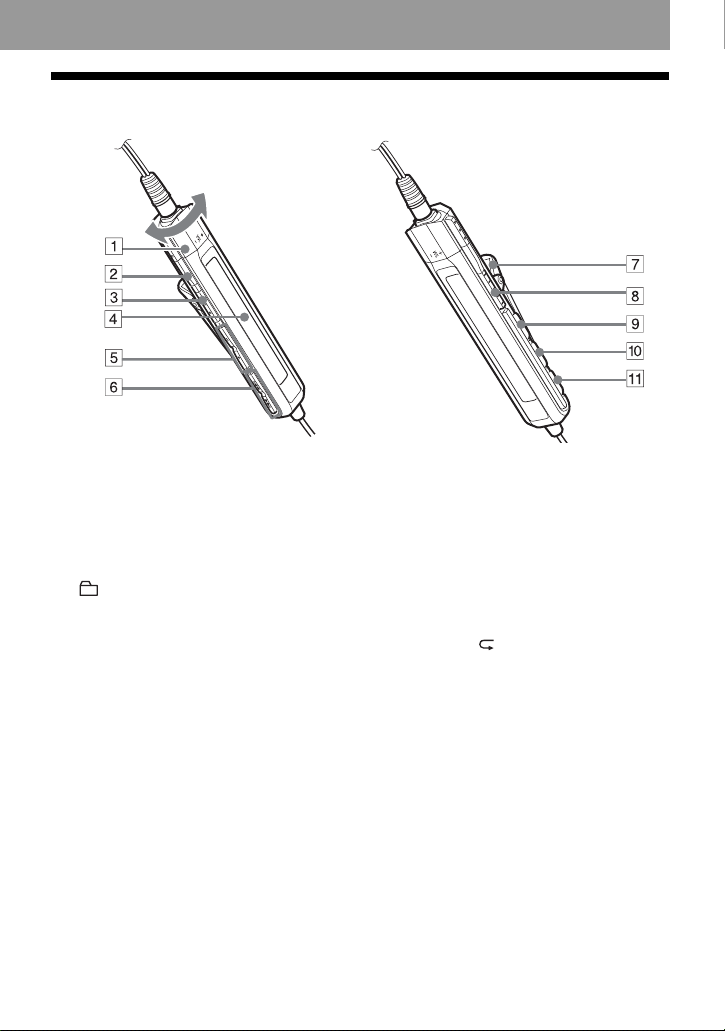
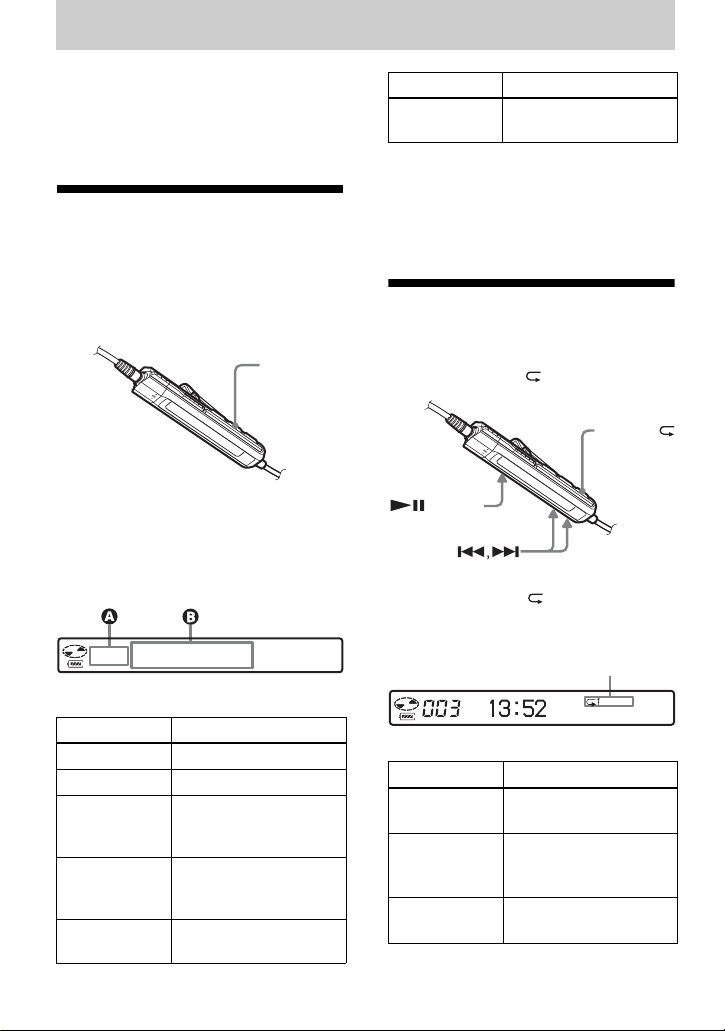
The headphones/earphones with a remote control
A Volume contro l (VOL+, –)
Turn to adjust the volume.
B x (stop) button
C NX/ENTER button: play, pause,
enter
D Dis pl ay window
E (group) +, –
F >: FF
.: REW
G Clip
H HOLD switch
Slide the switch in the directio n of the
arrow (a yellow mark appears) to
disable the buttons o n th e remote
control. To prevent the buttons from
being accidentally operated when you
carry the recorder, use this function.
I SOUND button
J DISPLAY button
K P MODE/ button
11
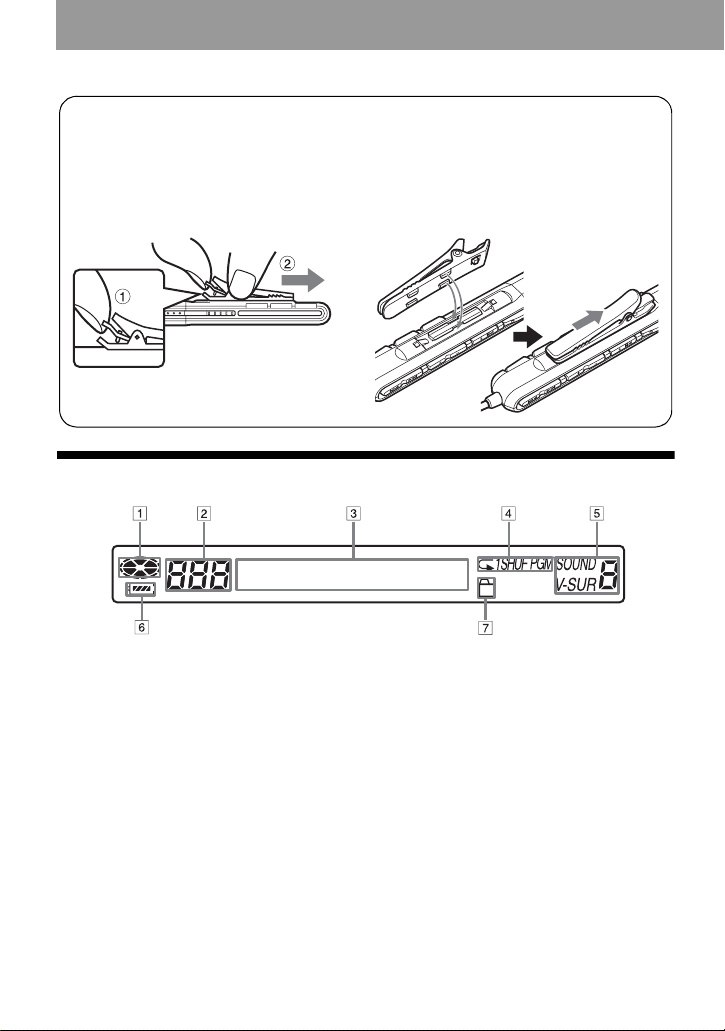
Using the clip for the remote control
It may be hard for you to read th e indications in the display if the remote control is attach e d
upside down with the clip in its c urrent position. In this case, attach the clip in the opposite
direction as shown below.
1 Remove the clip.
2 Attach the cl ip in th e opposite direction.
The display window of the remote control
A Disc indication
B Track number display
C Character information display
D Play mode indication
12
E SOUND indication
F Battery level indica tio n
G Group indication
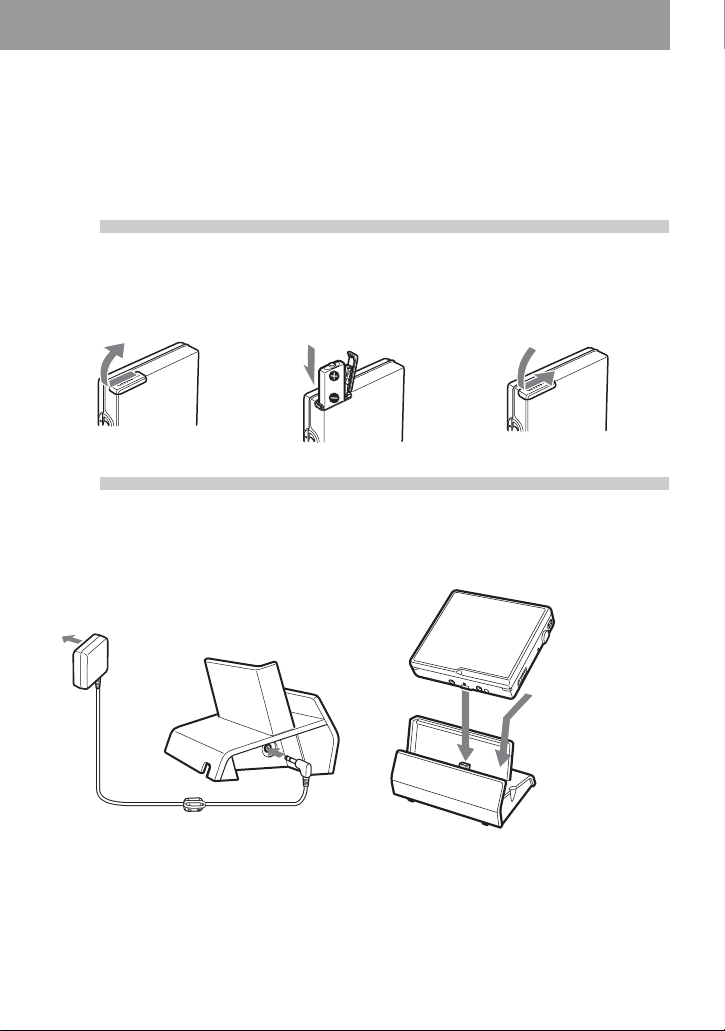
Getting started
Charge the rechar geabl e battery befor e using. Ev en if the rech arge able
battery is not charged, you can use the recorder as long as the AC
power adaptor is connected.
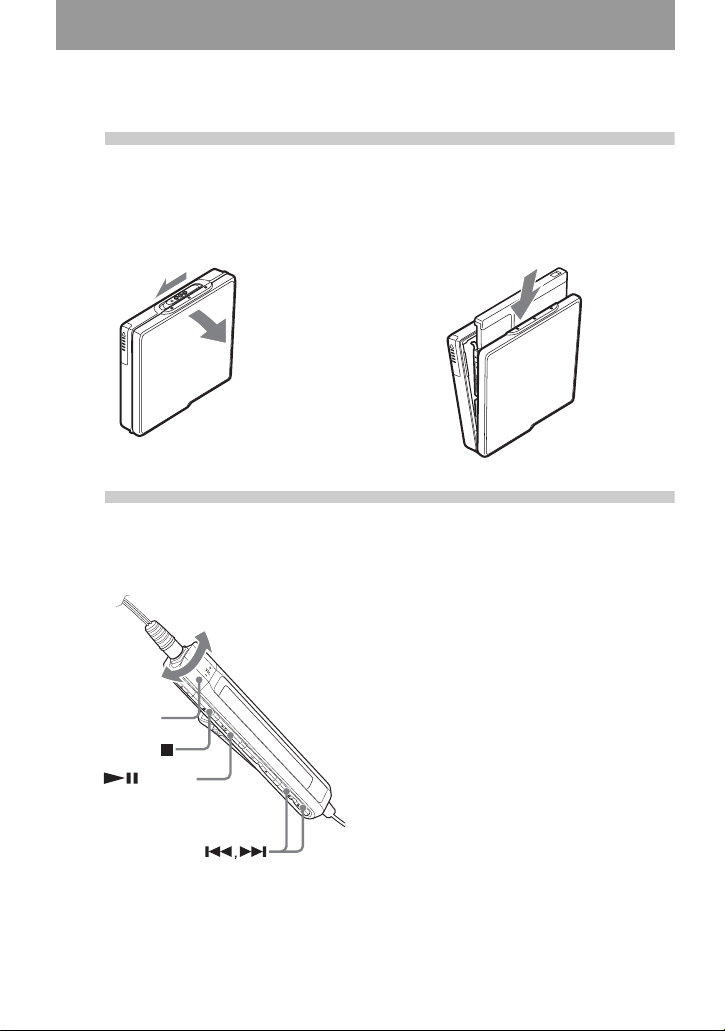
1
2
Insert the rechargeable battery.
Insert the NH - 14WM
battery compartment lid.
rechargeable battery minus
end first.
Charge the rechargeable battery.
1 Connect the AC power adaptor to the
battery chargin g st and and the AC
adaptor to a wall outlet.
To a wall
outlet
AC power
adaptor
Battery charging
stand
To DC IN 3V
Close the lid.Slide OPEN to open the
2 Place the recorder on the battery
charging stand.
Attach the
connector to the
jack firmly.
CHARGE/DA TA indicator lights in red, and
charging starts. When charging completed,
the CHARGE/DATA indicator goes off.
The battery is fully charged after charging is
continued 2 more hours.
13
3 Remove the recorder from the batter y
charging stand.
For models supplied with the AC plug adaptor
If the AC power adaptor does not fit the wall outlet, use the AC plug adaptor.
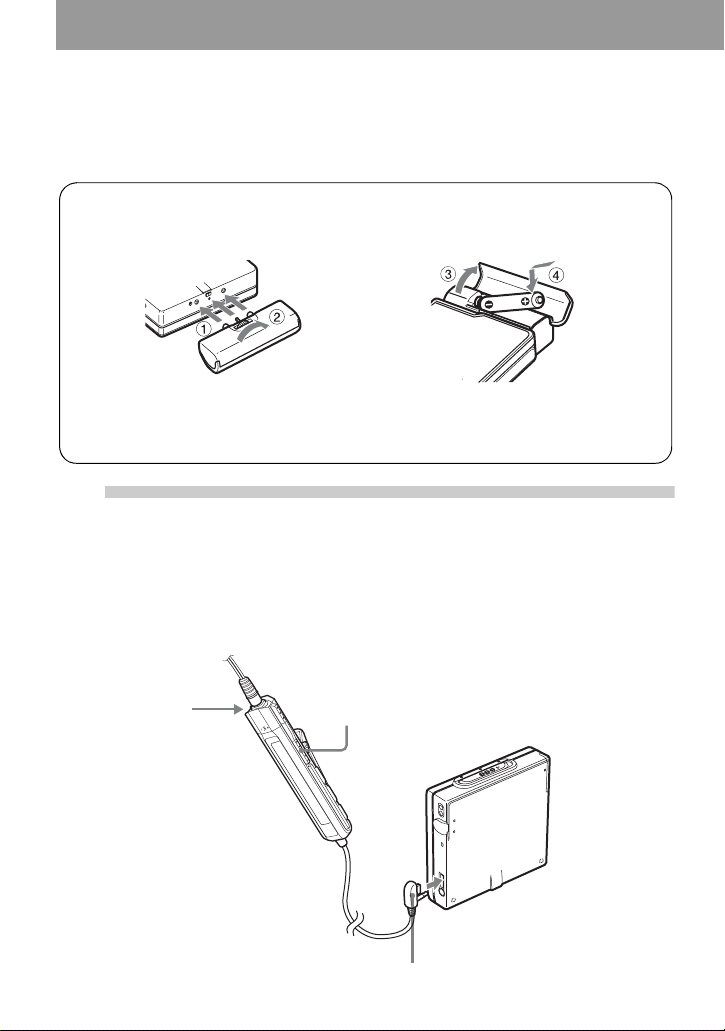
Using the alkaline dry battery
Attach the dry batter y c ase to the recorder.
Rear of the
recorder
Insert an LR6 (size AA) alkaline dry battery.
To operate the recorder for the longest possible time, use the dry battery together with a
fully charged rechargeable battery.
Insert the battery mi nus end first.
3
Make connections and unlock the
controls.
1 Connect the headphones/earphones
with the remote control to i.
Connect firmly.
14
2 Slide HOLD to the opposite direction of
the arrow (.) on the remote c ont rol
to unlock the controls .
HOLD
To i
Connect firmly.

z
Y ou can also char g e th e rech ar geab le b atte ry b y
connecting the A C p owe r adaptor d irectl y to th e
recorder.
Connect the headphones/ea rp hone s with the
remote control to i.
Connect the AC power adaptor to DC IN 3V on
the recorder, and then press x on the remote
control while the recorder is stoppe d.
“Charging” and e appear in the display and
charging starts. Full charging takes about 3.5
hours. Chargi ng is complete when
disappears. Charging time may vary depe nding
on the battery condit ion.
e
Notes
• If you start playback or do another operation
during charging, the charging will stop.
• “Charging” and e may not appear in the
display immediately after you place the
recorder on the battery char g ing stand. The
indication will, however, begin flashing after a
few minutes and charging will begin.
• Charge th e ba tt ery at a tem p erature of +5°C
(+41°F) to +40°C (+104° F).
Battery life
See page 30.
15
Playing an MD right away!
1
Insert an MD.
1 Press OPEN to open the lid. 2 Insert an MD to the direction of the
arrow with the label side facing front,
and press the lid down to clos e.
2
Play an MD.
1 Press NX/ENTER on the remote
control.
A short beep sounds in the headphones/
earphones when you operate.
2 Turn the volume control toward s VOL +
or – on the remote control.
Volume control
(VOL+, –)
/ENTER
The volume will be show n in the
display.
To stop play, press x.
A long beep sounds in the headphones/
earphones when you operate. After you stop the
recorder, the recorder will automatically turn
off in about 10 seconds.
Playback starts from the point you last stopped
playing.
To start with the first track of the disc, press
NX/ENTER on the remote control for 2
seconds or more.
16
To Operation
Pause Press NX.
Press NX again to resume play.
Find the beginning of the current track Press ..
Press . repeatedly until you reac h the
beginnin g of the desired track.
Find the beginning of the next track Press >.
Go backwards or forward while playing Press and hold . or >.
Search for a point in a track while
viewing the elapse d time (Time search)
Search for a specific track while viewing
track numbers (Index search)
Cue to the beginning o f every 10th tr ac k
(only during playback of the disc with no
group settings)
1)
Remove the MD Press x and open the lid.
1)
For more details, see “Using the group func tion” (page 23).
2)
Once you open the lid, the point to start play will change to the beginning of the first track (except when
the disc information is stored to the Playback Information Memory).
While pausing, pr ess and hold . or >.
While the recorder is stopped, press and hold
. or >.
Press + or –.
2)
If the play does not start
Make sure the recorder i s no t lo cked (pages 11,
14).
Note
The playback sound may skip if:
• the recorder receives stronger continuous
shock.
• a dirty or scratched MiniDisc is played.
17
Various ways of playback
This section explains the operations that
are done on the remote control. For details
on operations done on the recorder, see
the pages indicated for eac h op eration.
Viewing various
information
You can check the track name, disc name,
etc. during playback. Group-related items
appear only when a track with group
settings is played.
DISPLAY
1 While playing, pres s D ISPLAY.
Each time you press DISPLAY, the
display changes as follows.
Display windo w on the remot e cont r ol
AB
Track number SP/LP mode of the
current track
Note
Depending on the group settings, the ope r ating
conditions, and the disc settings, you may not
be able to select certain indications or the
indications may ap pe ar differ e n tly.
Selecting the play
mode
You can select the various play m odes
using the P MODE/ button.
P MODE/
/ENTER
1 Press P MODE/ repeatedly.
Each time you press the button, the
play mode changes as follows:
Play mode indication
Display: A/B
AB
Track nu m ber Elapsed time
Track number Track name
Numbers of
tracks in the
group
Numbers of
remaining
tracks
Track number Group name and track
Group name
Disc name
name
18
Indication
(none)
(normal Play)
1
(single-track
play)
SHUF
(shuffle play)
1)
Play mod e
All the tracks are
played once.
A single track is played
once.
All the tracks are
played in random order.
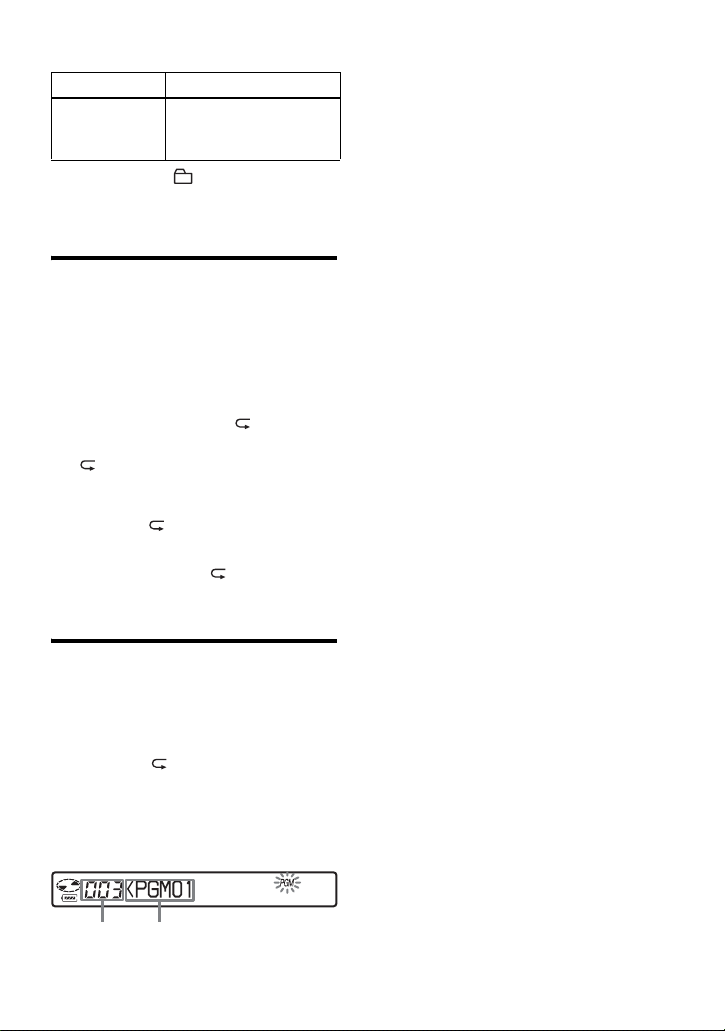
Indication1)Play mode
PGM
(program play)
1)
Group play mode ( ) appears whenever you
play a disc with group settings. For more
details, see “Playing a track in group play”
(page 23).
Tracks are pl ayed in the
order that you
specified.
Playing a track repeatedly
(Repeat P lay)
You can use th e r ep eat function for
normal play, single-track pl ay, shuffle
play, and program play mode.
1 While playin g in t he selected play
mode, press P MODE/ for 2
seconds or more.
appears in the dis play.
To cancel repeat play
Press P MODE/ for 2 seconds or more.
z
By pressing the P MODE/ button during
repeat play, you can change the play mode to
used with repeat play.
3 Repeat step 2 to program mor e tracks.
You can prog ram up to 20 tracks.
4 After programming the tracks, press
NX/ENTER for 2 seconds or mor e.
The program is st ored and playback
starts from the first track.
z
The program play setting will remain in
memory even after playback finishes or is
stopped.
Note
If you open the lid, all program settings are
canceled.
Listening to tracks in a
desired sequence (Program
Play)
1 While playing, press
P MODE/ repeatedly unti l
“PGM” appears in the display.
2 Press . or > repeatedly to
select a track, and th en press NX/
ENTER to enter that track.
Track
number
Programmed sequence
19
Adjusting the sound
(Virtual-Surround •
Digital Sound Equalizer)
You can vary the virtual sound to create
differe nt acous tics, o r modify the sound t o
suit your taste and store it for later use.
The following two effect can be selected.
V- SUR (Virtual-Surround)
Provides 4 kinds of virt ual surround
conditions.
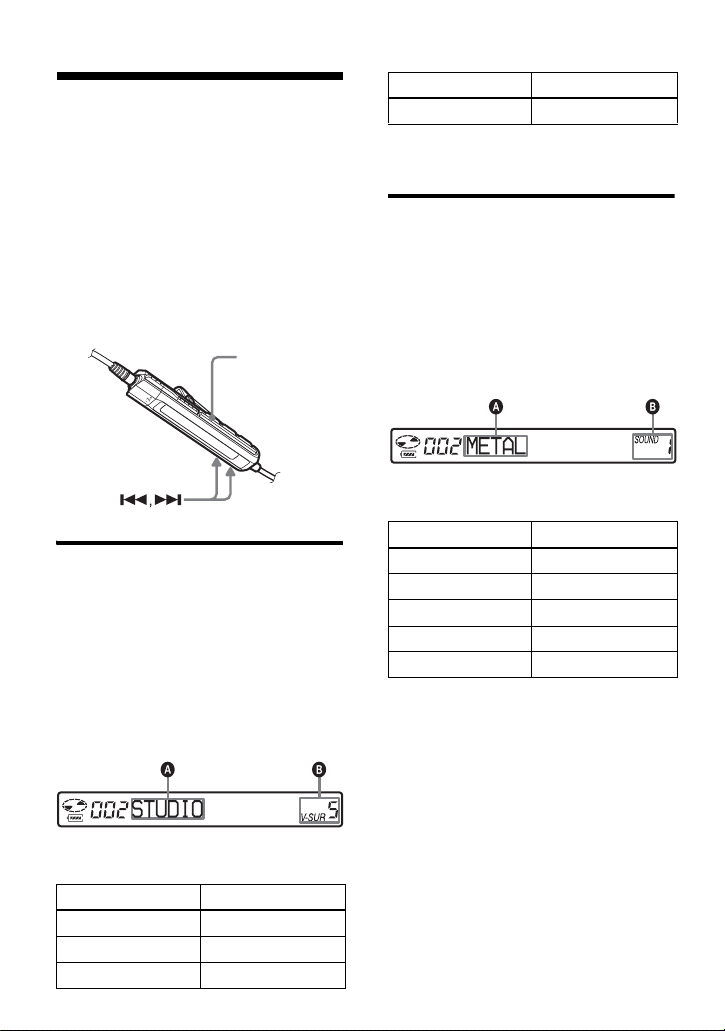
Digital Sound Equalizer
Provides 5 different sound qualities.
SOUND
Varying the virtual sound to
create different acoustics
(Virtual-Surround)
1 While playing, press SOUND
repeatedly to select “V-SUR”
2 Press SOUND for 2 seconds or more.
3 Press . or > repeat edly to
select the surround mode.
AB
CHURCH V-SUR C
4 Press NX/ENTER to enter the
selected surround mode.
Selecting the sound quality
(Digital Sound Equalizer)
1 While playing, press SOUND
repeatedly to select “SOUND.”
2 Press SOUND for 2 seconds or more.
3 Press . or > repeatedly to
select the sound mode.
Each time you press . or >, A
and B change a s follows:
AB
METAL
SOUL
JAZZ
TECHNO
USER
SOUND 1
SOUND 2
SOUND 3
SOUND 4
SOUND U
4 Press NX/ENTER to enter the
selected sound m ode.
To cancel the procedure
Press x for 2 seco nds or more.
Each time you press . or >, A
and B change as follows:
AB
STUDIO
LIVE
HALL
V-SUR S
V-SUR L
V-SUR H
20
To cancel the setting
Press SOUND repeatedly until the indication at
B disappears.
To modify and store the sound
You can modify the so und and store the
results in “USER”.
1 Do steps 1 to 3 of “Selecting the sound
quality (Digital Sound E qualizer )” (page20),
. or > repeatedly until
and press
“USER” appears.
2 Press NX/ENTER.
. or > repeatedly to select the
3 Press
frequency.
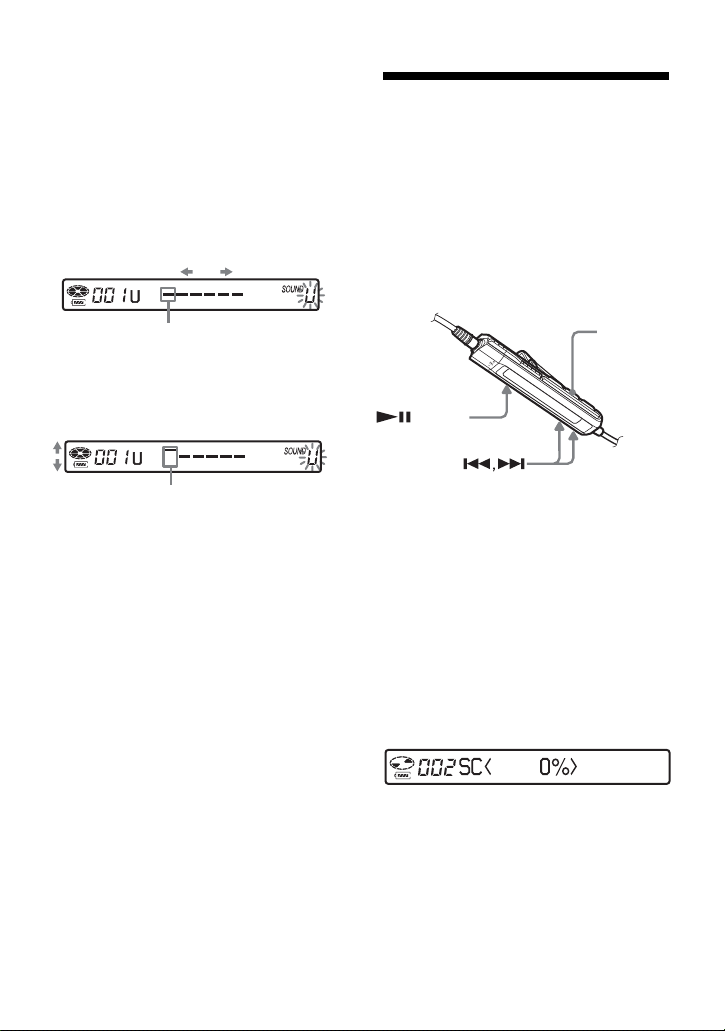
Changing playback
speed (Digital Speed
Control)
The speed contro l function is useful for
language study and other purpose. Thi s
function changes the playback speed
without changing the playback pitch.
The playback speed can be varied from
+100% to –50% the normal speed, in 13
steps.
Frequency (100 Hz)
From the left, you can se lec t 1 00 H z,
250 Hz, 630 Hz, 1.6kHz, 4 kHz, or 10 kHz
4 Turn the volume con trol repeatedly to adjus t
the level .
Level (+6 dB)
You can select from among five lev els .
–6 dB, –3 dB, 0 dB, +3 dB, +6 dB
5 Repeat steps 3 and 4 to adjust the level for
each frequency.
6 Press NX/ENTER to enter the selection.
To cancel the procedure
Press x for 2 seconds or more.
To return to the preceding
setting
Press x.
DISPLAY
/ENTER
1 While playing, press DISPLAY for 2
seconds or more.
2 Press . or > repeatedly until
“USEFUL” appea rs in th e di splay,
and then press
NX/ENTER.
3 Press . or > repeatedly until
“SpeedCtrl” appears in the display,
and then press
The player changes to speed-s et t i ng
mode. Select th e speed while
listening the sound.
NX/ENTER.
4 Press . or > repeatedly to sele ct
the desired play back speed, and then
NX/ENTER to enter the
press
selection.
“SC” appears in the display.
To cancel the procedure
Press x for 2 seconds or more.
21

To return to the preceding
setting
Press x.
z
Once you open the lid, the playback speed
reverts to the normal speed (0%).
Note
When using digital speed control, you may hear
noise or an echo in the playback.
22
Using the group function
What is the group
function?
The group function is provided to allow
playback of di scs with gr oup sett ings. The
group function is convenient for playb ack
of MDs on which several albums or CD
singles have been recorded in MDLP
(LP2/LP4) mode.
What is a disc with group
settings?
The recorder ca n operate various
functions in units of group; that is tracks
that have been recorded on a disc as part
of separate grou ps , as shown below.
Note
It will not be possible to make a group setting if
the tracks, groups and disc name on a disc
exceed the maximum number that can be input.
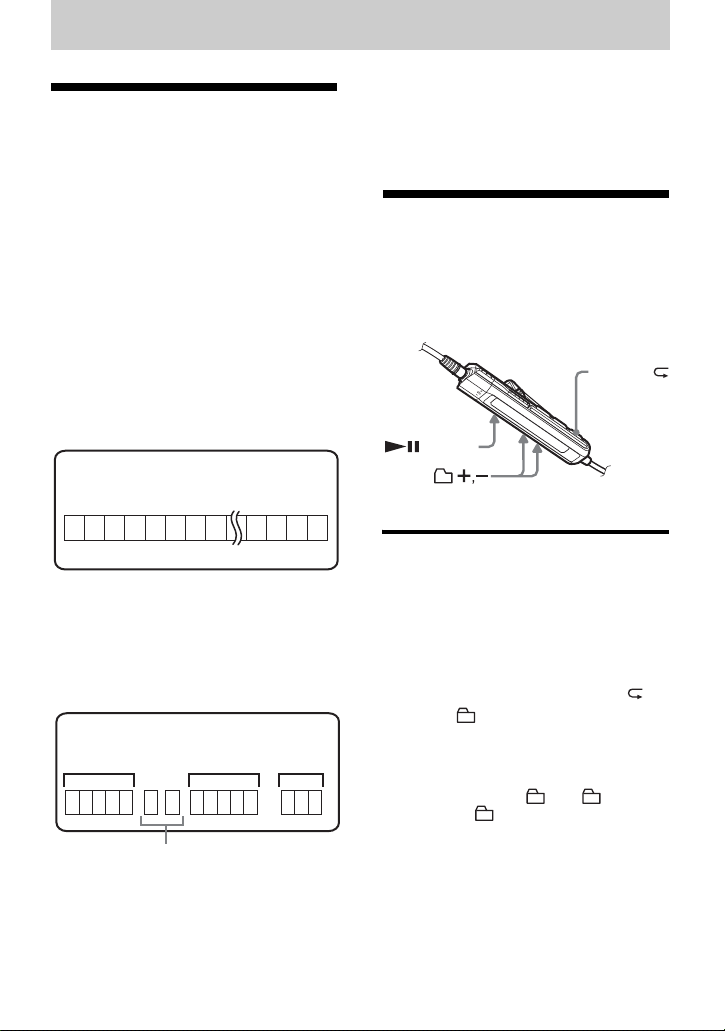
Using the group
function when playing
The recorder ca n operate various
playback wit h a disc which has group
setting.
P MODE/
Before group settings are m ade
Disc
3
2 4 5 6 7 8 12 131415
1
Track 1 to 5 are assigned to group 1.
Track 8 to12 are assigned to group 2.
Track 13 to15 are assigned to group 3.
m
Track 6 to 7 are assigned to no group.
After group assignments hav e been made
Disc
Group 1
1
2345 6
Tracks that were not assigned to a group
are treat ed as being part of “Group - -” .
You can create a maximum of 99 groups
on a disc.
Group 2
712345
Group 3
1
23
/ENTER
Playing a track in group play
In group play, all groups are played in
order, starting with group 1, followed by
the unassigned t racks (“Group -- ”) .
Playback stops after all the tracks have
been played.
1 While playing, press P MODE/
until “ ” appears in the display.
To cue to the start of a group
(Group Skip)
1 While playin g, pre ss + or –.
Pressing the – button cues to the first
track in the current group. Pressing the button
again cues to the first track of the previous
group.
23
Selecting the play mode for
group play (Group Play Mode)
The shuffle play and progr am play
function can be use d during group play
mode.
1 Press P MODE/ repeatedly.
After normal playback, the following
play modes are displayed.
Display Play mode
All tracks in the groups
(Normal
Group Play)
, SHUF
(In-Group
Shuffle)
, PGM
(Group
Program)
Repeat play for the selected
group play mode
(Group Repeat Play)
play back once (starting
with the first track in
group 1).
Shuffle play starts with the
group that is currently
playing, and co ntinues
with the succeeding
groups.
The groups are played in
the order that you
specified.
Playing groups in a desired
sequence (Group Program
Play)
Do the procedure explai ned in “Listening
to tracks in a desired sequence (Progr am
Play)” (page 19) to playback grou ps in a
desired sequence. You can program up to
10 groups. The seque nce of tracks within
the groups cannot be changed.
Suppressing the skips of the
sound (E.A.S.S. GP)
The E.A.S.S. GP func tion was developed
to provide a higher level of shock
resistance than that of existing players.
Note
The playback sound m ay skip if:
• the recorder received stronger
continuous shoc k.
• a dirty or scratc hed MD is played.
1 While playing in the selected group
play mode, press P MODE/ for 2
seconds or more.
Playback repea ts in th e respective
group mode.
Display Play mode
, Repeat play of tracks
, SHUF Repeat shuffle play of
, PGM Repeat play for gr oup
24
within a group.
tracks within a group.
program.
 Loading...