

Page 1
Mini
Dist
L
MINIDISC PLAYER
TOCADISCOSDE MINIDISCOS
AM-HX30
OPERATING INSTRUCTIONS
INSTRUCCIONES DE MANEJO
MODE D’EMPLOI
OWNER’S RECORD
For your convenience, record the model
number and serial number (you will find it
in the disc holder) in the space provided
below. Please refer tothem when you
contact your Aiwa dealer in case of
difficulty.
Model No. AM-HX30
Serial No.
WARNING
TO REDUCE THE RISK OF FIRE OR ELECTRIC SHOCK, DO NOT EXPOSE
THIS APPLIANCE TO RAIN OR MOISTURE.
Page 2

Accessories
Following accessories are supplied with
this unit. Check them before use.
@ LCD remote control
@ Stereo headphones
@ Battery charger
@ Rechargeable battery
@ Battery case
@ Battery carrying case
@ Carrying case
NOTE
FOR USE IN THE U.S.A.
This equipment has been tested and found
to comply with the limits for a Class B digital
device, pursuant to Parl 15 of the FCC
Rules. These limits are designed to provide
reasonable protection against harmful
interference in a residential installation.
Q’
%
This equipment generates, uses, and can
radiate radio frequency energy and, if not
installed and used in accordance with the
instructions, may
interference to radio communications.
However, there is no guarantee that
interference will not occur in a particular
installation. If this equipment does cause
harmful interference to radio or television
reception, which can be determined by
turning the equipment off and on, the user
is encouraged to try to correct the
interference by one or more of the following
measures:
- Reorient or relocate the receiving
antenna.
- Increase the separation between the
equipment and receiver.
- Connect the equipment into an outlet
on circuit different from that to which
the receiver is connected.
- Consult the dealer or an experienced
radio/TV technician for help.
CAUTION
Modifications oradjustmentsto this product,
which are not expressly approved by the
manufacturer, may void the user’s right or
authority to operate this product.
cause harmful
mm
Page 3
Accesorios
Los siguientes accesorios se entregan con
et aparato, V@rifiqUeel contenido antes de
usar.
@l Mando a distancia con pantalla cnstal
Iiquido
@ Auriculares estereo
@ Cargador de bateria
@ Bateria recargable
@ Caja de pilas
,, @ Caja de transport de bater(a
@) Bolsa de transporle
Accessoires
Les accessoires suivants sent fournis avec
cet appareil. V&ifiezd’abord Ieurpresence.
o Telecommande LCD
@ Ecouteurs stereo
@ Chargeur de batterie
@ Batterie rechargeable
@ Carter a piles
@ Bottler de transport de batterie
@ Sac de transport
3
Page 4
TABLE OF CONTENTS _
PRECAUTIONS .................................... 6
USING ON THE RECHARGEABLE
BATTERY ......................................... 10
USING ON AC HOUSE CURRENT ....12
USING ON DRY CELL BATTERY ......14
PREPARATIONS ................ ..... ......... 16
Em!E!El
Basic operation ................................... 18
Other playback modes ........................ 20
Programmed play ................................ 22
To change the display ......................... 24
Title search function ............................ 26
~OTHER SETTINGS [
To cancel the beep sound (Signal sound
function) .. ... ..................................... 28
To limit the maximum volume level
(Ear guard function) .......................... 28
To adjust the contrast of the display ...30
MD GUIDE MESSAGES ..................... 32
TROUBLESHOOTING GUIDE ...........34
SPECIFICATIONS .... ... .... .... ........... 36
Page 5
INDICE
E5m
TABLE DES MA TIERES -
PRECAUCIONES ................................. 7
USO CON LA BATERIA
RECARGABLE ................................... 11
USO CON LA CORRIENTE ELECTRICA
DEL HOGAR ...... ....... ..................... 13
USO CON UNA PILA .......................... 15
PREPARATIVES ................................ 17
IImEmEl
Funcionamiento basico ....................... 19
Otros modos de reproduction .............21
Reproduction programada .................23
Para cambiar la indication ..................25
Funcion de busqueda de tftulo ............27
j OTROS AJUSTES /
Para cancelar el sonido de alarma
(funcion de sonido de sehal) ............29
Para Iimitar el nivel de volumen maximo
(funcion de protection de oidos) ......29
Para ajustar el contraste de la
pantalla ............................................. 31
MENSAJES DE GUIA DE
MINIDISCO ......................................... 33
GUIA DE LOCALIZATION DE
AVERIAS .......... ................ ............ . 35
ESPECIFICACIONES ......................... 37
PRECAUTIONS .................................... 7
FONCTIONNEMENT SUR BATTERIE
RECHARGEABLE ............................ 11
FONCTIONNEMENT SUR LE SECTEUR
DOMESTIQUE ........... .................... 13
FONCTIONNEMENT SUR PILE
SECHE ............................................. 15
PREPARATIFS ................................... 17
EmEl
Operations de base ............................. 19
Autres modes de lecture ..................... 21
Lecture programmed ........................... 23
Pour changer I’affichage ..................... 25
Fonction recherche de titre .................27
I AUTRES REGLAGES [
Pour annuler la tonalite bip (fonction
Signal sonore) .................................. 29
Pour limiter Ie volume sonore maximum
(fonction Protection de I’ou’ie) ...........29
Pour ajustw Ie contraste de
I’affichage ......................................... 31
MESSAGES GUIDE DU MD ............... 33
GUIDE DE DEPANNAGE ...................35
SPECIFICATIONS .............................. 38
5
Page 6

PRECAUTIONS
To maintain good performance
● Do not use the unit in places which are
extremely hot, cold, dusty or humid, In
particular, do not use or keep the unit in
the following places.
● inahigh humidity area such asabathroom
● near a heater
● in an area exposed to direct sunlight
(Example: inside a parked car, where it
can become extremely hot)
● where it is very dusty or sandy
● near sources of strong magnetism, such
as televisions, speakers, or magnets
● where there is a lot of movement or
vibration, such as on a car dashboard or
unstable shelf
For safety
● Do not attempt to disassemble the unit.
Laser rays from the optical pickup are
dangerous to the eyes.
● Make sure that pins orotherforeign objects
do not get inside the unit.
● Take care not to drop the unit or subject it
to strong shocks.
● To keep dust from the pickup lens, keep
the disc holder closed after use. Never
touch the lens.
● If you hear no sound when playing a disc,
DO NOT turn the volume up too high
since the music could suddenly start.
Turn the volume to the lowest level before
starting playback and slowly turn it up to
the desired level.
Page 7
PRECAUCIOiVES
- PRECAUTIONS -
Para mantener sus buenas prestaciones
● No utilice el aparato en lugares muy
calientes, frfos, con polvo o humedad. No
utilice o deje el aparato en Ios siguientes
Iugares.
● en un Iugar muy humedo como en el
baiio
● cerca de la calefaccion
● en un Iugar expuesto a Ios rayos del SOI
(Ejemplo: entro de un coche
estacionado, donde puede aumentar
mucho la temperature)
● donde hay mucho polvo o arena
● cerca de una fuente magnetica fuerte,
por ejemplo un televisor, altavoces o
imanes
● donde hay mucho movimiento o
vibration, porejemploen elcubretablero
del coche o estante inestable
Para w seguridad
● No trate de desarmar este aparato. Los
rayos laser del receptor optico son
peligrosos para su vista.
● Verifique que no hayan entrado agujas u
otros objetos extratios en el aparato.
● No deje caer el aparato o exponga a un
golpe fuerte.
● Para mantenerel polvo fueradel receptor
optico, mantenga el comparhmlento del
disco cerrado despues de usar. No toque
nunca la Iente.
● Si no se escucha ningtin sonido durante
la reproduction de un disco, NO suba el
volumen muyalto porque puedeempezar
repentinamente la musics. Baje el
volumen a su nivel mas bajo antes de
empezar a reproducer y suba Ientamente
el volumen al nivel deseado.
Pour mainienir un bon fonctionnemeni
● N’utilisez pas cet appareil a des endroits
tres chauds, froids, poussiereux ou
humldes. En particulier, n’utilisez pas et
ne rangez pas cet apparell aux
emplacements suivants.
● a un endroit tres humide, une sane de
bains par exemple
● pres d’un appareil de chauffage
● clans une zone exposee en plein soleil
(Exemple: clans une voiture garee, ou la
temperature peut considerablement
augmenter).
● a un endroit tres poussiereux ou
sablonneux
● pres d’une source magnetique
puissante, telle que televiseur,
enceintes, aimants
● a un endroit soumis a beaucou~ de
movements ou vibrations, comrne Ie
tableau de bord d’une voiture ou une
etagere instable.
Securite
● N’essayez pas de demonter I’appareil.
Les rayons Iaserdu bloc de lecture optique
sent dangereux pour Ies yeux,
● Evltez que des epingles ou tout autre
objet exterieur ne penetrent clans
I’appareil.
● Prenez garde de ne pas Iaisser tomber
I’appareil et de ne pas Ie soumettre a des
chocs violents.
● Pour eviter toute accumulation de
pousslere sur la Ientille de lecture, laissez
Ie Iogement du disque ferme apres
I’emploi. Ne touchez jamam la Ientllle.
● SI aucun son n’est audible a la lecture
d’un dlsque, NE REGLEZ PAS Ie volume
trop haut car la musique pourrait demarrer
brutalement. Reglez Ie volume au
minimum avant de demarrer la lecture et
augmentez-le Ientement au niveau
souhaite.
7
Page 8
PRECAUTIONS
Note on listening with the headphones
● Listen at a moderate volume to avoid
hearing damage.
● Donotwearthe headphones while driving
or cycling. It may create a traffic hazard.
● You should use extreme caution or
temporarily discontinue use in potentially
hazardous situations, such as walking,
jogging, etc.
● Wear them properly; L is left, R is right.
Note on condensation
If the unit is suddenly moved from a cold
place to a warm one, it may result in
condensation on the pickup lens causing
malfunction or playback difficulties.
Should this occur, leave the unit for a few
hours, then try playback again.
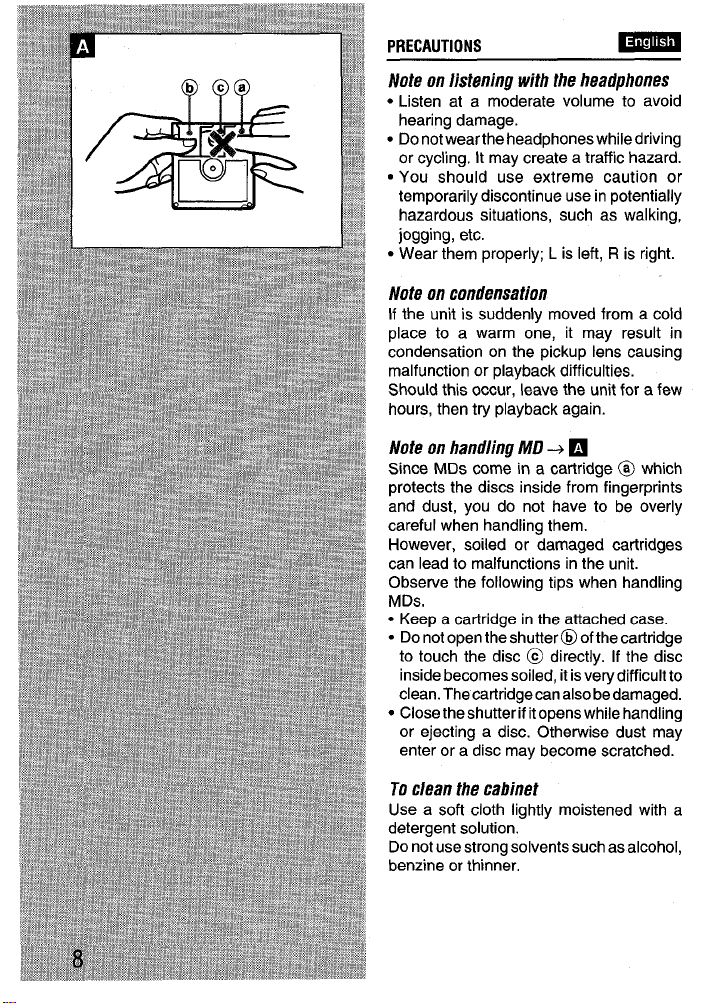
Note on handling MD --+ H
Since MDs come in a cartridge @ which
protects the discs inside from fingerprints
and dust, you do not have to be overly
careful when handling them.
However, soiled or damaged cartridges
can lead to malfunctions in the unit.
Observe the following tips when handling
MDs.
o Keep a cartridge in the attached case.
● Do not open the shutter@ of the cartridge
to touch the disc @ directly. If the disc
inside becomes soiled, it is very difficult to
clean. The cartridge can also be damaged.
● Close theshutterif itopens while handling
or ejecting a disc. Otherwise dust may
enter or a disc may become scratched.
To clean the cabinet
Use a soft cloth lightly moistened with a
detergent solution.
Do not use strong solvents such as alcohol,
benzine or thinner,
Page 9
PRECAUCIONES
PRECAUTIONS
Afotaspara escuchar con Ios aurirxlares
● Escuche a un volumen moderado para
no Iastimar sus oidos.
● No utilice Ios auriculares durante la
conduction oal andaren blcicleta. Puede
provocar accidents de transito.
● Debe tener cuidado y dejar se utilizar
provisoriamente en situaciones
potencialmente peligrosas, porejemplo
cuando camina o corre, etc.
● Utlhce correctamente: L es Izqulerdo, R
es derecho.
Afotasobre la condensation
Si se mueve el aparato repentinamente de
un Iugar frio a un Iugar caliente, el camblo
rapido de Iatemperatura puede hacerque la
humedad se condense en la Iente receptors
y puede produclr un malfuncionamiento o
problemas en la reproducclon.
Enese case, deje elaparatoapagado durante
varias horas y trate de reproducernuevamente.
Nota sobre el uso de minidiscos + H
Debido a que Ios minidiscos vienen en un
cartucho @ que protege el disco en su
interior de Ias huellas dactilares y el polvo,
no es necesario tener un cuidado especial
para su USO.
Sin embargo, un cartucho sucio o daiiado
puedeprovocarunaaveria enelfuncionamiento
del aparato. Tenga en cuenta Ios siguientes
puntos para el uso de Ios minidiscos.
● Mantengael cartucho enlacajaenlaque
viene.
● Noabralatapa @delcartucho paratocar
directamente el disco @. Si el disco en su
intenor se ensucla es dlf(cil de Irmpiar.
Tambien puede dafiar el cartucho.
● Cierre la tapa si se abre durante el uso o
al expulsar un disco. De 10contrario puede
entrar polvo o el disco puede rayarse.
Para Iimpiar el mueble
Utllice un paiio suave Ilgeramente
empapado con una solution detergence.
No utilice disolventes fuertes tales como
alcohol, bencina o diluyente.
Ecoute avec des 6couteurs
● Ecoutez a niveau modere pour eviter tout
dommage auditif.
● Ne portez pas Ies ecouteurs quand vous
conduisez ou a bicyclette. Cela pourrait
donnerheu a un accident de Iacirculation.
● UtilisezIesecouteursavecuneextr6meprudence
ou arr6tez temporalrementde Ies utiliserclans
une situation potentlellementdangereuse,par
exemplela marche,Ie)oggmg,etc.
● Portez Iesecouteurs correctement: L pour
la gauche et R pour la droite.
Remarque sur la condensation
Si I’appareil est brusquement deplace d’un
endroitfroid a unendroitchaud, cechangement
rapide de temperature pourra provoquer une
condensation d’humidite sur la Ienttle de
lecture,cequi pourrasetraduire parun mauvais
foncfionnement ou des difhcultes de lecture.
Si cela arrive, laissez I’appareil tel quel
pendant quelques heures, puis essayez a
nouveau de Iire un disque.
Remarque sur la manipulation des AID
(MiniDisc) +
Comme Ies MD se presentient sous forme de
cartouche @ protegeant Ie disque a I’interieur
des empreintes de doigts et de la pousslere, il
estmutilede Iesmanipuleravec unsoinexcessif.
Mais une cartouche sale ou endommagee
pourra
fonctlonnement de I’apparell.
Suivez Ies conseils ci-dessous pour la
manipulation des MD.
● Conservez la cartouche clans sa bo?te.
● N’ouvrez pas Ie volet @ de la cartouche
pour toucher dlrectement Ie dlsque @ a
I’interieur. Si Iedisquea I’interieurest sali,
il sera tres difficile de Ie nettoyer. La
cartouche peut aussi &re endommagee.
● Refermez Ie volet s’il s’ouvre pendant la
manipulation ou I’ejection d’un disque.
Sinon, de la poussiere pourrait penetrera
I’inteneur ou Ie disque pourrait &re raye.
❑
provoquer un mauvais
Nettoyage du coffret
Utilisez un chiffon doux Iegerement
humidifie de solution detergence.
N’utilisez pas de solvants puissants, tels
qu’alcool, benzine ou diluant.
9
Page 10
USING ON THE
mm
RECHARGEABLE BATTERY
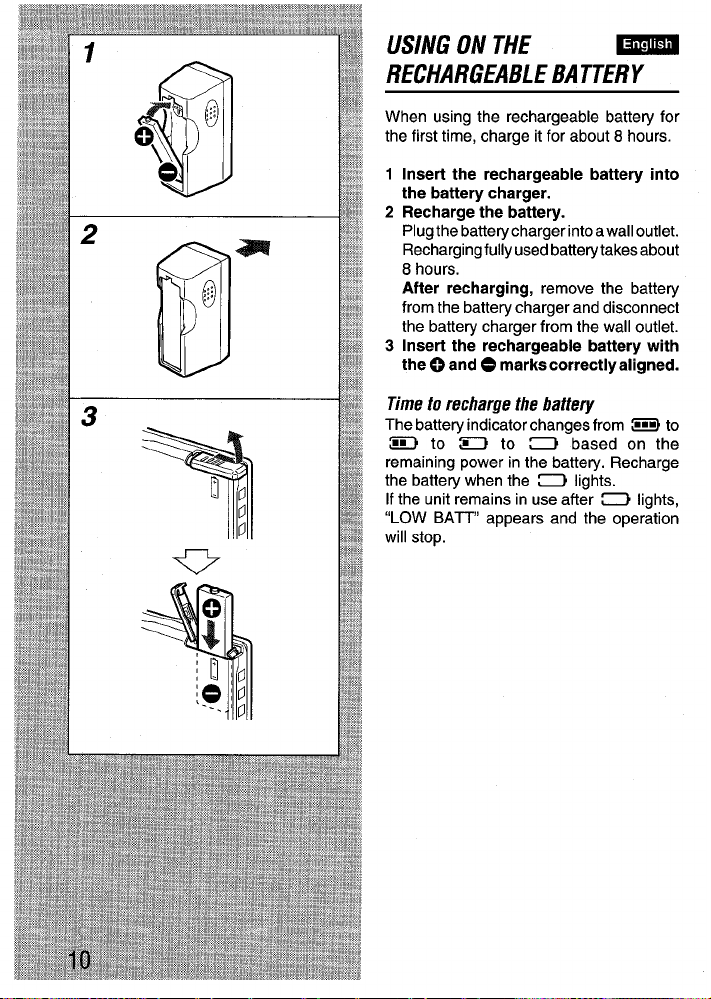
When using the rechargeable battery for
the first time, charge it for about 8 hours.
1 Insert the rechargeable battery into
the battery charger.
2 Recharge the battery.
Plug the battery charger into awall outlet.
Recharging fully used battery takes about
8 hours.
After recharging, remove the battery
from the battery charger and disconnect
the battery charger from the wall outlet.
3 Insert the rechargeable battery with
the ~ and ~ marks correctly aligned.
Time to recharge the battery
The battery indicator changes from EEE)to
= to = to ~ based on the
remaining power in the battery. Recharge
the battety when the ~ lights.
If the unit remains in use after ~ lights,
“LOW BATT appears and the operation
will stop.
Page 11
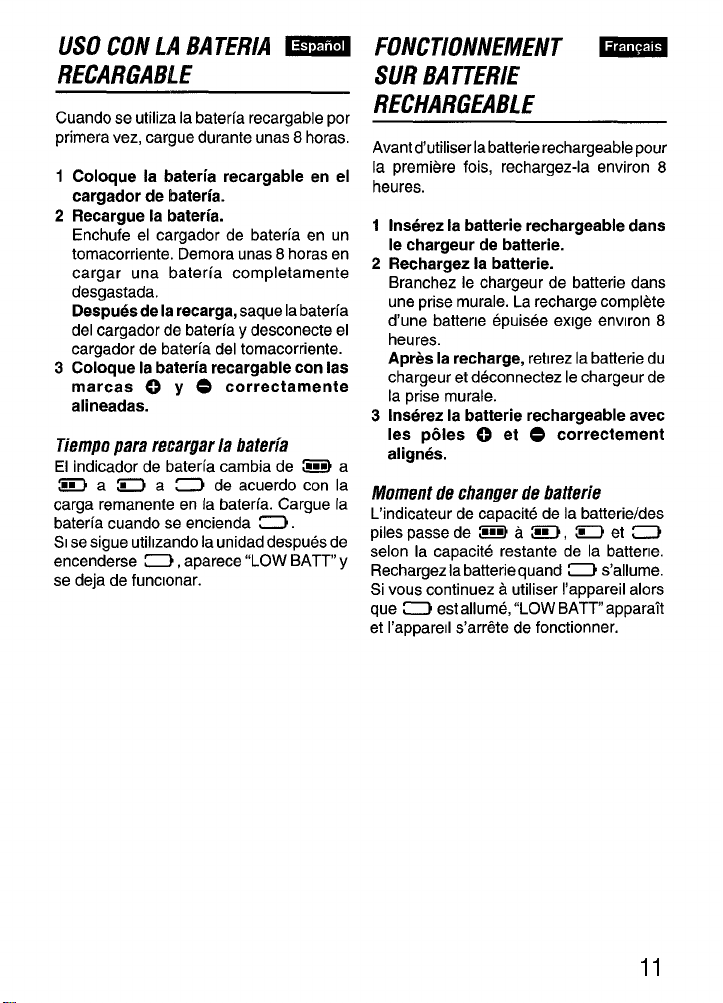
USO CON LA BATERIA -
RECARGABLE
Cuando se utiliza la bateria recargable por
primers vez, cargue durante unas 8 horas,
1 Coloque la bateria recargable en el
cargador de bateria.
2 Recargue la bateria.
Enchufe el cargador de bateria en un
tomacorriente. Demora unas 8 horas en
cargar una bater[a completamente
desgastada.
Despues de la recarga, saque la bateria
del cargador de bateria y desconecte el
cargador de bateria del tomacorriente.
3 Coloque la bater(a recargable con Ias
marcas Cj y 0 correctamente
alineadas.
Tiempo para recargar la bater[a
El indicador de bater~a cambia de ~ a
= a = a ~ de acuerdo con la
carga remanente en la bater[a. Cargue la
bater(a cuando se encienda ~.
SI se sigue utihzando la unidad despues de
encenderse ~, aparece “LOW BATT” y
se deja de funclonar.
FONCTIONNE/WENT SUR BATTERIE
RECHARGEABLE
Avant dutiliser la batterie rechargeable pour
la premiere fois, rechargez-la environ 8
heures.
1
Inserez la batterie rechargeable clans
Ie chargeur de batterie.
2
Rechargez la batterie.
Branchez Ie chargeur de batterie clans
une prise murale. La recharge complete
d’une battene epuisee exlge environ 8
heures.
Apres la recharge, rebrez la batterie du
chargeur et deconnectez Ie chargeur de
la prise murale.
Inserez la batterie rechargeable avec
3
Ies pbles O et o co;rectement
alignes.
Moment de changer de batterie
L’indicateur de capacite de la batterie/des
piles passede -a ~, =et ~
selon la capacite restante de la battene.
Rechargez la batteriequand ~ s’allume.
Si vous continuez a utiliser I’appareil alors
que ~ est allume, “LOW BATT” appara~t
et I’apparell s’arrete de fonctionner.
11
Page 12

USING ON THE RECHARGEABLE -
BATTERY
Note on the rechargeable battery
Use only the supplied charger to recharge
c
the battery.
● Do not carry the battery in a pocket or
handbag together with metal objects such
as pendants or key holders. Use the
supplied battery carrying case when
carrying the rechargeable battey.
● Do not short-circuit the terminals.
● Do not disassemble the battey, heat it or
put it in water.
● The supplied rechargeable battey can
be recharged approximately 300 times.
USING ONAC HOUSE
CURRENT
Contact your Aiwa dealer and purchase an
AC adaptor.
Connect the plug of AC adaptor to the DC
1.5 V jack on the battery case and connect
the AC adaptor to a wall outlet.
Page 13

USO CON LA BATERIA
RECARGABLE
-
FONCTIONNEMENTSUR
-
BATTERIERECHARGEABLE
iVotas sobre la bateria recargable
● Utlllce solo el cargadorsuminlstrado para
cargar la bateria.
● No Ileve la bateria en un bolsillo o cartera
junto con objetos de metal tales como
collares o Ilaveros. Utihce la caja de
transport de bater[a suministradacuando
Ileve una bateria recargable.
● No cortocircuite Ios terminals.
● No desarme la bateria, caliente osumerja
en agua.
● La baterfa recargable incluida puede
recargarse unas 300 veces.
USO CON LA CORRIENTE
ELECTRICA DEL HOGAR
Llameasu concesionario deAiwa ycompre
un adaptador de CA.
Conecte el enchufe del adaptador de CA
en la toma DC 1,5 V de la caja de bateria y
conecte el adaptador de CA en un
tomacorriente.
Remarques sur Ies batteries
rechargeable
● Utilisez uniquement Ie chargeur fourni
pour recharger la batterie.
● Neportez paslabatterie dansunepoche
ou un sac a main avec des objets
metalliques, tels que porte-cles ou
pendentifs. Utilisez Ie boRier de transport
de batterie pour transporter la batterie
rechargeable.
● Necourt-circuitez pas Ies bornes.
● Nedemontez paslabatterie, nelachauffez
pas et ne la mettez pas clans I’eau.
● La batterie rechargeable fournie peut se
recharger environ 300 fois.
FONCTIONNEMENT SUR LE
SECTEUR DOMESTIQUE
Adressez-vous avotre revendeurAlwa pour
I’achat d’un adaptateur secteur.
Raccordez unefiche de I’adaptateursecteur
ala prise DC 1.5 V du carter a pile et I’autre
a une prise murale.
13
Page 14

USING ON DRY CELL m
8A TZERY
1 Attach the battery case.
2 Insert a size AA (LR6) alkaline battery
with the 0 and
aligned.
Battery replacement
The battery indicator changes from ~ to
E!Cl to = to g based on the
remaining power of the battery. Replace
the battery when the ~ lights.
If the unit remains in use after ~ lights,
“LOW BATT” appears and the operation
will stop,
For prolonged operation
Inswtthefullycharged rechargeable battery
in the unit and attach the battery case with
anew size AA (LR6) alkaline battery inside.
Playback of approx. 21 hours is possible.
on dry cell battery
Note
● Make sure that o and 0 marks correctly
aligned.
● To prevent the risk of electrolyte leakage
or explosions, never recharge the battery,
apply heat to it, or take it apart.
● When not using the battery, remove it to
prevent needless battery wear.
● If liquid leaks from the battery, wipe
thoroughly to remove.
O marks correctly
Page 15

USO CON UIVA PILA -
1 Instale la caja de bateria.
2 Inserte una bateria alcalina de tamaiio
AA (LR6) con Ias marcas Q y
correctamente alineadas.
Cambio de la pi~a
El indlcadorde pila cambia de ZEE) a ZE)
a ~ a Z3 de acuerdo con la carga
remanenteen la pila. Cambie la pilacuando
se encienda ~.
Sise sigue utilizando la unidad despues de
encenderse ~, aparece “LOW BATT” y
se deja de funcionar.
Para un funcionamiento durante mas
tiempo
Inserte la bateria recargable totalmente
cargada en el aparato y coloque la caja de
pilascon una pilaalcalina nuevadetamaiio
AA (LR6) en su intenor.
Puede reproducer durante aprox. 21 horas.
FoJ/cT/oMvE/wvT EEEa
SUR PILE SECHE
1 Montez Ie carter a pile.
O
2 Inserez une pile alcaline de format AA
(LR6) en respectant Ies polarites 0 et
e.
Replacement de la pile
L’indlcateur de capacite de la batterie pile
passe de @E) a ~, ~ et ~ selon
la capaclte restante de la pile. RemplacezIa quand ~ s’allume.
Si vous contmuez a utiliser I’appareil alors
que ~ est allume, “LOW BATT’’apparaR
et I’appareil s’arr~te de fonctionner.
Pour un fonctionnement prolongi
Inserez la batterie rechargeable
entierement chargee clans I’appareil et fixez
Ie carter a piles contenant une pile alcaline
format AA (LR6).
Cela permetfraenviron 21 heuresde lecture.
Notas sobre la pila
● Asegtirese de que Ias marcas Q y o
estan correctamente alineadas.
● Para evitar que se derrame ei electrolito
o explosi6n, no recargue la pila, caliente
o desarme.
● Cuando no utllice la pila, saquela para
evitar que se desgaste intitllmente.
● Si se produce un derrame de la pila,
Iimpie completamente antes de sacarla.
Remarques sur /es piles siches
● Verifiez que Ies polarites 0 et e sent
correctement alignees.
● Pour evitertout risque de fuite delectrolyte
ou d’explosion, ne rechargez jamais la
pile, ne Iachauffez pas, et ne la demontez
pas.
● Quand la pile n’est pas utlhsee, retirez-la
pour eviter toute usure inutile.
● Quand du Iiquide fuit de la pile, essuyez-
Ie bien pour I’eliminer completement.
15
Page 16

PREPARATIONS
Emm
Connecting the headphones + ❑
Connect the supplied headphones to the
remote control and connect the remote
control to the f) REMOTE jack of the main
unit.
● To turn on the backlight of the display on
the remote control, press DISP/SEARCH.
HOLD switches + H
When operating with the main unit,
release HOLD on the main unit. + @
When operating with the remote control,
release HOLD on the remote control. + @
When not using the unit, set both to the
HOLD position. + @
Accidentally pressed buttons will not
function.
If buttons on the main unit are pressed
when the HOLD switch is set to the HOLD
position, “HOLD appears.
Page 17

PREPARATIVES -
PREPARATIFS
mm
Conexion de auriculares + ❑
Conecte [OS auriculares incluidos en el
mando a distancia y conecte el mando a
distancia en la toma O REMOTE del
aparato.
● Para encender la Iuz en la indication del
mando a distancia, oprima DISP/
SEARCH.
Interruptores HOLD-+ H
Cuando haga funcionar con el aparato,
suelte el HOLD del aparato. + @
Cuando haga funcionar con el mando a
diatancia, suelte el HOLD del mando a
distancla. + @
Cuando no utilice el aparato, mueva
ambos a la position HOLD. .+ @
Los botones oprimidos por accidente no
haran funcionar el aparato.
Si se Oprimen Ios botones del aparato
cuando el rrterruptor HOLD esta en la
position HOLD, aparece “HOLD.
Raccordement des ecouteurs + ❑
Raccordez Ies ecouteurs fournis a la
telecommande et la telecommande a la
prise (_)REMOTE de I’appareil.
● Appuyez sur DISP/SEARCH pour allumer
I’eclalrage de fond de I’afflcheur de la
telecommande.
Commandes HOLD+ ❑
A Iacommandea I’appareil, Iiberez HOLD
sur I’appareil. + @
A la commande avec la telecommande,
Iiberez HOLD sur la telecommande. + @
Quand I’appareil n’eat pas utilise, reglez
Ies deuxcommutateurs a la position HOLD.
+@
Les touches pressees par inadvettance
resteront saris effet.
Sides touches sur I’appareil sent pressees
alors que Ie commutateur HOLD est sur
HOLD, “HOLD s’affiche.
17
Page 18

PLAYBACK
Basic operation
1 Insert a disc with the label side@ up
and in the direction of the arrow@.
2 Press -11.
3 Adjust the volume.
ON
To stop playback, press
the
disc the next time, playback will start
from that point.
■ .When playing
Basicoperation Button10press Signalsound
To pause
To resume
Togo back to the f44 briefly bipbipbip
beginning of a
previous track
To go to the
beginning of a
succeeding track
To search for a
desired point
-II during hip, hip, hip,
playback
-II
pause mode
FM briefly bipbip
Keep W or
HI pressed
tip
while in bip
●.”
To adjust the sound
Press DSUENTER repeatedly.
DSL 1: Low frequency is emphasized.
DSL 2: Low and high frequencies are
DaL OFF: Normal sound
more emphasized than in DSLI.
Page 19

REPRODUCTION
LECTURE
-
Funcionamieflto basico
1 Inserte un disco con el Iado de la
etiqueta@ haciaarriba yen el sentido
de la flecha @.
2 Oprima -Ill.
3 Ajuste el volumen.
Para parar la reproduction, presione
Cuando reproduce el disco la siguiente
vez, la reproduction continuara desde ese
punto.
FuncionamienloBotonoprimido Sonidodela
basico seiial
Para hater una >11 durante la biD, biD, blD,
nausa
Para continuar -II en el bip
Para volver al l+ bipbipbip
principlo de la brevemente
cancion anterior
Para ir al
principio de una brevemente
cancion mas
adelante
Para buscar un Mantenga
punto deseado oprlmldo W o
reuroduccion
modo de pausa
WI
Wf
Para ajustar el sonido
Oprima DSUENTER varlas veces.
DSL 1:
DSL 2:
DSL OFF: Sonldo normal
Se da enfasis a Ias frecuencias
bajas.
Las frecuencias bajas y altas se
enfatizan mas en DSL 1.
bib .-~
blubirI
Operations debase
1 Inserez un disque, Ie ctite portant
I’etiquette vers Ie haut @, clans Ie
sens de la fleche @.
2 Appuyez sur -11.
3 Reglez Ie volume sonore.
■ .
Pour arr&er la lecture, appuyez sur
la lecture suivante du disque, la lecture
demarrera de ce point.
Op&rationsde
base
Pour faire une -II pendant blp, hip, hip,
pause
denregwtrement
Pour reprendre -11 en mode blp
I’enregistrement d’arr&
Pour revenir au W bipblpblp
debut de la
plste presente
Pour passer au WI bnevement blpblp
debut de la
piste suivante
Pour rechercher Mamtemr W
un point
souhaite
Pour ajuster Ie son
Appuyez plusleurs fois sur DSUENTER.
DSL 1: Les basses frequencies sent
DSL 2:
DSL OFF: Son normal
Borrlonapresser Signal sonora
Ie lecture
brievement
ou W presse
accentuees.
Les basses et Ies hautes
frequencies sent
accentuees qu’avec DSL 1.
blp
■. A
●*-
plus
19
Page 20

w
+
+
PLAYBACK
mm
Other playback modes
This unit has 4 play modes other than
normal play.
Press MODE repeatedly during playback
to select the desired play mode.
Each time the button is pressed, the play
mode changes in the following order.
@All-repeat play
All tracks are played repeatedly.
$
@One-track repeat play
Current track is played repeatedly.
+
@ Random play
All tracks are played in random order.
$
@ Programmed play
The programmed tracks are played in
programmed order.
To program, please refer to page 22.
4
Normal play
Note
● The selected playback mode does not
change when the power is turned off.
. The play mode changes to normal play
aftec
opening the disc holder
removing the battery
Page 21

REPROOUCCION
- LECTURE
-
Otros modos de reproduccih
Este aparatotlene 4 modos de reproduction
ademas de la reproduction normal.
Oprima MODE varias veces durante la
reproduction para seleccionar el modo de
reproduction deseado.
Cada vez que oprima el boton, et modo de
reproduction cambla en el sigwenteorden.
@ Repetition de todo el disco
Todas Ias canclones se reproduce
repetidamente.
+
@ Repetition de una cancion
La cancion actual se reproduce
repetidamente.
$
@ Reproducci6n aleatoria
Todas Ias canciones se reproduce en
orden aleatorio.
$
@ Reproducci6n programada
Las canciones programadas se repiten
en el orden programado.
Para la programaci6n, consulte lapagma
23.
‘4’
Reproducci6n normal
Notas
● El modo de reproduction seleccionado ● Le modede Iectureselectionne nechange
Autres modes de lecture
Cet appareil a 4 modes de lecture autres
que la lecture normale.
Appuyez plweurs fois sur MODE pendant
la lecture pour selectionner Ie mode de
lecture souhaite.
Chaque pression de la touche change de
mode de lecture clans I’ordre suivant.
@ Lecture repetee de toutes Ies pistes
Toutes Ies pistes sent Iues de maniere
repetee.
+
@ Lecture repetee d’une piste
La piste presente est Iue de mamere
repetee.
$
@ Lecture aleatoire
Toutes Ies pistes sent Iues clans Ie
desordre.
+
@ Lecture programmed
Les pistes programmers sent Iues clans
I’ordre programme.
Pour la programmation, r~ferez-vous a
la page 23.
+
Lecture normale
Remarques
no cambia cuando se desconecta el pas ala mise hors tension.
aparato.
● El modo de reproduction cambia a la
reproduction normal despues de:
abrlr el comparIimlento del disco
● Le mode de Iectu re passe au mode de
lecture normale apres:
ouverture du Iogement du disque
retrait de la batterie
desmontaje de la bater(a
21
Page 22

PLAYBACK
mm
Programmed play
● You can memorize up to 25 tracks in a
desired order.
Operate during playback or in
playback pause mode.
1 Press MODE repeatedly until “PRGM”
is displayed.
2 Press W or WI to select a track.
3 Press DSIJENTER to program the
track.
4 Repeat steps 2 and 3 to program other
tacks.
5 Press-11 to start programmed play.
Tocancel the program
Press MODE repeatedly until “PRGM
disappears.
You can cancel the program by opening the
disc holder or removing the battery.
If ‘6PRGAIFULL” appears
25 tracks are already programmed.
You cannot add any track to the program.
Note
You cannot go back to a previous track by
keeping K pressed during programmed
play.
Page 23

REPRODUCCIDN
- LECTURE
Reproducci6n programada
● Se pueden memorizar hasta 25 canciones
en el orden deseado.
Haga el siguiente procedimiento
durante la reproduction en el modo
de ~ausa de rwroduccion.
Oprima MODE varias veces hasta que
1
aparece “PF?GM”.
2
Oprima W o Wf para seleccionar
una cancion.
Oprima DSWENTER para programar
3
la cancion.
Repita Ios pasos 2 y 3 para programar
4
otras canciones.
5
Oprima D-n para empezar la
reproduccithr programada.
Para cancelarel programa
Oprima el MODE varias veces hasta que
desaparezca “PRGM.
Se puede cancelarel programa abnendo el
compatilmiento del disco o sacando la pila.
Si aparece “PRGM FULL”
Se han programado ya 25 canciones.
No puede agregar canciones en el
programa.
Nota
No puede volver a la canclon anterior
manteniendo W oprimido durante la
reproduction programada.
Lecture programmbe
● Vous pouvez memoriser jusqu’a25 pistes
clans I’ordre souhaite.
Operez en mode de lecture ou pause
de lecture.
1 Ap~uVez Dlusieurs fois aur MODE
juiqu;a ce que “PRGM” s’affiche.
2 Appuyez sur W ou w pour
selectionner une piate.
3 Appuyez sur DSLIENTER pour
programmer la piste.
4 Repetez les etapes 2 et 3 pour
programmer d’autres pistes.
5 Appuyez sur -11 pour demarrer la
lecture programmed.
Pourannuler la programmation
Appuyez plusieurs fois sur MODE jusqu’a
ce que “PRGM disparaisse.
Vous pouvez aussi annuler la
programmation en ouvrant Ie Iogement du
disque ou en retirant la batterie pile.
Si “PRGM FULL” apparaft
25 pistes sent deja programmers.
Vous ne pouvez plus ajouter de piste a la
programmatlon.
Remarque
En lecture programmed, Ie retour a la piste
precedence en maintenant W presse est
impossible.
23
Page 24

DISPI
SEAR
PLAYBACK
m
To change the display
Press DISPLSEARCH repeatedly during
playback. Each time the button is pressed,
the display changes in the following order.
@Title of current track
@Remaining time of current track
@ Disc name
@ Elapsed time of the current track
Note
● The display changes to @ when playback
is stopped.
● “NO Title” or “NO Name” appears when
playing a disc in which no data is
registered.
Page 25

REPRODUCTION _ LECTURE
-
Para cambiar la indication
Oprima DISP/SEARCH varias veces
durante la reproduction. Cada vez que
oprime el boton, la indication cambla en el
siguiente orden.
@Titulo de la cancion actual
@Tiempo remanente de la cancion actual
@ Nombre del disco
@)Tiempotrarwcurridode Iacancion actual
Notas
● La indication cambla a @) cuando se
detiene la reproduction.
● Aparece “NO Title” o “No Name” cuando
se reproduce un disco que no tiene dates
registrados.
Pour changer /’affichage
Appuyez plusieurs fois sur DISP/SEARCH
pendant la lecture. A chaque pression,
I’affichage change clans I’ordre suivant.
@ Titre de la plste presente
@ Temps restant de la piste presente
@ Nom du disque
@Temps ecoule de la piste presente
Remarques
● L’affichage passe a o a l’arr6t de la
lecture.
● “No Title” ou “NO Name” apparalt Iors de
la lecture d’un disque sur Iequel aucune
donnee n’est consignee.
25
Page 26

PLAYBACK
m
Title search function
● You can search for a desired track
confirming the title during playback.
Operate during playback.
1 Keep DISP/SEARCH preaaed for 3
seconds.
2 While the track number flashes, press
144 or WI repeatedly until the desired
track title is displayed.
3 Press >11 or DSUENTER to start
playback.
● You can start this operation in playback
pause mode.
In this case, press -II again after step
3 to resume playback.
Note
● Title search function isnotactivated during
random play and program play.
● If the flashing stops during operation,
repeat the procedure from the beginning.
Page 27

REPRODUCTION
LECTURE
Funcion de btisqueda de fifulo
● Se puede buscar una cancion deseada
confirmando el tftulo durante la
reproduction.
Haga este procedimiento durante la
rerxoduccion.
1
“Mantenga oprimido DISP/SEARCH
durante 3 segundos.
2
Mientras destella el ntimero de
cancion, oprima W o W varias
veces hasts que aparezca el titulo de
la cancion deseada.
3
Oprima ~11 o DSL/ENTER para
ernpezar a reproducer.
● Puede empezareste procedimiento en el
modo de pausa de reproduction.
En este case, opnma nuevamente FIl
despues del paso 3 para segulr
reproduciendcl.
Notas
● La funcion de busqueda de titulo no esta
actwadadurarnte la reproduction aleatoria
y la reproducmon programada.
● Si se detlene el destello durante el
funcionamiento, repita el procedimiento
desde el principio.
Foncfion recherche de titre
● Vous pouvez chercher la piste souhaitee
en confirmant Ie titre pendant la lecture.
Operez pendant la lecture.
1 Maintenez DISP/SEARCH presse 3
secondes.
2 Pandant Ie clignotement de la piste,
appuyez plusieurs fois sur M ou
~ jusqu’a ce que Ie titre de la piste
souhaitee s’afflche.
3 Appuyez sur >11 ou DSUENTER
pour demarrer la lecture.
● Vous pouvezdemarrer cette operation en
mode pause de lecture.
Dans ce cas, appuyez a nouveau sur
-11 apres I’etape 3 pour reprendre la
lecture.
Remarques
● La fonction recherche de tltre n’est pas
activee pendant la lecture aleatoire et la
lecture programmed.
● Si Ie clignotement s’arr&e pendant
I’operation, recommence la procedure
depuis Ie debut.
27
Page 28

OTHER SETTINGS -
To cancel the beep sound (Signal
sound funcfion) -+
Beep sounds are heard when you press an
operation button. You can cancel this beep
sound.
Operate in stop mode.
1 Keep DISP/SEARCHpresaedforabout
5 seconds.
“BEEP ON” is displayed.
2 Press DSIJENTER.
“BEEP OFF is displayed
sounds are canceled.
3 Press Z.
Toresume the beep sound
Display “BEEP ON in step 2.
To limit the maximum volume level
(Ear guard hmction) +
You can set the volume level from Oto 20.
When you set the Ear guard function, the
maximum volume will be limited at 12.
Operate in stop mode.
1 Keep DiSP/SEARCH pressed for about
5 seconds.
“BEEP ON is displayed.
2 Press MODE.
“EARG OFF is displayed.
3 Press DSIJENTER.
“EARG ON” is displayed and the Ear
guard function is set.
“ EAR GUARD ! “ is displayed when
setting the volume over the level of 12.
4 Press
■ .
❑
and beep
❑
Tocancel the Earguard function
Display “EARG OFF in step 3.
Page 29

OTROS AJ1/STES
- AUTRES REGLAGES -
Para cancelar el sonido de alarma
(funcion de sonido de sefial) +
Se escuchan sonidos de alarma cuando
oprima un boton de funcionamiento. Se
puede cancelar ei sonido de alarma.
Haga el siguiente procedimiento en el
modo de ~aradla.
1
Mantenga oprimido DISP/SEARCH
durante unos 5 segundos.
Aparece “BEEP ON.
2
Oprima DSIJENTER.
Aparece “BEEP OFF y se cancelan Ios
sonidos de alarma.
3
Oprima
■ .
❑
Para que vuelvana escucharseIos
sonidos de alarma
Haga aparecer “BEEP ON” en el paso 2,
Para Iimitar d nivel de volumen
maximo (funcion de proteccidn de
oidos) + E
Se puede ajustar el nivel de volumen entre
Oy 20. Cuando se selecciona la funcion de
protection de oido, el volumen maximo se
Iimitara a 12.
Haga ei siguielnte procedimiento en el
modo de parada.
1 Mantenga oprimido DISP/SEARCH
durante unos 5 segundos.
Aparece “BEEP ON.
2 Oprima MODE.
Aparece “EARG OFF.
3 Oprima DSL/ENTER.
Aparece “EARG ON y se activa Iafuncion
de protection de oidos.
Aparece “EAR GUARD !“ al seleccionar
un volumen de mas de 12.
4 Oprima
■ .
Para cancelar la funcionde protection
de oido
Haga aparecer “EARG OFF en el paso 3.
Pour anmder la tonalite bip
(fonction Signal sonore) -+
La tonalite hip, qui retentit a la pression
d’une touche de commande, peut 6tre
annulee.
Operez en mode d’erri?!t.
1 Maintenez DISP/SEARCH presse
environ 5 secondes.
“BEEP ON s’affiche.
2 Appuyez sur DSUENTER.
“BEEP OFF s’affiche et la tonalit6 bip
est annulee.
3 Appuyez sur W.
❑
Pourretablir la tonalite bip
Affichez “BEEP ON ~ I’etape 2.
Pour limiter Ie volume sonore
maximum (fonction Protection de
I’ouie) +
Vous pouvez regler Ie volume sonore entre
Oet 20. Si vows activez Iafonction Protection
de I’oufe, Ie volume sonore maximum sera
Iimite a 12.
O~erez en mode d’arr&.
1
Maintenez DISP/SEARCH presse
environ 5 secondes.
“BEEP ON s’affiche.
2
Appuyez sur MODE.
“EARG OFF s’affiche.
3
Appuyez sur DSUENTER.
“EARG ON” s’affiche et la fonction
Protection de I’oule est activee.
‘(EAR GUARD !“ s’affiche Iors du reglage
du volume sonore au-dessus du niveau
12.
4
Appuyez sur
❑
■ .
Pourannuler la fonction Protection de
l’ouTe
Affichez “EARG OFF a l’6tape 3.
29
Page 30

OTHERSETTINGS
w
To adjust Me contrast of the display
+E
You can set the contrast of the display from
oto 15.
Operate in stop mode.
1 Keep DISP/SEARCH pressed for 5
seconds.
“BEEP ON” is displayed.
2 Press MODE twice.
“CONTRAST is displayed.
3 Press VOL + or - to adjust the
contraat of the displav.
4 Press
■ .
Page 31

OTROSAJUSTES
-
AUTRESREGLAGES
-
Para ajustar el contraste de la
pantalla + H
Se puede ajustarel contraste de la pantalla
entre Oy 15.
Haga la operation en el modo de
parada.
1 Mantenga oprimido DISP/SEARCH
durante 5 segundos.
Aparece “BEEP ON”.
2 Oprima MOCtE dos veces.
Aparece “CONTRAST”.
3 Oprima VOL- + 0- para ajustar el
contraste en la pantalla.
4 Oprima
■ .
Pour ajuster /e contraste de
I’affichage -+
Le contraste de I’affichage est reglable de
oa 15.
Operez en mode d’arr&.
Maintenez DISPISEARCH presse 5
1
secondes.
“BEEP ON apparalt.
Appuyez deux fois sur MODE.
2
“CONTRAST” apparalt.
AppuyezaurVOL + ou - pourejuster
3
[e contraste de I’afflchage.
4
Appuyez sur
❑
■ .
31
Page 32

MD GUIDE MESSAGES m
BLANK DISC
● Nothing is recorded on the disc.
DISC ERROR
● The disc is damaged by scratches.
● The TOC (Table of contents) data is not
registered correctly.
EAR GUARD !
● You cannot increase thevolumeanymore
by the EAR GUARD function.
HOLD
● The HOLD switch issetto HOLD position.
NO DISC
● No disc is inside the unit.
LOW BATT
● The battery wears out.
OPEN
● The disc holder is not closed.
PRGM FULL
● 25 tracks are already programmed and
no track can be added,
Page 33

MEIUSAJES DE GUIA m
DE MINIDMCO
MESSAGES GUIDE DU -
MD
BLANK DISC
● No hay nada grabado en el disco.
DISC ERROR
● El disco esta tiene rayas.
● Los dates TOC (hldice tematico) noestan
registrados correctamente.
EAR GUARD !
● No es posibie aumentar mas el volumen
porlafuncion deprotecclon EAR GUARD.
HOLD
● Los interruptores HOLD estan en la
position HOL[).
NO DISC
● No hay un disco en el aparato.
LOW BATT
● La pila o bater[a esta agotada.
OPEN
● El compartimiento del disco no esta
cerrado.
PRGM FULL
● Ya hay 25 canciones programadas y no
puede agregar ninguna canci6n.
BLANK DISC
● Rlen n’est enregistre sur Ie disque.
DISC ERROR
● Le disque est raye.
● Les donnees TOC (Table des matieres)
sent mal consignees.
EAR GUARD !
● Le volume ne peut pas 6tre augmente
davantage a cause de la fonction EAR
GUARD.
HOLD
● Lecommutateur HOLD est regle a HOLD.
NO DISC
● II n’y a pas de disque clans I’appareil.
LOW BATT
La batterie/le pile est presque epuisee.
c
OPEN
● Le Iogement du disque n’est pas ferme.
PRGM FULL
● 25 pistes sent deja programmers et
aucune ne peut ~tre ajoutee.
33
Page 34

TROUBLESHOOTING =
GUIDE
If the unit sails to Derform as described in
these Operating instructions,
check the
following guide.
Power does not turn on.
● Insert the battery correct Iy.
● Recharge the rechargeable
replace the dry cell battery.
Operafion does
● ‘Close the disc holder completely.
● Insert a disc.
● Release the HOLD switch.
● Connect the remote control completely.
● Remove the battery and leave the unit for
not sfart.
about 30 seconds.
Then, inserf the battery and try playback
again.
battery or
Thesoundnoisy.
● If the unit is close to a magnetic object,
keep the unit further away from it.
Soundmutes.
● Place the unit on a stable surface with no
vibration.
Sound cannot be heard from the
headphones.
● Connect the headphones firmly.
Wrong or no display appears on the
remote control.
● Connect the remote control firmly.
Page 35

GUIA DE
mm
LOCALlZA170N DEA VERIAS
GUIDE DE
DEPANNAGE
Si el aparato no funciona como se describe
en el Manual de instrucciones, inspeccione
Ios puntos de esta gu(a.
Nose conecta ed aparato.
● Inserte correct,amente la pila o bateria.
● Recargue la bateria recargable o cambie
la pila.
No futfciona.
● Cierre bien el compartirnlento del disco.
● Inserte un disco.
● Suelte et interruptor HOLD
● Conecte comlpletamente el mando a
dlstancia.
● Saque la bateria y deje el aparato sin
carga durante unos 30 segundos.
Vuelva a colocar la bateria y pruebe a
reproducer nuevamente.
Hay mucho rui$o.
● Si el aparato esta cerca de un objeto
magnetico, mantenga el aparato alejado.
Silenciamiento del sm?ido.
● Coloque el aparato en una superficie
estable sin vibraciones.
No puede escuchar ningfin sonido por
/0s auriculares,,
● Conecte firme[menteIos auriculares.
Si cet appareil ne fonctionne pas comme
indique clans ce Mode d’emploi, veriflez Ies
grands points suivants
L‘appareil ne se met pas sous tension.
● Inserez correctement la batterie/le pile.
● Rechargez la batterie rechargeable ou
remplacez la pile seche.
L‘appareil ne demarre pas.
● Refermez completement Ie Iogement du
disque.
● Inserez un dlsque.
● Liberez Ie commutateur HOLD.
s Inserez fermement la fiche de la
telecommande.
● Rettrez la pile et laissez I’appareil tel quel
environ 30 secondes.
Puis, relnserez la pile et essayez a
nouveau de Iire.
Son parasit&
● Si I’apparetl est proche d’un objet
magnetise, eloignez-le davantage.
Assourdissement du son.
● Placez I’appareil sur une surface stable
saris vibration.
Son inaudible aux ecouteurs.
● Raccordez fermement Ies ecouteurs.
No aparece la indication o aparece una
equivocada
● Conecte flrmernenteelmandoadistancia.
en.9 mando a distancia.
Affichage errone ou pas d’affichage sur
la telecommande.
● Raccordez fermement la telecommande.
35
Page 36

SPECIFICATIONS
Main unit
Playback systsm
MiniDiscdigitalaudio system
Lassr pickup
Sernconductor laser
Sampling Frequency
44.1 kHz
Number of channels
Stereo: 2 channels
Monaural:l channel
DIA converter
1-bit
Frequency response
40 – 20,000
Hz *4 dB
20 –20,000 HZ *1 dB (10 I@
Wow and Flutter
Below measurable limit
(AO.001% W.PEAK)
output
QREMOTE jack
Maximum output level
10 mW +10 mW (16
ohms)
Power requirements
DC 1,2 V usingthe suppliedNi-MH
rechargeable batteryMHB-901
DC 1.5 V usinga size AA (LR6) dry cell
battety
house current using an optional AC
AC
adaptor
Battery life
Using the supplied rechargeable battery
Approx. 8 hours
Using a size AA (LR6) dry ceil battery
Approx. 9 hours
Using the supplied rechargeable battery and
a size AA (LR6) dry cell battery
Approx. 21 hours
Dimensions
Approx.86.8 (W) x 16.3 (H) x
mm
77.6 (D)
(3
1/8x 25/32X ?i 7/8 in.)
Weight Approx. 132 g, 6.5 oz
includingthe rechargeable
battery
cBattery charger RB-M02>
Rated voltage
AC 120 V, 60
● The specifications and external appearance of
this unit are subject to change without notica.
● US and foreign patents licensed from Dolby
Laboratories Licensing Corporation.
HZ
36
Page 37

ESPECIFICACIONES
mm
Aparato
Sistema de reproduction
Sistema de audio digital por
mmldisco
Receptor laser
Laser por semiconductor
Frecuencia de muestreo
44,1 kHz
Numero de carwles
Est&eo: 2 canales
Monoaural: 1 canal
Conversion digital/analogica
1 bli
Respuesta de frecuencia
40--20.000 HZ +4 dB
20-.20.000
Hz *1 dB (1O I@)
Fluctuaciones dlevelocidad
Por debajo del I(mite inedible
Salida
(* 0,001%
Toma flREMOTE
en el pico)
Nivel de sakda maximo
Requisites electricos
10 rnW +
CC de 1,2 V utikzando la bateria
recargable Ni-hflH MHB-901
CC de 1,5 V utlllizando una pila de tamaiio
AA (LR6)
CA del hogar con un adaptador de CA
optional
10 mW (16 ohmios)
Longevidad
Con la baterfa recargable suministrada
Aprox,8 horas
Con una
Con la bateria recargable suministrada y
una uila de tamafio AA (LR6)
plla de Itamafio AA (LR6)
Aprox. 9 horas
Aprox, 21 horas
Dimensioned
Aprox.86,6 (An.) x 16,3 (Al)x
77,6 (Prof.)
mm
Peso Aprox. 132 g incluyendo la
bateria recargable
cCargador de bateria RB-M02>
Voltsje de regimen
CA de 120 V, 60 Hz
● Las especlflcacionesy el aspectoexternode
esteaparatoestansujetosacambiossinprevio
aviso
● Las patentesEE, UU, y extranjeras han sido
otorgadas por Dolby Laboratories Licensing
Corporabon..
37
Page 38

SPECIFICATIONS
Appareil
Systeme de lecture
Systeme audio numerique
MiniDisc
Bloc de lecture Iaaer
Laser semi-conducteur
Frequence d’echantillonnage
44,1 kHz
Nombre de canaux
Stereo: 2
Convertisseur n-a
Reponseenfrequence
Pleurage et ecintillement
Sortie
Alimentation
1,2 V C.C. avec la baftarie rechargeable
Ni-MH MHB-901
1,5 V C.C. avec une pile seche format AA
(LR)
Secteur domestique avec un adaptateur
secteur
Autonomic
Batterierechargeable fournie
Monaural: 1 canal
1 bit
40 – 20.000 Hz +4 dB
20-20,000
Non mesurable
(W.PEAK *0,001%)
Prise OREMOTE
Niveau de sortie maximum
10mW+10mW(160hms)
canaux
HZ *I dB (10 IQ
Env. 8 heures
Pile seche de format AA (LR6)
Env. 9 heures
Batterierechargeable fournie et pile seche
de formatAA (LR6)
Env. 21 heures
Dimensions
(Lx H x P) Env. 86,8 x 16,3 x
Poids Env. 132 g, bafferie
77,6 mm
rechargeable incluse
<Chargeur de batterie RB-M02>
Tension nominale
Secteur 120 V, 60
. Les specifications et I’aspect exterieur de cet
appareil Sentsujets a modification saris preavls.
● Dolby Laboratories Licensing Corporation
autorise une license d’exploitation de ses
brevets d’invenfion americains et etrangers.
Hz
Page 39

Page 40

AIWA CO.,LTD.
8Z-HM4-903-01
981125AY0-O-UO
Printed m Japan
 Loading...