

Page 1
4-147-648-11(2)
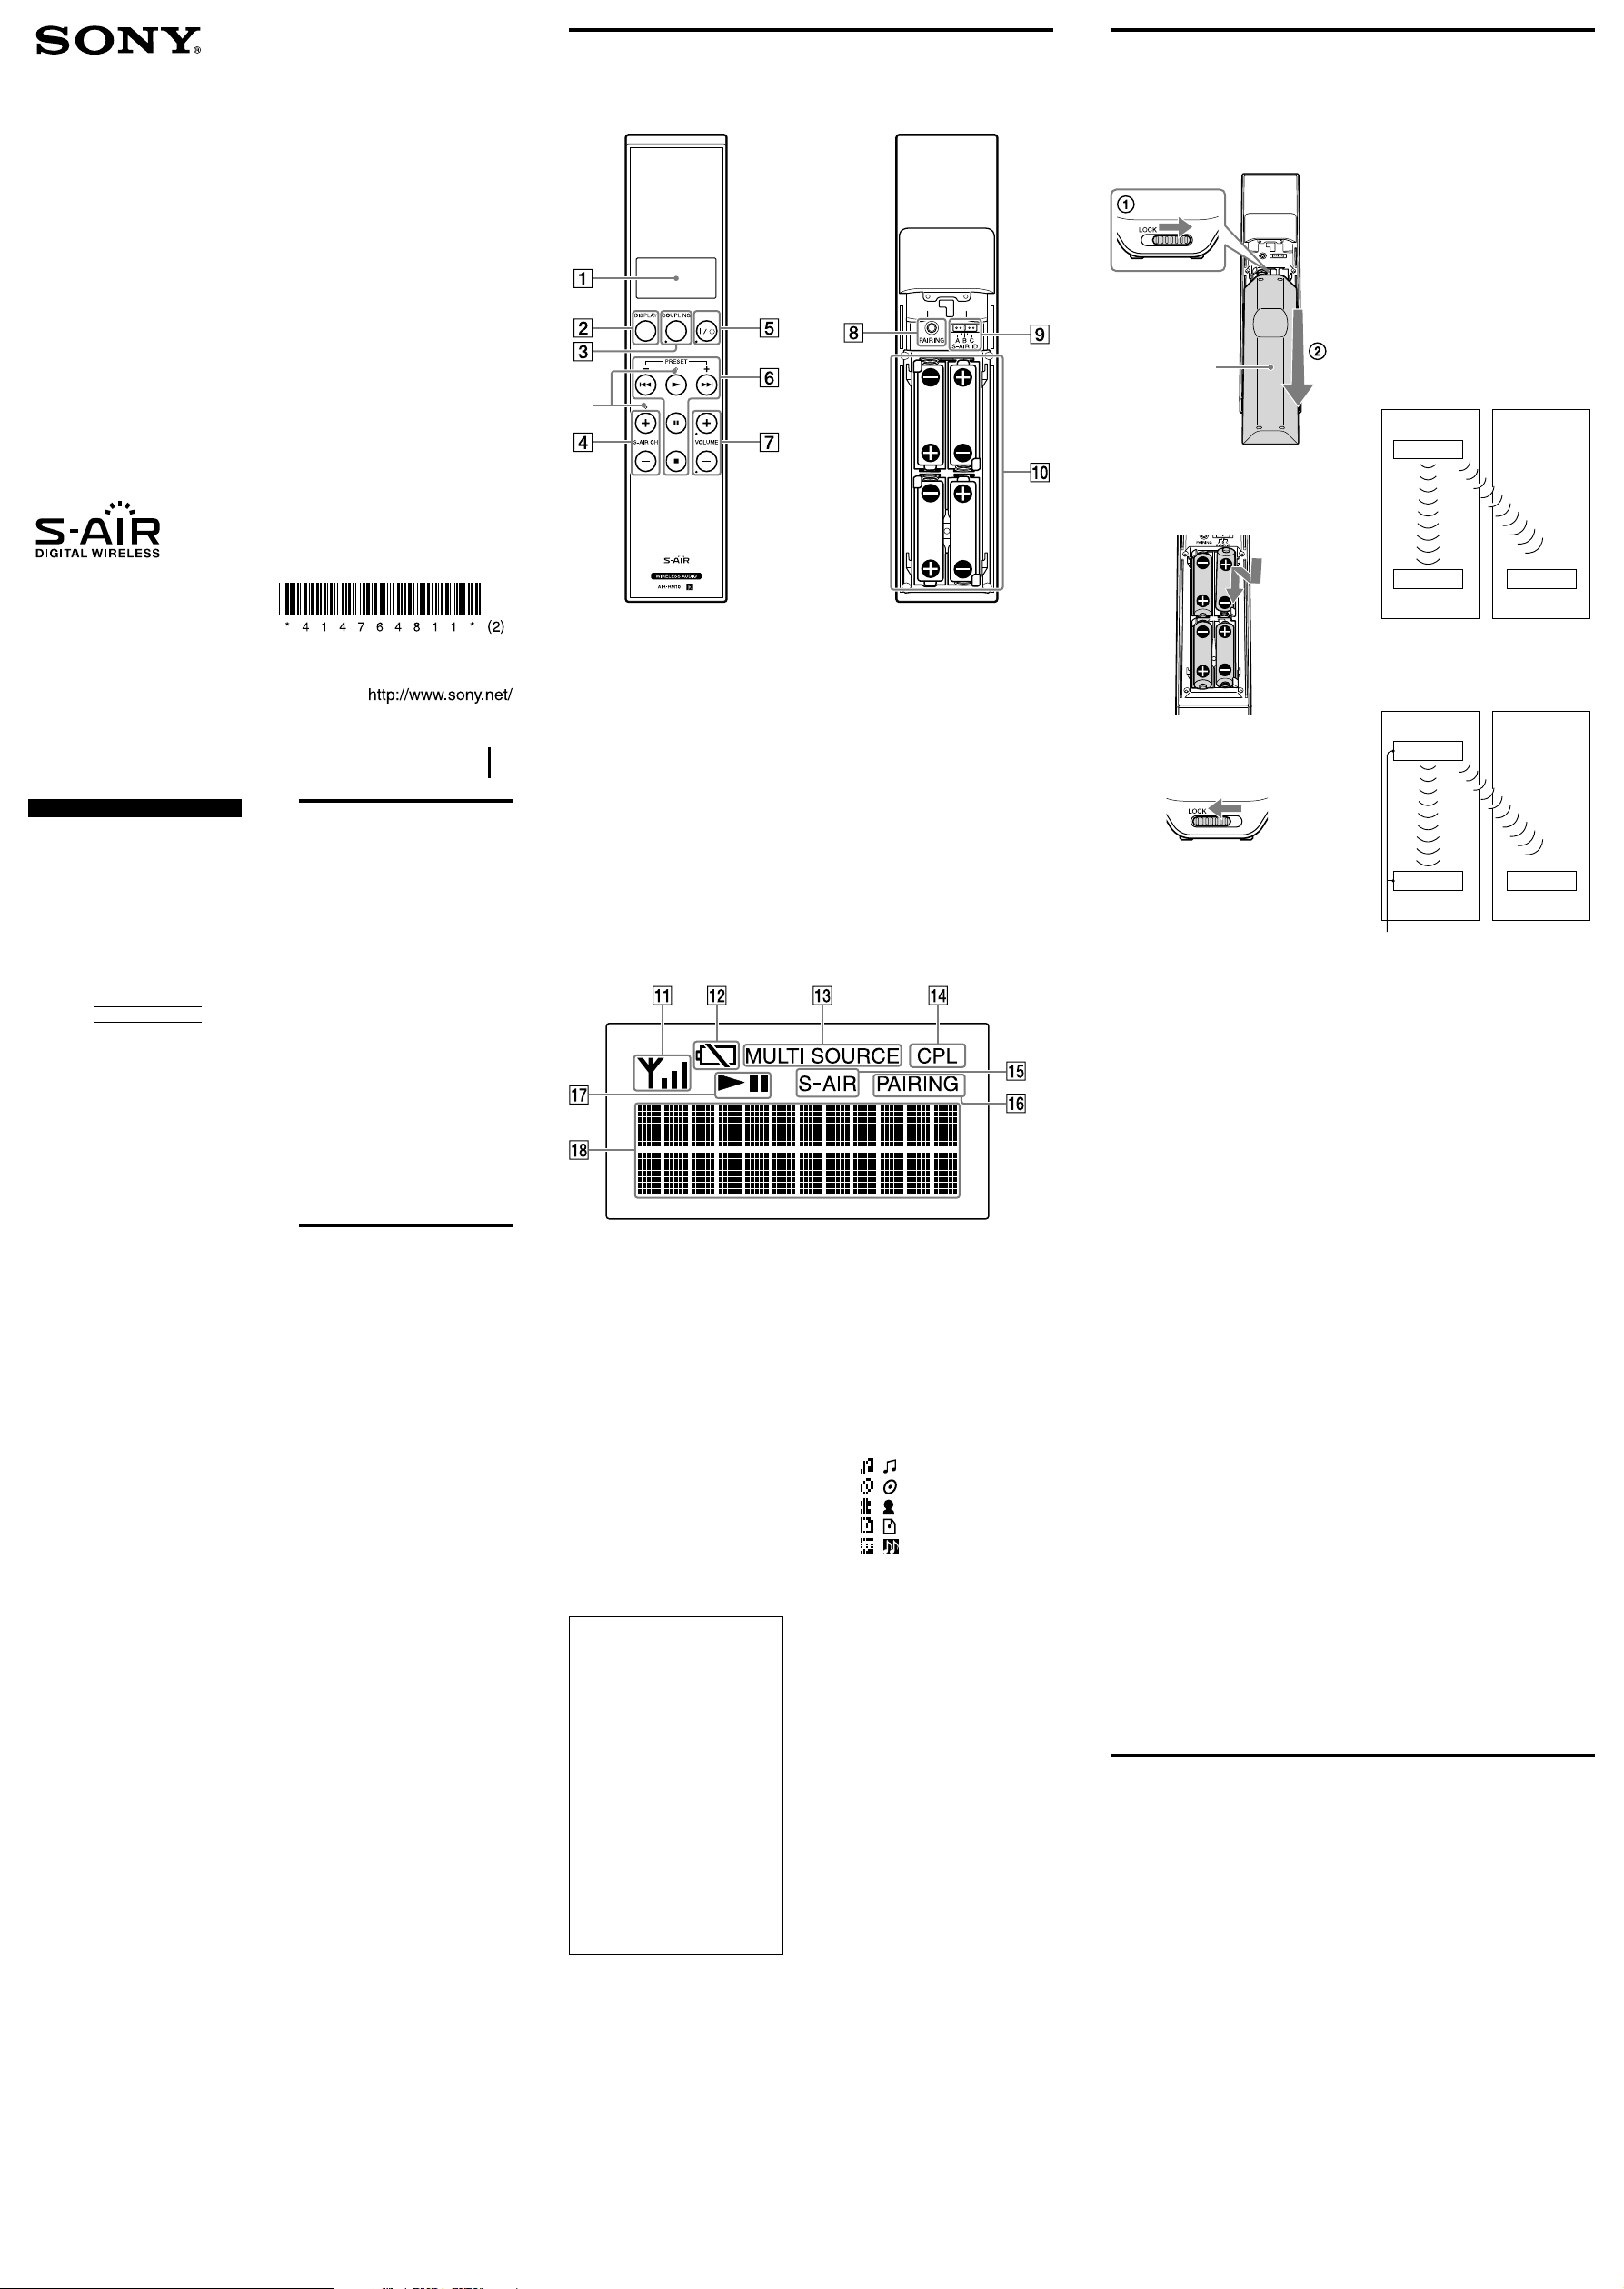
Identifying the parts
Getting started
Remote Commander
Unit (front)
**
Unit (rear without the
battery compartment lid)
Inserting the batteries
1 Unlock and slide the
battery compartment lid to
open.
Battery
compartment lid
2 Insert the four supplied LR6
(size AA) batteries.
Insert side first, matching the
polarities as shown below.
Identifying the unit with a
specific S‑AIR main unit
(Pairing operation)
It is easy to set the same S-AIR ID for
the unit and S-AIR main unit to
establish the connection.
However, if a neighbor has an S-AIR
main unit with the same S-AIR ID as
your S-AIR main unit, the neighboring
system may receive and react to the
command from this remote
commander. To prevent this, you can
identify the unit with a specific S-AIR
main unit by performing the pairing
operation.
Before pairing
The connection is established by the
S-AIR ID (example).
Your system
This unit
ID:A
ID:A ID:A
Main unit
Neighboring system
Main unit
Operating Instructions
AIR-RM10
©2009 Sony Corporation Printed in China
WARNING
Do not expose batteries or apparatus
with battery-installed to excessive heat
such as sunshine, fire or the like.
Owner’s Record
The model and serial numbers are
located on the bottom of the unit.
Record these numbers in the space
provided below. Refer to them
whenever you call upon your Sony
dealer regarding this product.
Model No.
Serial No.
NOTE:
This equipment has been tested and
found to comply with the limits for a
Class B digital device, pursuant to Part
15 of the FCC Rules. These limits are
designed to provide reasonable
protection against harmful interference
in a residential installation. This
equipment generates, uses and can
radiate radio frequency energy and, if
not installed and used in accordance
with the instructions, may cause
harmful interference to radio
communications. However, there is no
guarantee that interference will not
occur in a particular installation. If this
equipment does cause harmful
interference to radio or television
reception, which can be determined by
turning the equipment off and on, the
user is encouraged to try to correct the
interference by one or more of the
following measures:
Reorient or relocate the receiving
Increase the separation between the
Connect the equipment into an
Consult the dealer or an
CAUTION
You are cautioned that any changes or
modifications not expressly approved
in this manual could void your
authority to operate this equipment.
This equipment must not be co-located
or operated in conjunction with any
other antenna or transmitter.
This equipment complies with FCC
radiation exposure limits set forth for
uncontrolled equipment and meets the
FCC radio frequency (RF) Exposure
Guidelines in Supplement C to OET65.
This equipment has very low levels of
RF energy that it is deemed to comply
without testing of specific absorption
ratio (SAR).
“S-AIR” and its logo are trademarks of
Sony Corporation.
The Bluetooth word mark and logos are
owned by the Bluetooth SIG, Inc. and any
use of such marks by Sony Corporation is
under license. Other trademarks and trade
names are those of their respective owners.
iPod and iTunes are trademarks of Apple
Inc., registered in the U.S. and other
countries.
iPhone is a trademark of Apple Inc.
All other trademarks and registered
trademarks are of their respective holders.
In this manual, ™ and ® marks are not
specified.
antenna.
equipment and receiver.
outlet on a circuit different from
that to which the receiver is
connected.
experienced radio/TV technician
for help.
Features
The AIR-RM10 is an “S-AIR”
compatible product.
Using this unit, you can operate the
S-AIR transmitter product (called
S-AIR main unit) to select a track to be
played on the S-AIR receiver product
(called S-AIR sub unit) and check
information on the display of this
remote commander, such as a track
name, which is sent from the S-AIR
main unit.
For the S-AIR sub unit, power
management, volume adjustment and
coupling operations can be performed
using this remote commander. After
the coupling operation is established,
the S-AIR sub unit and this remote
commander are linked together.
This unit is also compatible with
“MULTI SOURCE” mode. That will
allow you to select and to listen to
multiple sources sent from the S-AIR
main unit to the S-AIR sub units.
Precautions
Notes on use of the S‑AIR
product
As the S-AIR product transmits data
by radio waves, data may skip when
radio waves are obstructed. This is a
characteristic of radio waves and is
not a malfunction.
As the S-AIR product transmits data
by radio waves, equipment that
generates electromagnetic energy,
such as a microwave oven, may
interfere with sound transmission.
As the S-AIR product uses the radio
waves that share the same frequency
as other wireless systems, such as
wireless LAN or Bluetooth devices,
interference or poor transmission
may result. In this case, take the
following step:
Do not use S-AIR product and
the other wireless systems at the
same time.
The transmission distance differs
depending on the usage
environment. Find a location where
transmission between the unit and
the S-AIR main unit is most
effective, and install the unit and the
S-AIR main unit there.
On safety
Should any solid object or liquid get
into the unit, and have it checked by
qualified personnel before operating it
again.
On placement
Do not place the unit in an inclined
position or in locations that are
extremely hot, cold, dusty, dirty,
humid or lacking adequate
ventilation, subject to vibration,
direct sunlight or bright light.
Be careful when placing the unit on
surfaces that have been specially
treated (for example, with wax, oil,
polish) as staining or discoloration
of the surface may result.
On heat buildup
Heat buildup in the unit during
operation is normal and is not cause
for alarm.
Cleaning the cabinet
Clean the cabinet with a soft dry cloth.
Do not use any type of abrasive pad,
scouring powder, or solvent, such as
thinner, benzine, or alcohol.
Display
DISPLAY button
Changes the content in the
information display lines.
COUPLING button*
To identify one of the S-AIR sub
units.
S‑AIR CH +/– button
/ (power) button*
Turns on/off the power of the
S-AIR sub unit.
Play operation buttons/
PRESET +/– button
VOLUME +/– button*
Changes the volume of sub unit.
Display
Wireless strength
Battery Status
Blinks when the battery level is
low. Turns on when the batteries
are empty. Replace all the batteries
with new ones.
MULTI SOURCE
Turns on when the main unit is
set to MULTI SOURCE mode.
CPL
Blinks when the coupling
operation setting is in process:
turns on when the coupling
operation is on.
S‑AIR
Turns on when the unit and the
main unit are connected by
S-AIR.
S‑AIR (Sony Audio
Interactive Radio frequency)
Recent times have seen the rapid
spread of DVD media, Digital
Broadcasting, and other highquality media.
To ensure that the subtle nuances of
these high-quality media are
transmitted with no deterioration,
Sony has developed a technology
called “S-AIR” for the radio
transmission of digital audio signals
with no compression, and has
incorporated this technology into
AIR-RM10.
This technology transfers digital
audio signals with no compression
using the 2.4 GHz band range of
ISM band (Industrial, Scientific, and
Medical band), such as wireless
LANs and Bluetooth applications.
PAIRING button
S‑AIR ID selector
To set the same ID for this unit
and an S-AIR main unit.
Battery compartment
* The buttons with a circle mark
beside them are for operating S-AIR
sub units. Aim the top end of this
unit at the remote sensor of a S-AIR
sub unit.
** These are tactile dots.
PAIRING
Blinks when the pairing operation
setting is in process: turns on
when the pairing operation is on.
Displays the playing status of the
main unit.
Information display lines
Displays setting status, the S-AIR
main/sub unit information, etc.
At the left end of each line, the
following icons will be displayed.
( ): Music/Track
( ): Album
( ): Artist
( ): Playlist
( ): Genre
After pairing
The connection is established between
the paired main unit and this unit.
Your system Neighboring system
3 After inserting the batteries,
attach the battery
compartment lid, and lock it.
Notes on using the remote commander
With normal use, the batteries should last
for about five months.
Do not mix old batteries with new ones or
mix different types of batteries.
If you do not use the remote commander
for a long period of time, remove the
batteries to avoid damage from battery
leakage and corrosion.
Establishing the
connection with an S‑AIR
main unit
Connect the unit and S-AIR main unit.
You can easily establish the connection
by setting the same S-AIR ID for this
unit and the S-AIR main unit.
1 Turn on the S‑AIR main unit.
Note
Pressing / (power) of this unit cannot
turn on the S-AIR main unit. Use the
button on the S-AIR main unit or
infrared remote (if supplied) to turn on
the main unit.
2 Unlock and open the battery
compartment lid, and then set
the S‑AIR ID selector to the
same ID as of the S‑AIR main
unit to be connected.
For details on setting the S-AIR ID
of the S-AIR main unit, refer to the
Operating Instructions supplied
with the S-AIR main unit.
3 Press any button on this unit.
The unit turns on and starts
searching S-AIR connection.
4 Operate the S‑AIR main unit to
turn on the S‑AIR function.
Once the connection is established,
“S‑AIR” turns on.
The model name of the main unit
and “LINKED” appears in
information display lines for a few
seconds.
Note
Be sure to also set the same S-AIR ID on the
S-AIR sub unit. Refer to the Operating
Instructions of the S-AIR sub unit for details.
This unit
ID:A
ID:A ID:A
Main unit Main unit
Pairing
1 Place the S‑AIR main unit to be
paired near this unit.
Pair the main unit with the remote
commander one at a time.
2 Check the power of the S‑AIR
main unit to be connected is
turned on.
Note
Pressing / (power) of this unit cannot
turn on the S-AIR main unit. Use the
button on the S-AIR main unit or
infrared remote (if supplied) to turn on
the main unit.
3 Press any button on this unit.
The unit turns on.
4 Operate the S‑AIR main unit to
turn on the pairing function.
For details on turning on the
pairing function, refer to the
Operating Instructions supplied
with the S-AIR main unit.
5 Unlock and open the battery
compartment lid, and press the
PAIRING button on the rear
panel of the unit.
When pairing is in progress,
“PAIRING” blinks in the display.
When completed, the display
message changes to “PAIRING
COMPLETE!” and it stays on for a
few seconds. “PAIRING” appears in
the display at the same time.
To cancel pairing
Change the S-AIR IDs of the unit and
the S-AIR main unit to different S-AIR
IDs.
To stop the pairing operation
midway
Press the PAIRING button again.
Note
Be sure to pair the S-AIR main unit with the
S-AIR sub unit.
Refer to the Operating instructions of the
S-AIR sub unit for details.
Operating S‑AIR sub unit with this unit
Turning on the sub unit
Using / on this unit can turn on the
power of selected sub unit.
1 Aim the unit to an S‑AIR sub
unit you want to turn on.
2 Press / to turn on the sub
unit.
Adjusting the volume
Using the VOLUME +/– can change
the volume of a sub unit when it is
turned on.
1 Aim the unit to an S‑AIR sub
unit you want to change the
volume.
2 Press VOLUME +/– to adjust the
volume.
Notes
Even when you have performed the
coupling operation with another sub unit,
volume operation is effective whenever the
remote sensor of the sub unit can receive
the command.
Even when you have set “REMOTE OFF”
on your sub unit, volume operation is
effective whenever the remote sensor of
the sub unit can receive the command.
not connected
Page 2
Operating S‑AIR main unit with iPod dock
such as the AIR‑SA17Ti with this unit
Operating BD/DVD Home Theatre System
main unit with this unit
Listening to sound with an
S‑AIR sub unit
1 Operate the main unit to output
sound.
For details on setting up and
operating the main unit, refer to
the Operating Instructions
supplied with the main unit.
2 Turn on the sub unit by
pressing / (power) of this
unit.
3 Press VOLUME +/– to adjust the
volume.
To identify the unit with a
specific sub unit (Coupling
operation)
If you have two or more sub units, you
can listen to different sound sources on
each sub unit by selecting the MULTI
SOURCE mode.
In MULTI SOURCE mode, since each
sub unit can receive different sound
sources from the main unit, this unit
may not display the correct sub unit
sound source information.
To prevent this, differentiate such sub
units from one another by identifying
(coupling) with the unit.
1 Make sure the sub units and
this unit have all established
connection with the S‑AIR main
unit.
2 Aim the unit at one of the S‑AIR
sub units and press COUPLING.
3 Check that “CPL” blinks, and
then stays on in the display to
indicate coupling was
successful.
If “CPL” does not turn on or an error
message appears, see
“Troubleshooting.”
Note
Use the main unit to set the S-AIR mode.
Refer to the Operating Instructions of the
main unit for details.
Performing play
operations
You can also perform the following
play operations with this unit.
To Press
Start playback.
Pause playback. , or
Resume playback
during pause.
Select a track. /
Find a point in a track. Hold down
Select preset radio
station.
Select the function. S-AIR CH +/–
or
/ during
playback, and
release the button
at the desired
point
PRESET +/–
Viewing information of
the S‑AIR main unit with
iPod dock such as the AIR‑
SA17Ti with this unit
Press DISPLAY.
Note that the title name is always
displayed in the top line when the
S-AIR connection is available.
Each time you press the button, you
can check the following information in
the bottom line of the Information
display lines.
Up to 64 characters of information can
be displayed.
When the unit is connected
Information of S-AIR main unit with
iPod dock such as the AIR-SA17Ti*
Model name of connected main unit
and the model name of connected sub
unit with coupling operation** …
* The following information can be viewed,
for example, while playing the iPod.
–Track name
–Artist name
–Album name
–Elapsed playing time of track
When listening to the radio, the frequency
is displayed.
** This information will return to “Title
name” automatically in a few seconds.
Note
Depending on the iPod or iPhone, some
information will not be displayed. For detail,
refer to the Operating Instructions of the
main unit.
Operating AIR‑PC10T S‑AIR main unit with
this unit
Listening to sound with an
S‑AIR sub unit
1 Operate the main unit to output
sound using the Remote Mode
or the Advanced Remote Mode.
For details on setting up and
operating the AIR-PC10T, refer to
the Operating Instructions
supplied with the AIR-PC10T.
2
Turn on the sub unit by pressing
/
(power) of this unit.
3 Press VOLUME +/– to adjust the
volume.
Using on the Remote
Mode
You can perform the following
operations on the Remote Mode of the
S-AIR Cast.
Key operations
To Press
Start playback.
Stop playback.
Pause playback.
Resume playback
during pause.
Select playlist.* S-AIR CH +/–
Select track. /
* When using Windows Media Player,
“Playlist” and “All Music” changes
alternately.
Contents of the Information
display lines
The title name is displayed in the top
line.
Press DISPLAY and you can change
information displayed in the bottom
line as follows.
Title name (continued from the top
line) Album name Artist name
Genre Playlist name Model
name of connected main unit** ...
Up to 64 characters of information can
be displayed.
** This information returns to “Title name”
automatically in a few seconds.
Tip
When you change playlist, the new playlist
name will be displayed for some seconds.
Press / to change the top
line (the track is also changed.)
Press DISPLAY to change the
information that appears in the
bottom line.
or
Using on the Advanced
Remote Mode
You can perform the following
operations on the Advanced Remote
Mode of the S-AIR Cast.
Key operations
To Press
Start playback.
Stop playback.
Pause playback.
Resume playback
during pause.
Change Channel
Group.
Select Channel. S-AIR CH +/–
Select track. /
Contents of the Information
display lines
The title name is displayed in the top
line.
Press DISPLAY and you can change
the Channel Group and information
displayed in the bottom line together
as follows.
Title name Album name Artist
name Genre iTunes MED
MGR (Media Manager) SonicStage
WMP (Windows Media Player)
Model name of connected main unit**
…
Up to 64 characters of information can
be displayed.
** This information returns to “Title name”
automatically in a few seconds.
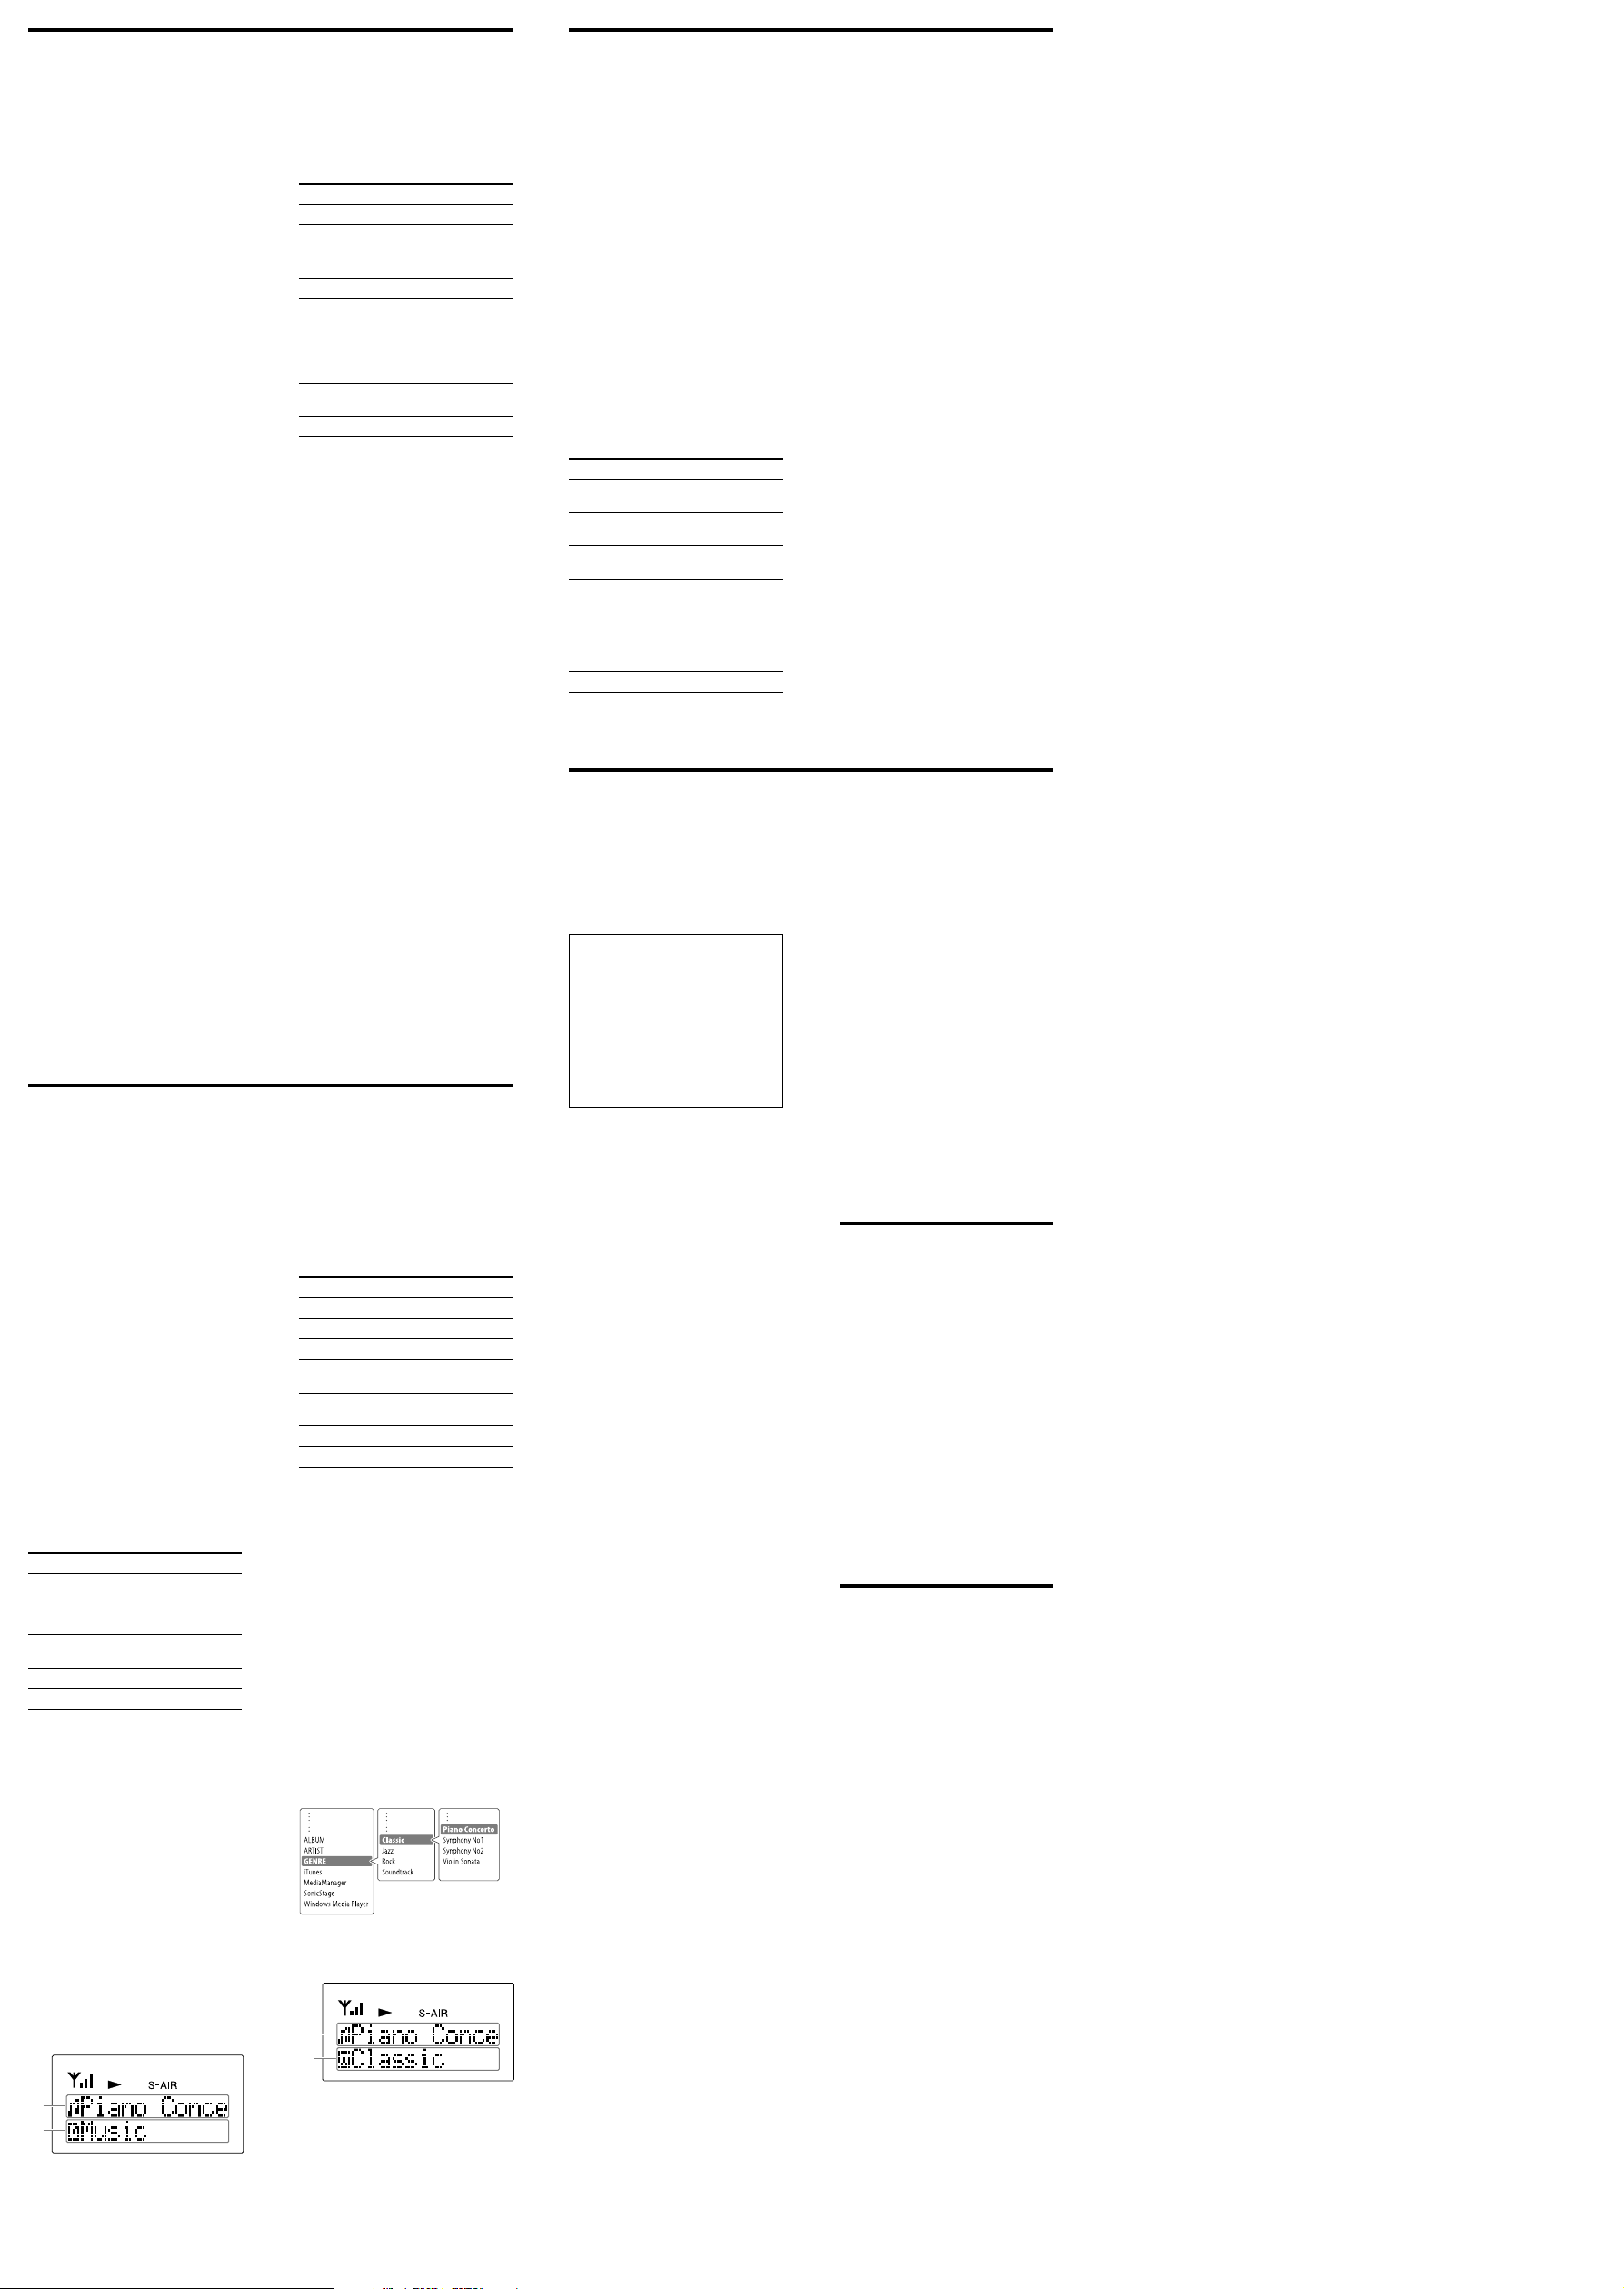
Examples of operating the
S‑AIR sub unit
Select channel
group by
pressing DISPLAY.
(Example: GENRE)
Press / to change the top
line (the track is also changed.)
Press DISPLAY or S-AIR CH+/– to
change the bottom line (the channel
group or channel is changed
according to the key operation.)
or
DISPLAY
Select a
channel by
pressing
S‑AIR CH+/–.
(Example:
Classic)
Select a track
by pressing
/.
(Example: Piano
Concerto)
Listening to sound with an
S‑AIR sub unit
1 Operate the main unit to output
sound.
For details on setting up and
operating, refer to the Operating
Instructions supplied with the
system.
2 Turn on the sub unit by
pressing / (power) of this
unit.
3 Press VOLUME +/– to adjust the
volume.
Performing play
operations
You can also perform the following
play operations with this unit.
To Press
Start playback of a CD/
DVD, etc.
Stop playback of a CD/
DVD, etc.
Pause playback of a
CD/DVD, etc.
Select a track, file or
chapter of a CD/DVD,
etc.
Select a preset station
when listening to the
radio.
Select the function. S-AIR CH +/–
/
PRESET +/–
Troubleshooting
1 Make sure that the batteries are
properly inserted.
2 Find your problem in the
checklist below, and take the
indicated corrective action.
If the issue persists, contact your
nearest Sony dealer.
When bringing this unit in for
repairs, be sure to bring in the entire
system (this unit, the S-AIR main
unit and sub units).
This product is a system product,
and the entire system is needed to
determine the location requiring
repair.
The remote commander does
not function.
Remove any obstacles between the
remote commander and the remote
sensor on the unit, and position the
unit away from fluorescent lights.
Point the remote commander at the
remote sensor on the unit.
Move the remote commander closer
to the unit.
The batteries are running out.
Replace all the batteries with new
ones.
Connecting the unit and S‑AIR
main unit is not possible. (The
“S‑AIR” in the display flashes.)
If you use another S-AIR main unit,
place it more than 8 m (26 1/4 feet)
away from the S-AIR main unit you
are using.
Confirm the S-AIR IDs of the unit
and the S-AIR main unit.
Place so that the unit and the S-AIR
main unit are separated from other
wireless devices.
Stop using any other wireless
devices.
The connected S-AIR main unit is
turned off. Make sure the power
cord is connected and turn on the
S-AIR main unit.
Check the pairing setting.
Place so that the unit and the S-AIR
main unit are closer.
Stop using any equipment that
generates electromagnetic wave such
as a microwave oven.
Change the S-AIR ID settings of the
unit and the S-AIR main unit.
Turn off the unit and S-AIR main
unit and then turn them on again.
The S‑AIR channel fails to
change.
Check that the unit and the S-AIR
main unit are connected properly.
When using the Wireless Audio
Transmitter for PC as the S-AIR
main unit, sub unit operations will
not be functional if S-AIR Cast is
not booted or Standard Mode is
selected.
“MULTI MODE INVALID”
appears in the display when
setting the Coupling
operation.
The main unit cannot be set to the
MULTI MODE. When using the
PARTY mode, the coupling
operation setting is not necessary.
“COUPLING INVALID” appears
in the display when setting the
Coupling operation.
The main unit cannot recognize the
coupling operation. In this case, the
sub unit cannot also be set on the
Coupling operation.
Viewing information of
DVD Home Theatre
System with this unit
Press DISPLAY.
Note that some information cannot be
displayed properly, depending on
models.
Each time you press the button, you
can check the following information in
the bottom line of the Information
display lines.
Up to 64 characters of information can
be displayed.
When the unit is connected
Function of connected main unit*
Model name of connected main unit**
...
* Depending on the model you are using,
information such as following can be
viewed.
–MAIN UNIT
–TUNER FM
–TUNER AM
–DMPORT
–AUDIO
** Displayed for a few seconds.
“COUPLING FAILED” appears in
the display when setting the
Coupling operation.
This message appears at the
following situation:
– The sub unit tried to be set is not
compatible.
– Two or more sub units accepted
the setting command at the same
time.
– An error occurs at the setting.
“COUPLING ERROR: RETRY”
appears in the display when
setting the Coupling
operation.
An error occurs at the setting. Try
the setting procedure again.
Display does not turn on (or
only turns on).
The batteries are running out.
Replace all the batteries with new
ones.
Messages
PAIRING CANCEL : Time out without
pairing.
PAIRING COMPLETE! : Pairing is
completed.
LINKED : The unit is connected to the
S-AIR main unit.
PAIRING… : Pairing is in progress.
COUPLING… : Coupling is in
progress.
COUPLING ON : Coupling is
completed.
((PLAY)) : This unit cancels the
standby mode, and then starts S-AIR
connecting.
STANDBY : This unit enters into
standby if no button is pressed for a
certain time. Press any key to clear
standby while “STANDBY” is
displayed.
Specifications
Power requirements: LR06 (size AA)
batteries
Battery life: Approx. 5 months
Dimensions: Approx. 53 × 220 × 29
mm (w/h/d) (2 1/8 × 8 3/4 × 1 3/16 in)
Mass: Approx. 132 g (4.6 oz) (not
including batteries)
Supplied accessories:
LR6 (size AA) batteries (4)
Design and specifications are subject
to change without notice.
 Loading...