

Page 1
4-678-793-11 (1)
User's Guide (Basic
)
Page 2

For Customers in
the U.S.A.
Safety Information
Owner’s Record
The model number and serial number are
located inside the cover of the unit and on the
side of the supplied AC adapter. Record the
serial number in the space provided below.
Refer to the model and serial number whenever
you call upon your Sony
Link (customer service).
Model No. ERS-7
Serial No. ________________
Warning
• To prevent fire or shock hazard, do not expose
the robot to rain or moisture.
• To avoid electrical shock, do not open the
enclosure. Refer servicing to qualified
personnel only. (Contact the AIBO Customer
Link for customer service.) (page 5)
• Periodically examine the AC adapter for
conditions that may result in the risk of fire,
electrical shock, or injury to persons (such as
damage to the cords, blades, housing) and in
the event of such conditions, the AC adapter
should not be used until properly repaired or
replaced.
• Not intended for children under 8 years old.
• This device complies with Part 15 of the FCC
Rules. Operation is subject to the following
two conditions: (1) This device may not cause
harmful interference, and (2) this device must
accept any interference received, including
interference that may cause undesired
operation.
®
AIBO® Customer
Regulatory Information
This equipment has been tested and found to
comply with the limits for a Class B digital
device, pursuant to Part 15 of the FCC Rules.
These limits are designed to provide reasonable
protection against harmful interference in a
residential installation. This equipment
generates, uses, and can radiate radio frequency
energy and, if not installed and used in
accordance with the instructions, may cause
harmful interference to radio communications.
However, there is no guarantee that interference
will not occur in a particular installation. If this
equipment does cause harmful interference to
radio or television reception, which can be
determined by turning the equipment off and on,
the user is encouraged to try to correct the
interference by one or more of the following
measures:
• Reorient or relocate the receiving antenna.
• Increase the separation between the
equipment and receiver.
• Connect the equipment into an outlet on a
circuit different from that to which the
receiver is connected.
• Consult the dealer or an experienced radio/TV
technician for help.
You are cautioned that any changes or
modifications not expressly approved in this
manual could void your authority to operate this
equipment.
The shielded interface cable recommended in
this manual must be used with this equipment in
order to comply with the limits for a digital
device pursuant to Subpart B of Part 15 of FCC
Rules.
Note
FCC RF Radiation Exposure Statement: This
equipment complies with FCC RF radiation
exposure limits set forth for an uncontrolled
environment. This device and its antenna must
not be co-located or operating in conjunction
with any other antenna or transmitter.
2
Page 3
DISPOSAL OF LITHIUMION BATTERY
LITHIUM-ION BATTERY
DISPOSE OF PROPERLY
You can return your unwanted Lithium-Ion
batteries to your nearest Sony
Caution
In some areas the disposal of Lithium-Ion batteries in
household or business trash may be prohibited.
For the Sony AIBO® Customer Link call 1-800427-2988 in the United States or contact us via
e-mail at aibosupport@info.sel.sony.com.
! Do not handle damaged or leaking Lithium-
Ion batteries.
! Danger of explosion if the battery is
incorrectly replaced. Replace only with the
ERA-7B1. Use of another battery may present
a risk of fire or explosion. Discard used
batteries according to the manufacturer’s
instructions.
! The battery used in this device may present a
fire or chemical burn hazard if mistreated. Do
not disassemble, heat above 140ºF (60ºC) or
incinerate. Dispose of used battery promptly.
Keep away from children.
RECYCLING LITHIUMION RECHARGEABLE
BATTERIES
Lithium-Ion batteries are recyclable.
You can help preserve our environment by
returning your used rechargeable batteries to
the collection and recycling location nearest
you.
For more information regarding recycling of
rechargeable batteries, call toll free
1-800-822-8837, or visit http://www.rbrc.org/
Caution: Do not handle damaged or leaking
Lithium-Ion batteries.
®
Service Center.
For Customers in
Europe
Safety Information
WARNING
• To prevent fire or shock hazard, do not expose
the robot to rain or moisture.
• To avoid electrical shock, do not open the
enclosure. Refer servicing to qualified
personnel only. (Contact the AIBO Customer
Link for customer service.) (page 5)
• Periodically examine the AC adapter for
conditions that may result in the risk of fire,
electric shock, or injury to persons (such as
damage to the cords, blades, housing) and in
the event of such conditions, the AC adapter
should not be used until properly replaced.
• The robot is not intended or recommended for
children under 8 years old.
• The robot must be used only with the
recommended AC adapter (ERA-201P1).
• The AC adapter is not a toy.
• Small parts can be swallowed.
• If the external flexible cable or cord is
damaged, it must be replaced or repaired only
by the manufacturer, an authorized service
agent or a similar qualified person in order to
avoid a hazard.
• All material for fastening or packing purposes
are not part of the robot and should be
discarded for children’s safety.
• Rechargeable batteries are only to be charged
under adult supervision.
3
Page 4
Regulatory Information
This product has been tested and found to
conform to the following Safety Standards.
Toy Directive 88/378/EEC
EMC Directive 89/336/EEC
LVD Directive 73/23/EEC
R&TTE Directive 1999/5/EC
We, Sony
AIBO
in compliance with the essential requirements
and other relevant provisions of Directive 1999/
5/EC.
For details, please access the following URL:
http://www.compliance.sony.de/
CE (EMC) Marking Conformity Remarks
a) This equipment complies with EN55022.
b) This product conforms with the following
®
Corporation, hereby declare that
®
Entertainment Robot, model ERS-7 is
Class B digital for use in following areas:
residential, business, and light-industrial.
European Directive:
89/336/EEC (EMC directive)
DISPOSAL OF LITHIUMION BATTERY
! Do not handle damaged or leaking Lithium-
Ion batteries.
! Danger of explosion if the battery is
incorrectly replaced. Replace only with the
ERA-7B1. Discard used batteries according to
the manufacturer’s instructions.
! The battery used in this device may present a
fire or chemical burn hazard if mistreated. Do
not disassemble, heat above 60 ºC (140 ºF) or
incinerate. Dispose of used battery promptly.
Keep away from children.
Voor de Klanten in
Nederland
(For customers in the
Netherlands)
Gooi de batterij niet weg maar lever deze in als
klein chemisch afval (KCA).
Opmerking betreffende de
geheugen-backupbatterij
(Note on a battery for memory
backup)
Dit apparaat bevat een vast
ingebouwde batterij die niet vervangen hoeft te
worden tijdens de levensduur van het apparaat.
Raadpleeg uw leverancier indien de batterij toch
vervangen moet-worden.
De batterij mag alleen vervangen worden door
vakbekwaam servicepersoneel.
Gooi de batterij niet weg maar lever deze in als
klein chemisch afval (KCA).
Lever het apparaat aan het einde van de
levensduur in voor recycling, de batterij zal dan
op correcte wijze verwerkt worden.
Fur Deutsch Kunden und
Kundinnen
(For customers in Germany)
Entsorgungshinweis: Bitte werfen Sie nur
entladene Batterien in die Sammelboxen beim
Handel oder den Kommunen. Entladen sind
Batterien in der Regel dann, wenn das Gerät
abschaltet und signalisiert „Batterie leer“ oder
nach längerer Gebrauchsdauer der Batterien
„nicht mehr einwandfrei funktioniert“. Um
sicherzugehen, kleben Sie die Batteriepole z.B.
mit einem Klebestreifen ab oder geben Sie die
Batterien einzeln in einen Plastikbeutel.
4
Page 5

Customer Support
How can you contact the AIBO Customer Link (customer service)?
In the U.S.A.:
Call 1-800-427-2988
E-mail address: aibosupport@info.sel.sony.com
In Europe:
English line: +44(0)-20-7365-2937
German line: +49(0)-69-9508-6309
French line: +33(0)-1-5569-5117
2003 Sony Corporation.
Reproduction in whole or in part without written permission is prohibited. All rights reserved.
5
Page 6
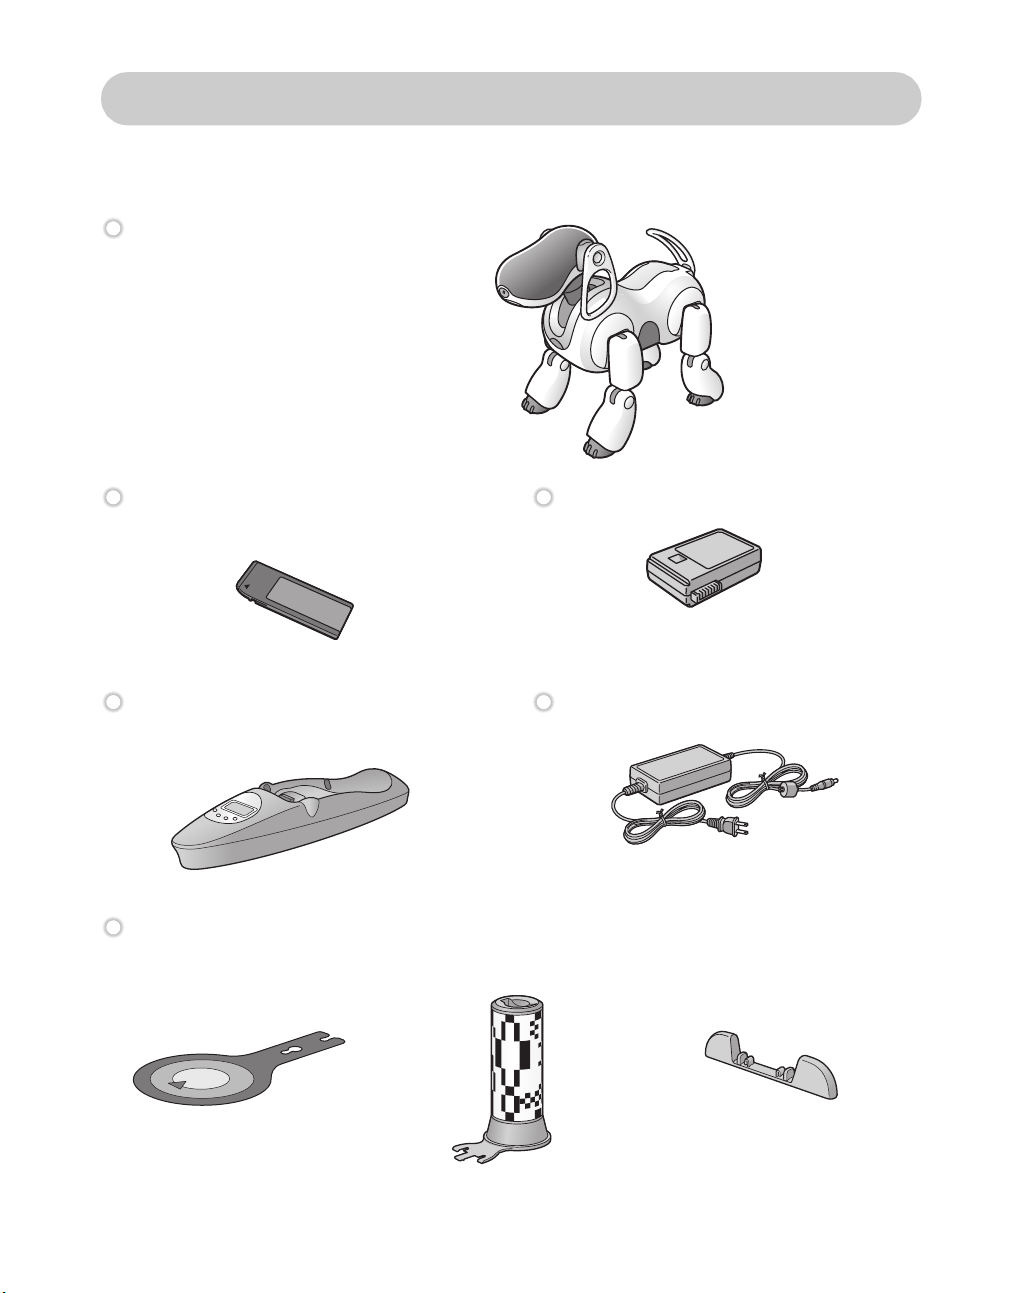
Opening the package (Checking the supplied items)
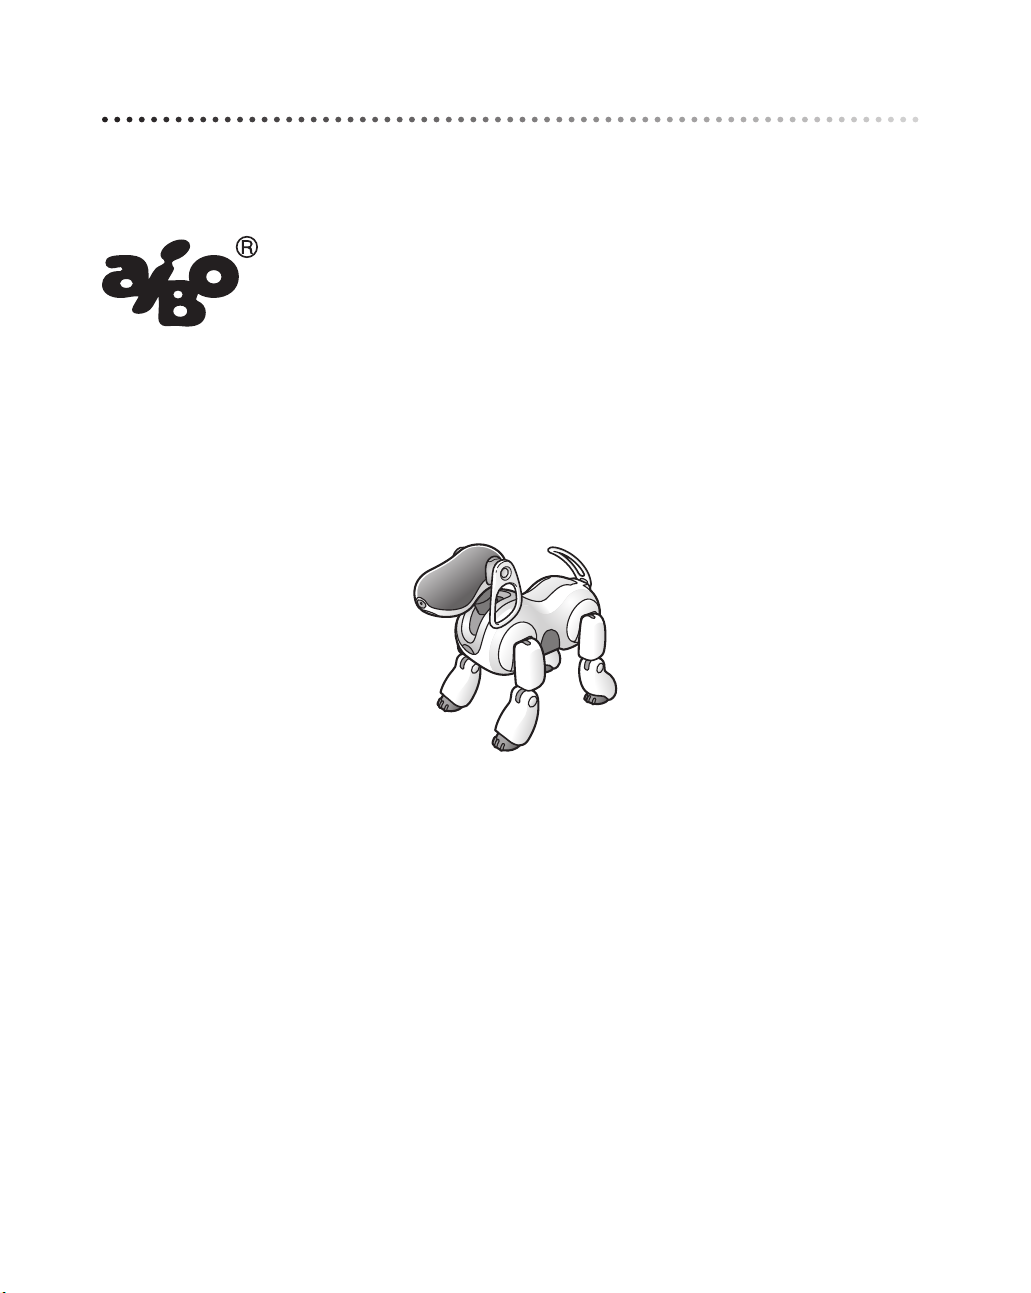
Check to see if you have the following items before starting to play with the AIBO®
Entertainment Robot.
AIBO Entertainment Robot ERS-7
AIBO-ware “Memory Stick™” media Lithium-ion battery pack
6
Energy Station Energy Station AC adapter
Self-charge markers (must be mounted on the Energy Station)
• Station marker • Station pole • Foot stopper
Page 7
AIBOne toy Pink ball
®
AIBO
cards (15) “User’s Guide (PC·Network)” for the
AIBO robot ERS-7/AIBO WLAN
Manager CD-ROM
Printed materials
• Safety Notice
• “User’s Guide (Basic)” for the AIBO
robot ERS-7 (this document)
• AIBO Info Sheet (Service and
• Quick Guide
• Software License Agreement
• Limited Warranty Card
• Wireless LAN Use Caution Sticker
Support Information)
• Other brochures
*
*
The “User’s Guide (PC·Network)” for the AIBO robot ERS-7 is included on the
supplied CD-ROM in PDF format. Adobe
®
Acrobat® Reader® 5.0, or Adobe Reader
6.0 or later is required to view the PDF files on the supplied CD-ROM.
Before use, be sure to read the supplied “Safety Notice” and “Software License
Agreement”.
7
Page 8
“OPEN-R” is the standard interface for the AIBO® Entertainment Robot
system that Sony
of the entertainment robot through a flexible combination of hardware and
interchangeable software to suit various applications.
The AIBO Entertainment Robot ERS-7 conforms to OPEN-R version 1.1.5.
“AIBO”, the AIBO logo , “OPEN-R” and the OPEN-R logo , “Memory Stick”,
“ ” and “ ” are trademarks or registered trademarks of Sony Corporation.
Adobe Acrobat, and Reader are registered trademarks of Adobe Systems Incorporated.
The visual pattern recognition software used for “AIBO MIND” incorporates
technology developed by Evolution Robotics, Inc.
The logo shown on the left is a trademark of Evolution Robotics, Inc.
®
is actively promoting. This interface expands the capability
The toes, station pole, and foot stopper of the AIBO robot are
manufactured using environment-friendly vegetable-based plastics.
Other information about the AIBO robot is available on the Internet at the following site:
http://www.aibo.com
8
Page 9

Table of contents
Introduction
What is an Autonomous Robot? . . . . . . . . . . . . . . . . . . . . . . . . . . . . . . . . . . . . . . . . . . . . 14
What is the AIBO
Autonomous activities of the AIBO robot . . . . . . . . . . . . . . . . . . . . . . . . . . . . . . . 14
Emotions and instincts of the AIBO Entertainment Robot . . . . . . . . . . . . . . . . . . . 15
It’s a robot, but it develops . . . . . . . . . . . . . . . . . . . . . . . . . . . . . . . . . . . . . . . . . . . 15
About the AIBO Entertainment Robot
Features of the AIBO robot . . . . . . . . . . . . . . . . . . . . . . . . . . . . . . . . . . . . . . . . . . 16
Features of the AIBO MIND software . . . . . . . . . . . . . . . . . . . . . . . . . . . . . . . . . . 17
Guide to parts and their functions . . . . . . . . . . . . . . . . . . . . . . . . . . . . . . . . . . . . . . . . . . . 20
The AIBO Entertainment Robot ERS-7 parts . . . . . . . . . . . . . . . . . . . . . . . . . . . . . 20
The AIBO Entertainment Robot (stomach) . . . . . . . . . . . . . . . . . . . . . . . . . . . . . . 22
Energy Station . . . . . . . . . . . . . . . . . . . . . . . . . . . . . . . . . . . . . . . . . . . . . . . . . . . . . 24
®
Entertainment Robot? . . . . . . . . . . . . . . . . . . . . . . . . . . . . . . . 14
ERS-7 . . . . . . . . . . . . . . . . . . . . . . . . . . . . . . . . . 16
Playing with the AIBO Entertainment Robot
Getting started . . . . . . . . . . . . . . . . . . . . . . . . . . . . . . . . . . . . . . . . . . . . . . . . . . . . . . . . . . 28
Preparing the AIBO robot . . . . . . . . . . . . . . . . . . . . . . . . . . . . . . . . . . . . . . . . . . . . 28
Preparing the Energy Station . . . . . . . . . . . . . . . . . . . . . . . . . . . . . . . . . . . . . . . . . 30
Playing with the AIBO Entertainment Robot . . . . . . . . . . . . . . . . . . . . . . . . . . . . . . . . . . 33
Various interactions . . . . . . . . . . . . . . . . . . . . . . . . . . . . . . . . . . . . . . . . . . . . . . . . 34
Let the AIBO Entertainment Robot rest on the Energy Station . . . . . . . . . . . . . . . . . . . . . 35
Placing the AIBO robot on the Energy Station . . . . . . . . . . . . . . . . . . . . . . . . . . . . 35
Removing the AIBO robot from the Energy Station . . . . . . . . . . . . . . . . . . . . . . . 35
Stopping the AIBO Entertainment Robot activity . . . . . . . . . . . . . . . . . . . . . . . . . . . . . . . 36
Modes and Conditions of the AIBO Entertainment Robot
Modes and conditions . . . . . . . . . . . . . . . . . . . . . . . . . . . . . . . . . . . . . . . . . . . . . . . . . . . . 38
The AIBO Entertainment Robot feature and mode map . . . . . . . . . . . . . . . . . . . . 40
Changing modes . . . . . . . . . . . . . . . . . . . . . . . . . . . . . . . . . . . . . . . . . . . . . . . . . . . . . . . . . 42
9
Page 10

Living with the AIBO® Entertainment Robot
Determining the AIBO Entertainment Robot’s lifestyle rhythm . . . . . . . . . . . . . . . . . . . . 44
Determining the AIBO robot’s period of activity . . . . . . . . . . . . . . . . . . . . . . . . . . 44
Switching the AIBO robot’s chime ON and OFF . . . . . . . . . . . . . . . . . . . . . . . . . . 47
Enabling/Disabling the AIBO Entertainment Robot’s alarm clock . . . . . . . . . . . . . 49
Charging . . . . . . . . . . . . . . . . . . . . . . . . . . . . . . . . . . . . . . . . . . . . . . . . . . . . . . . . . . . . . . . 51
How to charge the AIBO robot . . . . . . . . . . . . . . . . . . . . . . . . . . . . . . . . . . . . . . . . 51
The AIBO Entertainment Robot charges on its own (self-charge) . . . . . . . . . . . . . 52
When the AIBO robot recharge is not successful . . . . . . . . . . . . . . . . . . . . . . . . . . 55
Communicating with the AIBO Entertainment Robot
From you to the AIBO Entertainment Robot . . . . . . . . . . . . . . . . . . . . . . . . . . . . . . . . . . . 58
Sight . . . . . . . . . . . . . . . . . . . . . . . . . . . . . . . . . . . . . . . . . . . . . . . . . . . . . . . . . . . . 58
Touch . . . . . . . . . . . . . . . . . . . . . . . . . . . . . . . . . . . . . . . . . . . . . . . . . . . . . . . . . . . 58
Talking to the AIBO robot . . . . . . . . . . . . . . . . . . . . . . . . . . . . . . . . . . . . . . . . . . . 59
Giving the AIBO Entertainment Robot its own name . . . . . . . . . . . . . . . . . . . . . . . . . . . . 60
Teaching the AIBO Entertainment Robot to recognize your name and face . . . . . . . . . . . 61
Using AIBO cards . . . . . . . . . . . . . . . . . . . . . . . . . . . . . . . . . . . . . . . . . . . . . . . . . . . . . . . 63
From the AIBO Entertainment Robot to you . . . . . . . . . . . . . . . . . . . . . . . . . . . . . . . . . . . 64
Having the AIBO Entertainment Robot take a pictures . . . . . . . . . . . . . . . . . . . . . . . . . . . 66
10
Raising the AIBO Entertainment Robot
Enjoying the AIBO Entertainment Robot’s development . . . . . . . . . . . . . . . . . . . . . . . . . 70
Learning and acquiring skills . . . . . . . . . . . . . . . . . . . . . . . . . . . . . . . . . . . . . . . . . . . . . . . 75
The AIBO Entertainment Robot’s feelings and personality development . . . . . . . . . . . . . 76
Playing in Game mode
Playing Game 1, the AIBO Entertainment Robot’s “Function Demo” . . . . . . . . . . . . . . . 78
Page 11

Settings
Setting the volume level of the AIBO® Entertainment Robot . . . . . . . . . . . . . . . . . . . . . . 82
Adjusting the volume with an AIBO card . . . . . . . . . . . . . . . . . . . . . . . . . . . . . . . 82
Adjusting the volume with the control switch on
the AIBO Entertainment Robot . . . . . . . . . . . . . . . . . . . . . . . . . . . . . . . . . . . . . . . 83
Adjusting the volume using the Energy Station . . . . . . . . . . . . . . . . . . . . . . . . . . . 84
Changing the date and time . . . . . . . . . . . . . . . . . . . . . . . . . . . . . . . . . . . . . . . . . . . . . . . . 85
Setting the date and time . . . . . . . . . . . . . . . . . . . . . . . . . . . . . . . . . . . . . . . . . . . . . 85
Setting the time zone . . . . . . . . . . . . . . . . . . . . . . . . . . . . . . . . . . . . . . . . . . . . . . . . 86
Changing the date and time display format . . . . . . . . . . . . . . . . . . . . . . . . . . . . . . 88
Turning the wireless LAN function ON and OFF . . . . . . . . . . . . . . . . . . . . . . . . . . . . . . . 89
Additional Information
Notes on use . . . . . . . . . . . . . . . . . . . . . . . . . . . . . . . . . . . . . . . . . . . . . . . . . . . . . . . . . . . . 92
Handling the AIBO robot . . . . . . . . . . . . . . . . . . . . . . . . . . . . . . . . . . . . . . . . . . . . 92
“Memory Stick” media handling . . . . . . . . . . . . . . . . . . . . . . . . . . . . . . . . . . . . . . 93
Energy Station handling . . . . . . . . . . . . . . . . . . . . . . . . . . . . . . . . . . . . . . . . . . . . . 94
AC adapter handling . . . . . . . . . . . . . . . . . . . . . . . . . . . . . . . . . . . . . . . . . . . . . . . . 95
Battery handling . . . . . . . . . . . . . . . . . . . . . . . . . . . . . . . . . . . . . . . . . . . . . . . . . . . 95
Cleaning . . . . . . . . . . . . . . . . . . . . . . . . . . . . . . . . . . . . . . . . . . . . . . . . . . . . . . . . . 95
Troubleshooting . . . . . . . . . . . . . . . . . . . . . . . . . . . . . . . . . . . . . . . . . . . . . . . . . . . . . . . . . 96
Check this first . . . . . . . . . . . . . . . . . . . . . . . . . . . . . . . . . . . . . . . . . . . . . . . . . . . . 96
Checking with Clinic mode . . . . . . . . . . . . . . . . . . . . . . . . . . . . . . . . . . . . . . . . . 101
Limited warranty (for the U.S.A. only) . . . . . . . . . . . . . . . . . . . . . . . . . . . . . . . . . . . . . . 107
Service procedure (for the U.S.A. only) . . . . . . . . . . . . . . . . . . . . . . . . . . . . . . . . . . . . . 109
Specifications . . . . . . . . . . . . . . . . . . . . . . . . . . . . . . . . . . . . . . . . . . . . . . . . . . . . . . . . . . 110
Reference Material
AIBO card at a glance . . . . . . . . . . . . . . . . . . . . . . . . . . . . . . . . . . . . . . . . . . . . . . . . . . . 114
Front and back . . . . . . . . . . . . . . . . . . . . . . . . . . . . . . . . . . . . . . . . . . . . . . . . . . . 114
List of AIBO cards . . . . . . . . . . . . . . . . . . . . . . . . . . . . . . . . . . . . . . . . . . . . . . . . 115
Words understood by the AIBO Entertainment Robot . . . . . . . . . . . . . . . . . . . . . . . . . . 116
Time zone table . . . . . . . . . . . . . . . . . . . . . . . . . . . . . . . . . . . . . . . . . . . . . . . . . . . . . . . . 118
11
Page 12

Page 13
Introduction
Welcome to the world of the AIBO® Entertainment Robot
ERS-7!
Living together with you, the AIBO robot ERS-7 will develop
into a pet that is uniquely yours.
Before beginning your life together with the AIBO robot, please
familiarize yourself with the following.
Page 14
What is an Autonomous Robot?
What is the AIBO® Entertainment Robot?
The AIBO robot is the name which Sony® has given to its family of
entertainment robots, robots that are designed with the goal of
presenting a vision for a new type of life style in which human beings
derive enjoyment from mutual existence with robotic creatures.
The name itself is a play on the words “artificial intelligence” (AI) and
“robot”, or a robot with eyes. In its home country, Japan, the word
“AIBO” also means “partner” or “sidekick”.
For the latest information on the AIBO robot, visit the following Web site:
http://www.aibo.com
Autonomous activities of the AIBO robot
The AIBO robot combines a body (hardware) and mind (the AIBO MIND software) that
allow it to move, think, and display the lifelike attributes of emotion, instinct, learning, and
growth.
It establishes communication with people by displaying emotions, and assumes various
behaviors (autonomous actions) based on information which it gathers from its environment.
The AIBO robot is not only a robot, but an autonomous robot with the ability to complement
your life.
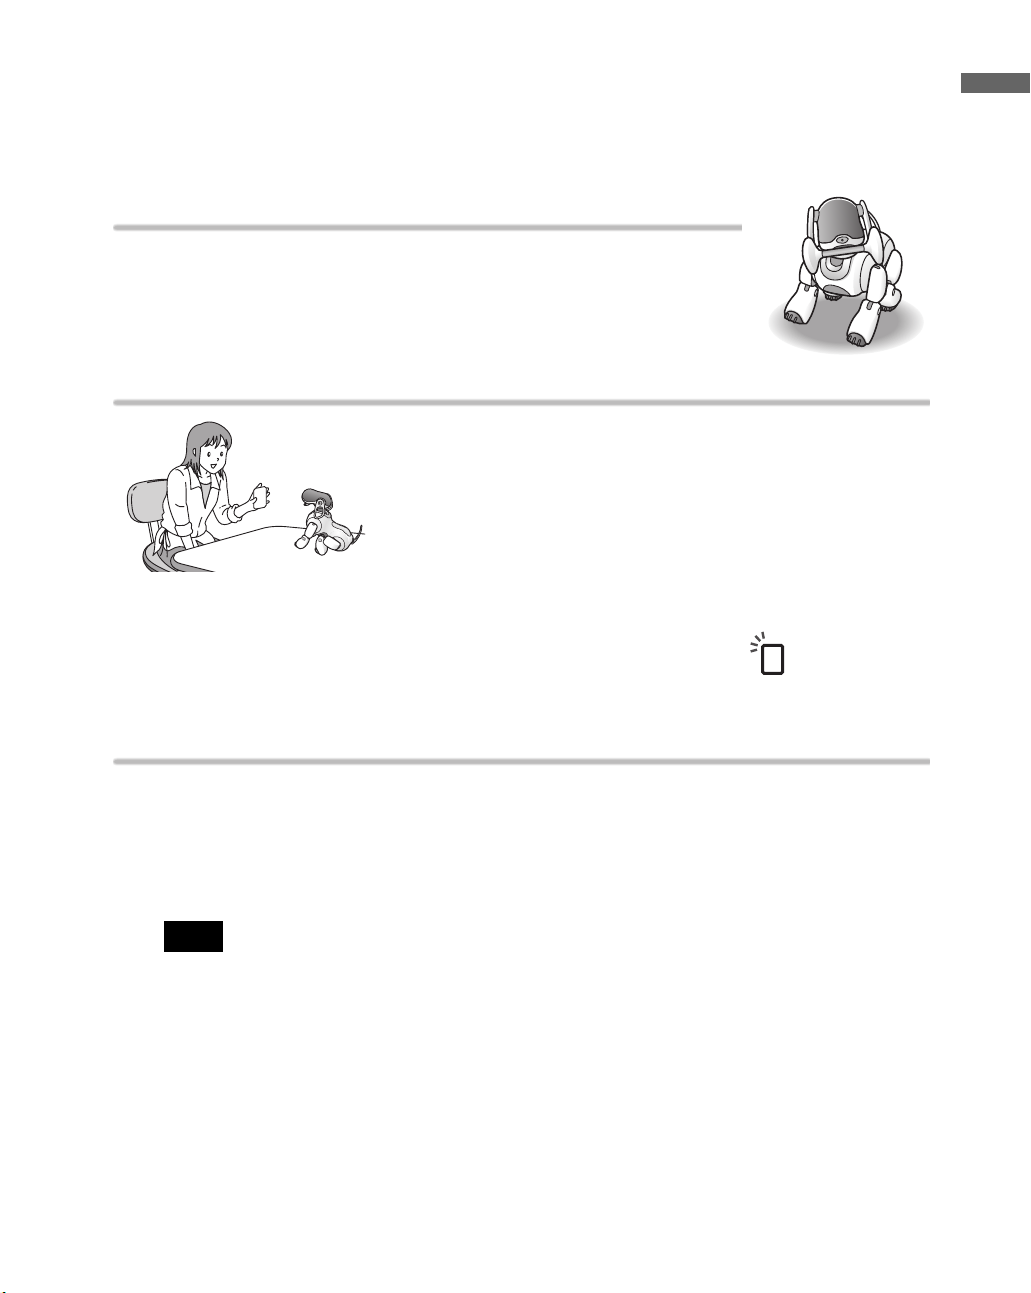
While living with you, the AIBO robot’s behavioral patterns will develop as it learns and
grows. When it finds you, it will approach you joyfully, perhaps bringing its “AIBOne toy”
along in an attempt to get you to play. On the other hand, when its attention is elsewhere, you
may find that the AIBO robot ignores you even when you talk to it. By understanding such
autonomous behavior, you will get even more enjoyment out of your life with the AIBO
robot.
14
Page 15

Emotions and instincts of the AIBO
®
Entertainment
Robot
Emotions and instincts form the basis for the AIBO robot’s autonomous behavior.
Based on all sorts of factors which it picks up from its surroundings, the AIBO robot
undergoes changes in spirit that display themselves in the form of emotional expression.
The AIBO robot possesses the following five basic instincts:
Love instinct: This instinct displays itself as a desire to communicate with people.
Search instinct: This instincts displays itself as a desire to satisfy its curiosity.
Movement instinct: This instincts displays itself as a desire to move about.
Recharge instinct: This instincts displays itself as a desire to find a source of electricity
to power its operation–just like the human instinct to eat.
Sleep instinct: This instincts displays itself as sleepy behavior.
For example:
Sometimes it will want to do things on its own, and sometimes it will seek your
help.
Sometimes it will think deeply before acting, and sometimes it will act on the spur
of the moment.
Sometimes its mood will be happy, and sometimes it will display all the signs of
annoyance.
Ultimately, the convergence of these instincts becomes noticeable as the
personality.
AIBO robot’s
Introduction
It’s a robot, but it develops
When the AIBO robot is first adopted, it is set to wake up and act as an adult. However, you can
also choose to have the AIBO robot begin life with you as a newborn puppy for you to raise and
watch as it develops.
How can the AIBO robot develop, even though it’s a robot?
“
That is because the AIBO robot is an
Upon joining your household, the AIBO robot adjusts itself to your life; that is the nature of
the AIBO robot’s “development”.
We hope that the AIBO robot will become your faithful companion.
Entertainment Robot”, designed to live with people.
15
Page 16
About the AIBO® Entertainment Robot ERS-7
The AIBO robot ERS-7 consists of the combination of the AIBO robot itself, and software
(“AIBO-ware”) that is recorded on a Sony
software is what constitutes the AIBO robot’s character and personality.
The present guide explains how the AIBO robot will develop and act with the AIBO MIND
software.
®
“Memory Stick™” media. The “AIBO-ware”
Features of the AIBO robot
The AIBO robot has all the functions and capabilities needed to move about by itself.
A variety of senses
The AIBO robot is equipped with a variety of sensors that give it “senses”, used to make
judgments about its conditions in its surroundings.
• Sense of touch: The AIBO robot has touch sensors on its head, back, chin, and paws,
allowing it to feel human contact.
• Sense of hearing: The AIBO robot detects sounds in its environment through a pair of
stereo microphones. This makes it possible for it to respond to your
voice.
• Sense of sight: The AIBO robot is equipped with a color camera and distance sensors.
This allows it to seek colors it likes, and to avoid obstacles. It can also
recognize your face.
• Sense of balance: The AIBO robot keeps its balance by means of acceleration sensors.
Natural, varied, and expressive movements
The AIBO robot has a vast range of natural and
expressive movements. Integrated control over the
operation of the 20 joints in the AIBO robot’s body (20
degrees of freedom), makes it possible for the AIBO
robot to achieve a rich variety of natural-looking
movements.
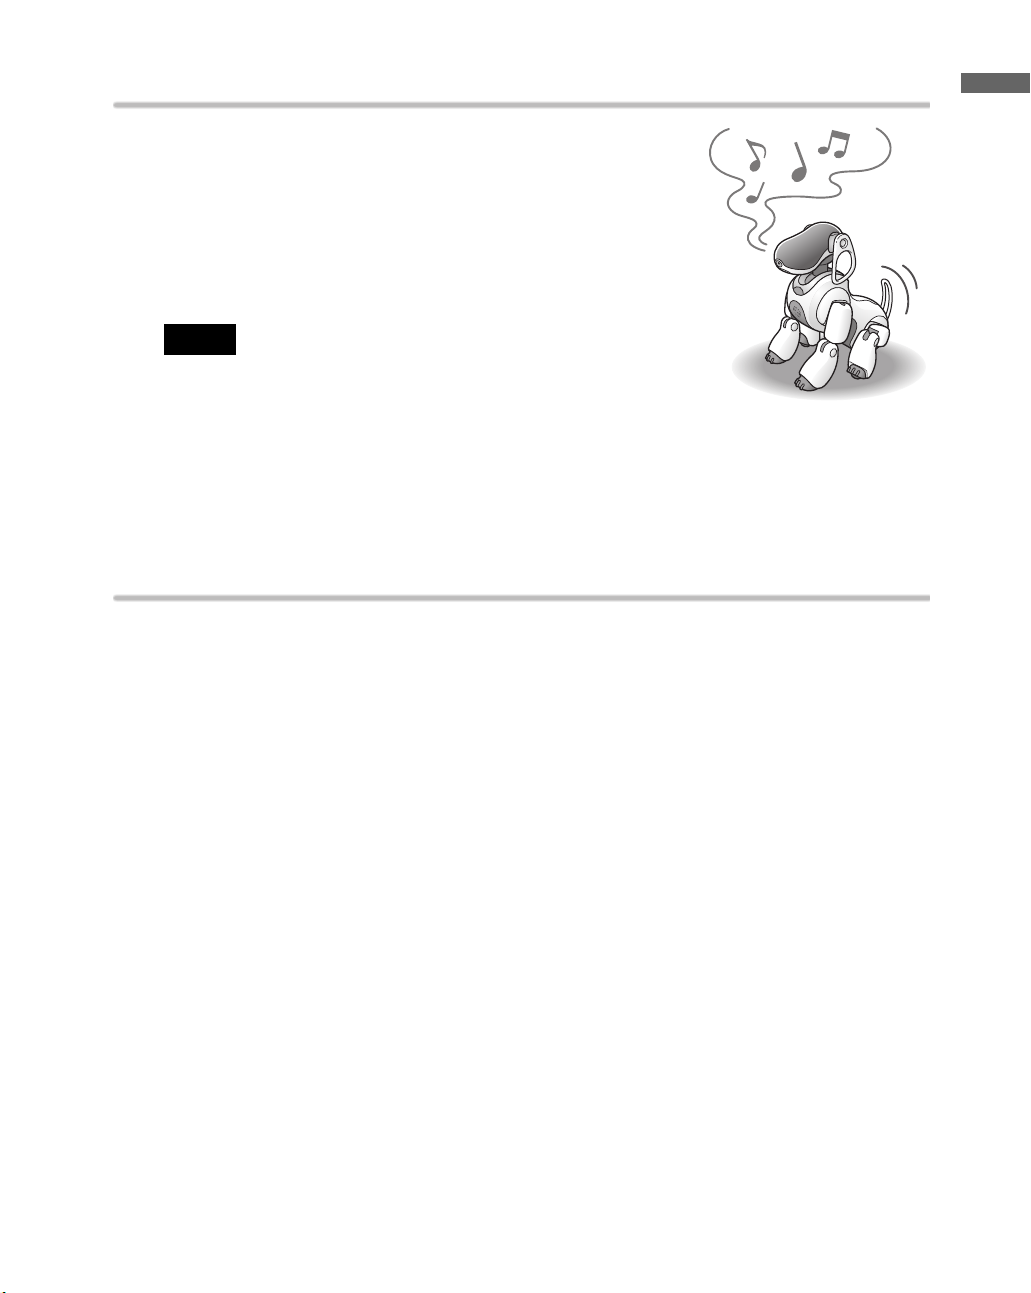
The AIBO robot is also equipped with face lights and the
ability to generate musical tones, which it uses to express
its emotional and physical condition.
16
Page 17
Features of the AIBO
®
MIND software
When the AIBO MIND software is installed in the AIBO Entertainment Robot, it learns from
you and its environment, acting on its free will as it develops into your very own AIBO robot.
The AIBOne toy and pink ball are its favorite toys!
The AIBO robot really loves its AIBOne toy and pink ball! Since it
regards them as its favorite toys, if it doesn't see them for a while, it
will begin to search for them. If you use them to play with AIBO, you
may be surprised by some of the tricks it performs!
Communication by AIBO card
The AIBO robot is capable of understanding the meaning of
the graphics on AIBO cards. By showing an AIBO card to the
AIBO robot, you can easily make various settings, have the
AIBO robot perform tricks, and enjoy a variety of activities.
Using AIBO cards, you can be sure of smooth communication
with the AIBO robot even when your surroundings are noisy.
* Some AIBO cards serve dual functions, depending on how they are presented when you show them to the
AIBO robot.
Introduction
In this guide, the things you can do with AIBO cards are noted with the icon. For a full
list of available AIBO cards, see “List of AIBO cards” (page 115).
Each AIBO robot is unique
The AIBO robot will develop into a pet that is uniquely yours.
Whether it develops into an AIBO robot with a deep love of communication, or becomes
accomplished at playing by itself will depend on how you interact with AIBO.
By using AIBO Custom Manager (supplied separately)*, you can play new games with the
AIBO robot and have it dance and sing according to your wishes.
Note
To be able to use AIBO Custom Manager (supplied separately)*, your computer must meet the following
requirements.
• Operating system: Windows® XP Home Edition or Professional, Windows® 2000 Professional,
Windows
• CPU: MMX Pentium 300 MHz or faster
• Memory: 64 MB or more
• Available hard disk space: 120 MB or more
• Display: 16-bit color display or higher; 800x600 pixels or more
• Equipped with a CD-ROM drive
• Capable of reading “Memory Stick™” media
* AIBO Custom Manager (supplied separately) is software that runs on a computer.
®
Me, or Windows® 98 SE
17
Page 18

The AIBO® Entertainment Robot matches your lifestyle.
The AIBO robot matches the rhythm of its life to yours.
It will wake you in the morning, and at night, go to bed at the same time you do. (For details,
see page 44.) When it is “hungry”, it will self-charge on the Energy Station, which it locates
by recognizing the station's pole and markers, and when it is “tired”, it simply relaxes. The
AIBO robot also loves playing with you, but is perfectly capable of amusing itself with its
AIBOne toy and pink ball. When you go out, it will take pictures upon your command, and
can spend time alone at home on the Energy Station.
18
Page 19
Game mode
Introduction
In Game mode, you can enjoy playing any of three different
®
games with the AIBO
Entertainment Robot. Game Mode 1 is
AIBO robot’s demo function. This is the only game provided
with the AIBO robot when you first take it home. In the future,
you will be able to add more games to the AIBO robot, using
AIBO Custom Manager (supplied separately)* when more
®
content is released from Sony
s
Notes
• Customization is the process of adding new functions to AIBO-ware,
modifying it to suit your preferences.
• For the latest information on AIBO Custom Manager (supplied
separately)* and available content, visit our Web site at http://www.aibo.com.
* AIBO Custom Manager (supplied separately) is software that runs on a computer.
.
Use your mobile communication device*1 and the Internet for even
greater enjoyment
You can use your PC, mobile communication device*1 or the Internet to mail commands to
the AIBO robot and have it take pictures while you are away, or have it convey messages to
nearby family or friends. You can view pictures that the AIBO robot takes using a Web
browser. The following facilities are required in order to take advantage of the AIBO robot
through a mobile communication device*
For details on how to use the AIBO robot through a mobile communication device*
Internet, refer to the “User’s Guide (PC·Network)” for the AIBO robot ERS-7 (PDF) on the
supplied CD-ROM. Note that Adobe
is required to view the User’s Guide.
1
or the Internet.
®
Acrobat® Reader® 5.0, or Adobe Reader 6.0 or higher
1
or the
The following are required to give commands to the AIBO robot through your PC, mobile
1
communication device*
, or the Internet.
• A “Memory Stick™” media reader/writer (Sony brand is recommended.)
• When connecting your computer and Access Point by wireless LAN, the PC side must
conform to IEEE 802.11b.
• In order to use the AIBO EYES feature, you must have an e-mail account that allows
2
POP*
reception and SMTP transmission.
*1
Caution: Your PC or mobile communication device must be able to receive JPEG e-mail.
*2
The POP server must support the UIDL command (the command that displays a listing of IDs attached to
individual mail messages). Check with your provider to determine whether support is available for your
e-mail account.
19
Page 20
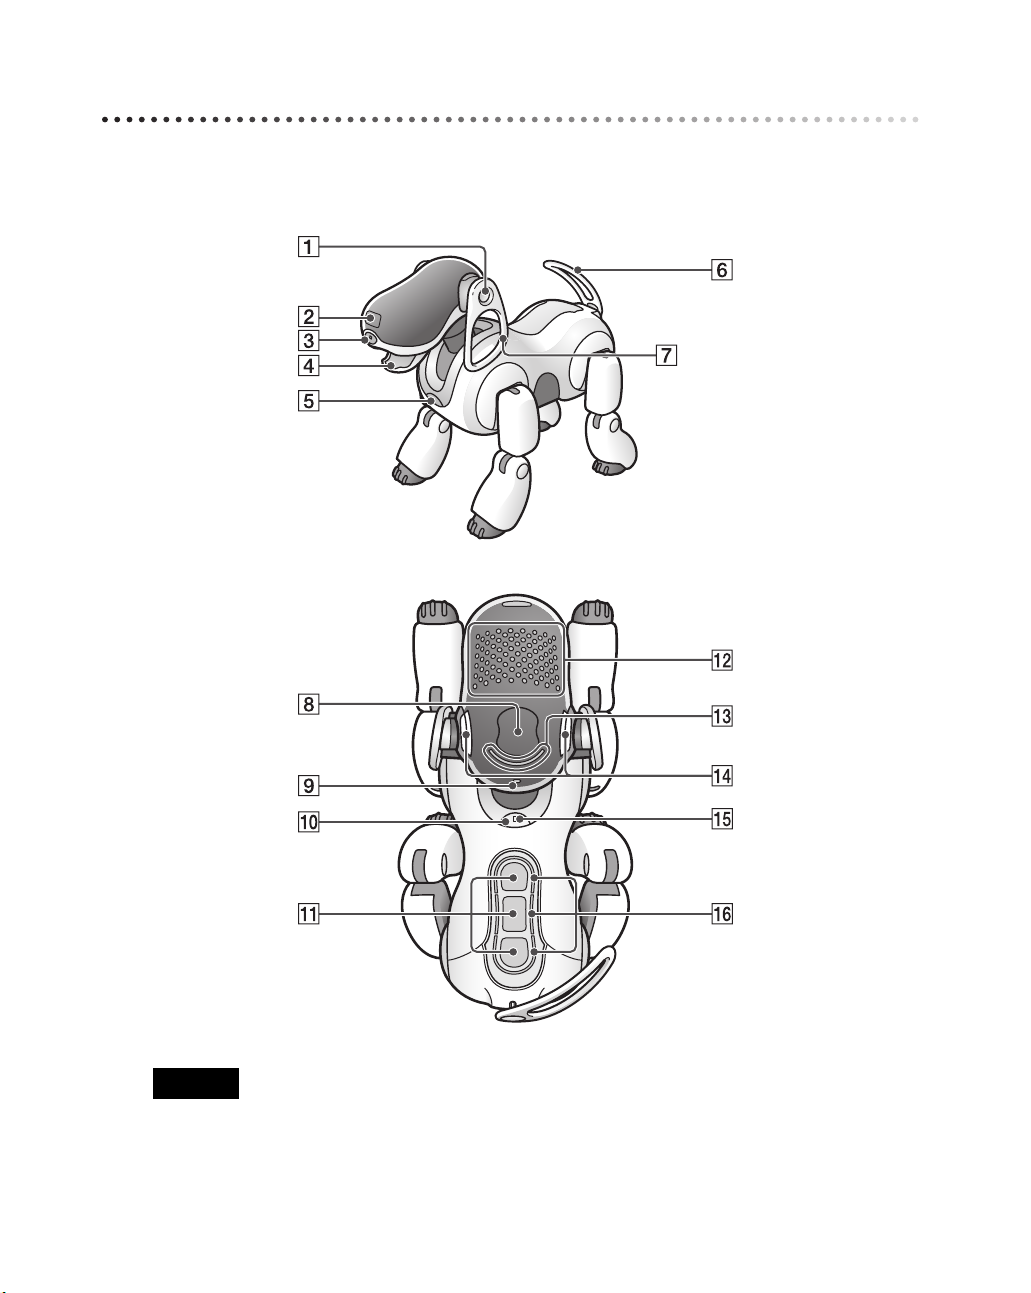
Guide to parts and their functions
The AIBO® Entertainment Robot ERS-7 parts
20
Caution
• Do not cover the color camera lens or distance sensors with stickers or similar objects.
• Do not limit the AIBO robot’s freedom of movement by affixing stickers to the AIBO robot’s joints or
inserting objects into moving parts.
• When lifting the AIBO robot, be sure to handle it by its body (page 33). To avoid damage to the AIBO
robot, never lift it by its head, ears, legs, tail, or any other part.
Page 21

A Stereo microphones
Allow the AIBO
to listen to the surrounding
environment.
®
Entertainment Robot
K
Back sensors (front, middle, and
rear)
Detect and turn white when you gently
stroke the AIBO robot’s back.
Introduction
B Head distance sensor
Measures the distance between the
AIBO robot and other objects.
C Color camera
Detects the color, shape, and movement
of nearby objects.
D Mouth
Picks up the AIBOne toy and expresses
emotions.
E Chest distance sensor
Measures the distance between the
AIBO robot and other objects.
F Tail
Moves up, down, left, and right to
express the AIBO robot’s emotions.
G Ears
Indicate the AIBO robot’s emotions and
condition.
H Head sensor
Detects and turns white when you
gently stroke the AIBO robot’s head.
I Wireless light (on the back of the
AIBO robot’s head)
Blue light for use with the Wireless
LAN function.
J Pause button
When pressed, the AIBO robot’s
activity will pause or resume.
L Face lights
These lights turn various colors to show
the AIBO robot’s emotions and
conditions.
M Head light
Detects and turns white when you touch
the head sensor.
Turns orange when an AIBO robot’s
joint is jammed (page 39).
N Mode indicators (inner side of
ears)
These indicate the present mode and
condition of the AIBO robot (page 38).
O Operation light
During operation: turns green.
During preparation for shutdown:
flashes green.
During charging: turns orange.
When a charging error occurs: flashes
orange.
When stopped: goes off.
P Back light (front, middle, and
rear)
Detect and turn white when you gently
touch the AIBO robot’s back sensors.
These lights also turn blue (front),
orange (middle), and red (rear) to
indicate a variety of actions.
21
Page 22
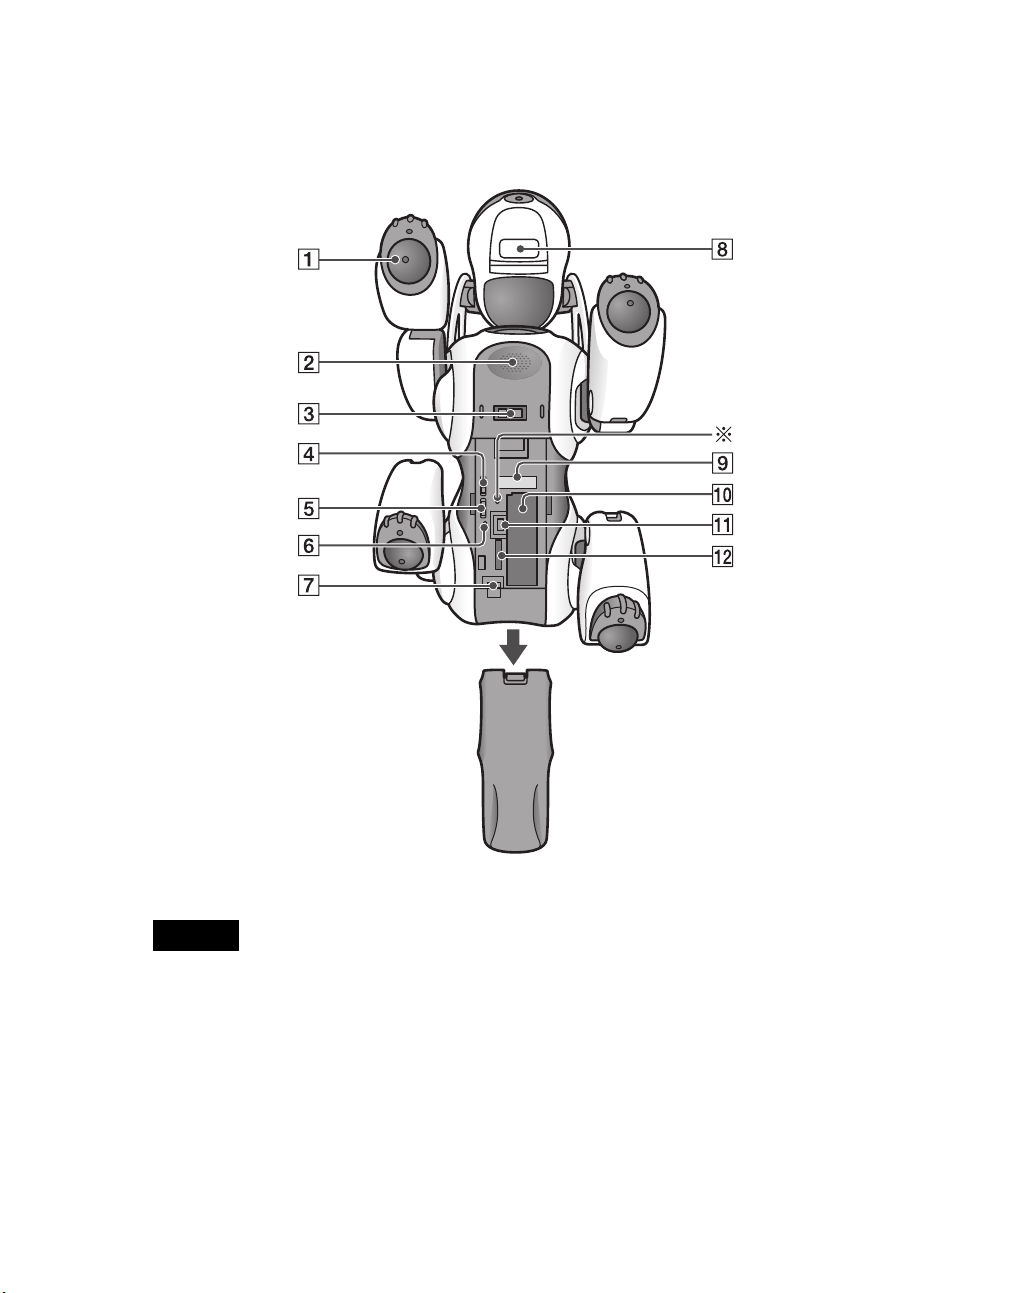
The AIBO
This shows the AIBO robot with its stomach compartment cover off.
®
Entertainment Robot (stomach)
22
Caution
Do not touch the charging contacts with your bare hands. Touching the contacts will reduce contact quality.
Page 23

A Paw sensors
These are located on the bottom of the
®
AIBO
with any surface it touches. When the
AIBO robot extends one of its paws, it
will react with happiness if you touch it.
B Speaker
Emits music, sound effects, and voice
guide.
C Charging terminal
When you place the AIBO robot on the
Energy Station, this part makes contact
with the station to allow charging of the
AIBO robot’s battery.
D Volume control switch (VOLUME)
Adjusts the volume of the speaker to one
of four levels (including mute).
E Wireless LAN switch (WIRELESS)
This turns the AIBO robot’s wireless
LAN function ON or OFF.
F “Memory Stick™” media access
indicator
This indicator goes on while the AIBO
robot is reading or writing to a “Memory
Stick” media. While the indicator is ON,
you cannot remove the “Memory Stick”
media or battery by means of the
“Memory Stick” media eject button (Z)
or the battery latch (Z). Under this
circumstance, never attempt to forcibly
remove the “Memory Stick” media.
robot’s paws, and detect contact
G Battery pack latch (BATT Z)
Flip this latch to the rear when you want
to remove the battery.
H Chin sensor
Senses when you touch the AIBO robot’s
chin.
I FCC ID/MAC address label
Indicates the FCC ID and MAC address
of the AIBO robot’s wireless unit.
J Battery slot
Holds the AIBO robot’s lithium-ion
battery.
K “Memory Stick” media eject button
(Z)
Press to eject the “Memory Stick” media.
L “Memory Stick” media slot
This is where you insert the provided
AIBO-ware “Memory Stick” media.
* Emergency eject hole
If you cannot eject the “Memory Stick”
media or battery normally because of a
malfunction or operation trouble, place the
AIBO robot in Pause mode, and then
insert an object such as a paper clip into
the emergency eject hole.
(Do not use fragile objects, such as
toothpicks, into the emergency eject hole
as they may break.)
Under normal circumstances, you do not
need to use the emergency eject hole.
Introduction
23
Page 24
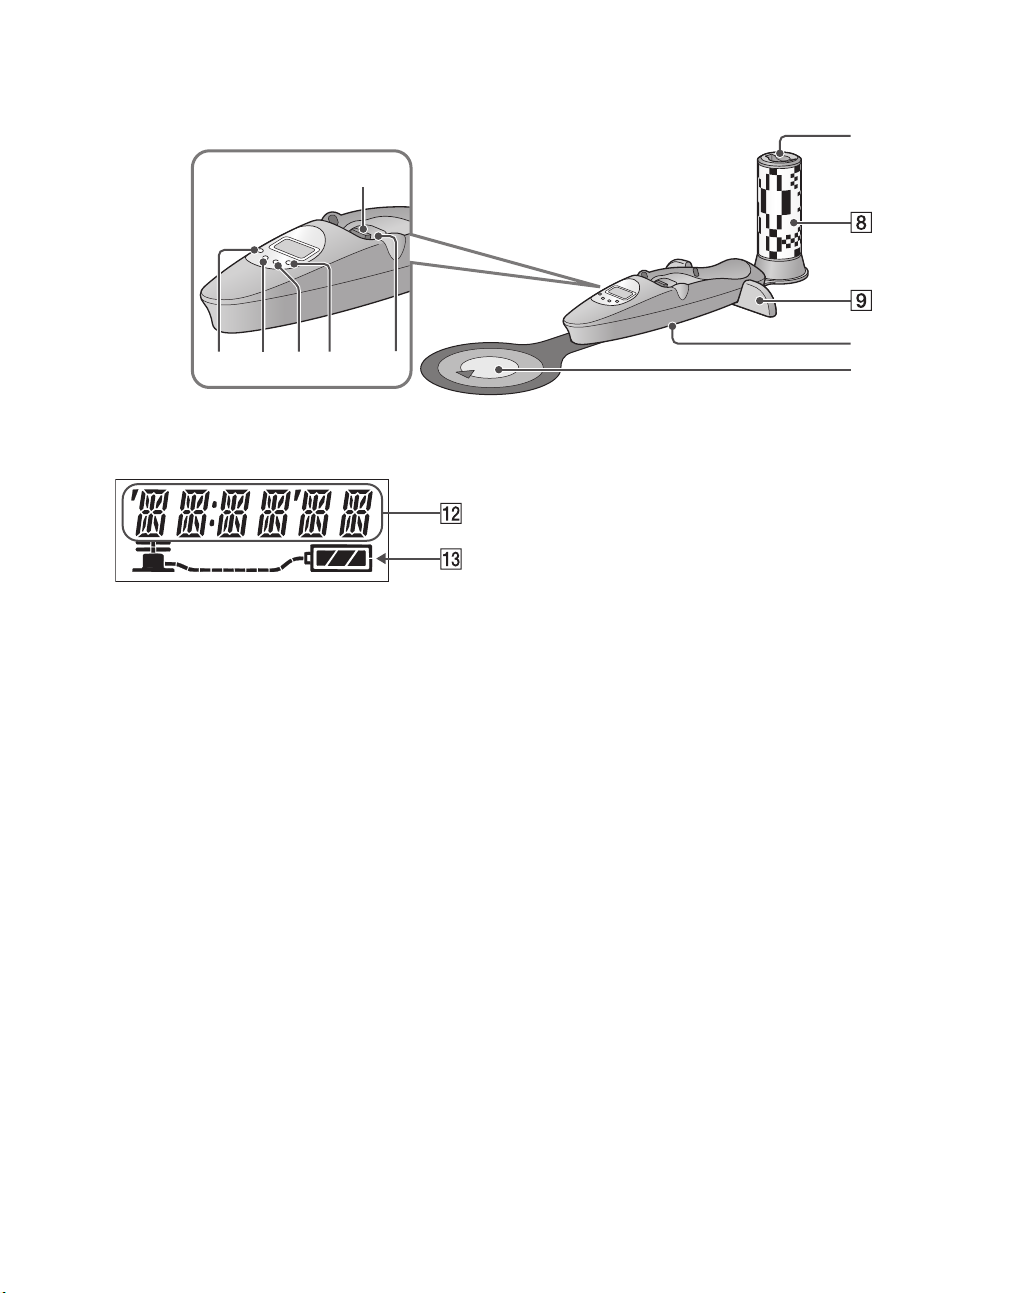
Energy Station
7
1
2345
LCD Panel
A Charging Contacts
When you place the AIBO
Entertainment Robot on the Energy
Station, the charging contacts on the
AIBO robot’s stomach connect to the
station and the AIBO robot’s battery is
charged.
B SET/CANCEL button
Press this button to put the display panel
into the setting mode. Press it a second
time to return the display to the normal
mode.
C MODE/NEXT button
Press to change the indication in the
display panel. In the setting mode,
pressing this button changes the item you
are setting.
6
®
0
qa
D DISPLAY/- (minus) button
When the date or time indication is
displayed, press this button to change the
display format. In the setting mode, each
press of the button decreases the value.
Hold down the button to decreases the
value continuously.
E LIGHT/+ (plus) button
In the normal mode, press this button to
turn ON the backlight.
In the setting mode, press this button to
increases the value that is displayed.
Holding down the button increases the
value continuously.
F Placement detection switch
Detects when the AIBO robot is
positioned on the Energy Station.
24
Page 25

G AIBO® card pocket
This holds the provided AIBO cards.
H Station pole
The AIBO robot uses this as a reference
guide to determine the position of the
Energy Station when self-charging.
I Foot stopper
These guides help the AIBO robot to
correctly position itself when sitting on the
Energy Station to self-charge. (The AIBO
robot mounts the Energy Station by
backing on to it.)
In this guide, the Energy Station (ERA-7P1) is referred to as the “Energy Station”.
J AC Adapter terminal (on the base of
the Energy Station)
Connect this terminal to the AC adapter
supplied with the AIBO robot or the
optional AC adapter ERA-201P1.
K Station marker
The AIBO robot uses this as a reference
guide to determine the position of the
Energy Station when self-charging
L Date / Time / Time zone / Volume
level indication
M Battery indicator
Indicates the AIBO robot’s battery level.
Introduction
25
Page 26

Page 27

Playing with the
®
AIBO
Entertainment
Robot
Now, let’s try playing with the AIBO robot. At first, the AIBO
robot will come to life as a mature robot.
Here we will describe how to prepare and play with the AIBO
robot, and provide further information, such as how to place
the AIBO robot on the Energy Station.
Page 28
Getting started
S
To start out, you will need the AIBO® Entertainment Robot and the Energy Station.
The supplied battery is delivered with minimal charge. Before you begin playing with the
AIBO robot, you must fully charge the battery. See page 51 for detailed instructions on
charging the battery.
First insert the battery and AIBO MIND software “Memory Stick
robot and set up the Energy Station. Charge the battery.
™
” media into the AIBO
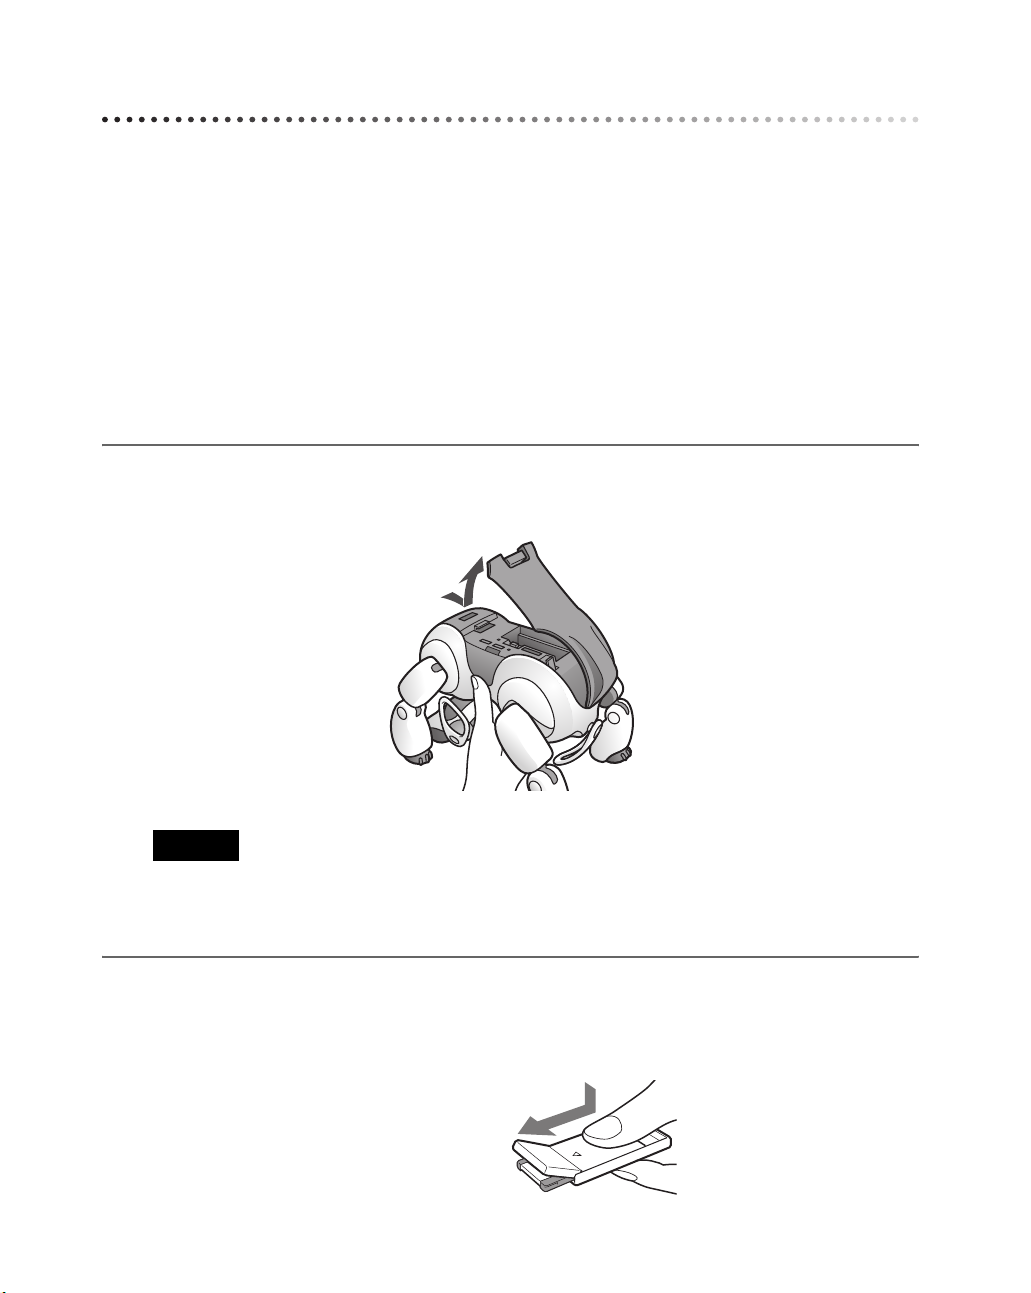
Preparing the AIBO robot
Insert the battery and AIBO MIND software “Memory Stick” media into the AIBO robot.
1 Securely hold the body of the AIBO robot from above, turn it upside down,
and open the stomach compartment cover.
Caution
• Always lift the AIBO robot by its body, not by it extremities.
• Do not touch the charging contacts located on the AIBO robot with your hand. Touching the contacts
will reduce contact quality.
2 Take out the AIBO MIND software “Memory Stick” media from its plastic
case.
lide the stomach compartment
cover in the direction of the arrow.
28
Page 29

3 Insert the AIBO MIND software
“Memory Stick™” media into the AIBO®
Entertainment Robot.
With the arrow pointing down and the angled
corner facing the AIBO robot’s tail, insert the
AIBO MIND software “Memory Stick” media
into the AIBO robot until it is flush with the
body.
When you want to eject the “Memory
Stick” media
Press the “Memory Stick” media eject button (Z) located next to the “Memory Stick”
media slot.
Caution
Do not set the safety switch of the “Memory Stick” media to “LOCK”.
Doing so will make it impossible for AIBO’s learning and picture taking
functions to work.
Playing with the AIBO® Entertainment Robot
Angled
corner
4 Insert the battery into the slot until it clicks into place.
Push here
2
1Insert the latch of
the stomach
compartment
cover into the
receiving hinge on
the AIBO robot’s
body.
29
Page 30

Preparing the Energy Station
To get the Energy Station ready for use, attach the station pole and station marker. These two
parts will enable the AIBO
whenever it needs recharging (self-charging function). However, the Energy Station can also
be used without the station pole and station marker. If you don't want to use the self-charging
function, these attachments are not necessary.
Positioning the Energy Station
The AIBO robot’s self-charge operation, using the station pole and station marker, requires an
open space with a radius of at least 4 ft. (1.2 m) around the station pole. (the AIBO robot will
make a turn on top of the station marker and walk backwards over the Energy Station and sit down
facing outwards.) For details on appropriate locations to place the Energy Station, see page 52 and
page 53.
®
Entertainment Robot to find the Energy Station on its own
1 Attach the station marker first, followed by the station pole.
Attach the station
marker as shown.
Reverse side of station
marker.
30
Attach station pole.
Page 31

2 Route the AC adapter cable along the wire guides and attach the foot
stopper.
Foot stopper
Attach the foot stopper after routing
and connecting the AC adapter cable.
About the cable
Feed the AC adapter cable through one of the cutouts on the right or left side of the
station pole base.
Playing with the AIBO® Entertainment Robot
Caution
• If installation is not performed correctly as shown above, self-charging may not be possible.
• Before transporting the Energy Station, remove the station marker, station pole, and foot stopper.
31
Page 32

3 Plug the AC adapter into an AC outlet.
4 Place the AIBO
When you place the AIBO robot on the Energy Station as shown below, the LCD display
shows the remaining battery capacity, and charging begins. Continue charging until the
battery indicator shows a full charge.
®
Entertainment Robot on the Energy Station.
When charging is complete, the
pump handle stops moving and
all hose image segments are lit.
zHint
When the AIBO robot is past the newborn stage, it will be able to locate and mount the Energy Station and
charge itself. For information on the self-charging function, see page 52.
If the station pole and station marker are not attached, route the AC adapter cable through one
of the cutouts in the station base as shown.
32
Station bottom view
Page 33

Playing with the AIBO® Entertainment Robot
Now that you are ready, try playing with the AIBO robot.
1 Place the AIBO robot on the floor as shown
on the right.
Place the AIBO robot on a flat, non-slippery surface,
such as a low pile carpet with a hard nap. Also,
choose a quiet place so that the AIBO robot can hear
you speak.
Caution
• On a slippery floor or thick-piled carpet, the AIBO robot may trip, or the carpet may get caught in its
joints, which will inhibit its motions.
• Be sure to place the AIBO robot on the floor in the position as shown above. This will prevent the AIBO
robot from moving unexpectedly and being damaged when you press the pause button.
2 Press the pause button on the AIBO robot’s back.
The Pause mode ends and the operation light turns green.
In a moment, the AIBO robot will automatically begin
moving.
Playing with the AIBO® Entertainment Robot
Caution
When you press the pause button, the face lights of the AIBO robot
may turn red. This indicates that the safety switch of the “Memory Stick
position.
Press the pause button, and then take out the “Memory Stick” media when the AIBO robot stops moving.
Release the “Memory Stick” media safety switch (see page 29.)
(Usually when the AIBO robot starts up, the face lights turn white.)
™
” media is set to the “LOCK”
zHint
The AIBO robot has been preset to a mature robot when it is adopted. However, you also have the option of
switching it to puppy stage, which will allow you to enjoy raising AIBO from a newborn. For details, see
page 70.
33
Page 34

Various interactions
When the AIBO® Entertainment Robot wakes up, try to
communicate with it as much as you can.
See page 116 for words that the AIBO robot can understand.
When you show the AIBO robot its favorite AIBOne toy and
pink ball, it will react with great enthusiasm.
Try moving the AIBOne toy and pink ball slowly and watch
the AIBO robot as it eagerly tries its best to follow along. If
you put them on the floor, the AIBO robot will entertain you
and play with its toys.
From here on, the AIBO robot will make its own judgments and move autonomously,
developing into a pet that is uniquely yours.
34
Page 35

Let the AIBO® Entertainment Robot rest on the Energy Station
The Energy Station is the AIBO robot’s favorite resting place. If you are done playing with
the AIBO robot, are going out, or going to bed, let the AIBO robot rest on its Energy Station.
While positioned there, the AIBO robot will recharge and relax.
Placing the AIBO robot on the Energy Station
As soon as you place the AIBO robot on the Energy
Station, charging begins. For details on the charging
process, see page 51.
If you place the AIBO robot on the Energy Station
while the AIBO robot is active, it will automatically
go into Station mode and recharge and relax.
zHints
• The AIBO robot can also wake up or go to sleep while on the Energy Station (page 44). The AIBO robot
will also restart itself once a day on the Energy Station in order to save data and perform other
maintenance functions.
• Before going out and leaving the AIBO robot, we recommend you set up the AIBO robot so that it will
not dismount the Energy Station while you are away. For details, see page 54.
Playing with the AIBO® Entertainment Robot
Caution
• There shouldn’t be any objects within reach of the AIBO robot’s front legs. Otherwise the legs may hit
and overturn the object when the AIBO robot tries to move, or the AIBO robot may fall off the Energy
Station.
• Do not move the AIBO robot’s rear legs while it is in Station mode. Otherwise the front legs, which can
move while in Station mode, may hit the rear legs.
Removing the AIBO robot from the Energy Station
To have the AIBO robot move about freely, gently lift it off
the Energy Station and place it on the floor, as shown in the
illustration.
The AIBO robot will be in Autonomous mode and move
autonomously.
If the AIBO robot is not on the Energy Station, it will not go to sleep or wake up at preset
times (page 44).
35
Page 36

Stopping the AIBO® Entertainment Robot activity
The AIBO robot continues to be in Autonomous mode while self-charging. If you will not be
playing with the AIBO robot for a long time, want to deactivate it in an emergency, or change
settings, you can stop the AIBO robot’s activity as follows.
Putting the AIBO robot in Pause mode
Press the pause button* located on the AIBO robot’s back.
The operation light flashes green for a while and then goes
out.
Note that a slight amount of current will be drawn from the
battery while the AIBO robot activity is stopped. When not
intending to use the AIBO robot for a long time, remove
the battery.
Removing the battery
Hold the AIBO robot firmly by its body and
turn it upside down, then open the stomach
compartment cover and move the battery latch
to the rear to remove the battery.
36
Caution
• Be sure to press the pause button on the AIBO
robot’s back. Be sure to put the AIBO robot in
Pause mode before removing the battery.
• When removing the battery, support it with your hand. Otherwise, the battery may pop out and fall.
* Why is it called a pause button?
Unlike conventional electrical products found in the home, the AIBO robot has no power
switch. It is designed as an autonomous robot that moves and learns on its own, while
communicating with its surroundings. The AIBO robot carries out autonomous actions
when it wants to play and charges itself when the battery power becomes weak.
Therefore, no power switch is necessary for the AIBO robot. However, when you wish to
stop, or need to stop the AIBO robot in cases as such emergencies, you can press a
dedicated button located on the AIBO robot’s back to temporarily stop its movement.
That is why this is called the “pause button” and not the “power button”.
Battery latch
Page 37

Modes and
Conditions of the
®
AIBO
Entertainment
Robot
This chapter explains the various modes and conditions of
the AIBO robot, as well as the transition between them.
Page 38

Modes and conditions
The AIBO® Entertainment Robot ERS-7 has the following modes and conditions.
Active conditions
Mode indicators OFF
Autonomous
mode
Pause mode
(inactive condition)
Back pause
button
The AIBO robot moves around on its own.
The AIBO robot collects information via its
camera/microphone/
sensors and acts
autonomously based
on its own feelings and
instincts.
The operation light
Caution
• Do not put the AIBO robot on an unstable
surface where it might fall or be subject to
vibrations.
• Do not place anything near the AIBO
robot that may hinder its movements.
turns green
• The AIBO
robot mounts
the Energy
Station by
itself
• The AIBO
robot is placed
on the Energy
Station while
active
38
The pause button on the back of the
AIBO robot was pressed to turn the
power OFF.
The AIBO robot must be in this mode
to replace the battery or “Memory
TM
Stick
” media, or to change the
ON/OFF setting of the wireless LAN
switch.
The AIBO robot
stops being
active in any of
the following
situations:
z
The back
pause button
is pressed
z
The battery is
empty
z
The AIBO
robot has
been unable
to recover
from a fall for
a certain
length of time
Touch the head
sensor for
3 seconds
Rest mode
The AIBO robot
does not move
around. In this mode
the AIBO robot
stays still and does
not respond to voice
commands, other
sounds, or show
interest in the ball
and AIBOne toy.
Touch the chin and front (blue)
sensors on the back of the AIBO
robot for 3 seconds
Mode indicators turn green
Page 39

Modes and Conditions of the AIBO® Entertainment Robot
• The AIBO
robot
dismounts the
Energy Station
by itself
• The AIBO
robot is
removed from
the Energy
Station
Mode indicators OFF
Station mode
On the Energy Station, the AIBO robot
wakes up and goes to sleep at a preset
time.
When the AIBO robot is awake
The AIBO robot
relaxes while being
recharged.
At wake-up
time
(page 44)
When the AIBO robot is sleeping
The AIBO robot is sound asleep. If
you remove the AIBO robot from the
Energy Station, it will be in
Autonomous mode,
even if the hour
is outside its
set activity
period.
At bedtime
(page 44)
Something has
jammed one of
the AIBO
robot's joints
Jam
Mode indicators turn orange
condition
If something gets jammed in any of
the AIBO robot's joints, the AIBO
Touch the head
sensor for
3 seconds
• Pick up while
touching the
back sensors*
• Pick up
quickly
• Place on the
floor
• Touch the
head sensor
for 3 seconds
*
Touch two or more back sensors (any of the following combinations)
for 3 seconds.
robot goes into this condition and all
of its joints become loose. This
mode is provided to protect your
fingers from being caught between
the AIBO robot's joints.
Mode indicators slowly flash green
Pick-up
condition
When you lift the AIBO robot, the AIBO
robot assumes a position that makes it
easier for you to hold it. This is to
prevent people from dropping the AIBO
robot, in reaction to movements that may
cause surprise.
Caution
When you press two or more of the paw sensors
of the AIBO robot, the AIBO robot thinks it has
been placed on the floor, and returns to
Autonomous mode. the AIBO robot may start to
walk after returning to Autonomous mode, so
avoid touching any of the AIBO robot's paw
sensors when you are holding it.
Front Rear
39
Page 40

The AIBO® Entertainment Robot feature and mode map
When the AIBO robot is in Autonomous mode, all the activities and settings shown below
are possible. When the AIBO robot is in Station mode (when it is awake), all the activities
and settings shown below except those marked with an asterisk (*) are possible.
When you show the AIBO robot the
AIBO EYES
• Mail check
• Message check
Refer to the "User's Guide (PC·Network)"
for the AIBO robot ERS-7.
• Mail received
• Message
received
"Game Mode (L)" card in Autonomous
L
mode, the game begins right away.
Mode indicators
Game mode
(page 78)
turn pink
The game
starts!
Autonomous
Mode indicators
OFF
mode
• Talk to the
AIBO robot
• Name the AIBO robot*
(page 60)
• Teach the AIBO robot your
name and your face*
(page 61)
• Have the AIBO robot take a
picture (page 66)
• Touch the front and
rear back sensors
simultaneously for
3 seconds
• Touch the head sensor
for 3 seconds
• Show “Alarm
On/Off (J)” card
• Talk to the AIBO robot
Alarm
ON/OFF
(page 49)
Have the AIBO robot
wake you up!
• Touch the front
(blue) back
sensor
Voice Guide
mode
Top menu
• Touch the rear
(red) back
sensor
Clinic mode*
(page 101)
You can check the
AIBO robot's
motions.
When you show the AIBO robot the
“Clinic Mode (O)” card in Autonomous
mode, it goes straight into Clinic mode.
Mode indicators
turn yellow
40
Page 41

Clock setup
You can set up the
following:
• Wake-up time for the
AIBO robot (page 44)
• Bedtime for the AIBO
robot (page 44)
• Chime ON/OFF (page 47)
Modes and Conditions of the AIBO® Entertainment Robot
• Touch the center
(orange) back
sensor
Setup
mode
• Touch the front
(blue) back
sensor
• Touch the center
(orange) back
sensor
• Touch the rear
(red) back
sensor
When you show the AIBO robot the
“Alarm Clock Set Up (I)” card in
I
Autonomous mode, it goes straight
into the mode to set up the time you
want it to wake up.
Energy Station
dismount setup
When self-charging is
complete, the AIBO robot
will dismount the Energy
Station by itself.
(page 54)
Development control
(page 70)
To cancel setup by voice guide,
touch the head sensor for 3 seconds
to return the AIBO
Robot to Autonomous mode.
®
Entertainment
You can also have fun
raising the AIBO robot
from the baby stage.
41
Page 42

Changing modes
You can change the AIBO® Entertainment Robot’s mode by utilizing its head and back
sensors. An even simpler method is to use the AIBO card to directly change the AIBO robot
to the desired mode, as follows.
• Alarm Clock Set Up (page 44)
• Game Mode (page 78)
Game 1 Game 2 Game 3
• Clinic Mode (page 101)
After showing the AIBO card, follow the voice guide to select the desired setting. When you
show the AIBO robot a Game Mode card, the game begins immediately.
For information on showing the AIBO robot its AIBO cards, see page 63.
42
zHints
•
To cancel a mode setting procedure and have the AIBO robot return to Autonomous mode, touch the head
sensor for 3 seconds.
•
For information on how to change modes with the head sensor and the back sensors of the AIBO robot, see
page 38.
•
The AIBO cards each have multiple usage. For details, see page 115.
•
While a setting is being performed via voice guide, a mode change utilizing the AIBO card is not possible.
Page 43

Living with the
AIBO®
Entertainment
Robot
When the AIBO robot is hungry, it instinctively searches and
recharges itself on its Energy Station, and if it is tired, it goes
off to relax.
Enjoy the functions of an autonomous robot, and your
lifestyle with the AIBO robot.
Page 44

Determining the AIBO® Entertainment Robot’s lifestyle rhythm
The AIBO robot matches itself to your lifestyle.
Its pattern of living will develop to match your lifestyle.
zHints
• When the AIBO robot first wakes up, it has a preset activity period extending from 7 a.m. to 11 p.m.
• The AIBO robot conforms to this activity pattern only when it is sitting on the Energy Station.
• Before you start playing with the AIBO robot, we suggest that you confirm the setting of its internal
clock (see page 85).
Determining the AIBO robot’s period of activity
AIBO card (Alarm Clock (wake-up time) Set Up)
You can set the time that the AIBO robot wakes up and goes to bed.
The AIBO robot wakes up and goes to bed on the Energy Station. When it is time for the
AIBO robot to go to bed, be sure to place it on the Energy Station. If you forget to place the
AIBO robot on the Energy Station, it will stay awake beyond its bedtime, but will go to sleep
as soon as you place it on the Energy Station.
You can only set the AIBO robot’s activity period while the AIBO robot is in Autonomous
mode.
zHints
• If you want the AIBO robot to be active 24 hours a day, simply set the AIBO robot’s bedtime and walk-
up time to the same value.
• For data storage purposes, the AIBO robot automatically restarts once a day about 10 minutes before its
set wake-up time. If the AIBO robot is not on the Energy Station when it is time for restart, it simply
restarts the next time it is placed on the Energy Station.
Here we will explain how to set the wake-up time using 7:15 a.m. as an example. (Bedtime
can be set in the same manner. However, AIBO cards cannot be used for bedtime setting.)
Since time settings are made using AIBO cards, first prepare the cards ready for the time you
intend to set, including the AM and PM cards.
44
Page 45

Note
The wake-up time and bedtime are set using the 12hour time system.
12-hour time system 24-hour time system
Midnight is 12 a.m. Midnight is 0:00
Noon is 12 p.m. Noon is 12:00
1 To use the voice guide:
Touch the front and rear back sensors simultaneously for 3 seconds.
Follow the voice guide below.
To use the AIBO® card:
Show the AIBO Entertainment Robot the “Alarm Clock Set Up (I)”
card.
Proceed to step 5 and follow the voice guide.
Voice guide mode, top menu. Let’s select the function.
Please touch the following colors on my back sensor:
For Game mode, touch blue. For Setup mode, touch orange.
For Clinic mode, touch red.
12 a.m.
PM AM
12 p.m.
6 a.m.6 p.m.
Living with the AIBO® Entertainment Robot
Within 10 seconds
*
2 Touch the middle (orange) back sensor.
Let’s proceed with various setups.
Please touch the following colors of my back sensors:
For clock setup, touch blue. For Station dismount setup, touch
orange. For development control, touch red.
Within 10 seconds
* If you do not perform the operation within the prescribed number of seconds, the AIBO robot enters
the Autonomous mode or returns to the previous state.
*
45
Page 46

3 Touch the front (blue) back sensor.
Time setup.
Please touch the following colors of my back sensors:
To set my wake-up time, touch blue. To set the time I go to
sleep, touch orange. To set my chime, touch red.
Within 10 seconds
4 Touch the front (blue) back sensor.
Alarm clock setup. I will get up at xx yy a.m.*
*The actual time is given in place of xx:xx a.m.
Within 10 seconds
5 Touch the front (blue) back sensor.
AM or PM? Please show me the card.
Within 20 seconds
6 Show the AIBO
AM. What hour? Please show me the card.
®
Entertainment Robot the “AM (M)” card.
Within 20 seconds
*
*
*
*
7 Show the AIBO robot the “7 (G)” card.
7 AM. How many minutes in the ten’s column?”
Please show me the card.
Within 20 seconds
* If you do not perform the operation within the prescribed number of seconds, the AIBO robot enters
the Autonomous mode or returns to the previous state.
46
*
Page 47

8 Show the AIBO
10. How many minutes in the one’s column?
Please show me the card.
®
Entertainment Robot the “1 (A)” card.
Within 20 seconds
*
9 Show the AIBO robot the “5 (E)” card.
15. 7:15 AM. I will get up at 7:15 AM.
This completes the setting.
zHints
• When showing the AIBO robot a number card, hide the card as soon as the AIBO robot recognizes it. If
you show the AIBO robot the same card for too long, it might recognize the same number twice. For
example, the AIBO robot may mistake “2” as “22”.
• If you only want to change part of the time setting, touch the head sensor to skip the current step (for
example, if you want to change the minute without changing the hour).
• To cancel a partially completed time setting and start over, touch the chin sensor to return to the voice
guide in step 3. To cancel changes altogether, touch the head sensor for 3 seconds. This will return the
AIBO robot to Autonomous mode.
Switching the AIBO robot’s chime ON and OFF
You can have the AIBO robot sound a chime and make some movement to signal the hour
and half hour when it is sitting on the Energy Station.
This feature is turned OFF when the AIBO robot is first adopted, but you can turn it on if you
would like to use this feature.
When the feature is turned ON, the AIBO robot will play a chime to signal the time only
during hours it is awake, and only when it is sitting on the Energy Station.
Living with the AIBO® Entertainment Robot
You can turn ON the AIBO robot’s chime feature as follows. The procedure for turning the
time signal off is the same.
* If you do not perform the operation within the prescribed number of seconds, the AIBO robot enters
the Autonomous mode or returns to the previous state.
47
Page 48

1 Touch front and rear back sensors simultaneously for 3 seconds.
(Next, follow the voice guide.)
Voice guide mode, top menu. Let’s select the function.
Please touch the following colors on my back sensor:
For Game mode, touch blue. For Setup mode, touch orange.
For Clinic mode, touch red.
Within 10 seconds
2 Touch the middle (orange) back sensor.
Let’s proceed with various setups.
Please touch the following colors of my back sensors:
For clock setup, touch blue. For Station dismount setup, touch
orange. For development control, touch red.
Within 10 seconds
3 Touch the front (blue) back sensor.
Time setup.
To set my wake-up time, touch blue. To set the time I go to
sleep, touch orange. To set my chime, touch red.
Within 10 seconds
4 Touch the rear (red) back sensor.
I will not emit any chimes.
*
*
*
48
To change these time settings, touch blue.
Within 10 seconds
* If you do not perform the operation within the prescribed number of seconds, the AIBO robot enters
the Autonomous mode or returns to the previous state.
*
Page 49

5 Touch the front (blue) back sensor.
I will emit a chime.
The change is now complete.
zHint
To cancel changes by voice guide, touch the head sensor for 3 seconds to return the AIBO robot to
Autonomous mode
Enabling/Disabling the AIBO® Entertainment Robot’s alarm clock
AIBO card (Alarm On/Off)
By setting the AIBO robot’s alarm clock, you can have the AIBO robot wake you up from its
position on the Energy Station. This alarm clock feature functions only when the AIBO robot
is sitting on the Energy Station. The alarm clock is turned OFF when the AIBO robot is first
adopted.
When the alarm clock is turned ON, the alarm sounds at the AIBO robot’s wake-up time. For
details, see page 44.
When you want to use the alarm clock feature, you must turn it ON each day. However, the
alarm time, once set, remains effective until you change it.
You can turn ON the AIBO robot’s alarm clock feature as follows. The alarm clock can be
turned OFF in the same manner.
1 Show the AIBO
Alternatively, you can give it the verbal command, “Set alarm”.
®
Entertainment Robot the “Alarm On/Off (J)” card.
Living with the AIBO® Entertainment Robot
(Next, follow the voice guide.)
When you show the AIBO robot the “Alarm On/Off (J)” card, you will hear the voice
guide given in step 2 and the setting will be changed.
The alarm clock is not set up.
Please touch blue if you are setting up my alarm to ring.
Please touch orange if you are turning off my alarm.
Within 10 seconds
* If you do not perform the operation within the prescribed number of seconds, the AIBO robot enters
the Autonomous mode or returns to the previous state.
*
49
Page 50

2 Touch the front (blue) back sensor.
The alarm is set for AM XX YY.*
* The actual time set is given in place of xx:xx a.m.
The change is now complete.
Turning the alarm OFF when it is ringing
Touch the head sensor, chin sensor, or any of the back sensors. The alarm also stops
automatically after ringing for one minute.
50
Page 51

Charging
The AIBO® Entertainment Robot’s source of energy is its battery which has to be regularly
charged. When using the lithium-ion battery ERA-7B1, the AIBO robot can operate (in
Autonomous mode) for about 1.5 hours on a full charge.
The AIBO robot can also find the Energy Station by itself (self-charging function).
Caution
The life of each battery depends on its usage and age.
How to charge the AIBO robot
Whenever you place the AIBO robot
on the Energy Station, charging begins.
If you place the AIBO robot on the
Energy Station while it is active, it will
relax and wait patiently while charging
is in progress.
While being charged...
The operation light on the back of the AIBO robot
turns orange.
Caution
• There should not be any objects within reach of the AIBO robot’s front legs. Otherwise the legs may hit
and overturn the object when the AIBO robot tries to move, or the AIBO robot may fall off the Energy
Station.
• If the AIBO robot’s body is too warm when being placed on the Energy Station, charging will only start
after it has cooled down.
• Do not move the AIBO robot’s rear legs while in Station mode. Otherwise the front legs, which move in
Station mode, may hit the rear legs, causing damage.
Living with the AIBO® Entertainment Robot
Display indication
While charging
The pump handle moves up and down.
When charging is complete
The pump handle stops moving and all hose segments are lit.
If all three segments of the battery indicator are flashing, the battery is not charging
properly. Check to see whether the battery is inserted correctly. If the flashing continues,
contact AIBO Customer Link (customer service).
51
Page 52

The AIBO
®
Entertainment Robot charges on its own
(self-charge)
The AIBO robot can use the station marker and station pole to find its way back to the Energy
Station for charging.
For information on how to set up the station marker
and station pole, see page 30.
The AIBO robot charges on its own in the following
situations:
• The battery level is low.
• When you say “Go to the Station”.
• When you show the AIBO robot the AIBO card:
“Station (G)”
Recommendations for positioning the Energy Station
• The room should be bright.
• Fluorescent lighting is recommended.
• Adjust lighting so that the AIBO robot’s shadow will not fall on the station marker.
• Make sure that there are no objects nearby with color or patterns similar to the station
marker and station pole.
• Make sure the walls and floor close to the station pole are relatively free of patterns (e.g.,
stripes).
• The walls and floor close to the station marker and station pole should be as plain as
possible.
• If the AIBO robot is more than 4 ft. (1.2 m) away from the station pole, it may have
difficulty finding the Energy Station.
• The AIBO robot first needs to locate the station pole to determine the orientation of the
Station. It then uses the station marker to determine the direction in which to reverse onto
the Energy Station.
52
Page 53

Space requirements
®
For the self-charging function of the AIBO
Entertainment Robot to work, an open space
with a radius of at least 4 ft. (1.2 m) around the station pole is required. The AIBO robot will
turn around on the station marker and move backwards onto the Energy Station facing away
from the station pole.
About 4 ft./1.2 m
Do not place any
objects in this area.
If the AIBO robot cannot find the Energy Station
The AIBO robot may not be able to find the Energy Station if the room is poorly lit, even if
the station pole and station marker are properly connected to the Station.
In this case, use the Clinic mode to check whether the AIBO robot can properly see the
station pole and station marker in your indoor environment. For information on the Clinic
mode, see page 101.
Living with the AIBO® Entertainment Robot
53
Page 54

Setting the AIBO® Entertainment Robot to automatically dismount/to
not dismount the Energy Station
You need to preset whether the AIBO robot should automatically dismount, or not dismount
the Energy Station after it is fully charged.
If you set the AIBO robot to “Dismount the Station”, the AIBO robot will dismount the
Energy Station on its own when charging is complete and resume its previous activity. You
do not need to manually remove the AIBO robot from the Energy Station.
If you do not want the AIBO robot to dismount the Energy Station on its own, set the AIBO
robot to “Do not dismount the Station”.
Note
Even if “Dismount the Station” is selected, the AIBO robot will not dismount the Energy Station on its
own when it was placed on the Station by you. If “Do not dismount the Station” is set, the AIBO robot
indicates this by raising the right front leg when it is positioned on the Energy Station.
Caution
When the AIBO robot is set to “Dismount the Station”, be careful of the following:
• Do not dismount the AIBO robot alone in a room where no one is present.
• Do not place the Energy Station on an unsafe surface (such as one where it might fall, or an unstable or
tilted surface). Falling could result in injury to a person or damage to the AIBO robot.
The following describes how to change the setting from “Do not dismount the Station” to
“Dismount the Station”. Use the same procedure to change the setting from “Dismount the
Station” to “Do not dismount the Station”.
1 Touch front and rear back sensors simultaneously for 3 seconds.
(Next, follow the voice guide.)
Voice guide mode, top menu. Let’s select the function.
Please touch the following colors on my back sensor:
For Game mode, touch blue. For Setup mode, touch orange.
For Clinic mode, touch red.
Within 10 seconds
* If you do not perform the operation within the prescribed number of seconds, the AIBO robot enters
the Autonomous mode or returns to the previous state.
54
*
Page 55

2 Touch the middle (orange) back sensor.
Let’s proceed with various setups.
Please touch the following colors of my back sensors:
For clock setup, touch blue. For Station dismount setup, touch
orange. For development control, touch red.
Within 10 seconds
*
3 Touch the middle (orange) back sensor.
I’m currently set up not to dismount the station. For station
dismount setup, touch blue. For station non-dismount setup,
touch orange.
Within 10 seconds
4 Touch the front (blue) back sensor to allow the AIBO
Robot to dismount the Energy Station on its own.
I’m currently set up to dismount the station.
Please don’t place the station at a high location. I’ve finished
registration.
The setting is now complete.
zHint
If you want to cancel changes by voice guide, pressing the head sensor for 3 seconds to return the AIBO
robot to Autonomous mode.
*
®
Entertainment
Living with the AIBO® Entertainment Robot
When the AIBO robot recharge is not successful
If the AIBO robot does not successfully self-charge and you do not charge it manually, the
operation light on the back of the AIBO robot turns OFF and the AIBO robot enters Pause
mode. If you do not charge the AIBO robot or replace the battery with a fully charged one,
the AIBO robot will not activate even if you press the pause button.
* If you do not perform the operation within the prescribed number of seconds, the AIBO robot enters
the Autonomous mode or returns to the previous state.
55
Page 56

Page 57

Communicating
®
with the AIBO
Entertainment
Robot
Show the AIBO robot its AIBOne toy or pink ball, or talk to it.
The AIBO robot is always waiting to communicating with
you.
Page 58

From you to the AIBO® Entertainment Robot
You can communicate with the AIBO robot in several different ways.
Sight
Show the AIBO robot its favorite AIBOne toy and pink ball. It
will respond to this communication by reacting with great
enthusiasm.
The AIBO robot also loves to see your face, and will
distinguish you from others. Its ability to recognize and
respond to the AIBO cards provides another means of visual
communication.
Touch
When you lightly touch the AIBO robot’s sensors for a moment, the AIBO robot will
recognize this as another form of communication. The AIBO robot always looks forward to
having you interact with its sensors.
Head sensor
Back sensors
Chin sensor
Paw sensors (4)
When you touch the AIBO robot’s head or back sensors, the AIBO robot recognizes this as
communication from you, and the sensors should turn white. If they do not, the AIBO robot
did not feel your touch, so please try again.
And when the AIBO robot extends one of its paws, touch the paw sensors. It will react with
surprise or joy.
58
Page 59

Praise
You can praise the AIBO
stroking two of your fingers back and forth across the AIBO
robot’s back sensors. You can also praise the AIBO robot by
saying “Good AIBO/Good boy/Good girl”.
Scold
You can scold the AIBO robot by very lightly tapping its back
sensors. You can also scold it by saying
®
Entertainment Robot by the lightly
“Don’t do that”
.
Talking to the AIBO robot
The AIBO robot enjoys having you speak to it. See page 116 for words that the AIBO robot
can understand.
Stereo microphones
Communicating with the AIBO® Entertainment Robot
Encouragement
When the AIBO robot is unsuccessful at something, say “Go for it” to the AIBO robot as
encouragement. Then the AIBO robot will try even harder to accomplish its goal.
59
Page 60

Giving the AIBO® Entertainment Robot its own name
Give the AIBO robot a name. After you teach the AIBO robot its name, it will respond when
called. However, if you teach the AIBO robot a new name, it forgets the old one.
Even after the AIBO robot learns its own name, it reacts when you call it “AIBO”. You can
only teach the AIBO robot its name when it is in Autonomous mode.
1 While the AIBO robot is in Autonomous mode, say “Name registration”.
(Next, follow the voice guide.)
Name registration. Please touch my back sensor.
Within 10 seconds
*
2 Touch a back sensor (any one).
After I count down, please say a name that is no longer than
two seconds. 3, 2, 1, go!
Within 10 seconds
*
3 Tell the AIBO robot its name in 2 seconds.
I’ve registered the name.
I’ve finished name registration.
If name registration is unsuccessful:
Follow the voice guide and register the name again from the
beginning.
Marshmallow!
60
* If you do not perform the operation within the prescribed number of seconds, the AIBO robot enters
the Autonomous mode.
Page 61

Teaching the
AIBO® Entertainment Robot
to
recognize your name and face
You can teach the AIBO robot to recognize your name, voice, and face. The owner of the
name, voice, and face that the AIBO robot learns to recognize becomes very special. The
AIBO robot will show special devotion to this person.
You can only teach the AIBO robot to recognize your name, voice, and face when it is in
Autonomous mode.
1 While the AIBO robot is in Autonomous mode, say “Owner registration”.
Owner registration. I’m going to register my owner’s name,
face and voice. Please touch my back sensor.
Communicating with the AIBO® Entertainment Robot
Within 10 seconds
*
2 Touch a back sensor (any one).
After I count down, please say the owner’s name that is no
longer than two seconds. 3, 2, 1, go!
Within 10 seconds
*
3 Tell the AIBO robot its owner’s name in 2 seconds or less.
I’ve registered my owner’s name.
Next, I’ll learn your voice. First, please say, “I am your owner”.
Within 10 seconds
*
4 Say, “I am your owner”.
Next, please say, “One, two, three, four, five”.
Within 10 seconds
*
* If you do not perform the operation within the prescribed number of seconds, the AIBO robot enters
the Autonomous mode or returns to the previous state.
61
Page 62

5 Say “one, two, three, four, five”.
I’ve registered your voice.
Next, I’ll register your face.
About 20 in./
50 cm
Please position your face in
front of the camera so I can
see you.
Please position yourself about 20 in. or 50 cm away.
When AIBO can see your face
I can see your face. Please don’t move until the music stops.
Wait for a moment without moving.
Within 10 seconds
*
I’ve finished registering your face. I’ve finished owner
registration.
Caution
While learning to recognize your face, the brightness of the room affects how your face is lit, and may
affect recognition in different lighting conditions.
If the AIBO® Entertainment Robot says, “I can’t see your face”
Slowly lift the AIBO robot up until the color camera
•
(in its nose) is at the same height as your face.
• When room brightness differs from that during
which it learned your face, it may not be able to
recognize you.
• When teaching the AIBO robot to recognize your
face, make sure you face it directly, without tilting
it either right or left.
• If you are wearing a distinctive item, such as thick-
rimmed glasses, the AIBO robot may not be able to
If you have trouble during
owner registration.
identify you.
• If your hair is covering your face, the AIBO robot may not be able to identify you.
• If the room is dark, or the light is coming from behind you, the AIBO robot may not be
able to identify you.
* If you do not perform the operation within the prescribed number of seconds, the AIBO robot enters
the Autonomous mode or returns to the previous state.
62
Page 63

Using AIBO® cards
The AIBO cards provided with the AIBO Entertainment Robot allow many different types of
Autonomous mode play, and also allow you to switch the AIBO robot to various modes. The
AIBO robot can understand communications from you by recognizing the graphics printed on
cards. This allows you to give it commands even when it is moving around or when the
surroundings are noisy.
For information about how to use the AIBO cards, please see the “AIBO card at a glance” (page
114).
Showing the AIBO cards to the AIBO robot
Show AIBO cards (the side with the graphics) to the
AIBO robot as shown in the illustration.
If the AIBO robot does not recognize the card,
adjust the card height so that it is at the same height
as the color camera in the AIBO robot’s nose.
Take note of the following points.
• If the card is too close to the AIBO robot, the AIBO
robot will not be able to see the entire card. Hold
the card at a distance of 8 to 12 in./20 to 30 cm.
Also make sure that the AIBO robot is not
looking at the card against bright
background lighting.
• Make sure that you hold the card right in front of
the AIBO robot’s camera vertically.
• Remember that the AIBO robot will not be able to recognize
the card if the card’s graphic is partially hidden by your
fingers or the sleeve of your clothing.
• The AIBO robot may also have difficulty recognizing a card if
the room is dark or lighting is falling from behind.
About 8 to
12 in. (20 to
30 cm)
Hold straight
Communicating with the AIBO® Entertainment Robot
When finished using the AIBO cards
To prevent losing the cards, place them into the card
pocket on the station pole.
AIBO card pocket
63
Page 64

From the AIBO® Entertainment Robot to you
The AIBO robot uses its lights to communicate its condition to you.
Mode indicators
The mode indicators indicate the AIBO robot’s current mode.
Mode
indicators
Out
Orange Jam condition
Pink Game mode
Green Rest mode
Slowly flashing green Pick-up condition
Yellow Clinic mode
Slowly flashing yellow The AIBO robot operation
Autonomous mode
Station mode
check mode
Wireless light
Light used with the AIBO robot’s wireless LAN function.
This light turns blue.
Refer to the “User’s Guide (PC·Network)” for the AIBO robot ERS-7 (PDF) for details about
the wireless LAN function.
Wireless
light
Note
64
When you first adopt the AIBO robot, its wireless LAN function is
disabled, so the wireless light does not turn blue.
Page 65

Operation light
Indicates the AIBO® Entertainment Robot’s activity condition.
Operation
light
Green Active
Orange Charging
Flashing orange Charging malfunction
Out Pause mode
(inactive condition)
Communicating with the AIBO® Entertainment Robot
65
Page 66

Having the AIBO® Entertainment Robot take a pictures
AIBO card (Photo)
The AIBO robot can store up to 20 pictures.
Caution
• When more than 20 pictures are stored in
the AIBO robot, the oldest picture is
deleted every time a new one is taken.
®
• Sony
disclaims all responsibility for any
problems arising out of allegations of
infringement of rights due to pictures
taken using the AIBO robot. Be careful to
avoid taking pictures that might
inconvenience others.
Color camera
About the pictures
• Pictures are stored into the “Memory Stick™” media in JPEG format.
• The picture resolution is 416
× 320 pixels.
• Depending on lighting conditions at the time the picture is taken, flicker (horizontal
stripes) may appear in pictures, or pictures may have red or blue hues.
• Fast movement may result in distortion of pictures.
You can instruct the AIBO robot to take pictures by sending the AIBO robot mail to it from
your mobile communication device* or PC. For details, refer to the “User’s Guide
(PC·Network)” for the AIBO robot ERS-7 (PDF) on the CD-ROM provided with the AIBO
robot.
* Caution: Your PC or mobile communication device must be able to receive JPEG e-mail.
66
Page 67

1 Say “Take a picture”, or show it the “Photo (B)” card.
Let’s take a picture. When you’re ready, touch my back sensor.
“Take a picture.”
Communicating with the AIBO® Entertainment Robot
Within 10 seconds
2 Touch the AIBO
The AIBO robot starts to count down and takes a picture when the shutter clicks.
Caution
When you set the safety switch of the “Memory Stick™” media to “LOCK,” the AIBO robot cannot store
any pictures.
®
robot’s back sensors.
*
Viewing pictures taken by the AIBO robot
Pictures taken by the AIBO robot are stored in the AIBO robot’s AIBO MIND software
“Memory Stick” media.
You can view them using either of the following methods.
• By using a Web browser to view the AIBO robot photo album (requires a PC and wireless
LAN connection).
• By using a “Memory Stick” media reader/writer.
For details on viewing pictures, refer to the “User’s Guide (PC·Network)” for the AIBO robot
ERS-7 (PDF) on the CD-ROM provided with the AIBO robot.
* If you do not perform the operation within the prescribed number of seconds, the AIBO robot enters
the Autonomous mode or returns to the previous state.
67
Page 68

Page 69

Raising the AIBO® Entertainment Robot
There are a few points you should keep in mind while raising
the AIBO robot. Once you become acquainted with these, it
will be easy to guide the AIBO robot into developing just the
kind of personality you like. As the AIBO robot shares its life
with you, it will grow to adapt to your lifestyle.
Page 70

Enjoying the AIBO® Entertainment Robot’s development
When the AIBO robot is adopted, it is already mature, and is
autonomously active, walking around and playing with its
AIBOne toy and pink ball. However, you can also switch it to
the puppy stage, which will allow you to enjoy raising the
AIBO robot from a puppy.
If you decide to go back to a mature the AIBO robot, you can
switch it back. However, please note that your the AIBO
robot will lose all maturity and accumulated development data when you switch it to the
puppy stage, and you will be going back to the maturity level it was at when you first adopted
the AIBO robot.
Putting the AIBO robot in the puppy stage
You can enjoy the joys of being the parent of a newborn AIBO robot by switching the AIBO
robot to the puppy stage. As a puppy, the AIBO robot will have difficulty trying to stand up
by itself, and you will enjoy raising it to a mature AIBO robot.
See page 75 for information on how to raise the AIBO robot from the puppy stage.
Caution
Note that putting the AIBO robot in the puppy stage will erase everything it has learned about you from its
memory. If you decide to switch the AIBO robot back to mature stage, it will start from the maturity level
it was at when you first adopted the AIBO robot.
However, the AIBO robot’s picture data will not be erased.
zHint
To cancel changes by voice guide, touch the head sensor to return the AIBO robot to Autonomous mode.
1 Touch the front and rear back sensors simultaneously for 3 seconds.
(Next, follow the voice guide.)
Voice guide mode, top menu. Let’s select the function.
Please touch the following colors on my back sensor:
For Game mode, touch blue. For Setup mode, touch orange.
For Clinic mode, touch red.
Within 10 seconds
* If you do not perform the operation within the prescribed number of seconds, the AIBO robot enters
the Autonomous mode.
70
*
Page 71

2 Touch the middle (orange) back sensor.
Let’s proceed with various setups.
Please touch the following colors of my back sensors:
For clock setup, touch blue. For station dismount setup, touch
orange. For development control, touch red.
Within 10 seconds
3 Touch the rear (red) back sensor.
To make me an adult, touch blue. To make me a newborn,
touch orange.
Within 10 seconds
4 Touch the middle (orange) back sensor.
I will reboot as a newborn. If this is OK, touch blue.
Within 10 seconds
5 Touch the front (blue) back sensor.
If this is really OK, touch red.
Within 10 seconds
6 Touch the rear (red) back sensor.
*
Raising the AIBO
*
®
Entertainment Robot
*
*
I will reboot as a newborn. I will turn OFF.
The AIBO
®
Entertainment Robot enters the Pause mode.
7 Touch the pause button on the AIBO robot’s
back to awaken it.
The AIBO robot wakes up as a newborn puppy.
* If you do not perform the operation within the prescribed number of seconds, the AIBO robot enters
the Autonomous mode.
71
Page 72

The AIBO® Entertainment Robot as a newborn puppy
The newborn AIBO robot cannot understand anything it sees or hears, and will be very
insecure.
At first, even touching its sensors will surprise it.
Teach it to trust you a step at a time by gently stroking its sensors.
As it starts to become accustomed to your presence, talk to it, and play with it by showing it
the AIBOne toy and pink ball. The AIBO robot will follow the movement of the AIBOne toy
and pink ball with its eyes, and will try to stand up to go after them. If the AIBO robot falls
down, give encouragement by saying, “Go for it”.
Even in its infancy, the AIBO robot will gradually be able to understand the following words.
Be sure to talk to it often.
AIBO, How cute, Go for it, Name Registration, What’s your name?, (the name you have
given AIBO), Owner registration, What’s your owner’s name?, Take a picture.
zHint
The key to getting AIBO to stand up is to show it its favorite AIBOne toy and pink ball.
It can easily become depressed when its attempts to stand up and isn’t successful.
Encourage it by frequently showing it the AIBOne toy and pink ball.
Once the AIBO robot is able to walk, it is no longer an infant. From this point on, the AIBO
robot will behave autonomously, developing in step with your life to become a pet that is
uniquely yours.
Skipping development and giving the AIBO robot a mature personality
You can also skip raising the AIBO robot from the puppy stage, and have it immediately
assume its mature personality.
When mature, the AIBO robot is fully capable of carrying its AIBOne toy, kicking the pink
ball in various ways, and walking certain distances on its own.
Note
Even if you skip part of its development, the AIBO robot will remember everything it has learned to that
point.
zHint
To cancel changes by voice guide, touch the head sensor to return the AIBO robot to Autonomous mode.
72
Page 73

1 Touch the front and rear back sensors simultaneously for 3 seconds.
(Next, follow the voice guide.)
Voice guide mode, top menu. Let’s select the function.
Please touch the following colors on my back sensor:
For Game mode, touch blue. For Setup mode, touch orange.
For Clinic mode, touch red.
Within 10 seconds
2 Touch the middle (orange) back sensor.
Let’s proceed with various setups.
Please touch the following colors of my back sensors:
For clock setup, touch blue. For Station dismount setup, touch
orange. For development control, touch red.
Within 10 seconds
3 Touch the rear (red) back sensor.
To make me an adult, touch blue. To make me a newborn,
touch orange.
Within 10 seconds
4 Touch the front (blue) back sensor.
I will reboot as an adult. If this is OK, touch blue.
*
Raising the AIBO
®
*
*
Entertainment Robot
Within 10 seconds
*
5 Touch the front (blue) back sensor.
If this is really OK, touch red.
Within 10 seconds
* If you do not perform the operation within the prescribed number of seconds, the AIBO robot enters
the Autonomous mode.
*
73
Page 74

6 Touch the rear (red) back sensor.
I will reboot as an adult. I will turn OFF.
®
The AIBO
Entertainment Robot enters the Pause mode.
7 Touch the pause button on the AIBO robot’s
back to awaken it.
The AIBO robot wakes up as an adult.
.
74
Page 75

Learning and acquiring skills
The AIBO® Entertainment Robot learns from you and its surroundings, becoming capable of
many different activities. If the AIBO robot paces back and forth, show it its AIBOne toy or pink
ball. It will chase after the AIBOne toy or pink ball, becoming capable of walking farther way.
By praising the AIBO robot, you give it encouragement. If you
praise it when it kicks the pink ball well, it practices hard to
please you, becoming quite skilled in playing with the pink ball.
On the other hand, if you don’t praise its efforts, the AIBO robot
may lose interest in the pink ball.
Raising the AIBO
You can judge the degree of the AIBO robot’s development from how it carries the AIBOne
pink
toy, the number of different ways in which it kicks the
walk around. When it shows tricks that are surprising, and walks a bit farther, you will know
that the AIBO robot has matured.
You can also check the degree of the AIBO robot’s development
directly.
Try asking it, “What’s your AIBOne skill level?”, “What’s your
pink ball skill level?”, or “What’s your walking skill level?”.
The AIBO robot will tell you how it’s doing by indicating its
progress with its face lights. Once it has mastered these skills...
your AIBO robot is a proud grown-up!
ball, and the distance it is able to
The more white face
lights, the higher the AIBO
robot’s skill level.
®
Entertainment Robot
75
Page 76

The AIBO® Entertainment Robot’s feelings and personality development
The AIBO robot’s feelings shift as it interacts with you, and are expressed through its face
lights.
For example, the face lights shine green when it is happy, blue when it is sad, and red when it
is angry.
The AIBO robot is also capable of a variety of other forms of expression, which on occasions
can be quite complex. Watch it closely, and try to understand the shades of its feelings.
The AIBO robot’s personality is formed through the accumulation of such heart-to-heart
interactions.
When the AIBO robot falls down and can’t get up, it will
appreciate if you lend a helping hand. In return, it will make
every effort possible to right itself on its own from the next
fall. On the other hand, if you do not help it, it may become
somewhat rebellious and come to depend on your help.
The personality that the AIBO robot forms can also change
through learning at later stages. By closely watching its
behavior and treating it with love and respect, a “spoiled”
AIBO robot can reform itself into a strong and independent
character, and a chronic fretting whiner can change into a
deep-thinker that is capable of sure and steady action.
76
Page 77

Playing in Game mode
The AIBO MIND software features a Game mode in which
you can enjoy playing games with the AIBO
Robot.
®
Entertainment
Page 78

Playing Game 1, the AIBO® Entertainment Robot’s “Function Demo”
AIBO card (Game Mode 1)
You can enjoy playing games with the AIBO robot when it is in Game mode.
When the AIBO robot is first adopted, it only possesses one game, the Function Demo.
However, using the AIBO Custom Manager (see the cautions below), you can obtain content
and have the AIBO robot play up to 3 games.
Caution
• The AIBO robot’s function demo game is not available while the AIBO robot is on the Energy Station.
Take the AIBO robot off of the Energy Station before playing.
• To add games to the AIBO robot, you must have the AIBO Custom Manager software (supplied
separately). (For the latest information on the AIBO Custom Manager (supplied separately) and
available Game mode content, visit our Web site at
http://www.aibo.com.)
Game 1 is a Function Demo that provides an entertaining introduction to the features of the
AIBO MIND software.
To end Game mode and return the AIBO robot to Autonomous mode, touch the head sensor
for 3 seconds.
1 Simultaneously touch the front and rear back sensors for 3 seconds, or
show it the “Game Mode 1 (L)” card.
(Next, follow the voice guide.)
When you show the AIBO robot the “Game Mode 1 (L)” card, it starts playing the
game immediately.
Voice guide mode, top menu. Let’s select the function.
Please touch the following colors on my back sensor:
For Game mode, touch blue. For Setup mode, touch orange.
For Clinic mode, touch red.
Within 10 seconds
* If you do not perform the operation within the prescribed number of seconds, the AIBO robot enters
the Autonomous mode or returns to the previous state.
78
*
Page 79

2 Touch the front (blue) back sensor.
Let’s select the game.
For #1, touch blue. For #2, touch orange. For #3, touch red.
Within 10 seconds
*
3 Touch the front (blue) back sensor.
The AIBO® Entertainment Robot shows that it is ready for the demonstration by
performing a happy little dance.
Prepare an AIBO card.
4 Show the AIBO robot an AIBO card, the AIBOne toy, or the pink ball.
The AIBO robot determines which demonstration and explanation it will show you,
according to the card you show.
Card name Demos & explanations
A Dancing
B Taking pictures
DSensors
F Explanation of visual pattern recognition (AIBO cards)
H Continuous demonstration of dances, expressions, and sensors
I Clock functions
Playing in Game mode
K Explanation of growth and personality
L Expression (face lights).
M Explanation of the AIBO robot’s photo album
N Explanation of the AIBO EYES feature
If you show the AIBO robot its AIBOne toy or pink ball, and place it on the floor
during the Function Demo, the AIBO robot will show you a variety of tricks.
To stop the demo, hide the AIBOne toy or pink ball from the AIBO robot, then touch
the AIBO robot’s head sensor.
* If you do not perform the operation within the prescribed number of seconds, the AIBO robot enters
the Autonomous mode or returns to the previous state.
79
Page 80

Notes
• In Game mode, the AIBO® cards have different meanings than in Autonomous mode. (When Game 1
starts, the AIBO Entertainment Robot interprets the cards as shown in step 4 on the previous page.)
• In Game mode 1, the AIBO robot will only respond to the following phrases.
AIBO, Shake hands, Good morning, Hello, Bye Bye, Sit down.
To end Game 1
Touch the head sensor for three seconds.
80
Page 81

Settings
This chapter explains how to set various items that you may
occasionally want to change.
Page 82

Setting the volume level of the AIBO® Entertainment Robot
You can set the volume level with an AIBO card, with the volume switch on the AIBO robot,
or with the Energy Station.
Using an AIBO card is quick and simple.
Adjusting the volume with an AIBO card
Show the AIBO robot the “Volume (K)” card.
The volume level is controlled by the direction in which the card is pointing.
To increase the volume, show the card like this:
To reduce the volume, show the card like this:
Volume adjustment is not possible if you hold the AIBO card sideways.
The volume can be adjusted in four steps, including mute. Each time you show the card, the
volume changes by one step. Repeat the process until the desired volume level is set.
Volume
82
Page 83

Adjusting the volume with the control switch on the
®
AIBO
Be sure to press the pause button on the AIBO robot’s back to stop the AIBO robot’s
movements before performing the following steps.
Entertainment Robot
1 Hold AIBO firmly by its body, turn it upside
down, and remove the stomach compartment
cover.
Caution
• Always lift the AIBO robot by its body, not by it extremities.
• Do not touch the charging contacts located on the AIBO robot
with your hand. Touching the contacts will reduce contact
quality.
2 Use the volume control switch to set the volume.
Slide the switch towards the + side to increase and
towards the - side to reduce the volume. When you
release the switch, it will return to the center position.
The volume can be adjusted in four steps, including
mute.
Each time you slide the switch, the volume changes
by one step.
Settings
83
Page 84

Adjusting the volume using the Energy Station
You can adjust the AIBO® Entertainment Robot’s volume while the AIBO robot is on the
Energy Station.
Caution
• When the AIBO robot is not on the Energy Station, you cannot change the setting. If you attempt to
change this setting when the AIBO robot is not on the Energy Station, the pump and battery indicators
on the LCD display will flash for several seconds to indicate that the AIBO robot is not on the Energy
Station.
• To turn ON the display panel backlight, press the LIGHT/+ button. The backlight stays on for about 60
seconds when the AIBO robot is on the Energy Station, and for about four seconds when the AIBO robot
is not on the Energy Station.
1 Place the AIBO robot on the Energy Station.
2 Press the MODE/NEXT button repeatedly until the volume level indication
appears.
Each push of the MODE/NEXT button cycles
through the display indications for date
time zone
t volume.
t time t
3 Press the SET/CANCEL button.
The current volume level setting starts to flash.
4 Use the DISPLAY/- or LIGHT/+ buttons to change the volume level. Then
press the MODE/NEXT button.
The volume level indication appears again, and the setting is transferred to the AIBO
robot.
The volume level can be set from “0” to “3”. If you select “0”, the AIBO robot’s sound
is muted.
Caution
To cancel the setting process, press the SET/CANCEL button. The initial indication appears again, and the
volume setting is not changed.
84
Page 85

Changing the date and time
The AIBO® Entertainment Robot has a built-in clock.
To change the date and time settings, the AIBO robot must be on the Energy Station.
Caution
• When the AIBO robot is not on the Energy Station, you cannot change the setting. If you attempt to
change this setting when the AIBO robot is not on the Energy Station, the pump and battery indicators
on the LCD display will flash for several seconds to indicate that the AIBO robot is not on the Energy
Station.
• To turn ON the display panel backlight, press the LIGHT/+ button. The backlight stays on for about 60
seconds when the AIBO robot is on the Energy Station, and for about four seconds when the AIBO robot
is not on the Energy Station.
Setting the date and time
The following procedure assumes that the date display format is “Year/Month/Day”.
1 Place the AIBO robot on the Energy Station.
2 Press the MODE/NEXT button repeatedly until the date or time indication
appears.
Settings
Each push of the MODE/NEXT button cycles through the display indications for date
t time t time zone t volume.
3 Press the SET/CANCEL button.
The year indication starts to flash.
Caution
Only the last two digits of the year are shown (such as
“03” for 2003).
4 Use the DISPLAY/- or LIGHT/+ buttons to set the year. Then press the
MODE/NEXT button.
The month indication starts to flash.
5 Use the DISPLAY/- or LIGHT/+ buttons to set the month. Then press the
MODE/NEXT button.
The day indication starts to flash.
85
Page 86

6 Use the DISPLAY/- or LIGHT/+ buttons to set the day of the month. Then
press the MODE/NEXT button.
The hour indication starts to flash.
7 Use the DISPLAY/- or LIGHT/+ buttons to set the hour. Then press the
MODE/NEXT button.
The minute indication starts to flash.
8 Use the DISPLAY/- or LIGHT/+ buttons to set the minute. Then press the
MODE/NEXT button.
Caution
To cancel the setting process, press the SET/CANCEL button. The initial indication appears again, and the
date/time setting is not changed.
Setting the time zone
Time zones indicate the difference to UTC (Coordinated Universal Time) in the range from
-12 to +12 (in 1-hour increments).
The time zones for the continental United States are “-8”, “-7”, “-6”, and “-5”. For details on
the time zones of the world, see “Time zone table” on page 118.
86
Caution
• When the AIBO® Entertainment Robot is not on the Energy Station, you cannot change the setting. If
you attempt to change this setting when the AIBO robot is not on the Energy Station, the pump and
battery indicators on the LCD display will flash for several seconds to indicate that the AIBO robot is
not on the Energy Station.
• To turn ON the display panel backlight, press the LIGHT/+ button. The backlight stays on for about 60
seconds when the AIBO robot is on the Energy Station, and for about four seconds when the AIBO is
not on the Energy Station.
Page 87

1 Place the AIBO
®
Entertainment Robot on the Energy Station.
2 Press the MODE/NEXT button repeatedly until the date or time indication
appears.
Each push of the MODE/NEXT button cycles through the display indications for date
t time t time zone t volume.
3 Press the SET/CANCEL button.
The time zone indication starts to flash.
4 Use the DISPLAY/- or LIGHT/+ buttons to set the time zone. Then press
the MODE/NEXT button.
The setting is entered and the time zone indication appears again.
Caution
• The time zone function does not support daylight savings.
• To cancel the setting process, press the SET/CANCEL button. The initial indication appears again, and
the time zone setting is not changed.
Settings
87
Page 88

Changing the date and time display format
You can change the format in which the date and time are shown on the LCD display of the
Energy Station.
Caution
• When the AIBO® Entertainment Robot is not on the Energy Station, you cannot change the setting. If
you attempt to change this setting when the AIBO robot is not on the Energy Station, the pump and
battery indicators on the LCD display will flash for several seconds to indicate that the AIBO robot is
not on the Energy Station.
• To turn ON the display panel backlight, press the LIGHT/+ button. The backlight stays on for about 60
seconds when the AIBO robot is on the Energy Station, and for about four seconds when the AIBO is
not on the Energy Station.
1 Place the AIBO robot on the Energy Station.
2 With the date or time indication being displayed, press the DISPLAY/-
button.
Each press of the button changes the display format as follows.
• Date: Year/Month/Day
• Time: 12-hour clock
Caution
• The date and time formats return to their default settings when the AC adapter of the Energy Station is
disconnected. Set the formats again when you reconnect the AC adapter.
• The default setting is Year/Month/Day and 12-hour clock.
• Also when you have set the Energy Station to the 24-hour clock format, the units for setting the time
with the AIBO cards remain the same. When setting the time with AIBO cards always uses the 12-hour
format.
t Month/Day/Year t Day/Month/Year
t 24-hour clock
88
Page 89

Turning the wireless LAN function ON and OFF
Be sure to press the pause button on the AIBO® Entertainment Robot’s back to stop the
AIBO robot’s movements before performing the following steps.
Caution
Turning switch to ON does not by itself make the wireless LAN function usable. Refer to the “User’s
Guide (PC·Network)” for the AIBO robot ERS-7(PDF) for instructions on how to configure the network.
1 Hold the AIBO robot firmly by its body, turn
it upside down, and remove the stomach
compartment cover.
Caution
• Always lift the AIBO robot by its body, not by it extremities.
• Do not touch the charging contacts located on the AIBO robot
with your hand. Touching the contacts will reduce contact
quality.
Settings
2 Set the wireless LAN switch to ON or OFF.
89
Page 90

Page 91

Additional Information
This chapter provides notes on use, a troubleshooting guide,
and other information concerning the AIBO
Robot.
®
Entertainment
Page 92

Notes on use
To prevent damage to and malfunction of the AIBO® Entertainment Robot, Energy Station,
AC adapter, and “Memory Stick™” media, carefully read and follow these precautions.
Handling the AIBO robot
• Do not use the AIBO robot in locations where there is a danger of falling objects, where
the AIBO robot may be subject to vibrations, where there are stairs or steps, and where
there is no firm support.
• Do not exert strong forces on the AIBO robot, such as pushing with hands or elbows.
• Do not subject the AIBO robot to shocks, and protect it from falls. Otherwise data may be
lost and damage may occur.
• Do not touch the charging contacts. Otherwise contact problems may occur.
• Do not lift the AIBO robot by its head, ears, tail, or legs and do not twist these parts.
• Do not forcibly place the AIBOne toy or any other object in the AIBO robot’s mouth.
• Do not subject the AIBO robot to extreme temperatures, such as by leaving it in direct
sunlight or in a closed car.
• Do not insert paper clips or any other foreign objects into the AIBO robot’s body or in any
joints.
• Do not use the AIBO robot outdoors. Otherwise, it may be damaged by water or foreign
objects.
• Do not use the AIBO robot on concrete floors or similar hard surfaces. Otherwise it may
be damaged and malfunction may occur.
• Do not use the AIBO robot on slippery floors or on thick-piled carpets. Otherwise it may
be damaged by falling over or by carpet hair getting caught in the joints, which prevents
the AIBO robot from moving forward.
• Do not let the AIBO robot get wet.
• Do not block the AIBO robot’s movements or exert force on the AIBO robot.
• Do not touch the color camera lens or distance sensors.
• Do not cover the color camera lens or distance sensors with stickers or similar objects.
• Never point the color camera at the sun, regardless of whether the power is turned OFF or
on. Otherwise the camera may be damaged.
• Do not lubricate any of the joints or other moving parts of the AIBO robot.
• Do not attach any stickers on any of the moving parts of the AIBO robot and do not let
anything get caught in them which could block movement.
• Do not attempt to disassemble or modify the AIBO robot. Your manufacturer’s limited
warranty will not be honored if you modify your AIBO robot.
• When transporting the AIBO robot, use the original packing or another suitable box that
will protect the body, head, tail, and legs from external force and shocks.
92
Page 93

• If you are away from home for an extended period, disconnect the Energy Station’s AC
adapter power cord from the wall outlet.
• Do not expose the AIBO
• Use only AIBO-ware compatible with the AIBO Entertainment Robot ERS-7. To verify
whether your version of AIBO-ware is compatible with your AIBO robot model, refer to
the AIBO-ware “Memory Stick™” media label.
®
Entertainment Robot to strong magnetic fields or X-rays.
Condensation
When the AIBO robot is brought from a cold to a warm location, moisture may form on its
surface and on the inside. If the AIBO robot is used in this condition, damage may occur.
Leave the AIBO robot in the new location for about an hour without starting it up, until the
moisture has evaporated.
“Memory Stick” media handling
To protect the saved data on the “Memory Stick” media, note the following:
• The AIBO MIND software “Memory Stick” media is designed only for use with the AIBO
robot ERS-7. It cannot be used with any other version of the AIBO robot.
• Do not use the AIBO-ware “Memory Stick” media to save data on PCs or camcorders, or
for any purpose other than for the AIBO robot. Doing so may result in damage to the
AIBO robot.
• Do not touch the terminal A with your hand or metal objects.
• If the “Memory Stick” media is used in a location subject to
static electricity or electric noise, data may be lost or corrupted.
• Do not attach anything other than the dedicated label in the areas
indicated by B.
• A label has already been attached to the AIBO-ware “Memory
Stick” media at the factory.
• Do not bend or drop the “Memory Stick” media or subject it to
strong shock.
• Do not attempt to disassemble or modify the “Memory Stick”
media.
• To remove the “Memory Stick” media from the AIBO robot while it is still operating, first
press the pause button to stop the AIBO robot’s movements.
• Keep the “Memory Stick” media away from water and other liquids.
• Do not use or store the “Memory Stick” media in places subject to:
− Excessively high temperatures, such as in a car parked in the sun,
− Direct sunlight, or
− High humidity or corrosive gas.
• When carrying or storing the “Memory Stick” media, keep it in the supplied case.
Additional Information
93
Page 94

• The contents of the AIBO-ware “Memory Stick™” media cannot be copied to another
“Memory Stick” media. Doing so contravenes with the clauses of the End-User License
Agreement and may void your authority to use this product.
®
• Sony
assumes no responsibility for any malfunctions that may occur as a result of using
®
the AIBO
Entertainment Robot in a way not specified in this manual.
• The specifications of the AIBO MIND software are subject to change without notice.
What is an AIBO-ware “Memory Stick” media?
It is a media produced by Sony exclusively for use with the AIBO robot, that contains
application software that can only be executed on an AIBO robot.
Caution
• Do not set the safety switch of the “Memory Stick” media to “LOCK”.
Doing so will make it impossible for the AIBO robot’s learning and
picture taking functions to work.
• If the safety switch on the “Memory Stick” media is set to “LOCK”, the
AIBO robot’s face lights will turn red to warn you when you press the
pause button to start the AIBO robot up. Press the pause button once more
to put the AIBO robot in Pause mode, then unlock the safety switch on the
“Memory Stick” media.
When the AIBO robot starts up normally, the face lights turn white.
Energy Station handling
• While the AIBO robot is on top of the Energy Station, do not place any object near it that
might interfere with its movements.
• Do not touch the charging contacts directly with your hand. Touching the contacts will
reduce contact quality.
• Before moving the Energy Station, detach the station marker, station pole, and foot
stopper.
• Do not press down hard on the Energy Station with your hand or elbow.
• Do not drop or shake the Energy Station as this may damage it.
• To prevent deformation and other damage, do not dismount the Energy Station in very hot
places, such as in a car parked in the sun.
• Do not allow the Energy Station to get wet.
• Do not bend the station marker or subject it to strong force as this may damage it.
94
Page 95

AC adapter handling
• Use only the supplied AC adapter or a separately available AC adapter designed
specifically for this product. Otherwise damage may occur.
• The supplied AC adapter is designed only for use in the specific regions as follows. Do not
use it in other regions at different voltages.
AC adapter input rating
U.S.A. model: 120 V AC, 50-60 Hz, 0.75 A
Other country models: 100 - 240 V AC, 50 - 60 Hz, 0.85 - 0.46 A
• Do not connect the AC adapter to electronic transformers, such as international travel
converters/adapters. Otherwise overheating or damage may occur.
Battery handling
• Do not expose the battery to temperatures above 113°F (45°C). Doing so may result in
performance degradation and damage.
• Take care that no dust or foreign objects enter the terminals of the battery.
• When not intending to use the AIBO
battery and store it in a cool location.
• Also when not in use, the battery will be subject to natural discharge. You should therefore
charge it before using it again.
• Take care not to drop the battery or subject it to force or shocks.
®
Entertainment Robot for a long time, remove the
Additional Information
Cleaning
• Clean the AIBO robot, the Energy Station, station pole, and station marker only by wiping
with a dry, soft cloth.
• Do not use solvents that may damage the surface finish.
• If you are using a chemical dust cloth or a similar product, follow its usage instructions.
95
Page 96

Troubleshooting
If you experience any difficulties, use this troubleshooting guide to check for possible causes
before contacting AIBO Customer Link (customer service). For problems when using AIBO
EYES feature and “AIBO Photo Album”, also refer to the troubleshooting section of the
“User’s Guide (PC·Network)” for the AIBO robot ERS-7 (PDF). Should the problem persist,
contact AIBO Customer Link (customer service). (See the front matter for details on AIBO
Customer Link.)
Go through “Check this first”
Use Clinic mode
Check this first
96
Symptom • Cause c Remedy (see page)
®
The AIBO
Robot does not move even
when you press the pause
button.
When you press the pause
button, the operation light
alternately flashes green and
orange, and a warning sound
is emitted.
* Only use a battery specifically designed for the AIBO® Entertainment Robot ERS-7.
Entertainment
• The battery* is not inserted.
c Insert the battery in the AIBO robot. Then press the pause
button again to end Pause mode.
• The battery
c
Recharge the battery or replace the battery with a charged one.
• The temperature of the battery is abnormally high.
c Wait until the battery
*
power is low.
*
cools down.
Page 97

Symptom • Cause c Remedy (see page)
The AIBO® Entertainment
Robot emits a sad melody and
does not move when you
press the pause button.
The battery cannot be
removed even when you
operate the battery eject lever
(BATT
It takes a long time for the
AIBO robot to start moving.
The AIBO robot tries to walk
but it does not move forward.
Z).
• A “Memory Stick™” media without application software for
the AIBO robot has been installed.
c Insert a “Memory Stick” media compatible with software
specifically designed for the AIBO Entertainment Robot
ERS-7.
• The “Memory Stick” media is defective.
c Check the AIBO robot movements with the AIBO robot
Operation Check mode.
When you remove the “Memory Stick” media from the
AIBO robot, it enters the AIBO robot Operation Check
mode. If there is no problem with the AIBO robot itself, it
will repeat the “Stand up” t “Sit down” t “Lay down”
routine. (In this condition, the mode indicators flash
yellow.)
• A program is running. Press the pause button to stop the
program, and then remove the battery.
Additional Information
• Data is being read from the “Memory Stick” media. Wait a
while.
• The floor may be too slippery.
c Place the AIBO robot on a surface that is not too slippery,
such as low pile carpet.
The AIBO robot falls often. • The floor may be too slippery, inclined, or unstable.
c Place the AIBO robot on a flat surface that is not too
slippery.
After you pick the AIBO robot
up, it moves only slowly
without any hand or leg
motions.
The mode indicators are lit
orange, the AIBO robot does
not move and its joints are
limp.
• The AIBO robot is designed to stop moving whenever it is
picked up from the floor.
c Check to see if the mode indicators slowly flash green. If they
do, place the AIBO robot on the floor. If it does not move
after a while, touch the head sensor for 3 seconds. The AIBO
robot will enter Autonomous mode again.
• Something is jammed in one of the AIBO robot’s joints.
c Place the AIBO robot on the floor and touch the head sensor
for 3 seconds.
97
Page 98

Symptom • Cause c Remedy (see page)
The operation light is flashing
orange.
The AIBO robot asks to be
charged even with a fully
charged battery.
The AIBO robot emits no
sound.
When the AIBO robot is
placed on the Energy Station,
its activity stops after a while.
The AIBO robot does not
self-charge.
• There may be a problem with the battery.
c Check to see if the battery is inserted correctly into the
• With a fully charged battery, the AIBO MIND software can
normally operate for about 1.5 hours (in Autonomous mode).
If the actual operating period is much shorter, the battery may
be reaching the end of its service life. Replace it with a new
battery specifically designed for the AIBO Entertainment
Robot ERS-7 (battery model: ERA-7B1).
• The volume setting may be set to “Mute”.
c Change the volume setting (page 82).
• The AIBO robot is overheated.
c Wait for the AIBO robot to cool down. Activity will resume
• The station pole and station marker are not mounted correctly.
c Attach these parts correctly (page 30).
• The AIBO robot cannot recognize the station marker due to its
surroundings.
c Make the room brighter (fluorescent lighting is
®
AIBO
though the battery is inserted correctly, contact the AIBO
Customer Link (customer service).
automatically after an hour or so.
recommended), and remove any objects from around the
Energy Station that are similar in color to those of the
station pole and/or station marker. Next, perform a sensor
check in Clinic mode (page 101) to test whether the AIBO
robot can find the Energy Station.
Entertainment Robot. If the flashing continues even
98
Cannot perform owner
registration.
• The AIBO robot cannot clearly identify your face.
c Hold your head straight without tilting it to the side. If you
are wearing a distinctive item, such as thick-rimmed
glasses, hair is covering your face, the room is poorly lit, or
if there is a light source behind you, the AIBO robot may
not be able to identify you.
Page 99

Symptom • Cause c Remedy (see page)
The AIBO® Entertainment
Robot does not respond to
AIBO cards.
The AIBO robot goes into
Stop mode when placed on
Energy Station.
When a button is pressed, the
battery level indicator on the
Energy Station LCD display
flashes.
• The AIBO robot cannot easily identify the card.
c Make sure that you hold the card at right angles to the
AIBO robot’s line of vision, so that it can see the entire
card. Remember that the AIBO robot will not be able to
recognize the card if it is partially hidden by fingers or parts
of your clothing, or if the room is too dark or the AIBO card
is lit from the rear.
• The AIBO robot does not respond to AIBO cards while you
are making settings using the voice guide.
• The AIBO robot may also ignore AIBO cards when it is
looking for the Energy Station in order to charge itself.
• The AIBO robot will not respond to AIBO cards if it is at the
puppy stage.
• There is a problem with the connection between the Energy
Station and the AC adapter, or between the AC adapter and the
AC outlet.
c Make sure that all connections are correctly established
(page 32).
• The AIBO robot is not correctly positioned on the Energy
Station.
c Press the button again after correctly positioning the AIBO
robot on the Energy Station (page 32).
Additional Information
The battery level indicator is
not shown on the LCD
display.
All three segments of the
battery level indicator
( ) on the LCD display
are flashing simultaneously.
• No battery is inserted in the AIBO robot.
c Insert the battery before placing the AIBO robot on the
Energy Station.
• Charging could not be carried out correctly.
c Check to see if the battery is inserted correctly into the
AIBO robot. If the flashing continues even though the
battery is inserted correctly, contact the AIBO Customer
Link (customer service).
99
Page 100

Symptom • Cause c Remedy (see page)
The AIBO® Entertainment
Robot does not go into Clinic
mode.
No response when the sensors
on the AIBO robot’s back are
touched. (The back sensors
do not light when touched.)
• There is a problem with the front (blue) or rear (red) sensor on
the back of the AIBO robot.
c Check the touch sensors on the AIBO robot’s back in the
AIBO robot Operation Check mode.
1 Remove the “Memory Stick™” media from the AIBO
robot and press the pause button to start the AIBO robot.
The AIBO robot goes into Operation Check mode. (In
this condition, the mode indicators flash yellow.)
2 The AIBO robot repeats the “Stand up” t “Sit down”
t “Lay down” routine. While the routine is in progress,
simultaneously touch the front (blue) and rear (red) back
sensors for 3 seconds.
The face and back lights should turn ON, and a sound should be
heard.
If the above response is observed, the touch sensors on the AIBO
robot’s back are functioning normally. The “Memory Stick”
media may be defective.
If the above response is not observed, one or more of the touch
sensors on the AIBO robot’s back may be defective. Contact the
AIBO Customer Link (customer service).
• See “The AIBO Entertainment Robot does not go into Clinic
mode” above and check the touch sensors on the back of the
AIBO robot.
100
When in Game mode or
Clinic mode, the mode light
goes out and the AIBO robot
returns to Autonomous mode.
The AIBO robot’s LEDs’
light and/or color is irregular.
• When in modes other than Autonomous mode (such as Game
mode and Clinic mode), the following situations may cause the
AIBO robot to cease current activity and lie down with its legs
spread in Autonomous mode.
− Application of excessive external force to the AIBO robot.
− Extended period of intense movement by the AIBO robot.
− Having the AIBO robot perform intense movements for an
extended period with AIBO cards, etc.
c Please wait for a few minutes without changing the AIBO
robot’s mode. You will be able to switch from Autonomous
mode to another mode (such as Game mode) after a few
minutes.
• The AIBO robot ERS-7 is equipped with several LEDs, and a
certain level of irregularity in the light and/or color of the
LEDs is to be expected. This does not constitute a malfunction.
 Loading...