

Page 1

3-252-228-11 (1)
Net MD Desktop
Audio
Operating Instructions
ADN-1
© 2003 Sony Corporation
Page 2

WARNING
To prevent fire or shock hazard,
do not expose the player to rain
or moisture.
To avoid electrical shock, do not
open the cabinet. Refer
servicing to qualified personnel
only.
Do not install the appliance in a confined space,
such as a bookcase or built-in cabinet.
To prevent fire, do not cover the ventilation of the
apparatus with newspapers, table-cloths, curtains,
etc. And don’t place lighted candles on the
apparatus.
Notice for customers in the United
Kingdom
A moulded plug complying with BS 1363 is fitted
to this equipment for your safety and convenience.
Should the fuse in the plug supplied need to be
replaced, same rating fuse approved by ASTA or
BSI to BS 1362, (i.e. marked with or mark)
must be used.
If the plug supplied with this equipment has a
detachable fuse cover, be sure to attach the fuse
cover after you change the fuse. Never use the
plug without the fuse cover. If you should lose the
fuse cover, please contact your nearest Sony
service station.
Program © 2001, 2002, 2003 Sony Corporation
Documentation © 2003 Sony Corporation
To prevent fire or shock hazard, do not place
objects filled with liquids, such as vases, on the
appliance.
CAUTION
The use of optical instruments with this product
will increase eye hazard.
Certain countries may regulate disposal of the
battery used to power this product. Please consult
with your local authority.
CAUTION
CLASS 1M INVISIBLE LASER RADIATION
WHEN OPEN
DO NOT VIEW DIRECTLY WITH OPTICAL
INSTRUMENTS
• SonicStage, OpenMG and the OpenMG logo
and Net MD and the Net MD logo are
trademarks of Sony Corporation.
• Microsoft, Windows, Windows NT and
Windows Media are trademarks or registered
trademarks of Microsoft Corporation in the
United States and /or other countries.
• All other trademarks and registered trademarks
are trademarks or registered trademarks of their
respective holders.
•TM and ® marks are omitted in this manual.
GB
2
Page 3

Table of contents
The Audio Emphasis
Selecting the audio emphasis ....................... 41
Connection and Setup
Connections ....................................................5
Adjusting the display window contrast .......... 7
Playing a CD .................................................. 8
Recording a whole CD (Synchronized
recording) ................................................. 11
Playing an MD.............................................. 15
Playing CDs or MDs
Using the display .......................................... 18
Locating a specific track............................... 20
To play just the beginning of each track, in
order (Intro Play) ...................................... 21
Playing tracks repeatedly (Repeat Play)....... 21
Playing tracks in random order
(Shuffle Play) ........................................... 22
Creating your own programme (Programme
Play).......................................................... 23
Playing tracks in an MD group..................... 24
Recording from CD to MD
Recording the track you are listening to
(Synchronized recording of a single track -
REC IT) .................................................... 26
Recording the tracks you programmed
(Synchronized recording of the tracks you
programmed) ............................................ 27
The Timer
Setting the clock ........................................... 42
Waking up to music...................................... 43
Falling asleep to music (Sleep Function) ..... 44
Using with your computer
Transferring music from your computer to an
MD (Check-out) ....................................... 46
Listening to audio from your computer
(USB Speaker Function) .......................... 47
Additional Information
Precautions ................................................... 48
Troubleshooting............................................ 50
Error messages ............................................. 54
Specifications ............................................... 55
Locating the Controls ................................... 56
Explanations ................................................. 60
System limitations of the MD ...................... 61
Index ............................................................. 63
GB
MD Editing
Creating a group (Group Function) .............. 28
Releasing a group setting (Group Release
Function) .................................................. 30
Adding a track to a group (Group In
Function) .................................................. 30
Removing a track from a group (Group Out
Function) .................................................. 31
Erasing recordings (Erase Function) ............ 32
Dividing a recorded track into two tracks
(Divide Function) ..................................... 34
Combining two adjacent tracks into a single
one (Combine Function)........................... 35
Moving recorded tracks (Move Function).... 36
Labelling recordings (Name Function) ........ 37
GB
3
Page 4
Before using this product
This manual explains the general operations of the player.
For the basic use of the supplied SonicStage software, refer to the separate manual.
On explanations in this manual
Explanations in this manual are based on the operations done by the remote
control.
Net MD Desktop
Audio
Operating Instructions
The operations on the main unit are explained when they are different from
those by the remote control.
ADN-1
© 2003 Sony Corporation
For SonicStage Ver. 1.5 software
SonicStage Ver. 1.5 Operating Instructions
This manual explains the installation and basic operations of the supplied
SonicStage software.
SonicStage Ver.1.5
Operating Instructions
SonicStage Ver. 1.5 Help
This is an online help that you can view on your computer screen. Refer to the
© 2002 Sony Corporation
online help for details on the use of the software.
On the Supplied Software
• Copyright laws prohibit reproducing the software or the manual accompanying it in
whole or in part, or renting the software without the permission of the copyright holder.
• In no event will SONY be liable for any financial damage, or loss of profits, including
claims made by third parties, arising out of the use of the software supplied with this
recorder.
• In the event a problem occurs with this software as a result of defective manufacturing,
SONY will replace it. However, SONY bears no other responsibility.
• The software provided with this recorder cannot be used with equipment other than that
which is so designated.
• Please note that, due to continued efforts to improve quality, the software specifications
may be changed without notice.
• Operation of this recorder with software other than that provided is not covered by the
warranty.
3-252-228-11 (1)
3-254-369-11(1)
GB
4
Page 5
Connection and Setup
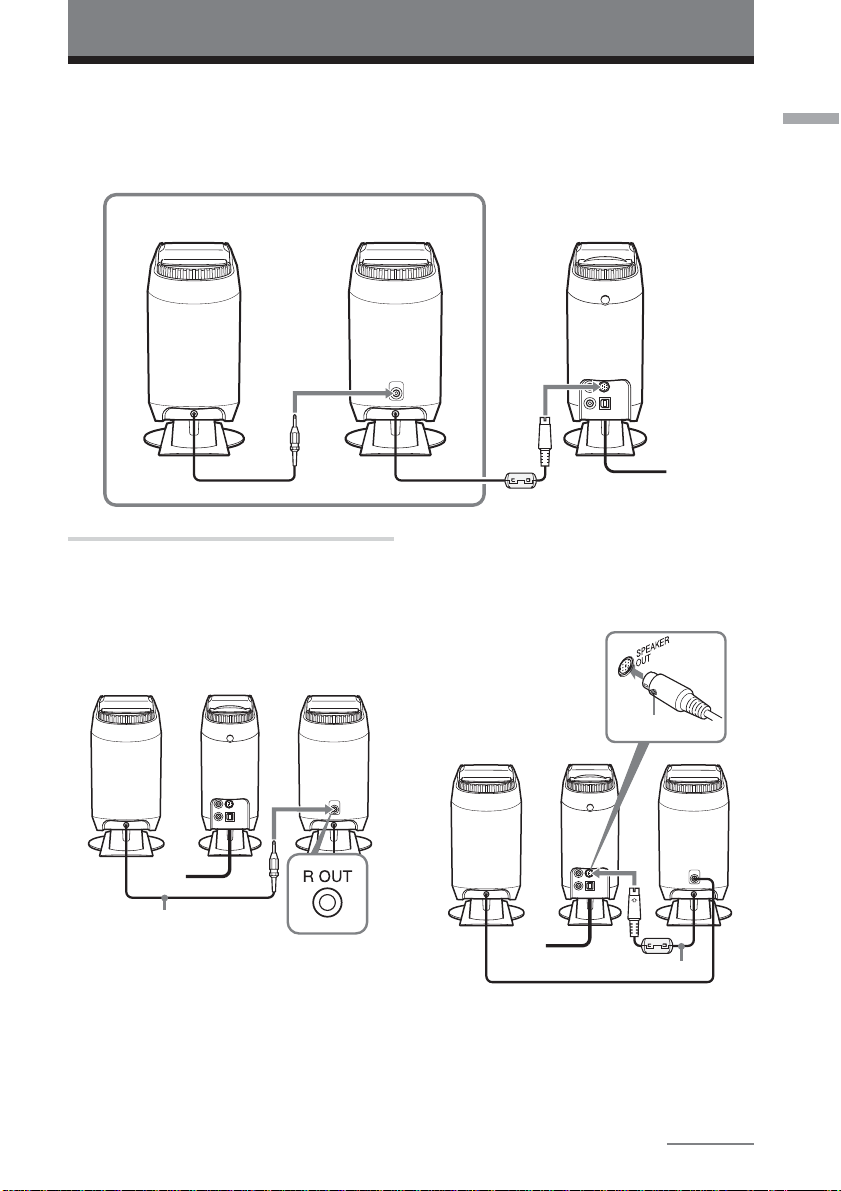
Connections
Insert the plugs firmly into their receptacles in the order shown in the figure below.
Connecting the cables incorrectly can cause incorrect operation.
Right speaker (rear) Left speaker (rear) Main unit (rear)
1
2
1
3 Plug into a
wall outlet
1 Connect the speakers.
1 Connect the speaker cord from the
right speaker to the R OUT
connector on the rear of the left
speaker.
Right Main unit Left
2 Connect the speaker cord from the
left speaker to the SPEAKER OUT
connector on the rear of the main
unit.
Connection and Setup
Speaker cord
Notes
• The operating panel on the main unit slides
to the right and left. Place the speakers a
short distance from the main unit so that
the operating panel does not bump the
speakers.
• Do not place objects such as books or vases
close enough to the main unit to interfere
with the movement of the operating panel.
Arrow
Right Main unit Left
Speaker cord
Notes
• Align the arrow on the speaker cord plug
with the left side of the SPEAKER OUT
connector.
• Take care not to force the plug into the
connector, or you may damage the unit.
continued
GB
5
Page 6
Connections (continued)
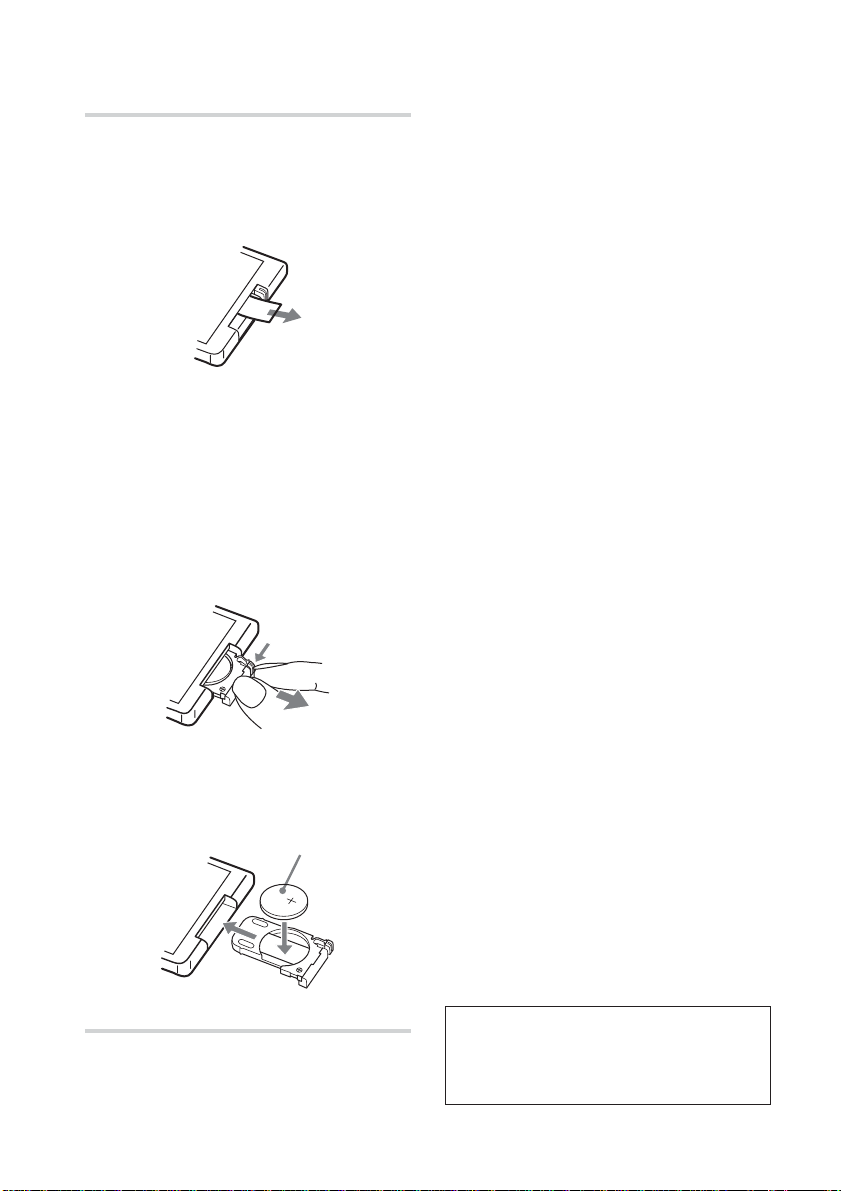
2 Prepare the remote control.
Pull the insulating sheet out from the
remote control to prepare it for use.
The remote control comes with a battery
pre-installed.
Note
When using the unit for the first time, or
after a long period of disuse, you need to
charge the memory battery in the main unit.
Wait about an hour after plugging in the
mains lead for the battery to be fully charged
(you can use the unit during this time).
Afterwards, always turn off the power on the
main unit before unplugging the mains lead.
When the battery is charged, the unit's clock
and timer information will be preserved for
about 30 minutes when the unit is not
supplied with power from a wall outlet. If
the clock and timer information is lost, you
will need to set the clock and timer again.
Replacing the battery in the
remote control
As the battery wears out, the range at
which the remote control will work will
decrease.
When this happens, follow the
procedure below to replace the battery
with a new one. The battery should last
about 6 months with normal use.
1 Slide out and remove the battery case.
2 Replace the battery with a new
CR2025 lithium battery, with the
side marked + facing up.
3 Replace the battery case.
3 Connect the mains lead.
Connect the mains lead of the main unit
to a wall outlet.
GB
6
Back side of
remote control
CR2025 lithium battery
(not supplied)
CAUTION
Danger of explosion if battery is incorrectly
replaced.
Replace only with the same or equivalent type
recommended by the manufacturer. Discard used
batteries according to the manufacturer’s
instructions.
Battery life
You can expect the remote control to operate for
about 6 months (using a Sony CR2025 lithium
battery) before the battery runs down. When the
battery no longer operates the remote, replace the
battery with a new one.
To avoid battery leakage
If you are not going to use the remote control for a
long time, remove the battery to avoid damage
caused by corrosion from battery leakage.
Notes on lithium battery
•Keep the lithium battery out of the reach of
children.
Should the battery be swallowed, immediately
consult a doctor.
• Wipe the battery with a dry cloth to assure a
good contact.
• Be sure to observe the correct polarity when
installing the battery.
• Do not hold the battery with metallic tweezers,
otherwise a short-circuit may occur.
WARNING
Battery may explode if you mistreated.
Do not recharge, disassemble or dispose of in
fire.
Page 7
Note
Make sure the remote sensor is not exposed to
strong light such as direct sunlight or fluorescent
lamp light.
Adjusting the display window contrast
Connection and Setup
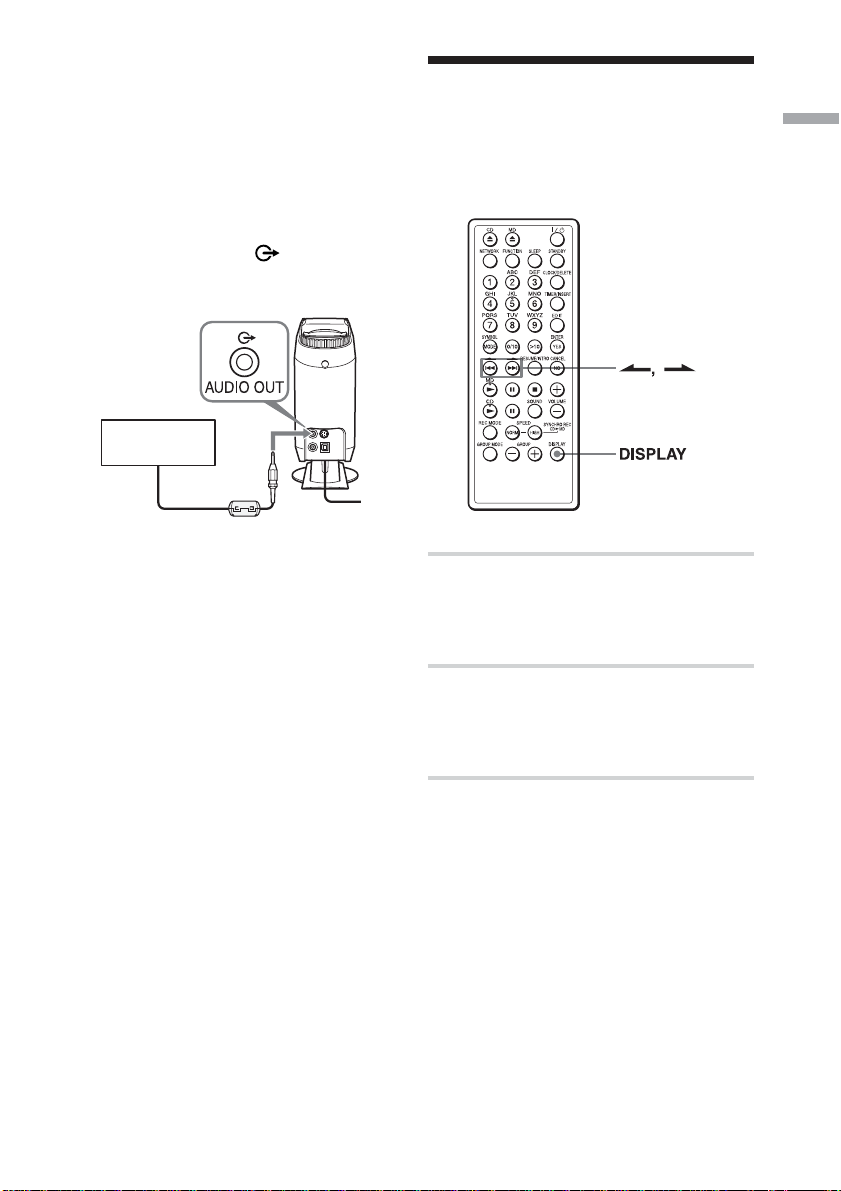
Using the unit with active
speakers (not supplied)
To use this unit with active speakers with
built-in amplifiers (not supplied), connect
the active speakers to the
jack on the main unit. See the active speaker
operating manual for more information.
Speaker (not
supplied)
Note
Before connecting the active speakers to the
player, be sure to attach the supplied clamp filter
to the cable. For more information on attaching
the clamp filter, see page 57.
AUDIO OUT
You can adjust the contrast of the display
window to your liking.
1 While the unit is turned off, hold down
DISPLAY for about 2 seconds.
“Contrast” will appear in the display
window.
2 Press > or . to adjust the
contrast.
The contrast can be adjusted within a
range from –7 to +7.
GB
7
Page 8
Playing a CD
Preparation: see Connections on page 5
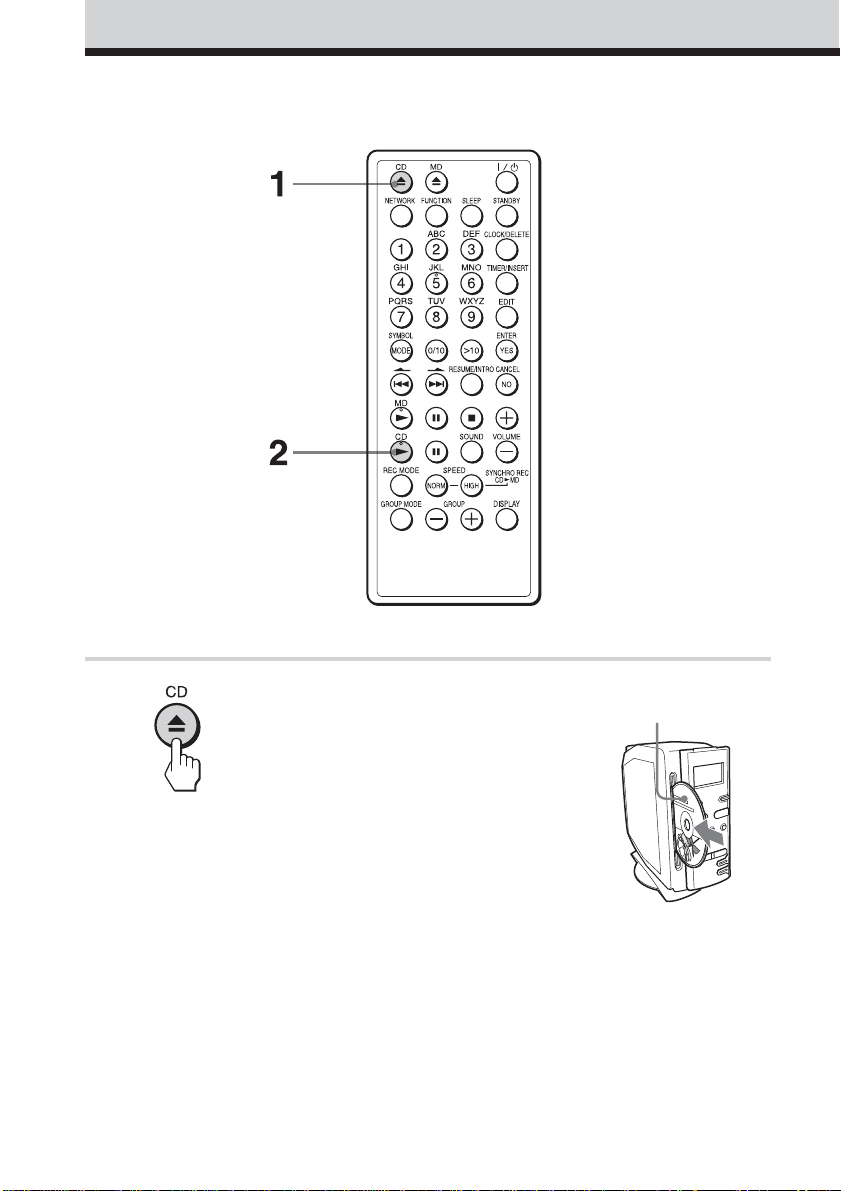
1 Press Z CD to open the operating
panel (or touch Z on the main unit)
and insert a CD into the slot.
The unit power will turn on
automatically when you press the
button. The operating panel will
slide to the right. Insert a CD into
the slot, with the label side (the side
with writing on it) facing to the left.
The operating panel will
automatically slide closed after you
insert the CD.
GB
8
Face the label side
toward the left
Page 9
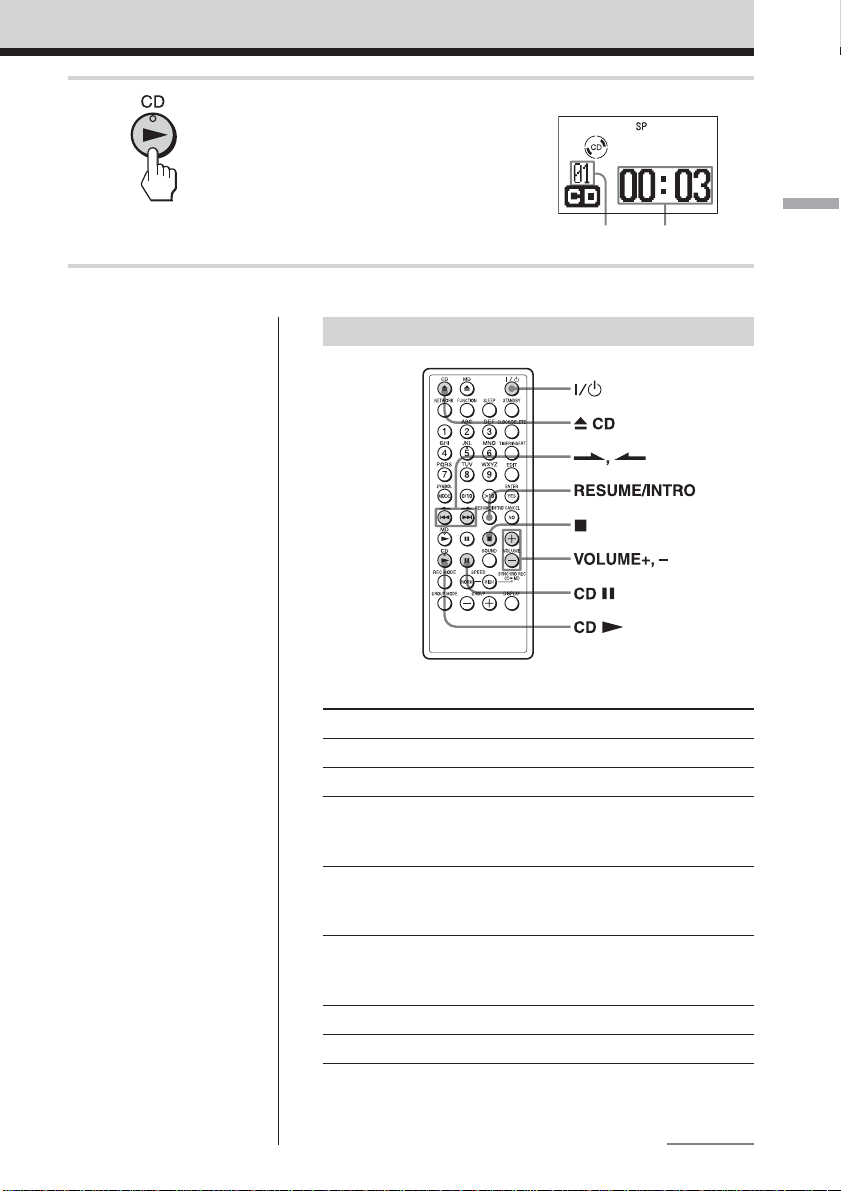
2 Press CD N.
(Or press CD u on the main unit).
The CD will start to play.
Main unit display window
Notes
• To play an 8-cm CD, insert
it into the center of the slot.
• Sometimes when an 8-cm
CD is inserted, the display
will show “No Disc”, and
you will not be able to play
or eject the disc. If this
happens, press x on the
main unit, and while
holding x, press the
VOLUME–, HIGH SPEED
REC, and VOLUME+ , in
that order.
• When Z CD is pressed,
there may be some delay
until the CD is ejected from
the slot.
Track
number
Track elapsed
playing time
Other operations
Button names in parentheses ( ) are buttons on the main unit.
To
adjust the volume
stop play
pause play
go back to the beginning of a track
go back to the previous track
go to the next track
eject the CD
turn the power on or off
Press
VOLUME +, –
x
CD X (CD u)
Press the button again to
resume play after pause.
.
Press and release the button
quickly.
>
Press and release the button
quickly.
Z CD
?/1
Playing a CD
continued
GB
9
Page 10

Playing a CD (continued)
Tip
When the CD is ejected, or
when x is pressed while CD
play is already stopped, play
will begin from the first track
on the CD the next time the
CD is played, even if the
Resume function is set to
“Resume On.”
To start play from the same track where
play was stopped (Resume function)
You can set this unit to remember the track that was
playing when x is pressed, and begin playing from that
track the next time CD N is pressed again.
Press RESUME/INTRO so that “Resume On” is shown in
the display window. When the CD is stopped, the display
window will show “R” and the number of the track from
which play will begin next time.
To turn off the Resume function, press RESUME/INTRO
so that “Resume Off” is shown in the display window.
10
GB
Page 11
Recording a whole CD (Synchronized recording)
2
4
Preparation: see Connections on page 5
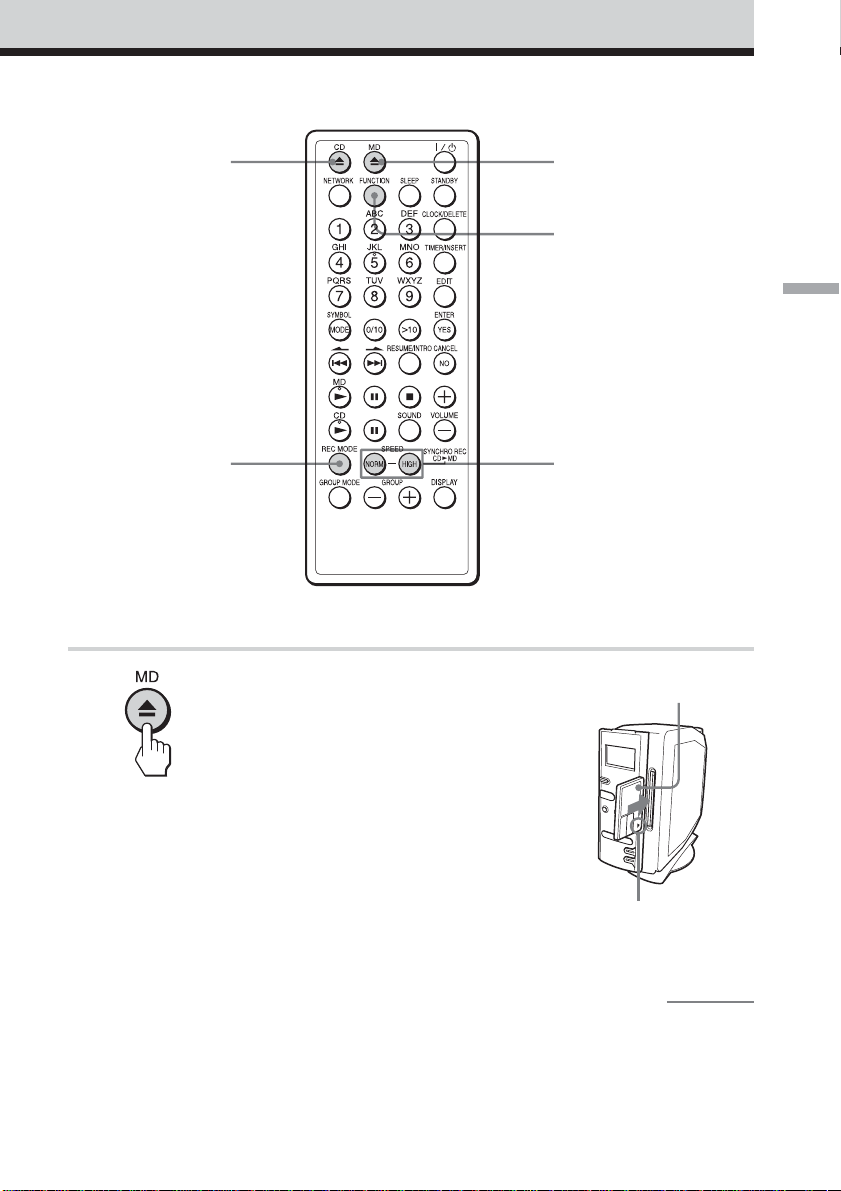
1 Press Z MD to open the operating
panel (or touch Z on the main unit)
and insert a recordable MD to be
recorded into the slot.
The unit power will turn on
automatically when you press the
button. The operating panel will
slide to the left. Insert an MD into
the slot, with the label side facing
to the right.
The operating panel will
automatically slide closed after
you insert the MD.
1
3
Recording a whole CD (Synchronized recording)
5
Face the label side
toward the right
Insert in the direction
indicated by the arrow
continued
11
GB
Page 12
Recording a whole CD (Synchronized recording) (continued)
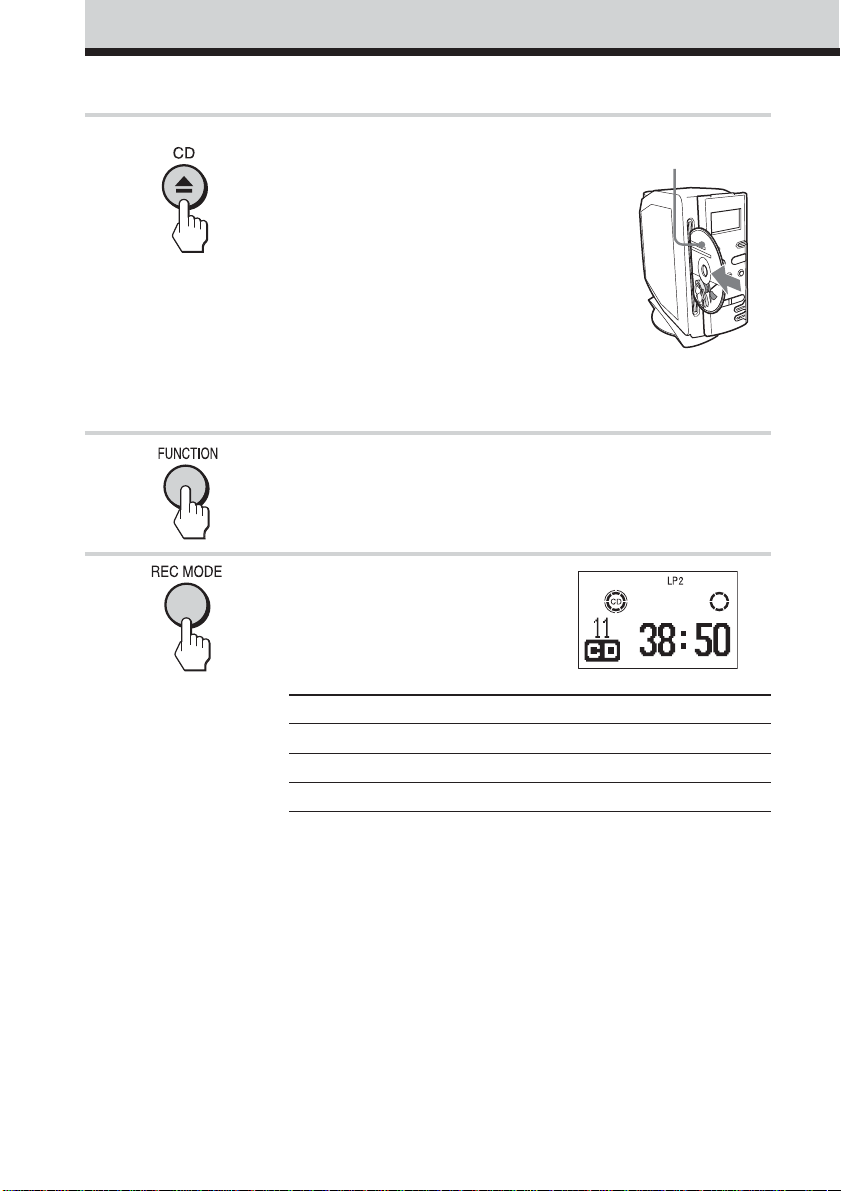
2 Press Z CD to open the operating
panel (or touch Z on the main unit)
and insert a CD into the slot.
The unit power will turn on
automatically when you press the
button. The operating panel will
slide to the right. Insert a CD into
the slot, with the label side (the
side with writing on it) facing to
the left.
The operating panel will
automatically slide closed after
you insert the CD.
3 Press FUNCTION to display “CD”
in the display window.
4 Press REC MODE to choose the
desired recording mode.
The recording mode will cycle
through SP , LP2 , LP4 as you
press the button.
Recording mode
Stereo SP about 80 minutes
LP2 Stereo LP2 about 160 minutes
LP4 Stereo LP4 about 320 minutes
1) For better audio quality, choose either stereo or LP2 stereo.
2) When recording to an 80-minute MD.
1)
Display Recording length
Face the label side
toward the left
2)
12
GB
Page 13
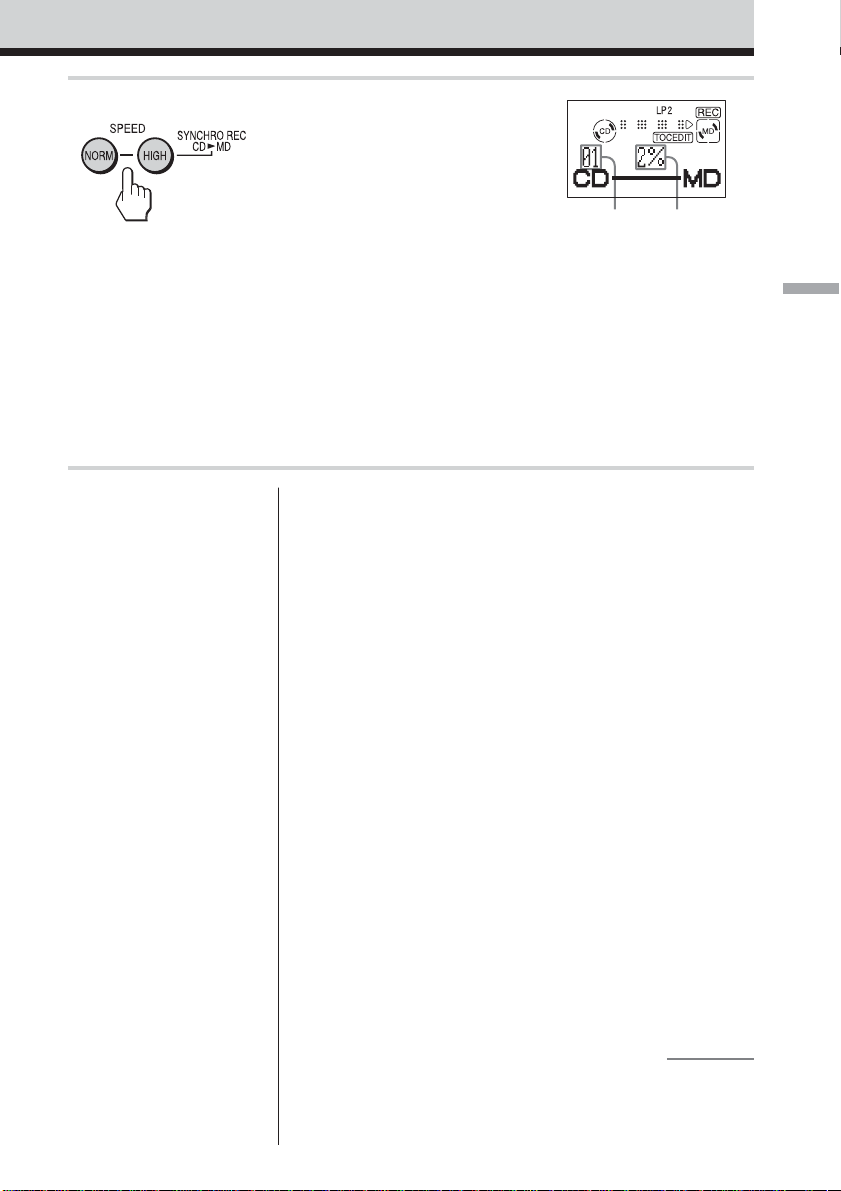
5 To start high-speed recording,
press HIGH SPEED SYNCHRO
REC CD N MD (or HIGH
SPEED REC on the main unit).
(To listen to the music while
recording at normal speed, press
NORM SPEED.)
Recording will start
automatically.
If the MD loaded into the unit
already has audio recorded on it,
recording will begin after the end
of the existing audio tracks.
No sound will come out of the
speakers or headphones during
high-speed recording.
Track number
XXXX XXXX
of CD
Elapsed
recording
condition
Recording a whole CD (Synchronized recording)
Tips
• LP4 stereo recording uses a
special compression
technique to provide longplaying stereo recording.
As a result, there is a
chance that there will, on
rare occasion, be some
noise in the recorded audio
when recording from some
sources. For the best audio
quality, we recommend
using either the SP or LP2
recording mode.
• Adjusting the volume or the
audio emphasis will not
affect the recording level.
Keep the volume at a
moderate level so as to
prevent the sound from
skipping.
• When recording at normal
speed, pressing DISPLAY
will cause the total elapsed
CD play time to be
displayed.
About long-time recording (MDLP)
In addition to ordinary stereo recording, this unit provides
the capability of recording two times (LP2) or four times
(LP4) as much music on a disc.
Discs you record in LP2 or LP4 mode can only be
played back in other MD equipment that supports
the LP2 and LP4 modes.
Notes on high-speed recording
• You cannot record the same track(s) over and over again
in high-speed recording mode. If you attempt to record a
CD in high-speed mode, and some of the tracks on the
CD have been recorded using high-speed mode in the
previous 74 minutes, those tracks will be recorded using
normal-speed mode, while the rest of the tracks will be
recorded using high-speed mode.
• If recording is stopped while in the middle of recording a
track using high-speed mode, that track will not be saved
on the MD.
• High-speed recording mode cannot be used when
recording from a CD-RW disc.
• If errors occur due to dirt or scratches on the CD when
recording in high-speed mode, the recording will
automatically shift to normal-speed mode.
continued
13
GB
Page 14
Recording a whole CD (Synchronized recording) (continued)
• Once the clock is set, the
recording date and time are
stamped automatically
(page 42).
• You can also save the track
names, disk name, and artist
names while recording
(pages 37 to 40).
Notes
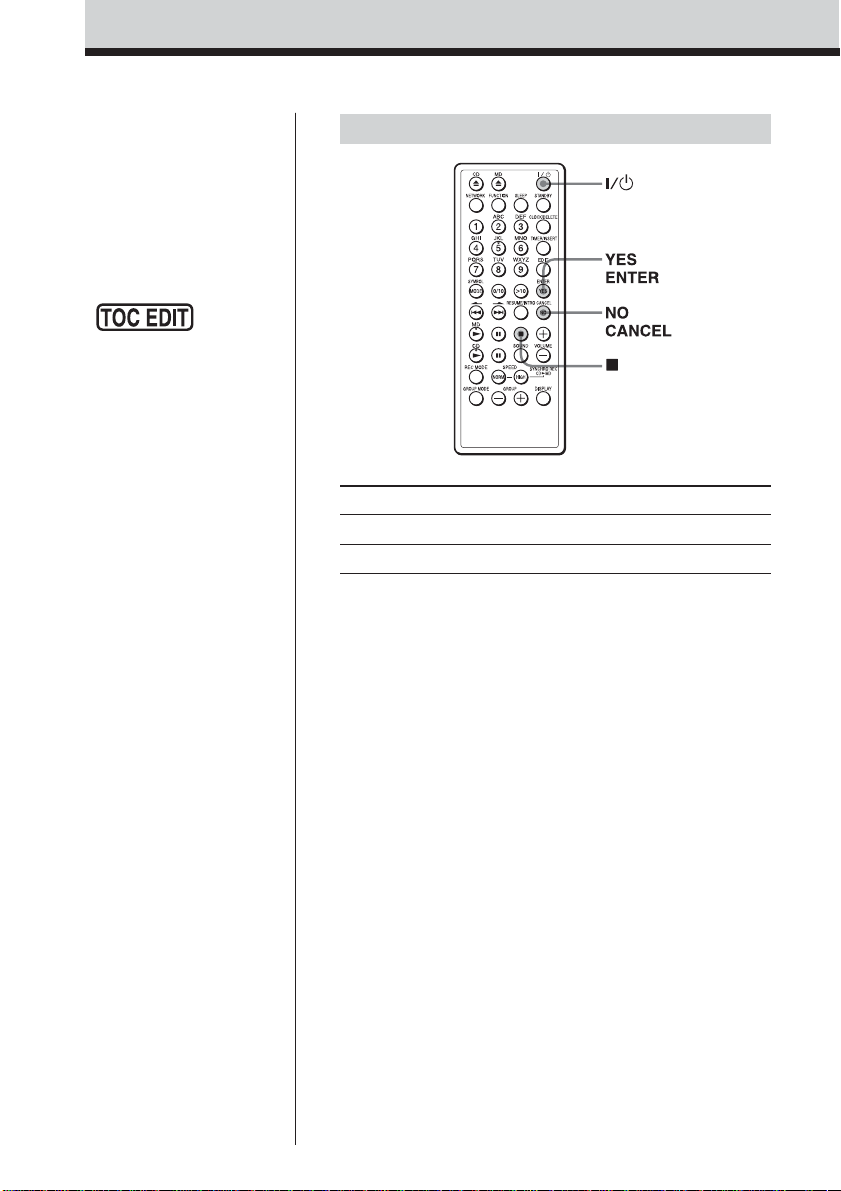
• After you
stop recording, do not
disconnect the mains
lead or move the player
while “TOC EDIT” is
flashing in the display.
If you do so, recording may
not be done properly.
• You will not be able to play
or edit discs recorded in
LP2 or LP4 mode on MD
equipment that does not
support LP2 and LP4
modes.
Other operations
To Press
stop recording x
turn the power on or off ?/1
If “-:- Short” is displayed
There is not enough space on the MD to record the whole
CD.
If you want to record as much of the CD as will fit, press
YES.ENTER. To stop recording, press NO.CANCEL.
See page 54 if any other messages are displayed.
14
GB
Page 15
Playing an MD
Playing an MD
Preparation: see Connections on page 5
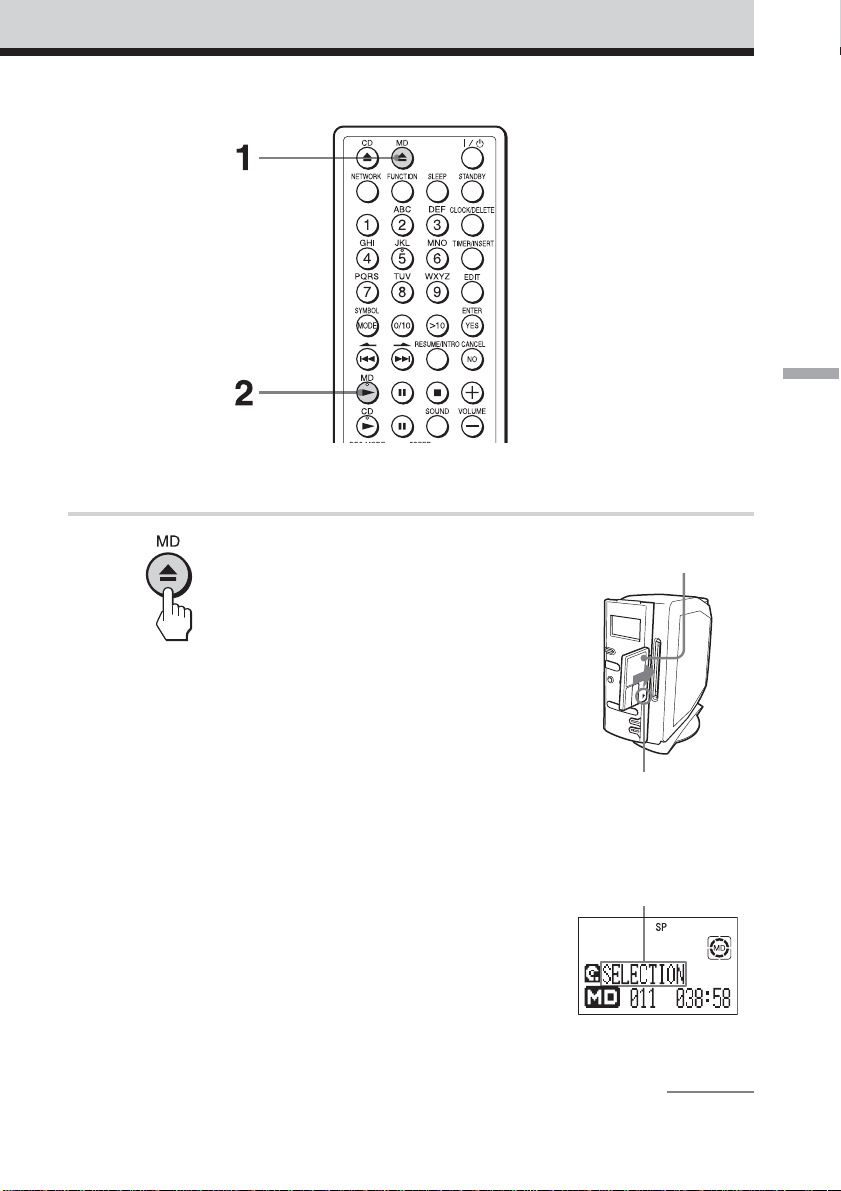
1 Press Z MD to open the operating
panel (or touch Z on the main unit)
and insert an MD into the slot.
The unit power will turn on
automatically when you press the
button. The operating panel will
slide to the left. Insert an MD into
the slot, with the label side facing to
the right.
The operating panel will
automatically slide closed after you
insert the MD.
Face the label side
toward the right
Insert in the direction
indicated by the arrow
After “TOC Reading” is
displayed, the disc
name will be displayed
if it is labelled.
continued
15
GB
Page 16
Playing an MD (continued)
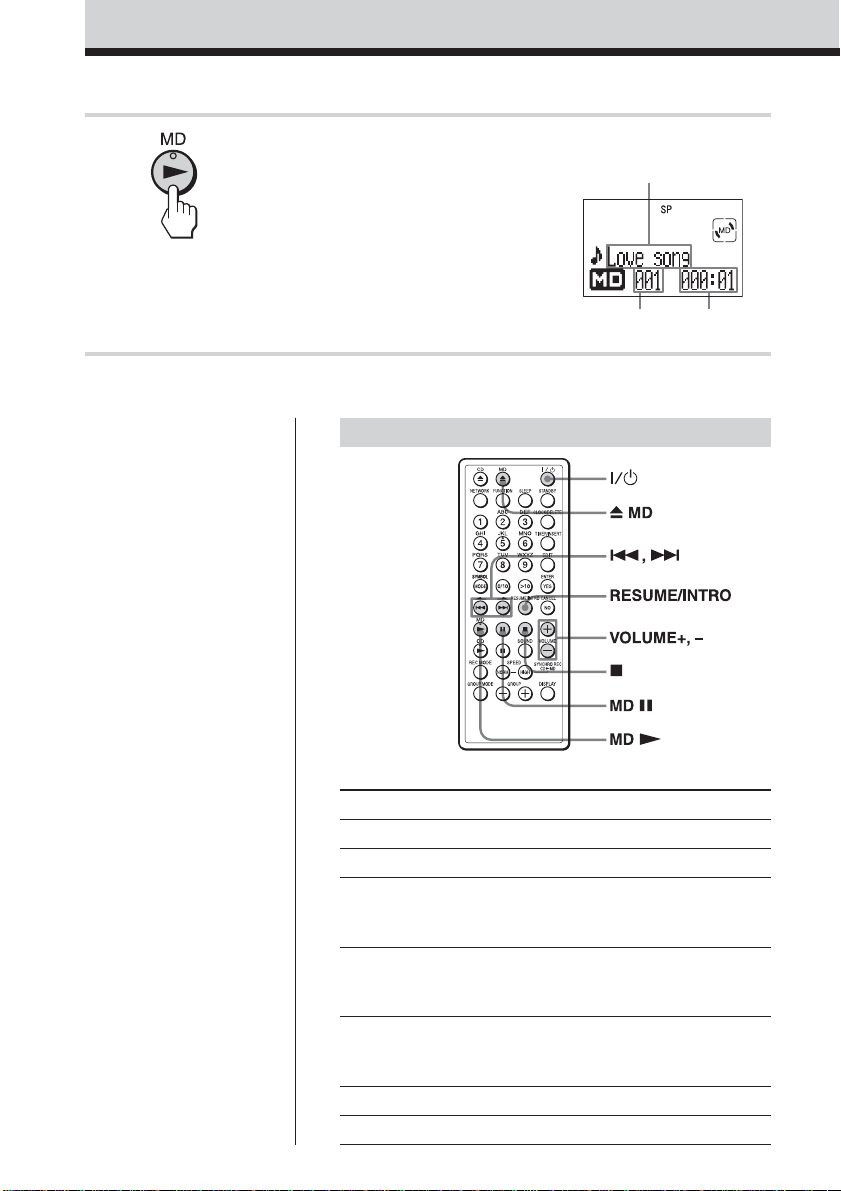
2 Press MD N.
(Or press MD u on the main unit.)
The MD will start to play.
Other operations
Track name is
displayed if it is
labelled.
Track number Playing time
16
GB
Button names in parentheses ( ) are buttons on the main unit.
To
adjust the volume
stop play
pause play
go back to the beginning of a track
go back to the previous track
go to the next track
eject the MD
turn the power on or off
Press
VOLUME +, –
x
MD X (MD u)
Press the button again to
resume play after pause.
.
Press and release the button
quickly.
>
Press and release the button
quickly.
Z MD
?/1
Page 17

Tips
• The MD will automatically
be played in Stereo, LP2
Stereo, LP4 Stereo, or
Monaural mode, according
to how it was recorded
(page 12).
• Pressing Z CD or Z MD
while a MD is sticking out
of the slot will cause the
front panel to slide into the
MD, but the disc will not be
damaged.
• When the MD is ejected, or
when x is pressed while
MD play is already stopped,
play will begin from the
first track on the MD the
next time the MD is played,
even if the Resume function
is set to “Resume On.”
To start play from the same track where
play was stopped (Resume function)
You can set this unit to remember the track that was
playing when x is pressed, and begin playing from that
track the next time MDN is pressed again.
Press RESUME / INTRO so that “Resume On” is shown in
the display window. When the MD is stopped, the display
window will show “R” and the number of the track from
which play will begin the next time.
To turn off the Resume function, press RESUME / INTRO
so that “Resume Off” is shown in the display window.
Playing an MD
17
GB
Page 18
Playing CDs or MDs
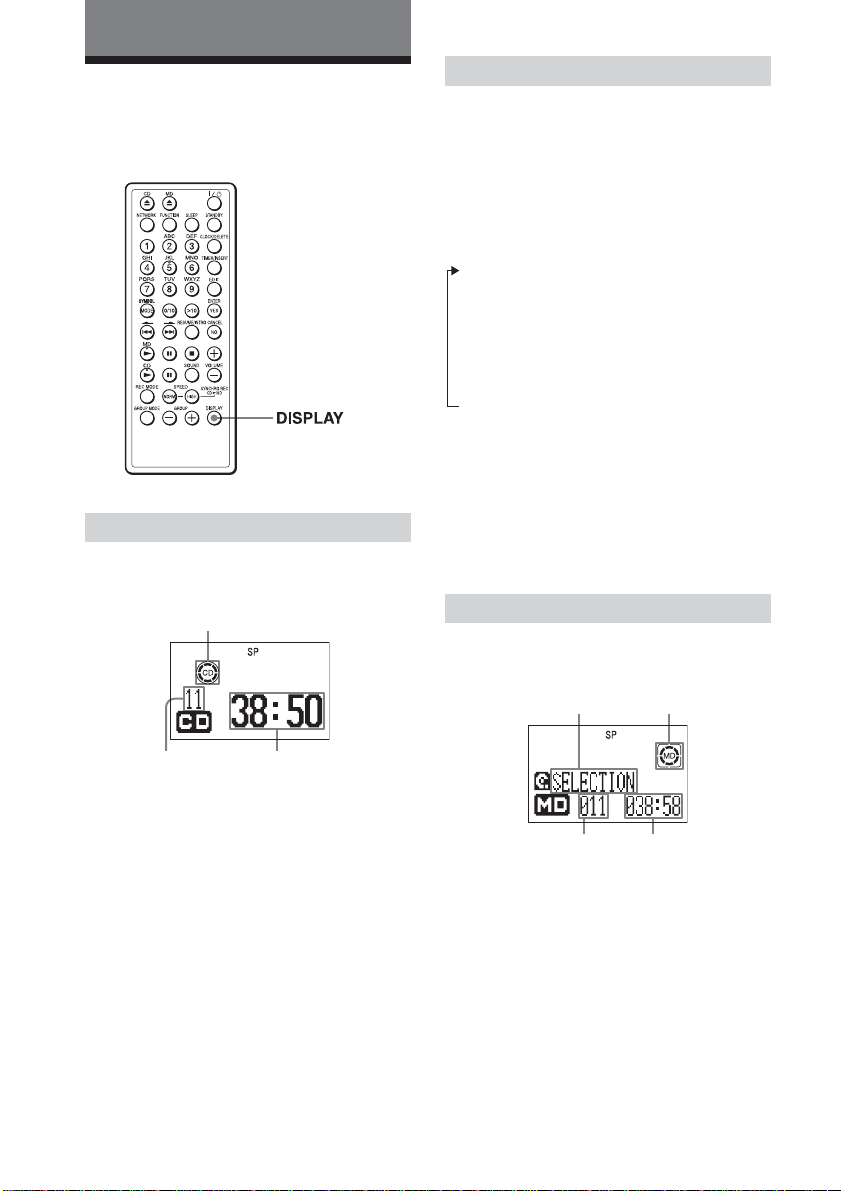
Using the display
You can check information about the CD
and MD using the display.
During stop (CD)
The total track number and playing time are
displayed.
CD indication
During play (CD)
The current track number and playing time
are displayed.
To check the remaining time
Press DISPLAY. The display window will
cycle through the following information.
Current track number and elapsed time
(normal display)
r
Current track number and remaining
time
r
Remaining number of tracks and total
remaining time
Note
The remaining number of tracks and total
remaining time will not be displayed during
Repeat Play (page 21), Shuffle Play (page 22), or
Programme Play (page 23).
During stop (MD)
The total track number and playing time are
displayed.
Disc name MD indication
18
GB
Total track
number
Total playing
time
Total track
number
Total playing
time
Page 19

Press DISPLAY. The display window will
change as follows.
Disc name, total number of tracks, total
playing time (normal display)*
r
Time available for recording **
* When Group Mode is set to ON (page 28), the
information displayed will pertain to the tracks
in the selected group.
** Time available for recording is not displayed
when Group Mode is set to ON (page 28).
Tip
Track names, disc name, and group name are only
displayed if those names are recorded on the MD.
Those names will not be displayed if they are not
recorded on the disc.
During play (MD)
The current track name, number, and playing
time are displayed.
To check the remaining time,
recording date and time, etc.
Press DISPLAY. The display window will
change as follows.
Tip
Track names, disc name, and group name are only
displayed if those names are recorded on the MD.
Those names will not be displayed if they are not
recorded on the disc.
Note
The disc name, remaining number of tracks, and
total remaining time will not be displayed during
Repeat Play (page 21), Shuffle Play (page 22), or
Programmed Play (page 23).
Playing CDs or MDs
Current track name, number, and playing
time (normal display)
r
Current track name, number, and
remaining time
r
Disc name, remaining number of tracks,
and total remaining time *
r
Recording date and time **
* When Group Mode is set to ON (page 28), the
information displayed will pertain to the tracks
in the selected group.
** Once the clock is set, the recording date and
time are stamped automatically (page 42).
19
GB
Page 20
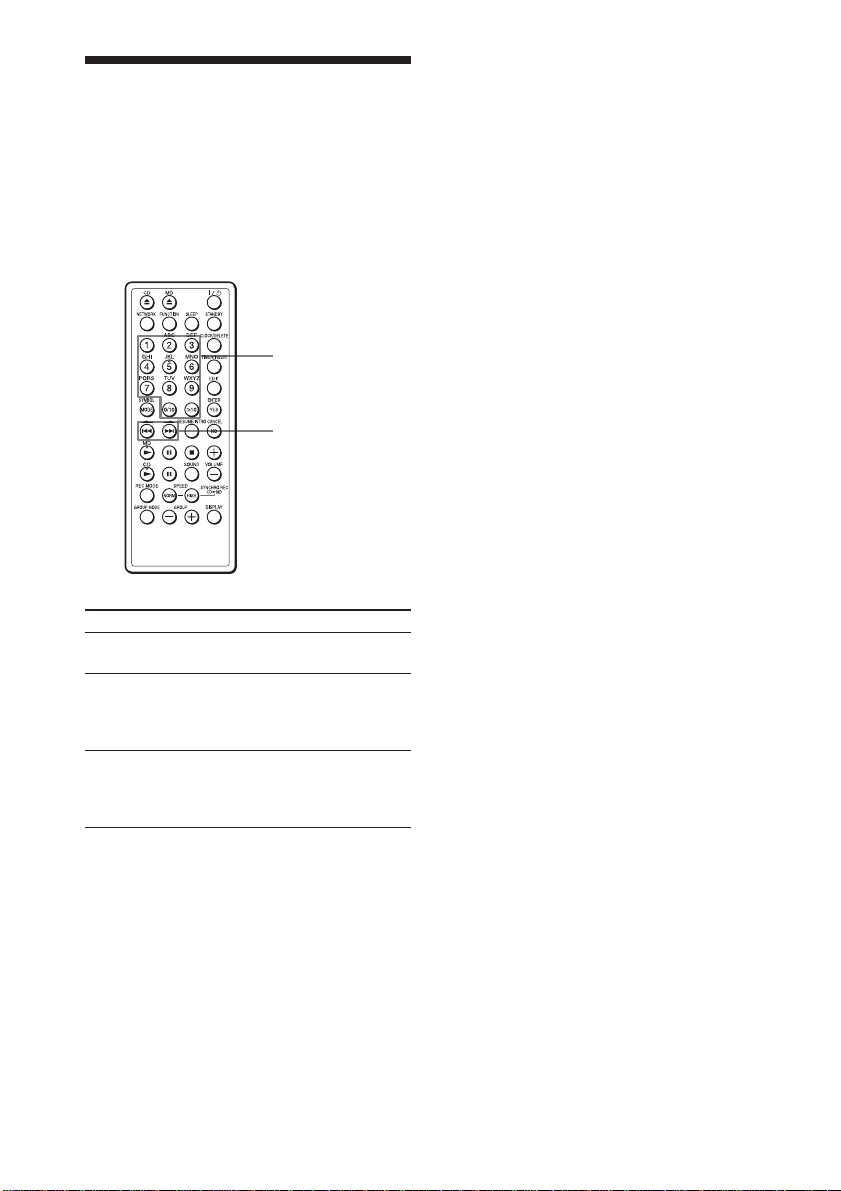
Locating a specific track
You can quickly locate any track on a CD or
an MD using the number/character buttons
on the remote control. You can also find a
specific point in a track while playing a CD
or an MD.
Number /
character buttons
., >
Tips
• To locate a track numbered over 10, press >10
first, then the corresponding number/character
buttons.
Example:
To play the track number 23, press >10 first,
then 2 and 3.
To play the track number 10, you can use the 0/
10 button as well as >10, 1 and 0.
• To select a track on an MD numbered 100 or
more, press >10 twice, then the corresponding
number/character buttons.
To locate
a specific track
directly
a point while
listening to the
sound
a point while
observing the
display
Note
You cannot locate a specific track if “REP PGM”,
“REP SHUF”, “PGM” or “SHUF” is lit in the
display. Turn off the indication by pressing x.
GB
20
Press
the number/character button
of the track.
> (forward) or .
(backward) while playing
and hold down until you find
the point.
> (forward) or .
(backward) in pause and
hold down until you find the
point.
Page 21

To play just the
Playing tracks
beginning of each track,
in order (Intro Play)
You can set this unit to play just the first 10
seconds of each track on a CD or MD.
Perform the following operation with the
desired source (CD or MD) stopped.
Hold down RESUME / INTRO more
than 2 seconds.
“I” will be shown in the display
window, and the first 10 seconds of
each track will be played.
To play a full track during intro
play
Press CD N (or MD N).
repeatedly (Repeat Play)
You can play tracks repeatedly in normal,
shuffle or programme play modes.
To repeat
a single track
all the tracks
tracks in
random order
programmed
tracks
Do this
1 Play the track you want.
2 Press MODE until “REP 1”
appears in the display.
1 Start normal play.
2 Press MODE until “REP”
appears in the display.
1 Start shuffle play (see page
22).
2 Press MODE until “REP”
and “SHUF” appears in the
display.
1 Start programme play (see
page 23).
2 Press MODE until “REP”
and “PGM” appears in the
display.
Playing CDs or MDs
continued
21
GB
Page 22

Playing tracks repeatedly
(Repeat Play) (continued)
To cancel Repeat Play
Stop playing first. Then, press MODE until
“REP” disappears from the display.
Tip
You can also select repeat play mode during stop.
Press MODE repeatedly until “REP 1”, “REP”,
“SHUF” and “REP” or “PGM” and “REP”
appears in the display. Then play the CD or MD.
Playing tracks in random order (Shuffle Play)
You can play tracks in random order.
Before you begin, make sure that the CD or
MD player is in stop mode.
1 Press MODE until “SHUF” appears in
the display.
22
2 Press CD N (or MD N) to start
shuffle play.
To cancel Shuffle Play
Stop playing first. Then, press MODE until
“SHUF” disappears from the display.
Tips
• During Shuffle Play, you cannot select the
previous track by pressing ..
• The Resume function (pages 10 and 17) cannot
be used during Shuffle Play.
GB
Page 23

Creating your own programme (Programme Play)
You can arrange the playing order of up to
20 tracks on a CD or an MD.
(In case of MD)
Playing order
Number /
character buttons
Before you begin, make sure that the CD or
MD player is in stop mode.
1 Press MODE until “PGM” appears in
the display.
2 Press the number / character buttons to
enter the numbers of the tracks you
want to play.
(In case of CD)
Playing order
Track
number
Repeat until all desired tracks are
programmed.
Total
programmed
time
3 Press CD N (or MD N) to start
programme play.
Tips
• If you accidentally enter an incorrect number,
press NO.CANCEL. Then enter the correct
number.
• The program you entered remains even after
playback is finished. You can play the same
programme again by pressing CD N (or
MD N).
• Ejecting the CD will delete the CD programme;
ejecting the MD will delete the MD programme.
• During play, total programmed time cannot be
displayed.
• The Resume function (pages 10 and 17) cannot
be used during programmed play.
To cancel Programme Play
Stop playing first. Then, press MODE until
“PGM” disappears from the display.
Playing CDs or MDs
Track number Total
programmed
time
To check the order of tracks
before play
Before starting the programme play, press
YES.ENTER.
Every time you press YES.ENTER, the track
number appears in the programmed order.
continued
23
GB
Page 24

Creating your own programme
(Programme Play) (continued)
To change the current
programme
Change before starting the programme play.
To
erase the last
track in the
programme
change the
whole program
completely
Do this
1 Press NO.CANCEL.
The track programmed last
is erased.
2 Re-enter the track numbers.
1 Press x to erase the whole
programme.
2 Create a new programme
following the programming
procedure.
Playing tracks in an MD group
You can use this unit to play all tracks in a
group you’ve defined. For more details on
the Group function, see “About the Group
function” on page 28.
Before you begin, make sure that the MD
player is in stop mode.
24
1 Press GROUP MODE until “GP”
appears in the display.
2 Press GROUP + or GROUP – to select
the desired group.
3 Press MD N.
Play will start. When all tracks in the
group have been played, MD playback
will stop automatically.
GB
Page 25

To
go back to the
previous group
go to the next
group
go back to the
previous track
go to the next
track
To turn off Group Mode
Stop playing first. Then, press GROUP MODE
until “GP” disappears in the display.
Note
When Group Mode is set to ON, you will not be
able to display or play tracks that are not assigned
to a group.
Press
GROUP–
GROUP+
.
>
Tip
You can use repeat play, shuffle play, and
programmed play with tracks in a group. See
pages 21 to 24 for information on these modes.
Playing CDs or MDs
25
GB
Page 26

Recording from CD to MD
Recording the track you
are listening to
(Synchronized recording of a single
track - REC IT)
You can record the track you are listening to
from its beginning using the SYNCHRO
REC CD N MD button.
1 Insert a recordable MD.
4 For high-speed recording, press HIGH
SPEED SYNCHRO REC CD N MD
(or HIGH SPEED REC on the main
unit).
(To record the track at normal speed
while listening to it, press NORM
SPEED instead.)
The CD playback will automatically
jump back to the beginning of the
current track, and recording will start.
If the MD loaded into the unit already
has audio recorded on it, recording will
begin after the end of the existing audio
tracks.
When recording of the track is finished,
the MD will stop automatically. The
CD will continue to play.
No sound will come out of the speakers
or headphones during high-speed
recording.
If “-:- Short” is displayed
There is not enough space on the MD to
record the track.
If you want to record as much of the CD
track as will fit, press YES.ENTER. To stop
recording, press NO.CANCEL.
See page 54 if any other messages are
displayed.
2 Insert the CD and play the track you
want to record.
3 Press REC MODE to select the desired
recording mode.
The recording mode will cycle through
SP , LP2 , LP4 as you press the
button. See page 12 for more
information.
GB
26
Notes
• After you stop recording,
do not disconnect the
mains lead or move the player while
“TOC EDIT” is flashing in the display. If
you do so, recording may not be done properly.
• See page 13 for cautions regarding high-speed
recording.
• If you turn up volume too high, sound skipping
may occur.
Tips
• Once the clock is set, the recording date and
time are stamped automatically (page 42).
• You can also save the track name while
recording (pages 37 to 40).
Page 27

Recording the tracks
you programmed
(Synchronized recording of the tracks
you programmed)
You can record the tracks you programmed
up to 20 tracks.
Number/character
buttons
1 Insert a recordable MD.
2 Insert the CD you want to record from.
3 Press FUNCTION until “CD” appears
in the display.
4 Press MODE until “PGM” appears in
the display.
5 Press the number / character buttons to
enter the numbers of the tracks you
want to record.
Playing order
6 Press REC MODE to select the desired
recording mode.
The recording mode will cycle through
SP , LP2 , LP4 as you press the
button. See page 12 for more
information.
7 Press NORM SPEED SYNCHRO REC
CD N MD.
Recording will start.
If the MD loaded into the unit already
has audio recorded on it, recording will
begin after the end of the existing audio
tracks.
If “-:- Short” is displayed
There is not enough space on the MD to
record the whole programme.
If you want to record as many of the
programmed tracks as will fit, press
YES.ENTER. To stop recording, press
NO.CANCEL.
See page 54 if any other messages are
displayed.
Notes
• After you stop recording,
do not disconnect the
mains lead or move the player while
“TOC EDIT” is flashing in the display. If
you do so, recording may not be done properly.
• If you turn up volume too high, sound skipping
may occur.
• Programmed synchronized recording cannot be
performed using high-speed recording mode.
Tips
• If you accidentally enter an incorrect number,
press NO.CANCEL. Then enter the correct
number.
• Once the clock is set, the recording date and
time are stamped automatically (page 42).
• You can also save track names, disc name, and
group names while recording (pages 37 to 40).
Recording from CD to MD
Track number Total
programmed
time
27
GB
Page 28

MD Editing
Creating a group
(Group Function)
Number /
character buttons
Storing group information on a
disc
When you edit an MD using the Group
function, group information is automatically
stored on the disc as a disc name. For
example, the following character string
could be stored in the disc’s name field:
Disc name field
1 Disc name: “Favorites”
2 Group name for tracks 1 through 5:
“Rock”
3 Group name for tracks 6 through 9:
“Pops”
As a result, the character string above would
be displayed as the disc name by MD players
which do not support the Group function, or
by players with the Group function turned
off.
About the Group function
The Group function allows you to gather
multiple tracks recorded on a single MD into
several groups for playback or editing. This
makes it easy to, for instance, group together
all the tracks on an MD by a particular artist,
or recorded from the same CD album. You
can create up to 99 groups on a single MD.
Group Mode off
Disc
Track numbers
Group Mode on
Disc
Group 1 Group 2 Group 3
28
Track
numbers
GB
Track
numbers
Note
When Group Mode is set to ON, you will not be
able to display or play tracks which are not
assigned to a group.
Track
numbers
Page 29

Assigning tracks or groups as
a new group (Group Setting)
1 While play is stopped, press EDIT
repeatedly until “GP Set” appears in the
display. Then press YES.ENTER.
2 Press > or . to select the first
track for the group. Then press
YES.ENTER.
3 Press > or . to select the last
track for the group. Then press
YES.ENTER.
Creating a new group during
recording
You can create a new group containing the
tracks currently being recorded via
synchronized recording.
1 To record the entire contents of a CD as
a new group, use synchronized
recording (page 11). To record only
desired tracks as a new group, use
programmed synchronized recording
(page 27).
2 While recording, press EDIT repeatedly
until “GP Name” appears in the display.
Then press YES.ENTER.
3 Enter a group name, using the
procedure described on page 38.
4 Enter a group name, using the
procedure described on page 38.
5 Press YES.ENTER.
The group will be created.
4 When finished entering the group name,
press YES.ENTER.
The group name will be saved, and all
tracks currently being recorded will be
registered to the group.
MD Editing
Notes
• If you stop recording before it completes
normally, the tracks recorded up to that point
will be saved as a single group.
• Entering two slash characters (“//”) in a group
name, for example “abc//def”, may cause the
Group function not to work correctly.
29
GB
Page 30

Releasing a group
Adding a track to a
setting (Group Release Function)
You can quickly release the group setting by
simply specifying the group name.
1 While play is stopped, press EDIT
repeatedly until “GP Release” appears
in the display. Then press
YES.ENTER.
2 Press GROUP + or GROUP – until the
desired group name appears in the
display.
3 Press YES.ENTER.
“Release OK?” appears in the display.
To cancel
Press NO.CANCEL or x.
4 Press YES.ENTER.
When “TOC Edit” disappears, the
group setting of the selected group is
released.
group (Group In Function)
1 Turn off Group Mode, then play the
track you want to add to a group (page
24).
2 Press EDIT repeatedly until “GP In”
appears in the display. Then press
YES.ENTER.
3 Press GROUP + or GROUP – until the
desired group name appears in the
display.
4 Press YES.ENTER.
“GP In OK?” appears in the display.
To cancel
Press NO.CANCEL or x.
5 Press YES.ENTER.
“Complete” appears in the display for a
few seconds, and the track will be added
to the end of the group.
30
GB
Page 31

Note
If you try to add a track which is already assigned
to the group, “Cannot Edit” will be displayed.
Removing a track from a group (Group Out Function)
1 Play the track you want to remove from
a group.
2 Press EDIT repeatedly until “GP Out”
appears in the display. Then press
YES.ENTER.
The name of the group to which the
track belongs will be displayed.
MD Editing
3 Press YES.ENTER.
“GP Out OK?” appears in the display.
To cancel
Press NO.CANCEL or x.
4 Press YES.ENTER.
“Complete” appears in the display for
several seconds, and the track will be
removed from the group.
Notes
• If you try to remove a track which is not
assigned to a group, “Cannot Edit” will be
displayed.
• If you remove all tracks from a group, the group
will be deleted.
31
GB
Page 32

Erasing recordings
(Erase Function)
You can quickly erase the recorded tracks or
groups. Unlike a cassette recorder, blank
portion will not remain after erasure.
Here are three options to erase recordings:
• Erasing a single track
• Erasing all tracks on an MD
• Erasing a group
Erasing a single track
You can erase a whole track quickly. When
you erase a track, the total number of tracks
on the MD decrease by one and all tracks
following the erased one are renumbered.
1 Play the track you want to erase.
2 Press EDIT repeatedly until “Track
Erase” appears in the display.
4 Press YES.ENTER.
“Complete” appears in the display for
several seconds, and the current track
will be erased.
Note
If you erase all tracks in a group, the group will be
deleted.
Erasing all tracks on an MD
You can erase the disc name, all recorded
tracks and their names at the same time.
After you have erased all tracks on the MD,
you can use it as a new MD.
1 While play is stopped, press EDIT
repeatedly until “All Erase” appears in
the display.
2 Press YES.ENTER.
“Erase OK?” appears the display.
Once you have erased tracks, you
cannot recover them. Be sure to check
the contents of the disc you are trying to
erase.
If you want to cancel the Erase
Function at this point:
Press NO.CANCEL or x.
3 Press YES.ENTER.
After “TOC Edit” disappears from the
display, “Blank Disc” appears in the
display, and all contents on the MD are
erased.
3 Press YES.ENTER.
“Erase OK?” appears in the display, and
one-track repeat play starts.
Once you have erased a track, you
cannot recover it. Be sure to check the
contents of the track you are trying to
erase.
If you want to cancel the Erase
Function at this point:
Press NO.CANCEL or x.
GB
32
Page 33

Erasing a group
You can erase all tracks that belong to a
group.
1 While play is stopped, press EDIT
repeatedly until “GP Erase” appears in
the display.
2 Press YES.ENTER.
A group name will be displayed.
3 Press GROUP + or GROUP – until the
desired group name appears in the
display.
4 Press YES.ENTER.
“Erase OK?” appears in the display.
Once you have erased a group, you
cannot recover it. Be sure to check the
contents of the group you are trying to
erase.
If you want to cancel the Erase
Function at this point:
Press NO.CANCEL or x.
Notes
• If “Protected” appears in the display, the tab on
the MD is in the record-protect position (page
49).
• You cannot use the unit to erase tracks that have
been checked out from a personal computer
(page 46). If there is one checked-out track in a
group or on the disc, you will not be able to
erase the group or disc. If you attempt to do so,
“Trk Protect” appears in the display. For more
information, see the “SonicStage Ver. 1.5”
manual, and the “SonicStage Ver. 1.5 Help”
electronic manual.
• After you stop editing,
do not disconnect the
mains lead or move the player while
“TOC EDIT” is flashing in the display. If
you do so, editing may not be done properly.
5 Press YES.ENTER.
After “TOC Edit” disappears from the
display, the group will be deleted and
all tracks belonging to it will be erased.
MD Editing
GB
33
Page 34

Dividing a recorded
track into two tracks
(Divide Function)
You can divide one track into separate
tracks, and add a new track mark to each
track. All tracks following the divided tracks
are renumbered.
Example: Dividing track 1 into two tracks
Track number
,
Dividing
Track 1 is divided, and the track
mark 2 is added.
3 Press YES.ENTER.
“Divide OK?” appears in the display.
If you want to cancel the Divide
Function at this point:
Press NO.CANCEL or x.
4 Press YES.ENTER.
“Complete” appears in the display for a
few seconds after the track is divided.
The original track only has the track
name, while the new track has no name
(this happens only when the track you
divided had its track name).
Tip
To put the divided tracks together, see
“Combining two adjacent tracks into a single
one”.
Notes
• If “Sorry” appears in the display, you cannot
divide the track.
If you repeat editing on the MD, you may not be
able to divide a track. This is due to the system
limitations of the MD (page 61), but not caused
by malfunction.
• You cannot divide a track that is checked out
from a computer (page 46). If you attempt to do
so, “Trk Protect” appears in the display.
For more information, see the “SonicStage Ver.
1.5” manual, and the “SonicStage Ver. 1.5 Help”
electronic manual.
• After you stop editing,
do not disconnect the
mains lead or move the player while
“TOC EDIT” is flashing in the display. If
you do so, editing may not be done properly.
1 While playing the MD, press MD X at
the point where you want to create a
new track.
The player pauses.
2 Press EDIT repeatedly until “Divide”
appears in the display.
GB
34
Page 35

Combining two adjacent
tracks into a single one
(Combine Function)
You can combine two adjacent tracks into a
single one. Using the Combine Function,
you can combine a number of fragmented
recordings or delete the unnecessary track
marks. All tracks following the combined
track are renumbered.
Example: Combining the tracks B and C
Track number
,
Combining
Combine two tracks into a single
one by erasing the track mark 3.
1 Play the track you want to combine.
For example: To combine the tracks B
and C, play the track C.
3 Press YES.ENTER.
“Combine OK?” appears in the display;
the player enters the playback pause
mode.
If you want to cancel the Combine
Function at this point:
Press NO.CANCEL or x.
4 Press YES.ENTER.
“Complete” appears in the display for a
few seconds after the tracks are
combined. If both of the combined
tracks had track names, the name of the
latter track is erased.
Notes
• If “Sorry” appears in the display, you cannot
combine the track.
If you repeat editing on the MD, you may not be
able to combine the track. This is due to the
system limitations of the MD (page 61), but not
caused by malfunction.
• If “Cannot Edit” appears in the display, you may
be trying to combine the tracks on the first track.
You cannot use the combine function on the first
track.
• You cannot combine a track that is checked out
from a computer (page 46). If you attempt to do
so, “Trk Protect” appears in the display.
For more information, see the “SonicStage Ver.
1.5” manual, and the “SonicStage Ver. 1.5 Help”
electronic manual.
• You cannot combine tracks that have been
assigned to two different groups.
• You cannot combine tracks that have been
recorded in different modes, for example a track
recorded in SP mode with one recorded in LP2
or LP4 mode.
• After you stop editing,
do not disconnect the
mains lead or move the player while
“TOC EDIT” is flashing in the display. If
you do so, editing may not be done properly.
MD Editing
2 Press EDIT repeatedly until “Combine”
appears in the display.
35
GB
Page 36

Moving recorded tracks
(Move Function)
You can change the order of the tracks or
groups.
After you move the track or group, the track
numbers or group numbers are renumbered
automatically.
Changing track order
Example: Moving the track C to the position
of track 1
Track number
,
Moving
Track number of the C
changes to 1
3 Press YES.ENTER.
“Track 003 , 001?” appears in the
display, and one-track repeat play starts.
4 Press > or . to select the new
track position, and press YES.ENTER.
If you want to cancel the Move
Function at this point:
Press NO.CANCEL or x.
5 Press YES.ENTER.
“Complete” appears in the display for a
few seconds after the track is moved.
Note
If the track you want to move is assigned to a
group, the positions to which it can be moved will
be limited. Only the possible new positions will
be displayed in step 4 above.
Changing group order
Example: Moving the “JAZZ” group in front
of the “ROCK” group
Group name
JAZZ
Moving
ROCK
JAZZ ROCK POP
POP
1 Play the track you want to move.
2 Press EDIT repeatedly until “Track
Move” appears in the display.
GB
36
1 Press EDIT repeatedly until “GP Move”
appears in the display. Then press
YES.ENTER.
2 Press GROUP + or GROUP – to select
the desired group.
“ JAZZ ,” appearsin the display.
3 Press YES.ENTER.
Page 37

4 Press GROUP + or GROUP – to select
the new group position.
“ , ROCK” appears in the display.
5 Press YES.ENTER.
“GP Move OK?” appears in the display.
If you want to cancel the Move
Function at this point:
Press NO.CANCEL or x.
6 Press YES.ENTER.
When “TOC EDIT” disappears, the
group will be moved.
Note
After you stop editing, do
not disconnect the mains
lead or move the player while “TOC EDIT”
is flashing in the display. If you do so,
editing may not be done properly.
Labelling recordings
(Name Function)
Either during recording or after recording,
you can label the MDs, groups and tracks
you have recorded with letters, numbers and
symbols. You can input up to about 1,700
characters into each MD.
For more information, see the “SonicStage
Ver. 1.5” manual, and the “SonicStage Ver.
1.5 Help” electronic manual.
Number /
character buttons
x
continued
MD Editing
GB
37
Page 38

Labelling recordings (Name
Function) (continued)
Labelling during recording
• You can label the MDs, groups and tracks
during synchronized recording of a whole
CD (page 11) or the tracks you
programmed (page 27).
• You can only label the tracks during
synchronized recording of a single track REC IT (page 26).
During synchronized recording of
a whole CD or the tracks you
programmed
You can label an MD or group with up to 50
characters. You can label up to 25 tracks.
If you want to label more than 25 tracks,
label the tracks after recording (page 39).
3 Enter a character.
Cursor
1 Press the number / character buttons
to enter a character (page 40).
2 Press . to move the cursor to
rightward.
You can also use the following buttons:
Button to
use
>, .
CLOCK/
DELETE
TIMER/
INSERT
Function
Move the cursor leftward or
rightward.
Delete the character marked
by the cursor.
Insert a space.
1 During recording, press EDIT
repeatedly until “Track Name,” “Disc
Name,” or “GP Name” appears in the
display, and press YES.ENTER.
2 When you label a track, press > and
. to select a track number in a CD,
and press YES.ENTER.
When you label an MD or group,
proceed to step 3.
4 Repeat step 3 to complete an entire
name.
5 Press YES.ENTER.
The name has been labelled on the MD,
the group or the track.
The characters you can input
• Uppercase letters: ABCD.....WXYZ
• Lowercase letters: abcd.....wxyz
• Numbers and symbols:
0123456789!”#$%&()*.;<=>?@_‘+-’,/:
(space)
38
GB
Page 39

During REC IT recording
You can label a track only. You can input up
to 50 characters.
1 During recording, press EDIT.
The display waits for the input of the
characters.
2 According to steps 3 and 4 in
“Labelling during recording”, label a
track.
3 Press YES.ENTER.
The name is labelled on the track.
Labelling after recording
To label an MD, group or track, operate as
follows. You can input up to 100 characters
for each label.
1 When you label an MD or a group,
insert the MD you want to label and
stop operation.
When you label a track, play the track
you want to label.
To change the name
According to steps 1 and 2 on this page,
make the disc name, group name or track
name you want to change appear in the
display.
Replace the old name with a new one, and
press YES.ENTER.
Tip
When using an MD that has been already labelled,
a disc name, group name or track name appears in
the display at the time of labelling. Change the
name according to step 3 and 4 on page 38, if
necessary, then press YES.ENTER to confirm the
new name.
Notes
• Entering two slash characters (“//”) in a group
name, for example “abc//def”, may cause the
Group function not to work correctly.
• “LP:” will be automatically added to the
beginning of names of tracks recorded in LP2 or
LP4 mode.
• After you stop editing,
do not disconnect the
mains lead or move the player while
“TOC EDIT” is flashing in the display. If
you do so, editing may not be done properly.
MD Editing
continued
2 Press EDIT repeatedly until “Track
Name,” “Disc Name,” or “GP Name”
appears in the display, and press
YES.ENTER.
3 Label the MD, group or track according
to steps 3 and 4 on page 38.
4 Press YES.ENTER.
The name is labelled on the MD, group
or track.
39
GB
Page 40

Labelling recordings (Name
Function) (continued)
The characters you can input using the remote
Numbers, letters and symbols are allocated to each number/character button on the remote.
Each time you press the button, the character changes in the display as follows.
Buttons
1
2ABC
3DEF
4GHI
5JKL
6MNO
7PQRS
8TUV
9WXYZ
Letter or number
40
GB
0/10
>10
SYMBOL
———
Page 41

The Audio Emphasis
Selecting the audio emphasis
You can adjust the audio emphasis of the
sound you are listening to.
Selecting the sound
characteristic
Press SOUND to select the audio emphasis
you want. Each time you press the button,
the display changes.
Choose
For
Rock’n’roll music:
powerful, clean sounds,
emphasizing low and high
range audio
Popular music:
light, bright sounds,
emphasizing high and middle
range audio
Jazz:
percussive sounds,
emphasizing bass audio
Vocals:
the presence of vocals,
stressing middle range audio
Classical music:
the whole dynamic range for
music
The Audio Emphasis
GB
41
Page 42

The Timer
Setting the clock
“- - : - -” indication appears in the display
until you set the clock.
Once the clock is set, the recording date and
time are stamped automatically (pages 14,
26 and 27).
Number /
character
buttons
1 Press and hold CLOCK/DELETE until
the year digit flash.
2 Press the number/character buttons
to set the month and press
YES.ENTER.
3 Press the number/character buttons
to set the day and press
YES.ENTER.
3 Set the time.
Press the number/character buttons to
set the time.
Example: Set “8:45”, press 8, 4
and 5.
2 Set the data.
GB
42
1 Press the number/character buttons
to set the year and press
YES.ENTER.
Example: Set Dec. 25, 2002
4 Press YES.ENTER.
The clock starts from 00 seconds.
Tips
• The time display system of this player is the 24hour system.
• If you made a mistake, press NO.CANCEL.
The setting entered last will be cleared. Re-enter
it.
Page 43

Waking up to music
You can wake up to music at a preset time.
Make sure you have set the clock (see
“Setting the clock” on page 42).
Number /
character
buttons
Before you begin, make sure “TIMER” is
not displayed. If displayed, press
STANDBY.
1 Prepare the music source you want to
play.
Source
MD
CD
2 Press TIMER / INSERT.
“TIMER” appears in the display.
Make the following settings by
checking the indications in the display.
Do this
Insert an MD
Insert a CD
3 Press > or . until the music
source you want to play (“MD Play” or
“CD Play”) appears in the display, and
press YES.ENTER.
4 Set the time you want play to begin.
1 Press the number/character buttons
to set the time.
Example: Set “6:45”, press 6, 4
and 5.
2 Press YES.ENTER.
5 Set the time you want play to go off (do
as step 4).
6 Press > or . to set the volume
you want, and press YES.ENTER.
7 Press STANDBY.
“TIMER” lights up; the player enters
the standby mode.
At the preset time, the power will go on
and music will play. Then the power
will go off at the preset time, and the
player will enter the standby mode
again.
The Timer
continued
43
GB
Page 44

Waking up to music (continued)
To check / change the waking up
timer settings
Press TIMER / INSERT, then YES.ENTER.
Each time you press YES.ENTER, the next
timer setting will be displayed. To change
the setting, display the setting you want to
change and re-enter it.
To use the player before a timer
playback starts
If you turn on the player, you can use it as
usual. Turn off the player before the preset
time.
To stop play
Press "/1 to turn off the power.
Tips
• If you made a mistake, press NO.CANCEL.
The setting entered last will be cleared. Re-enter
it.
• To exit the standby mode, press STANDBY to
make “TIMER” disappear from the display.
• The preset settings remain until you reset them.
• As long as the c indication appears in the
display, the player is in timer mode.
Note
If using the unit with powered speakers (not
supplied), turn on the speaker before using the
timer function.
Falling asleep to music
(Sleep Function)
You can set the player to turn off
automatically after 10, 20, 30, 60, 90 and
120 minutes, allowing you to fall asleep
while listening to music.
1 Play the music source you want.
2 Press SLEEP.
“Sleep” appears in the display.
3 Press SLEEP repeatedly to select the
minutes for the sleeping timer.
The indication changes as follows:
60 t 90 t 120 t Off t 10 t 20
t 30
44
If 4 seconds have passed after you press
SLEEP, the minutes in the display are
entered.
The display’s backlight will turn off,
and the sleep timer will start counting
down.
The preset time has passed, the player
goes off automatically.
GB
Page 45

To cancel the sleep function
Press SLEEP until “Sleep Off” appears in
the display.
To change the preset time
Do the steps 2 and 3.
Tips
• You can combine the waking up timer with the
sleeping timer. Set the waking up timer first
(page 43), turn on the player and then set the
sleeping timer.
• You can prepare the different music for the
waking up timer and the sleeping timer.
• You can set different volume for the waking up
timer and the sleeping timer. For instance, you
can sleep at lower volume and wake up at higher
volume.
• If using the unit with powered speakers (not
supplied), the speaker power will not turn off
automatically.
The Timer
GB
45
Page 46

Using with your computer
Transferring music from
your computer to an MD
(Check-out)
You can use the supplied USB cable to
connect the player to your computer and
transfer (check out) music data to an MD.
1 Install the SonicStage Ver. 1.5 software
on your computer from the CD-ROM
supplied with this unit. Load music
data onto your computer.
For more information, see the
“SonicStage Ver. 1.5” manual.
Note
Be sure to install the SonicStage software
and Net MD driver on your computer
before connecting this unit to your
computer for the first time.
2 Connect the player to your computer
using the supplied USB cable.
To USB connector
Supplied USB cable
To USB connector
Computer
3 Press NETWORK to display “NetMD”
in the display.
4 Transfer (Check out) music data to an
MD.
The procedure for transferring data is
described in the “SonicStage Ver. 1.5”
manual.
Notes
• Correct operation is not guaranteed if the player
is connected to the computer through a USB hub
or extension cable. Be sure to connect the player
and computer using only the supplied USB
cable.
• When not using the player with the computer,
unplug the USB cable.
46
GB
Page 47

Listening to audio from
your computer (USB Speaker
Function)
You can connect this unit to your computer,
using the supplied USB cable, and play
music stored on your computer over the
player's speakers.
1 Connect the player to your computer
using the supplied USB cable.
To USB connector
2 Press NETWORK to display “USB 5 ”
in the display.
3 Install the device driver (USB
Compatible Device and USB Audio
Device) on your computer.
The necessary device driver is included
with Windows. Follow the directions
displayed on your computer screen to
install the driver.
See your computer's operating manual
for more information.
4 Play music on your computer.
The sound will be heard through the
player's speakers.
Use VOLUME + and VOLUME – to
adjust the volume.
Notes
• After the first time you connect the player as
USB speakers, you will not need to install the
driver again (step 3 above).
• Correct operation is not guaranteed if the player
is connected to the computer through a USB hub
or extension cable. Be sure to connect the player
and computer using only the supplied USB
cable.
• When not using the player with your computer,
unplug the USB cable.
• Do not unplug the USB cable or turn off the
power while using the player as USB speakers.
• Some computers may introduce noise into the
audio stream, or may not work correctly when
connected to the player.
• The USB Speaker function may not work
correctly with some computers that use a
Transmeta Crusoe processor.
Using with your computer
Supplied
USB cable
To USB connector
Computer
47
GB
Page 48
Additional Information
Precautions
On safety
• As the laser beam used in the CD player
section is harmful to the eyes, do not
attempt to disassemble the casing. Refer
servicing to qualified personnel only.
• Should any solid object or liquid fall into
the player, unplug the player, and have it
checked by qualified personnel before
operating it any further.
• Discs with non-standard shapes (e.g.,
heart, square, star) cannot be played on
this player. Attempting to do so may
damage the player. Do not use such discs.
On power sources
The player is not disconnected from the AC
power source (mains) as long as it is
connected to the mains, even if the player
itself has been turned off.
Note on installation
If you use the player at a place subject to
static or electrical noise, the recording may
not be properly done or the recorded data
may be lost. If you perform a check-out or
check-in operation at such a place, the
track’s check-out or check-in authorization
may be lost.
On operation
• If the player is brought directly from a
cold to a warm location, or is placed in a
very damp room, moisture may condense
on the lens inside the CD player section.
Should this occur, the player will not
operate properly. In this case, remove the
CD and wait about an hour for the
moisture evaporate.
• If the player has not been used for a long
time, set it in the playback mode to warm
it up for a few minutes before inserting a
CD or MD.
On placement
• Do not leave the player in a location near
heat sources, or in a place subject to direct
sunlight, excessive dust or mechanical
shock.
• Do not place the player on an inclined or
unstable place.
• Do not place anything within 10 mm of
the side of the cabinet. The ventilation
holes must be unobstructed for the player
to operate properly and prolong the life of
its components.
• If the player is left in a car parked in the
sun, be sure to choose a location in the car
where the player will not be subjected to
the direct rays of the sun.
• Since a strong magnet is used for the
speakers, keep personal credit cards using
magnetic coding or spring-wound watches
away from the player to prevent possible
damage from the magnet.
GB
48
Notes on CDs
• Before playing, clean the CD with a
cleaning cloth. Wipe the CD from the
centre out.
• Do not use solvents such as benzine,
thinner, commercially available cleaners
or anti-static spray intended for vinyl LPs.
• Do not expose the CD to direct sunlight or
heat sources such as hot air ducts, nor
leave it in a car parked in direct sunlight
as there can be a considerable rise in
temperature inside the car.
• Do not stick paper or sticker on the CD,
nor scratch the surface of the CD.
• After playing, store the CD in its case.
If there is a scratch, dirt or fingerprints on
the CD, it may cause tracking error.
Page 49

About CD-Rs/CD-RWs
This CD player can play CD-Rs/CD-RWs
recorded in the CD-DA format*, but
playback capability may vary depending on
the quality of the disc and the condition of
the recording device.
Protecting a recorded MD
To record-protect an MD, slide open the tab
at the side of the MD (so the tab is
concealed).
In this position, the MD cannot be recorded.
To record on the MD, slide close the tab.
* CD-DA is the abbreviation for Compact
Disc Digital Audio. It is a recording
standard used for the Audio CDs.
Music discs encoded with
copyright protection
technologies
This product is designed to playback discs
that conform to the Compact Disc (CD)
standard. Recently, various music discs
encoded with copyright protection
technologies are marketed by some record
companies. Please be aware that among
those discs, there are some that do not
conform to the CD standard and may not be
playable by this product.
If you have any questions or problems
concerning your player, please consult your
nearest Aiwa dealer.
Notes on MDs
• Do not open the shutter to expose the MD.
Close the shutter immediately if the
shutter opens.
Write protect
tab
MD back
side
Lifting or moving the main unit
• Turn off the power and unplug the power
cord.
• Hold the unit as shown in the figure
below.
Additional Information
Not this way
Shutter Cartridge
• Wipe the disc cartridge with a dry cloth to
remove dirt.
• Affix the label supplied with the MD only
to the specified label indentation. Do not
affix the label around the shutter or in
other locations. Note that the shape of the
indentation depends on the MD.
49
GB
Page 50

Troubleshooting
If you are having trouble with this unit, check the following list of common problems before
contacting a repair facility. If you have questions, contact your nearest Aiwa dealer.
General
Problem
No sound
Noise is heard
CD
Problem
The CD does not play
Play does not start with the first track on the CD
A CD is loaded into the CD slot, but the display
windows shows “READ Error”
The sound drops out
Noise is heard
Possible solutions
• Press &/1 to turn on the player.
• Connect the mains lead securely.
• Adjust the volume.
• Unplug the headphones from the i PHONES jack.
• Wait until “TOC Reading” disappears from the
display.
• Make sure the speaker cords are connected securely.
• Someone is using a portable telephone or other
equipment that emits radio waves near the player.
Move the portable telephone, etc., away from the
player.
Possible solutions
• Make sure a CD is loaded into the CD slot.
• The Resume function may be enabled. Press
RESUME / INTRO to until “Resume Off” appears in
the display.
• The CD may not be inserted correctly. Insert the CD
with the label side facing to the left.
• The CD may be very dirty. Clean the CD (page 48).
• The lens may have condensation (water droplets) on
it. Eject the CD and leave the operating panel open
for several hours.
•A CD-R or CD-RW disc may not have had the
session properly closed when it was recorded. This
unit cannot play such discs.
• Some CD-R or CD-RW discs may not play. Also,
discs recorded on some CD burner equipment may
not play.
• The CD may have a copy protection mechanism.
Some discs with copy protection schemes on them
may not play (page 48).
• Reduce the volume.
• Clean the CD, or replace it if the CD is damaged.
• Place the player in a location free from vibration.
• The sound may drop out or noise may be heard if the
CD is recorded using a personal computer (CD-R,
etc.).
50
GB
Page 51

MD
Problem
“REC Error”, “READ Error”, or “TOC Error”
are displayed, and the disc cannot be used
“ - - - : - -” appears in the display instead of the
playing time or the remaining time.
MD does not play
Play does not start with the first track on the MD
The MD does not record
High-speed recording does not work
Possible solutions
• The MD maybe dirty or scratched. Try a different
MD.
• This player can display the time up to 999 minutes 59
seconds. If the time is longer than this, it will be
displayed as “- - - : - -”.
• Take out the MD and leave the player in a warm place
for several hours until the moisture evaporates.
• The MD is inserted in the wrong direction. Slide the
MD into the disc compartment with the label side
right and the arrow pointing towards the opening until
the player grips it.
• The MD may be blank (“Blank Disk” appears).
Replace the disc with one that has been recorded.
• The Resume function may be enabled. Press
RESUME / INTRO to until “Resume Off” appears in
the display.
• Group mode may be turned on. Turn Group mode off
and try playing again.
• The MD is record-protected (“Protected” appears).
Close the record-protect slot.
• The track has been protected using another MD
recorder (“Trk Protect” appears). Release the trackprotect on the same MD recorder that protected the
track.
• The player is not connected properly to the sound
source. Make connections properly to the sound
source.
•A pre-mastered MD is inserted. Replace it with a
recordable MD.
• There is not enough space left on the MD. Replace it
with another recordable MD with enough space, or
erase unnecessary tracks.
• There has been a power failure or the mains lead has
been disconnected during recording or while “TOC
Edit” is flashing. Data recorded to that point may be
lost. Repeat the recording procedure.
• You may be attempting to use high-speed recording
with a CD track that has already been recorded using
high-speed mode in the previous 74 minutes (page
61).
• High-speed recording may not be possible because
there is less than a track of free space on the MD
(“Error” appears in the display).
• High-speed recording cannot be done from a CD-RW
disc.
Additional Information
continued
51
GB
Page 52

Troubleshooting (continued)
Problem
The recorded sound drops out
Noise is heard
A track that should have been recorded using
high-speed mode isn’t recorded
The disc can’t be edited on other MD equipment
Small burst of noise occur during recording
Using with your computer
Problem
The audio is weak or has poor quality
“NetMD OFF” or “USB 5 OFF” is shown in the
display window
The main unit was not recognized when
connected to the computer
Operation is unreliable
Possible solutions
• The sound was recorded at high volume. Record again
at lower volume.
• The audio may have been recorded in high-speed
mode from a dirty CD. Try recording again at normal
speed.
• If recording is stopped partway through a track, that
track will not be saved.
• The other MD equipment may not support stereo LP
modes. Edit the disc on this unit, or on other MD
equipment which supports stereo LP modes.
• When recording in stereo LP4 mode, small bursts of
noise may be occasionally introduced for certain
audio sources, as a result of the LP4 audio
compression method. Try recording in stereo SP
mode or stereo LP2 mode.
Possible solutions
• Set the computer audio volume to its maximum
setting.
• The USB cable may be disconnected from either the
main unit or the computer. Unplug and reconnect the
USB cable securely.
• The USB cable may not be properly connected to the
computer. Unplug and reconnect the USB cable
securely.
• Install the SonicStage Ver. 1.5 software from the
included CD-ROM. For details, see the “SonicStage
Ver. 1.5” manual.
• You may have the unit and computer connected via a
USB hub or extension cable. Operation cannot be
guaranteed with such a connection. Connect the main
unit and the computer using the supplied USB cable.
52
GB
Page 53

Timer and clock
Problem
Timer does not operate
Possible solutions
• Make sure the time on the clock is correct.
• Check to see if the AC power had been cut off.
• Make sure “TIMER” appears in the display.
• Check and change the preset start/stop time if both
times are set to the same time.
Remote control
Problem
Remote control does not function
Operation may become unstable depending on the power supply or other causes because this
player employs a microcomputer to link each operation.
If the player still does not operate properly after performing the above measures, while
keeping x pressed on the main unit, press VOLUME –, HIGH SPEED REC, and VOLUME +
in that order. (In this case, clock set or timer setting are reset to the initial settings. Set these
items again if needed.) If the problem still persists, please consult your nearest Aiwa dealer.
Possible solutions
• Replace the battery in the remote control with new
one if it is weak (page 6).
• Make sure that you are pointing the remote control at
the remote sensor on the player.
• Remove any obstacles in the path of the remote
control and the player.
• Make sure the remote sensor is not exposed to strong
light such as direct sunlight or fluorescent lamp light.
• Move closer to the player when using the remote
control.
Additional Information
GB
53
Page 54

Error messages
If a problem occurs, one of the following error massages may appear in the display window.
This message will appear If
Blank Disc you try to play an MD with no recording on it.
Cannot Edit you try to use the combine function on the first track on the MD.
REC Error a problem occurred with recording. Place this unit somewhere free from
READ Error the MD may be very dirty or damaged. Try recording to a different MD.
TOC Error the MD may not conform to specification (information needed for
Disc Full there is no more space for recording or editing or the MD. (See “System
Error there is less than a track of free space remaining on the MD, so high-speed
Gp Full a maximum of 99 groups can be defined.
Name Full the labelling capacity of the MD has reached its limit. Each label can be
No Disc you try to play or record with no CD or MD in the player.
No MD you try to play or recorded with no MD in the player (in case of
PB Disc you try to record or edit on a pre-mastered MD (PB means playback).
Protected you try to record or edit on an MD with the tab in the record-protect
Sorry you try to edit, ignoring the system limitations of the MD.
Trk Protect you try to record or edit a track that has been already protected using other
you tried to use the Combine function on two tracks that are assigned to
different groups.
you try to add a track to a group when no groups have been defined.
you try to perform the Group In operation on a track that already belongs
to a group.
you try to perform the Group Out operation on a track that does not belong
to a group.
vibration and try recording again.
the MD may be very dirty or damaged. The MD may not conform to
specification (information needed for recording and editing may not be
correct). Try recording to a different MD.
the CD may be very dirty or damaged. Clean the CD. Try recording from
a different CD.
recording and editing may not be correct). Try a different MD.
limitations of the MD” on page 61.)
recording is not possible.
you try to programme the 21st track. You can programme up to 20 tracks.
you try to record the shuffle play of the CD using synchronized recording
function.
the CD may be very dirty or damaged. Clean the CD. Try recording from
a different CD.
you try to make the player enter the timer standby mode though you have
not set the clock.
made up of up to 100 characters. You can input up to about 1,700
characters into each MD.
synchronized recording, etc.).
position.
MD recorders.
tracks that have been checked out from a computer cannot be edited using
the Erase, Divide, or Combine functions.
54
GB
Page 55

Specifications
CD player section
System
Compact disc digital audio system
Laser diode properties
Material: GaAlAs
Wave length: 780 nm
Emission duration: Continuous
Laser output: Less than 44.6 µW
(This output is the value measured at a distance of about
200 mm from the objective lens surface on the optical
pick-up block with 7 mm aperture.)
Spindle speed
Normal speed (× 1)
200 r/min (rpm) to 500 r/min (rpm) (CLV)
High speed (× 4)
800 r/min (rpm) to 2 000 r/min (rpm) (CLV)
Number of channels
2
Frequency response
20 - 20 000 Hz +1/–2 dB
Wow and flutter
below measurable limit
MD Player section
System
MiniDisc Digital Audio system
Disc
MiniDisc
Laser diode properties
Material: GaAlAs
Wave length: 780 nm
Emission duration: Continuous
Laser output: Less than 44.6 µW
(This output is the value measured at a distance of about
200 mm from the objective lens surface on the optical
pick-up block with 7 mm aperture.)
Recording and playback time
160 minutes max. (Sony MDW-80 disc, LP2 mode)
320 minutes max. (Sony MDW-80 disc, LP4 mode)
LP2: 2× recording and playback
LP4: 4× recording and playback
Revolutions
400 rpm to 900 rpm (CLV)
Error correction
Advanced Cross Interleave Reed Solomon Code
(ACIRC)
Sampling frequency
44.1 kHz
Coding
ATRAC (Adaptive TRansform Acoustic Coding)
ATRAC3-LP2
ATRAC3-LP4
Modulation method
EFM (Eight-to-Fourteen Modulation)
Number of Channels
two-channel stereo
Frequency response
20 - 20 000 Hz, +1/–2 dB
Wow and flutter
below measurable limit
Speakers
Type
full-range passive radiator
Speaker type
80 mm antimagnetic
Impedance
3.2 Ω
Rated power
4 W
Dimensions (incl. projecting parts)
approx. 100 × 221 × 192 mm (w × h × d)
3
(4 × 8
Mass
Effective output
Output terminals
Input impedance
/4 × 7 5/8 in.) (JEITA)
left: approx. 1.22 kg (2.7 lb.)
right: approx 1.16 kg (2.6 lb.)
2 W + 2 W (JEITA)
R OUT (stereo mini jack)
6.4 kΩ (at 1 kHz)
General
Input / output terminals
USB
Output terminals
PHONES (stereo mini jack)
Load impedance: 16 - 68 Ω
AUDIO OUT (stereo mini jack)
Load impedance: 4.7 kΩ or greater
Power requirements
Main unit: 230 V AC, 50 Hz
Remote control: 3 V DC, one CR2025 lithium battery
Power consumption
15 W
Dimensions (incl. projecting parts)
approx. 94 × 221 × 192 mm (w × h × d)
3
(3
/4 × 8 3/4 × 7 5/8 in.)
Mass
approx. 1.3 kg (2.9 lb.)
Supplied accessories
Remote control (1)
USB cable (1)
CD-ROM (SonicStage Ver. 1.5) (1)*
Clamp filters (2)
US and foreign patents licensed from Dolby Laboratories.
Design and specifications are subject to change without
notice.
* Do not play a CD-ROM on an audio CD player.
Additional Information
55
GB
Page 56

Locating the Controls
For detailed information on a particular part or function, see the page numbers given in
parentheses ( ).
Main Unit
Front panel Rear panel
CD MD
1 &/1 Power switch
2 Display window
3 Z (CD eject) button
4 CD u (play / pause) button*
5 ., > (skip / search) buttons
These buttons are used to jump to the
beginning of a track on a CD or MD. (9,
16)
Pressing and holding one of these
buttons during playback will allow you
to move rapidly to a desired spot within
a track. (20)
6 x (stop) button
7 VOLUME –, VOLUME + buttons**
8 Remote sensor
9 Z (MD eject) button
0 MD u (play / pause) button*
qa NETWORK button and lamp
Use this button when connected to a
personal computer. (46)
GB
56
qs HIGH SPEED REC button and lamp
Use this button to initiate high-speed
synchronous recording from a CD to an
MD. (13, 26)
AUDIO OUT jack
qd
Use this to connect to active speakers
(not supplied). (7)
qf i PHONES jack
Use this to connect headphones (not
supplied).
qg SPEAKER OUT connector
Use this to connect the supplied
speakers. (5)
qh USB connector
Use this to connect this unit to a personal
computer, using the supplied USB cable.
(46, 47)
qj Mains lead
* These buttons have a tactile dot.
** VOLUME+ has a tactile dot.
Page 57

Before connecting the
headphones, active speakers or
audio connecting cable to the
player
Be sure to attach the supplied clamp filter to
each cable connected to the i PHONES jack
and the
the procedure below. (You must affix the
ferrite cores to comply with applicable EMC
standards.) The clamp filter should be
attached on one end of the cable, as close to
the plug as possible that is connected to each
jack.
(1) Open the clamp filter.
AUDIO OUT jack, following
(2) Wind the cable into the clamp filter as
shown below.
As close to the
plug as possible.
(3) Close the clamp filter.
Make sure the clasps
are fully engaged.
Speakers
Right speaker, rear panel Left speaker, rear panel
1 Speaker cord
Connect this cord to the R OUT
connector on the left speaker. (5)
2 R OUT connector
Connect the speaker cord from the right
speaker. (5)
3 Speaker cord
Connect this cord to the SPEAKER
OUT connector on the main unit. (5)
Additional Information
GB
57
Page 58

Remote control
1 Z MD (MD eject) button
2 Z CD (CD eject) button
3 NETWORK button
Use this button when connected to a
personal computer. (46, 47)
4 FUNCTION button
Use this button to change audio source.
Each time the button is pressed, the
audio source will switch from MD t
CD t NETWORK.
5 Number / character buttons
Use these buttons to select CD or MD
tracks directly, enter MD text, and to set
the clock and timer. (20, 37-40, 42-44).
6 MODE/SYMBOL button
Use this button to select different CD
and MD playback modes.
Repeat Play (21)
Shuffle Play (22)
Programme Play (23)
GB
58
7 ., > (skip / search) >, .
arrow buttons (9, 16, 20, 25, 29, 36, 38,
43)
8 MD X (pause) button
9 MD N (play) button*
0 x (stop) button
qa CD N (play) button*
qs CD X (pause) button
qd REC MODE button
Use this button to switch between stereo,
LP2 stereo, and LP4 stereo recording
modes. (12, 26, 27)
qf GROUP MODE button
Use this button to turn Group mode on
and off. (24)
qg GROUP–, GROUP+ buttons
Use these buttons to select MD groups.
(24, 30, 36, 37)
qh &/1 (power) button
qj SLEEP button
Use this button to listen to music while
falling asleep. (44)
qk STANDBY button
Use this button to activate the Timer
function. (43, 44)
ql CLOCK / DELETE button
Use this button to set the clock, and to
delete MD characters. (38, 42)
w; TIMER / INSERT button
Use this button to set the timer, and to
enter MD characters. (38, 43, 44)
wa EDIT button
Use this button when editing an MD.
(28-39)
ws YES.ENTER button
Use this button to confirm an entry.
wd NO.CANCEL button
Use this button to cancel an entry.
wf RESUME / INTRO button
Use this button to turn on and off the CD
and MD Resume function, and also to
enable Intro play. (10, 17, 21, 50, 51)
wg VOLUME+, VOLUME– (volume)
buttons
Page 59

wh SOUND button (41)
wj SYNCHRO REC CD N MD buttons
NORM SPEED (13, 26, 27)
HIGH SPEED (13, 26)
wk DISPLAY button
Use this button to change the
information shown in the display
window. (7, 18)
* These buttons have a tactile dot.
Additional Information
GB
59
Page 60

Explanations
This section explains some of the terms
related to MD technology that are used in
this manual, and describes some limitations
of the MD system.
TOC EDIT
“TOC” is an abbreviation for “Table Of
Contents.” This is a special region on the
MD that stores information other than audio
data. This information includes things like
which track number goes with which track,
and where the tracks are actually located on
the disc. If you think of the MD as a book,
the MD’s TOC corresponds to the book’s
table of contents or index. The MD recorder
modifies the TOC when recording, saving or
deleting track markers, moving tracks, etc.
While writing the TOC, “TOC EDIT” is
shown in the display. During this time, take
care not to jar the player or turn off the
power. Doing so may damage the TOC
information, and may cause the disc contents
to be lost.
MDLP
This unit supports the ATRAC (Adaptive
TRansform Acoustic Coding) audio
compression technology. In addition, it also
supports ATRAC3. This newer technology
applies psychoacoustic principles to cut out
sounds that cannot be heard by the human
ear, making it possible to compress audio
data to about 1/10 its original size. This
higher compression is used to enable
recording times 2× and 4× longer than
standard MD format. These new formats are
called MDLP (MD Long-Play mode). An
80-minute MD can hold about 160 minutes
of audio when recorded in LP2 mode, and
about 320 minutes when recorded in LP4
mode.
Net MD
Net MD is a format based on OpenMG and
MagicGate, which uses a high-level
copyright protection scheme. It allows MD
equipment to be connected to a personal
computer via a USB (Universal Serial Bus)
cable, and audio data to be transferred at
high speed from the PC to the MD. The
audio is recorded to the MD in the same
format used by other systems, so ordinary
MDs can be used with Net MD, and discs
recorded using Net MD can be played by
existing MD equipment.*
The SonicStage software application runs on
the personal computer, and provides
capability for various editing operations, as
well as text entry capabilities.
* When recorded in LP mode, the discs can
only be played by systems that support
MDLP.
GB
60
Page 61

System limitations of the MD
The recording system in your MiniDisc
recorder is radically different from those
used in cassette and DAT decks and the
system has limitations described below.
Note, however, that these limitations are due
to the inherent nature of the MD recording
system itself and not to mechanical causes.
“Disc Full” appears in the display
even before the MD has reached
the maximum recording time
(60, 74 or 80 minutes).
When 255 tracks have been recorded on the
MD, ”Disc Full” appears regardless of the
total recorded time. More than 255 tracks
cannot be recorded on the MD. To continue
recording, erase unnecessary tracks.
Some tracks cannot be
combined with others.
Track combination may become impossible
when tracks are shorter than 12 seconds.
The track recorded in stereo and that
recorded in monaural cannot be combined.
The total recorded time and the
remaining time on the MD may
not reach the maximum
recording time (60, 74 or 80
minutes).
Recording is done in minimum units of 2
seconds* each, no matter how short the
material. The contents recorded may thus be
shorter than the maximum recording
capacity. Disc space may also be further
reduced by scratches.
* During stereo recording. (approximately 4
seconds during monaural and LP2 stereo
recording, or 8 seconds during LP4 stereo
recording)
“Disc Full” appears in the display
even before the MD has reached
the maximum track number or
recording time.
Repeated recording and erasing may cause
fragmentation and scattering of data.
Although those scattered data can be read,
each fragment is counted as a track. In this
case, the number of tracks may reach 255
and further recording is not possible. To
continue recording, erase unnecessary tracks.
The remaining recording time
does not increase even after
erasing numerous short tracks.
Tracks shorter than 12 seconds* are not
counted, so erasing them may not increase
the recording time.
* During stereo recording. (approximately
24 seconds during monaural and LP2
stereo recording, or 48 seconds during
LP4 stereo recording)
The sound may dropout while
fast-fowarding or rewinding the
edited tracks.
Tracks created through editing may exhibit
sound dropout during fast-forwarding or
rewinding because high-speed playback
takes time to search for the position on the
disc when the tracks are scattered on the
disc.
Guide to the serial copy
management system
Digital audio equipment such as CDs, MDs,
DATs, etc., copy music easily with high
quality, for these products process music as a
digital signal. The Serial Copy Management
System allows you to make only a single
copy of a recorded digital source through
digital-to-digital connections because music
programmes may be copyrighted.
This system is applied to this player.
Additional Information
GB
61
Page 62

You can make only a firstgeneration copy* through a
digital-to-digital connection
That is:
1 You can make a copy of a digital sound
programme on the market such as CDs,
MDs, etc., but you cannot make a second
copy from the first-generation copy.
2 You can make a copy of a digital signal
from a digitally-recorded analog sound
programme on the market such as an
analog record, music cassette tape, etc., or
from digital satellite broadcasts, but you
cannot make a second copy.
Note
No restrictions apply when a digital signal is
recorded as an analog signal (that is, when a
digital signal is recorded through analog-to-analog
connection).
*A first-generation copy is a digital recording of a
digital signal made on digital audio equipment
through a digital-to-digital connection.
62
GB
Page 63

Index
A
Adjusting
audio emphasis 41
contrast 7
volume 9, 16
ATRAC 60
ATRAC3 60
B
Battery
for remote control 6
C
Checking playing time
a CD 18
an MD 18, 19
Check-out 46
Cleaning 48
Clock 42
Combine function 35
Connection
mains lead 5
USB 46, 47
Creating your own
programme 23
D
Direct selection 20
Display 18
Divide function 34
E, F
Editing 28-40
Erase function 32
Error message 54
G
Group Function 28
Group In Function 30
Group Out Function 31
Group Release Function 30
H
High-speed recording 13, 26
I, J, K
Intro play 21
L
Locating a specific point on a
track 20
Locating a specific track 20
Long-time recording (MDLP)
13, 60
M
Move function 36
N, O
Name function 37
Net MD 60
P, Q
Playing
a CD 8
an MD 15
tracks repeatedly 21
Programme Play 23
R
Recording
a CD 11, 26, 27
on an MD 11, 26, 27
Repeat Play 21
Resume function 10, 17
S
Serial copy management
system 61
Shuffle play 22
Synchronized recording 11
System limitations 61
T
Timer
playback 43
sleep timer 45
TOC EDIT 60
Troubleshooting 50
U, V, W, X, Y, Z
USB terminal 46, 47
USB speaker function 47
Using
the display 18, 19
Additional Information
63
GB
Page 64

Printed on 100% recycled paper using
VOC (Volatile Organic Compound)free vegetabel oil based ink.
Printed in Japan
http://www.aiwa.com/
 Loading...