

q
3-089-860-11(1)
English
Français
AC Adaptor/Charger
Operating Instructions
Mode d’emploi
Manual de instrucciones
使用说明书
AC-VQP10
© 2004 Sony Corporation Printed in Japan
Owner’s Record
The model and serial numbers are located on the bottom of the unit.
Record the serial number in the space provided below.
Refer to these numbers whenever you call upon your Sony dealer
regarding this product.
Model No. AC-VQP10 Serial No.
WARNING
To prevent fire or shock hazard, do not
expose the unit to rain or moisture.
To avoid electrical shock, do not open the
cabinet.
Refer servicing to qualified personnel
only.
NOTICE FOR THE CUSTOMERS IN THE U.S.A AND CANADA
This symbol is intended to alert the user to the presence
of uninsulated “Dangerous voltage” within the
product’s enclosure that may be of sufficient magnitude
to constitute a risk of electric shock to persons.
This symbol is intended to alert the user to the presence
of important operating and maintenance (servicing)
instructions in the literature accompanying the
appliance.
The Graphical Symbols with Supplemental Marking is located on the
bottom of the unit.
NOTICE FOR THE CUSTOMERS IN THE U.S.A
CAUTION
You are cautioned that any changes or modifications not expressly
approved in this manual could void your authority to operate this
equipment.
Note:
This equipment has been tested and found to comply with the limits for a
Class B digital device, pursuant to Part 15 of the FCC Rules. These limits
are designed to provide reasonable protection against harmful interference
in a residential installation. This equipment generates, uses, and can
radiate radio frequency energy and, if not installed and used in accordance
with the instructions, may cause harmful interference to radio
communications.
However, there is no guarantee that interference will not occur in a
particular installation. If this equipment does cause harmful interference to
radio or television reception, which can be determined by turning the
equipment off and on, the user is encouraged to try to correct the
interference by one or more of the following measures:
– Reorient or relocate the receiving antenna.
– Increase the separation between the equipment and receiver.
– Connect the equipment into an outlet on a circuit different from that to
which the receiver is connected.
– Consult the dealer or an experienced radio/TV technician for help.
NOTICE FOR THE CUSTOMERS IN THE UNITED KINGDOM
A moulded plug complying with BS 1363 is fitted to this equipment for
your safety and convenience.
Should the fuse in the plug supplied need to be replaced, a fuse of the
same rating as the supplied one and approved by ASTA or BSI to BS1362
(i.e., marked with or mark) must be used.
If the plug supplied with this equipment has a detachable fuse cover, be
sure to attach the fuse cover after you change the fuse. Never use the
plug without the fuse cover. If you should lose the fuse cover, please
contact your nearest Sony service station.
TM
SERIES
A
1 Slot 1
Fente 1
6 Mode change
switch
Sélecteur
de mode
9 DISPLAY
change button
Touche
DISPLAY
(changement
d’affichage)
q;
qa
qs
WARNING
TIME TO CHG
NORMAL FULL
qd
B
1
To install
2
Pour installer
C
3 CHARGE lamp 1
Témoin CHARGE 1
2 DC OUT connector
Connecteur DC OUT
BATTERY LIFE
hm
2
44
1
2
1
4
A
5
B
4 Slot 2
Fente 2
5 CHARGE
lamp 2
Témoin
CHARGE 2
7 Display window
Afficheur
8 Slot indicator lamp
Témoin d’indicateur
de logement
qg
VCR/CAMERA
qh
qj
3
To remove
Pour retirer
3
Thank you for purchasing the Sony AC adaptor/charger.
Before operating the unit, please read this manual thoroughly and retain it
for future reference.
The AC-VQP10 AC adaptor/charger can be used as follows:
Connect the power cord (supplied) to a wall outlet.
•To charge a lithium ion type battery pack. Ni-Cd/Ni-MH type batteries
are not rechargeable.
The following functions are available:
– Quickly charging
– Remaining charge time display
•To enable the power supply to the video equipment, connection cords are
included with this unit.
What is the “InfoLITHIUM” ?
The “InfoLITHIUM” is a lithium ion battery pack which can exchange data
with compatible electronic equipment about its battery consumption. Sony
recommends that you use the P series “InfoLITHIUM” battery pack with
electronic equipment having the mark.
“InfoLITHIUM” is a trademark of Sony Corporation.
f
Notes on Use
About the AC power cord plug
The AC-VQP10 comes in two models, differentiated by the shape of the AC
power cord plug.
Model Shape of the plug
Model for USA/Canada Polarized
Model for other countries/regions Non polarized
•The model for USA and Canada: One blade of the plug is wider than the
other for the purpose of safety and will fit into the wall outlet only one
way. If you are unable to insert the plug fully into the outlet, contact your
dealer.
About the remaining battery time
While charging the battery pack, this unit will show the remaining battery
time with your video equipment, etc. on the following conditions.
•Using the “InfoLITHIUM” battery pack
•Using the electronic equipment having the mark
Make sure that you use the battery pack having the mark.
Consult the operating instructions supplied with your video equipment if it
is applied to “InfoLITHIUM”.
If you use this battery pack with electronic equipment not having the
mark, the remaining battery capacity will not be indicated in minutes.*
* The indication may not be accurate depending on the condition and environment
which the equipment is used under.
Warranty for Recorded Content
Contents of the recording cannot be compensated if recording or playback
is not made due to a malfunction of the battery pack, AC power adaptor,
AC power adaptor/charger, etc.
We cannot provide compensation for image
Troubleshooting
Symptom
Video equipmet does not
work.
The battery is not charged.
Power immediately turns
off even though there is
sufficient remaining battery
power, or the displayed
remaining time differs from
the actual time.
The display is not switched.
The rapid charging is not
performed.
The CHARGE lamp blinks,
and “CHARGE ERROR” is
displayed in the display
window.
Remove the battery pack from this unit, then install the same battery pack
again.
If the CHARGE lamp blinks
again:
Install another battery pack.
If the CHARGE lamp blinks
again:
The problem is with this unit.
Please contact your nearest Sony dealer in connection with the product
with the problem.
•The power plug is disconnected from the
wall outlet.
t Insert into the wall outlet.
•The connector cable is not properly connected.
t Connect properly.
•The mode change switch is set to CHARGE.
t Set the mode change switch to VCR/
•The mode change switch is set to VCR/
CAMERA.
t Set the mode change switch to CHARGE.
•Fully charge again.
t The remaining battery power will be
t Read “About the remaining battery time”.
The display shown below may appear if a
battery pack is charged outside of the
recommended charging temperature range of
+10 °C to +30 °C. In this case, charging can be
performed, but it will not be performed with
quick charging to protect the battery pack.
t Check through the following chart.
Cause/Solution
CAMERA.
correctly displayed.
If the CHARGE lamp lights and
does not blink again:
If the CHARGE lamp goes out
because the charging time has
passed, there is no problem.
If the CHARGE lamp lights and
does not blink again:
If the CHARGE lamp goes out
because the charging time has
passed, the problem is with the
battery pack first installed.
content
We cannot provide compensation for recorded content such as images and
sound, if images are not recorded or played back due to a malfunction in
the AC adapter/charger, etc.
Charging
Use only a lithium ion type battery pack. This unit cannot be used to charge
a Ni-Cd/Ni-MH type battery pack.
•Attach the battery pack firmly.
•Charge the battery pack on a flat surface without vibration.
Charging temperature
• To provide maximum battery efficiency, the recommended temperature
range when charging is +10 °C to +30 °C (+50 °F to +86 °F).
• This unit complies with quick charging, but charging outside the
recommended temperature range will lead to longer charging times in
order to protect the battery pack. Once the charging time has been
extended, it will not return to quick charging even if the temperature is
brought within the recommended temperature range. Reattach the
battery and then recharge it.
Others
•The negligible amount of electric current will flow into the AC adaptor/
charger as long as the AC adaptor/charger is plugged into the wall outlet.
•Unplug the unit from the wall outlet if it will not be used for extended
period of time. To disconnect the cord, pull it out by the plug. Never pull
the cord itself.
•Do not operate the unit with a damaged cord or if it has been dropped or
damaged.
•Use this unit near to a wall outlet. This is to ensure that the power plug
can be immediately unplugged from the wall outlet to turn the power off
if some abnormality occurs during use.
•The nameplate indicating operating voltage, power consumption, etc. is
located on the bottom.
•Be sure that nothing metallic comes into contact with the metal parts of
the unit or connecting plate. If it does, a short may occur and the unit may
be damaged.
•Always keep the metal contacts clean.
•Do not disassemble or convert the unit.
•Do not apply mechanical shock or drop the unit.
•While the unit is in use, it gets warm. But this is normal.
•Keep the unit away from AM receivers, because it will disturb AM
reception.
•Do not place the unit in a location where it is:
— Extremely hot or cold
— Dusty or dirty
— Very humid
— Vibrating
•Placing this unit in locations subject to the direct sunlight such as on
dashboards or near heating apparatus may cause this unit to deform or
malfunction.
If any difficulty should arise, unplug the unit and contact your nearest Sony
dealer.
Specifications
Input rating 100 - 240 V AC 50/60 Hz 18 W
Output rating DC OUT: 8.4 V 1.5 A (VCR)
Operating temperature 0 °C to +40 °C (+32 °F to +104 °F)
Storage temperature –20 °C to +60 °C (–4 °F to +140 °F)
Dimensions Approx. 93 × 46 × 85 mm (w/h/d)
(3 3/
Mass (AC Adaptor/Charger only) Approx. 200 g (7.1 oz)
Supplied accessories Connecting cord DK-225 (1)
AC power cord (1)
Design and specifications are subject to change without notice.
Use a commercially available AC plug adaptor, if necessary, depending on
the design of the wall outlet.
AC-VQP10
AC plug adaptor
Do not connect the battery charger to a voltage adaptor (travel converter)
for overseas travel. This may result in overheating or other malfunction.
8.4 V 1.4 A (CHARGE)
13
16
/
3
× 3
/8 inches)
Wall outlet
4
× 1
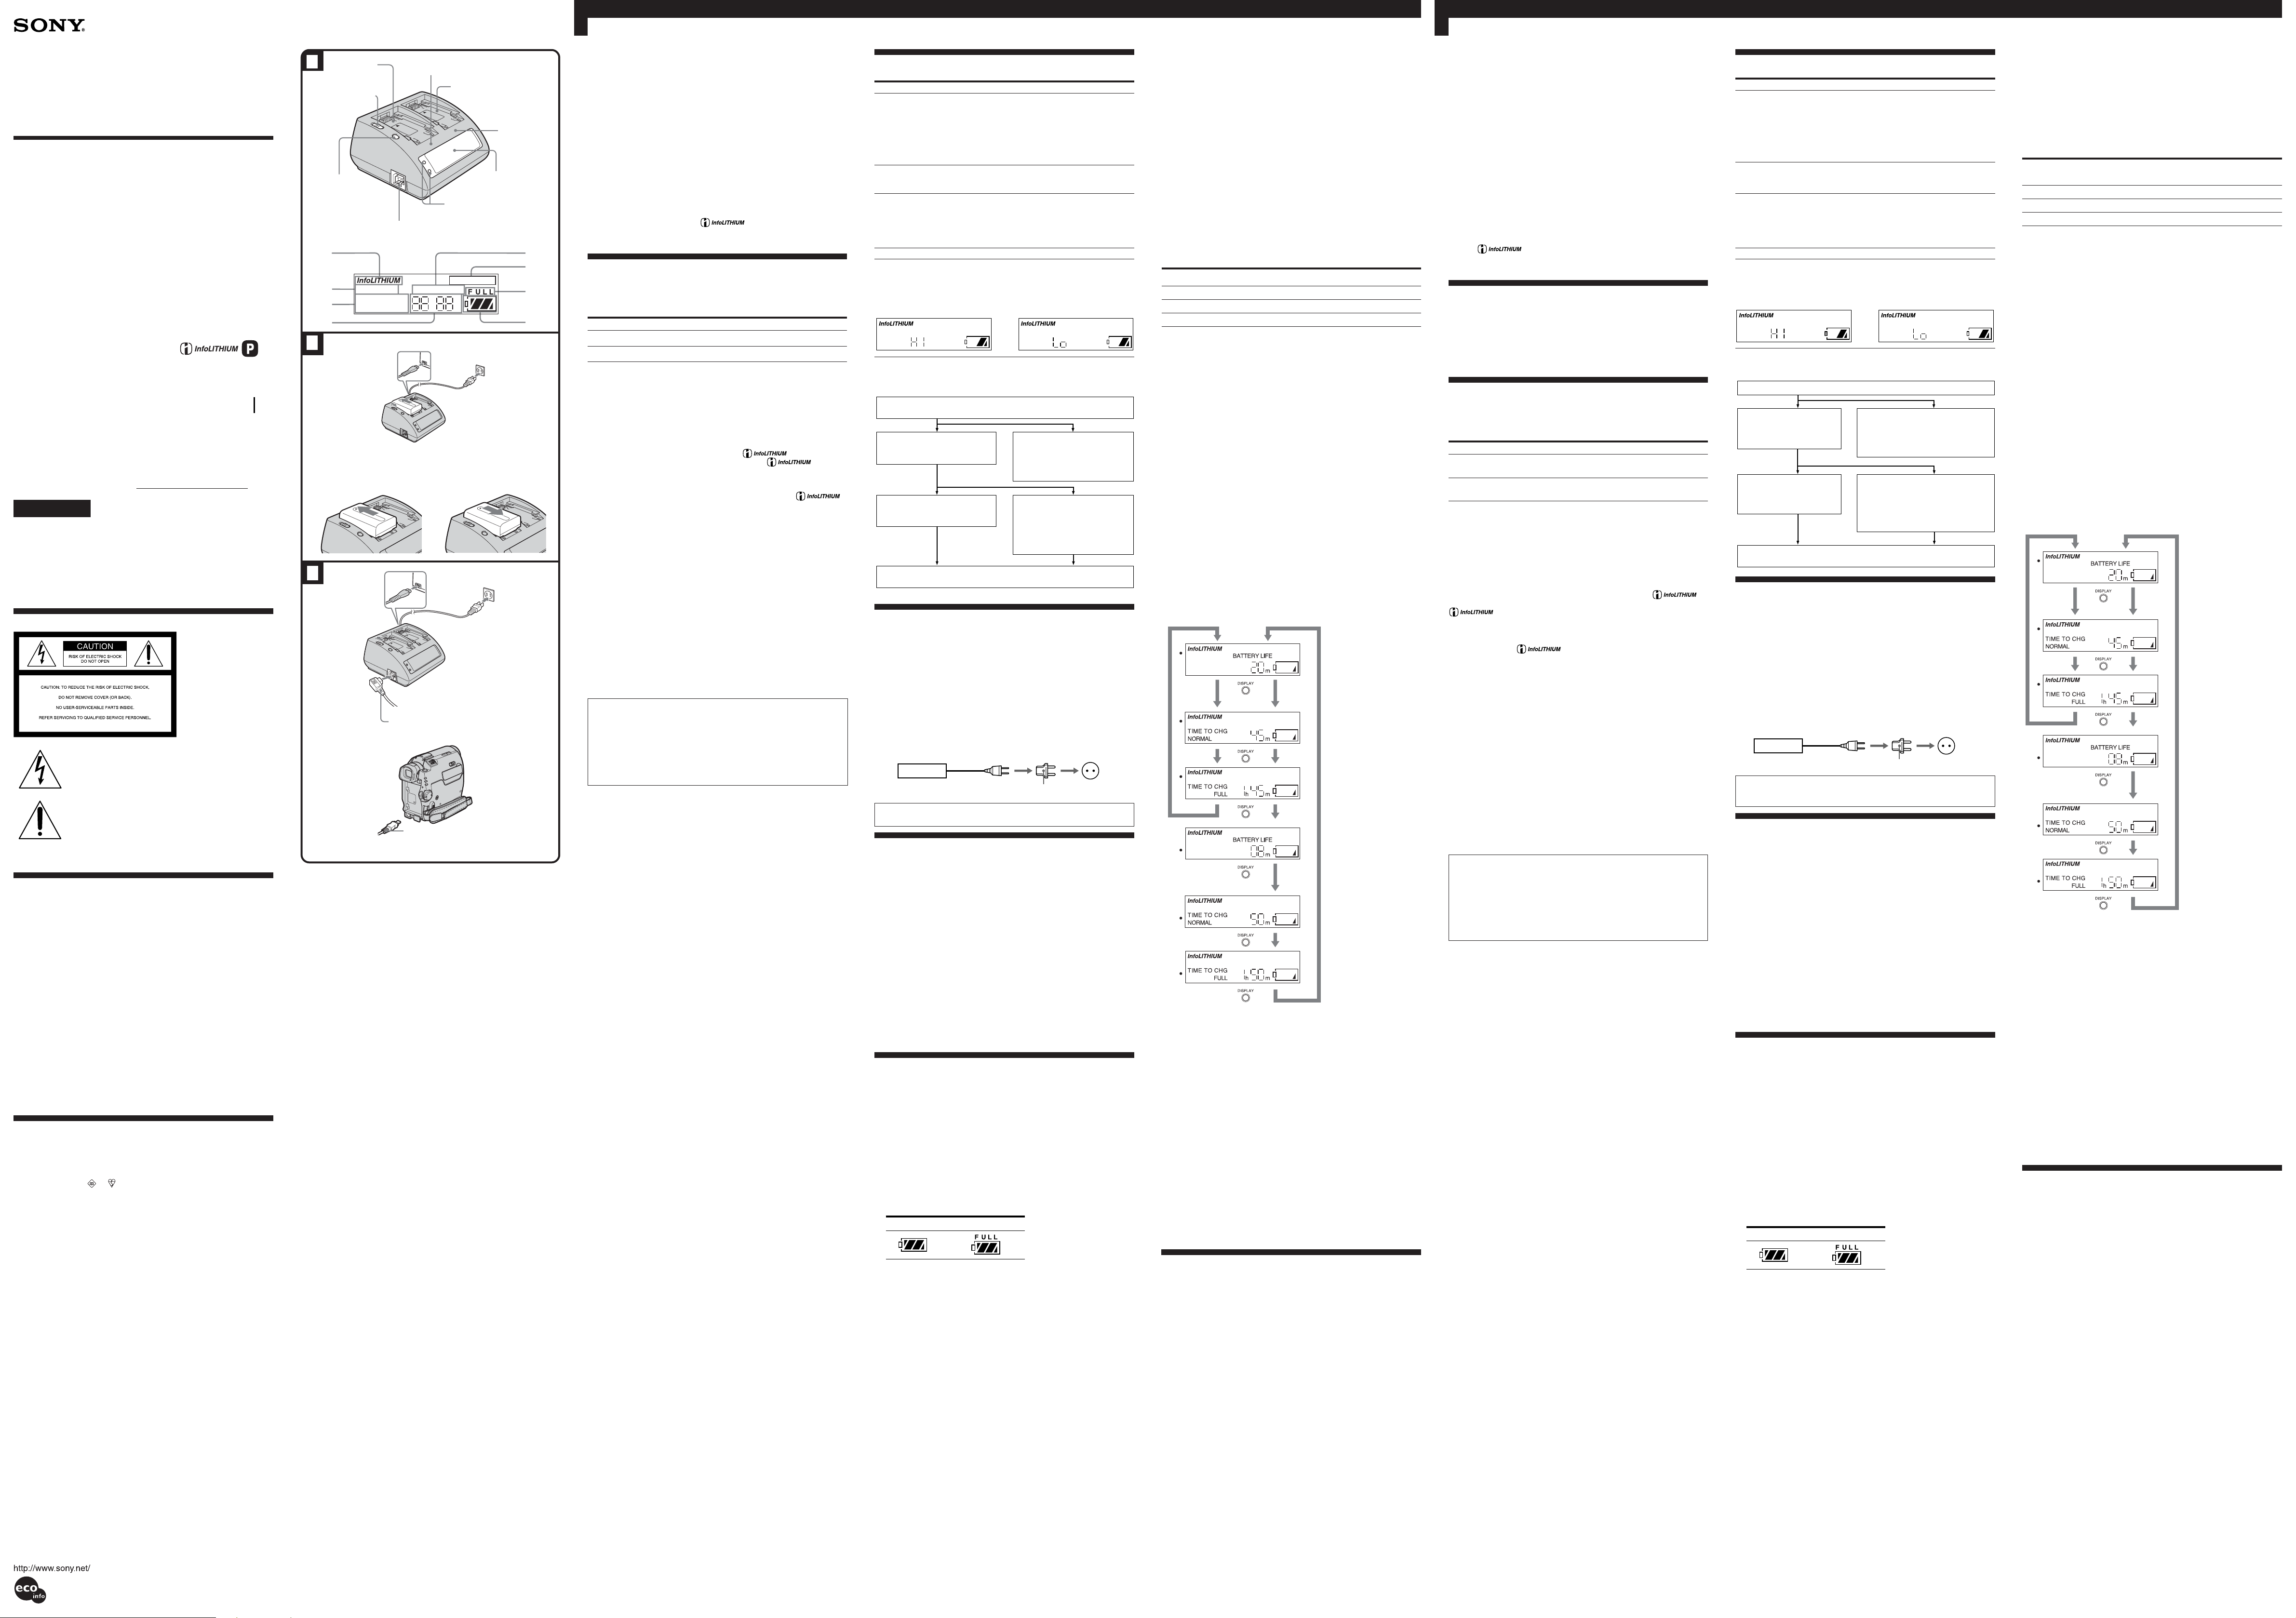
Identifying the parts
See illustration A.
1 Slot 1
2 DC OUT connector
3 CHARGE lamp 1
4 Slot 2
5 CHARGE lamp 2
6 Mode change switch
7 Display window
8 Slot indicator lamp
9 DISPLAY change button
Display window
q; “InfoLITHIUM” indicator
qa WARNING indicator
qs TIME TO CHG (charge) indicator
qd Time indicator
qf BATTERY LIFE (battery remaining time) indicator
qg VCR/CAMERA indicator
qh Full charge indicator
qj Remaining battery indicator
To Charge the Battery Pack
See illustration B-1.
1 Set the mode change switch to CHARGE.
2 Connect the power cord to this unit.
3 Connect the power cord to a wall outlet.
The beep sounds and the display window lights up.
4 Install the battery pack.
When charging starts, the battery mark in the display window will, in
order, blink and the internal CHARGE lamp on the main unit will be lit.
When charging, all of the battery marks will be lit (Normal charge).
In addition, the internal CHARGE lamp will go out; continuing to
charge until “FULL” is displayed in the battery mark (in about 1 hour)
will allow the unit to be used even longer (Full charge).
Remaining battery indicator
Normal charge Full charge
To Install the battery pack
See illustration B-2.
1 Place the battery pack on this unit with the
terminal.
2 Slide the battery pack in the direction of the arrow.
Slide it in until you hear a click.
b b
b mark facing the
b b
To remove the battery pack
See illustration B-2.
Slide the battery pack in the direction of the arrow, then lift it straight out.
Notes
•Do not pick up the AC adaptor/charger by the battery pack when there is
a battery pack installed.
•Be particularly careful not to hit the battery when installing it.
•Be careful not to pinch your fingers during attachment and removal of the
battery pack.
Charging time
The following table shows the charging time for the main battery pack
which is discharged completely.
Battery pack Full charging time Normal charging time
NP-FP50 125 (65)
NP-FP70 130 (70)
NP-FP90 175 (115)
•Approximate minutes to charge an empty battery pack fully (Full
charging time).
•Approximate minutes in parentheses indicate the time when you charge
normally (Normal charging time).
•To ascertain the battery life, refer to the instruction manual of the video
equipment which you use.
•The charging time may differ depending on the condition of the battery
pack or the temperature of the environment.
Notes
•When the mode change switch is set to VCR/CAMERA during charging,
charging stops.
•If the CHARGE lamp does not light or flash, check that the battery pack is
correctly attached to the AC adaptor/charger. If it is not attached it will
not be charged.
To Check Charging
While charging, you can check the charging time on the display. After
starting charging in a minute, BATTERY LIFE lights up on the display.
The displayed remaining time is the approximate time when taking
photographs via the viewfinder. The remaining time is shorter when the
LCD display is used.
Press DISPLAY while charging is underway.
After attaching a battery pack, wait for about 1 min. Each time you press
DISPLAY, the slot indicator lamp lights up and the display in the display
window changes to the display shown below.
When two battery packs are attached simultaneously, the time display of
the battery pack not being charged will automatically return to the time
display of the battery pack being charged after about 10 seconds.
Here is an example of installation of a battery pack in Slot 1 first and then
in Slot 2. The slot indicator lamp corresponds to the slot number.
The remaining battery
A battery pack attached only in Slot 1
1
2
1
2
1
2
1
2
1
2
1
2
Notes
•The time display shows the approximate time when charging at +25 °C.
The time display may differ from the actual charging time depending on
using conditions and circumstances.
•The time display may show “– – – –” in the following cases. However, this
is not a malfunction.
–The remaining battery time is less than 5 minutes.
– There is a difference between the displayed time and actual charging
time. Even if this happens, continue charging.
•Full charge requires about 1 hour after normal charge is complete. If you
remove the battery pack between normal charge and full charge, the
charging time may not be displayed properly in the next charging.
•When a battery that has not been used for a long time is charged, the
displayed remaining time and full charge time sometimes differ from the
actual times. This is not a malfunction. If this happens, charge the battery
pack until it is fully charged. The correct times can be displayed.
•When you attach a fully charged battery pack to this unit, “TIME TO CHG
FULL 1h” may appear on the display. However, this is not a malfunction.
•You may wait for a while after pressing DISPLAY until the display shows
the time indication.
• To display the remaining battery time of a new battery, attach it to your
video camera recorder and use it for about 20 seconds. Then, charge the
battery with this unit.
•You may wait for a while until the time display appears for the battery
pack that is not being charged. In addition, there are cases where the time
will not be displayed depending on the condition of the battery pack.
These instances are not malfunctions.
Two battery packs attached in Slot 1 and Slot 2
time when the first
attached battery pack
will be installed in your
“InfoLITHIUM” electronic
equipment
The time is not displayed
when the remaining battery
time is less than 5 minutes.
The remaining time until
normal charge of the
first attached battery
pack is complete
The normal charge time is not
displayed after the normal
charge is complete.
The remaining time until
full charge of the first
attached battery pack is
complete
The full charge time is not
displayed after the full charge
is complete.
The remaining battery
time when the last
attached battery pack
will be installed in your
“InfoLITHIUM” electronic
equipment
The time is not displayed
when the remaining battery
time is less than 5 minutes.
The remaining time until
normal charge of the
last attached battery
pack is complete
The normal charge time is not
displayed after the normal
charge is complete.
The remaining time until
full charge of the last
attached battery pack is
complete
The full charge time is not
displayed after the full charge
is complete.
To Operate Video Equipment
5When charging is complete, remove the battery pack.
Attaching two battery packs simultaneously
This unit allows attachment of two battery packs simultaneously. In this
case, charging starts with the battery pack attached in Slot 1.
When two battery packs are not attached simultaneously, charging starts
with the battery pack attached first regardless of whether it is in Slot 1
or 2.
Note
This unit cannot charge two battery packs simultaneously.
PRECAUTION
Tht set is not disconnected from the AC power source (wall outlet) as long
as it is connected to the wall outlet, even if the set itself has been turned off.
For details of the connection, refer to the instruction manual of the video
equipment.
1 Set the mode change switch to VCR/CAMERA.
2 Connect the power cord to this unit.
3 Connect the power cord to a wall outlet.
4 Connect the connecting cord A to the DC OUT connector of this
unit.
5Connect the connecting cord B to the video equipment.
For details of the direction of the connecting cord, refer to the instruction
manual of the video equipment.
Notes
•If you set the mode change switch to CHARGE while operating the video
equipment, the power supply to the video equipment stops.
•You cannot charge the battery pack attached to this unit while operating
the video equipment.
•Keep this unit away from the equipment you are using if the picture is
disturbed.
See illustration C.
Merci pour l’achat de cet adaptateur secteur/chargeur Sony.
Avant d’utiliser cet appareil, lisez cette notice avec attention et conservez-la
pour toute référence future.
L’adaptateur secteur/chargeur AC-VQP10 peut être utilisé de la façon
suivante:
Le cordon d’alimentation (fourni) doit être raccordé au préalable à une
prise murale.
•Pour recharger une batterie rechargeable au lithium-ion. Les batteries NiCd/Ni-MH ne sont pas rechargeables.
Les fonctions suivantes seront disponibles:
– Recharge rapide
– Affichage du temps de charge restant
•Pour alimenter un appareil vidéo (les cordons de liaison sont fournis avec
cet appareil).
Qu’est-ce qu’une batterie « InfoLITHIUM » ?
Une batterie « InfoLITHIUM » est une batterie rechargeable au lithium-ion
pouvant échanger des données sur la consommation d’énergie avec un
appareil électronique compatible. Sony recommande d’utiliser les modèles
P de batterie « InfoLITHIUM » avec les appareils électroniques portant la
marque .
« InfoLITHIUM » est une marque commerciale de Sony Corporation.
AVERTISSEMENT
Afin d’éviter tout risque d’incendie ou d’électrocution, ne pas exposer cet
appareil à la pluie ou à l’humidité.
Afin d’écarter tout risque d’électrocution, garder le coffret fermé.
Ne confier l’entretien de l’appareil qu’à un technicien qualifié.
Le cordon d’alimentation secteur de l’appareil doit être changé par un
professionnel uniquement.
Remarques sur l’utilisation
Fiche du cordon d’alimentation secteur
Le modèle AC-VQP10 existe en deux versions, qui se différencient par la
fiche du cordon d’alimentation secteur.
Modèle Forme de la fiche
Modèle pour les Etats-unis
et le Canada
Modèle pour les autres pays
ou régions
• Modèle pour les Etats-Unis ou le Canada: Une des lames de la fiche est
plus large que l’autre pour des raisons de sécurité et ne peut s’insérer que
dans un sens. Si vous ne parvenez pas à insérer complètement la fiche
dans la prise, contactez votre revendeur.
Indication d’autonomie
Pendant la recharge de la batterie, cet appareil indiquera l’autonomie de
l’appareil vidéo, etc. dans les cas suivants:
•Vous utilisez une batterie « InfoLITHIUM »
•Vous utilisez un appareil électronique utilisant la marque
Assurez-vous que la batterie que vous utilisez porte la marque
Consultez le mode d’emploi fourni avec votre appareil vidéo s’il s’agit d’un
appareil « InfoLITHIUM ».
Si vous utilisez la batterie « InfoLITHIUM » avec des appareils électroniques ne
portant pas la marque
en minutes.*
* Il se peut que l’indication ne soit pas précise. Cela dépend de la situation et de
l’environnement dans lesquels l’appareil est utilisé.
Garantie concernant l’enregistrement
Aucune compensation ne peut être accordée si l’enregistrement ou la
lecture n’a pas pu être effectué en raison d’un problème de batterie,
d’adaptateur secteur ou d’adaptateur secteur/chargeur, etc.
.
Aucune compensation en cas de perte
d’images
Aucune compensation ne peut être accordée si l'enregistrement ou la
lecture (images ou son) n’ont être effectuées en raison d’un mauvais
fonctionnement de l’adaptateur secteur/chargeur, etc.
Recharge
N’utilisez que des batteries au lithium-ion avec l’adaptateur. L’adaptateur
ne peut être utilisé pour charger une batterie au Ni-Cd/Ni-MH.
•Fixez bien la batterie.
•Chargez la batterie sur une surface plane et sans vibrations.
Temps de recharge
•Pour tirer le meilleur parti de la batterie, il est conseillé de la recharger
à une température de +10 °C à +30 °C (+50 °F à +86 °F).
•Cet appareil permet des recharges rapides, mais hors de la plage de
températures spécifiée, les temps de recharge sont plus longs pour
protéger la batterie. Lorsque le temps de recharge a été prolongé, il
n’est pas possible de faire une recharge rapide même si la température
ambiante augmente. Il faut remettre la batterie en place et la recharger
une nouvelle fois.
Divers
•Une quantité négligeable d’électricité circule dans l’adaptateur secteur/
chargeur s’il reste branché sur la prise murale.
•Débranchez l’appareil de la prise murale si vous n’avez pas l’intention de
l’utiliser pendant un certain temps. Pour débrancher le cordon secteur,
tirez sur la fiche. Ne tirez jamais sur le cordon.
•N’utilisez pas l’appareil lorsque le cordon est endommagé, ou si
l’adaptateur est tombé ou a été endommagé.
•Utilisez cet appareil près d’une prise murale. Vous pourrez débrancher
immédiatement la fiche de la prise murale pour éteindre l’appareil en cas
d’anomalie.
•La plaque signalétique indiquant la tension de fonctionnement, la
consommation électrique et d’autres informations électriques se trouve
sous l’appareil.
•Evitez que des objets métalliques ne touchent les parties métalliques de
l’appareil ou de la plaque de connexion. Un court-circuit pourrait se
produire et endommager l’appareil.
•Veillez à ce que les contacts soient toujours propres.
•Ne pas démonter ni modifier l’appareil.
•Ne pas appliquer de chocs mécaniques à l’appareil ni le laisser tomber.
•Quand l’appareil est utilisé, il devient chaud. C’est tout à fait normal.
•Ne pas laisser l’appareil près d’un récepteur AM, car il perturbera la
réception AM.
•Ne pas entreposer l’appareil dans les endroits suivants:
— extrêmement chauds ou froids
— poussiéreux ou sales
— très humides
— exposés à des vibrations.
•N’exposez pas cet appareil à la lumière directe du soleil, comme sur le
tableau de bord d’une voiture, ni à la chaleur d’un appareil de chauffage,
car il pourrait être déformé ou ne plus fonctionner.
En cas de problème, débranchez l’appareil et contactez votre revendeur Sony.
Polarisée
Non polarisée
, l’autonomie de la batterie ne sera pas indiquée
En cas de panne
Symptômes
L’appareil vidéo ne
fonctionne pas.
La batterie n’est pas
chargée.
L’alimentation est tout de
suite coupée, bien que
l’autonomie de la batterie
soit suffisante, ou le temps
restant affiché est différent
du temps actuel.
L’affichage ne change pas.
La recharge rapide est
impossible.
Le voyant CHARGE
clignote, et « CHARGE
ERROR » apparaît.
Retirez la batterie de l’appareil, puis remettez-la en place.
Si le témoin CHARGE
clignote encore:
Installez une autre batterie.
Si le témoin CHARGE
clignote encore:
Le problème vient de cet
appareil.
Veuillez contacter votre revendeur Sony et lui apporter l’appareil qui ne
fonctionne pas.
•Le cordon d’alimentation est débranché de la
prise murale.
t Rebranchez-le sur la prise murale.
•Le cordon de liaison n’est pas branché
correctement.
t Raccordez-le correctement.
•Le sélecteur de mode est réglé sur CHARGE.
t Réglez-le sur VCR/CAMERA.
•Le sélecteur de mode n’est pas réglé sur
VCR/CAMERA.
t Réglez-le sur CHARGE.
•Rechargez une nouvelle fois la batterie
complètement.
t L’autonomie n’est pas indiquée
t Voir « Indication d’autonomie ».
L’affichage suivant peut apparaître si la
batterie est rechargée hors de la plage de
températures recommandée (+10 °C à +30 °C).
Dans ce cas, la recharge est possible mais elle
est plus longue pour protéger la batterie.
t Consultez le tableau suivant.
Causes/Solutions
correctement.
Si le témoin CHARGE s’allume et ne
clignote plus:
Si le témoin CHARGE s’éteint parce
que la batterie a été rechargée, c’est
normal.
Si le témoin CHARGE s’allume et
ne clignote plus:
Si le témoin CHARGE s’éteint parce
que la batterie a été rechargée, le
problème vient de la première
batterie installée.
Spécifications
Alimentation 100 - 240 V CA 50/60 Hz 18 W
Tension de sortie DC OUT: 8,4 V 1,5 A (VCR)
Température de fonctionnement De 0 °C à +40 °C (+32 °F à +104 °F)
Température d’entreposage De –20 °C à +60 °C (– 4 °F à +140 °F)
Dimensions Env. 93 × 46 × 85 mm (l/h/p)
Poids (Adaptateur secteur/chargeur seulement)
Env. 200 g (7,1 on.)
Accessoires fournis Cordon de liaison DK-225 (1)
Cordon d’alimentation (1)
La conception et les spécifications peuvent être modifiées sans préavis.
Utilisez, au besoin, un adaptateur de fiche secteur vendu dans le commerce
selon la configuration de la prise murale.
AC-VQP10
Adaptateur de fiche secteur
Si vous voyagez à l’étranger, n’utilisez pas le chargeur avec un
adaptateur de tension (adaptateur portatif). Cela peut provoquer une
surchauffe et des dysfonctionnements.
8,4 V 1,4 A (CHARGE)
Prise murale
Nomenclature
Voir l’illustration A.
1 Fente 1
2 Connecteur DC OUT
3 Témoin CHARGE 1
4 Fente 2
5 Témoin CHARGE 2
6 Sélecteur de mode
7 Afficheur
8 Témoin d’indicateur de logement
9 Touche DISPLAY (changement d’affichage)
Afficheur
q; Indicateur « InfoLITHIUM »
qa Indicateur WARNING (avertissement)
qs Indicateur TIME TO CHG (recharge)
qd Indicateur de temps
qf Indicateur BATTERY LIFE (autonomie de la batterie)
qg Indicateur VCR/CAMERA (lecture/enregistrement)
qh Indicateur de recharge complète
qj Indicateur de temps restant
Pour charger une batterie
Voir l’illustration B-1.
1 Réglez le sélecteur de mode sur CHARGE.
2 Raccordez le cordon d’alimentation à cet appareil.
3 Raccordez le cordon d’alimentation à une prise murale.
Un bip retentit et l’afficheur s’allume.
4 Installez la batterie rechargeable.
Lorsque la recharge commence, l’icône de batterie dans l’afficheur
clignote d’abord puis le témoin CHARGE interne reste allumé sur
l’appareil.
Pendant la recharge, toutes les icônes de batterie sont allumées (Charge
normale).
Le témoin CHARGE interne s’éteint. Si la recharge se poursuit jusqu’à ce
que « FULL » apparaisse dans l’icône de batterie (1 heure de plus
environ), l’autonomie de la batterie sera plus longue (Charge complète).
Indicateur de charge de la batterie
Charge normale Charge complète
5 Lorsque la recharge est terminée, retirez la batterie.
Rattachement simultané de deux batteries
Deux batteries peuvent être rattachées en même temps. Dans ce cas, la
batterie dans la fente 1 est d’abord rechargée.
Si les deux batteries ne sont pas rattachées en même temps, la recharge
commence par la première batterie rattachée même si celle-ci se trouve
dans la fente 2.
Remarque
Les deux batteries ne peuvent pas être rechargé en même temps.
PRECAUTION
L’ensemble adaptateur-camescope n’est pas isolé de la source
d’alimentation secteur tant qu’il reste branché sur la prise murale (secteur),
même si le camescope a été mis hors tension.
Pour installer la batterie rechargeable
Voir l’illustration B-2.
1 Posez la batterie sur cet appareil avec le repère
borne.
2 Faites glisser la batterie dans le sens de la flèche.
Poussez-la de sorte qu’elle s’encliquette.
bb
b orienté vers la
bb
Remarques
•Ne saisissez pas l’adaptateur secteur/chargeur par la batterie lorsqu’elle
est installée dessus.
•Faites particulièrement attention de ne pas cogner la batterie lorsque vous
l’installez.
•Faites attention de ne pas vous coincer les doigts lorsque vous rattachez
ou retirez la batterie.
Temps de recharge
Le tableau suivant indique le temps de recharge quand la batterie
principale est complètement déchargée.
Batterie Temps de Temps de
rechargeable charge complète charge normale
NP-FP50 125 (65)
NP-FP70 130 (70)
NP-FP90 175 (115)
•Temps approximatif en minutes, nécessaire pour recharger complètement
une batterie vide (Temps de charge complète).
•Les minutes entre parenthèses indiquent le temps de recharge normale
(Temps de charge normale).
•Voir le mode d’emploi de l’appareil vidéo utilisé pour l’autonomie de la
batterie.
•Le temps de recharge varie selon l’état de la batterie et la température
ambiante.
Remarques
•Si vous réglez le sélecteur de mode sur VCR/CAMERA pendant la
recharge, la recharge s’arrêtera.
•Si le témoin CHARGE ne s’allume pas ou clignote, vérifiez que la batterie
est fixée correctement à l’adaptateur secteur/chargeur. Si elle n’est pas
rattachée correctement, elle ne se rechargera pas.
Indication des temps
Pendant la recharge, vous pouvez vérifier le temps de recharge sur la
fenêtre d’affichage. Une minute après le début de la recharge, BATTERY
LIFE s’allume. Le temps indiqué désigne l’autonomie de la batterie lorsque
vous prenez des photos avec le viseur. L’autonomie sera plus courte si vous
utilisez l’écran LCD.
Appuyez sur DISPLAY pendant la recharge
Après avoir rattaché la batterie, attendez environ 1 minute. A chaque
pression de DISPLAY, le témoin de fente s’allume et l’affichage suivant
apparaît sur l’afficheur.
Si deux batteries sont rattachées en même temps, l’indication de la batterie
qui n’est pas rechargée est automatiquement remplacé par l’indication du
temps de la batterie rechargée dans les 10 secondes qui suivent.
L’exemple suivant montre les temps indiqués lorsqu’une première batterie
est insérée dans la fente 1 et une seconde dans la fente 2. Le témoin de
fente correspond au numéro de fente.
Batterie dans la fente 1 seulement
1
2
1
2
1
2
1
2
1
2
1
2
Indication de
l’autonomie de la
batterie lorsque la
Batteries dans les fentes 1 et 2
première batterie
rattachée est installée
sur l'appareil
électronique
« InfoLITHIUM »
Le temps n’est pas indiqué
lorsque l’autonomie est
inférieure à 5 minutes.
Temps restant jusqu'à la
fin d’une recharge
normale de la première
batterie rattachée
Le temps d’une recharge
normale n’est pas indiqué
lorsque la recharge est
terminée.
Temps restant jusqu'à la
fin d’une recharge
complète de la première
batterie rattachée
Le temps de recharge
complète n’est pas affiché
lorsque la recharge complète
est terminée.
Autonomie de la
batterie lorsque la
dernière batterie
rattachée est installée
sur l’appareil
électronique
« InfoLITHIUM »
L’autonomie n’est pas
indiquée lorsque l’autonomie
est inférieure à 5 minutes.
Temps restant jusqu'à la
fin d’une recharge
normale de la dernière
batterie rattachée
Le temps de recharge normal
n’est pas indiqué lorsque la
recharge normale est
terminée.
Temps restant jusqu'à la
fin d’une recharge
complète de la batterie
rattachée
Le temps de recharge
complète n’est pas indiqué à
la fin de la recharge complète.
Remarques
•Le temps indiqué est approximatif même quand la batterie est rechargée
entre +25 °C. Selon les conditions d’utilisation et les circonstances, le
temps peut être différent du temps réel.
•« – – – – » peut apparaître sur la fenêtre d’affichage dans les cas suivants.
Il ne s’agit pas d’une anomolie.
– L’autonomie de la batterie est inférieure à 5 minutes.
– Il y a une différence entre le temps affiché et le temps de recharge réel.
Continuez la recharge, si cet indicateur apparaît.
•Une recharge complète prend environ une heure. Si vous détachez la
batterie entre la recharge normale et la recharge complète, le temps risque
de ne pas être indiqué correctement lors de la recharge suivante.
•Si une batterie n’a pas été utilisée pendant longtemps, l’autonomie
indiquée et le temps de recharge complète peuvent être inexacts. C’est
normal. Dans ce cas, rechargez une nouvelle fois la batterie. Les temps
seront alors corrects.
•Quand vous raccordez une batterie complètement rechargée à cet
appareil, « TIME TO CHG FULL 1h »peut apparaître sur la fenêtre
d’affichage. Il ne s’agit pas d’une anomolie.
•Il faut attendre un certain temps après une pression de DISPLAY pour
que le temps apparaisse.
•Pour connaître l’autonomie d’une batterie neuve, insérez-la sur l’appareil
vidéo et utilisez-la pendant 20 secondes environ. Rechargez ensuite la
batterie sur cet appareil.
•Il faut attendre un certain temps pour que le temps de la batterie qui n’est
pas rechargée soit indiqué. En outre, dans certain cas, le temps n’est pas
indiqué. Ceci dépend de l’état de la batterie, ce n’est pas une anomalie.
Pour utiliser l’appareil vidéo
Voir l’illustration C.
Pour le détail sur la connexion, reportez-vous au mode d’emploi de
l’appareil vidéo.
1Réglez le sélecteur de mode sur VCR/CAMERA.
2Raccordez le cordon d’alimentation à cet appareil.
3Raccordez le cordon d’alimentation à une prise murale.
4 Raccordez le cordon de liaison A au connecteur DC OUT de cet
appareil.
5 Raccordez le cordon de liaison B à l’appareil vidéo.
Pour le détail sur le sens du cordon de liaison, voir le mode d’emploi de
l’appareil vidéo.
Remarques
• Si vous réglez le sélecteur de mode sur CHARGE pendant l’utilisation de
l’appareil vidéo, l’alimentation sera coupée.
• Vous ne pouvez pas recharger la batterie quand elle est sur l’appareil
vidéo et que celui-ci bonctionne.
• Eloignez l’adaptateur de l’appareil vidéo s’il perturbe l’image.
Printed on 100% recycled paper using
VOC (Volatile Organic Compound)-free
vegetable oil based ink.
Pour enlever la batterie rechargeable
Voir l’illustration B-2.
Faites glisser la batterie dans le sens de la flèche, puis tirez-la tout droit.
Español
q
中文(简)
A
1 Ranura 1
槽 1
6 Selector de
modo
模式切换开关
9 Botón de
cambio de
visualización
DISPLAY
(显示)转换按钮
2 Conector de salida de cc (DC OUT)
q;
qa
qs
qd
B
1
Para instalar
2
安装
C
3 Lámpara indicadora de carga
(CHARGE) 1
CHARGE(充电)灯 1
8 Lámpara indicadora
DC OUT(直流电输出)连接器
WARNING
TIME TO CHG
NORMAL FULL
BATTERY LIFE
VCR/CAMERA
hm
2
44
1
2
1
4
A
5
B
4 Ranura 2
槽 2
7Visualizador
de ranura
槽指示灯
3
Para extraer
卸下
3
5 Lámpara
indicadora
de carga
(CHARGE) 2
CHARGE
(充电)灯 2
显示窗
f
qg
qh
qj
Muchas gracias por la adquisición de este adaptador de ca/cargador Sony.
Antes de utilizar la unidad, lea detenidamente este manual y consérvelo
para futuras referencias.
El adaptador de ca/cargador AC-VQP10 podrá utilizarse de la forma
siguiente:
Nombre del producto: Adaptador de ca/cargador
Modelo: AC-VQP10
Conecte el cable de alimentación (suministrado) a una toma de la red.
•Para cargar una batería de tipo de iones de litio. Las pilas de Ni-Cd/NiMH no son recargables.
Estarán disponibles las funciones siguientes:
– Carga rápida
– Visualización del tiempo de carga restante
•Con esta unidad se suministran cables conectores para poder alimentar
equipos de vídeo a través de ella.
¿Qué es “InfoLITHIUM”?
“InfoLITHIUM” es una batería que puede intercambiar datos con un
equipo electrónico compatible relacionados con el consumo de la misma.
Sony recomienda utilizar baterías “InfoLITHIUM” (Serie P) con equipos
electrónicos que posean la marca .
“InfoLITHIUM” es marca comercial de Sony Corporation.
ADVERTENCIA
Para evitar incendios o descargas eléctricas, no exponga la unidad a la lluvia
ni a la humedad.
Para evitar descargas eléctricas, no abra la unidad.
En caso de avería, solicite los servicios de personal cualificado solamente.
El cable de alimentación de ca solamente deberá ser cambiado en un
taller de reparaciones cualificado.
Notas sobre la utilización
Acerca del enchufe del cable de alimentación
de ca
Existen dos modelos de AC-VQP10, que se diferencian por la forma del
enchufe del cable de alimentación de ca
Modelo Forma del enchufe
Modelo para EE.UU./Canadá Polarizado
Modelo para otros países/regiones No polarizado
•Modelo para EE.UU. y Canadá: Por motivos de seguridad, una cuchilla
del enchufe es más ancha que la otra, y encajará en el tomacorriente en un
solo sentido. Si no puede insertar completamente el enchufe en el
tomacorriente, póngase en contacto con su proveedor.
Acerca del tiempo restante de la batería
Durante la carga de la batería, esta unidad mostrará el tiempo restante de la
misma con su equipo de vídeo, etc. en las condiciones siguientes.
•Cuando utilice una batería “InfoLITHIUM”
•Cuando utilice un equipo electrónico que posea la marca
Cerciórese de utilizar una batería que posea la marca .
Consulte el manual de instrucciones de su equipo de vídeo para ver si
utiliza batería “InfoLITHIUM”.
Si utiliza esta batería con un equipo electrónico que posea la marca , la
capacidad de batería restante no se indicará en min*
*La indicación puede no ser precisa dependiendo de las condiciones y el medio
ambiente de utilización del equipo.
Garantía del contenido grabado
El contenido de la grabación no podrá compensarse si la grabación o la
reproducción no se realiza debido a un mal funcionamiento de la batería, el
adaptador de alimentación de ca el adaptador de alimentación de ca/
cargador, etc.
No habrá ninguna compensación por el
contenido de las imágenes
Nosotros no ofreceremos ninguna compensación por el contenido grabado,
como imágenes y sonido, si no se graban o reproducen debido al mal
funcionamiento del adaptador de ca/cargador, etc.
Carga
Utilice solamente baterías de tipo iones de litio. Esta unidad no podrá
utilizarse para cargar baterías de tipo Ni-Cd/Ni-MH.
•Fije firmemente la batería.
•Cargue la batería sobre una superficie plana exenta de vibraciones.
Temperatura de carga
• Para obtener el máximo rendimiento de la batería, le recomendamos
que la cargue dentro de una gama de +10 °C a +30 °C
• Esta unidad es compatible con la carga rápida, pero la carga fuera de
la gama de temperaturas recomendada aumentará el tiempo de carga
para proteger la batería. Después de haberse sobrepasado el tiempo
de carga, ésta no volverá a la carga rápida incluso aunque la
temperatura entre dentro de la gama de temperaturas recomendada.
Reinstale la batería y vuelva a cargarla.
Otros
•Mientras el adaptador de ca/cargador esté enchufado en un
tomacorriente de la red, a través del mismo circulará una insignificante
cantidad de corriente eléctrica.
•Cuando no vaya a utilizar la unidad durante mucho tiempo, desenchúfela
del tomacorriente de la red. Para desconectar el cable, tire de la clavija.
No tire nunca del propio cable.
•No utilice la unidad con el cable de alimentación dañado, después de
haberse caído, ni cuando esté dañada.
•Utilice esta unidad cerca de un tomacorriente de la red. Esto es para poder
desconectar inmediatamente el enchufe de alimentación del tomacorriente
de la red, a fin de desconectar la alimentación, en caso de producirse
cualquier anormalidad durante la utilización.
•La placa de características, en la que se indica la tensión de alimentación,
el consumo, etc., se encuentra en la base.
•Tenga cuidado de que ningún objeto metálico entre en contacto con las
partes metálicas de la unidad ni con la placa conectora. En caso contrario,
podría producirse un cortocircuito, que dañaría la unidad.
•Mantenga siempre limpios los contactos metálicos.
•No desarme ni modifique la unidad.
•No golpee ni deje caer la unidad.
•Cuando utilice la unidad, se calentará. Sin embargo, esto es normal.
•Mantenga la unidad alejada de receptores de AM, porque podría interferir
en la recepción de AM.
•No coloque la unidad en un lugar:
— Extremadamente cálido o frío
— Polvoriento o sucio
— Muy húmedo
— Sometido a vibraciones
•Si coloca la unidad en lugares sometidos a la luz solar directa, como sobre
el panel de instrumentos, o cerca de aparatos de calefacción, es posible
que se deforme o funcione mal.
Si tiene alguna dificultad, desenchufe la unidad y póngase en contacto con
su proveedor Sony.
Solución de problemas
Síntoma
El equipo de vídeo no
funciona.
La batería no se carga.
La alimentación se
desconecta inmediatamente
aunque queda suficiente
energía en la batería, o el
tiempo restante visualizado
difiere del real.
La visualización no cambia.
No se realiza la carga
rápida.
La lámpara CHARGE
parpadea, y en el
visualizador se indica
“CHARGE ERROR”.
Retire la batería de esta unidad y, a continuación, vuelva a instalar la
misma batería.
Si la lámpara CHARGE
vuelve a parpadear:
Instale otra batería.
Si la lámpara CHARGE
vuelve a parpadear:
El problema reside en esta
unidad.
Póngase en contacto con su proveedor Sony más cercano en relación con
el producto afectado.
•El enchufe de alimentación está desconectado
del tomacorriente de la red.
t Insértelo en el tomacorriente de la red.
•El cable conector no está adecuadamente
conectado.
t Conéctelo adecuadamente.
•El selector de modo está ajustado a
CHARGE.
t Ajústelo a VCR/CAMERA.
• El selector de modo está en VCR/CAMERA.
t Póngalo en CHARGE.
• Vuelva a cargar completamente la batería.
t La energía restante de la batería se
t Consulte “Acerca del tiempo restante de
La visualización mostrada abajo puede
aparecer si la batería se carga fuera de la gama
de temperaturas de +10 °C a +30 °C
recomendada. En este caso, la carga
realizarse, pero no con la carga
proteger la batería.
t Compruebe el organigrama sigiente.
Causa/solución
visualizará correctamente.
la batería”.
podrá
rápida
Si la lámpara CHARGE se enciende y
no vuelve a parpadear:
Si la lámpara CHARGE se ha apagado
por haber transcurrido el tiempo de
carga, no existirá ningún problema.
Si la lámpara CHARGE se enciende
y no vuelve a parpadear:
Si la lámpara CHARGE se ha
apagado por haber transcurrido el
tiempo de carga, el problema residirá
en la primera batería instalada.
a fin de
Especificaciones
Alimentación ca 100 - 240 V 50/60 Hz 18 W
Tensión de salida DC OUT: 8,4 V 1,5 A (VCR)
Temperatura de funcionamiento 0 °C a +40 °C
Temperatura de almacenamiento –20 °C a +60 °C
Dimensiones Aprox. 93 × 46 × 85 mm (an/al/prf)
Masa (adaptador de ca/cargador solamente)
Aprox. 200 g
Accesorios suministrados Cable conector DK-225 (1)
Cable de alimentación de ca (1)
El diseño y las especificaciones están sujetos a cambio sin previo aviso.
No conecte el cargador de baterías a un adaptador de tensión
(convertidor para viajes) para ultramar. Esto podría causar el
recalentamiento u otros problemas.
8,4 V 1,4 A (CHARGE)
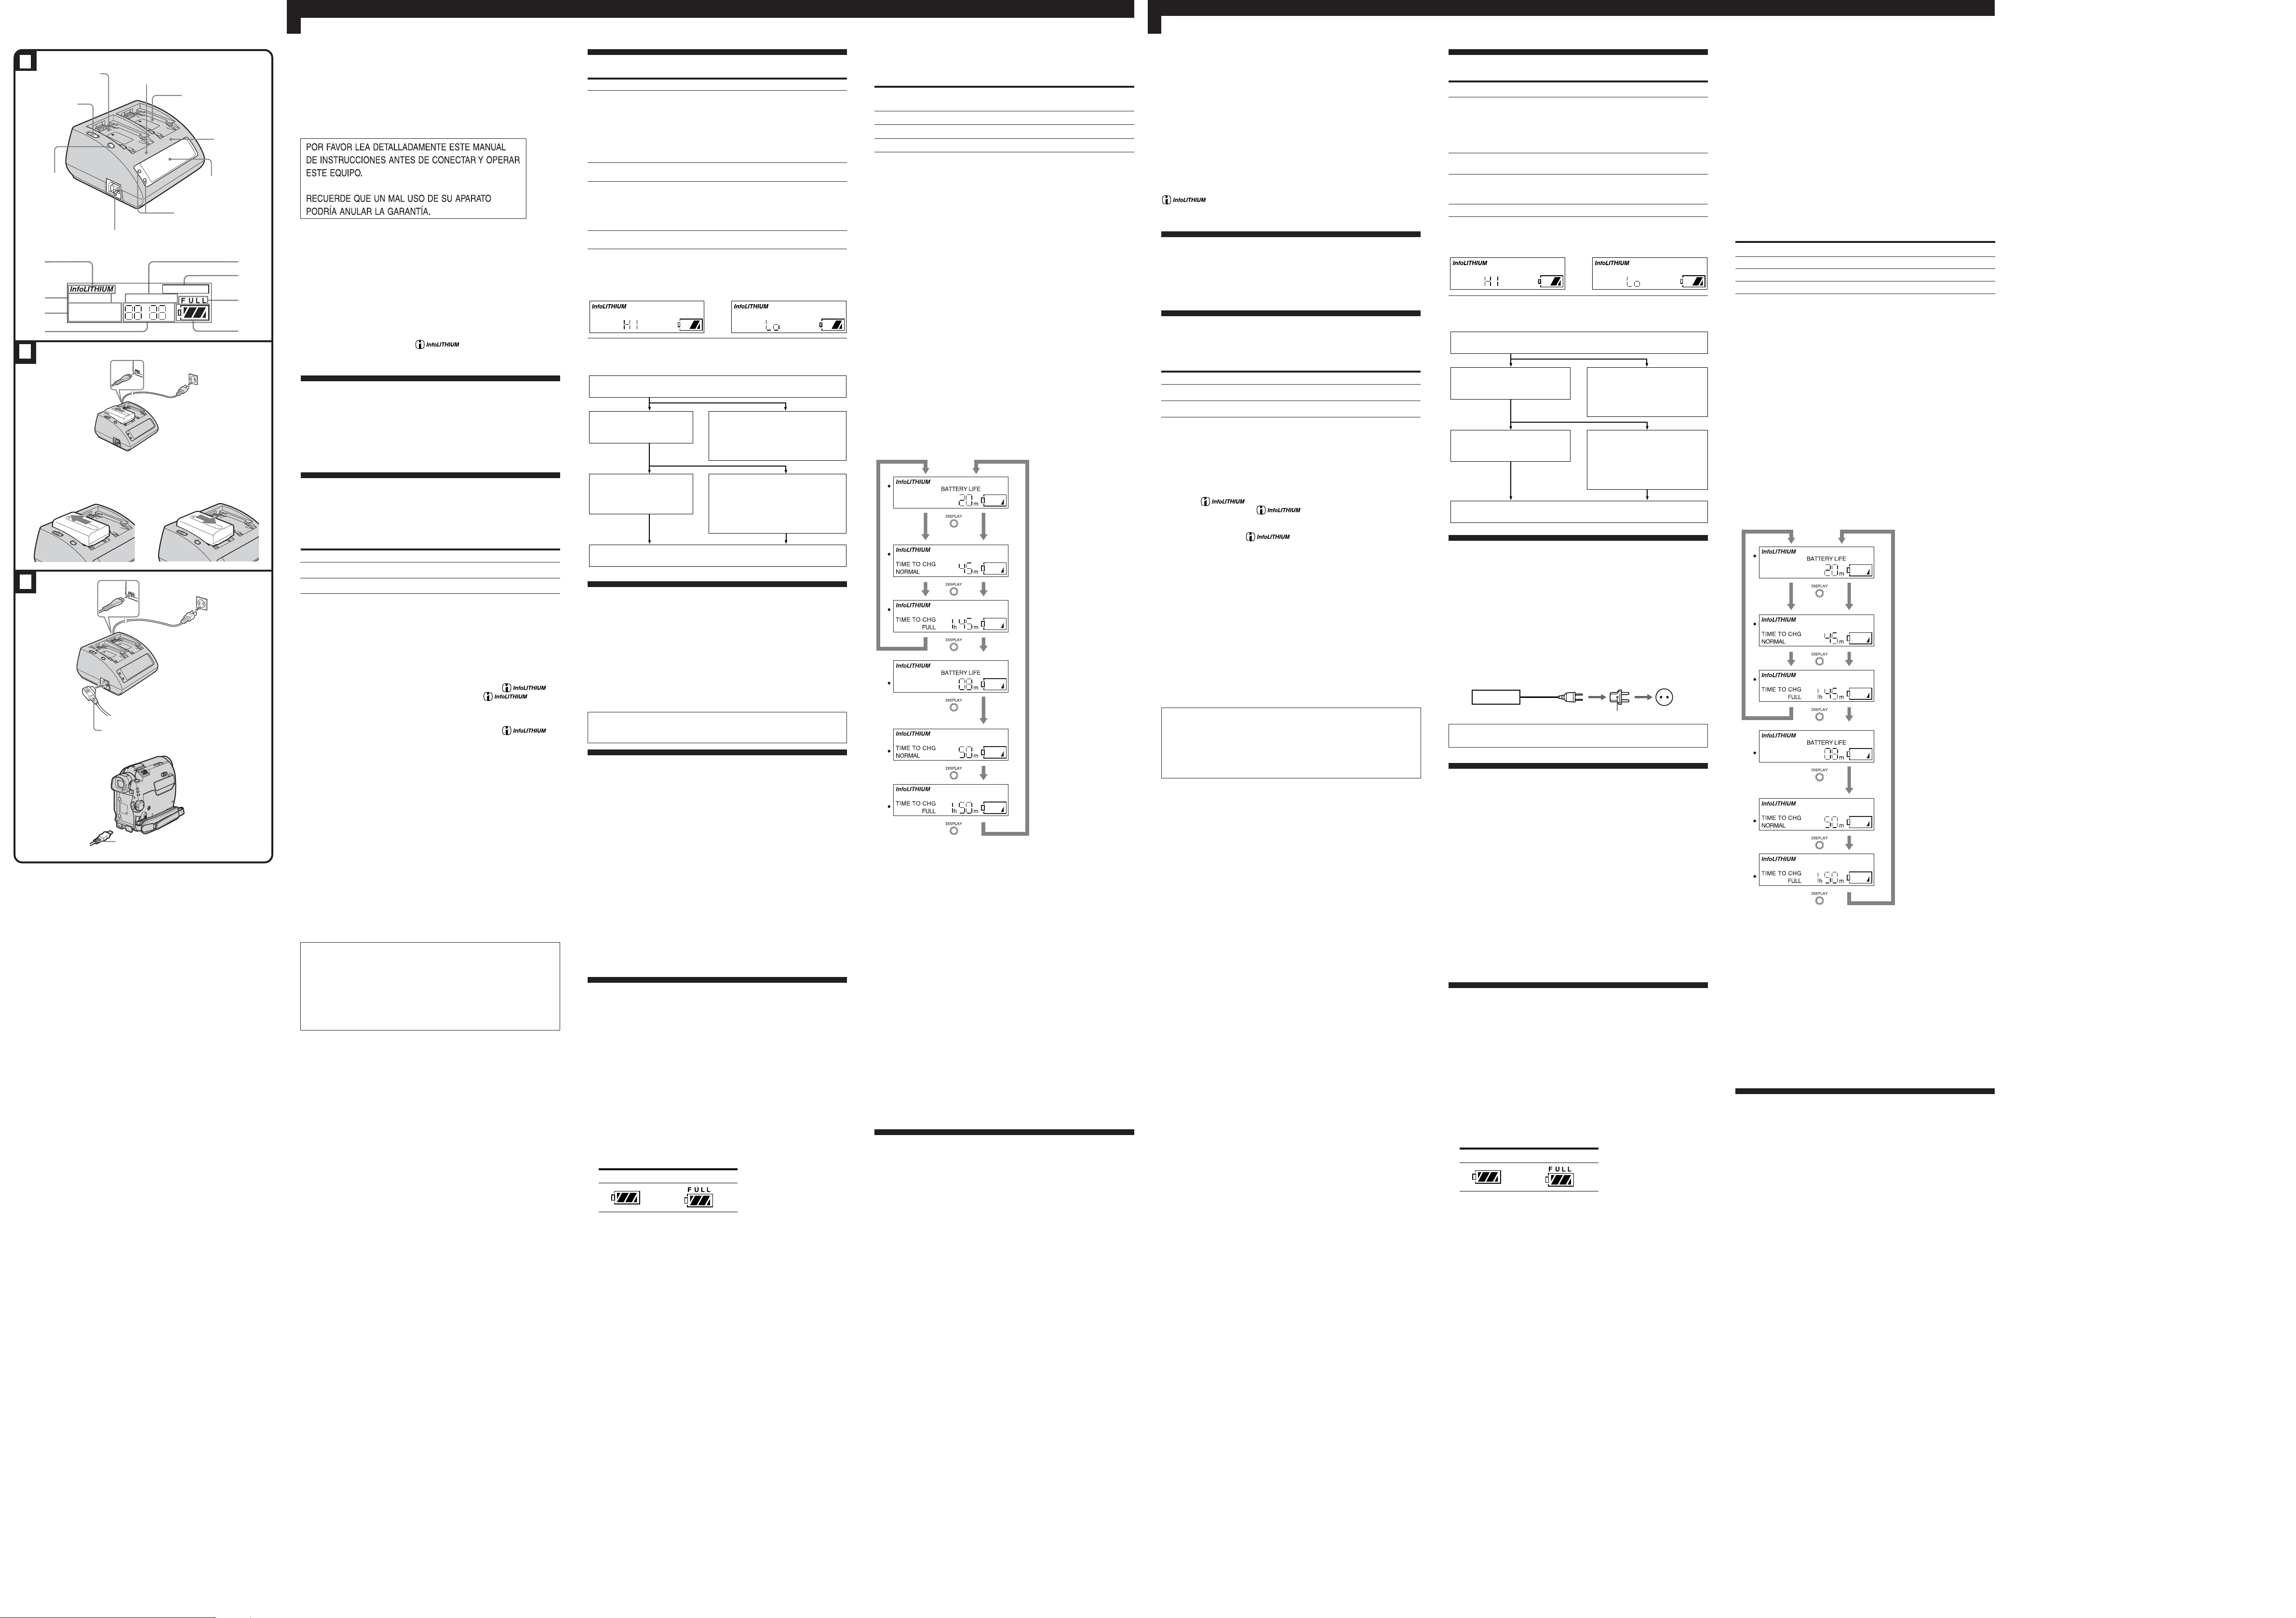
Identificación de partes
Consulte la ilustración A.
1 Ranura 1
2 Conector de salida de cc (DC OUT)
3 Lámpara indicadora de carga (CHARGE) 1
4 Ranura 2
5 Lámpara indicadora de carga (CHARGE) 2
6 Selector de modo
7 Visualizador
8 Lámpara indicadora de ranura
9 Botón de cambio de DISPLAY
Visualizador
q; Indicador de “InfoLITHIUM”
qa Indicador de WARNING
qs Indicador de TIME TO CHG
qd Indicador de tiempo
qf Indicador de BATTERY LIFE (tiempo restante de la batería)
qg Indicador de VCR/CAMERA
qh Indicador de carga completa
qj Indicador de batería restante
Para cargar la batería
Consulte la ilustración B-1.
1 Ponga el selector de modo en CHARGE.
2 Conecte el cable de alimentación a la unidad.
3 Conecte el cable de alimentación a un tomacorriente.
Sonará un pitido, y se encenderá el visualizador.
4 Instale la batería.
Cuando se inicie la carga, la marca de la misma del visualizador
parpadeará por orden, y la lámpara interna CHARGE de la unidad se
encenderá.
Durante la carga, todas las marcas de la batería permanecerán
encendidas (Carga normal).
Después de ello, la lámpara interna CHARGE se apagará, y la carga
continuará hasta que se visualice “FULL” en la marca de la batería
(después de aproximadamente 1 hora), después de lo cual usted podrá
utilizar la unidad durante más tiempo (Carga completa).
Indicador de batería restante
Carga normal Carga completa
5 Cuando finalice la carga, extraiga la batería.
Instalación simultánea de dos baterías
Esta unidad permite instalar simultáneamente dos baterías. En este
caso, la carga se iniciará con la batería instalada en la ranura 1.
Cuando no haya instalado simultáneamente dos baterías, la carga se
iniciará con la batería instalada en primer lugar independientemente de
la ranura, 1 o 2.
Nota
Esta unidad no puede cargar simultáneamente dos baterías.
PRECAUCIÓN
La unidad no se desconectará de la fuente de alimentación de ca (red)
mientras permanezca enchufado en un tomacorriente de la red, incluso
aunque haya desconectado su alimentación.
Tiempo de carga
En la tabla siguiente se muestra el tiempo de carga de la batería principal
completamente descargada.
Batería
NP-FP50 125 (65)
NP-FP70 130 (70)
NP-FP90 175 (115)
•Minutos aproximados para cargar completamente una batería vacía
(Tiempo de carga completa).
•Los minutos aproximados entre paréntesis indican el tiempo cuando
cargue normalmente la batería (Tiempo de carga normal).
•Para prolongar la duración útil de la batería, consulte el manual de
instrucciones del equipo de vídeo utilizado.
•El tiempo de carga puede diferir dependiendo de la condición de la
batería o de la temperatura ambiental.
Tiempo de Tiempo de
carga completa carga normal
Notas
•Si pone el selector de modo en VCR/CAMERA durante la carga, ésta se parará.
•Si la lámpara CHARGE no se enciende o parpadea, compruebe si la
batería está correctamente instalada en el adaptador de ca/cargador. Si
no está bien instalada, no se cargará.
Para comprobar la carga
Durante la carga podrá comprobar el tiempo de carga en el visualizador.
Un minuto después de haber iniciado la carga, en el visualizador se
encenderá BATTERY LIFE.
El tiempo restante visualizado será el aproximado cuando tome fotografías
a través del visor. El tiempo será más corto cuando utilice la LCD.
Presione DISPLAY durante la carga.
Después de haber instalado la batería, espere aproximadamente 1 min
Cada vez que presione DISPLAY, la lámpara indicadora de ranura se
encenderá y la indicación del visualizador cambiará de la forma mostrada
más abajo.
Cuando haya instalado simultáneamente dos baterías, la indicación de
tiempo de la batería que no esté cargándose volverá automáticamente a la
de la batería que esté cargándose después de unos 10 s
A continuación se muestra un ejemplo de instalación de una batería en la
ranura 1 en primero lugar, y después otra en la ranura 2. La lámpara
indicadora de ranura corresponde al número de ranura.
Tiempo restante de la
primera batería instalada
Batería instalada solamente en la ranura 1
1
2
1
2
1
2
1
2
1
2
1
2
Dos baterías instaladas en la ranura 1 y la ranura 2
cuando se instale en su
equipo electrónico que
utilice baterías
“InfoLITHIUM”
El tiempo no se visualizará
cuando el tiempo de batería
restante sea inferior a 5 min
Tiempo restante hasta
que finalice la carga
normal de la primera
batería instalada
El tiempo de carga normal no
se visualizará después de
haber finalizado la carga
normal.
Tiempo restante hasta
que finalice la carga
completa de la primera
batería instalada
El tiempo de carga completa
no se visualizará después de
haber finalizado la carga
completa.
Tiempo restante de la
última batería instalada
cuando se instale en su
equipo electrónico que
utilice baterías
“InfoLITHIUM”
El tiempo no se visualizará
cuando el tiempo de batería
restante sea inferior a 5 min
Tiempo restante hasta
que finalice la carga
normal de la última
batería instalada
El tiempo de carga normal no
se visualizará después de
haber finalizado la carga
normal.
Tiempo restante hasta
que finalice la carga
completa de la última
batería instalada
El tiempo de carga completa
no se visualizará después de
haber finalizado la carga
completa.
Notas
•La visualización del tiempo mostrará el tiempo aproximado cuando la
carga se realice de +25 °C
Esta visualización puede diferir del tiempo de carga real dependiendo de
las condiciones y circunstancias de utilización.
•La visualización del tiempo puede mostrar “– – – –” en los casos
siguientes. Sin embargo, esto no significa mal funcionamiento.
– El tiempo restante de la batería es inferior a 5 min
– Existe una diferencia entre el tiempo visualizado y el tiempo de carga
real. Aunque suceda esto, continúe cargando.
•La carga completa requerirá aproximadamente 1 h después de haber
finalizado la carga normal. Si extrae la batería entre la carga normal y la
completa, es posible que el tiempo de carga no se visualice
adecuadamente en la próxima carga.
•Cuando cargue una batería que no haya utilizado durante mucho tiempo,
el tiempo restante visualizado y el tiempo de carga completa pueden
diferir a veces de los tiempos reales. Esto no significa mal funcionamiento.
Cuando suceda esto, cargue completamente la batería. Se visualizarán los
tiempos correctos.
•Si instala una batería completamente cargada en esta unidad, es posible
que en el visualizador aparezca “TIME TO CHG FULL 1h”
Sin embargo, esto no significa mal funcionamiento.
•Es posible que tenga que esperar un poco después de haber presionado
DISPLAY hasta que el visualizador muestre la indicación del tiempo.
•Para hacer que se visualice el tiempo restante de una batería nueva,
instálela en su videocámara y utilícela durante unos 20 s
Después, cargue la batería con esta unidad.
•Es posible que tenga que esperar un poco hasta que aparezca la
visualización del tiempo para la batería que no esté cargándose. Además,
puede darse el caso de que el tiempo no se visualice dependiendo de las
condiciones de la batería. Esto no significa mal funcionamiento.
Para utilizar un equipo de vídeo
Consulte la ilustración C.
Con respecto a los detalles sobre la conexión, consulte el manual de
instrucciones del equipo de vídeo.
1 Ponga el selector de modo en VCR/CAMERA.
2 Conecte el cable de alimentación a esta unidad.
3 Conecte el cable de alimentación a una toma de la red.
A
4 Conecte la parte
esta unidad.
5 Conecte la parte
Con respecto a los detalles sobre el sentido del cable conector, consulte el
manual de instrucciones del equipo de vídeo.
Notas
•Si pone el selector de modo en CHARGE mientras esté utilizando el
equipo de vídeo, la alimentación de éste se cortará.
•Usted no podrá cargar la batería instalada en esta unidad mientras esté
utilizando el equipo de vídeo.
•Si las imágenes se ven con perturbaciones, aleje esta unidad del equipo
que esté utilizando.
del cable conector al conector DC OUT de
B
del cable conector al equipo de vídeo.
感谢您购买Sony公司的 AC 电源转接器/充电器。
使用本装置之前,请先阅读使用说明书并妥加保存以备将来参考之用。
AC-VQP10 AC电源转接器/充电器可用于:
将电源线(附带)接插到墙上电源插座。
•用于给锂离子型电池组充电时,镍镉/镍氢(Ni-Cd/ Ni-MH)型电池是不
能给充电的。
本装置具有以下功能:
– 快速充电
– 充电剩余时间显示
•为能供电给视频设备,本装置含有连接导线。
什么是“InfoLITHIUM”?
“InfoLITHIUM”是一种锂离子电池组,它可与兼容的电子设备交换其电池
消耗数据。Sony建议您采用“InfoLITHIUM”电池组(P系列)来操作带有
“InfoLITHIUM”是Sony公司的商标。
标志的电子设备。
警告
为防发生火灾或触电危险,请勿让本装置淋雨或受潮。
为了避免触电,请勿打开机壳。
维修限找专业人员为您服务。
AC电源线必须在专门的维修店更换。
使用须知
关于AC 电源线插头
AC-VQP10 有两种型号,其AC电源线的插头形状不同。
型号 插头的形状
美国/加拿大用型号 极化的
其它国家或地区用型号 非极化的
•美国和加拿大用型号:插头的两插脚宽度不同而只能以一定的方向插入电源
插座,是为安全而设计的。如果不能完全地插入插座时,请洽询购买机器的
售店。
关于电池剩余时间
给充电池组进行充电中,在下列条件下本装置将显示视频装置等的电池剩余时
间。
•使用“InfoLITHIUM”充电池组
•使用带有 标志的电子设备
确认所使用充电池组带有 标志。如果您的视频设备标示有
“InfoLITHIUM”,也请参考其附带的使用说明书。
如果把本充电池组用在不带 标志的电子设备,则电池的剩余容量将不以
分指示。*
* 根据设备使用的条件和环境,指示可能不准确。
所录内容的保证
如果是因为电池组,AC电源转接器,AC 电源转接器/充电器,等的故障而
不能记录或播放时,记录内容概不能获保证。
对所录图像内容,我们是不能给予补赏的
如果因为AC电源转接器/充电器等的故障而造成不能录到图像或不能播放
时,对于所录图像和声音内容,恕不能给予补赏。
充电
限使用锂离子型充电池组。本机不能用于给镍镉/镍氢(Ni-Cd/Ni-MH)型
电池组充电。
•稳固地装好充电池组。
•充电池组必须在没有振动的平坦面上进行充电。
充电温度
• 为了发挥电池的最大效果,最好是在 +10 ℃到+ 30 ℃的温度范围内进
行充电。
• 本机遵照快速充电性能特性,但如果不在规定温度范围内进行充电,为
了保护电池组,可能需要较长的充电时间。充电时间一旦延长,即使恢
复在规定温度范围内进行充电,也不能恢复快速充电。此时请卸下电池,
重新进行充电。
其他
•只要AC电源转接器/充电器仍接插在墙上电源插座,便有小量的电流流入
AC电源转接器/充电器的。
•如果有相当一段时期不使用本装置,则请自墙上拔下装置的电源线。要卸下
电池导线时,须抓住插头本身拔出,不可拉着导线拔。
•机器如果掉下过,损坏了或导线有损伤时,便请不要操作机器。
•请靠近电源插座使用本装置以保证在使用机器中万一发生异常现象时,能迅
速地自电源插座拔下电源线以关掉装置的电源。
•标示操作电压,电力消耗等的铭牌位于底面。
•慎防让金属件接触到装置的金属部分或连接板。否则可能发生短路而损坏本
装置。
•金属接触点须经常保持清洁。
•不可分解或改装本装置。
•别让本装置遭受机械性冲击或掉落地上。
•在使用中,装置可能变温热。这是正常现象。
•装置须远离开AM收音机,因为它会干扰 AM 广播收音。
•不要把装置放在如下状况的地方:
— 太热或太冷
— 多尘垢的地方
— 太潮湿的地方
— 有振动的地方
•把本装置放置在可直接照射到太阳的地方例如仪表板上方,或靠近加热装置
都可能使本装置变形或发生故障。
装置发生问题时,请立即拔下电源线并洽问附近的Sony销售店。
故障探寻
征状
视频设备不工作。
电池没有充电。
即使电池仍有足够的电力,
也立即关掉电源,或所显示
剩余时间与实际时间不符。
显示不能切换。
不能进行快速充电。
闪烁着CHARGE 灯而在显
示窗中显示“CHARGE
ERROR”。
从本装置卸下充电池组,然后再装上同充电池组。
如果CHARGE灯再次闪烁:
请安装另一套电池组。
如果CHARGE灯再次闪烁:
则问题在本装置。
关于产品的问题,请洽问附近的销售店。
•电源插头没有接到墙上电源插座。
t 请将其接到墙上电源插座。
•连接器电缆没有连接妥当。
t 请将其连接妥当。
•模式切换开关设定于CHARGE。
t 请将其设定为VCR/CAMERA。
•模式切换开关设定于VCR/CAMERA。
t 把模式切换开关设定于CHARGE。
•再次充满电。
t 电池剩余电力即将正确地显示。
t 参阅“关于电池剩余时间”。
如果电池组不在 +10 ℃到 +30 ℃的规定温度范
围内进行充电,将可能出现下列显示。此时,为
保护电池组,可进行充电但不能快速充电。
t 请通查下列图表。
原因/解决方法
如果CHARGE 灯点亮并不再闪
烁:
如果由于充电时间已到,从而
CHARGE灯熄灭,则没有问题。
如果CHARGE 灯点亮并不再闪
烁:
如果由于充电时间已到,从而
CHARGE灯熄灭,则问题在首次
安装的电池组。
规格
额定输入 100-240 V AC 50/60 Hz 18 W
额定输出 DC OUT: 8.4 V 1.5 A (VCR)
操作温度 0 ℃到 +40 ℃
储存温度 –20 ℃到 +60 ℃
尺寸 大约93 ×46 ×85 mm(宽/高/深)
质量(仅AC 电源转接器/充电器) 约200 g
附带附件 连接导线DK-225(1)
AC电源线(1)
设计和规格有所变更时,恕不另行奉告。
可利用市售的AC插头转接器,必要时,可对一下墙上电源插座的设计。
AC-VQP10
在国外旅行时,请勿把电池充电器连接到电压适配器(旅行转换器)上。否
则可能导致过热或其他故障。
8.4 V 1.4 A (CHARGE)
墙上电源插座
AC插头转接器
部件识别
参看图A。
1 槽 1
2 DC OUT(直流电输出)连接器
3 CHARGE(充电)灯 1
4 槽 2
5 CHARGE(充电)灯 2
6 模式切换开关
7 显示窗
8 槽指示灯
9 DISPLAY(显示)转换按钮
显示窗
0“InfoLITHIUM”(数据锂电池)指示灯
qa WARNING(警告)指示灯
qs TIME TO CHG(充电)指示灯
qd 时间指示灯
qf BATTERY LIFE(电池剩余时间)指示灯
qg VCR/CAMERA(录像机/摄像机)指示灯
qh 充满电指示灯
qj 电池剩余指示灯
给充电池组进行充电
参看图B-1。
1 将模式切换开关设定于CHARGE。
2 将电源线连接到本装置。
3 将电源线接插到墙上电源插座。
发出嘟声并点亮显示窗。
4 安装电池组。
当开始充电时,位于显示窗内的电池标志将按顺序闪烁,并且主机上的内
部CHARGE灯也点亮。
在进行充电时,所有的电池标志都点亮(正常充电)。
此外,内部CHARGE灯将熄灭;持续充电直至“FULL”显示于电池标志
时(大约1小时),将使本机有更长的使用时间(充满电)。
电池剩余指示灯
正常充电 充满电
5 完成充电时,请卸下电池组。
同时装上两电池组
本机可以同时装上两个电池组。装两个电池组时,将从装在槽 1 中的电
池组先开始充电。
如果不是同时装上两个电池组,充电将从先装上的电池组开始充电,不管
是先装在槽 1 或槽 2。
注
本机不能够同时给两电池组进行充电。
使用前须知
即使摄像机的电源已关闭,只要它还接在家用交流电源上,就未脱离交流电源
(家用交流电源)。
安装充电池组
参看图B-2。
bb
1 请让
b 标志面向端子并将电池组放入本装置。
bb
2 请按箭头所指的方向滑入电池组。
一直滑动直至听到咔喀声。
卸下充电池组
参看图B-2。
沿箭头方向滑入充电池组,然后把它举出。
注
• 装有电池组时,请勿抓着电池组拿起 AC 电源转接器/充电器。
• 在安装电池时尤其要小心以免碰坏电池。
• 在安装或卸下电池组时,请注意别让手指头被捏住了。
充电时间
下表表示完全放电的充电池组的充电时间。
充电池组 充满电时间 正常充电时间
NP-FP50 125 (65)
NP-FP70 130 (70)
NP-FP90 175 (115)
•给空电池组充满电所需大约分钟数(充满电时间)。
•括弧内的大约分钟数是指正常的充电时间(正常充电时间)。
•要知道电池寿命,请参考所使用视频设备的使用说明书。
•更根据充电池组的条件或环境温度,充电时间可能有异。
注
•充电中如果把模式切换开关设定于VCR/CAMERA,充电即将停止。
•如果CHARGE灯不点亮或闪烁,即请检查充电池组有没有正确的装在 AC
电源转接器/充电器上。如果没有装好,将不能充电。
检查充电
充电时,可以检查显示器上的充电时间。以分单位开始充电之后,显示器上即
点亮BATTERY LIFE。
所显示剩余时间是当通过取景器拍摄照片时的大约时间。当使用液晶显示器
(LCD)时,将缩短剩余时间。
进行充电中按DISPLAY。
装上电池组之后,请等大约1分钟。每次按了 DISPLAY,将点亮槽指示灯而
且显示窗中的显示将变化如下。
当同时装上两电池组时,未充电的电池组的时间显示将自动地恢复到大约充
电了10秒后的电池组的时间显示。
下面举例是先在槽 1 安装电池组,然后在槽 2 中安装。槽指示灯将跟随槽
号点亮。
只在槽 1 安装电池组
1
2
1
2
1
2
1
2
1
2
1
2
两电池组分别安装在槽 1 和槽 2
当第一个安装电池组是被
安装在“InfoLITHIUM”
(信息锂电池)电子设备时
的剩余电池时间
当剩余电池时间小于5分
钟时是不显示时间的。
至第一个安装的电池组完
成正常充电的剩余时间
当完成了正常充电之后,
即不显示正常充电时间。
至第一个安装的电池组完
成充满电的剩余时间
当完成了充满电之后,即
不显示充满电时间。
当后一个安装电池组被安
装在“InfoLITHIUM”(信
息锂电池)电子设备时的
剩余电池时间
当剩余电池时间小于5分
钟时是不显示时间的。
至后一个安装的电池组完
成正常充电的剩余时间
当完成了正常充电之后,
即不显示正常充电时间。
至后一个安装的电池组完
成充满电的剩余时间
当完成了充满电之后,即
不显示充满电时间。
注
•在 +25 ℃温度下充电时的时间显示是大约数。根据使用条件和环境,所显
示时间可能异于实际充电时间。
•因以下状况,时间显示可能出现“– – – –”,这并不是装置故障。
–
电池剩余时间小于5分钟。
–
显示时间与实际充电时间有异。虽然如此,装置仍继续进行充电。
•完成了正常充电之后大约还须 1小时才能充满电。如果在正常充电和充满电
之间卸下过电池组,在第二次充电的充电时间便可能不能显示适当。
•当给长时间放置不用的电池组充电时,所显示的剩余时间和充满电时间有时
会异于实际时间。这并不是装置故障。此时请给电池组充电到充满电,便可
显示正确的时间。
•当在本装置装了充满电的电池组时,显示器中可能出现“TIME TO CHG
FULL 1h”。这并不是装置故障。
•按了DISPLAY之后,可能要等一会儿时间才显示时间指示。
•要显示新电池组的电池剩余时间时,可以把它装到摄像机使用大约20秒钟,
然后用此装置给电池组充电。
•至出现未充电电池组的时间显示须等候片刻。此外,也可能因电池组的条件
而不作时间显示。这种状况并不是故障。
操作视频设备
参看图C。
有关连接的详情,请参考视频设备的使用说明书。
1 将模式切换开关设定于 VCR/CAMERA。
2 将电源线连接到本装置。
3 将电源线接插到墙上电源插座。
4 将连接导线 A 连接到本装置的 DC OUT(直流电输出)连接器。
5 将连接导线 B 连接到视频设备。
有关连接线方向的详情,请参考视频装置的使用说明书。
注
•在操作视频设备当中如果把模式切换开关设定于CHARGE,将停止给视频
设备供电。
•装在本装置操作视频设备的充电池组是不能进行充电的。
•如果视频设备发生影像失真,即请令本装置放离开视频设备。
Para instalar la batería
Consulte la illustración B-2.
1 Instale la batería en esta unidad con la marca
los terminales.
2 Deslice la batería en el sentido de la flecha.
Deslícela hasta que oiga un chasquido.
bb
b encarada hacia
bb
Para extraer la batería
Consulte la illustración B-2.
Deslícela en el sentido de la flecha y después levántela directamente hacia
arriba.
Notas
• No tome al adaptador de ca/cargador por la batería cuando haya una
instalada.
• Tenga cuidado de no golpear la batería cuando la instale.
• Tenga cuidado de no pillarse los dedos cuando instale o extraiga la
batería.
 Loading...