

Page 1
3-292-271-12(1)
AC Adaptor/Charger
Adaptateur secteur/
chargeur
Operating Instructions
Mode d’emploi
Manual de instrucciones
GB
FR
ES
CS
AC-VQL1BP
© 2008 Sony Corporation
Page 2
Owner’s Record
The model and serial numbers are located on the bottom of the unit.
Record the serial number in the space provided below.
Refer to these numbers whenever you call upon your Sony dealer regarding this product.
Model No. AC- Serial No.
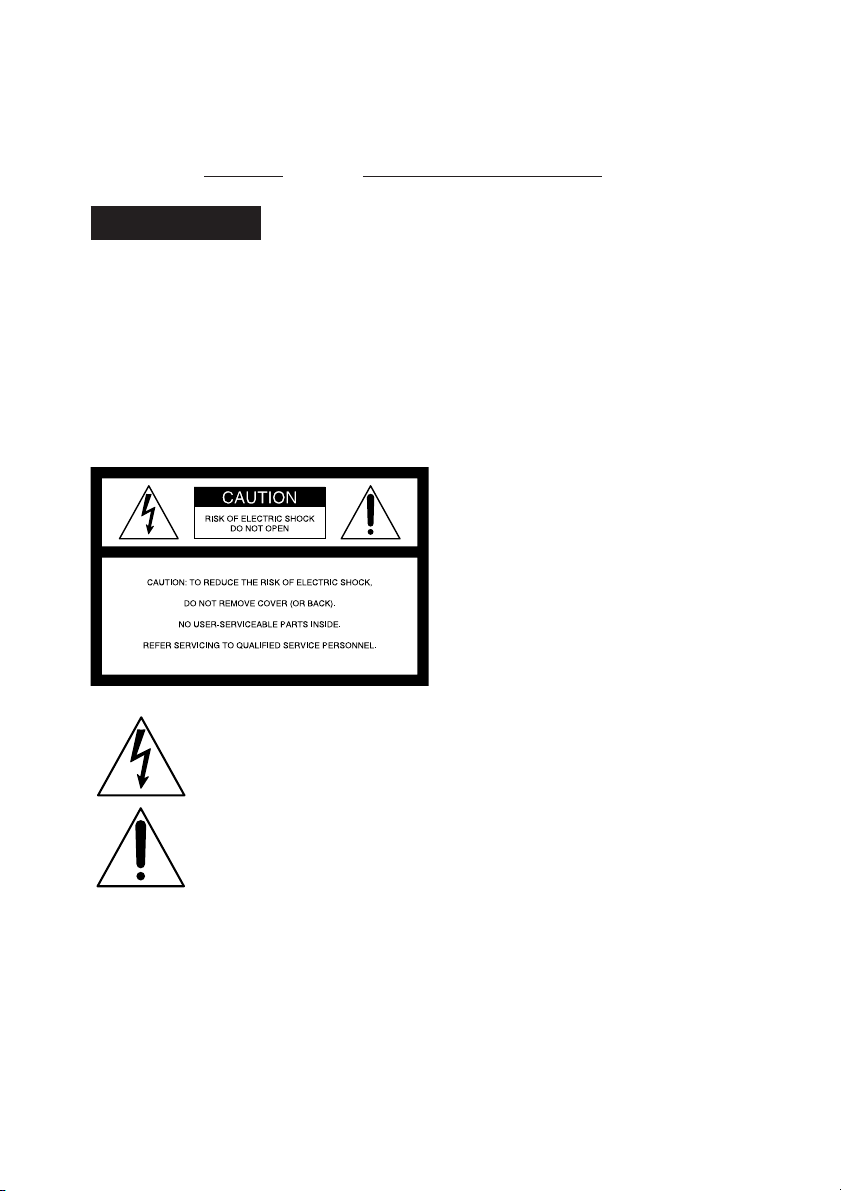
WARNING
To reduce fire or shock hazard, do not expose the unit
to rain or moisture.
To avoid electrical shock, do not open the cabinet.
Refer servicing to qualified personnel only.
The unit must be connected to an earthed MAINS socket-outlet.
CAUTION
Replace the battery with the specified type only. Otherwise, fire or injury may result.
This symbol is intended to alert the user to the presence of uninsulated
“Dangerous voltage” within the product’s enclosure that may be of
sufficient magnitude to constitute a risk of electric shock to persons.
This symbol is intended to alert the user to the presence of important
operating and maintenance (servicing) instructions in the literature
accompanying the appliance.
The Graphical Symbols with Supplemental Marking is located on the bottom of the unit.
2-GB
Page 3
IMPORTANT SAFEGUARDS
For your protection, please read these
safety instructions completely before
operating the appliance, and keep this
manual for future reference.
Carefully observe all warnings, precautions
and instructions on the appliance, or the
one described in the operating instructions
and adhere to them.
Use
Power Sources
This set should be operated only from the
type of power source indicated on the
marking label. If you are not sure of the
type of electrical power supplied to your
home, consult your dealer or local power
company. For those sets designed to
operate from battery power, or other
sources, refer to the operating instructions.
Grounding
This set is equipped with a three-wire
grounding type plug (a plug having a third
pin for grounding). Follow the instructions
below:
This plug will only fit into a groundingtype power outlet. This is a safety feature.
If you are unable to insert the plug into the
outlet, contact your electrician to have a
suitable outlet installed. Do not defeat the
safety purpose of the grounding plug.
Overloading
Do not overload wall outlets, extension
cords or convenience receptacles beyond
their capacity, since this can result in fire or
electric shock.
Object and Liquid Entry
Never push objects of any kind into the set
through openings as they may touch
dangerous voltage points or short out parts
that could result in a fire or electric shock.
Never spill liquid of any kind on the set.
Attachments
Do not use attachments not recommended
by the manufacturer, as they may cause
hazards.
Cleaning
Unplug the set from the wall outlet before
cleaning or polishing it. Do not use liquid
cleaners or aerosol cleaners. Use a cloth
lightly dampened with water for cleaning
the exterior of the set.
Installation
Water and Moisture
Do not use power-line operated sets near
water – for example, near a bathtub,
washbowl, kitchen sink, or laundry tub, in
a wet basement, or near a swimming pool,
etc.
Power-cord Protection
Route the power cord so that it is not likely
to be walked on or pinched by items placed
upon or against them, paying particular
attention to the plugs, receptacles, and the
point where the cord exits from the
appliance.
Accessories
Do not place the set on an unstable cart,
stand, tripod, bracket, or table. The set may
fall, causing serious injury to a child or an
adult, and serious damage to the set. Use
only a cart, stand, tripod, bracket, or table
recommended by the manufacturer. An
appliance and cart combination should be
moved with care. Quick stops, excessive
force, and uneven surfaces may cause the
appliance and cart combination to
overturn.
GB
3-GB
Page 4

Ventilation
The slots and openings in the cabinet are
provided for necessary ventilation. To
ensure reliable operation of the set, and to
protect it from overheating, these slots and
openings must never be blocked or
covered.
– Never cover the slots and openings with a
cloth or other materials.
– Never block the slots and openings by
placing the set on a bed, sofa, rug, or
other similar surface.
– Never place the set in a confined space,
such as a bookcase, or built-in cabinet,
unless proper ventilation is provided.
– Do not place the set near or over a
radiator or heat register, or where it is
exposed to direct sunlight.
Lightning
For added protection for this set during a
lightning storm, or when it is left
unattended and unused for long periods of
time, unplug it from the wall outlet and
disconnect the antenna or cable system.
This will prevent damage to the set due to
lightning and power-line surges.
Service
Damage Requiring Service
Unplug the set from the wall outlet and
refer servicing to qualified service
personnel under the following conditions:
– When the power cord or plug is damaged
or frayed.
– If liquid has been spilled or objects have
fallen into the set.
– If the set has been exposed to rain or
water.
– If the set has been subject to excessive
shock by being dropped, or the cabinet
has been damaged.
– If the set does not operate normally when
following the operating instructions.
Adjust only those controls that are
specified in the operating instructions.
Improper adjustment of other controls
may result in damage and will often
require extensive work by a qualified
technician to restore the set to normal
operation.
– When the set exhibits a distinct change in
performance – this indicates a need for
service.
Servicing
Do not attempt to service the set yourself
as opening or removing covers may expose
you to dangerous voltage or other hazards.
Refer all servicing to qualified service
personnel.
Replacement parts
When replacement parts are required, be
sure the service technician has used
replacement parts specified by the
manufacturer that have the same
characteristics as the original parts.
Unauthorized substitutions may result in
fire, electric shock, or other hazards.
Safety Check
Upon completion of any service or repairs
to the set, ask the service technician to
perform routine safety checks (as specified
by the manufacturer) to determine that the
set is in safe operating condition.
4-GB
Page 5
For the customers in the U.S.A
CAUTION
You are cautioned that any changes or modifications not expressly approved in this manual
could void your authority to operate this equipment.
Note:
This equipment has been tested and found to comply with the limits for a Class B digital device,
pursuant to Part 15 of the FCC Rules. These limits are designed to provide reasonable
protection against harmful interference in a residential installation. This equipment generates,
uses, and can radiate radio frequency energy and, if not installed and used in accordance with
the instructions, may cause harmful interference to radio communications.
However, there is no guarantee that interference will not occur in a particular installation. If
this equipment does cause harmful interference to radio or television reception, which can be
determined by turning the equipment off and on, the user is encouraged to try to correct the
interference by one or more of the following measures:
– Reorient or relocate the receiving antenna.
– Increase the separation between the equipment and receiver.
– Connect the equipment into an outlet on a circuit different from that to which the receiver is
connected.
– Consult the dealer or an experienced radio/TV technician for help.
For the customers in Europe
This product with the CE marking complies with both the EMC Directive and Low Voltage
Directive issued by the Commission of the European Community.
Compliance with these directives implies conformity to the following European standards:
•EN60065: Product Safety
•EN55103-1: Electromagnetic Interference (Emission)
•EN55103-2: Electromagnetic Susceptibility (Immunity)
This product is intended for use in the following Electromagnetic Environment(s):
E1 (residential), E2 (commercial and light industrial), E3 (urban outdoors) and E4 (controlled
EMC environment ex. TV studio).
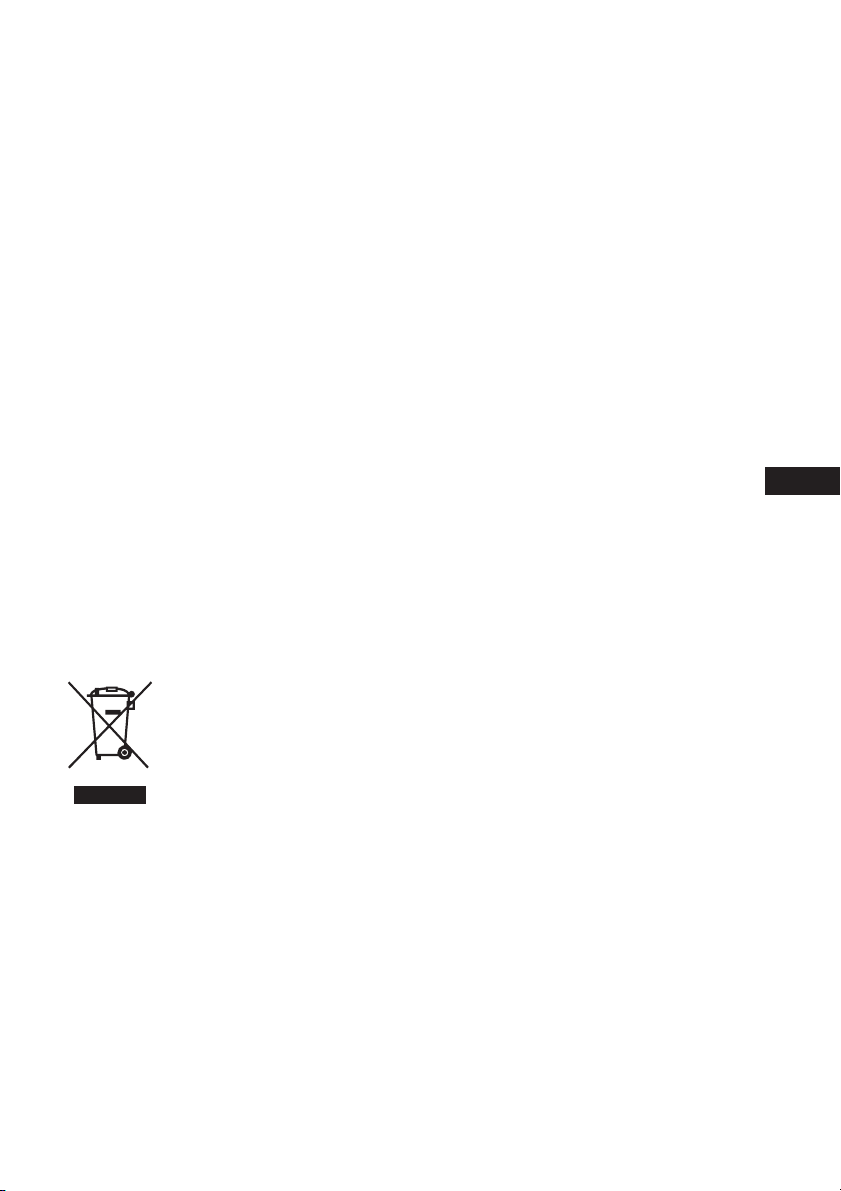
Disposal of Waste Electrical and Electronic Equipment for business use
(Applicable in the European Union and other European countries with
separate collection systems)
This symbol on the product or on its packaging indicates that this product shall
not be treated as household waste. Instead it shall be handed over to the
applicable take-back scheme for the recycling of electrical and electronic
equipment. By ensuring this product is disposed of correctly, you will help
prevent potential negative consequences for the environment and human health,
which could otherwise be caused by inappropriate waste handling of this product.
The recycling of materials will help to conserve natural resources. For more
detailed information about recycling of this product, please contact your local
Sony office or visit Sony Europe’s web site for business customers:
http://www.sonybiz.net/environment
GB
5-GB
Page 6

< Notice for the customers in the countries applying EU Directives >
The manufacturer of this product is Sony Corporation, 1-7-1 Konan Minato-ku Tokyo, 108-0075
Japan. The Authorized Representative for EMC and product safety is Sony Deutschland GmbH,
Hedelfinger Strasse 61, 70327 Stuttgart, Germany. For any service or guarantee matters please
refer to the addresses given in separate service or guarantee documents.
NOTICE FOR THE CUSTOMERS IN THE UNITED KINGDOM
A moulded plug complying with BS 1363 is fitted to this equipment for your safety and
convenience.
Should the fuse in the plug supplied need to be replaced, a fuse of the same rating as the
supplied one and approved by ASTA or BSI to BS1362 (i.e., marked with or mark)
must be used.
If the plug supplied with this equipment has a detachable fuse cover, be sure to attach the
fuse cover after you change the fuse. Never use the plug without the fuse cover. If you
should lose the fuse cover, please contact your nearest Sony service station.
PRECAUTION
The set is not disconnected from the AC power source (mains) as long as it is connected to the
wall outlet, even if the set itself has been turned off.
The nameplate is located on the bottom of the unit.
Do not use this unit placed in a narrow space, such as between a wall and furniture.
Use this unit close to a wall outlet. This ensures that the power plug can be quickly unplugged
from the wall outlet to turn off the power if a malfunction occurs during use.
6-GB
Page 7

Table of contents
CAUTION .................................................................................................................8
Notes on Use ..........................................................................................................10
Using this unit abroad...........................................................................................12
Features ...................................................................................................................13
Functions................................................................................................................. 14
Identifying the part ...............................................................................................15
Using as AC adaptor .............................................................................................16
Charging the battery pack ....................................................................................18
Charging check ......................................................................................................21
Troubleshooting .....................................................................................................24
Specifications ..........................................................................................................26
GB
7-GB
Page 8

CAUTION
• Do not use the unit in damp, oily, humid or dusty environments.
Such environments cause fires or even electric shocks.
• Do not allow water or foreign matter to get into this unit.
These can cause a fire or even an electric shock. If they get inside this unit, disconnect the
power cord from the wall outlet and contact your nearest Sony dealer.
• Do not allow this unit or the battery packs to get wet.
These can cause a fire or an electric shock.
• Do not place this unit near water.
Allowing water to get inside this unit or battery packs, allowing them to get wet or using
them in the bathroom, these can cause a fire or an electric shock.
• Do not attempt to disassemble or modify the unit.
These can cause a fire or an electric shock. Contact your nearest Sony dealer about inspections
or repairs.
• Do not attempt to shock or use force such as hammering, stomp or dropping.
These can cause a fire or an electric shock.
• Do not charge except specified battery packs.
These can cause a fire, smoke or even an electric shock.
• Avoid damaging the power cord or connecting cord.
A damaged AC power cord or DC cable can cause a fire or even an electric shock.
– Do not attempt to modify or damaging the cord or cable.
– Do not put anything heavy on or pull the cord or cable.
– Do not place this unit near a heater. Do not attempt to heat it.
– Be sure to hold the plug when disconnecting the cord or cable.
If the cords are damaged, stop using the unit and contact your nearest Sony dealer.
• Insert the plug part of the power cord into a wall outlet firmly.
If the plug part is not inserted firmly, it can cause a fire or smoke which can lead to burns or
other injuries.
• Use this unit with power supply voltage indicated on this unit.
Using this unit with any power supply voltage other than indicated can cause a fire or even an
electric shock.
• Do not use this unit in extremely hot places.
These can cause a fire, smoke or an electric shock.
Use this unit at temperatures under 40 °C (104 °F).
Do not leave this unit under the direct sunlight for extended periods of time.
• Do not hold the unit or battery packs for an extended amount of time if they are
plugged in.
These can become hot when energized which can lead to burns.
• Do not cover this unit with any object or material.
Covering the unit will prevent it from radiating heat and that can cause deformation and even
lead to a fire.
• Do not touch this unit with wet hands.
That can cause an electric shock.
• Place this unit on a stable place.
If place this unit is not placed on a stable place, it could fall or be dropped which can damage
the unit or cause an injury.
• Use the supplied power cord.
Not using the supplied power cord can cause an electric shock or damaged.
• Place the cords correctly.
Someone could trip over the power cord or connecting cable and be injured in a fall.
• When the unit is not being used, disconnect the power plug.
When storing this unit, disconnect the power cord from the wall outlet and detach the battery
packs. Leaving them connected can cause a fire.
8-GB
Page 9

• Connect the safety grounding wire.
If the grounding wire is disconnected, that can cause an electric shock. Connect the grounding
wire as follows.
Using the supplied grounding wire enables safety ground connection.
If the grounding wire cannot be connected, contact your nearest Sony dealer.
• Check the power consumption of the equipment used with this unit so that the rated
outlet will not be exceeded.
It can become hot which can lead to damage.
GB
9-GB
Page 10

Notes on Use
This unit does not have dust-proof, splash-proof or water-proof specifications.
Charging
•Be sure to use genuine Sony battery packs with this unit.
•Do not charge any other battery pack than the one meant for this unit.
•Attach the battery pack firmly.
Charging temperature
• For maximum battery efficiency, the recommended temperature range when charging is
+10 °C to +30 °C (+50 °F to +86 °F). Charging becomes more difficult at lower temperatures.
• Although this unit enables quick charging, charging outside the recommended temperature
range may lead to a longer charging time in order to protect the battery pack. Once the
charging time has been extended, quick charging will not be restored even if the
temperature is brought within the recommended temperature range. Remove and reinstall
the battery to recharge it again.
Where not to place this unit
Regardless of whether this unit is in use or in storage, do not place it in any of the following
locations. Doing so may lead to malfunction.
•Locations of extremely high temperature
– Locations exposed to direct sunlight such as dashboards or near a heater. The
temperature gets extremely high inside a car with the windows closed in summer or in
strong sunshine, and leaving the unit inside may cause it to be deformed or malfunction.
•Locations of excessive vibration
•Locations with strong electromagnetism or radiant rays
•Locations with excessive sand
– In locations such as the seashore and other sandy areas or where dust clouds occur, protect
the unit from sand and dust. Sand and dust can cause malfunction.
10-GB
Page 11

Precautions on use
•Attach the battery pack to this unit firmly when you charge the battery pack.
•The battery terminal may be damaged if the battery pack is not attached correctly.
•Do not use this unit in the location with strong electromagnetism or rays.
Electromagnetic waves can cause the unit not to record or playback video correctly.
•To protect the battery pack, remove the battery pack from the unit as soon as the charging is
completed.
•Do not apply mechanical shock or drop the unit.
•Keep the unit away from a TV or AM receivers.
Noise from the equipment may enter a TV or radio if it is placed nearby.
•Make sure that nothing metallic comes into contact with the metal parts of this unit or
connecting plate. It may cause a short circuit.
•Do not connect this unit to a voltage adaptor (travel converter) for overseas travel. It can cause
fires or damages.
•The battery pack and this unit can become warm during or immediately after recharging.
•Unplug this unit from the wall outlet after use. To disconnect the cord, pull it out by the plug.
•The nameplate indicating the operating voltage and power consumption is located on the
bottom of this unit.
•Connect the power cord to the wall outlet after ground connection.
Disconnect the power cord to the wall outlet before ground disconnection.
•Do not expose this unit to moisture. Do not place objects containing water, such as vase or the
like, on this unit.
Maintenance
•Wipe this unit with a soft dry cloth when it is dirty.
•When the unit is very dirty, wipe it using a cloth with a little neutral solvent added, and then
wipe it dry again.
•Do not use thinners, benzine, alcohol, etc. These may cause the surface of this unit to damage.
•When you use chemical cleaning clothes, refer to their instructions manual.
•Using a volatile solvent like an insecticide, or keeping this unit touching a rubber or vinyl
plastic products for a long time may cause a deterioration or damage of this unit.
GB
11-GB
Page 12

Using this unit abroad
Use a commercially available AC plug Adaptor (not supplied), if necessary, depending on the
design of the wall outlet.
Do not connect this unit to a voltage adaptor (travel converter) for overseas travel. It
can cause fires or damages.
12-GB
Page 13

Features
AC-VQL1BP is an AC adaptor/charger that can supply DC power to the Sony external
equipment and be attached and charge the four Sony lithium ion battery packs*.
* This unit can charge a maximum of two battery packs simultaneously (one of each by A slot
and B slot).
(When attaching two battery packs to the slots of the same system simultaneously, this unit
cannot charge the battery packs simultaneously. After charging of the battery pack attached
first is completed, this unit switches to charging of the other battery pack attached to the same
system automatically.)
•For charging lithium ion type battery packs.
You cannot be used to recharge Ni-Cd or Ni-MH type batteries.
•Cannot be used with some models of equipment (camcorder, etc.).
Confirm the compatibility of your equipment before use.
Features
Attaching the maximum four battery packs simultaneously
There are two charging system A and B. This unit can be attached a maximum four battery
packs. Each system charges a battery pack. After the charging is complete, it starts charging the
other battery pack attached to the same system automatically.
Tw o system DC output terminals
There are two DC output terminal systems A and B. This unit can operate the external
equipment as an AC adaptor. (This unit cannot operate as DC output and charge the battery
pack on the same system.)
Display “BATTERY LOG” and charging information
When attaching the “InfoLITHIUM” battery pack (L series) to this unit, the usage history and
charging condition of the battery pack are displayed.
•Total charging time, total number of charging cycles, the year and month of the last use
•Usable time of the battery pack attached, remaining time until charging will finish
(The indicated values are approximated. The information displayed to charge the battery packs
is limited.)
GB
Effective charging
You can select “full charging” or “normal charging” with charging mode change switch.
If you are in a hurry, set to “normal charge” to finish charging one of the battery pack when
normal charging is completed and start charging another battery pack.
If the battery pack that has charged fully, this unit indicates that charging is completed without
charging the battery pack.
Self-check function
When trouble has occurred with a battery pack or this unit, a warning will be indicated in the
display window.
For details, refer to “Charging the battery pack” (p. 18).
13-GB
Page 14
What is “InfoLITHIUM” ?
“InfoLITHIUM” is a lithium ion battery pack which can exchange data with compatible
electronic equipment about its battery consumption. We recommend that you use an
“InfoLITHIUM” battery pack (L series) with electronic equipment that has the
mark.
“InfoLITHIUM” is a trademark of Sony Corporation.
“BATTERY LOG”
This unit can display the information recorded on the battery packs.
•Total charging time
•Total number of charging cycles
•The year and month of the last use
Functions
Caution on each display (Read carefully before
use.)
While charging the battery pack, this unit shows charging condition and battery pack
information, so long as the following conditions are met.
•Using the “InfoLITHIUM” battery pack
•Using electronic device with the mark
Make sure that you use a battery pack with the mark. Check in the instruction
manual supplied with your video device whether it is “InfoLITHIUM” compatible.
If you use the battery pack with two or more video equipments etc., the battery information of
the last used equipment will be displayed.
“BATTERY LOG” is compatible with rechargeable battery pack NP-F970, NP-F770, NP-F570.
Other models are not compatible or have limit to display.
14-GB
Page 15
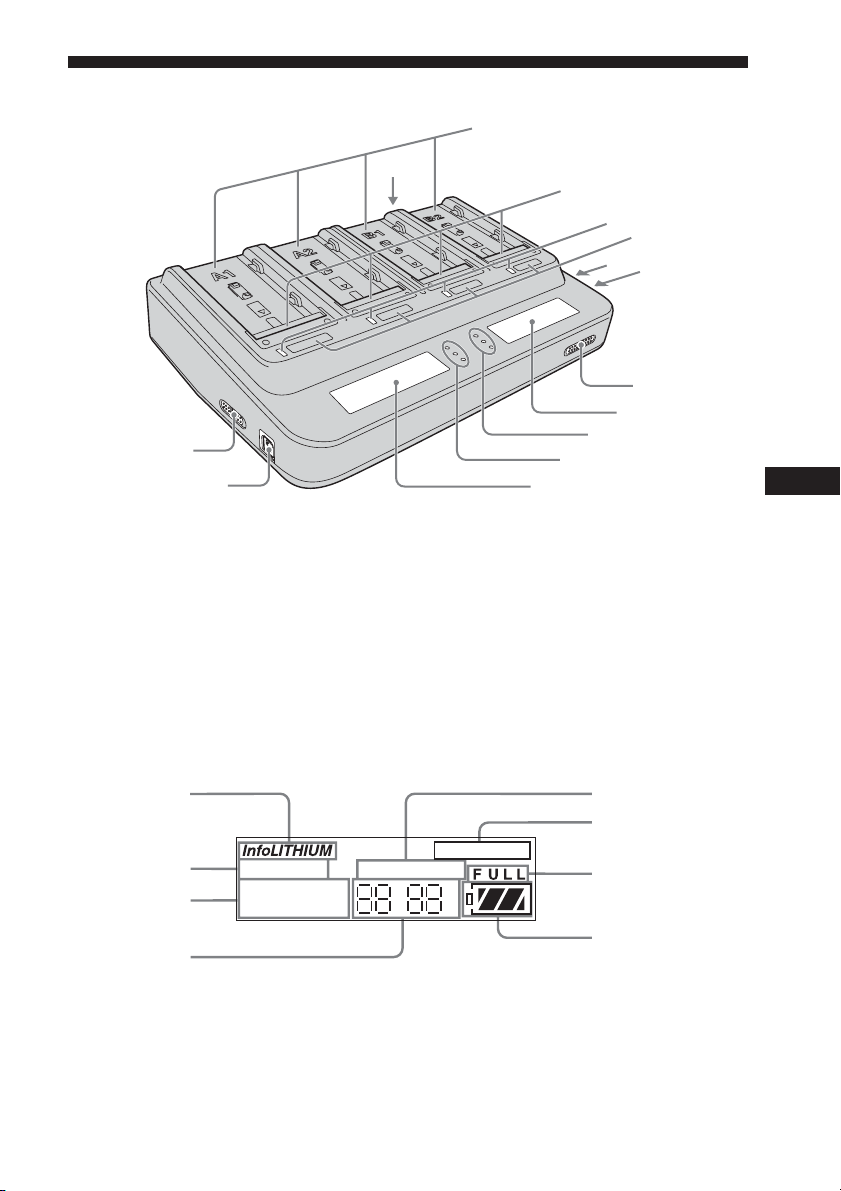
Identifying the part
1
3
4
1 Slot (A1, A2, B1, B2)
2 AC input terminal
3 Output change switch A
4 DC OUT connector A
5 Display window A
6 Log indicator lamp A
7 Log indicator lamp B
8 Display window B
2
14
13
12
11
10
9
8
7
6
5
9 Charging mode change switch
10 DC OUT connector B
11 Output change switch B
12 DISPLAY change button (A1, A2, B1, B2)
13 CHARGE lamp (A1, A2, B1, B2)
14 Terminal shutter
GB
Display Window
15
16
17
18
15 “InfoLITHIUM” indicator
16 WARNING indicator
17 TIME TO CHG (charge) indicator
18 Time indicator
WARNING
TIME TO CHG
NORMAL FULL
BATTERY LIFE
VCR/CAMERA
hm
19
20
21
22
19 BATTERY LIFE indicator
20 VCR/CAMERA indicator
21 Full charge indicator
22 Battery life indicator
15-GB
Page 16
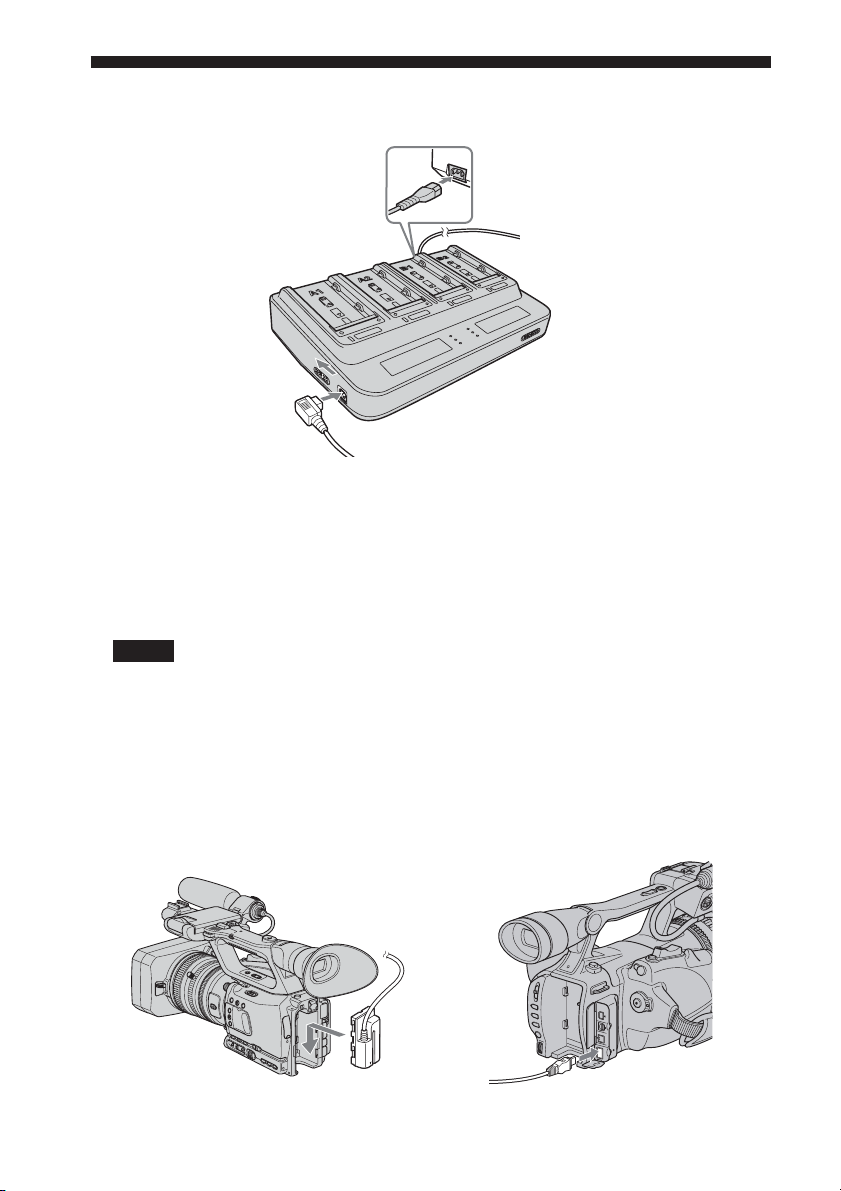
Using as AC adaptor
For details, refer to the instruction manual of the video equipment.
2
To the wall outlet
1
3
Switches and settings have two systems for A system and B system. Set the switch for the
system you are using.
1 Set the output change switch to “VCR/CAMERA.”
2 Connect the power cord to this unit and connect the power
cord to a wall outlet.
There is a beep and the display window comes on.
Notes
Securely push the power cord all the way into the wall outlet.
3 Connect the connecting cord to the DC OUT connector.
4 Connect the connecting cord to the video equipment.
For detail of the direction of the connecting cord, refer to the instruction manual of the video
equipment.
When using the connecting cord DK-215When using the connecting cord DK-415
16-GB
Page 17

Notes
•Setting the output change switch to “CHARGE” while operation this unit cuts the power
supply to the video equipment.
•You cannot charge the battery pack attached to this unit in “VCR/CAMERA” mode.
•You can use one system of this unit as an AC adaptor and use the other system as a charger.
•Keep this unit away from your video equipment if the image is distorted.
•The illustrated example is of connection to an HVR-Z7, HVR-V1 digital HD video camera
recorder.
GB
17-GB
Page 18
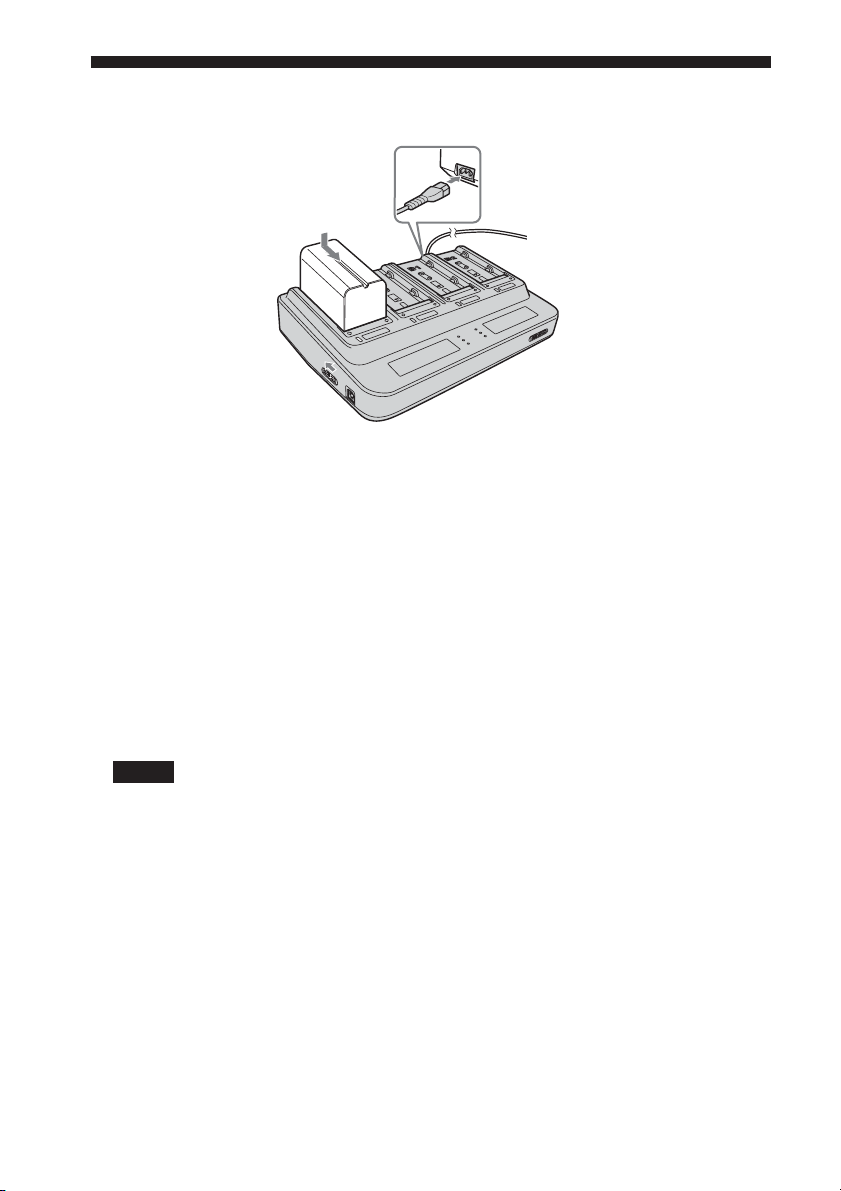
Charging the battery pack
For details, refer to the instruction manual of the video equipment.
3
4
3
To the wall outlet
1
2
Switches and settings have two systems for A system and B system. Set the switch for the
system you are using.
1 Set the charging mode change switch to “NORMAL CHARGE”
or “FULL CHARGE.”
Set to “FULL CHARGE” when you need full charging the battery pack.
Set to “NORMAL CHARGE” when you want to finish until normal charging.
For details, refer to “Changing the charging mode” (p. 19).
2 Set the output change switch to “CHARGE.”
For details, refer to “Attaching two or more battery packs simultaneously” (p. 20).
3 Connect an AC power cord to this unit and connect the AC
power cord to a wall outlet.
There is a beep and the display window comes on.
Notes
Securely push the power cord all the way into the wall outlet.
4Attach the battery pack.
For detail of attachment or removing the battery pack, refer to “Attaching and removing the
battery pack” (p. 21).
5When charging is completed, remove the battery pack.
When charging condition that is set by the charging mode change switch is completed, this
unit stops charging. When the CHARGE lamp of this unit turns off, charging has been
completed. About charging completed, refer to “Changing the charging mode” (p. 19).
Refer to “Attaching and removing the battery pack” (p. 21) to remove the battery pack.
18-GB
Page 19
Notes
•If the output change switch is set to “VCR/CAMERA” during charging, charging stops.
•If the CHARGE lamp does not light up or it flashes, check that the battery pack is attached to
this unit correctly. If the battery pack is not attached firmly, it will not be charged.
•Quick charging is only performed with “InfoLITHIUM” battery packs.
•Depending on the battery pack being used, the information displayed on the display window
may be limited.
•If any troubles occur while charging, the CHARGE lamp will flash and “WARNING” will be
indicated on the display window.
For details, refer to “Troubleshooting” (p. 24).
Changing the charging mode
There are two kinds of charging. They are “normal charging” and “full charging.”
You can change the charging mode by sliding the charging mode change switch.
Normal charging
(NORMAL
CHARGE)
Full charging
(FULL CHARGE)
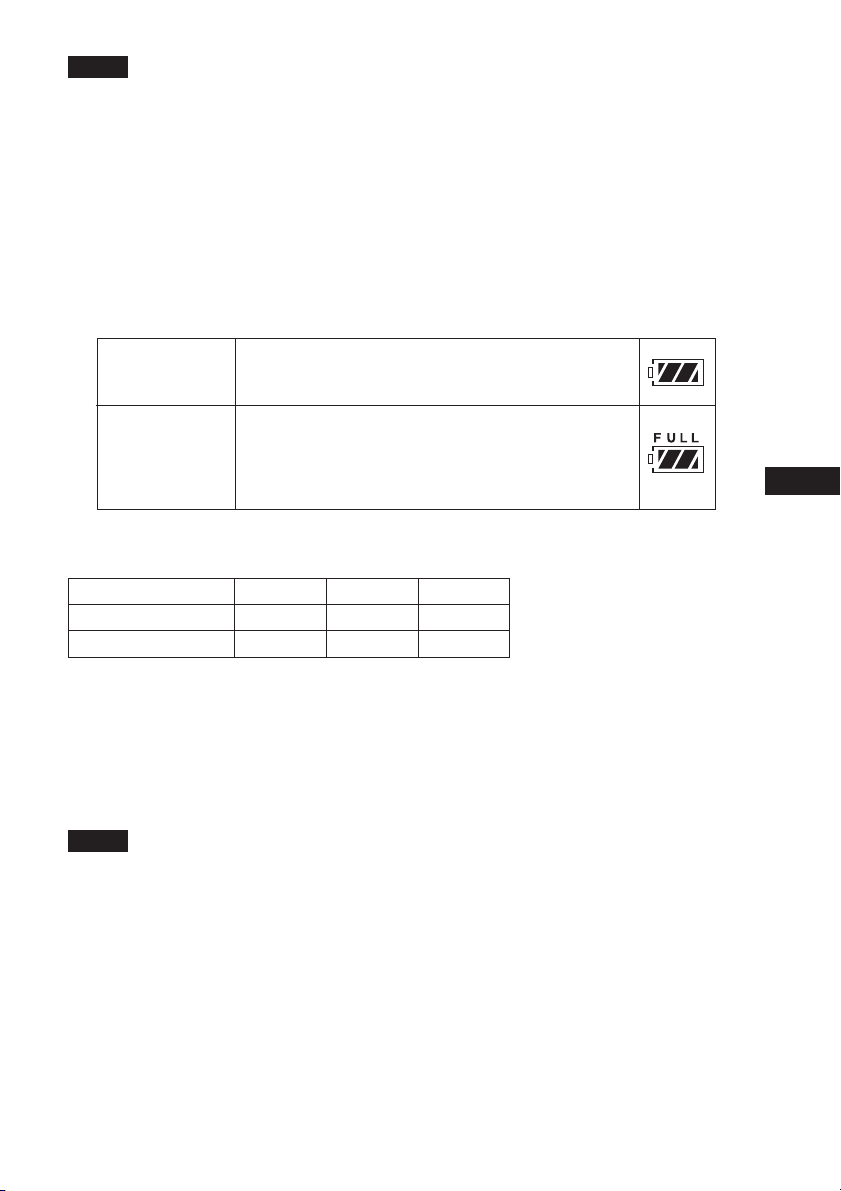
* In the normal charging mode, “FULL” is not displayed when normal charging is completed.
When normal charging is completed, the battery life
indicator displays as illustrated on the right.
When full charging is completed, the battery life
indicator displays as illustrated on the right. It takes a
long time than normal charging and the video
equipment attached the full charged battery pack can
use little longer.
Charging time
NP-F970 NP-F770 NP-F570
Normal charging time 200 min. 135 min. 85 min.
Full charging time 260 min. 195 min. 145 min.
•The approximate times shown are when charging an empty battery pack with this unit at +25
°C.
•The charging time may differ depending on the condition of the battery pack or ambient
temperature.
Use the battery pack before charging is not completed.
Remove the battery pack when required. It can be used even if charging is not completed.
The battery life differs depending on the charging time.
GB
Notes
•The indicated time is an approximate time when charging the battery pack with this unit at
+25 °C. The indicated time may differ depending on the ambient temperature from the actual
charging time. The charging time may be not indicated depending on the condition of the
battery pack, this is not a malfunction.
•To indicate the battery life of a new battery pack, first attach it to your video equipment and
use it for about 20 seconds and then charge it with this unit.
•The normal charging time and battery life differ depending on the using battery pack and
condition of use.
•When the charging mode change switch is set to “NORMAL CHARGE,” charging is
completed at normal charging and charging to full charge is not operated.
•Before charging has been completed in each mode, the charging mode can be changed.
19-GB
Page 20
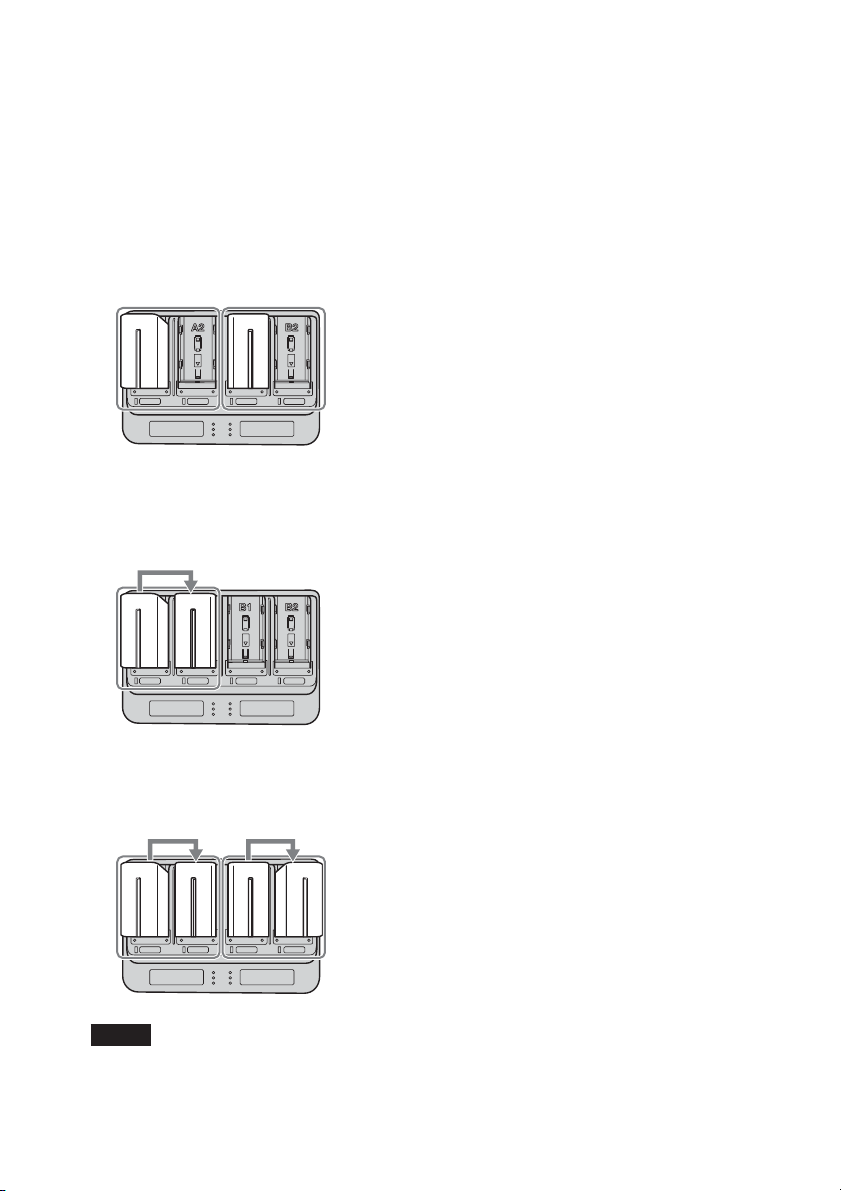
Attaching two or more battery packs simultaneously
1
1
2
•This unit can be attached up to four battery packs simultaneously.
(This unit has two systems A and B and each system has two slots.)
•The two battery packs attached to each one of the slot of the A system (A1 or A2) and attached
to each one of the slot of the B system (B1 or B2) (the two battery packs attached to the
different systems) can be charged simultaneously. When you want to charge two battery packs
quickly, attach one to the A system’s slot and the other to the B system’s slot. Charging of two
battery packs start simultaneously.
When attaching two battery packs to the slots of the different
systems
The two battery packs are charged simultaneously.
The two battery packs attached to each one of the slot of
the A system (A1 or A2) and attached to each one of the
slot of the B system (B1 or B2) (the two battery packs
attached to the different systems) can be charged
1111
1
simultaneously.
When attaching two battery packs to the slots of the same
system
Two battery packs are not charged simultaneously. When charging of one of them is completed,
the other one’s charging will start automatically.
When attaching two battery packs to the slots of the A
system simultaneously, charging of the battery pack
attached to the slot A1 starts first.
When attaching two battery packs to the slots of the A
11212
system not simultaneously, charging of the battery pack
attached first will start first. After charging of the first
battery pack is completed, charging of the other battery
pack will start automatically. B system is same as A
system.
When attaching four battery packs simultaneously
One of the battery pack attached to the A system’s slot and one of the battery pack attached to
the B system’s slot are charged simultaneously.
After charging of the battery packs attached to the slot1
of the A and B system (A1, B1) is completed, charging of
the battery packs attached to the slot2 of the A and B
system (A2, B2) will start.
1111
1222
2
Notes
•This unit can be attached up to four battery pack, but it can charge up to two battery packs.
•Two battery packs attached to the same systems cannot be charged simultaneously. (When
charging of one of them is completed, the other one’s charging will start automatically.)
20-GB
Page 21
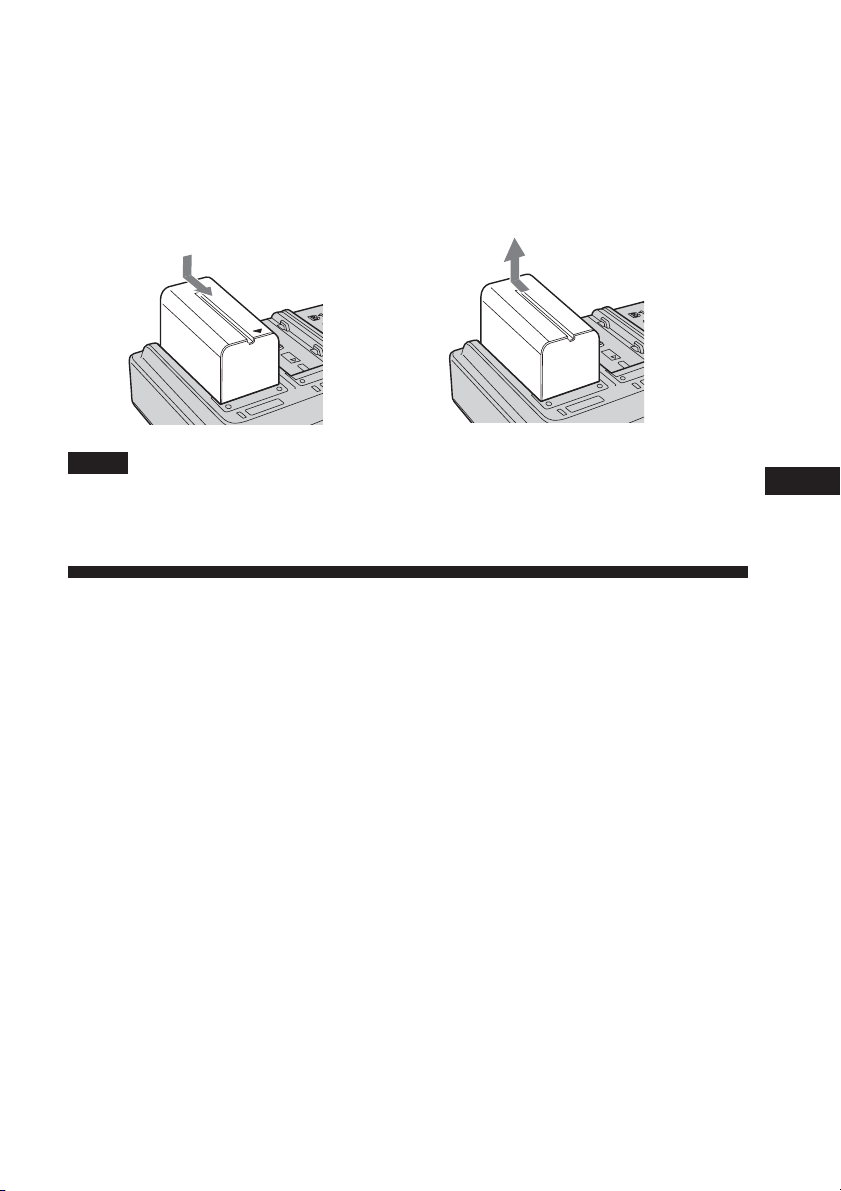
Attaching and removing the battery pack
1 Place the battery pack on this unit with the B mark facing the terminal shutter.
2 Slide the battery pack in the direction of the arrow.
Press the battery pack until the terminal shutter completely enters this unit.
Removing the battery pack
Slide the battery pack in the opposite
direction of attaching and lift it straight out.
Notes
•Do not lift this unit by holding the battery pack.
•Do not attempt to shock to the terminal shutter. When attaching the battery pack to this unit,
be sure not to hit the terminal shutter against the battery pack.
Charging check
When charging starts, the battery life is displayed on the display window.
Depending on the using video equipment, the battery life may not be displayed.
Refer to the instruction manual of the video equipment.
•Each time that you press the DISPLAY change button, the information displayed can be
changed. The lights of the DISPLAY change button and log indicator lamp indicates the slot
number and information item of the displayed information.
•The time display of the battery pack not charging disappears after about 10 seconds of display
and switches to the time display of the charging battery pack automatically.
This explanation is related to a charging check with the display for a battery pack attached to
the slot A1. The other slots are same as the slot A1.
GB
21-GB
Page 22
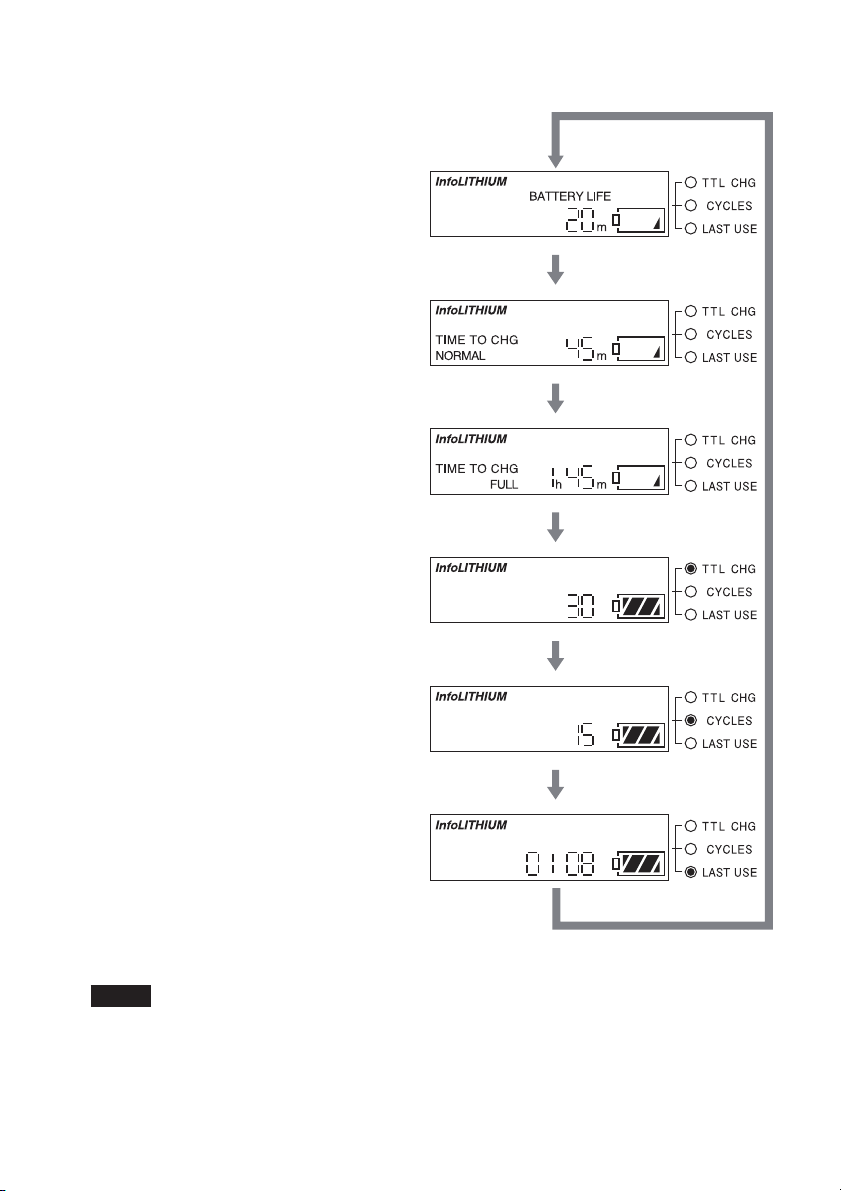
Each time that you press the DISPLAY change button, the information displayed can be
changed as following.
Battery life
The battery life of the battery pack attached
to the slot A1 is indicated.
Normal charging time
Remaining time until normal charging of
the battery pack attached to the slot A1 will
be completed is indicated.
Full charging time
Remaining time until full charging of the
battery pack attached to the slot A1 will be
completed is indicated.
(When the charging mode change switch is
set to “NORMAL CHARGE,” this is not
indicated.)
Total charging time
Total charging time of the battery pack
attached to the slot A1 is indicated.
Total number of charging
cycles
Total number of charging cycles of the
battery pack attached to the slot A1 is
indicated.
Last use
The year and month of the last use of the
battery pack attached to the slot A1 with
video equipment etc. is indicated. It is
displayed in order of month-year.
Notes
When battery life, normal charging time or full charging time is displayed on the display
window, the log indicator lamp does not light on.
22-GB
Page 23

Battery life
Approximate battery life using with the last used video equipment etc. indicated.
Normal charging time
Approximate remaining time until normal charging is completed is indicated.
Full charging time
Approximate remaining time until full charging is completed is indicated.
TTL CHG (total charging time)
Approximate total charging time since the first charging of the battery pack is indicated. The
minimum unit indicated is five hours.
CYCLE (total number of charging cycles)
Approximate total number of charging cycles since the first charging of the battery pack is
indicated. The minimum unit is 5 and the times indicated in multiples of five. Continuation
charging and stopping in the middle of charging may not be counted as number of charging.
LAST USE (last use year and month)
When attaching the battery pack to this unit, the year and month of last use with the video
equipment etc. is indicated. It is displayed in order of month-year.
Example:
01 08
RR
month year
The last use year and month is January of 2008.
“-- --” is displayed when using this unit with video equipment that does not have its calendar
set.
Notes
•“BATTERY LOG” display is compatible with the rechargeable battery pack NP-F970, NP-F770,
NP-F570. There are restrictions on the content which can be indicated with other models.
•The all indicated times are approximate value. This approximate value can be used as
reference the condition of use. It is not related with the deterioration of the battery pack or this
unit.
•When attaching the battery pack to this unit, the information of the last used video equipment
etc. may not be indicated. The video light or some models of the video equipment etc. may not
be compatible. When attaching the battery pack to the equipment, if the power of the
equipment does not turn on, it is not recognized as the last use. If the last use year and month
is unclear, “-- --” is indicated on the display window. This is not a malfunction.
•If the temperature of the battery pack is high or low during charging or attaching to this unit,
the following display will be indicated. In this case, the attached battery pack is charged with
low charging current value for protecting the battery pack. This is not a malfunction.
GB
23-GB
Page 24

Troubleshooting
Please check the following before contacting your nearest Sony dealer. If this unit does not
operate correctly after check, contact your nearest Sony dealer.
The video equipment does not work.
•The power plug is disconnected from the wall outlet.
t Connect the power plug to the wall outlet.
•The connecting cord is not connected correctly.
t Connect the connecting cord correctly.
•The output change switch is set to “CHARGE.”
t Set the output change switch of the using system to “VCR/CAMERA.”
The battery pack is not charged.
•The power plug is disconnected from the wall outlet.
t Connect the power plug to the wall outlet.
•The battery pack is not attached to this unit correctly.
t Check the direction of the battery pack and reattach the battery pack correctly.
•The output change switch is set to “VCR/CAMERA.”
t Set the output change switch of the using system to “CHARGE.”
•The first attached battery pack is charging.
t After charging the first attached battery pack is completed, charging of the other battery
pack starts.
•The full charged or nearly full charged battery pack is attached to this unit.
t Charging skips with the full charged battery pack.
•It is in the temperature protected condition.
t Use this unit at the recommended temperature range. Even if it was at the recommended
temperature range when starting charging, the temperature rises during charging, it will
exceed the recommended temperature range and may become in the temperature protected
condition.
Power immediately turns off even though there is sufficient
battery life, or the indicated battery life differs from the actual
battery life.
•Continuation charging or discharging is repeated several times.
t Recharge the battery pack after using until it has been emptied. The remaining time will be
indicated correctly.
Display is not changed.
t Refer to “Notes on the battery life display.”
24-GB
Page 25

The CHARGE lamp blinks and “WARNING” is indicated on the
display window.
•A battery pack that has not used for long time is charging.
t The battery pack that has not used for long time may not leave enough the minimum
capacity to recognize between this unit and battery pack. In this case, remove the battery
pack from this unit and reattach it.
If “WARNING” is indicated after reattaching the battery pack, check through the following
chart.
Remove the battery pack from this
unit and reattach it.
If the CHARGE lamp flashes again:
Attach a different “InfoLITHIUM”
battery pack.
If the CHARGE lamp flashes again:
There is a problem with this unit.
Please contact your nearest Sony dealer regarding the product that has a problem.
If the CHARGE lamp lights up and does
not flash again:
If the CHARGE lamp turns off after
charging is completed, there is no problem.
If the CHARGE lamp lights up and does
not flash again:
If the CHARGE lamp turns off after the
charging time has passed, there is a
problem with the first attached battery
pack.
GB
25-GB
Page 26

Specifications
AC adaptor/charger (AC-VQL1BP)
Power requirements 100 V - 240 V AC 50/60 Hz
Output voltage DC OUT: 8.4 V 2.0 A (VCR A/VCR B)
Operating temperature 0 °C to +40 °C (+32 °F to +104 °F)
Storage temperature -20 °C to +60 °C (-4 °F to +140 °F)
Dimensions Approx. 220 × 61 × 155 mm (w/h/d)
Mass Approx. 770 g (1 lb 11 oz.)
Hot switching inrush current, measured in accordance with European standard EN55103-1: 14 A
(230 V)
Included items
AC adaptor/charger (AC-VQL1BP main body).......(1)
Power cord..........(1)
Connecting cord (DK-215) ........... (1)
Connecting cord (DK-415) ........... (1)
Set of printed documentation
Design and specifications are subject to change without notice.
Battery charge terminal: 8.4 V 2.3 A (BATT A/BATT B)
(8 3/4 × 2 1/2 × 6 1/8 inches)
26-GB
Page 27

Page 28

AVERTISSEMENT
Afin de réduire les risques d’incendie ou de décharge
électrique, n’exposez pas cet appareil à la pluie ou à
l’humidité.
Pour prévenir les risques d’électrocution, ne pas ouvrir le boîtier.
Ne confier l’entretien de l’appareil qu’à un technicien qualifié.
Cet appareil doit être raccordé à une prise de courant secteur possédant une borne de terre.
ATTENTION
Remplacer la pile par une pile du type specifie uniquement. Sinon, cela peut provoquer un
incendie ou des blessures.
Consignes de sécurité importantes
Pour des raisons de sécurité, veuillez lire
toutes ces consignes de sécurité avant
d’utiliser l’appareil et conserver ce manual
pour toute référence future.
Tenez compte de tous les avertissements,
toutes les précautions et toutes les
instrucitons mentionnés sur l’appareil, ou
décrits dans le mode d’emploi et veuillez
les respecter.
Emploi
Sources d’alimentation
Cet appareil ne doit être alimenté que par
la source d’alimentation indiquée sur la
plaque signalétique. Si vous n’êtes pas sûr
du type de courant électrique local,
consultez votre revendeur ou le fournisseur
d’électricité à ce sujet. Pour les appareils
fonctionnant sur batterie ou sur une autre
source d’alimentation, reportez-vous au
mode d’emploi.
Mise à la terre
Cet appareil est muni d’un cordon
d’alimentation à fiche tripôle (avec pôle
pour la terre). Veuillez suivre les
instructions ci-dessous :
Par mesure de sécurité cette fiche ne peut
être insérée que dans une prise avec pôle
pour la terre. Si la fiche ne rentre toujours
pas dans la prise, contactez un électricien
pour faire remplacer la prise.
N’endommagez pas le système de sécurité
de la fiche polarisée en l’insérant de force.
Surcharge
Ne surchargez pas les prises, les cordons
rallonges ou les raccords car cela peut
entraîner un incendie ou une électrocution.
Pénétration d’objets ou de
liquides
Ne laissez jamais pénétrer d’objets dans
l’appareil car ils risquent de toucher des
pièces sous haute tension ou de provoquer
des courts-circuits qui pourraient causer un
incendie ou une électrocution. Ne jamais
répandre de liquide, quel qu’il soit, sur
l’appareil.
Fixations
N’utilisez que les fixations recommandées
par le fabricant pour éviter tout danger.
Nettoyage
Débranchez l’appareil de la prise secteur
avant de le nettoyer. Ne pas utiliser de
nettoyants liquides ni d’aérosols. Utilisez
un chiffon légèrement imprégné d’eau
pour nettoyer l’extérieur de l’appareil.
Installation
Eau et humidité
Ne pas utiliser un appareil fonctionnant
sur le courant secteur près d’un point
d’eau, par exemple près d’une baignoire,
d’un évier de cuisine ou d’un bac de
buanderie, dans un sous-sol humide, près
d’une piscine, etc.
2-FR
Page 29
Protection du cordon
d’alimentation
Disposez le cordon d’alimentation de sorte
qu’on ne risque pas de marcher dessus ou
qu’il ne soit pas coincé par des objets placés
dessus ou contre, et faites particulièrement
attention aux fiches, douilles et à l’endroit
où le cordon sort de l’appareil.
Accessoires
Ne pas poser l’appareil sur un chariot, un
support, un trépied, une étagère ou une
table branlante. Il risque de tomber et de
blesser un enfant ou un adulte dans sa
chute, ou d’être endommagé. N’utilisez
qu’un chariot, un support, un trépied, une
étagère ou une table recommandé par le
fabricant. Lorsqu’un chariot est utilisé pour
déplacer l’appareil, il faut agir avec
prudence. L’appareil risque de se renverser
si vous déplacez trop rapidement le
chariot, l’arrêtez brusquement, ou roulez
sur des surfaces irrégulières.
Ventilation
Les ailettes et ouvertures de ventilation
pratiquées dans le coffret sont
indispensables pour le refroidissement de
l’appareil. Pour que l’appareil fonctionne
normalement et ne surchauffe pas, ces
ailettes et ouvertures ne doivent pas être
obstruées ni recouvertes.
– Ne jamais recouvrir les ailettes et
ouvertures de ventilation avec un chiffon
ou d’autres matières.
– Ne jamais bloquer les ailettes et
ouvertures de ventilation en installant
l’appareil contre un lit, un sofa, une
couverture ou une surface similaire.
– Ne jamais installer l’appareil dans un
espace confiné, comme une bibliothèque,
un placard intégré, à moins que la
ventilation soit suffisante.
– Ne jamais installer l’appareil près ou sur
un radiateur ou un chauffage électrique et
ne pas l’exposer au rayonnement direct
du soleil.
Foudre
Par mesure de sécurité, débranchez
l’appareil de la prise secteur et de l’antenne
ou du câble en cas d’orage, ou si vous
prévoyez de ne pas utiliser l’appareil
pendant longtemps. L’appareil ne risquera
pas d’être endommagé par la foudre ou
une surtension.
Service
En cas de dommage
Débranchez l’appareil de la prise secteur et
faites appel à un personnel qualifié dans les
situations suivantes :
– Lorsque le cordon d’alimentation ou la
fiche est endommagé.
– Si du liquide s’est répandu sur l’appareil
ou des objets sont tombés dans l’appareil.
– Si l’appareil a été exposé à la pluie ou
l’eau.
– Si l’appareil a été soumis à un choc
excessif lors d’une chute, ou si le coffret a
été endommagé.
– Si l’appareil ne fonctionne pas selon les
instructions. Ne réglez que les
commandes spécifiées dans le mode
d’emploi. Le réglage de toute autre
commande peut causer des dommages et
exiger des réparations complexes pour
remettre l’appareil en état de
fonctionnement.
– Lorsque les performances de l’appareil
changent, car une réparation est
probablement nécessaire.
Réparation
N’essayez pas de réparer vous-même
l’appareil car l’ouverture ou le retrait des
panneaux du coffret expose à des tensions
dangereuses ou à d’autres dangers. Faites
toujours appel à un personnel qualifié pour
toutes vos réparations.
Pièces de rechange
Lorsque des pièces doivent être changées,
assurez-vous que le technicien utilise les
pièces de rechange spécifiées par le
fabricant, et celles-ci doivent avoir les
mêmes caractéristiques que les pièces
originales. L’utilisation de pièces de
rechange non autorisées peut entraîner un
incendie, une électrocution ou d’autres
risques.
Contrôle de la sécurité
Après tout contrôle ou toute réparation de
l’appareil, demandez au technicien
d’effectuer un contrôle de la sécurité (tel
que spécifié par le fabricant) pour qu’il
s’assure que l’appareil est en parfait état de
fonctionnement.
FR
3-FR
Page 30

Pour les clients residant en Europe
Ce produit porte la marque CE et est conforme à la Directive EMC et à la Directive « basse
tension » publiées par la Commission de la Communauté Européenne.
La conformité à ces directives implique la conformité aux normes européennes suivantes :
•EN60065 : Sécurité des produits
•EN55103-1 : Interférences (émissions) électromagnétiques
•EN55103-2 : Susceptibilité (immunité) électromagnétique
Ce produit est destiné à une utilisation dans les environnements électromagnétiques suivants :
E1 (résidentiel), E2 (commercial et industrie légère), E3 (intérieur urbain) et E4 (environnement
EMC contrôlé, par exemple studio de télévision).
Élimination des appareils électriques et électroniques professionnels en fin
de vie (Applicable dans les pays de l’Union Européenne et aux autres pays
européens disposant de systèmes de collecte sélective)
Ce symbole, apposé sur le produit ou son emballage, indique que ce produit ne
doit pas être traité avec les déchets ménagers. Il doit être déposé dans un point de
collecte spécialisé dans le recyclage des équipements électriques et électroniques.
En s’assurant que ce produit est bien mis au rebut de manière appropriée, vous
aiderez à prévenir les conséquences négatives potentielles pour l’environnement
et la santé humaine. Le recyclage des matériaux aidera à conserver les resources
naturelles. Pour toute information supplémentaire concernant le recyclage de ce
produit, contactez votre centre Sony local ou consultez le site webde Sony pour
l’Europe destiné aux professionnels :
http://www.sonybiz.net/environment
< Avis aux consommateurs des pays appliquant les Directives UE >
Le fabricant de ce produit est Sony Corporation, 1-7-1 Konan Minato-ku Tokyo, 108-0075 Japon.
Le représentant agréé pour la compatibilité électromagnétique et la sécurité du produit est Sony
Deutschland GmbH, Hedelfinger Strasse 61, 70327 Stuttgart, Allemagne. Pour toute question
relative à la garantie ou aux réparations, reportez-vous à l’adresse que vous trouverez dans les
documents ci-joints, relatifs à la garantie et aux réparations.
PRECAUTION
L’appareil n’est pas déconnecté de la source d’alimentation secteur tant qu’il reste branché sur la
prise murale, même s’il a été mis hors tension.
La plaque signalétique se situe sous l’appareil.
N’utilisez pas cet appareil dans un endroit exigu, notamment entre un mur et un meuble.
Utilisez cet appareil près d’une prise murale. Vous pourrez ainsi débrancher rapidement la fiche
de la prise murale pour éteindre l’appareil en cas de problème.
4-FR
Page 31

Table des matières
ATTENTION ............................................................................................................6
Remarques sur l’utilisation .................................................................................... 8
Utilisation de cet appareil à l’étranger ...............................................................10
Caractéristiques...................................................................................................... 11
Fonctions .................................................................................................................12
Identification des pièces .......................................................................................13
Utilisation comme adaptateur secteur................................................................ 14
Recharge de la batterie ..........................................................................................16
Pour vérifier la charge........................................................................................... 19
Dépannage ..............................................................................................................22
Spécifications ..........................................................................................................24
FR
5-FR
Page 32

ATTENTION
• N’utilisez pas l’appareil dans des environnements humides, gras ou poussiéreux.
De tels environnements risquent de provoquer un incendie ou des décharges électriques.
• Ne laissez pas de l’eau ou des corps étrangers pénétrer dans cet appareil.
Cela risque de provoquer un incendie, voire une décharge électrique. S’ils pénètrent dans cet
appareil, débranchez le cordon d’alimentation de la prise murale et contactez votre revendeur
Sony le plus proche.
• Ne mouillez pas cet appareil ou les batteries rechargeables.
Cela risque de provoquer un incendie ou une décharge électrique.
• Ne placez pas cet appareil à proximité de l’eau.
Si de l’eau pénètre dans cet appareil ou les batteries rechargeables et les mouille ou si vous les
utilisez dans la salle de bains, un incendie ou une décharge électrique risque d’être
occasionné(e).
• N’essayez pas de démonter ou de modifier l’appareil.
Cela risque de provoquer un incendie ou une décharge électrique. Contactez votre revendeur
Sony le plus proche concernant les révisions ou les réparations.
• Evitez les chocs ou les impacts, tels que des coups de marteau, des coups de pied ou une
chute.
Cela risque de provoquer un incendie ou une décharge électrique.
• Ne chargez aucune autre batterie que celles spécifiées.
Cela risque de provoquer un incendie, de la fumée, voire une décharge électrique.
• Evitez d’endommager le cordon d’alimentation ou le cordon de raccordement.
Un cordon d’alimentation secteur ou un câble CC endommagé risque de provoquer un
incendie voire une décharge électrique.
– N’essayez pas de modifier ou d’endommager le cordon ou le câble.
– Ne placez rien de lourd sur le cordon ou le câble et ne tirez pas dessus.
– Ne placez pas cet appareil à proximité d’un chauffage. N’essayez surtout pas de le chauffer.
– Saisissez toujours le cordon ou le câble par sa fiche lorsque vous le débranchez.
Si les cordons sont endommagés, cessez d’utiliser l’appareil et contactez votre revendeur
Sony le plus proche.
• Insérez fermement la fiche du cordon d’alimentation dans la prise murale.
Si la fiche n’est pas insérée fermement, cela peut provoquer un incendie ou de la fumée
pouvant entraîner des brûlures ou d’autres blessures.
• Utilisez cet appareil avec la tension d’alimentation indiquée sur celui-ci.
L’utilisation de cet appareil avec une autre tension d’alimentation que celle indiquée peut
provoquer un incendie voire une décharge électrique.
• N’utilisez pas cet appareil dans des endroits extrêmement chauds.
Cela risque de provoquer un incendie, de la fumée ou une décharge électrique.
Utilisez cet appareil à des températures inférieures à 40 °C (104 °F).
N’exposez pas cet appareil directement aux rayons du soleil pendant des périodes prolongées.
• Ne tenez pas l’appareil ou les batteries rechargeables pendant une période prolongée
lorsqu’ils sont branchés.
Ils peuvent chauffer, ce qui risque d’occasionner des brûlures.
• Ne couvrez pas cet appareil avec un objet ou un tissu.
Si vous le couvrez, la chaleur ne peut pas s’évacuer et il risque d’être déformé ou un incendie
peut être occasionné.
• Ne touchez pas cet appareil avec les mains mouillées.
Cela risque de provoquer une décharge électrique.
• Placez cet appareil sur une surface stable.
Si vous ne placez pas cet appareil sur une surface stable, il peut tomber et endommager
l’appareil ou entraîner des blessures.
• Utilisez uniquement le cordon d’alimentation fourni.
Si vous n’utilisez pas le cordon d’alimentation fourni, une décharge électrique peut être
occasionnée ou l’appareil peut être endommagé.
6-FR
Page 33

• Installez les cordons correctement.
Quelqu’un pourrait trébucher sur le cordon d’alimentation ou le cordon de raccordement et se
blesser en tombant.
• Débranchez la fiche d’alimentation si vous n’utilisez pas l’appareil.
Lorsque vous rangez cet appareil, débranchez le cordon d’alimentation de la prise murale et
retirez les batteries rechargeables. Sinon, cela risque de provoquer un incendie.
• Raccordez le conducteur de terre de sécurité.
Une décharge électrique peut être occasionnée si le conducteur de terre est débranché.
Raccordez le conducteur de terre comme suit.
L’utilisation du conducteur de terre offre un raccordement à la terre sûr.
Si le conducteur de terre ne peut pas être raccordé, contactez votre revendeur Sony le plus
proche.
• Vérifiez la consommation électrique de l’appareil utilisé avec cet appareil afin de ne pas
dépasser la sortie nominale.
Il peut chauffer, ce qui risque d’entraîner des dégâts matériels.
FR
7-FR
Page 34

Remarques sur l’utilisation
Cet appareil n’est pas étanche à la poussière, aux projections d’eau et à l’eau en général.
Mise en charge
•N’utilisez que des véritables batteries rechargeables Sony avec cet appareil.
•Ne rechargez pas d’autres batteries que celles prévues pour cet appareil.
•Installez la batterie rechargeable correctement.
Te mpérature de charge
•Pour offrir un maximum d’efficacité, la plage de températures recommandée pendant la
charge est comprise entre + 10 °C et + 30 °C (+50 °F et +86 °F). La charge s’avère difficile à
des températures inférieures.
•Bien que cet appareil permette des charges rapides, le temps de charge sera plus long en
dehors de la plage de températures recommandée afin de protéger la batterie. Une fois que
le temps de charge a été rallongé, une charge rapide n’est plus possible même si la
température revient dans la plage de températures recommandée. Retirez la batterie, puis
réinstallez-la pour la recharger de nouveau.
Endroits non indiqués pour l’installation de cet
appareil
Où que vous utilisiez ou stockiez cet appareil, ne le placez pas dans les endroits suivants. Ceci
pourrait entraîner un problème de fonctionnement.
•Endroits soumis à des températures extrêmes
– Endroits exposés aux rayons directs du soleil, comme sur un tableau de bord ou à proximité
d’un radiateur. La température devient extrêmement élevée dans une voiture aux vitres
fermées et garée en plein soleil l’été et si vous laissez l’appareil dans la voiture, il risque
d’être déformé ou de présenter un problème de fonctionnement.
•Endroits soumis à des vibrations excessives
•Endroits soumis à de fortes ondes électromagnétiques ou énergétiques
•Endroits excessivement sablonneux
– Dans les endroits tels qu’au bord de la mer ou dans d’autres endroits sablonneux ou dans
lesquels des nuages de poussière se produisent, protégez l’appareil contre le sable et la
poussière. Le sable et la poussière peuvent entraîner un problème de fonctionnement.
8-FR
Page 35

Précautions d’utilisation
•Lorsque vous changez la batterie, installez-la fermement sur cet appareil.
•Le connecteur de la batterie peut être endommagé si la batterie rechargeable n’est pas placée
correctement.
•Cet appareil ne doit pas être utilisé dans un endroit soumis à de l’électromagnétisme ou des
ondes fortes.
Des ondes électromagnétiques peuvent empêcher l’appareil d’enregistrer ou de lire une vidéo
correctement.
•Pour protéger la batterie, retirez-la de l’appareil dès que la charge est terminée.
•N’exposez pas cet appareil à des chocs mécaniques ou à des chutes.
•Eloignez cet appareil des téléviseurs et récepteurs AM.
Les parasites de l’appareil risquent d’être reçus par un téléviseur ou une radio placé(e) à
proximité.
•Veillez à ce qu’aucun objet métallique ne touche les pièces métalliques de cet appareil ou la
plaque de connexion. Cela pourrait entraîner un court-circuit.
•Ne raccordez pas cet appareil à un adaptateur de tension (convertisseur) pour les voyages à
l’étranger. Cela peut entraîner des incendies ou des dégâts matériels.
•La batterie rechargeable et cet appareil risquent de chauffer pendant ou immédiatement après
la recharge.
•Débranchez cet appareil de la prise murale après utilisation. Pour débrancher le cordon, tirezle par la fiche
•La plaque signalétique indiquant la tension de fonctionnement et la consommation est située
sous cet appareil.
•Raccordez le cordon d’alimentation secteur à la prise murale après avoir procédé au
raccordement à la terre.
Débranchez le cordon d’alimentation de la prise murale avant de débrancher le raccordement
à la terre.
•N’exposez pas cet appareil à l’humidité. Ne placez pas d’objets contenant de l’eau, tels qu’un
vase ou un objet similaire, sur cet appareil.
Entretien
•Essuyez cet appareil à l’aide d’un chiffon doux et sec lorsqu’il est sale.
•Si l’appareil est très sale, essuyez-le avec un chiffon imbibé d’un peu de solvant neutre, puis
essuyez-le de nouveau pour le sécher.
•N’utilisez pas de diluant, d’essence ou d’alcool, etc. Ils risqueraient d’endommager la surface
de cet appareil.
•Si vous utilisez des chiffons de nettoyage chimiques, suivez leurs instructions.
•L’utilisation d’un solvant volatil, tel qu’un insecticide ou le fait de laisser cet appareil en
contact avec des produits en caoutchouc ou en plastique vinyle pendant une période
prolongée peut dégrader ou endommager cet appareil.
FR
9-FR
Page 36

Utilisation de cet appareil à l’étranger
Utilisez si nécessaire un adaptateur de fiche secteur (non fourni), en fonction du modèle de la
prise murale.
Ne raccordez pas cet appareil à un adaptateur de tension (convertisseur) pour les
voyages à l’étranger. Cela peut entraîner des incendies ou des dégâts matériels.
10-FR
Page 37

Caractéristiques
L’AC-VQL1BP est un adaptateur secteur/chargeur pouvant fournir une alimentation CC à
l’appareil externe Sony et être raccordé et charger les quatre batteries rechargeables au lithiumion Sony*.
* Cet appareil peut charger maximum deux batteries simultanément (une dans le logement A et
l’autre dans le logement B).
(Si vous installez deux batteries simultanément dans les logements du même système, cet
appareil ne peut pas charger les batteries en même temps. Après avoir chargé la batterie
rechargeable insérée en premier, cet appareil bascule automatiquement sur la charge de l’autre
batterie insérée dans le même système.)
•Conçu pour recharger des batteries au lithium-ion.
Les batteries au Ni-Cd ou Ni-MH ne peuvent pas être chargées.
•Certains modèles d’appareils ne sont pas compatibles (caméscope, etc.).
Vérifiez la compatibilité de votre appareil avant toute utilisation.
Caractéristiques
Pour installer simultanément un maximum de quatre batteries
rechargeables
Cet appareil est doté de deux systèmes de charge (A et B) et peut accueillir un maximum de
quatre batteries. Chaque système charge une batterie. Une fois la charge terminée, l’appareil
bascule automatiquement sur la charge de l’autre batterie insérée dans le même système.
Deux bornes de sortie CC pour le système
L’appareil est doté de deux systèmes de borne de sortie CC (A et B). Il peut alimenter l’appareil
externe comme un adaptateur secteur. (Cet appareil ne peut pas fonctionner comme sortie CC et
charger la batterie sur le même système.)
FR
Affichage des informations « BATTERY LOG », ainsi que des
informations relatives à la charge
Lorsque vous insérez la batterie « InfoLITHIUM » (série L) sur cet appareil, l’historique de
l’utilisation et les conditions de charge de la batterie sont affichés.
•Temps de charge total, nombre total de cycles de charge, mois et année de la dernière
utilisation
•Autonomie de la batterie insérée, durée restante avant la fin de la charge.
(Les valeurs indiquées sont approximatives. Les informations affichées pour la charge des
batteries sont limitées).
Charge effective
Vous pouvez sélectionner « Charge complète » ou « Charge normale » grâce au sélecteur du
mode de charge.
Si vous êtes pressé, sélectionnez « Charge normale » pour terminer la charge d’une des batteries
une fois celle-ci effectuée et démarrer la charge d’une autre batterie.
Si la batterie a été chargée complètement, cet appareil indique que la charge est terminée sans
charger la batterie.
Fonction d’autodiagnostic
Si un problème s’est produit avec une batterie ou cet appareil, un message d’avertissement
apparaît dans la fenêtre d’affichage.
Pour plus d’informations, reportez-vous à la section « Recharge de la batterie » (p. 16).
11-FR
Page 38

Que signifie « InfoLITHIUM » ?
Les batteries « InfoLITHIUM » sont des batteries au lithium-ion qui peuvent échanger des
informations sur leur consommation avec des appareils électroniques compatibles. Nous vous
recommandons d’utiliser une batterie « InfoLITHIUM » (série L) avec les appareils
électroniques portant la marque .
« InfoLITHIUM » est une marque commerciale de Sony Corporation.
« BATTERY LOG »
Cet appareil peut afficher les informations enregistrées sur les batteries.
•Temps de charge total
•Nombre total de cycles de charge
•Année et mois de la dernière utilisation
Fonctions
Avertissement concernant chaque écran (à lire
attentivement avant utilisation)
Pendant la charge de la batterie rechargeable, cet appareil indique les conditions de charge et les
informations relatives à la batterie si les conditions suivantes sont remplies :
•vous utilisez une batterie « InfoLITHIUM » ;
•vous utilisez un appareil électronique portant la marque .
Assurez-vous que la batterie que vous utilisez porte bien la marque . Vérifiez dans
le mode d’emploi fourni avec votre appareil vidéo si celui-ci est compatible « InfoLITHIUM ».
Si vous utilisez la batterie rechargeable avec deux appareils vidéo ou plus, les informations
relatives à la batterie du dernier appareil utilisé sont affichées.
« BATTERY LOG » est compatible avec les batteries rechargeables NP-F970, NP-F770, NP-F570.
Les autres modèles ne sont pas compatibles ou sont en affichage limité.
12-FR
Page 39

Identification des pièces
1
3
4
1 Logement (A1, A2, B1, B2)
2 Borne d’entrée secteur
3 Commutateur de sortie A
4 Connecteur DC OUT A
5 Fenêtre d’affichage A
6 Témoin d’historique A
7 Témoin d’historique B
8 Fenêtre d’affichage B
2
14
13
12
11
10
9
8
7
6
5
9 Sélecteur du mode de charge
10 Connecteur DC OUT B
11 Commutateur de sortie B
12 Touche de réglage DISPLAY (A1, A2, B1, B2)
13 Témoin CHARGE (A1, A2, B1, B2)
14 Obturateur de borne
FR
Fenêtre d’affichage
15
16
17
18
15 Indicateur « InfoLITHIUM »
16 Indicateur WARNING
(avertissement)
17 Indicateur TIME TO CHG (temps
de charge)
18 Indicateur de durée
WARNING
TIME TO CHG
NORMAL FULL
19
20
BATTERY LIFE
VCR/CAMERA
21
hm
22
19 Indicateur BATTERY LIFE (autonomie de la
batterie)
20 Indicateur VCR/CAMERA (magnétoscope/
caméscope)
21 Indicateur de charge complète
22 Indicateur d’autonomie de la batterie
13-FR
Page 40

Utilisation comme adaptateur secteur
Pour plus d’informations, reportez-vous au mode d’emploi de l’appareil vidéo.
2
Vers la prise murale
1
3
Les commutateurs et réglages fonctionnent sur deux systèmes (A et B). Réglez le commutateur
sur le système que vous utilisez.
1 Réglez le commutateur de sortie sur « VCR/CAMERA ».
2 Raccordez le cordon d’alimentation à cet appareil et à une prise
murale.
Un bip est émis et la fenêtre d’affichage est activée.
Remarques
Enfoncez complètement le cordon d’alimentation dans la prise murale.
3 Raccordez le cordon de raccordement au connecteur DC OUT.
4 Raccordez le cordon de raccordement à l’appareil vidéo.
Pour plus d’informations sur le sens de raccordement du cordon de raccordement, reportezvous au mode d’emploi de l’appareil vidéo.
Si vous utilisez le cordon de
raccordement DK-415
Si vous utilisez le cordon de
raccordement DK-215
14-FR
Page 41

Remarques
•Si vous réglez le commutateur de sortie sur « CHARGE » pendant le fonctionnement de cet
appareil, l’appareil vidéo est mis hors tension.
•Vous ne pouvez pas charger la batterie rechargeable installée sur cet appareil en mode « VCR/
CAMERA ».
•Vous ne pouvez pas utiliser un des systèmes de cet appareil comme adaptateur secteur et
l’autre comme chargeur.
•Eloignez cet appareil de votre appareil vidéo s’il perturbe l’image.
•L’exemple de l’illustration représente le raccordement à un caméscope vidéo HD numérique
HVR-Z7, HVR-V1.
FR
15-FR
Page 42

Recharge de la batterie
Pour plus d’informations, reportez-vous au mode d’emploi de l’appareil vidéo.
3
4
3
Vers la prise murale
1
2
Les commutateurs et réglages fonctionnent sur deux systèmes (A et B). Réglez le commutateur
sur le système que vous utilisez.
1 Réglez le sélecteur du mode de charge sur « NORMAL
CHARGE » ou « FULL CHARGE ».
Sélectionnez « FULL CHARGE » si vous souhaitez effectuer une charge complète de la
batterie.
Sélectionnez « NORMAL CHARGE » si vous souhaitez terminer après une charge normale.
Pour plus d’informations, reportez-vous à la section « Modification du mode de charge » (p.
17).
2 Réglez le commutateur de sortie sur « CHARGE ».
Pour plus d’informations, reportez-vous à la section « Installation simultanée de deux
batteries ou plus » (p. 18).
3 Raccordez un cordon d’alimentation secteur à cet appareil et à
une prise murale.
Un bip est émis et la fenêtre d’affichage est activée.
Remarques
Enfoncez complètement le cordon d’alimentation dans la prise murale.
4 Insérez la batterie.
Pour plus d’informations sur l’insertion ou le retrait de la batterie rechargeable, reportezvous à la section « Insertion et retrait de la batterie rechargeable » (p. 19).
5 Lorsque la charge est terminée, retirez la batterie.
Lorsque les conditions de charge définies à l’aide du sélecteur du mode de charge sont
remplies, cet appareil cesse la charge. Lorsque le témoin CHARGE de cet appareil s’éteint, la
charge est terminée. Pour plus d’information sur la charge terminée, reportez-vous à la
section « Modification du mode de charge » (p. 17).
Reportez-vous à la section « Insertion et retrait de la batterie rechargeable » (p. 19) pour
retirer la batterie.
16-FR
Page 43

Remarques
•Si le commutateur est réglé sur « VCR/CAMERA » pendant la charge, celle-ci s’arrête.
•Si le témoin CHARGE ne s’allume pas ou clignote, vérifiez que la batterie est installée
correctement sur cet appareil. Si elle n’est pas installée correctement, elle ne sera pas chargée.
•La charge rapide est uniquement effectuée avec des batteries « InfoLITHIUM ».
•Il est possible que toutes les informations n’apparaissent pas dans la fenêtre d’affichage selon
la batterie utilisée.
•Si un problème se produit pendant la charge, le témoin CHARGE clignote et l’indication
« WARNING » apparaît dans la fenêtre d’affichage.
Pour plus d’informations, reportez-vous à la section « Dépannage » (p. 22).
Modification du mode de charge
Il existe deux types de charge : la « charge normale » et la « charge complète ».
Vous pouvez changer de mode en faisant glisser le sélecteur du mode de charge.
Charge normale
(NORMAL
CHARGE)
Charge complète
(FULL CHARGE)
* En mode de charge normale, l’indication « FULL » n’est pas affichée lorsque la charge normale est
terminée.
Lorsque la charge normale est terminée, l’indicateur de
l’autonomie de la batterie s’affiche comme illustré à
droite.
Lorsque la charge complète est terminée, l’indicateur de
l’autonomie de la batterie s’affiche comme illustré à
droite. Cela prend plus de temps que la charge normale
et il est possible d’utiliser plus longtemps l’appareil
vidéo avec la batterie complètement chargée.
Te mps de charge
NP-F970 NP-F770 NP-F570
Temps de charge normale 200 min. 135 min. 85 min.
Temps de charge complète 260 min. 195 min. 145 min.
FR
•Les temps approximatifs indiqués correspondent à la charge d’une batterie vide avec cet
appareil à + 25 °C.
•Le temps de charge peut varier selon l’état de la batterie ou la température ambiante.
Utilisation de la batterie avant la fin de la charge
Retirez la batterie si nécessaire. Elle peut être utilisée même si elle n’est pas entièrement chargée.
L’autonomie disponible varie selon le temps de charge.
Remarques
•Les temps indiqués sont approximatifs et correspondent à la charge d’une batterie avec cet
appareil à + 25 °C. Ils peuvent varier par rapport au temps de charge réel selon la température
ambiante. Il est possible que le temps de charge ne soit pas indiqué selon l’état de la batterie.
Ceci n’a rien d’anormal.
•Pour afficher l’autonomie d’une nouvelle batterie, installez-la d’abord sur votre appareil
vidéo, utilisez-la pendant environ 20 secondes, puis chargez-la avec cet appareil.
•L’autonomie de la batterie et le temps de charge normal varient en fonction de l’âge de la
batterie et des conditions d’utilisation.
•Lorsque le sélecteur du mode de charge est réglé sur « NORMAL CHARGE », la charge
normale est terminée et la charge complète n’est pas effectuée.
•Le mode de charge peut être modifié avant que la charge ne soit terminée, dans chaque mode.
17-FR
Page 44

Installation simultanée de deux batteries ou plus
1
1
2
•Jusqu’à quatre batteries peuvent être installées simultanément sur cet appareil.
(Cet appareil est doté de deux systèmes (A et B), comportant chacun deux logements)
•Les deux batteries installées dans chaque logement du système A (A1 ou A2) et dans chaque
logement du système B (B1 ou B2) (les deux batteries étant installées dans des systèmes
différents) peuvent être chargées simultanément. Si vous souhaitez charger deux batteries
rapidement, installez l’une dans le logement du système A et l’autre dans celui du système B.
La charge des deux batteries démarre simultanément.
Lors de l’insertion de deux batteries dans les logements de
systèmes différents
Les deux batteries sont chargées simultanément.
Les deux batteries installées dans chaque logement du
système A (A1 ou A2) et dans chaque logement du
système B (B1 ou B2) (les deux batteries étant installées
dans des systèmes différents) peuvent être chargées
1111
1
simultanément
Lors de l’insertion de deux batteries dans les logements du même
système
Les deux batteries ne sont pas chargées simultanément. Une fois la charge de l’une des batteries
terminée, la charge de la seconde démarre automatiquement.
Si vous installez deux batteries simultanément dans les
logements du système A, la charge de celle installée
dans le logement A1 démarre en premier.
Si vous installez deux batteries séparément dans les
logements du système A, la charge de celle installée en
11212
premier démarre en premier. Une fois la charge de la
première batterie terminée, celle de l’autre batterie
démarre automatiquement. Le système B fonctionne de
la même manière que le système A.
Lors de l’insertion de quatre batteries rechargeables
simultanément
L’une des batteries insérées dans le logement du système A et l’une des batteries insérées dans
le logement du système B sont chargées simultanément.
Une fois la charge des batteries installées dans le
logement 1 du système A et B (A1, B1), celle des
batteries installées dans le logement 2 du système A et B
(A2, B2) démarre.
1111
1222
2
Remarques
•Jusqu’à quatre batteries peuvent être installées simultanément sur cet appareil, mais il ne peut
charger que deux batteries à la fois.
•Si vous installez deux batteries dans les mêmes systèmes, elles ne sont pas chargées en même
temps. (Une fois la charge de l’une des batteries terminée, la charge de la seconde démarre
automatiquement.)
18-FR
Page 45

Insertion et retrait de la batterie rechargeable
1 Placez la batterie sur cet appareil avec le repère B orienté vers l’obturateur de borne.
2 Faites glisser la batterie dans le sens de la flèche.
Appuyez sur la batterie jusqu’à ce que l’obturateur de borne soit complètement introduit
dans l’appareil.
Retrait de la batterie
Faites glisser la batterie dans le sens opposé
à celui de son insertion et soulevez-la bien
droite.
Remarques
•Ne soulevez pas cet appareil en saisissant la batterie.
•Evitez les chocs au niveau de l’obturateur de borne. Lorsque vous insérez la batterie dans cet
appareil, prenez garde de ne pas cogner l’obturateur de borne contre la batterie.
Pour vérifier la charge
Lorsque la charge démarre, l’autonomie est affichée dans la fenêtre d’affichage.
FR
Il est possible que l’autonomie de la batterie ne s’affiche pas selon l’appareil vidéo utilisé.
Reportez-vous au mode d’emploi de votre appareil vidéo.
•Les informations affichées peuvent changer chaque fois que vous appuyez sur la touche de
réglage DISPLAY. L’éclairage de la touche de réglage DISPLAY et du témoin d’historique
indique le numéro du logement et les éléments d’information affichés.
•L’affichage de l’autonomie de la batterie qui n’est pas en cours de charge disparaît au bout de
10 secondes environ et revient automatiquement à l’indication d’autonomie de la batterie en
charge.
Cette explication est liée à un contrôle de charge par rapport à l’affichage d’une batterie insérée
dans le logement A1. Les autres logements sont identiques au logement A1.
19-FR
Page 46

Les informations affichées peuvent changer comme suit chaque fois que vous appuyez sur la
touche de réglage DISPLAY.
Autonomie de la batterie
L’autonomie de la batterie insérée dans le
logement A1 est indiquée.
Te mps de charge normale
Le temps restant jusqu’à la fin d’une charge
normale d’une batterie insérée dans le
logement A1 est indiqué.
Te mps de charge complète
Le temps restant jusqu’à la fin d’une charge
complète de la batterie insérée dans le
logement A1 est indiqué.
(Lorsque le sélecteur du mode de charge est
réglé sur « NORMAL CHARGE », ceci n’est
pas indiqué.)
Te mps de charge total
Le temps de charge total de la batterie
insérée dans le logement A1 est indiqué.
Nombre total de cycles de
charge
Le nombre total de cycles de charge de la
batterie insérée dans le logement A1 est
indiqué.
Dernière utilisation
L’année et le mois de la dernière utilisation
de la batterie insérée dans le logement A1
avec un appareil vidéo, etc. sont indiqués.
Le mois, puis l’année sont affichés, dans
l’ordre.
Remarques
Lorsque l’autonomie de la batterie, le temps de charge normale ou le temps de charge complète
apparaît dans la fenêtre d’affichage, le témoin d’historique ne s’allume pas.
20-FR
Page 47

Autonomie de la batterie
L’autonomie approximative de la batterie utilisée avec le dernier appareil vidéo utilisé, etc. est
indiquée.
Te mps de charge normale
La durée restante approximative jusqu’à la fin d’une charge normale est indiquée.
Te mps de charge complète
La durée restante approximative jusqu’à la fin d’une charge complète est indiquée.
TTL CHG (temps de charge total)
Le temps de charge total approximatif depuis la première charge de la batterie est indiqué.
L’unité minimale indiquée est de cinq heures.
CYCLE (nombre total de cycles de charge)
Le nombre total approximatif de cycles de charge depuis la première charge de la batterie est
indiqué.
L’unité minimale est de 5 et le nombre est indiqué en multiples de cinq. La charge et l’arrêt
continus en cours de charge peuvent ne pas être comptés pour le nombre de charges.
LAST USE (année et mois de la dernière utilisation)
Lorsque vous installez la batterie sur cet appareil, l’année et le mois de la dernière utilisation
avec un appareil vidéo, etc. sont indiqués. Le mois, puis l’année sont affichés, dans l’ordre.
Exemple :
01 08
RR
mois année
L’année et mois de la dernière utilisation est janvier 2008.
« -- -- » s’affiche lorsque le calendrier de l’équipement vidéo n’est pas réglé lors de
l’utilisation de cet appareil.
FR
Remarques
•L’écran « BATTERY LOG » est compatible avec les batteries rechargeables NP-F970, NP-F770
et NP-F570. Il n’existe aucune restriction concernant le contenu pouvant être indiqué avec
d’autres modèles.
•Toutes les durées indiquées sont approximatives. Ces valeurs approximatives peuvent être
utilisées comme référence pour les conditions d’utilisation. Elles n’ont rien à voir avec la
détérioration de la batterie ou de cet appareil.
•Lorsque vous installez la batterie sur cet appareil, les informations concernant le dernier
appareil vidéo, etc. utilisé peuvent ne pas être indiquées. La lampe vidéo ou certains modèles
d’appareils vidéo, etc., peuvent ne pas être compatibles. Lorsque vous installez la batterie sur
cet appareil, si l’appareil ne se met pas sous tension, il n’est pas reconnu comme celui utilisé
en dernier. Si l’année ou le mois de la dernière utilisation n’est pas clair, « -- -- » apparaît dans
la fenêtre d’affichage. Ceci n’est pas un problème de fonctionnement.
•Si la température de la batterie devient extrêmement élevée ou basse pendant la charge ou
l’installation sur cet appareil, l’écran suivant s’affiche. Dans ce cas, la batterie insérée est
chargée avec une valeur de charge courante basse pour la protéger. Ceci n’est pas un problème
de fonctionnement.
21-FR
Page 48

Dépannage
Vérifiez les éléments suivants avant de contacter votre revendeur Sony le plus proche. Si cet
appareil ne fonctionne pas correctement après les vérifications, contactez votre revendeur Sony
le plus proche.
L’appareil vidéo ne fonctionne pas.
•La fiche d’alimentation est débranchée de la prise murale.
t Raccordez la fiche d’alimentation à une prise murale.
•Le cordon de raccordement n’est pas raccordé correctement.
t Raccordez le cordon de raccordement correctement.
•Le commutateur de sortie est réglé sur « CHARGE ».
t Réglez le commutateur de sortie du système utilisé sur « VCR/CAMERA ».
La batterie n’est pas chargée.
•La fiche d’alimentation est débranchée de la prise murale.
t Raccordez la fiche d’alimentation à une prise murale.
•La batterie n’est pas installée correctement sur cet appareil.
t Vérifiez le sens de la batterie et réinstallez-la correctement.
•Le commutateur de sortie est réglé sur « VCR/CAMERA ».
t Réglez le commutateur de sortie du système utilisé sur « CHARGE ».
•La première batterie est en cours de charge.
t Une fois la charge de la première batterie terminée, celle de l’autre batterie démarre.
•Une batterie complètement chargée ou presque est installée sur cet appareil.
t La charge omet la batterie complètement chargée.
•Elle a atteint les températures déclenchant la protection de batterie.
t Utilisez cet appareil dans la plage de températures recommandée. Même si la température
du début de charge respectait la plage de températures recommandée, elle augmente
pendant la charge et peut dépasser la plage de températures recommandée. Elle peut alors
atteindre les températures déclenchant la protection de batterie.
L’appareil est automatiquement mis hors tension, même si
l’autonomie de la batterie est suffisante ou si l’autonomie de la
batterie indiquée ne correspond pas à l’autonomie réelle.
•Une charge ou décharge continue est répétée plusieurs fois.
t Rechargez la batterie après l’avoir vidée. L’indication de la durée restante sera correcte.
L’affichage ne change pas.
t Reportez-vous à la section « Remarques sur l’affichage de l’autonomie de la batterie ».
22-FR
Page 49

Le témoin CHARGE clignote et « WARNING » apparaît dans la
fenêtre d’affichage.
•Une batterie qui n’a pas été utilisée pendant longtemps est en cours de charge.
t La batterie qui n’a pas été utilisée pendant longtemps n’a peut-être pas la capacité
minimale suffisante pour reconnaître cet appareil ou une batterie. Dans ce cas, retirez la
batterie de cet appareil, puis réinstallez-la.
Si l’indication « WARNING » est indiquée après avoir réinstallé la batterie, effectuez les
vérifications du tableau suivant.
Retirez la batterie de cet appareil,
puis réinstallez-la.
Si le témoin CHARGE clignote
encore :
Installez une autre batterie
« InfoLITHIUM ».
Si le témoin CHARGE clignote
encore :
Le problème vient de cet appareil.
Contactez votre revendeur Sony le plus proche et apportez-lui l’appareil qui ne
fonctionne pas.
Si le témoin CHARGE s’allume, mais ne
clignote plus :
Si le témoin CHARGE s’éteint à la fin de la
charge, il n’y a aucun problème.
Si le témoin CHARGE s’allume, mais ne
clignote plus :
Si le témoin CHARGE s’éteint à la fin du
temps de charge, la première batterie
insérée présente un problème.
FR
23-FR
Page 50

Spécifications
Adaptateur secteur/chargeur (AC-VQL1BP)
Alimentation requise 100 V à 240 V CA, 50/60 Hz
Tension de sortie DC OUT : 8,4 V 2,0 A (VCR A/VCR B)
Température de fonctionnement 0 °C à + 40 °C (+32 °F à +104 °F)
Température de stockage - 20 °C à + 60 °C (-4 °F à +140 °F)
Dimensions environ 220 × 61 × 155 mm (l/h/p)
Poids environ 770 g (1 lb 11 oz)
Courant d’appel commutation à chaud, mesuré conforme aux norms européennes EN55103-1:
14 A (230 V)
Articles inclus
Adaptateur secteur/chargeur (AC-VQL1BP, appareil principal) .......... (1)
Cordon d’alimentation .......... (1)
Cordon de raccordement (DK-215) ........... (1)
Cordon de raccordement (DK-415) ........... (1)
Jeu de documents imprimés
La conception et les spécifications peuvent être modifiées sans préavis.
Borne de charge de la batterie : 8,4 V CC, 2,3 A (BATT A/
BATT B)
(8 3/4 × 2 1/2 × 6 1/8 po.)
24-FR
Page 51

Page 52

Nombre del producto: Adaptador/cargador de ca
Modelo: AC-VQL1BP
AVISO
Para reducir el riesgo de incendio o descarga eléctrica,
no exponga la unidad a la lluvia ni a la humedad.
Para evitar una descarga eléctrica, no abra la unidad.
Solicite servicio técnico únicamente a personal cualificado.
Esta unidad debe conectarse a una toma de corriente con conexión a tierra.
PRECAUCIÓN
Sustituya la batería únicamente por otra del tipo especificado, ya que de lo contrario es posible
que se produzcan incendios o lesiones.
Para los clientes de Europa
Este producto con la marca CE cumple tanto con la Directiva EMC como con la Directiva de
Bajo voltaje emitidas por la Comisión de la Comunidad Europea. El cumplimiento de estas
directivas implica conformidad con las siguientes normas europeas:
•EN60065: Seguridad del producto
•EN55103-1: Interferencia electromagnética (Emisión)
•EN55103-2: Susceptibilidad electromagnética (Inmunidad)
Este producto está diseñado para su utilización en los Entornos electromagnéticos siguientes: E1
(uso residencial), E2 (uso comercial e industrial ligero), E3 (exteriores urbanos) y E4 (entorno
con EMC controlada, por ejemplo un estudio de TV).
2-ES
Page 53

Tratamiento de equipos eléctricos y electrónicos de uso comercial al final de
su vida útil (applicable en la Unión Europea y en países europeos con
sistemas de recogida selectiva de residuos)
Este símbolo en su equipo o su embalaje indica que el presente producto no puede
ser tratado como residuos domésticos normales. En su lugar, deben entregarse
conforme al correspondiente plan de recogida para el reciclaje de equipos
eléctricos y electrónicos. Asegurándose de que este producto es desechado
correctamente, Ud. ayuda a prevenir las consecuencias negativas para el medio
ambiente y la salud humana que podrían derivarse de la incorrecta manipulación
de este producto. El reciclaje de materiales ayuda a conservar las reservas
naturales. Para obtener información detallada sobre el reciclaje de este
producto,contacte con su oficina local de Sony o visite la página Web europea de
Sony para empresas:
http://www.sonybiz.net/environment
< Aviso para los clientes de países en los que se aplican las directivas de la UE >
El fabricante de este producto es Sony Corporation, 1-7-1 Konan Minato-ku Tokyo, 108-0075,
Japón. El representante autorizado en lo referente al cumplimiento de la directiva EMC y a la
seguridad de los productos es Sony Deutschland GmbH, Hedelfinger Strasse 61, 70327
Stuttgart, Alemania. Para resolver cualquier asunto relacionado con el soporte técnico o la
garantía, consulte las direcciones que se indican en los documentos de soporte técnico y
garantía suministrados por separado.
PRECAUCIÓN
Aunque la estación se haya apagado, no debe desconectarse de la fuente de alimentación ca
mientras ésta permanezca enchufada a la toma de pared.
La placa de características está situada en la parte inferior.
ES
No coloque la unidad en lugares estrechos, como entre una pared y un mueble.
Utilice esta unidad cerca de una toma de corriente de pared. Así, se podrá desconectar
inmediatamente el enchufe de alimentación de la toma de corriente de pared para desconectar
la alimentación en caso de producirse cualquier anormalidad durante la utilización de la
unidad.
3-ES
Page 54

4-ES
Page 55

Índice
PRECAUCIÓN .........................................................................................................6
Notas sobre el uso.................................................................................................... 8
Usar esta unidad en el extranjero ........................................................................10
Características ........................................................................................................ 11
Funciones ................................................................................................................12
Identificación de los componentes ......................................................................13
Uso como adaptador de ca ...................................................................................14
Carga de la batería .................................................................................................16
Comprobación de la carga.................................................................................... 19
Solución de problemas ..........................................................................................22
Especificaciones .....................................................................................................24
ES
5-ES
Page 56

PRECAUCIÓN
• No utilice la unidad en entornos mojados, grasientos, húmedos o polvorientos.
Estas condiciones podrían ocasionar incendios e incluso descargas eléctricas.
• No permita que entre agua u objetos extraños en la unidad.
Esto podría causar incendios e incluso descargas eléctricas. Si se introducen en la unidad,
desconecte el cable de alimentación del enchufe de la pared y póngase en contacto con su
distribuidor Sony más cercano.
• No permita que entre agua u objetos extraños en la unidad.
Esto podría causar incendios o descargas eléctricas.
• No sitúe esta unidad cerca del agua.
Si permite que entre agua en esta unidad o en las baterías, si permite que se mojen o si las usa
en el cuarto de baño pueden causar un incendio o una descarga eléctrica.
• No intente desmontar ni modificar la unidad.
Esto podría causar incendios o descargas eléctricas. Póngase en contacto con el distribuidor de
Sony más cercano para obtener información sobre inspecciones o reparaciones.
• No intente romper o forzar la unidad con martillos, pisotones o golpes.
Esto podría causar incendios o descargas eléctricas.
• Cargue únicamente las baterías especificadas.
Si no lo hace, podría causar incendios, humo e incluso descargas eléctricas.
• Procure no dañar el cable de alimentación o de conexión.
Un cable de alimentación de ca o de cc dañado puede causar incendios e incluso descargas
eléctricas.
– No intente desmontar ni dañar el cable de alimentación.
– No coloque ningún objeto pesado encima del cable de alimentación ni tire de él.
– No sitúe esta unidad cerca de un calefactor. No intente calentarla.
– Asegúrese de desconectar siempre el cable de alimentación sujetando el enchufe.
Si los cables están dañados, deje de usar la unidad y póngase en contacto con su distribuidor
Sony más cercano.
• Conecte firmemente el extremo del cable de alimentación con el enchufe a la toma de
corriente de pared.
Si el enchufe no está correctamente enchufado, puede causar fuego o humo que pueden
producir quemaduras u otras lesiones.
• Utilice esta unidad con el voltaje de alimentación indicado en ella.
Usar esta unidad con cualquier otro voltaje que no sea el indicado puede causar un incendio o
incluso una descarga eléctrica.
• No use la unidad en lugares extremadamente cálidos.
Si no lo hace, podría causar incendios, humo o descargas eléctricas.
Use esta unidad a temperaturas inferiores a 40 °C
No exponga esta unidad a la luz solar directa durante períodos de tiempo prolongados.
• No sujete la unidad ni las baterías durante mucho tiempo mientras están enchufadas.
Estos dispositivos pueden calentarse cuando reciben alimentación, lo que podría provocar
quemaduras.
• No cubra la unidad con ningún objeto o material.
Si la cubre, impedirá que irradie calor, lo que podría provocar su deformación e incluso
incendios.
• No toque la unidad con las manos mojadas.
Podría sufrir una descarga eléctrica.
• Coloque la unidad sobre una superficie estable.
Si la superficie sobre la que se coloca la unidad no es estable esta podría caerse, lo cual puede
dañar la unidad o provocar lesiones.
• Utilice el cable de alimentación suministrado.
No usar el cable de alimentación suministrado puede causar descargas eléctricas o daños.
• Coloque los cables correctamente.
Si alguien tropieza con el cable de alimentación, podría caerse y sufrir lesiones.
6-ES
Page 57

• Cuando no utilice la unidad, desconecte el enchufe del cable de alimentación.
Cuando almacene la unidad, desconecte el cable de alimentación del enchufe de la pared y
desconecte las baterías. Si las deja conectadas, podrían producirse incendios.
• Conecte el cable de conexión a tierra.
Si el cable de conexión a tierra está desconectado pueden producirse descargas eléctricas.
Conecte el cable de conexión a tierra como se indica a continuación.
Usar el cable de conexión a tierra suministrado proporciona una conexión a tierra para mayor
seguridad.
Si no puede conectar la toma de tierra, contacte con el distribuidor de Sony más cercano.
• Compruebe el consumo de energía del equipamiento usado con esta unidad para no
sobrepasar el límite de la toma a la que está conectada.
Puede calentarse, lo que podría provocar quemaduras.
ES
7-ES
Page 58

Notas sobre el uso
Esta unidad no posee especificaciones contra el polvo, las salpicaduras ni el agua.
Carga
•Cargue solamente baterías auténticas Sony con esta unidad.
•No cargue baterías distintas de las designadas para esta unidad.
•Fije firmemente la batería.
Te mperatura de carga
•Para conseguir el máximo rendimiento de la batería, el rango de temperatura de carga
recomendado es de +10 °C a +30 °C La carga es más difícil a temperaturas más bajas.
•Aunque esta unidad es compatible con la carga rápida, la carga fuera de la gama de
temperaturas recomendada puede aumentar el tiempo de carga para proteger la batería.
Después de haberse sobrepasado el tiempo de carga, ésta no volverá a la carga rápida
aunque la temperatura entre dentro de la gama de temperaturas recomendada. Extraiga y
vuelva a instalar la batería para cargarla de nuevo.
Dónde no colocar esta unidad
Independientemente de si se está utilizando la unidad o no, no la coloque en ninguno de los
lugares siguientes. Si lo hiciese, podría provocar fallos de funcionamiento.
•Lugares con temperaturas extremadamente altas
– Lugares expuestos a la luz solar directa, como un salpicadero, o cerca de un calefactor. La
temperatura interior de un coche puede llegar a ser muy alta con las ventanas cerradas en
verano o expuesto a la luz solar y si deja la unidad en su interior, ésta se puede deformar o
funcionar indebidamente.
•Lugares expuestos a fuertes vibraciones
•Lugares con un potente electromagnetismo o expuestos a radiaciones
•Lugares con excesiva arena
– En lugares como en la orilla del mar, en otros lugares arenosos o en lugares en los que se
produzcan nubes de polvo, proteja la unidad de la arena y el polvo. La arena y el polvo
pueden provocar fallos de funcionamiento.
8-ES
Page 59

Precauciones de uso
•Fije la batería a esta unidad firmemente cuando desee cargar la batería.
•El terminal de la batería se puede dañar si la batería no está conectada correctamente.
•No utilice la unidad cerca de lugares con fuerte electromagnetismo o radiaciones.
Las ondas electromagnéticas pueden hacer que la unidad no grabe o reproduzca archivos de
vídeo correctamente.
•Para proteger la batería, extráigala de la unidad cuando haya terminado de cargarse.
•No golpee ni deje caer la unidad.
•Mantenga la unidad alejada de receptores de televisión o AM.
El ruido del equipo puede interferir con un televisor o radio si está colocada cerca.
•Procure que ningún objeto metálico entre en contacto con las partes metálicas de la unidad ni
con la placa de conexiones. De lo contrario es posible que se produzca un cortocircuito.
•No conecte esta unidad a un adaptador de tensión (convertidor para viajes) cuando viaje al
extranjero. Puede causar incendios o daños.
•Es posible que la batería y esta unidad se calienten durante la carga o inmediatamente
después de ésta.
•Desenchufe la unidad de la toma de pared después de utilizarla. Para desconectar el cable, tire
del enchufe.
•En la parte inferior de la unidad se encuentra una placa de características que indica la tensión
de alimentación y el consumo energético.
•Conecte el cable de alimentación a la toma de la pared después de conectar la toma de tierra.
Desconecte el cable de alimentación antes de desconectar la toma de tierra.
•No exponga la unidad a la humedad. No coloque objetos que contengan agua, como un
florero o similar, sobre la unidad.
Mantenimiento
•Limpie esta unidad con un paño seco y suave cuando se ensucie.
•Si la unidad está muy sucia, utilice un paño humedecido con una pequeña cantidad de
solución de detergente neutro en las zonas a limpiar y, a continuación, séquela de nuevo.
•No use ningún tipo de disolvente como diluyentes, alcohol o bencina. Estos pueden dañar la
superficie de la unidad.
•Cuando utilice un paño de limpieza tratado químicamente, siga las instrucciones
correspondientes.
•No rocíe disolventes volátiles, como insecticidas, ni coloque productos de caucho o vinilo
sobre la unidad durante un tiempo prolongado. Si lo hace puede deteriorar o dañar esta
unidad.
ES
9-ES
Page 60

Usar esta unidad en el extranjero
Utilice un adaptador de enchufe de ca disponible en el mercado (no suministrado), si es
necesario, en función del diseño de la toma de corriente de pared.
No conecte esta unidad a un adaptador de tensión (convertidor para viajes) cuando
viaje al extranjero. Puede causar incendios o daños.
10-ES
Page 61

Características
El AC-VQL1BP es un adaptador/cargador de ca que puede proporcionar alimentación de cc a
los equipos externos Sony y que permite conectar y cargar las cuatro baterías de iones de litio
Sony*.
* Esta unidad puede cargar un máximo de dos baterías simultáneamente (una en cada ranura, A
y B).
(Cuando conecte dos baterías a las ranuras del sistema al mismo tiempo, esta unidad no podrá
cargar las baterías simultáneamente. Después de cargar totalmente la batería que se ha
conectado primero, esta unidad pasa a cargar la otra batería conectada al sistema
automáticamente).
•Para cargar baterías de iones de litio.
No puede utilizarse para recargar baterías de níquel-cadmio o de hidruro de níquel-metal.
•No puede utilizarse en algunos modelos de equipos, como una videocámara, etc.
Confirme la compatibilidad de su equipo antes de utilizarlo.
Características
Conexión simultánea de un máximo de cuatro baterías
Hay dos sistemas de carga, A y B. Esta unidad puede aceptar un máximo de cuatro baterías.
Cada sistema carga una batería. Después de terminar el proceso de carga, esta unidad pasa a
cargar la otra batería conectada al sistema automáticamente.
Dos terminales de salida de cc del sistema
Hay dos sistemas de terminales de cc, A y B. Esta unidad puede operar el equipo externo como
un adaptador de ca (La unidad no podrá utilizarse como salida de cc y cargar la batería en el
mismo sistema).
Mostrar “BATTERY LOG” y la información de carga
Cuando conecta una batería “InfoLITHIUM” (serie L) a esta unidad, se muestra el historial de
uso y las condiciones de carga de la batería.
•Tiempo total de carga, número total de ciclos de carga, el año y el mes del último uso
•Tiempo de uso útil de la batería insertada, tiempo restante hasta que termine la carga
(Los valores indicados son aproximados. La información que se muestra para cargar las baterías
es limitada).
Carga efectiva
Puede seleccionar “carga completa” o “carga normal” con el interruptor del modo de carga.
Si tiene prisa, ajústelo en “carga normal” para terminar de cargar una de las baterías y, cuando
haya terminado la primera, empiece a cargar la otra.
Cuando la batería se haya cargado completamente, la unidad lo indicará y detendrá la carga.
Función de auto comprobación
Cuando ocurre algún problema con una batería o esta unidad, se mostrará un aviso en la
pantalla del visor.
Para obtener más información, consulte “Carga de la batería” (pág. 16).
ES
11-ES
Page 62

¿Qué es “InfoLITHIUM”?
“InfoLITHIUM” es una batería de iones de litio que puede intercambiar datos con un equipo
electrónico compatible relacionados con el consumo de la batería. Se recomienda utilizar una
batería “InfoLITHIUM” (serie L) con equipos electrónicos que posean la marca .
“InfoLITHIUM” es una marca comercial de Sony Corporation.
“BATTERY LOG”
Esta unidad puede mostrar la información almacenada en las baterías.
•Tiempo de carga total
•Número total de ciclos de carga
•El año y el mes del último uso
Funciones
Precaución acerca de cada visor (lea atentamente
esta información antes de utilizar la unidad).
Durante la carga de la batería, esta unidad mostrará las condiciones de carga y la información
de la batería, siempre que se cumplan las condiciones siguientes.
•Cuando utilice la batería “InfoLITHIUM”
•Cuando utilice un dispositivo electrónico que posea la marca
Asegúrese de utilizar una batería que posea la marca . Consulte el manual de
instrucciones suministrado con el dispositivo de vídeo para ver si es compatible con
“InfoLITHIUM”.
Si usa la batería en dos o más equipos de vídeo, etc. se mostrará la información de la batería del
último equipo que haya usado.
“BATTERY LOG” es compatible con las baterías recargables NP-F970, NP-F770, NP-F570.
Otros modelos no son compatibles o tienen limitaciones de visualización.
12-ES
Page 63

Identificación de los componentes
1
3
4
1 Ranura (A1, A2, B1, B2)
2 Terminal de entrada de ca
3 Selector A de modo de salida
4 Conector A de salida cc OUT
5 Visor A
6 Indicador luminoso de registro A
7 Indicador luminoso de registro B
8 Visor B
2
14
13
12
11
10
9
8
7
6
5
9 Selector de modo de carga
10 Conector B de salida cc OUT
11 Selector B de cambio de salida
12 Botón DISPLAY de cambio de visualización
(A1, A2, B1, B2)
13 Indicador luminoso CHARGE (A1, A2, B1, B2)
14 Obturador de terminales
ES
Visor
15
16
17
18
15 Indicador “InfoLITHIUM”
16 Indicador WARNING de
advertencia
17 Indicador TIME TO CHG de
tiempo hasta la carga
18 Indicador de tiempo
WARNING
TIME TO CHG
NORMAL FULL
19
20
BATTERY LIFE
VCR/CAMERA
21
hm
22
19 Indicador BATTERY LIFE de vida útil de la
batería
20 Indicador VCR/CAMERA de videograbadora/
videocámara
21 Indicador de carga completa
22 Indicador de carga restante de la batería
13-ES
Page 64

Uso como adaptador de ca
Para obtener más información, consulte el manual de instrucciones del equipo de vídeo.
2
A la toma de pared
1
3
Los interruptores y los ajustes tienen dos sistemas, A y B. Cambie el selector según el sistema
que esté usando.
1Ajuste el selector de modo de salida en “VCR/CAMERA”.
2 Conecte el cable de alimentación a esta unidad y a una toma de
pared.
Sonará un pitido y se encenderá la pantalla del visor.
Notas
Introduzca completamente y con firmeza el enchufe del cable de alimentación en la toma de
pared.
3 Conecte el cable de conexión al conector cc OUT.
4 Conecte el cable de conexión al equipo de vídeo.
Para obtener más información sobre la dirección del cable de conexión, consulte el manual
de instrucciones del equipo de vídeo.
Si utiliza el cable de conexión DK-215Si utiliza el cable de conexión DK-415
14-ES
Page 65

Notas
•Si ajusta el selector de salida en “CHARGE” durante el funcionamiento, la unidad
interrumpirá el suministro de alimentación al equipo de vídeo.
•No podrá cargar la batería conectada a esta unidad mientras esté en modo “VCR/CAMERA”.
•Puede usar un sistema de esta unidad como adaptador de ca y usar el otro sistema como
cargador.
•Mantenga alejada esta unidad del equipo de vídeo si la imagen se visualiza distorsionada.
•El ejemplo ilustrado corresponde a una conexión a una videocámara digital de alta definición
HVR-Z7, HVR-V1.
ES
15-ES
Page 66

Carga de la batería
Para obtener más información, consulte el manual de instrucciones del equipo de vídeo.
3
4
3
A la toma de pared
1
2
Los interruptores y los ajustes tienen dos sistemas, A y B. Cambie el selector según el sistema
que esté usando.
1Ajuste el selector de modo de carga en “NORMAL CHARGE” o
“FULL CHARGE”.
Ajústelo en “FULL CHARGE” cuando necesite cargar completamente la batería.
Ajústelo en “NORMAL CHARGE” cuando quiera terminar el proceso de carga cuando
posea una carga normal.
Para obtener más información, consulte “Cambiar el modo de carga” (pág. 17).
2Ajuste el selector de salida en “CHARGE”.
Para obtener más información, consulte “Instalación simultánea de dos o más baterías” (pág.
18).
3 Conecte el cable de alimentación de ca a esta unidad y a una
toma de pared.
Sonará un pitido y se encenderá la pantalla del visor.
Notas
Introduzca completamente y con firmeza el enchufe del cable de alimentación en la toma de
pared.
4 Conecte la batería.
Para obtener más información sobre cómo conectar o extraer la batería, refiérase a
“Colocación y extracción de la batería” (pág. 19).
5 Cuando finalice la carga, extraiga la batería.
Cuando las condiciones de carga establecidas en el selector de modo de carga se han
alcanzado, esta unidad deja de cargar. Cuando el indicador luminoso CHARGE de esta
unidad se apague, la carga se ha completado. Para obtener más información sobre la carga
completa, refiérase a “Cambiar el modo de carga” (pág. 17).
Refiérase a “Colocación y extracción de la batería” (pág. 19) para extraer la batería.
16-ES
Page 67

Notas
•Si ajusta el selector de salida en “VCR/CAMERA” durante la carga, ésta se detendrá.
•Si el indicador luminoso CHARGE no se enciende o parpadea, compruebe si la batería está
correctamente instalada en esta unidad. Si la batería no está bien colocada, no se cargará.
•La carga rápida sólo está disponible con las baterías “InfoLITHIUM”.
•Dependiendo de la batería que se use, la información que se muestra en el visor puede ser
limitada.
•Si ocurre algún problema durante el proceso de carga, el indicador luminoso CHARGE
parpadeará y la palabra “WARNING” aparecerá en la pantalla del visor.
Para obtener más información, refiérase a “Solución de problemas”, (pág. 22).
Cambiar el modo de carga
Existen dos tipos de carga. “Carga normal (NORMAL CHARGE)” y “Carga completa (FULL
CHARGE)”.
Puede ajustar el selector de modo de carga en “NORMAL CHARGE” o “FULL CHARGE”.
Carga normal
(NORMAL
CHARGE)
Carga completa
(FULL CHARGE)
* En el modo de carga normal, “FULL” no se visualizará cuando se ha completado la carga normal.
Cuando el proceso de carga normal haya terminado, el
indicador de carga de la batería se mostrará como se
describe a la derecha.
Cuando el proceso de carga completa haya terminado,
el indicador de carga de la batería se mostrará como se
describe a la derecha. Tarda más tiempo que la carga
normal, pero proporciona un tiempo extra de uso al
equipo de vídeo al que se conecte.
Tiempo de carga
NP-F970 NP-F770 NP-F570
Tiempo de carga normal 200 min 135 min 85 min
Tiempo de carga completa 260 min 195 min 145 min
•El tiempo aproximado que se muestra corresponde a la carga de una batería vacía con esta
unidad a 25 ºC
•El tiempo de carga puede diferir en función del estado de la batería o de la temperatura
ambiental.
Puede usar la batería antes de que la carga se haya completado.
Extraiga la batería cuando lo requiera. Podrá utilizarla aunque no haya finalizado la carga.
El tiempo disponible de la batería variará en función del tiempo de carga.
Notas
•El tiempo aproximado que se muestra corresponde a la carga de una batería vacía con esta
unidad a 25 ºC El tiempo indicado puede diferir en función del estado de la batería o del
tiempo real de carga. Puede que no se indique el tiempo de carga dependiendo de las
condiciones de la batería. No se trata de un fallo de funcionamiento.
•Para hacer que se visualice el tiempo restante de una batería nueva, instálela primero en el
equipo de vídeo y utilícela durante unos 20 segundo A continuación, cargue la batería con
esta unidad.
•El tiempo de carga normal y la duración de la carga de la batería dependen de la batería y de
las condiciones de uso.
•Cuando se selecciona el modo de carga “NORMAL CHARGE”, la carga se detiene cuando
llega al nivel normal y no está activada la carga completa.
•Antes de que la carga se complete en ambos modos, se puede cambiar el modo de carga.
ES
17-ES
Page 68

Instalación simultánea de dos o más baterías
1
1
2
•Esta unidad puede albergar un máximo de cuatro baterías simultáneamente.
(Esta unidad tiene dos sistemas, A y B, y cada sistema tiene dos ranuras).
•Las dos baterías instaladas en cada una de las ranuras del sistema A, (A1 o A2) y conectadas a
cada una de las ranuras del sistema B (B1 o B2) (las dos baterías conectadas a sistemas
diferentes) se pueden cargar simultáneamente. Cuando quiera cargar dos baterías
rápidamente, conecte una a la ranura del sistema A y la otra a la ranura del sistema B. La carga
de los dos baterías se iniciará simultáneamente.
Cuando conecte dos baterías a las ranuras de diferentes sistemas
Las dos baterías se cargan simultáneamente.
Las dos baterías instaladas en cada una de las ranuras
del sistema A, (A1 o A2) y conectadas a cada una de las
ranuras del sistema B (B1 o B2) (las dos baterías
conectadas a sistemas diferentes) se puede cargar
1111
1
simultáneamente.
Cuando conecte dos baterías a las ranuras del mismo sistema
Las dos baterías no se cargan simultáneamente. Cuando la carga de una ranura se haya
completado, se iniciará la de la otra automáticamente.
Cuando conecte dos baterías a las ranuras del sistema A
al mismo tiempo, se iniciará primero la carga de la
batería instalada en la ranura A1.
Cuando conecte dos baterías a las ranuras del sistema
A, pero no al mismo tiempo, se iniciará primero la carga
11212
de la batería instalada primero. Después de que la carga
de la primera batería se haya completado, la carga de la
otra batería se iniciará automáticamente. El sistema B
funciona igual que el sistema A.
Conexión simultánea del máximo de cuatro baterías
Si conecta una batería a la ranura del sistema A y otra a la ranura del sistema B, las dos se
cargan simultáneamente.
Después de cargar completamente las baterías
instaladas en la ranura 1 de los sistemas A y B, (A1, B1),
se iniciará la carga de las baterías instaladas en la
ranura 2 de los sistemas A y B.
1111
1222
2
Notas
•Esta unidad puede albergar un máximo de cuatro baterías simultáneamente, pero sólo puede
cargar dos baterías simultáneamente.
•Dos baterías conectadas al mismo sistema no se pueden cargar simultáneamente. (Cuando la
carga de una ranura se haya completado, se iniciará la otra automáticamente.)
18-ES
Page 69

Colocación y extracción de la batería
1 Coloque la batería en esta unidad con la marca B encarada hacia el obturador de
terminales.
2 Deslice la batería en el sentido de la flecha.
Presione la batería hasta que el obturador de terminales se introduzca completamente en la
unidad.
Extracción de la batería
Deslícela en el sentido contrario de la
instalación y después levántela en posición
recta para extraerla.
Notas
•No levante la unidad sujetándola por la batería.
•No intente provocar un cortocircuito en el obturador de terminales. Cuando instale la batería
en esta unidad, asegúrese de no golpear el obturador de terminales con la batería.
Comprobación de la carga
Cuando comienza la carga, el nivel de carga de la batería se ilumina en la pantalla del visor.
ES
Dependiendo del equipo de vídeo usado, es posible que la vida útil de la batería no se muestre.
Consulte el manual de instrucciones del equipo de vídeo.
•El contenido del visor cambia cada vez que se pulsa el botón de cambio de visualización
DISPLAY. Las luces del botón de cambio de DISPLAY y el indicador luminoso del registro
indican el número de ranura y el objeto de la información que se muestra.
•La indicación de tiempo de la batería que no esté cargándose volverá automáticamente a la de
la batería que esté cargándose transcurridos unos 10 segundo
Esta explicación hace referencia a la comprobación de carga con el visor de una batería
conectada a la ranura A1. Las otras ranuras funcionan igual que la ranura A1.
19-ES
Page 70

El contenido del visor cambia cada vez que se pulsa el botón de cambio de visualización
DISPLAY como se muestra a continuación.
Duración de la batería
Se indica la duración de la batería conectada
a la ranura A1.
Tiempo de carga normal
Se indica el tiempo restante hasta completar
la carga normal de la batería conectada a la
ranura A1.
Tiempo de carga completa
Se indica el tiempo restante hasta completar
la carga completa de la batería conectada a
la ranura A1
(Cuando se selecciona el modo de carga
“NORMAL CHARGE”, esto no se indica).
Tiempo de carga total
Se indica el tiempo de carga total de la
batería conectada a la ranura A1.
Número total de ciclos de
carga
Se indica el número de ciclos de carga de la
batería conectada a la ranura A1.
Último uso
Se indica el año y el mes del último uso de
la batería conectada a la ranura A1 con el
equipo de vídeo, etc. Se muestra en el
siguiente orden: mes - año.
Notas
Cuando se indican la duración de la batería, el tiempo de carga normal o el tiempo de carga
completa en el visor, el indicador luminoso de registro del visor no se enciende.
20-ES
Page 71

Duración de la batería
Se indica la duración aproximada de la batería si se usa con el último equipo de vídeo al que ha
sido conectada.
Tiempo de carga normal
Se indica el tiempo restante hasta alcanzar el nivel de carga normal.
Tiempo de carga completa
Se indica el tiempo restante hasta alcanzar el nivel de carga completo.
TTL CHG (tiempo de carga total)
Se indica el tiempo de carga total aproximado desde la primera carga de la batería. La unidad
mínima indicada son cinco horas.
CYCLE (número total de ciclos de carga)
Se indican los ciclos de carga total aproximados desde la primera carga de la batería.
La unidad mínima es 5 y los tiempos se indican en múltiplos de cinco. Si se interrumpe la carga
y se continúa en el medio de una carga no cuenta como una carga completa.
LAST USE (mes y año del último uso)
Cuando conecte una batería a esta unidad, se indica el año y el mes del último uso de la batería
con el equipo de vídeo, etc. Se muestra en el siguiente orden: mes - año.
Ejemplo:
01 08
RR
me año
El año y el mes del último uso es enero de 2008.
Se visualizará “-- --” cuando utilice esta unidad con un equipo de vídeo que no tenga
ajustado el calendario.
ES
Notas
•La indicación “BATTERY LOG” es compatible con las baterías recargables NP-F970, NP-F770,
NP-F570. Hay restricciones sobre el contenido que se puede mostrar con otros modelos.
•Todos los valores indicados son aproximados. Estos valores aproximados se pueden usar
como referencia de las condiciones de uso. No están relacionados con el deterioro de la batería
o esta unidad.
•Cuando conecte una batería a esta unidad, puede que no se muestre la información del último
uso de la batería con el equipo de vídeo, etc. La luz del vídeo o algunos modelos de equipos
de vídeo etc. pueden no ser compatibles. Cuando conecte la batería al equipo, si no se
enciende el interruptor de encendido del equipo, no se reconoce como el último uso. Si el año
y el mes del último uso no están claros, se muestra “-- --” en el visor. No se trata de un fallo de
funcionamiento.
•Si la temperatura de la batería es demasiado alta o baja durante la carga o instalación en esta
unidad, se indicará lo siguiente. En este caso, la batería conectada se carga con valores de bajo
voltaje para protegerla. No se trata de un fallo de funcionamiento.
21-ES
Page 72

Solución de problemas
Compruebe los siguientes puntos antes de ponerse en contacto con su distribuidor Sony más
cercano. Si esta unidad no funciona correctamente después de revisarla, contacte con su
distribuidor Sony más cercano.
El equipo de vídeo no funciona.
•El enchufe de alimentación está desconectado de la toma de corriente de pared.
t Conecte el enchufe de alimentación a la toma de corriente de pared.
•No está bien conectado el cable de conexión.
t Conecte correctamente el cable de conexión.
•El selector de modo de salida está ajustado en “CHARGE”.
t Ajuste el selector de modo de salida del sistema que usa en “VCR/CAMERA”.
La batería no está cargada.
•El enchufe de alimentación está desconectado de la toma de corriente de pared.
t Conecte el enchufe de alimentación a la toma de corriente de pared.
•La batería no está conectada a esta unidad correctamente.
t Compruebe la dirección en que está introducida la batería y coloque la batería de nuevo
correctamente.
•El selector de modo de salida está ajustado en “VCR/CAMERA”.
t Ajuste el selector de modo de salida del sistema que usa en “CHARGE”.
•La batería conectada primero se está cargando.
t Después de que la carga de la primera batería conectada se haya completado, la carga de la
otra batería se iniciará automáticamente.
•La batería completamente cargada o casi completamente cargada está conectada a esta unidad.
t La carga omite la batería totalmente cargada.
•Está en el estado de protección por temperatura.
t Use esta unidad en el margen de temperaturas recomendado. Incluso si la batería se
encuentra dentro del margen de temperaturas recomendado al inicio del proceso de carga,
esta se recalienta durante dicho proceso, y puede entrar en el modo de protección por
temperatura.
La alimentación se desconecta inmediatamente aunque queda
suficiente energía en la batería, o el tiempo restante visualizado
difiere del real.
•La carga o descarga continuada se repite varias veces.
t Recargue de nuevo la batería después de haberla agotado por completo. El tiempo restante
se indicará correctamente.
La visualización no cambia.
t Consulte “Notas sobre la visualización de la duración de la batería”.
22-ES
Page 73

El indicador luminoso CHARGE parpadea y en el visor se indica
“WARNING”.
•Se carga una batería que no se ha utilizado durante mucho tiempo.
t Es posible que una batería que no se ha utilizado durante mucho tiempo carezca de la
capacidad restante mínima necesaria para que la unidad y la batería se reconozcan entre sí.
En tal caso, extraiga la batería de la unidad y, a continuación, instálela de nuevo.
Si se indica “WARNING” en el visor después de conectar de nuevo la batería, sigua los
siguientes pasos.
Extraiga la batería de la unidad e
instálela de nuevo.
Si el indicador luminoso CHARGE
vuelve a parpadear:
Conecte otra batería
“InfoLITHIUM”.
Si el indicador luminoso CHARGE
vuelve a parpadear:
La unidad tiene un problema.
Póngase en contacto con su distribuidor Sony más cercano en relación con el
producto afectado.
Si el indicador luminoso CHARGE se
ilumina y no vuelve a parpadear:
Si el indicador luminoso CHARGE se
apaga después de completar la carga, no
hay ningún problema.
Si el indicador luminoso CHARGE se
ilumina y no vuelve a parpadear:
Si el indicador luminoso CHARGE se
apaga porque ha transcurrido el tiempo de
carga, el problema reside en la batería
instalada en primer lugar.
ES
23-ES
Page 74

Especificaciones
Cargador/adaptador de ca (AC-VQL1BP)
Requisitos de alimentación ca de 100 V a 240 V y 50/60 Hz
Voltaje de salida cc OUT: 8,4 V 2,0 A (VCR A/VCR B)
Temperatura de funcionamiento De 0 °C a 40 °C
Temperatura de almacenamiento De -20 °C a + 60 °C
Dimensiones Aprox. 220 × 61 × 155 mm (an/al/prf)
Peso Aprox. 770 g
Corriente de entrada de conmutación caliente, medida según el estándar europeo EN55103-1: 14
A (230 V)
Elementos incluidos
Cargador/adaptador de ca (AC-VQL1BP cuerpo principal).......(1)
Cable de alimentación.......(1)
Cable de conexión (DK-215).......(1)
Cable de conexión (DK-415).......(1)
Juego de documentación impresa
El diseño y las especificaciones están sujetos a cambios sin previo aviso.
Terminal de carga de la batería: 8,4 V 2,3 A (BATT A/BATT B)
24-ES
Page 75

Page 76

警告
为减少发生火灾或触电的危险,请勿让本装置淋雨或受潮。
为了避免触电,请勿打开机壳。
维修限找专业人员为您服务。
为减少火灾或触电的危险,请勿在本装置上放置如花瓶等盛有液体的物体。
本机必须接地
使用前须知
只要本装置连接在墙壁插座上,即使关闭装置本身的电源,也并未与交流电源断开。
标示牌位于该装置的底部。
请勿将本装置置于狭窄的空间,例如在墙壁与家具之间。
请在墙上电源插座附近使用本装置。这样可确保在使用中发生故障时,能够快速地将电源线从墙
上电源插座拔出以关闭电源。
制造商:索尼公司
版次:2007 年 12 月
2-CS
Page 77

目录
注意.....................................................................................................................4
使用须知 ............................................................................................................ 5
在海外使用本装置 ............................................................................................. 7
特征....................................................................................................................8
功能....................................................................................................................9
部件识别 .......................................................................................................... 10
用作电源适配器 ............................................................................................... 11
给电池组进行充电 ........................................................................................... 13
检查充电 .......................................................................................................... 16
故障排除 .......................................................................................................... 19
规格..................................................................................................................21
CS
3-CS
Page 78

注意
• 请勿在潮湿、油腻、湿润或多尘的环境使用本装置。
此类环境可导致起火甚至触电。
• 请勿使水或异物进入本装置。
这样可能导致起火或者触电。如果此类物质进入本装置,请断开电源线与墙上电源插座的连
接,并请就近咨询 Sony经销商。
• 请勿弄湿本装置或电池组。
这样可能导致起火甚至触电。
• 请勿将本装置置于水附近。
使水进入本装置或电池组、弄湿它们或者在浴室内使用它们,都可导致起火或者触电。
• 请勿试图拆卸或者改装本装置。
这样可能导致起火或者触电。关于检查或者修理,请就近咨询 Sony 经销商。
• 请勿试图击打或作用力于本装置,例如捶打、践踏或者掉落。
这样可能导致起火甚至触电。
• 请勿对非指定的电池组充电。
这样可能导致起火、冒烟、甚至触电。
• 请避免损坏电源线或者连接线。
损坏的交流电源线或直流电缆可导致起火甚至触电。
– 请勿试图改装或损坏电线或电缆。
– 请勿将任何重物置于电线或电缆上,或者拉扯电线或电缆。
– 请勿将本装置置于加热器附近。请勿试图对其进行加热。
– 在断开电线或电缆的连接时,请务必抓住插头。
如果电线发生损坏,请停止使用本装置并请就近咨询 Sony 经销商。
• 将电源线的插头部分稳固地插到墙上电源插座中。
如果插头没有稳固地插入,则可能导致起火或者冒烟,并可引发灼伤或者其他人身伤害。
• 使用本装置时请使用本装置上所标示的供电电压。
若在使用本装置时使用标示电压以外的供电电压,则可能导致起火甚至触电。
• 请勿在极热的地方使用本装置。
这样可能导致起火、冒烟、甚至触电。
请在 40℃ 以下的温度下使用本装置。
请勿将本装置过久地置于直射阳光下。
• 请勿使本装置或电池组过久地通电。
通电后它们可能变热,从而导致起火。
• 请勿使用任何物品或材料覆盖本装置。
覆盖本装置将妨碍其散热,从而导致其变形甚至起火。
• 请勿用湿手触碰本装置。
这样可能导致触电。
• 请将本装置放置在稳固的地点。
如果未将本装置放置在稳固的地点,它可能翻倒或者掉落,从而发生损坏或者导致人身伤害。
• 请使用随附的电源线。
不使用随附电源线可能导致触电或者损坏。
• 请正确放置线缆。
人员可能被电源线或连接电缆绊倒并跌伤。
• 不使用本装置时,请拔出电源插头。
存放本装置时,请将电源插头从墙上电源插座中拔出,并卸下电池组。否则可能导致起火。
• 请连接安全接地线。
如果断开与接地线的连接,可能导致触电。请按照以下步骤连接接地线。
使用随附的接地线进行安全接地连接。
如果无法连接接地线,请就近咨询 Sony 经销商。
• 请查看随本装置一起使用的设备的功率,确保定额插座不会过载。
它可能变热从而导致损坏。
4-CS
Page 79

使用须知
本装置不具备防尘、防溅湿或防水功能。
充电
• 本装置请务必使用原装 Sony 电池组。
• 除了适用于本装置的电池组以外,请勿对其他电池组进行充电。
• 请稳固地装好电池组。
充电温度
• 为了发挥电池的最大效率,建议在 10℃ 到 30℃ 的温度范围内进行充电。如果温度较低,
充电将变得更加困难。
• 尽管本机允许快速充电,但如果不在建议的温度范围内进行充电,为了保护电池组,可能需
要较长的充电时间。充电时间一旦延长了,则即使恢复在建议的温度范围内进行充电,也不
能恢复快速充电。此时,请卸下并重装电池,重新开始进行充电。
不要把装置放在以下地方
无论本装置处于使用中或者存放中,都不要将其放在以下任何一种场所。否则可能导致故障。
• 太热或太冷的场所
– 阳光直射的场所,例如仪表板上或加热器附近。在夏天密闭的车窗内或强烈日光下,汽车内
的温度会变得极高,此时若将本装置置于车内可能导致其变形或者发生故障。
• 振动剧烈的场所
• 有强电磁或射线的场所
• 多沙的场所
– 在海滨或其他多沙的区域或沙尘暴发生的场所,请保护本装置不受沙尘侵蚀。沙尘可能导致
故障。
CS
5-CS
Page 80

使用注意事项
• 对电池组进行充电时,请将电池组稳固地安装到本装置内。
• 如果电池组没有正确安装,电池端子可能被损坏。
• 请勿在有强电磁或射线的场所使用本装置。
电磁波可能导致本装置无法正确录制或者播放视频。
• 为保护电池组,请在充电完成后立即将电池组从本装置中卸下。
• 请勿对本装置实施机械冲击或者掉落本装置。
• 请将本装置远离电视机或 AM 收音机。
如果将本装置置于附近,设备噪音可能进入电视机或者收音机。
• 慎防让金属件接触到装置的金属部分或连接板。否则可能发生短路。
• 海外旅行时,切勿将本装置连接至电压转接器(旅行转接器)。否则,可能导致起火或损坏。
• 在充电过程中或充电刚刚完成时,电池组及本装置可能变热。
• 使用后请将本装置从墙上电源插座拔出。断开电源线时,请抓住插头将其拔出。
• 标示操作电压,功率消耗等的铭牌位于底面。
• 在接地连接以后,将电源线连接到墙上电源插座。
在接地连接之前,请将电源线从墙上电源插座断开。
• 请勿使本装置受潮。请勿将装有水的物品(例如花瓶等)放在本装置上。
保养
• 本装置变脏时,请用一块干布进行擦拭。
• 当本装置变得很脏时,请用布蘸上少量中性溶剂进行擦拭,然后再将其擦干。
• 请勿使用稀释剂、汽油、酒精等。否则可能损伤本装置表面。
• 当您使用化学清洁布时,请参阅其使用说明书。
• 使用挥发性溶剂(例如杀虫剂),或使本装置长期解除橡胶或乙烯塑料制品,可能导致本装置
发生老化或损坏。
6-CS
Page 81

在海外使用本装置
如有必要,请根据墙上电源插座的设计,使用市售的交流插头适配器(非附件)。
海外旅行时,请勿将本装置连接到电压转接器(旅行转接器)。否则可能导致起火或者损坏。
CS
7-CS
Page 82

特征
AC-VQL1BP 是一种电源适配器/充电器,它能够为 Sony 外部设备提供直流电源,并可安装
四个 Sony 锂离子电池组 * 并为其充电。
* 本装置最多可同时为两个电池组进行充电(分别在 A 槽及 B 槽)。
(将两个电池组同时安装到同一个系统的槽内时,本装置无法同时对两个电池组进行充电。
第一个电池组的充电完成以后,本装置自动切换为对同一系统内的另一个电池组进行充电。)
•关于对锂离子型电池组充电。
不能用于对镍镉或镍氢(Ni-Cd 或Ni-MH)电池进行充电。
•不能用于某些型号的设备(摄像机等)。
使用前,请确认所用设备的兼容性。
特征
最多可同时安装四个电池组
本装置具有两个充电系统 A 和 B。本装置能够安装四个电池组。每个系统为一个电池组充电。充
电完成后,它将开始自动为安装到同一系统内的其他电池组进行充电。
双系统直流输出终端
本装置具有两个直流输出终端系统 A 和 B。本装置能够作为一个电源适配器运作外部设备。(本
装置无法在进行直流输出作业的同时,对同一系统内的电池组充电。)
显示“BATTERY LOG”(电池日志)及充电信息
将“InfoLITHIUM”(L 系列)电池组安装到本装置时,将会显示电池组的使用履历及充电条
件。
• 总充电时间,充电循环总量,上次使用的年月
• 所装电池组的可用时间,距离充电完成的剩余时间
(所示值为大约值。对电池组充电的显示信息受到限制。)
有效充电
使用充电模式转换开关,您可选择“完全充电”或“标准充电”。
如果您急于使用,请设定于“标准充电”,当标准充电完成时,便会结束一个电池组的充电并开
始对另一个电池组充电。
如果是已完全充电的电池组,本装置将显示充电已完成,并不再对电池组充电。
自检功能
当电池组或本装置发生故障时,显示窗将显示警告信息。
有关详情,请参阅“给电池组进行充电”(第 13 页)。
8-CS
Page 83

什么是“InfoLITHIUM”电池?
“InfoLITHIUM”是一种锂离子充电池组,它可与兼容的视频装置交换其电池消耗数据。Sony
建议您采用“InfoLITHIUM”电池组(L 系列)来操作带有 标志的电子设备。
“InfoLITHIUM”是 Sony 公司的商标。
“BATTERY LOG”(电池日志)
本装置能够显示电池组上所记录的信息。
• 总充电时间
• 充电循环总量
• 上次使用的年月
功能
各个显示的注意事项(使用前请仔细阅读。)
在对电池组充电时,只要满足以下条件,本装置将显示充电条件及电池组信息。
• 使用“InfoLITHIUM”电池组
• 使用带有 标记的电子设备
请确认正在使用带有 标记的电子设备。有关您的视频设备是否兼容
“InfoLITHIUM”,请参阅随视频设备附送的使用说明书。
如果将电池组用于两个或更多的视频设备等,将显示上次使用设备的电池信息。
“BATTERY LOG”(电池日志)与充电电池组 NP-F970、NP-F770、NP-F570 兼容。
其他型号不兼容或者具在显示时受限制。
CS
9-CS
Page 84

部件识别
1
3
4
1 槽(A1、A2、B1、B2)
2 交流输入端子
3 输出转换开关 A
4 DC OUT(直流输出)连接器 A
5 显示窗 A
6 日志指示灯 A
7 日志指示灯 B
8 显示窗 B
2
14
13
12
11
10
9
8
7
6
5
9 充电模式转换开关
10 DC OUT(直流输出)连接器 B
11 输出转换开关 B
12 DISPLAY(显示)转换按钮
(A1、A2、B1、B2)
13 CHARGE(充电)灯(A1、A2、B1、B2)
14 端子快门
显示窗
15
16
17
18
15 “InfoLITHIUM”(数据锂电池)
指示灯
16 WARNING(警告)指示灯
17 TIME TO CHG(充电)指示灯
18 时间指示灯
10-CS
WARNING
TIME TO CHG
NORMAL FULL
BATTERY LIFE
VCR/CAMERA
hm
19 BATTERY LIFE(电池使用时间)
20 VCR/CAMERA(录像机/摄像
21 充满电指示灯
22 电池使用时间指示灯
19
20
21
22
指示灯
机)指示灯
Page 85

用作电源适配器
有关详情,请参阅视频设备的使用说明书。
2
连至电源插座
1
3
A 系统和 B 系统具有两套开关及设置系统。请为您正在使用的系统设置开关。
1 将输出范围开关设定于“VCR/CAMERA”。
2 将电源线连接到本装置,并将电源线连接到墙上电源插座。
此时会发出一声“哔”声,同时出现显示窗。
注
稳固地将电源线一直插进墙上电源插座内。
3 将连接电缆连接到 DC OUT(直流输出)连接器。
4 将连接电缆连接到视频设备。
有关连接电缆的详情,请参阅视频设备的使用说明书。
使用连接电缆 DK-215 时使用连接电缆 DK-415 时
CS
11-CS
Page 86

注
• 在作业中将输出转换开关设定于“CHARGE”(充电)会切断对视频设备的供电。
• 无法在“VCR/CAMERA”模式下对连接到本装置的电池组充电。
• 可以将本装置的一个系统用作电源适配器,并将另一个系统用作充电器。
• 如果图像扭曲,请将本装置远离您的视频设备。
• 图示是至 HVR-Z7,HVR-V1 数码 HD 视频摄像机的连接。
12-CS
Page 87

给电池组进行充电
有关详情,请参阅视频设备的使用说明书。
3
4
3
连至电源插座
1
2
对于 A 系统和 B 系统具有两套开关及设置系统。请为您正在使用的系统设置开关。
1 将充电模式转换开关设定于“NORMAL CHARGE”或“FULL
CHARGE”。
需要对电池组进行完全充电时,请设定于“FULL CHARGE”。
希望在标准充电完成后即停止时,请设定于“NORMAL CHARGE”。
有关详情,请参阅“转换充电模式”(第 14页)。
2 将输出转换开关设定于“CHARGE”。
有关详情,请参阅“同时安装两个或更多电池组”(第 15 页)。
3 将电源线连接到本装置,并将电源线连接到墙上电源插座。
此时会发出一声“哔”声,同时出现显示窗。
注
稳固地将电源线一直插进墙上电源插座。
4 安装电池组。
有关安装及卸下电池组的详情,请参阅“安装和卸下电池组”(第 16 页)。
CS
5 充电完成后,卸下电池组。
当达到充电模式转换开关所设置的充电条件后,本装置停止充电。当本装置的 CHARGE 灯
熄灭时,充电完成。有关充电完成的详情,请参阅“转换充电模式”(第 14 页)。
卸下电池组时请参阅“安装和卸下电池组”(第 16 页)。
13-CS
Page 88

注
• 充电期间如果把输出转换开关设定于“VCR/CAMERA”,充电即停止。
• 如果 CHARGE 灯不点亮或闪烁,即请检查电池组是否正确地装在本装置上。如果电池组没有
安装稳固,将不能被充电。
• 只有“InfoLITHIUM”电池组才可以进行快速充电。
• 根据使用电池的种类,在显示窗所显示的信息可能受到限制。
• 如果充电期间出现问题,CHARGE 灯将闪烁,“WARNING”(警告)将显示在显示屏中。
有关详情,请参见“故障排除”(第 19页)。
转换充电模式
充电模式有两种,分别是“标准充电”和“完全充电”。
您可滑动充电模式转换开关,转换充电模式。
标准充电
(NORMAL
CHARGE)
完全充电
(FULL
CHARGE)
* 在标准充电模式下,当正常充电完成时不显示“FULL”。
当标准充电完成时,电池使用时间指示灯的显示如右图
所示。
当完全充电完成时,电池使用时间指示灯的显示如右图
所示。此种模式用时长于标准充电,同时连接到完全充
电的电池组上的视频设备可使用稍长一点的时间。
充电时间
NP-F970 NP-F770 NP-F570
标准充电时间 200 分钟 135 分钟 85 分钟
完全充电时间 260 分钟 195 分钟 145 分钟
• 所示的大约时间为 25℃下使用本装置对一个空电池组充电的时间。
• 根据电池组情况或环境温度,充电时间可能有所不同。
在充电尚未完成时使用电池组。
需要时请卸下电池组。即使充电尚未完成,仍可使用电池组。
电池寿命随充电时间而不同。
注
• 所示时间为 25℃下使用本装置对一个电池组充电的大约用时。根据环境温度,所示时间可能
与实际充电时间不同。根据电池组条件,可能不显示充电时间,这并不是故障。
• 要显示新电池组的电池使用时间时,可以先把它装到摄像机使用约 20 秒钟,然后用本机对其
充电。
• 标准充电时间及电池使用时间由所使用的电池组及使用条件决定。
• 当充电模式转换开关设定于“NORMAL CHARGE”(标准充电)时,充电在标准充电完成时
即结束,而不进行到完全充电的充电过程。
• 在各个模式下充电完成前,可以转换充电模式。
14-CS
Page 89

1
1
2
同时安装两个或更多的电池组
• 本装置能够同时安装最多四个电池组。
(本装置具有两个系统 A 和 B,每个系统具有两个槽。)
• 能够对两个分别安装到 A 系统的任一槽(A1 或 A2)的电池组,及安装到 B 系统的任一槽
(B1 或 B2)的电池组同时进行充电(两个电池组分别安装在不同的系统)。如果您希望快速对
两个电池组进行充电,请将一个安装到 A 系统的槽,另一个安装到 B 系统的槽。这样将会同时
开始对两个电池组进行充电。
将两个电池组安装到不同系统的槽中时
同时对两个电池组进行充电。
能够对两个分别安装到 A系统的任一槽(A1 或 A2)的
电池组,及安装到 B 系统的任一槽(B1 或 B2)的电池
组同时进行充电(两个电池组分别安装在不同的系统)。
1111
1
将两个电池组安装到同一系统的槽中时
两个电池组并非同时进行充电。当其中一个充电完成时,自动开始对另一个的充电。
同时将两个电池组安装到 A系统的槽中时,对所安装的
电池组从槽 A1 开始充电。
先后将两个电池组安装到 A系统的槽中时,先从先安装
的电池组开始充电。当第一个电池组充电完成时,自动
开始对另一个的充电。B 系统同A 系统。
11212
同时安装四个电池组时
同时开始对安装到 A 系统槽中的其中一个和安装到 B 系统槽中的其中一个电池组进行充电。
在对安装到 A 和 B 系统的槽 1(A1,B1)的电池组的充
电完成后,开始对安装到 A和 B 系统的槽 2(A2,B2)
的电池组的充电。
1111
注
• 本装置能够安装最多四个电池组,但是只能对最多两个电池组进行充电。
• 不能同时对安装到同一个系统中的两个电池组进行充电。(当其中一个充电完成后,自动开始
对另一个充电。)
1222
2
CS
15-CS
Page 90

安装和卸下电池组
1 让 B 标志面向端子快门,把电池组放在本装置上。
2 沿箭头方向滑入电池组。
按电池组直至端子快门完全进入本装置。
卸下充电池组
沿安装时的相反方向滑动电池组,然后垂直
将其取出。
注
• 请勿抓住电池组提起本装置。
• 请勿试图撞击端子快门。将电池组安装到本装置时,请确保不要让端子快门碰到电池组。
检查充电
充电开始时,电池使用时间显示在显示窗上。
根据所使用的视频设备,可能不显示电池使用时间。
请参阅视频设备的使用说明书。
• 每按一次 DISPLAY 转换按钮,显示窗中的显示将发生变化。DISPLAY 转换按钮的灯和日志
指示灯显示出槽的编号及显示信息的信息条目。
• 未充电的电池组的时间显示将在显示约 10 秒后自动转变为正在充电的电池组的时间显示。
此例说明安装到槽 A1 的电池组的充电检查及显示。其余槽同槽 A1。
16-CS
Page 91

每按一次 DISPLAY 转换按钮,显示窗中的显示变化如下:
电池使用时间
图示为安装到槽 A1 的电池组的电池使用时
间。
标准充电时间
图示为安装到槽 A1 的电池组距离标准充电
完成的剩余时间。
完全充电时间
图示为安装到槽 A1 的电池组距离完全充电
完成的剩余时间。
(当充电模式转换开关设定于“NORMAL
CHARGE”(标准充电)时,不显示该时
间。)
总充电时间
图示为安装到槽 A1 的电池组的总充电时间。
CS
充电循环总量
图示为安装到槽 A1 的电池组的充电循环总
量。
上次使用时间
图示为安装到槽 A1 的电池组上次随视频设
备等使用的年月。时间以月 - 年的顺序进行
显示。
注
当电池使用时间、标准充电时间或完全充电时间显示在显示窗上时,日志指示灯不点亮。
17-CS
Page 92

电池使用时间
显示随上次使用的视频设备等的大约电池使用时间。
标准充电时间
显示距离标准充电完成所剩余的大约时间。
完全充电时间
显示距离完全充电完成所剩余的大约时间。
TTL CHG(总充电时间)
显示从电池组首次进行充电起开始的大约总充电时间。标示的最小单位为 5 小时。
CYCLE(充电循环总量)
显示从电池组首次进行充电起开始的大约充电循环总量。最小单位为 5,而且次数以 5 的倍数进
行显示。后续充电时间及充电过程中的停顿不算做充电次数。
LAST USE(上次使用的年月)
将电池组安装到本装置以后,将显示电池组上次随视频设备等使用的年月。时间以月 -年的顺序
进行显示。
例如:
01 08
RR
月年
上次使用的年月为 2008 年 1 月。
本装置与未设置日历的视频设备搭配使用时,显示“-- --”。
注
• BATTERY LOG”(电池日志)与充电电池组 NP-F970、NP-F770、NP-F570 兼容。
其他型号所能显示的内容受到限制。
• 所有的显示时间为大约值。大约值可用作使用条件的参考。它与电池组或本装置的老化无关。
• 将电池组连接到本装置时,可能不显示上次使用的视频设备等的信息。视频灯或某些型号的视
频设备等可能不兼容。将电池组连接到本装置时,如果不打开设备的电源,则不会被识别为上
次使用。如果上次使用的年月不明,显示窗将显示“-- --”。这并非故障。
• 在充电或者安装过程中,如果电池组的温度高或者低,将会显示以下画面。这种情况下,为保
护电池组,用低充电电流值对所安装的电池组进行充电。这并非故障。
18-CS
Page 93

故障排除
在就近咨询 Sony 经销商之前,请先检查以下内容。如果本装置在检查后仍无法正确操作,请就
近咨询 Sony 经销商。
视频设备不起作用。
• 电源插头没有接到墙上电源插座。
t 将电源插头插入墙上电源插座。
• 连接器电缆没有正确连接。
t 正确连接连接器电缆。
• 输出转换开关设定于“CHARGE”。
t 将输出转换开关设定于“VCR/CAMERA”。
电池组没有充电。
• 电源插头没有接插到墙上电源插座。
t 将电源插头插入墙上电源插座。
• 电池组没有正确地连接到本装置。
t 检查电池组的方向,并重新正确安装电池组。
• 输出转换开关设定于“VCR/CAMERA”。
t 将使用系统的输出转换开关设定于“CHARGE”。
• 首个安装的电池组正在充电。
t 在首个安装的电池组充电完成后,开始对其他电池组的充电。
• 将完全充电或者几乎完全充电的电池组安装到了本装置中。
t 充电将跳过已完全充电的电池组。
• 处于温度保护状态下。
t 请在建议温度范围下使用本装置。即使在开始充电时处于建议温度范围内,充电过程中温度
将会上升并超过推荐温度范围,并且可能变成温度保护状态。
即使电池仍有足够的电力,也立即关掉电源,或所显示的电池使用时
间与实际使用时间不符。
• 后续充电时间或充电过程中的停顿重复了数次。
t 将电池组电量用尽后重新充电。剩余时间将会正确显示。
显示不能改变。
t 参见“关于电池使用时间的注意事项”。
CS
19-CS
Page 94

CHARGE 灯闪烁,并在显示窗中显示“WARNING”。
• 正在对一个长期未使用的电池组充电。
t 长期未使用的电池组可能没有留下足够的最小点亮以识别本装置及电池组。这种情况下,请
将电池组从本装置中取出并重新装入。
如果“WARNING”在重新装入电池组后出现,请通查下列图表。
从本装置卸下电池组,然后再重新
装上。
如果 CHARGE 灯仍然闪烁:
请安装其他的“InfoLITHIUM”电
池组。
如果 CHARGE 灯仍然闪烁:
说明本装置存在问题。
关于装置的问题,请就近咨询 Sony经销商。
如果 CHARGE 灯不再闪烁而一直点亮:
如果充电时间已过而 CHARGE灯熄灭了,
便没有问题。
如果 CHARGE 灯不再闪烁而一直点亮:
如果充电时间已过而 CHARGE灯熄灭了,
说明安装的第一个电池组存在问题。
20-CS
Page 95

规格
电源适配器/充电器(AC-VQL1BP)
电源要求 100 V - 240 V AC 50/60 Hz
输出电压 DC OUT: 8.4 V 2.0 A (VCR A/VCR B)
电池充电端子: 8.4 V 2.3 A (BATT A/BATT B)
操作温度 0℃ 到 +40℃
储藏温度 -20℃ 到 +60℃
尺寸 约 220 × 61 × 155mm(宽 / 高 / 深)
质量 约 770g
所含物品:
电源适配器/充电器(AC-VQL1BP 主体).......(1)
电源线 ..........(1)
连接导线 (DK-215) ........... (1)
连接导线 (DK-415) ........... (1)
成套印刷文件
设计或规格如有变动,恕不另行通知。
CS
21-CS
Page 96

 Loading...