

5-038-031-01(1)
「400」+「#」
ACアダプター/チャージャー
AC Adaptor/Charger
Adaptateur/Chargeur CA
取扱説明書/Operating Instructions/Mode d’emploi/
Manual de instrucciones
AC-VQ1051
©2021 Sony Corporation
Printed in China
https://www.sony.net/
1
2
3
4
5
13
14
15
16
17
6
7
8
9
10
11
12
18
19
20
21
22
2
3
1
4
3
4
5
1 2
本書には、事故を防ぐための重要な注意事項と製品の取り扱いかたを
示しています。
本書をよくお読みのうえ、製品を安全にお使いください。お読みに
なったあとは、いつでも見られるところに必ず保管してください。
同梱物
ACアダプター/チャージャー(AC-VQ1051本体)(1 )
電源コード(1 )
接続コード(DK-215)( 1)
接続コード(DK-415)( 1 )
印刷物一式
各部のなまえ
1 端子シャッター
2 スロット
3 DC入力
4 DC出力
5 充電ランプ
6 スロット
7 充電ランプ
8 出力切替スイッチ
9 充電モード切替スイッチ
10表示窓
11 スロット表示ランプ
12表示切替ボタン
AC-VQ1051は次のようにお使いになれます
•付属の接続コードを使い、ソニー製機器(ビデオカメラなど)を動作
させる。
•ソニー製リチャージャブルバッテリーパック(Lシリーズ)の充電器
として使う。
‒ 充電終了を充電モード切替スイッチで「満充電」または「実用充
電」に設定できます。お急ぎのときは「実用充電」に設定して、各
バッテリーを実用充電で終了することができます。
•“インフォリチウム”バッテリーを装着した場合は、以下の機能が働
きます。
‒ 急速充電ができます。
(通常充電(ビデオカメラ本体を使った充電など)より早く充電す
ることができます。)
‒ “BATTERYLOG”と充電情報を表示できます。
バッテリーの使用履歴や、充電状況を表示します。
•総充電時間、充電回数、最終使用年月
•使用可能時間、充電終了までの時間
表示窓の表示
13InfoLITHIUM(インフォリチウム)
表示
14WAITING表示
15WARNING表示
16
TIMETOCHG(充電)表示
17時間/ LOG表示
18
BATTERYLIFE(使用可能時間)
表示
19VCR/CAMERA表示
20実用充電表示
21満充電表示
22バッテリーマーク
•本機は、リチウムイオンタイプのバッテリー用です。ニカドタイ
プ、ニッケル水素タイプのバッテリーの充電には使えません。
•機器(ビデオカメラなど)によっては使えないものもあります。
お使いになる前に、お手持ちの機器をお確かめください。
InfoLITHIUM(インフォリチウム)バッテリーとは
“インフォリチウム”バッテリーに対応した機器との間で、バッテリー
の使用状況に関するデータ通信をする機能を持った新しいタイプ
のリチウムイオンバッテリーです。本機は“インフォリチウム”バッ
テリー(Lシリーズ)対応です。“インフォリチウム”バッテリーには
ロゴが付いています。
“InfoLITHIUM”(“インフォリチウム”)はソニーグループ株式会社の商
標です。
“BATTERY LOG”( “バッテリーログ”)とは
バッテリーに記録されている使用履歴を表示します。
•総充電時間
•充電回数
•最終使用年月
(表示はあくまで目安です。バッテリーにより表示できる内容に制
限があります。)
使用可能時間表示についてのご注意(必ずお読みくだ
さい)
本機は充電器として使用中、以下の条件を満たせば、充電の状況確認
やバッテリーの情報の目安を表示します。
•“インフォリチウム”バッテリーを使用している。
•お手持ちのビデオカメラなどが“インフォリチウム”対応機種である。
お手持ちのバッテリーに
さい。また、お手持ちのビデオカメラなどの取扱説明書で“インフォリ
チウム”対応機種かどうかご確認ください。
複数の“インフォリチウム”対応のビデオカメラなどをお使いの場合
は、最後にバッテリーを取り付けていた機器での情報を表示します。
“BATTERYLOG”(“バッテリーログ”)は、リチャージャブルバッテ
リーパックNP-F970、NP-F770、NP-F570が対象です。その他のバッ
テリーは対応していないなど、表示内容に制限があります。
接続コードをつないで使う
ご使用の機器(ビデオカメラなど)の取扱説明書もあわせてご覧くだ
さい。
1
出力切替スイッチを「 VCR/CAMERA」にする。
2
電源コードを本体につなぐ。
3
コンセントへつなぐ。
「ピーッ」という音がして、表示窓に表示がでます。
4
接続コードをDC出力へつなぐ。
5
接続コードをビデオカメラへつなぐ。
接続コードの取り付け方向については、ビデオカメラなどの取扱
説明書をご覧ください。
接続コードDK-215での接続例
接続コードDK-415での接続例
ご注意
•ビデオカメラなどを使用中に、出力切替スイッチを「CHARGE」にす
ると、ビデオカメラなどへの電源の供給は中断されます。
•「VCR/CAMERA」のモードでは、本機にバッテリーを取り付けても
充電することはできません。
•ビデオカメラなどの映像が乱れるときは、本機をお使いの機器から
離してください。
•接続コードDK-415は、リチャージャブルバッテリーパック(Lシリーズ)
対応機器のみ使用できます。お手持ちの機器をお確かめください。
•イラストは、デジタルHDビデオカメラレコーダーHDR-AX2000の
接続例です。
バッテリーを充電する
1
充電モード切替スイッチを「 NORMAL CHARGE」または
ロゴが付いているかご確認くだ
「 FULL CHARGE」に設定する。
満充電する場合は「FULLCHARGE」に設定してください。
実用充電で充電完了とする場合は「NORMALCHARGE」に設定し
てください。
詳しくは「充電モード切り替えについて」をご覧ください。
2
出力切替スイッチを「 CHARGE」にする。
3
電源コードを本体につなぐ。
4
コンセントにつなぐ。
「ピーッ」という音がして、表示窓に表示がでます。
5
バッテリーを取り付ける。
「バッテリーの取り付けかた」を参照して取り付けてください。充
電が始まると、表示窓のバッテリーマークが順番に点滅し、充電ラ
ンプが点灯します。
6
充電終了後、バッテリーを取りはずす。
充電モード切替スイッチで設定した充電終了条件で充電を終了し
ます。充電ランプが消灯したら充電終了です。充電終了については
「充電モード切り替えについて」を参照してください。
「バッテリーの取りはずしかた」を参照して、取りはずしてくださ
い。
充電モード切り替えについて
充電の終了には、実用充電と満充電があります。充電モードは、本機の
充電モード切替スイッチで切り替えることができます。
•実用充電(NORMALCHARGE)
充電されるとバッテリーマークが右図の表示にな
ります。
満充電で終了するよりもバッテリーの状態をより
良く保つことが可能ですが、使用可能時間が若干短
くなります。
•満充電(FULLCHARGE)
満充電で充電を終了すると、バッテリーマークが右
図の表示になります。実用充電より使用可能時間が
若干長くなりますが、充電時間も長くなります。
2個のバッテリーを同時に取り付ける
本機は同時に2個のバッテリーを取り付けることができます。どちら
か1個でも充電できます。同時に取り付けた場合、スロット
けたバッテリーから充電されます。
また、同時に取り付けない場合は、スロット
り付けたバッテリーから充電されます。
ご注意
•2個のバッテリーを取り付けることができますが、同時に実用充電
することはできません。
•
充電モード切替スイッチを「FULLCHARGE」に設定した場合、先に
取り付けたバッテリーから順に実用充電まで充電した後、2個の
バッテリーが同時に満充電まで充電されます。
、 に関わらず、先に取
に取り付
バッテリーの取り付けかた
1
本機の上にバッテリーを置く。
マーク側を端子シャッ
ター側にあわせる。
2
矢印の方向にバッテリーをスライドさせる。
端子シャッターが完全に隠れるまでスライドしてください。
バッテリーの取りはずしかた
バッテリーを取り付けたときと反対の方向にスライドさせ、真上に持
ち上げる。
ご注意
•バッテリーをつかんで、本機を持ち上げないでください。
•端子シャッターには衝撃を与えないでください。バッテリーを取り
付けるときなどは、ぶつけないよう、特にご注意ください。
•バッテリーを取り付けるときや、取りはずすときに指をはさまない
ようご注意ください。
主なバッテリーの充電時間
急速充電
NP-F970
実用充電時間
満充電時間
•本機を使用し、使い切ったバッテリーを25℃の室温で充電したと
きの時間です。
•周囲の温度やバッテリーの状態によっては、上記の時間と異なる場
合があります。
約285分
約345分
NP-F770
約185分
約245分
NP-F570
約110分
約170分
急いで使いたいとき
バッテリーは、充電が完了する前でも必要なときに取りはずして使え
ます。ただし、充電時間によってお使いになれる時間が異なります。
ご注意
•充電中に出力切替スイッチを「VCR/CAMERA」にすると、充電は中
断されます。
•充電ランプが点灯しなかったり点滅したときは、バッテリーがしっ
かり取り付けられているか確認してください。しっかり取り付けら
れていないと、充電されないことがあります。
•“インフォリチウム”バッテリー以外のバッテリーは、急速充電でき
ません。
•
充電モード切替スイッチを「NORMALCHARGE」に設定した場合は、
実用充電で終了し、満充電までの充電は行いません。
•充電モードの切り替えは、各モードでの充電終了前であれば可能で
す。
•使用後は必ず電源コードをコンセントから抜いておいてください。
抜くときは電源プラグを持って抜いてください。
充電中に何か異常があると、充電ランプが点滅し、表示窓に
“WARNING”と表示されます。
詳しくは「故障かな?と思ったら」をお読みください。
充電の状況を確認する
充電を開始すると、表示窓に使用可能時間が表示されます。
使用可能時間はビデオカメラのビューファインダーを使って撮影し
た場合の使用可能時間の目安です。液晶画面を使うと、使用可能時間
は短くなります。
ご使用のビデオカメラによっては、使用可能時間が表示されないこと
があります。詳しくは、「使用可能時間表示についてのご注意」をお読
みください。
充電中の表示内容の切り替えには2通りの方法があります。
充電中の表示内容の切り替えには、自動的に切り替わる表示と、表示
切替ボタンを押すことで切り替わる表示の2通りがあります。スロッ
ト表示ランプの点灯は、表示しているバッテリー情報のスロット番号
を示しています。
ここではスロット
にバッテリーを取り付けた場合を例に示します。
充電中に表示内容が自動的に切り替わる。
使用可能時間
はじめに取り付けたバッテリーの使用可能時間です。
充電する前にお使いだった“インフォリチウム”対応のビデオカメ
ラなどに取り付けたときの使用可能時間です。
使用可能時間
あとから取り付けたバッテリーの使用可能時間です。
充電時間
スロット と のバッテリーの満充電が終了するまでのトータ
ル時間です。
充電モード切替スイッチが「NORMALCHARGE」の場合は、実用
充電が終了するまでの時間が表示されます。
充電中に表示切替ボタンを押す。
充電中に表示切替ボタンを押すと、“BATTERYLOG”を表示すること
ができます。表示切替ボタンを押すごとに、下記のように表示が切り
替わります。
表示切替ボタンを押してから約5秒が経過すると、バッテリーの使用
可能時間を表示し、使用可能時間と充電が終了するまでの時間の表示
を自動的に切り替えます。
総充電時間
はじめに取り付けたバッテリーの総充電時間です。
最初に充電してからのおおよその総充電時間を表示します。最小
単位は5時間です。
充電回数
はじめに取り付けたバッテリーの充電回数です。
最初に充電してからのおおよその充電回数を表示します。最小単
位は5回で、5の倍数で表示されます。継ぎ足し充電をしたときや
途中で充電を中止したときなどは、充電回数としてカウントされ
ない場合があります。
最終使用年月
はじめに取り付けたバッテリーの最終使用年月です。
「月」「年(西暦の下二桁)」の順に表示されます。カレンダー未設定
のビデオカメラで使用した場合は「----」として表示されます。
総充電時間
あとから取り付けたバッテリーの総充電時間です。
充電回数
あとから取り付けたバッテリーの充電回数です。
最終使用年月
あとから取り付けたバッテリーの最終使用年月です。
充電終了後に表示切替ボタンを押す。
充電終了後は表示内容が自動的に切り替わりません。表示切替ボタン
を押すごとに、下記のように表示が切り替わります。表示切替ボタン
を押してから約5秒が経過すると、
充電が終了した状態です。充電モード切り替えスイッチ
が「 NORMAL CHARGE」の場合は、バッテリーマークに
「 NORMAL」が表示されます。
使用可能時間
はじめに取り付けたバッテリーの使用可能時間です。
使用可能時間
あとから取り付けたバッテリーの使用可能時間です。
総充電時間
はじめに取り付けたバッテリーの総充電時間です。
充電回数
はじめに取り付けたバッテリーの充電回数です。
最終使用年月
はじめに取り付けたバッテリーの最終使用年月です。
総充電時間
あとから取り付けたバッテリーの総充電時間です。
充電回数
あとから取り付けたバッテリーの充電回数です。
最終使用年月
あとから取り付けたバッテリーの最終使用年月です。
ご注意
•表示時間は25℃の室温で充電したときの目安です。使用環境に
よって実際の時間と異なる場合があります。また、バッテリーの状
態によっては、時間が表示されない場合がありますが、故障ではあ
りません。
•充電を開始してから時間表示するまで、しばらく時間がかかること
があります。
•充電していない側のバッテリーは、時間やバッテリー残量表示まで
に時間のかかる場合があります。
•新品のバッテリーで使用可能時間を表示するには、お使いのビデオ
カメラなどにバッテリーを取り付け、20秒程度ご使用ください。そ
のあと、本機に取り付け、充電を開始してください。
•
満充電済みのバッテリーを取り付けると「TIMETOCHGFULL1h」
(満充電終了まで1時間)の表示が出ることがありますが、故障では
ありません。
に最初にバッテリーを取り付け、次にスロット
の状態に戻ります。
•以下のときは、時間/LOG表示が「----」になったり、時間の表示に
ずれが生じることがありますが、故障ではありません。
‒ 表示時間と実際の充電時間にずれが生じたとき(そのまま満充電
まで充電を続けてください。)
‒ “インフォリチウム”バッテリーではないとき(使用可能時間表示
などの機能はありません。)
‒ 最終使用年月が不明のとき(バッテリーをビデオカメラへ取り付
けても電源を入れなかったり、ビデオカメラのカレンダーが未設
定の場合など)
‒ 実用充電終了から満充電終了までの間に、本機からバッテリーを
取りはずした場合
(実用充電終了から満充電終了までは約1時間です。)
‒ 長時間使用していないバッテリーを充電する場合(一度、満充電
まで充電してください。)
なお、バッテリーを2個取り付けた場合、どちらかのバッテリーが上
記の状態であれば同じ症状が生じることがあります。
•
“BATTERYLOG”表示は、リチャージャブルバッテリーパックNPF970、NP-F770、NP-F570を対象としています。その他のバッテリー
では表示できる内容に制限があります。
海外へお持ちになる方へ
本機は100V-240Vのワールドワイド対応です。
本機を海外旅行者の電子式変圧器(トラベルコンバーター)に接続
しないでください。発熱や故障の原因となります。
故障かな?と思ったら
もう1度点検してみましょう。それでも正常に動作しないときは、ソ
ニーの相談窓口にご相談ください。
ビデオカメラなどが動作しない
•電源プラグがコンセントからはずれている。
コンセントに差し込む。
•接続コードを正しく接続していない。
正しくつなぐ。
•出力切替スイッチが「CHARGE」になっている。
「 VCR/CAMERA」にする。
バッテリーの充電が行われない
•出力切替スイッチが「VCR/CAMERA」になっている。
「 CHARGE」にする。
バッテリーの残量が充分あるのに電源がすぐ切れる、また
は残量表示時間とずれが生じる
•バッテリーを使いきってから、もう一度満充電する。
残量が正しく表示されます。
表示切り替えが行われない
「使用可能時間表示についてのご注意」をお読みください。
表示窓に“Lo”と表示される
•低温になっているバッテリーを装着したり、10℃~ 30℃の推奨充
電温度範囲より低い温度で充電すると、下記のように表示される場
合があります。この場合、充電は行われますが、このままの状態が続
くとバッテリー保護のために“充電待機”(下記参照)になったり、充
分な充電が行われないことがあります。10℃~ 30℃の推奨充電温
度範囲で充電することをおすすめします。
本機の充電ランプには以下の2つの点滅パターンがあり
ます。
速い点滅・・・・・・約0.15秒の点灯と消灯を繰り返す
遅い点滅・・・・・・約1.5秒の点灯と消灯を繰り返す
充電ランプが点滅した場合は、以下の文章を確認して、適切に対処し
てください。点滅のパターンによって対処の方法が異なります。
充電ランプが遅い点滅を繰り返し、表示窓に“WAITING”
と表示される
充電が一時停止した待機状態になっています。
室温やバッテリーの温度が充電に適した温度範囲外のとき、自動的に
充電が一時停止されます。
充電に適切な温度の範囲内に戻ると、充電ランプが点灯し充電が再開
されます。
バッテリーの充電は、周囲温度が10℃~30℃の環境で行うことをお
すすめします。
充電ランプが速い点滅をして、表示窓に“WARNING”
と表示される
以下のような場合、1度目の充電では“WARNING”が表示される場
合があります。その場合は1度本機からバッテリーをはずし、再度
充電を行ってください。
長時間バッテリーを放置した場合
長時間バッテリーをビデオカメラ本体に取り付けたまま放置
した場合
バッテリーをお買い上げ直後
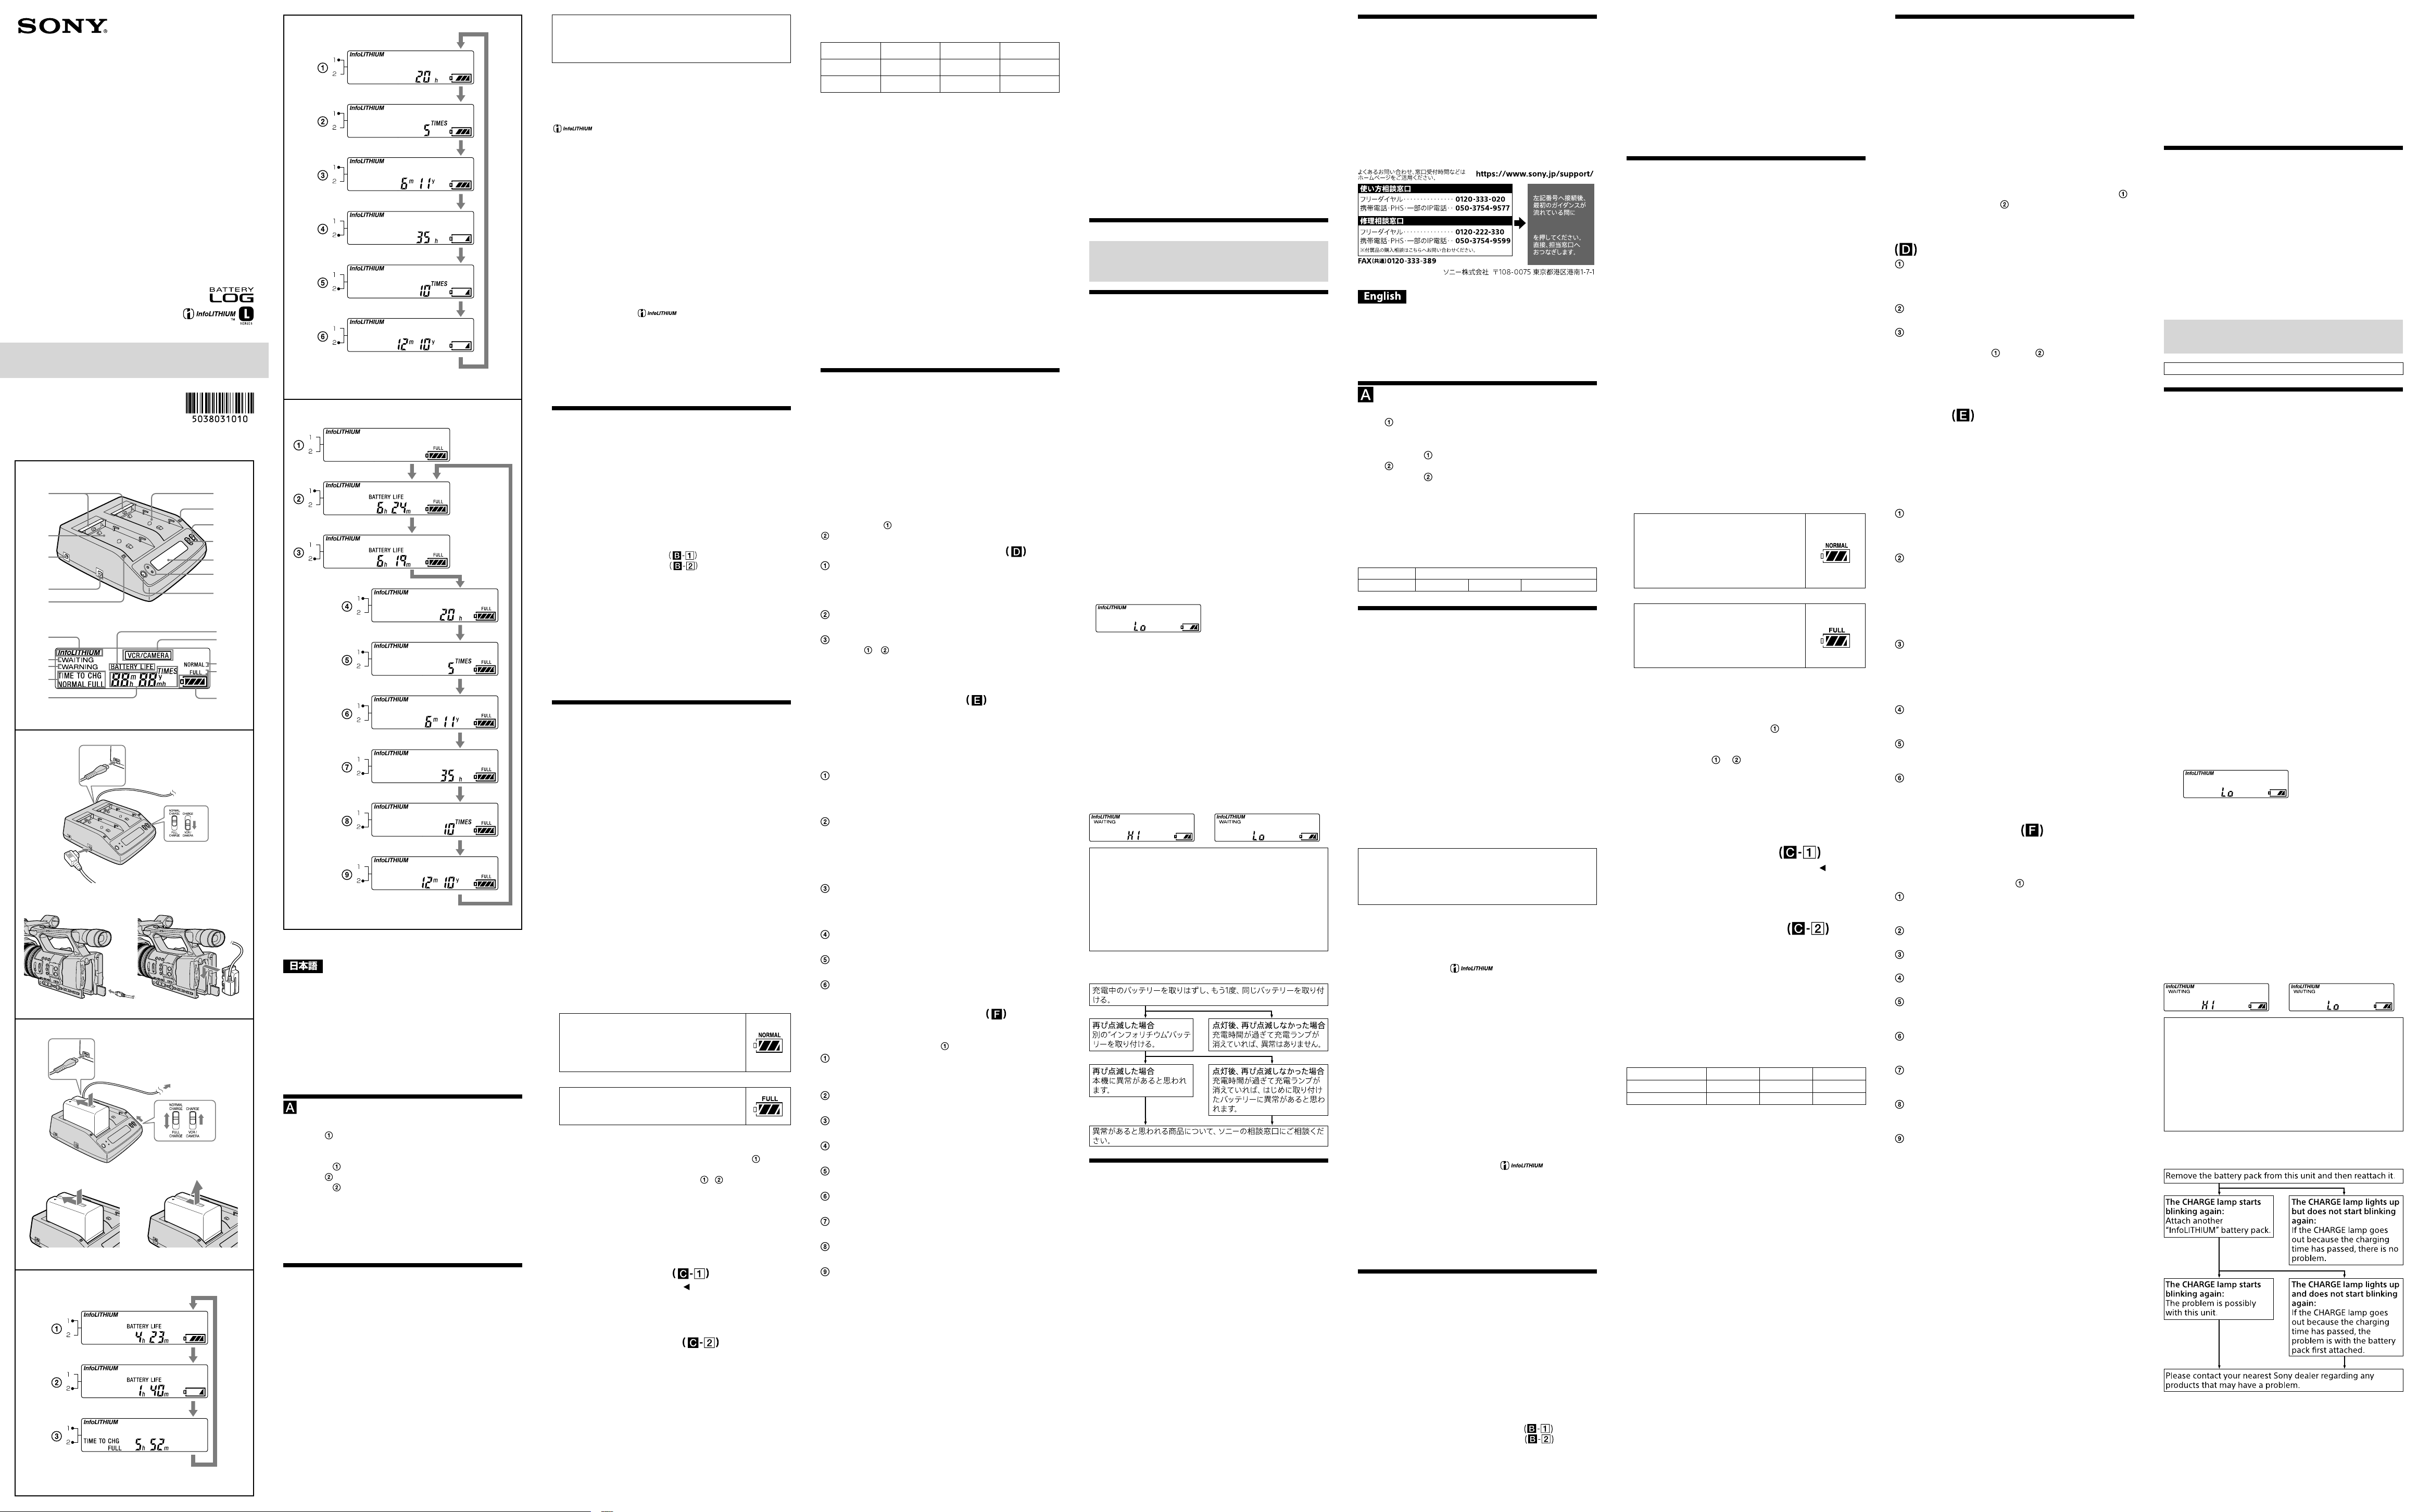
それでも“WARNING”が表示される場合、以下の手順に従って確認し
てください。
充電 中 のバッテリーを取りはずし 、もう1 度 、同じバッテリーを取り付
ける。
再び点滅した場 合
別 の “イン フ ォ リ チ ウム”バッ テ
リーを取り付 ける。
再び点滅した場 合
本機に異常 があると思われ
ます。
異常があると思われる商品について、ソニーの相談窓口にご相談くだ
さい。
点 灯 後 、再 び 点 滅 し な か っ た 場 合
充電時間が過ぎて充電ランプが
消 え て い れ ば 、異 常 は あ り ま せ ん 。
点 灯 後 、再 び 点 滅 し な か っ た 場 合
充電時間が過ぎて充電ランプが
消 え て い れ ば 、は じ め に 取 り 付 け
たバッテリーに異常があると思わ
れま す。
保証書とアフターサービス
保証書について
•この製品には保証書が添付されていますので、お買い上げの際、お
受け取りください。
•所定事項の記入および記載内容をお確かめのうえ、大切に保存して
ください。
•保証期間は、お買い上げ日より1年間です。
アフターサービスについて
調子が悪いときはまずチェックを
この取扱説明書をもう一度ご覧になってお調べください。
それでも具合の悪いときは
ソニーの相談窓口にご相談ください。
ご相談になるときは、次のことをお知らせください。
●型名:AC-VQ1051
●故障の状態:できるだけ詳しく
●お買い上げ日
保証期間中の修理は
保証書の記載内容に基づいて修理させていただきます。詳しくは保証
書をご覧ください。
記録内容の補償はできません
万一、本機の不具合により記録や再生がされなかった場合、画像や音
声などの記録内容の補償については、ご容赦ください。
主な仕様
定格入力 AC100V-240V 50Hz/60Hz 22W
DC12V/24V
定格出力 DC8.4V2.0A(VCR/CAMERA)
DC8.4V1.6A(CHARGE)
動作温度 0℃~40℃
保存温度 -20℃~+60℃
外形寸法(約)123mm×53mm×135mm
(幅/高さ/奥行き)(最大突起物を除く)
質量
仕様および外観は、改良のため予告なく変更することがありますが、
ご了承ください。
Included items
AC Adaptor/Charger (AC-VQ1051) (1)
AC Power cord (1)
Connecting cord (DK-215) (1)
Connecting cord (DK-415) (1)
Set of printed documentation
約400g
Identifying the parts
1 Terminal shutter
2 Slot
3 DC IN connector
4 DC OUT connector
5 CHARGE lamp
6 Slot
7 CHARGE lamp
8 Output change switch
9 Charging mode change
switch
10 Display window
11 Slot indicator lamp
12 DISPLAY change button
Battery to be recharged for this product is follows
Brand Name Sony
Battery Type NP-F570 NP-F770 NP-F970
Display window
13 “InfoLITHIUM” indicator
14 WAITING indicator
15 WARNING indicator
16 TIME TO CHG (charge)
indicator
17 Time/LOG indicator
18 BATTERY LIFE indicator
19 VCR/CAMERA indicator
20 Normal charge indicator
21 Full charge indicator
22 Battery life indicator
The AC-VQ1051 AC Adaptor/
Charger can be used as follows
• For operating Sony equipment (video cameras, etc.,) use the
connecting cords included with this unit.
• For charging Sony rechargeable battery packs (L series).
‒ You can set the level of charge completion to “Full charge”
or “Normal charge” with the charging mode change
switch. If you want to use the battery pack quickly, set
to “Normal charge” to complete charging in the normal
charged state.
• When “InfoLITHIUM” battery packs are attached to this unit,
the following functions are available.
‒ Quick charging
(Faster than charging with your video camera, etc.)
‒ “BATTERY LOG” and charging information can be
displayed.
Usage history and charging status of the battery pack is
displayed.
• Total charging time, charge count, last use year and
month
• Battery life, remaining time until charging is complete
• This unit is for charging lithium ion battery packs. It cannot
be used to recharge Ni-Cd or Ni-MH batteries.
• This unit cannot be used with some model video cameras
or other equipment. Confirm the compatibility of your
equipment before use.
What is “InfoLITHIUM”?
“InfoLITHIUM” is a lithium ion battery pack which can
exchange data on battery consumption with compatible
electronic equipment. We recommend that you use an
“InfoLITHIUM” battery pack (L series) with electronic
equipment that has the mark.
“InfoLITHIUM” is a trademark of Sony Group Corporation.
What is “BATTERY LOG”?
“BATTERY LOG” displays the usage history it recorded in the
battery pack.
• Total charging time
• Charge count
• Last use year and month
(Displays are approximate. Depending on the battery pack,
the contents of the display are limited.)
Notes on the BATTERY LIFE indicator
(Read carefully before use)
While charging the battery pack, this unit shows the status of
charging and information of the battery pack so long as the
following conditions are met.
• You are using an “InfoLITHIUM” battery pack.
• Your video camera, etc. is compatible with “InfoLITHIUM”.
Check that your battery pack has the mark.
Check in the operating instructions supplied with your video
equipment whether it is “InfoLITHIUM” compatible.
If you use the battery pack with more than one video camera,
etc. that is compatible with “InfoLITHIUM”, information is
shown for the equipment last attached to the battery pack.
“BATTERY LOG” is available with the rechargeable battery
packs NP-F970, NP-F770 and NP-F570. Other battery packs
may not be compatible or may display limited information.
To Operate Video Equipment
For details of connection, refer to the operating instructions of
the video camera etc.
1 Set the output change switch to VCR/CAMERA.
2 Connect the AC power cord to this unit.
3 Connect the AC power cord to a wall outlet.
There is a beep and the display window comes on.
4 Connect the connecting cord to the DC OUT connector
of this unit.
Connect the connecting cord to the video camera.
5
For the direction in which to fit the connecting cord,
refer to the operating instructions of video camera, etc.
When using the connecting cord DK-215
When using the connecting cord DK-415
Notes
• Setting the output change switch to CHARGE while
operating the video camera, etc. cuts the power supply to
the video camera.
• You cannot charge a battery pack attached to this unit when
this unit is in VCR/CAMERA mode.
• Move this unit away from your video camera, etc. if the
image is distorted.
• The connecting cord DK-415 can be used with equipment
compatible with the rechargeable battery pack (L series).
Confirm the compatibility of your equipment before use.
• The illustration shows connection to an HDR-AX2000 digital
HD video camera recorder.
To Charge the Battery Pack
1 Set the charging mode change switch to “NORMAL
CHARGE” or “FULL CHARGE”.
If you want to charge the battery pack until full charging is
complete, set the charging mode change switch to “FULL
CHARGE”.
If you want to finish charging when normal charging is
complete, set it to “NORMAL CHARGE”.
For details, refer to “Switching the charging mode”.
2 Set the output change switch to CHARGE.
3 Connect the AC power cord to this unit.
4 Connect the AC power cord to a wall outlet.
There is a beep and the display window comes on.
5 Attach the battery pack.
Refer to “To attach the battery pack”. When charging starts,
the battery life indicator in the display window blinks in
sequence and the CHARGE lamp lights up.
6 When charging is complete, remove the battery pack.
This unit finishes charging on the charging level that you
set with the charging mode change switch. When the
CHARGE lamp turns off, charging is complete. For details
about charge completion, refer to “Switching the charging
mode”.
Refer to “To remove the battery pack” when removing the
battery pack.
Switching the charging mode
There are two levels of charge completion: “Normal charge”
and “Full charge”. You can change the charging mode with the
charging mode change switch on this unit.
• NORMAL CHARGE
When charge is completed, the battery life
indicator is displayed as illustrated on the
right.
The condition of the battery pack can be
better maintained, but the battery life will
be slightly shorter than when in the full
charged state.
• FULL CHARGE
When charging is complete in the full
charged state, the battery life indicator is
displayed as illustrated on the right.
The battery life will be slightly longer than
when in the normal charged state, but the
charging time will also be longer.
Attaching two battery packs
simultaneously
You can attach two battery packs in this unit at the same time.
You can charge just one battery pack as well. Charging starts
with the battery pack installed in Slot .
When two battery packs are attached but not simultaneously,
charging starts with the battery pack attached first regardless
of whether it is in Slot or .
Notes
• Two battery backs can be attached, but they cannot be
charged at normal charging simultaneously.
• When the charging mode change switch is set to “FULL
CHARGE”, this unit completes normal charging in the order
that the battery packs were attached and then completes
full charging for both battery packs simultaneously.
To attach the battery pack
1 Place the battery pack on this unit with the mark
facing the terminal shutter.
2
Slide the battery pack in the direction of the arrow.
Press the battery pack until the terminal shutter is
completely concealed.
To remove the battery pack
Slide the battery pack in the direction of the arrow and
lift it straight out.
Notes
• Do not pick this unit up by holding the battery pack.
• Be sure not to hit the terminal shutter. When attaching the
battery pack, be particularly careful not to hit the battery
pack against it.
• Be careful not to pinch your fingers while attaching or
removing the battery pack.
Charging time
Quick Charge
NP-F970
Normal charge
Full charge
• The times shown are for charging an empty battery pack,
using this unit at an ambient temperature of 25 °C (77 °F).
• The charging time may differ depending on the condition of
the battery pack and the ambient temperature.
285 min
345 min
NP-F770
185 min
245 min
NP-F570
110 min
170 min
To use the battery pack quickly
You can use the battery pack even if you remove it from
this unit before charging is completed. However, a shorter
charging time means a shorter useable time.
Notes
• If the output change switch is set to VCR/CAMERA during
charging, charging stops.
• If the CHARGE lamp does not light up or blink, check that
the battery pack is correctly attached to this unit. If it is not
correctly attached, it will not be charged.
• Quick charging is only performed with “InfoLITHIUM” battery
packs.
• When the charging mode change switch is set to “NORMAL
CHARGE”, this unit finishes charging when normal charging
is complete.
• You can change the charging mode before each charging is
complete.
• Unplug this unit from the wall outlet after use. To disconnect
the cord, pull it out by the plug. Never pull the cord itself.
If anything goes wrong during charging, the CHARGE lamp
blinks and “WARNING” appears on the display. For details, see
“Troubleshooting”.
To Check Charging
When charging starts, the battery life lights up in the display
window.
The battery life displayed is the approximate time remaining
for recording images using the viewfinder. The battery life is
shorter if the LCD display is used.
The battery life may not be displayed with certain video
cameras. For details, refer to “Notes on the BATTERY LIFE
indicator”.
There are two methods of switching the contents of the
display window during charging.
There are two methods of switching the contents of the
display window: display changing automatically and display
changing each time you press the DISPLAY change button.
The slot indicator lamp corresponds to the slot number.
Following is an example of installing a battery pack in Slot
followed by another in Slot .
Changing the contents of the display
window automatically during charging
Battery life
The battery life of the first attached battery pack.
This is the battery life when attached to the “InfoLITHIUM”
compatible video camera, etc. last used.
Battery life
The battery life of the subsequently attached battery pack.
Charging time
The total remaining time until full charging of the battery
packs installed in Slot and Slot is complete.
When the charging mode change switch is set to “NORMAL
CHARGE”, the remaining time until normal charging is
complete is displayed.
Press the DISPLAY change button during
charging.
During charging, “BATTERY LOG” can be displayed by pressing
the DISPLAY change button.
The contents of the display window change each time you
press the DISPLAY change button as follows.
About five seconds after pressing the DISPLAY change
button, battery life is displayed and then this automatically
switches between the battery life and the remaining time until
charging is complete.
Total charging time
The total charging time of the first attached battery pack.
Displays the approximate total charging time from first
charging. The minimum displayed is 5 hours.
Total charge count
The number of times the first attached battery pack has
been charged.
Displays the approximate number of times the battery
pack has been charged since its first charging. The
minimum displayed is 5 times, and the count is displayed
in multiples of five. Top-up charges and suspended
charges may not be counted.
Year and month of last use
The year and month when the first attached battery pack
was last used.
Displays “Month” followed by “Year” (last two digits of the
year). If used with a video camera that has no calendar set,
“-- --” is displayed.
Total charging time
The total charging time of the subsequently attached
battery pack.
Total charge count
The number of times the subsequently attached battery
pack has been charged.
Year and month of last use
The year and month when the subsequently attached
battery pack was last used.
Press the DISPLAY change button after
charging is complete.
After charging is complete, the display does not change
automatically. The contents of the display window change
each time you press the DISPLAY change button as follows.
About five seconds after pressing the DISPLAY change button,
returns to the display shown in .
Charging is complete. When the charging mode
change switch is set to “NORMAL CHARGE”, the
battery life indicator shows “NORMAL”.
Battery life
The battery life of the first attached battery pack.
Battery life
The battery life of the subsequently attached battery pack.
Total charging time
The total charging time of the first attached battery pack.
Total charge count
The number of times the first attached battery pack has
been charged.
Year and month of last use
The year and month when the first attached battery pack
was last used.
Total charging time
The total charging time of the subsequently attached
battery pack.
Total charge count
The number of times the subsequently attached battery
pack has been charged.
Year and month of last use
The year and month when the subsequently attached
battery pack was last used.
Notes
• The time display is an approximate time when charging at
25 °C (77 °F). It may differ from the actual time depending
on the environment. Also, depending on the condition
of the battery, a time may not be displayed. This is not a
malfunction.
• It may take some time for the time to be displayed after
starting the charging.
• The time display and remaining battery life of the battery
pack on the side not being charged may take some time to
appear.
• To display the battery life of a new battery pack, first attach
it to your video camera and use it for about 20 seconds, and
then charge it with this unit.
• If you attach a fully charged battery pack to this unit, “TIME
TO CHG FULL 1h” may appear on the display. This is not a
malfunction.
• In the following cases, the time/LOG display may show
“-- --” or the time display may be out. This is not a
malfunction.
‒ There is a difference between the time display and actual
charging time. (Even if this happens, continue charging
until fully charged.)
‒ When charging a battery other than an “InfoLITHIUM”
battery pack (Battery life display and other functions are
not available.)
‒ When last use year and month are unclear. (When you
attach the battery pack to a video camera but do not
turn on the power of the video camera, or the calendar
function of the video camera is not setup, etc.)
‒ If the battery pack is removed from this unit after normal
charging is complete but before full charging is complete.
(It takes about one hour from when normal charging is
complete to when full charging is complete.)
‒ When charging a battery pack that has not been used for
a long time. (Fully charge once first.)
When two battery packs are attached to this unit, similar
symptoms may appear if either one of the batteries is in the
above condition.
• “BATTERY LOG” display is available with the rechargeable
battery packs NP-F970, NP-F770 and NP-F570. With other
battery packs, the contents of the display are limited.
Specifications
Input 100 V - 240 V AC 50 Hz/60 Hz 22 W
12 V/24 V DC
Output 8.4 V DC 2.0 A (VCR/CAMERA)
8.4 V DC 1.6 A (CHARGE)
Operating temperature 0 °C to 40 °C (32 °F to 104 °F)
Storage temperature –20 °C to +60 °C (–4 °F to +140 °F)
Dimensions (Approx.) 123 mm × 53 mm × 135 mm (w/h/d)
(4 7/8 in. × 2 1/8 in. × 5 3/8 in.)
(excluding the projecting parts)
Mass Approx. 400 g (14.1 oz.)
Design and specifications are subject to change without
notice.
Note
This unit supports worldwide voltages 100 V to 240 V.
Do not use an electronic voltage transformer, as this may
cause a malfunction.
NOT FOR RESIDENTIAL OR CONSUMER USE
Troubleshooting
Video equipment does not work.
• The power plug is disconnected from the wall outlet (wall
socket).
Insert into a wall outlet.
• The connector cable is not properly connected.
Connect properly.
• The output change switch is set to CHARGE.
Set the output change switch to VCR/CAMERA.
The battery pack does not charge.
• The output change switch is set to VCR/CAMERA.
Set the output change switch to CHARGE.
Power immediately turns off even though there is
sufficient battery life remaining, or the displayed
battery life differs from the actual battery life.
• Run down the battery pack and then fully charge it again.
The battery life will be correctly displayed.
The display does not change.
Refer to “Notes on the BATTERY LIFE indicator”.
“Lo” is displayed in the display window.
• The temperature of the battery pack is too low.
• Charging is performed at lower temperature than the
recommended charging temperature range.
The display shown below may appear if a battery
pack with a low temperature is attached, or if charging
is performed at a lower temperature than the
recommended charging temperature range. Although
charging can still be performed in these cases, if this
situation continues, this unit will switch to the standby
state (refer to the following item) or charging will be not
performed properly in order to protect the battery pack.
We recommend charging the battery pack at 10 ºC to
30 ºC (50 ºF to 86 ºF).
The CHARGE lamp blinks in the following two ways.
Blinks quickly: Turns on and off repeatedly every 0.15 seconds
Blinks slowly: Turns on and off repeatedly every 1.5 seconds
When the CHARGE lamp blinks, read the following and take
suitable action depending on how the CHARGE lamp blinks.
When the CHARGE lamp keeps blinking slowly and
“WAITING” is displayed in the display window.
Charging is temporarily stopped. This unit is in the standby
state.
If the room temperature or the battery temperature is
out of the appropriate temperature range, charging stops
automatically.
When the room temperature returns to the appropriate range,
the CHARGE lamp lights up and charging restarts.
We recommend charging the battery pack at 10 °C to 30 °C
(50 °F to 86 °F).
When the CHARGE lamp keeps blinking quickly and
“WARNING” is displayed in the display window.
When charging the battery pack for the first time in one
of the following situations, the CHARGE lamp may blink
quickly. If this happens, remove the battery pack from this
unit, reattach it and charge it again.
When the battery pack has been left for a long time
When the battery pack has been left attached to the
camera for a long time
Immediately after purchase
If “WARNING” is still displayed, check by following the steps
below.

Articles inclus
Adaptateur/Chargeur CA (AC-VQ1051) (1)
Cordon d’alimentation secteur (1)
Cordon de liaison (DK-215) (1)
Cordon de liaison (DK-415) (1)
Jeu de documents imprimés
Identification des éléments
1 Obturateur de borne
2 Logement
3 Prise DC IN
4 Prise DC OUT
5 Témoin CHARGE
6 Logement
7 Témoin CHARGE
8 Sélecteur de sortie
9 Sélecteur de mode de
charge
10 Afficheur
11 Indicateur de logement
12 Touche de changement
DISPLAY
Les batteries pouvant être rechargées pour ce produit sont les
suivantes
Marque Sony
Type de batterie NP-F570 NP-F770 NP-F970
Afficheur
13 Indicateur « InfoLITHIUM »
14 Indicateur WAITING
15 Indicateur WARNING
16 Indicateur TIME TO CHG
(charge)
17 Indicateur Temps/LOG
18 Indicateur BATTERY LIFE
19 Indicateur VCR/CAMERA
20 Indicateur de charge
normale
21 Indicateur de charge
complète
22 Indicateur d’autonomie de
la batterie
L’adaptateur/chargeur CA
AC-VQ1051 peut être utilisé de la
façon suivante.
• Pour faire fonctionner un appareil Sony (caméscopes, etc.),
utilisez les cordons de liaison fournis avec cet appareil.
• Pour charger des batteries rechargeables Sony (séries L).
‒ Vous pouvez régler le niveau de charge souhaité sur
« Charge complète » ou « Charge normale » avec le
sélecteur de mode de charge. Si vous voulez charger
rapidement une batterie, réglez le sélecteur sur « Charge
normale » pour atteindre un niveau de charge normal.
• Lorsque des batteries « InfoLITHIUM » sont insérées dans cet
appareil, les fonctions suivantes sont disponibles.
‒ Charge rapide
(Plus rapide que la charge avec votre caméscope, etc.)
‒ « BATTERY LOG » et les informations concernant la charge
s’affichent.
Un historique de l’utilisation de la batterie et son état de
charge s’affichent.
• Le temps de charge total, le nombre de charges, l’année
et le mois de la dernière utilisation
• L’autonomie de la batterie, le temps restant jusqu’à la
fin de la charge
• Cet appareil est conçu pour les batteries au lithium-ion. Il
ne peut pas être utilisé pour charger des batteries Ni-Cd
ou Ni-MH.
• Cet appareil ne peut pas être utilisé avec certains modèles
de caméscopes et certains appareils. Assurez-vous de la
compatibilité de votre appareil avant usage.
Que désigne « InfoLITHIUM »?
« InfoLITHIUM » désigne un nouveau type de batterie
au lithium-ion qui peut échanger des données sur la
consommation d’énergie avec un appareil électronique
compatible. Il est conseillé d’utiliser des batteries
« InfoLITHIUM » (série L) avec un appareil électronique portant
la marque .
« InfoLITHIUM » est une marque commerciale de
Sony Group Corporation.
Que désigne « BATTERY LOG »?
« BATTERY LOG » désigne l’historique des utilisations,
enregistré dans la batterie.
• Temps total de charge
• Nombre de charges
• Année et mois de la dernière utilisation
(Les indications sont approximatives. Selon la batterie, les
informations affichées peuvent être moins complètes.)
Remarques sur l’indicateur BATTERY LIFE
(Lire avec attention avant utilisation.)
Pendant la charge de la batterie, cet appareil indique l’état
de charge et les informations concernant la batterie dans la
mesure où les conditions suivantes sont remplies.
• Vous utilisez une batterie « InfoLITHIUM ».
• Votre caméscope, etc. est compatible avec « InfoLITHIUM ».
Assurez-vous que votre batterie présente le signe .
Vérifiez dans le mode d’emploi fourni avec votre appareil
vidéo si celui-ci est compatible « InfoLITHIUM ».
Si vous utilisez la batterie avec plusieurs caméscopes, etc.
compatibles « InfoLITHIUM », les informations qui apparaissent
se rapportent à l’appareil sur lequel la batterie a été rattachée
en dernier lieu.
« BATTERY LOG » est disponible sur les batteries rechargeables
NP-F970, NP-F770 et NP-F570. Les autres batteries
rechargeables peuvent ne pas être compatibles ou peuvent
afficher des informations moins complètes.
Pour faire fonctionner un
appareil vidéo
Pour le détail sur le raccordement, reportez-vous au mode
d’emploi du caméscope, etc.
1 Réglez le sélecteur de sortie sur VCR/CAMERA.
2 Raccordez le cordon d’alimentation secteur à cet
appareil.
Raccordez le cordon d’alimentation secteur à une
3
prise murale.
Un bip retentit et l’affichage apparaît.
4 Raccordez le cordon de liaison à la prise DC OUT de
cet appareil.
Raccordez le cordon de liaison au camescope.
5
Pour le sens d’insertion du cordon de liaison, reportezvous au mode d’emploi du caméscope, etc.
Lorsque le cordon de liaison DK-215 est utilisé (-)
Lorsque le cordon de liaison DK-415 est utilisé (-)
Remarques
• Le réglage du sélecteur de sortie sur CHARGE pendant le
fonctionnement du caméscope, etc. a pour effet de couper
l’alimentation du caméscope.
• Vous ne pouvez pas charger la batterie rattachée à cet
appareil lorsque celui-ci est en mode VCR/CAMERA.
• Éloignez cet appareil du caméscope, etc. si l’image est
déformée.
• Le cordon de liaison DK-415 peut être utilisé avec un
appareil compatible avec la batterie rechargeable (séries L).
Assurez-vous de la compatibilité de votre appareil avant
usage.
• L’illustration montre le raccordement d’un Caméscope
numérique HD HDR-AX2000.
Pour charger la batterie
1 Réglez le sélecteur de mode de charge sur « NORMAL
CHARGE » ou « FULL CHARGE ».
Si vous voulez que la batterie soit complètement
chargée, réglez le sélecteur de mode de charge sur « FULL
CHARGE ».
Si vous voulez que la charge s’arrête quand la batterie est
normalement chargée, réglez-le sur « NORMAL CHARGE ».
Pour le détail, reportez-vous à « Sélection du mode de
charge ».
2 Réglez le sélecteur de sortie sur CHARGE.
3 Raccordez le cordon d’alimentation secteur à cet
appareil.
Raccordez le cordon d’alimentation secteur à une
4
prise murale.
Un bip retentit et l’affichage apparaît.
5 Insérez la batterie rechargeable.
Reportez-vous à « Pour rattacher la batterie rechargeable ».
Lorsque la charge commence, l’indicateur d’autonomie de
la batterie clignote dans l’afficheur et le témoin CHARGE
s’allume.
6 Lorsque la charge est terminée, retirez la batterie.
La charge s’arrête sur cet appareil selon le niveau de
charge spécifié avec le sélecteur de mode de charge.
Lorsque le témoin CHARGE s’éteint, la charge est terminée.
Pour le détail sur la fin de la charge, reportez-vous à
« Sélection du mode de charge ».
Reportez-vous à « Pour retirer la batterie » lorsque vous
voulez retirer la batterie.
Sélection du mode de charge
Il y a deux niveaux de fin de charge : « Charge normale »
et « Charge complète ». Vous pouvez changer de mode de
charge avec le sélecteur de mode de charge sur cet appareil.
• Charge normale (NORMAL CHARGE)
Lorsque la charge est terminée, l’indicateur
d’autonomie de la batterie apparaît de la
façon illustrée à droite.
La batterie restera en meilleur état mais
son autonomie sera un peu inférieure
à celle d’une batterie complètement
chargée.
• Charge complète (FULL CHARGE)
Lorsque la charge est terminée et
la batterie complètement chargée,
l’indicateur d’autonomie de la batterie
apparaît de la façon illustrée à droite.
L’autonomie de la batterie sera légèrement
plus courte que lors d’une charge normale,
mais le temps de charge sera plus long.
Rattachement simultané de deux
batteries
Vous pouvez rattacher deux batteries en même temps à cet
appareil. Vous pouvez aussi charger une seule batterie. La
charge commence par la batterie installée dans le logement .
Si deux batteries sont rattachées mais pas simultanément, la
charge commence par la première batterie rattachée, que ce
soit dans le logement ou le logement .
Remarques
• Deux batteries peuvent être rattachées, mais elles ne
peuvent pas être chargées simultanément dans le cas d’une
charge normale.
• Lorsque le sélecteur de mode de charge est en position
« FULL CHARGE », l’appareil charge d’abord les batteries
dans l’ordre dans lequel elles ont été rattachées jusqu’au
niveau normal, puis complète la charge simultanément sur
les deux batteries.
Pour rattacher la batterie rechargeable
(-)
1 Placez la batterie sur cet appareil avec le repère
du
côté de l’obturateur de borne.
2
Faites glisser la batterie dans le sens de la flèche.
Appuyez sur la batterie jusqu’à ce que l’obturateur de
borne soit complètement dissimulé.
Pour retirer la batterie rechargeable
(-)
Faites glisser la batterie dans le sens de la flèche et
levez-la tout droit.
Remarques
• Ne saisissez pas cet appareil par la batterie.
• Veillez à ne pas heurter l’obturateur de borne. Lorsque vous
rattachez la batterie, faites attention à ne pas heurter la
batterie contre l’obturateur.
• Faites attention à ne pas vous pincer les doigts lorsque vous
rattachez ou retirez la batterie.
Temps de charge
Charge rapide
NP-F970 NP-F770 NP-F570
Charge normale 285 min 185 min 110 min
Charge complète 345 min 245 min 170 min
• Les temps indiqués correspondent à la charge d’une
batterie vide avec cet appareil à une température ambiante
de 25 °C (77 °F).
• Le temps de charge peut être différent selon l’état de la
batterie et la température ambiante.
Pour utiliser rapidement la batterie
Vous pouvez utiliser la batterie même si vous la retirez de
cet appareil avant la fin de la charge. Toutefois, le temps
d’utilisation sera d’autant plus court que le temps de charge
est court.
Remarques
• Si le sélecteur de sortie est sur VCR/CAMERA pendant la
charge, la charge s’arrête.
• Si le témoin CHARGE ne s’allume ou clignote pas, vérifiez si
la batterie est installée correctement sur cet appareil. Si elle
n’est pas installée correctement, elle ne se chargera pas.
• La charge rapide n’est possible qu’avec les batteries
« InfoLITHIUM ».
• Lorsque le sélecteur de mode de charge est en position
« NORMAL CHARGE », la charge s’arrête quand le niveau de
charge normal est atteint.
• Vous pouvez changer de mode de charge avant la fin de
chaque charge.
• Débranchez cet appareil de la prise murale après utilisation.
Pour débrancher le cordon, tirez sur la fiche. Ne tirez jamais
sur le cordon proprement dit.
Si quelque chose ne fonctionne pas pendant la charge,
le témoin CHARGE clignote et « WARNING » apparaît sur
l’afficheur. Pour le détail, voir « En cas de problème ».
Pour vérifier la charge
Lorsque la charge démarre, l’autonomie s’éclaire dans
l’afficheur.
L’autonomie de la batterie indiquée est le temps restant
approximativement pour la prise de vue avec le viseur.
L’autonomie de la batterie sera plus courte si l’écran LCD est
utilisé.
L’autonomie de la batterie peut ne pas être indiquée
avec certains caméscopes. Pour le détail, reportez-vous à
« Remarques sur l’indicateur BATTERY LIFE ».
Pendant la charge, le contenu de l’afficheur peut être
changé de deux façons.
Le contenu de l’afficheur peut être changé de deux façons :
changement automatique de l’afficheur ou changement à
chaque pression sur la touche de changement DISPLAY.
Le témoin de logement correspond au numéro de logement.
L’installation d’une batterie dans le logement puis d’une
autre dans le logement est donnée à titre d’exemple cidessous.
Changement automatique du contenu de
l’afficheur pendant la charge ()
Autonomie de la batterie
L’autonomie de la première batterie rattachée.
C’est l’autonomie de la batterie rattachée au dernier
caméscope, etc. compatible « InfoLITHIUM » utilisé.
Autonomie de la batterie
L’autonomie de la seconde batterie rattachée.
Temps de charge
Le temps restant total jusqu’à la fin de la charge complète
des batteries installées dans le logement et le logement
.
Lorsque le sélecteur de mode de charge est en position
« NORMAL CHARGE », le temps restant jusqu’à la fin d’une
charge normale apparaît.
Appuyez sur la touche de changement
DISPLAY pendant la charge. ()
Pendant la charge « BATTERY LOG » peut être affiché par une
pression sur la touche de changement DISPLAY.
Le contenu de l’afficheur change chaque fois que vous
appuyez sur la touche de changement DISPLAY de la façon
suivante.
Environ cinq secondes après une pression sur la touche de
changement DISPLAY, l’autonomie de la batterie est indiquée
puis l’affichage bascule automatiquement entre l’autonomie
de la batterie et le temps restant jusqu’à la fin de la charge.
Temps total de charge
Le temps de charge total de la première batterie rattachée.
Indique le temps de charge total approximatif depuis la
première charge. Le minimum affiché est 5 heures.
Nombre total de charges
Le nombre de fois que la première batterie rattachée a été
chargée.
Indique le nombre approximatif de fois que la batterie
a été chargée depuis sa première charge. Le minimum
affiché est 5 fois, et ensuite le nombre est indiqué par
un multiple de cinq. Les charges d’appoint et les charges
interrompues peuvent ne pas être prises en compte.
Année et mois de la dernière utilisation
L’année et le mois où la première batterie rattachée a été
utilisée en dernier.
Indique « le mois » puis « l’année » (deux derniers chiffres
de l’année). Si la batterie est utilisée avec un caméscope
sur lequel la date n’a pas été spécifiée, « -- -- » s’affichera.
Temps total de charge
Le temps de charge total de la seconde batterie rattachée.
Nombre total de charges
Le nombre de fois que la seconde batterie rattachée a été
chargée.
Année et mois de la dernière utilisation
L’année et le mois où la seconde batterie rattachée a été
utilisée en dernier.
Appuyez sur la touche de changement
DISPLAY lorsque la charge est terminée.
()
Lorsque la charge est terminée, l’affichage ne change pas
automatiquement. Le contenu de l’afficheur change chaque
fois que vous appuyez sur la touche de changement DISPLAY
de la façon suivante.
Environ cinq secondes après une pression sur la touche de
changement DISPLAY, il revient à l’affichage indiqué dans .
La charge est terminée. Lorsque le sélecteur de mode
de charge est en position « NORMAL CHARGE »,
l’indicateur d’autonomie de la batterie indique
« NORMAL ».
Autonomie de la batterie
L’autonomie de la première batterie rattachée.
Autonomie de la batterie
L’autonomie de la seconde batterie rattachée.
Temps total de charge
Le temps de charge total de la première batterie rattachée.
Nombre total de charges
Le nombre de fois que la première batterie rattachée a été
chargée.
Année et mois de la dernière utilisation
L’année et le mois où la première batterie rattachée a été
utilisée en dernier.
Temps total de charge
Le temps de charge total de la seconde batterie rattachée.
Nombre total de charges
Le nombre de fois que la seconde batterie rattachée a été
chargée.
Année et mois de la dernière utilisation
L’année et le mois où la seconde batterie rattachée a été
utilisée en dernier.
Remarques
• Le temps indiqué est une valeur approximative pour une
charge à 25 °C (77 °F). Il peut être différent du temps réel
selon l’environnement. De plus, selon l’état de la batterie, un
temps peut ne pas s’afficher. C’est normal.
• L’indication du temps après le début de la charge nécessite
un certain temps.
• L’indication du temps et l’autonomie restante de la batterie
sur le côté non chargé peut mettre un certain temps à
apparaître.
• Pour afficher l’autonomie d’une batterie neuve, rattachezla d’abord à votre caméscope et utilisez-la environ 20
secondes, puis chargez-la sur cet appareil.
• Si vous rattachez une batterie complètement chargée sur
cet appareil, « TIME TO CHG FULL 1h » peut apparaître sur
l’afficheur. C’est normal.
• Dans les cas suivants, le temps/LOG peut être remplacé par
« -- -- » ou l’indication du temps peut être absente. C’est
normal.
‒ Il y a une différence entre l’indication du temps et le
temps de charge réel. (Même si ce cas se présente,
continuez de charger la batterie jusqu’à ce qu’elle soit
complètement chargée.)
‒ Si vous chargez une autre batterie qu’une batterie
« InfoLITHIUM » (L’indication de l’autonomie de la batterie
et d’autres fonctions ne sont pas disponibles.)
‒ Si l’année et le mois de la dernière année d’utilisation ne
sont pas évidents. (Lorsque vous rattachez la batterie à un
caméscope mais n’allumez pas le caméscope, ou lorsque
la date n’a pas été réglée sur le caméscope, etc.)
‒ Si la batterie est retirée de cet appareil après la charge
normale mais avant la fin de la charge complète. (Il faut
attendre environ une heure depuis la fin de la charge
normale jusqu’à la fin de la charge complète.)
‒ Si la batterie chargée n’a pas été utilisée depuis
longtemps. (Chargez-la d’abord complètement.)
Lorsque deux batteries sont rattachées à cet appareil,
des symptômes similaires peuvent apparaître si une des
batteries se trouve dans une des situations précédentes.
• L’affichage « BATTERY LOG » apparaît avec les batteries
rechargeables NP-F970, NP-F770 et NP-F570. Avec d’autres
batteries, les informations affichées sont moins complètes.
Spécifications
Entrée 100 V - 240 V CA 50 Hz/60 Hz 22 W
12 V/24 V CC
Sortie 8,4 V CC 2,0 A (VCR/CAMERA)
8,4 V CC 1,6 A (CHARGE)
Température de
fonctionnement
Température de
stockage
Dimensions (Environ) 123 mm × 53 mm × 135 mm (l/h/p)
Poids Environ 400 g (14,1 oz)
La conception et les spécifications peuvent être modifiées
sans préavis.
0 °C à 40 °C (32 °F à 104 °F)
–20 °C à +60 °C (–4 °F à +140 °F)
(4 7/8 po. × 2 1/8 po. × 5 3/8 po.)
(parties saillantes non comprises)
Remarque
Cet appareil supporte les tensions du monde entier, de
100 V à 240 V.
N’utilisez pas un transformateur électronique de tension
car ceci pourrait provoquer un dysfonctionnement.
NE PAS UTILISER SUR PRODUITS RÉSIDENTIEL OU
CONSOMMATEUR
En cas de problème
L’appareil vidéo ne fonctionne pas.
• La fiche d’alimentation est débranchée de la prise murale
(prise électrique).
Branchez sur une prise murale.
• Le câble de liaison n’est pas branché correctement.
Branchez-le correctement.
• Le sélecteur de sortie est réglé sur CHARGE.
Réglez le sélecteur de sortie sur VCR/CAMERA.
La batterie ne se charge pas.
• Le sélecteur de sortie est réglé sur VCR/CAMERA.
Réglez le sélecteur de sortie sur CHARGE.
L’appareil s’éteint immédiatement bien que la
batterie soit encore suffisamment chargée, ou bien
l’autonomie de la batterie indiquée est différente de
l’autonomie réelle de la batterie.
• Videz la batterie puis chargez-la complètement une
nouvelle fois.
L’autonomie de la batterie sera indiquée correctement.
L’affichage ne change pas.
Reportez-vous à « Remarques sur l’indicateur BATTERY
LIFE ».
« Lo » apparaît sur l’afficheur.
• La température de la batterie est trop basse.
• La batterie est chargée à une température inférieure à la
plage de températures de charge recommandée.
Bien qu’il soit possible de charger la batterie dans ces
cas, si cette situation persiste, cet appareil se mettra en
veille (voir la rubrique suivante) ou la batterie ne sera
pas chargée correctement pour protéger la batterie. Il est
conseillé de charger la batterie entre 10 ºC et 30 ºC (50 ºF
et 86 ºF).
Le témoin CHARGE clignote des deux façons
suivantes.
Clignotement rapide : S’allume et s’éteint toutes les
0,15 secondes de façon répétée.
Clignotement lent : S’allume et s’éteint toutes les 1,5 secondes
de façon répétée.
Lorsque le témoin CHARGE clignote, lisez ce qui suit et prenez
la mesure appropriée selon la façon dont le témoin CHARGE
clignote.
Lorsque le témoin CHARGE continue de clignoter
lentement et « WAITING » apparaît sur l’afficheur.
La charge est temporairement arrêtée. Cet appareil est en
attente.
Si la température de la pièce ou de la batterie est hors de
la plage de températures appropriée, la charge s’arrête
automatiquement.
Lorsque la température de la pièce revient à la plage
appropriée, le témoin CHARGE s’allume et la charge
redémarre.
Il est conseillé de charger la batterie rechargeable entre 10 °C
et 30 °C (50 °F et 86 °F).
Lorsque le témoin CHARGE clignote rapidement et
« WARNING » apparaît sur l’afficheur.
La première fois que vous chargez la batterie dans une
des situations suivantes, le témoin CHARGE peut clignoter
rapidement. Dans ce cas, retirez la batterie de cet appareil
puis réinsérez-la et chargez-la de nouveau.
Si la batterie est restée longtemps inutilisée
Si la batterie est restée longtemps rattachée au
caméscope
Immédiatement après l’achat
Si « WARNING » s’affiche toujours, vérifiez les points suivants.
Retirez la batterie de cet appareil et rattachez-la de
nouveau.
Le témoin CHARGE se
remet à clignoter :
Rattachez une autre
batterie
« InfoLITHIUM ».
Le témoin CHARGE se
remet à clignoter :
Le problème vient
peut-être de cet appareil.
Veuillez contacter le revendeur Sony le plus proche au sujet
des produits qui sont peut-être défectueux.
Le témoin CHARGE s’allume
mais ne se remet pas à
clignoter :
Si le témoin CHARGE s’éteint
parce que le temps de
charge est dépassé, il n’y a
aucun problème.
Le témoin CHARGE s’allume
et ne se remet pas à
clignoter :
Si le témoin CHARGE s’éteint
parce que le temps de
charge est dépassé, le
problème vient de la
première batterie rattachée.
Nombre del producto: Adaptador / Cargador de ca
Modelo: AC-VQ1051
Elementos incluidos
Adaptador / Cargador de ca (AC-VQ1051) (1)
Cable de alimentación de ca (1)
Cable de conexión (DK-215) (1)
Cable de conexión (DK-415) (1)
Juego de documentación impresa
Identificación de las partes
1 Obturador de terminales
2 Ranura
3 Conector DC IN
4 Conector DC OUT
5 Lámpara CHARGE
6 Ranura
7 Lámpara CHARGE
8 Selector de cambio de
9 Selector de cambio de
10 Ventanilla visualizadora
11 Lámpara indicadora de
12 Botón de cambio DISPLAY
salida
modo de carga
ranura
Ventanilla visualizadora
13 Indicador "InfoLITHIUM"
14 Indicador WAITING
15 Indicador WARNING
16 Indicador TIME TO CHG
(carga)
17 Indicador de tiempo/
registro
18 Indicador BATTERY LIFE
19 Indicador VCR/CAMERA
20 Indicador de carga normal
21 Indicador de carga completa
22 Indicador de duración útil
de la batería
El Adaptador / Cargador de ca
AC-VQ1051 puede utilizarse de la
forma siguiente
• Para utilizar equipos Sony (videocámaras, etc.), utilice los
cables de conexión incluidos con esta unidad.
• Para cargar baterías recargables Sony (serie L).
‒ Usted podrá establecer el nivel finalización de carga a
“Carga completa” o “Carga normal” con el selector de
cambio de modo de carga. Si desea utilizar rápidamente
la batería, ajuste a “Carga normal” a fin de completar la
carga en estado de normalmente cargada.
• Cuando instale baterías “InfoLITHIUM” en esta unidad,
estarán disponibles las funciones siguientes.
‒ Carga rápida
(Más rápida que la carga con su videocámara, etc.)
‒ Podrá visualizarse la información de “BATTERY LOG” y de
carga.
Se visualizará el historial y el estado de carga de la
batería.
• Tiempo de carga total, recuento de cargas, año y mes
de la última utilización
• Duración útil de la batería, tiempo restante hasta que
finalice la carga
• Esta unidad es para cargar baterías de iones de litio. No
puede utilizarse para recargar baterías de Ni-Cd ni de
Ni-MH.
• Esta unidad no puede utilizarse con ciertos modelos de
videocámaras ni otros equipos. Confirme la compatibilidad
de su equipo antes de utilizarlo.
¿Qué es “InfoLITHIUM”?
“InfoLITHIUM” es un nuevo tipo de batería de iones de litio
que puede intercambiar datos sobre el consumo de la batería
con equipos electrónicos compatibles. Recomendamos utilizar
baterías “InfoLITHIUM” (serie L) con equipos electrónicos que
posean la marca .
“InfoLITHIUM” es marca comercial de Sony Group Corporation.
¿Qué es “BATTERY LOG”?
“BATTERY LOG” visualiza el historial de utilización registrado
en la batería.
• Tiempo de carga total
• Recuento de cargas
• Último año y mes de utilización
(Las indicaciones son aproximadas. Dependiendo de la
batería, el contenido de la indicación puede estar limitado.)
Notas sobre el indicador BATTERY LIFE
(Lea cuidadosamente antes de utilizar.)
Durante la carga de la batería, esta unidad mostrará el estado
de carga y la información de la batería mientras se cumplan
las condiciones siguientes.
• Está utilizando una batería “InfoLITHIUM”.
• Su videocámara, etc., es compatible con “InfoLITHIUM”.
Compruebe si su batería posee la marca .
Compruebe en el manual de instrucciones suministrado con
su equipo de vídeo si éste es compatible con “InfoLITHIUM”.
Si utiliza una batería con más de una videocámara, etc., que
sea compatible con la marca “InfoLITHIUM”, la información
se mostrará para el último equipo al que se haya fijado la
batería.
“BATTERY LOG” está disponible con las baterías recargables
NP-F970, NP-F770 y NP-F570. Otras baterías pueden no ser
compatibles o pueden visualizar información limitada.
Para operar un equipo de
vídeo
Con respecto a los detalles, consulte el manual de
instrucciones de la videocámara, etc.
1 Ponga el selector de cambio de salida en VCR/
CAMERA.
Enchufe el cable de alimentación de ca a esta unidad.
2
3 Enchufe el cable de alimentación de ca a una toma de
corriente de la pared.
Sonará un pitido y se encenderá la ventanilla visualizadora.
4 Enchufe el cable de conexión al conector DC OUT de
esta unidad.
Enchufe el cable de conexión a la videocámara.
5
Con respecto al sentido en el que hay que fijar el cable
de conexión, consulte el manual de instrucciones de la
videocámara, etc.
Cuando utilice el cable de conexión DK-215 (-)
Cuando utilice el cable de conexión DK-415 (-)
Notas
• El ajuste del selector de cambio de salida a CHARGE
mientras se esté operando la videocámara, etc., hará que se
corte el suministro de alimentación a la videocámara.
• No será posible cargar una batería fijada a esta unidad
cuando ésta se encuentre en el modo VCR/CAMERA.
• Aleje esta unidad de su videocámara, etc., si la imagen se
distorsiona.
• El cable de conexión DK-415 podrá utilizarse con un equipo
compatible con la batería recargable (serie L). Confirme la
compatibilidad de su equipo antes de utilizarlo.
• La ilustración muestra la conexión a una videocámara digital
HD HDR-AX2000.
Para cargar la batería
1 Ponga el selector de cambio de modo de carga en
“NORMAL CHARGE” o “FULL CHARGE”.
Si desea cargar la baterías hasta que finalice la carga
completa, ponga el selector de cambio de modo de carga
en “FULL CHARGE”.
Si desea finalizar la carga cuando finalice la carga normal,
póngalo en “NORMAL CHARGE”.
Con respecto a los detalles, consulte “Cambio del modo de
carga”.
2 Ponga el selector de cambio de salida en CHARGE.
3 Enchufe el cable de alimentación de ca a esta unidad.
4 Enchufe el cable de alimentación de ca a una toma de
corriente de la pared.
Sonará un pitido y se encenderá la ventanilla visualizadora.
5 Fije la batería.
Consulte “Para fijar la batería”. Cuando comience la carga,
el indicador de duración útil de la batería de la ventanilla
visualizadora parpadeará en secuencia y se encenderá la
lámpara CHARGE.
6 Cuando finalice la carga, retire la batería.
La unidad finalizará la carga con el nivel de carga
establecido con el selector de cambio de modo de carga.
Cuando se apague la lámpara CHARGE, habrá finalizado la
carga. Con respecto a los detalles sobre la finalización de la
carga, consulte “Cambio del modo de carga”.
Para retirar la batería, consulte “Para retirar la batería”.
Cambio del modo de carga
Hay dos niveles de finalización de la carga: “Carga normal”
y “Carga completa”. Puede cambiar el modo de carga con el
selector de cambio de modo de carga de esta unidad.
• Carga normal (NORMAL CHARGE)
Cuando finalice la carga, el indicador de
duración útil de la batería se visualizará
como muestra la ilustración de la derecha.
La condición de la batería podrá
mantenerse mejor, pero la duración útil de
la batería será ligeramente más corta que
en el estado de completamente cargada.
• Carga completa (FULL CHARGE)
Cuando finalice la carga en el estado de
completamente cargada, el indicador de
duración útil de la batería se visualizará
como muestra la ilustración de la derecha.
La duración útil de la batería será
ligeramente mayor que en el estado de
normalmente cargada, pero el tiempo de
carga será también más largo.
Fijación simultánea de dos baterías
En esta unidad podrán fijarse al mismo tiempo dos baterías.
También podrá cargar solamente una batería. La carga se
iniciará en la batería instalada en la ranura .
Cuando fije dos baterías, pero no simultáneamente,
la carga se iniciará en la batería fijada en primer lugar
independientemente de la ranura que sea, o .
Notas
• Podrá fijar dos baterías, pero no podrán cargarse
simultáneamente con la carga normal.
• Cuando ponga el selector de cambio de modo de carga en
“FULL CHARGE”, esta unidad completará la carga normal en
el orden en el que se hayan fijado las baterías y después
se finalizará la carga completa para ambas baterías
simultáneamente.
Para fijar la batería (-)
1 Coloque la batería en esta unidad con la marca
encarada hacia el obturador de terminales.
2
Deslice la batería en el sentido de la flecha.
Presione la batería hasta que el obturador de terminales
quede completamente oculto.
Para retirar la batería (-)
Deslice la batería en el sentido de la flecha y levántela
directamente hacia arriba.
Notas
• No tome esta unidad sujetándola por la batería.
• Cerciórese de no golpear el obturador de terminales.
Cuando fije la batería, tenga especial cuidado de no golpear
la batería contra él.
• Tenga cuidado de no pillarse los dedos cuando fije o retire
la batería.
Tiempo de carga
Carga rápida
NP-F970 NP-F770 NP-F570
Carga normal 285 min 185 min 110 min
Carga completa 345 min 245 min 170 min
• Los tiempos mostrados son para carga de una batería
vacía, que se haya agotado utilizando esta unidad, a una
temperatura ambiental de 25 °C
• El tiempo de carga puede diferir dependiendo de la
condición de la batería y de la temperatura ambiental.
Para utilizar rápidamente la batería
Puede utilizar la batería incluso aunque la retire de esta
unidad antes de haber finalizado la carga. Sin embargo,
un tiempo de carga más corto significa menos tiempo de
utilización.
Notas
• Si pone el selector de cambio de salida en VCR/CAMERA
durante la carga, ésta se detendrá.
• Si la lámpara CHARGE no se enciende o parpadea,
compruebe si la batería está correctamente fijada a esta
unidad. Si la batería no está correctamente fijada, no se
cargará.
• La carga rápida solamente se realizará con baterías
“InfoLITHIUM”.
• Cuando el selector de cambio de modo de carga esté en
“NORMAL CHARGE”, esta unidad finalizará la carga cuando
finalice la carga normal.
• Puede cambiar el modo de carga antes de que finalice cada
carga.
• Después de haber utilizado esta unidad, desenchúfela de la
toma de corriente de la pared. Para desconectar el cable, tire
del enchufe para desenchufarlo. No tire nunca del propio
cable.
Si algo va mal durante la carga, la lámpara CHARGE
parpadeará y en el visualizador aparecerá “WARNING”. Con
respecto a los detalles, consulte “Solución de problemas”.
Para comprobar la carga
Cuando comience la carga, el indicador de duración útil de la
batería se encenderá en la ventanilla visualizadora.
La duración de la batería visualizada es el tiempo restante
aproximado de grabación de imágenes utilizando el visor.
La duración de la batería será más corta si se utiliza el
visualizador LCD.
La duración de la batería puede no mostrarse con ciertos tipos
de videocámaras. Con respecto a los detalles, consulte “Notas
sobre el indicador BATTERY LIFE”.
Existen dos métodos de cambio del contenido de la
ventanilla visualizadora durante la carga.
Existen dos métodos de cambio del contenido de la ventanilla
visualizadora: cambio automático de la indicación y cambio
de la indicación cuando se pulse el botón de cambio DISPLAY.
La lámpara indicadora de ranura corresponde al número de
ranura.
A continuación se ofrece un ejemplo de instalación de una
batería en la ranura seguida por otra en la ranura .
Cambio automático del contenido de la
ventanilla visualizadora durante la carga
()
Duración útil de la batería
La duración útil de la primera batería fijada.
Ésta es la duración útil de la batería cuando se fijó a una
videocámara, etc., compatible con “InfoLITHIUM” utilizada
por última vez.
Duración útil de la batería
La duración útil de la siguiente batería fijada.
Tiempo de carga
El tiempo restante total hasta que finalice la carga
completa de las baterías instaladas en la ranura y la
ranura .
Cuando el selector de cambio de modo de carga esté en
“NORMAL CHARGE”, se mostrará el tiempo restante hasta
que finalice la carga normal.
Pulse el botón de cambio DISPLAY
durante la carga. ()
Durante la carga, podrá visualizarse “BATTERY LOG” pulsando
del botón de cambio DISPLAY.
El contenido de la ventanilla visualizadora cambiará de la
forma siguiente cada vez que pulse el botón de cambio
DISPLAY.
Unos cinco segundos después de haber pulsado el botón de
cambio DISPLAY, se visualizará la duración útil de la batería y
después ésta cambiará automáticamente entre la duración
útil de la batería y el tiempo restante hasta que finalice la
carga.
Tiempo de carga total
El tiempo de carga total de la primera batería fijada.
Muestra el tiempo de carga total aproximado desde la
primera carga. La indicación mínima es de 5 horas.
Recuento total de cargas
El número de veces que se ha cargado la primera batería
fijada.
Muestra el número de veces aproximado que la batería se
ha cargado desde su primera carga. La indicación mínima
es de 5 veces, y el recuento se visualizará en múltiplos
de cinco. Las cargas de relleno y las cargas suspendidas
pueden no contarse.
Año y mes de la última utilización
El año y el mes que se utilizó por última vez la primera
batería fijada.
Visualiza “Mes” seguido por “Año” (los dos últimos dígitos
del año). Si se utiliza con una videocámara que no tenga el
calendario ajustado, se visualizará “-- --”.
Tiempo de carga total
El tiempo de carga total de la siguiente batería fijada.
Recuento total de cargas
El número de veces que se ha cargado la siguiente batería
fijada.
Año y mes de la última utilización
El año y el mes que se utilizó por última vez la siguiente
batería fijada.
Pulse el botón de cambio DISPLAY
después de finalizar la carga. ()
Después de finalizar la carga, la indicación no cambiará
automáticamente. El contenido de la ventanilla visualizadora
cambiará de la forma siguiente cada vez que pulse el botón
de cambio DISPLAY.
Unos cinco segundos después de haber pulsado el botón de
cambio DISPLAY, volverá a la indicación mostrada en .
La carga ha finalizado. Cuando el selector de cambio
de modo de carga esté en “NORMAL CHARGE”, el
indicador de duración útil mostrará “NORMAL”.
Duración útil de la batería
La duración útil de la primera batería fijada.
Duración útil de la batería
La duración útil de la siguiente batería fijada.
Tiempo de carga total
El tiempo de carga total de la primera batería fijada.
Recuento total de cargas
El número de veces que se ha cargado la primera batería
fijada.
Año y mes de la última utilización
El año y el mes que se utilizó por última vez la primera
batería fijada.
Tiempo de carga total
El tiempo de carga total de la siguiente batería fijada.
Recuento total de cargas
El número de veces que se ha cargado la siguiente batería
fijada.
Año y mes de la última utilización
El año y el mes que se utilizó por última vez la siguiente
batería fijada.
Notas
• La indicación del tiempo es un tiempo aproximado cuando
la carga se realiza a 25 °C Puede diferir del tiempo real
dependiendo del entorno. Además, dependiendo de la
condición de la batería, es posible que no se visualice el
tiempo. Esto no significa mal funcionamiento.
• El tiempo puede tardar algo en visualizarse después de
haberse iniciado la carga.
• La indicación del tiempo y la duración útil de la batería del
lado que no esté cargándose puede tardar algo en aparecer.
• Para que se visualice la duración útil de una batería nueva,
primero fíjela en su videocámara y utilícela durante unos 20
segundos y después cárguela con esta unidad.
• Si fija una batería completamente cargada en esta unidad,
en el visualizador puede aparecer “TIME TO CHG FULL 1h”.
Esto no significa mal funcionamiento.
• En los casos siguientes, la indicación de tiempo/registro
puede mostrar “-- --” o es posible que no aparezca
indicación de tiempo. Esto no significa mal funcionamiento.
‒ Existe una diferencia entre la indicación del tiempo y el
tiempo de carga real. (Aunque suceda esto, continúe
cargando hasta que finalice la carga completa.)
‒ Cuando cargue una batería que no sea “InfoLITHIUM” (La
indicación de la duración de la batería y otras funciones
no estarán disponibles.)
‒ Cuando el último año y mes de utilización no sean
claros. (Cuando fije la batería a una videocámara pero no
encienda la videocámara, o la función de calendario de la
cámara no esté configurada, etc.)
‒ Si retira la batería de esta unidad después de haber
finalizado la carga normal pero antes de haber finalizado
la carga completa. (Desde la finalización de la carga
normal a la finalización de la carga completa se tardará
aproximadamente una hora.)
‒ Cuando se cargue una batería que no se haya utilizado
durante mucho tiempo. (Cáguela primero completamente
una vez.)
Cuando fije dos baterías a esta unidad, pueden aparecer
síntomas similares si una de las baterías esté en la condición
de arriba.
• La indicación “BATTERY LOG” está disponible con las
baterías recargables NP-F970, NP-F770 y NP-F570. Con
otras baterías, el contenido de la visualización puede estar
limitado.
Especificaciones
Entrada 100 V - 240 V ca 50 Hz/60 Hz 22 W
12 V/24 V cc
Salida 8,4 V cc 2,0 A (VCR/CAMERA)
8,4 V cc 1,6 A (CHARGE)
Temperatura de
funcionamiento
Temperatura de
almacenamiento
Dimensiones (Aprox.) 123 mm × 53 mm × 135 mm (an/al/prf)
Peso Aprox. 400 g
El diseño y las especificaciones están sujetos a cambio sin
previo aviso.
0 °C a 40 °C
–20 °C a +60 °C
(excluyendo las partes salientes)
Nota
Esta unidad es compatible con las tensiones de todo el
mundo de 100 V a 240 V
No utilice un transformador de voltaje electrónico, porque
es posible que ocasione un mal funcionamiento.
NO ES PARA USO RESIDENCIAL O DE CONSUMO
Solución de problemas
El equipo de vídeo no trabaja.
• El enchufe de alimentación está desconectado de la toma
de corriente de la pared (toma de la red).
Inserte en una toma de corriente de la pared.
• El cable de conexión no está conectado adecuadamente.
Conéctelo adecuadamente.
• El selector de cambio de salida está en CHARGE.
Ponga el selector de cambio de salida en VCR/CAMERA.
La batería no se carga.
• El selector de cambio de salida está en VCR/CAMERA.
Ponga el selector de cambio de salida en CHARGE.
La alimentación se desconecta inmediatamente
incluso aunque la duración de la batería restante es
suficiente, o la duración útil de la batería mostrada
difiere de la real.
• Agote la batería y vuelva a cargarla por completo.
La duración de la batería se mostrará correctamente.
La visualización no cambia.
Consulte “Notas sobre el indicador BATTERY LIFE”.
En la ventana visualizadora se muestra “Lo”.
• La temperatura de la batería es demasiado baja.
• La carga se realiza a una temperatura inferior a la de la
gama de temperaturas de carga recomendada.
Aunque en estos caso la carga todavía podrá realizarse,
si esta situación continúa, esta unidad cambiará al
estado de espera (consulte el punto siguiente) o la carga
no se efectuará adecuadamente a fin de proteger la
batería. Recomendamos cargar la batería de 10 °C a 30 °C
La lámpara CHARGE parpadea de las dos formas
siguientes.
Parpadeo rápido: Se enciende y apaga repetidamente cada
0,15 segundos
Parpadeo lento: Se enciende y apaga repetidamente cada
1,5 segundos
Cuando parpadee la lámpara CHARGE, lea lo siguiente y tome
las medidas adecuadas dependiendo de cómo parpadee
dicha lámpara CHARGE.
Cuando la lámpara CHARGE continúe parpadeando
lentamente y en la ventanilla visualizadora se
muestre “WAITING”.
La carga está temporalmente en pausa. Esta unidad está en
estado de espera.
Si la temperatura ambiental o la de la batería sale fuera del
margen apropiado, la carga se parará automáticamente.
Cuando la temperatura ambiental vuelva al margen
apropiado, la lámpara CHARGE se encenderá una vez y se
reiniciará la carga.
Recomendamos cargar la batería de 10 °C a 30 °C
Cuando la lámpara CHARGE continúe parpadeando
rápidamente y en la ventanilla visualizadora se
muestre “WARNING”.
Cuando cargue la batería por primera vez en una de
las situaciones siguientes, la lámpara CHARGE puede
parpadear rápidamente. Cuando suceda esto, retire la
batería de esta unidad, vuelva a fijarla y cárguela.
Cuando la batería que se haya dejado sin utilizar
durante mucho tiempo
Cuando la batería que se haya dejado fijada a la cámara
durante mucho tiempo
Inmediatamente después de la adquisición
Si “WARNING” continúa mostrándose, compruebe de acuerdo
con los pasos siguientes.
Retire la batería de esta unidad y vuelva a fijarla.
La lámpara CHARGE
comienza a parpadear de
nuevo:
Fije otra batería
“InfoLITHIUM”.
La lámpara CHARGE
comienza a parpadear de
nuevo:
El problema se encuentra
posiblemente en esta
unidad.
Póngase en contacto con su proveedor Sony más cercano
con respecto a cualquier producto que pueda tener el
problema.
La lámpara CHARGE se
enciende pero no comienza
a parpadear de nuevo:
Si la lámpara CHARGE se
apaga debido a que haya
transcurrido el tiempo de
carga, no habrá ningún
problema.
La lámpara CHARGE se
enciende y no comienza a
parpadear de nuevo:
Si la lámpara CHARGE se
apaga debido a que haya
transcurrido el tiempo de
carga, el problema se
encuentra en la primera
batería fijada.
 Loading...