

Page 1

AC ADAPTOR
AC-DN2B
MAINTENANCE MANUAL
1st Edition
Serial No. 10001 and Higher
Page 2

! WARNING
This manual is intended for qualified service personnel only.
To reduce the risk of electric shock, fire or injury, do not perform any servicing other than that
contained in the operating instructions unless you are qualified to do so. Refer all servicing to
qualified service personnel.
! WARNUNG
Die Anleitung ist nur für qualifiziertes Fachpersonal bestimmt.
Alle Wartungsarbeiten dürfen nur von qualifiziertem Fachpersonal ausgeführt werden. Um die
Gefahr eines elektrischen Schlages, Feuergefahr und Verletzungen zu vermeiden, sind bei
Wartungsarbeiten strikt die Angaben in der Anleitung zu befolgen. Andere als die angegeben
Wartungsarbeiten dürfen nur von Personen ausgeführt werden, die eine spezielle Befähigung
dazu besitzen.
! AVERTISSEMENT
Ce manual est destiné uniquement aux personnes compétentes en charge de l’entretien. Afin
de réduire les risques de décharge électrique, d’incendie ou de blessure n’effectuer que les
réparations indiquées dans le mode d’emploi à moins d’être qualifié pour en effectuer d’autres.
Pour toute réparation faire appel à une personne compétente uniquement.
AC-DN2B
Page 3

Table of Contents
Manual Structure
Purpose of this manual ........................................................................................ 3 (E)
Related manual .................................................................................................... 3 (E)
Contents ............................................................................................................... 3 (E)
1. Service Overview
1-1. Connectors and Cable ........................................................................... 1-1 (E)
1-1-1. Recommended DC OUT Cable ............................................ 1-1 (E)
1-1-2. Recommended Power Cords ................................................ 1-1 (E)
1-1-3. Connector Input/Output Signals ........................................... 1-2 (E)
1-2. Operating Environment .........................................................................1-2 (E)
1-3. Checking the Fan Operation..................................................................1-2 (E)
1-4. Removing the Cabinets ......................................................................... 1-3 (E)
1-5. Replacing the Fuse ................................................................................ 1-4 (E)
1-6. Replacing the Fan .................................................................................. 1-4 (E)
1-7. Notes on Repair Parts ............................................................................ 1-5 (E)
1-8. Printing of the Reference Numbers on Printed Boards .........................1-5 (E)
1-9. Optional Fixture .................................................................................... 1-5 (E)
2. Electrical Alignment
2-1. Preparations ........................................................................................... 2-1 (E)
2-2. Output Voltage Adjustment .................................................................. 2-1 (E)
2-3. Note after Adjustment ...........................................................................2-1 (E)
3. Spare Parts
3-1. Exploded Views .......................................................................................... 3-1
3-2. Electrical Parts List ..................................................................................... 3-3
3-3. Supplied Accessory .....................................................................................3-4
3-4. Optional Fixture .......................................................................................... 3-4
AC-DN2B
1 (E)
Page 4

4. Diagrams and Board Layouts
Overall .................................................................................................................... 4-1
MAIN ..................................................................................................................... 4-2
SUB01 .................................................................................................................... 4-3
SUB02 .................................................................................................................... 4-3
Frame ......................................................................................................................4-4
2 (E)
AC-DN2B
Page 5

Purpose of this manual
Related manual
Contents
Manual Structure
This manual is the maintenance manual for AC Adaptor AC-DN2B.
This manual describes the information items on maintenance, and items that premise
the service based on the components parts such as alignment, schematic diagram,
board layout and spare parts list, assuming use of service engineers.
Besides this maintenance manual, the following manual is available for this unit.
..
. Operation Manual (Supplied with this unit)
..
This manual is necessary for application and operation of this unit.
Part number : 3-204-884-0X
The following are summaries of the each section for understanding the manual.
Section 1 Service Overview
Describes information about connector input/output signals, recommended power
cords, and replacement of part.
Section 2 Electrical Alignment
Describes electrical adjustment.
Section 3 Spare Parts
Describes parts list, exploded view, and supplied accessories used in the unit.
Section 4 Diagrams and Board Layouts
Describes block diagram, schematic diagram and board layouts.
AC-DN2B
3 (E)
Page 6

Page 7
Section 1
1
2
3
4
5
6
Service Overview
1-1. Connectors and Cable
1-1-1. Recommended DC OUT Cable
When connecting a cable to the DC OUT connector (XLR,
4P), be sure to use the specified connector/complete cable
assemblies.
Connection Connector
. XLR 4P, MALE : 1-508-369-11
Connection Cable
. CORD WITH CONNECTOR : 1-790-446-11
(0.26 m, supplied with the unit)
. CCDD-X2 (2 m, option)
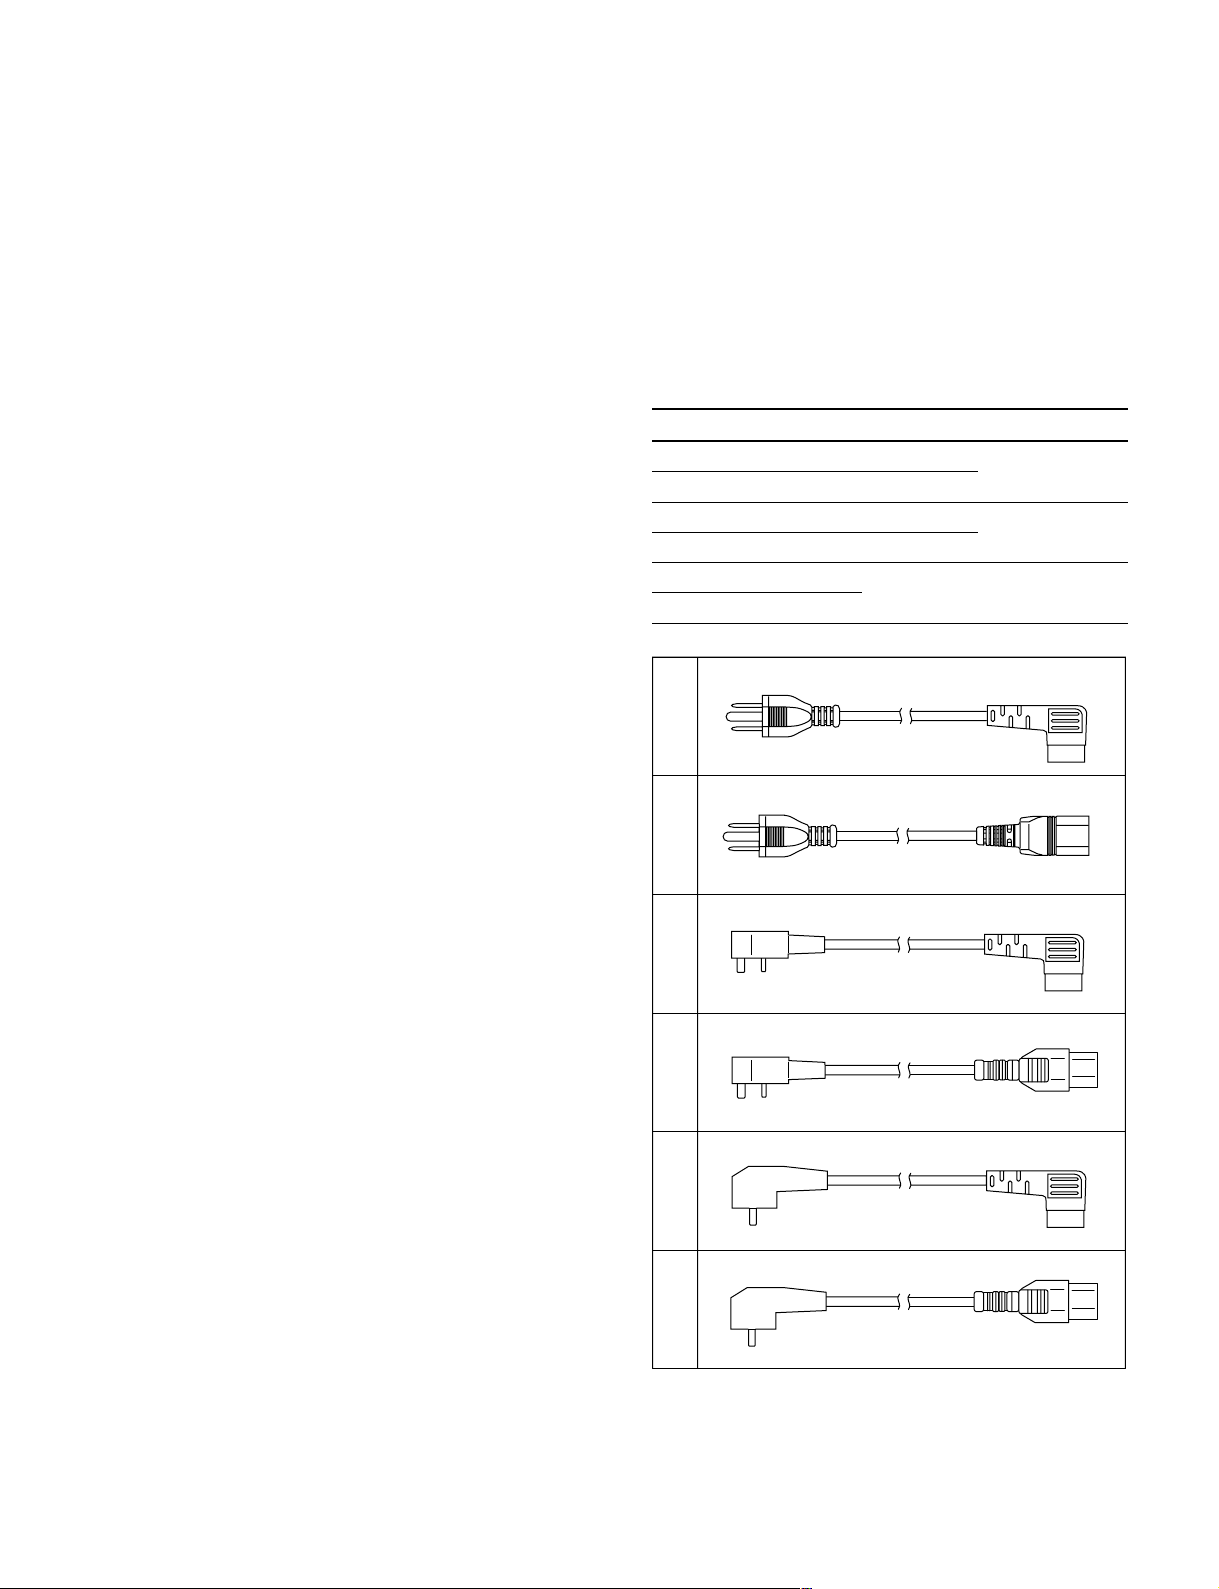
1-1-2. Recommended Power Cords
The following power cords are available separately for this
unit. See the following table to determine the proper
power code for your location.
SONY POWER CORD (2.4 m) DK-2401L (Angle type)
Fig. Power cord Rated current Rated voltage
1 DK-2401L (UC) 7 A 125 V
2 P/N 1-557-377-11 10 A
3 P/N 1-782-167-11 7 A 250 V
4 P/N 1-782-165-11 10 A
5 P/N 1-782-168-11 10 A 250 V
6 P/N 1-782-164-11
AC-DN2B
1-1 (E)
Page 8
1-1. Connectors and Cable
1-2. Operating Environment
1-3. Checking the Fan Operation
1-1-3. Connector Input/Output Signals
AC IN
AC 100 V to 240 V, 200 W
DC OUT (4P FEMALE)
4
3
__
_ EXT VIEW
__
Pin No. Signal Specifications
1 GND GND for UNREG
2 NC No connection
3 NC No connection
4 DC OUT +16.4 to +17.0 V, 9 A MAX
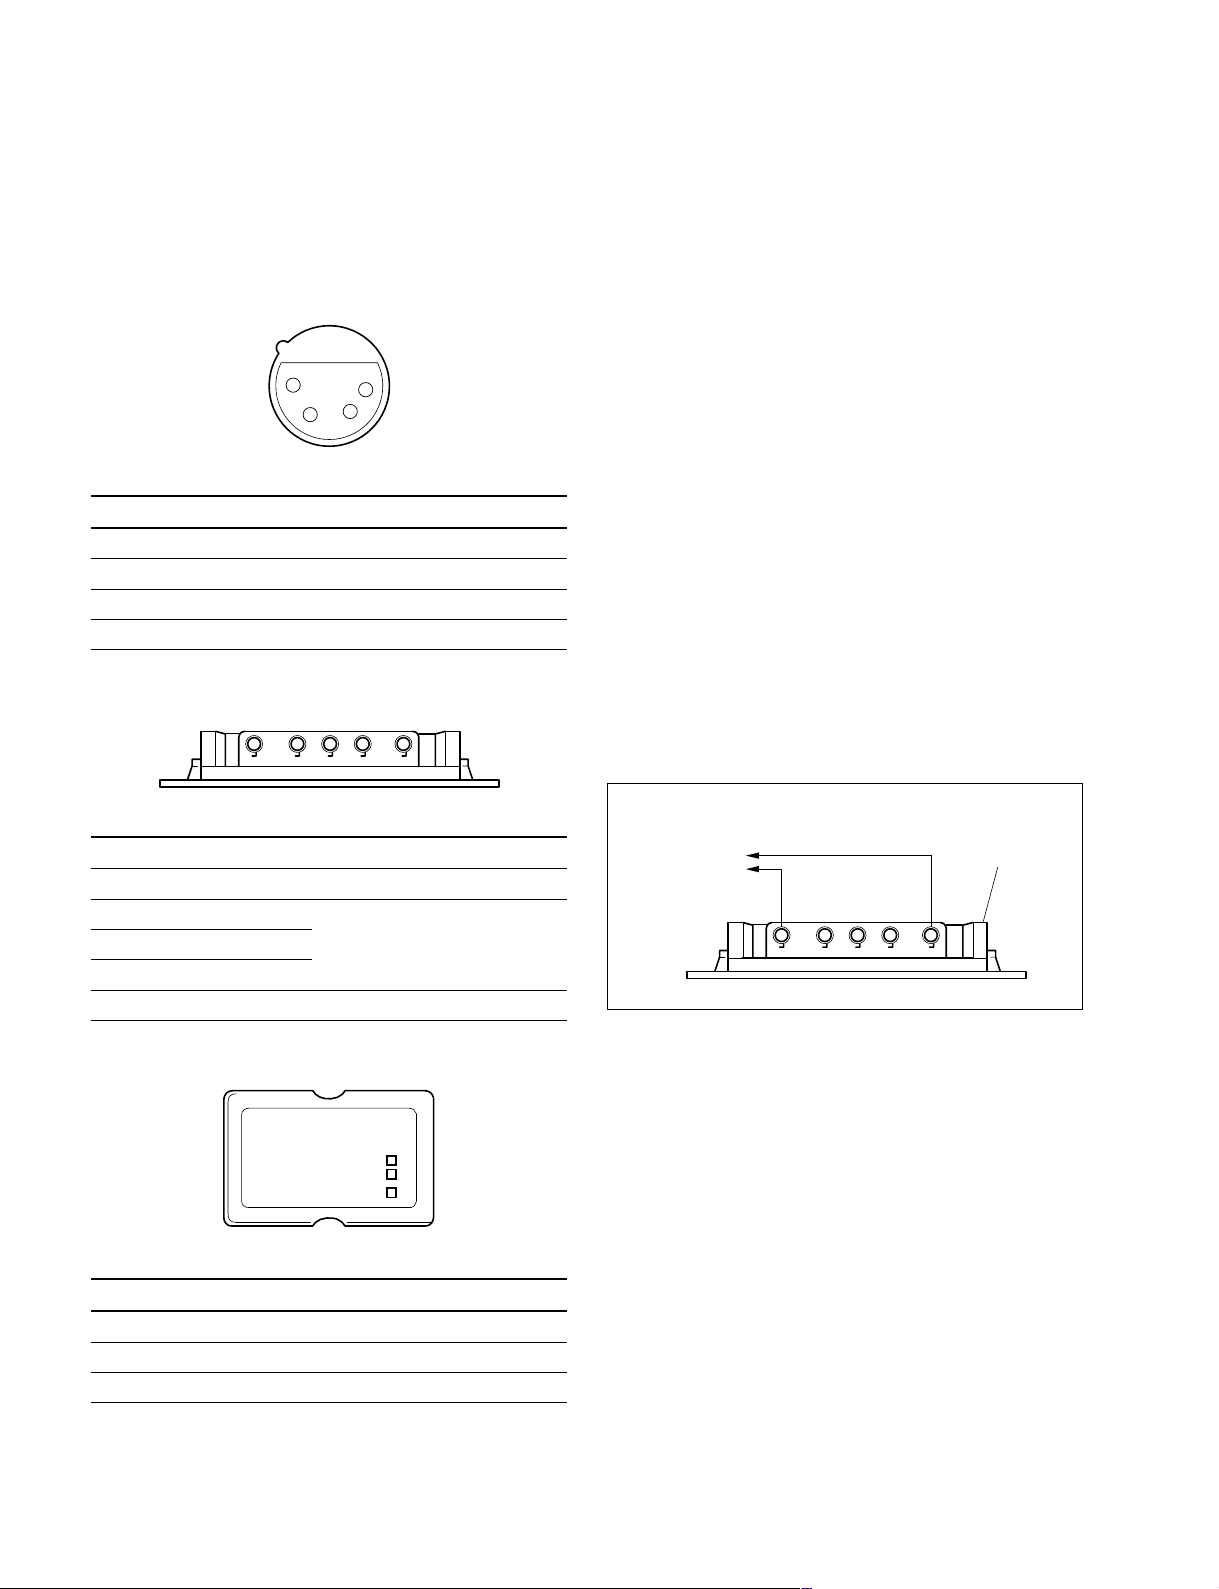
DC OUT (5P FEMALE)
12345
1
2
__
_
__
1-2. Operating Environment
Operating Temperature : 0 dC to +40 dC
Storage Temperature : _5 dC to +45 dC
Humidity : No condensation
1-3. Checking the Fan Operation
The unit is provided with a fan. It is designed to run
automatically when temperature of the heat sink inside the
equipment exceeds over 55dC. If there is any doubt that the
fan or fan motor control circuit fails, check the fan operation as follows.
Equipment Required
. Electric Load
Hewlett-Packard HP6051A + HP60501B
1. Set the electric load to 9 A in the CC (constant current)
mode.
2. Connect the electric load as follows and make sure that
the fan starts up within ten minutes.
__
_ EXT VIEW
__
Pin No. Signal Specifications
1 GND GND for DC OUT
2 NC No connection
3NC
4NC
5 DC OUT +16.4 to +17.0 V, 9 A MAX
__
_
__
DC OUT (3P)
1
2
3
__
_ EXT VIEW
__
Pin No. Signal Specifications
1 BATT (_) OUT GND for DC OUT
2 BATT (+) OUT +16.5 to +16.9 V, 2.2 A MAX
3 RID IN SENS
__
_
__
To
Electric Load
<Connection for 5P terminal>
(_)
(+)
Lower cover
1-2 (E)
AC-DN2B
Page 9

1-4. Removing the Cabinets
SMP
4 x 8
CN253
CN252
CN1
Earth wire
Main board
SUB 02 board
1-4. Removing the Cabinets
1. Remove the four screws (B3 x 6) securing the BKWL601 and loosen the two screws (PSW3 x 8).
B3 x 6
B3 x 6
BKW-L601
PSW3 x 8
4. Remove the screw securing the earth wire and disconnect the harnesses from the connector (CN1) on the
main board.
5. Disconnect the harness from the connectors (CN252,
CN253) on the SUB02 board.
2. Remove the four screws (PSW3 x 8) and remove the
upper case.
3.
Remove the two screws (B3 x 6) securing the shield plate.
PSW3 x 8
Upper case
B3 x 6
PSW3 x 8
Shield plate
6. Assemble the parts in reverse order of the disassembling procedure.
AC-DN2B
1-3 (E)
Page 10

1-5. Replacing the Fuse
1-6. Replacing the Fan
1-5. Replacing the Fuse
w
The fuse is critical to safe operation. For replacement, be
sure to use the specified part.
Sony P/N : ! 9-885-009-46 5 A 250 V
1. Remove the cabinets while referring to Section 1-4.
2. Remove the three spacer 1s and the one spacer 2.
Spacer 1
Spacer 1
Spacer 2
1-6. Replacing the Fan
Fan used in the unit is a periodic replacement part. For
replacement, be sure to use the specified part.
Sony P/N : 1-763-098-11
Recommended Replacement Period : Every five years
1. Remove the cabinets while referring to Section 1-4.
2. Pull the fan socket out of the upper case.
Upper case
Spacer 1
3. Raise the switching regulator and remove the two solderings as shown in the figure. Then, replace the fuse.
Switching
regulator
Fuse
Remove the
solderings.
Fan socket
4. Assemble the unit in the reverse order of removal.
Spacer 1/Spacer 2 tightening torque : 4 N.m (40 kgf.cm)
1-4 (E)
AC-DN2B
Page 11

1-6. Replacing the Fan
1-8. Printing of the Reference Numbers on Printed Boards
1-7. Notes on Repair Parts
1-9. Optional Fixture
3. Remove the two screws and remove the fan.
PTP3 x 8
4. Install a new fan in the reverse order of removal.
Note at installation
Install the fan to the fan socket with care so that air flows
in the direction of the arrow.
1-7. Notes on Repair Parts
1. Safety Related Components Warning
w
Components marked ! are critical to safe operation.
Therefore, specified parts should be used in the case of
replacement.
2. Standardization of Parts
Some repair parts supplied by Sony differ from those
used for the unit. These are because of parts commonality and improvement.
Parts list has the present standardized repair parts.
3. Stock of Parts
Parts marked with “o” at SP (Supply Code) column of
the spare parts list may not be stocked. Therefore, the
delivery date will be delayed.
4. Harness
Harnesses with no part number are not registered as
spare parts.
In need of repair, get components shown in the list and
repair using them.
PTP3 x 8
Air flows
1-8. Printing of the Reference Numbers
on Printed Boards
Only the lower two digits of the reference numbers of the
SUB01 board and SUB02 board are shown respectively on
the printed board. Note that these indications differ from
those on the schematic diagram, block diagram and
electrical parts list.
(example)
Board Indication on the Ref.No.
printed board in the manual
SUB01 CN01 CN101
SUB02 VR51 VR251
1-9. Optional Fixture
The following special driver is separately available as a
fixture to remove the screws securing the V shoe to the
unit.
Description Sony Part No.
5-wing screwdriver DF-018 (for M3) J-6530-180-A
AC-DN2B
1-5 (E)
Page 12

Page 13

Section 2
Electrical Alignment
2-1. Preparations
Equipment Required
. Electric Load
Hewlett-Packard HP6051A + HP60501B
. DC Voltmeter
Connection
<Connection for 5P terminal>
To
Electric Load
(_)
(+)
Lower cover
To
DC Voltmeter
2-2. Output Voltage Adjustment
Preparation
. Set the electric load to 9 A in the CC (constant current)
mode.
Test Points : Pins (+), (_)/5P terminal
Adj. Point : 1VR251 (SUB02 board)
Specifications : 16.7 ± 0.3 V
VR251
1
SUB02 board (B side)
2-3. Note after Adjustment
After adjustment has been completed, be sure to lock
1VR251 with paint.
AC-DN2B
2-1 (E)
Page 14

Page 15

3-1. Exploded Views
AC Adaptor
Section 3
Spare Parts
B3 x 6
Precision
P 2.6 x 6
SMP
4 x 8
b
c
*1
B3 x 6
c
NUT4,
1
HEXAGON CAP
a
*2
B3 x 6
6
8
PTP2.6 x 6
14
*1
B3 x 6
b
7
10
PSW
3 x 8
8
a
P2 x 4
11
15
*2
413
5
No. Part No. SP Description
1 1-509-185-31 s CONNECTOR (RECEPTACLE) 4P
2 1-763-098-11 s FAN, DC (40 SQUARE)
3 2-378-311-01 o NUT(XLR), PLATE
4 3-193-925-01 o SHOE (AC), V
5 3-193-926-01 o SCREW (M3X7), 5LR PLATE SMALL
6 3-692-186-01 s HOLDER,CABLE
7 3-724-723-01 s RUBBER (BATT), DROP PROTECTION
8 9-885-004-70 o HARNESS ASSY, INLET(WITH SW)
9 9-885-009-68 o CASE, UPPER
10 9-885-009-69 o HARNESS ASSY, OUTPUT
AC-DN2B
12
2
PTP3 x 8
3
No. Part No. SP Description
11 9-885-009-71 o LENS, LED
12 9-885-009-72 o SOCKET, FAN
13 9-885-009-73 o CASE, LOWER
14 9-885-009-74 o CONNECTOR ASSY, BATTERY
15 9-885-009-75 o HARNESS ASSY, XLR
7-627-553-47 s SCREW PRECISION +P2X4
7-627-556-77 s SCREW PRECISION +P2.6X6 TYPE1
7-682-547-09 s SCREW +B3X6
7-684-221-00 s NUT 4, HEXAGON CAP
7-685-752-09 s SCREW +PTT3X8
7-685-792-09 s SCREW +PTP2.6X6
3-1
Page 16

Battery Adaptor
101
105
102
P2.6 x 4
P2.6 x 4
PSW3 x 8
110
P2 x 3
108
B3 x 5
106
112
113
109
103
B3 x 5
114
107
111
P2 x 3
P2 x 3
104
P2.6 x 4
P2.6 x 4
P2.6 x 4
No. Part No. SP Description
101 A-8278-025-C s MOUNT, V ASSY
102 1-766-377-12 s CONNECTOR, BATTERY
103 3-606-344-01 o PLATE (ID)
104 3-606-345-01 o SEAL
105 3-606-346-02 o SEAL (FRONT)
106 3-669-596-00 s WASHER (2.3), STOPPER
107 3-679-648-02 o SPRING, COMPRESSION
108 3-679-688-02 o LEVER, RELEASE
109 3-679-690-02 o MOUNT, V
110 3-680-952-01 o KNOB, RELEASE LEVER
No. Part No. SP Description
111 3-680-996-02 o PLATE
112 3-680-997-02 o INSULATOR
113 3-680-998-02 o PLATE (+)
114 3-680-999-02 o PLATE (-)
7-627-553-38 s SCREW, PRECISION +P 2X3
7-627-556-38 s SCREW +P 2.6X4.0
7-682-546-09 s SCREW +B 3X5
7-682-948-01 s SCREW +PSW 3X8
3-2
AC-DN2B
Page 17

3-2. Electrical Parts List
---------MAIN BOARD
----------
(MAIN BOARD)
Ref.No.
or Q’ty Part No. SP Description
C1 ! 9-885-009-14 s CAPACITOR 1uF/AC250
C2 ! 9-885-009-15 s CAPACITOR 0.22uF/AC250
C3 ! 9-885-009-16 s CAPACITOR 1500PF/AC250
C4 ! 9-885-009-16 s CAPACITOR 1500PF/AC250
C5 9-885-009-17 s CAPACITOR 470PF/AC250
C6 9-885-009-18 s CAPACITOR 0.47uF/450V
C7 9-885-009-18 s CAPACITOR 0.47uF/450V
C8 9-885-009-19 s CAPACITOR 270uF/450V
C9 9-885-009-20 s CAPACITOR 47uF/50V
C10 9-885-009-21 s CAPACITOR 100uF/50V
C11 9-885-009-22 s CAPACITOR 47uF/50V
C12 9-885-009-23 s CAPACITOR 220uF/25V
C13 9-885-009-24 s CAPACITOR 15000PF/630V
C14 9-885-009-25 s CAPACITOR 1000PF/630V
C15 9-885-009-25 s CAPACITOR 1000PF/630V
C17 9-885-009-26 s CAPACITOR 0.22uF/25V
C18 9-885-009-27 s CAPACITOR 4700PF/50V
C19 9-885-009-28 s CAPACITOR 0.1uF/50V
C20 9-885-009-29 s CAPACITOR 0.1uF/50V
C21 9-885-009-30 s CAPACITOR 10000PF/50V
C22 9-885-009-31 s CAPACITOR 470PF/630V
C23 9-885-009-31 s CAPACITOR 470PF/630V
C24 9-885-009-31 s CAPACITOR 470PF/630V
C25 9-885-009-31 s CAPACITOR 470PF/630V
C26 9-885-009-32 s CAPACITOR 0.22uF/25V
C27 9-885-009-32 s CAPACITOR 0.22uF/25V
C28 9-885-009-33 s CAPACITOR 10000PF/50V
C29 9-885-009-34 s CAPACITOR 470PF/50V
C30 9-885-009-35 s CAPACITOR 10000PF/50V
C31 9-885-009-36 s CAPACITOR 4700PF/50V
Ref.No.
or Q’ty Part No. SP Description
D52 9-885-009-11 s DIODE FCH30A06
F1 ! 9-885-009-46 s FUSE 215005ME600
IC1 9-885-008-98 s IC TA78M18S
IC2 9-885-008-97 s IC IR2101
IC3 9-885-008-99 s IC MC34262D
IC4 9-885-009-00 s IC NJM431U-TE1
L1 ! 9-885-009-76 s COIL
L2 9-885-009-77 s COIL
L3 9-885-009-78 s COIL
L51 9-885-009-79 s COIL
Q1 9-885-009-01 s FET 2SK2837
Q2 9-885-009-02 s FET 2SK2842
Q3 9-885-009-02 s FET 2SK2842
Q4 9-885-009-03 s TRANSISTOR 2SA1298-TE85L
Q5 9-885-009-04 s TRANSISTOR RN2404
RY1 ! 9-885-009-80 s RELAY
SW51 9-885-009-47 s SWITCH OHD5R-60B
T1 ! 9-885-009-44 s TRANSFORMER
T2 9-885-009-45 s TRANSFORMER
TH51 ! 9-885-009-13 s THERMISTOR
ZD1 9-885-009-12 s DIODE 02CZ20
ZD2 9-885-009-12 s DIODE 02CZ20
C32 9-885-009-37 s CAPACITOR 10000PF/630V
C33 9-885-009-37 s CAPACITOR 10000PF/630V
C34 9-885-009-37 s CAPACITOR 10000PF/630V
C51 9-885-009-38 s CAPACITOR 680uF/25V
C52 9-885-009-38 s CAPACITOR 680uF/25V
C53 9-885-009-38 s CAPACITOR 680uF/25V
C54 9-885-009-39 s CAPACITOR 100uF/25V
C55 9-885-009-40 s CAPACITOR 10000PF/AC250
C56 9-885-009-41 s CAPACITOR 470PF/630V
C57 9-885-009-41 s CAPACITOR 470PF/630V
C58 9-885-009-42 s CAPACITOR 0.1uF/50V
C59 9-885-009-43 s CAPACITOR 1uF/25V
C60 9-885-009-43 s CAPACITOR 1uF/25V
D1 9-885-009-05 s DIODE D5SB60
D2 9-885-009-06 s DIODE SF10L60U
D3 9-885-009-07 s DIODE U1DL44A-TE12L
D4 9-885-009-07 s DIODE U1DL44A-TE12L
D5 9-885-009-08 s DIODE U1JU44-TE12L
D6 9-885-009-09 s DIODE 1SS184-TE85L
D7 9-885-009-09 s DIODE 1SS184-TE85L
D8 9-885-009-09 s DIODE 1SS184-TE85L
D9 9-885-009-09 s DIODE 1SS184-TE85L
D10 9-885-009-09 s DIODE 1SS184-TE85L
D11 9-885-009-09 s DIODE 1SS184-TE85L
D12 9-885-009-09 s DIODE 1SS184-TE85L
D13 9-885-009-09 s DIODE 1SS184-TE85L
D14 9-885-009-10 s DIODE U2JC44
D51 9-885-009-11 s DIODE FCH30A06
AC-DN2B
3-3
Page 18

----------SUB01 BOARD
-----------
Ref.No.
or Q’ty Part No. SP Description
IC101 9-885-009-48 s IC MC34067P
Q101 9-885-009-49 s TRANSISTOR 2SC2712-TE85L
Q102 9-885-009-49 s TRANSISTOR 2SC2712-TE85L
Q103 9-885-009-50 s TRANSISTOR 2SA1162-TE85L
Q104 9-885-009-51 s TRANSISTOR DTC114EKA-T146
ZD101 9-885-009-52 s DIODE 02CZ6.8Y
----------SUB02 BOARD
-----------
Ref.No.
or Q’ty Part No. SP Description
D251 9-885-009-62 s DIODE FCH30A06
D252 9-885-009-63 s DIODE 1SS184-TE85L
D253 9-885-009-64 s DIODE 1SS181-TE85L
IC251 9-885-009-53 s IC NJM2903M-TE2
IC252 9-885-009-54 s IC NJM2904M-TE2
IC253 9-885-009-55 s IC NJM431U-TE1
3-3. Supplied Accessory
Ref.No.
or Q’ty Part No. SP Description
1pc 1-790-446-11 s CORD, CONNECTION (XLR TYPE 4P)
3-4. Optional Fixture
Part No. SP Description
J-6530-180-A o SCREW DRIVER, 5-WING (FOR M3)
PC201 ! 9-885-009-56 s PHOTO COUPLER TLP621D4-GB-LF2
PC202 ! 9-885-009-56 s PHOTO COUPLER TLP621D4-GB-LF2
PC203 ! 9-885-009-56 s PHOTO COUPLER TLP621D4-GB-LF2
Q251 9-885-009-57 s FET 2SJ334
Q252 9-885-009-58 s TRANSISTOR 2SC2655 TPE6
Q253 9-885-009-59 s TRANSISTOR DTC114EKA-T146
Q254 9-885-009-60 s TRANSISTOR 2SC2712-TE85L
Q255 9-885-009-61 s TRANSISTOR 2SA1162-TE85L
Q256 9-885-009-61 s TRANSISTOR 2SA1162-TE85L
ZD251 9-885-009-65 s DIODE HZM5.1N B2-TL
ZD252 9-885-009-66 s DIODE HZM18N B2-TL
ZD253 9-885-009-65 s DIODE HZM5.1N B2-TL
----------SUB03 BOARD
-----------
Ref.No.
or Q’ty Part No. SP Description
D301 9-885-009-67 s DIODE TLG223
----FRAME
-----
Ref.No.
or Q’ty Part No. SP Description
HN001 9-885-009-69 o HARNESS ASSY, OUTPUT
HN002 ! 9-885-009-70 o HARNESS ASSY, INLET (WITH SW)
HN003 9-885-009-74 o CONNECTOR ASSY, BATTERY
HN004 9-885-009-75 o HARNESS ASSY, XLR
3-4
AC-DN2B
Page 19

AC-DN2B (SY) : S/N 10001 and Higher
OverallOverall
Section 4
Diagrams and Board Layouts
!
!
!
!
!
4
1
3
!
2
AC-DN2B
4-1
!
!
MAIN
Overall
LOT NO. 085-
4-1
Page 20

MAINMAIN
AC-DN2B (SY) : S/N 10001 and Higher
MAIN -A SIDE- MAIN -B SIDE-
4-2
4-2
AC-DN2B
Page 21

SUB01, SUB02SUB01, SUB02
AC-DN2B (SY) : S/N 10001 and Higher
SUB01 -A SIDE- SUB01 -B SIDE-
AC-DN2B
AC-DN2B (SY) : S/N 10001 and Higher
SUB02 -A SIDE- SUB02 -B SIDE-
4-3
4-3
Page 22

FrameFrame
AC-DN2B (SY) : S/N 10001 and Higher
1
!!
CN1
SW1
AC(H)IN
GND
AC(C)IN
HN002
2
F1
!
C1
R9
R8
R10
R11
!
C4
!!
C2C3
L1
!
!
RY1
D13
R45R46
C102
C101
R110
C110
16 15 14 13 12 11 10 9
IC101
R103
R101C103
R102
C34 C33 C32
89
C109
C107
87654321
C105
C106R106
D5
IC2
C26
8
1
7
2
6
3
54
R40
R122C108R108
R109
5
R112
4
R111
R113
10
7
11
R107R104
R38
ZD02
D12
C12
6
R37
ZD01
R39
D9 C29 R44 C30
C27
Q3
321
C22
Q2
C23
S
C24
S
C25
T2
D11D10
C13
!
T1
C56
C28
IC1
C11
R43
R42
D4
R41
C57
SUB01
3
R105C104
R47
R114R115
ZD101Q101
C115C114C111R117
C55
Q102
C112R119
R121C113
R120
IC3
1
2
3
R7R6 D14
L3
52
9
D3
C9
R3R35 R16
R18
8
7
6
R19
54
C19
Q1
R17
D2
R31
IC4
D8
R36
C8
R26
R21
R27
R22
R28
R23
R29
R24
R25
R4
S
R20
C14
C15
Q5
C17R32
D6
D7
R5
Q4
D1
4
C5
C10
C20
R34
C31 R15 C21
L2
R12
R13
R14
R1C7C6
R2
C18
Q103
Q104
R118
31 2
C16R30
SW51
R54
D51
6
7
8
R51
5
R52
TH51
C58 ZD252
!
1
2
3
9
FAN
R252
Q252
13
12
11
10
PC202
(2/2)
!
Q254
C260
R286
Q256 Q255
R281
R280C256
R287C257
R288
R289
C202
L51
R56
R55
C54C53C52C51
4
R271
R293
R282
C261
VR251
R272
PC203
(1/2)
C254
R275
C253
!
PC203
(2/2)
R292
ZD253
R277
R276C255
2
3
PC201
(2/2)
C259R291
R264
R290
C258
R263
IC253
R262
R285D253
R284
R202
ZD251
1
R278
!
R265
R266
R267
R257
R258
D252
7
C60C59
R279
D251D52
R251
R253
R254
R255
C252R260
5
6
IC252IC252
(2/2)(1/2)
R259
R269
R270
5
7
6
IC251
(2/2)
2
1
3
IC251
(1/2)
R268
R256
R261
Q253
Q251
S
C251
CN52 HN004
2
+
1
GND
CN51
4
3
2
1
CN252
5
4
3
2
1
+
+
GND
GND
+
+
SENS
GND
GND
HN003
HN001
DC OUT
4
NC
3
NC
2
GND
1
5
DC OUT
4
NC
3
NC
2
NC
1
GND
3
RID IN
2
BATT(+)OUT
1
BATT(-)OUT
4
1
3
2
!
PC202
(1/2)
!
R201
C201
PC201
(1/2)
!
SUB02
5
MAIN
Frame
4-4
4-4
ABCDEFGH
AC-DN2B
Page 23

For the U.S.A. and Canada
SAFETY CHECK-OUT
After correcting the original service problem,
perform the following safety checks before
releasing the set to the customer :
Check the metal trim, “metallized” knobs, screws,
and all other exposed metal parts for AC
leakage. Check leakage as described below.
LEAKAGE TEST
The AC leakage from any exposed metal part to
earth ground and from all exposed metal parts to
any exposed metal part having a return to
chassis, must not exceed 0.5 mA. Leakage
current can be measured by any one of three
methods.
1. A commercial leakage tester, such as the
Simpson 229 or RCA WT-540A. Follow the
manufacturers’ instructions to use these
instruments.
2. A battery-operated AC milliammeter. The
Data Precision 245 digital multimeter is
suitable for this job.
3. Measuring the voltage drop across a resistor
by means of a VOM or battery-operated AC
voltmeter. The “limit” indication is 0.75 V, so
analog meters must have an accurate lowvoltage scale. The Simpson 250 and Sanwa
SH-63Trd are examples of a passive VOM
that is suitable. Nearly all battery operated
digital multimeters that have a 2 V AC range
are suitable. (See Fig. A)
AC-DN2B
To Exposed Metal
Parts on Set
0.15 µF 1.5 k
Fig A. Using an AC voltmeter to check AC leakage.
Z
Earth Ground
AC
voltmeter
(0.75V)
Page 24

AC-DN2B (SY) J, E
9-968-578-01 (1)
Printed in Japan
Sony Corporation 2000. 10 16
Communication System Solutions Network Company ©2000
 Loading...